Posted on Leave a comment

Air Fryer Chicken Drumsticks Recipe: Crispy, Juicy Chicken Legs in About 30 Minutes

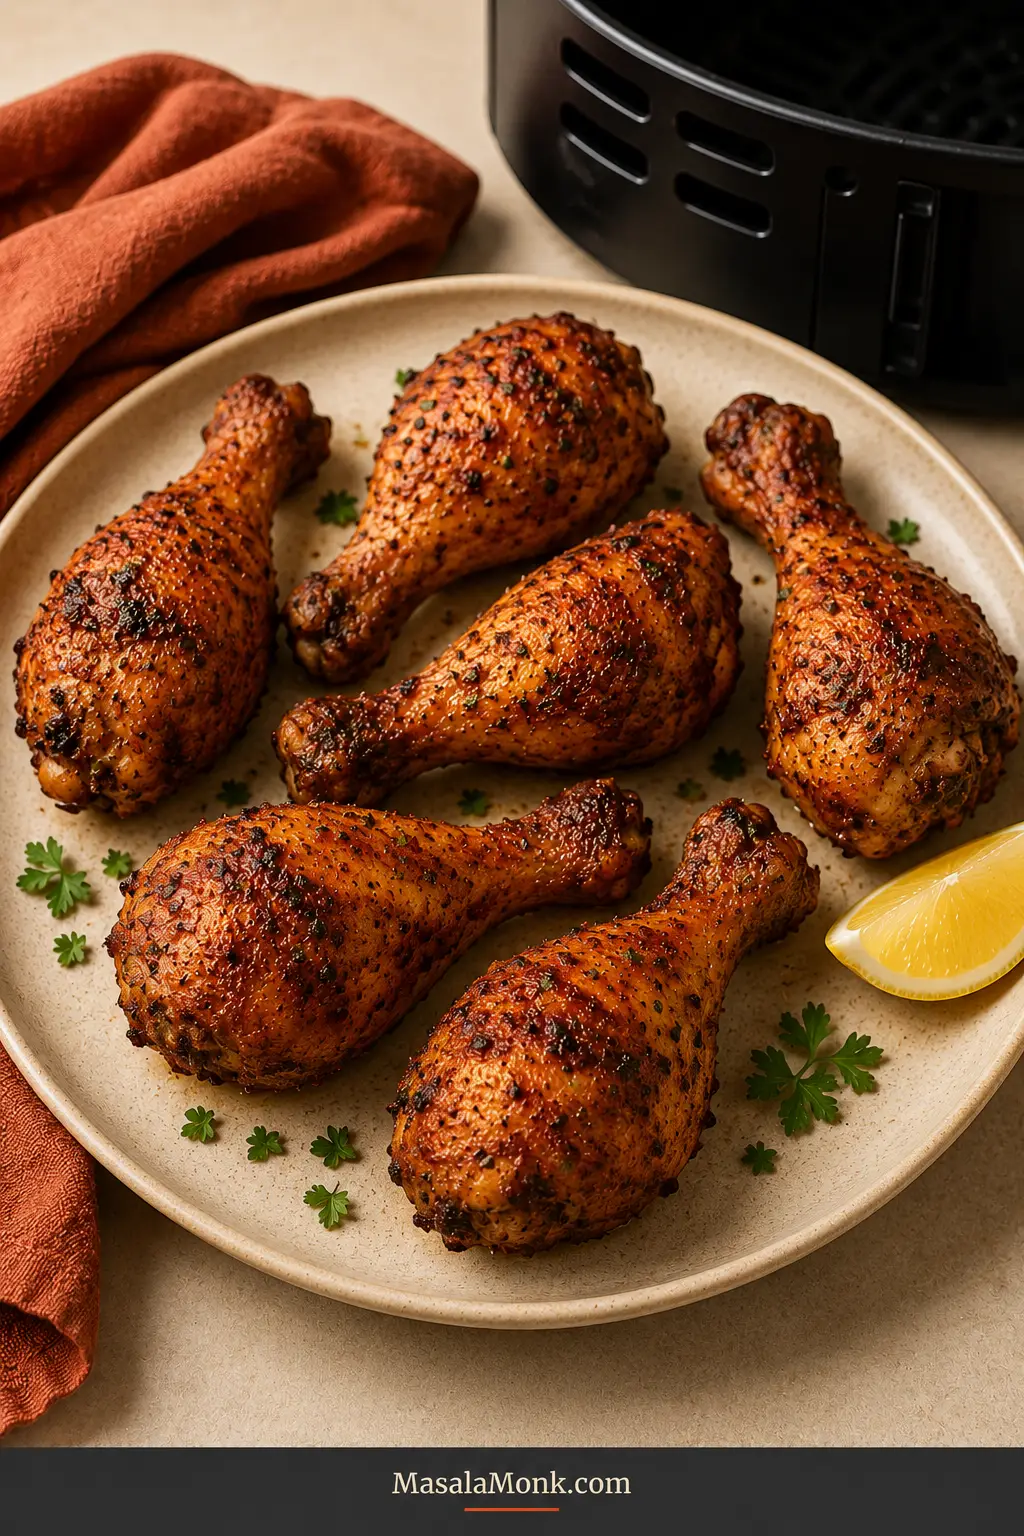
Six cooked paprika-garlic chicken drumsticks on a cream platter with browned blistered skin, a lemon wedge, parsley and a blurred air fryer in the background.

A good air fryer chicken drumstick delivers the contrast bone-in chicken should have: browned skin that crackles under the tongs and dark meat that stays succulent right beside the bone.

The awkward part is timing. A small drumstick can be ready while a thicker one still needs several minutes, and a beautifully browned exterior cannot tell you what is happening at the deepest point. One fixed number will suit some packages and disappoint with others.

This recipe keeps the weeknight method simple without pretending every drumstick is identical. Start with thawed chicken; dry it well, leave room around each drumstick, turn once and check the largest one first.

For pieces weighing about 4–4½ oz / 113–128 g each, dinner is ready in about 30 minutes, including a short rest. Larger and frozen drumsticks need longer, while flour-coated or glazed versions need a small method adjustment.

The piece count matters less than the weight of the largest drumstick. Once that idea is clear, an uneven supermarket package becomes much easier to manage.

Quick answer

The Base Method: 400°F / 200°C for 18–20 Minutes

Drumsticks weighing about 4–4½ oz / 113–128 g each: cook at 400°F / 200°C and begin checking at 17 minutes. Most finish around 18–20 minutes.

Drumsticks above about 5½ oz / 156 g: use 380°F / 190°C and the weight chart below.

Chicken is safe at 165°F / 74°C; many people prefer the softer texture of dark meat closer to 175–180°F / 79–82°C. The timer starts the check; the thermometer ends it.
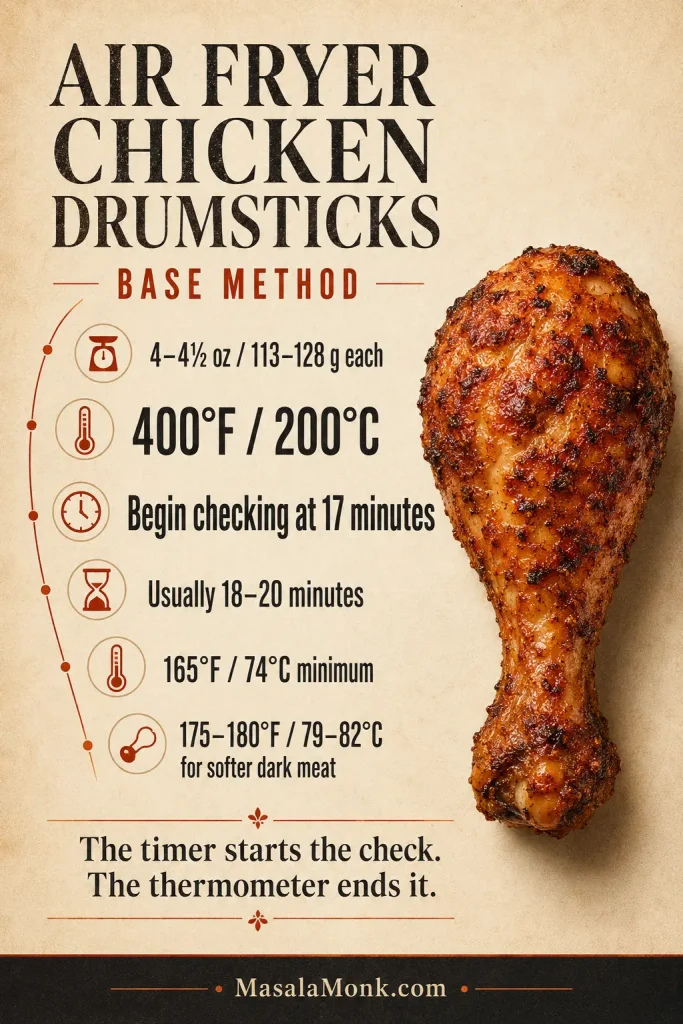
Recipe summary card for air fryer chicken drumsticks showing base weight, 400 degrees Fahrenheit, checking at 17 minutes and safe internal temperatures.
Use this as a first-check roadmap for drumsticks weighing about 4–4½ oz / 113–128 g each; the thermometer still decides the finish.

Make it now

Air Fryer Chicken Drumsticks Recipe

Start with this unbreaded version: crisp natural skin, a smoky paprika-garlic flavor and a cooking time based on actual drumstick weight—not a generic piece count. Here, “chicken legs” means drumsticks, not attached thigh-and-drumstick leg quarters.

Recipe at a glance

  • Yield: 6 drumsticks; serves 3 generously or 4 with substantial sides
  • Preparation: About 5–10 minutes
  • Air frying: 18–20 minutes
  • Resting: About 5 minutes
  • Total time: About 28–35 minutes
  • Temperature: 400°F / 200°C
  • Safe minimum: 165°F / 74°C

Ingredients

  • 6 skin-on chicken drumsticks, thawed and refrigerator-cold
    Target weight: 4–4½ oz / 113–128 g each; 24–27 oz / 680–770 g total
  • Neutral cooking oil: 1 tablespoon / 15 ml
  • Paprika or smoked paprika: 1½ teaspoons / about 3 g
  • Garlic powder: 1 teaspoon / about 3 g
  • Onion powder: 1 teaspoon / about 2.5 g
  • Fine sea salt: 1 teaspoon / about 5–6 g, or about 2 teaspoons Diamond Crystal kosher salt
  • Black pepper: ½ teaspoon / about 1 g
  • Dried oregano or thyme: ½ teaspoon
  • Cayenne: ¼ teaspoon, optional
  • Baking powder: 1 teaspoon / about 4 g, optional for more blistered skin
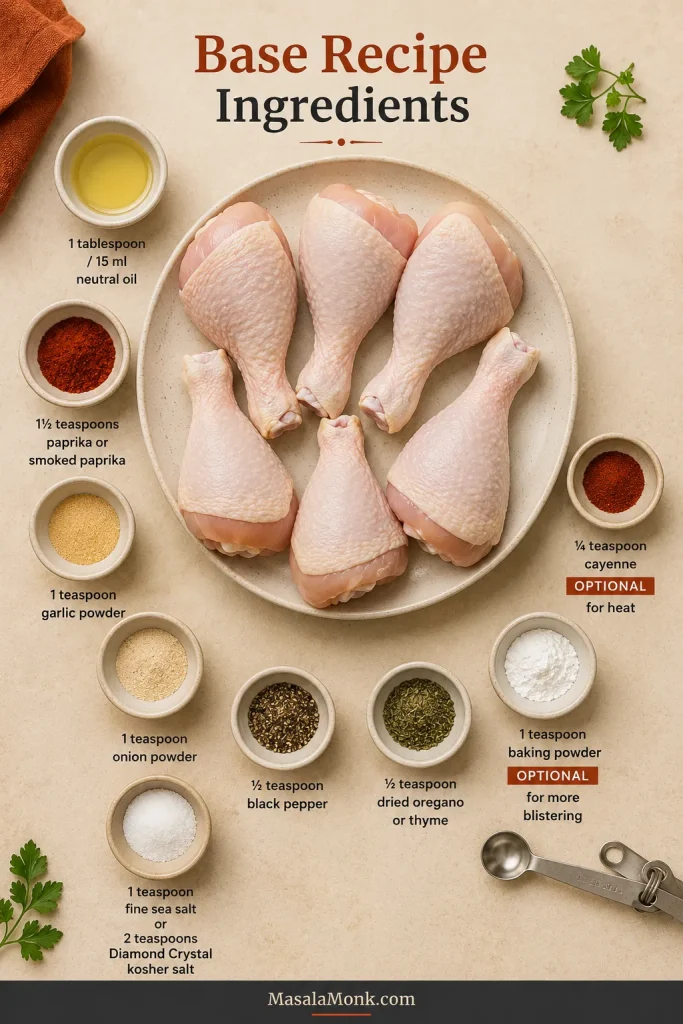
Overhead ingredient board with six raw chicken drumsticks, oil, paprika, garlic powder, onion powder, salt, pepper, dried herbs, cayenne and baking powder in small bowls.
Oil helps seasoning cling, while paprika and dry aromatics build color without adding moisture to the chicken skin.

Equipment: air fryer, instant-read thermometer, bowl, paper towels and smooth-edged tongs.

Instructions

Prepare and season

  1. Preheat the air fryer. Set it to 400°F / 200°C. Let it heat for 3–5 minutes when your model recommends preheating; the chicken can be prepared during that time.
  2. Dry the drumsticks. There is no need to bring raw chicken to room temperature. The USDA advises against washing raw poultry. Pat every side thoroughly dry, including beneath loose skin and around the broad end.
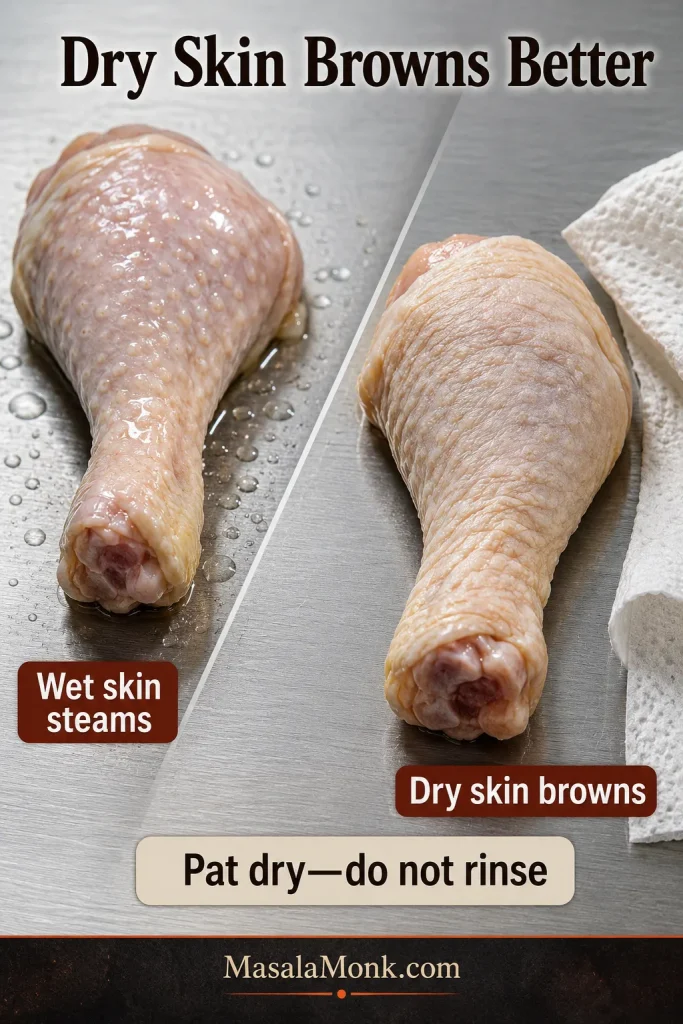
Comparison image showing a wet raw chicken drumstick with shiny moisture beside a patted-dry raw drumstick with matte skin.
Dry skin browns faster. Pat away package moisture before oiling so steam does not soften the surface.
  1. Add a thin coat of oil. Turn the drumsticks in the oil until the skin has a light sheen rather than wet patches.
  2. Season evenly. Mix the paprika, garlic, onion, salt, pepper, oregano, optional cayenne and optional baking powder. Coat the drumsticks all over, including the narrow ends.
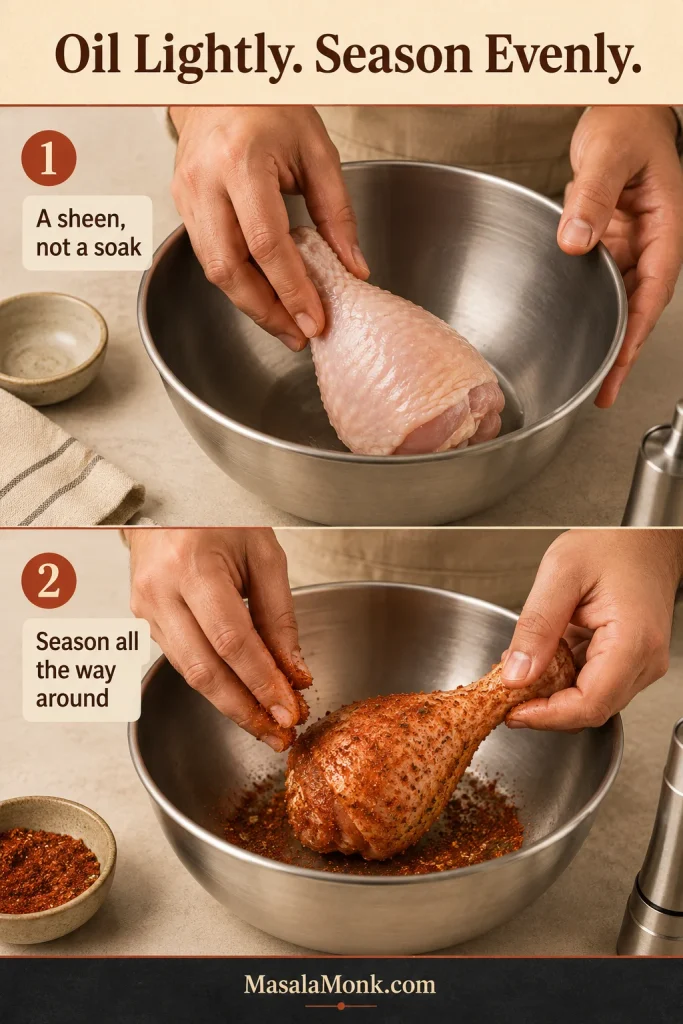
Two-stage preparation image showing a raw chicken drumstick lightly coated with oil and then evenly covered with paprika-garlic seasoning.
Aim for a light oil sheen and even seasoning, especially around the ends and folds before air frying.

Air fry, check and rest

  1. Give them room. Arrange the drumsticks in one layer without stacking or wedging them together. Use two batches when necessary.
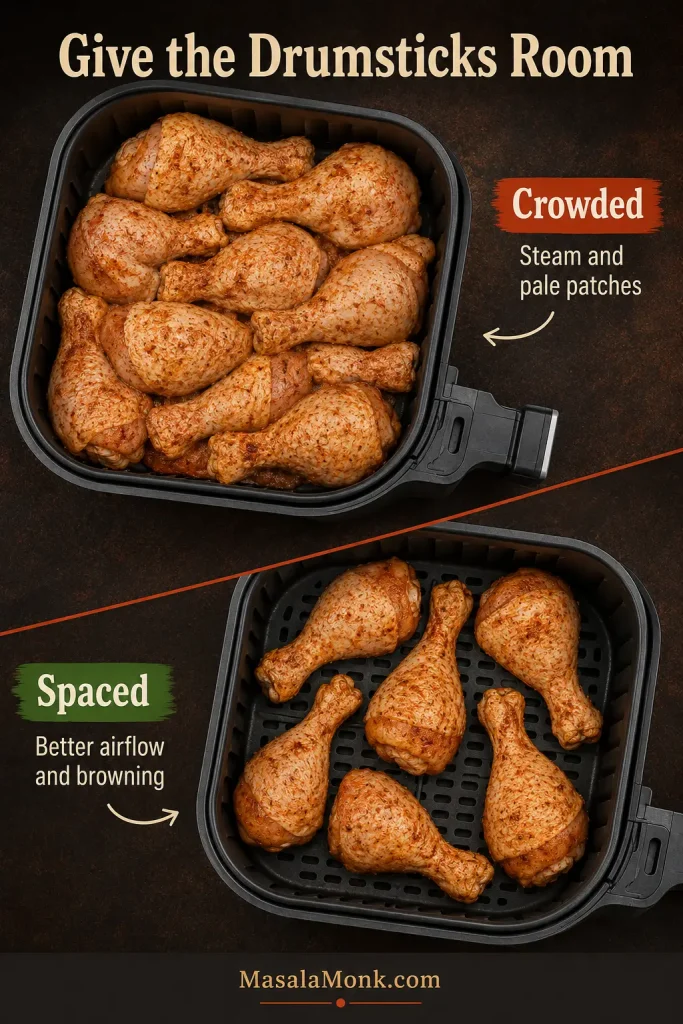
Basket comparison showing crowded chicken drumsticks touching on one side and spaced drumsticks with visible basket openings on the other side.
Visible gaps matter: crowded drumsticks steam, while spaced pieces brown more evenly in the air fryer basket.
  1. Cook the first side. Air fry at 400°F / 200°C for 9 minutes.
  2. Turn once. The exposed skin should look drier, deeper in color and lightly blistered, and the seasoning should smell toasted rather than scorched. If the skin still clings, wait another minute before turning.
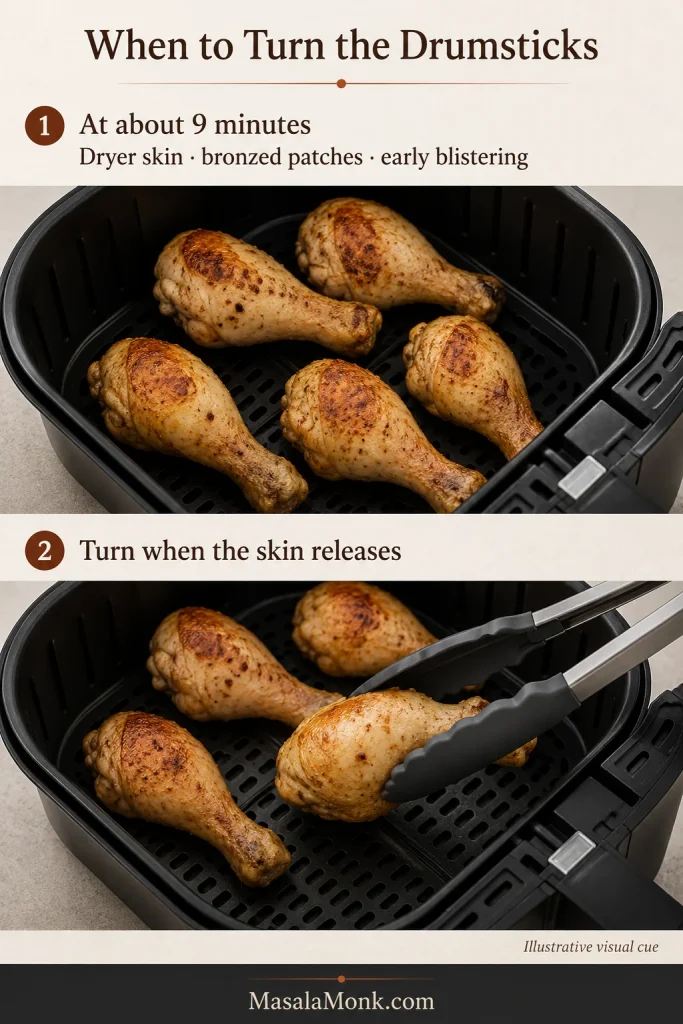
Two-stage guide showing partly cooked drumsticks at about nine minutes and one drumstick being turned with tongs in an air fryer basket.
At the turn, look for drying skin and early browning—not a finished surface—before flipping gently.
  1. Cook the second side. Continue for 8 minutes, bringing the total to 17 minutes.
  2. Check the thickest drumstick. Insert the thermometer from the fleshy side into the deepest meat without touching bone, then test another drumstick from a different part of the basket.
  3. Let each one finish in its own time. Return undercooked drumsticks for 1–2 minutes at a time. If the skin is already dark, lower the air fryer to 380°F / 190°C while the inside catches up. Take the smaller drumsticks out as soon as they are ready.
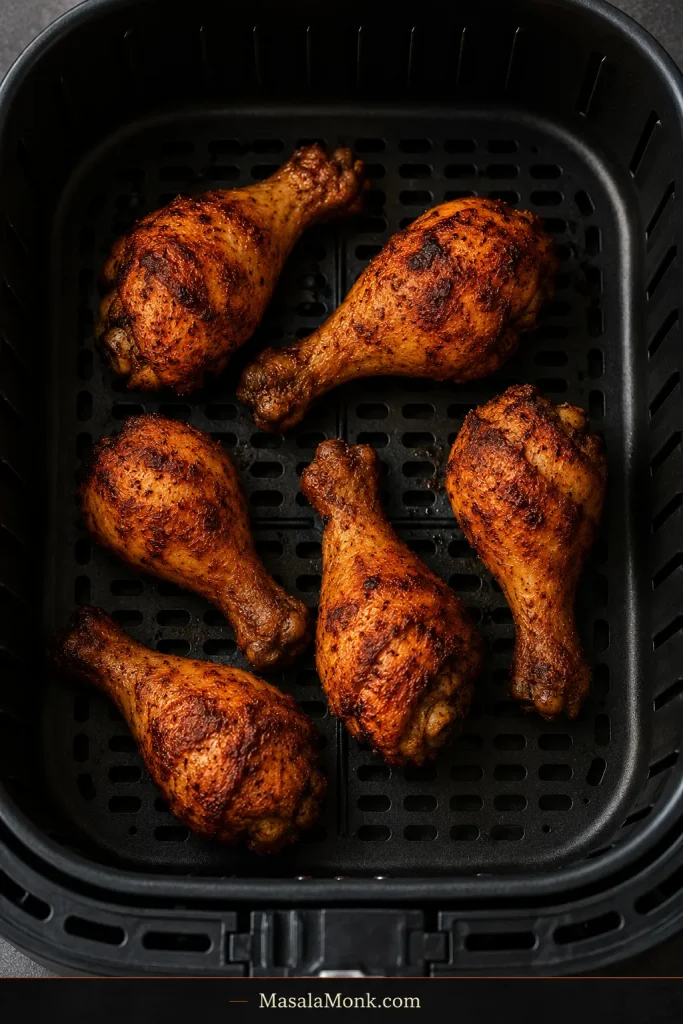
Cooked paprika-garlic chicken drumsticks arranged in a black air fryer basket with visible openings and varied browning.
Remove ready drumsticks as they finish instead of waiting for the largest piece, so smaller pieces stay juicy.
  1. Rest for about 5 minutes. The skin should feel firm beneath the tongs while the meat remains plump around the bone. Keep the drumsticks loosely arranged so steam can escape.

Recipe notes

  • Scale the dry seasoning roughly with the package’s total weight; cooking time still follows the weight of each drumstick.
  • For a softer dark-meat texture, continue beyond the 165°F / 74°C safety floor toward roughly 175–180°F / 79–82°C, provided the skin is not becoming too dark.
  • Add BBQ sauce, honey glaze and other sugary finishes only during the final few minutes.
  • The dry seasoning can be mixed ahead. Keep the raw chicken refrigerated, then dry, oil and season it shortly before air frying.

How Long Drumsticks Take by Weight

A mixed package does not mean anything has gone wrong. Remove the smaller drumsticks as they become ready and give the largest one a few more minutes.

Why air-fryer drumstick recipes give different times

If a previous batch took longer than a recipe promised, that does not necessarily mean you did anything wrong. Six drumsticks can vary dramatically in weight, and two air fryers set to the same temperature may cook at different speeds.

That is why published cooking times disagree. Weight tells you when to begin checking, while the thermometer tells you when each drumstick is ready.

Estimate Drumstick Weight Without a Scale

No kitchen scale?

Divide the package weight by the number of drumsticks to estimate the average. A 2 lb / 907 g package containing six drumsticks averages about 5⅓ oz / 151 g each. Use that as the starting row, then move a visibly oversized drumstick into the next heavier range.
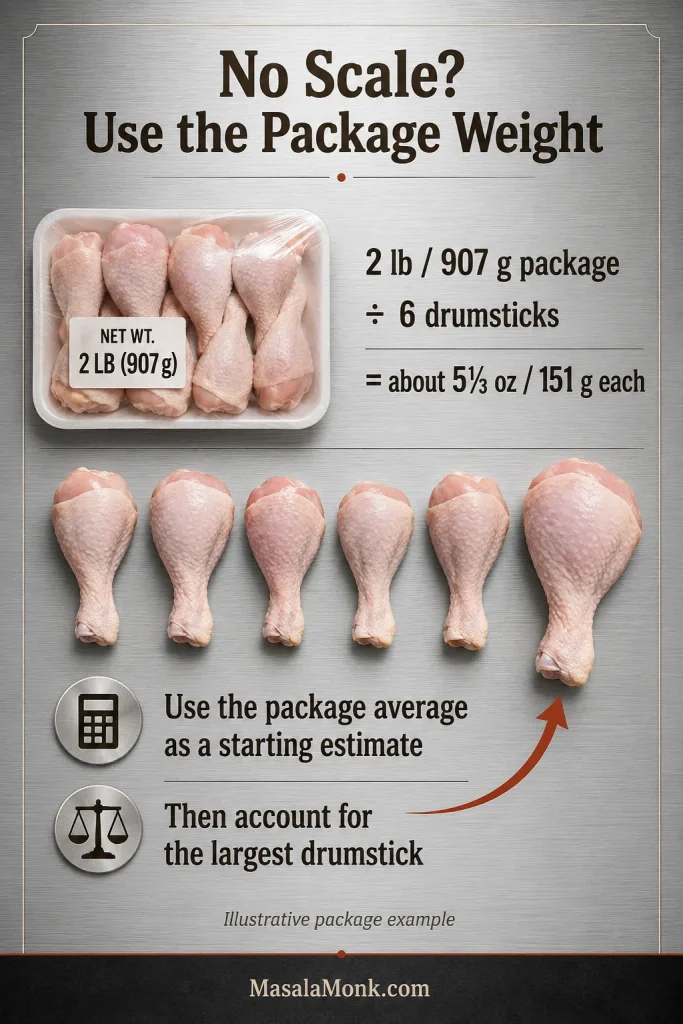
Infographic showing a two-pound chicken package divided by six drumsticks to estimate about five and one-third ounces each, with one larger drumstick highlighted.
Use package weight as a starting estimate, then adjust for the heaviest-looking drumstick before choosing the chart row.

Size names vary between shops and recipes, so use the weight—not labels such as small or large—to choose when to begin checking.

Use the Time Chart Correctly

These are practical first-check starting points, not rigid cutoffs. Drumstick shape, air-fryer design and a cold start can all shift the timing.

The chart is for thawed, skin-on drumsticks in a preheated, wide basket-style air fryer.
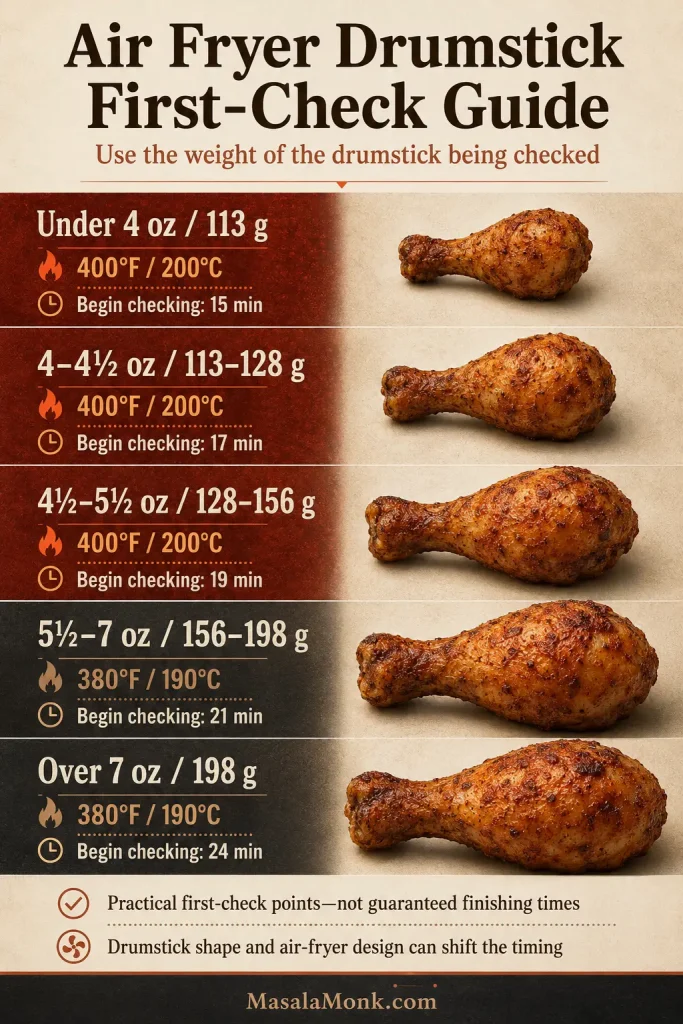
Portrait infographic listing chicken drumstick weight ranges with air fryer temperatures and begin-checking times from 15 to 24 minutes.
These are first-check times for air fryer drumsticks by weight, not guaranteed finish times; after that, test the thickest meat.
Weight per drumstickTemperatureBegin checking
Under 4 oz / 113 g400°F / 200°C15 minutes
4–4½ oz / 113–128 g400°F / 200°C17 minutes
4½–5½ oz / 128–156 g400°F / 200°C19 minutes
5½–7 oz / 156–198 g380°F / 190°C21 minutes
Over 7 oz / 198 g380°F / 190°C24 minutes
First-check starting points for thawed, skin-on drumsticks.

When a drumstick sits on the boundary between two rows, begin with the earlier check; then remove smaller pieces as they finish instead of waiting for the largest one.
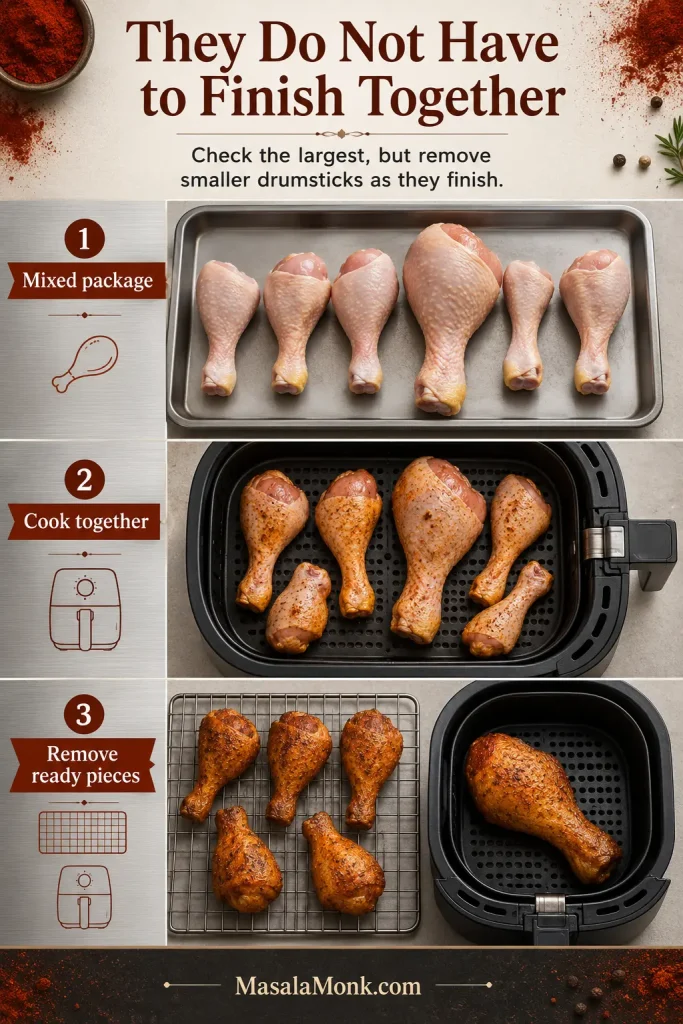
Three-stage guide showing six mixed-size drumsticks raw, cooking together, and five finished pieces resting while one larger drumstick remains in the air fryer.
Mixed-size packs cook better when smaller drumsticks leave early and the largest piece gets extra time instead of overcooking everything.

How to Know When Chicken Drumsticks Are Done

A deeply browned drumstick can still be behind at its thickest point. The thermometer makes bone-in chicken less stressful, not more technical. It lets you stop with confidence instead of cutting every drumstick open or adding precautionary minutes to the whole batch.

Where to place the thermometer

  1. Start with the largest drumstick.
  2. Insert the probe from the fleshy side into the deepest meat, keeping the tip away from the bone.
  3. Check one more drumstick from a different part of the basket.
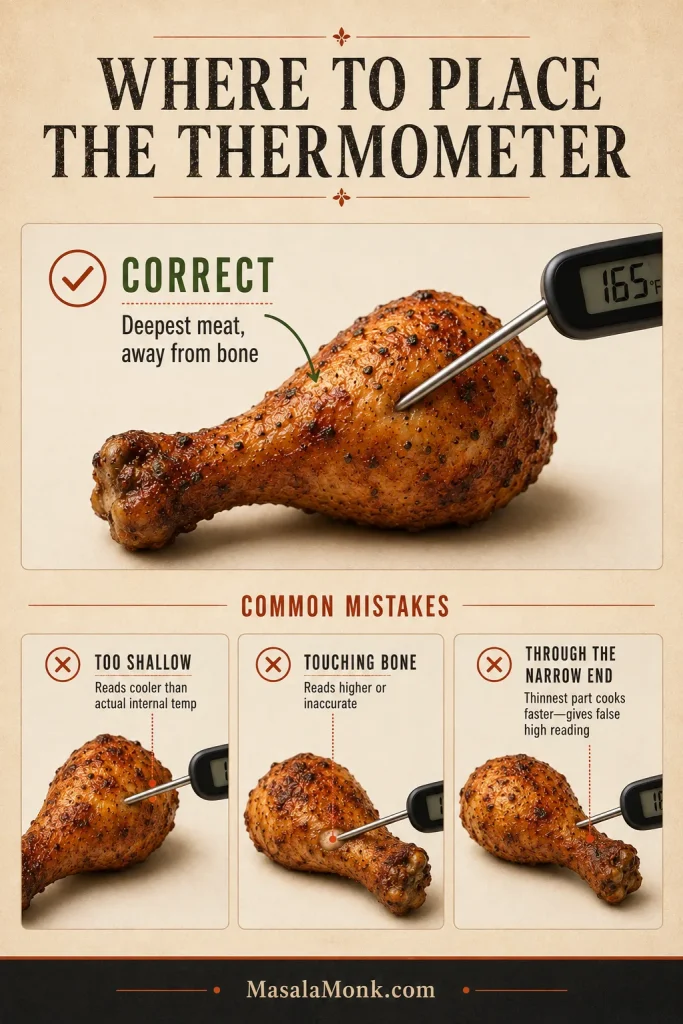
Thermometer placement guide showing a correct probe angle into the thickest meat of a cooked drumstick and three mistake callouts.
Probe the thickest meat from the side and keep the tip away from bone for a reliable temperature reading.

165°F / 74°C is the safety floor

The USDA lists 165°F / 74°C as the safe minimum for chicken pieces. Many people prefer dark-meat drumsticks closer to 175–180°F / 79–82°C. At that temperature, the meat often feels softer and releases from the bone more readily.

That higher range is a texture preference, not a different safety rule. Every drumstick should reach at least 165°F / 74°C before it leaves the air fryer.
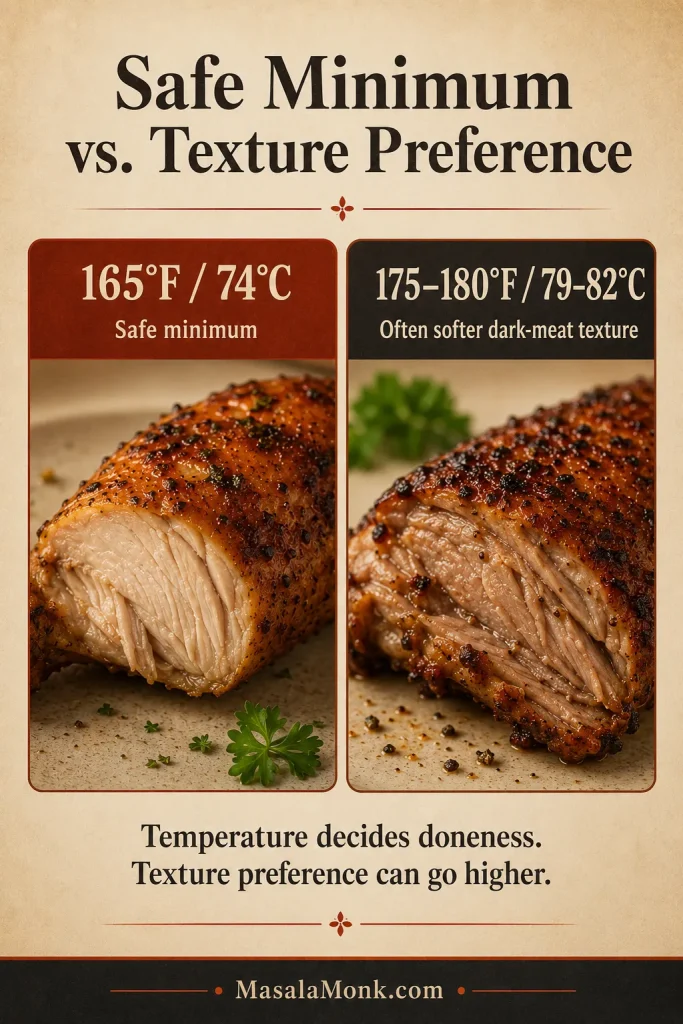
Educational temperature board showing 165 degrees Fahrenheit as the safe minimum and 175 to 180 degrees Fahrenheit as a softer dark-meat texture range.
165°F / 74°C is the safety floor; higher dark-meat temperatures are a texture choice, not a separate safety rule.

Pink or dark meat near the bone

The USDA explains that safely cooked poultry can remain pink, and darkening beside porous young bones can be more noticeable after freezing.

If that pink patch makes you hesitate, trust the thermometer rather than the color. You are not looking for perfectly white meat; you are looking for a safe temperature in the thickest flesh.
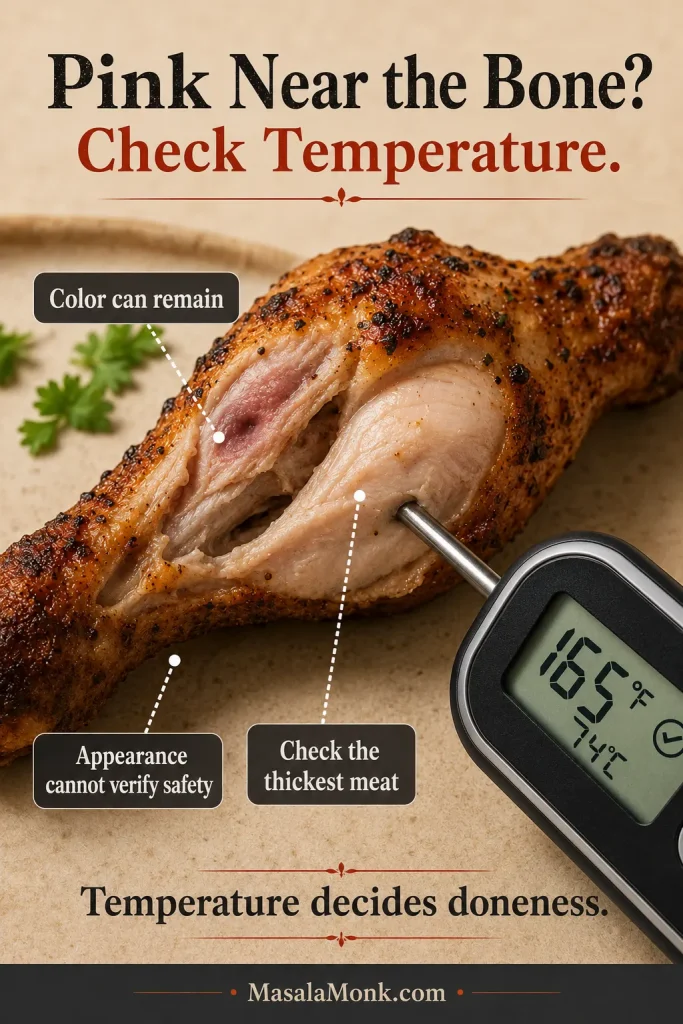
Cooked chicken drumstick opened near the bone with a small pink area, plus a thermometer reading showing a safe internal temperature.
Pink near the bone can happen in cooked chicken; the thermometer is the deciding tool, not the color alone.

When one drumstick needs more time

Return only that drumstick for 1–2 minutes at a time. Keep the finished ones loosely arranged rather than sealing them under foil, which traps steam and softens the skin.

Once the base method feels clear, the more enjoyable decision is how you want the drumsticks to taste.

Choose the Version That Fits Your Dinner

The easiest way to keep the method dependable is to change one thing at a time—the crust, the seasoning or the final sauce.
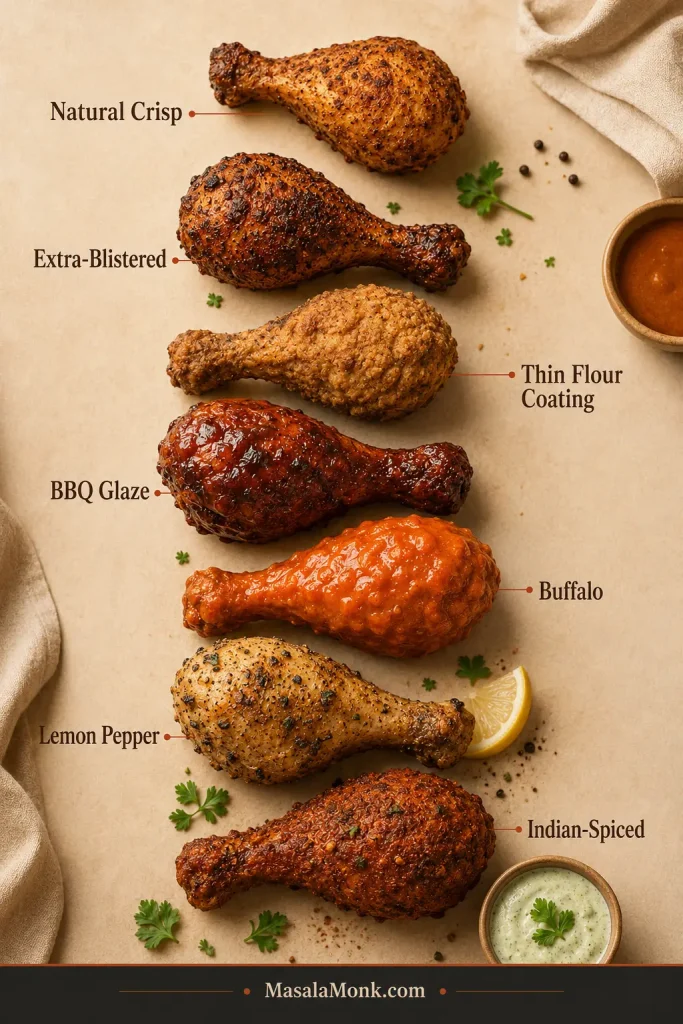
Flavor board showing seven different finished chicken drumsticks labeled natural crisp, extra-blistered, thin flour coating, BBQ glaze, Buffalo, lemon pepper and Indian-spiced.
Choose the finish first—crisp, coated, sauced, bright, spicy or Indian-spiced—then follow the matching dinner adjustment.
VersionWhat to expect
Natural crisp skinCrisp, savory and uncomplicated.
Extra-blistered skinCrisper, evenly browned skin with tiny blisters.
Thin flour coatingA light, craggy shell rather than thick breading.
BBQ, honey or teriyakiA sticky, glossy, sweet-savory finish.
BuffaloButtery heat with a tangy finish.
Lemon pepperBright, peppery and fresh.
Indian-spicedAromatic, earthy and gently hot.
Choose the texture or flavor, then apply the matching adjustment.

For more blistered skin

Mix the optional 1 teaspoon / about 4 g baking powder thoroughly into the base seasoning. It raises the skin’s surface pH, helping it brown and form tiny blisters. A light, even amount avoids a chalky or alkaline taste; baking soda is much stronger and should not be used measure for measure.
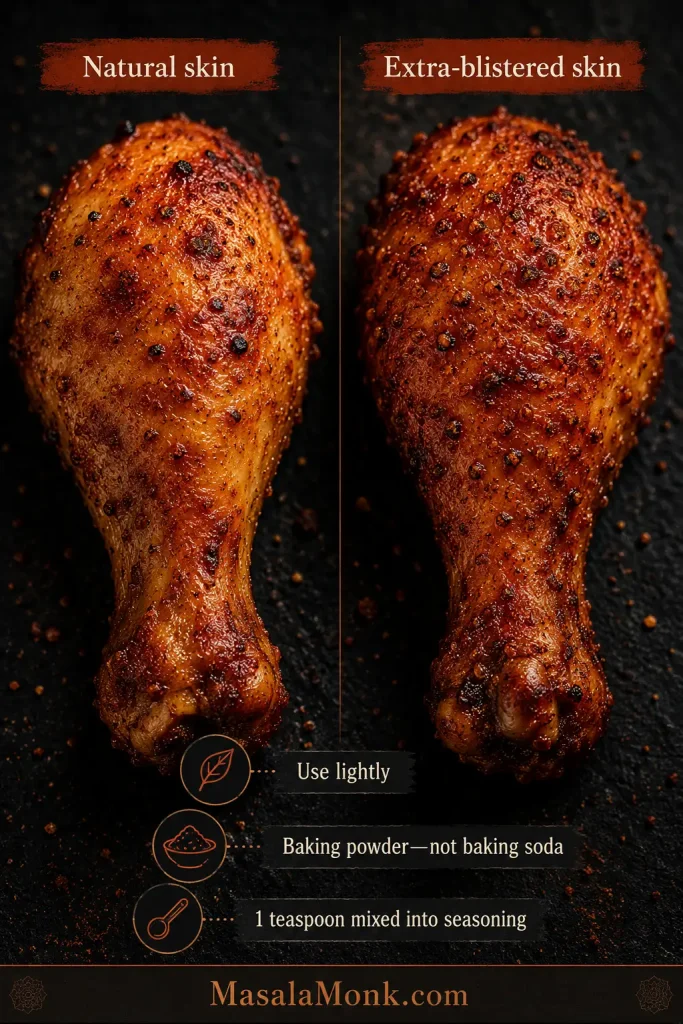
Close-up comparison of natural air-fried chicken skin and extra-blistered chicken skin with a callout about using baking powder, not baking soda.
Baking powder should add subtle blistering, not a thick crust; never swap in baking soda.

For a thin flour coating

Omit the optional baking powder from the base rub. Combine the base seasonings with ¼ cup / 30 g all-purpose flour and 1 teaspoon / about 4 g baking powder. Coat dried, lightly oiled drumsticks thinly, shake off the excess and mist only visible white patches.

For drumsticks weighing about 4–4½ oz / 113–128 g each, cook at 400°F / 200°C. Turn gently once the coating has begun to set and begin checking at about 20 minutes.

The coating is ready when no dry flour remains, the shell feels set beneath the tongs and the thickest meat has reached its target temperature.
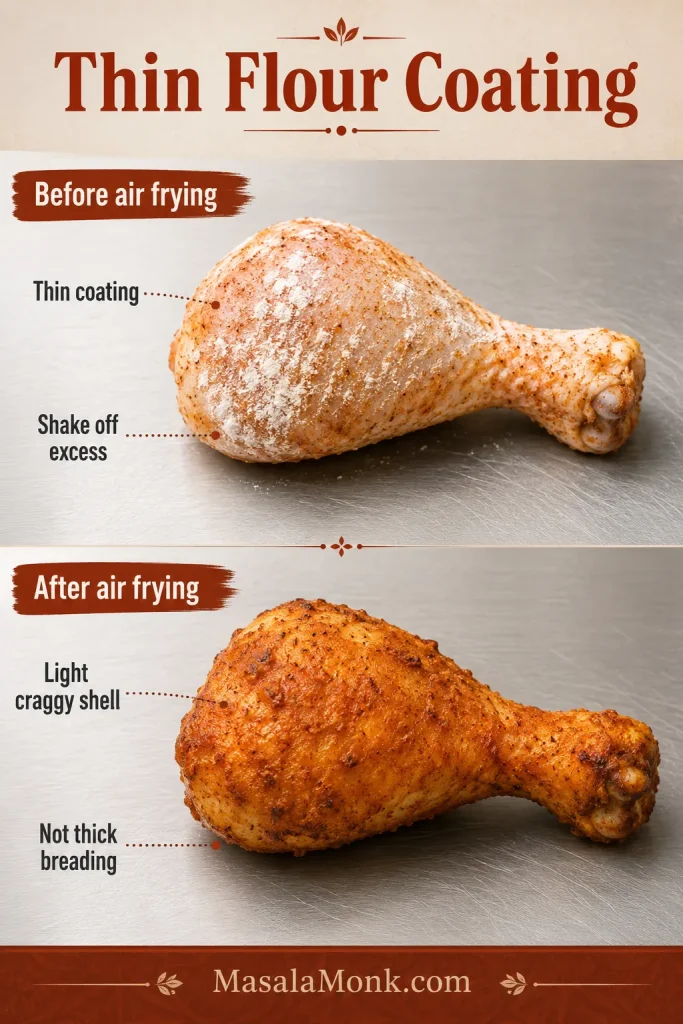
Before-and-after guide showing a raw drumstick with a thin flour coating and a cooked drumstick with a light craggy shell.
Think thin dusting, not breading, so the air-fried shell turns craggy instead of heavy.

For BBQ, honey, teriyaki or Buffalo

For BBQ, honey or teriyaki: cook the drumsticks mostly dry. A batch of six drumsticks usually needs about ⅓ cup / 80 ml BBQ sauce. Brush BBQ sauce on during the final 3–5 minutes; add honey or a thin coat of homemade teriyaki sauce during the final 2–4 minutes.

For Buffalo: air fry the chicken completely, then toss it with about ¼ cup / 60 ml Buffalo sauce.

Keep serving sauce separate. Use a clean brush and a fresh portion for the final glaze rather than returning sauce or utensils that touched undercooked chicken to the table.
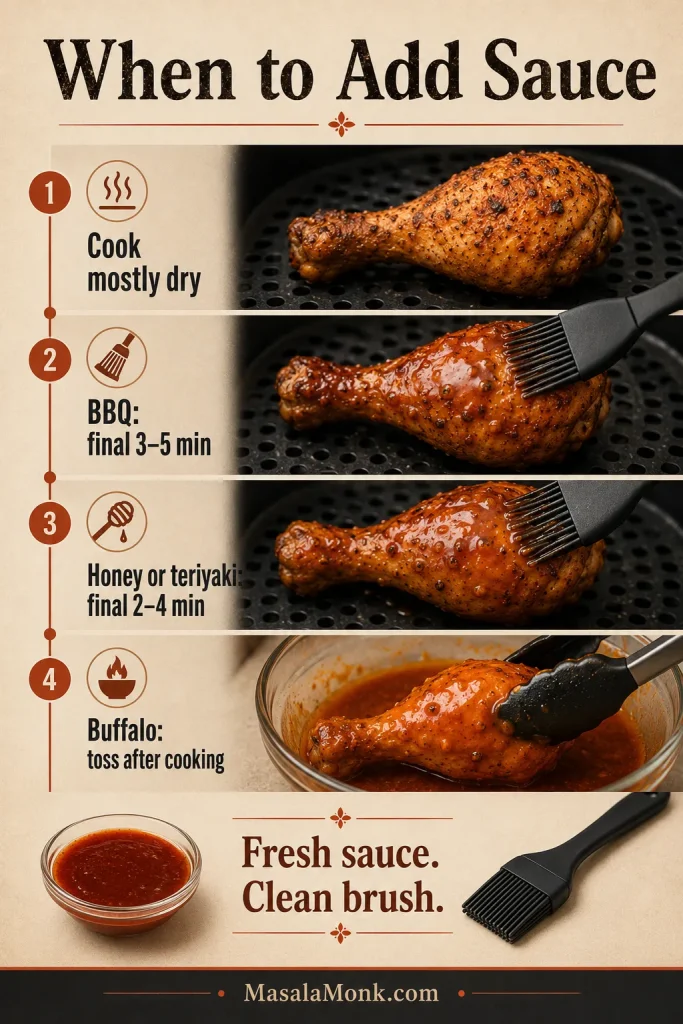
Vertical sauce timing guide for air fryer chicken drumsticks showing dry cooking, late BBQ glaze, late honey or teriyaki, and Buffalo sauce added after cooking.
Sweet glazes go on late; Buffalo sauce works best after the chicken finishes cooking.

For lemon pepper or Indian spices

For lemon pepper, use a dry seasoning before cooking and squeeze fresh lemon over the drumsticks afterward. This lemon pepper chicken recipe gives the full seasoning balance.

For the Indian-spiced version, replace the oregano and cayenne with 1 teaspoon garam masala, ½ teaspoon ground cumin, ½ teaspoon ginger powder and ¼–½ teaspoon Kashmiri chili powder. Serve with rice, raita and lemon, then finish with chopped cilantro.

Skinless drumsticks work with the same seasoning, but this timing chart is calibrated for skin-on chicken. Oil them lightly, expect browned spices and juicy meat rather than crackly skin, and begin checking earlier than a skin-on drumstick of the same size.

Whatever seasoning or sauce you choose, the crispest natural skin still comes down to dryness, airflow and heat.
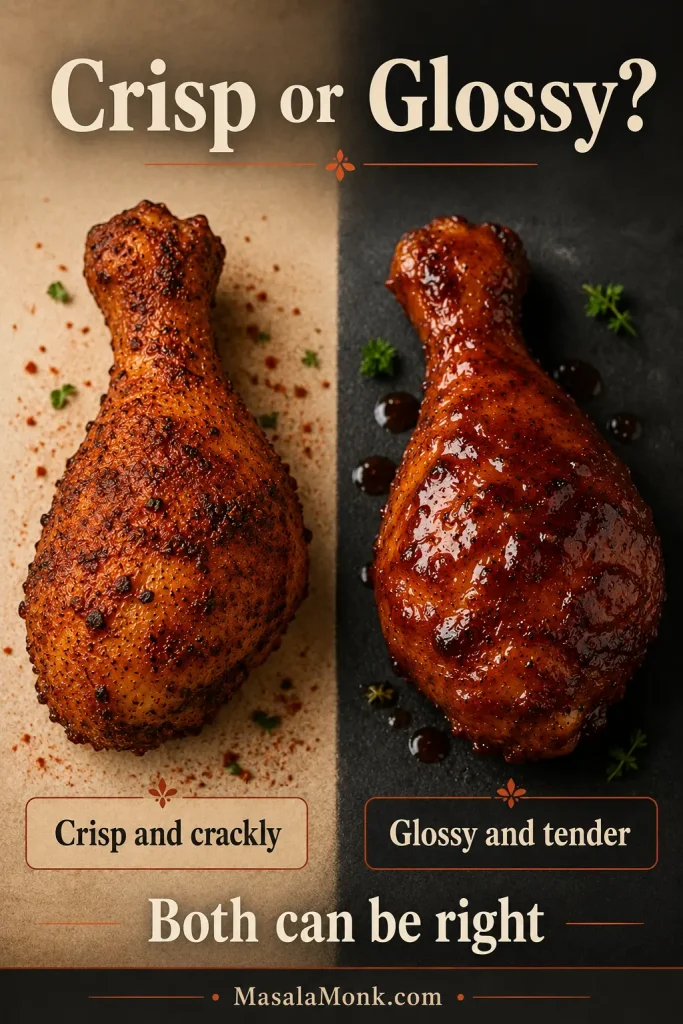
Side-by-side image of a crisp dry-seasoned chicken drumstick and a glossy sauced chicken drumstick labeled as two successful finishes.
Crisp dry skin and glossy sauced skin are different successful finishes, depending on whether sauce is involved.

How to Get Crispy Skin

The air fryer has two jobs: brown the skin and carry heat into the meat around the bone. Crisp natural skin does not require flour, but the chicken must begin dry enough to brown before the inside overcooks.

Crisp-Skin Basics

  • Dry the skin: pat beneath folds and around the broad end until it feels tacky rather than wet.
  • Leave open space: pressed-together patches steam and stay pale.
  • Use a thin sheen of oil: enough for the seasoning to cling, not enough to pool under the chicken.
  • Match the heat to the weight: drumsticks around 4–4½ oz / 113–128 g suit 400°F / 200°C, while pieces above about 5½ oz / 156 g often brown more evenly at 380°F / 190°C.
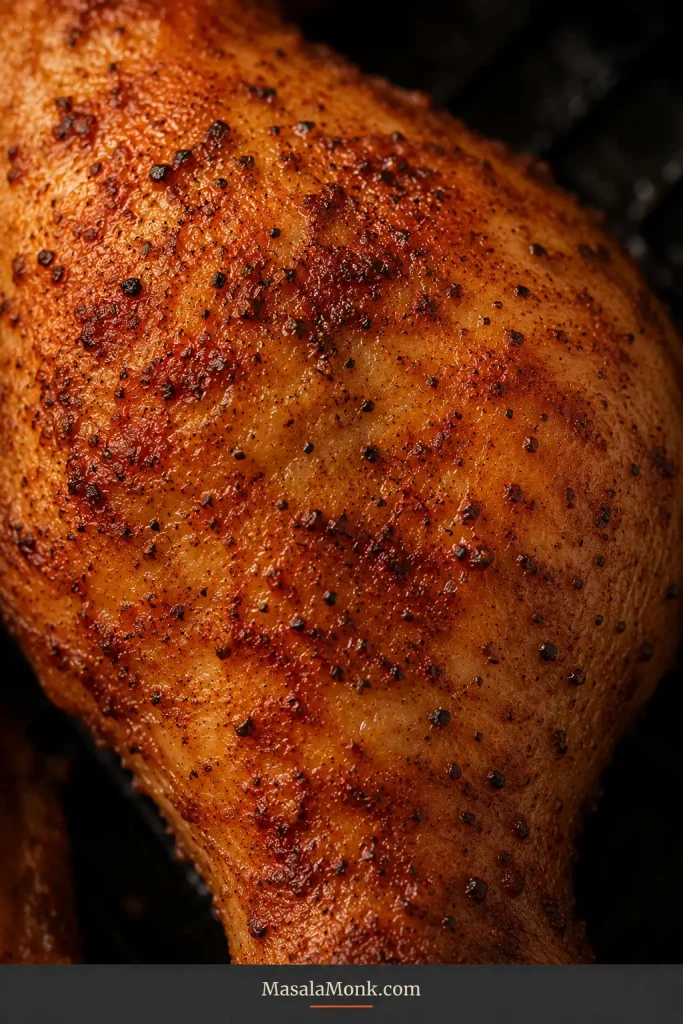
Extreme close-up of crisp cooked chicken drumstick skin with tiny blisters, toasted paprika, pepper flecks and browned edges.
Tiny blisters, rendered skin and toasted seasoning are the natural crisp-skin target for unsauced air fryer drumsticks.

Fix Pale or Soft Skin

If the underside stays pale. The underside receives less direct heat and may sit against the crisper plate. Turning once, keeping the basket holes open and resting on a rack all help. A solid liner makes cleanup easier but usually sacrifices some lower-skin browning.

If you used a wet marinade. Yogurt, coconut milk, soy-heavy mixtures and generous lemon juice add flavor and charred edges, but they also add moisture. Scrape away heavy excess before cooking. Expect tender chicken with a seasoned, lightly charred coating rather than dry, crackly skin.

If the cooked skin is still soft. Give unsauced chicken another 1–3 minutes at 400°F / 200°C, watching closely. Once the drumsticks are coated with BBQ, honey or another sugary glaze, aim for a glossy, tender finish rather than forcing the skin to become crackly. Rest the chicken on a rack so steam does not soften it further.
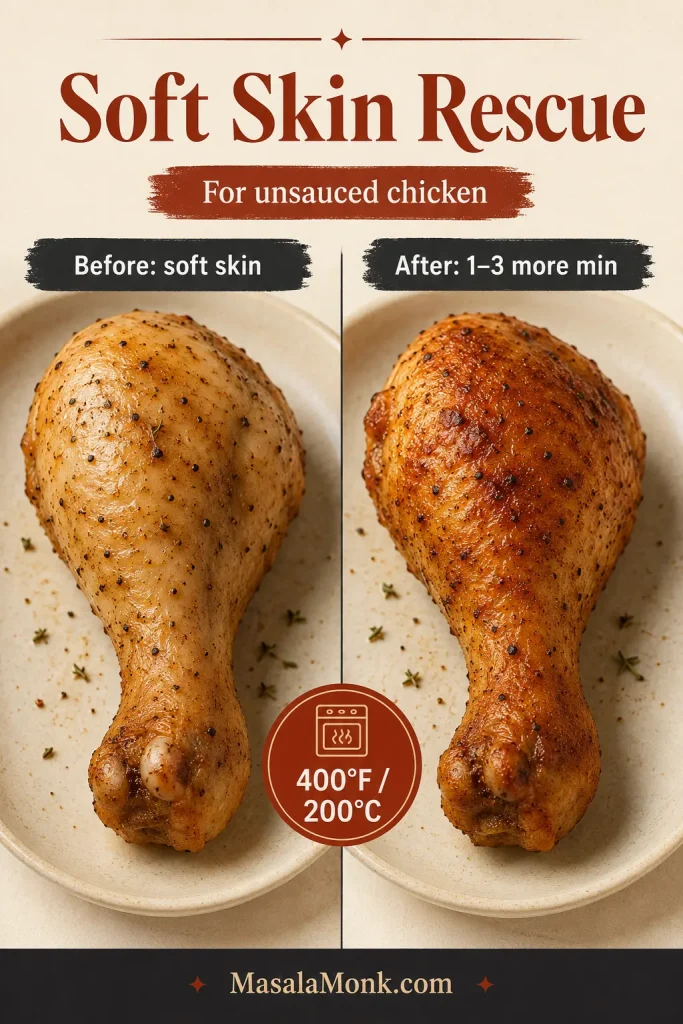
Before-and-after guide showing a cooked drumstick with soft skin and another drumstick with firmer browned skin after one to three more minutes.
Use this quick blast only for cooked, unsauced drumsticks with soft skin, not sugary glazed pieces.

Why the Base Seasoning Works

Oil: one tablespoon is enough to help the dry seasoning cling and give the skin more even color. The drumsticks can cook without it, but the base version browns more dependably with a light coating.

Paprika and aromatics: smoked paprika adds mild barbecue character, while sweet paprika is gentler. Garlic and onion powders build savory flavor without adding the surface moisture of fresh chopped aromatics.

Salt and baking powder: use about 5–6 g salt for the base batch—roughly 1 teaspoon fine sea salt or 2 teaspoons Diamond Crystal kosher salt. Baking powder is optional; used lightly, it encourages browning and small blisters.

Frozen Chicken Drumsticks in the Air Fryer

Frozen drumsticks need a short softening stage before the seasoning can cling and the skin can brown. Confirm that your air-fryer manual permits cooking raw poultry from frozen, and make sure the drumsticks become fully separable so hot air can reach every side.

Frozen dinner rescue

If the drumsticks are frozen into one solid block, thaw them in the refrigerator until they can be separated. Individually frozen pieces can go straight into the staged method below.

  1. Loosen the drumsticks. Air fry at 360°F / 180°C for 5–10 minutes.
  2. Separate and dry them. Once the drumsticks loosen, pull them apart with tongs and pat away the melted ice you can reach.
  3. Oil and season. Add the oil and dry rub once the skin is dry enough for the seasoning to cling.
  4. Continue at 380°F / 190°C. For individually frozen drumsticks around 4–4½ oz / 113–128 g each, begin checking the largest one when the total cooking time reaches about 25 minutes. Continue for 2–3 minutes at a time and test more than one drumstick.
  5. Crisp only when needed. If the chicken is safely cooked but still pale, use 400°F / 200°C for the final 2–3 minutes.
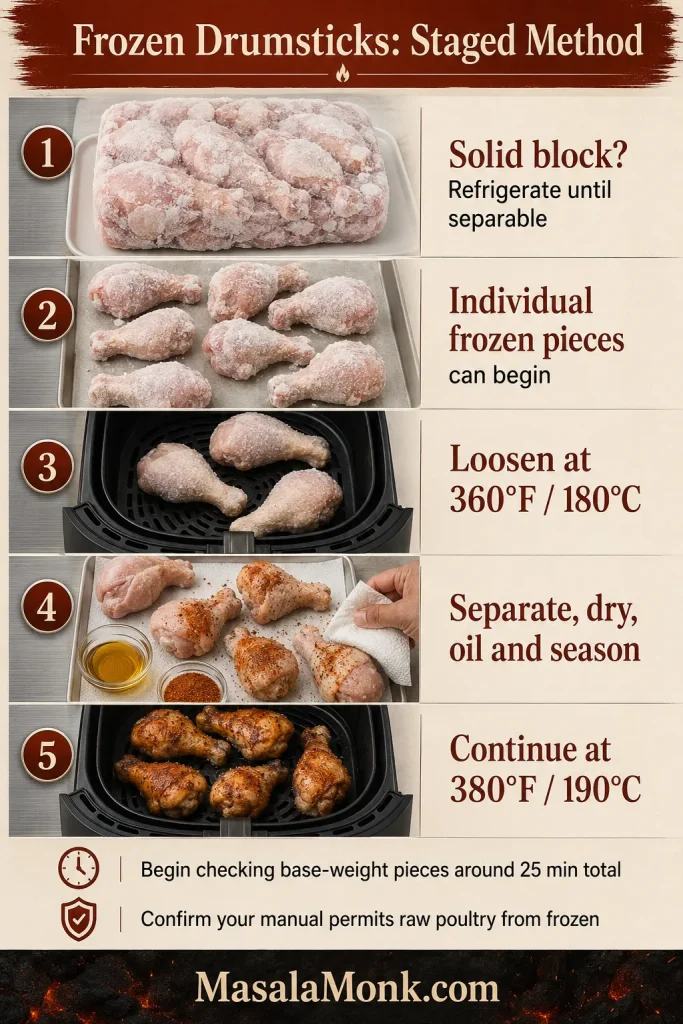
Five-stage frozen drumstick guide showing a frozen block, individual frozen pieces, loosening, drying and seasoning, and continued air frying.
Frozen drumsticks need staging: separate first, then dry, season and continue cooking so seasoning can actually stick.

Allow approximately 25–40 minutes from frozen, depending on weight and ice. The approximately 30-minute timing applies to fully thawed drumsticks in the base weight range.

How Different Air Fryers Change the Timing

Most timing differences come down to how close the chicken sits to the heating element, how much open cooking space the machine provides and whether different zones or levels heat evenly.

Match the Method to Your Air Fryer

  • Compact or narrow basket: cook fewer drumsticks or use batches so hot air can move freely around each one.
  • Hot-running machine: begin checking early. If the skin darkens before the inside is ready, continue at 380°F / 190°C.
  • Dual basket: divide the drumsticks evenly and check both zones; one side may finish first.
  • Oven-style or multi-level machine: follow the recommended rack position, rotate levels when needed and watch the drumsticks closest to the heating element.
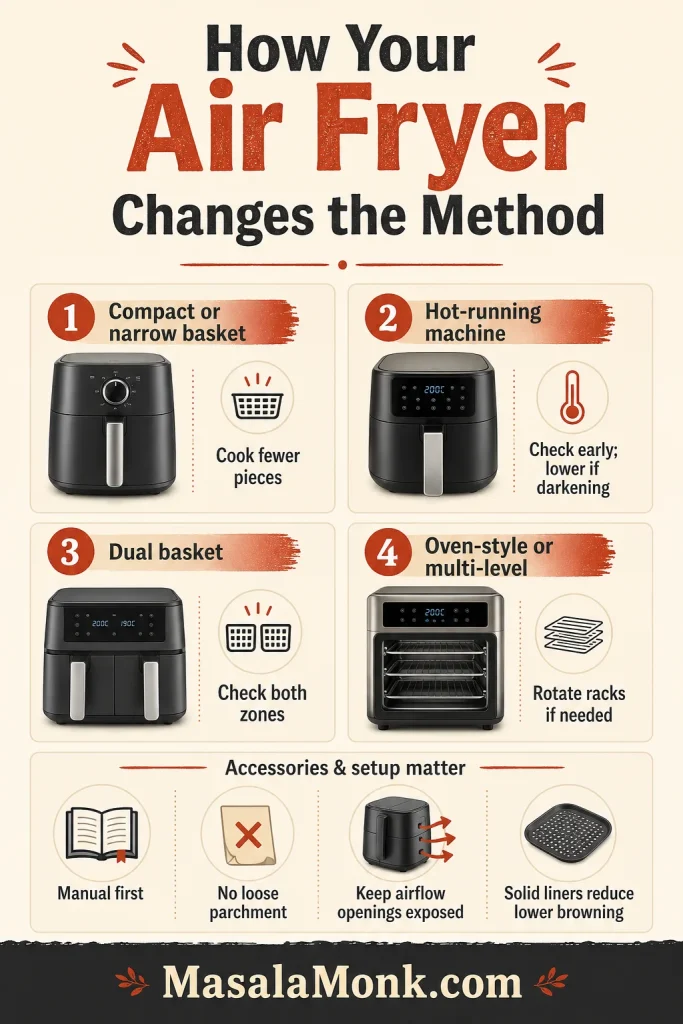
Appliance guide showing four generic air fryer types with tips for compact baskets, hot-running machines, dual baskets and oven-style models.
Match the method to the machine: basket size, heat pattern and rack position all matter for air fryer chicken legs.

Preheating gives the first batch a more consistent start. From a cold machine, keep the same thermometer target and expect the first check to move by roughly 1–3 minutes.

Liners, Tools and Two Batches

Liners and tools: smooth or silicone-tipped tongs are less likely to tear the skin. A solid liner can simplify cleanup but may block lower airflow. Do not use or preheat parchment unless your appliance manual permits it, and never leave loose paper unweighted near the heating element.

Cooking two batches? Rest the first batch on a wire rack, where steam can escape. While the second batch cooks, keep the first on the rack in a 200°F / 95°C oven and avoid holding it longer than necessary. A final minute in the air fryer can refresh the skin before serving.
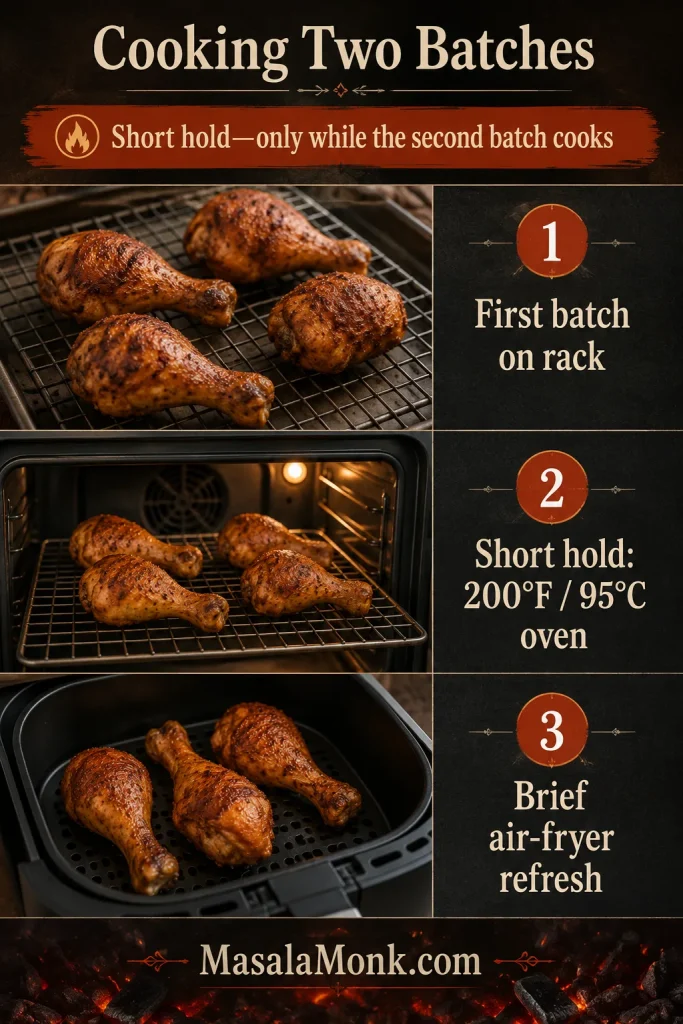
Three-stage board showing cooked drumsticks on a wire rack, a short low-oven hold and a brief air fryer refresh.
A rack and short low-oven hold protect the first batch while the second cooks, without steaming the skin.

Troubleshooting Soft Skin, Uneven Cooking and Smoke

Most disappointing batches are fixable. One undercooked drumstick can go back into the air fryer without delaying the rest of dinner.

Dark Outside, Low Inside

If the exterior is already dark but the center is still below target, lower the heat and finish the drumstick in short checks instead of pushing the whole batch harder.
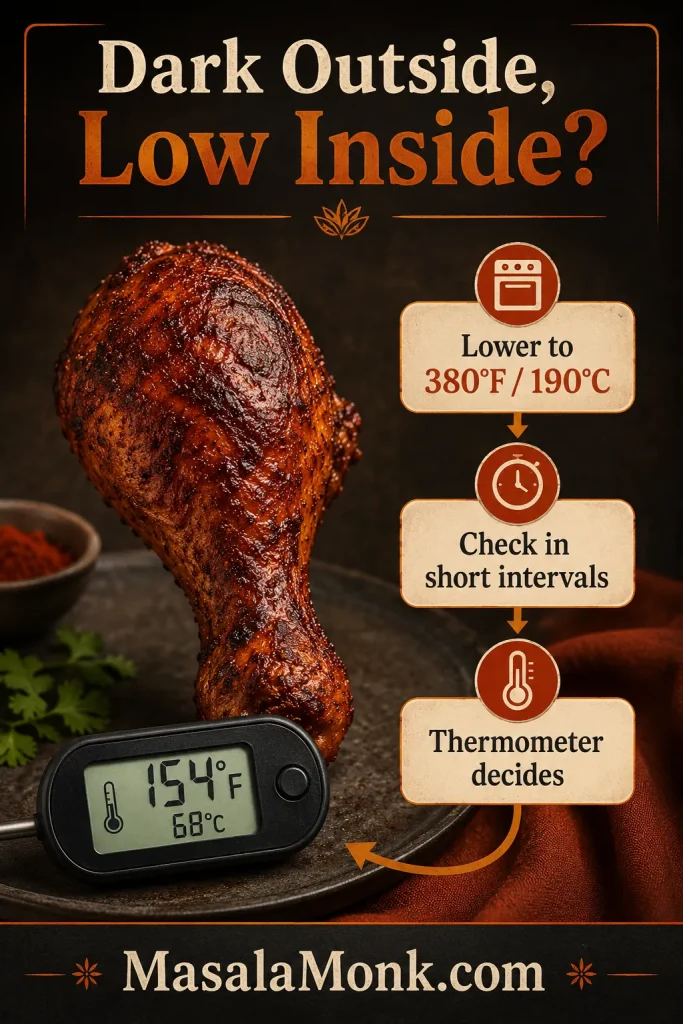
Troubleshooting image showing a dark browned drumstick with a thermometer below the target temperature and instructions to lower the air fryer to 380 degrees Fahrenheit.
When the outside races ahead, lower the heat and finish in short thermometer-led intervals rather than forcing a hotter cook.

Quick Fixes by Problem

ProblemWhat to do
Skin stayed soft or rubberyFix now: give unsauced chicken another 1–3 minutes at 400°F / 200°C, watching closely. Next time: dry the skin more thoroughly and leave more space between the drumsticks.
Skin burnt before the inside cookedLower the temperature to 380°F / 190°C and continue in short intervals. Large drumsticks often need gentler heat.
One drumstick is undercookedReturn only that drumstick. The others can rest while it cooks for another 1–2 minutes at a time.
Chicken turned dryRemove smaller drumsticks earlier. They do not need to wait for the largest one.
Seasoning or flour looks patchyPat the skin dry, add a thin sheen of oil and mist only visible dry flour patches.
Coating fell offShake off excess flour and wait until the crust begins to set before turning with smooth tongs.
BBQ or honey glaze burntSweet sauce went on too early. Cook mostly dry and glaze only during the final few minutes.
Chicken looks pink near the boneCheck the thickest flesh with a thermometer. Color alone cannot confirm whether poultry is safe.
Underside stayed paleTurn once and keep the crisper-plate holes open. Solid liners reduce the hot air reaching the underside.
The air fryer is smokingStop and inspect the appliance safely. Clean old residue and rendered fat, reduce excess oil and keep sugary sauce away from the hottest part of the cook.
Fast fixes for skin, doneness, coating, smoke and sauce problems.

Smoke and Safe Inspection

Persistent or unusual smoke deserves a pause. Once the appliance is safe to inspect, clean the basket, crisper plate and collection area, then follow the manual if the problem continues.
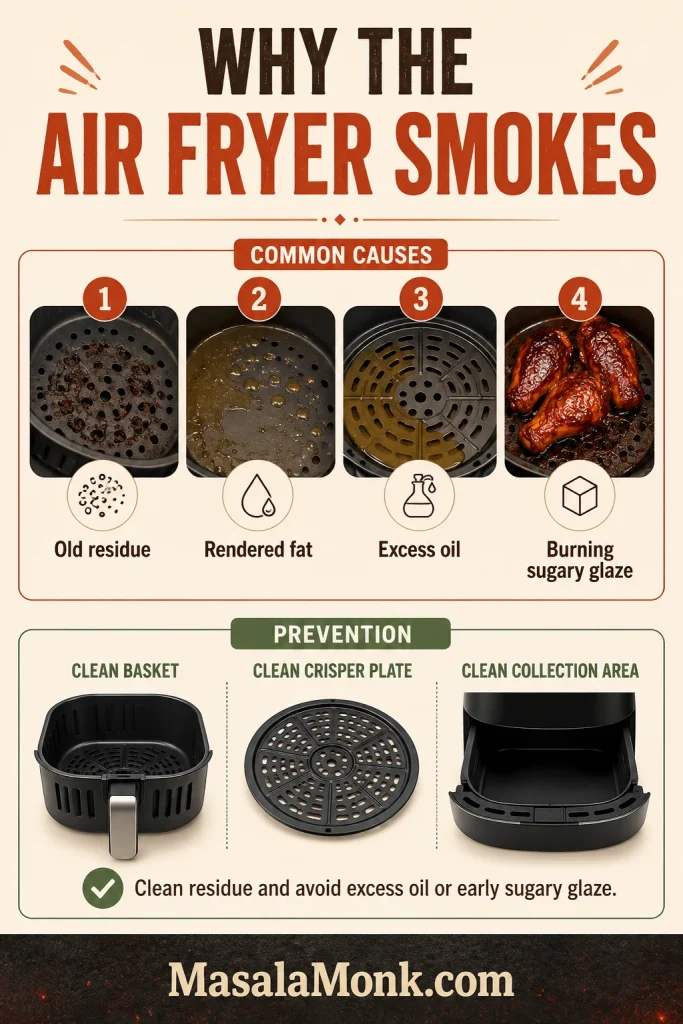
Infographic showing common air fryer smoke causes including old residue, rendered fat, excess oil and burning sugary glaze, with a clean basket shown as prevention.
Most smoke comes from residue, fat, excess oil or sugar added too early, so check those causes first.

What to Serve With Air Fryer Chicken Drumsticks

Once the drumsticks are crisp and rested, dinner only needs one comforting side and something fresh. Cool or acidic sides are especially good beside Buffalo, BBQ and honey-glazed versions because they cut through the richer coating.

Fast weeknight plate: smoky paprika-garlic drumsticks, roasted potatoes and green beans.

Cookout plate: BBQ drumsticks, corn and cold potato salad.

Fresh and tangy plate: Buffalo or glazed drumsticks with yogurt dip and a cold vinegar and dill cucumber salad.

Indian-spiced plate: jeera rice, kachumber, mint yogurt, flatbread and lemon wedges.

Serving board with four different chicken drumstick meals labeled weeknight, BBQ, Buffalo and Indian-spiced, each with different sides.
The same air fryer chicken drumsticks can shift from weeknight plate to BBQ, Buffalo or Indian-spiced dinner.

Once the plates are planned, the final cue is the bite itself: browned skin, juicy dark meat and a drumstick that still feels like easy dinner.
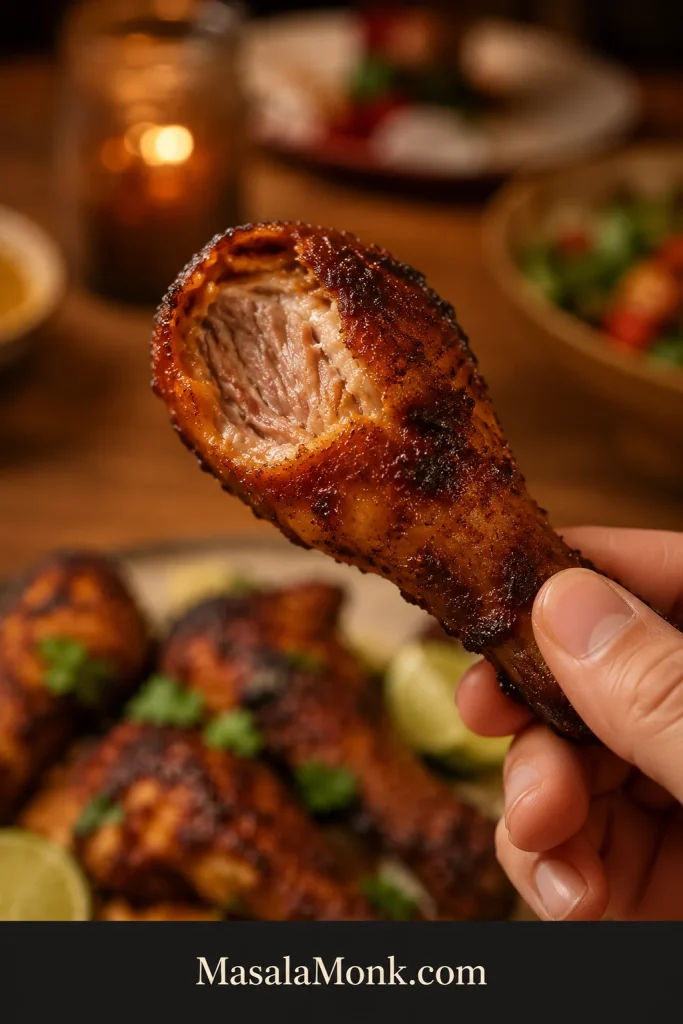
A hand holding a cooked chicken drumstick with one bite taken, showing browned skin and juicy cooked dark meat against a blurred dinner table.
The payoff is crisp-edged skin with juicy dark meat—not just a correct temperature—when the method is right.

Storage, Freezing and Reheating

Refrigerate cooked drumsticks in shallow covered containers within 2 hours—or within 1 hour when the surrounding temperature is above 90°F / 32°C. Use them within 3–4 days and store extra sauce separately when possible.

For reheating, arrange the drumsticks in one layer and air fry at 350–375°F / 180–190°C for 5–8 minutes, turning once, until the center reaches 165°F / 74°C. Use the lower end of the range for BBQ, honey or other sugary finishes.

Freeze cooled drumsticks in a freezer-safe container and thaw them in the refrigerator before reheating. For the best flavor and texture, use frozen cooked drumsticks within about 4 months. The skin may not return to its original crispness, but the air fryer usually restores it more successfully than a microwave.

For meal prep, keep sauce separate and reheat only the number you plan to eat. Cold meat can also be pulled from the bone for wraps or these chicken sandwich ideas. That often protects the texture better than reheating the same drumstick twice.
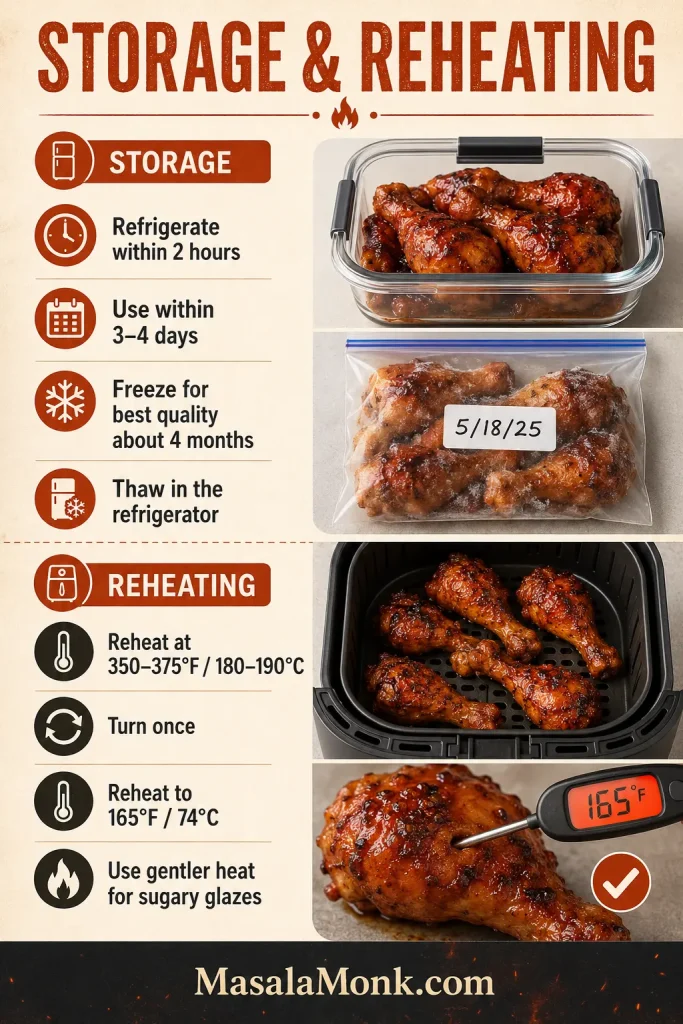
Storage and reheating guide showing cooked drumsticks in a container, freezer storage, an air fryer reheating step and a thermometer cue.
Chill promptly, reheat to 165°F / 74°C, and use the air fryer when leftover texture matters.

Frequently Asked Questions

Is 380°F or 400°F better for chicken drumsticks?

Use 400°F / 200°C for drumsticks under about 5½ oz / 156 g. Heavier pieces often cook more evenly at 380°F / 190°C.

Can I use parchment paper or foil?

Only use parchment or foil when your specific air-fryer manual permits it. Solid liners restrict airflow and lower-surface browning, while loose paper can be pulled toward the heating element. When a liner is permitted, keep it weighted beneath the food and avoid covering the basket’s airflow openings.

Why are my drumsticks pink beside the bone?

Bone pigments can color safely cooked meat, especially after freezing. Pinkness alone cannot confirm doneness, so check the thickest flesh with a thermometer.

Can I cook drumsticks from frozen?

Yes, when your appliance manual permits it. Loosen and separate the drumsticks first, then dry, oil and season them. Continue at 380°F / 190°C and begin checking drumsticks around 4–4½ oz / 113–128 g each at about 25 minutes total.

Use this card when weight, frozen chicken or sauce changes the base method.
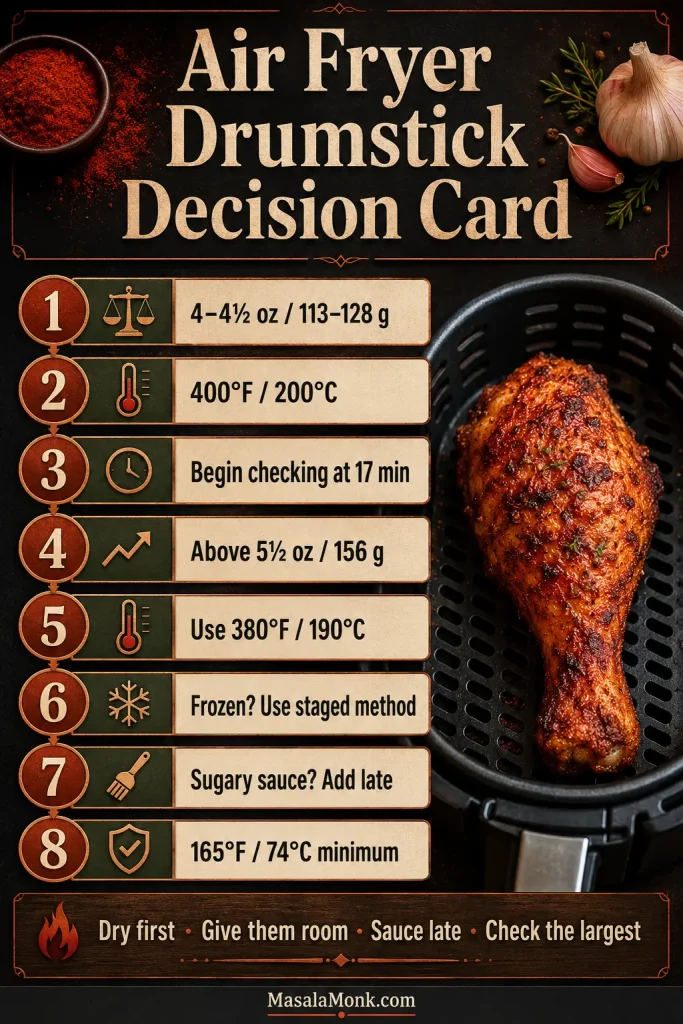
Air fryer drumstick decision card with cooking temperatures, weight ranges, frozen and sauce guidance, and a cooked drumstick in an open basket.
Weight sets the first check, frozen chicken needs staging, and sugary sauces belong near the end.

The four drumstick decisions to remember

Dry first. Give them room. Sauce late. Check the largest piece. Those four decisions do more for crisp skin and juicy meat than chasing one supposedly perfect cooking time.

That is the small satisfaction of this dinner: an inexpensive package of chicken comes out smoky, properly browned and generous. The thermometer quietly removes the worry that usually comes with meat beside the bone.

Which version made it to your table—the smoky base, a sticky glaze, Buffalo or the Indian-spiced batch? If your drumsticks needed noticeably longer than the guide suggested, add the average weight and air-fryer model too. Those details can help the next cook understand why.
Recipe card Guide contents Back to top ↑

Posted on Leave a comment

Chicken Paprikash Recipe: Easy Hungarian Paprika Chicken With Sour Cream

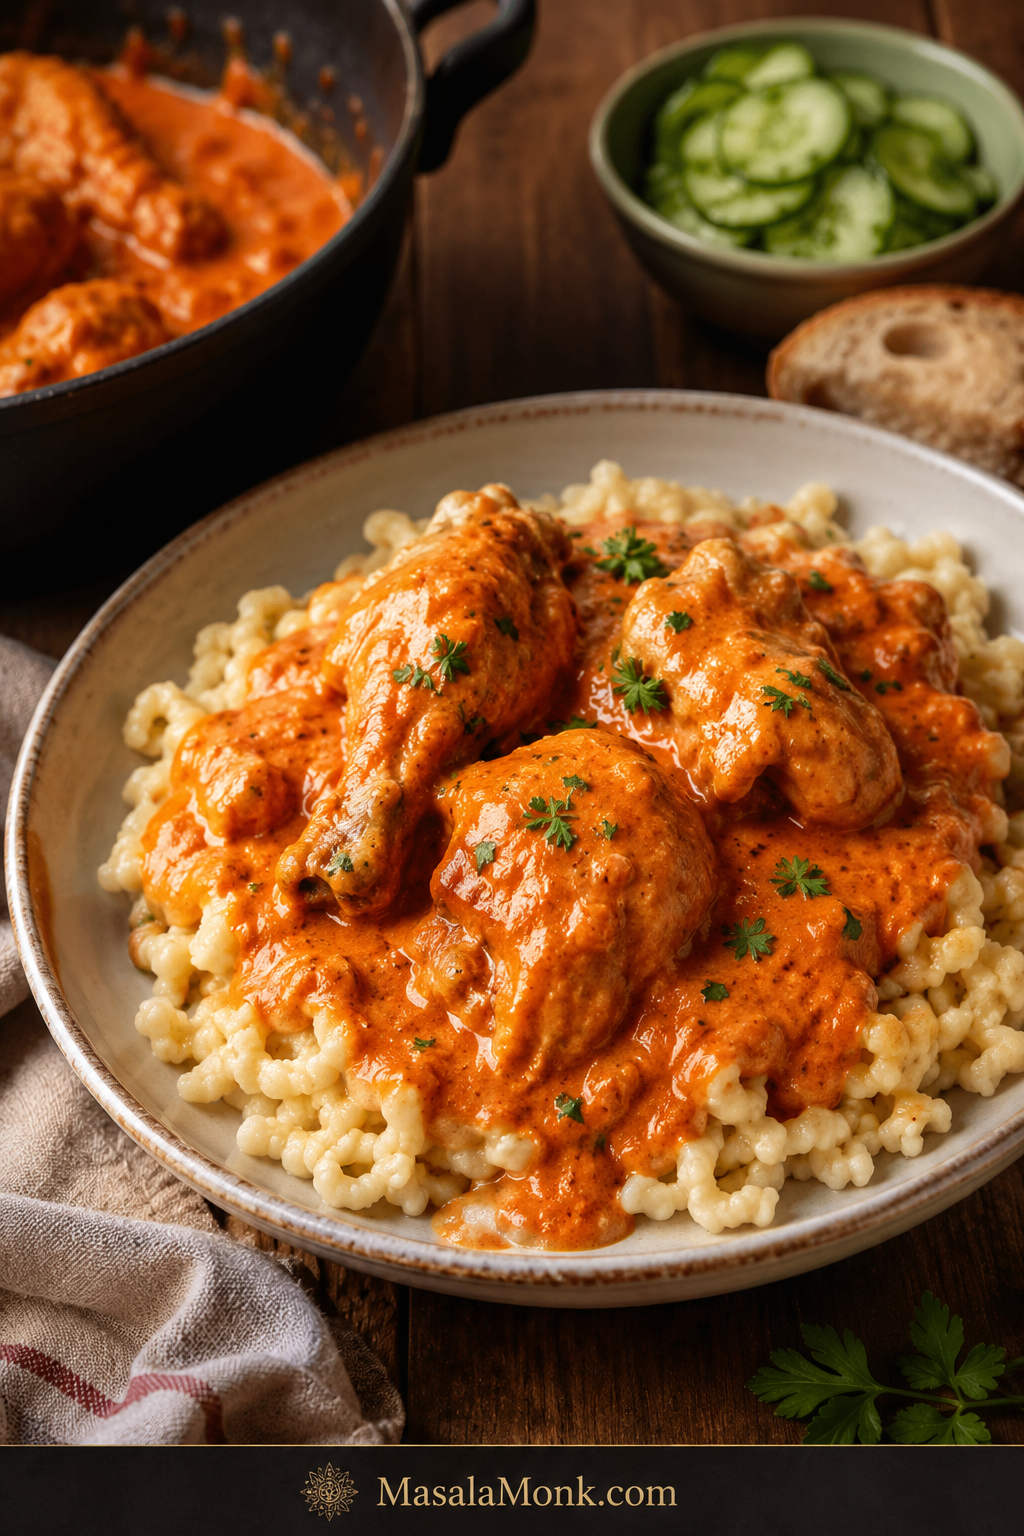
Chicken paprikash with red-orange sour cream sauce served over noodles, garnished with parsley, with cucumber salad and bread nearby.

Chicken paprikash looks like a simple pot of chicken in sauce, but the magic is in a few small moments: the onions softening until they smell sweet, the paprika blooming just long enough to wake up, and the sour cream turning the sauce creamy and red-orange at the end.

Rush those moments and the sauce can taste flat, bitter, or grainy. Handle them gently and you get tender chicken in a paprika-rich sour cream sauce that begs for noodles, dumplings, rice, mashed potatoes, or a piece of crusty bread.

This easy chicken paprikash keeps the familiar Hungarian-style comfort of paprikás csirke, but makes it practical for a normal evening: no scorched paprika, no grainy sour cream, no mandatory dumplings, and enough sauce to make the whole plate feel generous.

Quick Answer: What Is Chicken Paprikash?

Chicken paprikash is a Hungarian chicken dish made with chicken, onions, paprika, broth, and sour cream. The sauce is creamy, savory, red-orange, lightly tangy, and paprika-forward. It is usually mild rather than spicy, unless hot paprika or cayenne is added.

  • Chicken to use: boneless thighs for an easy weeknight version; bone-in thighs or legs for deeper flavor.
  • Paprika to use: sweet Hungarian paprika, ideally fresh and fragrant.
  • Key technique: bloom the paprika briefly off harsh heat, then add sour cream gently at the end.
  • Sides that work: nokedli, spaetzle, egg noodles, rice, mashed potatoes, cucumber salad, or crusty bread.
  • Main mistake to avoid: letting paprika scorch or boiling the sauce after sour cream goes in.

Make This Chicken Paprikash When

  • Creamy chicken sounds good, but you want more character than a plain cream sauce.
  • A cozy dinner needs to feel special without fancy ingredients.
  • You want something saucy enough for noodles, dumplings, rice, or potatoes.
  • Comfort food should reward careful heat, not complicated technique.

Boneless thighs keep it practical, while the important details stay protected: warm paprika, tender chicken, smooth sour cream, and enough sauce to carry the whole plate.

The 4 Details That Make or Break Chicken Paprikash

Chicken paprikash does not need many ingredients, but it does need a little care. These four details make the biggest difference.

  1. Start with good paprika. Old paprika makes the dish taste flat, even if you use enough of it.
  2. Protect the paprika from high heat. It only needs a short bloom, not a long fry.
  3. Simmer gently. The chicken should cook in small, steady bubbles, not a hard boil.
  4. Add sour cream carefully. Temper it first and stir it in after the strongest heat has passed.

This is not a fussy dish, but it does ask you to pay attention for a few small moments. Paprikash rewards patience, not perfection. Slow down for the paprika and sour cream, and the rest of the recipe is very forgiving.

Choose Your Paprikash Path

Are you making the weeknight version or the deeper traditional version? That choice decides the chicken and the side more than anything else.

VersionUse this whenWhat changes
WeeknightYou want dinner fasterUse boneless thighs with egg noodles, rice, or mashed potatoes
More traditionalYou want deeper flavorUse bone-in thighs or drumsticks with nokedli or spaetzle
Extra saucyYou are serving dumplings or noodlesKeep extra broth nearby and loosen as needed
Slow cookerYou want hands-off cookingSauté onions and bloom paprika first for better flavor
ShortcutYou have cooked chickenMake the paprika base first, then fold chicken in at the end

Chicken Paprikash Recipe Card

Recipe: Chicken Paprikash Recipe: Easy Hungarian Paprika Chicken With Sour Cream
Prep time: 15 minutes
Cook time: 40 minutes
Total time: 55 minutes
Servings: 4

Main flavorSweet paprika, onion, chicken, sour cream
TextureTender chicken in a creamy, spoonable sauce
Sauce colorRed-orange, not pale beige
Weeknight chickenBoneless skinless chicken thighs
More traditional optionBone-in thighs, drumsticks, or cut-up chicken
PaprikaSweet Hungarian paprika
Chicken doneness165°F / 74°C internal temperature
Good sidesNokedli, spaetzle, egg noodles, rice, mashed potatoes
Key techniqueUse gentle heat for paprika and sour cream

Useful Equipment

  • Dutch oven or deep 12-inch skillet with lid
  • Sharp knife and cutting board
  • Mixing bowl for tempering sour cream
  • Whisk or fork
  • Wooden spoon or spatula
  • Instant-read thermometer, helpful for checking chicken doneness

Ingredients

For the chicken

  • 2 lb / 900 g boneless skinless chicken thighs, cut into large bite-size pieces
  • 1 teaspoon fine salt
  • 1/2 teaspoon black pepper
  • 2 tablespoons neutral oil, chicken fat, or lard

For the paprika base

  • 2 large yellow onions, finely chopped
  • 1/4 teaspoon fine salt, plus more to taste
  • 3 garlic cloves, minced
  • 3 tablespoons sweet Hungarian paprika
  • 1/4 teaspoon hot Hungarian paprika or cayenne, optional
  • 1 1/4 to 1 1/2 cups / 300 to 360 ml low-sodium chicken broth, plus more if needed

To finish

  • 3/4 cup / 180 g full-fat sour cream, set out while the chicken cooks so it is not ice-cold
  • 1 tablespoon all-purpose flour, optional, for a thicker sauce
  • 1 teaspoon lemon juice or a small splash of vinegar, optional, only if the sauce needs brightness
  • Chopped parsley, optional, for serving

For serving

  • Nokedli, spaetzle, egg noodles, rice, mashed potatoes, or crusty bread

Instructions

Brown, bloom and simmer

  1. Season the chicken. Pat the chicken dry. Season with 1 teaspoon salt and the black pepper.
  2. Brown the chicken. Heat the oil in a Dutch oven or deep skillet over medium-high heat. Brown the chicken in batches for 2 to 3 minutes per side. It does not need to cook through yet. Transfer to a plate.
  3. Cook the onions. Reduce heat to medium. Add the chopped onions and the remaining 1/4 teaspoon salt. Cook for 8 to 10 minutes, stirring often, until soft and lightly golden. Stir in the garlic for 30 seconds.
  4. Add the paprika carefully. Lower the heat or briefly move the pot off the burner. Stir in the sweet paprika and optional hot paprika for 20 to 30 seconds. If the pot looks dry or too hot, add a small splash of broth right away.
  5. Simmer the chicken. Pour in 1 1/4 cups broth and scrape up the browned bits from the bottom of the pot. Return the chicken and any juices to the pot. Bring to a gentle simmer with small bubbles, not a hard boil. Partly cover and cook for 18 to 22 minutes, or until the chicken is tender and reaches 165°F / 74°C.

Finish the sauce gently

  1. Check the sauce before adding sour cream. It should be spoonable and flavorful. A thin sauce needs a few uncovered minutes before the sour cream goes in. A tight sauce needs the remaining 1/4 cup broth, or a little more as needed.
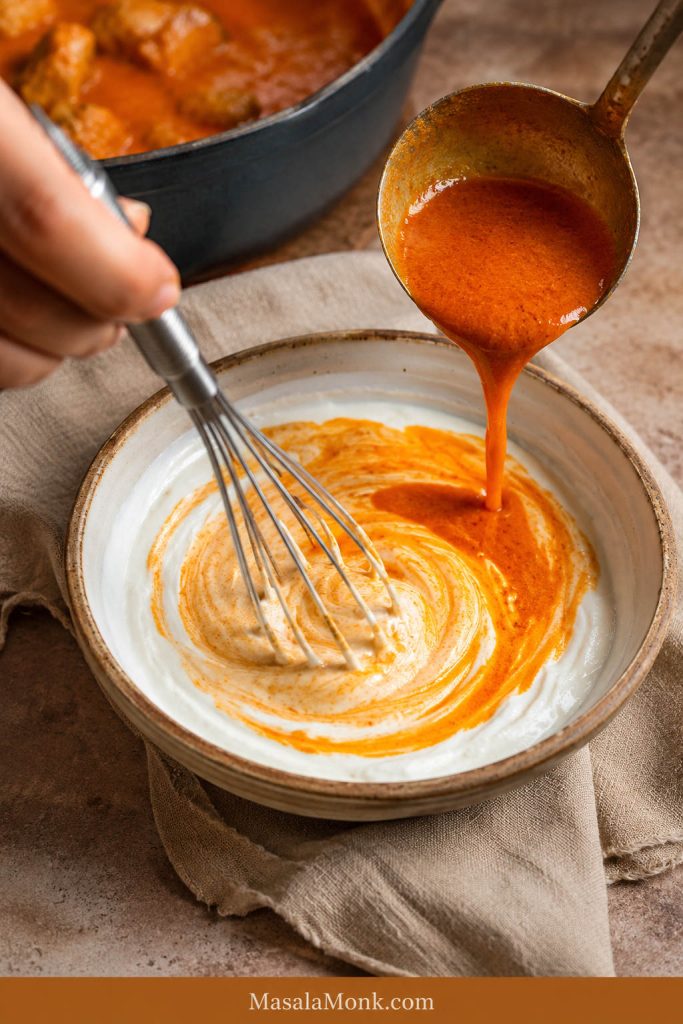
  2. Temper the sour cream. In a bowl, whisk the sour cream with the flour, if using. Slowly whisk in a few spoonfuls of hot sauce from the pot to warm the sour cream mixture gradually.
  3. Finish gently. Turn the heat to very low or off. Stir the tempered sour cream mixture into the pot. Warm through for 2 to 3 minutes without boiling. Taste and adjust salt. Add lemon juice or vinegar only if the sauce tastes too heavy.
  4. Serve. Spoon the chicken paprikash over nokedli, spaetzle, egg noodles, rice, or mashed potatoes. Garnish with parsley if you like.

Recipe Notes

  • Bone-in chicken: use thighs, drumsticks, or a mix. Simmer for 35 to 45 minutes, or until tender and cooked through.
  • Chicken breast: simmer gently and check early so it does not dry out.
  • Thicker sauce: use the flour in the sour cream mixture or simmer the paprika base uncovered before adding sour cream.
  • Gluten-free thickener: mix 1 teaspoon cornstarch with 1 tablespoon cold water, stir it into the simmering base before adding sour cream, and cook briefly until slightly thickened.
  • Looser sauce: skip the flour and add a splash more broth if needed.
  • Best paprika flavor: use fresh sweet Hungarian paprika as the base, add a small pinch of hot Hungarian paprika if you want more depth, and keep the heat gentle when blooming it.
  • Before serving: taste for salt, warmth, and brightness. Add salt if flat, a tiny splash of lemon juice or vinegar if heavy, or a spoonful of sour cream if too sharp.
  • Serving amounts: plan on about 8 oz / 225 g dry egg noodles, 3 to 4 cups cooked nokedli or spaetzle, 3 cups cooked rice, or 4 portions mashed potatoes for 4 servings.

Need help before you cook? See which paprika to use, which chicken cut works best, how to keep sour cream smooth, or what to serve with chicken paprikash.

Once the recipe is clear, the rest is about control: choosing the right paprika, keeping the sour cream smooth, and knowing what the finished dish should look and taste like.

What Is Chicken Paprikash?

Chicken paprikash, often called paprikás csirke, is a Hungarian chicken dish built around onion, paprika, liquid, and sour cream. It is sometimes called chicken paprika in English-language recipes.

What makes it different from plain creamy chicken is the paprika. The finished dish should taste warm, savory, gently sweet from the onions, lightly tangy from the sour cream, and clearly paprika-forward. If it tastes like cream sauce with a little red color, the paprika has not done its job.

Paprikash is not a dry chicken dish with a little sauce on the side. The creamy red-orange sauce is the reason the noodles, dumplings, rice, or potatoes make sense.

If you like creamy chicken dinners such as cream of mushroom chicken, this gives you the same cozy feel in a paprika, onion, and sour cream direction.

Authentic-Style vs Easy Chicken Paprikash

This is a practical home-style version of paprikás csirke, built around the essentials: chicken, onion, paprika, liquid, and sour cream. Hungarian families make paprikash in many ways, so this version keeps the core flavor while making the method easier for a normal evening.

More traditional versions often use bone-in chicken pieces, sweet Hungarian paprika, sour cream, and nokedli or spaetzle on the side. Some cooks add tomato or sweet pepper, while others keep the pot focused on onion, paprika, and sour cream.

Boneless thighs cook faster than bone-in pieces, egg noodles or rice can stand in for dumplings, and the sauce still gets the care it needs: softened onions, protected paprika, gentle simmering, and sour cream added at the end.

For a deeper, more traditional result, use bone-in thighs or drumsticks and simmer them longer. For the easiest dinner, use boneless thighs and serve the chicken over egg noodles, rice, or mashed potatoes.

Why This Recipe Works

This version gives you classic paprikash comfort without making dumplings mandatory, without using hard-to-find steps, and without making the dish grainy or bitter.

The method works because it protects the two delicate parts of the dish: paprika and sour cream. The paprika blooms briefly away from harsh heat, and the sour cream is warmed gradually before it goes into the pot.

Boneless thighs keep the chicken juicy, softened onions give the paprika base body, and the consistency is adjusted before the dairy goes in. The result is tender chicken in a dish that feels rich without being heavy, creamy without being bland, and warm with paprika in every bite.

Ingredients for Chicken Paprikash

Because this recipe uses a short ingredient list, each ingredient matters. Paprika is not just color here; it is the main flavor.

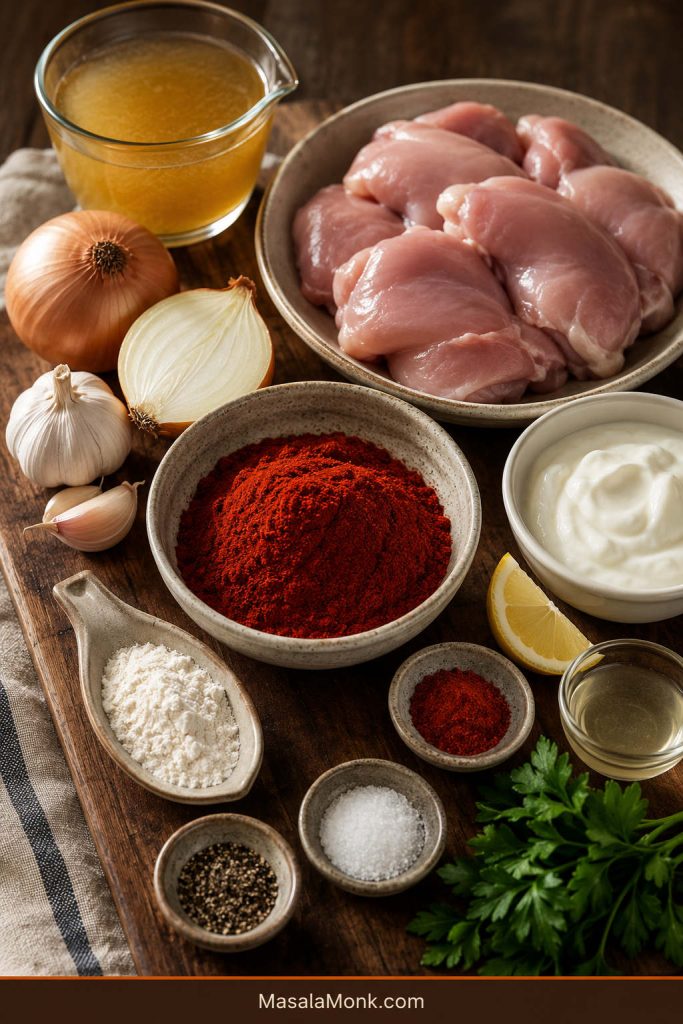
Boneless chicken thighs, sweet paprika, onions, garlic, broth, sour cream, flour, lemon, parsley, salt and pepper arranged on a wooden board.
Chicken paprikash starts with a short ingredient list, so freshness matters. Good paprika brings warmth and color, while onions, broth, and full-fat sour cream build the body of the dish.

Chicken

Boneless skinless chicken thighs are the easiest choice for this version. They stay tender, cook quickly, and hold up well in the sauce. Bone-in thighs and drumsticks give more flavor, while chicken breast gives a leaner but less forgiving result.

Paprika

Use sweet Hungarian paprika if possible. Fresh paprika should smell warm, peppery, and fragrant. A small pinch of hot Hungarian paprika adds depth if you want more character without making the dish truly spicy.

Regular sweet paprika can work if it smells fresh. Smoked paprika should not be the main paprika here because it turns the dish in a smokier direction. Use it only as a small accent if you love the flavor.

Onions

Onions create the body of the sauce. Cook them until soft and lightly golden so they bring sweetness instead of raw sharpness.

Garlic

Garlic should stay in the background here. You want it to round the sauce, not pull attention away from the paprika.

Broth

Broth does two quiet jobs: it loosens the paprika base and pulls the browned bits from the pot into the sauce. Start with 1 1/4 cups and add more if the sauce reduces too much or if you are serving it with noodles or dumplings.

Sour Cream

Sour cream gives paprikash its creamy tang. Full-fat sour cream is the safest choice because it handles gentle heat better than low-fat versions. Add it at the end and keep the heat low.

Flour

Flour is optional, but helpful if you want a sauce that clings more confidently to noodles or dumplings. You can skip it for a looser result, or use the cornstarch slurry in the recipe notes if you need a gluten-free thickener.

Tomato or Pepper

Some versions include a little tomato, tomato paste, or fresh pepper. Others do not. Use 1 small chopped tomato, 1 teaspoon tomato paste, or 1/2 finely chopped bell pepper if you like, but keep it subtle so the dish still tastes like paprika and sour cream, not tomato chicken stew.

The ingredient notes above give the basics. These two choices — paprika and chicken — are where the dish changes most.

Choosing Paprika

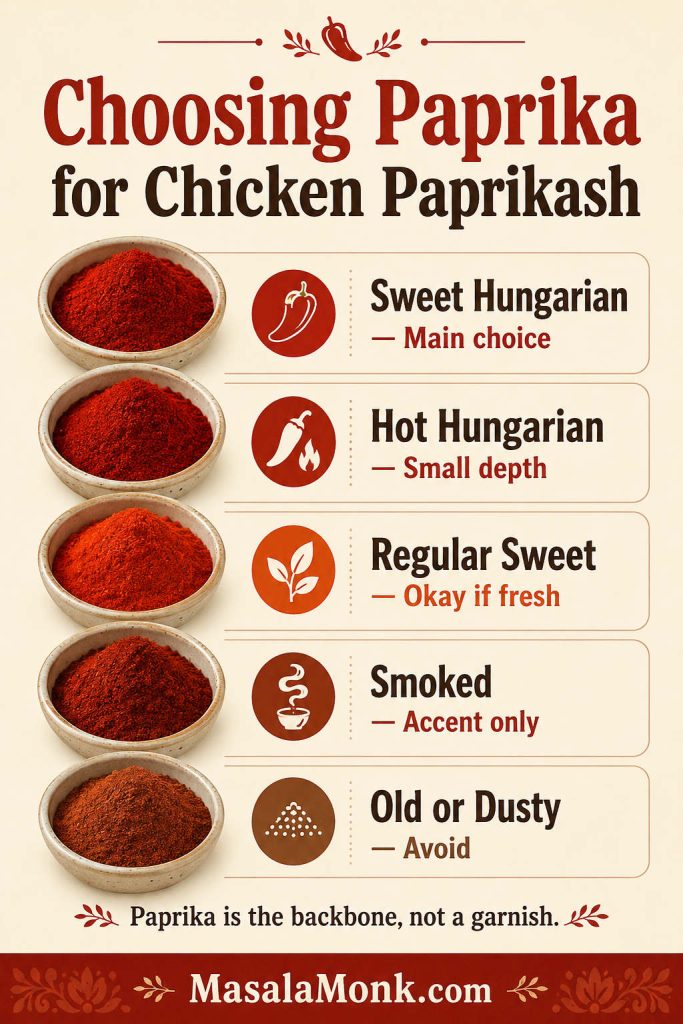
Sweet Hungarian paprika gives chicken paprikash its red-orange color and warm pepper flavor without making it overly spicy. Before you measure it, smell it. Good paprika should smell warm and peppery, not dusty or flat.

Infographic comparing sweet Hungarian paprika, hot Hungarian paprika, regular sweet paprika, smoked paprika and old paprika for chicken paprikash.
Sweet Hungarian paprika is the main flavor in chicken paprikash, not just a color booster. Use fresh paprika for depth, add hot paprika only for gentle heat, and keep smoked paprika as an accent.

Three tablespoons of paprika may look like a lot, but paprikash needs more than a dusting. The spice is the backbone of the dish, not a garnish.

For more depth, use mostly sweet Hungarian paprika with a small pinch of hot Hungarian paprika. Cayenne can add heat, but hot Hungarian paprika keeps the flavor closer to the dish.

Paprika brings both color and flavor here, but it is delicate. A short bloom in onion fat helps it open up; a long fry on high heat makes it harsh. Once the paprika goes in, stay close to the pot. You should smell the paprika before you worry about seeing a big change. The color deepens quickly, but the aroma is the real cue.

Paprika typeUse it?What to know
Sweet Hungarian paprikaYesBest default for classic paprikash flavor
Regular sweet paprikaYes, if freshWorks, but may taste less deep than Hungarian paprika
Hot Hungarian paprikaYes, in small amountsAdds warmth and depth without changing the dish too much
Smoked paprikaOnly as an accentCan taste good, but changes the dish into a smokier version
Old paprikaAvoidMakes the finished dish taste flat and dusty
CayenneOptionalUseful if you want heat but not more paprika flavor

Choosing the Chicken

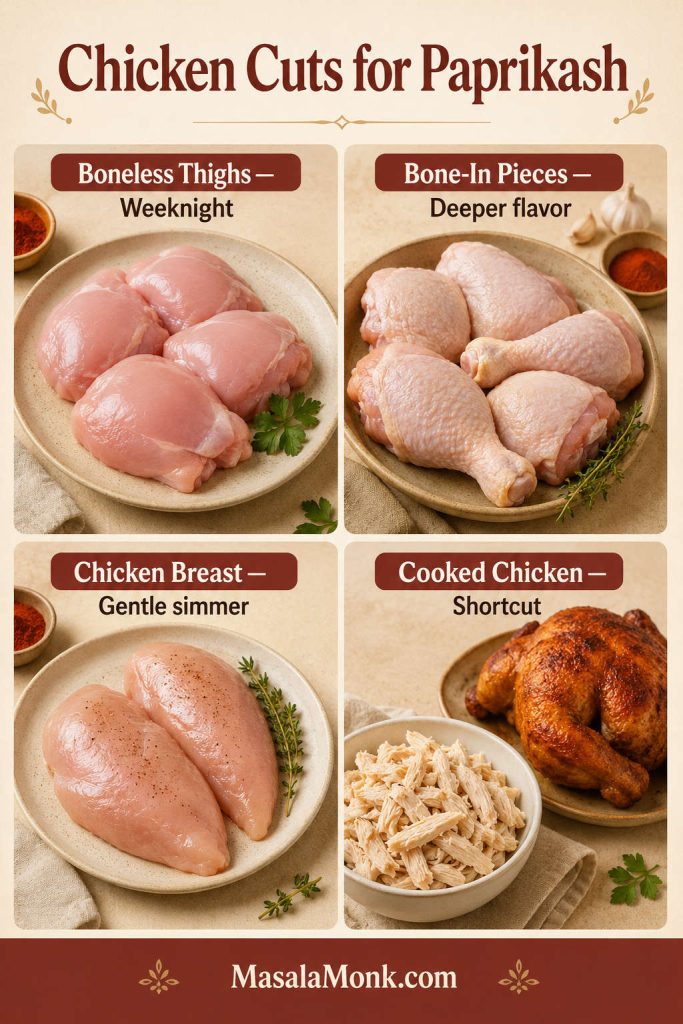
The right cut depends on the kind of dinner you want. Boneless thighs are the easiest all-around choice for weeknight paprikash. Bone-in chicken gives deeper flavor. Chicken breast works, but it needs a gentler hand.

Guide showing boneless thighs, bone-in chicken pieces, chicken breast and cooked chicken as options for chicken paprikash.
Boneless thighs are the easiest choice for weeknight chicken paprikash because they stay juicy. Bone-in pieces are worth using when you want deeper flavor and have time for a longer simmer.

If chicken breast is what you have, this baked chicken breast guide is useful for understanding timing, thickness, and how to avoid dry white meat.

Chicken cutDoes it work?Use when
Boneless thighsYesYou want a juicy, easy weeknight version
Bone-in thighs or drumsticksYesYou want deeper flavor and a longer simmer
Chicken breastYesYou want a leaner version and can cook gently
Rotisserie chickenYesYou want a shortcut and already-cooked chicken
Shredded cooked chickenYesYou want leftovers, bowls, noodles, or quick lunches

For rotisserie chicken, make the paprika base first, then fold in the cooked chicken just long enough to warm it through.

Once the chicken is chosen and the paprika is ready, the cooking is mostly about building the dish in the right order.

How to Make Chicken Paprikash

The recipe card gives you the full method. This section shows what to look for as you cook, because paprikash is easier when you can see and smell the right moments.

The recipe is not difficult because it has many steps. It is difficult only if the heat gets impatient. Keep the pot gentle, and the dish gives you back more comfort than the ingredient list promises.

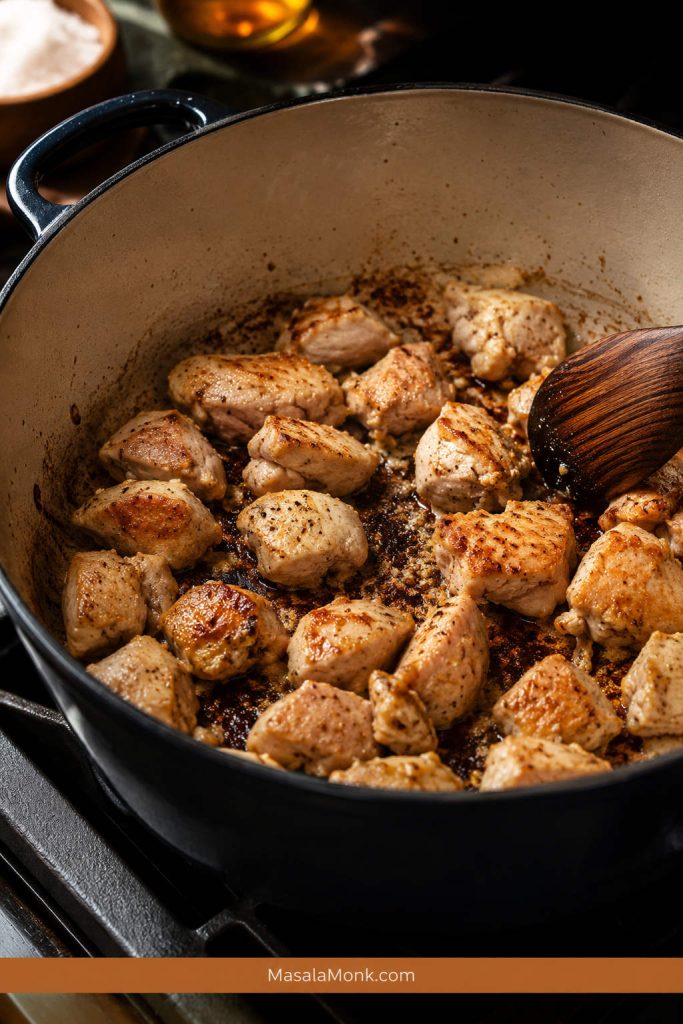
Step 1: Brown the chicken for flavor, not doneness

The chicken should pick up color on the outside, but it does not need to cook through yet. Those browned bits on the bottom of the pot will dissolve into the paprika base later.

Boneless chicken thigh pieces browning in a Dutch oven with golden edges and browned bits on the bottom.
Brown the chicken for flavor, not doneness. Those golden edges and browned bits will later dissolve into the paprika base and make the finished dish taste richer.

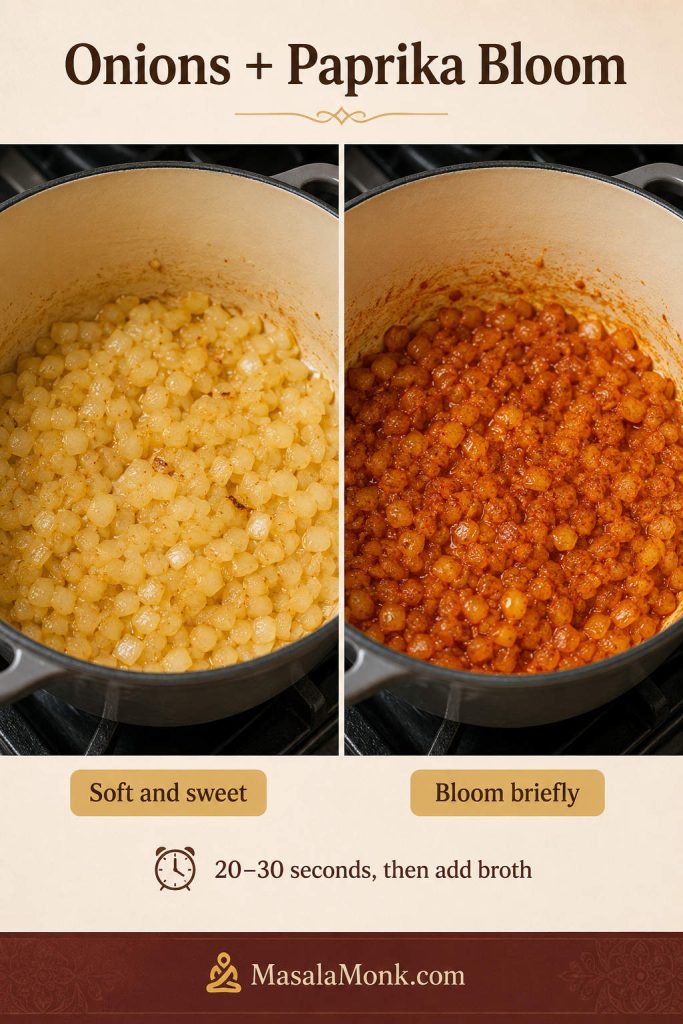
Step 2: Cook the onions until they smell sweet

The onions should soften, shrink, and smell sweet instead of sharp. This is where the dish starts getting body. Rushed onions make a thinner-tasting paprikash.

Step 3: Bloom the paprika briefly

Lower the heat before the paprika goes in. The spice should hit warm fat and smell fragrant almost immediately. That is the moment to add broth. A good bloom smells warm and peppery; a scorched one smells harsh.

Two-panel guide showing softened onions on one side and paprika blooming with onions on the other side.
Let the onions turn soft and sweet before adding paprika. Once the spice smells warm and peppery, add liquid so it blooms without scorching.

Step 4: Simmer gently

The pot should bubble quietly, not aggressively. Gentle simmering keeps the chicken tender and lets the paprika base pick up flavor without reducing too fast.

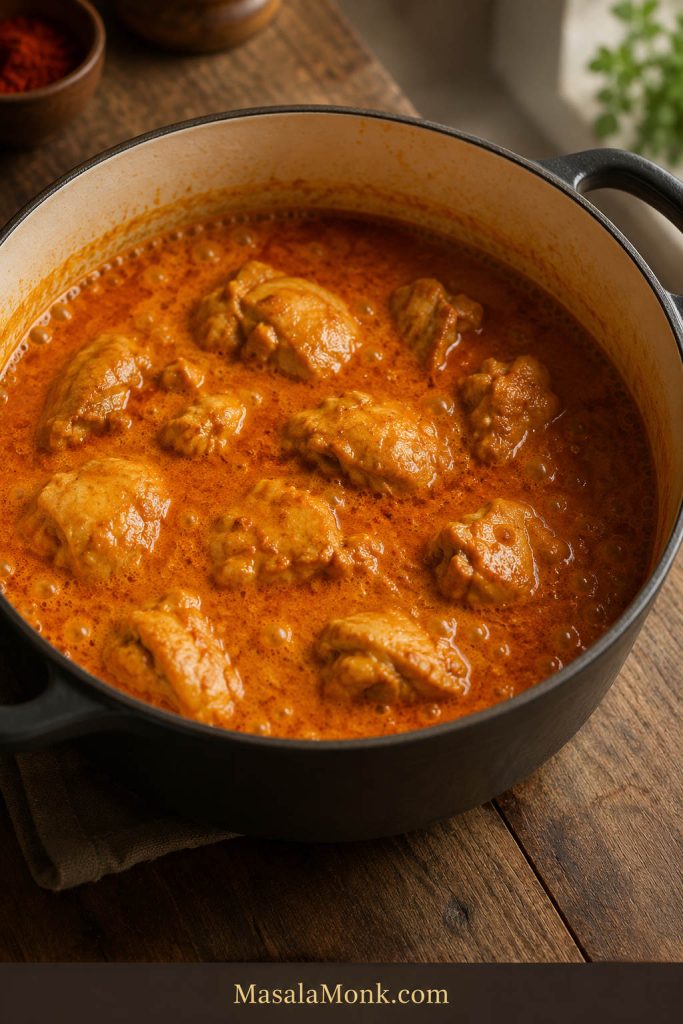
Boneless chicken pieces gently simmering in red-orange paprika sauce with small bubbles around the edge of the pot.
Keep chicken paprikash at a quiet simmer with small bubbles. This helps the chicken stay tender while the paprika base reduces slowly.

Step 5: Fix the consistency before the sour cream goes in

The sauce should already taste savory and spoonable before the dairy is added. Reduce it if it looks watery. Loosen it with broth if it looks tight. Once sour cream goes in, you want to warm the dish, not wrestle with it.

Step 6: Temper the sour cream

Whisking hot sauce into sour cream first keeps the temperature change gentle. The mixture should look smooth in the bowl before it goes back into the pot.

Sour cream being whisked in a bowl while hot paprika sauce is added gradually from a spoon.
Tempering sour cream protects the creamy finish. Whisk in a little hot paprika sauce first, then stir the warmed mixture back into the pot on low heat.

Step 7: Finish low and slow

Once the sour cream goes in, the sauce is no longer something to boil; it is something to warm. The finished dish should look creamy, red-orange, and ready to coat every noodle, dumpling, or spoonful of rice underneath.

How It Should Look and Taste

The finished dish should look creamy, warm, and generous. It should be red-orange from paprika, not pale beige and not tomato-red. It should coat the chicken and spoon easily over noodles, dumplings, rice, or potatoes.

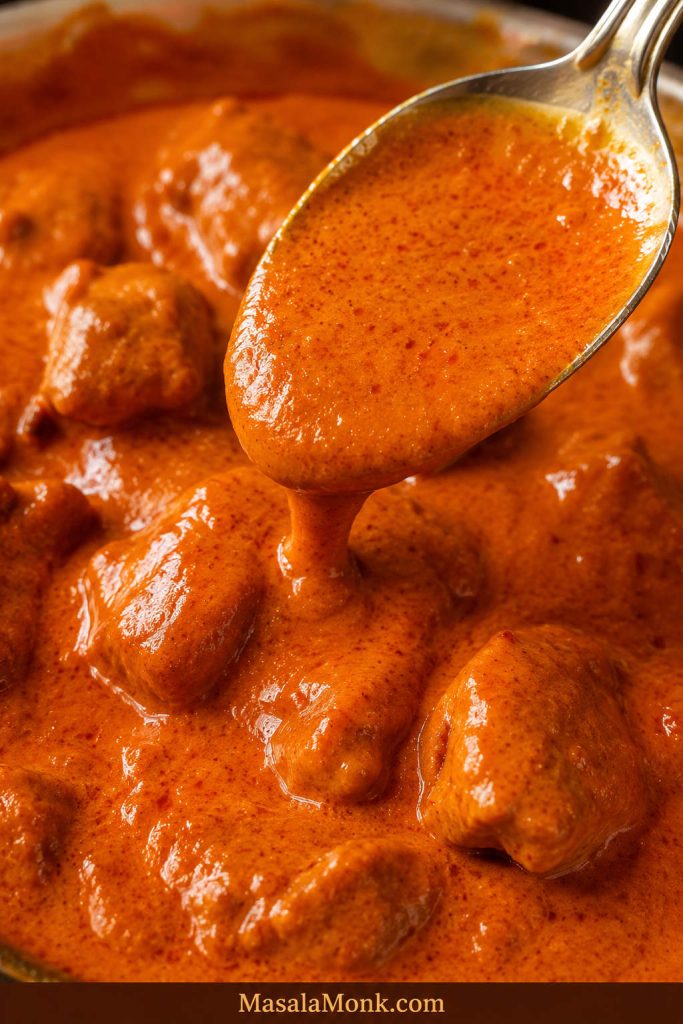
Close-up of finished chicken paprikash sauce coating chicken and a spoon with a glossy red-orange texture.
The finished sauce should coat a spoon but still flow easily. Before serving, adjust it so it clings to noodles, rice, nokedli, or potatoes without turning heavy.
  • Color: red-orange and paprika-rich.
  • Texture: creamy and spoonable, not watery or paste-thick.
  • Chicken: tender pieces that still hold their shape.
  • Flavor: savory, paprika-forward, lightly tangy, and gently sweet from onions.
  • Heat level: mild unless you add hot paprika or cayenne.
  • Sauce amount: generous enough to coat whatever you serve underneath.

A good paprikash should coat a spoon and leave a brief trail when you drag the spoon through the pan, but it should still flow easily over noodles, dumplings, rice, or potatoes.

The plate should not look tidy; it should look saucy. Every noodle should catch a little red-orange cream.

If the dish tastes flat, it may need salt or a little brightness. Dull flavor from the start often points to old paprika. Bitterness usually means the paprika caught too much heat.

Sauce not looking right yet? Jump to the troubleshooting guide before serving.

How to Keep the Sour Cream Smooth

The sour cream is where paprikash becomes silky and comforting, as long as the heat stays gentle. If the sauce gets too hot after the sour cream goes in, the creamy finish can turn grainy.

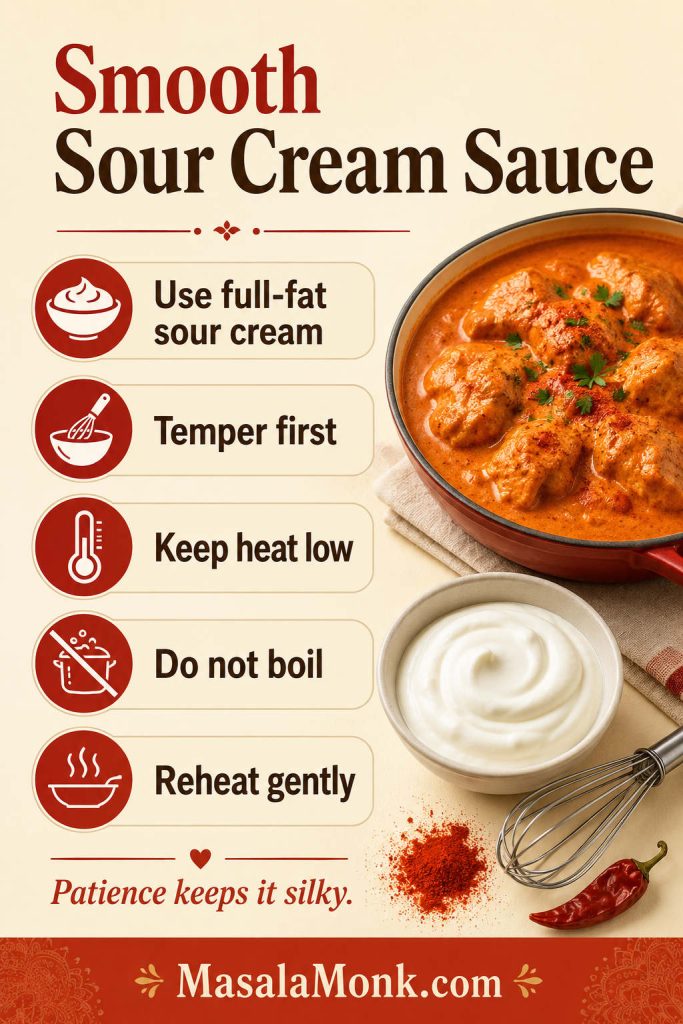
Infographic with tips for smooth sour cream sauce, including using full-fat sour cream, tempering first and keeping heat low.
Sour cream stays smooth when it is warmed gradually and kept away from hard boiling. Low heat is what keeps chicken paprikash silky instead of grainy.

Sour cream behaves better when it is warmed gradually. Tempering is not a fancy step; it simply narrows the temperature gap between cool dairy and hot sauce.

  • Use full-fat sour cream. It is more stable and gives better texture.
  • Do not add it ice-cold. Let it sit while the chicken cooks so it loses the refrigerator chill.
  • Temper it first. Whisk a little hot sauce into the sour cream before adding it to the pot.
  • Lower the heat. Add sour cream on very low heat or off heat.
  • Warm it through. Boiling is what puts the sauce at risk.
  • Reheat slowly. Leftovers need low heat and patience.

The dish does not need bravery here; it needs patience. If sour cream sauces make you nervous, turn the heat off before adding it. You have more control than you think.

If the sauce does split, lower the heat, add a small splash of broth, and stir gently. It may not become perfectly silky again, but it will still taste good.

Ready to cook now? Return to the recipe card and add the sour cream only after the strongest heat has passed.

Chicken Paprikash With Dumplings, Nokedli, Spaetzle or Egg Noodles

A saucy dish like this needs somewhere soft to land. In a more traditional plate, that usually means nokedli or spaetzle. On a weeknight, egg noodles, rice, or mashed potatoes still do the job beautifully.

Split image comparing chicken paprikash served over nokedli or spaetzle with chicken paprikash served over egg noodles.
Nokedli or spaetzle gives chicken paprikash a more traditional feel, while egg noodles make it easier for a weeknight dinner. Either way, the side should be soft enough to catch the sauce.

Want the Traditional Side Without a Project?

Nokedli are small Hungarian-style dumplings and one of the most traditional partners for this dish. Spaetzle is very similar and works beautifully. Egg noodles are the easiest weeknight option when you want the comfort of dumplings without making dumplings from scratch.

Use store-bought spaetzle, homemade nokedli, or egg noodles. For homemade nokedli, keep the batter soft and cook the dumplings separately in boiling water, then spoon the paprikash over the top. Do not simmer dumplings directly in the finished sauce unless you want a thicker, heavier pot. The shortcut version is not a failure; it is dinner moving at real-life speed.

SideAmount for 4 servingsUse when
Nokedli3 to 4 cups cookedYou want the most traditional serving
Spaetzle3 to 4 cups cookedYou want an easy dumpling substitute
Egg noodles8 oz / 225 g dryYou want a fast weeknight dinner
Rice3 cups cookedYou want a simple gluten-free meal
Mashed potatoes4 portionsYou want full comfort food

Dumplings make the plate feel most traditional. Egg noodles make it weeknight-easy. Rice keeps it simple. Mashed potatoes make it full comfort. None of them are wrong; the only mistake is not having enough sauce.

If rice is your easiest side, this guide on how to cook perfect rice helps you time the grains while the chicken simmers. For a deeper comfort-food version, spoon the paprika sour cream sauce over creamy mashed potatoes instead.

The side is not just filler here. It is the thing that catches the red-orange cream and makes every forkful feel complete.

Once you choose the base, see what to serve with chicken paprikash for fresh sides that balance the plate.

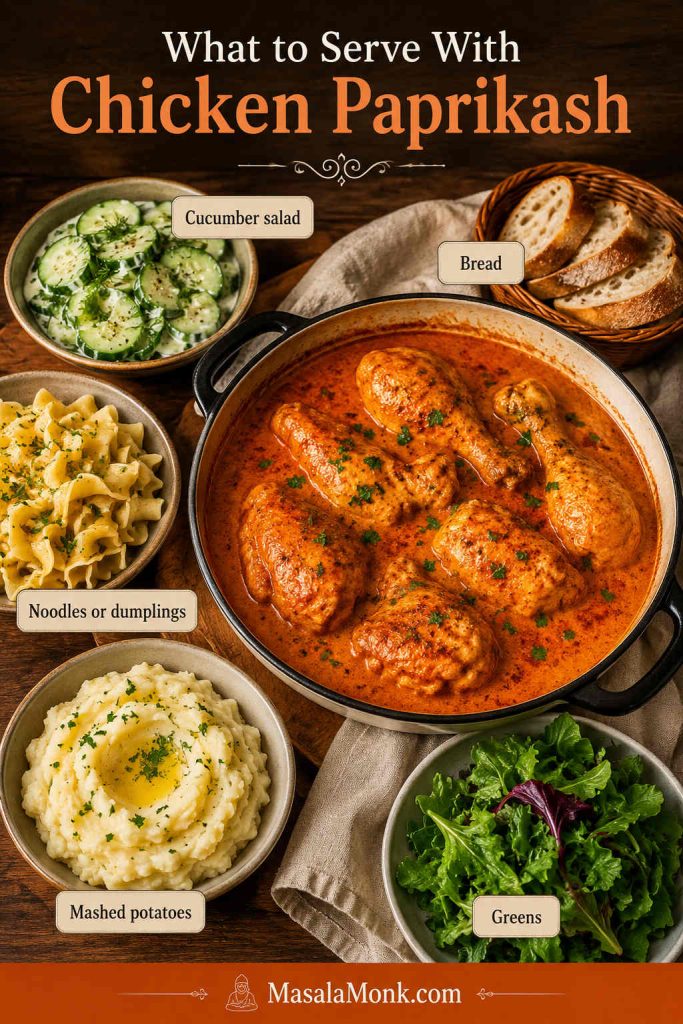
What to Serve With Chicken Paprikash

Because the dish is rich and creamy, the rest of the plate works best when it adds freshness, crunch, or something simple for wiping up the last spoonfuls.

Chicken paprikash served with cucumber salad, bread, noodles or dumplings, mashed potatoes and greens on a wooden table.
Rich chicken paprikash works best with contrast. Cucumber salad and greens add freshness, while noodles, dumplings, mashed potatoes, or bread give the paprika sauce somewhere to land.
  1. Cucumber salad: crisp and refreshing against the creamy sauce, especially a cold cucumber salad with vinegar, dill, and onion.
  2. Green salad: helpful when you want the meal to feel lighter.
  3. Roasted or steamed vegetables: green beans, cabbage, carrots, broccoli, or peas work well.
  4. Roasted potatoes: a crispier potato option if you are not serving mashed potatoes.
  5. Crusty bread: perfect for wiping up the last spoonfuls in the pan.

Choose noodles if you want the dish to feel lighter, dumplings if you want it to feel most traditional, and mashed potatoes if you want the plate to lean fully into comfort.

For the most balanced dinner, serve the chicken with noodles or dumplings and a crisp cucumber salad or green salad on the side.

Slow Cooker and Crock Pot Chicken Paprikash

The stovetop version gives you the best feel for the dish, but the same flavors can work in a slow cooker or Crock Pot as long as the sour cream is added at the end.

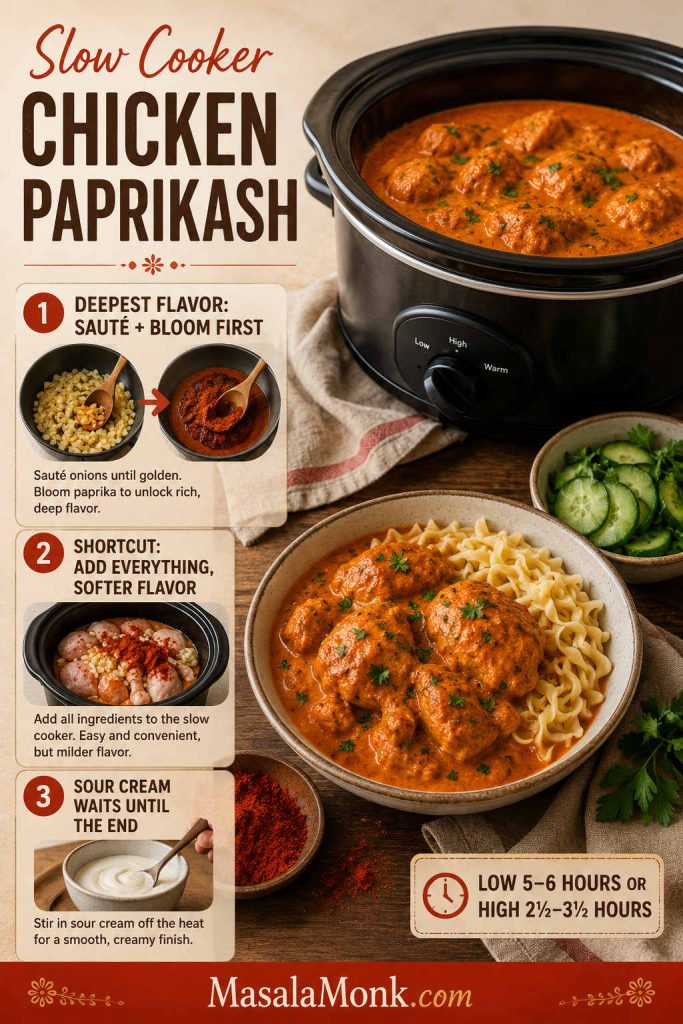
Chicken paprikash can be made in a slow cooker or Crock Pot two ways: the deepest-flavor method and the dump-and-go shortcut.

Slow cooker chicken paprikash guide showing a Crock Pot, sautéed onions, paprika bloom, sour cream and egg noodles.
For deeper slow cooker chicken paprikash, sauté the onions and bloom the paprika before everything goes into the Crock Pot. Add sour cream at the end so it stays creamy instead of grainy.

For the deepest flavor

  1. Sauté the onions in a skillet until soft.
  2. Add garlic, then lower the heat and stir in the paprika for 20 to 30 seconds.
  3. Add a splash of broth to loosen the paprika-onion mixture.
  4. Transfer the mixture to the slow cooker with the chicken, salt, pepper, and remaining broth.
  5. Cook boneless thighs on low for 5 to 6 hours or on high for 2 1/2 to 3 1/2 hours, until tender and cooked through.
  6. Whisk a little hot cooking liquid into the sour cream, then stir the tempered sour cream into the slow cooker at the end.

Dump-and-go shortcut

Add chicken, onions, paprika, salt, pepper, and broth directly to the slow cooker. This works, but the flavor will be softer because the onions are not browned and the paprika is not bloomed first. Stir in tempered sour cream only at the end.

Chicken thighs are better than chicken breast for slow cooker paprikash because they stay juicier during long cooking. If you are set on using breast meat, this guide to crock pot chicken breast recipes goes deeper into keeping lean chicken tender in the slow cooker.

If the slow cooker version looks thin, transfer the liquid to a pan and simmer briefly before adding sour cream, or thicken it with a small cornstarch slurry.

For the stovetop version, use the main recipe card. For sauce issues, keep the troubleshooting table nearby.

Instant Pot, Baked and One-Pot Methods

Instant Pot Chicken Paprikash

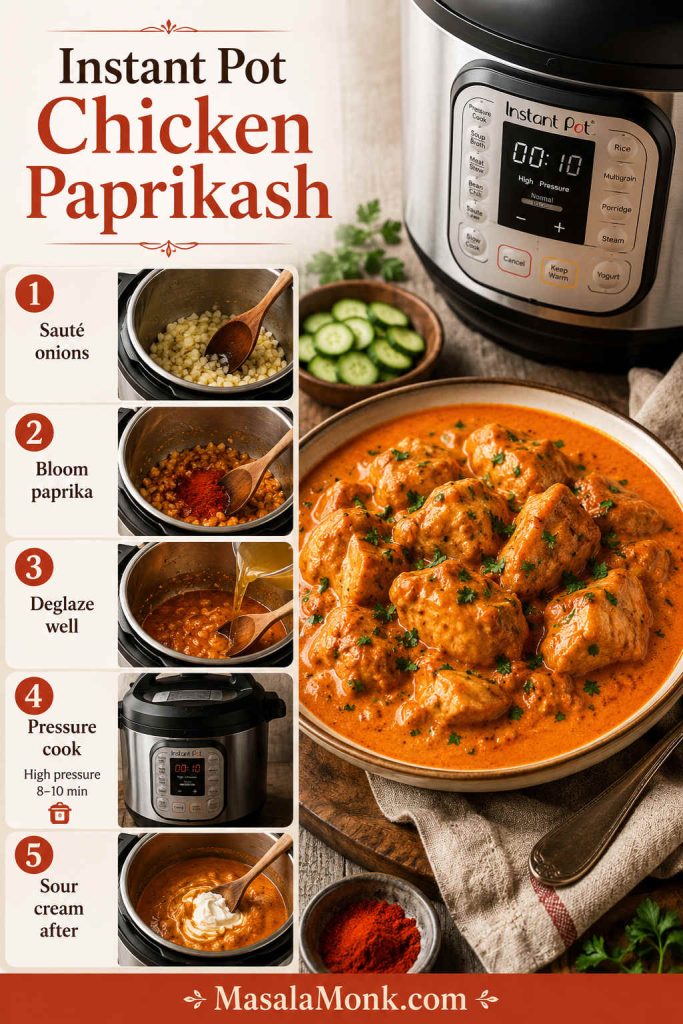
Instant Pot chicken paprikash works best with boneless thighs. Keep the sour cream out until after pressure cooking.

Instant Pot chicken paprikash step guide showing sautéing onions, blooming paprika, deglazing, pressure cooking and adding sour cream after cooking.
In the Instant Pot, deglazing protects the recipe. Scrape the bottom well before pressure cooking, then add sour cream after cooking for a creamy finish.
  1. Sauté the onions first, then add garlic.
  2. Lower the heat briefly and stir in paprika for 20 to 30 seconds.
  3. Add broth and scrape the bottom very well so no browned bits are stuck.
  4. Add the chicken and pressure cook on high for 8 to 10 minutes.
  5. Let the pressure release naturally for 5 minutes, then quick release.
  6. Stir in tempered sour cream after pressure cooking.

Baked Chicken Paprikash

Baked chicken paprikash works best with bone-in pieces. Start the onions and paprika base on the stovetop, add the chicken, cover, and bake at 350°F / 175°C for about 35 to 45 minutes, or until the chicken is cooked through and tender. Stir in sour cream after baking so the sauce stays smoother.

One-Pot Chicken Paprikash

The stovetop version is already a one-pot chicken paprikash if you cook the chicken and paprika base in one Dutch oven or deep skillet. Cook noodles, rice, or dumplings separately so they do not soak up everything before serving.

Cooking by pressure cooker instead? Return to the Instant Pot steps, or use the main recipe card for the classic stovetop flow.

Can You Make Chicken Paprikash Without Sour Cream?

Can you make it without sour cream? Yes. Will it taste like classic chicken paprikash? Not exactly.

Sour cream gives the dish its familiar creamy tang. Without it, the recipe becomes closer to paprika chicken stew or creamy paprika chicken, depending on what you use instead.

SubstituteHow it worksImportant note
Greek yogurtTangy and creamyMore likely to split; add off heat
Heavy creamRich and smoothLess tangy than sour cream
Crème fraîcheSmooth, tangy, and richUsually more heat-stable but heavier
Dairy-free sour creamUseful for dairy-free mealsFlavor and texture depend on the brand
No creamy ingredientLighter paprika dishLess familiar and less creamy

For the most familiar paprikash flavor, use full-fat sour cream and add it gently at the end.

Chicken Paprikash vs Goulash

Chicken paprikash and goulash both use paprika, but they are not the same dish. The easiest difference is texture and finish: paprikash is creamy and saucy, while goulash is usually more stew-like.

DishMain ideaTextureDairy?
Chicken paprikashChicken in paprika sour cream sauceCreamy and saucyUsually finished with sour cream
GoulashPaprika stew, often beef-basedBrothy or stew-likeUsually not finished the same creamy way

This dish should be creamy and saucy, not thin like soup. If you make it much brothier, it starts moving toward chicken paprikash soup or paprika chicken stew instead of the creamy version most people expect.

How to Store, Freeze and Reheat Chicken Paprikash

Fridge

Store leftovers in an airtight container in the fridge for 3 to 4 days. If possible, store noodles, rice, or dumplings separately so they do not soak up too much sauce.

Freezer

You can freeze chicken paprikash, but sour cream can change texture after thawing. For the smoothest result, freeze the chicken and paprika base before adding sour cream, then add sour cream after reheating.

Reheating

Leftovers are still cozy, but creamy sauces need gentle reheating to stay their best. Reheat on the stovetop over low heat and add a splash of broth if the sauce looks too thick.

Make-Ahead Tip

For guests, cook the chicken and paprika base first, then cool and refrigerate it without the sour cream. Reheat gently and stir in the sour cream right before serving so the dish tastes freshly made.

Troubleshooting the Sauce and Chicken

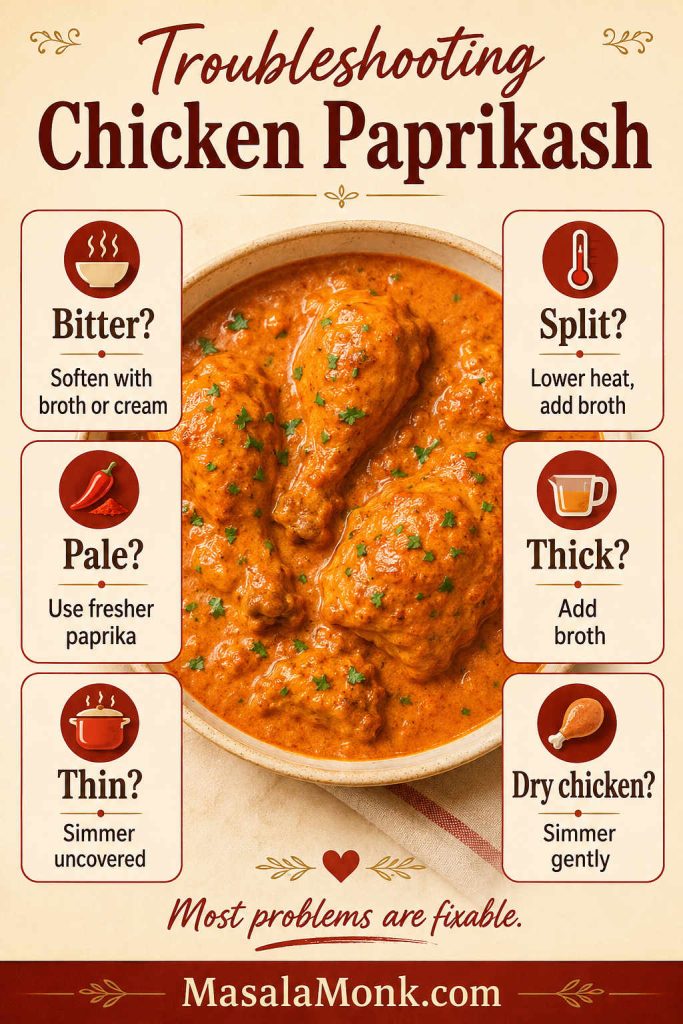
Paprikash is forgiving until the heat gets aggressive. A dish that is too thick, too thin, slightly split, or a little flat can usually be brought back enough for dinner. Use this table before you give up on the pot.

Troubleshooting guide for chicken paprikash with fixes for bitter sauce, split sauce, pale sauce, thin sauce, thick sauce and dry chicken.
Most chicken paprikash problems come back to heat, paprika freshness, or texture. Fortunately, you can soften bitterness, loosen thick sauce, reduce thin sauce, and keep sour cream away from boiling.
ProblemLikely causeFix
Tastes bitterPaprika scorched or heat was too highAdd a little broth or cream to soften the bitterness; next time lower heat before adding paprika
Tastes flatOld paprika, not enough salt, or undercooked onionsSeason in layers, cook onions until soft, and use fresher paprika next time
Looks paleNot enough paprika or paprika is weakUse fresh sweet paprika and let it bloom briefly off high heat
Tastes too tomatoeyToo much tomato or tomato pasteAdd broth and sour cream to rebalance; next time keep tomato subtle
Sour cream curdledAdded cold sour cream to very hot sauce or overheated after addingTemper sour cream first and stir it in off heat or on very low heat
Too thinToo much broth or not enough reductionSimmer uncovered before adding sour cream, or thicken with flour or cornstarch
Too thickReduced too much or used too much flourAdd chicken broth a splash at a time until smooth
Chicken is dryChicken breast overcooked or heat was too highUse thighs next time, or simmer breast pieces gently and check early
Split when reheatedReheated too hot after sour cream was addedReheat on low and stir in a splash of broth or sour cream

FAQ About Chicken Paprikash

What is chicken paprikash made of?

Chicken paprikash is usually made with chicken, onions, paprika, broth or water, and sour cream. Some versions also include garlic, tomato, pepper, flour, hot paprika, or cayenne.

Is chicken paprikash Hungarian?

Chicken paprikash is a Hungarian dish often known as paprikás csirke. This recipe is an easy home-style version with the familiar paprika and sour cream sauce.

Can I use regular paprika if I do not have Hungarian paprika?

Regular sweet paprika works if it is fresh and fragrant. Hungarian paprika gives a deeper flavor, but regular paprika can still make a good dish if it has not gone stale.

Should chicken paprikash be spicy?

Usually, chicken paprikash is more warm and paprika-rich than hot. Use sweet paprika for the base, then add hot paprika or cayenne only if you want extra heat.

Why does my chicken paprikash taste bitter?

Bitter paprikash usually means the paprika scorched. Lower the heat or move the pot off the burner before adding paprika, stir briefly, then add broth before the spice burns.

Does chicken breast work for chicken paprikash?

Chicken breast works, but it asks for a gentler hand. Keep the simmer quiet and check it early so it stays juicy.

Why did my sour cream curdle?

Sour cream usually curdles when the sauce is too hot or the sour cream is too cold. Temper it with warm sauce first, then stir it in off heat or on very low heat.

Do I need dumplings, or are noodles okay?

You do not need dumplings. Nokedli and spaetzle are traditional choices, but egg noodles are a very good weeknight option. Rice, mashed potatoes, and bread also work well.

Can chicken paprikash be frozen?

The sauce is smoother if you freeze it before adding sour cream. Reheat the chicken and paprika base gently, then stir in sour cream just before serving.

Can I make chicken paprikash ahead of time?

For the smoothest make-ahead version, cook the chicken and paprika base ahead, then reheat gently and stir in the sour cream just before serving.

Is chicken paprikash the same as goulash?

No. Chicken paprikash is usually chicken in a paprika sour cream sauce. Goulash is usually more stew-like and often made with beef, vegetables, broth, and paprika.

Can I make chicken paprikash in a slow cooker or Crock Pot?

The slow cooker works, but the sour cream should wait until the end. For deeper flavor, sauté the onions and bloom the paprika before transferring everything to the slow cooker.

Chicken paprikash is simple food, but it pays you back for the few moments when you slow down. Let the onions sweeten, let the paprika bloom, keep the sour cream gentle, and give the sauce something soft to land on. That is the whole comfort of the dish: tender chicken, a warm red-orange sauce, and a plate that feels generous from the first spoonful.

Did you go traditional with nokedli, weeknight-easy with egg noodles, or full comfort with mashed potatoes? Leave a comment and tell us what caught the sauce.