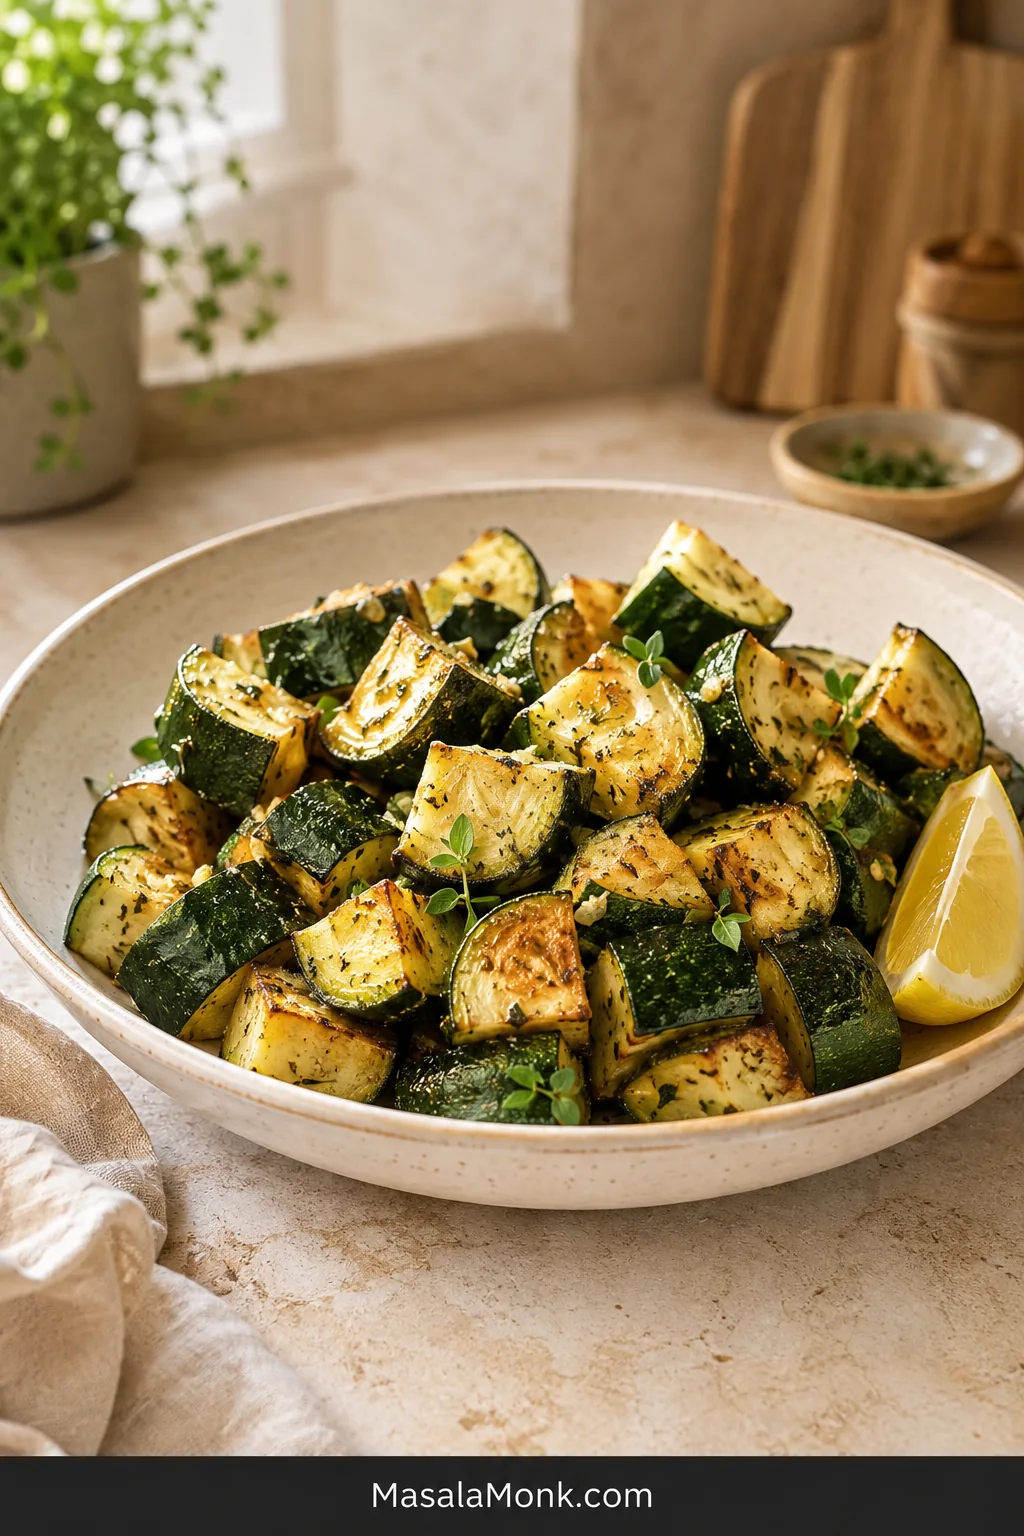
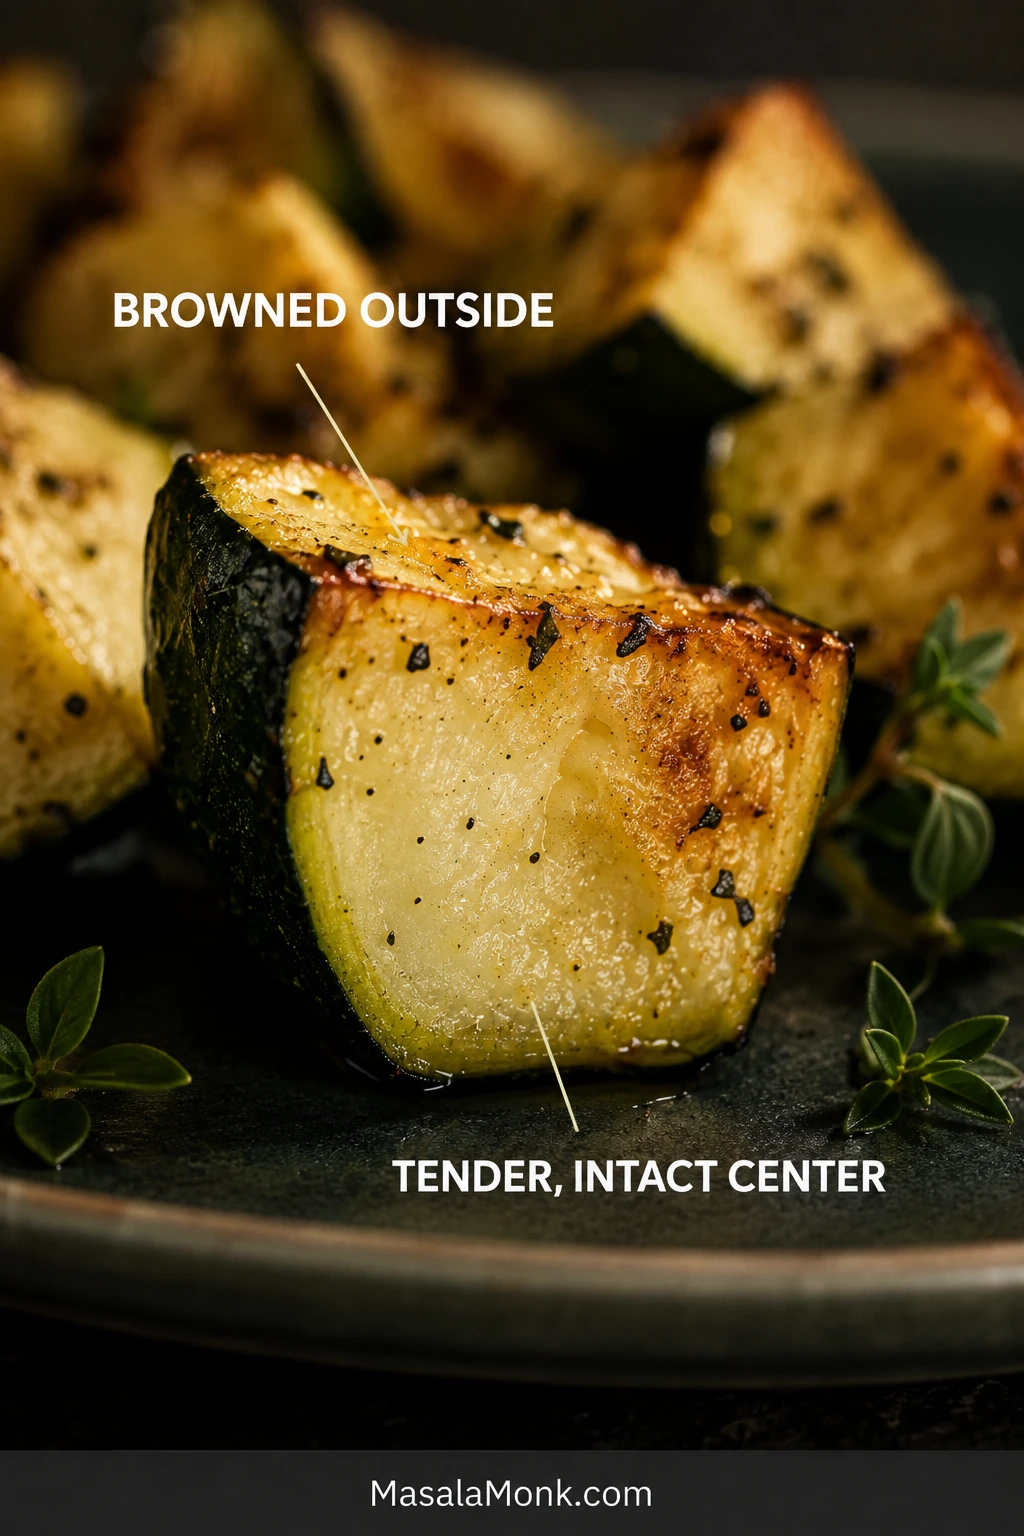
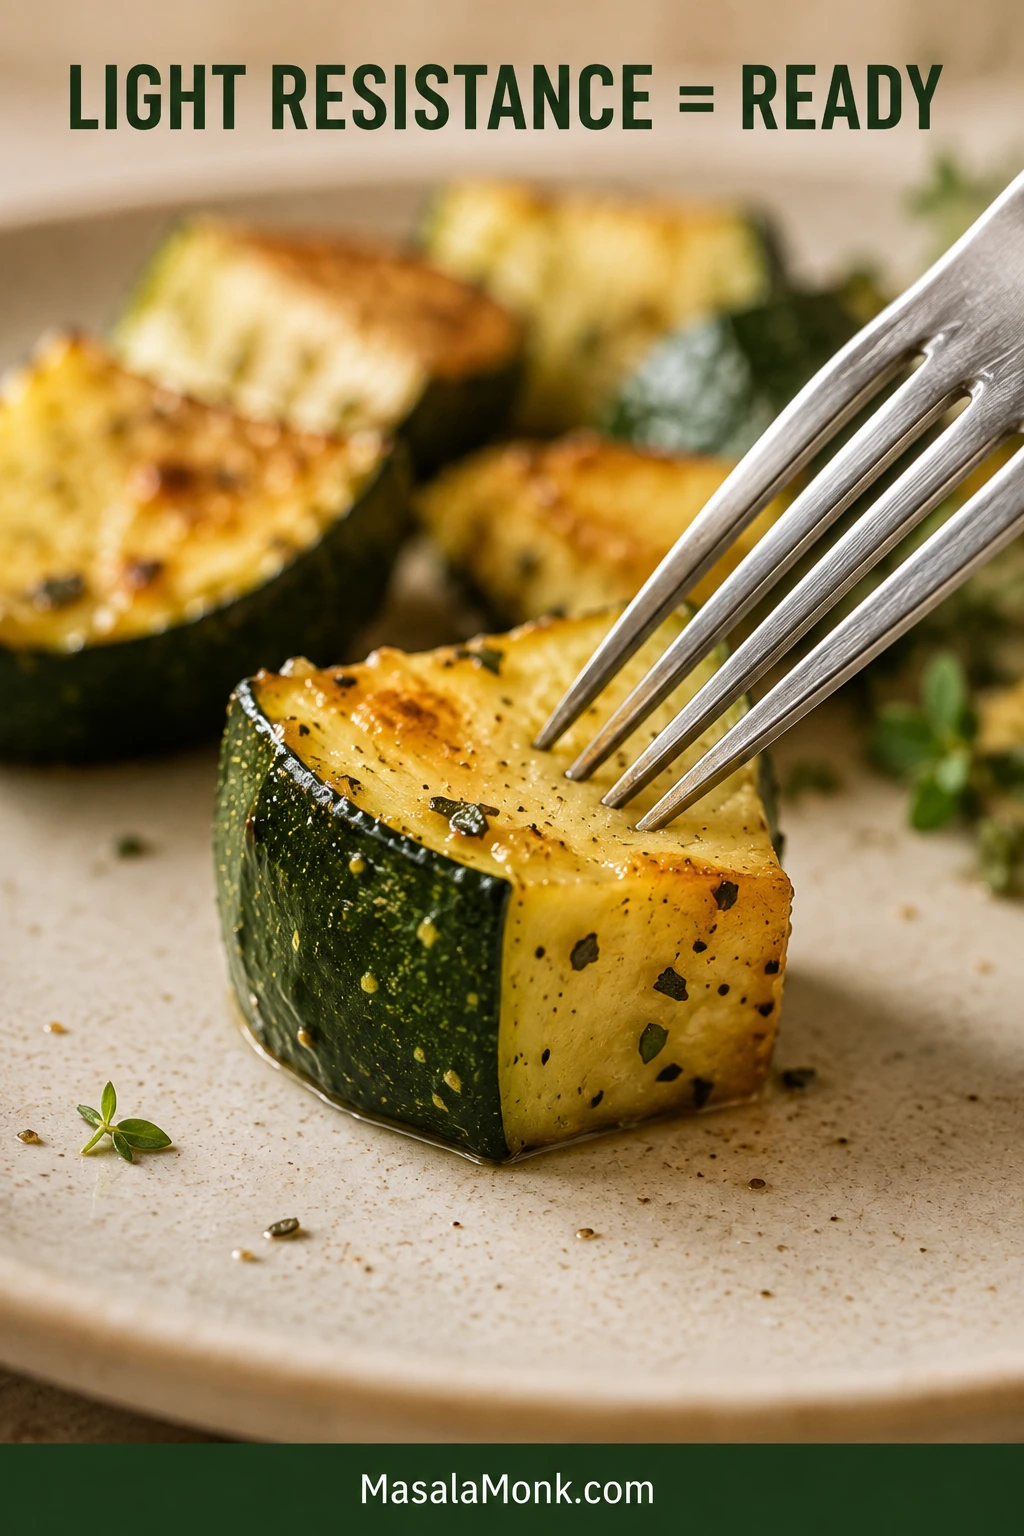
Good air fryer zucchini has a small, easy-to-spot window. The cut faces have started to bronze, the edges look roasted instead of wet, and the center is tender without folding when lifted with a fork.
Some nights dinner needs one last thing—something green, hot and bright that does not ask for another pan or a bowl of breading. Zucchini, called courgette in the UK, fills that gap when it gets enough heat and breathing room.
This is air fryer zucchini without breading, flour or egg. The goal is not to dry the vegetable until it crunches like a chip; it is to brown the outside while the middle still tastes fresh and juicy. For thin Parmesan rounds or panko-coated pieces, use the separate crispy zucchini chips recipe.
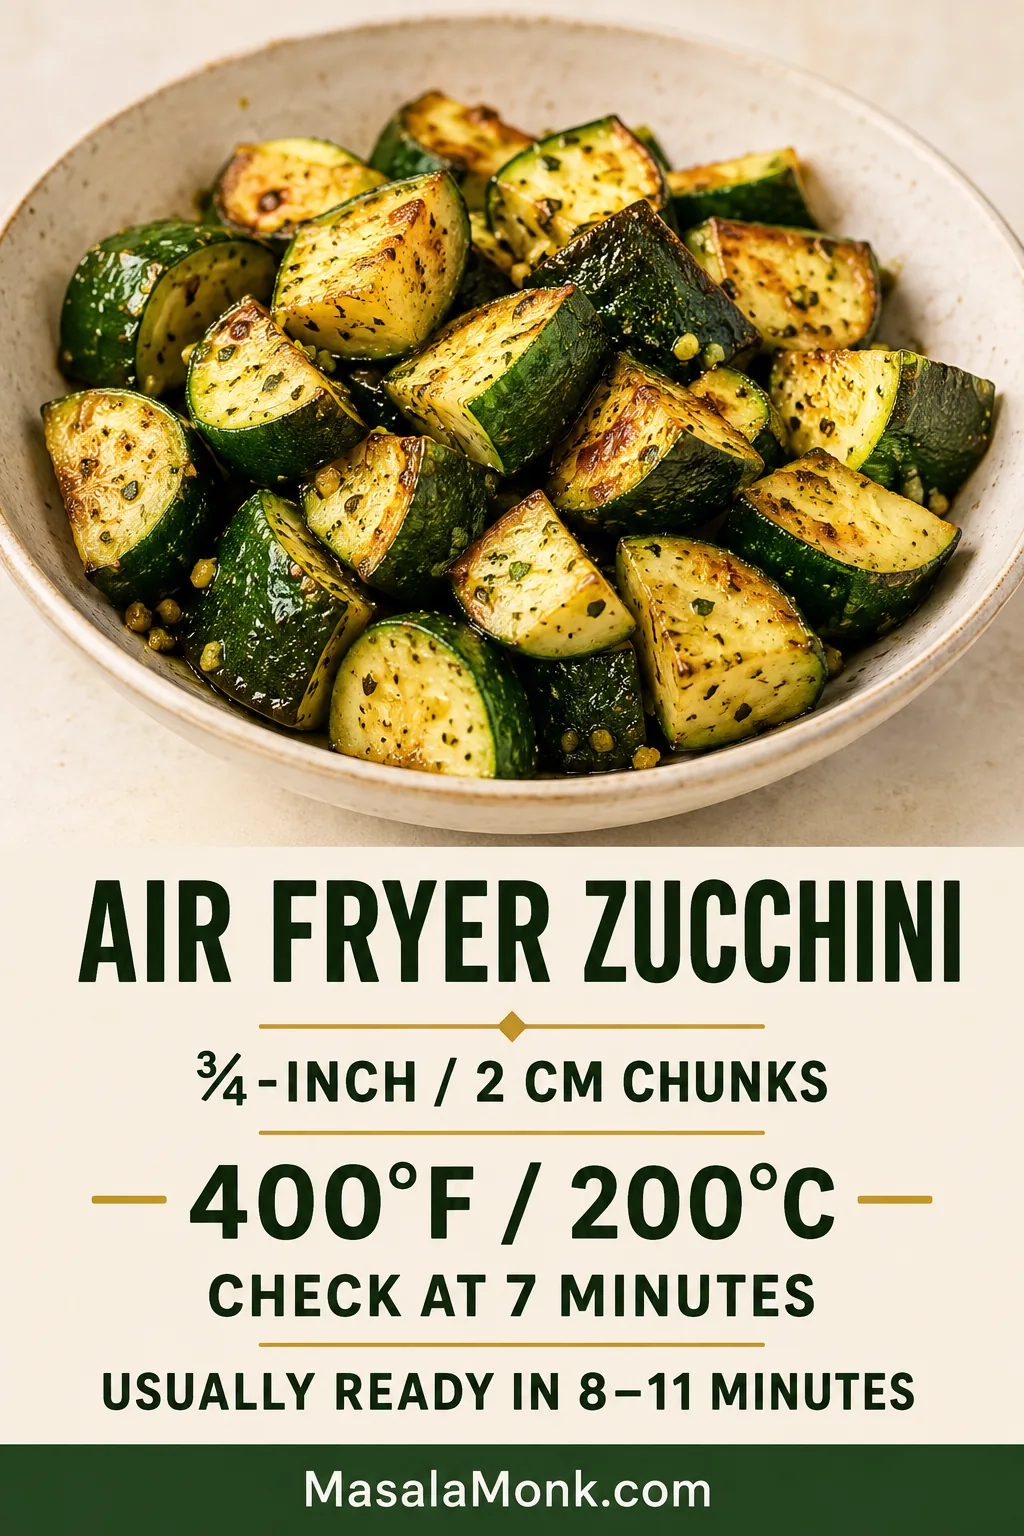
Cut 1 lb / 454 g small or medium zucchini into ¾-inch / 2 cm chunks. Coat with 2 teaspoons / 10 ml oil, add the dry seasonings and spread the pieces loosely in a preheated 400°F / 200°C air fryer.
Cook undisturbed for 5 minutes, shake well and begin checking at 7 minutes. Many basket-style air fryers finish this cut in about 8–11 minutes. Remove the zucchini when several faces are golden, the surfaces no longer look watery and a fork enters with a little resistance.
Cut thick. Cook hot. Check early.
How long to air fry zucchini depends on basket shape, load and fan strength. Use the stated range for your first batch, then remember where your own machine landed.
Air Fryer Zucchini Recipe
Thick zucchini chunks with browned corners and tender centers that still hold their shape. The base version is lightly garlicky and gently herbal, with fresh zucchini sweetness and an optional squeeze of lemon.
Active prep: About 8–10 minutes · Cook time: 8–11 minutes per batch
Total time: About 20 minutes for one batch; preheating overlaps with prep · Temperature: 400°F / 200°C
Yield: Serves 4 alongside a main course, or 2 as a generous vegetable portion
Small basket: Allow another 9–12 minutes if the zucchini needs two batches.
Dietary note: The base recipe is vegan and dairy-free, with no flour or breadcrumbs. Check packaged seasoning labels when strict gluten avoidance matters.
Equipment
Basket-style or oven-style air fryer
Sharp knife and cutting board
Mixing bowl
Measuring spoons or a digital kitchen scale
Silicone-tipped tongs or a small flexible spatula
Ingredients
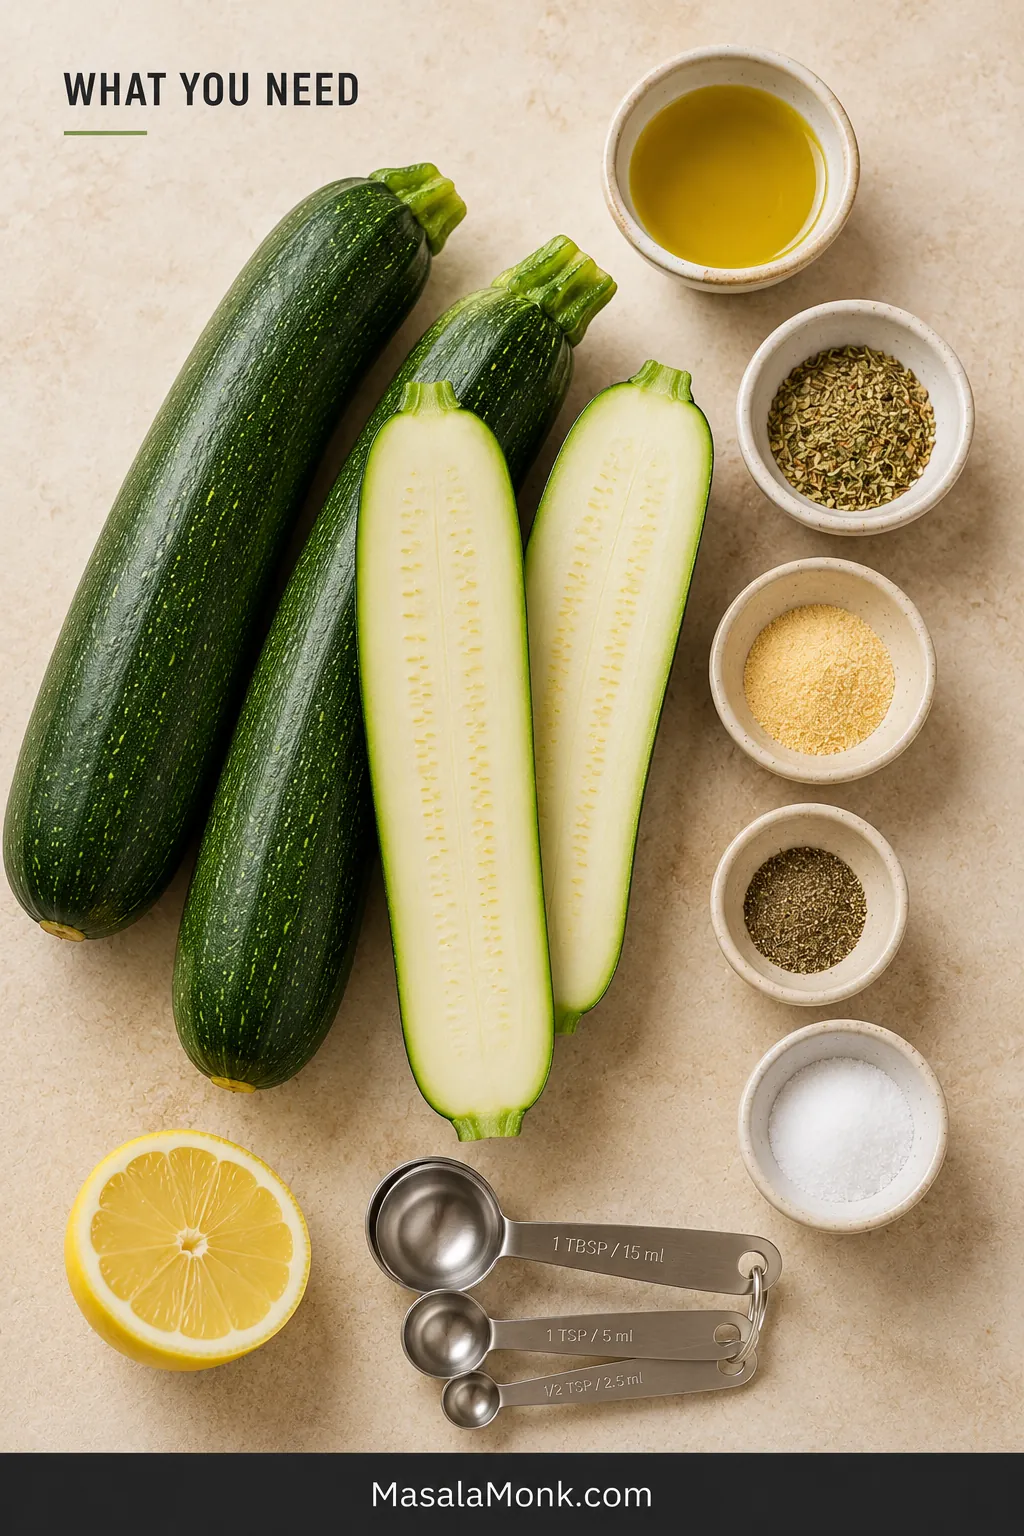
1 lb / 454 g small or medium zucchini, usually 2 to 3 depending on size
2 teaspoons / 10 ml olive oil or avocado oil
1 teaspoon Italian seasoning, or ½ teaspoon dried oregano
½ teaspoon garlic powder
¼ teaspoon ground black pepper
3 g salt, or about ½ teaspoon fine salt when not weighing
1 teaspoon / 5 ml lemon juice, optional, added after cooking
For air fryer zucchini without breading, two teaspoons of oil are enough to help the seasonings cling. Extra oil cannot compensate for wet zucchini or restricted airflow.
Method
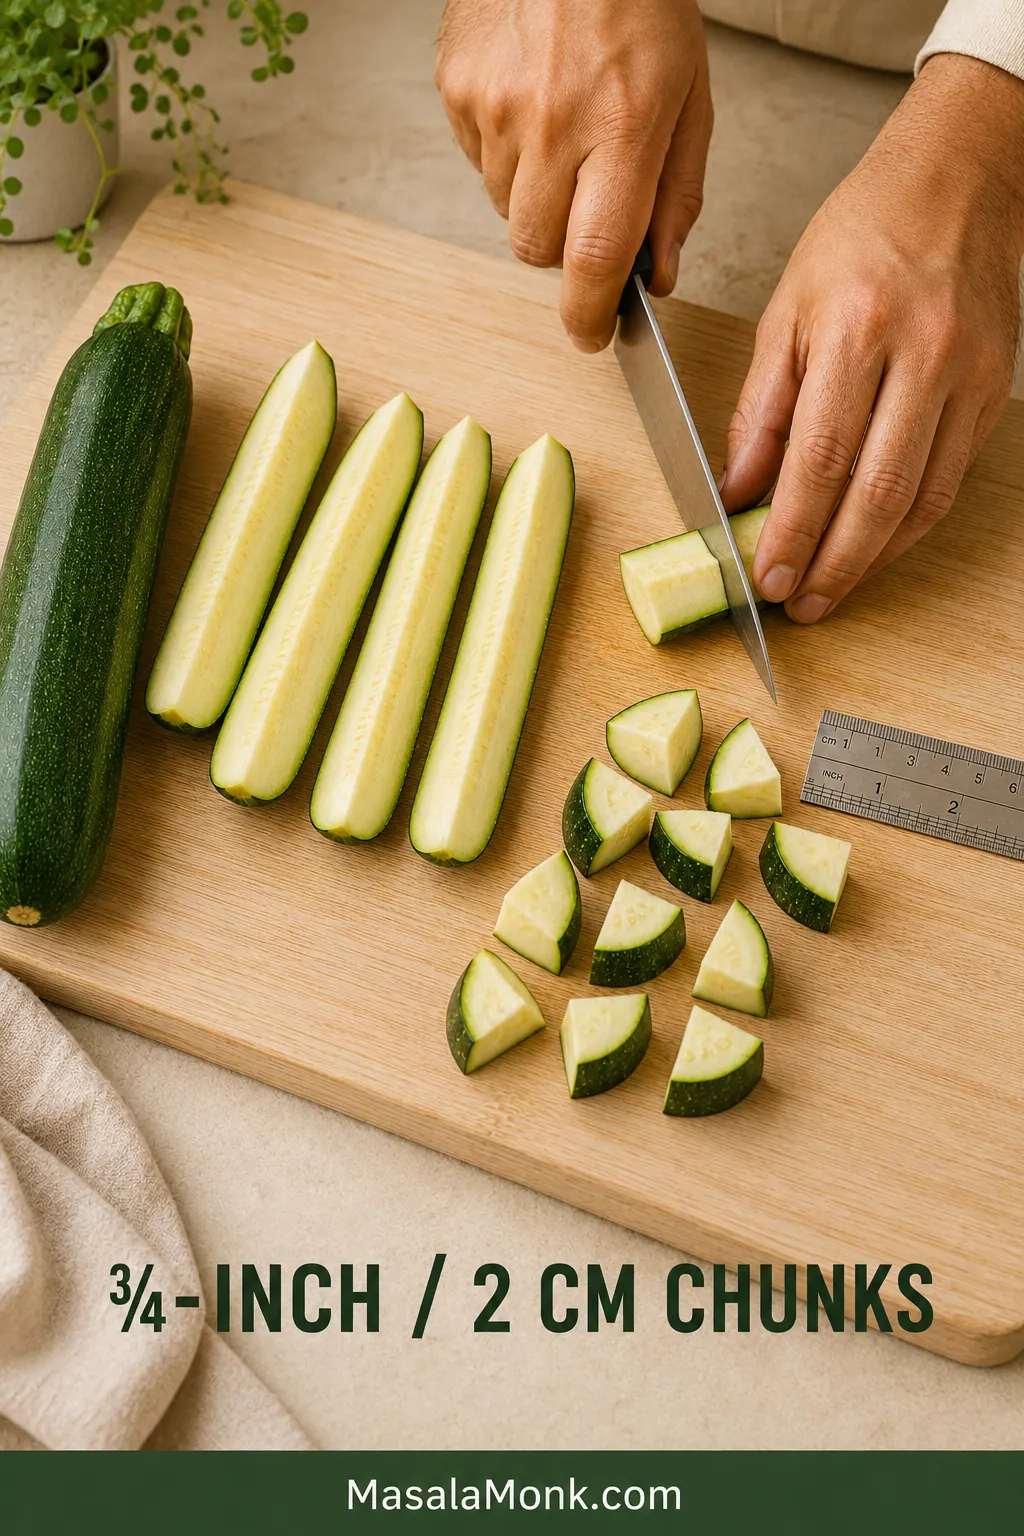
Dry and cut the zucchini. Wash it, dry the skin well and trim the ends. Quarter each zucchini lengthwise, then cut the long quarters crosswise into ¾-inch / 2 cm chunks. Blot any visibly wet sides.
Preheat the air fryer. Heat it to 400°F / 200°C for 3 to 5 minutes, unless the machine preheats automatically or its instructions recommend starting from cold.
Oil the zucchini. While the air fryer heats, toss the chunks with the oil until they carry a thin, even sheen.
Season just before cooking. Add the Italian seasoning, garlic powder, pepper and salt. Toss again and move the zucchini straight into the hot basket. If you salted an oversized zucchini earlier, omit the salt here and adjust only after cooking.
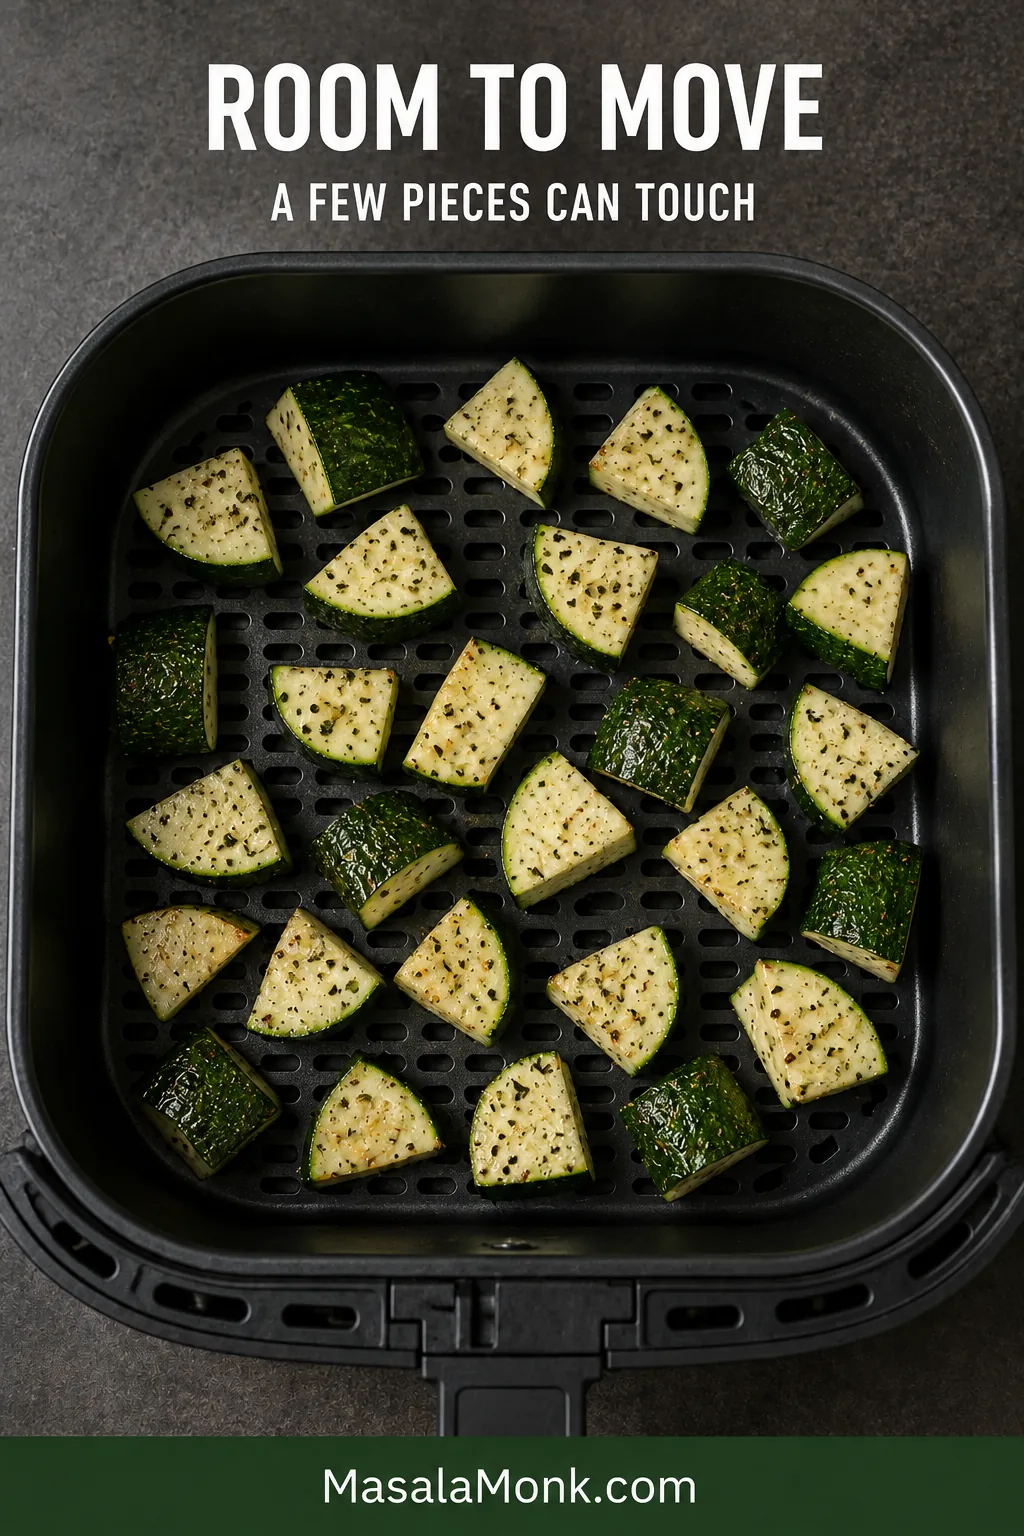
Spread the pieces loosely. A little touching is fine, but the chunks should shift when the basket is shaken. Divide them into two batches when needed.
Cook undisturbed for 5 minutes. This gives the surfaces touching the basket time to begin browning.
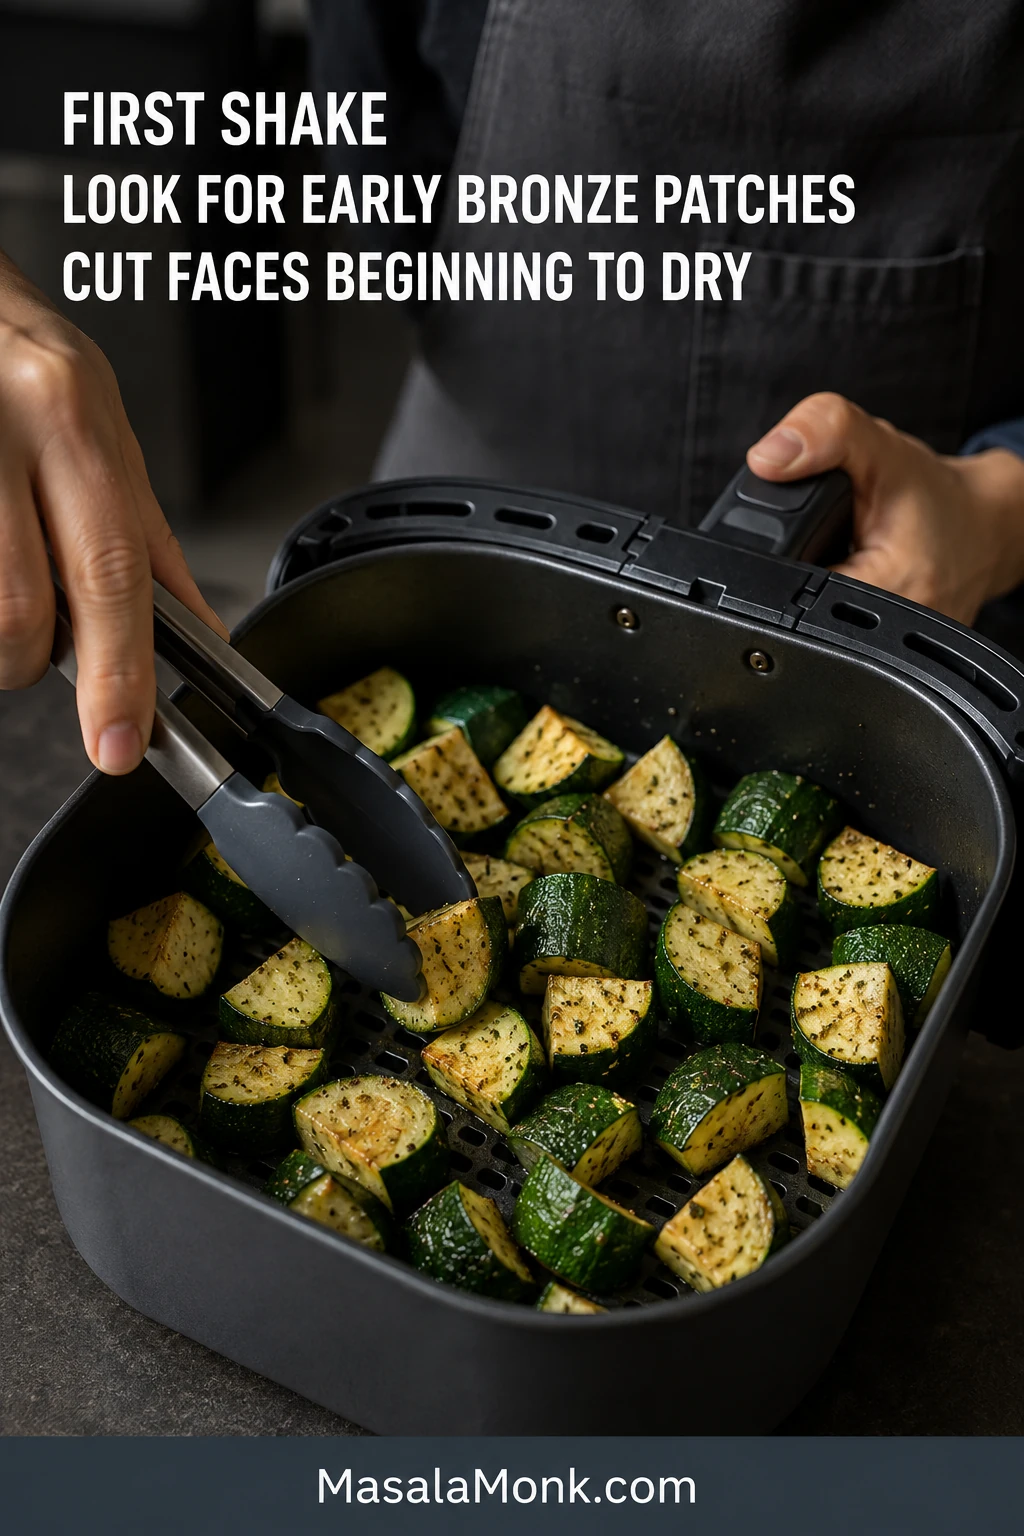
Shake well. The zucchini will not look finished yet. Look for the first bronze patches and cut faces beginning to dry—the signs that the basket is roasting rather than steaming. Turn any pieces still resting on one pale face.
Begin checking at 7 minutes. Give the zucchini another minute or two as needed. Remove it when several corners are golden, the cut sides no longer look wet and a fork enters with light resistance. For side-by-side cues, see how to tell when air fryer zucchini is done.
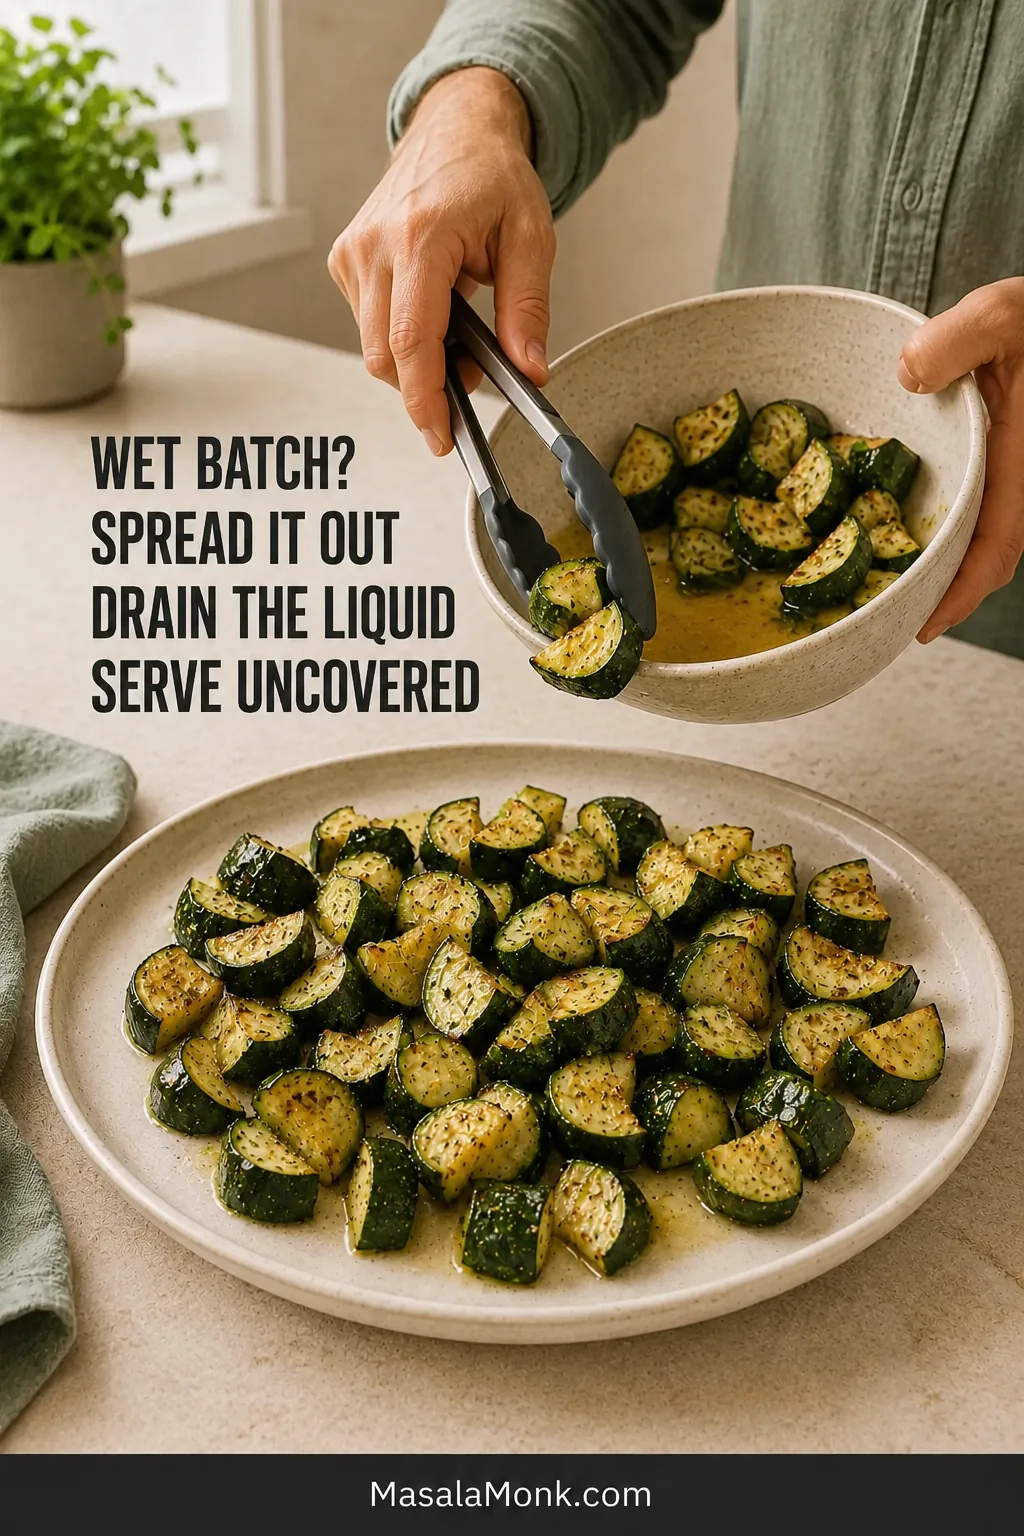
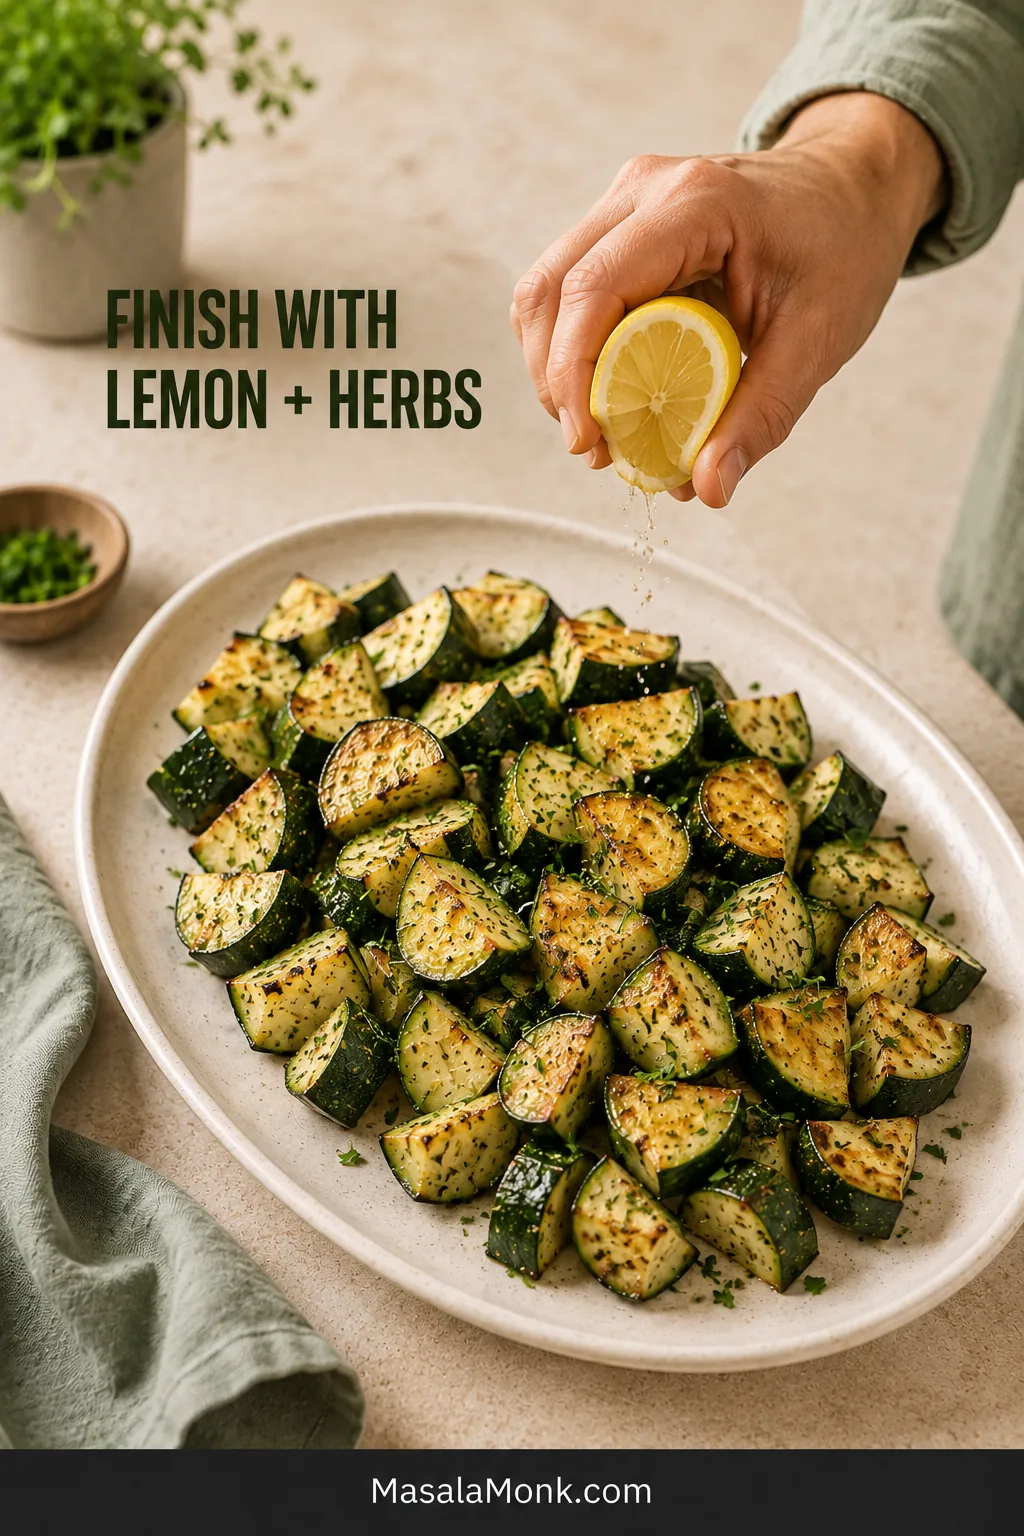
Finish and serve. Transfer the zucchini to a broad, uncovered plate. Add lemon juice or fresh herbs while it is hot.
Success Cues and Second-Batch Timing
One deliberate shake is usually more useful than repeatedly opening the machine. Turn the pale faces, redistribute any clustered pieces and give the heat time to recover.
What success smells and feels like: The basket should smell garlicky and lightly roasted. Lift one piece: it should hold its shape while the fork meets only slight resistance in the center.
A little moisture in the center is the point. A puddle underneath is not.
Still uncertain? Cut open one of the largest chunks. A moist center that holds together is desirable; waterlogged flesh that slumps or releases liquid has moved beyond the ideal window.
Cooking two batches: Keep the first batch uncovered. When the second is nearly ready, return the first batch to the air fryer for 30–60 seconds only if it has cooled noticeably.
If your zucchini tends to come out pale, watery or softer than expected, four variables usually explain it.
Four Things to Control Before Cooking
1. Start with firm zucchini
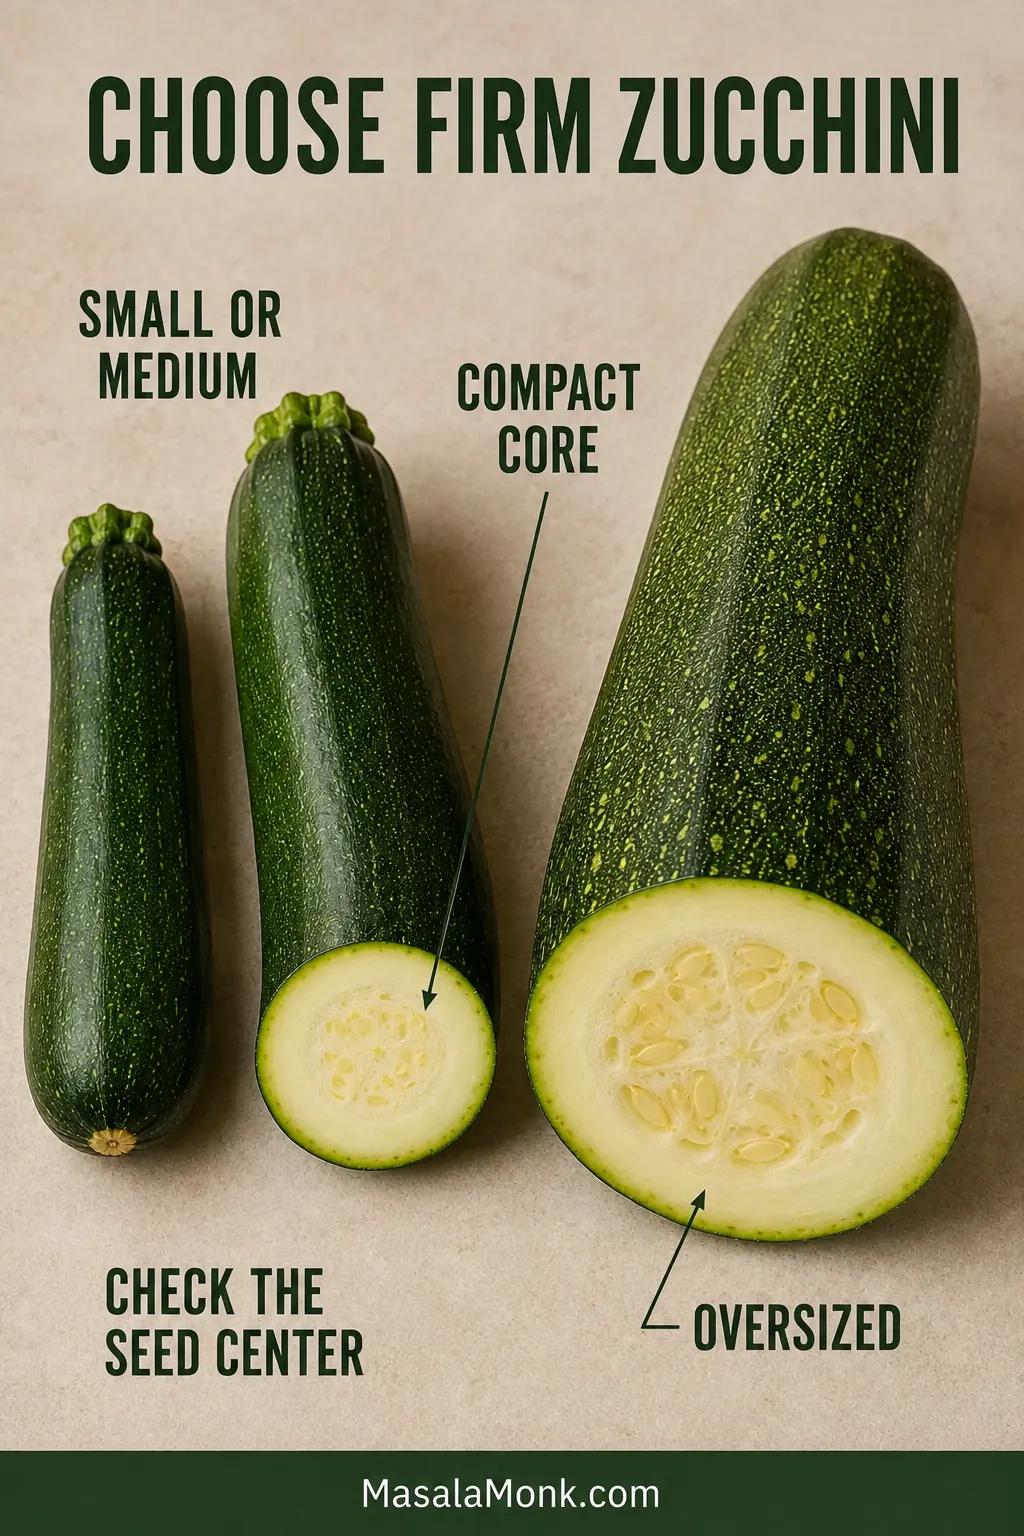
Small and medium zucchini are usually easiest to air fry because their flesh is firm and their seed cores are compact. Choose vegetables that feel heavy for their size, with smooth skin and no broad soft patches.
With an oversized garden zucchini, scoop away broad seeds surrounded by loose, spongy flesh. If the remaining pieces still look unusually wet, sprinkle them with about half the measured salt, rest for 10 minutes and blot thoroughly. Add more salt only after cooking and tasting.
An oversized zucchini is still useful. Air fry the firm outer flesh, then save a loose or heavily seeded center for soup, curry or a blended vegetable sauce.
2. Cut thick, even chunks
Quarter the zucchini lengthwise, then cut across those long quarters. This shape gives the hot air several edges to brown without leaving the middle so thin that it folds.
Match thickness more closely than shape. Pieces with similar thickness soften at a similar rate even when their outlines are not perfectly identical.
The tapered ends naturally make smaller pieces. Check those first and take them out when ready. The larger chunks can continue for another minute.
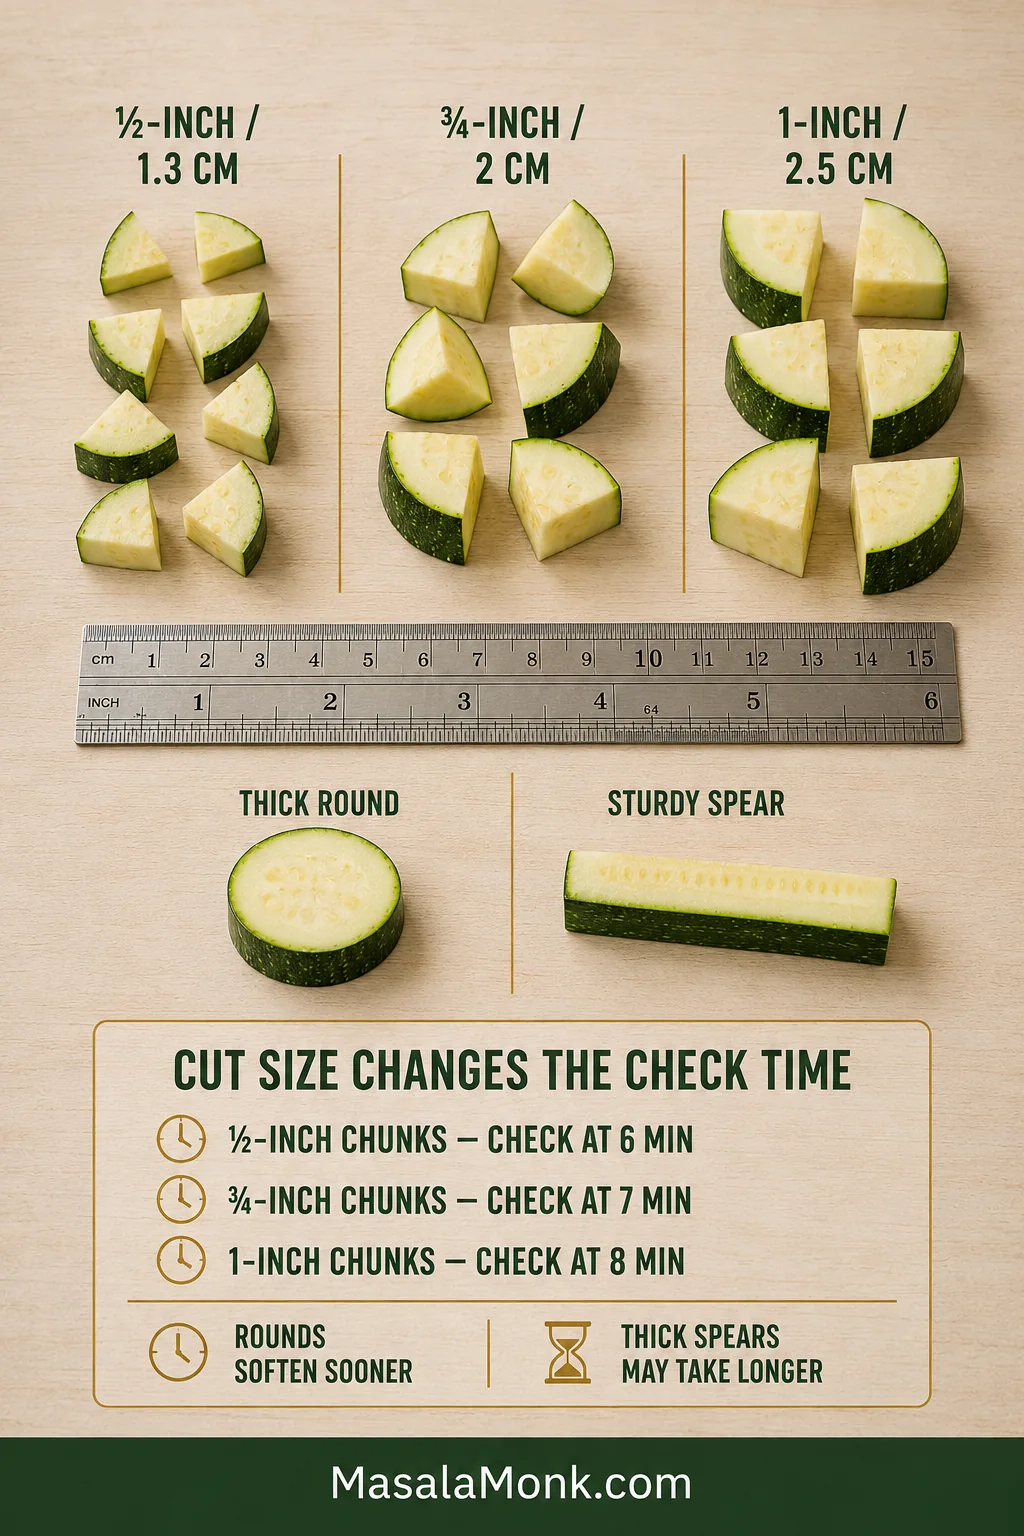
Cut
First check
What to expect
½-inch / 1.3 cm chunks
6 minutes
Fast cooking; remove smaller pieces promptly
¾-inch / 2 cm chunks
7 minutes
The balanced everyday cut used in this recipe
1-inch / 2.5 cm chunks
8 minutes
A firmer, juicier middle; continue as needed
Thick rounds or spears can also work. Rounds expose broader cut faces and usually soften sooner, while sturdy spears may need slightly longer depending on their width.
Choose the cut for the meal: chunks make the most forgiving side, sturdy spears suit dipping, and thick rounds cook quickly but lose structure sooner.
To prepare ahead, refrigerate the cut zucchini in a dry, covered container. Blot it before cooking and wait to add the seasonings.
3. Dry the surface and season late
Blot any cut faces that look glossy with water. A thin coat of oil helps the seasonings cling and encourages the exposed edges to brown instead of drying into leathery patches.
Blot after cutting, not only after washing. Newly exposed zucchini flesh can develop a fresh sheen of moisture even when the outer skin was dried thoroughly.
Season when the air fryer is already hot. Moving the salted pieces directly into the basket gives them less time to release water before cooking begins.
Flavor note: Garlic powder and dried herbs can cook with the zucchini. Add lemon, lime and fresh herbs afterward so their flavor stays bright.
The mixing bowl should look nearly dry after tossing. Oil pooling beneath the zucchini signals more than the batch needs.
4. Leave room for the hot air
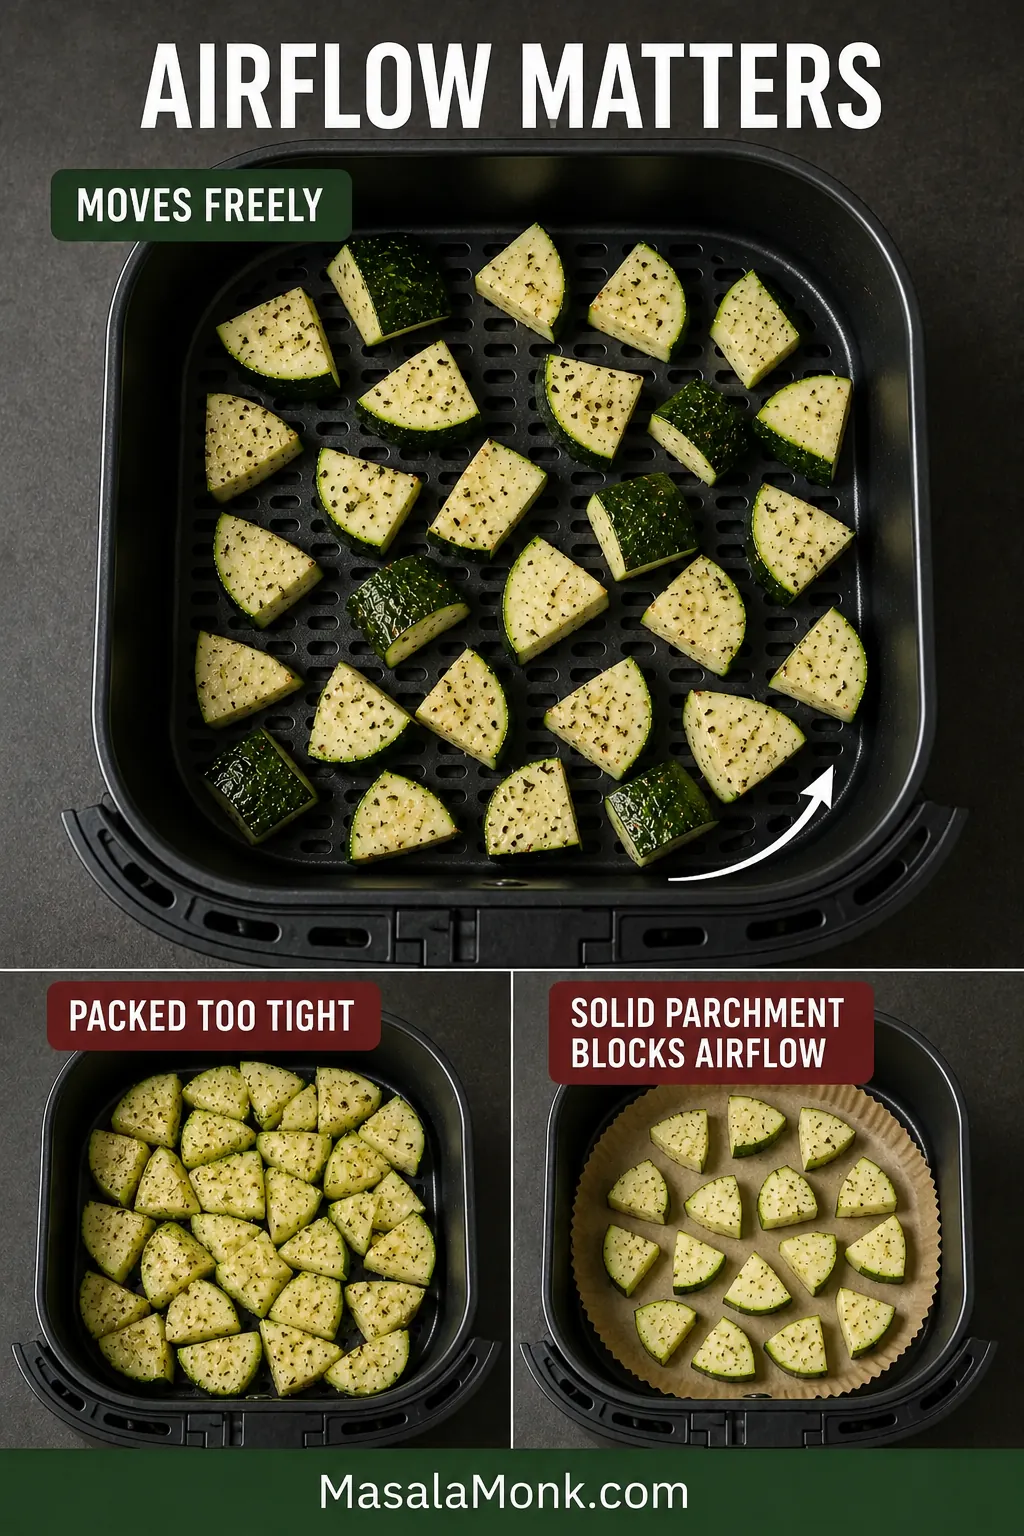
What matters is the flat cooking area, not the capacity printed on the box. A few pieces can touch, but the load should redistribute when the uncooked basket is gently shaken. If it moves as one packed mass, divide it into two batches.
One smaller, freely moving batch often browns faster than an overloaded basket that must first evaporate trapped moisture. Capacity matters less than usable flat space.
If several foods come out pale or uneven in your machine—not only zucchini—these common air fryer mistakes and fixes cover crowding, preheating, oil and halfway turning in more detail.
Solid parchment can block airflow beneath the zucchini. Cook directly in a clean basket, or use only a properly secured perforated liner approved for your machine.
Some basket holes should remain visible, but movement matters most. If the zucchini shifts as one packed mass instead of redistributing, divide the batch.
Once these four details are in place, zucchini stops feeling unpredictable. It becomes the kind of side you can start while the rest of dinner finishes.
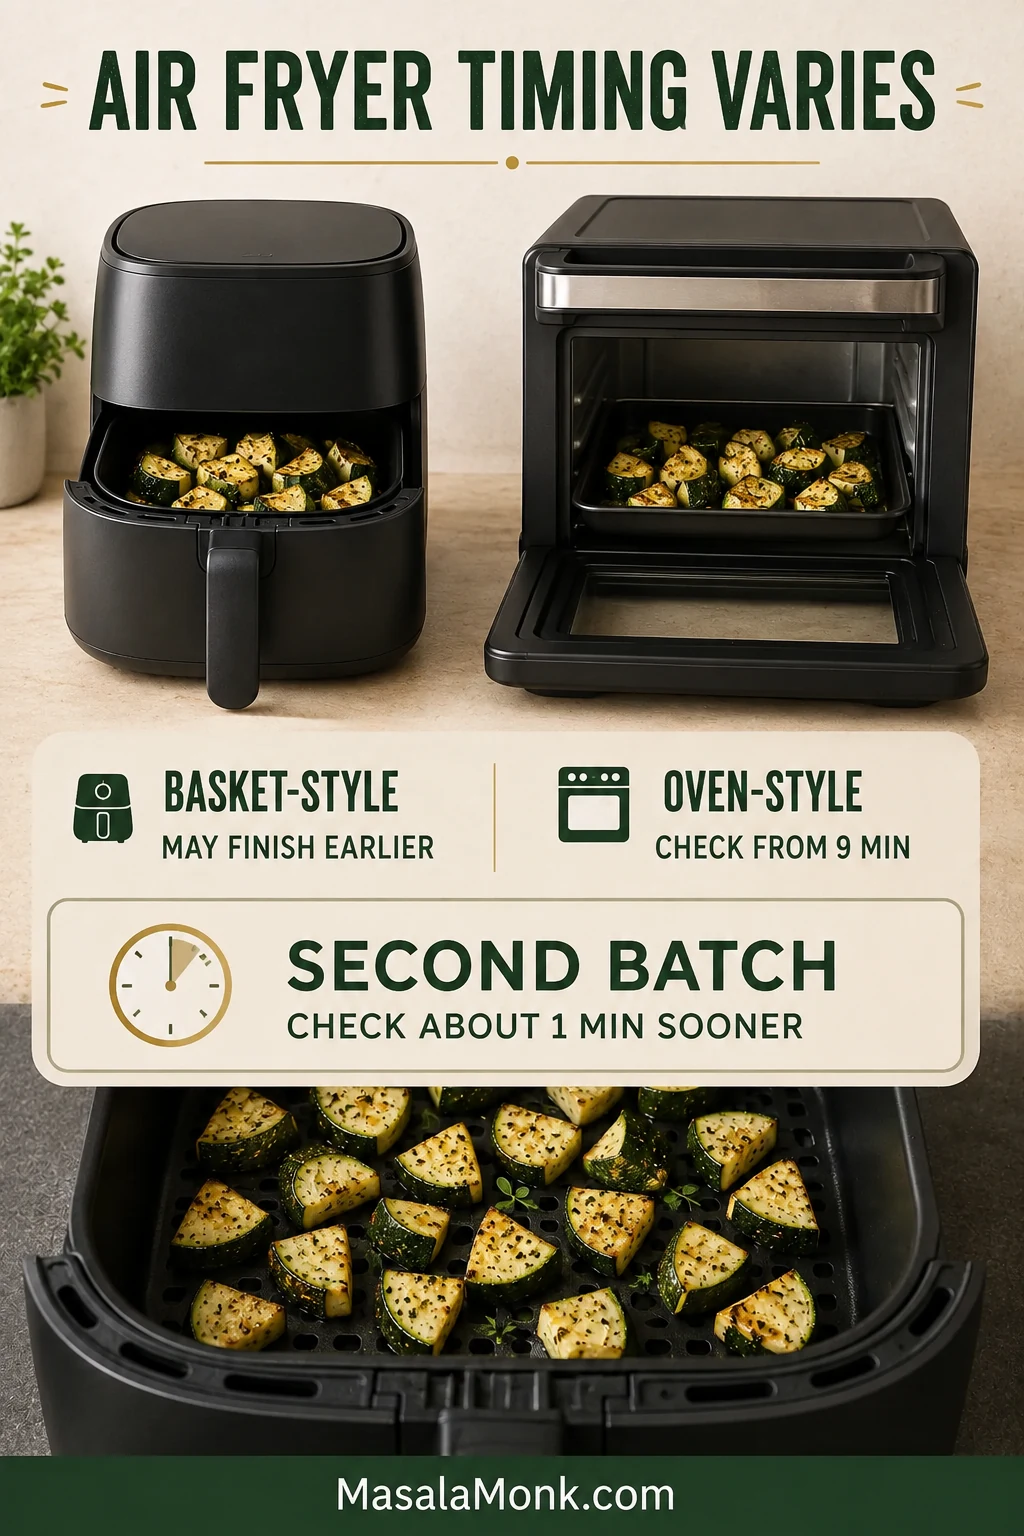
Treat the recipe’s 8–11-minute cooking time as a checking range, not a guaranteed finish. Basket shape, load size and fan strength determine where your zucchini falls within it.
Compact basket machines may finish early. Oven-style air fryers often need several extra minutes, so inspect them from around 9 minutes and turn pieces whose undersides remain pale. A later batch may cook faster because the chamber is already thoroughly hot.
Write down the finish time of the first successful batch in your machine. That personal benchmark will be more dependable next time than any universal minute count.
How to Tell When Air Fryer Zucchini Is Done
If your zucchini needs ten minutes while another recipe promises seven, nothing has gone wrong. The timer should tell you when to check. The zucchini should tell you when to stop.
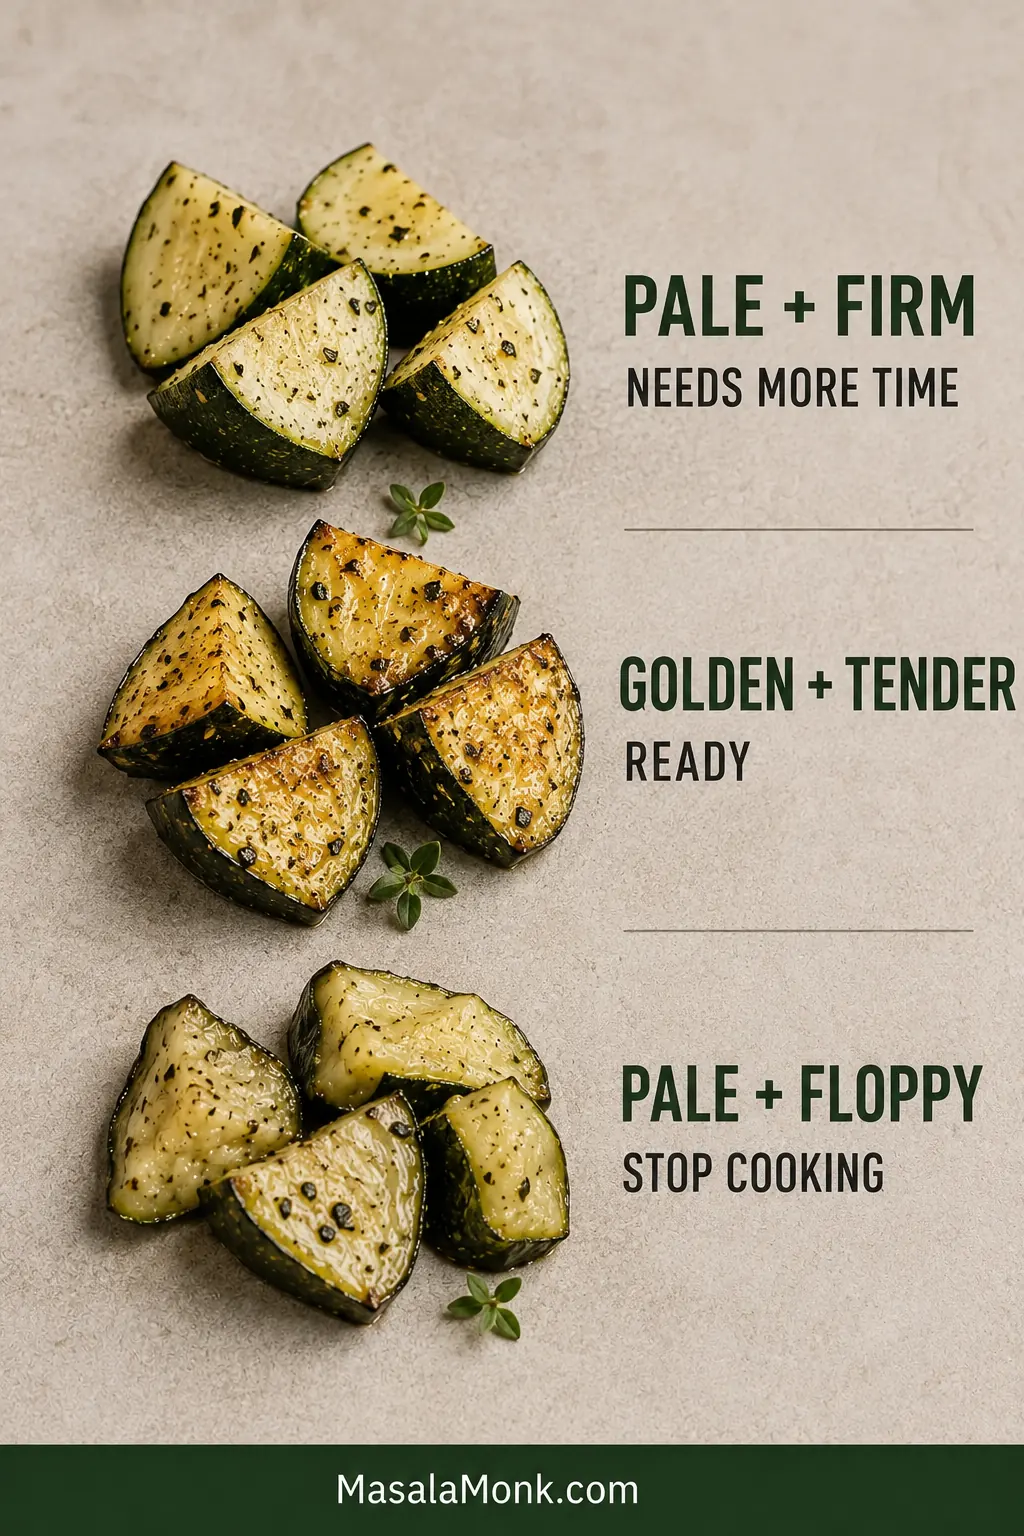
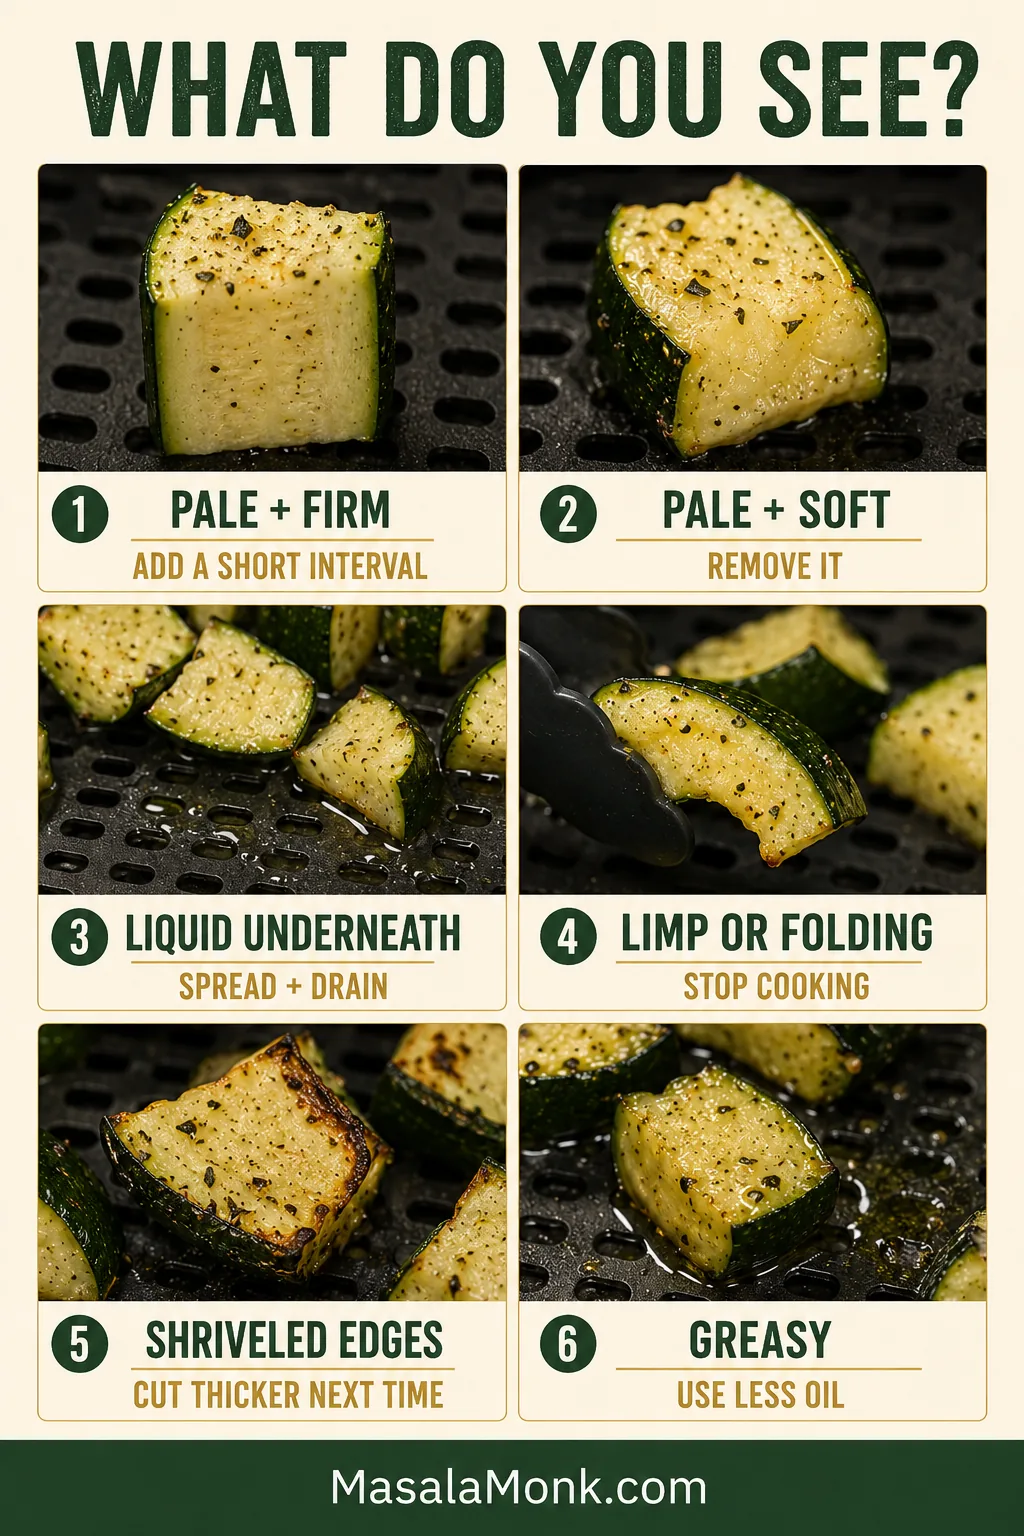
Before adding another minute, check one piece: Pale and firm means it needs more time. Golden and tender means it is ready. Pale and floppy usually means extra cooking will not improve the texture.
Air fryer zucchini doneness will not always be uniform. Remove the early winners and let only the firmer, paler pieces continue for another brief interval.
Look for several golden faces rather than identical color on every side. The cut surfaces should no longer look wet, and a fork should enter easily while still meeting a little resistance in the middle.
Test one of the thickest pieces rather than the darkest one. If its center gives gently without collapsing, the smaller pieces are already ready to leave the basket.
Even a softer batch is usually still usable. Stop cooking before it collapses further, then serve it promptly or fold it into pasta, rice or a sauced dish.
When diagnosing soggy air fryer zucchini, judge texture before color. Firm pieces may need more heat; already-soft pieces need to come out, whatever shade they are.
Pale but already soft
This usually means the zucchini became tender before it received enough heat or airflow to brown. Likely causes: an overloaded basket, a cold start, weak oven-style airflow or excess surface moisture. Do now: remove it once tender; more time may only make it softer. Next time: reduce the load, dry the pieces carefully and preheat where appropriate.
Wet or sitting in liquid
Water was released faster than the basket could evaporate it. Move the zucchini to a wide, uncovered plate and drain any liquid that has collected. Common causes include wet cut sides, early salting, a packed basket or transferring the hot pieces into a narrow or covered bowl.
Spreading the batch prevents further steaming, but it cannot rebuild lost structure. Do not return floppy zucchini to the air fryer merely to chase darker color.
If the zucchini was oversized and seedy, scoop out the loose center next time. Otherwise, reduce the load, blot the pieces and season only when the air fryer is ready.
Limp or folding in half
The zucchini’s structure has already started to break down. Thin pieces, cooking past tenderness, leaving the finished batch in the hot basket or giving a second batch the same timing in an already-hot chamber can all cause it.
Remove it immediately and serve it now instead of chasing more color. Next time, cut thicker and watch the second batch a minute sooner.
Other common problems
Shriveled edges: Use thicker pieces, a measured coat of oil and an earlier check.
Burned seasoning: Use a lighter coating of spices and add Parmesan or delicate finishes near the end.
Taking much longer: A cold start, dense load, larger cut or oven-style appliance may be slowing the batch. Keep checking in short intervals.
Seasoning fell off: Dry the zucchini, add oil before the dry ingredients and avoid repeated shaking.
Greasy zucchini: Measure the oil and reduce it when cooking less than one pound.
Softened on the plate: Use a broad uncovered dish and add wet sauces at the table.
Once the texture is under control, changing the flavor is the easy part.
Air Fryer Zucchini Variations
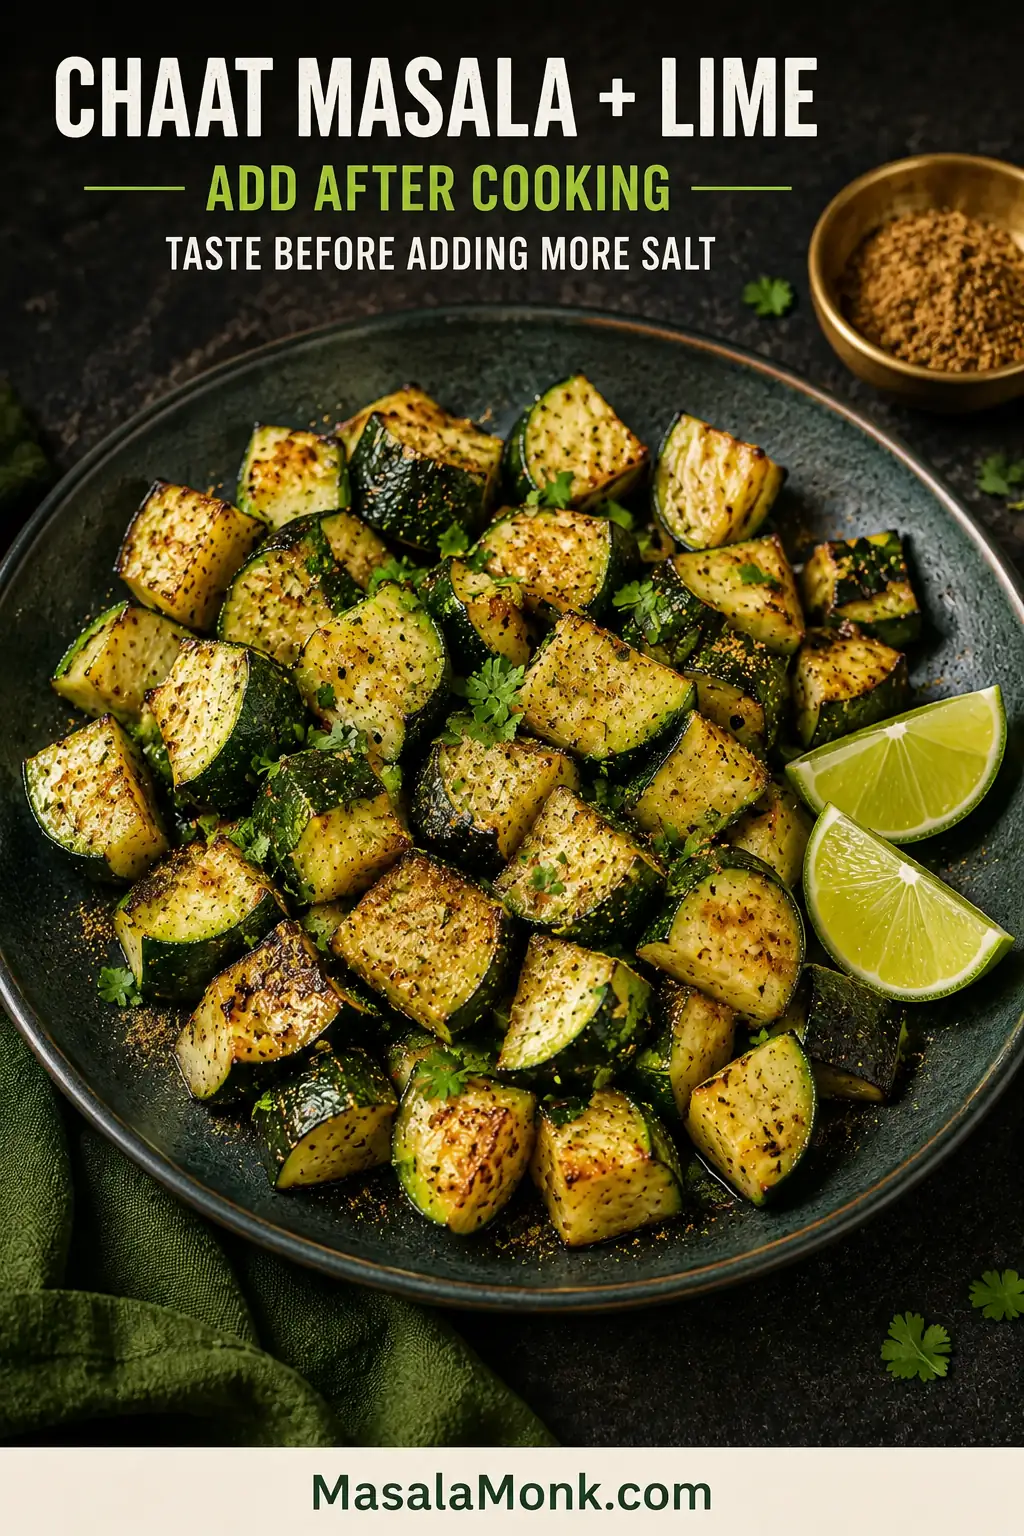
Choose your finish: Keep the garlic-and-herb version simple, add Parmesan for nutty browned edges, or finish the zucchini with chaat masala and lime.
Finish
Best when you want
Key adjustment
Everyday unbreaded
Golden edges and a tender middle
Use the base recipe
Parmesan
Savory, nutty browned corners
Reduce the salt and add cheese near the end
Chaat masala and lime
Tangy, bright flavor
Skip the Italian herbs; add chaat masala, lime and cilantro after cooking
Very low oil
Minimal added fat
Expect lighter browning and slightly drier edges
Thin chips or breaded fries
A crisp coating
Use the separate chips method
Using little or no oil: The zucchini will brown less evenly and may develop drier edges. Dry it carefully, keep the basket loose and check it sooner than the standard version. A fine oil spray offers a useful middle ground.
Air fryer zucchini without oil needs closer attention at the small tapered pieces. Their exposed edges may dry before the larger chunks develop much color.
Parmesan Zucchini
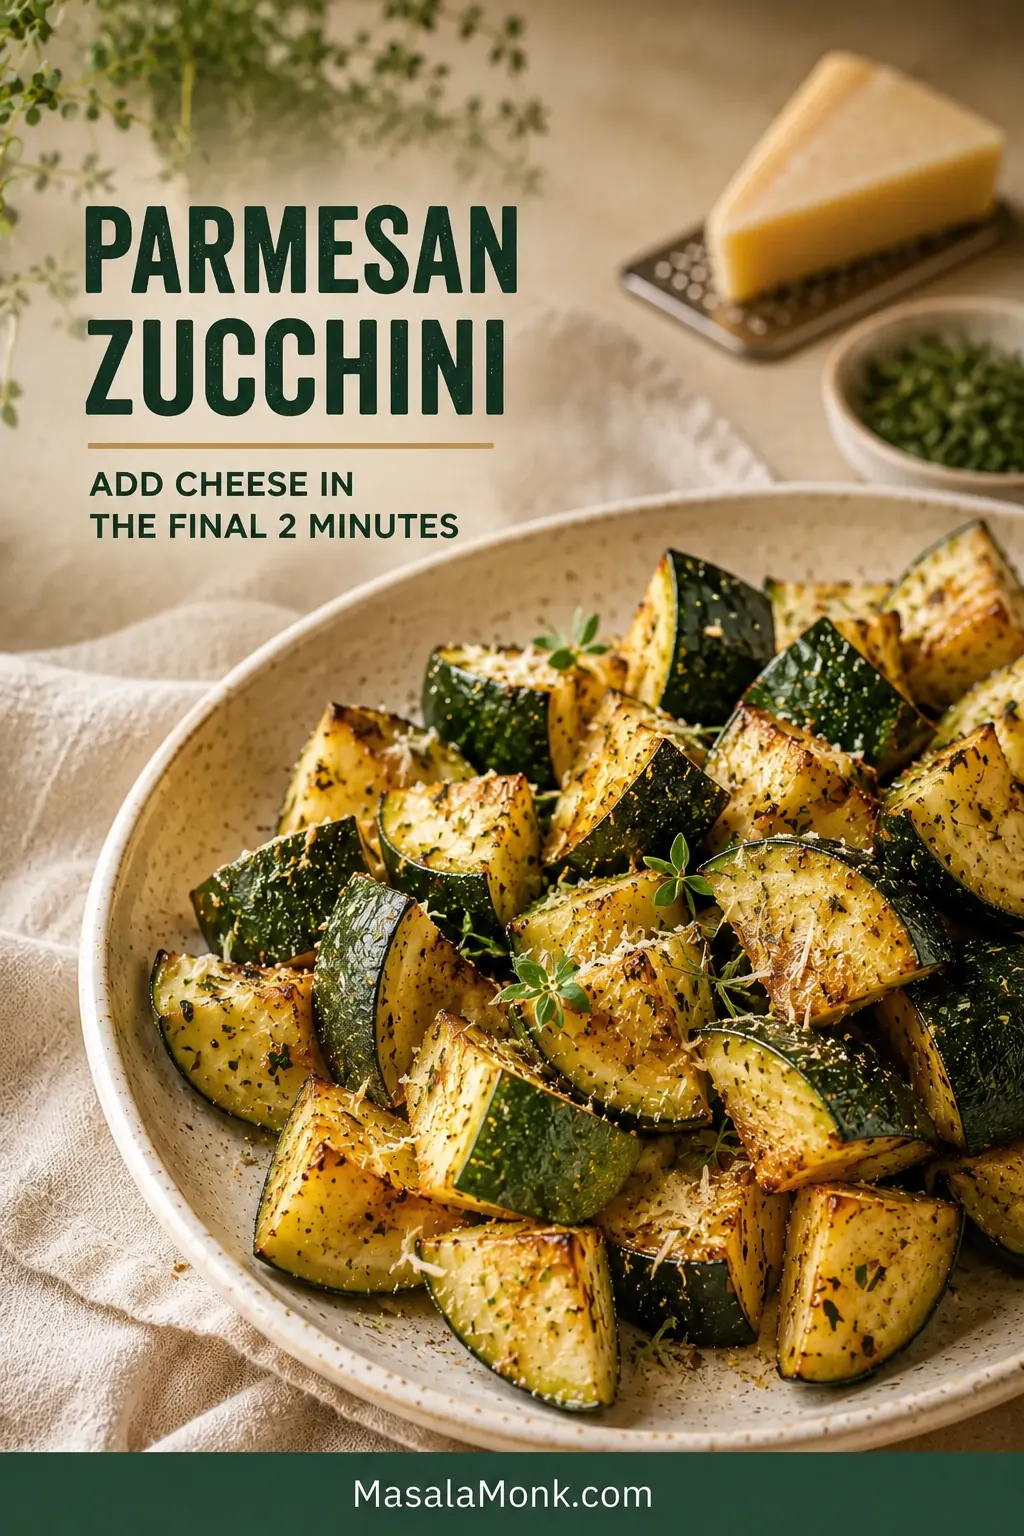
Use half the salt in the base recipe. During the final 2 minutes, add 2 tablespoons / about 10 g finely grated Parmesan. Sprinkle it over the zucchini, return the basket and avoid shaking again.
The cheese should catch on the corners and smell nutty as it browns. For an easier finish, sprinkle Parmesan over the zucchini on the serving plate instead.
For Parmesan air fryer zucchini, use finely grated cheese rather than coarse shreds. The smaller particles cling to the corners and melt before they have time to scorch.
Beside garlic Parmesan broccoli pasta, keep the zucchini lightly seasoned and add only a light dusting of cheese at the table.
Chaat Masala and Lime Zucchini
Omit the Italian seasoning, but keep the garlic powder and black pepper. Reduce the fine salt to ¼ teaspoon.
After cooking, sprinkle the hot zucchini with ½ teaspoon chaat masala, add 1 teaspoon / 5 ml lime juice and finish with a small handful of chopped cilantro. Taste before adding more because chaat masala blends vary in salt and intensity.
Chaat masala, lime and cilantro belong after cooking, when their flavor stays vivid. Taste before adding more salt because seasoning blends vary widely.
The tangy spice and bright lime work especially well beside dal and rice, chickpeas or cubes of soft homemade paneer.
Zucchini and Yellow Squash
Yellow summer squash can cook in the same basket when the pieces are similar in size. Softer or seedier chunks may finish first, so take them out and let the firmer pieces continue.
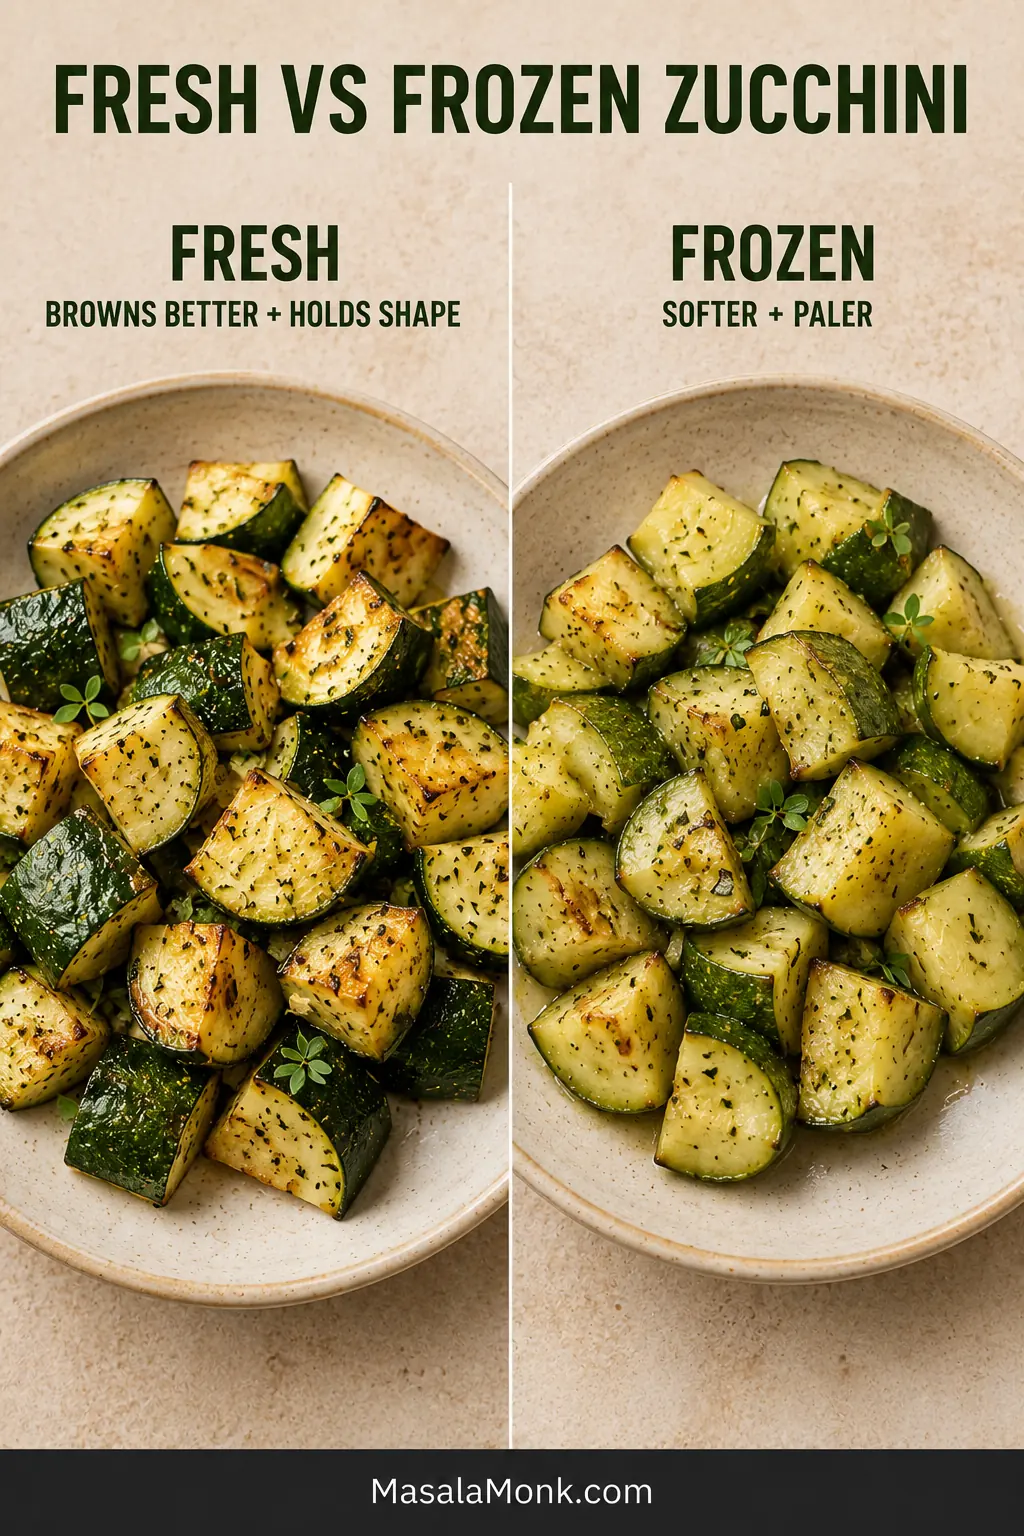
Can You Air Fry Frozen Zucchini?
Yes, but it will be softer, paler and less distinctly roasted than fresh zucchini. Frozen pieces release more water and lose structure quickly.
Use fresh zucchini when you want browned chunks that hold their shape. Save frozen zucchini for soup, curry, pasta sauce, casseroles or blended vegetable sauces where softness belongs.
Treat frozen zucchini in the air fryer as an ingredient rather than a roasted side. Its softer texture becomes far less noticeable once folded into a curry, soup or sauce.
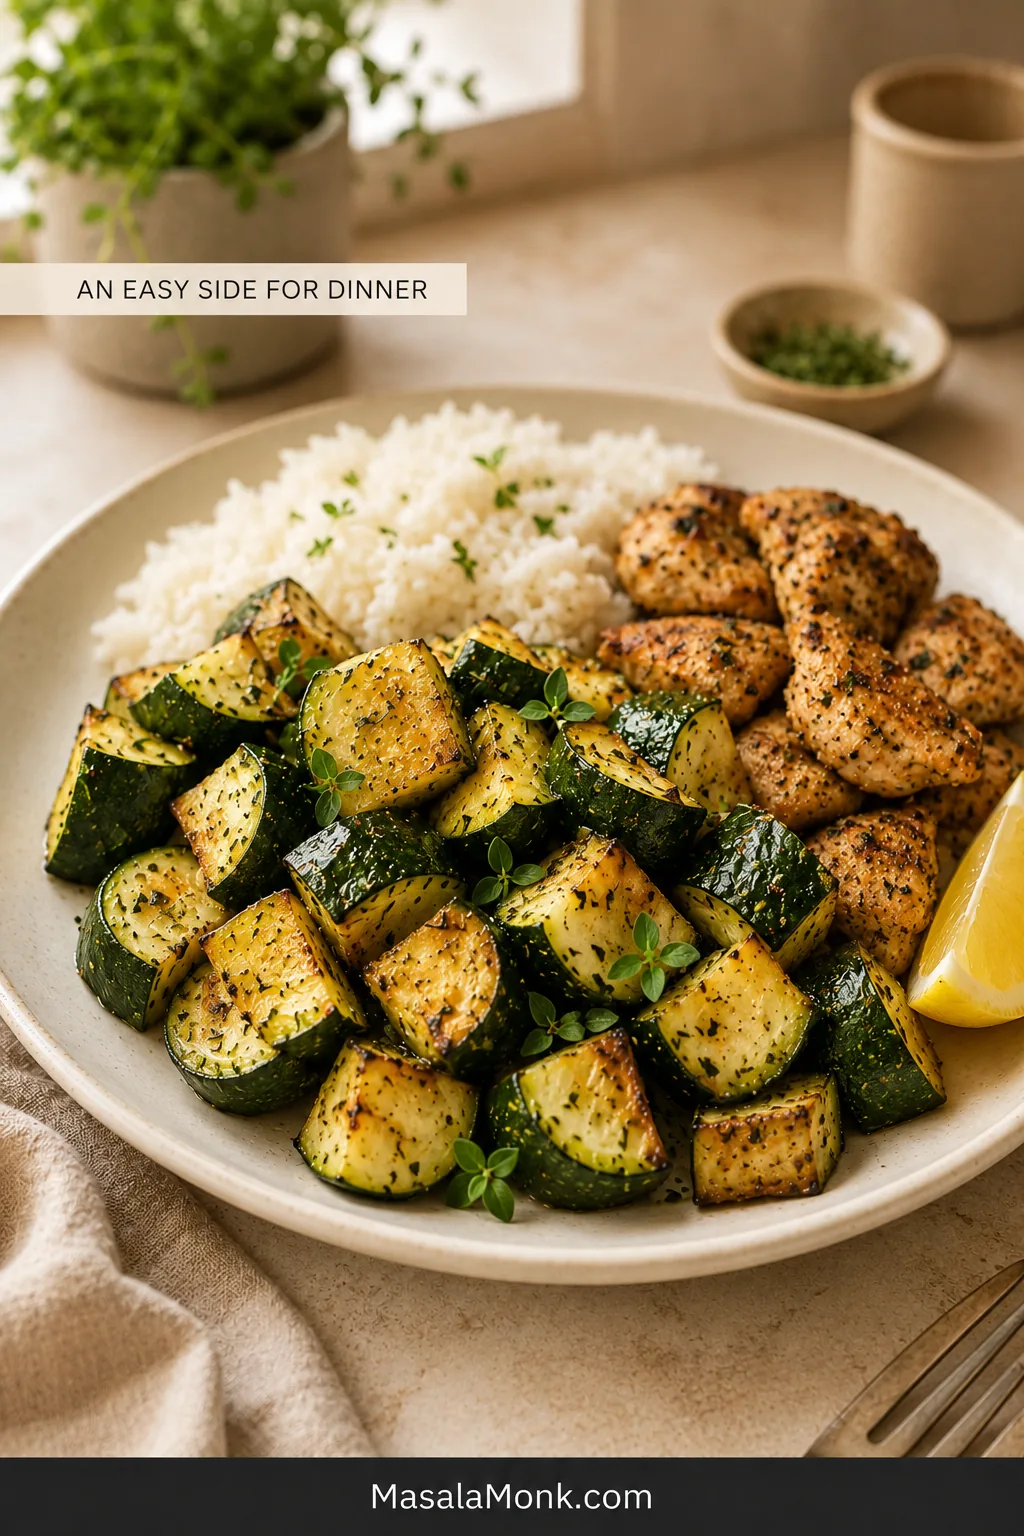
Once the texture is right, this is the kind of side that quietly fits around almost anything already planned for dinner. Spoon the zucchini beside rice or potatoes and juicy air fryer chicken breast, salmon, paneer or tofu. Squeeze lemon over the whole plate and add a little salt at the table.
Add lemon and fresh herbs after cooking so their flavor stays bright. A broad platter lets steam escape instead of softening the browned surfaces.
With a richer main such as honey garlic salmon, keep the zucchini lemony and herb-led. For a vegetarian bowl, layer it with warm grains, chickpeas or paneer, plenty of herbs and a cool yogurt or tahini sauce.
Wondering what to serve with air fryer zucchini? Plate it last and keep gravy, dressing or wetter sauces alongside it so the browned surfaces remain distinct longer.
Once chilled, fold leftovers into a chickpea salad, wrap or pasta bowl. Add them close to serving so they do not sit in dressing and soften further.
When the air fryer is already occupied—or a softer vegetable side suits dinner better—the skillet mushroom and zucchini stir-fry is a useful stovetop alternative.
How to Store and Reheat Air Fryer Zucchini
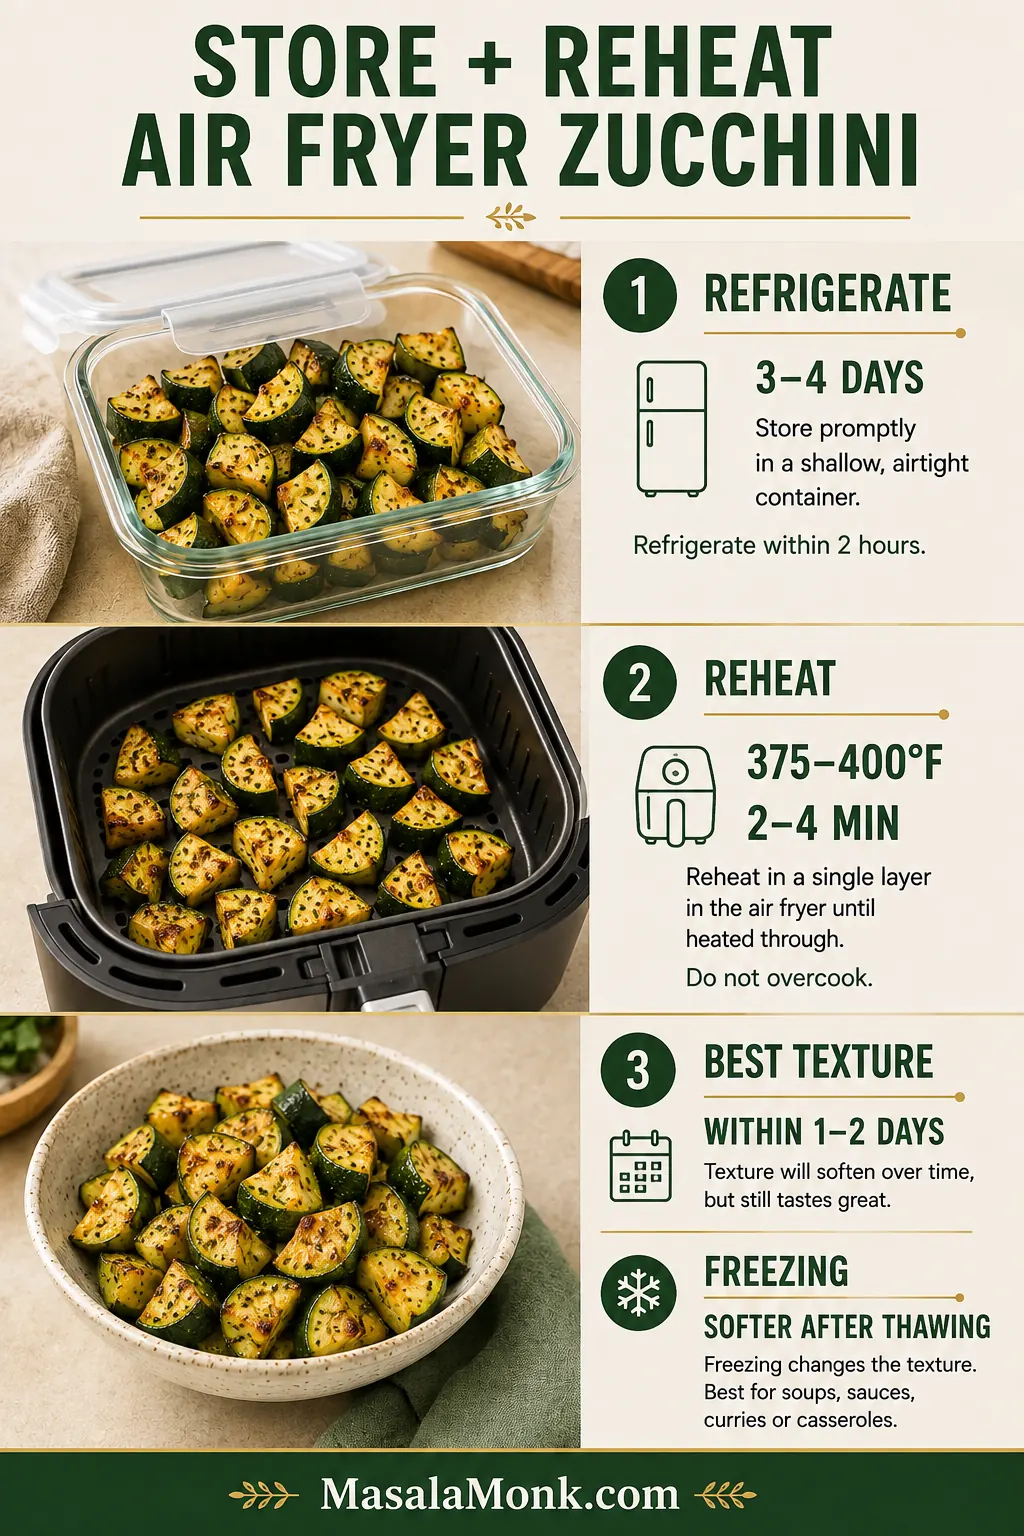
Transfer leftovers promptly to a shallow covered container and refrigerate them within two hours. The zucchini does not need to cool completely before going into the refrigerator.
For the best way to reheat air fryer zucchini, warm only the portion you need in one layer. Add reserved lemon, herbs or cheese after reheating—not before storage.
Reheating
Arrange the zucchini in one layer and reheat at 375–400°F / 190–200°C for approximately 2 to 4 minutes. Check early; the goal is to reheat it, not cook the center a second time.
The microwave is convenient, although the zucchini will be softer. Heat it in short intervals. Freezing cooked zucchini will not preserve its roasted texture; use thawed leftovers in soup, sauce, curry or a casserole.
Food-safety note: Reheat leftovers until hot throughout. If you check with a thermometer, USDA recommends reheating leftovers to 165°F / 74°C.
Frequently Asked Questions
Do you need to peel zucchini before air frying?
No. The skin is edible, adds color and helps the chunks stay intact. Leave it on unless it is unusually tough or damaged.
Do you need to preheat the air fryer?
Preheating gives the zucchini a hot start and makes the checking range more predictable. Skip it only when your machine preheats automatically or its manufacturer recommends starting from cold.
Should zucchini be salted before air frying?
Salt small or medium zucchini immediately before air frying, not well in advance. Only oversized, visibly watery zucchini benefits from a 10-minute salted rest followed by thorough blotting.
Why did my air fryer zucchini turn soggy?
Common causes include thin pieces, a crowded basket, wet surfaces, a cold start, salting too early, overcooking or trapping steam after cooking. Use the full troubleshooting guide to match the visible symptom with the right correction.
How long does zucchini take at 400°F?
Begin checking thick chunks at 7 minutes. Many preheated basket-style machines will finish them between 8 and 11 minutes. See the time and temperature guide for oven-style machines, second batches and visual stopping cues.
Can you air fry zucchini rounds or spears?
Yes. Keep rounds and spears fairly thick and inspect them early. Rounds usually soften faster because they expose broad cut faces, while sturdy spears may take closer to the chunk timing. See the cut-size and shape guide for the visual comparison. Use the separate zucchini chips method for very thin or breaded pieces.
When the zucchini looks ready before the timer does, trust your fork. Take it out and let dinner continue.
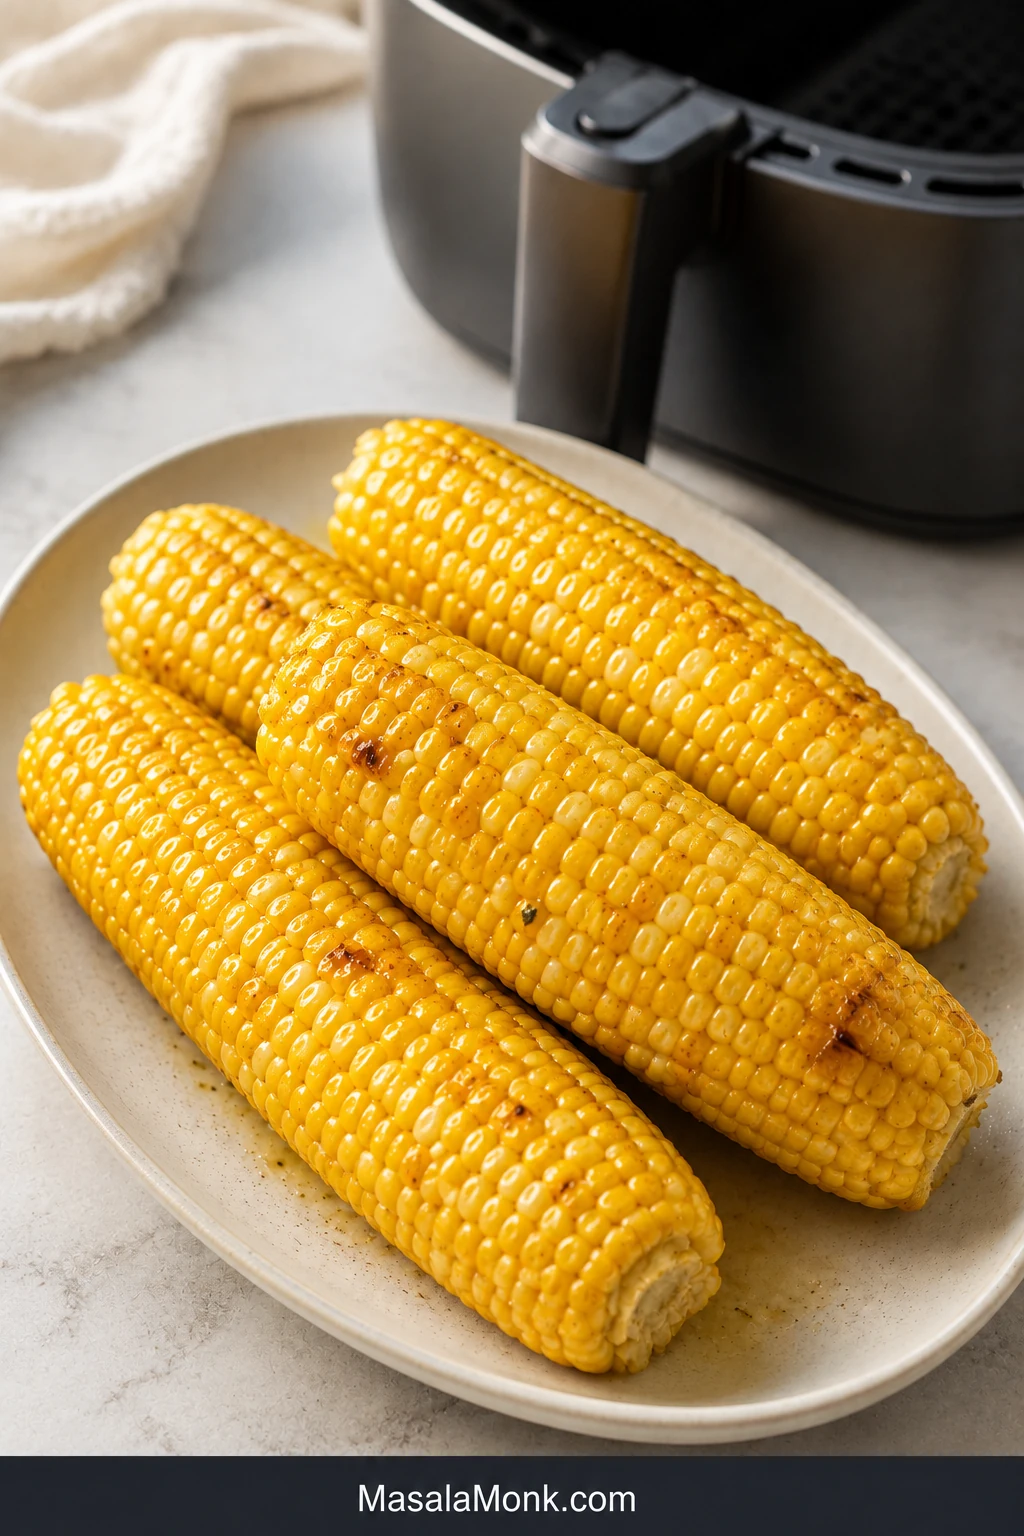
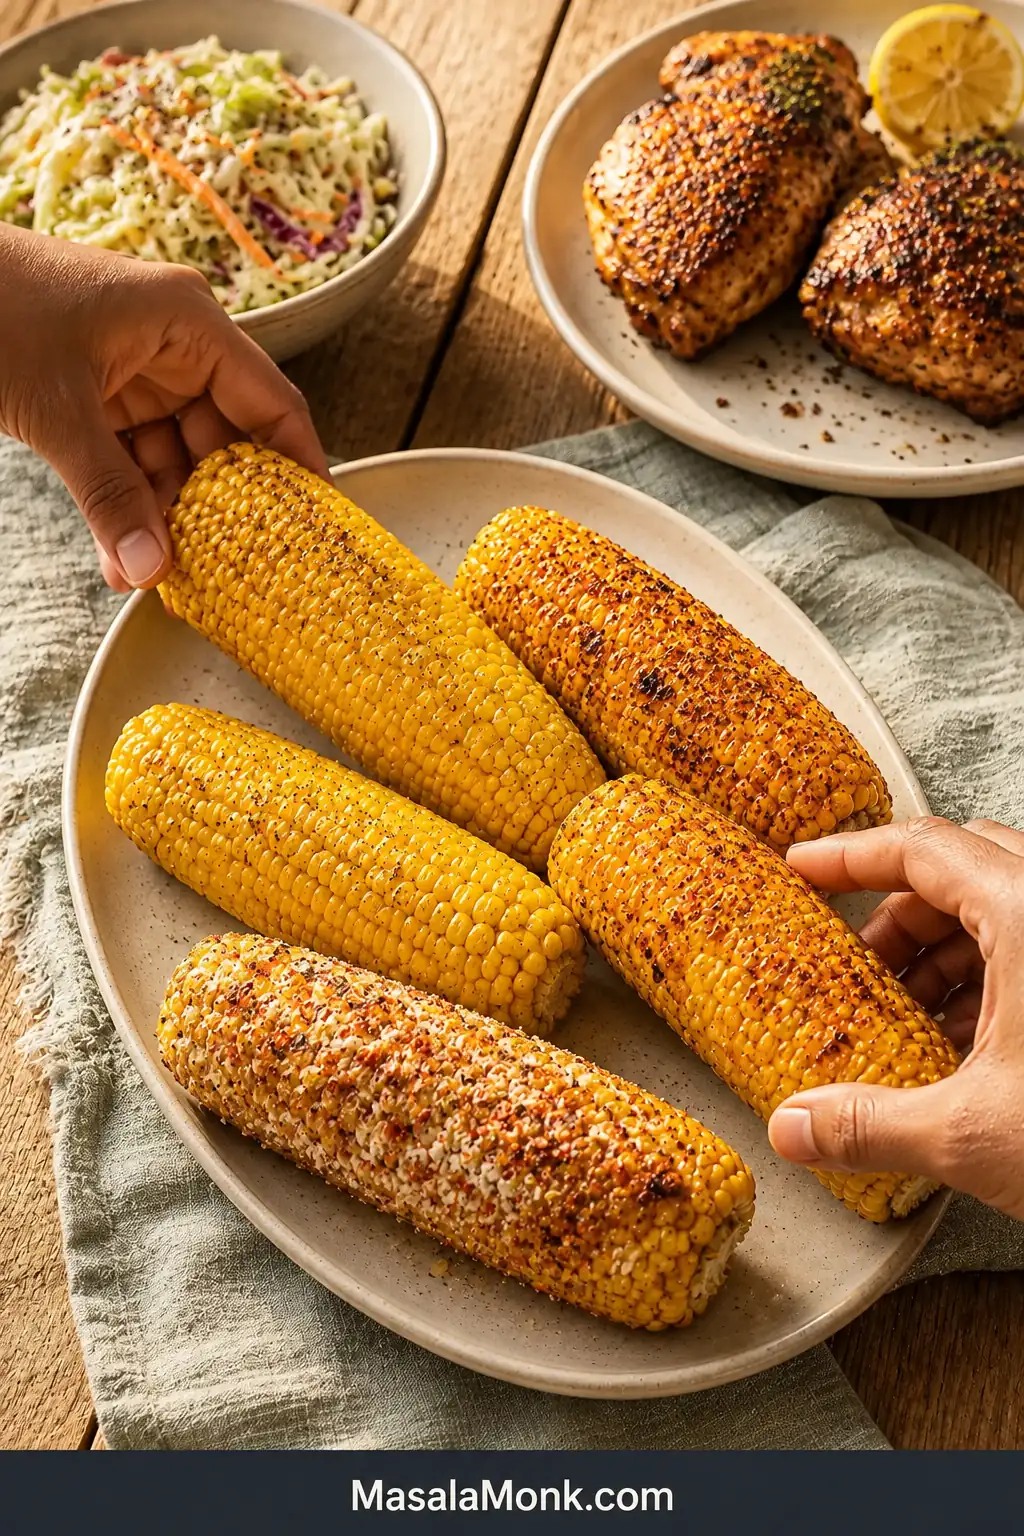
Air fryer corn on the cob should be one of the easiest sides you make all summer. You can skip the pot of boiling water, leave the grill unlit and cook only the number of ears dinner actually needs.
The confusing part is the timer. One recipe says six minutes, another says twelve, and a third keeps the corn cooking for nearly twenty. Thick ears may still feel firm after a fast recipe, while slim ears can turn wrinkled if you wait too long for dramatic black spots.
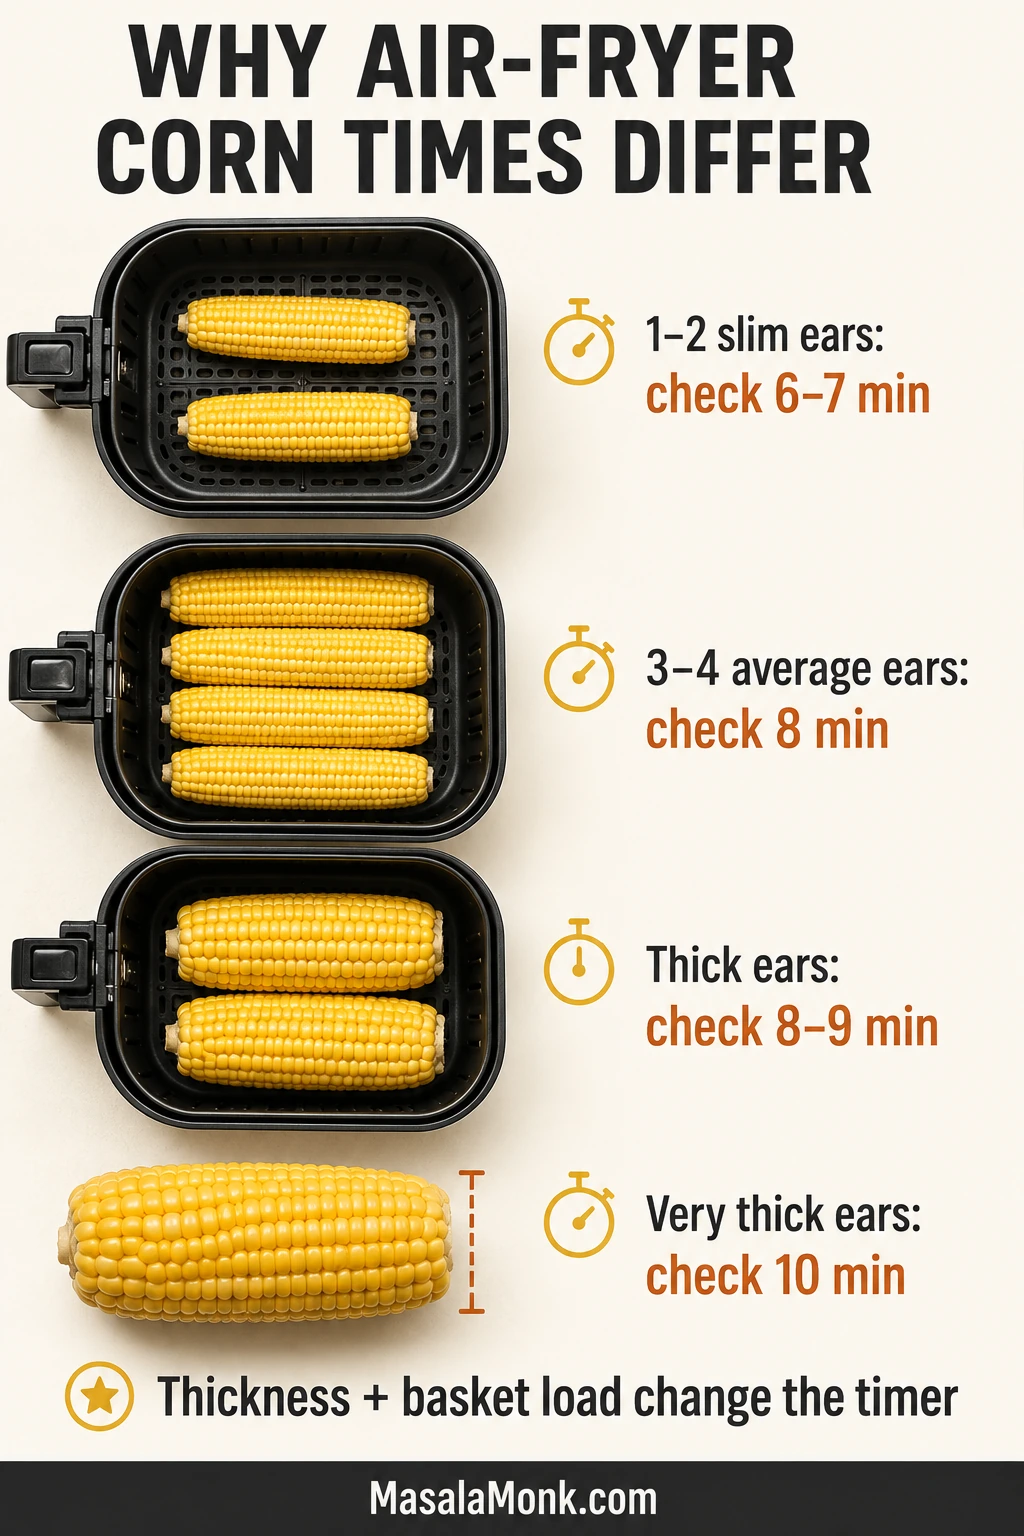
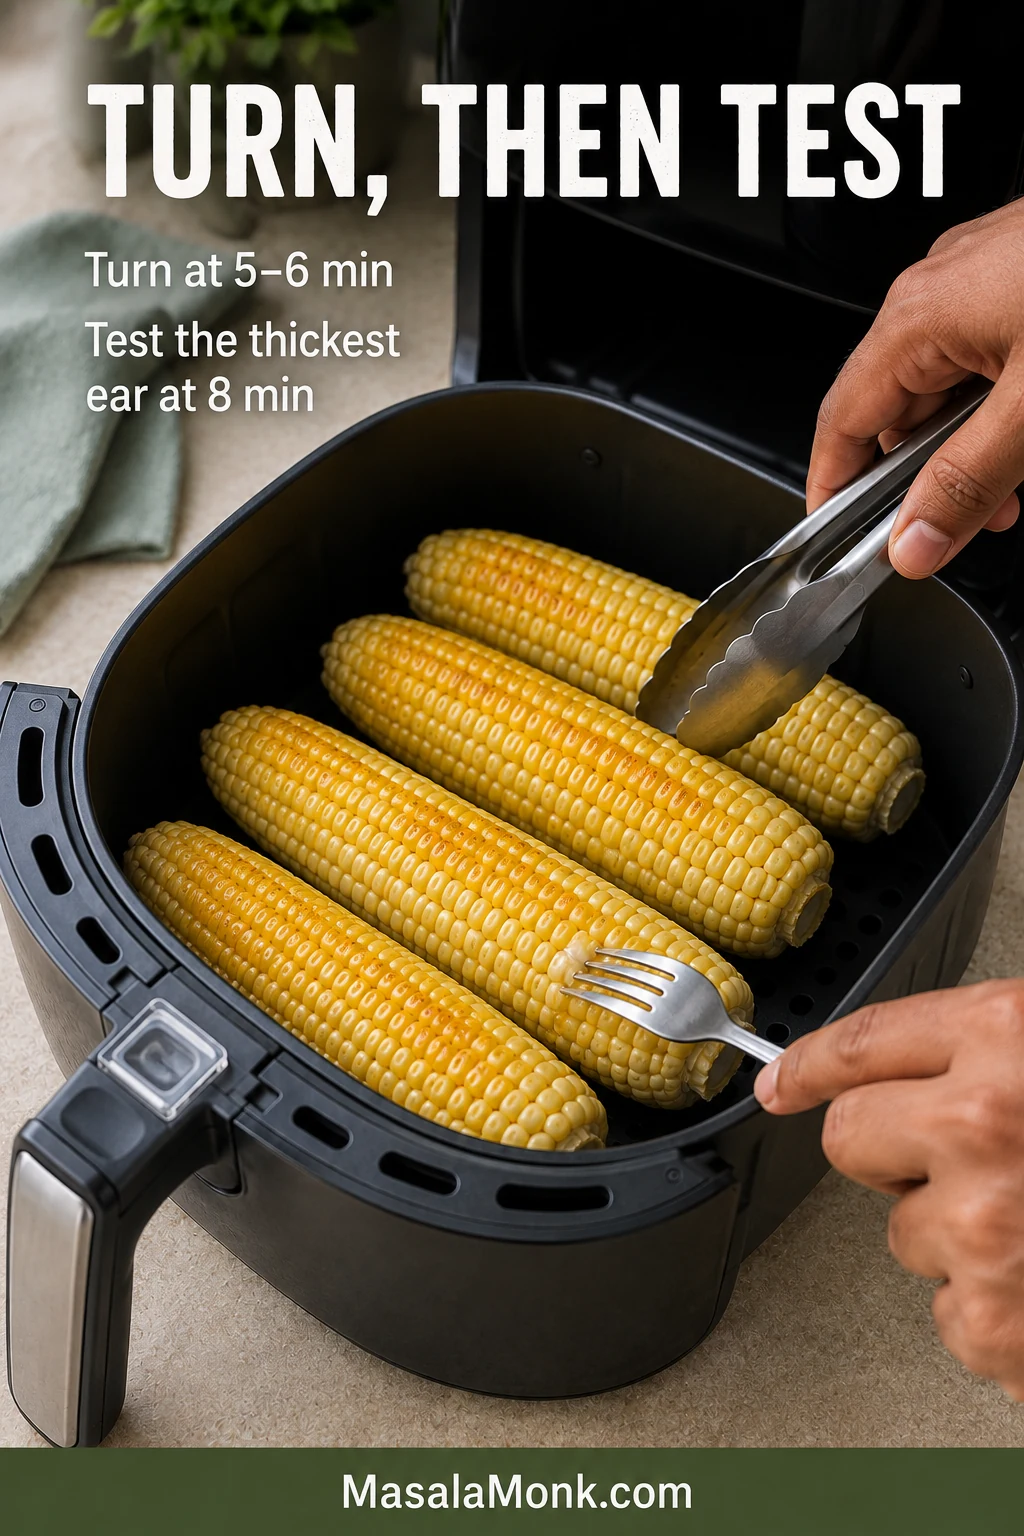
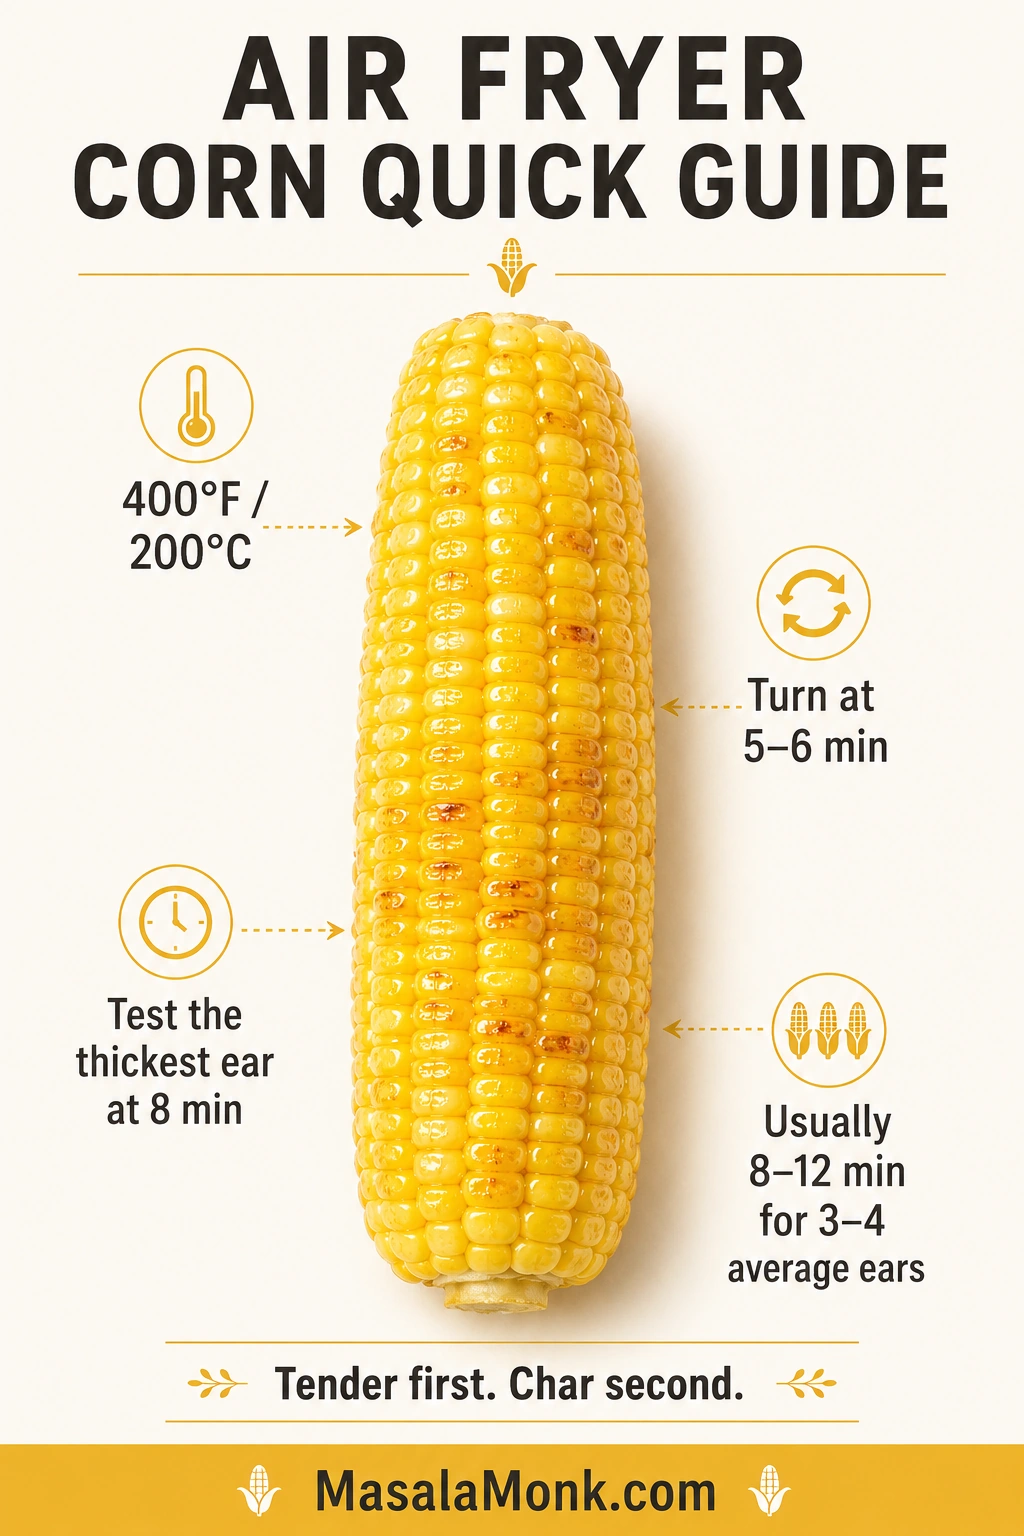
Air fry three or four average-thickness ears at 400°F / 200°C for 8–12 minutes, turning once. Test the thickest ear at eight minutes; one or two slim ears may be ready around 6–7 minutes.
The MasalaMonk rule: tenderness decides when the corn is cooked; extra time decides how deeply browned and charred it becomes.
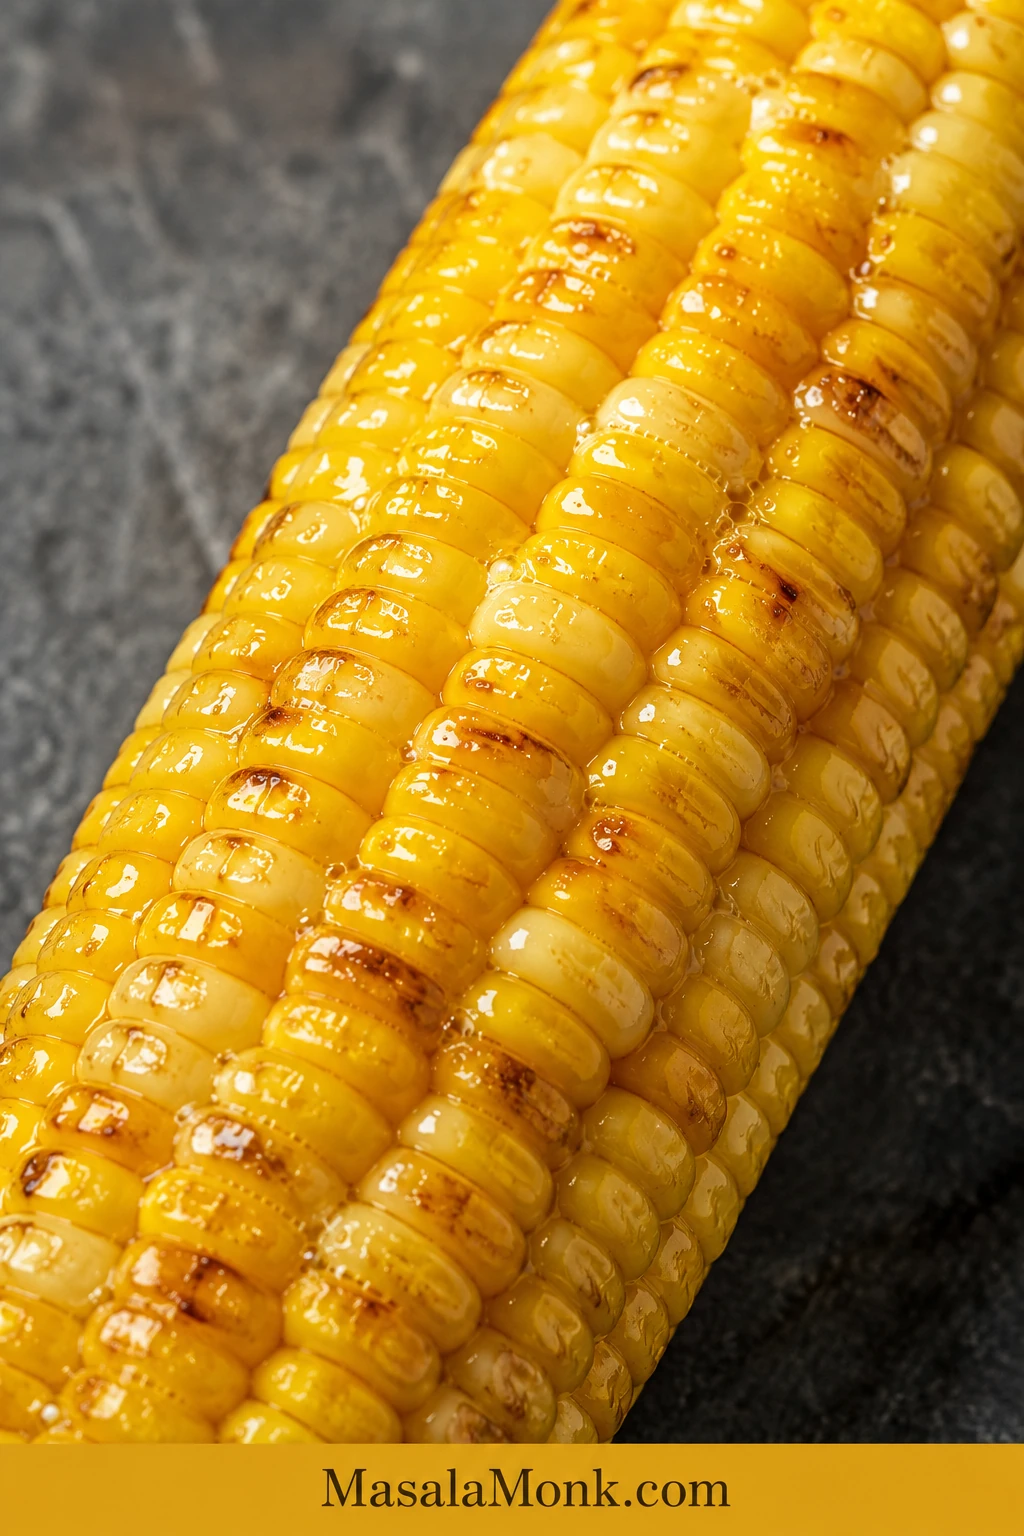
Once a pierced kernel gives with gentle resistance and beads with juice, the ear can leave the basket. Add colour afterward, one minute at a time, for up to 3 extra minutes. Brush on the butter at the end so it melts between the hot rows instead of scorching beside the heating element.
Inspect the broad centre rows rather than the tapered tip, since the smaller end can colour and dry sooner.
Air Fryer Corn on the Cob Recipe
Fresh sweet corn with juicy kernels and lightly blistered edges. Check the thickest ear early and remove each one as soon as it becomes tender.
PrepAbout 5 minutes
Cook8–12 minutes
TotalAbout 13–17 minutes
Yield4 side servings
Temperature400°F / 200°C
First Check8 minutes
Want deeper roasted colour? Allow another 1–3 minutes after the kernels are tender.
Ingredients
For the Corn
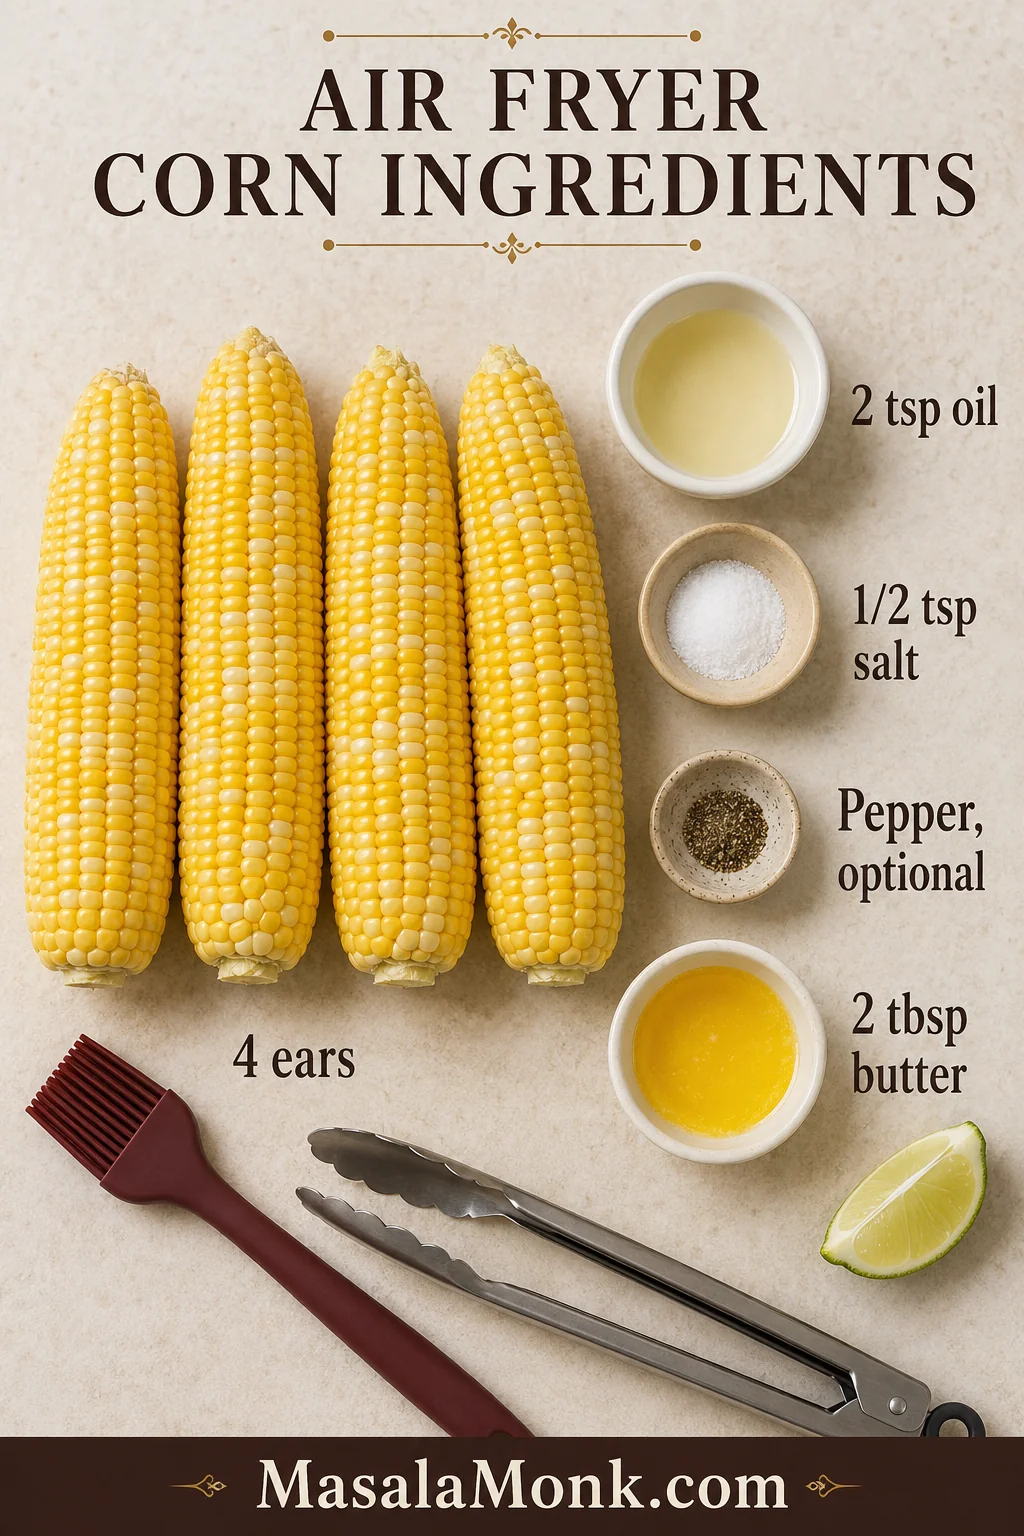
4 average-thickness ears of fresh sweet corn
2 teaspoons neutral oil or olive oil
½ teaspoon fine salt, about 3 g
¼ teaspoon black pepper, optional
For Serving
2 tablespoons unsalted butter, melted, 28 g / 1 oz
Lemon or lime wedges, optional
Additional salt and pepper, only after tasting
Properly oiled corn should have a faint sheen, not visible droplets; excess fat can pool between the rows instead of improving browning.
Equipment
Basket-style air fryer large enough to hold the corn in one layer
Tongs
Small bowl
Pastry or silicone brush
Knife and cutting board when the ears need trimming or halving
Method
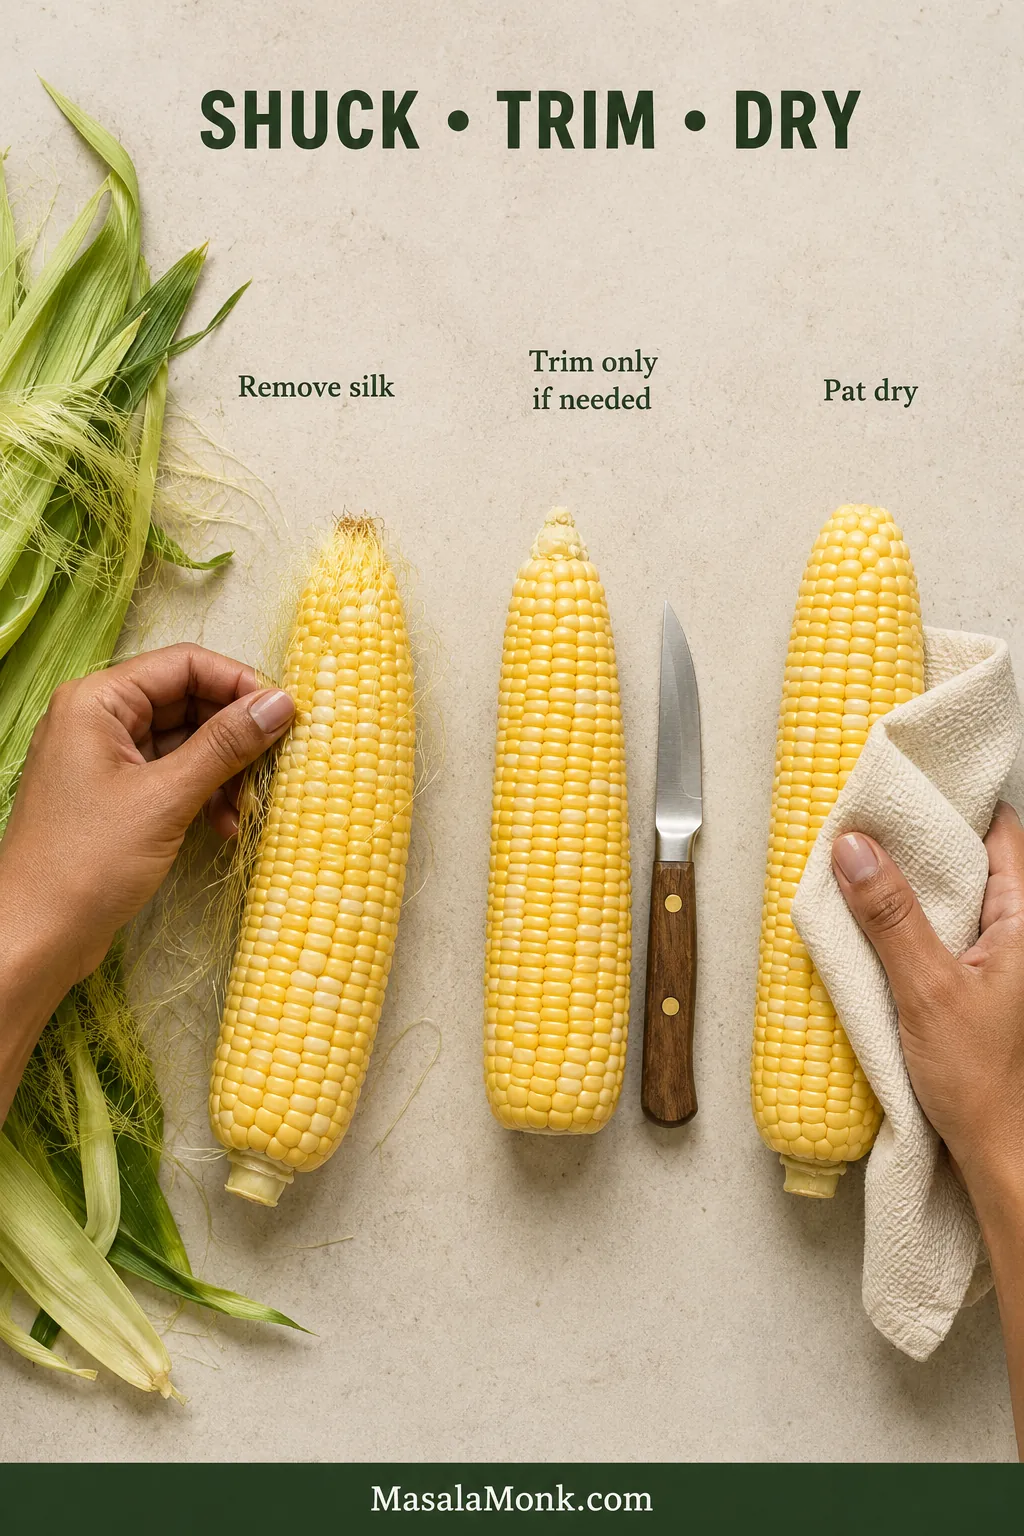
Prepare the corn. Remove the husks and silk. Trim the narrow tip or halve the ears only when needed to fit. Pat the kernels dry.
Preheat if recommended for your model. Heat the air fryer to 400°F / 200°C for up to 3 minutes. Prepare the ears while the basket heats.
Season lightly. Brush the ears with oil until they look lightly glossy rather than wet. Add the salt and optional pepper.
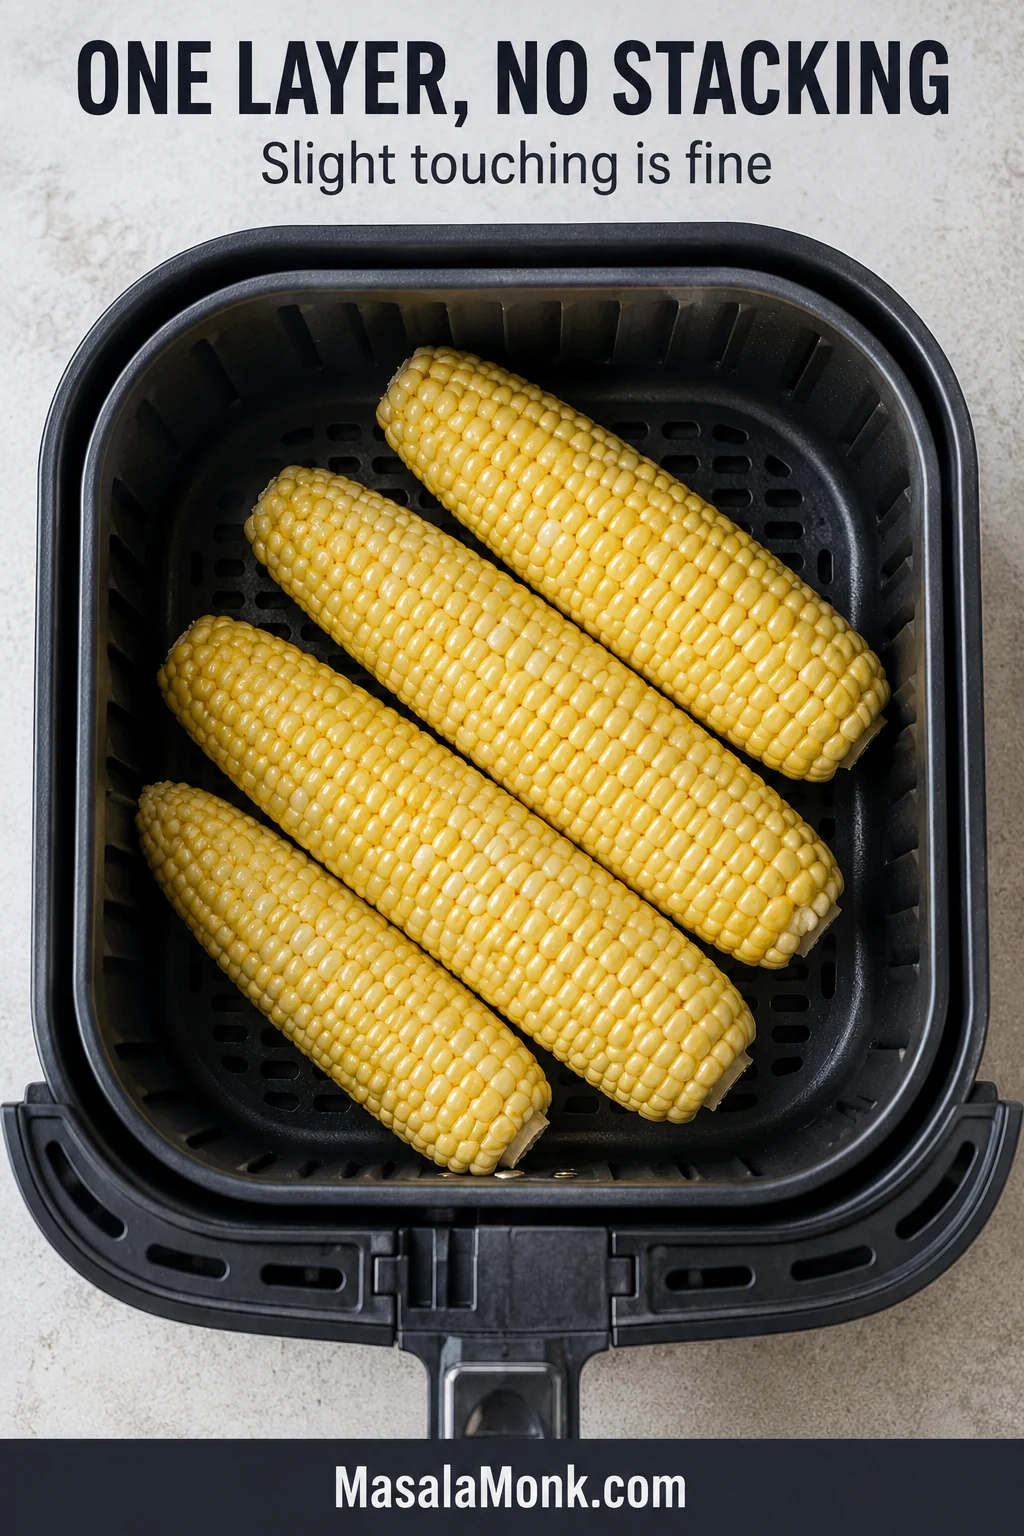
Arrange the basket. Place the corn in one layer. A little touching is fine, but do not stack the ears or force them close to the upper element.
Air fry. Cook at 400°F / 200°C and turn or roll the ears after 5–6 minutes.
Test the thickest ear. At 8 minutes, pierce a kernel near the middle. Continue until the kernel looks full, releases a little juice and offers only gentle resistance.
Choose the colour. Once tender, cook for another minute at a time when you want darker roasted patches. Stop after 3 additional minutes.
Serve hot. Brush with melted butter, taste and add more seasoning only as needed.
Recipe notes:
Cooking only 1–2 slim ears? Start checking at 6–7 minutes.
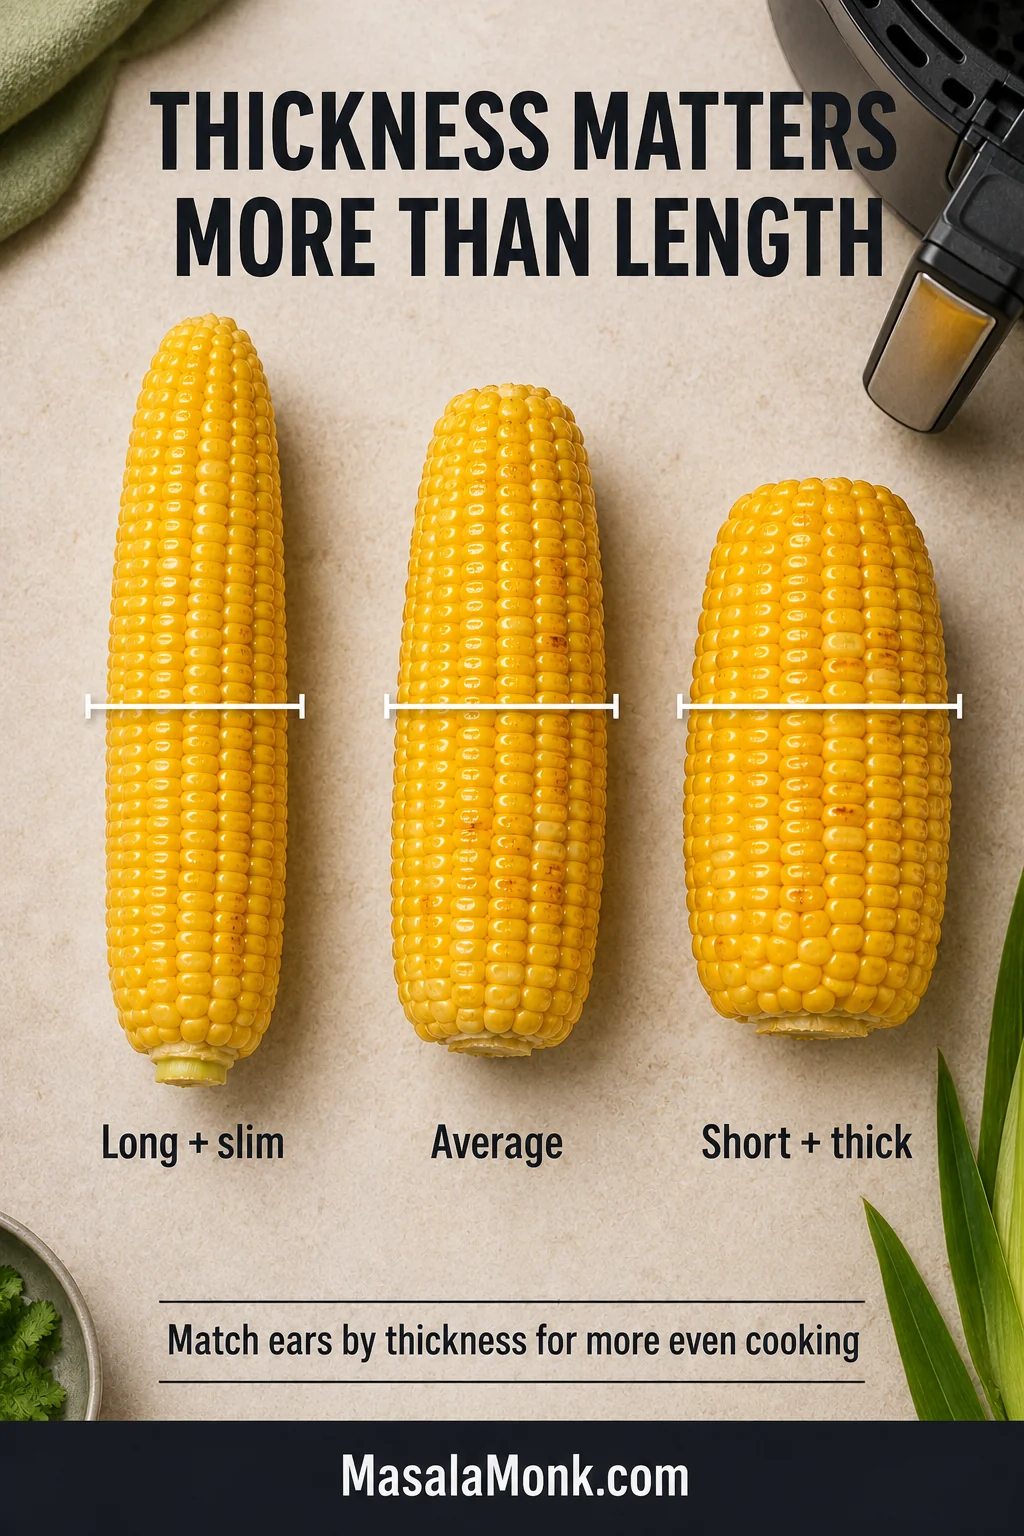
Matching ear thickness is more useful than matching length.
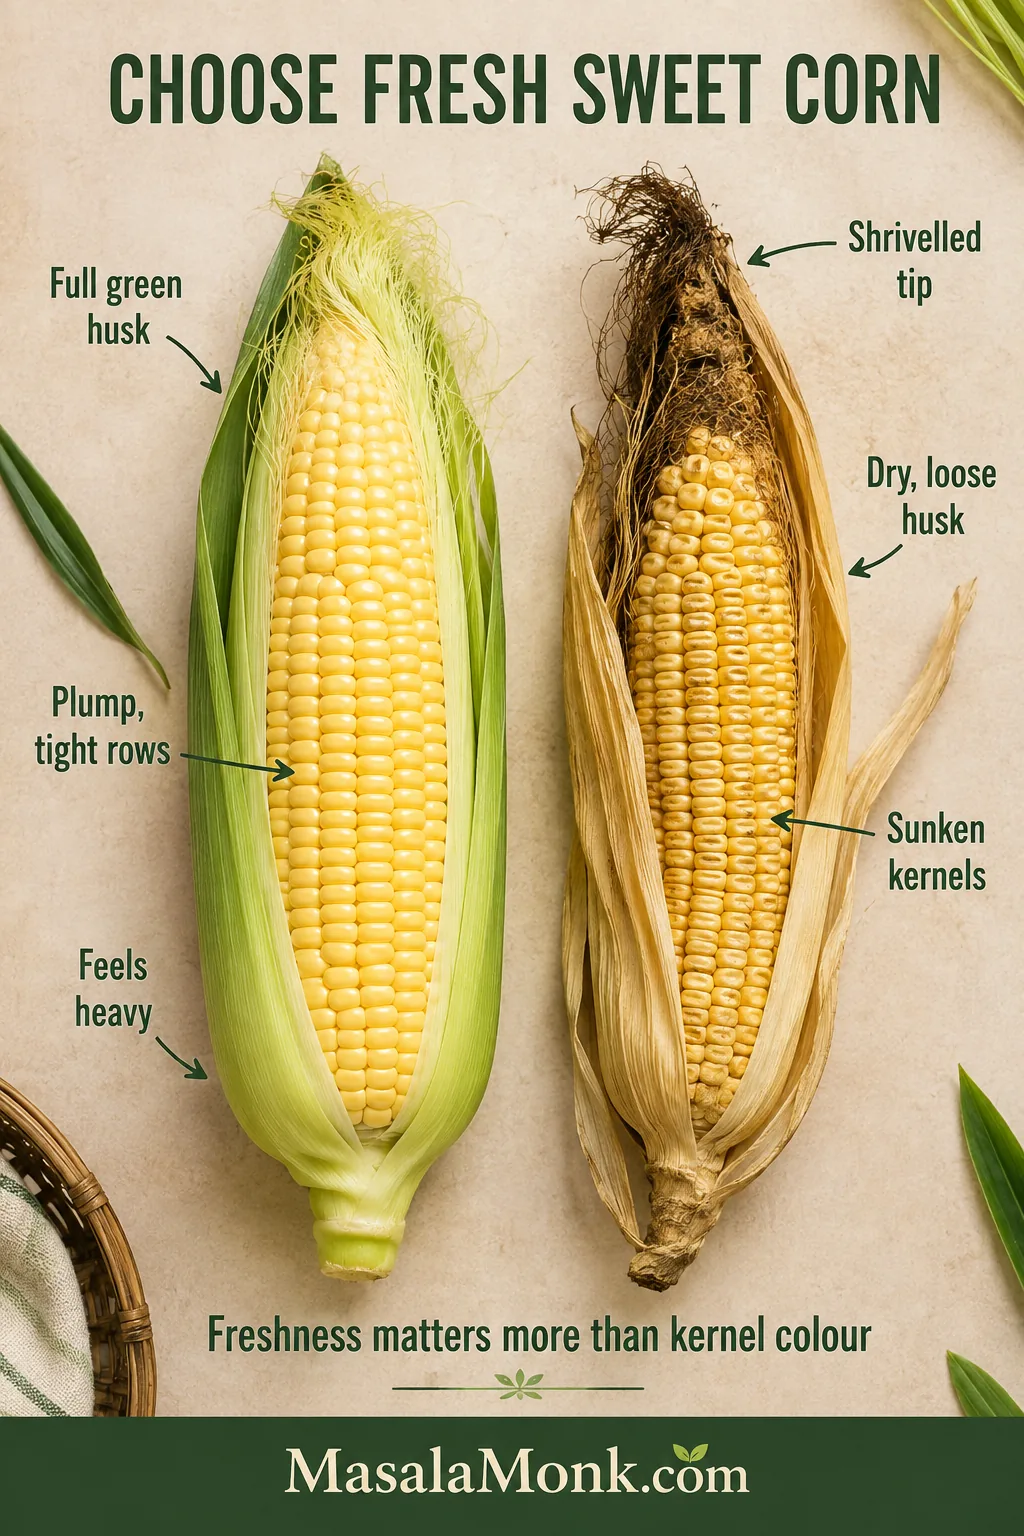
Yellow, white and bicolour sweet corn all work. Freshness matters more than kernel colour.
Kosher salt crystals vary by brand, so begin lightly and adjust after adding butter.
For three or four average ears, air fry at 400°F / 200°C for 8–12 minutes. Turn at 5–6 minutes and test the thickest ear at 8.
Air fryers vary, so treat those times as checking points rather than guaranteed finishing times. Ear thickness and basket load explain most of the variation; if you are unsure what “tender” should look and feel like, use the visual doneness cues.
The listed minute starts the check; the thickest ear’s texture determines when the cook ends.
How to use this table: Start with the listed first-check time, test the thickest ear and continue only until its kernels are tender.
Air fryer corn cooking times by ear thickness and basket load
Your basket
First check
Typical range at 400°F / 200°C
1–2 slim ears
6–7 minutes
7–10 minutes
3–4 average-thickness ears
8 minutes
8–12 minutes; a closely fitted basket often lands near 10–12
1–2 noticeably thick ears
8–9 minutes
10–12 minutes
Very thick ears
10 minutes
12–15 minutes
How to Tell When the Corn Is Done
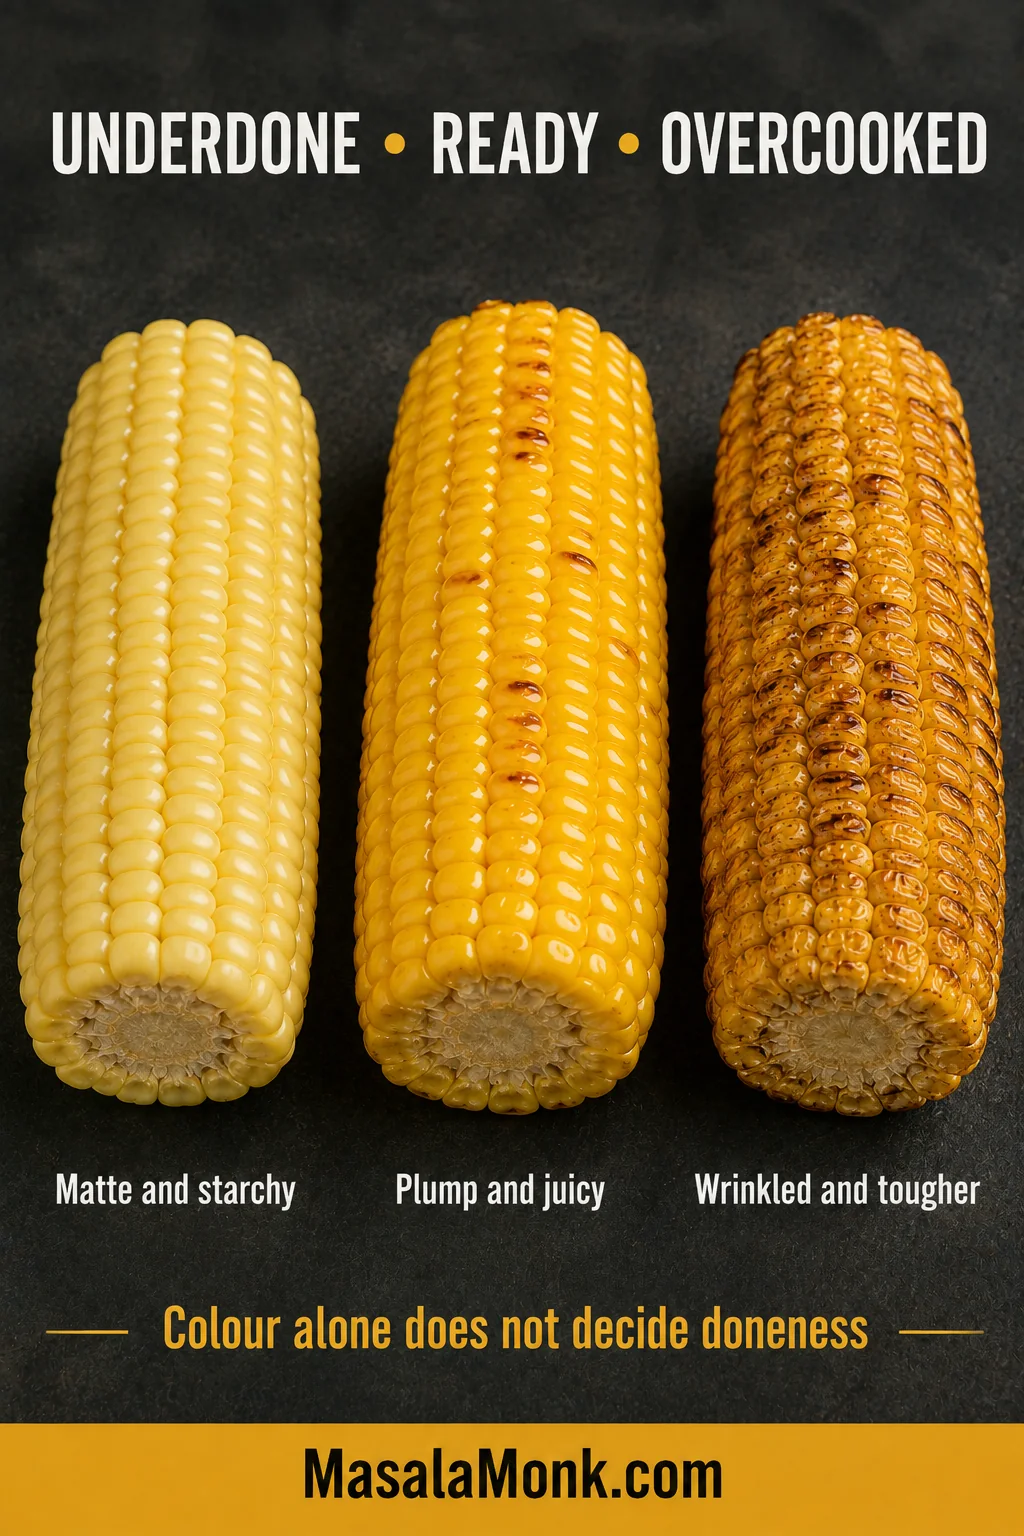
Otherwise-good corn often stays in the basket too long because someone is waiting for every row to turn dark. Colour can deepen after the centre is already cooked.
Underdone
The kernels look matte, resist a fork and taste dense or starchy.
Ready to Serve
The rows look full and glossy. A pierced kernel gives easily and beads with juice.
Overcooked
The kernels begin to wrinkle or lose their plump shape, and the skins become noticeably tougher.
If one person wants deeper char, remove the other tender ears and leave theirs in a little longer. Dinner does not improve by making every cob wait for the darkest one.
Because wrinkling cannot be reversed, pull a ready ear early instead of waiting for every cob to develop matching colour.
For more roasted colour without drier kernels, wait until the centre is tender, then continue uncovered. Turn frequently near the end and stop as soon as the blistered patches are as dark as you want.
Roll each ear onto a less-coloured side rather than simply nudging it; meanwhile, remove any thinner ear that becomes tender early.
Choosing, Preparing and Arranging the Corn
Start with ears that feel full and heavy, with close-fitting green husks and no badly dried or mushy tip. Older corn can taste starchier and remain less juicy even when the timing is right.
When the husk cannot be opened, feel through it for firmly packed rows without soft gaps, missing kernels or a hollow tip.
Next, match the ears by thickness rather than length. Similar diameters are more likely to become tender together, while a tapered tip can make a substantial ear look slimmer than it really is.
A shorter thick ear can take longer than a long slim one, so compare the widest middle sections rather than overall size.
Sweet summer corn already brings most of the flavour; the air fryer’s job is to deepen the edges without taking the juice from the centre.
Remove the husks and stubborn silk, trim only what prevents the ear from fitting and pat the exposed kernels dry. Surface water must evaporate before browning can begin.
A barely damp towel can help lift fine strands of silk; pat the kernels dry afterward so surface moisture does not delay browning.
Oil: A thin coating helps seasoning cling and encourages more even colour. Two teaspoons across four ears is enough. Oil-free corn still cooks.
Butter: Save it for the moment the ears leave the basket. It melts into the hot rows without risking burnt milk solids near the upper element.
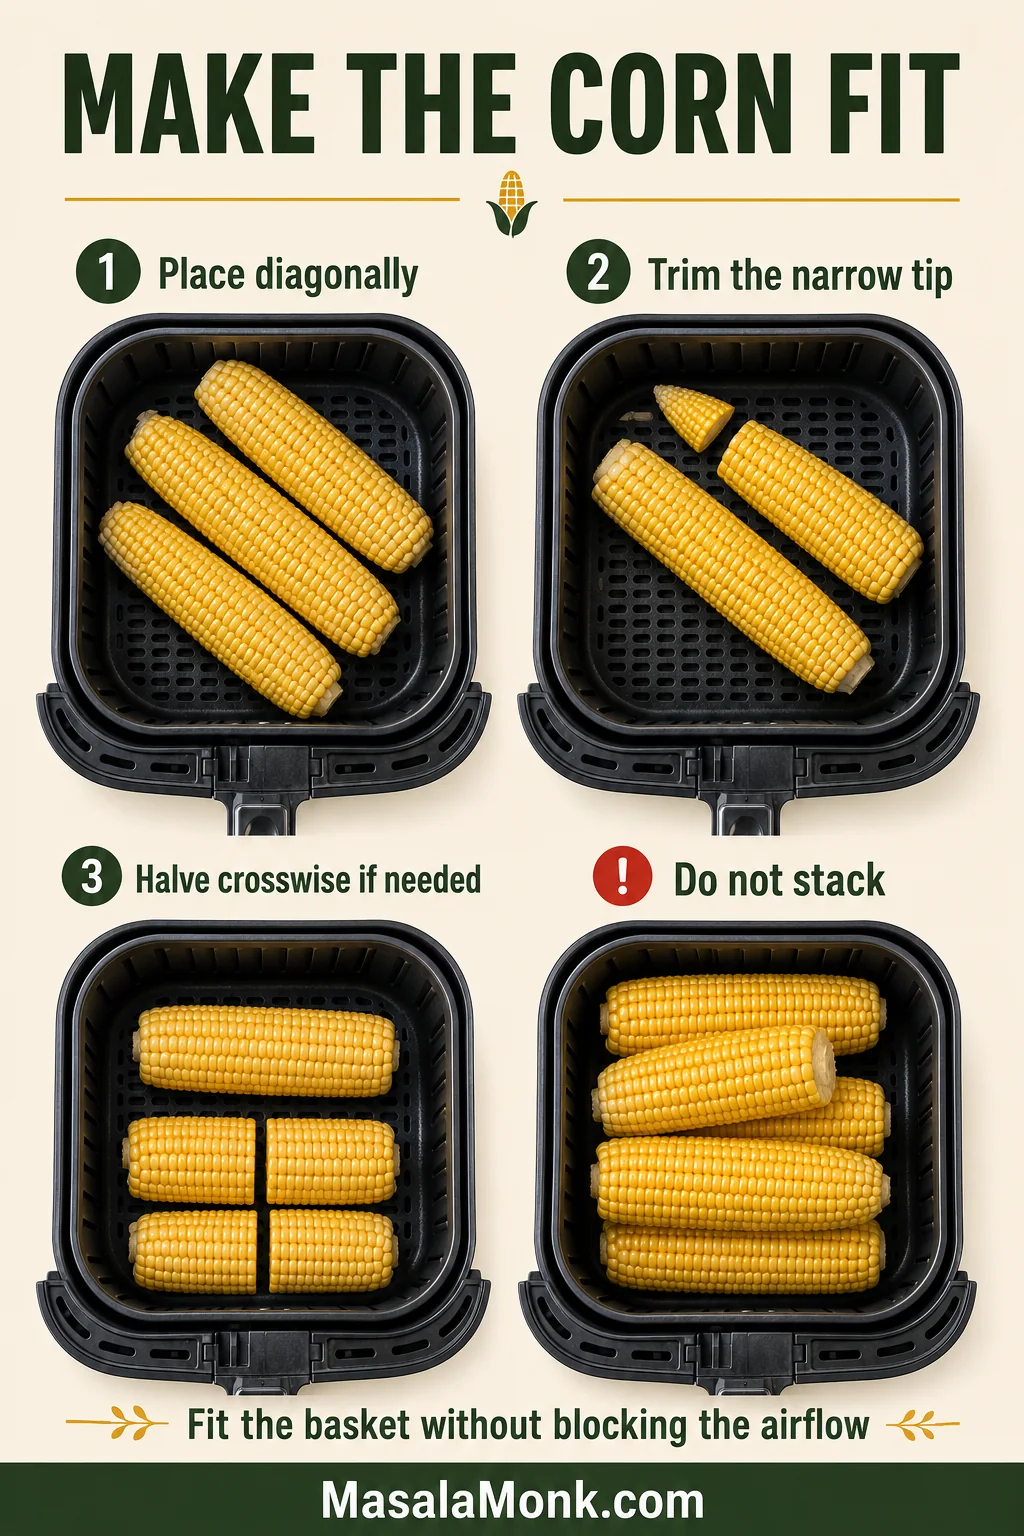
Make the Ears Fit Without Crowding
Halving creates extra exposed ends for browning and can make a closely fitted basket easier to arrange.
Trim the narrow tip first. The tapered end may be all that prevents an ear from fitting.
Halve the ear when needed. A crosswise cut improves fit and may create more open airflow.
Keep the corn in one layer. Slight touching and diagonal placement are fine; stacking is not.
Leave room below the element. Do not force an oversized ear close to the upper heater.
Remove loose silk and husk. Lightweight dry pieces can move in the fan.
Save cheese, honey, sugar and fresh garlic for after cooking. They can scorch before the centre softens; instead, add them through one of the finishing options once the ears are tender.
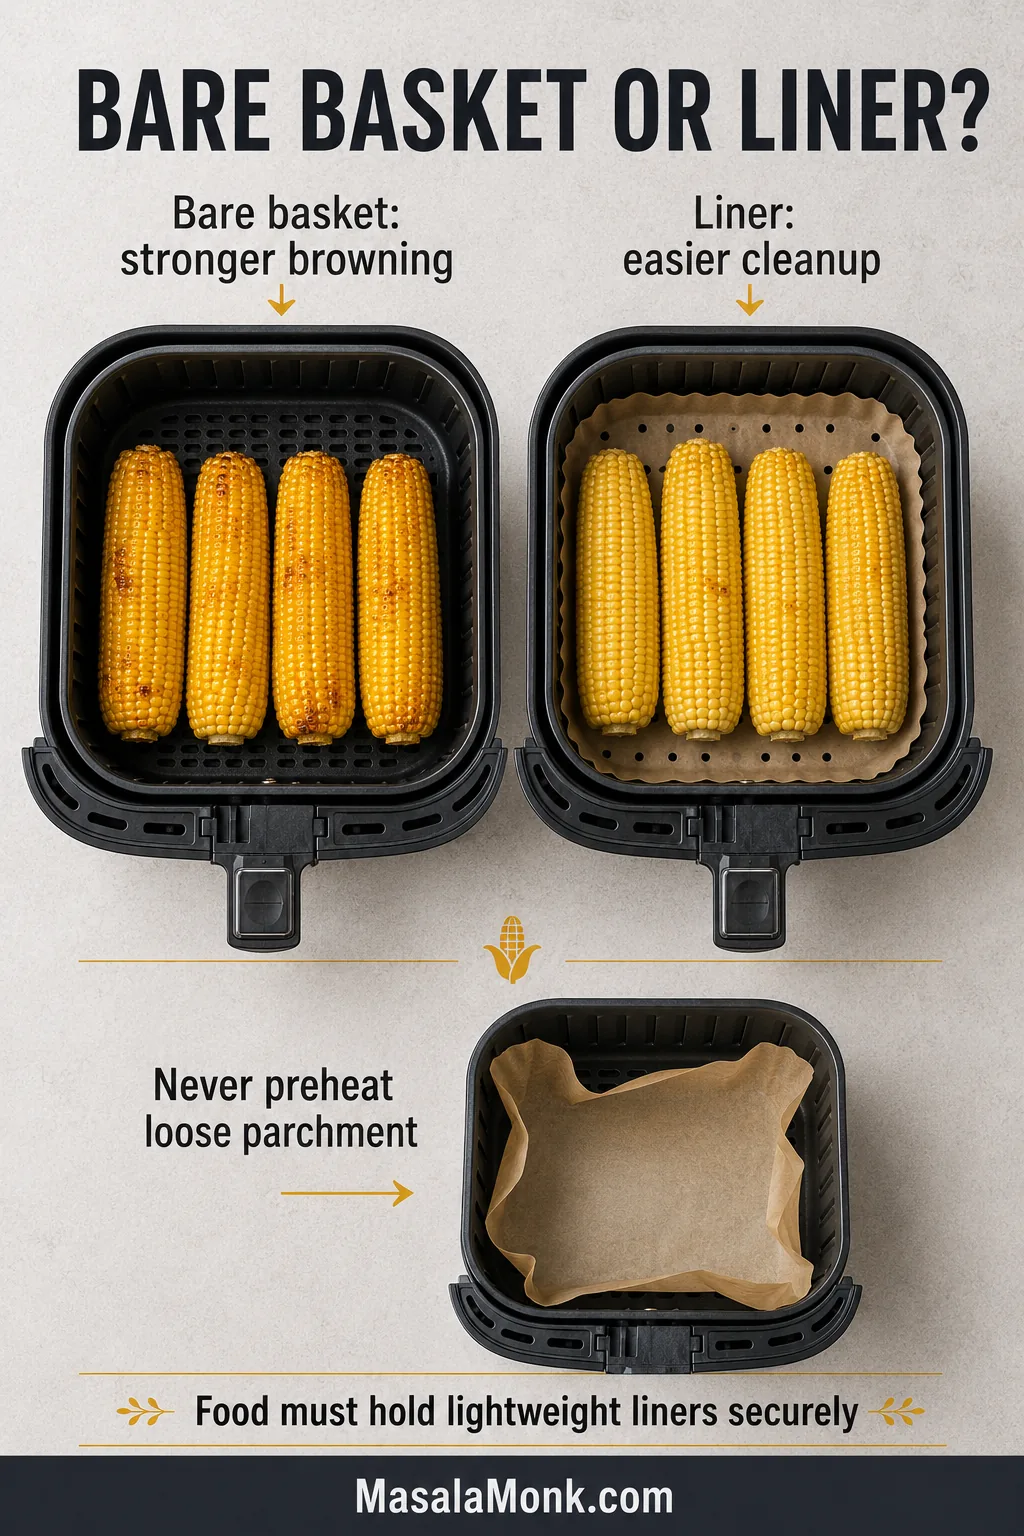
Should You Use a Paper or Silicone Liner?
Liners make cleanup easier. Direct basket contact gives the exposed kernels better airflow and stronger browning, so the lower side may stay paler when a liner is used.
Use the bare air-fryer basket when underside colour matters most; choose a fitted liner when easier cleanup is the greater priority.
Never preheat loose parchment without food securing it. A lightweight sheet can lift toward the heating element. The guide to common air fryer mistakes goes further into crowding, wet food, blocked airflow and basket smoke.
Adjusting for Thick Ears and Different Air Fryers
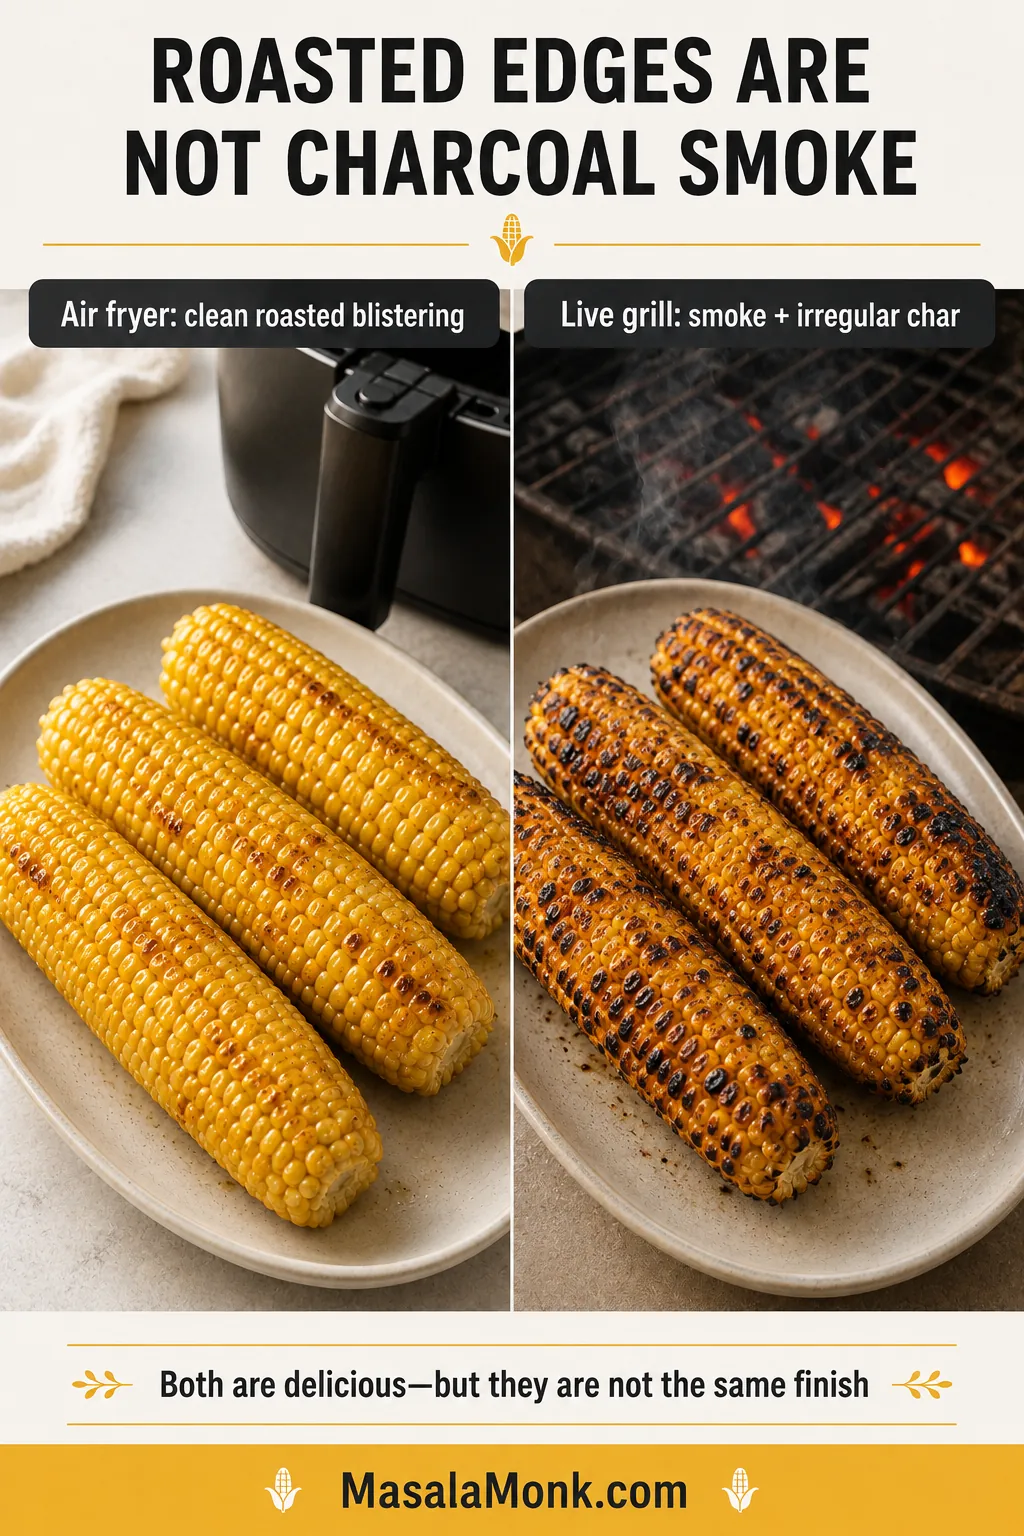
Moving heat gives the exposed rows roasted, blistered patches as the centre warms. It creates more browning than a microwave, but it will not reproduce the smoke of corn cooked over charcoal or a live grill.
Choose the air fryer for controlled tenderness and convenient roasting; choose live fire when genuine smoke is central to the flavour.
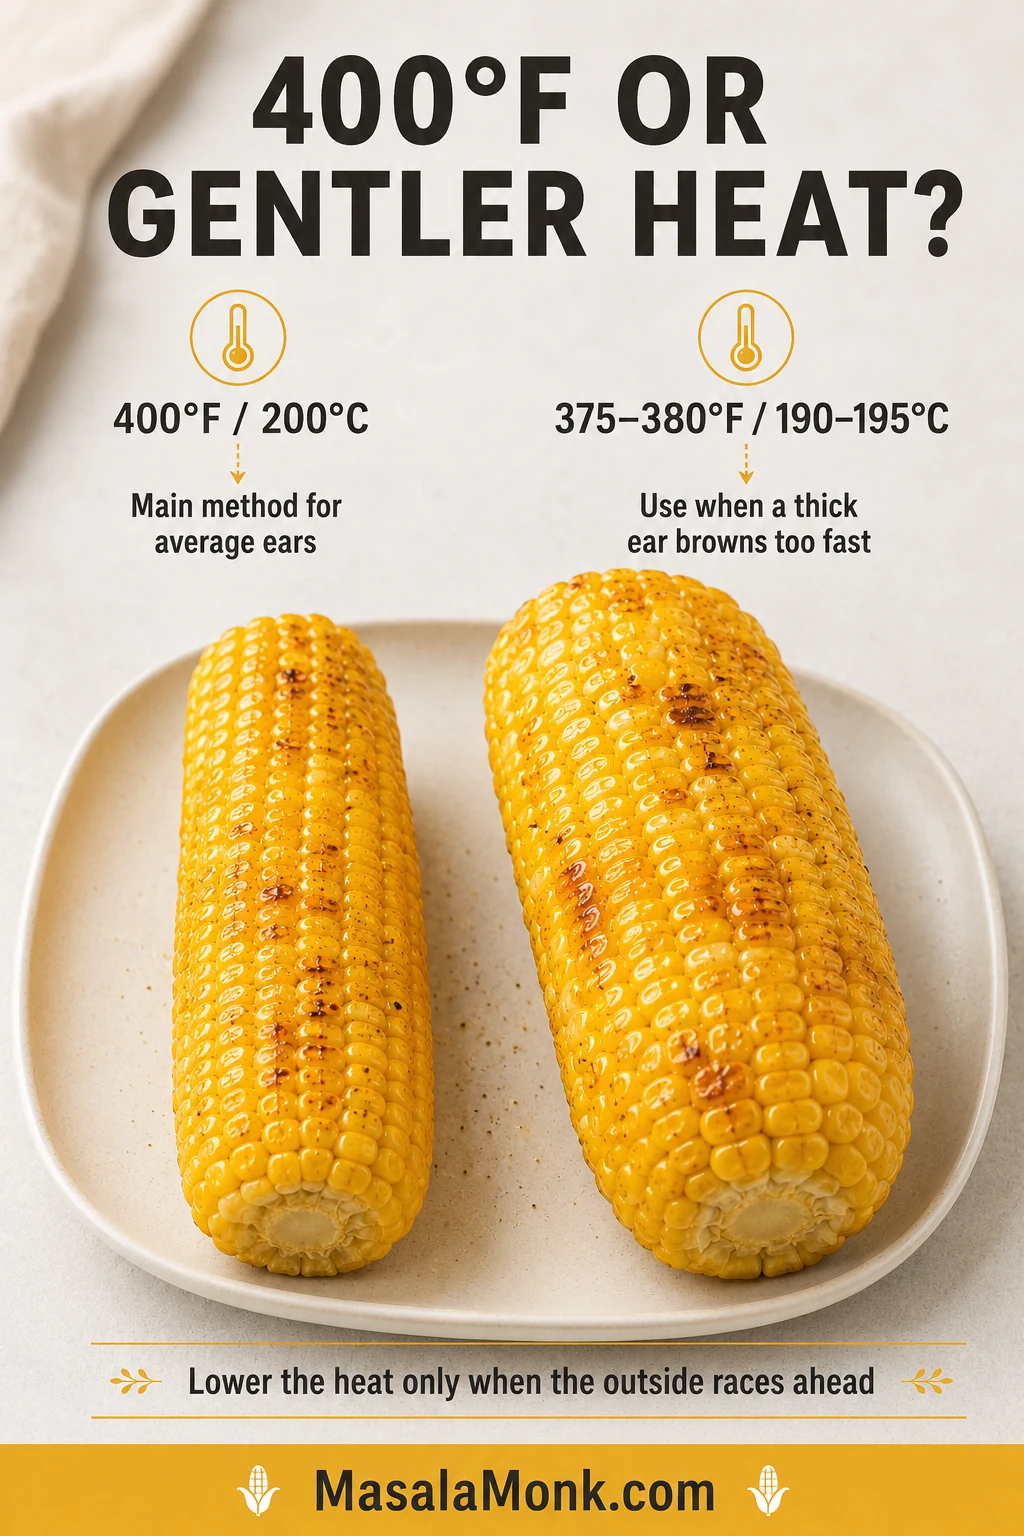
Use 400°F / 200°C for the main method. Lower the heat only when the outside is colouring faster than the centre is softening.
400°F / 200°C — Main Method
Best for average fresh ears and stronger roasted patches. Check early.
375–380°F / 190–195°C — Gentler Adjustment
Use for very thick ears or a compact fryer that darkens the outside before the centre becomes tender.
Treat gentler air-fryer temperature as a correction for premature browning, not the default starting point for every batch.
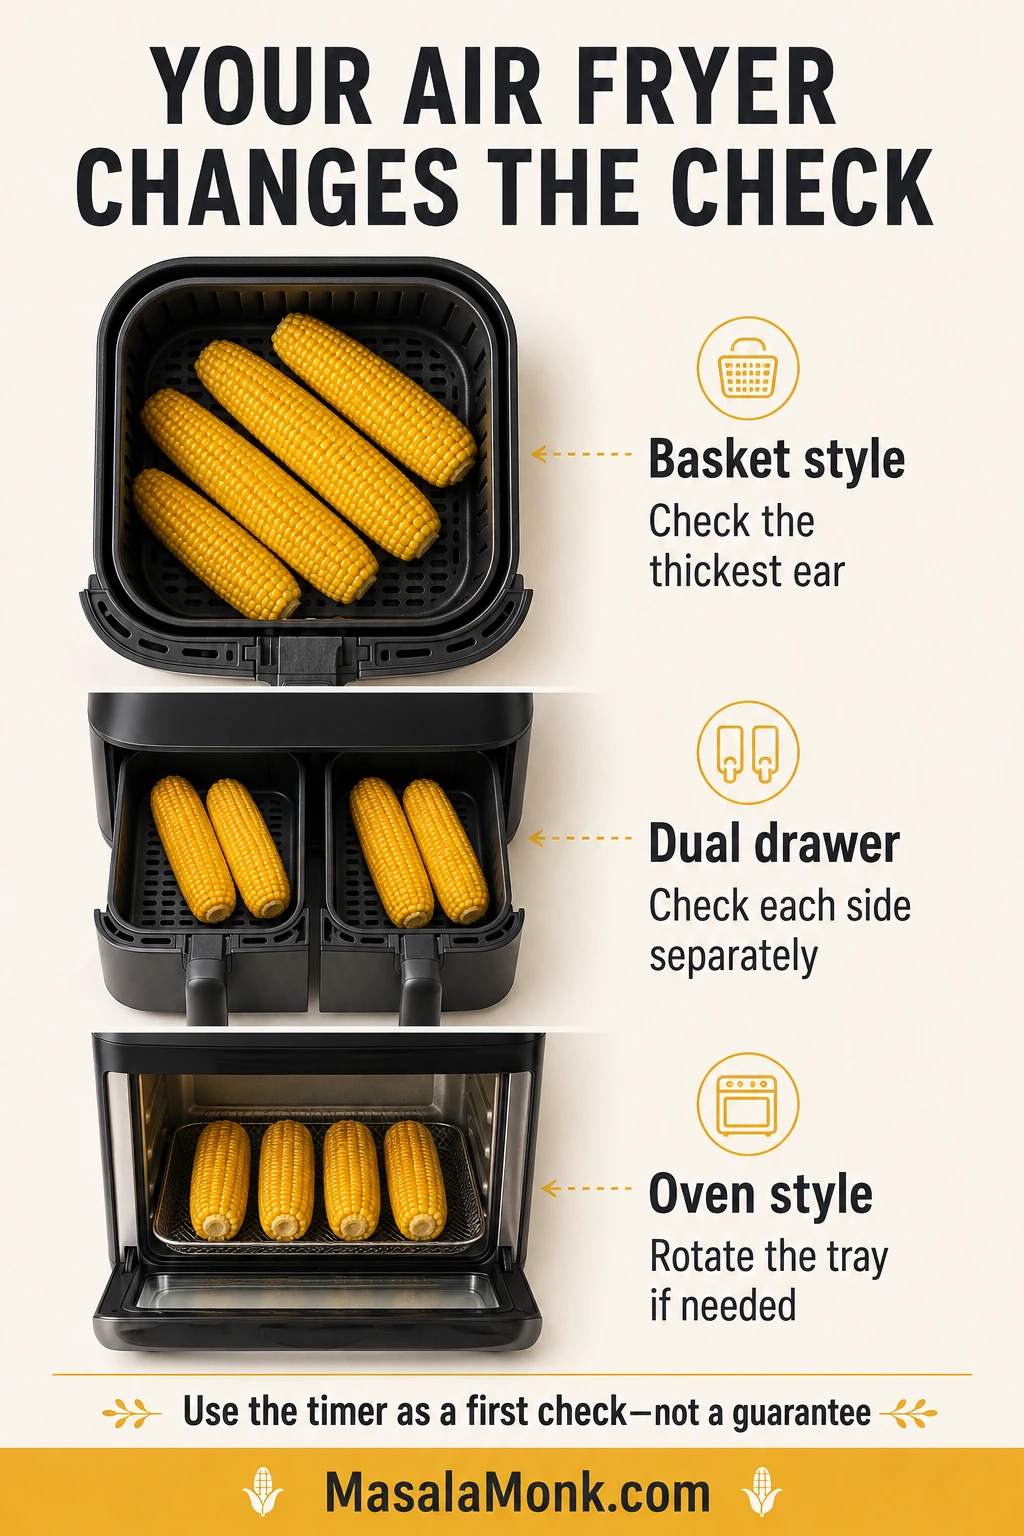
How Different Air Fryer Styles Change the Timing
Timings may shift between basket, dual-drawer and oven-style models; however, the same kernel texture cues still determine doneness.
Thick ears: allow more time for heat to reach the centre.
A full basket: expect the later end of the timing range.
A compact fryer: check sooner because the corn may sit closer to the element.
Dual drawers: inspect both sides separately; they may not finish together.
Oven-style fryer: allow a little longer and rotate the tray if one side colours faster.
A broil, max-crisp or extra-high setting is much more aggressive than Air Fry. Use it only as a brief finishing boost when the appliance manual permits it.
Once you find the timing that suits your machine, note the number and approximate thickness of the ears. That result will be more useful next time than trying to match somebody else’s exact minute.
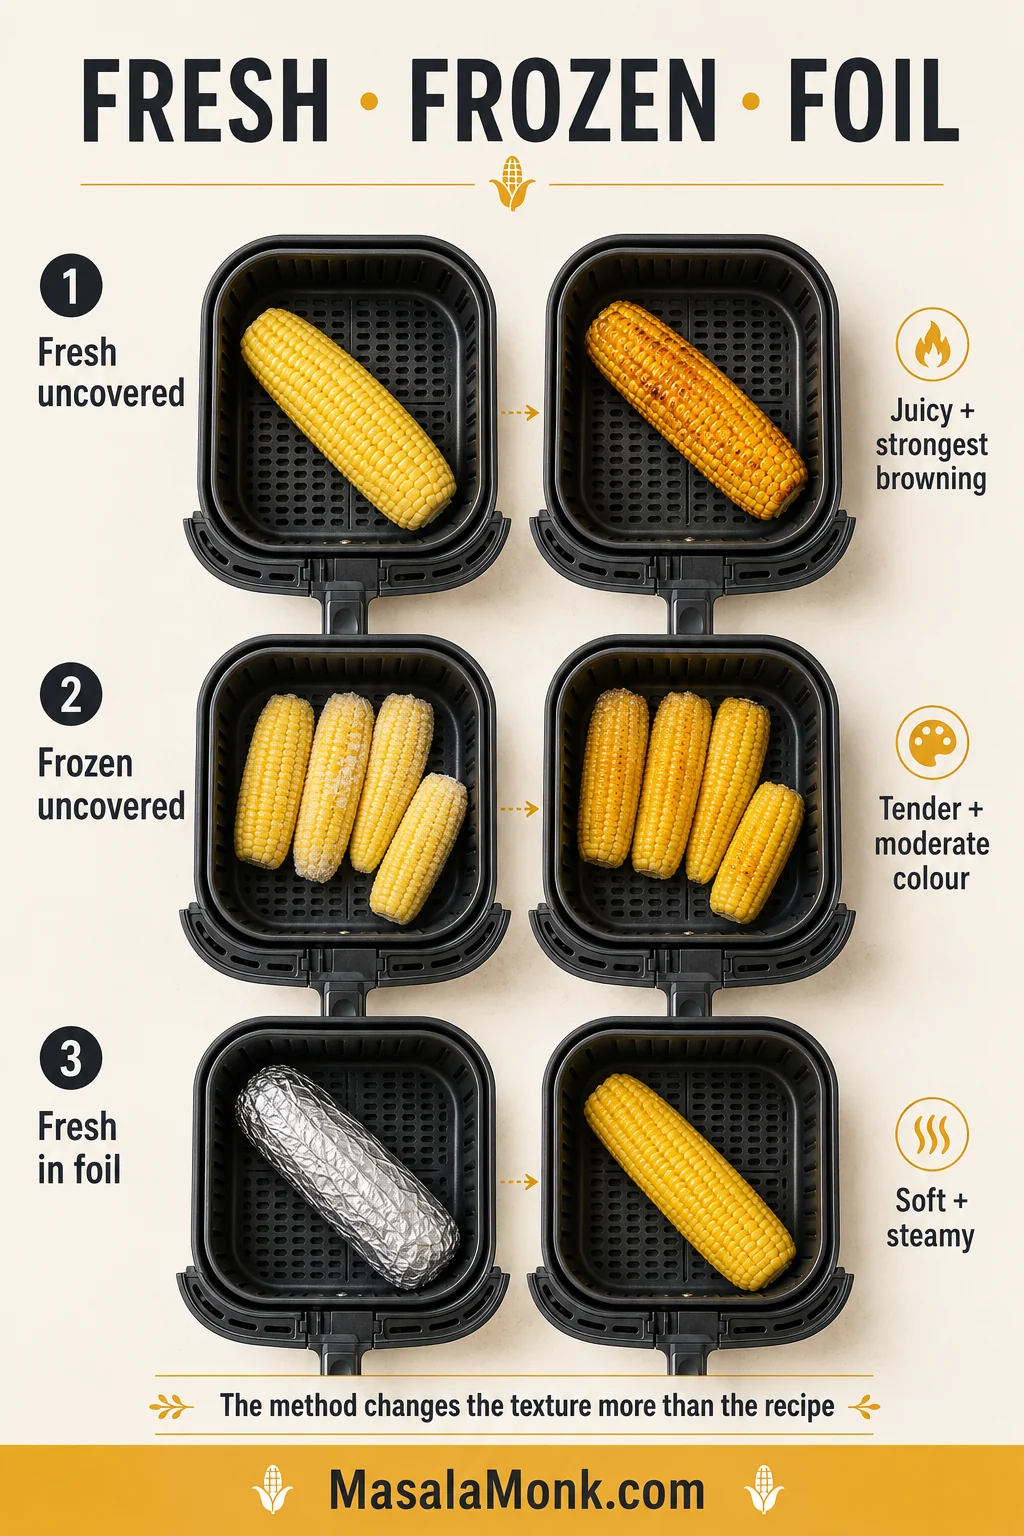
Fresh, Frozen or Foil-Wrapped Corn
Fresh uncovered corn gives the strongest browning. Frozen corn needs time to shed its icy coating, while foil shifts the result toward soft, buttery and steamy.
Foil is primarily a texture decision—not a speed shortcut—because trapped steam softens the kernels while limiting roasted colour.
Air fryer cooking times and textures for fresh uncovered corn, fresh foil-wrapped corn and frozen uncovered corn
Corn
Method
First check
Usual time
Texture
Fresh
Uncovered
8 minutes
8–12 minutes
Juicy with the strongest browning
Fresh
Foil-wrapped
11 minutes
11–15 minutes
Soft and steamy with little colour
Frozen
Uncovered
12 minutes
12–15 minutes for half-cobs or average ears
Tender with moderate colour
How to Air Fry Frozen Corn on the Cob
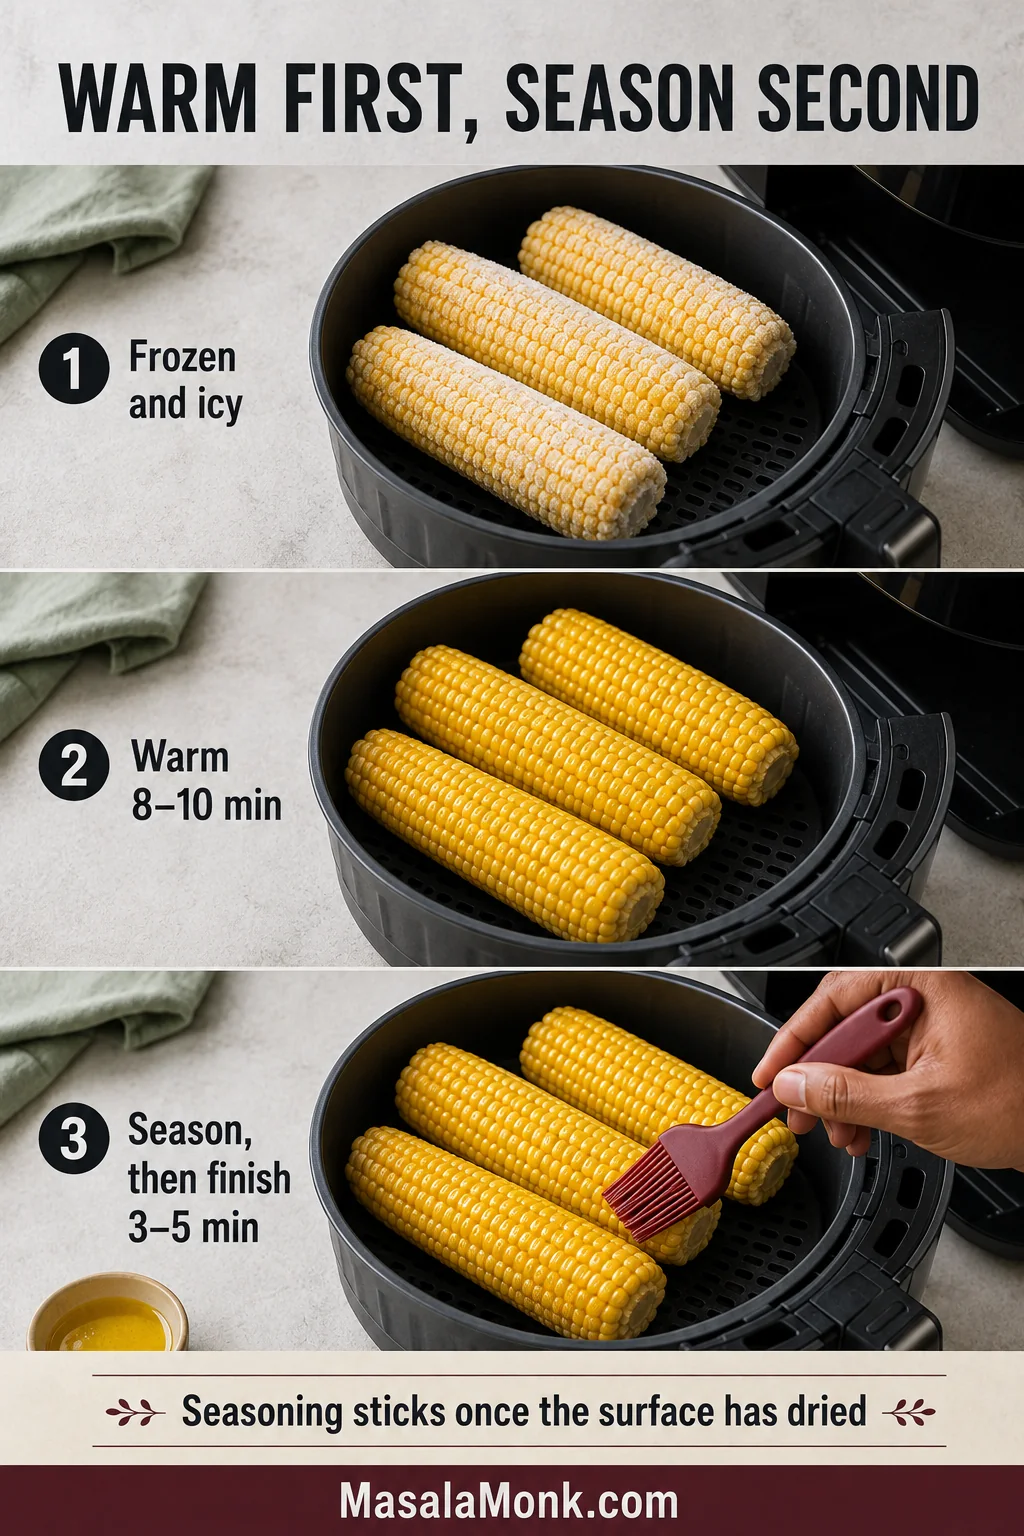
Frozen corn releases water as the ice melts. Butter and dry seasoning can slide away during that early stage, and the extra moisture slows browning.
After the warming stage, blot away any collected meltwater before seasoning; otherwise, the new coating may still slide from the corn.
Arrange frozen half-cobs or average ears in one layer.
Air fry at 400°F / 200°C.
Turn once the outside has thawed and begun to dry.
Test a kernel at 12 minutes.
Continue until tender, usually 12–15 minutes. Large whole frozen ears may need longer.
Add butter and seasoning once the corn is hot and no longer icy.
For better seasoning adhesion: warm the frozen corn for 8–10 minutes first. Once the icy surface has dried, brush with butter or oil, season and finish at 400°F / 200°C for another 3–5 minutes, or until tender. Then choose a buttery, spicy or tangy finish.
Thawed corn cooks faster than fully frozen corn. Start near the early end of the fresh-corn range and check frequently.
How to Air Fry Corn in Foil
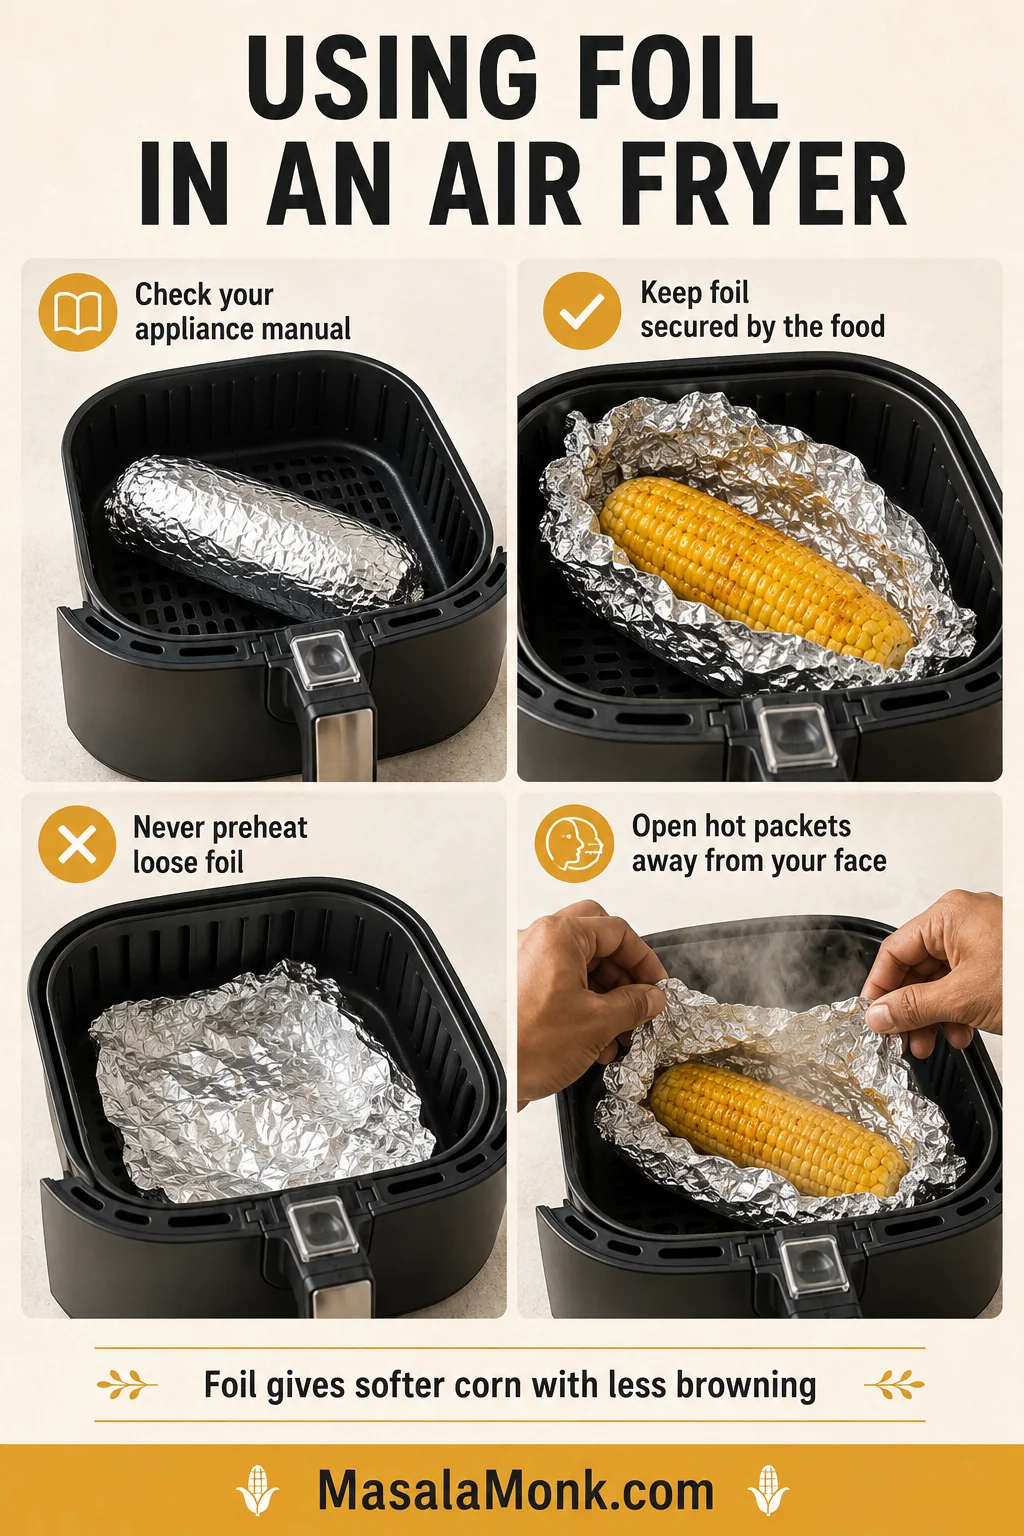
Foil traps steam and butter around each ear, giving you softer kernels with much less roasted colour. Some manufacturers permit foil when food holds it securely; others advise against it.
Philips, for example, warns that foil or baking paper can restrict airflow or lift toward the heating element. Check the Philips Airfryer foil and paper guidance, then follow the manual for your own model.
Even when foil is permitted, keep basket vents exposed so hot air can circulate instead of turning the appliance into a sealed steamer.
Spread ½ tablespoon / 7 g butter over each fresh ear and season lightly. This butter replaces the 2 tablespoons used for serving in the main recipe.
Wrap each ear securely without covering the entire basket base.
Air fry at 400°F / 200°C, turning once.
Test the corn at 11 minutes and expect 11–15 minutes.
Open the packet away from your face because hot steam will escape.
For more colour, remove the foil and cook uncovered for another 1–3 minutes.
Add lemon or lime after cooking for the brightest flavour.
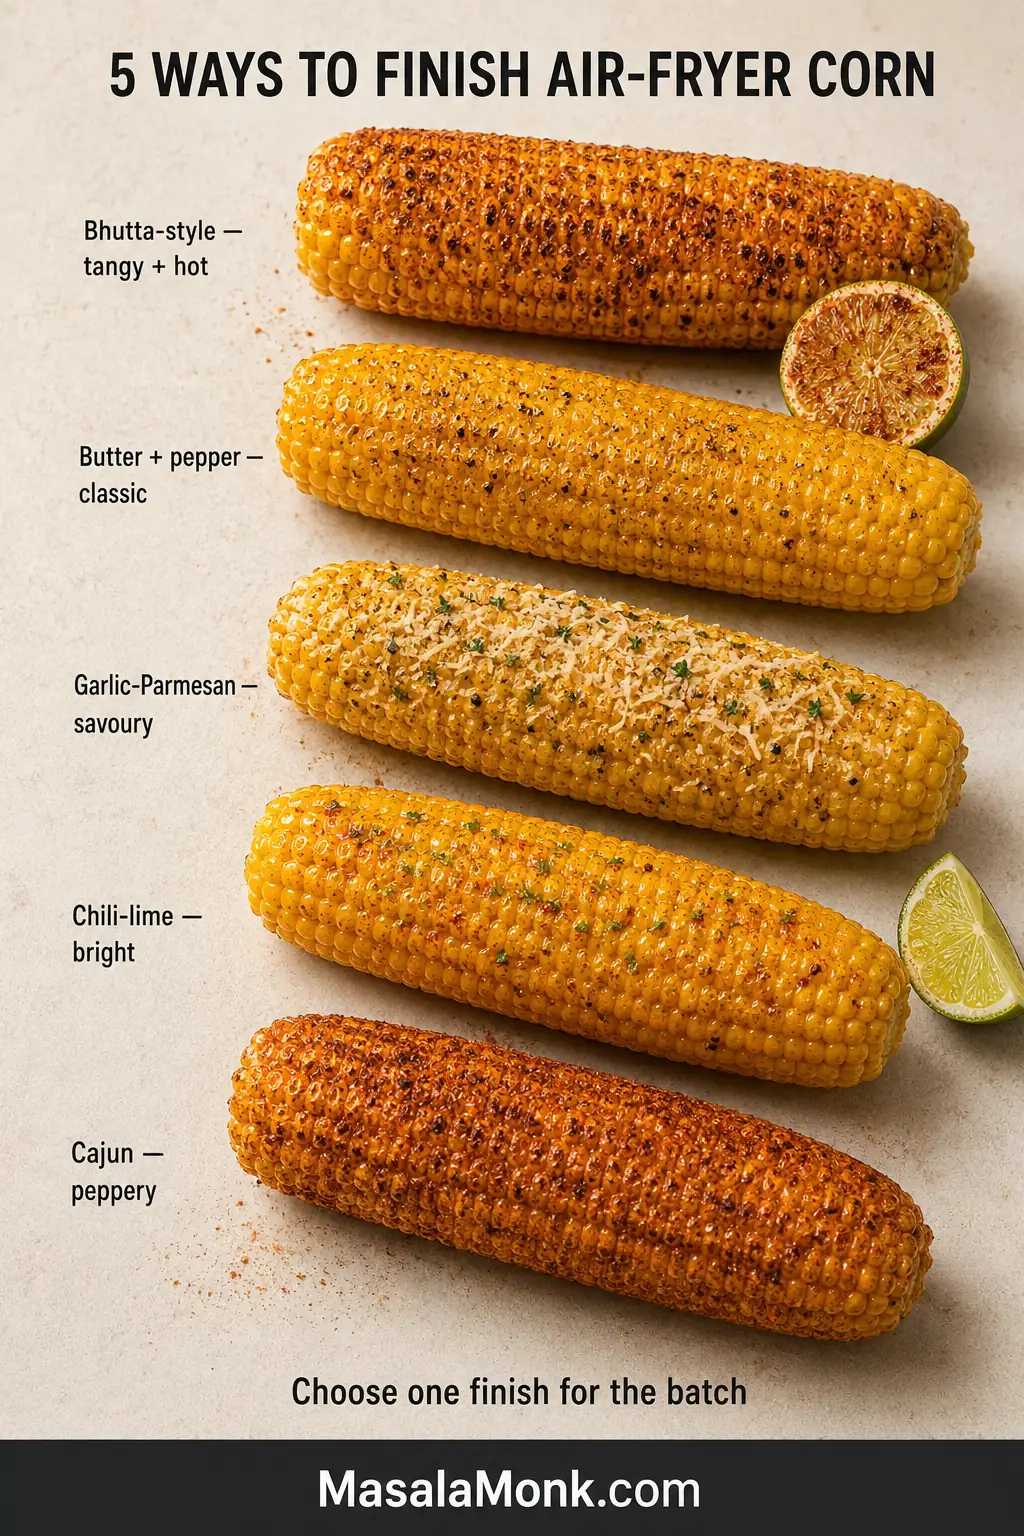
Five Easy Ways to Season the Corn
Keep it buttery and simple when everyone wants something familiar, use chili-lime beside a rich main dish, choose Cajun seasoning for a peppery edge, or reach for lime and chaat masala when the plate needs something sharp and bright.
Before choosing a finish: each variation below seasons four ears and replaces the 2 tablespoons of serving butter in the main recipe. Bhutta-style corn uses no butter unless you choose to add it. When using Parmesan, Cajun seasoning or chaat masala, reduce or omit the salt added before cooking and adjust after tasting.
Bhutta-Style Lime and Chaat Masala
Use: 1 lime, 1 teaspoon chaat masala and ¼ teaspoon red chili powder. Butter is optional.
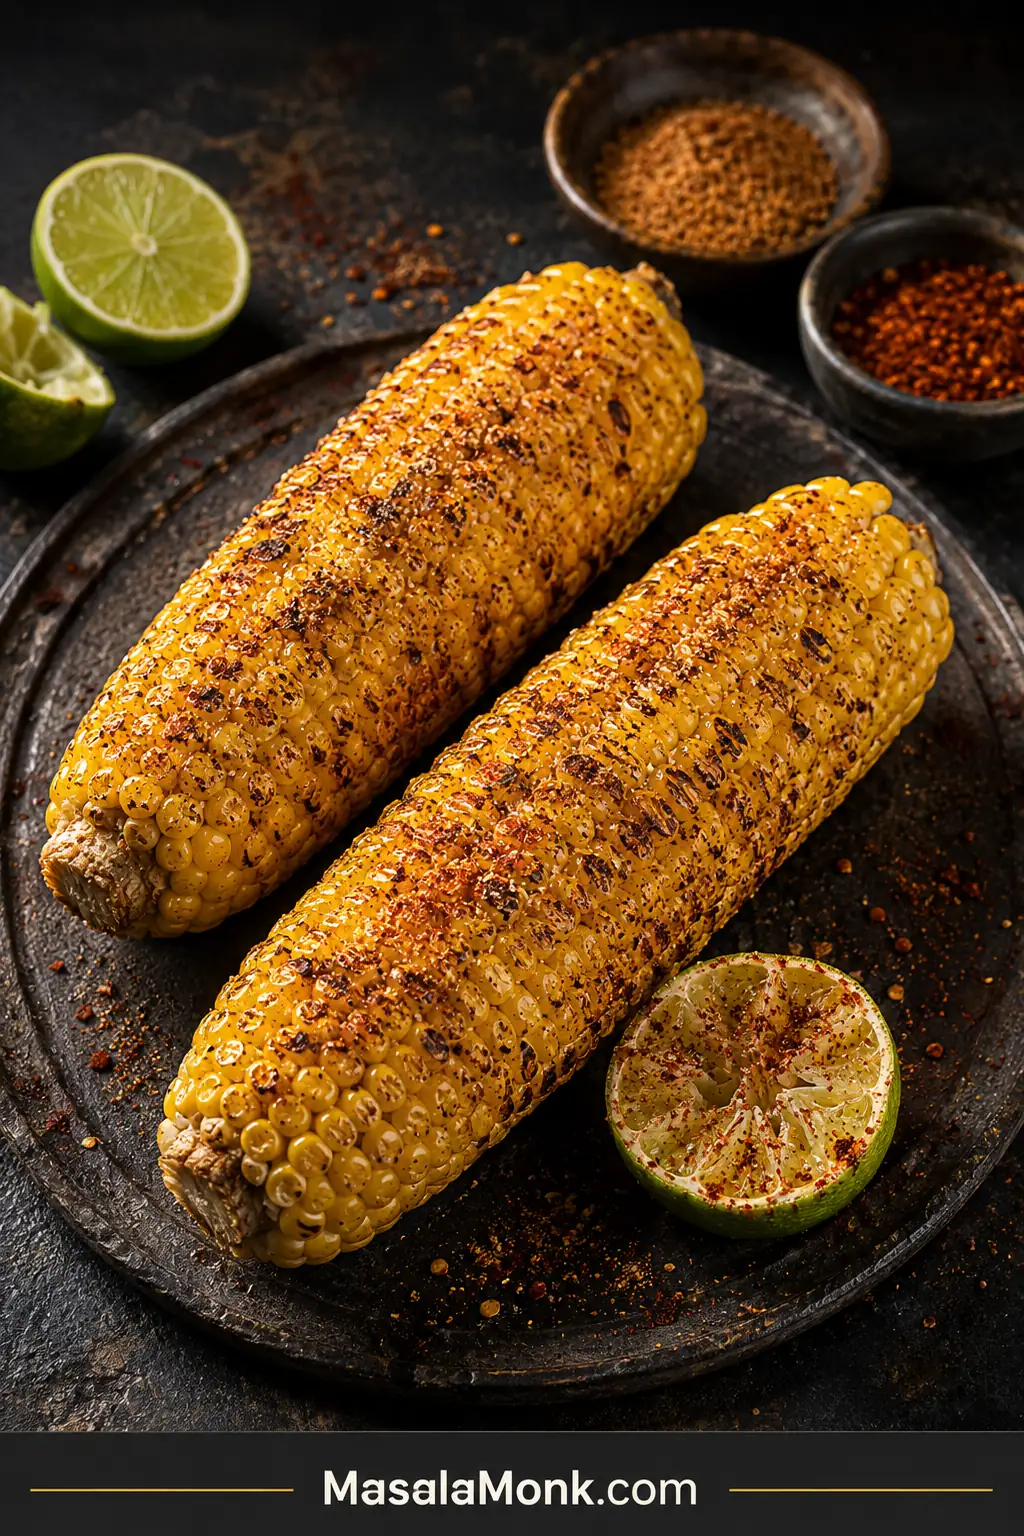
This is the brightest finish in the set—tangy, salty and hot rather than rich and buttery. Place the spices on the cut side of the lime, then rub it over the hot corn. The juice carries the seasoning between the rows.
Apply the lime-and-spice rub after cooking so the citrus stays bright and the damp masala does not scorch against the hot basket.
Classic Butter and Pepper
Use: 2 tablespoons / 28 g melted butter, black pepper and salt to taste.
Brush the butter over the hot corn, add pepper and taste before adding more salt. Simple, sweet and buttery.
Garlic-Parmesan
Use: 2 tablespoons / 28 g melted butter, ½ teaspoon garlic powder, ¼ cup finely grated Parmesan and 1 tablespoon chopped parsley.
Mix the garlic into the butter, brush it over the corn, then add the Parmesan and parsley for a savoury, nutty finish.
Chili-Lime
Use: 2 tablespoons / 28 g melted butter, ½ teaspoon mild chili powder, plus the zest and juice of 1 lime.
Brush with chili butter, then add the lime zest and juice for a bright finish that cuts through richer main dishes.
Cajun Corn
Use: 2 tablespoons / 28 g melted butter and 1–1½ teaspoons Cajun seasoning.
Brush with butter, sprinkle lightly and taste before adding separate salt. The result is warm, peppery and lightly smoky.
What Went Wrong—and How to Fix It
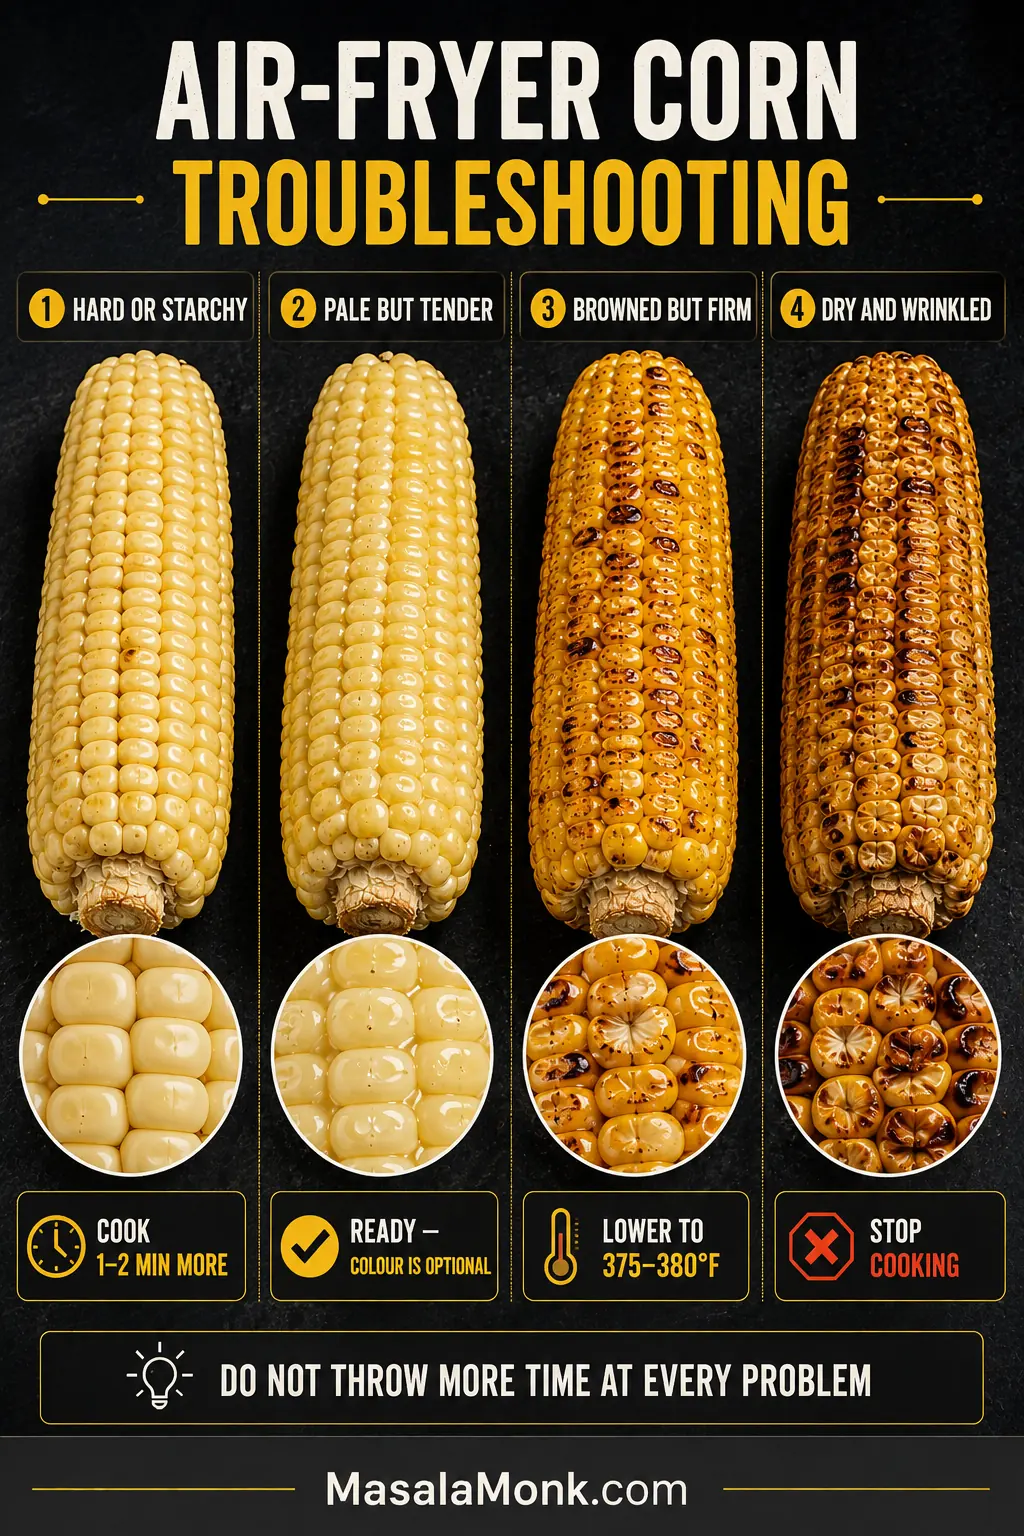
Plump kernels that still feel hard or dense usually need more cooking. Pale but tender corn is ready—add colour only if you want it. Browned but firm corn needs gentler heat. If tender corn still tastes starchy, the ear may simply be older rather than undercooked.
Do not throw more time at every problem. Many batches can still be improved while dinner comes together.
Use the first correction only when the centre is still hard or dense; tender corn that tastes starchy is more likely an age issue than a timing issue.
Texture and Doneness Problems
Air fryer corn troubleshooting for undercooked, pale, browned, dry and starchy kernels
What you see
Why it happened
What to do now
Kernels look plump but remain hard or starchy
Thick ears, a full basket or too little cooking time
Continue in 1–2-minute intervals and test the thickest ear again.
Corn is pale but tender
Wet kernels, foil, a liner or limited airflow
Serve it as it is, or uncover and create more space for another minute when you want deeper colour.
Corn is pale and firm
It needs more cooking and better surface drying
Continue uncovered and roll the ears once more.
The browned side is dark but the centre is firm
The outside heated faster than the middle
Lower the temperature to 375–380°F / 190–195°C and continue in short intervals.
Kernels are dry or wrinkled
Too much time, slim ears or older corn
Remove immediately. Butter adds richness but cannot replace lost moisture.
Kernels look full but still taste starchy
The corn may have been older or less sweet before cooking
Serve with butter and a bright seasoning; more cooking is unlikely to restore sweetness.
Uneven Browning, Seasoning and Smoke Problems
Air fryer corn troubleshooting for uneven cooking, burnt toppings, frozen seasoning and basket smoke
What you see
Why it happened
What to do now
One side is burning
The ear is close to the element or was turned too late
Roll the ear, lower the heat if needed and check more frequently.
Different ears are cooking at different speeds
The batch contains mixed thicknesses
Remove tender ears and leave the thicker ones to continue.
Butter, garlic, cheese or sugar is burning
Delicate ingredients were added too early
Remove badly burnt bits and add a fresh topping after cooking.
Seasoning slides off frozen corn
The icy outside is melting
Warm the corn first, then season it once the ears are hot and the surface has dried.
The basket is smoking
Fat, sugary seasoning or old residue is reaching the base
Stop the air fryer if smoke is heavy or persistent. Let it cool, remove burnt residue or excess fat, and clean the basket before continuing.
Make Ahead, Storage and Reheating
Air fryer corn is best as soon as it leaves the basket, while the kernels are hot and the blistered patches still taste roasted.
Reheat only the portion being served, then refresh it with butter, lime or seasoning rather than repeatedly drying the entire stored batch.
Prepare ahead: shuck the corn earlier in the day and refrigerate it tightly covered so the exposed kernels do not dry out.
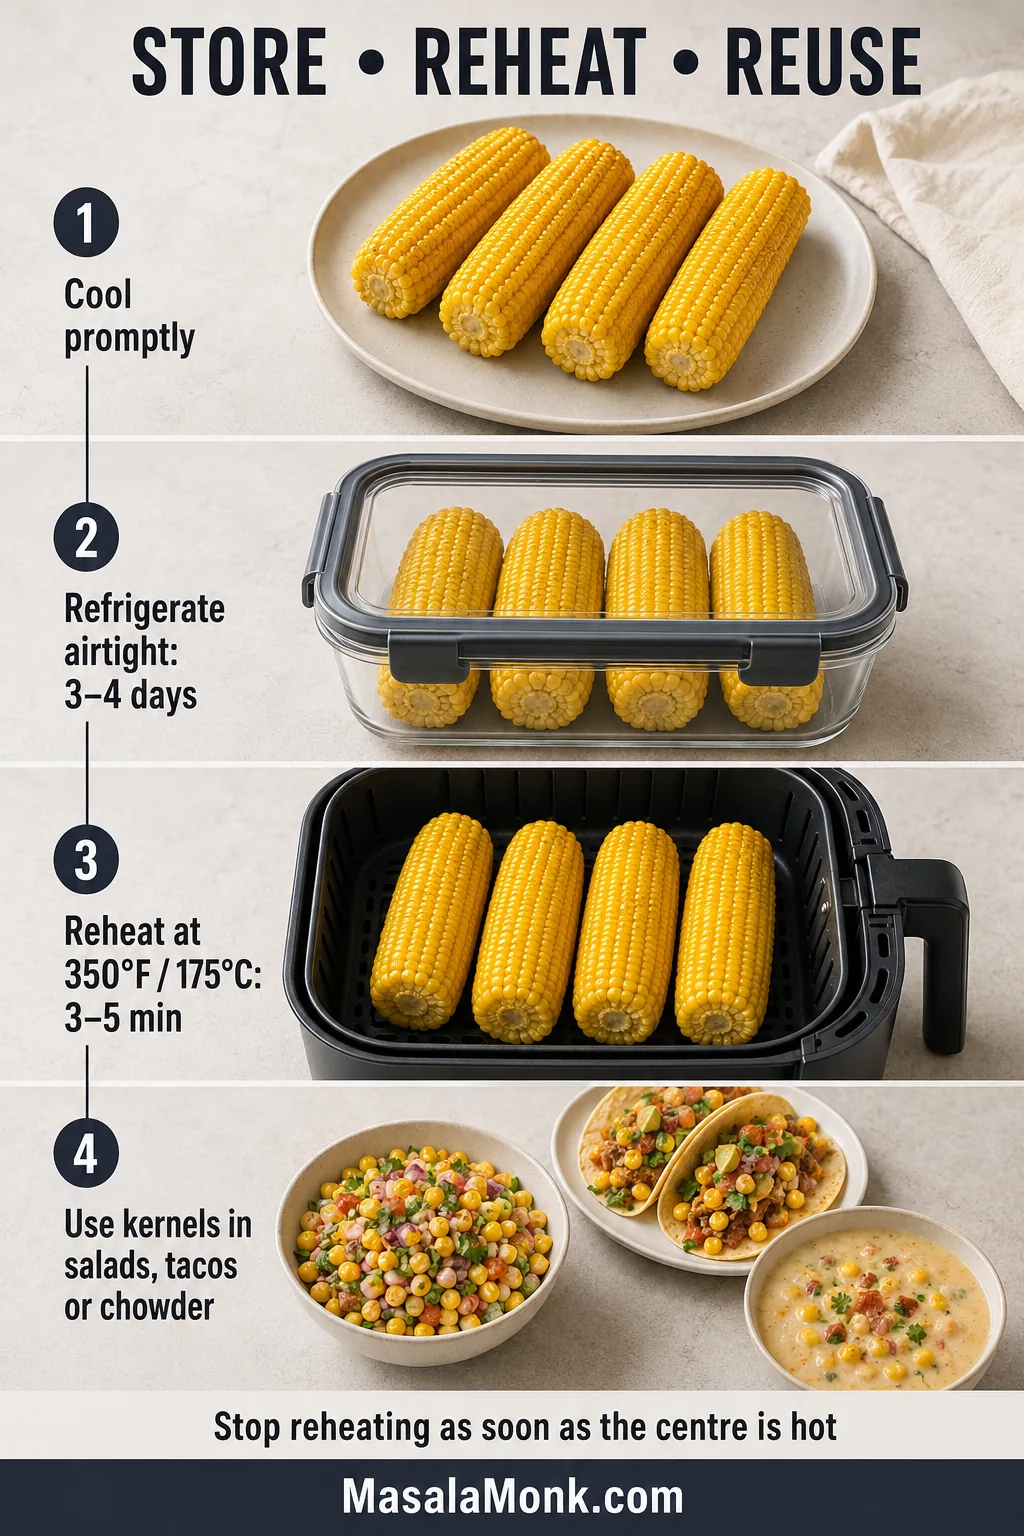
Refrigerate: cool cooked corn promptly and store it in an airtight container for up to 3–4 days.
Reheat: air fry at 350°F / 175°C for 3–5 minutes, checking early.
Serve again: add a little fresh butter after reheating rather than warming the corn in a pool of butter.
Stop as soon as the centre is hot; extended reheating tightens the kernel skins. For broader refrigerator and freezer guidance, see the FoodSafety.gov cold-storage chart.
Have several ears left? Slice off the kernels for salsa, salads, tacos or grain bowls, or turn a larger amount into creamy vegetarian corn chowder.
What to Serve With Air Fryer Corn
For a cookout or summer dinner, make a bowl of crisp homemade coleslaw first and refrigerate it while the meal comes together. Air fry the corn last so the slaw stays cold and crunchy while the ears reach the table hot.
Chili-lime corn works especially well with honey garlic salmon because the lime cuts through the sweet glaze.
For a vegetarian plate, pair bhutta-style corn with a sturdy black bean burger. Lime and chaat masala brighten the burger’s earthy filling.
When one finish will cover the whole batch, use the chart below to match the corn to the meal. For mixed preferences, season individual ears separately after cooking.
Use this chart when all four ears will share one finish; for mixed preferences, season individual ears separately after cooking.
Frequently Asked Questions
Why Do Air-Fryer Corn Recipes Give Such Different Cooking Times?
Ear thickness, basket load, preheating, appliance shape and the desired amount of browning all affect the final time. Treat a published time as a first-check point, then stop when the thickest ear is tender and juicy.
For a single-screen recap, use this guide after identifying the approximate thickness and basket load. It condenses the checkpoints, while tenderness still decides the finish.
A brief early basket check costs less than several unattended extra minutes, especially when slim and thick ears cook together.
Do You Need to Soak Corn Before Air Frying?
No. Soaking adds moisture to the exposed kernels and delays browning. Remove the husks and silk, dry the ears and cook them directly.
Do You Need to Boil or Microwave Corn First?
No. Fresh average ears cook completely in the air fryer. If very thick ears brown before the centre softens, lower the temperature to 375–380°F / 190–195°C and continue in short intervals.
Should You Salt Corn Before or After Air Frying?
A light seasoning before cooking gives the kernels a base layer of flavour. Reduce or omit it when the finish contains Parmesan, Cajun seasoning or chaat masala, then adjust after tasting.
Can You Cook More Than Four Ears?
Cook only as many ears as fit in one layer. For a larger batch, work in rounds and check the second batch slightly earlier because the air fryer is already fully hot.
This basket shows the practical limit: the ears may touch at narrow points, but the fuller middle sections still need open space for moving air.
The narrow ends may touch, but leave breathing room around the fuller middle sections where the ears occupy the most basket space.
Can You Air Fry Corn Without Oil?
Yes. Place dry, shucked ears directly in the basket and follow the fresh-corn timing. The kernels soften normally, though the exposed rows may brown less evenly and dry seasoning will not cling as readily.
Can You Air Fry Corn in the Husk?
Some appliances permit husk-on corn, but loose silk and dry husk can move toward the heating element. Because timing and appliance guidance vary, fully shucked corn is the more predictable choice for this recipe.
Once the rest of the meal is ready, bring the corn out last and let each person add butter, lime or spice at the table. The point is not matching every ear; it is serving each one while the kernels are still hot and juicy.
Serve the ears as soon as they are tender; finishing choices can happen at the table.
Tender First, Char Second
For three or four average fresh ears, begin at 400°F / 200°C and test the thickest ear at eight minutes. Turn once, stop when the kernels are juicy and tender, and add only a short final burst when you want darker roasted patches.
Bring the corn to the table while the butter is still disappearing between the rows. Some ears may be only lightly browned while others are more deeply blistered; tenderness is the part that matters.
How long did your corn need? Share the time below—and add your air-fryer model if you know it.
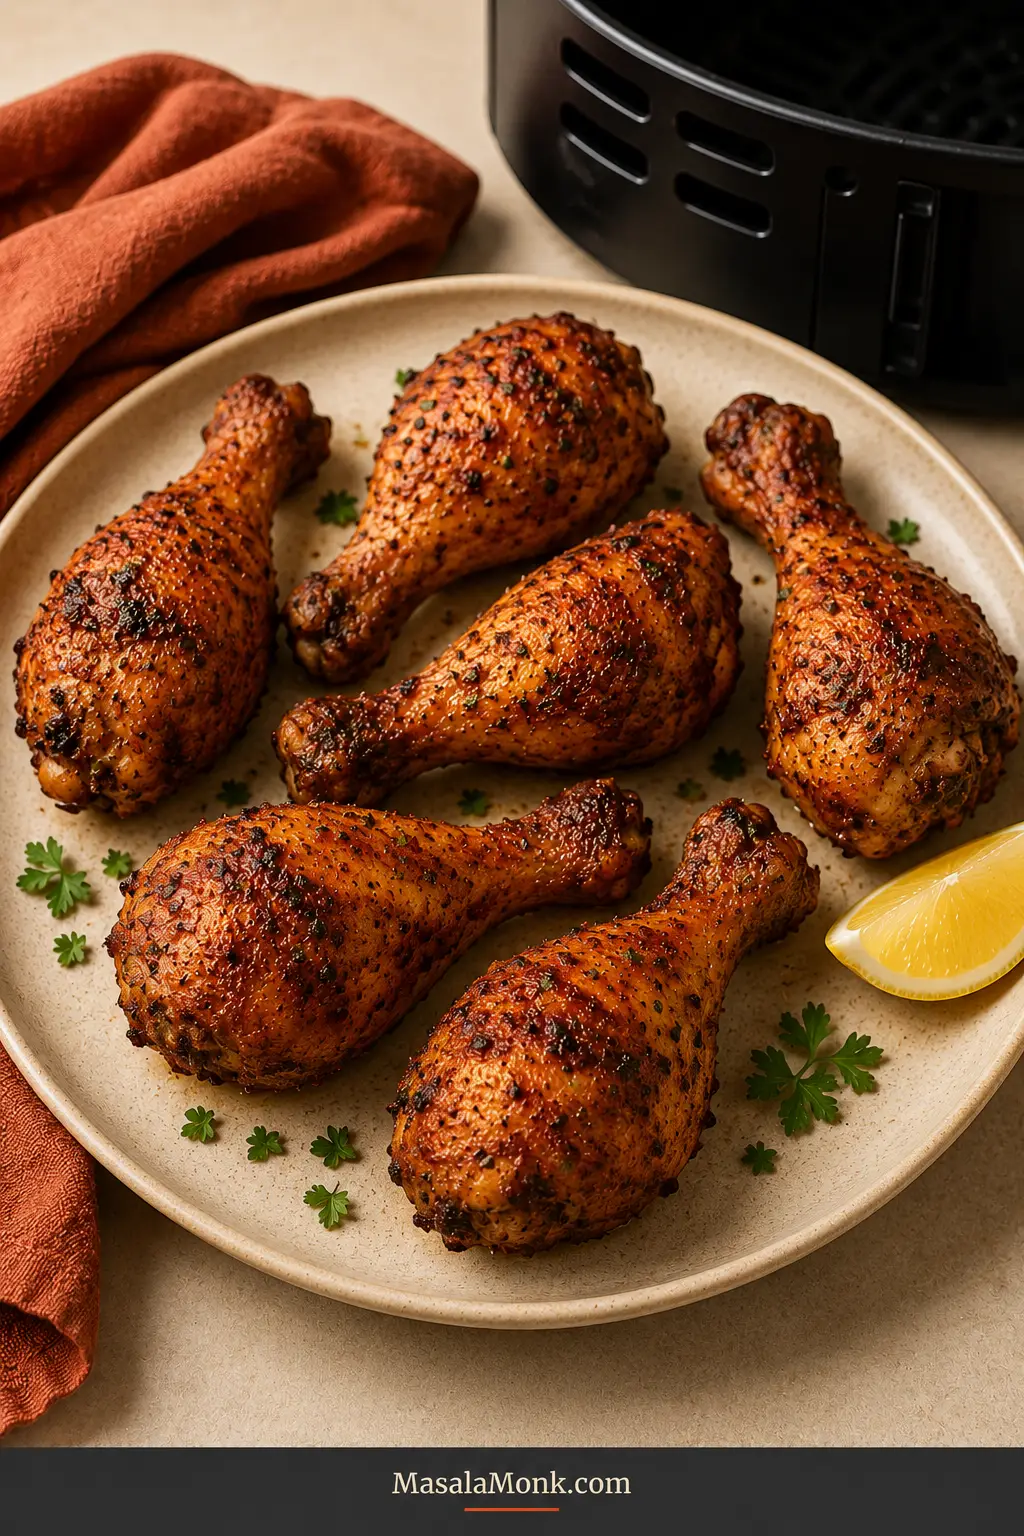
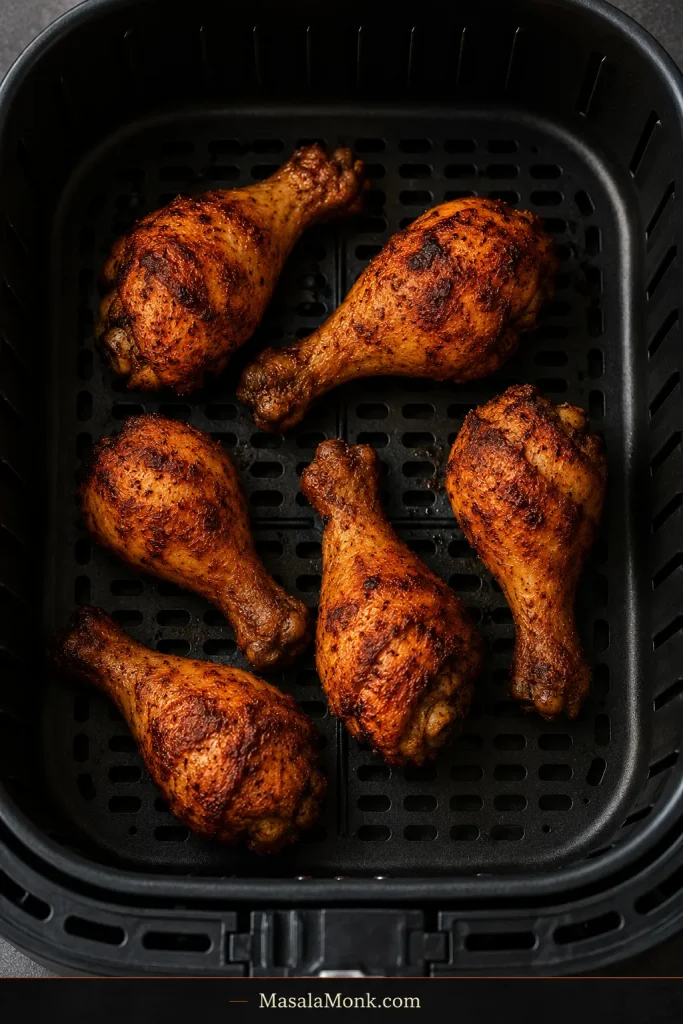
A good air fryer chicken drumstick delivers the contrast bone-in chicken should have: browned skin that crackles under the tongs and dark meat that stays succulent right beside the bone.
The awkward part is timing. A small drumstick can be ready while a thicker one still needs several minutes, and a beautifully browned exterior cannot tell you what is happening at the deepest point. One fixed number will suit some packages and disappoint with others.
This recipe keeps the weeknight method simple without pretending every drumstick is identical. Start with thawed chicken; dry it well, leave room around each drumstick, turn once and check the largest one first.
For pieces weighing about 4–4½ oz / 113–128 g each, dinner is ready in about 30 minutes, including a short rest. Larger and frozen drumsticks need longer, while flour-coated or glazed versions need a small method adjustment.
The piece count matters less than the weight of the largest drumstick. Once that idea is clear, an uneven supermarket package becomes much easier to manage.
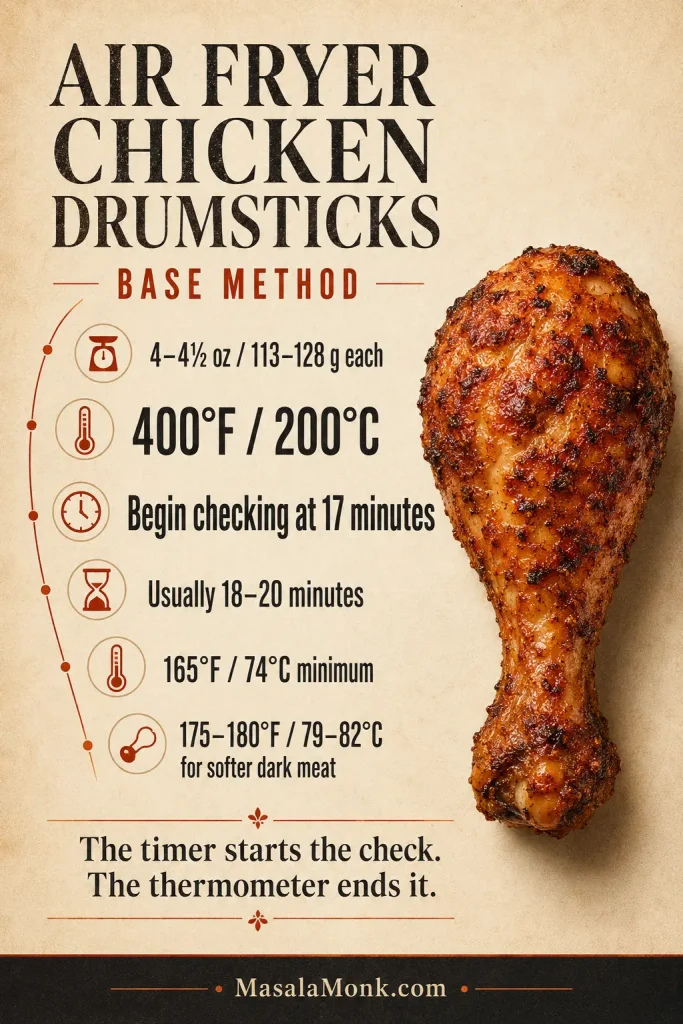
Drumsticks weighing about 4–4½ oz / 113–128 g each: cook at 400°F / 200°C and begin checking at 17 minutes. Most finish around 18–20 minutes.
Drumsticks above about 5½ oz / 156 g: use 380°F / 190°C and the weight chart below.
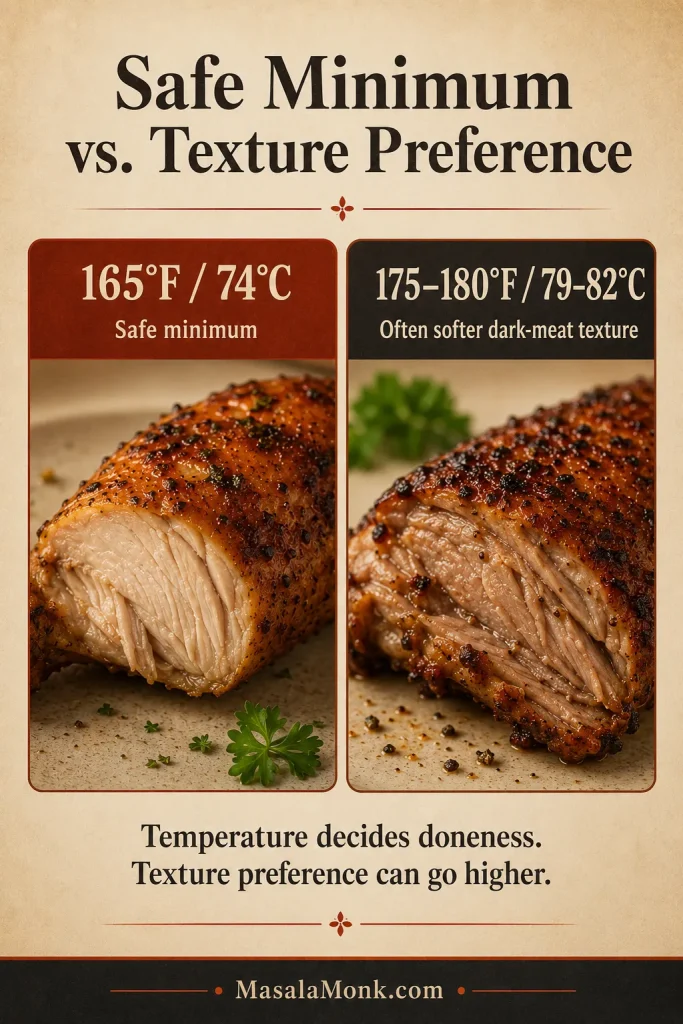
Chicken is safe at 165°F / 74°C; many people prefer the softer texture of dark meat closer to 175–180°F / 79–82°C. The timer starts the check; the thermometer ends it.
Use this as a first-check roadmap for drumsticks weighing about 4–4½ oz / 113–128 g each; the thermometer still decides the finish.
Make it now
Air Fryer Chicken Drumsticks Recipe
Start with this unbreaded version: crisp natural skin, a smoky paprika-garlic flavor and a cooking time based on actual drumstick weight—not a generic piece count. Here, “chicken legs” means drumsticks, not attached thigh-and-drumstick leg quarters.
Recipe at a glance
Yield: 6 drumsticks; serves 3 generously or 4 with substantial sides
Preparation: About 5–10 minutes
Air frying: 18–20 minutes
Resting: About 5 minutes
Total time: About 28–35 minutes
Temperature: 400°F / 200°C
Safe minimum: 165°F / 74°C
Ingredients
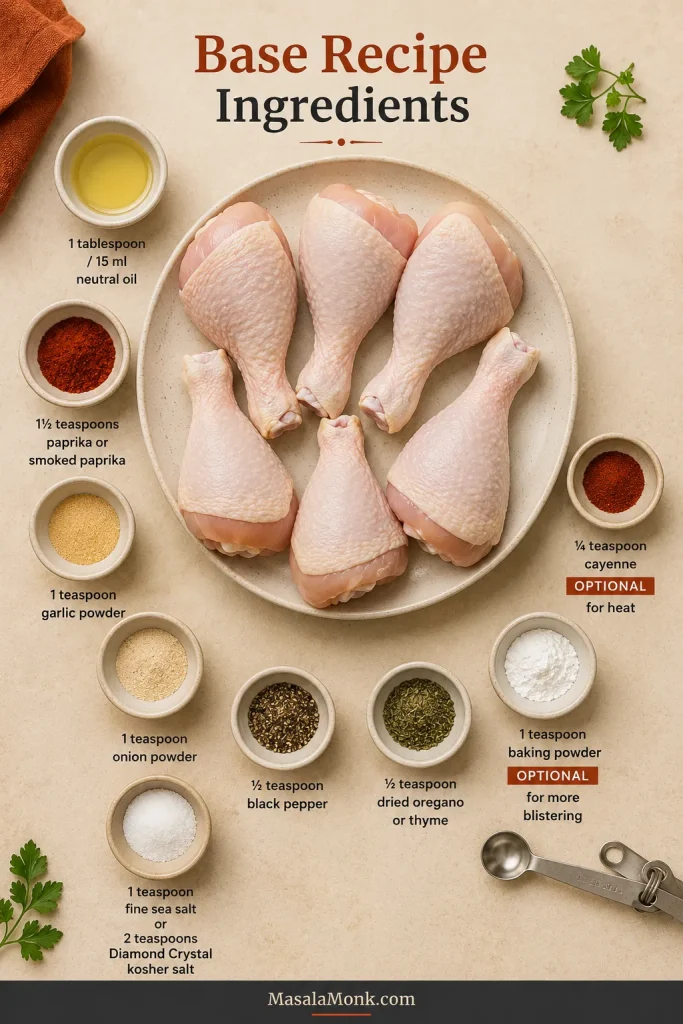
6 skin-on chicken drumsticks, thawed and refrigerator-cold Target weight: 4–4½ oz / 113–128 g each; 24–27 oz / 680–770 g total
Neutral cooking oil: 1 tablespoon / 15 ml
Paprika or smoked paprika: 1½ teaspoons / about 3 g
Garlic powder: 1 teaspoon / about 3 g
Onion powder: 1 teaspoon / about 2.5 g
Fine sea salt: 1 teaspoon / about 5–6 g, or about 2 teaspoons Diamond Crystal kosher salt
Black pepper: ½ teaspoon / about 1 g
Dried oregano or thyme: ½ teaspoon
Cayenne: ¼ teaspoon, optional
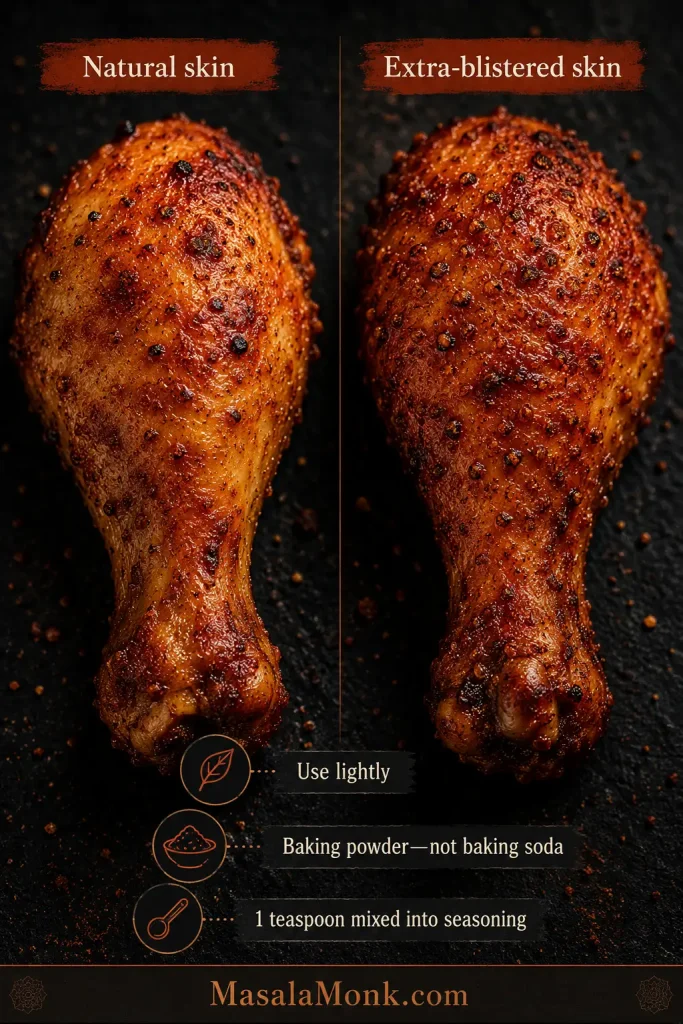
Baking powder: 1 teaspoon / about 4 g, optional for more blistered skin
Oil helps seasoning cling, while paprika and dry aromatics build color without adding moisture to the chicken skin.
Equipment: air fryer, instant-read thermometer, bowl, paper towels and smooth-edged tongs.
Instructions
Prepare and season
Preheat the air fryer. Set it to 400°F / 200°C. Let it heat for 3–5 minutes when your model recommends preheating; the chicken can be prepared during that time.
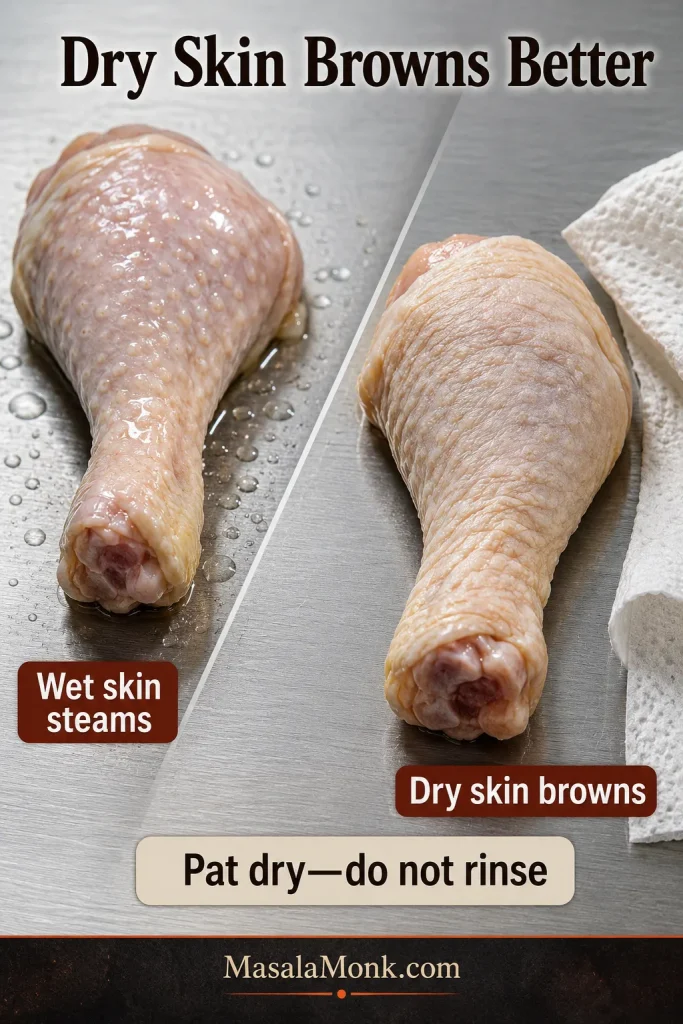
Dry the drumsticks. There is no need to bring raw chicken to room temperature. The USDA advises against washing raw poultry. Pat every side thoroughly dry, including beneath loose skin and around the broad end.
Dry skin browns faster. Pat away package moisture before oiling so steam does not soften the surface.
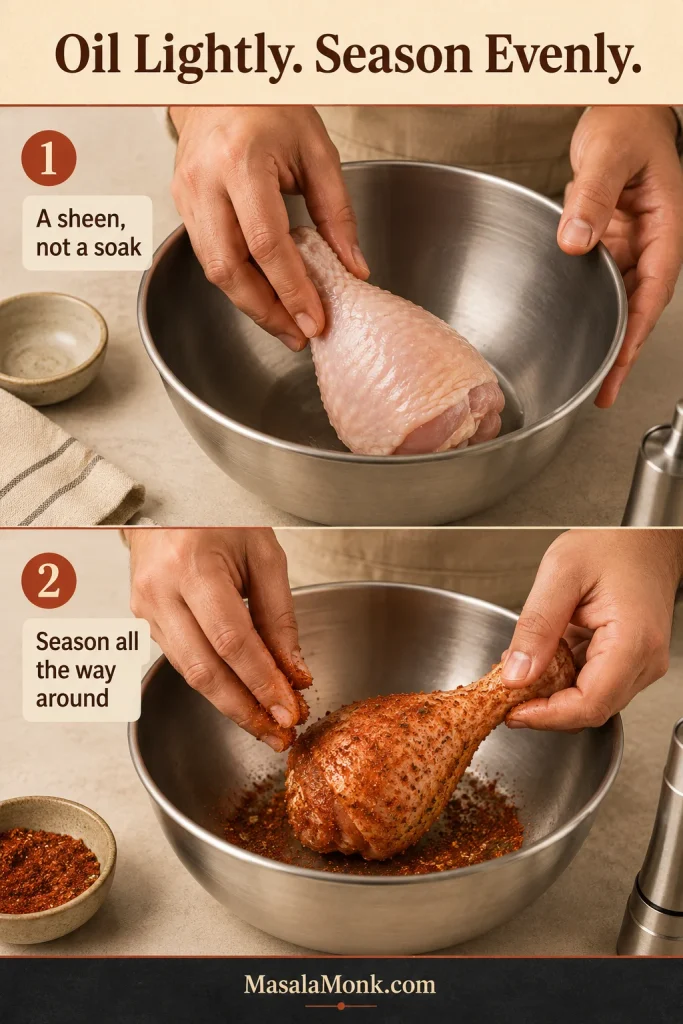
Add a thin coat of oil. Turn the drumsticks in the oil until the skin has a light sheen rather than wet patches.
Season evenly. Mix the paprika, garlic, onion, salt, pepper, oregano, optional cayenne and optional baking powder. Coat the drumsticks all over, including the narrow ends.
Aim for a light oil sheen and even seasoning, especially around the ends and folds before air frying.
Air fry, check and rest
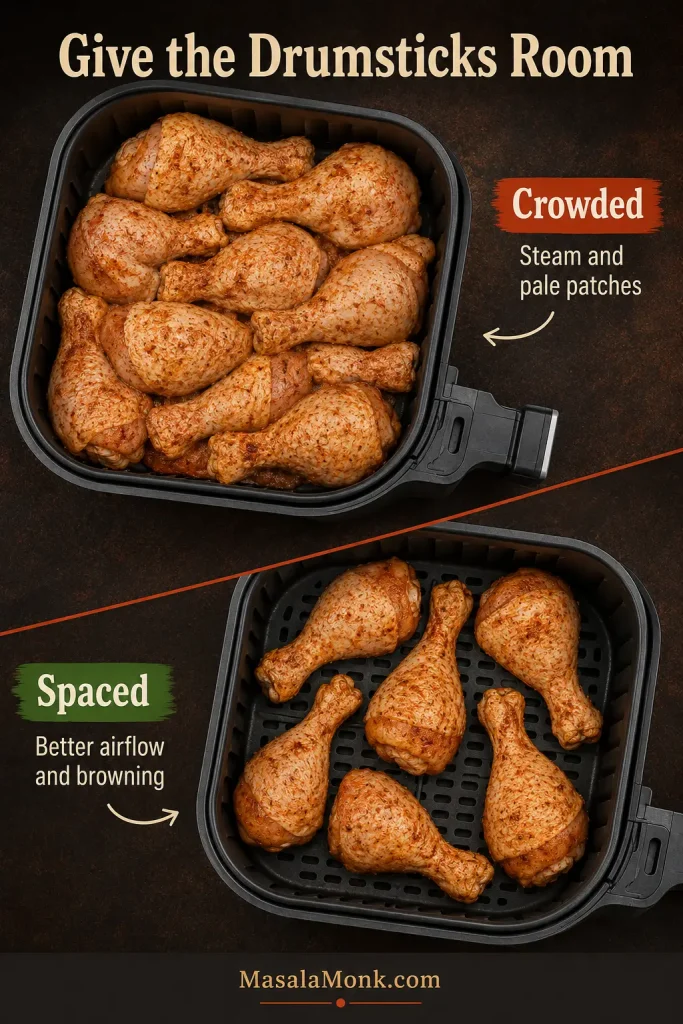
Give them room. Arrange the drumsticks in one layer without stacking or wedging them together. Use two batches when necessary.
Visible gaps matter: crowded drumsticks steam, while spaced pieces brown more evenly in the air fryer basket.
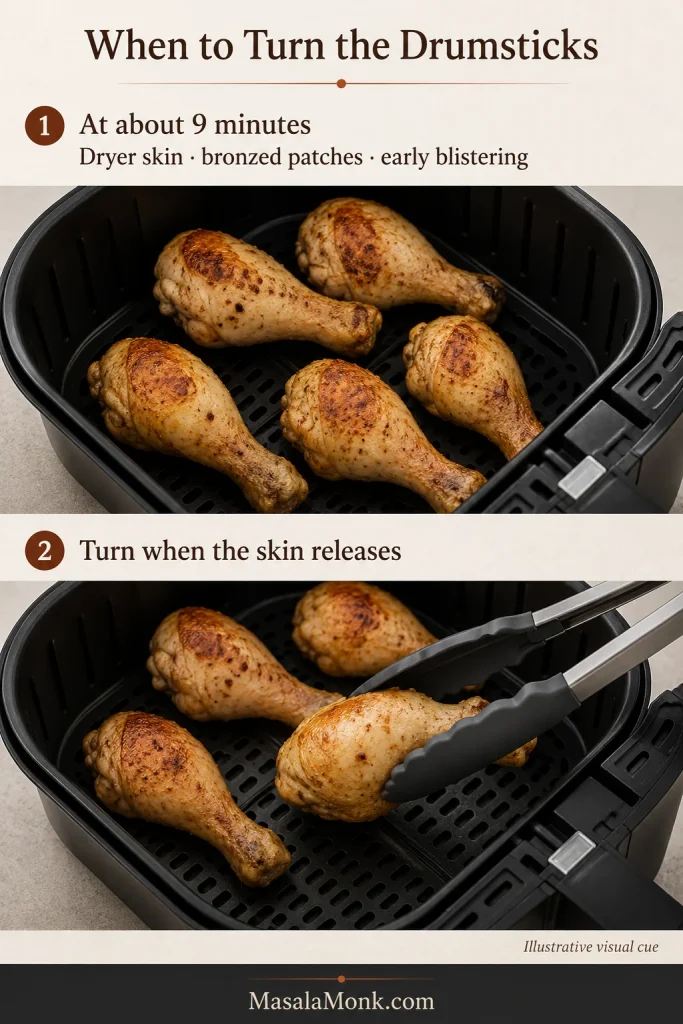
Cook the first side. Air fry at 400°F / 200°C for 9 minutes.
Turn once. The exposed skin should look drier, deeper in color and lightly blistered, and the seasoning should smell toasted rather than scorched. If the skin still clings, wait another minute before turning.
At the turn, look for drying skin and early browning—not a finished surface—before flipping gently.
Cook the second side. Continue for 8 minutes, bringing the total to 17 minutes.
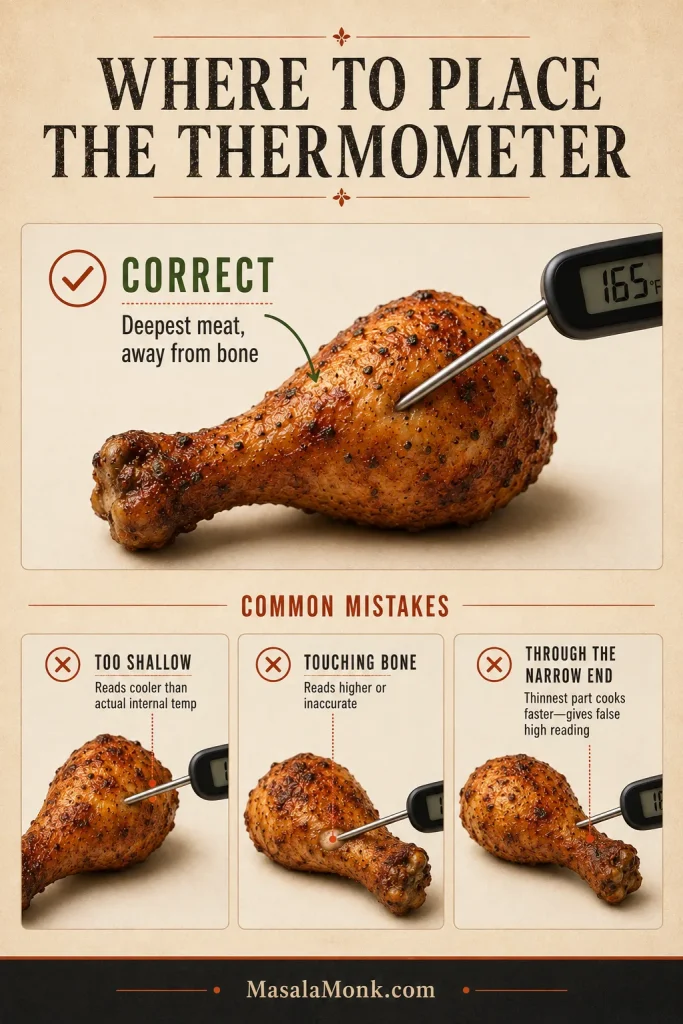
Check the thickest drumstick. Insert the thermometer from the fleshy side into the deepest meat without touching bone, then test another drumstick from a different part of the basket.
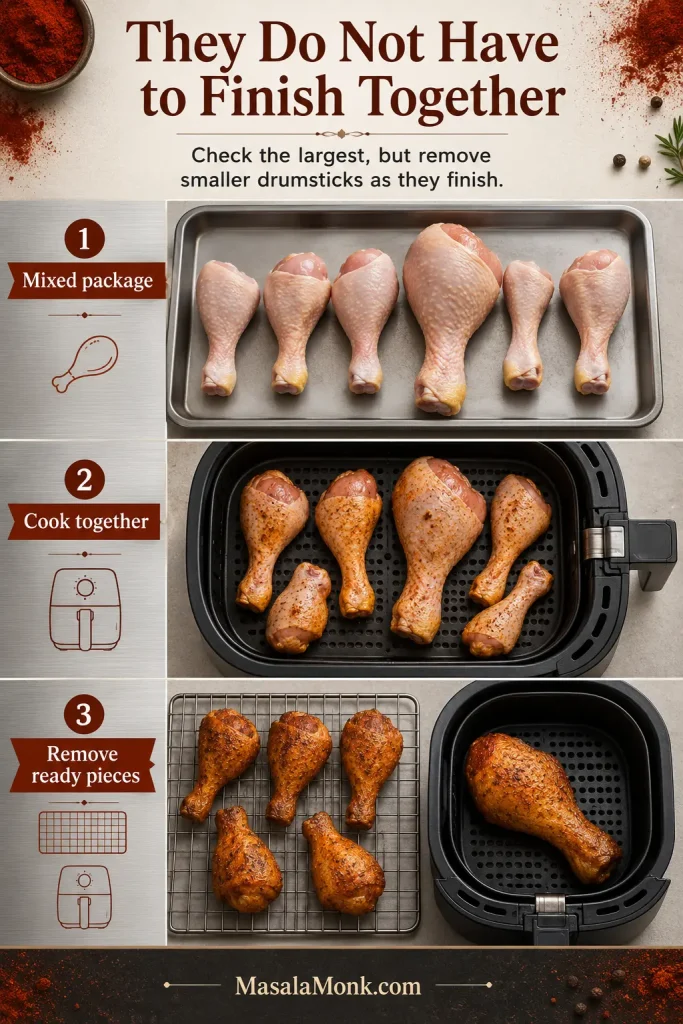
Let each one finish in its own time. Return undercooked drumsticks for 1–2 minutes at a time. If the skin is already dark, lower the air fryer to 380°F / 190°C while the inside catches up. Take the smaller drumsticks out as soon as they are ready.
Remove ready drumsticks as they finish instead of waiting for the largest piece, so smaller pieces stay juicy.
Rest for about 5 minutes. The skin should feel firm beneath the tongs while the meat remains plump around the bone. Keep the drumsticks loosely arranged so steam can escape.
Recipe notes
Scale the dry seasoning roughly with the package’s total weight; cooking time still follows the weight of each drumstick.
For a softer dark-meat texture, continue beyond the 165°F / 74°C safety floor toward roughly 175–180°F / 79–82°C, provided the skin is not becoming too dark.
Add BBQ sauce, honey glaze and other sugary finishes only during the final few minutes.
The dry seasoning can be mixed ahead. Keep the raw chicken refrigerated, then dry, oil and season it shortly before air frying.
A mixed package does not mean anything has gone wrong. Remove the smaller drumsticks as they become ready and give the largest one a few more minutes.
Why air-fryer drumstick recipes give different times
If a previous batch took longer than a recipe promised, that does not necessarily mean you did anything wrong. Six drumsticks can vary dramatically in weight, and two air fryers set to the same temperature may cook at different speeds.
That is why published cooking times disagree. Weight tells you when to begin checking, while the thermometer tells you when each drumstick is ready.
Estimate Drumstick Weight Without a Scale
No kitchen scale?
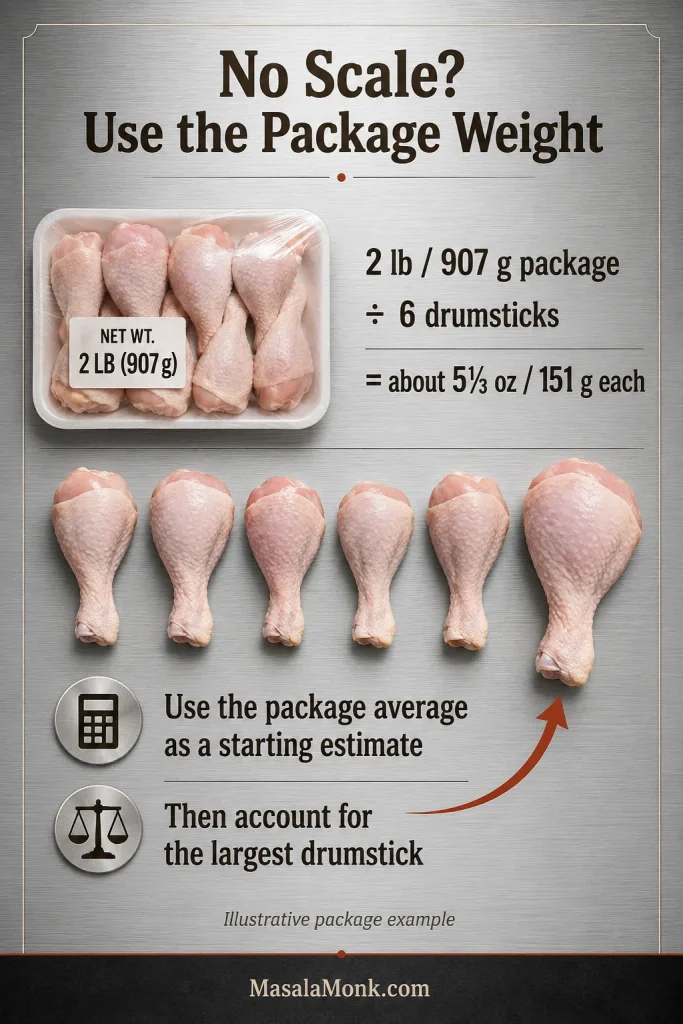
Divide the package weight by the number of drumsticks to estimate the average. A 2 lb / 907 g package containing six drumsticks averages about 5⅓ oz / 151 g each. Use that as the starting row, then move a visibly oversized drumstick into the next heavier range.
Use package weight as a starting estimate, then adjust for the heaviest-looking drumstick before choosing the chart row.
Size names vary between shops and recipes, so use the weight—not labels such as small or large—to choose when to begin checking.
Use the Time Chart Correctly
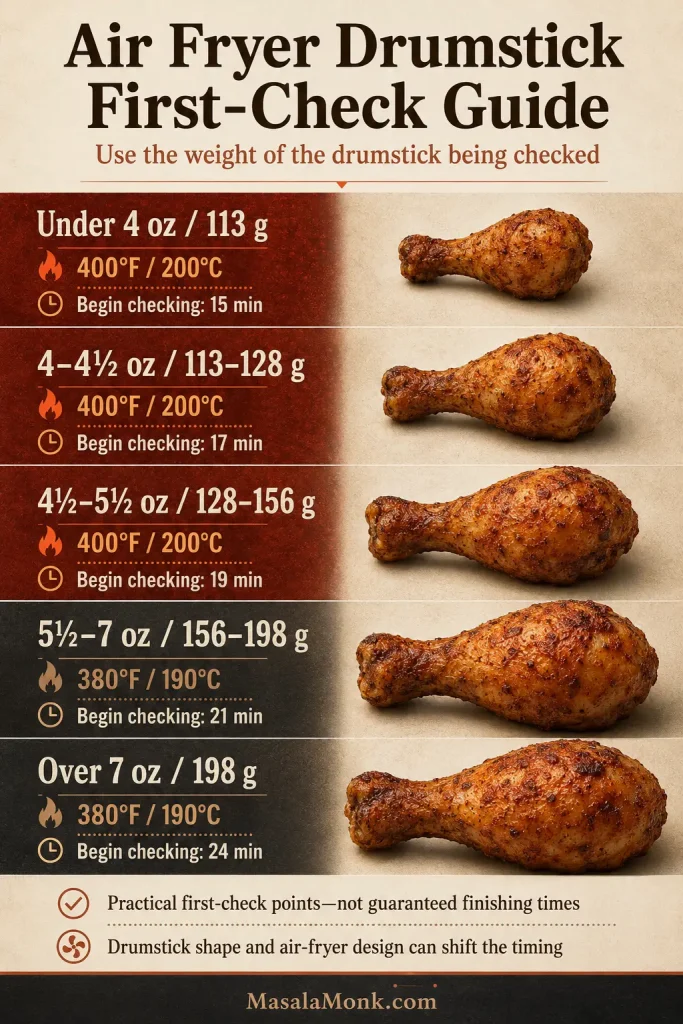
These are practical first-check starting points, not rigid cutoffs. Drumstick shape, air-fryer design and a cold start can all shift the timing.
The chart is for thawed, skin-on drumsticks in a preheated, wide basket-style air fryer.
These are first-check times for air fryer drumsticks by weight, not guaranteed finish times; after that, test the thickest meat.
Weight per drumstick
Temperature
Begin checking
Under 4 oz / 113 g
400°F / 200°C
15 minutes
4–4½ oz / 113–128 g
400°F / 200°C
17 minutes
4½–5½ oz / 128–156 g
400°F / 200°C
19 minutes
5½–7 oz / 156–198 g
380°F / 190°C
21 minutes
Over 7 oz / 198 g
380°F / 190°C
24 minutes
First-check starting points for thawed, skin-on drumsticks.
When a drumstick sits on the boundary between two rows, begin with the earlier check; then remove smaller pieces as they finish instead of waiting for the largest one.
Mixed-size packs cook better when smaller drumsticks leave early and the largest piece gets extra time instead of overcooking everything.
How to Know When Chicken Drumsticks Are Done
A deeply browned drumstick can still be behind at its thickest point. The thermometer makes bone-in chicken less stressful, not more technical. It lets you stop with confidence instead of cutting every drumstick open or adding precautionary minutes to the whole batch.
Where to place the thermometer
Start with the largest drumstick.
Insert the probe from the fleshy side into the deepest meat, keeping the tip away from the bone.
Check one more drumstick from a different part of the basket.
Probe the thickest meat from the side and keep the tip away from bone for a reliable temperature reading.
That higher range is a texture preference, not a different safety rule. Every drumstick should reach at least 165°F / 74°C before it leaves the air fryer.
165°F / 74°C is the safety floor; higher dark-meat temperatures are a texture choice, not a separate safety rule.
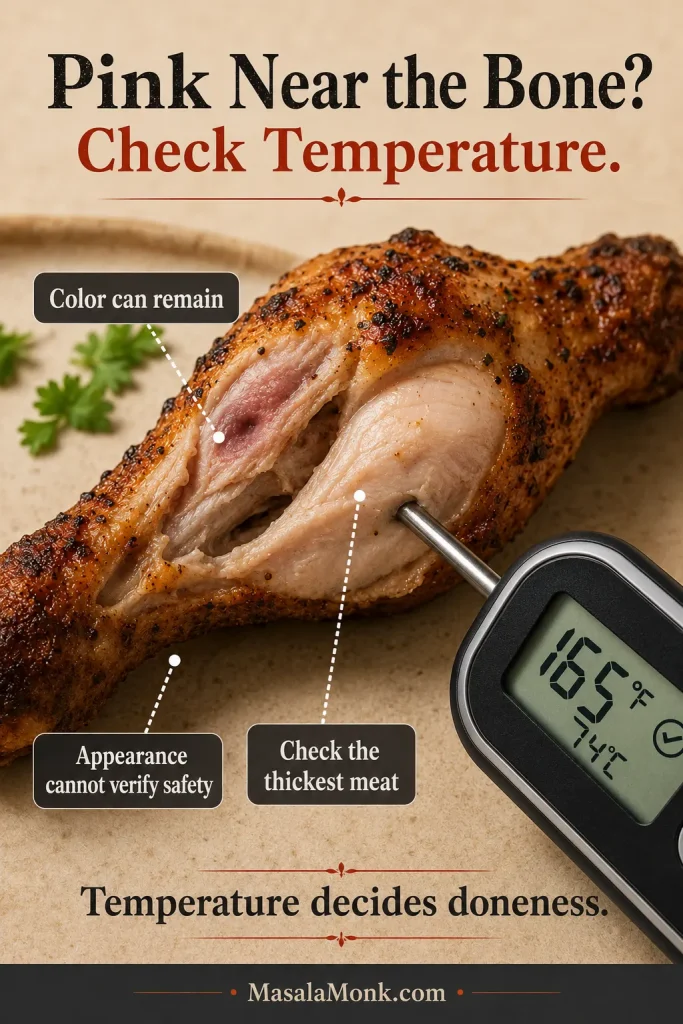
If that pink patch makes you hesitate, trust the thermometer rather than the color. You are not looking for perfectly white meat; you are looking for a safe temperature in the thickest flesh.
Pink near the bone can happen in cooked chicken; the thermometer is the deciding tool, not the color alone.
When one drumstick needs more time
Return only that drumstick for 1–2 minutes at a time. Keep the finished ones loosely arranged rather than sealing them under foil, which traps steam and softens the skin.
Once the base method feels clear, the more enjoyable decision is how you want the drumsticks to taste.
Choose the Version That Fits Your Dinner
The easiest way to keep the method dependable is to change one thing at a time—the crust, the seasoning or the final sauce.
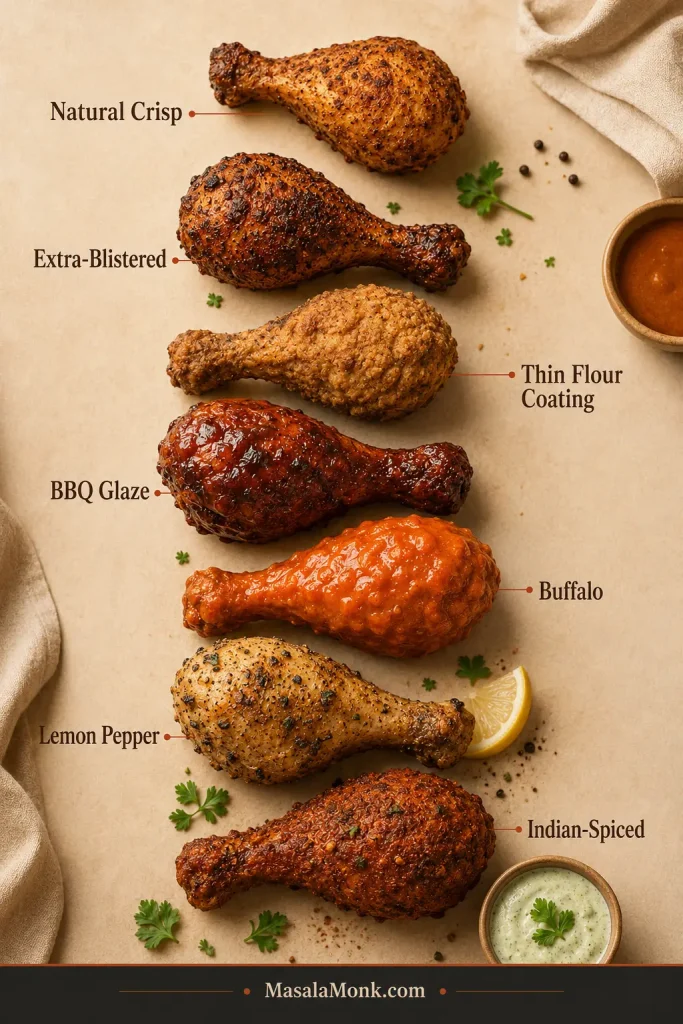
Choose the finish first—crisp, coated, sauced, bright, spicy or Indian-spiced—then follow the matching dinner adjustment.
Version
What to expect
Natural crisp skin
Crisp, savory and uncomplicated.
Extra-blistered skin
Crisper, evenly browned skin with tiny blisters.
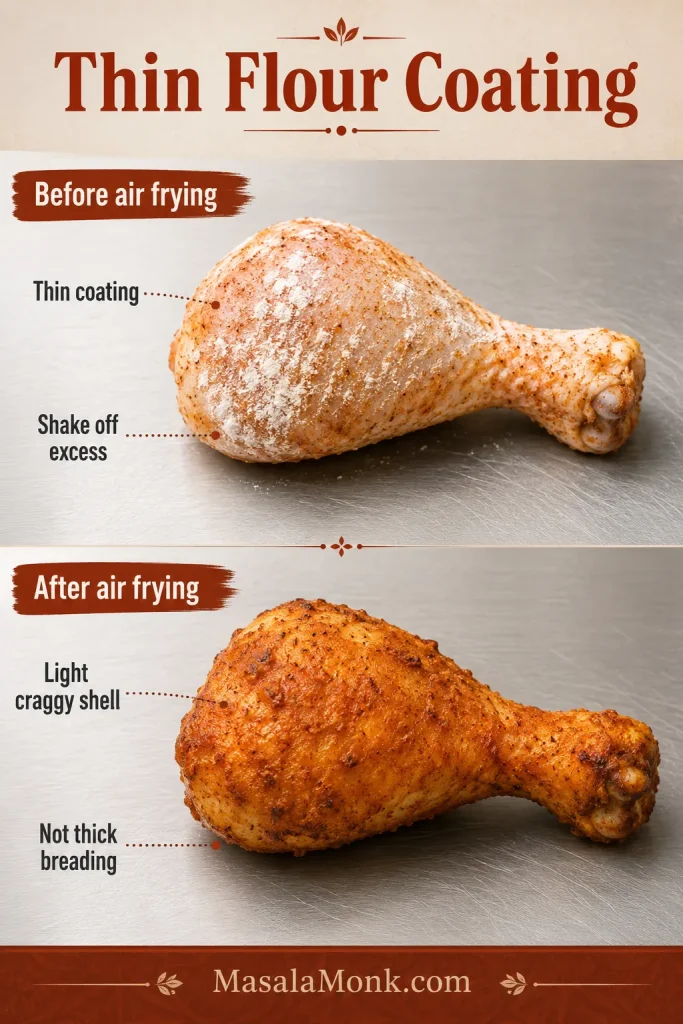
Thin flour coating
A light, craggy shell rather than thick breading.
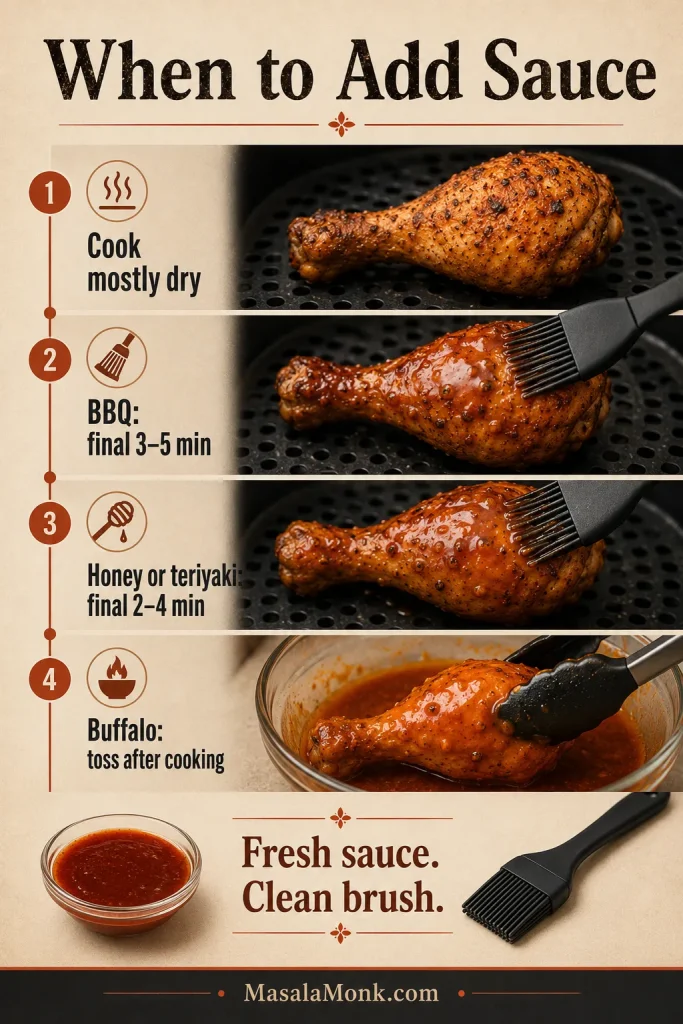
BBQ, honey or teriyaki
A sticky, glossy, sweet-savory finish.
Buffalo
Buttery heat with a tangy finish.
Lemon pepper
Bright, peppery and fresh.
Indian-spiced
Aromatic, earthy and gently hot.
Choose the texture or flavor, then apply the matching adjustment.
For more blistered skin
Mix the optional 1 teaspoon / about 4 g baking powder thoroughly into the base seasoning. It raises the skin’s surface pH, helping it brown and form tiny blisters. A light, even amount avoids a chalky or alkaline taste; baking soda is much stronger and should not be used measure for measure.
Baking powder should add subtle blistering, not a thick crust; never swap in baking soda.
For a thin flour coating
Omit the optional baking powder from the base rub. Combine the base seasonings with ¼ cup / 30 g all-purpose flour and 1 teaspoon / about 4 g baking powder. Coat dried, lightly oiled drumsticks thinly, shake off the excess and mist only visible white patches.
For drumsticks weighing about 4–4½ oz / 113–128 g each, cook at 400°F / 200°C. Turn gently once the coating has begun to set and begin checking at about 20 minutes.
The coating is ready when no dry flour remains, the shell feels set beneath the tongs and the thickest meat has reached its target temperature.
Think thin dusting, not breading, so the air-fried shell turns craggy instead of heavy.
For BBQ, honey, teriyaki or Buffalo
For BBQ, honey or teriyaki: cook the drumsticks mostly dry. A batch of six drumsticks usually needs about ⅓ cup / 80 ml BBQ sauce. Brush BBQ sauce on during the final 3–5 minutes; add honey or a thin coat of homemade teriyaki sauce during the final 2–4 minutes.
For Buffalo: air fry the chicken completely, then toss it with about ¼ cup / 60 ml Buffalo sauce.
Keep serving sauce separate. Use a clean brush and a fresh portion for the final glaze rather than returning sauce or utensils that touched undercooked chicken to the table.
Sweet glazes go on late; Buffalo sauce works best after the chicken finishes cooking.
For lemon pepper or Indian spices
For lemon pepper, use a dry seasoning before cooking and squeeze fresh lemon over the drumsticks afterward. This lemon pepper chicken recipe gives the full seasoning balance.
For the Indian-spiced version, replace the oregano and cayenne with 1 teaspoon garam masala, ½ teaspoon ground cumin, ½ teaspoon ginger powder and ¼–½ teaspoon Kashmiri chili powder. Serve with rice, raita and lemon, then finish with chopped cilantro.
Skinless drumsticks work with the same seasoning, but this timing chart is calibrated for skin-on chicken. Oil them lightly, expect browned spices and juicy meat rather than crackly skin, and begin checking earlier than a skin-on drumstick of the same size.
Whatever seasoning or sauce you choose, the crispest natural skin still comes down to dryness, airflow and heat.
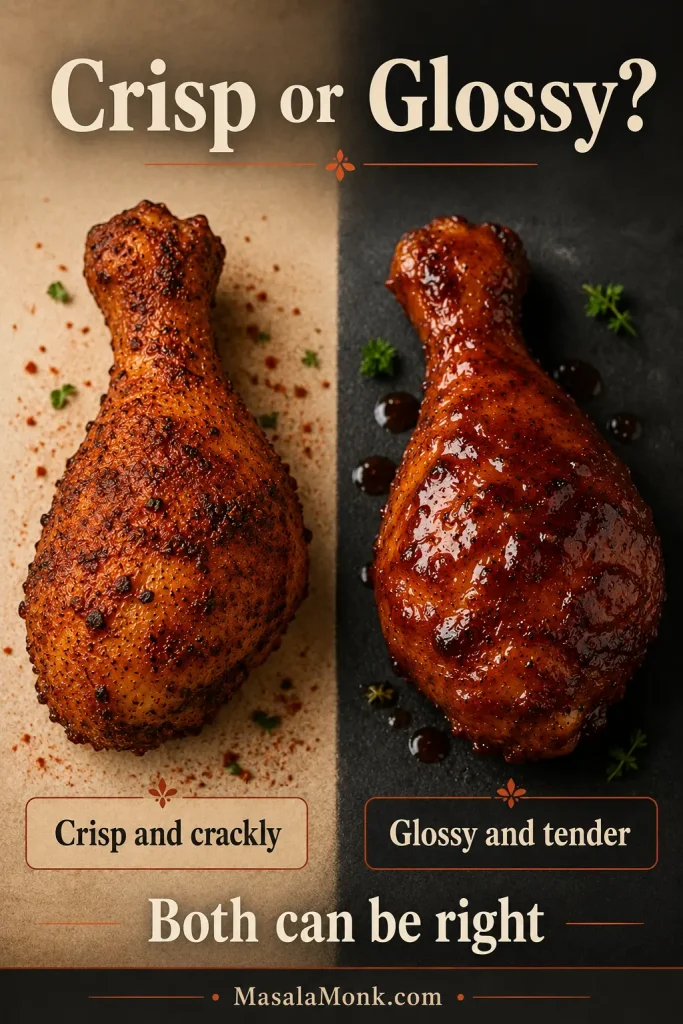
Crisp dry skin and glossy sauced skin are different successful finishes, depending on whether sauce is involved.
How to Get Crispy Skin
The air fryer has two jobs: brown the skin and carry heat into the meat around the bone. Crisp natural skin does not require flour, but the chicken must begin dry enough to brown before the inside overcooks.
Crisp-Skin Basics
Dry the skin: pat beneath folds and around the broad end until it feels tacky rather than wet.
Leave open space: pressed-together patches steam and stay pale.
Use a thin sheen of oil: enough for the seasoning to cling, not enough to pool under the chicken.
Match the heat to the weight: drumsticks around 4–4½ oz / 113–128 g suit 400°F / 200°C, while pieces above about 5½ oz / 156 g often brown more evenly at 380°F / 190°C.
Tiny blisters, rendered skin and toasted seasoning are the natural crisp-skin target for unsauced air fryer drumsticks.
Fix Pale or Soft Skin
If the underside stays pale. The underside receives less direct heat and may sit against the crisper plate. Turning once, keeping the basket holes open and resting on a rack all help. A solid liner makes cleanup easier but usually sacrifices some lower-skin browning.
If you used a wet marinade. Yogurt, coconut milk, soy-heavy mixtures and generous lemon juice add flavor and charred edges, but they also add moisture. Scrape away heavy excess before cooking. Expect tender chicken with a seasoned, lightly charred coating rather than dry, crackly skin.
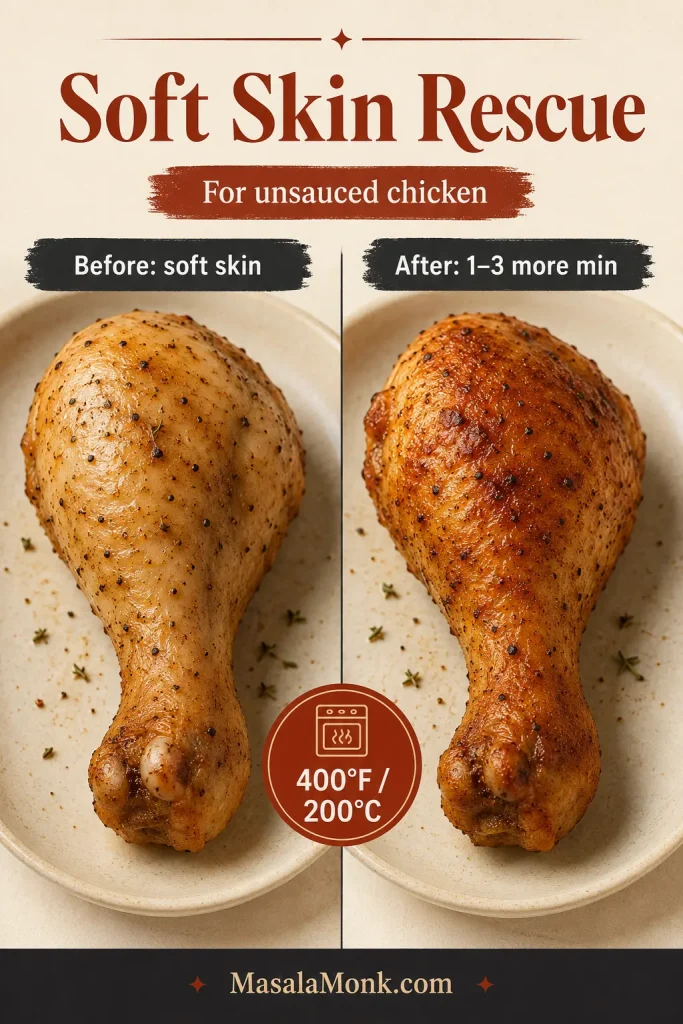
If the cooked skin is still soft. Give unsauced chicken another 1–3 minutes at 400°F / 200°C, watching closely. Once the drumsticks are coated with BBQ, honey or another sugary glaze, aim for a glossy, tender finish rather than forcing the skin to become crackly. Rest the chicken on a rack so steam does not soften it further.
Use this quick blast only for cooked, unsauced drumsticks with soft skin, not sugary glazed pieces.
Oil: one tablespoon is enough to help the dry seasoning cling and give the skin more even color. The drumsticks can cook without it, but the base version browns more dependably with a light coating.
Paprika and aromatics: smoked paprika adds mild barbecue character, while sweet paprika is gentler. Garlic and onion powders build savory flavor without adding the surface moisture of fresh chopped aromatics.
Salt and baking powder: use about 5–6 g salt for the base batch—roughly 1 teaspoon fine sea salt or 2 teaspoons Diamond Crystal kosher salt. Baking powder is optional; used lightly, it encourages browning and small blisters.
Frozen Chicken Drumsticks in the Air Fryer
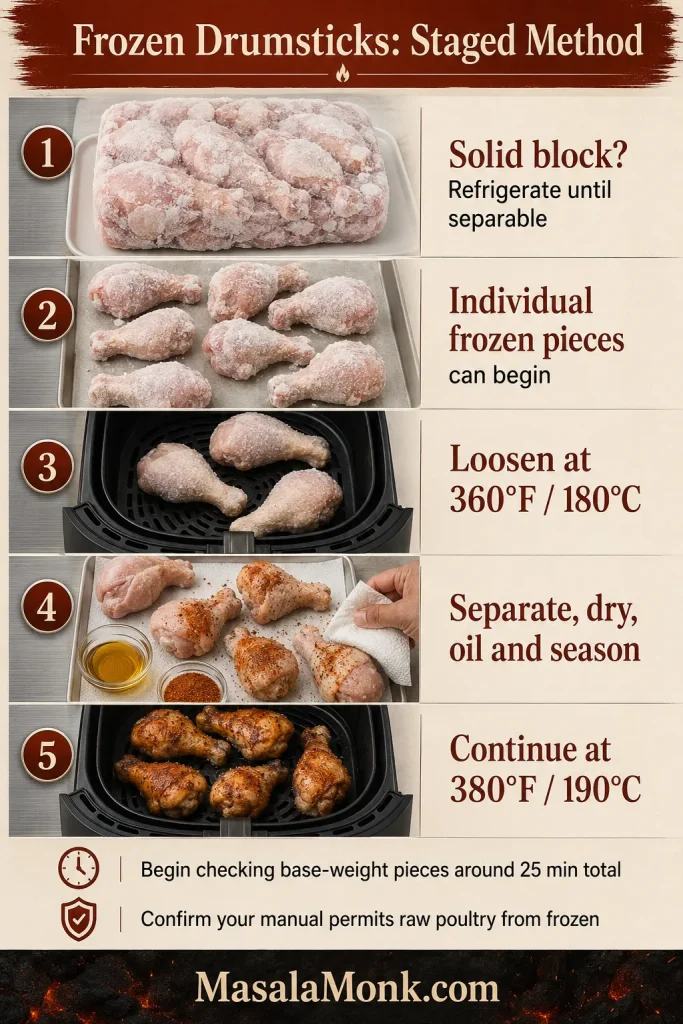
Frozen drumsticks need a short softening stage before the seasoning can cling and the skin can brown. Confirm that your air-fryer manual permits cooking raw poultry from frozen, and make sure the drumsticks become fully separable so hot air can reach every side.
Frozen dinner rescue
If the drumsticks are frozen into one solid block, thaw them in the refrigerator until they can be separated. Individually frozen pieces can go straight into the staged method below.
Loosen the drumsticks. Air fry at 360°F / 180°C for 5–10 minutes.
Separate and dry them. Once the drumsticks loosen, pull them apart with tongs and pat away the melted ice you can reach.
Oil and season. Add the oil and dry rub once the skin is dry enough for the seasoning to cling.
Continue at 380°F / 190°C. For individually frozen drumsticks around 4–4½ oz / 113–128 g each, begin checking the largest one when the total cooking time reaches about 25 minutes. Continue for 2–3 minutes at a time and test more than one drumstick.
Crisp only when needed. If the chicken is safely cooked but still pale, use 400°F / 200°C for the final 2–3 minutes.
Frozen drumsticks need staging: separate first, then dry, season and continue cooking so seasoning can actually stick.
Allow approximately 25–40 minutes from frozen, depending on weight and ice. The approximately 30-minute timing applies to fully thawed drumsticks in the base weight range.
How Different Air Fryers Change the Timing
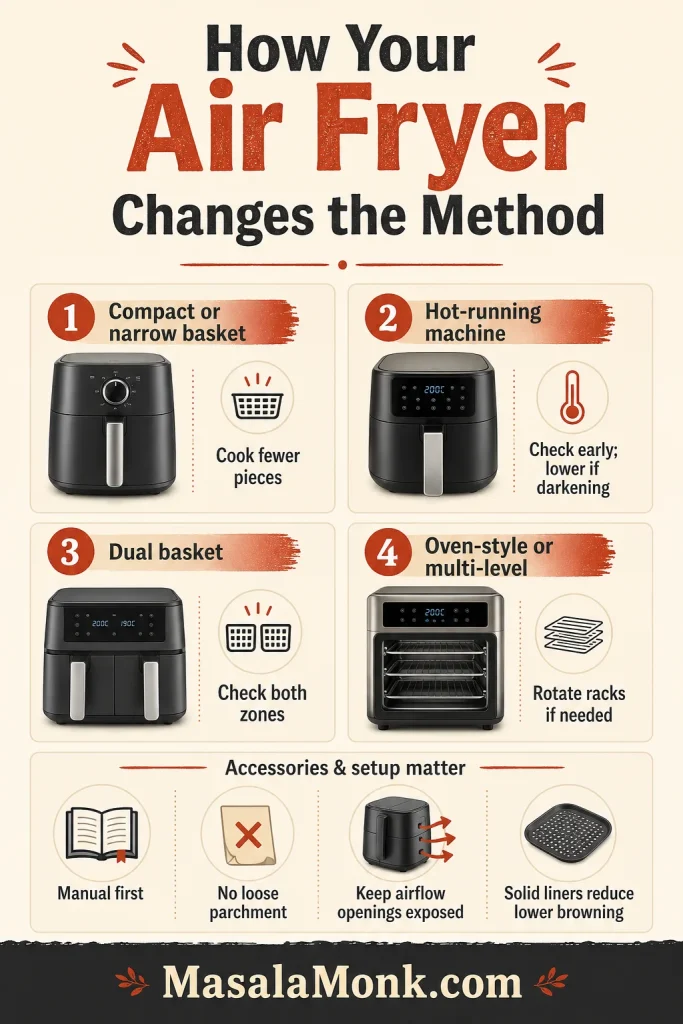
Most timing differences come down to how close the chicken sits to the heating element, how much open cooking space the machine provides and whether different zones or levels heat evenly.
Match the Method to Your Air Fryer
Compact or narrow basket: cook fewer drumsticks or use batches so hot air can move freely around each one.
Hot-running machine: begin checking early. If the skin darkens before the inside is ready, continue at 380°F / 190°C.
Dual basket: divide the drumsticks evenly and check both zones; one side may finish first.
Oven-style or multi-level machine: follow the recommended rack position, rotate levels when needed and watch the drumsticks closest to the heating element.
Match the method to the machine: basket size, heat pattern and rack position all matter for air fryer chicken legs.
Preheating gives the first batch a more consistent start. From a cold machine, keep the same thermometer target and expect the first check to move by roughly 1–3 minutes.
Liners, Tools and Two Batches
Liners and tools: smooth or silicone-tipped tongs are less likely to tear the skin. A solid liner can simplify cleanup but may block lower airflow. Do not use or preheat parchment unless your appliance manual permits it, and never leave loose paper unweighted near the heating element.
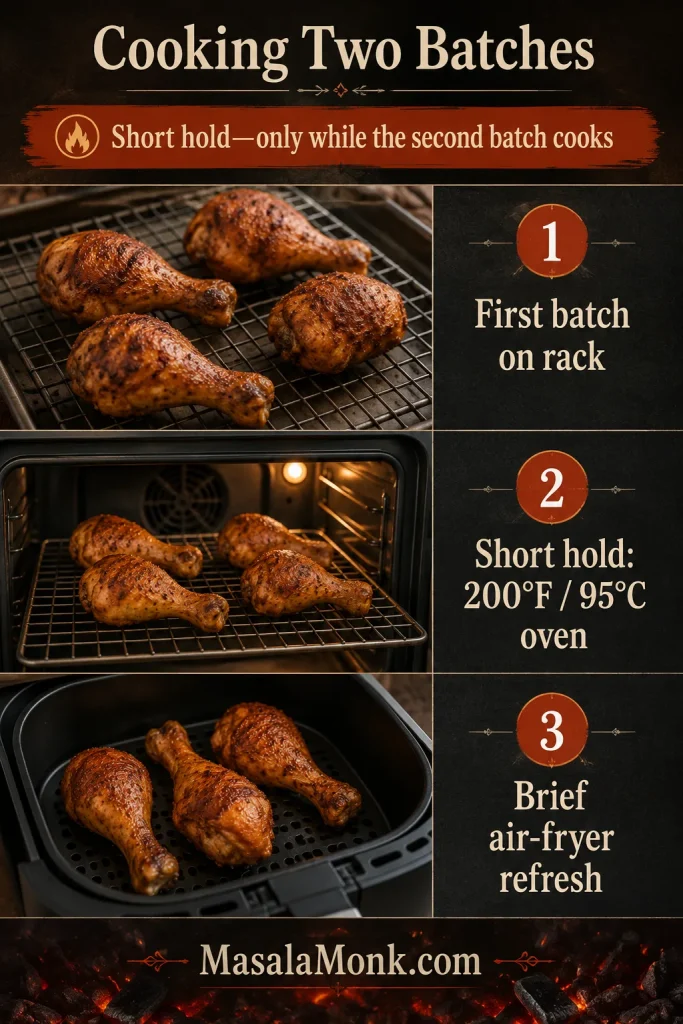
Cooking two batches? Rest the first batch on a wire rack, where steam can escape. While the second batch cooks, keep the first on the rack in a 200°F / 95°C oven and avoid holding it longer than necessary. A final minute in the air fryer can refresh the skin before serving.
A rack and short low-oven hold protect the first batch while the second cooks, without steaming the skin.
Troubleshooting Soft Skin, Uneven Cooking and Smoke
Most disappointing batches are fixable. One undercooked drumstick can go back into the air fryer without delaying the rest of dinner.
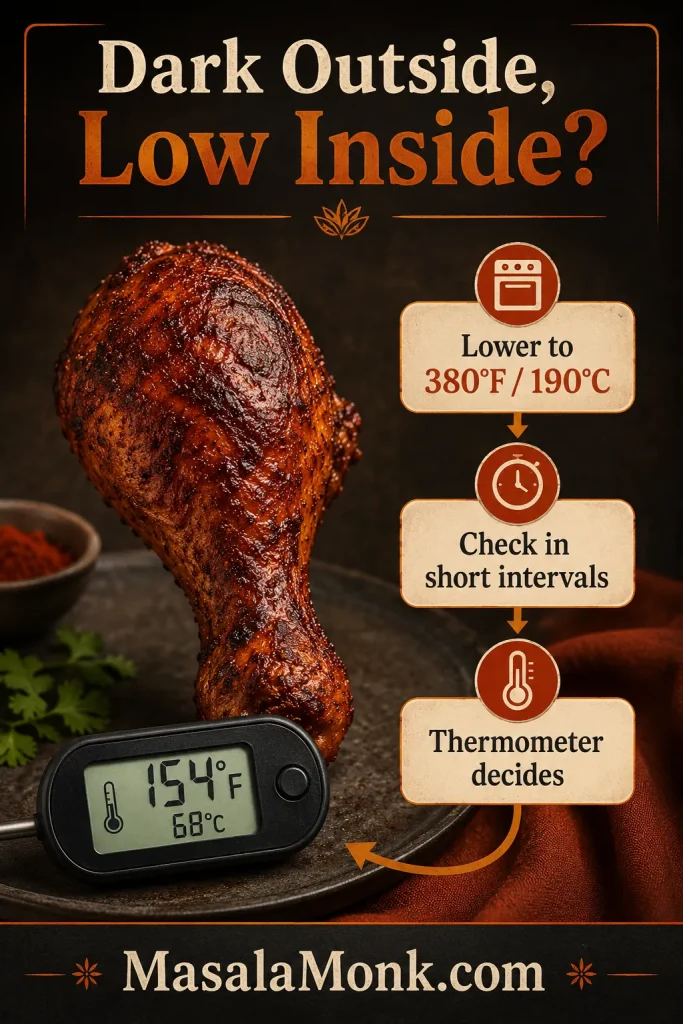
Dark Outside, Low Inside
If the exterior is already dark but the center is still below target, lower the heat and finish the drumstick in short checks instead of pushing the whole batch harder.
When the outside races ahead, lower the heat and finish in short thermometer-led intervals rather than forcing a hotter cook.
Quick Fixes by Problem
Problem
What to do
Skin stayed soft or rubbery
Fix now: give unsauced chicken another 1–3 minutes at 400°F / 200°C, watching closely. Next time: dry the skin more thoroughly and leave more space between the drumsticks.
Skin burnt before the inside cooked
Lower the temperature to 380°F / 190°C and continue in short intervals. Large drumsticks often need gentler heat.
One drumstick is undercooked
Return only that drumstick. The others can rest while it cooks for another 1–2 minutes at a time.
Chicken turned dry
Remove smaller drumsticks earlier. They do not need to wait for the largest one.
Seasoning or flour looks patchy
Pat the skin dry, add a thin sheen of oil and mist only visible dry flour patches.
Coating fell off
Shake off excess flour and wait until the crust begins to set before turning with smooth tongs.
BBQ or honey glaze burnt
Sweet sauce went on too early. Cook mostly dry and glaze only during the final few minutes.
Chicken looks pink near the bone
Check the thickest flesh with a thermometer. Color alone cannot confirm whether poultry is safe.
Underside stayed pale
Turn once and keep the crisper-plate holes open. Solid liners reduce the hot air reaching the underside.
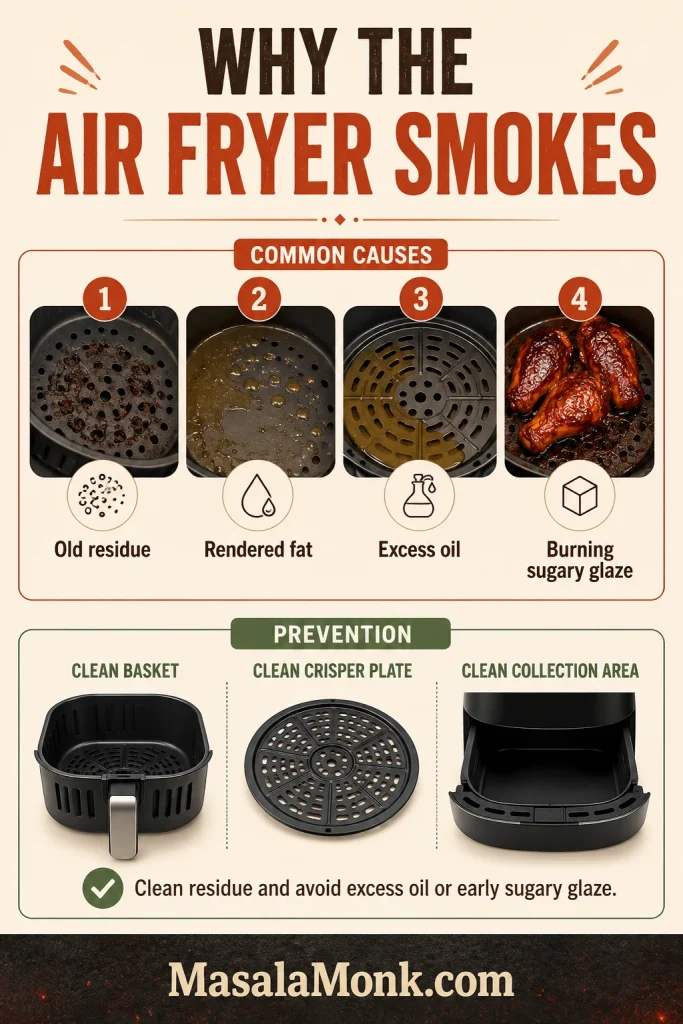
The air fryer is smoking
Stop and inspect the appliance safely. Clean old residue and rendered fat, reduce excess oil and keep sugary sauce away from the hottest part of the cook.
Fast fixes for skin, doneness, coating, smoke and sauce problems.
Smoke and Safe Inspection
Persistent or unusual smoke deserves a pause. Once the appliance is safe to inspect, clean the basket, crisper plate and collection area, then follow the manual if the problem continues.
Most smoke comes from residue, fat, excess oil or sugar added too early, so check those causes first.
What to Serve With Air Fryer Chicken Drumsticks
Once the drumsticks are crisp and rested, dinner only needs one comforting side and something fresh. Cool or acidic sides are especially good beside Buffalo, BBQ and honey-glazed versions because they cut through the richer coating.
Fast weeknight plate: smoky paprika-garlic drumsticks, roasted potatoes and green beans.
Cookout plate: BBQ drumsticks, corn and cold potato salad.
Indian-spiced plate: jeera rice, kachumber, mint yogurt, flatbread and lemon wedges.
The same air fryer chicken drumsticks can shift from weeknight plate to BBQ, Buffalo or Indian-spiced dinner.
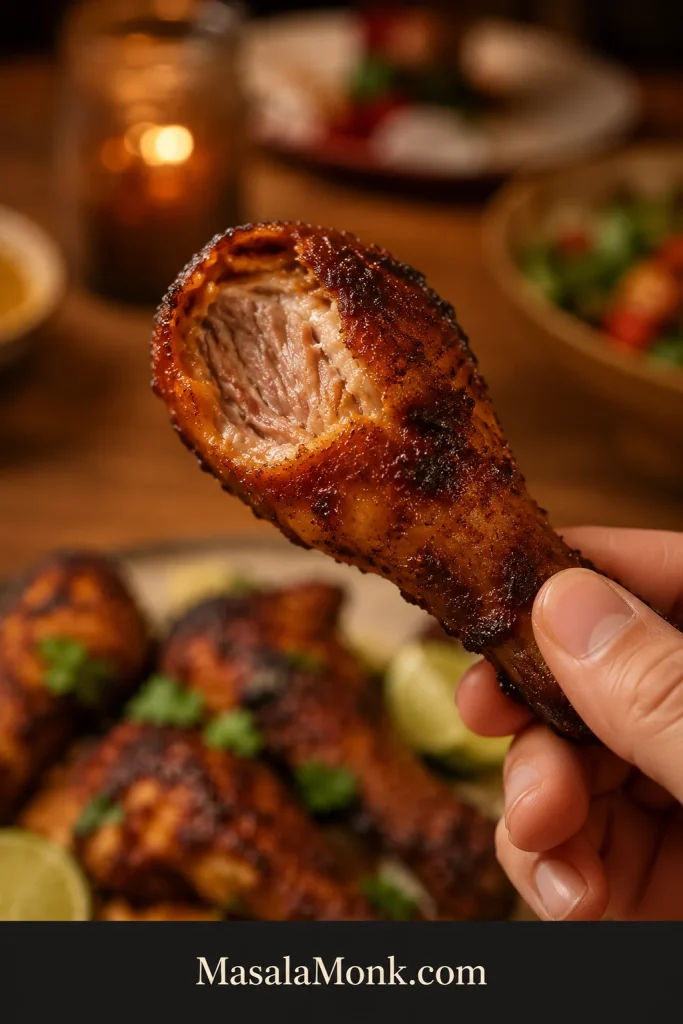
Once the plates are planned, the final cue is the bite itself: browned skin, juicy dark meat and a drumstick that still feels like easy dinner.
The payoff is crisp-edged skin with juicy dark meat—not just a correct temperature—when the method is right.
Storage, Freezing and Reheating
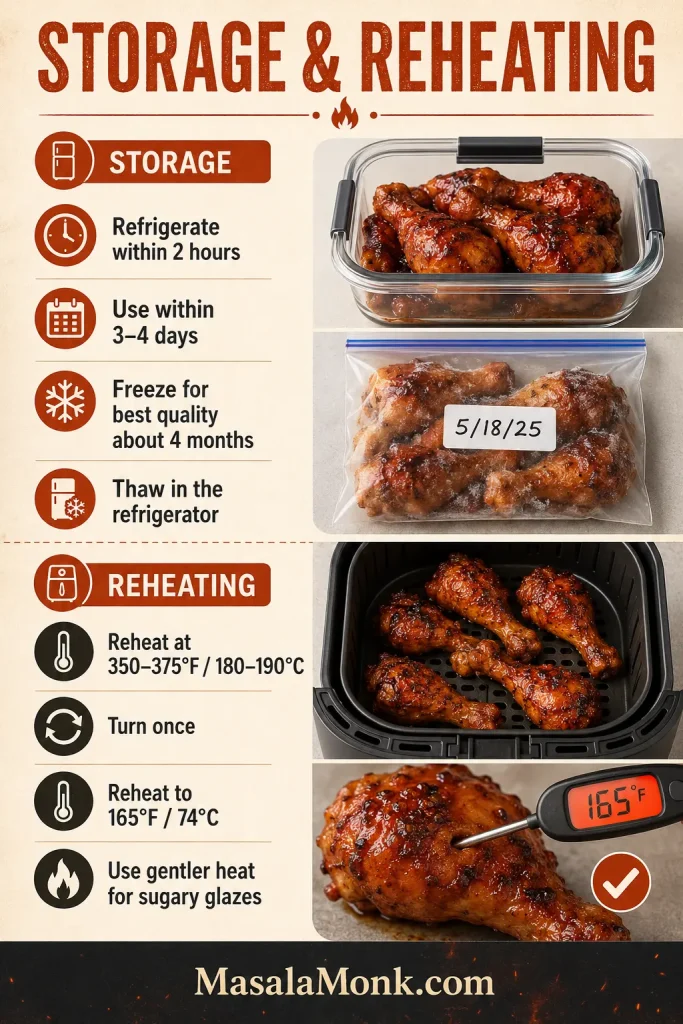
Refrigerate cooked drumsticks in shallow covered containers within 2 hours—or within 1 hour when the surrounding temperature is above 90°F / 32°C. Use them within 3–4 days and store extra sauce separately when possible.
For reheating, arrange the drumsticks in one layer and air fry at 350–375°F / 180–190°C for 5–8 minutes, turning once, until the center reaches 165°F / 74°C. Use the lower end of the range for BBQ, honey or other sugary finishes.
Freeze cooled drumsticks in a freezer-safe container and thaw them in the refrigerator before reheating. For the best flavor and texture, use frozen cooked drumsticks within about 4 months. The skin may not return to its original crispness, but the air fryer usually restores it more successfully than a microwave.
For meal prep, keep sauce separate and reheat only the number you plan to eat. Cold meat can also be pulled from the bone for wraps or these chicken sandwich ideas. That often protects the texture better than reheating the same drumstick twice.
Chill promptly, reheat to 165°F / 74°C, and use the air fryer when leftover texture matters.
Frequently Asked Questions
Is 380°F or 400°F better for chicken drumsticks?
Use 400°F / 200°C for drumsticks under about 5½ oz / 156 g. Heavier pieces often cook more evenly at 380°F / 190°C.
Can I use parchment paper or foil?
Only use parchment or foil when your specific air-fryer manual permits it. Solid liners restrict airflow and lower-surface browning, while loose paper can be pulled toward the heating element. When a liner is permitted, keep it weighted beneath the food and avoid covering the basket’s airflow openings.
Why are my drumsticks pink beside the bone?
Bone pigments can color safely cooked meat, especially after freezing. Pinkness alone cannot confirm doneness, so check the thickest flesh with a thermometer.
Can I cook drumsticks from frozen?
Yes, when your appliance manual permits it. Loosen and separate the drumsticks first, then dry, oil and season them. Continue at 380°F / 190°C and begin checking drumsticks around 4–4½ oz / 113–128 g each at about 25 minutes total.
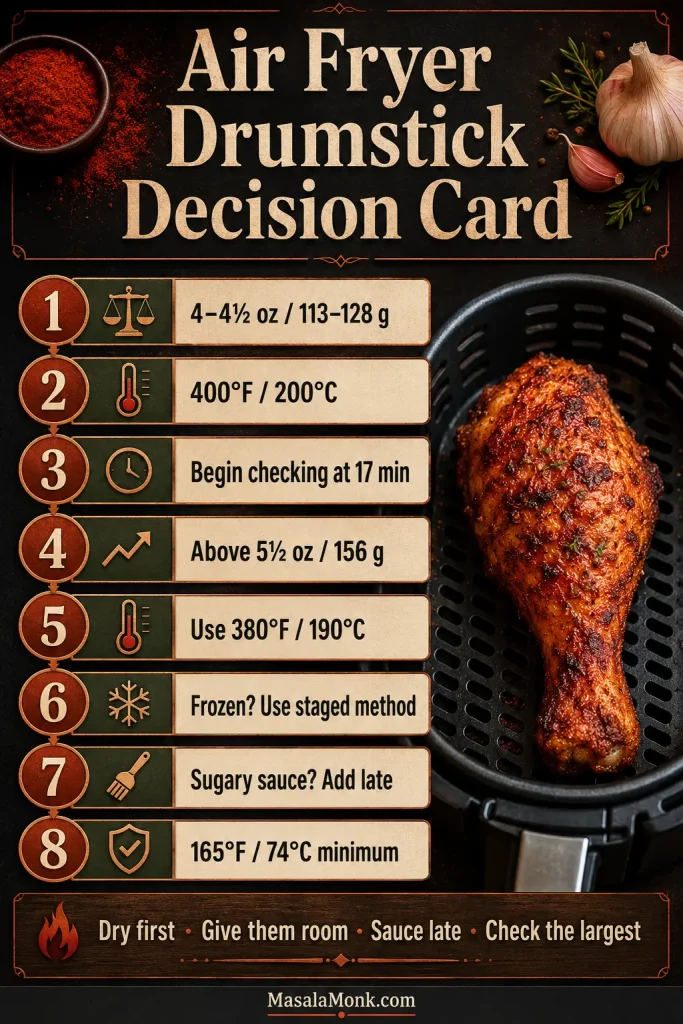
Use this card when weight, frozen chicken or sauce changes the base method.
Weight sets the first check, frozen chicken needs staging, and sugary sauces belong near the end.
The four drumstick decisions to remember
Dry first. Give them room. Sauce late. Check the largest piece. Those four decisions do more for crisp skin and juicy meat than chasing one supposedly perfect cooking time.
That is the small satisfaction of this dinner: an inexpensive package of chicken comes out smoky, properly browned and generous. The thermometer quietly removes the worry that usually comes with meat beside the bone.
Which version made it to your table—the smoky base, a sticky glaze, Buffalo or the Indian-spiced batch? If your drumsticks needed noticeably longer than the guide suggested, add the average weight and air-fryer model too. Those details can help the next cook understand why.
Air fryer chicken breast should be one of the easiest dinners in your week: quick enough for tonight, versatile enough for tomorrow’s lunch, and simple enough that you don’t need to hover over it.
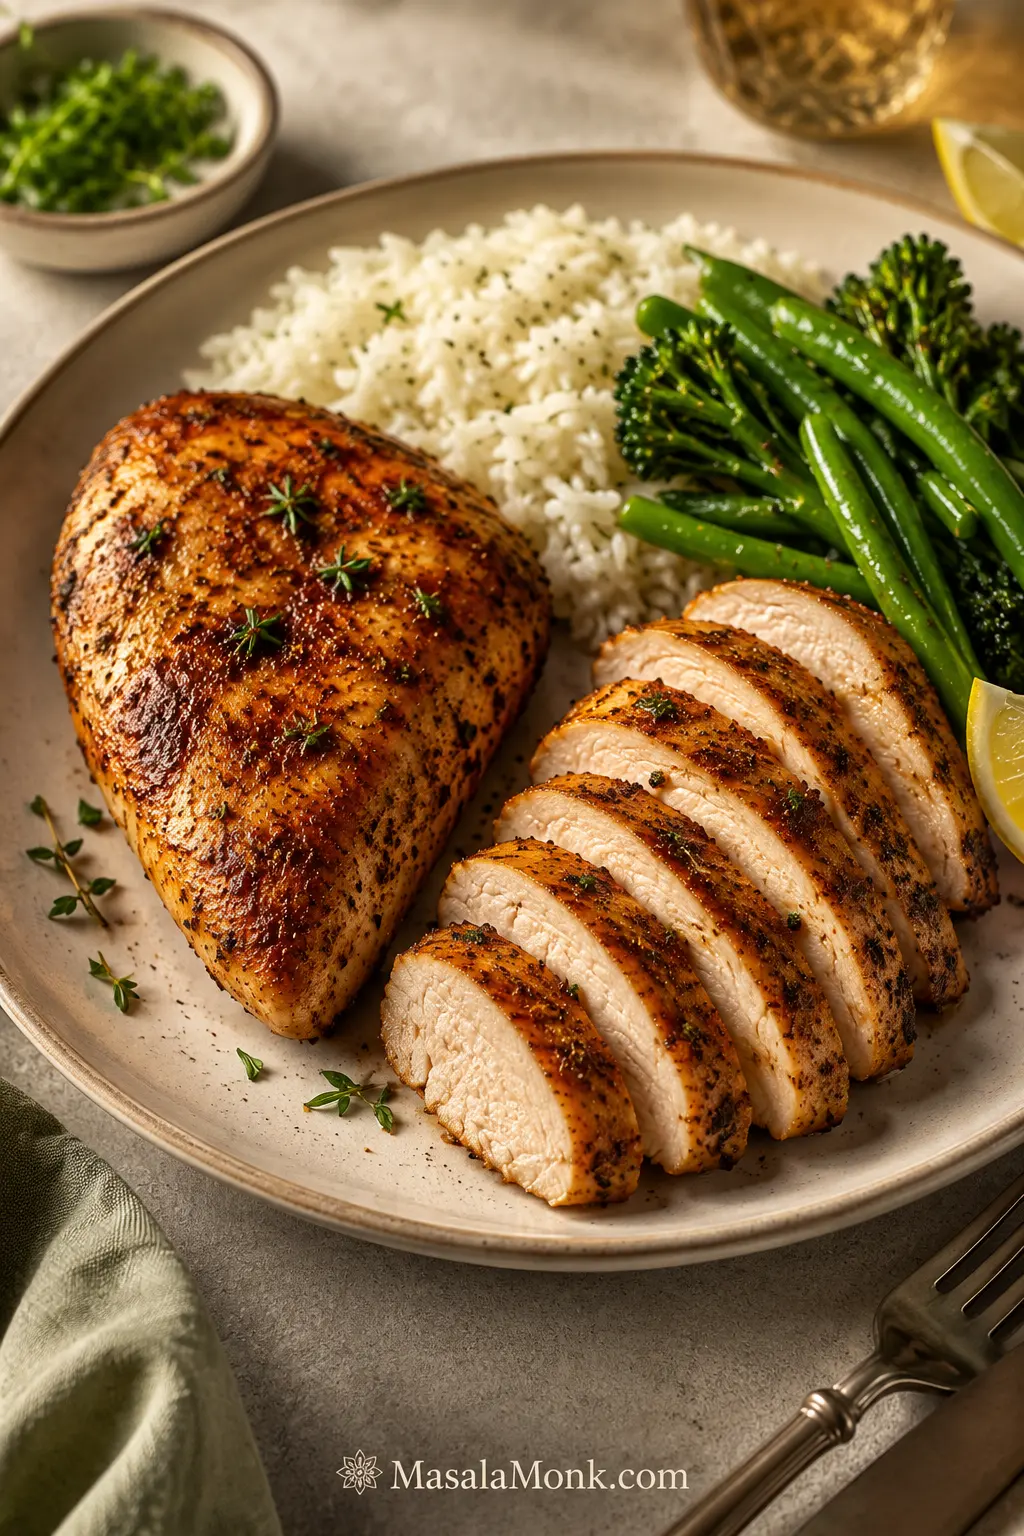
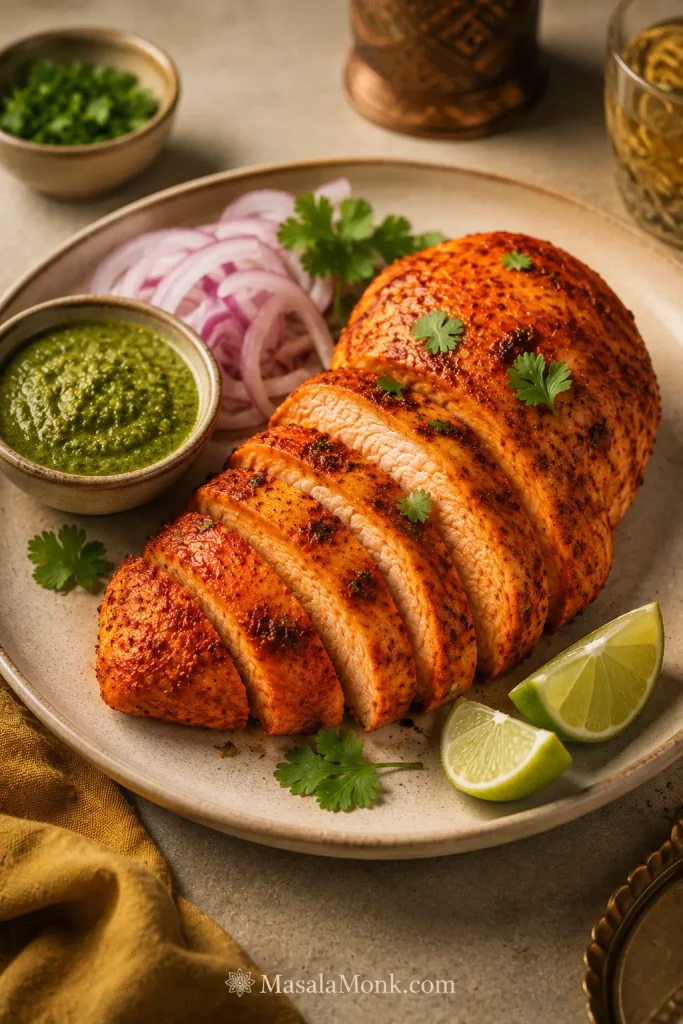
When it goes well, the paprika-garlic coating is warm, savoury and lightly bronzed. The rested centre stays tender enough to slice cleanly and juicy enough to eat without hiding it beneath a heavy sauce.
When it doesn’t, the narrow end turns dry while the thick centre is still catching up—or the seasoning darkens before the meat is ready. That inconsistency is real. Chicken breasts don’t arrive in one standard size, and air fryers don’t all move heat in exactly the same way.
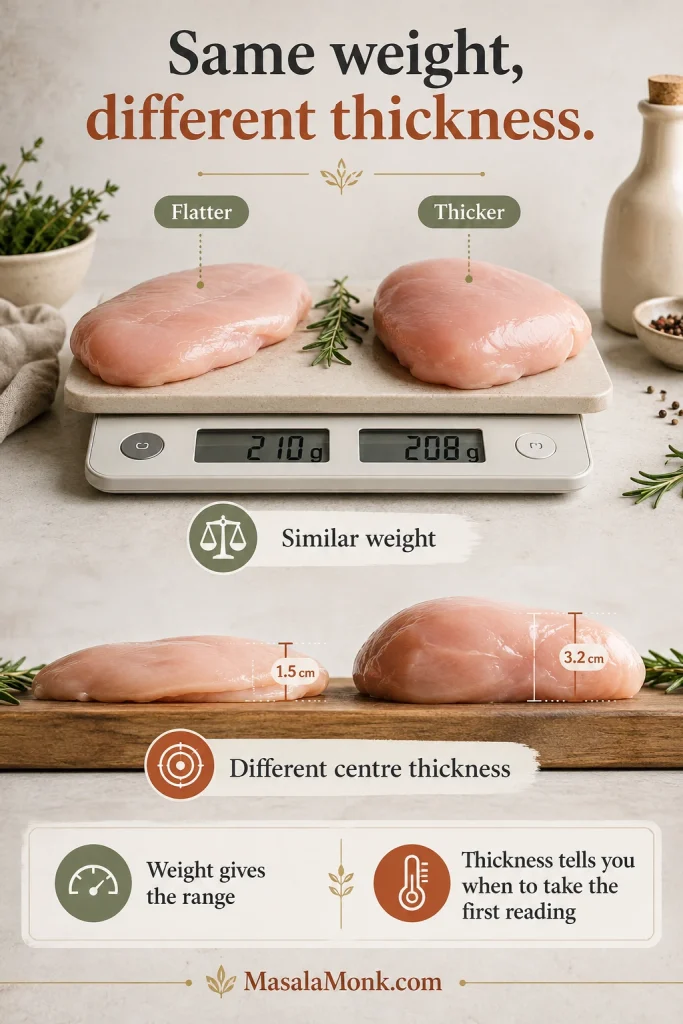
Start with the chicken, not the timer. Weight gives you the broad cooking window; thickness tells you when to check.
Two breasts can weigh almost the same and still cook differently when one is much thicker through the centre.
Similar weights can hide very different centre thicknesses — and different first-check times.
Quick Answer: How Long to Air Fry Chicken Breast
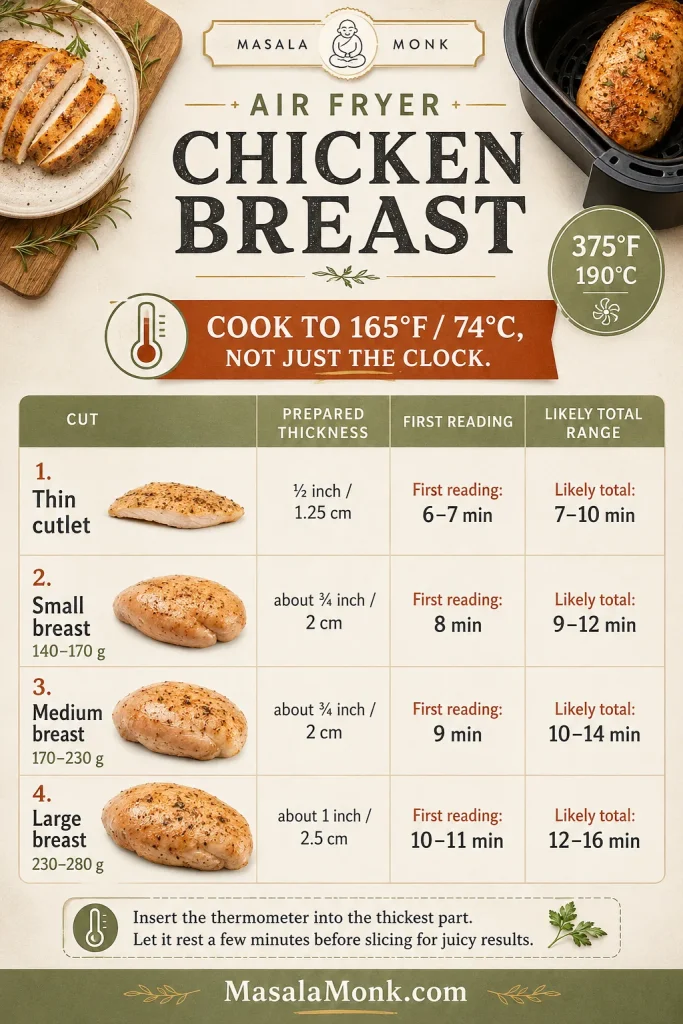
Air-fry fresh, boneless, skinless, unbreaded chicken breasts at 375°F / 190°C. For breasts weighing about 7–8 oz / 200–225 g each and evened to roughly ¾ inch / 2 cm thick, begin checking at 9 minutes. Many will finish between 10 and 14 minutes.
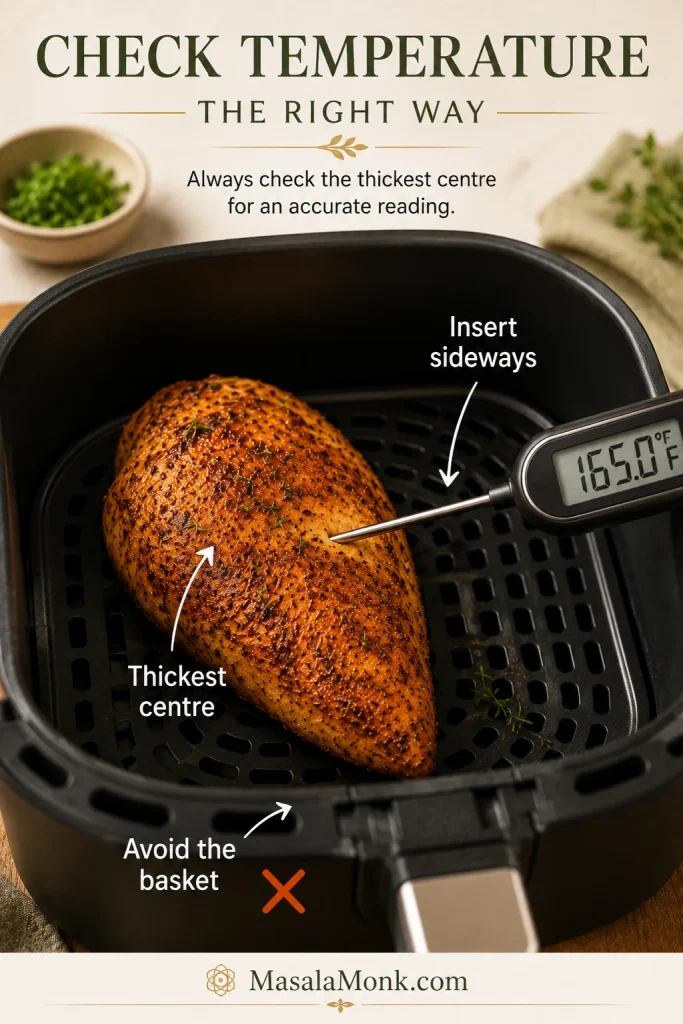
Flip once during cooking. Insert an instant-read thermometer sideways into the thickest part and remove each breast when the centre reaches 165°F / 74°C. Rest the chicken for five minutes on a clean plate or board rather than inside the hot basket.
The time range gets you close; the temperature in the centre gives you the final answer.
Make this version first. The paprika-garlic coating develops golden patches and a savoury edge, while the seasoning is simple enough to work in salads, wraps, pasta, sandwiches and meal-prep bowls.
Prep time
10 minutes
Cook time
About 10–14 minutes
Rest time
5 minutes
Total time
About 25–29 minutes
Servings
2 main-dish servings or 4 smaller meal-prep portions
Setting
Air Fry or equivalent Air Crisp setting
Temperature
375°F / 190°C
Safe internal temperature
165°F / 74°C
Equipment
Air fryer, instant-read thermometer, tongs, and a meat mallet, rolling pin or small heavy pan
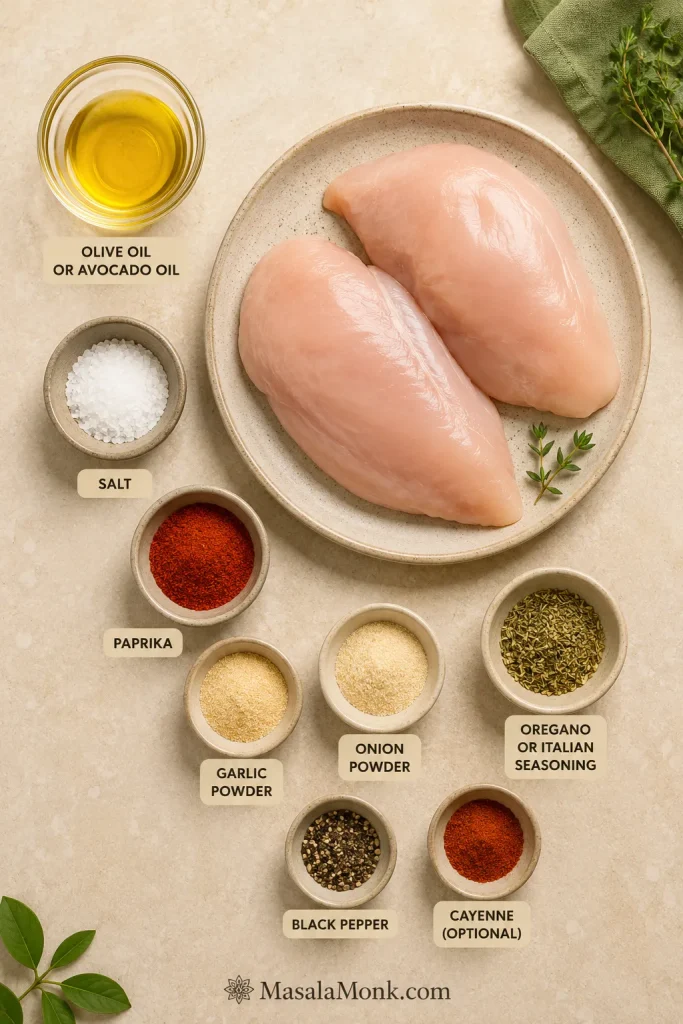
Ingredients
2 boneless, skinless chicken breasts, about 14–16 oz / 400–450 g total
2 teaspoons / 10 ml olive oil or avocado oil
Fine salt, ¾ teaspoon, roughly 4–4.5 g depending on crystal size
Paprika, 1 teaspoon
Garlic powder, ¾ teaspoon
Onion powder, ½ teaspoon
Dried oregano or Italian seasoning, ½ teaspoon
Ground black pepper, ¼ teaspoon
Pinch of cayenne pepper, optional
This simple paprika-garlic base adds colour and savoury flavour without turning the dish into a sauced recipe.
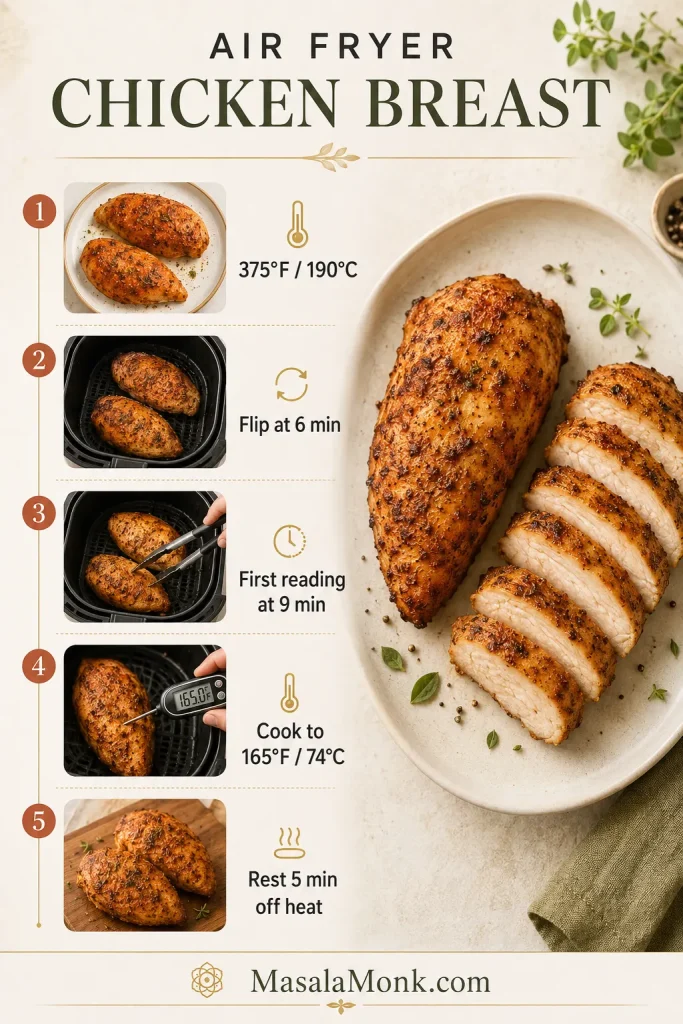
Use this map as a checkpoint: 375°F / 190°C, flip at 6 minutes, first reading at 9 minutes, finish at 165°F / 74°C and rest off heat.
Instructions
Prepare the chicken
Check the size. The timing below works best for breasts weighing about 7–8 oz / 200–225 g each. Take a noticeably smaller piece out first if it reaches temperature sooner.
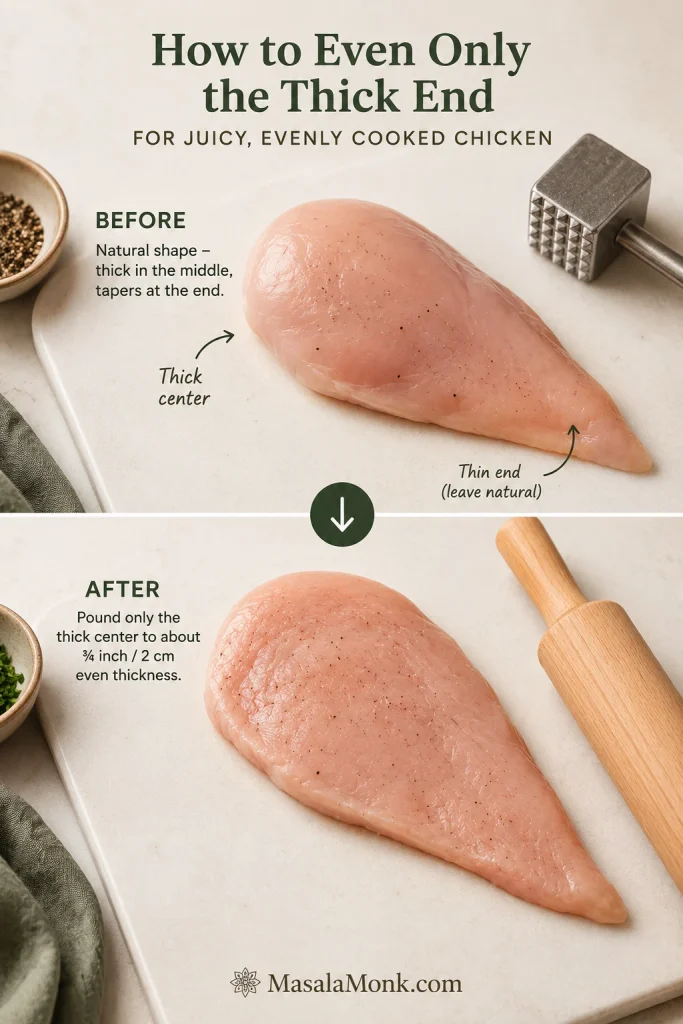
Even the thickest section. Place the chicken between two sheets of baking parchment or inside a sturdy food-safe bag. Gently level only the thick central area until each breast is close to ¾ inch / 2 cm thick.
Level the thick centre only; keep the thin end from getting hammered flat and drying out.
Preheat the air fryer. Select Air Fry, or the equivalent Air Crisp setting, and heat to 375°F / 190°C for about three minutes. Follow the manufacturer’s guidance when it recommends a different preheating routine.
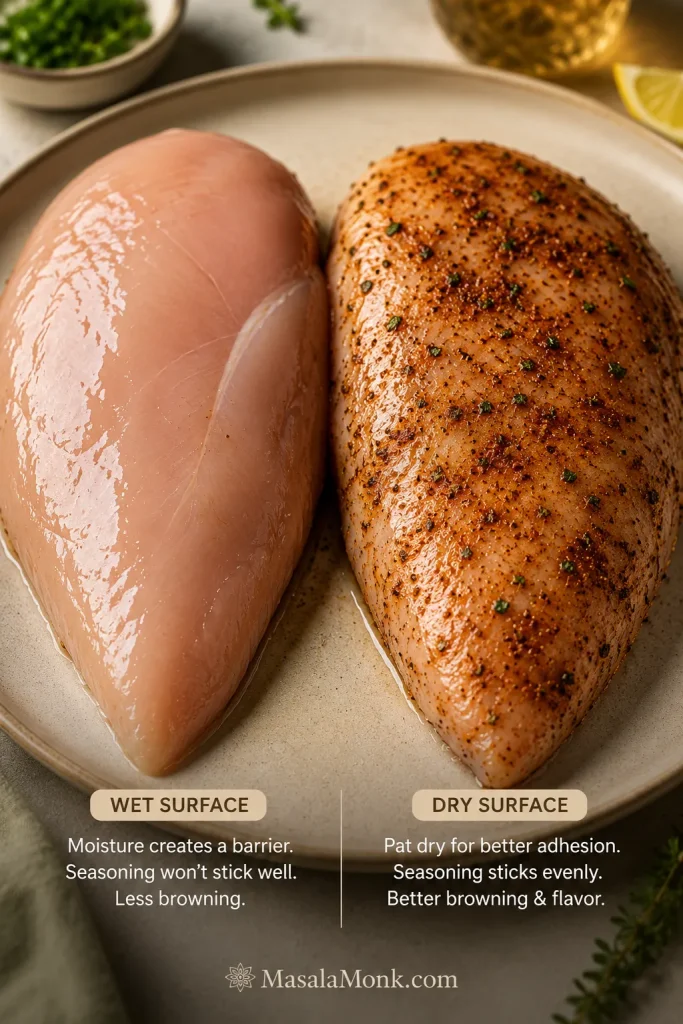
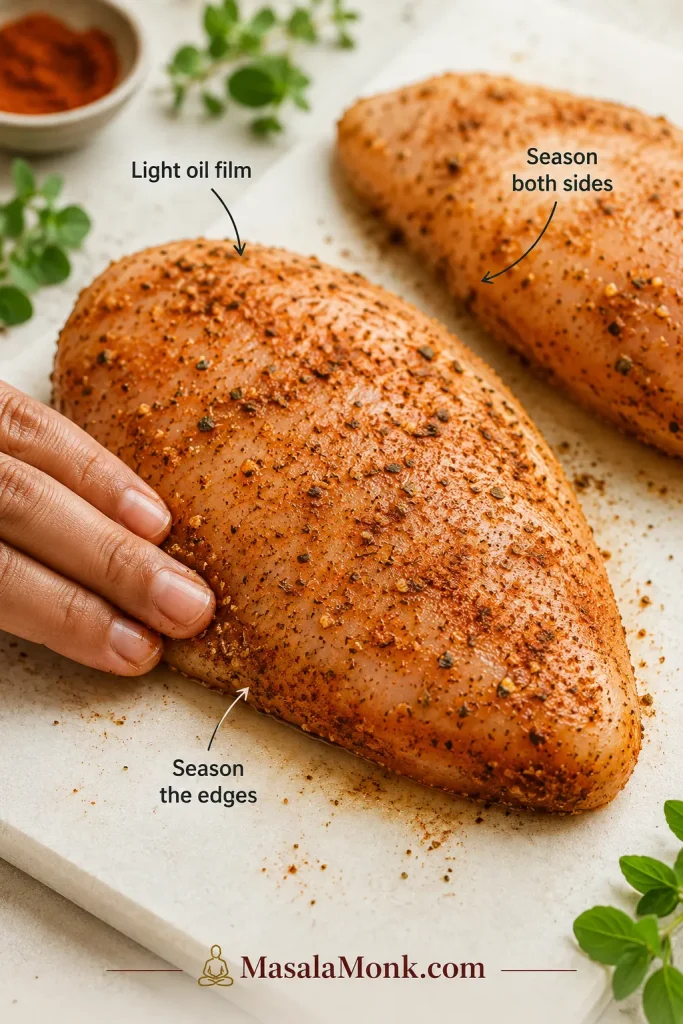
Dry and season. Pat the breasts dry with paper towels and coat them with the oil. Mix the salt, paprika, garlic powder, onion powder, oregano, black pepper and optional cayenne, then season both sides and the thicker edges.
Dry the surface so the spices cling and the exterior browns more evenly.
A thin oil film is enough; season the thick edges too, so every slice carries flavour.
Cook, check and rest
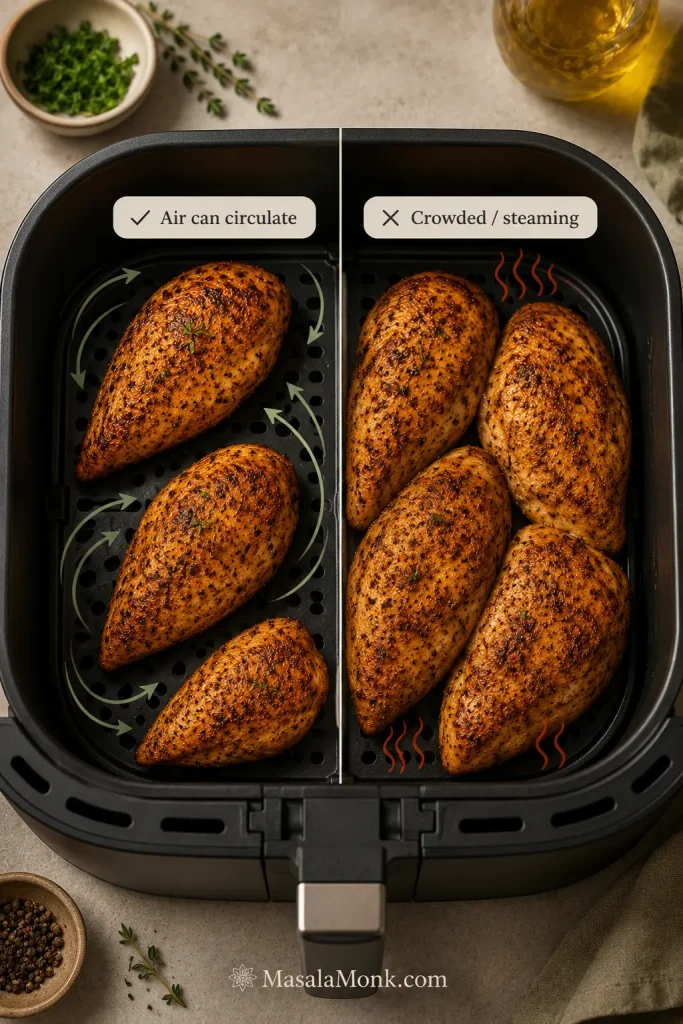
Arrange the basket. Place the chicken in one layer with a visible gap between the pieces. Extra basket spray is usually unnecessary when the chicken is lightly oiled and the basket coating is in good condition.
Visible space is part of the method. Crowded chicken steams before it browns.
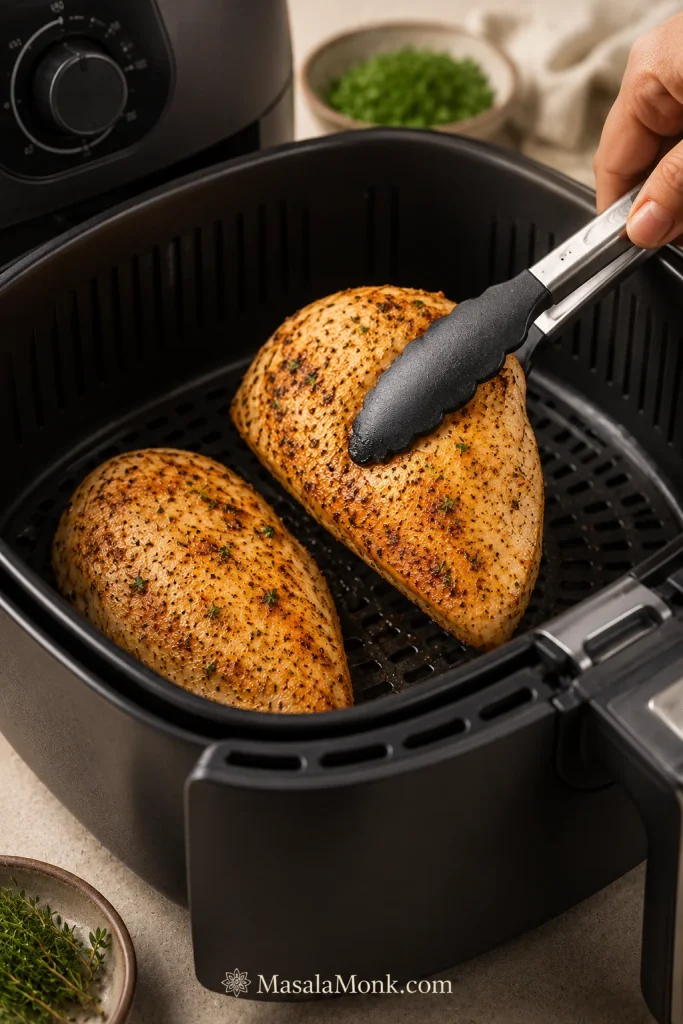
Cook and flip. Air-fry for six minutes, then turn the chicken gently with tongs. Look for scattered golden patches and the aroma of toasted spices. Do not wait for a dark crust.
Take the first temperature reading. Cook for another three minutes, then insert an instant-read thermometer sideways into the thickest central part.
Finish the chicken. A reading below 165°F / 74°C is useful: you have caught the chicken while there is still room to finish it gently. Continue in one-minute increments and lift out each piece as soon as it reaches temperature.
Use colour as a clue, not the final answer. Temperature decides when the chicken is done.
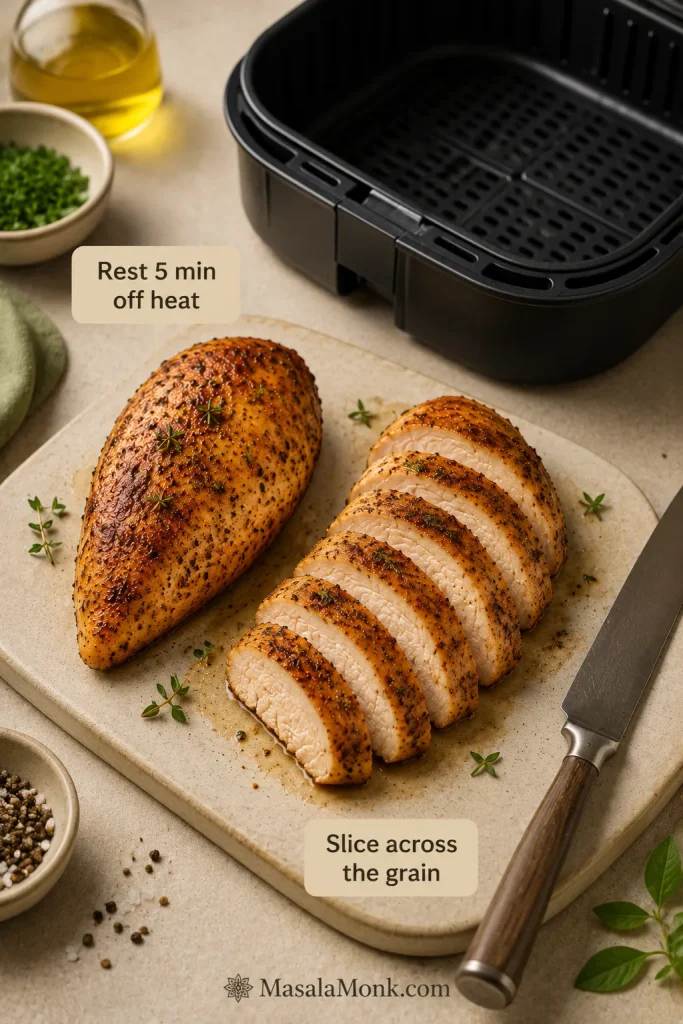
Rest away from the heat. Transfer the chicken to a clean plate or cutting board and rest for five minutes.
Slice across the grain. Cut the rested chicken this way for shorter, more tender pieces.
Rest outside the hot basket, then slice across the grain for shorter, more tender pieces.
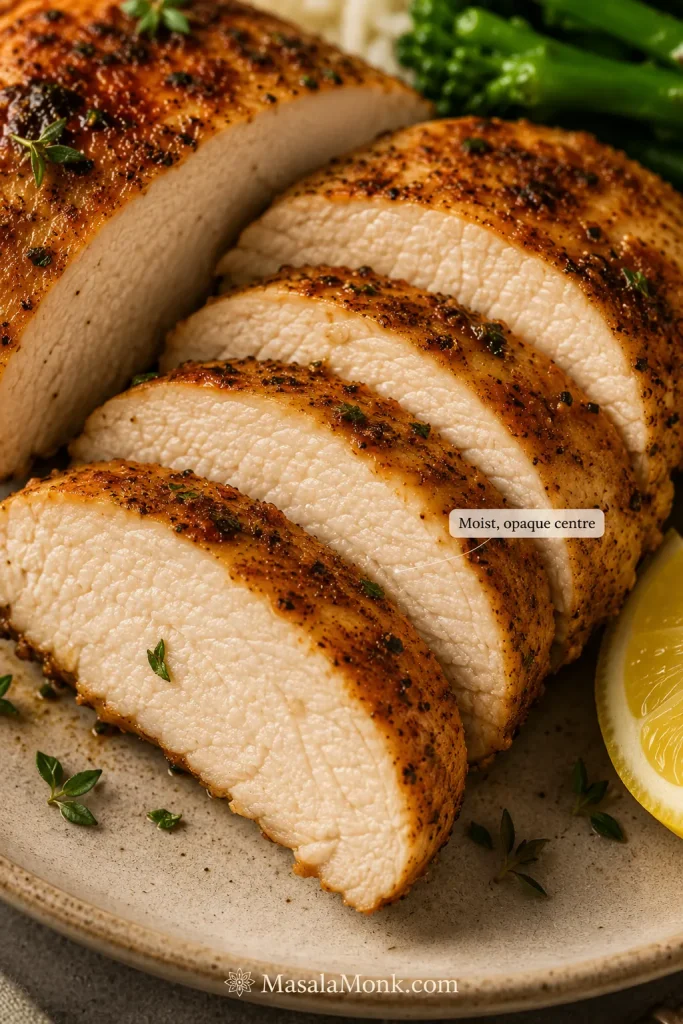
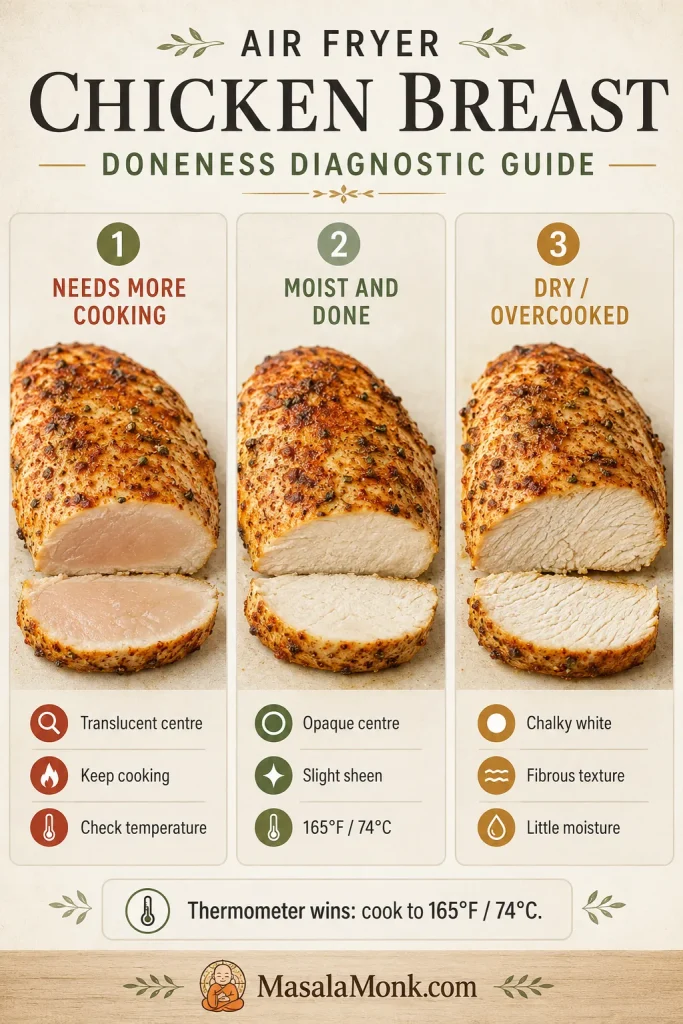
The target slice is opaque, moist and gently glossy, not pink, chalky or oily.
Food-safety reminder
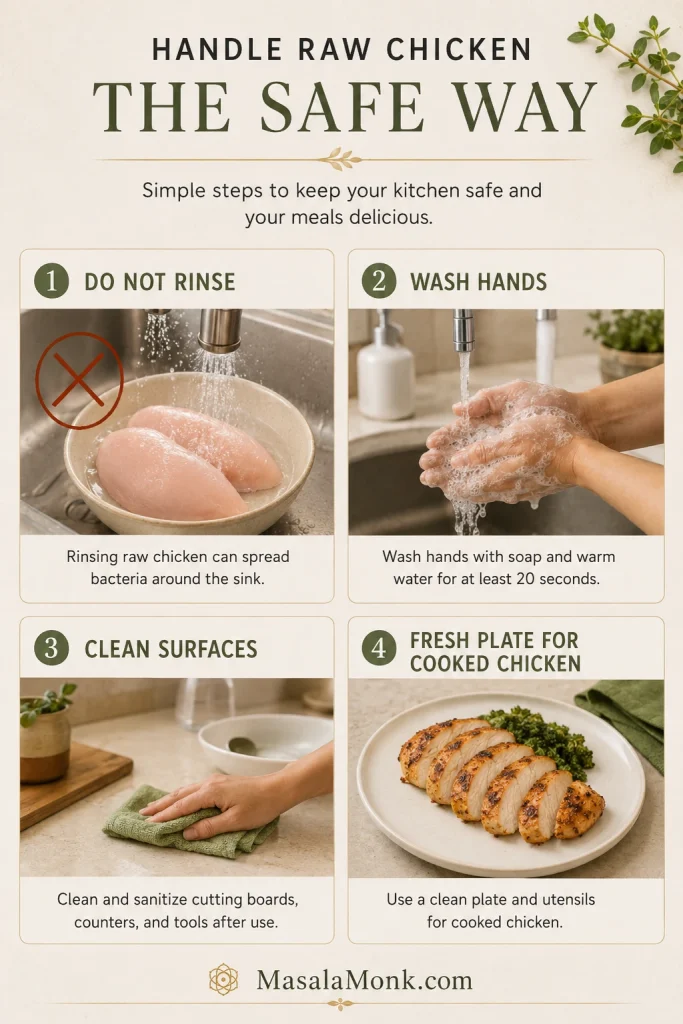
Raw-chicken safety: Don’t rinse raw poultry. Wash your hands after handling it, clean any surface it touched, and use clean utensils and a fresh plate for the cooked chicken.
Skip rinsing, wash hands, clean surfaces and switch to a fresh plate before cooked chicken comes out.
Recipe Notes
Fridge-cold chicken: The breasts can go directly from the refrigerator to preparation. They do not need to reach room temperature.
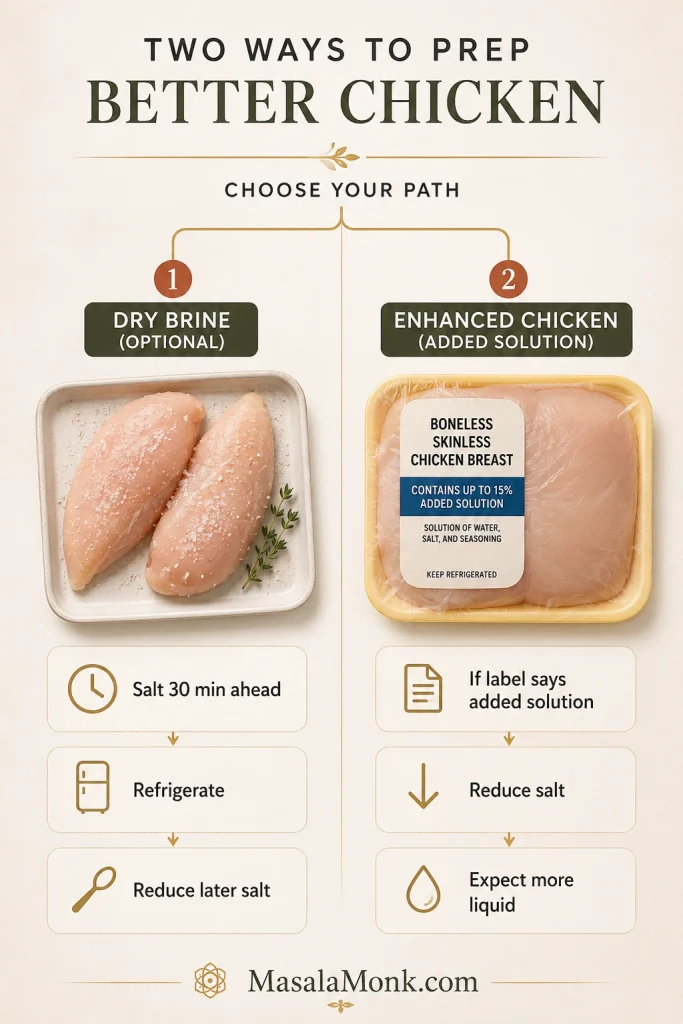
Enhanced chicken: When the package says the meat contains an added solution, reduce the salt and expect it to release more liquid.
Optional 30-minute dry brine: Salt the chicken in advance and keep it refrigerated for deeper seasoning. Reduce or omit the salt in the later spice mixture.
Salted chicken can taste more seasoned; enhanced chicken may need less salt and can release more liquid.
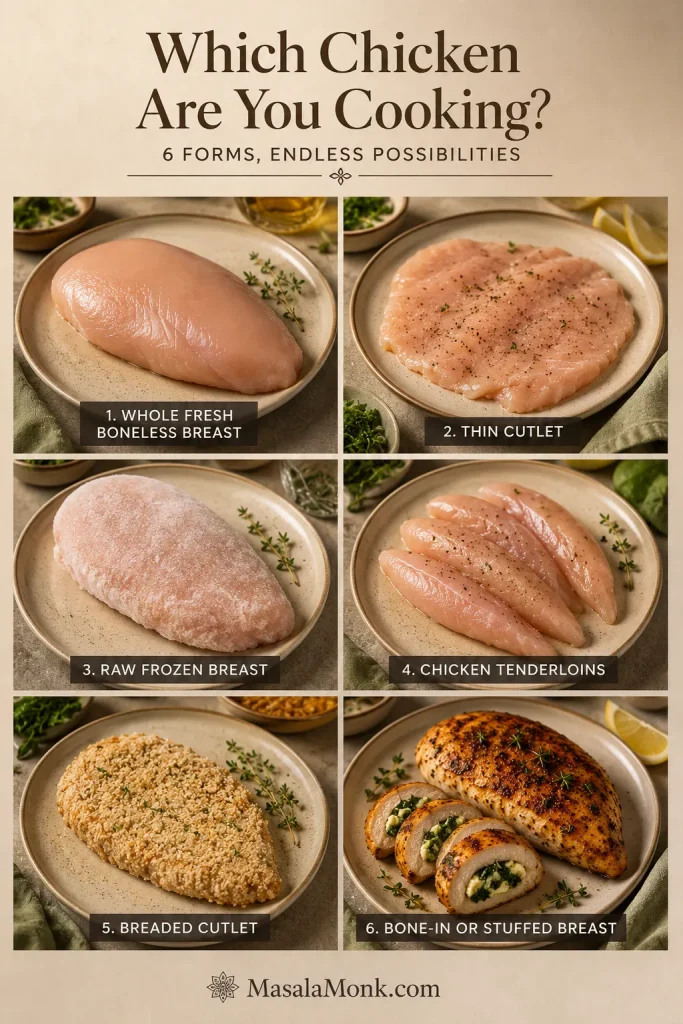
Use this visual checklist when your package does not match the fresh, whole, boneless chicken breast method above.
Match the form before you use the timing; whole breasts, cutlets, tenderloins and frozen pieces need different handling.
Four things make the difference: even the thick end, dry the surface, leave visible gaps and take the first temperature reading early. Together, they help the centre cook through without drying the tapered end.
Air Fryer Chicken Breast Time and Thickness Chart
Start with the row that most closely matches the piece in front of you. Similar-sized breasts are easier to manage together, while extremely large or strongly tapered pieces are better sliced horizontally before cooking.
How to use this timing chart: These ranges are starting points for fresh, boneless, skinless chicken breasts prepared to the thickness shown. The first-reading time is intentionally early because breast shape, basket position and machine style can change the finish time. Use the chart to know when to start checking; use 165°F / 74°C in the thickest centre to know when to stop.
Chicken form
Individual weight
Prepared thickness
Timing at 375°F / 190°C
Thin cutlet
3–5 oz / 85–140 g
⅜–½ inch / 1–1.25 cm
First reading: 5 minutes; often 6–10 minutes total
Small breast
5–6½ oz / 140–185 g
About ⅝ inch / 1.5–1.6 cm
First reading: 7 minutes; often 8–11 minutes total
Medium breast
6½–8 oz / 185–225 g
About ¾ inch / 2 cm
First reading: 9 minutes; often 10–14 minutes total
Large breast
8–10 oz / 225–285 g
¾–1 inch / 2–2.5 cm
First reading: 10–11 minutes; often 12–16 minutes total
Very large breast
More than 10 oz / 285 g
More than 1 inch / 2.5 cm
Butterfly or slice horizontally, then use the row matching the new thickness
The chart tells you when to take the first reading; the thermometer tells you when to stop.
If your chicken needs another two or three minutes, nothing has gone wrong. The chart tells you when to start looking; it does not force every breast to finish on schedule.
Chicken breast is safely cooked when the centre of its thickest part reaches 165°F / 74°C. Insert the thermometer from the side so the sensing tip reaches the middle instead of passing through the meat and touching the basket. Take the first reading before you expect the chicken to be done; a lower number means there is still room to finish it gently.
Insert from the side so the probe reaches the thickest centre without touching the basket.
No thermometer? Cut into the centre of the thickest breast. The meat should be opaque with no glossy, translucent or raw-looking section. Return it to the air fryer in one-minute increments when needed. Visual checks are less dependable, so an instant-read thermometer remains the easiest way to remove the guesswork.
Colour and texture cues help you spot trouble, but 165°F / 74°C in the thickest centre is the decision point.
The first slice should look moist through the centre, with a slight sheen of juice rather than a wet raw appearance or dry, fibrous meat. Once you have seen that fully cooked centre, the next batch becomes much easier to judge.
Chicken breast is leaner and less forgiving than chicken thighs. For a richer cut with a wider timing margin, use this air fryer chicken thighs recipe.
Change the flavour, not the method: thickness, early checks and final temperature still matter.
Bright and fresh
For lemon pepper chicken, replace the paprika and oregano with a lemon-pepper blend, checking first to see how much salt it contains. Finish with fresh lemon after cooking.
For chilli lime, add chilli powder and cumin to the base seasoning, then squeeze lime over the warm slices. A spoonful of salsa also works well when the chicken is headed for tacos or rice bowls.
Cajun seasoning can replace the individual spices, although many blends already contain salt. For smoky barbecue chicken, use smoked paprika and add barbecue sauce only during the final one to two minutes so the sugars do not scorch.
With garlic Parmesan, lean into the garlic powder and add finely grated Parmesan near the end. Cheese left in the basket for the full cooking time can darken before a thick breast is ready.
Marinated chicken
A thin oil-based or yogurt marinade works well. Let the excess drip away so the chicken browns instead of steaming beneath a heavy coating.
Tandoori-inspired chicken can be coated with yogurt, ginger, garlic, chilli, garam masala and salt. Serve it with a bright coriander-mint green chutney.
Yogurt, spices, chutney, onion and lime give this variation MasalaMonk flavour without fake tandoor char.
Keep acid-heavy marinades relatively short because a long soak in lemon or vinegar can soften the outer texture. Add sticky, sweet marinades closer to the end.
Keep any sauce intended for serving separate from marinade that touched raw poultry. If the same mixture is reused, it must be safely cooked first.
Turn It Into Dinner
Spoon something cool, sharp or creamy over the warm slices—a squeeze of lemon, green chutney, honey mustard or herby chimichurri—and simple chicken immediately feels like a finished dinner.
Eat it tonight
Serve it with fluffy rice, couscous or a tray of crispy ranch roasted potatoes. Add a green vegetable or a crisp salad.
Rice, potatoes, greens and a small sauce turn the chicken into a complete dinner.
Make tomorrow easier
Slice it cold for salads, wraps and sandwiches
Cube it for rice or grain bowls
Fold it into pesto pasta for an easy second-night dinner
Chop it into cheesy chicken broccoli rice, adding the cooked chicken near the end so it warms without drying again
Shred it into soup or pack it with vegetables and a separate sauce for lunch
Cook once, then use the leftovers in a salad, grain bowl, wrap or chicken-broccoli rice.
Most cooks can stop after the serving ideas. If your basket, liner or machine behaves differently, use the setup notes below. Storing leftovers? Jump to storage and reheating.
Temperature and Air-Fryer Setup
The main recipe uses 375°F / 190°C because it gives everyday chicken breasts a useful balance of colour, speed and control. Other settings still have their place.
Temperature
Best use
Trade-off
350°F / 177°C
Thicker but reasonably even pieces when gentler browning is preferred
Slower cooking with less surface colour
375°F / 190°C
Everyday whole or evenly prepared breasts
The best general balance of speed, colour and control
400°F / 204°C
Thin fillets and faster browning
A narrower margin before the edges dry or spices darken
350°F is gentler, 375°F is the baseline and 400°F / 204°C browns faster; check earlier when cooking hotter.
Save temperatures above 400°F / 204°C for thin pieces or specialised coatings.
Cooking a larger batch in the oven? This baked chicken breast recipe uses the same weight-and-thickness approach.
Preheating, settings and basket capacity
Select Air Fry, or the equivalent Air Crisp setting, and preheat for the published timing. If an oven-style machine has no Air Fry setting, use convection Bake or Roast at 375°F / 190°C as a starting point.
Cook as many breasts as fit in one uncrowded layer. A full basket may need a little longer because several cold pieces pull down the heat at once. Check differently sized breasts separately and remove each one when it is ready.
Parchment, silicone and machine styles
Never preheat loose parchment without food holding it down; moving air can lift it toward the heating element.
Solid liners reduce airflow beneath the chicken and can leave the underside paler or wetter.
Perforated liners preserve more airflow than solid sheets.
Compact baskets often colour food quickly, while oven-style models may brown more strongly near the back or upper rack.
Open baskets circulate best; perforated liners breathe, solid liners slow browning, and oven-style models may need rotation.
Saving the second breast for tomorrow? Keep it whole when practical; whole chicken generally holds its moisture better than pre-sliced meat. Refrigerate it within two hours—or within one hour when the surrounding temperature is above 90°F / 32°C.
Divide a larger batch between shallow containers so it cools more quickly.
Need
Best approach
Refrigerate
Store in an airtight container for 3–4 days
Freeze
Pack airtight, remove excess air and use within about 4 months for the best quality
Reheat one breast
Air-fry at 325–350°F / 160–177°C with a light brush of broth or oil
Reheat slices
Warm over low skillet heat with a splash of broth or sauce
Serve without reheating
Use properly refrigerated chicken in salads, wraps and sandwiches
Store whole when practical, then reheat gently or add moisture to slices to protect texture.
Reheat cooked chicken to 165°F / 74°C. Thin slices heat—and overheat—much faster than a whole breast.
Freezer note: Four months is a quality recommendation. Chicken held continuously at 0°F / −18°C remains safe longer, although its texture will gradually decline.
When you need a larger, hands-off batch rather than the air fryer’s quick small-basket method, these crock pot chicken breast recipes offer several dinner and meal-prep directions.
The way the chicken failed usually tells you what to change.
Cooking problems
Problem
Likely reason
What to change
The chicken is dry
It cooked too long or stayed inside the hot basket after it was ready
Take the temperature earlier and transfer it out promptly
The centre is raw but the edges are dry
The breast was too thick or uneven
Butterfly it or gently even the thick section
The outside is pale
The surface was wet, the basket was crowded or there was very little oil
Pat the chicken dry and use a thin, even oil coating
The spices burnt
The heat was high or the seasoning contained sugar or a large amount of paprika
Use gentler heat or add sweet sauces near the end
The seasoning fell off
The surface was wet or the chicken was turned roughly
Dry the surface and flip gently with tongs
The chicken browned unevenly
The basket was crowded, the chicken was not flipped or the machine has a hot area
Leave more space and turn or rotate once
Timing, reheating and basket problems
Problem
Likely reason
What to change
The chicken took much longer
It was thicker, colder, crowded or cooked from a cold start
Continue in short increments and note the thickness for next time
One breast finished first
The pieces differed in weight, thickness or basket position
Lift out each piece when it is ready
Liquid collected beneath it
The meat contained added solution, the basket was crowded or the marinade was heavy
Reduce excess coating and leave more open space
The reheated chicken is rubbery
It was reheated too hot or for too long
Use gentler heat, add moisture and stop once it reaches temperature
The air fryer smoked
Old grease, excessive oil, loose spice or sugary marinade reached a hot surface
Stop cooking, clean the drawer and apply sweet sauce late
Dry, pale, uneven or watery chicken usually points back to timing, thickness, surface moisture, spacing or added solution.
Cooked correctly but still tough or fibrous? Occasionally, the problem comes from the meat rather than from overcooking. A poultry-quality condition commonly called woody breast can leave some pieces unusually firm even when they reach the correct temperature. Slice the chicken thinly and serve it with a moist sauce or dressing.
How to Rescue Chicken That Is Already Dry
You can’t uncook dry chicken, but you can make it much more enjoyable. Slice it thinly across the grain and add moisture instead of reheating it again as a plain whole breast.
Dry chicken is not wasted; chop, sauce, wrap or bowl it instead of reheating it plain.
Do I need to brine chicken breast before air frying?
No. Evening the thick section and taking an early temperature reading matter more for this baseline method. For deeper seasoning, salt the chicken about 30 minutes ahead and keep it refrigerated. A wet brine can also work, but it adds time, and chicken labelled as containing an added solution may already be seasoned.
Do I need to preheat the air fryer?
Preheating gives the published timing a more consistent starting point. You can cook from a cold start, but the chicken may need a little longer. Take the first reading at the usual time rather than automatically adding several minutes.
Do I have to flip air fryer chicken breast?
Flipping is recommended because most basket air fryers colour more strongly from above. The chicken can still cook through without flipping, but the underside may remain paler and the result may be less even.
Can I use this timing for frozen chicken breast?
No. Frozen chicken needs a method designed around a longer cooking window and the way the centre thaws as it cooks. Do not simply add a few minutes to this fresh-chicken recipe.
Can I make air fryer chicken breast without oil?
Yes. Oil is not required for the chicken to cook safely, but the seasoning may cling less evenly and the exterior may remain paler. Pat the surface very dry and press the seasoning on firmly before cooking.
The Takeaway
Start with the chicken, not the timer. Even the thick section and leave space around each breast. Weight gets you into the right range; thickness tells you when to take the first reading. Move each piece out of the hot basket as soon as it is ready.
Then let it rest while you finish the rice, dress the salad or warm the tortillas. Slice it while it is still moist, add the sauce that suits the evening, and keep the second breast for the lunch that will be easier tomorrow.
If you make it, tell us which air fryer you used, how large the breasts were, how long they took and what you served with them. Did the weight-and-thickness chart match your batch? Your experience may help the next person standing over the basket.
Air fryer pork tenderloin is the kind of dinner that feels almost too easy when it goes right. The outside turns browned and savory, the inside stays juicy, and you can slice it onto plates in about half an hour without heating the oven.
You are not trying to make fancy pork here. The goal is smoky browned edges, tender slices, and just enough pan-style flavor to make dinner feel like more than a shortcut. Everything comes down to three things: cook it hot, check it early, and rest before slicing.
Because pork tenderloin is lean, a few extra minutes can turn glossy slices into dry pork, especially if your piece is small, your air fryer runs hot, or the package in front of you is actually pork loin instead of tenderloin.
This guide is built for the real-life versions too: small tenderloins, hot air fryers, pre-marinated packs, pork fillet labels, frozen pork, and the moment you realize your potatoes need longer than the pork.
Cook pork tenderloin in the air fryer at 400°F / 200°C, or 205°C if your air fryer uses exact 5-degree settings, until the middle of the pork reads 145°F / 63°C. Most 1–1½ lb / 450–680g tenderloins take about 18–24 minutes, but small or slim pieces can finish sooner. Start checking early, rest for 5 minutes, then slice across the grain.
The clock gets you close. A temperature check saves the pork.
What success looks like
The pork should have browned, smoky-garlic edges, a moist center, and slices that look glossy instead of chalky. Spoon any board juices back over the sliced pork before serving. That little step makes the whole plate feel more finished.
Texture check: Before serving, look for a moist center and glossy slices rather than a chalky cut surface.
Look for slices that stay glossy in the center after resting; that shine is the visual clue that the pork was not cooked too long.
You want pork that slices juicy, not dry and gray.
You need dinner fast, but still want it to feel complete.
You bought pork tenderloin or pork fillet and need clear air fryer timing.
You are using a Ninja Foodi, basket air fryer, oven-style air fryer, or pre-marinated pack.
You want potatoes, carrots, green beans, rice, salad, or a simple sauce on the side.
Air Fryer Pork Tenderloin Recipe Card
This is the fast version: season the pork with a smoky garlic-Dijon rub, air fry it hot, check once before it overcooks, and rest it so the slices stay juicy.
Recipe at a Glance
Recipe
Air Fryer Pork Tenderloin
Best cut
Pork tenderloin or pork fillet, 1–1½ lb / 450–680g
Prep time
5–10 minutes
Cook time
18–24 minutes for most tenderloins
Start checking
13–14 minutes for small/slim pieces; 16–18 minutes for standard pieces
Rest time
5 minutes
Total time
About 28–35 minutes
Servings
4
Air fryer temperature
400°F / 200°C, or 205°C if available
Internal temperature
145°F / 63°C in the center, then rest
Ingredients
1 pork tenderloin, 1–1½ lb / 450–680g
1 tablespoon / 15 ml olive oil or avocado oil
1 teaspoon / 5 ml Dijon mustard
1–2 teaspoons brown sugar or honey
1 teaspoon smoked paprika
1 teaspoon garlic powder
½ teaspoon onion powder
¾–1 teaspoon kosher salt, depending on size and seasoning
½ teaspoon black pepper
Pinch of cayenne, chili powder, or red pepper flakes, optional
Method
Preheat the air fryer to 400°F / 200°C, or 205°C if your air fryer allows that setting. Give it 3–5 minutes if your model recommends preheating.
Pat the pork dry. Remove any tough silver skin if present.
Mix the oil, Dijon mustard, brown sugar or honey, smoked paprika, garlic powder, onion powder, salt, pepper, and optional chili in a small bowl.
Rub the seasoning mixture all over the tenderloin.
Place it in the air fryer basket with space around it. Cut it in half crosswise if needed so it fits without curling tightly.
Air fry for 10–12 minutes, then flip.
Continue cooking until the middle reaches 145°F / 63°C, checking early for small or slim tenderloins.
Rest loosely tented for 5 minutes, then slice across the grain into thick, juicy pieces.
Do not cook by time alone. A slim 1 lb tenderloin and a thick 1½ lb tenderloin should not be treated like the same piece of meat.
A simple plate of potatoes and green vegetables turns the tenderloin into a full weeknight dinner after the main method is done.
For a fast weeknight plate, pair pork tenderloin slices with potatoes and green vegetables so the air fryer recipe feels like a full meal, not just the main protein.
From here, the things that change the result are the cut, the thickness, the air fryer style, and when you stop cooking. That is what the rest of the guide helps you control.
With a plain tenderloin, start with the recipe card and cooking chart. For a package labeled pork loin filet, check the cut section before you season anything. Adding potatoes or carrots? Read the sides section first so the pork does not wait around while the vegetables finish.
Why This Works
The air fryer works beautifully for pork tenderloin because the cut is small enough to cook through before the outside has time to dry out. You get browned edges without babysitting a skillet, as long as you stop at temperature.
The flavor is simple but satisfying: smoky, garlicky, lightly tangy, and just sweet enough to help the edges brown. Oil helps the rub toast instead of sitting dry on the surface. Dijon adds a quiet tang without making the pork taste mustardy. Brown sugar or honey helps the outside color. The short rest keeps the slices glossy when you cut in.
When it comes out right, the edges are smoky and browned, the slices look moist, and the mustard-garlic rub tastes like it took more effort than it did.
That is also why this tenderloin cooks hotter than some air fryer pork chops. Pork chops are flatter and can tighten quickly, so if the package in front of you is actually chops, switch to this air fryer boneless pork chops guide instead.
The no-dry rules
Use pork tenderloin, not pork loin. The cuts are different and need different timing.
Cook hot, but check early. 400°F / 200°C browns well, but small pieces finish quickly.
Test the middle, not the tapered end. The thin tail is not the doneness judge.
Rest before slicing. Five quiet minutes gives you glossier, juicier slices.
Do not chase “no pink.” A slight blush can be normal when the pork is cooked to temperature.
Before any of those rules can help, though, the cut has to be right.
Pork Tenderloin vs Pork Loin vs Pork Fillet
This is worth checking before you cook, because the wrong cut is the easiest way to follow the recipe perfectly and still end up disappointed. Pork tenderloin, pork loin, pork loin filet, pork fillet, and pork roast sound similar, but they do not cook the same way.
How to Identify the Right Cut
Cut check: Shape matters here; this visual helps you confirm tenderloin or pork fillet before using the air fryer timing.
A quick shape check here can save the whole recipe: tenderloin and pork fillet are usually long and narrow, while pork loin is wider and cooks on a different timeline.
Package says
What it likely is
Use this recipe?
Pork tenderloin
Long, narrow, lean cut, usually 1–1½ lb
Yes
Pork fillet
Often the same cut as pork tenderloin in UK, Australia, and some grocery labeling
Yes, if long, narrow, and about 450–680g / 1–1½ lb
Pork loin
Wider, larger roast-style cut
No, it needs different timing
Pork loin filet
Can be a branded or pre-marinated loin-style cut; check shape and weight carefully
Maybe, only if it looks like tenderloin
Pork roast
Usually larger and wider than tenderloin
No
When to Switch Recipes
If it is wide like a roast, stop. This method is for a long, narrow pork tenderloin or pork fillet. A pork loin roast needs a different timing plan.
If your package turns out to be a bigger pork loin, you are not stuck — just switch methods. MasalaMonk already has a dedicated slow cooker pork loin recipe and a smoked pork loin recipe for that larger cut.
The ingredient list is short on purpose. Pork tenderloin does not need to be buried under sauce. It needs enough fat for browning, enough salt for flavor, and a rub that gives the air fryer something to toast.
The result is a smoky garlic crust with a little mustardy brightness and just enough sweetness to make the edges taste dinner-worthy, not sugary.
What Each Ingredient Does
Gather the rub ingredients before preheating so the pork can go from seasoning to basket without losing momentum.
This short ingredient list works because each part has a job: oil helps the rub cling, Dijon adds brightness, and paprika plus garlic build the crust.
Ingredient
US amount
Metric amount
Why it helps
Pork tenderloin
1–1½ lb
450–680g
The ideal size for this method
Olive oil or avocado oil
1 tbsp
15 ml
Helps browning and seasoning coverage
Dijon mustard
1 tsp
5 ml
Adds tang and helps the rub cling
Brown sugar or honey
1–2 tsp
5–10 ml
Balances lean pork and helps browning
Smoked paprika
1 tsp
2–3g
Adds color and smoky depth
Garlic powder
1 tsp
3g
Main savory note
Onion powder
½ tsp
1–2g
Rounds out the rub
Kosher salt
¾–1 tsp
4–6g
Prevents bland pork
Black pepper
½ tsp
1g
Adds gentle heat
Cayenne or chili powder
Pinch
Pinch
Optional heat
Salt and Seasoning Notes
For smaller or pre-marinated tenderloins, stay near the lower salt amount. Use the higher amount for a plain, larger one. When the pork is already seasoned, injected, or packed in a salty marinade, reduce the salt in the rub.
With fine salt or table salt instead of kosher salt, start with about ½ teaspoon for a 1 lb / 450g tenderloin and adjust next time. Fine salt packs more tightly, so the same spoonful tastes saltier.
Easy Substitutions
No Dijon? Use yellow mustard, whole-grain mustard, or skip it and add a small splash of lemon juice or vinegar for brightness.
No smoked paprika? Use regular paprika with a pinch of chili powder, cayenne, or cumin.
No brown sugar? Use honey or maple syrup. Skip the sweetener if your marinade is already sweet.
No avocado oil? Olive oil works well. Use a light coating so the rub clings and browns.
Using a salty seasoning blend? Reduce or skip the added salt until you know how salty the blend is.
Rub texture: Aim for a loose paste that coats the pork evenly instead of dropping into the basket.
The rub should look like a loose paste so it clings to the pork instead of dropping off as dry seasoning in the basket.
Can I use a marinade instead?
Yes. For a simple marinade-style version, mix 1 tablespoon oil, 2 teaspoons soy sauce, 1 teaspoon Dijon mustard, 1 tablespoon honey or brown sugar, 1 teaspoon garlic powder, and 1–2 teaspoons lemon juice or vinegar. Marinate for 20–30 minutes if you have time, then air fry the same way and check the internal temperature.
Equipment You Need
You can make this with basic kitchen tools, but the thermometer is the one that matters. Pork tenderloin is too lean and too quick-cooking for blind timing.
Air fryer
Instant-read thermometer
Tongs
Small bowl for the seasoning paste
Measuring spoons
Paper towels
Cutting board
Sharp knife for trimming silver skin and slicing
Basket Air Fryer, Oven-Style Air Fryer, and Ninja Foodi Notes
Air fryer style changes how quickly the outside browns, so use this as a first-check guide before trusting one fixed time.
Air fryer type
What to expect
First check
Basket air fryer
Browns fastest with strong direct airflow
13–16 minutes
Oven-style air fryer
May need a few extra minutes
16–18 minutes
Ninja Foodi or Foodi Grill
Can brown aggressively from the top
13–15 minutes
Small air fryer
Cut the tenderloin in half; do not coil it tightly
Based on thickness
Air fryer with liner
Browning can slow if airflow is blocked
Check color and temperature early
How to Prepare the Pork
A good result starts before the basket: dry the surface, season all sides, and remove any tough silver skin so the finished slices are tender from edge to edge.
Prep Steps Before Air Frying
Look for the shiny strip before seasoning; trimming it now prevents chewy bites later.
Trim the silver skin before cooking, otherwise that shiny strip stays tough even when the pork itself is perfectly done.
Pat it dry. Surface moisture slows browning.
Remove silver skin. This is the shiny, tough membrane that does not soften well during cooking. Slide a thin knife under it and trim it away.
Trim lightly. Pork tenderloin is already lean. Remove loose fat or ragged edges, but do not over-trim.
Protect the thin tail. If the tapered end is very thin, tuck it slightly under so it does not overcook too far ahead of the center.
Season all over. Coat the top, bottom, sides, and tapered end.
Let it sit briefly. Even 5–10 minutes while the air fryer preheats helps the seasoning settle.
Seasoning Check Before Air Frying
The tenderloin should look evenly coated before cooking, with no bare patches on the sides or tapered end.
Once the tenderloin is evenly coated, the paprika-Dijon rub can toast into a savory crust while the center stays protected from drying out.
How to Cook It in the Air Fryer
This is where the pork starts becoming dinner, not just a timing problem. Once it is seasoned, the cooking is simple. The only trick is not walking away for too long the first time you make it in your air fryer.
Basket spacing: Leave visible room around the pork so hot air can reach the sides and brown the surface.
Leave open space around the pork tenderloin in the air fryer basket; that airflow helps the surface brown instead of steaming.
Step-by-Step Air Fryer Method
Preheat the air fryer. Set it to 400°F / 200°C, or 205°C if available. Preheat for 3–5 minutes if your air fryer recommends it.
Season the pork. Rub the oil, mustard, and spice mixture over the whole tenderloin.
Place it in the basket. Leave space around the meat so hot air can circulate. Cut it in half crosswise if it is too long.
Cook the first side. Air fry for 10–12 minutes. The outside should be starting to color, but it does not need to look deeply browned yet.
Flip. Turn the tenderloin with tongs. Some juices in the basket are normal.
Watch the surface. By the time it is close, the rub should smell toasted and savory, and the outside should look browned in patches rather than wet.
Finish cooking. Continue air frying until the middle reaches 145°F / 63°C.
Rest. Transfer to a board and rest loosely tented for 5 minutes.
Slice. Cut across the grain into thick slices. The center should look moist, not chalky.
After the Flip
After the flip, browned patches are enough; from this point, temperature matters more than chasing a darker crust.
After flipping, the surface should start browning in patches; from here, rely on the thermometer rather than waiting for the outside to get darker.
When the Outside Browns Fast
Dark edges before a done center usually mean the heat is too aggressive. Lower the air fryer to 375–390°F / 190–200°C for the remaining minutes. If the pork is cooked through but pale, brush it with a little oil, honey mustard, or pan juices and air fry for 1–2 more minutes only if it is not already above temperature.
Rest and Slice Before Serving
Resting is not just waiting. It helps the juices settle before you slice. Spoon those juices back over the meat, and the pork tastes more finished.
Rest the pork here before slicing so the juices settle and the board juices can be spooned back over the meat.
Give the pork a few quiet minutes here; that short rest keeps more juices in the slices and leaves enough on the board to spoon back over the top.
When the tenderloin has rested, use a steady cross-grain cut to make thick slices that stay moist on the plate.
Then slice across the grain into thick pieces; thinner slices dry out faster, while thicker slices hold moisture better on the plate.
The chart is here to keep you from guessing, not to make the recipe complicated. Use the earliest check time when cooking a new brand, a new air fryer, or a pre-marinated pack.
First time with this air fryer? Watch closely once. After that, your own air fryer timing becomes the shortcut.
Use the timer to know when to start checking, then let the thermometer decide when the pork is done.
Your timer helps you know when to start checking, while the thermometer tells you when to stop; together, they make air fryer pork tenderloin repeatable.
Pork tenderloin size
Metric
Air fryer temp
Start checking
Likely total time
Small or slim tenderloin
450g / 1 lb
400°F / 200°C
13–14 min
14–18 min
Standard tenderloin
565g / 1¼ lb
400°F / 200°C
16 min
18–22 min
Larger tenderloin
680g / 1½ lb
400°F / 200°C
18–20 min
20–26 min
Very thick tenderloin
700g+ / 1½ lb+
390–400°F / 200–205°C
20 min
24–28 min
Cut in half to fit
Same total weight
400°F / 200°C
13–16 min
Depends on thickness, not length
How to Use the Chart
Cutting a tenderloin in half does not automatically cook it in half the time. Thickness matters more than length. Pieces that stay thick in the center still need time, while slim pieces finish faster.
Save your first successful timing. Once you know how your air fryer handles a 1 lb or 1½ lb tenderloin, this recipe becomes much easier the next time.
If your “very thick tenderloin” is actually wide like a roast, pause and check the package. It may be pork loin, not tenderloin, and it needs a different cooking plan.
Internal Temperature and Pink Pork
Pork tenderloin is done when the middle of the thickest part reaches 145°F / 63°C, followed by a short rest. Check the largest section, not the thin tail end.
Temperature check: Measure the thickest center, not the thin end, when checking for 145°F / 63°C.
The thermometer should go into the thickest center, not the thin end; pull the pork at 145°F / 63°C so the slices stay tender after resting.
For food safety, FoodSafety.gov lists pork steaks, roasts, and chops at 145°F / 63°C with a 3-minute rest.
That is why a slight blush of pink can be normal. Pink does not automatically mean raw; temperature tells you more than color.
For beginners, keep the target simple: cook to 145°F / 63°C, then rest for 5 minutes. Experienced cooks may start watching closely around 140–143°F because carryover can raise the final temperature during rest, but the clearest serving target for this recipe is still 145°F / 63°C.
Once you trust the thermometer, pork tenderloin stops being stressful. Instead of guessing by color or cutting into it five times, cook to the number, let it rest, and slice when the juices have settled.
Doneness guide
140–143°F / 60–62°C: Watch closely here only if you understand carryover cooking and will rest the pork immediately.
145°F / 63°C: Clearest finished target for most home cooks.
150°F / 66°C: Still usable, but getting firmer.
160°F / 71°C and above: Much drier, especially in lean tenderloin.
This visual pairs with the doneness guide: as pork cooks longer, the slices turn paler, firmer, and less glossy.
As pork cooks longer, the slices turn paler and firmer; a slight blush with the right internal temperature can still mean tender, safe pork.
This is the section to read if you are nervous, using a new air fryer, or already worried you left the pork in a minute too long. Dryness usually comes down to timing, cut, or resting. The good news is that all three are fixable.
Problem
What happens
Fix
Cooking by time only
The pork can overcook before you notice
Use the time chart, then do the doneness check
Using pork loin instead of tenderloin
The cut is larger and needs different timing
Check the package and shape before cooking
Very small tenderloin
It cooks faster than the recipe range
Start checking at 13–14 minutes
No rest
Juices run out when sliced
Rest 5 minutes before cutting
Sugary marinade burns early
The outside darkens before the middle is done
Check early or reduce the temperature slightly
Aggressive reheating
Leftovers become dry and firm
Reheat gently with sauce, broth, or butter
Match Your Result
Still not sure what happened? Match the result:
Outside dark, inside not ready: The heat was too aggressive, the rub was sugary, or the pork sat too close to the heating element. Lower the temperature for the remaining minutes.
Pale outside, dry inside: The pork likely cooked too long without enough surface oil or browning. Next time, dry it well, coat lightly with oil, and start checking earlier.
Only the thin end was dry: The tenderloin was tapered. Tuck the thin tail slightly under or expect the end pieces to cook faster than the center slices.
Dry pork is not ideal, but it is rarely beyond saving. Slice it thicker and serve it with something moist: pan juices, honey mustard, mushroom sauce, gravy, melted butter, broth, apple chutney, or a spoon of barbecue sauce.
If the slices need extra help, a spoon of creamy mushroom sauce turns slightly over-rested or lean pork into a much softer dinner plate.
Adding Potatoes, Carrots, or Green Beans
After the pork is under control, the real trick is keeping the sides from making it wait. You can cook it with potatoes, carrots, green beans, or sweet potatoes in the air fryer, but dense vegetables often take longer than the pork.
The pork is the part you protect. Vegetables are the part you can let keep cooking.
Best No-Dry Method
Cook the tenderloin first.
Rest it for 5–10 minutes.
While it rests, cook or finish the potatoes, carrots, or green beans in the air fryer.
Slice the pork right before serving.
This keeps the pork from waiting around while the potatoes catch up.
If you would rather keep the air fryer focused on the meat, make the potatoes separately. These ranch roasted potatoes give you crisp, salty-herby edges without forcing the tenderloin to wait in the basket.
One-Basket Dinner Example
For a simple one-basket version, use 1 lb / 450g pork tenderloin, 8 oz / 225g baby potatoes, and 1 large carrot. Halve the baby potatoes, slice the carrot thinly, toss the vegetables with oil and seasoning, and air fry them for 8–10 minutes at 390–400°F / 200–205°C. Add the seasoned pork, then cook until it reaches 145°F / 63°C. If the meat finishes before the vegetables are tender, remove and rest it while the vegetables cook a few minutes longer.
One-basket note: Keep the pork visible and let dense vegetables finish separately if they need more time.
When making a one-basket dinner, keep the pork visible and give potatoes or carrots extra time so the vegetables finish without overcooking the meat.
Vegetable Timing Tips
Side
Best way to handle it
Baby potatoes
Halve them and give them a head start.
Regular potatoes
Cut into ½-inch cubes so they cook faster.
Carrots
Slice thinly or cut small; thick carrots need extra time.
Green beans
Add later or cook while pork rests.
Sweet potatoes
Cut small and expect them to need more time than green vegetables.
Thawed is the recipe. Frozen is the emergency version.
A thawed tenderloin seasons better, browns better, cooks more evenly, and usually has a better texture. If you are staring at a frozen one and need a fallback, drop the heat and give it more time.
Use a lower temperature: about 330°F / 165°C.
Start checking around 30 minutes and expect roughly 33–38 minutes for many pieces, depending on thickness.
Start from frozen, then season once the surface softens enough for the rub to stick.
Flip halfway.
Check the middle, not just the browned outside.
Rest before slicing.
Do not cook a frozen double pack as one solid block. Separate the tenderloins first if they are frozen together. Do not use this fallback method for stuffed, rolled, or bacon-wrapped frozen tenderloin. Frozen breaded pork tenderloin is also a different product from raw whole tenderloin, so follow the package guidance and confirm doneness.
Smithfield, Hormel, and Pre-Marinated Packs
Pre-marinated packs are where label confusion shows up again. They are convenient, but some are pork tenderloin, some are pork loin filet, and some are wider, sweeter, or saltier than this recipe assumes.
These packs can still make an easy dinner; they just need a quick label check before they go into the basket.
Before cooking a pre-marinated pack, check the shape, salt level, sweetness, and final temperature instead of trusting the label alone.
Pre-marinated pork tenderloin can be convenient, but check the shape, salt level, sweetness, and final temperature instead of trusting package timing alone.
Pre-Marinated Package Checklist
Check the package name, weight, and shape before cooking.
Long, narrow packs around 1–1½ lb / 450–680g usually work with this method.
A pork loin filet label deserves a closer look. It may look long in the package but still be wider and denser than pork tenderloin.
Wider pork loin filet or roast-style packs need different timing.
Pat off excess wet marinade if it is very drippy.
Start checking around 15 minutes because sugar-heavy marinades can brown faster.
Dark edges early are a sign to check temperature before assuming the pork is done.
Use less added salt because many pre-marinated packs are already seasoned.
Package timing is a starting point, not a promise. Use the package for flavor guidance and your thermometer for doneness.
Air Fryer Pork Tenderloin Medallions
If you sliced the pork already, switch timing systems. Medallions cook much faster than a whole tenderloin, which makes them useful for rice bowls, salads, wraps, or a faster dinner plate.
Slice the tenderloin into even medallions, about 1–1½ inches thick.
Season both sides.
Air fry at 350°F / 175°C for about 9–12 minutes, flipping once.
Start checking around 7–8 minutes if the pieces are closer to 1 inch thick.
Check the largest medallion for 145°F / 63°C, then rest briefly before serving.
Even thickness matters. Tiny end pieces cook faster than center-cut medallions, so pull them early if needed.
Flavor Variations
After you know when to stop cooking, the flavor can go almost anywhere. The timing usually stays close unless the tenderloin is thicker, smaller, wrapped, frozen, or heavily coated.
Honey mustard: Add extra Dijon and honey, then finish sliced pork with a small spoon of sauce.
BBQ rub: Use smoked paprika, brown sugar, garlic powder, onion powder, salt, pepper, and chili powder.
Garlic herb: Use garlic powder, thyme, rosemary, parsley, black pepper, and olive oil.
Cajun: Use Cajun seasoning, smoked paprika, garlic, and oil. Watch the salt if your blend is salty.
Soy-Dijon marinade: Use soy sauce, Dijon mustard, honey, garlic powder, and a little vinegar or lemon juice.
Spicy chili-garlic: Add chili flakes, cayenne, or chili paste to the oil and mustard mixture.
Bacon-wrapped: Cook more carefully because bacon needs time to render. Start checking early so the pork does not overcook while the bacon browns.
Choose honey mustard for a softer family-style dinner, Cajun for heat, garlic herb for mashed potatoes, and BBQ rub if you want leftovers for sandwiches.
After slicing, this honey mustard dressing can double as a bright pork drizzle, especially with the honey mustard or garlic herb versions.
With BBQ-style pork tenderloin, creamy coleslaw is a natural fresh side because it brings crunch, tang, and a little sweetness.
What to Serve with It
This pork tenderloin is flexible enough for a quick weeknight dinner, a meal-prep bowl, or a slightly nicer weekend plate. A few slices over mashed potatoes feels cozy; the same pork over rice with sauce becomes lunch tomorrow.
Once the pork is sliced, a platter with vegetables, potatoes, sauce, and board juices makes serving easier.
For serving, arrange sliced pork tenderloin with vegetables, potatoes, and sauce so each portion gets crust, tender center, and a little pan-style flavor.
Comfort sides
A classic comfort plate starts with sliced pork over creamy mashed potatoes, so the juices, mustard sauce, or mushroom gravy have somewhere to land.
Garlic mashed potatoes are the richer version, especially if you are skipping a sauce. For a cozy family-style dinner, creamy macaroni and cheese also works well with something green or crisp on the side.
Fresh sides
Something crisp beside the warm pork helps balance the plate. A wedge salad gives you cold crunch, creamy dressing, and steakhouse-style balance. Green beans, simple salad, apple sauce, apple chutney, and roasted carrots also fit the plate.
Bowls, wraps, and easy leftovers
Sliced pork works well over rice, in wraps, on salads, or tucked into quick bowls with vegetables and sauce. If you are turning leftovers into rice bowls, this how to cook rice guide helps with stovetop, rice cooker, and Instant Pot timing.
Make-Ahead Tips
You can season the pork up to 12 hours ahead and refrigerate it covered. Let it sit at room temperature for 15–20 minutes while the air fryer preheats, then cook as directed.
If the rub contains a lot of salt or soy sauce, avoid over-marinating a very small tenderloin. The smaller the piece, the faster salty marinades can make the texture feel firm.
Storage and Reheating
Leftover pork is best when you treat it gently. The meat is lean, so reheating should warm it through without blasting away the moisture you protected during cooking.
Need
Best method
Fridge storage
Store in an airtight container for 3–4 days.
Freezer storage
Freeze sliced or portioned pork, wrapped well, for easier reheating.
Air fryer reheating
Reheat slices at 350°F / 175°C for 3–4 minutes.
Microwave reheating
Add a splash of broth, water, butter, or sauce and heat gently.
What to avoid
Do not blast a whole cooked tenderloin in the air fryer again. It can dry out before the center warms.
Leftover slices are best used gently: tucked into rice bowls with sauce, folded into wraps, chopped into breakfast hash, or added cold to salads instead of aggressively reheated.
Extra slices can become an easy lunch with rice, crisp vegetables, greens, and a sauce that brings moisture back.
Finally, leftover air fryer pork tenderloin works beautifully in rice bowls because the sauce, greens, and crisp vegetables bring moisture back to the slices.
How long do you cook pork tenderloin in the air fryer?
Most 1–1½ lb / 450–680g pork tenderloins take 18–24 minutes at 400°F / 200°C. Slim 1 lb pieces may finish closer to 14–18 minutes, while thick pieces may need 24–28 minutes. Use the chart, then confirm 145°F / 63°C in the center.
What temperature should I air fry pork tenderloin?
Set the air fryer to 400°F / 200°C, or 205°C if your model allows that setting. This gives good browning without a long cook time. If your air fryer runs very hot, reduce slightly to 375–390°F / 190–200°C and cook to temperature.
How do I keep it from drying out?
Use the right cut, check early, and rest before slicing. The mistake is usually not the seasoning — it is leaving lean pork in the air fryer a few minutes too long.
What if I do not have a meat thermometer?
A thermometer is strongly recommended because pork tenderloin is lean and cooks quickly. Without one, use the timing chart, slice into the thickest part, and check that the pork is hot all the way through with no raw-looking center. This is less reliable than a temperature check, so a small instant-read thermometer is worth it.
Is pork tenderloin the same as pork loin?
No. Pork tenderloin is long, narrow, and usually 1–1½ lb. Loin is wider, larger, and more roast-like. They need different cooking times, so checking the package before cooking matters.
Is pork fillet the same as pork tenderloin?
Often, yes. In many places, pork tenderloin is sold as pork fillet. If your pork fillet is long, narrow, and around 450–680g / 1–1½ lb, this air fryer method applies.
Can pork tenderloin be pink inside?
Yes. A slight blush can be normal when the pork is cooked to temperature. Do not keep cooking just to erase every hint of pink, or the tenderloin can turn dry.
Do I need to flip it?
Yes. Flipping helps the pork brown more evenly, especially in basket-style air fryers where the top often gets more direct heat than the bottom. Turn it after the first 10–12 minutes, then finish cooking.
Can I cook frozen pork tenderloin in the air fryer?
You can, but thawed is better for browning and texture. For frozen pork tenderloin, use about 330°F / 165°C, begin testing around 30 minutes, season once the surface softens, flip halfway, and confirm doneness before serving.
Can I cook pork tenderloin and potatoes together?
Yes, but potatoes need a head start because they usually take longer. Cook the pork first and finish the vegetables while it rests, or start small-cut potatoes 8–10 minutes before adding the pork.
How do I cook pre-marinated pork tenderloin?
Check that the package is actually pork tenderloin and not pork loin filet. Pat off excess wet marinade if needed, begin testing around 15 minutes, and cook until the pork reaches 145°F / 63°C. If the outside darkens early, check the temperature before assuming the middle is done.
Can I season pork tenderloin ahead of time?
Yes. You can season it up to 12 hours ahead and refrigerate it covered. Let it sit out for 15–20 minutes while the air fryer preheats so it is not going into the basket ice-cold.
How do I reheat leftovers?
Reheat slices at 350°F / 175°C for 3–4 minutes in the air fryer, or microwave gently with a splash of broth, water, butter, or sauce. Sliced pork reheats better than a whole tenderloin because it warms faster and needs less time.
Can I make pork tenderloin medallions in the air fryer?
Yes. Slice the tenderloin into even 1–1½ inch medallions, season both sides, and air fry at 350°F / 175°C for about 9–12 minutes, flipping once. Start checking early if the pieces are closer to 1 inch thick.
Final Tip
Once you know the cut, the temperature, and when to stop cooking, air fryer pork tenderloin becomes a very easy win: browned outside, juicy inside, and flexible enough for potatoes, salads, bowls, or leftovers the next day. The first cook teaches you your air fryer; after that, this becomes one of those dinners you can repeat without hovering over the basket.
If your air fryer runs especially hot or slow, drop your timing in the comments — model, weight, and total cook time are especially helpful. Someone else with the same style of air fryer may be comparing notes before dinner.