Air fryer chicken breast should be one of the easiest dinners in your week: quick enough for tonight, versatile enough for tomorrow’s lunch, and simple enough that you don’t need to hover over it.
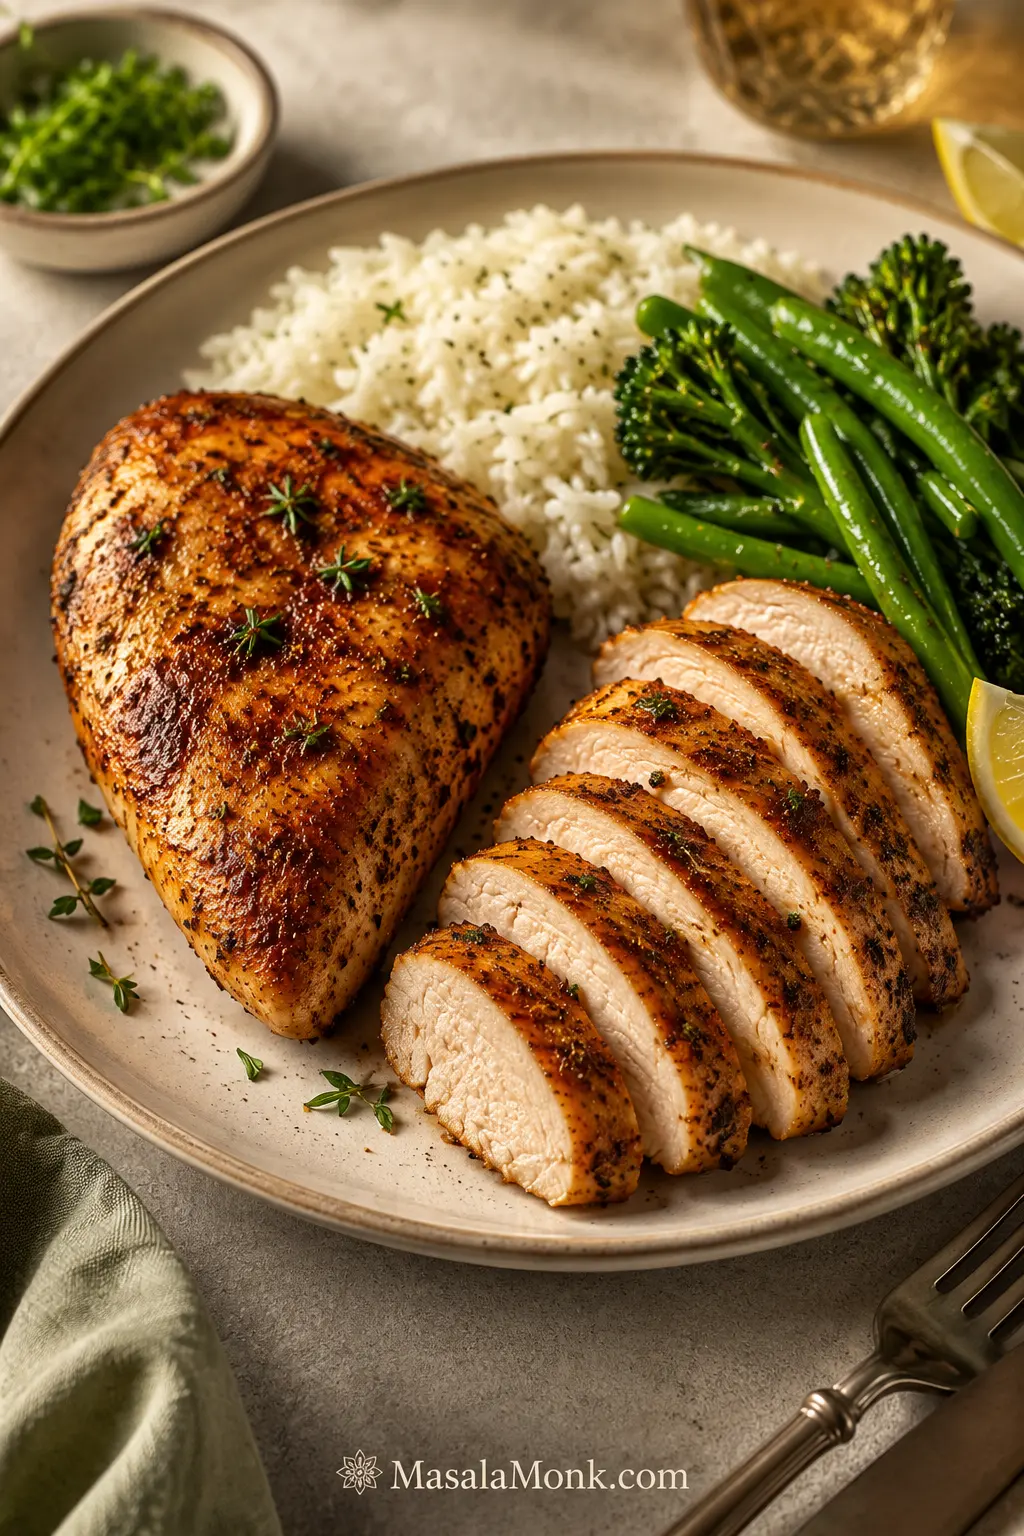
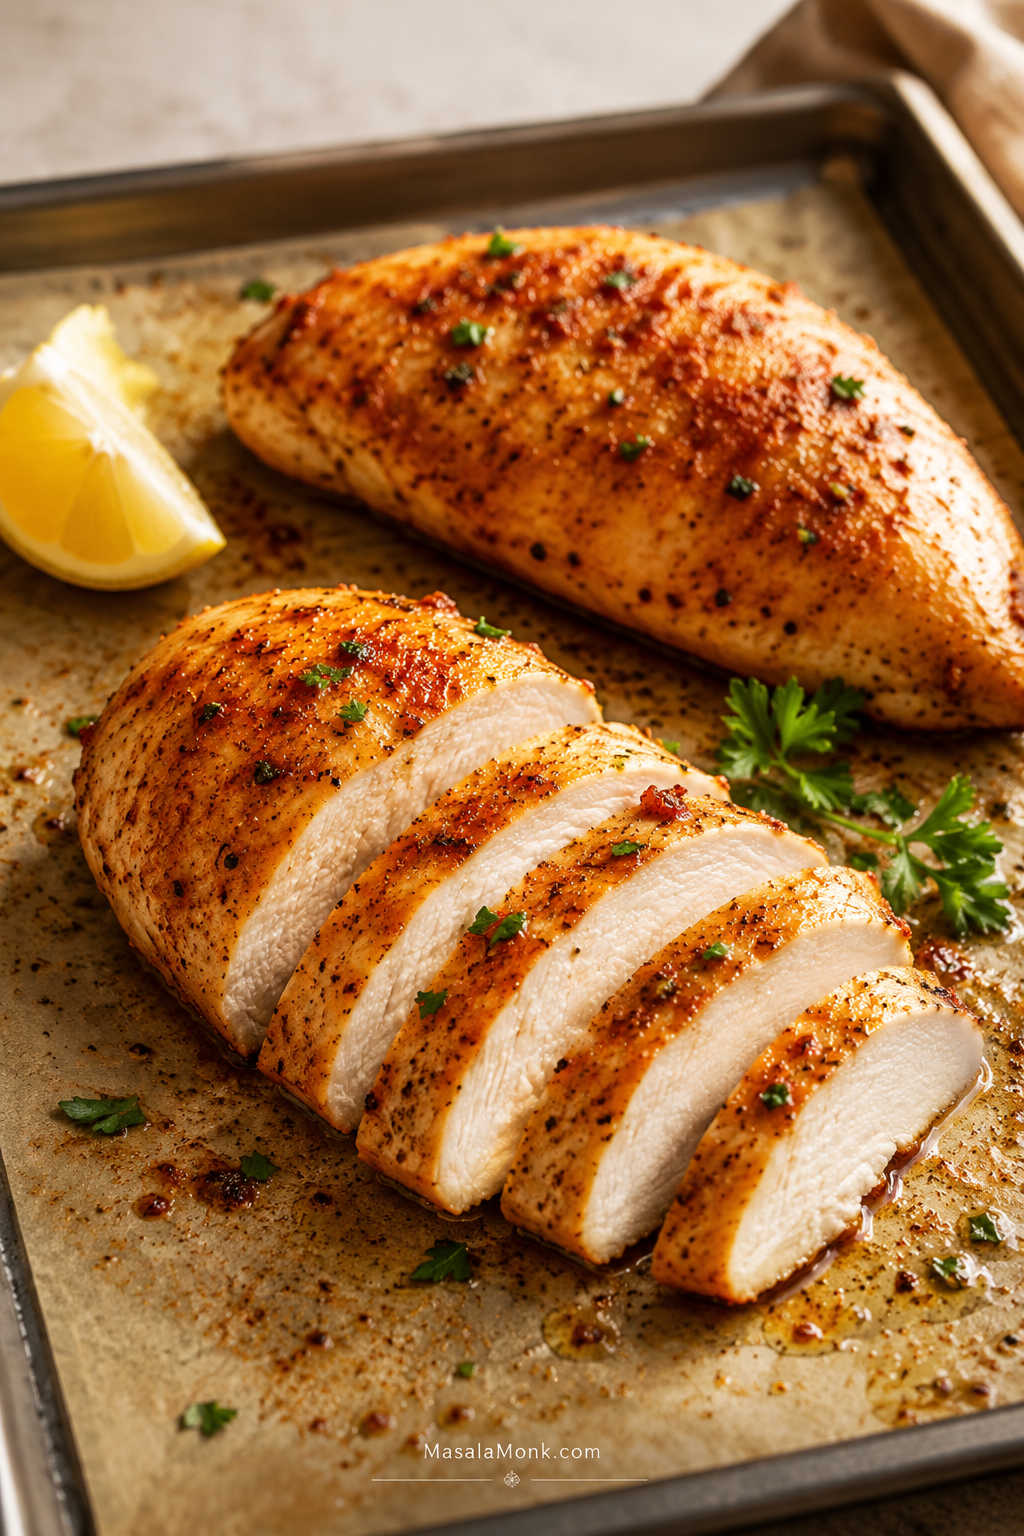
When it goes well, the paprika-garlic coating is warm, savoury and lightly bronzed. The rested centre stays tender enough to slice cleanly and juicy enough to eat without hiding it beneath a heavy sauce.
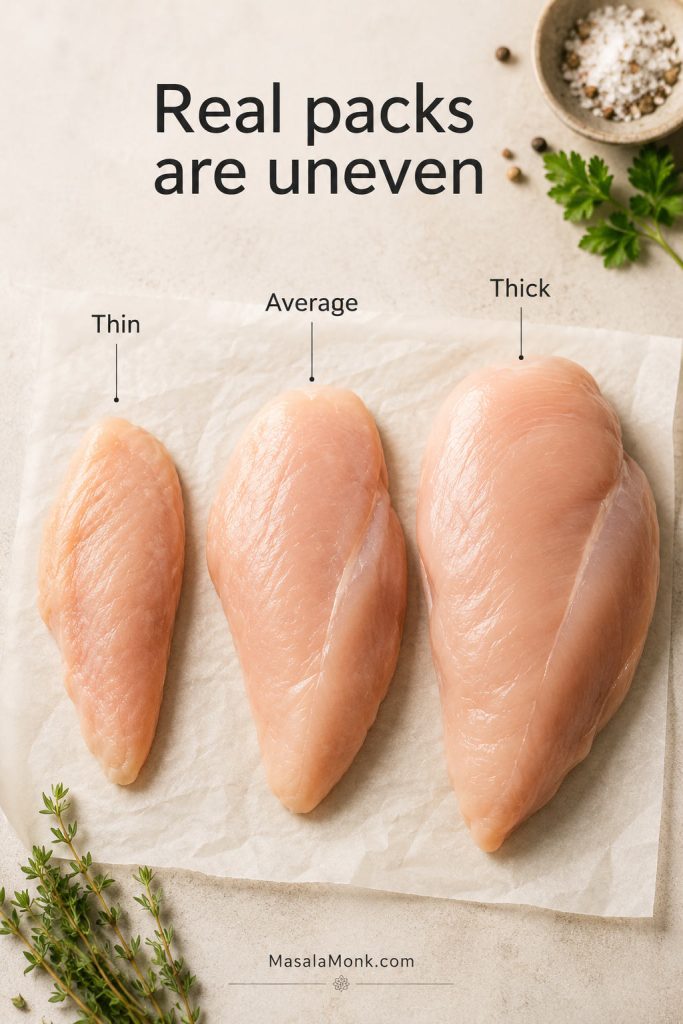
When it doesn’t, the narrow end turns dry while the thick centre is still catching up—or the seasoning darkens before the meat is ready. That inconsistency is real. Chicken breasts don’t arrive in one standard size, and air fryers don’t all move heat in exactly the same way.
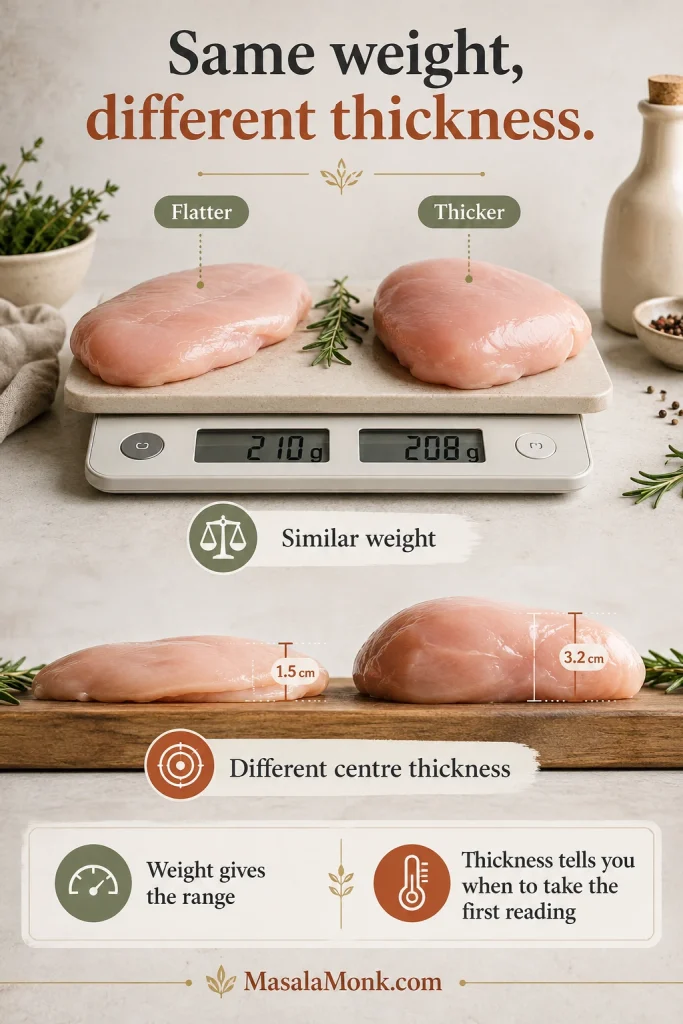
Start with the chicken, not the timer. Weight gives you the broad cooking window; thickness tells you when to check.
Two breasts can weigh almost the same and still cook differently when one is much thicker through the centre.
Similar weights can hide very different centre thicknesses — and different first-check times.
Quick Answer: How Long to Air Fry Chicken Breast
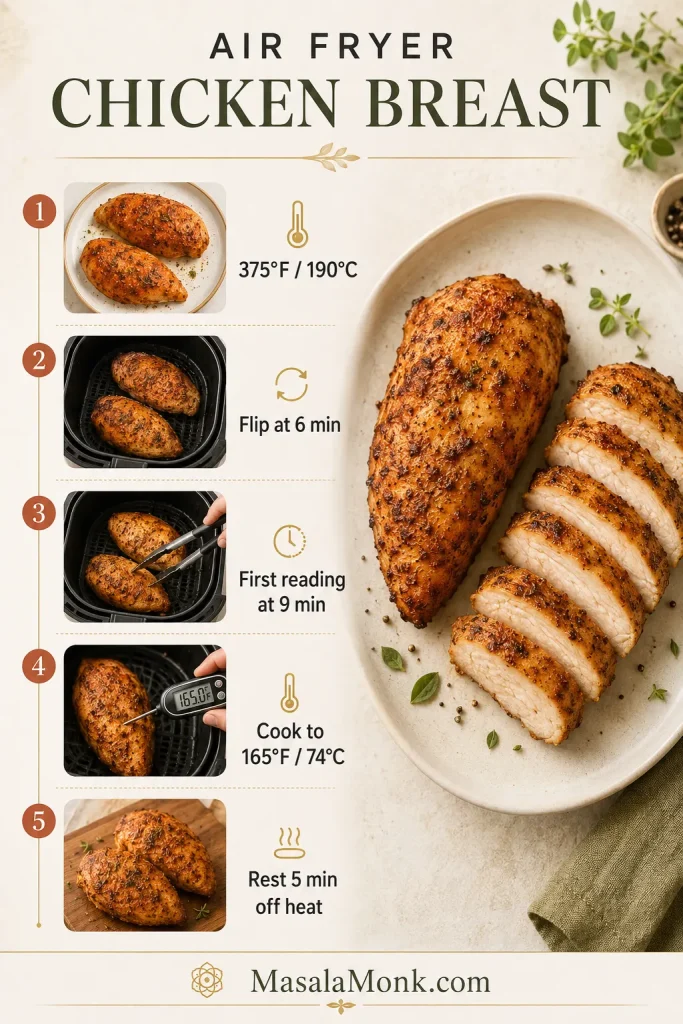
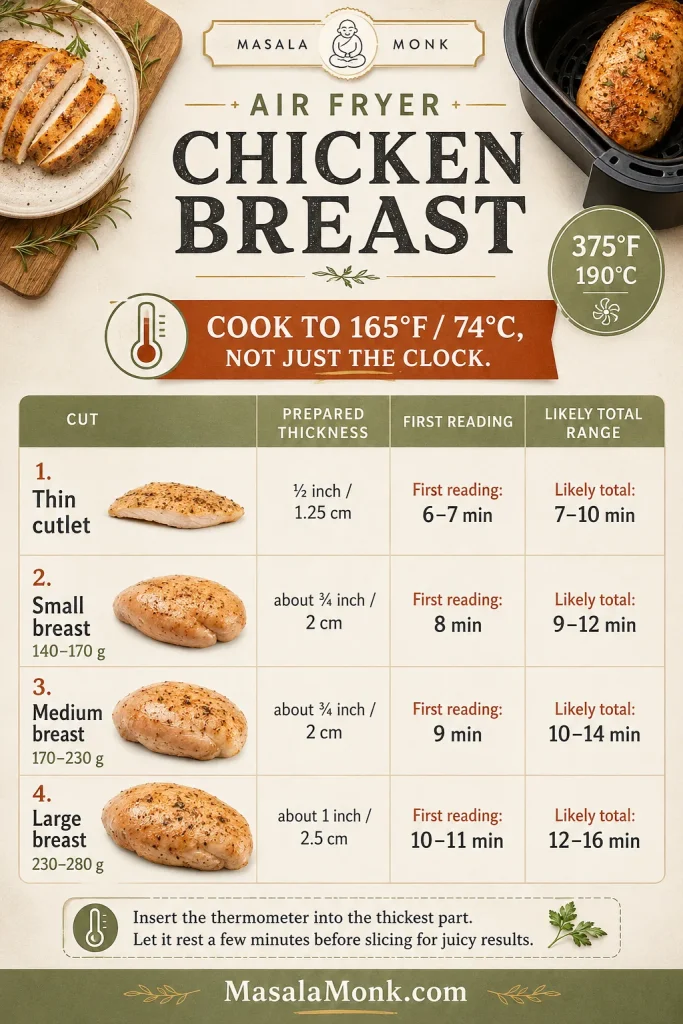
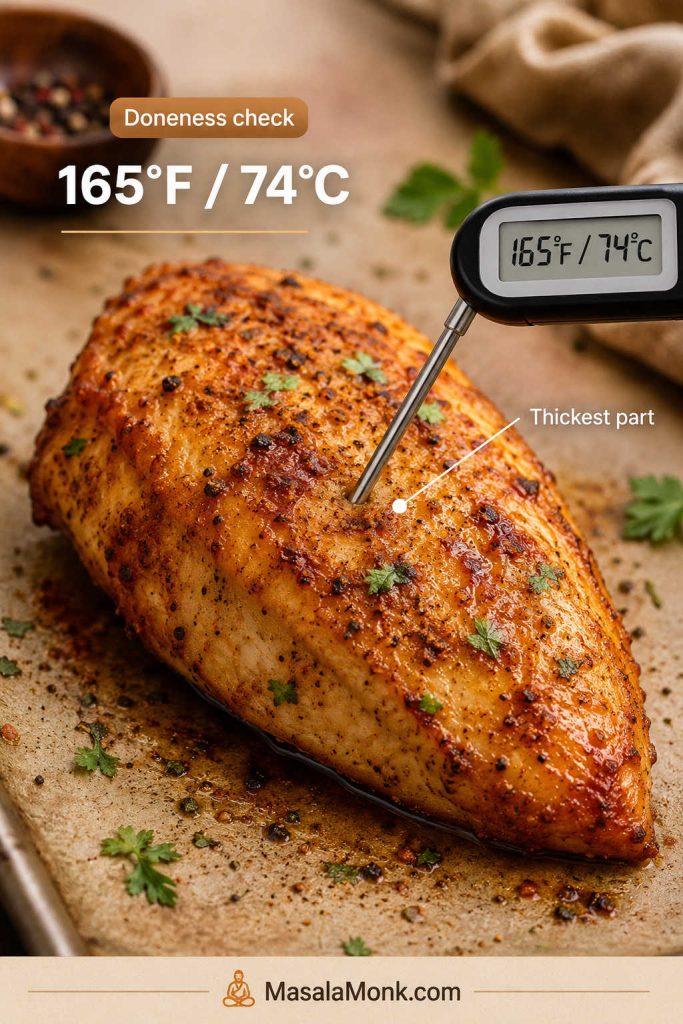
Air-fry fresh, boneless, skinless, unbreaded chicken breasts at 375°F / 190°C. For breasts weighing about 7–8 oz / 200–225 g each and evened to roughly ¾ inch / 2 cm thick, begin checking at 9 minutes. Many will finish between 10 and 14 minutes.
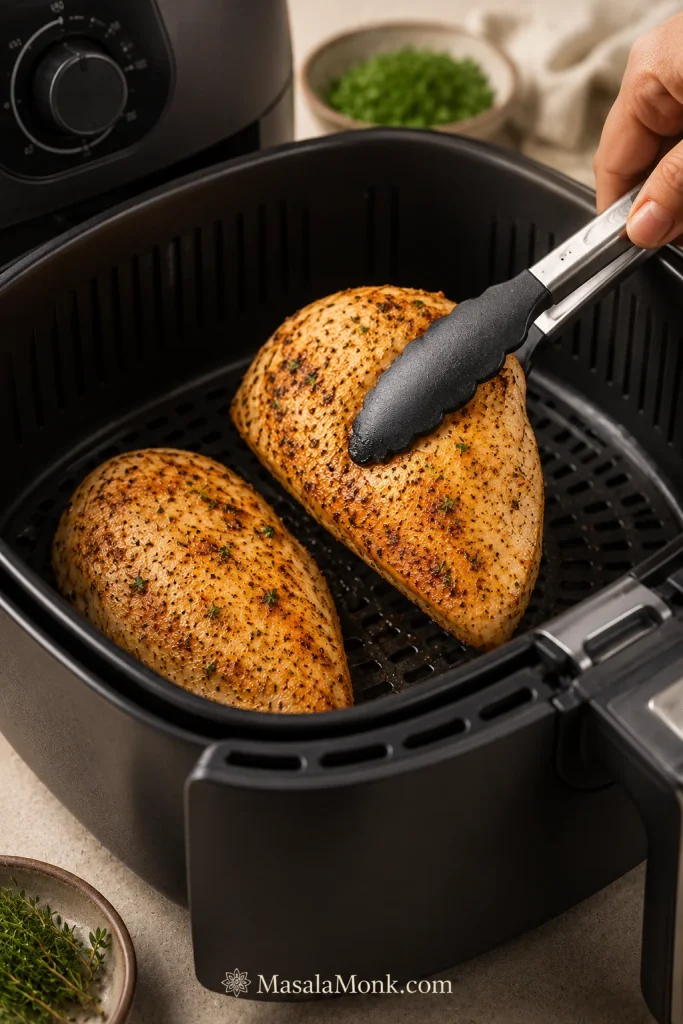
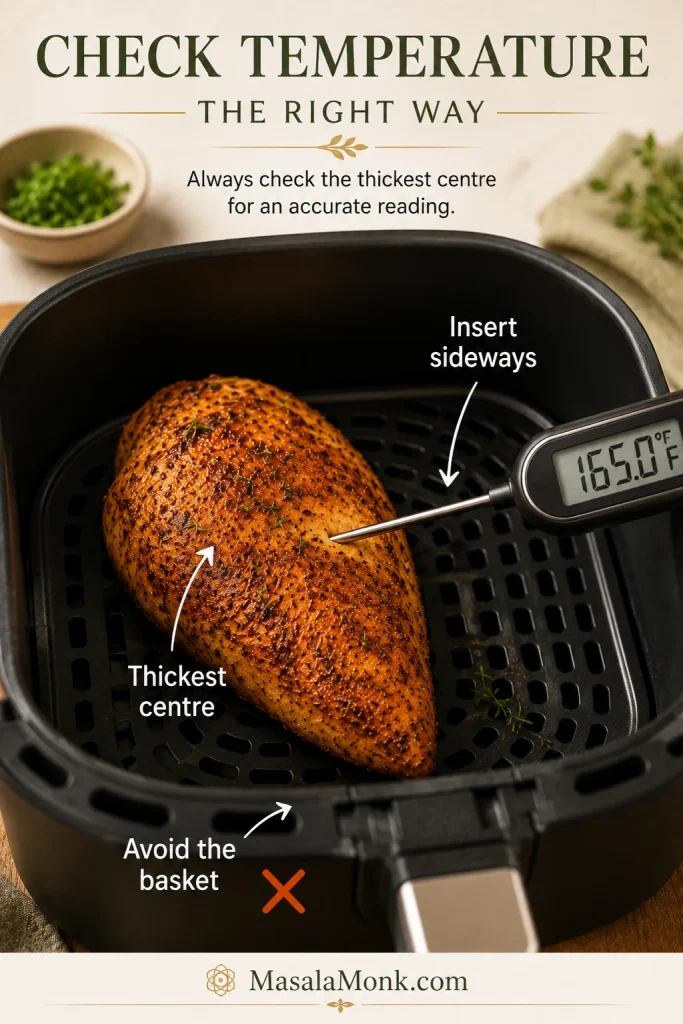
Flip once during cooking. Insert an instant-read thermometer sideways into the thickest part and remove each breast when the centre reaches 165°F / 74°C. Rest the chicken for five minutes on a clean plate or board rather than inside the hot basket.
The time range gets you close; the temperature in the centre gives you the final answer.
Make this version first. The paprika-garlic coating develops golden patches and a savoury edge, while the seasoning is simple enough to work in salads, wraps, pasta, sandwiches and meal-prep bowls.
Prep time
10 minutes
Cook time
About 10–14 minutes
Rest time
5 minutes
Total time
About 25–29 minutes
Servings
2 main-dish servings or 4 smaller meal-prep portions
Setting
Air Fry or equivalent Air Crisp setting
Temperature
375°F / 190°C
Safe internal temperature
165°F / 74°C
Equipment
Air fryer, instant-read thermometer, tongs, and a meat mallet, rolling pin or small heavy pan
Ingredients
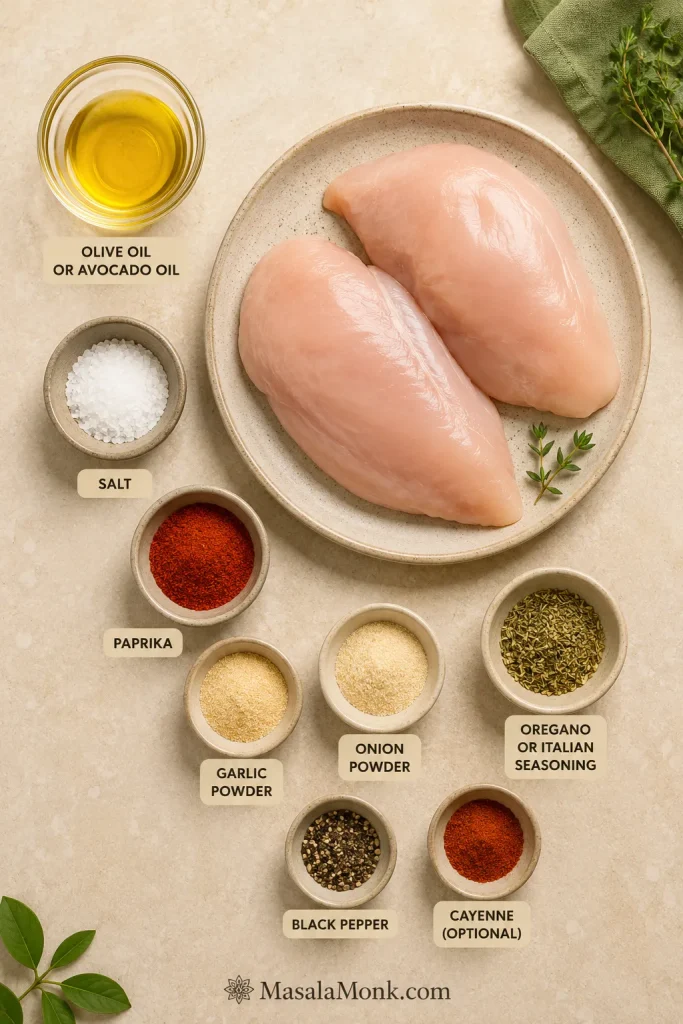
2 boneless, skinless chicken breasts, about 14–16 oz / 400–450 g total
2 teaspoons / 10 ml olive oil or avocado oil
Fine salt, ¾ teaspoon, roughly 4–4.5 g depending on crystal size
Paprika, 1 teaspoon
Garlic powder, ¾ teaspoon
Onion powder, ½ teaspoon
Dried oregano or Italian seasoning, ½ teaspoon
Ground black pepper, ¼ teaspoon
Pinch of cayenne pepper, optional
This simple paprika-garlic base adds colour and savoury flavour without turning the dish into a sauced recipe.
Use this map as a checkpoint: 375°F / 190°C, flip at 6 minutes, first reading at 9 minutes, finish at 165°F / 74°C and rest off heat.
Instructions
Prepare the chicken
Check the size. The timing below works best for breasts weighing about 7–8 oz / 200–225 g each. Take a noticeably smaller piece out first if it reaches temperature sooner.
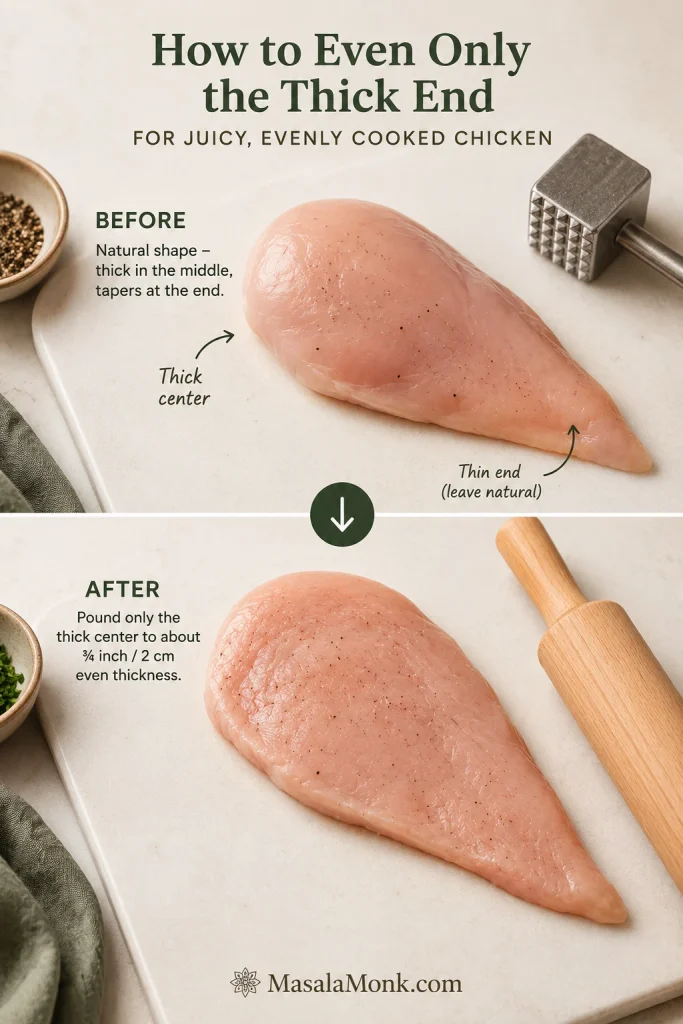
Even the thickest section. Place the chicken between two sheets of baking parchment or inside a sturdy food-safe bag. Gently level only the thick central area until each breast is close to ¾ inch / 2 cm thick.
Level the thick centre only; keep the thin end from getting hammered flat and drying out.
Preheat the air fryer. Select Air Fry, or the equivalent Air Crisp setting, and heat to 375°F / 190°C for about three minutes. Follow the manufacturer’s guidance when it recommends a different preheating routine.
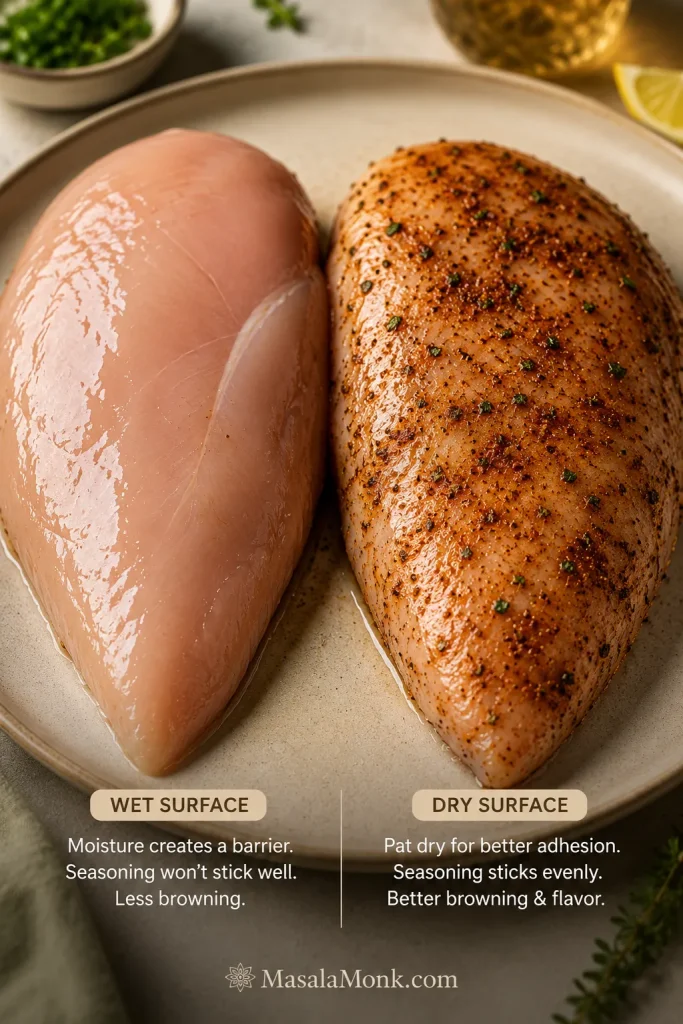
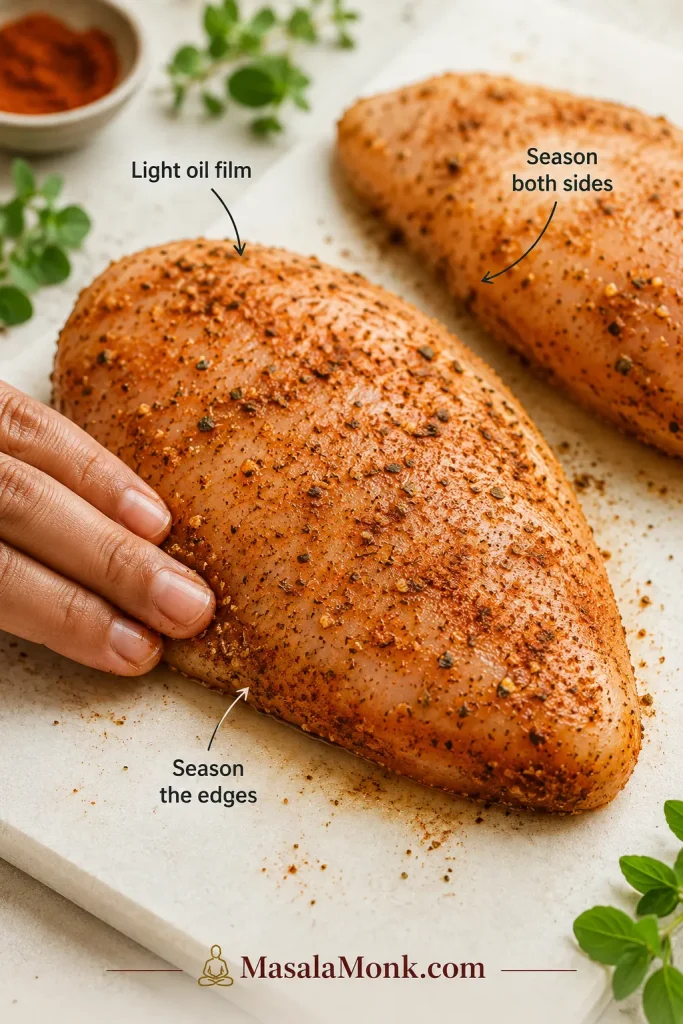
Dry and season. Pat the breasts dry with paper towels and coat them with the oil. Mix the salt, paprika, garlic powder, onion powder, oregano, black pepper and optional cayenne, then season both sides and the thicker edges.
Dry the surface so the spices cling and the exterior browns more evenly.
A thin oil film is enough; season the thick edges too, so every slice carries flavour.
Cook, check and rest
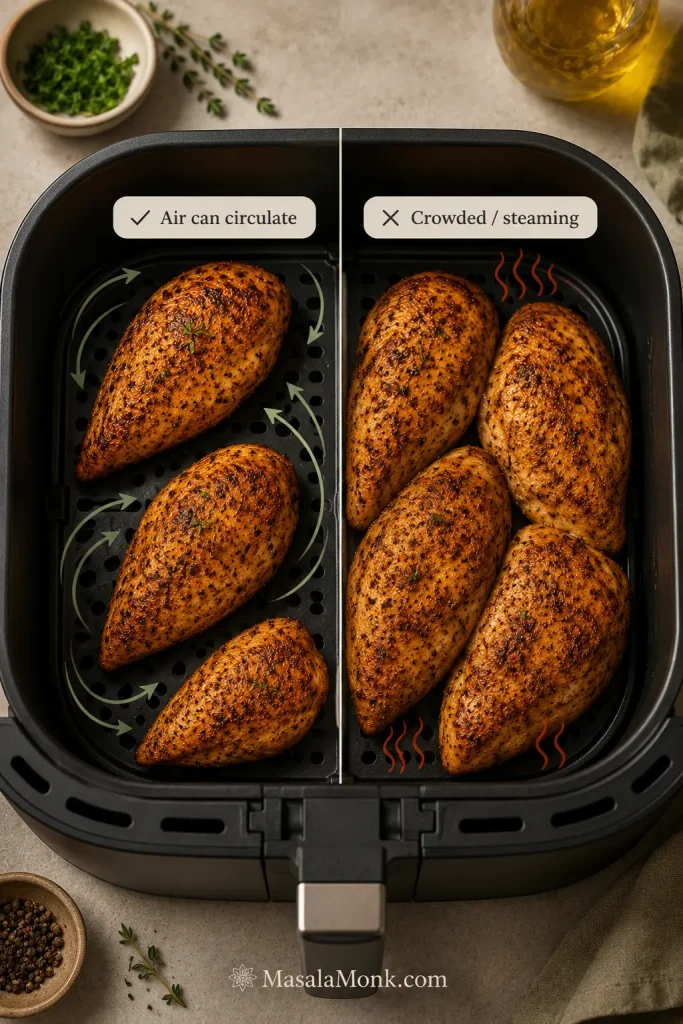
Arrange the basket. Place the chicken in one layer with a visible gap between the pieces. Extra basket spray is usually unnecessary when the chicken is lightly oiled and the basket coating is in good condition.
Visible space is part of the method. Crowded chicken steams before it browns.
Cook and flip. Air-fry for six minutes, then turn the chicken gently with tongs. Look for scattered golden patches and the aroma of toasted spices. Do not wait for a dark crust.
Take the first temperature reading. Cook for another three minutes, then insert an instant-read thermometer sideways into the thickest central part.
Finish the chicken. A reading below 165°F / 74°C is useful: you have caught the chicken while there is still room to finish it gently. Continue in one-minute increments and lift out each piece as soon as it reaches temperature.
Use colour as a clue, not the final answer. Temperature decides when the chicken is done.
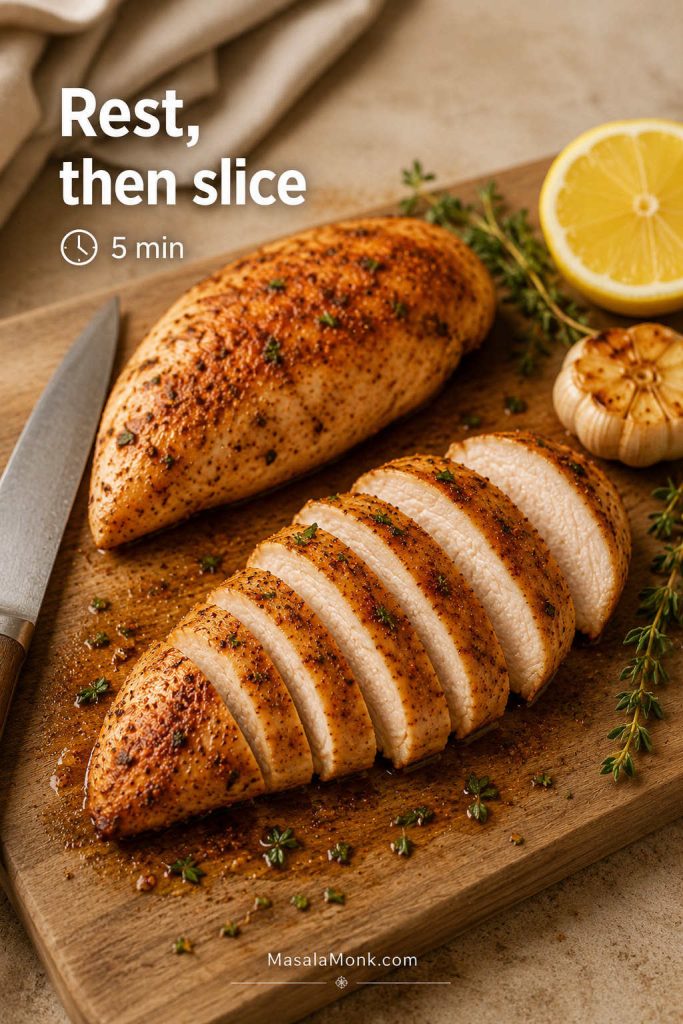
Rest away from the heat. Transfer the chicken to a clean plate or cutting board and rest for five minutes.
Slice across the grain. Cut the rested chicken this way for shorter, more tender pieces.
Rest outside the hot basket, then slice across the grain for shorter, more tender pieces.
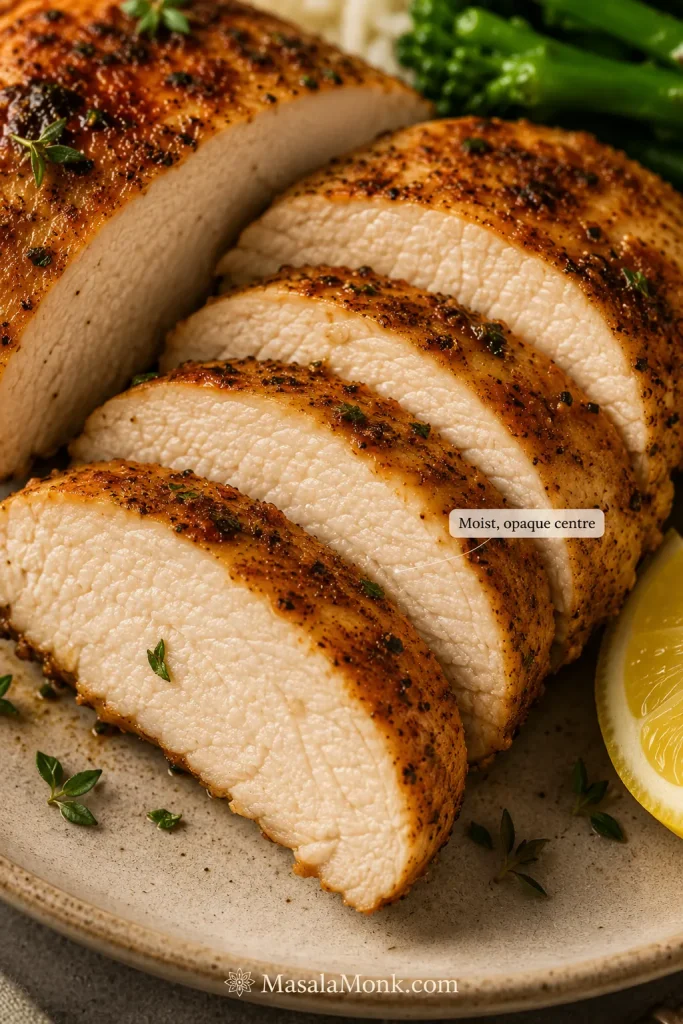
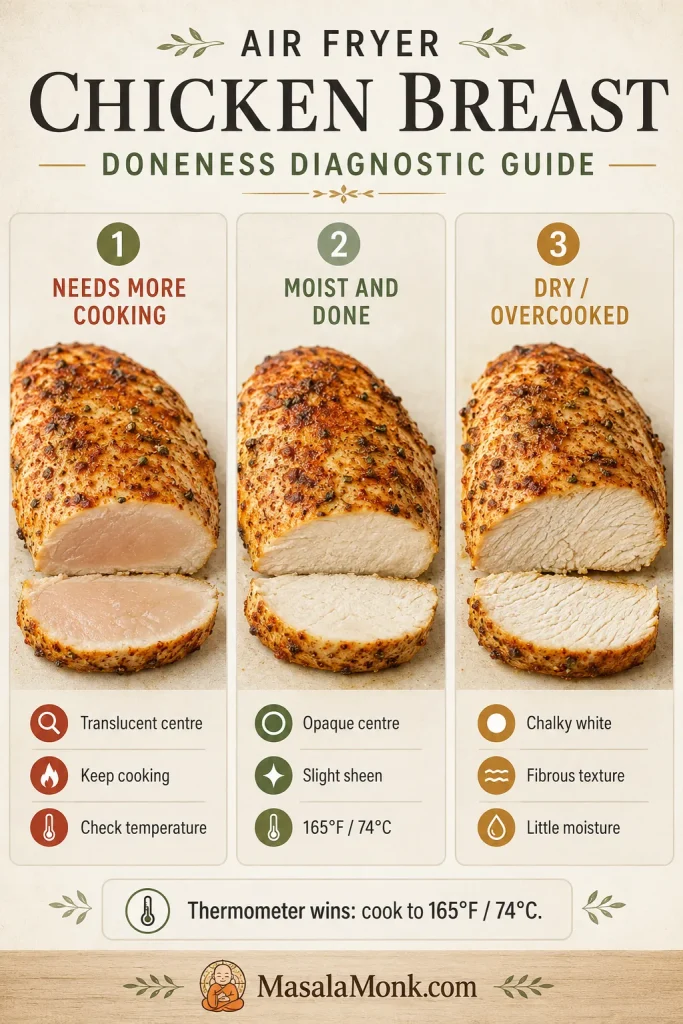
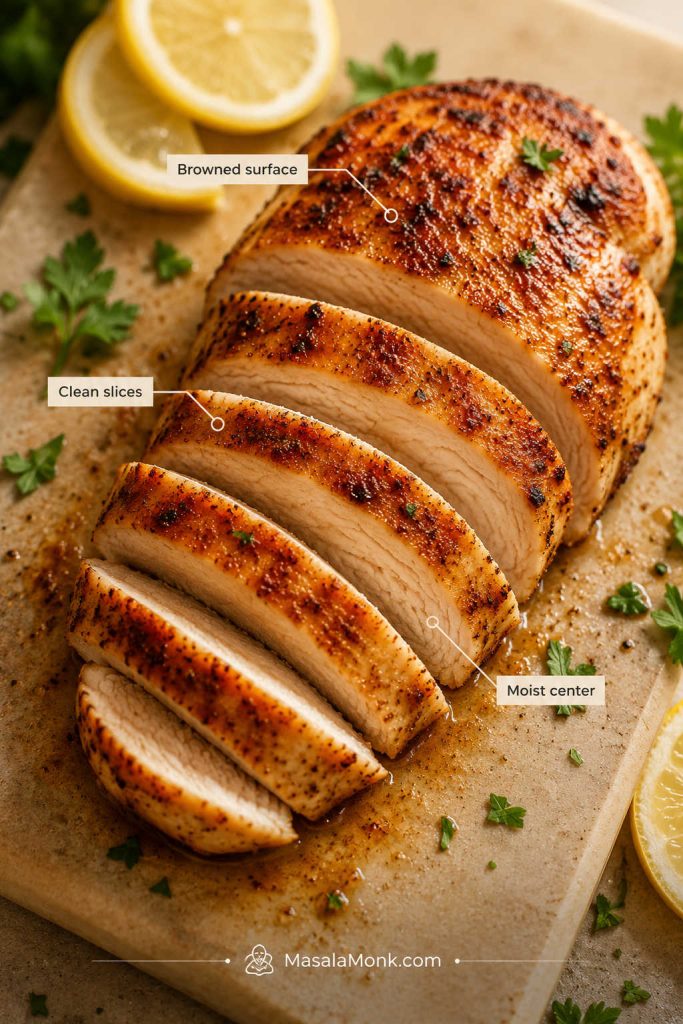
The target slice is opaque, moist and gently glossy, not pink, chalky or oily.
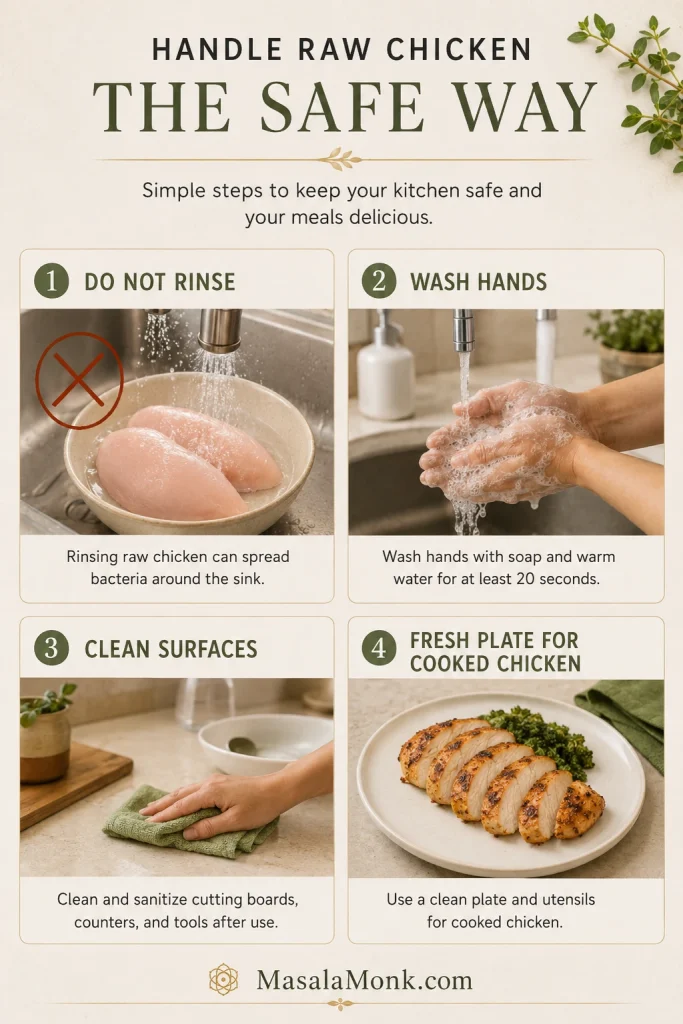
Food-safety reminder
Raw-chicken safety: Don’t rinse raw poultry. Wash your hands after handling it, clean any surface it touched, and use clean utensils and a fresh plate for the cooked chicken.
Skip rinsing, wash hands, clean surfaces and switch to a fresh plate before cooked chicken comes out.
Recipe Notes
Fridge-cold chicken: The breasts can go directly from the refrigerator to preparation. They do not need to reach room temperature.
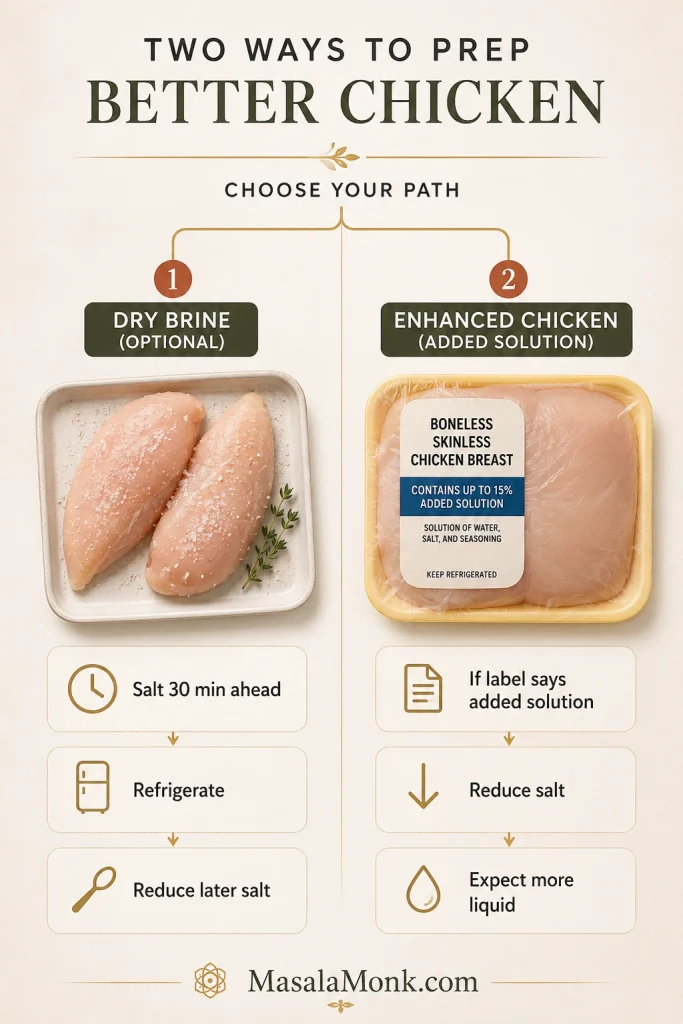
Enhanced chicken: When the package says the meat contains an added solution, reduce the salt and expect it to release more liquid.
Optional 30-minute dry brine: Salt the chicken in advance and keep it refrigerated for deeper seasoning. Reduce or omit the salt in the later spice mixture.
Salted chicken can taste more seasoned; enhanced chicken may need less salt and can release more liquid.
Use this visual checklist when your package does not match the fresh, whole, boneless chicken breast method above.
Match the form before you use the timing; whole breasts, cutlets, tenderloins and frozen pieces need different handling.
Four things make the difference: even the thick end, dry the surface, leave visible gaps and take the first temperature reading early. Together, they help the centre cook through without drying the tapered end.
Air Fryer Chicken Breast Time and Thickness Chart
Start with the row that most closely matches the piece in front of you. Similar-sized breasts are easier to manage together, while extremely large or strongly tapered pieces are better sliced horizontally before cooking.
How to use this timing chart: These ranges are starting points for fresh, boneless, skinless chicken breasts prepared to the thickness shown. The first-reading time is intentionally early because breast shape, basket position and machine style can change the finish time. Use the chart to know when to start checking; use 165°F / 74°C in the thickest centre to know when to stop.
Chicken form
Individual weight
Prepared thickness
Timing at 375°F / 190°C
Thin cutlet
3–5 oz / 85–140 g
⅜–½ inch / 1–1.25 cm
First reading: 5 minutes; often 6–10 minutes total
Small breast
5–6½ oz / 140–185 g
About ⅝ inch / 1.5–1.6 cm
First reading: 7 minutes; often 8–11 minutes total
Medium breast
6½–8 oz / 185–225 g
About ¾ inch / 2 cm
First reading: 9 minutes; often 10–14 minutes total
Large breast
8–10 oz / 225–285 g
¾–1 inch / 2–2.5 cm
First reading: 10–11 minutes; often 12–16 minutes total
Very large breast
More than 10 oz / 285 g
More than 1 inch / 2.5 cm
Butterfly or slice horizontally, then use the row matching the new thickness
The chart tells you when to take the first reading; the thermometer tells you when to stop.
If your chicken needs another two or three minutes, nothing has gone wrong. The chart tells you when to start looking; it does not force every breast to finish on schedule.
Chicken breast is safely cooked when the centre of its thickest part reaches 165°F / 74°C. Insert the thermometer from the side so the sensing tip reaches the middle instead of passing through the meat and touching the basket. Take the first reading before you expect the chicken to be done; a lower number means there is still room to finish it gently.
Insert from the side so the probe reaches the thickest centre without touching the basket.
No thermometer? Cut into the centre of the thickest breast. The meat should be opaque with no glossy, translucent or raw-looking section. Return it to the air fryer in one-minute increments when needed. Visual checks are less dependable, so an instant-read thermometer remains the easiest way to remove the guesswork.
Colour and texture cues help you spot trouble, but 165°F / 74°C in the thickest centre is the decision point.
The first slice should look moist through the centre, with a slight sheen of juice rather than a wet raw appearance or dry, fibrous meat. Once you have seen that fully cooked centre, the next batch becomes much easier to judge.
Chicken breast is leaner and less forgiving than chicken thighs. For a richer cut with a wider timing margin, use this air fryer chicken thighs recipe.
Change the flavour, not the method: thickness, early checks and final temperature still matter.
Bright and fresh
For lemon pepper chicken, replace the paprika and oregano with a lemon-pepper blend, checking first to see how much salt it contains. Finish with fresh lemon after cooking.
For chilli lime, add chilli powder and cumin to the base seasoning, then squeeze lime over the warm slices. A spoonful of salsa also works well when the chicken is headed for tacos or rice bowls.
Cajun seasoning can replace the individual spices, although many blends already contain salt. For smoky barbecue chicken, use smoked paprika and add barbecue sauce only during the final one to two minutes so the sugars do not scorch.
With garlic Parmesan, lean into the garlic powder and add finely grated Parmesan near the end. Cheese left in the basket for the full cooking time can darken before a thick breast is ready.
Marinated chicken
A thin oil-based or yogurt marinade works well. Let the excess drip away so the chicken browns instead of steaming beneath a heavy coating.
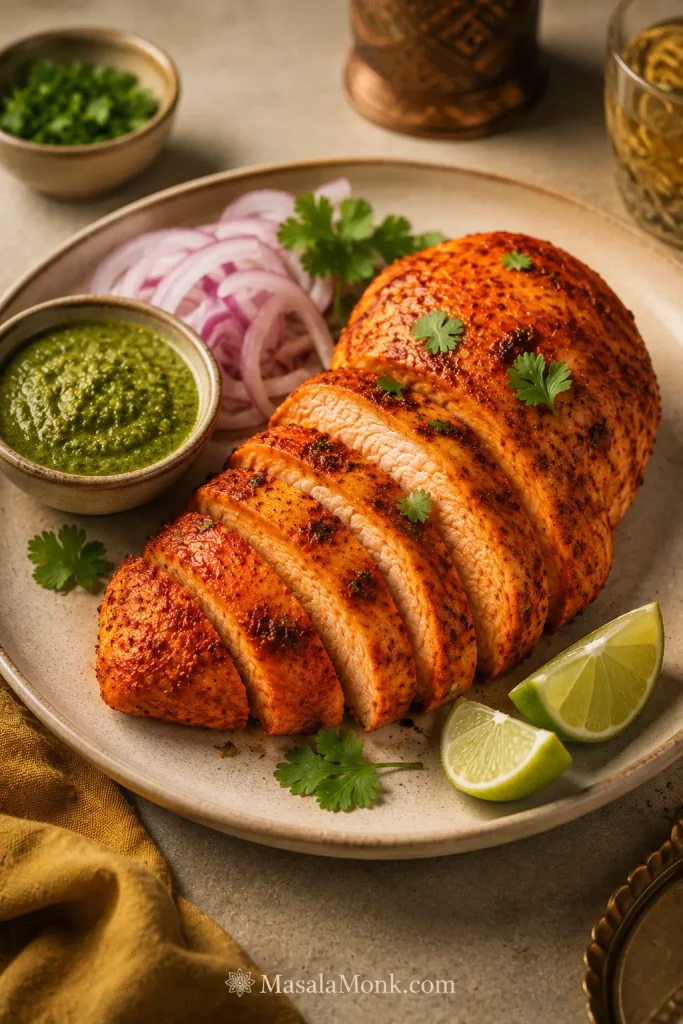
Tandoori-inspired chicken can be coated with yogurt, ginger, garlic, chilli, garam masala and salt. Serve it with a bright coriander-mint green chutney.
Yogurt, spices, chutney, onion and lime give this variation MasalaMonk flavour without fake tandoor char.
Keep acid-heavy marinades relatively short because a long soak in lemon or vinegar can soften the outer texture. Add sticky, sweet marinades closer to the end.
Keep any sauce intended for serving separate from marinade that touched raw poultry. If the same mixture is reused, it must be safely cooked first.
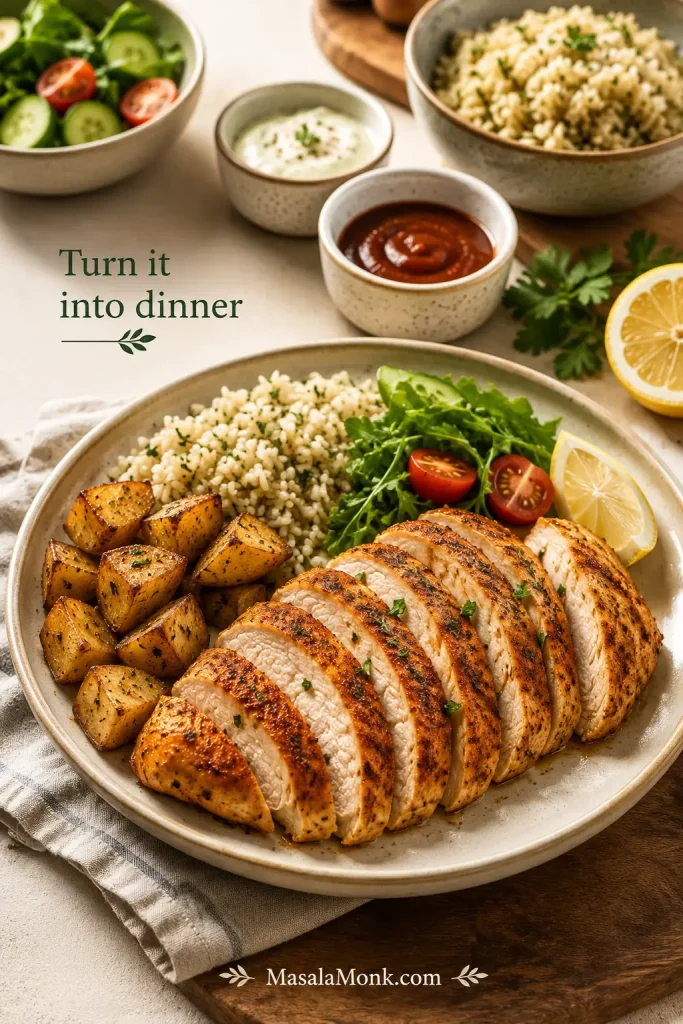
Turn It Into Dinner
Spoon something cool, sharp or creamy over the warm slices—a squeeze of lemon, green chutney, honey mustard or herby chimichurri—and simple chicken immediately feels like a finished dinner.
Eat it tonight
Serve it with fluffy rice, couscous or a tray of crispy ranch roasted potatoes. Add a green vegetable or a crisp salad.
Rice, potatoes, greens and a small sauce turn the chicken into a complete dinner.
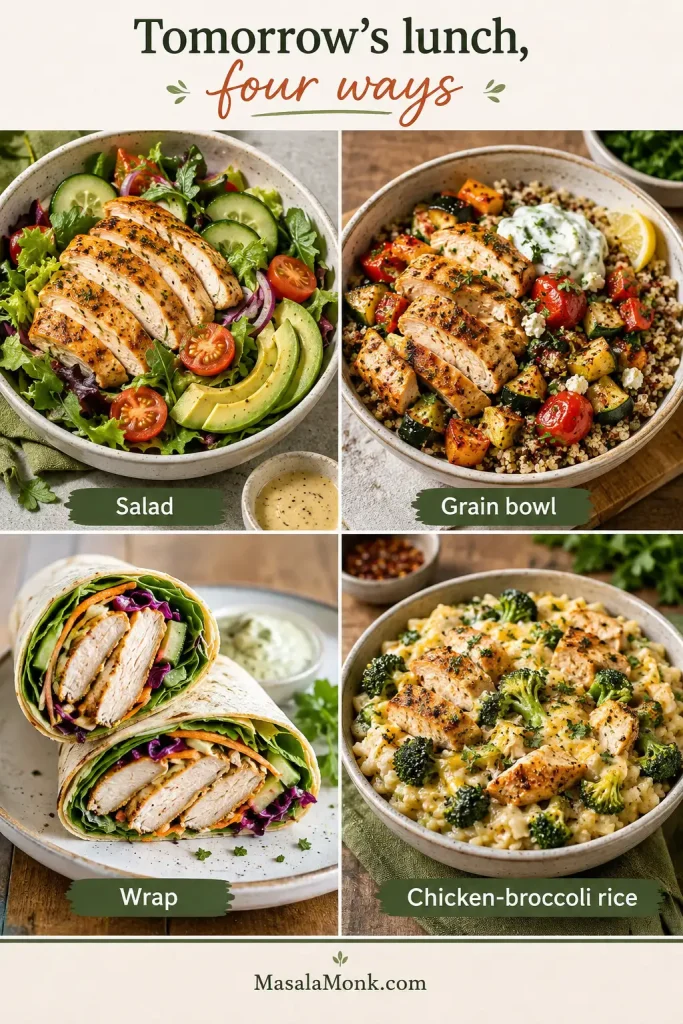
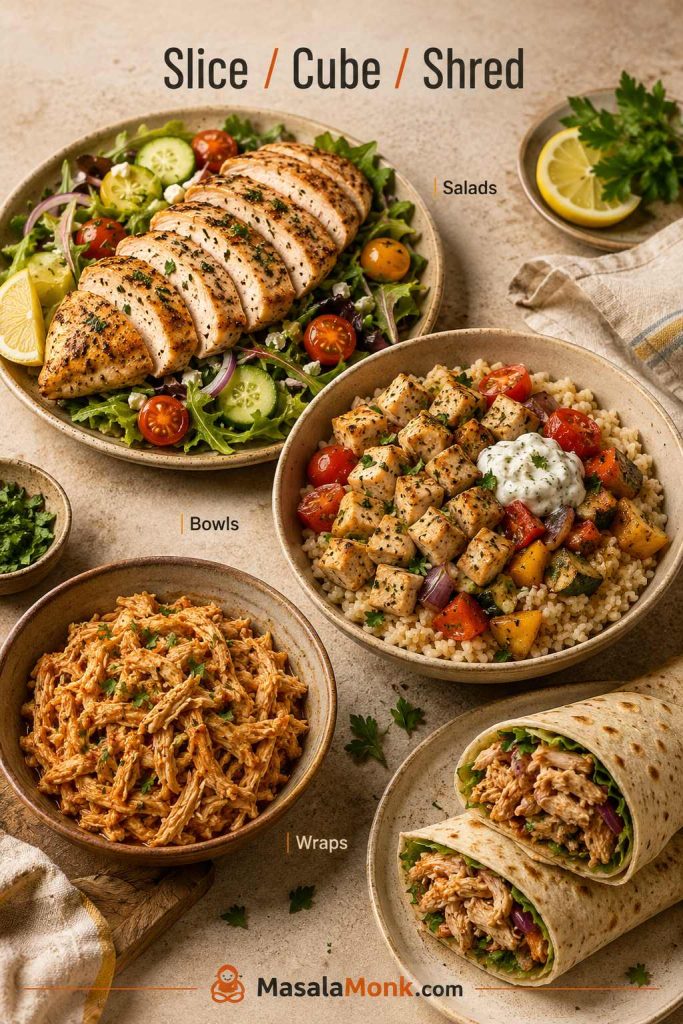
Make tomorrow easier
Slice it cold for salads, wraps and sandwiches
Cube it for rice or grain bowls
Fold it into pesto pasta for an easy second-night dinner
Chop it into cheesy chicken broccoli rice, adding the cooked chicken near the end so it warms without drying again
Shred it into soup or pack it with vegetables and a separate sauce for lunch
Cook once, then use the leftovers in a salad, grain bowl, wrap or chicken-broccoli rice.
Most cooks can stop after the serving ideas. If your basket, liner or machine behaves differently, use the setup notes below. Storing leftovers? Jump to storage and reheating.
Temperature and Air-Fryer Setup
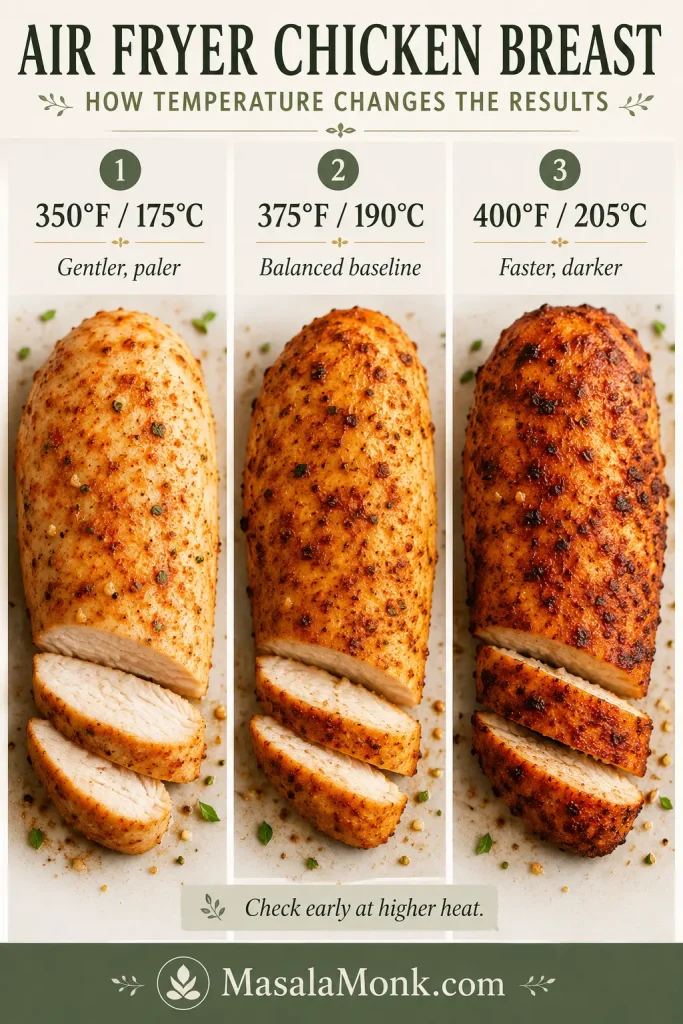
The main recipe uses 375°F / 190°C because it gives everyday chicken breasts a useful balance of colour, speed and control. Other settings still have their place.
Temperature
Best use
Trade-off
350°F / 177°C
Thicker but reasonably even pieces when gentler browning is preferred
Slower cooking with less surface colour
375°F / 190°C
Everyday whole or evenly prepared breasts
The best general balance of speed, colour and control
400°F / 204°C
Thin fillets and faster browning
A narrower margin before the edges dry or spices darken
350°F is gentler, 375°F is the baseline and 400°F / 204°C browns faster; check earlier when cooking hotter.
Save temperatures above 400°F / 204°C for thin pieces or specialised coatings.
Cooking a larger batch in the oven? This baked chicken breast recipe uses the same weight-and-thickness approach.
Preheating, settings and basket capacity
Select Air Fry, or the equivalent Air Crisp setting, and preheat for the published timing. If an oven-style machine has no Air Fry setting, use convection Bake or Roast at 375°F / 190°C as a starting point.
Cook as many breasts as fit in one uncrowded layer. A full basket may need a little longer because several cold pieces pull down the heat at once. Check differently sized breasts separately and remove each one when it is ready.
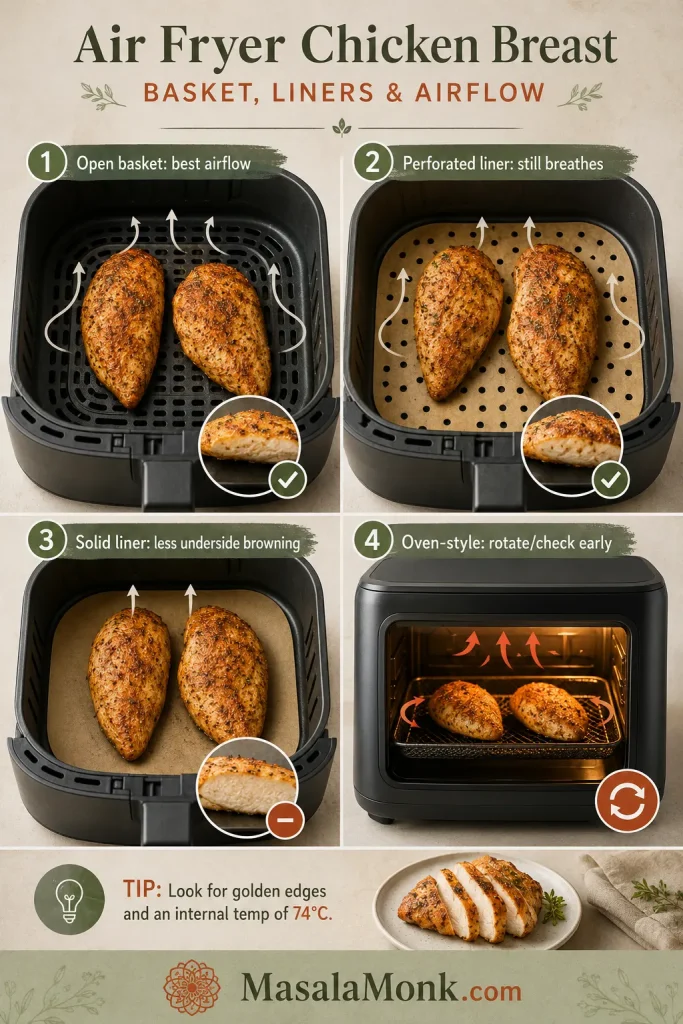
Parchment, silicone and machine styles
Never preheat loose parchment without food holding it down; moving air can lift it toward the heating element.
Solid liners reduce airflow beneath the chicken and can leave the underside paler or wetter.
Perforated liners preserve more airflow than solid sheets.
Compact baskets often colour food quickly, while oven-style models may brown more strongly near the back or upper rack.
Open baskets circulate best; perforated liners breathe, solid liners slow browning, and oven-style models may need rotation.
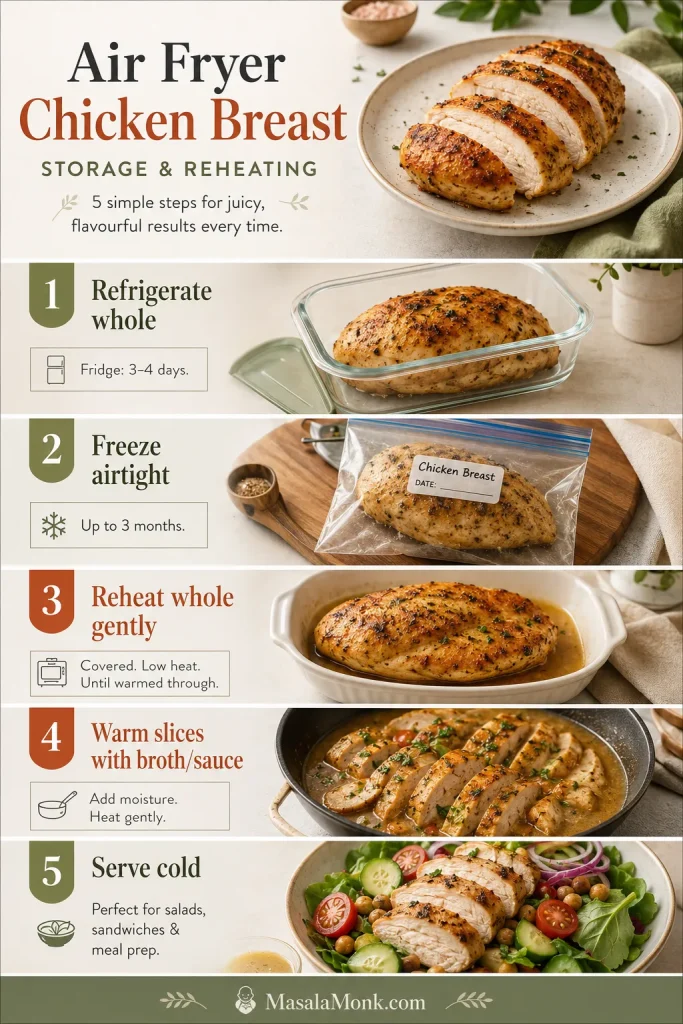
Saving the second breast for tomorrow? Keep it whole when practical; whole chicken generally holds its moisture better than pre-sliced meat. Refrigerate it within two hours—or within one hour when the surrounding temperature is above 90°F / 32°C.
Divide a larger batch between shallow containers so it cools more quickly.
Need
Best approach
Refrigerate
Store in an airtight container for 3–4 days
Freeze
Pack airtight, remove excess air and use within about 4 months for the best quality
Reheat one breast
Air-fry at 325–350°F / 160–177°C with a light brush of broth or oil
Reheat slices
Warm over low skillet heat with a splash of broth or sauce
Serve without reheating
Use properly refrigerated chicken in salads, wraps and sandwiches
Store whole when practical, then reheat gently or add moisture to slices to protect texture.
Reheat cooked chicken to 165°F / 74°C. Thin slices heat—and overheat—much faster than a whole breast.
Freezer note: Four months is a quality recommendation. Chicken held continuously at 0°F / −18°C remains safe longer, although its texture will gradually decline.
When you need a larger, hands-off batch rather than the air fryer’s quick small-basket method, these crock pot chicken breast recipes offer several dinner and meal-prep directions.
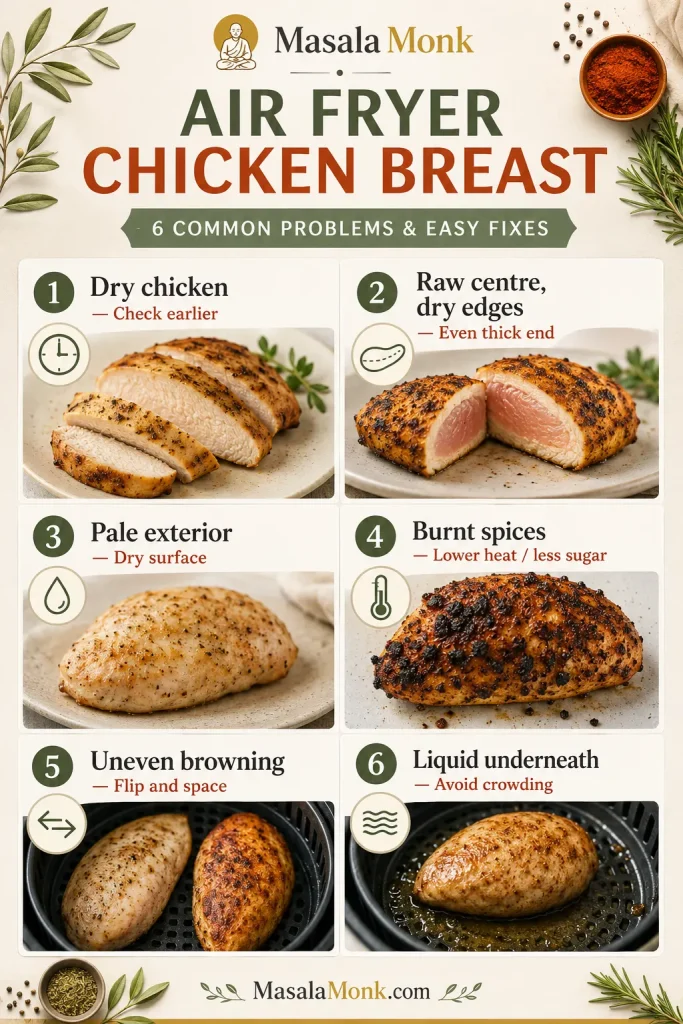
The way the chicken failed usually tells you what to change.
Cooking problems
Problem
Likely reason
What to change
The chicken is dry
It cooked too long or stayed inside the hot basket after it was ready
Take the temperature earlier and transfer it out promptly
The centre is raw but the edges are dry
The breast was too thick or uneven
Butterfly it or gently even the thick section
The outside is pale
The surface was wet, the basket was crowded or there was very little oil
Pat the chicken dry and use a thin, even oil coating
The spices burnt
The heat was high or the seasoning contained sugar or a large amount of paprika
Use gentler heat or add sweet sauces near the end
The seasoning fell off
The surface was wet or the chicken was turned roughly
Dry the surface and flip gently with tongs
The chicken browned unevenly
The basket was crowded, the chicken was not flipped or the machine has a hot area
Leave more space and turn or rotate once
Timing, reheating and basket problems
Problem
Likely reason
What to change
The chicken took much longer
It was thicker, colder, crowded or cooked from a cold start
Continue in short increments and note the thickness for next time
One breast finished first
The pieces differed in weight, thickness or basket position
Lift out each piece when it is ready
Liquid collected beneath it
The meat contained added solution, the basket was crowded or the marinade was heavy
Reduce excess coating and leave more open space
The reheated chicken is rubbery
It was reheated too hot or for too long
Use gentler heat, add moisture and stop once it reaches temperature
The air fryer smoked
Old grease, excessive oil, loose spice or sugary marinade reached a hot surface
Stop cooking, clean the drawer and apply sweet sauce late
Dry, pale, uneven or watery chicken usually points back to timing, thickness, surface moisture, spacing or added solution.
Cooked correctly but still tough or fibrous? Occasionally, the problem comes from the meat rather than from overcooking. A poultry-quality condition commonly called woody breast can leave some pieces unusually firm even when they reach the correct temperature. Slice the chicken thinly and serve it with a moist sauce or dressing.
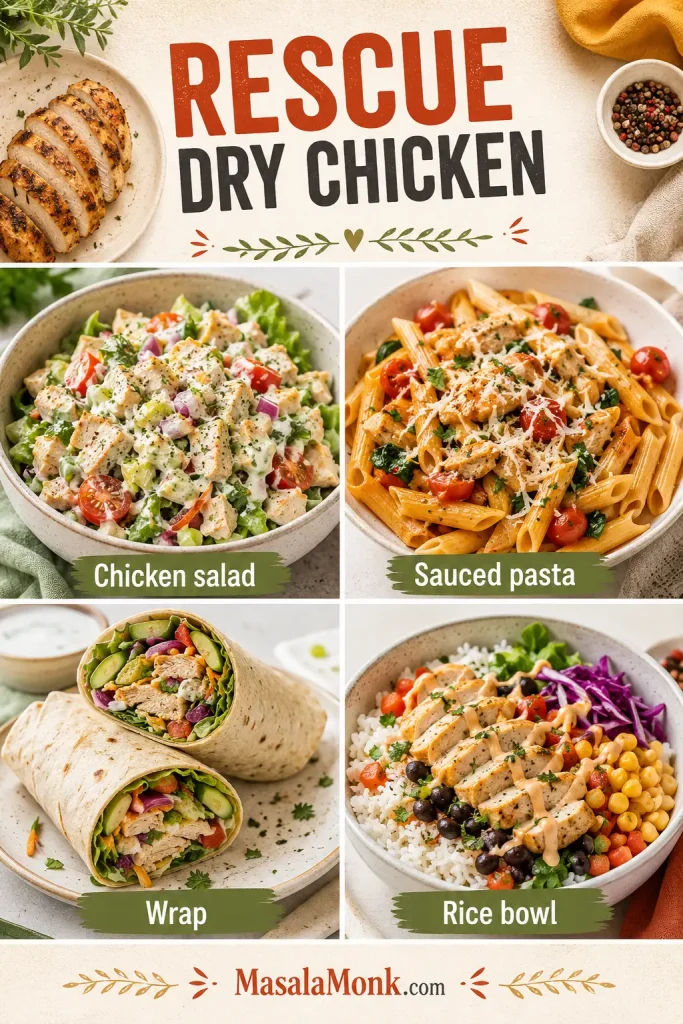
How to Rescue Chicken That Is Already Dry
You can’t uncook dry chicken, but you can make it much more enjoyable. Slice it thinly across the grain and add moisture instead of reheating it again as a plain whole breast.
Dry chicken is not wasted; chop, sauce, wrap or bowl it instead of reheating it plain.
Do I need to brine chicken breast before air frying?
No. Evening the thick section and taking an early temperature reading matter more for this baseline method. For deeper seasoning, salt the chicken about 30 minutes ahead and keep it refrigerated. A wet brine can also work, but it adds time, and chicken labelled as containing an added solution may already be seasoned.
Do I need to preheat the air fryer?
Preheating gives the published timing a more consistent starting point. You can cook from a cold start, but the chicken may need a little longer. Take the first reading at the usual time rather than automatically adding several minutes.
Do I have to flip air fryer chicken breast?
Flipping is recommended because most basket air fryers colour more strongly from above. The chicken can still cook through without flipping, but the underside may remain paler and the result may be less even.
Can I use this timing for frozen chicken breast?
No. Frozen chicken needs a method designed around a longer cooking window and the way the centre thaws as it cooks. Do not simply add a few minutes to this fresh-chicken recipe.
Can I make air fryer chicken breast without oil?
Yes. Oil is not required for the chicken to cook safely, but the seasoning may cling less evenly and the exterior may remain paler. Pat the surface very dry and press the seasoning on firmly before cooking.
The Takeaway
Start with the chicken, not the timer. Even the thick section and leave space around each breast. Weight gets you into the right range; thickness tells you when to take the first reading. Move each piece out of the hot basket as soon as it is ready.
Then let it rest while you finish the rice, dress the salad or warm the tortillas. Slice it while it is still moist, add the sauce that suits the evening, and keep the second breast for the lunch that will be easier tomorrow.
If you make it, tell us which air fryer you used, how large the breasts were, how long they took and what you served with them. Did the weight-and-thickness chart match your batch? Your experience may help the next person standing over the basket.
This baked chicken breast recipe is for anyone who has pulled a tray of chicken from the oven and wondered why it turned out dry, bland, rubbery, or unevenly cooked. Chicken breast is not hard to cook, but it is unforgiving: a few extra minutes can turn tender slices into dry, chalky pieces.
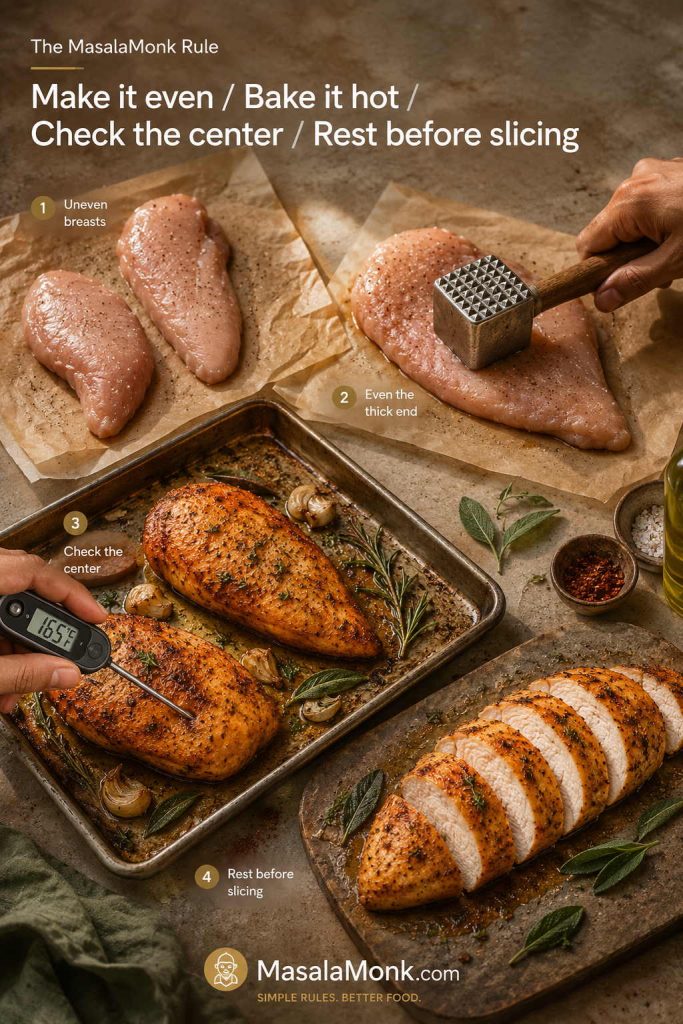
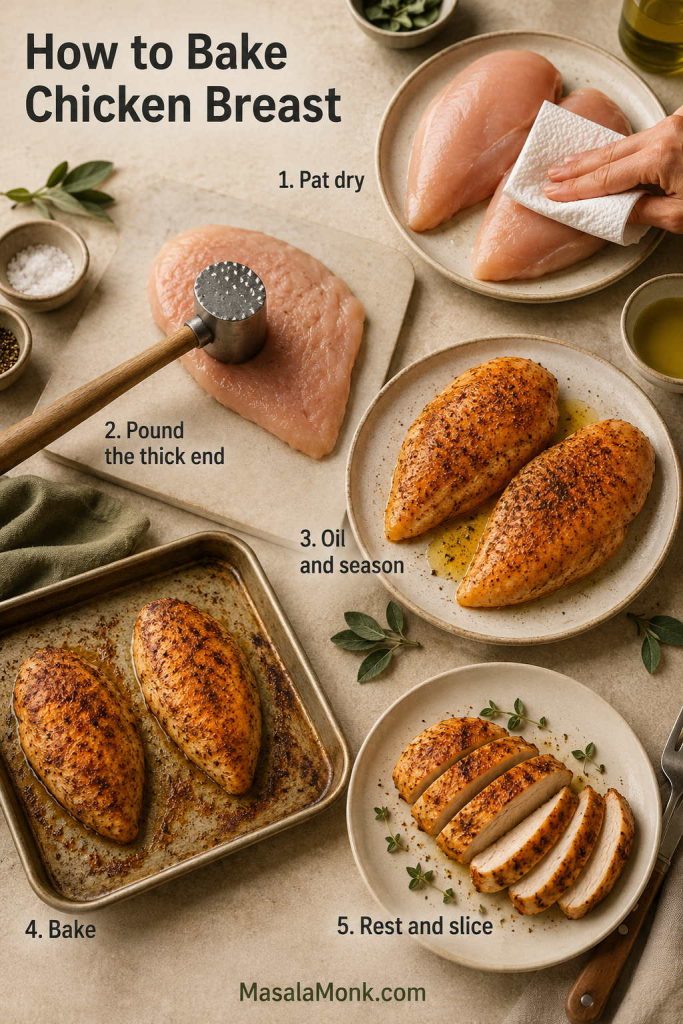
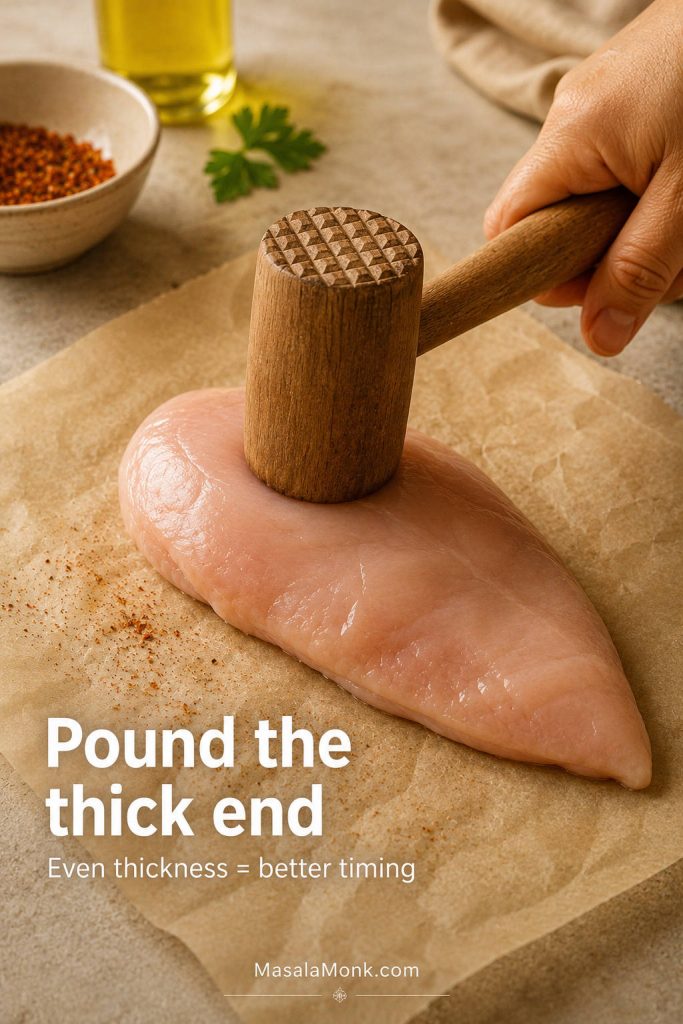
The fix is simple and specific. First, pound the thick end, then coat the chicken with oil and seasoning, bake it hot, check the center, and rest before slicing. Most dry chicken breast is not a marinade problem; instead, it is usually a thickness, timing, or resting problem.
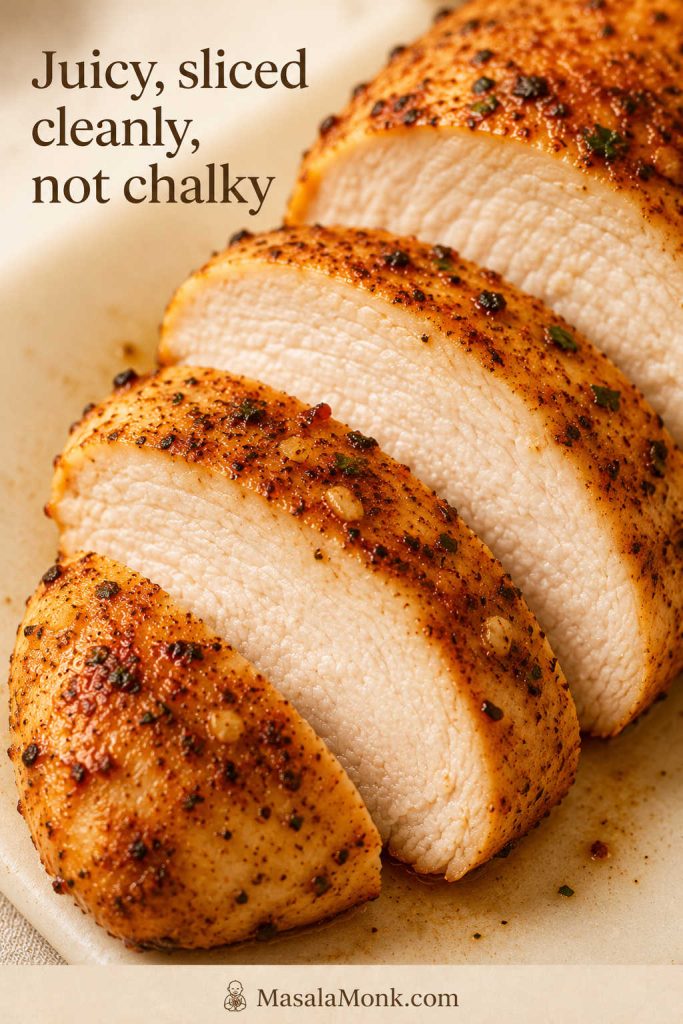
When chicken breast is cooked well, the slices look clean, tender, and moist enough to serve without hiding them under sauce.
The MasalaMonk rule for chicken breast is simple: make it even, bake it hot, check the center, and rest before slicing. No single timer can understand the chicken breast in front of you, especially when one piece is thick, another is thin, and the pack is uneven.
When the thickness and timing are right, the chicken slices cleanly, tastes seasoned across the surface, and stays useful enough for dinner tonight and lunches later.
Once the chicken is even in thickness, the oven can work more predictably; after that, temperature and resting protect the texture.
The main method uses 425°F / 220°C for tender, lightly browned boneless skinless chicken breast, with clear timing for 350°F, 375°F, 400°F, 425°F, and 450°F. You will also get help for thin chicken, large pieces, bone-in chicken, frozen chicken, meal prep, storage, reheating, and dry-chicken fixes.
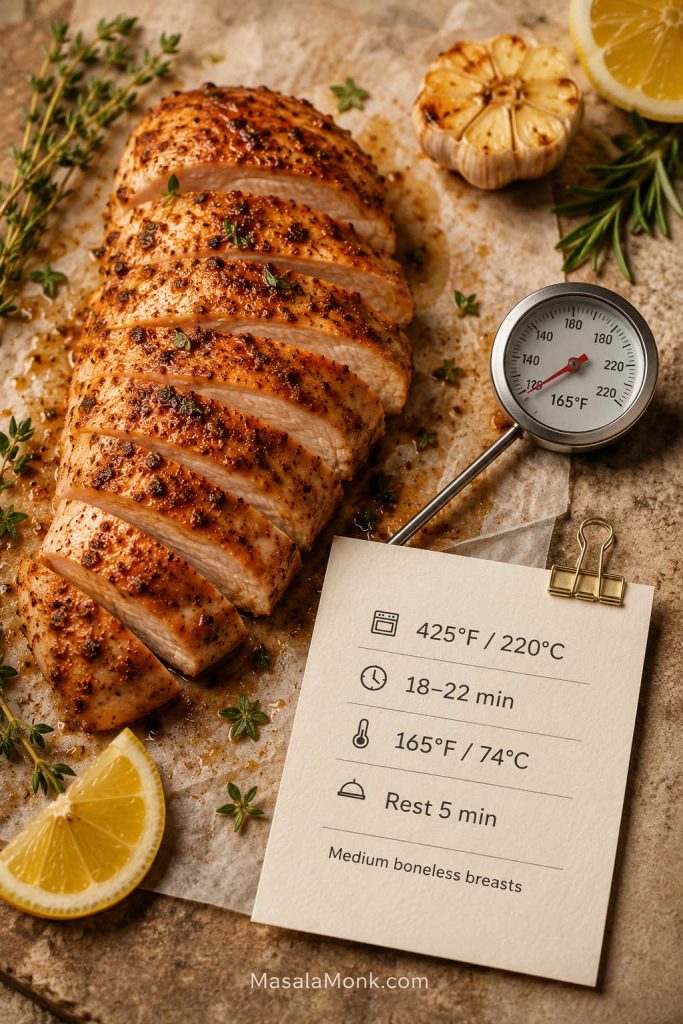
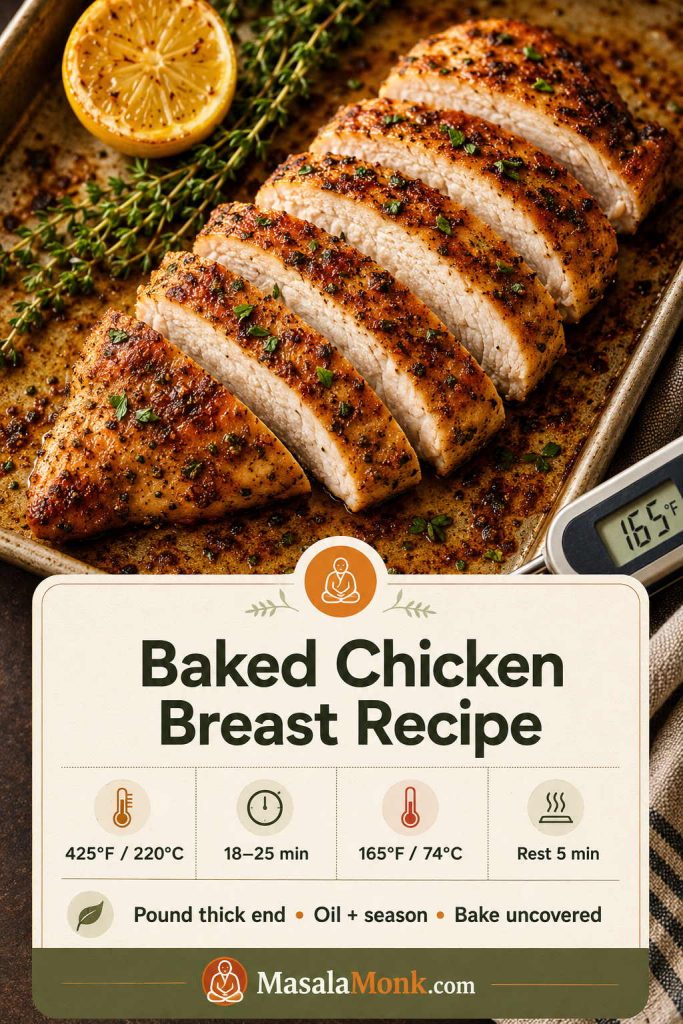
For juicy baked chicken breast, pound the thick end so the pieces cook evenly, rub the chicken with oil and seasoning, then bake uncovered at 425°F / 220°C until the center of the thickest piece reaches 165°F / 74°C. Rest for at least 5 minutes before slicing.
At 425°F / 220°C, medium boneless skinless chicken breasts usually take 18 to 22 minutes. Thin pieces may finish in 10 to 14 minutes, while very large or thick breasts can need 24 to 30 minutes or more. The clock gives you a window; the thermometer gives you the answer.
Use this baked chicken breast recipe as the base method, then adjust the timing based on the size, thickness, and cut of chicken you have.
Need to compare thin, medium, large, or extra-large pieces? Go straight to the bake time chart.
Baked Chicken Breast at a Glance
Question
Best answer
Best oven temperature
425°F / 220°C for tender, lightly browned chicken breast
Fan or convection oven
400°F / 200°C fan, or reduce by about 25°F and check early
Normal bake time
18–22 minutes for medium breasts at 425°F
Wider timing range
16–25 minutes for most boneless breasts, depending on size and thickness
Safe internal temperature
165°F / 74°C in the center of the thickest piece
Best cut
Boneless skinless chicken breasts, close in size
Best thickness
Even thickness, ideally about 3/4–1 inch / 2–2.5 cm for average breasts
Rest time
At least 5 minutes before slicing
Best tool
Instant-read thermometer
Average-size, thawed, boneless chicken breasts that are close in thickness can follow the main recipe directly. Use the extra charts when your chicken is thin, very large, bone-in, frozen, or when your oven is already set to a different temperature.
These numbers are a strong starting point, but once the tray goes into the oven, thickness and internal temperature matter more than the timer.
In practice, this comes down to a few moves: pound the thick end so the chicken cooks evenly, oil the surface so the seasoning sticks, season all sides, bake hot, check the thickest piece, and rest before slicing.
Once you understand what the chicken in front of you needs — thinner timing, thicker prep, or a little more rest — the recipe becomes much less stressful.
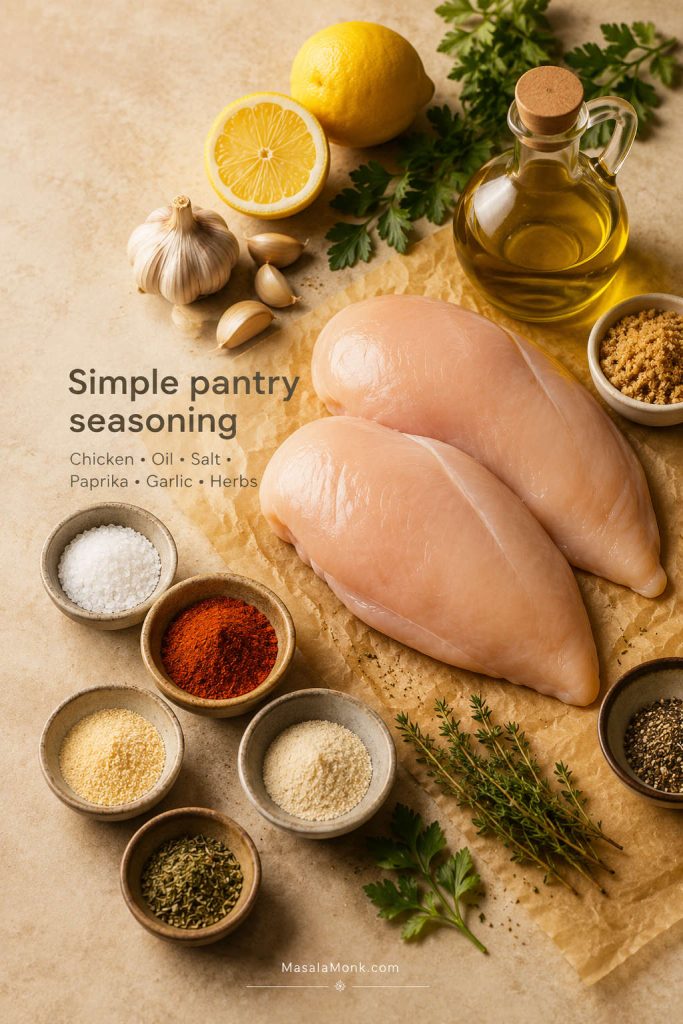
Ingredients for Baked Chicken Breast
The seasoning here is built from pantry basics, so the chicken tastes good on its own. At the same time, it still fits into salads, bowls, wraps, pasta, sandwiches, and meal-prep boxes.
Simple pantry seasoning works because oil helps the spices cling to the chicken, so every slice tastes seasoned instead of flat.
Ingredient
US amount
Metric amount
Why it matters
Boneless skinless chicken breasts
4 medium breasts, 5–8 oz each
600–900g total
The main cut for fast, easy oven baked chicken breast
Olive oil or avocado oil
1 1/2 tbsp
22 ml
Helps seasoning stick and protects the surface
Fine salt
1 tsp
About 6g
Seasons the chicken properly, not just the outside
Paprika or smoked paprika
1 tsp
2–3g
Adds color, warmth, and gentle flavor
Garlic powder
1 tsp
About 3g
Gives the chicken a savory base
Onion powder
1/2 tsp
1–2g
Rounds out the seasoning
Black pepper
1/2 tsp
About 1g
Adds mild heat
Italian seasoning, oregano, or thyme
1 tsp
About 1g
Adds herby flavor without needing a marinade
Brown sugar, optional
1–2 tsp
4–8g
Helps browning, especially if you are not broiling
Lemon wedges or parsley, optional
For serving
For serving
Adds freshness at the end
Best Chicken Breast to Use
Use boneless skinless chicken breasts that are close in size. Most supermarket packs are uneven: one breast may be thick enough to need pounding, while another may already be thin enough to overcook early.
Since most supermarket packs are uneven, checking thickness before baking is more useful than treating every piece like it needs the same time.
For this method, similar-size pieces matter more than buying perfectly shaped chicken. As a result, the closer the pieces are in thickness, the easier it is to avoid dry edges and undercooked centers.
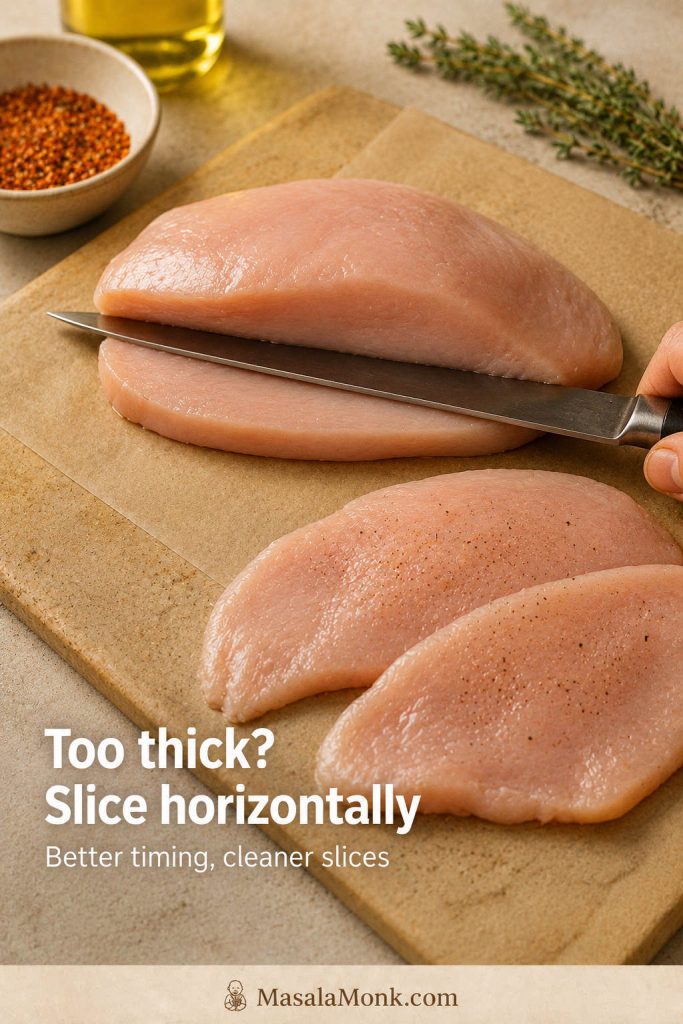
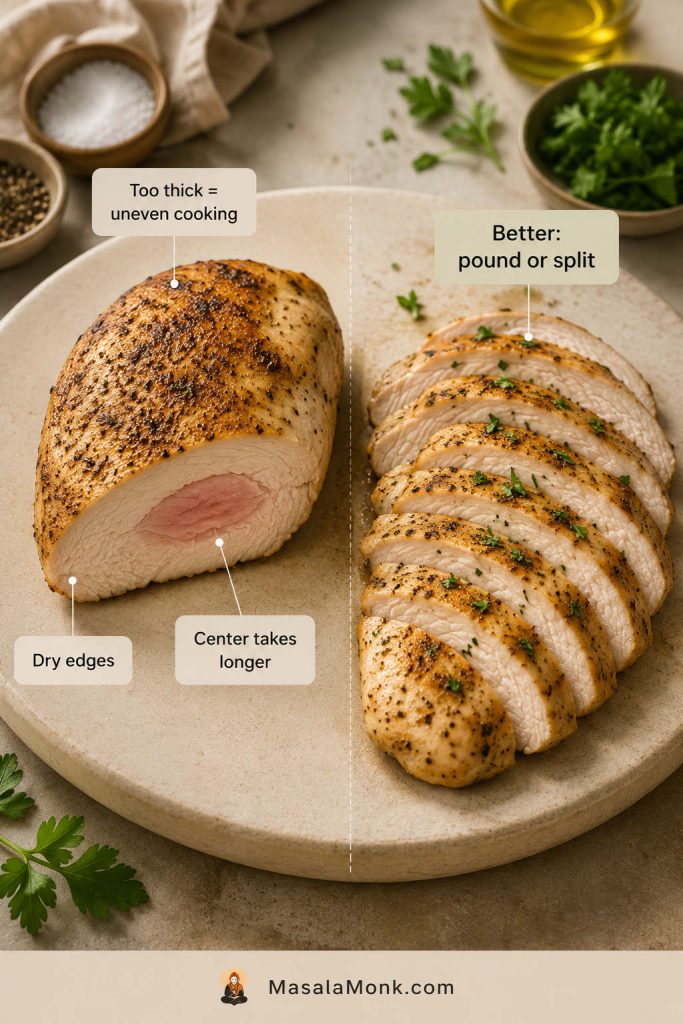
Very large chicken breasts are often thick at one end and thin at the other. For the best texture, pound only the bulky end until the piece is closer to one thickness, or slice extra-large breasts horizontally into two thinner pieces. That one step does more for tenderness than adding another sauce or spice.
Best Seasoning for Baked Chicken Breast
The best seasoning for baked chicken breast gives salt, savoriness, color, and aroma without requiring a long marinade. Salt, paprika, garlic powder, onion powder, black pepper, and herbs are enough for a reliable everyday version.
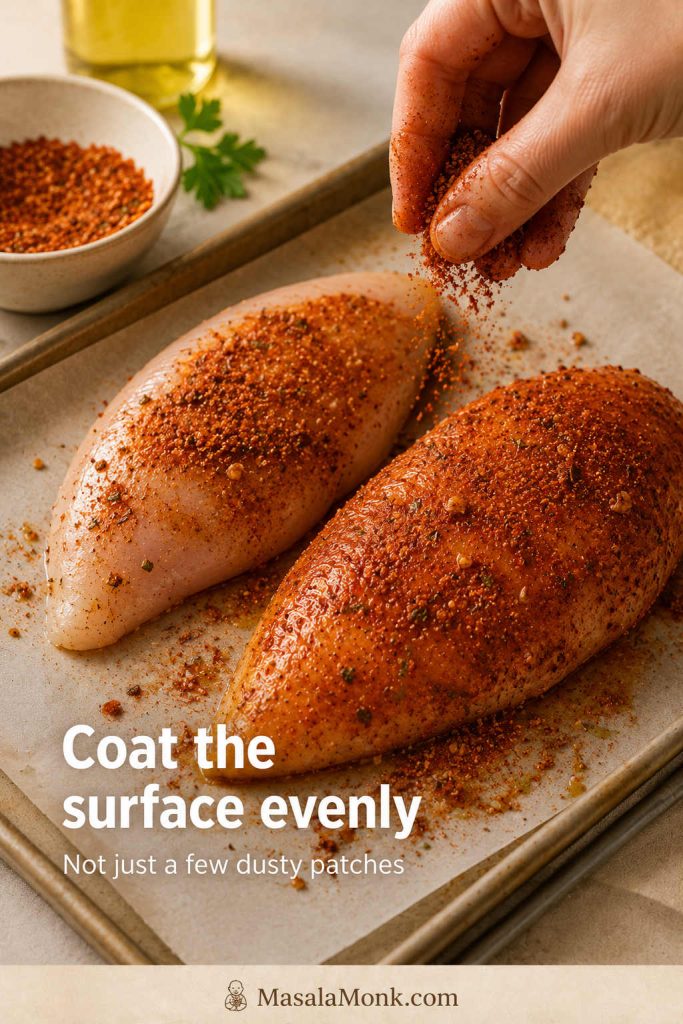
The seasoning should look like a real coating, not a few dusty patches. Because chicken breast is mild, it needs enough salt and spice across the whole surface. If the top looks barely seasoned before baking, the finished chicken will probably taste flat.
A visible coating matters because chicken breast is mild; without enough seasoning on the surface, the finished slices can taste plain.
The brown sugar is optional, but useful. Although it does not make the chicken taste sweet, it helps the paprika-garlic coating brown faster, especially because boneless skinless chicken breast has no skin to crisp.
Salt note: This recipe uses fine salt. If you use kosher salt, you may need a little more by volume because the crystals are larger. Seasoning should taste balanced, not harshly salty.
Oil or Butter?
Oil is the easiest choice for high-heat baking because it coats the chicken evenly and handles the oven well. Butter tastes great, but it can brown faster, so it is often better as a finishing sauce with garlic, lemon, herbs, or pan juices.
Equipment You Need
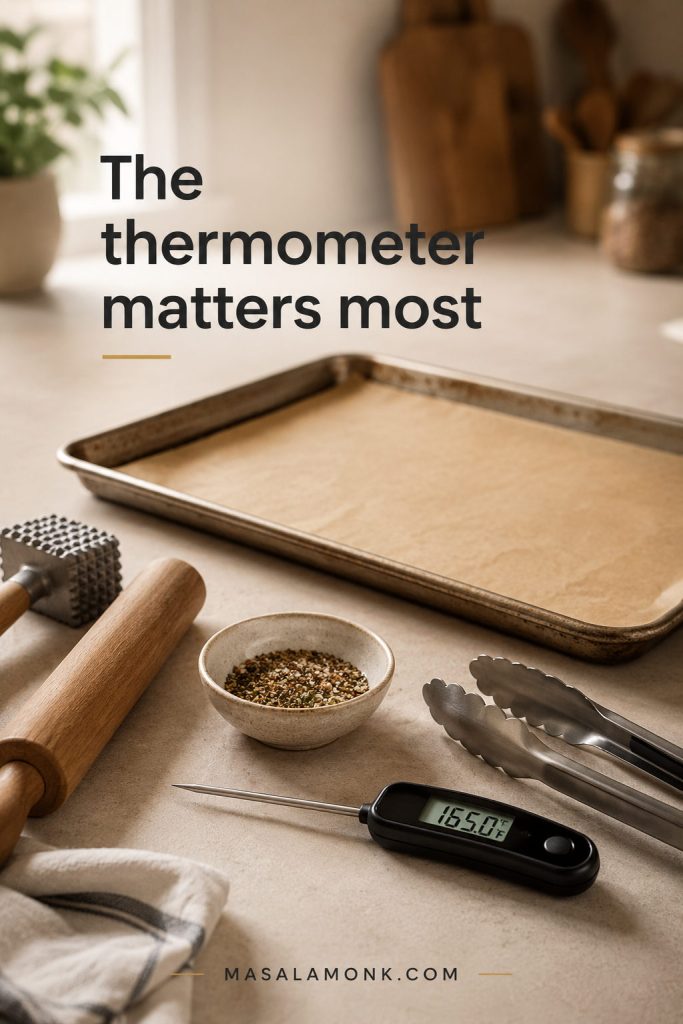
You do not need special equipment, but a thermometer makes a huge difference. Without one, baked chicken breast often goes dry because the cook is guessing by time, color, or juices instead of checking the center of the thickest piece.
A thermometer and a way to even the thick end do more for juicy baked chicken breast than a long list of special tools.
Instant-read thermometer: the most important tool for tender, safe chicken.
Rimmed sheet pan or metal baking dish: good for high heat and even cooking.
Parchment paper or foil: useful for cleanup and to prevent sticking.
Meat mallet or rolling pin: helps even out thick chicken breasts.
Small bowl: for mixing the seasoning.
Tongs: for handling seasoned chicken neatly.
Cutting board: for resting and slicing after baking.
Pan note: For very high heat, a rimmed sheet pan or metal baking dish is more predictable than glass. If you use a glass baking dish, check the manufacturer’s temperature limit and avoid sudden temperature changes.
How to Make Baked Chicken Breast
This method uses a plain, reliable oven approach: boneless skinless chicken breasts, baked uncovered, with enough seasoning to taste good on their own and enough flexibility to use later in other meals.
Each step solves a different problem: moisture on the surface, uneven thickness, weak seasoning, uncertain doneness, or slicing too soon.
1. Preheat the oven
Preheat the oven to 425°F / 220°C. Use the middle rack so the chicken cooks evenly. For a fan or convection oven, use 400°F / 200°C fan and start checking a few minutes early.
Fan and convection ovens move hot air more aggressively, so chicken can cook faster and brown sooner. Reduce the temperature by about 25°F / 15–20°C and start checking a few minutes before the chart says.
2. Pat the chicken dry
Pat the chicken breasts dry with paper towels. A dry surface helps the oil and seasoning cling better. Otherwise, very wet chicken can steam in the pan and release more liquid.
3. Pound the thick end
When the thick end is much taller than the thin end, gently pound only the bulky part with a meat mallet or rolling pin. Aim for an even piece, roughly 3/4 inch to 1 inch / 2 to 2.5 cm thick for average chicken breasts.
Pounding the thick end helps the center and edges finish closer together, so you are not waiting on one bulky section while the rest dries.
When to Slice Large Chicken Breasts Horizontally
Extra-large chicken breasts usually need a different move: slice them horizontally into thinner pieces instead of forcing one thick piece to cook evenly. This makes the timing more predictable and, more importantly, helps avoid a dry outside with an undercooked center.
For extra-large chicken breasts, slicing horizontally creates thinner pieces that season better, cook faster, and finish more evenly.
4. Season the chicken
Mix the salt, paprika, garlic powder, onion powder, black pepper, herbs, and optional brown sugar in a small bowl. Then rub the chicken with oil and coat both sides with the seasoning. Season all sides, not just the top.
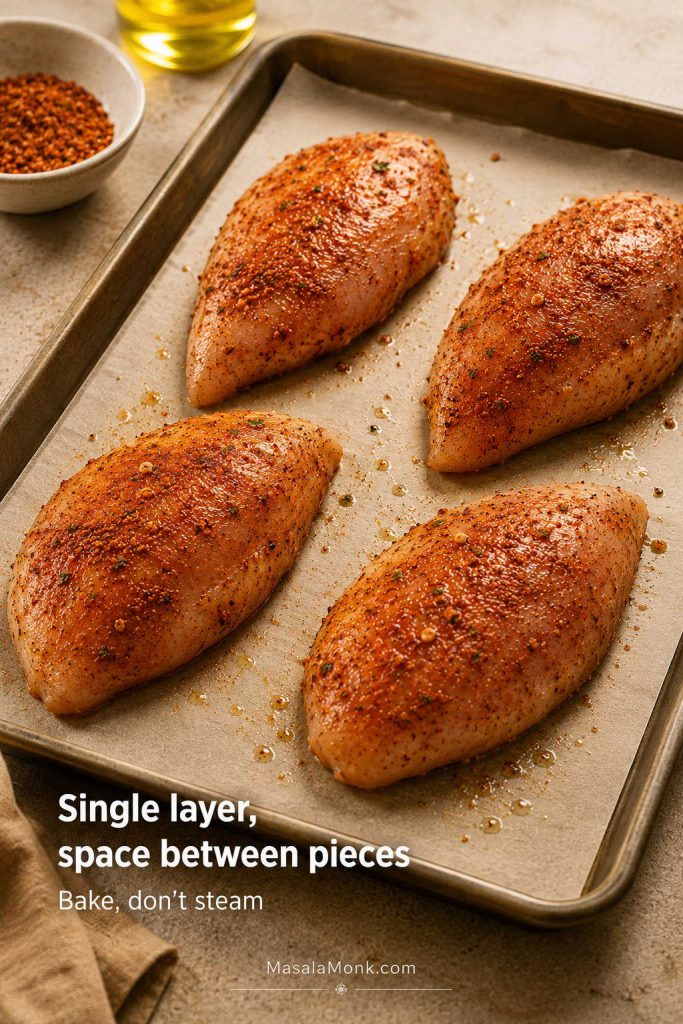
5. Bake uncovered
Arrange the chicken in a single layer with a little space between pieces. Place the smoother side up if you want the best presentation. Bake on the middle rack, uncovered, until each piece reaches the safe temperature.
Before baking, the tray should look organized: seasoned pieces in one layer, with enough room for heat to move around them.
Smaller or thinner pieces should come out early. Waiting for the largest breast is how the smaller one turns dry.
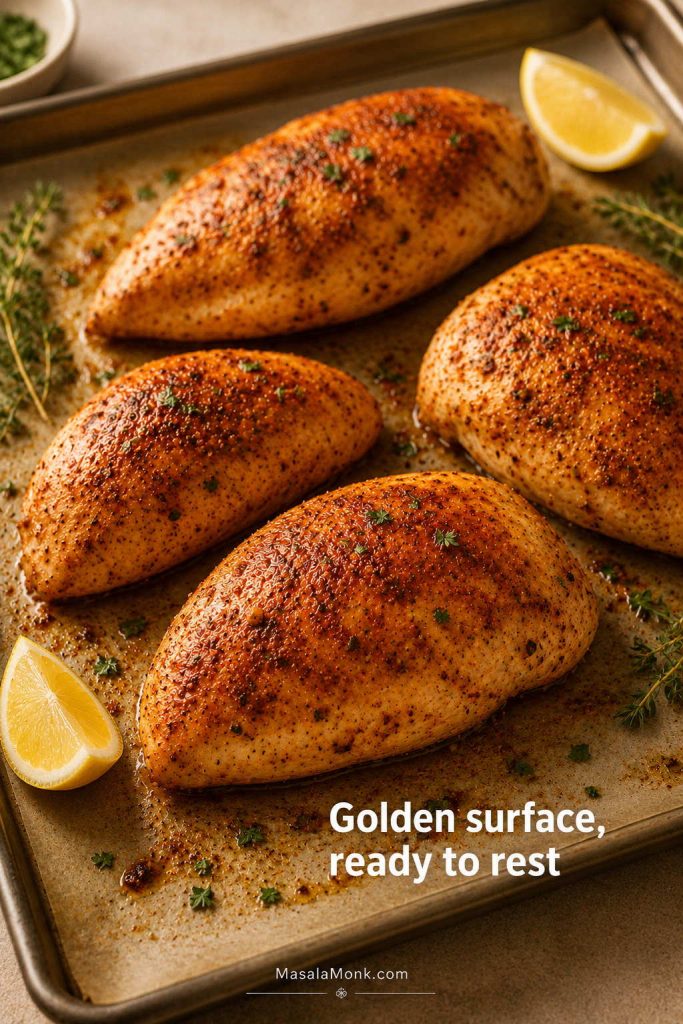
What the Chicken Should Look Like After Baking
When the chicken comes out of the oven, look for a lightly browned surface, seasoning that still clings, and a small amount of pan juice rather than a watery tray.
Look for light browning, seasoning clinging to the surface, and a small amount of pan juice—not a tray full of liquid.
For a full tray dinner instead of plain baked chicken breast, this Sheet Pan Chicken Fajitas recipe uses the same oven-friendly logic with sliced chicken, peppers, onions, and smoky seasoning.
6. Rest before slicing
Move the chicken to a cutting board and rest for at least 5 minutes. Then slice against the grain for the most tender texture. For meal prep, let the chicken cool before packing it into containers.
After baking, resting first and slicing second helps the chicken hold its texture instead of losing juices immediately on the board.
Should You Cover Chicken Breast While Baking?
For this recipe, bake the chicken uncovered. Covering traps steam and can make the surface wetter instead of lightly browned. However, covered baking can work well for saucy or casserole-style chicken recipes.
Do You Need to Flip Chicken Breast?
No, not for this method. Chicken arranged in a single layer on a sheet pan or shallow baking dish can bake without flipping. A wet pan or uneven oven may make flipping once useful, but it is not required.
What Good Baked Chicken Breast Looks Like
Good baked chicken breast should have a lightly browned, seasoned surface and a center that slices cleanly without looking wet, raw, chalky, or stringy. When you cut it after resting, you may see a little juice, but the board should not flood immediately.
The slices should bend slightly instead of crumbling, and the cut surface should still look moist enough to eat without hiding it under sauce. A breast that looks dry around the edges but underdone in the center was probably too thick or uneven before it went into the oven. Next time, pound the thick end or slice the breast horizontally before baking.
Good baked chicken breast should look seasoned, slice cleanly, and stay moist without needing sauce to hide the texture.
How Long to Bake Chicken Breast
With this method, medium boneless chicken breast usually takes 18 to 22 minutes at 425°F / 220°C. Thin pieces can finish in 10 to 14 minutes, while large thick breasts may need 24 to 30 minutes or more.
Use 18 to 22 minutes as the normal starting point for medium chicken breasts. However, the wider 16 to 25 minute range covers smaller, thinner, larger, or uneven pieces. There is no single perfect timer setting because two pieces from the same pack can cook differently.
As a general rule, thin chicken breast cooks fast and dries fast. Thick chicken breast needs either more time or better prep, such as pounding or slicing horizontally. Smaller pieces may finish several minutes before larger ones, so remove them as they are done.
Baked Chicken Breast Time at 425°F / 220°C
Chicken breast size
Approx weight
Thickness guide
Approx bake time at 425°F / 220°C
Thin-sliced breast or cutlet
3–5 oz
About 1/2 inch / 1.25 cm
10–14 minutes
Small breast
5–6 oz / 150–180g
0.6–0.8 inch / 1.5–2 cm
13–18 minutes
Medium breast
7–8 oz / 200–225g
3/4–1 inch / 2–2.5 cm
18–22 minutes
Large breast
9–10 oz / 255–285g
About 1 inch / 2.5 cm
22–26 minutes
Extra-large breast
11–12 oz / 310–340g
Usually thick unless split or pounded
24–30+ minutes
The thermometer decides. These times are estimates. Once the center of the thickest piece reaches 165°F / 74°C, the chicken is ready to rest.
Use this bake-time chart as a starting point; then, check the thickest part because thickness can change the timing by several minutes.
The best oven temperature for most boneless skinless chicken breasts is 425°F / 220°C. It is hot enough to cook quickly and brown lightly, but still manageable if you check early and use similar-size pieces.
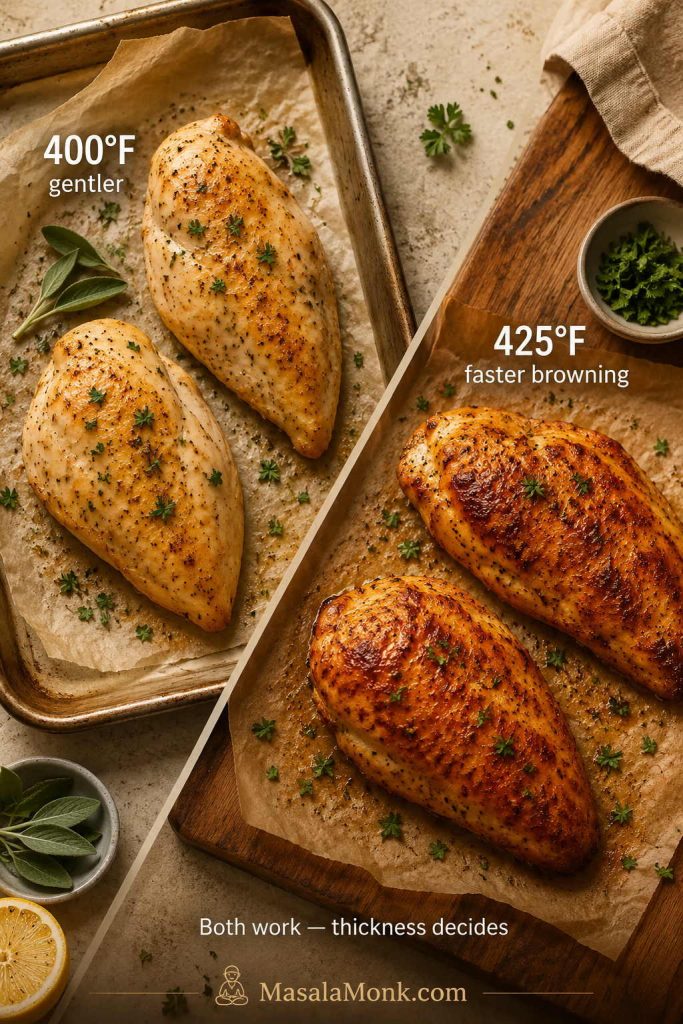
That said, 425°F is not the only correct temperature. A 400°F / 200°C oven is better when you want a slightly gentler bake or have larger pieces. When the breasts are even in thickness, 425°F gives faster cooking with better surface color.
For larger or less even pieces, 400°F gives you more margin; for even breasts, 425°F helps the surface brown before the meat dries out.
Chicken Breast Oven Temperature Chart
Use this chart when your oven is already set to a different temperature, your chicken is larger than average, or you simply feel more comfortable with a gentler bake. The timing changes, but the final check stays the same.
Oven temperature
Best for
Approx time for medium boneless breast
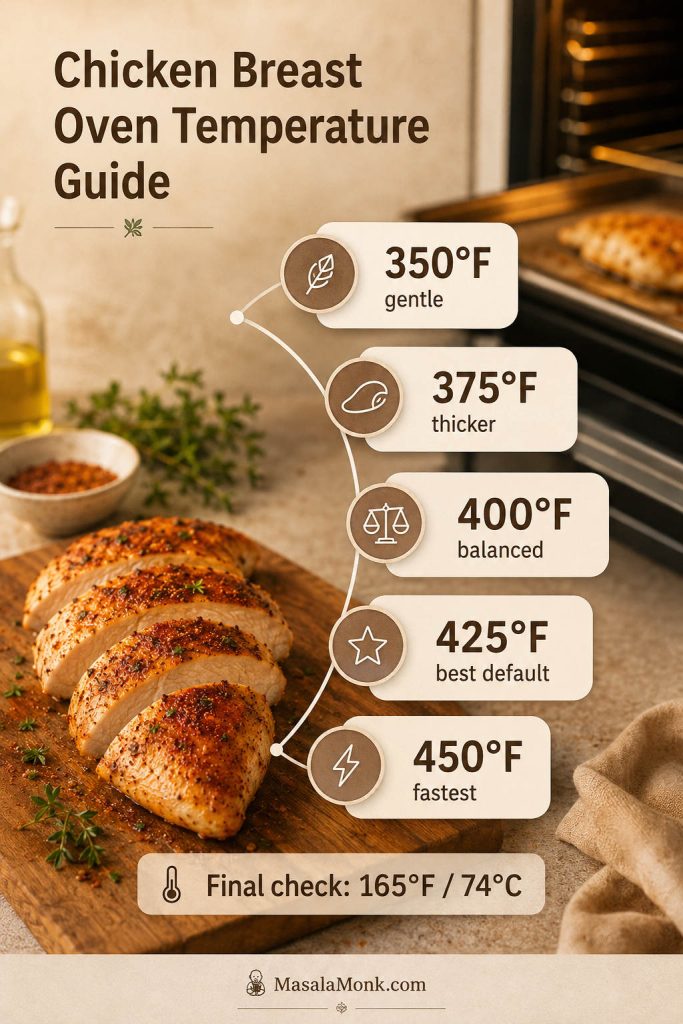
350°F / 175°C
Gentle bake, less browning, slower cooking
25–35 minutes
375°F / 190°C
Larger or thicker breasts, gentler cooking
22–30 minutes
400°F / 200°C
Balanced weeknight bake
18–26 minutes
425°F / 220°C
Best default for tender, lightly browned chicken
16–25 minutes
450°F / 232°C
Fastest bake, best for thinner/even pieces, less forgiving
15–22 minutes
If you are unsure, choose 425°F for plain seasoned chicken breast, 400°F for a slightly gentler middle ground, and 375°F for very large pieces or saucier recipes. Lower heat is not automatically juicier; it just gives the chicken more time in the oven, so temperature checking still matters.
Lower oven temperatures are gentler, while higher temperatures brown faster; however, every version still needs the same 165°F / 74°C doneness check.
Whichever oven temperature you choose, finish with the internal temperature check instead of relying only on time.
How Long to Bake Chicken Breast at 350°F
At 350°F / 175°C, medium boneless chicken breasts usually take about 25 to 35 minutes. This temperature is gentle, but it gives less browning and can dry the chicken if it stays in the oven too long.
How Long to Bake Chicken Breast at 375°F
At 375°F / 190°C, medium boneless chicken breasts usually take about 22 to 30 minutes. This is a good option for thicker pieces or recipes with a wetter marinade or sauce.
How Long to Bake Chicken Breast at 400°F
At 400°F / 200°C, medium boneless chicken breasts usually take about 18 to 26 minutes. This is a balanced middle temperature if you do not want to bake as hot as 425°F.
How Long to Bake Chicken Breast at 425°F
At 425°F / 220°C, medium boneless chicken breasts usually take about 16 to 25 minutes, depending on thickness. This is the default temperature for the main recipe because it gives the best balance of speed, tenderness, and light browning.
How Long to Bake Chicken Breast at 450°F
At 450°F / 232°C, chicken breast cooks fast, often in about 15 to 22 minutes. This temperature can work well for even pieces, but it is less forgiving. Check early, and avoid using bakeware that is not rated for high heat.
Internal Temperature for Baked Chicken Breast
The safe internal temperature for baked chicken breast is 165°F / 74°C in the center of the thickest piece. Use an instant-read thermometer and measure the largest breast first. Do not rely only on color, juices, or the outside texture.
The timer can only estimate doneness; the thermometer tells you when the thickest part has reached 165°F / 74°C.
When checking the temperature, avoid touching the pan. For bone-in chicken breast, insert the thermometer near the deepest part of the meat without touching bone.
Can You Pull Chicken Breast at 160°F?
The simplest safety rule is to cook chicken breast until the thickest part reaches 165°F / 74°C. Some experienced cooks remove chicken around 160°F and let carryover heat finish the last few degrees while it rests, but that only makes sense if you are using an accurate thermometer and the chicken continues rising to 165°F. If you want the clearest beginner-friendly target, use 165°F.
What If You Do Not Have a Thermometer?
A thermometer is the only reliable way to know chicken has reached 165°F / 74°C without overcooking it. Without one, use the timing chart only as an estimate and cut into the thickest piece to check that it is no longer pink. Color and juices are less reliable than temperature, so an instant-read thermometer is worth buying if you cook chicken often.
Thin vs Thick Chicken Breast
Thickness matters more than the number on the timer. A thick 6 oz chicken breast can take longer than a flatter 8 oz chicken breast because heat has to reach the center.
For thin-sliced chicken breast or cutlets, start testing around 8 to 10 minutes at 425°F / 220°C. Thin pieces dry out quickly, so do not wait for the same timing you would use for a full chicken breast.
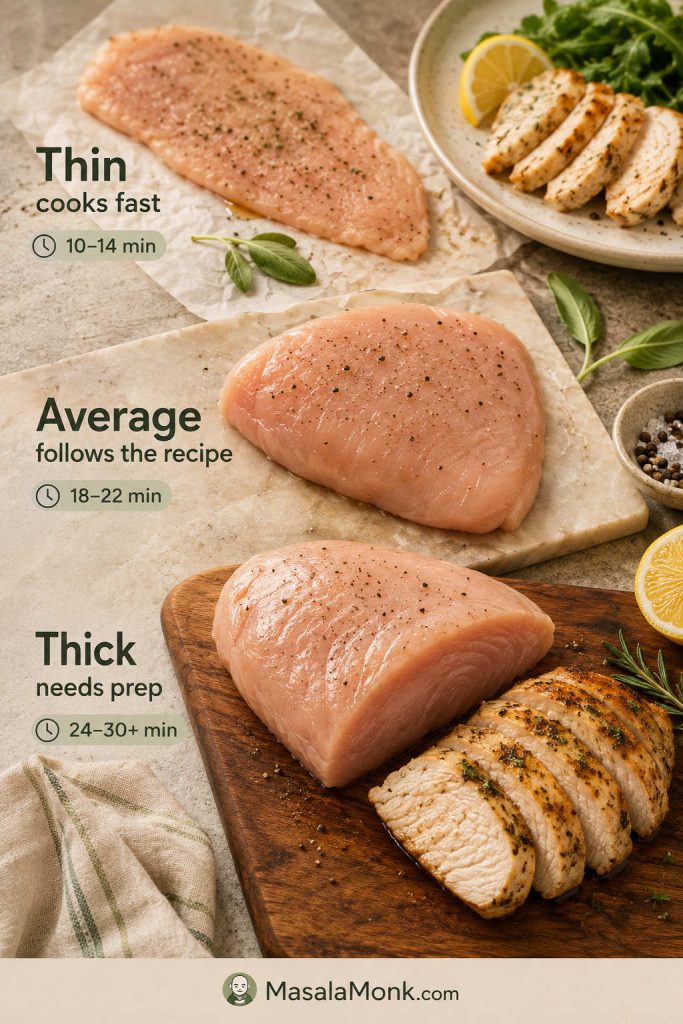
Thin pieces need speed, average pieces follow the recipe more closely, and thick chicken breasts usually need prep before timing becomes reliable.
Type
What to do
Timing note
Thin-sliced chicken breast
Season lightly, bake fast, check early
Often 10–14 minutes at 425°F
Average chicken breast
Use the main recipe method
Usually 18–22 minutes at 425°F
Large thick chicken breast
Pound, butterfly, or slice horizontally
Can take 24–30+ minutes if left thick
Uneven pieces
Sort by size or remove smaller pieces early
Do not force every piece to finish at the same time
Why Large Chicken Breasts Cook Unevenly
Large chicken breasts can look done at the edges before the center is ready. That is why thick pieces need either a gentler bake, more time, or better prep before they go into the oven.
A thick chicken breast can dry around the edges while the center lags behind, which is why pounding or splitting changes the result.
Boneless Skinless vs Bone-In Chicken Breast
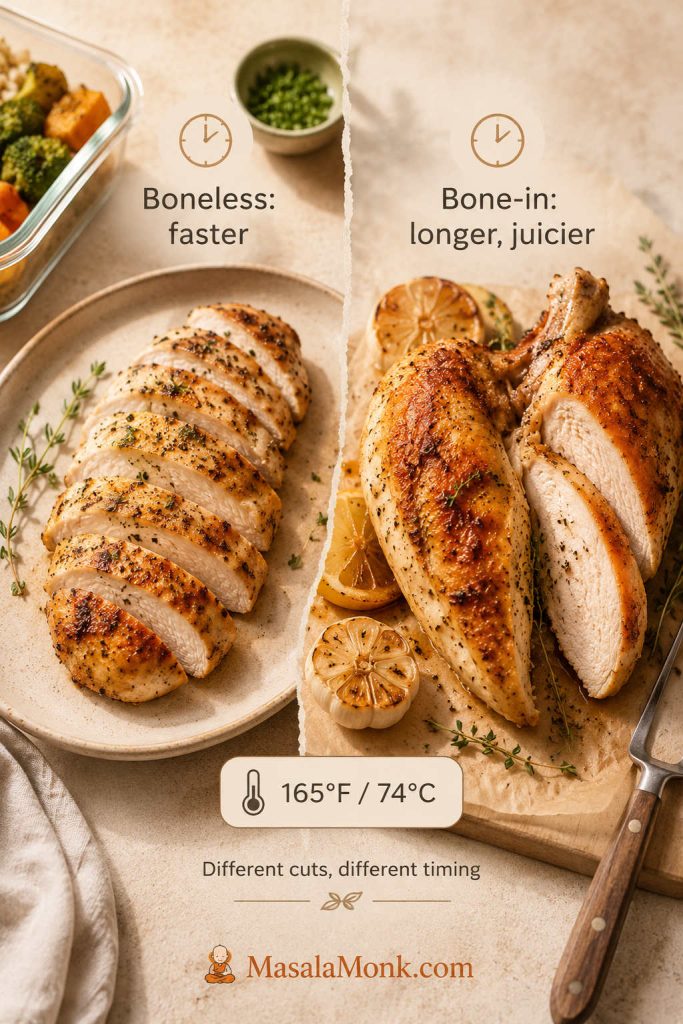
This recipe is written for boneless skinless chicken breast because it is the most common choice for quick dinners and meal prep. Bone-in skin-on chicken breast, also called split chicken breast, is juicier and more flavorful, but it takes longer.
Boneless chicken breast is faster for weeknight cooking, while bone-in split breast takes longer and gives you a little more forgiveness.
Boneless skinless chicken breast: fastest, leanest, easiest for salads, bowls, wraps, pasta, and sandwiches.
Bone-in skin-on chicken breast: more flavorful and forgiving, but slower to bake.
Do not use the same bake time for both. Bone-in chicken breast needs more time, and the thermometer should go near the thickest part without touching bone.
As a rough guide, bone-in split chicken breasts often need closer to 35 to 45 minutes at 400°F / 200°C, depending on size. However, the thermometer still decides, so check the thickest part of the meat without touching bone.
Why This Method Keeps Chicken Breast Juicy
Chicken breast usually gets dry for one of three reasons: the pieces are uneven, the chicken is baked too long, or it is sliced before the juices settle. Seasoning can make chicken taste better, but it cannot fully rescue meat that has been overcooked.
This method fixes those problems directly. Pound the thick end, coat the surface with oil and seasoning, bake hot, measure the thickest piece, and rest before slicing. Once you stop treating the timer as a guarantee, baked chicken breast becomes much easier to repeat.
Use similar-size pieces. Chicken breasts of the same size cook more evenly.
Pound the thick end. This prevents the thin end from drying out while the center finishes.
Do not skip the oil. Oil helps protect the surface and carries flavor.
Bake hot and uncovered. A hot oven cooks the chicken efficiently and gives better color.
Let temperature decide. Overcooking is the main reason chicken breast gets dry.
Remove smaller pieces early. If one breast is thinner, it may finish before the others.
Rest before slicing. Give the juices a few minutes to settle.
Slice against the grain. This makes the chicken feel more tender.
If your chicken breast keeps turning out dry, it probably does not mean you are bad at cooking chicken. It usually means the pieces needed a little prep before they went into the oven.
Should You Brine Chicken Breast Before Baking?
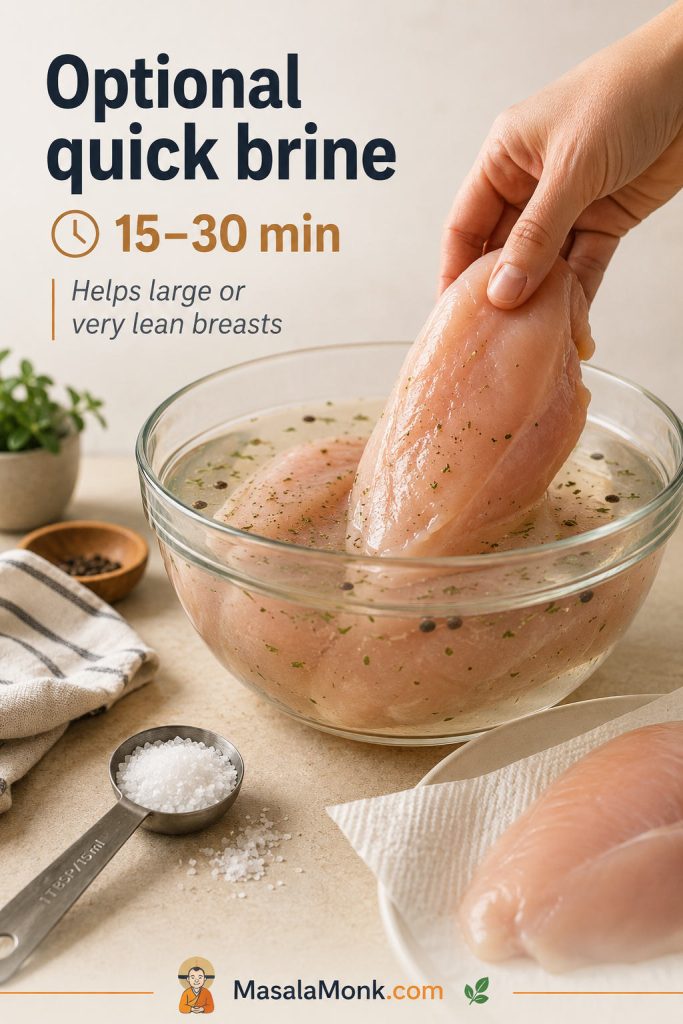
You do not need to brine chicken breast for this recipe. If the chicken is even in thickness and you use a thermometer, it can still come out tender and moist. However, a quick brine can help if your chicken breasts are very large, very lean, or often turn out dry.
If dinner is in 30 minutes, skip the brine and focus on the bigger wins: even thickness, oil, seasoning, hot oven, and a reliable doneness check.
Quick Chicken Breast Brine
4 cups / 950 ml cold water
2 tbsp kosher salt, or 1 tbsp fine salt
Brine for 15–30 minutes
Pat very dry before seasoning
Use less salt in the seasoning after brining
A quick brine can help large or very lean chicken breasts, although it still cannot replace even thickness or a proper temperature check.
Salt note: Different salts have different crystal sizes. A tablespoon of fine salt is not the same as a tablespoon of flaky kosher salt. If you are unsure, brine lightly and reduce the salt in the seasoning rub.
Can You Marinate Chicken Breast Before Baking?
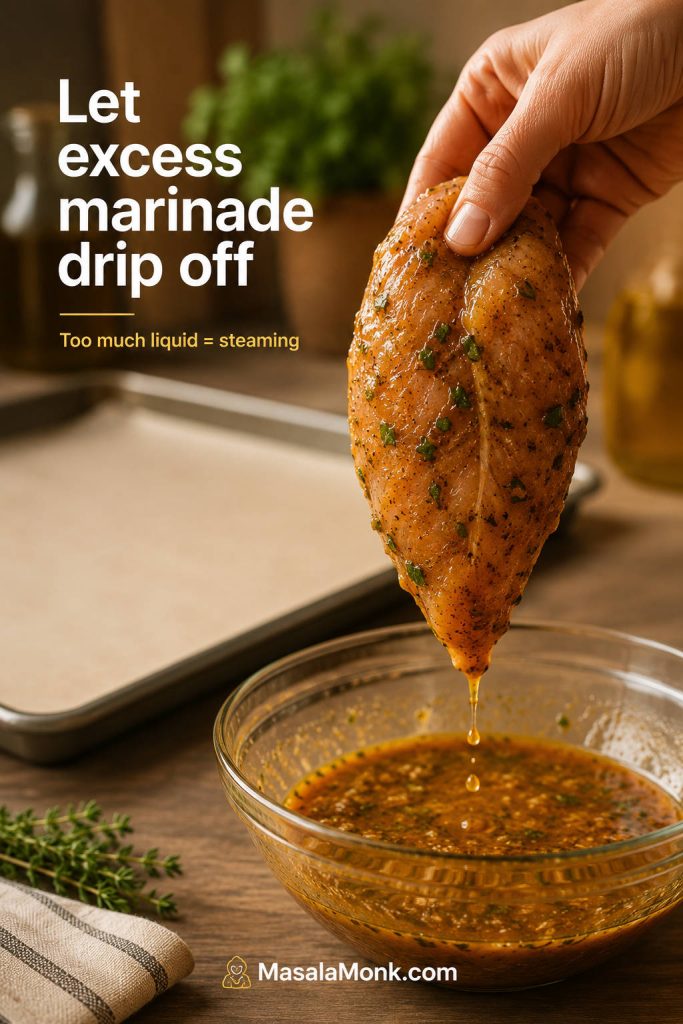
Yes, you can marinate chicken breast before baking. A short marinade of 30 minutes can add flavor, while a longer marinade can help with meal prep. However, very acidic marinades can change the texture if the chicken sits too long.
If the chicken has been sitting in a wet marinade, do not pour all of that liquid into the pan. Let excess drip off first and pat the surface lightly if needed. A little moisture is fine, but too much liquid makes the chicken steam instead of bake, which reduces browning and can create watery pan juices.
Let excess marinade drip off before baking, because too much liquid in the pan makes the chicken steam instead of brown.
Can You Bake Frozen Chicken Breast?
For best results, thaw chicken breast before baking. Thawed chicken seasons more evenly, cooks more predictably, and is easier to pound before it goes into the oven.
If baking from frozen, make sure the pieces are separated, not frozen together in a block. As a rough guide, frozen chicken breast can take about 1.5 times as long as thawed chicken, especially if the pieces are thick. Check the thickest piece carefully because the chicken still needs to reach 165°F / 74°C.
Separated frozen chicken breasts cook more predictably than a frozen block, although the thermometer still matters more than the clock.
Because frozen chicken needs longer, use timing as a rough guide and finish with the internal temperature check.
Do not thaw chicken on the counter. Refrigerator thawing is the easiest safe method; cold-water and microwave thawing are faster, but the chicken should be cooked right away afterward. For a deeper safety reference on thawing chicken and cooking from frozen, the USDA FSIS Chicken from Farm to Table guide explains safe thawing methods and cooking guidance.
Baked Chicken Breast Variations
Once the method is working, the flavor can change easily. Keep the same oven temperature and doneness target, then adjust the seasoning or sauce.
For sweet sauces like BBQ or honey mustard, bake the chicken almost all the way first, then brush on the sauce during the final few minutes. This gives flavor without burning the sugars.
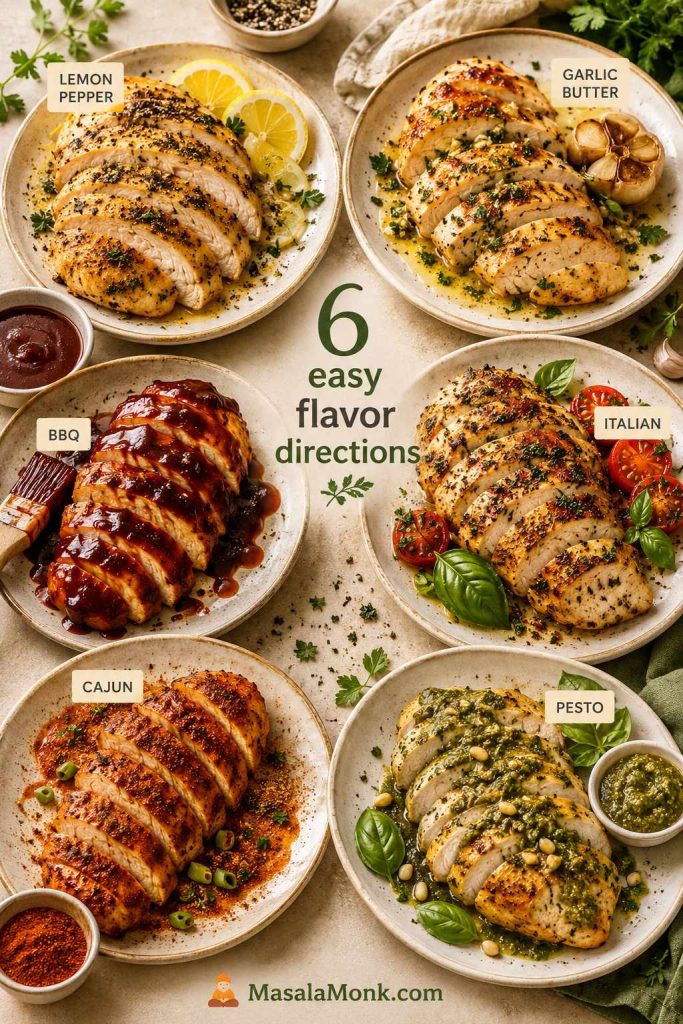
Six Baked Chicken Breast Flavor Directions
Once the base method works, lemon pepper, BBQ, Cajun, pesto, and other flavor directions can change the meal while keeping the same doneness target.
Lemon pepper baked chicken breast: use lemon pepper, garlic powder, and a squeeze of fresh lemon after baking.
Garlic butter baked chicken breast: finish with melted butter, minced garlic, parsley, and pan juices.
BBQ baked chicken breast: bake most of the way, brush with barbecue sauce near the end, and return to the oven briefly.
Italian baked chicken breast: use Italian seasoning, garlic, paprika, and a little parmesan after baking.
Cajun baked chicken breast: use Cajun seasoning and serve with rice, salad, or pasta. If you want a creamier pasta dinner, this Cajun Chicken Pasta is a natural next recipe.
Honey mustard baked chicken breast: brush with honey mustard near the end so the sugars do not burn.
Pesto baked chicken breast: spoon pesto over the chicken after baking, or add it during the final few minutes. Leftover sliced chicken also works well in Chicken Pesto Pasta.
Spicy chili-lime chicken breast: use chili powder, paprika, garlic, lime juice, and a little oil.
When to Use Another Chicken Method
Use another method when the result changes. This recipe is best for simple seasoned chicken breast. For saucy shredded chicken, these Crock Pot Chicken Breast Recipes are better for pull-apart chicken that stays moist in its cooking juices. For creamy pasta or a complete tray meal, use a recipe built for that result instead of forcing this plain baked method to do everything.
Sauces and Serving Ideas
The nice thing about simple baked chicken breast is that it does not trap you into one meal. When you are serving it as a main dish, a quick sauce makes it feel more complete without changing the basic method.
Easy Sauces for Baked Chicken Breast
A sauce gives baked chicken breast a second life at the table; garlic butter, pesto, chimichurri, honey mustard, or salsa can change the whole meal.
Garlic butter
Lemon pan juices
Honey mustard
Barbecue sauce
Pesto
Salsa
Mushroom cream sauce
Yogurt herb sauce
Hot sauce and butter
For a fresh herb sauce that makes plain baked chicken breast taste brighter, try spooning over homemade chimichurri. It works especially well when the chicken is sliced for rice bowls, potatoes, vegetables, or next-day lunches.
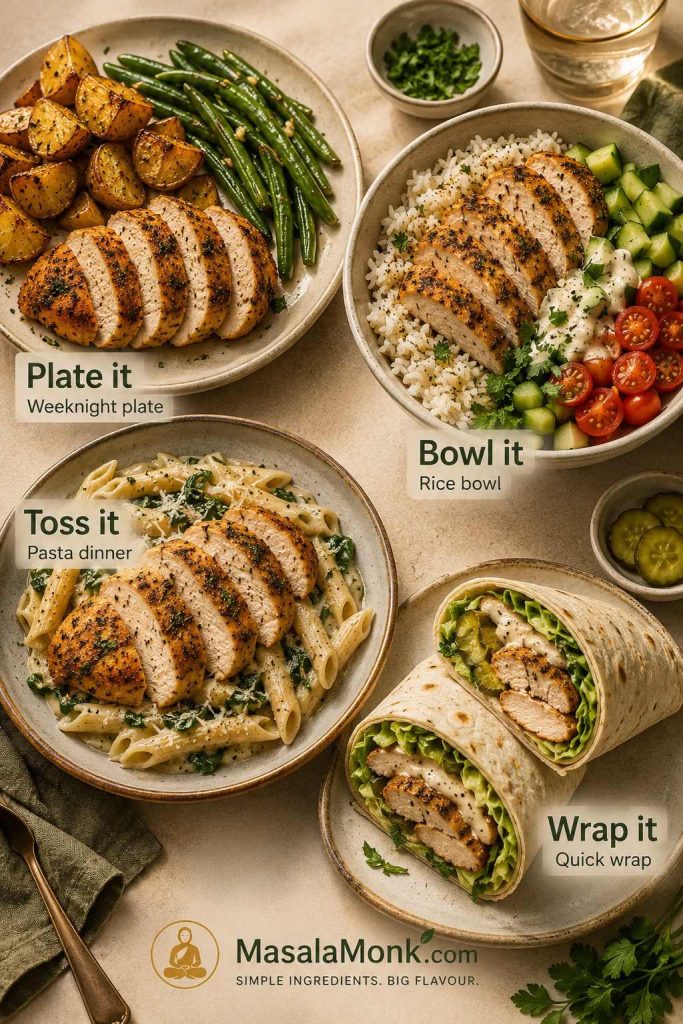
What to Serve with Baked Chicken Breast
Pairing chicken with potatoes, rice, pasta, or wraps turns it into a complete meal instead of just plain protein on a plate.
Weeknight plate: sliced chicken, roasted potatoes, green beans, and garlic butter or pan juices.
Rice bowl: chicken, rice, cucumber, tomatoes, herbs, and chimichurri or yogurt sauce.
Meal-prep lunch: cold sliced chicken, potato salad, greens, and a lemony dressing.
Pasta dinner: cubed chicken, pesto or Cajun cream sauce, and a simple salad.
Quick wrap: sliced chicken, lettuce, sauce, pickles or onions, and a soft tortilla.
Soup or noodle bowl: sliced chicken added at the end so it warms through without drying out.
For a make-ahead side that works with cold sliced chicken, wraps, or picnic-style plates, this Potato Salad recipe guide gives you classic, lighter, and variation-friendly options.
Baked Chicken Breast for Meal Prep
This recipe works well for meal prep because the chicken can be sliced, cubed, or shredded after cooking. Keep the seasoning simple if you want to use it in several meals during the week, then save stronger sauces for the day you serve it.
The point of baked chicken breast is not just tonight’s dinner. It is tomorrow’s salad, the wrap you can make in five minutes, the pasta that needs protein, and the lunch that does not feel like punishment. When the chicken is cooked gently and stored well, it becomes useful instead of dry meal-prep filler.
For meal prep, slice some chicken for salads, cube some for bowls, and shred some for wraps or saucy lunches later.
Cool the chicken before storing.
Slice it for salads, bowls, wraps, and sandwiches.
Cube it for pasta, rice bowls, and quick skillets.
Shred it for tacos, soups, and saucy meals.
Keep sauces separate until serving when possible.
How Much Cooked Chicken Does This Make?
Four medium chicken breasts usually give enough cooked chicken for 4 dinner portions or several meal-prep portions once sliced, cubed, or shredded. For salads, wraps, or bowls, slice the chicken after resting and store it in portions so it is easy to use during the week.
For lunch prep, leftover baked chicken breast can also become sandwiches. Start with these chicken sandwich recipes if you want BBQ, Buffalo, chicken salad, pesto, or quick café-style ideas.
Storage, Freezing, and Reheating
The main reheating mistake is blasting lean chicken breast until it dries out. Instead, reheat gently and add a little moisture if the chicken has already been sliced.
Task
Best method
Refrigerate
Store cooled chicken in an airtight container for 3–4 days.
Freeze
Cool first, wrap well, and freeze for up to 2–3 months.
Reheat in microwave
Add a splash of water, broth, or sauce; cover loosely and heat gently.
Reheat on stovetop
Warm sliced chicken with a little broth, sauce, or pan juices over low heat.
Avoid
Overheating lean chicken breast until it becomes dry and rubbery.
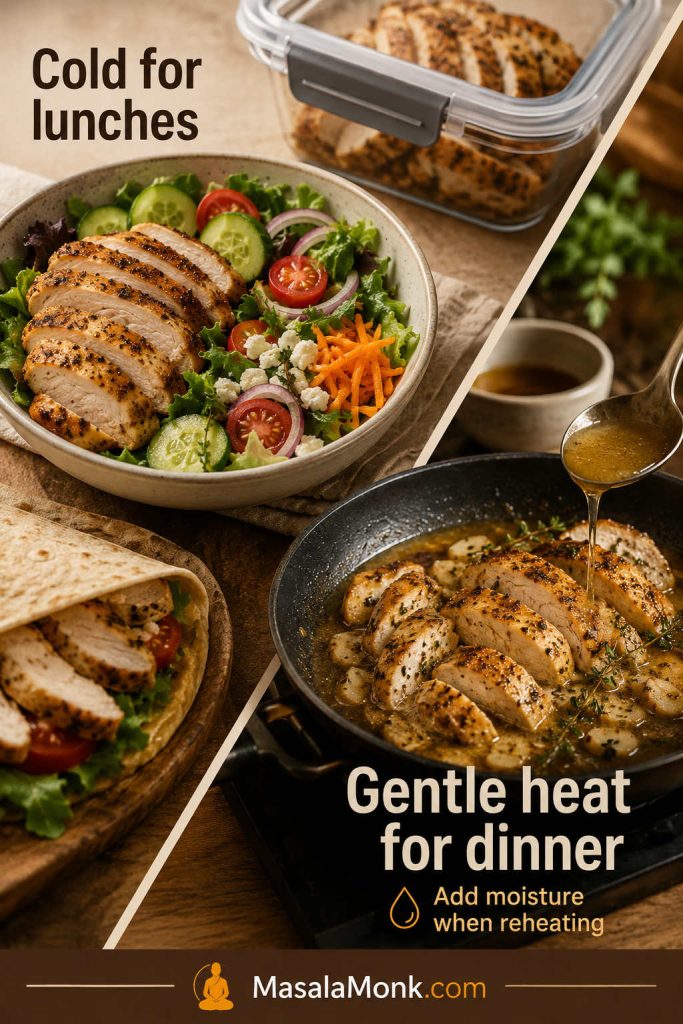
For salads, wraps, and sandwiches, safely stored baked chicken breast can be used cold straight from the fridge. For a hot plate, reheat only until warmed through; lean chicken breast gets dry when it is blasted a second time.
Safely stored chicken works cold for lunches; however, hot leftovers need gentle heat and a little moisture to stay pleasant.
Chopped or shredded leftovers are often better in moisture-rich lunches than reheated as plain slices. Fold them into chicken salad, tuck them into wraps, or mix them with a little sauce before reheating. This chicken salad sandwich recipe is a natural next step when you want leftover cooked chicken to taste intentional instead of leftover.
If the chicken already feels dry after reheating, jump to how to fix dry chicken breast instead of serving it plain.
Troubleshooting Baked Chicken Breast
Most baked chicken breast problems come from thickness, temperature, timing, or seasoning. Find the problem you had last time, then fix that one thing first.
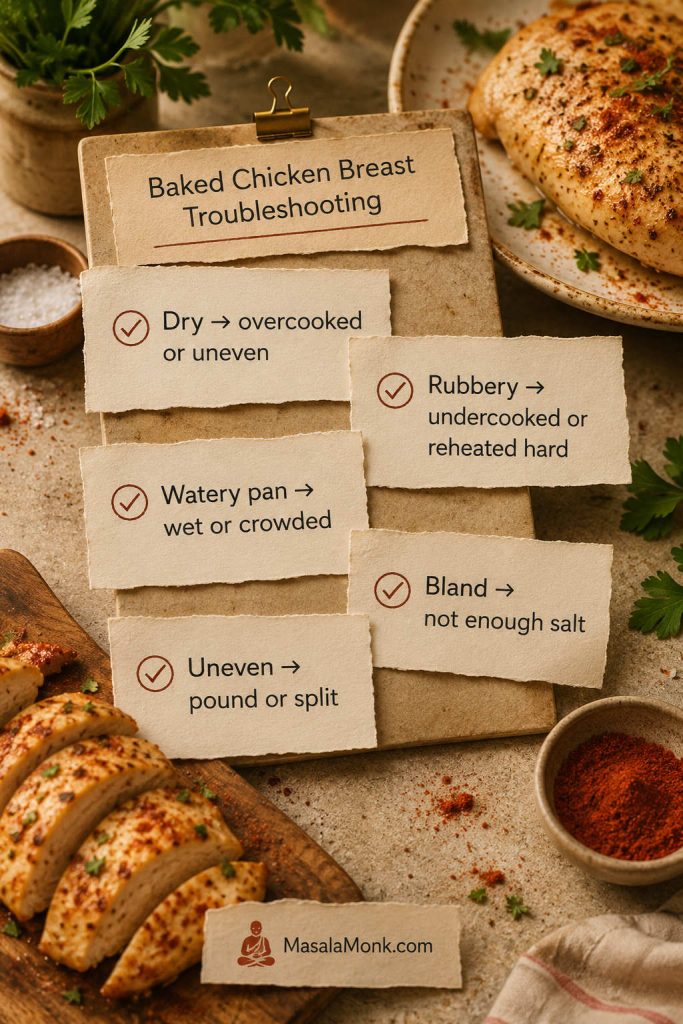
When chicken breast turns out dry, bland, watery, rubbery, or uneven, the fix usually starts with thickness, seasoning, heat, or moisture.
Problem
Likely cause
Fix
Dry chicken
Overcooked, uneven thickness, or sliced too soon
Pound the thick end, use a thermometer, and rest before slicing.
Rubbery chicken
Undercooked, cooked too low and slow, or reheated too aggressively
Check the thickest part and reheat gently with moisture.
Bland chicken
Not enough salt or seasoning
Season all sides and use enough salt for the amount of chicken.
Watery pan juices
Chicken was very wet, crowded, or heavily marinated
Pat dry, avoid overcrowding, and use a rimmed sheet pan.
Outside dry, inside undercooked
Chicken breast was too thick
Butterfly, slice horizontally, or pound before baking.
Chicken cooked unevenly
Pieces were different sizes or thicknesses
Sort by size, pound thick pieces, and remove smaller pieces early.
Seasoning burned
Too much sugar, broiler too long, or pan too close to heat
Use less sugar, skip the broiler, or check earlier.
Chicken stuck to pan
Not enough oil or no liner
Use parchment or lightly oil the pan.
How to Fix Dry Chicken Breast After Baking
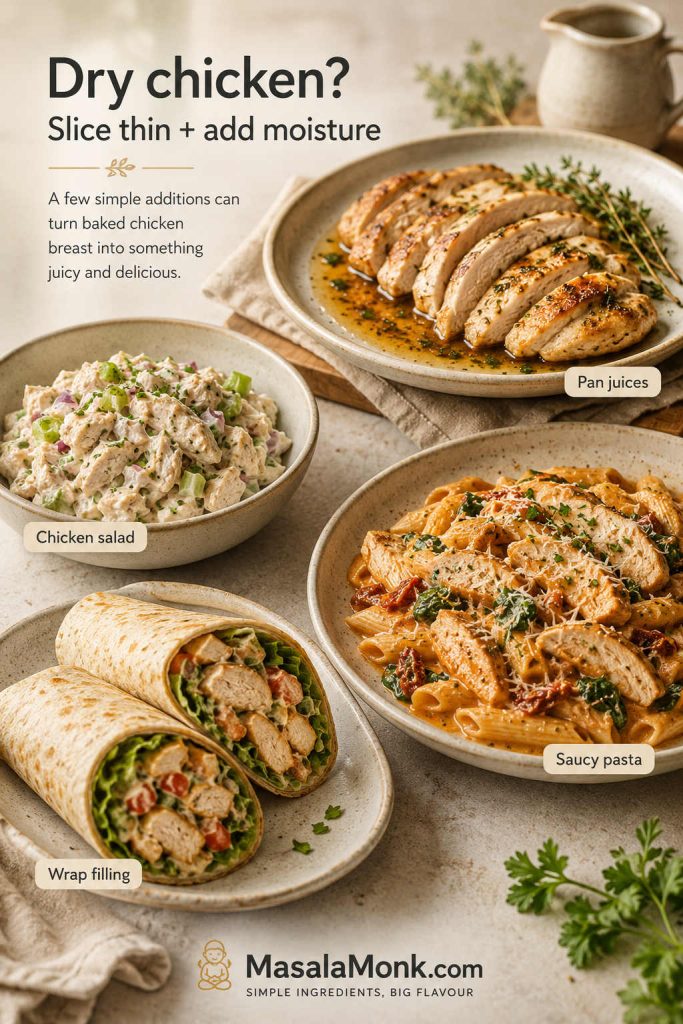
You cannot fully undo overcooked chicken breast, but you can make it much better. Slice it thinly across the grain and add moisture: pan juices, garlic butter, yogurt herb sauce, salsa, pesto, broth, gravy, or a creamy dressing. Dry baked chicken breast is often better chopped into chicken salad, folded into pasta, tucked into wraps, or simmered briefly in sauce than served as a plain whole breast.
Dry chicken cannot be uncooked, but slicing it thin and adding moisture can make it useful again in salads, pasta, wraps, or pan juices.
Help other readers with real timing: Chicken breast timing changes by size, thickness, oven, and pan. If you make this recipe, share your oven temperature, approximate chicken size or thickness, and how long it took to reach 165°F. Your note may help someone else avoid dry chicken.
Once you know what went wrong, return to the recipe card and adjust the thickness, timing, or temperature next time.
Common Mistakes to Avoid
Baking uneven pieces together without checking early: smaller pieces may finish before larger ones.
Skipping the oil: chicken breast is lean, so the surface needs a little fat to carry seasoning and protect texture.
Using the timer as a guarantee: time gets you close, but thickness and temperature decide.
Slicing immediately: give the chicken at least 5 minutes so the juices do not run out on the board.
Adding sauce too early: sweet sauces can burn at high heat, so brush them on near the end.
Cooking all pieces until the largest one is done: remove thinner pieces as they finish.
Baked Chicken Breast Recipe Card
Save the core method: even the thick end, coat the surface, bake uncovered, check the internal temperature, and rest before slicing.
Baked Chicken Breast Recipe
This easy baked chicken breast recipe uses even thickness, a paprika-garlic seasoning, high oven heat, and a short rest for chicken that slices cleanly and stays useful for dinner or meal prep.
Prep Time10 minutes
Cook Time18–25 minutes
Rest Time5 minutes
Servings4
Ingredients
4 boneless skinless chicken breasts, 5–8 oz / 150–225g each
1 1/2 tbsp / 22 ml olive oil or avocado oil
1 tsp fine salt, or to taste
1 tsp paprika or smoked paprika
1 tsp garlic powder
1/2 tsp onion powder
1/2 tsp black pepper
1 tsp Italian seasoning, oregano, or thyme
1–2 tsp brown sugar, optional, for better browning
Lemon wedges or chopped parsley, optional, for serving
Instructions
Preheat the oven. Heat the oven to 425°F / 220°C. For fan or convection, use 400°F / 200°C fan and check early.
Prep the chicken. Pat the chicken dry. Pound the thick end until the pieces are more even, or slice very large breasts horizontally.
Mix the seasoning. In a small bowl, combine salt, paprika, garlic powder, onion powder, pepper, herbs, and optional brown sugar.
Season. Rub the chicken with oil, then coat both sides evenly with the seasoning blend.
Bake. Arrange in a single layer on a parchment-lined rimmed sheet pan or lightly oiled metal baking dish. Bake uncovered for 18–25 minutes, depending on size and thickness.
Check doneness. Start checking smaller or thinner pieces early. Chicken breast is done when the center of the thickest part reaches 165°F / 74°C.
Rest and serve. Rest for at least 5 minutes, then slice against the grain and serve with pan juices, lemon, parsley, sauce, salad, rice, potatoes, or vegetables.
Notes
No timer works for every chicken breast. Thickness, not just weight, changes the bake time, so check thin pieces early.
The seasoning should coat the surface evenly. If it looks patchy before baking, the finished chicken may taste uneven.
For a wet marinade, pat off excess before baking so the chicken browns better.
After brining, reduce the salt in the seasoning blend.
Smaller pieces should come out early instead of waiting for the largest piece.
For meal prep, cool before storing and reheat gently with a splash of broth, water, or sauce.
FAQs About Baked Chicken Breast
What is the best temperature to bake chicken breast?
For most boneless skinless chicken breasts, 425°F / 220°C is the best default. It cooks quickly, gives light browning, and works well when the pieces are similar in size. Use 400°F / 200°C if you want a gentler first try.
How long does chicken breast take in the oven?
At 425°F / 220°C, medium boneless chicken breast usually takes 18–22 minutes. Thin pieces may finish in 10–14 minutes, while large thick breasts can need 24–30 minutes or more. The safest answer still comes from checking the thickest piece, not just watching the clock.
How do I know baked chicken breast is done?
Measure the center of the thickest piece with an instant-read thermometer. Once it reaches 165°F / 74°C, the chicken is ready to rest. Color and juices can help you notice problems, but temperature is the reliable check.
Why is my baked chicken breast dry?
Usually because the chicken stayed in the oven too long, cooked unevenly, or was sliced too soon. Pound the thick end, use the thermometer, and rest before slicing. If it is already dry, slice it thin and use it with sauce, chicken salad, pasta, wraps, or rice bowls.
Should I cover chicken breast while baking?
For this recipe, bake chicken breast uncovered. Covering traps steam and can make the surface wet instead of lightly browned. Covered baking is better for saucy chicken or casserole-style recipes.
Is it better to bake chicken breast at 400°F or 425°F?
Both work. Use 400°F / 200°C when you want a slightly gentler bake or have larger pieces. Use 425°F / 220°C when the breasts are even in thickness and you want faster cooking with better surface color. Either way, use the thermometer instead of relying only on the timer.
How do I bake thin chicken breast?
Thin chicken breast cooks quickly. At 425°F / 220°C, thin-sliced chicken breast or cutlets may take only 10–14 minutes, so start checking early. Removing thin pieces on time matters more than following the timing for a full chicken breast.
What seasoning is best for baked chicken breast?
A simple mix of salt, paprika, garlic powder, onion powder, black pepper, and herbs works well for everyday baked chicken breast. Make sure it coats the surface evenly before baking so the finished chicken tastes seasoned, not patchy.
Can baked chicken breast be made ahead?
Yes. Let it cool, store it in an airtight container, and slice, cube, or shred it for salads, bowls, wraps, sandwiches, pasta, and quick dinners. Keep sauces separate when possible so the chicken stays flexible for different meals.
How do I reheat baked chicken breast without drying it out?
Reheat it gently with a splash of broth, water, sauce, or pan juices. Cover loosely and warm only until heated through. For salads, wraps, and sandwiches, safely stored chicken can also be used cold.
Can I use bone-in chicken breast?
Yes, but bone-in chicken breast takes longer than boneless chicken breast. Check near the thickest part without touching the bone, and do not use the boneless timing chart as the final guide.
The Takeaway
When the timing and thickness are right, baked chicken breast becomes a dependable dinner protein instead of the dry part of the plate.
This baked chicken breast recipe gets easier once you stop treating the timer as the recipe. Start with the chicken in front of you: make uneven pieces more even, season them properly, bake hot, let temperature decide, and rest before slicing. Once you do that a few times, chicken breast stops feeling like the dry part of dinner and becomes one of the most useful proteins in your weeknight rotation.
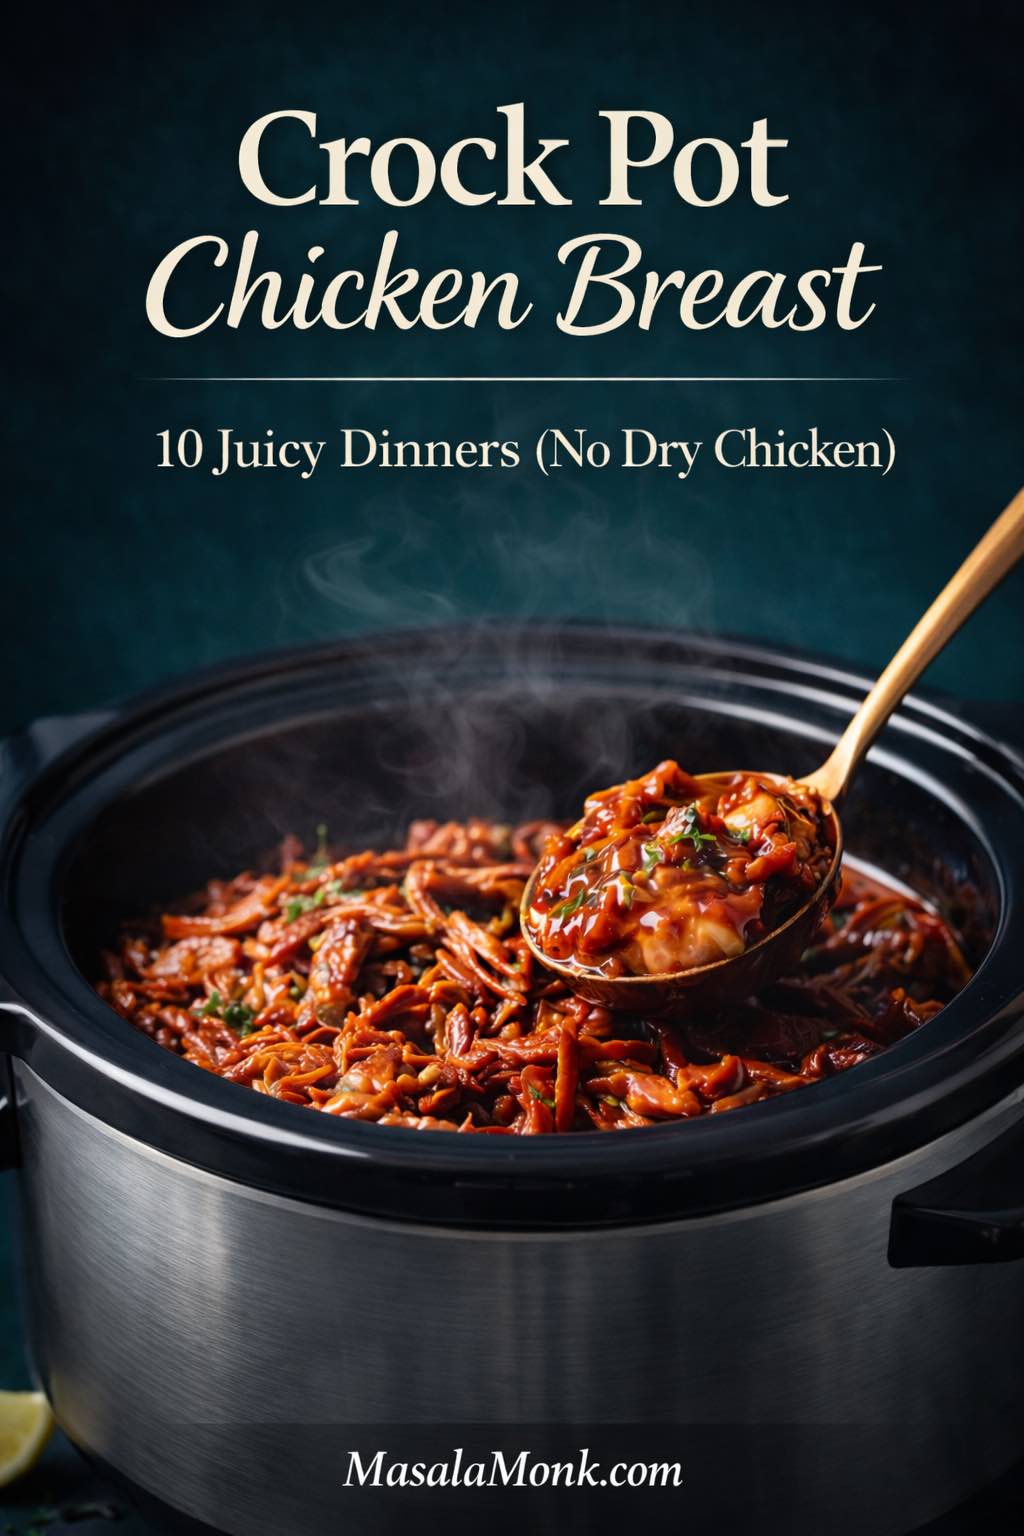
There’s a particular kind of relief that comes from putting dinner in motion early—then letting the evening unfold without hovering over a stove. A crock pot is built for that. It turns a handful of ingredients into something warm and comforting, while you do everything else life asks for—and crock pot chicken breast is one of the easiest ways to make that happen.
Crock Pot Chicken Breast: The Simple Rules That Keep It Juicy
Chicken breast, though, has a reputation. It’s lean, which is exactly why it can dry out when it’s cooked too long. Even so, slow cooker chicken breast doesn’t have to be bland or overdone. With the right approach—enough moisture, steady timing, and a finishing touch that brightens flavor—you can get tender chicken breast in a crock pot that tastes like you actually tried.
To keep things consistent, it helps to anchor your cooking to one simple target: chicken is done when it reaches 165°F / 74°C in the thickest part. After that, the next step matters just as much—pull it on time, then let it rest before slicing or shredding. That short pause is what keeps the juices where you want them: in the chicken, not on the cutting board.
At the same time, starting with thawed chicken makes the whole process more predictable. Since slow cookers warm food gradually, thawed pieces cook more evenly, which means fewer dry edges and fewer “is this done yet?” moments. As a result, you get better texture with less fuss.
One more thing keeps prep calmer: skip washing raw chicken. Instead, go straight from package to pot, then wash hands and surfaces well. Not only is it simpler, it also avoids spreading raw chicken juices around the sink and countertop.
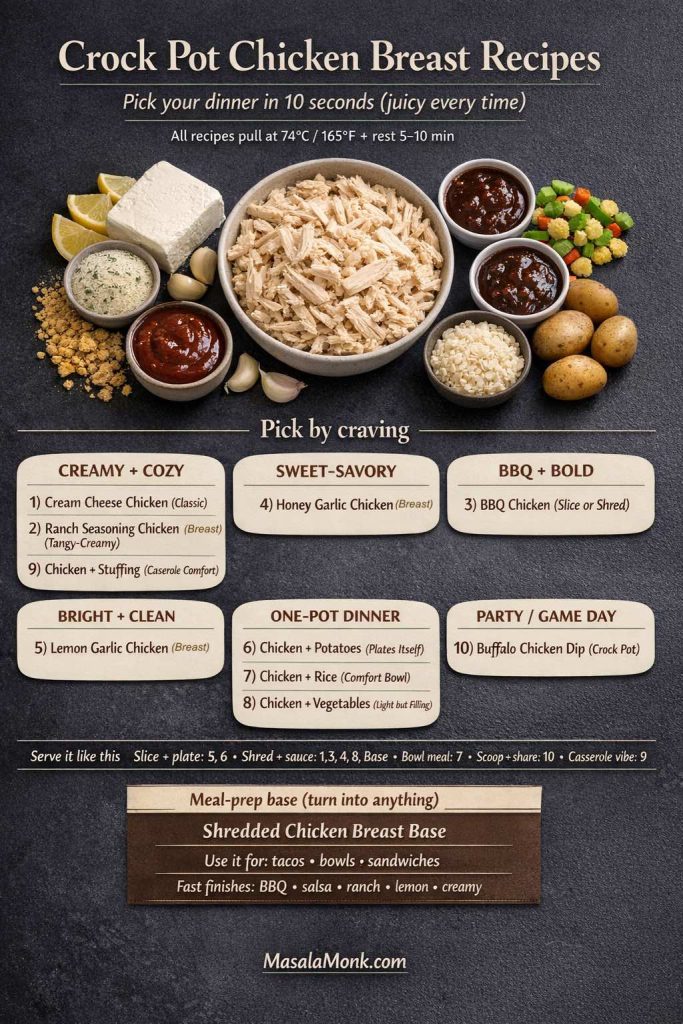
With those basics in place, everything else becomes easier. From here, you can choose a direction based on what you’re craving: creamy and cozy, tangy and ranchy, sweet-smoky BBQ, bright lemon-garlic, spicy buffalo, or hearty bowls with rice and potatoes. In other words, these ten slow cooker chicken breast dinner recipes aren’t just different—they’re built to rotate nicely, so you can keep dinner interesting without reinventing the wheel every week.
How to Cook Chicken Breast in a Crock Pot Without Drying It Out
Chicken breast becomes “juicy” in the slow cooker for one reason: it finishes at the right temperature and stays surrounded by moisture. Everything else—seasonings, sauces, sides—builds on that foundation.
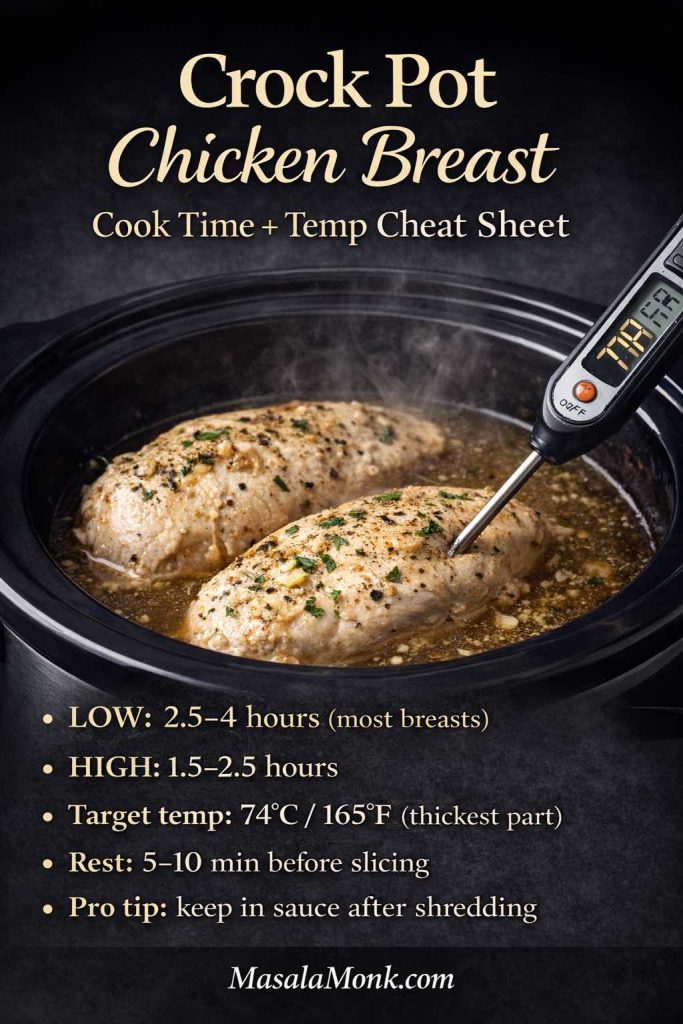
Bookmark this crock pot chicken breast cheat sheet before your next slow cooker dinner. It shows the key timings (LOW vs HIGH), the target internal temp (74°C / 165°F), and the quick rest rule that keeps chicken juicy—plus the simple “shred + soak in sauce” trick for meal-prep friendly pulled chicken. Save it, share it, and use it as your go-to reference right before you start Recipe #1.
Timing that works in real kitchens
Slow cookers run differently, so time is a guide rather than a guarantee. Still, these ranges are a good starting point for boneless, skinless chicken breasts (roughly 2–3 cm thick):
LOW: 2.5 to 4 hours
HIGH: 1.5 to 2.5 hours
And if you are doing 1–1.5 cm chicken cutlets/tenders, then check early, while for 3.5+ cm thick breasts, expect the long end of the above time range (or slice horizontally).
Tenderloins, thin cutlets, and bone-in chicken breasts in the crock pot
These cuts follow the same rule—cook to 74°C / 165°F—but the timing window changes fast. The key is simple: check early, then pull as soon as you hit temperature.
Chicken tenderloins / tenders: usually finish sooner than whole breasts. Start checking around LOW 1.5–2.5 hours or HIGH 1–1.5 hours.
Thin-sliced breasts / cutlets: quickest to overcook. Treat them like a short cook, keep them in sauce, and start checking at the early end (similar to tenderloins).
Bone-in chicken breast: takes longer because the bone slows heat transfer. Expect a longer cook (often LOW 4–6 hours), but temperature is still the real finish line.
Consistency hack: Keep pieces similar in thickness, cook in a single layer when possible, and avoid lifting the lid. If you’re shredding, do it in the cooking liquid and let it sit a few minutes to soak.
In other words, these cuts aren’t harder—just faster or slower. Start checking early, pull at 74°C / 165°F, and then rest briefly. Finally, if you’re shredding, do it in the cooking liquid and let it sit for a few minutes so the chicken reabsorbs moisture and flavor.
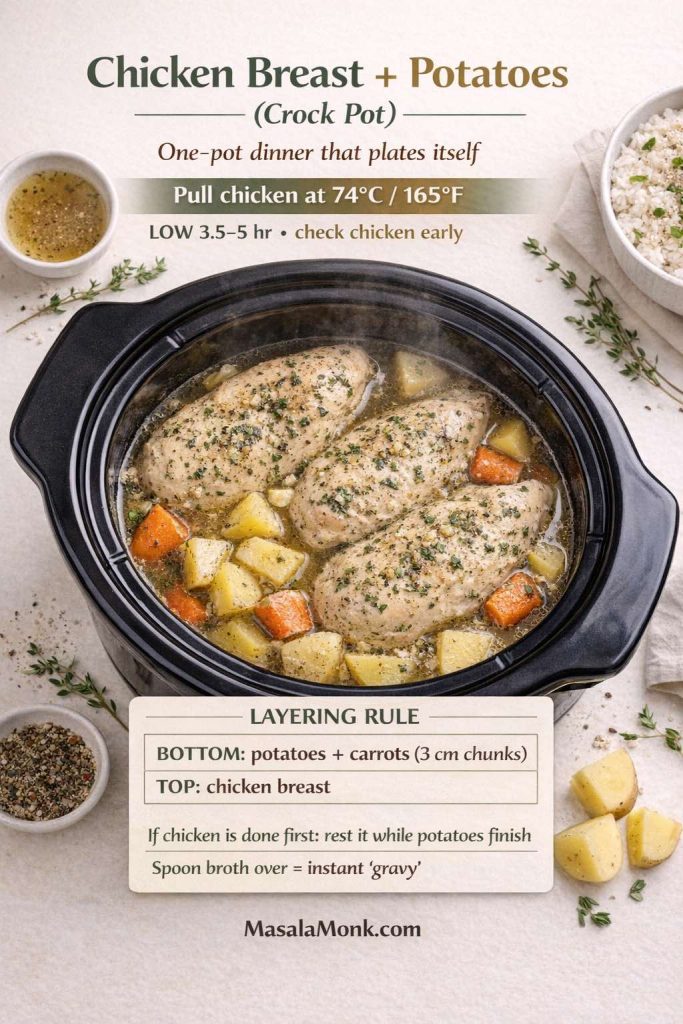
One-pot layering rules (potatoes, vegetables, and rice)
Quick rule card: firm veg on the bottom, chicken on top, and rice goes in late (or gets checked early) to avoid mush.
When you want a true one-pot slow cooker dinner, ingredients can’t all be treated the same. Instead, you’ll get better results by arranging the crock pot based on how quickly each component cooks—and how easily chicken breast can overdo.
For potatoes and firm vegetables (the “bottom first” rule):
Potatoes, carrots, and similar sturdy vegetables need more direct heat. Therefore, place them on the bottom, closest to the heat source. Next, lay the chicken on top so it cooks gently while the vegetables catch up. In addition, keep potato chunks fairly large (around 3 cm) so they soften at the same pace instead of turning grainy or falling apart.
For softer vegetables (the “late add” rule):
Zucchini, bell peppers, and mushrooms cook faster and can go limp if they sit too long. Consequently, add them later when possible—especially if your slow cooker runs hot. If you do cook them from the start, keep the slices thicker so they hold their shape.
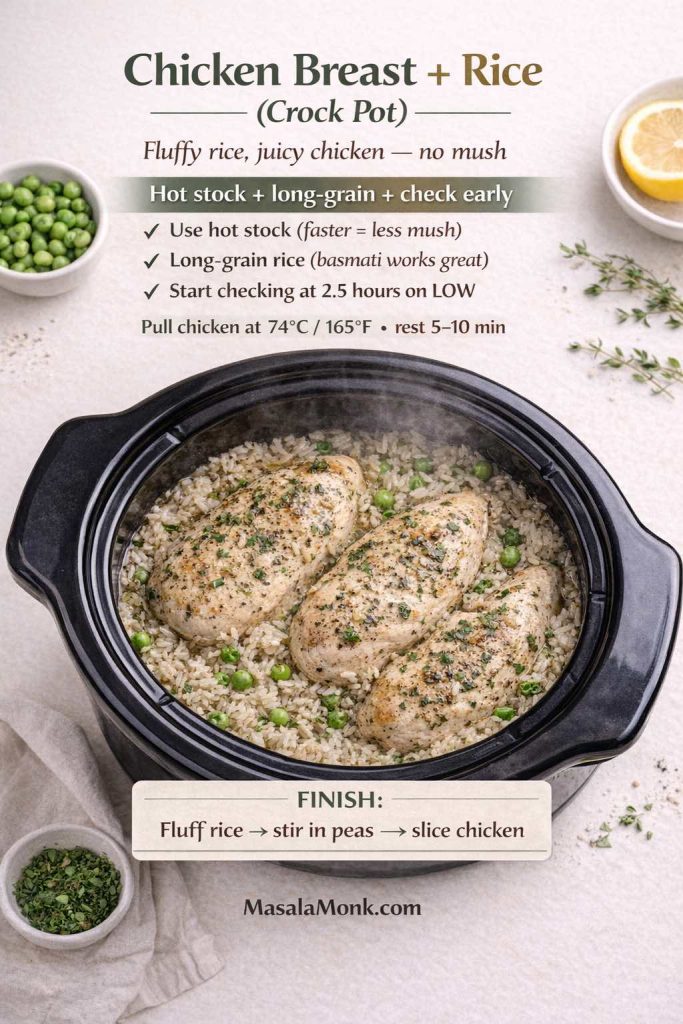
For rice (the “don’t let it idle” rule):
Rice is delicious in the slow cooker, yet it’s also the easiest to overdo. Once rice is tender, it keeps absorbing liquid; which means, it can drift from fluffy to mushy if it sits too long. To avoid that:
Use long-grain rice for better separation.
Start with hot stock so the rice moves toward tenderness sooner and spends less time lingering.
Begin checking early and stop as soon as the rice is done.
If your cooker tends to run strong, consider adding rice later (often the final 60–90 minutes on LOW) so chicken doesn’t have to wait around on heat.
In short, the layout and timing do the heavy lifting—so the chicken stays juicy and the “side” stays the right texture.
Why chicken breast turns dry in a slow cooker or crock pot
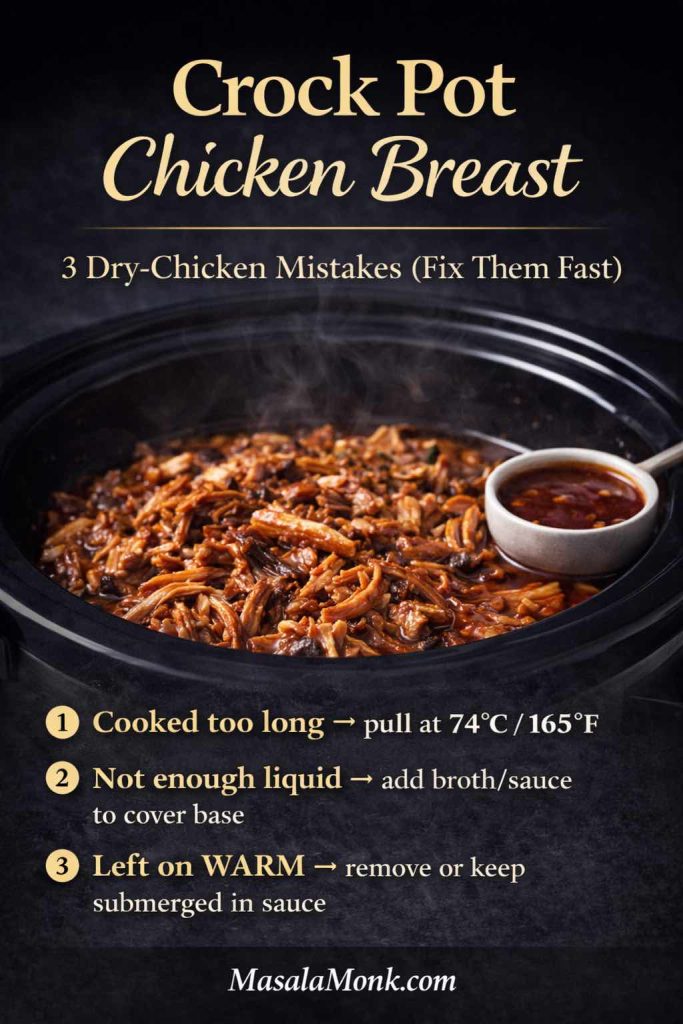
Dry crock pot chicken breast usually comes from one of these:
It stayed on heat long after reaching temperature.
It cooked without enough liquid or sauce to protect moisture.
Pieces cooked unevenly because some were much thicker than others.
The lid came off repeatedly, causing temperature swings and longer cooking.
Dry crock pot chicken breast is usually one of these three mistakes: cooking too long, too little liquid, or leaving it on WARM after it’s done. This quick fix card shows exactly what to do instead—pull at 74°C/165°F, keep enough sauce in the pot, and hold chicken submerged so it stays juicy. Save this before your next slow cooker dinner, then scroll for the 10 crock pot chicken breast recipes and variations.
Instead, keep chicken in one layer when possible, build a saucy environment, and avoid constant lifting of the lid. Meanwhile, if the breasts are thick, slicing them horizontally into thinner fillets can be the difference between tender and overdone.
About frozen chicken breast in a crock pot or slow cooker
It’s tempting to lean on “crock pot frozen boneless chicken breast recipes,” especially on hectic days. Still, thawed chicken is the easiest path to consistent tenderness and safety, and it follows USDA guidance on slow cooker use. If you want the details, the USDA addresses this directly in its Q&A on frozen foods in a slow cooker.
If you’re stuck with frozen chicken, a practical workaround is to partially thaw in the microwave just until pieces separate, then start cooking immediately in a sauce-heavy recipe and check temperature early. All the same, thawed will taste better.
The simple “rest, then slice” rule
Once chicken reaches temperature, let it rest 5–10 minutes before slicing. Resting keeps juices from running out on the cutting board. Afterward, slice across the grain for tenderness.
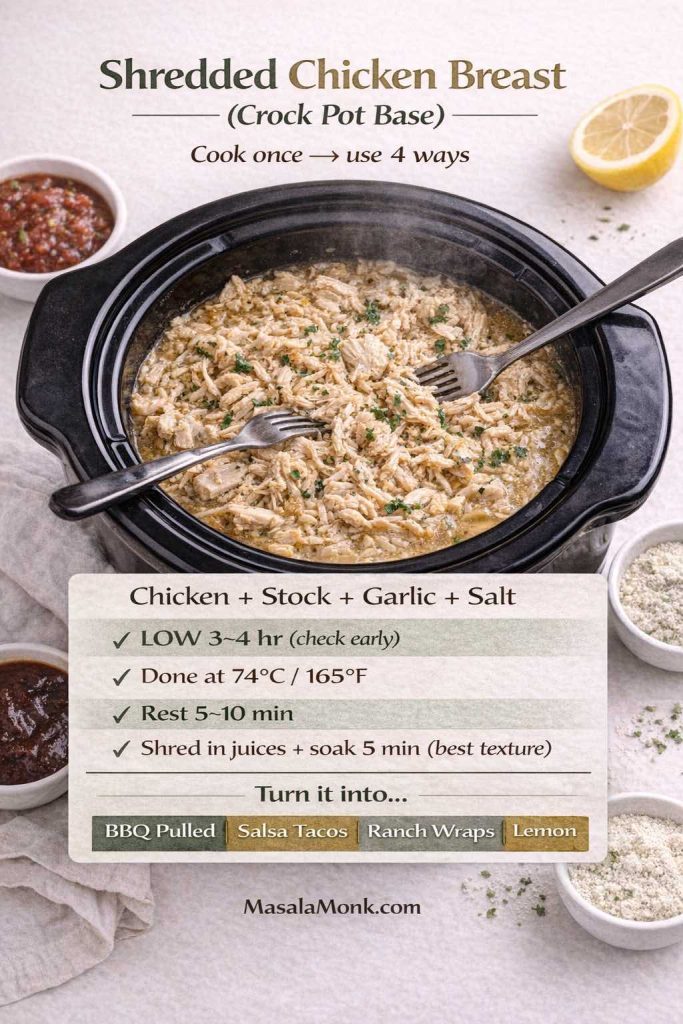
Shredding that stays moist
If you want shredded chicken breast slow cooker style, shred it in the cooking juices, then let it sit for a few minutes so it reabsorbs sauce. From there, leftovers can become wraps, bowls, soups, or sandwiches. For lunch ideas, MasalaMonk’s Chicken Salad Sandwich is a great direction when you want something creamy and bright without a lot of work.
Each recipe below is written as a fully developed “card” with metric weights, clear steps, serving ideas, and multiple variations. You’ll also see options that naturally fit different needs—few-ingredient nights, low fat dinners, gluten free swaps, low carb tweaks, and bold flavors like salsa chicken and spicy slow cooker chicken.
Use this ‘pick by craving’ cheat sheet to choose the right crock pot chicken breast dinner fast — creamy, BBQ, lemony, one-pot (rice/potatoes/veg), or party-style buffalo dip. Every recipe is built around the same juicy rule: pull at 74°C/165°F, rest 5–10 minutes, then slice or shred in sauce. Save this guide for busy weeknights, and scroll to Recipe #1 to start cooking.
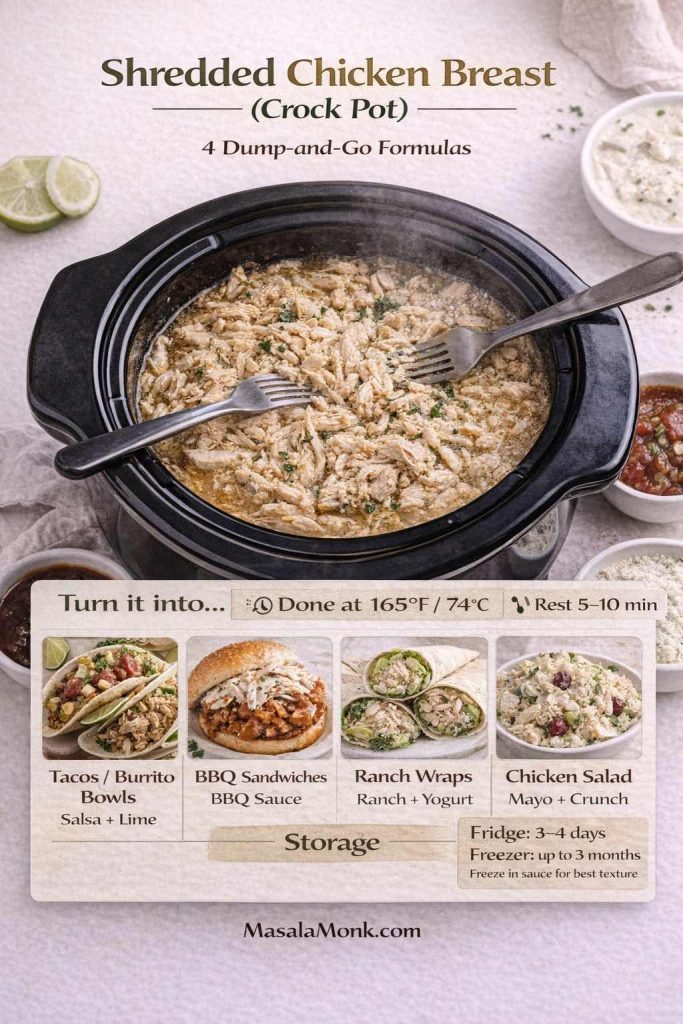
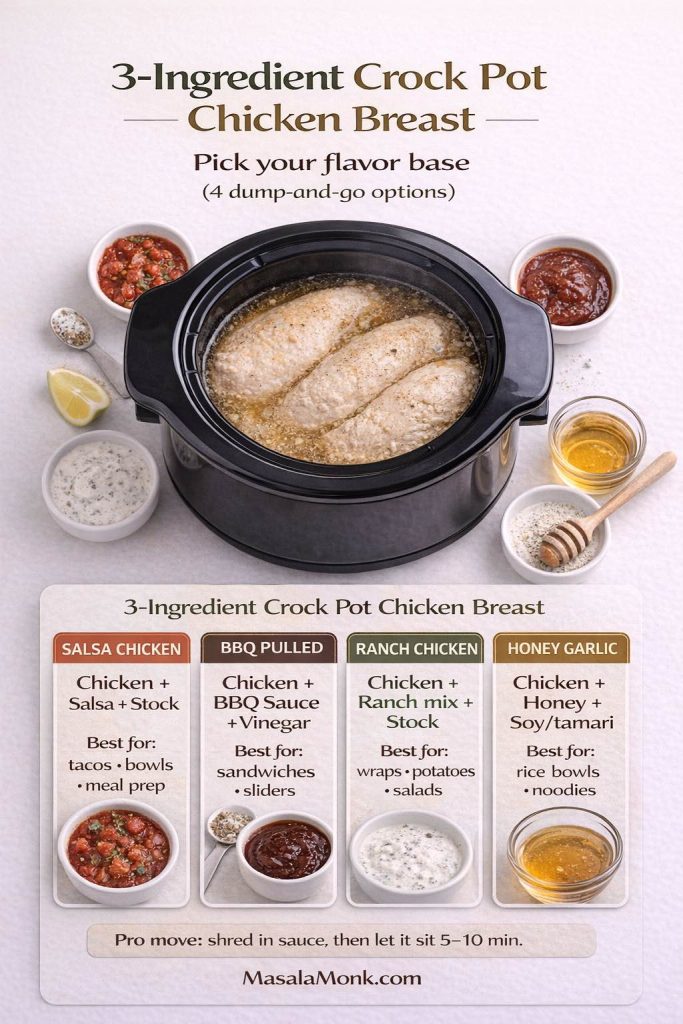
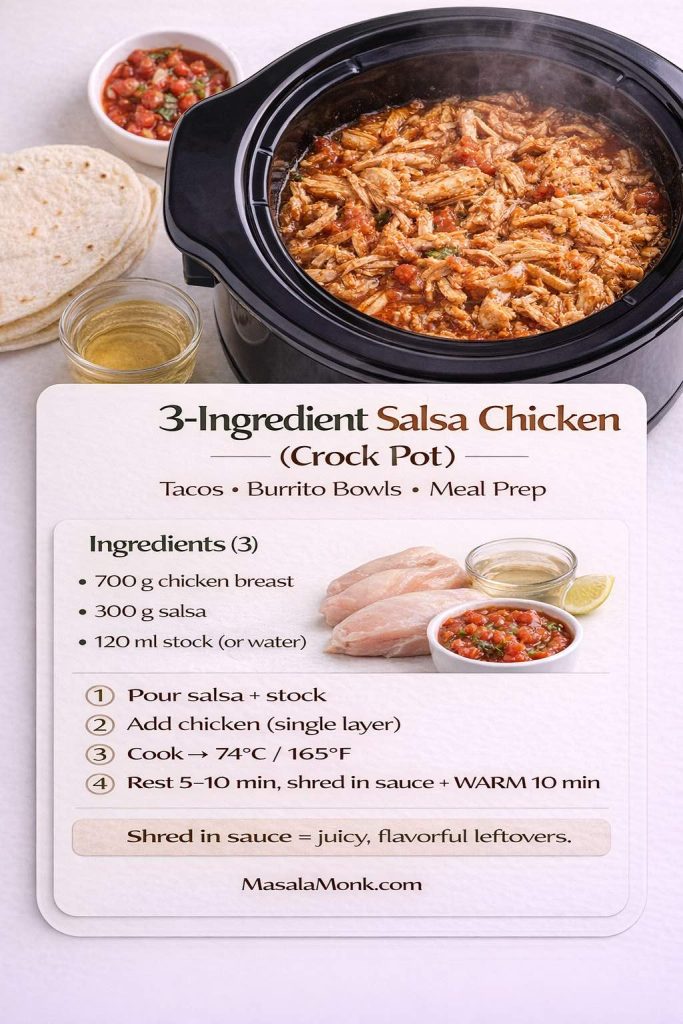
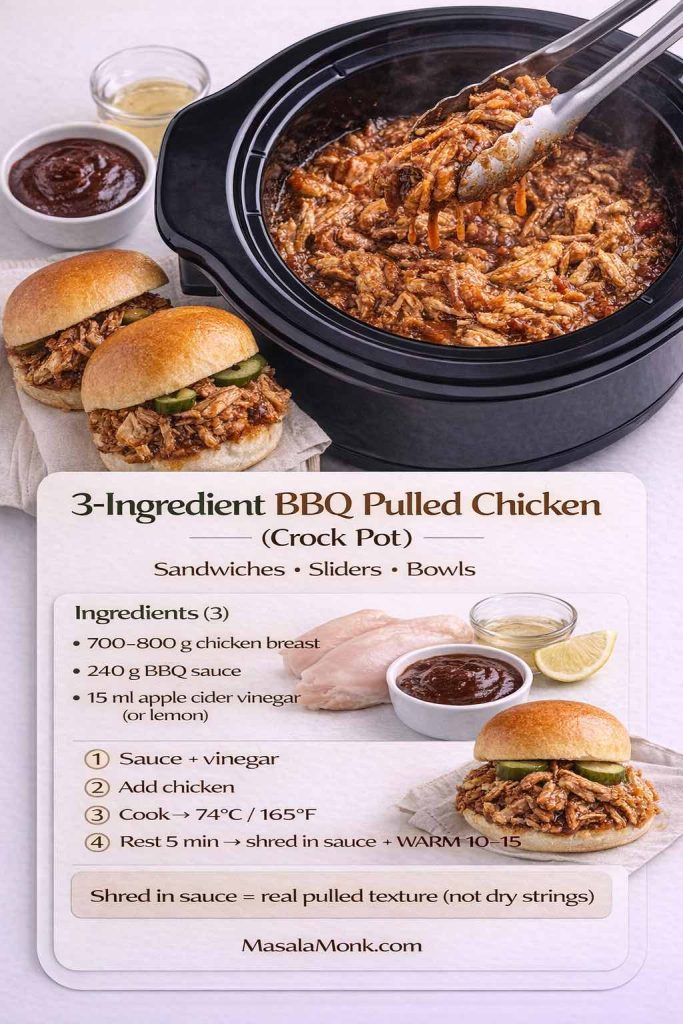
If you want ultra-minimal ingredient options, jump to the 3-ingredient dump-and-go formulas towards the end of this post.
Pick by goal (healthy, low carb, gluten free)
Sometimes you’re not choosing dinner by mood—you’re choosing by the kind of week you’re having. With that in mind, here’s a quick way to match the recipes below to common goals without overthinking it.
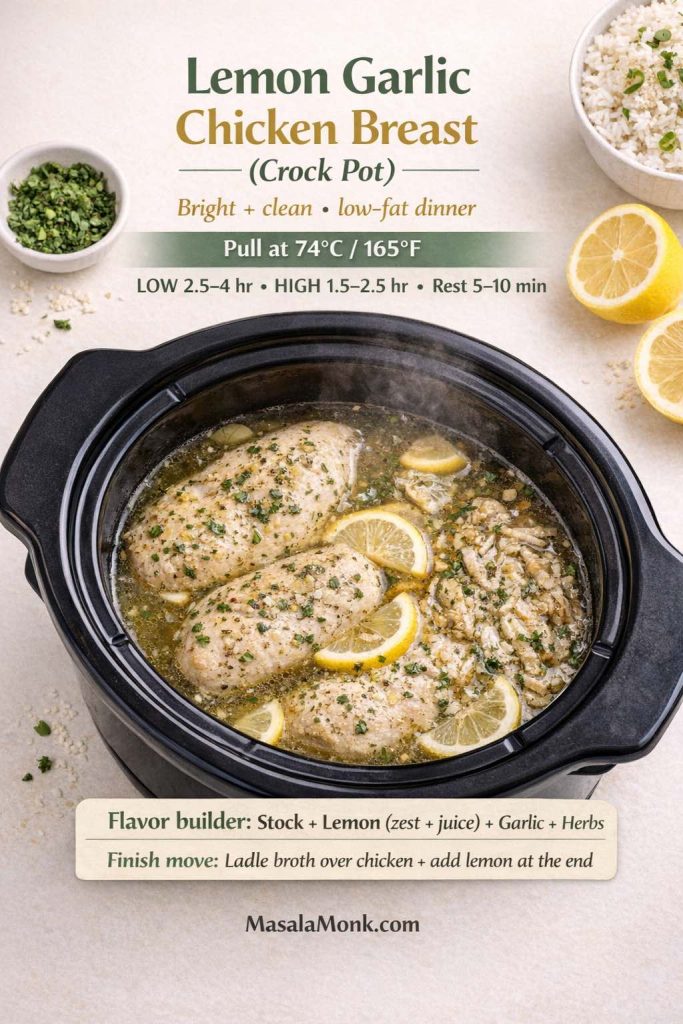
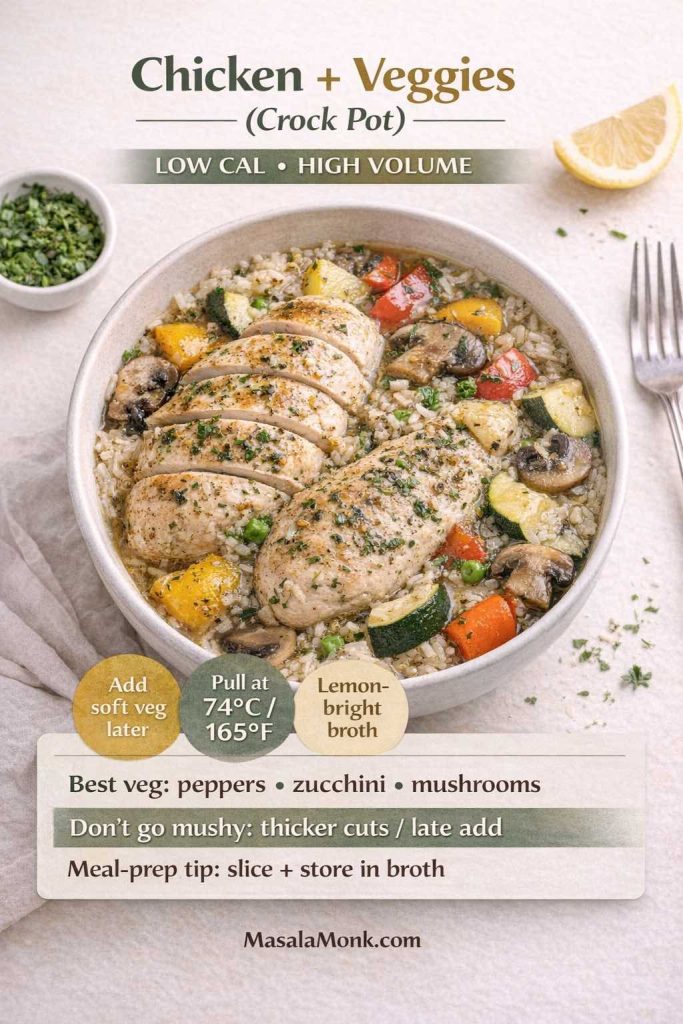
Low calorie / low fat: #5 Lemon Garlic Chicken Breast (bright, broth-based) and #8 Chicken Breast and Vegetables (lighter, filling, meal-prep friendly). Both stay satisfying as the flavor comes from aromatics and acidity rather than heavy dairy.
Low carb / keto-ish: #3 BBQ Chicken Breast (use a no-sugar-added BBQ sauce), #2 Ranch Seasoning Chicken (finish with Greek yogurt instead of richer dairy), and #5 Lemon Garlic (naturally lower carb). Together, they give variety while keeping the plate simpler.
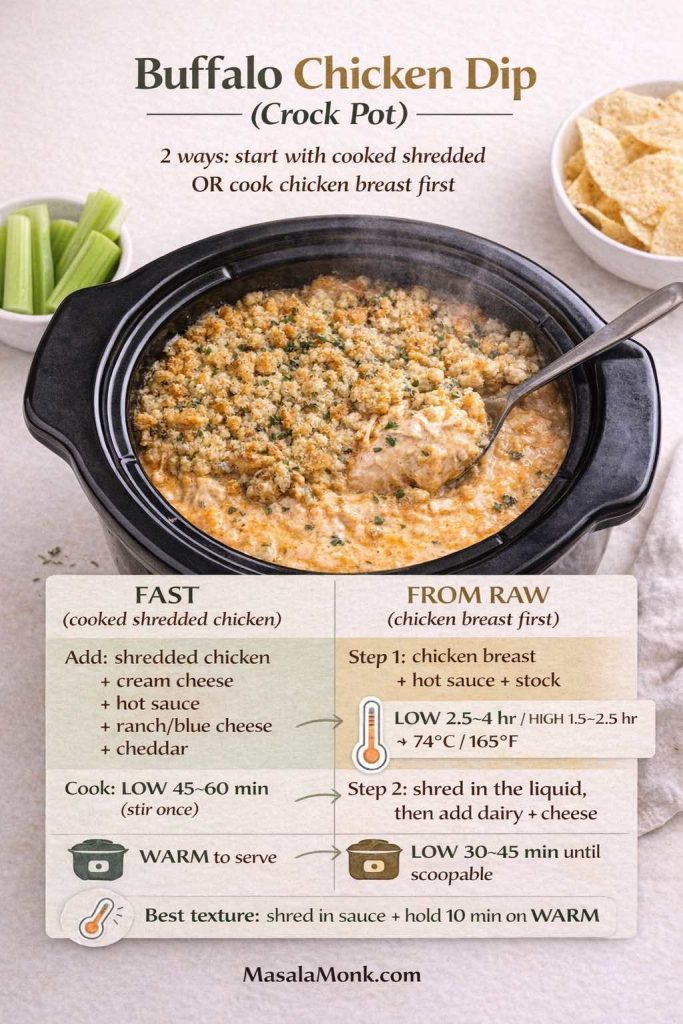
Gluten free: #4 Honey Garlic Chicken (use tamari), #5 Lemon Garlic, #8 Chicken + Vegetables, and #10 Buffalo Chicken Dip—just double-check the labels on hot sauce, dressing, and seasoning blends since those are the usual hidden sources.
Finally, no matter which direction you pick, the same juicy rule still applies: pull the chicken at 74°C / 165°F, rest briefly, then keep it in sauce so leftovers stay tender.
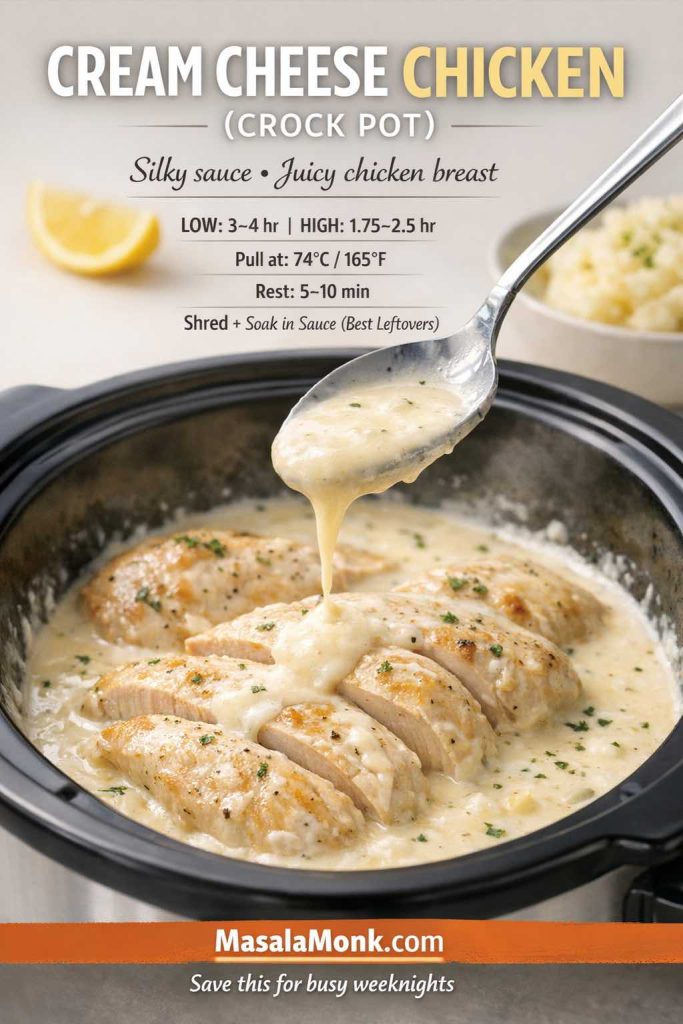
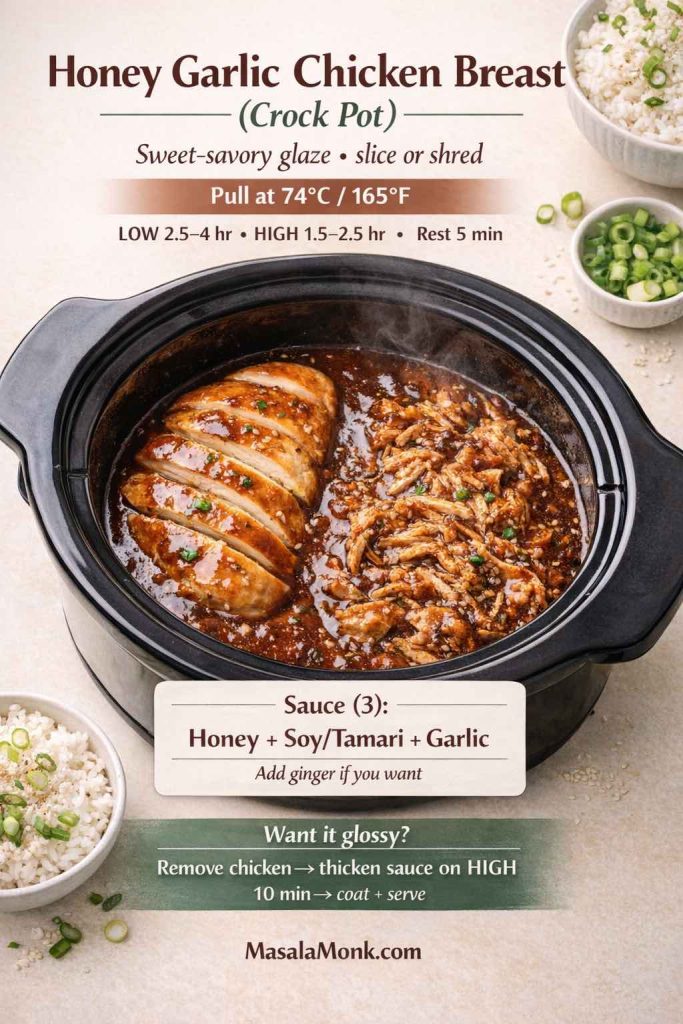
1) Cream Cheese Chicken Breast (Crock Pot Creamy Classic)
Creamy chicken breast in a crock pot can feel like a cheat code: it tastes rich, yet it’s built from everyday ingredients. The sauce turns silky, the chicken stays tender, and the leftovers reheat surprisingly well when you keep them saucy.
This version has a subtle lemon lift that keeps the creaminess from feeling heavy. Still, it’s flexible—add mushrooms for deeper savoriness, stir in spinach for a greener finish, or turn it into a cozy casserole-style dinner with a soup swap. Given that it’s a foundational creamy recipe, it also becomes the base for several variations people love: cream cheese ranch chicken, cream-of-mushroom versions, cream-of-chicken versions, and even a stuffed chicken breast approach if you want something a little more dramatic.
Serves: 4 Prep: 10 minutes Cook: 3–4 hours on LOW (or 1.75–2.5 hours on HIGH) Slow cooker size: 4–6 qt / 4–5.5 L
Creamy crock pot chicken breast with cream cheese is one of the easiest ways to get juicy chicken without babysitting dinner. Use this quick timing guide as your “don’t overcook it” reference: LOW 3–4 hours / HIGH 1.75–2.5 hours, pull at 74°C / 165°F, then rest 5–10 minutes before slicing or shredding. For the best texture (and better leftovers), shred the chicken in the sauce and let it sit a few minutes so it soaks flavor back in.
Ingredients
700 g boneless, skinless chicken breasts
200 g cream cheese
180 ml chicken stock
12 g garlic, minced
8 g onion powder
6 g fine salt
2 g black pepper
5 g smoked paprika (optional)
15 ml lemon juice
Optional thickener: 10 g cornstarch + 15 ml water
Optional add-ins: 150 g mushrooms (sliced), 60–80 g baby spinach
Method or Recipe for Cream Cheese Chicken Breast in a Crock Pot
Add chicken stock, garlic, onion powder, salt, pepper, paprika, and lemon juice to the slow cooker. Stir to combine.
Add chicken breasts in a single layer if possible.
Scatter cream cheese in chunks over the chicken.
Cook until chicken reaches 165°F / 74°C internally, following the guidance on the safe temperature chart.
Rest chicken 5–10 minutes. Then slice or shred.
Stir the sauce until smooth. If you want it thicker, whisk in cornstarch slurry, cover, and cook on HIGH for 10–15 minutes, stirring once.
What it tastes like
Creamy, gently tangy, savory, and comforting. The lemon keeps the sauce lively rather than flat.
Best sides
This sauce loves starch. It’s fantastic over rice, pasta, or mashed potatoes. For a classic pairing, MasalaMonk’s perfect mashed potatoes fits beautifully.
Variations (pick what matches your mood)
Cream of mushroom soup version: replace stock + seasonings with 300 g condensed cream of mushroom soup + 120 ml stock; keep garlic and black pepper.
Cream of chicken soup version: same swap, different soup.
Half-and-half split: use 150 g cream of mushroom + 150 g cream of chicken for deeper flavor.
Spicy creamy chicken: add 10–15 g chili paste or 2–3 g cayenne to the liquid before cooking.
Salsa chicken creamy finish: stir in 200–250 g salsa after cooking, then taste and adjust salt.
Stuffed chicken breast in a crock pot (spinach-cream cheese): butterfly the breasts, season lightly, fill with a mixture of 120 g cream cheese + 80 g chopped spinach + 1 g garlic powder, secure with toothpicks, then cook in the sauce as written. Slice to reveal the filling.
Storage and reheating
Cool leftovers promptly and refrigerate. Reheat gently (low heat on the stove or a lower-power microwave) so the sauce stays smooth. For general chicken handling and safety basics, the CDC’s chicken food safety guidance is a solid reference.
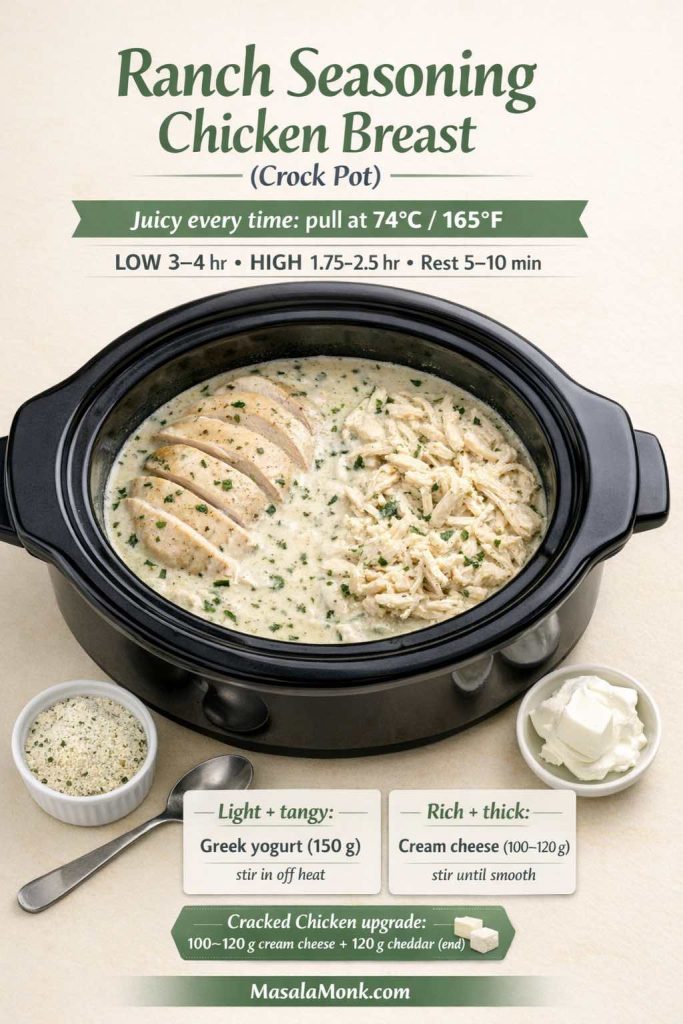
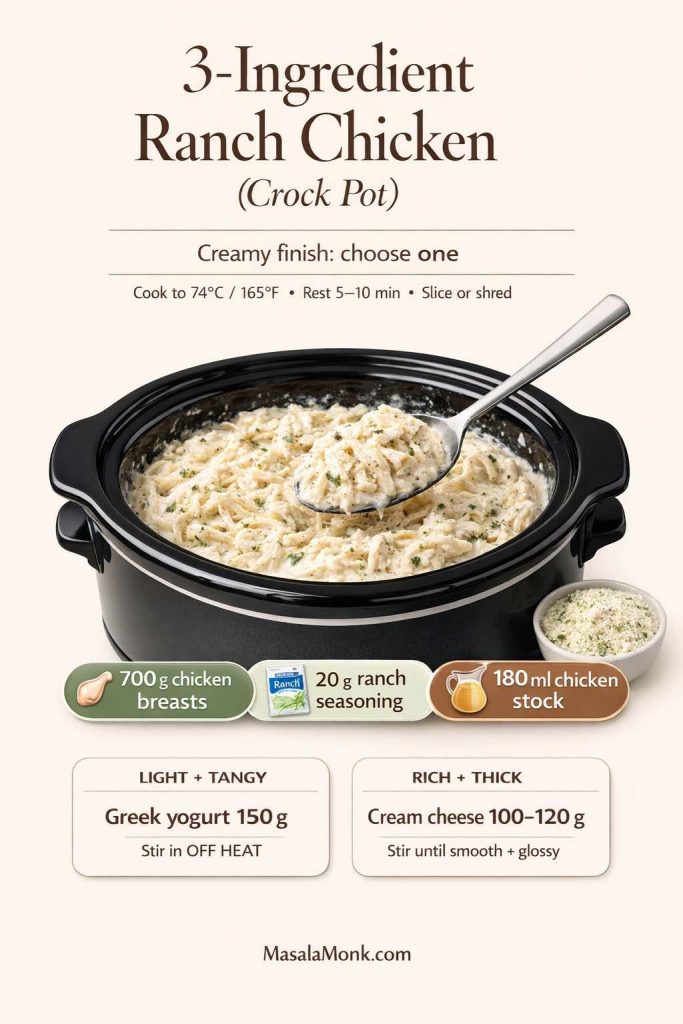
2) Ranch Seasoning Chicken Breast (Crock Pot Tangy + Creamy)
Ranch seasoning and slow cooker chicken breast is a combination that just works. It’s savory, herb-forward, and comforting in a familiar way. Unlike some creamy crock pot chicken breast recipes, this one can go lighter or richer depending on how you finish it—Greek yogurt for a brighter, lower-fat version, or cream cheese for a thicker, more luxurious sauce.
It’s also a great “few ingredients” dinner: chicken, broth, ranch seasoning, and one creamy finish. Then, if you want, you can add mushrooms or vegetables without changing the method.
Serves: 4 Prep: 10 minutes Cook: 3–4 hours on LOW (or 1.75–2.5 hours on HIGH)
Ranch chicken is all about the finish: pull at 74°C / 165°F, rest 5–10 minutes, then choose your texture—Greek yogurt for a lighter tangy sauce or cream cheese for a thicker, richer one. Want the viral-style upgrade? Turn it into cracked chicken by stirring in cheddar at the end. Save this card as your quick-reference before you start Recipe #2.
Ingredients
700 g boneless, skinless chicken breasts
240 ml chicken stock
20 g ranch seasoning mix
10 g garlic, minced
30 ml lemon juice (optional, brightens)
2 g black pepper
Finish (choose one):
120 g sour cream
or 150 g thick Greek yogurt
or 100–120 g cream cheese
Method or Recipe for Ranch Crock Pot Seasoning Chicken Breast
Whisk stock, ranch seasoning, garlic, lemon juice, and pepper in the slow cooker.
Stir in sour cream, yogurt, or cream cheese until smooth.
Serving ideas
Ranch chicken is great with potatoes, rice, or wraps. For a cool contrast, a yogurt-based sauce is surprisingly good alongside ranchy flavors—MasalaMonk’s tzatziki sauce guide has several variations worth trying.
Variations
Cracked-style creamy ranch: add 100 g cream cheese at the start, then stir in 120 g shredded cheddar at the end until melted. Detailed instructions are given below.
Ranch + vegetables crock pot dinner: add 150 g mushrooms + 120 g sliced onion at the start; stir in spinach at the end.
Cracked Chicken (Crock Pot Ranch + Cream Cheese + Cheddar)
If ranch chicken is the cozy classic, cracked chicken is the indulgent upgrade. It keeps the same easy slow-cooker recipe; however, it finishes richer, cheesier, and more “scoopable,” which is why people with slow cooker look it up so often—and why the method matters.
To make it, start with the Recipe #2 base (ranch seasoning + stock + chicken), then follow these tweaks:
Add cream cheese early for body: drop in 100–120 g cream cheese in chunks at the beginning (or during the last hour on LOW if you prefer a cleaner melt). As it softens, it turns the cooking liquid into a thicker, clingier sauce.
Cook as usual, but shred in the juices: once the thickest part hits 74°C / 165°F, rest briefly, then shred directly in the ranchy sauce. That way, the chicken stays moist instead of stringy.
Finish with cheddar for the “cracked” texture: stir in 120 g shredded cheddar until it melts and looks glossy. At this point, the flavor becomes deeper and the texture turns properly creamy.
Optional, but popular: add crumbled cooked bacon at the end. It brings salt and crunch, so the dip-like vibe becomes even more pronounced.
As a result, you get a dish that feels like comfort food without changing your workflow—just a smarter finish.
BBQ chicken breast in a crock pot is one of those meals that feels like it belongs at a weekend cookout—even when it’s a Tuesday. It’s bold, saucy, and forgiving. As the sauce surrounds the chicken, it stays moist as long as you don’t overcook it. Later, leftovers become sandwiches, rice bowls, nachos, or a quick loaded baked potato situation.
This recipe can be served sliced for dinner plates, or shredded for pulled chicken breast in the crock pot. Either way, it’s deeply useful.
Serves: 4–5 Prep: 10 minutes Cook: 3–4 hours on LOW (or 1.75–2.5 hours on HIGH)
BBQ chicken breast is a weeknight cheat code because it works two ways: slice it for dinner plates or shred it for pulled chicken. The quick rule is the same—pull at 74°C/165°F, rest 5 minutes, then (if shredding) let it sit in the sauce on WARM for that glossy, juicy finish.
Ingredients
800 g boneless, skinless chicken breasts
240 g BBQ sauce
120 ml chicken stock
15 ml apple cider vinegar
6 g salt
2 g smoked paprika
2 g garlic powder
Optional sweetness: 12 g brown sugar (skip if you prefer)
Method or Recipe of BBQ Chicken Breast in a Slow Cooker
Stir BBQ sauce, stock, vinegar, salt, paprika, and garlic powder in the slow cooker.
Rest 5 minutes. Slice for plates, or shred directly in the sauce for pulled chicken.
Leave on WARM 10–15 minutes so the chicken absorbs sauce.
Best sides
For a hearty comfort pairing, try it with MasalaMonk’s Red Beans and Rice. For something crisp and salty, homemade fries are always a win—MasalaMonk’s homemade French fries is a great reference if you want to go all-in.
Variations
Low carb BBQ: use a no-sugar-added BBQ sauce and skip brown sugar.
Spicy BBQ: add 10–15 g hot sauce or 2 g chili flakes.
Honey BBQ: add 20 g honey for shine.
BBQ chicken breast and potatoes slow cooker dinner: add 500–600 g potato chunks under the chicken and increase stock to 180 ml.
If you like turning leftovers into lunch, MasalaMonk’s chicken sandwich recipes is a great place to find a new direction.
4) Honey Garlic Chicken Breast (Crock Pot Sweet-Savory)
Honey garlic chicken breast is weeknight-friendly in the best way: the ingredient list is short, the sauce tastes balanced, and the final plate feels like something you’d happily eat twice. The vinegar keeps sweetness in check, while garlic does the heavy lifting. If you add ginger, it becomes even more fragrant.
Since the sauce is glossy and strong, you can pair it with simple sides and still feel like dinner has personality. Moreover, it reheats well, which makes it ideal for meal prep.
Serves: 4 Prep: 10 minutes Cook: 2.5–4 hours on LOW (or 1.5–2.5 hours on HIGH)
Honey garlic chicken breast is one of the best “set-and-forget” crock pot dinners because the glaze keeps it juicy and the leftovers stay flavorful. Use this quick cheat sheet to nail the one rule that matters: pull at 74°C / 165°F, rest briefly, then slice for plates or shred for bowls. Want that glossy, sticky finish? Remove the chicken and reduce the sauce on HIGH for 10 minutes, then coat and serve.
Ingredients
700 g chicken breasts
90 g honey
60 ml soy sauce (or tamari for gluten free)
30 ml rice vinegar (or apple cider vinegar)
12 g garlic, minced
10 g fresh ginger, grated (optional)
15 ml water
Optional thickener: 12 g cornstarch + 15 ml water
Method or Recipe for Slow Cooker Honey Garlic Chicken Breast
Whisk honey, soy sauce, vinegar, garlic, ginger, and water in the slow cooker.
Add chicken and coat.
Cook until chicken reaches 74°C.
Remove chicken to a plate. If you want thicker sauce, stir in cornstarch slurry and cook on HIGH 10 minutes.
Return chicken, coat, then slice to serve.
Serving ideas
Rice is the obvious partner. If rice texture ever drives you crazy, MasalaMonk’s how to cook rice is a steady guide.
Variations
Spicy honey garlic: add 10 g chili paste or 2 g chili flakes.
Orange-honey twist: add 60 ml orange juice and reduce water accordingly.
Teriyaki night: swap the sauce direction entirely using MasalaMonk’s teriyaki sauce as your base.
5) Lemon Garlic Chicken Breast (Crock Pot Bright + Clean)
After a stretch of creamy dinners, lemon garlic chicken is refreshing. It’s light yet satisfying, and the broth becomes a simple sauce you can ladle over everything. The key is balance: lemon juice for brightness, stock for depth, and herbs for aroma.
This is also one of those slow cooker chicken breast recipes that fits a low fat dinner comfortably, especially when paired with vegetables or rice.
Serves: 4 Prep: 10 minutes Cook: 2.5–4 hours on LOW (or 1.5–2.5 hours on HIGH)
Bright, low-fat slow cooker dinner made simple: cook chicken breast in broth with lemon + garlic, pull at 74°C/165°F, then rest 5–10 minutes. The “finish move” here is the difference-maker—ladle the lemony broth over the sliced chicken and add a final squeeze of lemon for a clean, vivid flavor that keeps leftovers tasting fresh.
Ingredients
700 g chicken breasts
240 ml chicken stock
2 g lemon zest
45 ml lemon juice
18 g garlic, minced
15 ml olive oil
6 g salt
2 g black pepper
5 g oregano (or Italian herb mix)
Optional: 120 g sliced onion
Method or Recipe for Lemon Garlic Chicken Breast in a Slow Cooker
Add stock, zest, lemon juice, garlic, olive oil, salt, pepper, and herbs to the slow cooker. Stir.
This chicken loves rice, potatoes, or a crisp salad. If you want a herb-forward finish, pesto stirred in at the end is excellent—MasalaMonk’s pesto recipes offer plenty of directions.
Variations
Spicy lemon chicken: add 2 g cayenne or 10 g chili paste.
Creamy lemon: stir in 120 g Greek yogurt at the end (off heat) for a tangy creamy sauce.
Mediterranean-style: add 100 g olives and 150 g cherry tomatoes in the last 30 minutes.
6) Chicken Breast and Potatoes (Crock Pot Dinner That Plates Itself)
Chicken breast and potatoes in the crock pot is comfort with built-in convenience. Potatoes soak up seasoning, the broth turns into a quick gravy, and dinner is basically ready the moment you lift the lid. This is especially useful when you want a complete meal without a second pot of sides.
As potatoes can take longer than chicken, the most dependable approach is to keep potato pieces chunky and start checking chicken for doneness before the potatoes are fully done. Then, if needed, chicken can rest while potatoes finish.
Serves: 4 Prep: 15 minutes Cook: 3.5–5 hours on LOW
This one image explains why “chicken breast and potatoes in the crock pot” actually works: potatoes + carrots go on the bottom (they need direct heat), chicken sits on top (so it stays juicy), and you pull chicken at 74°C / 165°F. If the chicken finishes first, let it rest while the potatoes keep going—then spoon that broth over everything like instant gravy.
Ingredients
700 g chicken breasts
600 g potatoes, cut into 3 cm chunks
120 g carrots, cut thick (optional)
120 g onion, sliced (optional)
240 ml chicken stock
20 ml olive oil
8 g salt
2 g black pepper
5 g paprika
3 g dried thyme
Method or Recipe for Crock Pot Chicken Breast and Potatoes
Toss potatoes (and carrots) with olive oil, paprika, thyme, and half the salt.
Add vegetables to the slow cooker first. Pour in stock.
Place chicken on top and season with remaining salt and pepper.
Cook until chicken reaches 74°C and potatoes are tender.
Rest chicken. Slice and serve with potatoes and broth.
Cozy companion idea
If you love the “big payoff, minimal effort” slow cooker vibe, MasalaMonk’s Whole Chicken in Crock Pot is a great batch-cooking follow-up.
Variations
BBQ chicken breast and potatoes: add 200 g BBQ sauce and reduce stock to 120 ml.
Creamy potatoes finish: stir in 80–100 g cream cheese at the end.
Spicy potatoes: add 2 g cayenne and 3 g cumin to the seasoning mix.
7) Chicken Breast and Rice (Crock Pot Comfort Bowl)
Chicken breast and rice in a slow cooker is deeply satisfying when it works: one pot, balanced plate, cozy texture. The challenge is that rice can turn mushy if it sits too long after it’s done. The solution is straightforward: use hot stock, choose long-grain rice, and check earlier rather than later. If the chicken hits temp first, pull it to rest while the rice finishes—don’t keep the chicken hostage to the rice.
Once you dial this in, it becomes an easy dinner staple—especially if you like making rice bowls.
Serves: 4 Prep: 10 minutes Cook: 2.5–3.5 hours on LOW
If your chicken breast and rice crock pot dinners ever turn soft or mushy, this is the fix: hot stock + long-grain rice + check early. Long-grain (basmati is perfect) stays separated, hot stock helps the rice finish sooner (less time idling = better texture), and checking at the early end keeps both the rice and chicken from overcooking. The real “juicy” rule still applies: pull chicken at 74°C / 165°F, rest 5–10 minutes, then slice. Save this as your quick reference before you make Recipe #7 (Chicken Breast + Rice) so you get fluffy rice and tender chicken every time—no guesswork, no mush.
Ingredients
700 g chicken breasts
220 g long-grain rice (basmati works well)
600 ml hot chicken stock
120 g onion, finely chopped
10 g garlic, minced
6 g salt
2 g black pepper
5 g paprika
15 ml olive oil
120 g peas (stir in at end)
Method or Recipe for Chicken Breast and Rice in a Slow Cooker
Add onion, garlic, rice, salt, pepper, paprika, and olive oil to the slow cooker.
Pour in hot stock and stir.
Lay chicken on top in a single layer.
Cook until chicken reaches 74°C and rice is tender.
Remove chicken to rest. Fluff rice, stir in peas, then slice chicken and serve.
Serving ideas
A bowl like this loves toppings: chopped herbs, lemon, yogurt drizzle, or a quick salad on the side. If you’re curious about making rice feel lighter, MasalaMonk’s guide to reducing the glycemic impact of rice is a useful read.
Variations
Cheesy rice dinner: stir in 80–100 g cream cheese at the end, or try a comfort cousin recipe like Cheesy Chicken Broccoli Rice.
Southwest rice bowl: add 200 g salsa and 150 g corn; finish with lime.
Spicy chicken breast slow cooker version: add 10 g chili paste and top with green onions.
8) Chicken Breast and Vegetables (Healthy Crock Pot Dinner That Still Feels Filling)
Some nights you want dinner to feel lighter without feeling like you’re giving something up. This chicken breast and vegetables crock pot dinner does that beautifully: colorful vegetables, a simple broth-based sauce, and enough flavor to keep things satisfying.
It also fits meal prep well. Because the sauce is broth-based and lemon-bright, it reheats without the “heavy” feel that some creamy leftovers can develop.
Serves: 4 Prep: 15 minutes Cook: 2.5–4 hours on LOW
A fast “pick-and-cook” guide for slow cooker chicken breast and vegetables: cook until the thickest part hits 74°C / 165°F, keep veggies in thicker cuts (or add softer veg later), and finish with a lemon-bright broth so leftovers stay juicy. Perfect for low calorie crock pot chicken breast meal prep—slice and store the chicken in the broth so it reheats tender.
Ingredients
700 g chicken breasts
250 g bell peppers, sliced
200 g zucchini, thick half-moons
150 g mushrooms, sliced
150 g onion, sliced
240 ml chicken stock
30 ml lemon juice
15 ml olive oil
6 g salt
2 g black pepper
5 g Italian herb mix
Method or Recipe for Slow Cooker Chicken Breast and Vegetables
Add vegetables, stock, lemon juice, olive oil, salt, pepper, and herbs to the slow cooker. Stir.
Slice chicken and serve with vegetables and broth.
Serving ideas
Serve over rice, potatoes, or with a crusty bread. If you want something fun alongside, crispy fries can turn it into a more “treat yourself” plate—MasalaMonk’s homemade French fries is a great reference.
Variations
Southwest slow cooker chicken: add 200 g salsa, 150 g corn, and 2 g cumin; finish with lime.
Salsa chicken meal prep: keep it simple with salsa + stock; shred at the end and serve in bowls.
Spicy version: add chili paste or cayenne, then cool it down with a yogurt sauce. MasalaMonk’s tzatziki variations work surprisingly well here.
9) Chicken and Stuffing in a Crock Pot (Casserole Comfort, Minimal Effort)
This is the dinner that feels like a warm blanket. Chicken and stuffing in a slow cooker gives you tender chicken, savory gravy, and that buttery stuffing layer that makes everything feel like a holiday plate—even on a random weekday.
It’s also wonderfully practical: you stir the sauce, add the chicken, top with stuffing, then let the slow cooker do the rest. The leftovers reheat well, which makes it a good candidate for busy weeks.
Serves: 4–5 Prep: 10 minutes Cook: 3–4 hours on LOW
Chicken + stuffing is the “casserole comfort” slow-cooker dinner that plates itself. The key move: keep the stuffing on top (don’t stir it in), then pull the chicken breast at 74°C/165°F and rest 5–10 minutes so it stays juicy. Save this as your quick reminder before you make Recipe #9.
Ingredients
700 g chicken breasts
240 ml chicken stock
300 g condensed cream of chicken soup (or cream of mushroom soup)
200 g dry stuffing mix
60 g butter, melted
2 g black pepper
Optional: 120 g onion, diced
Optional finish: 120 g sour cream (stir in at end)
Method or Recipe for Slow Cooker Chicken Stuffing
Whisk stock, condensed soup, and black pepper (and onion, if using) in the slow cooker.
Add chicken and spoon sauce over the top.
Mix stuffing with melted butter, then sprinkle evenly over the chicken. Keep it on top rather than stirring it in.
Cook until chicken reaches 74°C.
Rest chicken, then slice. If using sour cream, stir it into the sauce just before serving.
Cream-of-mushroom vs cream-of-chicken
Both work. Cream of chicken tastes classic and mild, while cream of mushroom adds deeper savory notes. If you can’t decide, a half-and-half split is a surprisingly good middle ground.
10) Buffalo Chicken Dip (Crock Pot + Chicken Breast, Party-Ready)
This one belongs on the list because it’s one of the most satisfying ways to use cooked chicken breast—especially if you’ve made shredded chicken earlier in the week. Buffalo chicken dip is creamy, spicy, salty, and extremely scoopable. It’s also flexible: more tang, more heat, more cheese, less cheese—whatever your crowd likes.
Serves: 8 as an appetizer Prep: 10 minutes Cook: 2–3 hours on LOW, then WARM
Save this Buffalo Chicken Dip crock pot cheat sheet: make it fast with cooked shredded chicken, or start from raw chicken breast (cook to 74°C/165°F, shred in the hot sauce liquid, then melt in the cheeses). The ‘hold 10 minutes on WARM’ step is the texture trick that keeps it creamy, scoopable, and never stringy.
Ingredients
500 g cooked shredded chicken breast
200 g cream cheese
120 g Greek yogurt or sour cream
120 ml hot sauce (adjust to taste)
60 ml ranch or blue cheese dressing
120 g shredded cheddar
Optional: 60 g shredded mozzarella
Method or Recipe for Buffalo Chicken Dip
Add everything to the slow cooker and stir roughly.
Cook until melted and smooth, stirring once or twice.
Hold on WARM and serve with celery, carrots, chips, or toasted bread.
Starting with raw chicken breast (instead of cooked shredded chicken)
If you are looking specifically for “buffalo chicken dip crock pot with chicken breast,” this is the version you want. You cook the chicken breast first, shred it, then turn it into the dip—same slow cooker, same comfort, no extra pans.
Step 1 (cook + shred the chicken): Add 700 g boneless, skinless chicken breasts to the slow cooker with 120 ml hot sauce + 120 ml chicken stock (or water). Cook on LOW 2.5–4 hours (or HIGH 1.5–2.5 hours) until the thickest part hits 74°C / 165°F. Rest 5 minutes, then shred directly in the liquid.
Step 2 (turn it into dip): Stir in the remaining dip ingredients (cream cheese, yogurt/sour cream, dressing, cheddar, optional mozzarella). Cover and cook on LOW 30–45 minutes, stirring once or twice, until smooth and scoopable. Hold on WARM for serving.
Juicy tip: Keep the shredded chicken bathed in the buffalo liquid while the cheeses melt—this is what keeps the dip rich and not dry or stringy.
Serving extras
If you’re firmly on team blue cheese, MasalaMonk’s blue cheese dip guide is a great companion. For a full MasalaMonk take on this dish, including other methods, the Buffalo Chicken Dip recipe is worth bookmarking.
Shredded Chicken Breast Base in Crock Pot (For Tacos, Bowls, and Sandwiches)
If you want a plain, dependable slow cooker chicken breast recipe that becomes anything, this is it. It’s the kind of cooked shredded chicken breast you can stretch across multiple meals—tacos tonight, rice bowls tomorrow, sandwiches the day after. Because the seasoning stays gentle, you can steer it toward BBQ, salsa, ranch, lemon garlic, or spicy flavors later without starting over.
Serves: 4–6 Prep: 5 minutes Cook: 3–4 hours on LOW
Cook once, then remix all week: this shredded chicken breast crock pot base is the meal-prep “starter” that keeps dinner easy without tasting repetitive. Use the temp rule (74°C/165°F), rest briefly, then shred in the juices and let it soak for 5 minutes—this is the small step that keeps chicken moist for leftovers. Turn it into BBQ pulled sandwiches, salsa taco bowls, ranch wraps, or lemony rice bowls with almost no extra work. Save this card so you can batch-cook chicken once and build multiple dinners fast.
Ingredients
900 g chicken breasts
240 ml chicken stock
10 g garlic, minced
6 g salt
2 g black pepper
Optional: 1 bay leaf
Method or Recipe for Shredded Chicken Breast Base in Crock Pot
Add stock, garlic, salt, pepper (and bay leaf) to the slow cooker.
Add chicken in a single layer.
Cook until chicken reaches 74°C, then rest 5 minutes.
Shred in the juices, then let it sit a few minutes so it absorbs flavor.
Your “make-once, eat-all-week” slow cooker base: shredded chicken breast that stays juicy because you pull it at 165°F / 74°C, rest 5–10 minutes, then shred in the cooking juices. Save this formula card for meal prep—turn the same crock pot chicken into tacos/burrito bowls, BBQ sandwiches, ranch wraps, or chicken salad (plus storage guidance so leftovers stay tender instead of dry).
Easy “turn it into…” ideas
Salsa chicken: stir in salsa + lime and serve with rice.
Ranch shredded chicken: stir in ranch seasoning + a spoon of yogurt.
BBQ pulled chicken: stir in BBQ sauce and simmer on WARM.
Creamy chicken: stir in cream cheese until smooth.
Chicken salad: mix with mayo, crunch, and herbs—MasalaMonk’s homemade mayo guide is a great base if you like making it from scratch.
3-Ingredient Crock Pot Chicken Breast (Fast Dump-and-Go Formulas)
There are nights when you don’t want “a recipe.” You want a reliable formula that works every time, tastes like you tried, and doesn’t create extra dishes. That’s what these are: four 3-ingredient crock pot chicken breast recipes built around the same juicy rule—cook to 74°C / 165°F, rest, then slice or shred in the sauce.
A true dump-and-go cheat sheet: four 3-ingredient crock pot chicken breast flavor bases (salsa, BBQ pulled, ranch, honey-garlic) plus the one finishing move that makes it taste better—shred in the sauce and let it sit 5–10 minutes so it turns glossy and stays juicy. Keep this right above the 3-ingredient section so readers can choose a direction at a glance.
The base rules (use for all 4 recipes below)
Chicken: 700 g boneless, skinless chicken breasts (best if similar thickness; single layer if possible)
Cook: covered on LOW 2.5–4 hours or HIGH 1.5–2.5 hours
Done = 74°C / 165°F in the thickest part
Rest: 5–10 minutes before slicing
If shredding: shred in the cooking liquid, then let it sit 5 minutes so it soaks flavor back in
Pro tip that saves texture: Don’t keep opening the lid. Every peek slows the cook and increases the chance you overcook the chicken at the end.
Salsa Chicken (Crock Pot) — tacos, bowls, and meal prep
This is the weeknight MVP: tangy, juicy, and built for shredding. It’s also one of the best “few ingredients” slow cooker chicken breast dinners because salsa does the seasoning work for you.
3-Ingredient Salsa Chicken (Crock Pot): a true dump-and-go formula for tacos, burrito bowls, and meal prep. The big win is the texture rule—cook to 74°C / 165°F, rest, then shred in the salsa + keep it warm 10 minutes so the chicken soaks flavor back in (and leftovers stay juicy).
Ingredients (3):
700 g boneless, skinless chicken breasts
300 g salsa (any style you like)
120 ml chicken stock (or water)
Method:
Pour salsa and stock into the slow cooker and stir.
Add chicken in a single layer (or as close as you can). Spoon sauce over the top.
Cook on LOW or HIGH until the chicken reaches 74°C / 165°F.
Rest 5–10 minutes.
For shredded salsa chicken: shred directly in the sauce, then leave on WARM 10 minutes so it absorbs flavor.
Add 10–15 ml lime juice at the end for brightness.
Stir in chopped cilantro after shredding.
Want it creamier? Add a spoon of Greek yogurt when serving (not while cooking).
BBQ Pulled Chicken Breast (Crock Pot) — sandwiches and sliders
If you want “pulled chicken” texture without it turning dry, the trick is simple: shred it in sauce, then give it a short soak on WARM so it goes glossy and tender.
3-Ingredient BBQ Pulled Chicken (Crock Pot): the key to real pulled texture (not dry strings) is shredding in the sauce, then letting it sit on WARM for 10–15 minutes so it turns glossy and tender. Use it for sandwiches, sliders, bowls, wraps, or loaded baked potatoes—and remember the finish line is 74°C / 165°F, then a short rest before shredding.
Ingredients (3):
700–800 g boneless, skinless chicken breasts
240 g BBQ sauce
15 ml apple cider vinegar (or lemon juice)
Method:
Stir BBQ sauce + vinegar in the slow cooker.
Add chicken and coat well.
Cook on LOW or HIGH until the thickest part hits 74°C / 165°F.
Rest 5 minutes.
Shred in the sauce, then keep it on WARM 10–15 minutes for proper pulled texture.
Add a splash of stock (60–120 ml) if your BBQ sauce is very thick.
Add chili flakes or hot sauce for spicy BBQ.
Ranch Seasoning Chicken (Crock Pot) — creamy finish, few ingredients
This one hits the “crock pot chicken breast recipes with ranch seasoning” intent perfectly. It’s also flexible: you can finish it lighter with yogurt or richer with cream cheese.
3-Ingredient Ranch Chicken (Crock Pot): a dump-and-go chicken breast formula that stays juicy if you cook to 74°C / 165°F and rest 5–10 minutes. Finish it two ways—Greek yogurt (light + tangy) or cream cheese (rich + thick)—then slice or shred for rice bowls, potatoes, wraps, or salads. Save this card for busy nights.
Ingredients (3):
700 g boneless, skinless chicken breasts
20 g ranch seasoning mix
180 ml chicken stock
Method:
Whisk ranch seasoning into the stock in the slow cooker.
Add chicken and spoon liquid over the top.
Cook until chicken reaches 74°C / 165°F.
Rest 5–10 minutes, then slice or shred in the ranchy juices.
Creamy finish (choose one):
Stir in 150 g thick Greek yogurt (lighter, tangier)
OR stir in 100–120 g cream cheese (richer, thicker)
Serving ideas:
Over rice, with potatoes, inside wraps, or on salads.
Important texture note: If you use yogurt, stir it in at the end (off high heat) so it stays smooth.
Honey Garlic Chicken Breast (Crock Pot) — sweet-savory plates or shredded bowls
This one tastes like a complete sauce even with only 3 ingredients. It’s excellent sliced for dinner plates, but it also shreds beautifully for meal prep.
3-ingredient Honey Garlic Chicken (crock pot) at a glance: cook to 74°C/165°F, rest, then choose your finish — slice for dinner plates or shred in the sauce for bowls. If you want a thicker glaze, simmer the sauce uncovered on HIGH for 10–15 minutes, then coat the chicken.
Ingredients (3):
700 g boneless, skinless chicken breasts
90 g honey
60 ml soy sauce (or tamari for gluten free)
Method:
Whisk honey and soy sauce (or tamari) in the slow cooker.
Add chicken and coat.
Cook until chicken reaches 74°C / 165°F.
Rest 5 minutes.
Slice for plates, or shred in the sauce for bowls and sandwiches.
Serving ideas:
With rice, noodles, stir-fried vegetables, lettuce wraps, or sandwiches.
Optional (if you want thicker sauce):
Remove chicken, simmer sauce on HIGH uncovered 10–15 minutes, then return chicken to coat.
The “small rule” that makes all chicken recipes taste better
If you shred the chicken, don’t serve immediately. Let it sit in the sauce for 5–10 minutes (WARM is perfect). It reabsorbs flavor and stays moist—especially for leftovers.
Turn one batch of crock pot shredded chicken into six fast dinners: tacos, rice bowls, sliders, loaded baked potatoes, salad protein, and nachos/quesadillas. Save this as your “leftovers plan” for the 3-ingredient formulas—best texture comes from shredding in the sauce and letting it rest 5–10 minutes before serving.
Keeping the Rotation Fresh (Without Making Dinner Harder)
Even the best crock pot chicken breast recipes can start to feel similar if the finish never changes. Luckily, small swaps create big variety.
A spoon of pesto at the end transforms lemon chicken into something herbaceous—MasalaMonk’s pesto recipes are full of ideas.
A sauce swap changes the entire vibe; MasalaMonk’s pizza sauce recipes can spark smoky, spicy, or tangy directions that work with shredded chicken.
A cozy slow cooker dinner doesn’t always have to be chicken; sometimes a comfort soup resets the week. MasalaMonk’s Crock Pot Lasagna Soup keeps the same ease while changing texture and flavor.
When you want a non-slow-cooker night that’s still effortless, Sheet Pan Chicken Fajitas brings big flavor without another long cook.
Finally, if you ever want to double-check slow cooker basics (especially around timing and safety), the USDA’s page on slow cookers and food safety is a practical reference, and the CDC’s chicken food safety guidance is a helpful reminder for clean prep habits.
One more thing for juicy crock pot chicken breast
If your slow cooker chicken breast has ever come out dry, it usually wasn’t the recipe. It was timing. Pull it when it’s done, rest it, then keep it in sauce. After that, everything becomes easier: creamy chicken stays silky, BBQ chicken stays tender, rice bowls stay satisfying, and leftovers actually taste good.
1) How long should crock pot chicken breast cook on LOW?
Most boneless, skinless chicken breasts finish in 2.5 to 4 hours on LOW, depending on thickness and your slow cooker. In practice, the most reliable cue is doneness: pull the chicken as soon as the thickest part hits 74°C so it stays juicy.
2) How long should chicken breast cook in a crock pot on HIGH?
On HIGH, chicken breast typically takes 1.5 to 2.5 hours. Even so, thinner pieces can finish earlier, so start checking sooner rather than later.
3) What’s the best way to keep chicken breast moist in a crock pot?
First, use enough liquid or sauce to surround the chicken. Next, keep pieces similar in thickness so they cook evenly. Finally, stop cooking once it’s done and let it rest briefly before slicing or shredding—those small steps make a big difference.
4) Can I cook frozen chicken breast in the crock pot?
It’s possible, yet it’s not ideal. Because frozen chicken warms slowly, it may cook unevenly and turn stringy. Whenever you can, thaw first for better texture and more consistent results.
5) Why is my slow cooker chicken breast tough or rubbery?
Usually it’s overcooked, even if it doesn’t look dry. Chicken breast firms up the longer it stays hot. A better move is to aim for doneness, then switch to WARM or remove it and keep it in sauce.
6) Is it better to cook chicken breast in the crock pot with broth or with water?
Broth adds flavor immediately, whereas water stays neutral. If you’re keeping the recipe very simple, broth is the easier win. That said, water can work when you’re using bold seasonings or a strong sauce.
7) Can I cook thin sliced chicken breast in a crock pot?
Yes, although it cooks faster than whole breasts. Consequently, thin sliced chicken breast can go from perfect to dry quickly, so check early and avoid long “keep warm” time.
8) How do I cook chicken tenderloins in the crock pot?
Chicken tenderloins generally finish quicker than full breasts. For that reason, treat them like a shorter cook: keep them in sauce, begin checking around the early end of your time window, and pull as soon as they’re done.
9) What’s the easiest crock pot chicken breast recipe with few ingredients?
A simple combination is chicken breast + salsa, or chicken breast + BBQ sauce, or chicken breast + ranch seasoning with a splash of broth. In other words, pick one strong flavor base, then keep everything else minimal.
10) Can I make crock pot buffalo chicken dip with chicken breast?
Absolutely. You can cook the chicken breast first and shred it, then stir it into a slow cooker with cream cheese, hot sauce, and cheese. Alternatively, use already cooked shredded chicken to make it even faster.
11) What’s the best way to shred chicken breast for tacos in the slow cooker?
Cook chicken in a flavorful liquid, then shred it directly in the juices. Afterward, let it sit a few minutes so it soaks flavor back in. That extra minute makes the chicken taste fuller, not washed out.
12) Can I make chicken breast and potatoes in the slow cooker at the same time?
Yes—just keep potato chunks fairly large. Meanwhile, place potatoes underneath and chicken on top so the potatoes get direct heat. If the chicken finishes first, remove it to rest while the potatoes continue until tender.
13) Can I make chicken breast and rice in a slow cooker?
Yes, although rice texture depends on timing. Use long-grain rice for better separation, keep the liquid ratio steady, and check as soon as the rice turns tender so it doesn’t turn mushy.
14) What’s the best slow cooker chicken breast recipe for meal prep?
Saucy recipes tend to reheat better—think BBQ, honey garlic, ranch, or creamy versions. Moreover, shredding chicken into the sauce keeps it moist for later lunches.
15) How do I make creamy chicken breast in a crock pot without it getting watery?
First, don’t add too much broth. Next, add dairy at the right time: cream cheese is stable and can go in early, while sour cream or yogurt is better stirred in at the end. If you still want thicker sauce, a small cornstarch slurry can tighten it up quickly.
16) Can I use cream of mushroom soup in slow cooker chicken breast recipes?
Yes, and it adds deeper savory flavor. Similarly, cream of chicken soup works when you want something milder. If you want the best of both, a half-and-half mix gives a more rounded taste.
17) Is crock pot chicken breast healthy?
It can be, depending on the sauce. For a lighter option, choose broth-based recipes with vegetables, or use yogurt instead of heavier dairy. On the other hand, creamy recipes still fit if you balance the plate with vegetables and simpler sides.
18) How do I avoid bland slow cooker chicken breast?
Salt early, add aromatics like garlic/onion, and finish with something bright—lemon, vinegar, salsa, or a spoon of sauce stirred in at the end. In addition, letting shredded chicken sit in the cooking juices helps the flavor deepen.
19) Can I cook bone-in chicken breast in a crock pot?
Yes, although it generally takes longer than boneless. Also, it benefits from enough liquid to keep it moist. Once it’s done, remove the chicken and rest it briefly before serving.
20) What temperature should crock pot chicken breast be when it’s done?
Chicken breast is done at 165°F / 74°C in the thickest part. After that, rest it briefly; then slice or shred, and keep it in sauce to stay juicy.