This baked chicken breast recipe is for anyone who has pulled a tray of chicken from the oven and wondered why it turned out dry, bland, rubbery, or unevenly cooked. Chicken breast is not hard to cook, but it is unforgiving: a few extra minutes can turn tender slices into dry, chalky pieces.
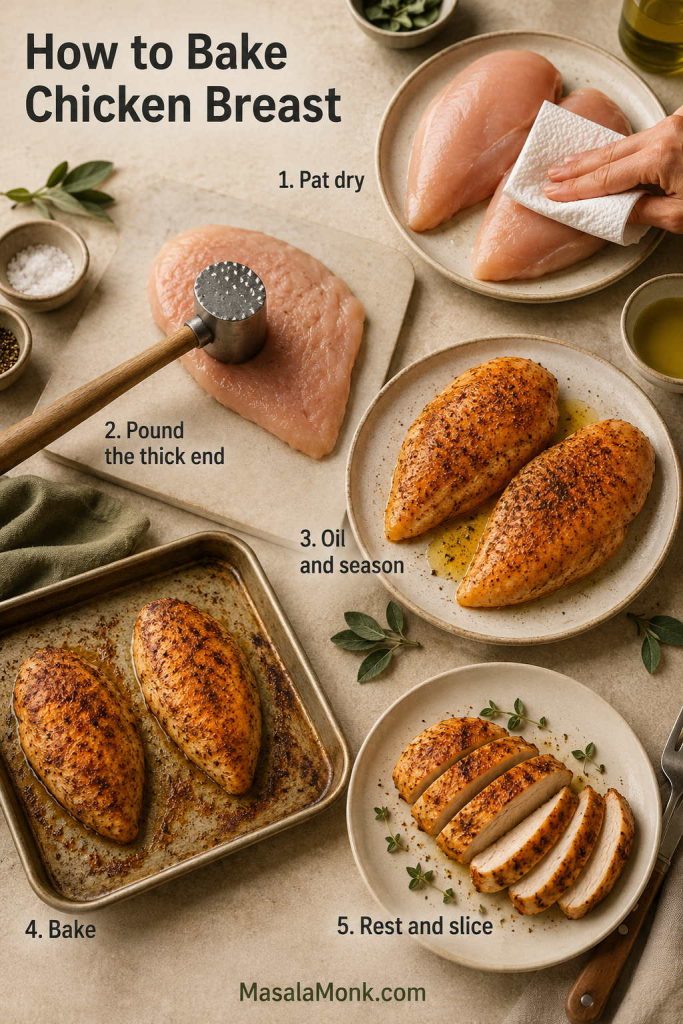
The fix is simple and specific. First, pound the thick end, then coat the chicken with oil and seasoning, bake it hot, check the center, and rest before slicing. Most dry chicken breast is not a marinade problem; instead, it is usually a thickness, timing, or resting problem.
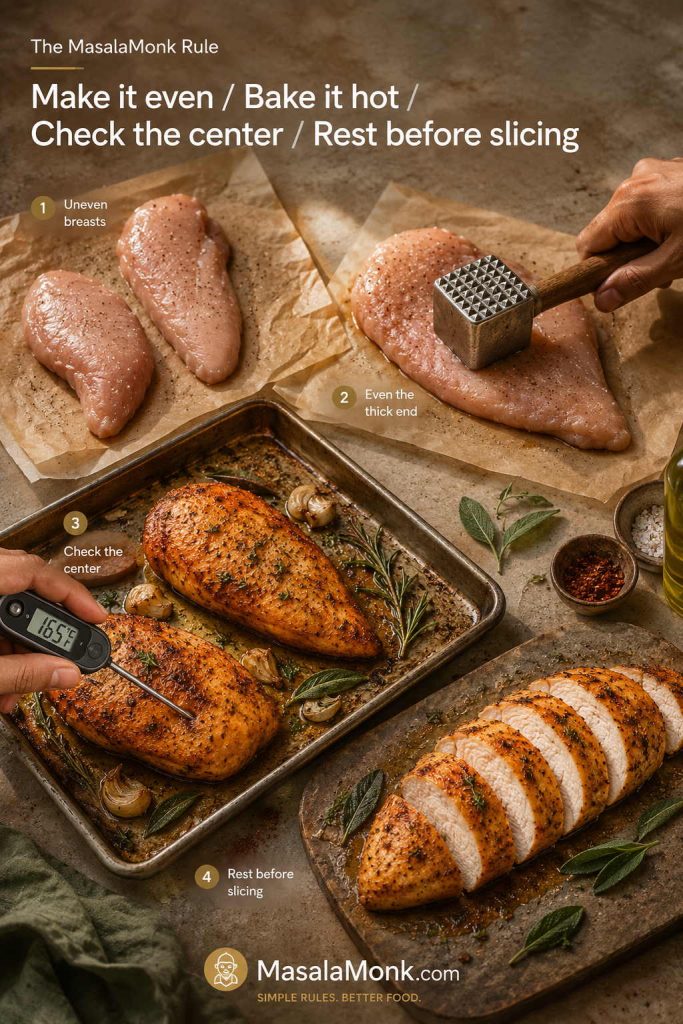
The MasalaMonk rule for chicken breast is simple: make it even, bake it hot, check the center, and rest before slicing. No single timer can understand the chicken breast in front of you, especially when one piece is thick, another is thin, and the pack is uneven.
When the thickness and timing are right, the chicken slices cleanly, tastes seasoned across the surface, and stays useful enough for dinner tonight and lunches later.
The main method uses 425°F / 220°C for tender, lightly browned boneless skinless chicken breast, with clear timing for 350°F, 375°F, 400°F, 425°F, and 450°F. You will also get help for thin chicken, large pieces, bone-in chicken, frozen chicken, meal prep, storage, reheating, and dry-chicken fixes.
In This Guide
Quick Answer: How to Bake Chicken Breast
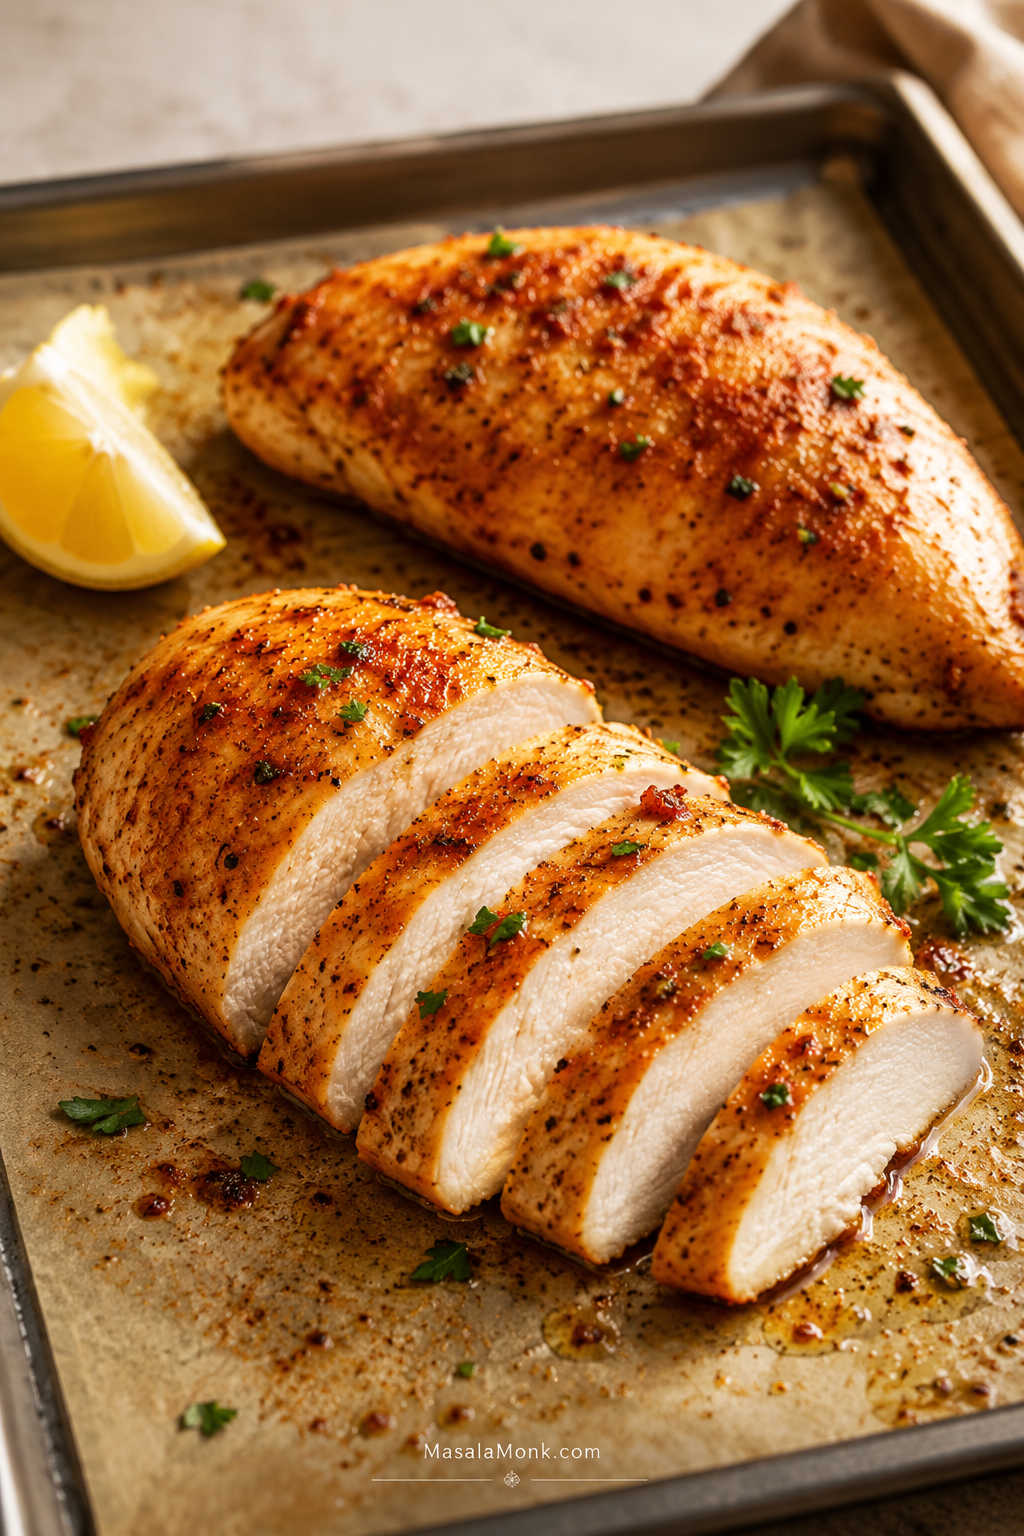
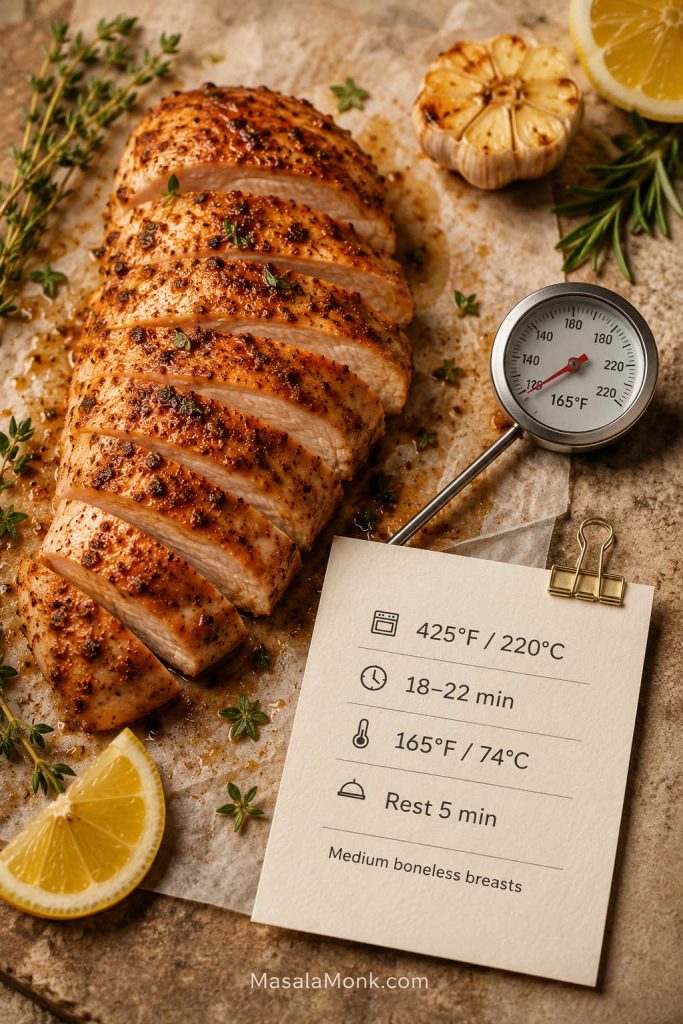
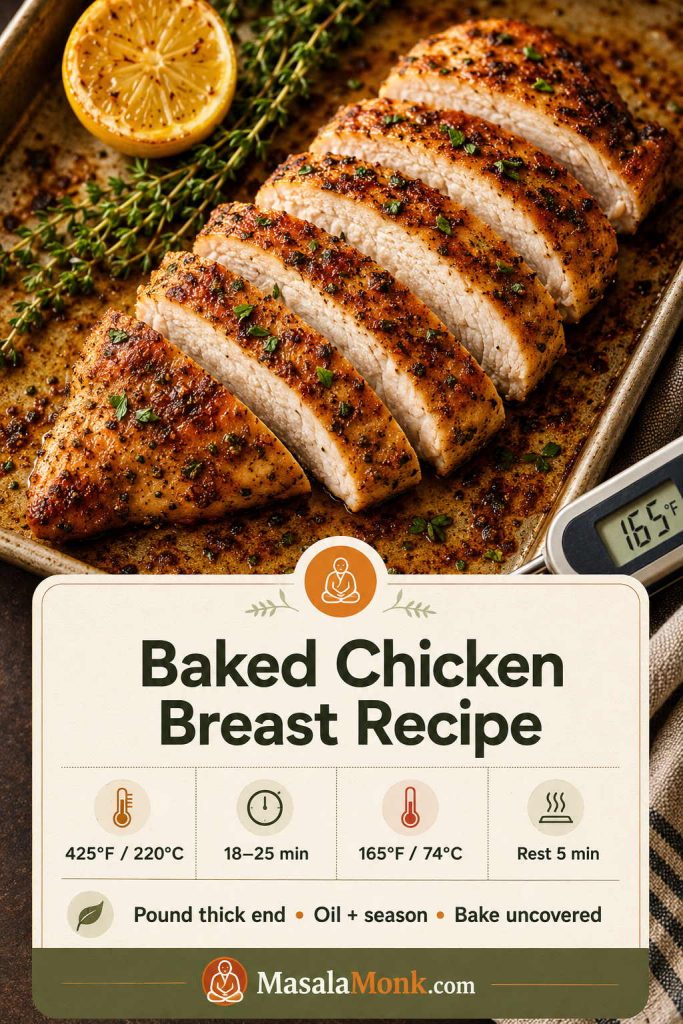
For juicy baked chicken breast, pound the thick end so the pieces cook evenly, rub the chicken with oil and seasoning, then bake uncovered at 425°F / 220°C until the center of the thickest piece reaches 165°F / 74°C. Rest for at least 5 minutes before slicing.
At 425°F / 220°C, medium boneless skinless chicken breasts usually take 18 to 22 minutes. Thin pieces may finish in 10 to 14 minutes, while very large or thick breasts can need 24 to 30 minutes or more. The clock gives you a window; the thermometer gives you the answer.
Use this baked chicken breast recipe as the base method, then adjust the timing based on the size, thickness, and cut of chicken you have.
Need to compare thin, medium, large, or extra-large pieces? Go straight to the bake time chart.
Baked Chicken Breast at a Glance
| Question | Best answer |
|---|---|
| Best oven temperature | 425°F / 220°C for tender, lightly browned chicken breast |
| Fan or convection oven | 400°F / 200°C fan, or reduce by about 25°F and check early |
| Normal bake time | 18–22 minutes for medium breasts at 425°F |
| Wider timing range | 16–25 minutes for most boneless breasts, depending on size and thickness |
| Safe internal temperature | 165°F / 74°C in the center of the thickest piece |
| Best cut | Boneless skinless chicken breasts, close in size |
| Best thickness | Even thickness, ideally about 3/4–1 inch / 2–2.5 cm for average breasts |
| Rest time | At least 5 minutes before slicing |
| Best tool | Instant-read thermometer |
Average-size, thawed, boneless chicken breasts that are close in thickness can follow the main recipe directly. Use the extra charts when your chicken is thin, very large, bone-in, frozen, or when your oven is already set to a different temperature.
Working with thin cutlets, extra-large pieces, or a different oven temperature? The thin vs thick chicken guide and oven temperature chart will be more useful than one fixed timer.
The Simple Method in Practice
In practice, this comes down to a few moves: pound the thick end so the chicken cooks evenly, oil the surface so the seasoning sticks, season all sides, bake hot, check the thickest piece, and rest before slicing.
Once you understand what the chicken in front of you needs — thinner timing, thicker prep, or a little more rest — the recipe becomes much less stressful.
Ingredients for Baked Chicken Breast
The seasoning here is built from pantry basics, so the chicken tastes good on its own. At the same time, it still fits into salads, bowls, wraps, pasta, sandwiches, and meal-prep boxes.
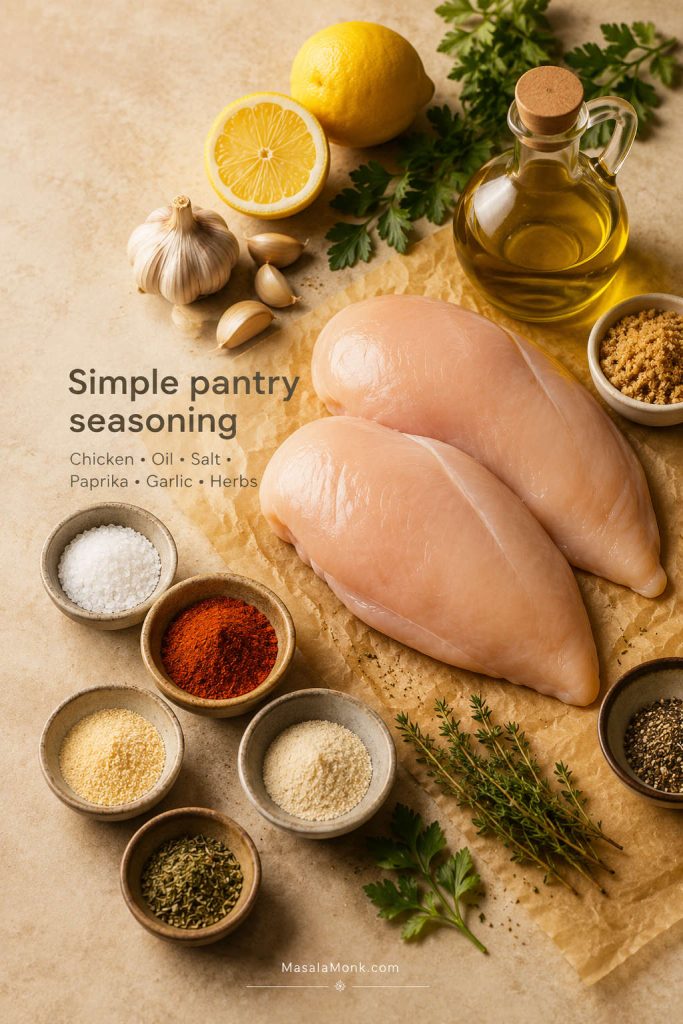
| Ingredient | US amount | Metric amount | Why it matters |
|---|---|---|---|
| Boneless skinless chicken breasts | 4 medium breasts, 5–8 oz each | 600–900g total | The main cut for fast, easy oven baked chicken breast |
| Olive oil or avocado oil | 1 1/2 tbsp | 22 ml | Helps seasoning stick and protects the surface |
| Fine salt | 1 tsp | About 6g | Seasons the chicken properly, not just the outside |
| Paprika or smoked paprika | 1 tsp | 2–3g | Adds color, warmth, and gentle flavor |
| Garlic powder | 1 tsp | About 3g | Gives the chicken a savory base |
| Onion powder | 1/2 tsp | 1–2g | Rounds out the seasoning |
| Black pepper | 1/2 tsp | About 1g | Adds mild heat |
| Italian seasoning, oregano, or thyme | 1 tsp | About 1g | Adds herby flavor without needing a marinade |
| Brown sugar, optional | 1–2 tsp | 4–8g | Helps browning, especially if you are not broiling |
| Lemon wedges or parsley, optional | For serving | For serving | Adds freshness at the end |
Best Chicken Breast to Use
Use boneless skinless chicken breasts that are close in size. Most supermarket packs are uneven: one breast may be thick enough to need pounding, while another may already be thin enough to overcook early.
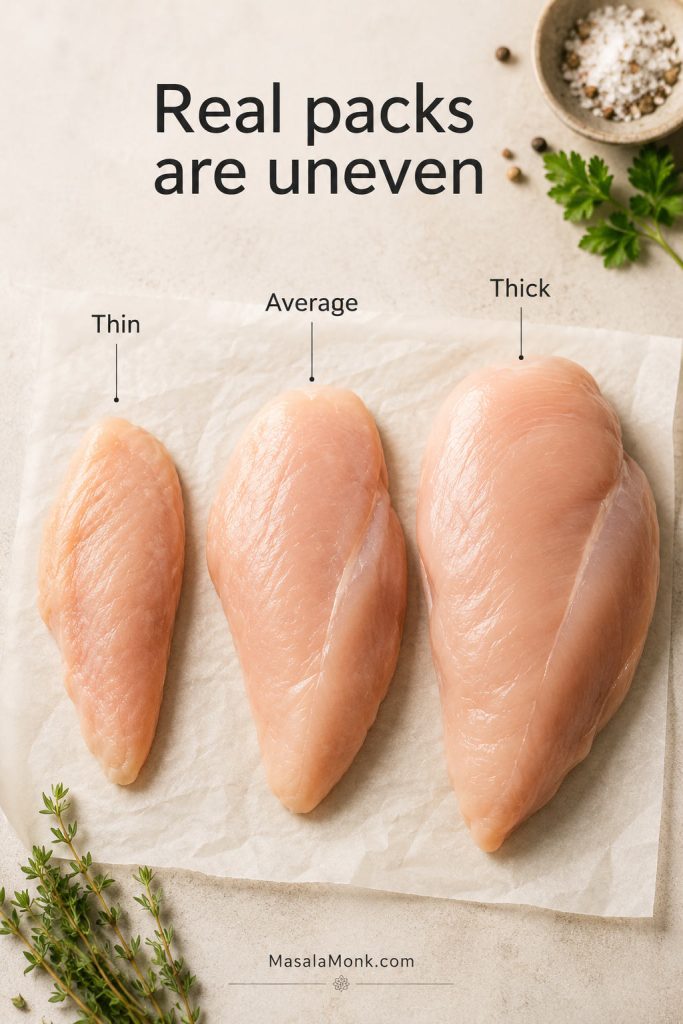
For this method, similar-size pieces matter more than buying perfectly shaped chicken. As a result, the closer the pieces are in thickness, the easier it is to avoid dry edges and undercooked centers.
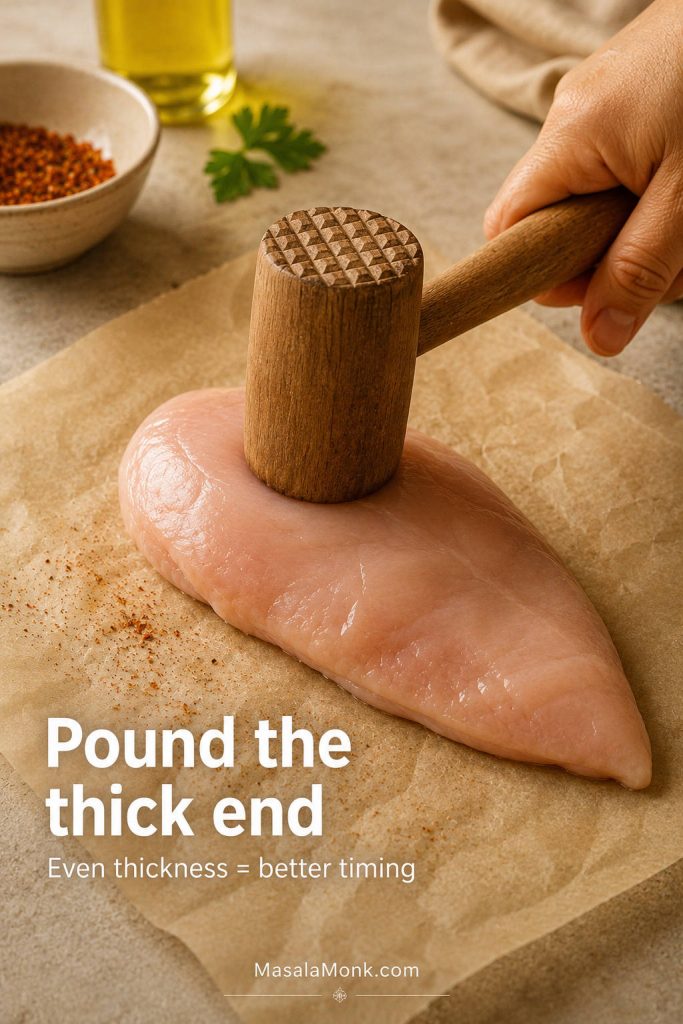
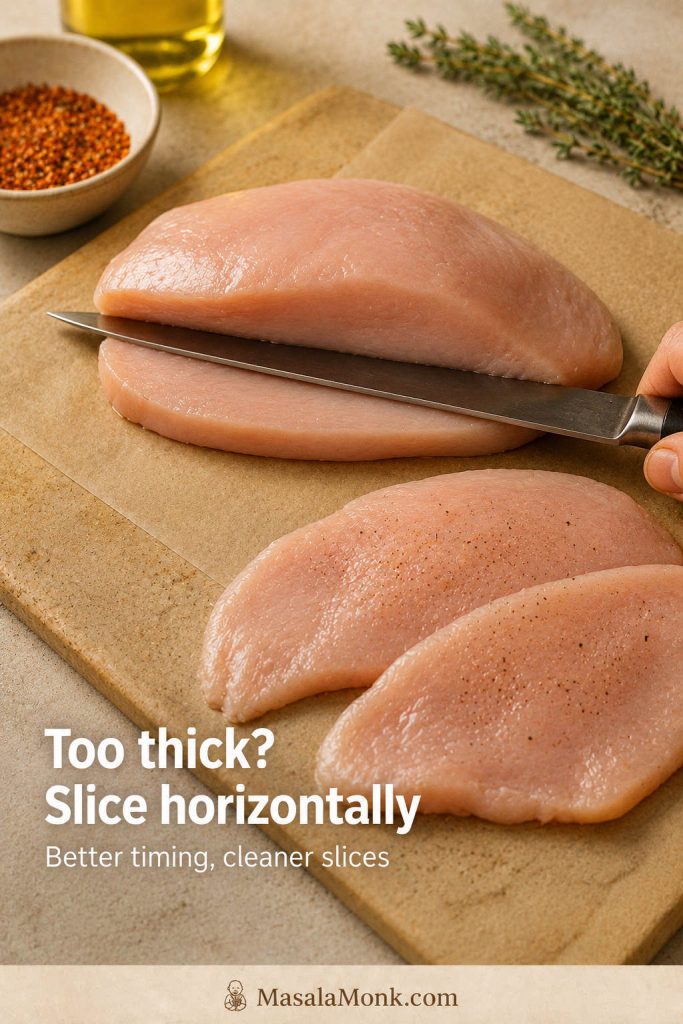
Very large chicken breasts are often thick at one end and thin at the other. For the best texture, pound only the bulky end until the piece is closer to one thickness, or slice extra-large breasts horizontally into two thinner pieces. That one step does more for tenderness than adding another sauce or spice.
Best Seasoning for Baked Chicken Breast
The best seasoning for baked chicken breast gives salt, savoriness, color, and aroma without requiring a long marinade. Salt, paprika, garlic powder, onion powder, black pepper, and herbs are enough for a reliable everyday version.
The seasoning should look like a real coating, not a few dusty patches. Because chicken breast is mild, it needs enough salt and spice across the whole surface. If the top looks barely seasoned before baking, the finished chicken will probably taste flat.
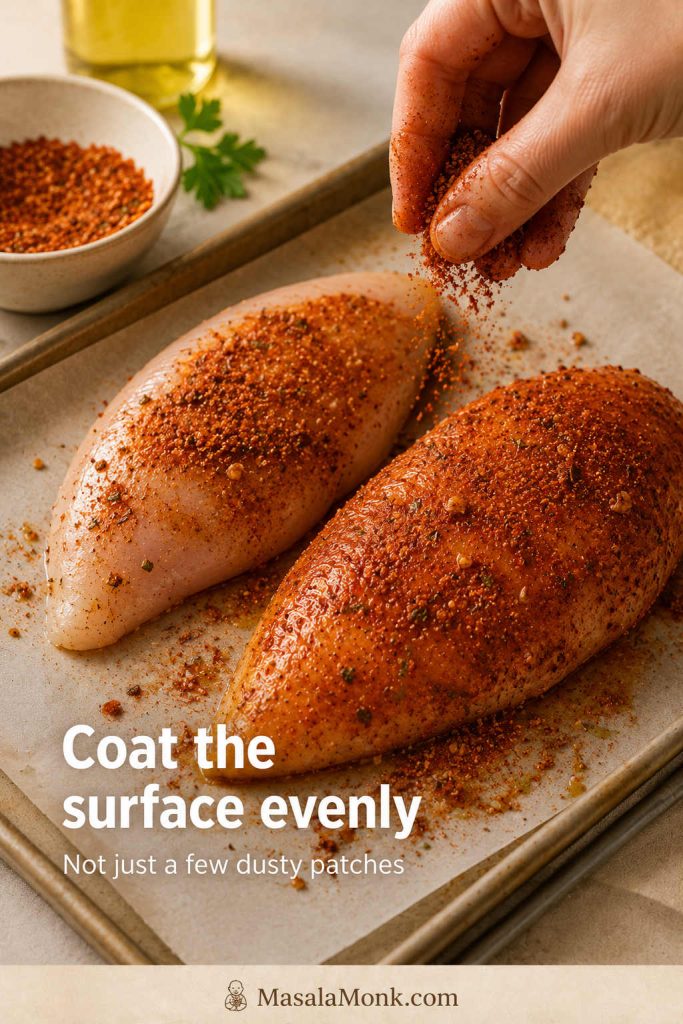
The brown sugar is optional, but useful. Although it does not make the chicken taste sweet, it helps the paprika-garlic coating brown faster, especially because boneless skinless chicken breast has no skin to crisp.
Oil or Butter?
Oil is the easiest choice for high-heat baking because it coats the chicken evenly and handles the oven well. Butter tastes great, but it can brown faster, so it is often better as a finishing sauce with garlic, lemon, herbs, or pan juices.
Equipment You Need
You do not need special equipment, but a thermometer makes a huge difference. Without one, baked chicken breast often goes dry because the cook is guessing by time, color, or juices instead of checking the center of the thickest piece.
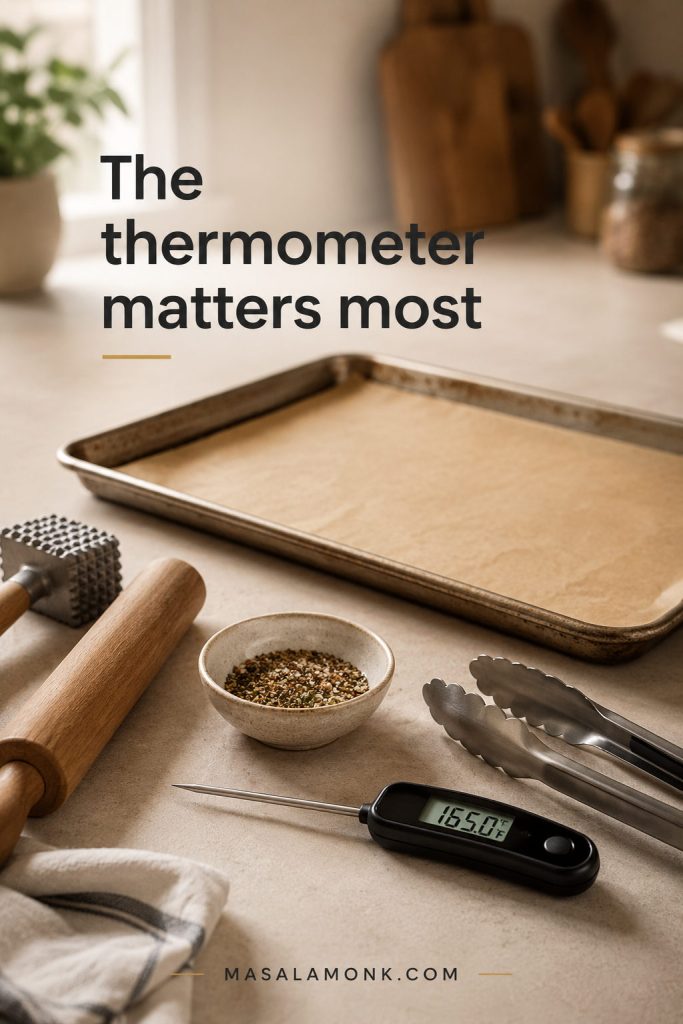
No thermometer yet? Read what to do if you do not have one, but a thermometer is still the most reliable way to avoid dry chicken.
- Instant-read thermometer: the most important tool for tender, safe chicken.
- Rimmed sheet pan or metal baking dish: good for high heat and even cooking.
- Parchment paper or foil: useful for cleanup and to prevent sticking.
- Meat mallet or rolling pin: helps even out thick chicken breasts.
- Small bowl: for mixing the seasoning.
- Tongs: for handling seasoned chicken neatly.
- Cutting board: for resting and slicing after baking.
How to Make Baked Chicken Breast
This method uses a plain, reliable oven approach: boneless skinless chicken breasts, baked uncovered, with enough seasoning to taste good on their own and enough flexibility to use later in other meals.
1. Preheat the oven
Preheat the oven to 425°F / 220°C. Use the middle rack so the chicken cooks evenly. For a fan or convection oven, use 400°F / 200°C fan and start checking a few minutes early.
Fan and convection ovens move hot air more aggressively, so chicken can cook faster and brown sooner. Reduce the temperature by about 25°F / 15–20°C and start checking a few minutes before the chart says.
2. Pat the chicken dry
Pat the chicken breasts dry with paper towels. A dry surface helps the oil and seasoning cling better. Otherwise, very wet chicken can steam in the pan and release more liquid.
3. Pound the thick end
When the thick end is much taller than the thin end, gently pound only the bulky part with a meat mallet or rolling pin. Aim for an even piece, roughly 3/4 inch to 1 inch / 2 to 2.5 cm thick for average chicken breasts.
When to Slice Large Chicken Breasts Horizontally
Extra-large chicken breasts usually need a different move: slice them horizontally into thinner pieces instead of forcing one thick piece to cook evenly. This makes the timing more predictable and, more importantly, helps avoid a dry outside with an undercooked center.
4. Season the chicken
Mix the salt, paprika, garlic powder, onion powder, black pepper, herbs, and optional brown sugar in a small bowl. Then rub the chicken with oil and coat both sides with the seasoning. Season all sides, not just the top.
5. Bake uncovered
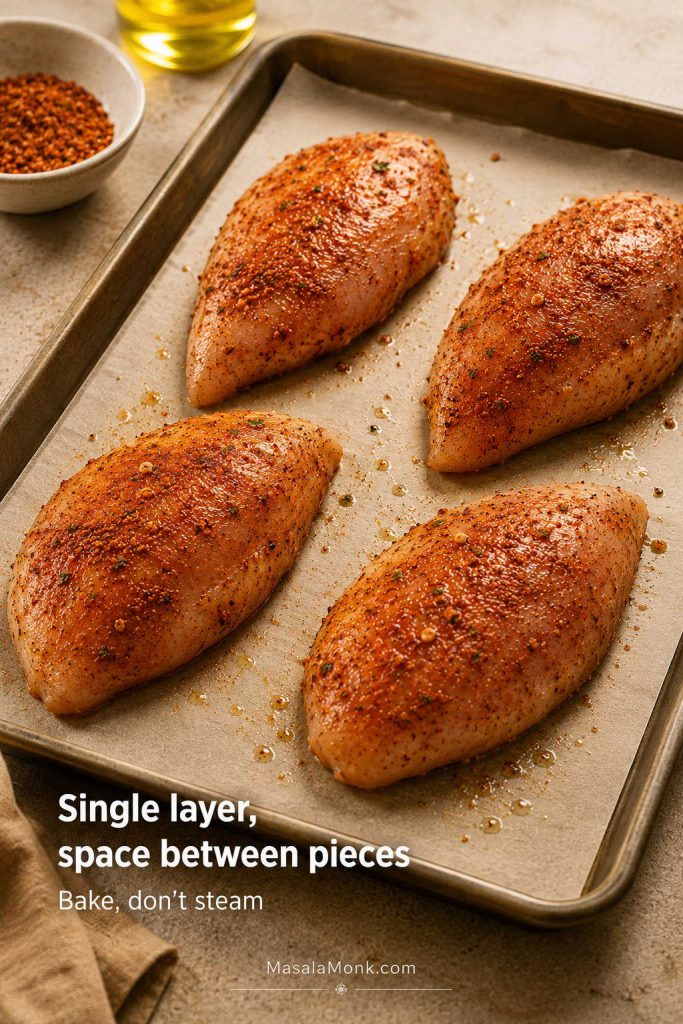
Arrange the chicken in a single layer with a little space between pieces. Place the smoother side up if you want the best presentation. Bake on the middle rack, uncovered, until each piece reaches the safe temperature.
Smaller or thinner pieces should come out early. Waiting for the largest breast is how the smaller one turns dry.
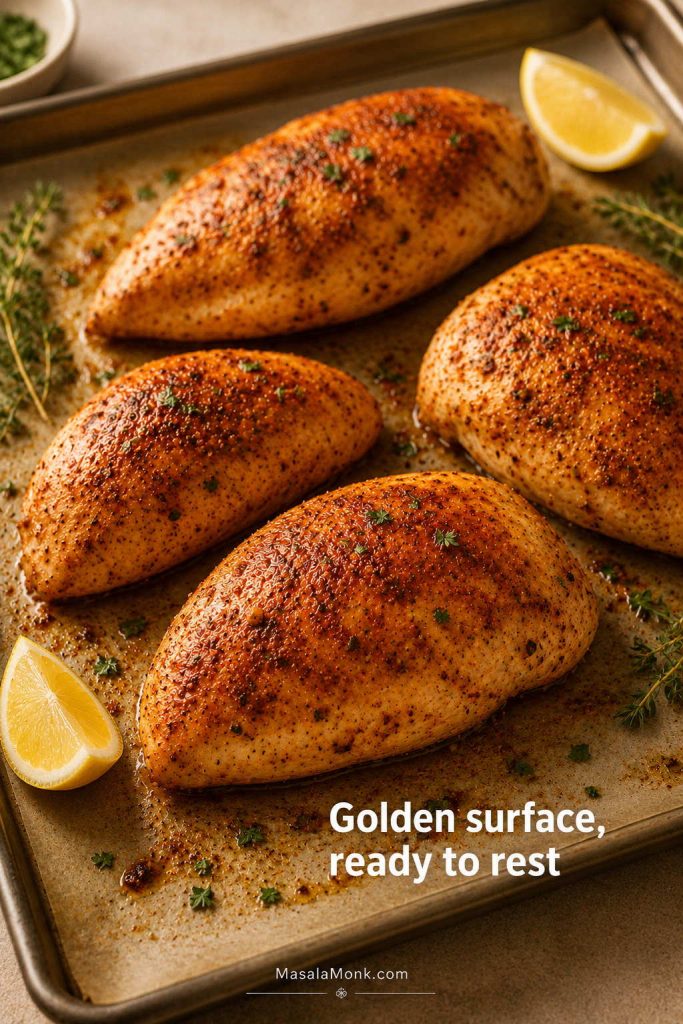
What the Chicken Should Look Like After Baking
When the chicken comes out of the oven, look for a lightly browned surface, seasoning that still clings, and a small amount of pan juice rather than a watery tray.
For a full tray dinner instead of plain baked chicken breast, this Sheet Pan Chicken Fajitas recipe uses the same oven-friendly logic with sliced chicken, peppers, onions, and smoky seasoning.
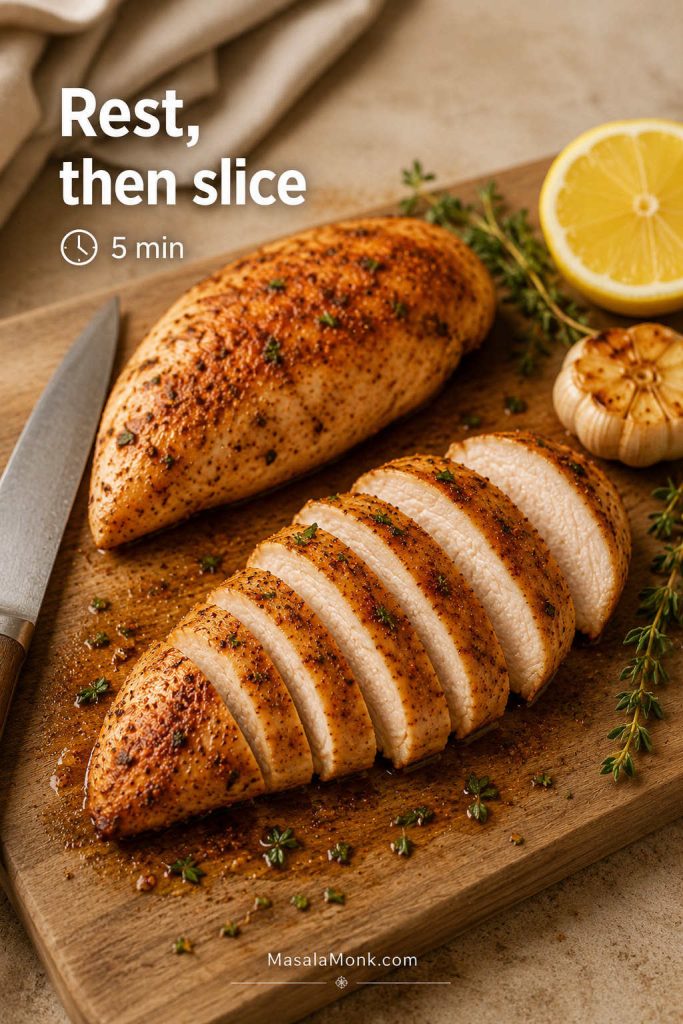
6. Rest before slicing
Move the chicken to a cutting board and rest for at least 5 minutes. Then slice against the grain for the most tender texture. For meal prep, let the chicken cool before packing it into containers.
Should You Cover Chicken Breast While Baking?
For this recipe, bake the chicken uncovered. Covering traps steam and can make the surface wetter instead of lightly browned. However, covered baking can work well for saucy or casserole-style chicken recipes.
Do You Need to Flip Chicken Breast?
No, not for this method. Chicken arranged in a single layer on a sheet pan or shallow baking dish can bake without flipping. A wet pan or uneven oven may make flipping once useful, but it is not required.
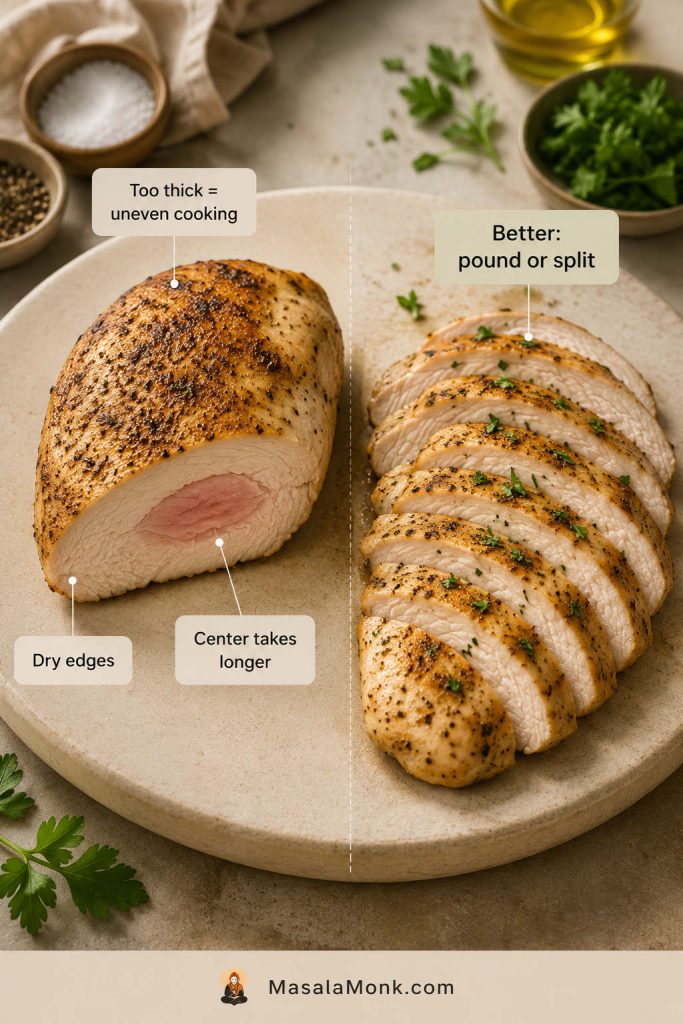
What Good Baked Chicken Breast Looks Like
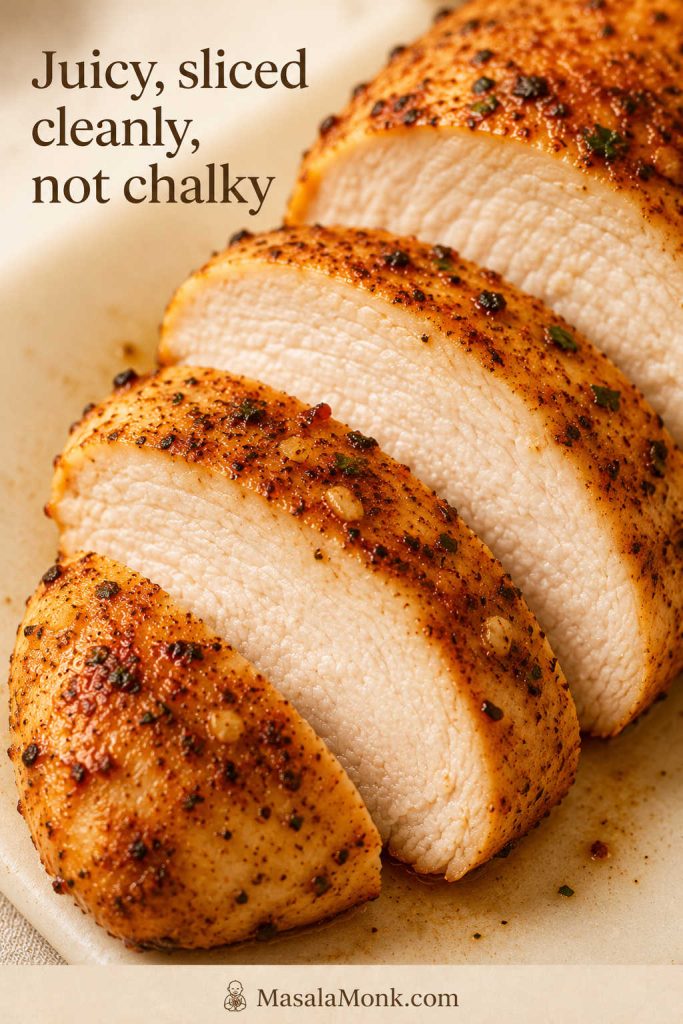
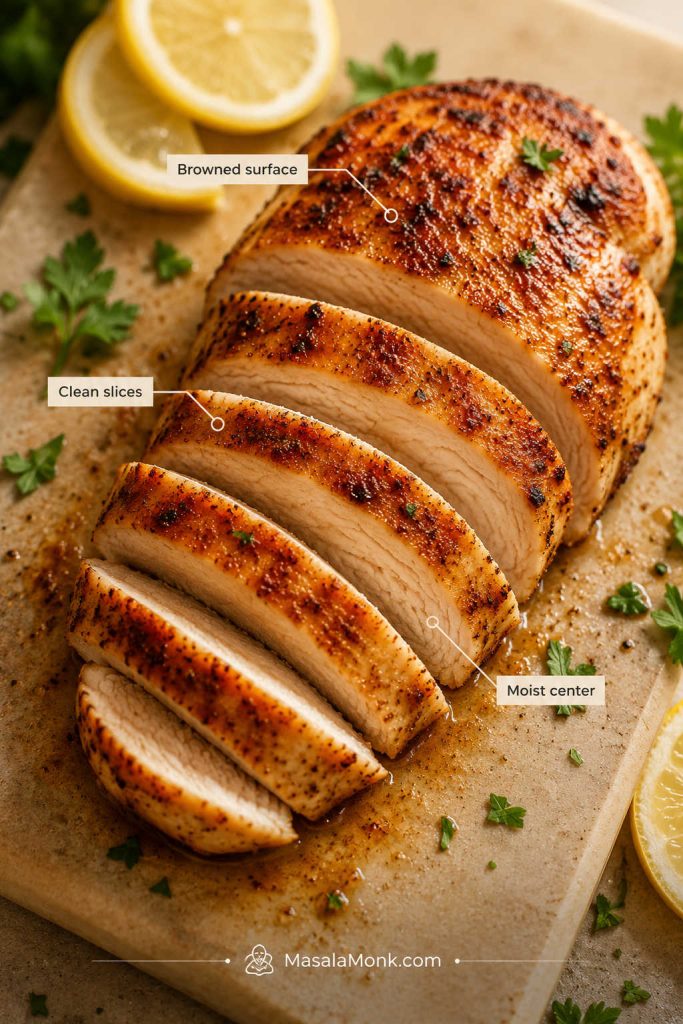
Good baked chicken breast should have a lightly browned, seasoned surface and a center that slices cleanly without looking wet, raw, chalky, or stringy. When you cut it after resting, you may see a little juice, but the board should not flood immediately.
The slices should bend slightly instead of crumbling, and the cut surface should still look moist enough to eat without hiding it under sauce. A breast that looks dry around the edges but underdone in the center was probably too thick or uneven before it went into the oven. Next time, pound the thick end or slice the breast horizontally before baking.
How Long to Bake Chicken Breast
With this method, medium boneless chicken breast usually takes 18 to 22 minutes at 425°F / 220°C. Thin pieces can finish in 10 to 14 minutes, while large thick breasts may need 24 to 30 minutes or more.
Use 18 to 22 minutes as the normal starting point for medium chicken breasts. However, the wider 16 to 25 minute range covers smaller, thinner, larger, or uneven pieces. There is no single perfect timer setting because two pieces from the same pack can cook differently.
As a general rule, thin chicken breast cooks fast and dries fast. Thick chicken breast needs either more time or better prep, such as pounding or slicing horizontally. Smaller pieces may finish several minutes before larger ones, so remove them as they are done.
Baked Chicken Breast Time at 425°F / 220°C
| Chicken breast size | Approx weight | Thickness guide | Approx bake time at 425°F / 220°C |
|---|---|---|---|
| Thin-sliced breast or cutlet | 3–5 oz | About 1/2 inch / 1.25 cm | 10–14 minutes |
| Small breast | 5–6 oz / 150–180g | 0.6–0.8 inch / 1.5–2 cm | 13–18 minutes |
| Medium breast | 7–8 oz / 200–225g | 3/4–1 inch / 2–2.5 cm | 18–22 minutes |
| Large breast | 9–10 oz / 255–285g | About 1 inch / 2.5 cm | 22–26 minutes |
| Extra-large breast | 11–12 oz / 310–340g | Usually thick unless split or pounded | 24–30+ minutes |

Using 350°F, 375°F, 400°F, or 450°F instead? Use the oven temperature chart next.
Best Oven Temperature for Baked Chicken Breast
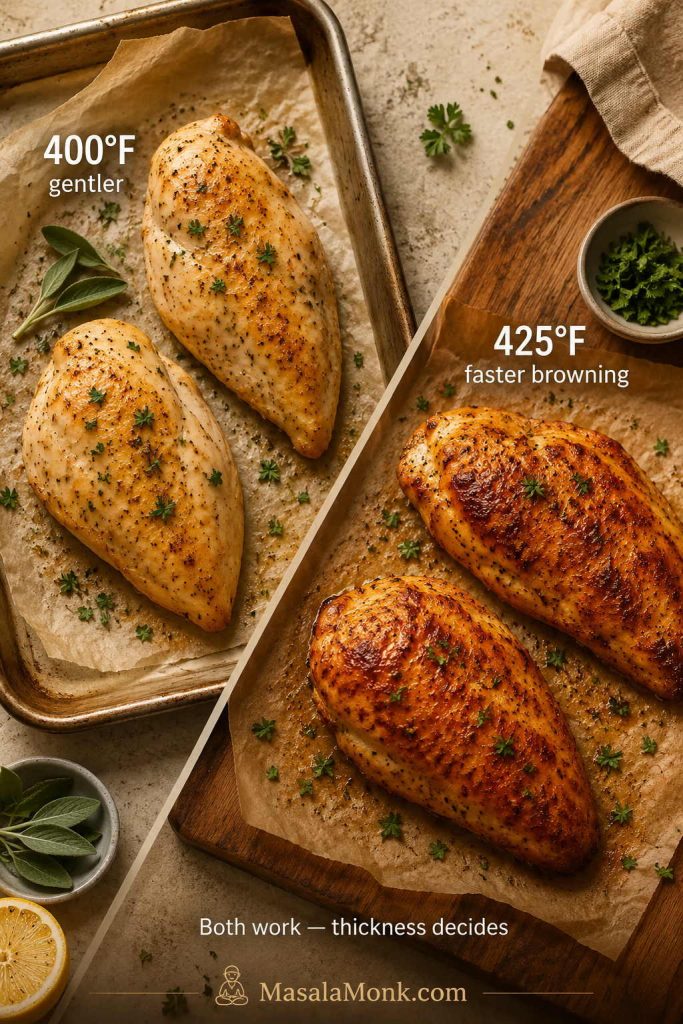
The best oven temperature for most boneless skinless chicken breasts is 425°F / 220°C. It is hot enough to cook quickly and brown lightly, but still manageable if you check early and use similar-size pieces.
That said, 425°F is not the only correct temperature. A 400°F / 200°C oven is better when you want a slightly gentler bake or have larger pieces. When the breasts are even in thickness, 425°F gives faster cooking with better surface color.
Chicken Breast Oven Temperature Chart
Use this chart when your oven is already set to a different temperature, your chicken is larger than average, or you simply feel more comfortable with a gentler bake. The timing changes, but the final check stays the same.
| Oven temperature | Best for | Approx time for medium boneless breast |
|---|---|---|
| 350°F / 175°C | Gentle bake, less browning, slower cooking | 25–35 minutes |
| 375°F / 190°C | Larger or thicker breasts, gentler cooking | 22–30 minutes |
| 400°F / 200°C | Balanced weeknight bake | 18–26 minutes |
| 425°F / 220°C | Best default for tender, lightly browned chicken | 16–25 minutes |
| 450°F / 232°C | Fastest bake, best for thinner/even pieces, less forgiving | 15–22 minutes |
If you are unsure, choose 425°F for plain seasoned chicken breast, 400°F for a slightly gentler middle ground, and 375°F for very large pieces or saucier recipes. Lower heat is not automatically juicier; it just gives the chicken more time in the oven, so temperature checking still matters.
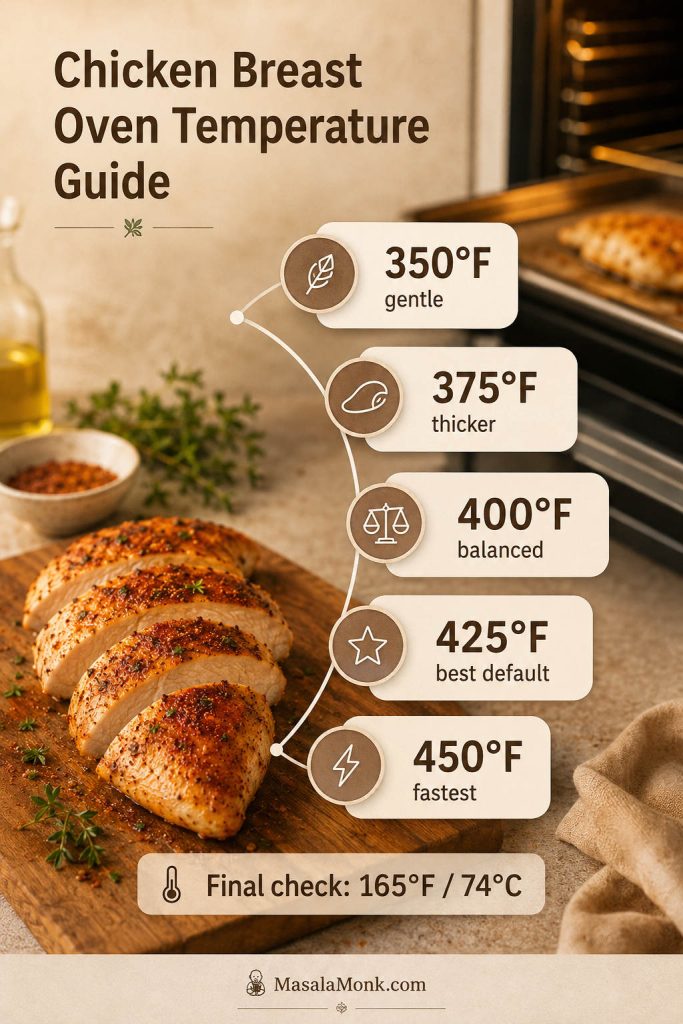
Whichever oven temperature you choose, finish with the internal temperature check instead of relying only on time.
How Long to Bake Chicken Breast at 350°F
At 350°F / 175°C, medium boneless chicken breasts usually take about 25 to 35 minutes. This temperature is gentle, but it gives less browning and can dry the chicken if it stays in the oven too long.
How Long to Bake Chicken Breast at 375°F
At 375°F / 190°C, medium boneless chicken breasts usually take about 22 to 30 minutes. This is a good option for thicker pieces or recipes with a wetter marinade or sauce.
How Long to Bake Chicken Breast at 400°F
At 400°F / 200°C, medium boneless chicken breasts usually take about 18 to 26 minutes. This is a balanced middle temperature if you do not want to bake as hot as 425°F.
How Long to Bake Chicken Breast at 425°F
At 425°F / 220°C, medium boneless chicken breasts usually take about 16 to 25 minutes, depending on thickness. This is the default temperature for the main recipe because it gives the best balance of speed, tenderness, and light browning.
How Long to Bake Chicken Breast at 450°F
At 450°F / 232°C, chicken breast cooks fast, often in about 15 to 22 minutes. This temperature can work well for even pieces, but it is less forgiving. Check early, and avoid using bakeware that is not rated for high heat.
Internal Temperature for Baked Chicken Breast
The safe internal temperature for baked chicken breast is 165°F / 74°C in the center of the thickest piece. Use an instant-read thermometer and measure the largest breast first. Do not rely only on color, juices, or the outside texture.
You can use the FoodSafety.gov safe minimum internal temperature chart as the authority for poultry doneness. It lists chicken, turkey, and other poultry at 165°F / 74°C.
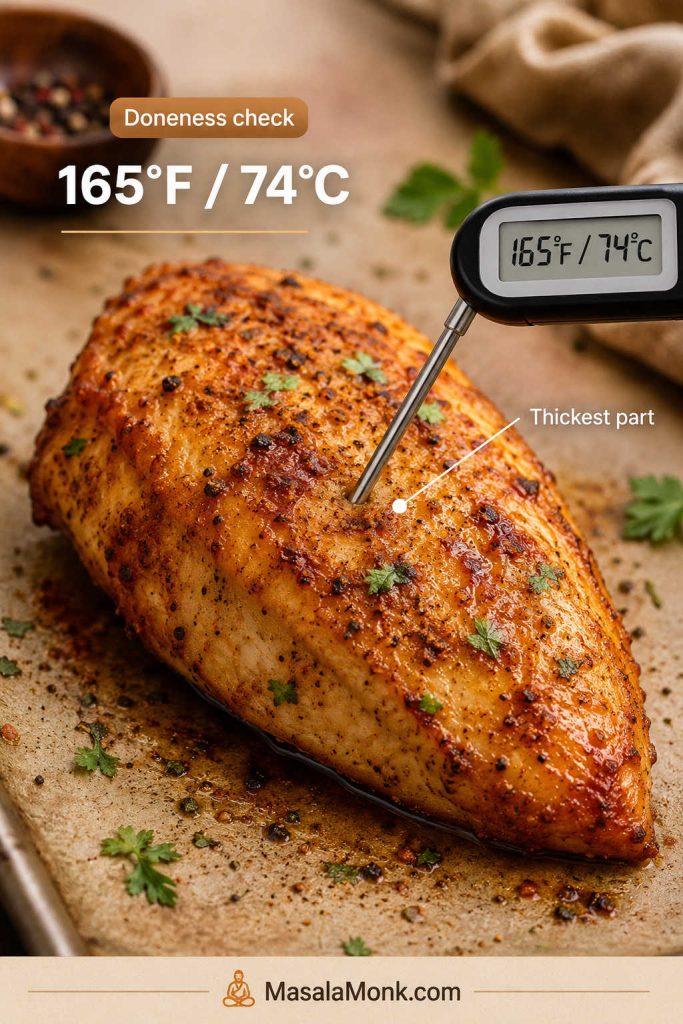
When checking the temperature, avoid touching the pan. For bone-in chicken breast, insert the thermometer near the deepest part of the meat without touching bone.
Can You Pull Chicken Breast at 160°F?
The simplest safety rule is to cook chicken breast until the thickest part reaches 165°F / 74°C. Some experienced cooks remove chicken around 160°F and let carryover heat finish the last few degrees while it rests, but that only makes sense if you are using an accurate thermometer and the chicken continues rising to 165°F. If you want the clearest beginner-friendly target, use 165°F.
What If You Do Not Have a Thermometer?
A thermometer is the only reliable way to know chicken has reached 165°F / 74°C without overcooking it. Without one, use the timing chart only as an estimate and cut into the thickest piece to check that it is no longer pink. Color and juices are less reliable than temperature, so an instant-read thermometer is worth buying if you cook chicken often.
Thin vs Thick Chicken Breast
Thickness matters more than the number on the timer. A thick 6 oz chicken breast can take longer than a flatter 8 oz chicken breast because heat has to reach the center.
For thin-sliced chicken breast or cutlets, start testing around 8 to 10 minutes at 425°F / 220°C. Thin pieces dry out quickly, so do not wait for the same timing you would use for a full chicken breast.
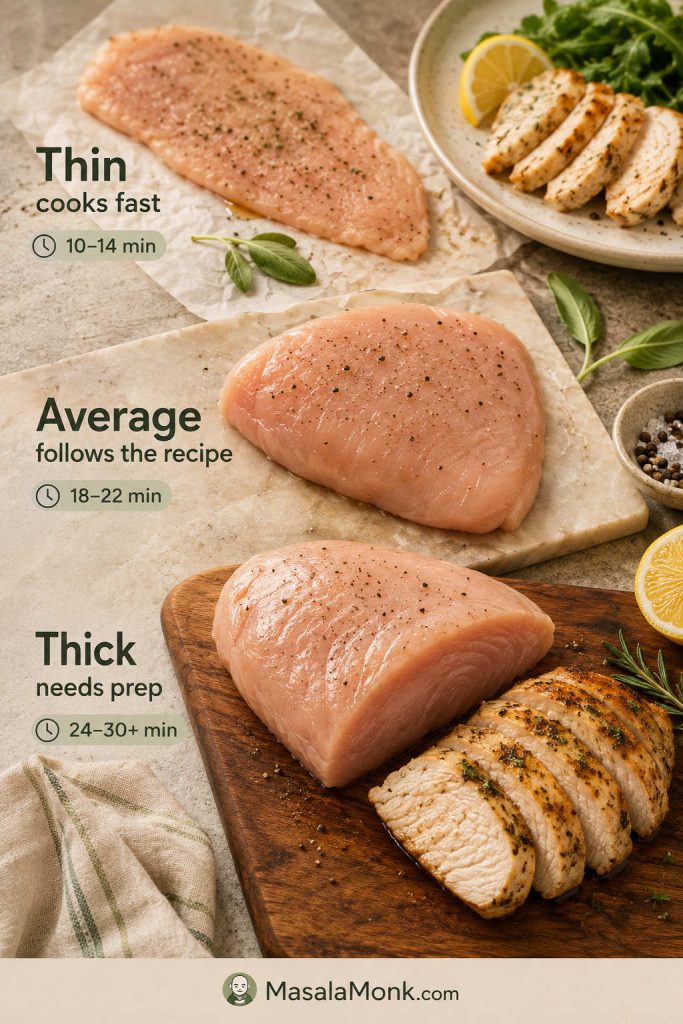
| Type | What to do | Timing note |
|---|---|---|
| Thin-sliced chicken breast | Season lightly, bake fast, check early | Often 10–14 minutes at 425°F |
| Average chicken breast | Use the main recipe method | Usually 18–22 minutes at 425°F |
| Large thick chicken breast | Pound, butterfly, or slice horizontally | Can take 24–30+ minutes if left thick |
| Uneven pieces | Sort by size or remove smaller pieces early | Do not force every piece to finish at the same time |
Why Large Chicken Breasts Cook Unevenly
Large chicken breasts can look done at the edges before the center is ready. That is why thick pieces need either a gentler bake, more time, or better prep before they go into the oven.
Boneless Skinless vs Bone-In Chicken Breast
This recipe is written for boneless skinless chicken breast because it is the most common choice for quick dinners and meal prep. Bone-in skin-on chicken breast, also called split chicken breast, is juicier and more flavorful, but it takes longer.
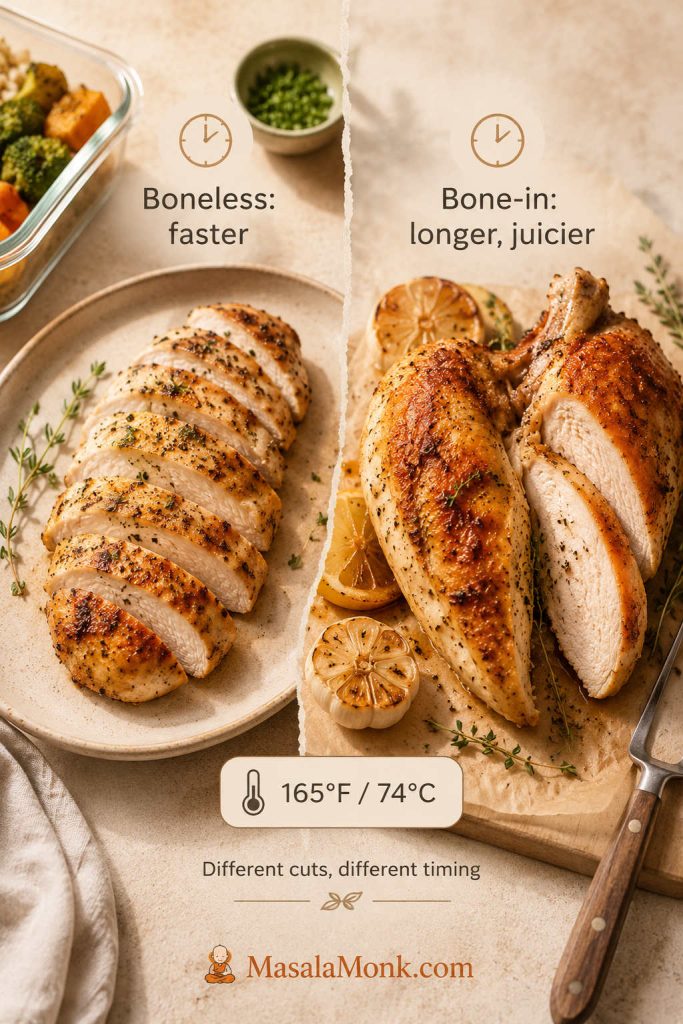
- Boneless skinless chicken breast: fastest, leanest, easiest for salads, bowls, wraps, pasta, and sandwiches.
- Bone-in skin-on chicken breast: more flavorful and forgiving, but slower to bake.
- Do not use the same bake time for both. Bone-in chicken breast needs more time, and the thermometer should go near the thickest part without touching bone.
As a rough guide, bone-in split chicken breasts often need closer to 35 to 45 minutes at 400°F / 200°C, depending on size. However, the thermometer still decides, so check the thickest part of the meat without touching bone.
Why This Method Keeps Chicken Breast Juicy
Chicken breast usually gets dry for one of three reasons: the pieces are uneven, the chicken is baked too long, or it is sliced before the juices settle. Seasoning can make chicken taste better, but it cannot fully rescue meat that has been overcooked.
This method fixes those problems directly. Pound the thick end, coat the surface with oil and seasoning, bake hot, measure the thickest piece, and rest before slicing. Once you stop treating the timer as a guarantee, baked chicken breast becomes much easier to repeat.
- Use similar-size pieces. Chicken breasts of the same size cook more evenly.
- Pound the thick end. This prevents the thin end from drying out while the center finishes.
- Do not skip the oil. Oil helps protect the surface and carries flavor.
- Bake hot and uncovered. A hot oven cooks the chicken efficiently and gives better color.
- Let temperature decide. Overcooking is the main reason chicken breast gets dry.
- Remove smaller pieces early. If one breast is thinner, it may finish before the others.
- Rest before slicing. Give the juices a few minutes to settle.
- Slice against the grain. This makes the chicken feel more tender.
If your chicken breast keeps turning out dry, it probably does not mean you are bad at cooking chicken. It usually means the pieces needed a little prep before they went into the oven.
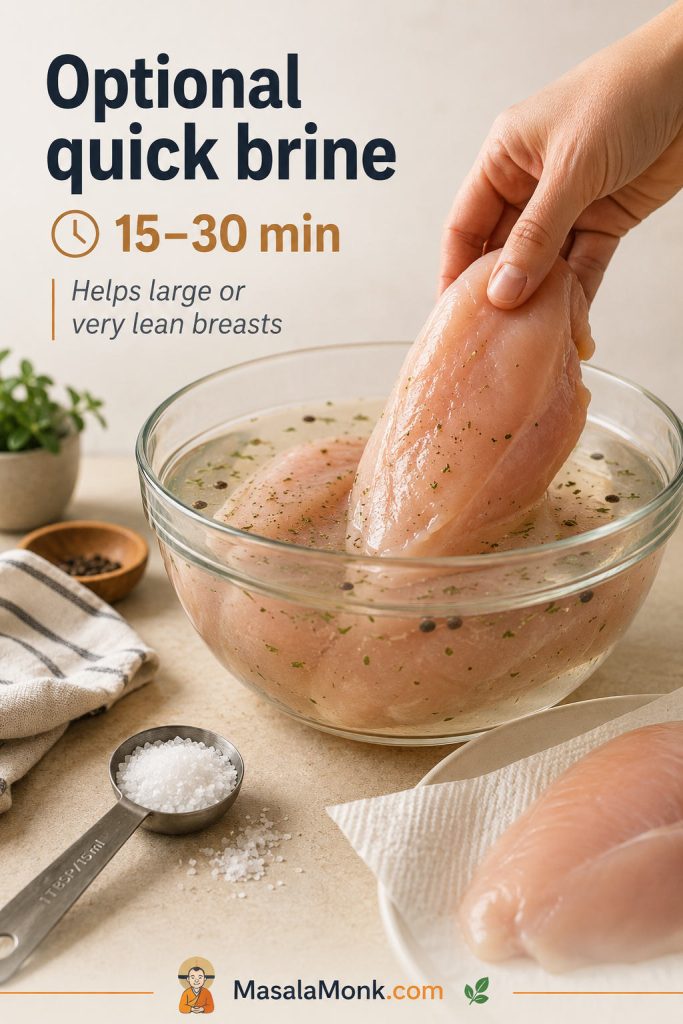
Should You Brine Chicken Breast Before Baking?
You do not need to brine chicken breast for this recipe. If the chicken is even in thickness and you use a thermometer, it can still come out tender and moist. However, a quick brine can help if your chicken breasts are very large, very lean, or often turn out dry.
If dinner is in 30 minutes, skip the brine and focus on the bigger wins: even thickness, oil, seasoning, hot oven, and a reliable doneness check.
Quick Chicken Breast Brine
- 4 cups / 950 ml cold water
- 2 tbsp kosher salt, or 1 tbsp fine salt
- Brine for 15–30 minutes
- Pat very dry before seasoning
- Use less salt in the seasoning after brining
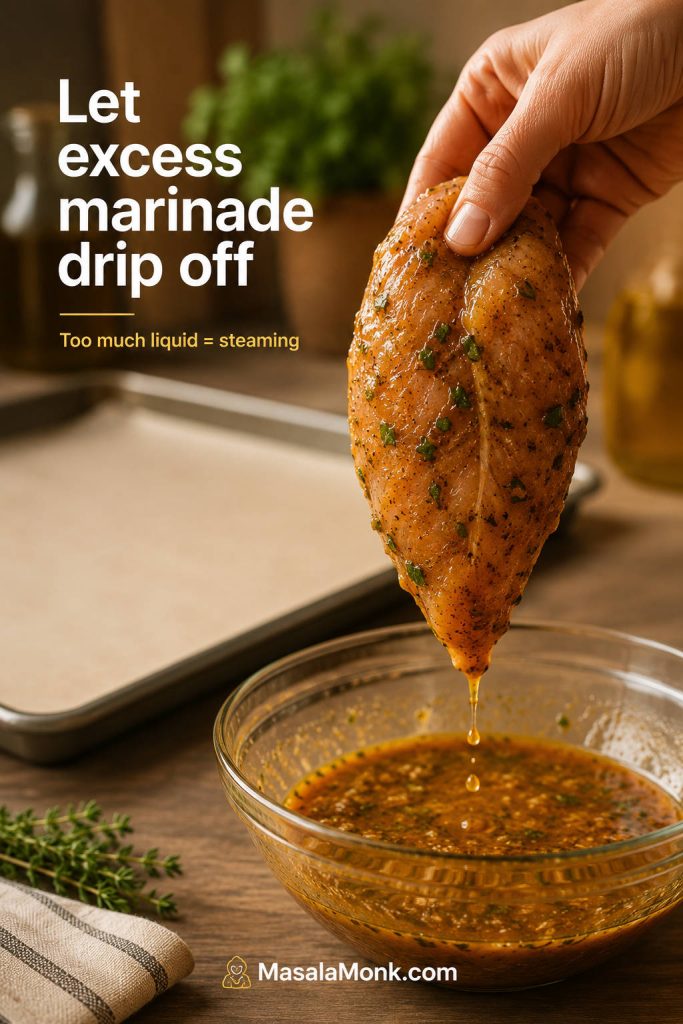
Can You Marinate Chicken Breast Before Baking?
Yes, you can marinate chicken breast before baking. A short marinade of 30 minutes can add flavor, while a longer marinade can help with meal prep. However, very acidic marinades can change the texture if the chicken sits too long.
If the chicken has been sitting in a wet marinade, do not pour all of that liquid into the pan. Let excess drip off first and pat the surface lightly if needed. A little moisture is fine, but too much liquid makes the chicken steam instead of bake, which reduces browning and can create watery pan juices.
Can You Bake Frozen Chicken Breast?
For best results, thaw chicken breast before baking. Thawed chicken seasons more evenly, cooks more predictably, and is easier to pound before it goes into the oven.
If baking from frozen, make sure the pieces are separated, not frozen together in a block. As a rough guide, frozen chicken breast can take about 1.5 times as long as thawed chicken, especially if the pieces are thick. Check the thickest piece carefully because the chicken still needs to reach 165°F / 74°C.

Because frozen chicken needs longer, use timing as a rough guide and finish with the internal temperature check.
Do not thaw chicken on the counter. Refrigerator thawing is the easiest safe method; cold-water and microwave thawing are faster, but the chicken should be cooked right away afterward. For a deeper safety reference on thawing chicken and cooking from frozen, the USDA FSIS Chicken from Farm to Table guide explains safe thawing methods and cooking guidance.
Baked Chicken Breast Variations
Once the method is working, the flavor can change easily. Keep the same oven temperature and doneness target, then adjust the seasoning or sauce.
For sweet sauces like BBQ or honey mustard, bake the chicken almost all the way first, then brush on the sauce during the final few minutes. This gives flavor without burning the sugars.
Six Baked Chicken Breast Flavor Directions

- Lemon pepper baked chicken breast: use lemon pepper, garlic powder, and a squeeze of fresh lemon after baking.
- Garlic butter baked chicken breast: finish with melted butter, minced garlic, parsley, and pan juices.
- BBQ baked chicken breast: bake most of the way, brush with barbecue sauce near the end, and return to the oven briefly.
- Italian baked chicken breast: use Italian seasoning, garlic, paprika, and a little parmesan after baking.
- Cajun baked chicken breast: use Cajun seasoning and serve with rice, salad, or pasta. If you want a creamier pasta dinner, this Cajun Chicken Pasta is a natural next recipe.
- Honey mustard baked chicken breast: brush with honey mustard near the end so the sugars do not burn.
- Pesto baked chicken breast: spoon pesto over the chicken after baking, or add it during the final few minutes. Leftover sliced chicken also works well in Chicken Pesto Pasta.
- Spicy chili-lime chicken breast: use chili powder, paprika, garlic, lime juice, and a little oil.
When to Use Another Chicken Method
Sauces and Serving Ideas
The nice thing about simple baked chicken breast is that it does not trap you into one meal. When you are serving it as a main dish, a quick sauce makes it feel more complete without changing the basic method.
Easy Sauces for Baked Chicken Breast

- Garlic butter
- Lemon pan juices
- Honey mustard
- Barbecue sauce
- Pesto
- Salsa
- Mushroom cream sauce
- Yogurt herb sauce
- Hot sauce and butter
For a fresh herb sauce that makes plain baked chicken breast taste brighter, try spooning over homemade chimichurri. It works especially well when the chicken is sliced for rice bowls, potatoes, vegetables, or next-day lunches.
What to Serve with Baked Chicken Breast
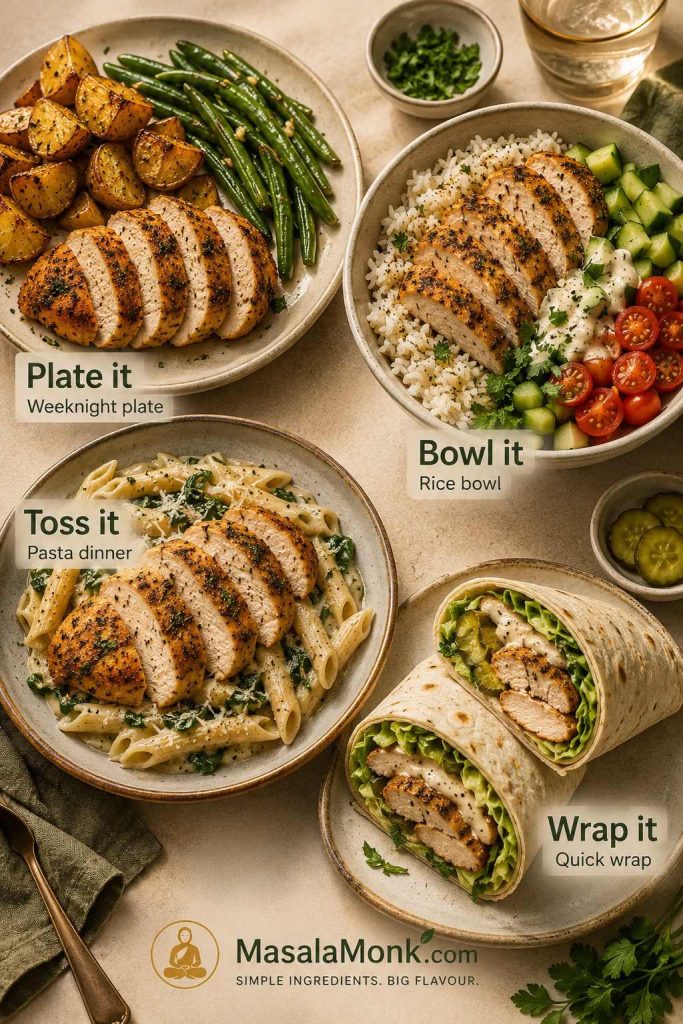
- Weeknight plate: sliced chicken, roasted potatoes, green beans, and garlic butter or pan juices.
- Rice bowl: chicken, rice, cucumber, tomatoes, herbs, and chimichurri or yogurt sauce.
- Meal-prep lunch: cold sliced chicken, potato salad, greens, and a lemony dressing.
- Pasta dinner: cubed chicken, pesto or Cajun cream sauce, and a simple salad.
- Quick wrap: sliced chicken, lettuce, sauce, pickles or onions, and a soft tortilla.
- Soup or noodle bowl: sliced chicken added at the end so it warms through without drying out.
For a make-ahead side that works with cold sliced chicken, wraps, or picnic-style plates, this Potato Salad recipe guide gives you classic, lighter, and variation-friendly options.
Baked Chicken Breast for Meal Prep
This recipe works well for meal prep because the chicken can be sliced, cubed, or shredded after cooking. Keep the seasoning simple if you want to use it in several meals during the week, then save stronger sauces for the day you serve it.
The point of baked chicken breast is not just tonight’s dinner. It is tomorrow’s salad, the wrap you can make in five minutes, the pasta that needs protein, and the lunch that does not feel like punishment. When the chicken is cooked gently and stored well, it becomes useful instead of dry meal-prep filler.
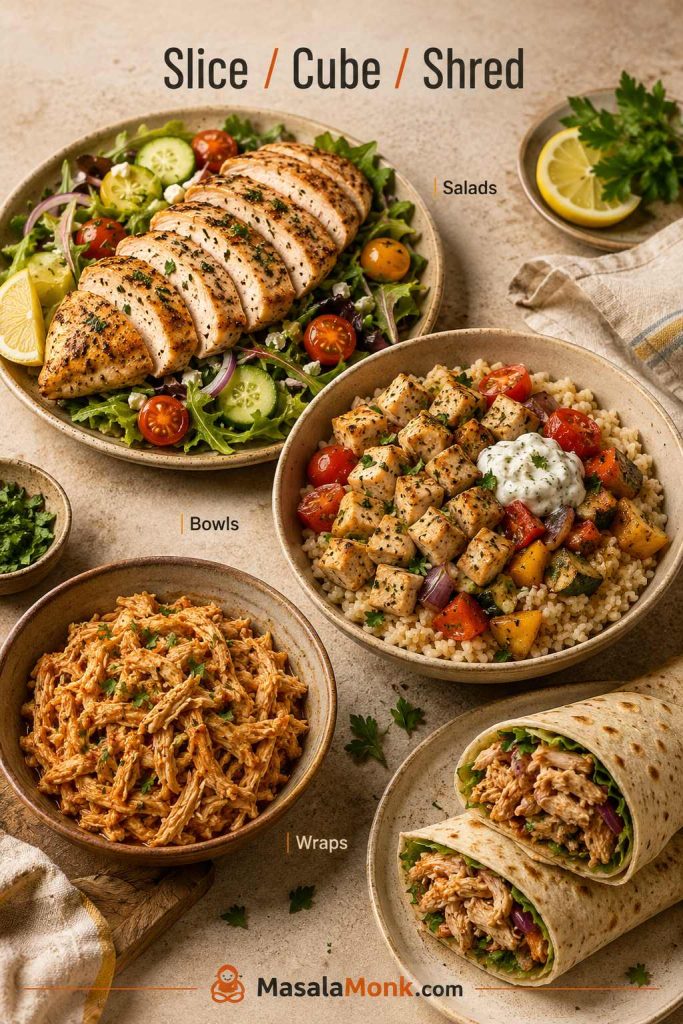
- Cool the chicken before storing.
- Slice it for salads, bowls, wraps, and sandwiches.
- Cube it for pasta, rice bowls, and quick skillets.
- Shred it for tacos, soups, and saucy meals.
- Keep sauces separate until serving when possible.
How Much Cooked Chicken Does This Make?
Four medium chicken breasts usually give enough cooked chicken for 4 dinner portions or several meal-prep portions once sliced, cubed, or shredded. For salads, wraps, or bowls, slice the chicken after resting and store it in portions so it is easy to use during the week.
For lunch prep, leftover baked chicken breast can also become sandwiches. Start with these chicken sandwich recipes if you want BBQ, Buffalo, chicken salad, pesto, or quick café-style ideas.
Storage, Freezing, and Reheating
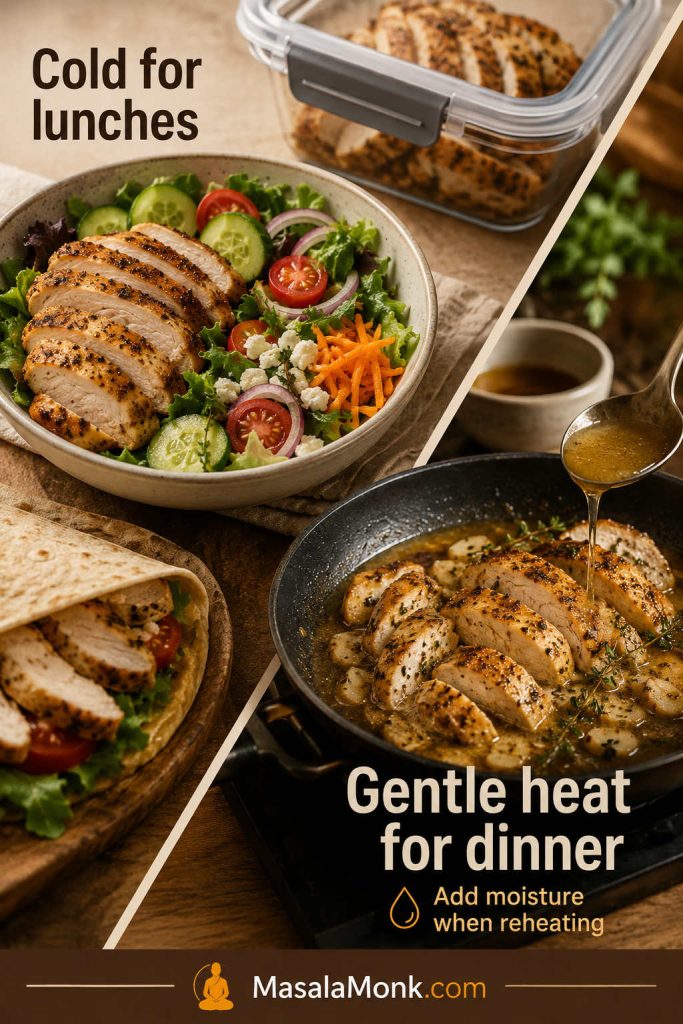
The main reheating mistake is blasting lean chicken breast until it dries out. Instead, reheat gently and add a little moisture if the chicken has already been sliced.
| Task | Best method |
|---|---|
| Refrigerate | Store cooled chicken in an airtight container for 3–4 days. |
| Freeze | Cool first, wrap well, and freeze for up to 2–3 months. |
| Reheat in microwave | Add a splash of water, broth, or sauce; cover loosely and heat gently. |
| Reheat on stovetop | Warm sliced chicken with a little broth, sauce, or pan juices over low heat. |
| Avoid | Overheating lean chicken breast until it becomes dry and rubbery. |
For salads, wraps, and sandwiches, safely stored baked chicken breast can be used cold straight from the fridge. For a hot plate, reheat only until warmed through; lean chicken breast gets dry when it is blasted a second time.
Chopped or shredded leftovers are often better in moisture-rich lunches than reheated as plain slices. Fold them into chicken salad, tuck them into wraps, or mix them with a little sauce before reheating. This chicken salad sandwich recipe is a natural next step when you want leftover cooked chicken to taste intentional instead of leftover.
If the chicken already feels dry after reheating, jump to how to fix dry chicken breast instead of serving it plain.
Troubleshooting Baked Chicken Breast
Most baked chicken breast problems come from thickness, temperature, timing, or seasoning. Find the problem you had last time, then fix that one thing first.
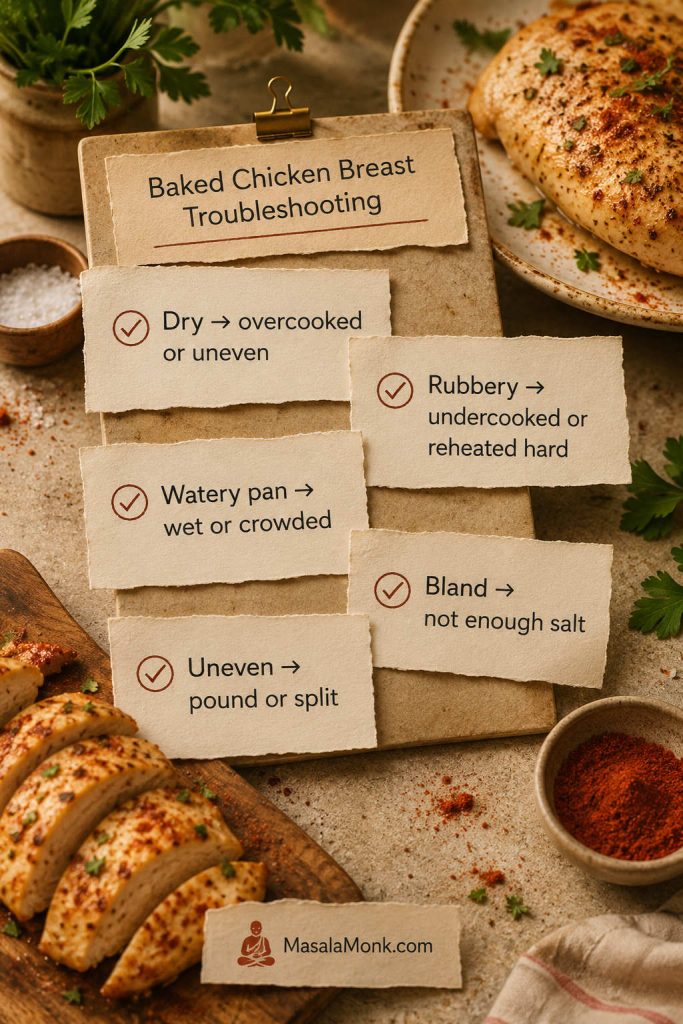
| Problem | Likely cause | Fix |
|---|---|---|
| Dry chicken | Overcooked, uneven thickness, or sliced too soon | Pound the thick end, use a thermometer, and rest before slicing. |
| Rubbery chicken | Undercooked, cooked too low and slow, or reheated too aggressively | Check the thickest part and reheat gently with moisture. |
| Bland chicken | Not enough salt or seasoning | Season all sides and use enough salt for the amount of chicken. |
| Watery pan juices | Chicken was very wet, crowded, or heavily marinated | Pat dry, avoid overcrowding, and use a rimmed sheet pan. |
| Outside dry, inside undercooked | Chicken breast was too thick | Butterfly, slice horizontally, or pound before baking. |
| Chicken cooked unevenly | Pieces were different sizes or thicknesses | Sort by size, pound thick pieces, and remove smaller pieces early. |
| Seasoning burned | Too much sugar, broiler too long, or pan too close to heat | Use less sugar, skip the broiler, or check earlier. |
| Chicken stuck to pan | Not enough oil or no liner | Use parchment or lightly oil the pan. |
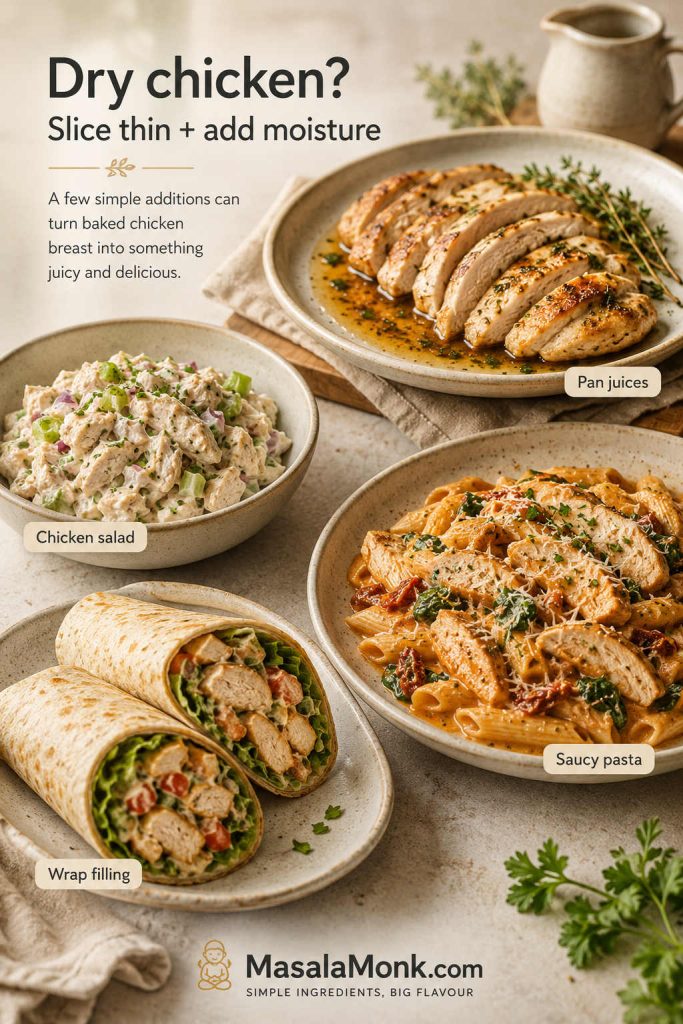
How to Fix Dry Chicken Breast After Baking
You cannot fully undo overcooked chicken breast, but you can make it much better. Slice it thinly across the grain and add moisture: pan juices, garlic butter, yogurt herb sauce, salsa, pesto, broth, gravy, or a creamy dressing. Dry baked chicken breast is often better chopped into chicken salad, folded into pasta, tucked into wraps, or simmered briefly in sauce than served as a plain whole breast.
Once you know what went wrong, return to the recipe card and adjust the thickness, timing, or temperature next time.
Common Mistakes to Avoid
- Baking uneven pieces together without checking early: smaller pieces may finish before larger ones.
- Skipping the oil: chicken breast is lean, so the surface needs a little fat to carry seasoning and protect texture.
- Using the timer as a guarantee: time gets you close, but thickness and temperature decide.
- Slicing immediately: give the chicken at least 5 minutes so the juices do not run out on the board.
- Adding sauce too early: sweet sauces can burn at high heat, so brush them on near the end.
- Cooking all pieces until the largest one is done: remove thinner pieces as they finish.
Baked Chicken Breast Recipe Card
Baked Chicken Breast Recipe
This easy baked chicken breast recipe uses even thickness, a paprika-garlic seasoning, high oven heat, and a short rest for chicken that slices cleanly and stays useful for dinner or meal prep.
Ingredients
- 4 boneless skinless chicken breasts, 5–8 oz / 150–225g each
- 1 1/2 tbsp / 22 ml olive oil or avocado oil
- 1 tsp fine salt, or to taste
- 1 tsp paprika or smoked paprika
- 1 tsp garlic powder
- 1/2 tsp onion powder
- 1/2 tsp black pepper
- 1 tsp Italian seasoning, oregano, or thyme
- 1–2 tsp brown sugar, optional, for better browning
- Lemon wedges or chopped parsley, optional, for serving
Instructions
- Preheat the oven. Heat the oven to 425°F / 220°C. For fan or convection, use 400°F / 200°C fan and check early.
- Prep the chicken. Pat the chicken dry. Pound the thick end until the pieces are more even, or slice very large breasts horizontally.
- Mix the seasoning. In a small bowl, combine salt, paprika, garlic powder, onion powder, pepper, herbs, and optional brown sugar.
- Season. Rub the chicken with oil, then coat both sides evenly with the seasoning blend.
- Bake. Arrange in a single layer on a parchment-lined rimmed sheet pan or lightly oiled metal baking dish. Bake uncovered for 18–25 minutes, depending on size and thickness.
- Check doneness. Start checking smaller or thinner pieces early. Chicken breast is done when the center of the thickest part reaches 165°F / 74°C.
- Rest and serve. Rest for at least 5 minutes, then slice against the grain and serve with pan juices, lemon, parsley, sauce, salad, rice, potatoes, or vegetables.
Notes
- No timer works for every chicken breast. Thickness, not just weight, changes the bake time, so check thin pieces early.
- The seasoning should coat the surface evenly. If it looks patchy before baking, the finished chicken may taste uneven.
- For a wet marinade, pat off excess before baking so the chicken browns better.
- After brining, reduce the salt in the seasoning blend.
- Smaller pieces should come out early instead of waiting for the largest piece.
- For meal prep, cool before storing and reheat gently with a splash of broth, water, or sauce.
FAQs About Baked Chicken Breast
What is the best temperature to bake chicken breast?
For most boneless skinless chicken breasts, 425°F / 220°C is the best default. It cooks quickly, gives light browning, and works well when the pieces are similar in size. Use 400°F / 200°C if you want a gentler first try.
How long does chicken breast take in the oven?
At 425°F / 220°C, medium boneless chicken breast usually takes 18–22 minutes. Thin pieces may finish in 10–14 minutes, while large thick breasts can need 24–30 minutes or more. The safest answer still comes from checking the thickest piece, not just watching the clock.
How do I know baked chicken breast is done?
Measure the center of the thickest piece with an instant-read thermometer. Once it reaches 165°F / 74°C, the chicken is ready to rest. Color and juices can help you notice problems, but temperature is the reliable check.
Why is my baked chicken breast dry?
Usually because the chicken stayed in the oven too long, cooked unevenly, or was sliced too soon. Pound the thick end, use the thermometer, and rest before slicing. If it is already dry, slice it thin and use it with sauce, chicken salad, pasta, wraps, or rice bowls.
Should I cover chicken breast while baking?
For this recipe, bake chicken breast uncovered. Covering traps steam and can make the surface wet instead of lightly browned. Covered baking is better for saucy chicken or casserole-style recipes.
Is it better to bake chicken breast at 400°F or 425°F?
Both work. Use 400°F / 200°C when you want a slightly gentler bake or have larger pieces. Use 425°F / 220°C when the breasts are even in thickness and you want faster cooking with better surface color. Either way, use the thermometer instead of relying only on the timer.
How do I bake thin chicken breast?
Thin chicken breast cooks quickly. At 425°F / 220°C, thin-sliced chicken breast or cutlets may take only 10–14 minutes, so start checking early. Removing thin pieces on time matters more than following the timing for a full chicken breast.
What seasoning is best for baked chicken breast?
A simple mix of salt, paprika, garlic powder, onion powder, black pepper, and herbs works well for everyday baked chicken breast. Make sure it coats the surface evenly before baking so the finished chicken tastes seasoned, not patchy.
Can baked chicken breast be made ahead?
Yes. Let it cool, store it in an airtight container, and slice, cube, or shred it for salads, bowls, wraps, sandwiches, pasta, and quick dinners. Keep sauces separate when possible so the chicken stays flexible for different meals.
How do I reheat baked chicken breast without drying it out?
Reheat it gently with a splash of broth, water, sauce, or pan juices. Cover loosely and warm only until heated through. For salads, wraps, and sandwiches, safely stored chicken can also be used cold.
Can I use bone-in chicken breast?
Yes, but bone-in chicken breast takes longer than boneless chicken breast. Check near the thickest part without touching the bone, and do not use the boneless timing chart as the final guide.
The Takeaway

This baked chicken breast recipe gets easier once you stop treating the timer as the recipe. Start with the chicken in front of you: make uneven pieces more even, season them properly, bake hot, let temperature decide, and rest before slicing. Once you do that a few times, chicken breast stops feeling like the dry part of dinner and becomes one of the most useful proteins in your weeknight rotation.


