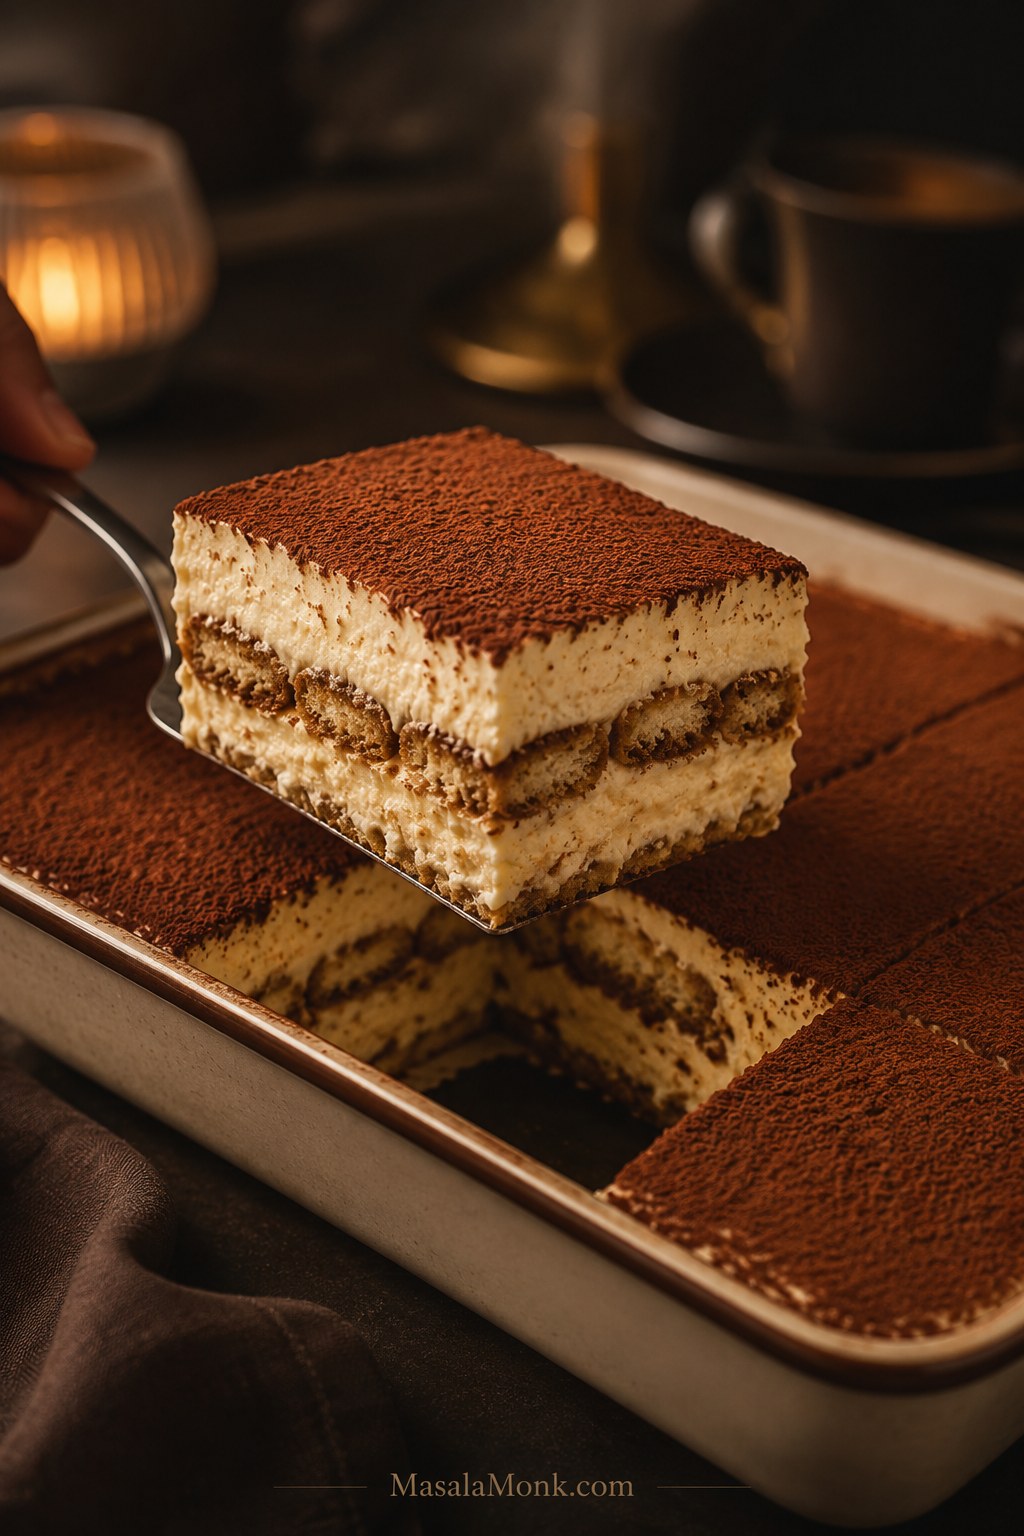
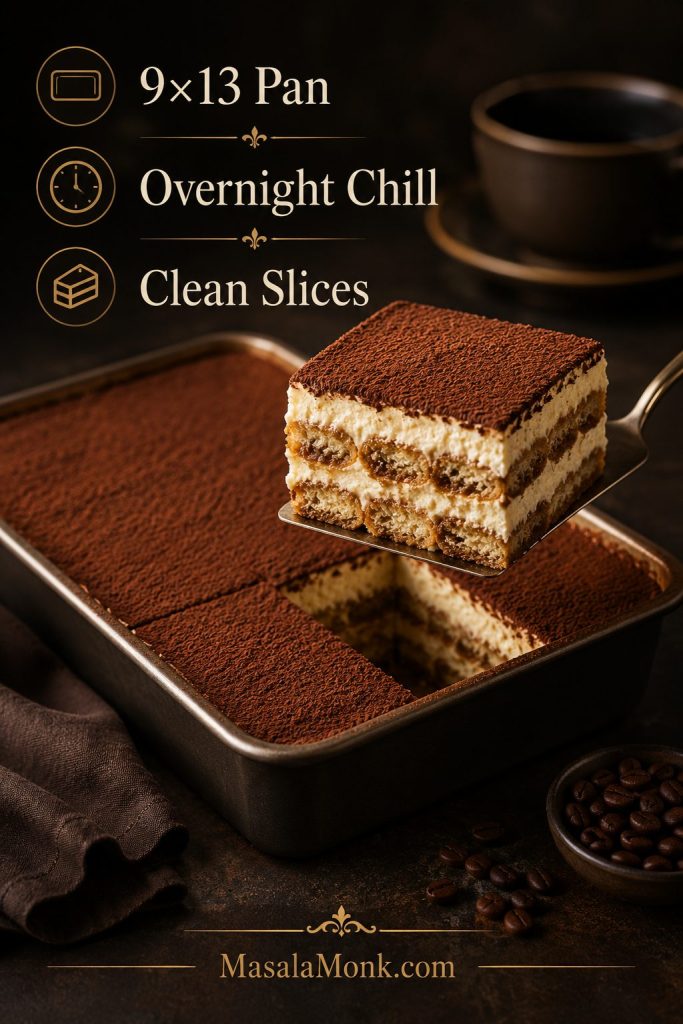
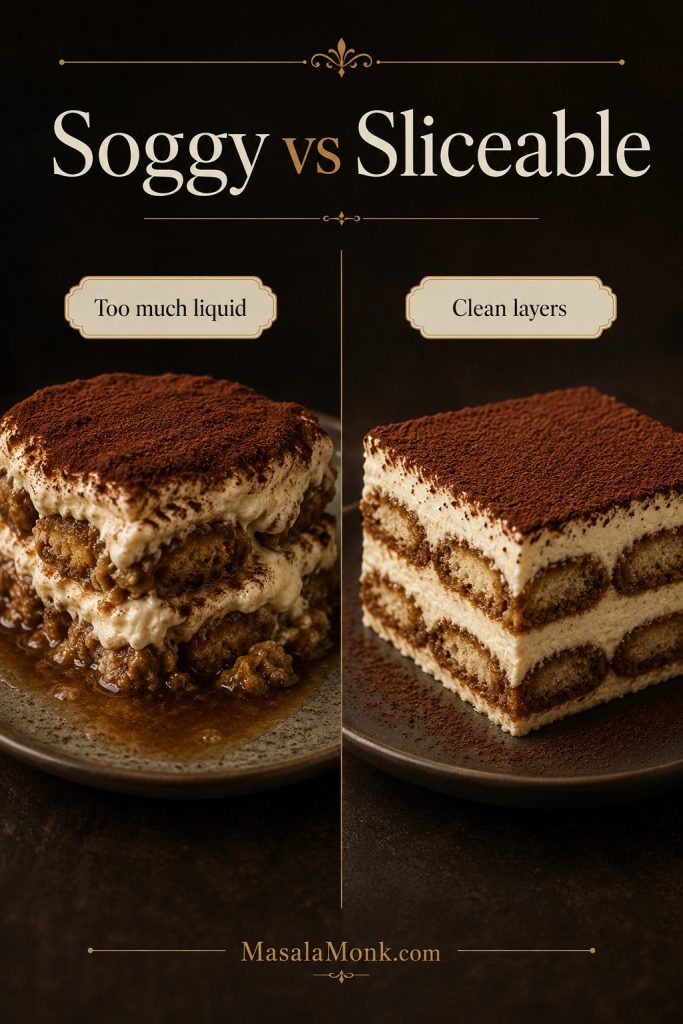
This tiramisu recipe gives you creamy, coffee-soaked layers with rich mascarpone cream, firm savoiardi, deep espresso flavor, and a cocoa finish that cuts through the sweetness. The main version uses cooked yolks and whipped cream, so it does not rely on raw eggs for structure, and it is built for a generous 9×13-inch pan that slices cleanly after an overnight chill.
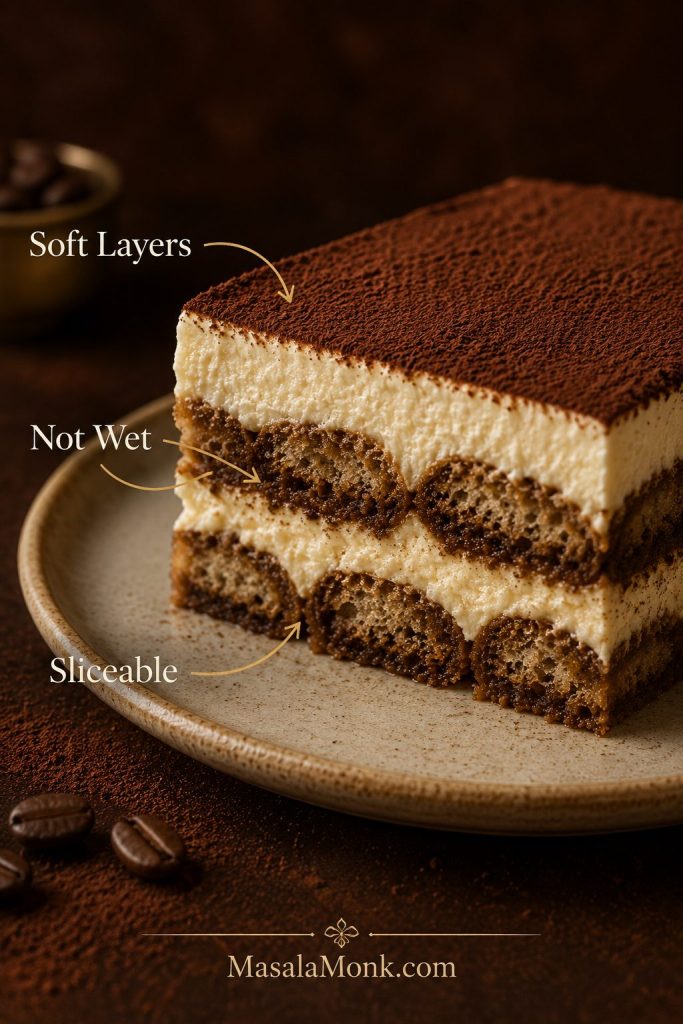
Here, the goal is not the fastest 10-minute shortcut. It is a reliable make-ahead tiramisu you can serve to guests tomorrow: soft but visible layers, coffee-soaked ladyfingers that are not wet, and a cream filling that holds on the plate without turning stiff or heavy.
Think of it as a modern home-kitchen tiramisu built around the classic structure: savoiardi, mascarpone, eggs, coffee, and cocoa, with a cooked-yolk cream method for more confidence.
You will also get a smaller 8×8 half-batch, a no-alcohol option, a more traditional no-cream direction, mascarpone substitute notes, pan-size guidance, and practical fixes for tiramisu that turns wet, dry, bitter, grainy, or too loose to slice.
Good tiramisu feels quietly luxurious: the spoon meets soft cream, the coffee has soaked into the ladyfingers without leaking into the dish, and the cocoa gives each bite a slightly bitter finish. Once the layers are built, the fridge does most of the work.
Table of Contents
Make the Tiramisu
Quick Answer: How to Make Tiramisu
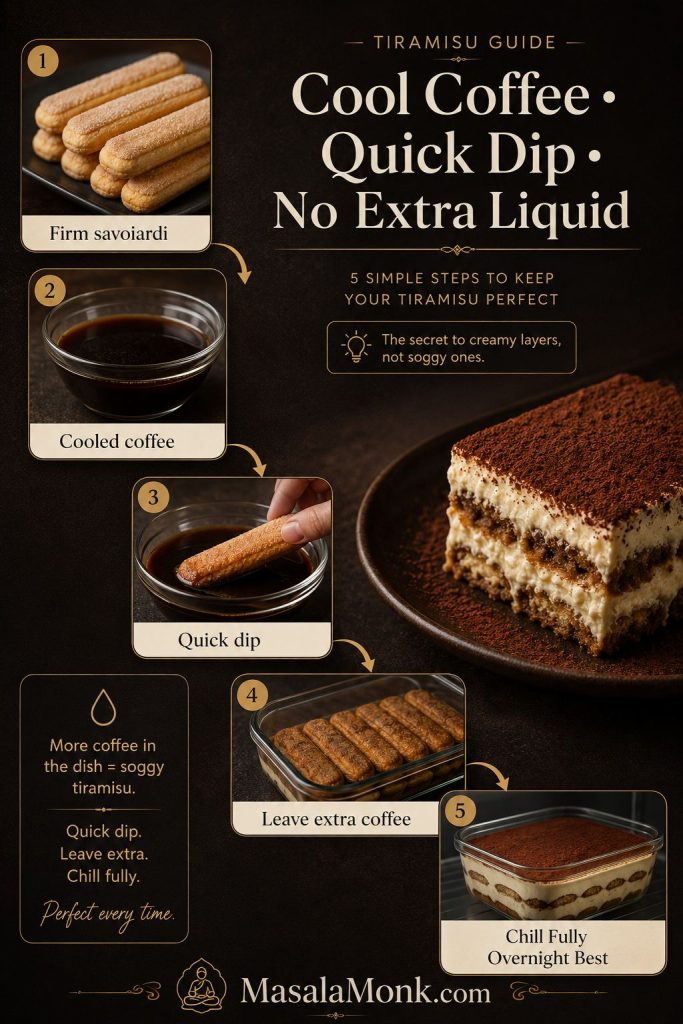
To make tiramisu, quickly dip firm ladyfingers in cooled espresso or strong coffee, layer them with mascarpone cream, chill until set, and dust the top with cocoa before serving. This cooked-yolk version gives you classic coffee-mascarpone flavor without relying on raw eggs in the main recipe.
For a full 9×13-inch pan, use about 40–45 firm ladyfingers, 500 g mascarpone, 4 egg yolks, 100–120 g sugar, 360 ml heavy cream, 300–360 ml strong cooled coffee, optional alcohol, and cocoa. Then dip the ladyfingers quickly rather than soaking them, and chill the finished tiramisu overnight for the cleanest slices.
Tiramisu at a Glance
| Detail | Use this |
|---|---|
| Best dish | 9×13-inch / 33×23 cm dish for the full recipe |
| Best ladyfingers | Firm dry savoiardi, not soft cake-style fingers |
| Best coffee | Strong espresso, moka coffee, or bold brewed coffee, fully cooled |
| Egg method | Cooked yolks in the main version; pasteurized eggs for raw-egg variations |
| Alcohol | Optional; rum, Marsala, brandy, coffee liqueur, or no alcohol all work |
| Chill time | 8 hours minimum; overnight is best |
| Texture goal | Creamy, soft, coffee-rich, and sliceable |
| Biggest mistake | Soaking the ladyfingers too long |
If you are nervous about wet layers, start with the ladyfinger dip test before you assemble the pan.
What This Tiramisu Should Look Like
This cooked-yolk version gives you the familiar coffee, mascarpone, and cocoa flavor of tiramisu while keeping the main method more comfortable for a home kitchen.

For a full 9×13 pan, the goal is a generous make-ahead tiramisu that chills overnight and lifts into clean, guest-friendly squares.
Before you move deeper into the method, it helps to know the texture target: creamy layers, coffee-soaked ladyfingers, and no liquid pooling at the bottom.
Why This Tiramisu Recipe Works
Tiramisu looks simple, but small details decide whether it slices cleanly or turns soft and wet. Because the yolks are gently cooked, the cream is folded carefully, and the dessert chills overnight, the flavor stays familiar while the texture becomes more reliable for a home kitchen.
- Cooked yolks give richness without making fully raw eggs the only option.
- Mascarpone keeps the cream layer thick, smooth, and lightly sweet.
- Whipped cream adds stability for clean slices.
- A quick coffee dip keeps the ladyfingers soft but not soggy.
- Overnight chilling lets the dessert set instead of collapsing into a loose spoon dessert.
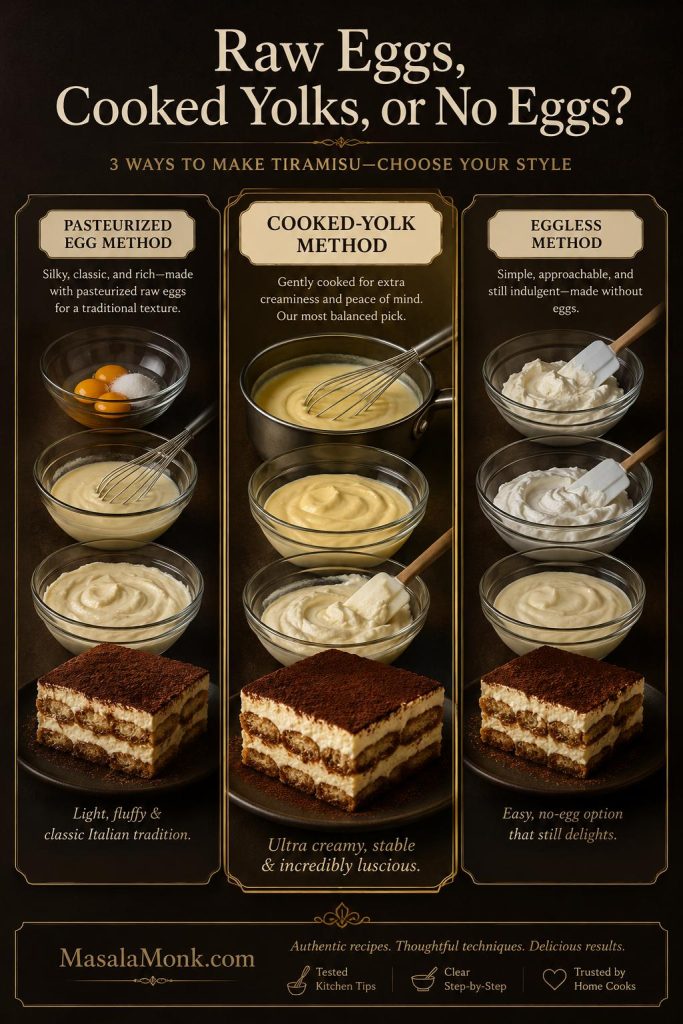
Choose Your Method
There is no single tiramisu method that suits every kitchen. The right choice depends on how traditional you want the texture to be, how comfortable you are with eggs, and whether you need the dessert to slice neatly for guests.
| If you want… | Use this path |
|---|---|
| Classic lightness | Pasteurized eggs and whipped egg whites |
| Stable guest-friendly slices | Cooked yolks and whipped cream |
| No alcohol | Strong coffee plus vanilla in the cream |
| No eggs at all | Use an eggless tiramisu method |
This version is slightly more work than a no-egg shortcut, but it tastes more classic and gives you a creamier, more stable dessert that can be sliced cleanly the next day.
If you like make-ahead desserts that set in the fridge, MasalaMonk’s no bake cheesecake recipe follows a similar patience-first logic.
What Is Tiramisu?
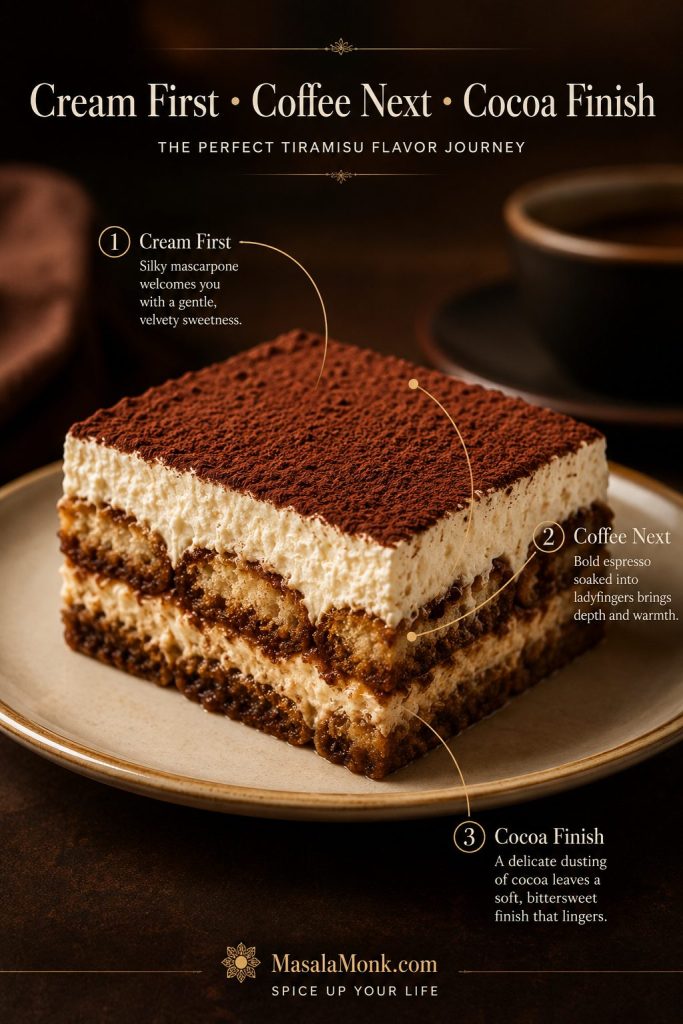
Tiramisu is a no-bake Italian dessert made with coffee-soaked ladyfingers layered with mascarpone cream and finished with cocoa powder. It should taste creamy, lightly sweet, coffee-rich, and just bitter enough at the end.
The Accademia del Tiramisù traditional Treviso recipe uses mascarpone, egg yolks, sugar, ladyfingers, coffee, and bitter cocoa, then rests the dessert in the refrigerator before serving.
This version keeps that coffee-mascarpone-cocoa structure, but adapts the cream method for a modern home kitchen. Instead of relying on fully raw eggs, it uses gently cooked yolks and whipped cream for a filling that is rich, stable, and easier to slice.
Tiramisu Ingredients: What Matters Most
The ingredient list is short, so every choice matters. Tiramisu is not a dessert where you can hide weak coffee, watery mascarpone, or soggy biscuits under decoration. The flavor and texture come directly from the basics.
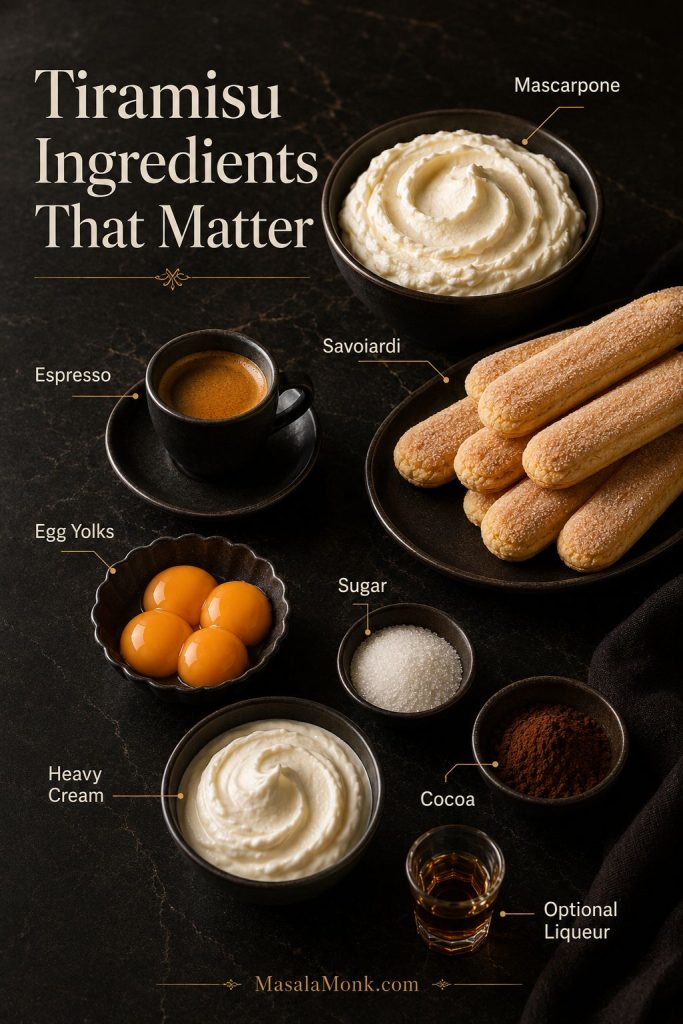
Mascarpone
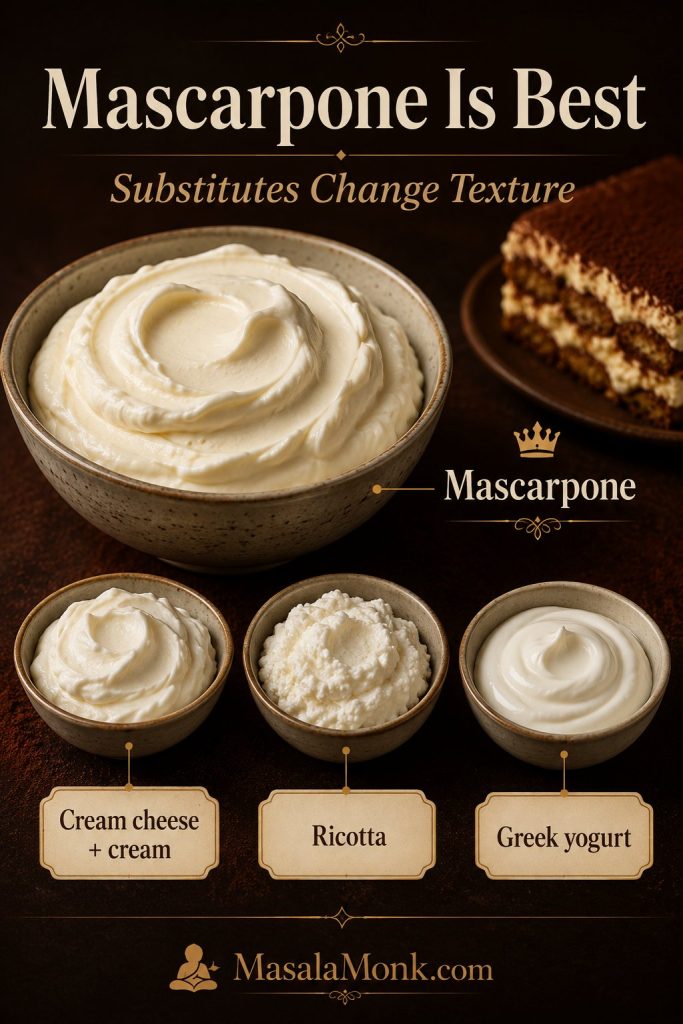
Mascarpone gives tiramisu its rich, creamy body. Look for mascarpone that is thick, smooth, and spoonable, not watery or loose. A little separated liquid can usually be stirred back in gently. Mascarpone that still looks pourable after stirring is more risky, because the finished dessert may not slice cleanly.
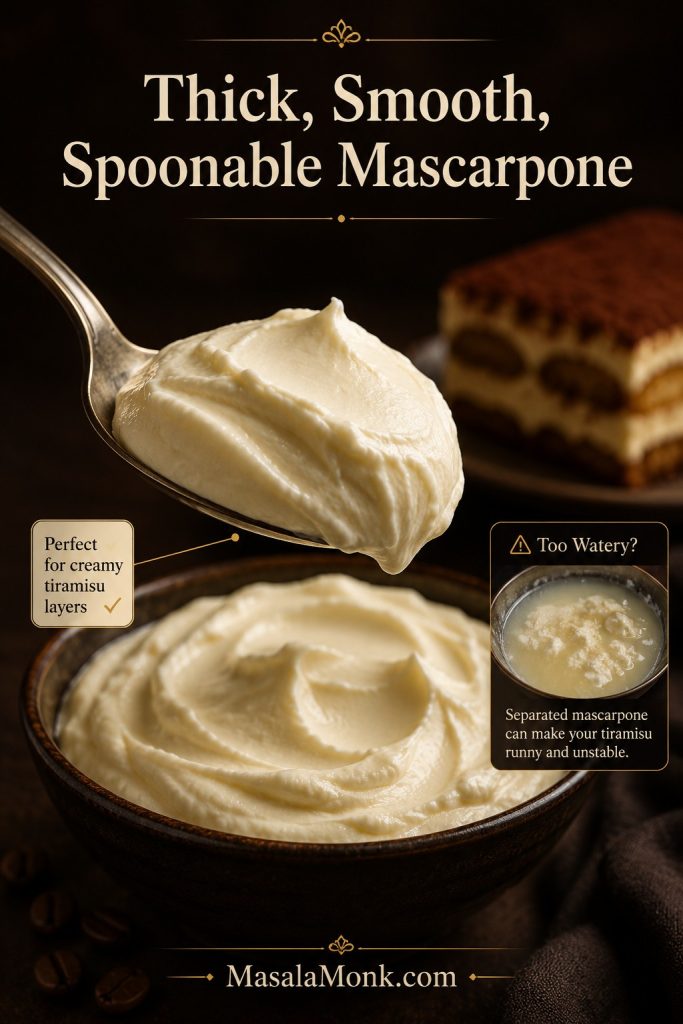
Meanwhile, keep mascarpone cold until you are ready to mix, but do not beat it aggressively. Once mascarpone loosens, overmixing can make it grainy or split. In this method, you only need to smooth it briefly before folding in the cooked yolk mixture and whipped cream.
Mascarpone is worth using when you can find it because it gives tiramisu that soft, rich, almost cloud-like cream that tangier substitutes cannot fully copy.
If your mascarpone already looks loose, check the runny tiramisu troubleshooting guide before you continue.
Cream cheese, ricotta, and Greek yogurt can all make tiramisu-style desserts, but they are not one-for-one replacements. Cream cheese is tangier and denser, ricotta can be grainy unless blended very smooth, and Greek yogurt creates a lighter, tangier dessert rather than classic tiramisu. For a dessert where cream cheese is meant to be the star instead of a substitute, MasalaMonk’s New York cheesecake recipe is the better direction.
Ladyfingers / Savoiardi
Firm dry savoiardi are the best choice because they soften slowly and help the layers hold together. They absorb coffee quickly, soften during the chill, and still give the dessert structure. Soft sponge fingers can work, but they need an even faster dip because they collapse more easily.
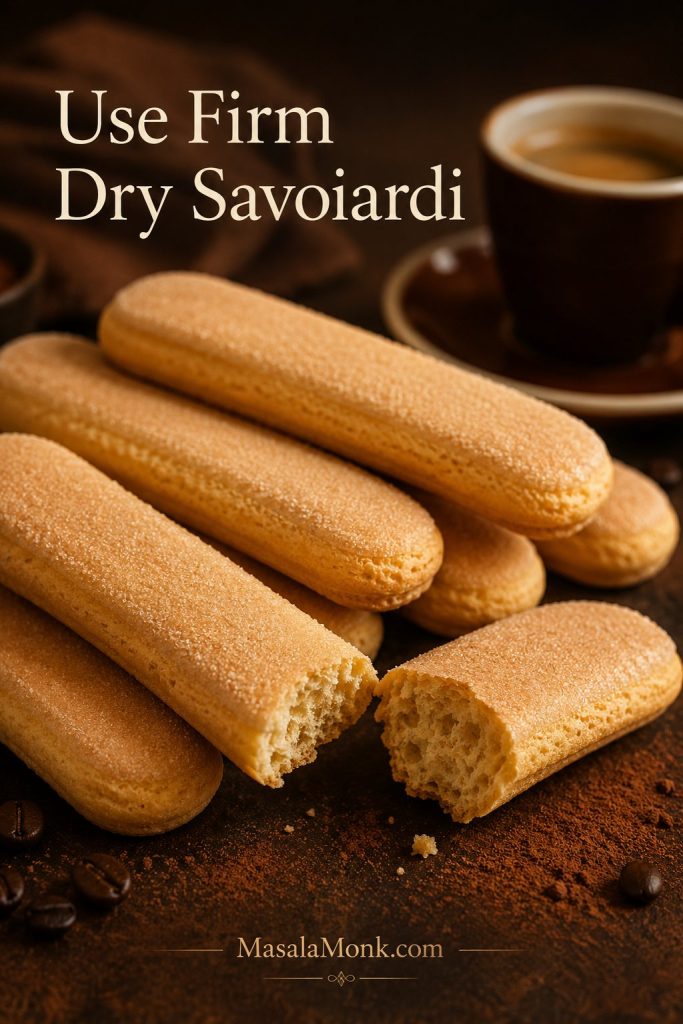
If the package says savoiardi, that is usually what you want. They should feel dry and crisp before dipping. If your ladyfingers are soft and cake-like, treat them more gently: brush or barely dip them instead of dunking them like firm savoiardi.
For a 9×13-inch tiramisu, you will usually need 40–45 ladyfingers. Do not worry if you have to trim a few pieces to fill the corners of the dish; neat layers matter more than perfect whole biscuits.
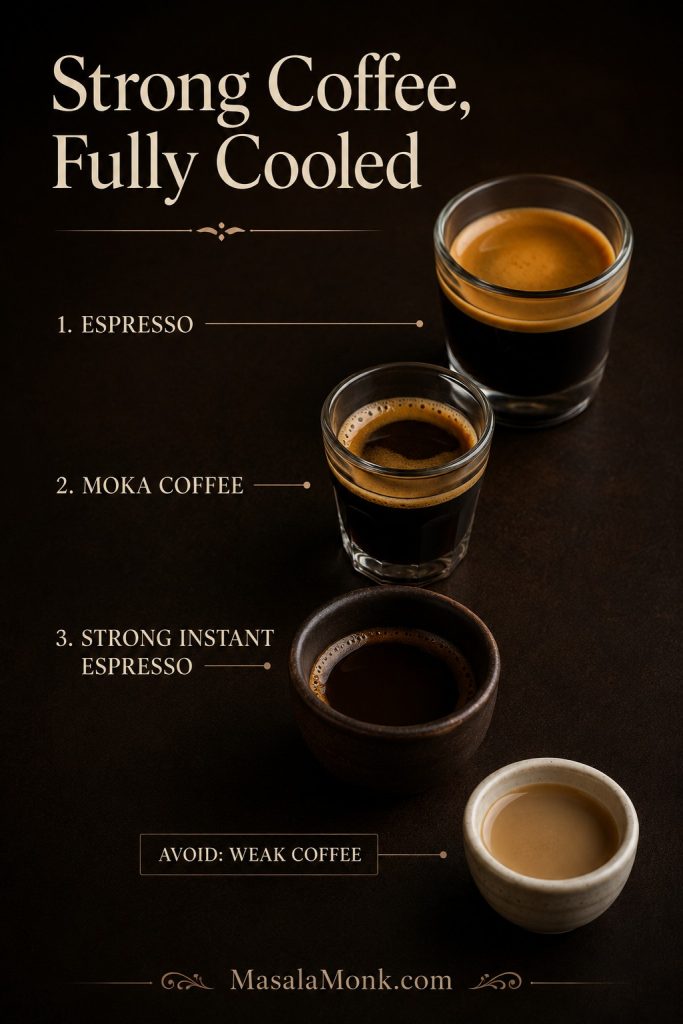
Coffee or Espresso
Espresso is ideal, but moka coffee, bold brewed coffee, or strong instant espresso can also work. The coffee should taste a little too strong on its own because the mascarpone cream will soften it into balance. Weak coffee disappears under the cream and makes tiramisu taste flat.
When the coffee is right, you should smell it as soon as the tiramisu is sliced. It should support the cream, not disappear under it. The first forkful should taste creamy first, then coffee, then cocoa bitterness at the end.
Before dipping, let the coffee cool completely. Otherwise, hot coffee can make the biscuits soften too quickly, and it can also loosen the cream if the dessert is assembled while everything is warm.
Eggs
Classic tiramisu uses eggs. This cooked-yolk version gives the filling richness without making fully raw yolks the default. The yolks are heated gently with sugar over a double boiler, then folded into mascarpone and whipped cream.
For recipes served with raw or undercooked eggs, the FDA recommends pasteurized shell eggs or pasteurized egg products. That is why the more traditional raw-egg direction in this post uses pasteurized eggs.
Heavy Cream
Heavy cream is a modern home-kitchen choice, not the strict Treviso-style path. Here, it helps the mascarpone layer stay stable and sliceable while still keeping the familiar coffee, cocoa, and mascarpone flavor profile.
For a more traditional no-cream direction, use pasteurized egg whites instead of whipped cream. That option is lighter and closer to old-school tiramisu, but it needs more care because the egg whites are not cooked.
Sugar, Salt, Cocoa, and Alcohol
Sugar softens the bitterness of coffee and cocoa. Use 100 g if you prefer a balanced, less-sweet tiramisu, or up to 120 g if you want a rounder dessert.
A small pinch of salt helps the mascarpone cream taste fuller rather than simply sweet. It should not make the dessert salty; instead, it should make the coffee and cream taste more complete.
Use unsweetened cocoa powder for the top. Dust it shortly before serving if you want the cleanest finish. If you dust it before a long chill, the cocoa will darken and hydrate into the surface, which some people enjoy but others find less polished.
Alcohol is optional. Dark rum, Marsala, brandy, coffee liqueur, amaretto, or Grand Marnier can all work, but coffee-only tiramisu is completely valid.
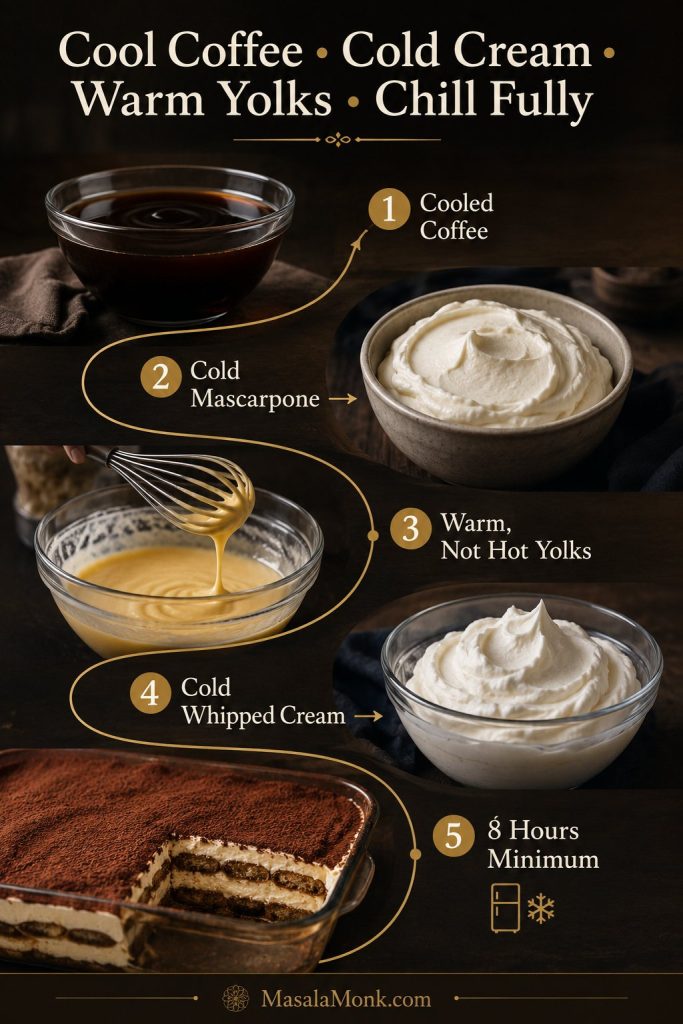
Temperature Cues That Prevent Problems
| Ingredient or layer | Best temperature | Why it matters |
|---|---|---|
| Coffee | Fully cooled before dipping | Hot coffee softens ladyfingers too fast and can loosen the cream. |
| Mascarpone | Cold but stirrable | Too warm can turn loose; too cold can stay lumpy. |
| Yolk mixture | Warm, not hot, before folding | Hot yolks can loosen the mascarpone layer. |
| Heavy cream | Cold before whipping | Cold cream whips better and holds structure. |
| Finished tiramisu | Fully chilled before slicing | Cold layers cut more cleanly and hold on the plate. |
Once those temperatures are right, the recipe becomes much calmer. The cream folds more smoothly, the ladyfingers behave better, and the finished tiramisu sets with less drama.
How to Make This Tiramisu Step by Step
Once the coffee is cooled and the cream is ready, tiramisu is mostly assembly. The only technical step is the cooked yolk base, and even that is simple if you keep the heat gentle.
Move slowly through the cream, then quickly through the dipping. That is the rhythm of good tiramisu: gentle mixing, fast dipping, patient chilling.

1. Brew and Cool the Coffee
Make espresso, moka coffee, or bold brewed coffee. Pour it into a shallow bowl and let it cool completely. If using rum, Marsala, brandy, or coffee liqueur, stir it in after the coffee has cooled.
2. Cook the Egg Yolks and Sugar
Set a heatproof bowl over a saucepan of barely simmering water. The bottom of the bowl should not touch the water. Add the egg yolks and sugar, then whisk constantly.
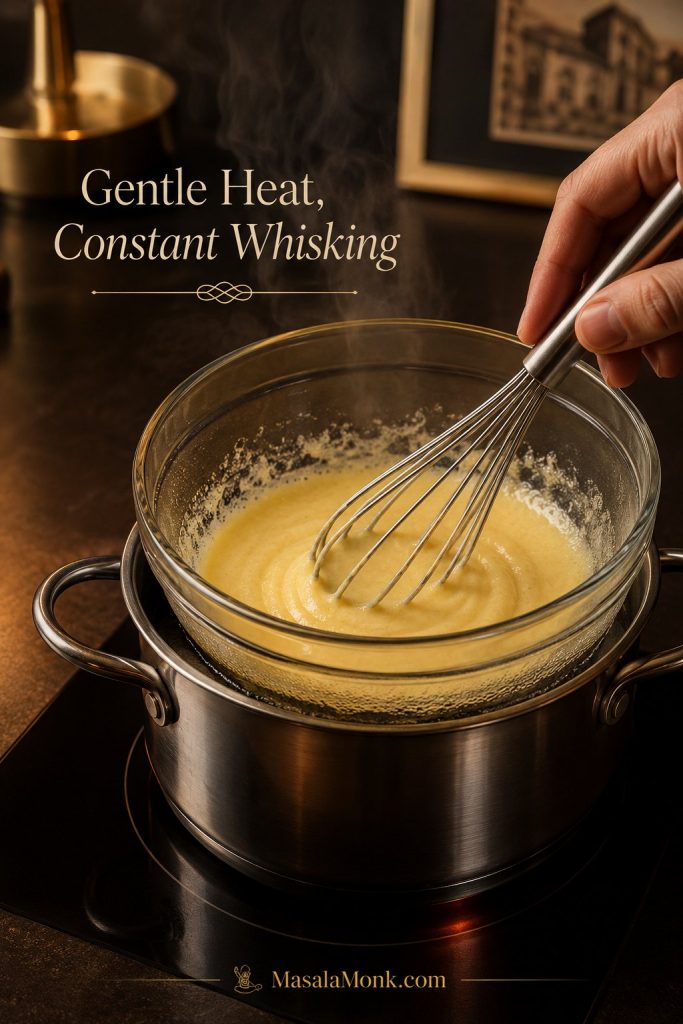
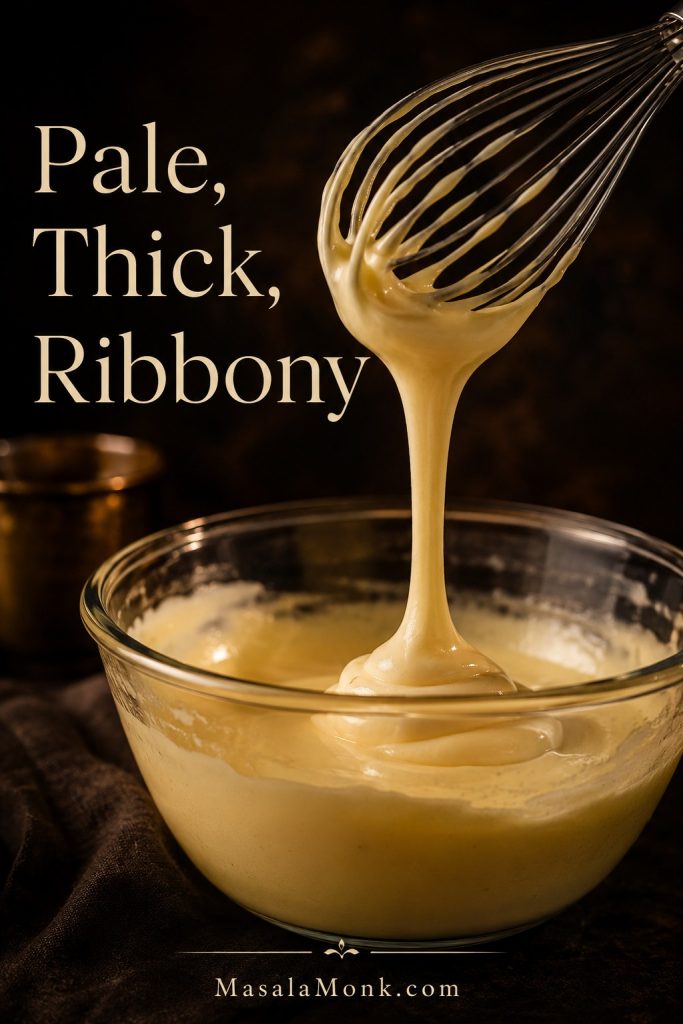
Whisk for 3–5 minutes, until the mixture becomes pale, thick, and ribbony. When you lift the whisk, the mixture should fall back into the bowl in a thick ribbon for a second before disappearing. For extra confidence, aim for about 160°F / 71°C while keeping the heat gentle.
Remove the bowl from the heat and let the mixture cool until warm, not hot. If the yolk mixture is too hot when it meets the mascarpone, the cream can loosen.
3. Loosen the Mascarpone
In a large bowl, beat the mascarpone only until it looks smooth and spreadable. Stop as soon as the lumps disappear. If you keep beating after it loosens, the cream can turn grainy later.
4. Whip the Cream
In another bowl, whip the cold heavy cream to medium-stiff peaks. The cream should hold a soft point on the whisk, but the surface should still look smooth and glossy. If it looks rough, dry, or clumpy, it has gone too far.
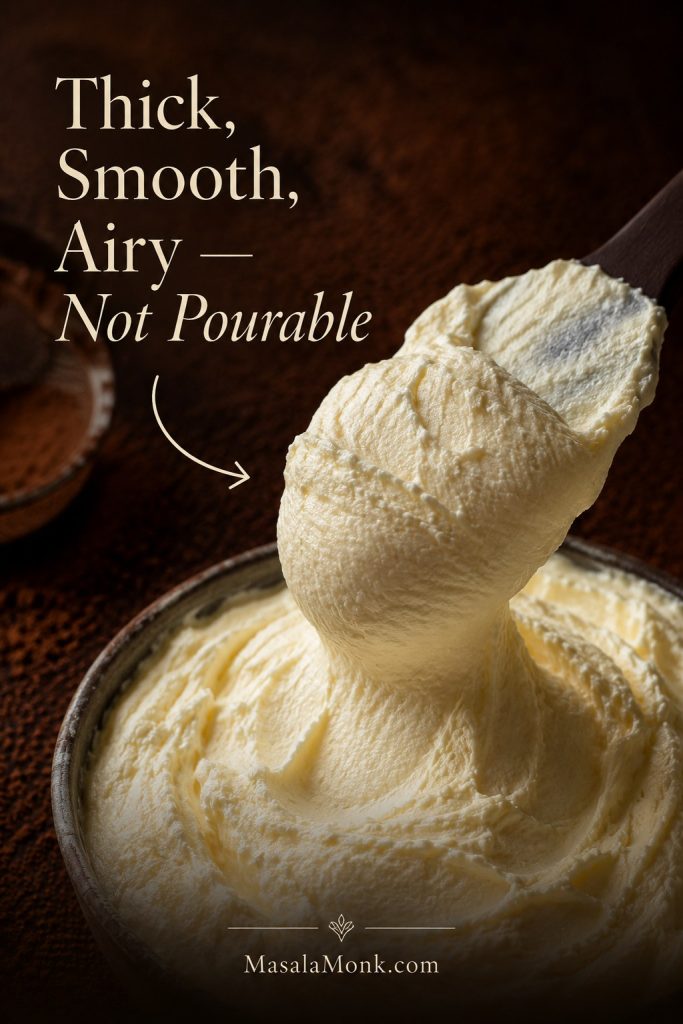
5. Fold the Cream Together
Fold the cooled yolk mixture into the mascarpone. Then fold in the whipped cream in two additions. Fold slowly until no obvious white streaks remain, then stop. The goal is a filling that looks thick, smooth, and airy, not something stirred until it turns loose or pourable.
When you lift the spatula, the cream should mound softly before settling. If it runs like sauce, chill it briefly before assembly and check that the whipped cream reached medium-stiff peaks.
Before you start assembling, use the texture checkpoint below to make sure the filling is thick, smooth, and airy rather than pourable.
Texture Target Before You Layer
The cream should be thick enough to mound on a spatula, the dipped ladyfingers should still lift without bending, and the chilled tiramisu should cut into soft but visible layers.
6. Dip the Ladyfingers
Working one at a time, dip each ladyfinger into the cooled coffee for about one second per side. Arrange the dipped ladyfingers in a single layer in the dish. Trim pieces as needed to fill gaps.
Leave any extra coffee behind instead of adding it to the pan. Too much added liquid is one of the main causes of soggy tiramisu.
7. Layer the Tiramisu
Spread half of the mascarpone cream over the first ladyfinger layer. Add a second layer of dipped ladyfingers, then spread the remaining cream over the top. Smooth the surface with an offset spatula.
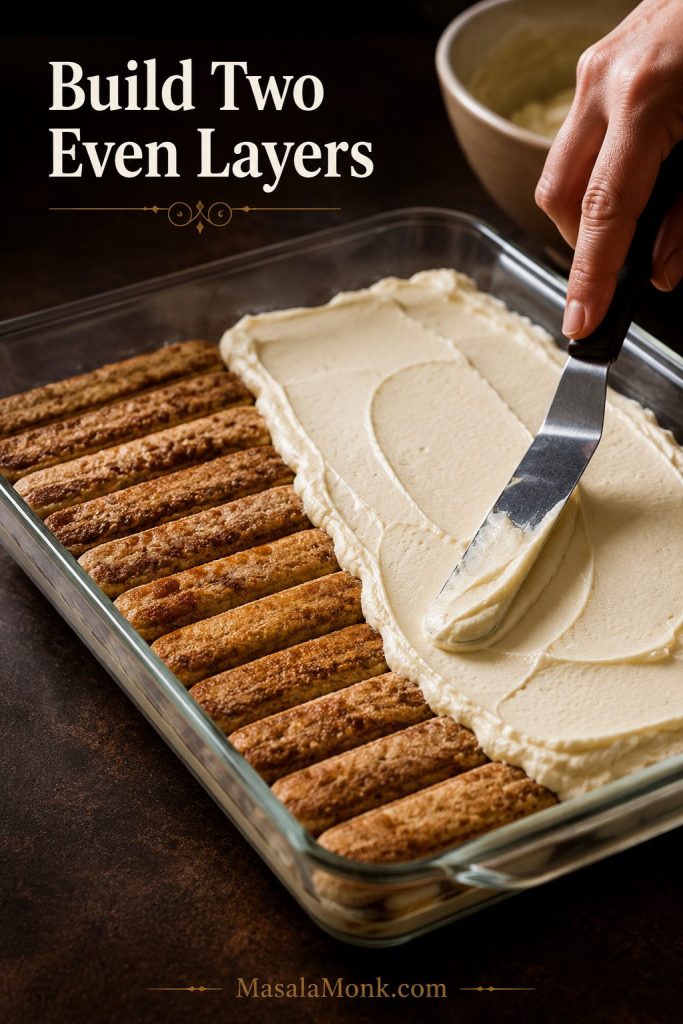
8. Chill Until Set
Cover the dish and refrigerate for at least 8 hours. Overnight is best. During this time, the ladyfingers soften, the coffee flavor settles, and the mascarpone cream firms enough to slice.
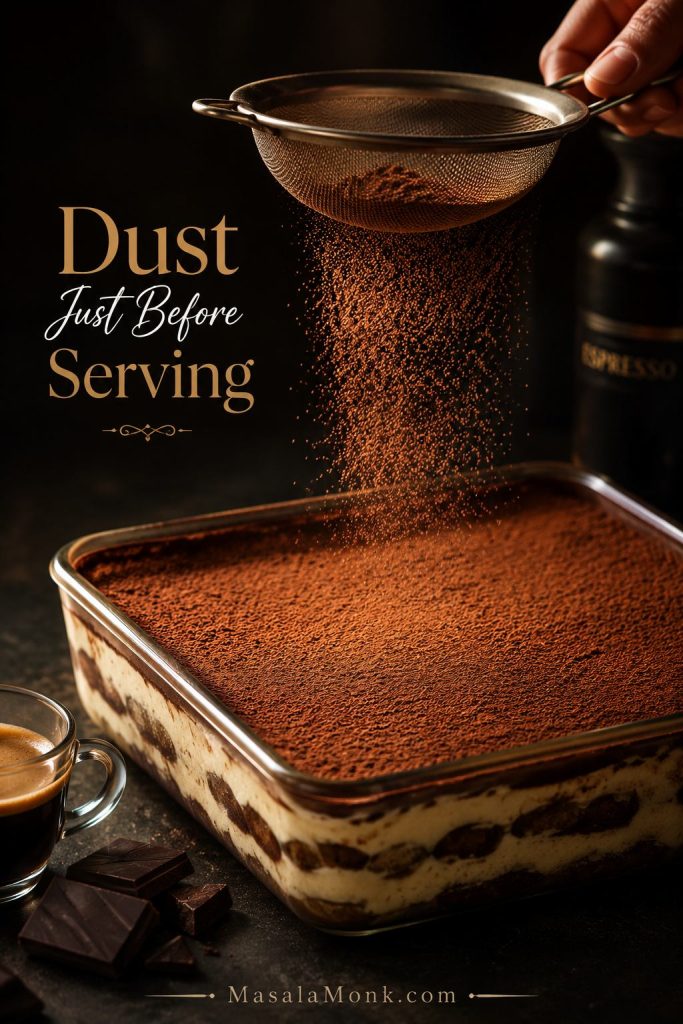
9. Dust with Cocoa and Serve
Just before serving, sift unsweetened cocoa powder over the top. Slice the tiramisu cold, wiping the knife between cuts for cleaner pieces.
Recipe Card: Tiramisu with Cooked Yolks
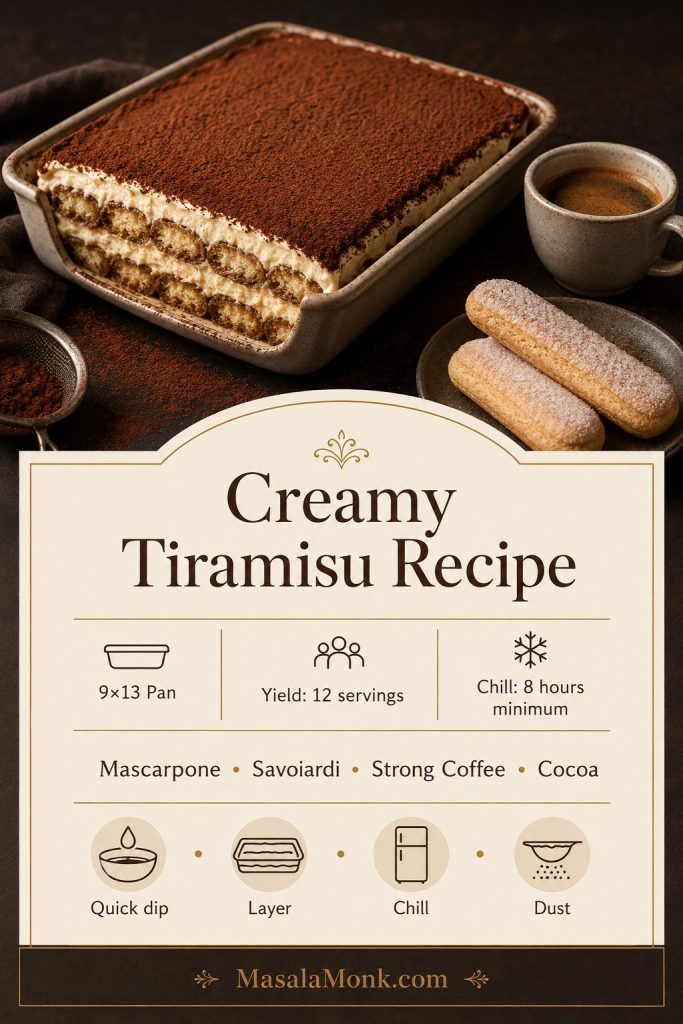
Creamy Tiramisu Recipe
This tiramisu gives you soft coffee-soaked ladyfingers, cooked-yolk mascarpone cream, and a cocoa-dusted top that slices cleanly after an overnight chill. It is rich and creamy without relying on raw eggs in the main version, with notes for no alcohol, an 8×8 half-batch, and a more traditional no-cream option.
Quick Texture Rule
Dip each ladyfinger for about 1 second per side. It should be damp outside but still firm enough to lift into the dish.
Equipment
- 9×13-inch / 33×23 cm dish
- Hand mixer or stand mixer
- Heatproof bowl and small saucepan for double boiler
- Shallow bowl for coffee dipping
- Rubber spatula
- Offset spatula
- Fine mesh sieve
- Kitchen scale, recommended
- Instant-read thermometer, optional
Ingredients
Coffee Dip
- 300–360 ml / 1¼–1½ cups strong espresso or very strong coffee, cooled
- 30–45 ml / 2–3 tablespoons dark rum, Marsala, brandy, or coffee liqueur, optional
- 1–2 teaspoons sugar, optional, only if the coffee tastes very bitter
Mascarpone Cream
- 4 large egg yolks
- 100 g / ½ cup granulated sugar for a balanced tiramisu, or up to 120 g / ½ cup plus 2 tablespoons for a sweeter version
- 500 g / 17.6 oz mascarpone, cold but stirrable
- 360 ml / 1½ cups heavy cream, cold
- 1 teaspoon vanilla extract, optional
- ⅛–¼ teaspoon fine salt
Assembly Ingredients
- 40–45 firm savoiardi ladyfingers / about 300–350 g
- 2–3 tablespoons unsweetened cocoa powder, for dusting
Instructions
Make the Coffee and Cream
- Make and cool the coffee. Brew strong espresso, moka coffee, or very strong coffee. Pour into a shallow bowl and cool completely. Stir in optional alcohol once cool.
- Cook the yolks and sugar. Set a heatproof bowl over a saucepan of barely simmering water, making sure the bowl does not touch the water. Add egg yolks and sugar. Whisk constantly for 3–5 minutes, until pale, thick, and ribbony. For extra confidence, aim for about 160°F / 71°C.
- Cool slightly. Remove the yolk mixture from the heat and let it cool until warm, not hot.
- Loosen the mascarpone. In a large bowl, beat the mascarpone briefly until smooth. Stop as soon as it is spreadable.
- Add the yolk mixture. Fold the cooled yolk mixture into the mascarpone until smooth.
- Whip the cream. In a separate bowl, whip cold heavy cream to medium-stiff peaks. It should hold shape but still look smooth.
- Fold the filling. Fold the whipped cream into the mascarpone mixture in two additions. Add vanilla and salt if using. The filling should look thick and airy, not pourable.
Layer the Tiramisu
- Dip the ladyfingers. Dip each ladyfinger into the cooled coffee for about 1 second per side. Keep the dip brief; the biscuit should still lift easily into the dish.
- Build the first layer. Arrange dipped ladyfingers in a single layer in the dish, trimming pieces to fit if needed.
- Add cream. Spread half of the mascarpone cream over the ladyfingers.
- Repeat. Add a second layer of dipped ladyfingers, then spread the remaining cream over the top.
- Leave extra coffee behind. Once the ladyfingers are dipped and arranged, do not pour leftover coffee into the dish. Extra liquid is one of the main causes of soggy tiramisu.
Chill, Finish, and Serve
- Chill. Cover and refrigerate for at least 8 hours, preferably overnight.
- Finish. Just before serving, sift unsweetened cocoa powder over the top.
- Serve cold. Slice straight from the fridge, wiping the knife between cuts for cleaner pieces.
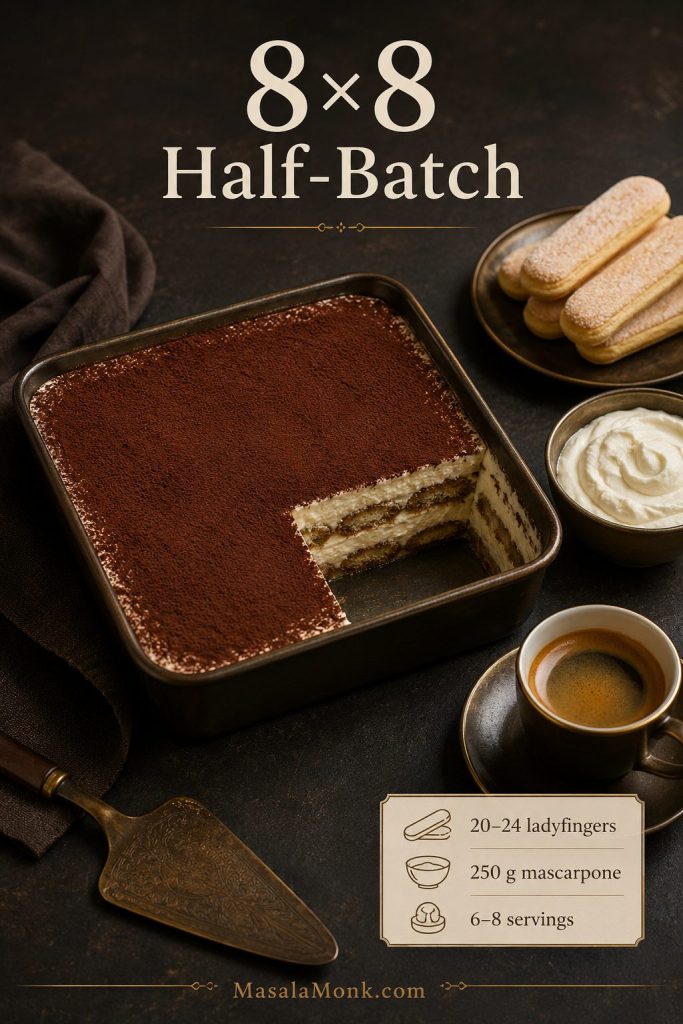
8×8 Half-Batch
For an 8×8-inch / 20 cm dish, use 20–24 ladyfingers, 250 g mascarpone, 2 egg yolks, 50–60 g sugar, 180 ml / ¾ cup heavy cream, 180 ml / ¾ cup strong coffee, 15–22 ml / 1–1½ tablespoons optional alcohol, and cocoa as needed.
Using a different dish? Check the tiramisu pan size guide before changing quantities.
No-Alcohol Option
Skip the alcohol and use strong coffee only. Add 1 teaspoon vanilla to the mascarpone cream for a rounder flavor.
More Traditional No-Cream Option
For a lighter, more traditional-style version, replace the 360 ml / 1½ cups heavy cream with 4 large pasteurized egg whites. Whip the egg whites to stiff but glossy peaks, then fold them gently into the mascarpone-yolk mixture. Use pasteurized eggs because the whites are not cooked.
Storage
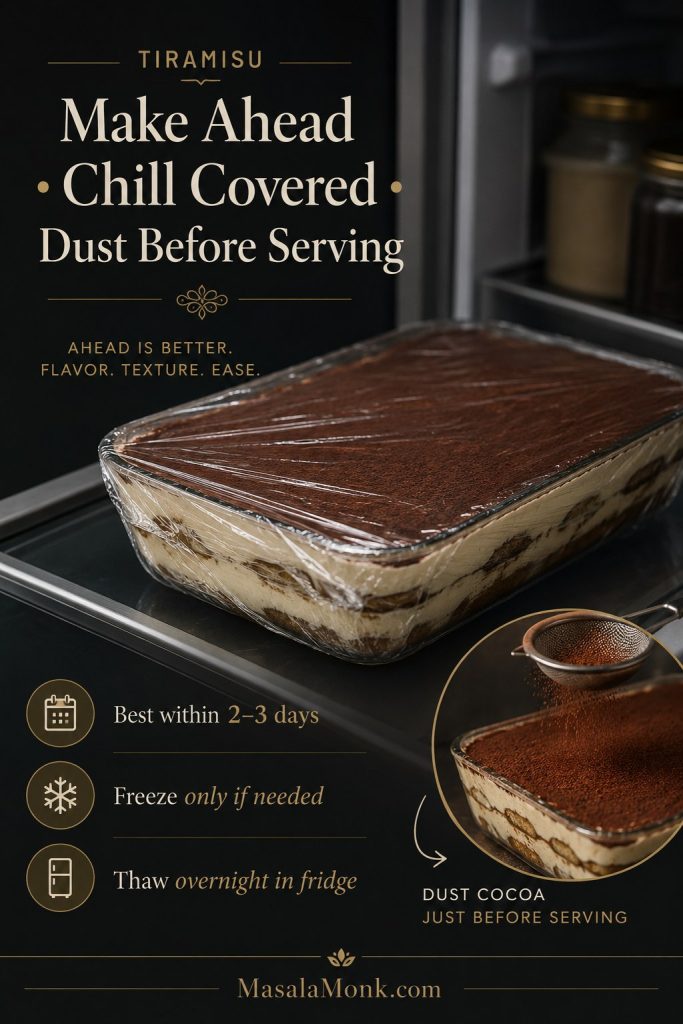
Keep tiramisu covered and refrigerated. It is best within 2–3 days. Do not leave it at room temperature for more than 2 hours. Freeze only if needed, preferably before the final cocoa dusting.
This is the kind of dessert that rewards patience. It looks simple when it goes into the fridge, then comes out the next day with softer layers, deeper coffee flavor, and a cleaner slice. That first lifted piece may never be the neatest, but once the pan opens up, the layers show beautifully.
Raw Eggs, Cooked Eggs, or No Eggs?
This is one of the most important decisions in tiramisu. Raw eggs are traditional in many versions, but not every guest is comfortable with them. Pregnant people, young children, older adults, and anyone with a weakened immune system should be especially careful with raw or undercooked eggs.
The cooked-yolk method gives the filling richness without making fully raw yolks the default. The yolks and sugar are whisked over gentle heat into a simple zabaglione-style base until pale, thick, and ribbony.
While you whisk, keep the heat gentle. If the bowl gets too hot or the mixture starts steaming heavily, lift it off the pan for a few seconds. That way, the yolks thicken into a glossy ribbon instead of scrambling into bits.
If you prefer the more traditional raw-egg method, use pasteurized eggs. To avoid eggs completely, use an eggless tiramisu method rather than simply leaving the eggs out of this recipe, because the cream structure will change.
Which Egg Method Should You Use?
| Method | Egg-safety note | Texture | Best use |
|---|---|---|---|
| Raw yolks and raw whites | Use pasteurized eggs | Light and classic | Traditional-style tiramisu |
| Cooked yolks + whipped cream | Higher confidence if yolks are heated properly | Creamy and stable | Main recipe |
| Cooked yolks + pasteurized egg whites | Use pasteurized whites because they are not cooked | Lighter and more traditional | No-cream variation |
| No eggs | No raw eggs, but the cream structure changes | Creamier, less classic | Eggless tiramisu |
Important egg note
If you serve tiramisu made with raw or lightly cooked eggs, use pasteurized eggs or pasteurized egg products. That is especially important when serving higher-risk guests.
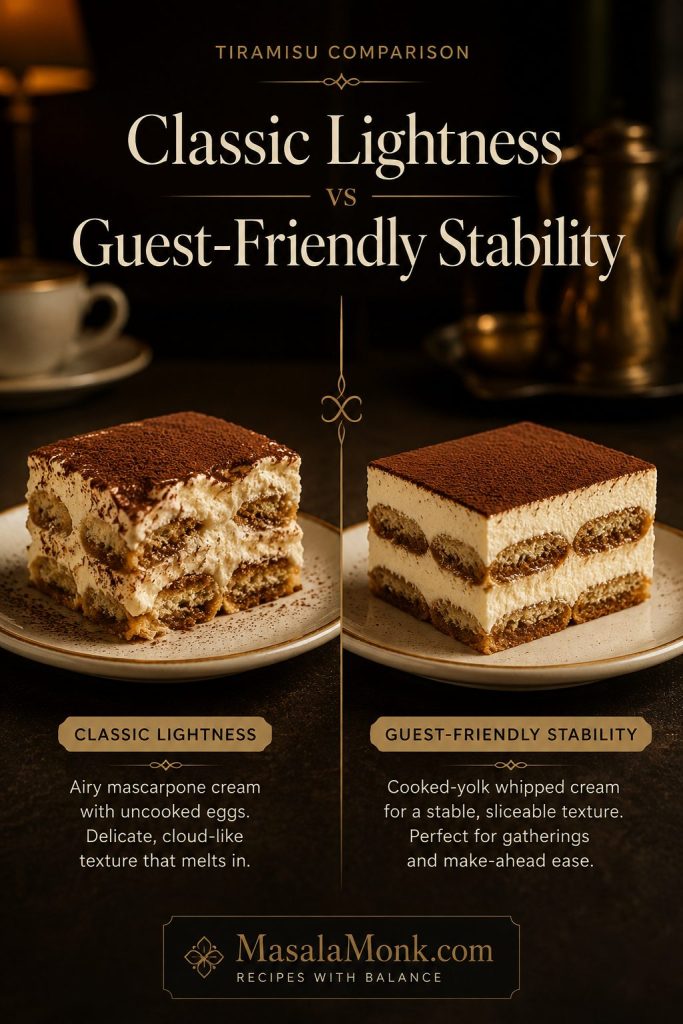
Classic vs Easy Tiramisu: Which Method Should You Use?
The biggest difference between classic Italian tiramisu and many easy versions is the cream layer. Traditionally, tiramisu relies on mascarpone, eggs, sugar, coffee, ladyfingers, and cocoa. Easier modern versions often use whipped cream for stability or skip eggs completely.
If you are looking for the strictest traditional version, use mascarpone, eggs, sugar, coffee, savoiardi, and cocoa without heavy cream. The version here keeps that flavor structure, but uses whipped cream for a more stable filling that many home cooks find easier to serve.
Both approaches have a place. A traditional egg-white version gives a lighter cream, while the cooked-yolk and whipped-cream method is more predictable when you want neat slices for guests.
| Style | Uses | Best for | Tradeoff |
|---|---|---|---|
| Traditional raw/pasteurized egg tiramisu | Mascarpone, yolks, whipped whites | Classic lightness | Raw egg concern unless pasteurized eggs are used |
| Cooked-yolk modern classic | Mascarpone, cooked yolks, whipped cream | Reliable home tiramisu | Modern, stable, and guest-friendly |
| Easy no-egg tiramisu | Mascarpone and whipped cream | Speed and no raw eggs | Creamier and simpler, but less traditional |
| Eggless tiramisu | Cream, mascarpone, or substitutes | No-egg dietary needs | Needs its own method |
Best Ladyfingers for Tiramisu
The best ladyfingers for tiramisu are firm, dry savoiardi. They are crisp enough to absorb coffee without falling apart immediately, then they soften during the fridge rest.
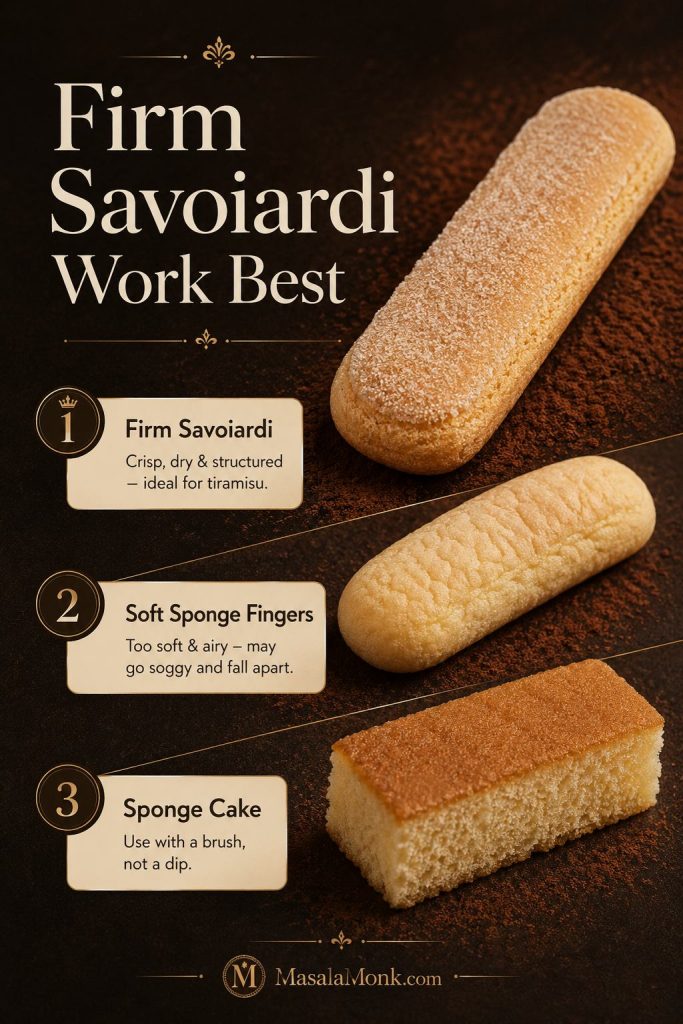
Soft cake-style ladyfingers are more delicate. They can still work, but you should barely touch them to the coffee rather than giving them a full dip. If you use sponge cake instead of ladyfingers, brush it with coffee rather than dunking it.
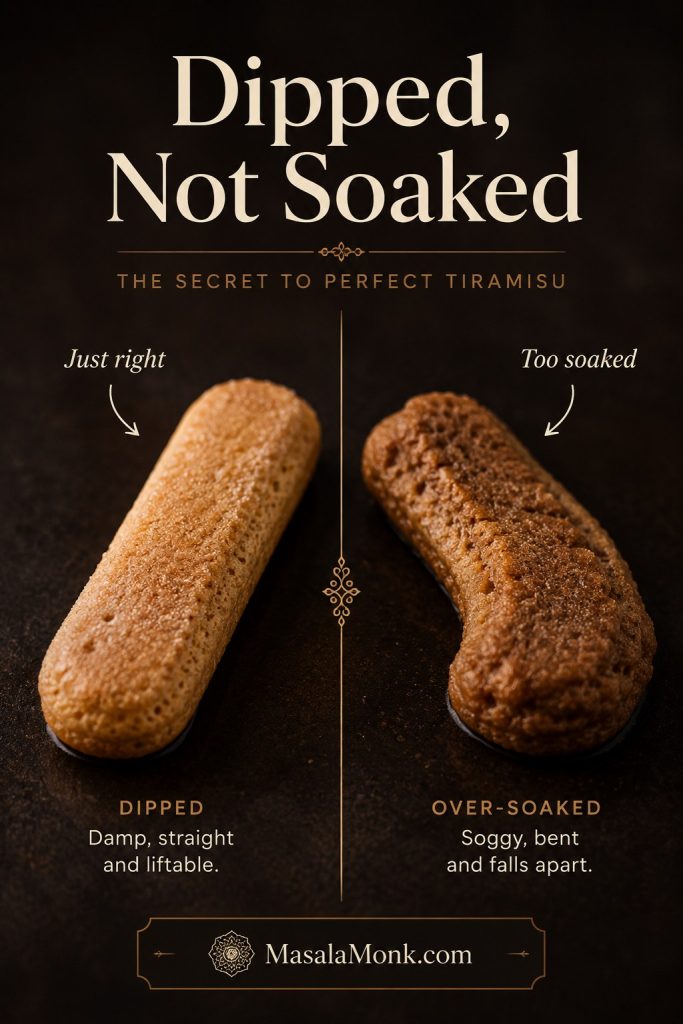
The Ladyfinger Dip Test
After dipping, a ladyfinger should feel damp on the outside but still firm enough to lift without bending. If it starts sagging before it reaches the dish, it has absorbed too much coffee. If it still feels completely dry and chalky, the dip was too shallow.
A good rule is one second per side for firm savoiardi. For softer sponge fingers, touch them to the coffee and lift immediately. For sponge cake, do not dip at all; brush the coffee over the surface instead.
Do not worry if the first one feels awkward; after two or three ladyfingers, the rhythm becomes obvious.
Finally, remember the simplest rule: dip, do not soak. Each ladyfinger should touch the cooled coffee briefly and come out before it softens in your hand.
For the full prevention checklist, see how to keep tiramisu from getting soggy.
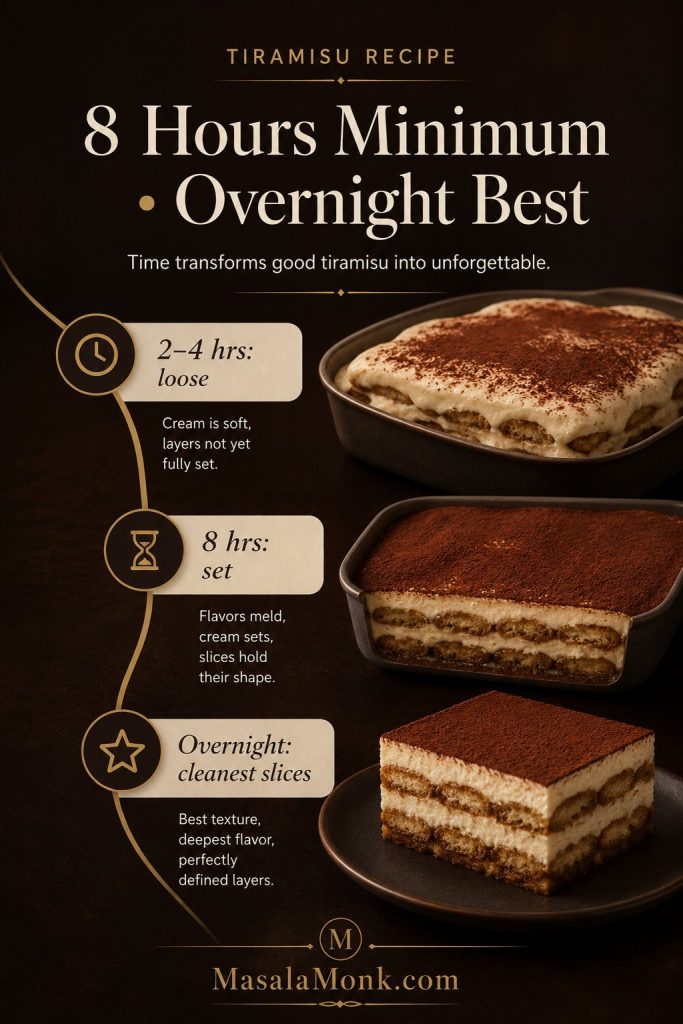
How Long to Chill Tiramisu
Because tiramisu needs time, a short chill may taste fine but rarely gives the same soft, sliceable texture. For the best result, make it the day before serving.
You can serve tiramisu the same day if it has at least 8 hours to chill, but it is noticeably better the next day. The coffee flavor settles, the ladyfingers soften evenly, and the cream cuts more cleanly.
This is why tiramisu is such a good hosting dessert: you are not rushing around while people are at the table. The hard work is already done, and all that is left is cocoa, a cold knife, and the first clean slice.
| Chill time | Result |
|---|---|
| 2–4 hours | Edible, but often loose or uneven |
| 6 hours | Better set, but not always ideal |
| 8 hours | Reliable minimum for this recipe |
| Overnight | Best flavor and cleanest texture |
| 2–3 days | Still good if covered, but softer |
Making it further ahead? See the make-ahead and storage notes before you decide how long to keep it.
That same patience matters in other make-ahead desserts too. MasalaMonk’s no bake mango cheesecake recipe is another good example, especially because fruit can make a chilled filling softer if the texture is not controlled.
How to Keep Tiramisu from Getting Soggy
In most cases, soggy tiramisu comes from too much liquid, weak structure, or not enough chill time. Fortunately, the fix starts before the dessert goes into the fridge.
Soft ladyfingers are not the problem; wet ladyfingers are. A good tiramisu should have tender layers after chilling, but the bottom of the pan should not be swimming in coffee. If you see liquid pooling, the ladyfingers were soaked too long or too much coffee was added to the dish.
How to Prevent Soggy Tiramisu
- Choose firm dry savoiardi instead of soft cake-style fingers.
- Cool the coffee completely before dipping.
- Dip one ladyfinger at a time for about one second per side, then move it straight into the dish.
- Leave any extra coffee behind instead of adding it to the pan.
- Keep the mascarpone thick, cold, and smooth.
- Whip the cream to medium-stiff peaks.
- Chill the tiramisu for at least 8 hours.
If you love a wetter tiramisu, you can dip slightly longer, but be careful. A few extra seconds can turn firm ladyfingers into a soft pudding layer.
Alcohol, Coffee, and Cocoa: How to Balance the Flavor
Tiramisu should taste like cream, coffee, cocoa, and a little bitterness. It should not taste like plain whipped cream, wet cake, or a glass of liqueur.
The best version should not taste like sugar first. It should open with cold cream, move into coffee, and finish with enough cocoa bitterness to make the next bite feel tempting.
Does Tiramisu Need Alcohol?
No. Alcohol is optional. Marsala, dark rum, brandy, coffee liqueur, amaretto, or Grand Marnier can add aroma and depth, but the dessert works beautifully with coffee only.
For a family-friendly tiramisu, skip the alcohol and add 1 teaspoon vanilla to the mascarpone cream. You can also stir a teaspoon of sugar into the coffee if it tastes too bitter.
| Flavor goal | What to use |
|---|---|
| Classic and clean | Strong coffee only |
| Warm and traditional | Marsala or dark rum |
| Coffee-shop style | Coffee liqueur |
| Nutty | Amaretto or Frangelico |
| Brighter and citrusy | Grand Marnier or orange liqueur |
| Family-friendly | No alcohol, plus vanilla in the cream |
What Coffee Works Best?
Espresso is ideal, but moka coffee, bold brewed coffee, or strong instant espresso can also work. The coffee should taste a little stronger than something you would casually drink, because the mascarpone cream softens its bitterness.
Avoid weak coffee. It makes tiramisu taste flat and sweet instead of balanced.
Can You Make Tiramisu Without Coffee?
You can, but it becomes a tiramisu-style dessert rather than classic tiramisu. For a no-coffee version, use hot chocolate, matcha, chai, or a fruit syrup as the soak. Keep the liquid strong and not too sweet, and dip even more carefully because many non-coffee soaks are thinner or sweeter than espresso.
When to Add Cocoa Powder
Dust cocoa just before serving if you want a clean, powdery finish. Dust it earlier if you prefer a darker, hydrated cocoa top. Both are acceptable, but the just-before-serving version looks fresher.
Tiramisu Pan Sizes: 9×13, 8×8, and Metric Baking Dishes
One reason tiramisu recipes feel confusing is that different recipes use different dish sizes. A small 8×8 tiramisu and a large 9×13 tiramisu cannot use the same number of ladyfingers or the same amount of mascarpone cream.
| Dish size | Serves | Ladyfingers | Mascarpone | Coffee | Best use |
|---|---|---|---|---|---|
| 9×13 inch / 33×23 cm | 12 | 40–45 | 500 g | 300–360 ml | Full recipe, parties, holidays |
| 8×8 inch / 20 cm | 6–8 | 20–24 | 250 g | 180 ml | Small batch |
| 20×30 cm / about 8×12 inch | 8–10 | About 30 | 500 g | 300 ml | Medium, slightly taller tiramisu |
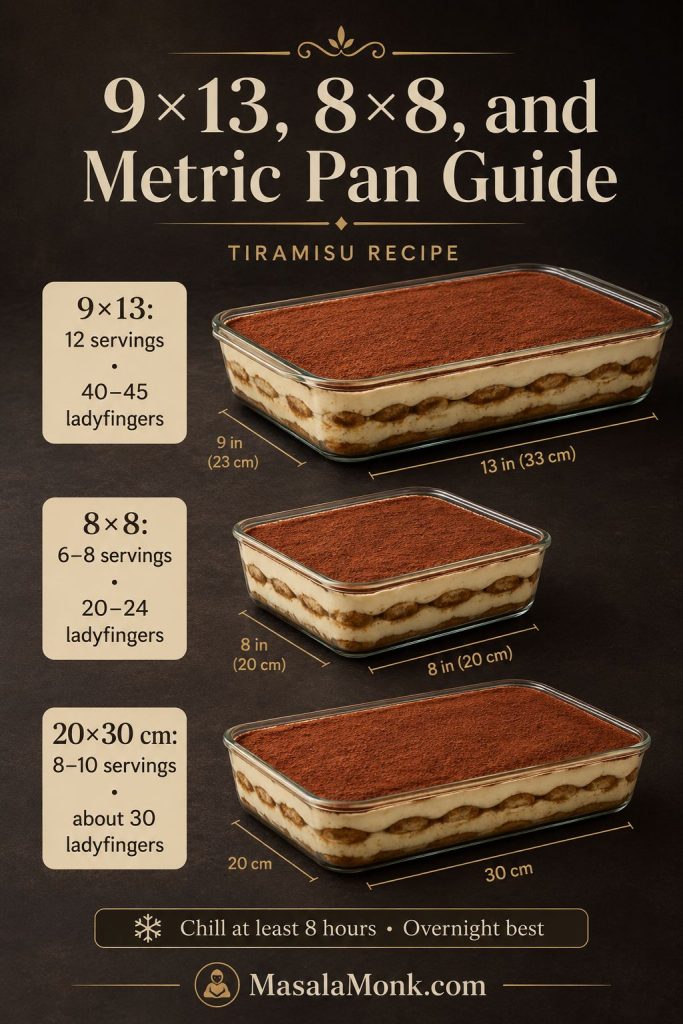
A 9×13-inch dish is the easiest default here because it gives you a generous dessert for guests and enough room for two clean layers. Use the half-batch note in the recipe card for an 8×8 pan.
A dish that is slightly larger or smaller is workable. Build two even layers, keep the coffee controlled, and prioritize balance over forcing every last drop into the pan.
Tiramisu Without Mascarpone
Mascarpone is best for classic tiramisu. It is rich, lightly sweet, and less tangy than cream cheese. If you replace it, the dessert can still be good, but it will not taste exactly the same.
When mascarpone is missing, you can still make a good layered coffee dessert, but it is better to be honest about the result: it will be tiramisu-style, not the same classic texture.
As a practical backup, cream cheese plus cream is the closest option. For something lighter, Greek yogurt works better as a healthy variation. Very smooth ricotta can give a more Italian-adjacent dairy flavor, but it will not create the same silky cream.
If the lighter dairy angle is what interests you most, MasalaMonk’s cottage cheese cheesecake recipe is a better fit than forcing cottage cheese or yogurt into classic tiramisu.
| Substitute | What changes | Best use |
|---|---|---|
| Cream cheese | Tangier, denser, less classic | Emergency substitute |
| Ricotta | Lighter but can be grainy unless blended smooth | Ricotta-style tiramisu |
| Greek yogurt | Tangy, lighter, more “healthy dessert” than classic tiramisu | Healthy tiramisu variation |
| Cream cheese + cream | Closer body, still tangier | Better than plain cream cheese |
| Homemade mascarpone | Closest replacement if made well | Best planned substitute |
How to Fix Runny or Soggy Tiramisu
Most tiramisu problems come from the same few places: thin mascarpone, too much coffee, underwhipped cream, overmixed filling, or not enough time in the fridge.
Although some tiramisu problems can be improved after assembly, they cannot always be fully reversed. For example, a runny tiramisu can often be chilled longer and served in softer scoops or cups, but it will not magically become a firm slice if the cream was too loose or the ladyfingers were oversoaked. The real fix is usually in the next batch.
If the issue is wet layers, revisit the dip test. If the cream is loose or grainy, the temperature cues are usually the better place to start.
Tiramisu Troubleshooting Guide
| Problem | Likely cause | Fix now | Fix next time |
|---|---|---|---|
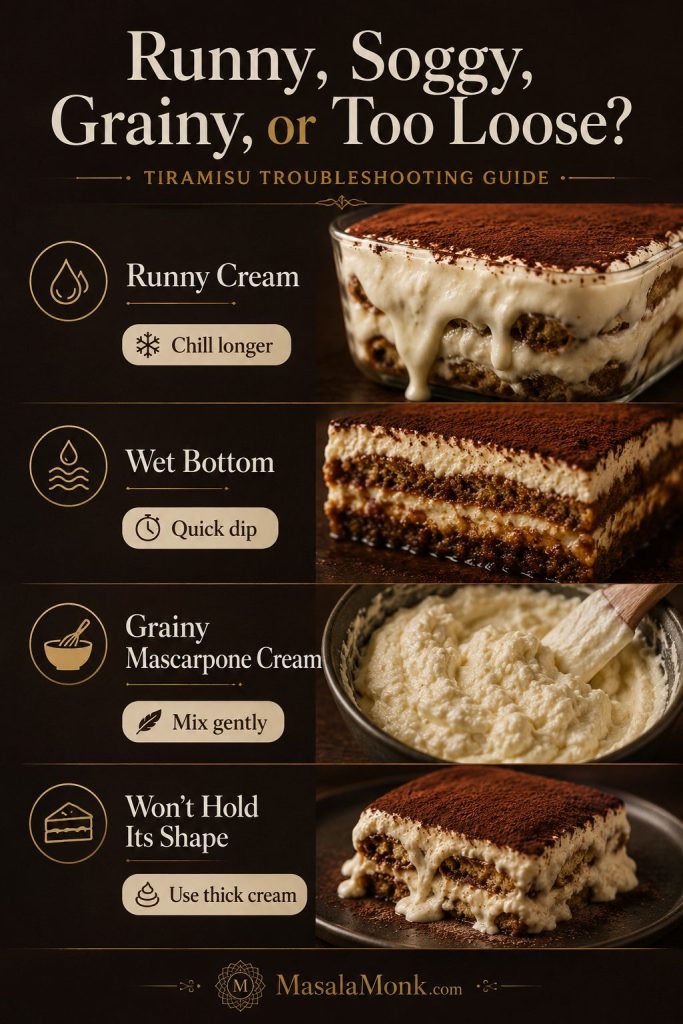
| Runny cream | Loose mascarpone, underwhipped cream, or warm yolk mixture | Chill longer; serve in cups if it still will not slice | Use thick mascarpone and medium-stiff whipped cream |
| Grainy cream | Overmixed mascarpone or overheated egg mixture | Do not try to beat it smooth after assembly | Mix mascarpone briefly and use gentle heat |
| Wet bottom | Ladyfingers soaked too long or extra coffee added | Chill well and serve as a softer spoon dessert | Use a 1-second dip per side and never pour coffee into the pan |
| Dry ladyfingers | Dip was too quick or chill time was too short | Chill longer | Dip slightly deeper next time |
| Too bitter | Coffee too harsh or too much cocoa | Serve with lightly sweetened cream or reduce cocoa on top | Use smoother coffee and a lighter cocoa dusting |
| Too sweet | Too much sugar or sweet liqueur | Add a heavier cocoa dusting and serve with unsweetened coffee | Use 100 g sugar instead of 120 g |
| Won’t slice cleanly | Under-chilled or too much liquid | Chill longer | Rest overnight and reduce soaking |
| Flat flavor | Weak coffee | Serve with espresso | Use stronger coffee next time |
| Grainy mascarpone cream | Overmixed mascarpone, overheated yolks, or temperature shock | Chill and serve gently; do not keep beating it | Mix mascarpone briefly and fold only after the yolks cool |
Most tiramisu mistakes are not dramatic failures. They usually become softer, spoonable desserts instead of clean slices. That is still delicious, but the next batch will be better once you know which detail caused the problem.
Make Ahead, Storage, and Freezing
Tiramisu is one of the best make-ahead desserts because it improves as it rests. The ladyfingers soften, the cream sets, and the coffee flavor becomes more even.
- Best make-ahead timing: assemble the tiramisu the day before serving.
- Fridge storage: keep it covered and refrigerated.
- Best quality: eat within 2–3 days.
- Serving: keep chilled until close to serving time.
- Freezing: freeze only if needed; texture may soften after thawing.
- Freezing tip: freeze before the final cocoa dusting, then dust after thawing.
Do not leave tiramisu at room temperature for more than 2 hours. In hot weather or warm rooms, keep the serving window shorter and return leftovers to the refrigerator promptly.
After freezing, thaw tiramisu overnight in the refrigerator and dust with fresh cocoa after thawing. Do not thaw it at room temperature.
For the more traditional version with raw pasteurized egg whites, be stricter with storage. Keep it chilled the entire time and serve it within 24–48 hours for best quality.
For another chilled dessert that depends on layer structure, MasalaMonk’s banoffee pie recipe is a no-bake style dessert where the base, cream, and filling need to hold together before serving.
Tiramisu Variations
Once you understand the basic structure, tiramisu is easy to adapt. The trick is to keep the balance: a creamy layer, a soaked base, a bitter or bright finish, and enough chill time to bring everything together.
If you are changing the flavor, change only one major thing at a time: the soak, the cream, or the topping. Changing all three can make the dessert stop feeling like tiramisu.
Before changing flavors, it helps to understand the cream, coffee, and cocoa balance so the variation still tastes like tiramisu.
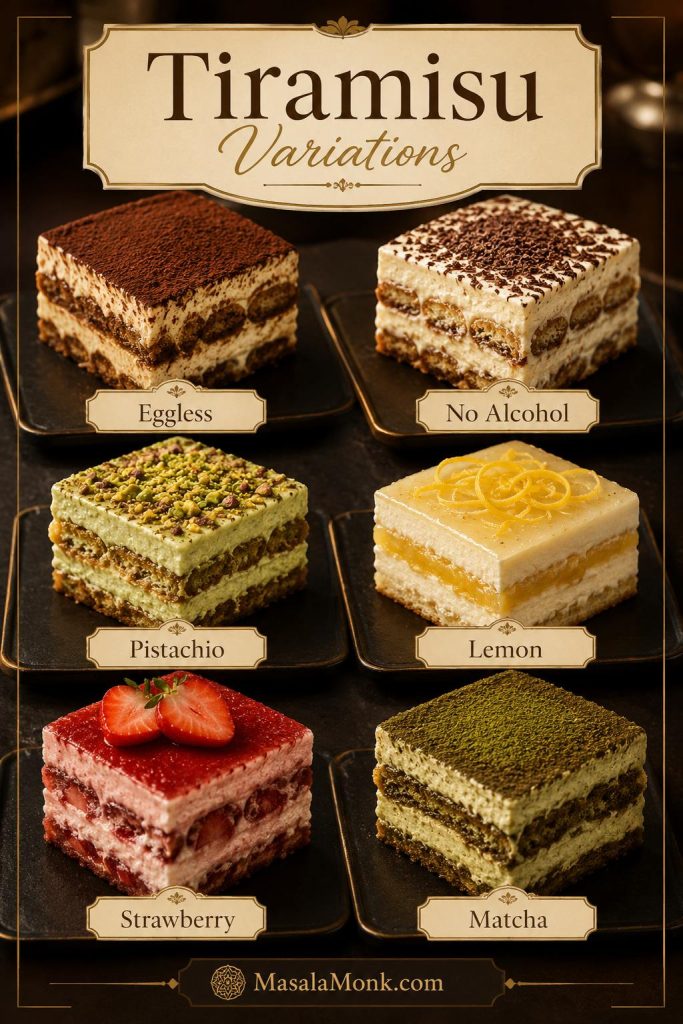
Eggless Tiramisu
Use mascarpone and whipped cream without eggs. This is the best direction for readers who want no raw eggs and no cooked yolks at all, but the dessert will taste creamier and less classic than the cooked-yolk version.
No-Alcohol Tiramisu
Skip the rum or liqueur and use strong coffee only. Add vanilla to the cream if you want a rounder flavor.
For another family-friendly layered dessert, MasalaMonk’s no-bake banana pudding has a softer vanilla-banana profile built around cookies, cream, fruit, and chill time.
Pistachio Tiramisu
For pistachio tiramisu, fold a small amount of pistachio cream into the mascarpone layer and keep the coffee dip brief. Pistachio paste is rich, so start modestly and taste before adding more. Finish with chopped pistachios for texture.
Lemon or Limoncello Tiramisu
Use lemon syrup, lemon curd, or limoncello instead of a coffee-heavy profile. Keep the soak controlled so the dessert does not turn watery, and balance the lemon with enough mascarpone cream so it still feels lush.
Strawberry Tiramisu
Use a thick strawberry sauce or roasted strawberry layer rather than very juicy fresh berries. Fresh strawberries release liquid as they sit, so the fruit layer needs to be controlled if you want clean slices.
Matcha Tiramisu
Replace the coffee dip with a matcha soak and dust the top with matcha or a cocoa-matcha blend. Keep the matcha balanced so it does not taste bitter.
Cake-Style Tiramisu
A cake-style version is usually built with cake layers, mascarpone filling, coffee syrup, and cocoa instead of dipped savoiardi.
FAQs
Does tiramisu have raw eggs?
Traditional tiramisu often uses raw eggs, but this version uses cooked egg yolks for a more comfortable home method. If you make a raw-egg version, use pasteurized eggs.
What is a safer way to make tiramisu at home?
Use cooked yolks or pasteurized eggs, keep the dessert refrigerated, and do not leave it at room temperature for more than 2 hours. The cooked-yolk method gives you a good balance of classic flavor, texture, and home-kitchen confidence.
How long should tiramisu chill before serving?
Chill tiramisu for at least 8 hours. Overnight is best because the ladyfingers soften evenly and the mascarpone cream sets enough to slice.
Can I make tiramisu the same day?
Yes, if you can give it at least 8 hours in the refrigerator. However, overnight tiramisu usually tastes better and slices more cleanly because the coffee flavor settles and the layers soften evenly.
Why did my tiramisu turn runny?
Runny tiramisu usually comes from watery mascarpone, underwhipped cream, warm filling, oversoaked ladyfingers, or too little chill time. Chill it longer if it is already assembled, and use thicker mascarpone next time.
How do I stop ladyfingers from getting soggy?
Use firm dry savoiardi, cool the coffee completely, and dip each ladyfinger for about one second per side. Keep the dip brief and leave extra coffee behind instead of pouring it into the dish.
Why is my mascarpone cream grainy?
Grainy mascarpone cream usually comes from overmixing mascarpone, overheating the yolk mixture, or folding ingredients together at very different temperatures. Mix mascarpone briefly, cool the yolks until warm rather than hot, and fold gently.
Can I use instant coffee for tiramisu?
Yes. Instant espresso is better than weak brewed coffee. Make it strong, let it cool completely, and taste it before dipping the ladyfingers.
Can kids eat tiramisu?
For a kid-friendly tiramisu, skip the alcohol, use the cooked-yolk version or pasteurized eggs, and consider decaf coffee or a lighter coffee dip. Keep in mind that classic tiramisu still has a coffee flavor.
Does tiramisu need alcohol?
No. Alcohol is optional. Coffee-only tiramisu is valid and works well for a family-friendly version.
What alcohol is best in tiramisu?
Dark rum, Marsala, brandy, coffee liqueur, amaretto, and Grand Marnier can all work. Use only a small amount so the alcohol supports the coffee rather than overpowering it.
What can replace mascarpone in tiramisu?
Cream cheese, ricotta, or Greek yogurt can be used in tiramisu-style desserts, but they change the flavor and texture. Mascarpone is still the best choice for classic tiramisu.
Are ladyfingers and savoiardi the same thing?
Savoiardi are Italian ladyfingers. They are usually firm and dry, which makes them ideal for tiramisu. Some soft sponge-style ladyfingers are more delicate and need a much quicker dip.
Should cocoa powder go on before or after chilling?
Dust cocoa just before serving for the cleanest finish. If you dust before chilling, the cocoa will darken and hydrate into the top layer.
How long does tiramisu last in the fridge?
Tiramisu is best within 2–3 days when covered and refrigerated. It becomes softer as it sits. If you use raw pasteurized egg whites in the traditional option, serve it within 24–48 hours for best quality.
Is tiramisu better the next day?
Yes. Tiramisu is usually better the next day because the layers have time to soften, set, and absorb the coffee flavor evenly.


