Posted on Leave a comment

Juicy Air Fryer Chicken Breast Recipe: Time & Temperature Guide

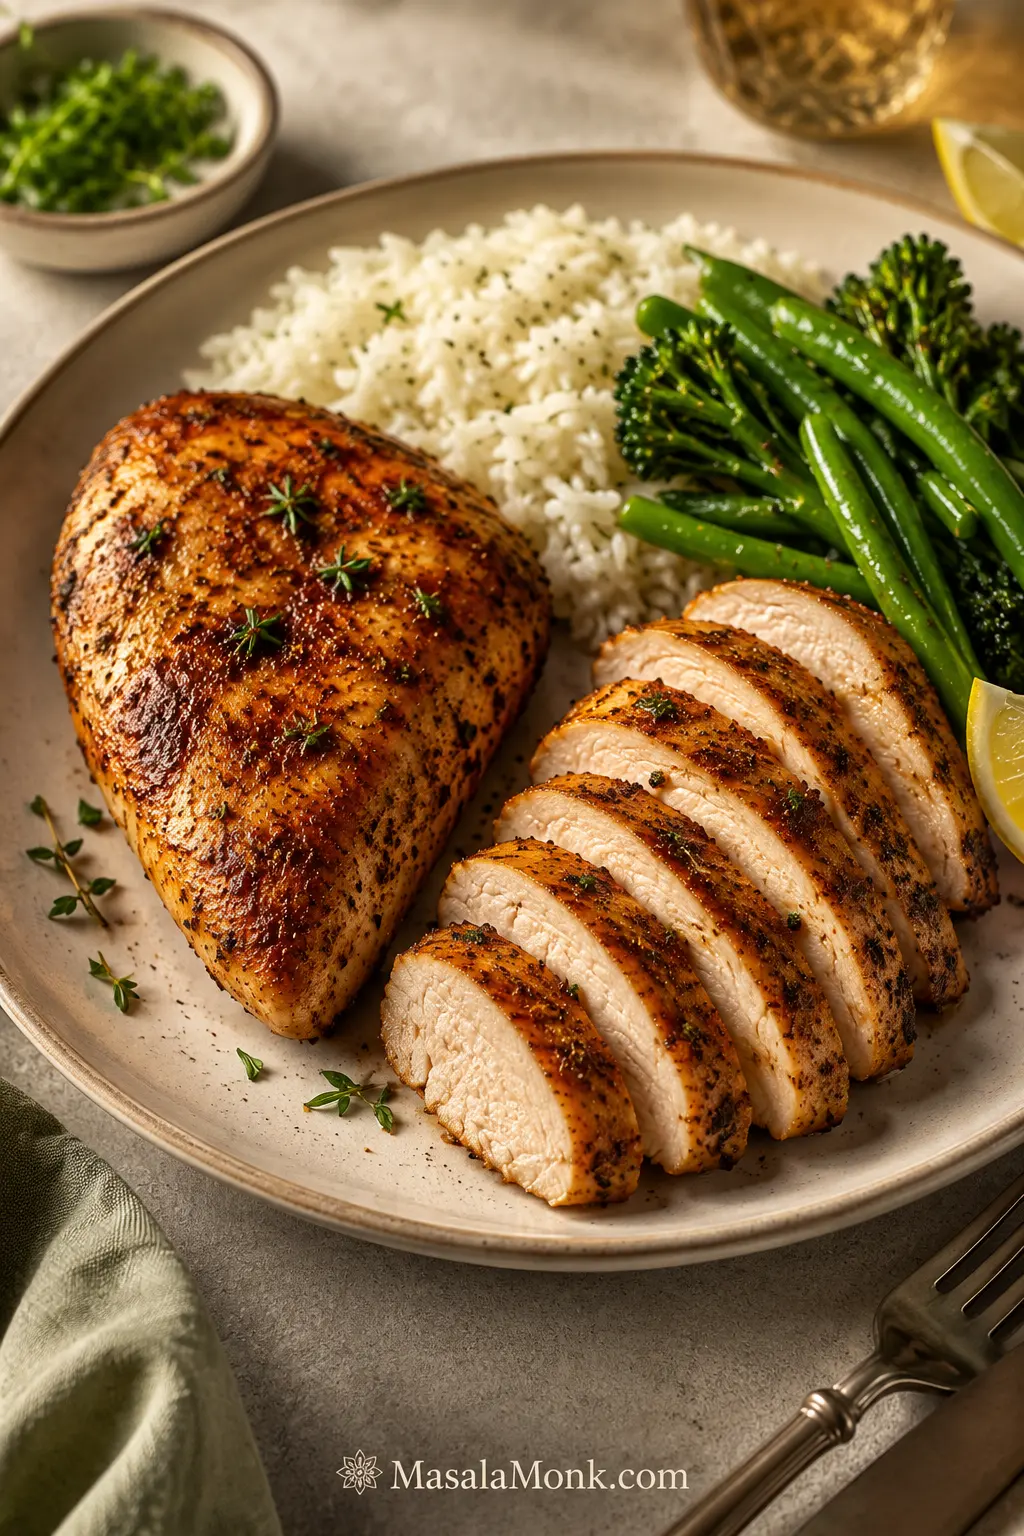
Sliced paprika-garlic air fryer chicken breast served with rice, green vegetables, lemon and herbs on a warm plate.

Air fryer chicken breast should be one of the easiest dinners in your week: quick enough for tonight, versatile enough for tomorrow’s lunch, and simple enough that you don’t need to hover over it.

When it goes well, the paprika-garlic coating is warm, savoury and lightly bronzed. The rested centre stays tender enough to slice cleanly and juicy enough to eat without hiding it beneath a heavy sauce.

When it doesn’t, the narrow end turns dry while the thick centre is still catching up—or the seasoning darkens before the meat is ready. That inconsistency is real. Chicken breasts don’t arrive in one standard size, and air fryers don’t all move heat in exactly the same way.

Start with the chicken, not the timer. Weight gives you the broad cooking window; thickness tells you when to check.

Two breasts can weigh almost the same and still cook differently when one is much thicker through the centre.
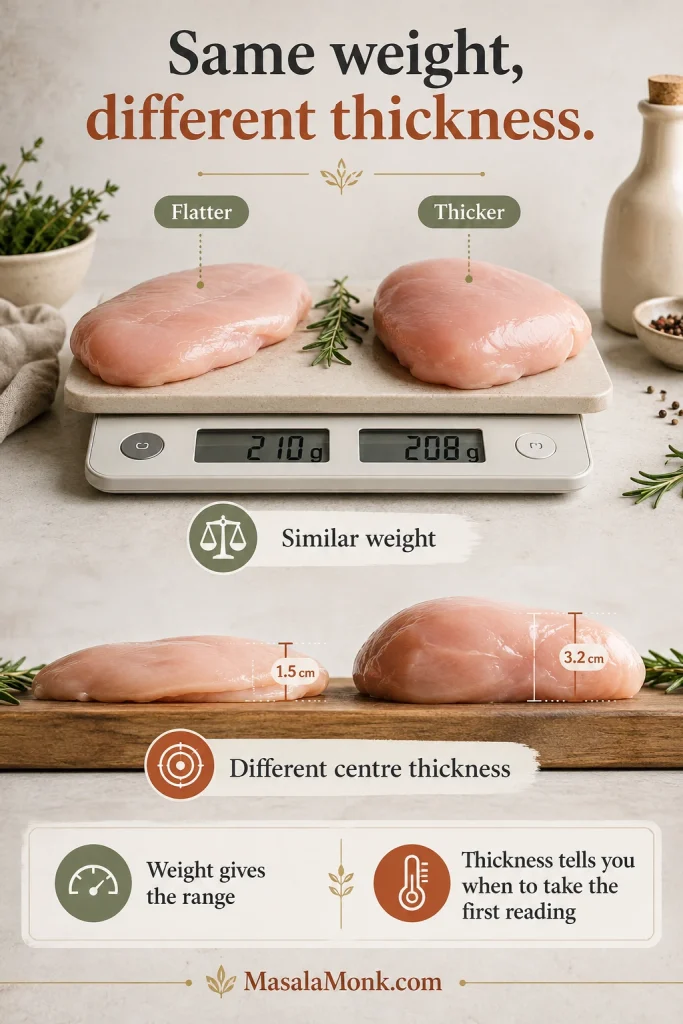
Comparison of two raw chicken breasts with similar weights but different centre thicknesses, showing why thickness affects cooking time.
Similar weights can hide very different centre thicknesses — and different first-check times.

Quick Answer: How Long to Air Fry Chicken Breast

Air-fry fresh, boneless, skinless, unbreaded chicken breasts at 375°F / 190°C. For breasts weighing about 7–8 oz / 200–225 g each and evened to roughly ¾ inch / 2 cm thick, begin checking at 9 minutes. Many will finish between 10 and 14 minutes.

Flip once during cooking. Insert an instant-read thermometer sideways into the thickest part and remove each breast when the centre reaches 165°F / 74°C. Rest the chicken for five minutes on a clean plate or board rather than inside the hot basket.

The time range gets you close; the temperature in the centre gives you the final answer.

Which Chicken Are You Cooking?

Match your chicken to the row below before using the timing.

What you haveBest approach
Fresh, whole, boneless and unbreaded breastUse the recipe and timing chart below
Thin-sliced breast or chicken cutletUse the thin-cutlet row and check the centre much earlier
Raw frozen chicken breastChoose a method written specifically for frozen chicken
Chicken tenderloinsUse these shorter air-fryer tenderloin directions
Breaded breast or cutletsChoose a method designed for breading and oil spray
Stuffed or bone-in breastChoose instructions designed for that form

Using fresh, whole, boneless chicken breast? Go straight to the recipe card. Cooking a thinner or thicker piece? Check the timing chart first.

Air Fryer Chicken Breast Recipe

Make this version first. The paprika-garlic coating develops golden patches and a savoury edge, while the seasoning is simple enough to work in salads, wraps, pasta, sandwiches and meal-prep bowls.

Prep time10 minutes
Cook timeAbout 10–14 minutes
Rest time5 minutes
Total timeAbout 25–29 minutes
Servings2 main-dish servings or 4 smaller meal-prep portions
SettingAir Fry or equivalent Air Crisp setting
Temperature375°F / 190°C
Safe internal temperature165°F / 74°C
EquipmentAir fryer, instant-read thermometer, tongs, and a meat mallet, rolling pin or small heavy pan

Ingredients

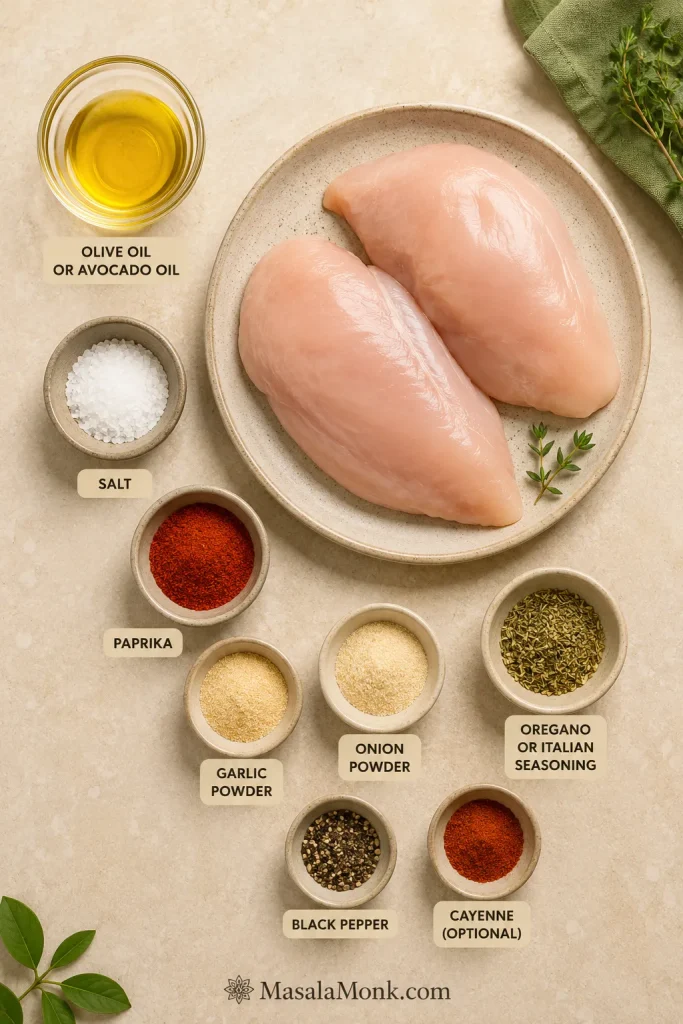
  • 2 boneless, skinless chicken breasts, about 14–16 oz / 400–450 g total
  • 2 teaspoons / 10 ml olive oil or avocado oil
  • Fine salt, ¾ teaspoon, roughly 4–4.5 g depending on crystal size
  • Paprika, 1 teaspoon
  • Garlic powder, ¾ teaspoon
  • Onion powder, ½ teaspoon
  • Dried oregano or Italian seasoning, ½ teaspoon
  • Ground black pepper, ¼ teaspoon
  • Pinch of cayenne pepper, optional
Overhead ingredient board with raw chicken breasts, oil, salt, paprika, garlic powder, onion powder, oregano, black pepper and cayenne.
This simple paprika-garlic base adds colour and savoury flavour without turning the dish into a sauced recipe.
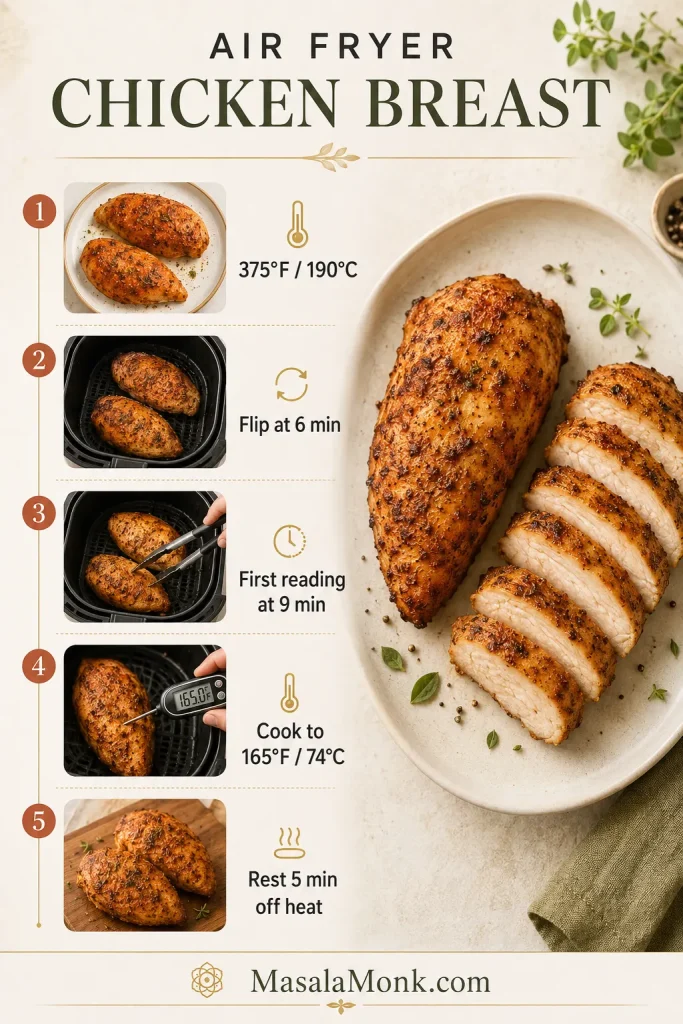
Vertical air fryer chicken breast method guide showing 375°F, flip at 6 minutes, first reading at 9 minutes, 165°F endpoint and 5-minute rest.
Use this map as a checkpoint: 375°F / 190°C, flip at 6 minutes, first reading at 9 minutes, finish at 165°F / 74°C and rest off heat.

Instructions

Prepare the chicken

  1. Check the size. The timing below works best for breasts weighing about 7–8 oz / 200–225 g each. Take a noticeably smaller piece out first if it reaches temperature sooner.
  2. Even the thickest section. Place the chicken between two sheets of baking parchment or inside a sturdy food-safe bag. Gently level only the thick central area until each breast is close to ¾ inch / 2 cm thick.
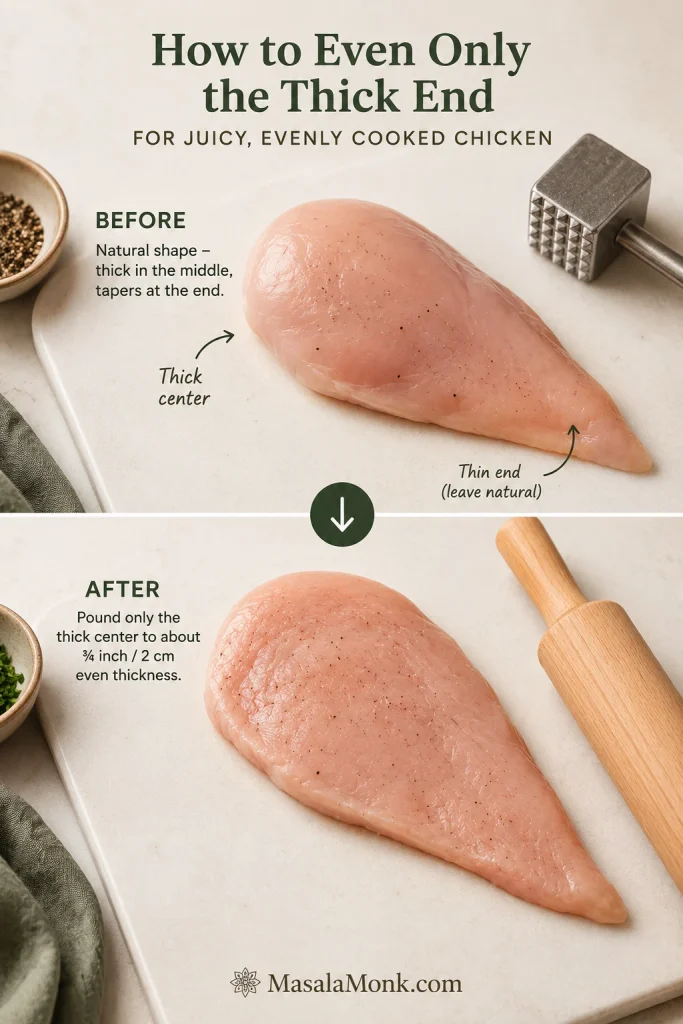
Before-and-after guide showing a raw chicken breast with the thick centre gently flattened while the thin tapered end remains natural.
Level the thick centre only; keep the thin end from getting hammered flat and drying out.
  1. Preheat the air fryer. Select Air Fry, or the equivalent Air Crisp setting, and heat to 375°F / 190°C for about three minutes. Follow the manufacturer’s guidance when it recommends a different preheating routine.
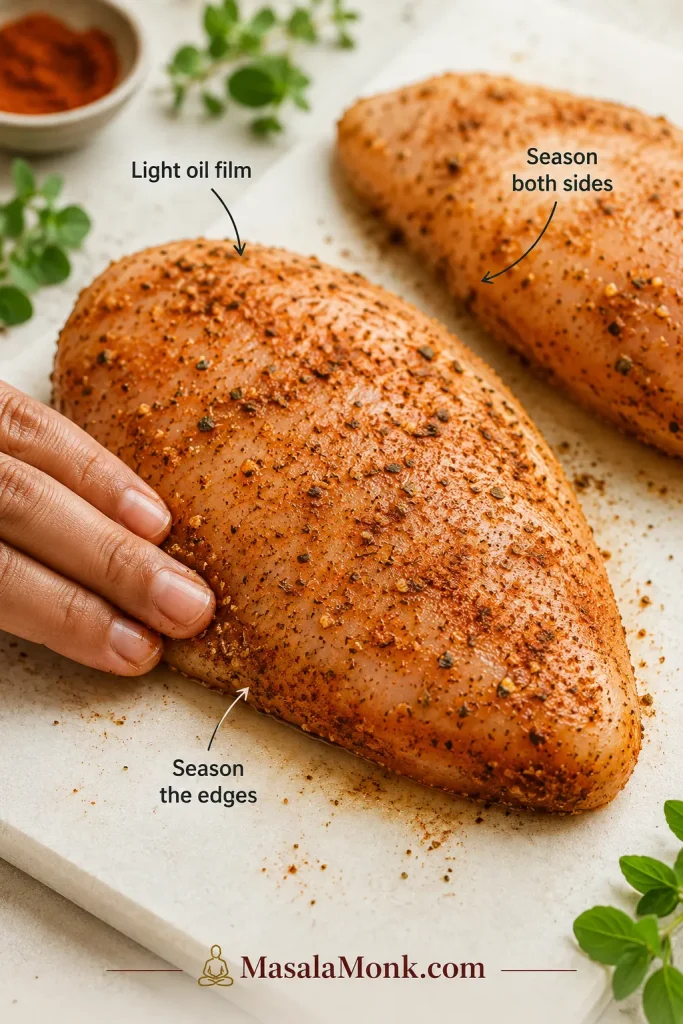
  2. Dry and season. Pat the breasts dry with paper towels and coat them with the oil. Mix the salt, paprika, garlic powder, onion powder, oregano, black pepper and optional cayenne, then season both sides and the thicker edges.
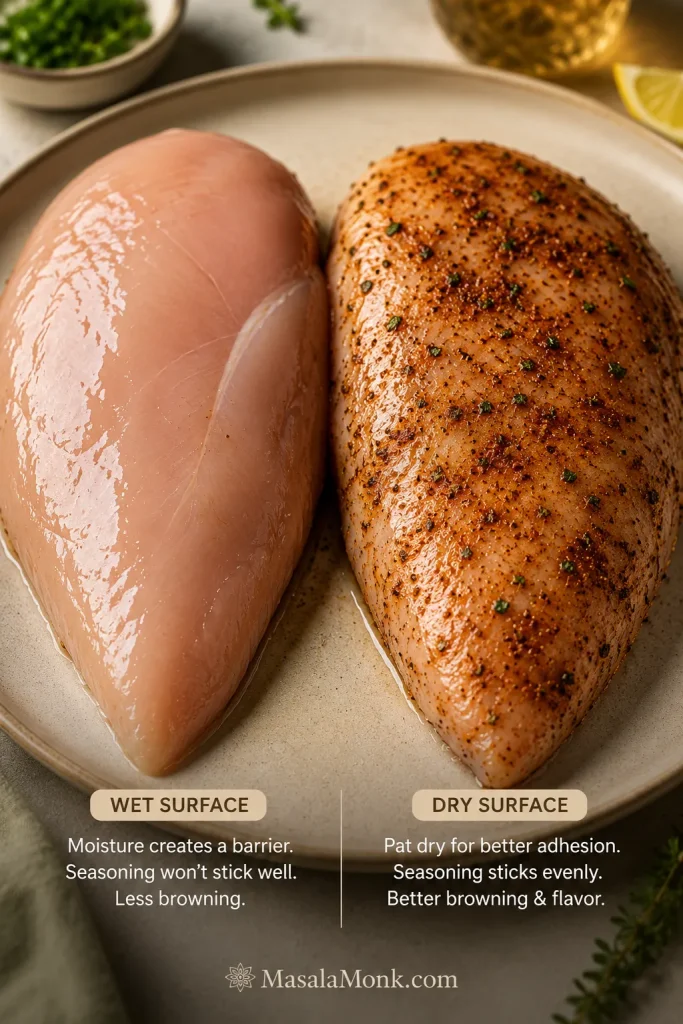
Split comparison of a wet raw chicken breast surface and a dried, seasoned chicken breast surface with better seasoning adhesion.
Dry the surface so the spices cling and the exterior browns more evenly.
Close-up of raw chicken breast with paprika-garlic seasoning on the surface and thick side edge, with labels for light oil and seasoning.
A thin oil film is enough; season the thick edges too, so every slice carries flavour.

Cook, check and rest

  1. Arrange the basket. Place the chicken in one layer with a visible gap between the pieces. Extra basket spray is usually unnecessary when the chicken is lightly oiled and the basket coating is in good condition.
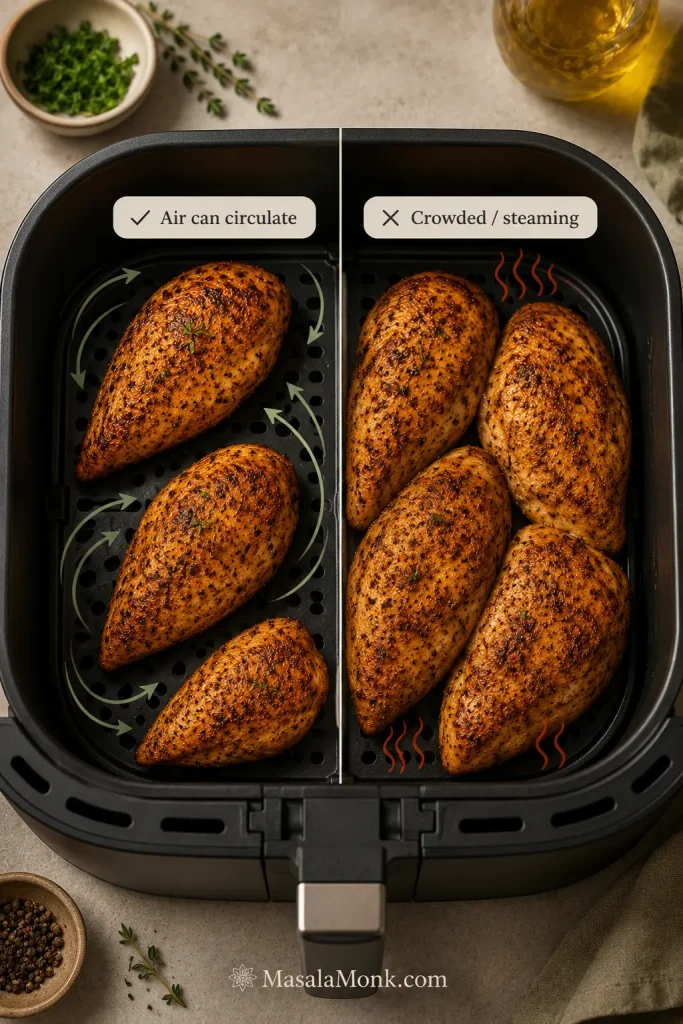
Split air fryer basket comparison showing properly spaced chicken breasts with airflow arrows and crowded chicken breasts touching.
Visible space is part of the method. Crowded chicken steams before it browns.
  1. Cook and flip. Air-fry for six minutes, then turn the chicken gently with tongs. Look for scattered golden patches and the aroma of toasted spices. Do not wait for a dark crust.
  2. Take the first temperature reading. Cook for another three minutes, then insert an instant-read thermometer sideways into the thickest central part.
  3. Finish the chicken. A reading below 165°F / 74°C is useful: you have caught the chicken while there is still room to finish it gently. Continue in one-minute increments and lift out each piece as soon as it reaches temperature.
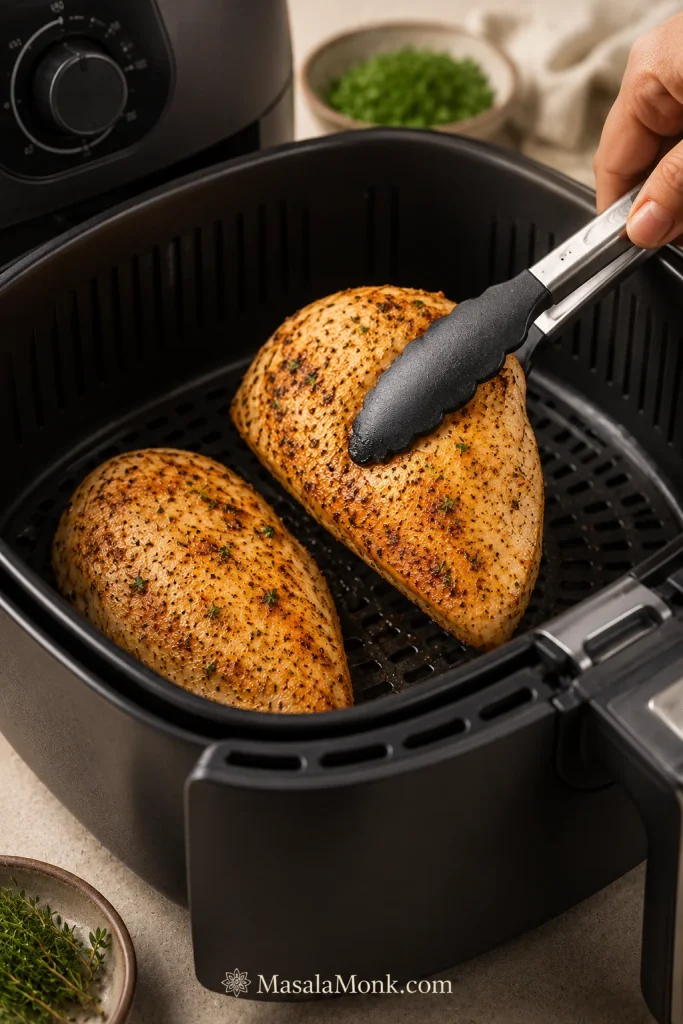
Tongs turning paprika-seasoned chicken breasts in a black air fryer basket at the flip stage with golden browned patches.
Use colour as a clue, not the final answer. Temperature decides when the chicken is done.
  1. Rest away from the heat. Transfer the chicken to a clean plate or cutting board and rest for five minutes.
  2. Slice across the grain. Cut the rested chicken this way for shorter, more tender pieces.
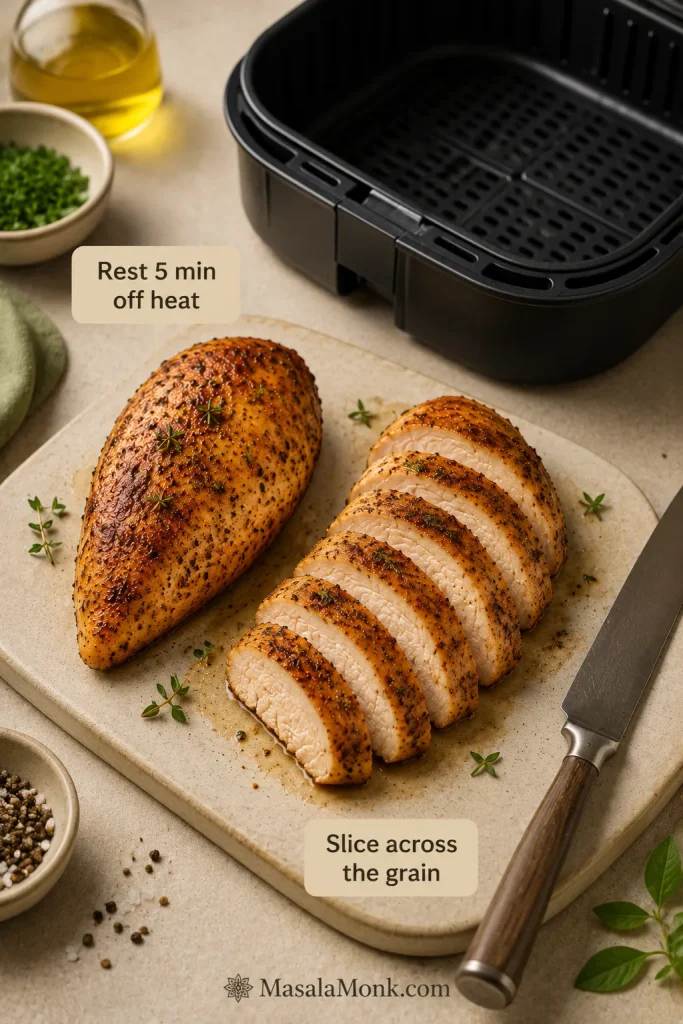
Cooked air fryer chicken breast resting on a clean board beside an empty basket, with one breast sliced across the grain.
Rest outside the hot basket, then slice across the grain for shorter, more tender pieces.
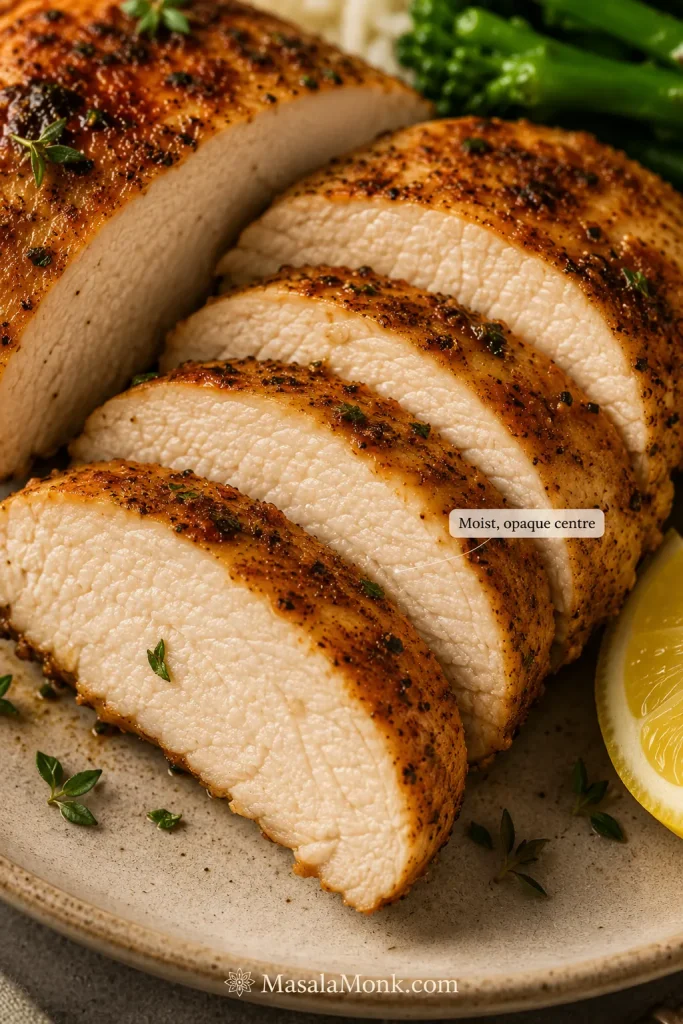
Macro close-up of sliced air fryer chicken breast with a moist opaque centre, paprika-garlic crust, lemon and herbs.
The target slice is opaque, moist and gently glossy, not pink, chalky or oily.

Food-safety reminder

Raw-chicken safety: Don’t rinse raw poultry. Wash your hands after handling it, clean any surface it touched, and use clean utensils and a fresh plate for the cooked chicken.
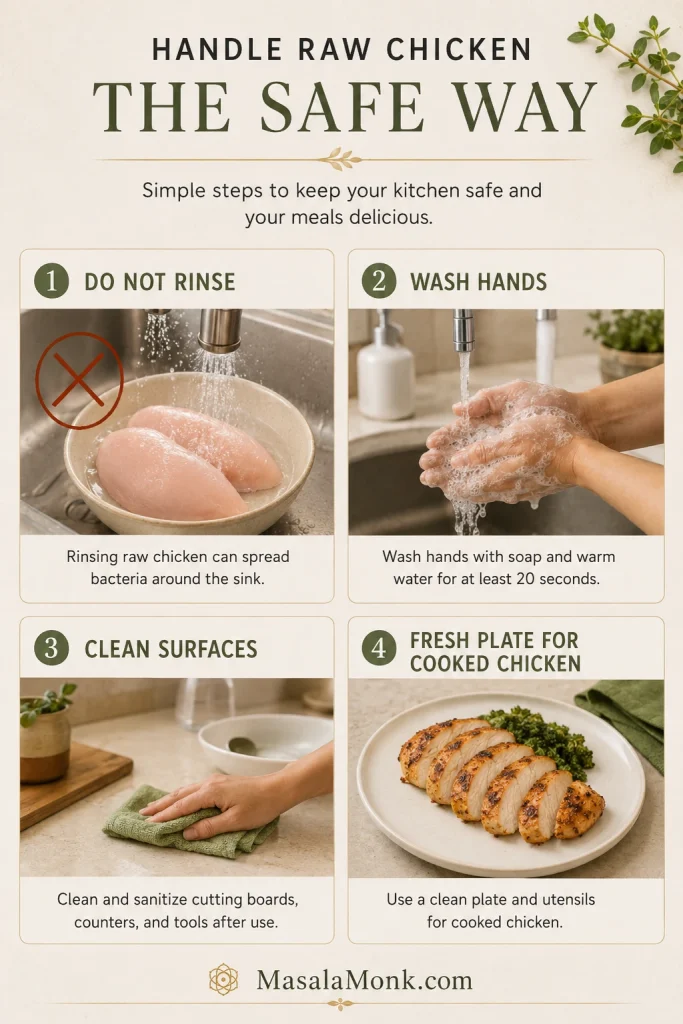
Four-panel raw chicken safety guide showing do not rinse, wash hands, clean surfaces and use a fresh plate for cooked chicken.
Skip rinsing, wash hands, clean surfaces and switch to a fresh plate before cooked chicken comes out.

Recipe Notes

  • Fridge-cold chicken: The breasts can go directly from the refrigerator to preparation. They do not need to reach room temperature.
  • Enhanced chicken: When the package says the meat contains an added solution, reduce the salt and expect it to release more liquid.
  • Optional 30-minute dry brine: Salt the chicken in advance and keep it refrigerated for deeper seasoning. Reduce or omit the salt in the later spice mixture.
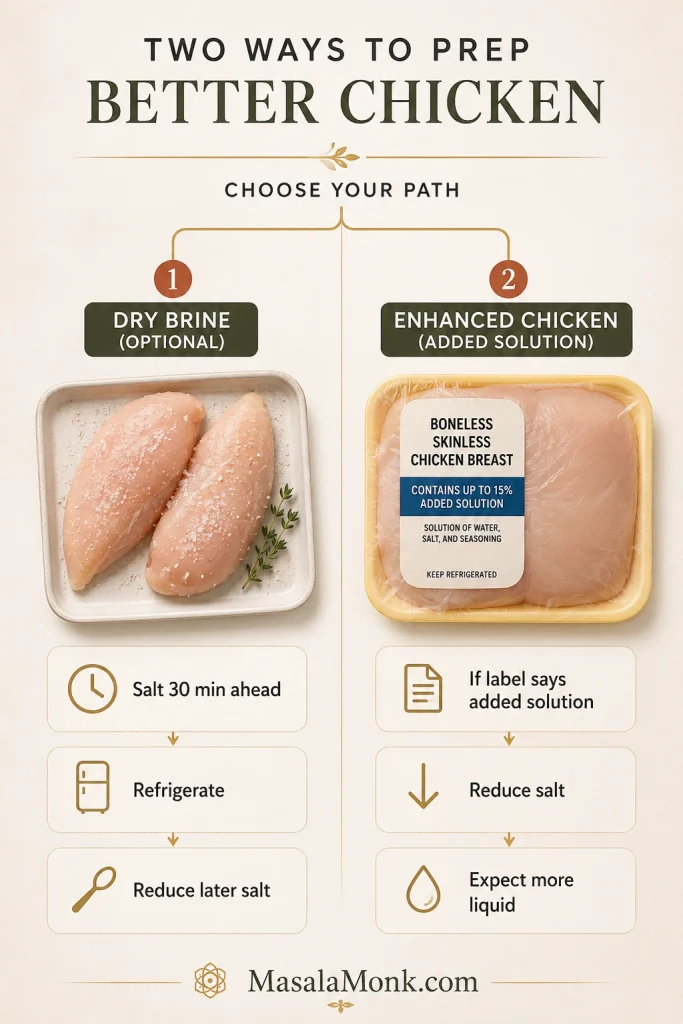
Two-branch prep guide showing salted raw chicken for a dry brine and packaged chicken labeled as containing added solution.
Salted chicken can taste more seasoned; enhanced chicken may need less salt and can release more liquid.

Use this visual checklist when your package does not match the fresh, whole, boneless chicken breast method above.
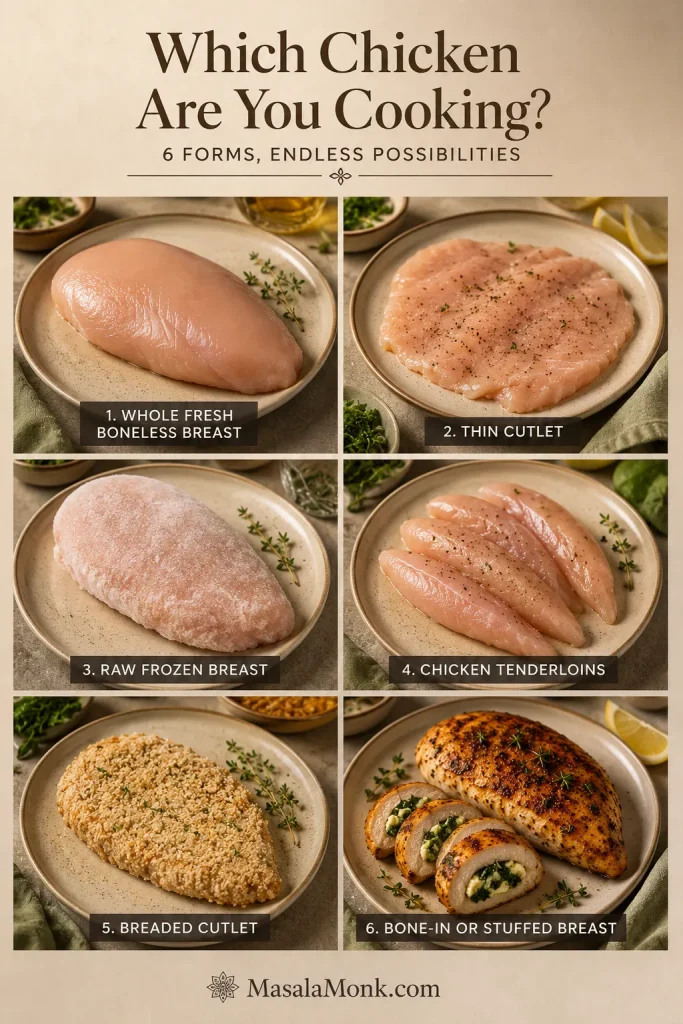
Six-panel guide showing whole fresh breast, thin cutlet, frozen breast, chicken tenderloins, breaded cutlet and stuffed chicken breast.
Match the form before you use the timing; whole breasts, cutlets, tenderloins and frozen pieces need different handling.

Four things make the difference: even the thick end, dry the surface, leave visible gaps and take the first temperature reading early. Together, they help the centre cook through without drying the tapered end.

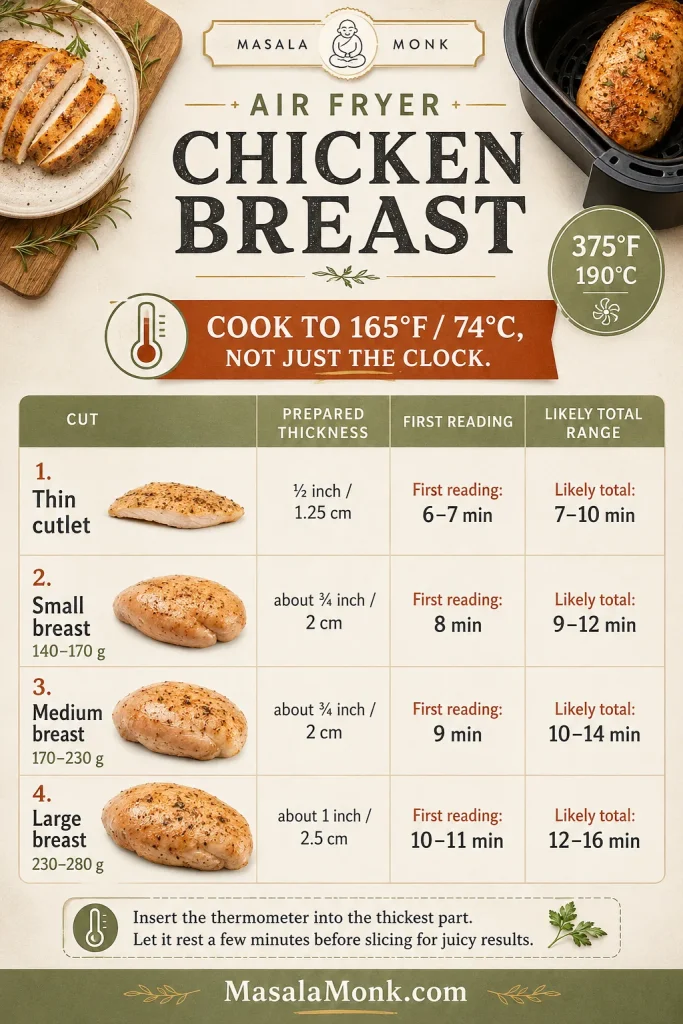
Air Fryer Chicken Breast Time and Thickness Chart

Start with the row that most closely matches the piece in front of you. Similar-sized breasts are easier to manage together, while extremely large or strongly tapered pieces are better sliced horizontally before cooking.

How to use this timing chart: These ranges are starting points for fresh, boneless, skinless chicken breasts prepared to the thickness shown. The first-reading time is intentionally early because breast shape, basket position and machine style can change the finish time. Use the chart to know when to start checking; use 165°F / 74°C in the thickest centre to know when to stop.

Chicken formIndividual weightPrepared thicknessTiming at 375°F / 190°C
Thin cutlet3–5 oz / 85–140 g⅜–½ inch / 1–1.25 cmFirst reading: 5 minutes; often 6–10 minutes total
Small breast5–6½ oz / 140–185 gAbout ⅝ inch / 1.5–1.6 cmFirst reading: 7 minutes; often 8–11 minutes total
Medium breast6½–8 oz / 185–225 gAbout ¾ inch / 2 cmFirst reading: 9 minutes; often 10–14 minutes total
Large breast8–10 oz / 225–285 g¾–1 inch / 2–2.5 cmFirst reading: 10–11 minutes; often 12–16 minutes total
Very large breastMore than 10 oz / 285 gMore than 1 inch / 2.5 cmButterfly or slice horizontally, then use the row matching the new thickness
Timing chart for air fryer chicken breast at 375°F showing thin cutlet, small, medium and large breast first-reading times and total ranges.
The chart tells you when to take the first reading; the thermometer tells you when to stop.

If your chicken needs another two or three minutes, nothing has gone wrong. The chart tells you when to start looking; it does not force every breast to finish on schedule.

Once you have the timing range, check how to confirm doneness or return to the recipe card.

How to Tell When the Chicken Is Done

Use a thermometer first

Chicken breast is safely cooked when the centre of its thickest part reaches 165°F / 74°C. Insert the thermometer from the side so the sensing tip reaches the middle instead of passing through the meat and touching the basket. Take the first reading before you expect the chicken to be done; a lower number means there is still room to finish it gently.
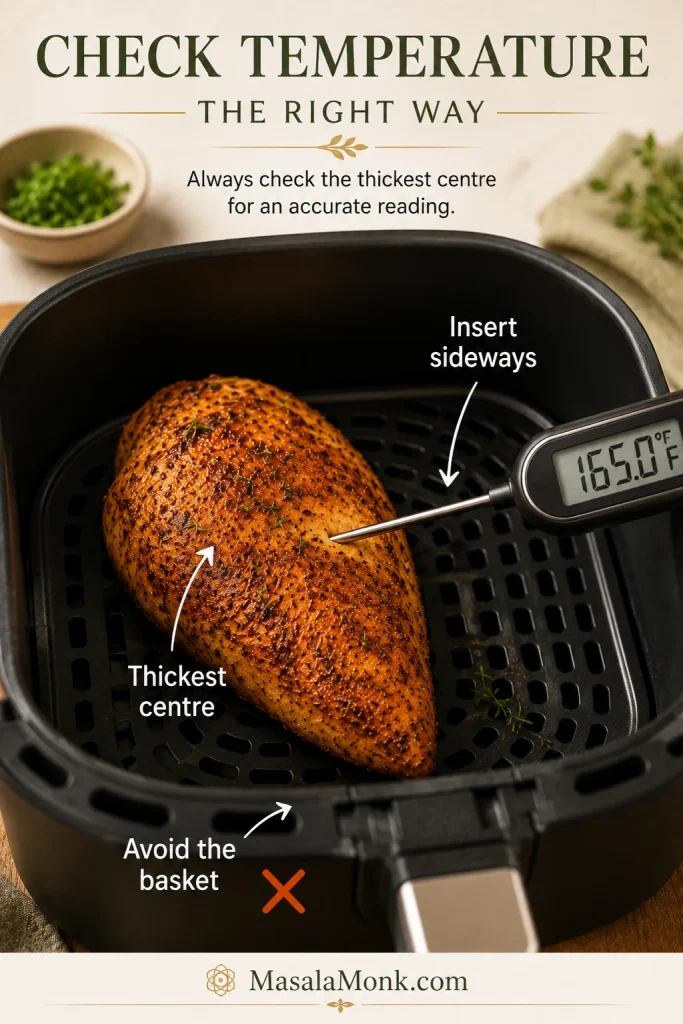
Instant-read thermometer inserted sideways into the thickest centre of a paprika-garlic chicken breast in an air fryer basket.
Insert from the side so the probe reaches the thickest centre without touching the basket.

The official safe minimum internal temperature guidance lists 165°F / 74°C for poultry, including chicken breast.

If you do not have a thermometer

No thermometer? Cut into the centre of the thickest breast. The meat should be opaque with no glossy, translucent or raw-looking section. Return it to the air fryer in one-minute increments when needed. Visual checks are less dependable, so an instant-read thermometer remains the easiest way to remove the guesswork.
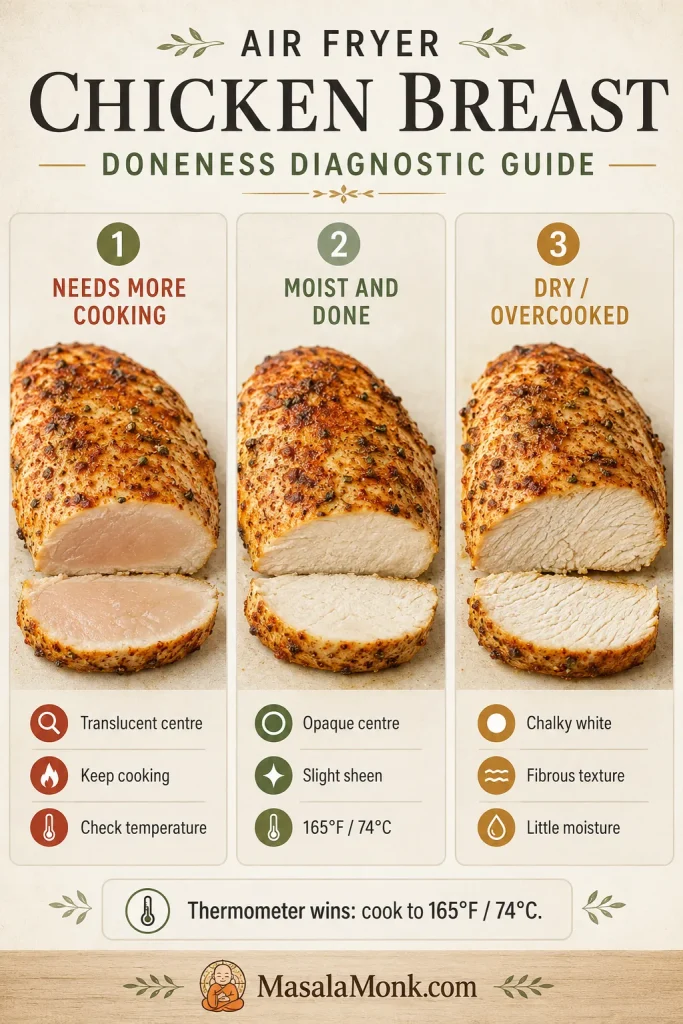
Three-panel chicken breast doneness guide showing translucent centre, moist opaque centre and dry fibrous overcooked centre.
Colour and texture cues help you spot trouble, but 165°F / 74°C in the thickest centre is the decision point.

The first slice should look moist through the centre, with a slight sheen of juice rather than a wet raw appearance or dry, fibrous meat. Once you have seen that fully cooked centre, the next batch becomes much easier to judge.

Chicken breast is leaner and less forgiving than chicken thighs. For a richer cut with a wider timing margin, use this air fryer chicken thighs recipe.

Chicken is cooked and resting? Jump to serving ideas. Still troubleshooting texture? Go to the problem-solving section.

Seasoning Ideas and Marinades
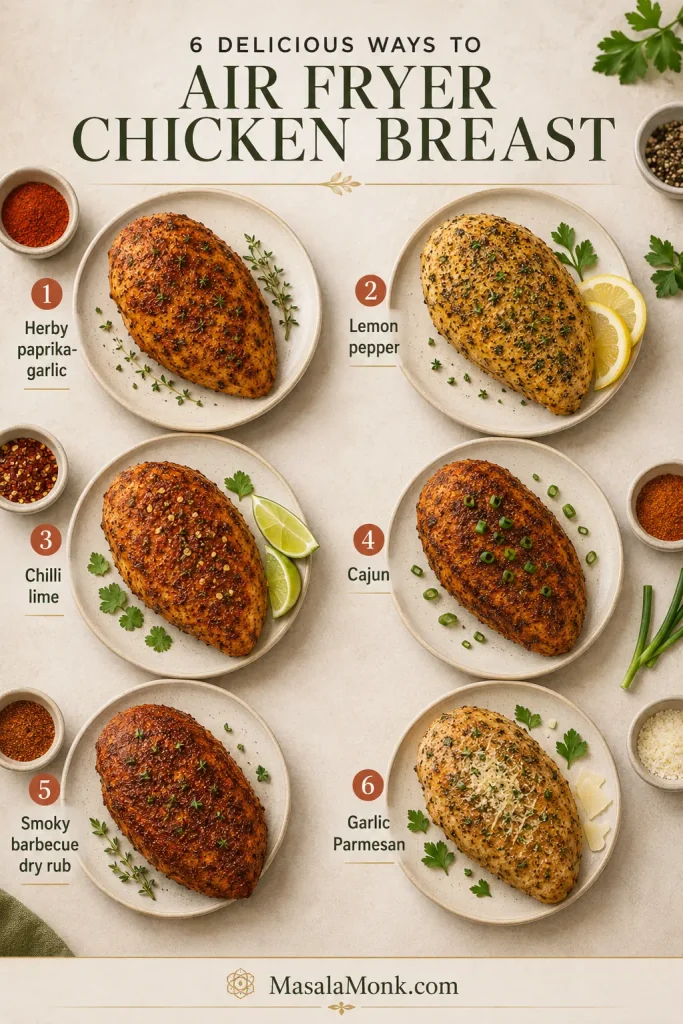
Six air fryer chicken breast seasoning options labeled herby paprika-garlic, lemon pepper, chilli lime, Cajun, smoky barbecue dry rub and garlic Parmesan.
Change the flavour, not the method: thickness, early checks and final temperature still matter.

Bright and fresh

For lemon pepper chicken, replace the paprika and oregano with a lemon-pepper blend, checking first to see how much salt it contains. Finish with fresh lemon after cooking.

For chilli lime, add chilli powder and cumin to the base seasoning, then squeeze lime over the warm slices. A spoonful of salsa also works well when the chicken is headed for tacos or rice bowls.

Prefer browned chicken with a proper lemon-butter pan sauce? Use this lemon pepper chicken recipe.

Smoky and savoury

Cajun seasoning can replace the individual spices, although many blends already contain salt. For smoky barbecue chicken, use smoked paprika and add barbecue sauce only during the final one to two minutes so the sugars do not scorch.

With garlic Parmesan, lean into the garlic powder and add finely grated Parmesan near the end. Cheese left in the basket for the full cooking time can darken before a thick breast is ready.

Marinated chicken

A thin oil-based or yogurt marinade works well. Let the excess drip away so the chicken browns instead of steaming beneath a heavy coating.

Tandoori-inspired chicken can be coated with yogurt, ginger, garlic, chilli, garam masala and salt. Serve it with a bright coriander-mint green chutney.
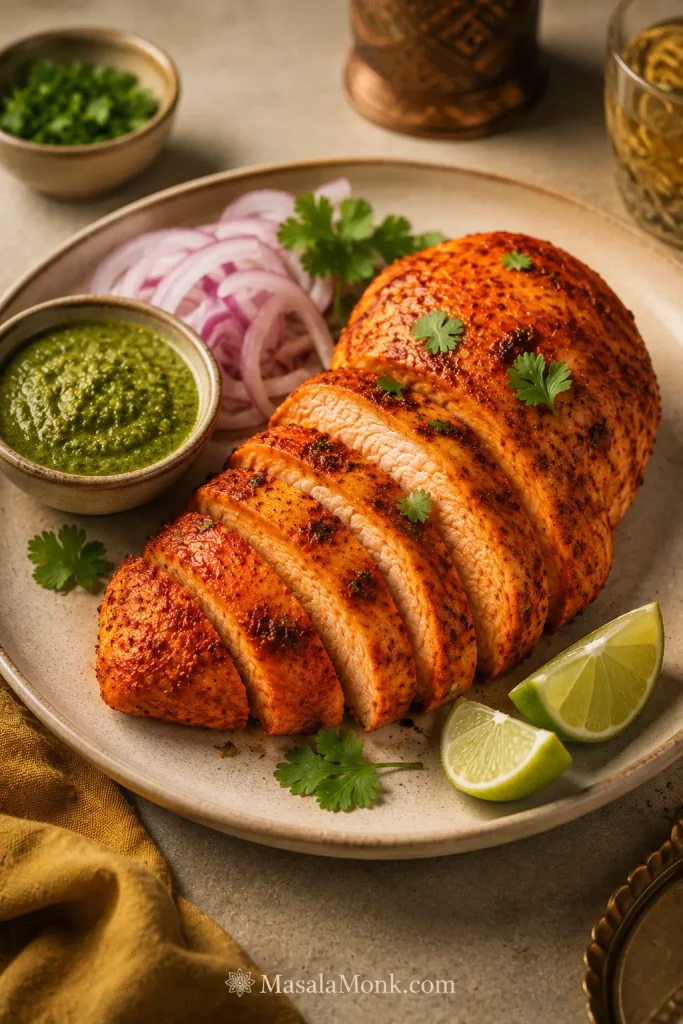
Tandoori-inspired air fryer chicken breast sliced on a plate with green chutney, red onion, lime wedges and coriander.
Yogurt, spices, chutney, onion and lime give this variation MasalaMonk flavour without fake tandoor char.

Keep acid-heavy marinades relatively short because a long soak in lemon or vinegar can soften the outer texture. Add sticky, sweet marinades closer to the end.

Keep any sauce intended for serving separate from marinade that touched raw poultry. If the same mixture is reused, it must be safely cooked first.

Turn It Into Dinner

Spoon something cool, sharp or creamy over the warm slices—a squeeze of lemon, green chutney, honey mustard or herby chimichurri—and simple chicken immediately feels like a finished dinner.

Eat it tonight

Serve it with fluffy rice, couscous or a tray of crispy ranch roasted potatoes. Add a green vegetable or a crisp salad.

For a quick sauce, finish the plate with lemon, pesto, salsa or a spoonful of homemade honey mustard dressing.
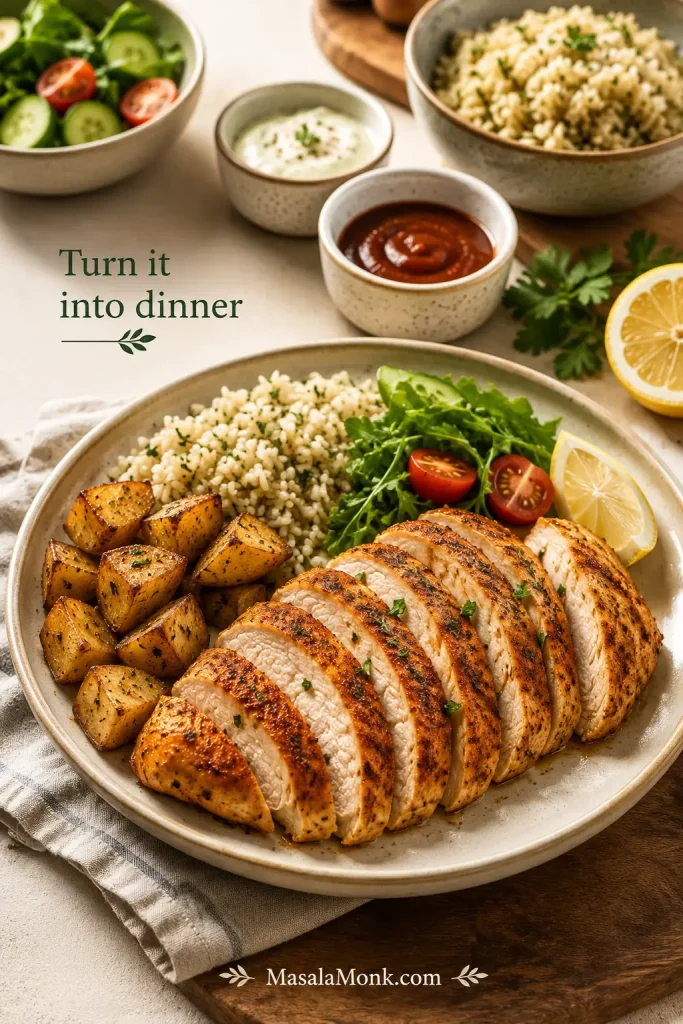
Sliced paprika-garlic air fryer chicken breast served with rice, roasted potatoes, salad, sauces, lemon and herbs.
Rice, potatoes, greens and a small sauce turn the chicken into a complete dinner.

Make tomorrow easier

  • Slice it cold for salads, wraps and sandwiches
  • Cube it for rice or grain bowls
  • Fold it into pesto pasta for an easy second-night dinner
  • Chop it into cheesy chicken broccoli rice, adding the cooked chicken near the end so it warms without drying again
  • Shred it into soup or pack it with vegetables and a separate sauce for lunch

Four-panel lunch board showing air fryer chicken in a salad, grain bowl, wrap and chicken-broccoli rice bowl.
Cook once, then use the leftovers in a salad, grain bowl, wrap or chicken-broccoli rice.

Most cooks can stop after the serving ideas. If your basket, liner or machine behaves differently, use the setup notes below. Storing leftovers? Jump to storage and reheating.

Temperature and Air-Fryer Setup

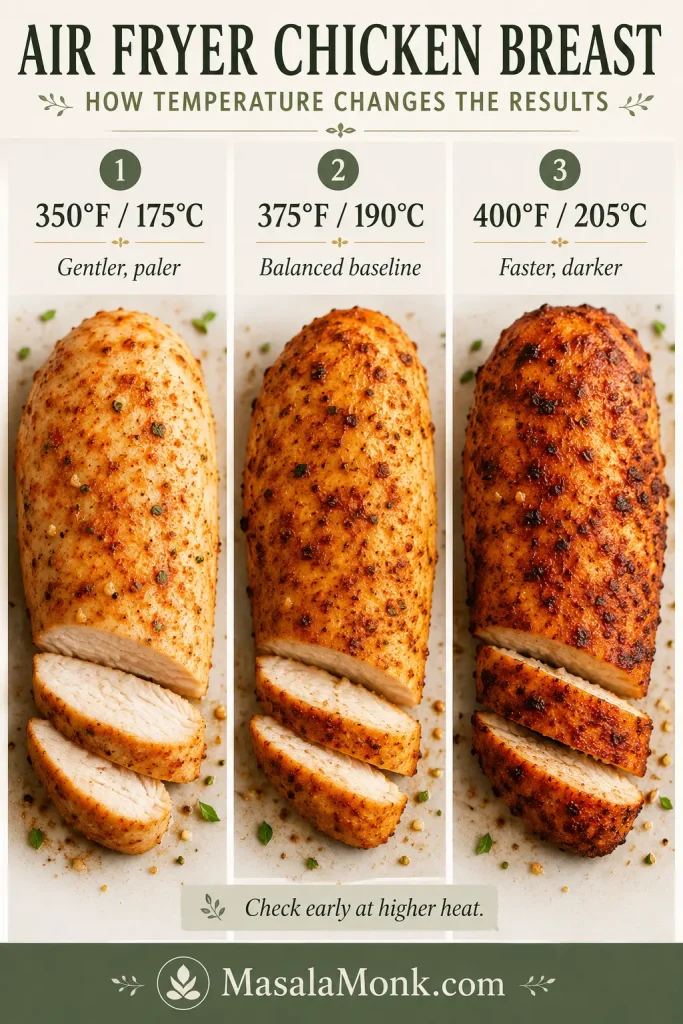
The main recipe uses 375°F / 190°C because it gives everyday chicken breasts a useful balance of colour, speed and control. Other settings still have their place.

TemperatureBest useTrade-off
350°F / 177°CThicker but reasonably even pieces when gentler browning is preferredSlower cooking with less surface colour
375°F / 190°CEveryday whole or evenly prepared breastsThe best general balance of speed, colour and control
400°F / 204°CThin fillets and faster browningA narrower margin before the edges dry or spices darken
Three-panel comparison of air fryer chicken breast cooked at 350°F, 375°F and 400°F with paler, balanced and darker results.
350°F is gentler, 375°F is the baseline and 400°F / 204°C browns faster; check earlier when cooking hotter.

Save temperatures above 400°F / 204°C for thin pieces or specialised coatings.

Cooking a larger batch in the oven? This baked chicken breast recipe uses the same weight-and-thickness approach.

Preheating, settings and basket capacity

Select Air Fry, or the equivalent Air Crisp setting, and preheat for the published timing. If an oven-style machine has no Air Fry setting, use convection Bake or Roast at 375°F / 190°C as a starting point.

Cook as many breasts as fit in one uncrowded layer. A full basket may need a little longer because several cold pieces pull down the heat at once. Check differently sized breasts separately and remove each one when it is ready.

Parchment, silicone and machine styles

  • Never preheat loose parchment without food holding it down; moving air can lift it toward the heating element.
  • Solid liners reduce airflow beneath the chicken and can leave the underside paler or wetter.
  • Perforated liners preserve more airflow than solid sheets.
  • Compact baskets often colour food quickly, while oven-style models may brown more strongly near the back or upper rack.
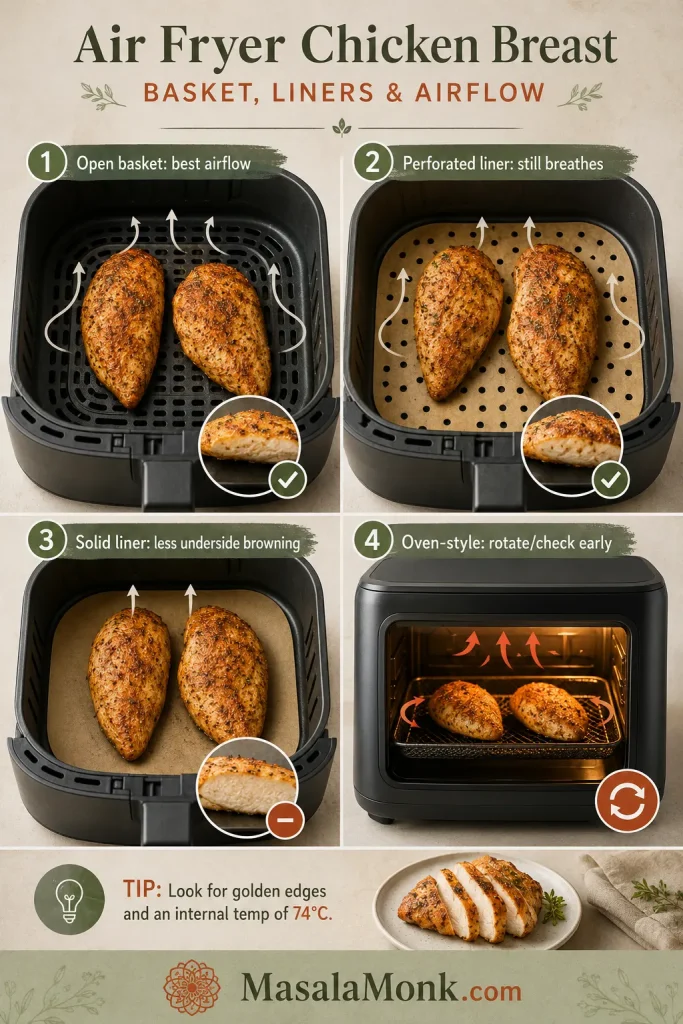
Four-panel air fryer airflow guide showing open basket, perforated liner, solid liner and oven-style air fryer with airflow arrows.
Open baskets circulate best; perforated liners breathe, solid liners slow browning, and oven-style models may need rotation.

For help with liners, blocked airflow, smoking and cleanup, see these common air-fryer mistakes and their fixes.

Storage and Reheating

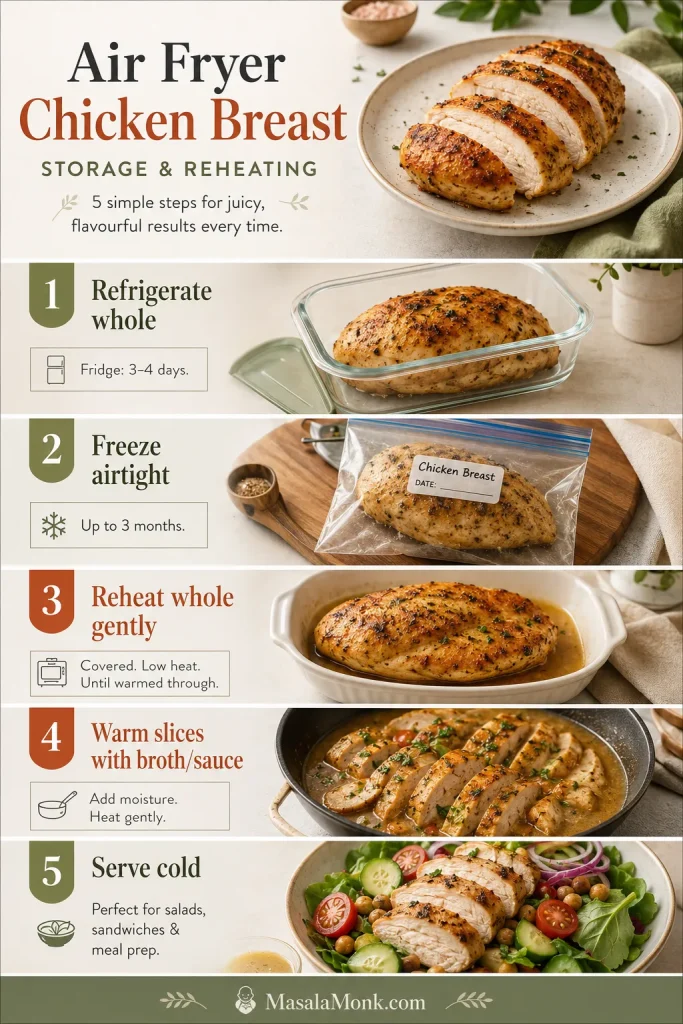
Saving the second breast for tomorrow? Keep it whole when practical; whole chicken generally holds its moisture better than pre-sliced meat. Refrigerate it within two hours—or within one hour when the surrounding temperature is above 90°F / 32°C.

Divide a larger batch between shallow containers so it cools more quickly.

NeedBest approach
RefrigerateStore in an airtight container for 3–4 days
FreezePack airtight, remove excess air and use within about 4 months for the best quality
Reheat one breastAir-fry at 325–350°F / 160–177°C with a light brush of broth or oil
Reheat slicesWarm over low skillet heat with a splash of broth or sauce
Serve without reheatingUse properly refrigerated chicken in salads, wraps and sandwiches
Storage and reheating guide for air fryer chicken breast showing refrigerating, freezing, reheating whole, warming slices with sauce and serving cold.
Store whole when practical, then reheat gently or add moisture to slices to protect texture.

Reheat cooked chicken to 165°F / 74°C. Thin slices heat—and overheat—much faster than a whole breast.

Freezer note: Four months is a quality recommendation. Chicken held continuously at 0°F / −18°C remains safe longer, although its texture will gradually decline.

When you need a larger, hands-off batch rather than the air fryer’s quick small-basket method, these crock pot chicken breast recipes offer several dinner and meal-prep directions.

For detailed cooling, storage and reheating guidance, see the USDA leftovers and food-safety guide.

Back to top ↑

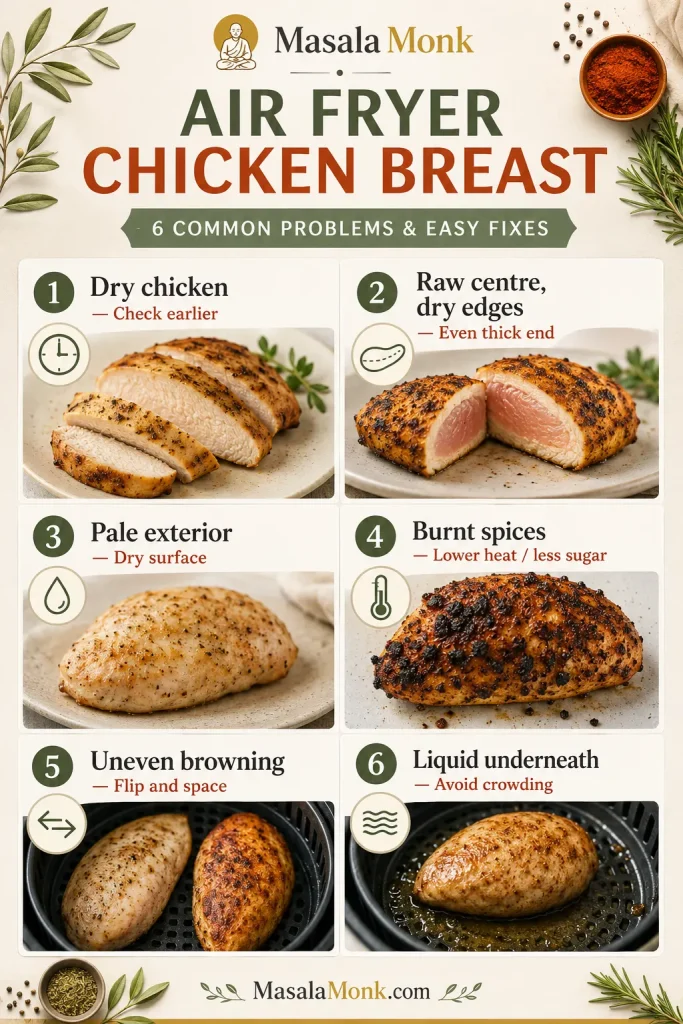
Troubleshooting Dry or Uneven Chicken

The way the chicken failed usually tells you what to change.

Cooking problems

ProblemLikely reasonWhat to change
The chicken is dryIt cooked too long or stayed inside the hot basket after it was readyTake the temperature earlier and transfer it out promptly
The centre is raw but the edges are dryThe breast was too thick or unevenButterfly it or gently even the thick section
The outside is paleThe surface was wet, the basket was crowded or there was very little oilPat the chicken dry and use a thin, even oil coating
The spices burntThe heat was high or the seasoning contained sugar or a large amount of paprikaUse gentler heat or add sweet sauces near the end
The seasoning fell offThe surface was wet or the chicken was turned roughlyDry the surface and flip gently with tongs
The chicken browned unevenlyThe basket was crowded, the chicken was not flipped or the machine has a hot areaLeave more space and turn or rotate once

Timing, reheating and basket problems

ProblemLikely reasonWhat to change
The chicken took much longerIt was thicker, colder, crowded or cooked from a cold startContinue in short increments and note the thickness for next time
One breast finished firstThe pieces differed in weight, thickness or basket positionLift out each piece when it is ready
Liquid collected beneath itThe meat contained added solution, the basket was crowded or the marinade was heavyReduce excess coating and leave more open space
The reheated chicken is rubberyIt was reheated too hot or for too longUse gentler heat, add moisture and stop once it reaches temperature
The air fryer smokedOld grease, excessive oil, loose spice or sugary marinade reached a hot surfaceStop cooking, clean the drawer and apply sweet sauce late
Troubleshooting board for air fryer chicken breast showing dry chicken, raw centre, pale exterior, burnt spices, uneven browning and liquid underneath.
Dry, pale, uneven or watery chicken usually points back to timing, thickness, surface moisture, spacing or added solution.

Cooked correctly but still tough or fibrous? Occasionally, the problem comes from the meat rather than from overcooking. A poultry-quality condition commonly called woody breast can leave some pieces unusually firm even when they reach the correct temperature. Slice the chicken thinly and serve it with a moist sauce or dressing.

How to Rescue Chicken That Is Already Dry

You can’t uncook dry chicken, but you can make it much more enjoyable. Slice it thinly across the grain and add moisture instead of reheating it again as a plain whole breast.
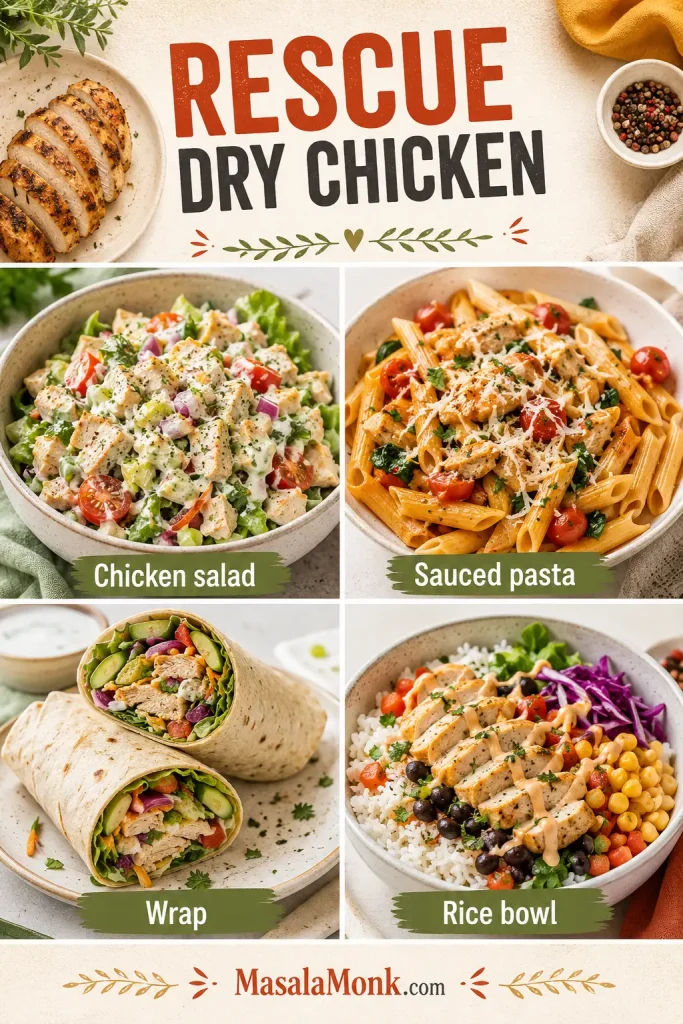
Four-panel rescue board showing dry chicken turned into chicken salad, sauced pasta, a vegetable wrap and a rice bowl with sauce.
Dry chicken is not wasted; chop, sauce, wrap or bowl it instead of reheating it plain.
  • Chop it finely and turn it into a creamy chicken salad sandwich
  • Fold it into pasta with a creamy or tomato sauce
  • Tuck thin slices into a wrap with dressing and crunchy vegetables
  • Warm it briefly in broth, gravy or pan juices
  • Cube it for a rice bowl and add salsa, yogurt sauce or a generous spoonful of homemade chimichurri

Starting over with fresh chicken? Return to the recipe card. Need the timing again? Open the time chart.

Frequently Asked Questions

Do I need to brine chicken breast before air frying?

No. Evening the thick section and taking an early temperature reading matter more for this baseline method. For deeper seasoning, salt the chicken about 30 minutes ahead and keep it refrigerated. A wet brine can also work, but it adds time, and chicken labelled as containing an added solution may already be seasoned.

Do I need to preheat the air fryer?

Preheating gives the published timing a more consistent starting point. You can cook from a cold start, but the chicken may need a little longer. Take the first reading at the usual time rather than automatically adding several minutes.

Do I have to flip air fryer chicken breast?

Flipping is recommended because most basket air fryers colour more strongly from above. The chicken can still cook through without flipping, but the underside may remain paler and the result may be less even.

Can I use this timing for frozen chicken breast?

No. Frozen chicken needs a method designed around a longer cooking window and the way the centre thaws as it cooks. Do not simply add a few minutes to this fresh-chicken recipe.

Can I make air fryer chicken breast without oil?

Yes. Oil is not required for the chicken to cook safely, but the seasoning may cling less evenly and the exterior may remain paler. Pat the surface very dry and press the seasoning on firmly before cooking.


The Takeaway

Start with the chicken, not the timer. Even the thick section and leave space around each breast. Weight gets you into the right range; thickness tells you when to take the first reading. Move each piece out of the hot basket as soon as it is ready.

Then let it rest while you finish the rice, dress the salad or warm the tortillas. Slice it while it is still moist, add the sauce that suits the evening, and keep the second breast for the lunch that will be easier tomorrow.

If you make it, tell us which air fryer you used, how large the breasts were, how long they took and what you served with them. Did the weight-and-thickness chart match your batch? Your experience may help the next person standing over the basket.
Back to top ↑

Posted on Leave a comment

Air Fryer Pork Tenderloin Recipe: Juicy, Easy, No-Dry Timing Guide

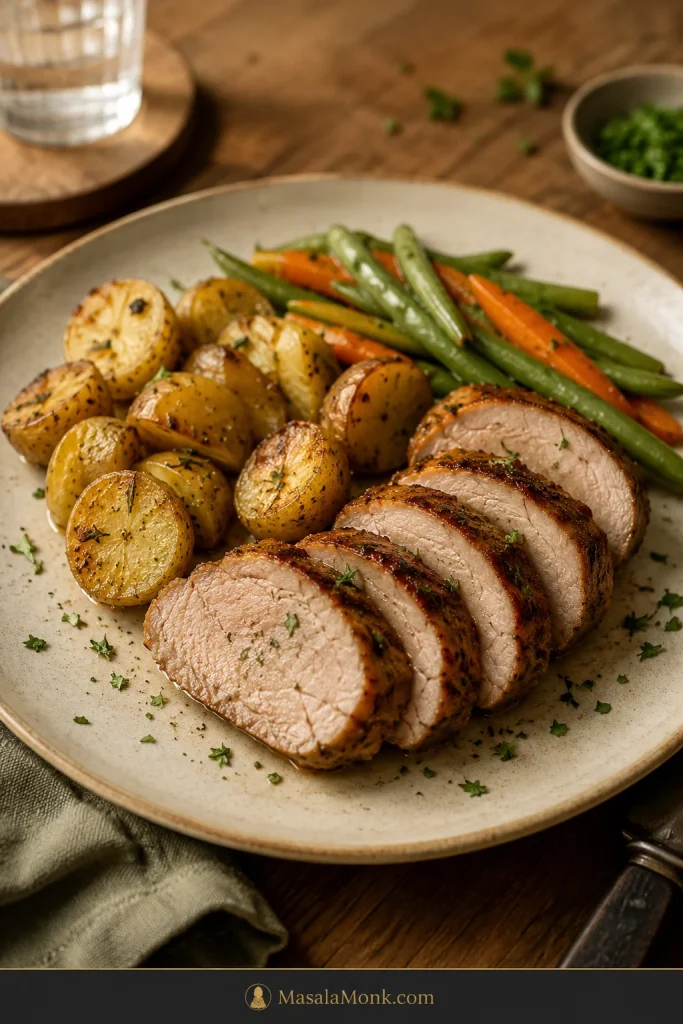
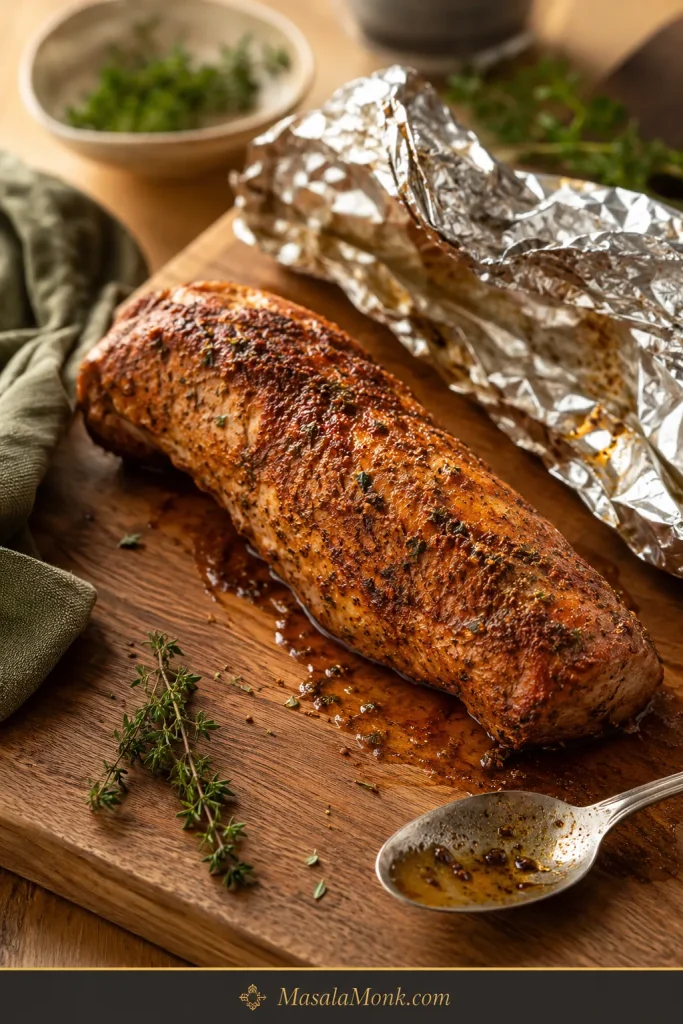
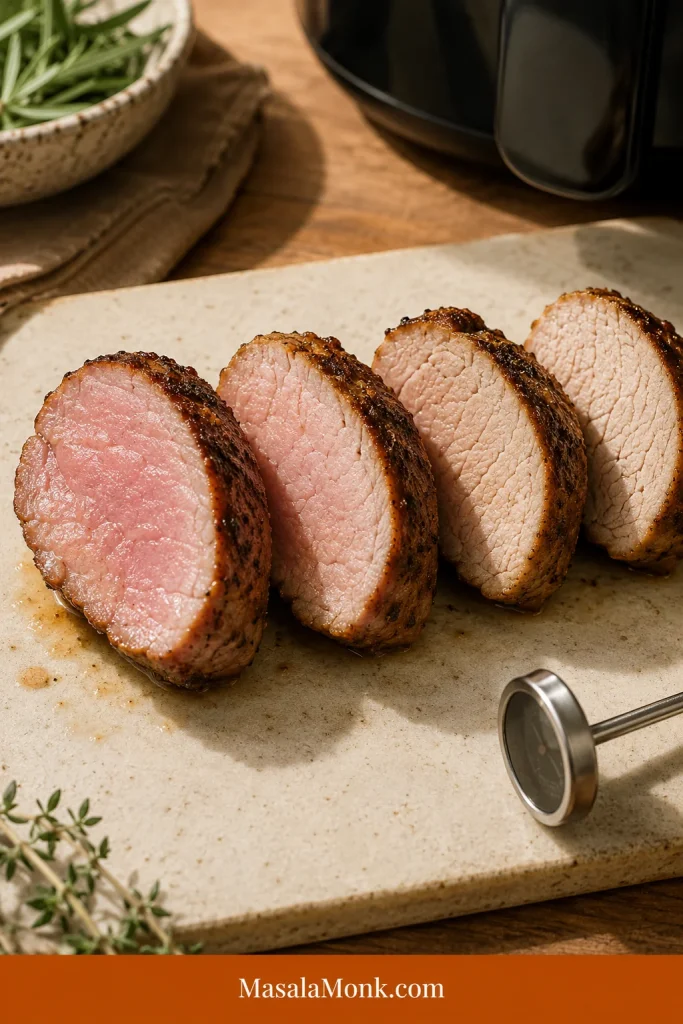
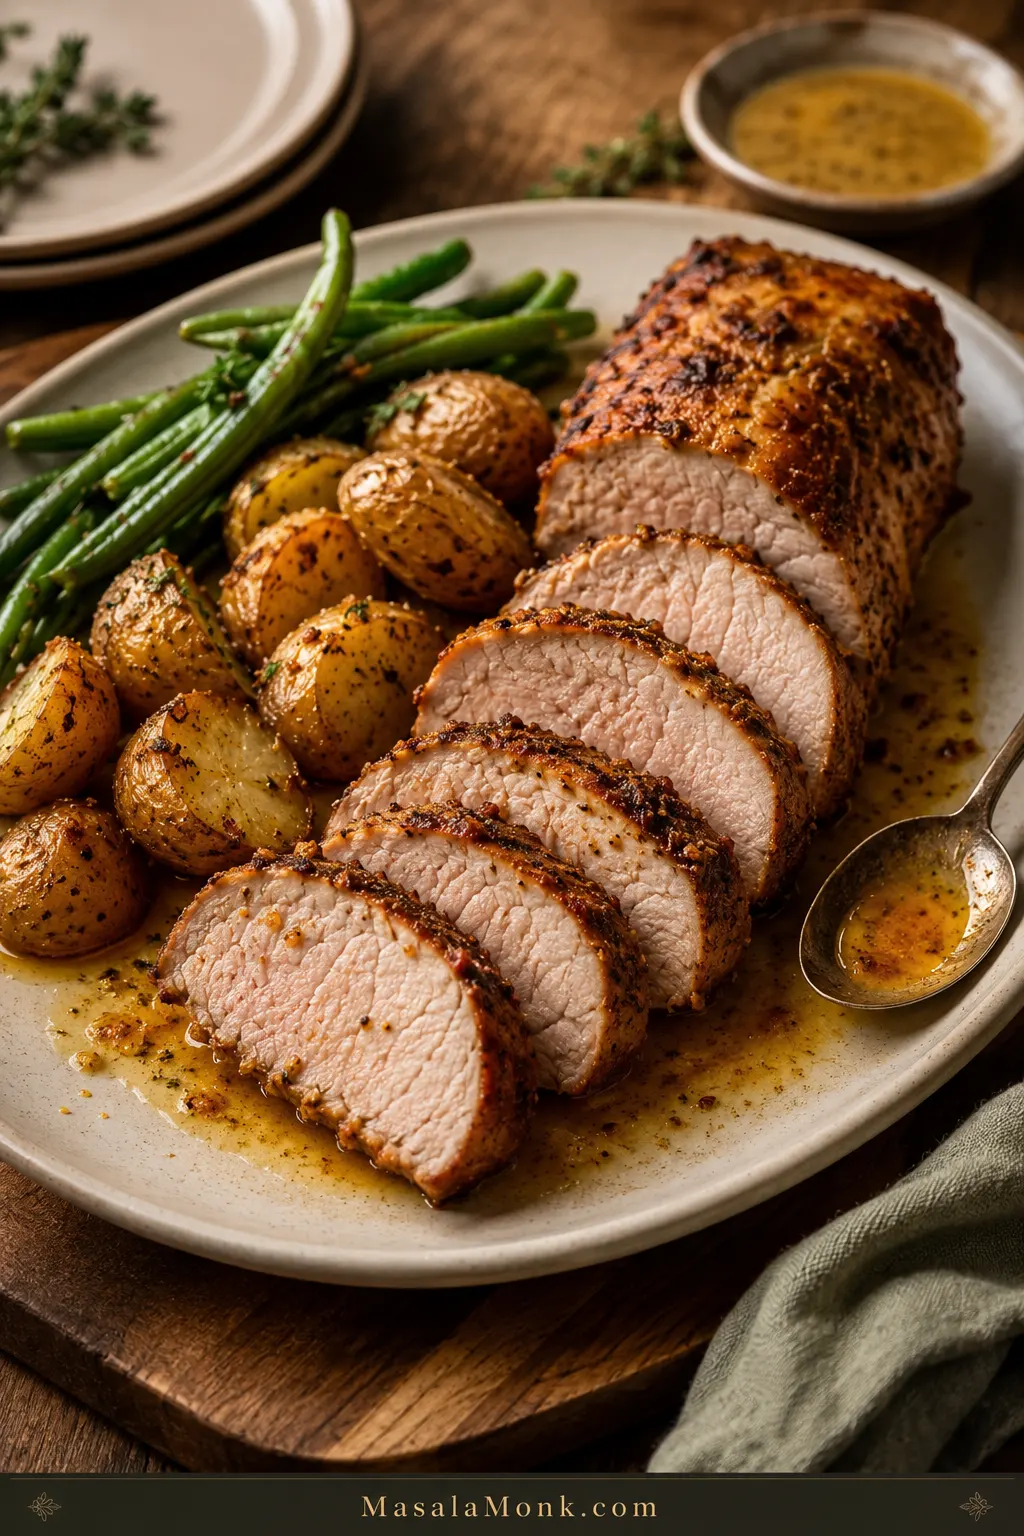
Sliced air fryer pork tenderloin with browned edges, tender center, roasted potatoes, green beans, and juices on a serving board.

Air fryer pork tenderloin is the kind of dinner that feels almost too easy when it goes right. The outside turns browned and savory, the inside stays juicy, and you can slice it onto plates in about half an hour without heating the oven.

You are not trying to make fancy pork here. The goal is smoky browned edges, tender slices, and just enough pan-style flavor to make dinner feel like more than a shortcut. Everything comes down to three things: cook it hot, check it early, and rest before slicing.

Because pork tenderloin is lean, a few extra minutes can turn glossy slices into dry pork, especially if your piece is small, your air fryer runs hot, or the package in front of you is actually pork loin instead of tenderloin.

This guide is built for the real-life versions too: small tenderloins, hot air fryers, pre-marinated packs, pork fillet labels, frozen pork, and the moment you realize your potatoes need longer than the pork.

Quick Answer

Cook pork tenderloin in the air fryer at 400°F / 200°C, or 205°C if your air fryer uses exact 5-degree settings, until the middle of the pork reads 145°F / 63°C. Most 1–1½ lb / 450–680g tenderloins take about 18–24 minutes, but small or slim pieces can finish sooner. Start checking early, rest for 5 minutes, then slice across the grain.

The clock gets you close. A temperature check saves the pork.

What success looks like

The pork should have browned, smoky-garlic edges, a moist center, and slices that look glossy instead of chalky. Spoon any board juices back over the sliced pork before serving. That little step makes the whole plate feel more finished.

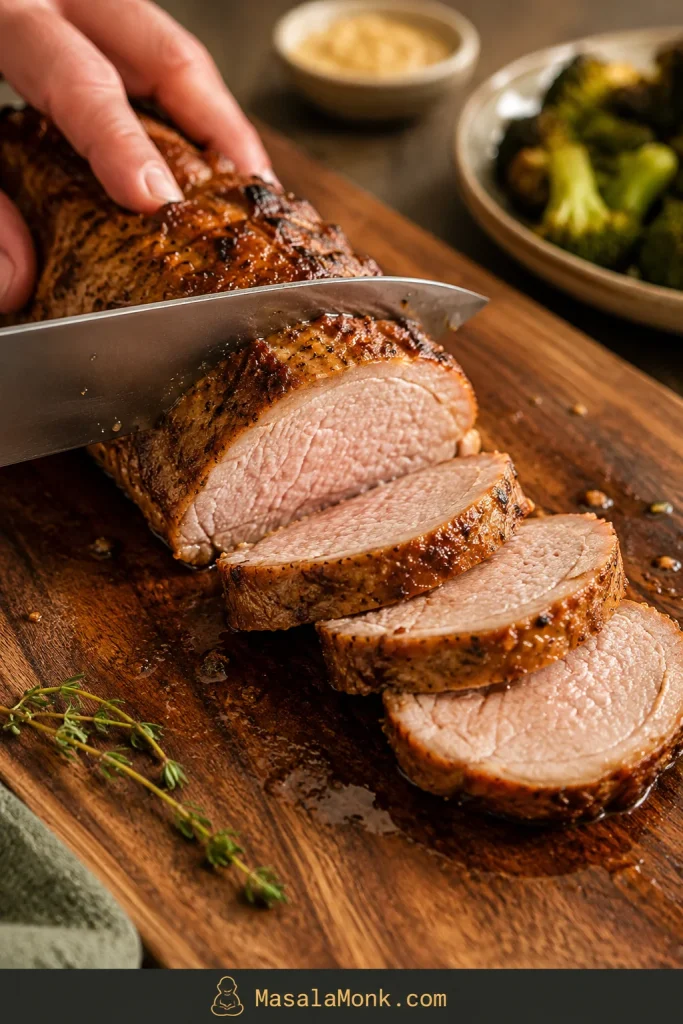
Texture check: Before serving, look for a moist center and glossy slices rather than a chalky cut surface.

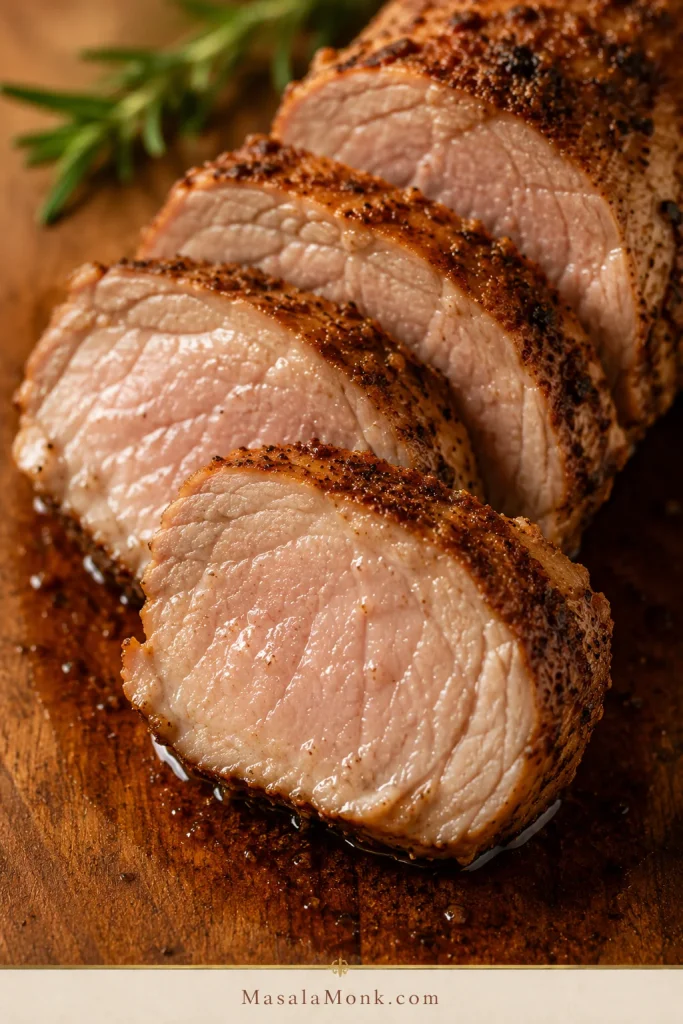
Close-up of sliced air fryer pork tenderloin with browned crust, moist center, and juices on a wooden cutting board.
Look for slices that stay glossy in the center after resting; that shine is the visual clue that the pork was not cooked too long.

Ready to cook? Jump to the recipe cardNeed timing? See the chart

Make this when

  • You want pork that slices juicy, not dry and gray.
  • You need dinner fast, but still want it to feel complete.
  • You bought pork tenderloin or pork fillet and need clear air fryer timing.
  • You are using a Ninja Foodi, basket air fryer, oven-style air fryer, or pre-marinated pack.
  • You want potatoes, carrots, green beans, rice, salad, or a simple sauce on the side.

Air Fryer Pork Tenderloin Recipe Card

This is the fast version: season the pork with a smoky garlic-Dijon rub, air fry it hot, check once before it overcooks, and rest it so the slices stay juicy.

Recipe at a Glance

RecipeAir Fryer Pork Tenderloin
Best cutPork tenderloin or pork fillet, 1–1½ lb / 450–680g
Prep time5–10 minutes
Cook time18–24 minutes for most tenderloins
Start checking13–14 minutes for small/slim pieces; 16–18 minutes for standard pieces
Rest time5 minutes
Total timeAbout 28–35 minutes
Servings4
Air fryer temperature400°F / 200°C, or 205°C if available
Internal temperature145°F / 63°C in the center, then rest

Ingredients

  • 1 pork tenderloin, 1–1½ lb / 450–680g
  • 1 tablespoon / 15 ml olive oil or avocado oil
  • 1 teaspoon / 5 ml Dijon mustard
  • 1–2 teaspoons brown sugar or honey
  • 1 teaspoon smoked paprika
  • 1 teaspoon garlic powder
  • ½ teaspoon onion powder
  • ¾–1 teaspoon kosher salt, depending on size and seasoning
  • ½ teaspoon black pepper
  • Pinch of cayenne, chili powder, or red pepper flakes, optional

Method

  1. Preheat the air fryer to 400°F / 200°C, or 205°C if your air fryer allows that setting. Give it 3–5 minutes if your model recommends preheating.
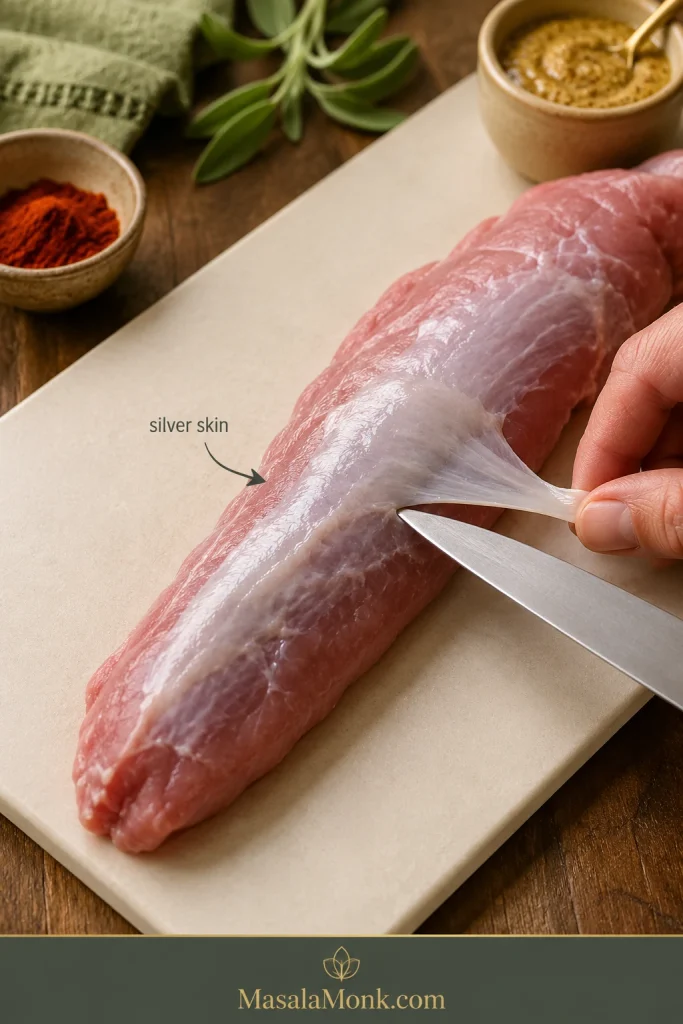
  2. Pat the pork dry. Remove any tough silver skin if present.
  3. Mix the oil, Dijon mustard, brown sugar or honey, smoked paprika, garlic powder, onion powder, salt, pepper, and optional chili in a small bowl.
  4. Rub the seasoning mixture all over the tenderloin.
  5. Place it in the air fryer basket with space around it. Cut it in half crosswise if needed so it fits without curling tightly.
  6. Air fry for 10–12 minutes, then flip.
  7. Continue cooking until the middle reaches 145°F / 63°C, checking early for small or slim tenderloins.
  8. Rest loosely tented for 5 minutes, then slice across the grain into thick, juicy pieces.

Do not cook by time alone. A slim 1 lb tenderloin and a thick 1½ lb tenderloin should not be treated like the same piece of meat.

A simple plate of potatoes and green vegetables turns the tenderloin into a full weeknight dinner after the main method is done.

Plate of sliced pork tenderloin served with roasted potatoes, green beans, carrots, and herbs.
For a fast weeknight plate, pair pork tenderloin slices with potatoes and green vegetables so the air fryer recipe feels like a full meal, not just the main protein.

From here, the things that change the result are the cut, the thickness, the air fryer style, and when you stop cooking. That is what the rest of the guide helps you control.

Table of Contents

Choose your path

With a plain tenderloin, start with the recipe card and cooking chart. For a package labeled pork loin filet, check the cut section before you season anything. Adding potatoes or carrots? Read the sides section first so the pork does not wait around while the vegetables finish.

Why This Works

The air fryer works beautifully for pork tenderloin because the cut is small enough to cook through before the outside has time to dry out. You get browned edges without babysitting a skillet, as long as you stop at temperature.

The flavor is simple but satisfying: smoky, garlicky, lightly tangy, and just sweet enough to help the edges brown. Oil helps the rub toast instead of sitting dry on the surface. Dijon adds a quiet tang without making the pork taste mustardy. Brown sugar or honey helps the outside color. The short rest keeps the slices glossy when you cut in.

When it comes out right, the edges are smoky and browned, the slices look moist, and the mustard-garlic rub tastes like it took more effort than it did.

That is also why this tenderloin cooks hotter than some air fryer pork chops. Pork chops are flatter and can tighten quickly, so if the package in front of you is actually chops, switch to this air fryer boneless pork chops guide instead.

The no-dry rules

  • Use pork tenderloin, not pork loin. The cuts are different and need different timing.
  • Cook hot, but check early. 400°F / 200°C browns well, but small pieces finish quickly.
  • Test the middle, not the tapered end. The thin tail is not the doneness judge.
  • Rest before slicing. Five quiet minutes gives you glossier, juicier slices.
  • Do not chase “no pink.” A slight blush can be normal when the pork is cooked to temperature.

Before any of those rules can help, though, the cut has to be right.

Pork Tenderloin vs Pork Loin vs Pork Fillet

This is worth checking before you cook, because the wrong cut is the easiest way to follow the recipe perfectly and still end up disappointed. Pork tenderloin, pork loin, pork loin filet, pork fillet, and pork roast sound similar, but they do not cook the same way.

How to Identify the Right Cut

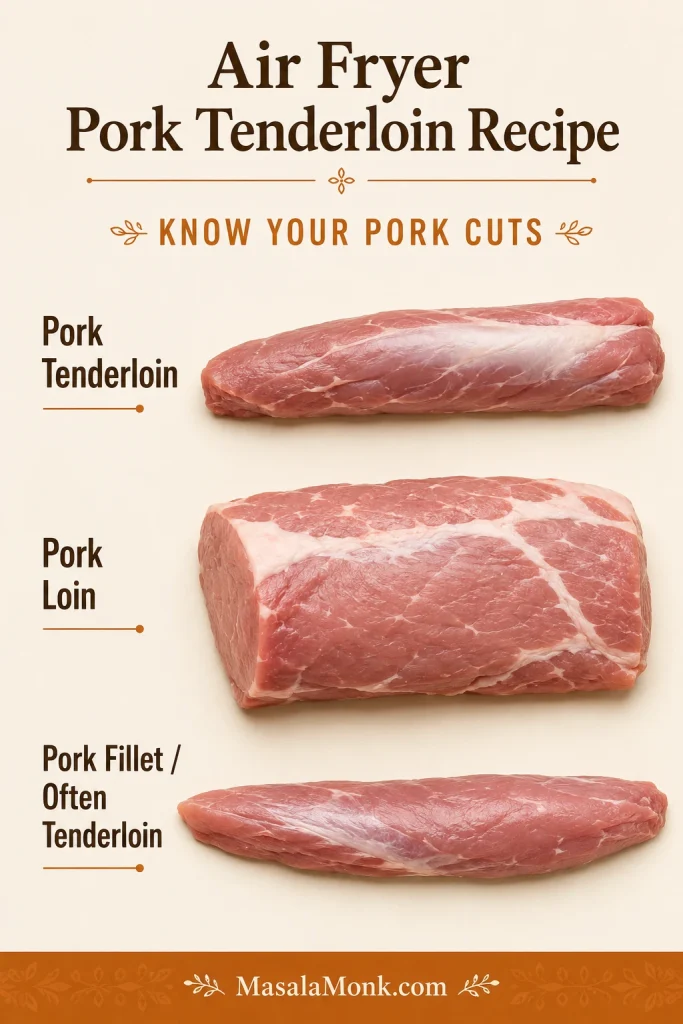
Cut check: Shape matters here; this visual helps you confirm tenderloin or pork fillet before using the air fryer timing.

Comparison image showing pork tenderloin, pork loin, and pork fillet with different shapes and sizes.
A quick shape check here can save the whole recipe: tenderloin and pork fillet are usually long and narrow, while pork loin is wider and cooks on a different timeline.
Package saysWhat it likely isUse this recipe?
Pork tenderloinLong, narrow, lean cut, usually 1–1½ lbYes
Pork filletOften the same cut as pork tenderloin in UK, Australia, and some grocery labelingYes, if long, narrow, and about 450–680g / 1–1½ lb
Pork loinWider, larger roast-style cutNo, it needs different timing
Pork loin filetCan be a branded or pre-marinated loin-style cut; check shape and weight carefullyMaybe, only if it looks like tenderloin
Pork roastUsually larger and wider than tenderloinNo

When to Switch Recipes

If it is wide like a roast, stop. This method is for a long, narrow pork tenderloin or pork fillet. A pork loin roast needs a different timing plan.

If your package turns out to be a bigger pork loin, you are not stuck — just switch methods. MasalaMonk already has a dedicated slow cooker pork loin recipe and a smoked pork loin recipe for that larger cut.

If you have pork tenderloin but want another cooking method, see the pork tenderloin in oven guide or this softer, hands-off slow cooker pork tenderloin recipe.

Cut confirmed? Back to the recipe cardGo to the cooking time chart

Ingredients for Juicy Pork Tenderloin

The ingredient list is short on purpose. Pork tenderloin does not need to be buried under sauce. It needs enough fat for browning, enough salt for flavor, and a rub that gives the air fryer something to toast.

The result is a smoky garlic crust with a little mustardy brightness and just enough sweetness to make the edges taste dinner-worthy, not sugary.

What Each Ingredient Does

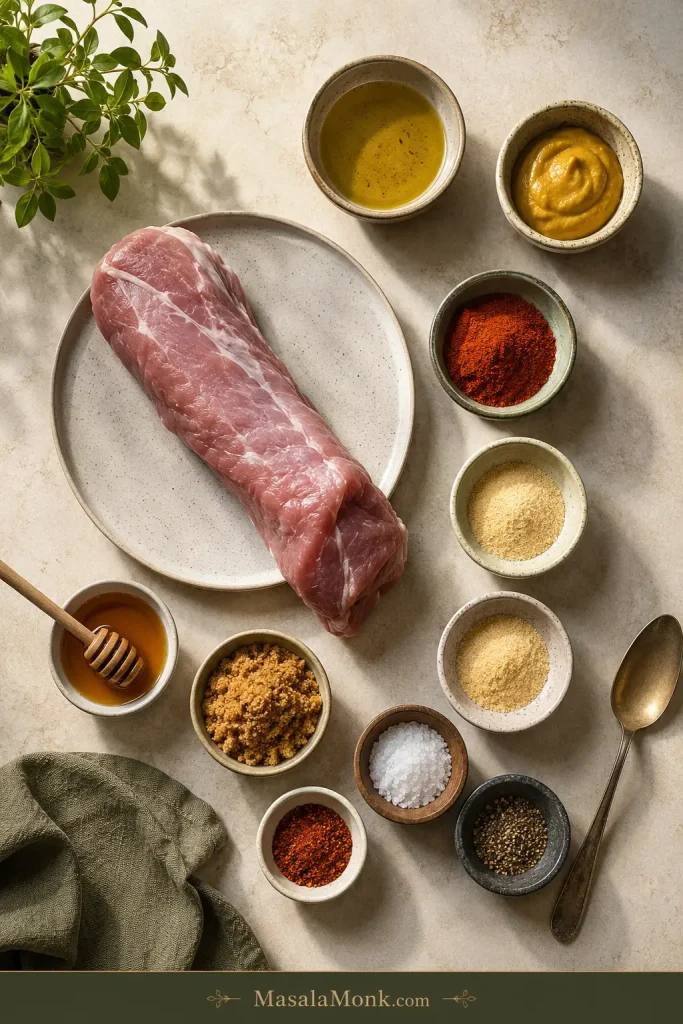
Gather the rub ingredients before preheating so the pork can go from seasoning to basket without losing momentum.

Overhead view of pork tenderloin ingredients including raw pork, oil, Dijon mustard, smoked paprika, garlic powder, onion powder, salt, pepper, honey, and brown sugar.
This short ingredient list works because each part has a job: oil helps the rub cling, Dijon adds brightness, and paprika plus garlic build the crust.
IngredientUS amountMetric amountWhy it helps
Pork tenderloin1–1½ lb450–680gThe ideal size for this method
Olive oil or avocado oil1 tbsp15 mlHelps browning and seasoning coverage
Dijon mustard1 tsp5 mlAdds tang and helps the rub cling
Brown sugar or honey1–2 tsp5–10 mlBalances lean pork and helps browning
Smoked paprika1 tsp2–3gAdds color and smoky depth
Garlic powder1 tsp3gMain savory note
Onion powder½ tsp1–2gRounds out the rub
Kosher salt¾–1 tsp4–6gPrevents bland pork
Black pepper½ tsp1gAdds gentle heat
Cayenne or chili powderPinchPinchOptional heat

Salt and Seasoning Notes

For smaller or pre-marinated tenderloins, stay near the lower salt amount. Use the higher amount for a plain, larger one. When the pork is already seasoned, injected, or packed in a salty marinade, reduce the salt in the rub.

With fine salt or table salt instead of kosher salt, start with about ½ teaspoon for a 1 lb / 450g tenderloin and adjust next time. Fine salt packs more tightly, so the same spoonful tastes saltier.

Easy Substitutions

  • No Dijon? Use yellow mustard, whole-grain mustard, or skip it and add a small splash of lemon juice or vinegar for brightness.
  • No smoked paprika? Use regular paprika with a pinch of chili powder, cayenne, or cumin.
  • No brown sugar? Use honey or maple syrup. Skip the sweetener if your marinade is already sweet.
  • No avocado oil? Olive oil works well. Use a light coating so the rub clings and browns.
  • Using a salty seasoning blend? Reduce or skip the added salt until you know how salty the blend is.

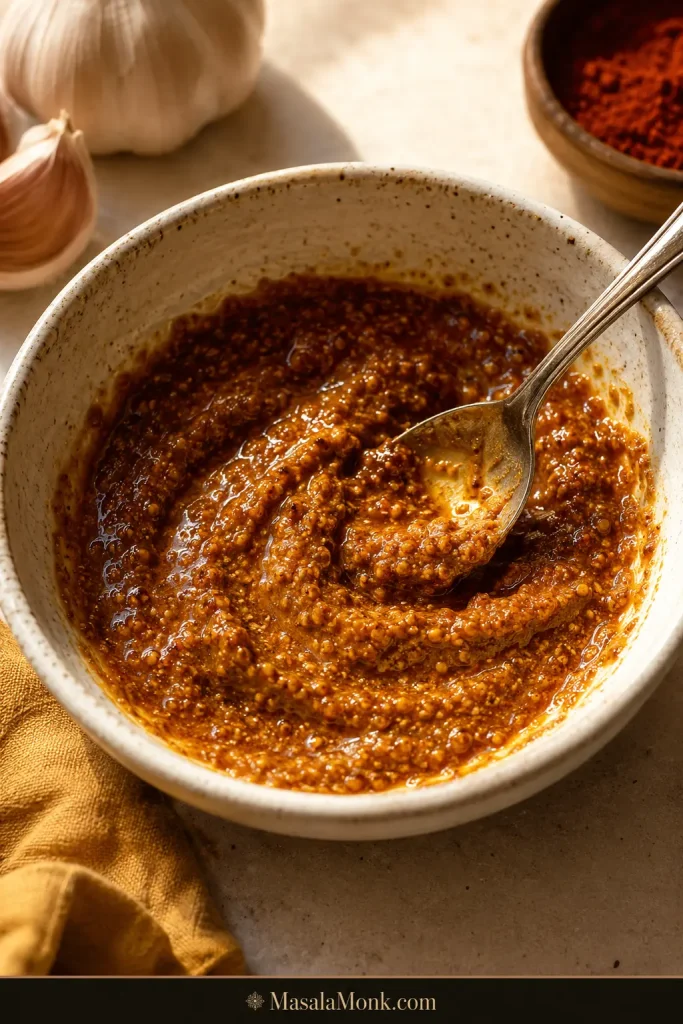
Rub texture: Aim for a loose paste that coats the pork evenly instead of dropping into the basket.

Bowl of smoky garlic Dijon rub with a spoon, made with mustard, paprika, oil, garlic, and seasonings.
The rub should look like a loose paste so it clings to the pork instead of dropping off as dry seasoning in the basket.

Can I use a marinade instead?

Yes. For a simple marinade-style version, mix 1 tablespoon oil, 2 teaspoons soy sauce, 1 teaspoon Dijon mustard, 1 tablespoon honey or brown sugar, 1 teaspoon garlic powder, and 1–2 teaspoons lemon juice or vinegar. Marinate for 20–30 minutes if you have time, then air fry the same way and check the internal temperature.

Equipment You Need

You can make this with basic kitchen tools, but the thermometer is the one that matters. Pork tenderloin is too lean and too quick-cooking for blind timing.

  • Air fryer
  • Instant-read thermometer
  • Tongs
  • Small bowl for the seasoning paste
  • Measuring spoons
  • Paper towels
  • Cutting board
  • Sharp knife for trimming silver skin and slicing

Basket Air Fryer, Oven-Style Air Fryer, and Ninja Foodi Notes

Air fryer style changes how quickly the outside browns, so use this as a first-check guide before trusting one fixed time.

Air fryer typeWhat to expectFirst check
Basket air fryerBrowns fastest with strong direct airflow13–16 minutes
Oven-style air fryerMay need a few extra minutes16–18 minutes
Ninja Foodi or Foodi GrillCan brown aggressively from the top13–15 minutes
Small air fryerCut the tenderloin in half; do not coil it tightlyBased on thickness
Air fryer with linerBrowning can slow if airflow is blockedCheck color and temperature early

How to Prepare the Pork

A good result starts before the basket: dry the surface, season all sides, and remove any tough silver skin so the finished slices are tender from edge to edge.

Prep Steps Before Air Frying

Look for the shiny strip before seasoning; trimming it now prevents chewy bites later.

Raw pork tenderloin on a cutting board with silver skin being lifted and trimmed with a knife.
Trim the silver skin before cooking, otherwise that shiny strip stays tough even when the pork itself is perfectly done.
  1. Pat it dry. Surface moisture slows browning.
  2. Remove silver skin. This is the shiny, tough membrane that does not soften well during cooking. Slide a thin knife under it and trim it away.
  3. Trim lightly. Pork tenderloin is already lean. Remove loose fat or ragged edges, but do not over-trim.
  4. Protect the thin tail. If the tapered end is very thin, tuck it slightly under so it does not overcook too far ahead of the center.
  5. Season all over. Coat the top, bottom, sides, and tapered end.
  6. Let it sit briefly. Even 5–10 minutes while the air fryer preheats helps the seasoning settle.

Seasoning Check Before Air Frying

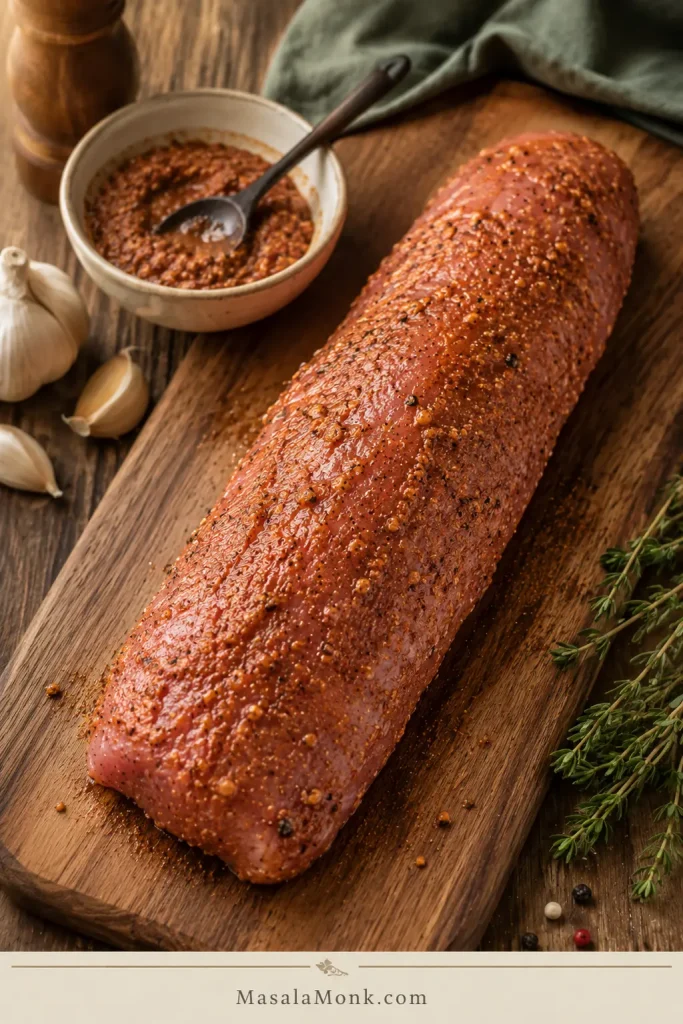
The tenderloin should look evenly coated before cooking, with no bare patches on the sides or tapered end.

Raw pork tenderloin coated evenly with reddish garlic Dijon seasoning paste on a wooden board.
Once the tenderloin is evenly coated, the paprika-Dijon rub can toast into a savory crust while the center stays protected from drying out.

How to Cook It in the Air Fryer

This is where the pork starts becoming dinner, not just a timing problem. Once it is seasoned, the cooking is simple. The only trick is not walking away for too long the first time you make it in your air fryer.

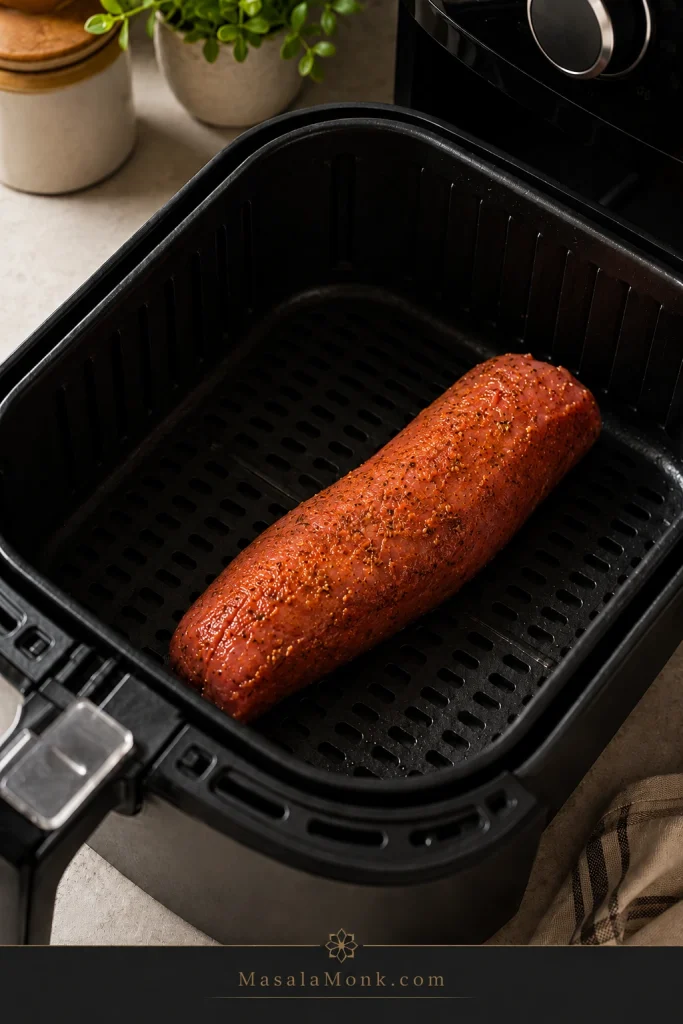
Basket spacing: Leave visible room around the pork so hot air can reach the sides and brown the surface.

Seasoned raw pork tenderloin placed inside an air fryer basket with clear space around it.
Leave open space around the pork tenderloin in the air fryer basket; that airflow helps the surface brown instead of steaming.

Step-by-Step Air Fryer Method

  1. Preheat the air fryer. Set it to 400°F / 200°C, or 205°C if available. Preheat for 3–5 minutes if your air fryer recommends it.
  2. Season the pork. Rub the oil, mustard, and spice mixture over the whole tenderloin.
  3. Place it in the basket. Leave space around the meat so hot air can circulate. Cut it in half crosswise if it is too long.
  4. Cook the first side. Air fry for 10–12 minutes. The outside should be starting to color, but it does not need to look deeply browned yet.
  5. Flip. Turn the tenderloin with tongs. Some juices in the basket are normal.
  6. Watch the surface. By the time it is close, the rub should smell toasted and savory, and the outside should look browned in patches rather than wet.
  7. Finish cooking. Continue air frying until the middle reaches 145°F / 63°C.
  8. Rest. Transfer to a board and rest loosely tented for 5 minutes.
  9. Slice. Cut across the grain into thick slices. The center should look moist, not chalky.

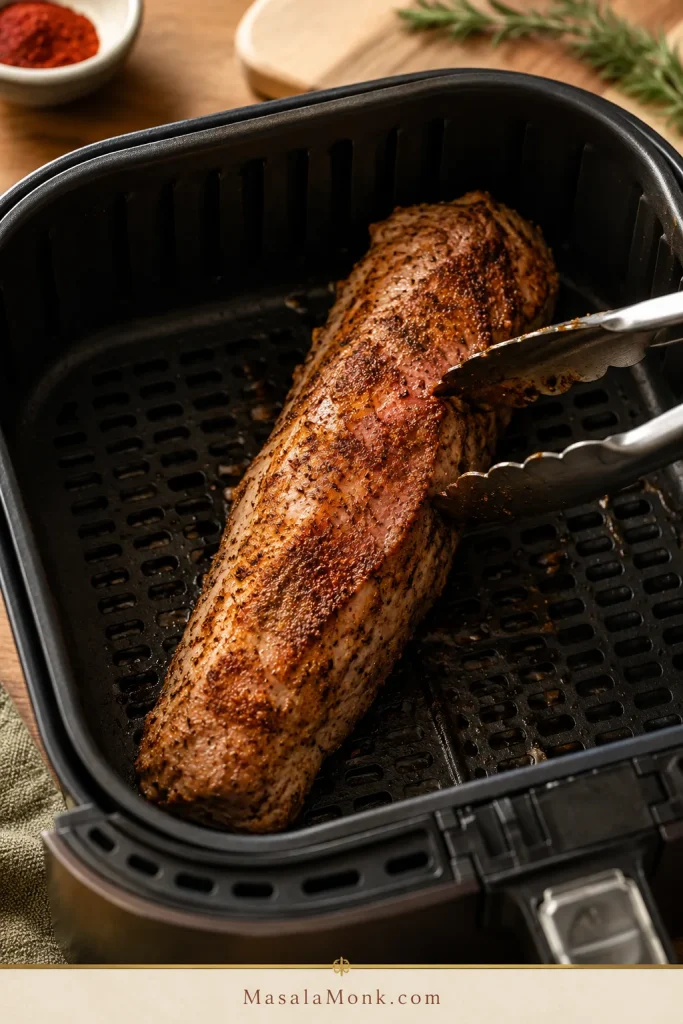
After the Flip

After the flip, browned patches are enough; from this point, temperature matters more than chasing a darker crust.

Pork tenderloin halfway cooked in an air fryer basket with browned seasoning patches after being flipped.
After flipping, the surface should start browning in patches; from here, rely on the thermometer rather than waiting for the outside to get darker.

When the Outside Browns Fast

Dark edges before a done center usually mean the heat is too aggressive. Lower the air fryer to 375–390°F / 190–200°C for the remaining minutes. If the pork is cooked through but pale, brush it with a little oil, honey mustard, or pan juices and air fry for 1–2 more minutes only if it is not already above temperature.

Rest and Slice Before Serving

Resting is not just waiting. It helps the juices settle before you slice. Spoon those juices back over the meat, and the pork tastes more finished.

Rest the pork here before slicing so the juices settle and the board juices can be spooned back over the meat.

Whole cooked pork tenderloin resting on a wooden board with foil nearby, herbs, a spoon, and visible board juices.
Give the pork a few quiet minutes here; that short rest keeps more juices in the slices and leaves enough on the board to spoon back over the top.

When the tenderloin has rested, use a steady cross-grain cut to make thick slices that stay moist on the plate.

Cooked pork tenderloin being sliced with a knife into thick pieces on a wooden cutting board.
Then slice across the grain into thick pieces; thinner slices dry out faster, while thicker slices hold moisture better on the plate.

Need exact timing? See the chartCheck the temperature guide

Cooking Time Chart by Weight

The chart is here to keep you from guessing, not to make the recipe complicated. Use the earliest check time when cooking a new brand, a new air fryer, or a pre-marinated pack.

First time with this air fryer? Watch closely once. After that, your own air fryer timing becomes the shortcut.

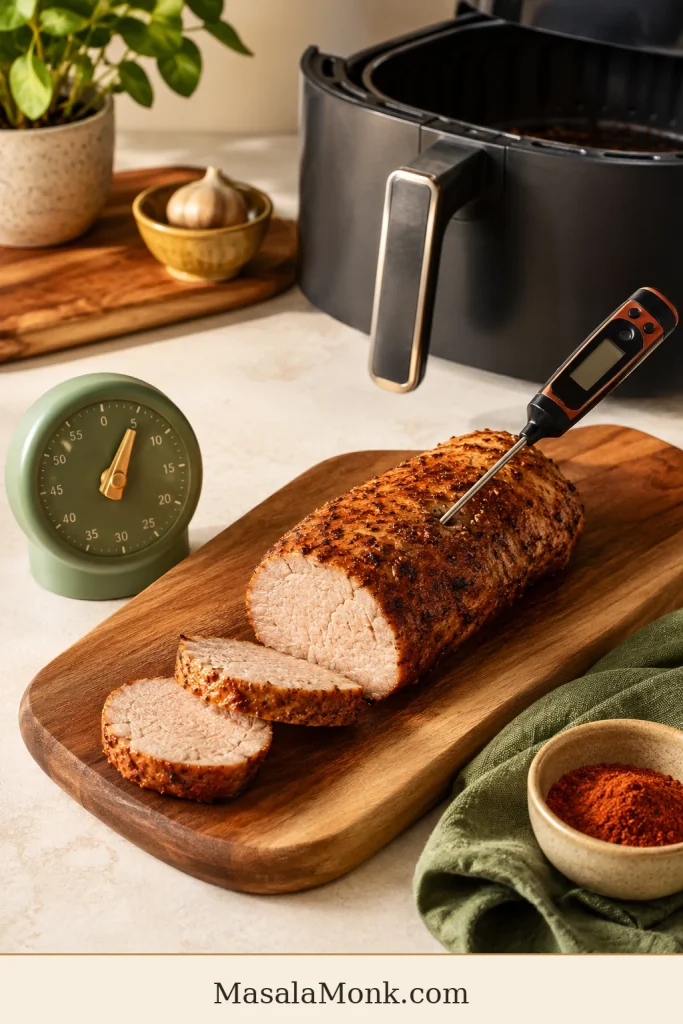
Use the timer to know when to start checking, then let the thermometer decide when the pork is done.

Cooked pork tenderloin on a cutting board with an instant-read thermometer, kitchen timer, air fryer, spice bowl, and green towel.
Your timer helps you know when to start checking, while the thermometer tells you when to stop; together, they make air fryer pork tenderloin repeatable.
Pork tenderloin sizeMetricAir fryer tempStart checkingLikely total time
Small or slim tenderloin450g / 1 lb400°F / 200°C13–14 min14–18 min
Standard tenderloin565g / 1¼ lb400°F / 200°C16 min18–22 min
Larger tenderloin680g / 1½ lb400°F / 200°C18–20 min20–26 min
Very thick tenderloin700g+ / 1½ lb+390–400°F / 200–205°C20 min24–28 min
Cut in half to fitSame total weight400°F / 200°C13–16 minDepends on thickness, not length

How to Use the Chart

Cutting a tenderloin in half does not automatically cook it in half the time. Thickness matters more than length. Pieces that stay thick in the center still need time, while slim pieces finish faster.

Save your first successful timing. Once you know how your air fryer handles a 1 lb or 1½ lb tenderloin, this recipe becomes much easier the next time.

If your “very thick tenderloin” is actually wide like a roast, pause and check the package. It may be pork loin, not tenderloin, and it needs a different cooking plan.

Internal Temperature and Pink Pork

Pork tenderloin is done when the middle of the thickest part reaches 145°F / 63°C, followed by a short rest. Check the largest section, not the thin tail end.

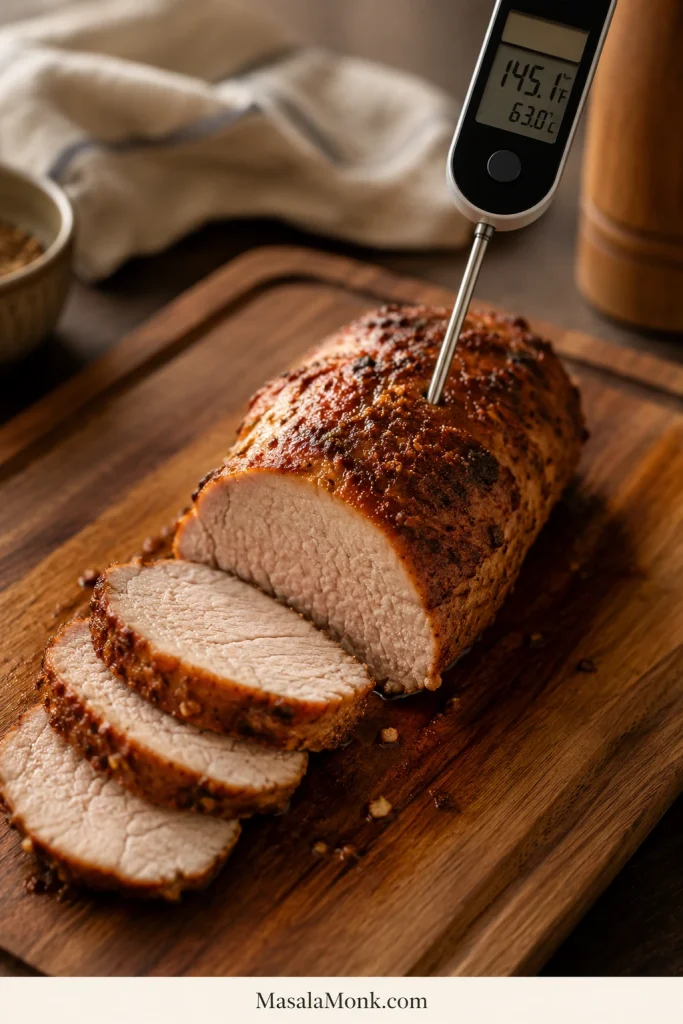
Temperature check: Measure the thickest center, not the thin end, when checking for 145°F / 63°C.

Instant-read thermometer inserted into the thickest center of cooked pork tenderloin on a wooden cutting board.
The thermometer should go into the thickest center, not the thin end; pull the pork at 145°F / 63°C so the slices stay tender after resting.

For food safety, FoodSafety.gov lists pork steaks, roasts, and chops at 145°F / 63°C with a 3-minute rest.

The National Pork Board pork cooking temperature guide gives the same practical guidance: 145°F, a short rest, and a digital thermometer.

What Pink Pork Means

That is why a slight blush of pink can be normal. Pink does not automatically mean raw; temperature tells you more than color.

For beginners, keep the target simple: cook to 145°F / 63°C, then rest for 5 minutes. Experienced cooks may start watching closely around 140–143°F because carryover can raise the final temperature during rest, but the clearest serving target for this recipe is still 145°F / 63°C.

Once you trust the thermometer, pork tenderloin stops being stressful. Instead of guessing by color or cutting into it five times, cook to the number, let it rest, and slice when the juices have settled.

Doneness guide

  • 140–143°F / 60–62°C: Watch closely here only if you understand carryover cooking and will rest the pork immediately.
  • 145°F / 63°C: Clearest finished target for most home cooks.
  • 150°F / 66°C: Still usable, but getting firmer.
  • 160°F / 71°C and above: Much drier, especially in lean tenderloin.

This visual pairs with the doneness guide: as pork cooks longer, the slices turn paler, firmer, and less glossy.

Four pork tenderloin slices arranged from pink and moist to pale and firmer, with a meat thermometer nearby.
As pork cooks longer, the slices turn paler and firmer; a slight blush with the right internal temperature can still mean tender, safe pork.

Nervous about dryness? Troubleshoot itBack to the recipe card

Why It Turns Dry — and How to Prevent It

This is the section to read if you are nervous, using a new air fryer, or already worried you left the pork in a minute too long. Dryness usually comes down to timing, cut, or resting. The good news is that all three are fixable.

ProblemWhat happensFix
Cooking by time onlyThe pork can overcook before you noticeUse the time chart, then do the doneness check
Using pork loin instead of tenderloinThe cut is larger and needs different timingCheck the package and shape before cooking
Very small tenderloinIt cooks faster than the recipe rangeStart checking at 13–14 minutes
No restJuices run out when slicedRest 5 minutes before cutting
Sugary marinade burns earlyThe outside darkens before the middle is doneCheck early or reduce the temperature slightly
Aggressive reheatingLeftovers become dry and firmReheat gently with sauce, broth, or butter

Match Your Result

Still not sure what happened? Match the result:

  • Outside dark, inside not ready: The heat was too aggressive, the rub was sugary, or the pork sat too close to the heating element. Lower the temperature for the remaining minutes.
  • Pale outside, dry inside: The pork likely cooked too long without enough surface oil or browning. Next time, dry it well, coat lightly with oil, and start checking earlier.
  • Only the thin end was dry: The tenderloin was tapered. Tuck the thin tail slightly under or expect the end pieces to cook faster than the center slices.

Dry pork is not ideal, but it is rarely beyond saving. Slice it thicker and serve it with something moist: pan juices, honey mustard, mushroom sauce, gravy, melted butter, broth, apple chutney, or a spoon of barbecue sauce.

If the slices need extra help, a spoon of creamy mushroom sauce turns slightly over-rested or lean pork into a much softer dinner plate.

Adding Potatoes, Carrots, or Green Beans

After the pork is under control, the real trick is keeping the sides from making it wait. You can cook it with potatoes, carrots, green beans, or sweet potatoes in the air fryer, but dense vegetables often take longer than the pork.

The pork is the part you protect. Vegetables are the part you can let keep cooking.

Best No-Dry Method

  1. Cook the tenderloin first.
  2. Rest it for 5–10 minutes.
  3. While it rests, cook or finish the potatoes, carrots, or green beans in the air fryer.
  4. Slice the pork right before serving.

This keeps the pork from waiting around while the potatoes catch up.

If you would rather keep the air fryer focused on the meat, make the potatoes separately. These ranch roasted potatoes give you crisp, salty-herby edges without forcing the tenderloin to wait in the basket.

One-Basket Dinner Example

For a simple one-basket version, use 1 lb / 450g pork tenderloin, 8 oz / 225g baby potatoes, and 1 large carrot. Halve the baby potatoes, slice the carrot thinly, toss the vegetables with oil and seasoning, and air fry them for 8–10 minutes at 390–400°F / 200–205°C. Add the seasoned pork, then cook until it reaches 145°F / 63°C. If the meat finishes before the vegetables are tender, remove and rest it while the vegetables cook a few minutes longer.

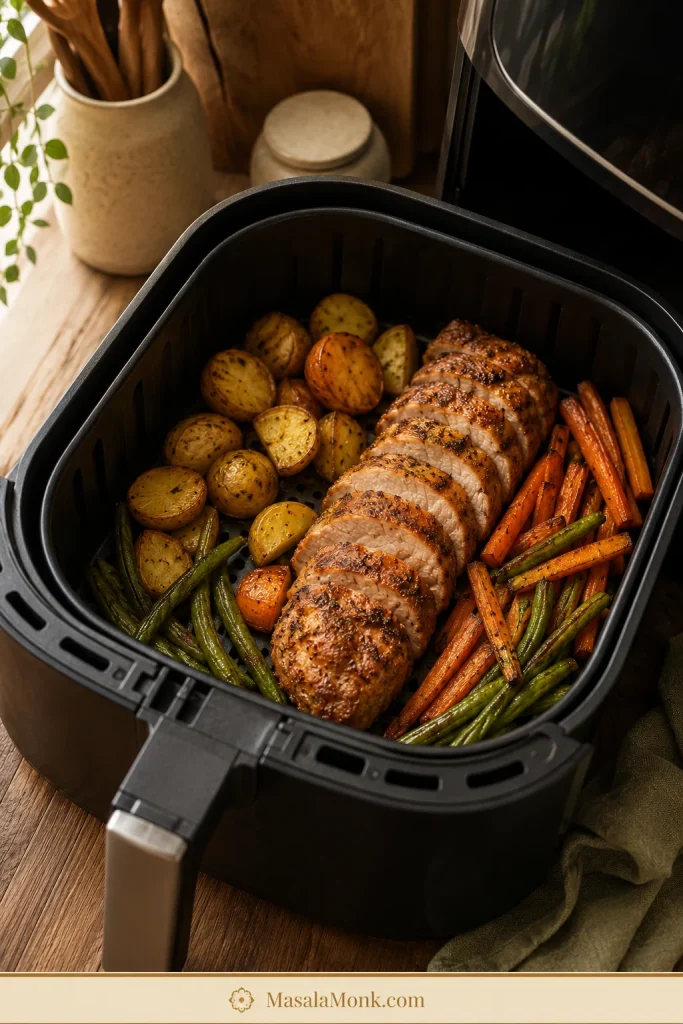
One-basket note: Keep the pork visible and let dense vegetables finish separately if they need more time.

Air fryer basket with sliced pork tenderloin, roasted baby potatoes, carrots, and green beans.
When making a one-basket dinner, keep the pork visible and give potatoes or carrots extra time so the vegetables finish without overcooking the meat.

Vegetable Timing Tips

SideBest way to handle it
Baby potatoesHalve them and give them a head start.
Regular potatoesCut into ½-inch cubes so they cook faster.
CarrotsSlice thinly or cut small; thick carrots need extra time.
Green beansAdd later or cook while pork rests.
Sweet potatoesCut small and expect them to need more time than green vegetables.

For a sweeter vegetable side, roasted carrots with honey, maple, or garlic work especially well with the smoky paprika and mustard in this pork rub.

Can You Cook It From Frozen?

Thawed is the recipe. Frozen is the emergency version.

A thawed tenderloin seasons better, browns better, cooks more evenly, and usually has a better texture. If you are staring at a frozen one and need a fallback, drop the heat and give it more time.

  • Use a lower temperature: about 330°F / 165°C.
  • Start checking around 30 minutes and expect roughly 33–38 minutes for many pieces, depending on thickness.
  • Start from frozen, then season once the surface softens enough for the rub to stick.
  • Flip halfway.
  • Check the middle, not just the browned outside.
  • Rest before slicing.

Do not cook a frozen double pack as one solid block. Separate the tenderloins first if they are frozen together. Do not use this fallback method for stuffed, rolled, or bacon-wrapped frozen tenderloin. Frozen breaded pork tenderloin is also a different product from raw whole tenderloin, so follow the package guidance and confirm doneness.

Smithfield, Hormel, and Pre-Marinated Packs

Pre-marinated packs are where label confusion shows up again. They are convenient, but some are pork tenderloin, some are pork loin filet, and some are wider, sweeter, or saltier than this recipe assumes.

These packs can still make an easy dinner; they just need a quick label check before they go into the basket.

Before cooking a pre-marinated pack, check the shape, salt level, sweetness, and final temperature instead of trusting the label alone.

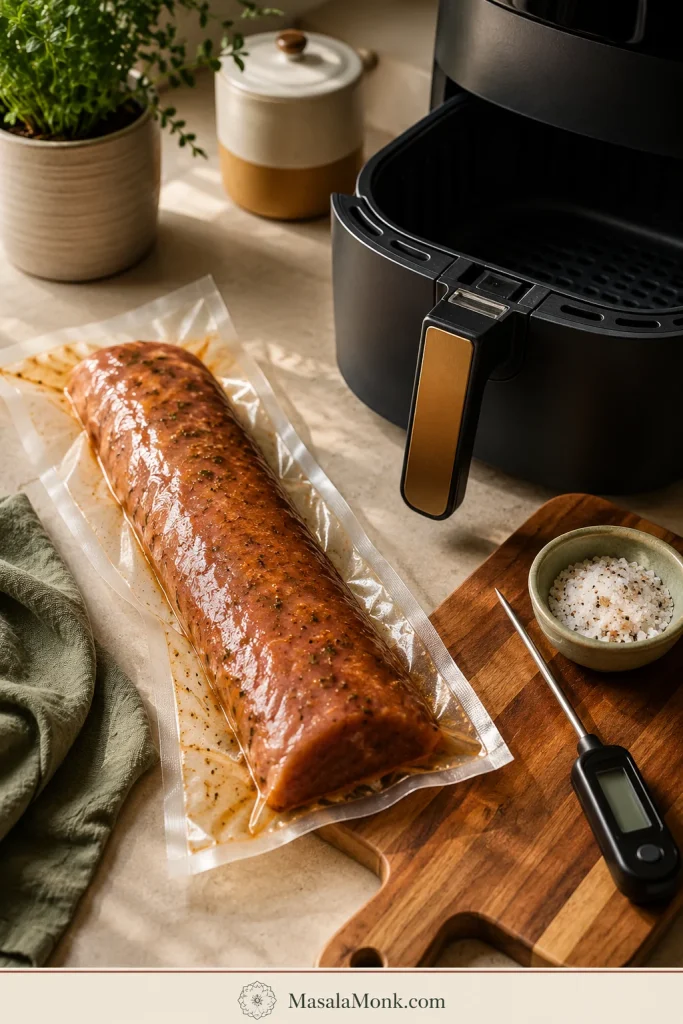
Unbranded pre-marinated pork tenderloin package beside an air fryer basket, thermometer, salt bowl, wooden board, and green towel.
Pre-marinated pork tenderloin can be convenient, but check the shape, salt level, sweetness, and final temperature instead of trusting package timing alone.

Pre-Marinated Package Checklist

  • Check the package name, weight, and shape before cooking.
  • Long, narrow packs around 1–1½ lb / 450–680g usually work with this method.
  • A pork loin filet label deserves a closer look. It may look long in the package but still be wider and denser than pork tenderloin.
  • Wider pork loin filet or roast-style packs need different timing.
  • Pat off excess wet marinade if it is very drippy.
  • Start checking around 15 minutes because sugar-heavy marinades can brown faster.
  • Dark edges early are a sign to check temperature before assuming the pork is done.
  • Use less added salt because many pre-marinated packs are already seasoned.

Package timing is a starting point, not a promise. Use the package for flavor guidance and your thermometer for doneness.

Air Fryer Pork Tenderloin Medallions

If you sliced the pork already, switch timing systems. Medallions cook much faster than a whole tenderloin, which makes them useful for rice bowls, salads, wraps, or a faster dinner plate.

  1. Slice the tenderloin into even medallions, about 1–1½ inches thick.
  2. Season both sides.
  3. Air fry at 350°F / 175°C for about 9–12 minutes, flipping once.
  4. Start checking around 7–8 minutes if the pieces are closer to 1 inch thick.
  5. Check the largest medallion for 145°F / 63°C, then rest briefly before serving.

Even thickness matters. Tiny end pieces cook faster than center-cut medallions, so pull them early if needed.

Flavor Variations

After you know when to stop cooking, the flavor can go almost anywhere. The timing usually stays close unless the tenderloin is thicker, smaller, wrapped, frozen, or heavily coated.

  • Honey mustard: Add extra Dijon and honey, then finish sliced pork with a small spoon of sauce.
  • BBQ rub: Use smoked paprika, brown sugar, garlic powder, onion powder, salt, pepper, and chili powder.
  • Garlic herb: Use garlic powder, thyme, rosemary, parsley, black pepper, and olive oil.
  • Cajun: Use Cajun seasoning, smoked paprika, garlic, and oil. Watch the salt if your blend is salty.
  • Soy-Dijon marinade: Use soy sauce, Dijon mustard, honey, garlic powder, and a little vinegar or lemon juice.
  • Spicy chili-garlic: Add chili flakes, cayenne, or chili paste to the oil and mustard mixture.
  • Bacon-wrapped: Cook more carefully because bacon needs time to render. Start checking early so the pork does not overcook while the bacon browns.

Choose honey mustard for a softer family-style dinner, Cajun for heat, garlic herb for mashed potatoes, and BBQ rub if you want leftovers for sandwiches.

After slicing, this honey mustard dressing can double as a bright pork drizzle, especially with the honey mustard or garlic herb versions.

With BBQ-style pork tenderloin, creamy coleslaw is a natural fresh side because it brings crunch, tang, and a little sweetness.

What to Serve with It

This pork tenderloin is flexible enough for a quick weeknight dinner, a meal-prep bowl, or a slightly nicer weekend plate. A few slices over mashed potatoes feels cozy; the same pork over rice with sauce becomes lunch tomorrow.

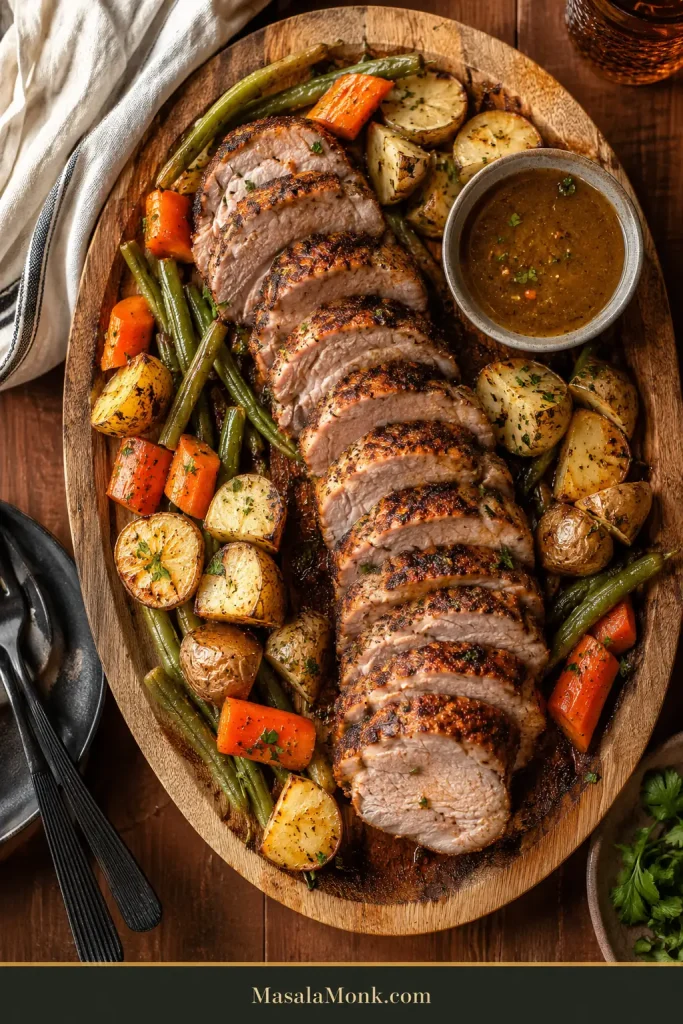
Once the pork is sliced, a platter with vegetables, potatoes, sauce, and board juices makes serving easier.

Family-style wooden platter with sliced pork tenderloin, roasted potatoes, carrots, green beans, herbs, and a bowl of sauce.
For serving, arrange sliced pork tenderloin with vegetables, potatoes, and sauce so each portion gets crust, tender center, and a little pan-style flavor.

Comfort sides

A classic comfort plate starts with sliced pork over creamy mashed potatoes, so the juices, mustard sauce, or mushroom gravy have somewhere to land.

Garlic mashed potatoes are the richer version, especially if you are skipping a sauce. For a cozy family-style dinner, creamy macaroni and cheese also works well with something green or crisp on the side.

Fresh sides

Something crisp beside the warm pork helps balance the plate. A wedge salad gives you cold crunch, creamy dressing, and steakhouse-style balance. Green beans, simple salad, apple sauce, apple chutney, and roasted carrots also fit the plate.

Bowls, wraps, and easy leftovers

Sliced pork works well over rice, in wraps, on salads, or tucked into quick bowls with vegetables and sauce. If you are turning leftovers into rice bowls, this how to cook rice guide helps with stovetop, rice cooker, and Instant Pot timing.

Make-Ahead Tips

You can season the pork up to 12 hours ahead and refrigerate it covered. Let it sit at room temperature for 15–20 minutes while the air fryer preheats, then cook as directed.

If the rub contains a lot of salt or soy sauce, avoid over-marinating a very small tenderloin. The smaller the piece, the faster salty marinades can make the texture feel firm.

Storage and Reheating

Leftover pork is best when you treat it gently. The meat is lean, so reheating should warm it through without blasting away the moisture you protected during cooking.

NeedBest method
Fridge storageStore in an airtight container for 3–4 days.
Freezer storageFreeze sliced or portioned pork, wrapped well, for easier reheating.
Air fryer reheatingReheat slices at 350°F / 175°C for 3–4 minutes.
Microwave reheatingAdd a splash of broth, water, butter, or sauce and heat gently.
What to avoidDo not blast a whole cooked tenderloin in the air fryer again. It can dry out before the center warms.

Leftover slices are best used gently: tucked into rice bowls with sauce, folded into wraps, chopped into breakfast hash, or added cold to salads instead of aggressively reheated.

Extra slices can become an easy lunch with rice, crisp vegetables, greens, and a sauce that brings moisture back.

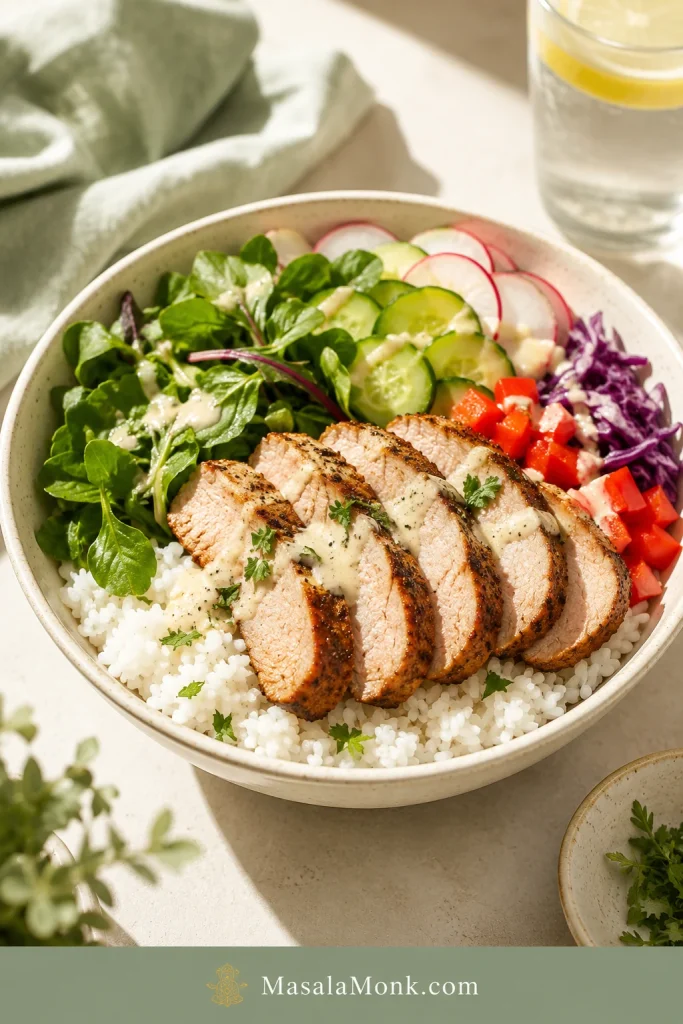
Rice bowl with sliced pork tenderloin, white rice, leafy greens, cucumber, radish, red pepper, purple cabbage, herbs, and sauce.
Finally, leftover air fryer pork tenderloin works beautifully in rice bowls because the sauce, greens, and crisp vegetables bring moisture back to the slices.

Go to FAQBack to the recipe cardBack to top

FAQ

How long do you cook pork tenderloin in the air fryer?

Most 1–1½ lb / 450–680g pork tenderloins take 18–24 minutes at 400°F / 200°C. Slim 1 lb pieces may finish closer to 14–18 minutes, while thick pieces may need 24–28 minutes. Use the chart, then confirm 145°F / 63°C in the center.

What temperature should I air fry pork tenderloin?

Set the air fryer to 400°F / 200°C, or 205°C if your model allows that setting. This gives good browning without a long cook time. If your air fryer runs very hot, reduce slightly to 375–390°F / 190–200°C and cook to temperature.

How do I keep it from drying out?

Use the right cut, check early, and rest before slicing. The mistake is usually not the seasoning — it is leaving lean pork in the air fryer a few minutes too long.

What if I do not have a meat thermometer?

A thermometer is strongly recommended because pork tenderloin is lean and cooks quickly. Without one, use the timing chart, slice into the thickest part, and check that the pork is hot all the way through with no raw-looking center. This is less reliable than a temperature check, so a small instant-read thermometer is worth it.

Is pork tenderloin the same as pork loin?

No. Pork tenderloin is long, narrow, and usually 1–1½ lb. Loin is wider, larger, and more roast-like. They need different cooking times, so checking the package before cooking matters.

Is pork fillet the same as pork tenderloin?

Often, yes. In many places, pork tenderloin is sold as pork fillet. If your pork fillet is long, narrow, and around 450–680g / 1–1½ lb, this air fryer method applies.

Can pork tenderloin be pink inside?

Yes. A slight blush can be normal when the pork is cooked to temperature. Do not keep cooking just to erase every hint of pink, or the tenderloin can turn dry.

Do I need to flip it?

Yes. Flipping helps the pork brown more evenly, especially in basket-style air fryers where the top often gets more direct heat than the bottom. Turn it after the first 10–12 minutes, then finish cooking.

Can I cook frozen pork tenderloin in the air fryer?

You can, but thawed is better for browning and texture. For frozen pork tenderloin, use about 330°F / 165°C, begin testing around 30 minutes, season once the surface softens, flip halfway, and confirm doneness before serving.

Can I cook pork tenderloin and potatoes together?

Yes, but potatoes need a head start because they usually take longer. Cook the pork first and finish the vegetables while it rests, or start small-cut potatoes 8–10 minutes before adding the pork.

How do I cook pre-marinated pork tenderloin?

Check that the package is actually pork tenderloin and not pork loin filet. Pat off excess wet marinade if needed, begin testing around 15 minutes, and cook until the pork reaches 145°F / 63°C. If the outside darkens early, check the temperature before assuming the middle is done.

Can I season pork tenderloin ahead of time?

Yes. You can season it up to 12 hours ahead and refrigerate it covered. Let it sit out for 15–20 minutes while the air fryer preheats so it is not going into the basket ice-cold.

How do I reheat leftovers?

Reheat slices at 350°F / 175°C for 3–4 minutes in the air fryer, or microwave gently with a splash of broth, water, butter, or sauce. Sliced pork reheats better than a whole tenderloin because it warms faster and needs less time.

Can I make pork tenderloin medallions in the air fryer?

Yes. Slice the tenderloin into even 1–1½ inch medallions, season both sides, and air fry at 350°F / 175°C for about 9–12 minutes, flipping once. Start checking early if the pieces are closer to 1 inch thick.

Final Tip

Once you know the cut, the temperature, and when to stop cooking, air fryer pork tenderloin becomes a very easy win: browned outside, juicy inside, and flexible enough for potatoes, salads, bowls, or leftovers the next day. The first cook teaches you your air fryer; after that, this becomes one of those dinners you can repeat without hovering over the basket.

If your air fryer runs especially hot or slow, drop your timing in the comments — model, weight, and total cook time are especially helpful. Someone else with the same style of air fryer may be comparing notes before dinner.

Back to recipe cardBack to cooking chartBack to top

Posted on Leave a comment

Frozen Shrimp in Air Fryer: No-Thaw Time & Temp Guide

Cooked shrimp on a white plate with lemon wedges, garlic butter, parsley, and a blurred air fryer in the background.

This is the kind of recipe for the night when dinner was not really planned, the shrimp are still frozen, and you need the air fryer to save the meal. A bag of frozen shrimp can turn into shrimp tacos, rice bowls, pasta, salads, wraps, or garlic-butter shrimp in minutes — but only if you use the right timing for the shrimp you actually have.

Do not start with the timer. Start with the bag: raw or precooked, small or jumbo, peeled or shell-on, plain or breaded/coated. The rule is simple: cook raw shrimp, reheat precooked shrimp, and crisp coated shrimp. No thawing bowl, no guessing, no rubbery shrimp if you start with that bag check.

Quick Answer

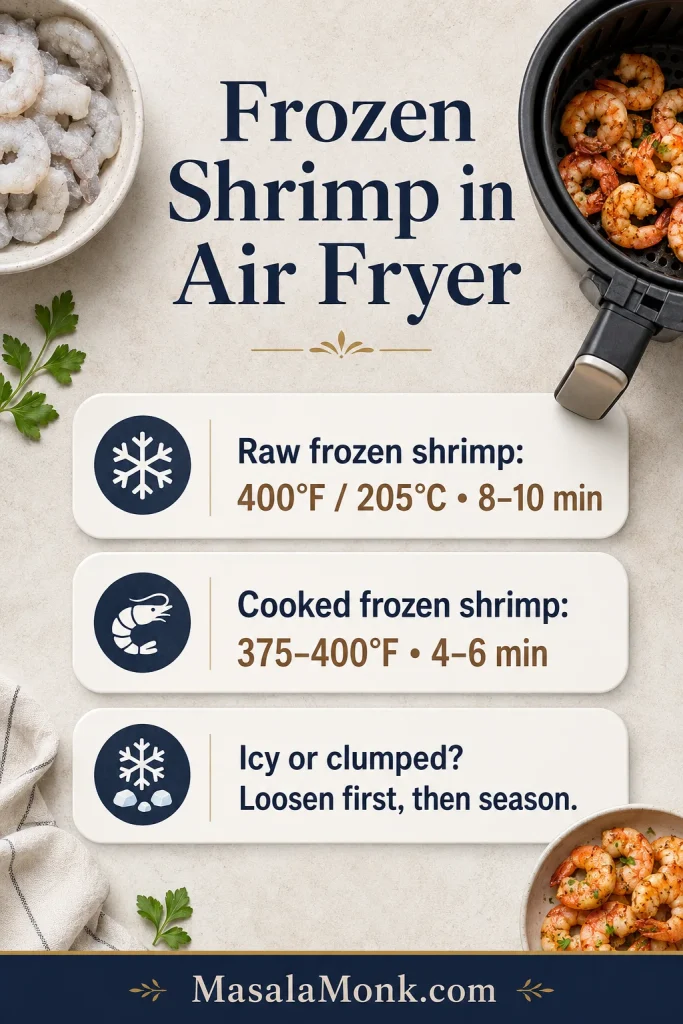
Most plain frozen raw shrimp takes 8 to 10 minutes at 400°F / 205°C in the air fryer, with a shake or flip halfway. Frozen cooked or precooked shrimp takes 4 to 6 minutes at 375°F to 400°F / 190°C to 205°C because it only needs reheating.

Icy, glazed, or stuck-together pieces need a short head start. Air fry them plain for 2 to 3 minutes first, then separate them, drain off extra moisture if needed, add oil and seasoning, and finish cooking. Some frozen shrimp has a thin ice glaze, and that is normal. The short head start helps the flavor stick to the seafood, not the ice.

That tiny pause is the difference between seasoning the shrimp and seasoning the basket.

Timing graphic showing raw frozen shrimp at 400°F for 8 to 10 minutes, cooked frozen shrimp for 4 to 6 minutes, and icy shrimp loosened before seasoning.
Start with the timing split: raw frozen shrimp needs full cooking time, while precooked shrimp only needs a quick reheat.

Jump to What You Need

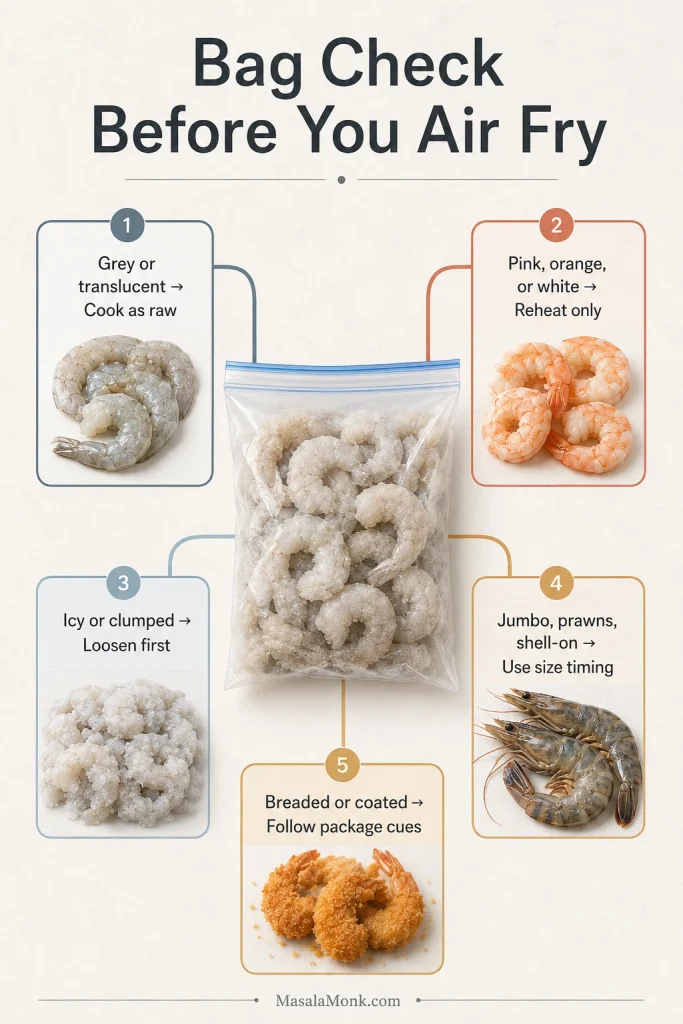
Bag Check: What Do You Have?

Use this quick check before you set the timer. It is the fastest way to avoid rubbery precooked shrimp, bland icy shrimp, or coated shrimp that browns outside before it heats through.

What the bag says or looks likeWhat to do
Grey or translucent shrimpCook as raw shrimp
Pink, orange, or white shrimpReheat only; do not use raw-shrimp timing
Icy, glazed, or clumped piecesAir fry briefly, separate, then season
Jumbo shrimp, prawns, or shell-on shrimpUse size-based timing and check doneness
Breaded, popcorn, coconut, or scampi shrimpFollow package timing and crisping cues
Bag check guide showing raw, cooked, icy, jumbo, shell-on, prawn, breaded, and coated frozen shrimp categories for air fryer timing.
Before the shrimp goes into the air fryer, check the bag. Raw, cooked, icy, jumbo, shell-on, and coated shrimp need different timing.

Air Fryer Frozen Shrimp Recipe

The recipe below is the simple cook-now path for plain frozen raw shrimp — the bag most people grab when dinner needs to happen fast. If yours is cooked, jumbo, shell-on, thawed, prawn-style, or coated, use the chart right after the card to adjust.

Recipe at a Glance

Cooking methodAir fryer
Shrimp typePlain frozen raw shrimp
ThawingNo thawing needed
Prep time3 minutes
Cook time8 to 10 minutes
Total time11 to 13 minutes
Serves3 to 4
Temperature400°F / 205°C
Using precooked shrimp?Reduce time to 4 to 6 minutes

Ingredients

  • 1 lb / 454 g frozen raw shrimp, peeled and deveined
  • 1 tbsp / 15 ml olive oil or avocado oil
  • ½ tsp garlic powder
  • ½ to 1 tsp paprika, Cajun seasoning, or Old Bay-style seafood seasoning
  • Salt: ¼ to ½ tsp, depending on how salty your seasoning blend is
  • ¼ tsp black pepper
  • Lemon wedges, to serve
  • Optional: 1 tbsp / 14 g melted butter, for finishing
  • Fresh herbs, optional: 1 to 2 tbsp chopped parsley or cilantro

For a smaller 8 oz / 225 g batch, use half the shrimp and roughly half the seasoning. Smaller batches are especially useful in 3 to 4 quart air fryers.

Frozen shrimp, oil, garlic powder, paprika, salt, pepper, lemon, melted butter, herbs, and an unbranded freezer bag arranged on a light counter.
Keep the base simple: oil helps seasoning cling, dry spices add quick flavor, and lemon or butter finishes the shrimp cleanly.

Method

  1. Preheat the air fryer to 400°F / 205°C for 3 to 5 minutes.
  2. Add the frozen shrimp in a mostly single layer.
  3. If the pieces are icy, glazed, or clumped, air fry them plain for 2 to 3 minutes first.
  4. Shake, separate, and drain excess liquid if needed.
  5. Toss with oil, garlic powder, seasoning, salt, and pepper.
  6. Air fry for 8 to 10 minutes total, shaking or flipping halfway, until opaque and tender.
  7. Finish with lemon, melted butter, herbs, or your favorite sauce. For a full garlic-butter pasta route, use the shrimp in a shrimp scampi-style dinner.

The batch is ready when the center is opaque, not grey or glassy. For jumbo, precooked, shell-on, thawed, or prawn-style bags, use the timing chart below.

Frozen Shrimp Air Fryer Time and Temperature Chart

Use this chart when your bag is not plain frozen raw shrimp. Size, raw or cooked status, surface ice, and crowding can all change the timing.

ShrimpTempTimeCue
Frozen raw small or medium400°F / 205°C6 to 8 minOpaque, gently curled
Frozen raw large400°F / 205°C8 to 10 minOpaque through center
Frozen raw jumbo400°F / 205°C9 to 12 minCheck thickest piece
Frozen cooked or precooked shrimp375°F to 400°F / 190°C to 205°C4 to 6 minHot through, not tight
Thawed raw shrimp350°F to 375°F / 175°C to 190°C5 to 7 minPat dry first
Thawed cooked shrimp350°F / 175°C2 to 4 minWarm gently
Shell-on frozen shrimp400°F / 205°C8 to 12 minShells pink, flesh opaque
Frozen prawns400°F / 205°C8 to 12 minTime by size

Treat the chart as a starting point, then let doneness get the final vote. In most baskets, large raw shrimp land in the 8 to 10 minute range, but crowding or a heavy glaze can push the batch toward the longer end. If the basket looks watery, it usually means surface ice is melting, so drain if needed instead of cooking the shrimp longer.

Got your timing? Go to the step-by-step method.

How to Air Fry Frozen Shrimp

The method below gives you tender shrimp without thawing first. That small head start for icy pieces is worth it because it keeps the seasoning from washing away. Frozen shrimp is fast, but it asks for one favor: stop early and check.

1. Preheat the air fryer

Preheat to 400°F / 205°C for raw frozen shrimp. A hot basket helps the pieces start cooking quickly instead of slowly thawing and releasing too much liquid.

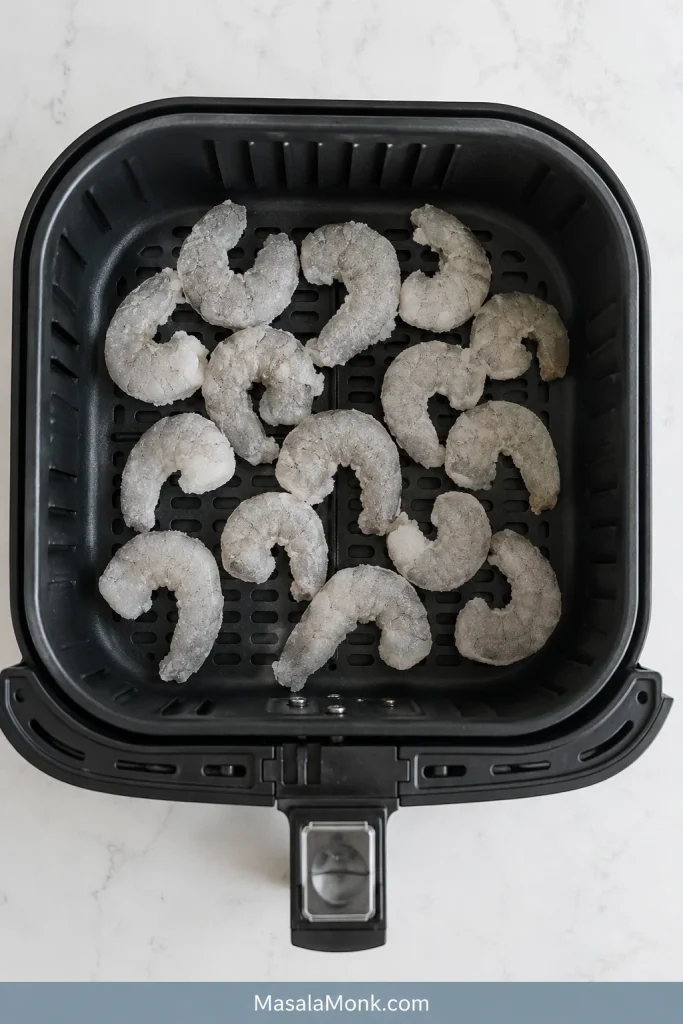
2. Add the shrimp in one layer

Place the frozen shrimp in the basket in a mostly single layer. A little overlap is fine, but avoid a thick pile. You are not trying to fill the basket; you are trying to give the hot air room to work.

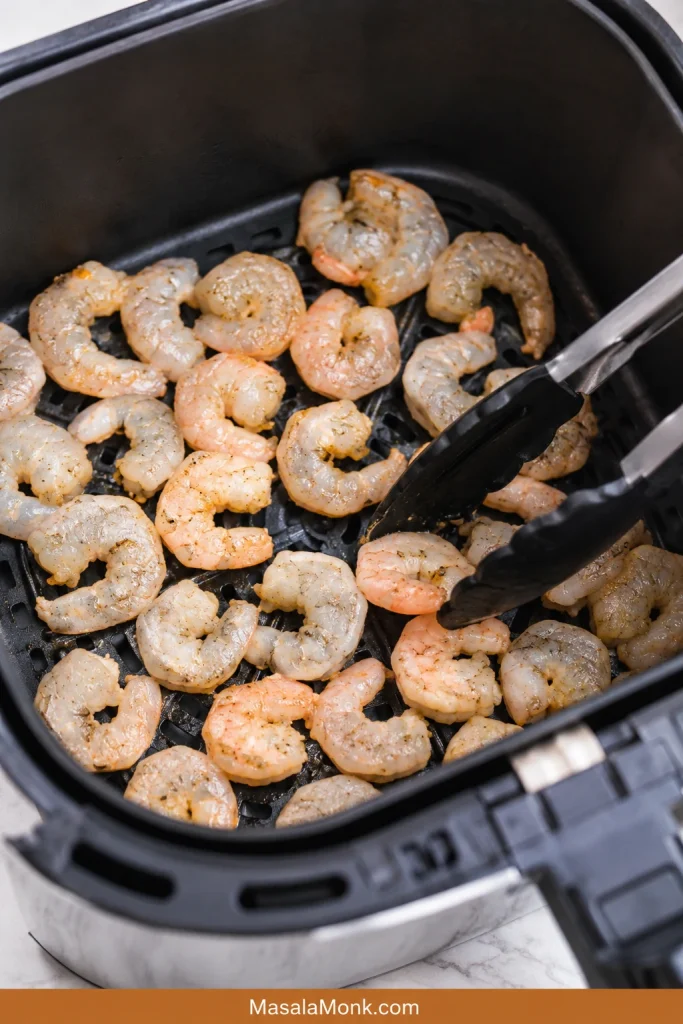
Grey frozen raw shrimp with visible frost spread in a mostly single layer inside a black air fryer basket.
A mostly single layer gives frozen raw shrimp space to cook evenly instead of trapping steam in a crowded basket.

3. Loosen icy or clumped shrimp first

When the pieces are stuck together or covered in a thin ice glaze, air fry them plain for 2 to 3 minutes. Then shake the basket and separate them with tongs. After that short head start, the icy glaze should look wet instead of frosty, and the pieces should separate easily. That is the moment to season.

Side-by-side comparison of icy clumped frozen shrimp before cooking and loosened shrimp after a short air fryer head start.
When shrimp is clumped or heavily glazed, loosen it first; then seasoning sticks to the shrimp instead of melting away.

4. Add oil and seasoning

Move the shrimp to a bowl if needed, then toss with oil, garlic powder, seasoning, salt, and pepper. Drain any liquid in the basket before adding the shrimp back.

Shrimp being tossed in a bowl with oil, garlic powder, paprika, salt, and pepper after the frost has loosened.
Season once the surface frost softens. At that point, oil and spices can coat the shrimp instead of pooling below.

5. Finish cooking

Air fry until the pieces are opaque and tender, shaking or flipping halfway. Use the timing chart for small, jumbo, precooked, shell-on, thawed, or prawn-style bags.

Partly cooked shrimp in an air fryer basket with tongs turning the pieces halfway through cooking.
Halfway through cooking, shake or flip the shrimp so pale centers, pink edges, and released moisture even out.

6. Finish with lemon or butter

Squeeze lemon over the hot shrimp. For a richer finish, toss with melted butter, chopped herbs, garlic butter, or a quick sauce after cooking. When it works, the shrimp tastes bright and clean, with lemon, butter, and seasoning clinging to the surface instead of sliding into the basket.
Close-up of finished air fryer shrimp with lemon butter, herbs, and light seasoning on the surface.
Finished shrimp should look moist, pearly, and lightly curled, with the seasoning clinging to the surface instead of the basket.
How Shrimp Type Changes the Timing

This is where the label on the bag matters most. The same air fryer can give you tender shrimp or rubbery shrimp depending on whether the pieces started raw, cooked, icy, jumbo, or shell-on.

Raw vs cooked frozen shrimp

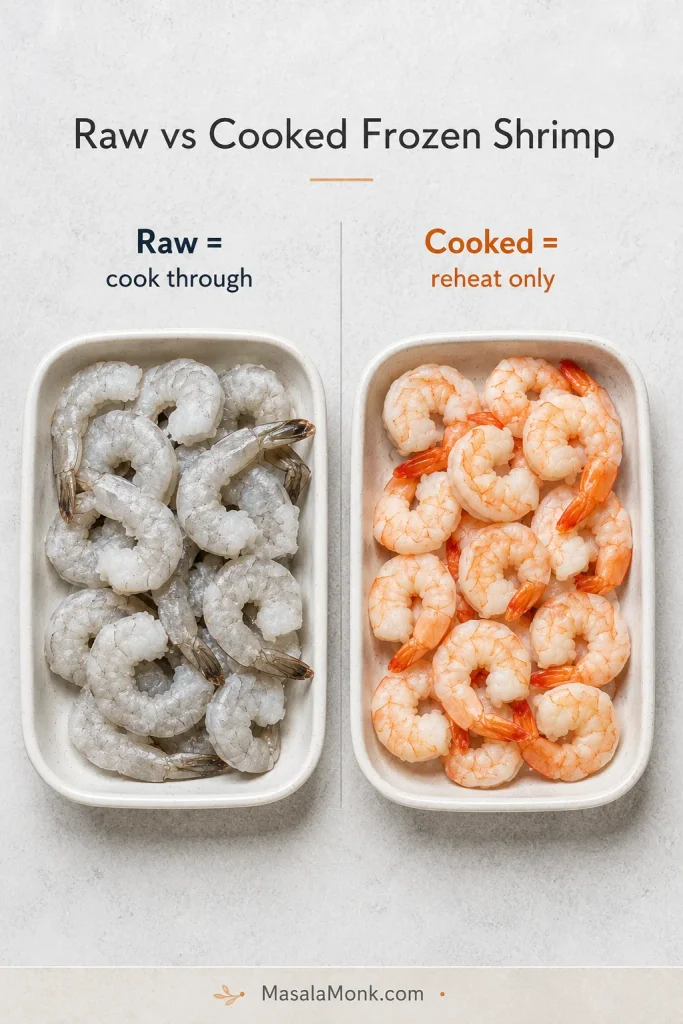
Raw shrimp usually looks grey or translucent and needs to cook through. Cooked or precooked shrimp usually already looks pink, orange, or white and only needs to get hot. For precooked shrimp, look for heat, not a deeper curl.

Split comparison showing grey frozen raw shrimp on one side and pink cooked frozen shrimp on the other side.
This is the biggest timing mistake to avoid: grey raw shrimp must cook through, while pink cooked shrimp only needs heat.

Shrimp size guide: what 16/20, 21/25, and 31/40 mean

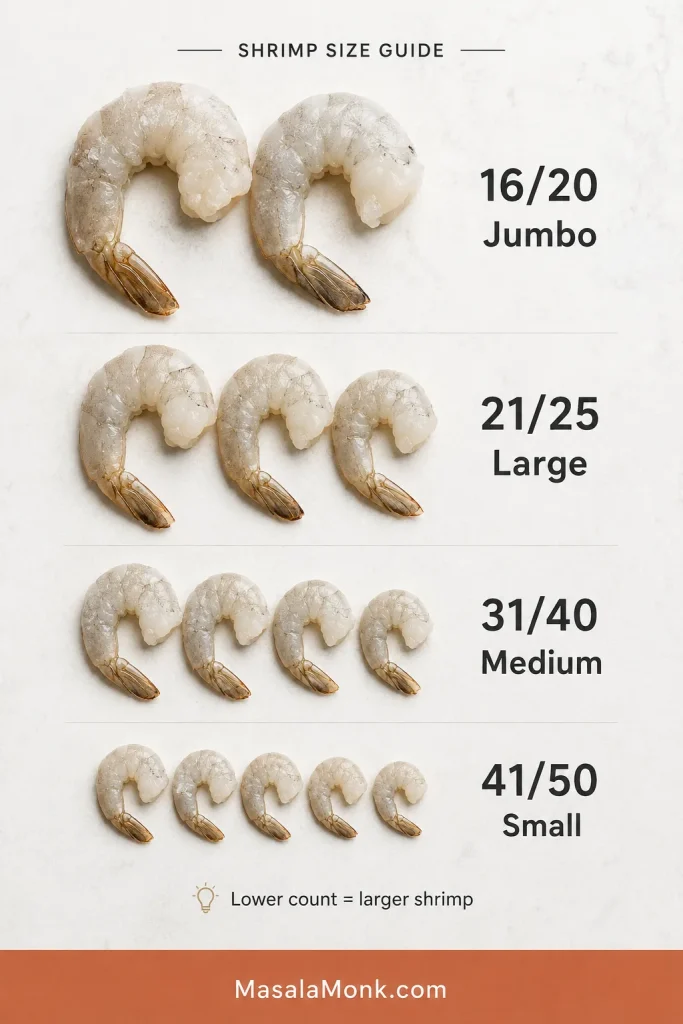
Many frozen shrimp bags use a count-per-pound number instead of words like medium or jumbo. A lower number means larger shrimp because there are fewer pieces in a pound. Higher numbers mean smaller shrimp, which cook faster.

Shrimp size guide showing 16/20 jumbo, 21/25 large, 31/40 medium, and 41/50 small shrimp arranged from largest to smallest.
Shrimp count tells you size. Lower numbers mean larger pieces, so jumbo shrimp usually needs more air fryer time than small shrimp.
Package countCommon sizeAir fryer note
16/20JumboUse the longer range, often 9 to 12 minutes from frozen
21/25Extra large or largeMain 8 to 10 minute timing usually works
26/30LargeMain 8 to 10 minute timing usually works
31/40MediumStart checking around 6 to 8 minutes
41/50 and smallerSmallCheck early; small shrimp can overcook fast

Once you know the count, the timing starts making much more sense. When the bag gives both a size word and a count, trust the count more. “Large” can vary by brand, but 16/20 will almost always need more time than 31/40.

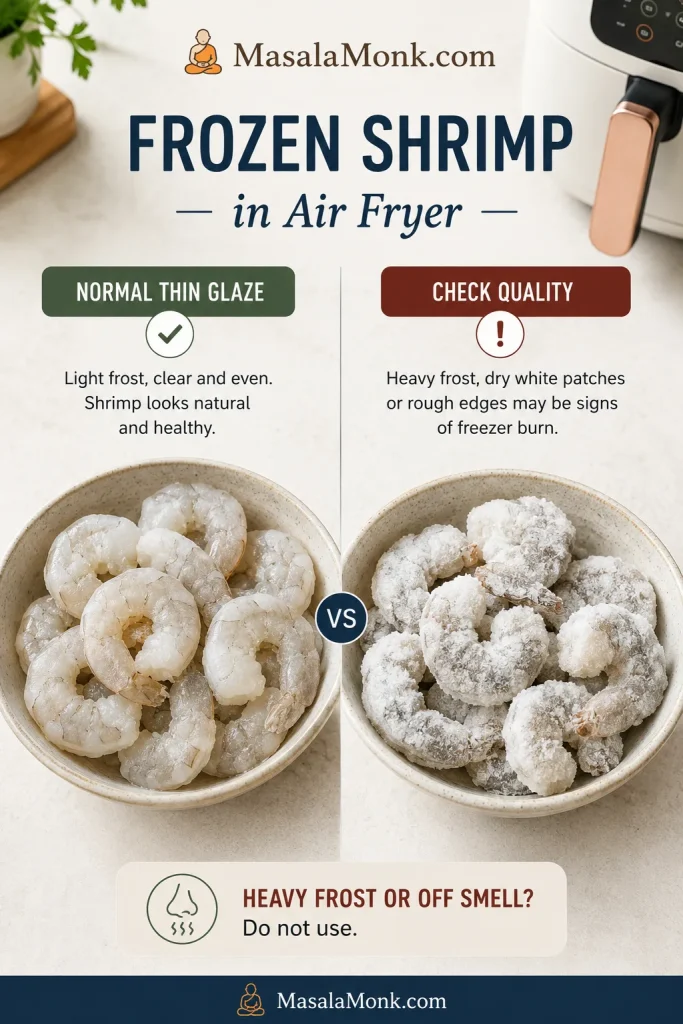
Thin ice glaze or freezer burn?

A thin ice glaze is normal on many frozen shrimp bags. Heavy frost, dry white patches, freezer-burned edges, or a stale smell are different. If the seafood smells off after opening, do not use it.

Comparison of frozen shrimp with a normal thin ice glaze beside shrimp with heavy frost, dry white patches, and freezer burn signs.
A light ice glaze is normal. However, heavy frost, dry patches, rough edges, or an off smell are signs to pause and check quality.

Shell-on shrimp, prawns, and thawed shrimp

These need small adjustments, not a new recipe. Shell-on frozen shrimp usually needs 8 to 12 minutes at 400°F / 205°C, depending on size. Frozen prawns cook like shrimp; let size decide. Thawed raw shrimp cooks faster, usually about 5 to 7 minutes at 350°F to 375°F / 175°C to 190°C.

Shell-on shrimp or prawns cooked in a black air fryer basket with pink-orange shells and a lemon wedge.
Shell-on shrimp and prawns can air fry from frozen, but larger pieces need a center check instead of timer-only cooking.

Tail-on and tail-off shrimp cook almost the same way. Leaving the tail on looks a little more dramatic for serving, while tail-off is easier for bowls, tacos, fried rice, and pasta.

Ready to cook now? Return to the recipe card or follow the full method.

Why This Method Works

Frozen shrimp needs quick heat, enough space, and a moment for surface ice to loosen. Once the frost turns wet and the pieces separate, the seasoning can land on the shrimp instead of sliding into the basket. That is why the short head start matters more than adding extra seasoning at the beginning.
Ingredient Notes

Oil helps the spices cling. Garlic powder adds quick flavor without burning. Paprika, Cajun seasoning, or Old Bay-style seafood seasoning adds color and depth. If your bag is already seasoned, marinated, or salty, start with less salt and adjust after cooking.

Equipment and Batch Size

You do not need special equipment beyond an air fryer, but basket size matters. A hot basket helps. Crowding does not. In a smaller air fryer, a smaller batch works better than a longer struggle.

  • For a 3 to 4 quart air fryer, cook smaller 8 oz / 225 g batches.
  • A 5 to 6 quart air fryer can handle 12 to 16 oz / 340 to 454 g if the shrimp are mostly in one layer.
  • Keep tongs nearby to separate clumped pieces and a slotted spoon or quick drain ready if liquid collects.
  • Pat thawed shrimp dry with a paper towel before cooking.
  • Ninja Foodi, Cosori, Instant Vortex, basket-style, and oven-style air fryers can all work, but timing may vary slightly.

If your air fryer is small, cook less shrimp rather than forcing the whole bag in. That one choice fixes more problems than extra minutes ever will.

Season Before or After Air Frying?

Separate, lightly frosty shrimp can be seasoned before air frying. Icy, glazed, or clumped pieces do better with a short head start in the basket first, then seasoning.

  • Lightly frosty shrimp: toss with oil and seasoning before cooking.
  • Icy or clumped shrimp: loosen first, then season.
  • Thawed shrimp: pat dry, then season before air frying.
  • Precooked frozen shrimp: season lightly and reheat briefly.
  • Coated shrimp: skip wet seasoning before air frying; use dips or sauces after cooking.

For slightly crisp edges on plain shrimp, add 1 teaspoon cornstarch or cornflour after the surface frost has loosened. This is optional. Do not use this trick for shrimp that are already breaded, battered, popcorn-style, or coconut-coated.

Once the seasoning actually lands on the shrimp, even a simple garlic-lemon finish tastes cleaner and brighter.

How to Know Shrimp Is Done

The goal is not hard browning. You want tender shrimp with no grey center. For plain shrimp, the flesh should be pearly, opaque, and no longer grey or glassy in the middle. The pieces should feel springy, not tight.

Check the center

For a thermometer check, seafood is generally cooked to 145°F / 63°C. Visually, shrimp should be firm, pearly, and opaque. When you cut into the thickest piece, the center should look opaque and moist, not grey, glassy, or dry. For more detail, see the FDA seafood safety guide.

Cut shrimp comparison showing a grey glassy center labelled needs more time and an opaque white center labelled done.
When you are unsure, cut the thickest shrimp. The center should be opaque and moist, not grey, glassy, or translucent.

Use the curl as a texture clue

Shrimp moves from perfect to rubbery quickly, so checking early is not fussy. It is the shortcut.

  • Undercooked shrimp: grey, glassy, or translucent in the center
  • Done shrimp: opaque, pearly, springy, and loosely curled
  • Overcooked shrimp: tight, dry, rubbery, or curled into a very tight O
Cooked shrimp comparison showing a loose C-shaped tender shrimp and a tightly curled overcooked shrimp.
Shrimp shape gives a fast texture clue: a loose curl usually means tender, while a tight O-shape often means overcooked.

For coated or sauced frozen shrimp, follow the package directions because the outside can brown before the inside is fully heated.

Avoid These Mistakes

Most mistakes come from treating every frozen shrimp bag the same. A few small changes make the difference between tender shrimp and a tough batch.

  • Precooked shrimp should not cook like raw shrimp. It only needs reheating.
  • Do not season a block of icy shrimp. Loosen it first so the flavor can stick.
  • Give the pieces room instead of piling them high. Shrimp cook faster and more evenly with space.
  • If the basket gets watery, drain it instead of trying to cook the water away.
  • Do not use plain-shrimp timing for coated frozen shrimp. Breaded, popcorn, and coconut shrimp need package and crisping cues.

Already dealing with a watery, bland, or rubbery batch? Jump to troubleshooting or rescue it for dinner.

Troubleshooting Air Fryer Frozen Shrimp

A first batch that goes sideways is usually easy to fix. Watery baskets, bland seasoning, or a slightly rubbery bite do not mean the recipe failed. Usually, the shrimp just needed a different timing path.

If your first batch looks watery, do not panic. That is usually ice, not failure. The next batch is easier once you know what happened.

Why did my shrimp turn rubbery?

Rubbery shrimp usually means overcooking. This is common with frozen cooked or precooked shrimp because it only needs reheating. Use the shorter timing range, and check even earlier if the pieces are already thawed.

A batch that is already a little rubbery should not keep air frying. Toss it with garlic butter, lemon, sauce, pasta, fried rice, or a rice bowl where moisture can help soften the bite.

Why is there water in the air fryer basket?

That water in the basket is usually just surface ice melting. The goal is not to panic-cook the water away; drain it, season the shrimp itself, and finish gently.

Air fryer basket tilted over a bowl while liquid drains from cooked shrimp inside the basket.
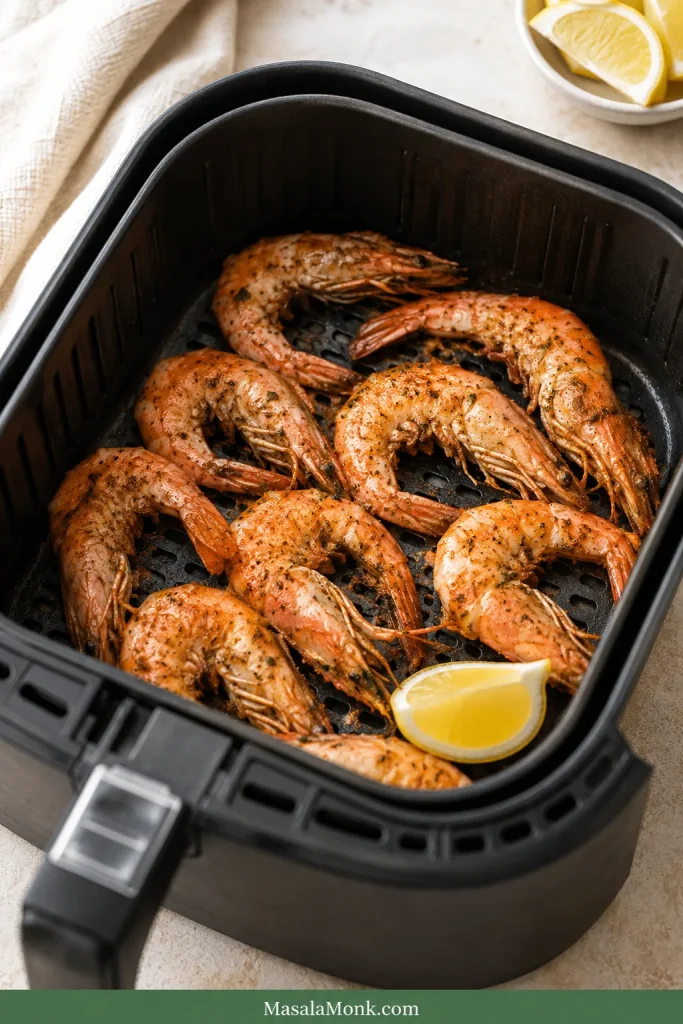
If the basket turns watery, drain the moisture instead of adding more minutes. Extra time can make shrimp tough.
  • Loosen icy pieces before seasoning.
  • Shake halfway through cooking.
  • Separate clumped pieces as soon as they loosen.
  • Drain excess liquid instead of cooking it away.

Why is the shrimp bland?

Seasoning ice is frustrating because the flavor ends up in the basket. Let frosty pieces loosen first, then add oil and seasoning so the flavor sticks.
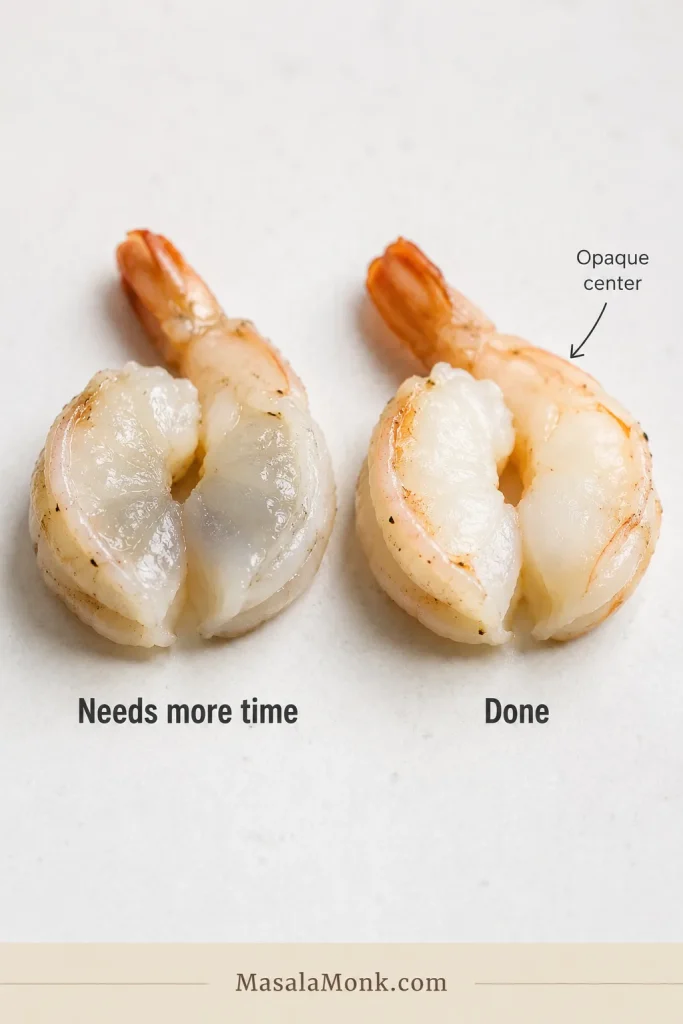
To rescue a bland batch, toss it immediately with melted butter, lemon juice, garlic powder, black pepper, and a pinch of seasoning while it is still hot. For rice bowls or noodles, a spoonful of stir-fry sauce can turn plain shrimp into dinner quickly.

Why did some pieces cook faster than others?

The pieces were probably clumped, crowded, or mixed in size. Separate stuck pieces early and shake the basket halfway. A mixed bag of small and jumbo shrimp will not finish all at once; the small ones will cook first.

ProblemLikely causeFix nowNext time
Rubbery shrimpPrecooked shrimp got too much timeStop cooking; toss with sauce, butter, pasta, or riceReheat only 4 to 6 minutes
Dry shrimpToo much heat or too much timeFinish with lemon, butter, or sauceCheck earlier and stop at opaque
Bland shrimpSeasoning slid off iceToss hot shrimp with butter, lemon, and seasoningSeason after frost loosens
Watery basketSurface ice meltedDrain the basket and finish gentlyUse one layer and shake halfway
Uneven cookingClumped, crowded, or mixed-size shrimpSeparate pieces and add 1 minute if neededSpread into a mostly single layer
Slightly underdoneJumbo pieces or cold centerAdd 1 minute and check the thickest pieceUse the longer range for jumbo shrimp

Best Uses for an Imperfect Batch

Not every batch has to become a perfect shrimp plate. If the texture or seasoning is not exactly where you wanted it, turn the shrimp into the kind of meal that helps it shine anyway.

Four-panel collage showing air fryer shrimp used in fried rice, garlic butter shrimp, wraps, and tacos.
An imperfect batch still has uses: watery shrimp suits fried rice, bland shrimp likes garlic butter, and firm shrimp works better chopped.
If the shrimp turned out…Use it for…
Tender and juicyTacos, bowls, salads, pasta, or peel-and-eat plates
A little wateryFried rice, noodles, saucy bowls, or garlic butter pasta
Slightly rubberyChopped wraps, rice bowls, pasta, or saucy stir-fries
Mild or blandStir-fry sauce, peanut sauce, Cajun butter, lemon butter, or chutney
Shell-onPeel-and-eat plates, seafood bowls, or simple lemon-and-salt platters

This is one of those freezer shortcuts that gets easier every time you make it. The first batch teaches you the bag; the next one feels simple.

Batch fixed? Turn it into tacos, rice bowls, pasta, or fried rice.

Flavor Variations

This is where the plain batch becomes dinner. Once you know the timing, keep the base method the same and change the seasoning or finish.

  • Garlic butter shrimp: finish with melted butter, garlic, lemon, and parsley so the hot shrimp turns glossy and bright. Best with pasta, rice bowls, bread, or vegetables.
  • Old Bay-style shrimp: use seafood seasoning, lemon, and black pepper for a simple peel-and-eat feel. Good for salads, tacos, and quick plates.
  • Cajun shrimp: use Cajun seasoning, paprika, and a little cayenne for smoky heat. Serve in tacos, wraps, or grain bowls.
  • Lemon pepper shrimp: use lemon zest, black pepper, and garlic powder for a bright, sharp finish. Good for salads, pasta, and quick lunches.
  • Taco shrimp: use chili powder, cumin, and lime. Serve in tacos, burrito bowls, lettuce cups, or with mango habanero sauce.
  • Light masala shrimp: use garlic, chili, black pepper, and a tiny pinch of turmeric or garam masala. Finish with green chutney.

Add fresh garlic or butter near the end or after cooking. Garlic can burn if it sits in the hot basket too long, and butter can brown quickly if it drips under the shrimp.

What to Serve With Air Fryer Frozen Shrimp

Think of this as a fast protein you can drop into whatever meal is already halfway planned. The shrimp cook quickly, so they work especially well with rice, pasta, noodles, salads, and wraps.

Three-panel collage showing cooked shrimp served as tacos, a garlic butter rice bowl, and shrimp fried rice.
Use cooked shrimp as a flexible protein: pile it into tacos, spoon it over rice, or fold it into fried rice when dinner needs to move fast.
  • Shrimp tacos with slaw, lime, and mango salsa
  • Rice bowls with vegetables, garlic butter, lemon, and herbs
  • Pasta with lemon butter, garlic, tomato sauce, or a quick scampi-style finish
  • Salads with avocado, cucumber, corn, herbs, or greens
  • Wraps with lettuce, onion, spicy mayo, and a squeeze of lime
  • Noodle bowls with chili oil, peanut sauce, or soy-lime dressing
  • Quick shrimp fried rice
  • Shrimp cocktail-style plates with lemon and dipping sauce

For pasta, fried rice, or saucy dishes, stop cooking as soon as the shrimp are just done. They will keep warming when tossed with the rest of the meal.

Storage and Reheating

Air fryer shrimp is best right after cooking, but leftovers can still be useful. Cool the shrimp, store it in an airtight container, and refrigerate for up to 3 days. Reheat gently at 300°F to 350°F / 150°C to 175°C for 1 to 3 minutes, just until warm.

Shrimp is not very patient the second time around, so reheat gently and avoid warming it again and again. Cold leftover shrimp is often kinder than reheated shrimp, especially in salads, wraps, shrimp cocktail-style plates, or quick lunch bowls.

Breaded, Popcorn, Coconut, or Scampi Shrimp

These are not plain uncoated shrimp, so let the bag’s directions lead. Coated shrimp plays by slightly different rules: the outside needs to crisp while the inside heats through.

  • Frozen breaded shrimp: use a single layer, shake or flip, and follow package timing so the coating crisps.
  • Popcorn shrimp: shake often because the pieces are small and can brown quickly.
  • Frozen coconut shrimp: watch the coating closely because coconut can brown faster than the inside heats.
  • Scampi-style frozen shrimp: use scampi-specific package directions because butter, sauce, and coating can change the method.

As a loose starting point, many frozen breaded, popcorn, and coconut shrimp products cook around 390°F to 400°F / 200°C to 205°C for 7 to 12 minutes, but the package should lead. Product size, coating, brand, and raw or precooked status can change the timing quickly.

Plain shrimp is about tenderness; coated shrimp is about crispness.

FAQs

Do you need to thaw shrimp before air frying?

No. Plain frozen shrimp can go straight into the air fryer. If the pieces are icy or clumped, loosen them briefly first, then season and finish cooking.

How long does frozen shrimp take in the air fryer?

Most frozen raw shrimp takes 8 to 10 minutes at 400°F / 205°C. Small shrimp can finish closer to 6 minutes, while jumbo shrimp may need 9 to 12.

What temperature works best for frozen shrimp?

For raw frozen shrimp, 400°F / 205°C is the best starting point. With precooked shrimp, use 375°F to 400°F / 190°C to 205°C and stop once hot.

Raw or cooked frozen shrimp: what changes?

Raw shrimp needs to cook through. Precooked shrimp only needs to get hot. That one difference changes the timing completely.

How do you air fry precooked frozen shrimp?

Air fry precooked frozen shrimp at 375°F to 400°F / 190°C to 205°C for 4 to 6 minutes, shaking halfway. Stop once the pieces are hot.

Can you air fry frozen shrimp with vegetables?

Yes, but vegetables often need more time and frozen vegetables can release water. Start firmer vegetables first, then add shrimp near the end.

Can you air fry frozen shrimp without oil?

Yes, but a little oil helps seasoning stick and improves texture. For oil-free shrimp, cook in one layer and finish with lemon or sauce.

What do shrimp size numbers like 16/20 or 31/40 mean?

The number tells you roughly how many shrimp are in one pound. Lower numbers mean larger shrimp, so 16/20 needs more time than 31/40 or 41/50.

Are frozen prawns cooked the same way as shrimp?

Yes. Frozen prawns can be air fried like frozen shrimp. Let size guide the timing.

Should shell-on frozen shrimp be peeled before cooking?

No. You can air fry shell-on frozen shrimp, then peel after cooking. Cook until the shells turn pink and the flesh is opaque.

Why did my air fryer shrimp turn rubbery?

Rubbery shrimp almost always means it went too long, especially if it was precooked. Use a shorter time and stop once hot.

Why is there water in the air fryer basket?

Frozen shrimp releases moisture as surface ice melts. Use one layer, shake halfway, separate clumps early, and drain excess liquid if needed.

What about frozen breaded shrimp or popcorn shrimp?

Treat breaded, popcorn, and coconut shrimp as coated products. Start with package directions, then watch for a crisp outside and a fully heated center.

Back to Quick Answer · Back to Recipe Card

Final Tender Shrimp Check

Before you serve, the shrimp should be opaque through the center, loosely curled, and hot without feeling tight or dry. Raw shrimp should have no grey or glassy center. Precooked shrimp should be hot, not curled tighter and tighter.

Once you learn to read the bag, frozen shrimp becomes one of the easiest freezer proteins to trust. Loosen icy pieces if needed, season the shrimp instead of the frost, and stop as soon as the center is opaque. That is how a forgotten bag of shrimp turns into dinner instead of a guessing game.

Posted on Leave a comment

Air Fryer Pork Chops Recipe: Juicy Boneless, Bone-In, Thin & Thick Chops

No-breading air fryer pork chops on a cream plate, with one pork chop sliced open to show the cooked center.

Dry pork chops are usually not a pork chop problem — they are a timing problem. Air fryers cook lean pork quickly, which is great for dinner, but it also means a thin or boneless chop can turn tough if it stays in the basket just a little too long.

If you have ever pulled pork chops out of the air fryer looking perfect on the outside but tight and dry inside, the fix is usually not a complicated marinade. It is better timing, enough space, and knowing when to stop.

This recipe is built around a no-dry timing guide, so you can match the method to the pork chop you actually bought — boneless, bone-in, thin, thick, breaded, frozen, or air fryer oven-style.

When it works, the edges are browned, the paprika-garlic rub smells warm and smoky, and the inside stays tender enough to slice cleanly without losing all its juices. The timer gives you a starting point; the thermometer gives you the answer.

Quick Time and Temperature Answer

For most 1-inch boneless pork chops, air fry at 380°F / 193°C for 10 to 12 minutes, flipping halfway, until the center reaches 145°F / 63°C. Rest for 3 to 5 minutes before slicing. Use 390°F to 400°F / 199°C to 204°C for breaded chops or crispier edges, and start checking earlier for thin chops.

Many recipes use 400°F, and that can work. This recipe uses 380°F as the default because it gives lean pork a little more time to cook through before the outside tightens up.

Jump to What You Need

Quick No-Breading Recipe for 1-Inch Boneless Chops

Need dinner moving now? This is the fast path for the most common version: 1-inch boneless pork chops with no breading.

Seasoned boneless pork chops on a wooden board beside an air fryer basket, spice bowl, and oil brush.
For 1-inch boneless air fryer pork chops, this is the simplest starting point: season, arrange, cook, and check the center. Then adjust the timing if your chops are thin, thick, bone-in, breaded, or frozen.
  1. Preheat the air fryer to 380°F / 193°C for 3 to 5 minutes.
  2. Pat dry 4 pork chops, about 6 oz / 170 g each.
  3. Rub with oil: use 1½ tbsp / 22 ml olive oil or avocado oil.
  4. Season with 2 tsp smoked paprika, 1 tsp garlic powder, ½ tsp onion powder, 1 tsp fine salt, ½ tsp black pepper, ½ tsp thyme, Italian seasoning, or ground mustard, and 1 tbsp brown sugar if you want a lightly caramelized edge.
  5. Air fry in a single layer for 10 to 12 minutes, flipping halfway.
  6. Remove when the center reaches 145°F / 63°C.
  7. Rest loosely for 3 to 5 minutes, then serve.

The goal is not a perfect-looking chop that eats dry. What you want is pork that still feels tender when you cut into it.

Once you have made this basic version once, the rest is just adjusting for the chop in front of you: thinner, thicker, bone-in, breaded, or frozen.

If your chops are thinner, thicker, bone-in, breaded, or still frozen, do not force the 10 to 12 minute timing. Use the air fryer pork chops time and temperature chart and start checking early.

Air Fryer Pork Chops Time and Temperature Chart

Use this chart when your pork chops are not the exact 1-inch boneless chops in the quick recipe. Pick the row closest to your chop thickness. The “first check” column tells you when to start checking so you can stop before lean pork overcooks.

Timing by Pork Chop Type

Pork Chop TypeAir Fryer TempCook TimeFirst CheckBest Note
Very thin boneless, under ½ inch / 1.25 cm375°F / 190°C4–6 minutes3–4 minutesFast cook; stay close.
Thin boneless, about ½ inch / 1.25 cm375°F / 190°C6–8 minutes4–5 minutesDo not use thick-chop timing.
Boneless, about ¾ inch / 2 cm380°F / 193°C8–10 minutes6–7 minutesGood everyday size.
Boneless, about 1 inch / 2.5 cm380°F / 193°C10–12 minutes8–9 minutesBest default for this recipe.
Thick boneless, about 1½ inches / 4 cm375–380°F / 190–193°C12–16 minutes10–12 minutesUse patience, not high heat.
Bone-in, about 1 inch / 2.5 cm390–400°F / 199–204°C11–15 minutes9–10 minutesCheck the meat near the bone.
Bone-in, about 1½ inches / 4 cm380–400°F / 193–204°C14–18 minutes12–14 minutesRest well before slicing.
Breaded pork chops390–400°F / 199–204°C8–12 minutes7–8 minutesSpray dry spots with oil.
Shake and Bake pork chops390–400°F / 199–204°C8–12 minutes7–8 minutesSingle layer matters.
Frozen boneless pork chops375–380°F / 190–193°C12–20+ minutesAfter softening, then oftenSeason after the surface softens.
Reheating cooked pork chops350°F / 175°C3–5 minutes3 minutesWarm gently.
Air fryer pork chops time and temperature chart with cook times and first-check times for different pork chop cuts.
Use this air fryer pork chops time and temperature chart as a starting range, not a strict countdown. The first-check column matters because lean pork can move from tender to overdone quickly.

Why Thin and Thick Pork Chops Need Different Timing

Three raw pork chops of different thicknesses on a cutting board, labeled as thin, one-inch, and thick chops.
Before choosing a cook time, look at thickness first. Thin pork chops can finish quickly even without deep browning, while thick chops need enough time for the center to cook through gently.

In plain terms: thin chops need speed, thick chops need patience, breaded chops need oil-kissed crumbs, and frozen chops need the thermometer more than the timer.

These are ranges, not promises. Air fryer model, chop thickness, bone, breading, and basket crowding all change the final time. For safe, juicy pork chops, the important number is 145°F / 63°C with at least a 3-minute rest. If you are deciding between 375°F, 380°F, and 400°F, use the temperature comparison next.

Air Fryer Pork Chops at 375°F, 380°F, or 400°F

The temperature question matters because lean pork can move from juicy to tough quickly. Use lower heat when you need control, and higher heat when you want crisping.

Choosing 375°F, 380°F, or 400°F

Temperature guide comparing 375°F, 380°F, and 390 to 400°F for cooking different air fryer pork chops.
Temperature should match the job. Use 375°F for control, 380°F for everyday boneless pork chops, and 390–400°F when breading, Shake and Bake, or stronger browning needs extra heat.
TemperatureBest ForWatch Out For
375°F / 190°CThin chops, frozen-start chops, thick chops that are browning too fastSlower browning
380°F / 193°CDefault juicy boneless chops, especially around 1 inch thickLess aggressive crisping than 400°F
390–400°F / 199–204°CBreaded chops, Shake and Bake, bone-in chops, crispier edgesLean boneless chops can overcook faster

For most people making plain boneless chops tonight, 380°F is the easiest place to start. Move hotter when you want crisp coating, stronger browning, or a bone-in chop that needs more edge color; for coating-specific guidance, jump to the breaded pork chops section.

If the pork reaches 145°F earlier than the chart says, take it out. The timer is not the goal; juicy pork is.

Best Pork Chops to Use

The right chop gives you more forgiveness before you even start cooking. If you are standing at the store, choose chops that are evenly thick, not paper-thin on one end and thick on the other.

Raw bone-in, boneless, thin, and uneven pork chops shown as a visual guide for air fryer cooking.
The best pork chops for the air fryer are evenly thick because they cook more predictably from edge to center. If the chop is very thin or uneven, start checking earlier than the timer suggests.
ChoiceBest ForWhy It Works
Best beginner choice1-inch bone-in center-cut chopsJuicier and more forgiving.
Best weeknight choice1-inch boneless center-cut chopsFast, easy, and reliable with the chart.
Best crispy option1-inch boneless or bone-in chops with breadingEnough thickness to cook through while the coating browns.
Risky but workable½-inch thin chops or cutletsFast dinner, but they need early checking.
Best to avoidUneven ultra-thin chopsOne part dries out before the thicker part finishes.

Bone-in cuts are a little more forgiving if you are worried about dryness. Boneless cuts are faster and convenient, but they need closer attention. Around 1 inch thick is the easiest size to cook well. Already bought a different cut? Use the boneless, bone-in, thin, and thick chop guide before choosing a final cook time.

Ingredients and Equipment

The rub is not trying to hide the pork. It helps the edges brown and gives every bite a little garlic-smoky warmth. If you are cooking from the pantry, the essentials are simple: pork chops, oil, salt, garlic powder, paprika, and pepper. For the full measured version, jump to the recipe card.

Raw pork chops with olive oil, smoked paprika, garlic powder, onion powder, salt, pepper, brown sugar, and herbs.
This pork chop seasoning builds flavor without a long ingredient list. Paprika helps the surface look warm and browned, garlic and onion add savory depth, and optional brown sugar encourages caramelized edges.

Pork Chop Seasoning Ingredients

IngredientUS AmountMetric Amount
Pork chops4 x 6 oz chops4 x 170 g chops
Olive oil or avocado oil1½ tbsp22 ml
Brown sugar, optional1 tbsp12 g
Smoked paprika2 tsp4–5 g
Garlic powder1 tsp3 g
Onion powder½ tsp1–2 g
Fine salt1 tsp5–6 g
Black pepper½ tsp1 g
Dried thyme, Italian seasoning, or ground mustard½ tspabout 1 g
  • Salt note: If your pork chops are labeled enhanced, pre-brined, or already seasoned, reduce the salt slightly.
  • Brown sugar note: It helps the edges caramelize, but you can skip it for a sugar-free version.
  • Oil note: Use just enough to lightly coat the surface. Greasy pork will not brown better.

Equipment

  • Air fryer: Basket-style or oven-style both work.
  • Instant-read meat thermometer: The most important tool for avoiding dry pork chops.
  • Paper towels: For drying the surface before seasoning.
  • Small bowl: For mixing the rub.
  • Tongs: For flipping without scraping off the seasoning.
  • Perforated parchment, optional: Use only if sticking is a problem; do not preheat loose parchment without food weighing it down.

Why These Air Fryer Pork Chops Stay Juicy

These are the small details that make the difference between pork chops that only look done and pork chops that actually eat juicy. Need a visual doneness check later? Use the done pork chops guide.

  • Match the chop, not the clock. Thin, thick, bone-in, breaded, and frozen chops all need different timing.
  • Dry, oil, season. A dry surface and a light oil coating help the rub brown instead of steam. This is the same reason air fryer chicken wings crisp better when the skin is dry.
  • Give the air space. Cook in a single layer so the hot air can reach the edges.
  • Check before the timer ends. Especially with thin chops, small chops, or compact basket-style air fryers.
  • Rest loosely. A tight foil wrap can soften the crust, while a short loose rest lets the juices settle.

Quick Visual Steps Before Air Frying

Pat the Pork Chops Dry

Before seasoning, blot the surface well so the rub has something dry to cling to. This visible step supports the pat-dry instruction in the quick recipe.

A hand pats raw pork chops dry with a paper towel on a wooden cutting board.
Blotting the pork chops dry before seasoning helps the rub cling instead of sliding around. As a result, the surface browns better and the air fryer does less steaming.

Season Both Sides Evenly

Next, coat both sides with oil and seasoning, then press the rub in lightly. This is where the no-breading version gets most of its color and aroma.

A hand sprinkles paprika-garlic seasoning over raw pork chops on a wooden cutting board.
Season both sides and press the rub in lightly so it stays attached during cooking. Since these are no-breading pork chops, that spice layer becomes the main source of color, aroma, and flavor.

Leave Space in the Basket

Arrange the pork chops in a single layer instead of stacking or overlapping them. Space around the edges helps the air fryer brown the surface more evenly.

Seasoned pork chops arranged in a single layer with space between them inside a black air fryer basket.
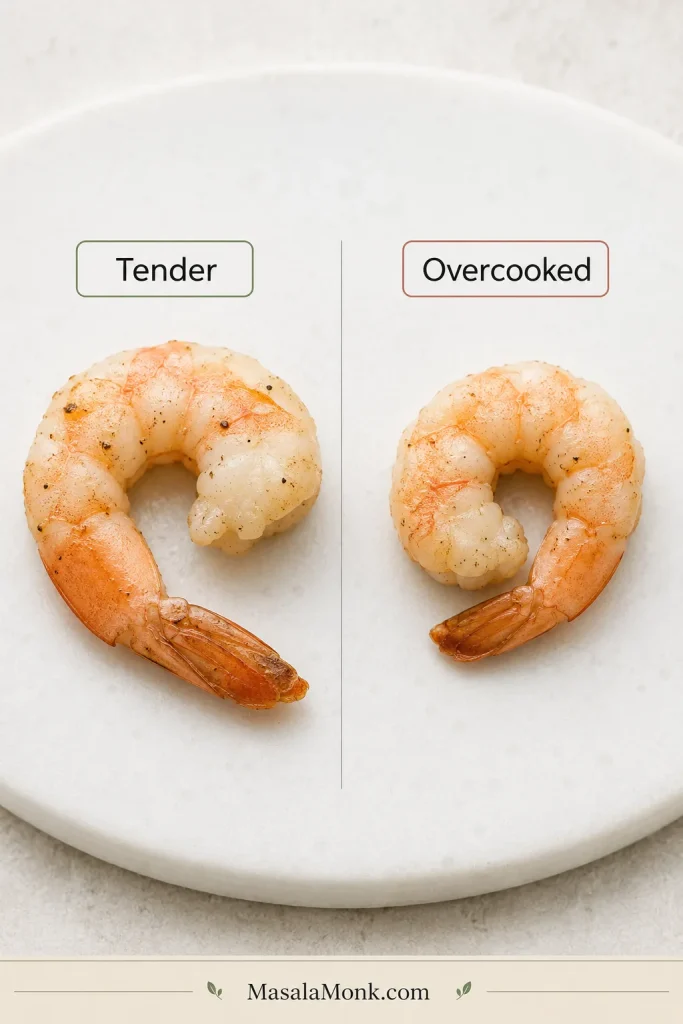
A single layer lets hot air reach the top, sides, and edges of each pork chop. If the basket is crowded, the chops can steam where they touch and brown unevenly.

Flip Halfway Through Cooking

Halfway through the cook time, turn the chops gently with tongs. This gives both sides direct heat and helps prevent one pale side.

Tongs lift a browned pork chop from an air fryer basket while other pork chops cook nearby.
Flip pork chops halfway through air frying so both sides get direct heat. For breaded chops, lift gently with tongs instead of dragging, which helps keep the coating intact.

Once the main method is clear, the rest is just small adjustments: the chop you bought, the air fryer you own, and how crisp you want the edges.

What Done Pork Chops Look and Feel Like

The best batch should look roasted at the edges, smell garlicky and smoky, and slice without turning chalky. The seasoning should look darker and fragrant, and the surface should look browned rather than wet. Breaded chops should be golden, not pale or dusty.

Doneness guide for air fryer pork chops showing browned edges, 145°F internal temperature, and a sliced cooked center.
Browned edges are helpful, but color alone is not enough for pork chops. For better doneness confidence, combine a 145°F / 63°C center with a short rest and a tender-looking slice.

If you grew up thinking pork had to be cooked until completely white, this may feel different. A slight blush can be normal when pork reaches 145°F / 63°C and rests. The thermometer matters more than fear.

Use 145°F as the Stop Point

A meat thermometer inserted into a cooked pork chop shows an internal temperature of 145°F.
The timer tells you when to check, but the thermometer tells you when the pork is actually done. Aim for 145°F / 63°C in the thickest part, then rest the chops before cutting.

When the outside is browning too fast but the center is not done, lower the temperature to 350°F / 175°C and cook for a few more minutes. That is better than burning the crust while waiting for the inside.

Check the Slice After Resting

Sliced air fryer pork chop with a browned crust and moist cooked center on a wooden board.
After resting, a good air fryer pork chop should slice cleanly and still look tender inside. If the meat looks tight or chalky, check the next batch sooner and rely on temperature instead of time alone.

If your pork chops still turn out dry or tough after checking temperature, use the troubleshooting guide before the next batch.

If you want the complete measured version in one place, use the recipe card below.

Air Fryer Pork Chops Recipe Card

This is the full recipe card version for 1-inch boneless chops. Use the chart above for thin, thick, bone-in, breaded, or frozen chops.

Recipe Details

Prep Time10 minutes
Cook Time10–12 minutes
Resting Time3–5 minutes
Total TimeAbout 25 minutes
Servings4
Cooking MethodAir fryer
Best For1-inch boneless chops; see chart for other cuts

Ingredients

  • 4 pork chops, about 6 oz / 170 g each, preferably 1 inch thick
  • 1½ tbsp / 22 ml olive oil or avocado oil
  • 1 tbsp / 12 g brown sugar, optional
  • 2 tsp / 4–5 g smoked paprika
  • 1 tsp / 3 g garlic powder
  • ½ tsp / 1–2 g onion powder
  • 1 tsp / 5–6 g fine salt
  • ½ tsp / 1 g black pepper
  • ½ tsp dried thyme, Italian seasoning, or ground mustard

Instructions

  1. Preheat. Set the air fryer to 380°F / 193°C and preheat for 3 to 5 minutes.
  2. Dry. Pat both sides of the pork chops dry with paper towels.
  3. Oil and season. Rub both sides lightly with oil, then coat with the spice mixture.
  4. Arrange. Place pork chops in a single layer. Cook in batches if needed.
  5. Air fry. Cook for 10 to 12 minutes for 1-inch boneless chops, flipping halfway through.
  6. Check doneness. Remove when the center reaches 145°F / 63°C.
  7. Rest. Rest loosely for 3 to 5 minutes before slicing.

Recipe Notes

  • Bone-in chops may need 2 to 3 extra minutes; check near, but not touching, the bone.
  • Thin chops can be ready quickly, so start checking around 4 to 5 minutes.
  • Thick chops do better at 375°F to 380°F with internal temperature as the final guide.
  • Crispier edges usually need heat closer to 400°F / 204°C, but lean boneless chops need close attention.
  • If using enhanced, pre-brined, or already seasoned pork chops, reduce the salt slightly.

Nutrition will vary most by chop size, breading, oil, sugar, and sauces. If you are tracking closely, use the cooked chop weight and adjust for toppings. For a deeper look, see this guide to calories in a pork chop.

Back to top ↑

Boneless, Bone-In, Thin, and Thick Chops

If you already bought a different chop, you do not need a different recipe. You just need to adjust the timing.

Cooked boneless, bone-in, thin, and thick air fryer pork chops shown in a labeled comparison guide.
The seasoning can stay the same, but the cooking approach should change by cut. Boneless chops cook fast, bone-in chops are more forgiving, thin chops need attention, and thick chops need patience.
  • Boneless pork chops: Fast and convenient, but less forgiving. Best around 1 inch thick.
  • Bone-in pork chops: Usually juicier and more forgiving. Check the meaty area near the bone without touching the bone.
  • Thin pork chops: Not difficult, but they do not forgive distraction. Start checking early and do not walk away.
  • Thick pork chops: Better texture potential, but they need patience. Lower the heat if the outside browns too fast.

The seasoning can stay the same; the timing cannot.

Breaded or Fried-Style Pork Chops

The base version skips breading: oil, seasoning, air fryer, done. Breading changes the job. Now you are cooking the pork and managing the crust at the same time. Air fryers crisp oil-kissed crumbs; they do not magically brown dry flour.

Golden breaded air fryer pork chops with crisp breadcrumb coating on a plate.
Breaded air fryer pork chops crisp best with a thin coating and a light oil mist. That way, the crumbs turn golden before the pork underneath has a chance to overcook.

How to Bread Pork Chops for the Air Fryer

Pork chops being coated in flour, egg, and breadcrumbs at a breading station.
For crispy breaded pork chops, keep the flour, egg, and breadcrumb layers even rather than thick. Too much coating can stay pale while the meat continues cooking underneath.

For breaded chops, use 2 tbsp / 15 g flour, 1 egg, ½ cup / 30 g panko or breadcrumbs, optional ¼ cup / 20–25 g parmesan, and oil spray. Air fry at 390°F to 400°F / 199°C to 204°C, flip halfway, and spray pale or dusty spots lightly with oil.

Why Breaded Pork Chops Look Pale in the Air Fryer

If breaded pork chops look pale, the coating usually needs a light mist of oil, not several extra minutes. Dry crumbs do not brown well in the air fryer, and overcooking the pork just to darken the crust can make the center tough.

Comparison guide showing pale dry breading and lightly oiled golden breading on air fryer pork chops.
If breaded pork chops look pale, the coating may need a light mist of oil, not more time. Adding several extra minutes can brown the crumbs but push the pork past its best texture.

If the coating browns before the pork is done, lower the heat and finish gently. Do not bread frozen chops directly; thaw first or use the frozen pork chops method before seasoning. If the crust stays pale or the center finishes unevenly, check the troubleshooting guide.

Frozen Pork Chops in the Air Fryer

Frozen pork chops are not the most even-cooking option, but they can still work when dinner needs to happen now. It will not be quite as even as thawed pork, but it can still save dinner if you check the center instead of trusting the timer. For the target temperature and visual cues, use the done pork chops guide.

Two-step guide showing frozen pork chops in an air fryer basket before seasoning and then brushed with oil after softening.
Frozen pork chops are easier to season after the surface softens. Start them plain in the air fryer, then add oil and seasoning once the rub can stick evenly.
  1. Preheat the air fryer to 375°F / 190°C.
  2. Place frozen chops in a single layer.
  3. Air fry for 5 to 8 minutes, just until the surface starts to soften.
  4. Brush lightly with oil or melted butter.
  5. Add seasoning to both sides.
  6. Continue air frying, flipping occasionally, until the center reaches 145°F / 63°C.
  7. Rest for 3 to 5 minutes before serving.

Frozen timing varies heavily. Thin frozen chops may cook fairly quickly, while thick frozen chops may take 20 minutes or more. For another frozen air fryer example, see these frozen chicken wings in the air fryer.

Basket vs Oven-Style Air Fryers

Different air fryers do not behave exactly the same, so treat your first batch as a calibration batch. Compact basket-style air fryers may brown faster, while oven-style models may need rack rotation.

Comparison of basket-style and oven-style air fryers cooking pork chops in separate labeled sections.
Basket-style and oven-style air fryers can brown pork chops at different speeds because the airflow is different. Keep the same internal temperature goal, but adjust the timing for your machine.
  • Basket-style air fryers: Start checking early if your machine browns food quickly.
  • Oven-style air fryers: Rotate racks if one level cooks faster than another.
  • Ninja Foodi, Cosori, Instant Vortex, PowerXL, Philips, and similar models: Use the chart as a starting point, then adjust by a minute or two after your first batch.
  • Small baskets: Cook in batches instead of stacking.

Back to top ↑

Flavor Variations

Keep the base timing steady, then change the finish based on the kind of dinner you want: creamy, smoky, spicy, sweet, or crisp. After choosing a flavor, use the serving ideas to build the plate.

Flavor variation guide for air fryer pork chops with ranch, parmesan, BBQ, Cajun, garlic butter, honey mustard, lemon pepper, and Shake and Bake ideas.
Once the basic air fryer pork chop timing works, change the finish to fit the meal. Ranch feels creamy and herby, BBQ adds smoky sweetness, Cajun brings heat, and lemon pepper keeps the plate brighter.
VariationAdd ThisWhen to AddBest With
RanchRanch seasoningBefore cookingPotatoes, green beans, salad
Parmesan crustedFinely grated parmesanBefore cooking or in crumbsCaesar-style salad or roasted vegetables
BBQBBQ sauceLast 1–2 minutesBaked beans, coleslaw, applesauce
CajunCajun seasoningBefore cookingRice, corn, creamy slaw
Garlic butterMelted garlic butterAfter cookingMashed potatoes or roasted vegetables
Honey mustardHoney mustard glazeNear the endCarrots, potatoes, green salad
Lemon pepperLemon pepper and lemon juiceBefore cooking, then finish afterAsparagus, rice, crisp salad
Shake and BakePackaged seasoned coatingBefore cooking, with oil sprayMac and cheese, green beans, slaw

What to Serve with Them

The easiest plate is creamy potatoes, something green, and a little sweetness on the side. That gives you comfort, freshness, and balance without making dinner complicated.

Three air fryer pork chop dinner plates with mashed potatoes, mushroom sauce, baked beans, coleslaw, salad, and roasted carrots.
Build the plate around contrast so the pork chop dinner feels complete. Pair the savory chop with something creamy, something green, and something a little sweet for better balance.

Storage and Reheating

Let leftovers cool, then store them in an airtight container in the refrigerator. Keep sauce separate when possible so the surface does not turn soggy.

Reheat cooked chops at 350°F / 175°C for 3 to 5 minutes, just until warmed through. When the chops are very lean, brush with a little butter, broth, or sauce before reheating. Breaded chops usually reheat better in the air fryer than in the microwave because the coating can crisp again.

Back to top ↑

Troubleshooting Dry or Tough Pork Chops

When pork chops turn out dry, the fix is usually small. Change the check time, the temperature, or the thickness next time.

Troubleshooting guide for air fryer pork chops with fixes for dry centers, pale outsides, uneven cooking, and frozen centers.
When air fryer pork chops go wrong, match the fix to the symptom. Dry centers, pale crusts, uneven cooking, and frozen middles usually point to timing, heat, spacing, or thickness.
What HappenedLikely CauseFix Next Time
Brown outside, dry insideHeat too high, chop too thin, or cooked too longCheck earlier or use 375°F to 380°F.
Pale outside, cooked insideSurface too wet or basket crowdedPat dry, oil lightly, and leave space.
Crispy coating but undercooked centerBreading browned too fastLower heat and finish gently.
One side dry, one side juicyUneven chop thicknessChoose more even chops or check the thinner side early.
Tough even though timing seemed rightVery lean boneless chop or no restUse 1-inch chops, rest before slicing, and add sauce if needed.
Frozen chop browned outside but cold insideFrozen center needed more timeUse the staged frozen method and check the center.

For a slower comfort-food pork chop dinner next time, try cream of mushroom pork chops, smothered pork chops, or crock pot pork chops and sauerkraut.

The first time you make these, check early and note your air fryer’s timing. After that, this becomes the kind of weeknight recipe you can repeat without hovering: same seasoning, same method, and one small adjustment based on the chop in front of you.

Back to top ↑

FAQs

How long do pork chops take in the air fryer?

Most 1-inch boneless pork chops take 10 to 12 minutes at 380°F / 193°C. Thin chops cook faster; thick or bone-in chops need more time.

What temperature is best for air fryer pork chops?

380°F / 193°C is the best default for juicy pork chops. Use 390°F to 400°F / 199°C to 204°C for breaded or crispier chops.

How do you keep pork chops from drying out in the air fryer?

Use chops around 1 inch thick, cook in a single layer, and stop when the center reaches 145°F / 63°C. The biggest fix is not overcooking them.

Do boneless pork chops work well in the air fryer?

Boneless pork chops work well in the air fryer when they are close to 1 inch thick. They cook quickly, so start checking before they turn tight or dry.

Are bone-in pork chops better in the air fryer?

Bone-in pork chops are often more forgiving because the bone slows the cook slightly. Check the thickest meaty part without touching the bone.

How long do thin pork chops take in the air fryer?

Thin chops around ½ inch thick may take 6 to 8 minutes. Very thin cuts can be done in 4 to 6 minutes, so check early.

How long do thick pork chops take in the air fryer?

Thick chops around 1½ inches may take 12 to 16 minutes for boneless cuts and longer for bone-in cuts.

Do you flip pork chops in the air fryer?

Yes. Flip halfway through for more even browning and better texture on both sides.

Is slightly pink pork safe?

A slight blush can be safe when pork reaches 145°F / 63°C and rests for at least 3 minutes. Temperature matters more than color alone.

No-breading pork chops: what changes?

No-breading pork chops rely on a dry surface, light oil, and a flavorful rub instead of crumbs. They are faster and less fussy than breaded chops.

Breaded air fryer pork chops: what changes?

Breaded pork chops need a thin coating, a light oil spray, and enough basket space for the crumbs to crisp. The internal temperature still needs to reach 145°F / 63°C.

Frozen pork chops: what is the safest method?

The safest frozen method is staged: soften the chops first, then oil, season, and finish cooking until the center reaches 145°F / 63°C.

Does Shake and Bake work in the air fryer?

Shake and Bake works in the air fryer when the coated chops are sprayed lightly with oil, cooked in a single layer, flipped halfway, and checked with a thermometer.

Should you preheat the air fryer?

Preheating helps pork chops cook evenly and brown better. If there is no preheat setting, run the air fryer empty at the cooking temperature for about 3 minutes.

Why are my pork chops tough?

They were probably overcooked, too thin for the timing, or sliced before resting. Next time, start checking earlier, especially if your chops are thin or boneless.

Posted on 3 Comments

Air Fryer Bacon Recipe: Crispy Bacon, Time, Temp, Thick-Cut & Turkey Bacon

Air fryer basket filled with crisp cooked bacon, with more bacon resting on a rack beside a breakfast plate.

This air fryer bacon recipe gives you crisp, evenly cooked strips without standing over a skillet or heating the oven for just a few slices. The trick is not simply dropping bacon into the basket and hoping for the best. Bacon is fatty, air fryers run differently, and the wrong temperature often means smoke, curled strips, burnt edges, or chewy centers. If smoke is your main problem, jump straight to the smoke prevention section.

For regular bacon, start at 350°F / 175°C for 7–10 minutes in a single layer. That temperature is hot enough to crisp the edges, but gentle enough to let the fat render before the bacon scorches or the air fryer starts smoking. Thick-cut slices need longer, turkey bacon needs a closer eye, and frozen bacon works best when you soften and separate the slices before crisping them.

Use this guide when you want a few slices for breakfast, sandwiches, salads, wraps, burgers, or meal prep. If you are cooking a full pack for a crowd, MasalaMonk’s oven bacon method is usually the better move because it gives you more space and less batch-by-batch grease management.

Air Fryer Bacon at a Glance

Best default

350°F / 175°C for 7–10 minutes for regular bacon in a single layer.

For thick-cut bacon

350°F / 175°C for 10–15 minutes, with a quick flip or rearrange if the strips brown unevenly.

For turkey bacon

350–360°F / 175–182°C for 5–10 minutes. It is leaner than pork bacon, so it dries faster.

For less smoke

Begin with moderate heat, keep the bacon in a loose single layer, drain grease between batches, and drop to 320–325°F if your machine smokes easily.

Quick Answer: How Long to Cook Bacon in the Air Fryer?

For this recipe, regular bacon in the air fryer usually lands in the 7–10 minute range at 350°F / 175°C. Thin bacon finishes faster, while thick-cut bacon needs more time for the fat to render. The time and temperature chart below helps when you are switching between regular, thick-cut, turkey, frozen, or candied bacon.

When in doubt, begin with the moderate 350°F method, then adjust by thickness and crispness on your next batch. A second batch cooking faster is normal; it does not mean the timing failed. It simply means the basket and drawer are already hot.

Air fryer basket with crisp bacon and a quick answer showing regular bacon cooked at 350°F for 7 to 10 minutes.
Start regular bacon at 350°F / 175°C for the most reliable air fryer bacon texture. It is hot enough to crisp the edges, yet gentle enough to render the fat before the strips darken too fast.

What Done Bacon Looks Like

Look for bubbling fat, browned or lightly ruffled edges, and centers that no longer look pale or raw. The bacon should look almost done, not cardboard-stiff, when it leaves the basket. Give it a minute on paper towels or a rack and it will firm into the crisp texture you actually want.
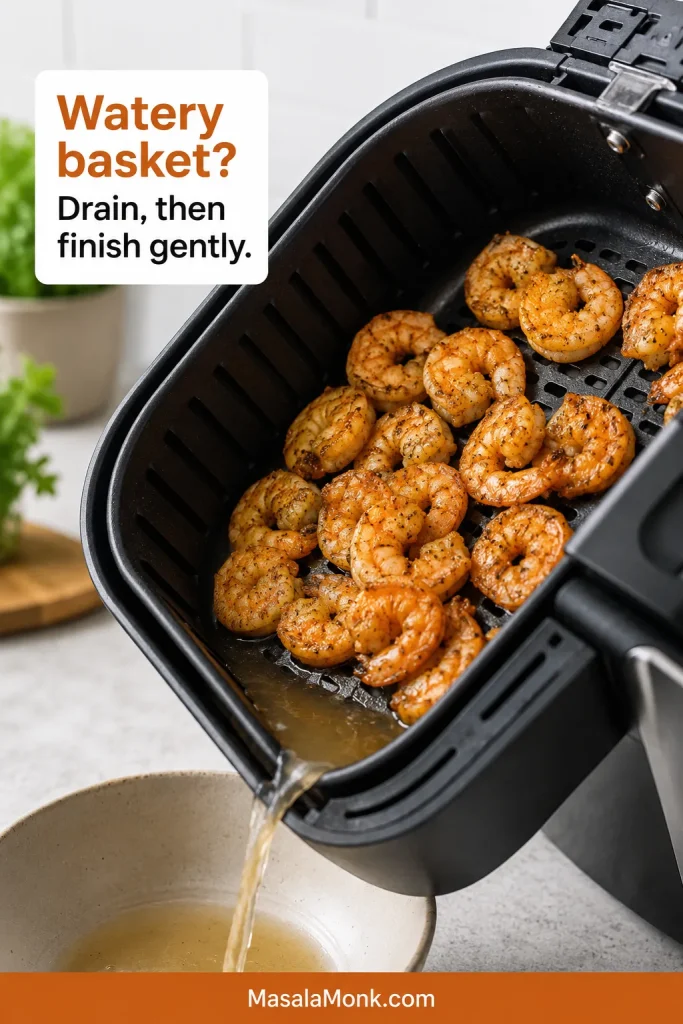
Close-up of air fryer bacon lifted with tongs showing browned edges, bubbled rendered fat, and a slightly flexible strip.
Rather than waiting for bacon to turn rigid in the basket, look for browned edges, bubbled fat, and a strip that still bends slightly. That is usually the sweet spot for crisp bacon after resting.

The Main Rule

Give the strips room. A little touching is fine, but stacked or heavily overlapped pieces trap steam and block airflow. Bacon needs moving air around the surface; when the strips overlap, the covered parts steam instead of crisping.

Air Fryer Bacon Time and Temperature Chart

Start with the chart below when the bacon in front of you does not match the “regular slice” timing. That is where most air fryer bacon mistakes begin: the slice is thinner, thicker, leaner, sweeter, or still frozen, but the timing is treated like it never needs to change.

Air fryer bacon time and temperature chart for thin, regular, thick-cut, turkey, frozen, and candied bacon.
Since bacon thickness changes cook time so much, this chart works best as a starting guide, not a rigid rule. Thin slices, thick-cut bacon, turkey bacon, frozen bacon, and candied bacon all need their own timing.
Bacon type Temperature Time Best for
Thin bacon 350°F / 175°C 5–7 minutes Fast strips, softer bacon, quick breakfast plates
Regular bacon 350°F / 175°C 7–10 minutes Best everyday method
Regular bacon, very crisp 350°F / 175°C 10–12 minutes Extra crisp edges without jumping straight to high heat
Thick-cut bacon 350°F / 175°C 10–15 minutes Better fat rendering and less scorching
Low-smoke bacon 320–325°F / 160–165°C 9–15 minutes Air fryers that smoke easily
Fast crisp method 375–400°F / 190–205°C 6–12 minutes Fast browning when your air fryer handles bacon well
Turkey bacon 350–360°F / 175–182°C 5–10 minutes Leaner strips that dry out quickly
Regular frozen bacon 350–360°F / 175–182°C 4–8 minutes to separate, then 6–10 minutes Stuck frozen slices; thick-cut frozen bacon may need longer
Candied bacon 325–350°F / 160–175°C 8–15 minutes Brown sugar, maple, or spicy-sweet bacon

Why the Timing Changes So Much

Bacon timing changes because strips vary in thickness, fat level, sugar content, moisture, and size. A thin supermarket slice may burn before a thick-cut slice has fully rendered. Turkey bacon has less fat, so it dries out faster. Candied bacon has sugar on the surface, which means it needs a gentler temperature. Your appliance also matters: a compact, powerful basket often cooks much faster than a larger air fryer oven.

Second Batch Warning

If you cook more than one batch, check the second batch 1–2 minutes earlier. The basket, drawer, and surrounding parts are already hot, so the next round often browns faster. That smoky second batch is usually a grease-management problem, not a failed recipe.

Ingredients and Equipment for Air Fryer Bacon

The ingredient list is short — just bacon — but the setup still matters. A good pair of tongs, a place to drain the strips, and the right liner choice make the difference between easy cleanup and a smoky mess. For liner and smoke-control questions, the foil, parchment, water, and bread section explains what actually helps.

Air fryer bacon setup with bacon, tongs, rack or paper towels, parchment, and a clean air fryer basket.
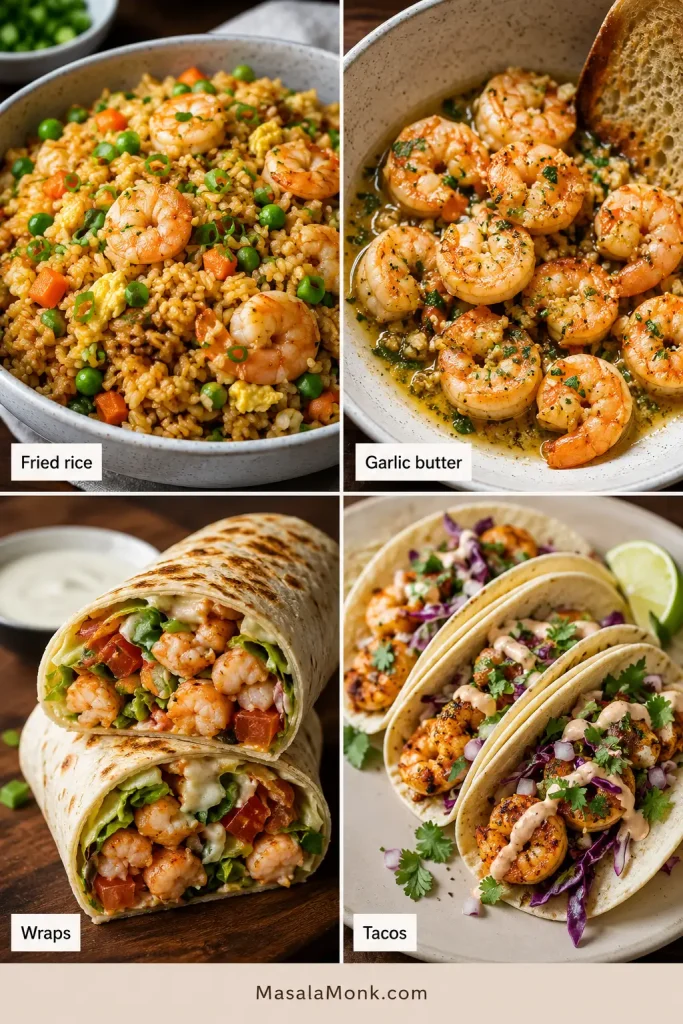
Although air fryer bacon needs only a few ingredients, the setup still matters. Tongs, a draining surface, and a clean basket make the cook easier, cleaner, and less likely to smoke.

Ingredients

  • 5 slices regular bacon, about 6 oz / 170 g
  • Or 4–5 slices thick-cut bacon, about 6–8 oz / 170–225 g
  • Optional for turkey bacon: a very light mist of oil
  • Optional for candied bacon: brown sugar, black pepper, cayenne, or maple
  • Optional smoke-control helpers: water, bread, foil, or parchment, explained later in the post

Equipment

  • Basket-style air fryer or air fryer oven
  • Silicone-tipped tongs
  • Paper towel-lined plate or cooling rack
  • Optional perforated parchment liner
  • Optional foil for the lower drawer or drip tray only, if your manual allows it
  • Optional instant-read thermometer for turkey bacon or thicker cured meats

Best Amount of Bacon to Air Fry at Once

The best amount depends on basket size, but the bacon should still sit mostly in one layer. If you force in a full pack, the slices steam, stick, cook unevenly, and release more grease than the drawer can comfortably handle.

Capacity guide showing small basket, large basket, and air fryer oven with different amounts of bacon.
Even a powerful air fryer cannot crisp bacon well when the basket is overcrowded. Keep the batch size realistic so hot air can move around the strips instead of steaming the covered spots.
Air fryer type Practical bacon amount Best note
Small basket air fryer 3–5 slices Cut strips in half if they fit better
Large basket air fryer 5–7 slices Keep the layer loose, not packed tight
Air fryer oven 6–9 slices, depending on tray size Use the drip tray correctly and watch upper racks
Small-batch tip: The air fryer is best for a few slices. If you need a full pack of bacon for a crowd, the oven usually gives the strips more space and saves you from draining grease between several small batches.

Should You Cut Bacon in Half?

Cutting bacon in half helps when long strips do not fit flat. Shorter pieces stay away from the basket sides, curl less dramatically, and are easier to flip or rearrange with tongs. A little curling is normal; you only need to intervene if the strips fold over themselves or block airflow.

Raw bacon strips being cut in half before being arranged in an air fryer basket.

When long strips do not fit flat, cut them in half before cooking. That simple step helps reduce curling, improves spacing, and makes the bacon easier to check halfway through.

Best Temperature for Air Fryer Bacon: 350°F vs 375°F vs 400°F

For this recipe, 350°F / 175°C is the sweet spot for bacon in the air fryer. It is hot enough to brown the edges, but not so aggressive that the grease starts smoking before the fat has properly rendered.

Temperature guide for air fryer bacon showing lower smoke, best default, faster crisping, and fast browning settings.
If smoke control matters most, stay lower. On the other hand, if you want faster crisping and already know your air fryer runs cleanly, you can move hotter with a closer eye on the bacon.
Goal Best setting Why it works
Least smoke 320–325°F / 160–165°C Gentler heat helps reduce grease smoke in sensitive machines
Best everyday bacon 350°F / 175°C Good balance of rendered fat, crisp edges, and control
Faster crisping 375°F / 190°C Useful once you know your air fryer handles bacon cleanly
Fastest browning 390–400°F / 200–205°C Works for some batches, but needs close watching and a clean drawer

350°F / 175°C — Best Default

This is the setting to trust first. It gives regular bacon enough heat to brown while still giving the fat time to soften, bubble, and render. It is not the fastest option, but it is the most forgiving one.
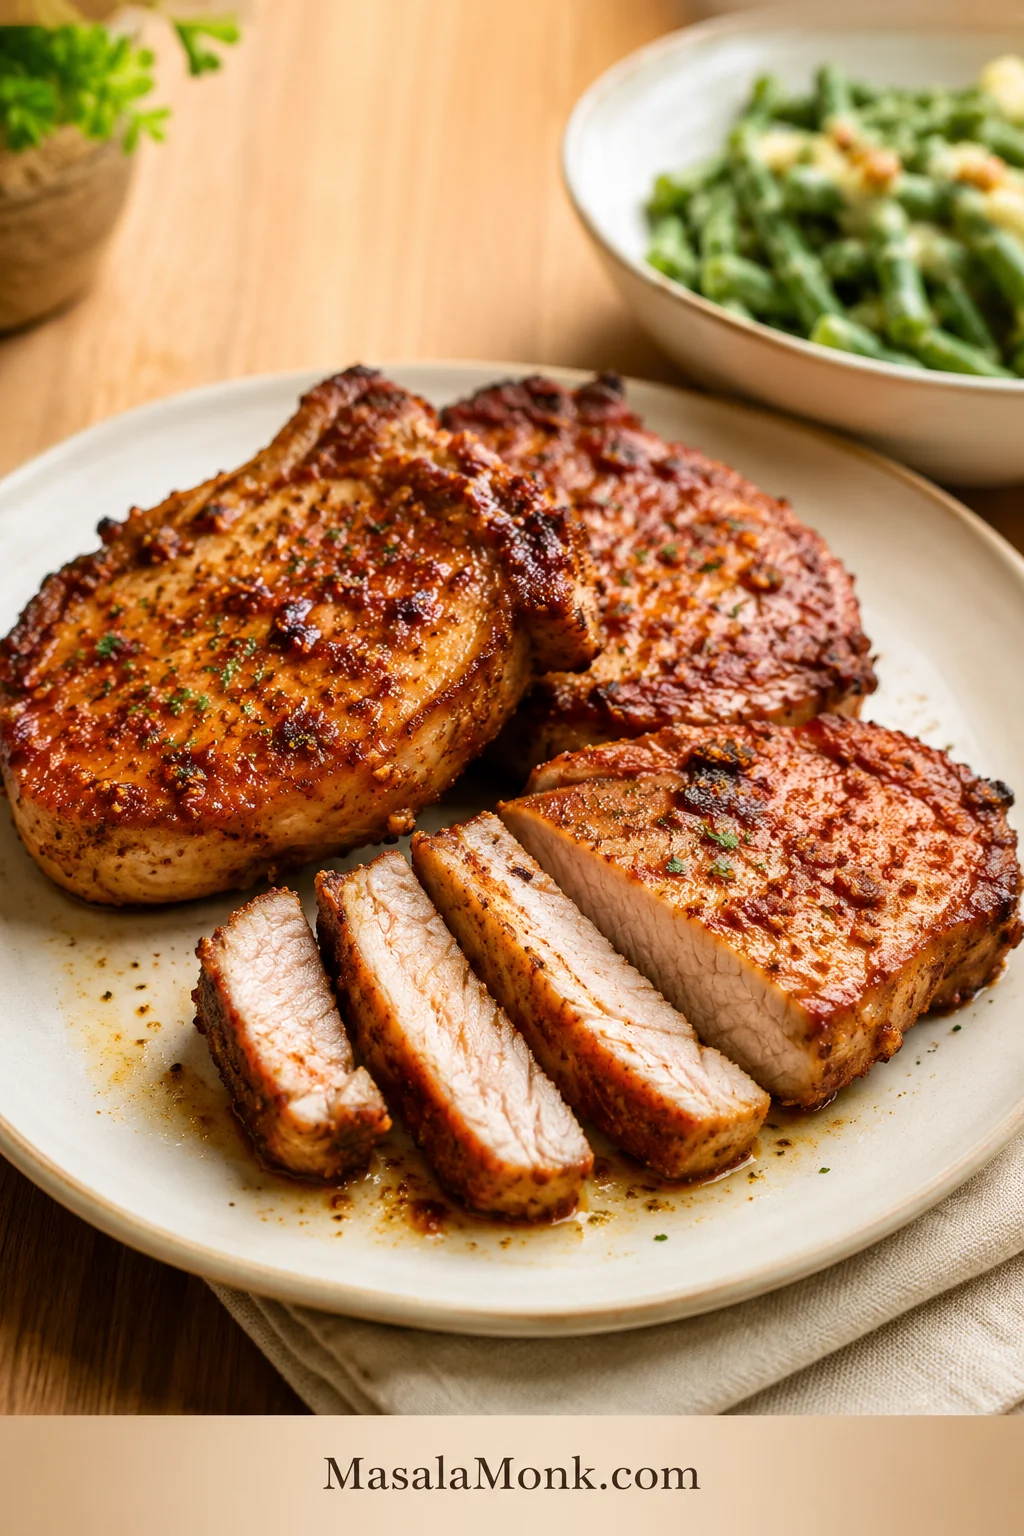
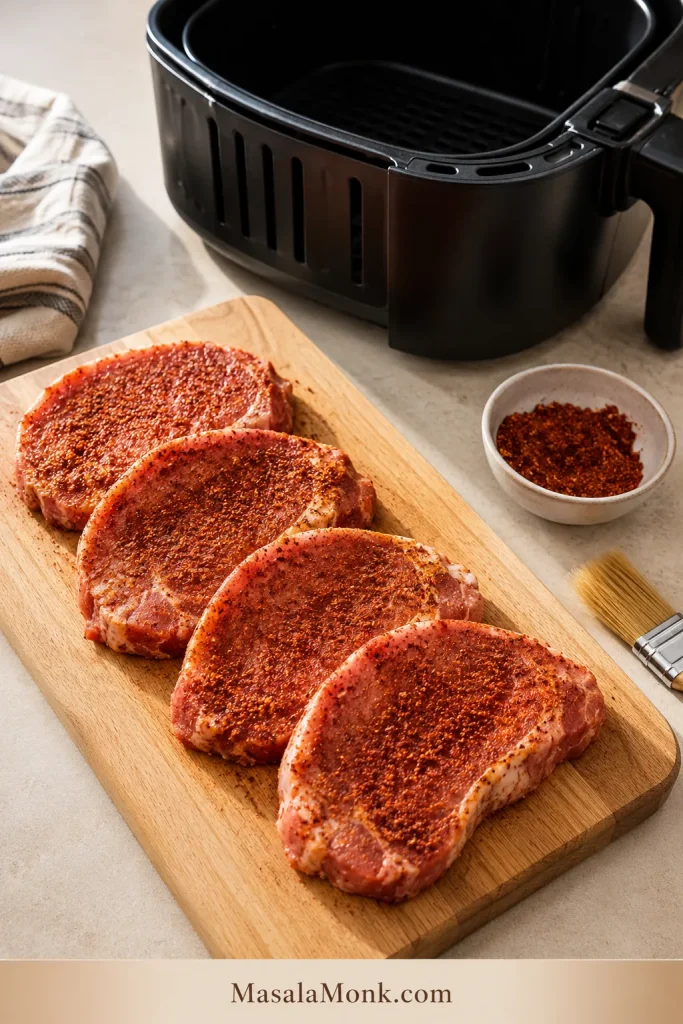
375°F / 190°C — Faster Crisping

Once your air fryer has proven it handles fatty foods without smoking, 375°F / 190°C becomes a useful faster setting. It crisps regular strips quickly, but the margin for error gets smaller. Thin bacon, sugary bacon, and second batches need extra attention at this temperature.

390–400°F / 200–205°C — Fast but Watch Closely

This is the tempting shortcut because the bacon browns quickly. The catch is that high heat gives you less time between crisp edges and burnt-smelling grease. Use this range only when you are nearby, the drawer is clean, and the basket is not crowded. If your machine smokes with fatty foods, use the low-smoke temperature or go to the smoke fixes.

Comparison of air fryer bacon cooked at 350°F versus 400°F, with the 350°F side showing more even rendering.
At 350°F, bacon fat has more time to render before the edges race ahead. By contrast, 400°F cooks faster, but the margin between crisp and overdone gets much smaller.

320–325°F / 160–165°C — Low-Smoke Mode

If your air fryer has ever smoked with bacon, wings, sausage, or anything fatty, do not start at 400°F. Drop to 320–325°F / 160–165°C and let the fat render more slowly. This lower setting is especially useful for thick-cut bacon, very fatty slices, or compact baskets where grease sits close to the heat source.

How to Cook Bacon in the Air Fryer

Once the air fryer is set, the method is mostly about giving the bacon enough room, letting the fat render, and remembering that the final crispness happens after the strips leave the basket.

Step-by-step air fryer bacon process showing arranging bacon, air frying, checking halfway, and draining on a rack.
First arrange the bacon so air can circulate, then cook, check, and let it rest. Those last two steps matter because curling, overlap, and post-cook crisping all affect the final texture.

Step 1 — Preheat or Start Cold

Preheating is optional. A cold start works, while a 2–3 minute preheat makes the timing chart more predictable. If you use parchment, add it only when the bacon is on top and weighing it down.

Step 2 — Arrange Bacon in a Single Layer

Lay the strips flat in the basket. A little touching is fine; heavy overlap is not. Cut long pieces in half if they fit better that way. This is the step that keeps the bacon from steaming underneath itself.

Bacon arranged in a loose single layer inside an air fryer basket with no heavy overlap.
A loose single layer is one of the biggest keys to crispy air fryer bacon. That way, the heat can circulate properly and the strips can brown instead of trapping steam underneath.

Step 3 — Cook, Check, Flip if Needed

Cook regular bacon at 350°F / 175°C for 7–10 minutes. Around the halfway point, check the basket instead of walking away completely: if the strips are folding over, touching too much, or browning unevenly, flip or rearrange them.

Tongs checking and rearranging bacon halfway through cooking in an air fryer basket.
Meanwhile, a quick halfway check helps you catch the small issues that change results most, such as folding strips, uneven browning, or pieces that started overlapping as the fat rendered.

Step 4 — Drain and Cool

Transfer the bacon to paper towels or a cooling rack. It may still bend slightly when it comes out, but it will firm as it cools. Before cooking another batch, carefully drain the lower drawer or drip tray. Do not pour hot bacon grease down the sink. Let it cool until it thickens, scrape it into the trash, or save clean rendered bacon fat in a heat-safe container if you cook with it.

Cooked air fryer bacon resting on a wire rack with an air fryer basket nearby.
Once the bacon leaves the basket, give it a minute on a rack or paper towels. As steam escapes, the texture firms up, which is why bacon often crisps more after cooking than during it.

Air fryer bacon grease disposal setup with cooled bacon fat in a heat-safe container, paper towels, and an empty air fryer basket.
After air frying bacon, let the grease cool before you move it. You can discard it safely or save clean bacon fat for cooking, but do not pour it down the sink.

If the strips are still soft, burnt, or uneven, the troubleshooting table will help you adjust the next batch.

How to Make Crispy Air Fryer Bacon

Crisp air fryer bacon comes from more than heat alone. It needs rendered fat, moving air, and a short rest after cooking so steam can escape. Too much heat may brown the edges before the center has had time to render properly, especially with thick-cut bacon.

Pull It When the Fat Looks Rendered

Look for browned edges, bubbling fat, and strips that no longer look raw or shiny in the center. The best air fryer bacon comes out slightly flexible, then crisps as the steam escapes. If you wait until it looks completely rigid in the basket, it may cool into hard, brittle strips.

Air fryer bacon doneness guide with three strips labeled pale center, just right, and too stiff.
If timing feels uncertain, let the bacon itself guide you. Pale centers usually need more time, while strips that look very dark and rigid have gone beyond the best crisp point.

Do Not Crowd the Basket

If your bacon is pale in the middle but dark at the edges, the basket may be too full. Cook fewer strips so hot air reaches the surface of each piece. Crowding is one of the easiest ways to turn bacon from crisp to limp.

Use a Rack or Paper Towels After Cooking

Move the bacon out of the hot basket and let it rest on paper towels or a rack. This keeps it from sitting in grease and gives steam somewhere to escape. For a crisp breakfast plate, pair it with air fryer hash browns, where the same airflow-and-spacing rule matters just as much.

Thick-Cut Bacon in the Air Fryer

Thick-cut bacon is where patience pays off. The outside browns fast, but the fat inside still needs time to soften, bubble, and render. Start at 350°F / 175°C and give the bacon a steadier cook.

Thick-cut bacon cooking in an air fryer basket with a 350°F and 10 to 15 minute timing cue.
For thick-cut bacon, a steadier cook matters more than aggressive heat. Give the fat time to soften and render at 350°F so the outside does not outpace the center.

Cook thick-cut bacon at 350°F / 175°C for 10–15 minutes, flipping or rearranging halfway if needed.

Thick-Cut Bacon Time Chart

Texture Temperature Time
Tender-crisp 350°F / 175°C 10–12 minutes
Crisp 350°F / 175°C 12–15 minutes
Low-smoke thick-cut bacon 320–325°F / 160–165°C 13–18 minutes

Why Thick-Cut Bacon Takes Longer

Thick bacon is not just regular bacon with a few extra minutes tacked on. It has more fat and more thickness to render through. Lower, steadier heat helps the bacon become crisp without leaving chewy centers.

Close-up of thick-cut bacon in an air fryer showing rendered fat and browned edges.
In other words, thick-cut bacon is not done just because the edges browned. The real goal is rendered fat through the strip, which is what gives thick bacon its best tender-crisp bite.

Turkey Bacon in the Air Fryer

Turkey bacon works well in the air fryer, but the timing is less forgiving. Without pork bacon’s fat cushion, turkey bacon goes from flexible to dry before you expect it. It still crisps nicely, especially with moderate heat and a very light mist of oil when needed.

Turkey bacon strips in an air fryer basket with a 350 to 360°F and 5 to 10 minute timing cue.
Because turkey bacon is leaner than pork bacon, it can go from flexible to dry much faster. Start moderate, check early, and use only a light oil mist if the surface needs help browning.

Air fry turkey bacon at 350–360°F / 175–182°C for 5–10 minutes, flipping once if needed. Thin turkey bacon may finish in 4–6 minutes, while thicker turkey bacon may need closer to 8–10 minutes.

Turkey Bacon Time Chart

Turkey bacon type Temperature Time Notes
Thin turkey bacon 350°F / 175°C 4–6 minutes Start checking before the low end of the range
Regular turkey bacon 350–360°F / 175–182°C 5–8 minutes Flip halfway for even browning
Extra crisp turkey bacon 360°F / 182°C 8–10 minutes Watch the edges closely

Should You Spray Turkey Bacon with Oil?

A very light mist of oil helps turkey bacon brown because it has less fat than pork bacon. Use a pump spray or brush if your air fryer manual warns against aerosol sprays. Do not soak the strips; a quick, even coating is enough.

How to Tell Turkey Bacon Is Done

Turkey bacon is done when the strips look set, the edges have browned, and the texture is no longer soft or floppy. Because turkey bacon products vary more than pork bacon, treat the package directions as the final authority for doneness and safe handling. For thicker pieces, an instant-read thermometer helps remove guesswork.

Turkey bacon doneness guide showing set texture, light browning, and a reminder not to overcook.
Even then, turkey bacon does not need to look deeply browned to be done. Once the strips look set and lightly colored, extra time often dries them out instead of making them better.

Frozen Bacon in the Air Fryer

Frozen bacon works best with a short softening stage before the strips are separated and crisped. Those first few minutes are not really about browning; they loosen the slices so you do not tear them into thin, uneven pieces that overcook.

Frozen bacon in the air fryer shown in three stages: frozen stack, separated strips, and crisp cooked bacon.
With frozen bacon, the smartest move is to soften first and crisp second. Separate the slices as soon as they loosen, then cook them in a single layer for the most even result.
  1. Place the frozen bacon block or stuck slices in the air fryer.
  2. Air fry at 350–360°F / 175–182°C for 4–8 minutes, just until the slices loosen.
  3. Use tongs to separate the strips carefully.
  4. Arrange the slices in a single layer.
  5. Cook for another 6–10 minutes, depending on thickness and crispness.

Do Not Force Apart Frozen Bacon

If the slices are frozen together, do not pry them apart while they are still rigid. Warm them briefly first, then separate them once the fat softens and the strips loosen naturally.

Frozen Bacon Timing by Thickness

Frozen bacon timing guide showing soften and crisp stages for thin, regular, and thick-cut bacon.
As thickness increases, the softening stage matters more. Thin frozen bacon separates quickly, whereas thick-cut frozen strips need extra time before the final crisping step begins.
Frozen bacon type Stage 1: Separate Stage 2: Crisp
Thin frozen bacon 350°F / 175°C for 3–5 minutes 5–7 minutes more
Regular frozen bacon 350–360°F / 175–182°C for 4–8 minutes 6–10 minutes more
Thick-cut frozen bacon 350–360°F / 175–182°C for 6–8 minutes 10–15 minutes more

Once the slices are separated, treat them like fresh bacon and use the main timing ranges above.

Candied Bacon in the Air Fryer

Candied air fryer bacon is easy, but sugar changes the rules. Brown sugar and maple darken faster than the bacon underneath cooks, so use gentler heat and look at the strips before they go from glossy to bitter.

Glossy candied bacon on a rack with brown sugar, pepper, and a 325 to 350°F temperature cue.
Meanwhile, candied bacon needs gentler heat because sugar colors faster than the meat cooks. Aim for a glossy amber finish, then pull it before the sweet coating turns bitter.

For 4–5 slices bacon, use 2–3 tablespoons brown sugar, a little black pepper, and optional cayenne. Cook at 325–350°F / 160–175°C for 8–15 minutes, depending on bacon thickness and how sticky-crisp you want it.

Brown Sugar Bacon

Pat the bacon dry, sprinkle lightly with brown sugar, and press the sugar onto the top side. Avoid heavy piles of sugar because they can melt into the basket before the bacon finishes.

Maple Bacon

Brush the bacon lightly with maple syrup during the last few minutes of cooking. Adding maple too early makes the surface darken before the bacon is crisp.

Spicy Candied Bacon

Add a pinch of cayenne or crushed red pepper to the brown sugar. Keep the temperature moderate so the spice blooms and the sugar caramelizes without turning bitter.

If you are making bacon for a snack tray instead of breakfast, MasalaMonk’s baked jalapeño poppers are a natural next recipe because they use bacon for that salty, crisp, party-style finish.

Other Bacon Types: Rashers, Back Bacon, Canadian Bacon and Beef Bacon

Bacon names and cuts vary by country. Use this section if your package does not look like standard streaky bacon strips; leaner cuts cook faster, thicker cuts need more time, and already-cooked products are usually closer to reheating than raw bacon cooking.

Guide to other bacon types for the air fryer including streaky rashers, back bacon, Canadian bacon, and beef bacon.
Not every bacon package behaves like standard streaky strips. Back bacon, Canadian bacon, beef bacon, and rashers can cook differently, so use the cut itself as your first clue.

Streaky Bacon and Rashers

Streaky bacon is closest to US-style strips. Cook it gently at 350°F / 175°C, or use 200°C / 400°F for a faster UK-style method if your machine does not smoke easily. Most streaky rashers take 6–10 minutes.

Back Bacon

Back bacon is leaner and usually cooks faster than streaky bacon. At 200°C / 400°F, many rashers finish in 4–8 minutes. Since it has less fat, check it a minute or two sooner than you would with streaky bacon.

Canadian Bacon

Canadian bacon is usually more of a reheating and light-crisping job than a raw fatty bacon job. Start at 350°F / 175°C and check after 2–4 minutes. Continue briefly if you want browned edges.

Beef Bacon

Beef bacon varies a lot by cut and fat level. Start around 350°F / 175°C and check after 6 minutes. Fattier beef bacon may need more time, while leaner pieces dry out quickly.

Basket Air Fryer vs Air Fryer Oven Bacon

A basket air fryer and an air fryer oven both cook with hot circulating air, but bacon behaves a little differently in each. This is why the same bacon timing can feel perfect in one air fryer and too fast in another. Basket models are compact and quick. Air fryer ovens give more surface area, but they need more attention to trays, racks, and grease drips.

Basket air fryer and air fryer oven comparison showing bacon cooked in a small basket and on a larger tray.
A basket air fryer usually cooks bacon faster in smaller batches. By contrast, an oven-style air fryer gives you more surface area, though rack position and tray layout can change browning.

Basket Air Fryer

Basket air fryers are best for small batches. Bacon may curl, overlap, or brown unevenly, so flipping or rearranging halfway helps. Grease collects below the basket, which is convenient, but the drawer should be drained before the next batch.

Air Fryer Oven

Air fryer ovens fit more bacon on trays or racks. Use the drip tray correctly, watch for hot spots, and check whether the top rack browns faster than the lower rack. Rotate trays if needed.

Dual-Rack Air Fryers

If you use two racks, the top rack may cook faster because it is closer to the heating element. Check the top layer first and remove strips as they finish instead of waiting for every piece to match exactly.

How to Stop Air Fryer Bacon from Smoking

Smoke is the reason many people try bacon in the air fryer once and never do it again. Usually, though, it is not the bacon’s fault. It is grease sitting too close to high heat, old residue burning off, or a second batch going into an already-hot drawer.

Air fryer bacon smoke prevention guide showing a 350°F setting, bacon in a basket, drained grease, and a clean drawer cue.
If bacon starts smoking in the air fryer, the cause is usually heat, grease buildup, or old residue. Start at 350°F, drain between batches, and keep the drawer clean before blaming the method.

For general air fryer safety, the USDA’s Food Safety and Inspection Service recommends following the manufacturer’s instructions for your appliance. That matters here because air fryer designs vary, especially around liners, trays, water, and grease handling. You can read their general guidance here: USDA FSIS air fryer food safety guidance.

Start at 350°F, Not 400°F

If your kitchen fills with smoke, start by lowering the heat rather than blaming the whole method. Begin at 350°F / 175°C. If that still smokes, move down to 320–325°F / 160–165°C and add a few minutes.

Drain Grease Between Batches

Grease from the first batch often smokes during the second batch. Let the air fryer cool slightly if needed, then carefully drain the lower drawer or drip tray before continuing.

Clean Old Grease Before Cooking Bacon

Old residue may smoke before the fresh bacon even starts rendering. If your air fryer smells burnt as soon as it heats, clean the basket, drawer, tray, and any reachable grease spots according to your manual.

Use Low-Smoke Mode for Sensitive Air Fryers

Low-smoke mode means 320–325°F / 160–165°C and a longer cook. It is especially useful for thick-cut bacon, very fatty slices, or air fryers that have smoked with wings, sausages, or other greasy foods.

Stop If Smoke Turns Heavy or Burnt-Smelling

A little steam or light haze is different from heavy smoke. If the air fryer is smoking heavily or smells burnt, stop the machine, let it cool, remove the food safely, and check for grease buildup or food touching the heating area. MasalaMonk’s guide to common air fryer mistakes is also useful here, especially for crowding, airflow, and cleanup problems.

Foil, Parchment, Water, or Bread: What Actually Helps?

This is where a lot of air fryer bacon advice gets messy. Foil, parchment, water, and bread all help in some situations, but none of them should block airflow or fight your air fryer’s manual.

Air fryer bacon safety guide showing perforated parchment, foil in the lower tray, a small amount of water in the drawer, and bread below the basket.

However, cleanup helpers only work when they do not interfere with airflow or safety. Use parchment, foil, water, or bread carefully, and always follow the air fryer manual first.
Option Use it? Best guidance
Perforated parchment Sometimes Useful for cleanup, but never preheat loose parchment. Add it only when bacon weighs it down.
Foil Cautiously Use only if your manual allows it. Keep it in the lower tray or drawer and do not block airflow.
Water Sometimes Helps some basket models reduce smoking, but only if your air fryer design safely allows water in the lower drawer.
Bread Sometimes A slice below the basket absorbs some grease, but it must not touch the heating element or block airflow.
Nothing Often best Single layer, 350°F, and draining grease between batches is enough for many air fryers.

The biggest mistake is treating liners like a full basket cover. Bacon still needs exposed airflow to crisp, so any foil or parchment should help with cleanup without blocking circulation.

Foil in the Air Fryer for Bacon

Only use foil if your manual allows it. Place it where it catches grease without covering air holes or interfering with circulation. Do not wrap the basket tightly in foil, and do not place loose foil where it might lift into the heating element.

Parchment Paper for Air Fryer Bacon

Perforated air fryer parchment helps with cleanup, but it should be weighed down by food. Never preheat the air fryer with loose parchment inside. For bacon, parchment may reduce sticking, but it also reduces some direct airflow under the strips.

Water Under Bacon in the Air Fryer

Some cooks add a small splash or thin layer of water to the lower drawer to reduce smoke from hot grease. This works in some basket-style models, but not universally. Use water only if your manual allows it and only if the water stays safely away from electrical parts and the heating element.

Bread Under Bacon in the Air Fryer

A slice of bread below the basket absorbs dripping grease in some models. It is a helper, not a requirement. Make sure it sits safely below the basket, away from the heating element, and does not block airflow.

What to Serve with Air Fryer Bacon

Once the bacon is cooked, it is more than a breakfast side. Use the crisp strips for eggs and toast, tuck them into sandwiches, crumble them over salads, add them to burgers, or chop them for meal prep.

Classic Breakfast Plate

Serve them with eggs, toast, fruit, avocado, or roasted tomatoes. If you want eggs without boiling water, MasalaMonk’s air fryer hard-boiled eggs guide gives timing for soft, jammy, and fully hard yolks.

Crispy Air Fryer Breakfast

For a crisp diner-style breakfast, pair bacon with air fryer hash browns. Cook the bacon first, drain the grease, wipe the basket if needed, then cook the potatoes so they do not pick up too much bacon residue.

Meal Prep Wraps, Burritos and Salads

Chopped bacon works well in breakfast wraps, egg bites, salads, sandwiches, and freezer-friendly burritos. If you are building a bigger make-ahead breakfast, the breakfast burrito recipe is a natural place to use crisp pieces with eggs, potatoes, cheese, and sauce.

How to Store and Reheat Air Fryer Bacon

Leftover bacon is useful, but it is easy to overdo during reheating. Store it cold, reheat it gently, and stop as soon as it is hot and crisp again. The goal is to bring back the crispness without cooking all the moisture out of the strip.

Fridge Storage

Let the bacon cool, then store it in an airtight container in the refrigerator for 3–4 days. For broader cold-storage guidance, refer to the FoodSafety.gov cold food storage chart.

Freezer Storage

To freeze cooked bacon, layer cooled strips between parchment, place them in a freezer bag, press out excess air, and freeze. For best quality, use frozen cooked bacon within about 1 month.

Reheating Bacon in the Air Fryer

Reheat cooked bacon at 325–350°F / 160–175°C for 2–5 minutes, depending on thickness. Thin bacon may only need a couple of minutes. Thick-cut slices may need longer.

Reheating Turkey Bacon

Reheat turkey bacon at 350°F / 175°C for 2–3 minutes. Because it is lean, avoid reheating it too long or it may become dry and leathery.

Air Fryer Bacon Troubleshooting

If your bacon did not come out right, do not give up on the method yet. The mistake is usually visible once you know what to look for: pale centers mean crowding or short timing, burnt edges point to heat, and smoke usually points to grease.

Air fryer bacon troubleshooting guide with fixes for soft bacon, burnt bacon, smoke, and curled strips.
If a batch goes wrong, the fix is often small: add space for soft bacon, lower the heat for burnt edges, drain grease to reduce smoke, and cut long strips shorter to limit curling.
Problem Likely cause Fix
Bacon is not crispy Basket is crowded, cook time is short, or bacon is steaming Cook in a single layer, add 1–2 minutes, and cool on a rack or paper towels
Bacon burns at the edges Temperature is too high or bacon is thin Use 325–350°F and check earlier
Air fryer smokes Grease buildup, old residue, or high heat Drain grease, clean the drawer, and lower the temperature
Bacon curls Long strips are hitting basket sides or shrinking unevenly Cut strips in half and flip or rearrange halfway
Bacon cooks unevenly Hot spots or overlapping pieces Rearrange halfway and avoid stacking
Second batch burns Air fryer is already hot Check the second batch 1–2 minutes earlier
Turkey bacon is dry Too lean or overcooked Use a light oil mist and shorter timing
Candied bacon burns Sugar cooked too hot Use 325–350°F and check early

Bacon Is Not Crispy

Add another 1–2 minutes, but also check the setup. If the strips are crowded or sitting in trapped steam, extra time alone may not fix it. Cook fewer pieces and let them rest on paper towels or a rack after air frying.

Bacon Is Burning

Lower the temperature. Thin bacon and sugary bacon burn quickly at high heat. Use 325–350°F and check the next batch sooner.

Bacon Is Smoking

Drain grease, clean old residue, and lower the heat. If the smoke is heavy or smells burnt, stop the machine and inspect it safely after it cools.

Bacon Is Chewy

Chewy bacon usually needs more rendering time, not more heat. Keep the temperature moderate and cook a little longer, especially for thick-cut slices.

Turkey Bacon Is Dry

Turkey bacon dries out when it is cooked too long or too hot. Use a light oil mist, check it sooner, and pull it when the edges are browned and the strips look set.

Air Fryer Bacon Recipe Card

Air Fryer Bacon Recipe

This method uses 350°F / 175°C as the default temperature for crisp, evenly cooked bacon with better smoke control than hotter methods.

Yield4–5 slices
Prep Time2 minutes
Cook Time7–15 minutes
Total Time9–17 minutes

Equipment

  • Air fryer
  • Silicone-tipped tongs
  • Paper towel-lined plate or cooling rack

Ingredients

  • 5 slices regular bacon, about 6 oz / 170 g
  • Or 4–5 slices thick-cut bacon, about 6–8 oz / 170–225 g

Instructions

  1. Preheat the air fryer to 350°F / 175°C for 2–3 minutes, if you want more consistent timing.
  2. Arrange the bacon in a single layer in the basket. Cut strips in half if needed so they fit flat.

  3. Air fry regular bacon for 7–10 minutes, checking thin slices near the lower end of the range.
  4. Air fry thick-cut bacon for 10–15 minutes, flipping or rearranging halfway if needed.
  5. Transfer the bacon to paper towels or a rack. It will crisp more as it cools.
  6. Carefully drain grease from the lower drawer or drip tray before cooking another batch.

Notes

  • For less smoke, use 350°F instead of starting at 400°F.
  • For very smoky air fryers, use 320–325°F / 160–165°C and add a few minutes. See the smoke prevention tips if needed.
  • Do not crowd the basket. Cook in batches if needed.

  • The second batch may cook faster because the basket is already hot.
  • For turkey bacon, use 350–360°F / 175–182°C for 5–10 minutes, or see the turkey bacon section above.
  • Let bacon grease cool before discarding it. Do not pour hot grease down the sink.

FAQs About Air Fryer Bacon

Does bacon cook well in an air fryer?

Bacon cooks well in an air fryer when it sits in a loose single layer and the grease has room to drip below. The main things to watch are smoke, crowding, and overcooking.

How long does bacon take in the air fryer?

Regular bacon usually takes 7–10 minutes at 350°F / 175°C. Thin bacon may take 5–7 minutes, while thick-cut bacon may take 10–15 minutes.

What temperature is best for air fryer bacon?

350°F / 175°C is the best default because it gives the fat time to render without pushing the air fryer into a hotter, smokier range. Use 375–400°F only when you want faster crisping and know your air fryer handles bacon well.

Do you preheat the air fryer for bacon?

Preheating is optional. A cold start works, while a 2–3 minute preheat makes the timing more predictable. If you use parchment, never preheat with loose parchment inside the basket.

Do you flip bacon in the air fryer?

Flipping is not always required, but it helps when the strips curl, overlap, or brown unevenly. Basket-style air fryers often benefit from a quick flip or rearrange.

How do you stop bacon from smoking in the air fryer?

Start at 350°F instead of 400°F, cook in a single layer, drain grease between batches, and clean old residue from the basket and drawer. If your machine still smokes easily, use 320–325°F and cook a little longer.

How do you cook turkey bacon in the air fryer?

Cook turkey bacon at 350–360°F / 175–182°C for 5–10 minutes. Since turkey bacon is leaner than pork bacon, check it early and consider a very light oil mist if it tends to dry out.

How do you cook frozen bacon in the air fryer?

Frozen bacon works best with a two-stage method. Warm the frozen slices at 350–360°F for 4–8 minutes until they separate, then arrange them in a single layer and cook another 6–10 minutes. Thick-cut frozen bacon may need longer.

Should foil go under bacon in the air fryer?

Only use foil if your air fryer manual allows it. Keep it in the lower drawer or drip tray, do not block airflow, and do not place loose foil where it might lift toward the heating element.

Should you use parchment paper for air fryer bacon?

Use only air-fryer-safe perforated parchment, and make sure it is weighed down by bacon. Do not preheat with loose parchment inside the basket.

Why is my air fryer bacon not crispy?

Air fryer bacon usually stays soft when the basket is crowded, the strips overlap, or the cook time is too short for the bacon’s thickness. Cook in a loose single layer, add 1–2 minutes, and let the bacon rest on paper towels or a rack so steam can escape.

Is air fryer bacon better than oven bacon?

Air fryer bacon is better for small batches because it is fast and convenient. Oven bacon is better when you want to cook a full pack or feed a group because there is more space and less batch-by-batch grease management.

Back to top ↑