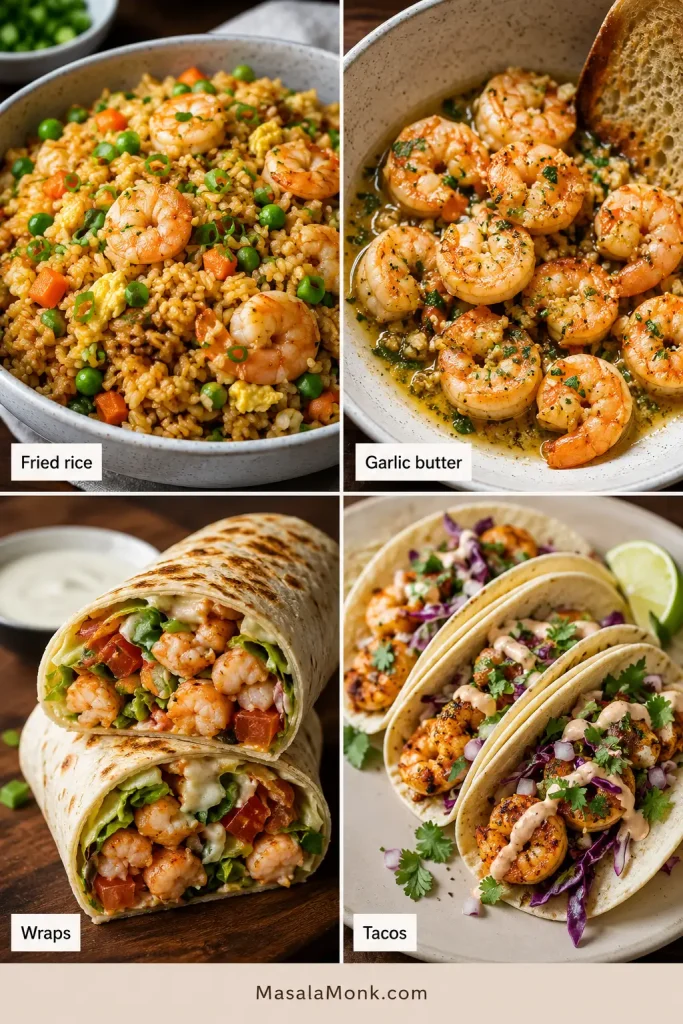
This is the kind of recipe for the night when dinner was not really planned, the shrimp are still frozen, and you need the air fryer to save the meal. A bag of frozen shrimp can turn into shrimp tacos, rice bowls, pasta, salads, wraps, or garlic-butter shrimp in minutes — but only if you use the right timing for the shrimp you actually have.
Do not start with the timer. Start with the bag: raw or precooked, small or jumbo, peeled or shell-on, plain or breaded/coated. The rule is simple: cook raw shrimp, reheat precooked shrimp, and crisp coated shrimp. No thawing bowl, no guessing, no rubbery shrimp if you start with that bag check.
Quick Answer
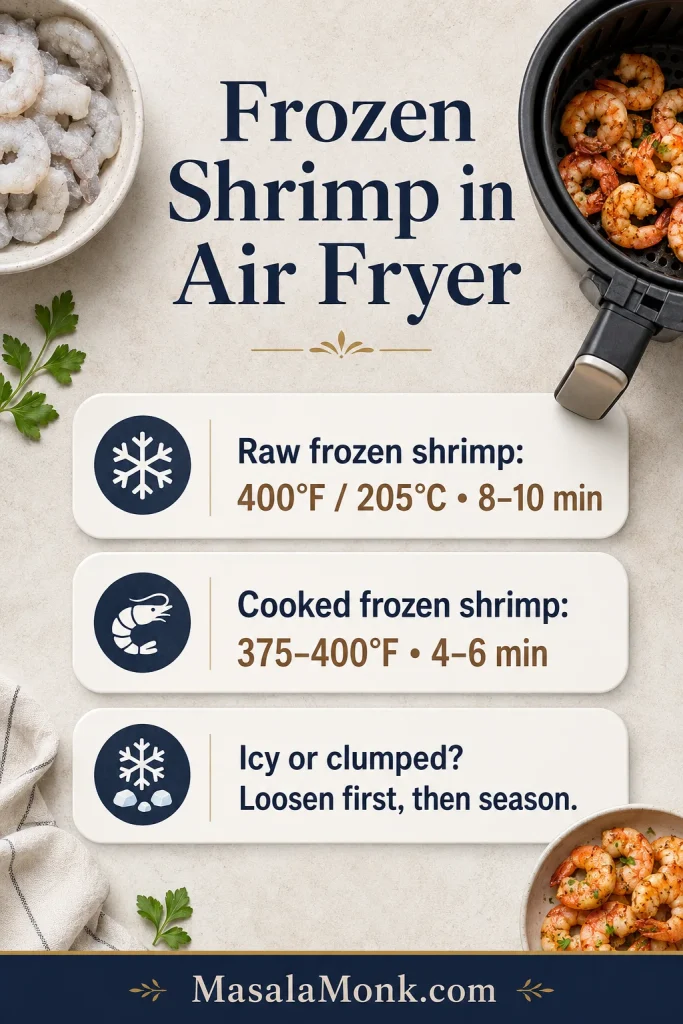
Most plain frozen raw shrimp takes 8 to 10 minutes at 400°F / 205°C in the air fryer, with a shake or flip halfway. Frozen cooked or precooked shrimp takes 4 to 6 minutes at 375°F to 400°F / 190°C to 205°C because it only needs reheating.
Icy, glazed, or stuck-together pieces need a short head start. Air fry them plain for 2 to 3 minutes first, then separate them, drain off extra moisture if needed, add oil and seasoning, and finish cooking. Some frozen shrimp has a thin ice glaze, and that is normal. The short head start helps the flavor stick to the seafood, not the ice.
That tiny pause is the difference between seasoning the shrimp and seasoning the basket.
Jump to What You Need
Bag Check: What Do You Have?
Use this quick check before you set the timer. It is the fastest way to avoid rubbery precooked shrimp, bland icy shrimp, or coated shrimp that browns outside before it heats through.
| What the bag says or looks like | What to do |
|---|---|
| Grey or translucent shrimp | Cook as raw shrimp |
| Pink, orange, or white shrimp | Reheat only; do not use raw-shrimp timing |
| Icy, glazed, or clumped pieces | Air fry briefly, separate, then season |
| Jumbo shrimp, prawns, or shell-on shrimp | Use size-based timing and check doneness |
| Breaded, popcorn, coconut, or scampi shrimp | Follow package timing and crisping cues |

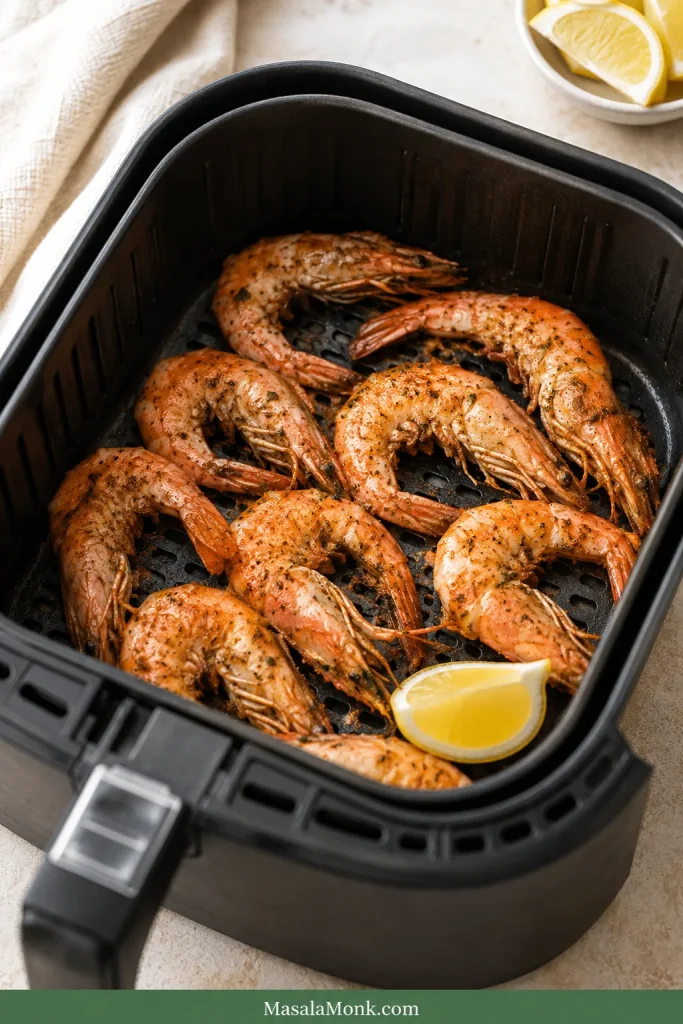
Air Fryer Frozen Shrimp Recipe
The recipe below is the simple cook-now path for plain frozen raw shrimp — the bag most people grab when dinner needs to happen fast. If yours is cooked, jumbo, shell-on, thawed, prawn-style, or coated, use the chart right after the card to adjust.
Recipe at a Glance
| Cooking method | Air fryer |
| Shrimp type | Plain frozen raw shrimp |
| Thawing | No thawing needed |
| Prep time | 3 minutes |
| Cook time | 8 to 10 minutes |
| Total time | 11 to 13 minutes |
| Serves | 3 to 4 |
| Temperature | 400°F / 205°C |
| Using precooked shrimp? | Reduce time to 4 to 6 minutes |
Ingredients
- 1 lb / 454 g frozen raw shrimp, peeled and deveined
- 1 tbsp / 15 ml olive oil or avocado oil
- ½ tsp garlic powder
- ½ to 1 tsp paprika, Cajun seasoning, or Old Bay-style seafood seasoning
- Salt: ¼ to ½ tsp, depending on how salty your seasoning blend is
- ¼ tsp black pepper
- Lemon wedges, to serve
- Optional: 1 tbsp / 14 g melted butter, for finishing
- Fresh herbs, optional: 1 to 2 tbsp chopped parsley or cilantro
For a smaller 8 oz / 225 g batch, use half the shrimp and roughly half the seasoning. Smaller batches are especially useful in 3 to 4 quart air fryers.

Method
- Preheat the air fryer to 400°F / 205°C for 3 to 5 minutes.
- Add the frozen shrimp in a mostly single layer.
- If the pieces are icy, glazed, or clumped, air fry them plain for 2 to 3 minutes first.
- Shake, separate, and drain excess liquid if needed.
- Toss with oil, garlic powder, seasoning, salt, and pepper.
- Air fry for 8 to 10 minutes total, shaking or flipping halfway, until opaque and tender.
- Finish with lemon, melted butter, herbs, or your favorite sauce. For a full garlic-butter pasta route, use the shrimp in a shrimp scampi-style dinner.
The batch is ready when the center is opaque, not grey or glassy. For jumbo, precooked, shell-on, thawed, or prawn-style bags, use the timing chart below.
Frozen Shrimp Air Fryer Time and Temperature Chart
Use this chart when your bag is not plain frozen raw shrimp. Size, raw or cooked status, surface ice, and crowding can all change the timing.
| Shrimp | Temp | Time | Cue |
|---|---|---|---|
| Frozen raw small or medium | 400°F / 205°C | 6 to 8 min | Opaque, gently curled |
| Frozen raw large | 400°F / 205°C | 8 to 10 min | Opaque through center |
| Frozen raw jumbo | 400°F / 205°C | 9 to 12 min | Check thickest piece |
| Frozen cooked or precooked shrimp | 375°F to 400°F / 190°C to 205°C | 4 to 6 min | Hot through, not tight |
| Thawed raw shrimp | 350°F to 375°F / 175°C to 190°C | 5 to 7 min | Pat dry first |
| Thawed cooked shrimp | 350°F / 175°C | 2 to 4 min | Warm gently |
| Shell-on frozen shrimp | 400°F / 205°C | 8 to 12 min | Shells pink, flesh opaque |
| Frozen prawns | 400°F / 205°C | 8 to 12 min | Time by size |
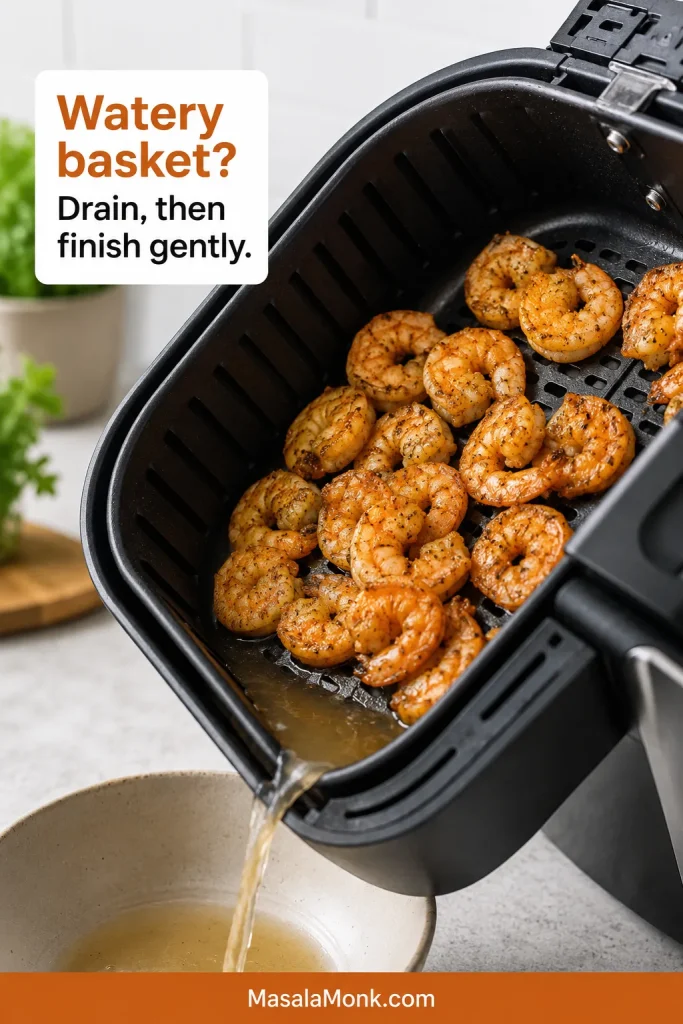
Treat the chart as a starting point, then let doneness get the final vote. In most baskets, large raw shrimp land in the 8 to 10 minute range, but crowding or a heavy glaze can push the batch toward the longer end. If the basket looks watery, it usually means surface ice is melting, so drain if needed instead of cooking the shrimp longer.
Got your timing? Go to the step-by-step method.
How to Air Fry Frozen Shrimp
The method below gives you tender shrimp without thawing first. That small head start for icy pieces is worth it because it keeps the seasoning from washing away. Frozen shrimp is fast, but it asks for one favor: stop early and check.
1. Preheat the air fryer
Preheat to 400°F / 205°C for raw frozen shrimp. A hot basket helps the pieces start cooking quickly instead of slowly thawing and releasing too much liquid.
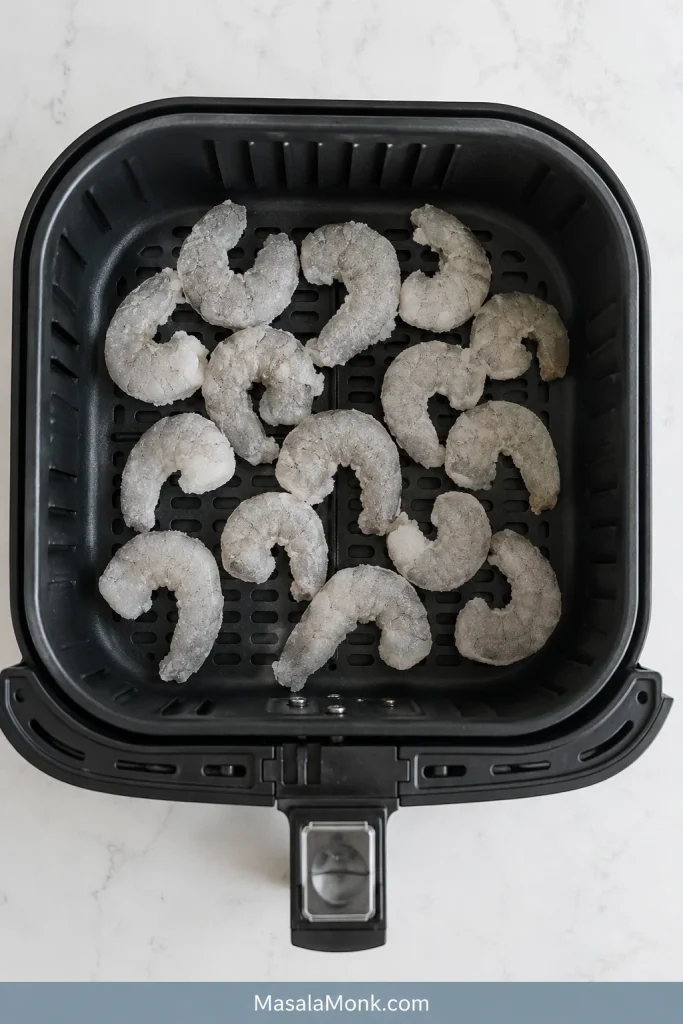
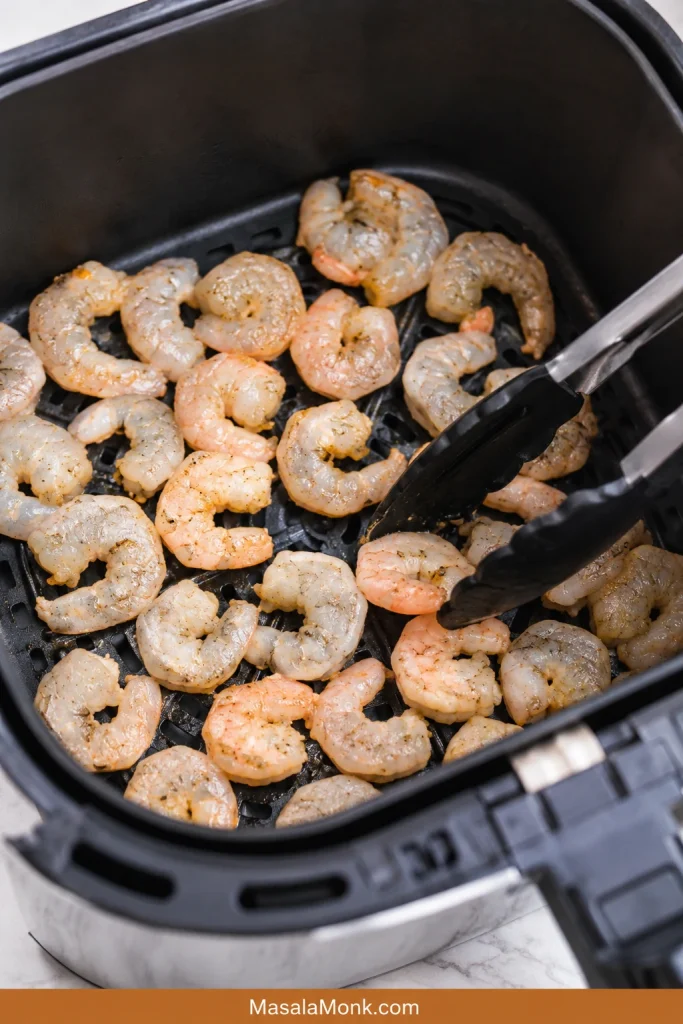
2. Add the shrimp in one layer
Place the frozen shrimp in the basket in a mostly single layer. A little overlap is fine, but avoid a thick pile. You are not trying to fill the basket; you are trying to give the hot air room to work.
3. Loosen icy or clumped shrimp first
When the pieces are stuck together or covered in a thin ice glaze, air fry them plain for 2 to 3 minutes. Then shake the basket and separate them with tongs. After that short head start, the icy glaze should look wet instead of frosty, and the pieces should separate easily. That is the moment to season.

4. Add oil and seasoning
Move the shrimp to a bowl if needed, then toss with oil, garlic powder, seasoning, salt, and pepper. Drain any liquid in the basket before adding the shrimp back.

5. Finish cooking
Air fry until the pieces are opaque and tender, shaking or flipping halfway. Use the timing chart for small, jumbo, precooked, shell-on, thawed, or prawn-style bags.
6. Finish with lemon or butter
Squeeze lemon over the hot shrimp. For a richer finish, toss with melted butter, chopped herbs, garlic butter, or a quick sauce after cooking. When it works, the shrimp tastes bright and clean, with lemon, butter, and seasoning clinging to the surface instead of sliding into the basket.

How Shrimp Type Changes the Timing
This is where the label on the bag matters most. The same air fryer can give you tender shrimp or rubbery shrimp depending on whether the pieces started raw, cooked, icy, jumbo, or shell-on.
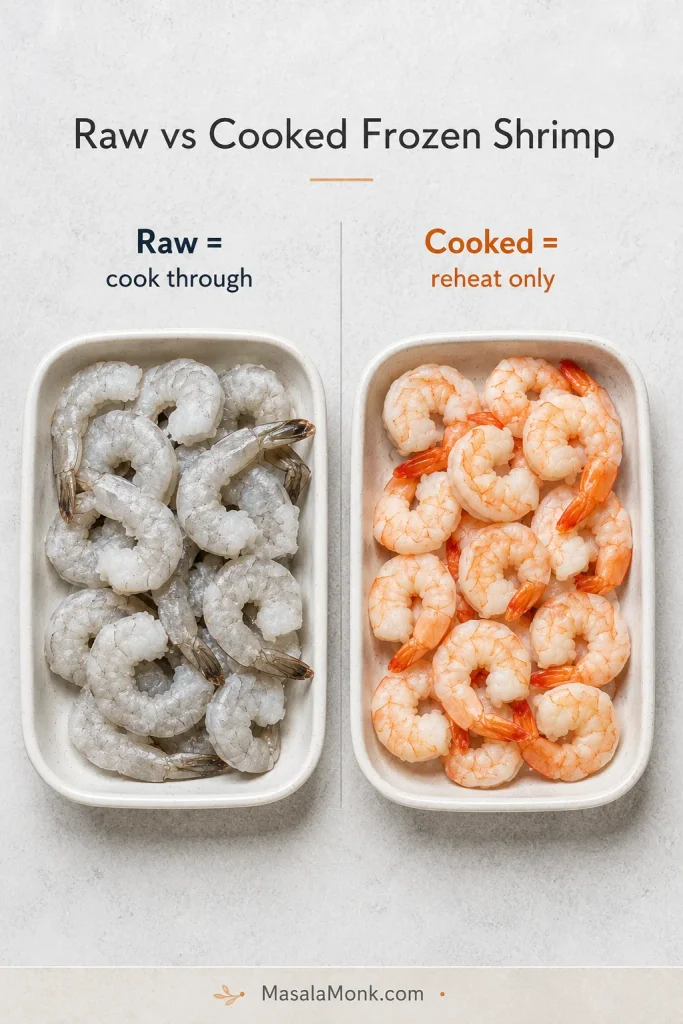
Raw vs cooked frozen shrimp
Raw shrimp usually looks grey or translucent and needs to cook through. Cooked or precooked shrimp usually already looks pink, orange, or white and only needs to get hot. For precooked shrimp, look for heat, not a deeper curl.
Shrimp size guide: what 16/20, 21/25, and 31/40 mean
Many frozen shrimp bags use a count-per-pound number instead of words like medium or jumbo. A lower number means larger shrimp because there are fewer pieces in a pound. Higher numbers mean smaller shrimp, which cook faster.
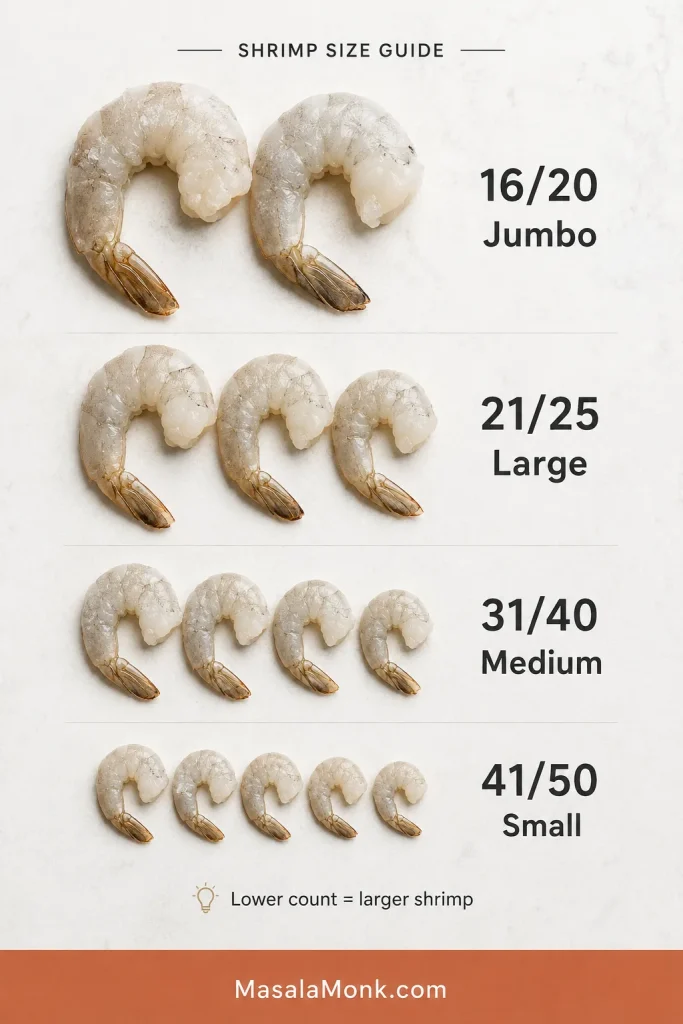
| Package count | Common size | Air fryer note |
|---|---|---|
| 16/20 | Jumbo | Use the longer range, often 9 to 12 minutes from frozen |
| 21/25 | Extra large or large | Main 8 to 10 minute timing usually works |
| 26/30 | Large | Main 8 to 10 minute timing usually works |
| 31/40 | Medium | Start checking around 6 to 8 minutes |
| 41/50 and smaller | Small | Check early; small shrimp can overcook fast |
Once you know the count, the timing starts making much more sense. When the bag gives both a size word and a count, trust the count more. “Large” can vary by brand, but 16/20 will almost always need more time than 31/40.
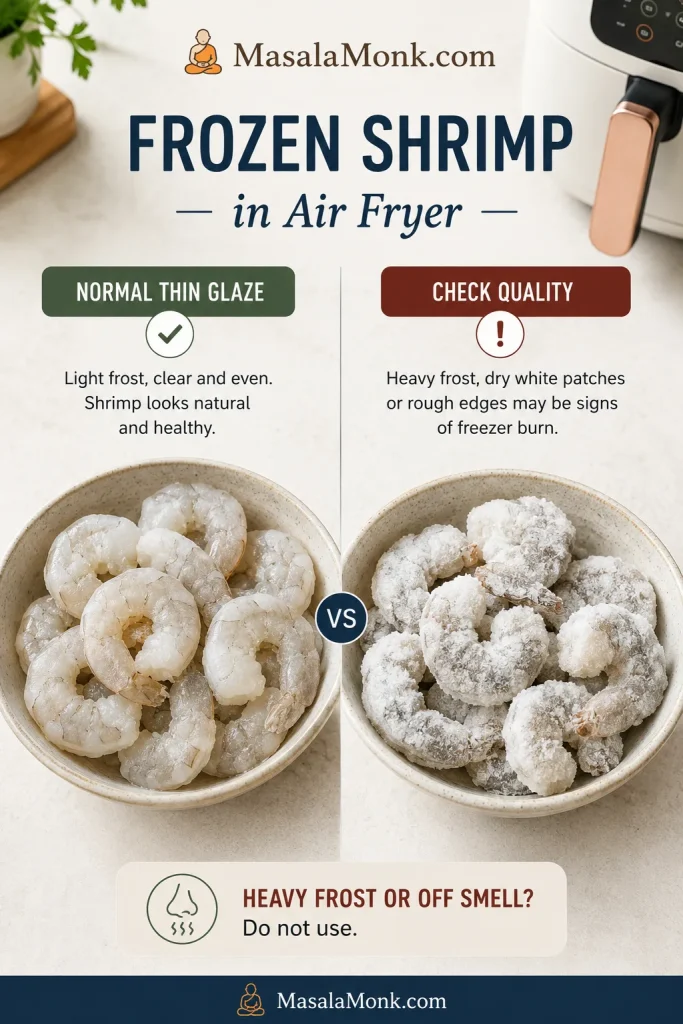
Thin ice glaze or freezer burn?
A thin ice glaze is normal on many frozen shrimp bags. Heavy frost, dry white patches, freezer-burned edges, or a stale smell are different. If the seafood smells off after opening, do not use it.
Shell-on shrimp, prawns, and thawed shrimp
These need small adjustments, not a new recipe. Shell-on frozen shrimp usually needs 8 to 12 minutes at 400°F / 205°C, depending on size. Frozen prawns cook like shrimp; let size decide. Thawed raw shrimp cooks faster, usually about 5 to 7 minutes at 350°F to 375°F / 175°C to 190°C.
Tail-on and tail-off shrimp cook almost the same way. Leaving the tail on looks a little more dramatic for serving, while tail-off is easier for bowls, tacos, fried rice, and pasta.
Ready to cook now? Return to the recipe card or follow the full method.
Why This Method Works
Frozen shrimp needs quick heat, enough space, and a moment for surface ice to loosen. Once the frost turns wet and the pieces separate, the seasoning can land on the shrimp instead of sliding into the basket. That is why the short head start matters more than adding extra seasoning at the beginning.
Ingredient Notes
Oil helps the spices cling. Garlic powder adds quick flavor without burning. Paprika, Cajun seasoning, or Old Bay-style seafood seasoning adds color and depth. If your bag is already seasoned, marinated, or salty, start with less salt and adjust after cooking.
Equipment and Batch Size
You do not need special equipment beyond an air fryer, but basket size matters. A hot basket helps. Crowding does not. In a smaller air fryer, a smaller batch works better than a longer struggle.
- For a 3 to 4 quart air fryer, cook smaller 8 oz / 225 g batches.
- A 5 to 6 quart air fryer can handle 12 to 16 oz / 340 to 454 g if the shrimp are mostly in one layer.
- Keep tongs nearby to separate clumped pieces and a slotted spoon or quick drain ready if liquid collects.
- Pat thawed shrimp dry with a paper towel before cooking.
- Ninja Foodi, Cosori, Instant Vortex, basket-style, and oven-style air fryers can all work, but timing may vary slightly.
If your air fryer is small, cook less shrimp rather than forcing the whole bag in. That one choice fixes more problems than extra minutes ever will.
Season Before or After Air Frying?
Separate, lightly frosty shrimp can be seasoned before air frying. Icy, glazed, or clumped pieces do better with a short head start in the basket first, then seasoning.
- Lightly frosty shrimp: toss with oil and seasoning before cooking.
- Icy or clumped shrimp: loosen first, then season.
- Thawed shrimp: pat dry, then season before air frying.
- Precooked frozen shrimp: season lightly and reheat briefly.
- Coated shrimp: skip wet seasoning before air frying; use dips or sauces after cooking.
For slightly crisp edges on plain shrimp, add 1 teaspoon cornstarch or cornflour after the surface frost has loosened. This is optional. Do not use this trick for shrimp that are already breaded, battered, popcorn-style, or coconut-coated.
Once the seasoning actually lands on the shrimp, even a simple garlic-lemon finish tastes cleaner and brighter.
How to Know Shrimp Is Done
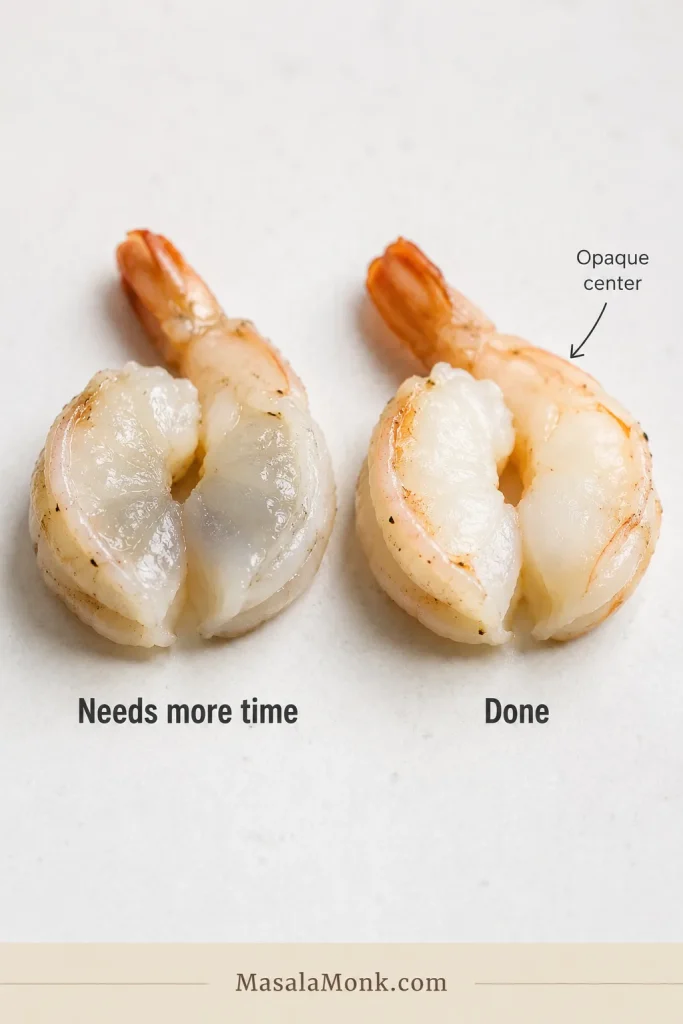
The goal is not hard browning. You want tender shrimp with no grey center. For plain shrimp, the flesh should be pearly, opaque, and no longer grey or glassy in the middle. The pieces should feel springy, not tight.
Check the center
For a thermometer check, seafood is generally cooked to 145°F / 63°C. Visually, shrimp should be firm, pearly, and opaque. When you cut into the thickest piece, the center should look opaque and moist, not grey, glassy, or dry. For more detail, see the FDA seafood safety guide.
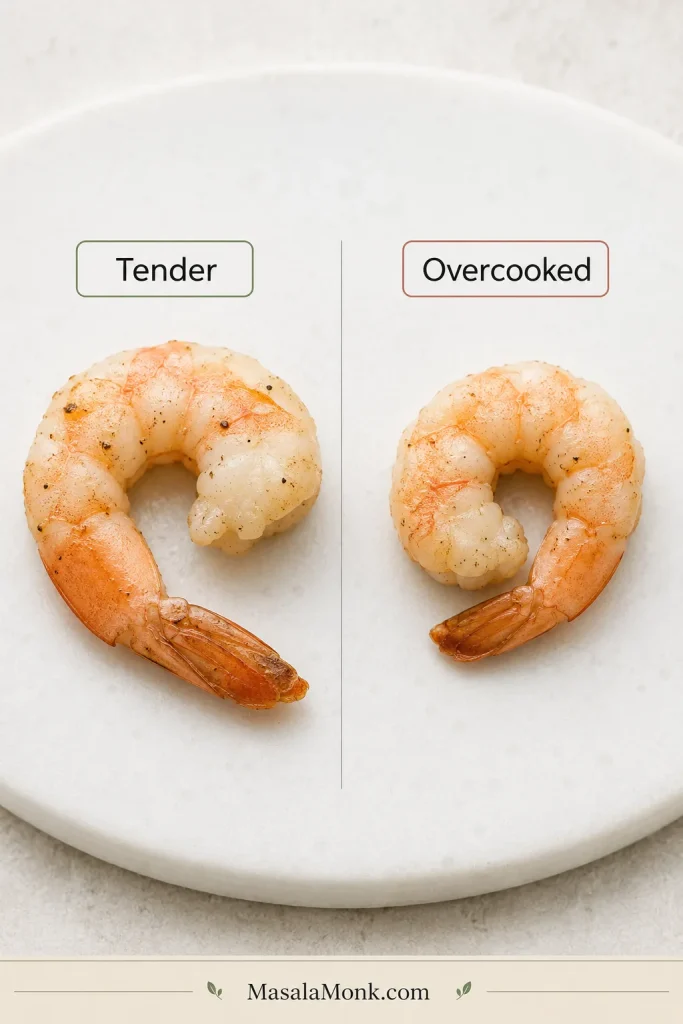
Use the curl as a texture clue
Shrimp moves from perfect to rubbery quickly, so checking early is not fussy. It is the shortcut.
- Undercooked shrimp: grey, glassy, or translucent in the center
- Done shrimp: opaque, pearly, springy, and loosely curled
- Overcooked shrimp: tight, dry, rubbery, or curled into a very tight O
For coated or sauced frozen shrimp, follow the package directions because the outside can brown before the inside is fully heated.
Avoid These Mistakes
Most mistakes come from treating every frozen shrimp bag the same. A few small changes make the difference between tender shrimp and a tough batch.
- Precooked shrimp should not cook like raw shrimp. It only needs reheating.
- Do not season a block of icy shrimp. Loosen it first so the flavor can stick.
- Give the pieces room instead of piling them high. Shrimp cook faster and more evenly with space.
- If the basket gets watery, drain it instead of trying to cook the water away.
- Do not use plain-shrimp timing for coated frozen shrimp. Breaded, popcorn, and coconut shrimp need package and crisping cues.
Already dealing with a watery, bland, or rubbery batch? Jump to troubleshooting or rescue it for dinner.
Troubleshooting Air Fryer Frozen Shrimp
A first batch that goes sideways is usually easy to fix. Watery baskets, bland seasoning, or a slightly rubbery bite do not mean the recipe failed. Usually, the shrimp just needed a different timing path.
If your first batch looks watery, do not panic. That is usually ice, not failure. The next batch is easier once you know what happened.
Why did my shrimp turn rubbery?
Rubbery shrimp usually means overcooking. This is common with frozen cooked or precooked shrimp because it only needs reheating. Use the shorter timing range, and check even earlier if the pieces are already thawed.
A batch that is already a little rubbery should not keep air frying. Toss it with garlic butter, lemon, sauce, pasta, fried rice, or a rice bowl where moisture can help soften the bite.
Why is there water in the air fryer basket?
That water in the basket is usually just surface ice melting. The goal is not to panic-cook the water away; drain it, season the shrimp itself, and finish gently.
- Loosen icy pieces before seasoning.
- Shake halfway through cooking.
- Separate clumped pieces as soon as they loosen.
- Drain excess liquid instead of cooking it away.
Why is the shrimp bland?
Seasoning ice is frustrating because the flavor ends up in the basket. Let frosty pieces loosen first, then add oil and seasoning so the flavor sticks.
To rescue a bland batch, toss it immediately with melted butter, lemon juice, garlic powder, black pepper, and a pinch of seasoning while it is still hot. For rice bowls or noodles, a spoonful of stir-fry sauce can turn plain shrimp into dinner quickly.
Why did some pieces cook faster than others?
The pieces were probably clumped, crowded, or mixed in size. Separate stuck pieces early and shake the basket halfway. A mixed bag of small and jumbo shrimp will not finish all at once; the small ones will cook first.
| Problem | Likely cause | Fix now | Next time |
|---|---|---|---|
| Rubbery shrimp | Precooked shrimp got too much time | Stop cooking; toss with sauce, butter, pasta, or rice | Reheat only 4 to 6 minutes |
| Dry shrimp | Too much heat or too much time | Finish with lemon, butter, or sauce | Check earlier and stop at opaque |
| Bland shrimp | Seasoning slid off ice | Toss hot shrimp with butter, lemon, and seasoning | Season after frost loosens |
| Watery basket | Surface ice melted | Drain the basket and finish gently | Use one layer and shake halfway |
| Uneven cooking | Clumped, crowded, or mixed-size shrimp | Separate pieces and add 1 minute if needed | Spread into a mostly single layer |
| Slightly underdone | Jumbo pieces or cold center | Add 1 minute and check the thickest piece | Use the longer range for jumbo shrimp |
Best Uses for an Imperfect Batch
Not every batch has to become a perfect shrimp plate. If the texture or seasoning is not exactly where you wanted it, turn the shrimp into the kind of meal that helps it shine anyway.
| If the shrimp turned out… | Use it for… |
|---|---|
| Tender and juicy | Tacos, bowls, salads, pasta, or peel-and-eat plates |
| A little watery | Fried rice, noodles, saucy bowls, or garlic butter pasta |
| Slightly rubbery | Chopped wraps, rice bowls, pasta, or saucy stir-fries |
| Mild or bland | Stir-fry sauce, peanut sauce, Cajun butter, lemon butter, or chutney |
| Shell-on | Peel-and-eat plates, seafood bowls, or simple lemon-and-salt platters |
This is one of those freezer shortcuts that gets easier every time you make it. The first batch teaches you the bag; the next one feels simple.
Batch fixed? Turn it into tacos, rice bowls, pasta, or fried rice.
Flavor Variations
This is where the plain batch becomes dinner. Once you know the timing, keep the base method the same and change the seasoning or finish.
- Garlic butter shrimp: finish with melted butter, garlic, lemon, and parsley so the hot shrimp turns glossy and bright. Best with pasta, rice bowls, bread, or vegetables.
- Old Bay-style shrimp: use seafood seasoning, lemon, and black pepper for a simple peel-and-eat feel. Good for salads, tacos, and quick plates.
- Cajun shrimp: use Cajun seasoning, paprika, and a little cayenne for smoky heat. Serve in tacos, wraps, or grain bowls.
- Lemon pepper shrimp: use lemon zest, black pepper, and garlic powder for a bright, sharp finish. Good for salads, pasta, and quick lunches.
- Taco shrimp: use chili powder, cumin, and lime. Serve in tacos, burrito bowls, lettuce cups, or with mango habanero sauce.
- Light masala shrimp: use garlic, chili, black pepper, and a tiny pinch of turmeric or garam masala. Finish with green chutney.
Add fresh garlic or butter near the end or after cooking. Garlic can burn if it sits in the hot basket too long, and butter can brown quickly if it drips under the shrimp.
What to Serve With Air Fryer Frozen Shrimp
Think of this as a fast protein you can drop into whatever meal is already halfway planned. The shrimp cook quickly, so they work especially well with rice, pasta, noodles, salads, and wraps.
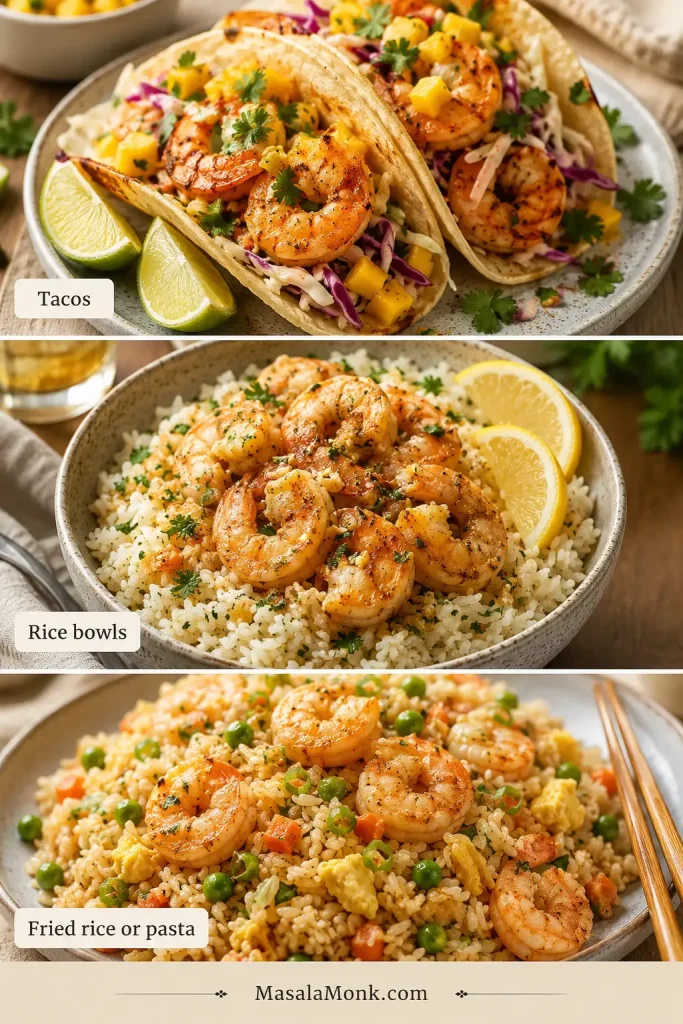
- Shrimp tacos with slaw, lime, and mango salsa
- Rice bowls with vegetables, garlic butter, lemon, and herbs
- Pasta with lemon butter, garlic, tomato sauce, or a quick scampi-style finish
- Salads with avocado, cucumber, corn, herbs, or greens
- Wraps with lettuce, onion, spicy mayo, and a squeeze of lime
- Noodle bowls with chili oil, peanut sauce, or soy-lime dressing
- Quick shrimp fried rice
- Shrimp cocktail-style plates with lemon and dipping sauce
For pasta, fried rice, or saucy dishes, stop cooking as soon as the shrimp are just done. They will keep warming when tossed with the rest of the meal.
Storage and Reheating
Air fryer shrimp is best right after cooking, but leftovers can still be useful. Cool the shrimp, store it in an airtight container, and refrigerate for up to 3 days. Reheat gently at 300°F to 350°F / 150°C to 175°C for 1 to 3 minutes, just until warm.
Shrimp is not very patient the second time around, so reheat gently and avoid warming it again and again. Cold leftover shrimp is often kinder than reheated shrimp, especially in salads, wraps, shrimp cocktail-style plates, or quick lunch bowls.
Breaded, Popcorn, Coconut, or Scampi Shrimp
These are not plain uncoated shrimp, so let the bag’s directions lead. Coated shrimp plays by slightly different rules: the outside needs to crisp while the inside heats through.
- Frozen breaded shrimp: use a single layer, shake or flip, and follow package timing so the coating crisps.
- Popcorn shrimp: shake often because the pieces are small and can brown quickly.
- Frozen coconut shrimp: watch the coating closely because coconut can brown faster than the inside heats.
- Scampi-style frozen shrimp: use scampi-specific package directions because butter, sauce, and coating can change the method.
As a loose starting point, many frozen breaded, popcorn, and coconut shrimp products cook around 390°F to 400°F / 200°C to 205°C for 7 to 12 minutes, but the package should lead. Product size, coating, brand, and raw or precooked status can change the timing quickly.
Plain shrimp is about tenderness; coated shrimp is about crispness.
FAQs
Do you need to thaw shrimp before air frying?
No. Plain frozen shrimp can go straight into the air fryer. If the pieces are icy or clumped, loosen them briefly first, then season and finish cooking.
How long does frozen shrimp take in the air fryer?
Most frozen raw shrimp takes 8 to 10 minutes at 400°F / 205°C. Small shrimp can finish closer to 6 minutes, while jumbo shrimp may need 9 to 12.
What temperature works best for frozen shrimp?
For raw frozen shrimp, 400°F / 205°C is the best starting point. With precooked shrimp, use 375°F to 400°F / 190°C to 205°C and stop once hot.
Raw or cooked frozen shrimp: what changes?
Raw shrimp needs to cook through. Precooked shrimp only needs to get hot. That one difference changes the timing completely.
How do you air fry precooked frozen shrimp?
Air fry precooked frozen shrimp at 375°F to 400°F / 190°C to 205°C for 4 to 6 minutes, shaking halfway. Stop once the pieces are hot.
Can you air fry frozen shrimp with vegetables?
Yes, but vegetables often need more time and frozen vegetables can release water. Start firmer vegetables first, then add shrimp near the end.
Can you air fry frozen shrimp without oil?
Yes, but a little oil helps seasoning stick and improves texture. For oil-free shrimp, cook in one layer and finish with lemon or sauce.
What do shrimp size numbers like 16/20 or 31/40 mean?
The number tells you roughly how many shrimp are in one pound. Lower numbers mean larger shrimp, so 16/20 needs more time than 31/40 or 41/50.
Are frozen prawns cooked the same way as shrimp?
Yes. Frozen prawns can be air fried like frozen shrimp. Let size guide the timing.
Should shell-on frozen shrimp be peeled before cooking?
No. You can air fry shell-on frozen shrimp, then peel after cooking. Cook until the shells turn pink and the flesh is opaque.
Why did my air fryer shrimp turn rubbery?
Rubbery shrimp almost always means it went too long, especially if it was precooked. Use a shorter time and stop once hot.
Why is there water in the air fryer basket?
Frozen shrimp releases moisture as surface ice melts. Use one layer, shake halfway, separate clumps early, and drain excess liquid if needed.
What about frozen breaded shrimp or popcorn shrimp?
Treat breaded, popcorn, and coconut shrimp as coated products. Start with package directions, then watch for a crisp outside and a fully heated center.
Back to Quick Answer · Back to Recipe Card
Final Tender Shrimp Check
Before you serve, the shrimp should be opaque through the center, loosely curled, and hot without feeling tight or dry. Raw shrimp should have no grey or glassy center. Precooked shrimp should be hot, not curled tighter and tighter.
Once you learn to read the bag, frozen shrimp becomes one of the easiest freezer proteins to trust. Loosen icy pieces if needed, season the shrimp instead of the frost, and stop as soon as the center is opaque. That is how a forgotten bag of shrimp turns into dinner instead of a guessing game.