Posted on Leave a comment

New Orleans BBQ Shrimp Recipe: Buttery, Peppery & Easy

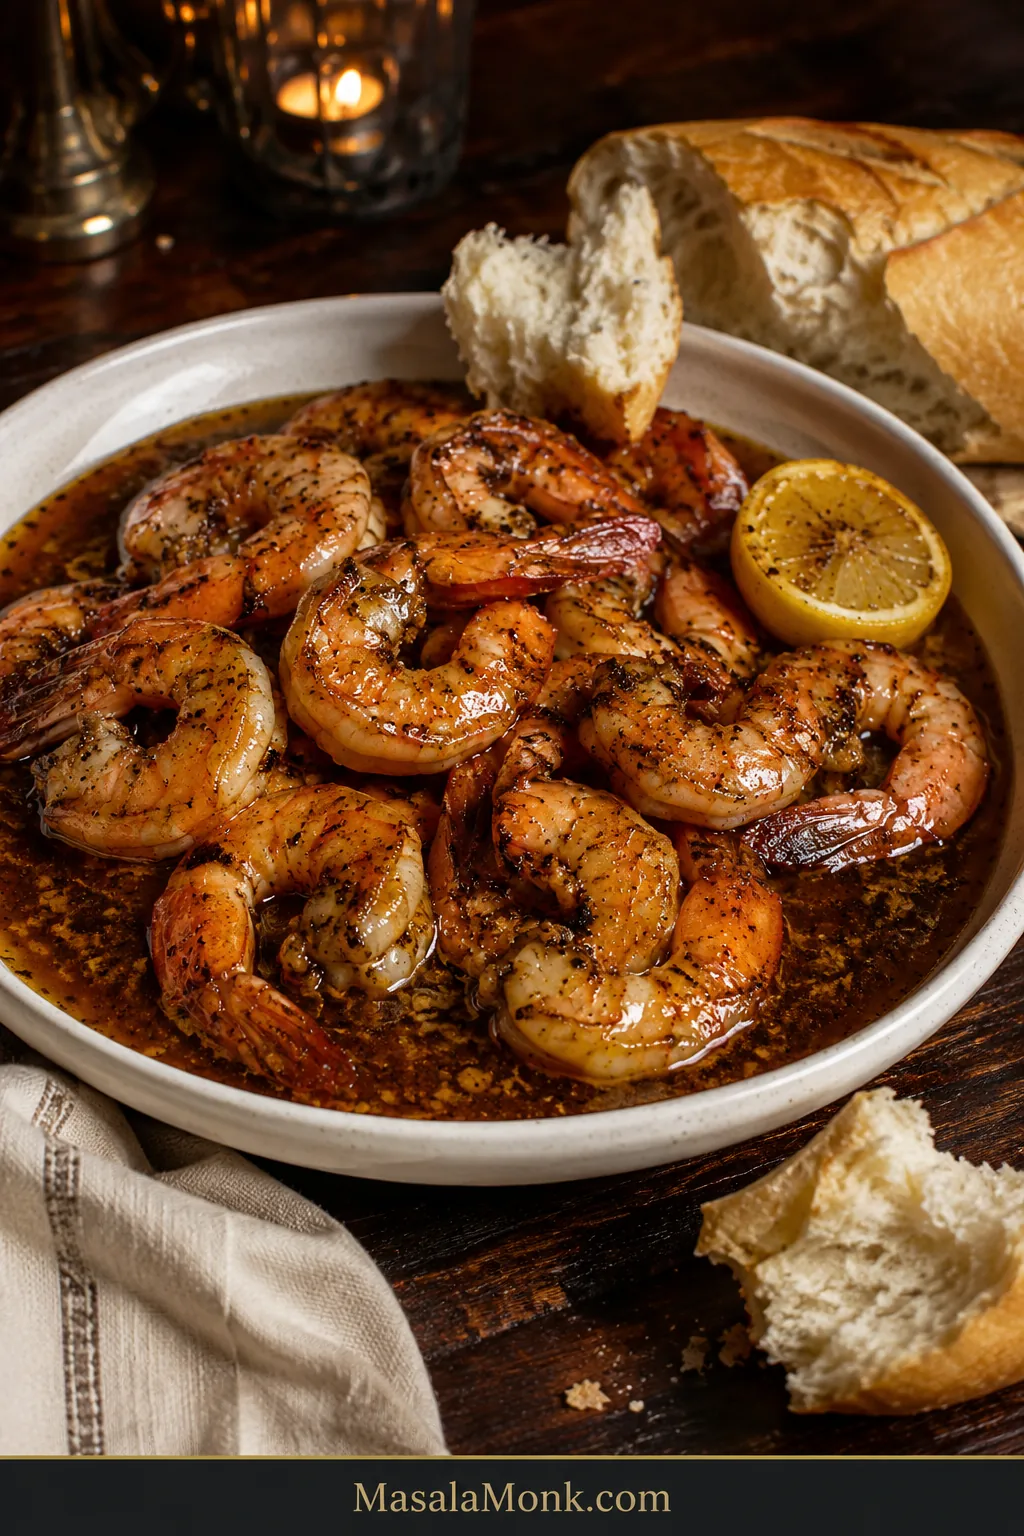
New Orleans BBQ shrimp in a shallow ivory bowl with glossy dark peppery sauce, lemon and torn French bread.

New Orleans BBQ shrimp arrives at the table with its own plan for the evening: plump shrimp, cracked black pepper, lemon, garlic and enough silky butter sauce to make warm French bread feel less like a side and more like essential equipment.

Worcestershire, garlic, rosemary, lemon and black pepper simmer down around the shrimp before cold butter finishes the concentrated pan juices. The result is savory, bright, deeply peppered and richly buttery.

The cooking moves quickly, but it isn’t difficult. Salt intensifies as the liquid reduces, shrimp toughen if they linger too long, and the butter finish needs gentle heat. Get those moments right and you have juicy shrimp, bold black pepper and a sauce worth reaching across the table for.

Quick Answer

New Orleans BBQ shrimp is jumbo shrimp cooked in a buttery Worcestershire sauce with black pepper, lemon and garlic—no grill or bottled barbecue sauce involved. For this version, use 1½ lb / 680 g raw 16/20 shrimp. Reduce the seasoned liquid first, cook the shrimp until almost done, move them to a bowl, then finish the pan with cold unsalted butter before returning the shrimp briefly.

  • Hold the salt. Worcestershire, hot sauce and seasoning may already provide enough.
  • Pull the shrimp slightly early. The thickest part finishes during the final toss.
  • Use gentle heat for the butter. Add it gradually so the sauce turns smooth and unified.

The sauce can wait; the shrimp can’t.


New Orleans BBQ Shrimp Recipe

Juicy jumbo shrimp in a buttery, garlicky, boldly peppery Worcestershire sauce made for warm French bread.

Prep10–15 minutes
Cook10–15 minutes, plus 2–4 minutes if batching
TotalAbout 25–30 minutes; up to 35 minutes with batches
Yield2 generous mains or 4 appetizers
Shrimp1½ lb / 680 g 16/20 shrimp, roughly 24–30
Pan12–14-inch / 30–35-cm heavy skillet or sauté pan
HeatBoldly peppery; chile heat adjustable
Finished SauceSilky, pepper-flecked and fluid enough for dipping bread

Ingredients

  • 1½ lb / 680 g raw 16/20 shrimp, preferably headless easy-peel shell-on; thawed if frozen
  • 8 oz / 225 g cold unsalted butter, cut into small pieces
  • 5 tbsp / 75 ml Worcestershire sauce
  • ¼ cup / 60 ml amber lager or mild amber ale, dry white wine, or unsalted/low-sodium shrimp or chicken stock
  • 1–2 lemons, for 2 tbsp / 30 ml fresh juice plus wedges for serving
  • 4 medium garlic cloves, finely minced or grated
  • 2 tsp coarsely cracked black pepper
  • 2 tsp finely ground black pepper; use 1 tsp for a gentler pepper bite
  • 1 tsp sweet paprika
  • ½ tsp dried thyme
  • ¼ tsp dried oregano
  • ¼ tsp cayenne pepper, or less for mild heat
  • 1 tsp finely chopped fresh rosemary
  • 1–2 tsp Louisiana-style hot sauce, to taste
  • Kosher salt, only if needed after tasting the finished sauce
  • 1 small French loaf or baguette, warmed and torn or sliced for serving
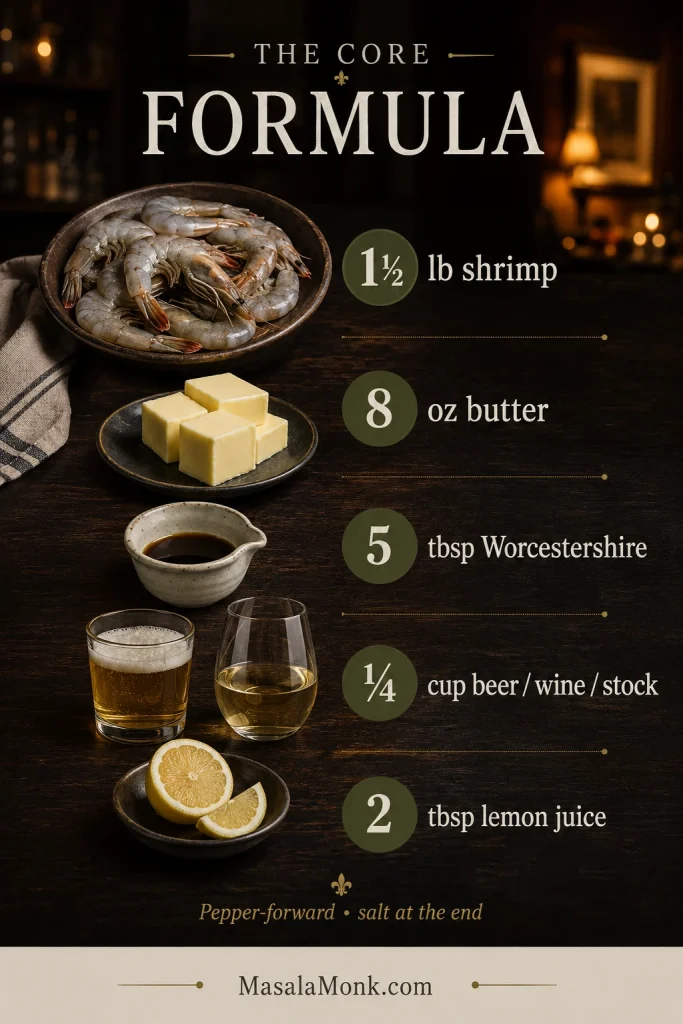
Recipe formula showing 1½ pounds shrimp, 8 ounces butter, 5 tablespoons Worcestershire, ¼ cup beer, wine or stock, and 2 tablespoons lemon juice.
The core ratio keeps the sauce rich, balanced and fluid enough to reduce before the final butter finish.

About the butter: the amount is intentional. Halving only the butter leaves the Worcestershire much sharper and can make the finished sauce taste noticeably saltier, so keep the ratio as written on your first batch.

Before the Pan Gets Hot

Measure the Worcestershire and cooking liquid, juice the lemon, chop the garlic and rosemary, measure the dry spices, and cut the butter into small pieces. Keep the butter cold.

Frozen shrimp should be completely thawed, drained and patted dry. Once the Worcestershire mixture starts reducing, the rest moves quickly.
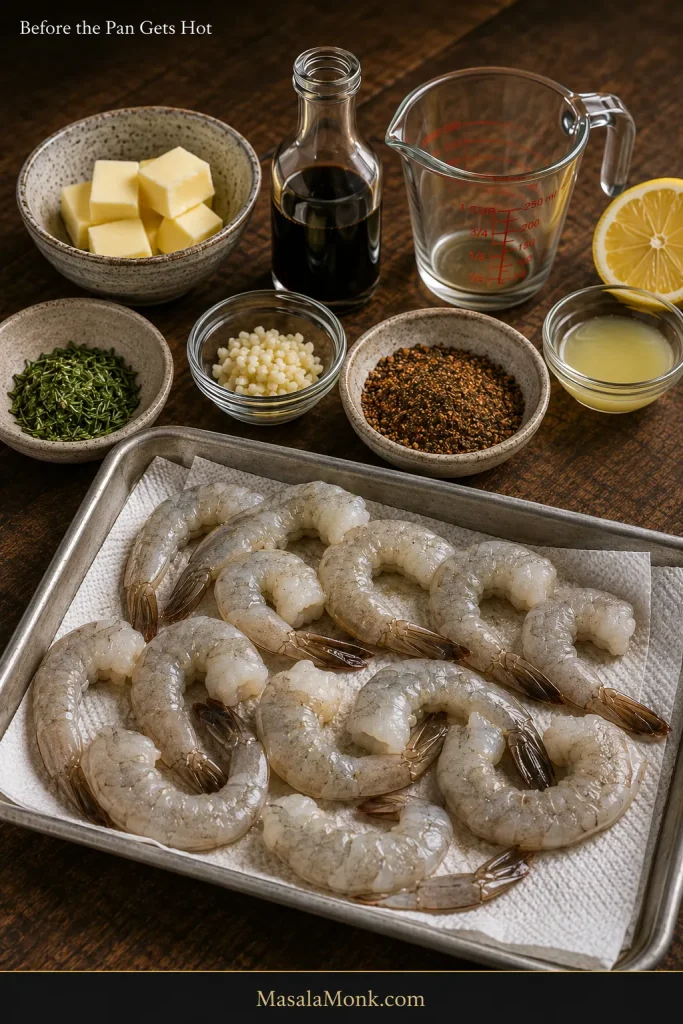
Raw shell-on shrimp beside cold butter, Worcestershire, measured cooking liquid, lemon, garlic, rosemary and spices arranged for cooking.
Before the pan gets hot, dry shrimp solve the moisture problem while measured ingredients solve the timing problem. Both matter once this fast sauce starts moving.

1. Mix the Seasoning

Combine the cracked black pepper, ground black pepper, paprika, thyme, oregano and cayenne. Set the mixture beside the stove.

Leave the separate salt for later. Taste the finished sauce before deciding whether it needs any.

2. Build the Sauce Base

Set the skillet over medium heat and add 1 tbsp / 14 g of the butter.

When it foams, add the garlic and rosemary. Cook for 20–30 seconds, just until fragrant.

Add the Worcestershire, beer, wine or stock, lemon juice, hot sauce and dry seasoning mixture. Stir and bring the liquid to a lively simmer.

Reduce for roughly 3–5 minutes. About one-quarter to one-third of the initial liquid should evaporate. Draw a spoon or spatula through the pan: the liquid should leave a brief trail, then flow back into place. Stop before it turns thick or sticky.
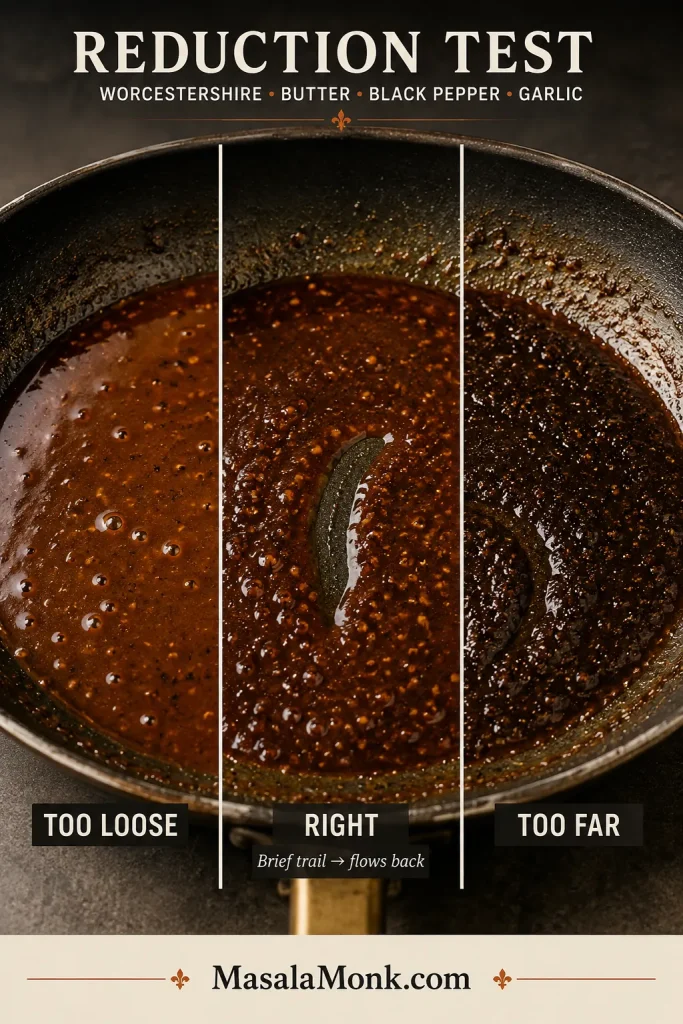
Three stages of dark sauce reduction labeled too loose, right and too far, with the correct stage leaving a brief trail that flows back.
Stop earlier than a finished sauce might suggest. The right pre-shrimp reduction still flows because shrimp juices and cold butter will change its concentration again later.

3. Cook the Shrimp

Add the shrimp in one mostly even layer. If a 12-inch skillet feels crowded, cook half at a time.
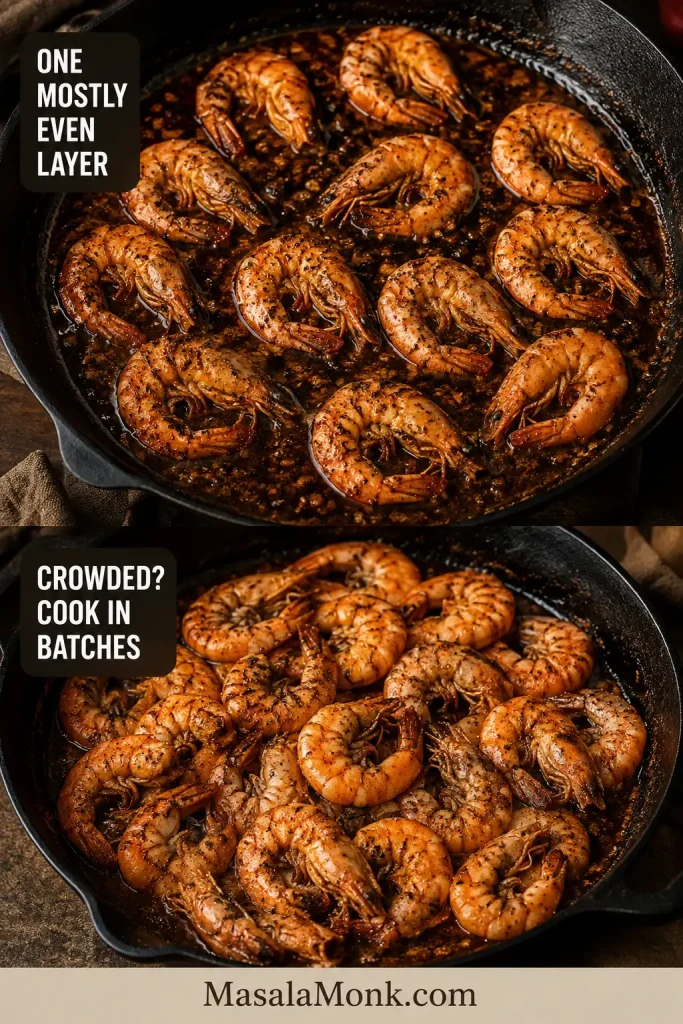
Comparison of jumbo shrimp arranged in a mostly even skillet layer versus shrimp crowded tightly together.
Leave visible space between shrimp; crowding traps steam and makes both doneness and sauce concentration harder to judge.

Cook for about 1–2 minutes on the first side, then turn. Continue until the shrimp are mostly pearly and opaque, with the thickest part just shy of done. They should be starting to feel springy.

Transfer them to a bowl. Smaller shrimp may reach that point sooner, so pull those first.

Cooking two batches? Check the liquid before the second batch. If it has tightened noticeably, stir in 1–2 tbsp / 15–30 ml unsalted stock or water so it moves freely again.

4. Take a 30-Second Sauce Check

With the shrimp resting in the bowl, look at what remains in the skillet.

  • Concentrated and flowing: move on to the butter.
  • Thin from shrimp juices: simmer for another 30–60 seconds.
  • Very dark or tight: stir in 1 tbsp / 15 ml unsalted stock or water.
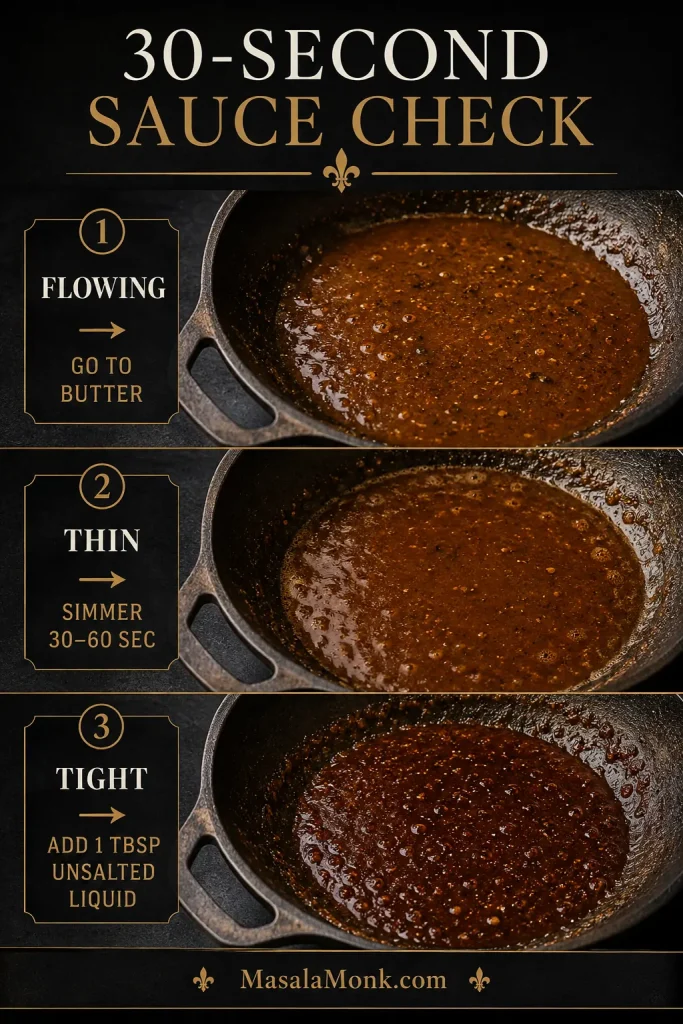
Three post-shrimp sauce states: flowing sauce ready for butter, thin sauce needing more simmering, and tight sauce needing a little unsalted liquid.
Once the shrimp come out, read the pan again. Their juices may have loosened the reduction, so the sauce you have now matters more than how it looked a minute earlier.

5. Finish With Cold Butter

Turn the heat low. If the liquid is still boiling hard, slide the skillet off the burner for 20–30 seconds.

Add the remaining cold butter a few pieces at a time, stirring or whisking steadily. Let each addition disappear before adding more.
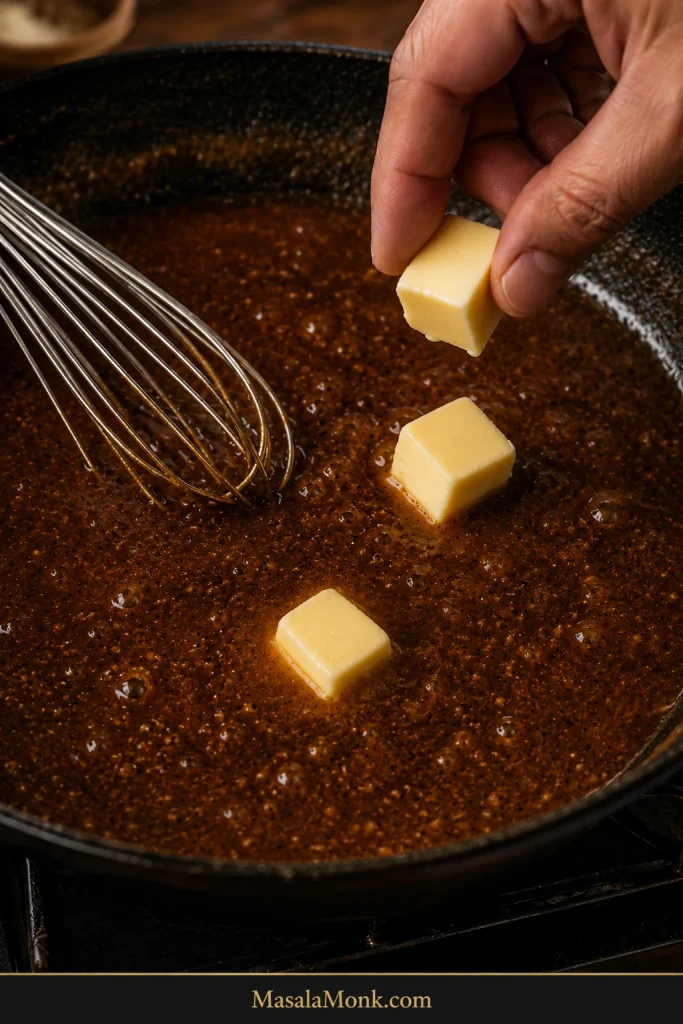
Cold butter pieces being added gradually to dark pepper-speckled sauce while a whisk stirs the skillet over gentle heat.
At this stage, temperature matters more than speed. Gentle heat gives the cold butter time to join the Worcestershire reduction instead of separating into an oily layer.

The reduced liquid will briefly look streaky, then become smooth and unified. It should lightly coat a spoon and flow back into the skillet.

“Emulsion” sounds fussier than it is here. Cold butter, gentle heat and steady stirring do most of the work.

6. Finish the Shrimp and Taste

Return the shrimp and any juices from the bowl. Toss over very low heat just until the thickest pieces finish cooking and everything is coated—usually about 20–30 seconds. Turn off the heat immediately.

Press one gently. It should give a little and spring back, with tender flesh beneath the surface. A hard, tight texture means the shrimp have gone too far.

Taste the sauce. Add salt only if it genuinely needs it. A squeeze of lemon brings brightness; another dash of hot sauce raises the chile heat without muting the black pepper.

Serve immediately in shallow bowls with warm French bread, lemon wedges and plenty of napkins.

Scaling to 3 lb / 1.36 kg: two complete batches are easier to control than one crowded pan. A genuinely wide sauté pan can handle a larger batch, but evaporation changes with pan size, so watch how the sauce moves instead of simply doubling the cooking time.
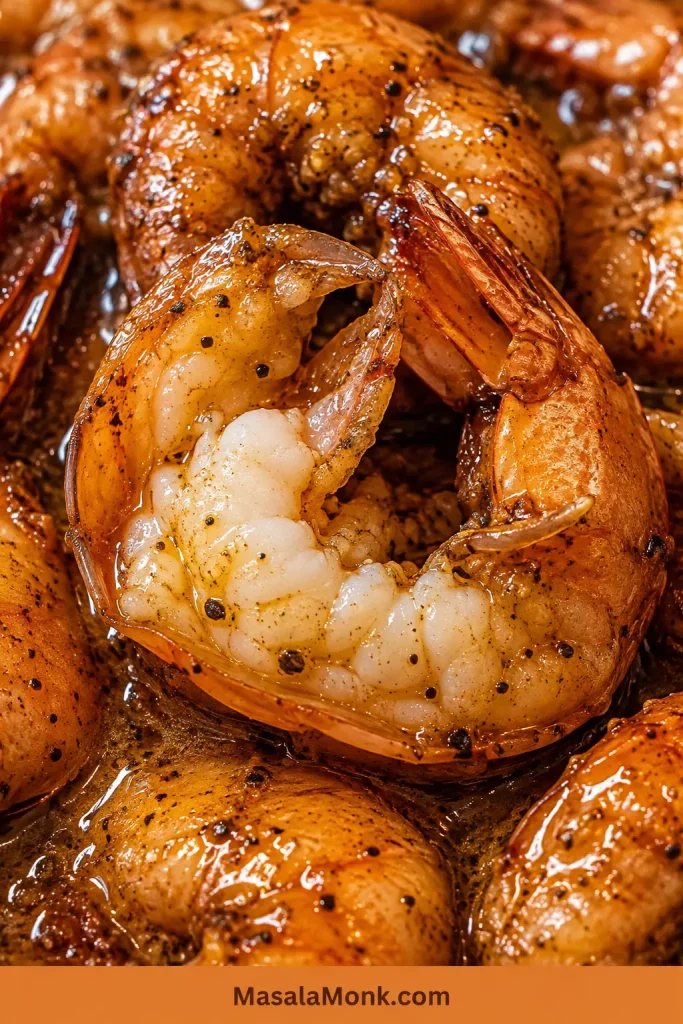
Close-up of a plump cooked shrimp coated in glossy peppery sauce with moist flesh visible beneath the shell.
The inside tells you more than the curl: properly cooked shrimp still look plump and moist beneath the shell, rather than tight, shrunken or chalky.

In This Guide

What Is New Orleans BBQ Shrimp?

New Orleans BBQ shrimp is a richly sauced shrimp dish built around butter, black pepper, Worcestershire and lemon. Garlic, herbs, hot sauce and beer, wine or stock may join the skillet depending on the cook and the version.

Why Is It Called BBQ Shrimp If It Isn’t Barbecued?

No one explanation for the name is definitive. A common theory is that “barbecue” refers to the dish’s reddish-brown color and intensely seasoned sauce, not to grilling. Whatever the original reasoning, BBQ shrimp became the New Orleans name for this buttery, pepper-forward preparation.
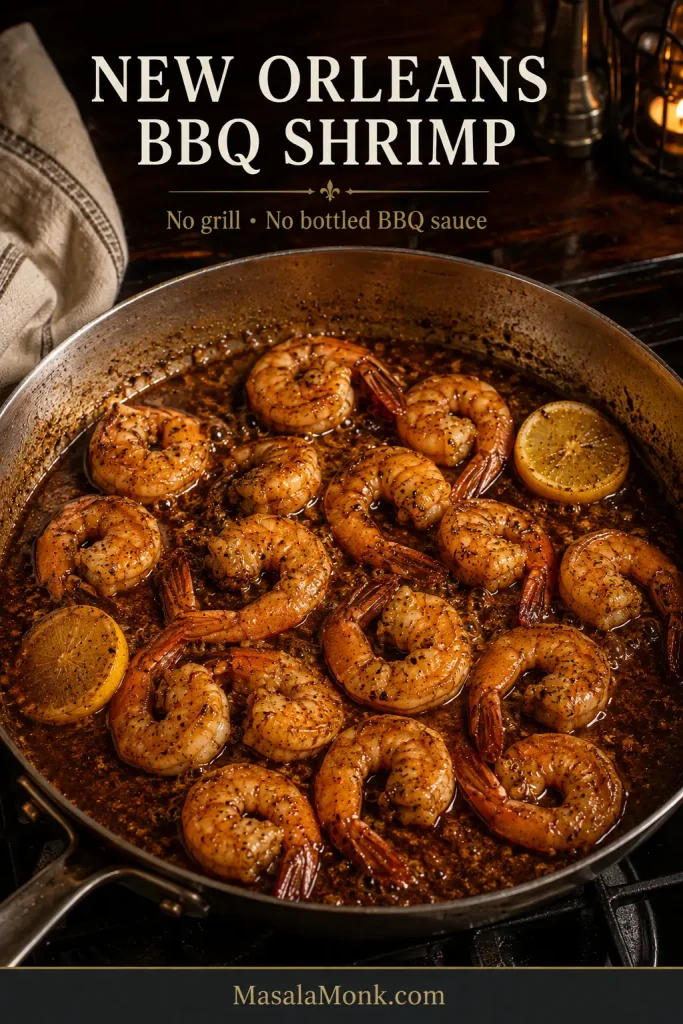
Jumbo shrimp cooking in a stovetop skillet filled with dark peppery Worcestershire-butter sauce, with no grill or bottled barbecue sauce.
Here, “BBQ” means the saucy New Orleans preparation—not grilling.

Pascal’s Manale is closely associated with the dish’s origin. From there, restaurant and home versions moved in many directions, changing the balance of butter, Worcestershire, pepper, beer, stock and herbs.

Whatever the version, there’s usually plenty of sauce. You want enough left in the bowl for bread after the last shrimp is gone. If direct heat over a grill is what you were looking for, grilled shrimp follows a different cooking path.

Why the Famous New Orleans Versions Taste Different

Sometimes what you’re chasing is not New Orleans BBQ shrimp in general. It is the bowl you remember from one restaurant, one trip or one table.

Maybe that sauce stained the bread with Worcestershire and black pepper. Maybe your favorite was so buttery it almost seemed creamy. Another version may have tasted noticeably malty from beer or brighter from lemon.

Well-known versions show just how wide the style can be.

Version or Reference PointWhat Stands Out
Pascal’s Manale tradition The restaurant most closely associated with the dish’s origin; recreations of the style vary considerably.
Mr. B’s Bistro Exceptionally rich in butter and Worcestershire, with plenty of black pepper and a cold-butter finish.
Paul Prudhomme Published versions use much more seasoning, stock and beer, with far less Worcestershire than Mr. B’s style.
Emeril Lagasse versions Some published versions build a more elaborate concentrated shrimp base and may include cream along with butter.

The published Mr. B’s Bistro BBQ shrimp recipe, for example, uses substantially more butter and Worcestershire than the skillet here. That doesn’t make one version the correction of another; it helps explain why two bowls carrying the same name can taste surprisingly different.

What to Expect From This Version

This one leads with black pepper, followed by Worcestershire, butter and lemon. The sauce has enough body to cling to the shrimp but stays fluid for bread, without the cream used in some other versions.

The sauce-first method lets you get the liquid where you want it before the shrimp and butter change what you’re seeing in the pan.

Is New Orleans BBQ Shrimp Cajun or Creole?

New Orleans BBQ shrimp belongs first to New Orleans. It is commonly associated with the city’s Creole cooking tradition, while modern recipes may use products labelled either Cajun or Creole seasoning.

The two Louisiana traditions have different histories and geographic roots, even though they influence one another. For this skillet, the useful question is what the seasoning actually contains—especially how much salt it brings.

Which Shrimp Should You Buy?

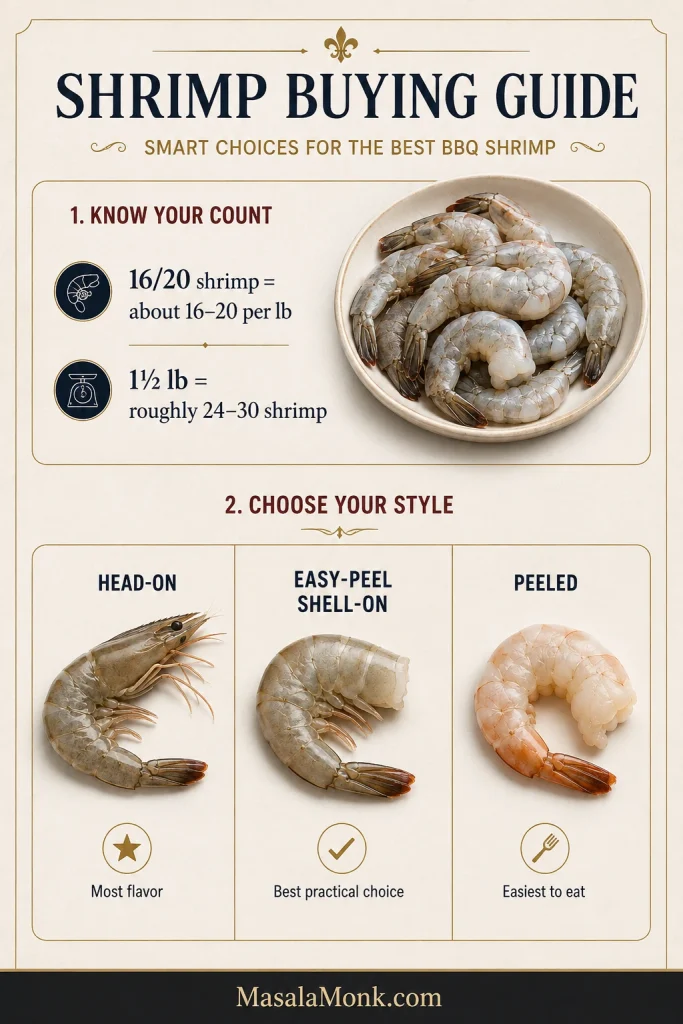
The count printed on the package tells you more than loose labels such as “large” or “jumbo.” Look for 16/20 shrimp, meaning there are approximately 16 to 20 shrimp per pound.

For 1½ lb / 680 g, that works out to roughly 24 to 30 substantial shrimp. They are large enough to give you some breathing room during the fast cook while remaining easy to find in many supermarkets.

What You BuyWhy Choose It?What Changes?
Head-on, shell-onMost flavor from the heads and shells; classic peel-at-the-table experienceMessier and harder to source outside Gulf regions
Headless, easy-peel, shell-onBest practical choice for most home cooksVery good flavor and moisture protection with easier cleaning and peeling
PeeledEasiest at the table, especially over grits or riceCooks faster and contributes less shell flavor
Shrimp buying guide comparing head-on shrimp, headless easy-peel shell-on shrimp and peeled shrimp, with 16/20 count shown as the recommended size.
For most cooks, 16/20 easy-peel shell-on shrimp balance generous size, flavor and easier eating.

Head-On Shrimp Are an Upgrade, Not an Entrance Exam

Good head-on shrimp are worth using when they’re readily available. Their heads and shells add another layer of seafood richness as they cook.

They aren’t required. Headless shell-on shrimp make an excellent skillet, and raw easy-peel shrimp are often the sweet spot for cooks shopping far from Louisiana or the Gulf Coast.

If peeling buttery shrimp at the table sounds fun, choose shell-on. If it sounds annoying, use peeled shrimp and enjoy your dinner. Start checking peeled shrimp earlier because they cook faster.

Deveining and Frozen Shrimp

Easy-peel shrimp already have a slit along the back, so you can open it gently and lift out the vein with the tip of a small knife, skewer or toothpick. For intact shells, make a shallow cut along the back first and leave the rest of the shell in place.
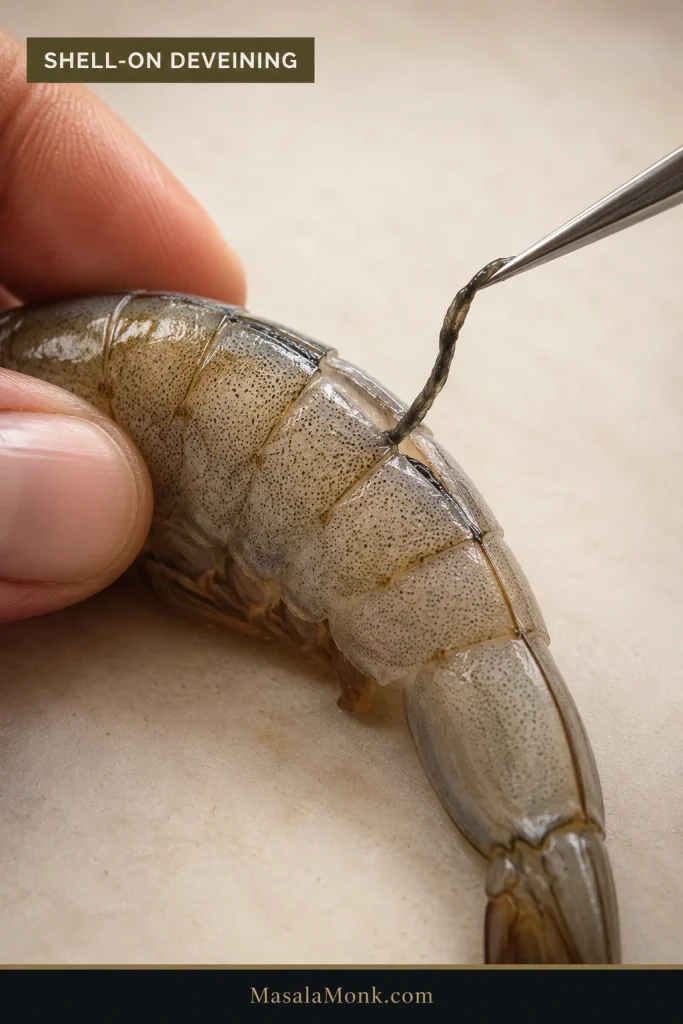
Raw headless shell-on shrimp with a shallow opening along the back while the dark vein is gently lifted out.
A shallow slit gives enough access to devein while leaving most of the shell intact.

Raw frozen shrimp are also a perfectly practical choice. Frozen doesn’t automatically mean soggy; excess surface water is the problem. Thaw them fully, drain well and pat them dry so they don’t flood and cool the skillet.

Shrimp prepped and ready? Jump back to the recipe.

What Makes the Sauce Work

New Orleans BBQ shrimp sauce starts with butter, Worcestershire, lemon, black pepper and garlic, often with herbs, hot sauce and beer, wine or stock. Once it reaches the skillet, the balance shifts as water cooks away and every savory, salty and acidic note becomes more concentrated.

Butter, Worcestershire + Salt

Worcestershire gives the sauce its deep savory tang. Butter softens its sharper edges and gives the pan enough richness to coat both shrimp and bread. That Worcestershire backbone is also what separates this dish from a simpler garlic-lemon butter skillet such as shrimp scampi.

Butter is part of the seasoning balance, not just extra richness. Cutting the butter aggressively while keeping all 5 tablespoons / 75 ml Worcestershire leaves the finished sauce much sharper.

Salt deserves the same attention. Worcestershire, hot sauce and packaged seasoning may already contain plenty, and every minute of reduction concentrates what’s there. Unsalted butter and a final taste check leave room to adjust at the end.
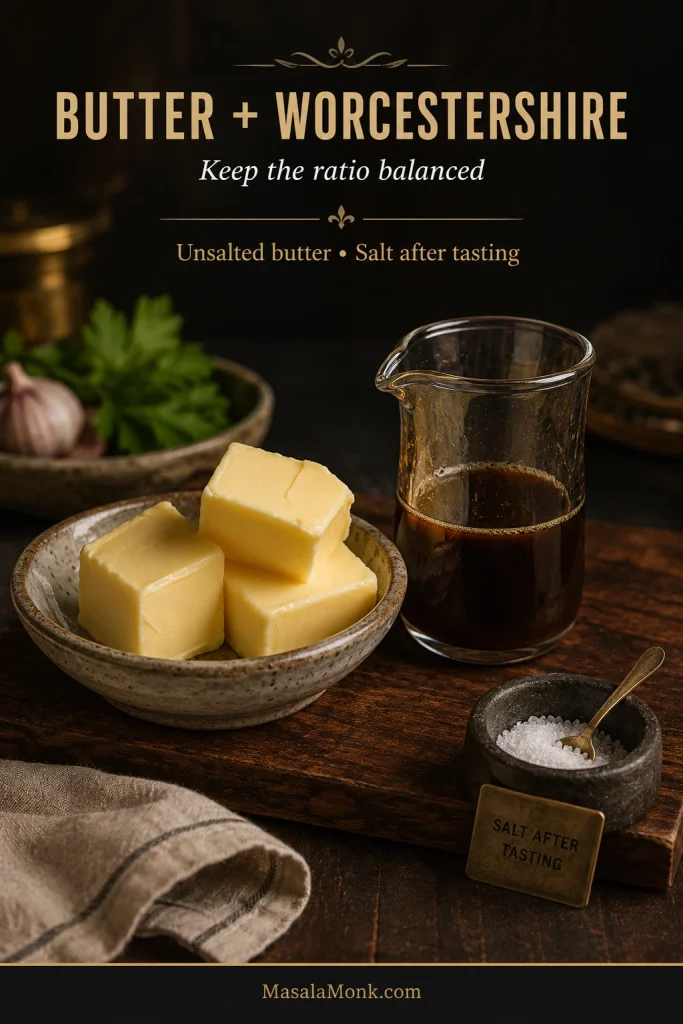
Unsalted butter beside Worcestershire sauce and a salt cellar set apart to show that extra salt is added only after tasting.
Unsalted butter preserves room to adjust after Worcestershire and hot sauce have concentrated.

That balance matters once dinner starts. The sauce should be bold enough to season every shrimp while still leaving you eager to drag another piece of bread through the bowl.

Can you make New Orleans BBQ shrimp without Worcestershire? You can make excellent buttered shrimp, but the flavor moves away from this particular style. Worcestershire brings salt, acidity, sweetness and fermented savoriness all at once, so there isn’t a simple equal-volume substitute that behaves exactly the same way.

Black Pepper + Seasoning

Black pepper is one of the flavors that makes this dish recognizable. Fine pepper disappears into the liquid and spreads its warmth throughout. Coarsely cracked pepper stays visible and delivers aromatic bursts as you eat.
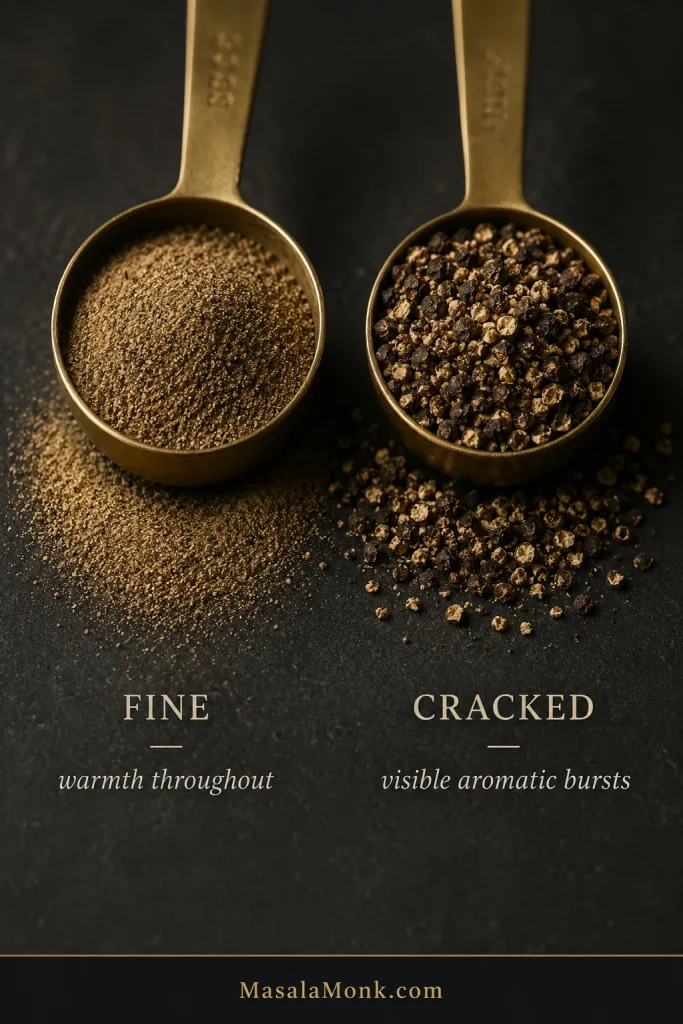
Close-up comparison of finely ground black pepper and coarse cracked black pepper showing their different particle sizes and textures.
Use both: fine pepper seasons the sauce; cracked pepper stays distinct.

Cayenne and Louisiana hot sauce control most of the chile heat, so a strongly black-peppered skillet doesn’t have to be painfully hot.

Commercial Cajun and Creole blends vary widely, especially in sodium. Here, paprika, thyme, oregano and cayenne are measured separately for predictable seasoning. If you prefer a packaged blend, use about 2 teaspoons in place of those four spices and check the label before adding salt.

Lemon, Garlic, Rosemary + Hot Sauce

Lemon keeps the richness lively, garlic deepens the savory side, and rosemary adds a restrained herbal note. Louisiana-style hot sauce is easiest to adjust at the end, once you know how much heat the cayenne and black pepper have already brought.

Rosemary belongs in the background. You want to notice that something herbal is there, not feel as though the shrimp landed under a rosemary bush.

Beer, Wine or Stock?

Use ¼ cup / 60 ml and choose the direction you want the sauce to take.

  • Amber lager or mild amber ale: deeper and lightly malty.
  • Dry white wine: brighter, with a sharper edge.
  • Unsalted or low-sodium stock: more neutral, alcohol-free and especially easy to control for salt.
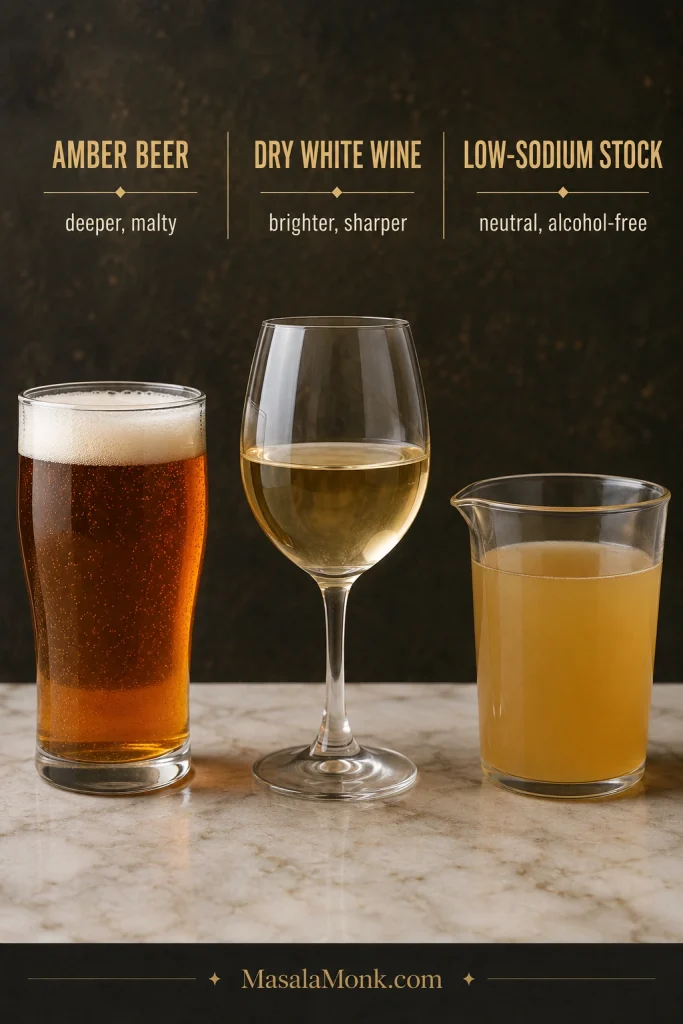
Amber beer, dry white wine and low-sodium stock shown as three cooking-liquid options with their flavor differences labeled.
Keep the volume at ¼ cup; change the liquid to change the direction.

Skip very bitter IPAs, which can dominate after reduction. For wine, use a dry bottle such as Sauvignon Blanc or Pinot Grigio and avoid salted “cooking wine.”

Want the pan cues instead? See what the sauce should look like at each stage.

The Shrimp and Sauce Are on Two Separate Clocks

Shrimp often reach their pull point before the sauce is ready. That’s why they leave the skillet while their centers still have a final touch of cooking left.

Let the sauce reduce to the right point, build the butter finish, then bring the shrimp back briefly. That short rest is how they reach the table juicy and tender even though the sauce gets a few extra minutes to come together.
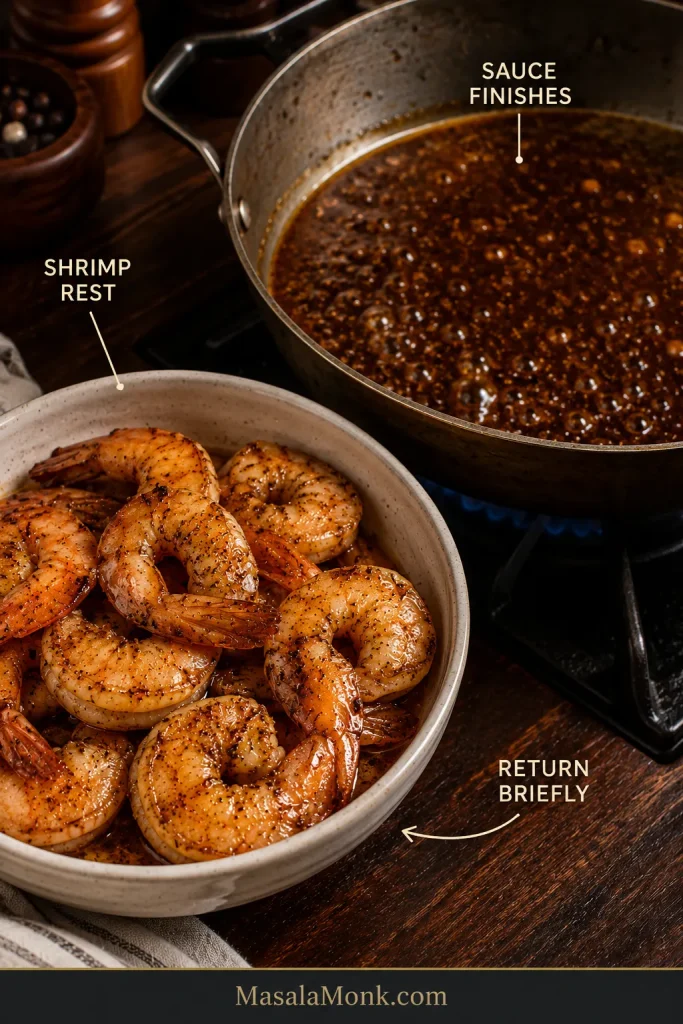
Cooked shrimp resting in a bowl beside sauce finishing in a skillet, with the shrimp shown returning briefly at the end.
Removing the shrimp buys the sauce extra time without overcooking the shrimp.

Unsure exactly when to pull them? See the shrimp doneness guide.

What the Sauce Should Look Like at Each Stage

The numbered recipe gives you the timing; these visual cues show what the sauce should actually look like.

  • Before the shrimp: the liquid has darkened and leaves a brief trail behind the spatula, but still flows easily across the pan.
  • After the shrimp: check again. Shrimp juices may have thinned it; extra pan time may have tightened it. Adjust it before the butter goes in.
  • During the butter: brief streakiness is normal at first. Keep stirring gently until the sauce becomes smooth and cohesive.
  • If it breaks: clear yellow butter begins pooling separately from the darker liquid. Stop the heat and use the rescue below.
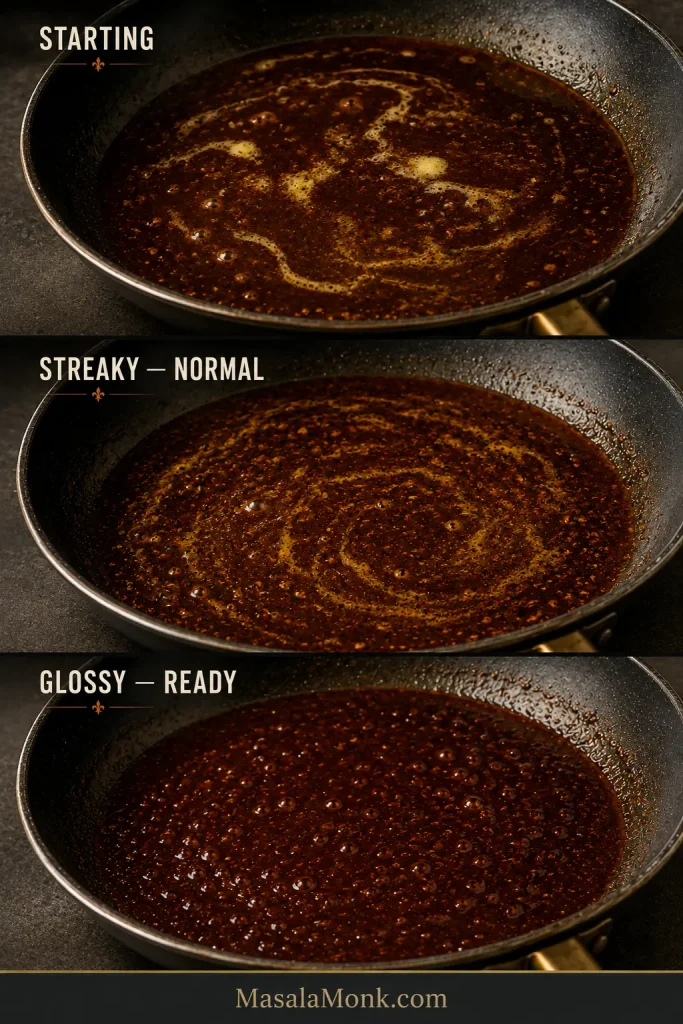
Three stages of sauce in the same skillet: butter starting to melt, a streaky middle stage, and a smooth glossy finished emulsion.
Streaky doesn’t automatically mean broken. Keep the heat gentle and watch for the moment the separate golden streaks become one glossy, freely moving butter emulsion.

When it comes together properly, the sauce coats the shrimp and then slips back into the bottom of the bowl instead of sitting heavily on top.

The clock gets you close; the pan tells you when to stop.

Something in the pan looks wrong? Jump to troubleshooting.

How to Know When the Shrimp Are Done

  • Pull: mostly pearly and opaque; the thickest center still needs its final touch of cooking.
  • Finished: pearly and opaque through the thickest part, with a gentle spring when pressed.
  • Overdone: hard or rubbery, often with a much tighter curl.

Still unsure? Take one of the largest shrimp out and peel it or cut through the thickest part. The center should be almost opaque at the pull point and completely opaque after the final toss.
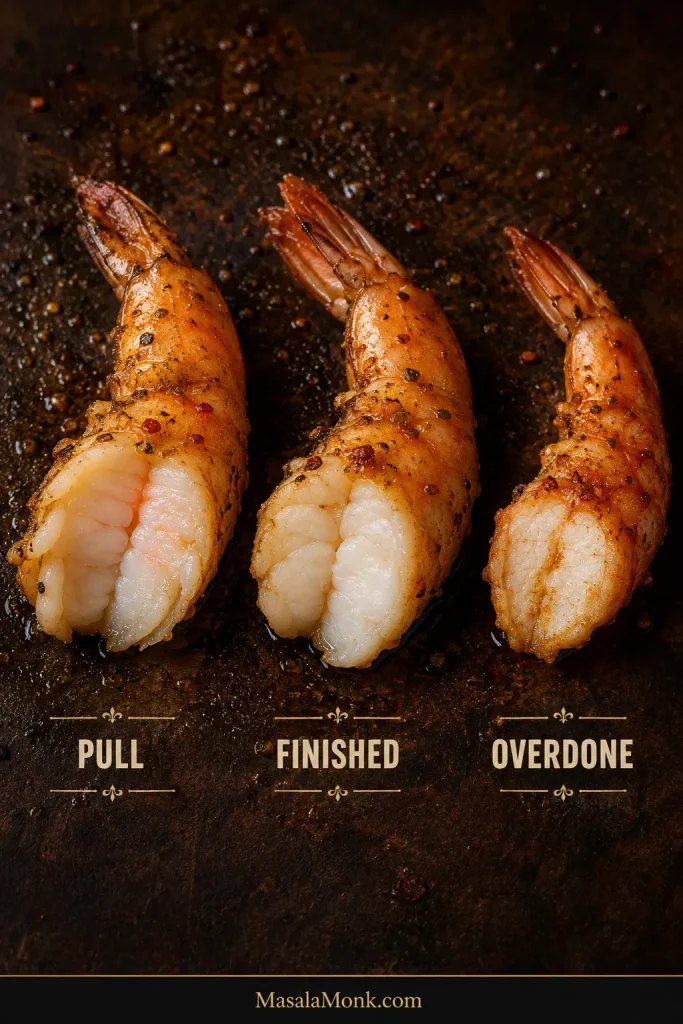
Three shrimp showing the pull point, properly finished juicy opaque flesh, and an overdone shrimp that looks tighter and drier.
When curl and color are ambiguous, check the thickest center: opaque, plump and still juicy.

That physical check is more useful here than repeatedly poking shell-on shrimp with a thermometer.

Ready to cook? Back to the recipe.

What About the Oven?

Oven versions are common, but the stovetop suits this recipe better. A skillet lets you watch the sauce reduce, pull the shrimp at the right moment and lower the heat immediately for the cold-butter finish.

Pan depth, oven temperature, shell status and sauce volume all change the timing. That’s why this particular version is better kept on the stovetop than given one catch-all baking time.

Troubleshooting: Fix the Sauce or Shrimp

Most problems show themselves before the skillet reaches the table. Match the symptom below, make the best correction you can, and use the cause to improve the next batch.

Sauce Balance Problems

The sauce is a little too salty

What probably happened: a salty seasoning blend brought in too much salt, or the sauce reduced farther than intended.

Fix it now: take the pan off the heat and add unsalted stock or water 1 tbsp / 15 ml at a time, tasting between additions.

If it is aggressively salty: there is no perfect tablespoon-sized rescue. More unsalted liquid and butter can dilute the salt, but you’ll also create more sauce and may need to rebalance the other flavors.

Next time: leave separate salt until the butter is in and you’ve tasted the finished sauce.

The sauce tastes harsh or overwhelmingly of Worcestershire

What probably happened: the cooking liquid reduced too far.

Fix it now: add unsalted stock or water gradually until the Worcestershire no longer tastes so harsh. Taste again before deciding whether the sauce needs more butter.

Next time: stop the first reduction while the liquid still runs easily across the skillet.

Sauce Texture Problems

The sauce is watery

What probably happened: the base needed more reduction, or wet shrimp released additional water.

Fix it now: keep the shrimp in their bowl and simmer the liquid briefly before finishing with butter.

Next time: dry thawed shrimp thoroughly and judge the reduction by how it moves in the pan.

The butter sauce looks oily or split

What probably happened: the pan was too hot or the butter went in too quickly.

Fix it now: remove the skillet from the heat and whisk in 1 tbsp / 15 ml cool water. Add another teaspoon or two only if needed.

Next time: keep the heat gentle and add the cold butter gradually.
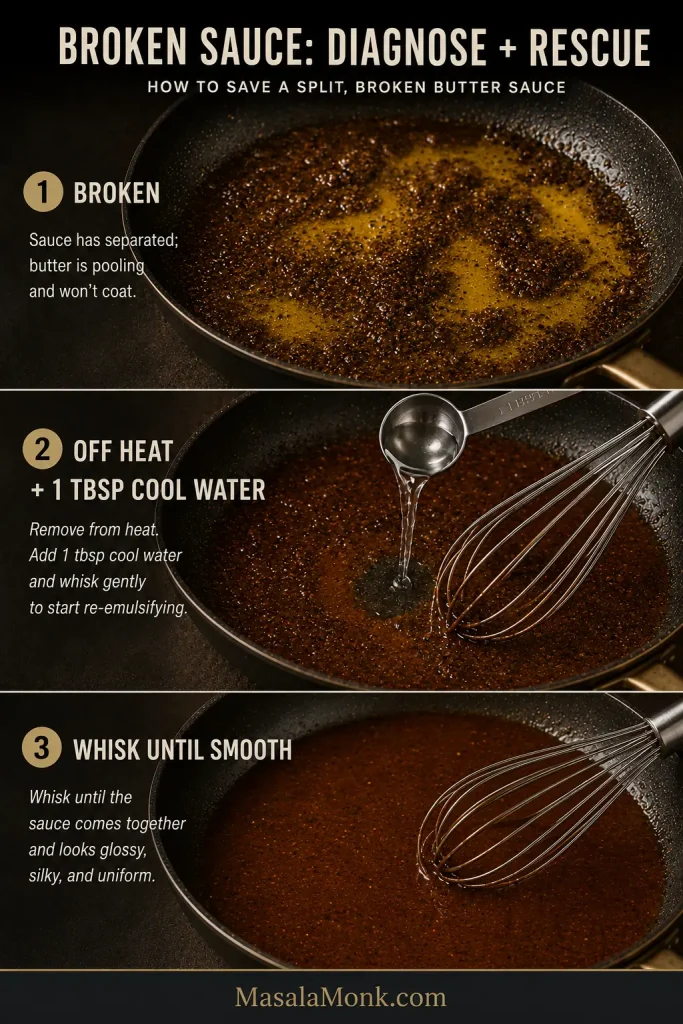
Three-step broken sauce rescue showing separated butter, 1 tablespoon cool water whisked in off heat, and a smooth glossy sauce afterward.
Cool water isn’t meant to dilute the sauce—it gives separated fat and liquid another chance to come together. First, however, get the skillet off the heat.

Shrimp Timing Problems

The shrimp are ready before the sauce

Nothing’s gone wrong. Move the shrimp to the bowl and finish the sauce without them.

The final return to the skillet is enough to finish their centers and coat them.

The shrimp are rubbery

What probably happened: they cooked too long.

Fix it now: overcooked shrimp can’t be made tender again.

Next time: remove them slightly earlier and let the short final toss finish the center.

Heat and Final Flavor Problems

The dish is hotter than you wanted

What probably happened: too much cayenne, hot sauce or a particularly hot seasoning blend.

Fix it now: if the sauce isn’t already loose, a splash of unsalted liquid and a little more butter can soften the chile heat.

Next time: keep the black pepper bold and reduce the cayenne or hot sauce.

It tastes flat even though it is salty enough

What probably happened: the pan needs acidity or fresh pepper.

Fix it now: try a small squeeze of lemon or freshly cracked black pepper before reaching for more salt.

Next time: taste salt, acidity and pepper as separate parts of the final balance.

Once the pan is back in balance, stop tinkering and get it to the table. This dish is at its best while the shrimp are still juicy and the butter sauce is warm enough to run into the bread.

Back to the recipe  ·  Back to top

What to Serve With New Orleans BBQ Shrimp

French Bread

Warm French bread is the first choice because the sauce is intentionally plentiful.

Look for a loaf with a thin crust and light, airy interior. A true New Orleans-style French loaf is ideal when available. Vietnamese bánh mì-style loaves are excellent substitutes because their relatively delicate crust and fluffy crumb soak up sauce more easily than a dense artisan baguette.
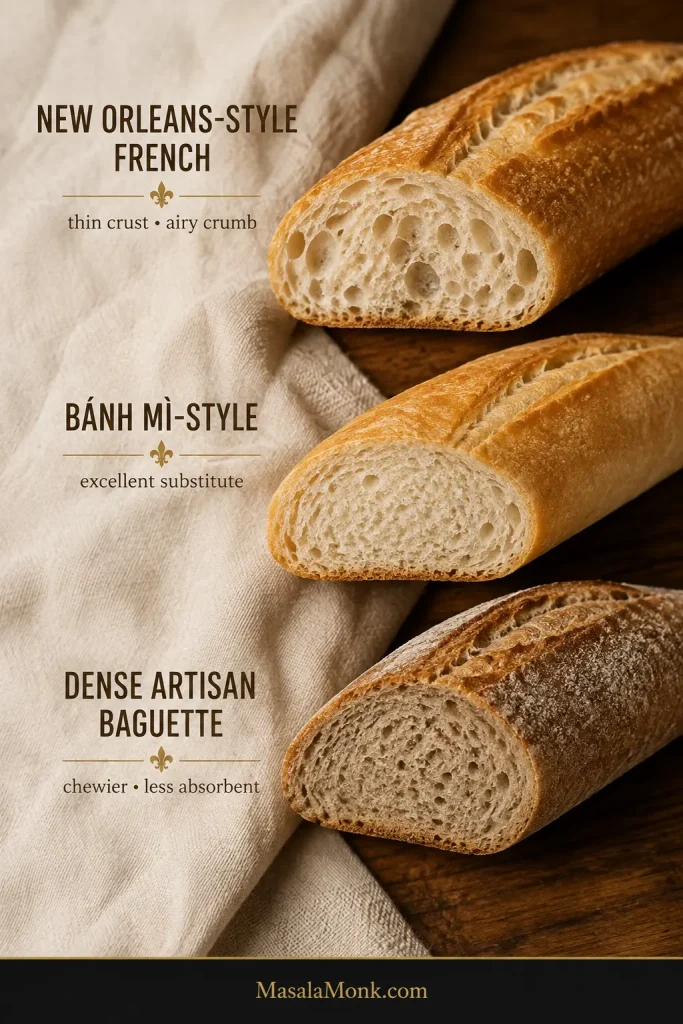
Cross-sections of New Orleans-style French bread, a bánh mì-style loaf and a dense artisan baguette showing differences in crust and crumb density.
For dipping, choose the loaf with the lightest, airiest crumb.

A light supermarket baguette works too. For a richer homemade option—not a traditional substitute for New Orleans French bread—homemade garlic bread is very good at making sure little sauce survives the meal.

Grits or Rice

Creamy grits turn the shrimp into a substantial Southern main course. Peeled shrimp are much easier to manage over a bowl of grits; shell-on shrimp suit a meal built around peeling and dipping.
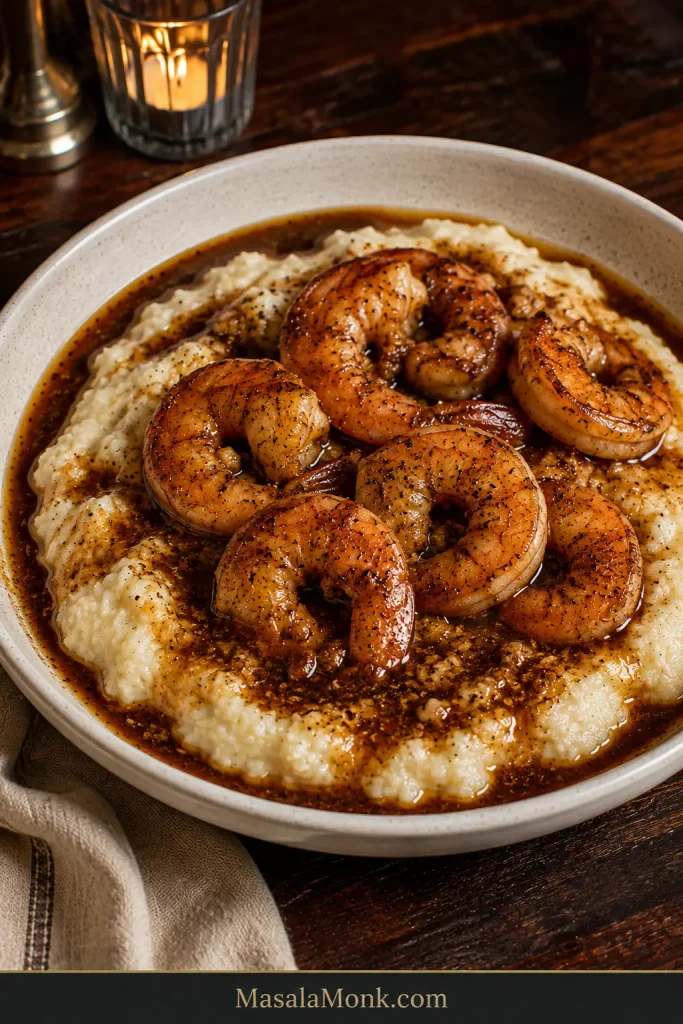
Large peeled BBQ shrimp served over creamy pale grits with dark pepper-speckled sauce spooned across the bowl.
For shrimp and grits, peeled shrimp make eating easier while the grits catch the sauce.

Plain white rice gives the buttery cooking juices somewhere else to land and makes the whole meal easier to eat with a fork.

Something Cool and Crisp

A fresh, acidic side gives the butter and pepper some contrast. A cucumber salad with vinegar, dill and onion can chill while you cook and is especially useful when the shrimp are the rich centerpiece of the meal.

Yes, It’s Supposed to Be a Little Messy

Shell-on shrimp call for napkins before the skillet reaches the table. Serve them in shallow bowls, put another bowl nearby for discarded shells and let everyone peel with their hands.
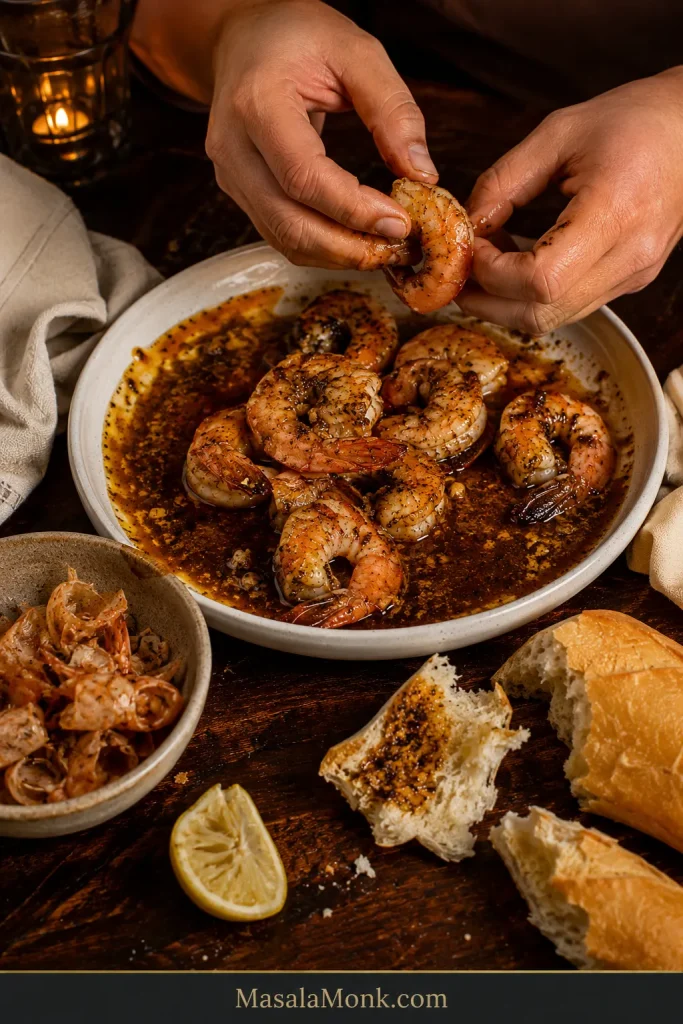
Hands peeling a saucy shell-on shrimp over a partly eaten bowl with discarded shells, torn French bread, lemon and napkins nearby.
Set out a shell bowl, napkins and torn bread before everyone starts peeling.

The sauce on your fingers, bread dragged through the bottom of the bowl and that final lemony, peppery mouthful are part of the experience. If that hands-on peel-and-dip style of dinner is what you enjoy, a Cajun seafood boil takes the same communal instinct to a much bigger scale.

Storage and Reheating

Refrigerate leftovers promptly—within 2 hours of cooking, or within 1 hour if they’ve been sitting in temperatures above 90°F / 32°C.

For the best texture, eat the shrimp within a day or two. Properly refrigerated leftovers can be kept for 3–4 days.

For reheating, separate the cold shrimp from the sauce when practical. Warm the sauce gently over low heat, adding a teaspoon or two of water if it has tightened in the refrigerator. Return the shrimp only long enough to heat the leftovers through to 165°F / 74°C.
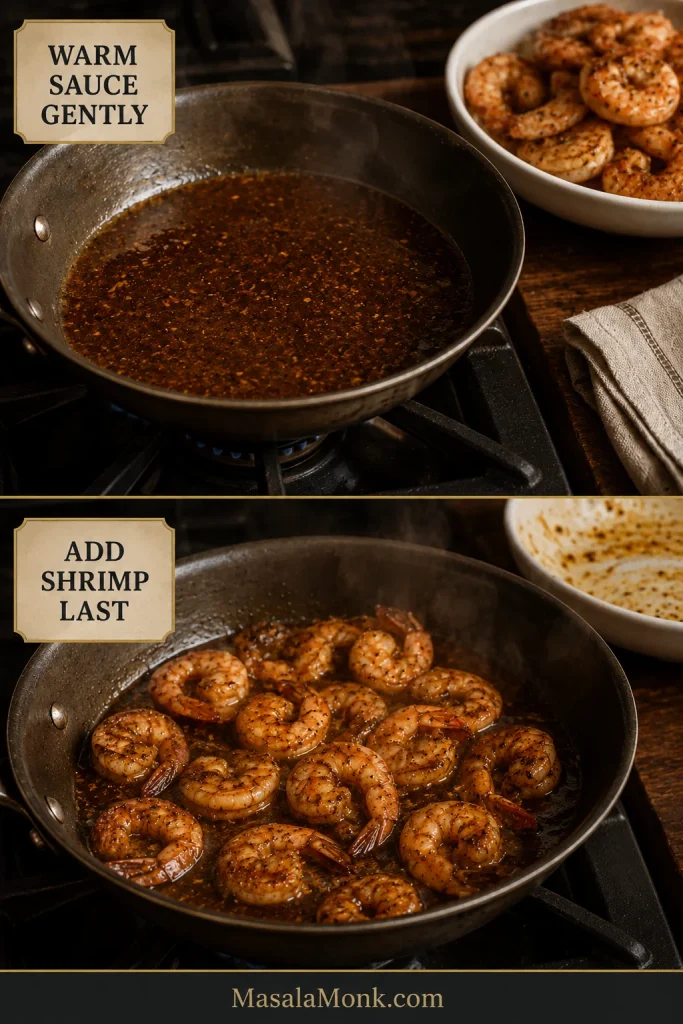
Two-stage guide showing dark BBQ shrimp sauce warming gently by itself and cooked shrimp being returned to the skillet only at the end.
Sauce first. Shrimp last.

A hard simmer or long microwave blast is far more likely to give you rubbery shrimp and a broken butter sauce. Refrigeration also treats the dish better than freezing, which works against both the shrimp texture and the emulsion.

Back to the recipe  ·  Back to top

When the Skillet Is Right

You can see the difference before the first bite. The shrimp are plump and tender, with an easy spring when pressed. Cracked pepper is still visible across the shells. The sauce moves freely around them with a slight sheen. The lemon still comes through clearly against all that butter and black pepper.
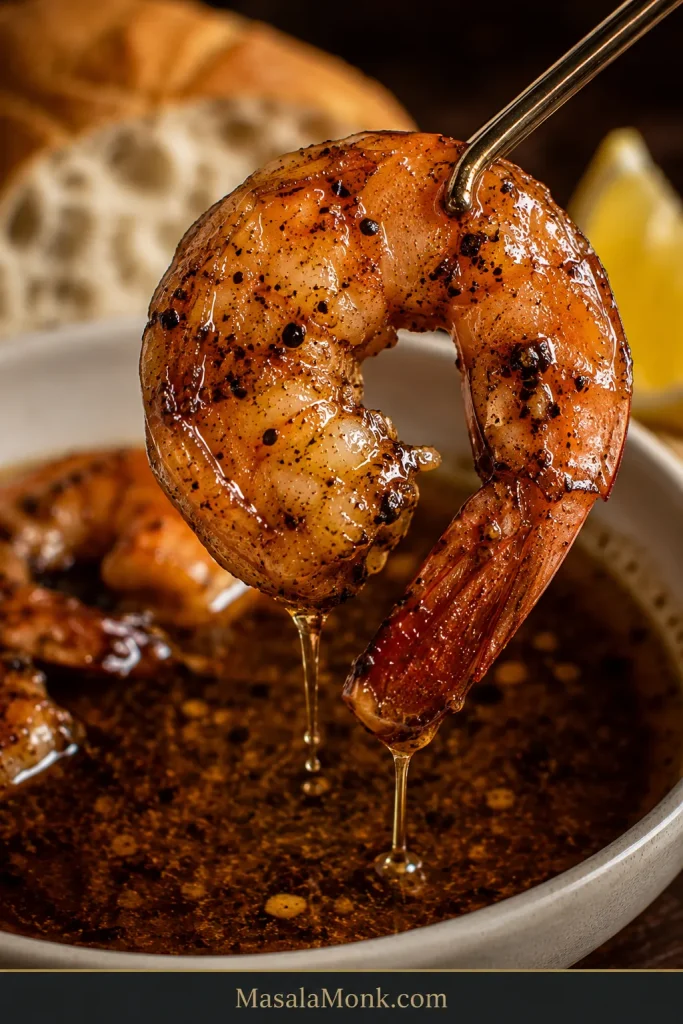
Shell-on shrimp lifted above a bowl while thin droplets of glossy dark peppery sauce fall back into the sauce below.
At the finish, look for cling and run together: the BBQ shrimp sauce should coat the shell, then fall back into the bowl rather than hanging like a sticky glaze.

Then the bread goes in.

All the careful reduction, timing and butter work leads to something very simple: juicy shrimp and enough garlicky, peppery sauce that nobody wants to leave the last spoonful behind.

If you make it, tell us which shrimp you used—head-on, easy-peel or peeled—and whether you chose beer, wine or stock. If something behaved differently in your skillet, mention that too. Those little details are often the ones that help the next cook most.

Posted on Leave a comment

Frozen Shrimp in Air Fryer: No-Thaw Time & Temp Guide

Cooked shrimp on a white plate with lemon wedges, garlic butter, parsley, and a blurred air fryer in the background.

This is the kind of recipe for the night when dinner was not really planned, the shrimp are still frozen, and you need the air fryer to save the meal. A bag of frozen shrimp can turn into shrimp tacos, rice bowls, pasta, salads, wraps, or garlic-butter shrimp in minutes — but only if you use the right timing for the shrimp you actually have.

Do not start with the timer. Start with the bag: raw or precooked, small or jumbo, peeled or shell-on, plain or breaded/coated. The rule is simple: cook raw shrimp, reheat precooked shrimp, and crisp coated shrimp. No thawing bowl, no guessing, no rubbery shrimp if you start with that bag check.

Quick Answer

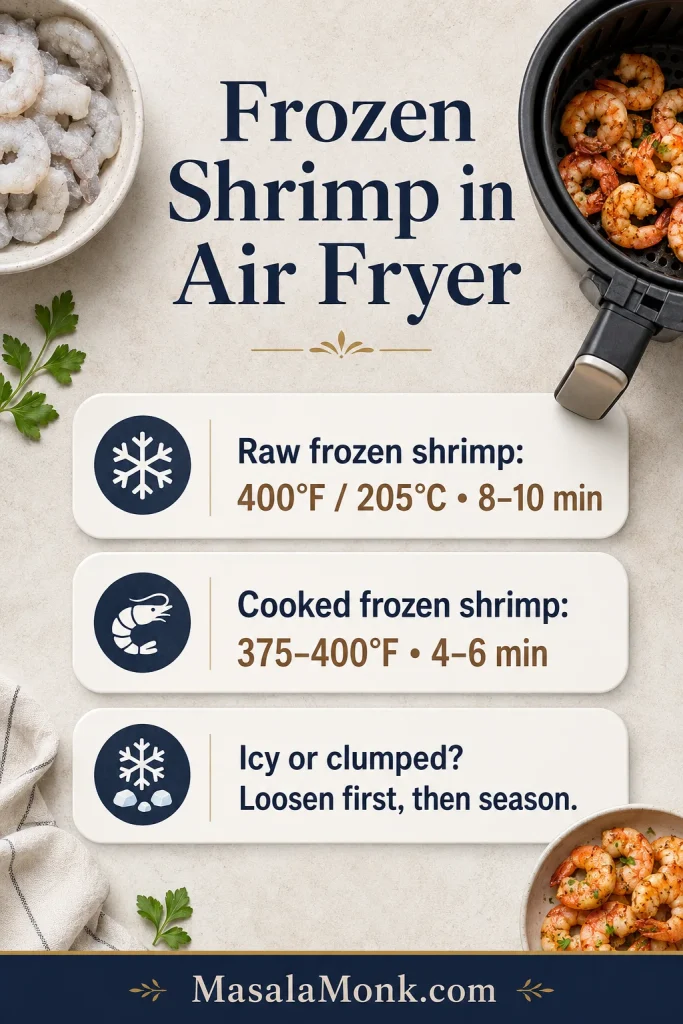
Most plain frozen raw shrimp takes 8 to 10 minutes at 400°F / 205°C in the air fryer, with a shake or flip halfway. Frozen cooked or precooked shrimp takes 4 to 6 minutes at 375°F to 400°F / 190°C to 205°C because it only needs reheating.

Icy, glazed, or stuck-together pieces need a short head start. Air fry them plain for 2 to 3 minutes first, then separate them, drain off extra moisture if needed, add oil and seasoning, and finish cooking. Some frozen shrimp has a thin ice glaze, and that is normal. The short head start helps the flavor stick to the seafood, not the ice.

That tiny pause is the difference between seasoning the shrimp and seasoning the basket.

Timing graphic showing raw frozen shrimp at 400°F for 8 to 10 minutes, cooked frozen shrimp for 4 to 6 minutes, and icy shrimp loosened before seasoning.
Start with the timing split: raw frozen shrimp needs full cooking time, while precooked shrimp only needs a quick reheat.

Jump to What You Need

Bag Check: What Do You Have?

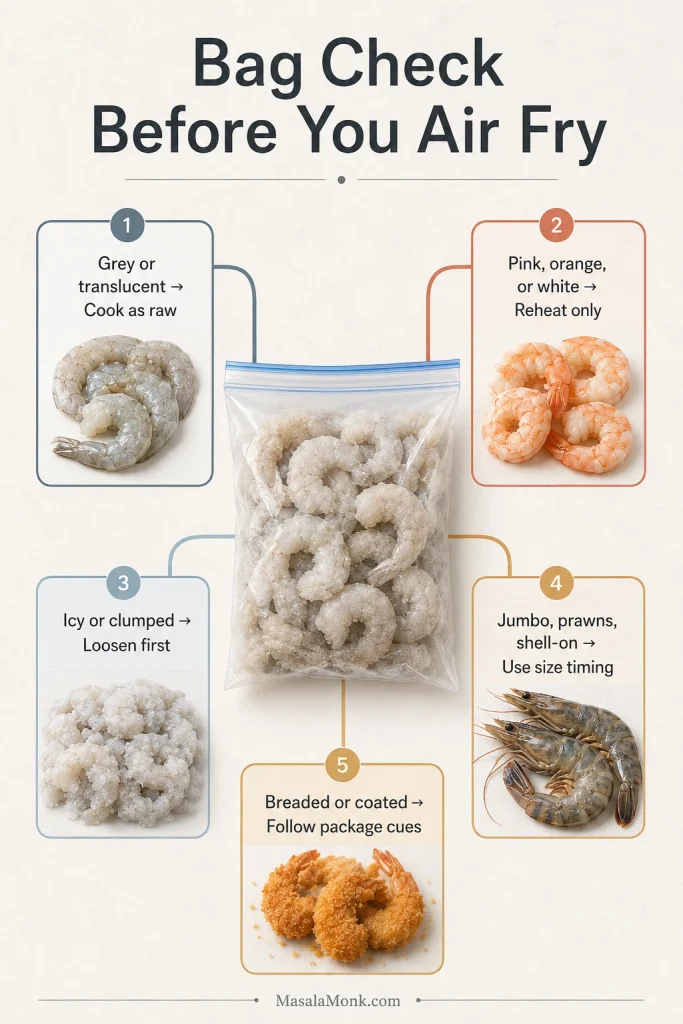
Use this quick check before you set the timer. It is the fastest way to avoid rubbery precooked shrimp, bland icy shrimp, or coated shrimp that browns outside before it heats through.

What the bag says or looks likeWhat to do
Grey or translucent shrimpCook as raw shrimp
Pink, orange, or white shrimpReheat only; do not use raw-shrimp timing
Icy, glazed, or clumped piecesAir fry briefly, separate, then season
Jumbo shrimp, prawns, or shell-on shrimpUse size-based timing and check doneness
Breaded, popcorn, coconut, or scampi shrimpFollow package timing and crisping cues
Bag check guide showing raw, cooked, icy, jumbo, shell-on, prawn, breaded, and coated frozen shrimp categories for air fryer timing.
Before the shrimp goes into the air fryer, check the bag. Raw, cooked, icy, jumbo, shell-on, and coated shrimp need different timing.

Air Fryer Frozen Shrimp Recipe

The recipe below is the simple cook-now path for plain frozen raw shrimp — the bag most people grab when dinner needs to happen fast. If yours is cooked, jumbo, shell-on, thawed, prawn-style, or coated, use the chart right after the card to adjust.

Recipe at a Glance

Cooking methodAir fryer
Shrimp typePlain frozen raw shrimp
ThawingNo thawing needed
Prep time3 minutes
Cook time8 to 10 minutes
Total time11 to 13 minutes
Serves3 to 4
Temperature400°F / 205°C
Using precooked shrimp?Reduce time to 4 to 6 minutes

Ingredients

  • 1 lb / 454 g frozen raw shrimp, peeled and deveined
  • 1 tbsp / 15 ml olive oil or avocado oil
  • ½ tsp garlic powder
  • ½ to 1 tsp paprika, Cajun seasoning, or Old Bay-style seafood seasoning
  • Salt: ¼ to ½ tsp, depending on how salty your seasoning blend is
  • ¼ tsp black pepper
  • Lemon wedges, to serve
  • Optional: 1 tbsp / 14 g melted butter, for finishing
  • Fresh herbs, optional: 1 to 2 tbsp chopped parsley or cilantro

For a smaller 8 oz / 225 g batch, use half the shrimp and roughly half the seasoning. Smaller batches are especially useful in 3 to 4 quart air fryers.

Frozen shrimp, oil, garlic powder, paprika, salt, pepper, lemon, melted butter, herbs, and an unbranded freezer bag arranged on a light counter.
Keep the base simple: oil helps seasoning cling, dry spices add quick flavor, and lemon or butter finishes the shrimp cleanly.

Method

  1. Preheat the air fryer to 400°F / 205°C for 3 to 5 minutes.
  2. Add the frozen shrimp in a mostly single layer.
  3. If the pieces are icy, glazed, or clumped, air fry them plain for 2 to 3 minutes first.
  4. Shake, separate, and drain excess liquid if needed.
  5. Toss with oil, garlic powder, seasoning, salt, and pepper.
  6. Air fry for 8 to 10 minutes total, shaking or flipping halfway, until opaque and tender.
  7. Finish with lemon, melted butter, herbs, or your favorite sauce. For a full garlic-butter pasta route, use the shrimp in a shrimp scampi-style dinner.

The batch is ready when the center is opaque, not grey or glassy. For jumbo, precooked, shell-on, thawed, or prawn-style bags, use the timing chart below.

Frozen Shrimp Air Fryer Time and Temperature Chart

Use this chart when your bag is not plain frozen raw shrimp. Size, raw or cooked status, surface ice, and crowding can all change the timing.

ShrimpTempTimeCue
Frozen raw small or medium400°F / 205°C6 to 8 minOpaque, gently curled
Frozen raw large400°F / 205°C8 to 10 minOpaque through center
Frozen raw jumbo400°F / 205°C9 to 12 minCheck thickest piece
Frozen cooked or precooked shrimp375°F to 400°F / 190°C to 205°C4 to 6 minHot through, not tight
Thawed raw shrimp350°F to 375°F / 175°C to 190°C5 to 7 minPat dry first
Thawed cooked shrimp350°F / 175°C2 to 4 minWarm gently
Shell-on frozen shrimp400°F / 205°C8 to 12 minShells pink, flesh opaque
Frozen prawns400°F / 205°C8 to 12 minTime by size

Treat the chart as a starting point, then let doneness get the final vote. In most baskets, large raw shrimp land in the 8 to 10 minute range, but crowding or a heavy glaze can push the batch toward the longer end. If the basket looks watery, it usually means surface ice is melting, so drain if needed instead of cooking the shrimp longer.

Got your timing? Go to the step-by-step method.

How to Air Fry Frozen Shrimp

The method below gives you tender shrimp without thawing first. That small head start for icy pieces is worth it because it keeps the seasoning from washing away. Frozen shrimp is fast, but it asks for one favor: stop early and check.

1. Preheat the air fryer

Preheat to 400°F / 205°C for raw frozen shrimp. A hot basket helps the pieces start cooking quickly instead of slowly thawing and releasing too much liquid.

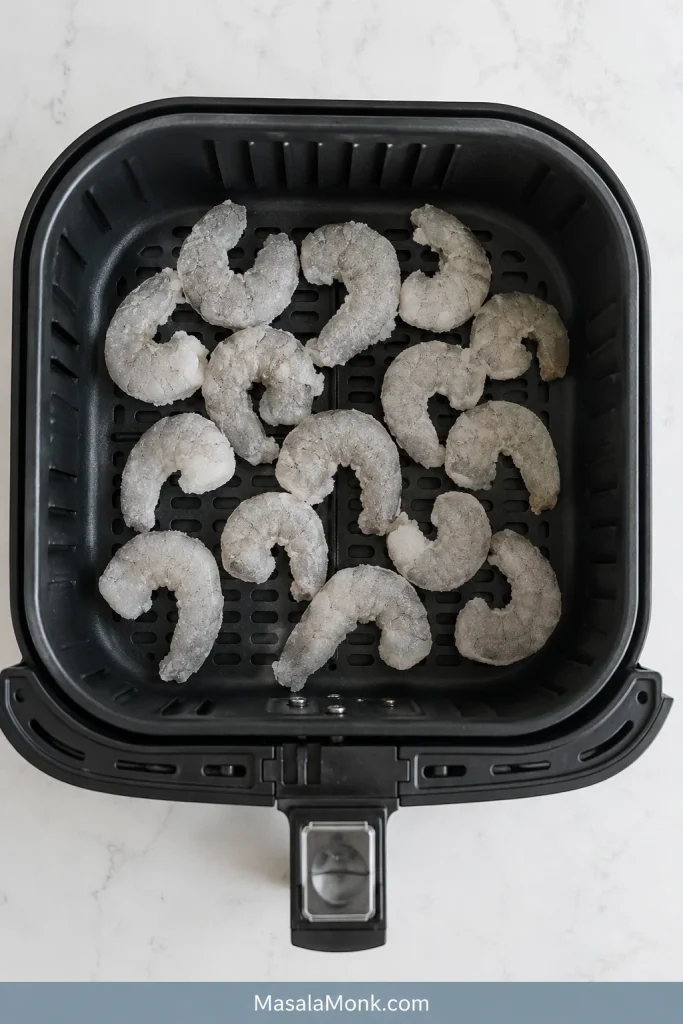
2. Add the shrimp in one layer

Place the frozen shrimp in the basket in a mostly single layer. A little overlap is fine, but avoid a thick pile. You are not trying to fill the basket; you are trying to give the hot air room to work.

Grey frozen raw shrimp with visible frost spread in a mostly single layer inside a black air fryer basket.
A mostly single layer gives frozen raw shrimp space to cook evenly instead of trapping steam in a crowded basket.

3. Loosen icy or clumped shrimp first

When the pieces are stuck together or covered in a thin ice glaze, air fry them plain for 2 to 3 minutes. Then shake the basket and separate them with tongs. After that short head start, the icy glaze should look wet instead of frosty, and the pieces should separate easily. That is the moment to season.

Side-by-side comparison of icy clumped frozen shrimp before cooking and loosened shrimp after a short air fryer head start.
When shrimp is clumped or heavily glazed, loosen it first; then seasoning sticks to the shrimp instead of melting away.

4. Add oil and seasoning

Move the shrimp to a bowl if needed, then toss with oil, garlic powder, seasoning, salt, and pepper. Drain any liquid in the basket before adding the shrimp back.

Shrimp being tossed in a bowl with oil, garlic powder, paprika, salt, and pepper after the frost has loosened.
Season once the surface frost softens. At that point, oil and spices can coat the shrimp instead of pooling below.

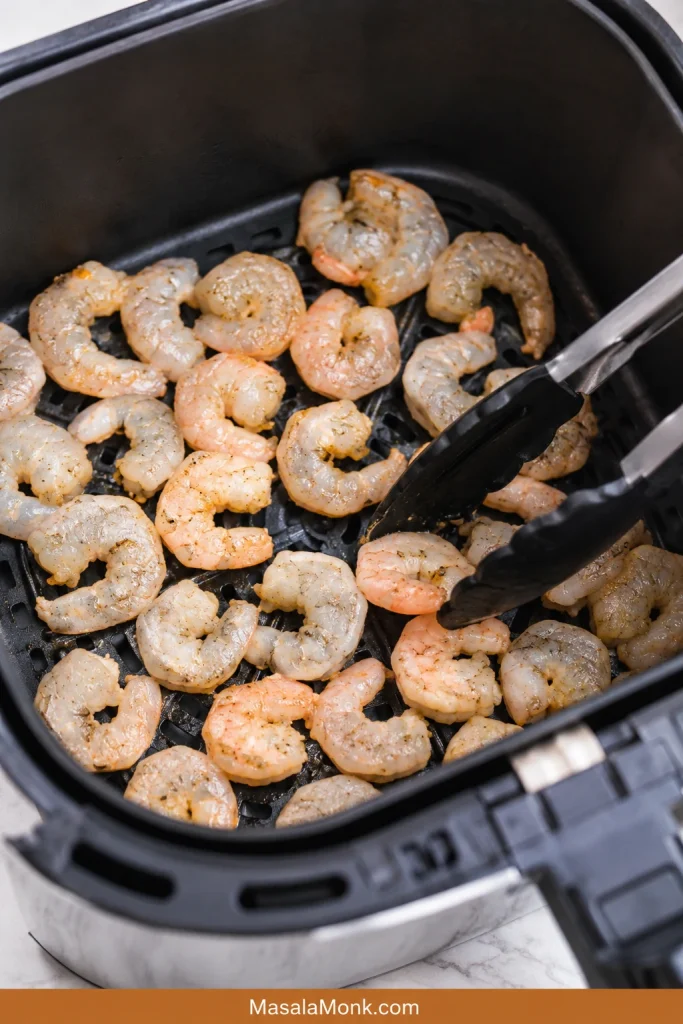
5. Finish cooking

Air fry until the pieces are opaque and tender, shaking or flipping halfway. Use the timing chart for small, jumbo, precooked, shell-on, thawed, or prawn-style bags.

Partly cooked shrimp in an air fryer basket with tongs turning the pieces halfway through cooking.
Halfway through cooking, shake or flip the shrimp so pale centers, pink edges, and released moisture even out.

6. Finish with lemon or butter

Squeeze lemon over the hot shrimp. For a richer finish, toss with melted butter, chopped herbs, garlic butter, or a quick sauce after cooking. When it works, the shrimp tastes bright and clean, with lemon, butter, and seasoning clinging to the surface instead of sliding into the basket.

Close-up of finished air fryer shrimp with lemon butter, herbs, and light seasoning on the surface.
Finished shrimp should look moist, pearly, and lightly curled, with the seasoning clinging to the surface instead of the basket.

How Shrimp Type Changes the Timing

This is where the label on the bag matters most. The same air fryer can give you tender shrimp or rubbery shrimp depending on whether the pieces started raw, cooked, icy, jumbo, or shell-on.

Raw vs cooked frozen shrimp

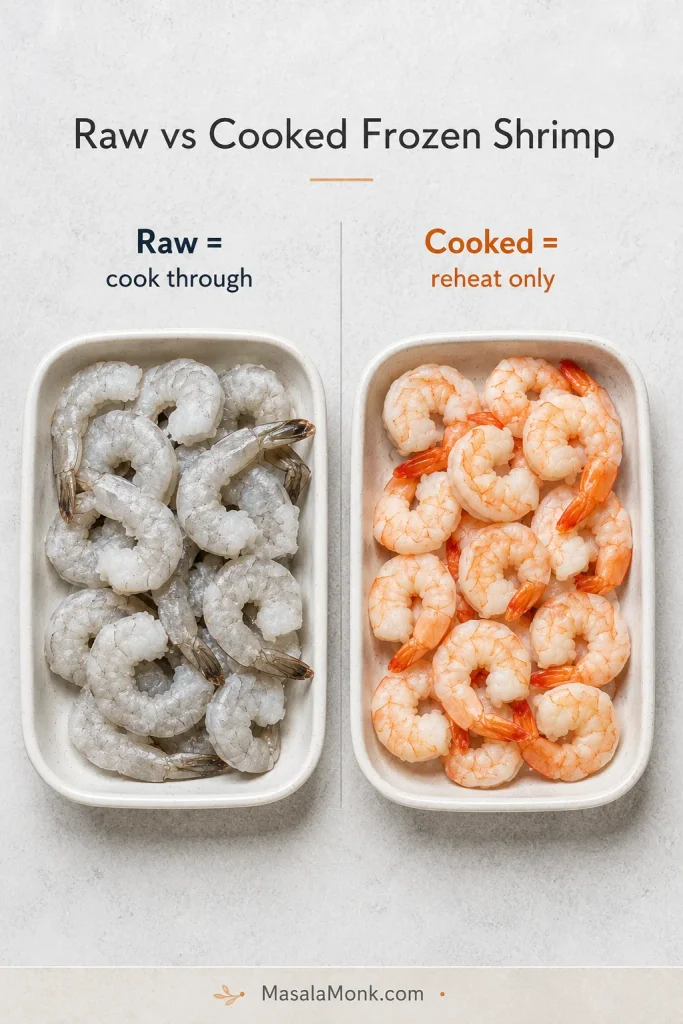
Raw shrimp usually looks grey or translucent and needs to cook through. Cooked or precooked shrimp usually already looks pink, orange, or white and only needs to get hot. For precooked shrimp, look for heat, not a deeper curl.

Split comparison showing grey frozen raw shrimp on one side and pink cooked frozen shrimp on the other side.
This is the biggest timing mistake to avoid: grey raw shrimp must cook through, while pink cooked shrimp only needs heat.

Shrimp size guide: what 16/20, 21/25, and 31/40 mean

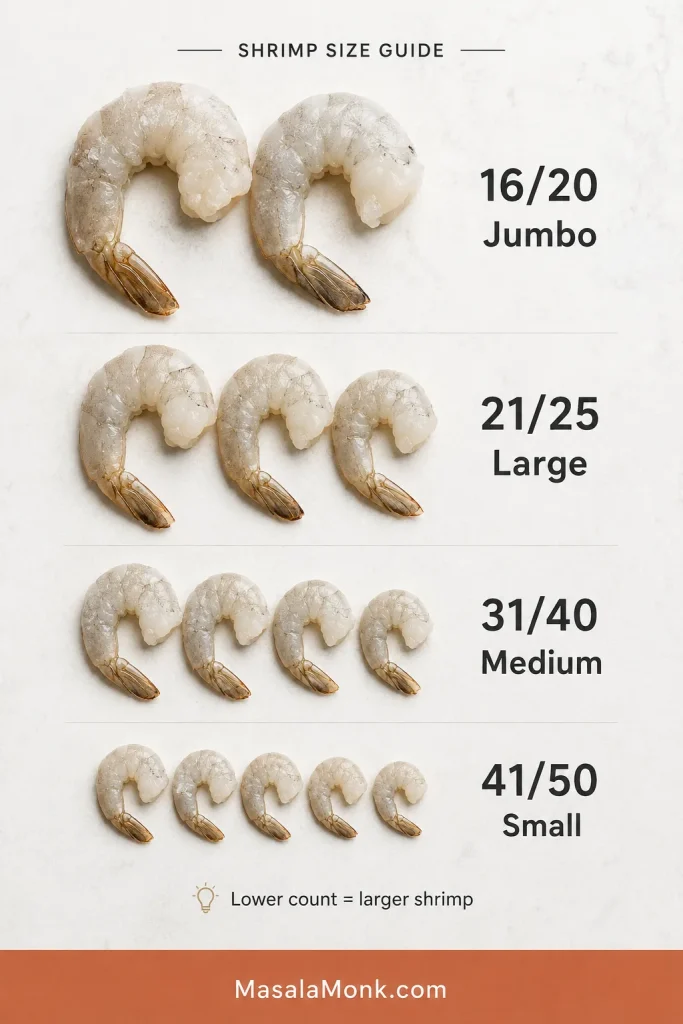
Many frozen shrimp bags use a count-per-pound number instead of words like medium or jumbo. A lower number means larger shrimp because there are fewer pieces in a pound. Higher numbers mean smaller shrimp, which cook faster.

Shrimp size guide showing 16/20 jumbo, 21/25 large, 31/40 medium, and 41/50 small shrimp arranged from largest to smallest.
Shrimp count tells you size. Lower numbers mean larger pieces, so jumbo shrimp usually needs more air fryer time than small shrimp.
Package countCommon sizeAir fryer note
16/20JumboUse the longer range, often 9 to 12 minutes from frozen
21/25Extra large or largeMain 8 to 10 minute timing usually works
26/30LargeMain 8 to 10 minute timing usually works
31/40MediumStart checking around 6 to 8 minutes
41/50 and smallerSmallCheck early; small shrimp can overcook fast

Once you know the count, the timing starts making much more sense. When the bag gives both a size word and a count, trust the count more. “Large” can vary by brand, but 16/20 will almost always need more time than 31/40.

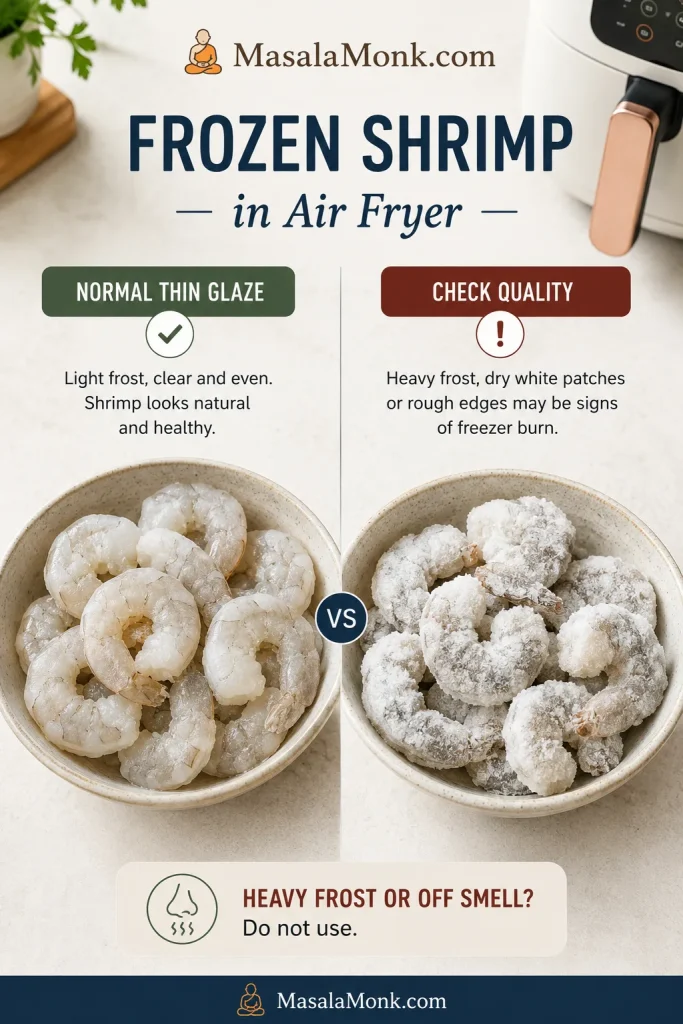
Thin ice glaze or freezer burn?

A thin ice glaze is normal on many frozen shrimp bags. Heavy frost, dry white patches, freezer-burned edges, or a stale smell are different. If the seafood smells off after opening, do not use it.

Comparison of frozen shrimp with a normal thin ice glaze beside shrimp with heavy frost, dry white patches, and freezer burn signs.
A light ice glaze is normal. However, heavy frost, dry patches, rough edges, or an off smell are signs to pause and check quality.

Shell-on shrimp, prawns, and thawed shrimp

These need small adjustments, not a new recipe. Shell-on frozen shrimp usually needs 8 to 12 minutes at 400°F / 205°C, depending on size. Frozen prawns cook like shrimp; let size decide. Thawed raw shrimp cooks faster, usually about 5 to 7 minutes at 350°F to 375°F / 175°C to 190°C.

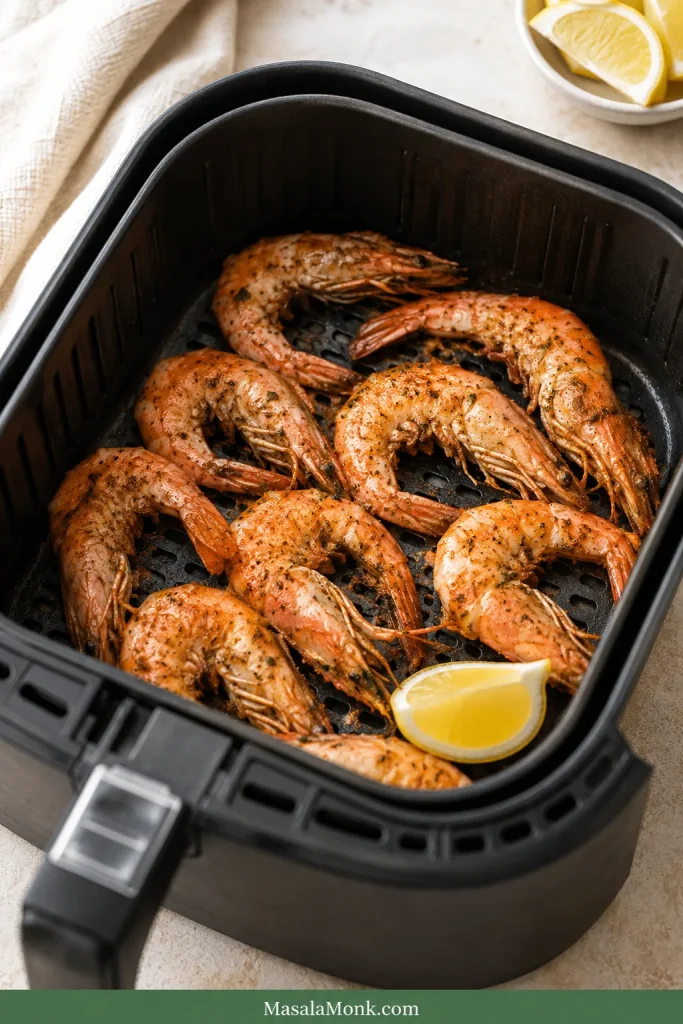
Shell-on shrimp or prawns cooked in a black air fryer basket with pink-orange shells and a lemon wedge.
Shell-on shrimp and prawns can air fry from frozen, but larger pieces need a center check instead of timer-only cooking.

Tail-on and tail-off shrimp cook almost the same way. Leaving the tail on looks a little more dramatic for serving, while tail-off is easier for bowls, tacos, fried rice, and pasta.

Ready to cook now? Return to the recipe card or follow the full method.

Why This Method Works

Frozen shrimp needs quick heat, enough space, and a moment for surface ice to loosen. Once the frost turns wet and the pieces separate, the seasoning can land on the shrimp instead of sliding into the basket. That is why the short head start matters more than adding extra seasoning at the beginning.

Ingredient Notes

Oil helps the spices cling. Garlic powder adds quick flavor without burning. Paprika, Cajun seasoning, or Old Bay-style seafood seasoning adds color and depth. If your bag is already seasoned, marinated, or salty, start with less salt and adjust after cooking.

Equipment and Batch Size

You do not need special equipment beyond an air fryer, but basket size matters. A hot basket helps. Crowding does not. In a smaller air fryer, a smaller batch works better than a longer struggle.

  • For a 3 to 4 quart air fryer, cook smaller 8 oz / 225 g batches.
  • A 5 to 6 quart air fryer can handle 12 to 16 oz / 340 to 454 g if the shrimp are mostly in one layer.
  • Keep tongs nearby to separate clumped pieces and a slotted spoon or quick drain ready if liquid collects.
  • Pat thawed shrimp dry with a paper towel before cooking.
  • Ninja Foodi, Cosori, Instant Vortex, basket-style, and oven-style air fryers can all work, but timing may vary slightly.

If your air fryer is small, cook less shrimp rather than forcing the whole bag in. That one choice fixes more problems than extra minutes ever will.

Season Before or After Air Frying?

Separate, lightly frosty shrimp can be seasoned before air frying. Icy, glazed, or clumped pieces do better with a short head start in the basket first, then seasoning.

  • Lightly frosty shrimp: toss with oil and seasoning before cooking.
  • Icy or clumped shrimp: loosen first, then season.
  • Thawed shrimp: pat dry, then season before air frying.
  • Precooked frozen shrimp: season lightly and reheat briefly.
  • Coated shrimp: skip wet seasoning before air frying; use dips or sauces after cooking.

For slightly crisp edges on plain shrimp, add 1 teaspoon cornstarch or cornflour after the surface frost has loosened. This is optional. Do not use this trick for shrimp that are already breaded, battered, popcorn-style, or coconut-coated.

Once the seasoning actually lands on the shrimp, even a simple garlic-lemon finish tastes cleaner and brighter.

How to Know Shrimp Is Done

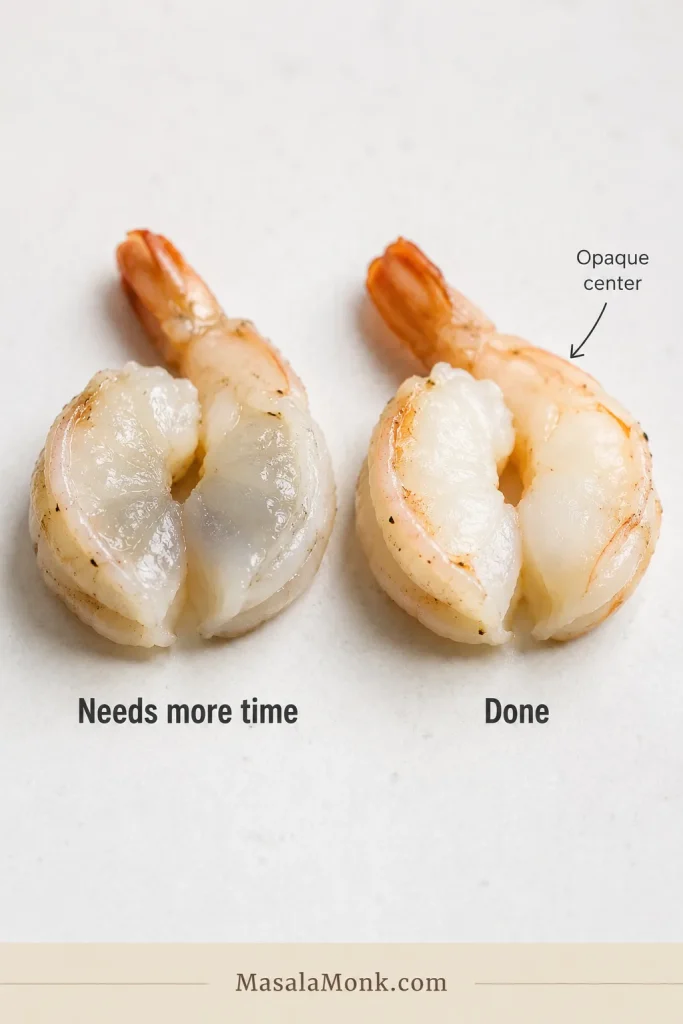
The goal is not hard browning. You want tender shrimp with no grey center. For plain shrimp, the flesh should be pearly, opaque, and no longer grey or glassy in the middle. The pieces should feel springy, not tight.

Check the center

For a thermometer check, seafood is generally cooked to 145°F / 63°C. Visually, shrimp should be firm, pearly, and opaque. When you cut into the thickest piece, the center should look opaque and moist, not grey, glassy, or dry. For more detail, see the FDA seafood safety guide.

Cut shrimp comparison showing a grey glassy center labelled needs more time and an opaque white center labelled done.
When you are unsure, cut the thickest shrimp. The center should be opaque and moist, not grey, glassy, or translucent.

Use the curl as a texture clue

Shrimp moves from perfect to rubbery quickly, so checking early is not fussy. It is the shortcut.

  • Undercooked shrimp: grey, glassy, or translucent in the center
  • Done shrimp: opaque, pearly, springy, and loosely curled
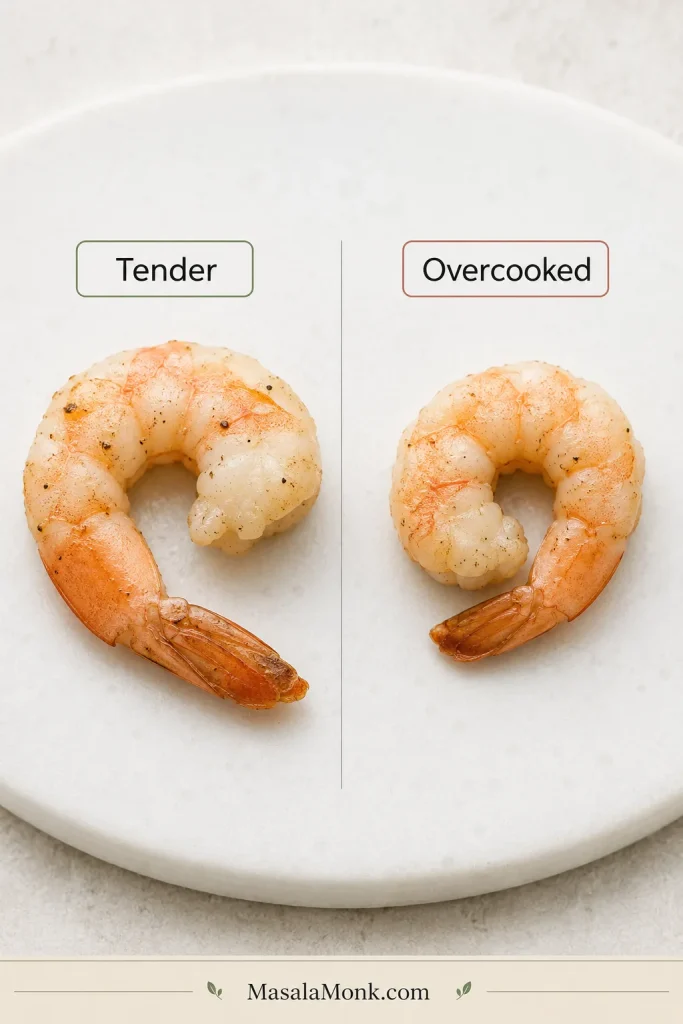
  • Overcooked shrimp: tight, dry, rubbery, or curled into a very tight O
Cooked shrimp comparison showing a loose C-shaped tender shrimp and a tightly curled overcooked shrimp.
Shrimp shape gives a fast texture clue: a loose curl usually means tender, while a tight O-shape often means overcooked.

For coated or sauced frozen shrimp, follow the package directions because the outside can brown before the inside is fully heated.

Avoid These Mistakes

Most mistakes come from treating every frozen shrimp bag the same. A few small changes make the difference between tender shrimp and a tough batch.

  • Precooked shrimp should not cook like raw shrimp. It only needs reheating.
  • Do not season a block of icy shrimp. Loosen it first so the flavor can stick.
  • Give the pieces room instead of piling them high. Shrimp cook faster and more evenly with space.
  • If the basket gets watery, drain it instead of trying to cook the water away.
  • Do not use plain-shrimp timing for coated frozen shrimp. Breaded, popcorn, and coconut shrimp need package and crisping cues.

Already dealing with a watery, bland, or rubbery batch? Jump to troubleshooting or rescue it for dinner.

Troubleshooting Air Fryer Frozen Shrimp

A first batch that goes sideways is usually easy to fix. Watery baskets, bland seasoning, or a slightly rubbery bite do not mean the recipe failed. Usually, the shrimp just needed a different timing path.

If your first batch looks watery, do not panic. That is usually ice, not failure. The next batch is easier once you know what happened.

Why did my shrimp turn rubbery?

Rubbery shrimp usually means overcooking. This is common with frozen cooked or precooked shrimp because it only needs reheating. Use the shorter timing range, and check even earlier if the pieces are already thawed.

A batch that is already a little rubbery should not keep air frying. Toss it with garlic butter, lemon, sauce, pasta, fried rice, or a rice bowl where moisture can help soften the bite.

Why is there water in the air fryer basket?

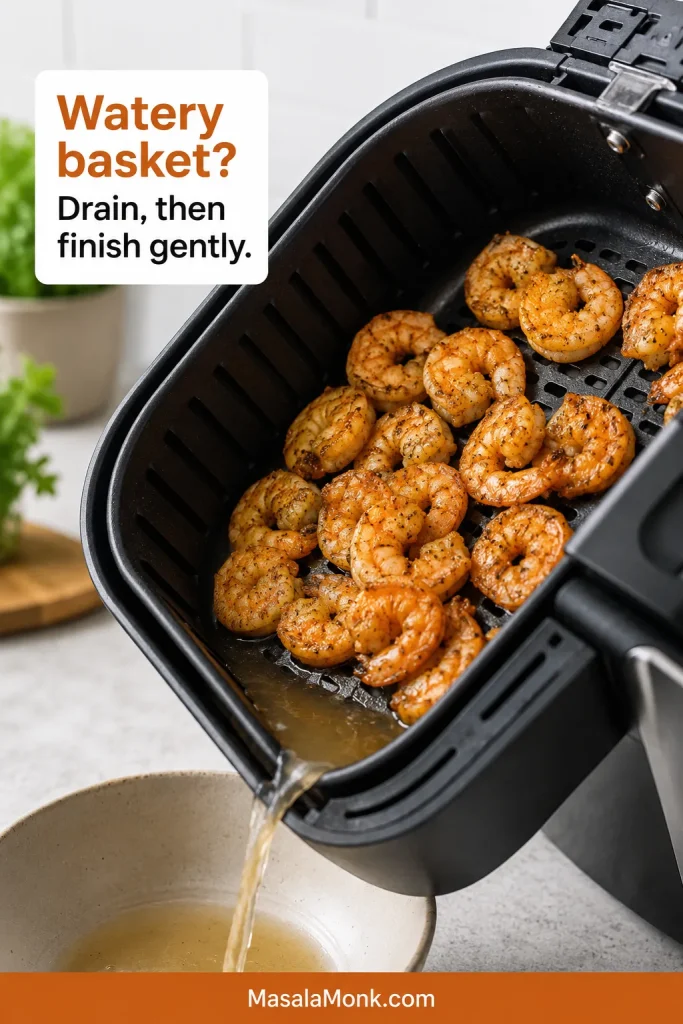
That water in the basket is usually just surface ice melting. The goal is not to panic-cook the water away; drain it, season the shrimp itself, and finish gently.

Air fryer basket tilted over a bowl while liquid drains from cooked shrimp inside the basket.
If the basket turns watery, drain the moisture instead of adding more minutes. Extra time can make shrimp tough.
  • Loosen icy pieces before seasoning.
  • Shake halfway through cooking.
  • Separate clumped pieces as soon as they loosen.
  • Drain excess liquid instead of cooking it away.

Why is the shrimp bland?

Seasoning ice is frustrating because the flavor ends up in the basket. Let frosty pieces loosen first, then add oil and seasoning so the flavor sticks.

To rescue a bland batch, toss it immediately with melted butter, lemon juice, garlic powder, black pepper, and a pinch of seasoning while it is still hot. For rice bowls or noodles, a spoonful of stir-fry sauce can turn plain shrimp into dinner quickly.

Why did some pieces cook faster than others?

The pieces were probably clumped, crowded, or mixed in size. Separate stuck pieces early and shake the basket halfway. A mixed bag of small and jumbo shrimp will not finish all at once; the small ones will cook first.

ProblemLikely causeFix nowNext time
Rubbery shrimpPrecooked shrimp got too much timeStop cooking; toss with sauce, butter, pasta, or riceReheat only 4 to 6 minutes
Dry shrimpToo much heat or too much timeFinish with lemon, butter, or sauceCheck earlier and stop at opaque
Bland shrimpSeasoning slid off iceToss hot shrimp with butter, lemon, and seasoningSeason after frost loosens
Watery basketSurface ice meltedDrain the basket and finish gentlyUse one layer and shake halfway
Uneven cookingClumped, crowded, or mixed-size shrimpSeparate pieces and add 1 minute if neededSpread into a mostly single layer
Slightly underdoneJumbo pieces or cold centerAdd 1 minute and check the thickest pieceUse the longer range for jumbo shrimp

Best Uses for an Imperfect Batch

Not every batch has to become a perfect shrimp plate. If the texture or seasoning is not exactly where you wanted it, turn the shrimp into the kind of meal that helps it shine anyway.

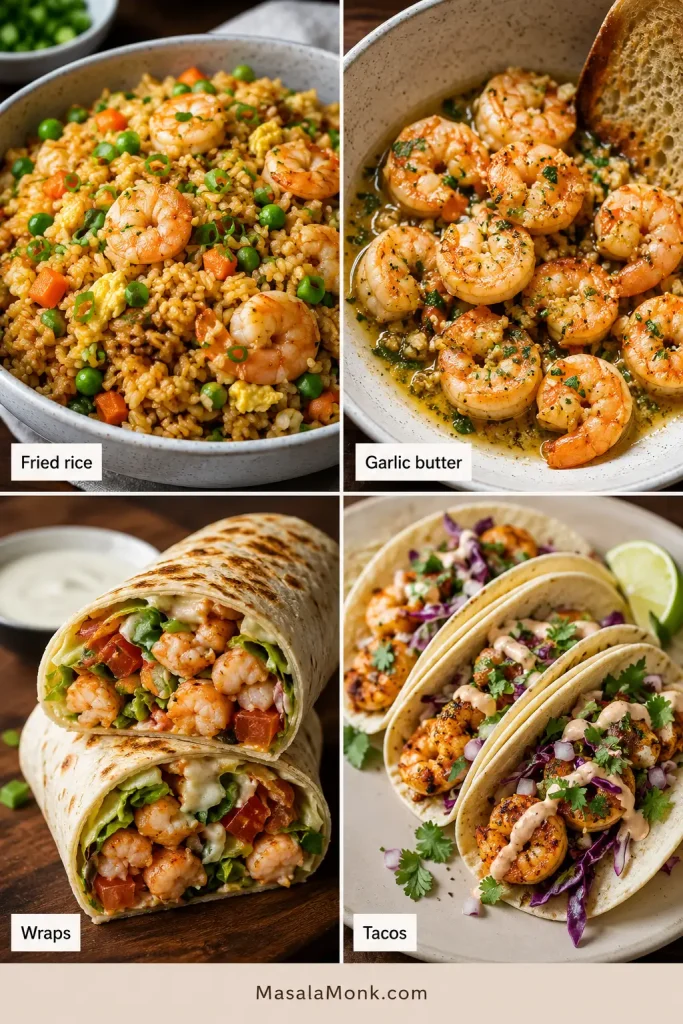
Four-panel collage showing air fryer shrimp used in fried rice, garlic butter shrimp, wraps, and tacos.
An imperfect batch still has uses: watery shrimp suits fried rice, bland shrimp likes garlic butter, and firm shrimp works better chopped.
If the shrimp turned out…Use it for…
Tender and juicyTacos, bowls, salads, pasta, or peel-and-eat plates
A little wateryFried rice, noodles, saucy bowls, or garlic butter pasta
Slightly rubberyChopped wraps, rice bowls, pasta, or saucy stir-fries
Mild or blandStir-fry sauce, peanut sauce, Cajun butter, lemon butter, or chutney
Shell-onPeel-and-eat plates, seafood bowls, or simple lemon-and-salt platters

This is one of those freezer shortcuts that gets easier every time you make it. The first batch teaches you the bag; the next one feels simple.

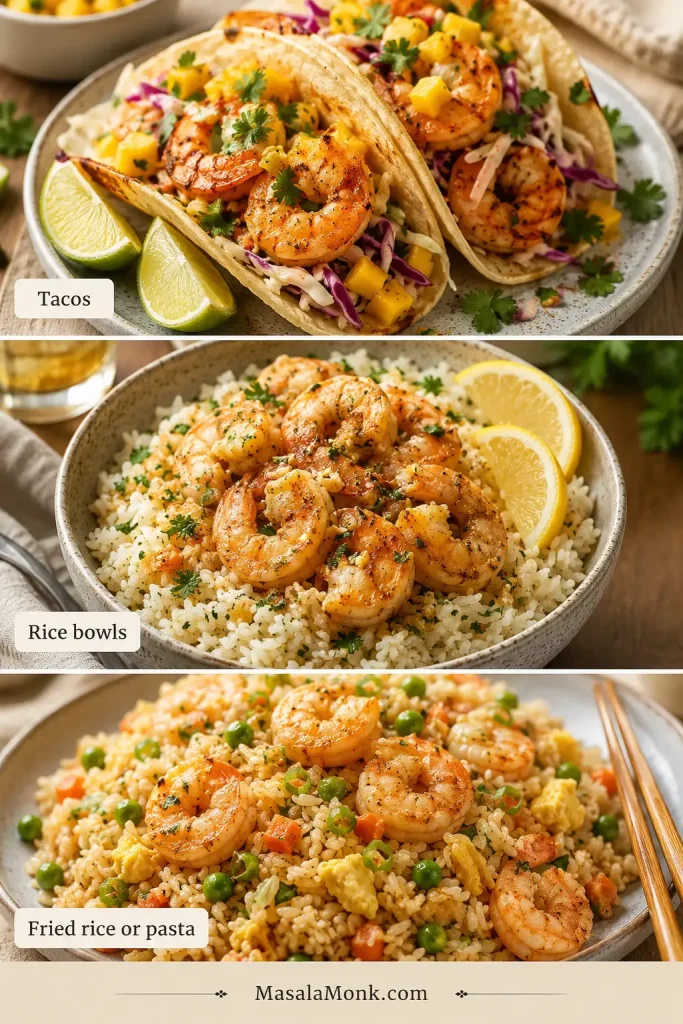
Batch fixed? Turn it into tacos, rice bowls, pasta, or fried rice.

Flavor Variations

This is where the plain batch becomes dinner. Once you know the timing, keep the base method the same and change the seasoning or finish.

  • Garlic butter shrimp: finish with melted butter, garlic, lemon, and parsley so the hot shrimp turns glossy and bright. Best with pasta, rice bowls, bread, or vegetables.
  • Old Bay-style shrimp: use seafood seasoning, lemon, and black pepper for a simple peel-and-eat feel. Good for salads, tacos, and quick plates.
  • Cajun shrimp: use Cajun seasoning, paprika, and a little cayenne for smoky heat. Serve in tacos, wraps, or grain bowls.
  • Lemon pepper shrimp: use lemon zest, black pepper, and garlic powder for a bright, sharp finish. Good for salads, pasta, and quick lunches.
  • Taco shrimp: use chili powder, cumin, and lime. Serve in tacos, burrito bowls, lettuce cups, or with mango habanero sauce.
  • Light masala shrimp: use garlic, chili, black pepper, and a tiny pinch of turmeric or garam masala. Finish with green chutney.

Add fresh garlic or butter near the end or after cooking. Garlic can burn if it sits in the hot basket too long, and butter can brown quickly if it drips under the shrimp.

What to Serve With Air Fryer Frozen Shrimp

Think of this as a fast protein you can drop into whatever meal is already halfway planned. The shrimp cook quickly, so they work especially well with rice, pasta, noodles, salads, and wraps.

Three-panel collage showing cooked shrimp served as tacos, a garlic butter rice bowl, and shrimp fried rice.
Use cooked shrimp as a flexible protein: pile it into tacos, spoon it over rice, or fold it into fried rice when dinner needs to move fast.
  • Shrimp tacos with slaw, lime, and mango salsa
  • Rice bowls with vegetables, garlic butter, lemon, and herbs
  • Pasta with lemon butter, garlic, tomato sauce, or a quick scampi-style finish
  • Salads with avocado, cucumber, corn, herbs, or greens
  • Wraps with lettuce, onion, spicy mayo, and a squeeze of lime
  • Noodle bowls with chili oil, peanut sauce, or soy-lime dressing
  • Quick shrimp fried rice
  • Shrimp cocktail-style plates with lemon and dipping sauce

For pasta, fried rice, or saucy dishes, stop cooking as soon as the shrimp are just done. They will keep warming when tossed with the rest of the meal.

Storage and Reheating

Air fryer shrimp is best right after cooking, but leftovers can still be useful. Cool the shrimp, store it in an airtight container, and refrigerate for up to 3 days. Reheat gently at 300°F to 350°F / 150°C to 175°C for 1 to 3 minutes, just until warm.

Shrimp is not very patient the second time around, so reheat gently and avoid warming it again and again. Cold leftover shrimp is often kinder than reheated shrimp, especially in salads, wraps, shrimp cocktail-style plates, or quick lunch bowls.

Breaded, Popcorn, Coconut, or Scampi Shrimp

These are not plain uncoated shrimp, so let the bag’s directions lead. Coated shrimp plays by slightly different rules: the outside needs to crisp while the inside heats through.

  • Frozen breaded shrimp: use a single layer, shake or flip, and follow package timing so the coating crisps.
  • Popcorn shrimp: shake often because the pieces are small and can brown quickly.
  • Frozen coconut shrimp: watch the coating closely because coconut can brown faster than the inside heats.
  • Scampi-style frozen shrimp: use scampi-specific package directions because butter, sauce, and coating can change the method.

As a loose starting point, many frozen breaded, popcorn, and coconut shrimp products cook around 390°F to 400°F / 200°C to 205°C for 7 to 12 minutes, but the package should lead. Product size, coating, brand, and raw or precooked status can change the timing quickly.

Plain shrimp is about tenderness; coated shrimp is about crispness.

FAQs

Do you need to thaw shrimp before air frying?

No. Plain frozen shrimp can go straight into the air fryer. If the pieces are icy or clumped, loosen them briefly first, then season and finish cooking.

How long does frozen shrimp take in the air fryer?

Most frozen raw shrimp takes 8 to 10 minutes at 400°F / 205°C. Small shrimp can finish closer to 6 minutes, while jumbo shrimp may need 9 to 12.

What temperature works best for frozen shrimp?

For raw frozen shrimp, 400°F / 205°C is the best starting point. With precooked shrimp, use 375°F to 400°F / 190°C to 205°C and stop once hot.

Raw or cooked frozen shrimp: what changes?

Raw shrimp needs to cook through. Precooked shrimp only needs to get hot. That one difference changes the timing completely.

How do you air fry precooked frozen shrimp?

Air fry precooked frozen shrimp at 375°F to 400°F / 190°C to 205°C for 4 to 6 minutes, shaking halfway. Stop once the pieces are hot.

Can you air fry frozen shrimp with vegetables?

Yes, but vegetables often need more time and frozen vegetables can release water. Start firmer vegetables first, then add shrimp near the end.

Can you air fry frozen shrimp without oil?

Yes, but a little oil helps seasoning stick and improves texture. For oil-free shrimp, cook in one layer and finish with lemon or sauce.

What do shrimp size numbers like 16/20 or 31/40 mean?

The number tells you roughly how many shrimp are in one pound. Lower numbers mean larger shrimp, so 16/20 needs more time than 31/40 or 41/50.

Are frozen prawns cooked the same way as shrimp?

Yes. Frozen prawns can be air fried like frozen shrimp. Let size guide the timing.

Should shell-on frozen shrimp be peeled before cooking?

No. You can air fry shell-on frozen shrimp, then peel after cooking. Cook until the shells turn pink and the flesh is opaque.

Why did my air fryer shrimp turn rubbery?

Rubbery shrimp almost always means it went too long, especially if it was precooked. Use a shorter time and stop once hot.

Why is there water in the air fryer basket?

Frozen shrimp releases moisture as surface ice melts. Use one layer, shake halfway, separate clumps early, and drain excess liquid if needed.

What about frozen breaded shrimp or popcorn shrimp?

Treat breaded, popcorn, and coconut shrimp as coated products. Start with package directions, then watch for a crisp outside and a fully heated center.

Back to Quick Answer · Back to Recipe Card

Final Tender Shrimp Check

Before you serve, the shrimp should be opaque through the center, loosely curled, and hot without feeling tight or dry. Raw shrimp should have no grey or glassy center. Precooked shrimp should be hot, not curled tighter and tighter.

Once you learn to read the bag, frozen shrimp becomes one of the easiest freezer proteins to trust. Loosen icy pieces if needed, season the shrimp instead of the frost, and stop as soon as the center is opaque. That is how a forgotten bag of shrimp turns into dinner instead of a guessing game.