This air fryer bacon recipe gives you crisp, evenly cooked strips without standing over a skillet or heating the oven for just a few slices. The trick is not simply dropping bacon into the basket and hoping for the best. Bacon is fatty, air fryers run differently, and the wrong temperature often means smoke, curled strips, burnt edges, or chewy centers. If smoke is your main problem, jump straight to the smoke prevention section.
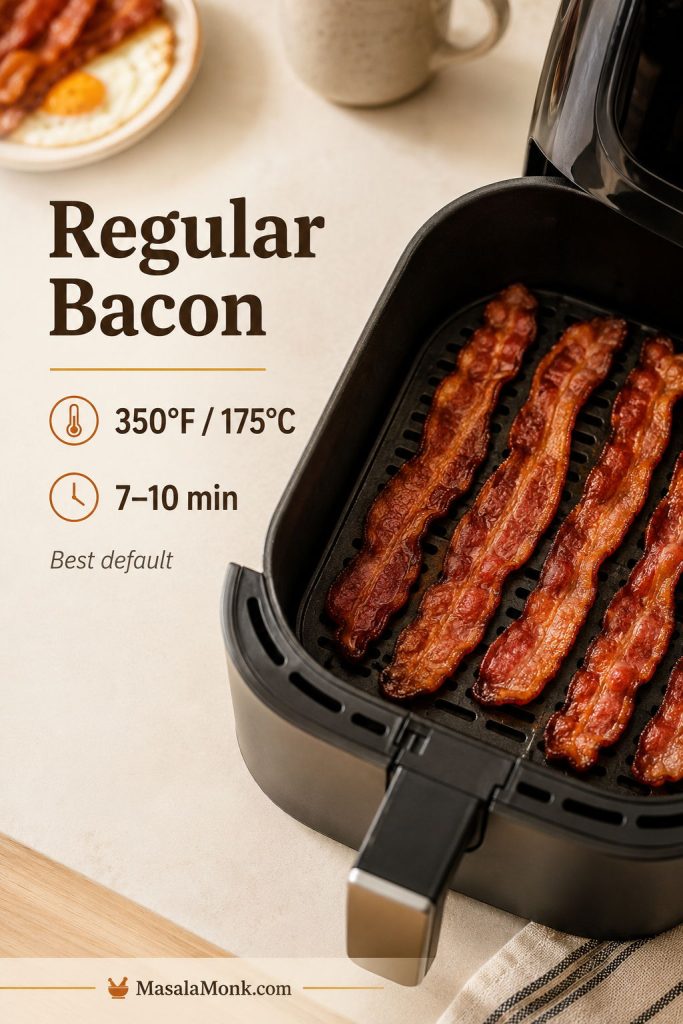
For regular bacon, start at 350°F / 175°C for 7–10 minutes in a single layer. That temperature is hot enough to crisp the edges, but gentle enough to let the fat render before the bacon scorches or the air fryer starts smoking. Thick-cut slices need longer, turkey bacon needs a closer eye, and frozen bacon works best when you soften and separate the slices before crisping them.
Use this guide when you want a few slices for breakfast, sandwiches, salads, wraps, burgers, or meal prep. If you are cooking a full pack for a crowd, MasalaMonk’s oven bacon method is usually the better move because it gives you more space and less batch-by-batch grease management.
What This Air Fryer Bacon Guide Covers
Recipe Basics
Air Fryer Bacon at a Glance
Best default
350°F / 175°C for 7–10 minutes for regular bacon in a single layer.
For thick-cut bacon
350°F / 175°C for 10–15 minutes, with a quick flip or rearrange if the strips brown unevenly.
For turkey bacon
350–360°F / 175–182°C for 5–10 minutes. It is leaner than pork bacon, so it dries faster.
For less smoke
Begin with moderate heat, keep the bacon in a loose single layer, drain grease between batches, and drop to 320–325°F if your machine smokes easily.
Quick Answer: How Long to Cook Bacon in the Air Fryer?
For this recipe, regular bacon in the air fryer usually lands in the 7–10 minute range at 350°F / 175°C. Thin bacon finishes faster, while thick-cut bacon needs more time for the fat to render. The time and temperature chart below helps when you are switching between regular, thick-cut, turkey, frozen, or candied bacon.
When in doubt, begin with the moderate 350°F method, then adjust by thickness and crispness on your next batch. A second batch cooking faster is normal; it does not mean the timing failed. It simply means the basket and drawer are already hot.
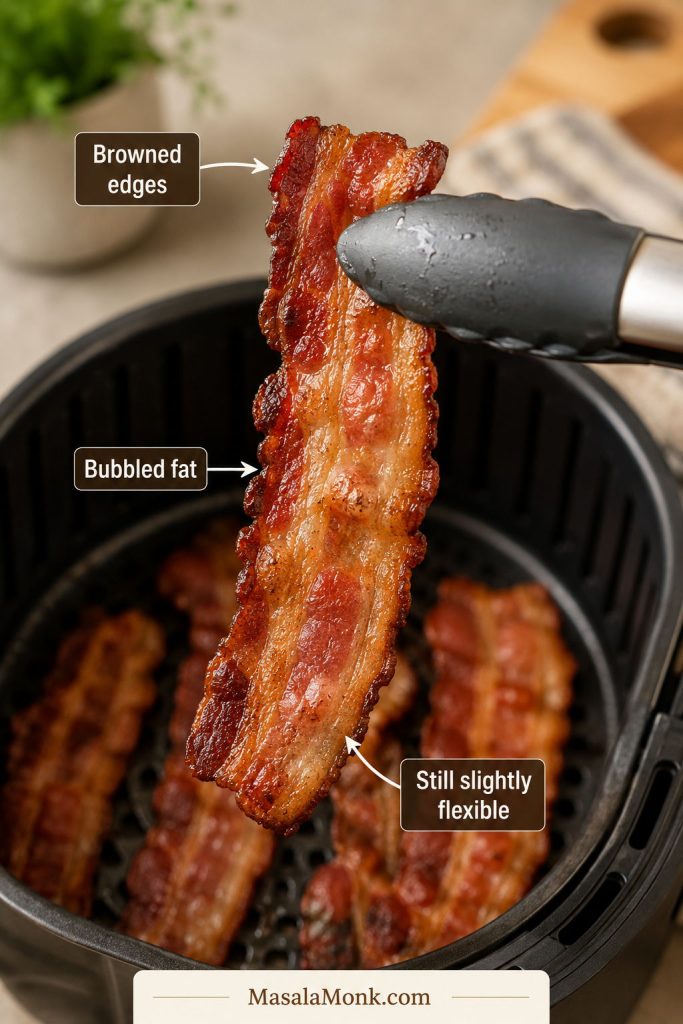
What Done Bacon Looks Like
Look for bubbling fat, browned or lightly ruffled edges, and centers that no longer look pale or raw. The bacon should look almost done, not cardboard-stiff, when it leaves the basket. Give it a minute on paper towels or a rack and it will firm into the crisp texture you actually want.
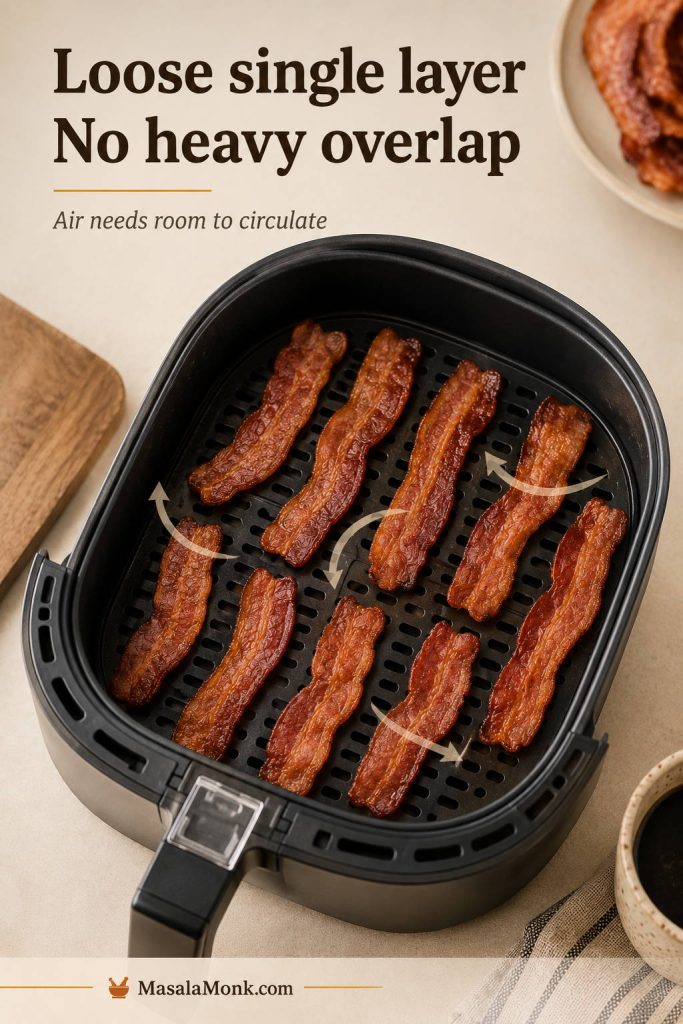
The Main Rule
Give the strips room. A little touching is fine, but stacked or heavily overlapped pieces trap steam and block airflow. Bacon needs moving air around the surface; when the strips overlap, the covered parts steam instead of crisping.
Air Fryer Bacon Time and Temperature Chart
Start with the chart below when the bacon in front of you does not match the “regular slice” timing. That is where most air fryer bacon mistakes begin: the slice is thinner, thicker, leaner, sweeter, or still frozen, but the timing is treated like it never needs to change.
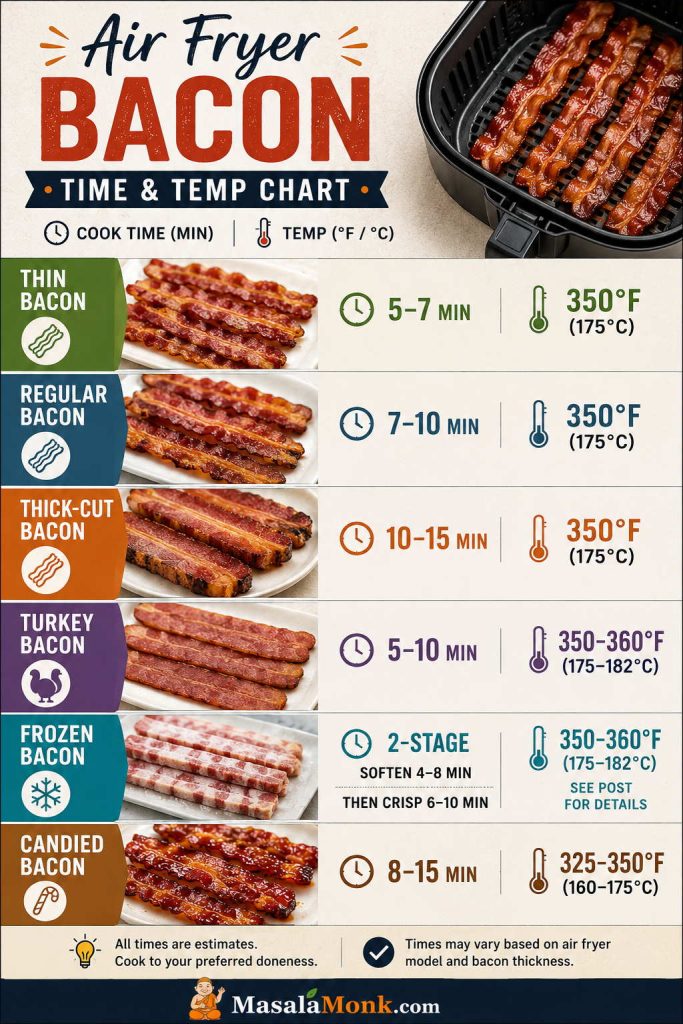
| Bacon type | Temperature | Time | Best for |
|---|---|---|---|
| Thin bacon | 350°F / 175°C | 5–7 minutes | Fast strips, softer bacon, quick breakfast plates |
| Regular bacon | 350°F / 175°C | 7–10 minutes | Best everyday method |
| Regular bacon, very crisp | 350°F / 175°C | 10–12 minutes | Extra crisp edges without jumping straight to high heat |
| Thick-cut bacon | 350°F / 175°C | 10–15 minutes | Better fat rendering and less scorching |
| Low-smoke bacon | 320–325°F / 160–165°C | 9–15 minutes | Air fryers that smoke easily |
| Fast crisp method | 375–400°F / 190–205°C | 6–12 minutes | Fast browning when your air fryer handles bacon well |
| Turkey bacon | 350–360°F / 175–182°C | 5–10 minutes | Leaner strips that dry out quickly |
| Regular frozen bacon | 350–360°F / 175–182°C | 4–8 minutes to separate, then 6–10 minutes | Stuck frozen slices; thick-cut frozen bacon may need longer |
| Candied bacon | 325–350°F / 160–175°C | 8–15 minutes | Brown sugar, maple, or spicy-sweet bacon |
Why the Timing Changes So Much
Bacon timing changes because strips vary in thickness, fat level, sugar content, moisture, and size. A thin supermarket slice may burn before a thick-cut slice has fully rendered. Turkey bacon has less fat, so it dries out faster. Candied bacon has sugar on the surface, which means it needs a gentler temperature. Your appliance also matters: a compact, powerful basket often cooks much faster than a larger air fryer oven.
Second Batch Warning
If you cook more than one batch, check the second batch 1–2 minutes earlier. The basket, drawer, and surrounding parts are already hot, so the next round often browns faster. That smoky second batch is usually a grease-management problem, not a failed recipe.
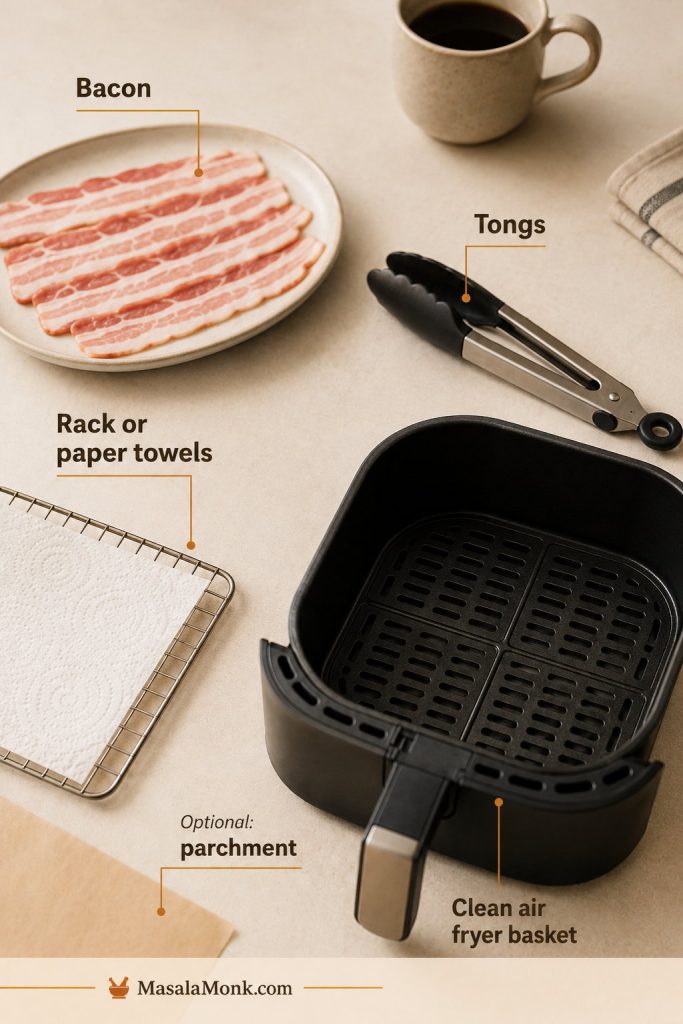
Ingredients and Equipment for Air Fryer Bacon
The ingredient list is short — just bacon — but the setup still matters. A good pair of tongs, a place to drain the strips, and the right liner choice make the difference between easy cleanup and a smoky mess. For liner and smoke-control questions, the foil, parchment, water, and bread section explains what actually helps.
Ingredients
- 5 slices regular bacon, about 6 oz / 170 g
- Or 4–5 slices thick-cut bacon, about 6–8 oz / 170–225 g
- Optional for turkey bacon: a very light mist of oil
- Optional for candied bacon: brown sugar, black pepper, cayenne, or maple
- Optional smoke-control helpers: water, bread, foil, or parchment, explained later in the post
Equipment
- Basket-style air fryer or air fryer oven
- Silicone-tipped tongs
- Paper towel-lined plate or cooling rack
- Optional perforated parchment liner
- Optional foil for the lower drawer or drip tray only, if your manual allows it
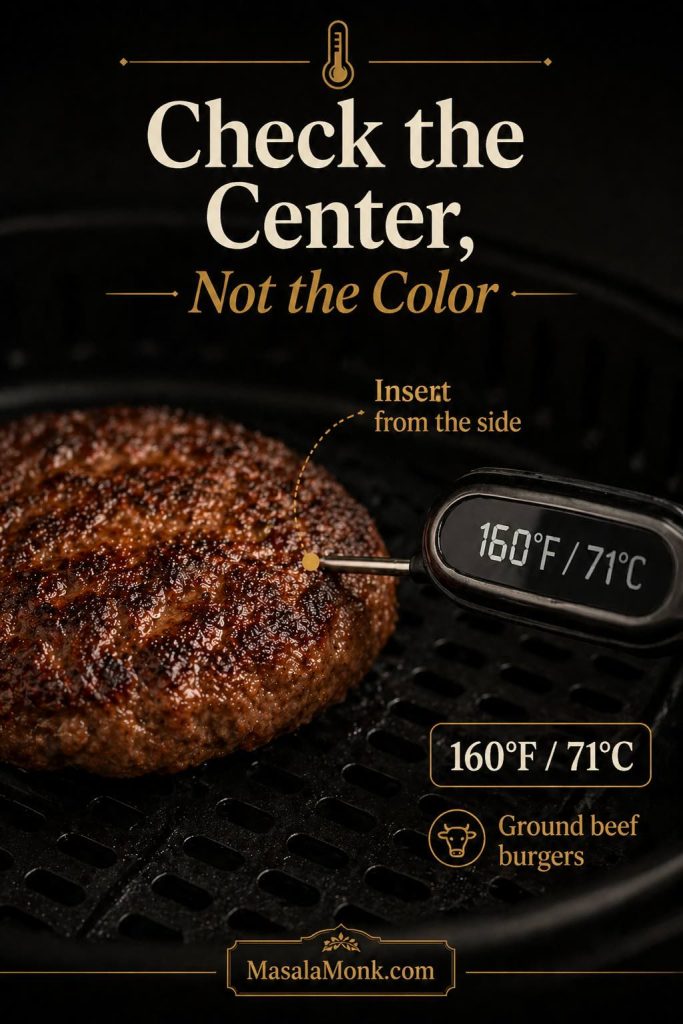
- Optional instant-read thermometer for turkey bacon or thicker cured meats
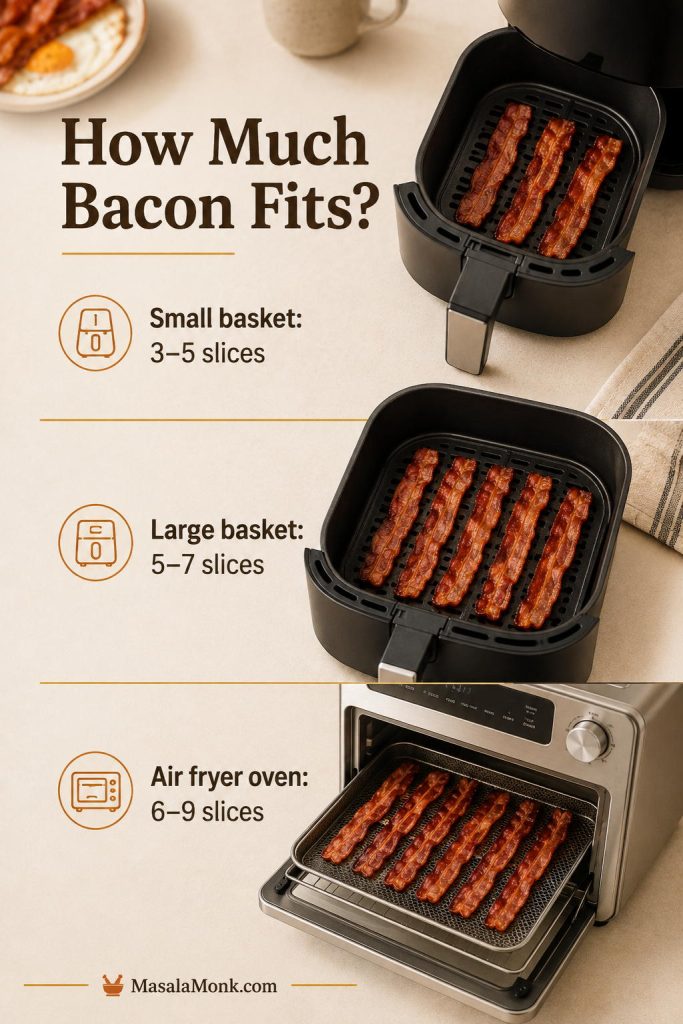
Best Amount of Bacon to Air Fry at Once
The best amount depends on basket size, but the bacon should still sit mostly in one layer. If you force in a full pack, the slices steam, stick, cook unevenly, and release more grease than the drawer can comfortably handle.
| Air fryer type | Practical bacon amount | Best note |
|---|---|---|
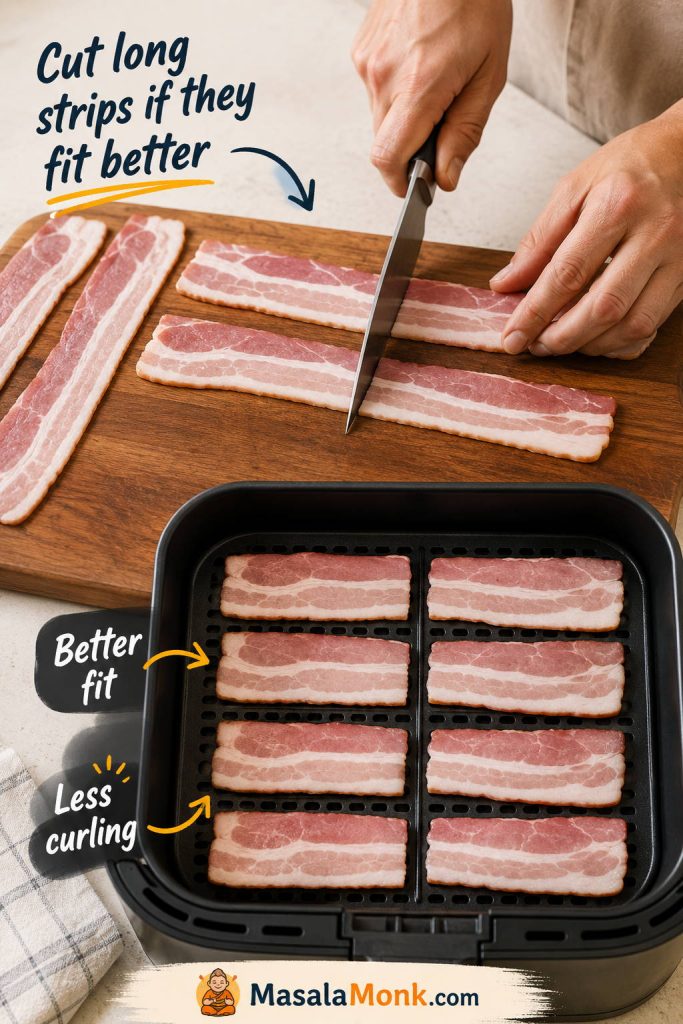
| Small basket air fryer | 3–5 slices | Cut strips in half if they fit better |
| Large basket air fryer | 5–7 slices | Keep the layer loose, not packed tight |
| Air fryer oven | 6–9 slices, depending on tray size | Use the drip tray correctly and watch upper racks |
Should You Cut Bacon in Half?
Cutting bacon in half helps when long strips do not fit flat. Shorter pieces stay away from the basket sides, curl less dramatically, and are easier to flip or rearrange with tongs. A little curling is normal; you only need to intervene if the strips fold over themselves or block airflow.
Best Temperature for Air Fryer Bacon: 350°F vs 375°F vs 400°F
For this recipe, 350°F / 175°C is the sweet spot for bacon in the air fryer. It is hot enough to brown the edges, but not so aggressive that the grease starts smoking before the fat has properly rendered.
| Goal | Best setting | Why it works |
|---|---|---|
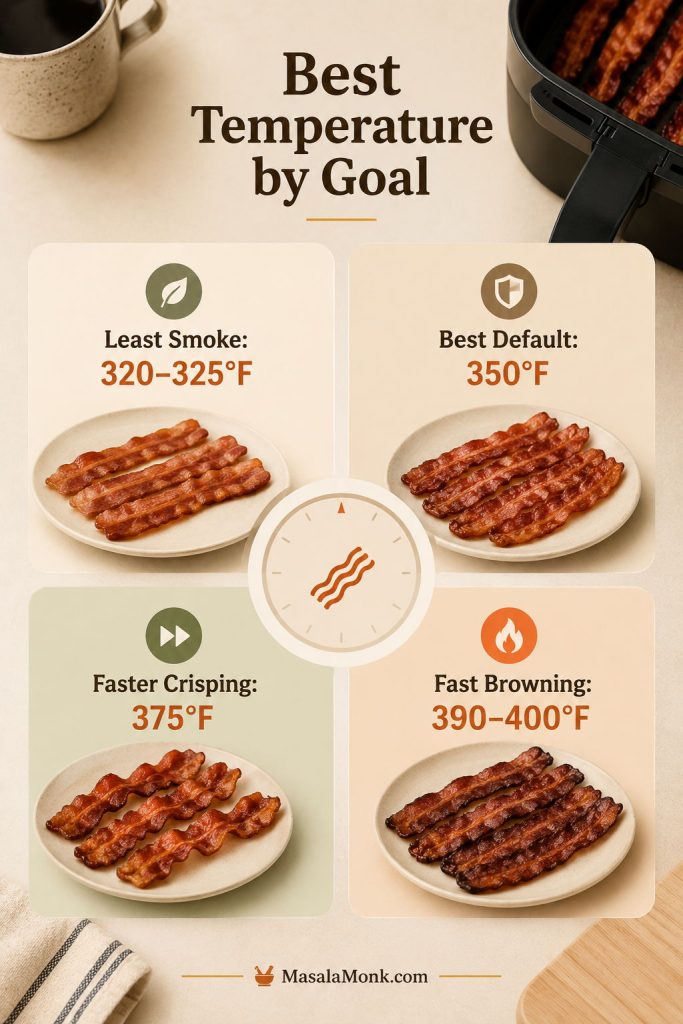
| Least smoke | 320–325°F / 160–165°C | Gentler heat helps reduce grease smoke in sensitive machines |
| Best everyday bacon | 350°F / 175°C | Good balance of rendered fat, crisp edges, and control |
| Faster crisping | 375°F / 190°C | Useful once you know your air fryer handles bacon cleanly |
| Fastest browning | 390–400°F / 200–205°C | Works for some batches, but needs close watching and a clean drawer |
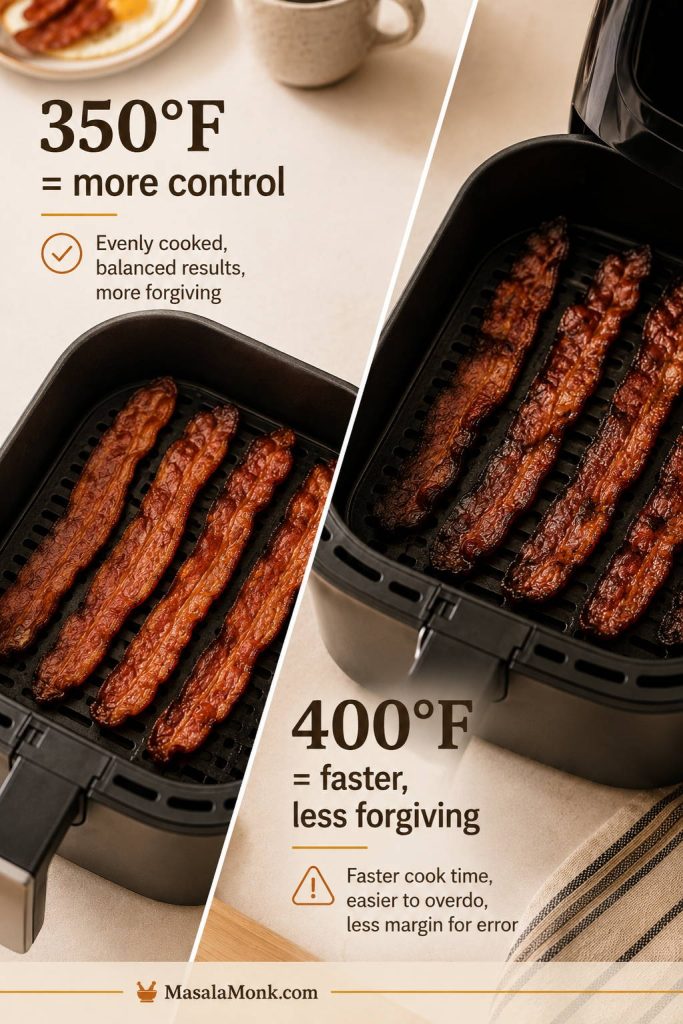
350°F / 175°C — Best Default
This is the setting to trust first. It gives regular bacon enough heat to brown while still giving the fat time to soften, bubble, and render. It is not the fastest option, but it is the most forgiving one.
375°F / 190°C — Faster Crisping
Once your air fryer has proven it handles fatty foods without smoking, 375°F / 190°C becomes a useful faster setting. It crisps regular strips quickly, but the margin for error gets smaller. Thin bacon, sugary bacon, and second batches need extra attention at this temperature.
390–400°F / 200–205°C — Fast but Watch Closely
This is the tempting shortcut because the bacon browns quickly. The catch is that high heat gives you less time between crisp edges and burnt-smelling grease. Use this range only when you are nearby, the drawer is clean, and the basket is not crowded. If your machine smokes with fatty foods, use the low-smoke temperature or go to the smoke fixes.
320–325°F / 160–165°C — Low-Smoke Mode
If your air fryer has ever smoked with bacon, wings, sausage, or anything fatty, do not start at 400°F. Drop to 320–325°F / 160–165°C and let the fat render more slowly. This lower setting is especially useful for thick-cut bacon, very fatty slices, or compact baskets where grease sits close to the heat source.
How to Cook Bacon in the Air Fryer
Once the air fryer is set, the method is mostly about giving the bacon enough room, letting the fat render, and remembering that the final crispness happens after the strips leave the basket.
Step 1 — Preheat or Start Cold
Preheating is optional. A cold start works, while a 2–3 minute preheat makes the timing chart more predictable. If you use parchment, add it only when the bacon is on top and weighing it down.
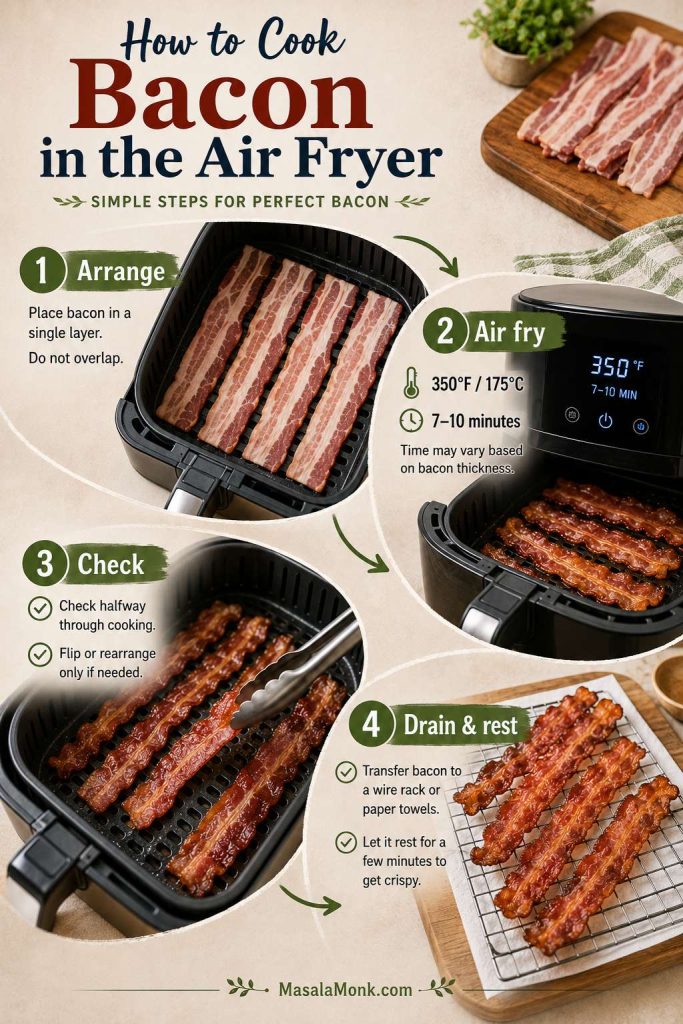
Step 2 — Arrange Bacon in a Single Layer
Lay the strips flat in the basket. A little touching is fine; heavy overlap is not. Cut long pieces in half if they fit better that way. This is the step that keeps the bacon from steaming underneath itself.
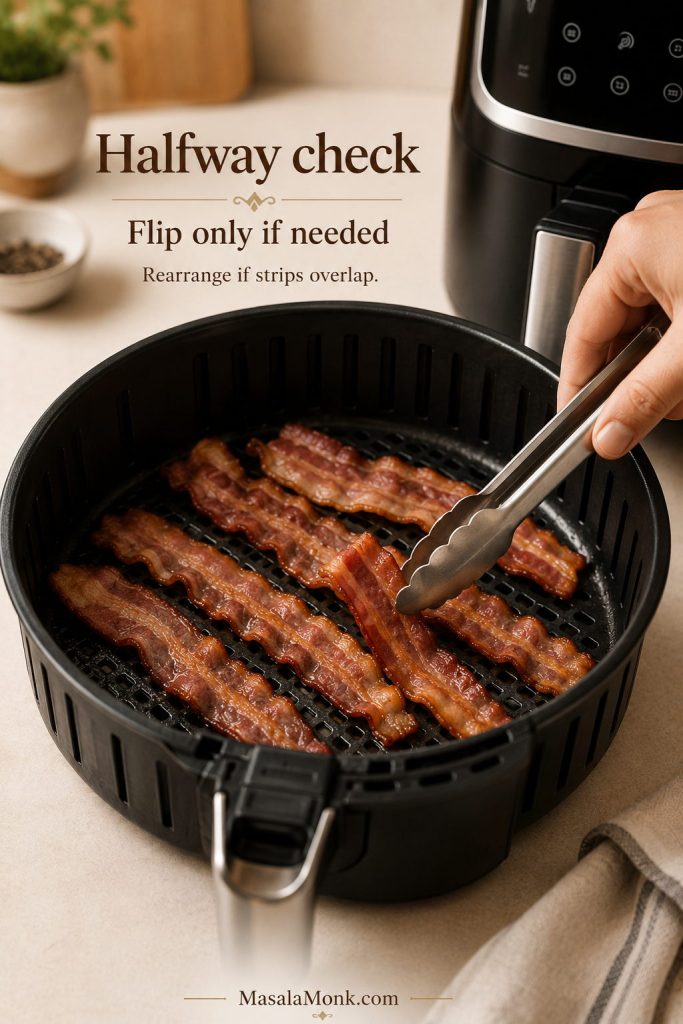
Step 3 — Cook, Check, Flip if Needed
Cook regular bacon at 350°F / 175°C for 7–10 minutes. Around the halfway point, check the basket instead of walking away completely: if the strips are folding over, touching too much, or browning unevenly, flip or rearrange them.
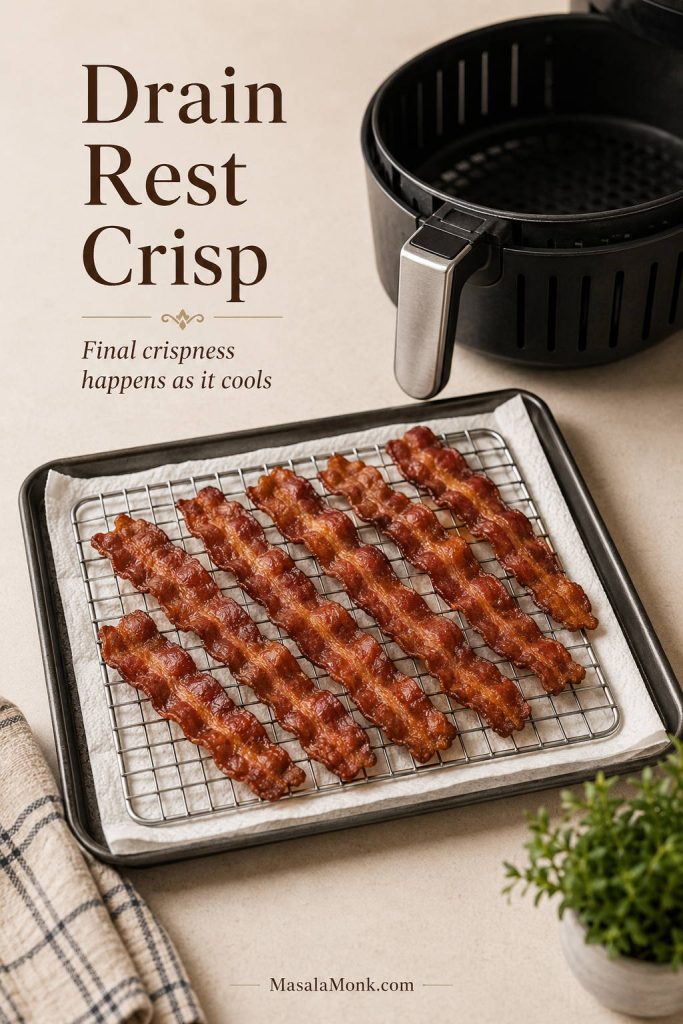
Step 4 — Drain and Cool
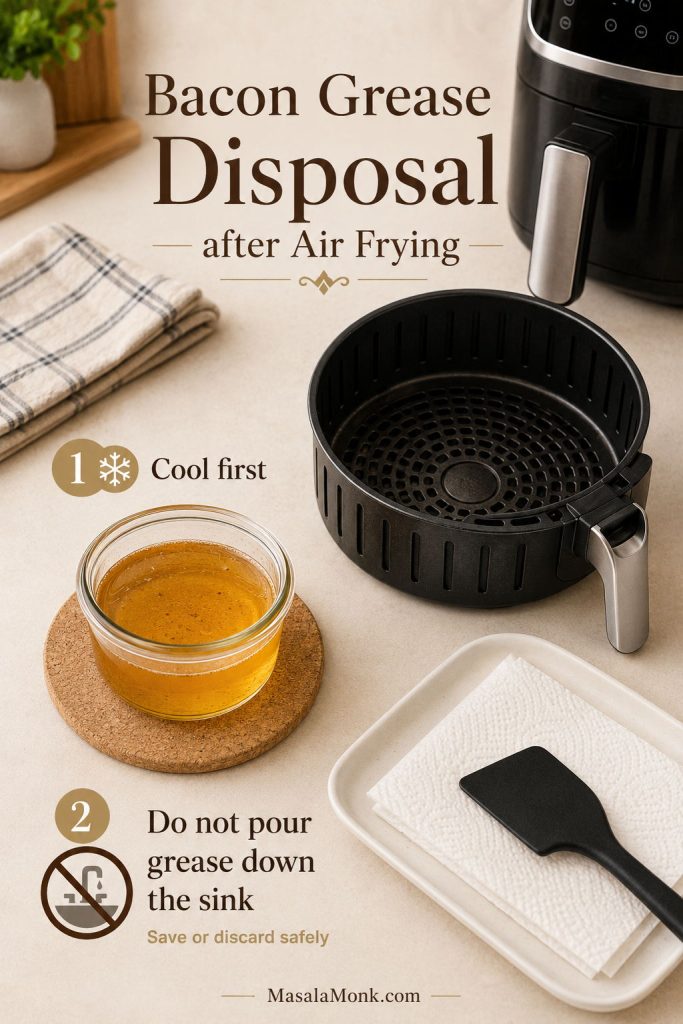
Transfer the bacon to paper towels or a cooling rack. It may still bend slightly when it comes out, but it will firm as it cools. Before cooking another batch, carefully drain the lower drawer or drip tray. Do not pour hot bacon grease down the sink. Let it cool until it thickens, scrape it into the trash, or save clean rendered bacon fat in a heat-safe container if you cook with it.
If the strips are still soft, burnt, or uneven, the troubleshooting table will help you adjust the next batch.
How to Make Crispy Air Fryer Bacon
Crisp air fryer bacon comes from more than heat alone. It needs rendered fat, moving air, and a short rest after cooking so steam can escape. Too much heat may brown the edges before the center has had time to render properly, especially with thick-cut bacon.
Pull It When the Fat Looks Rendered
Look for browned edges, bubbling fat, and strips that no longer look raw or shiny in the center. The best air fryer bacon comes out slightly flexible, then crisps as the steam escapes. If you wait until it looks completely rigid in the basket, it may cool into hard, brittle strips.

Do Not Crowd the Basket
If your bacon is pale in the middle but dark at the edges, the basket may be too full. Cook fewer strips so hot air reaches the surface of each piece. Crowding is one of the easiest ways to turn bacon from crisp to limp.
Use a Rack or Paper Towels After Cooking
Move the bacon out of the hot basket and let it rest on paper towels or a rack. This keeps it from sitting in grease and gives steam somewhere to escape. For a crisp breakfast plate, pair it with air fryer hash browns, where the same airflow-and-spacing rule matters just as much.
Thick-Cut Bacon in the Air Fryer
Thick-cut bacon is where patience pays off. The outside browns fast, but the fat inside still needs time to soften, bubble, and render. Start at 350°F / 175°C and give the bacon a steadier cook.
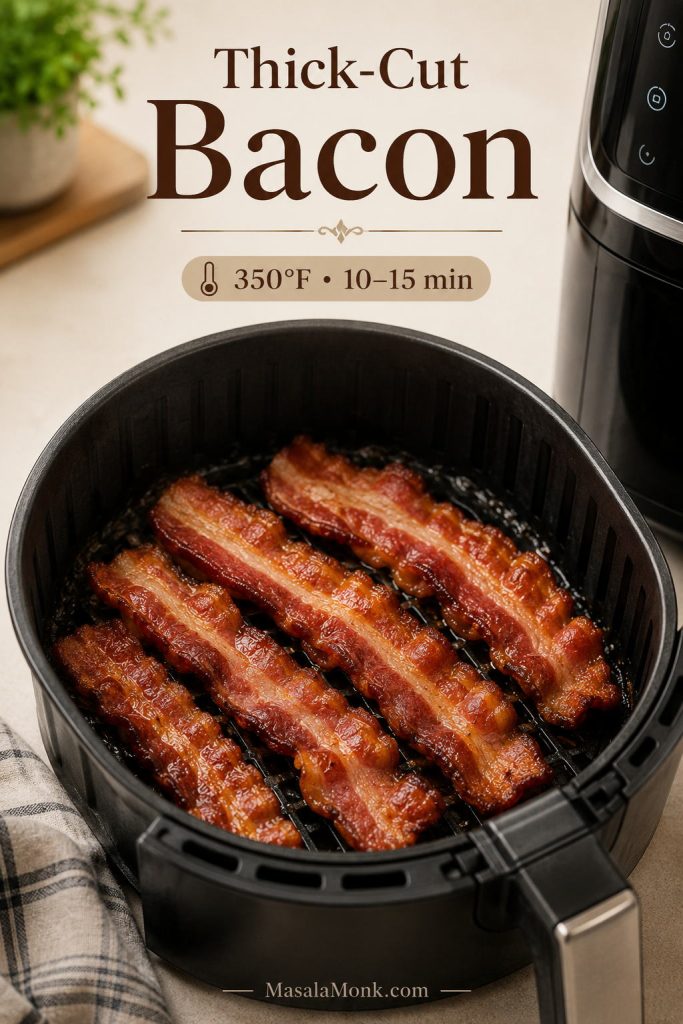
Cook thick-cut bacon at 350°F / 175°C for 10–15 minutes, flipping or rearranging halfway if needed.
Thick-Cut Bacon Time Chart
| Texture | Temperature | Time |
|---|---|---|
| Tender-crisp | 350°F / 175°C | 10–12 minutes |
| Crisp | 350°F / 175°C | 12–15 minutes |
| Low-smoke thick-cut bacon | 320–325°F / 160–165°C | 13–18 minutes |
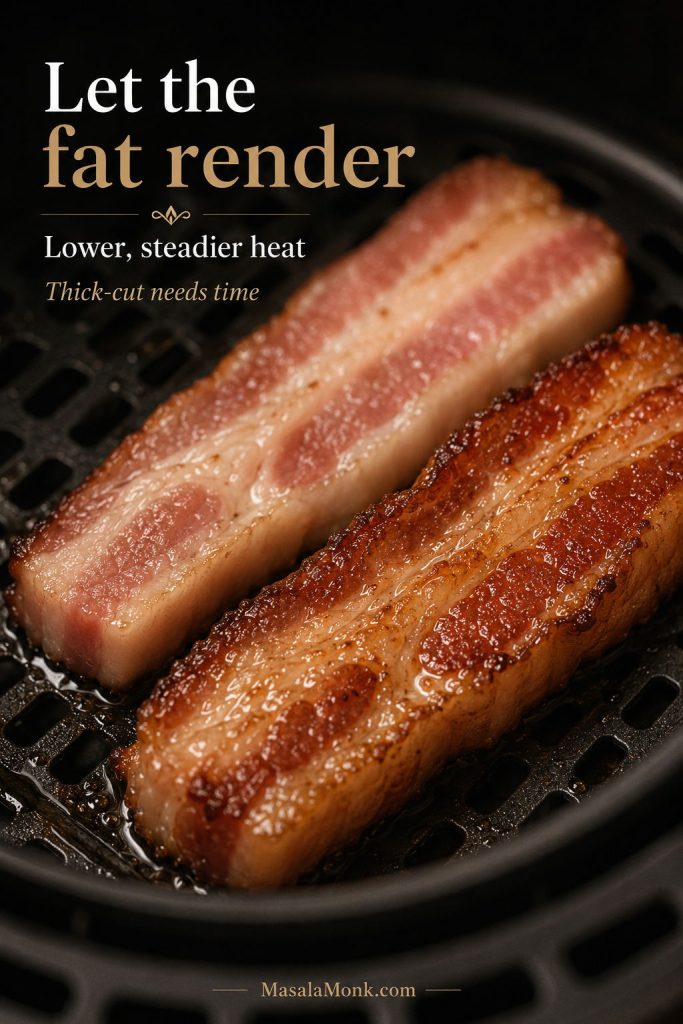
Why Thick-Cut Bacon Takes Longer
Thick bacon is not just regular bacon with a few extra minutes tacked on. It has more fat and more thickness to render through. Lower, steadier heat helps the bacon become crisp without leaving chewy centers.
Turkey Bacon in the Air Fryer
Turkey bacon works well in the air fryer, but the timing is less forgiving. Without pork bacon’s fat cushion, turkey bacon goes from flexible to dry before you expect it. It still crisps nicely, especially with moderate heat and a very light mist of oil when needed.
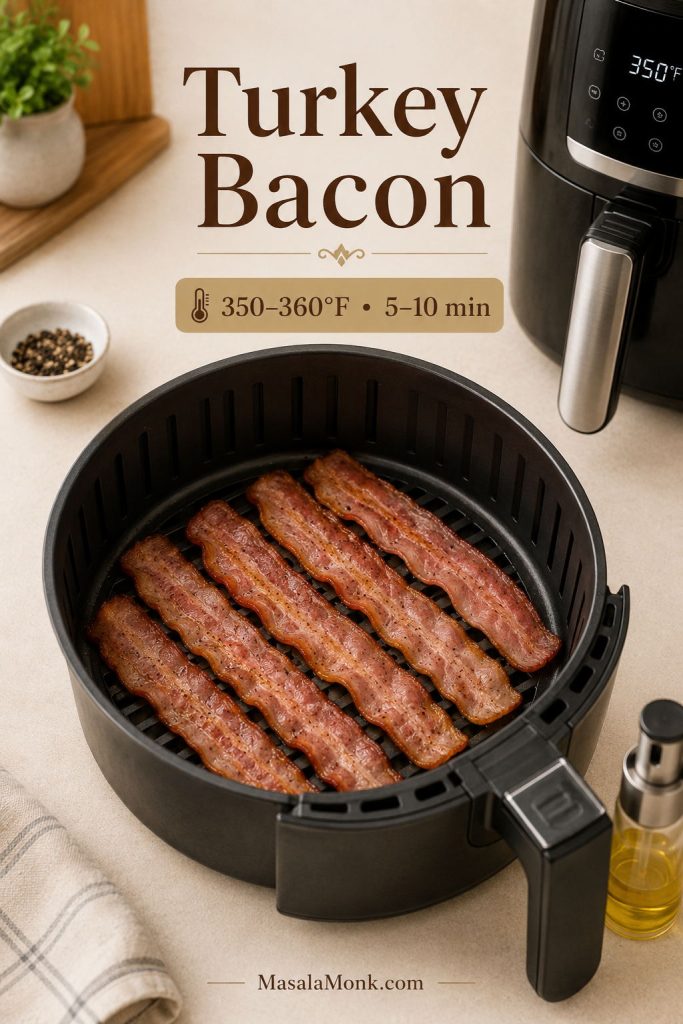
Air fry turkey bacon at 350–360°F / 175–182°C for 5–10 minutes, flipping once if needed. Thin turkey bacon may finish in 4–6 minutes, while thicker turkey bacon may need closer to 8–10 minutes.
Turkey Bacon Time Chart
| Turkey bacon type | Temperature | Time | Notes |
|---|---|---|---|
| Thin turkey bacon | 350°F / 175°C | 4–6 minutes | Start checking before the low end of the range |
| Regular turkey bacon | 350–360°F / 175–182°C | 5–8 minutes | Flip halfway for even browning |
| Extra crisp turkey bacon | 360°F / 182°C | 8–10 minutes | Watch the edges closely |
Should You Spray Turkey Bacon with Oil?
A very light mist of oil helps turkey bacon brown because it has less fat than pork bacon. Use a pump spray or brush if your air fryer manual warns against aerosol sprays. Do not soak the strips; a quick, even coating is enough.
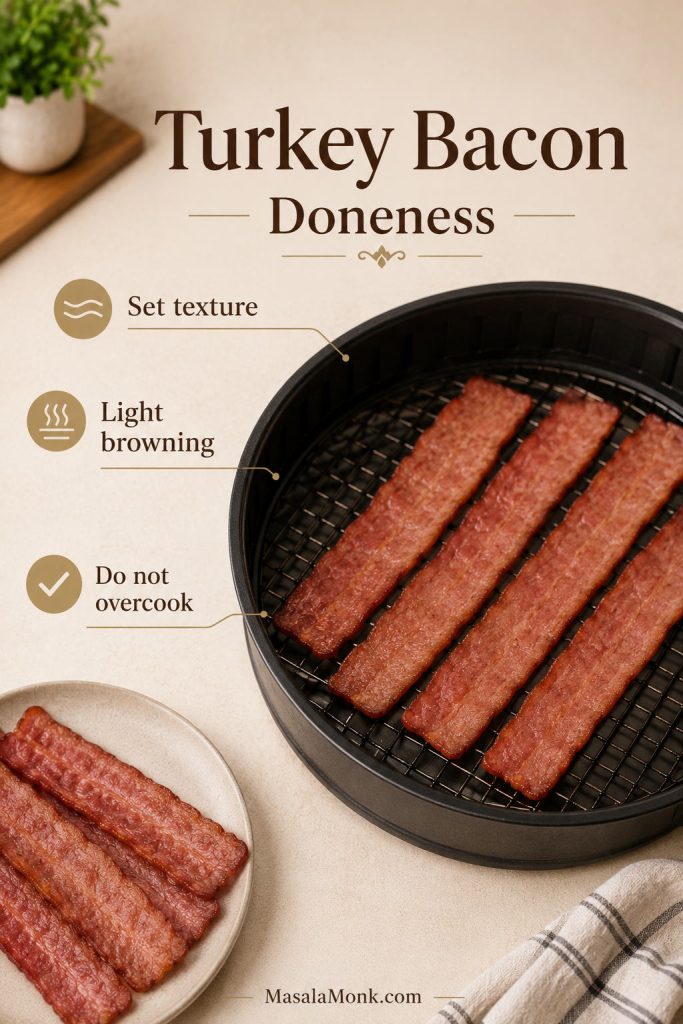
How to Tell Turkey Bacon Is Done
Turkey bacon is done when the strips look set, the edges have browned, and the texture is no longer soft or floppy. Because turkey bacon products vary more than pork bacon, treat the package directions as the final authority for doneness and safe handling. For thicker pieces, an instant-read thermometer helps remove guesswork.
Frozen Bacon in the Air Fryer
Frozen bacon works best with a short softening stage before the strips are separated and crisped. Those first few minutes are not really about browning; they loosen the slices so you do not tear them into thin, uneven pieces that overcook.
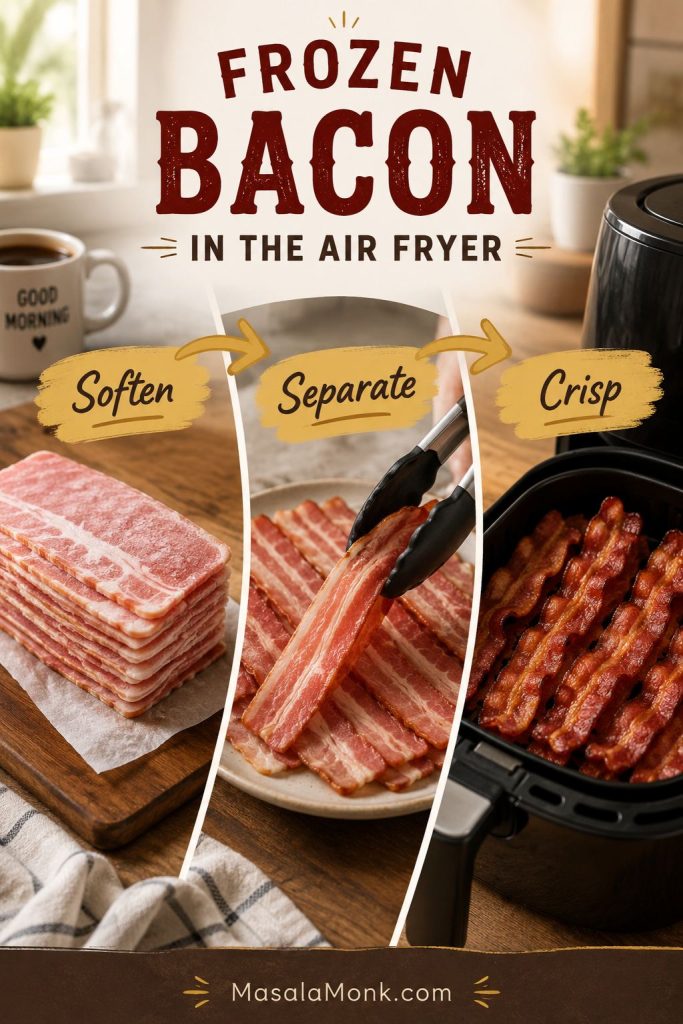
- Place the frozen bacon block or stuck slices in the air fryer.
- Air fry at 350–360°F / 175–182°C for 4–8 minutes, just until the slices loosen.
- Use tongs to separate the strips carefully.
- Arrange the slices in a single layer.
- Cook for another 6–10 minutes, depending on thickness and crispness.
Do Not Force Apart Frozen Bacon
If the slices are frozen together, do not pry them apart while they are still rigid. Warm them briefly first, then separate them once the fat softens and the strips loosen naturally.
Frozen Bacon Timing by Thickness
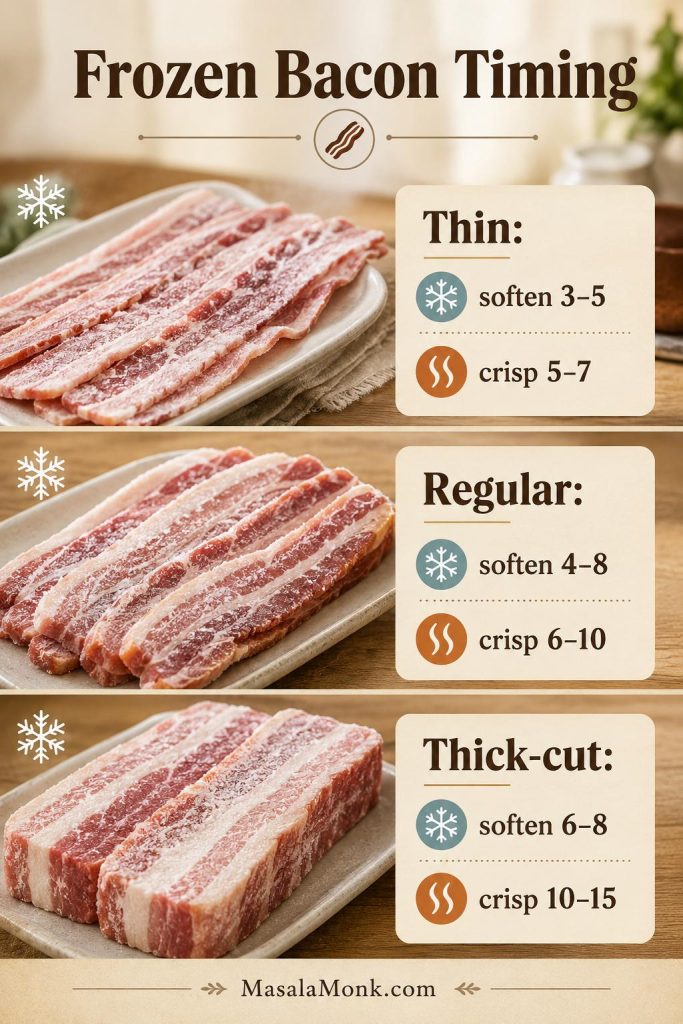
| Frozen bacon type | Stage 1: Separate | Stage 2: Crisp |
|---|---|---|
| Thin frozen bacon | 350°F / 175°C for 3–5 minutes | 5–7 minutes more |
| Regular frozen bacon | 350–360°F / 175–182°C for 4–8 minutes | 6–10 minutes more |
| Thick-cut frozen bacon | 350–360°F / 175–182°C for 6–8 minutes | 10–15 minutes more |
Once the slices are separated, treat them like fresh bacon and use the main timing ranges above.
Candied Bacon in the Air Fryer
Candied air fryer bacon is easy, but sugar changes the rules. Brown sugar and maple darken faster than the bacon underneath cooks, so use gentler heat and look at the strips before they go from glossy to bitter.
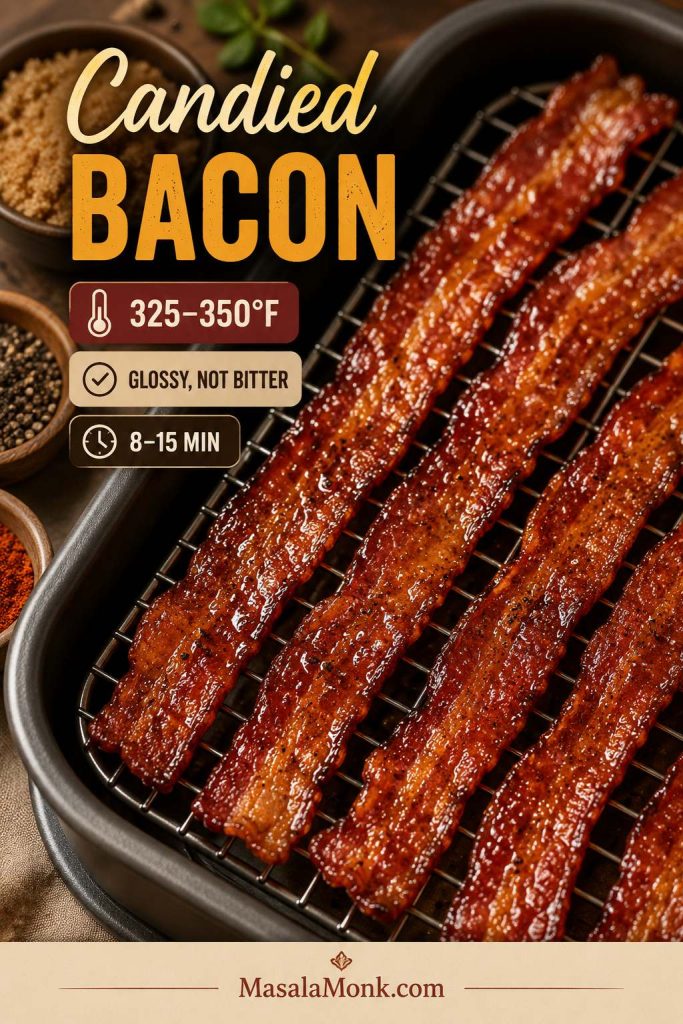
For 4–5 slices bacon, use 2–3 tablespoons brown sugar, a little black pepper, and optional cayenne. Cook at 325–350°F / 160–175°C for 8–15 minutes, depending on bacon thickness and how sticky-crisp you want it.
Brown Sugar Bacon
Pat the bacon dry, sprinkle lightly with brown sugar, and press the sugar onto the top side. Avoid heavy piles of sugar because they can melt into the basket before the bacon finishes.
Maple Bacon
Brush the bacon lightly with maple syrup during the last few minutes of cooking. Adding maple too early makes the surface darken before the bacon is crisp.
Spicy Candied Bacon
Add a pinch of cayenne or crushed red pepper to the brown sugar. Keep the temperature moderate so the spice blooms and the sugar caramelizes without turning bitter.
If you are making bacon for a snack tray instead of breakfast, MasalaMonk’s baked jalapeño poppers are a natural next recipe because they use bacon for that salty, crisp, party-style finish.
Other Bacon Types: Rashers, Back Bacon, Canadian Bacon and Beef Bacon
Bacon names and cuts vary by country. Use this section if your package does not look like standard streaky bacon strips; leaner cuts cook faster, thicker cuts need more time, and already-cooked products are usually closer to reheating than raw bacon cooking.
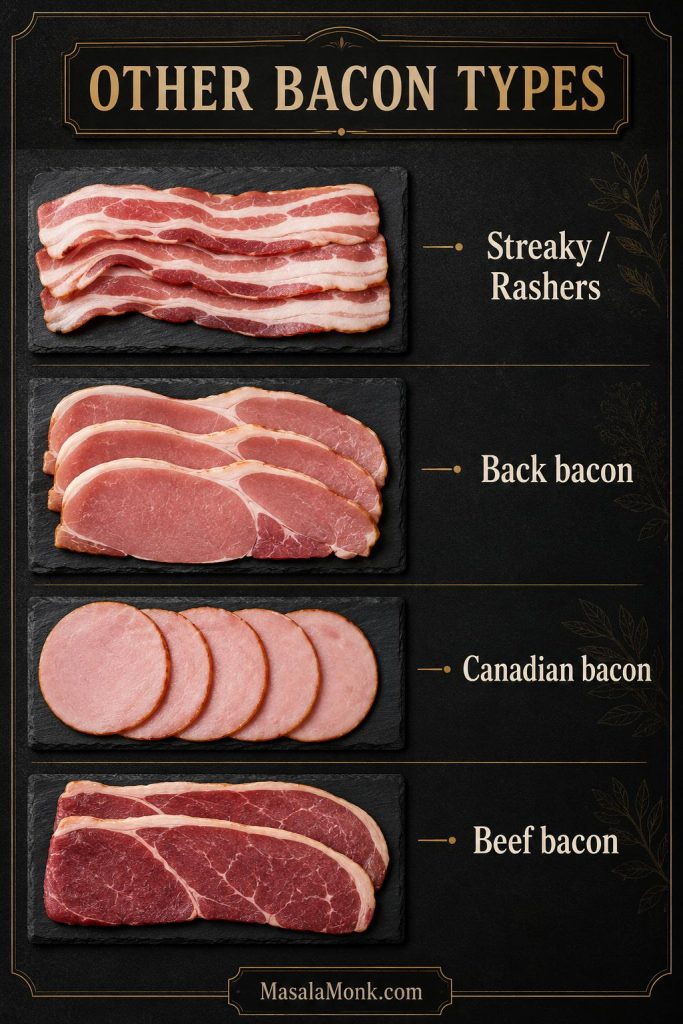
Streaky Bacon and Rashers
Streaky bacon is closest to US-style strips. Cook it gently at 350°F / 175°C, or use 200°C / 400°F for a faster UK-style method if your machine does not smoke easily. Most streaky rashers take 6–10 minutes.
Back Bacon
Back bacon is leaner and usually cooks faster than streaky bacon. At 200°C / 400°F, many rashers finish in 4–8 minutes. Since it has less fat, check it a minute or two sooner than you would with streaky bacon.
Canadian Bacon
Canadian bacon is usually more of a reheating and light-crisping job than a raw fatty bacon job. Start at 350°F / 175°C and check after 2–4 minutes. Continue briefly if you want browned edges.
Beef Bacon
Beef bacon varies a lot by cut and fat level. Start around 350°F / 175°C and check after 6 minutes. Fattier beef bacon may need more time, while leaner pieces dry out quickly.
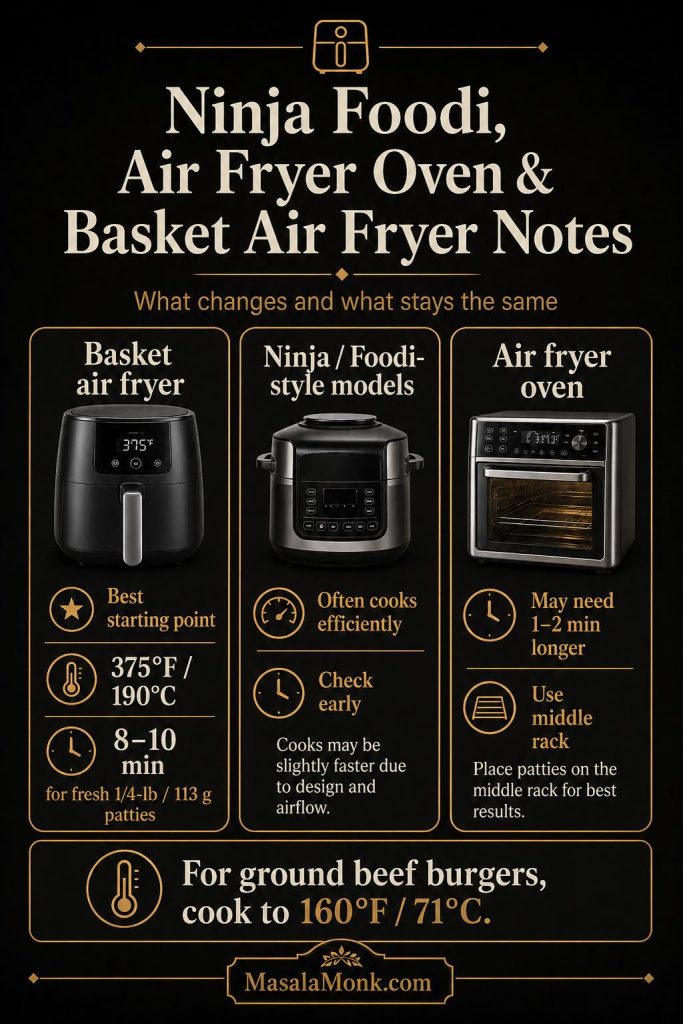
Basket Air Fryer vs Air Fryer Oven Bacon
A basket air fryer and an air fryer oven both cook with hot circulating air, but bacon behaves a little differently in each. This is why the same bacon timing can feel perfect in one air fryer and too fast in another. Basket models are compact and quick. Air fryer ovens give more surface area, but they need more attention to trays, racks, and grease drips.
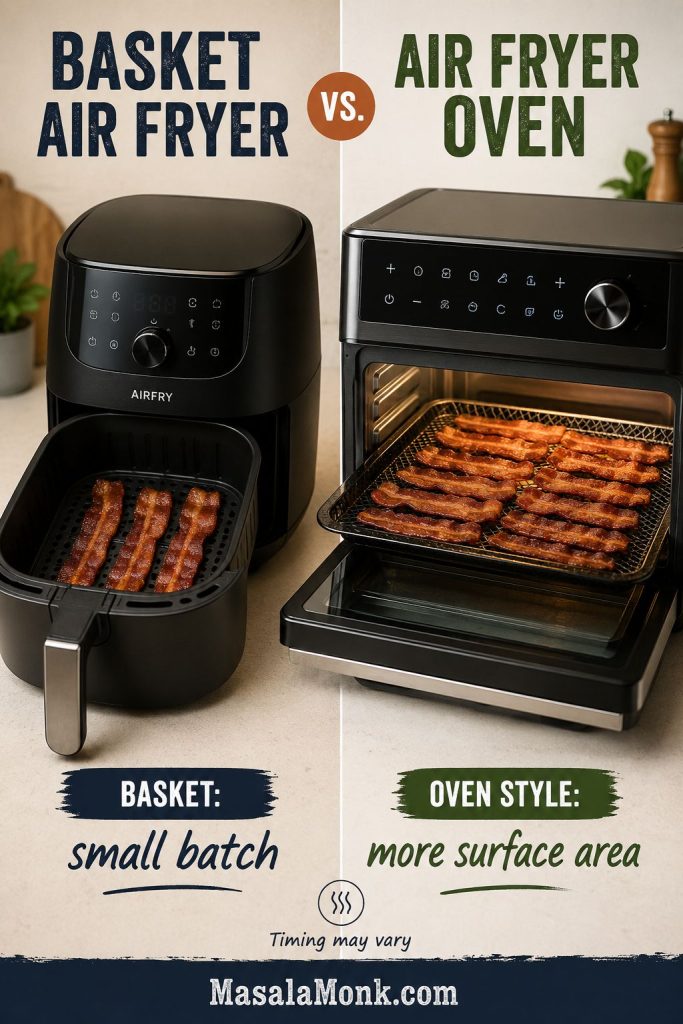
Basket Air Fryer
Basket air fryers are best for small batches. Bacon may curl, overlap, or brown unevenly, so flipping or rearranging halfway helps. Grease collects below the basket, which is convenient, but the drawer should be drained before the next batch.
Air Fryer Oven
Air fryer ovens fit more bacon on trays or racks. Use the drip tray correctly, watch for hot spots, and check whether the top rack browns faster than the lower rack. Rotate trays if needed.
Dual-Rack Air Fryers
If you use two racks, the top rack may cook faster because it is closer to the heating element. Check the top layer first and remove strips as they finish instead of waiting for every piece to match exactly.
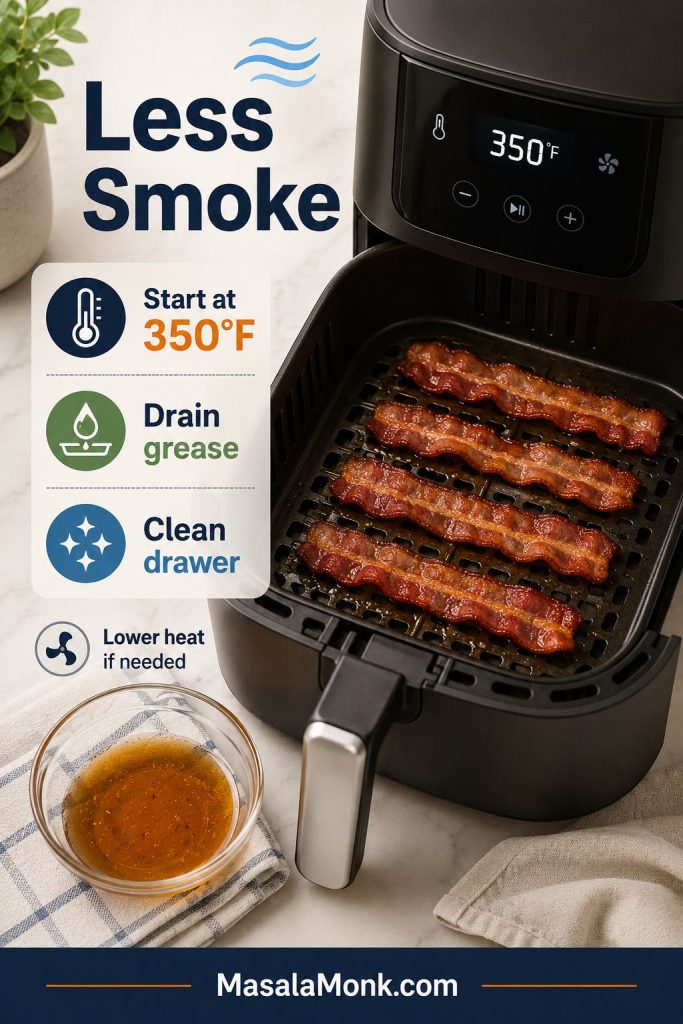
How to Stop Air Fryer Bacon from Smoking
Smoke is the reason many people try bacon in the air fryer once and never do it again. Usually, though, it is not the bacon’s fault. It is grease sitting too close to high heat, old residue burning off, or a second batch going into an already-hot drawer.
For general air fryer safety, the USDA’s Food Safety and Inspection Service recommends following the manufacturer’s instructions for your appliance. That matters here because air fryer designs vary, especially around liners, trays, water, and grease handling. You can read their general guidance here: USDA FSIS air fryer food safety guidance.
Start at 350°F, Not 400°F
If your kitchen fills with smoke, start by lowering the heat rather than blaming the whole method. Begin at 350°F / 175°C. If that still smokes, move down to 320–325°F / 160–165°C and add a few minutes.
Drain Grease Between Batches
Grease from the first batch often smokes during the second batch. Let the air fryer cool slightly if needed, then carefully drain the lower drawer or drip tray before continuing.
Clean Old Grease Before Cooking Bacon
Old residue may smoke before the fresh bacon even starts rendering. If your air fryer smells burnt as soon as it heats, clean the basket, drawer, tray, and any reachable grease spots according to your manual.
Use Low-Smoke Mode for Sensitive Air Fryers
Low-smoke mode means 320–325°F / 160–165°C and a longer cook. It is especially useful for thick-cut bacon, very fatty slices, or air fryers that have smoked with wings, sausages, or other greasy foods.
Stop If Smoke Turns Heavy or Burnt-Smelling
A little steam or light haze is different from heavy smoke. If the air fryer is smoking heavily or smells burnt, stop the machine, let it cool, remove the food safely, and check for grease buildup or food touching the heating area. MasalaMonk’s guide to common air fryer mistakes is also useful here, especially for crowding, airflow, and cleanup problems.
Foil, Parchment, Water, or Bread: What Actually Helps?
This is where a lot of air fryer bacon advice gets messy. Foil, parchment, water, and bread all help in some situations, but none of them should block airflow or fight your air fryer’s manual.
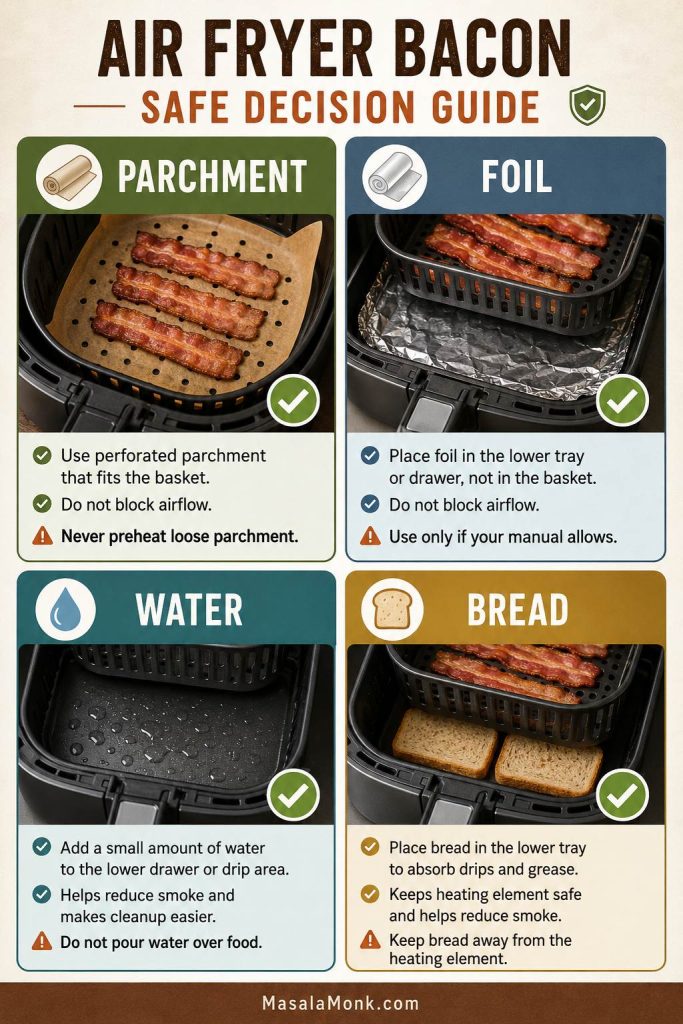
| Option | Use it? | Best guidance |
|---|---|---|
| Perforated parchment | Sometimes | Useful for cleanup, but never preheat loose parchment. Add it only when bacon weighs it down. |
| Foil | Cautiously | Use only if your manual allows it. Keep it in the lower tray or drawer and do not block airflow. |
| Water | Sometimes | Helps some basket models reduce smoking, but only if your air fryer design safely allows water in the lower drawer. |
| Bread | Sometimes | A slice below the basket absorbs some grease, but it must not touch the heating element or block airflow. |
| Nothing | Often best | Single layer, 350°F, and draining grease between batches is enough for many air fryers. |
The biggest mistake is treating liners like a full basket cover. Bacon still needs exposed airflow to crisp, so any foil or parchment should help with cleanup without blocking circulation.
Foil in the Air Fryer for Bacon
Only use foil if your manual allows it. Place it where it catches grease without covering air holes or interfering with circulation. Do not wrap the basket tightly in foil, and do not place loose foil where it might lift into the heating element.
Parchment Paper for Air Fryer Bacon
Perforated air fryer parchment helps with cleanup, but it should be weighed down by food. Never preheat the air fryer with loose parchment inside. For bacon, parchment may reduce sticking, but it also reduces some direct airflow under the strips.
Water Under Bacon in the Air Fryer
Some cooks add a small splash or thin layer of water to the lower drawer to reduce smoke from hot grease. This works in some basket-style models, but not universally. Use water only if your manual allows it and only if the water stays safely away from electrical parts and the heating element.
Bread Under Bacon in the Air Fryer
A slice of bread below the basket absorbs dripping grease in some models. It is a helper, not a requirement. Make sure it sits safely below the basket, away from the heating element, and does not block airflow.
What to Serve with Air Fryer Bacon
Once the bacon is cooked, it is more than a breakfast side. Use the crisp strips for eggs and toast, tuck them into sandwiches, crumble them over salads, add them to burgers, or chop them for meal prep.
Classic Breakfast Plate
Serve them with eggs, toast, fruit, avocado, or roasted tomatoes. If you want eggs without boiling water, MasalaMonk’s air fryer hard-boiled eggs guide gives timing for soft, jammy, and fully hard yolks.
Crispy Air Fryer Breakfast
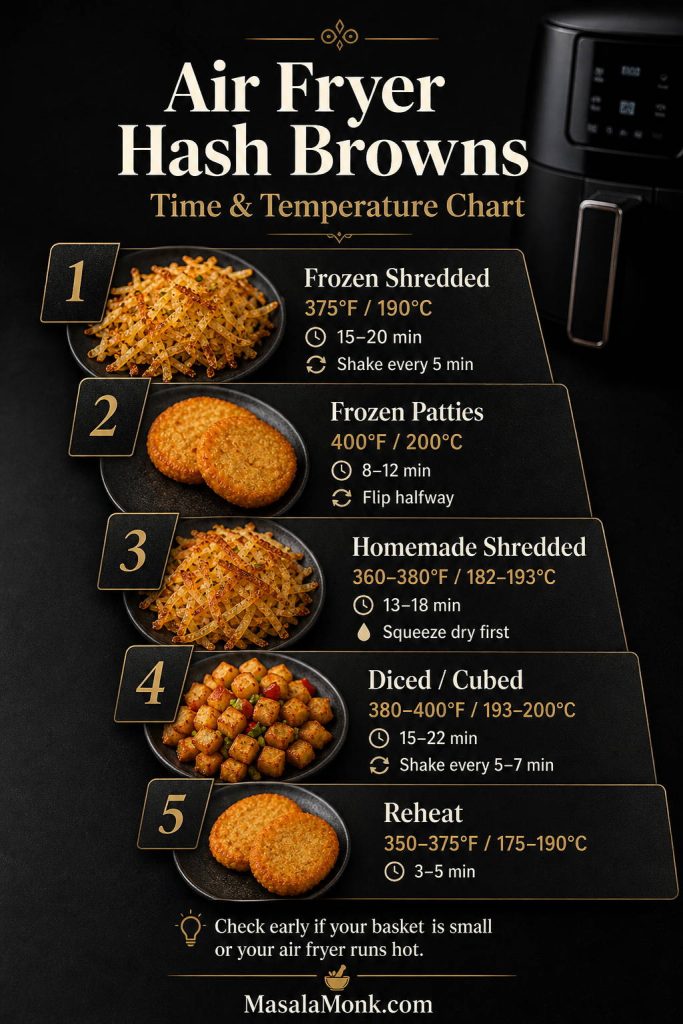
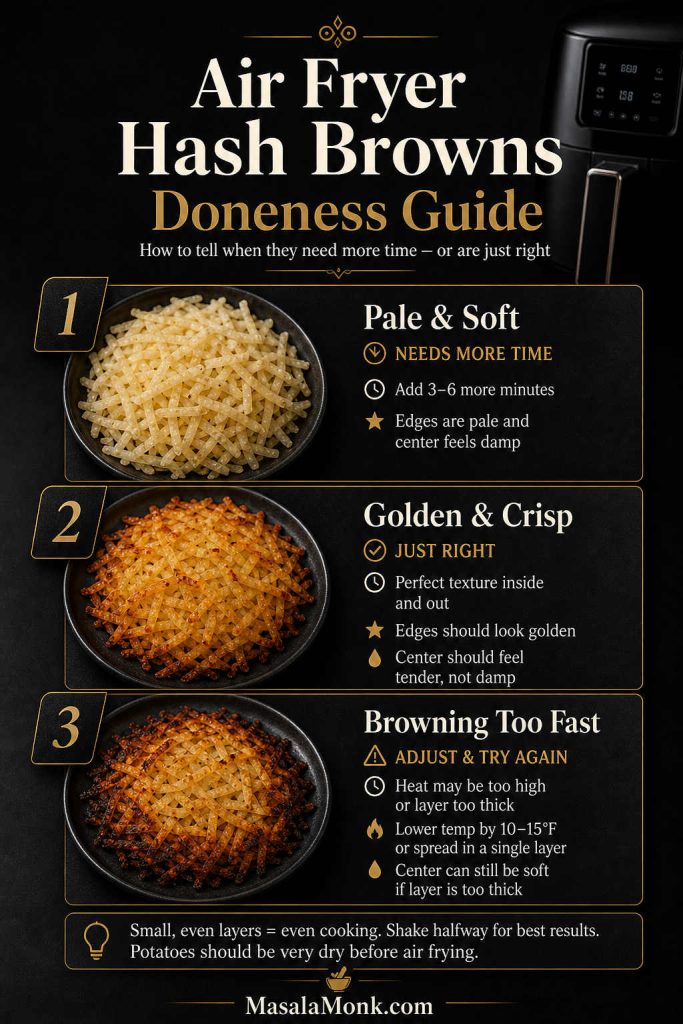
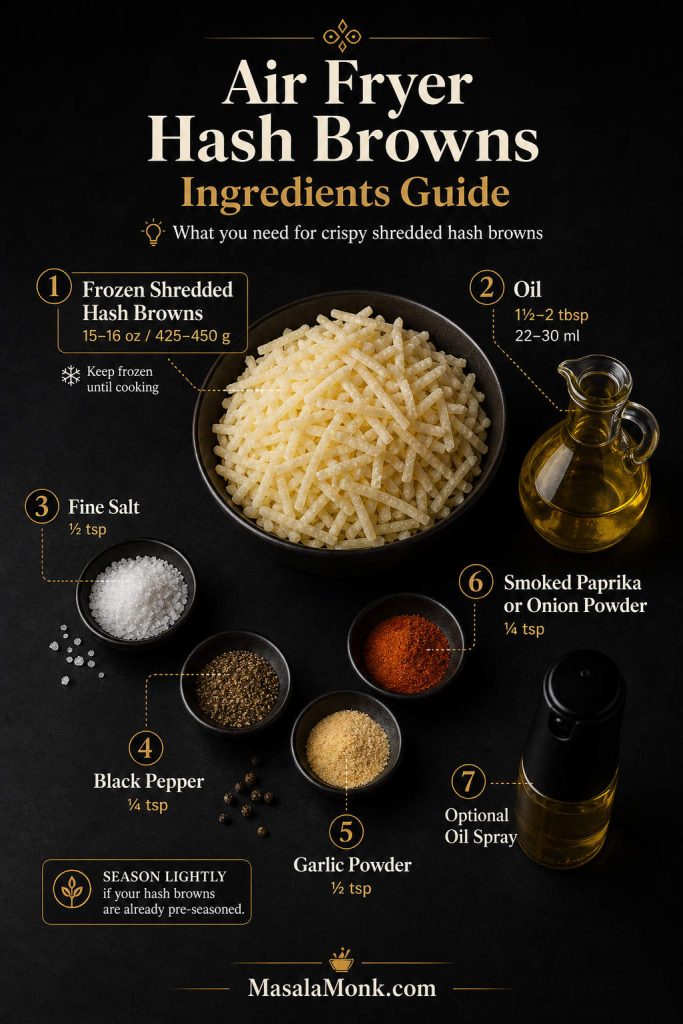
For a crisp diner-style breakfast, pair bacon with air fryer hash browns. Cook the bacon first, drain the grease, wipe the basket if needed, then cook the potatoes so they do not pick up too much bacon residue.
Meal Prep Wraps, Burritos and Salads
Chopped bacon works well in breakfast wraps, egg bites, salads, sandwiches, and freezer-friendly burritos. If you are building a bigger make-ahead breakfast, the breakfast burrito recipe is a natural place to use crisp pieces with eggs, potatoes, cheese, and sauce.
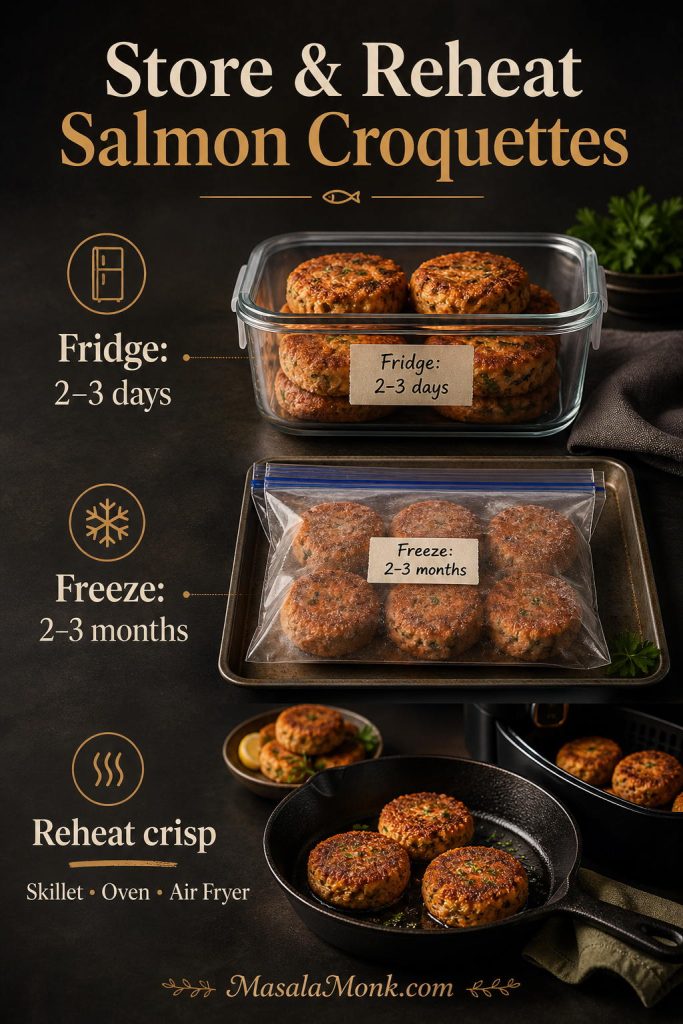
How to Store and Reheat Air Fryer Bacon
Leftover bacon is useful, but it is easy to overdo during reheating. Store it cold, reheat it gently, and stop as soon as it is hot and crisp again. The goal is to bring back the crispness without cooking all the moisture out of the strip.
Fridge Storage
Let the bacon cool, then store it in an airtight container in the refrigerator for 3–4 days. For broader cold-storage guidance, refer to the FoodSafety.gov cold food storage chart.
Freezer Storage
To freeze cooked bacon, layer cooled strips between parchment, place them in a freezer bag, press out excess air, and freeze. For best quality, use frozen cooked bacon within about 1 month.
Reheating Bacon in the Air Fryer
Reheat cooked bacon at 325–350°F / 160–175°C for 2–5 minutes, depending on thickness. Thin bacon may only need a couple of minutes. Thick-cut slices may need longer.
Reheating Turkey Bacon
Reheat turkey bacon at 350°F / 175°C for 2–3 minutes. Because it is lean, avoid reheating it too long or it may become dry and leathery.
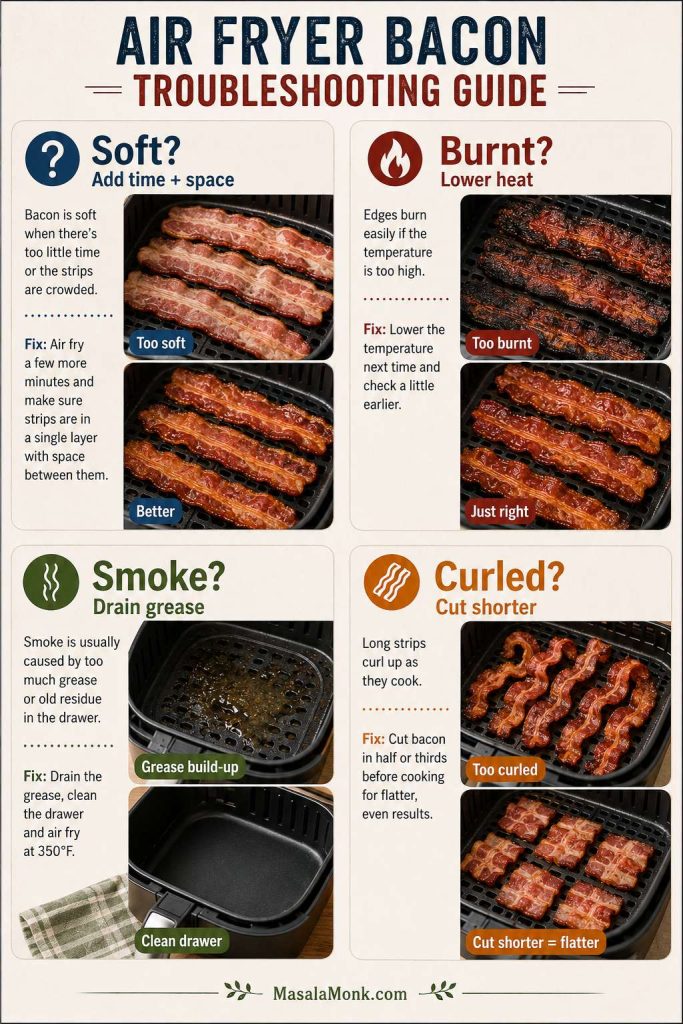
Air Fryer Bacon Troubleshooting
If your bacon did not come out right, do not give up on the method yet. The mistake is usually visible once you know what to look for: pale centers mean crowding or short timing, burnt edges point to heat, and smoke usually points to grease.
| Problem | Likely cause | Fix |
|---|---|---|
| Bacon is not crispy | Basket is crowded, cook time is short, or bacon is steaming | Cook in a single layer, add 1–2 minutes, and cool on a rack or paper towels |
| Bacon burns at the edges | Temperature is too high or bacon is thin | Use 325–350°F and check earlier |
| Air fryer smokes | Grease buildup, old residue, or high heat | Drain grease, clean the drawer, and lower the temperature |
| Bacon curls | Long strips are hitting basket sides or shrinking unevenly | Cut strips in half and flip or rearrange halfway |
| Bacon cooks unevenly | Hot spots or overlapping pieces | Rearrange halfway and avoid stacking |
| Second batch burns | Air fryer is already hot | Check the second batch 1–2 minutes earlier |
| Turkey bacon is dry | Too lean or overcooked | Use a light oil mist and shorter timing |
| Candied bacon burns | Sugar cooked too hot | Use 325–350°F and check early |
Bacon Is Not Crispy
Add another 1–2 minutes, but also check the setup. If the strips are crowded or sitting in trapped steam, extra time alone may not fix it. Cook fewer pieces and let them rest on paper towels or a rack after air frying.
Bacon Is Burning
Lower the temperature. Thin bacon and sugary bacon burn quickly at high heat. Use 325–350°F and check the next batch sooner.
Bacon Is Smoking
Drain grease, clean old residue, and lower the heat. If the smoke is heavy or smells burnt, stop the machine and inspect it safely after it cools.
Bacon Is Chewy
Chewy bacon usually needs more rendering time, not more heat. Keep the temperature moderate and cook a little longer, especially for thick-cut slices.
Turkey Bacon Is Dry
Turkey bacon dries out when it is cooked too long or too hot. Use a light oil mist, check it sooner, and pull it when the edges are browned and the strips look set.
Air Fryer Bacon Recipe Card
Air Fryer Bacon Recipe
This method uses 350°F / 175°C as the default temperature for crisp, evenly cooked bacon with better smoke control than hotter methods.
Equipment
- Air fryer
- Silicone-tipped tongs
- Paper towel-lined plate or cooling rack
Ingredients
- 5 slices regular bacon, about 6 oz / 170 g
- Or 4–5 slices thick-cut bacon, about 6–8 oz / 170–225 g
Instructions
- Preheat the air fryer to 350°F / 175°C for 2–3 minutes, if you want more consistent timing.
- Arrange the bacon in a single layer in the basket. Cut strips in half if needed so they fit flat.
- Air fry regular bacon for 7–10 minutes, checking thin slices near the lower end of the range.
- Air fry thick-cut bacon for 10–15 minutes, flipping or rearranging halfway if needed.
- Transfer the bacon to paper towels or a rack. It will crisp more as it cools.
- Carefully drain grease from the lower drawer or drip tray before cooking another batch.
Notes
- For less smoke, use 350°F instead of starting at 400°F.
- For very smoky air fryers, use 320–325°F / 160–165°C and add a few minutes. See the smoke prevention tips if needed.
- Do not crowd the basket. Cook in batches if needed.
- The second batch may cook faster because the basket is already hot.
- For turkey bacon, use 350–360°F / 175–182°C for 5–10 minutes, or see the turkey bacon section above.
- Let bacon grease cool before discarding it. Do not pour hot grease down the sink.
FAQs About Air Fryer Bacon
Does bacon cook well in an air fryer?
Bacon cooks well in an air fryer when it sits in a loose single layer and the grease has room to drip below. The main things to watch are smoke, crowding, and overcooking.
How long does bacon take in the air fryer?
Regular bacon usually takes 7–10 minutes at 350°F / 175°C. Thin bacon may take 5–7 minutes, while thick-cut bacon may take 10–15 minutes.
What temperature is best for air fryer bacon?
350°F / 175°C is the best default because it gives the fat time to render without pushing the air fryer into a hotter, smokier range. Use 375–400°F only when you want faster crisping and know your air fryer handles bacon well.
Do you preheat the air fryer for bacon?
Preheating is optional. A cold start works, while a 2–3 minute preheat makes the timing more predictable. If you use parchment, never preheat with loose parchment inside the basket.
Do you flip bacon in the air fryer?
Flipping is not always required, but it helps when the strips curl, overlap, or brown unevenly. Basket-style air fryers often benefit from a quick flip or rearrange.
How do you stop bacon from smoking in the air fryer?
Start at 350°F instead of 400°F, cook in a single layer, drain grease between batches, and clean old residue from the basket and drawer. If your machine still smokes easily, use 320–325°F and cook a little longer.
How do you cook turkey bacon in the air fryer?
Cook turkey bacon at 350–360°F / 175–182°C for 5–10 minutes. Since turkey bacon is leaner than pork bacon, check it early and consider a very light oil mist if it tends to dry out.
How do you cook frozen bacon in the air fryer?
Frozen bacon works best with a two-stage method. Warm the frozen slices at 350–360°F for 4–8 minutes until they separate, then arrange them in a single layer and cook another 6–10 minutes. Thick-cut frozen bacon may need longer.
Should foil go under bacon in the air fryer?
Only use foil if your air fryer manual allows it. Keep it in the lower drawer or drip tray, do not block airflow, and do not place loose foil where it might lift toward the heating element.
Should you use parchment paper for air fryer bacon?
Use only air-fryer-safe perforated parchment, and make sure it is weighed down by bacon. Do not preheat with loose parchment inside the basket.
Why is my air fryer bacon not crispy?
Air fryer bacon usually stays soft when the basket is crowded, the strips overlap, or the cook time is too short for the bacon’s thickness. Cook in a loose single layer, add 1–2 minutes, and let the bacon rest on paper towels or a rack so steam can escape.
Is air fryer bacon better than oven bacon?
Air fryer bacon is better for small batches because it is fast and convenient. Oven bacon is better when you want to cook a full pack or feed a group because there is more space and less batch-by-batch grease management.