
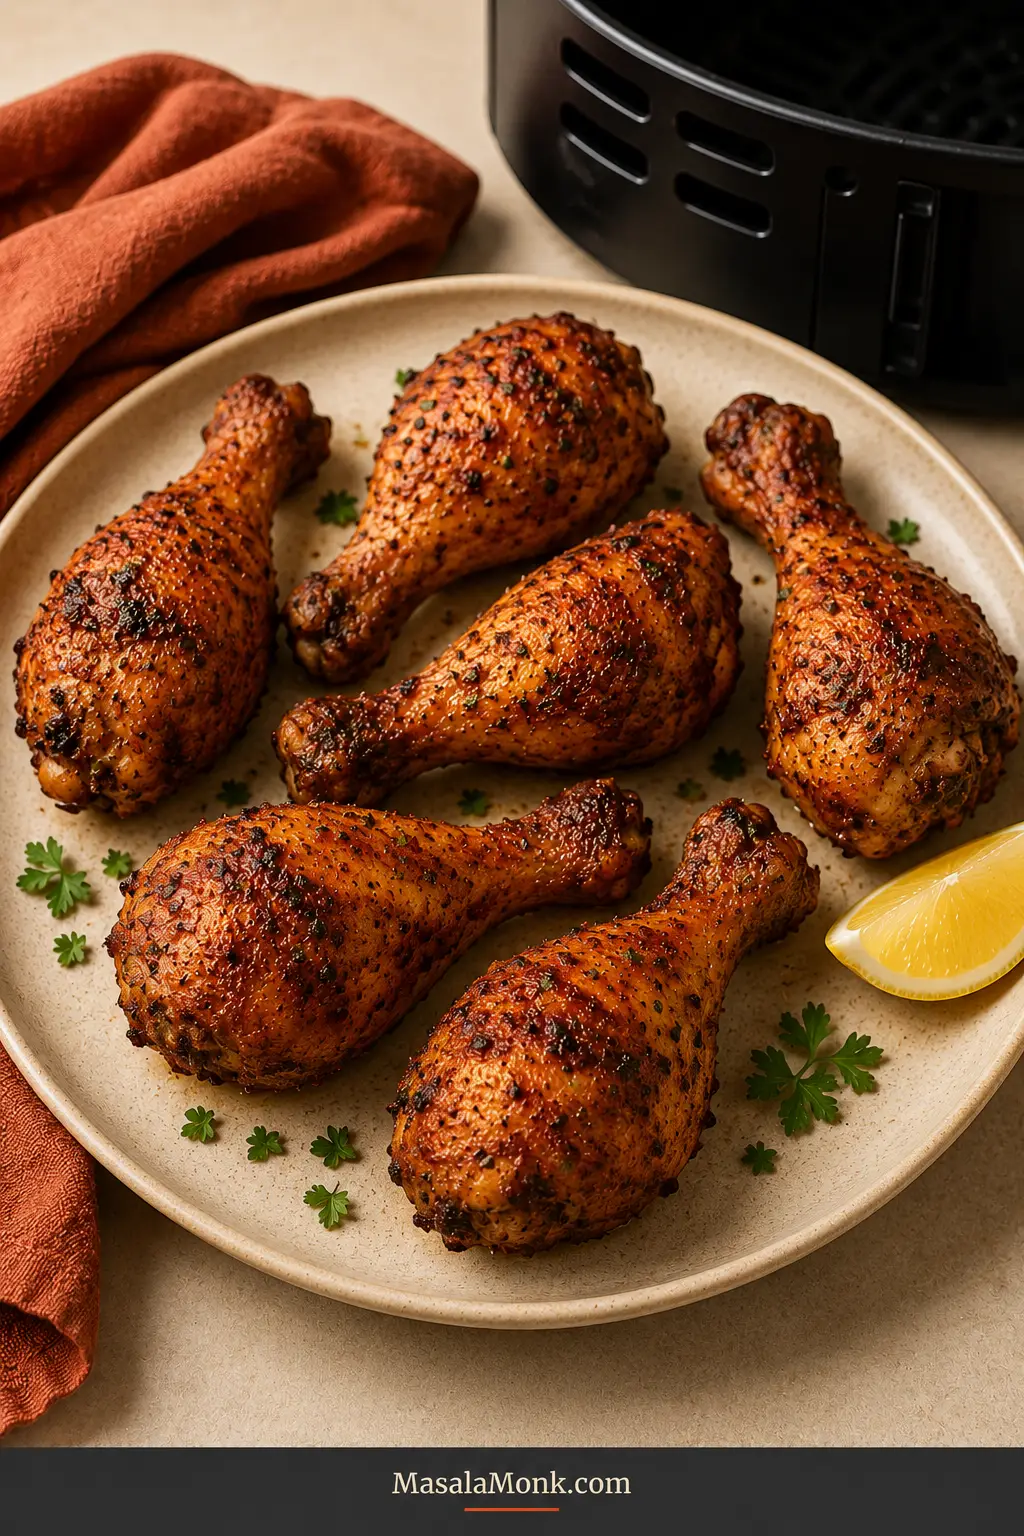
A good air fryer chicken drumstick delivers the contrast bone-in chicken should have: browned skin that crackles under the tongs and dark meat that stays succulent right beside the bone.
The awkward part is timing. A small drumstick can be ready while a thicker one still needs several minutes, and a beautifully browned exterior cannot tell you what is happening at the deepest point. One fixed number will suit some packages and disappoint with others.
This recipe keeps the weeknight method simple without pretending every drumstick is identical. Start with thawed chicken; dry it well, leave room around each drumstick, turn once and check the largest one first.
For pieces weighing about 4–4½ oz / 113–128 g each, dinner is ready in about 30 minutes, including a short rest. Larger and frozen drumsticks need longer, while flour-coated or glazed versions need a small method adjustment.
The piece count matters less than the weight of the largest drumstick. Once that idea is clear, an uneven supermarket package becomes much easier to manage.
Quick answer
The Base Method: 400°F / 200°C for 18–20 Minutes
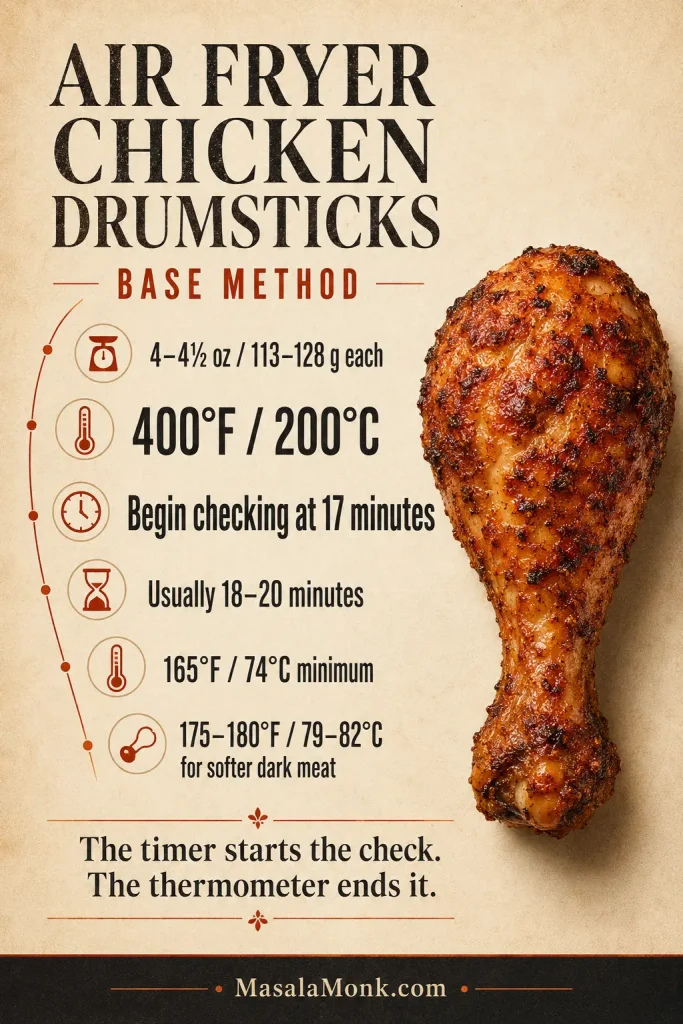
Drumsticks weighing about 4–4½ oz / 113–128 g each: cook at 400°F / 200°C and begin checking at 17 minutes. Most finish around 18–20 minutes.
Drumsticks above about 5½ oz / 156 g: use 380°F / 190°C and the weight chart below.
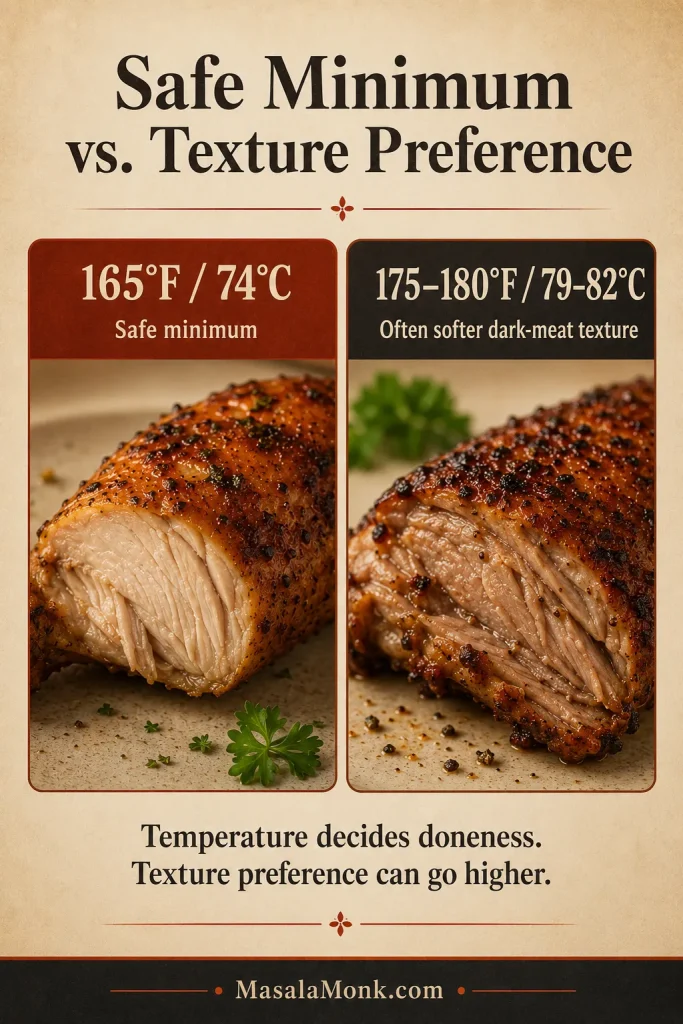
Chicken is safe at 165°F / 74°C; many people prefer the softer texture of dark meat closer to 175–180°F / 79–82°C. The timer starts the check; the thermometer ends it.
Make it now
Air Fryer Chicken Drumsticks Recipe
Start with this unbreaded version: crisp natural skin, a smoky paprika-garlic flavor and a cooking time based on actual drumstick weight—not a generic piece count. Here, “chicken legs” means drumsticks, not attached thigh-and-drumstick leg quarters.
Recipe at a glance
- Yield: 6 drumsticks; serves 3 generously or 4 with substantial sides
- Preparation: About 5–10 minutes
- Air frying: 18–20 minutes
- Resting: About 5 minutes
- Total time: About 28–35 minutes
- Temperature: 400°F / 200°C
- Safe minimum: 165°F / 74°C
Ingredients
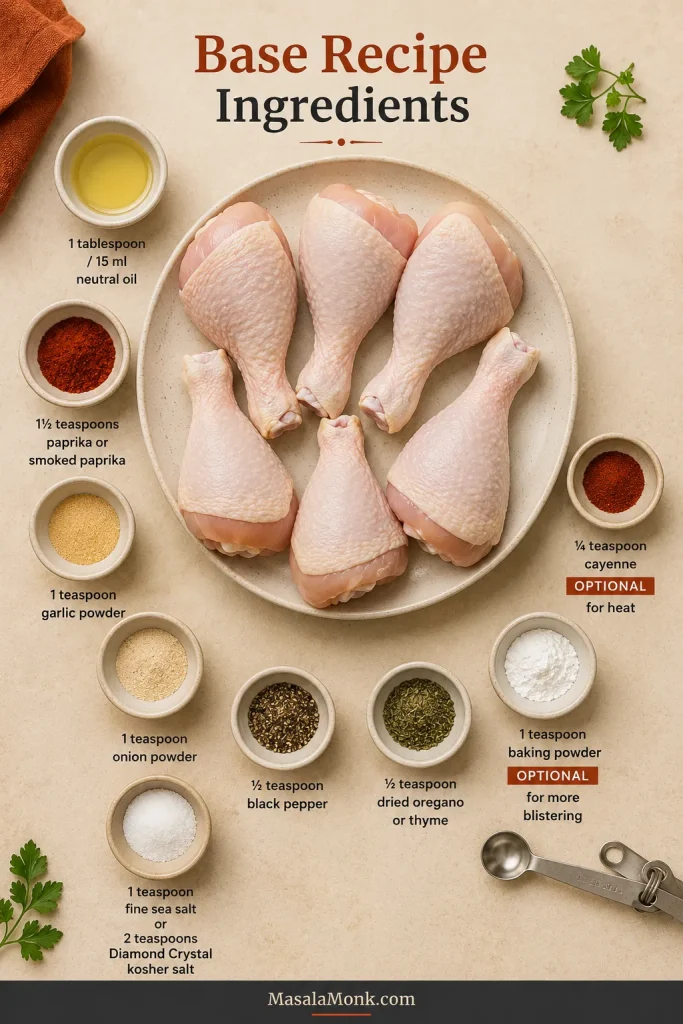
- 6 skin-on chicken drumsticks, thawed and refrigerator-cold
Target weight: 4–4½ oz / 113–128 g each; 24–27 oz / 680–770 g total - Neutral cooking oil: 1 tablespoon / 15 ml
- Paprika or smoked paprika: 1½ teaspoons / about 3 g
- Garlic powder: 1 teaspoon / about 3 g
- Onion powder: 1 teaspoon / about 2.5 g
- Fine sea salt: 1 teaspoon / about 5–6 g, or about 2 teaspoons Diamond Crystal kosher salt
- Black pepper: ½ teaspoon / about 1 g
- Dried oregano or thyme: ½ teaspoon
- Cayenne: ¼ teaspoon, optional
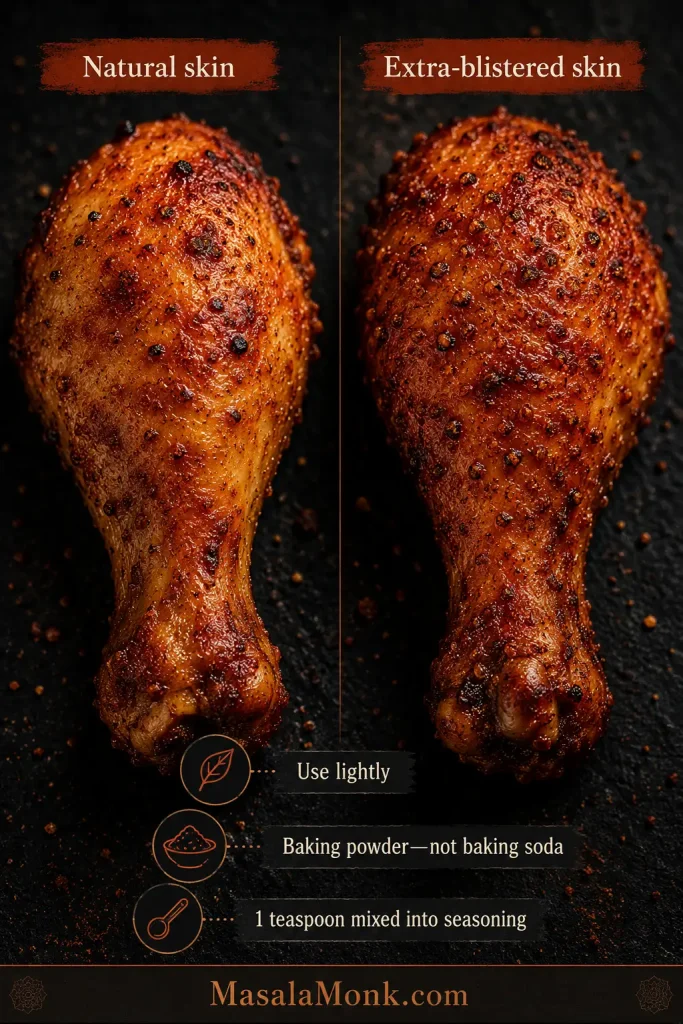
- Baking powder: 1 teaspoon / about 4 g, optional for more blistered skin
Equipment: air fryer, instant-read thermometer, bowl, paper towels and smooth-edged tongs.
Instructions
Prepare and season
- Preheat the air fryer. Set it to 400°F / 200°C. Let it heat for 3–5 minutes when your model recommends preheating; the chicken can be prepared during that time.
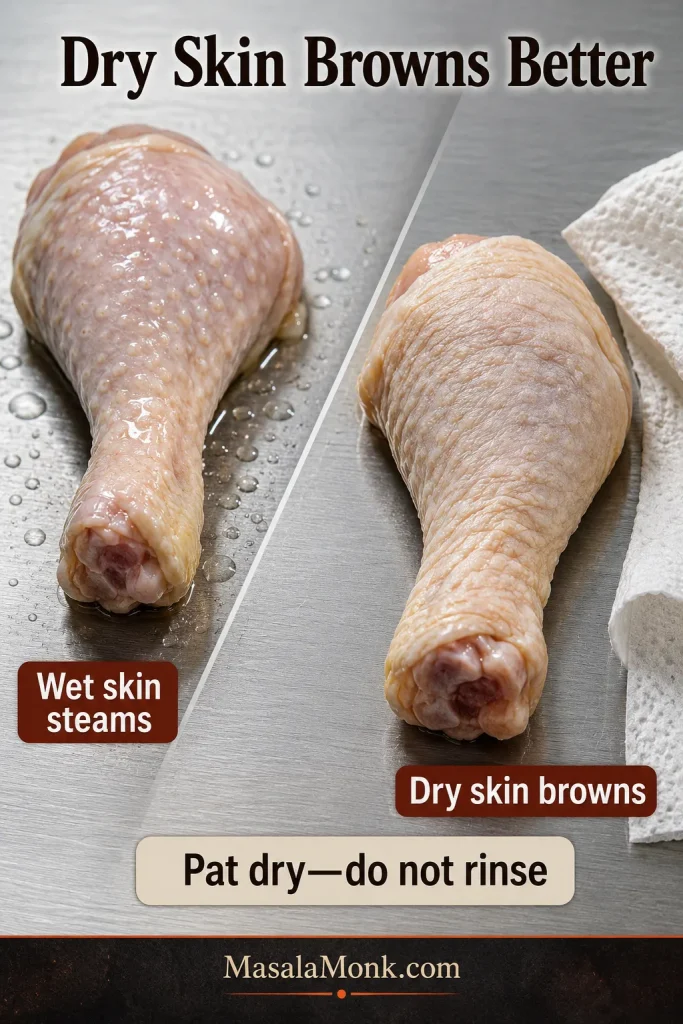
- Dry the drumsticks. There is no need to bring raw chicken to room temperature. The USDA advises against washing raw poultry. Pat every side thoroughly dry, including beneath loose skin and around the broad end.
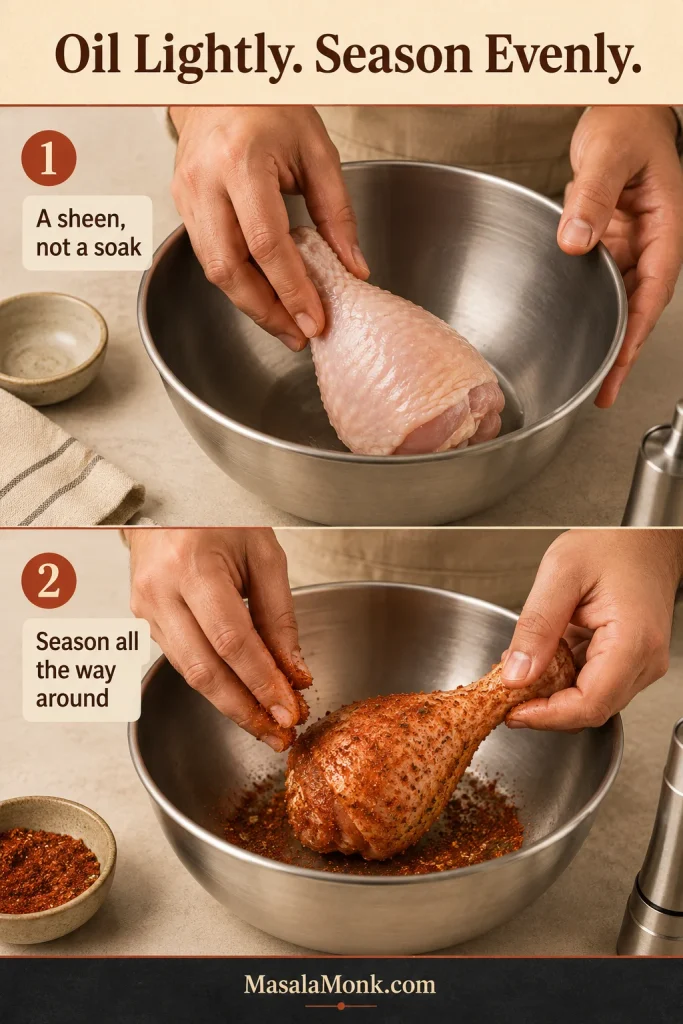
- Add a thin coat of oil. Turn the drumsticks in the oil until the skin has a light sheen rather than wet patches.
- Season evenly. Mix the paprika, garlic, onion, salt, pepper, oregano, optional cayenne and optional baking powder. Coat the drumsticks all over, including the narrow ends.
Air fry, check and rest
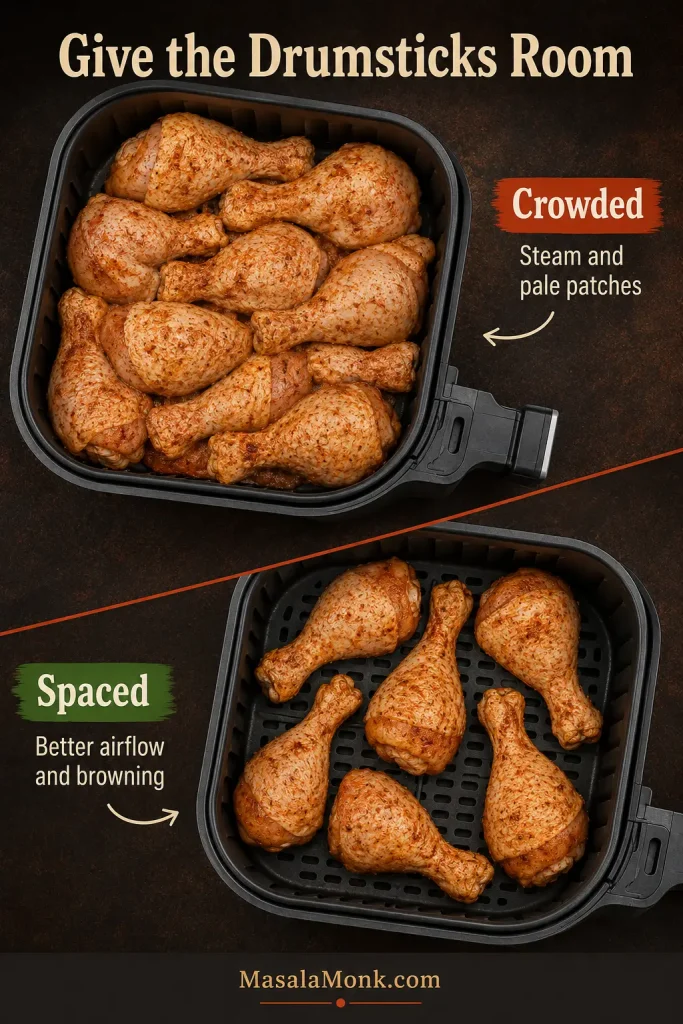
- Give them room. Arrange the drumsticks in one layer without stacking or wedging them together. Use two batches when necessary.
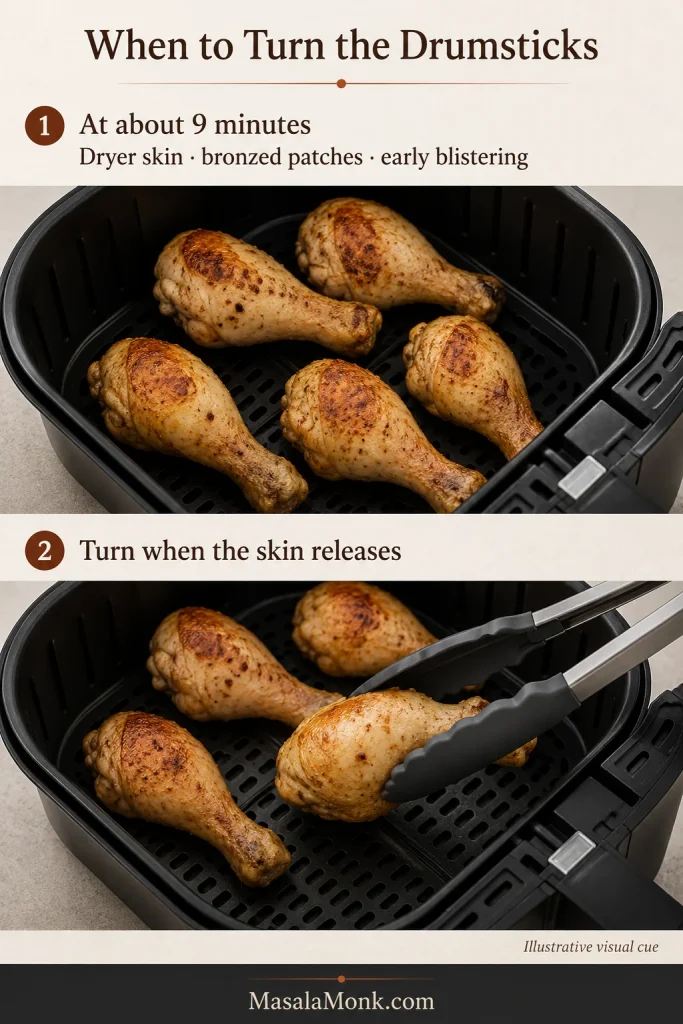
- Cook the first side. Air fry at 400°F / 200°C for 9 minutes.
- Turn once. The exposed skin should look drier, deeper in color and lightly blistered, and the seasoning should smell toasted rather than scorched. If the skin still clings, wait another minute before turning.
- Cook the second side. Continue for 8 minutes, bringing the total to 17 minutes.
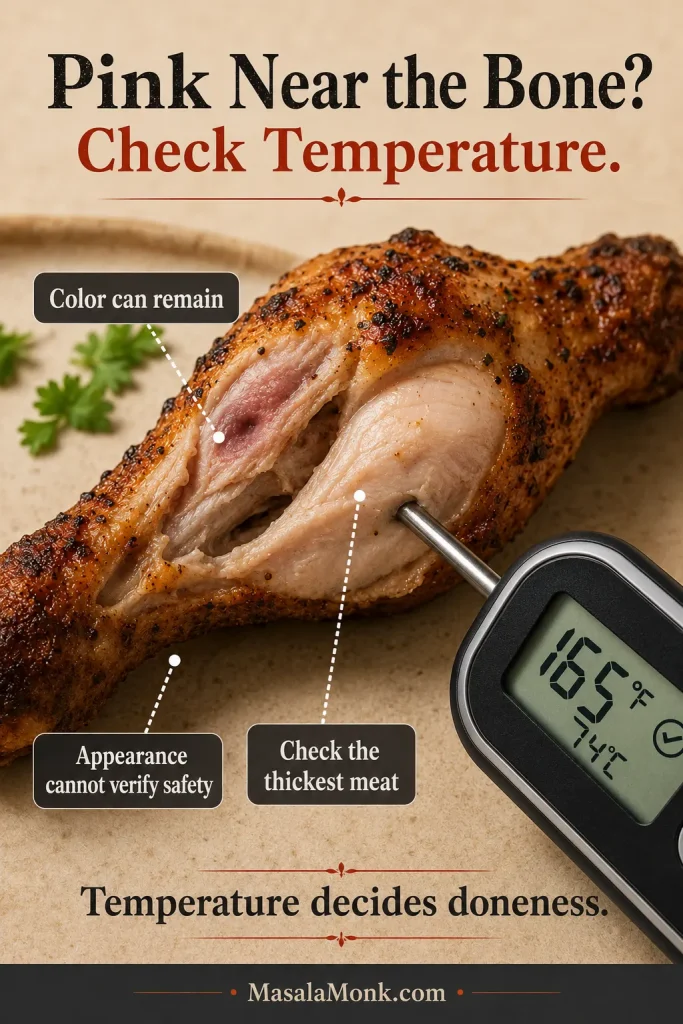
- Check the thickest drumstick. Insert the thermometer from the fleshy side into the deepest meat without touching bone, then test another drumstick from a different part of the basket.
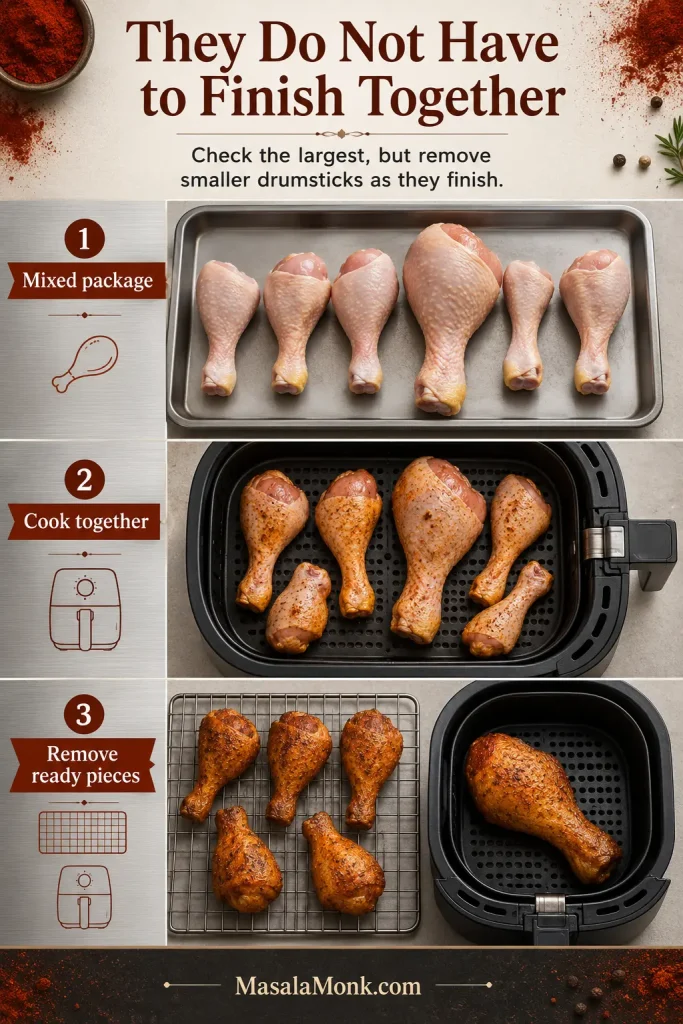
- Let each one finish in its own time. Return undercooked drumsticks for 1–2 minutes at a time. If the skin is already dark, lower the air fryer to 380°F / 190°C while the inside catches up. Take the smaller drumsticks out as soon as they are ready.
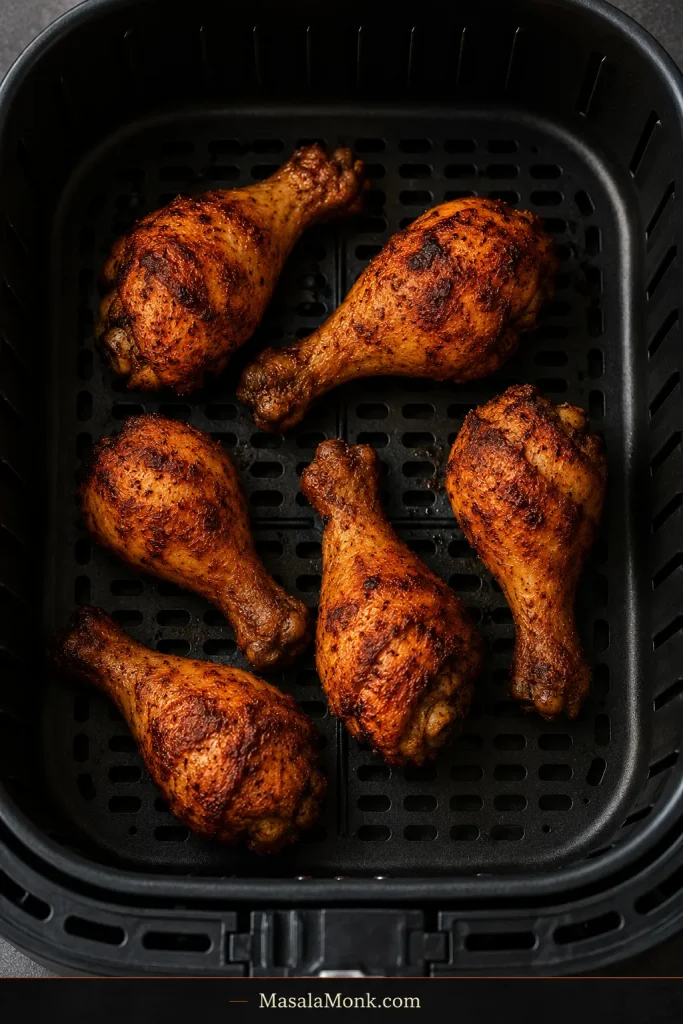
- Rest for about 5 minutes. The skin should feel firm beneath the tongs while the meat remains plump around the bone. Keep the drumsticks loosely arranged so steam can escape.
Recipe notes
- Scale the dry seasoning roughly with the package’s total weight; cooking time still follows the weight of each drumstick.
- For a softer dark-meat texture, continue beyond the 165°F / 74°C safety floor toward roughly 175–180°F / 79–82°C, provided the skin is not becoming too dark.
- Add BBQ sauce, honey glaze and other sugary finishes only during the final few minutes.
- The dry seasoning can be mixed ahead. Keep the raw chicken refrigerated, then dry, oil and season it shortly before air frying.
How Long Drumsticks Take by Weight
A mixed package does not mean anything has gone wrong. Remove the smaller drumsticks as they become ready and give the largest one a few more minutes.
Why air-fryer drumstick recipes give different times
If a previous batch took longer than a recipe promised, that does not necessarily mean you did anything wrong. Six drumsticks can vary dramatically in weight, and two air fryers set to the same temperature may cook at different speeds.
That is why published cooking times disagree. Weight tells you when to begin checking, while the thermometer tells you when each drumstick is ready.
Estimate Drumstick Weight Without a Scale
No kitchen scale?
Divide the package weight by the number of drumsticks to estimate the average. A 2 lb / 907 g package containing six drumsticks averages about 5⅓ oz / 151 g each. Use that as the starting row, then move a visibly oversized drumstick into the next heavier range.
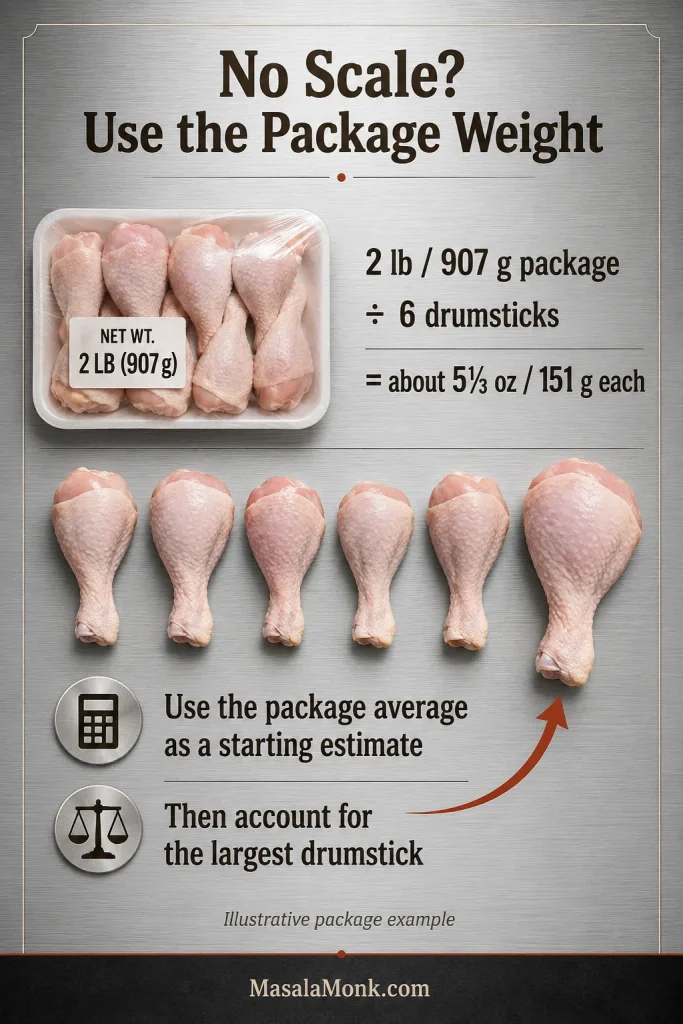
Size names vary between shops and recipes, so use the weight—not labels such as small or large—to choose when to begin checking.
Use the Time Chart Correctly
These are practical first-check starting points, not rigid cutoffs. Drumstick shape, air-fryer design and a cold start can all shift the timing.
The chart is for thawed, skin-on drumsticks in a preheated, wide basket-style air fryer.
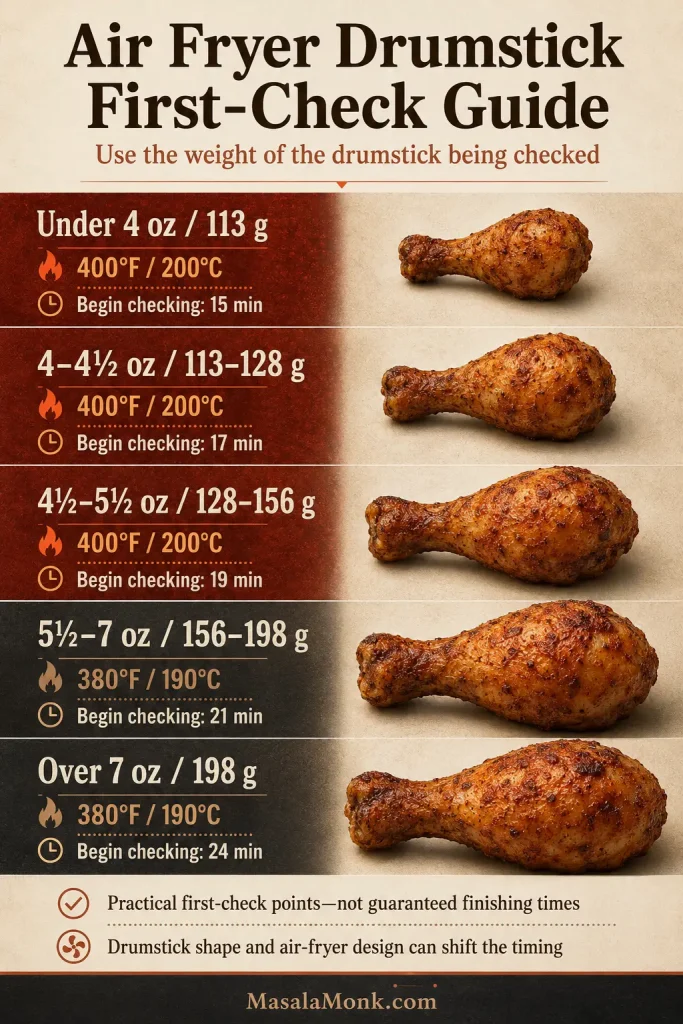
| Weight per drumstick | Temperature | Begin checking |
|---|---|---|
| Under 4 oz / 113 g | 400°F / 200°C | 15 minutes |
| 4–4½ oz / 113–128 g | 400°F / 200°C | 17 minutes |
| 4½–5½ oz / 128–156 g | 400°F / 200°C | 19 minutes |
| 5½–7 oz / 156–198 g | 380°F / 190°C | 21 minutes |
| Over 7 oz / 198 g | 380°F / 190°C | 24 minutes |
When a drumstick sits on the boundary between two rows, begin with the earlier check; then remove smaller pieces as they finish instead of waiting for the largest one.
How to Know When Chicken Drumsticks Are Done
A deeply browned drumstick can still be behind at its thickest point. The thermometer makes bone-in chicken less stressful, not more technical. It lets you stop with confidence instead of cutting every drumstick open or adding precautionary minutes to the whole batch.
Where to place the thermometer
- Start with the largest drumstick.
- Insert the probe from the fleshy side into the deepest meat, keeping the tip away from the bone.
- Check one more drumstick from a different part of the basket.
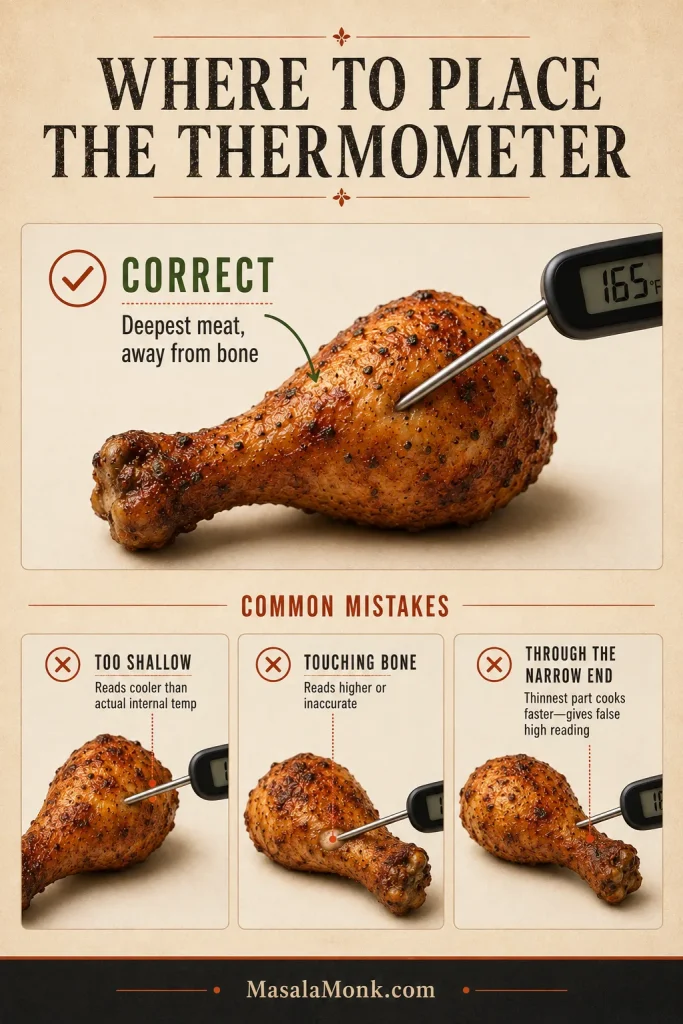
165°F / 74°C is the safety floor
The USDA lists 165°F / 74°C as the safe minimum for chicken pieces. Many people prefer dark-meat drumsticks closer to 175–180°F / 79–82°C. At that temperature, the meat often feels softer and releases from the bone more readily.
That higher range is a texture preference, not a different safety rule. Every drumstick should reach at least 165°F / 74°C before it leaves the air fryer.
Pink or dark meat near the bone
The USDA explains that safely cooked poultry can remain pink, and darkening beside porous young bones can be more noticeable after freezing.
If that pink patch makes you hesitate, trust the thermometer rather than the color. You are not looking for perfectly white meat; you are looking for a safe temperature in the thickest flesh.
When one drumstick needs more time
Return only that drumstick for 1–2 minutes at a time. Keep the finished ones loosely arranged rather than sealing them under foil, which traps steam and softens the skin.
Once the base method feels clear, the more enjoyable decision is how you want the drumsticks to taste.
Choose the Version That Fits Your Dinner
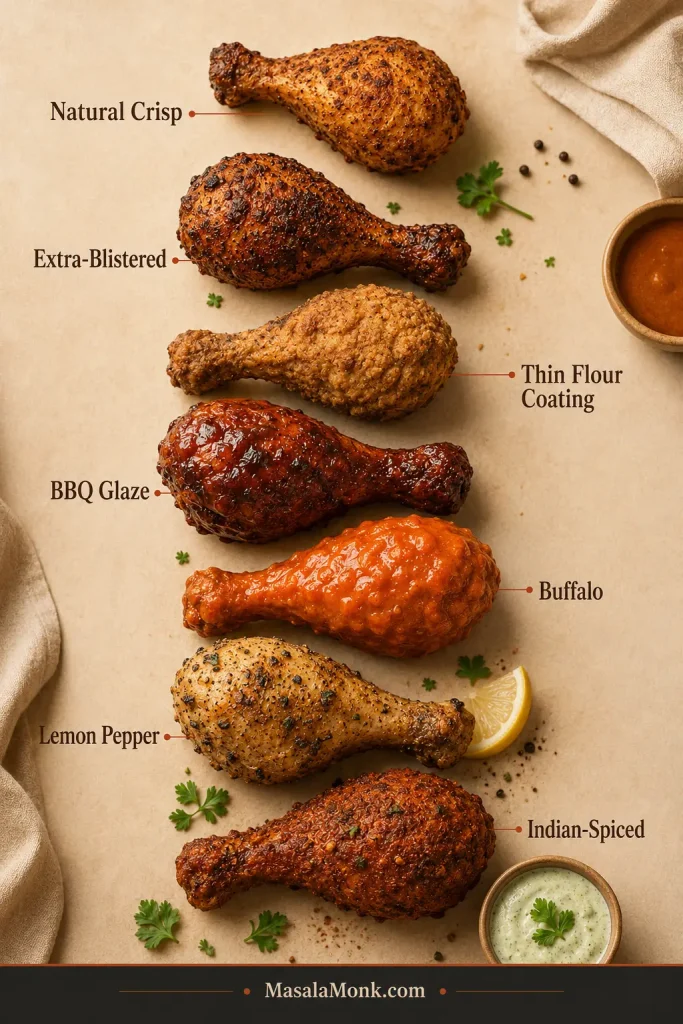
The easiest way to keep the method dependable is to change one thing at a time—the crust, the seasoning or the final sauce.
| Version | What to expect |
|---|---|
| Natural crisp skin | Crisp, savory and uncomplicated. |
| Extra-blistered skin | Crisper, evenly browned skin with tiny blisters. |
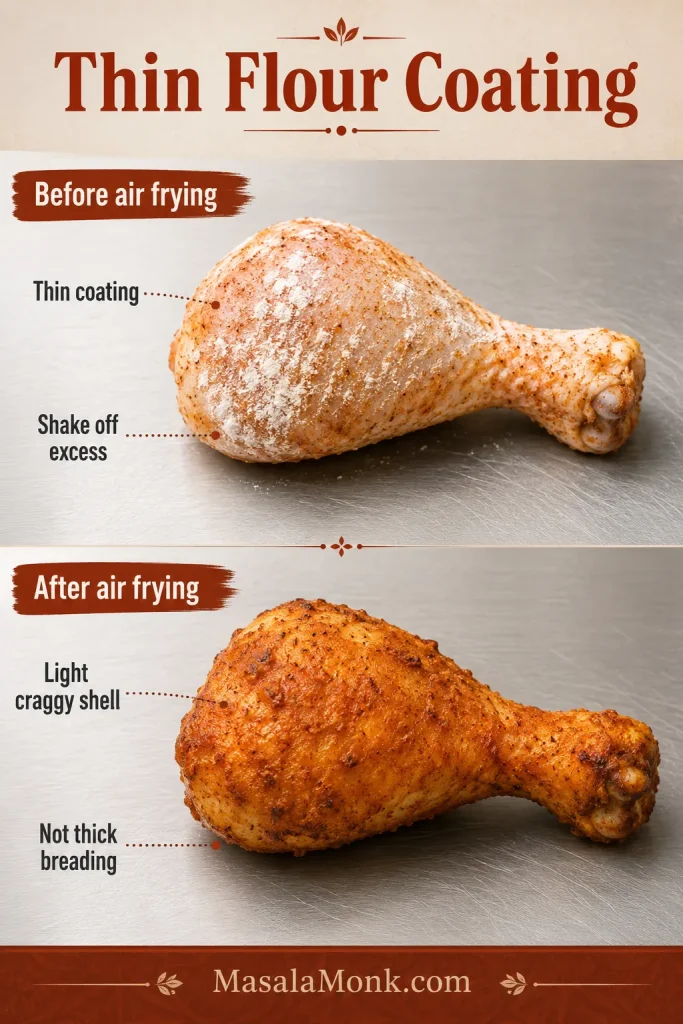
| Thin flour coating | A light, craggy shell rather than thick breading. |
| BBQ, honey or teriyaki | A sticky, glossy, sweet-savory finish. |
| Buffalo | Buttery heat with a tangy finish. |
| Lemon pepper | Bright, peppery and fresh. |
| Indian-spiced | Aromatic, earthy and gently hot. |
For more blistered skin
Mix the optional 1 teaspoon / about 4 g baking powder thoroughly into the base seasoning. It raises the skin’s surface pH, helping it brown and form tiny blisters. A light, even amount avoids a chalky or alkaline taste; baking soda is much stronger and should not be used measure for measure.
For a thin flour coating
Omit the optional baking powder from the base rub. Combine the base seasonings with ¼ cup / 30 g all-purpose flour and 1 teaspoon / about 4 g baking powder. Coat dried, lightly oiled drumsticks thinly, shake off the excess and mist only visible white patches.
For drumsticks weighing about 4–4½ oz / 113–128 g each, cook at 400°F / 200°C. Turn gently once the coating has begun to set and begin checking at about 20 minutes.
The coating is ready when no dry flour remains, the shell feels set beneath the tongs and the thickest meat has reached its target temperature.
For BBQ, honey, teriyaki or Buffalo
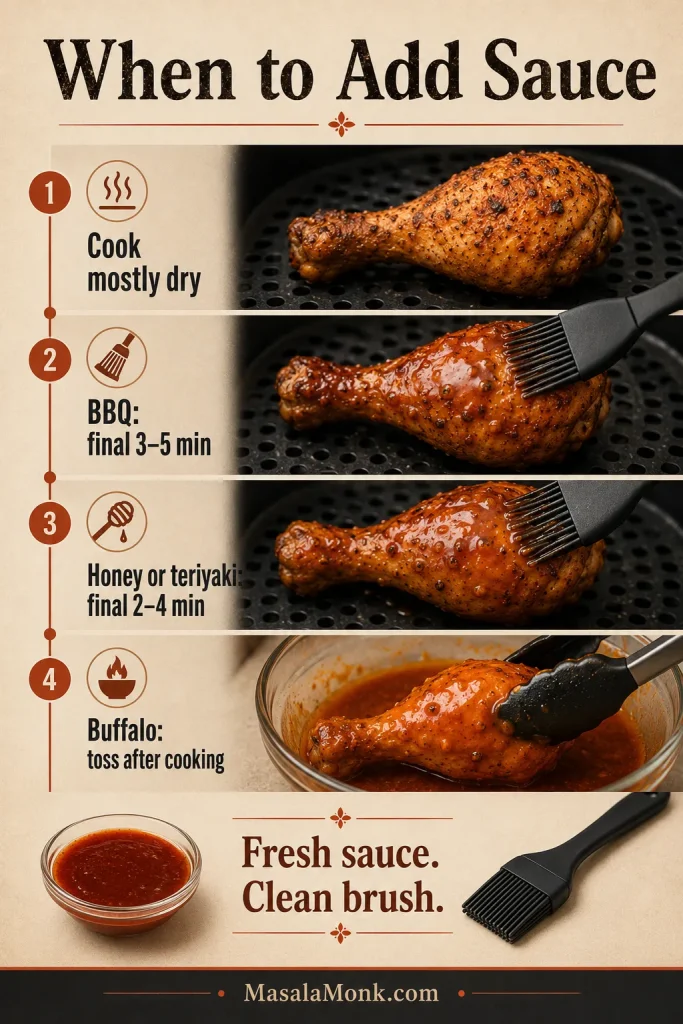
For BBQ, honey or teriyaki: cook the drumsticks mostly dry. A batch of six drumsticks usually needs about ⅓ cup / 80 ml BBQ sauce. Brush BBQ sauce on during the final 3–5 minutes; add honey or a thin coat of homemade teriyaki sauce during the final 2–4 minutes.
For Buffalo: air fry the chicken completely, then toss it with about ¼ cup / 60 ml Buffalo sauce.
Keep serving sauce separate. Use a clean brush and a fresh portion for the final glaze rather than returning sauce or utensils that touched undercooked chicken to the table.
For lemon pepper or Indian spices
For lemon pepper, use a dry seasoning before cooking and squeeze fresh lemon over the drumsticks afterward. This lemon pepper chicken recipe gives the full seasoning balance.
For the Indian-spiced version, replace the oregano and cayenne with 1 teaspoon garam masala, ½ teaspoon ground cumin, ½ teaspoon ginger powder and ¼–½ teaspoon Kashmiri chili powder. Serve with rice, raita and lemon, then finish with chopped cilantro.
Skinless drumsticks work with the same seasoning, but this timing chart is calibrated for skin-on chicken. Oil them lightly, expect browned spices and juicy meat rather than crackly skin, and begin checking earlier than a skin-on drumstick of the same size.
Whatever seasoning or sauce you choose, the crispest natural skin still comes down to dryness, airflow and heat.
How to Get Crispy Skin
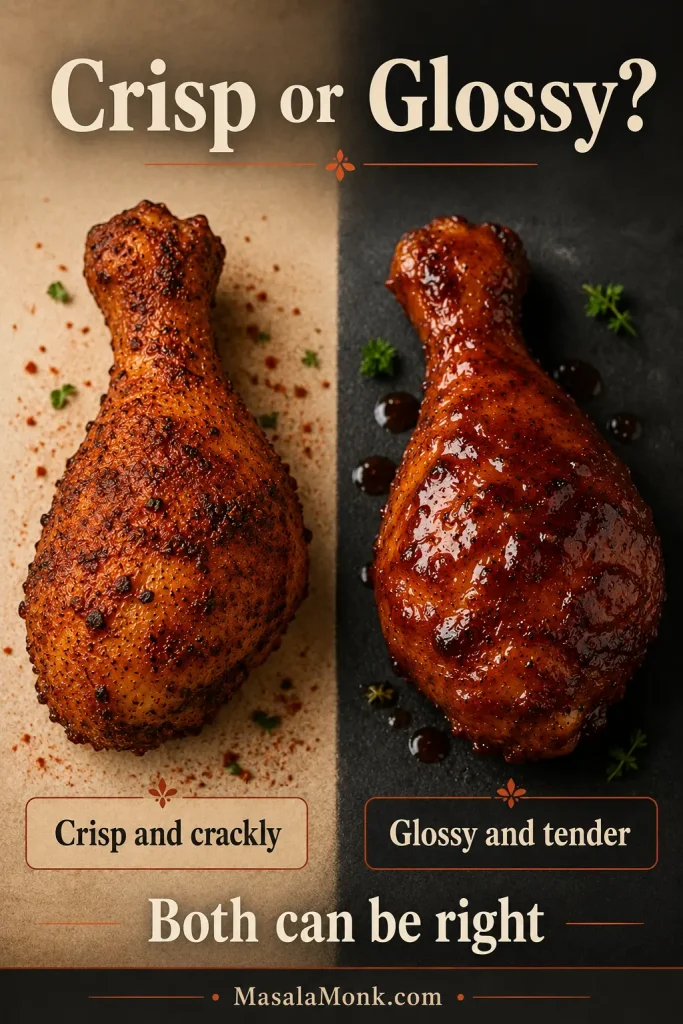
The air fryer has two jobs: brown the skin and carry heat into the meat around the bone. Crisp natural skin does not require flour, but the chicken must begin dry enough to brown before the inside overcooks.
Crisp-Skin Basics
- Dry the skin: pat beneath folds and around the broad end until it feels tacky rather than wet.
- Leave open space: pressed-together patches steam and stay pale.
- Use a thin sheen of oil: enough for the seasoning to cling, not enough to pool under the chicken.
- Match the heat to the weight: drumsticks around 4–4½ oz / 113–128 g suit 400°F / 200°C, while pieces above about 5½ oz / 156 g often brown more evenly at 380°F / 190°C.
Fix Pale or Soft Skin
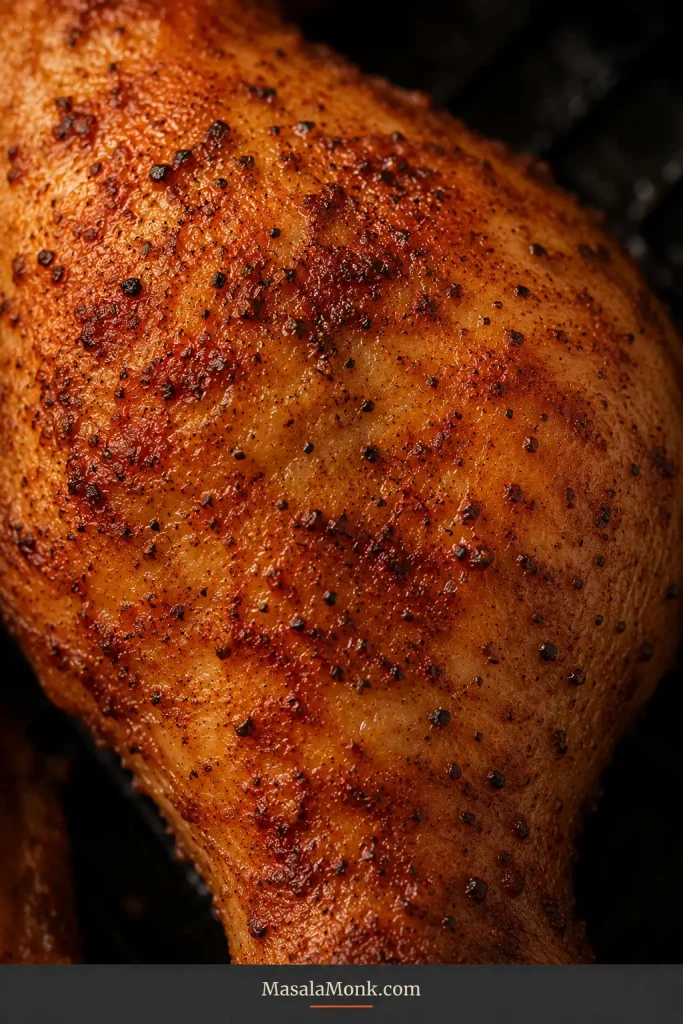
If the underside stays pale. The underside receives less direct heat and may sit against the crisper plate. Turning once, keeping the basket holes open and resting on a rack all help. A solid liner makes cleanup easier but usually sacrifices some lower-skin browning.
If you used a wet marinade. Yogurt, coconut milk, soy-heavy mixtures and generous lemon juice add flavor and charred edges, but they also add moisture. Scrape away heavy excess before cooking. Expect tender chicken with a seasoned, lightly charred coating rather than dry, crackly skin.
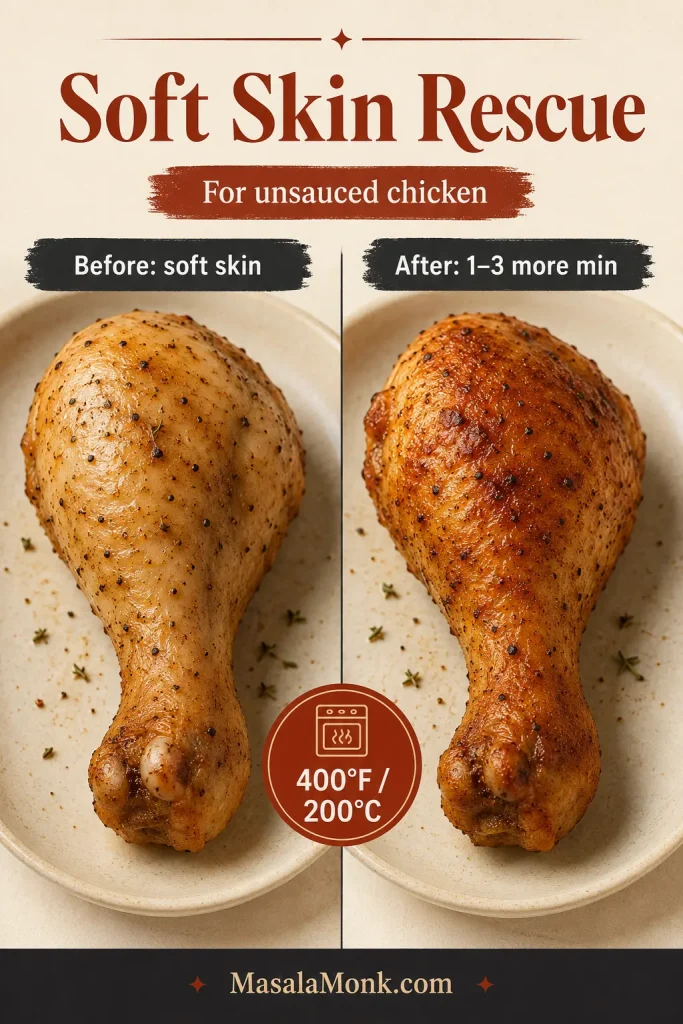
If the cooked skin is still soft. Give unsauced chicken another 1–3 minutes at 400°F / 200°C, watching closely. Once the drumsticks are coated with BBQ, honey or another sugary glaze, aim for a glossy, tender finish rather than forcing the skin to become crackly. Rest the chicken on a rack so steam does not soften it further.
Different starting point? Frozen drumsticks Air-fryer model adjustments Back to recipe card
Why the Base Seasoning Works
Oil: one tablespoon is enough to help the dry seasoning cling and give the skin more even color. The drumsticks can cook without it, but the base version browns more dependably with a light coating.
Paprika and aromatics: smoked paprika adds mild barbecue character, while sweet paprika is gentler. Garlic and onion powders build savory flavor without adding the surface moisture of fresh chopped aromatics.
Salt and baking powder: use about 5–6 g salt for the base batch—roughly 1 teaspoon fine sea salt or 2 teaspoons Diamond Crystal kosher salt. Baking powder is optional; used lightly, it encourages browning and small blisters.
Frozen Chicken Drumsticks in the Air Fryer
Frozen drumsticks need a short softening stage before the seasoning can cling and the skin can brown. Confirm that your air-fryer manual permits cooking raw poultry from frozen, and make sure the drumsticks become fully separable so hot air can reach every side.
Frozen dinner rescue
If the drumsticks are frozen into one solid block, thaw them in the refrigerator until they can be separated. Individually frozen pieces can go straight into the staged method below.
- Loosen the drumsticks. Air fry at 360°F / 180°C for 5–10 minutes.
- Separate and dry them. Once the drumsticks loosen, pull them apart with tongs and pat away the melted ice you can reach.
- Oil and season. Add the oil and dry rub once the skin is dry enough for the seasoning to cling.
- Continue at 380°F / 190°C. For individually frozen drumsticks around 4–4½ oz / 113–128 g each, begin checking the largest one when the total cooking time reaches about 25 minutes. Continue for 2–3 minutes at a time and test more than one drumstick.
- Crisp only when needed. If the chicken is safely cooked but still pale, use 400°F / 200°C for the final 2–3 minutes.
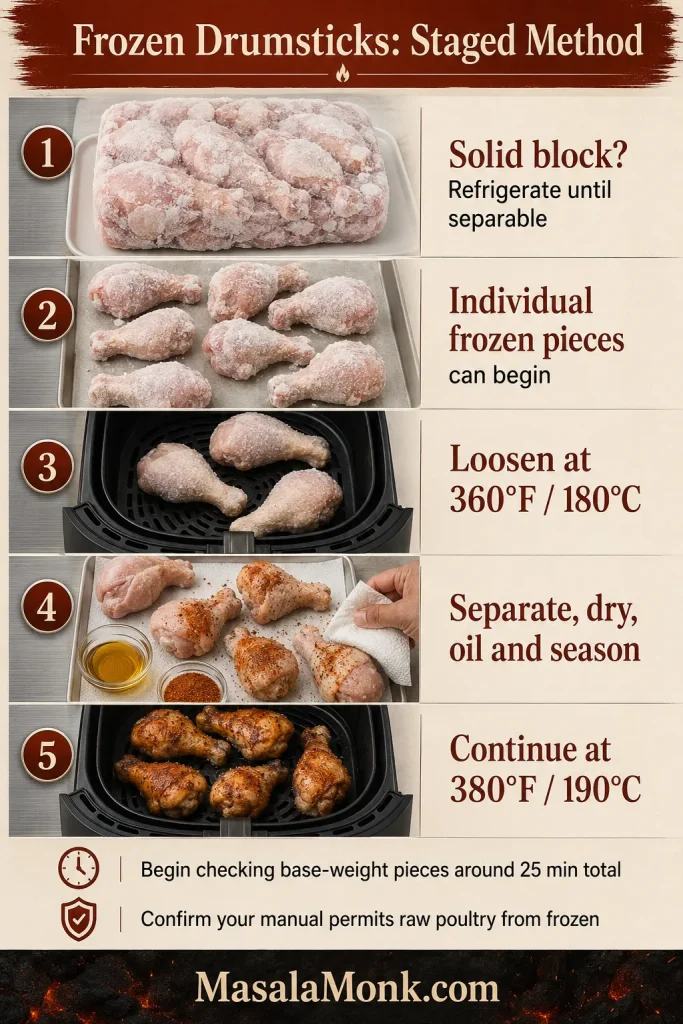
Allow approximately 25–40 minutes from frozen, depending on weight and ice. The approximately 30-minute timing applies to fully thawed drumsticks in the base weight range.
How Different Air Fryers Change the Timing
Most timing differences come down to how close the chicken sits to the heating element, how much open cooking space the machine provides and whether different zones or levels heat evenly.
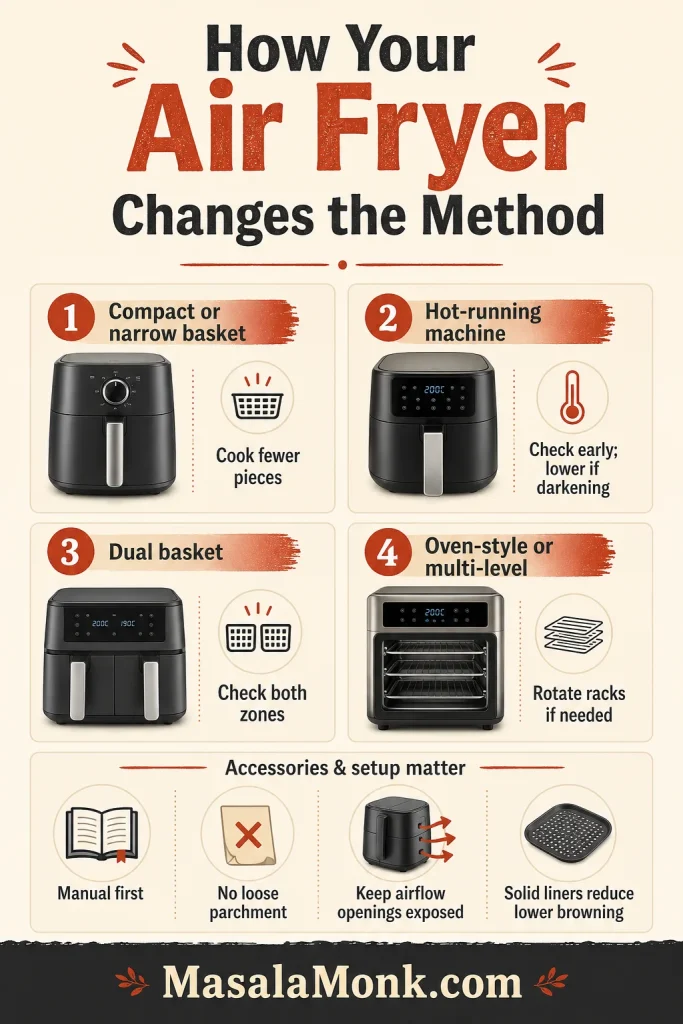
Match the Method to Your Air Fryer
- Compact or narrow basket: cook fewer drumsticks or use batches so hot air can move freely around each one.
- Hot-running machine: begin checking early. If the skin darkens before the inside is ready, continue at 380°F / 190°C.
- Dual basket: divide the drumsticks evenly and check both zones; one side may finish first.
- Oven-style or multi-level machine: follow the recommended rack position, rotate levels when needed and watch the drumsticks closest to the heating element.
Preheating gives the first batch a more consistent start. From a cold machine, keep the same thermometer target and expect the first check to move by roughly 1–3 minutes.
Liners, Tools and Two Batches
Liners and tools: smooth or silicone-tipped tongs are less likely to tear the skin. A solid liner can simplify cleanup but may block lower airflow. Do not use or preheat parchment unless your appliance manual permits it, and never leave loose paper unweighted near the heating element.
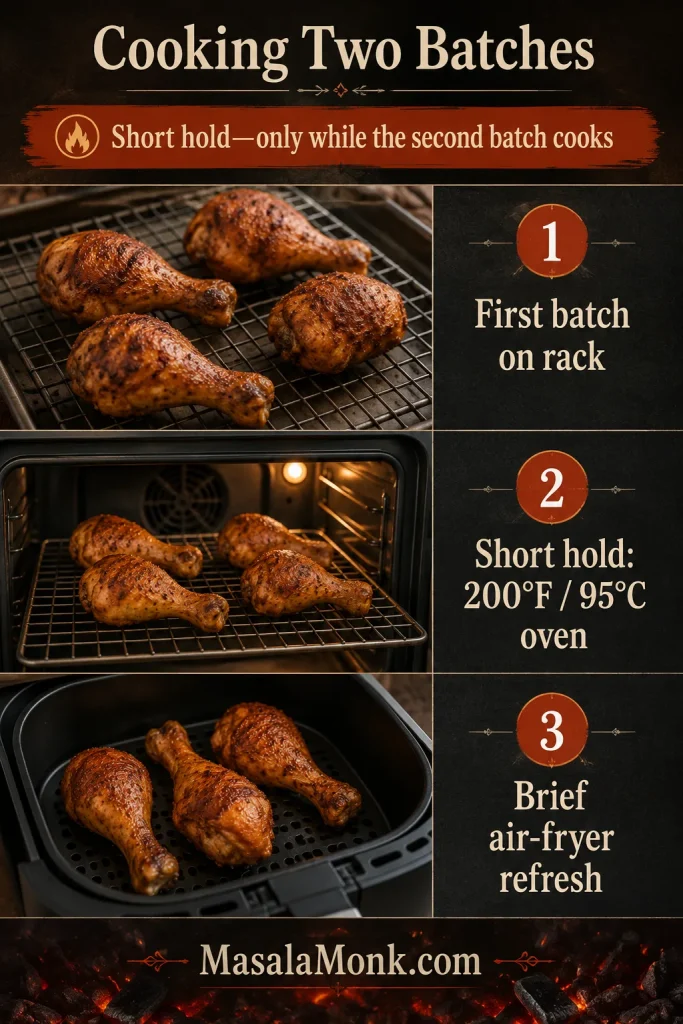
Cooking two batches? Rest the first batch on a wire rack, where steam can escape. While the second batch cooks, keep the first on the rack in a 200°F / 95°C oven and avoid holding it longer than necessary. A final minute in the air fryer can refresh the skin before serving.
Troubleshooting Soft Skin, Uneven Cooking and Smoke
Most disappointing batches are fixable. One undercooked drumstick can go back into the air fryer without delaying the rest of dinner.
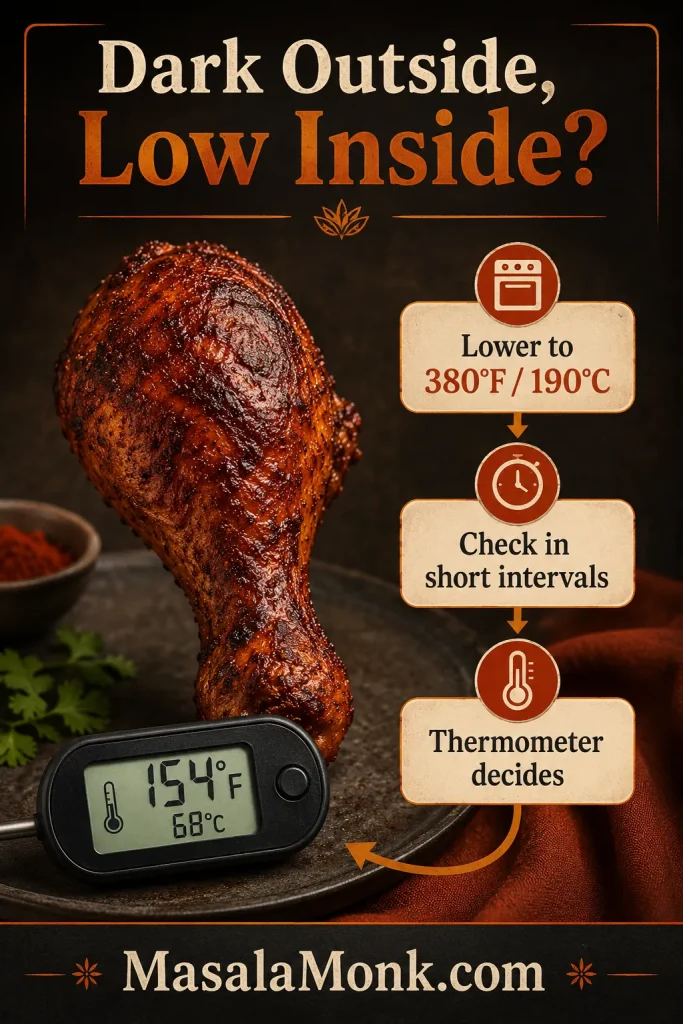
Dark Outside, Low Inside
If the exterior is already dark but the center is still below target, lower the heat and finish the drumstick in short checks instead of pushing the whole batch harder.
Quick Fixes by Problem
| Problem | What to do |
|---|---|
| Skin stayed soft or rubbery | Fix now: give unsauced chicken another 1–3 minutes at 400°F / 200°C, watching closely. Next time: dry the skin more thoroughly and leave more space between the drumsticks. |
| Skin burnt before the inside cooked | Lower the temperature to 380°F / 190°C and continue in short intervals. Large drumsticks often need gentler heat. |
| One drumstick is undercooked | Return only that drumstick. The others can rest while it cooks for another 1–2 minutes at a time. |
| Chicken turned dry | Remove smaller drumsticks earlier. They do not need to wait for the largest one. |
| Seasoning or flour looks patchy | Pat the skin dry, add a thin sheen of oil and mist only visible dry flour patches. |
| Coating fell off | Shake off excess flour and wait until the crust begins to set before turning with smooth tongs. |
| BBQ or honey glaze burnt | Sweet sauce went on too early. Cook mostly dry and glaze only during the final few minutes. |
| Chicken looks pink near the bone | Check the thickest flesh with a thermometer. Color alone cannot confirm whether poultry is safe. |
| Underside stayed pale | Turn once and keep the crisper-plate holes open. Solid liners reduce the hot air reaching the underside. |
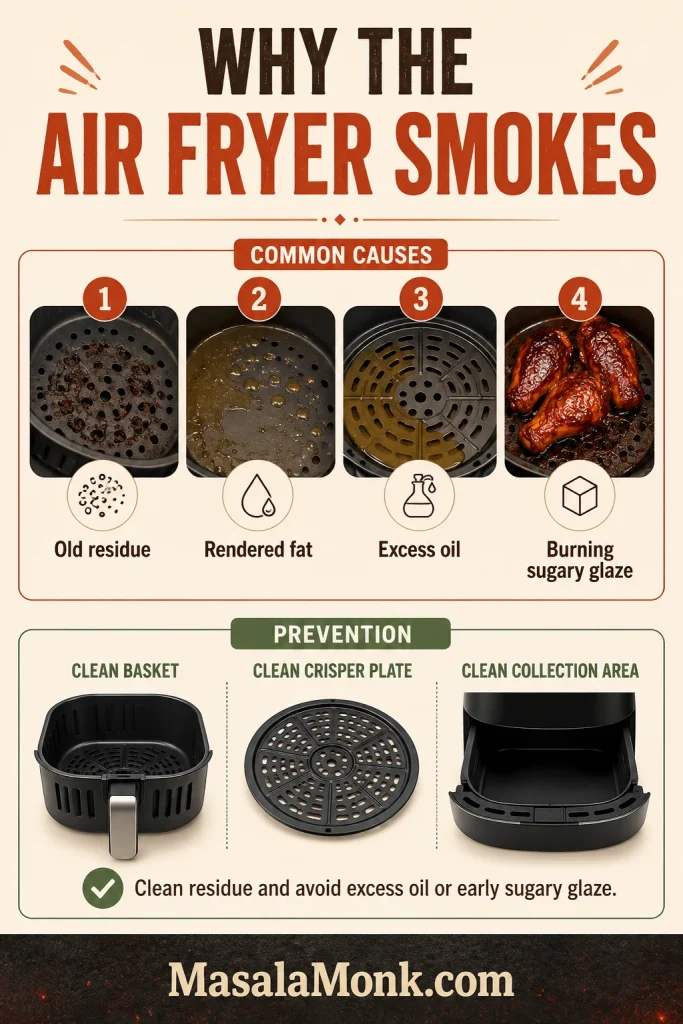
| The air fryer is smoking | Stop and inspect the appliance safely. Clean old residue and rendered fat, reduce excess oil and keep sugary sauce away from the hottest part of the cook. |
Smoke and Safe Inspection
Persistent or unusual smoke deserves a pause. Once the appliance is safe to inspect, clean the basket, crisper plate and collection area, then follow the manual if the problem continues.
What to Serve With Air Fryer Chicken Drumsticks
Once the drumsticks are crisp and rested, dinner only needs one comforting side and something fresh. Cool or acidic sides are especially good beside Buffalo, BBQ and honey-glazed versions because they cut through the richer coating.
Fast weeknight plate: smoky paprika-garlic drumsticks, roasted potatoes and green beans.
Cookout plate: BBQ drumsticks, corn and cold potato salad.
Fresh and tangy plate: Buffalo or glazed drumsticks with yogurt dip and a cold vinegar and dill cucumber salad.
Indian-spiced plate: jeera rice, kachumber, mint yogurt, flatbread and lemon wedges.

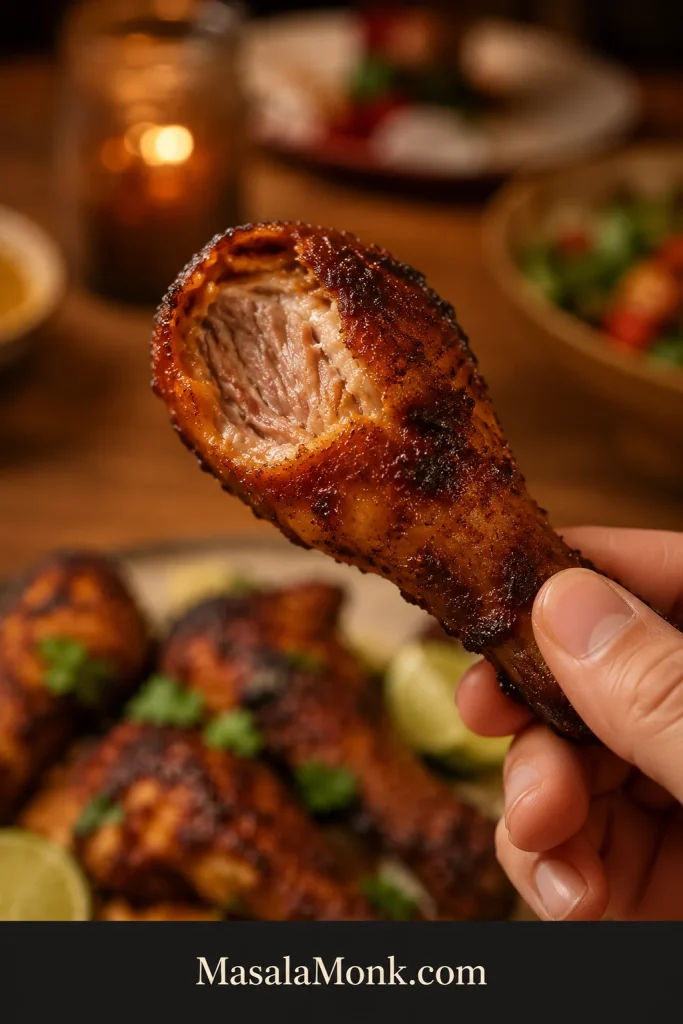
Once the plates are planned, the final cue is the bite itself: browned skin, juicy dark meat and a drumstick that still feels like easy dinner.
Storage, Freezing and Reheating
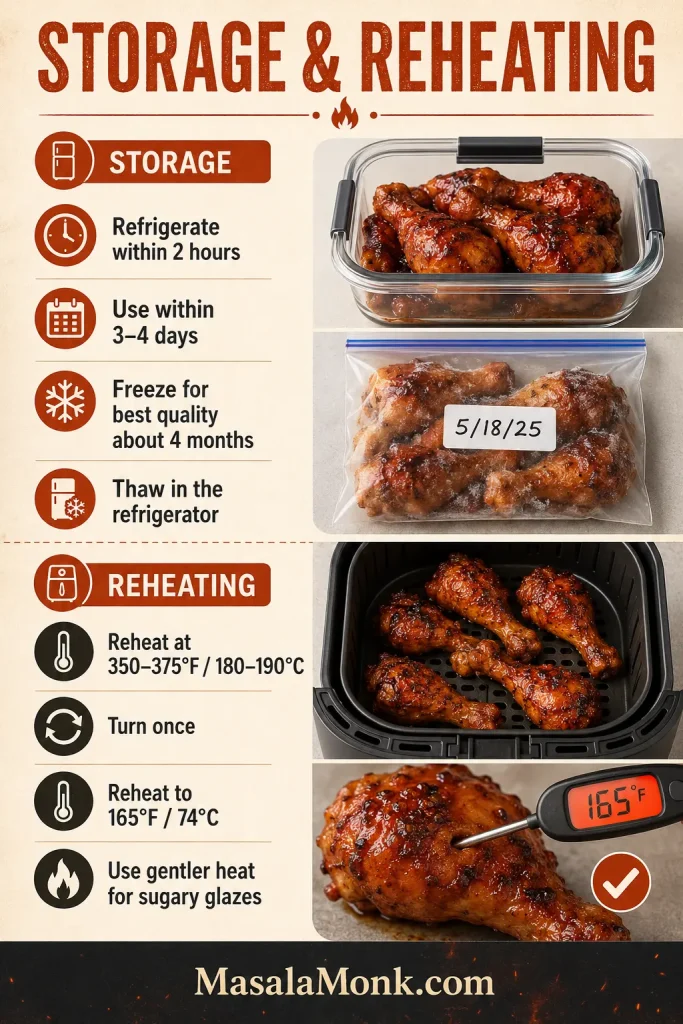
Refrigerate cooked drumsticks in shallow covered containers within 2 hours—or within 1 hour when the surrounding temperature is above 90°F / 32°C. Use them within 3–4 days and store extra sauce separately when possible.
For reheating, arrange the drumsticks in one layer and air fry at 350–375°F / 180–190°C for 5–8 minutes, turning once, until the center reaches 165°F / 74°C. Use the lower end of the range for BBQ, honey or other sugary finishes.
Freeze cooled drumsticks in a freezer-safe container and thaw them in the refrigerator before reheating. For the best flavor and texture, use frozen cooked drumsticks within about 4 months. The skin may not return to its original crispness, but the air fryer usually restores it more successfully than a microwave.
For meal prep, keep sauce separate and reheat only the number you plan to eat. Cold meat can also be pulled from the bone for wraps or these chicken sandwich ideas. That often protects the texture better than reheating the same drumstick twice.
Frequently Asked Questions
Is 380°F or 400°F better for chicken drumsticks?
Use 400°F / 200°C for drumsticks under about 5½ oz / 156 g. Heavier pieces often cook more evenly at 380°F / 190°C.
Can I use parchment paper or foil?
Only use parchment or foil when your specific air-fryer manual permits it. Solid liners restrict airflow and lower-surface browning, while loose paper can be pulled toward the heating element. When a liner is permitted, keep it weighted beneath the food and avoid covering the basket’s airflow openings.
Why are my drumsticks pink beside the bone?
Bone pigments can color safely cooked meat, especially after freezing. Pinkness alone cannot confirm doneness, so check the thickest flesh with a thermometer.
Can I cook drumsticks from frozen?
Yes, when your appliance manual permits it. Loosen and separate the drumsticks first, then dry, oil and season them. Continue at 380°F / 190°C and begin checking drumsticks around 4–4½ oz / 113–128 g each at about 25 minutes total.
Use this card when weight, frozen chicken or sauce changes the base method.
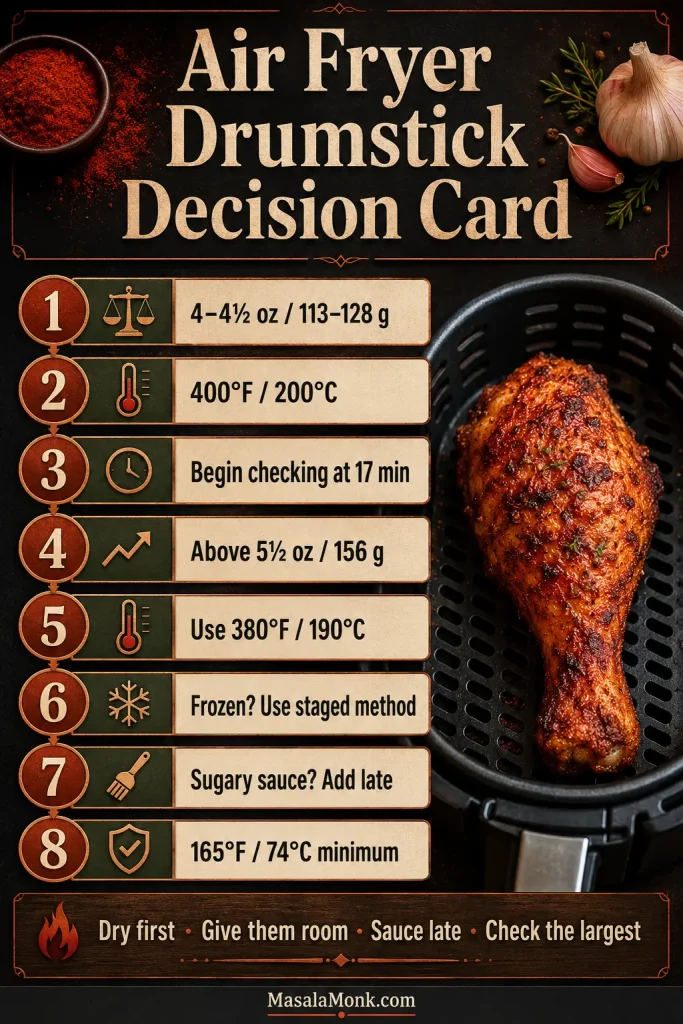
The four drumstick decisions to remember
Dry first. Give them room. Sauce late. Check the largest piece. Those four decisions do more for crisp skin and juicy meat than chasing one supposedly perfect cooking time.
That is the small satisfaction of this dinner: an inexpensive package of chicken comes out smoky, properly browned and generous. The thermometer quietly removes the worry that usually comes with meat beside the bone.
Which version made it to your table—the smoky base, a sticky glaze, Buffalo or the Indian-spiced batch? If your drumsticks needed noticeably longer than the guide suggested, add the average weight and air-fryer model too. Those details can help the next cook understand why.








