Posted on Leave a comment

Air Fryer Chicken Thighs Recipe: Crispy Skin, Juicy Meat & Time Chart

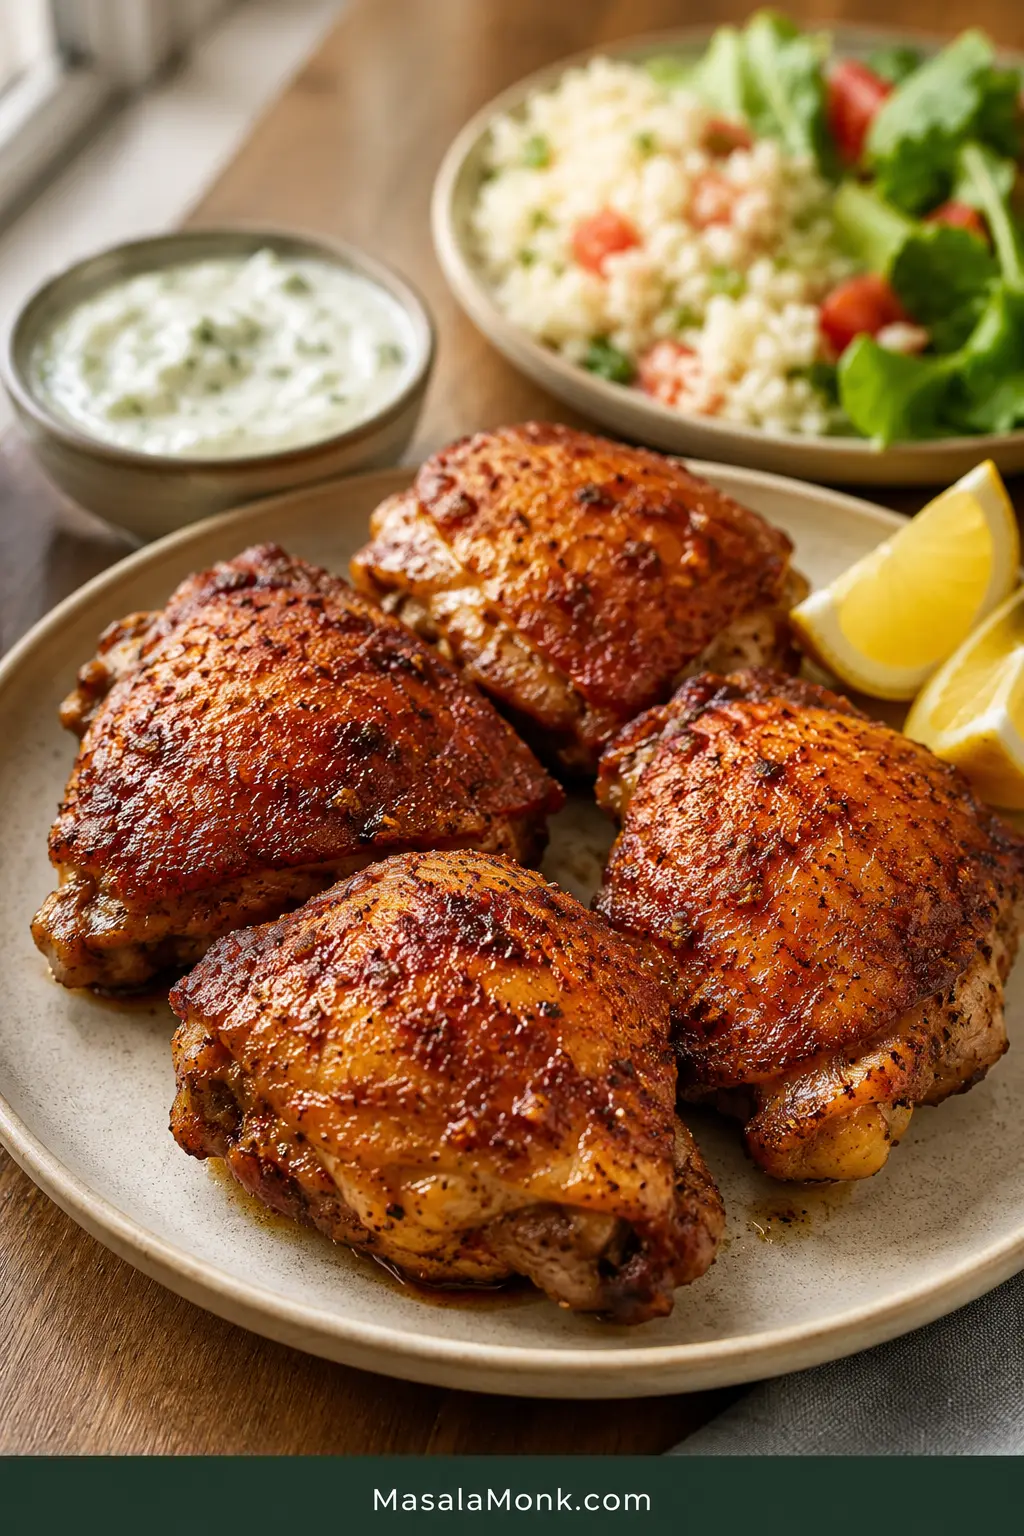
Crispy air fryer chicken thighs served on a plate with lemon wedges, rice, salad, and a creamy dipping sauce.

The air fryer is especially good for chicken thighs because the heat moves fast around the skin while the dark meat stays forgiving and juicy. When the timing is right, you get golden crisp edges, tender meat near the bone, and a dinner that feels much more satisfying than the effort it takes.

The easiest mistake is treating every chicken thigh the same. Bone-in, skin-on thighs need time for the skin to render. Boneless skinless thighs cook much faster. Frozen thighs need a slower start. BBQ sauce and sweet marinades need to go in late so they turn sticky instead of burnt.

Start with the best all-purpose version: bone-in, skin-on thighs with crisp skin and juicy meat. Bought boneless, frozen, sauced, skinless, tiny, or extra-large thighs? You are still covered. Use the recipe card for the classic crispy-skin version, then jump to the section that matches the chicken you actually have.

The goal is simple: no rubbery skin, no dry boneless pieces, and no guessing whether the thickest part is done. You should be able to open the basket and know what you are looking at: crisp skin where there is skin, juicy meat in the center, and no awkward cutting into every piece to check.

Jump to: Recipe Card · Time Chart · Boneless Skinless · Crispy Skin · Frozen Thighs · BBQ & Marinated · Troubleshooting · FAQs

Quick Answer: How Long to Cook Air Fryer Chicken Thighs

For bone-in, skin-on chicken thighs, air fry at 400°F / 200°C for 20 to 24 minutes, flipping once, until the center of the largest thigh reaches at least 165°F / 74°C. Many people prefer dark meat closer to 175°F / 79°C for a softer texture, while still using 165°F as the food-safety minimum.

Boneless skinless thighs need a shorter window. Thin pieces may take 11–13 minutes, average pieces usually take 14–17 minutes, and thick or folded pieces may need 18–20 minutes.

Skin-side up or down? Start skin-side down, then finish skin-side up. Starting skin-side down gives the fat under the skin time to render; finishing skin-side up gives the skin direct heat so it turns golden instead of rubbery.

Air fryers vary. A compact basket model may finish faster than a large oven-style model, so use the time range as a starting point and let the thermometer decide the final few minutes.

Choose Your Thighs

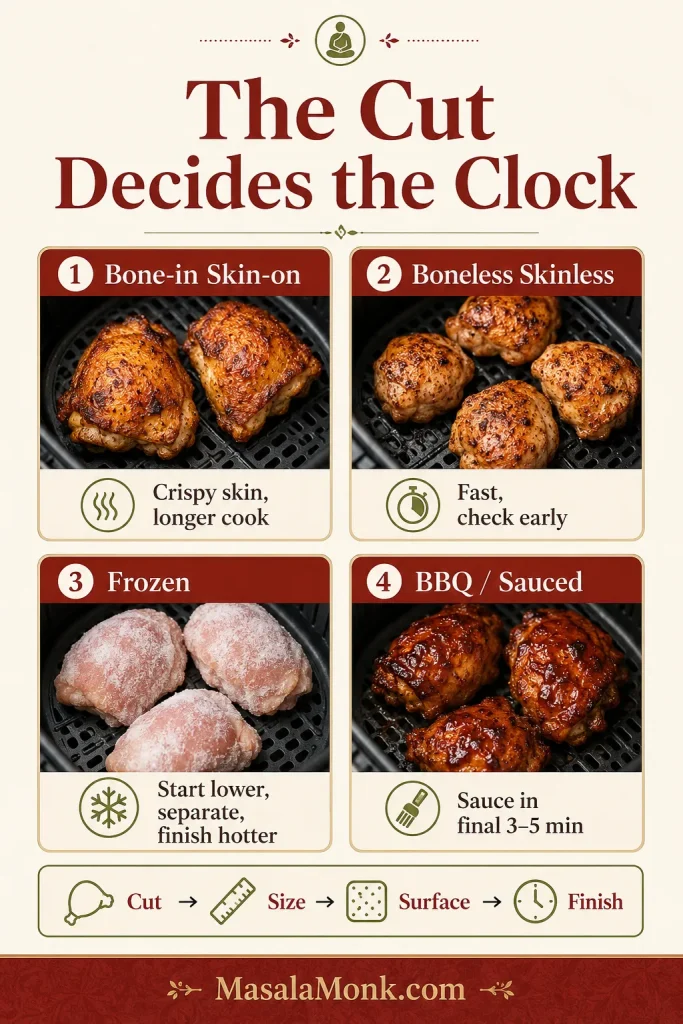
The cut decides the clock: bone-in needs time, boneless needs attention, frozen needs patience, and sauced chicken needs a late glaze. Match your pack of chicken to the right path before you cook.

Think of air fryer chicken thighs in four decisions: cut, size, surface, and finish. Cut gives you the basic timing, size tells you when to start checking, surface decides whether you get crisp skin, a browned coating, or a sticky glaze, and the thermometer confirms when dinner is actually done.

What you haveBest forWatch out forWhere to go
Bone-in, skin-on thighsCrisp skin and juicy dinner platesNeeds enough time for the skin to renderRecipe Card
Boneless skinless thighsBowls, wraps, salads, tacos, noodles, meal prepCooks fast and can dry if ignoredBoneless Skinless
Skinless bone-in thighsJuicy meat without skinLess browning, no crispy skinTime Chart
Frozen thighsRescue dinners when you forgot to thawLess predictable; must check temperatureFrozen Thighs
BBQ or sauced thighsSticky, glossy finishSugar can burn if added too earlyBBQ & Marinated
Marinated thighsDeeper flavorToo much wet marinade prevents browningBBQ & Marinated
Very small or very large thighsStill usable with adjusted timingSmall pieces finish early; large pieces need more timeTime Chart
Guide to choosing air fryer chicken thigh timing for bone-in skin-on, boneless skinless, frozen, and BBQ sauced thighs.
Before you choose a time, choose your chicken. Bone-in, boneless, frozen, and sauced thighs all need a slightly different air fryer game plan.

Next step: Making the classic bone-in version? Jump to the recipe card. Need exact timing? Use the time chart. Bought a different pack? Go to boneless skinless, frozen thighs, or BBQ and marinated thighs.

Before You Start: The 3 Rules That Change the Result

1. Dry skin browns; wet skin steams

Pat the chicken dry before seasoning, especially on the skin side. If the skin still looks shiny-wet, it will steam before it crisps.

2. Airflow is what makes the edges crisp

The thighs can touch lightly at the edges, but they should not overlap or cover each other. If air cannot move around the chicken, the skin softens and the pieces cook unevenly. The same airflow issue is behind many common air fryer mistakes.
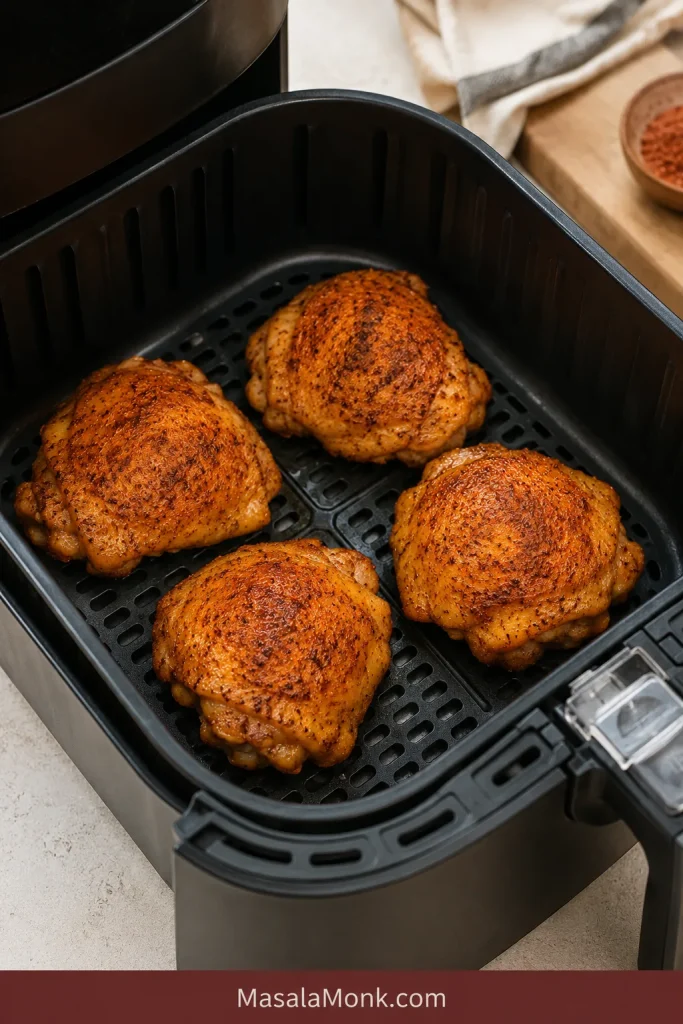
Four seasoned chicken thighs arranged in a single layer with space between them inside a black air fryer basket.
A little space does real work here. When the thighs sit in one layer, hot air can reach more surface area and brown the chicken more evenly.

3. The biggest thigh decides when the batch is done

Chicken thighs vary in size, shape, and thickness. Use the time range to start, then check the center of the largest piece with a thermometer. That is the difference between guessing and knowing.

Avoid These 5 Mistakes

  • Keep the thighs in one layer instead of stacking them.
  • Brush BBQ sauce on near the end, not at the beginning.
  • Use browned skin as a clue, not the final doneness test.
  • Insert the thermometer into the meat without touching the bone.
  • Give boneless thighs their own shorter timing instead of using the bone-in timing.
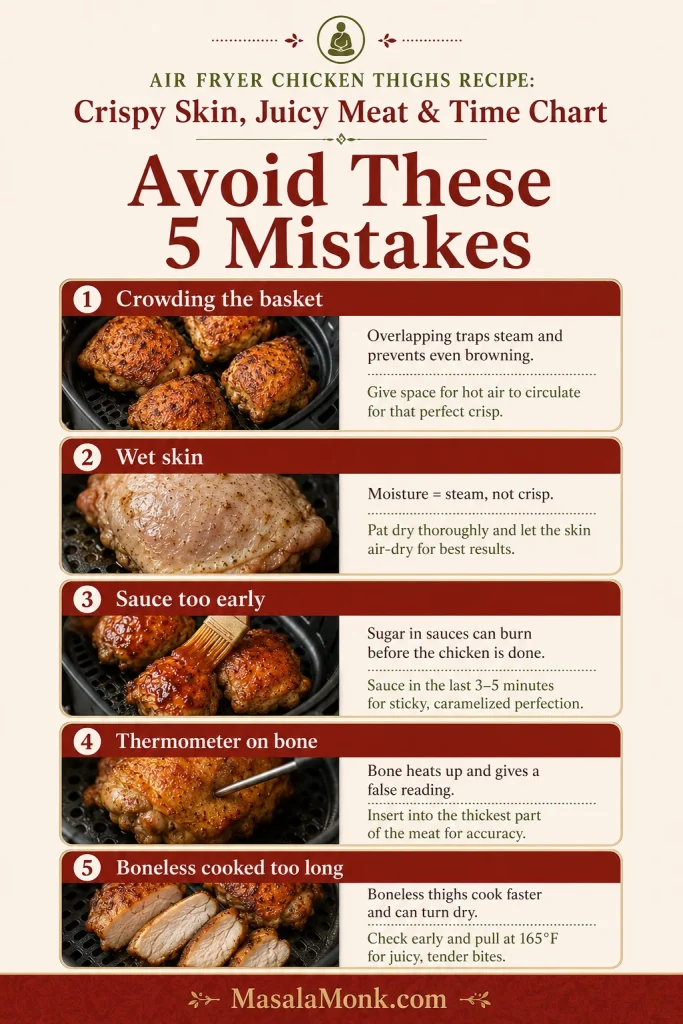
Infographic listing common air fryer chicken thigh mistakes including crowding, wet skin, early sauce, wrong thermometer placement, and overcooked boneless thighs.
When air fryer chicken thighs disappoint, the fix is usually simple: more space, drier skin, later sauce, better thermometer placement, or less time for boneless pieces.

Ready to cook? Follow the recipe card for the classic version, or check the time chart first if your thighs are boneless, frozen, sauced, skinless, unusually small, or unusually large.

Air Fryer Chicken Thighs Recipe Card

This is the everyday version: bone-in, skin-on thighs rubbed with smoked paprika, garlic, herbs, and a little oil, then air fried until the skin is golden and the dark meat stays juicy. The skin should smell like paprika and garlic as it browns, and the first cut should stay juicy instead of spilling everything onto the plate.

This is the kind of chicken that works on a tired weeknight: crisp enough to feel special, simple enough that you are not babysitting a pan.

Serve it straight from the basket with lemon wedges, rice, salad, or a cool dip, and it feels like a proper dinner without much planning.

Prep time5 minutes
Cook time20–24 minutes
Rest time5 minutes
Total time30–34 minutes
Servings4
Main cut4 medium bone-in, skin-on chicken thighs
Temperature400°F / 200°C
Basket setupSingle layer, no overlapping

Equipment

  • 5–6 quart air fryer
  • Instant-read thermometer
  • Tongs
  • Paper towels
  • Small bowl for the seasoning

Ingredients

  • 4 medium bone-in, skin-on chicken thighs, about 2–2.5 lb / 900–1130 g total
  • 1 tablespoon / 15 ml olive oil or avocado oil
  • 1 teaspoon smoked paprika
  • 1 teaspoon garlic powder
  • 1/2 teaspoon onion powder
  • 1/2 teaspoon dried oregano or thyme
  • 3/4 teaspoon fine salt, or about 1 teaspoon coarse kosher salt, plus more to taste
  • 1/4 teaspoon black pepper
  • Optional for extra-crisp skin: 1/4 teaspoon aluminum-free baking powder
  • Lemon wedges, for serving

Instructions

  1. Dry the chicken well. Pat the thighs very dry with paper towels, especially on the skin side.
  2. Trim loose pieces. Remove large hanging pieces of skin or fat, but leave the skin attached. If the skin folds under itself, gently spread it back over the top.
  3. Mix the seasoning. In a small bowl, combine smoked paprika, garlic powder, onion powder, oregano or thyme, salt, and pepper. For extra-crisp skin, add the baking powder.
  4. Season the thighs. Rub the chicken with oil, then coat both sides with the seasoning. Season the edges too.
  5. Preheat the air fryer. Set it to 400°F / 200°C for 3–5 minutes if your model recommends preheating.
  6. Start skin-side down. Place the thighs in a single layer, skin-side down. Air fry for 10–12 minutes.
  7. Flip and finish skin-side up. Turn the thighs over and air fry for another 8–12 minutes, until the skin is golden and the chicken is cooked through.
  8. Check the temperature. Insert an instant-read thermometer into the center of the largest thigh without touching the bone. The safe minimum is 165°F / 74°C; for softer dark meat, cook closer to 175°F / 79°C.
  9. Rest before serving. Let the thighs rest for 5 minutes so the juices settle instead of running out as soon as you cut into the meat.

Recipe Notes

  • The baking powder is optional, but it helps skin-on thighs crisp more deeply. Use only a tiny amount.
  • With table salt, start slightly lighter. Coarse kosher salt may need a little more by volume.
  • Small thighs may finish closer to 18–20 minutes. Large thighs may need 2–5 extra minutes.
  • If the chicken is cooked but the skin is not crisp, air fry skin-side up for 2–4 more minutes.
  • For boneless skinless thighs, use the boneless timing section instead of the main bone-in timing.

Using a different kind of thigh? See boneless skinless thighs, frozen thighs, or BBQ and marinated thighs before you cook.

Ingredients You Need

The recipe card gives you the amounts. These notes help you choose the right cut, seasoning, and crisping option before you cook.
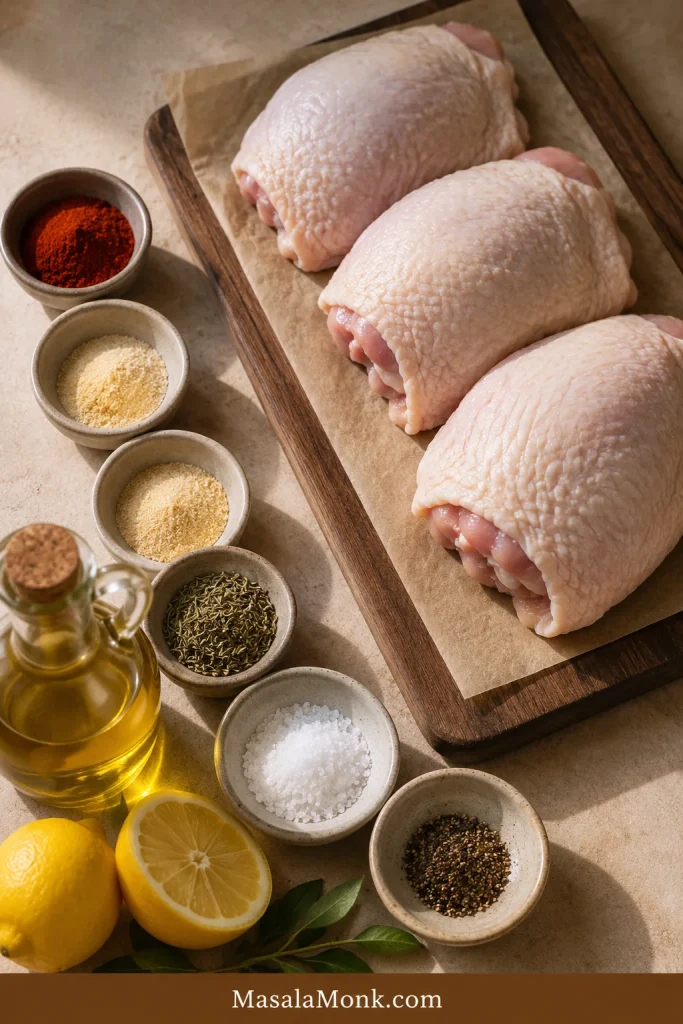
Raw chicken thighs with paprika, garlic powder, herbs, salt, pepper, oil, and lemon arranged on a prep board.
The seasoning stays flexible on purpose. Paprika brings color, garlic and herbs bring depth, and oil helps the air fryer build better browning.

Chicken thighs

Bone-in, skin-on thighs are best for the main recipe because they give you crisp skin and juicy meat. Boneless skinless thighs cook faster and are better for bowls, wraps, salads, tacos, noodles, and meal prep.

Oil

One tablespoon / 15 ml of oil is enough for 4 thighs. It helps the seasoning cling and encourages browning. Too much oil can make the basket smoky and the skin heavy.

Smoked paprika

Smoked paprika gives the chicken a warm color and a lightly smoky flavor, which helps the thighs taste roasted even though they cook quickly.

Garlic powder and onion powder

Powdered garlic and onion coat the chicken evenly and are less likely to burn than fresh garlic in the air fryer.

Dried herbs

Oregano or thyme adds a simple savory note. Crush dried herbs between your fingers before adding them to wake up the aroma. You can also use Italian seasoning, Cajun seasoning, ranch seasoning, lemon pepper, or a pinch of garam masala.

Salt

Fine salt seasons quickly and evenly. Table salt is stronger by volume, so start a little lighter. Coarse kosher salt may need a little more.

How to Make It

Here is what each stage should look and feel like, so you can adjust confidently even if your thighs are bigger, smaller, or shaped differently from mine.

1. Dry the chicken until the skin is no longer shiny

Blot both sides, then give the skin side a second pass. If the surface still looks wet, it will steam first and brown later.
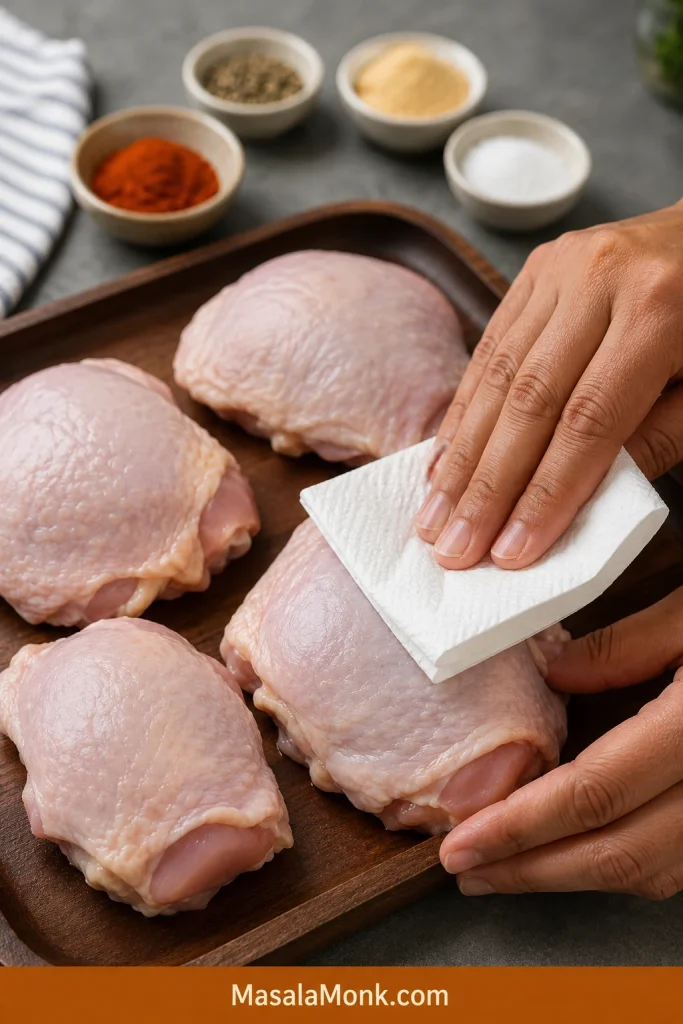
Hands patting raw chicken thighs dry with a white paper towel before seasoning.
Remove surface moisture before seasoning. Dry skin has a much better chance of crisping instead of steaming in the basket.

2. Trim loose fat, but keep the skin attached

Trim large hanging pieces of skin or fat, but do not remove the skin completely. Spread folded skin back over the top instead of leaving it tucked underneath.

3. Coat the edges, not just the top

Rub the thighs with oil, then season both sides and around the edges. If the skin is loose, you can season lightly underneath it without pulling it off.
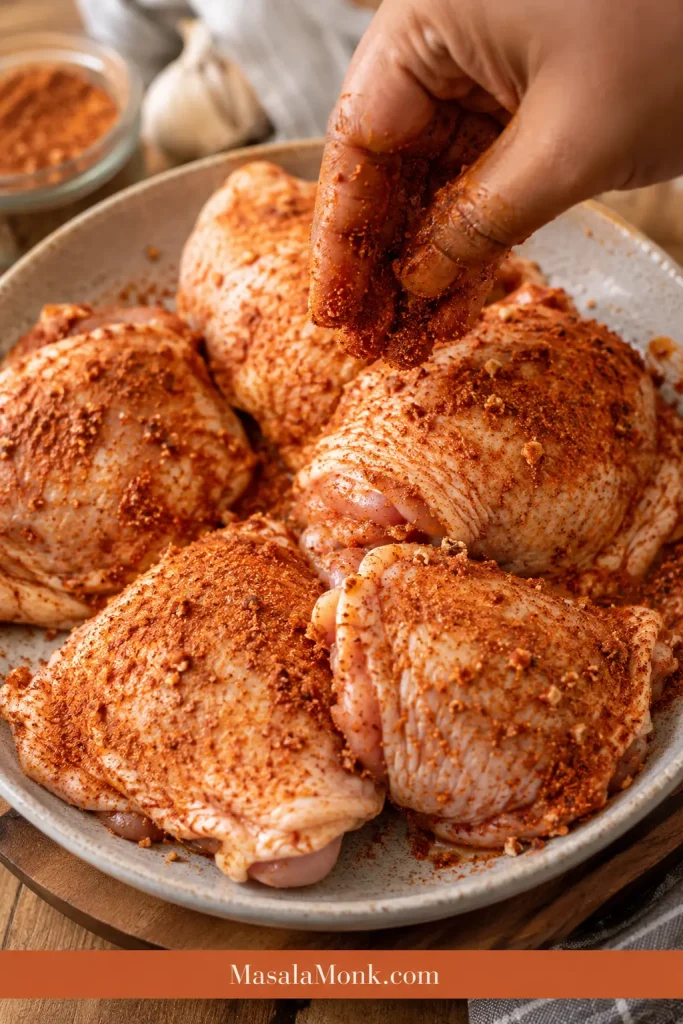
Raw chicken thighs being coated with a paprika garlic seasoning rub in a shallow bowl.
Season the edges as well as the top. As the thighs cook and tighten, those seasoned edges become some of the most flavorful bites.

4. Start hot so the surface begins browning quickly

Preheating helps the chicken start cooking as soon as it hits the basket. If your air fryer does not require preheating, you can still run it empty for 3 minutes while you finish seasoning the chicken.

5. Give the skin time to render before the flip

Arrange the thighs in a single layer, skin-side down. Cook for 10–12 minutes. The pieces can touch lightly at the edges, but they should not overlap.
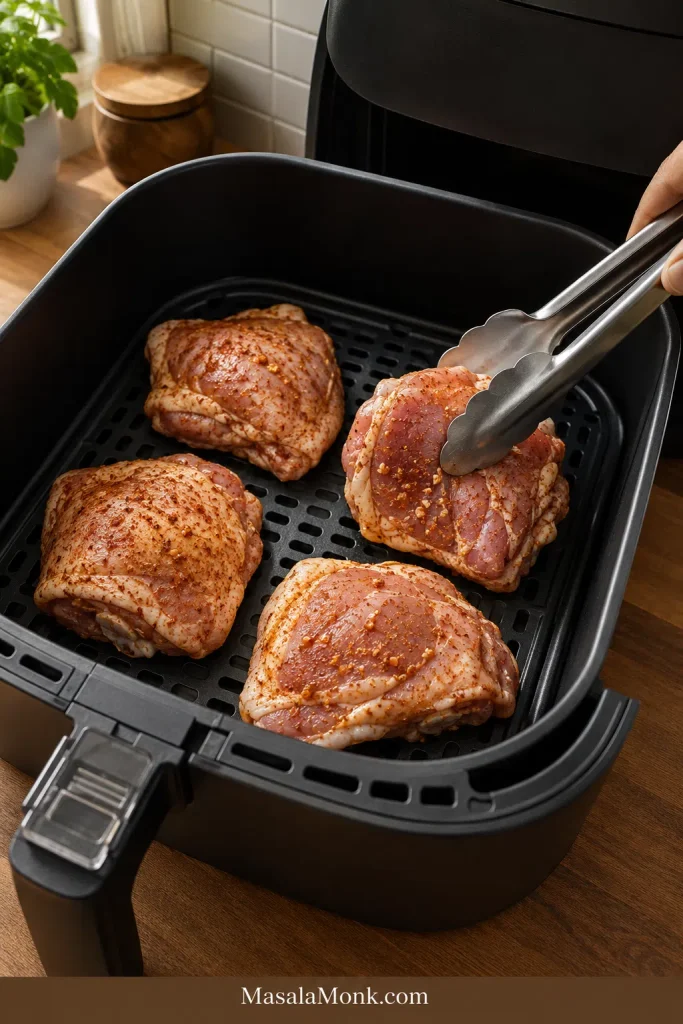
Seasoned chicken thighs placed skin-side down in an air fryer basket with metal tongs.
Starting skin-side down gives the fat under the skin time to warm and render. That quiet first step helps set up the crispier finish.

6. Finish skin-side up for color and texture

Turn the thighs over and finish cooking skin-side up for another 8–12 minutes. This final stage is where the skin gets its best color. If one thigh is much smaller than the others, check it early and pull it out if it is already done.
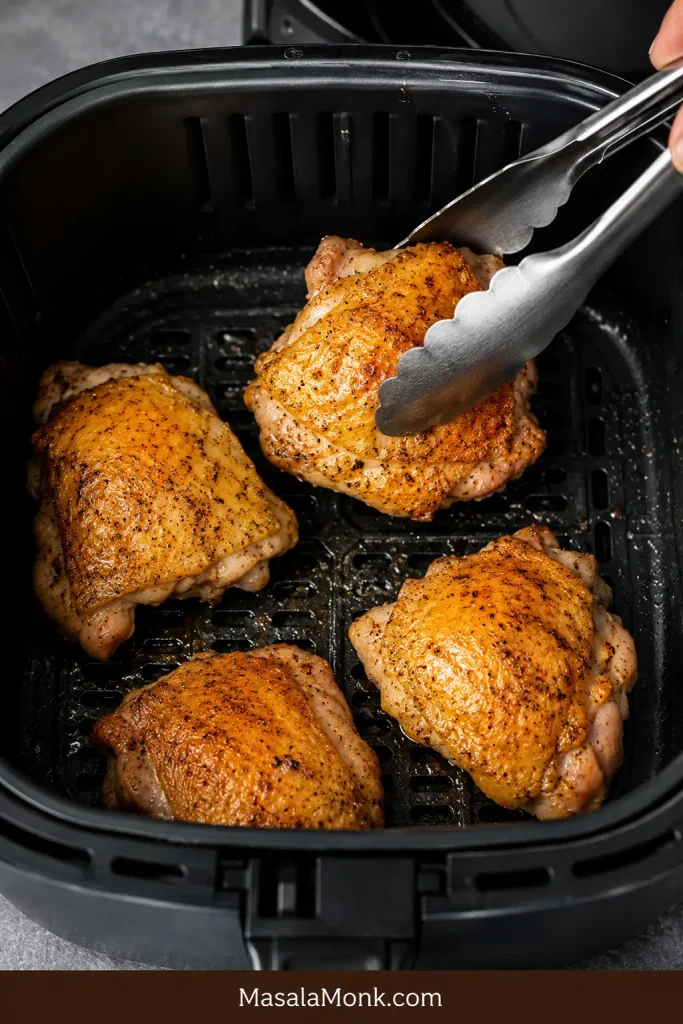
Chicken thighs flipped skin-side up in an air fryer basket with metal tongs.
The final direct heat is what turns the skin crisp. During this stage, the color deepens and the surface changes from soft to browned.

7. Check the thickest thigh, not the prettiest one

Insert the thermometer into the deepest part of the meat without touching the bone. The safe minimum for poultry is 165°F / 74°C; FoodSafety.gov lists that same minimum for chicken thighs and other poultry cuts.
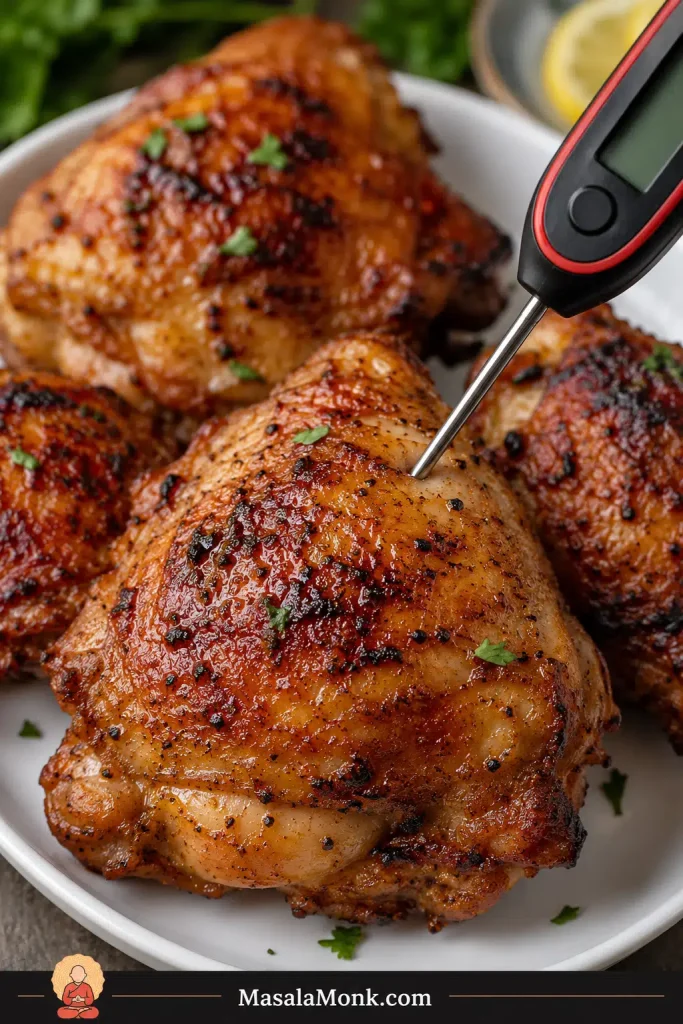
Instant-read thermometer inserted into the thickest part of a cooked chicken thigh.
A thermometer removes the guesswork. Check the thickest thigh first because the largest piece decides when the whole batch is ready.

Think of 165°F / 74°C as the safety line. Going closer to 175°F / 79°C is a texture choice, not a safety rule; many people like dark meat better there because it turns softer instead of dry.

8. Rest before cutting so the juices stay in the meat

Rest the chicken for 5 minutes before serving. Resting keeps the first cut from sending all those juices onto the plate.

How to Tell When Chicken Thighs Are Done

Look for golden skin, browned seasoning around the edges, and juices that do not look pink when the thigh rests. Boneless thighs should feel springy but not tight. Bone-in thighs can still look slightly pink near the bone, so color alone is not enough.

Temperature is still the real check: 165°F / 74°C in the thickest part for safety, or closer to 175°F / 79°C if you prefer softer dark meat.
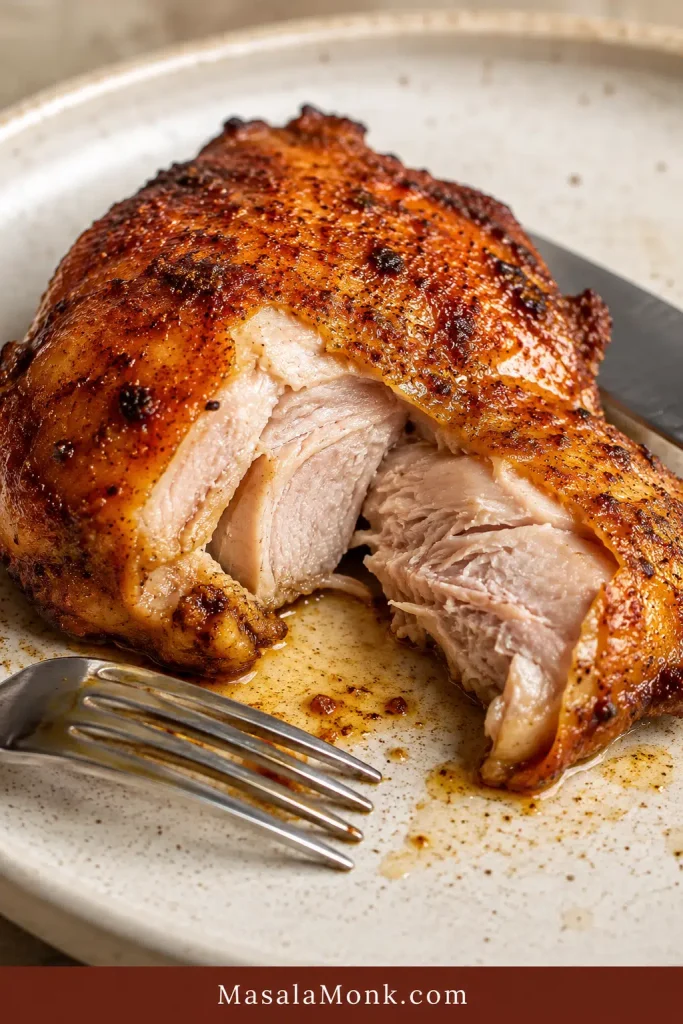
Cut-open air fryer chicken thigh showing crisp browned skin and fully cooked juicy meat inside.
Aim for contrast: browned skin outside, moist cooked meat inside. Resting briefly helps keep those juices in the chicken.

A compact, thick thigh usually needs more time than a flatter thigh of the same weight. Large pieces can look browned outside before the center is ready, so check the largest thigh in the basket before serving.

Why This Method Works

This method works because it gives the skin time to render before the final crisping stage. Starting skin-side down warms the fat under the skin; finishing skin-side up gives the surface direct heat. The thermometer check keeps the timing flexible, because a small boneless thigh and a large bone-in thigh can look similar outside but cook very differently inside.

Time and Temperature Chart

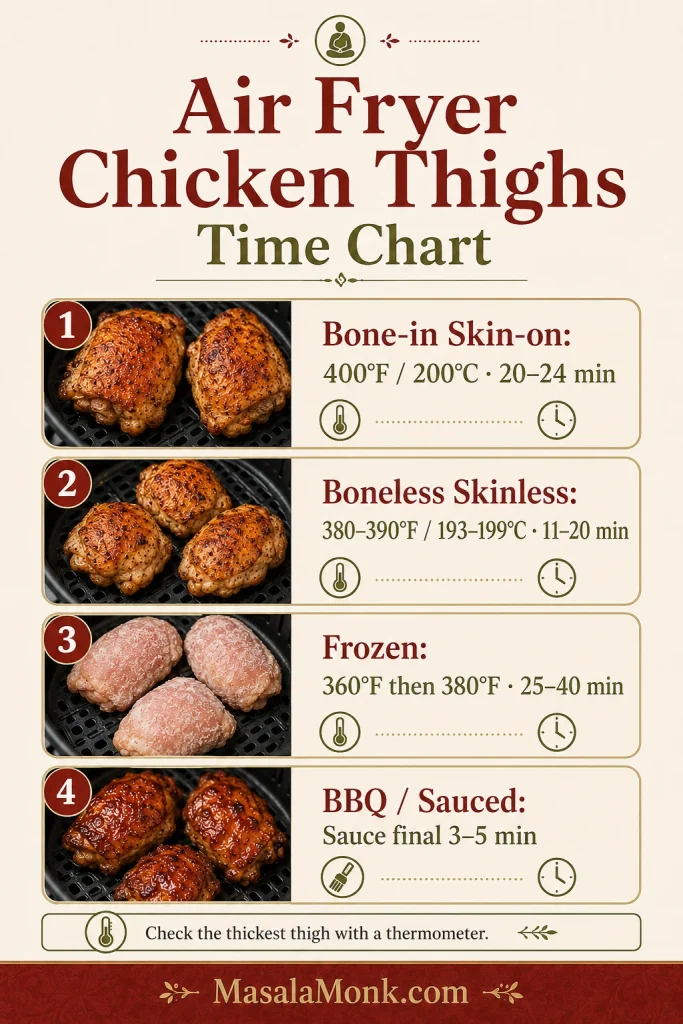
If you remember one thing, remember this: the cut decides the clock. Use the chart to get close, then use the thermometer to land the chicken exactly where you want it: safe, juicy, and not overcooked.

Chicken thigh typeTemperatureApprox. timeFlip?Doneness cue
Bone-in, skin-on400°F / 200°C20–24 minYesSkin crisp, 165°F minimum inside
Small bone-in, skin-on400°F / 200°C18–20 minYesCheck early so they do not dry
Large bone-in, skin-on390–400°F / 199–200°C24–28 minYesContinue in 3-minute bursts if needed
Boneless skinless, thin375–400°F / 190–200°C11–13 minOptionalEdges browned, center 165°F
Boneless skinless, average380–390°F / 193–199°C14–17 minYesJuicy center, browned surface
Boneless skinless, thick380–390°F / 193–199°C18–20 minYesCheck the thickest folded part
Bone-in, skinless390–400°F / 199–200°C18–22 minYesJuicy but less browned
Frozen bone-in360°F then 380°F / 180°C then 190°C25–40 minYesSeparate once softened, check near bone
BBQ thighs380–400°F / 193–200°CNormal time + 3–5 min glazeYesSauce sticky, not burned
Marinated thighs380–400°F / 193–200°CDepends on cutYesPat dry if you want browning
Air fryer chicken thighs time and temperature chart for bone-in, boneless, frozen, and BBQ sauced thighs.
Treat the air fryer chicken thighs time chart as your starting point, then let size and thickness guide the final few minutes. Smaller thighs often finish faster than the chart suggests.

Need the full method? Return to the recipe card. For special cases, jump to boneless skinless thighs, frozen thighs, or BBQ and marinated thighs.

Boneless Skinless Air Fryer Chicken Thighs

Boneless skinless chicken thighs in the air fryer are the fast version: less dramatic than crisp skin, maybe, but incredibly useful for rice bowls, wraps, salads, tacos, noodles, and lunch boxes.
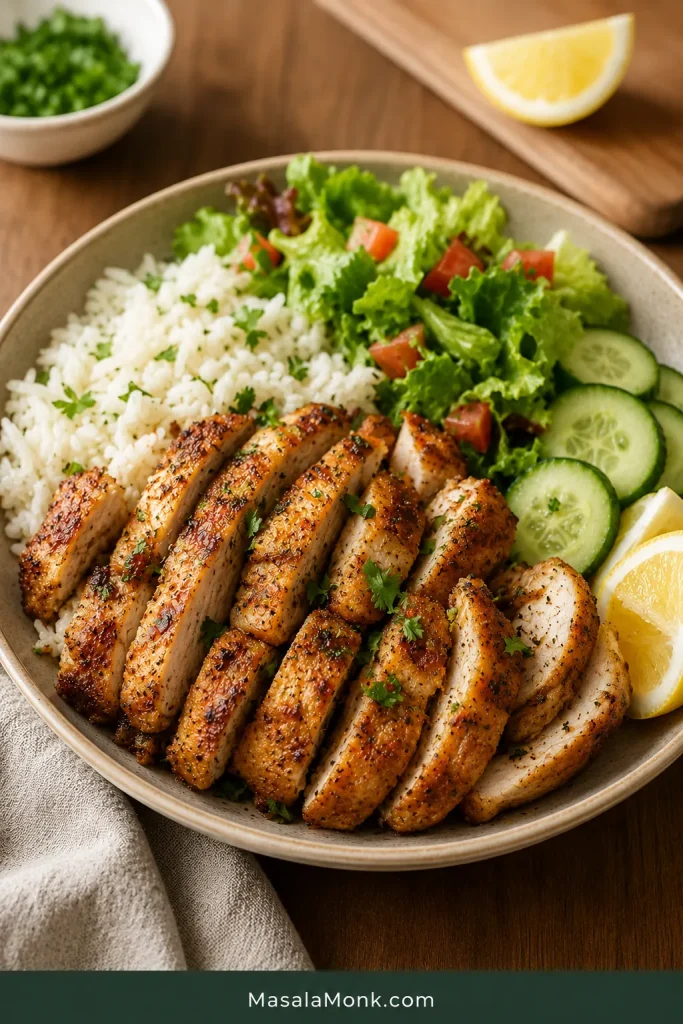
Sliced boneless skinless air fryer chicken thighs served with rice, salad, cucumbers, herbs, and lemon wedges.
This sliced version is built for bowls, wraps, salads, noodles, and meal prep. Start checking early so the pieces stay juicy.

The texture is different from skin-on thighs. Boneless pieces can get browned edges and a roasted surface, but they will not have crispy chicken skin. For a better surface, pat them dry, use a little oil, and toss the seasoned thighs with 1 tablespoon / about 8 g cornstarch if you want a light crisp coating.

This is the version to make when you want cooked chicken you can actually use all week: slice it hot for dinner, then tuck leftovers into wraps, bowls, salads, noodles, or a filling chickpea salad with lemon, herbs, or a spoonful of yogurt dip.

Best method for boneless skinless thighs

  1. Pat the thighs dry.
  2. Open any folded pieces so the thickness is more even.
  3. Rub with oil and seasoning.
  4. Use cornstarch if you want a light browned coating.
  5. Air fry average pieces at 380–390°F / 193–199°C.
  6. Flip halfway for better browning.
  7. Check the center for 165°F / 74°C.

Thin boneless thighs may be ready in 11–13 minutes. Average pieces usually need 14–17 minutes. Thick pieces, folded pieces, or a crowded basket may need closer to 18–20 minutes. Start checking at the low end of the range if your air fryer runs hot.

How to Get Crispy Skin

Crisp skin is not luck. It is mostly dryness, space, and the final few minutes.

  • Blot the skin very dry. Keep blotting until it no longer looks shiny.
  • Give the thighs space. Light edge-touching is fine; overlapping traps steam.
  • Start skin-side down, finish skin-side up. The first stage helps render fat; the second gives the skin direct heat.
  • Use very little oil. Too much oil makes the surface heavy instead of crisp.
  • Add wet or sweet things late. BBQ sauce, honey, and sugary marinades brown fast and can burn before the chicken is done.
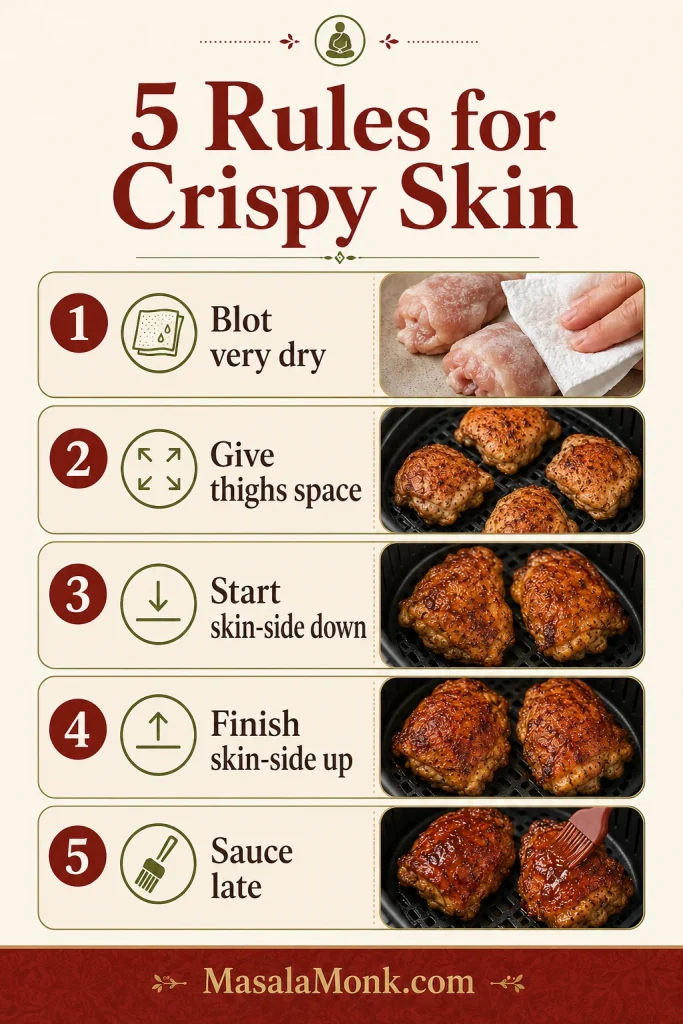
Infographic showing five rules for crispy air fryer chicken thigh skin, including drying, spacing, flipping, and saucing late.
Crispy skin works best as a sequence: dry surface, good airflow, a purposeful flip, and sauce only at the end.

For the crispiest version, season the thighs and refrigerate them uncovered for 1–8 hours before cooking. This dries the surface even more, but it is optional for a regular weeknight batch.

If the chicken is cooked through but the skin is still soft, air fry skin-side up for another 2–4 minutes. Watch closely near the end because spices can darken quickly. For another crisp chicken guide, see these air fryer chicken wings.

Frozen Chicken Thighs in the Air Fryer

You can cook frozen thighs in the air fryer, but treat them like a rescue dinner, not the crispiest version of the recipe. Begin gently, separate the pieces as soon as they loosen, and let the thermometer make the final call.

For frozen bone-in thighs, start at 360°F / 180°C for 20–30 minutes, flipping halfway, then finish hotter only after the pieces have separated and the centers are mostly cooked. When pieces are frozen into a solid block, do not force them apart with a knife; warm them until they loosen.

Frozen-together thighs cook unevenly because the center of the stack lags behind the outside pieces. Separate them as soon as they loosen, season any exposed surfaces, then continue cooking in a single layer.
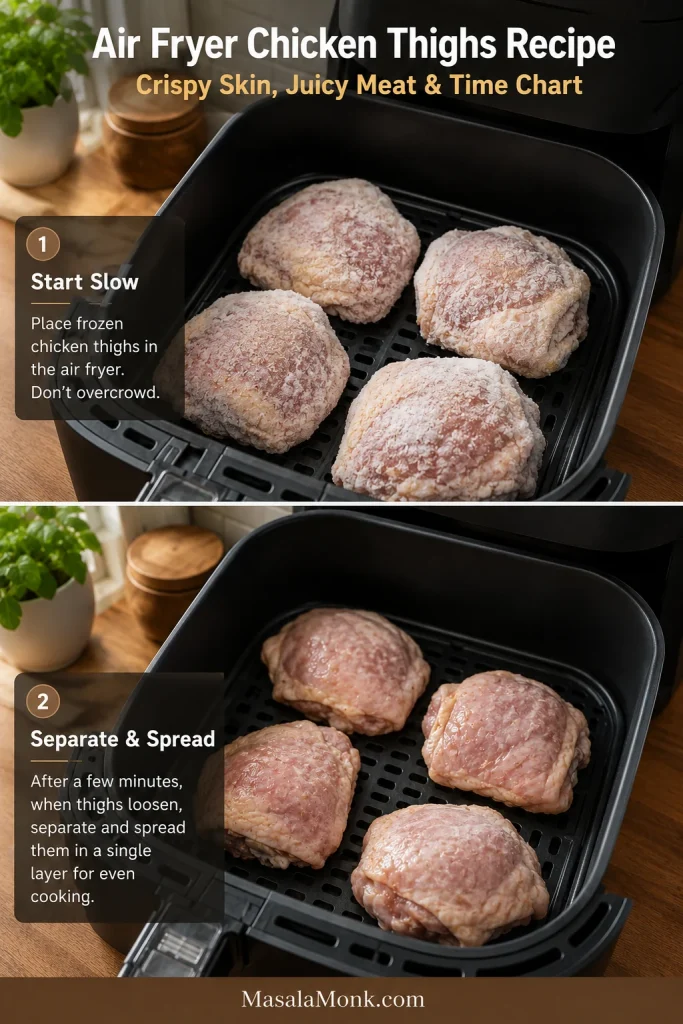
Frozen chicken thighs in an air fryer basket shown before and after separating into a single layer.
When cooking frozen chicken thighs, separation is the turning point. After the pieces loosen, spread them out so the middle cooks as evenly as the edges.

Once the chicken is mostly cooked through, increase to 380°F / 190°C for 3–5 minutes to improve browning and crisp the skin. Medium frozen thighs may take about 25–35 minutes total. Large frozen thighs can take 30–40 minutes. Check near the bone before serving.

The same staged approach works for other frozen chicken pieces too, including frozen chicken wings in the air fryer. Fresh or fully thawed thighs usually brown better and cook more predictably, but frozen thighs are useful when dinner needs to happen without a thawing plan.

Thawed thighs? Return to the classic recipe card or compare cuts in the time chart.

BBQ, Sauced, and Marinated Chicken Thighs

BBQ sauce and marinades can make the chicken taste deeper and more flavorful, but they also change how the surface cooks. Think dry rub early, sweet sauce late. That is the simple rule.

The best sauced thighs should look glossy and sticky at the edges, not blackened before the center is done.
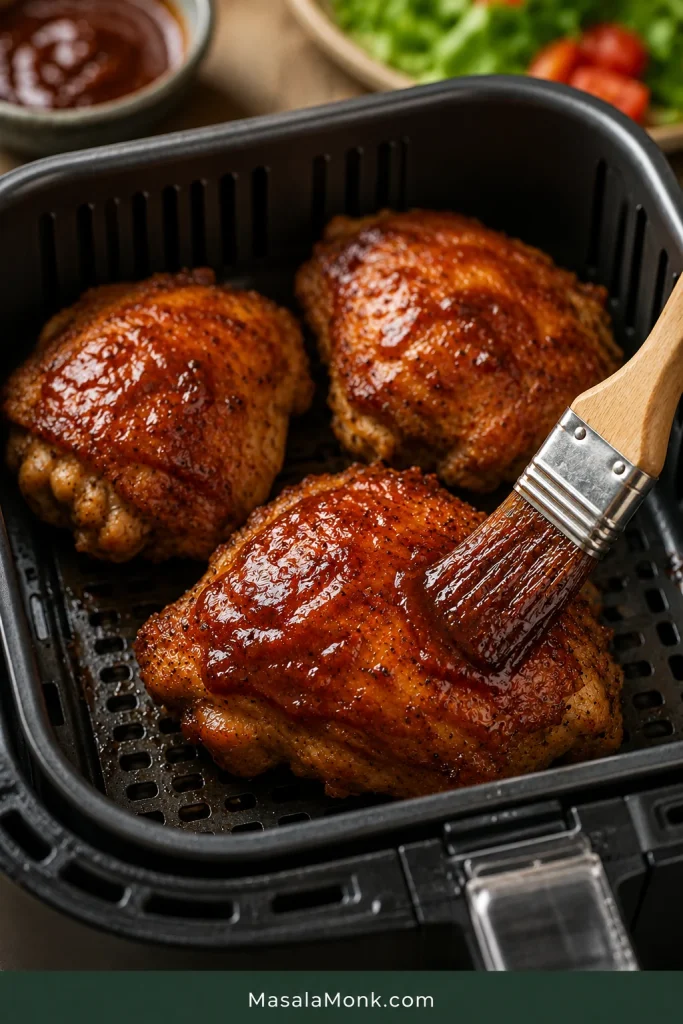
BBQ sauce brushed onto cooked chicken thighs inside an air fryer basket.
Timing matters more than extra sauce here. Brush near the end so the BBQ glaze turns sticky and glossy instead of burnt.

For BBQ thighs

Air fry the thighs mostly plain or with a dry rub first. Sauce belongs near the end: brush it on during the final 3–5 minutes, then cook until it looks glossy at the edges, not blackened. Add a second light brush after cooking if you want a saucier finish. For very sugary sauces, use a thin layer first and add more after cooking.

Marinated thighs

Lift the chicken out of the marinade and wipe off excess liquid before air frying. Let the flavor stay, but leave the liquid behind. This is especially useful for soy-based marinades, honey garlic marinades, yogurt marinades, and tandoori-style marinades.

With sweet marinades, cook closer to 380°F / 193°C and watch the last few minutes carefully. Honey, sugar, and bottled sauces can darken quickly. For a glossy sweet-savory finish, brush on homemade teriyaki sauce near the end rather than at the start.

Flavor Variations

Once the cooking method is clear, flavor becomes the easy part. Keep the timing steady and adjust the seasoning around it.

  • Lemon pepper: Use lemon pepper seasoning and finish with fresh lemon juice after cooking. For a saucier version, see this lemon pepper chicken.
  • Garlic herb: Use garlic powder, onion powder, thyme, oregano, and black pepper.
  • Cajun: Use Cajun seasoning and reduce added salt if the blend is already salty.
  • Ranch: Use dry ranch seasoning lightly, then taste before adding extra salt.
  • Teriyaki: Cook with a dry base seasoning, then glaze near the end.
  • Honey garlic: Add honey garlic glaze during the final few minutes so it does not burn.
  • Tandoori-style: Use a thick yogurt-spice marinade, wipe off excess, then air fry until cooked through.
  • Garam masala: Add a small pinch of garam masala to the paprika-garlic rub for a warmer spice note.
  • Green chutney: Serve with green chutney, or stir the chutney into yogurt for a quick herby dip.
  • Spicy: Add cayenne, chili powder, crushed red pepper, or hot sauce after cooking. Serve sweet-hot versions with mango habanero sauce.

Bright, spicy serving idea

For a brighter plate, keep the thighs dry-rubbed and crisp, then serve them with sliced onions, lemon wedges, green chutney, and a quick yogurt-garlic dip. You get the crisp skin from the air fryer and the fresh, spicy contrast on the side.

Air Fryer Size, Basket Space, and Equipment

A 5–6 quart basket-style air fryer is ideal for 4 medium bone-in thighs. Smaller air fryers may only fit 2 or 3 at a time. Light edge-touching is fine; overlapping or stacking means you should cook in batches.

Basket-style air fryers often brown faster than oven-style air fryers. Larger oven-style models may need a few extra minutes because the food sits farther from the heating element. Ninja Foodi, Cosori, Instant, Philips, and similar models can all work, but basket shape and heating strength change the final few minutes more than the brand name does.

The most useful tool is an instant-read thermometer. It removes the guesswork, especially when the thighs are different sizes or when you are cooking frozen pieces.

Troubleshooting

Most air fryer chicken thigh problems are not recipe failures. They are usually surface problems, spacing problems, timing problems, or sauce problems. Once you know which one happened, the fix is usually simple.

Quick fixes by problem

ProblemLikely reasonFix
Skin is rubberyThe skin was wet, the basket was crowded, or the thighs did not finish skin-side up long enoughPat dry, cook in a single layer, and add 2–4 minutes skin-side up
Chicken is dryThe thighs were small or cooked too longStart checking earlier and rest for 5 minutes before serving
Outside is browned but inside is undercookedThe thighs are large, very cold, frozen, or crowdedLower the temperature slightly and continue cooking in 3-minute bursts
Seasoning burnedToo much sugar, fresh garlic, or sauce went in too earlyUse dry spices first and add sweet sauces near the end
Air fryer smokedToo much oil, excess fat, old grease, or a dirty basketTrim loose fat, use less oil, and check the drawer for old grease before starting
Chicken tastes blandThe surface was under-seasonedSeason both sides, including edges, and add a squeeze of lemon after cooking if the chicken tastes flat
Thighs cooked unevenlyPieces were different sizes or folded under themselvesUse similar-sized thighs and open folded boneless pieces before cooking
Skin stuck to the basketThe basket was not clean, the skin was too wet, or the chicken was moved too earlyClean the basket, dry the skin well, and let the first side cook before flipping
Frozen thighs cooked unevenlyThe pieces were stuck together or too thickSeparate once softened and check near the bone before serving

When the skin is still soft

When the chicken is already cooked but the skin is disappointing, do not start over. Put it back skin-side up for a few minutes, then serve with lemon, chutney, sauce, or a cool dip.

Storage and Reheating

Store leftover chicken thighs in an airtight container in the refrigerator for 3–4 days. That matches USDA guidance for cooked leftovers, which gives a 3–4 day refrigerator window.

To reheat, air fry at 350°F / 175°C until hot in the center. The exact time depends on whether the thigh is bone-in or boneless. Reheating in the air fryer keeps the surface much better than microwaving.

For the best leftover texture, reheat only what you plan to eat and keep the rest chilled until needed.

The microwave works when speed matters, but the skin will soften. If you want the skin crisp again, microwave briefly to warm the center, then air fry for a few minutes to revive the outside.

Cooked thighs can also be frozen, though the skin will not be as crisp after thawing. For best results, remove the meat from the bone and use it later in rice bowls, wraps, soups, noodles, or salads.

What to Serve with Them

These thighs are flexible enough for a simple dinner, a meal prep box, or a more flavorful weekend plate. The best plate is usually hot chicken, something cool, something bright, and something that catches the juices.
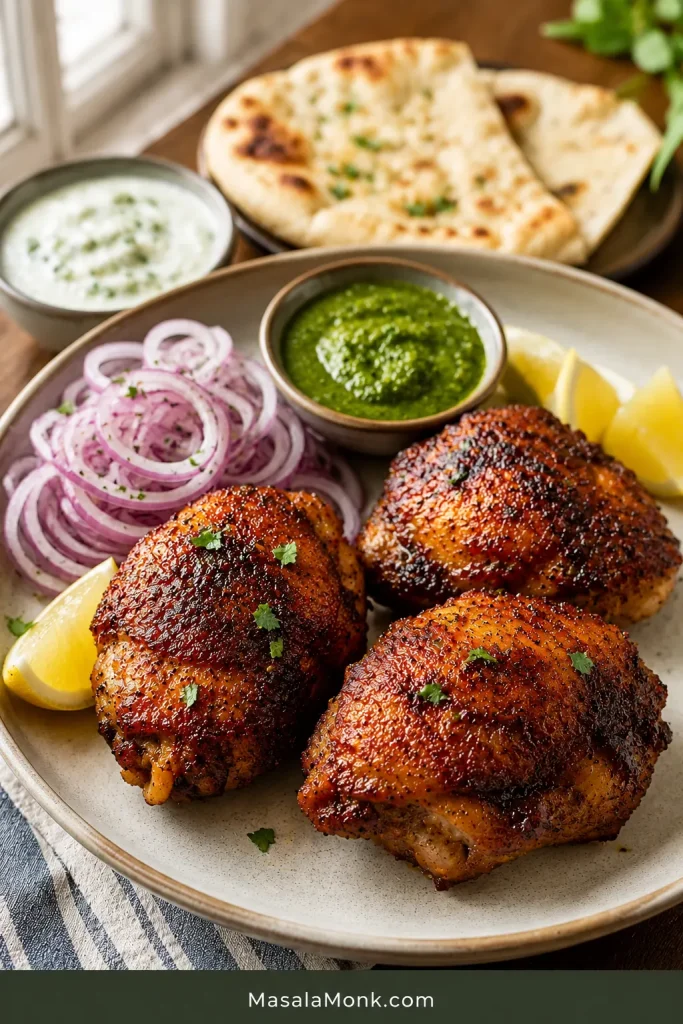
Crispy air fryer chicken thighs served with green chutney, yogurt dip, sliced onions, lemon wedges, and naan.
To serve, build contrast around the crispy chicken. Lemon brightens it, onions add bite, chutney brings heat, and yogurt dip cools everything down.
  • Plain rice, jeera rice, fried rice, or a bowl with sliced thighs and crunchy vegetables
  • Mashed potatoes, roasted potatoes, or air fryer hash browns
  • Steamed vegetables, roasted broccoli, green beans, carrots, or corn
  • A cold cucumber salad for smoky, spicy, or BBQ-style thighs
  • Garlic bread, dinner rolls, or naan
  • Noodles with garlic, chili, or teriyaki-style sauce
  • Cool yogurt-garlic dip, green chutney, ranch, aioli, hot sauce, or lemon wedges for squeezing over the hot skin

Creamy garlic mayo works well here, or you can build one from this homemade mayonnaise guide. For a tandoori-style version, serve the chicken with naan, rice, sliced onions, lemon wedges, and a cooling yogurt dip.

A lighter meal works well with sliced boneless thighs over salad. Tuck extras into wraps with crunchy vegetables.

FAQs

How long do chicken thighs take in the air fryer?

Bone-in, skin-on thighs usually take 20–24 minutes at 400°F / 200°C. Boneless skinless thighs cook faster, usually 11–20 minutes depending on thickness. Start checking at the low end of the range if your thighs are small or your air fryer runs hot.

What temperature works best?

For bone-in, skin-on thighs, 400°F / 200°C gives the best balance of golden skin and juicy meat. Boneless skinless thighs do better around 380–390°F / 193–199°C because the center can cook before the edges dry.

Do you need to preheat the air fryer?

Preheating helps the chicken start browning quickly, especially for skin-on thighs. If your air fryer does not require preheating, you can still run it empty for 3 minutes while you finish seasoning the chicken.

Should chicken thighs start skin-side up or down?

Start skin-side down, then flip skin-side up to finish. The first stage helps the fat begin to render, and the final stage gives the skin direct heat so it can crisp.

Are boneless skinless thighs faster?

Yes. Boneless skinless thighs cook much faster than bone-in thighs, especially when they are thin or opened flat. Start checking early so they stay juicy instead of tightening up.

How do you make the skin crispy?

Use skin-on thighs, blot the skin dry, preheat the air fryer, avoid overcrowding, and finish cooking skin-side up. A tiny amount of baking powder can also help the skin crisp more deeply.

Why is the skin not crispy?

The skin may have been too damp, the basket may have been crowded, or the chicken may have needed a few extra minutes skin-side up. Wet marinades and too much oil can also soften the surface.

Is 165°F enough for chicken thighs?

Yes. Chicken thighs are safe to eat once they reach 165°F / 74°C in the deepest part of the meat. Check the thickest thigh and keep the thermometer in the meat, not against the bone.

Why cook thighs closer to 175°F?

They do not have to reach 175°F for safety, but many people prefer dark meat around that temperature because it can taste softer and more tender. Thighs are more forgiving than chicken breast, so they can handle a slightly higher finish.

Can frozen thighs go straight in?

Yes, but give them a slower start and check the center carefully. Begin around 360°F / 180°C to cook through, then finish hotter around 380°F / 190°C to brown and crisp the outside. Separate pieces as soon as they loosen so the centers cook evenly.

How many thighs fit in an air fryer?

A 5–6 quart basket usually fits 4 medium bone-in thighs in a single layer. Smaller air fryers may fit only 2 or 3. The thighs can touch lightly, but they should not overlap.

Can you use BBQ sauce?

Yes. Brush BBQ sauce on during the final 3–5 minutes so it turns sticky without burning. If the sauce is very sugary, use a thin layer first and add more after cooking.

Can you air fry marinated thighs?

Yes, just do not move them straight from a dripping marinade into the basket. Let the flavor stay, but wipe away excess liquid so the surface can brown.

Need the short version again? Return to the Quick Answer or the Recipe Card.

Final Tip

Once you know what kind of thigh is in the basket, the recipe becomes simple. Give skin-on thighs time to render, check boneless pieces early, be patient with frozen pieces, and finish with something bright: lemon, chutney, yogurt dip, or a sticky glaze. The result is a low-effort dinner that still feels like you meant to make something good.
Posted on Leave a comment

Frozen Chicken Wings in Air Fryer (No Thaw) — Crispy From Frozen + Time & Temp

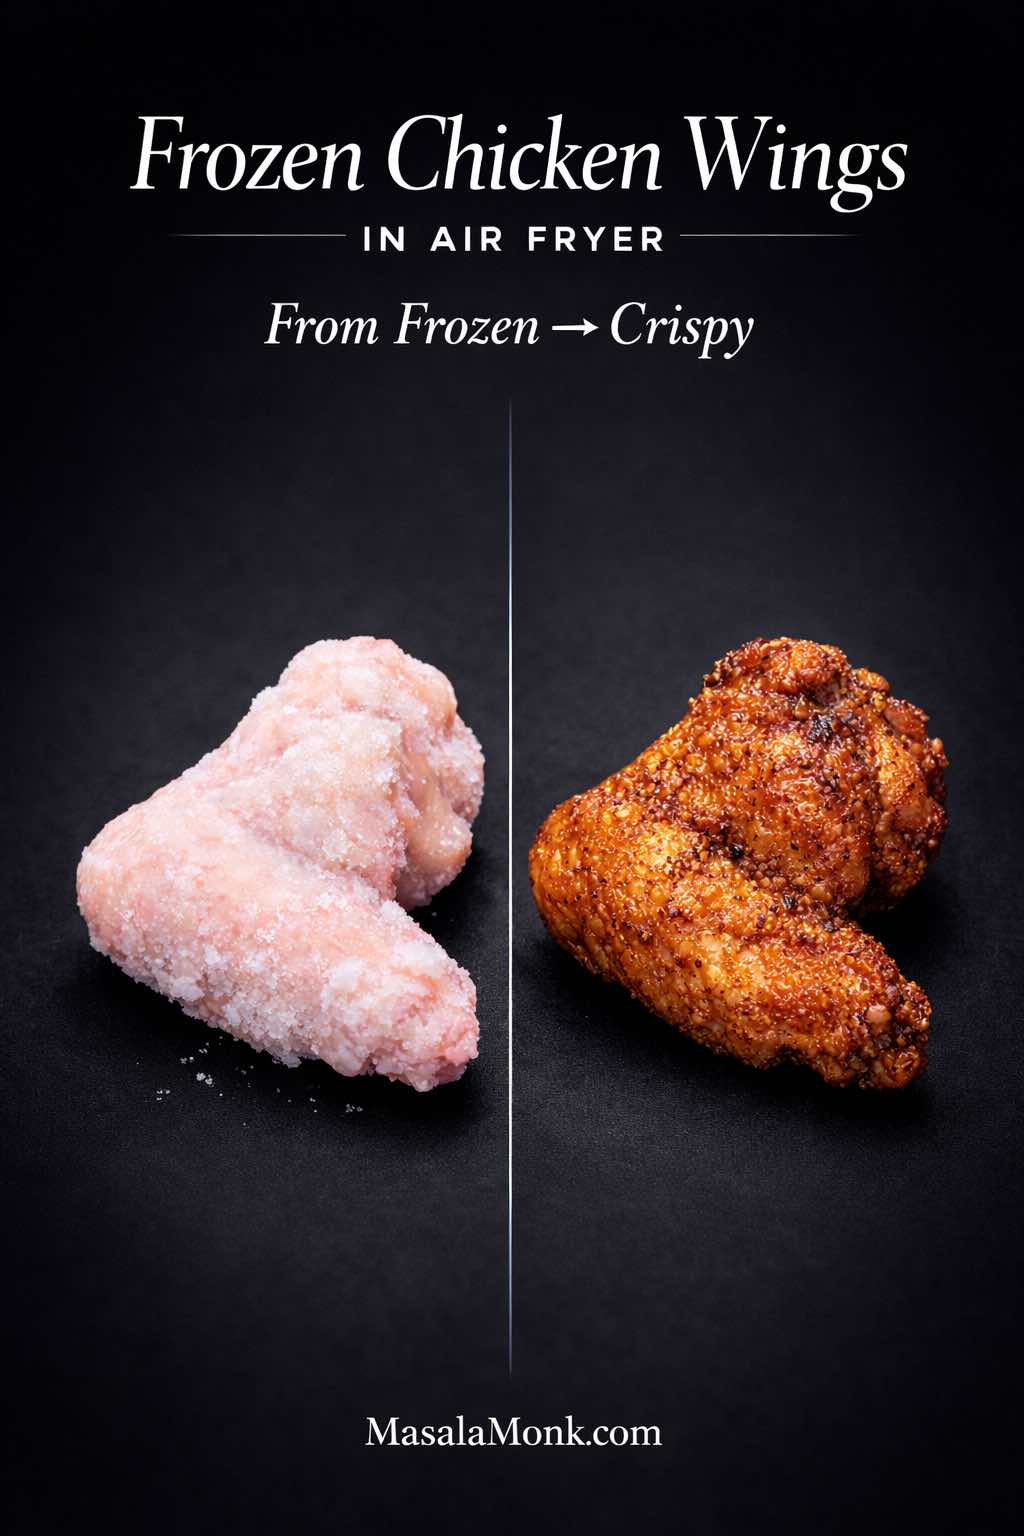
Split “before and after” cover image: a frosty frozen chicken wing on the left and a golden, crispy air-fried chicken wing on the right, separated by a thin vertical line on a smooth black background. Text overlay reads “Frozen Chicken Wings in Air Fryer” and “From Frozen → Crispy,” with “MasalaMonk.com” in the footer.

Cooking frozen chicken wings in an air fryer should feel effortless. Still, the first time you try wings straight from the freezer, they can come out pale, soggy, or oddly chewy—like the outside never decided whether it wanted to crisp or steam. Fortunately, the fix isn’t complicated. In fact, once you understand what’s happening inside the basket, you can turn almost any bag of frozen wings into crispy, juicy wings you’d happily serve at a party.

Because this method starts with frozen wings, you won’t need thawing or any fussy steps that only work in one specific model. Along the way, you’ll see how to handle raw frozen chicken wings in the air fryer versus pre cooked wings in the air fryer, how to get time and temperature right without second-guessing, and how to finish with Buffalo, hot, garlic-parm, or dry-rub flavors without sacrificing crispiness.

Quick answer (no thaw): cook frozen wings in 2 stages for crisp skin.

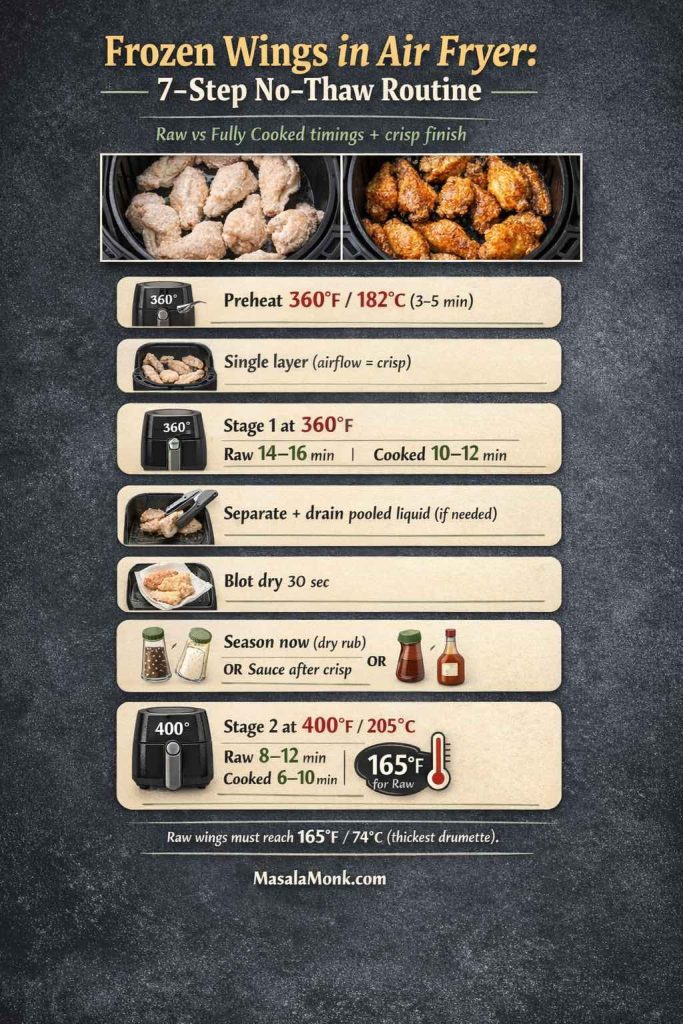
  • Raw frozen wing sections (drumettes + flats): 360°F / 182°C for 14–16 min, then 400°F / 205°C for 8–12 min (total 22–28 min). Cook to 165°F / 74°C in the thickest piece.
  • Fully cooked frozen wings: 360°F / 182°C for 10–12 min, then 400°F / 205°C for 6–10 min (total 16–22 min).

Tip: If wings are stuck together, run the first stage for 6–8 minutes, then separate and continue.

If you ever want a “fresh wings” method with extra technique and seasoning ideas, you’ll also like this related MasalaMonk recipe: Air Fryer Chicken Wings. It complements what you’re doing here, especially when you’re working with thawed wings in the air fryer.

Also Read: Mozzarella Sticks Recipe (Air Fryer, Oven, or Fried): String Cheese, Shredded Cheese, and Every Crunchy Variation


Start here: what kind of frozen wings do you have?

Before you press Start, it helps to identify what’s in the bag. This one detail decides your timing, your doneness check, and your crisping strategy.

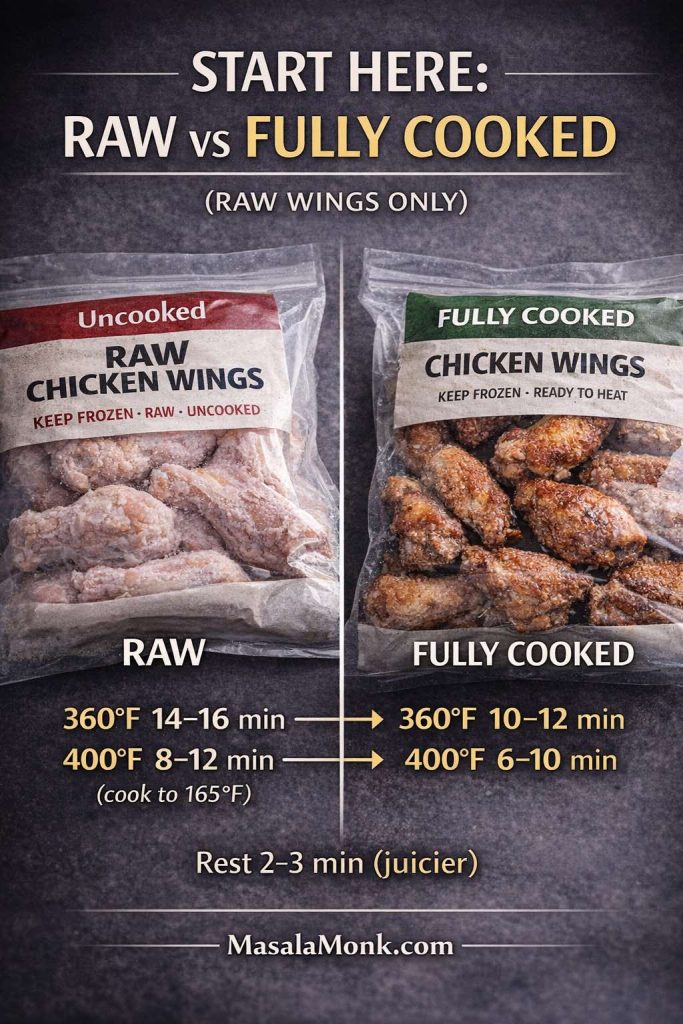
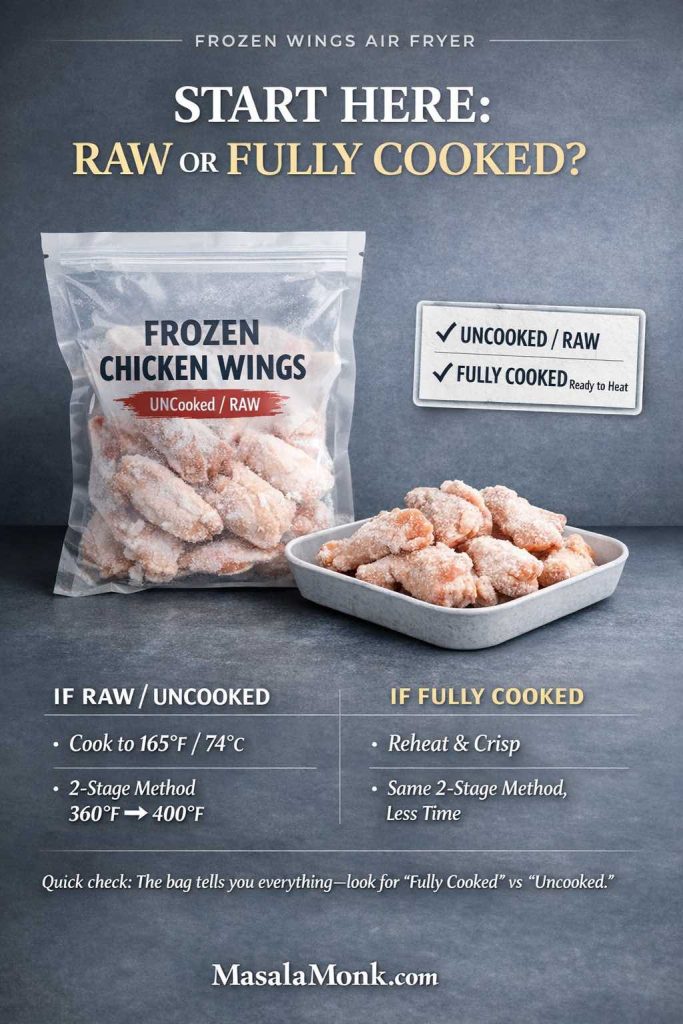
Start-here guide for frozen wings in an air fryer: check the bag for “raw/uncooked” vs “fully cooked.” Raw wings use a 2-stage cook (360°F then 400°F) and must reach 165°F/74°C. Fully cooked wings use the same two-stage method with less time for reheating and crisping.
Not sure if your frozen wings are raw or fully cooked? This one check saves you from pale, soggy wings (or undercooked chicken). Look for “uncooked/raw” vs “fully cooked” on the bag, then use the same 2-stage air-fryer method: start at 360°F to de-ice/render, finish at 400°F to crisp. Raw wings must hit 165°F / 74°C in the thickest piece. Save this graphic for quick reference and share it for your next wing night.

Raw frozen chicken wings

These are uncooked wings that have been frozen. They might be labeled “uncooked,” “raw,” or “ready to cook.” They must reach a safe internal temperature of 165°F / 74°C in the thickest part. For a clear, authoritative reference, the USDA FSIS safe temperature chart is the standard. If the packaging is gone and you truly can’t tell, treat them like raw: use the raw timing, then confirm 165°F / 74°C in the thickest piece before serving.

Pre-cooked frozen wings

These are already cooked, then frozen. They might say “fully cooked” or “ready to heat.” Your goal becomes reheating and re-crisping, not cooking through from raw. As a result, they usually finish faster, and they’re more forgiving—unless they’re heavily sauced, which can soften the skin if you don’t crisp first.

Split comparison graphic showing bagged frozen chicken wings: raw/uncooked on the left and fully cooked/ready-to-heat on the right. It lists a two-stage air fryer method. Raw wings: 360°F for 14–16 minutes, then 400°F for 8–12 minutes (cook to 165°F). Fully cooked wings: 360°F for 10–12 minutes, then 400°F for 6–10 minutes. Rest 2–3 minutes. MasalaMonk.com footer.
Not sure if your frozen wings are raw or fully cooked? This one detail changes everything. Use this quick visual to pick the right air fryer time + temperature: raw wings need a longer first stage and must hit 165°F / 74°C, while fully cooked wings finish faster because you’re mainly reheating + crisping. Save it for busy nights, then follow the full method below for the crispy two-stage finish (and Buffalo, hot, garlic-parm, and dry-rub options). If this helped, save/share/pin it so you’ve got the timings when you need them.

Sauced “Buffalo” or “hot wings” frozen

Some bags are fully cooked and pre-sauced. They’re convenient, although the sauce can trap moisture. That doesn’t mean you’re stuck with soggy wings—rather, it means you’ll do a crisp stage first, then sauce again at the end (or at least “reset” the sauce so it clings).

Wingettes/drumettes vs whole wings

Frozen wing sections (flats and drumettes) cook more evenly than whole wings. Whole wings can still work, although they often need a little more time because the thickest parts are larger and the joints hold moisture.

One more reassurance, since it comes up constantly: cooking from frozen is considered safe when done correctly, and the USDA discusses safe defrosting methods and the “cook without thawing” approach in its guide, The Big Thaw.

Bagged frozen wings (premade): what to check first

If you’re using a store bag (including Perdue), check the label for “fully cooked” vs “uncooked/raw.” That one line decides everything.

• If fully cooked: follow the fully cooked times (your goal is heat-through + crisp).
• If raw/uncooked: treat them like raw chicken and cook to 165°F / 74°C in the thickest piece. Cook raw wings to 165°F / 74°C in the thickest piece; a thermometer is the most reliable check.

If the bag is heavily sauced, crisp first and re-sauce at the end so the skin doesn’t go soggy.

Also Read: Sourdough Starter Recipe: Make, Feed, Store & Fix Your Starter (Beginner Guide)


The core method: how to cook frozen chicken wings in an air fryer so they turn crispy

There’s a reason “crispy frozen chicken wings” can be elusive: frozen wings release water as they heat, and that water turns into steam. Steam is the enemy of crisp skin. So the method that works best is a deliberate two-stage approach: first you melt away the surface ice and render fat, then you crank the heat to drive off moisture and crisp the skin.

This is the foundation for almost every variation in this post—whether you’re making frozen buffalo wings in the air fryer, air fried wings from frozen with dry rub, or even an air fryer recipe for frozen chicken wings that you toss in garlic-parm.

Step 1: Preheat the Air Fryer

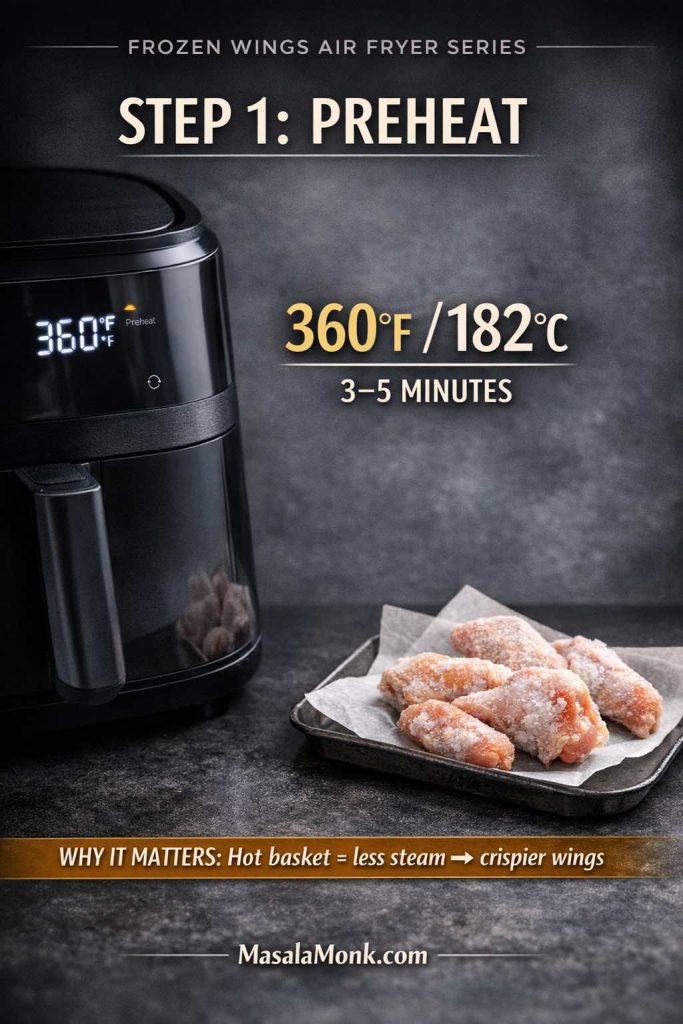
Preheat to 360°F / 182°C for 3–5 minutes.

Step 1 graphic for frozen chicken wings in an air fryer: a black air fryer shows 360°F with “Preheat,” raw frozen wing sections sit on a tray, and the overlay reads “360°F / 182°C for 3–5 minutes” plus “Hot basket = less steam → crispier wings,” with MasalaMonk.com in the footer.
Step 1 (Preheat): Start frozen chicken wings at 360°F / 182°C for 3–5 minutes so the basket is already hot when the wings go in. That quick preheat reduces early steam (the #1 reason frozen wings turn pale or soggy), which sets you up for crisp skin in the final 400°F stage—whether you’re cooking raw frozen wings or reheating fully cooked frozen wings. Save/share this step for a repeatable frozen-wings routine.

Even if your air fryer “doesn’t require” preheating, a short preheat improves consistency. It gives you a predictable starting point, so your first minutes aren’t spent slowly warming the basket while the wings leak water.

Step 2: Arrange wings in a single layer

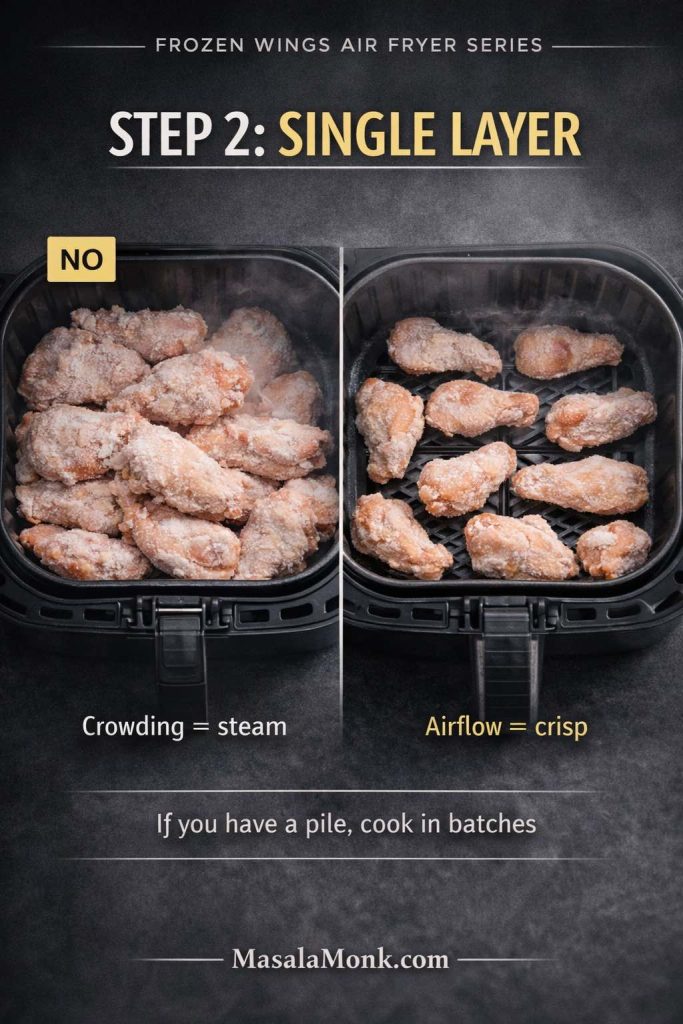
Put the wings in the basket in one layer. If you have a big pile, cook in batches. Crowding is the fastest way to turn crisping into steaming.

Split comparison photo of frozen chicken wings in an air fryer basket: left side shows wings piled/crowded with “NO” label and note “Crowding = steam”; right side shows wings spaced in a single layer with note “Airflow = crisp.” Headline reads “Step 2: Single Layer,” with tip “If you have a pile, cook in batches,” and MasalaMonk.com footer.
Single layer is the difference between crispy wings and steamy wings. If your frozen wings come out pale or soggy, it’s usually crowding—not your air fryer. Use this quick visual: pile = trapped steam, space = airflow + crunch. Cook in batches if needed (it’s faster than re-cooking soft wings later). Keep going for the exact time + temperature stages that turn frozen wings into real “game-day crisp.”

If you’ve ever had a batch come out uneven—some wings crisp, others soft—this is usually why. For a helpful deep dive on airflow issues (and other common problems), you can check MasalaMonk’s guide on air fryer mistakes to avoid.

Step 3: First cook at 360°F / 182°C (the “de-ice + render” stage)

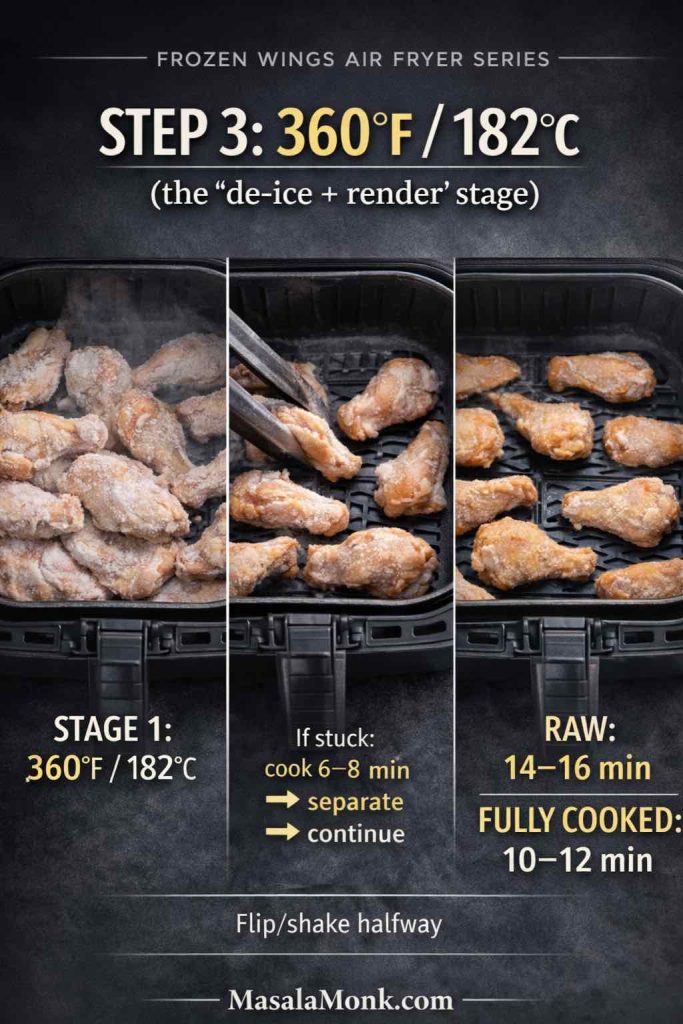
Cook at 360°F / 182°C:

  • Pre cooked chicken wings in air fryer (from frozen): 10–12 minutes
  • Raw frozen chicken wings in air fryer: 14–16 minutes
Three-panel photo shows frozen chicken wings in an air fryer basket during Step 3 at 360°F / 182°C. Left: wings still icy and clumped. Middle: tongs separating wings after 6–8 minutes if stuck. Right: wings spaced in a single layer. Overlay lists timing: raw frozen wings 14–16 minutes; fully cooked frozen wings 10–12 minutes; flip or shake halfway. Footer reads MasalaMonk.com.
Step 3 is where frozen wings stop “steaming” and start getting on track for crisp skin. Cook at 360°F / 182°C to melt surface ice and begin rendering fat—then separate any stuck wings at 6–8 minutes so airflow can hit every side. Use the timing that matches your bag (raw: 14–16 min; fully cooked: 10–12 min) and flip/shake halfway. This sets you up perfectly for the high-heat crisp stage next.

Halfway through, open the basket, separate any wings that have frozen together, then flip or shake gently.

If you see a lot of water collecting in the bottom, that’s normal. If your model has a pull-out drawer, carefully empty the liquid once during the first stage, then continue. It helps to carefully drain it off if your air fryer design makes that easy. Otherwise, the wings sit in moisture and soften instead of browning.

Step 4: Dry the surface quickly

This step sounds small, yet it changes everything.

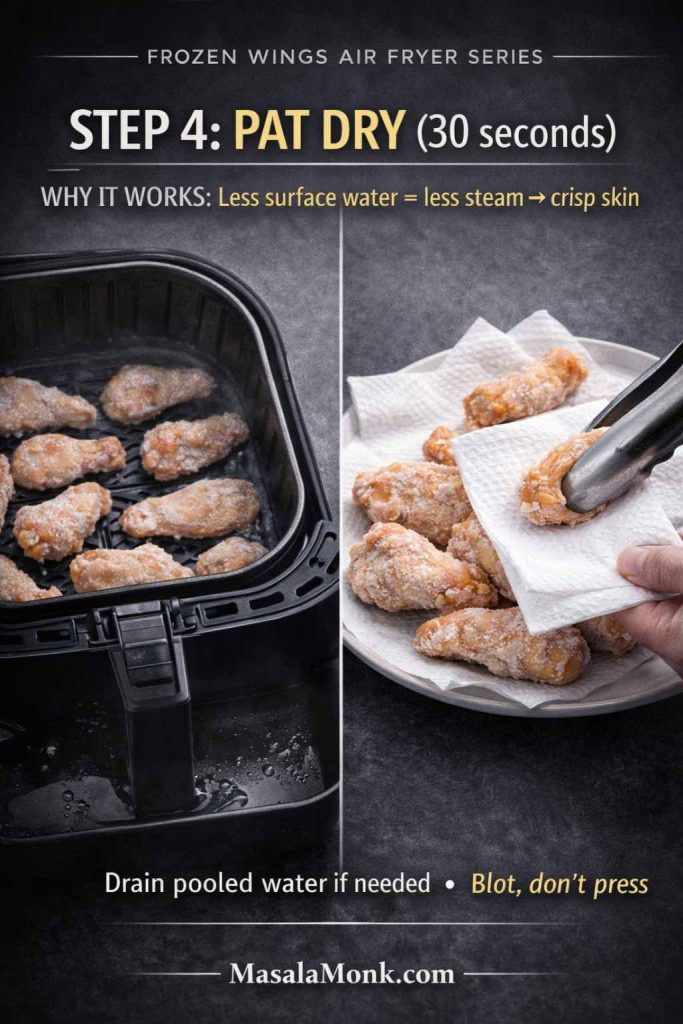
Split-screen instructional photo for frozen chicken wings in an air fryer. Left: air fryer basket with frozen drumettes and pooled water underneath after the first cook stage. Right: wings on a paper-towel-lined plate being gently blotted with tongs. Text overlay explains: less surface water = less steam = crisp skin; “drain pooled water if needed” and “blot, don’t press.” MasalaMonk.com in footer.
Step 4 is the crunch “switch.” Frozen wings release water as they heat—if that moisture stays on the surface, it turns into steam and the skin stays soft. After the first 360°F stage, quickly drain any pooled water, then pat/blot the wings for 30 seconds (don’t press). Now your 400°F crisp stage actually crisps. This tiny move is the difference between rubbery freezer wings and crispy frozen chicken wings in the air fryer—especially for drumettes, wing sections, and pre-cooked bagged wings.

Pull the basket and use tongs to move wings onto a plate lined with paper towels. Pat the top lightly. You’re not trying to crush anything; you’re simply removing the layer of moisture that would otherwise re-steam in the crisp stage.

If your wings are pre-sauced, you can still blot gently. You’ll keep plenty of flavor, while giving the skin a better shot at crisping.

Step 5: Season (or wait, depending on the style)

Now decide your flavor direction:

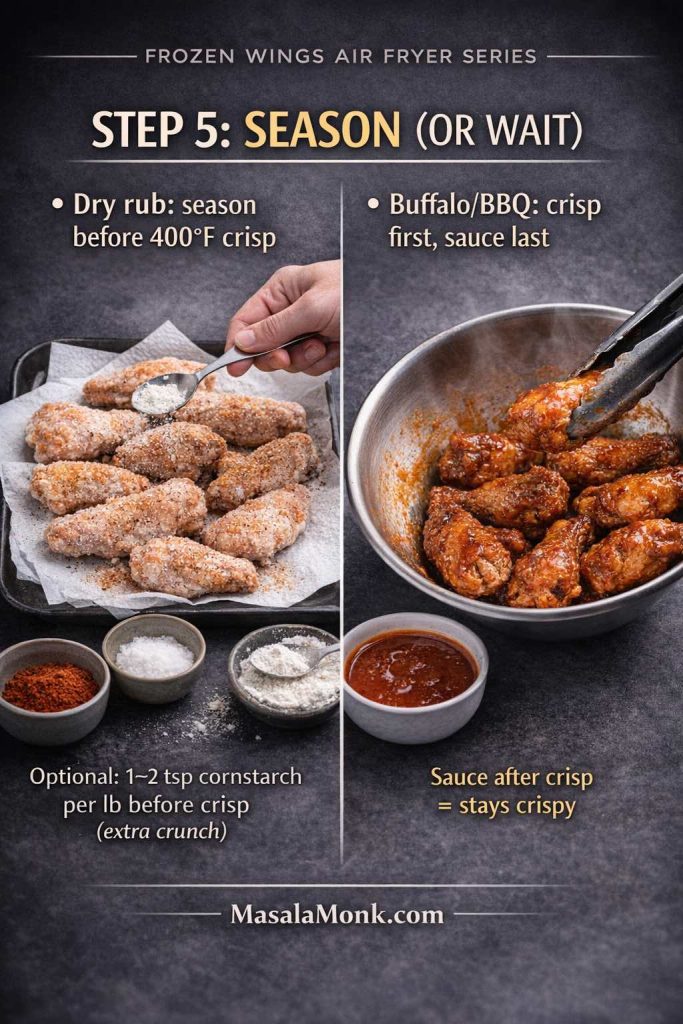
Step 5 seasoning guide for frozen chicken wings in an air fryer: split image shows wings being dusted with dry rub/cornstarch before the 400°F crisp stage on the left, and crispy wings being tossed in Buffalo/BBQ sauce after cooking on the right. Text highlights “season now for dry rub” and “crisp first, sauce last” for best crunch, with MasalaMonk.com footer.
Step 5 is where most “frozen wings” go wrong: timing. If you’re doing a dry rub (salt, pepper, garlic, paprika, lemon pepper), season right after the blot-dry step so it grabs and crisps at 400°F. If you’re going Buffalo, hot wings, or BBQ, hold the sauce until AFTER the crisp stage—sauce too early traps steam and softens the skin. Optional crunch boost: toss with 1–2 tsp cornstarch per lb before the final crisp. Save this as your quick “season vs sauce” rulebook for crispy frozen chicken wings every time.
  • For dry rub wings, season now.
  • For classic salt-and-pepper wings, season now.
  • For Buffalo/hot wings, wait until after crisping for the best texture.
  • For sweet BBQ, wait until after crisping so sugars don’t burn.

Optional crisp booster: toss wings with 1–2 teaspoons cornstarch per pound right before the 400°F stage (especially helpful for wings that look wet after blotting).

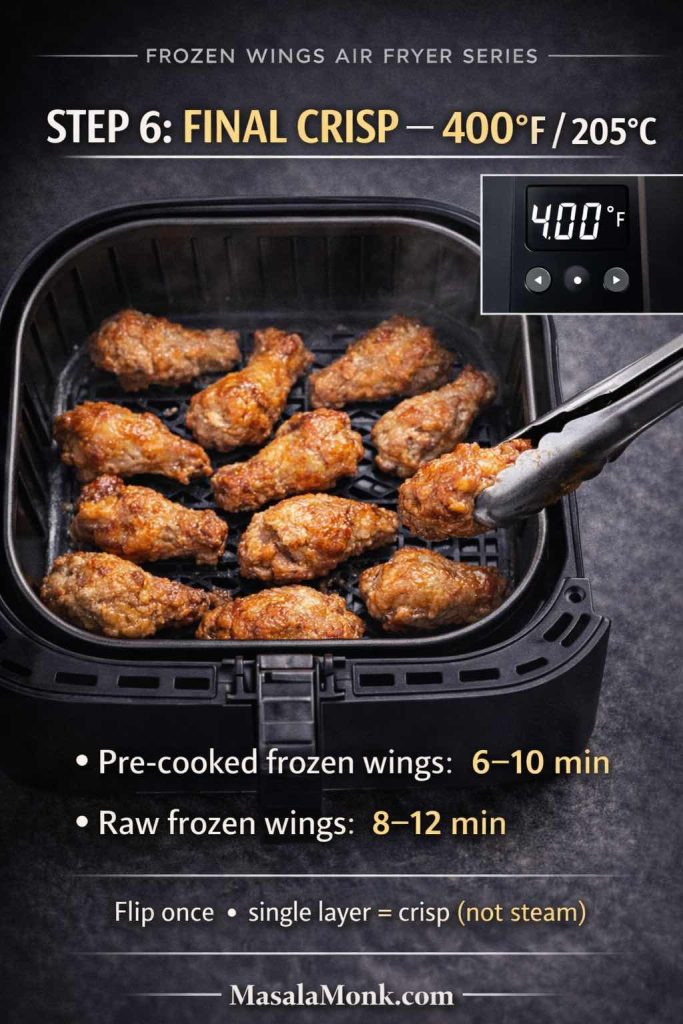
Step 6: Final crisp for frozen chicken wings in air fryer: 400°F / 205°C

Turn the air fryer up to 400°F / 205°C and cook:

  • Pre cooked frozen wings in air fryer: 6–10 minutes
  • Raw frozen wings in air fryer: 8–12 minutes
Step 6 of a frozen wings air fryer guide: cooked wings in an air fryer basket being flipped with tongs, with an inset showing 400°F / 205°C. Text notes final crisp timing: pre-cooked frozen wings 6–10 minutes and raw frozen wings 8–12 minutes, single layer for crisp skin. MasalaMonk.com in footer.
Final crisp is where frozen wings turn from “heated” to actually crispy: raise the air fryer to 400°F / 205°C, keep wings in a single layer, and flip once. Use 6–10 minutes for pre-cooked frozen wings and 8–12 minutes for raw frozen wings after the first stage—this is the moisture-drive-off step that gives you crackly skin instead of steam-soft wings.

Flip once during this stage. You’re looking for a deeper golden color, a tighter skin, and edges that look slightly blistered.

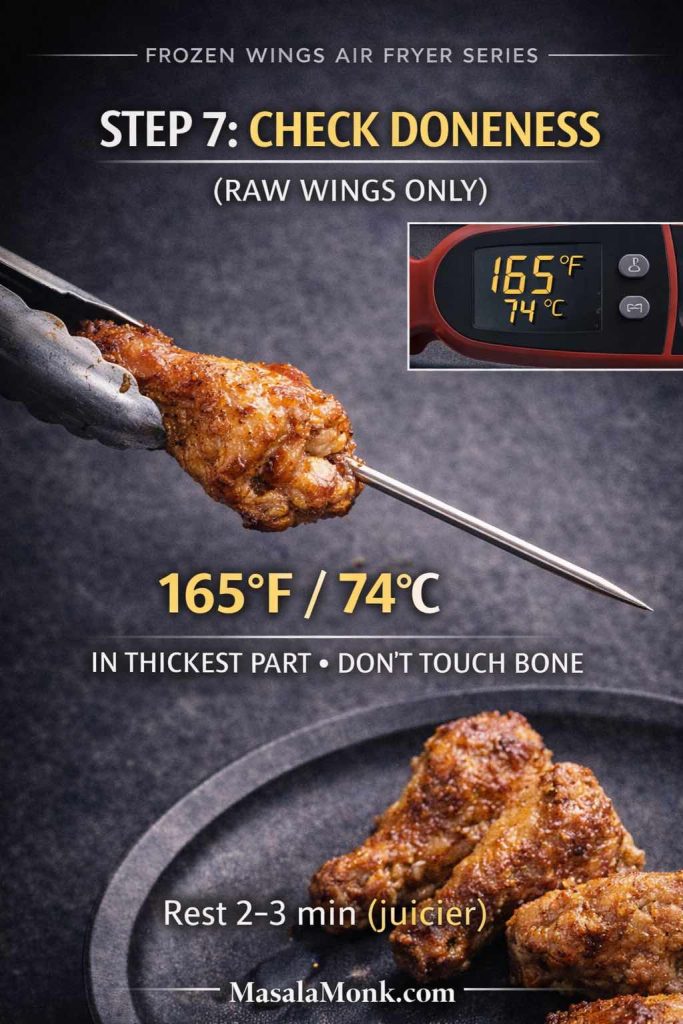
Step 7: Check doneness (raw wings only)

For raw wings, measure internal temperature in the thickest part of the drumette without touching bone. As metioned earlier, you’re aiming for 165°F / 74°C as that is considered a safe point.

Step 7 “Check Doneness” graphic for frozen chicken wings in an air fryer: a cooked wing held with tongs while an instant-read thermometer probes the thickest part of a drumette. The display shows 165°F / 74°C with the note “don’t touch bone” and “rest 2–3 min,” plus MasalaMonk.com in the footer.
Raw frozen wings aren’t “done” when they look brown—they’re done when the thickest drumette hits 165°F / 74°C. Use an instant-read thermometer, insert it into the meatiest part, and avoid touching bone (bone can give a false reading). Once you hit temp, rest 2–3 minutes so juices settle and the skin stays crisp. This one check removes guesswork and makes your frozen chicken wings in the air fryer reliably juicy every time. Save or pin this quick safety check so you never have to second-guess wing doneness again—full timings + crisp stages are in this blog post.

Once you hit that number, rest the wings for 2–3 minutes. During that short pause, the surface stays crisp while juices settle.

Also Read: How to make No-Bake Banana Pudding: No Oven Required Recipe


Frozen chicken wings in air fryer: how long do they take?

The exact time depends on wing size, air fryer power, and whether the wings are raw or pre-cooked. Still, you can rely on a range and then adjust using visual cues and (for raw wings) a thermometer. If you’re cooking more than a single layer (or your basket is small), plan on adding 2–4 minutes to the crisp stage—or cook in batches for better crunch.

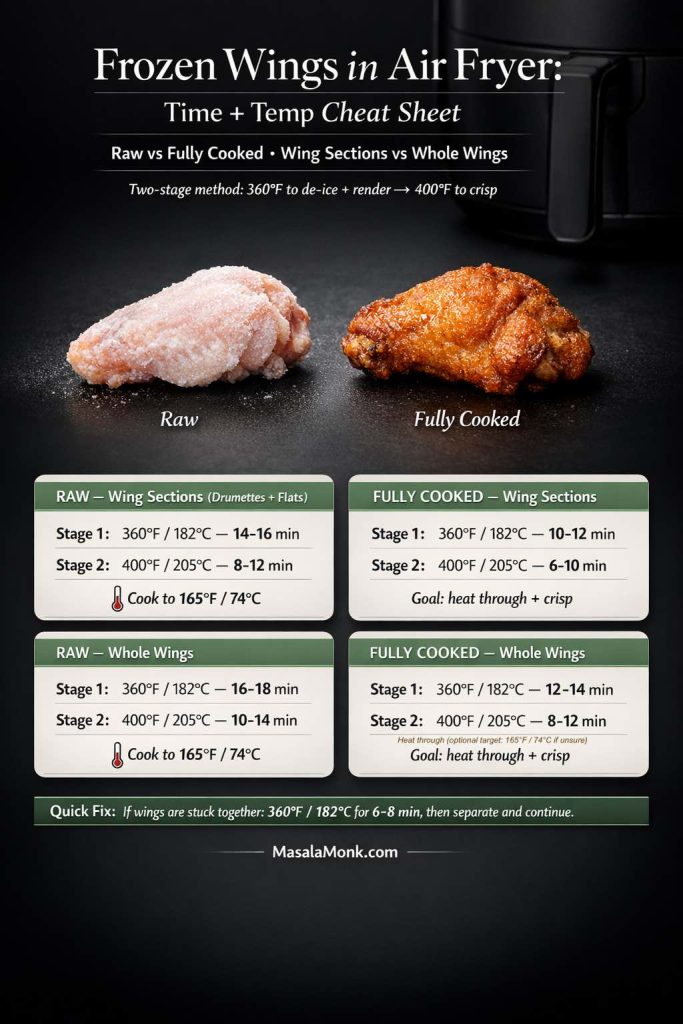
Frozen wings in air fryer time and temperature cheat sheet showing two-stage method: 360°F (182°C) then 400°F (205°C), with timings for raw vs fully cooked and wing sections vs whole wings, plus cook-to 165°F (74°C) note and quick fix for stuck wings. MasalaMonk.com
Frozen Wings Air Fryer Time + Temp Cheat Sheet: Use the two-stage method—360°F / 182°C to de-ice + render, then 400°F / 205°C to crisp. This chart breaks down exact ranges for raw vs fully cooked and wing sections vs whole wings, plus the quick fix for wings stuck together.

Frozen chicken wings in air fryer time & temperature (ranges by type)

Sections of frozen chicken wings (drumettes + flats), raw:

  • 360°F / 182°C for 14–16 minutes
  • then 400°F / 205°C for 8–12 minutes
    Total: about 22–28 minutes

Frozen wing sections, pre-cooked:

  • 360°F / 182°C for 10–12 minutes
  • then 400°F / 205°C for 6–10 minutes
    Total: about 16–22 minutes

Whole frozen wings (larger), raw:

  • 360°F / 182°C for 16–18 minutes
  • then 400°F / 205°C for 10–14 minutes
    Total: about 26–32 minutes

Whole frozen wings, pre-cooked:

  • 360°F / 182°C for 12–14 minutes
  • then 400°F / 205°C for 8–12 minutes
    Total: about 20–26 minutes

If you’re thinking “that’s a wide range,” you’re right. The key is to treat the time like a starting point and use the crisp stage to dial in texture.

Moreover, if your air fryer is smaller (or you’re cooking a lot), you’ll likely need batches. On the other hand, if you have a large basket that fits wings in a single layer comfortably, you’ll finish faster because airflow is stronger.

Frozen wings at 400°F: how long?

Using 400°F for the entire cook can over-brown the outside before the inside heats evenly (especially with raw wings). The best use of 400°F is as the final crisp stage:

  • Fully cooked frozen wings: 6–10 minutes at 400°F / 205°C
  • Raw frozen wings (after a 360°F start): 8–12 minutes at 400°F / 205°C

If wings still look pale or feel soft, add 2–4 minutes at 400°F, but only if they’re in a single layer.

Also Read: Chicken Adobo — Step-by-Step Recipe — Classic Filipino Adobong Manok


Cooking frozen wings in an air fryer: the small details that make a big difference

Crispy wings are rarely about one magic trick. Instead, it’s a handful of small choices that stack in your favor.

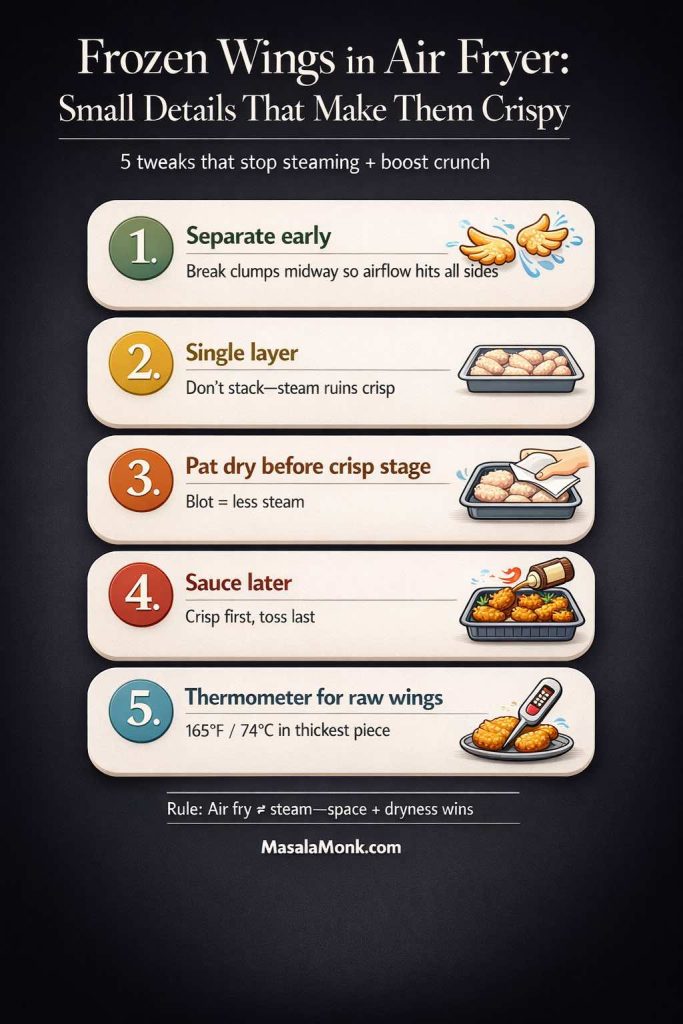
Infographic titled “Frozen Wings in Air Fryer: Small Details That Make Them Crispy” showing 5 tweaks: separate wings early so airflow hits all sides, cook in a single layer (don’t stack), pat dry before the crisp stage to reduce steam, sauce after crisping, and use a thermometer for raw wings (165°F / 74°C in the thickest piece). MasalaMonk.com branding at bottom.
Frozen wings in the air fryer: 5 tiny tweaks that stop steaming and boost crunch. Separate clumps, keep a single layer, blot before the crisp stage, sauce last, and use 165°F / 74°C for raw wings—then jump back to the full guide for exact times, temps, and troubleshooting.

Separate wings early

Frozen wings often clump. If you let them stay glued together too long, the interior sides won’t crisp because they never get exposed to airflow. So, midway through the first stage, use tongs to separate them.

Don’t stack

This is worth repeating because it’s the difference between “air fry” and “steam.”

If you’re tempted to pile them high, cook two batches instead. You’ll end up with wings that are actually crisp, which is the whole point of making wings in air fryer frozen in the first place.

Pat dry before the crisp stage

Water on the surface becomes steam. Steam softens skin. Therefore, blotting is not optional if you want reliable crunch.

Sauce later

If you want sticky wings, you can still get them. You just have to crisp first, then sauce. That sequencing keeps the outside crisp while still delivering the “saucy wing” experience.

Use a thermometer for raw wings

Visual cues aren’t dependable for safety. Wings can brown before they’re done. Conversely, they can look pale while they’ve already reached temperature. The simplest standard is to cook to 165°F / 74°C, as per USDA, and a thermometer is the most reliable check.

Also Read: Sweetened Condensed Milk Fudge: 10 Easy Recipes


Chicken wings in air fryer from frozen: two paths depending on raw vs pre-cooked

At this point, you can follow the core method and succeed. Still, it helps to see the two most common cases written out clearly—because these are the questions people run into when they’re standing in front of the air fryer trying to decide whether to add five minutes or ten.

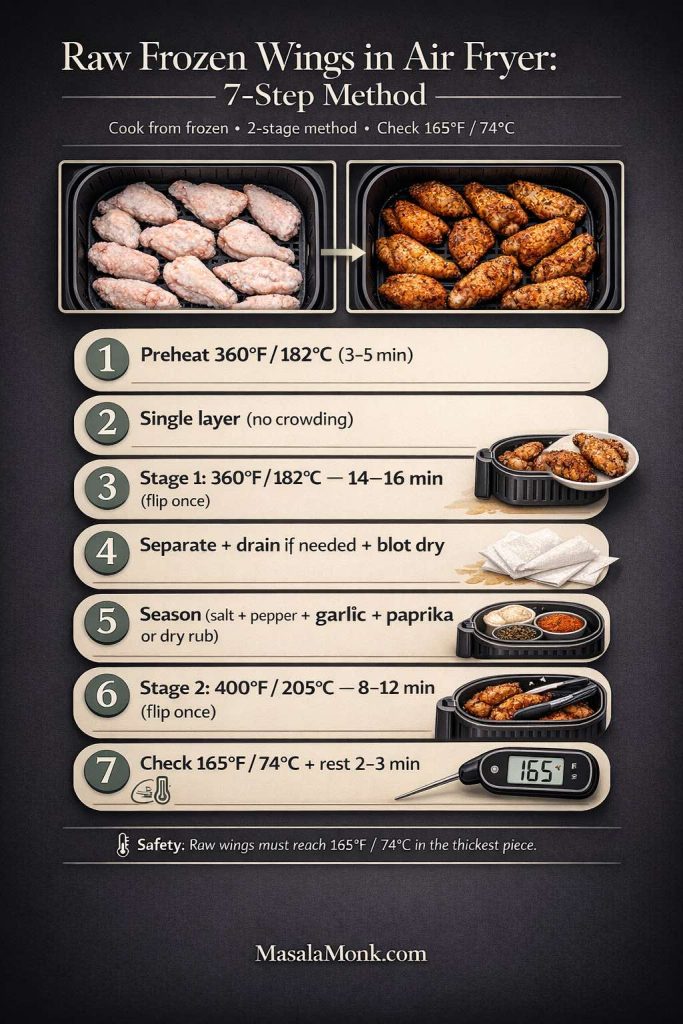
Raw frozen chicken wings in air fryer (clear step-by-step recipe)

  1. Preheat to 360°F / 182°C.
  2. Cook wings 14–16 minutes (single layer), flipping once.
  3. Separate wings, drain moisture if needed, and blot dry.
  4. Season with salt, pepper, garlic powder, paprika, or your favorite dry rub.
  5. Crisp at 400°F / 205°C for 8–12 minutes, flipping once.
  6. Check 165°F / 74°C in the thickest piece.
  7. Rest 2–3 minutes, then sauce or serve.
Infographic showing raw frozen chicken wings in an air fryer with a 7-step method: preheat 360°F/182°C, cook in a single layer 14–16 min (flip once), separate/drain/blot dry, season, crisp at 400°F/205°C for 8–12 min (flip once), then check 165°F/74°C and rest 2–3 min.
Raw frozen wings, simplified: follow this 7-step two-stage air fryer method (360°F cook → blot + season → 400°F crisp) and always confirm 165°F / 74°C in the thickest piece for safe, truly crispy wings.

Because these are raw, treat them like raw chicken from start to finish. If you want a quick safety refresh—especially about cross-contamination and why rinsing isn’t recommended—the CDC’s chicken food safety guidance is straightforward and practical.

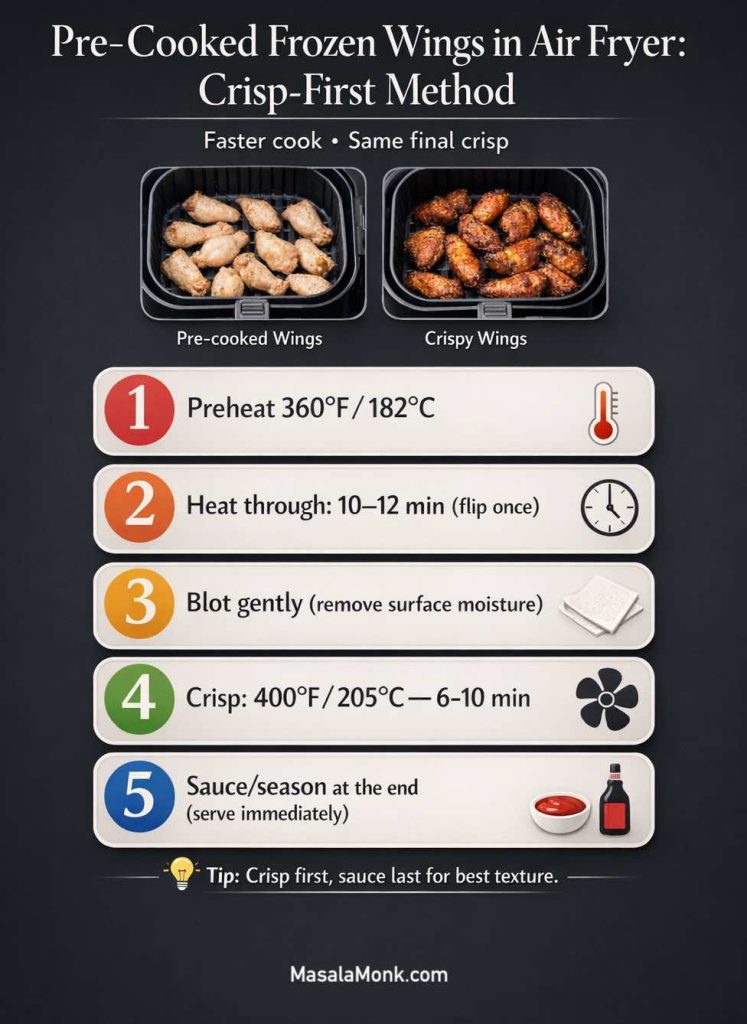
Pre cooked chicken wings in air fryer (from frozen, crisp-first approach)

  1. Preheat to 360°F / 182°C.
  2. Cook wings 10–12 minutes, flipping once.
  3. Blot gently to remove surface moisture.
  4. Crisp at 400°F / 205°C for 6–10 minutes.
  5. Toss with sauce or finish with seasoning.
Pre-cooked frozen chicken wings in an air fryer, crisp-first method infographic. Steps: preheat to 360°F/182°C; heat through 10–12 minutes flipping once; blot gently to remove surface moisture; crisp at 400°F/205°C for 6–10 minutes; sauce or season at the end and serve immediately. Tip: crisp first, sauce last for best texture.
Pre-cooked frozen wings don’t need the long “ice-melt” stage—just heat through, blot off surface moisture, then finish with a high-heat crisp. This crisp-first sequence keeps the skin snappy and stops wings from tasting like reheated freezer food. Use 360°F/182°C to warm them evenly, then 400°F/205°C to lock in crunch, and toss with sauce only at the very end.

Pre-cooked wings are especially good for quick weeknights. Even so, they benefit from that crisp stage—otherwise they can taste like reheated freezer food instead of something you actually crave.

Also Read: Sourdough Recipe: 10 Easy Bread Bakes (Loaves, Rolls & Bagels)


Frozen buffalo wings in air fryer: crisp, then sauce (so they stay snappy)

Buffalo wings are a classic for a reason. Yet, when you start from frozen, the biggest risk is sauce + steam turning the skin soft.

So here’s the pattern: crisp first, then sauce, then a short “set” step if you want extra cling.

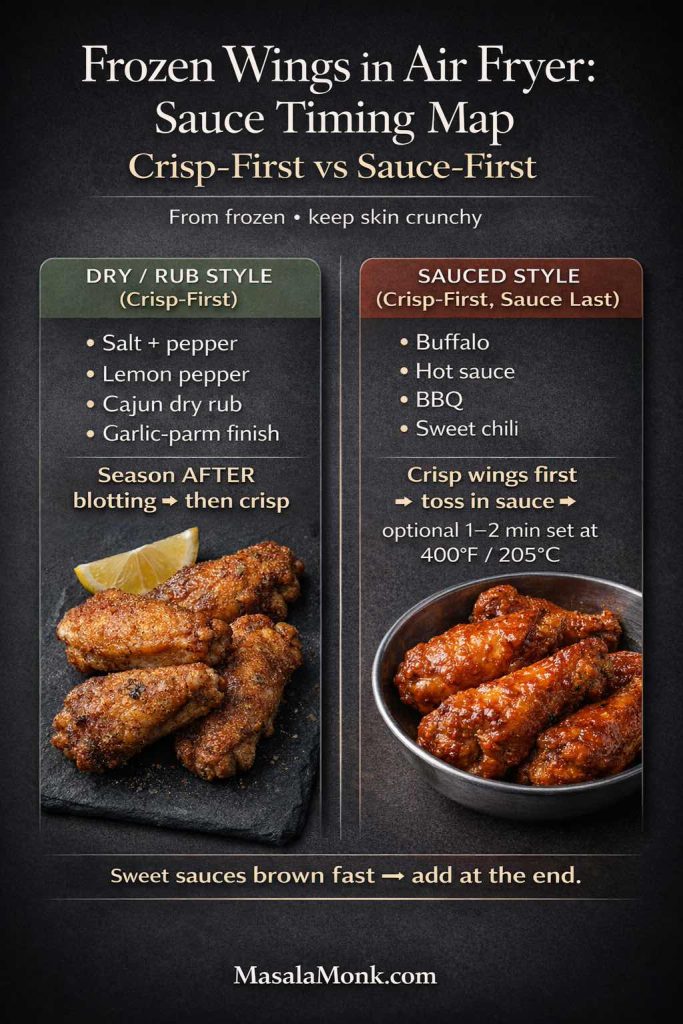
Infographic titled ‘Frozen Wings in Air Fryer: Sauce Timing Map: Crisp-First vs Sauce-First.’ Left panel: dry/rub style (crisp-first) with salt + pepper, lemon pepper, Cajun dry rub, garlic-parm finish; note says ‘Season AFTER blotting → then crisp.’ Right panel: sauced style (crisp-first, sauce last) with Buffalo, hot sauce, BBQ, sweet chili; note says crisp wings first, toss in sauce, optional 1–2 minutes at 400°F/205°C to set. Footer: MasalaMonk.com.
Sauce timing is the #1 reason frozen wings turn soggy. Use this quick map: dry rub = season after blotting, then crisp; Buffalo/BBQ/sweet chili = crisp first, sauce last (and if you want the sauce to cling, give it 1–2 minutes at 400°F / 205°C to “set”). Save this graphic for wing nights—then use the exact time + temp ranges above for your wing type.

Buffalo finish for frozen chicken wings in air fryer (crisp, then sauce)

  1. Cook and crisp using the core method.

  2. Meanwhile, warm hot sauce with a little butter until glossy.
  3. Toss wings quickly, coating evenly.
  4. For extra adhesion, put sauced wings back in the air fryer for 1–2 minutes at 400°F / 205°C.

Now you get the best of both worlds: saucy wings that still have bite.

To serve Buffalo wings the classic way, the tangy cooling dip matters just as much as the sauce. This MasalaMonk roundup is perfect for pairing: blue cheese dip for wings.

Also Read: Peanut Butter Fudge: Recipes & Guide (8 Methods + Easy Variations)


Frozen hot wings recipe: a simple way to make them taste bold without getting soggy

“Hot wings” can mean a lot of things. Sometimes it’s a spicier Buffalo. Other times it’s a sticky hot glaze. In either case, the approach remains similar: get the wings crisp first, then add heat.

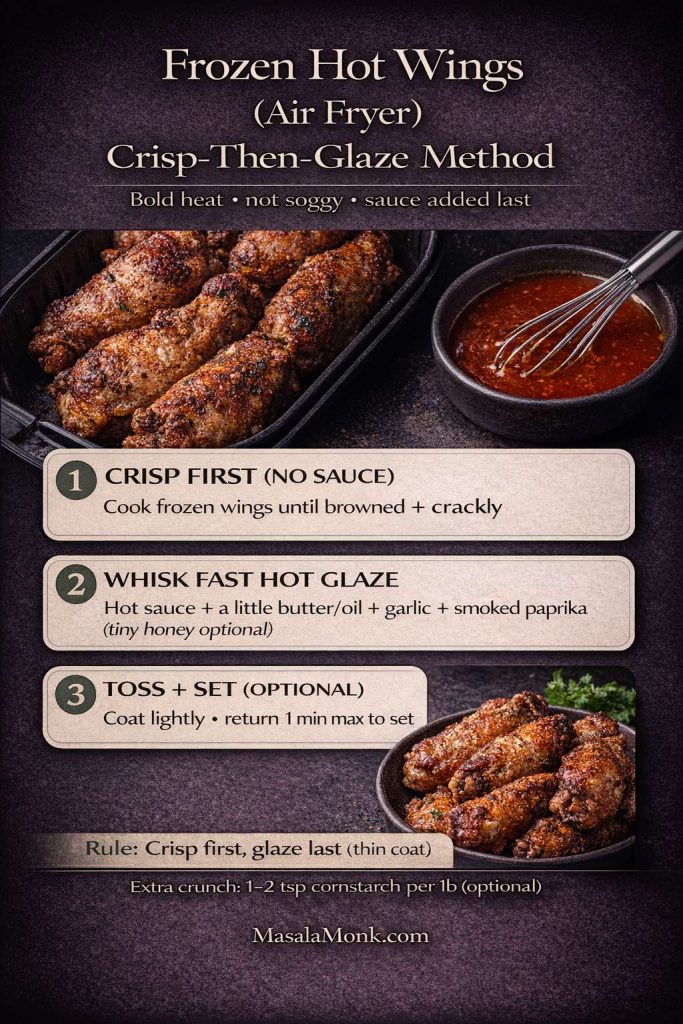
Infographic showing frozen hot wings in an air fryer using a crisp-then-glaze method: 1) Crisp frozen wings first with no sauce until browned and crackly. 2) Whisk a fast hot glaze (hot sauce, a little butter/oil, garlic, smoked paprika; tiny honey optional). 3) Toss lightly and return to air fryer up to 1 minute to set. Rule: crisp first, glaze last.
Frozen hot wings in the air fryer taste best when you crisp first and sauce last. This quick “crisp-then-glaze” method keeps wings bold and spicy without turning the skin soggy—plus you can set the glaze for just 1 minute max. Optional: a light cornstarch dusting (1–2 tsp per lb) can boost crunch. Use this as your fast game-day shortcut, then follow the full MasalaMonk frozen wings guide for timings, temps, and sauce variations.

Fast hot glaze (spicy, glossy, not too sweet)

  • Hot sauce
  • A touch of butter or oil
  • Garlic powder
  • A pinch of smoked paprika
  • Optional: a tiny amount of honey (keep it minimal so it doesn’t burn)

Toss wings after crisping, then return them for a minute to set. Because the glaze is thin, it clings without drowning the skin.

If you’re building a game-day spread, another wing-adjacent crowd-pleaser is a warm dip. MasalaMonk’s Buffalo chicken dip fits naturally next to wings on the table.

Also Read: 10 Vegan Chocolate Cake Recipes (Easy, Moist, & Dairy-Free)


Air fryer wings frozen: dry-rub and “no-sauce” styles that stay crisp longer

Sauced wings are great. Still, if you want wings that stay crisp for longer—especially if you’re serving a crowd—dry rub wings are the easiest win. They also travel better, hold better, and reheat better.

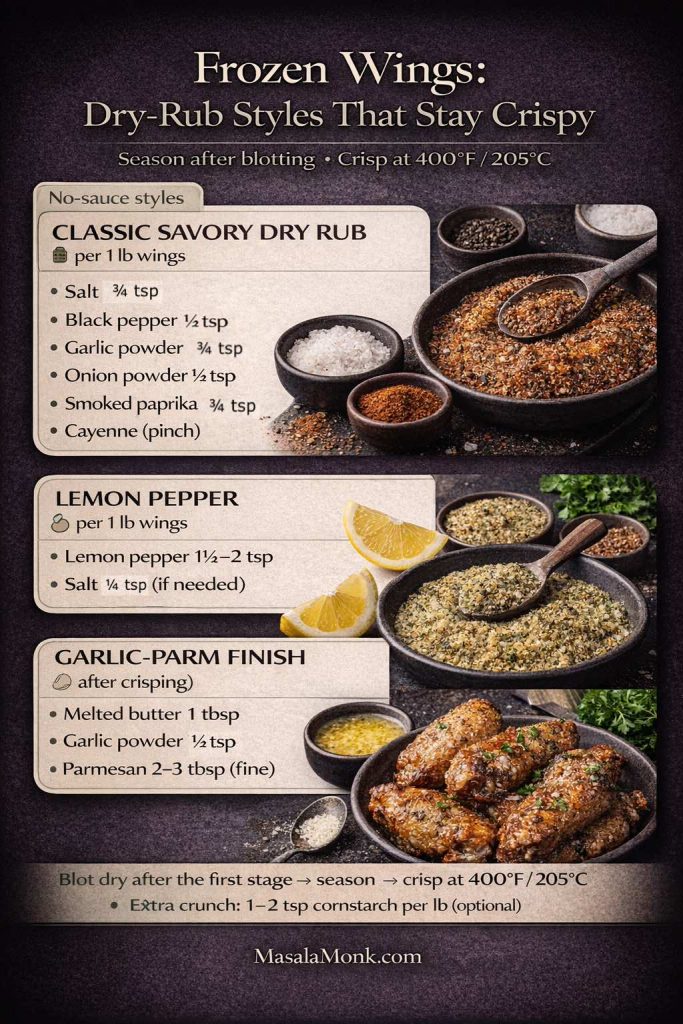
Vertical infographic titled “Frozen Wings: Dry-Rub Styles That Stay Crispy.” It says to season after blotting and crisp at 400°F / 205°C. It lists 3 no-sauce options per 1 lb wings: Classic savory dry rub (salt 3/4 tsp, black pepper 1/2 tsp, garlic powder 3/4 tsp, onion powder 1/2 tsp, smoked paprika 3/4 tsp, cayenne pinch), Lemon pepper (1 1/2–2 tsp plus optional salt), and Garlic-parm finish after crisping (butter, garlic powder, parmesan).
Want wings that stay crispy longer (and hold up for batches)? Use these low-moisture “no-sauce” finishes: a classic savory dry rub, a bright lemon-pepper hit, or a garlic-parm finish added after crisping. The key is simple: blot dry after the first stage, then season, then crisp at 400°F / 205°C—so flavor sticks without steaming the skin. Optional pro move: a tiny cornstarch dusting for extra crunch.

Classic savory dry rub

  • Salt
  • Black pepper
  • Garlic powder
  • Onion powder
  • Smoked paprika
  • Optional: pinch of cayenne

Season after the first stage (when you blot dry), then crisp at 400°F / 205°C.

Lemon pepper style (bright and punchy)

Lemon pepper seasoning works beautifully on wings because it tastes big without needing sauce. Add it after blotting so it adheres, then crisp.

Garlic-parmesan finish (crispy + rich)

Crisp the wings first. Then toss in:

  • A little melted butter
  • Garlic powder (or minced garlic, quickly warmed)
  • Finely grated parmesan

Because the finish is low-moisture, the wings stay crunchy instead of turning soft.

Also Read: Kahlua Drinks: 10 Easy Cocktail Recipes (Milk, Vodka, Coffee)


Best way to cook frozen chicken wings: what to do when your air fryer behaves differently

Some air fryers run hot. While some run cool. Then some have strong fans. And some have weaker airflow. Instead of fighting your machine, use these adjustments.

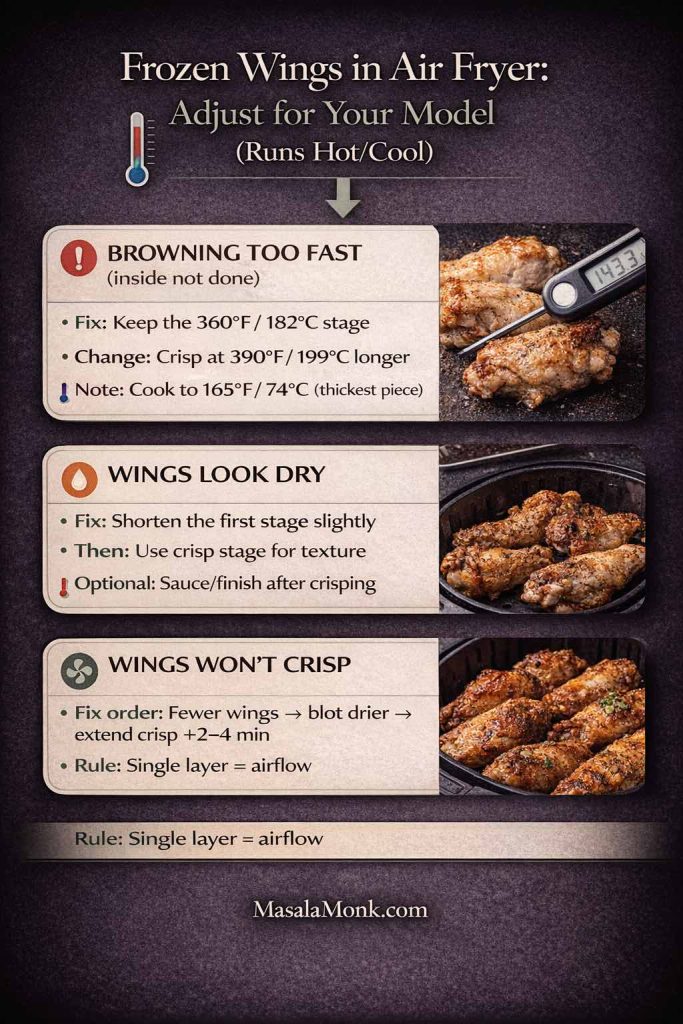
Vertical infographic: ‘Frozen Wings in Air Fryer—Adjust for Your Model (Runs Hot/Cool)’. Three fixes: (1) Browning too fast (inside not done): keep 360°F/182°C stage, crisp longer at 390°F/199°C; cook raw wings to 165°F/74°C. (2) Wings look dry: shorten first stage slightly, rely on crisp stage; sauce/finish after crisping. (3) Wings won’t crisp: fewer wings, blot drier, extend crisp +2–4 min; single layer = airflow. MasalaMonk.com footer.
When your air fryer runs hot, cool, or has weaker airflow, this quick guide stops the guesswork: adjust the crisp stage (390°F vs 400°F), fix dryness, and force crisping with the right order (fewer wings → blot drier → extend crisp). Save this troubleshooting card for the next batch—then follow the full method in this post for timings, flavors, and doneness checks.

If wings are browning too fast but not done inside (raw wings)

Lower the crisp stage slightly: do 390°F / 199°C instead of 400°F / 205°C, and add a few minutes. Meanwhile, keep the first stage the same so fat renders properly.

If wings look dry

Oddly enough, overly long cooking can dry the meat even if the skin isn’t that crisp. In that case, shorten the first stage a little and rely on the crisp stage for texture.

If wings won’t crisp

This usually comes down to moisture and crowding. First, reduce how many wings are in the basket. Next, blot more thoroughly after the first stage. Finally, extend the crisp stage by 2–4 minutes.

Also Read: Hot Chocolate Coffee: 3 Easy Recipes (Cocoa, Mix, or Espresso)


Frozen party wings in air fryer: how to keep batches consistent

Party wings are where the air fryer shines—because you can cook in batches while keeping quality high. Still, consistency matters.

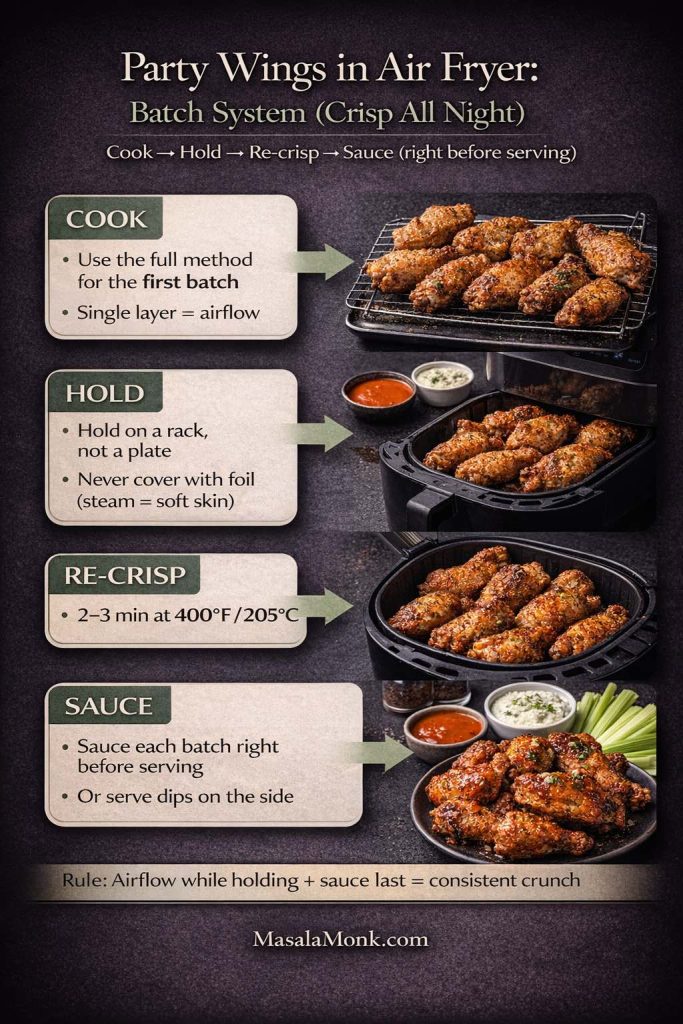
Vertical infographic titled “Party Wings in Air Fryer: Batch System (Crisp All Night).” It shows a 4-step flow: Cook first batch in a single layer for airflow, Hold wings on a rack (not a plate) and don’t cover with foil, Re-crisp 2–3 minutes at 400°F/205°C, then Sauce right before serving or offer dips on the side. Footer: MasalaMonk.com.
Cooking wings for a crowd? Use this “Cook → Hold → Re-crisp → Sauce” batch system so every round stays crunchy. The key is airflow while holding (rack, not a plate), then a quick 2–3 minute re-crisp at 400°F/205°C—sauce goes on at the very end. Save/pin this for game day.

Batch strategy

  • Cook the first batch using the full method.
  • Hold finished wings on a rack (not a plate) so airflow keeps them crisp.
  • When you’re ready to serve, do a quick 2–3 minute re-crisp at 400°F / 205°C.

Avoid covering hot wings with foil while holding—trapped steam will soften the skin fast.

Sauce strategy

Sauce each batch right before serving. That way, wings don’t sit in sauce and soften. Alternatively, offer sauces on the side and let people dip.

If you want a “dip-friendly” base that you can turn into garlic mayo, spicy mayo, or creamy herb dip, MasalaMonk’s eggless mayonnaise is an excellent starting point. If you prefer plant-based, vegan mayo also works beautifully as a wing dip base.

Also Read: Cappuccino Recipe: How to Make a Perfect Cappuccino at Home


Thawed wings in air fryer: what changes if you already thawed them?

Sometimes you planned ahead. Other times the wings thawed in the fridge because plans changed. Either way, the method is similar, yet timing changes because you’re no longer melting ice first.

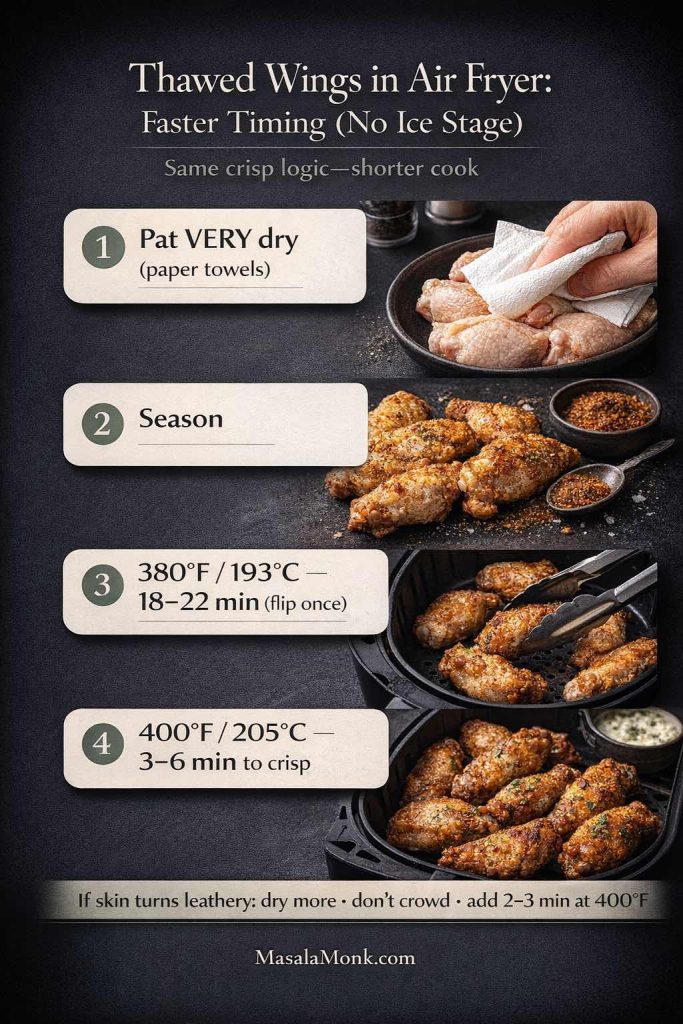
Thawed chicken wings in an air fryer timing guide (no ice stage): 1) Pat wings very dry with paper towels, 2) Season, 3) Air fry at 380°F / 193°C for 18–22 minutes, flipping once, 4) Crisp at 400°F / 205°C for 3–6 minutes. Tip shown: if skin turns leathery, dry more, don’t crowd, and add 2–3 minutes at 400°F. MasalaMonk.com
Thawed wings cook faster because there’s no ice stage—but crisp skin still depends on drying and airflow. Use this quick timing card: 380°F (18–22 min) to cook through, then 400°F (3–6 min) to crisp. If the skin turns leathery, the fix is simple: pat drier, don’t crowd, and extend the final crisp a couple minutes. Save this graphic for wing night, and scroll this post for the full frozen-vs-thawed method + sauce ideas.

Thawed chicken wings in air fryer (baseline method)

  1. Pat wings very dry.
  2. Season.
  3. Cook at 380°F / 193°C for 18–22 minutes, flipping once.
  4. Crisp at 400°F / 205°C for 3–6 minutes.

Because thawed wings release less water upfront, you can often start a bit higher than the frozen method. Still, blotting matters. Otherwise, the skin can turn leathery instead of crisp.

For a full fresh-wing technique and seasoning inspiration, MasalaMonk’s Air Fryer Chicken Wings is a natural next read.

Also Read: Cold Brew Espresso Martini: How to Make It (Step-by-Step Recipe)


Frozen chicken wings in the air fryer: serving ideas that make the meal feel complete

Wings are often the main event. Yet, what you serve alongside them changes the whole vibe. Moreover, sides and dips give you variety without additional work.

Classic dip pairings

  • Blue cheese dip (especially for Buffalo)
  • Ranch-style dips (easy to build from mayo)
  • Garlic-herb dip

For a quick ranch-style dip, stir dried herbs (dill/parsley), garlic powder, black pepper, lemon, and a pinch of salt into mayo or vegan mayo—then thin with a splash of water until it’s pourable. For a dedicated dip lineup, this MasalaMonk guide to blue cheese dip for wings is a perfect guide to explore.

Fresh, herby “sauce direction” (lighter than Buffalo)

If you want a change from butter-and-hot-sauce flavors, go herby. Toss wings with a spoonful of chimichurri after crisping, or serve it on the side for dipping. MasalaMonk’s chimichurri recipe is ideal for that.

Pesto-style finishes

A small drizzle of pesto (or pesto mayo) can turn wings into something that feels restaurant-y. If you want variations, MasalaMonk’s pesto recipes and variations can give you multiple directions without adding complexity.

Also Read: Iced Coffee: 15 Drink Recipes—Latte, Cold Brew, Frappe & More


Cooking frozen buffalo wings and other sauced wings: how to avoid burning sugars

Many store-bought sauces contain sugar. Sugar browns fast. Consequently, if you cook heavily sauced wings at high heat for too long, you can end up with scorched spots before the wing is crisp.

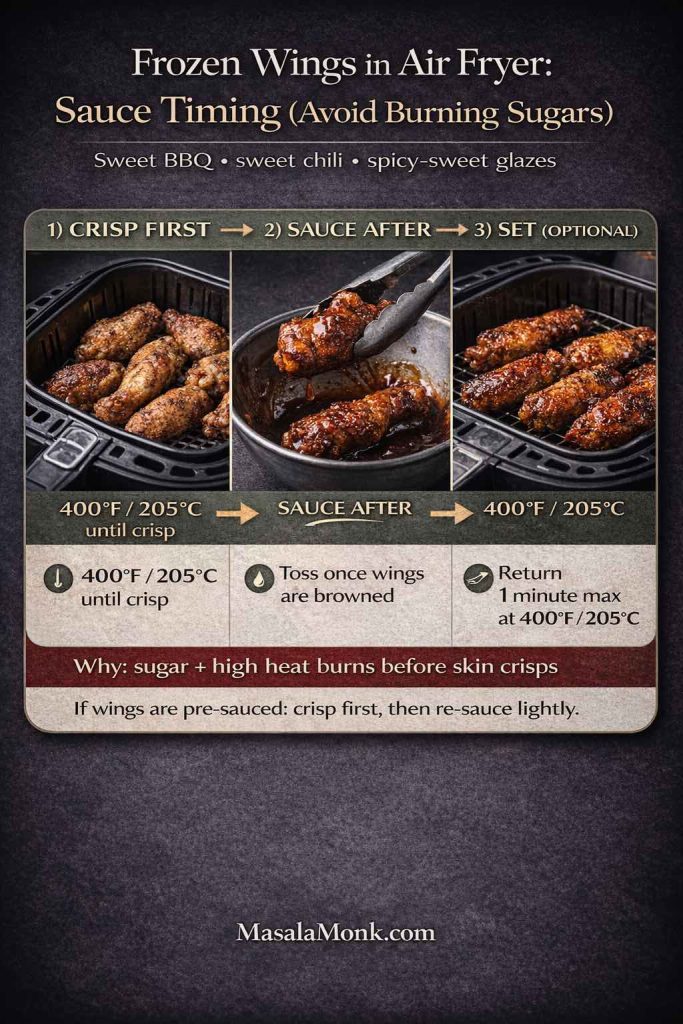
Frozen wings in air fryer sauce timing guide to avoid burning sugars: crisp wings first at 400°F / 205°C, toss in sweet BBQ or sweet chili sauce after browning, then return to the air fryer for 1 minute max at 400°F / 205°C to set (optional).
Sauce timing is the #1 fix for sweet BBQ, sweet chili, and spicy-sweet frozen wings. Crisp the wings first (no sauce) so the skin can actually brown. Then toss in sauce after crisping—this prevents sugar from scorching before the wings get crunchy. Want extra cling? Do a 1-minute max “set” back in the air fryer at 400°F / 205°C. Save/pin this graphic for instant “no-burn” wing nights.

The safer approach for sweet or sticky sauces

  • Crisp the wings first with no sauce at 400°F / 205°C.
  • Toss with sauce after crisping.
  • Return for 1 minute only if you want it set and tacky.

This works for BBQ wings, sweet chili wings, and spicy-sweet glazes.

Also Read: Cranberry Moscow Mule Recipe: A Festive Holiday Cocktail With Easy Variations


Frozen wings in air fryer time: how to tell when they’re “done” beyond the clock

Time is useful, yet doneness is more reliable when you combine a few signals.

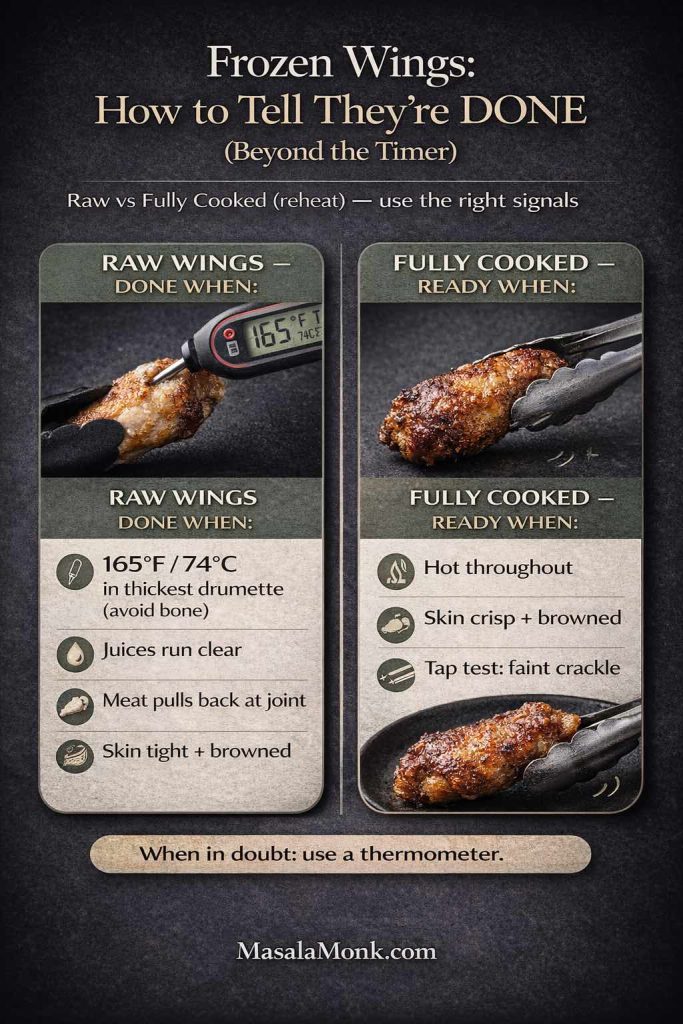
Portrait infographic titled “Frozen Wings: How to Tell They’re DONE (Beyond the Timer).” Two columns compare doneness signals for raw vs fully cooked frozen wings (reheat). Raw wings: thermometer reads 165°F/74°C in thickest drumette (avoid bone), juices run clear, meat pulls back at joint, skin tight and browned. Fully cooked wings: hot throughout, skin crisp and browned, tap test gives a faint crackle. Footer: MasalaMonk.com.
Beyond the clock: use the right doneness signals for frozen wings based on what you have—raw vs fully cooked (reheat). Raw wings are only “done” when the thickest piece hits 165°F / 74°C (avoid bone for accurate readings), then confirm the skin is tight + browned. Fully cooked wings don’t need a safety temp check—your goal is hot throughout + crisp skin, and the “tap test” (faint crackle) is the quickest cue. Save this as your frozen chicken wings doneness checklist for consistently crispy results.

For raw wings

  • Thermometer reads 165°F / 74°C in the thickest part (refer to USDA temperature guidance)
  • Juices run clear when pierced
  • The meat pulls slightly from the bone at the joint
  • The skin looks tightened and browned

For pre-cooked wings

  • Wings are hot throughout
  • Skin is crisped and browned
  • You hear a faint crackle when you tap the surface with tongs

If you’re unsure whether your frozen wings are raw or pre-cooked, treat them like raw and check temperature. It’s the simplest way to remove doubt.

Also Read: Baked Ziti Recipe Collection: 15 Easy Variations


Best frozen wings for air fryer: what actually matters when choosing a bag

Different brands vary, yet the most important factor for results is often not the brand—it’s the wing style.

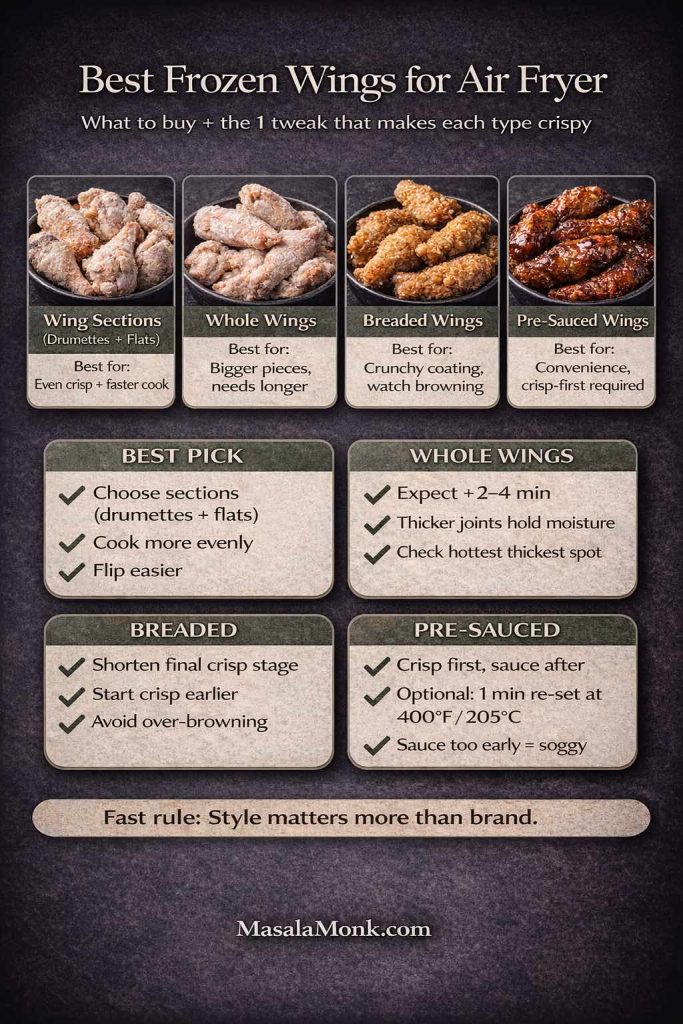
Vertical infographic titled “Best Frozen Wings for Air Fryer” showing four frozen wing types—wing sections (drumettes + flats), whole wings, breaded wings, and pre-sauced wings—with what each is best for. Notes: sections cook evenly and flip easier; whole wings may need +2–4 minutes and thicker joints hold moisture; breaded wings brown fast so shorten the final crisp stage; pre-sauced wings should be crisped first, sauced after, with an optional 1-minute reset at 400°F / 205°C. Footer: MasalaMonk.com.
Best Frozen Wings for Air Fryer (what to buy): Wing style matters more than brand. For the crispiest results, choose wing sections (drumettes + flats)—they cook more evenly and flip easier. Using whole wings? Expect +2–4 minutes since thicker joints hold moisture. Breaded wings brown fast, so shorten the final crisp stage. Pre-sauced wings stay best when you crisp first, sauce last (optional: 1 minute at 400°F / 205°C to “set” sauce). Keep reading for the full timing chart + the two-stage crisp method.

Wing sections usually outperform whole wings

Wingettes/drumettes crisp more evenly, fit better, and flip more easily.

Breaded wings can be great, but need careful timing

Breaded wings brown quickly. That’s fine, although it means the crisp stage might be shorter to prevent scorching.

Pre-sauced wings can be convenient, but crisp-first still wins

They’ll taste much better if you crisp them first, then refresh sauce at the end.

If you’re building a broader air-fryer setup and want a practical list of machines, MasalaMonk has a roundup of best-selling air fryers. It’s a useful internal reference if you’re comparing sizes and baskets.

Also Read: Manhattan Cocktail Recipe (Classic + 6 Variations)


Frozen chicken wings in air fryer troubleshooting (the real fixes)

Even with a good method, a few problems show up again and again. Here’s what to do when they do.

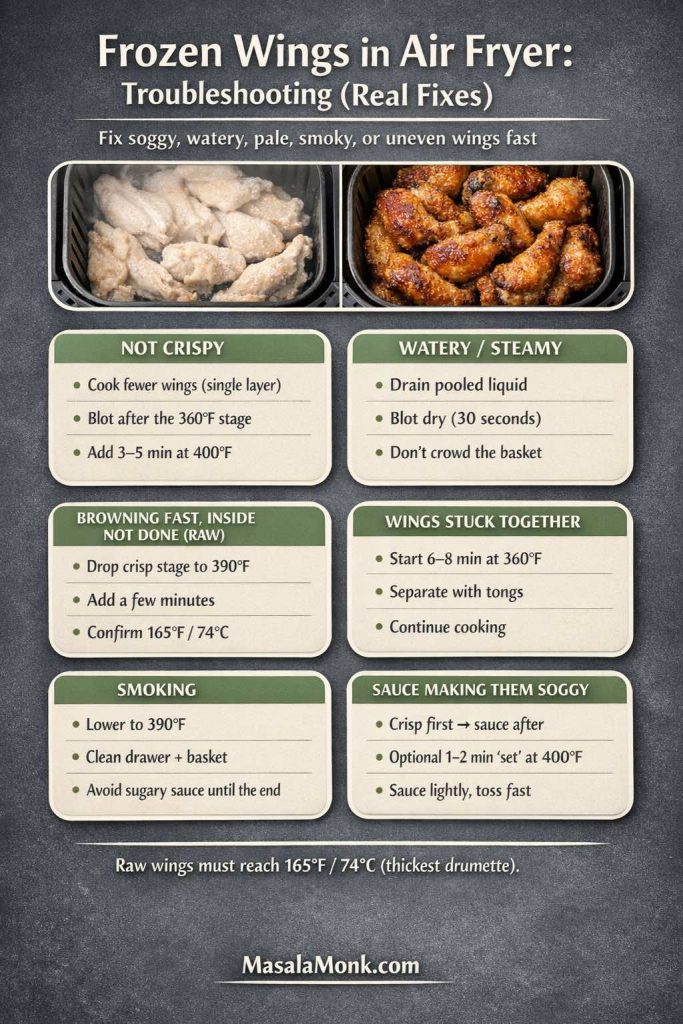
Infographic titled ‘Frozen Wings in Air Fryer: Troubleshooting (Real Fixes)’ with a top photo strip showing pale steamed wings vs browned crispy wings. Six tip boxes: Not Crispy (single layer, blot after 360°F stage, add 3–5 min at 400°F); Watery/Steamy (drain liquid, blot 30 sec, don’t crowd); Browning fast inside not done (raw) (390°F + time, confirm 165°F/74°C); Wings stuck together (start 6–8 min at 360°F, separate, continue); Smoking (390°F, clean basket, avoid sugary sauce); Sauce soggy (crisp first, optional 1–2 min set). Footer: MasalaMonk.com.
Wings coming out soggy, watery, smoky, or uneven? Save this quick troubleshooting guide. It shows the real fixes that work with frozen wings: single-layer airflow (no steaming), drain + blot after the 360°F stage, then finish hot at 400°F for crisp skin. If you’re using raw frozen wings, the chart reminds you to confirm 165°F / 74°C in the thickest drumette before serving. And if sauce keeps ruining crunch, the rule is simple: crisp first → sauce after (optional 1–2 minutes to “set”). Keep this handy for wing night—and scroll for the full step-by-step method, times, and flavor options.

“My wings are still not crispy”

  • Cook fewer wings at once.
  • Blot more thoroughly after the first stage.
  • Extend the 400°F / 205°C crisp stage by 3–5 minutes.

“My wings are watery”

This often happens with frozen wings that release a lot of moisture early.

  • Drain the basket if water collects.
  • Blot thoroughly.
  • Give the wings a longer crisp stage.

“My wings are browned but the inside feels underdone”

This is most common with larger raw wings.

  • Add time at 360°F / 182°C first, then crisp again.
  • Confirm doneness with a thermometer and aim for 165°F / 74°C (USDA guidance).
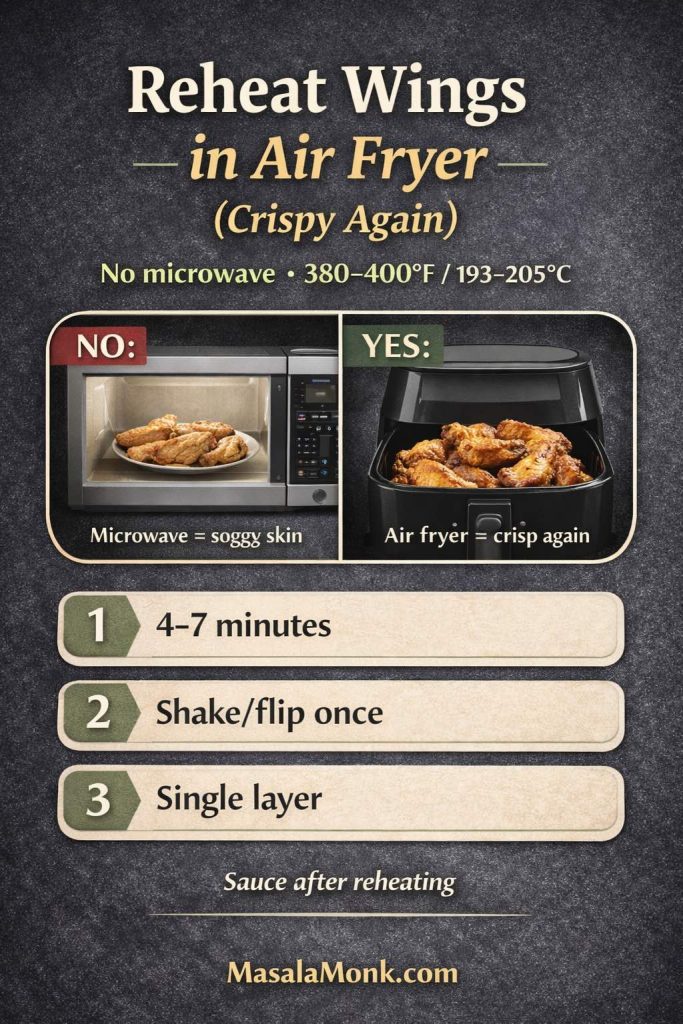
Reheating chicken wings in an air fryer: avoid the microwave. Reheat at 380–400°F (193–205°C) for 4–7 minutes, shake or flip once, keep wings in a single layer, and sauce after reheating for crisp skin.
Leftover wings? Skip the microwave. Reheat in the air fryer at 380–400°F (193–205°C) for 4–7 minutes, flip once, and keep them in a single layer so the skin turns crisp again. Sauce after reheating to avoid soggy wings.

“My wings are smoking”

Rendered chicken fat can smoke, especially at 400°F. If your model smokes easily:

  • Reduce crisp stage to 390°F / 199°C and cook slightly longer.
  • Clean the basket and drawer regularly.
  • Avoid sugary sauces until the end.

Also Read: Rob Roy Drink Recipe: Classic Scotch Cocktail (Perfect + Dry + Sweet Variations)


Baked chicken wings from frozen: a solid oven backup when you’re cooking a lot

Sometimes you need volume. In that case, the oven is convenient because you can do a full sheet pan at once. Even so, the same crisping logic applies: airflow and moisture control.

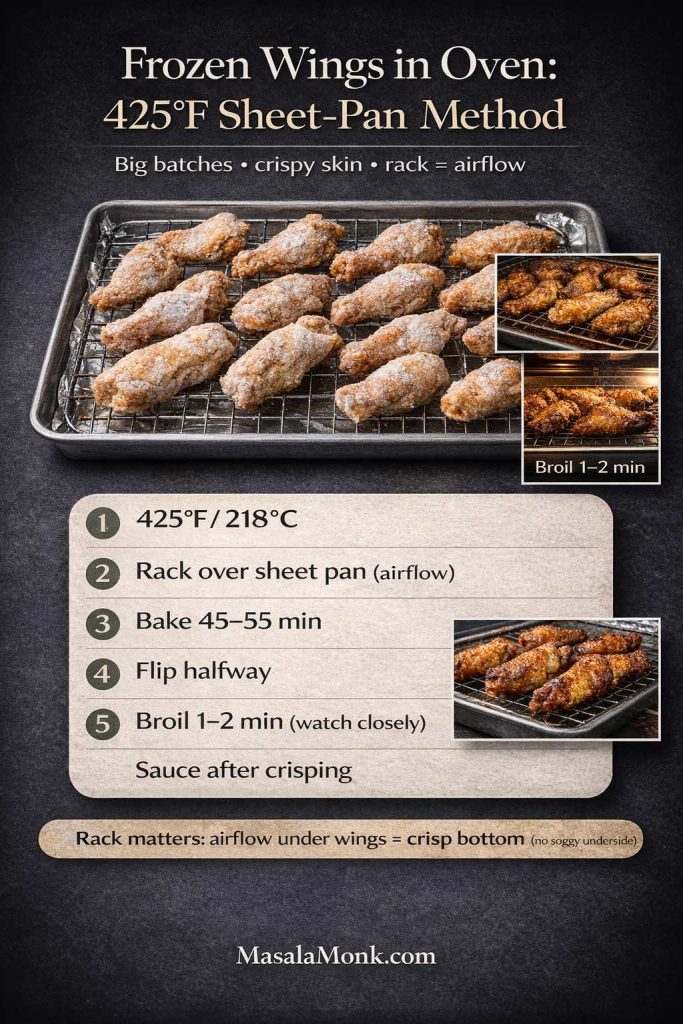
Frozen chicken wings baked in the oven using a rack-over-sheet-pan method: bake at 425°F / 218°C for 45–55 minutes, flip halfway, then broil 1–2 minutes for extra crisp skin. Includes a visual reminder that the rack improves airflow so the bottoms don’t turn soggy. MasalaMonk.com footer.
Oven backup for big batches: When you need volume, this rack-over-sheet-pan method nails the same goal as air frying—airflow + moisture control. Bake frozen wings at 425°F / 218°C for 45–55 minutes, flip halfway, then broil 1–2 minutes right at the end for that last crisp hit. The rack is the difference-maker: it keeps the undersides from steaming against the pan. Sauce after crisping so you don’t soften the skin.

Oven method for frozen wings

  1. Heat oven to 425°F / 218°C.
  2. Place wings on a rack set over a sheet pan.
  3. Bake 45–55 minutes, flipping halfway.
  4. For extra crispness, broil 1–2 minutes at the end (watch closely).
  5. Sauce after crisping.

The rack matters because it lets hot air circulate around the wings. Without it, the underside can soften from contact with the pan.

Also Read: Best Vermouth for a Negroni Cocktail Drink Recipe


Fried chicken wings from frozen: what to know before you do it

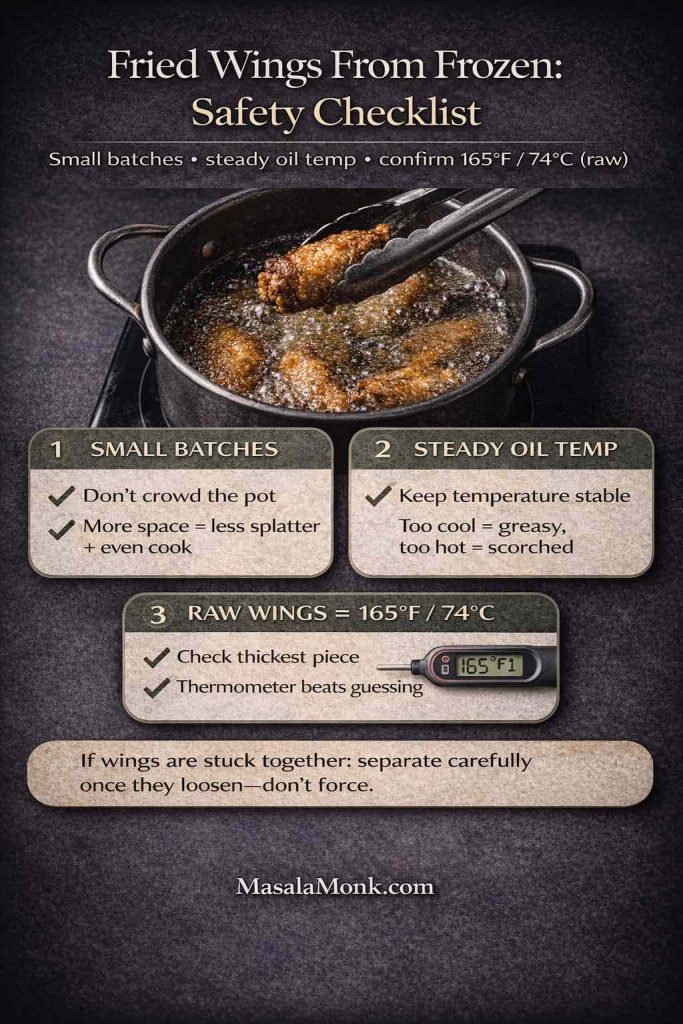
Deep frying from frozen can be done, although it’s messy and can be risky if you aren’t careful. Frozen surfaces can cause oil splatter. Additionally, wing pieces that are stuck together can create uneven cooking.

Fried wings from frozen safety checklist graphic: deep-frying pot with wings and tongs. Key tips: fry in small batches (don’t crowd—less splatter, more even cooking), keep oil temperature steady (too cool = greasy, too hot = scorched), and for raw wings confirm 165°F / 74°C in the thickest piece with a thermometer. Note: if wings are stuck together, separate gently once loosened.
Deep-frying frozen wings can work, but it’s the easiest way to create a splattery mess (or uneven cooking) if you rush it. Use this quick safety checklist: small batches + steady oil temp + thermometer to 165°F / 74°C for raw wings. If wings are stuck together, let them loosen in the oil first—don’t force them apart. (Save/pin this so you don’t have to guess next time.)

If you include this method, keep it cautious:

  • Fry in small batches
  • Maintain steady oil temperature
  • Confirm raw wings reach 165°F / 74°C

For most people, an air fryer gives you enough crunch without the mess—especially when you follow the two-stage crisping method.

Also Read: Paper Plane Cocktail Recipe + Best Amaro Substitutes & Tips


A few flavorful ways to keep wings exciting (without turning the kitchen into a project)

Wings get repetitive only when you repeat the same sauce. Instead, rotate finishes that don’t add work.

Creamy dips that pair with everything

If you want a dip you can customize endlessly, start with a mayo base. MasalaMonk’s eggless mayonnaise is perfect for classic creamy dips, while the vegan mayo recipe gives you a plant-based option that still tastes rich.

From there, you can build:

  • Garlic mayo (garlic + lemon + salt)
  • Spicy mayo (hot sauce + paprika)
  • Herb dip (dill/parsley + lemon)

Fresh sauces for contrast

Chimichurri turns wings bright and herby. It feels lighter than Buffalo and adds a restaurant-style edge. Use MasalaMonk’s chimichurri recipe either as a toss after crisping or as a side dip.

A “sauce library” approach

If you like having options ready, a sauce hub helps. MasalaMonk’s pizza sauce collection and pesto variations can inspire new wing finishes beyond the usual lineup, while still staying practical.

Also Read: Green Chutney Recipe (Coriander–Mint / Cilantro Chutney)


Handling and safety, especially for raw frozen wings

Raw frozen wings behave like raw chicken once they start thawing in the basket. So it’s worth treating them with the same kitchen habits you’d use for fresh poultry:

  • Use separate tongs or wash them after touching raw wings
  • Wash hands after handling
  • Sanitize the cutting board if you use one
  • Avoid rinsing raw chicken (it spreads bacteria around the sink)

The CDC summarizes these basics clearly in its guide to chicken and food safety.

Meanwhile, for doneness, keep it simple: 165°F / 74°C at the thickest point is the standard, and the USDA safe temperature chart lays it out cleanly.

Also Read: 19 Essential Kitchen Tools That Make Cooking Easier


Bringing it all together: a simple “from frozen” wing routine you can repeat

If you want a routine you can memorize, use this:

  1. Preheat 360°F / 182°C
  2. Cook frozen wings (raw: 14–16 min, pre-cooked: 10–12 min)
  3. Separate + blot dry
  4. Season (or wait if saucing)
  5. Crisp 400°F / 205°C (raw: 8–12 min, pre-cooked: 6–10 min)
  6. Sauce after crisping
  7. For raw wings, confirm 165°F / 74°C
Infographic titled “Frozen Wings in Air Fryer: 7-Step No-Thaw Routine” showing raw vs fully cooked frozen wing timings. Steps: preheat 360°F/182°C for 3–5 minutes, cook in a single layer, Stage 1 at 360°F (raw 14–16 min, cooked 10–12 min), separate wings and drain liquid, blot dry 30 seconds, season now for dry rub or sauce after crisp, then Stage 2 at 400°F/205°C (raw 8–12 min, cooked 6–10 min). Raw wings must reach 165°F/74°C.
Use this 7-step no-thaw routine any time you’re making frozen chicken wings in the air fryer. It shows the exact two-stage method (360°F → 400°F), the correct time ranges for raw vs fully cooked wings, and the one doneness rule that matters for raw wings: 165°F / 74°C in the thickest drumette. Save this as your quick “wing night” checklist—then follow the steps above in this blog post for the full method and flavor options.

From there, you can go Buffalo with blue cheese dip, hot wings with a spicy glaze, dry rub for maximum crunch, or chimichurri for a bright twist—without changing your cooking method every time.

And if you want to explore the fresh-wing version later—especially for thawed wings, bigger seasoning ideas, or extra technique—MasalaMonk’s Air Fryer Chicken Wings is a natural next step.

Also Read: How to Cook Tortellini (Fresh, Frozen, Dried) + Easy Dinner Ideas


FAQs: Frozen Chicken Wings in Air Fryer

1) How long do frozen chicken wings take in an air fryer?

Most frozen chicken wings in an air fryer take 16–22 minutes if they’re pre-cooked and 22–30 minutes if they’re raw, depending on size and how full your basket is. As a rule of thumb, cook in two stages: a lower-temp warm/render stage, followed by a higher-temp crisp stage. That combination is usually more reliable than trying to blast them at one temperature the whole time.

2) What temperature should I use for frozen chicken wings in the air fryer?

A practical approach is 360°F / 182°C first, then 400°F / 205°C to crisp. The first temperature melts surface ice and helps fat render; afterward, the higher heat drives off moisture so the skin can brown and tighten.

3) Can I cook chicken wings in the air fryer from frozen without thawing?

Yes—chicken wings in air fryer from frozen work well when you leave space for airflow and finish with a high-heat crisp. In other words, the key is not thawing; it’s managing moisture and giving the wings enough room to brown rather than steam.

4) How do I make crispy frozen chicken wings in an air fryer?

To get crispy frozen chicken wings, avoid stacking, flip at least once, and use a brief crisp finish at 400°F / 205°C. Also, blotting the wings after the first stage helps, because it removes moisture that would otherwise soften the skin during the final minutes.

5) What’s the best air fryer wings from frozen method if my wings are stuck together?

Start the first stage at 360°F / 182°C for several minutes, then open the basket and separate them with tongs once the ice loosens. Afterward, continue cooking as normal. Trying to pry them apart while they’re rock-solid often tears skin and slows crisping later.

6) Can I air fry raw frozen chicken wings in the air fryer?

You can air fry raw frozen chicken wings, but you must ensure they’re cooked through. Use the two-stage method and check the thickest drumette for doneness. If you’re uncertain, extend the lower-temp stage slightly, then crisp at the end so texture doesn’t suffer.

7) How long should I air fry frozen wings at 400°F?

As a crisp stage, 400°F / 205°C is perfect: fully cooked wings usually need 6–10 minutes, while raw wings typically need 8–12 minutes after a 360°F start. If you try 400°F the entire time, the outside can brown before the inside heats evenly—so use it mainly for the final crisp.

8) What’s the frozen chicken wings air fryer time and temperature for drumettes or wing sections?

For frozen chicken wing sections (drumettes and flats), many batches do well with 360°F / 182°C for 14–16 minutes (raw) or 10–12 minutes (pre-cooked), then 400°F / 205°C for 6–12 minutes to crisp. However, larger pieces may require a few extra minutes, especially if the basket is crowded.

9) Can I cook pre cooked chicken wings in air fryer straight from frozen?

Absolutely. Pre cooked chicken wings in air fryer are ideal from frozen because your job is mainly reheating and crisping. Nevertheless, you’ll get the best bite if you crisp first and add sticky sauces afterward.

10) How do I make frozen buffalo wings in the air fryer without soggy skin?

Crisp the wings first, then toss in Buffalo sauce after they’re browned. If you want the sauce to cling, return the sauced wings to the basket for 1–2 minutes—just enough to set the coating without steaming the skin.

11) Can I stack frozen wings in an air fryer basket?

It’s possible, yet it usually sacrifices crispiness. When wings overlap, steam gets trapped and browning becomes patchy. Instead, cook in batches or use a rack accessory if your air fryer supports it, keeping space between pieces as much as possible.

12) Why are my air fried frozen wings not crispy?

Usually it comes down to one of three issues: too many wings at once, too much surface moisture, or not enough high-heat time at the end. Consequently, reduce the batch size, blot after the first stage, and extend the final crisp stage by a few minutes.

13) What if my frozen wings are already sauced or breaded?

For sauced wings, crisp them first and refresh sauce at the end. For breaded frozen wings, keep a close eye during the high-heat stage, because breading can brown quickly. In that case, shorten the final crisp stage slightly and rely on airflow (single layer) for texture.

14) How long do frozen wings take in an air fryer if they’re thawed first?

If they’re thawed, they usually cook faster because you’re no longer melting ice. Often, thawed wings take 18–24 minutes total, depending on size. Even so, drying them well before cooking remains important, because damp skin tends to turn rubbery rather than crisp.

15) What’s the best way to cook frozen wings if I’m making a lot for a party?

When you’re cooking for a crowd, batch cooking is the most consistent approach. Cook each batch until crisp, then hold wings on a rack so air can circulate. Right before serving, re-crisp for a couple minutes to restore crunch, then sauce or season immediately.

16) Can I cook frozen chicken wings in the oven if I don’t have an air fryer?

Yes. While an air fryer is faster, the oven works well for bigger batches. Typically, bake wings on a rack at 425°F / 218°C until browned and cooked through, flipping halfway. For extra crispness, finish with a short broil—watching closely so they don’t burn.

17) Is it better to air fry frozen wings at one temperature or two?

Two temperatures are usually better. First, a moderate heat helps thaw the surface and render fat; afterward, higher heat crisps. As a result, you get wings that are both juicy inside and properly crisp outside, instead of wings that are dark in spots and soft elsewhere.

18) How do I know whether my frozen wings are raw or pre-cooked?

Check the packaging for phrases like “fully cooked” or “uncooked.” If you’ve already tossed the bag and you’re not sure, treat them like raw wings and cook until fully done, then crisp at the end. That approach removes doubt while still giving you good texture.

19) Why are my frozen wings chewy or rubbery?

This usually happens when moisture never fully evaporates (crowded basket, no blotting, or too short a high-heat finish). Cook in a single layer, blot after the first stage, then extend the 400°F crisp stage by 2–5 minutes until the skin tightens and browns.

20) How do I reheat leftover wings so they stay crispy?

Air fry at 380–400°F / 193–205°C for 4–7 minutes, shaking once. Don’t microwave first—microwaving steams the skin and makes it soft.