Posted on Leave a comment

Slow Cooker Leg of Lamb Recipe: Garlic and Rosemary Lamb with Gravy

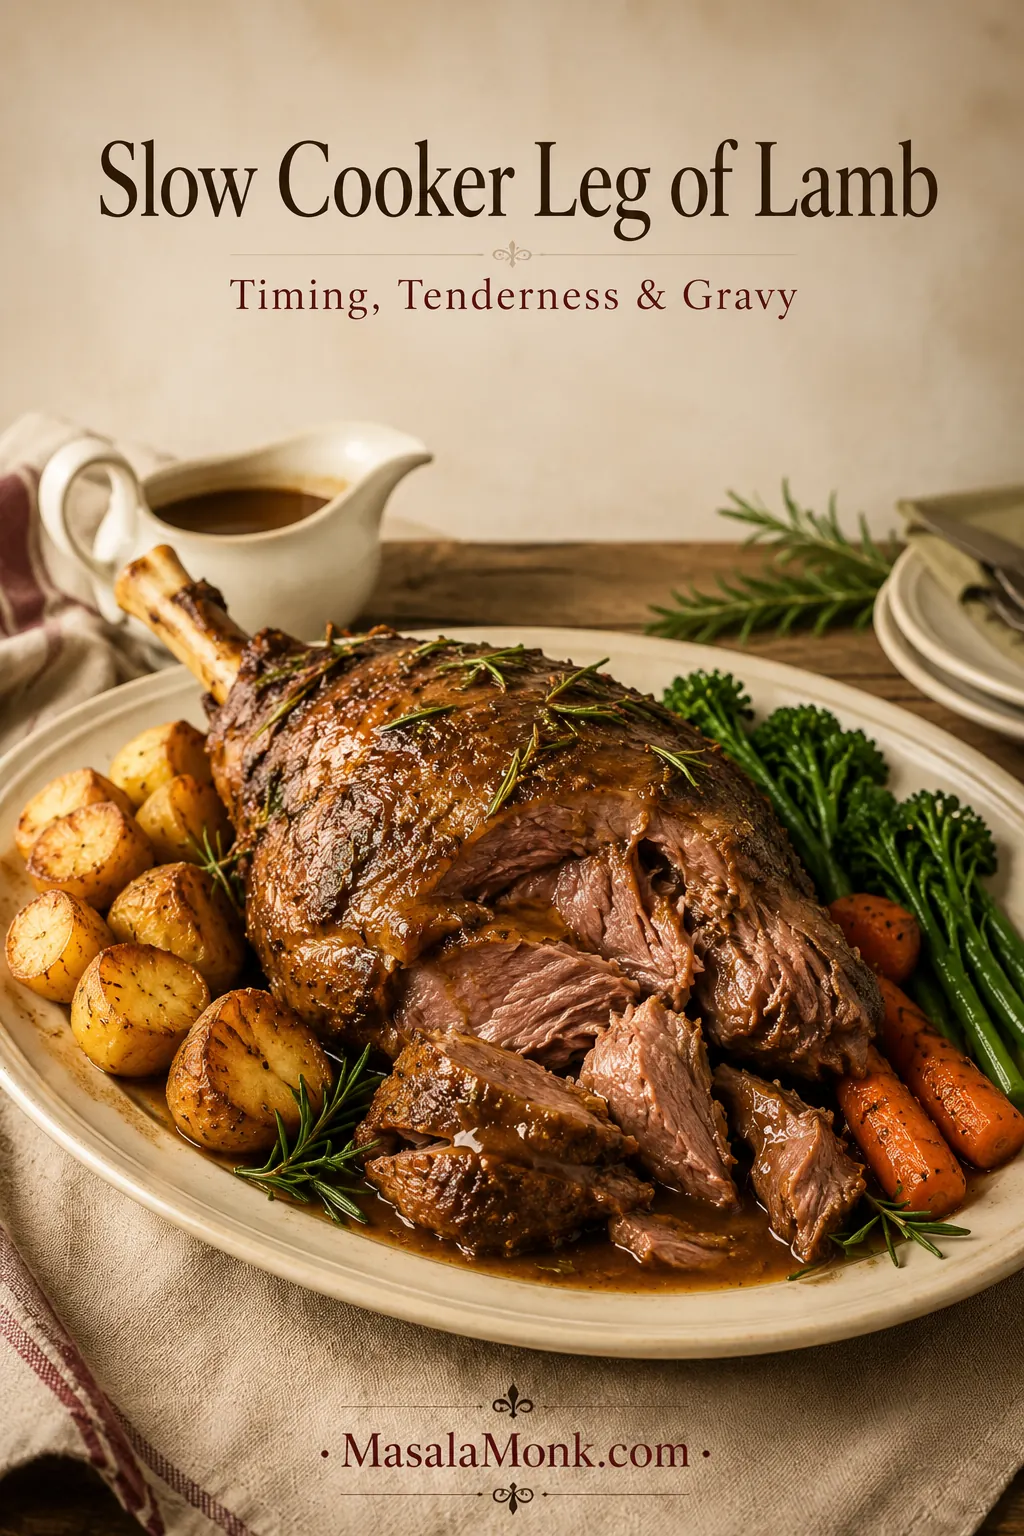
Finished slow cooker leg of lamb on an ivory platter with gravy, roast potatoes, carrots, green vegetables and rosemary.

Slow cooker leg of lamb should give you three things when the lid comes off: meat that yields beneath a fork, a kitchen full of garlic and rosemary, and cooking juices already halfway to becoming gravy.

That is the calm version of Sunday lunch. Leg of lamb is not something most people want to experiment with blindly, especially when several people are waiting to eat—and a compact boneless roll, bone-in half leg and large whole leg will not all behave in exactly the same way.

The recipe below gives you a dependable starting point. Then the joint-specific guide shows when to begin checking a 1 kg half leg, a rolled boneless joint or a larger bone-in leg, because shape and thickness can matter almost as much as weight.

Quick Answer: Slow Cooker Leg of Lamb

A 1.3–1.5 kg / 2.9–3.3 lb leg of lamb generally needs about 7–8 hours on low in a slow cooker or Crock-Pot. Start checking the thickest meat at around 6½ hours. A smaller 1 kg / 2.2 lb half leg can take about 3½–4½ hours on high, with the first check at three hours.

Keep most of the lamb above the liquid. Continue cooking until it has reached a safe temperature and a fork twists through the thickest section with little resistance, then brown it briefly while turning the cooking juices into gravy.

This method produces fully cooked, fork-tender lamb. It is not the right method when you want a pink or medium-rare centre with neat carved slices.

Not sure your joint matches this timing? Check the joint type, test the cooker fit, or use the timing guide.

Slow Cooker Leg of Lamb Recipe

Garlic and Rosemary Lamb with Gravy

The lamb is savoury and rosemary-scented, with mellow garlic, soft sweet onions and plenty of cooking juice for gravy. A short hot-oven finish gives the pale slow-cooked surface burnished edges without drying the tender meat underneath.

Recipe at a glance:
Prep: 25 minutes
Slow cooking: about 7–8 hours on low
Browning and gravy: 15–20 minutes
Final rest: 5–10 minutes
Serves: 4 generously, or 5–6 with substantial sides
Slow cooker: about 5.5–6 litres / 6 quarts

Equipment: slow cooker, meat thermometer, roasting tray, broad spatula or serving spoon, heatproof jug, fine-mesh strainer and saucepan.

Choose your finish: For the best colour and a fuller gravy, brown the lamb in the oven, then defat, reduce and thicken the cooking juices. For the easiest route, skip the oven finish and serve the pale but tender lamb with defatted cooking juices or a simple gravy.

Before you start: check whether the lamb fits and see how to test doneness if this is your first time slow-cooking a leg of lamb.

Most of the cooking time is unattended. The active work is divided between the initial preparation and the optional browning-and-gravy finish.

Using a smaller or boneless leg? Follow the same preparation and finishing method, then use the timing guide later in the article for the cooking window.

Ingredients

IngredientAmount
Bone-in half leg of lamb1.3–1.5 kg / 2.9–3.3 lb
Fine sea salt10 g / about 1¾ teaspoons
Freshly ground black pepperAbout 2 g / 1 teaspoon
Garlic, finely grated or crushed6 cloves / about 20–24 g
Fresh rosemary, finely chopped2 tablespoons / about 6–8 g
Olive oil, divided30 ml / 2 tablespoons
Large onions, thickly sliced2 / about 350–400 g
Large carrots, cut into large pieces2 / about 200–250 g
Unsalted or low-sodium lamb, beef or chicken stock240 ml / 1 cup
Dry red wine, or additional stock120 ml / ½ cup
Redcurrant jelly or mint jelly, optional2 tablespoons / about 35–40 g

For the Gravy

  • 16 g / 2 tablespoons cornflour or cornstarch
  • 45 ml / 3 tablespoons cold water
  • Hot unsalted stock or water, only if needed
  • Salt and black pepper, added only after tasting

The ingredient set is small, but it builds both the lamb and the gravy.
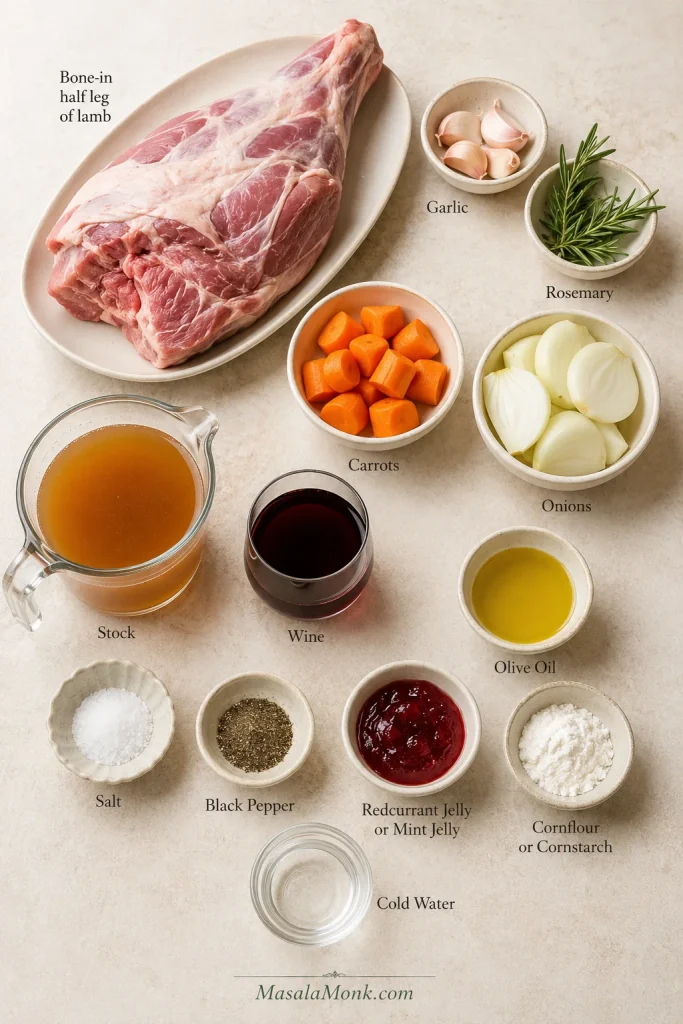
Ingredient board for slow cooker leg of lamb with lamb, garlic, rosemary, onions, carrots, stock, wine, salt, pepper and gravy ingredients.
Garlic, rosemary, onion, carrot, stock and wine build both lamb flavour and gravy.

Instructions

Prepare and Load the Lamb

  1. Thaw, trim and test the fit. Begin with fully thawed lamb and remove all outer packaging. Leave a thin, soft fat covering in place, but trim away any unusually thick or hard external fat. Put the unseasoned leg inside the clean cooker. The lid must close flat, with room underneath for the vegetables and cooking juices. Remove the lamb and pat it dry.

Trim only the heavy excess fat before seasoning.
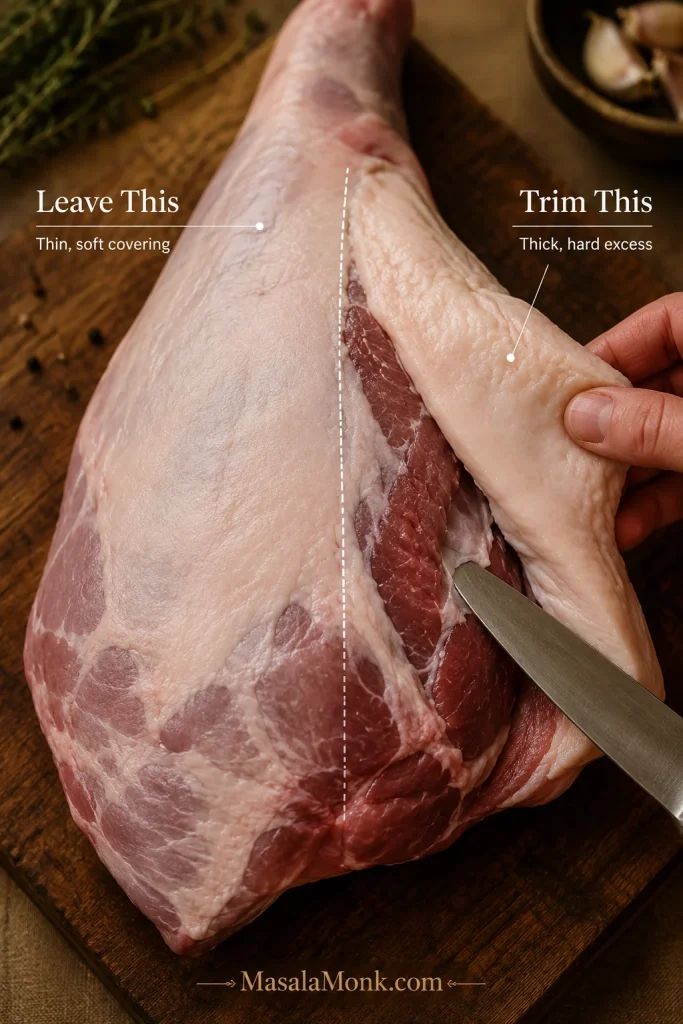
Raw leg of lamb on a board showing thin soft fat to leave and a thick flap of excess fat being trimmed with a knife.
Leave a thin fat cover for moisture; trim thick hard excess before it greases the gravy.
  1. Season the lamb. Mix the salt, pepper, garlic, rosemary and 1 tablespoon of olive oil into a damp, coarse paste. It should cling to the meat rather than run off. Rub it over every exposed surface.

Aim for a paste that clings.
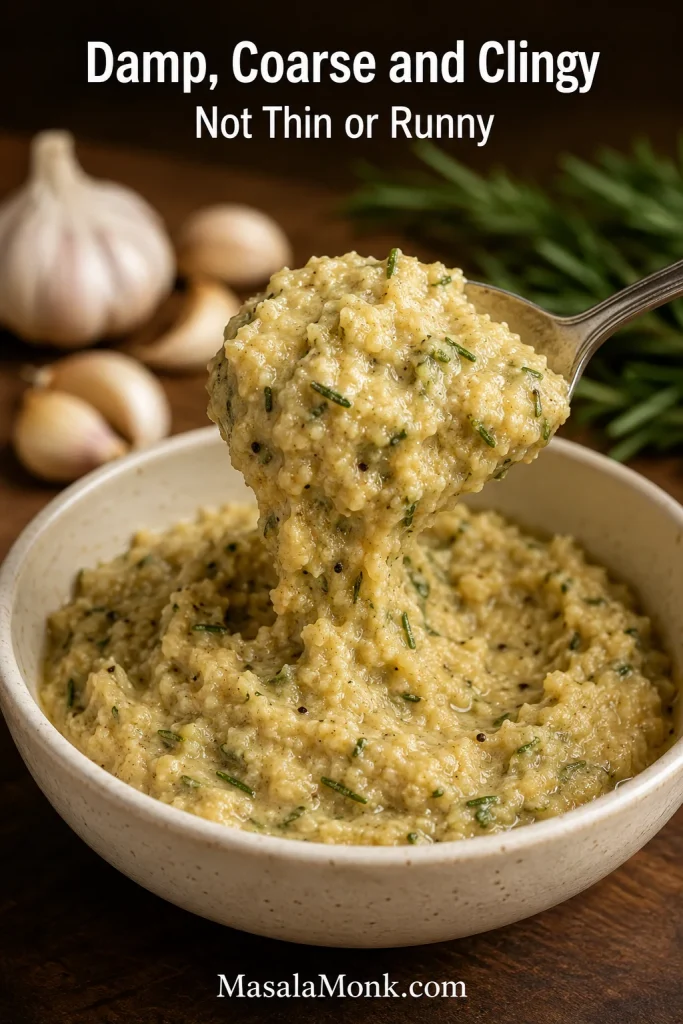
Close-up of pale golden garlic and rosemary paste clinging to a spoon, with black pepper specks and whole garlic blurred behind.
The rub should cling like a damp paste, not run into the cooker.
  1. Build the cooker. Spread the onion and carrot over the base. Place the lamb on top with the fattier side facing upward where its shape allows.

This is the setup to copy before the lid goes on.
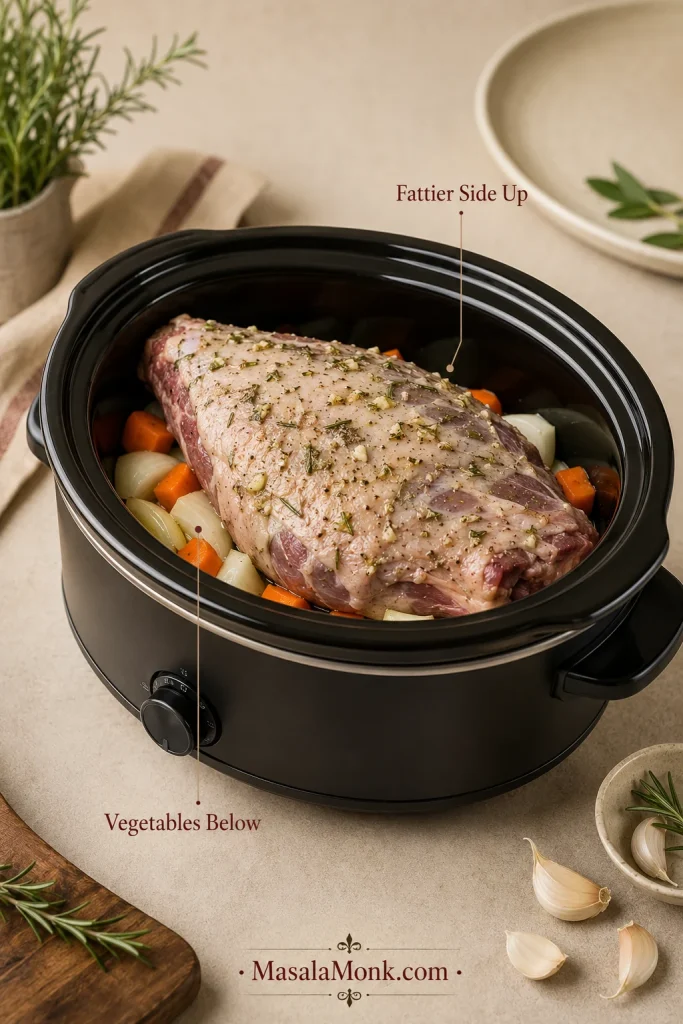
Raw rubbed leg of lamb resting on onions and carrots in a black slow cooker with labels for vegetables below and fattier side up.
Set the lamb above the vegetables with the fattier side up where possible.
  1. Add the stock and wine. Pour them around the sides rather than over the seasoning. Only the vegetables and lower part of the lamb should sit in the liquid; the cooker is not meant to look like soup.

Pour the liquid around the lamb, not over the rub.
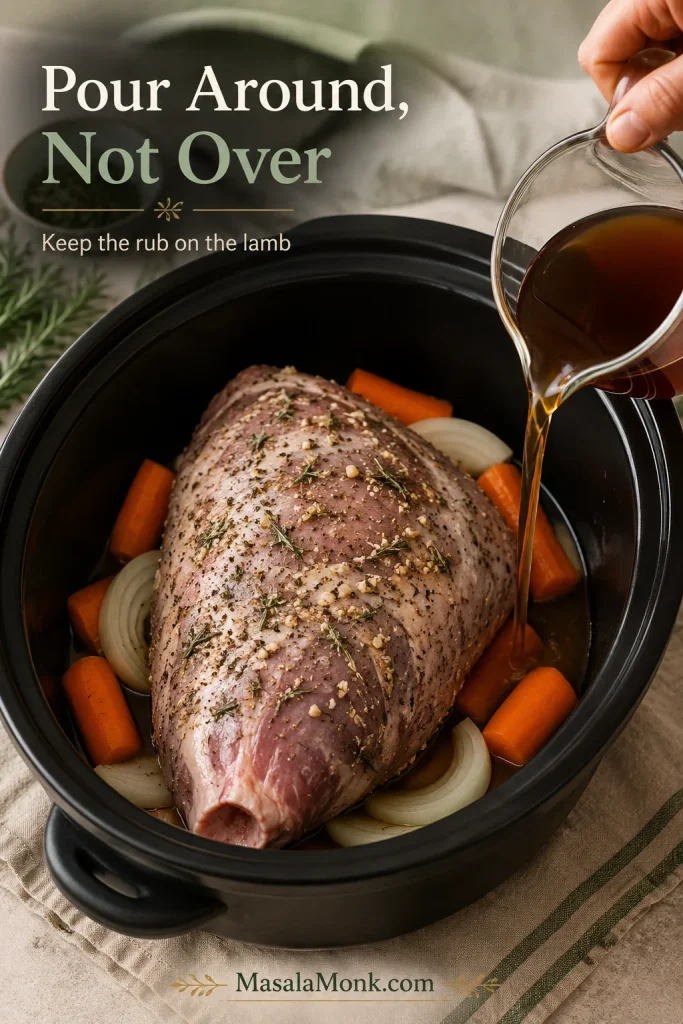
Stock or wine being poured down the side of a slow cooker around a raw rubbed leg of lamb without washing off the seasoning.
Pour liquid around the edge to preserve the rub and keep the gravy base clean.

Cook and Check Doneness

  1. Slow cook. Cover and cook the 1.3–1.5 kg / 2.9–3.3 lb bone-in half leg on low for about 7–8 hours. Keep the lid closed until the first check at around 6½ hours, because repeated lifting releases heat and can lengthen the cook.
  2. Check the thickest part.
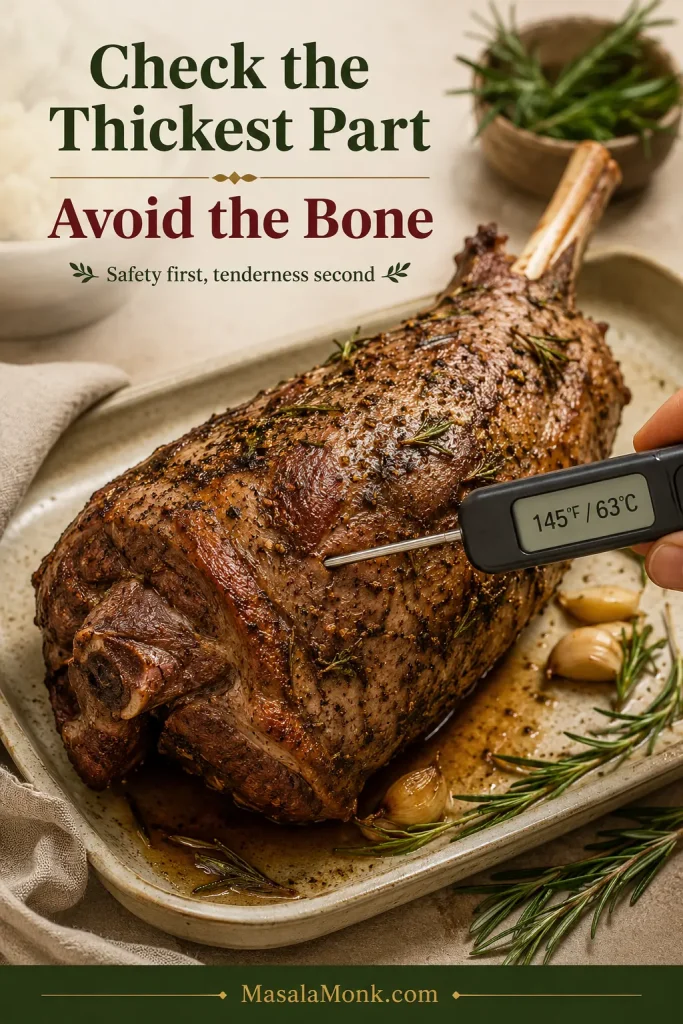
    Confirm safety: Insert the thermometer into the thickest meat without touching the bone. It must reach at least 63°C / 145°F, followed by a rest of at least 3 minutes. The final 5–10-minute rest in this recipe satisfies that minimum.

    Then check tenderness: The fork should slide into the thickest section and twist easily. The fibres should begin to separate, and a bone-in leg should feel loose around the bone. Reaching the safe temperature does not automatically mean the lamb is tender.

Need more detail? See the full temperature and fork-tenderness guide.

Brown, Make Gravy and Serve

  1. Transfer and strain. By this point the leg may feel unexpectedly fragile. Support it from underneath with a broad spatula or serving spoon rather than trusting the tongs to hold it together. Move it to a lined roasting tray, then strain the cooking juices through a fine-mesh strainer into a heatproof jug. Heat the oven to 220°C / 425°F.

Lift with support underneath once the lamb is tender.
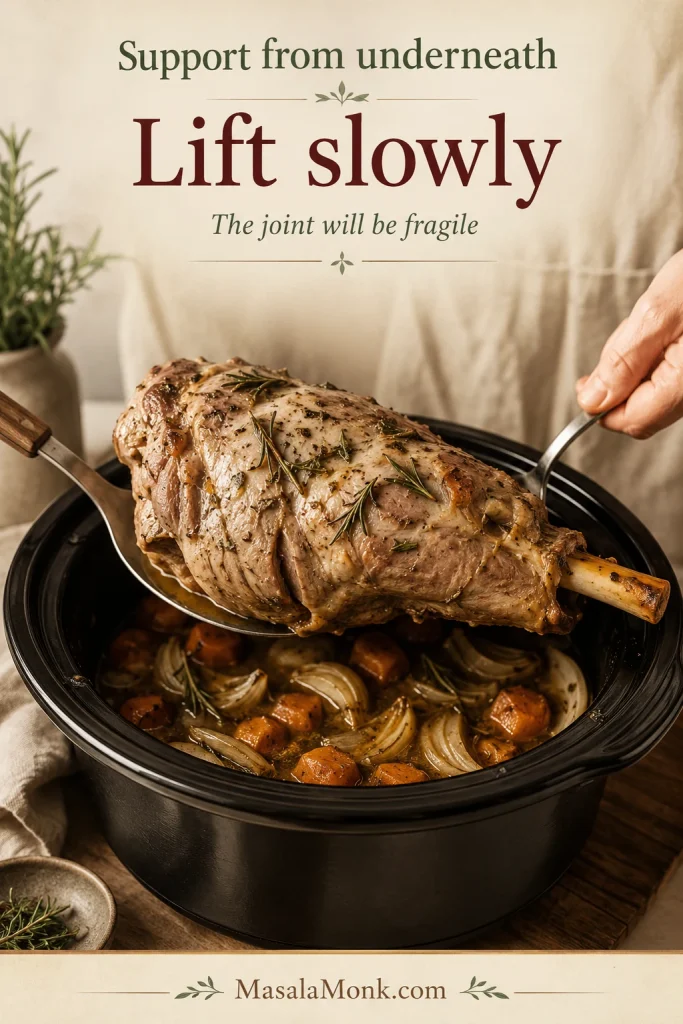
Cooked leg of lamb being lifted from a slow cooker with a broad spoon underneath while onions, carrots and juices remain below.
Support tender lamb from underneath so it reaches the tray intact.
  1. Brown the lamb. Brush the surface lightly with the remaining olive oil or a thin layer of jelly. Roast for about 10–15 minutes, stopping when the garlic-and-rosemary surface looks burnished and the edges begin to darken. A hot grill or broiler can do the same job in a few minutes, but watch continuously.
  2. Make the gravy. Remove the surface fat from the strained juices, then simmer them in a wide saucepan. Mix the cornflour or cornstarch with the cold water and whisk the slurry in gradually. Stop when the gravy coats the back of a spoon; you may not need all of it.
  3. Rest, portion and serve. Rest the browned lamb for 5–10 minutes. Lift away the loosened bone, discard any large pieces of fat and pull the meat into generous sections rather than fine shreds. Remove the string from a boneless roll before portioning, then serve with hot gravy.

Gravy looking greasy or thin? Jump to the gravy fixing guide.

Recipe Notes

  • Boneless rolled leg: leave ordinary butcher’s string in place while cooking. Follow the package instructions for elastic or synthetic netting.
  • Skipping wine: replace it with the same amount of unsalted or low-sodium stock.
  • Using dried rosemary: use 1–1½ teaspoons dried rosemary, crushed between your fingers.
  • Extra cooking juice is normal: the liquid level usually rises as the lamb, onions and carrots release moisture.
  • Gravy yield: depending on the leg and how far the juices are reduced, there should be enough for roughly 4–6 servings.

Slow-cooker safety: thaw the lamb completely, load and switch on the cooker immediately, and follow your appliance manual for large cuts and fill levels. Use the hob, oven or microwave—not the slow cooker—to reheat refrigerated leftovers.

Choose the Lamb Joint You Actually Have

Best default: use a 1.3–1.5 kg bone-in half leg and cook it on low. It fits more readily than a whole leg, still looks generous on the table and gives you a useful cue near the end as the bone begins to loosen.

Compare Common Lamb Joints

JointBest forMain caution
Bone-in half legBest all-round choiceThe bone reduces the edible yield
Rolled boneless legEasy fit and simple portioningCheck it earlier than a long bone-in leg
Whole bone-in legA larger gatheringThe long shank may prevent the lid from closing
Butterflied legGrilling or faster oven roastingUneven thickness makes it less suited to this method

A smaller 800 g–1 kg bone-in half leg works well on high when time is shorter, although there is less meat to protect from overcooking. A rolled boneless leg gives more edible meat at the same raw weight and is often the easiest choice for a compact cooker.

Whole Leg and Shoulder Cautions

Bought a whole leg? Test it before seasoning. When the shank is too long, ask a butcher whether it can be shortened or partly cut so the joint bends more easily.

Start by identifying the joint you actually bought.
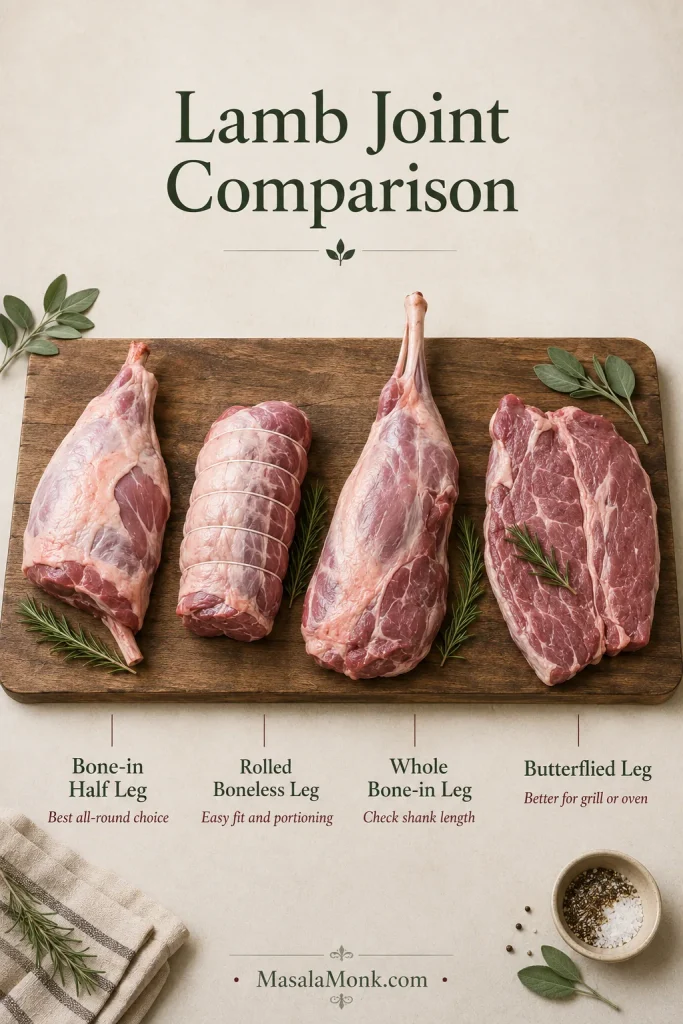
Four lamb cuts on a board labelled bone-in half leg, rolled boneless leg, whole bone-in leg and butterflied leg.
Identify your joint first; the cut decides timing, fit and tenderness expectations.

Lamb shoulder contains more fat and connective tissue and is better treated as a separate recipe rather than assigned the leg timings in this guide.

Will the Lamb Fit Your Slow Cooker?

The slow cooker does not care how elegant the leg looked in the butcher’s case. It cares whether the lid can close.

  1. Before seasoning, place the lamb in the clean cooker insert.
  2. Make sure the thickest part sits below the rim.
  3. Leave room underneath for the onion, carrot and cooking liquid.
  4. Check that the lid closes flat without touching or pressing against the meat.
  5. Remove the lamb before preparing the recipe.

The lid must close flat.
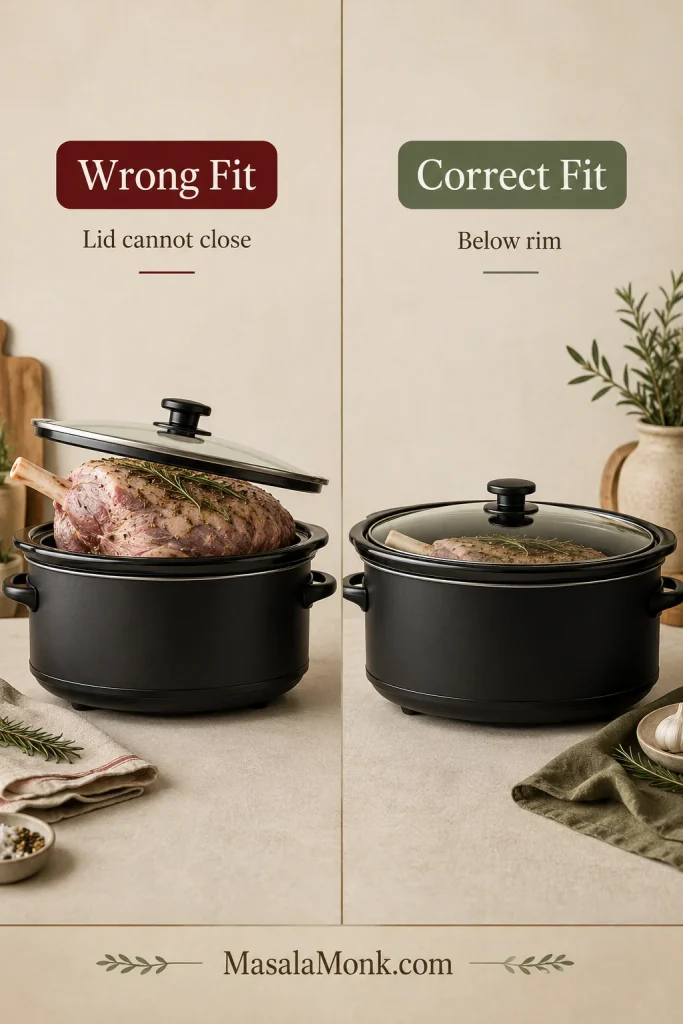
Split image comparing a lamb leg that prevents the slow-cooker lid from closing with a smaller leg below the rim and lid closed flat.
If the lid does not close flat, the cook becomes unpredictable.

The fit test takes less than a minute and is worth doing before your hands are covered in garlic and rosemary. A 5.5–6 litre / 6-quart oval cooker is a useful starting size for many half legs, but the appliance manual should take priority for unusually large cuts.

FoodSafety.gov also recommends checking the manufacturer’s guidance for large cuts. See its slow-cooker safety advice.

Slow Cooker Leg of Lamb Cooking-Time Guide

Two legs with the same weight can still finish at different times. These conservative planning windows bring together timings used for comparable joints. Begin checking at the stated time, then let the thermometer and fork make the final decision.

LambSettingFirst checkCommon working window
1 kg / 2.2 lb bone-in half legHigh3 hoursAbout 3½–4½ hours
1 kg / 2.2 lb bone-in half legLow6½ hoursAbout 7–8 hours
1.3–1.5 kg / 2.9–3.3 lb bone-in half legLow6½ hoursAbout 7–8 hours
1.3–1.5 kg / 2.9–3.3 lb rolled boneless legLow6 hoursAbout 6½–8 hours
1.3–1.5 kg / 2.9–3.3 lb rolled boneless legHigh3½ hoursAbout 4–5 hours
Approximately 2 kg / 4.4 lb legLow8 hoursAbout 8–10 hours

Use the full timing guide for planning, not final doneness.
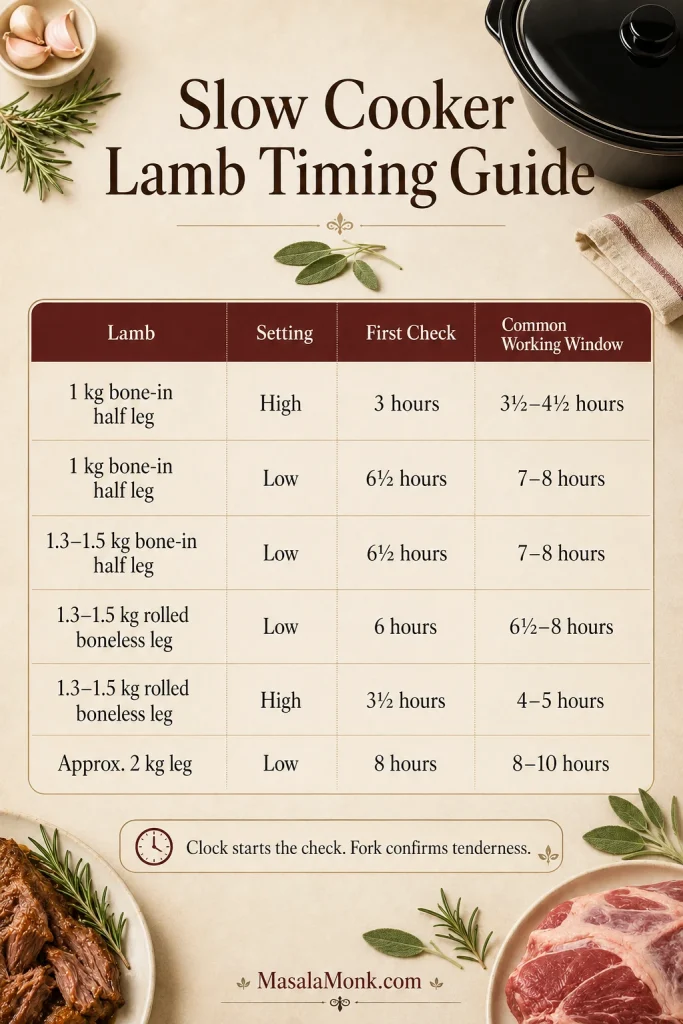
Slow cooker lamb timing guide table with weights, settings, first-check times and common working windows for leg of lamb.
The table tells you when to check, not when to stop cooking.

Planning around a meal time? Use the dinner and Sunday lunch schedules, or check the four-hour route for a smaller half leg.

Need to use high for a 1.3–1.5 kg bone-in half leg? Treat four hours as an early check rather than a promised finishing time. The thickest meat may need closer to five or six hours before the fork turns easily. Low remains the more forgiving route.

Use the clock to start checking. Confirm safety with the thermometer. Judge tenderness with the fork.

Three checks matter: time, temperature and tenderness.
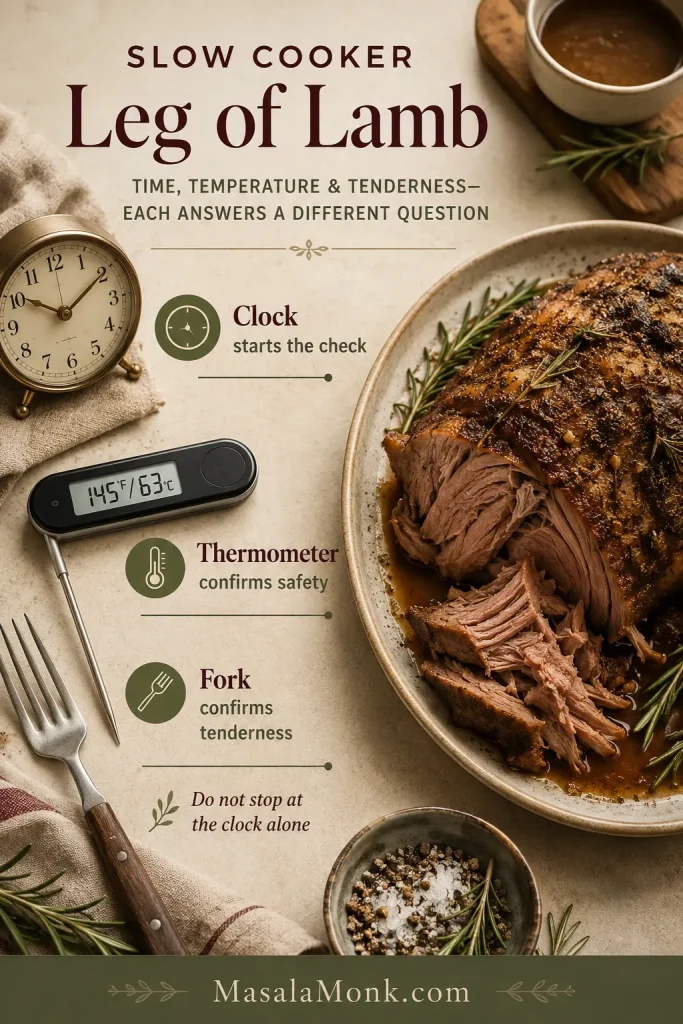
Instructional graphic with a clock, thermometer reading 145°F and 63°C, fork and cooked lamb showing time, safety and tenderness checks.
Time starts the check; temperature confirms safety; the fork confirms tenderness.

A safe temperature may arrive before the fork agrees. When the thickest meat still pushes back, the connective tissue needs more time to soften.

Can Leg of Lamb Be Ready in Four Hours?

Yes—for a fully thawed 1 kg half leg on high. Check the thickest section from three hours and probe more than one area when the joint is thick or uneven. A larger bone-in leg may still feel firm at four hours.

The four-hour route only suits a smaller half leg.
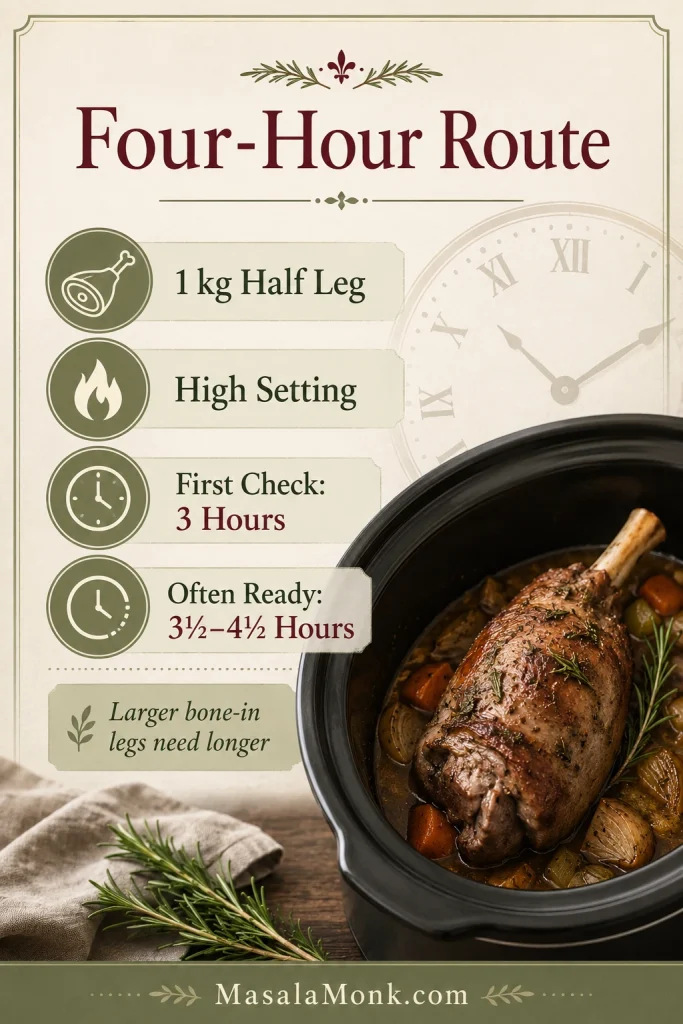
Four-hour route timing card showing 1 kg half leg, High setting, first check at 3 hours and often ready in 3.5 to 4.5 hours.
A four-hour route is realistic only for a smaller, fully thawed half leg on High.

Choose the setting according to the joint and time available:

  • Low: the most forgiving setting for a larger leg and the best default for a family meal.
  • High: useful for a smaller half leg, compact boneless roll or late start, but with a narrower finishing window.
  • Warm: for holding already-cooked food, not for beginning with raw lamb.

Cooking Schedules for Dinner and Sunday Lunch

Serving planSuggested approach
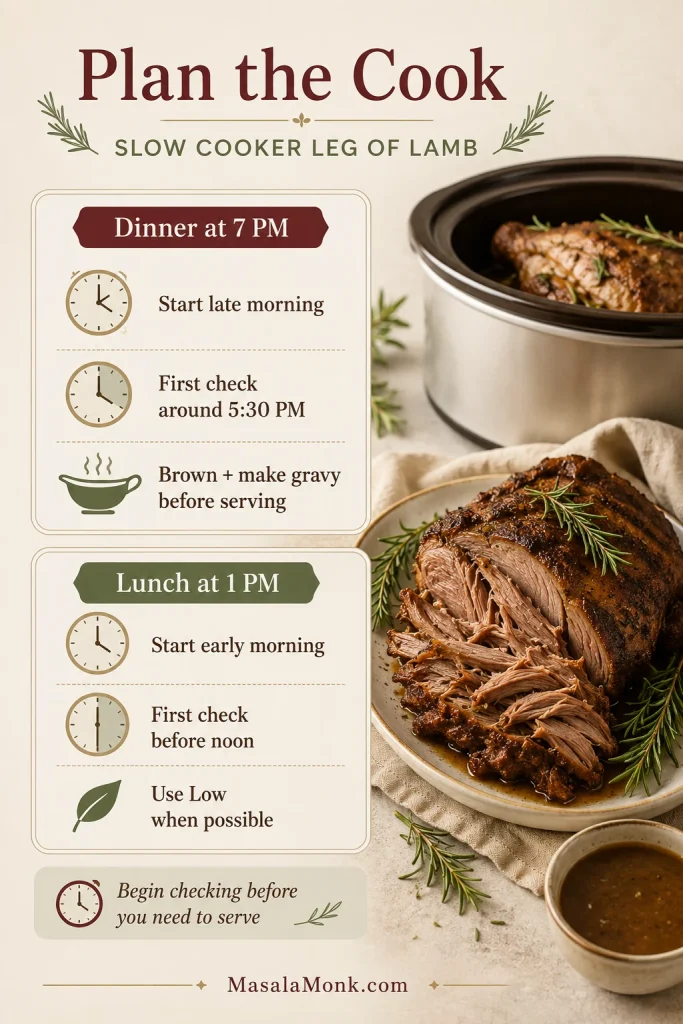
Dinner at 7 p.m.For the main recipe joint, start on low between about 10:30 and 11:30 a.m. Check from around 5:30–6 p.m., then brown and finish the gravy shortly before serving.
Lunch at 1 p.m.Use a smaller half leg on high, or cook the lamb the previous day and reheat it gently.
Make it the previous dayCook until tender, cool promptly and refrigerate with some cooking juice. Reheat covered before restoring the browned surface.
Cook overnightReserve this for a larger leg whose low-setting window suits the time available. A small, lean joint may become soft but dry during an extreme overnight cook.
Schedule board for slow cooker leg of lamb showing dinner at 7 PM and lunch at 1 PM planning steps.
Plan backwards from the meal and leave time for checking, browning and gravy.

If the lamb becomes tender early: remove it from the cooker. If serving soon, keep it safely hot; if the wait will be longer, cool it promptly and refrigerate it with some cooking juice. Reheat and brown it shortly before serving.

For the previous-day route, cover the lamb and reheat it in a 163°C / 325°F oven until the centre reaches 74°C / 165°F. Uncover and increase the heat briefly to restore the browned surface, then rest the meat while warming the gravy separately.

Have a safe plan if the lamb finishes early.
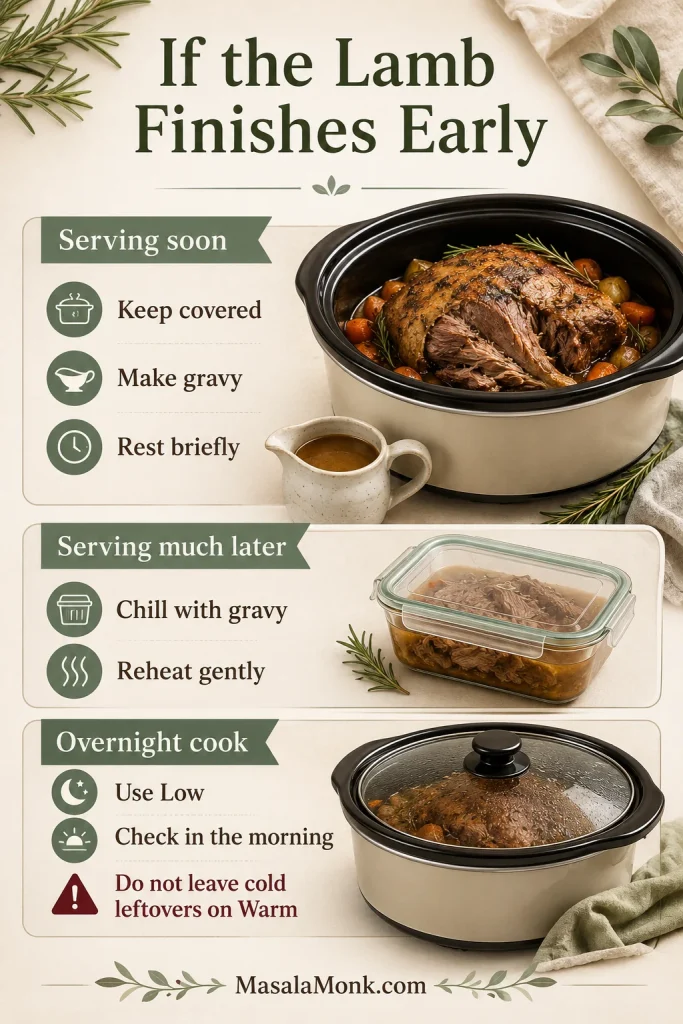
Decision guide showing what to do if slow cooker lamb finishes early, including keeping covered, chilling with gravy and reheating gently.
Serve soon, or chill with juices and reheat safely when the wait is longer.

How Much Liquid Does Leg of Lamb Need?

During cooking, the slow cooker will usually create considerably more liquid than you put into it. The lamb should therefore sit above most of the stock rather than disappear into it.

  • Little or no added liquid gives concentrated juices and a more roast-like result, but may leave too little for a generous gravy.
  • A moderate amount gives enough cooking juice for gravy without turning the dish into a stew. The main recipe uses this middle route.
  • A large amount creates a wetter, more fully braised result.

Enough liquid for gravy is not the same as submerging the lamb.
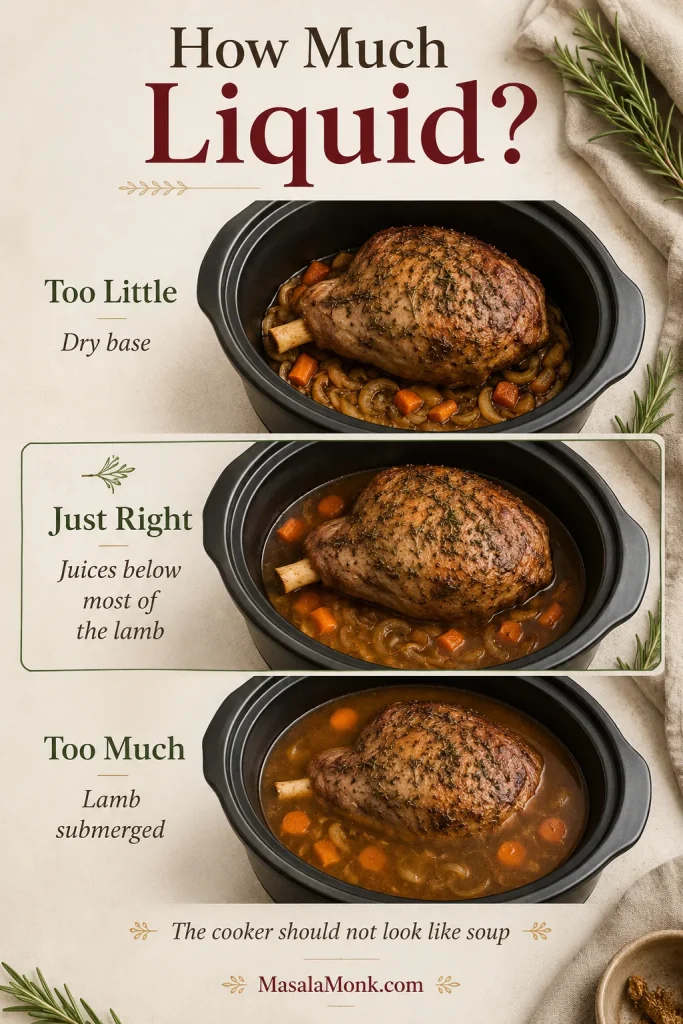
Three-panel liquid guide showing too little liquid, just-right liquid below most of the lamb and too much liquid submerging the lamb.
Use enough liquid for gravy, but keep most of the lamb above the juices.

A larger-than-expected pool of cooking juice is normal. Strain it, remove the fat and reduce it before adding cornflour or cornstarch.

Too much liquid after cooking? See how to defat, reduce and thicken the juices.

How to Tell When Slow-Cooked Lamb Is Done

Temperature answers the safety question. The fork tells you what the meat will feel like on the plate.

This slow-cooker version is about fork-tender lamb, not pink carving slices.
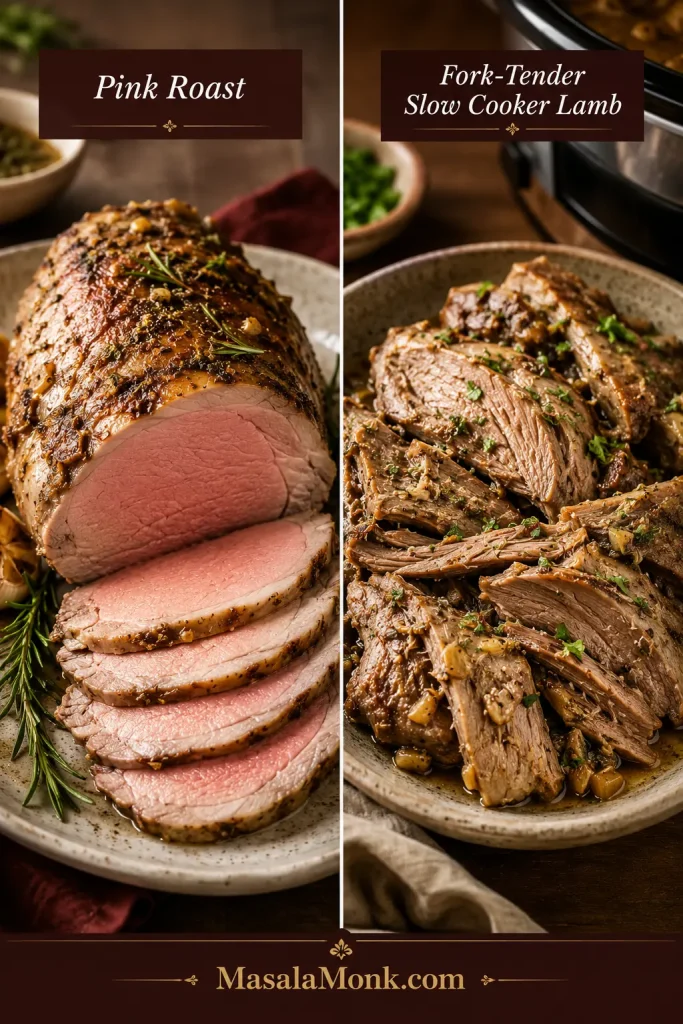
Split image comparing pink sliced roast leg of lamb with fully cooked fork-tender slow cooker lamb.
Slow-cooker lamb is fully cooked and fork-tender, not a pink roast for neat slices.
Digital thermometer inserted into the thickest part of a cooked leg of lamb, showing 145°F and 63°C while avoiding the bone.
Probe thick meat away from bone so the reading is useful.

Temperature vs Texture

StageWhat you noticeResult
Firm but safely cookedThe meat slices cleanly and pushes back against the forkSuitable for firm slices
TenderThe fork enters easily but the leg still holds togetherSoft carved slices
Easy to separateThe fibres part with little pressureFork-tender serving pieces
Dry and fibrousThe meat separates but feels cottonyCooked beyond its best point

Doneness is a texture journey, not a single moment.
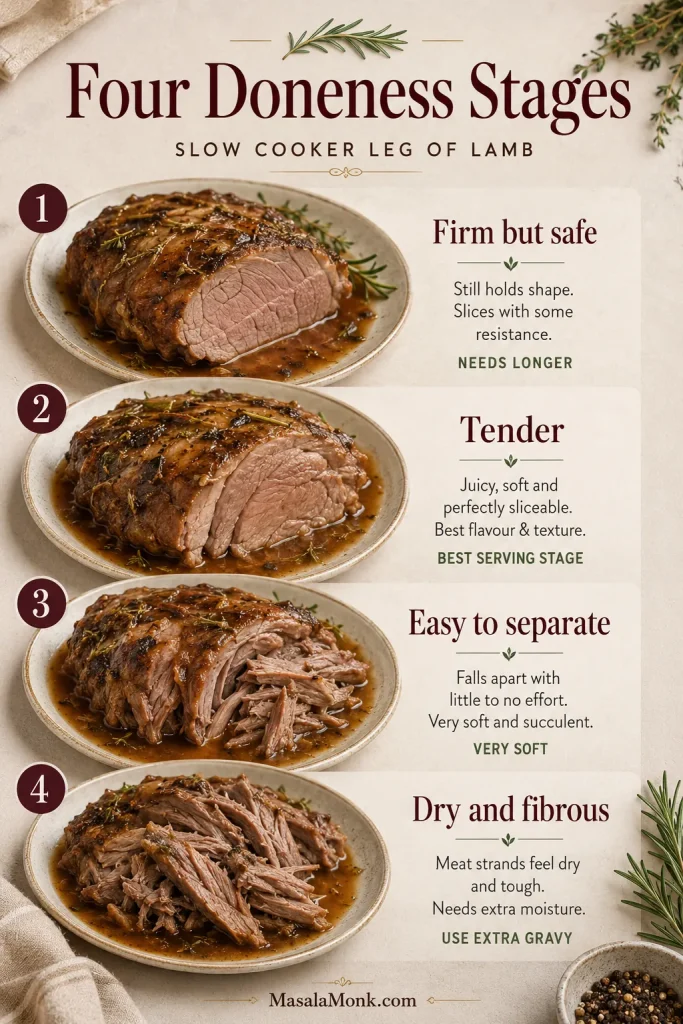
Four-stage guide showing slow cooker lamb as firm but safe, tender, easy to separate, and dry and fibrous.
Safe lamb is not always tender; keep cooking until the texture matches your goal.

Most slow-cooker cooks are aiming for the third row: lamb that still looks like a roast on the tray but separates easily when served.

Place the thermometer in the thickest meat without touching the bone or sitting inside a large seam of fat. Whole lamb roasts should reach at least 63°C / 145°F and rest for at least 3 minutes. See the FoodSafety.gov safe-temperature chart for current official guidance.

Fork Tenderness Cues

If the fork still pushes back, dinner is not ruined. The lamb is usually asking for more time, not a rescue operation.

By the time the fork turns easily, the garlic has mellowed, the rosemary has scented the cooking juices and the onions have softened into the base of the gravy. The lamb may still look pale, but most of the flavour work is already done.

The fork test tells you what the thermometer cannot.
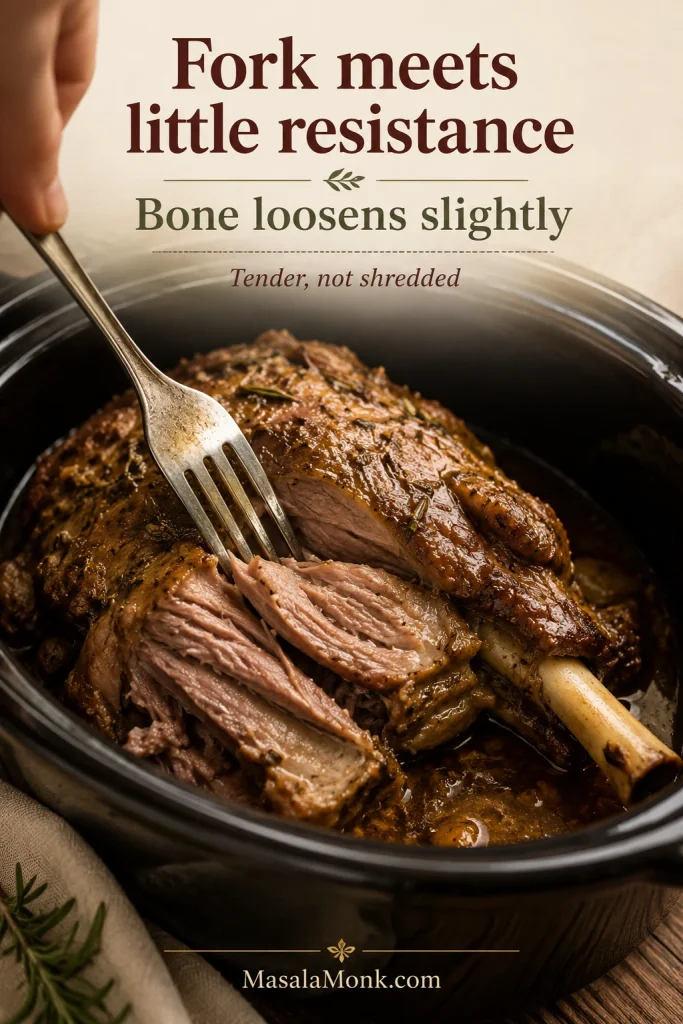
Fork twisting gently into slow-cooked leg of lamb near the bone, with tender meat separating in broad pieces.
The best texture separates in broad tender sections, not dry strands.

Brown the Lamb and Make the Gravy

When the lid first comes off, the aroma may promise roast lamb before the surface looks the part. That is normal. The slow cooker has done the tenderising; the oven finish supplies the colour.

Do not panic if the lamb looks pale when the lid lifts.
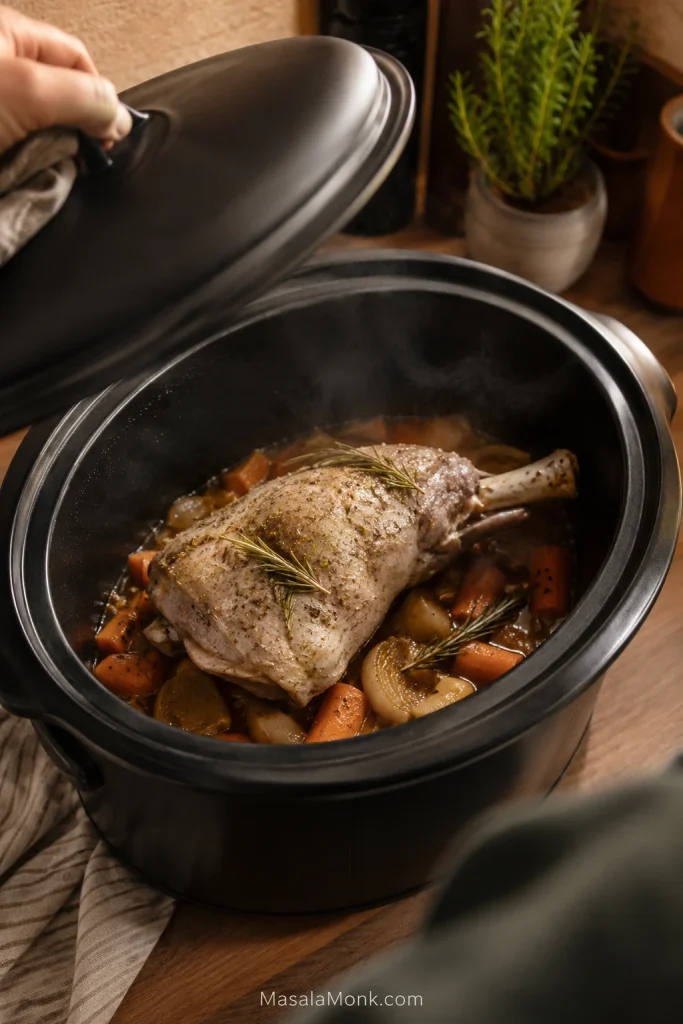
Hand lifting the lid of a slow cooker with a pale cooked bone-in leg of lamb over onions, carrots, rosemary and cooking juices.
Pale lamb from the cooker can still be tender; browning supplies the colour later.

Browning changes the finish, not the tenderness.
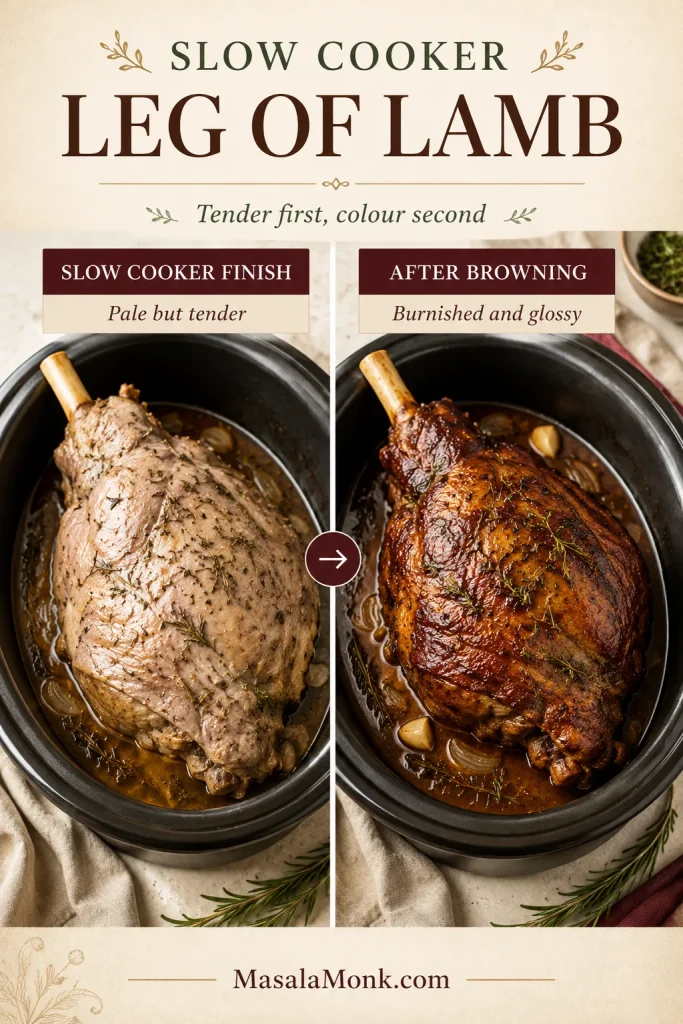
Split image showing pale tender slow cooker leg of lamb before browning and burnished glossy lamb after browning.
Tenderness comes from the slow cooker; roast-style colour comes from finishing heat.

Sear First or Brown Afterwards?

Searing first adds browned flavour to the cooking juices, but the crust softens beneath the lid. Browning afterwards gives the most visible colour and avoids handling a heavy raw leg in a hot pan.

  • Hot oven: brown at 220°C / 425°F for about 10–15 minutes.
  • Grill or broiler: use intense top heat for only a few minutes and watch continuously.
  • No oven available: serve the lamb directly from the cooker. It will remain pale and soft, but still taste good.

Jelly glazes contain sugar, so they can move quickly from glossy to burnt. Stop when the surface looks burnished and the edges begin to darken.

Make the Gravy

  1. Strain the cooking juices into a heatproof jug.
  2. Let the fat rise, then remove it with a gravy separator or large spoon.
  3. Taste the defatted liquid before adding any salt.
  4. Simmer it in a wide saucepan until the flavour is concentrated.
  5. Whisk in the cornflour or cornstarch slurry gradually, stopping when the gravy coats the back of a spoon.

Make the gravy in the right order.
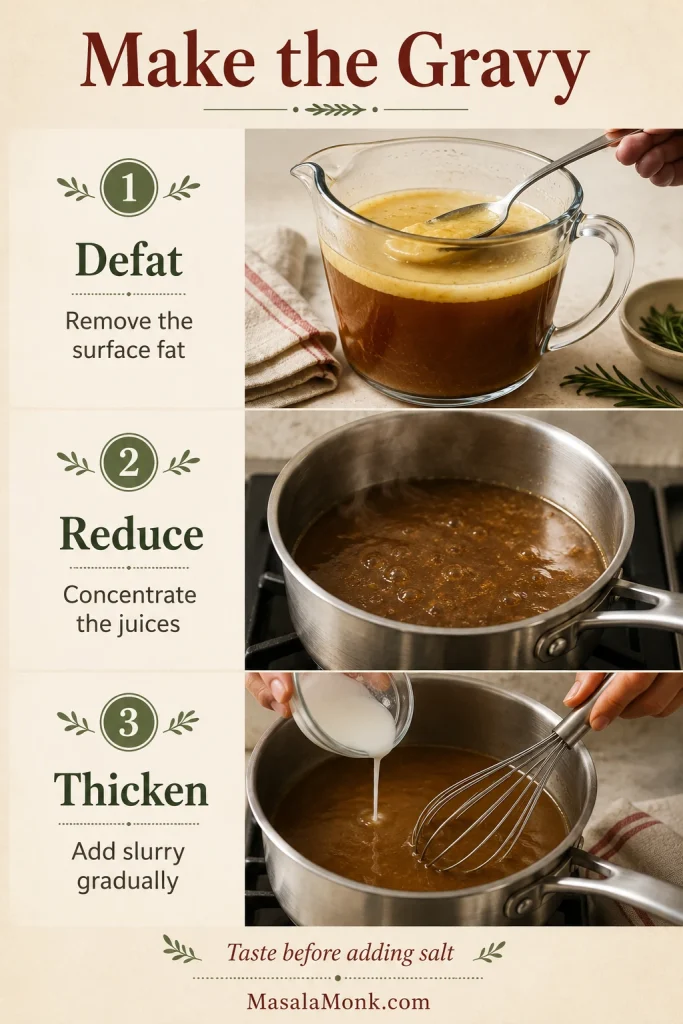
Three-step gravy guide showing cooking juices being defatted in a jug, reduced in a saucepan and thickened with slurry.
Defat, reduce and thicken in that order for smooth lamb gravy.

Defat, reduce, then thicken. Reducing first concentrates the flavour and helps prevent a gluey gravy—the same fix that works for a watery slow cooker beef stew.

If the juices look greasy, do not panic. That is rendered fat waiting to be separated—not a failed gravy.

Stop thickening while the gravy still pours.
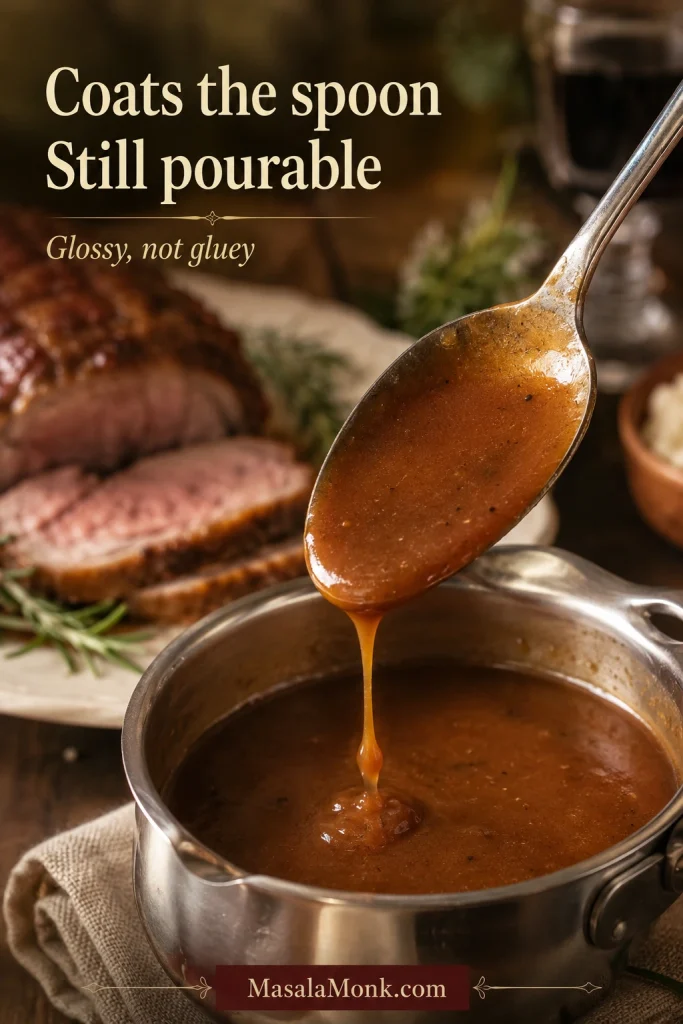
Spoon lifted from a saucepan of glossy brown lamb gravy, with gravy coating the spoon and dripping back into the pan.
Stop when the gravy coats the spoon while still pouring easily.

When to Add Potatoes and Carrots

  • Add them at the start for flavour. Onion and large carrot pieces beneath the lamb become very soft and enrich the cooking juices.
  • Add them around halfway for more shape. Cut large carrots, parsnips or waxy potatoes into even 4–5 cm / 1½–2 inch pieces and test the largest piece with a knife before serving.
  • Cook them separately for browned edges. Vegetables underneath the lamb cannot become crisp.

Choose soft slow-cooker vegetables or firmer roasted sides.
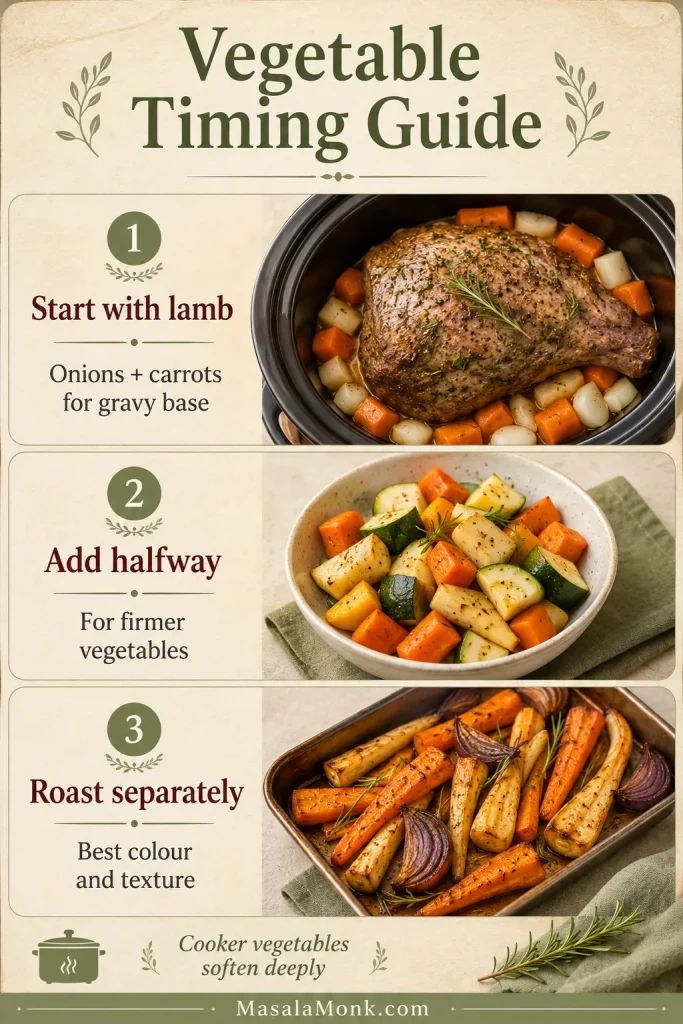
Vegetable timing guide showing onions and carrots with lamb, firmer vegetables to add halfway and roasted vegetables cooked separately.
Soft gravy vegetables go in early; firmer serving vegetables do better later or separately.

Dense potatoes can take longer than expected. Roast the vegetables separately when lunch needs to arrive on time; their doneness is much easier to control outside the slow cooker. These oven-roasted carrots can cook while the lamb browns and rests.

How to Serve Slow Cooker Leg of Lamb

This is not a roast that needs ceremonial carving. Once the bone lifts away, arrange the meat generously on a warm platter, spoon over enough gravy to make the surface shine and bring the remaining gravy separately so everyone can help themselves.

At the table, the work should feel finished: soft lamb in generous pieces, crisp sides around it and hot gravy passed separately.

This is the payoff: generous lamb, hot gravy and simple sides that make the slow cooking feel worth it.
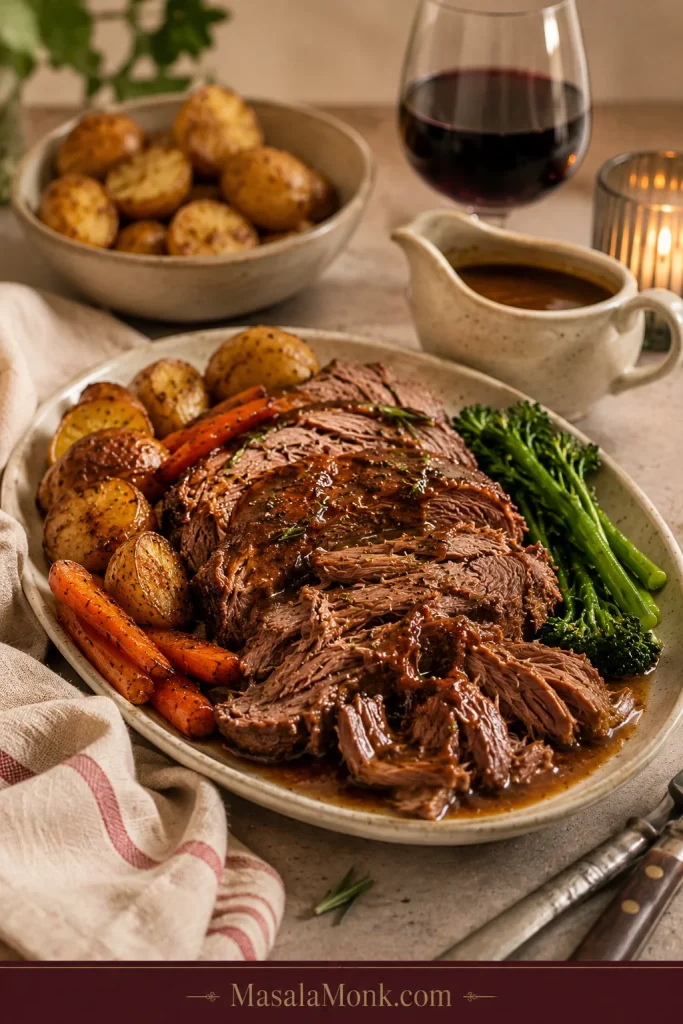
Slow cooker leg of lamb served in broad tender pieces with gravy, roast potatoes, carrots, green vegetables and extra gravy on the side.
At the table, the lamb should feel generous and easy to serve: broad tender pieces, hot gravy and simple sides that bring colour and bite.

Rich lamb and glossy gravy are at their best with something crisp, green or sharply dressed beside them. For a classic roast-dinner plate, add creamy mashed potatoes, green beans or peas and roasted carrots.

  • Crispy roast potatoes or lemon potatoes
  • Cauliflower cheese
  • Crisp eggless Yorkshire puddings
  • Mint sauce, yogurt-herb sauce or chimichurri
  • A bright cucumber or leafy salad
  • Herbed rice or couscous for a lighter meal

Three Ways to Finish It

Use the same salt, oil, vegetables and cooking liquid as the main recipe. These are flexible ways to change the flavour without turning the guide into three separate recipes.

  • Classic rosemary and redcurrant: use the recipe as written and brush the lamb with a thin layer of redcurrant jelly before browning.
  • Greek lemon and oregano: use 1 tablespoon chopped rosemary, 1½ teaspoons dried oregano and the finely grated zest of 1 lemon. Finish the gravy with a small squeeze of lemon.
  • Sumac, mint and yogurt: add 2 teaspoons sumac and 1 teaspoon dried mint to the garlic paste, then serve with yogurt, lemon and fresh herbs. A cool cucumber salad with dill and onion adds the crispness rich lamb needs.

One method can finish three ways.
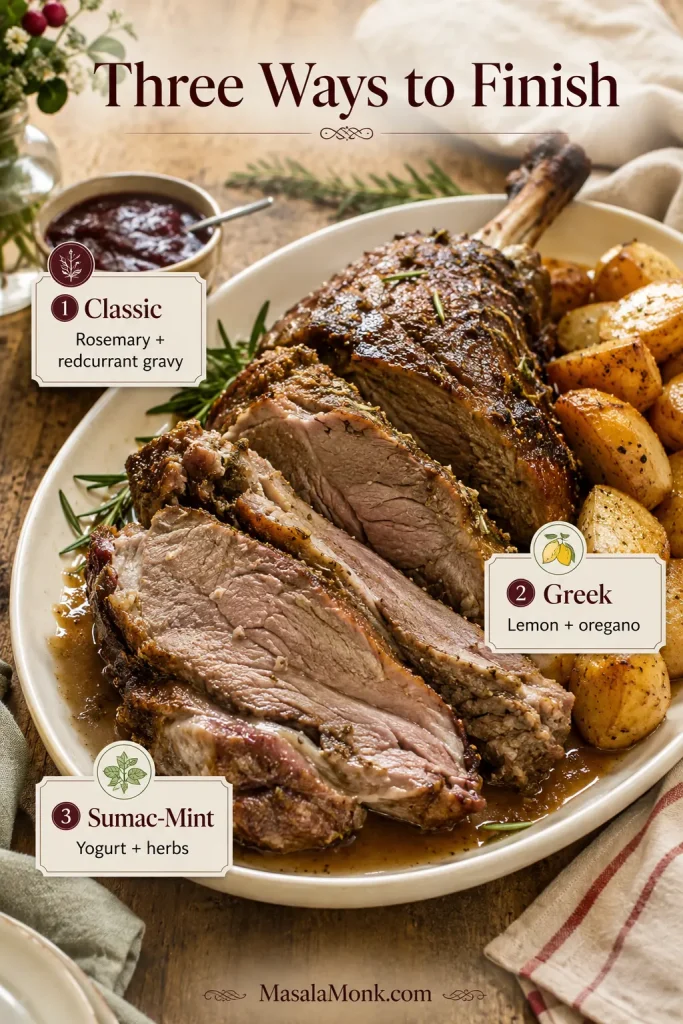
Serving platter of sliced slow cooker leg of lamb with gravy and labels for classic, Greek and sumac-mint finishing options.
Change the finish and garnish without changing the slow-cooker method.

Slow Cooker Leg of Lamb Troubleshooting

The Meat

The lamb is tough.
It has not softened enough. Continue cooking and check the thickest section again.

It is cooked but will not pull apart.
It has reached a sliceable stage. Cook it longer only when you want softer meat.

It is dry and fibrous.
A small or lean leg has cooked too long. Serve it with gravy and check it earlier next time.

The outside is soft but the centre is firm.
The joint is thick, cold or unevenly shaped. Continue cooking and probe more than one thick area.

The Finish

The surface is pale.
Slow cookers do not brown meat. Use a short oven or broiler finish.

The leg breaks during transfer.
It has become very tender. Support it from underneath and arrange the meat directly on the serving platter.

The Cooker, Vegetables and Gravy

The leg will not fit.
The cooker is too small or the bone is too long. Use a half leg or ask a butcher to shorten the shank.

There is too much cooking juice.
The lamb released substantial moisture. Reduce the liquid before thickening it.

The gravy is greasy.
Rendered fat remains in the liquid. Separate it before reducing or thickening.

The vegetables are mushy.
Serving vegetables were added too early. Add them later or cook them separately.

Firm meat needs longer. Soft but dry meat has already had enough.

Use the texture first, then choose the fix.
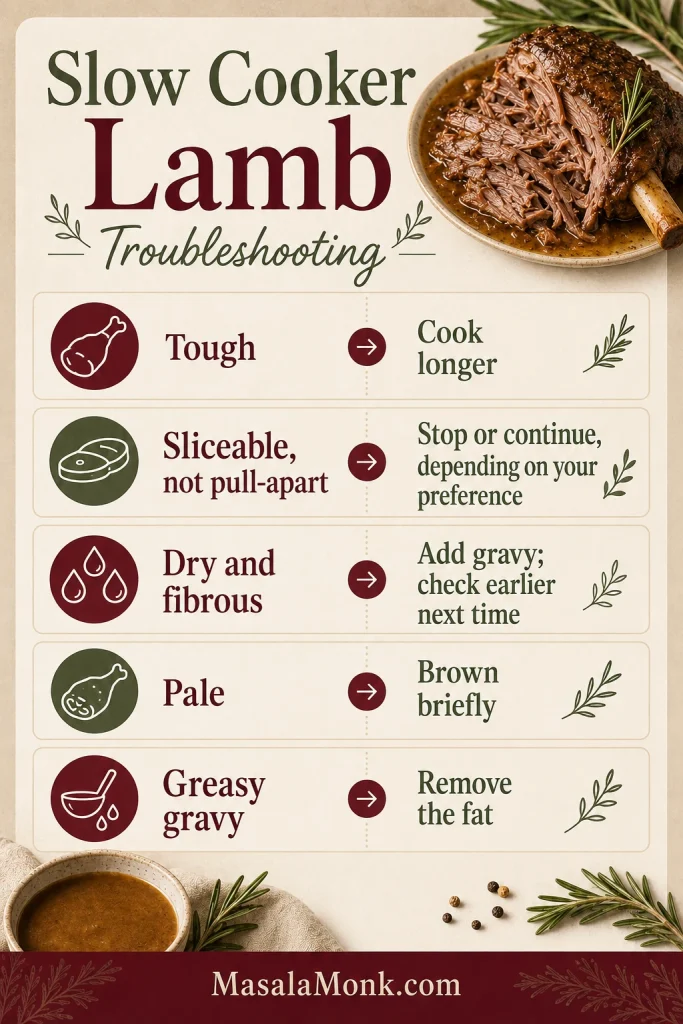
Troubleshooting guide for slow cooker leg of lamb showing tough meat, sliceable but not pull-apart meat, dry meat, pale lamb and greasy gravy with the matching fixes.
Use the texture first. Tough lamb needs more time, dry lamb needs gravy, pale lamb needs browning, and greasy gravy needs the fat removed.

Problem solved? Go back to the recipe steps or continue to storage and reheating.

Storage, Freezing and Reheating

Keep a little gravy with the leftovers. It protects the meat as it reheats and makes tomorrow’s dinner much more forgiving.

Keep the storage plan simple: chill with juices, freeze in portions and reheat gently.
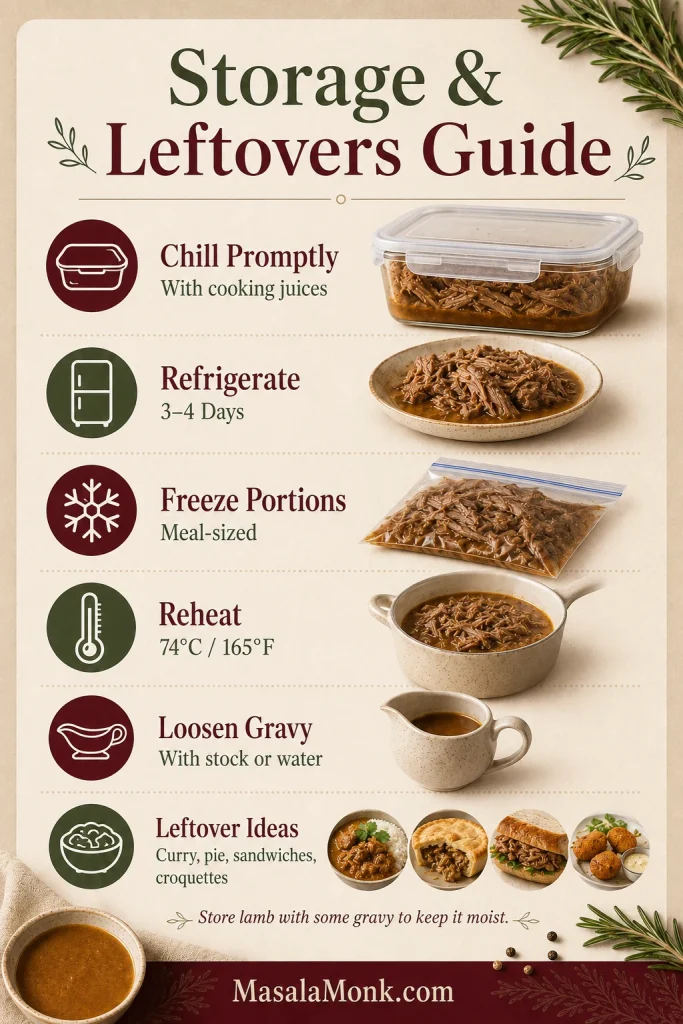
Storage and leftovers guide for slow cooker leg of lamb showing refrigeration with cooking juices, freezing portions, reheating to 165°F, loosening gravy and using leftovers.
Store lamb with some gravy or cooking juices, then reheat gently so the leftovers stay moist instead of drying out.

Cool the lamb promptly and refrigerate it in shallow airtight containers within two hours of cooking. Use refrigerated leftovers within 3–4 days.

Freeze meal-sized portions with a little gravy for around 2–3 months for the best quality. Thaw them safely in the refrigerator.

Reheat the lamb in a saucepan with gravy, in a covered oven dish or in microwave-safe portions until it reaches 74°C / 165°F in the centre. Add a splash of stock or water if the gravy has become very thick.

Use the hob, oven or microwave for refrigerator-cold leftovers rather than warming them slowly in the slow cooker.

Ideas for Leftover Lamb

  • Lamb curry with some leftover gravy stirred into the sauce
  • Turn chopped lamb and gravy into shepherd’s pie. The gravy-first, mash-second approach in our slow cooker cottage pie guide works here too—use cooked lamb instead of beef.
  • Rolls or sandwiches with gravy, mint sauce, crisp lettuce or sharp pickles
  • Lamb tacos with yogurt and herbs
  • Lamb orzo or tomato-based pasta
  • Mix chopped lamb with mashed potato and turn it into crisp homemade croquettes.

Frequently Asked Questions

Will slow-cooker leg of lamb stay pink?

Not with this method. It is designed for fully cooked, fork-tender lamb. Use a conventional oven-roasting method when you want a pink or medium-rare centre.

What if I want slices rather than pull-apart lamb?

Remove the lamb at the tender stage, when the fork enters easily but the joint still holds together. It must still reach the safe minimum temperature and complete the required rest.

Can I put frozen lamb in the slow cooker?

No. Thaw the lamb completely before slow cooking so the centre heats predictably and safely.

Can I cook the lamb the day before?

Yes. Refrigerate the cooked lamb with some of its juices, then reheat it covered until the centre reaches 74°C / 165°F. Brown the surface only after the meat is hot.

Can I cook leg of lamb without added liquid?

Some joints release enough juice to cook with little or no added liquid, but the result depends on the lamb and the appliance. The main recipe uses a moderate amount because it provides a more dependable quantity of cooking juice for gravy.


What size leg did you cook, and when did it become tender? Share the setting too—and your slow-cooker size if you know it. Those details may help the next person cooking the same joint.

When the fork meets almost no resistance, lift the lamb carefully, give it a little colour and turn the juices into gravy. That is the moment an expensive leg stops feeling risky and starts feeling like dinner is handled.
Back to top

Posted on Leave a comment

Chicken Souvlaki Recipe: Juicy Greek Skewers with Grill, Oven & Air Fryer Methods

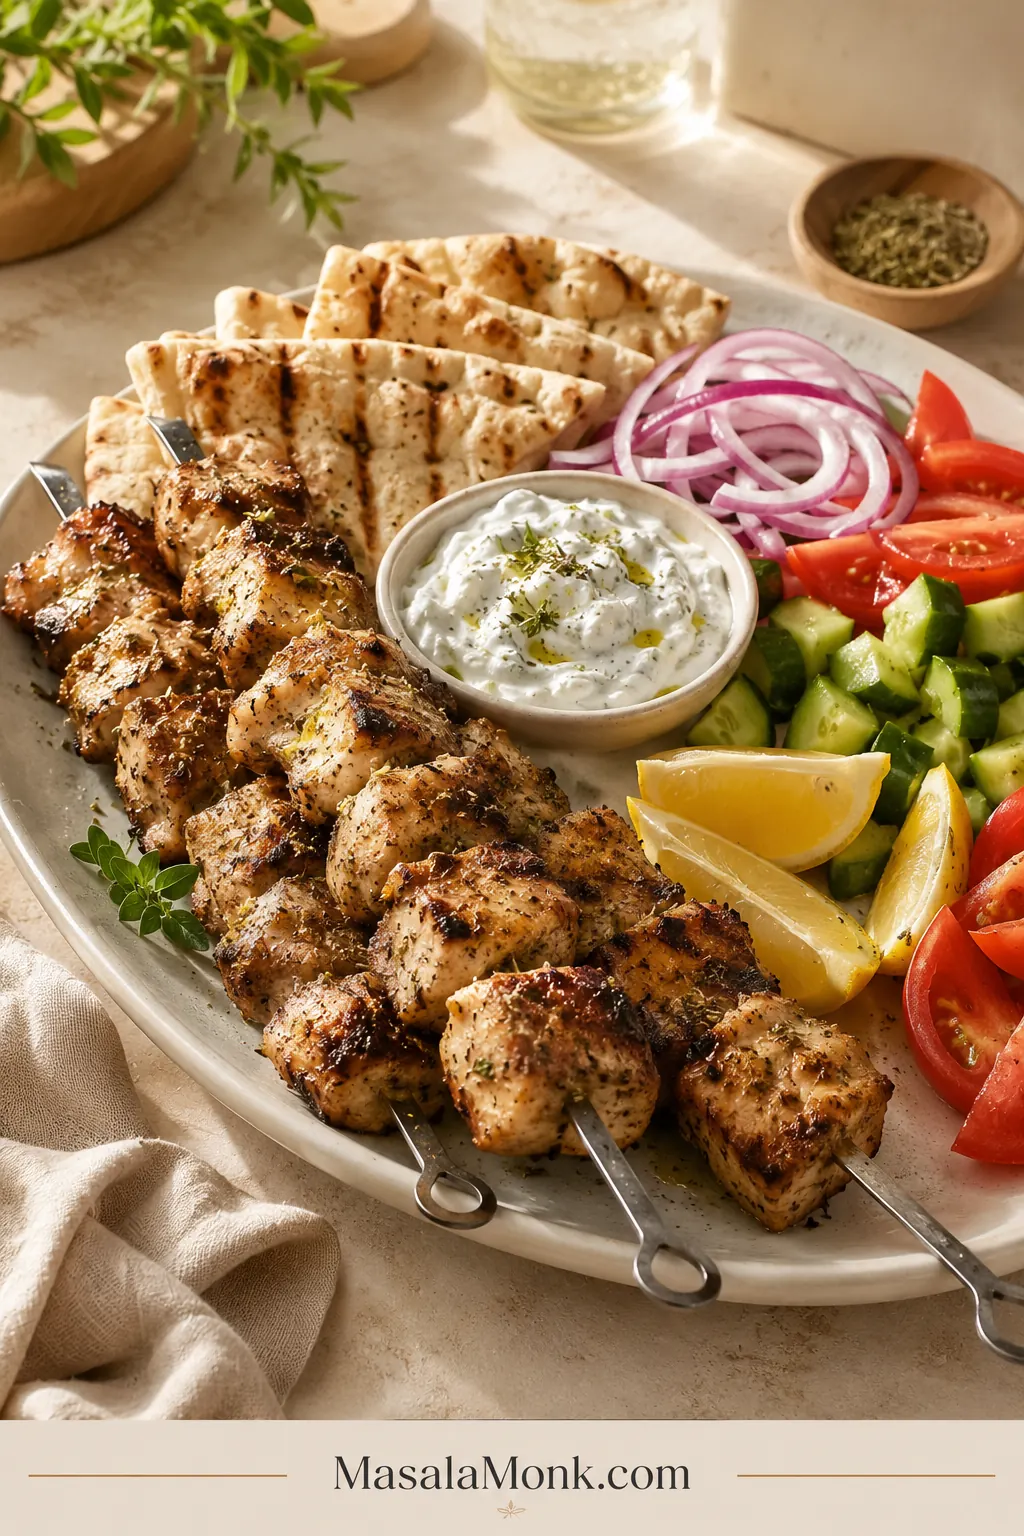
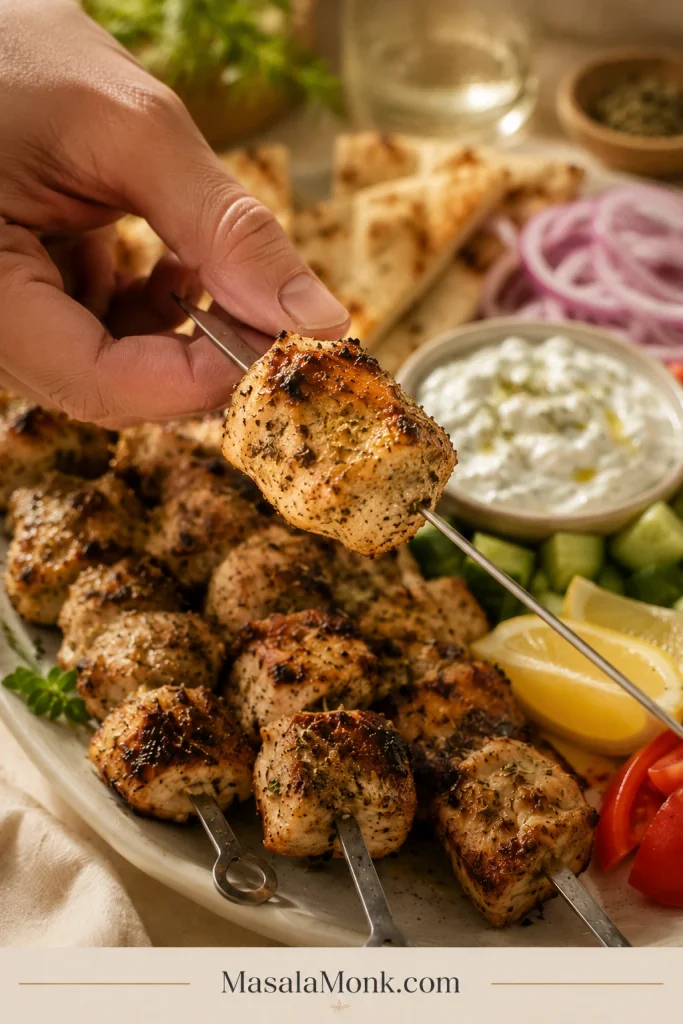
Grilled chicken souvlaki skewers on a cream platter with warm pita, thick tzatziki, cucumber, tomato, red onion and lemon wedges.

The first piece of chicken rarely makes it to the serving plate. It comes off the skewer hot, lemony and garlicky, with oregano clinging to the edges and just enough char to make waiting for the pita difficult.

That is the result this chicken souvlaki recipe is built around: juicy in the centre, browned in scattered patches, and bright without tasting sharply acidic. Boneless thighs are the most forgiving starting point. Chicken breast works too, but it needs a shorter marinade and an earlier temperature check.

A hand lifts a browned chicken piece from a souvlaki skewer above a platter with pita, tzatziki and fresh vegetables.
Let the first piece fall back over the platter, where its juices can mingle with the lemon and vegetables instead of soaking the pita.

Start here

The version to make first

Use 750 g / 1 lb 10 oz boneless chicken thighs, cut into pieces around 3 cm / 1¼ inches thick. Marinate for 1 to 4 hours, then cook over medium-high heat until the edges are browned and the thickest piece reaches 165°F / 74°C.

The ingredient list is short. What matters is keeping the pieces even, the lemon restrained, the heat strong and taking the skewers off on time. Thighs give you more time to build colour; breast needs to leave the heat sooner.

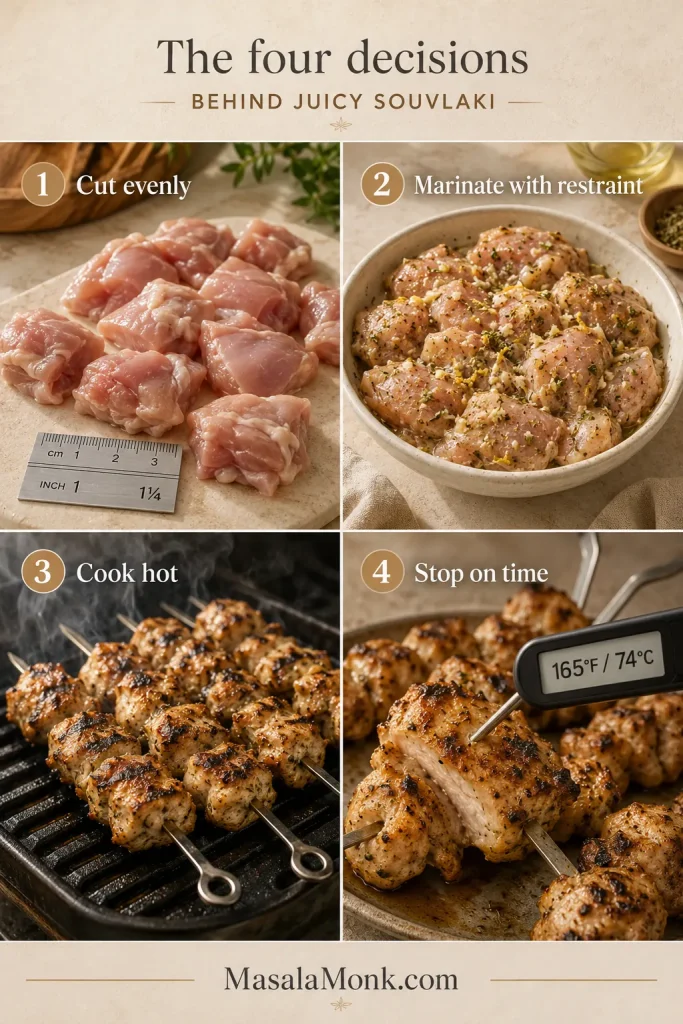
Remember: Cut evenly, marinate with restraint, cook hot and stop on time.

Four-panel infographic showing evenly cut chicken, restrained lemon-oregano marinade, strong grill heat and a thermometer checking doneness.
Even pieces, a light coating and strong heat give the chicken time to brown before the centre dries.

Make it now

Chicken Souvlaki Recipe

The main method uses chicken thighs and an outdoor grill. Broiler, oven, air fryer and stovetop adjustments follow the grill instructions.

Recipe at a glance

  • Serves: 4 as a pita or plated meal
  • Yield: About 6 medium skewers
  • Preparation: 20 minutes
  • Marinating: 1 to 4 hours
  • Grilling: About 8 to 12 minutes
  • Piece size: Around 3 cm / 1¼ inches
  • Doneness: 165°F / 74°C

Equipment that helps most

  • Six flat metal skewers, or bamboo skewers soaked for at least 30 minutes
  • Instant-read food thermometer
  • Wire rack and rimmed sheet pan for oven or broiler cooking

Ingredients

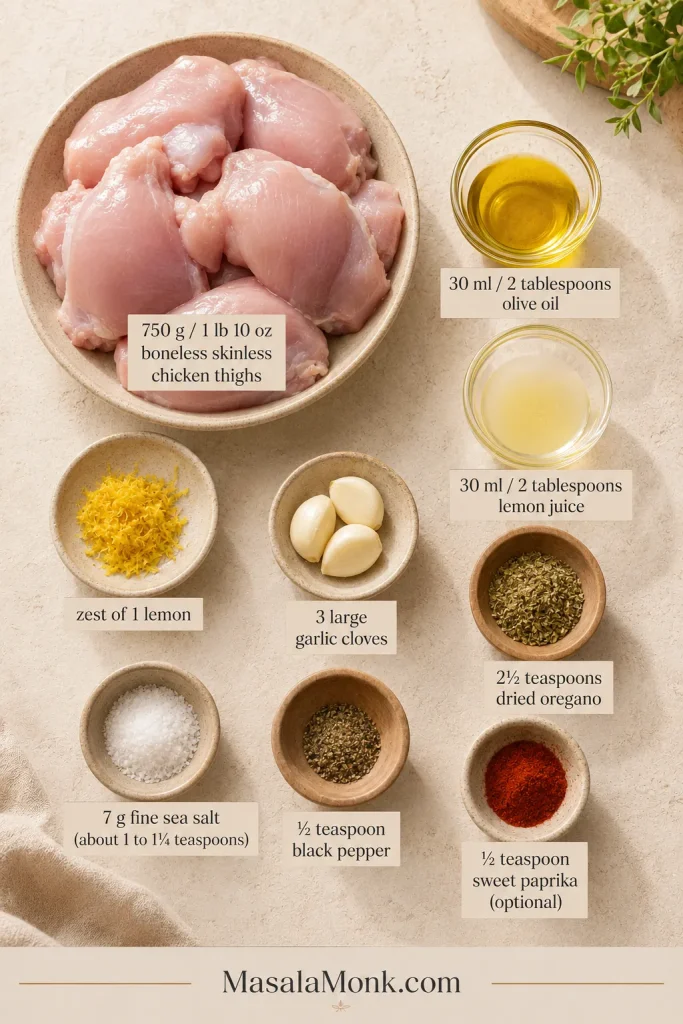
Overhead arrangement of chicken thighs, olive oil, lemon, garlic, dried oregano, salt, black pepper and optional paprika.
To make chicken souvlaki marinade, grate the lemon before juicing it; an intact lemon is easier to hold and preserves more fragrant zest.

For the chicken and marinade

  • 750 g / 1 lb 10 oz boneless, skinless chicken thighs
  • 30 ml / 2 tablespoons extra-virgin olive oil
  • 30 ml / 2 tablespoons fresh lemon juice
  • Finely grated zest of 1 lemon
  • 3 large garlic cloves, finely grated or minced
  • 2½ teaspoons dried oregano
  • 7 g fine sea salt, approximately 1 to 1¼ teaspoons depending on the salt
  • ½ teaspoon freshly ground black pepper
  • ½ teaspoon sweet paprika, optional

For serving

  • 4 soft Greek-style pitas
  • 120 to 160 g / about ½ to ⅔ cup thick tzatziki (opens in a new tab)
  • 1 medium tomato, sliced or chopped
  • ½ small red onion, very thinly sliced
  • Lemon wedges
  • Chopped parsley or fresh oregano, optional
  • Cooked fries, shredded lettuce or crumbled feta, optional

Instructions

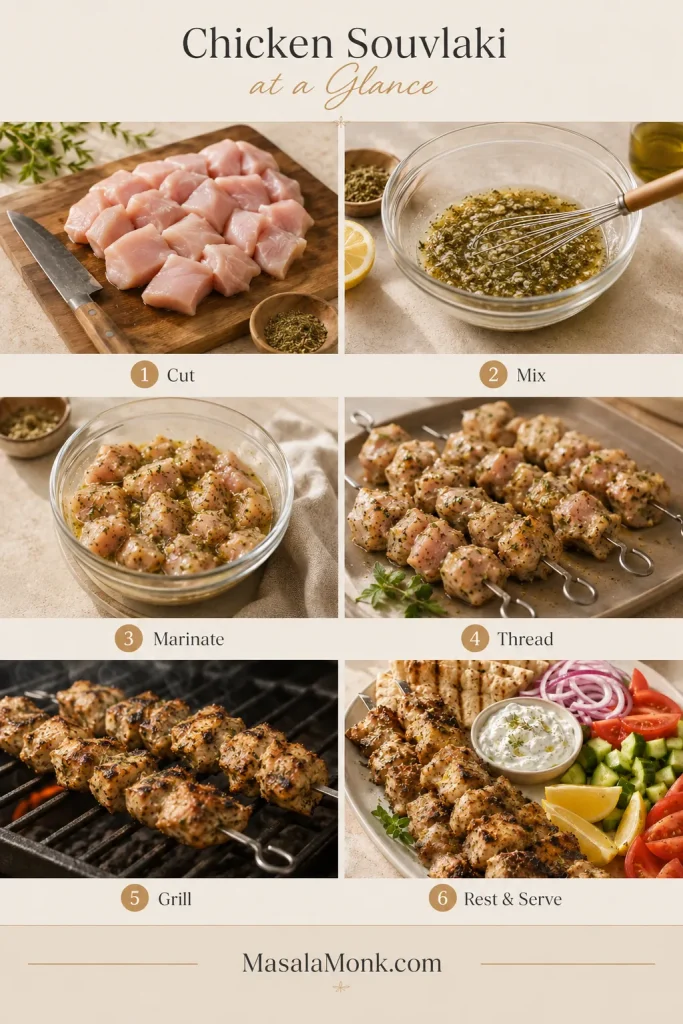
Six-step sequence showing chicken being cut, marinated, threaded onto skewers, grilled, rested and served.
Prepare the pita, tzatziki and vegetables before cooking, because the skewers move quickly once they reach strong heat.

Prepare and thread

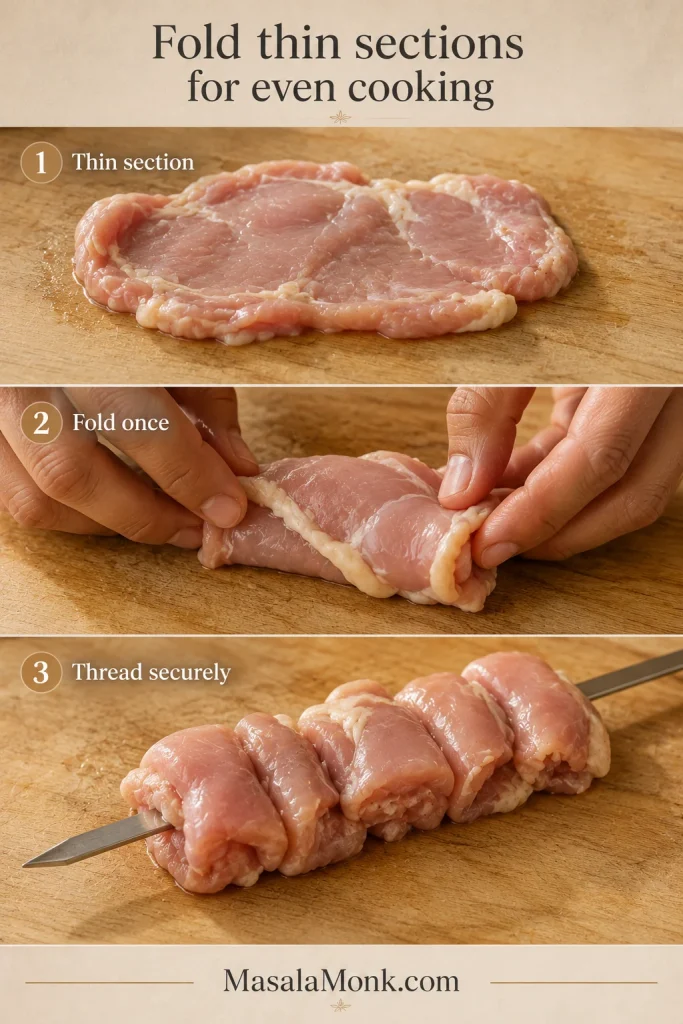
1. Cut the chicken. Trim away large pockets of fat and loose pieces. Cut the thighs into pieces around 3 cm / 1¼ inches thick. Fold thin sections over themselves so they cook at a similar rate. Similar thickness matters more than tidy cubes.

2. Mix and check the marinade. Whisk together the olive oil, lemon juice, zest, garlic, oregano, salt, pepper and optional paprika. Before adding the chicken, taste a little of the marinade. It should be well seasoned, clearly lemony and strongly herbal.

3. Marinate. Add the chicken and turn until every piece is coated. Cover and refrigerate for 1 to 4 hours.

4. Thread and preheat. Let excess marinade drip back into the bowl, then thread five or six pieces onto each skewer. Preheat the grill with the lid closed to medium-high, approximately 400–450°F / 205–230°C on its built-in thermometer. Clean and lightly oil the grate.

Cook, check and serve

5. Begin grilling. Place the skewers over direct heat. They should sizzle immediately. Cook for 2 to 3 minutes before making the first turn.

6. Turn and brown. Continue cooking for approximately 8 to 12 minutes in total, turning every 2 to 3 minutes. Move the skewers to a cooler area whenever dripping oil causes flames.

7. Check and rest. Begin checking the thickest piece after 7 to 8 minutes. Remove the skewers when the centre reaches 165°F / 74°C, then rest for 3 to 5 minutes.

8. Finish and serve. Add a squeeze of lemon, a small drizzle of olive oil and a pinch of oregano. Serve with warm pita, tzatziki, tomato and red onion.

Using chicken breast?

Replace the thighs with an equal weight of boneless, skinless breast. Keep the pieces around 3 cm / 1¼ inches thick, marinate for 30 to 60 minutes, and begin checking 2 to 3 minutes earlier. Put breast and thigh on separate skewers so each can leave the heat when ready.

Other cooking methods at a glance

MethodHeatStarting rangeWhat matters most
BroilerHigh8 to 12 minutesKeep the pan about 5 to 6 inches below the element
Oven425°F / 220°C10 to 15 minutes depending on cutFinish briefly under the broiler if the chicken needs colour
Air fryer390–400°F / 200–205°C9 to 14 minutes depending on cutUse short skewers and leave room for air to circulate
Grill pan or skilletMedium-high7 to 12 minutes depending on cutCook in batches with space between the pieces

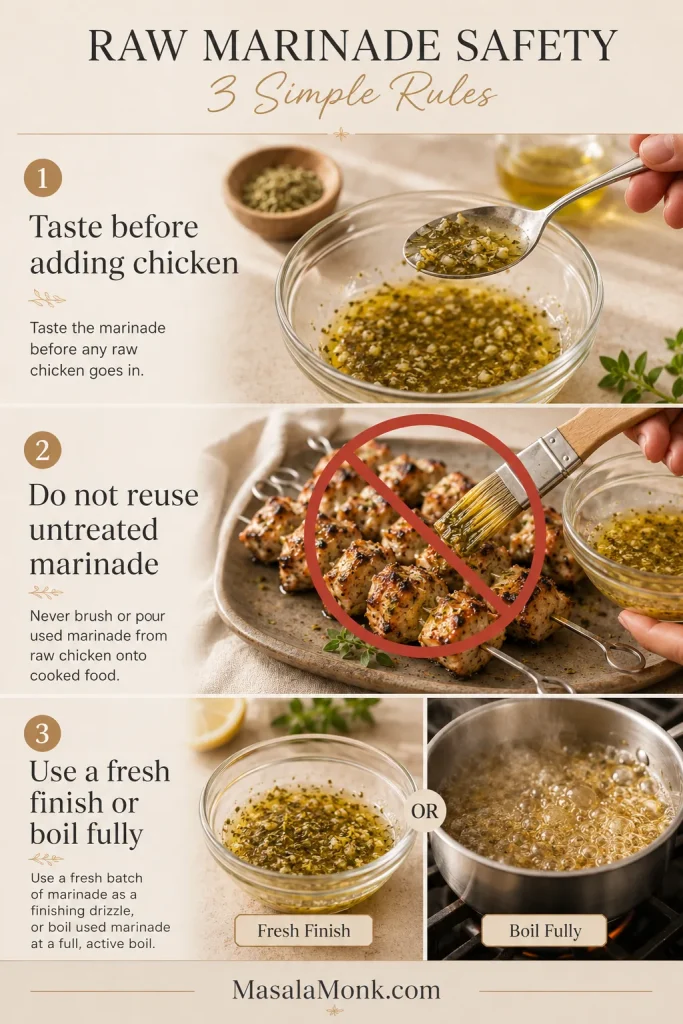
Raw-marinade safety

Do not taste the marinade after raw chicken has entered the bowl. Do not brush used marinade over nearly cooked or finished chicken unless it has first been brought to a full boil. This follows USDA poultry-marination guidance (opens in a new tab). Fresh lemon, olive oil and oregano make a simpler finishing mixture.

Three-panel safety infographic showing marinade tasted before raw chicken, used marinade kept away from cooked food, and safe fresh or boiled finishing options.
Set aside any finishing mixture before raw chicken enters the bowl. Afterward, discard the used marinade unless it is brought to a full boil.

Chicken Souvlaki Guide

Use the contents below to jump to the chicken cut, marinade, cooking method, serving idea or troubleshooting help you need.

What Is Chicken Souvlaki?

Chicken souvlaki is made from small pieces of marinated chicken threaded onto skewers and cooked quickly over strong heat. It can be eaten directly from the skewer, served on a plate, or tucked into warm pita with sauce and vegetables.

You may also see it called Greek chicken skewers or Greek chicken kebabs. Names and serving styles vary across Greece and Cyprus; here, souvlaki means lemon-oregano chicken cooked on small skewers and served directly or in pita.

Souvlaki differs from gyro, which is cooked as a larger stack on a vertical rotisserie and shaved into slices.

Chicken Thighs or Chicken Breast?

Thighs stay juicy longer, while breast cooks leaner and faster and gives you less room to miss the moment.

Chicken cutWhat it does bestMarinating timeWatch for
Boneless thighsStay juicy and tolerate stronger heat1 to 4 hoursUneven fatty or folded sections
Chicken breastGives a leaner, cleaner-tasting skewer30 to 60 minutesDrying before deep colour develops
Cooked chicken thigh and chicken breast souvlaki shown side by side and cut open to compare their interiors.
Choose thighs when you want more flexibility at the table; breast is leaner but rewards precise timing and prompt serving.

Why thighs are the easiest first choice

Chicken thighs cope well with the strong heat needed for browning. Their fuller flavour also stands up to the citrus and oregano. Trim large pockets of fat and loose flaps, but leave the smaller seams that help the meat remain succulent.

How to keep chicken breast juicy

Cut breast into pieces around 3 cm / 1¼ inches thick and marinate for only 30 to 60 minutes. Begin checking early. The centre should remain moist and opaque, with modest browning around the edges.

Keep breast and thigh on separate skewers. Breast may be ready while thicker thigh pieces still need another minute.

Chicken Souvlaki Marinade: Lemon, Oregano and Timing

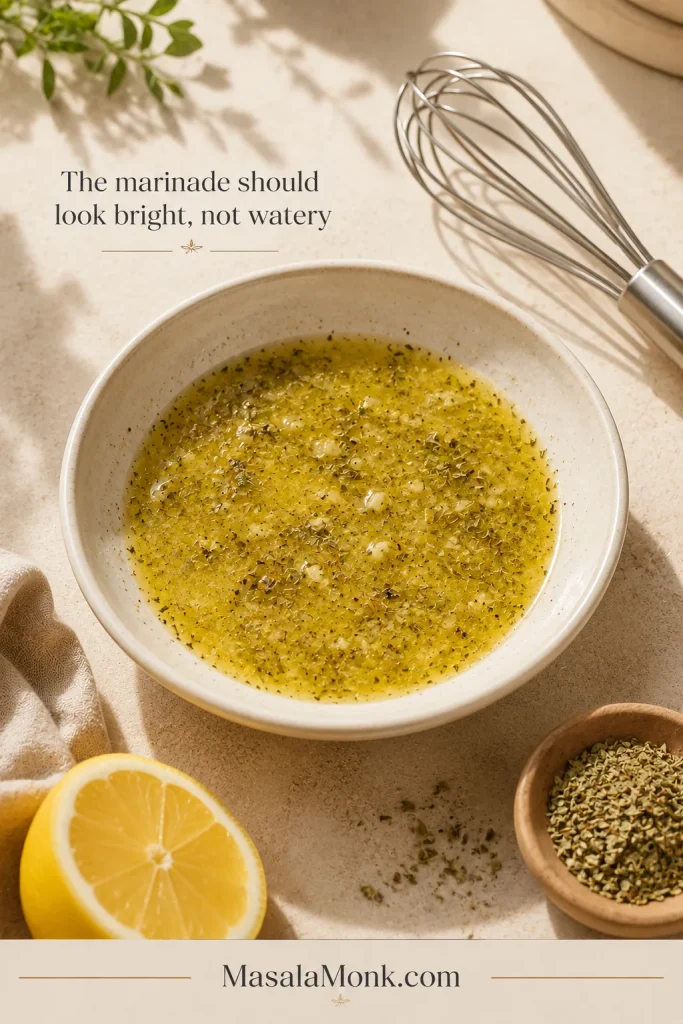
The marinade should smell strongly of oregano and garlic, with lemon brightening the mixture without taking over. Garlic, oregano, salt and black pepper form the core; zest adds fragrance, while paprika is optional.

Shallow bowl of glossy lemon-oregano marinade with finely minced garlic, lemon zest, herbs and black pepper.
The right coating clings as a thin film; if marinade streams from the chicken, let the excess drain before threading.
  • Lemon juice and zest: Juice sharpens the marinade; zest adds fragrance. Grate only the yellow outer layer because the white pith can taste bitter.
  • Garlic: Finely grated or minced garlic coats the chicken evenly. Brush away any large loose pieces before intense broiling if they begin darkening too quickly.
  • Oregano: Greek oregano is ideal, but any fragrant dried oregano works. Rub it briefly between your fingers to release more aroma.
  • Salt: Seven grams gives a dependable starting point because different salts occupy different amounts of space.
  • Paprika: Optional for gentle colour and sweetness.

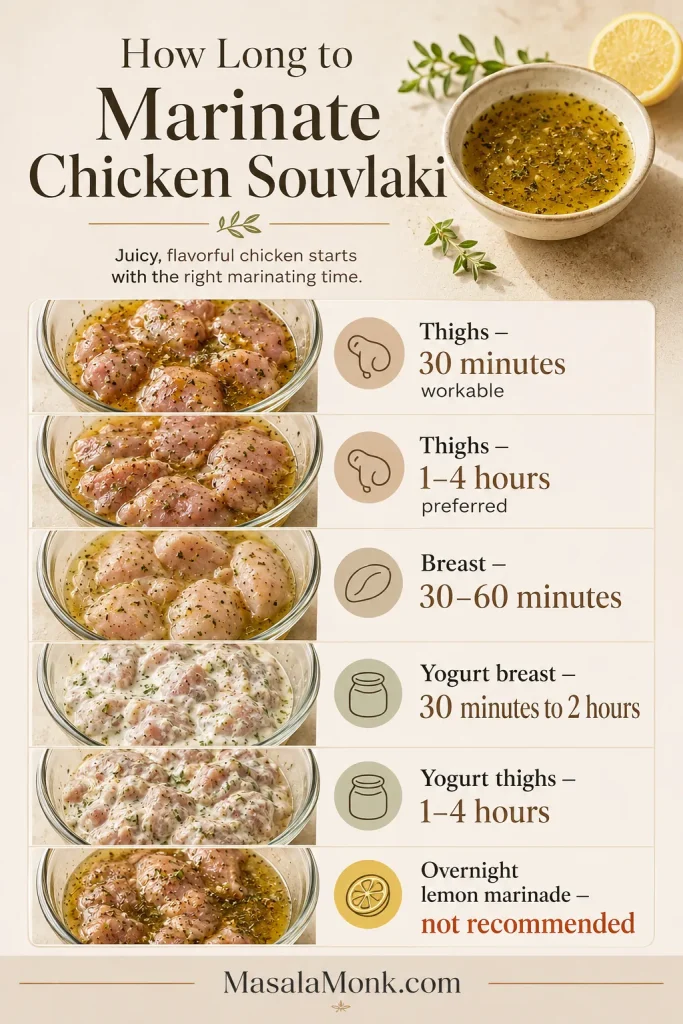
How long should the chicken marinate?

Small pieces season quickly. Thighs can remain in the lemon-oregano marinade for 1 to 4 hours, while breast needs only 30 to 60 minutes.

Short on time? Thirty minutes still gives chicken thighs useful surface flavour. One to four hours produces a fuller lemon, garlic and oregano coating.

Infographic comparing marinating windows for chicken thighs, chicken breast and yogurt-coated versions, with overnight lemon marination discouraged.
Chicken breast needs only 30 to 60 minutes, so it can be marinated much closer to cooking time than thighs.
VersionBest forMarinating time
Classic lemon-oregano thighsGrilling and a forgiving texture1 to 4 hours
Classic lemon-oregano breastA leaner skewer30 to 60 minutes
Yogurt-coated breastA thicker, gently tangy coating30 minutes to 2 hours
Yogurt-coated thighsA softer exterior and fuller coating1 to 4 hours

Overnight marination is unnecessary here and can affect the outside texture, particularly with breast. The lemon should brighten the chicken without making the surface feel cured or soft.

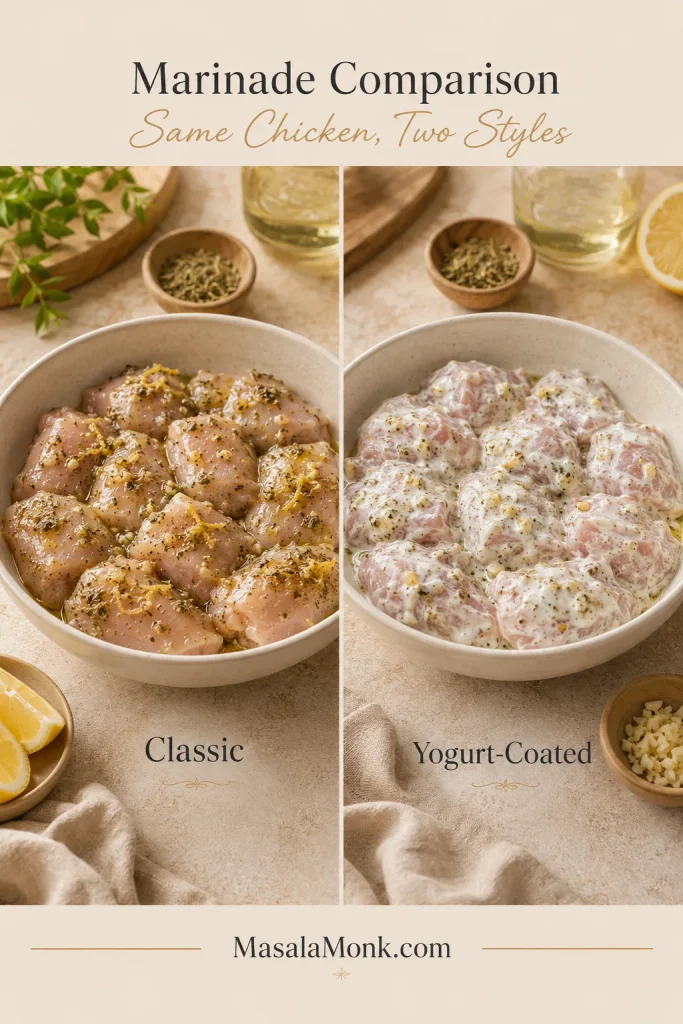
For a yogurt-coated version, add 60 g / ¼ cup thick Greek yogurt and reduce the lemon juice to 15 ml / 1 tablespoon. Keep the zest, garlic, oregano, salt and pepper unchanged.

Two bowls of raw chicken, one in a glossy lemon-oregano marinade and one in a thicker Greek-yogurt coating.
Classic marinade handles direct high heat well. Yogurt-coated chicken colours faster, so watch closely as the dairy solids brown.

For a little heat, add ¼ to ½ teaspoon chilli flakes or a small pinch of cayenne.

Cut and Thread the Chicken for Even Cooking

Cut by thickness, not perfect shape

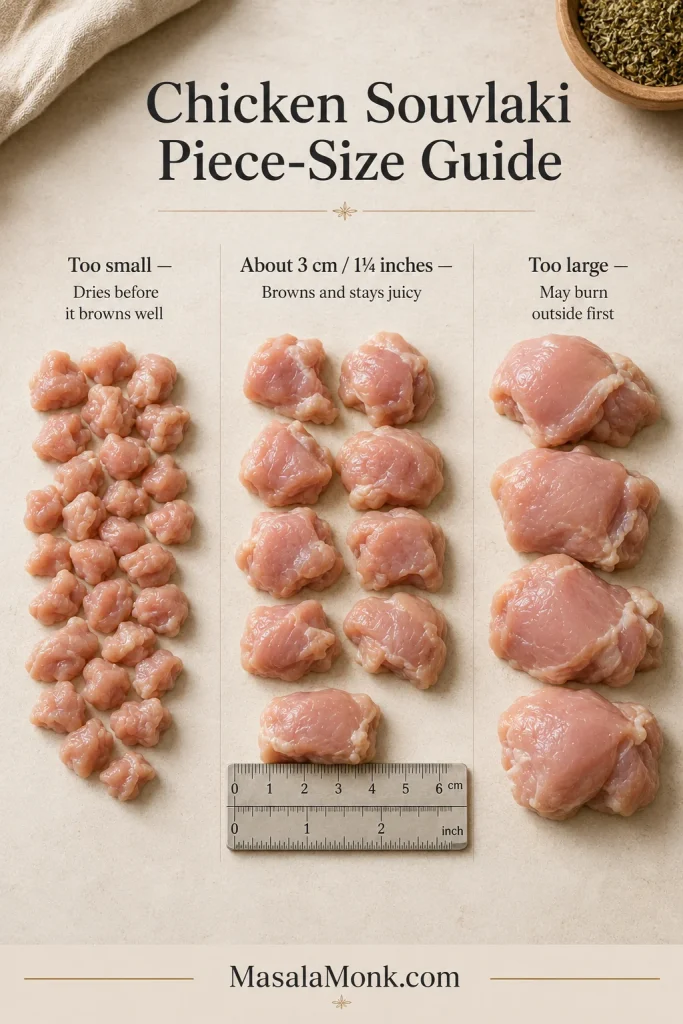
Tiny cubes cook so quickly that they can dry before they develop good colour. Very large pieces protect the centre but may blacken outside before cooking through. Pieces around 3 cm / 1¼ inches sit between those two problems.

Three groups of raw chicken thigh pieces—too small, about 3 centimetres and too large—shown beside a ruler.
Judge the thickest cross-section, not the footprint: irregular thigh pieces can look different yet cook together when their depth matches.

Fold thin thigh sections once

Cut by thickness and fold thin thigh sections over themselves. Even pieces finish at roughly the same time, allowing the edges to brown while the centres stay juicy.

Three-step close-up showing a thin chicken-thigh flap, hands folding it once and the folded meat threaded onto a flat skewer.
Fold a thin flap once, not repeatedly. One fold evens the thickness; a tight bundle creates a slow-cooking centre.

Thread closely without packing the pieces

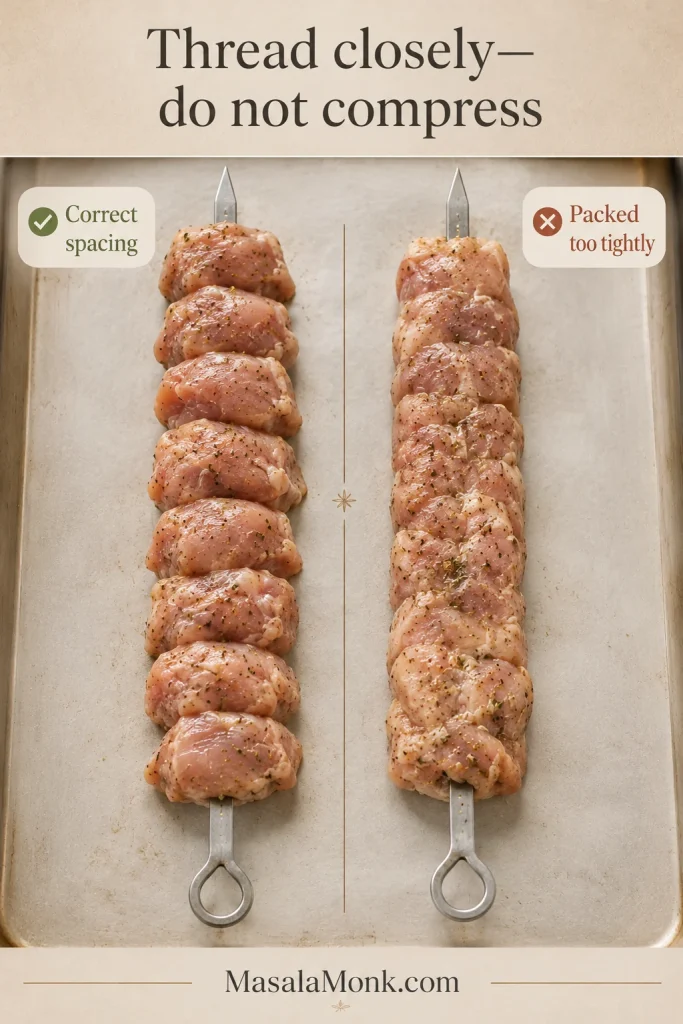
Leave a little breathing room as you thread the chicken because tightly compressed pieces cook more slowly between the folds. Flat metal skewers are easiest to turn because the meat does not spin around the stick; when using bamboo, soak the skewers for at least 30 minutes to reduce scorching.

Two raw chicken skewers compared side by side, one with visible individual edges and one compressed into a dense block.
A properly loaded skewer still shows seams between pieces; when the chicken becomes one solid cylinder, the inner surfaces steam.

Thread peppers, onions, zucchini or mushrooms separately so the vegetables can continue cooking after the chicken is ready.

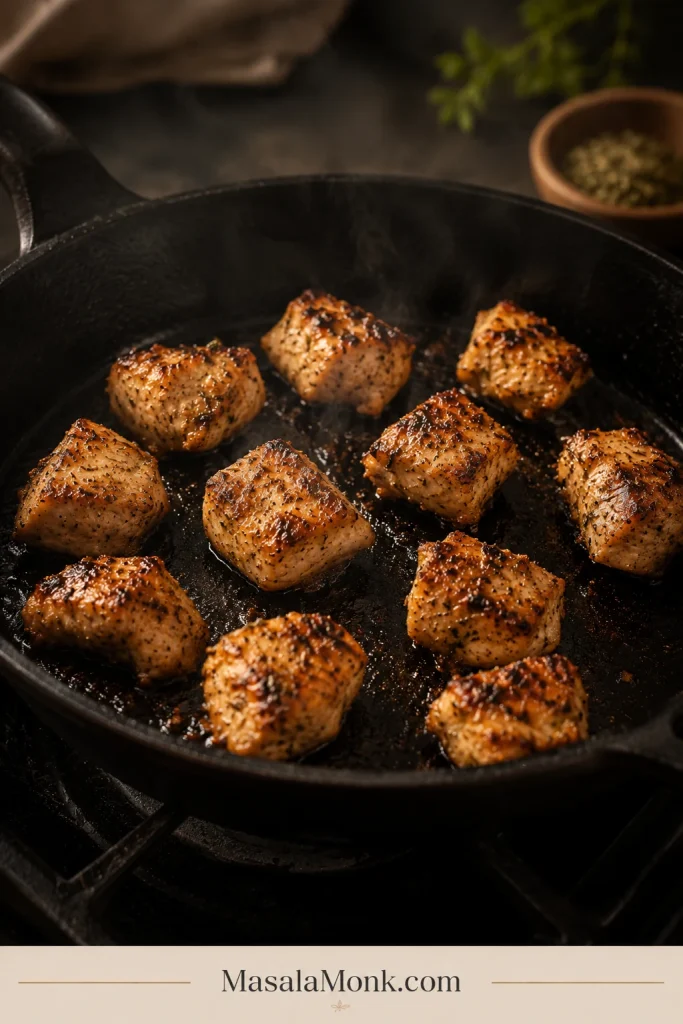
No skewers? Cook the marinated pieces loose in a skillet, air fryer or on a lined sheet pan. They still brown well and work especially nicely in bowls or pita.

The skewers can also be threaded several hours ahead and kept covered in the refrigerator until the grill, broiler or oven is hot.

Choose Your Cooking Method

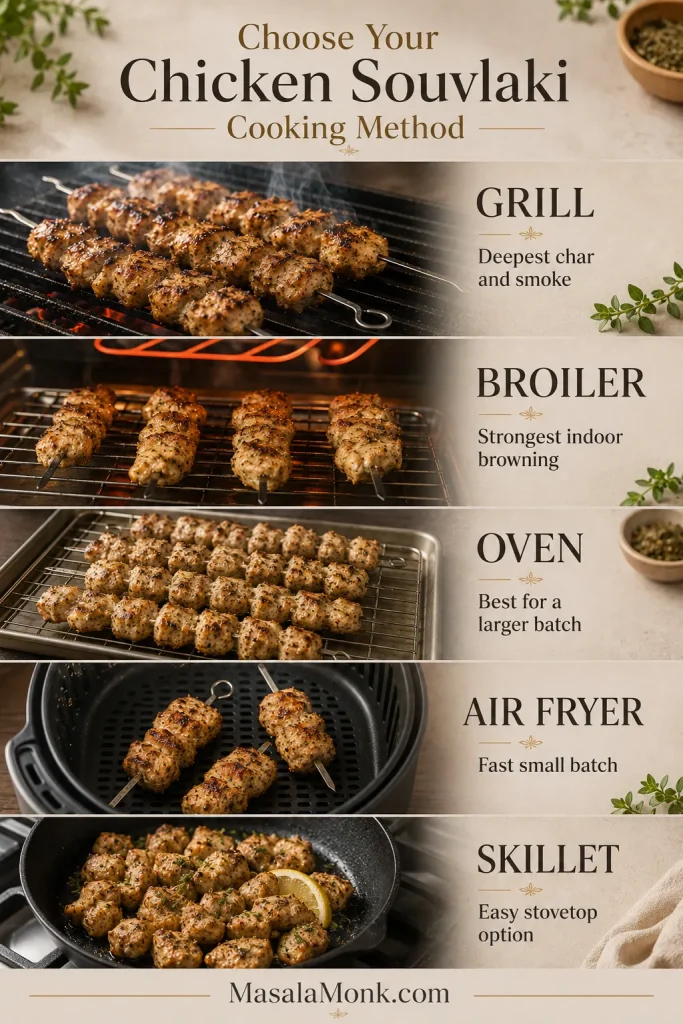
Grill for the deepest char and a touch of smoke. Use the broiler for the closest indoor equivalent, the oven for a larger batch, the air fryer for a fast small batch, or a heavy skillet when you want to stay on the stovetop.

Five-part infographic showing chicken souvlaki cooked on a grill, under a broiler, in an oven, air fryer and skillet.
Choose by food arrangement as well as appliance: full skewers suit the grill, broiler or oven, while loose pieces fit skillets and compact air fryers.

Grilled Chicken Souvlaki: Colour, Sizzle and Flare-Ups

Begin with a properly heated grate, then give each surface enough time to brown before turning.

Charcoal gives the deepest smoky flavour, while a fully heated gas grill offers easier temperature control and still produces excellent browning. On a gas grill, keep one burner lower or switched off so the skewers have somewhere to move during flare-ups.

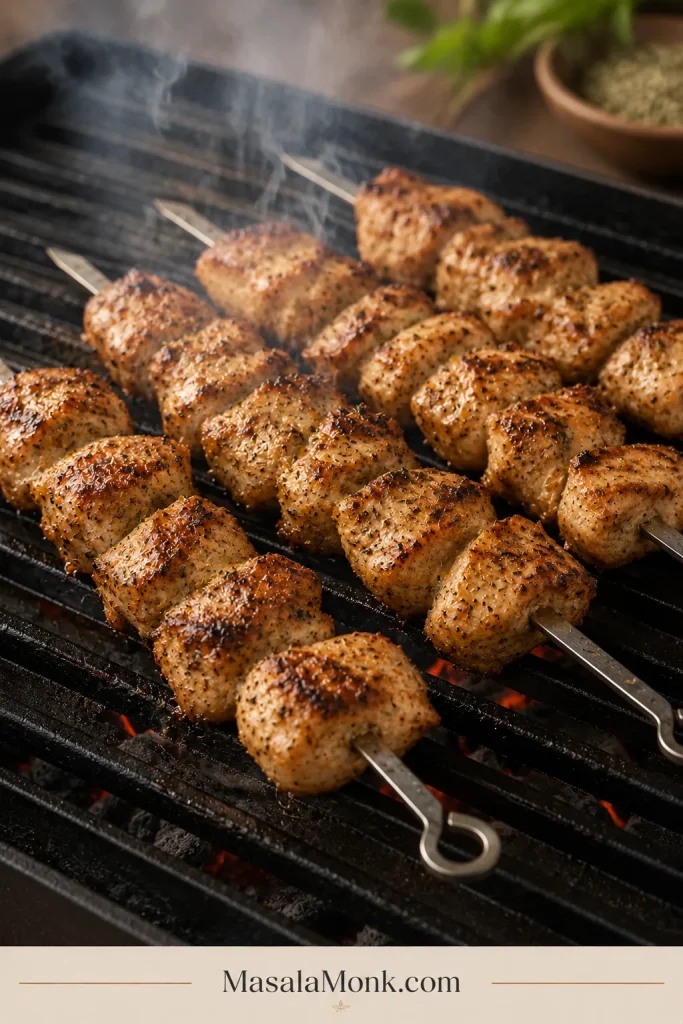
Herb-coated chicken souvlaki skewers browning over a hot grill with light smoke and glowing heat beneath the grate.
A clean sizzle with light smoke signals useful heat. Tall yellow flames mean a flare-up, not better char.

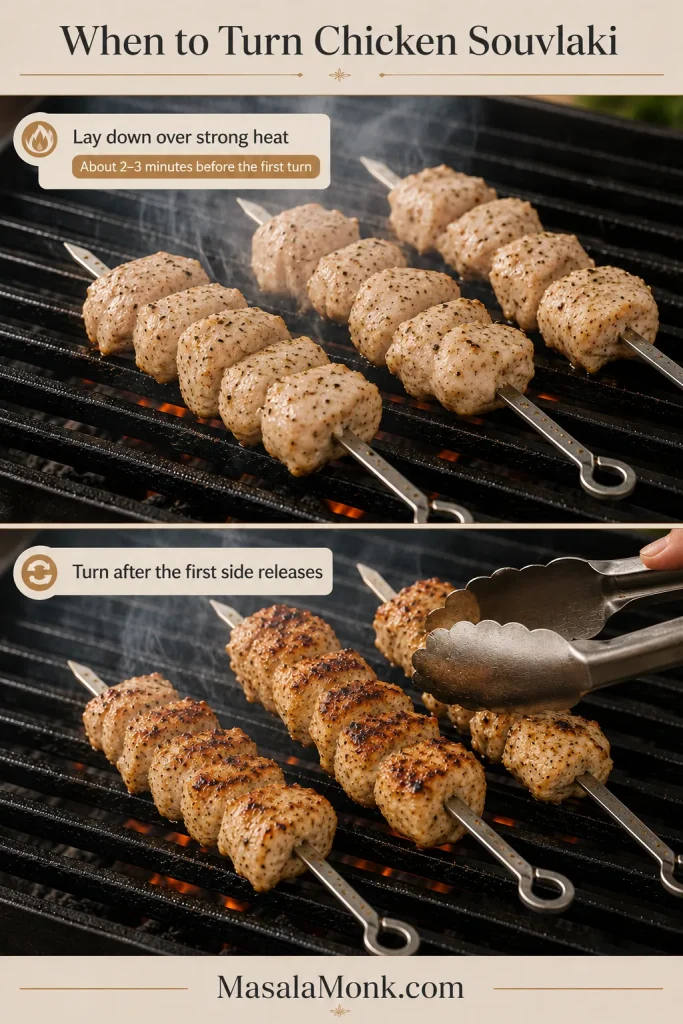
Wait for the first side to release

The chicken should sizzle as soon as it touches the grate. Give the first surface time to sear, then turn every 2 to 3 minutes so the irregular edges can pick up small patches of colour.

Two-panel grill sequence showing pale chicken skewers over heat and the browned first side being turned with tongs.
Test with a gentle nudge: if the chicken resists, wait; once the browned surface sets, the skewer releases with far less tearing.

Chicken thighs give you some breathing room. Scattered char is enough; a thick black shell means the chicken has spent too long over strong heat.

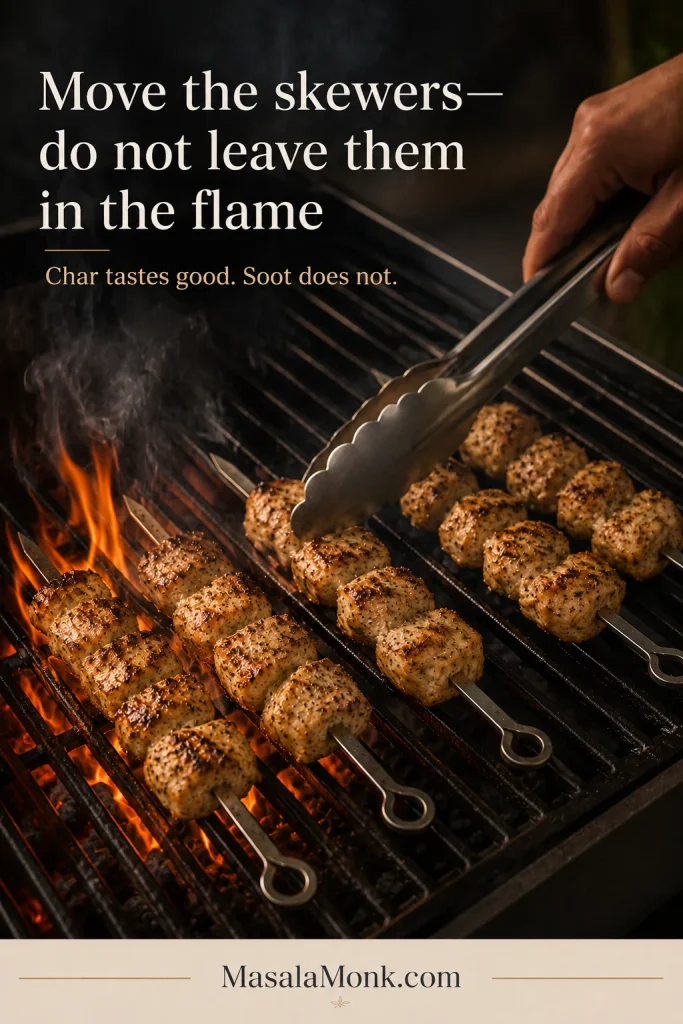
Move away from flare-ups

If flames rise, move the skewers briefly to the cooler part of the grill. Char from hot metal tastes good; soot from an uncontrolled flare-up does not.

Tongs move chicken souvlaki skewers away from an active flare-up toward a cooler section of the grill.
Reserve part of the grill as a landing zone before cooking begins; then a flare-up becomes a simple sideways move rather than a scramble.

Oven-Baked and Broiled Chicken Souvlaki

Broiler: the strongest indoor browning

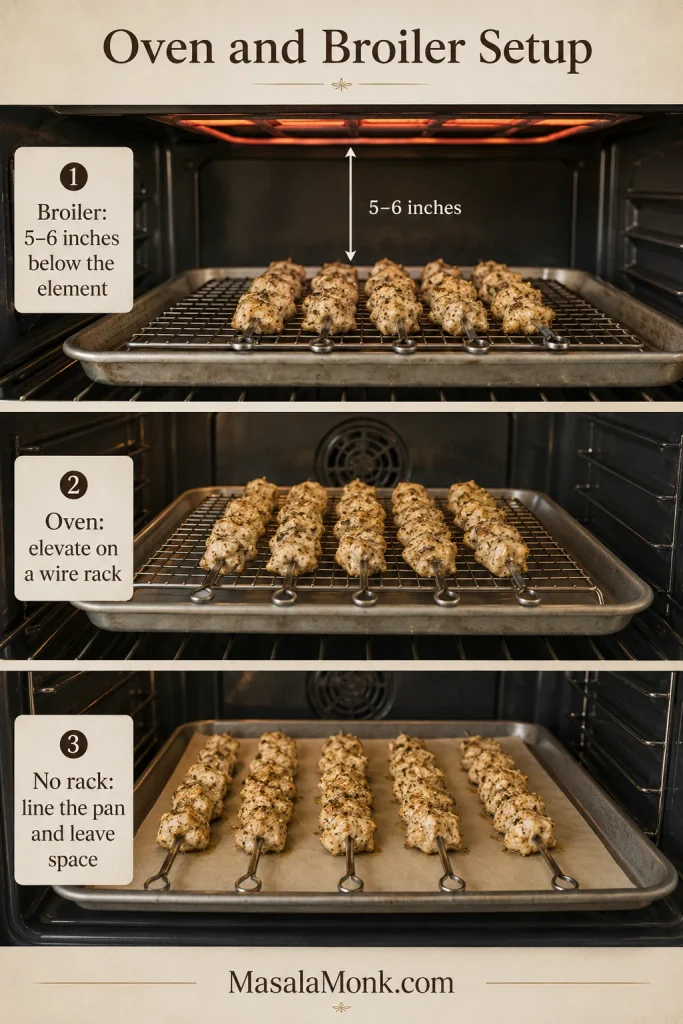
Set a wire rack over a rimmed pan and position it about 5 to 6 inches below the upper element. Let the broiler become fully hot before adding the skewers.

Three-panel indoor cooking guide showing broiler distance, skewers elevated on a wire rack and a lined pan used without a rack.
Under an active broiler, use a heat-safe rack over a rimmed metal pan; parchment can scorch when positioned too close to the upper element.
  1. Arrange the skewers with space between them.
  2. Broil for 4 to 5 minutes.
  3. Turn and continue for another 4 to 6 minutes.
  4. Check the thickest piece and remove the chicken at 165°F / 74°C.

As the upper edges bronze, the garlic and oregano should smell toasted. Stay beside the oven during the final minute because garlic can move quickly from golden to bitter.

Oven: the easiest larger batch

Use 425°F / 220°C in a conventional oven or about 400°F / 200°C with fan assistance.

  1. Arrange the skewers on a wire rack over a rimmed pan.
  2. Bake breast for 10 to 13 minutes or thighs for 12 to 15 minutes, turning once.
  3. Confirm doneness in the thickest piece.
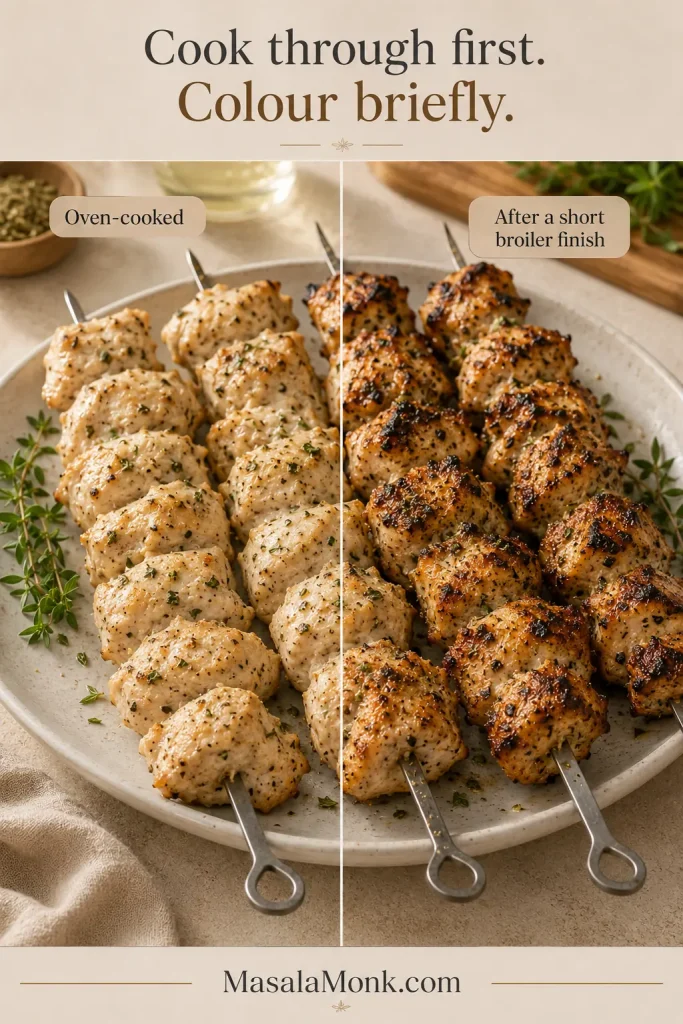
  4. Move the cooked chicken under the broiler for 1 to 2 minutes if the surface needs more colour.
Lightly coloured oven-cooked chicken souvlaki beside the same skewers after a brief broiler finish.
Stop the broiler as soon as the highest edges bronze; the goal is surface colour, not a second round of cooking.

No wire rack? Line the pan, leave space between the skewers and turn them carefully halfway through. The underside will brown more lightly, but the brief broiler finish will colour the exposed edges.

Air Fryer Chicken Souvlaki

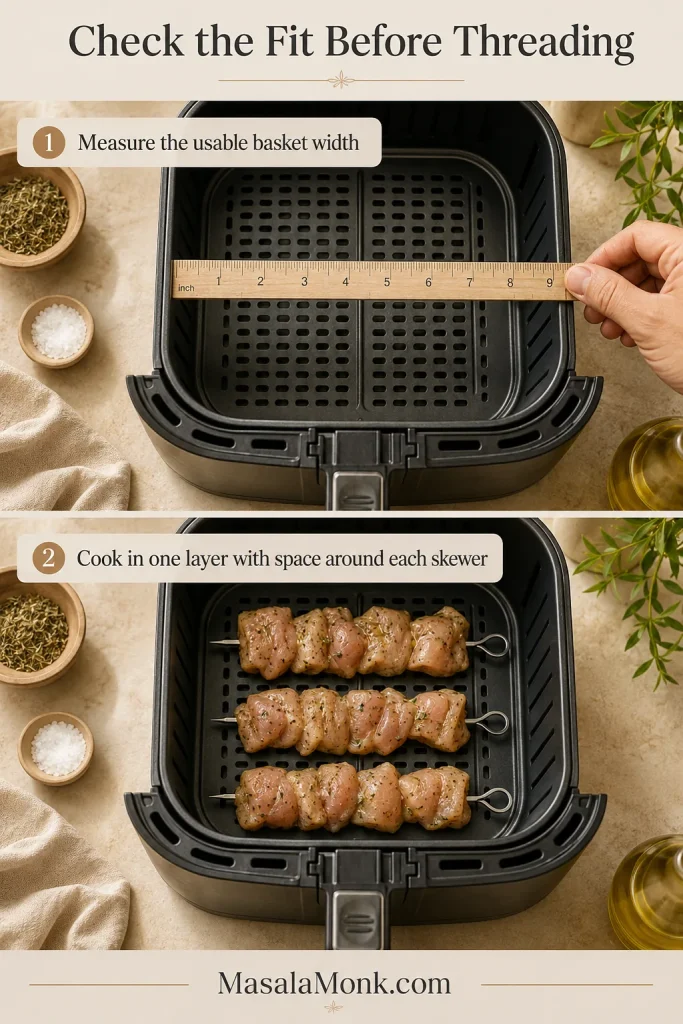
Measure the usable basket width before threading the chicken. Short bamboo or metal skewers should rest naturally inside without pressing against the sides.

Two-panel air-fryer guide showing the basket width being measured and three chicken skewers arranged in one spaced layer.
Check that skewer tips and handles clear the basket walls; even well-spaced chicken cooks poorly when the drawer cannot close completely.
  1. Preheat the air fryer to 390–400°F / 200–205°C if your model benefits from preheating.
  2. Let excess marinade drip away.
  3. Arrange two or three skewers in one layer with visible space around them.
  4. Cook breast for 9 to 12 minutes or thighs for 11 to 14 minutes, turning halfway.
  5. Confirm that the thickest piece has reached 165°F / 74°C.

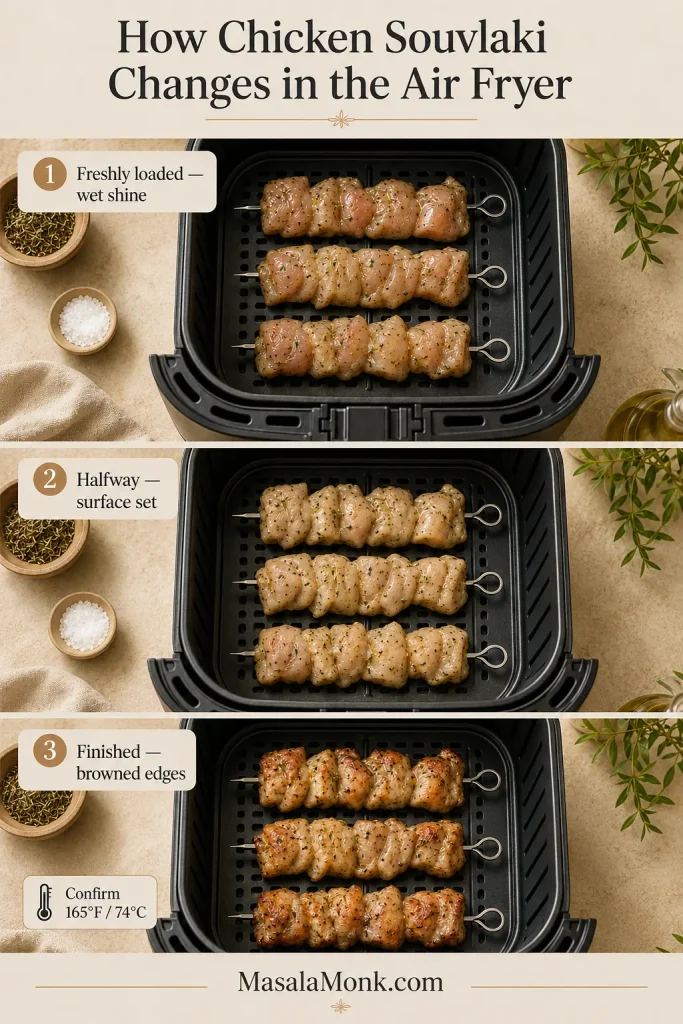
The surface will first lose its wet shine, then small browned edges will appear as the circulating heat reaches the spaces between the pieces.

Three-stage air-fryer sequence showing glossy raw chicken, partially cooked opaque surfaces and finished chicken with browned edges.
At the halfway turn, swap front and back positions when your model browns unevenly; rotation corrects hot spots without extending the entire batch.

If the skewers do not fit, cook the chicken as loose pieces. Avoid stacking or crowding. Trapped steam keeps the surface wet and leaves the chicken pale.

Stovetop Chicken Souvlaki

A heavy grill pan or cast-iron skillet works well when you have no grill and do not want to heat the oven. Open a window or use the extractor fan because the garlic and marinade can smoke in a very hot pan.

Well-spaced chicken pieces searing in a cast-iron skillet with browned surfaces and no pooled cooking liquid.
Between skillet batches, remove blackened garlic fragments before adding fresh chicken; otherwise, the next batch may taste bitter before it browns.
  1. Heat the pan over medium-high heat and add a thin film of oil.
  2. Cook breast for 7 to 10 minutes or thighs for 8 to 12 minutes.
  3. Turn every 2 to 3 minutes and work in batches if necessary.
  4. Check the thickest piece for 165°F / 74°C, then rest before serving.

The pan should answer with a clear sizzle. If the sound fades quickly and liquid begins collecting around the chicken, the batch is too crowded.

Chicken Souvlaki Time, Temperature and Doneness

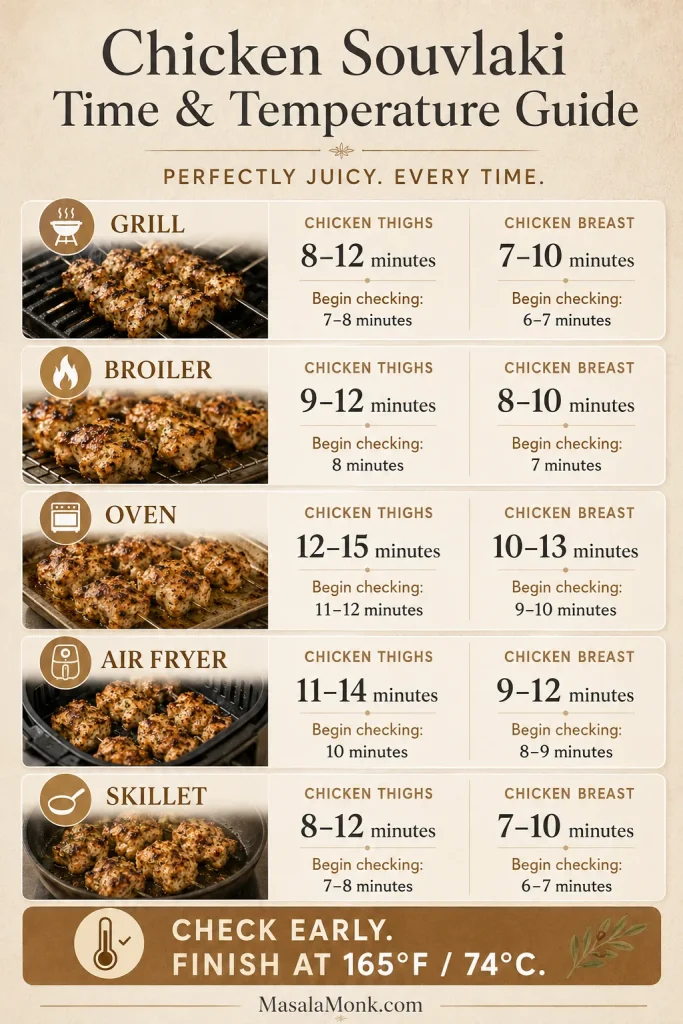
The clock brings you close, but the thermometer lets you relax. Use this chart as a starting point for your chicken cut and cooking method.

Timing infographic for grill, broiler, oven, air fryer and skillet, with separate ranges for chicken thighs and breast.
Treat chicken souvlaki cooking times as checking windows: the earliest-check column marks when to measure, not when every piece must be finished.
Chicken and methodApproximate rangeEarliest check
Thighs on an outdoor grill8 to 12 minutes7 to 8 minutes
Breast on an outdoor grill7 to 10 minutes6 to 7 minutes
Thighs under the broiler9 to 12 minutes8 minutes
Breast under the broiler8 to 10 minutes7 minutes
Thighs in the oven, before optional broiling12 to 15 minutes11 to 12 minutes
Breast in the oven, before optional broiling10 to 13 minutes9 to 10 minutes
Thighs in an air fryer11 to 14 minutes10 minutes
Breast in an air fryer9 to 12 minutes8 to 9 minutes
Thighs in a skillet8 to 12 minutes7 to 8 minutes
Breast in a skillet7 to 10 minutes6 to 7 minutes

Check the thickest piece accurately

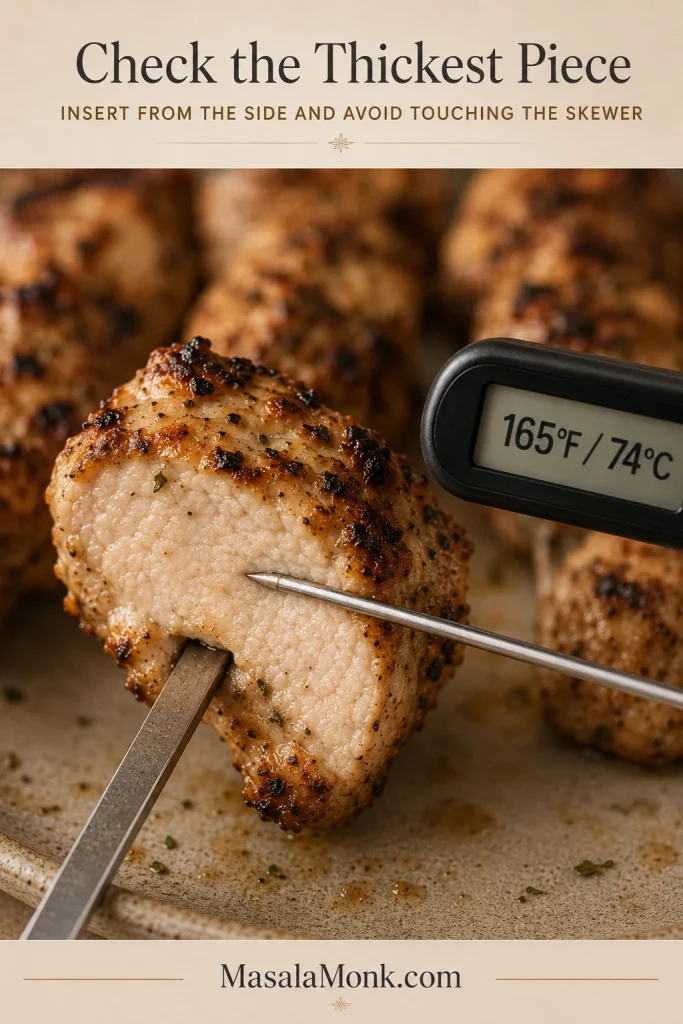
Insert an instant-read thermometer into the centre of the thickest piece without touching a metal skewer. Cook poultry to 165°F / 74°C. Official safe-minimum guidance is available from FoodSafety.gov (opens in a new tab).

Instant-read thermometer inserted from the side into the thickest cooked chicken piece without touching the metal skewer, reading 165°F and 74°C.
Check a piece from the coolest-looking or most crowded skewer as well as the thickest one, because grill heat is rarely perfectly even.

Properly cooked chicken has a browned surface that no longer looks wet, with a moist, opaque centre. Small charred spots are welcome. Breast should not look stringy or chalky, while thigh remains softer and slightly richer.

Once the chicken is resting, the technical part is over. Now it becomes dinner.

Build a Chicken Souvlaki Pita

The pita brings all the contrasts together: hot savoury chicken, cool tzatziki, juicy tomato and just enough sharp onion to wake everything up.

Choose the right pita

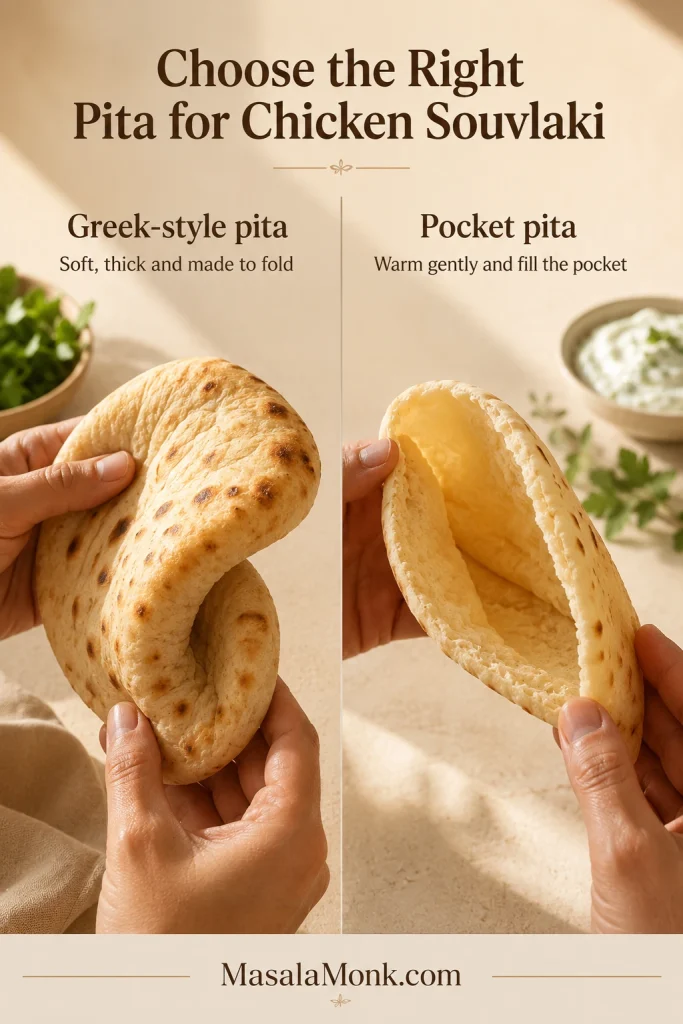
Look for a soft, pocketless Greek-style pita when possible. It is thicker and more flexible than thin pocket pita, so it folds around the chicken without splitting. When only pocket pita is available, warm it gently and fill the pocket.

Hands compare a thick, pocketless Greek-style pita with a thinner pita opened to reveal its internal pocket.
Greek-style pita can hold a longer strip of filling, while pocket pita works better with a smaller, compact portion.

For each pita

  • 1 soft Greek-style pita, approximately 7 to 8 inches
  • 100 to 120 g cooked chicken
  • 30 to 40 g / about 2 tablespoons thick tzatziki
  • 2 or 3 tomato slices, or a small handful of chopped tomato
  • A small amount of very thinly sliced red onion
  • A squeeze of lemon
  • Optional shredded lettuce, crumbled feta or cooked fries

Warm the pita briefly in a dry skillet, on the grill or in a low oven, just until it becomes soft and flexible. A microwave also works in short bursts when the bread is wrapped in a barely damp kitchen towel.

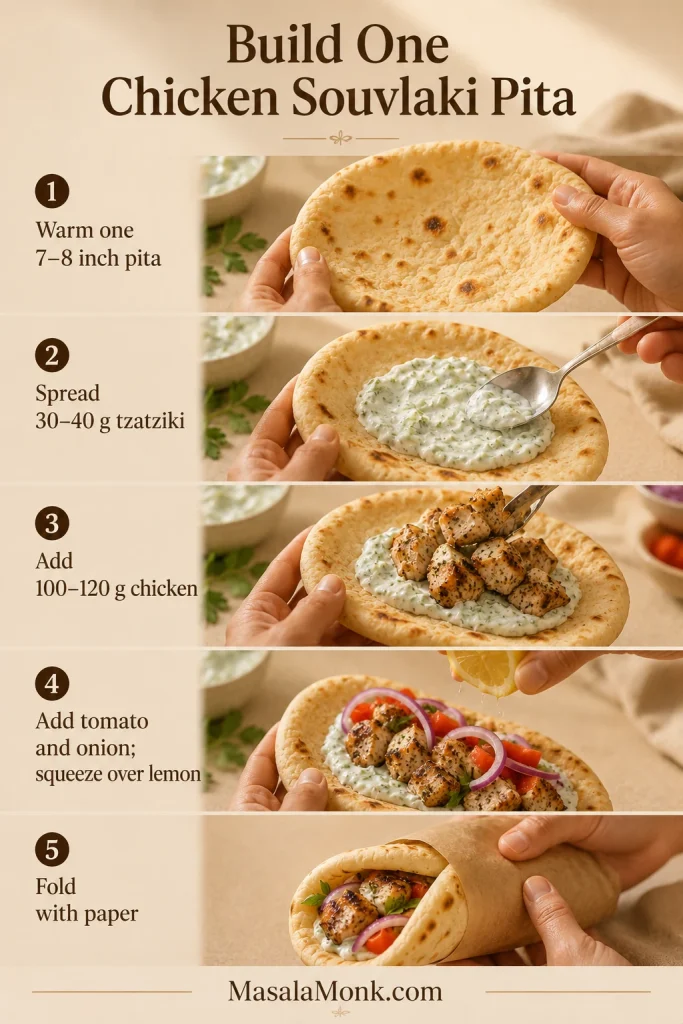
Build and wrap

  1. Place the warm pita on parchment, foil or food-safe paper.
  2. Spread the tzatziki through the centre, leaving the lower edge clear.
  3. Slide 100 to 120 g chicken off the skewer and arrange it over the sauce.
  4. Add tomato, onion and any optional fillings.
  5. Fold the bottom upward, bring in the two sides and use the paper to hold the wrap together.
Five-step pita assembly showing warmed bread, tzatziki, chicken, tomato and onion, lemon squeezed over the filling and a paper-supported fold.
Keep tomato and lemon above the chicken rather than against the lower fold; the base of the chicken souvlaki pita stays drier and easier to hold.

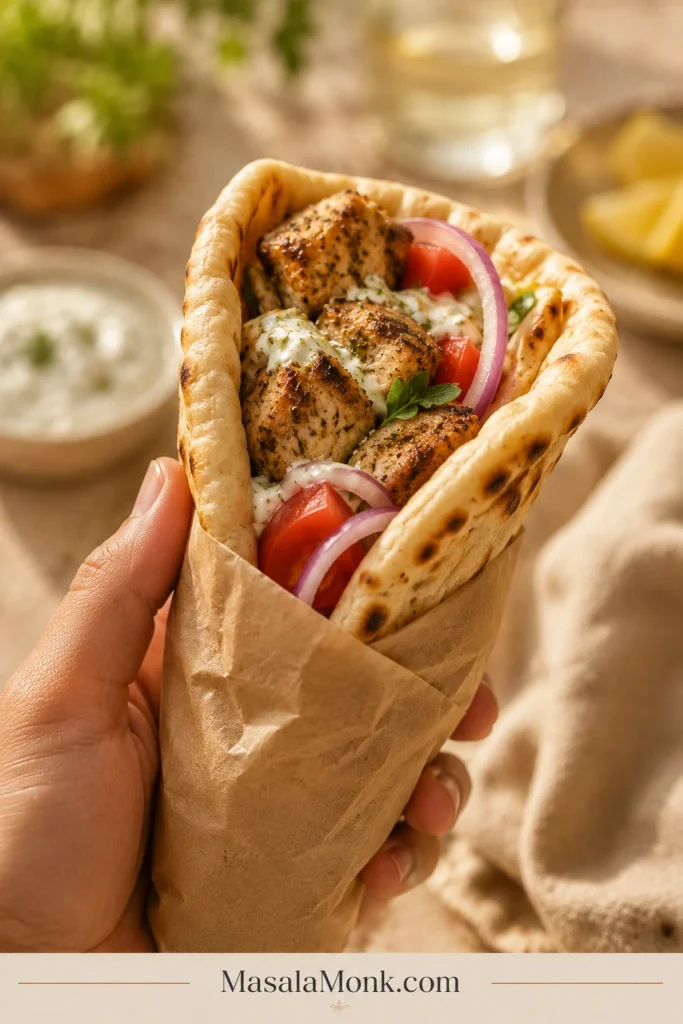
The pita does not need to close perfectly. The paper wrapper will do part of the work.

A hand holds a folded pita filled with browned chicken souvlaki, tzatziki, tomato and thin red onion, supported by brown paper.
Leave the top third unwrapped so steam can escape and the pita stays soft without turning wet.

A small handful of fries makes the pita more substantial without pushing the chicken into the background. For fries that stay crisp enough to hold their own, follow the cutting, soaking and frying method (opens in a new tab).

What to Serve with Chicken Souvlaki

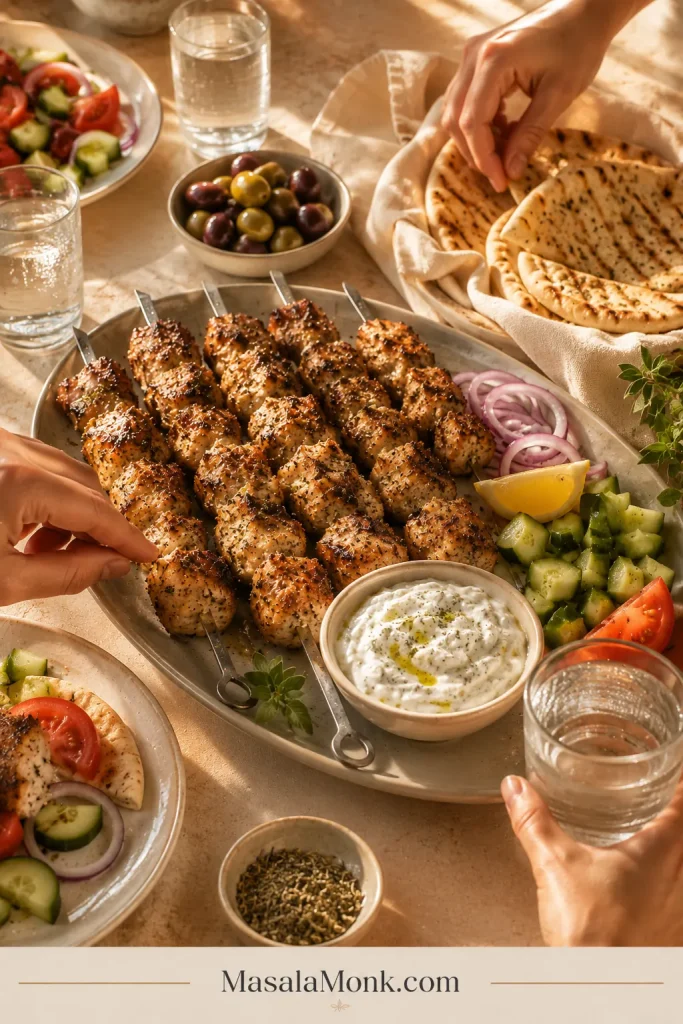
Put the chicken in the middle of the table, still on its skewers, with warm bread wrapped in a towel, a cold bowl of tzatziki and lemon wedges within reach. That alone is enough. Everything else is optional.

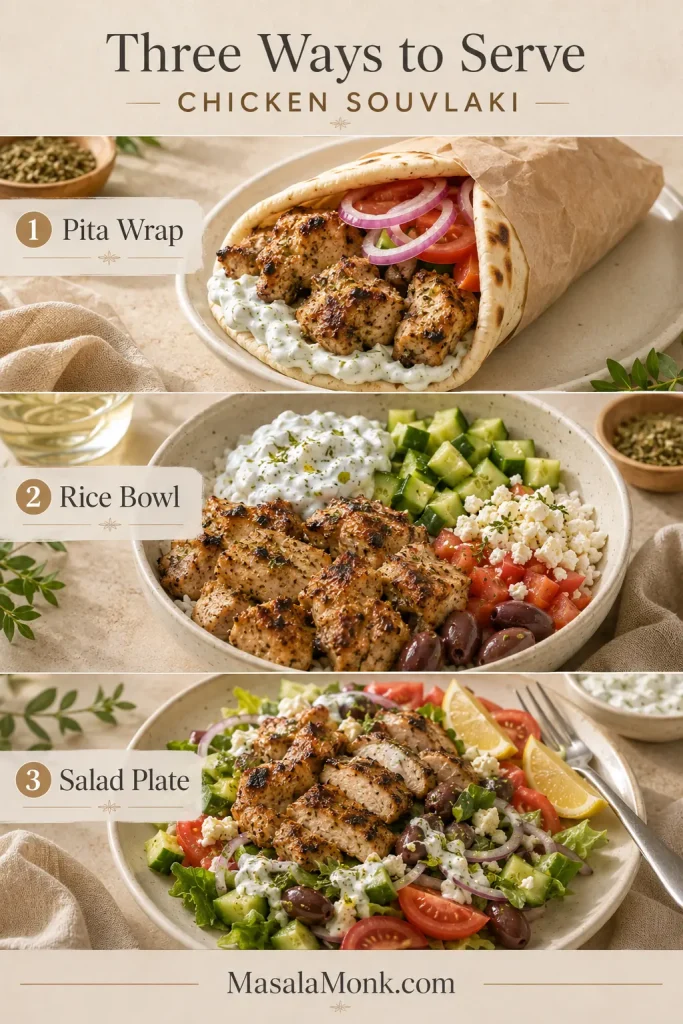
Choose how to serve it

The same chicken can move from a hand-held wrap to a plated meal without changing the recipe. The base and fresh components determine how light, substantial or make-ahead-friendly it feels.

Three-panel serving infographic showing chicken souvlaki as a pita wrap, Mediterranean rice bowl and salad plate.
Pita is best assembled immediately; rice bowls and salads are easier to portion ahead or build from leftovers.

A simple dinner plate

Serve the skewers with pita wedges, tzatziki, olives and a crisp cucumber salad with red onion and herbs (opens in a new tab). Roast potatoes or rice can make the plate more substantial.

A rice or grain bowl

A bed of fluffy rice (opens in a new tab) turns the skewers into an easy bowl. Add cucumber, tomato, onion, olives, feta and tzatziki, then keep the cool vegetables and sauce separate from the warm chicken until serving.

A substantial salad

Slide the chicken off the skewers and serve it over cucumber, tomato, onion, olives and feta. Use tzatziki as a thick dressing or loosen a smaller amount with lemon and olive oil.

Prefer a more herb-forward side? This fresh tabbouleh with parsley, tomato, mint and lemon (opens in a new tab) pairs naturally with grilled chicken and warm pita.

To keep the plate gluten-free, serve the chicken over rice or salad. A dairy-free meal works with dairy-free yogurt sauce or a simple lemon-herb dressing in place of tzatziki.

Warm dinner table with chicken souvlaki skewers, pita, tzatziki, cucumber salad, olives, lemon and hands beginning to serve.
Set out the cool sauces and vegetables first, then bring the hot skewers to the table last.

Fix Dry, Pale or Uneven Chicken

A pale or dry batch is not necessarily a lost dinner. Save it first, then fix the cause before the next round of skewers.

The chicken is dry

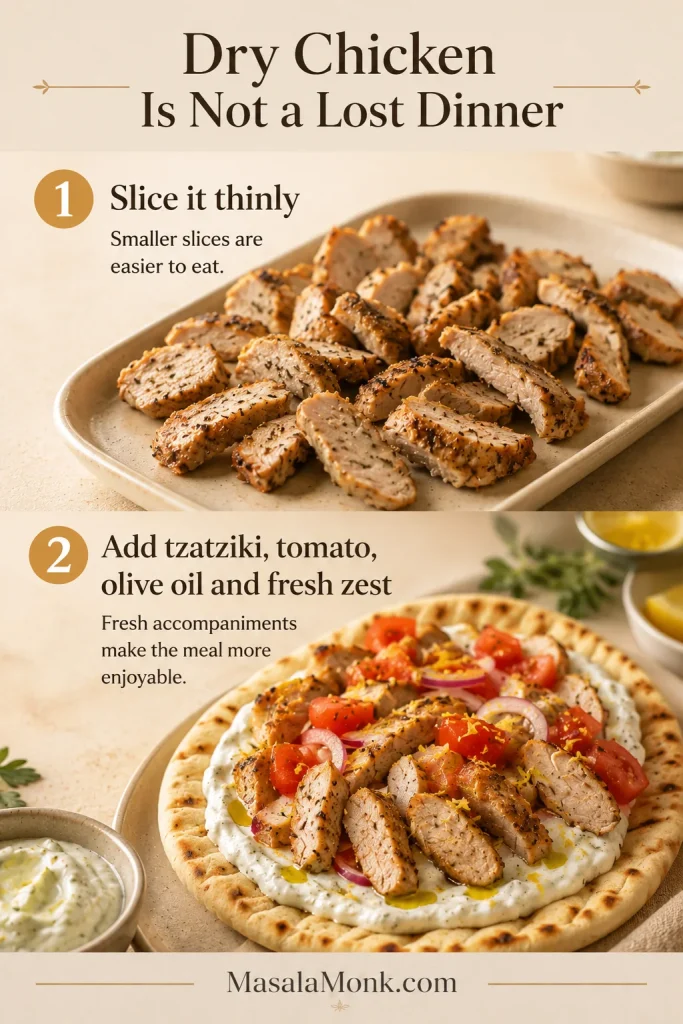
Rescue this batch: Slice the chicken thinly and serve it immediately with extra tzatziki, chopped tomato and warm pita. A little olive oil helps the slices feel less dry, while fresh lemon zest brings back the aroma without adding more acid.

Prevent it next time: Use larger breast pieces, keep the marinade brief and begin checking sooner. Review the earliest checking times before the next batch; dry breast is usually a timing problem, not proof that the cut cannot work.

Dry cooked chicken sliced thinly, then served over warm pita with tzatziki, tomato, olive oil and fresh lemon zest.
Slice dry chicken thinly across the grain before adding sauce; shorter fibres feel more tender even though the meat cannot regain lost moisture.

The chicken is pale but cooked

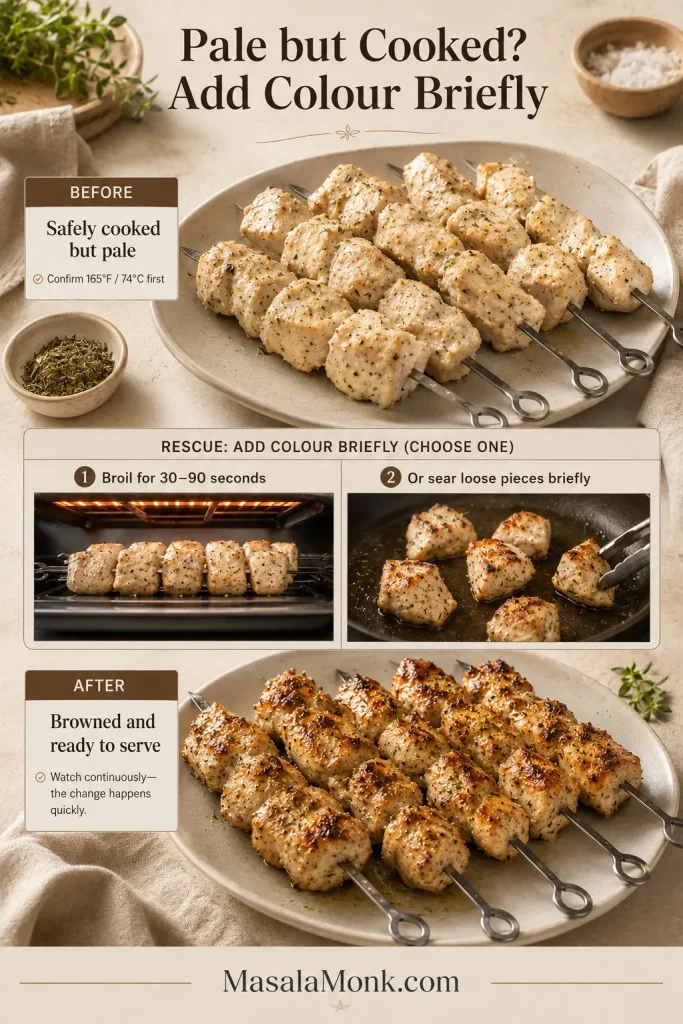
Rescue this batch: First confirm doneness with the thermometer guide. Then place the skewers under a fully heated broiler for 30 to 90 seconds, watching continuously; loose pieces can also be seared briefly in a hot skillet.

Prevent it next time: Let excess marinade drip away, preheat fully and leave more space between the pieces. Pale chicken usually reflects heat or surface moisture—not a bad marinade.

Before-and-after infographic showing pale but fully cooked chicken souvlaki browned briefly beneath a broiler or in a hot skillet.
Blot visible surface moisture before the brief high-heat finish; otherwise, the extra heat first evaporates water and continues cooking the centre.

Quick fixes for other problems

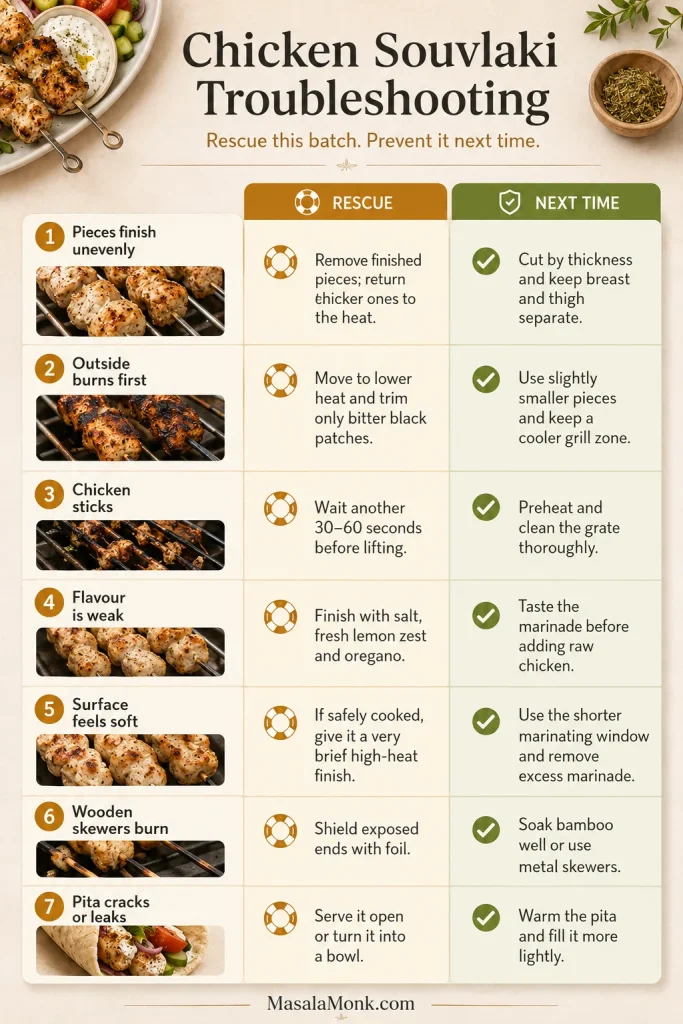
ProblemRescue this batchPrevent it next time
Pieces finish unevenlyRemove finished pieces and return thicker ones to the heatCut by thickness and keep breast and thigh separate
Outside burns firstMove to lower heat and trim only bitter black patchesUse slightly smaller pieces and keep a cooler grill zone
Chicken sticksWait another 30 to 60 seconds before liftingPreheat and clean the grate thoroughly
Flavour is weakFinish with salt, fresh lemon zest and oreganoTaste the marinade before adding raw chicken
Surface feels softIf safely cooked, give it a very brief high-heat finishUse the shorter marinating window and remove excess marinade
Wooden skewers burnShield the exposed ends with foilSoak them well or use metal skewers
Pita cracks or leaksServe it as an open pita or turn it into a bowlWarm the bread and fill it more lightly
Troubleshooting infographic covering uneven cooking, burning, sticking, weak flavour, soft surfaces, scorched wooden skewers and cracked pita.
After rescuing dinner, change only one variable on the next batch; that makes the true cause easier to identify instead of creating another problem.

Storage, Reheating and Freezing

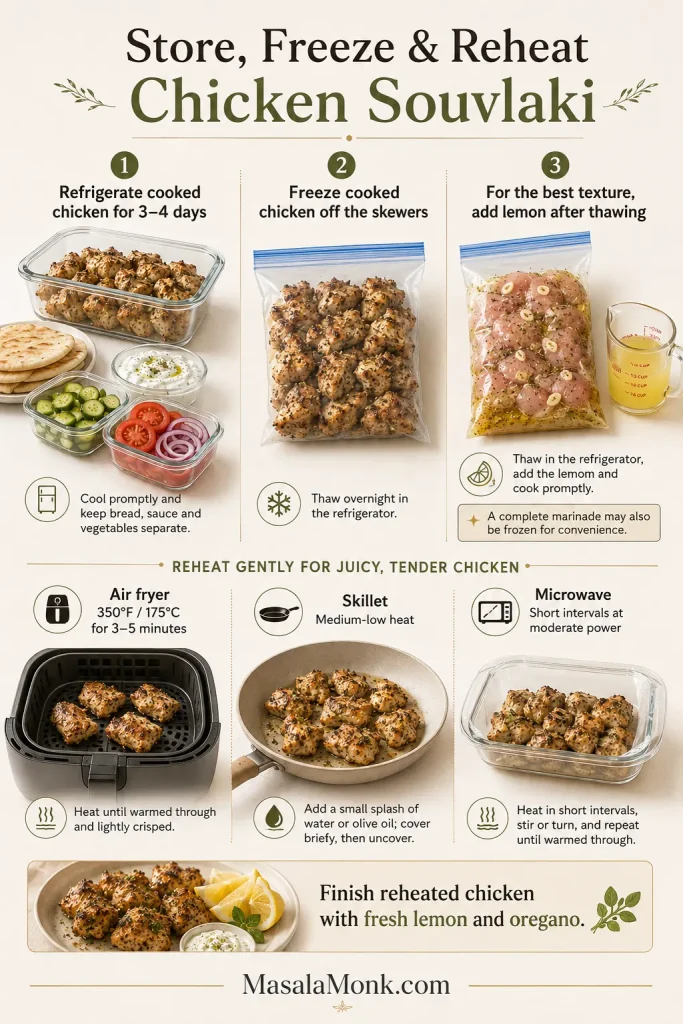
Remove cooked chicken from the skewers and refrigerate it in a covered container. Store pita, tzatziki and fresh vegetables separately. Cool the chicken promptly and use it within 3 to 4 days.

For a cold next-day lunch, slice the chicken over this Mediterranean chickpea salad (opens in a new tab), then add the tzatziki just before eating.

Reheating without drying it out

  • Air fryer: Heat at about 350°F / 175°C for 3 to 5 minutes.
  • Skillet: Warm over medium-low heat with a small splash of water or olive oil. Cover briefly, then uncover.
  • Microwave: Cover and heat in short intervals at moderate power.

Finish reheated chicken with fresh lemon and a pinch of oregano. That small fresh note helps leftovers taste less like leftovers.

Freezing cooked or raw chicken

Freeze cooked chicken off the skewers in a well-sealed container. Thaw it overnight in the refrigerator and reheat gently. Do not freeze assembled pita wraps.

For raw meal preparation, freeze the chicken with the olive oil, zest, garlic, oregano, salt and pepper, then add the measured lemon juice after thawing. When freezing it in the complete marinade for convenience, thaw in the refrigerator and cook promptly.

Infographic showing cooked chicken refrigerated or frozen off skewers, raw seasoned chicken frozen without lemon, and air-fryer, skillet and microwave reheating.
Reheat only the chicken souvlaki you plan to serve, because repeated warming dries small pieces faster than one gentle reheating.

The moment to aim for is simple: browned edges, a centre that still glistens when cut, and enough lemon to make the next bite feel fresh.

Warm the pita, spoon over the tzatziki and bring the skewers to the table while they are still hot. Then eat the first one before anyone has time to ask whether dinner is ready.

Recipe card ↑ Guide contents ↑ Back to top ↑

Posted on Leave a comment

Honey Garlic Pork Chops: Juicy 30-Minute Skillet Recipe

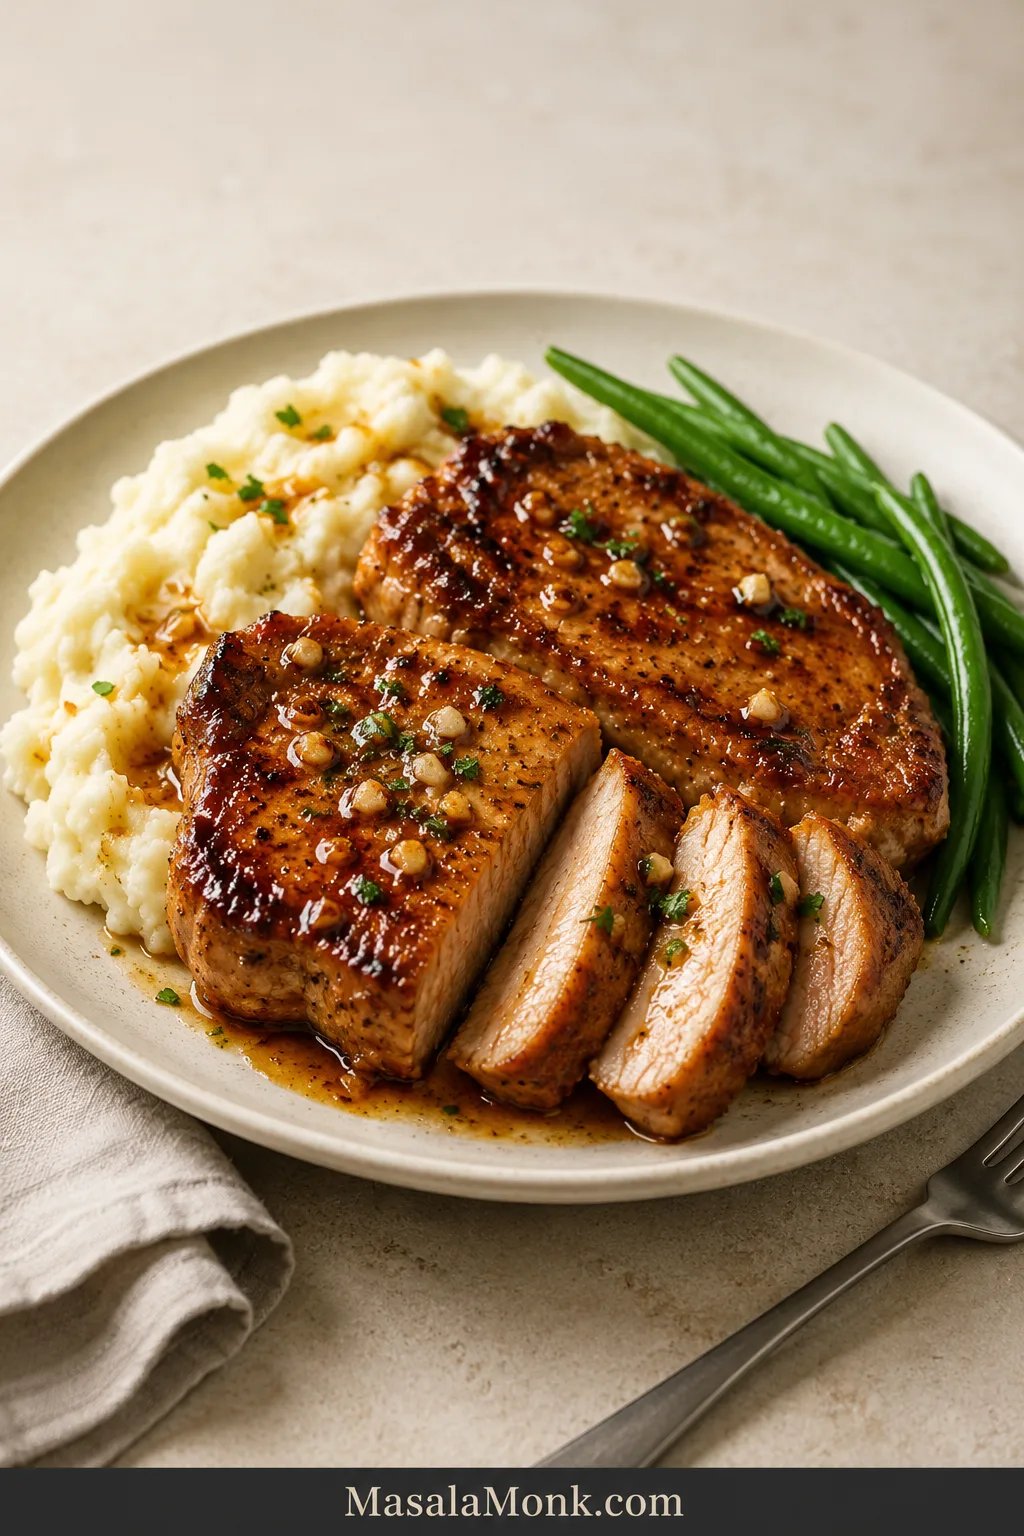
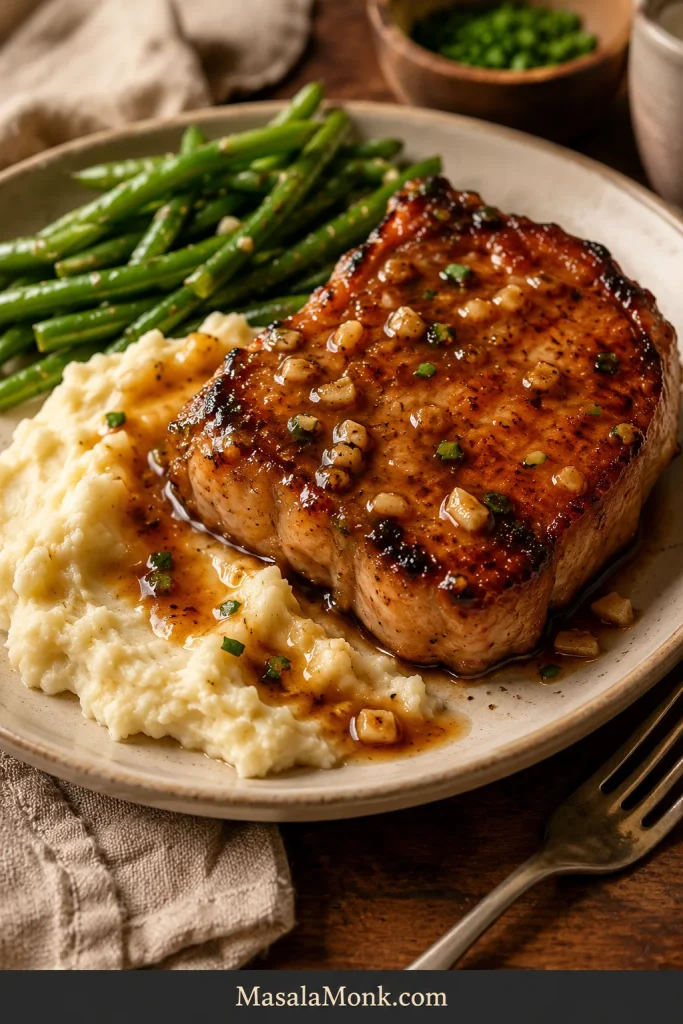
Alt text: Two honey garlic pork chops served with mashed potatoes and green beans on an ivory plate; one chop is sliced to reveal a moist, fully cooked center.

Some weeknight dinners simply get the job done. These honey garlic pork chops feel like you made an effort—golden at the edges, juicy in the center, and finished with a savory-sweet glaze that slips into the rice or mashed potatoes underneath.

In about 30 minutes—slightly longer if the chops need to brown in batches—one skillet takes the pork from deeply browned to glossy and glazed. It starts hot enough for golden edges, then cools before the honey and garlic go in, so the sauce turns shiny instead of scorched.

Pork chops rarely come home from the store perfectly matched. Timing tells you when to check, the thermometer tells you when to stop, and thinner pieces can come out before thicker ones.

Quick Answer: Honey Garlic Pork Chops

For four chops about ¾–1 inch / 19–25 mm thick, the first side commonly needs 3–4 minutes and the second 2–3 minutes. Those times tell you when to check; thickness and internal temperature tell you when to stop.

Move the pork out before it is fully done, lower the heat, and simmer the honey mixture until the bubbles become smaller and the sauce lightly coats a spoon. Return each chop only long enough to reach 145°F / 63°C, then rest for at least 3 minutes.

The method: sear first, lower the heat, sauce second, glaze last.

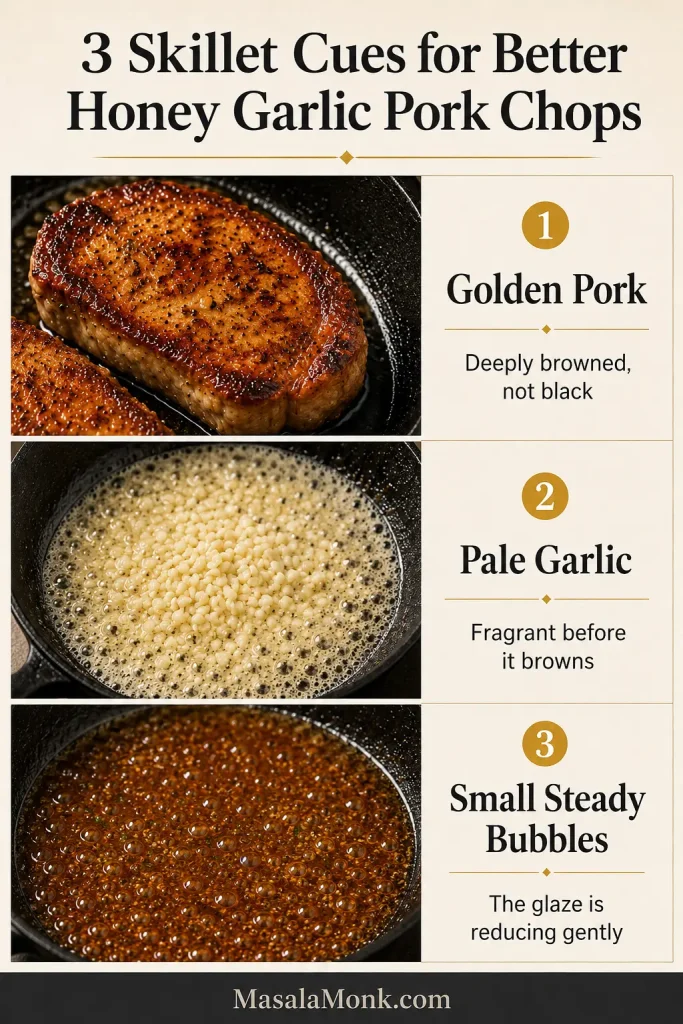
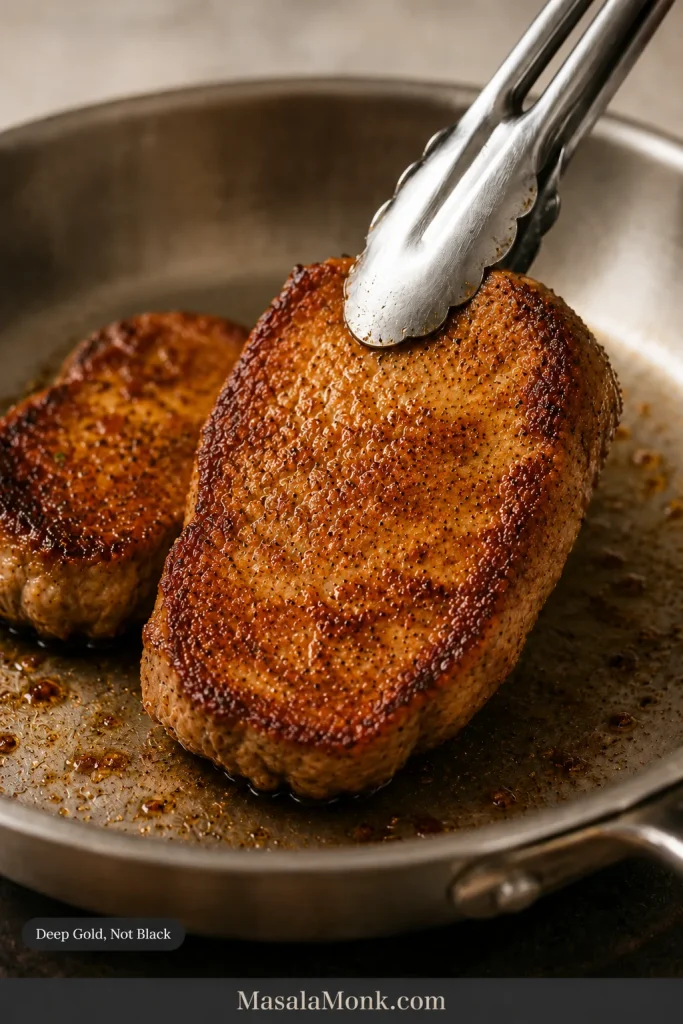
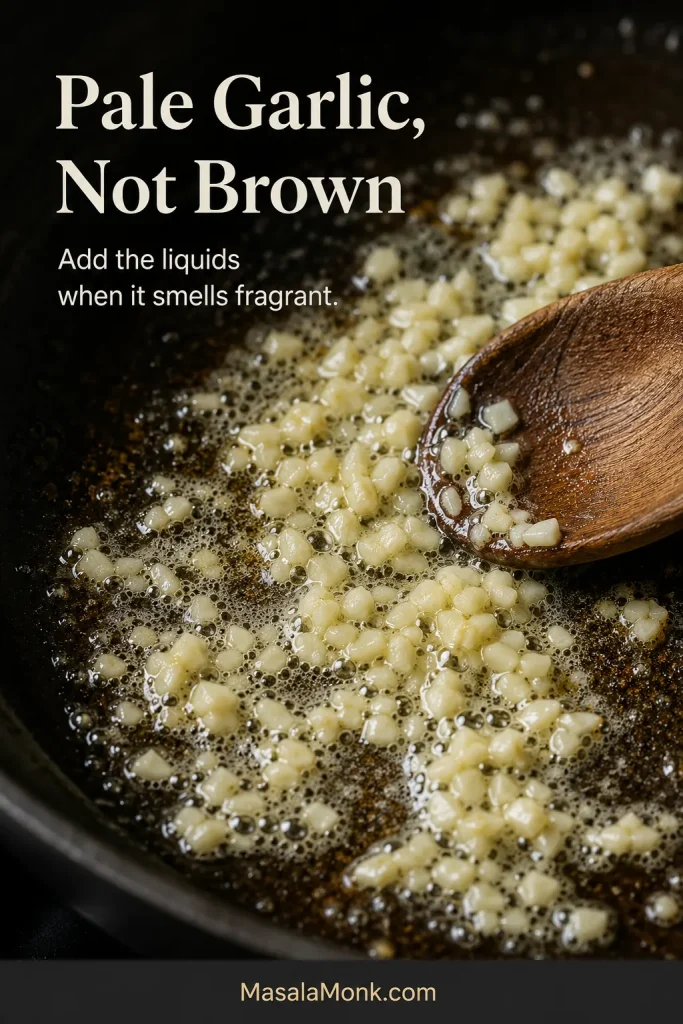
The visual cues: golden pork, pale garlic, small steady bubbles.

Different thickness? Use the pork chop thickness guide before choosing a cooking time.

Three-panel guide showing a golden-brown pork chop, pale chopped garlic cooking in butter and honey garlic sauce reducing with small bubbles.
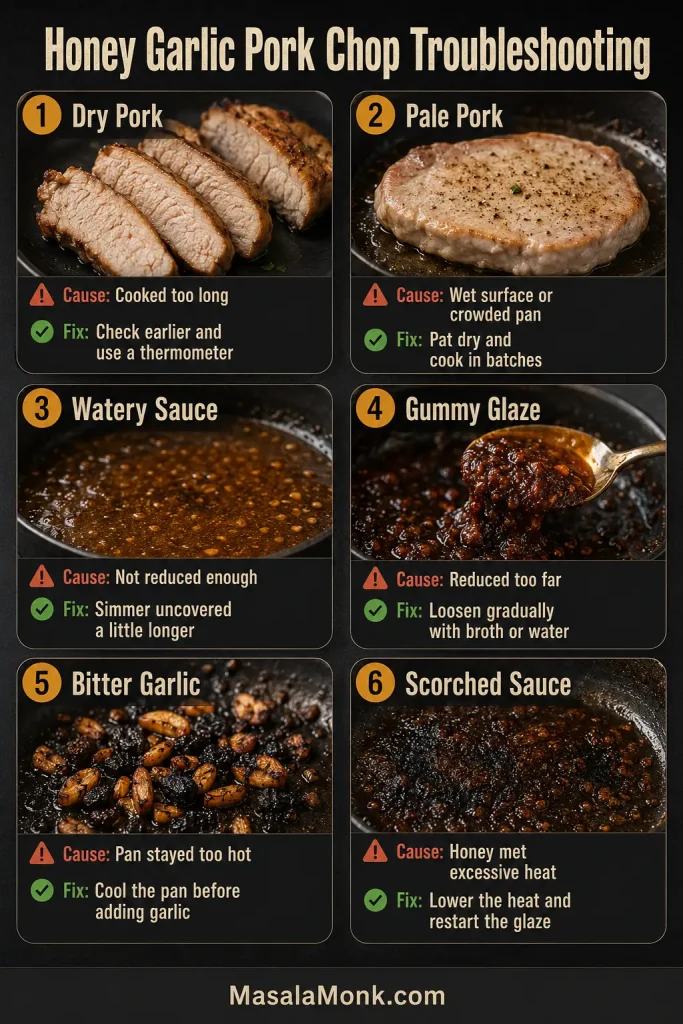
When one cue is missing, pause and adjust: pale pork needs more browning, darkening garlic needs a cooler pan, and large bubbles signal that the sauce still contains excess water.

Honey Garlic Pork Chops Recipe

Recipe at a Glance

Prep Time10 minutes
Cook Time15–18 minutes
Total TimeAbout 30 minutes
Servings4
Best Chop¾–1 inch / 19–25 mm
Best Pan12 inch / 30 cm skillet
Final Temperature145°F / 63°C
RestAt least 3 minutes

Equipment

  • 12-inch / 30-cm heavy skillet
  • Instant-read meat thermometer
  • Tongs and a wooden or silicone spoon
  • Small bowl or liquid measuring jug
  • A clean plate for holding the seared pork

Ingredients

For the pork chops

  • 4 pork chops, preferably ¾–1 inch / 19–25 mm thick, about 6–8 oz / 170–225 g each
  • Fine salt: ¼ teaspoon, about 1.5 g, plus more only after tasting the reduced sauce
  • Black pepper: ½ teaspoon, about 1 g
  • Garlic powder: ½ teaspoon, about 1.5 g
  • Neutral cooking oil: 1 tablespoon / 15 ml, plus a little more if cooking in batches

For the sauce

  • ¼ cup honey, about 3 oz / 85 g
  • 3 tablespoons low-sodium soy sauce, 45 ml
  • ½ cup low-sodium chicken broth, 4 fl oz / 120 ml
  • 1 tablespoon apple cider vinegar or unseasoned rice vinegar, 15 ml
  • 4–6 garlic cloves, finely chopped, about 12–18 g; use 4 for gentler garlic or 6 for a bolder glaze
  • 1 tablespoon unsalted butter, about ½ oz / 14 g
  • ¼ teaspoon red-pepper flakes, optional
  • Sliced scallions or chopped parsley, optional, for serving

Optional, for a thicker glaze

  • 1 teaspoon cornstarch, about 3 g
  • 1 tablespoon cold water, 15 ml
Overhead arrangement of four raw pork chops with measured honey, low-sodium soy sauce, chicken broth, vinegar, garlic, butter, seasonings, oil and cornstarch slurry.
Low-sodium soy sauce and broth give the glaze room to reduce without becoming overly salty; taste only after the sauce has concentrated.

Method

Six-step honey garlic pork chops guide showing the meat being dried, seasoned, seared and removed before the garlic sauce is simmered and used for glazing.
The skillet method for honey garlic pork chops has two separate stopping points: temperature decides when the meat leaves, while texture decides when the glaze is ready.

Prepare and Sear

  1. Mix the sauce. Whisk the honey, soy sauce, broth, vinegar, and optional red-pepper flakes. Keep the garlic and butter separate. If using cornstarch, stir it with the cold water in a second bowl.
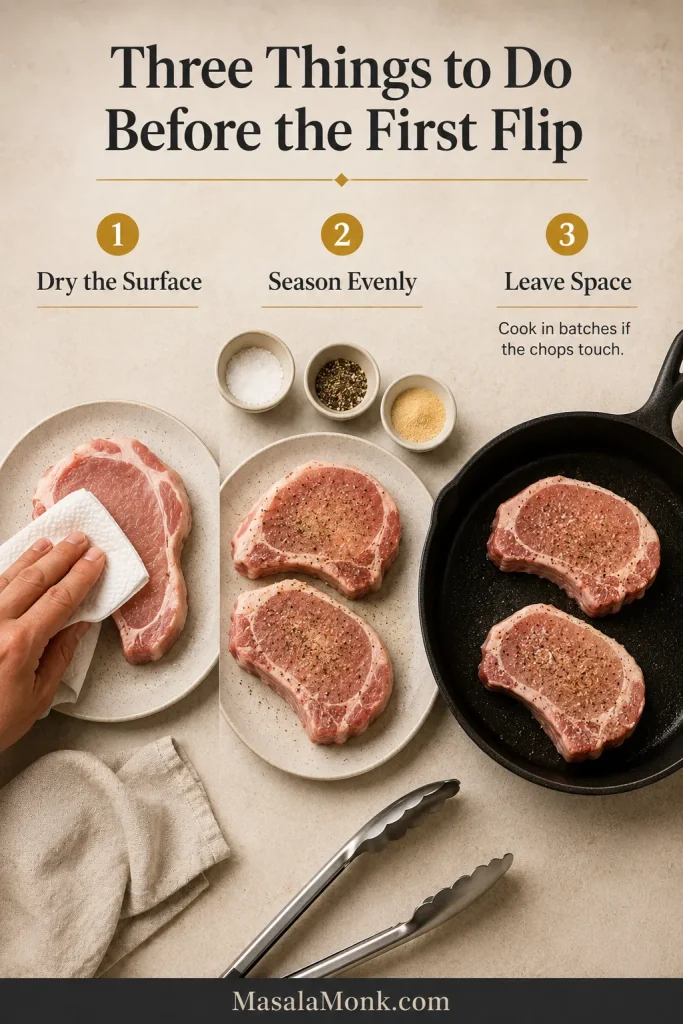
  2. Prepare the pork. Pat the chops thoroughly dry and season both sides with salt, pepper, and garlic powder. If a chop has a firm fat rim, make two or three shallow cuts through the fat so it lies flat.
  3. Sear the first side. Heat the skillet over medium-high for about 2 minutes, then add the oil. Add the chops with space between them and cook without moving until golden, commonly 3–4 minutes. Work in two batches if they touch.
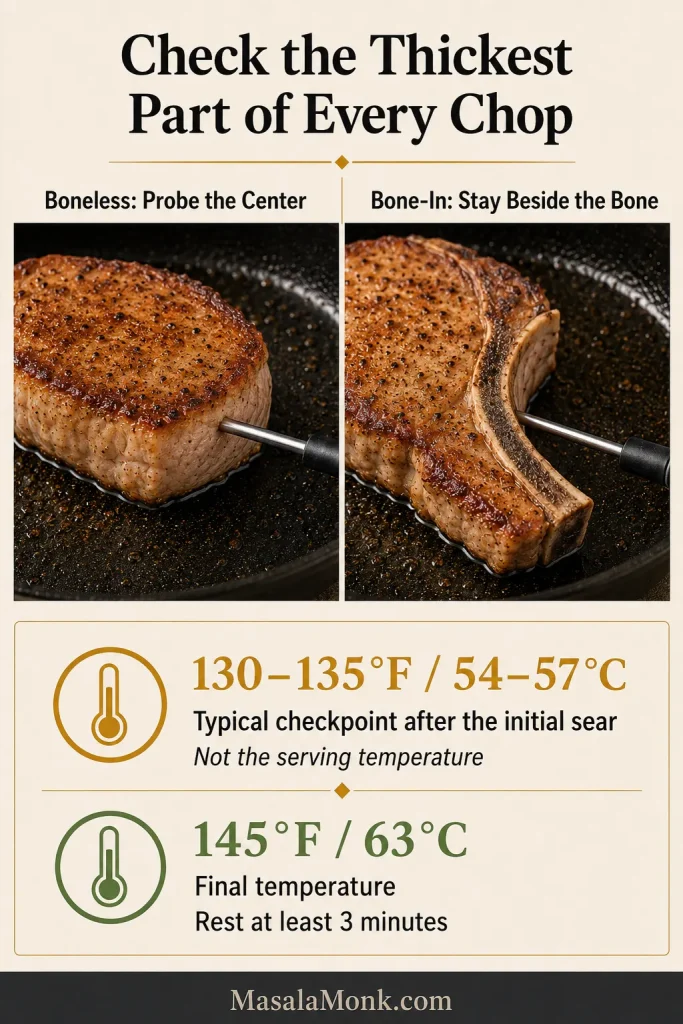
  4. Turn, check, and remove. Cook the second side for about 2–3 minutes, checking early if the chops are thin. Remove each piece when it is roughly 10–15°F / 6–8°C below the final temperature—usually around 130–135°F / 54–57°C for standard chops. This is only an interim checkpoint, not the serving temperature.

Make the Glaze and Finish

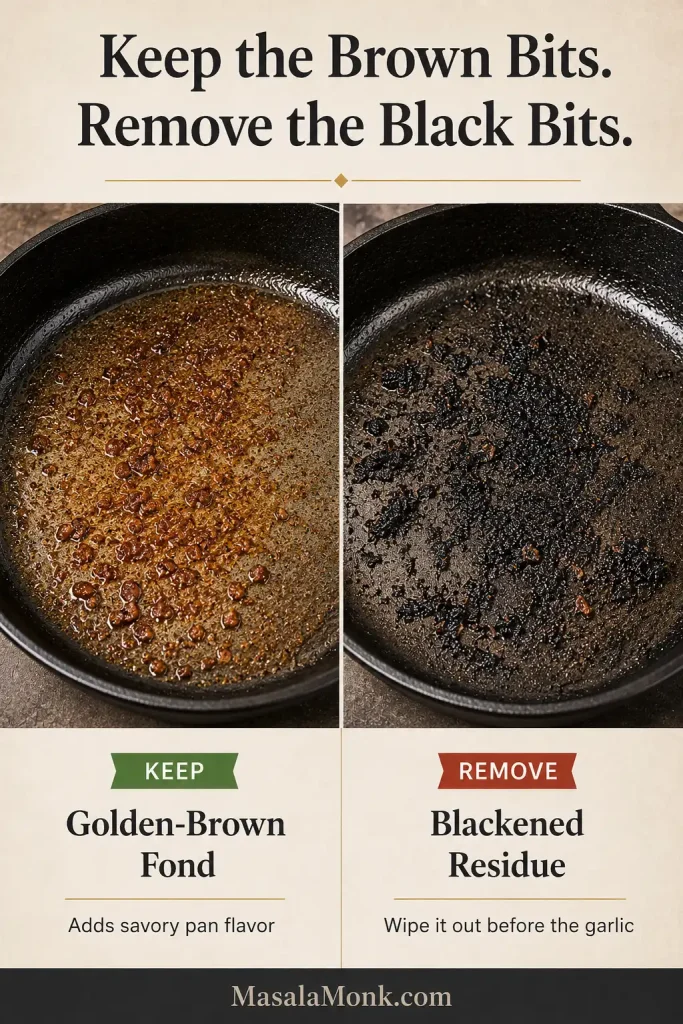
  1. Lower the heat and check the skillet. Golden-brown residue adds flavor; black residue tastes bitter. Wipe out blackened bits, lower the heat to medium-low, and move the skillet off the burner briefly if it is still fiercely hot.
  2. Make the pan sauce. Melt the butter and stir in the garlic for 20–30 seconds, keeping it pale. Pour in the honey mixture and scrape up the golden pan juices. Maintain a gentle, steady simmer until the bubbles tighten and the sauce leaves a brief trail behind the spoon, usually 4–6 minutes.
  3. Glaze the pork. If the sauce remains watery, add half the cornstarch slurry and simmer for 20–30 seconds. Add more only if it still runs quickly from the spoon. Return the pork and any plate juices, turning each chop through the glaze only until its thickest part reaches 145°F / 63°C.
  4. Rest and serve. Move the chops to a clean plate and rest for at least 3 minutes. Spoon over the glaze. If it tightens too much, loosen it with broth or water, 1 tablespoon / 15 ml at a time.

The thinnest chop is allowed to finish first. Dinner does not improve by making every piece wait for the slowest one.

Recipe Notes

  • Thin chops: Start checking after about 2 minutes on the first side and 1–2 minutes on the second.
  • Thick chops: Chops thicker than 1¼ inches / 32 mm are easier to finish in a 400°F / 200°C oven after searing.
  • Bone-in chops: Measure beside the bone without touching it.
  • Enhanced or pre-brined pork: Omit the added salt at first and adjust the finished sauce only after tasting.
  • Food safety: Whole pork chops should reach 145°F / 63°C and rest for at least 3 minutes.

Need more guidance? Choose by thickness Read the skillet cues Use another cooking method

Once the pork is browned and resting, the most time-sensitive part is over. The sauce can reduce without leaving the pork in the skillet long enough to dry out.

Why This Method Works

Removing the pork gives the skillet time to cool before the garlic goes in. The sauce can then reduce without overcooking the meat.

Cooking timeline showing pork browned over medium-high heat, removed from the skillet, then returned after garlic and sauce cook over gentler heat.
Heavy skillets retain heat after the burner is lowered. A brief pause off the heat can protect the butter and garlic before the sauce ingredients enter the pan.

Honey alone would taste sweet but flat. Soy sauce brings savory depth, broth loosens the browned pan juices and gives the sauce enough volume to reduce gradually, and vinegar keeps the final glaze bright. Fresh garlic leads the aroma, while garlic powder seasons the meat beneath the sauce.

Use oil for the hot sear, then add butter after the pan cools to soften and round out the sauce. Maple syrup can replace the honey for a softer maple-garlic variation, though the flavor and final texture will be different.

Choose Your Pork Chops by Thickness

Thickness matters more than bone status. Use the package measurement as a starting point, then let the thermometer decide when each chop leaves the heat.

Three raw pork chops shown from the side with guides identifying thin, standard and thick cuts.
Sort the chops by thickness before cooking and remember where each one sits in the skillet. That makes it easier to check and remove the thinnest piece first.
ThicknessHow to cook itWhen to begin checking
Under ½ inch / 13 mmBrief skillet sear; glaze off the heat if already doneAfter about 2 minutes on the first side
¾–1 inch / 19–25 mmUse the main skillet methodDuring the second side
1¼–1½ inches / 32–38 mmSear, then finish in the ovenAbout 4 minutes after entering the oven

Boneless chops are often more uniform and may cook a little faster. Bone-in chops can be more forgiving, but place the thermometer beside the bone without touching it. Brown the batch together, then let every chop finish on its own time.

Guide showing a thermometer inserted horizontally into a boneless pork chop and beside the bone in a bone-in chop, with interim and final temperature markers.
Check every chop individually rather than treating the skillet as one piece of meat; shape, thickness and pan position can produce different temperatures within the same batch.

FoodSafety.gov lists whole pork chops at 145°F / 63°C with a 3-minute rest.

Different cut? Pork tenderloin needs its own oven method; its long, narrow shape cooks differently from individual chops.

Read the Skillet: Golden Pork, Pale Garlic, Small Bubbles

Those three cues tell you more than the clock. They show when the pork has browned, when the pan is cool enough for garlic, and when the loose sauce is becoming a glaze.

Build the Sear

Overhead scene showing a pork chop being patted dry, two chops seasoned and two more spaced apart in a skillet.
Listen after the pork enters the pan: a clear searing sound is useful, but a weak watery hiss often means surface moisture or crowding is slowing the browning.

Golden pork: Dry chops brown faster. Give them space and leave the first side alone until a real crust forms; in cast iron or stainless steel, the meat often releases more easily at that point.

Stainless-steel tongs lift a pork chop in a skillet to reveal an evenly golden-brown seared surface with a few darker caramelized patches.
Do not wait for perfectly uniform color. A real skillet crust usually combines deep-golden areas with a few darker caramelized patches and naturally lighter edges.

After the pork leaves the skillet, inspect what remains before building the sauce. Golden-brown fond can enrich the glaze, while genuinely black residue should be wiped away so it does not add bitterness.

Side-by-side skillet comparison showing usable golden-brown fond and blackened residue left after searing pork chops.
Keep caramel-brown fond; wipe away genuinely black flakes before adding the sauce.

Control the Garlic and Glaze

Pale garlic: Let the skillet settle before the butter and garlic go in. Add the liquid when the garlic smells warm and savory but still looks pale.

Irregularly chopped pale garlic cooking gently in foaming melted butter inside a dark skillet while a wooden spoon moves the pieces.
Use aroma as the first signal: once the garlic loses its raw sharpness and smells warm and savory, the liquids can go in before the color changes.

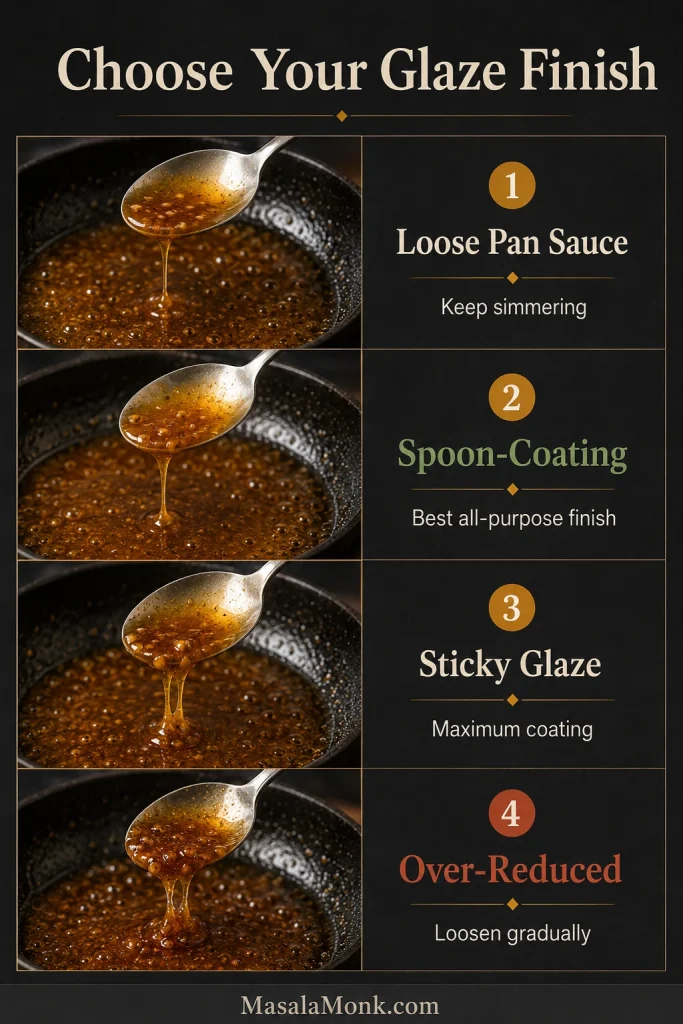
Small steady bubbles: The sauce begins loose with large bubbles. As water evaporates, the bubbles become smaller, the surface turns shiny, and a spoon leaves a short trail through the pan. When that happens, the glaze is ready to settle over the pork and whatever you have waiting underneath.

StageWhat it looks likeBest use
Loose pan sauceRuns quickly from a spoonKeep simmering, or use extra over rice
Spoon-coating sauceClings, then slides slowlyBest all-purpose finish
Sticky glazeHolds firmly to the chopsMaximum coating on the pork
Over-reducedDense, tacky, or stringyLoosen with broth or water
Four-stage guide comparing loose pan sauce, spoon-coating sauce, sticky glaze and an over-reduced glaze dripping from a spoon.
Choose the finish for the meal: spoon-coating sauce spreads well over rice or potatoes, while a stickier glaze keeps more flavor concentrated on the pork.

Honey tightens as it cools, so give the glaze the three-minute rest before deciding it needs more thickening. Cornstarch is optional; natural reduction is usually enough when the sauce simmers steadily. Once the glaze turns shiny, there is very little left to manage—coat the chops, let them rest, and bring the plate together.

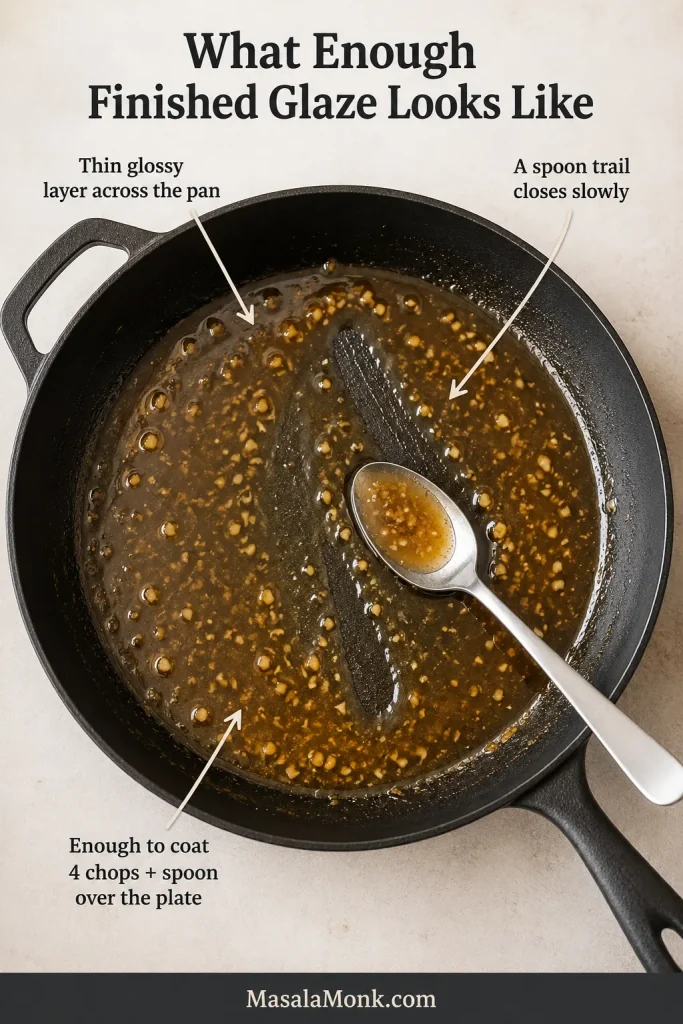
Overhead skillet coated with a shallow layer of honey garlic glaze, visible chopped garlic and a spoon trail through the center.
Tilt the skillet once to judge the quantity. A finished glaze should move as a shallow glossy sheet rather than collect like a deep pool in the center.

What to Expect from the Finished Dish

Expect garlic and savory pan juices first, with honey softening the edges and vinegar keeping the finish clean. The glaze clings to the browned pork but stays loose enough to spoon over the plate.

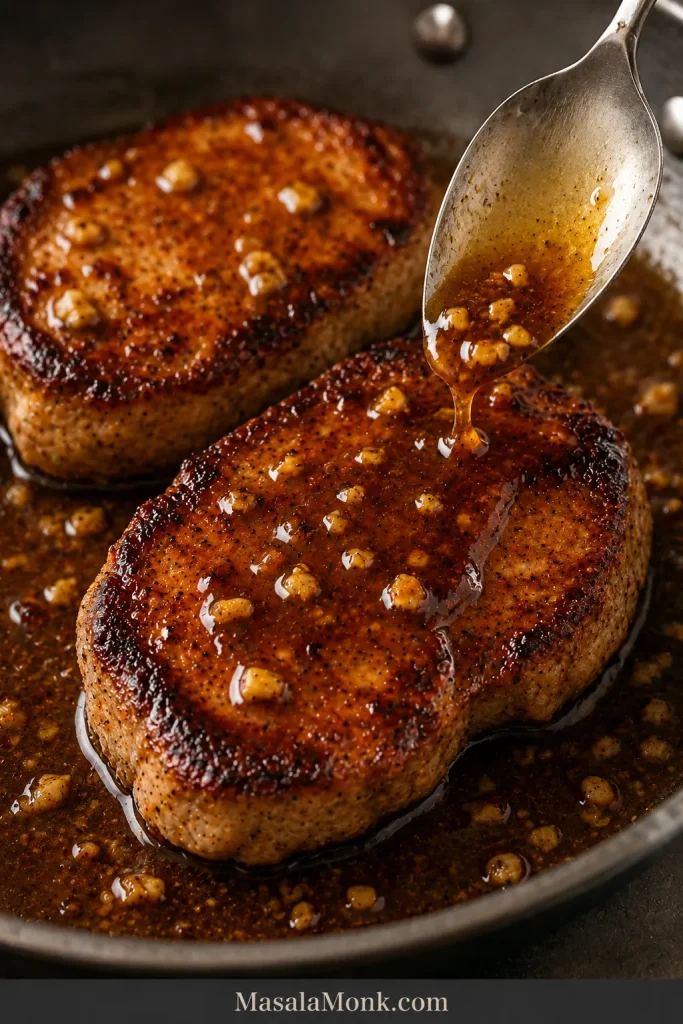
Two browned pork chops in a skillet while translucent amber glaze is spooned over the nearest chop.
Turn each chop through the sauce once, then spoon glaze over the top. Prolonged bubbling after the pork returns adds more heat than useful flavor.

Should You Marinate the Pork?

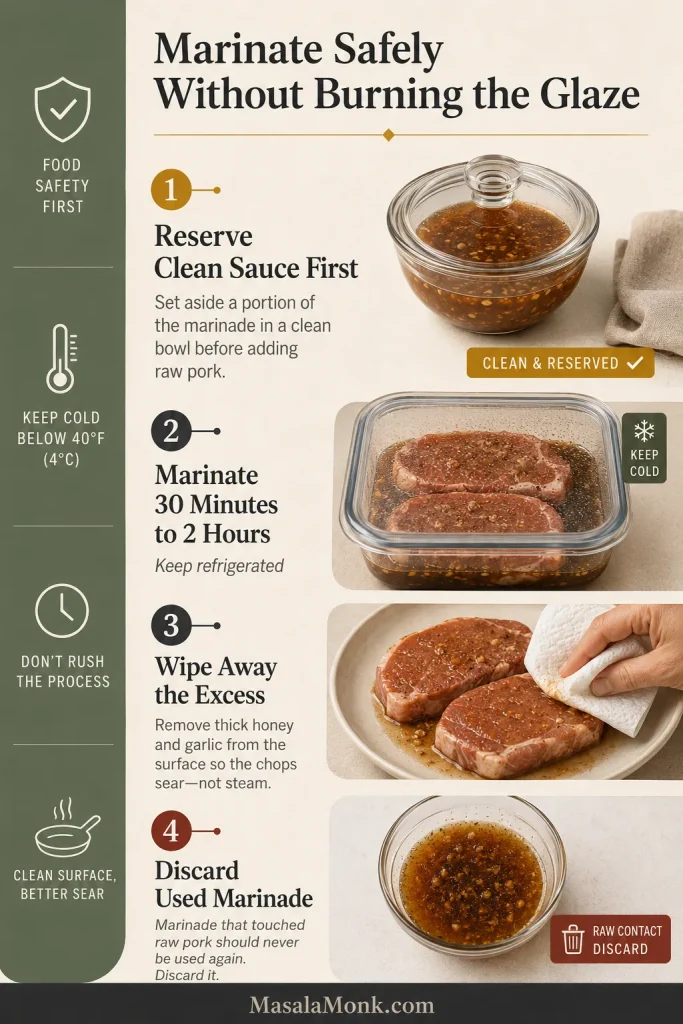
You can, but the main method is easier to control. Honey and chopped garlic left on the surface can darken quickly during the sear. To marinate, reserve a clean portion of sauce, refrigerate the pork for 30 minutes to 2 hours, wipe away excess marinade before cooking, and discard anything that touched raw meat.

Four-step safety guide showing clean sauce reserved separately, raw pork refrigerated in marinade, excess marinade wiped away and used marinade discarded.
Marinating changes the surface flavor, but it does not guarantee juicy pork. Thickness, internal temperature and timely removal from the heat still control the final texture.

Other Ways to Cook Honey Garlic Pork Chops

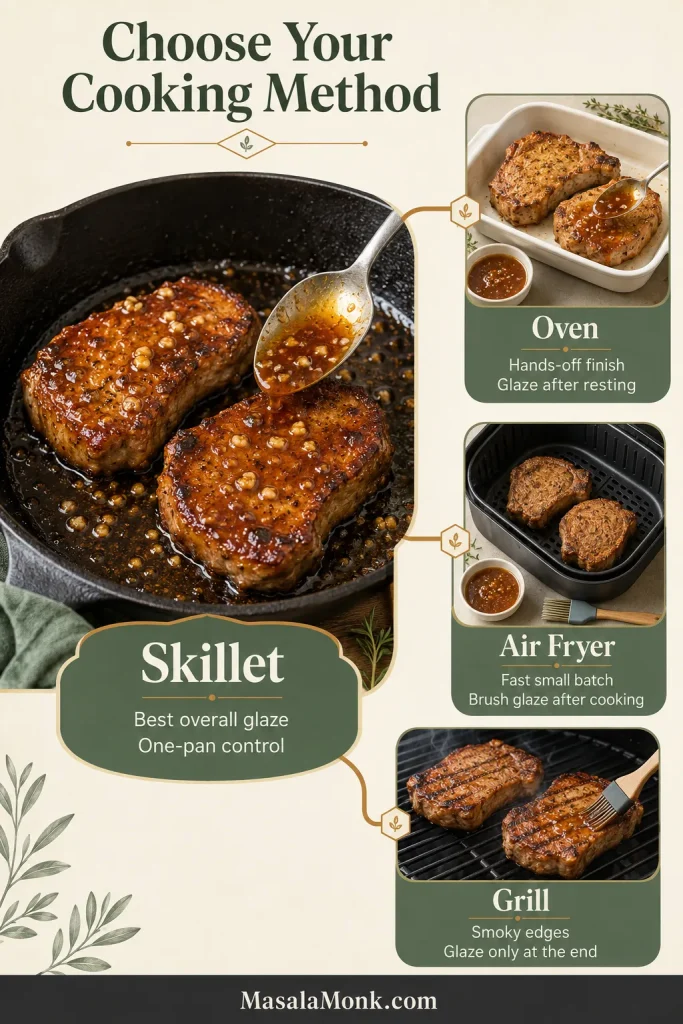
The skillet method gives the best control over browning and reduction. The same flavor still works in the oven, air fryer, and on the grill as long as the glaze arrives late.

Cooking-method guide for honey garlic pork chops with a glazed skillet version in the center and smaller baked, air-fried and grilled versions around it.
For honey garlic pork chops, choose by batch and cut: skillet for control, oven for thick pieces, air fryer for two or three chops, and grill when smoky flavor matters most.

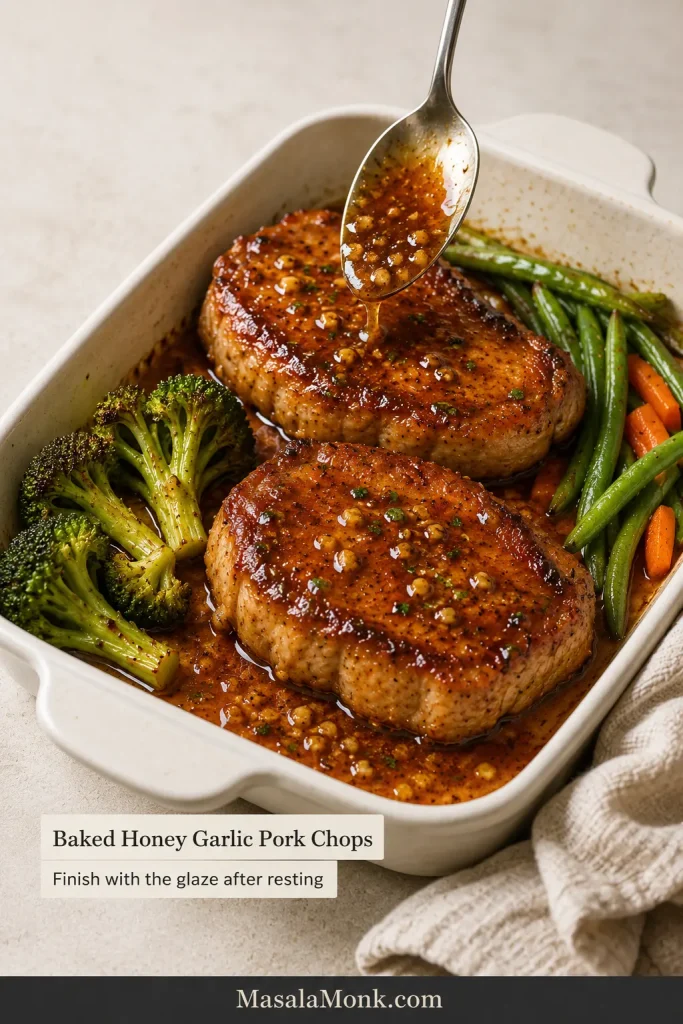
Baked Honey Garlic Pork Chops

Heat the oven to 400°F / 200°C. Sear thick chops for about 2–3 minutes per side, then move them to a small baking dish or sheet pan. Use the skillet to make the pan sauce while the pork finishes in the oven.

Begin checking the chops after about 4 minutes and remove each one at 145°F / 63°C. Rest for at least 3 minutes, then spoon on the glaze off the heat so the pork stays juicy.

Baked honey garlic pork chops in a pale ceramic dish with vegetables while amber glaze is spooned over the cooked meat.
Move thick chops to the oven when the crust is ready but the center still needs time. The gentler finish prevents the exterior from becoming too dark.

Oven-only option: Bake seasoned chops at 375°F / 190°C until they reach 145°F / 63°C. Make the sauce separately in a small saucepan and glaze the rested pork.

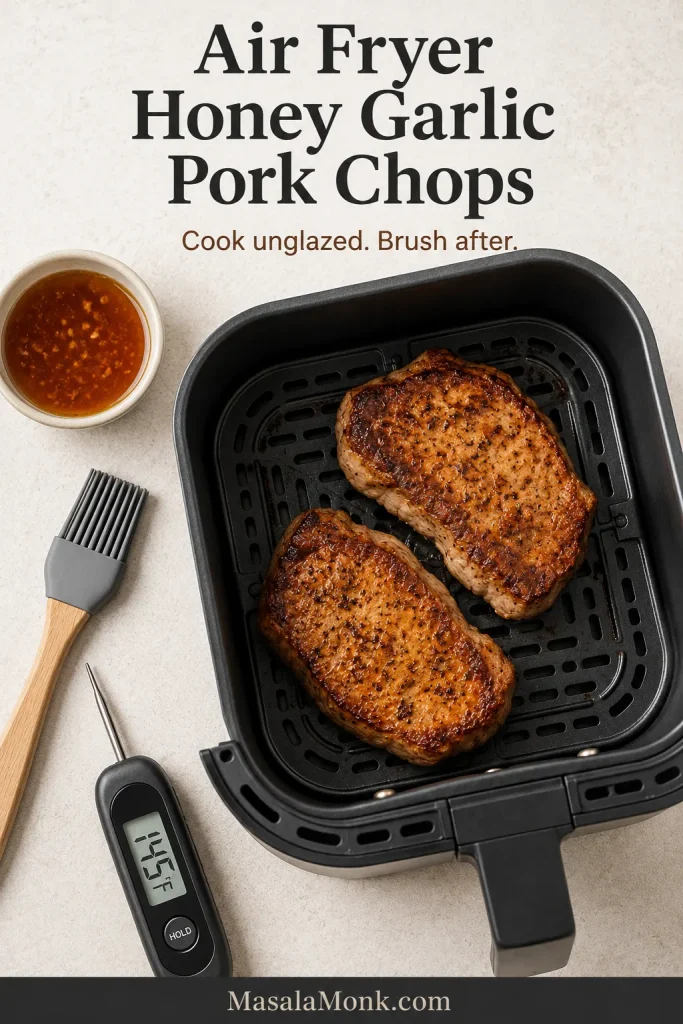
Air Fryer Honey Garlic Pork Chops

Air fry the seasoned pork first and make the sauce separately. Boneless chops around ¾–1 inch commonly take about 8–12 minutes at 380°F / 190°C, turning halfway; begin checking early because models vary. Remove each chop at 145°F / 63°C, rest for at least 3 minutes, then brush on the glaze. This air fryer timing guide handles thin and thick boneless chops separately.

Air fryer honey garlic pork chops shown unglazed and spaced apart in a basket beside a bowl of sauce, a brush and a thermometer reading 145°F.
Basket space matters more than squeezing in an extra portion. Two well-separated chops usually brown better than four crowded pieces surrounded by trapped moisture.

Grilled Honey Garlic Pork Chops

Heat the grill to about 400–450°F / 200–230°C. Grill 1-inch chops for roughly 4–5 minutes per side, but begin checking before the full time because thickness and temperature override the clock. Remove each chop at 145°F / 63°C, rest for at least 3 minutes, and brush on the glaze only during the final 1–2 minutes or after cooking.

Grilled honey garlic pork chops on outdoor grates while one chop is brushed with amber glaze near the end of cooking.
Set up a cooler section of the grill before cooking. If the honey causes a flare-up, move the pork away from direct heat instead of letting the glaze burn.

About the slow cooker: This skillet glaze does not convert directly because trapped moisture keeps it thin and lean chops can dry out over several hours. A slow-cooker version needs different liquid proportions and its own timing.

Honey Garlic Pork Chop Variations

Honey garlic pork chops flavor board showing Dijon, chili, ginger, mushroom and pork-bite variations around a central glazed chop, plus substitution notes.
Change one direction at a time before combining variations: acidity sharpens, chili contrasts, ginger brightens, mushrooms deepen, and smaller pork pieces alter the cooking speed.
  • Dijon: Whisk in 1–2 teaspoons. One teaspoon quietly sharpens the sweetness; two makes mustard more prominent.
  • Spicy: Add ½ teaspoon red-pepper flakes, 1–2 teaspoons sriracha, chili-garlic sauce, or a thinly sliced fresh chili.
  • Ginger: Stir 1 tablespoon finely grated fresh ginger in with the garlic.
  • Mushrooms: Brown 8 oz / 225 g sliced mushrooms after removing the pork. Let their moisture evaporate before adding the butter and garlic.
  • Pork bites: Cut boneless pork into even pieces and sear in batches. The smaller pieces cook much faster than chops.
  • Gluten-free: Use certified gluten-free tamari and check that the broth is labeled gluten-free.
  • Soy-free: Use verified soy-free broth in place of the soy sauce, then season the reduced sauce gradually. Suitable coconut aminos can also work but are usually sweeter.
  • Cooking more chops: Brown them in batches and reduce the sauce before returning the pork.

Want a creamy mushroom gravy rather than a sticky glaze? Use these cream of mushroom pork chops.

Honey Garlic Pork Chops Troubleshooting

If dinner is already in the skillet, most problems are still fixable. First decide whether the pork or the sauce needs attention.

Honey garlic pork chops troubleshooting guide showing dry pork, pale pork, watery sauce, gummy glaze, bitter garlic and scorched sauce with causes and fixes.
When honey garlic pork chops need rescuing, remove the meat first and troubleshoot the sauce separately. Cooked pork should not remain in the skillet while the glaze is corrected.

Pork Problems

ProblemLikely reasonWhat to do
Pork is dryThin chops or too much finishing timeCheck earlier and remove each piece as soon as it reaches 145°F / 63°C
Pork is paleWet surface or crowded skilletPat it dry and brown in batches
Chops finish unevenlyDifferent thicknessesRemove each chop individually instead of waiting for the batch

Sauce and Glaze Problems

ProblemLikely reasonWhat to do
Sauce is wateryNot enough reduction or extra pork juicesRemove the pork and simmer the sauce alone
Glaze is too thickReduced too far or cooledAdd broth or water 1 tablespoon at a time
Glaze is too sweetNot enough acidAdd vinegar ½ teaspoon at a time
Glaze is too saltyRegular soy sauce or heavy reductionAdd low-sodium broth and a little honey
Glaze is gummyToo much cornstarchWhisk in broth gradually and simmer gently
Garlic tastes bitterIt browned too farRemake the sauce in a cooler skillet
Sauce tastes scorchedThe skillet or residue was too darkClean the pan and restart over gentler heat
Glaze slides offIt is still too thinReduce it separately before coating the pork

A thick glaze can be loosened; a scorched sauce cannot be hidden. If the pork is cooked and the sauce is not scorched, the dish is usually recoverable: broth loosens, honey softens a sharp edge, and vinegar restores brightness.

Build the Plate

Give the glaze something soft to soak into and something green or crisp on the side.

For the coziest plate, spoon the chops and glaze over garlic mashed potatoes and add green beans or broccoli.

A glazed honey garlic pork chop served with creamy mashed potatoes and green beans on a warm-toned plate.
Spoon most of the glaze beside the pork rather than covering every browned edge. The potatoes will catch the runoff while the crust keeps its texture.

For a lighter bowl, serve the pork over rice with cucumber salad, cabbage, or sugar snap peas.

Overhead rice bowl with sliced glazed pork, white rice, cucumber, purple cabbage, carrots, scallions and sesame seeds.
Use cool, undressed vegetables beside the warm pork for stronger contrast. Add the glaze mainly to the meat and rice so the cabbage and cucumber stay crisp.

Slice the pork before adding the final spoonful of glaze so some of it catches along the freshly cut edges. Buttered noodles, soft polenta, roasted potatoes, slaw, corn, or a make-ahead potato salad can round out the plate.

A glazed pork chop sliced into thick pieces, showing a moist, fully cooked interior, browned edges and a small pool of amber sauce.
Keep the serving slices reasonably thick. Thin decorative slices cool quickly and expose more surface area, whereas substantial pieces retain warmth and moisture longer.

Want a richer comfort-food direction? Smothered pork chops replace the sticky glaze with a deep onion gravy.

Storage, Reheating, and Leftovers

Keep the pork and glaze together so every piece has some moisture around it. That small amount of sauce makes reheating much kinder to a lean chop.

Honey garlic pork chops storage guide showing cooked pork kept with glaze, gently reheated in a covered skillet and repurposed with noodles and vegetables.
Portion leftover honey garlic pork chops before reheating so only the amount being served is warmed. Repeated heating is more likely to dry out the lean meat.

Refrigerate: Cool the pork and sauce, then store them in a covered container within 2 hours. FoodSafety.gov recommends using cooked leftovers within 3–4 days.

Freeze: Freeze individual portions with some glaze in tightly closed containers. The pork may feel slightly firmer after reheating, but the sauce helps protect it from drying out.

Reheat: Warm the pork and glaze in a covered skillet over low heat with 1–2 tablespoons / 15–30 ml broth or water until the leftovers reach 165°F / 74°C. In the microwave, use reduced power and short intervals.

Use leftovers in: rice bowls, noodles, wraps, chopped salads, fried rice, or a quick vegetable stir-fry. Slice the pork while cold and fold it into the new dish near the end.

More pork-chop help: Compare cuts and serving weights in the pork chop calorie and nutrition guide, or use crock-pot pork chops with sauerkraut for a dinner designed around slow cooking.

Frequently Asked Questions

Can I Use Regular Soy Sauce?

Regular soy sauce works, but start with 2 tablespoons instead of 3 because it becomes saltier as the sauce reduces. Add more only after tasting.

Can I Make the Sauce Ahead?

Prepare the honey, soy sauce, broth, vinegar, and red-pepper flakes up to 2 days ahead and refrigerate. Keep the garlic separate so its flavor stays fresher.

Can I Make Extra Sauce?

For extra sauce, use 1½ to 2 times the listed quantities, depending on how much you want for rice or vegetables. Reduce the larger batch before returning the pork so the chops do not overcook.

Can I Start with Frozen Pork Chops?

Thawing first gives better browning and more predictable timing. Frozen pork releases water, weakens the sear, and dilutes the sauce. Thaw safely in the refrigerator and dry thoroughly.

Brown First, Glaze Last

Brown the pork while the skillet is hot, then make the sauce after the heat comes down. The edges stay golden, the center stays juicy, and the glaze tastes balanced instead of merely sweet.

It still feels like a proper plated dinner, even though the whole thing came from one skillet on an ordinary evening. Keep the glaze spoonable or reduce it until it clings to every bite—the method works either way.

If you make it, tell us what kind of chops you used—thin, thick, bone-in, or boneless—and whether you kept the glaze glossy or took it all the way to sticky.

← Back to the recipe card ↑ Back to the top

Posted on Leave a comment

Air Fryer Pork Tenderloin Recipe: Juicy, Easy, No-Dry Timing Guide

Sliced air fryer pork tenderloin with browned edges, tender center, roasted potatoes, green beans, and juices on a serving board.

Air fryer pork tenderloin is the kind of dinner that feels almost too easy when it goes right. The outside turns browned and savory, the inside stays juicy, and you can slice it onto plates in about half an hour without heating the oven.

You are not trying to make fancy pork here. The goal is smoky browned edges, tender slices, and just enough pan-style flavor to make dinner feel like more than a shortcut. Everything comes down to three things: cook it hot, check it early, and rest before slicing.

Because pork tenderloin is lean, a few extra minutes can turn glossy slices into dry pork, especially if your piece is small, your air fryer runs hot, or the package in front of you is actually pork loin instead of tenderloin.

This guide is built for the real-life versions too: small tenderloins, hot air fryers, pre-marinated packs, pork fillet labels, frozen pork, and the moment you realize your potatoes need longer than the pork.

Quick Answer

Cook pork tenderloin in the air fryer at 400°F / 200°C, or 205°C if your air fryer uses exact 5-degree settings, until the middle of the pork reads 145°F / 63°C. Most 1–1½ lb / 450–680g tenderloins take about 18–24 minutes, but small or slim pieces can finish sooner. Start checking early, rest for 5 minutes, then slice across the grain.

The clock gets you close. A temperature check saves the pork.

What success looks like

The pork should have browned, smoky-garlic edges, a moist center, and slices that look glossy instead of chalky. Spoon any board juices back over the sliced pork before serving. That little step makes the whole plate feel more finished.

Texture check: Before serving, look for a moist center and glossy slices rather than a chalky cut surface.

Close-up of sliced air fryer pork tenderloin with browned crust, moist center, and juices on a wooden cutting board.
Look for slices that stay glossy in the center after resting; that shine is the visual clue that the pork was not cooked too long.

Ready to cook? Jump to the recipe cardNeed timing? See the chart

Make this when

  • You want pork that slices juicy, not dry and gray.
  • You need dinner fast, but still want it to feel complete.
  • You bought pork tenderloin or pork fillet and need clear air fryer timing.
  • You are using a Ninja Foodi, basket air fryer, oven-style air fryer, or pre-marinated pack.
  • You want potatoes, carrots, green beans, rice, salad, or a simple sauce on the side.

Air Fryer Pork Tenderloin Recipe Card

This is the fast version: season the pork with a smoky garlic-Dijon rub, air fry it hot, check once before it overcooks, and rest it so the slices stay juicy.

Recipe at a Glance

RecipeAir Fryer Pork Tenderloin
Best cutPork tenderloin or pork fillet, 1–1½ lb / 450–680g
Prep time5–10 minutes
Cook time18–24 minutes for most tenderloins
Start checking13–14 minutes for small/slim pieces; 16–18 minutes for standard pieces
Rest time5 minutes
Total timeAbout 28–35 minutes
Servings4
Air fryer temperature400°F / 200°C, or 205°C if available
Internal temperature145°F / 63°C in the center, then rest

Ingredients

  • 1 pork tenderloin, 1–1½ lb / 450–680g
  • 1 tablespoon / 15 ml olive oil or avocado oil
  • 1 teaspoon / 5 ml Dijon mustard
  • 1–2 teaspoons brown sugar or honey
  • 1 teaspoon smoked paprika
  • 1 teaspoon garlic powder
  • ½ teaspoon onion powder
  • ¾–1 teaspoon kosher salt, depending on size and seasoning
  • ½ teaspoon black pepper
  • Pinch of cayenne, chili powder, or red pepper flakes, optional

Method

  1. Preheat the air fryer to 400°F / 200°C, or 205°C if your air fryer allows that setting. Give it 3–5 minutes if your model recommends preheating.
  2. Pat the pork dry. Remove any tough silver skin if present.
  3. Mix the oil, Dijon mustard, brown sugar or honey, smoked paprika, garlic powder, onion powder, salt, pepper, and optional chili in a small bowl.
  4. Rub the seasoning mixture all over the tenderloin.
  5. Place it in the air fryer basket with space around it. Cut it in half crosswise if needed so it fits without curling tightly.
  6. Air fry for 10–12 minutes, then flip.
  7. Continue cooking until the middle reaches 145°F / 63°C, checking early for small or slim tenderloins.
  8. Rest loosely tented for 5 minutes, then slice across the grain into thick, juicy pieces.

Do not cook by time alone. A slim 1 lb tenderloin and a thick 1½ lb tenderloin should not be treated like the same piece of meat.

A simple plate of potatoes and green vegetables turns the tenderloin into a full weeknight dinner after the main method is done.

Plate of sliced pork tenderloin served with roasted potatoes, green beans, carrots, and herbs.
For a fast weeknight plate, pair pork tenderloin slices with potatoes and green vegetables so the air fryer recipe feels like a full meal, not just the main protein.

From here, the things that change the result are the cut, the thickness, the air fryer style, and when you stop cooking. That is what the rest of the guide helps you control.

Table of Contents

Choose your path

With a plain tenderloin, start with the recipe card and cooking chart. For a package labeled pork loin filet, check the cut section before you season anything. Adding potatoes or carrots? Read the sides section first so the pork does not wait around while the vegetables finish.

Why This Works

The air fryer works beautifully for pork tenderloin because the cut is small enough to cook through before the outside has time to dry out. You get browned edges without babysitting a skillet, as long as you stop at temperature.

The flavor is simple but satisfying: smoky, garlicky, lightly tangy, and just sweet enough to help the edges brown. Oil helps the rub toast instead of sitting dry on the surface. Dijon adds a quiet tang without making the pork taste mustardy. Brown sugar or honey helps the outside color. The short rest keeps the slices glossy when you cut in.

When it comes out right, the edges are smoky and browned, the slices look moist, and the mustard-garlic rub tastes like it took more effort than it did.

That is also why this tenderloin cooks hotter than some air fryer pork chops. Pork chops are flatter and can tighten quickly, so if the package in front of you is actually chops, switch to this air fryer boneless pork chops guide instead.

The no-dry rules

  • Use pork tenderloin, not pork loin. The cuts are different and need different timing.
  • Cook hot, but check early. 400°F / 200°C browns well, but small pieces finish quickly.
  • Test the middle, not the tapered end. The thin tail is not the doneness judge.
  • Rest before slicing. Five quiet minutes gives you glossier, juicier slices.
  • Do not chase “no pink.” A slight blush can be normal when the pork is cooked to temperature.

Before any of those rules can help, though, the cut has to be right.

Pork Tenderloin vs Pork Loin vs Pork Fillet

This is worth checking before you cook, because the wrong cut is the easiest way to follow the recipe perfectly and still end up disappointed. Pork tenderloin, pork loin, pork loin filet, pork fillet, and pork roast sound similar, but they do not cook the same way.

How to Identify the Right Cut

Cut check: Shape matters here; this visual helps you confirm tenderloin or pork fillet before using the air fryer timing.

Comparison image showing pork tenderloin, pork loin, and pork fillet with different shapes and sizes.
A quick shape check here can save the whole recipe: tenderloin and pork fillet are usually long and narrow, while pork loin is wider and cooks on a different timeline.
Package saysWhat it likely isUse this recipe?
Pork tenderloinLong, narrow, lean cut, usually 1–1½ lbYes
Pork filletOften the same cut as pork tenderloin in UK, Australia, and some grocery labelingYes, if long, narrow, and about 450–680g / 1–1½ lb
Pork loinWider, larger roast-style cutNo, it needs different timing
Pork loin filetCan be a branded or pre-marinated loin-style cut; check shape and weight carefullyMaybe, only if it looks like tenderloin
Pork roastUsually larger and wider than tenderloinNo

When to Switch Recipes

If it is wide like a roast, stop. This method is for a long, narrow pork tenderloin or pork fillet. A pork loin roast needs a different timing plan.

If your package turns out to be a bigger pork loin, you are not stuck — just switch methods. MasalaMonk already has a dedicated slow cooker pork loin recipe and a smoked pork loin recipe for that larger cut.

If you have pork tenderloin but want another cooking method, see the pork tenderloin in oven guide or this softer, hands-off slow cooker pork tenderloin recipe.

Cut confirmed? Back to the recipe cardGo to the cooking time chart

Ingredients for Juicy Pork Tenderloin

The ingredient list is short on purpose. Pork tenderloin does not need to be buried under sauce. It needs enough fat for browning, enough salt for flavor, and a rub that gives the air fryer something to toast.

The result is a smoky garlic crust with a little mustardy brightness and just enough sweetness to make the edges taste dinner-worthy, not sugary.

What Each Ingredient Does

Gather the rub ingredients before preheating so the pork can go from seasoning to basket without losing momentum.

Overhead view of pork tenderloin ingredients including raw pork, oil, Dijon mustard, smoked paprika, garlic powder, onion powder, salt, pepper, honey, and brown sugar.
This short ingredient list works because each part has a job: oil helps the rub cling, Dijon adds brightness, and paprika plus garlic build the crust.
IngredientUS amountMetric amountWhy it helps
Pork tenderloin1–1½ lb450–680gThe ideal size for this method
Olive oil or avocado oil1 tbsp15 mlHelps browning and seasoning coverage
Dijon mustard1 tsp5 mlAdds tang and helps the rub cling
Brown sugar or honey1–2 tsp5–10 mlBalances lean pork and helps browning
Smoked paprika1 tsp2–3gAdds color and smoky depth
Garlic powder1 tsp3gMain savory note
Onion powder½ tsp1–2gRounds out the rub
Kosher salt¾–1 tsp4–6gPrevents bland pork
Black pepper½ tsp1gAdds gentle heat
Cayenne or chili powderPinchPinchOptional heat

Salt and Seasoning Notes

For smaller or pre-marinated tenderloins, stay near the lower salt amount. Use the higher amount for a plain, larger one. When the pork is already seasoned, injected, or packed in a salty marinade, reduce the salt in the rub.

With fine salt or table salt instead of kosher salt, start with about ½ teaspoon for a 1 lb / 450g tenderloin and adjust next time. Fine salt packs more tightly, so the same spoonful tastes saltier.

Easy Substitutions

  • No Dijon? Use yellow mustard, whole-grain mustard, or skip it and add a small splash of lemon juice or vinegar for brightness.
  • No smoked paprika? Use regular paprika with a pinch of chili powder, cayenne, or cumin.
  • No brown sugar? Use honey or maple syrup. Skip the sweetener if your marinade is already sweet.
  • No avocado oil? Olive oil works well. Use a light coating so the rub clings and browns.
  • Using a salty seasoning blend? Reduce or skip the added salt until you know how salty the blend is.

Rub texture: Aim for a loose paste that coats the pork evenly instead of dropping into the basket.

Bowl of smoky garlic Dijon rub with a spoon, made with mustard, paprika, oil, garlic, and seasonings.
The rub should look like a loose paste so it clings to the pork instead of dropping off as dry seasoning in the basket.

Can I use a marinade instead?

Yes. For a simple marinade-style version, mix 1 tablespoon oil, 2 teaspoons soy sauce, 1 teaspoon Dijon mustard, 1 tablespoon honey or brown sugar, 1 teaspoon garlic powder, and 1–2 teaspoons lemon juice or vinegar. Marinate for 20–30 minutes if you have time, then air fry the same way and check the internal temperature.

Equipment You Need

You can make this with basic kitchen tools, but the thermometer is the one that matters. Pork tenderloin is too lean and too quick-cooking for blind timing.

  • Air fryer
  • Instant-read thermometer
  • Tongs
  • Small bowl for the seasoning paste
  • Measuring spoons
  • Paper towels
  • Cutting board
  • Sharp knife for trimming silver skin and slicing

Basket Air Fryer, Oven-Style Air Fryer, and Ninja Foodi Notes

Air fryer style changes how quickly the outside browns, so use this as a first-check guide before trusting one fixed time.

Air fryer typeWhat to expectFirst check
Basket air fryerBrowns fastest with strong direct airflow13–16 minutes
Oven-style air fryerMay need a few extra minutes16–18 minutes
Ninja Foodi or Foodi GrillCan brown aggressively from the top13–15 minutes
Small air fryerCut the tenderloin in half; do not coil it tightlyBased on thickness
Air fryer with linerBrowning can slow if airflow is blockedCheck color and temperature early

How to Prepare the Pork

A good result starts before the basket: dry the surface, season all sides, and remove any tough silver skin so the finished slices are tender from edge to edge.

Prep Steps Before Air Frying

Look for the shiny strip before seasoning; trimming it now prevents chewy bites later.

Raw pork tenderloin on a cutting board with silver skin being lifted and trimmed with a knife.
Trim the silver skin before cooking, otherwise that shiny strip stays tough even when the pork itself is perfectly done.
  1. Pat it dry. Surface moisture slows browning.
  2. Remove silver skin. This is the shiny, tough membrane that does not soften well during cooking. Slide a thin knife under it and trim it away.
  3. Trim lightly. Pork tenderloin is already lean. Remove loose fat or ragged edges, but do not over-trim.
  4. Protect the thin tail. If the tapered end is very thin, tuck it slightly under so it does not overcook too far ahead of the center.
  5. Season all over. Coat the top, bottom, sides, and tapered end.
  6. Let it sit briefly. Even 5–10 minutes while the air fryer preheats helps the seasoning settle.

Seasoning Check Before Air Frying

The tenderloin should look evenly coated before cooking, with no bare patches on the sides or tapered end.

Raw pork tenderloin coated evenly with reddish garlic Dijon seasoning paste on a wooden board.
Once the tenderloin is evenly coated, the paprika-Dijon rub can toast into a savory crust while the center stays protected from drying out.

How to Cook It in the Air Fryer

This is where the pork starts becoming dinner, not just a timing problem. Once it is seasoned, the cooking is simple. The only trick is not walking away for too long the first time you make it in your air fryer.

Basket spacing: Leave visible room around the pork so hot air can reach the sides and brown the surface.

Seasoned raw pork tenderloin placed inside an air fryer basket with clear space around it.
Leave open space around the pork tenderloin in the air fryer basket; that airflow helps the surface brown instead of steaming.

Step-by-Step Air Fryer Method

  1. Preheat the air fryer. Set it to 400°F / 200°C, or 205°C if available. Preheat for 3–5 minutes if your air fryer recommends it.
  2. Season the pork. Rub the oil, mustard, and spice mixture over the whole tenderloin.
  3. Place it in the basket. Leave space around the meat so hot air can circulate. Cut it in half crosswise if it is too long.
  4. Cook the first side. Air fry for 10–12 minutes. The outside should be starting to color, but it does not need to look deeply browned yet.
  5. Flip. Turn the tenderloin with tongs. Some juices in the basket are normal.
  6. Watch the surface. By the time it is close, the rub should smell toasted and savory, and the outside should look browned in patches rather than wet.
  7. Finish cooking. Continue air frying until the middle reaches 145°F / 63°C.
  8. Rest. Transfer to a board and rest loosely tented for 5 minutes.
  9. Slice. Cut across the grain into thick slices. The center should look moist, not chalky.

After the Flip

After the flip, browned patches are enough; from this point, temperature matters more than chasing a darker crust.

Pork tenderloin halfway cooked in an air fryer basket with browned seasoning patches after being flipped.
After flipping, the surface should start browning in patches; from here, rely on the thermometer rather than waiting for the outside to get darker.

When the Outside Browns Fast

Dark edges before a done center usually mean the heat is too aggressive. Lower the air fryer to 375–390°F / 190–200°C for the remaining minutes. If the pork is cooked through but pale, brush it with a little oil, honey mustard, or pan juices and air fry for 1–2 more minutes only if it is not already above temperature.

Rest and Slice Before Serving

Resting is not just waiting. It helps the juices settle before you slice. Spoon those juices back over the meat, and the pork tastes more finished.

Rest the pork here before slicing so the juices settle and the board juices can be spooned back over the meat.

Whole cooked pork tenderloin resting on a wooden board with foil nearby, herbs, a spoon, and visible board juices.
Give the pork a few quiet minutes here; that short rest keeps more juices in the slices and leaves enough on the board to spoon back over the top.

When the tenderloin has rested, use a steady cross-grain cut to make thick slices that stay moist on the plate.

Cooked pork tenderloin being sliced with a knife into thick pieces on a wooden cutting board.
Then slice across the grain into thick pieces; thinner slices dry out faster, while thicker slices hold moisture better on the plate.

Need exact timing? See the chartCheck the temperature guide

Cooking Time Chart by Weight

The chart is here to keep you from guessing, not to make the recipe complicated. Use the earliest check time when cooking a new brand, a new air fryer, or a pre-marinated pack.

First time with this air fryer? Watch closely once. After that, your own air fryer timing becomes the shortcut.

Use the timer to know when to start checking, then let the thermometer decide when the pork is done.

Cooked pork tenderloin on a cutting board with an instant-read thermometer, kitchen timer, air fryer, spice bowl, and green towel.
Your timer helps you know when to start checking, while the thermometer tells you when to stop; together, they make air fryer pork tenderloin repeatable.
Pork tenderloin sizeMetricAir fryer tempStart checkingLikely total time
Small or slim tenderloin450g / 1 lb400°F / 200°C13–14 min14–18 min
Standard tenderloin565g / 1¼ lb400°F / 200°C16 min18–22 min
Larger tenderloin680g / 1½ lb400°F / 200°C18–20 min20–26 min
Very thick tenderloin700g+ / 1½ lb+390–400°F / 200–205°C20 min24–28 min
Cut in half to fitSame total weight400°F / 200°C13–16 minDepends on thickness, not length

How to Use the Chart

Cutting a tenderloin in half does not automatically cook it in half the time. Thickness matters more than length. Pieces that stay thick in the center still need time, while slim pieces finish faster.

Save your first successful timing. Once you know how your air fryer handles a 1 lb or 1½ lb tenderloin, this recipe becomes much easier the next time.

If your “very thick tenderloin” is actually wide like a roast, pause and check the package. It may be pork loin, not tenderloin, and it needs a different cooking plan.

Internal Temperature and Pink Pork

Pork tenderloin is done when the middle of the thickest part reaches 145°F / 63°C, followed by a short rest. Check the largest section, not the thin tail end.

Temperature check: Measure the thickest center, not the thin end, when checking for 145°F / 63°C.

Instant-read thermometer inserted into the thickest center of cooked pork tenderloin on a wooden cutting board.
The thermometer should go into the thickest center, not the thin end; pull the pork at 145°F / 63°C so the slices stay tender after resting.

For food safety, FoodSafety.gov lists pork steaks, roasts, and chops at 145°F / 63°C with a 3-minute rest.

The National Pork Board pork cooking temperature guide gives the same practical guidance: 145°F, a short rest, and a digital thermometer.

What Pink Pork Means

That is why a slight blush of pink can be normal. Pink does not automatically mean raw; temperature tells you more than color.

For beginners, keep the target simple: cook to 145°F / 63°C, then rest for 5 minutes. Experienced cooks may start watching closely around 140–143°F because carryover can raise the final temperature during rest, but the clearest serving target for this recipe is still 145°F / 63°C.

Once you trust the thermometer, pork tenderloin stops being stressful. Instead of guessing by color or cutting into it five times, cook to the number, let it rest, and slice when the juices have settled.
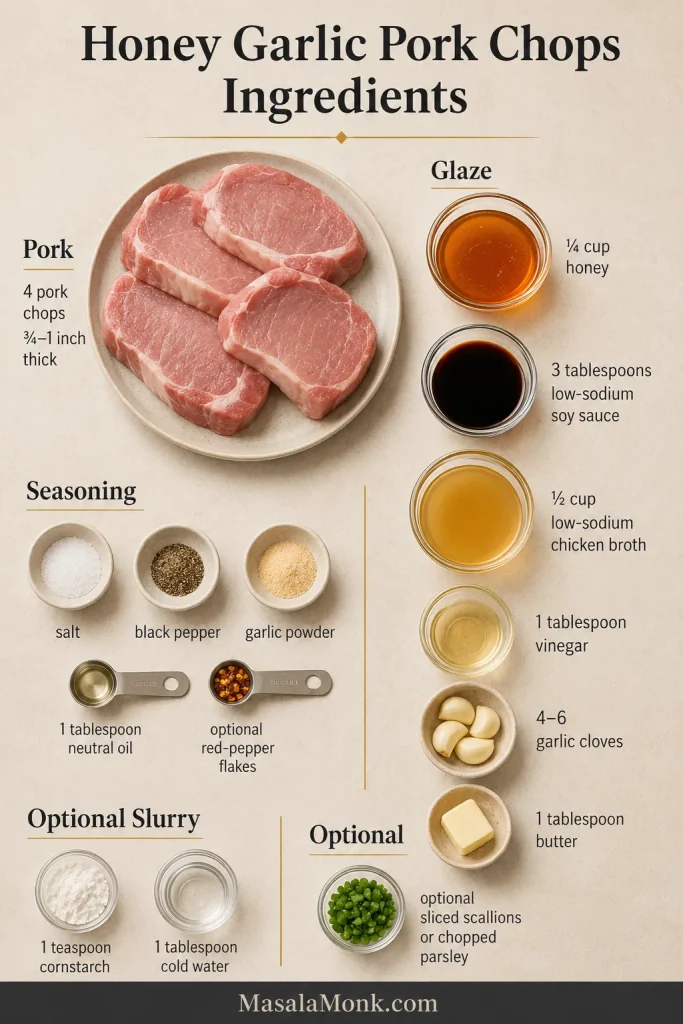
Doneness guide

  • 140–143°F / 60–62°C: Watch closely here only if you understand carryover cooking and will rest the pork immediately.
  • 145°F / 63°C: Clearest finished target for most home cooks.
  • 150°F / 66°C: Still usable, but getting firmer.
  • 160°F / 71°C and above: Much drier, especially in lean tenderloin.

This visual pairs with the doneness guide: as pork cooks longer, the slices turn paler, firmer, and less glossy.

Four pork tenderloin slices arranged from pink and moist to pale and firmer, with a meat thermometer nearby.
As pork cooks longer, the slices turn paler and firmer; a slight blush with the right internal temperature can still mean tender, safe pork.

Nervous about dryness? Troubleshoot itBack to the recipe card

Why It Turns Dry — and How to Prevent It

This is the section to read if you are nervous, using a new air fryer, or already worried you left the pork in a minute too long. Dryness usually comes down to timing, cut, or resting. The good news is that all three are fixable.

ProblemWhat happensFix
Cooking by time onlyThe pork can overcook before you noticeUse the time chart, then do the doneness check
Using pork loin instead of tenderloinThe cut is larger and needs different timingCheck the package and shape before cooking
Very small tenderloinIt cooks faster than the recipe rangeStart checking at 13–14 minutes
No restJuices run out when slicedRest 5 minutes before cutting
Sugary marinade burns earlyThe outside darkens before the middle is doneCheck early or reduce the temperature slightly
Aggressive reheatingLeftovers become dry and firmReheat gently with sauce, broth, or butter

Match Your Result

Still not sure what happened? Match the result:

  • Outside dark, inside not ready: The heat was too aggressive, the rub was sugary, or the pork sat too close to the heating element. Lower the temperature for the remaining minutes.
  • Pale outside, dry inside: The pork likely cooked too long without enough surface oil or browning. Next time, dry it well, coat lightly with oil, and start checking earlier.
  • Only the thin end was dry: The tenderloin was tapered. Tuck the thin tail slightly under or expect the end pieces to cook faster than the center slices.
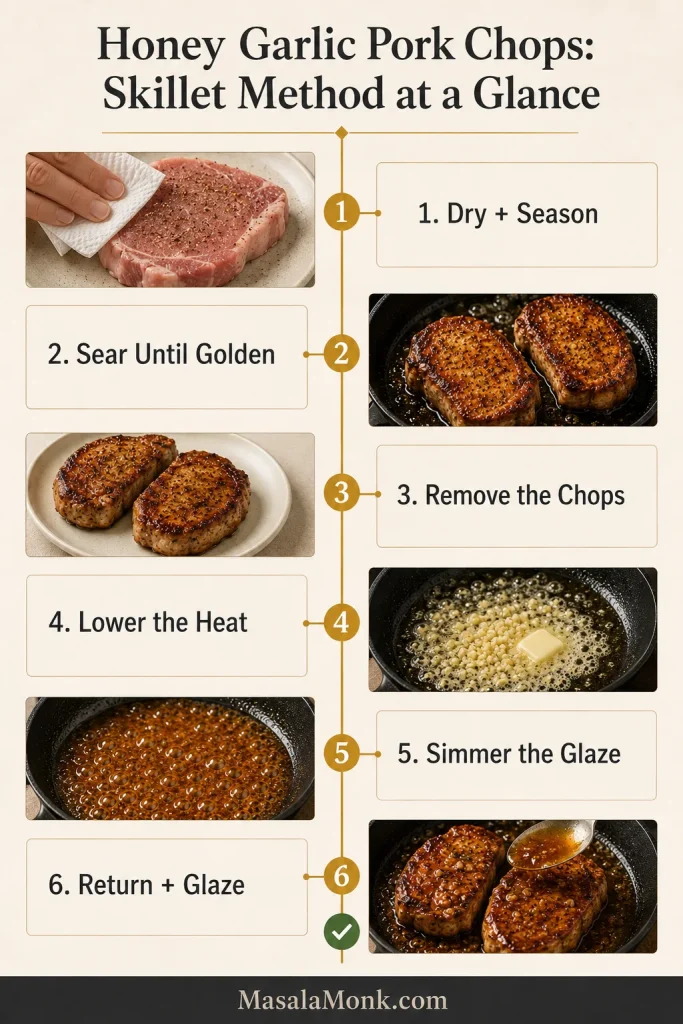
Dry pork is not ideal, but it is rarely beyond saving. Slice it thicker and serve it with something moist: pan juices, honey mustard, mushroom sauce, gravy, melted butter, broth, apple chutney, or a spoon of barbecue sauce.

If the slices need extra help, a spoon of creamy mushroom sauce turns slightly over-rested or lean pork into a much softer dinner plate.

Adding Potatoes, Carrots, or Green Beans

After the pork is under control, the real trick is keeping the sides from making it wait. You can cook it with potatoes, carrots, green beans, or sweet potatoes in the air fryer, but dense vegetables often take longer than the pork.

The pork is the part you protect. Vegetables are the part you can let keep cooking.

Best No-Dry Method

  1. Cook the tenderloin first.
  2. Rest it for 5–10 minutes.
  3. While it rests, cook or finish the potatoes, carrots, or green beans in the air fryer.
  4. Slice the pork right before serving.

This keeps the pork from waiting around while the potatoes catch up.

If you would rather keep the air fryer focused on the meat, make the potatoes separately. These ranch roasted potatoes give you crisp, salty-herby edges without forcing the tenderloin to wait in the basket.

One-Basket Dinner Example

For a simple one-basket version, use 1 lb / 450g pork tenderloin, 8 oz / 225g baby potatoes, and 1 large carrot. Halve the baby potatoes, slice the carrot thinly, toss the vegetables with oil and seasoning, and air fry them for 8–10 minutes at 390–400°F / 200–205°C. Add the seasoned pork, then cook until it reaches 145°F / 63°C. If the meat finishes before the vegetables are tender, remove and rest it while the vegetables cook a few minutes longer.

One-basket note: Keep the pork visible and let dense vegetables finish separately if they need more time.

Air fryer basket with sliced pork tenderloin, roasted baby potatoes, carrots, and green beans.
When making a one-basket dinner, keep the pork visible and give potatoes or carrots extra time so the vegetables finish without overcooking the meat.

Vegetable Timing Tips

SideBest way to handle it
Baby potatoesHalve them and give them a head start.
Regular potatoesCut into ½-inch cubes so they cook faster.
CarrotsSlice thinly or cut small; thick carrots need extra time.
Green beansAdd later or cook while pork rests.
Sweet potatoesCut small and expect them to need more time than green vegetables.

For a sweeter vegetable side, roasted carrots with honey, maple, or garlic work especially well with the smoky paprika and mustard in this pork rub.

Can You Cook It From Frozen?

Thawed is the recipe. Frozen is the emergency version.

A thawed tenderloin seasons better, browns better, cooks more evenly, and usually has a better texture. If you are staring at a frozen one and need a fallback, drop the heat and give it more time.

  • Use a lower temperature: about 330°F / 165°C.
  • Start checking around 30 minutes and expect roughly 33–38 minutes for many pieces, depending on thickness.
  • Start from frozen, then season once the surface softens enough for the rub to stick.
  • Flip halfway.
  • Check the middle, not just the browned outside.
  • Rest before slicing.

Do not cook a frozen double pack as one solid block. Separate the tenderloins first if they are frozen together. Do not use this fallback method for stuffed, rolled, or bacon-wrapped frozen tenderloin. Frozen breaded pork tenderloin is also a different product from raw whole tenderloin, so follow the package guidance and confirm doneness.

Smithfield, Hormel, and Pre-Marinated Packs

Pre-marinated packs are where label confusion shows up again. They are convenient, but some are pork tenderloin, some are pork loin filet, and some are wider, sweeter, or saltier than this recipe assumes.

These packs can still make an easy dinner; they just need a quick label check before they go into the basket.

Before cooking a pre-marinated pack, check the shape, salt level, sweetness, and final temperature instead of trusting the label alone.

Unbranded pre-marinated pork tenderloin package beside an air fryer basket, thermometer, salt bowl, wooden board, and green towel.
Pre-marinated pork tenderloin can be convenient, but check the shape, salt level, sweetness, and final temperature instead of trusting package timing alone.

Pre-Marinated Package Checklist

  • Check the package name, weight, and shape before cooking.
  • Long, narrow packs around 1–1½ lb / 450–680g usually work with this method.
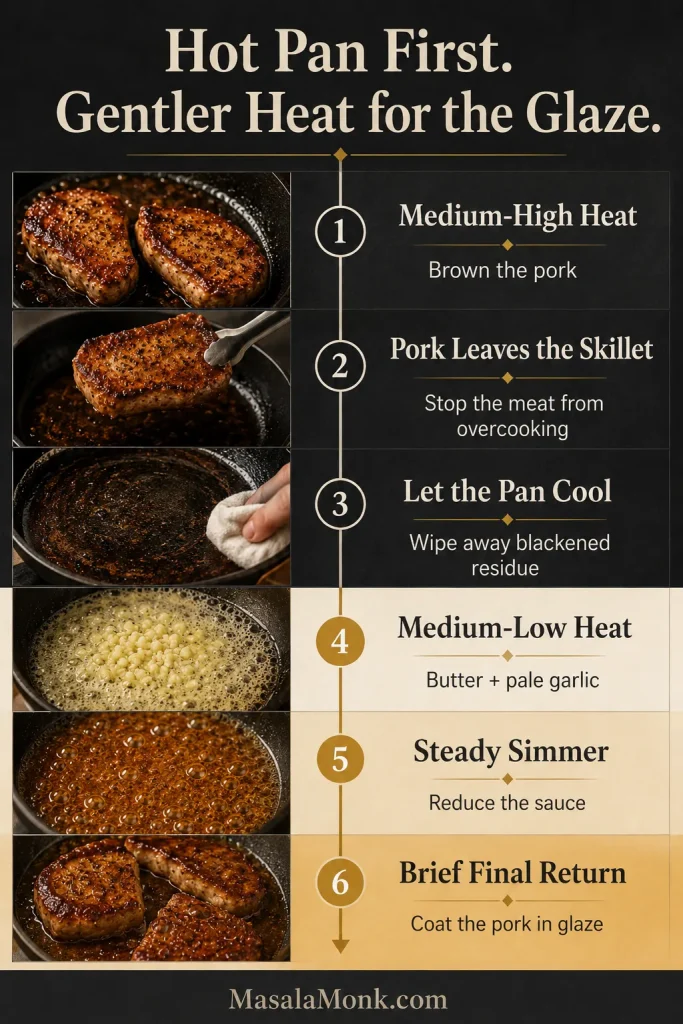
  • A pork loin filet label deserves a closer look. It may look long in the package but still be wider and denser than pork tenderloin.
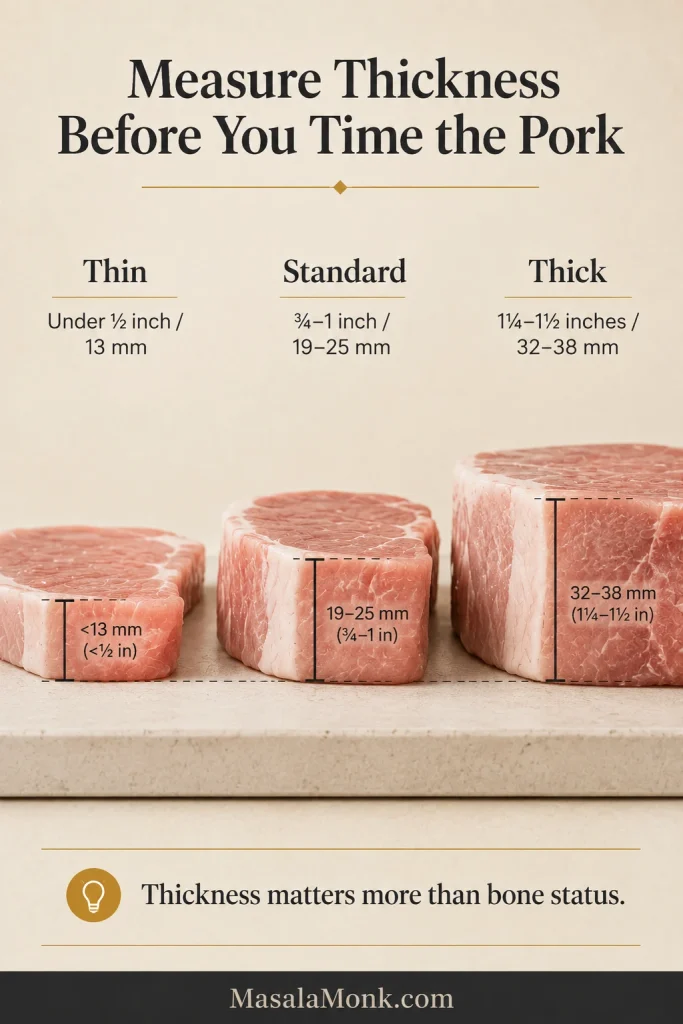
  • Wider pork loin filet or roast-style packs need different timing.
  • Pat off excess wet marinade if it is very drippy.
  • Start checking around 15 minutes because sugar-heavy marinades can brown faster.
  • Dark edges early are a sign to check temperature before assuming the pork is done.
  • Use less added salt because many pre-marinated packs are already seasoned.

Package timing is a starting point, not a promise. Use the package for flavor guidance and your thermometer for doneness.

Air Fryer Pork Tenderloin Medallions

If you sliced the pork already, switch timing systems. Medallions cook much faster than a whole tenderloin, which makes them useful for rice bowls, salads, wraps, or a faster dinner plate.

  1. Slice the tenderloin into even medallions, about 1–1½ inches thick.
  2. Season both sides.
  3. Air fry at 350°F / 175°C for about 9–12 minutes, flipping once.
  4. Start checking around 7–8 minutes if the pieces are closer to 1 inch thick.
  5. Check the largest medallion for 145°F / 63°C, then rest briefly before serving.

Even thickness matters. Tiny end pieces cook faster than center-cut medallions, so pull them early if needed.

Flavor Variations

After you know when to stop cooking, the flavor can go almost anywhere. The timing usually stays close unless the tenderloin is thicker, smaller, wrapped, frozen, or heavily coated.

  • Honey mustard: Add extra Dijon and honey, then finish sliced pork with a small spoon of sauce.
  • BBQ rub: Use smoked paprika, brown sugar, garlic powder, onion powder, salt, pepper, and chili powder.
  • Garlic herb: Use garlic powder, thyme, rosemary, parsley, black pepper, and olive oil.
  • Cajun: Use Cajun seasoning, smoked paprika, garlic, and oil. Watch the salt if your blend is salty.
  • Soy-Dijon marinade: Use soy sauce, Dijon mustard, honey, garlic powder, and a little vinegar or lemon juice.
  • Spicy chili-garlic: Add chili flakes, cayenne, or chili paste to the oil and mustard mixture.
  • Bacon-wrapped: Cook more carefully because bacon needs time to render. Start checking early so the pork does not overcook while the bacon browns.

Choose honey mustard for a softer family-style dinner, Cajun for heat, garlic herb for mashed potatoes, and BBQ rub if you want leftovers for sandwiches.

After slicing, this honey mustard dressing can double as a bright pork drizzle, especially with the honey mustard or garlic herb versions.

With BBQ-style pork tenderloin, creamy coleslaw is a natural fresh side because it brings crunch, tang, and a little sweetness.

What to Serve with It

This pork tenderloin is flexible enough for a quick weeknight dinner, a meal-prep bowl, or a slightly nicer weekend plate. A few slices over mashed potatoes feels cozy; the same pork over rice with sauce becomes lunch tomorrow.

Once the pork is sliced, a platter with vegetables, potatoes, sauce, and board juices makes serving easier.

Family-style wooden platter with sliced pork tenderloin, roasted potatoes, carrots, green beans, herbs, and a bowl of sauce.
For serving, arrange sliced pork tenderloin with vegetables, potatoes, and sauce so each portion gets crust, tender center, and a little pan-style flavor.

Comfort sides

A classic comfort plate starts with sliced pork over creamy mashed potatoes, so the juices, mustard sauce, or mushroom gravy have somewhere to land.

Garlic mashed potatoes are the richer version, especially if you are skipping a sauce. For a cozy family-style dinner, creamy macaroni and cheese also works well with something green or crisp on the side.

Fresh sides

Something crisp beside the warm pork helps balance the plate. A wedge salad gives you cold crunch, creamy dressing, and steakhouse-style balance. Green beans, simple salad, apple sauce, apple chutney, and roasted carrots also fit the plate.

Bowls, wraps, and easy leftovers

Sliced pork works well over rice, in wraps, on salads, or tucked into quick bowls with vegetables and sauce. If you are turning leftovers into rice bowls, this how to cook rice guide helps with stovetop, rice cooker, and Instant Pot timing.

Make-Ahead Tips

You can season the pork up to 12 hours ahead and refrigerate it covered. Let it sit at room temperature for 15–20 minutes while the air fryer preheats, then cook as directed.

If the rub contains a lot of salt or soy sauce, avoid over-marinating a very small tenderloin. The smaller the piece, the faster salty marinades can make the texture feel firm.

Storage and Reheating

Leftover pork is best when you treat it gently. The meat is lean, so reheating should warm it through without blasting away the moisture you protected during cooking.

NeedBest method
Fridge storageStore in an airtight container for 3–4 days.
Freezer storageFreeze sliced or portioned pork, wrapped well, for easier reheating.
Air fryer reheatingReheat slices at 350°F / 175°C for 3–4 minutes.
Microwave reheatingAdd a splash of broth, water, butter, or sauce and heat gently.
What to avoidDo not blast a whole cooked tenderloin in the air fryer again. It can dry out before the center warms.

Leftover slices are best used gently: tucked into rice bowls with sauce, folded into wraps, chopped into breakfast hash, or added cold to salads instead of aggressively reheated.

Extra slices can become an easy lunch with rice, crisp vegetables, greens, and a sauce that brings moisture back.

Rice bowl with sliced pork tenderloin, white rice, leafy greens, cucumber, radish, red pepper, purple cabbage, herbs, and sauce.
Finally, leftover air fryer pork tenderloin works beautifully in rice bowls because the sauce, greens, and crisp vegetables bring moisture back to the slices.

Go to FAQBack to the recipe cardBack to top

FAQ

How long do you cook pork tenderloin in the air fryer?

Most 1–1½ lb / 450–680g pork tenderloins take 18–24 minutes at 400°F / 200°C. Slim 1 lb pieces may finish closer to 14–18 minutes, while thick pieces may need 24–28 minutes. Use the chart, then confirm 145°F / 63°C in the center.

What temperature should I air fry pork tenderloin?

Set the air fryer to 400°F / 200°C, or 205°C if your model allows that setting. This gives good browning without a long cook time. If your air fryer runs very hot, reduce slightly to 375–390°F / 190–200°C and cook to temperature.

How do I keep it from drying out?

Use the right cut, check early, and rest before slicing. The mistake is usually not the seasoning — it is leaving lean pork in the air fryer a few minutes too long.

What if I do not have a meat thermometer?

A thermometer is strongly recommended because pork tenderloin is lean and cooks quickly. Without one, use the timing chart, slice into the thickest part, and check that the pork is hot all the way through with no raw-looking center. This is less reliable than a temperature check, so a small instant-read thermometer is worth it.

Is pork tenderloin the same as pork loin?

No. Pork tenderloin is long, narrow, and usually 1–1½ lb. Loin is wider, larger, and more roast-like. They need different cooking times, so checking the package before cooking matters.

Is pork fillet the same as pork tenderloin?

Often, yes. In many places, pork tenderloin is sold as pork fillet. If your pork fillet is long, narrow, and around 450–680g / 1–1½ lb, this air fryer method applies.

Can pork tenderloin be pink inside?

Yes. A slight blush can be normal when the pork is cooked to temperature. Do not keep cooking just to erase every hint of pink, or the tenderloin can turn dry.

Do I need to flip it?

Yes. Flipping helps the pork brown more evenly, especially in basket-style air fryers where the top often gets more direct heat than the bottom. Turn it after the first 10–12 minutes, then finish cooking.

Can I cook frozen pork tenderloin in the air fryer?

You can, but thawed is better for browning and texture. For frozen pork tenderloin, use about 330°F / 165°C, begin testing around 30 minutes, season once the surface softens, flip halfway, and confirm doneness before serving.

Can I cook pork tenderloin and potatoes together?

Yes, but potatoes need a head start because they usually take longer. Cook the pork first and finish the vegetables while it rests, or start small-cut potatoes 8–10 minutes before adding the pork.

How do I cook pre-marinated pork tenderloin?

Check that the package is actually pork tenderloin and not pork loin filet. Pat off excess wet marinade if needed, begin testing around 15 minutes, and cook until the pork reaches 145°F / 63°C. If the outside darkens early, check the temperature before assuming the middle is done.

Can I season pork tenderloin ahead of time?

Yes. You can season it up to 12 hours ahead and refrigerate it covered. Let it sit out for 15–20 minutes while the air fryer preheats so it is not going into the basket ice-cold.

How do I reheat leftovers?

Reheat slices at 350°F / 175°C for 3–4 minutes in the air fryer, or microwave gently with a splash of broth, water, butter, or sauce. Sliced pork reheats better than a whole tenderloin because it warms faster and needs less time.

Can I make pork tenderloin medallions in the air fryer?

Yes. Slice the tenderloin into even 1–1½ inch medallions, season both sides, and air fry at 350°F / 175°C for about 9–12 minutes, flipping once. Start checking early if the pieces are closer to 1 inch thick.

Final Tip

Once you know the cut, the temperature, and when to stop cooking, air fryer pork tenderloin becomes a very easy win: browned outside, juicy inside, and flexible enough for potatoes, salads, bowls, or leftovers the next day. The first cook teaches you your air fryer; after that, this becomes one of those dinners you can repeat without hovering over the basket.

If your air fryer runs especially hot or slow, drop your timing in the comments — model, weight, and total cook time are especially helpful. Someone else with the same style of air fryer may be comparing notes before dinner.

Back to recipe cardBack to cooking chartBack to top

Posted on Leave a comment

Cajun Étouffée Recipe

Cajun étouffée with shrimp and crawfish served over white rice in a shallow cream bowl

A great Cajun étouffée recipe lands on the table as hot rice, tender shrimp or crawfish, and glossy sauce that settles into every grain. It should smell like toasted roux, sweet bell pepper, garlic, seafood, and a little vinegar heat before the first spoonful even reaches the bowl.

You can make this with shrimp, crawfish, or a mix of both without changing the base method. Once the vegetables are chopped and the rice is started, the rest is one steady stovetop pot: roux, holy trinity, sauce, seafood, herbs, and hot rice waiting.

The rhythm is simple: trust the roux, taste the sauce, then add the seafood. That order gives you deep flavor without rubbery shrimp, tough crawfish, or a thin sauce that disappears into the rice.

You do not need to guess your way through the roux, the sauce texture, or the seafood timing. This guide also covers frozen crawfish tails, salty Cajun seasoning, prepared roux, boxed étouffée base, cream soup shortcuts, tomato options, and the common fixes that save the pot before dinner gets stressful.

Quick Answer: What Is Cajun Étouffée?

Cajun étouffée is a thick, seasoned Louisiana-style dish made with a roux, onion, celery, green bell pepper, stock, Cajun seasoning, and seafood such as crawfish or shrimp. It is served over white rice and eats more like a rich seafood gravy than a soup.

The word étouffée means “smothered,” and that is exactly how the dish should land on the plate: shrimp or crawfish smothered in a savory sauce that clings to every spoonful of rice. This version keeps the main pot roux-forward and no-tomato, with an easy tomato option if you prefer a brighter Creole-style sauce.

The final bowl should look rich and spoonable, with seafood and rice held together by a sauce that is thicker than broth.

Cajun étouffée with shrimp and crawfish served over white rice in a shallow cream bowl
A strong Cajun étouffée looks glossy and spoonable; as it settles, the sauce should hug the rice instead of flooding the bowl.

Make It Now

Ready to cook? Use this as the quick roadmap, then follow the recipe card for exact amounts. Nothing here needs to be rushed; once your prep is done, the recipe is mostly steady stirring, simmering, tasting, and finishing.

  1. Chop the onion, celery, bell pepper, garlic, green onions, and parsley.
  2. Start the rice early so it is hot when the étouffée is ready.
  3. Warm the stock and cook the roux until it turns copper to peanut-butter brown.
  4. Stir in the holy trinity, garlic, seasoning, stock, Worcestershire sauce, and a splash of hot sauce.
  5. Simmer until the base tastes rounded and thick enough to spoon over rice.
  6. Finish with your chosen seafood, add the final herbs, rest briefly, and serve.

The checkpoint that saves the pot: the sauce should taste good before the seafood goes in.

Use the quick flow to keep the method calm: roux, trinity, sauce, seafood, herbs, and rice.

Six-step visual guide showing trinity, roux, sauce, seafood, herbs, and rice for Cajun étouffée
Start with roux, build flavor with trinity, loosen the sauce with stock, then finish seafood gently before serving over rice.

Cajun Étouffée at a Glance

Main styleRoux-based Cajun-style étouffée, no tomato by default
Best seafoodShrimp, crawfish tails, or a mix of both
Servings6
Total timeAbout 1 hour 5 minutes
Roux targetCopper to peanut-butter brown
Sauce textureGlossy, spoonable, thick enough to hug rice
Serve withLong-grain white rice, fresh herbs, and table hot sauce
Best quick pathMake a light roux instead of relying only on canned soup or boxed mix
Biggest success cueLet the base taste complete, then finish with seafood

Cajun Étouffée Recipe Card

This stovetop recipe makes a roux-based Cajun étouffée with shrimp, crawfish tails, or both. The method stays the same; the main change is when each type of seafood goes into the finished sauce.

Keep the rice hot and the seafood cold until the sauce is ready. That little bit of timing is what makes the bowl feel generous instead of rushed.

Recipe Snapshot

Prep time20 minutes
Cook time45 minutes
Total time1 hour 5 minutes
Servings6
MethodStovetop
CuisineCajun / Louisiana-style
Main equipmentDutch oven, heavy-bottomed pot, or deep heavy skillet

Ingredients

Before cooking, notice how each ingredient has a job: roux for body, trinity for sweetness, stock for sauce, and seafood for the finish.

Cajun étouffée ingredients arranged with seafood, rice, vegetables, stock, herbs, seasoning, flour, and fat
Even with a full ingredient board, the real flavor builders are roux, holy trinity, stock, seafood, and a fresh finish.
  • ½ cup unsalted butter, 113 g, or 120 ml neutral oil
  • All-purpose flour, ½ cup, about 60–65 g
  • 1½ cups finely chopped yellow onion, about 225 g
  • 1 cup finely chopped green bell pepper, about 150 g
  • ¾ cup finely chopped celery, about 100 g
  • 4–6 garlic cloves, minced, about 15–25 g
  • 2½–3 cups warm seafood stock, shrimp stock, crawfish stock, or chicken stock, plus more as needed, 600–720 ml
  • 2–3 teaspoons salted Cajun seasoning, or 1½–2 tablespoons salt-free Cajun seasoning
  • 1 teaspoon paprika or smoked paprika
  • ½ teaspoon dried thyme
  • 2 bay leaves
  • ¼–½ teaspoon cayenne pepper, optional
  • 1 tablespoon Worcestershire sauce, 15 ml
  • Hot sauce, 1–2 tablespoons, 15–30 ml, plus more for serving
  • 2 lb total peeled shrimp, crawfish tails, or a mix, about 900 g
  • ½ cup sliced green onions
  • ¼ cup chopped parsley
  • Salt and black pepper, to taste
  • 4–6 cups cooked long-grain white rice, for serving

Ingredient Notes for Salt, Seafood, and Rice

Salt note: If your Cajun seasoning already contains salt, do not add extra salt until the sauce has simmered and you have tasted it. Stock, hot sauce, boxed bases, and cream soup can all add salt too. Salt-free Cajun blends can usually be used more generously because they bring spice without adding as much sodium.

Seafood note: Use 2 lb total seafood, not 2 lb shrimp plus 2 lb crawfish. If using a mix, combine the shrimp and crawfish together to reach about 2 lb / 900 g total.

Pick the seafood before you start, because shrimp and crawfish can share the same sauce but need different finishing care.

Three bowls showing shrimp, crawfish tails, and mixed seafood for Cajun étouffée
Whether you use shrimp, crawfish tails, or both, keep the seafood amount steady so the étouffée stays balanced.

Rice note: Use 6 cups cooked rice for generous bowls, or 4 cups for lighter servings. Start the rice before the seafood goes in so everything reaches the table hot.

Equipment

  • Dutch oven or heavy-bottomed pot, important for steady roux heat
  • Deep heavy skillet, if it gives you enough room to stir safely
  • Wooden spoon or heat-safe spatula
  • Whisk
  • Small saucepan for warming stock
  • Cutting board and sharp knife
  • Measuring cups and spoons
  • Rice cooker or rice pot

Roux can scorch quickly in thin cookware. A heavy pot gives you more control as the flour moves from pale to nutty brown. Patience beats speed here; burnt roux is not worth saving.

Steady cookware protects the roux, giving flour time to brown evenly instead of scorching in one hot spot.

Heavy Dutch oven with flour, fat, and wooden spoon set up for making Cajun étouffée roux
A heavy pot spreads heat more evenly, which gives the roux time to brown slowly instead of scorching in hot spots.

Instructions

Prep and Roux

  1. Prep first. Chop the onion, bell pepper, celery, garlic, green onions, and parsley before you start. Cook the rice or set it going. Thaw and drain frozen shrimp or crawfish. Pat shrimp dry if it is very wet.
  2. Warm the stock. Keep the stock warm in a small saucepan over low heat. It should be warm, not boiling.
  3. Make the roux. Melt the butter, warm the oil, or heat a butter-oil mix in a Dutch oven or heavy-bottomed pot over medium heat. Add the flour and stir constantly for 8–15 minutes, lowering the heat if needed, until the roux turns copper to peanut-butter brown and smells nutty. If the roux starts darkening faster than you can comfortably stir, lower the heat before you panic; roux forgives patience better than speed.

Build the Sauce

  1. Add the holy trinity. Stir in the onion, green bell pepper, and celery. Cook for 6–8 minutes, stirring often, until the vegetables soften and the roux clings to them.
  2. Add garlic and seasoning. Stir in the garlic, Cajun seasoning, paprika, thyme, bay leaves, and cayenne if using. Cook for 30–60 seconds, just until fragrant.
  3. Build the sauce. Slowly whisk in 2½ cups warm stock, adding it gradually so the sauce stays smooth. The first splash may make the roux seize and thicken; keep whisking and it will loosen as the rest of the stock goes in. Stir in Worcestershire sauce and hot sauce. Bring to a gentle simmer.
  4. Simmer until rounded. Reduce the heat to medium-low and simmer for 15–20 minutes, stirring occasionally, until the sauce thickens and tastes complete. Add more warm stock if it becomes too thick.

Add Seafood and Serve

  1. Finish with seafood. Raw shrimp cooks gently in 3–5 minutes, just until opaque and lightly curled. Cooked crawfish tails should be stirred in and heated gently for 3–5 minutes. If using both, add shrimp first, then stir in crawfish during the final 2–3 minutes. Already-cooked shrimp only needs the final 1–2 minutes to warm through.
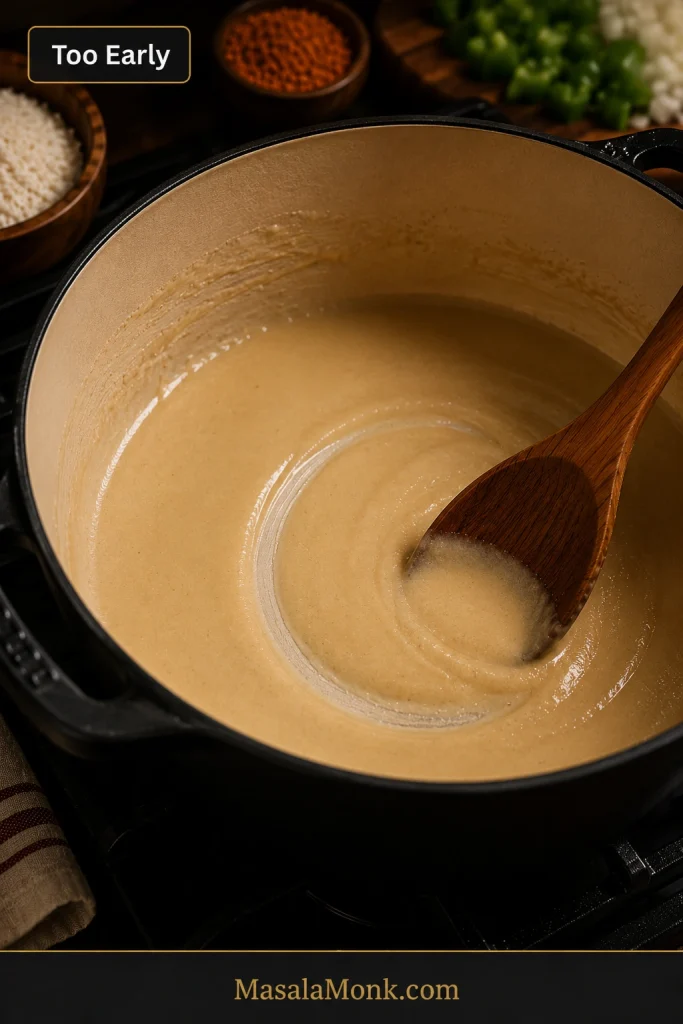
  2. Season and brighten. Remove the bay leaves. Stir in most of the green onions and parsley. Taste and adjust with salt, black pepper, Cajun seasoning, a splash of acidity, or a little more stock.
  3. Rest and serve. Turn off the heat and let the étouffée rest for 5 minutes. Spoon over hot white rice so the sauce pools around the grains, then finish with fresh herbs and extra hot sauce at the table.

Recipe Notes

Seasoning, Stock, and Roux Notes

  • Seasoning: If your Cajun seasoning is salty, start with less and add more only after the sauce has simmered.
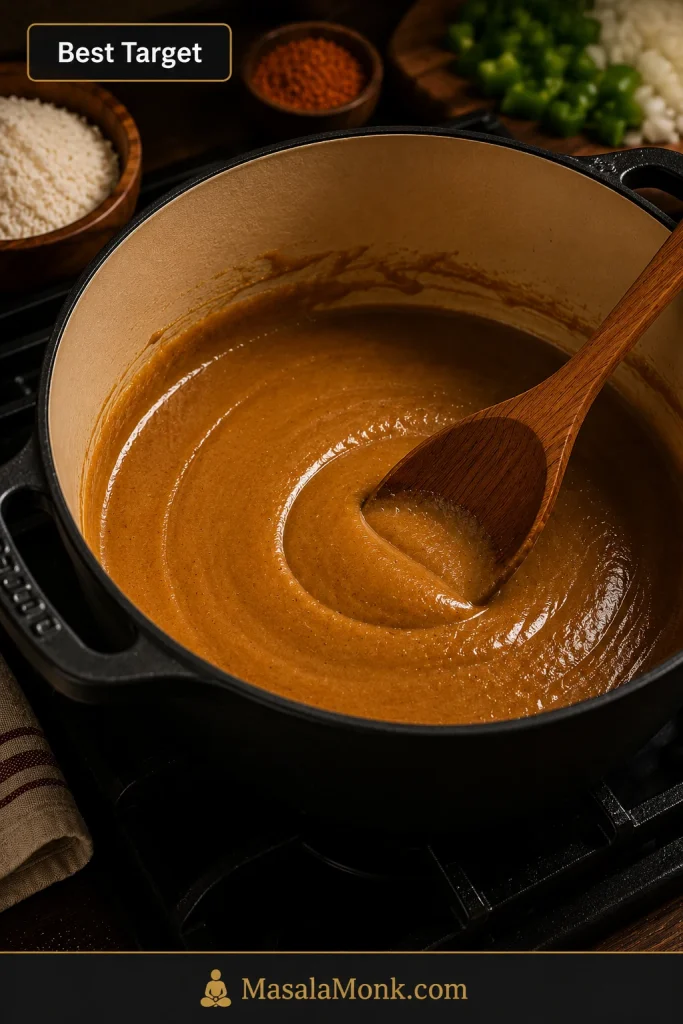
  • Stock: Low-sodium stock is safest if your Cajun seasoning, hot sauce, or boxed base is already salty. Chicken stock works when seafood stock is unavailable; a small splash of bottled clam juice adds deeper seafood flavor if you like that taste.
  • Flour and roux: Spoon and level the flour if measuring by cup; a packed ½ cup can make the sauce thicker. A peanut-butter roux gives the best balance of flavor and thickening for this recipe.

Seafood, Heat, and Make-Ahead Notes

  • Shrimp: Medium, large, or medium-large shrimp work best. Peeled shrimp are easiest for spooning over rice. Shrimp is done when opaque and lightly curled, not tightly coiled into hard rings.
  • Cooked shrimp: Add cooked shrimp only in the final 1–2 minutes so it warms without turning rubbery.
  • Food safety: Shrimp, lobster, crab, and scallops should cook until the flesh is pearly or white and opaque, as noted by FoodSafety.gov.
  • Crawfish: Crawfish tails are often already cooked, so they only need gentle heating. For frozen crawfish tails, thaw and drain excess liquid. Do not rinse away flavorful crawfish fat or juices unless they smell muddy, overly fishy, or unpleasant.
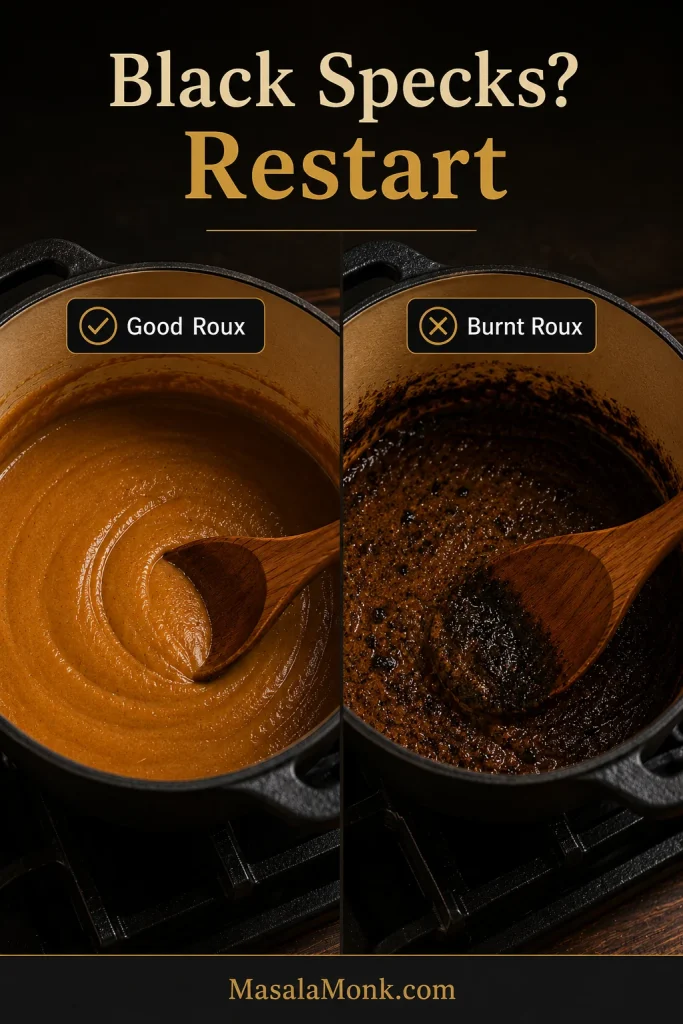
  • Heat: Use a vinegar-forward Louisiana-style hot sauce if you want brightness, or keep the pot mild and let people add heat at the table. For more spice, add cayenne near the end so you can control it.
  • Resting and make-ahead: The sauce thickens as it sits. Loosen with warm stock or water if needed. Best make-ahead results come from preparing the sauce first and adding the seafood during reheating.

Half-Batch Note

To make a smaller pot, use 1 lb / 450 g total seafood, ¼ cup butter or oil, ¼ cup flour, and about 1½–2 cups stock. Keep the same method, but start checking the sauce thickness sooner because a smaller batch reduces faster. Begin with the lower amount of Cajun seasoning, especially if your blend contains salt.

Need help while cooking? Jump to Success Cues, Roux Guide, Troubleshooting, or Serving Tips.

Success Cues

The recipe card gives you the steps. These cues help you know when each stage is actually working. Once the pot is on the stove, smell, color, texture, and the way the sauce moves matter more than the exact minute on the clock.

Roux smells nutty, not raw

Smell is the first real sign. The roux stops smelling like raw flour and starts smelling warm, buttery, and nutty. Its color should move from pale flour to copper or peanut-butter brown. A sharp, scorched, or bitter smell means it is better to restart before adding the vegetables.

Vegetables soften into the base

When the onion, celery, and bell pepper hit the roux, the pot should start smelling like dinner. The vegetables cool the roux slightly, then soften into it until the base tastes sweet, savory, and rounded instead of sharp or raw.

The base tastes complete

This is the biggest checkpoint. Once the base tastes like dinner, the seafood only has to show up. It should already taste seasoned, rounded, and spoonable before shrimp or crawfish is added.

At this point, the base should carry the flavor on its own; seafood is only the final gentle finish.

Glossy Cajun étouffée sauce in a pot before shrimp or crawfish is added
Taste the sauce at this stage; once it feels rounded and spoonable, the seafood can cook quickly at the end.

Shrimp stays tender, crawfish warms gently

Shrimp should turn opaque and curl softly. Crawfish tails should be warmed through, not boiled hard. The pot should bubble softly after the seafood is added, not roll like a hard boil.

Raw shrimp belongs in the finished sauce, not in a long simmer, so the timing stays short and gentle.

Raw peeled shrimp added to finished Cajun étouffée sauce in a dark pot
Add raw shrimp only after the sauce is ready, so it cooks gently instead of turning rubbery.

Soft curl is the shrimp signal; take the pot off hard heat before tender shrimp turns into tight rings.

Opaque shrimp softly curled in Cajun étouffée sauce with herbs
Shrimp is done when it turns opaque and curls softly; tight rings usually mean it cooked too long.

Gentle warming protects crawfish tails, especially when they are already cooked before they reach the sauce.

Crawfish tails warmed in Cajun étouffée sauce on a wooden spoon
Crawfish tails are often already cooked, so warm them gently in the sauce instead of boiling them hard.

The rice catches a gravy, not a broth

When you spoon étouffée over rice, the sauce should settle into the grains instead of sliding away like broth or sitting on top like paste. The rice should catch a gravy, not chase a broth.

This is the bowl test: rice should hold sauce between the grains, not sit under a watery layer.

Close-up of Cajun étouffée sauce settling into white rice with seafood
Good étouffée gravy settles between the rice grains, which keeps each spoonful saucy without turning the bowl watery.

What the Finished Étouffée Should Look Like

CueWhat to look for
AromaToasted roux, softened onion, bell pepper, garlic, seafood, and a little vinegar heat
ColorGolden brown to light brown, not pale beige and not burnt dark
TextureThick gravy that moves slowly from the spoon and spreads gently over rice
SeafoodShrimp softly curled and opaque; crawfish warmed through, not boiled hard
RiceSauce settling around the grains, not watery puddles at the bottom of the bowl

Use the checklist as the final pass before serving, especially if the sauce looked uncertain earlier.

Finished étouffée checklist showing toasted roux aroma, golden color, spoonable texture, tender seafood, and rice
Check the pot from several angles: aroma, color, sauce body, seafood tenderness, and how well the rice holds the gravy.

Still checking the pot? Use the Roux Guide if the base looks too light or too dark, or go to Troubleshooting if the sauce feels thin, thick, salty, or floury.

Why This Cajun Étouffée Works

This pot works because the flavor is built before the seafood goes in. The roux turns nutty, the trinity softens, the seasoning settles into the stock, and the seafood only needs a short, gentle finish.

  • Roux builds body and flavor. It thickens the sauce and gives the dish that warm, toasted smell that makes the whole pot feel deeper.
  • The holy trinity makes the base taste complete. Onion, celery, and green bell pepper soften into the roux before the liquid is added.
  • Warm stock keeps the sauce smooth. Adding it slowly helps prevent lumps and gives you control over the final texture.
  • Seafood is treated gently. Shrimp and crawfish stay tender because they only need a short finish.
  • Tomato stays optional. The main recipe stays roux-forward, while a small tomato option gives you a brighter Creole-style variation.
  • Shortcuts have a place. Cream soup, boxed mix, prepared roux, and étouffée base can help on busy nights, but the from-scratch roux method gives the best flavor and control.

Choose Your Version: Shrimp, Crawfish, or Both

Before you worry about spice level, choose the seafood that makes sense for your kitchen. Crawfish gives étouffée its classic Louisiana feel, shrimp makes the recipe easier to shop for, and using both turns the pot into a fuller seafood dinner.

VersionUse it whenHow to cook it
Crawfish étoufféeYou have crawfish tails and want the most classic seafood flavorAdd thawed crawfish tails at the end and heat gently for 3–5 minutes
Shrimp étoufféeYou want the easiest seafood version with ingredients that are easier to findAdd raw peeled shrimp at the end and cook 3–5 minutes until opaque
Shrimp and crawfish étoufféeYou want a bigger seafood dinner with more texture and flavorAdd shrimp first, then stir in crawfish during the final 2–3 minutes
Chicken étoufféeYou want the same sauce structure without seafoodUse cooked chicken or simmer small pieces until fully cooked and tender

Compare the versions before cooking so the pot matches your seafood, shopping, and serving plan.

Three finished bowls comparing shrimp étouffée, crawfish étouffée, and mixed seafood étouffée
The roux-based sauce stays the same, but shrimp cooks quickly while crawfish tails only need gentle warming.

Seafood Timing Notes

Good crawfish tails are worth using when you can get them. Otherwise, shrimp is not a compromise; it is a strong version of the dish on its own. Thaw frozen shrimp fully and pat it dry so extra water does not thin the pot. For another shrimp dinner where timing matters, this shrimp scampi also keeps the shrimp tender by cooking it quickly in a finished sauce.

Chosen your seafood? Return to the Recipe Card, or review Success Cues for shrimp and crawfish timing.

Ingredients You Need for Cajun Étouffée

Once the roux is under control, the rest of the ingredient list is simple. Each piece has a job, and the timing matters more than using a long list of extras.

Roux: butter or oil plus flour

The roux gives the sauce its body and toasted depth. Butter tastes richer; oil is more forgiving. Nervous about scorching? Use half butter and half oil so you get flavor with a little more stability.

The holy trinity

Onion, celery, and green bell pepper form the Cajun holy trinity. Green bell pepper gives the most classic flavor, but red or yellow bell pepper works when that is what you have. Chop the vegetables finely so the finished dish feels smooth and spoonable instead of chunky.

The Cajun holy trinity belongs in the ingredient notes because it shapes the sweetness and depth of the sauce.

Chopped onion, celery, green bell pepper, and garlic arranged on a wooden board
Onion, celery, and green bell pepper form the Cajun holy trinity; garlic joins later so it does not burn.

Garlic and Cajun seasoning

Garlic adds depth, but it burns quickly, so add it after the onion, celery, and bell pepper have softened. Cajun seasoning varies a lot by brand. Some blends are mostly spice; others are very salty. Start with less if your seasoning contains salt, then adjust after the sauce simmers.

Salted seasoning, salted stock, hot sauce, and boxed bases can stack quickly. Wait until the sauce has simmered, then taste and adjust. Rice will soften saltiness on the plate, but it is much easier to add salt than remove it.

Stock

Seafood stock or shrimp stock gives the deepest flavor, but chicken stock works well for a home version. Choose low-sodium stock when your Cajun seasoning is salted. Warm stock blends into the roux more smoothly. For another seafood recipe where the base makes or breaks the final flavor, this lobster bisque uses the same idea: build the base first so the seafood tastes richer without overcooking.

Shrimp or crawfish

Use peeled raw shrimp, thawed crawfish tails, or a mix. Shrimp cooks quickly, crawfish tails are often already cooked, and both do best with gentle heat.

Green onions, parsley, and hot sauce

Green onions and parsley cut through the richness right at the end, so the bowl tastes bright instead of heavy. Hot sauce brings acidity as well as heat. Add some to the pot, then keep more on the table for anyone who wants a brighter final kick.

What Is Étouffée Sauce Made Of?

Think of étouffée sauce as a roux-thickened seafood gravy: not soup, not paste, and not a loose pan sauce. It should move slowly from the spoon, coat the seafood, and settle into hot rice.

The roux gives body, the trinity gives sweetness and depth, stock loosens everything into a spoonable base, and Cajun seasoning, Worcestershire sauce, hot sauce, green onions, and parsley finish the flavor. Crawfish tail juices, when they smell clean and sweet, can add extra seafood depth near the end.

Stiff sauce needs warm stock. Watery sauce needs a few uncovered minutes before the seafood is added. The goal is simple: thick enough to coat the back of a spoon, soft enough to flow around rice.

Texture matters most here: étouffée sauce should behave like seafood gravy, not broth or paste.

Spoonful of Cajun étouffée with thick sauce, white rice, shrimp, and crawfish
This is the texture to aim for: thick seafood gravy that clings to rice, yet still feels loose enough to spoon.

Check the spoon before serving; a slow coating means the sauce has enough body without turning pasty.

Thick Cajun étouffée sauce coating a wooden spoon with a slow drip
Use the spoon test before serving: the sauce should coat the spoon, then move slowly back into the pot.

If you love Cajun-style seafood sauces in general, this seafood boil sauce is useful for a different kind of seafood dinner. It is more buttery and pourable than étouffée, but it works with many of the same shrimp, crab, crawfish, garlic, and Cajun seasoning flavors.

Roux Color Guide for Étouffée

The roux is the only part of this recipe that asks for your full attention, but it does not ask you to rush. You do not need a restaurant-speed roux here. A steady, slower roux is easier to control and still gives you the nutty flavor this dish needs.

Watch Color Before Time

Stir steadily, control the heat, and watch the color more than the clock. Do not judge the pot too early; the roux changes slowly at first, then deepens faster as it gets darker.

Start the roux guide with color, because the stages tell you more than the clock on the stove.

Roux stage guide showing pale, copper, peanut-butter, and burnt roux for Cajun étouffée
Roux moves from pale to nutty to deep brown quickly, so watch the color closely and restart if black specks appear.

The times below are estimates. Color and smell matter more than minutes, especially if your pot runs hot or your stove is uneven. For this Cajun étouffée recipe, aim for a peanut-butter-colored roux. It gives the sauce a nutty flavor without taking as long as a very dark gumbo-style roux.

Roux Colors at a Glance

Roux colorApproximate timeFlavorBest use
Blonde3–5 minutesMild, buttery, lightly cookedFastest version, but less Cajun depth
Copper6–8 minutesLightly nutty and beginner-friendlyGood weeknight étouffée
Peanut butter8–15 minutesNutty, rounded, deeper flavorBest balance for this recipe
Dark brown18–25+ minutesMore intense, slightly smokyAdvanced version; thickens less and burns more easily
Burnt with black specksAny time if heat is too highBitterDiscard and restart

The color guide turns roux judgment into a visual check instead of a guessing game.

Roux color guide for étouffée showing blonde, copper, peanut butter, dark brown, and burnt stages
Use this roux color guide to judge whether your base is still mild, ready for étouffée, or too far gone.

This early roux stage explains why color matters before the sauce gets its deeper Cajun flavor.

Pale roux in a Dutch oven with a wooden spoon showing an early cooking stage
Pale roux can thicken the sauce, but it has not developed the nutty flavor Cajun étouffée needs.

Aim for this peanut-butter shade when you want toasted flavor without losing too much thickening power.

Peanut-butter-colored roux in a heavy pot with a wooden spoon trail
Peanut-butter roux gives Cajun étouffée its best middle ground: warm color, toasted flavor, and enough body for the sauce.

When to Restart the Roux

As the roux darkens, lower the heat if it starts moving too fast. Black specks or a sharp burnt aroma mean it is time to restart. Burnt roux will make the whole pot taste bitter.

Restarting is better than saving burnt roux, because scorched flavor will travel through the whole sauce.

Comparison of good roux and burnt roux with black specks
Burnt roux will turn the whole pot bitter, so restart when you see black specks or smell scorching.

Roux ready? Continue to How to Make Cajun Étouffée, or use Troubleshooting if the pot smells burnt, tastes floury, or feels too thick.

How to Make Cajun Étouffée

The recipe card gives the exact steps. This walkthrough is here for the cooking cues: what should be ready, what should smell right, and when the pot is safe for seafood.

1. Prep everything before the roux

Once the roux starts cooking, your attention belongs to the pot. Chop the vegetables, mince the garlic, slice the herbs, warm the stock, cook the rice, and thaw the seafood before you turn on the stove.

2. Cook the roux slowly

Melt the butter, warm the oil, or heat a butter-oil mix, then add the flour and stir constantly over medium heat. The roux will move from pale to blonde, then copper, then peanut-butter brown. Darkening too quickly is your cue to lower the heat and keep stirring.

3. Add onion, celery, and bell pepper

When the roux reaches the color you want, stir in the holy trinity. The vegetables cool the roux slightly, then turn sweet and savory as they soften into the base. This is the moment the pot starts smelling like dinner.

Once the trinity hits the roux, the pot shifts from toasted flour to a sweet, savory Cajun base.

Chopped onion, celery, and green bell pepper stirred into brown roux in a Dutch oven
When the trinity hits the roux, it cools the pot slightly while building a sweet, savory Cajun base.

4. Build the sauce with warm stock

After the garlic blooms, the first splash of stock will make the roux seize and thicken. Keep whisking. It loosens as the rest of the stock goes in and turns into a smooth, spoonable base.

Warm stock and steady whisking turn the roux from tight and thick into a smooth sauce.

Warm stock being whisked into a roux base for Cajun étouffée sauce
The first splash of stock may tighten the roux, but steady whisking turns it into a smooth étouffée sauce.

5. Simmer until the base tastes complete

Let the sauce simmer until the floury edge has cooked away and the seasoning tastes balanced. The pot should already taste like dinner before the seafood arrives.

6. Finish with shrimp or crawfish

Raw shrimp only needs a few minutes. Crawfish tails are often already cooked and only need to be heated through. Treat the seafood like the finish, not the simmer.

7. Rest, garnish, and serve

Let the pot rest for a few minutes so the sauce settles and thickens slightly. Spoon it over hot white rice so the gravy pools around the grains, then serve with fresh herbs and extra hot sauce at the table.

Troubleshooting: Fix Thin, Thick, Salty, Bland, Spicy, or Floury Étouffée

Do not panic if the sauce looks wrong at first. Étouffée can look too thick, too thin, or too dark for a minute before it comes together. Most problems are easier to fix before the seafood goes in, so taste and adjust while the shrimp or crawfish is still safely waiting.

Check Texture Before Seafood

Étouffée should be thicker than soup but softer than paste. It should spoon easily over rice, coat the seafood, and settle into the grains without disappearing completely.

Diagnose the sauce before adding seafood by comparing thin, spoonable, and overly thick textures.

Three-panel guide comparing thin, just-right, and too-thick Cajun étouffée sauce textures
The ideal étouffée sauce sits between watery and pasty: spoonable, glossy, and thick enough to coat rice.

Common Étouffée Fixes

ProblemWhat it meansHow to fix it
Too thinUsually too much liquid or not enough simmeringSimmer uncovered for a few more minutes before adding seafood
Too thickThe roux absorbed more liquid than expectedAdd warm stock a splash at a time
Floury tasteRoux was undercooked or sauce needs more timeSimmer the sauce longer before adding seafood
Too saltySeasoning blend, stock, hot sauce, or boxed base was saltyAdd unsalted stock, a little butter, and serve with plain rice
Too spicyOften too much cayenne, hot sauce, or spicy Cajun seasoningAdd unsalted stock, a little butter, and serve with extra plain rice
BlandNeeds more spice, acid, or finishing flavorAdd Cajun seasoning, hot sauce, Worcestershire, green onion, or cayenne
Burnt rouxRoux scorched before vegetables were addedRestart the roux; burnt flavor will not cook out
Rubbery shrimpShrimp cooked too long or boiled too hardAdd shrimp only at the end and cook just until opaque
Watery seafood flavorFrozen seafood released too much liquidThaw, drain, and pat dry before adding; simmer the sauce first so it has body

After the detailed fixes, this guide works as a quick save-the-pot reminder for common étouffée problems.

Troubleshooting guide for Cajun étouffée with fixes for thin, thick, floury, salty, spicy, and rubbery shrimp issues
Fix sauce problems early; once shrimp or crawfish goes in, there is less time to correct thickness, salt, or floury flavor.

Pot fixed? Return to the Recipe Card, check Serving Ideas, or use Shortcut Options if you are adjusting a faster version.

Cajun vs Creole Étouffée: Tomato or No Tomato?

Tomato is where étouffée opinions can get loud, so this recipe keeps the choice simple. This version keeps tomato out of the main pot for a roux-forward Cajun-style flavor. Some home cooks add tomato, especially in Creole-leaning or family-style versions, so the option is included below.

For a brighter sauce, add 1 tablespoon tomato paste with the garlic and spices, or stir in ½ cup diced tomato when you add the stock. Tomato changes the flavor, but it can still make a delicious pot.

The tomato choice belongs here because roux-forward Cajun-style and brighter Creole-leaning bowls can both be delicious.

Side-by-side étouffée bowls showing a no-tomato version and a tomato-option version
No tomato keeps the étouffée roux-forward, while a small tomato option adds a brighter Creole-style note.

Skip the tomato if you came here for a roux-forward bowl. Add a little if you like a softer, brighter sauce. Like many Louisiana-style dishes, every kitchen has its own opinion.

Étouffée Sauce, Base, Mix, and Cream Soup Shortcuts

Some nights, you want the roux. On other nights, you want dinner faster. Both are real kitchens. Shortcut étouffée works best when you add freshness back: sautéed trinity, garlic, herbs, a splash of hot sauce, and gentle seafood timing.

The goal is not to pretend a shortcut tastes exactly the same as a from-scratch roux. Instead, make it balanced, creamy or saucy in the right way, and worth spooning over rice.

ShortcutMain riskBest fix
Prepared or jarred rouxToo intense or too darkAdd gradually and taste before adding more seasoning
Boxed étouffée mix or baseToo salty or flatUse less seasoning and add sautéed trinity, garlic, herbs, and hot sauce
Cream soupToo heavy, thick, or saltyThin with stock and finish with fresh herbs and gentle seafood timing
Light rouxLess depthUse good stock, Cajun seasoning, Worcestershire sauce, and a little acidity

For shortcut methods, keep the focus on salt control, sauce thickness, fresh trinity, and gentle seafood timing.

Shortcut étouffée guide showing prepared roux, boxed base, cream soup, and light roux fixes
Shortcut étouffée tastes more homemade when you control salt, loosen heavy bases with stock, and add fresh trinity.

Using prepared or jarred roux

Prepared roux can save time if you want roux flavor without standing over the pot as long. Follow the jar’s or package’s guidance as your baseline, then add gradually rather than all at once. Build the sauce with sautéed onion, celery, bell pepper, garlic, warm stock, and seasoning. Taste before adding more Cajun seasoning because prepared roux can vary in intensity.

Using étouffée mix or base

Boxed étouffée mix or jarred base can be useful when you want dinner fast. Most mixes already contain seasoning, thickener, and salt, so taste before adding more Cajun seasoning. Add shrimp or crawfish near the end instead of boiling it hard for the whole cooking time.

To make a mix taste more homemade, sauté onion, celery, bell pepper, and garlic in a little butter before adding the mix and liquid. Finish with fresh herbs, a splash of hot sauce, and a small knob of butter.

Using cream of mushroom, cream of shrimp, or cream of celery soup

Many home cooks make a creamy shortcut étouffée with condensed soup. If this is the version you grew up with, it deserves a place too. Cream of mushroom, cream of shrimp, cream of celery, and golden mushroom soup all create an easy, comforting sauce. It will not taste exactly like a roux-based Cajun étouffée, but it can still be a cozy family-style dinner.

Cream soup shortcuts work best when stock loosens the base and seafood stays gently cooked.

Cream soup shortcut setup for étouffée with stock, trinity, seafood, herbs, and creamy sauce
When using cream soup, loosen the base with stock first, then finish with seafood gently so the sauce stays spoonable.

Condensed soup needs a lighter hand with salt and seasoning. Start with about ½ can of water or stock per can of condensed soup, then loosen the sauce more only if needed. Cream soup versions can become salty quickly, especially when combined with Cajun seasoning and table hot sauce.

For a full dinner built around the same condensed-soup comfort idea, this cream of mushroom chicken shows how much the soup-to-liquid ratio matters when you want the sauce creamy instead of watery.

The fastest from-scratch shortcut

If you have 5–8 minutes, make a light roux instead of relying only on soup or mix. Even a copper-colored roux gives the sauce more flavor and better texture than a fully instant version.

Using a shortcut tonight? Keep Troubleshooting nearby, then return to the Recipe Card for seafood timing.

What to Serve With Cajun Étouffée

Cajun étouffée is usually served over white rice, and for good reason. The rice catches the sauce, softens the heat, and turns the dish into a full meal. If rice is the part that usually lets you down, this guide on how to cook perfect rice will help you get fluffy grains before the étouffée is ready.

A shallow bowl works best here: rice in the center, sauce ladled around it, herbs on top, and table hot sauce close by. It feels generous without needing many sides.

Serving gets easier when rice is mounded first and the étouffée is ladled around it.

Cajun étouffée plated with rice in the center and sauce spooned around it
For a cleaner bowl, mound the rice first, then ladle the étouffée around it so the gravy pools neatly.
  • Long-grain white rice: the classic, clean choice.
  • Green onions and parsley: a fresh finish for a rich sauce.
  • Hot sauce: serve on the side so everyone controls the heat.
  • Cornbread: good for soaking up extra sauce.
  • Simple green salad: balances the richness.
  • Roasted okra or sautéed greens: adds a Southern-style vegetable side.
  • Red beans and rice: better as a separate meal or part of a larger Cajun/Creole spread rather than something you need on the same plate.
  • Cajun seafood boil: a natural next recipe if you are building a bigger seafood spread around shrimp, crawfish, crab, or potatoes.

Finish with herbs and a sharp splash of hot sauce.

Make-Ahead, Storage, Freezing, and Reheating

Étouffée is a good make-ahead dish when the sauce and seafood are handled separately. Prepare the sauce ahead, then add the seafood when you reheat and serve.

Make ahead

Make the sauce through the simmering step, then cool and refrigerate it. When ready to serve, warm it gently, add a splash of stock if needed, and finish with shrimp, crawfish tails, or both.

Storage works best when the sauce is made ahead and seafood is saved for reheating.

Make-ahead étouffée sauce stored separately from seafood and rice
For better make-ahead texture, store the sauce separately; then add seafood during reheating so it stays tender.

Refrigerating leftovers

Store leftovers in an airtight container in the refrigerator for up to 3 days. Keep rice separate if possible so the sauce does not become too thick and starchy.

If you have extra cooked rice but not enough étouffée for another full bowl, turn the rice into a separate dinner like this shrimp fried rice instead of stretching the sauce too thin.

Freezing

You can freeze étouffée, but seafood texture may change after thawing. The best method is to freeze the sauce without seafood, then add fresh shrimp or crawfish when reheating. Leftovers with seafood already in the sauce should be cooled quickly, frozen in a sealed container, and reheated gently.

Reheating

Reheat on low heat, stirring often. Add a splash of stock or water to loosen the sauce. Avoid boiling leftovers hard because shrimp and crawfish can toughen.

Variations

Shrimp étouffée

Use 2 lb total peeled and deveined raw shrimp. Add it near the end and cook gently until opaque and softly curled.

Crawfish étouffée

Use 2 lb total thawed crawfish tails. Already cooked crawfish should be warmed gently instead of boiled hard.

Seafood étouffée

Use a mix of shrimp and crawfish, or add a little crabmeat at the end. Delicate seafood stays best when it is added late.

Chicken étouffée

Use bite-size cooked chicken or small pieces of boneless chicken thighs. Simmer until the chicken is fully cooked and tender, then finish with fresh herbs.

Gluten-free étouffée

Use a gluten-free all-purpose flour blend or rice flour for the roux. The texture may be slightly different, so add stock gradually and adjust the sauce as it thickens.

Vegetarian mushroom étouffée

Use mushrooms instead of seafood and vegetable stock instead of seafood or chicken stock. Brown the mushrooms first so they bring depth to the sauce instead of watering it down.

Extra spicy Cajun étouffée

Add more cayenne, diced jalapeño, or extra hot sauce at the table. Build spice gradually because Cajun seasoning and hot sauce can also add salt.

Creamy shortcut étouffée

Use condensed cream of mushroom, cream of shrimp, or cream of celery soup as part of the sauce base. Keep the seasoning lighter, thin with stock, and add seafood at the end.

Cajun Étouffée FAQs

How do you pronounce étouffée?

Étouffée is usually pronounced ay-too-FAY or eh-too-FAY. The word comes from French and means “smothered.”

Is shrimp okay instead of crawfish?

Yes. Use raw peeled shrimp and add it during the final 3–5 minutes so it stays tender. Shrimp is easier to find than crawfish and works very well in Cajun étouffée.

Are crawfish tails already cooked?

Many packaged crawfish tails are already cooked. Check the package, but in most cases they only need to be warmed through in the sauce for a few minutes.

How should frozen crawfish tails be handled?

Thaw frozen crawfish tails first, then drain excess liquid. Do not automatically rinse them, especially if the package has flavorful crawfish fat or juices. Muddy or overly fishy liquid should be drained more aggressively, with stock doing more of the flavor work.

What roux color is best for étouffée?

Peanut-butter brown is the best balance for this recipe. It gives the sauce nutty flavor without requiring a very dark roux. A lighter copper roux also works for an easier weeknight version.

Does Cajun étouffée need tomatoes?

No. This version does not use tomato by default. A little tomato paste or diced tomato gives the sauce a brighter Creole-style feel. Tomato changes the flavor, but it can still make a delicious pot.

Should étouffée be thick?

Yes, but not pasty. Étouffée should be thicker than soup and thin enough to spoon over rice. A thick sauce needs warm stock; a thin one needs a few more uncovered minutes.

Why does my étouffée taste floury?

The roux may not have cooked long enough, or the sauce may need more simmering time. Cook the roux until it smells nutty, then simmer the sauce until the floury taste disappears.

How do I keep shrimp from overcooking?

Build and simmer the sauce first, then add shrimp at the end. Shrimp usually needs only 3–5 minutes in a gentle simmer. Remove the pot from heat as soon as the shrimp is opaque and tender.

Cream of mushroom soup in étouffée: yes or no?

Yes, if you want a creamy home-style shortcut. Cream of mushroom soup is not the same as a roux-based Cajun étouffée, but it can be useful for a fast, comforting version. Use less salt because condensed soup and Cajun seasoning can become salty together.

Gumbo vs étouffée: what is the difference?

Gumbo is usually more soup-like and often served as a stew with rice, while étouffée is thicker and more sauce-like. Étouffée should cling to the seafood and rice rather than feel like broth. For a deeper comparison, Southern Living has a helpful étouffée vs gumbo explainer.

Make-ahead étouffée: what works best?

Best texture comes from making the sauce ahead and adding the seafood when reheating. This keeps shrimp and crawfish from becoming tough.

Need the essentials again? Jump back to the Recipe Card, Roux Guide, Troubleshooting, or Top.

Final Spoonful

Once you know what the roux should smell like, how the sauce should move, and when the seafood should go in, Cajun étouffée stops feeling intimidating. It becomes what it should be: glossy, spicy, seafood-rich comfort poured over hot rice, finished with herbs and one more sharp splash of hot sauce.

The finished-pot target is simple: glossy sauce, hot rice, fresh herbs, and enough Cajun étouffée for the table.

Dutch oven of Cajun étouffée served at a table with rice, bowls, herbs, ladle, and hot sauce
Once the sauce is glossy and the rice is hot, étouffée becomes the kind of pot people gather around.

Every kitchen has an opinion on tomato, cream soup, crawfish, shrimp, or how dark the roux should be — and that is part of why étouffée is so fun to cook. If your family has a version, it probably has a reason behind it. Learn the base method, adjust the pot to your table, keep the rice hot, and serve it while the sauce is still glossy.