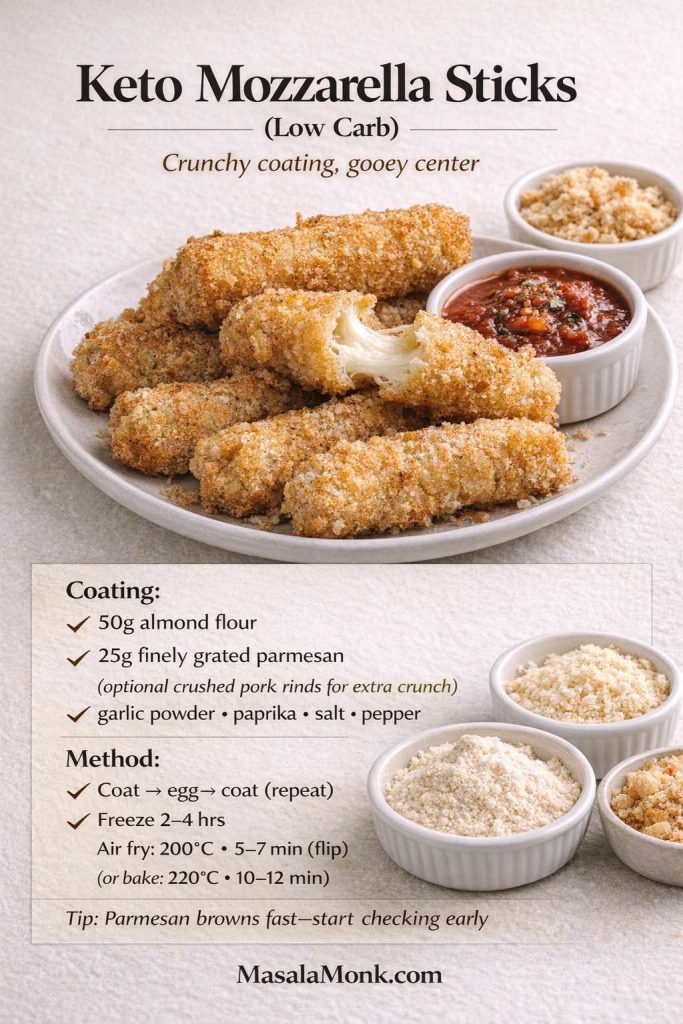
Broccoli pasta should be easy: pasta, broccoli, garlic, Parmesan, done. But anyone who has made a disappointing bowl knows the usual problems. The pasta turns dry before it reaches the table. Broccoli tastes watery or bland. Cheese clumps instead of melting. Somehow, dinner ends up tasting like plain noodles with steamed vegetables.
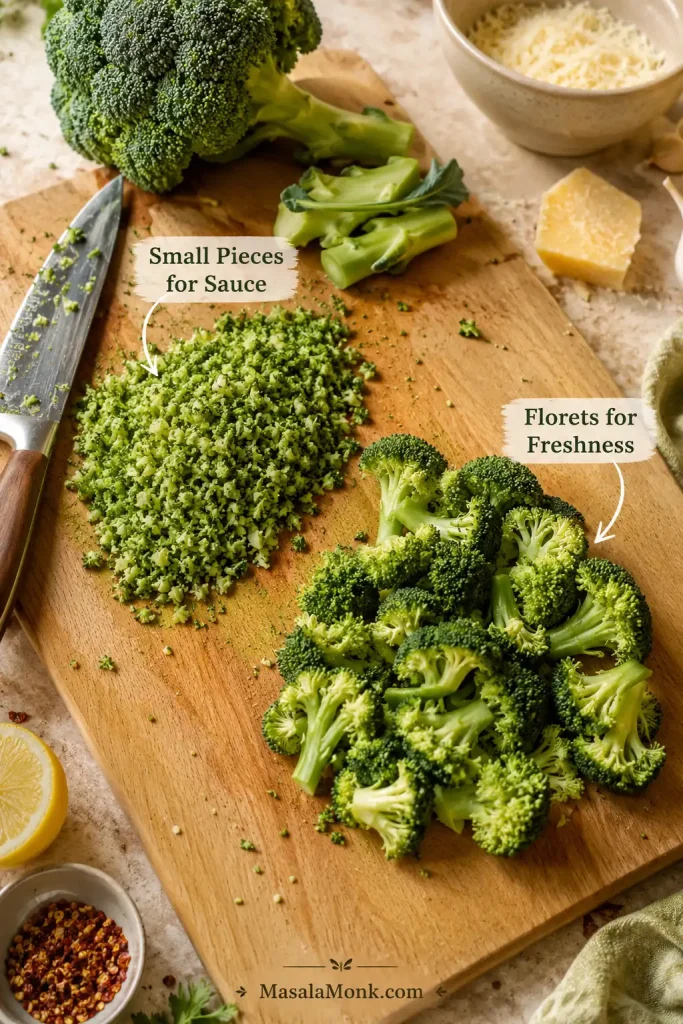
This broccoli pasta recipe is built to avoid that. The trick is simple: use broccoli in two textures — small pieces for sauce, florets for freshness.
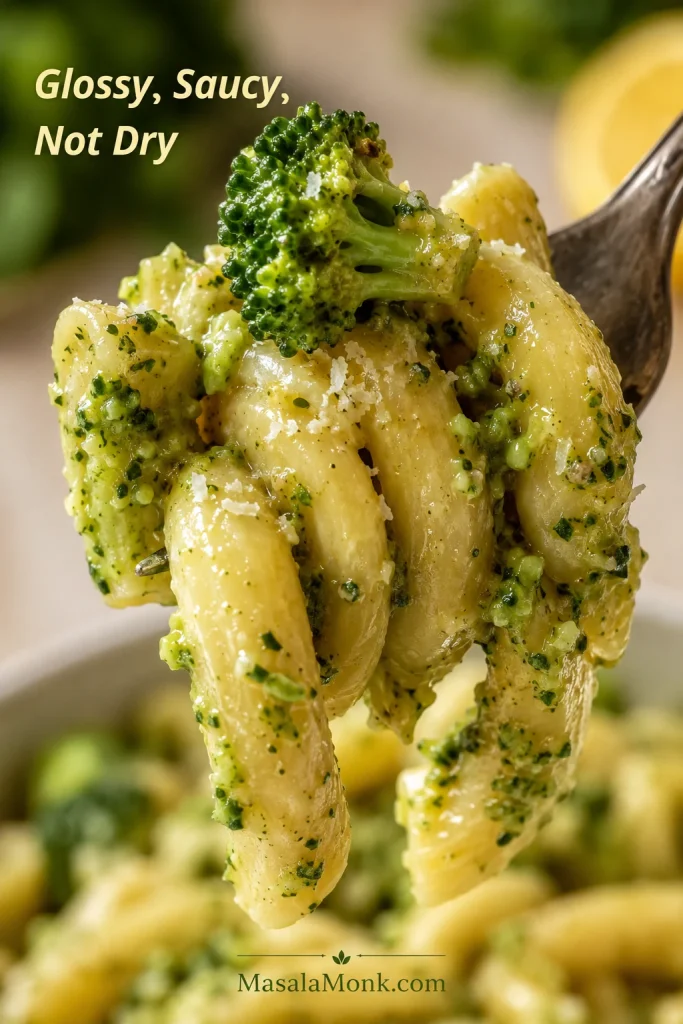
The good version should feel like vegetables and comfort food finally agreeing with each other. Some broccoli melts into the garlic-Parmesan coating; some stays green and visible. Lemon keeps the cheese from feeling heavy, and the whole bowl lands somewhere between fresh weeknight pasta and cozy comfort food.
Once the broccoli is cut, the pasta comes together in about 25 minutes. The first time may take closer to 30 minutes while you grate the cheese, learn the timing, and see how loose the sauce should look in the pan.
If your broccoli pasta usually turns dry, the two biggest fixes are simple: save pasta water, and add Parmesan off the heat.
Quick Answer: How Do You Make Broccoli Pasta?
To make broccoli pasta, cook the pasta with finely chopped broccoli until some of the broccoli is soft enough to mash. Toss it with garlic, butter or olive oil, Parmesan, and starchy pasta water until saucy. Add a few visible florets near the end so the bowl still looks green and fresh. That balance keeps the pasta saucy without turning the whole bowl soft.
What makes this version different is that broccoli is not just a topping. Some becomes sauce, some stays visible, and the best bites taste like broccoli all the way through.
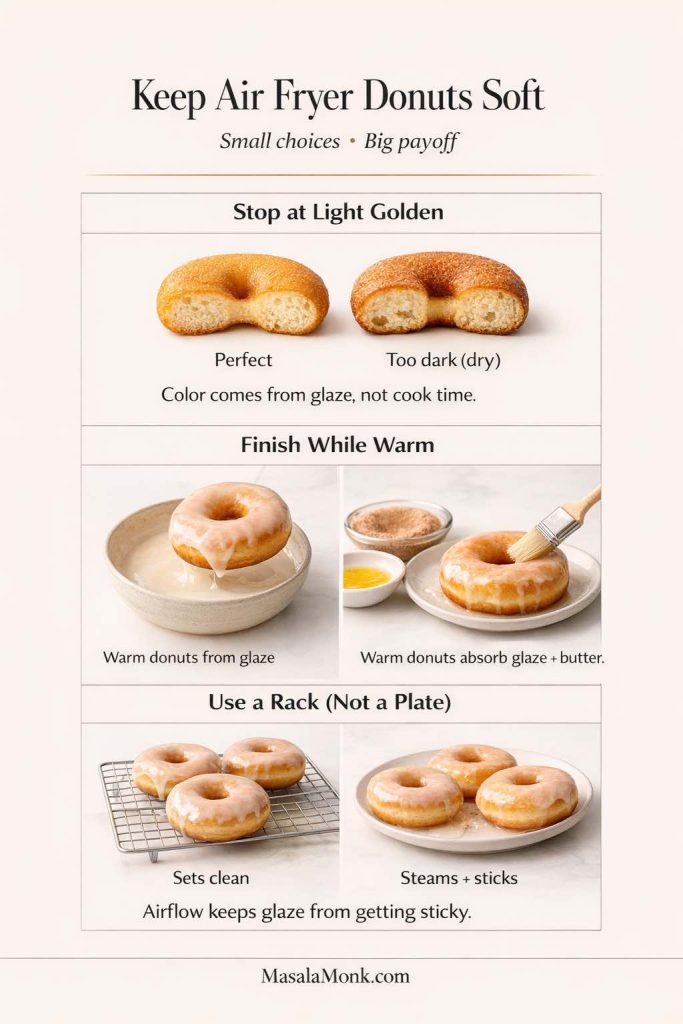
What Good Broccoli Pasta Should Look Like
Use this as the visual target before you cook: the pasta should look coated and lively, not matte, stiff, or separated from the broccoli.
At a Glance
- Total time: about 25 minutes once you know the rhythm
- Yield: 4 dinner servings or 6 smaller side servings
- Main flavor: garlic, Parmesan, lemon, black pepper, broccoli
- Texture: saucy, green-flecked, lightly creamy, not heavy
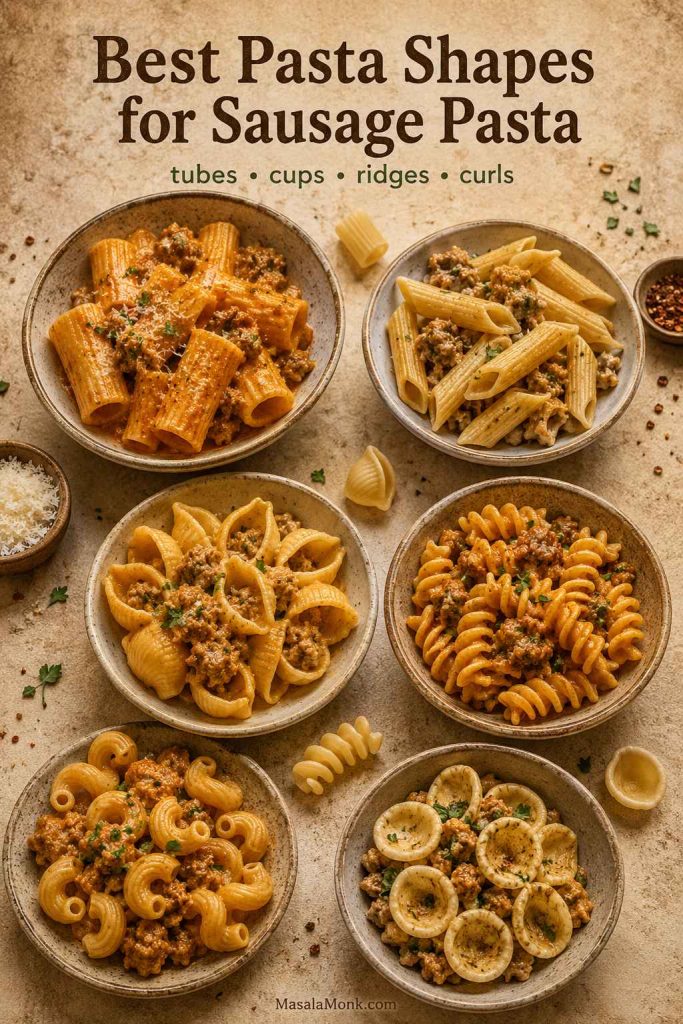
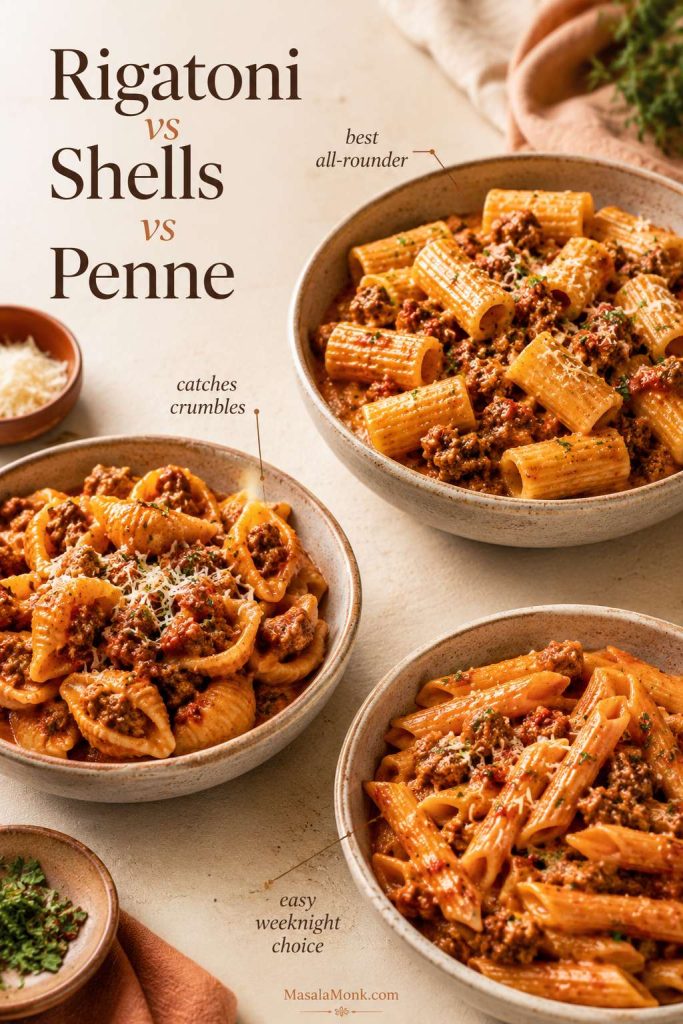
- Best pasta: shells, fusilli, orecchiette, penne, rigatoni, or cavatappi
- Fresh or frozen: both work
Garlic Parmesan Broccoli Pasta That Stays Saucy Without Cream
Recipe Card
This garlic Parmesan broccoli pasta turns finely chopped broccoli, garlic, Parmesan, and pasta water into a light, glossy sauce, with a few florets kept whole for freshness. It stays saucy without heavy cream.
Equipment
- Large pot
- 12-inch skillet or wide sauté pan
- Colander, slotted spoon, or spider
- Measuring cup for pasta water
- Fine grater or microplane
- Fork, potato masher, wooden spoon, or spatula
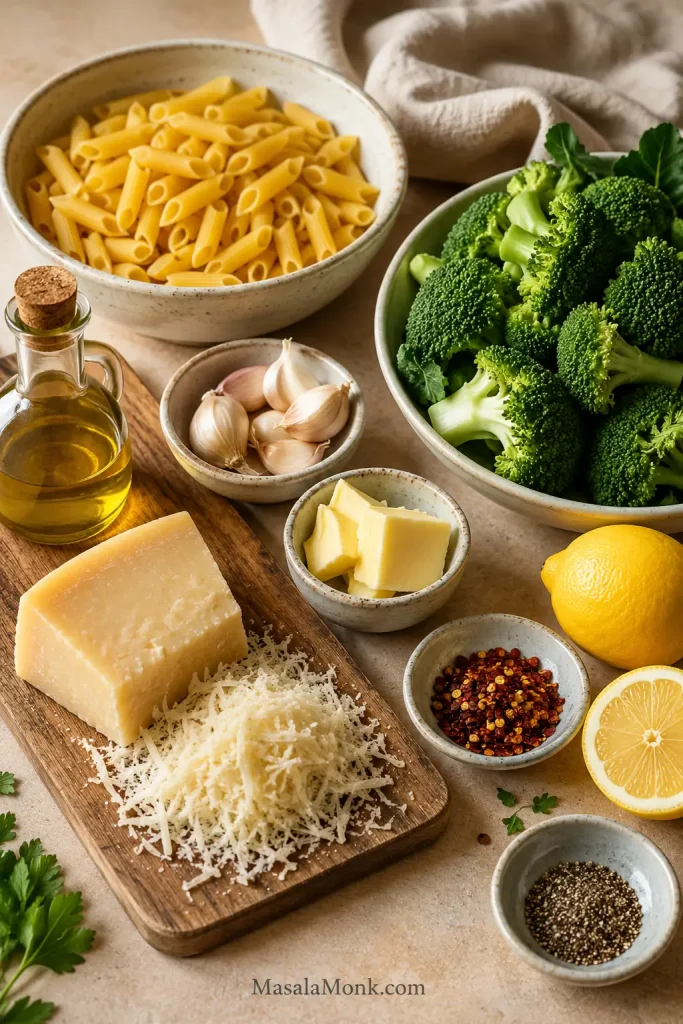
Ingredients
- 12 oz / 340g short pasta, such as shells, fusilli, orecchiette, penne, rigatoni, or cavatappi
- 1¼ to 1½ lb / 565 to 675g broccoli, florets and tender stems
- Kosher salt, for the pasta water
- 3 tbsp / 45 ml olive oil
- 1 to 2 tbsp / 14 to 28g butter
- 4 garlic cloves, finely minced or grated
- ½ tsp red pepper flakes, optional
- ½ cup / 45 to 50g finely grated Parmesan, plus more for serving
- 1 cup / 240 ml reserved pasta water, divided
- 1 to 2 tsp lemon zest or 1 tbsp lemon juice, to taste
- Black pepper, to taste
Optional Add-Ins
- 2 tbsp cream cheese for a creamier sauce
- ¼ cup / 60 ml milk for a lighter creamy version
- ½ cup shredded cheddar or mozzarella for a cheesier pasta
- 2 cups cooked chicken for a fuller dinner
Instructions: Cook the Pasta and Broccoli
- Cut the broccoli in two textures. Finely chop about two-thirds of the broccoli into ¼ to ½ inch pieces, including tender stems. Cut the remaining broccoli into small visible florets, about ¾ to 1 inch. Peel thick stems first if the outside feels tough.
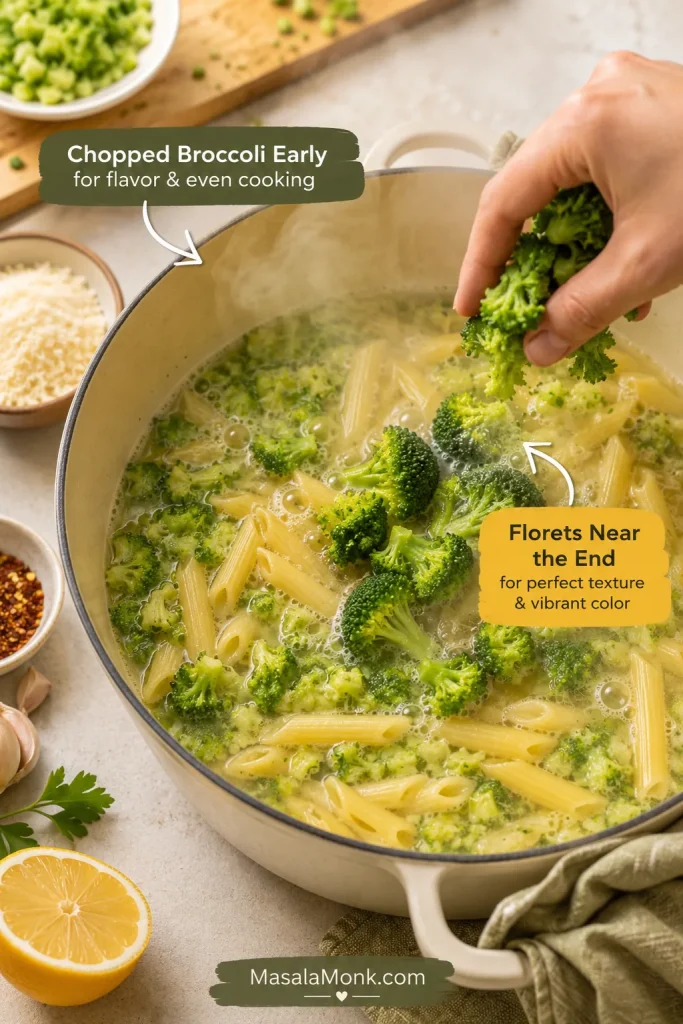
- Boil the pasta water. Bring a large pot of water to a boil and salt it well. Add pasta and cook until just shy of al dente. Start checking 1 to 2 minutes before the package time.
- Add the finely chopped broccoli. When the pasta has about 5 minutes left, add the finely chopped broccoli pieces. Make sure the water returns to a steady boil.
- Add the visible florets. When the pasta has about 2 minutes left, add the remaining small florets.
- Reserve pasta water. Scoop out 1 cup / 240 ml pasta water before draining. Do not rinse the pasta.
Build the Sauce and Finish
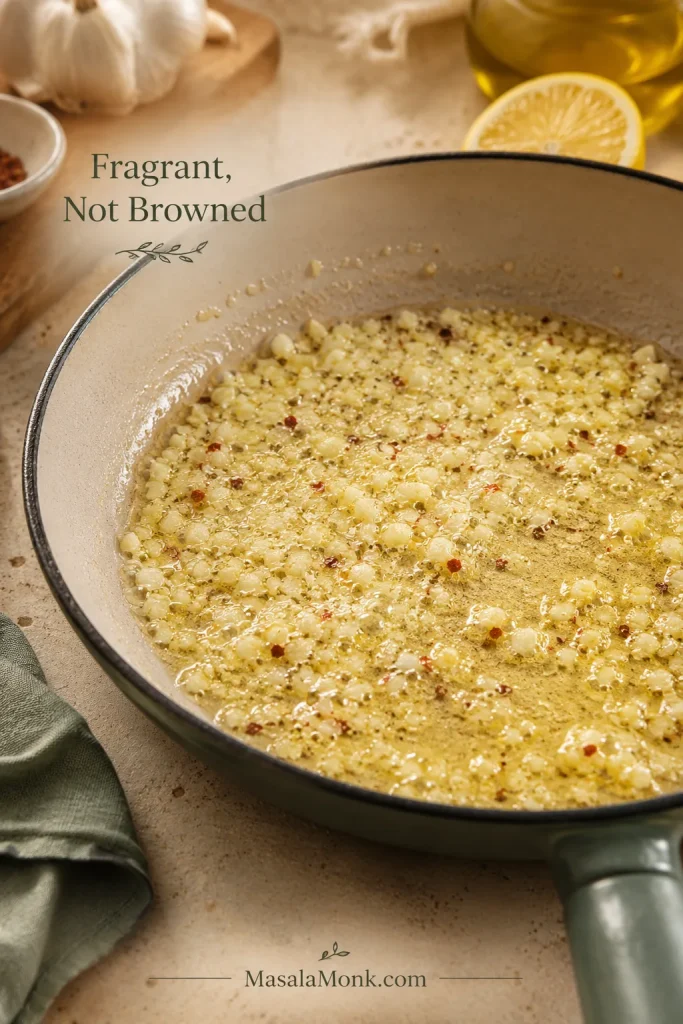
- Make the garlic base. While the pasta cooks, warm olive oil and butter in a wide skillet over medium-low heat. Add garlic and red pepper flakes. Cook for 30 to 60 seconds, until fragrant but not browned.
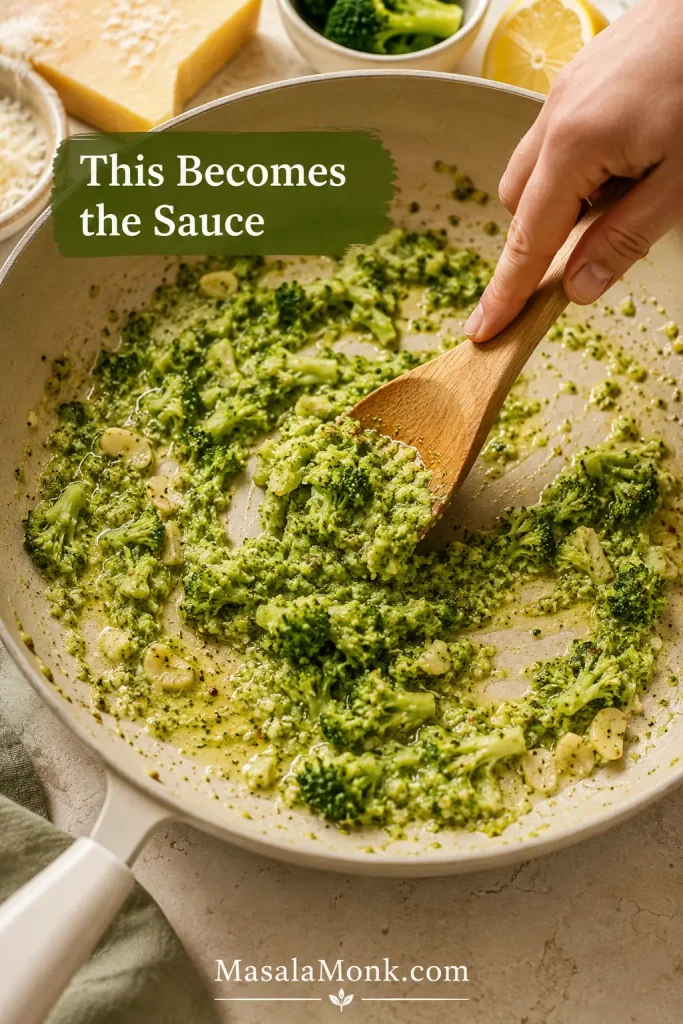
- Mash some broccoli. If using a slotted spoon, move broccoli into the skillet first and mash the soft pieces into the garlic oil. Then add pasta. If everything was drained together, add pasta and broccoli to the skillet and mash some broccoli in place.
- Toss with pasta water. Add ½ cup / 120 ml reserved pasta water. Toss until the pasta looks coated and green bits cling to it. Add more pasta water a few tablespoons at a time if needed.
- Add Parmesan off the heat. Turn off the heat. Add Parmesan gradually, tossing until it melts into the pasta. Loosen with more hot pasta water if needed.
- Finish and serve. Add lemon zest or juice, black pepper, and more Parmesan. Taste and adjust salt, lemon, pepper, and cheese before serving.
Notes
- If your pasta cooks in less than 9 minutes, boil the finely chopped broccoli pieces for 2 to 3 minutes before adding the pasta, or cook the broccoli separately until mashable.
- Frozen broccoli: thaw large florets enough to chop and drain well.
- Gluten-free, chickpea, or lentil pasta: check early and toss gently.
- Add Parmesan off the heat so it melts smoothly.
- Chicken: add extra pasta water because it absorbs sauce.
- Stop while the skillet looks slightly loose; the pasta thickens as it sits.
Why the Two-Texture Broccoli Method Works
The method works because the broccoli has two jobs. Chopped broccoli softens enough to coat the pasta; florets keep the bowl green and fresh. If all the broccoli is large, the pasta tastes like noodles with vegetables on top. If all of it is finely chopped, the flavor is good but the bowl looks dull.
The best broccoli pieces are not the pretty ones. They are the little bits that disappear into the garlic oil and make every shell taste like sauce. Do not worry if the broccoli looks a little messy in the skillet. That mess is what makes the sauce.
Small Pieces for Sauce, Florets for Freshness
This cut is the foundation of the recipe. The small pieces are for flavor and body; the larger florets are for color, bite, and the finished look.
Success cue: the pasta should look a little saucier in the pan than you want on the plate. Hot pasta keeps absorbing as it sits, so a slightly loose skillet becomes a well-coated bowl by the time you eat.
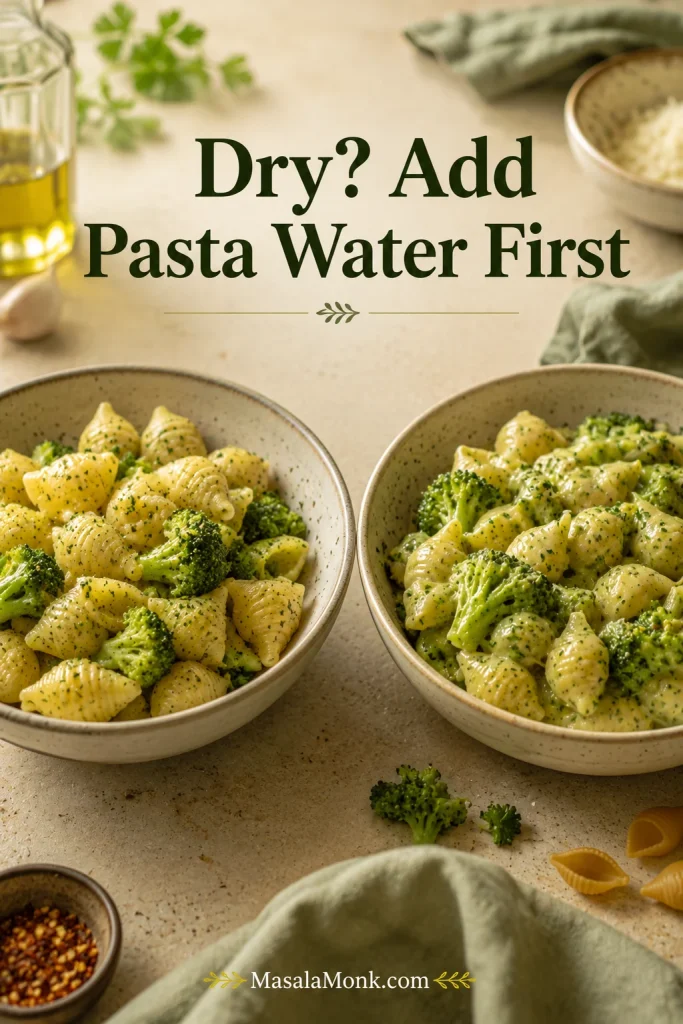
Do not chase dryness with more cheese. Wake the sauce up with pasta water first, then add cheese for flavor.
Ingredients You’ll Need
The ingredients are simple, but three details matter most: broccoli cut size, starchy pasta water, and finely grated Parmesan.
The Ingredients That Make the Sauce Work
Use short pasta, enough broccoli, fresh garlic, finely grated cheese, and lemon. Those few choices carry most of the flavor.
Best Pasta Shapes for Broccoli Pasta
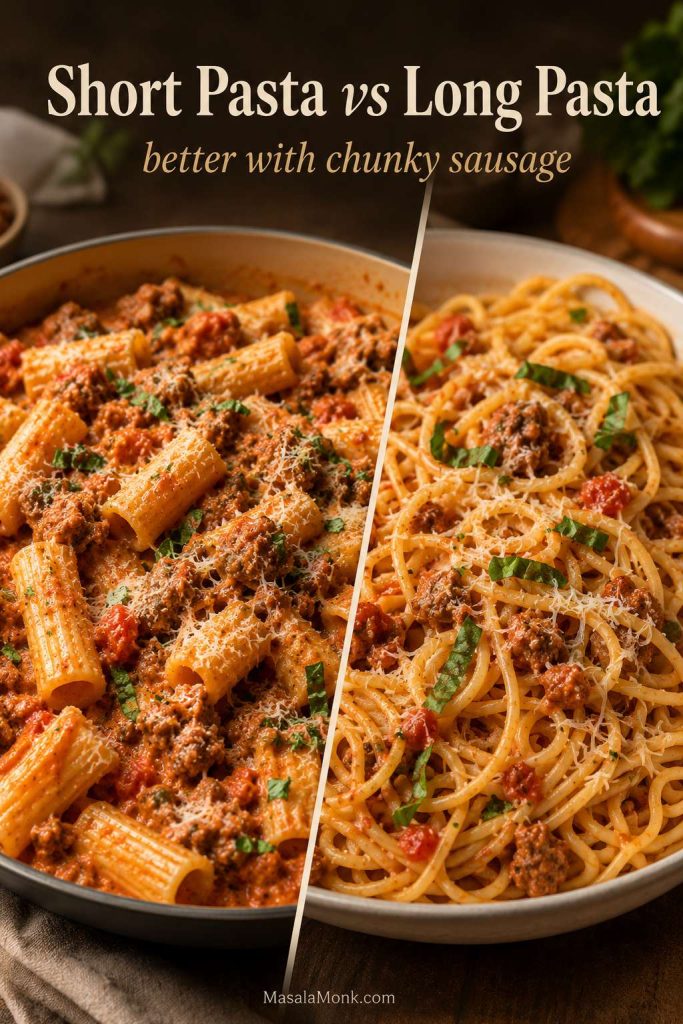
Use 12 oz / 340g short pasta. Shells and fusilli are especially good because mashed broccoli catches in their curves. Orecchiette, penne, rigatoni, and cavatappi also work. Long pasta needs smaller broccoli and more tossing.
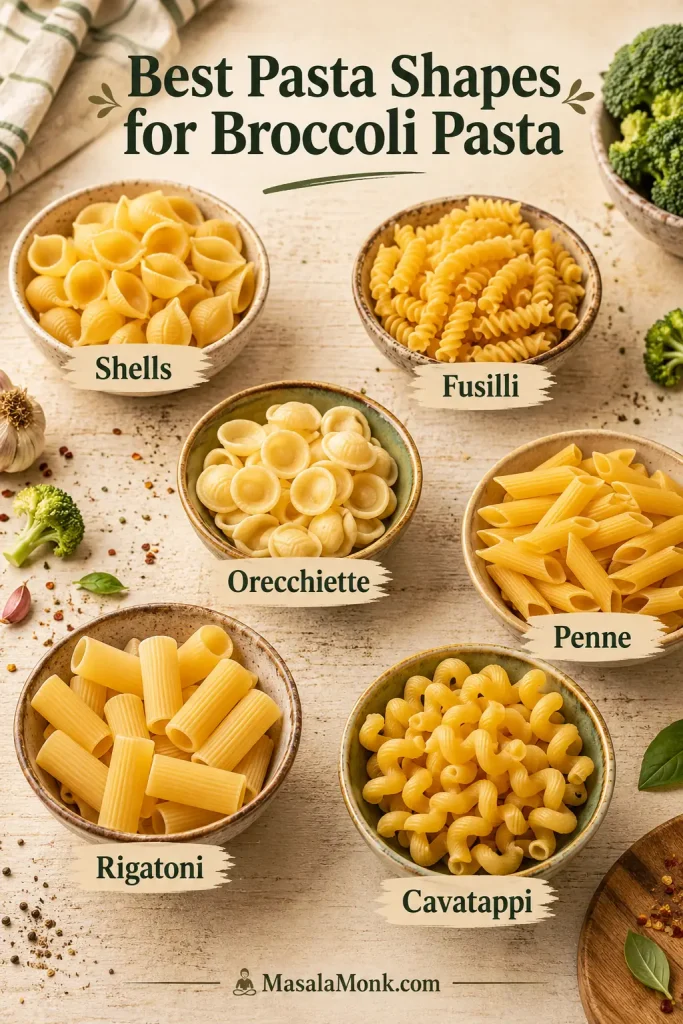
Chickpea, lentil, and gluten-free pasta can work too, but check early and toss gently because they can break more easily than regular wheat pasta.
Broccoli
Use 1¼ to 1½ lb / 565 to 675g broccoli. Chop most of it into ¼ to ½ inch pieces so it can soften into the sauce. Save a handful of ¾ to 1 inch florets so the finished pasta still looks green and fresh.
Do not waste the stems. Peel tough outsides, then chop the tender centers small so they can help thicken the sauce.
Using frozen broccoli instead? Jump to the fresh vs frozen broccoli notes before you start, because frozen broccoli needs a little more moisture control.
Garlic, Oil, and Butter
Use 4 garlic cloves, 3 tbsp / 45 ml olive oil, and 1 to 2 tbsp / 14 to 28g butter. They build the warm base later, so keep the heat gentle.
Parmesan
Use ½ cup / 45 to 50g finely grated Parmesan, plus more for serving. A block grated finely at home melts better than large shreds. Pecorino Romano is sharper; Grana Padano is milder. Taste before adding extra salt.
Lemon, Salt, Pepper, and Red Pepper Flakes
Use 1 to 2 tsp lemon zest or 1 tbsp lemon juice. Lemon does not need to taste loud; it just keeps the cheese and broccoli from feeling flat. Finish with black pepper and red pepper flakes if you want gentle heat.
Common Broccoli Pasta Mistakes to Avoid
Before you cook, watch these four things:
- Do not cut all the broccoli large. You need chopped broccoli that can collapse into sauce.
- Do not forget pasta water. It is the difference between glossy and dry.
- Do not add Parmesan over high heat. That is how smooth cheese turns grainy.
- Do not rinse the pasta. The surface starch helps the broccoli sauce cling.
How to Make Broccoli Pasta with the Two-Texture Method
Once you know the basic steps, the real difference is in the cues: how soft the broccoli gets, how loose the sauce looks, and when to stop adding heat.
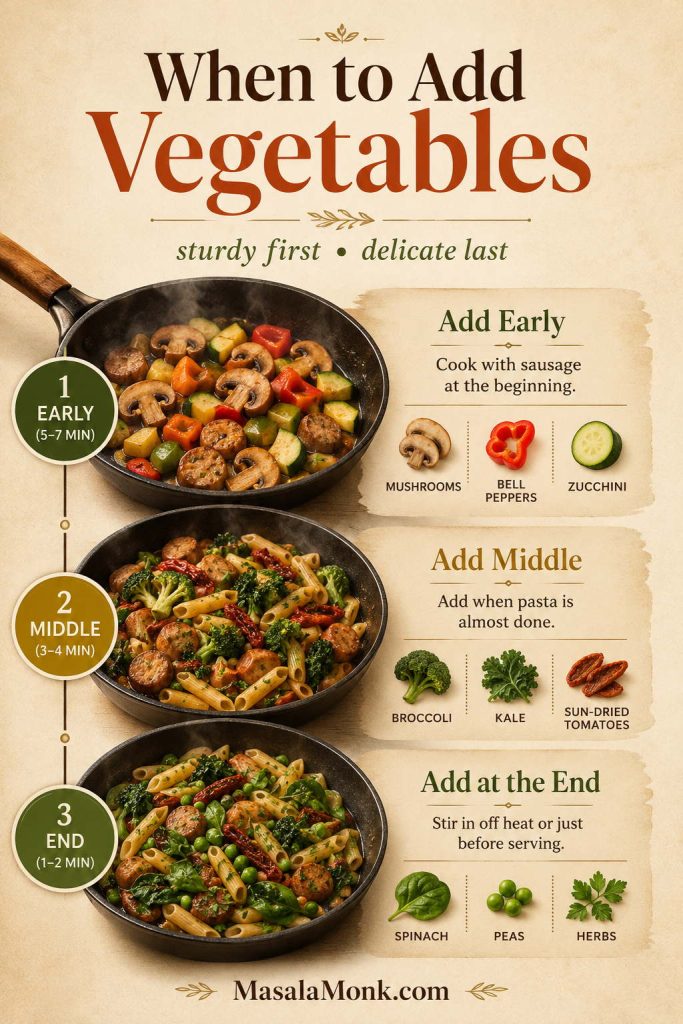
When to Add Broccoli to Pasta
Use the timing as a texture guide, not just a clock. Chopped broccoli needs time to soften enough for sauce; florets need less time so they stay green.
| Timing | Add This | Goal |
|---|---|---|
| 5 minutes before pasta is done | Finely chopped broccoli | Soft enough to mash |
| 2 minutes before pasta is done | Visible florets | Green and tender |
| Before draining | Pasta water | Sauce insurance |
| Off the heat | Parmesan | Smooth, not grainy |
1. Cut for Sauce, Not for Perfect Florets
Do not worry about perfect broccoli shapes here. The chopped broccoli is supposed to look a little messy because it is going to disappear into the sauce. Keep a handful of visible florets aside so the finished pasta still looks like broccoli pasta, not just green pasta.
2. Use the Pasta Pot for Timing
The only timing that matters is this: chopped broccoli needs enough time to soften; florets only need enough time to turn green and tender. If the water slows down after adding broccoli, give the pasta a little extra time and check before draining.
3. Why Pasta Water Makes Broccoli Pasta Glossy
Pasta water is boring until the moment your skillet looks dry. Then it becomes the thing that saves dinner. Scoop it before draining so you are not trying to fix dry pasta with plain water later.
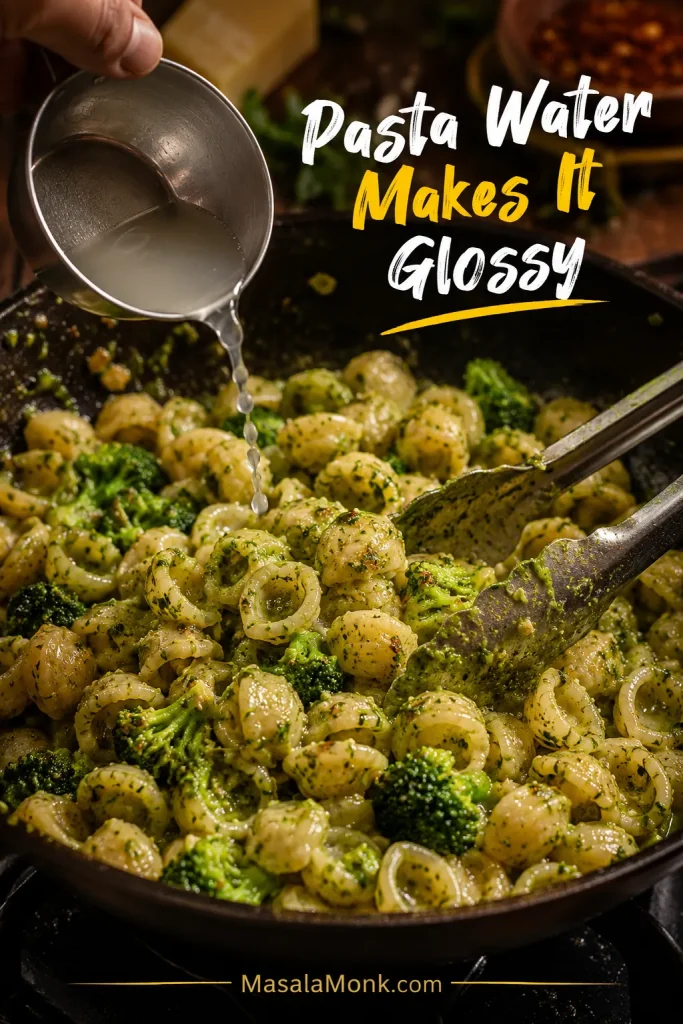
If your pasta already looks matte or tight, see the dry vs glossy broccoli pasta fix before adding more cheese.
4. Keep the Garlic Gentle
Warm the olive oil, butter, garlic, and red pepper flakes over medium-low heat. The goal is fragrance, not color; if the garlic browns hard here, the bitterness follows the broccoli sauce into the bowl.
5. Mash Broccoli Into the Sauce
Mash the soft broccoli into the garlic oil, then add pasta water and toss until the sauce clings. The pan should look slightly too loose before serving; the bowl will catch up. By the end, the green bits should be tucked into the curves of the pasta, not sitting at the bottom of the pan.
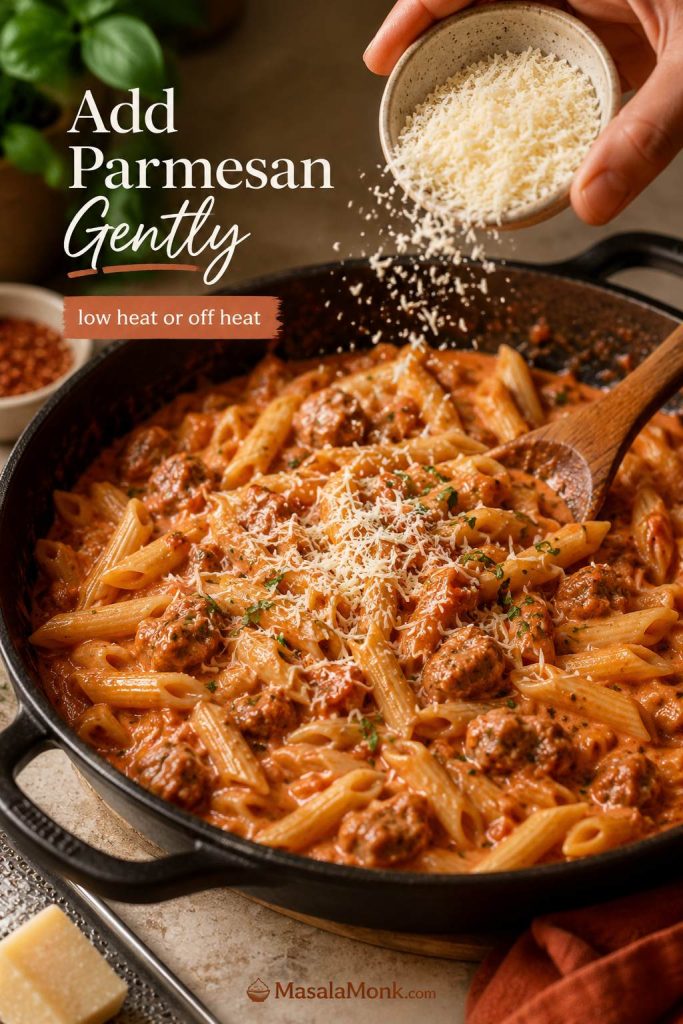
6. Add Parmesan Off the Heat and Finish
Turn off the heat before adding Parmesan. Finish with lemon when the pasta tastes good but not quite awake. The lemon should lift the cheese, not make the pasta sour.
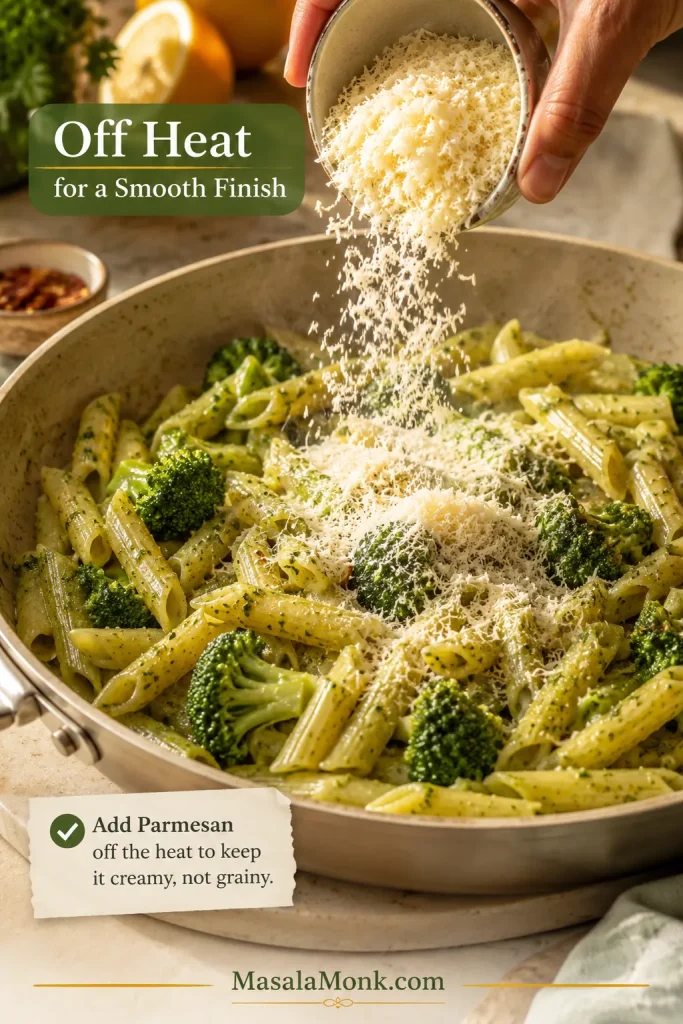
If the cheese clumps or turns grainy, use the troubleshooting table instead of adding more Parmesan.
Fresh vs Frozen Broccoli for Pasta
The choice is not about right or wrong broccoli. It is about what kind of bowl you want. Use fresh when you want the pasta to look bright and dinner-table pretty. Use frozen when you want a softer, saucier weeknight bowl.
Choose the Broccoli Texture You Want
Fresh and frozen broccoli both work here, but they do not behave the same way. Use the image and table below to choose the texture you want before you cook.
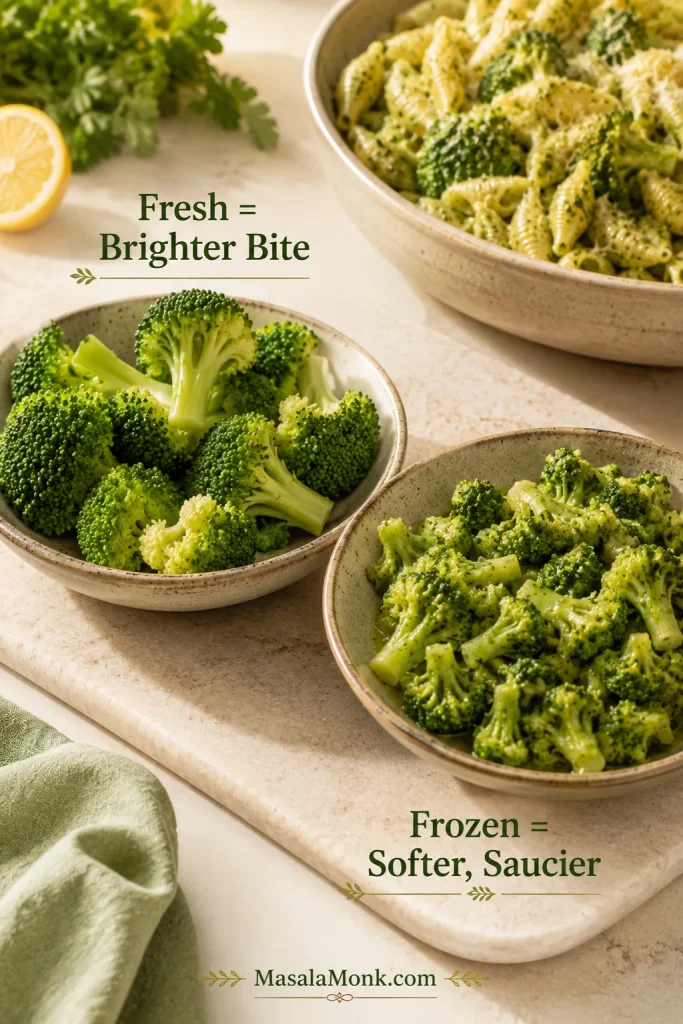
| Broccoli Type | Best For | How to Use It |
|---|---|---|
| Fresh broccoli | Prettiest bowl and cleaner bite | Cut small pieces for sauce and save a few small florets for the end. |
| Frozen broccoli, thawed and chopped | Best control with frozen broccoli | Thaw just enough to chop large florets, drain extra water, then cook until mashable. |
| Frozen broccoli added directly | Fastest pantry version | Add near the end of pasta cooking, mash in the skillet, and add pasta water slowly. |
Is This Creamy Broccoli Pasta?
Yes, but it is not cream-sauce pasta. The creaminess comes from soft broccoli, pasta water, butter or olive oil, and finely grated Parmesan, so the pasta feels glossy and coated while the broccoli stays central. These add-ins push it further toward comfort food.
Make It Creamier or Cheesier
Build the broccoli sauce first, then add dairy slowly. That keeps the flavor green instead of turning the bowl into plain cheese pasta.

| Goal | What to Add | When to Add It |
|---|---|---|
| Creamier sauce | 2 tbsp cream cheese | After mashing broccoli and adding pasta water, before Parmesan |
| Lighter creamy sauce | ¼ cup / 60 ml milk | Add with pasta water and warm gently before cheese |
| More Parmesan flavor | Extra ¼ cup Parmesan | Off the heat, gradually, with splashes of pasta water |
| Broccoli-cheddar pasta | ½ cup shredded cheddar | Off the heat or very low heat after Parmesan |
| Stretchy cheesy pasta | ½ cup shredded mozzarella | Off the heat, then serve immediately |
If you want a true mac-and-cheese style dinner, MasalaMonk’s macaroni and cheese recipe is the better direction.
If the cheese turns grainy, the heat was probably too high when it went in. Move the pan off the heat, add a splash of hot pasta water, and stir gently.
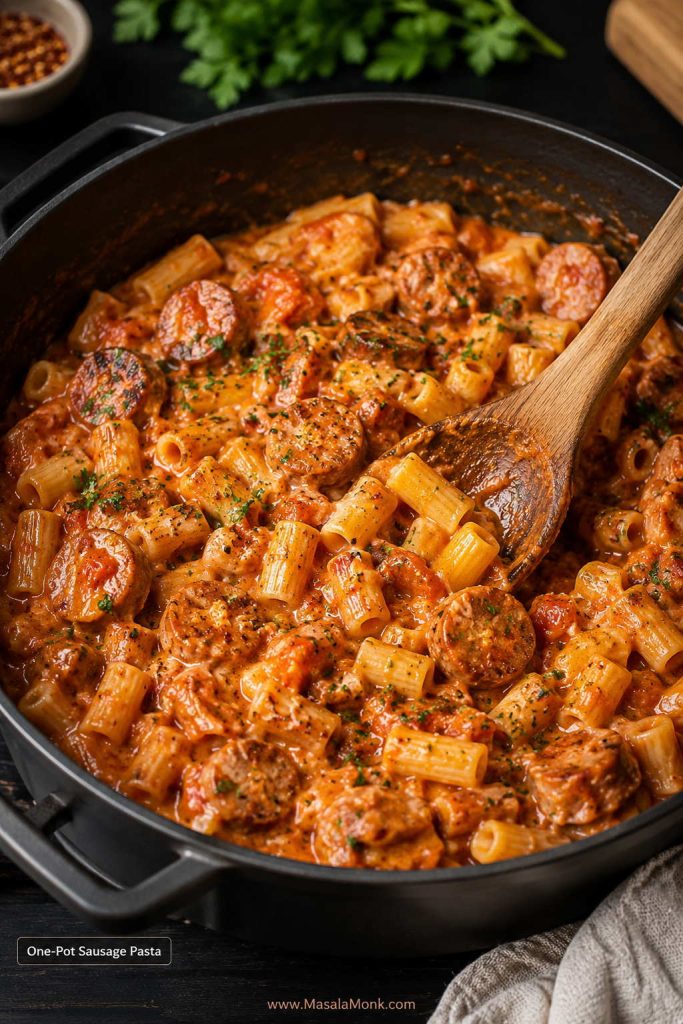
Can You Make This One-Pot?
Yes, but the skillet version gives better garlic flavor and more room to toss. Use the one-pot shortcut when convenience matters more than maximum garlic flavor.
The One-Pot Shortcut
In the one-pot version, stop while the pasta still looks a little loose. It tightens faster than the skillet version, so serve as soon as the sauce coats.
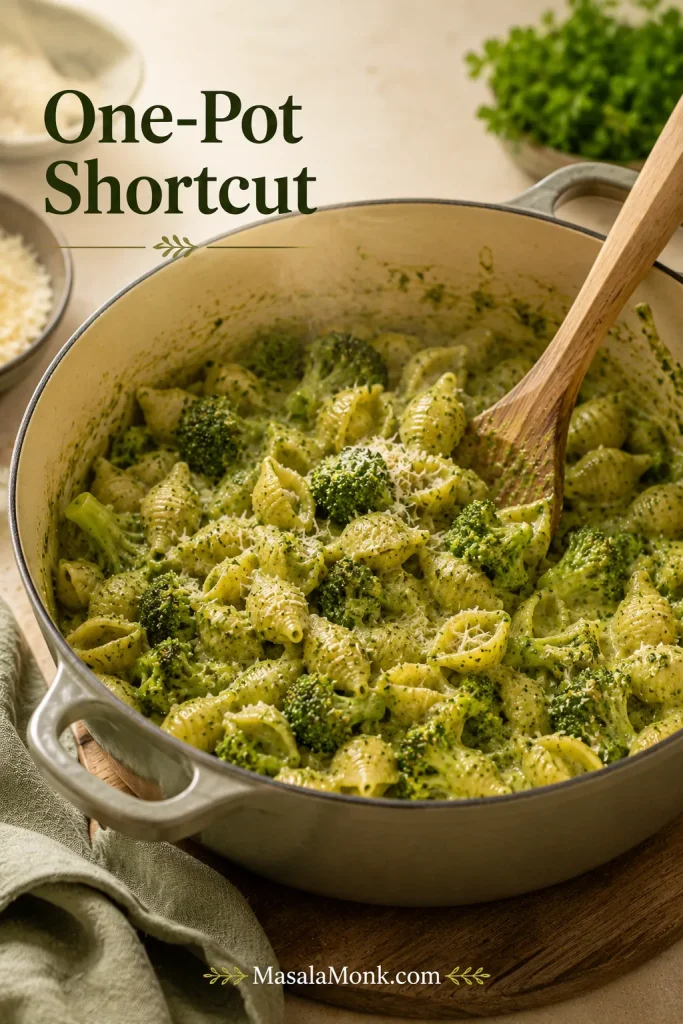
For the shortcut, cook the pasta and broccoli in one large pot, reserve pasta water, drain, then build the garlic oil in the same pot. Return the pasta and broccoli, mash some of the soft pieces, loosen with pasta water, and add Parmesan off the heat.
Finishing Options That Make It Better
Broccoli pasta is simple, so the best finishes solve small problems in the bowl.
- If it tastes flat: add lemon juice.
- When it smells good but needs lift: add lemon zest.
- For mild flavor: add Parmesan and black pepper.
- If it feels too soft: add toasted breadcrumbs.
- When it needs warmth: add red pepper flakes or extra black pepper.
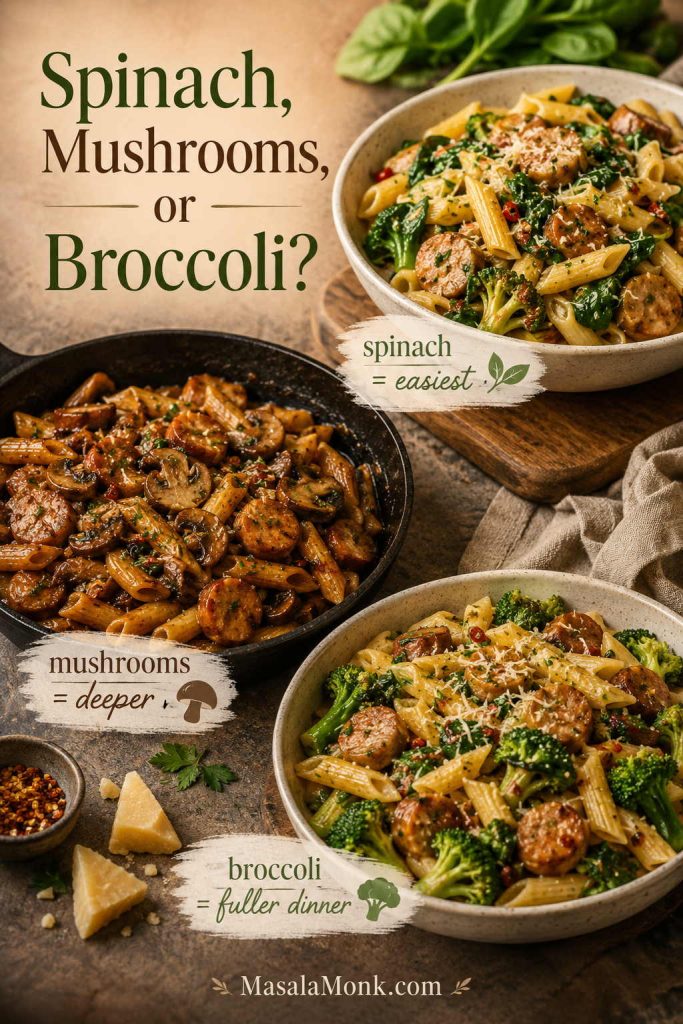
Broccoli Pasta Variations by Dinner Mood
Once the base works, the variations are easy. Keep the broccoli sauce loose, then add whatever makes dinner feel complete.
Make It a Full Dinner
Choose one of these when the pasta needs to become the whole meal.
- Chicken broccoli pasta: fold in 2 cups cooked chicken once the pasta is coated. Add extra pasta water because chicken absorbs moisture quickly. For a more casserole-style chicken and broccoli dinner, MasalaMonk’s Cheesy Chicken Broccoli Rice is the better fit.
- Salmon broccoli pasta: fold cooked salmon flakes in at the end, after the pasta is coated. Lemon matters even more here because it balances both the fish and broccoli.
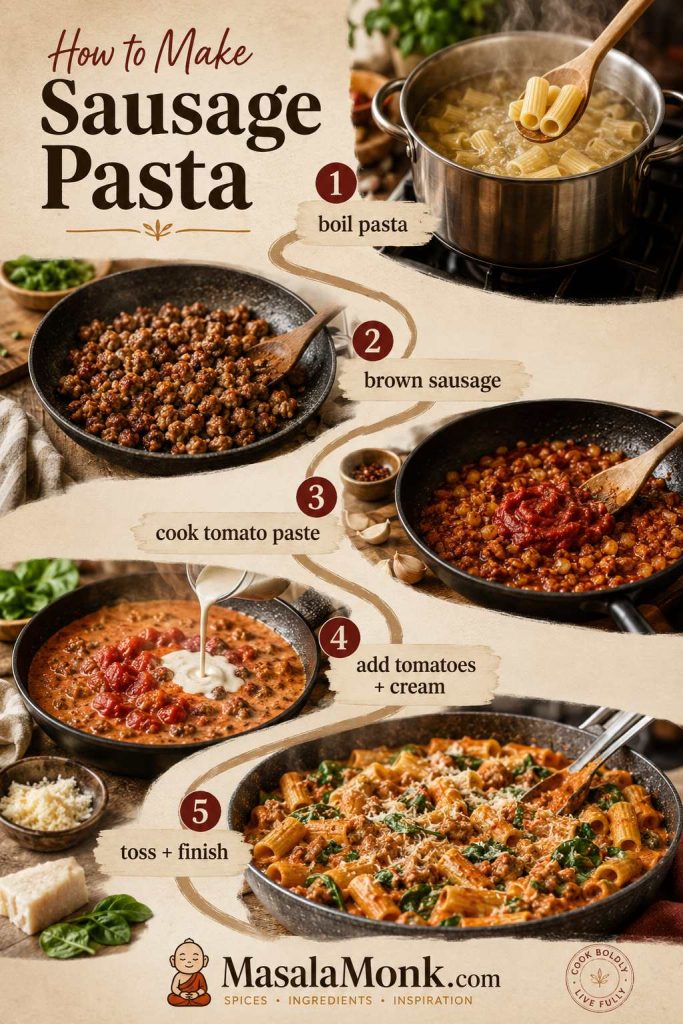
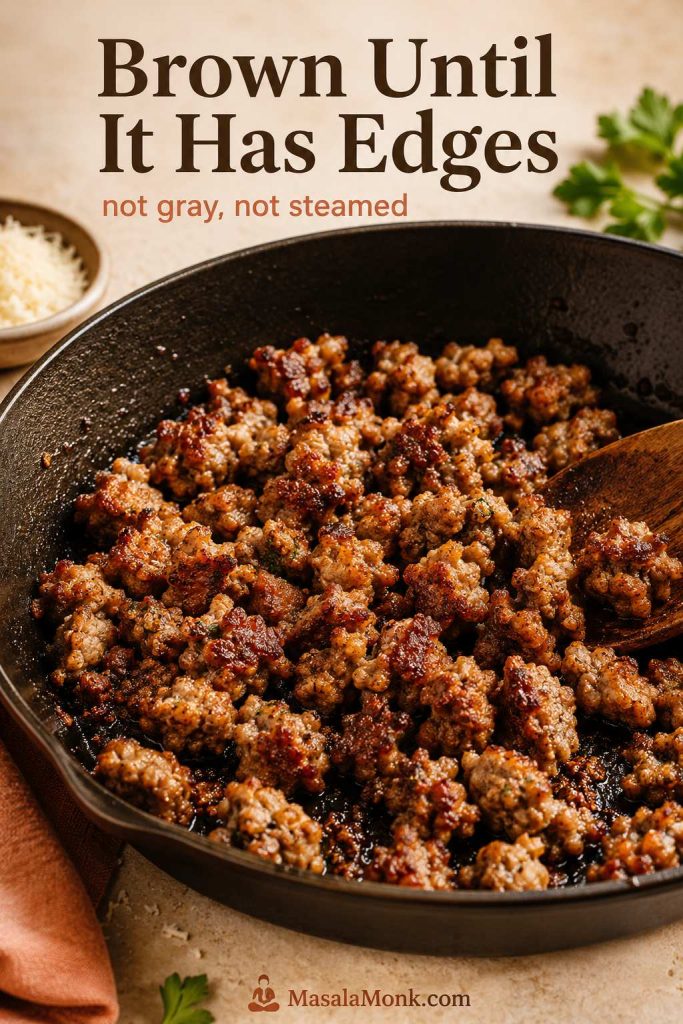
- Sausage broccoli pasta: brown sausage in the skillet first, scoop it out if needed, then use the same pan for the garlic base so the broccoli picks up the browned bits.
- White beans or chickpeas: add them at the end with a splash of pasta water so they warm without breaking apart.
Make It More Comforting
- Cheesy broccoli pasta: add cheddar off the heat with the Parmesan when you want the bowl to feel closer to mac and cheese but still taste like broccoli.
- Baked broccoli pasta: best as a leftover move. Add a splash of milk or pasta water, spoon into a baking dish, top with cheese and breadcrumbs, and bake until bubbling.
Make It Fresher
- Broccoli pesto pasta: blend some cooked broccoli with basil or parsley, Parmesan, lemon, olive oil, garlic, and pasta water. MasalaMonk’s pesto pasta recipe uses a similar pasta-water tossing technique.
- Lemon breadcrumb broccoli pasta: finish with toasted breadcrumbs and extra lemon zest for crunch and brightness.
- Broccoli rabe or rapini pasta: treat it as its own dish. Broccoli rabe is more bitter and leafy than regular broccoli, and it works especially well with garlic, chili, olive oil, and sausage.
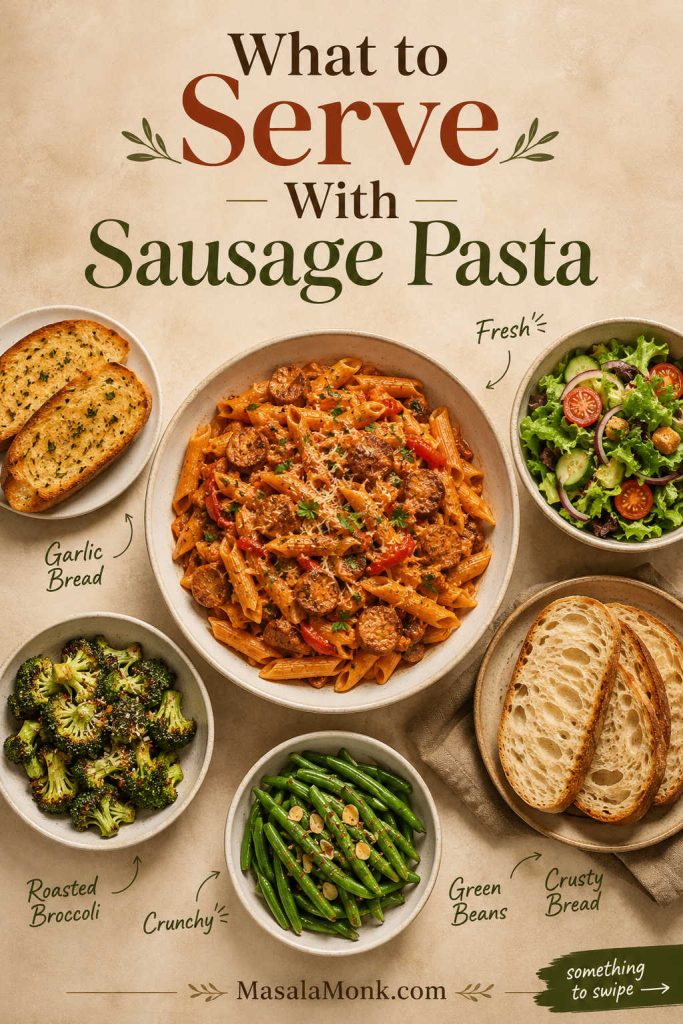
What to Serve with Broccoli Pasta
A bowl of this with extra Parmesan is enough for a quick dinner, but it also plays well with protein, crunch, and something fresh on the side.
- For a light dinner, serve it with a simple salad, lemony greens, grilled fish, or baked tofu.
- Need more protein? Add chicken, shrimp, salmon, sausage, or a fried egg.
- For a vegetarian full meal, add white beans, chickpeas, toasted nuts, or extra broccoli.
- To make it a comfort meal, serve it with extra Parmesan, toasted breadcrumbs, or MasalaMonk’s homemade garlic bread loaf.
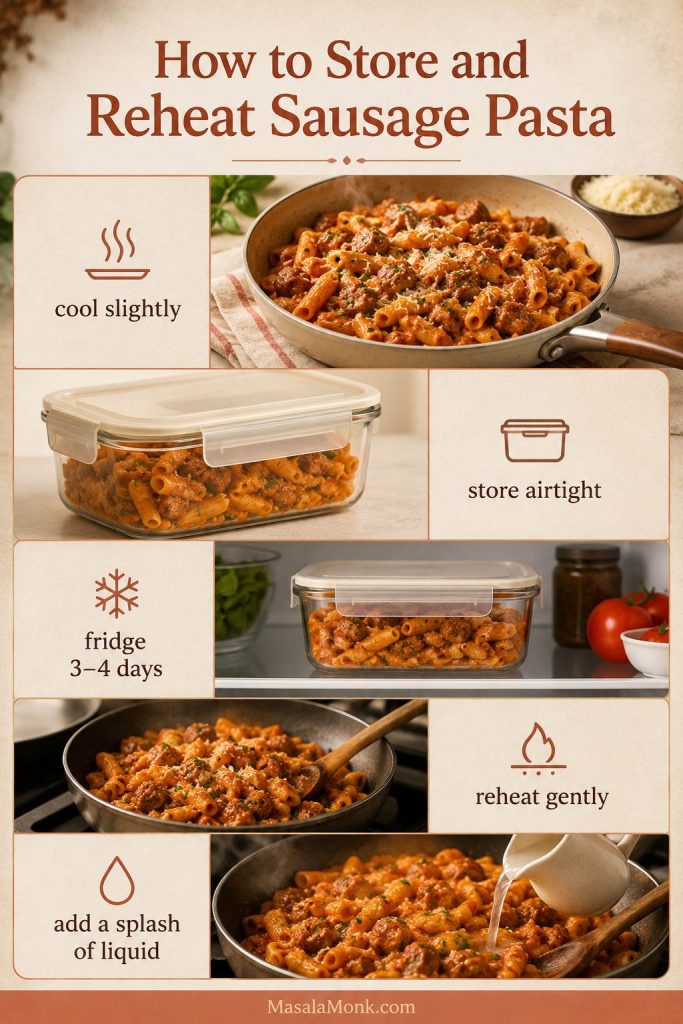
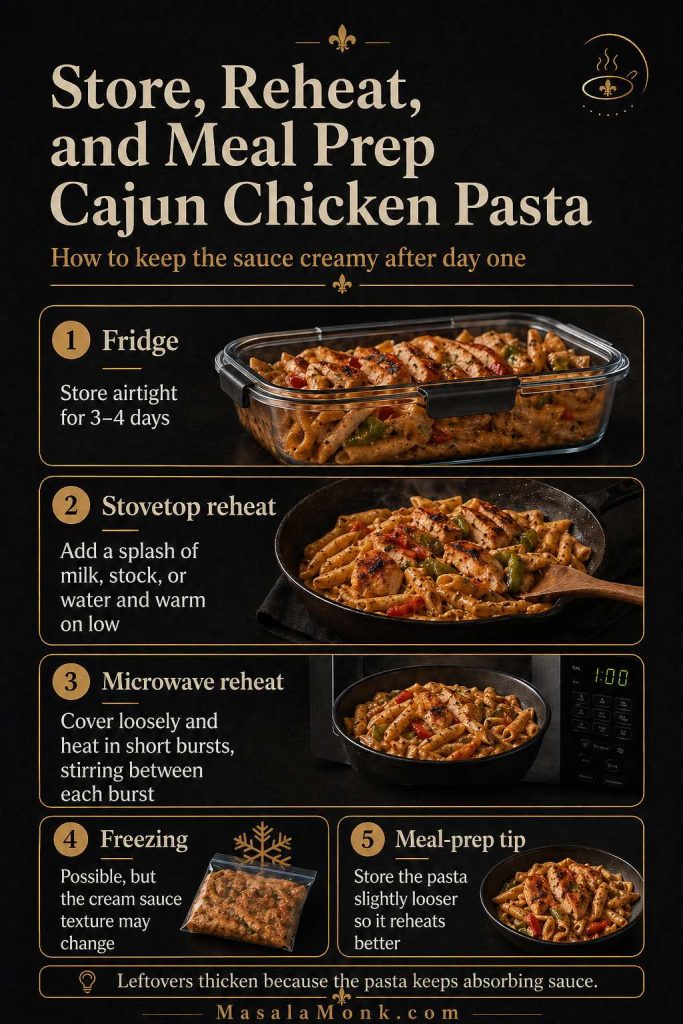
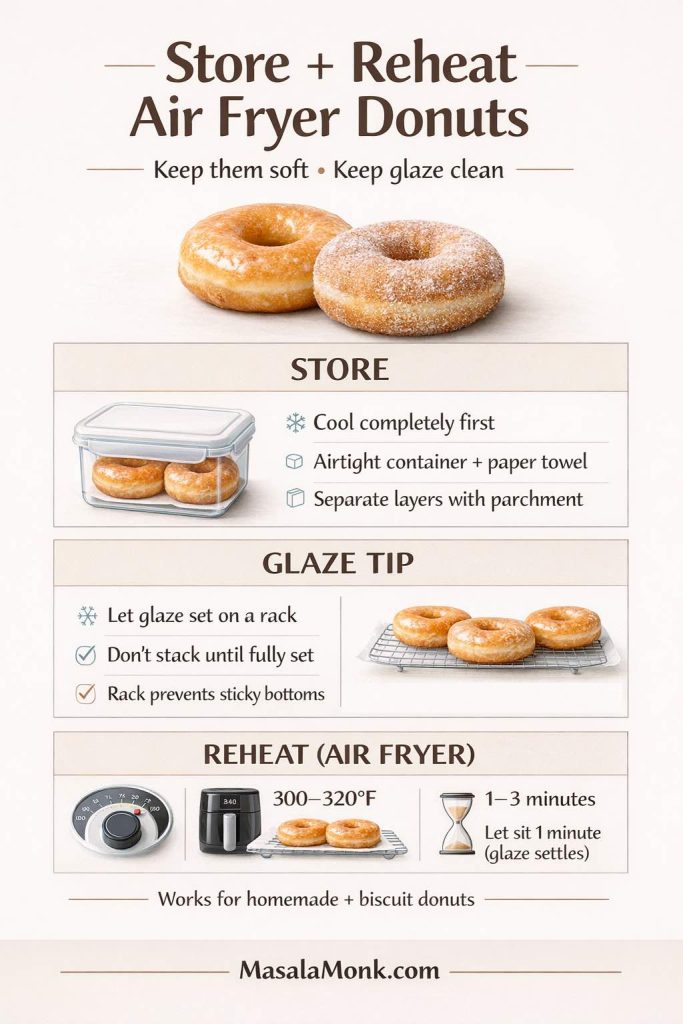
Storage, Reheating, and Make-Ahead Tips
Broccoli pasta is best right after tossing, while the pasta is warm and glossy. Leftovers can still be good, but they need a splash of moisture when reheating because pasta keeps absorbing sauce in the fridge.
- Refrigerate: store in an airtight container for 3 to 4 days. For general cold-storage guidance, see the FoodSafety.gov cold food storage chart.
- Reheat on the stovetop: add a splash of water, milk, or stock and warm gently over low heat, stirring often.
- Reheat in the microwave: add a splash of water or milk, cover loosely, heat in short bursts, and stir halfway through.
- Add lemon after reheating: a fresh squeeze at the end tastes brighter than lemon added before storage.
- Freeze: possible, but not ideal. Pasta softens after freezing, and cheesier versions can reheat less smoothly.
If leftovers seem gluey after reheating, add moisture first, then cheese. The same rescue logic works after storage.
For make-ahead, prep the broccoli and grate the cheese ahead of time, but cook the pasta just before serving. When saving leftovers, keep the pan a little saucier than usual and save extra Parmesan for reheating.
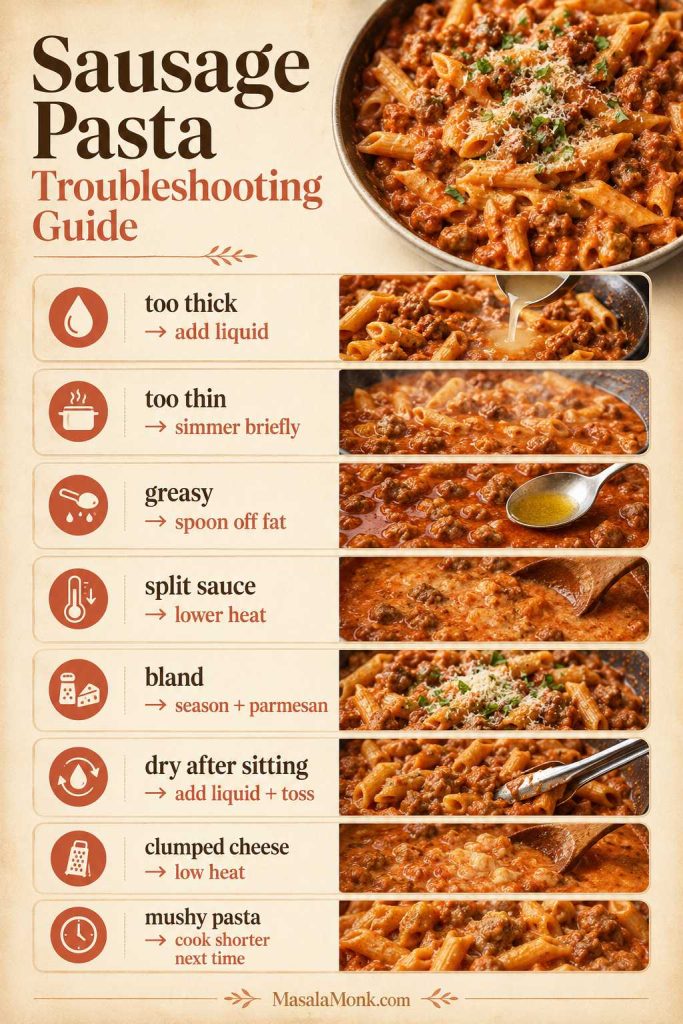
Troubleshooting Broccoli Pasta
Most broccoli pasta problems look worse than they are. If you saved pasta water, you can usually bring the pan back. Match the problem to the fix below.
Dry or Glossy: What to Fix First
This is the fastest visual check. If the pasta looks dull or tight, loosen it before you add more cheese or toppings.
| Problem | Fix Now | Fix Next Time |
|---|---|---|
| Pasta is dry or matte | Add hot pasta water 2 tbsp at a time and toss vigorously. | Reserve a full cup of pasta water and keep the pan slightly saucier. |
| Liquid is pooling | Toss over medium-low heat for 1 to 2 minutes, then rest briefly. | Drain broccoli better and add pasta water gradually. |
| Pasta tastes bland or broccoli tastes dull | Add salt, lemon, black pepper, and more Parmesan. | Salt the pasta water properly and keep some florets greener. |
| Garlic tastes bitter | Add lemon and cheese to soften the bitterness, if mild. | Cook garlic over medium-low heat and do not brown it hard. |
| Parmesan turned grainy or clumpy | Add a splash of hot pasta water and stir gently off heat. | Add finely grated Parmesan gradually, off the heat or over very low heat. |
| Broccoli is too firm | Add a splash of water, cover, and cook 2 to 3 minutes. | Cut the broccoli smaller and add it earlier. |
| Frozen broccoli made it watery | Stop adding liquid and toss until the coating tightens. | Thaw, chop, and drain frozen broccoli before adding. |
| Leftovers are gluey | Reheat with water, milk, or stock and stir gently. | Store with a little extra moisture or loosen before refrigerating. |
FAQs About Broccoli Pasta
How do you make broccoli pasta creamy without cream?
Mash tender broccoli into garlic oil and butter, loosen it with hot pasta water, then add finely grated Parmesan off the heat. The sauce should look glossy and loose, not thick like Alfredo. For a richer version, add cream cheese or milk before the Parmesan.
Fresh or frozen broccoli — which works better?
Fresh broccoli gives brighter florets and better bite. Frozen broccoli gives a softer, saucier pasta. Both work; just add pasta water slowly with frozen broccoli.
Can I use broccoli stems in broccoli pasta?
Yes. Peel thick stems if the outside feels tough, then chop the tender inside into small pieces. Stems soften well and are excellent for the sauce.
Why did my broccoli pasta turn dry?
It needed more pasta water or sat too long before serving. Add hot pasta water a few tablespoons at a time and toss until shiny again. Loosen first, then add more cheese only if the flavor still needs it.
What is the best pasta shape for broccoli pasta?
Short pasta shapes are best because they catch the small broccoli pieces. Shells, fusilli, orecchiette, penne, rigatoni, and cavatappi all work well. Long pasta can work too, but chop the broccoli smaller and toss more thoroughly.
How do you keep Parmesan from turning grainy?
Add finely grated Parmesan gradually, off the heat, not all at once. High heat can make it clump or turn grainy. If it tightens, loosen with a splash of hot pasta water.
Can I add chicken to broccoli pasta?
Yes. Add about 2 cups cooked chicken or rotisserie chicken once the pasta is coated. Add an extra splash of pasta water because chicken absorbs sauce quickly.
Is this the same as broccoli Alfredo?
No. Broccoli Alfredo usually uses a heavier cream-based sauce. This version is lighter; the sauce comes from mashed broccoli, pasta water, butter or olive oil, and Parmesan.
Can this be made as a one-pot broccoli pasta?
Yes. It is convenient, but a skillet gives better garlic flavor and more room to toss. For one-pot broccoli pasta, cook the pasta and broccoli together, reserve pasta water, drain, build the garlic oil in the same pot, then return everything and add Parmesan off the heat.
Does broccoli rabe work in this recipe?
Broccoli rabe, or rapini, is more bitter and leafy than regular broccoli, so it needs different handling. It is delicious with garlic, olive oil, chili, and sausage, but use regular broccoli for this version.
How can I make this more kid-friendly?
Chop the broccoli smaller, mash more into the sauce, skip the red pepper flakes, and use shells. A little extra Parmesan or cheddar can make the broccoli flavor feel familiar.
Can leftovers be reheated without drying out?
Yes. Add a splash of water, milk, or stock before reheating. Warm gently and finish with extra Parmesan, black pepper, or lemon.
Final Thoughts
Once you learn the rhythm — soften, mash, loosen, cheese off the heat — broccoli pasta stops feeling like a compromise dinner. It becomes something worth repeating.
Did you keep it simple, make it cheesy, add chicken, or use frozen broccoli? Tell me how you made it — those little changes are often what help the next cook.