
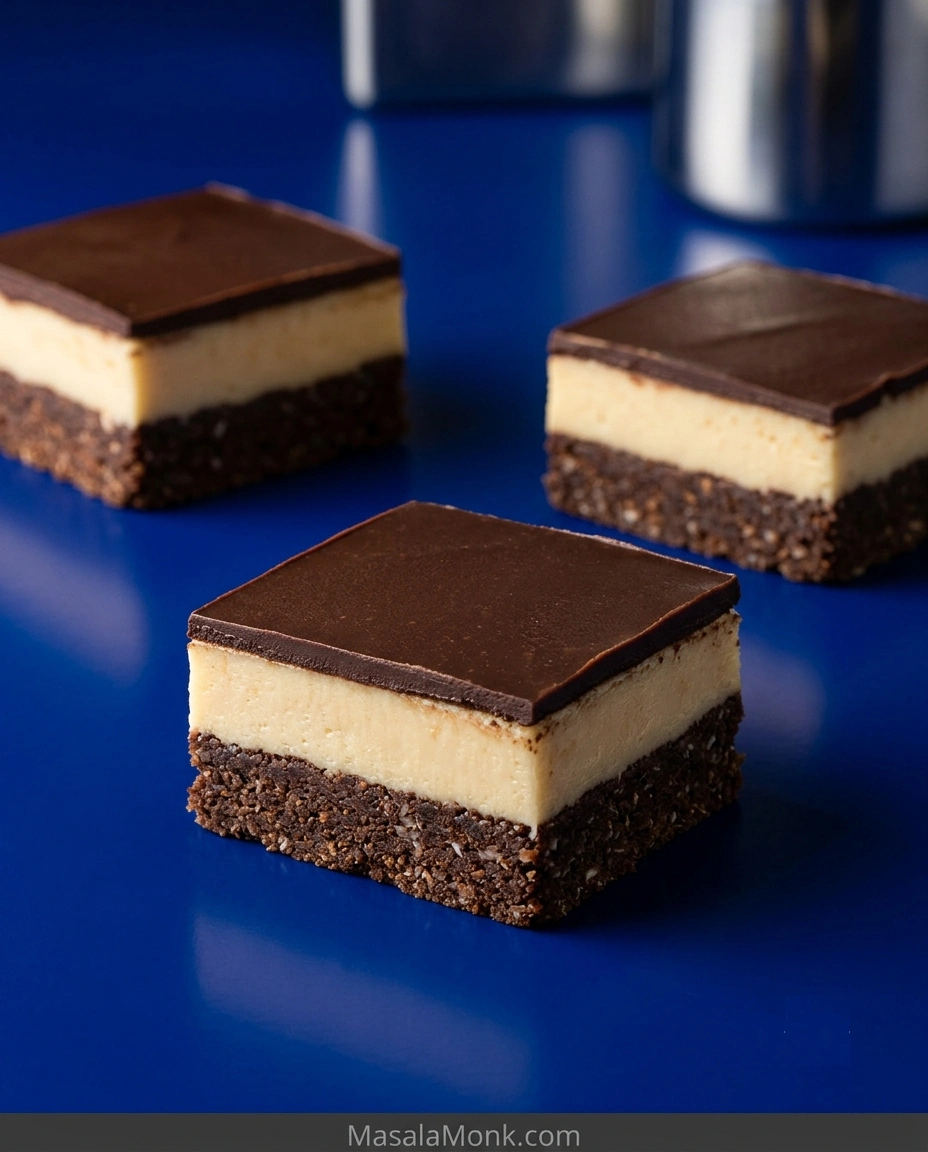
A Nanaimo bar is one of those desserts where the first cut matters almost as much as the first bite. You can spend a couple of hours building three beautifully straight layers, only to hear the chocolate crack under the knife and watch the custard squeeze sideways.
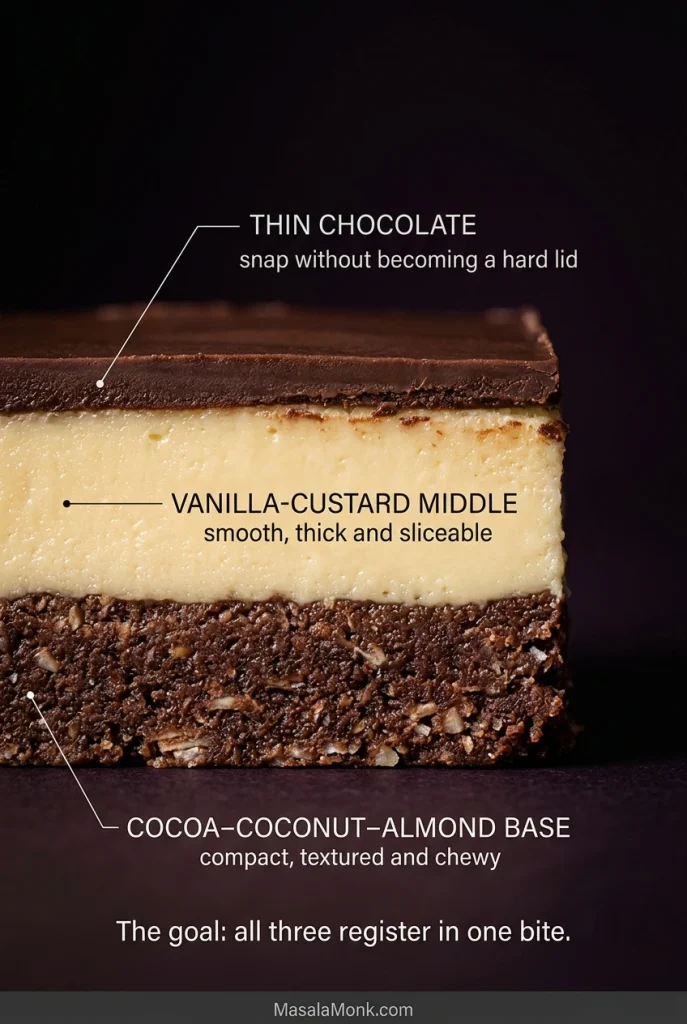
When everything is right, the layers work together: a substantial dark cocoa-coconut base with chew and nutty crunch, a cool middle that actually tastes of vanilla custard, and a thin chocolate top with just enough snap. This version stays close to the City of Nanaimo’s classic blueprint, with one clear aim: the base, custard, and chocolate should all register in the same bite.
No-bake does not mean instant here. Nanaimo bars are not difficult, but they do ask for patience. Hands-on time is only about 35 minutes; most of the rest is the refrigerator doing its job.
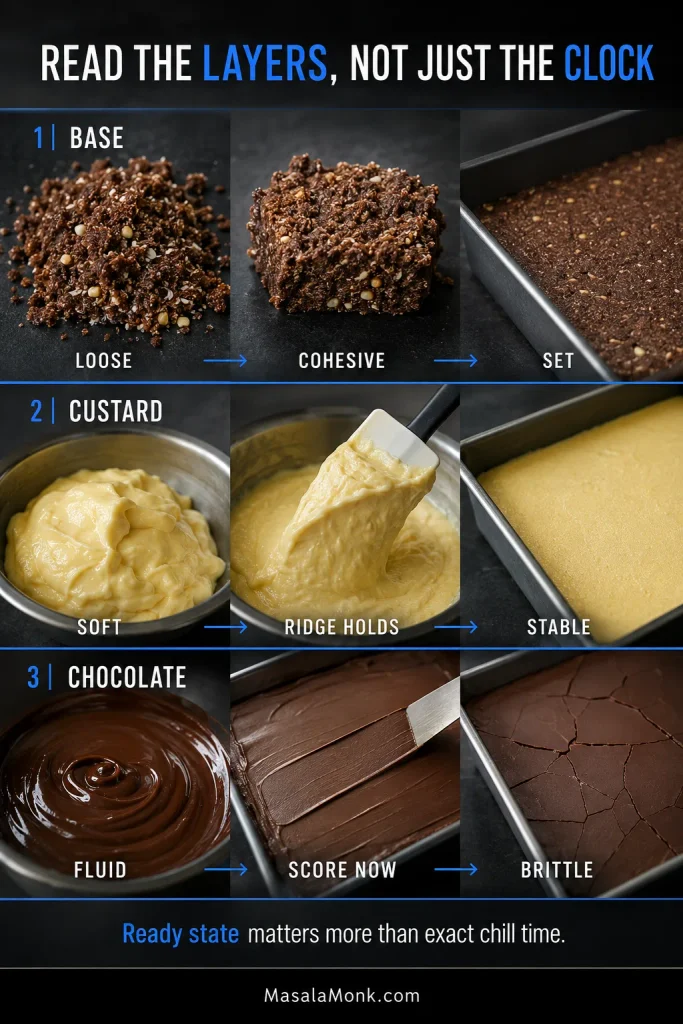
Many of the most common problems are really temperature problems between one layer and the next: a base that is still too soft, custard that is too warm for chocolate, or a chocolate top that has become too cold to cut gracefully. Watch the state of each layer as well as the clock and the whole dessert becomes much more predictable.
What Are Nanaimo Bars?
Nanaimo bars are Canadian no-bake squares with a cocoa-graham-coconut base, vanilla-custard middle, and chocolate topping. The egg in the base cooks on the stovetop; the bars are then built by chilling each layer until it is ready for the next.
Jump to: Recipe & Ingredients · Step-by-Step · Custard Powder · Troubleshooting · Pan & Portions · Storage & Freezing
Classic Canadian Nanaimo Bars Recipe
Recipe at a Glance
| Pan | 8 × 8-inch / 20 × 20-cm square pan |
|---|---|
| Yield | 16 generous squares, 25 smaller squares, or 36 small tray pieces |
| Oven | None; the base cooks on the stovetop |
| Active work | About 35 minutes |
| Chilling / setting | About 1¾–2½ hours |
| Total elapsed time | About 2¼–3 hours |
| Make ahead | Yes — particularly good made a day ahead |
| Freezer friendly | Yes |
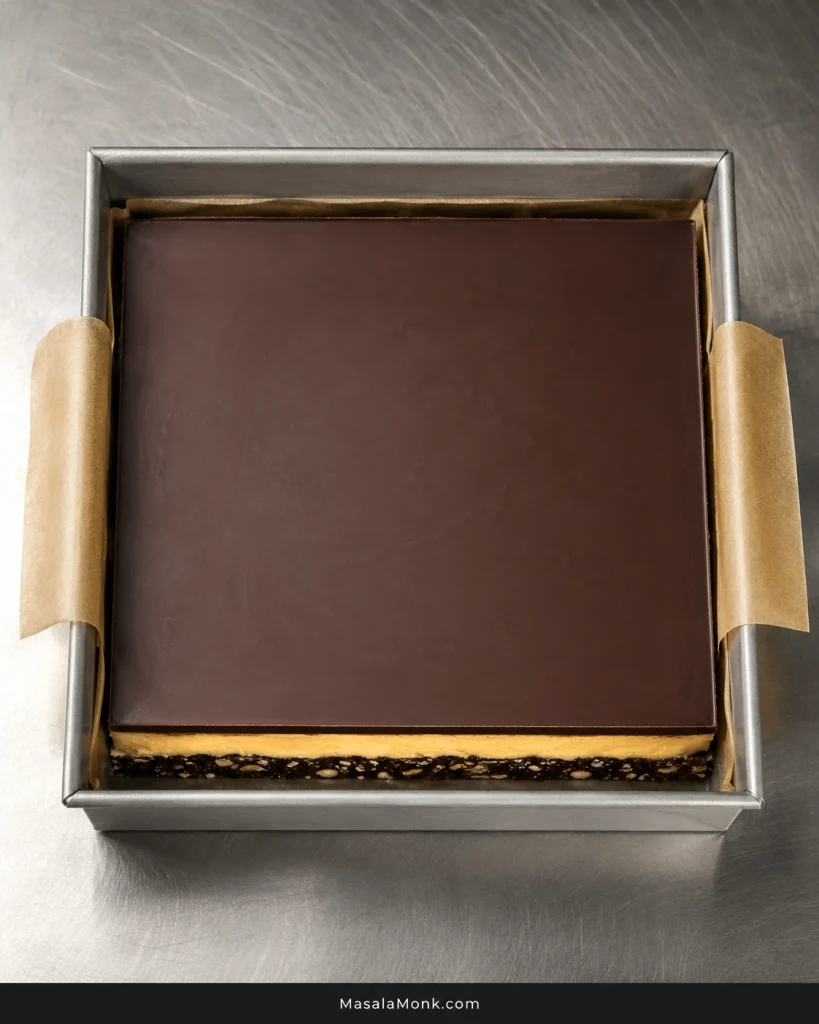
Use the gram weights when you can. Graham crumbs, coconut, and chopped nuts can occupy very different amounts of space depending on brand, grind, shred, and how tightly they are packed into a cup.
Ingredients
Chocolate-Coconut Base
- 113 g (1/2 cup / 4 oz) unsalted butter
- 50 g (1/4 cup) granulated sugar
- 25 g (5 tbsp) unsweetened cocoa powder, natural or Dutch-process
- 1 large egg, beaten
- 180 g finely ground graham cracker or graham wafer crumbs, roughly 1 1/2–1 3/4 cups depending on grind
- 70 g finely shredded unsweetened coconut, about 1 cup depending on the shred
- 65 g (about 1/2 cup) finely chopped almonds
- 1/4 tsp fine salt
Vanilla-Custard Filling
- 113 g (1/2 cup / 4 oz) unsalted butter, softened but not greasy or partially melted
- 225 g (about 2 cups) confectioners’ / icing sugar, sifted if lumpy
- 36 g (3 level tbsp) vanilla custard powder, preferably Bird’s
- 30 ml (2 tbsp) heavy or whipping cream, plus more only if needed
- 1 tsp vanilla extract
- 1/4 tsp fine salt
Chocolate Topping
- 115 g (4 oz) good-quality semisweet or dark chocolate, finely chopped
- 28 g (2 tbsp / 1 oz) unsalted butter
Ingredient notes:
- No graham crackers? Plain digestive biscuits work well. They absorb butter differently, so judge the mixed base by the cohesion cue in Step 3. Our no-bake lemon bars go deeper into how biscuit crumbs behave in chilled bases.
- Using sweetened coconut? Use roughly the same cup volume, not the same gram weight. It packs differently and will make the base noticeably sweeter.
- Choosing chocolate: Semisweet or dark chocolate around 55–70% cacao gives useful contrast to the sweet middle. Chopped bar chocolate usually melts more smoothly than chips.
- Only have salted butter? Use it and omit the added salt from whichever layer contains it.
Equipment: You will need an 8 × 8-inch / 20 × 20-cm square pan, parchment paper, a saucepan and heatproof bowl for a double boiler, an electric mixer, a spatula, a flat-bottomed cup or glass for pressing the base, and a sharp knife. A kitchen scale is recommended; an instant-read thermometer is optional.
Step-by-Step: Make the Layers
1. Line the Pan
Line the pan with parchment, leaving overhang on opposite sides so you can lift the finished slab out later. That bit of paper saves a lot of wrestling with a cold first square.
2. Cook the Cocoa and Egg Mixture
Bring a small amount of water to a gentle simmer in the saucepan. Set the heatproof bowl over it without letting the bottom touch the water.
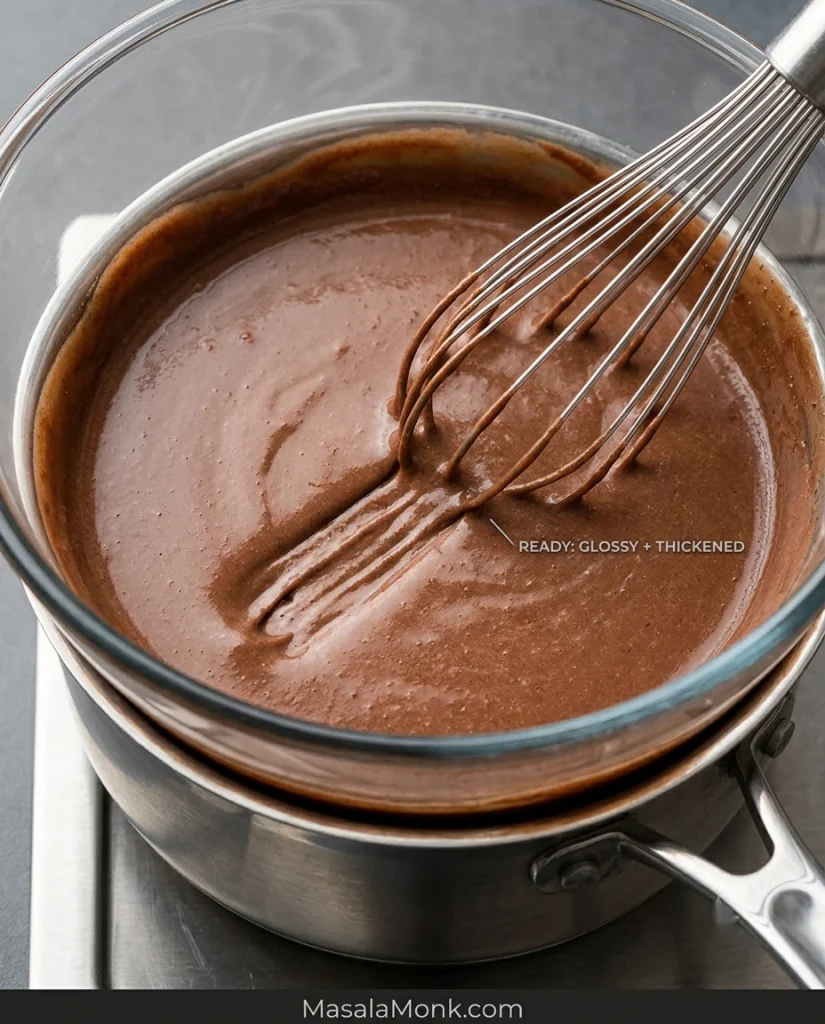
Add the butter, sugar, cocoa, and salt. Stir until the butter melts and the cocoa darkens into a glossy mixture.
Pour in the beaten egg gradually while whisking continuously. Keep the bowl over gentle heat until the mixture gains body under the whisk, usually about 2–5 minutes.
A few minutes in, it should smell more deeply chocolatey and look clearly thicker than when you started. You should not see obvious pieces of cooked egg. If you’re using a thermometer, take the egg-containing mixture to 160°F / 71°C; FDA guidance uses 160°F for dishes containing eggs.
3. Add the Crumbs, Coconut, and Almonds
Remove the bowl from the heat and stir in the graham crumbs, coconut, and almonds. The glossy cocoa mixture will quickly turn into a sticky, coconut-studded crumb.
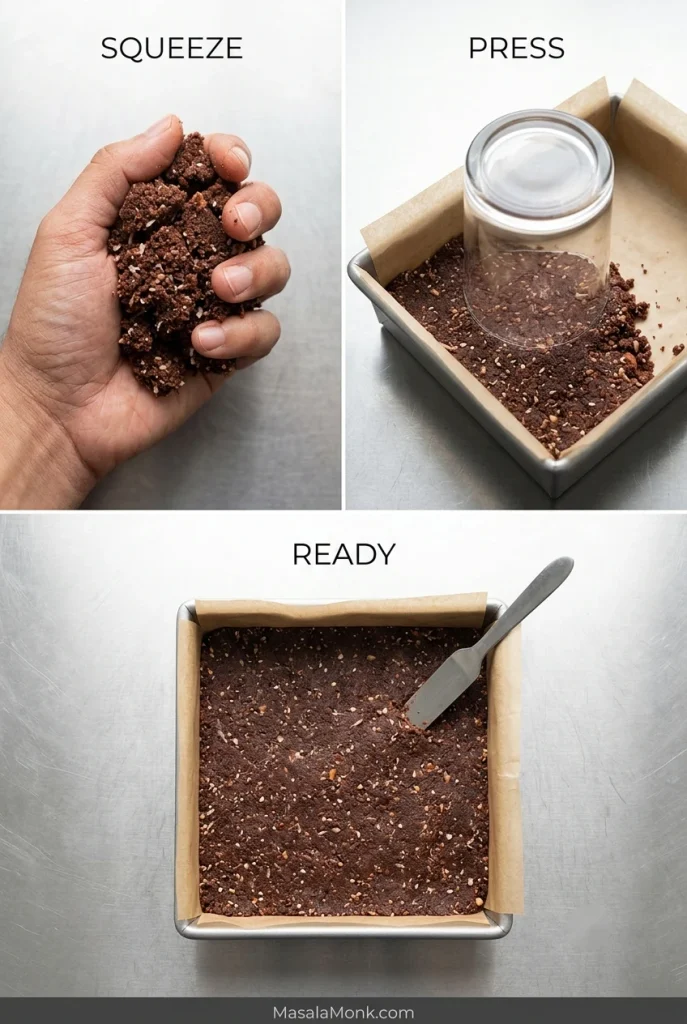
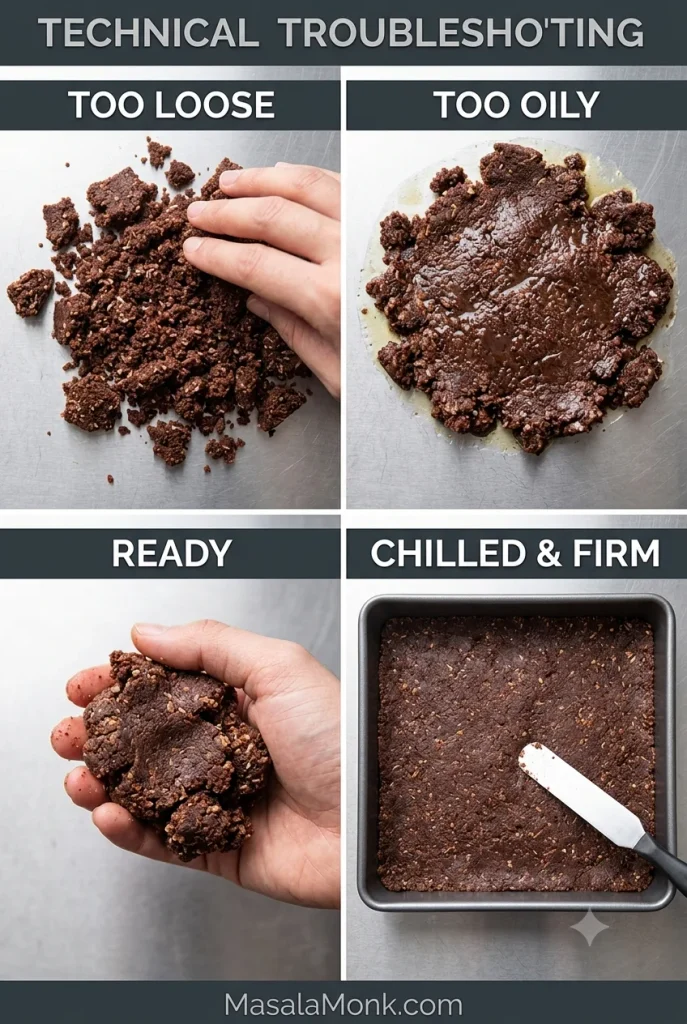
Squeeze a spoonful in your hand. It should stay together. The mixture can look looser than you expect in the bowl, and that is fine; pressure tells you more than appearances here.
If you’re using a different biscuit and the mixture genuinely won’t hold, add melted butter 1 teaspoon at a time, mix, and test again. A teaspoon is easy to correct. A large splash is not.
4. Press and Chill the Base
Transfer the mixture to the lined pan and push it into the corners before compacting the surface with the flat bottom of a measuring cup or drinking glass. Once pressed, it should look compact and almost fudgy, especially around the edges and corners.
Chill until the surface stays put when you lightly drag the edge of a spatula across it — usually 20–30 minutes in the refrigerator or 10–15 minutes in the freezer. If crumbs still come away, give it another few minutes before adding the custard.
Base still giving you trouble? Jump to base troubleshooting →
5. Beat the Custard Filling
Beat the softened butter until creamy. Add the custard powder, vanilla, and salt, then gradually beat in the icing sugar.
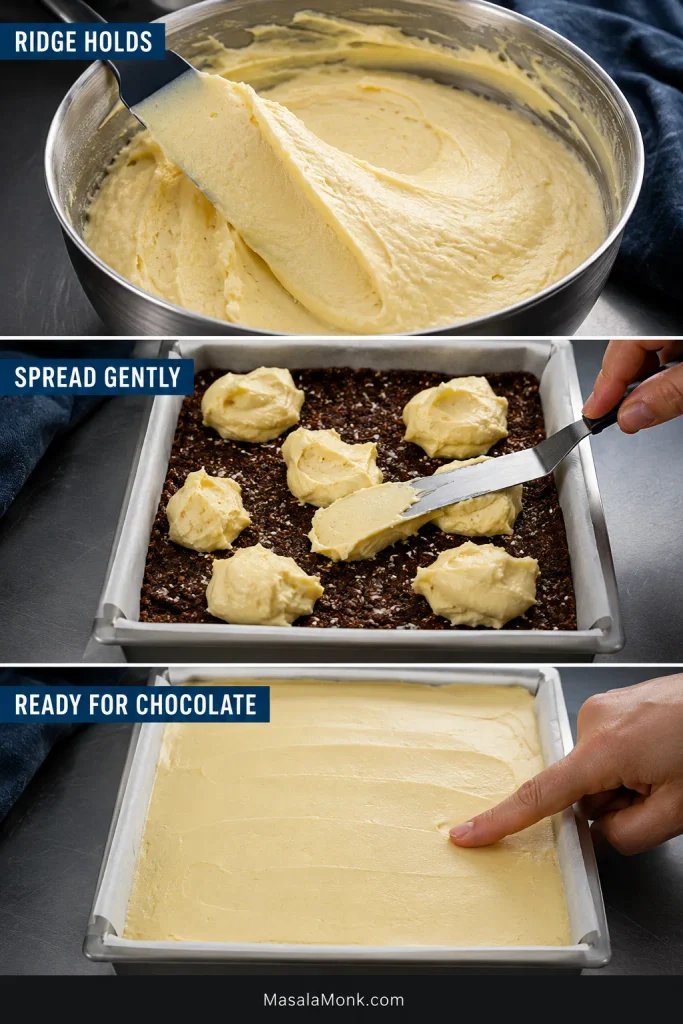
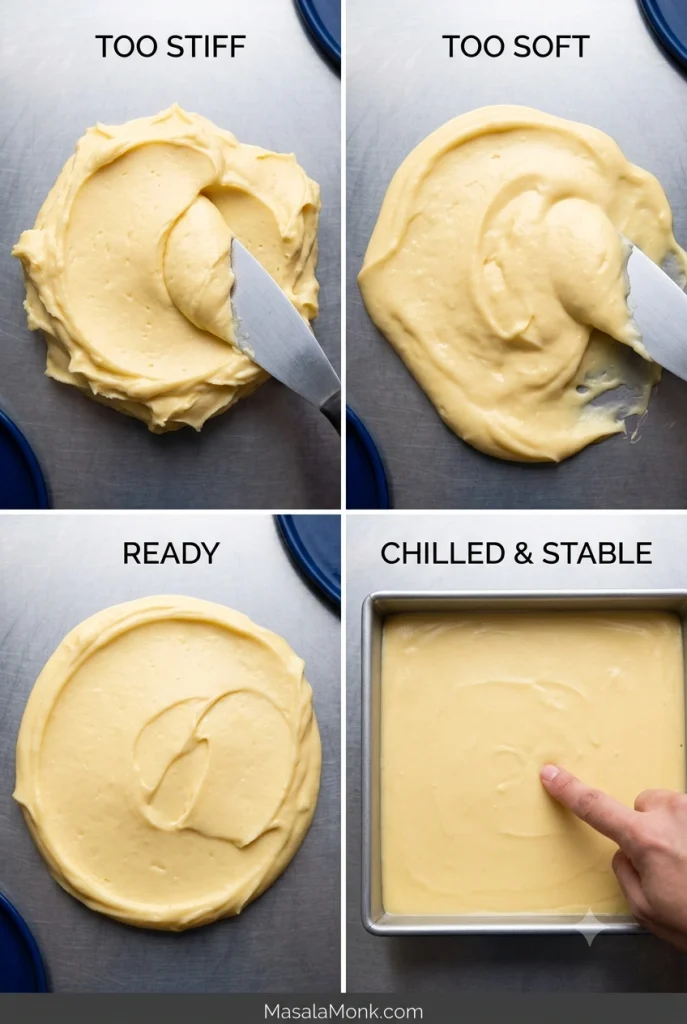
Beat in the 2 tablespoons of cream for another 2–3 minutes. The filling may look almost absurdly thick compared with ordinary cake frosting. You are probably closer than you think. A spatula should leave a ridge that stays in place while the custard still moves when you push it.
Too stiff? Add cream 1 teaspoon at a time. If it looks unexpectedly soft, check the butter before reaching for more sugar. Very soft butter can loosen an otherwise correct filling; a 10–15 minute chill may be all it needs.
6. Spread and Chill the Custard
Drop several spoonfuls of filling across the cold base, then connect them with a spatula. This is kinder to the crumb layer than pushing one heavy mound from the centre to every corner.
Chill until the pale layer resists a light fingertip without shifting underneath, usually about 45–60 minutes. This is one of the satisfying stages: the custard should now sit evenly over the dark base, without crumbs dragged up through it.
Custard too stiff, soft, or pulling up crumbs? Jump to custard troubleshooting →
7. Melt the Chocolate
Melt the chopped chocolate and butter together over a double boiler or in short microwave intervals, stirring until smooth. Keep the bowl and utensils completely dry; steam or stray water droplets can make chocolate seize.
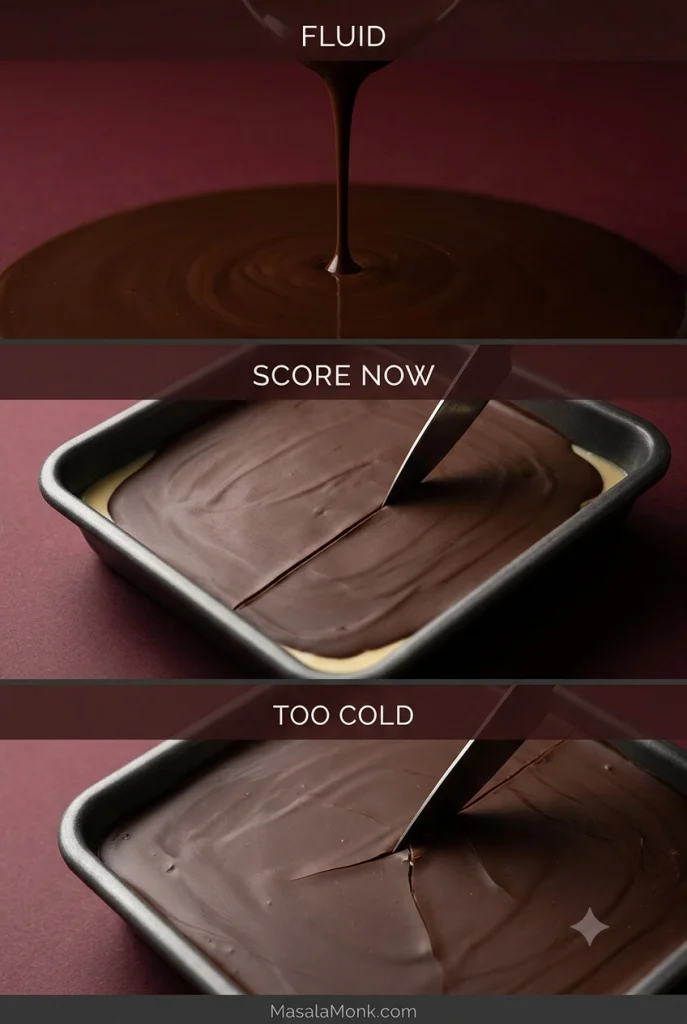
Give the melted chocolate a minute or two to cool. A perfectly smooth top is not worth melting the custard underneath. It is ready to pour when it still flows easily but no longer feels hot.
8. Pour the Chocolate
Pour it over the centre of the cold filling, then tilt the pan so the chocolate flows toward the edges. Use the spatula only where a corner needs help. A gentle tap of the pan can settle the surface and release small bubbles.
9. Let the Chocolate Partly Set, Then Score It
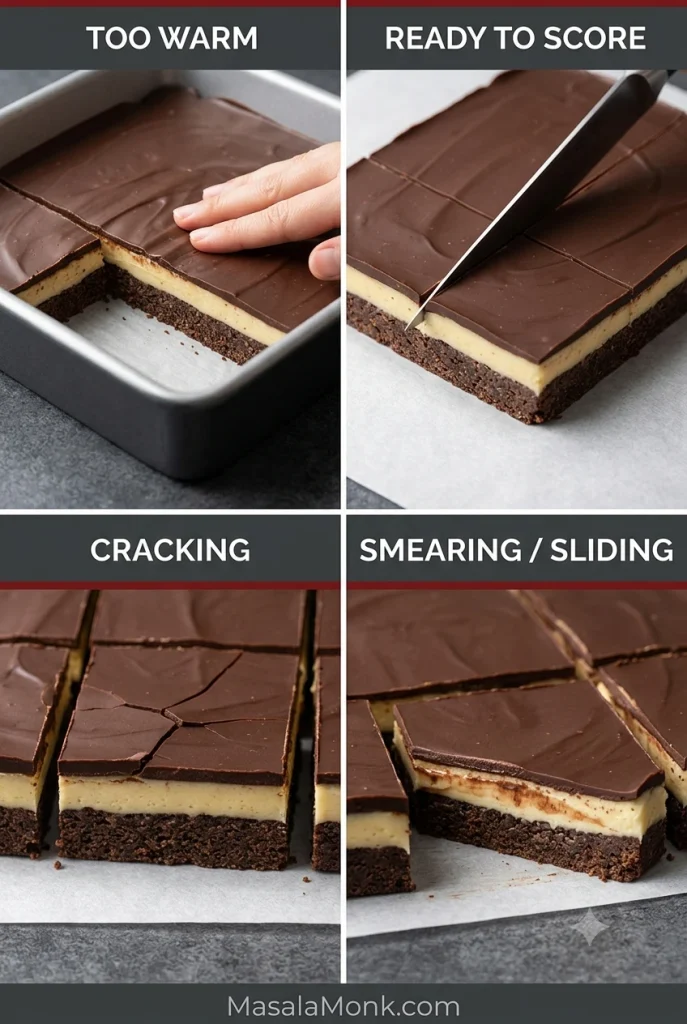
Chill until the wet shine disappears, a knife leaves a shallow line, and the chocolate still bends slightly instead of cracking — usually about 10–20 minutes.
Mark 4 × 4 for 16 larger pieces, 5 × 5 for 25 smaller squares, or finer portions for a dessert tray. Cut only through the chocolate at this stage.
Chocolate already cracking, smearing, or sliding? Jump to chocolate and cutting troubleshooting →
10. Chill Fully and Cut Nanaimo Bars Without Cracking the Chocolate
Return the pan to the refrigerator for at least another 30 minutes, or until the slab is thoroughly chilled.
Lift it out using the parchment. Run a long, sharp knife under hot water, dry the blade completely, line it up with a score mark, and press straight down.
Wipe, rewarm, and dry the knife between cuts. If you forgot to score the topping and the chocolate is already hard, leave the slab out for about 5–10 minutes first. You only need to take the brittle edge off the chocolate; do not wait until the custard starts softening.
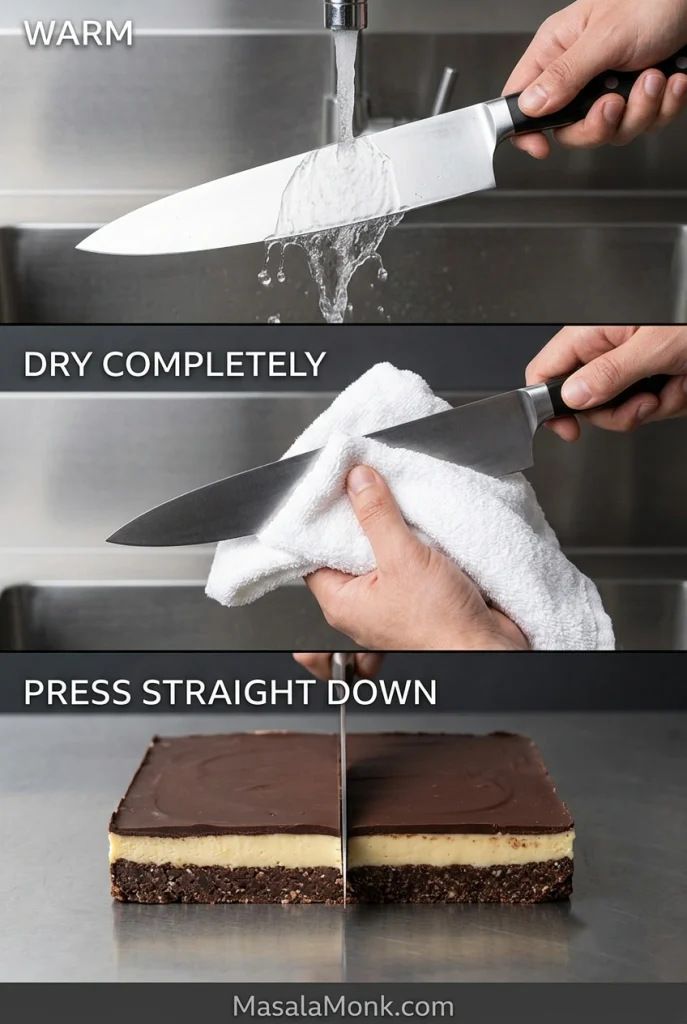
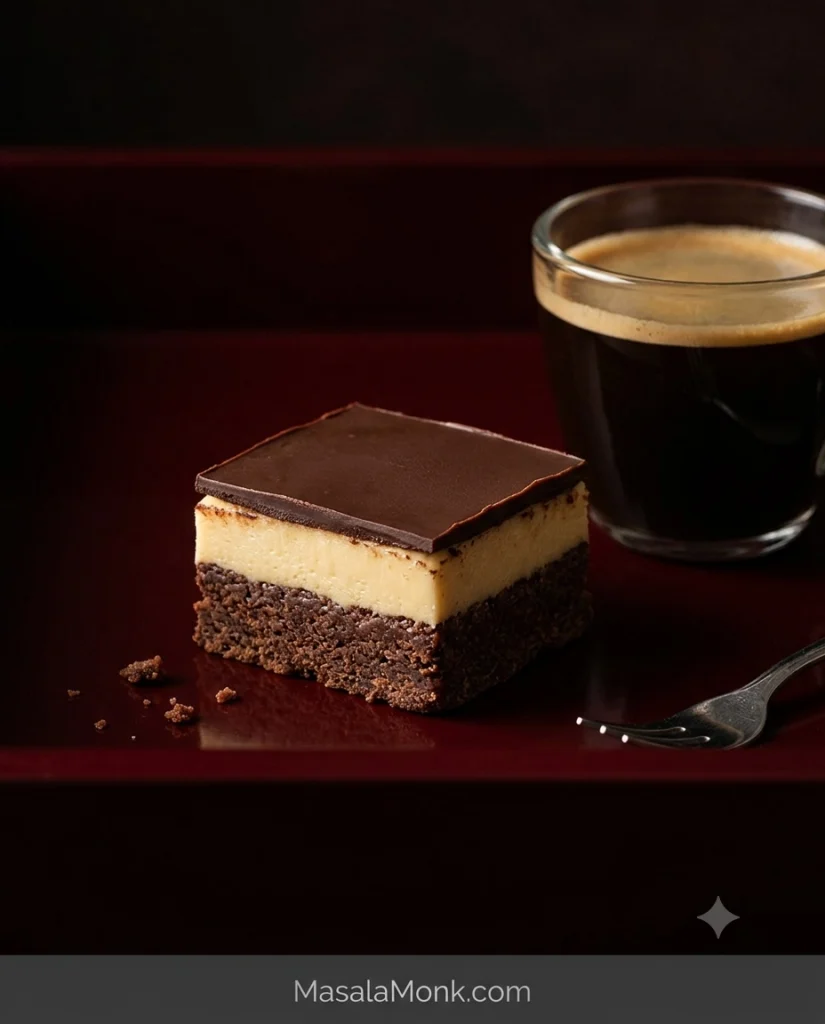
Take a look at the first neat cut. You want a dark textured base, a smooth pale centre that stays where it belongs, and chocolate that follows the knife instead of breaking away in shards.
Cold from the refrigerator, the chocolate gives a small snap before the creamy custard and chewy coconut-and-almond base underneath. That’s the payoff for all the waiting between layers.
What Makes a Classic Nanaimo Bar?
That balance still sits inside the familiar Nanaimo blueprint. The City of Nanaimo’s official recipe uses an 8-inch pan, a stovetop cocoa-and-egg base with graham crumbs, coconut and almonds, a custard-powder middle, and chocolate melted with butter on top.
This version keeps that basic structure but makes a few deliberate balancing choices. Keep the chocolate thin. A thick lid fights the softer custard underneath. The cocoa-coconut base is a little more substantial than the custard layer, while 36 g / 3 level tablespoons of custard powder gives the middle a clearer vanilla-custard character.
Some bakery versions turn the custard into the main event. Here it stays generous enough to taste clearly without making the cocoa base disappear.
The pleasure is in the contrast — cocoa and coconut underneath, cool creamy custard through the centre, then chocolate across the top. None of them needs to erase the other two.
Why is there egg in a no-bake bar? No-bake means the dessert never goes into the oven. The egg in the traditional-style base is still cooked gently in the warm cocoa mixture before the crumbs, coconut, and nuts go in.
Bird’s Custard Powder: What It Is and What to Use Instead
If you have never bought Bird’s before, the middle layer is probably where this very Canadian recipe starts looking slightly mysterious.
Custard powder goes into the filling dry. You are not making a bowl of custard first. Bird’s brings the familiar vanilla-custard flavour and colour, and its starch gives the middle a little extra body.
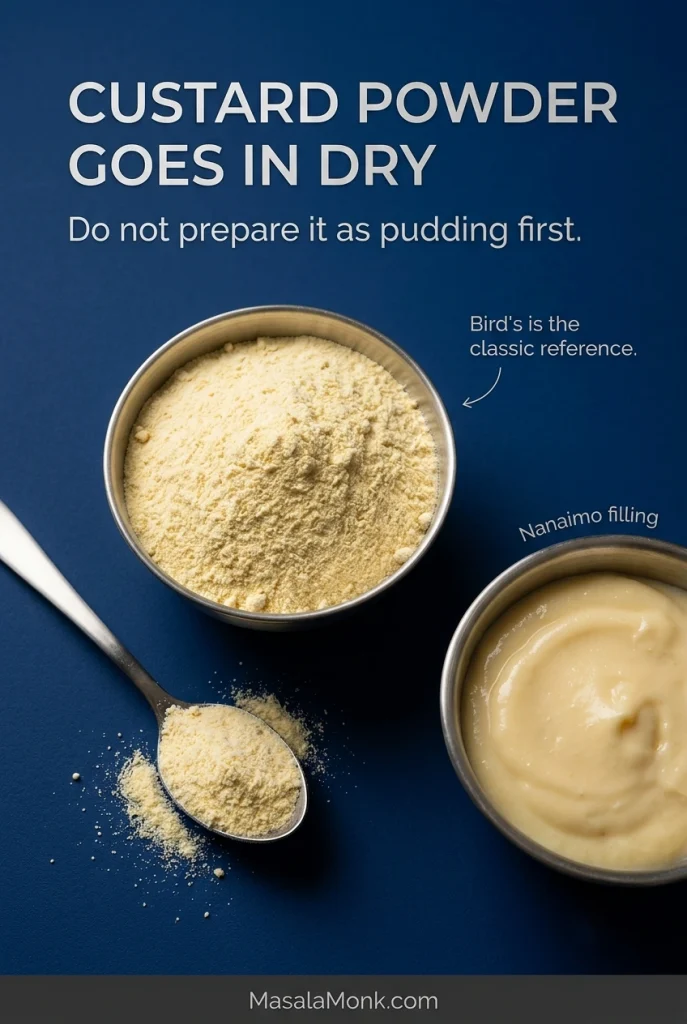
| What you have | Use it? | What to expect |
|---|---|---|
| Bird’s custard powder | Preferred | Closest to the familiar flavour and colour |
| Dry instant vanilla pudding mix | Possible | Use it dry; brands vary and the middle may taste sweeter |
| Cornstarch + vanilla | Only in an adapted filling | Not a direct 1:1 substitute for Bird’s; the filling needs to be balanced around the change |
| Prepared liquid custard or pudding | No | Adds far too much moisture |
Can you make Nanaimo bars without custard powder? Yes. Dry instant vanilla pudding mix is the simplest substitute. Cornstarch plus vanilla can work in a filling adjusted around it, but it should not be treated as a direct gram-for-gram swap for Bird’s.
Making the filling now? Back to Step 5: beat the custard filling →
How Sweet Should a Nanaimo Bar Be?
Nanaimo bars are very sweet and very buttery. That is part of what they are. But you should still taste more than sugar.
The base ought to taste unmistakably of cocoa and coconut, with almond in the background. Then comes the vanilla custard, followed by real chocolate bitterness on top to pull everything back into balance.
Unsweetened coconut, salt, and semisweet or dark chocolate all help. Smaller pieces help too. A Nanaimo bar is far richer than an ordinary brownie, and it does not need to be enormous to feel generous.
Why not cut the icing sugar in half? Because the sugar does more than sweeten the filling. It also helps the butter-based middle hold a neat slice. A dramatic reduction changes the texture too, so a genuinely lower-sugar middle needs other adjustments.
Nanaimo Bar Troubleshooting
If your bars do not look like the layers above, start with what you can actually see or feel. Most batches give you a clue about what happened.
When the Base Isn’t Behaving
- Looks loose before pressing: Squeeze some first. If it stays together in your hand, press it into the pan and judge it after chilling before adding more butter.
- Really won’t hold together: A substitute biscuit may be drier or more absorbent. Add melted butter 1 teaspoon at a time and test again.
- Crumbles after chilling: Keep this batch very cold for cutting. Finer crumbs, smaller coconut and nut pieces, and firmer compaction will help next time.
- Butter is pooling: A rich sheen is normal; a visible pool is not. Mix in 1–2 tablespoons of fine graham crumbs before pressing.
- The egg visibly scrambled: A few tiny flecks will not wreck the base. If cooked egg is scattered throughout the cocoa mixture, restart that part with gentler heat and add the egg more gradually.
When the Custard Feels Wrong
Warm butter is behind a surprising number of apparent filling problems, so check the temperature before changing anything else.
- Too stiff: Beat in cream 1 teaspoon at a time. Stop when the spatula moves through the filling comfortably.
- Too soft: Chill the bowl for 10–15 minutes and beat briefly again before reaching for more icing sugar. The butter may just be too warm.
- Dragging crumbs from the base: Stop spreading, chill both layers briefly, then continue with several smaller dollops and a lighter hand.
- Grainy: Beat longer if the filling is still in the bowl. Once the layers are assembled, persistent grit is difficult to repair.
- Never really sets: Too much liquid or several substitutions may have weakened it. Keep this batch well chilled. Freezing will firm it temporarily but will not correct the mixture.
Chocolate, Scoring, and Cutting
- Chocolate cracks into shards: It is probably too cold. Let the slab stand for 5–10 minutes, then cut with a hot, completely dry knife and press straight down.
- Forgot to score it: You have not ruined anything. Let the slab lose some refrigerator chill before cutting with a hot, dry blade.
- The topping softened the custard: The chocolate went on too hot. Stop spreading and return the pan to the refrigerator until the layers settle again.
- Cuts smear or the layers slide: The slab is warming. Rechill it, wipe and reheat the knife, then use a straight downward cut.
- Chocolate turns thick while melting: If it merely cooled, warm it gently again. If water or steam turned it grainy and seized, starting the topping again is the most reliable route to a smooth finish.
← Back to the step-by-step recipe · ↑ Back to top
Nanaimo Bar Ingredient Substitutions
Flavour swaps are easy. Structural swaps aren’t. Nuts and chocolate can change with little fuss. Coconut supplies a large amount of dry bulk, the egg binds the base, and icing sugar does much of the work of giving the middle its firm, sliceable body.
- Graham crackers: Plain digestive biscuits work well; check the mixed texture against the cue in Step 3 because absorption varies.
- Almonds: Walnuts or pecans work well. For nut-free bars, replace the missing dry volume so the base does not become overly buttery.
- Coconut: That cup of coconut contributes substantial dry bulk. A coconut-free version needs something else to take its place.
- Egg: The egg helps bind the traditional base. Leaving it out makes this version more fragile, so use a recipe developed to be eggless.
- Gluten-free crumbs: Gluten-free graham-style biscuits can work, but brands vary in fat and absorption. Let the mixed texture guide any small butter adjustment.
- Vegan or dairy-free: Replacing butter, cream, egg, and possibly chocolate changes several parts at once. A recipe designed for those substitutions is much more dependable.
Pan Size, Scaling, and Serving
An 8-inch / 20-cm square pan gives the layers enough height to look distinct without turning the finished dessert into an enormous slab.
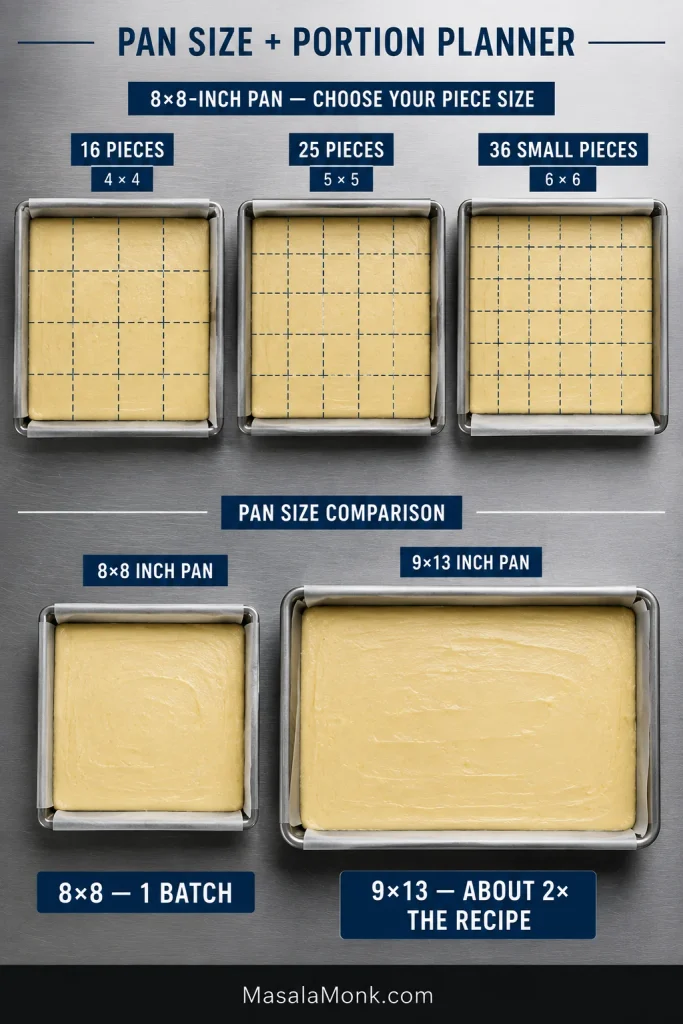
Can I Make Nanaimo Bars in a 9 × 13-Inch Pan?
Yes. A 9 × 13-inch pan is almost twice the area of an 8 × 8, so doubling the recipe is the easiest practical move. The layers end up only slightly thicker than the original and you avoid awkward quantities such as 1.8 eggs.
One regular batch also works in a 9 × 13 if you deliberately want much thinner pieces for a large dessert tray.
Serving size: Cut 16 squares for generous standalone portions, 25 for a more practical everyday size, or 36 small pieces for Christmas trays, parties, and mixed dessert platters.
On a crowded dessert tray, the smaller Nanaimo square is often the right one. It looks modest beside a cookie or brownie, then turns out to be far richer than its size suggests.
Serving temperature: For a softer, creamier bite, give an individual square about 5–10 minutes out of the refrigerator. The chocolate relaxes slightly and the custard becomes silkier. Serve them straight from the fridge when you want sharper-looking layers and more chocolate snap.
Make Ahead, Refrigerate, and Freeze Nanaimo Bars
Nanaimo bars are particularly convenient made a day ahead because chilling is already part of the recipe. For a holiday tray, finish and cut them while thoroughly cold, then pack them away. There is nothing left to assemble when guests arrive.
Do Nanaimo Bars Need to Be Refrigerated?
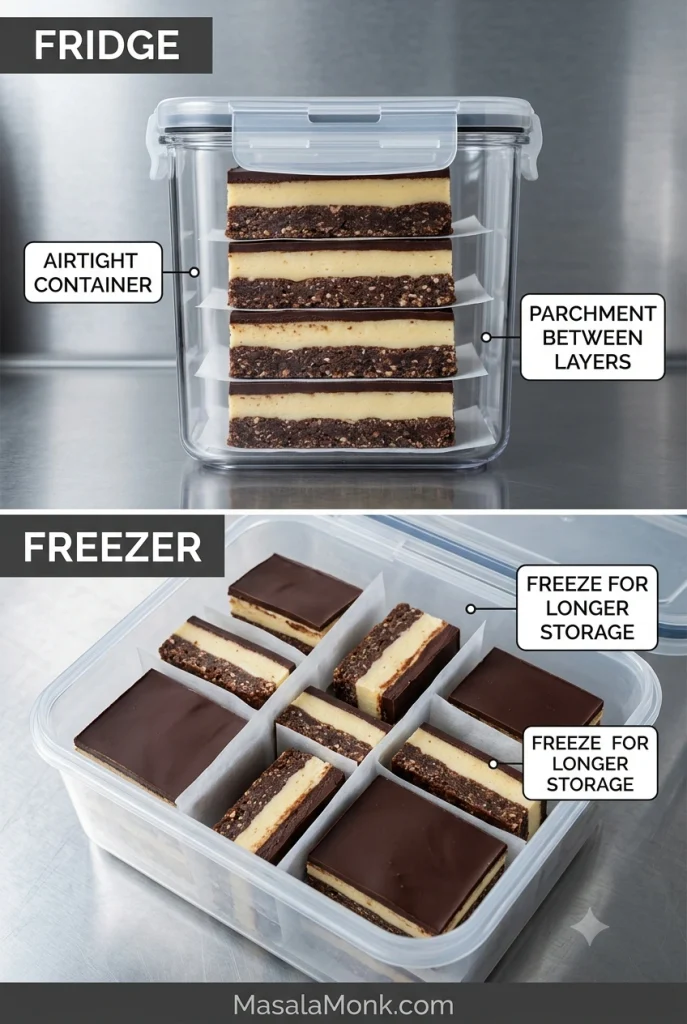
Yes. Keep them airtight in the refrigerator. For a conservative storage window, plan on 3–4 refrigerated days and freeze anything you’re keeping longer.
Airtight really matters with these. Butter-rich fillings pick up refrigerator aromas easily, so loosely covered bars can start tasting faintly of onions, garlic, strong cheese, or savoury leftovers sitting nearby.
For parties or dessert trays, keep them chilled until serving. FDA egg-safety guidance says egg-containing foods should not sit at room temperature for more than 2 hours, or more than 1 hour above 90°F / 32°C.
Can You Freeze Nanaimo Bars?
Yes. For best quality, freeze them for up to about 2 months. Cutting the slab first makes it easy to thaw only what you need.
- Chill and cut the bars completely.
- Pack them into an airtight freezer-safe container.
- Place parchment between stacked layers.
- Thaw in the refrigerator.
Freezing preserves a good batch; it does not repair a weak one. A filling that was too wet before freezing will soften again as it thaws.
Why Are They Called Nanaimo Bars?
Nanaimo — roughly pronounced “nah-NIGH-moh” — is a city on Vancouver Island in British Columbia, Canada. The bars take their name from the city, and you may also see them called Nanaimo squares or Nanaimo slices.
Published history is not completely settled, but there are useful landmarks in the record. In its 2025 Nanaimo Bar Day proclamation, the City of Nanaimo notes a “Chocolate Square” in the Women’s Auxiliary to the Nanaimo Hospital cookbook in 1952, followed by the name “Nanaimo Bar” in an Edith Adams cookbook in 1953. A 1986 city competition selected Joyce Hardcastle’s recipe from almost 100 entries.

Those dates trace the bar’s published history without giving us one neat moment of invention. What is easier to see is how recognizable the format became: the dark base, pale custard, and chocolate top look completely at home among Canadian holiday baking. The City now maintains an official recipe and has even proclaimed Nanaimo Bar Day — quite a cultural footprint for a dessert that never sees the inside of an oven.
Nanaimo Bar Variations
The layered idea is flexible once you understand the classic version. Mint and coffee sit naturally beside the chocolate. Cheesecake versions make the pale middle softer and tangier, while cookies and cakes take the cocoa-custard combination into completely different textures.
Gluten-free, coconut-free, custard-powder-free, eggless, and vegan versions need more deliberate changes because each removes something that affects how a layer behaves. Those are better handled with recipes built around the change from the beginning.
However you vary them later, the classic bar is still about the same small pleasure: distinctly different textures packed into one very rich square. First comes the chocolate snap, then cool vanilla custard, then cocoa, coconut, and almond underneath. When the knife comes down and everything stays exactly where it belongs, the refrigerator has done its job.








