Posted on Leave a comment

Pumpkin Cream Cheese Muffins Recipe: Moist, Spiced & Cream Cheese-Filled

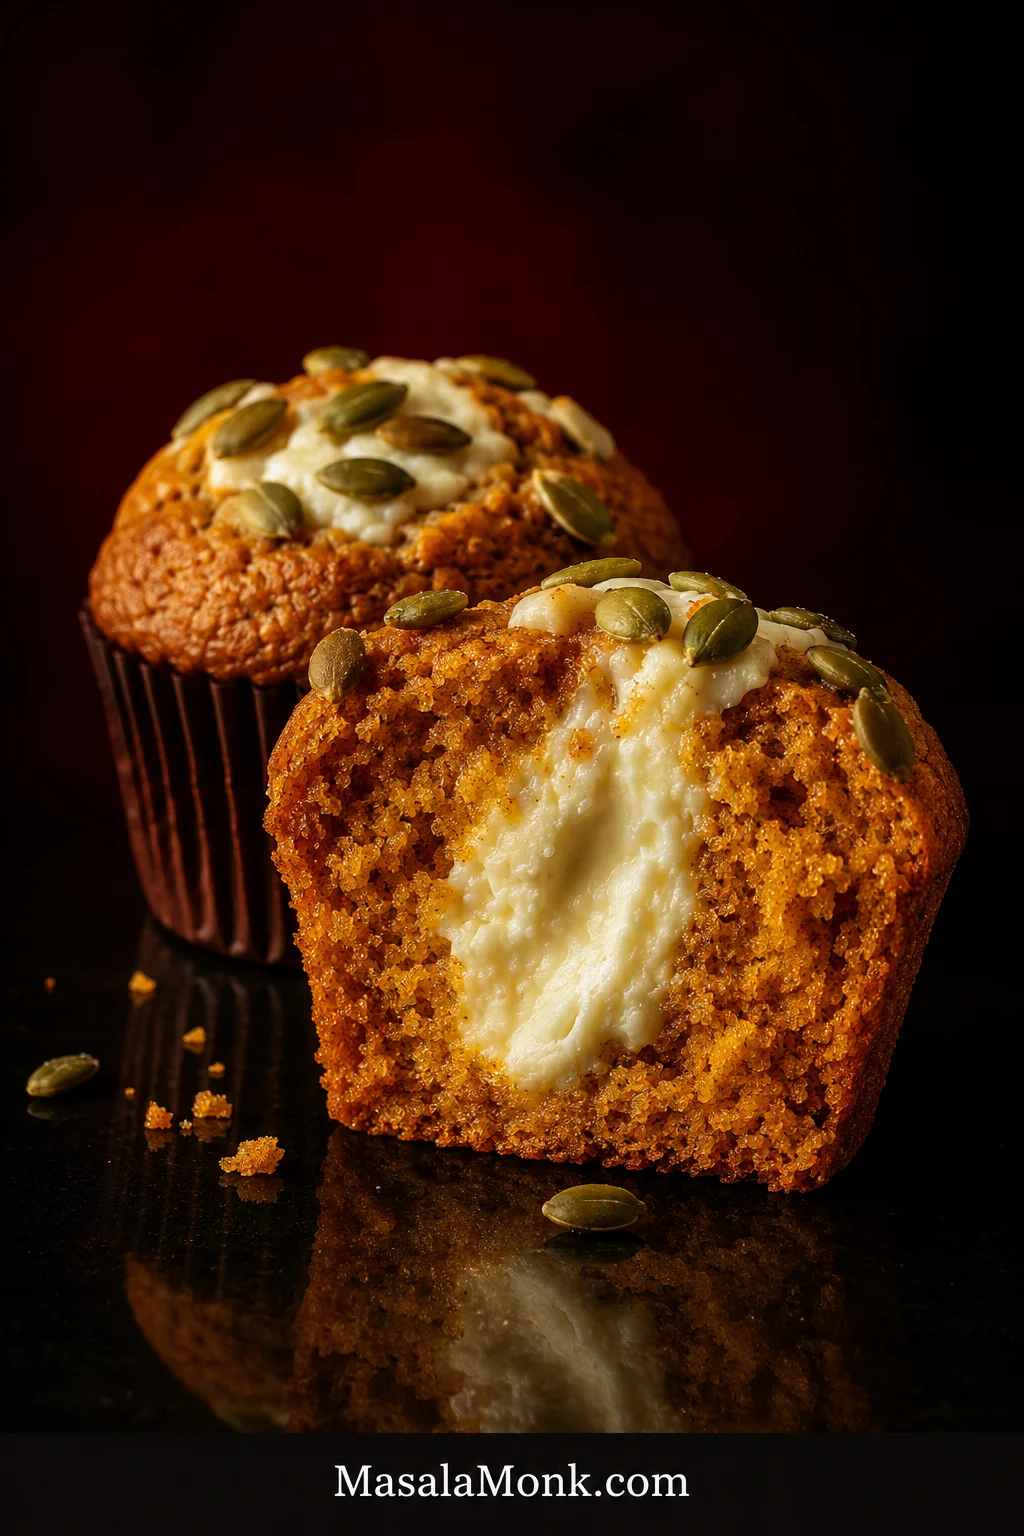
Cut-open pumpkin cream cheese muffin showing a generous white cream cheese center inside orange pumpkin crumb, with a whole pepita-topped muffin behind it.

Cut one of these pumpkin cream cheese muffins open after it has cooled a little and the best part should be obvious: a creamy white filling inside a tender, warmly spiced pumpkin muffin. Roasted pepitas bring a salty crunch to the top, while tangy cream cheese keeps the sweetness in balance.

The disappointing version looks promising from above and then gives you bite after bite of pumpkin with barely a streak of cream cheese inside. Here, each standard muffin gets about 1 1/2 tablespoons of filling, piped into the raw batter rather than left as a small dollop at the crown.

There’s no need to freeze the filling first or rest the batter. Once the cream cheese is smooth, the rest is whisk, fold, pipe and bake.

Pumpkin Cream Cheese Muffins Recipe

This batch makes about 12 generously filled muffins in a deep standard 12-cup pan. Shallower wells may give you 13 or 14. Let the pan decide the final yield instead of forcing every bit of batter into 12 cups.
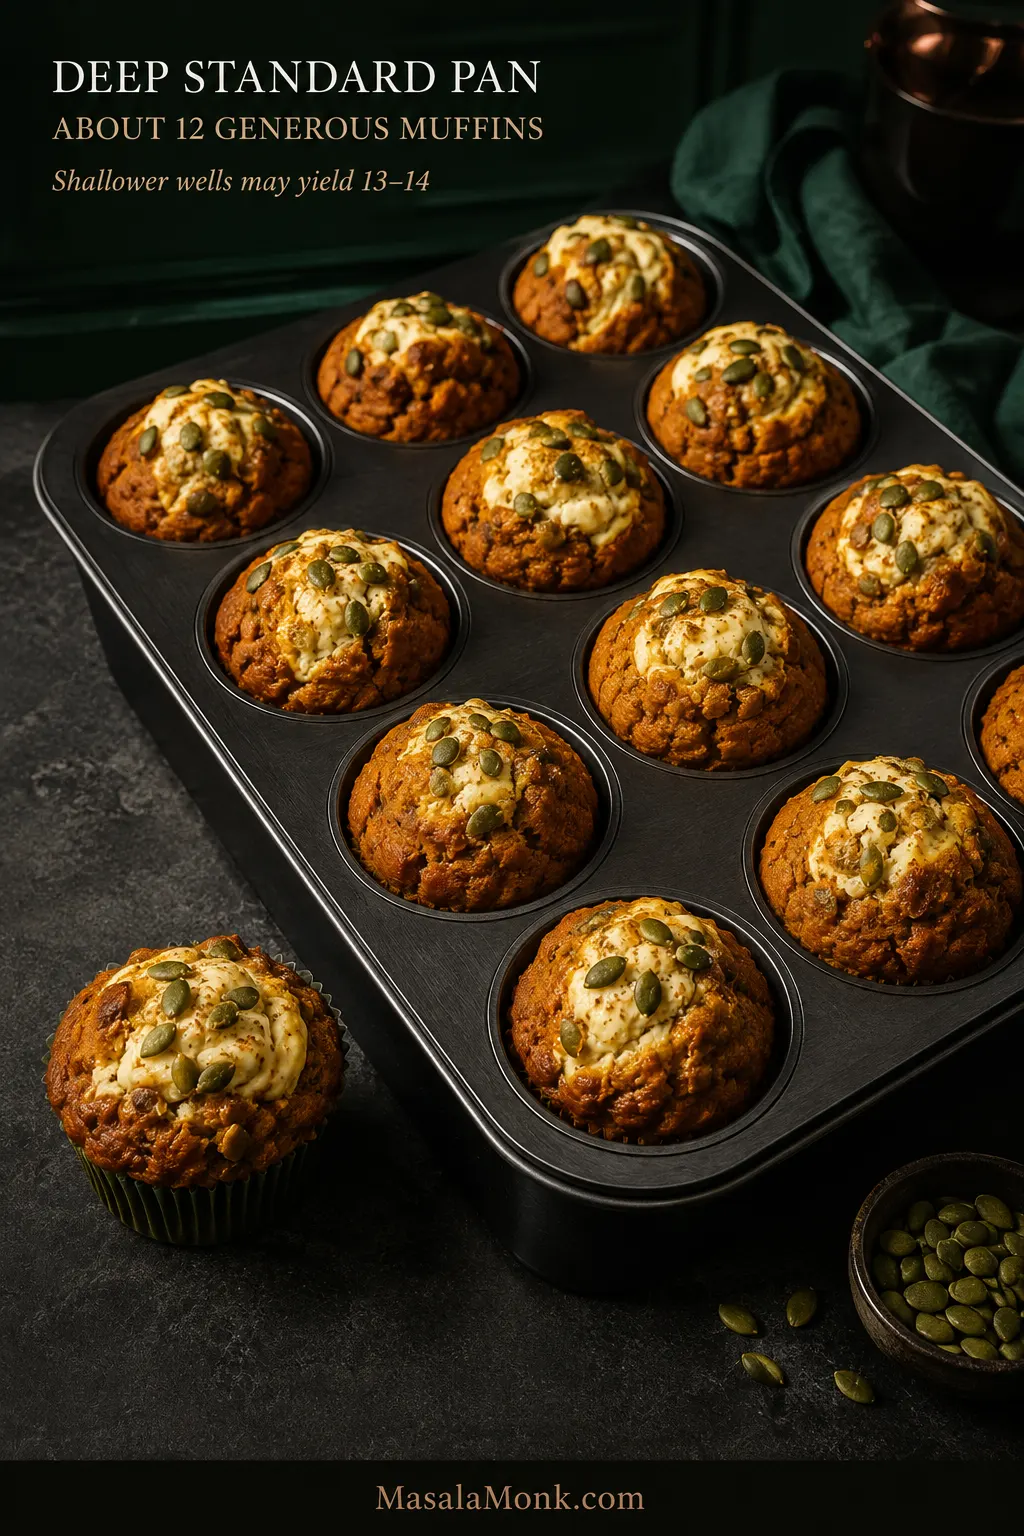
Deep 12-cup muffin pan filled with pumpkin cream cheese muffins, with batter portioned high in each lined well.
Use the pan, not the recipe yield, as the final portioning guide. If a shallower cup already looks comfortably full around 85–90 g of batter, move the rest into another liner rather than forcing a taller muffin into too little space.

The target is a tender, warmly spiced pumpkin crumb with enough structure to hold the cream cheese without turning dense or gummy.

  • Yield: about 12 standard muffins; 13–14 in shallower wells
  • Prep: about 25 minutes
  • Bake: about 19–23 minutes
  • Cool before a clean first cut: about 20–30 minutes
  • Conventional oven: 425°F / 220°C, then 350°F / 175°C
  • Fan/convection: as a starting point, reduce both temperatures by about 25°F / 15°C—roughly 400°F / 205°C, then 325°F / 165°C—and begin checking a little earlier; ovens vary
  • Batter rest: none

You will need: a standard muffin pan, liners, two large mixing bowls, a small bowl for the filling, a whisk, a flexible spatula and a piping bag or sturdy zip-top bag. A handheld mixer is convenient for smoothing the cream cheese, but properly softened cream cheese can also be stirred smooth by hand. A kitchen scale is especially useful for the flour and filling.

Cream Cheese Filling

  • 8 oz (226 g) full-fat block cream cheese, softened until pliable but still cool
  • 1/2 cup (60 g) confectioners’ sugar (powdered or icing sugar)
  • 1 tablespoon (8 g) all-purpose flour
  • 1 teaspoon (5 ml) vanilla extract
  • 1/8 teaspoon fine salt

Pumpkin Muffin Batter

  • 2 1/4 cups (280 g) all-purpose flour
  • 2 teaspoons pumpkin pie spice
  • 1 teaspoon ground cinnamon
  • 1 teaspoon baking powder
  • 1 teaspoon baking soda
  • 1/2 teaspoon fine salt
  • 2 large eggs
  • 3/4 cup packed light brown sugar (150 g); dark brown sugar also works
  • 1/3 cup granulated sugar (67 g)
  • 1 1/3 cups (330 g) 100% pumpkin purée
  • 1/2 cup (120 ml) neutral oil, such as vegetable, canola, sunflower or mild avocado oil
  • 1/3 cup (80 ml) whole milk
  • 2 teaspoons (10 ml) vanilla extract

For the Top

  • 1/4 cup (about 30 g) roasted salted pepitas (hulled pumpkin seeds)
  • 1/4 teaspoon pumpkin pie spice, optional

How to Make Pumpkin Cream Cheese Muffins

Prep, Mix the Filling and Batter

  1. Heat the oven. Position a rack in the middle and preheat a conventional oven to 425°F / 220°C. Line the muffin pan.
  1. Mix the filling. Smooth the softened cream cheese, then mix in the confectioners’ sugar, flour, vanilla and salt. Scoop some up with a spoon: it should sit in a soft mound briefly instead of running flat. Chill for 15–20 minutes if it has become loose. Transfer to a piping bag or sturdy zip-top bag and cut an opening about 1/2 inch / 1–1.5 cm wide.
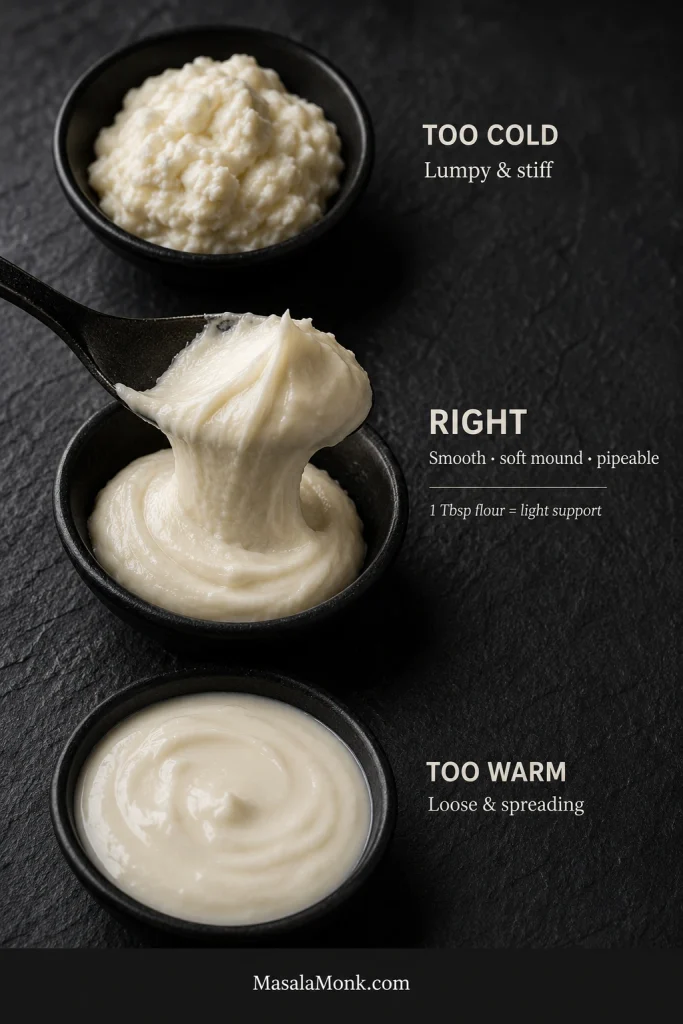
Three cream cheese filling consistencies comparing stiff and lumpy, smooth and pipeable, and loose spreading filling.
Temperature usually explains the filling before flour does. Lumpy filling is often still too cold; filling that spreads immediately has usually become too warm. Correct the temperature first so the center stays creamy rather than turning pasty.
  1. Whisk the dry ingredients. Combine the flour, pumpkin pie spice, cinnamon, baking powder, baking soda and salt.
  2. Mix the pumpkin base. In the second large bowl, whisk the eggs and both sugars until smooth. Add the pumpkin purée, oil, milk and vanilla and whisk again.
  1. Fold the batter. Add the dry ingredients to the pumpkin mixture and switch to a spatula. Fold until the last visible flour disappears. The batter should sit heavily on the spatula but still scoop easily. A few small lumps are fine. Stop there.
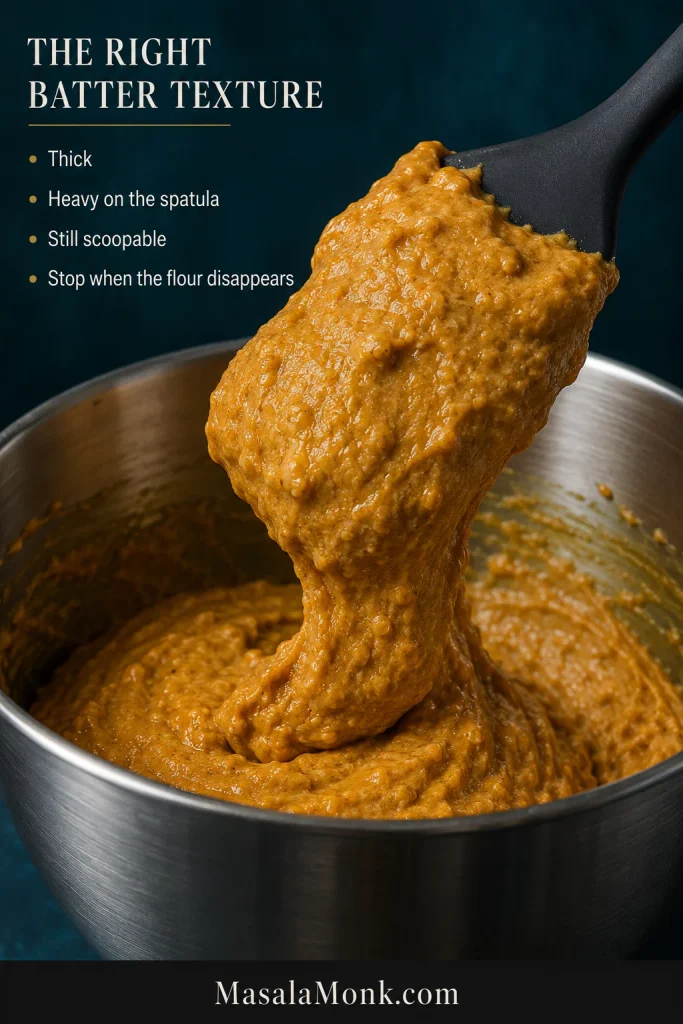
Thick orange pumpkin muffin batter held on a spatula above a mixing bowl, showing a heavy but scoopable consistency.
A few small lumps are a better stopping point than a perfectly smooth batter. Once the flour is incorporated, extra folding can tighten the pumpkin crumb long before the batter starts looking obviously overmixed.

Fill and Top the Muffins

  1. Fill the muffin wells. In a deep standard pan, divide the batter among 12 wells, about 95 g each. Shallower cups may already look full at 85–90 g; use a 13th or 14th liner instead of squeezing in the rest.
  1. Pipe in the cream cheese. Divide the filling among the muffins, about 24–25 g each when making 12. Insert the tip about 1/2 inch / 1–1.5 cm into the batter. Squeeze as you slowly pull the bag upward, finishing with some cream cheese visible at the surface. Keep the filling away from the liner.
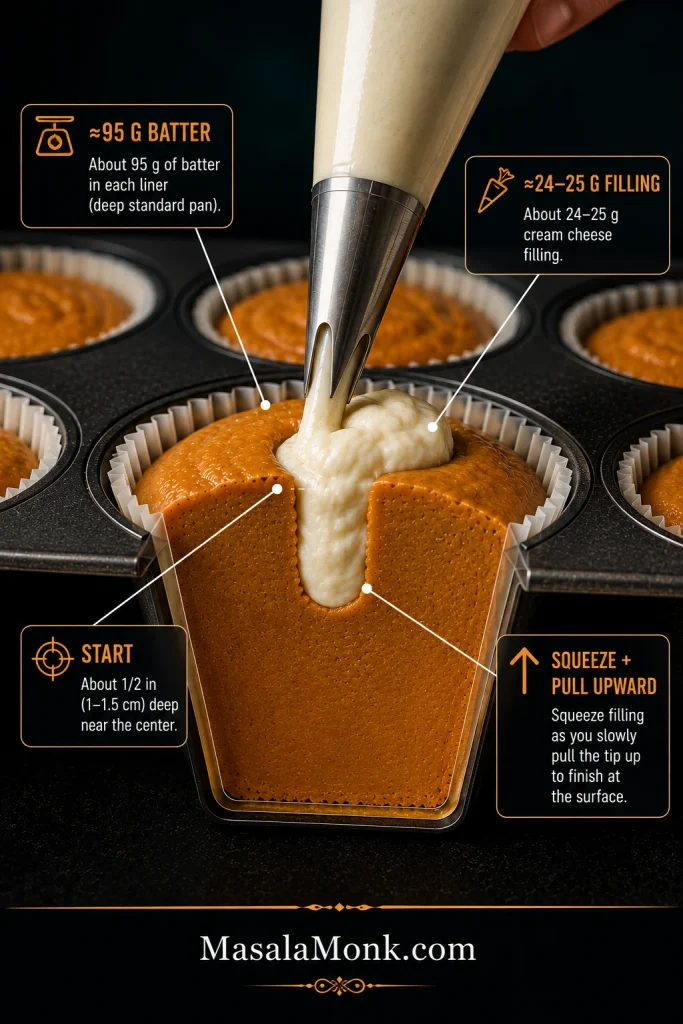
Cutaway of raw pumpkin muffin batter showing cream cheese piped near the center and pulled upward, with pumpkin batter left beneath the filling.
Piping upward creates a narrower vertical pocket instead of a broad cheese layer. That helps preserve pumpkin underneath and around the filling, which matters just as much as getting plenty of cream cheese into the muffin.
  1. Add the pepitas. Toss the pepitas with the optional 1/4 teaspoon pumpkin pie spice, if using, then scatter them around the exposed cream cheese and press very lightly. The white crowns will vary a bit from muffin to muffin. That’s fine.

Bake, Check and Cool

  1. Start hot. Bake at 425°F / 220°C for 5 minutes. The early heat encourages the thick batter to rise quickly. Without opening the oven, reduce the temperature to 350°F / 175°C so the centers can finish without overbaking the tops.
  2. Finish baking. Continue for another 14–18 minutes. Start checking near the early end of the range.
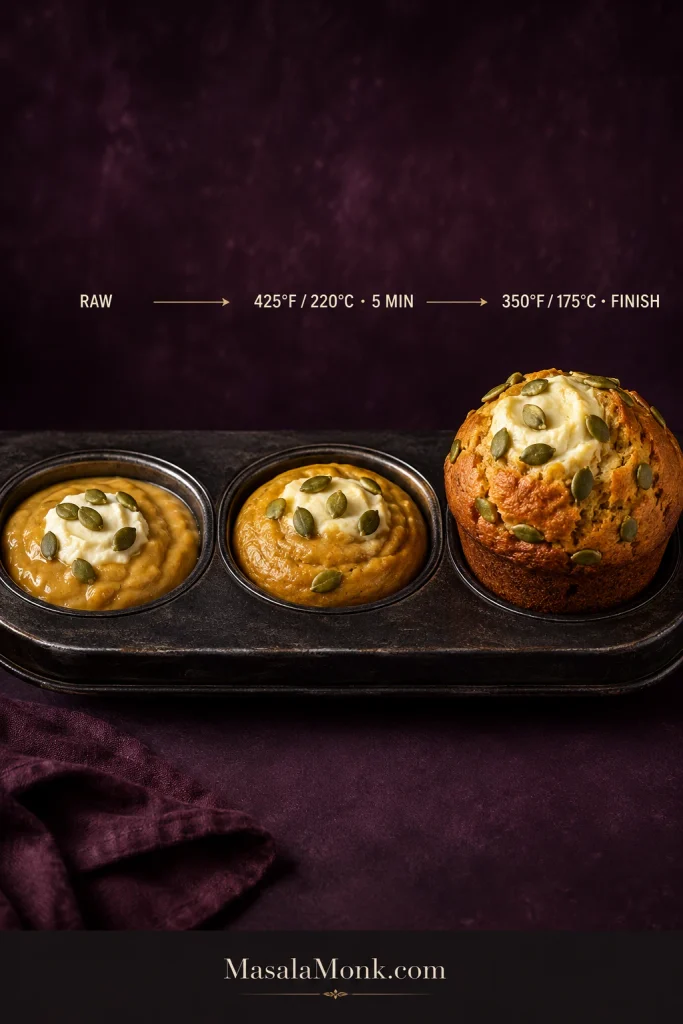
Three stages of a pumpkin cream cheese muffin showing raw batter, early rise after five minutes at 425°F, and the finished muffin at 350°F.
The two-temperature bake works as part of the whole system, not as a shortcut. Thick batter, sensible portioning and fresh leaveners still determine whether the muffin rises well; the hot start simply gives them an early advantage.
  1. Check beside the filling. Insert a toothpick into the pumpkin portion just off-center. A few moist crumbs are fine; wet batter isn’t. The top should spring back lightly and the exposed cream cheese should look set and more matte than glossy.
  2. Cool before cutting. Leave the muffins in the pan for about 5–10 minutes, then move them to a wire rack. Give the filling another 15–20 minutes to settle if you want a cleaner first cut.

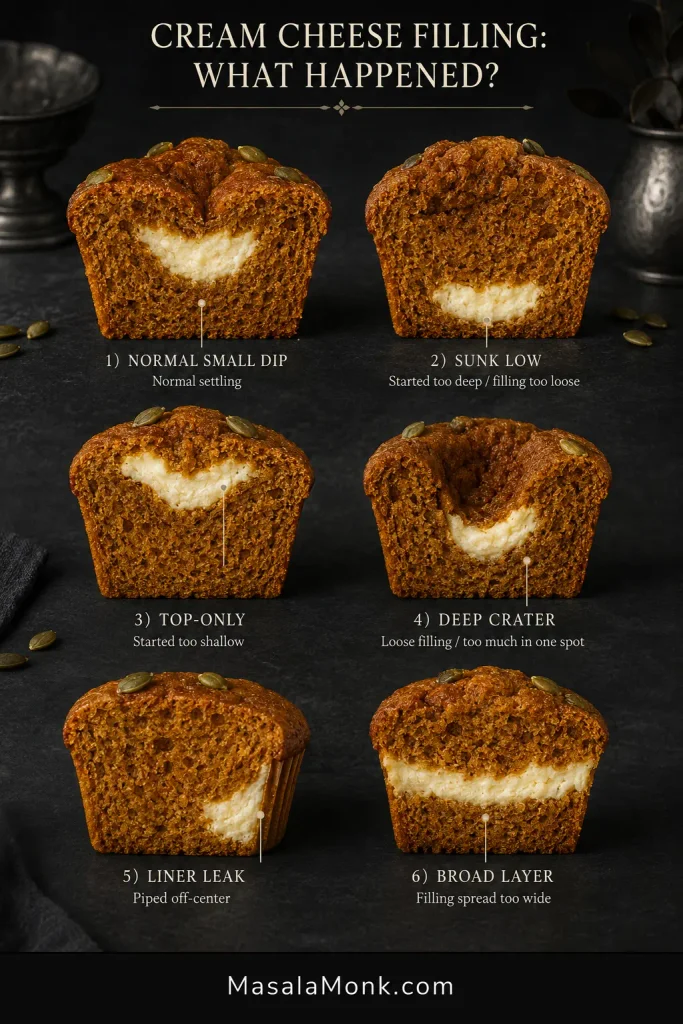
That first cut tells you more than the top does. Cream cheese settling slightly to one side is normal; a deep crater or filling pooled near the bottom is a different story.
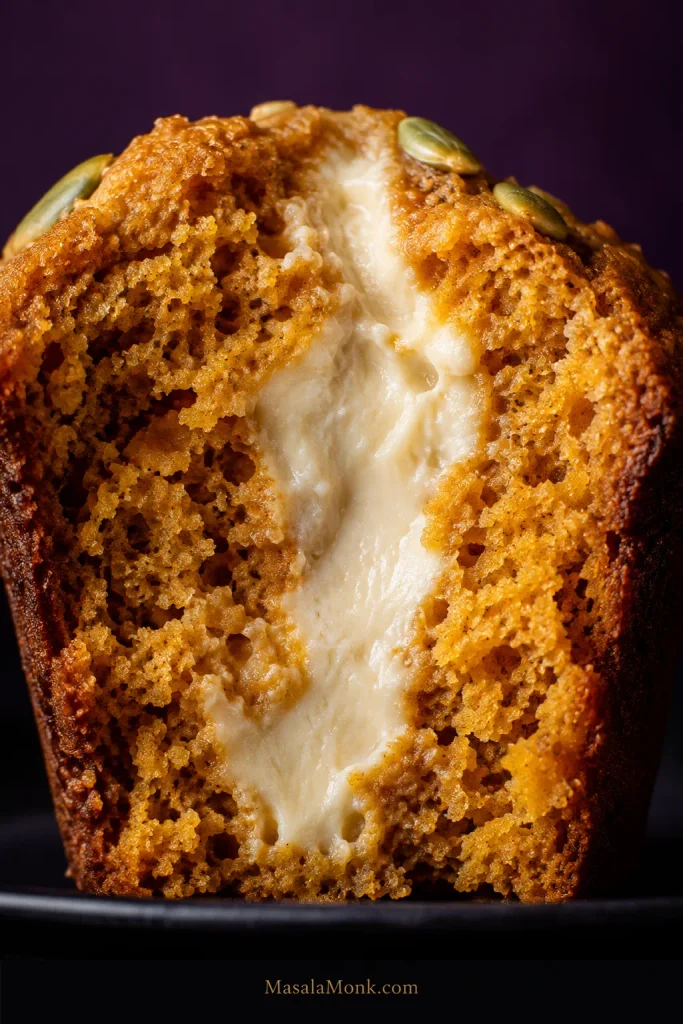
Macro cross-section of a pumpkin cream cheese muffin showing a creamy white center surrounded by tender orange crumb with open, baked pores.
The pumpkin crumb around the center should stay open and tender; a shiny, compressed band suggests excess moisture or underbaking.

That white center and pepita crown may look familiar.

Are These Starbucks Pumpkin Cream Cheese Muffins a Copycat?

They’re Starbucks-inspired rather than an exact replica. Starbucks’ 2026 Pumpkin Cream Cheese Muffin combines spiced pumpkin muffin, sweet cream-cheese filling and spiced pepitas. This recipe keeps that recognizable white center and pumpkin-seed top while using its own eggless filling, proportions and method.

If that seasonal coffee-shop muffin is what brought you here, homemade has one obvious advantage: you decide when the season starts—and how much cream cheese goes into the middle.

What Keeps the Muffins Tender and the Filling Creamy

A few ingredient choices do most of the work here: thick pumpkin keeps excess water in check, block cream cheese makes the center more predictable, oil helps the crumb stay tender after chilling, and fresh spices keep the pumpkin tasting lively after baking.
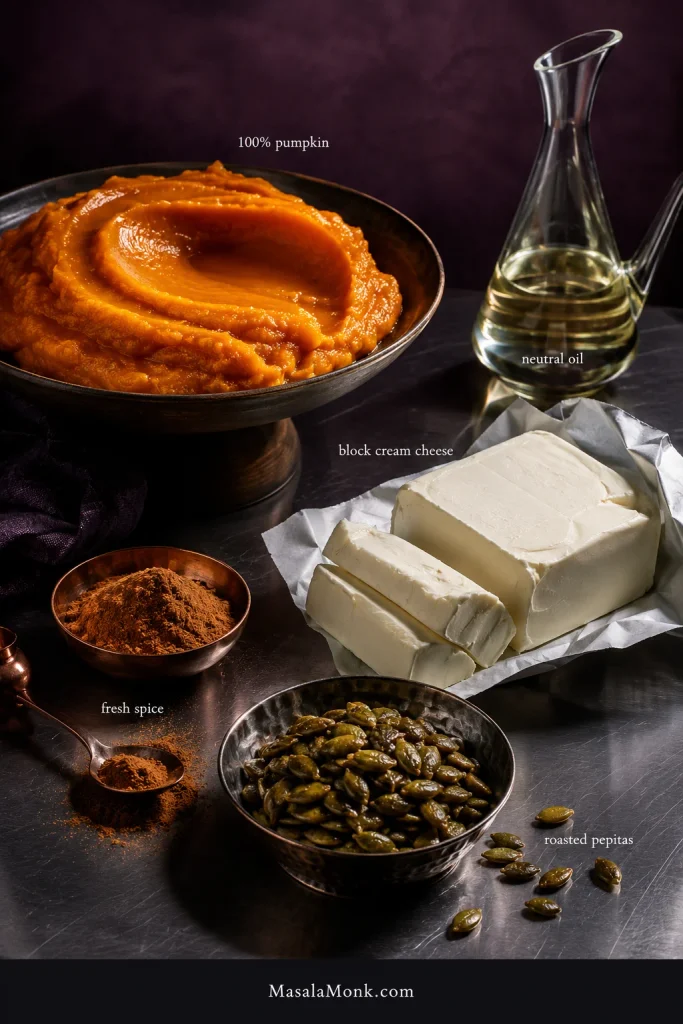
Editorial still life of thick pumpkin purée, block cream cheese, neutral oil, spices and green pepitas used for pumpkin cream cheese muffins.
Ingredient form matters more than brand here: thick purée, block cream cheese and neutral oil give the recipe its intended balance.

Use Thick Pumpkin Purée

Use plain 100% pumpkin purée, not pumpkin pie filling. Pie filling already contains sugar, spices and other ingredients, so it changes both flavor and moisture.

Homemade purée works when it is roughly as thick as canned pumpkin. Drag a spoon through it; the track should stay visible briefly instead of flooding straight back in. Our pumpkin bread recipe has more detail on canned versus fresh pumpkin and handling a watery homemade purée.
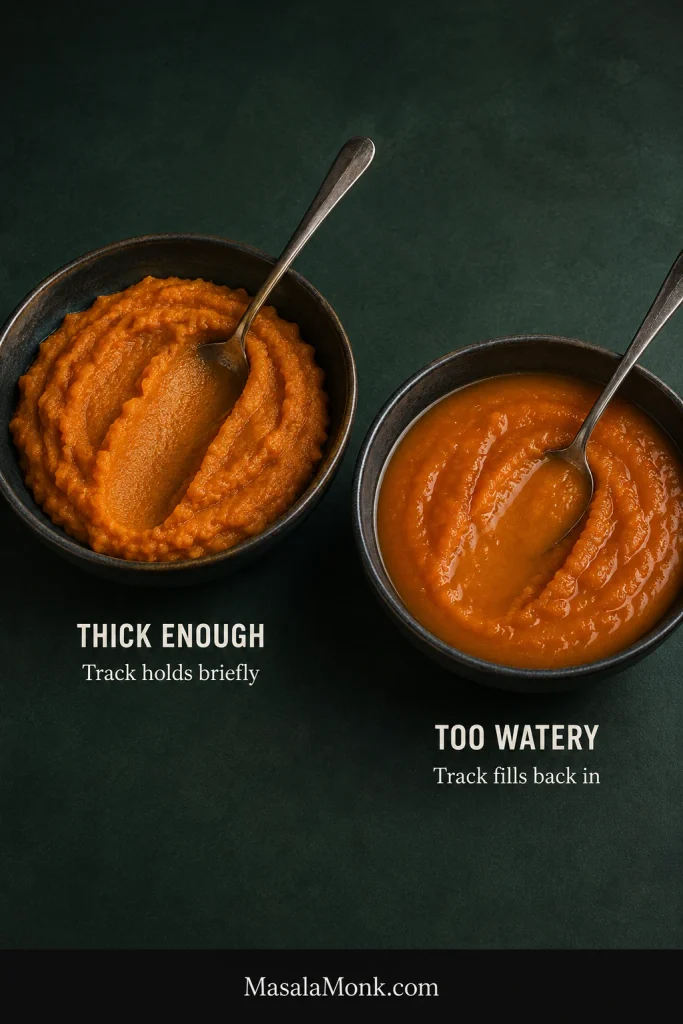
Two bowls comparing thick pumpkin purée that holds a spoon track with watery purée whose track quickly fills back in.
If homemade pumpkin purée closes over the spoon track almost immediately, deal with the excess water at the source. Draining or gently reducing it protects pumpkin flavor better than correcting a wet batter later with extra flour.

A typical 15 oz / 425 g can leaves roughly 95 g after you measure what this recipe needs. Save it for oatmeal, pancakes, soup, smoothies or a healthy pumpkin spice latte. Adding the remainder here would throw off the moisture balance.

Keep the Cream Cheese Cool Enough to Hold Its Shape

Use full-fat block or brick-style cream cheese. Tub-style, whipped and reduced-fat products may contain more water, stabilizers or incorporated air, making the filling less predictable.

You want the block pliable enough to mix without stubborn lumps while it still feels cool. Leave it in a hot kitchen too long and the mixture loosens noticeably.

Oil for Tenderness, Flour Measured Carefully

Neutral oil helps these muffins stay tender after cooling and refrigeration. Melted butter brings more buttery richness, but the texture firms more once chilled.

Weigh the flour if you can: 280 g. With cups, loosen it, spoon it in and level without packing. Extra flour makes this batter heavy surprisingly quickly.

Use Spices You Can Actually Smell

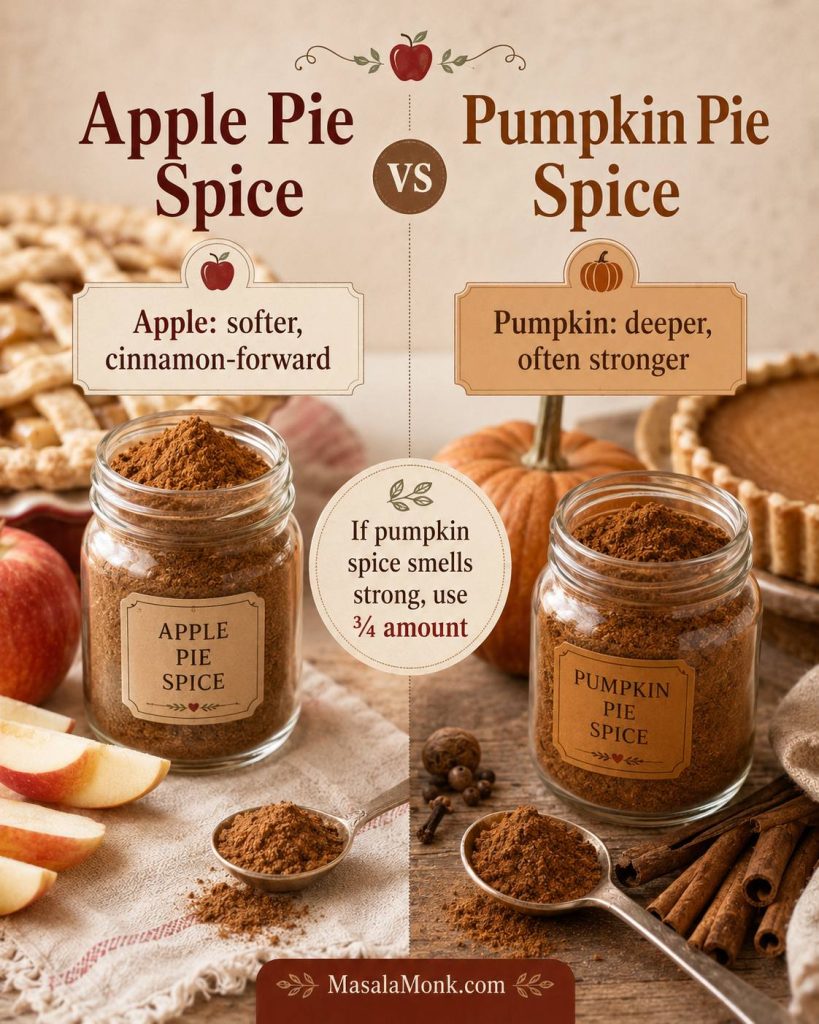
Smell your pumpkin pie spice before measuring it.

Pumpkin and cream cheese can mute a timid blend, so stale spices leave the finished muffins noticeably flat. Fresh cinnamon and ginger should announce themselves as soon as the jar opens and become even more noticeable once the pan is in the oven.

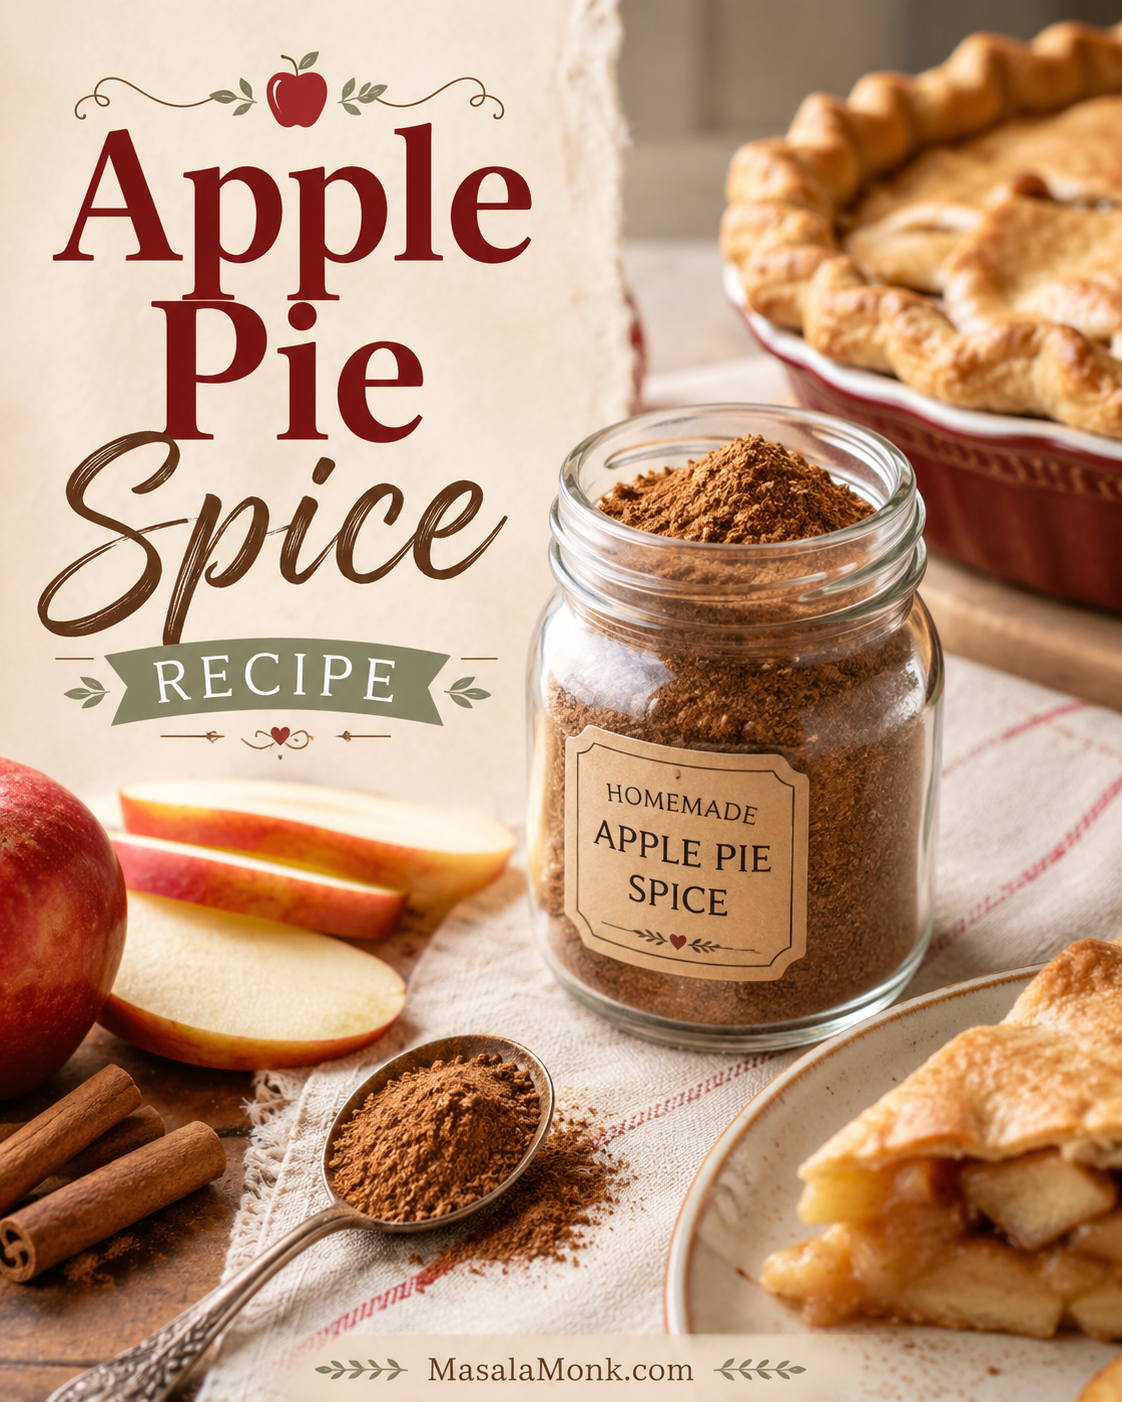
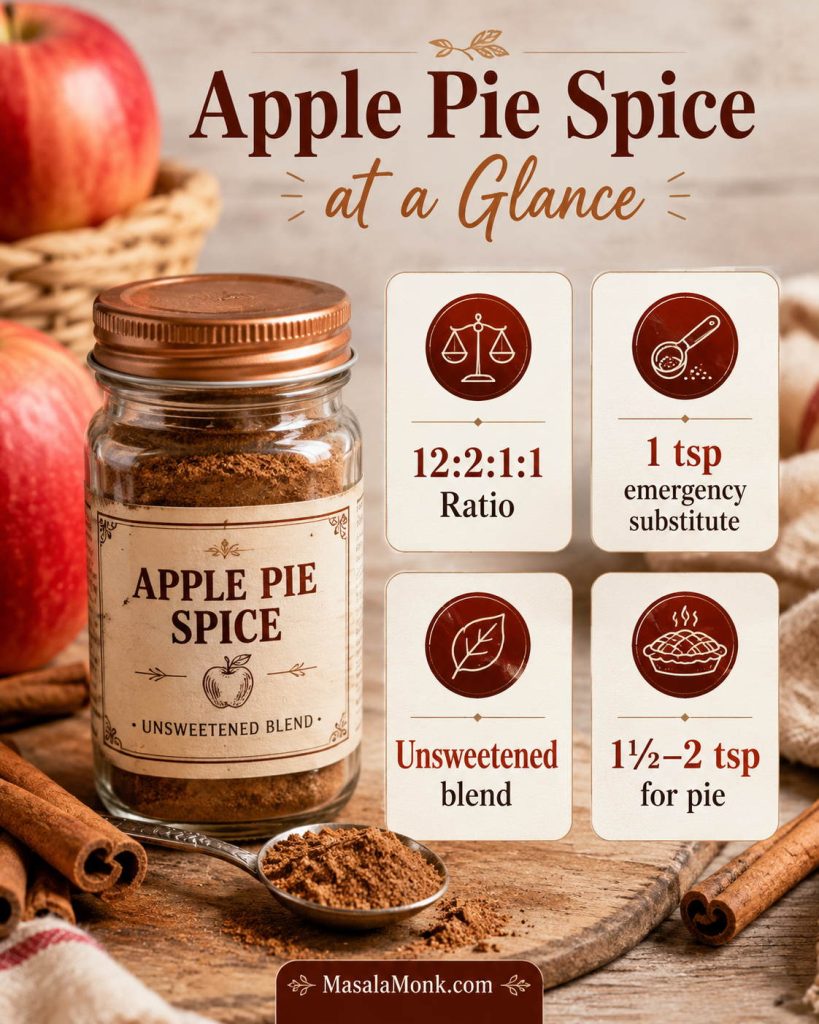
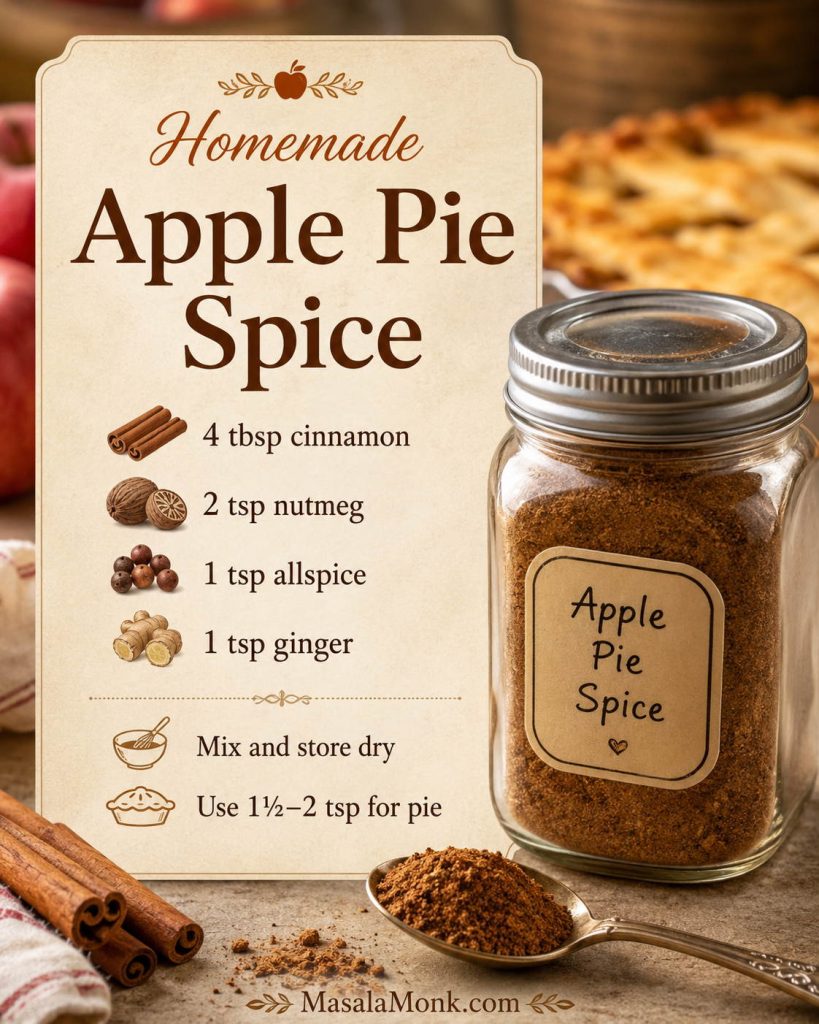
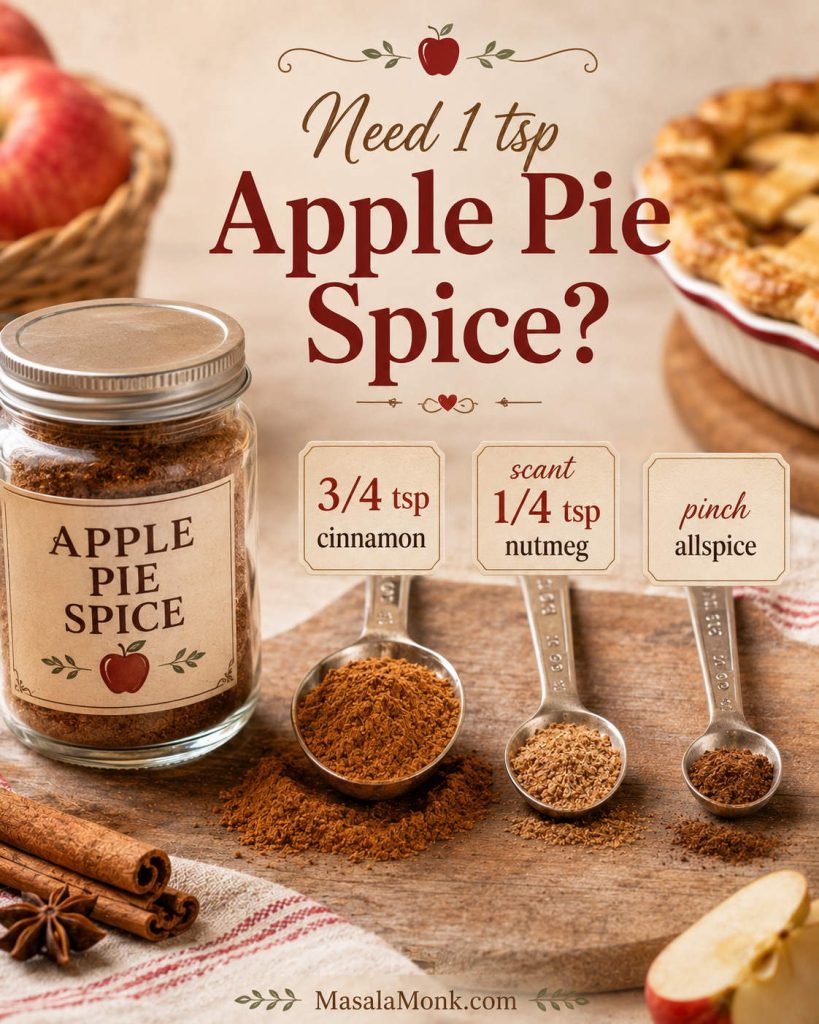
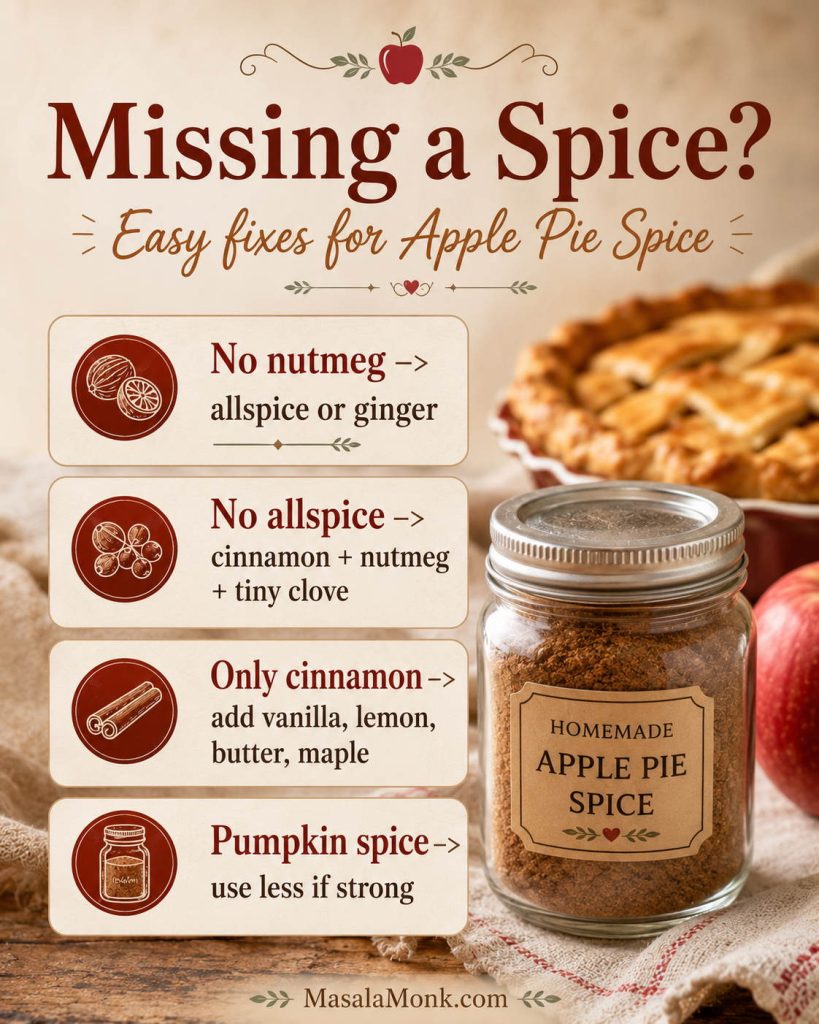
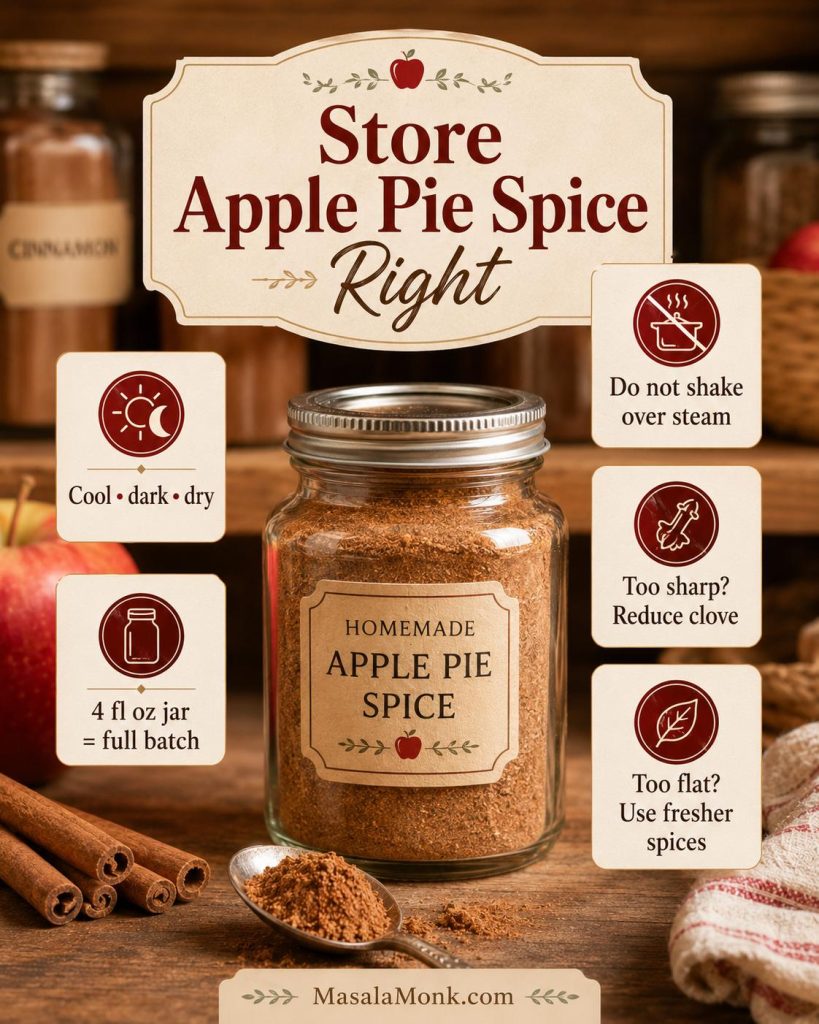
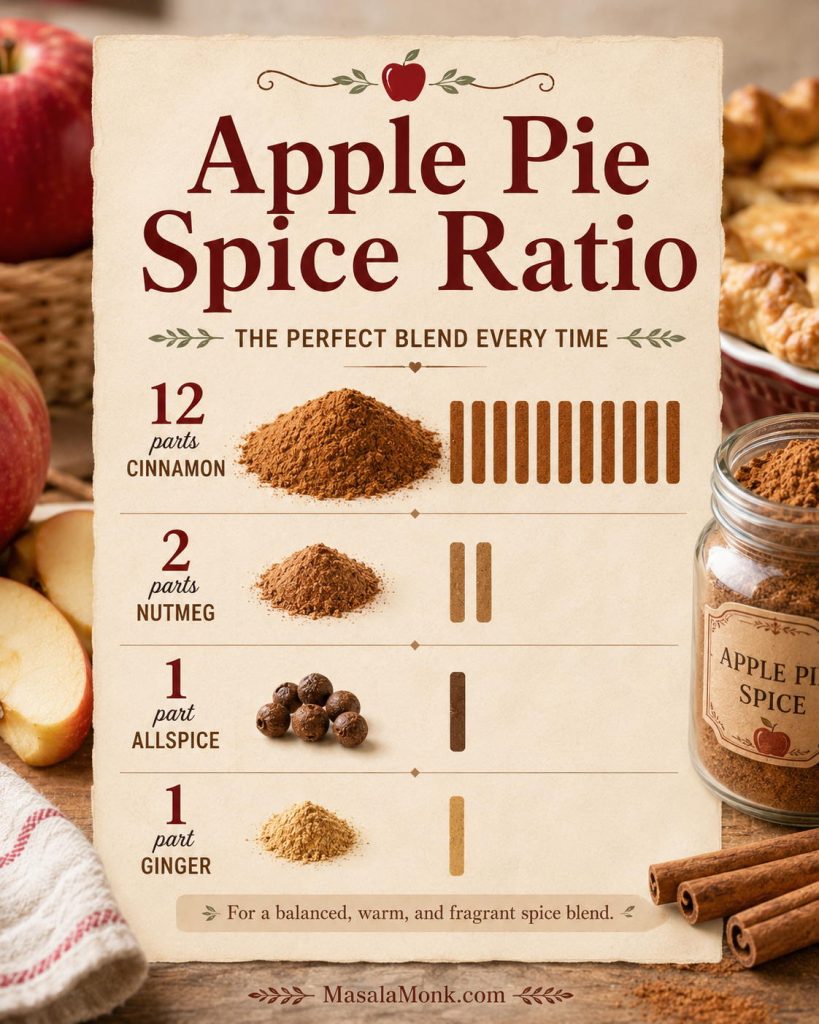
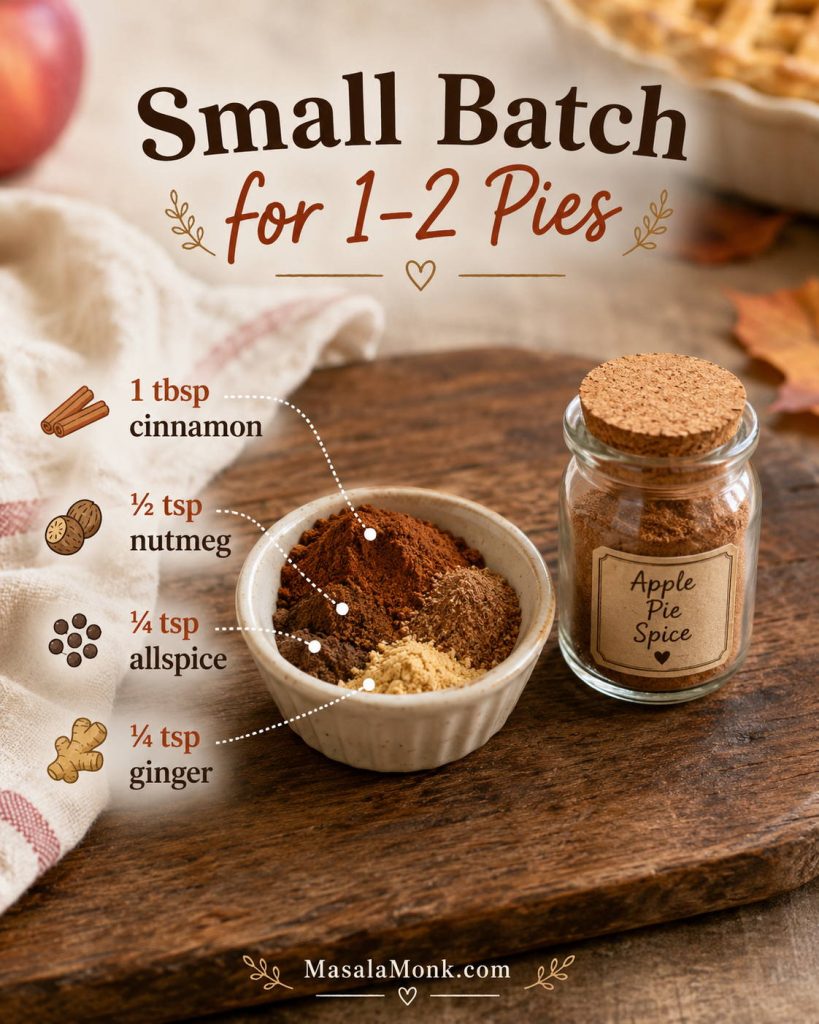
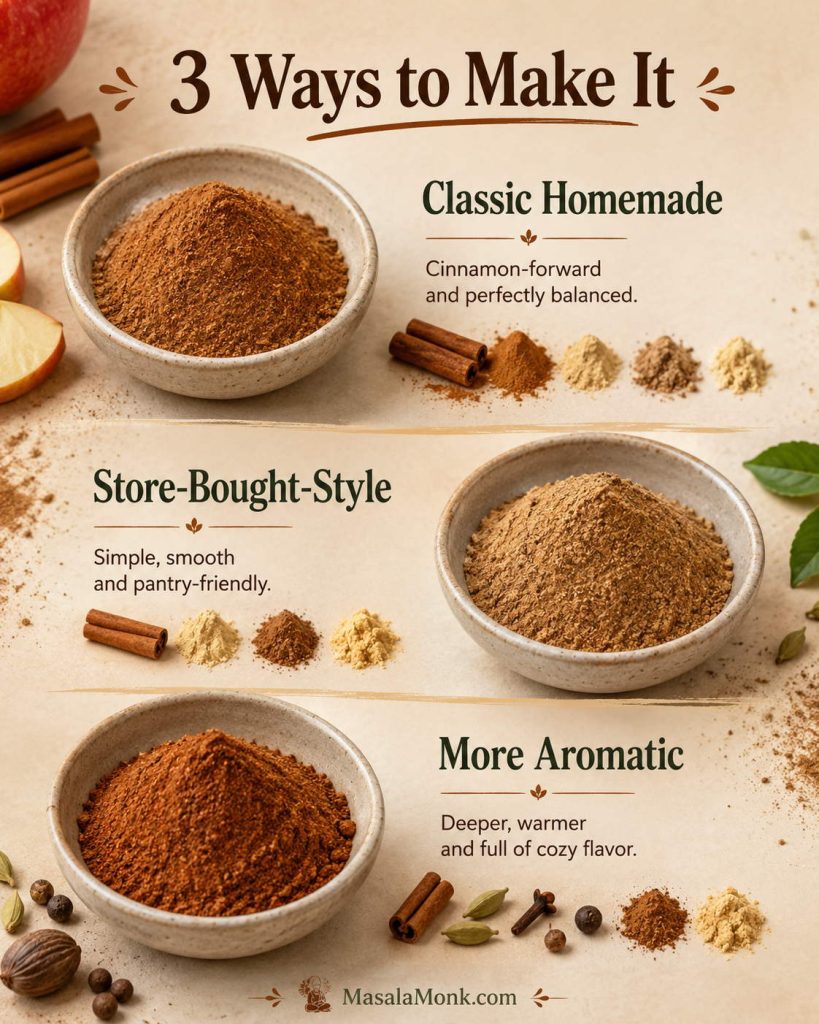
If you need a fresh blend, use our homemade pumpkin pie spice. In a pinch, replace the 2 teaspoons here with approximately 1 teaspoon cinnamon, 1/2 teaspoon ginger, 1/4 teaspoon nutmeg, 1/8 teaspoon cloves and 1/8 teaspoon allspice, then keep the additional teaspoon of cinnamon already listed in the batter.

How to Get a Creamy Center That Stays Put

Keep the filling creamy but pipeable. The tablespoon of flour already in the recipe gives the eggless center enough support; adding more can make it pasty. If the mixture stops holding a soft mound in a warm kitchen, chill it briefly instead of adding extra flour.

Pipe through the center. Start around the middle and squeeze as you pull upward, keeping pumpkin batter between the filling and liner. A small dip or slightly off-center cream-cheese crown after cooling is normal.

Filling sank, leaked or cratered? Jump to troubleshooting →

How to Tell When Pumpkin Cream Cheese Muffins Are Done

A toothpick pushed straight through the cream cheese may come back coated even when the muffin is fully baked. Test just beside it.

  • Press the top. It should spring back lightly.
  • Check the pumpkin portion. A few moist crumbs are fine; wet batter isn’t.
  • Look at the exposed cream cheese. It should appear set and more matte than glossy.
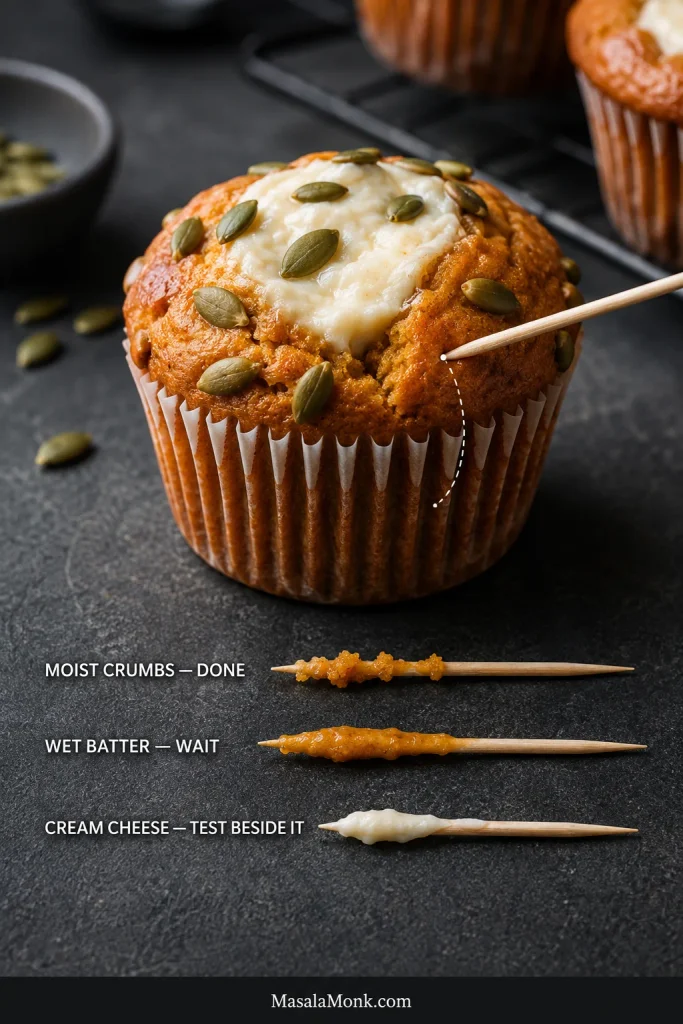
Pumpkin cream cheese muffin with a toothpick inserted beside the filling, plus examples of moist crumbs, wet batter and cream cheese on testers.
Do not wait for a bone-dry tester. A few moist crumbs from the pumpkin portion are a better endpoint than baking until every trace disappears, especially with a cream cheese center that naturally stays soft.

Troubleshooting Pumpkin Cream Cheese Muffins

The hardest part is sometimes knowing when to stop fixing something that isn’t broken. A small dip, an off-center white crown or two muffins that rise differently can still be completely good muffins.

For a real problem, match the symptom you saw and change one thing at a time.

Cream Cheese Filling Problems: Sinking, Leaking, Craters & Lumps

What you seeLikely causeNext time
Small dip after coolingNormal settlingLeave it alone if the surrounding muffin is baked.
Cream cheese sinks toward the bottomPiping started too deep, or the filling was very looseStart nearer the middle and briefly chill loose filling.
Most cream cheese stays on topPiping began too close to the surfaceInsert the bag a little farther before squeezing.
Deep craterLoose filling or too much filling concentrated in one spotChill the filling and spread it vertically as you withdraw the bag.
Filling leaks to the linerIt was piped off-centerKeep pumpkin batter between the cream cheese and paper.
Lumpy fillingCream cheese was too coldSoften it until pliable before mixing.
Muffin separates around the cream-cheese layerThe filling spread into a broad horizontal layerKeep the pocket narrower and more central.
Six pumpkin cream cheese muffin cross-sections comparing normal settling, sunk filling, top-only filling, a crater, liner leakage and a broad cream cheese layer.
Treat filling position as evidence. A problem that is mostly about where the cream cheese ended up usually points toward piping depth or direction; a loose cratered center suggests you should look at filling consistency instead.

Muffin Texture & Rise Problems: Dense, Gummy, Dry or Flat

What you seeLikely causeNext time
Dense or rubberyToo much mixing after the flour went inFold only until the last dry streak disappears.
Dry and heavyToo much flour or too much oven timeWeigh the flour and begin checking earlier.
Wet or gummyUnderbaking or watery pumpkin puréeUse thick purée and test beside the filling.
Flat topsWeak leavener, underheated oven or very loose batterUse fresh baking powder and soda and fully preheat the oven.
Lopsided topsUneven portions, off-center filling or uneven oven heatPortion carefully and keep the filling near the middle.
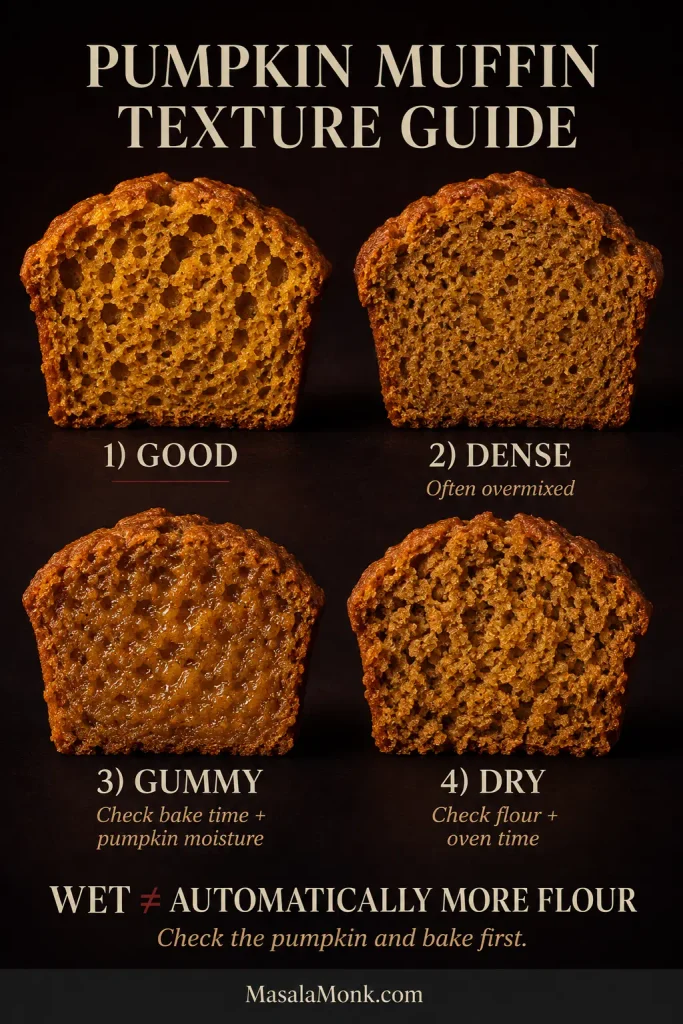
Four pumpkin muffin crumb examples labeled good, dense, gummy and dry, with visibly different pore structure and moisture.
The crumb tells you which direction to investigate. Tight pores suggest density, a shiny compressed interior points toward gumminess, and rough fragile crumb suggests dryness—three different problems that should not receive one generic fix.

A wet, heavy muffin doesn’t automatically need more flour. Check the pumpkin and baking time first, or an underbaking problem can easily become a dry-muffin problem on the next batch.

Once the muffin is baked through, the center should still be creamy while the pumpkin around it pulls apart cleanly rather than compressing into a wet, gummy band.
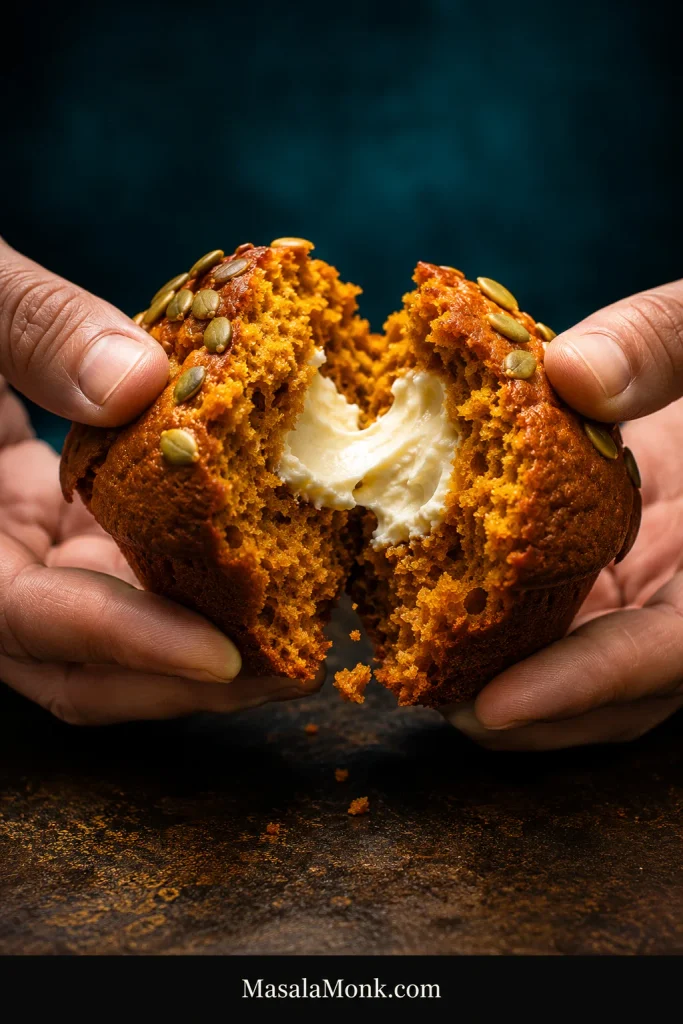
Hands breaking apart a pumpkin cream cheese muffin to reveal tender orange crumb, a thick white cream cheese center and pepitas on top.
This is the payoff: soft pumpkin crumb pulling away from a thick creamy center, with pepitas adding crunch at the top.

Back to the recipe ↑

Pumpkin Cream Cheese Muffin Variations

Once the base muffin works for you, these variations change one element at a time—the center, the crown or the mix-ins—without rebuilding the whole recipe.

Filled, Cheesecake-Style or Swirled?

They’re related, but they don’t give you the same muffin. The main recipe is a filled or stuffed pumpkin cream cheese muffin with a distinct creamy pocket inside. Add egg or egg yolk to a filling and it sets more firmly, closer to baked cheesecake. A surface swirl keeps more of the cream cheese near the top and gives the crown a marbled look.
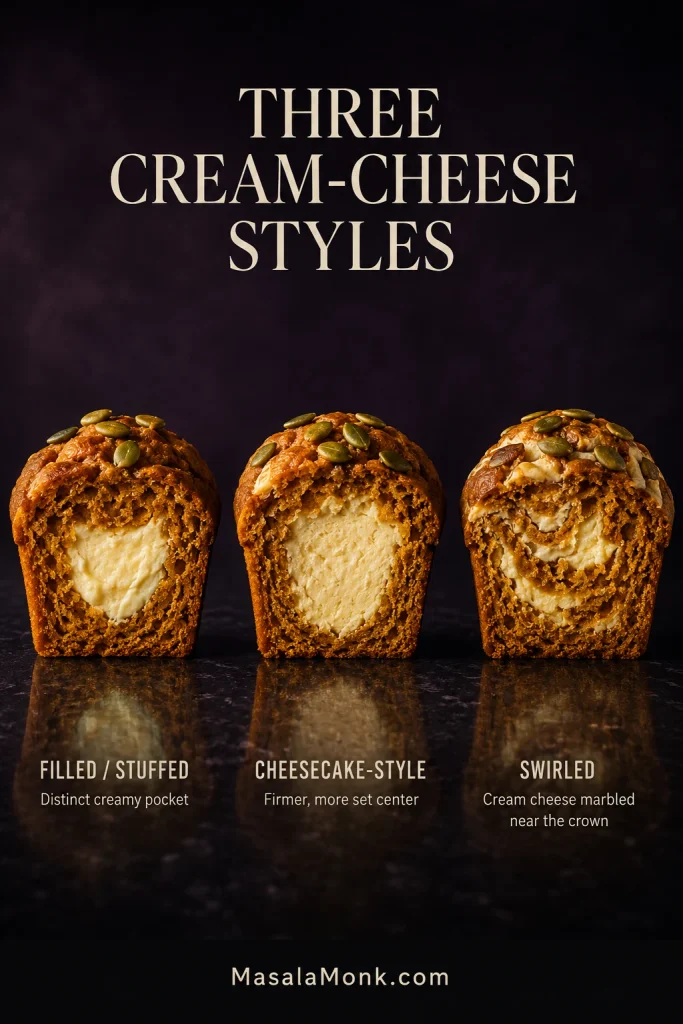
Three cut pumpkin muffins comparing a soft filled center, a firmer cheesecake-style center and cream cheese swirled through the crown.
Filled gives the strongest cream-cheese pocket, cheesecake-style sets firmer, and a swirl spreads the tangy richness through more of the crown.

Keep the Pepitas for Salty Crunch

The muffin and filling are already sweet, so roasted salted pepitas bring welcome contrast without adding another sugary layer. Toss them with the optional pumpkin pie spice for a slightly more aromatic top.

Use Streusel for a Sweeter Bakery Muffin

Leave off the pepitas and mix:

  • 1/2 cup (63 g) all-purpose flour
  • 1/4 cup packed brown sugar (50 g)
  • 1 teaspoon cinnamon
  • 3 tablespoons (42 g) melted unsalted butter

Stir with a fork until irregular crumbs form, then divide the streusel evenly among the muffins, scattering it around rather than directly over the cream cheese.

Swirl the Cream Cheese for a Creamier Crown

A surface swirl needs only half of the main filling: 113 g cream cheese, 30 g confectioners’ sugar, about 1 1/2 teaspoons (4 g) flour, 1/2 teaspoon vanilla and a pinch of salt.

Divide it over the pumpkin batter and make a few loose passes with a toothpick or thin skewer. Stop while clear streaks of white and orange remain. Bake on the same standard-muffin schedule and test the pumpkin portion for doneness.

Chocolate Chip Pumpkin Cream Cheese Muffins

Fold 1/2 cup (about 85 g) semisweet chocolate chips into the pumpkin batter before filling the pan. Keep the cream-cheese quantity and baking method unchanged.

If you’re deciding which version to make, this final lineup shows how the four easiest finishes change the look and balance of the same pumpkin cream cheese muffin.
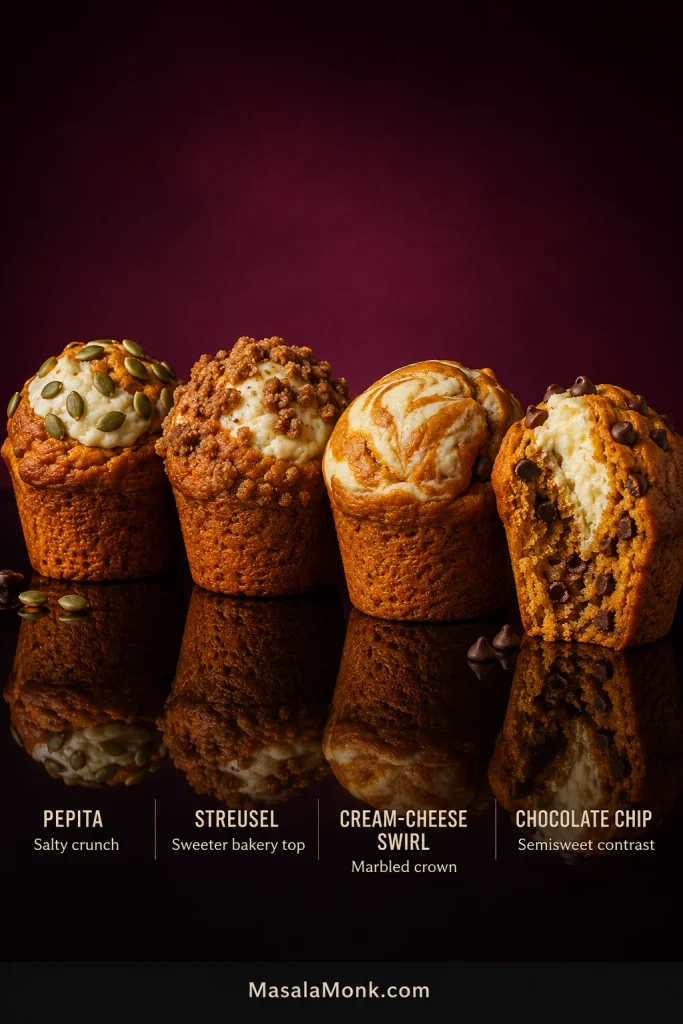
Four pumpkin cream cheese muffin variations topped with pepitas, streusel, a cream cheese swirl and chocolate chips.
Pepitas keep the top least sweet; streusel makes it richer, a cream-cheese swirl emphasizes tang, and semisweet chocolate adds deeper contrast.

Mini and Jumbo Pumpkin Cream Cheese Muffins

The standard and mini portions suggest a useful starting point for larger muffins: roughly 1 part cream-cheese filling for every 4 parts batter by weight. Use that as a starting point for larger cavities, not a fixed rule.
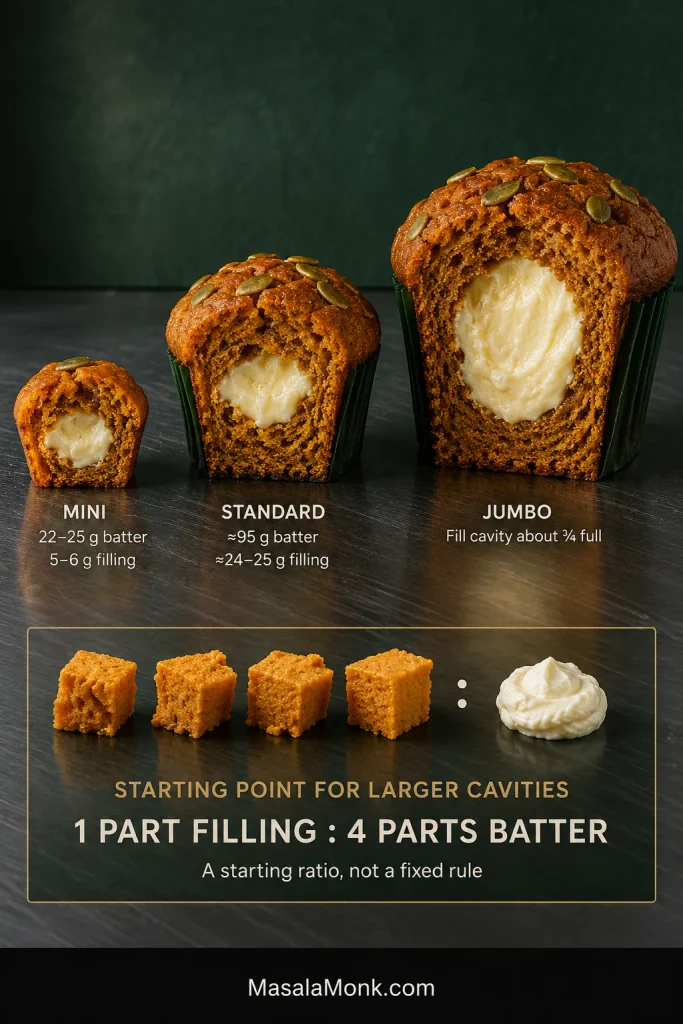
Cut-open mini, standard and jumbo pumpkin cream cheese muffins with portion guidance and a one-part filling to four-parts batter scaling ratio.
Scaling up is not just a matter of adding more filling. If cream cheese increases faster than the pumpkin batter around it, the shell becomes thinner and craters or leaks become more likely—so both parts should grow together.
SizeStarting pointBake
StandardAbout 95 g batter + 24–25 g filling in a deep 12-cup pan425°F / 220°C for 5 min, then 350°F / 175°C; start checking around 19 min total
MiniAbout 22–25 g batter + 5–6 g filling; roughly 48 minis from the full batch, depending on the pan350°F / 175°C throughout; start checking at 11–12 min, with many pans finishing around 12–14 min
JumboFill each cavity roughly three-quarters full, then use the 1:4 filling-to-batter ratio as a starting point425°F / 220°C for 5 min, then 350°F / 175°C; begin checking around 27 min total, with deeper pans sometimes needing longer

Jumbo cavities vary too much for one universal gram amount or bake time to be genuinely useful. Let the pan and the same doneness cues from the standard muffins guide you.

Back to the main recipe ↑

How to Store Pumpkin Cream Cheese Muffins

Because the filling is dairy-based, the timeline below separates cooling, refrigeration, serving and freezing so each stage is easy to follow.
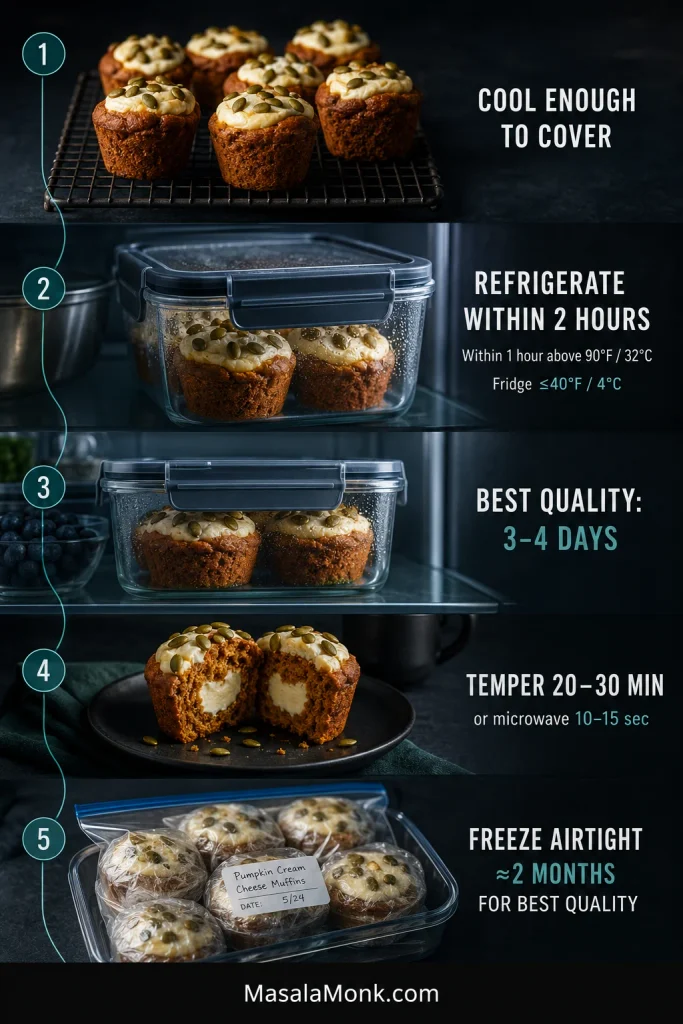
Storage guide showing pumpkin cream cheese muffins cooling, refrigerated in a sealed container, served after tempering and individually wrapped for freezing.
Storage changes texture as well as shelf life. Once chilled, the pumpkin crumb firms and the cream cheese loses some softness; a short temper at room temperature restores much of the freshly baked eating texture.

Do Pumpkin Cream Cheese Muffins Need to Be Refrigerated?

Yes. Let the muffins stop steaming and cool enough to cover, then refrigerate them while keeping the total room-temperature time under 2 hours. If the room or outdoor temperature is above 90°F / 32°C, keep that time under 1 hour. The FDA recommends keeping the refrigerator at 40°F / 4°C or below.

For the best quality, use the refrigerated muffins within about 3–4 days, consistent with USDA guidance for refrigerated leftovers. Give a chilled muffin 20–30 minutes at room temperature and it softens again while the filling loses its hard chill. A brief 10–15 second microwave warm-up works too.

Can You Freeze Pumpkin Cream Cheese Muffins?

Yes. Cool them completely, wrap well and freeze airtight for up to about 2 months for best quality. The filling may thaw slightly softer or a bit more granular than it was fresh.

Can You Make Them Ahead?

The cream-cheese filling can be mixed ahead and refrigerated separately; let it loosen just enough to pipe before assembling. For the muffins themselves, bake ahead rather than holding the fully mixed pumpkin batter overnight.

Pumpkin Cream Cheese Muffins FAQ

Can I Make Them Without a Piping Bag?

Yes. A sturdy zip-top bag with a corner cut off works well. You can also spoon in some pumpkin batter, add cream cheese to the middle and cover it with more batter. That gives you a more hidden pocket with less filling visible on top.
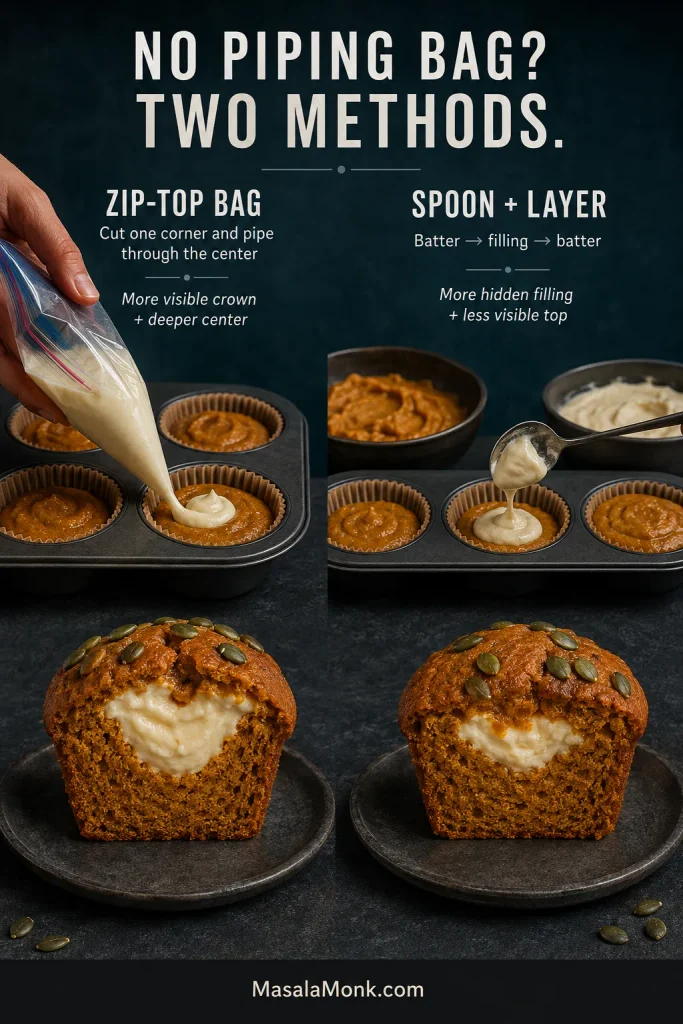
Two methods for filling pumpkin muffins without a piping bag: piping with a cut zip-top bag and spooning cream cheese between layers of batter.
Choose the workaround according to the result you want. A cut zip-top bag gives better control over a visible crown and central filling path; spoon-and-layer assembly is simpler when a hidden cream cheese pocket is perfectly fine.

Can I Replace the Oil With Butter?

Yes. Replace the 1/2 cup oil with 1/2 cup (113 g) melted unsalted butter and let it cool slightly before mixing it with the wet ingredients. You’ll get more buttery richness, but the muffin will firm somewhat more after cooling and refrigeration.

Can I Add Even More Cream Cheese?

The main recipe already uses a generous amount. Packing substantially more cream cheese into the same-size muffin leaves less pumpkin batter around it and makes craters, leaks and gummy edges more likely. For a bigger cream-cheese pocket, move to a larger muffin and scale the batter and filling together.

If you want one visual reference to keep beside the pan, the blueprint below is the most useful place to start.
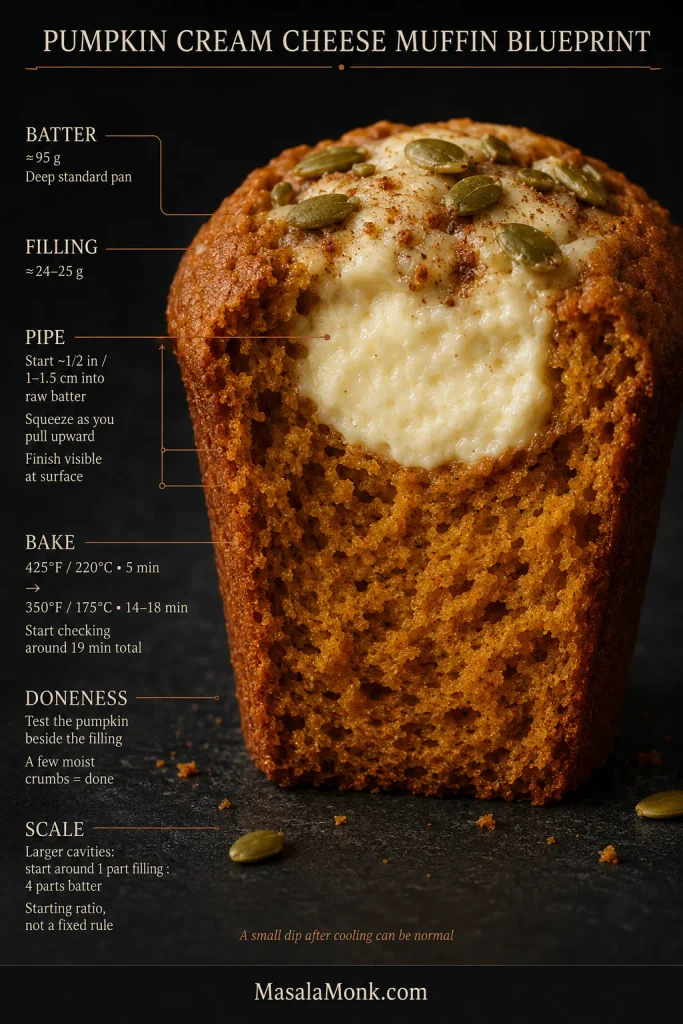
Annotated cutaway pumpkin cream cheese muffin showing batter and filling amounts, piping position, two-stage baking temperatures, doneness test and scaling ratio.
Use this as a troubleshooting map rather than a second recipe card. When a batch looks different, compare the batter-to-filling balance, piping position, bake sequence and doneness check before changing the formula itself.

Let the first one cool enough for the filling to settle, then cut straight through the middle. The tender pumpkin crumb should pull apart around a creamy white center, with salty pepitas cracking across the top. Take another bite, and there should still be cream cheese there.
Jump to the recipe ↑ · Troubleshooting · Back to top ↑

Posted on Leave a comment

Pumpkin Bread Recipe: Easy, Moist Pumpkin Loaf

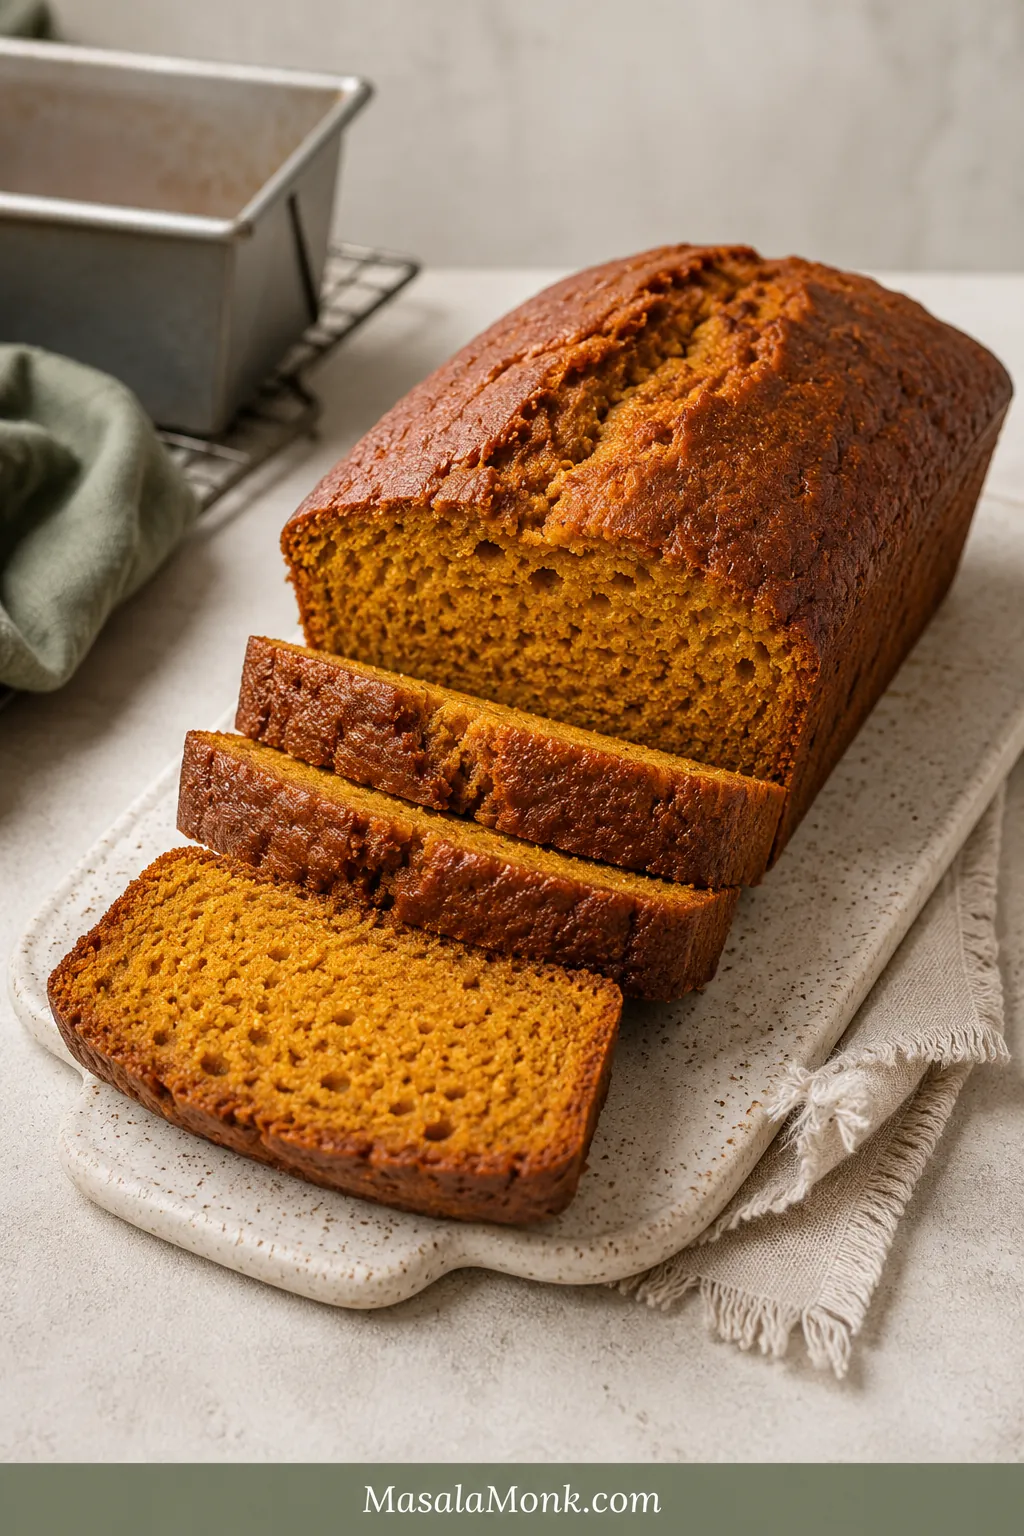
Pumpkin bread should feel soft and generous when you cut into it: warmly spiced, unmistakably pumpkin and moist enough to stay tender after cooling. The challenge is getting that softness without leaving a heavy, wet stripe through the center.

A loaf that looks beautifully baked on top and turns wet when sliced is especially frustrating. The good news is that the middle gives you clues before the knife goes in. The thickness of the puree, the way the batter falls and the appearance of the center crack all help you judge what is happening inside.

This easy pumpkin bread recipe uses one bowl, a whisk and a spatula—no electric mixer and no complicated technique. It is simple enough for breakfast, warm enough for an autumn afternoon and sturdy enough to wrap and take to someone else. The first slice feels like a treat; the loaf often cuts even more cleanly the next morning.

Quick Answer

Use 340 g / 1½ cups plain pumpkin puree with 220 g / 1¾ cups all-purpose flour. Bake the batter in a light-colored 9×5-inch / 23×13 cm metal loaf pan at 350°F / 175°C and begin checking at 52 minutes.

The center crack should look matte rather than glossy. Press beside it for a gentle spring, then check that a toothpick or thin skewer shows moist crumbs instead of liquid batter. For final confirmation, an optional thermometer usually reads 200–205°F / 93–96°C.

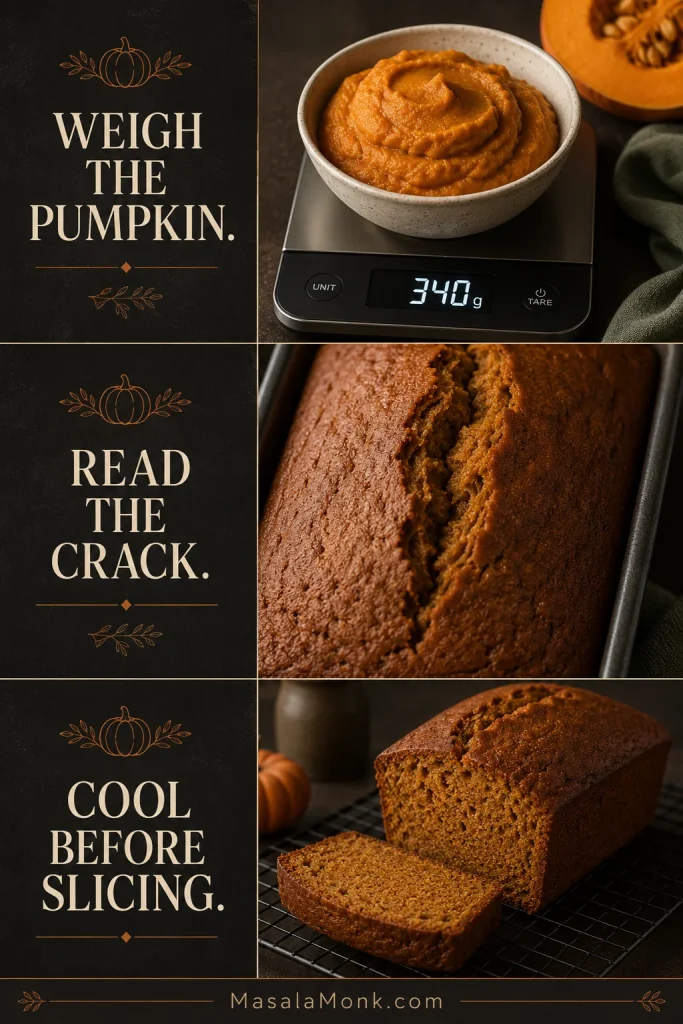
Weigh the pumpkin. Read the crack. Cool before slicing.

These are the three checks to remember before baking.

Three-panel pumpkin bread guide showing 340 g pumpkin puree on a scale, a matte center crack and a cooled sliced loaf.
Weigh the pumpkin, read the crack and cool before slicing—three checks that protect texture.

Easy, Moist Pumpkin Bread Recipe

A lightly firm top gives way to a plush orange crumb. Pumpkin comes first, cinnamon follows, and ginger, nutmeg and cloves stay quietly in the background. The loaf itself is dairy-free, so serve it plain or choose a dairy-free topping when needed.

Judge the crumb after the loaf has cooled.

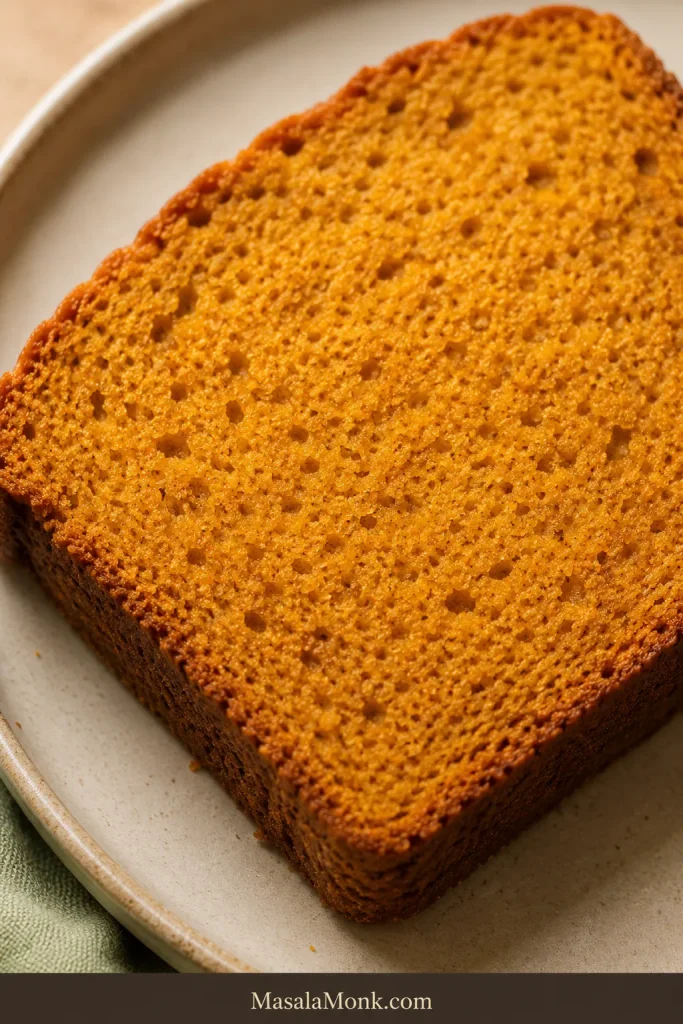
Close-up of a thick pumpkin bread slice showing orange, fully baked crumb with small pores and browned crust.
The crumb should look plush and moist, not shiny, wet or compressed.

Prep: 15 minutes
Bake: about 55–65 minutes
Cooling: 1½–2 hours

Total: about 2 hours 10 minutes–2 hours 30 minutes
Yield: 1 loaf / about 10 slices
Pan: 9×5 inches / 23×13 cm

Equipment

  • Light-colored metal 9×5-inch / 23×13 cm loaf pan
  • Large mixing bowl
  • Whisk
  • Flexible spatula

A kitchen scale is the most useful extra. Parchment paper and a cooling rack are strongly recommended. Use a toothpick or thin skewer for checking the middle; an instant-read thermometer is optional.

Ingredients

  • 1¾ cups all-purpose flour, 220 g
  • 1 teaspoon baking soda
  • ½ teaspoon baking powder
  • ¾ teaspoon fine salt
  • 2 teaspoons ground cinnamon
  • ½ teaspoon ground ginger
  • ¼ teaspoon ground nutmeg
  • ⅛ teaspoon ground cloves
  • 2 large eggs, preferably at room temperature
  • ¾ cup packed light brown sugar, 150 g
  • ¼ cup granulated sugar, 50 g
  • 1½ cups plain pumpkin puree, 340 g
  • ½ cup neutral oil, 120 ml
  • 2 teaspoons vanilla extract, 10 ml
  • Optional: 2 tablespoons pumpkin seeds
  • Optional cinnamon-sugar top: 1 tablespoon sugar mixed with ¼ teaspoon cinnamon

Pumpkin pie spice option: Replace the cinnamon, ginger, nutmeg and cloves with about 1 tablespoon of homemade pumpkin pie spice.

Keep the main formula steady before changing add-ins.

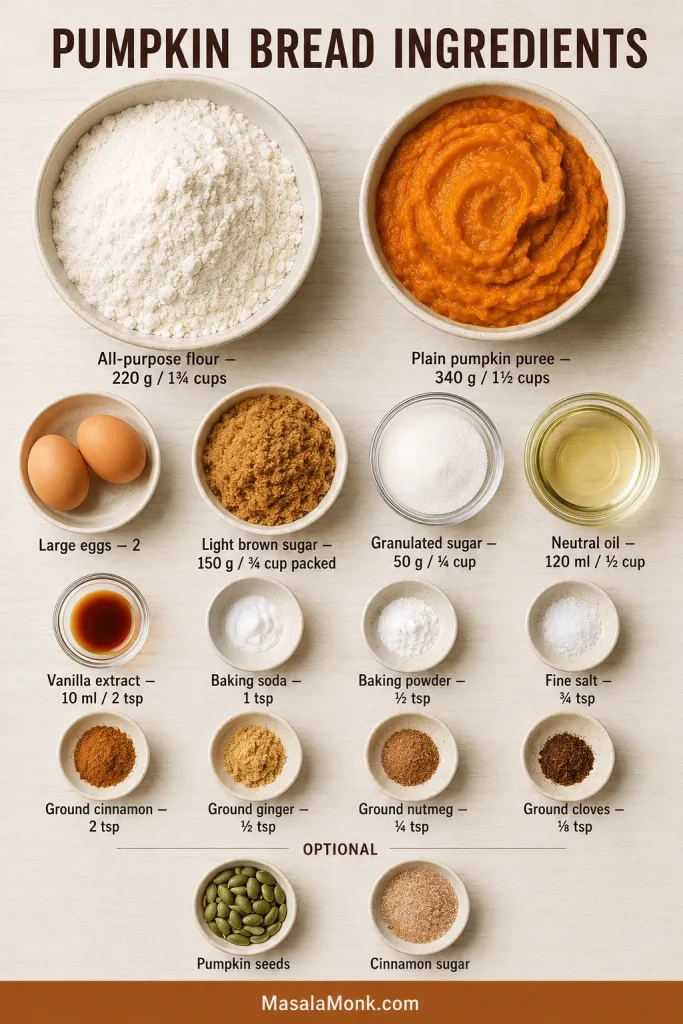
Overhead pumpkin bread ingredient board with flour, pumpkin puree, eggs, sugars, oil, vanilla, leaveners, salt and spices.
Pumpkin brings moisture, flour and eggs provide structure, and oil keeps the cooled crumb tender.

Instructions

Set Up the Oven and Pan

  1. Preheat the oven. Heat the oven to 350°F / 175°C. Position a rack in the center. When the top regularly browns too quickly, move the pan one level away from the oven’s strongest heat source. In many ovens, that means one level below center.
  2. Prepare the pan. Lightly grease a 9×5-inch loaf pan. If using parchment, line the base and long sides, leaving enough overhang to lift out the bread.

Mix the Batter

  1. Whisk the eggs and sugars. Whisk the eggs, brown sugar and granulated sugar in a large bowl until smooth and slightly lighter.
  2. Add the pumpkin and oil. Whisk in the pumpkin puree, oil and vanilla until the mixture looks evenly orange and no oily streaks remain.
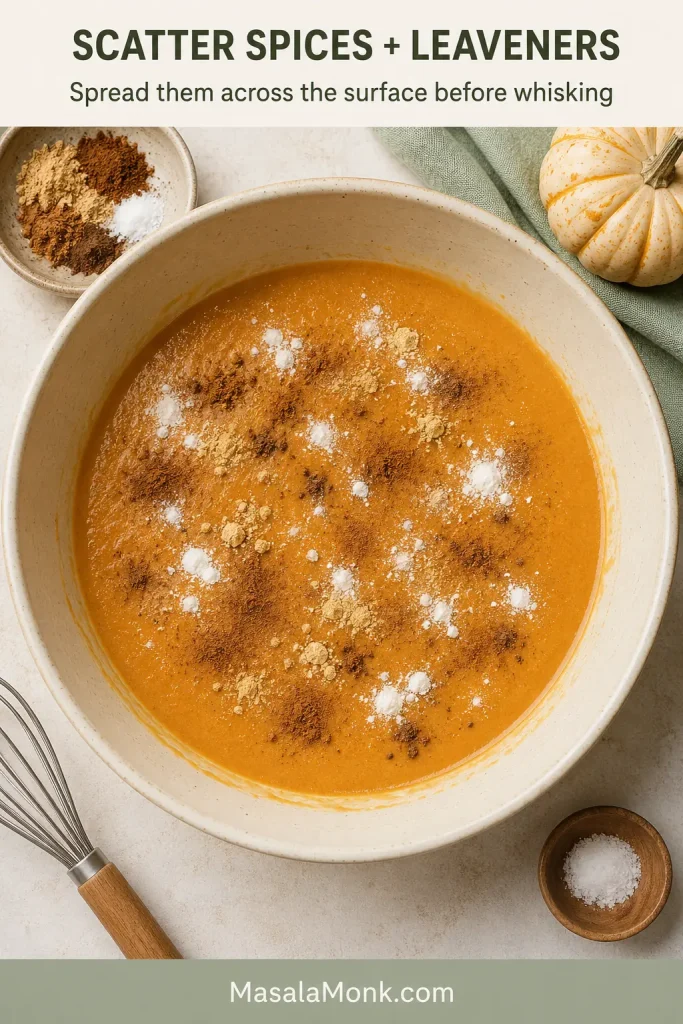
  3. Add the leaveners and spices. Break up any lumps in the baking soda and baking powder. Sprinkle the leaveners, salt and spices across the entire surface, then whisk for about 20 seconds while scraping around the bowl.
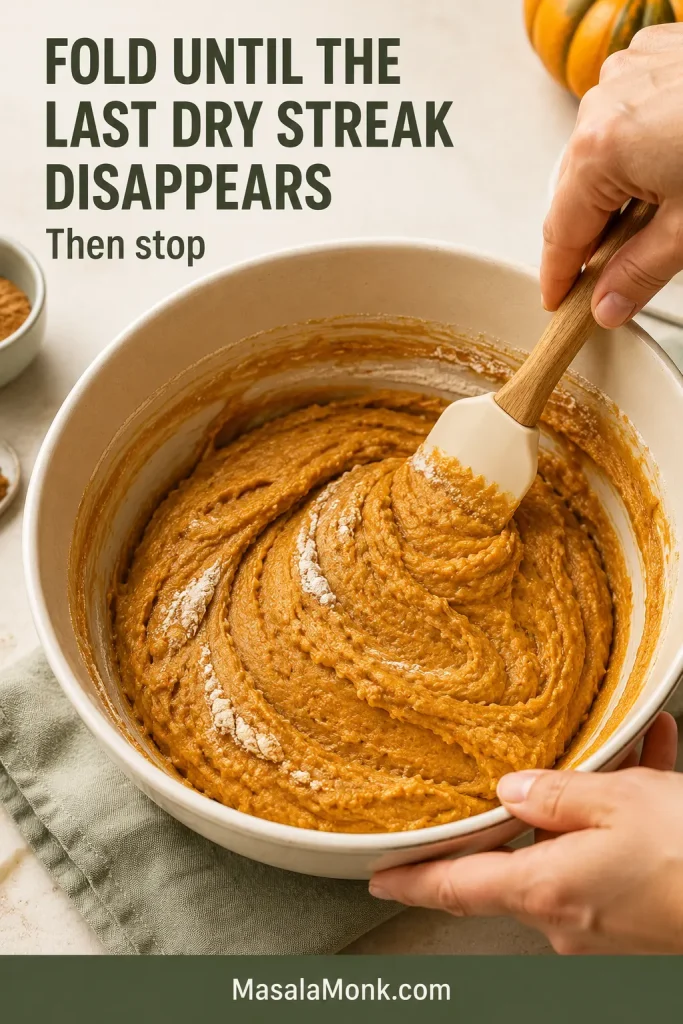
  4. Fold in the flour. Add the flour and switch to a spatula. Fold from the bottom until the final dry streak disappears. Scrape across the base once, then stop.
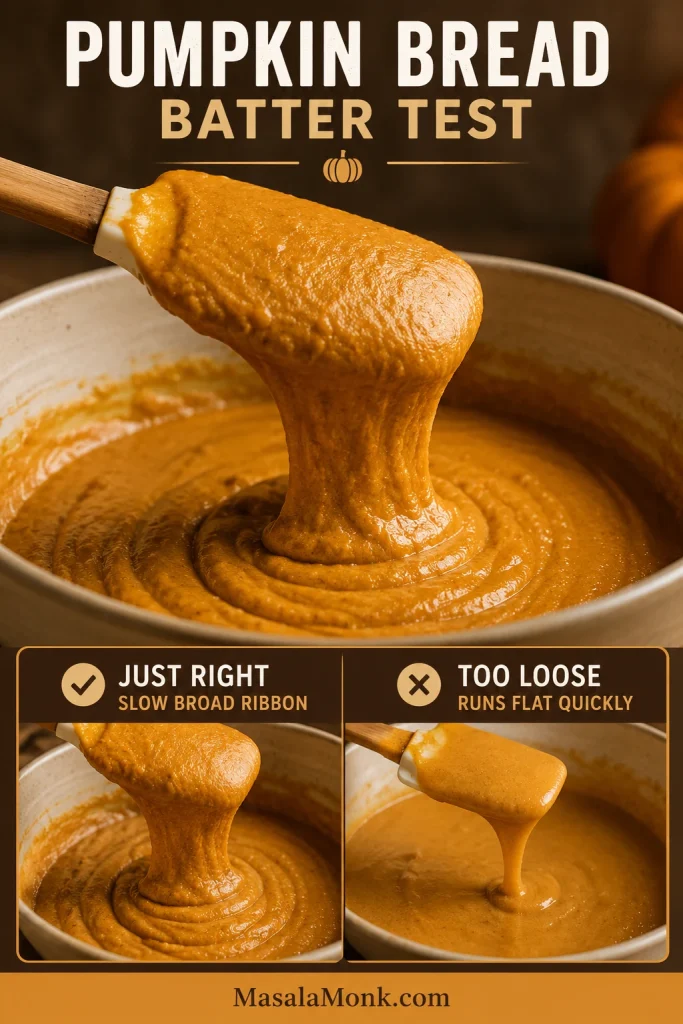
  5. Check the batter. Lift the spatula. The mixture should fall in a slow, broad ribbon and settle back into the bowl. A rough-looking surface and a few small lumps are harmless.

Fill, Bake and Cool

  1. Fill the pan. Scrape in the batter and level the top lightly. Leave the pan about one-quarter to one-third empty so the loaf has room to rise. Add pumpkin seeds or cinnamon sugar, if using.
  2. Bake and protect the crust. Begin checking at 52 minutes. A 9×5-inch metal loaf generally needs about 55–65 minutes. Avoid opening the oven during the first 40 minutes. If the top has enough color before the middle is ready, tent it loosely with foil.
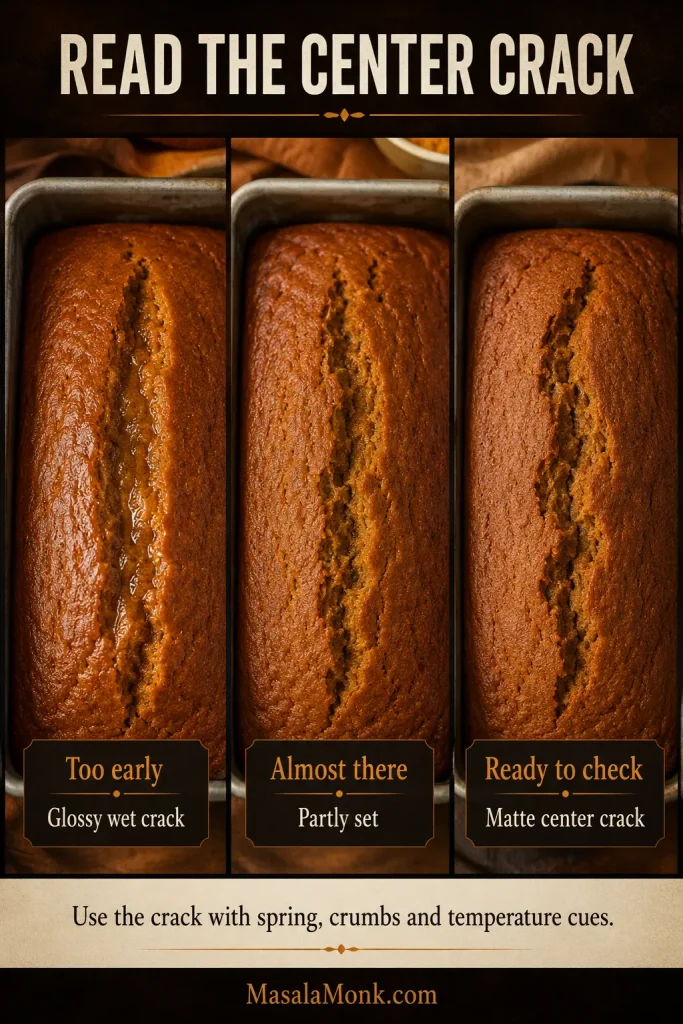
  3. Check the middle. Look for a matte center crack and gentle spring beside it. A toothpick or thin skewer should show moist crumbs rather than liquid batter. If one spot looks clean but the crack still appears glossy, test again slightly beside it.
  4. Cool completely. Leave the bread in the pan for 15 minutes, then transfer it to a wire rack or another dry, heatproof surface. Wait 1½–2 hours before judging the crumb or cutting clean slices.

A successful loaf: risen above the pan, matte inside the center crack and tender enough to bend slightly when sliced, with no wet stripe through the crumb. Moist crumbs are welcome; liquid batter or thick pumpkin paste needs more oven time.

Testing note: This loaf is written around a light-colored 9×5-inch metal pan and 340 g thick pumpkin puree. Treat other pan sizes and formats as starting windows, then finish with the center cues.

Need extra help? If you are using fresh pumpkin, start with choosing and preparing pumpkin puree. If the loaf is already baking, go straight to how to tell when pumpkin bread is done.

What’s in This Guide

Canned Pumpkin, Fresh Pumpkin and Pumpkin Pie Filling

The puree controls more of the final texture than any other wet ingredient. Plain canned pumpkin is the most predictable option because it is smooth and usually thick enough for quick-bread batter. Fresh pumpkin works too, but its water content varies, so adjust the consistency before measuring.

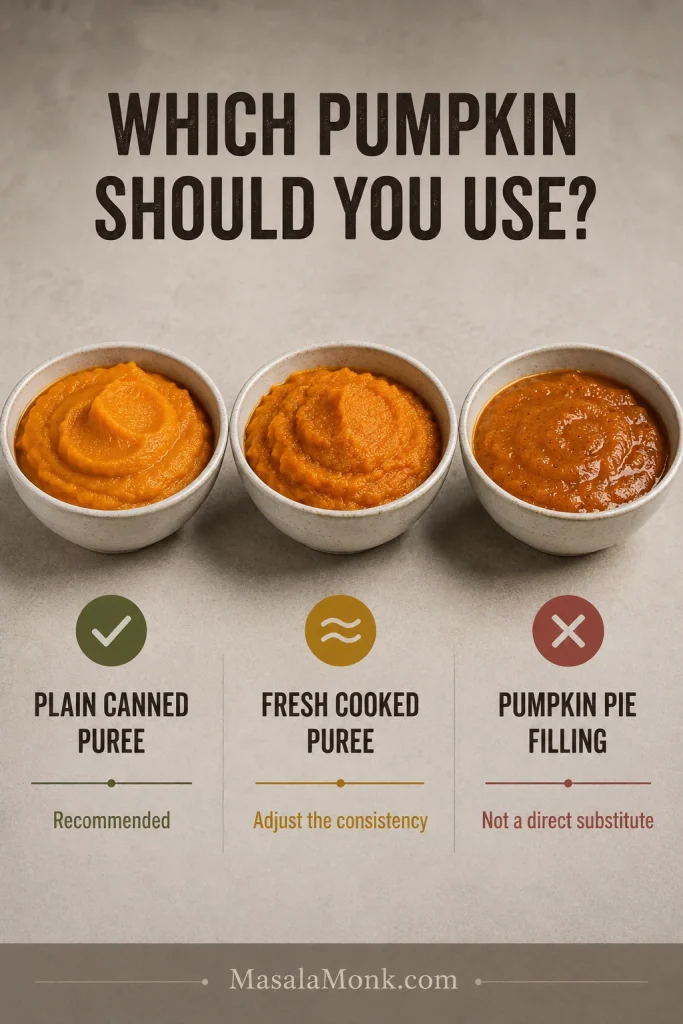
Plain pumpkin puree and pumpkin pie filling behave differently.

Comparison board showing canned pumpkin puree, fresh pumpkin puree and pumpkin pie filling in separate labeled bowls.
Use plain pumpkin puree; pie filling already contains sugar and spices.
Pumpkin productBest usePreparation
Plain canned pumpkin pureeRecommended first choiceMeasure 340 g and use directly.
Homemade cooked pureeGood alternativeBlend until smooth, drain or loosen to match thick canned puree, then weigh 340 g.
Pumpkin pie fillingNot a direct swapIt already contains sugar, spices and other ingredients.
Fresh steamed pumpkinUsually needs drainingPuree smoothly, drain and weigh 340 g.
Fresh roasted pumpkinOften naturally thickerPuree until smooth and loosen only when unusually dry.
Raw grated pumpkinUse a different formulaIt behaves differently from cooked puree.

Can You Use Pumpkin Pie Filling?

Not as a direct substitute here. Plain puree is cooked and blended pumpkin. Pumpkin pie filling has already been sweetened and seasoned and may contain additional ingredients, so it changes the flavor and moisture balance.
Look for plain pumpkin, pumpkin puree or 100% pumpkin on the label.

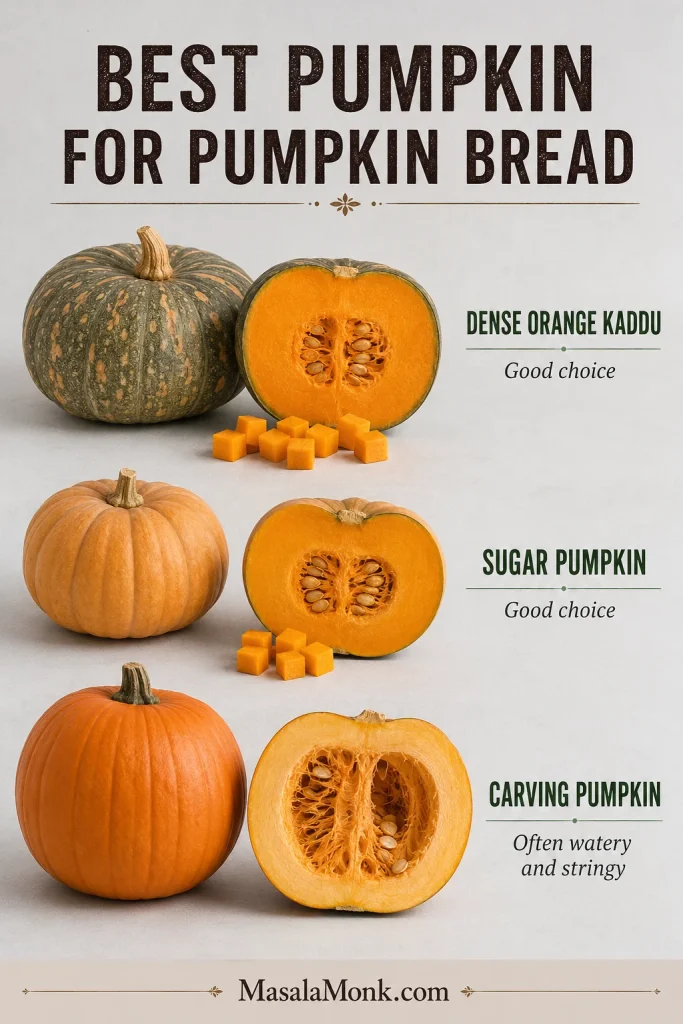
For fresh puree, choose dense cooking pumpkin when possible.

Pumpkin selection guide showing dense orange kaddu, sugar pumpkin and carving pumpkin with cut pieces and labels.
Dense cooking pumpkin makes thicker puree; watery carving pumpkin can loosen the batter.

How to Prepare Fresh Pumpkin Puree

Dense, orange-fleshed kaddu, sugar pumpkin or another cooking pumpkin works best. Large carving pumpkins tend to be stringier and more watery.

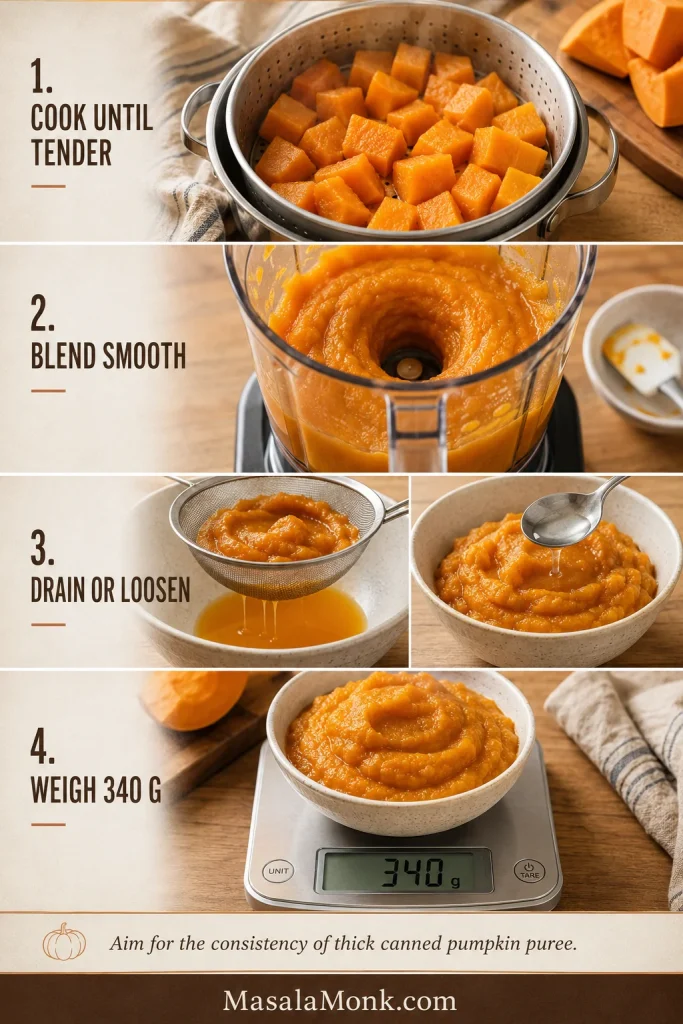
  1. Steam or roast peeled pumpkin pieces until completely tender.
  2. Blend until smooth.
  3. Drain puree that pours or spreads quickly. If roasted puree is dry and pasty, blend in water 1 teaspoon at a time.
  4. Once it resembles thick canned pumpkin, weigh 340 g.

Fresh puree needs thickness control before it goes into batter.

Four-step fresh pumpkin puree process showing peeled pumpkin cooking, blending, draining or loosening, and weighing 340 g.
Cook, blend, adjust thickness and weigh 340 g before adding fresh puree to the batter.

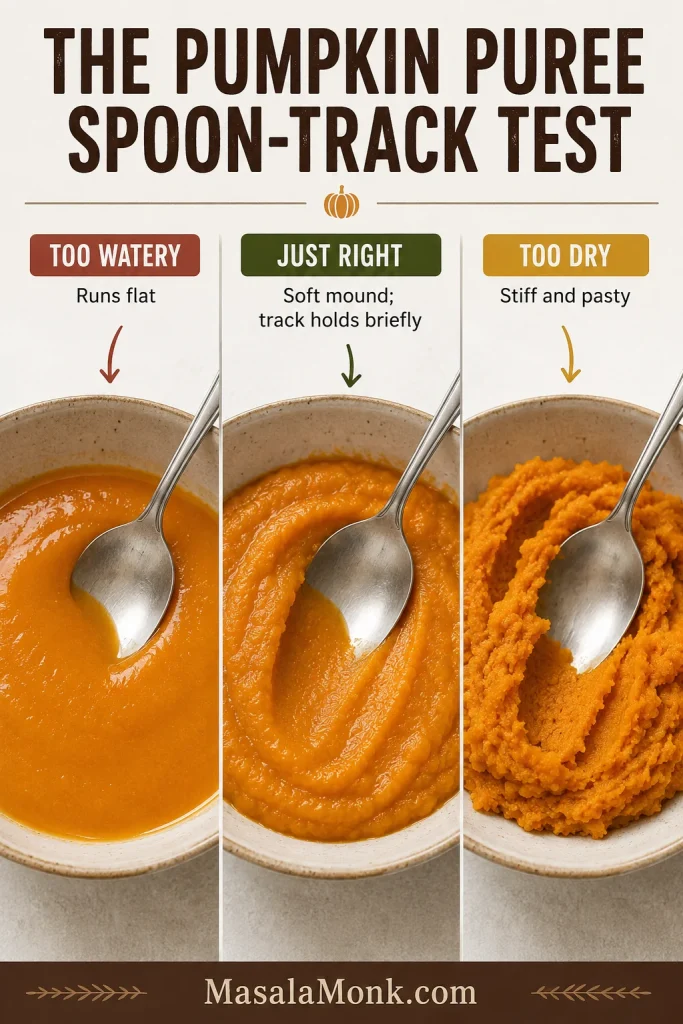
Drag a spoon through the puree. The track should remain visible for a moment. A soft mound that holds briefly is a better sign than a glossy puree that immediately runs flat.

Check the puree texture before measuring it.

Pumpkin puree consistency test showing watery puree, thick puree with a spoon track and overly dry puree.
A spoon track should hold briefly; runny puree can make the loaf heavy.

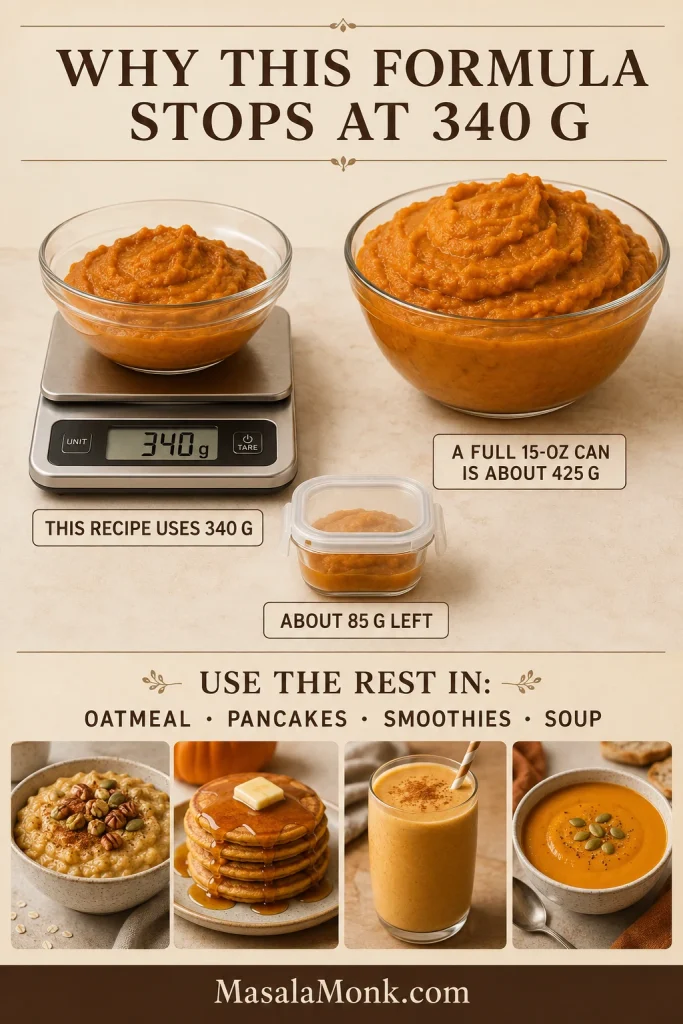
Can You Use the Whole Can? Why This Recipe Stops at 1½ Cups

A full 15-ounce / 425 g can adds more moisture and more batter than this formula is designed to hold. Whole-can pumpkin breads can be excellent, but they need their own balance of flour, egg, pan capacity and baking time.

This recipe leaves about 85 g, or roughly one-third cup. Keep it covered in the refrigerator for a few days, or freeze it in a labeled portion for oatmeal, pancakes, smoothies or soup.

The extra pumpkin is useful, but not in this loaf.

Pumpkin puree measurement board showing 340 g used in the recipe, about 425 g in a full can and about 85 g left over.
Use 340 g pumpkin puree; save the small leftover from a full can for another dish.

For the full reason this loaf stops at 340 g pumpkin puree, see why this pumpkin bread stays moist without turning gummy.

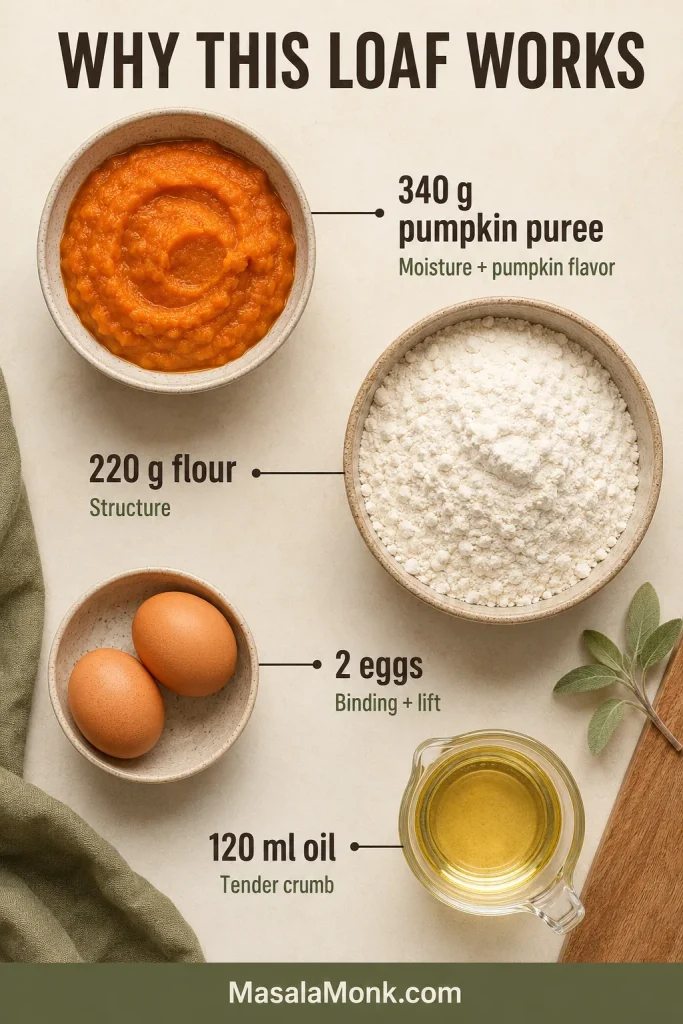
Why This Pumpkin Bread Stays Moist Without Turning Gummy

Using 340 g of puree keeps the pumpkin flavor clear while leaving enough flour and egg to support the moisture. The loaf stays pumpkin-first rather than tasting like a spice cake with pumpkin added to it.

Neutral oil keeps the cooled crumb soft. Brown sugar adds caramel depth and helps the bread retain moisture, while the smaller amount of granulated sugar rounds out the sweetness without bringing more molasses flavor.

Baking soda helps with early lift and browning. The small amount of baking powder supports the thick batter while the middle catches up. Because ovens and loaf pans vary, the timer tells you when to start looking; the center tells you when to stop.

This is the formula logic in one glance.

Ingredient-ratio board showing 340 g pumpkin puree, 220 g flour, 2 eggs and 120 ml oil with their roles in pumpkin bread.
Pumpkin adds moisture, flour and eggs set structure, and oil keeps the crumb tender.

Ingredient Notes

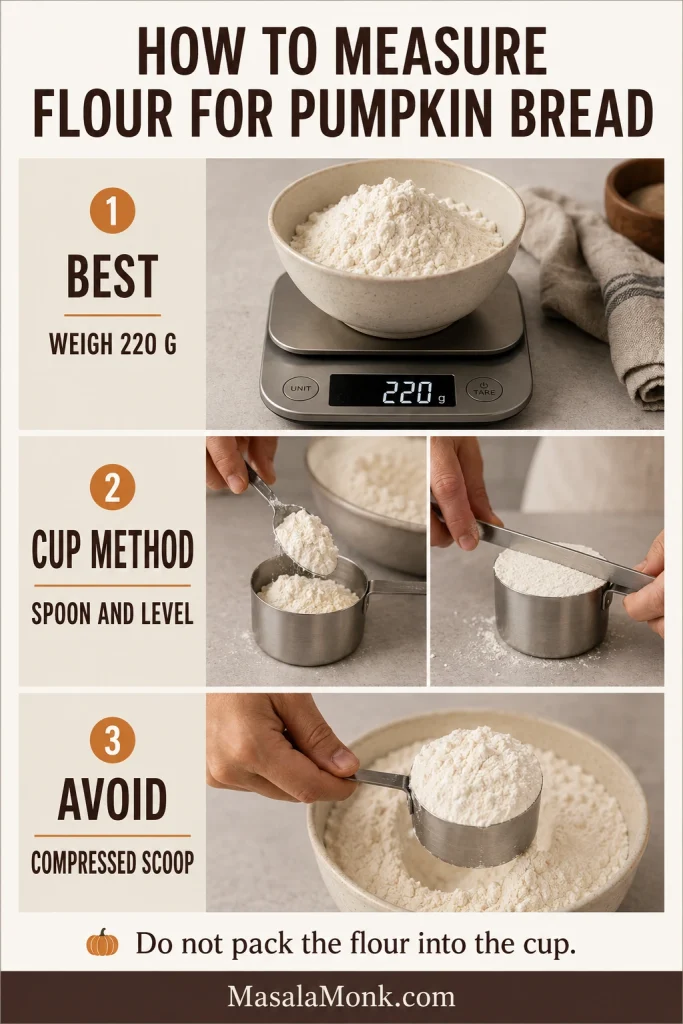
  • Flour: 220 g gives the most repeatable result. When measuring by cups, loosen the flour, spoon it into the measure and level without pressing.
  • Brown sugar: light brown sugar keeps the pumpkin and spices clear. Dark brown sugar gives the loaf a deeper molasses note and darker color.
  • Oil: vegetable, canola, sunflower, grapeseed or mild avocado oil all suit this loaf.
  • Spices: use cinnamon or a spice blend that still smells lively in the jar. Faint spices become even quieter after baking.

A packed cup can quietly change the loaf.

Flour measurement guide showing 220 g flour on a scale, spoon-and-level cup method and compressed scoop to avoid.
Weigh 220 g flour, or spoon and level it gently to avoid a dry loaf.

Apple pie spice can work when that is what you already have, although its balance is usually softer and less clove-forward. Add a tiny pinch of cloves for a more familiar pumpkin-spice finish.

The Best Pumpkin Bread Pan—and How Other Sizes Change the Bake

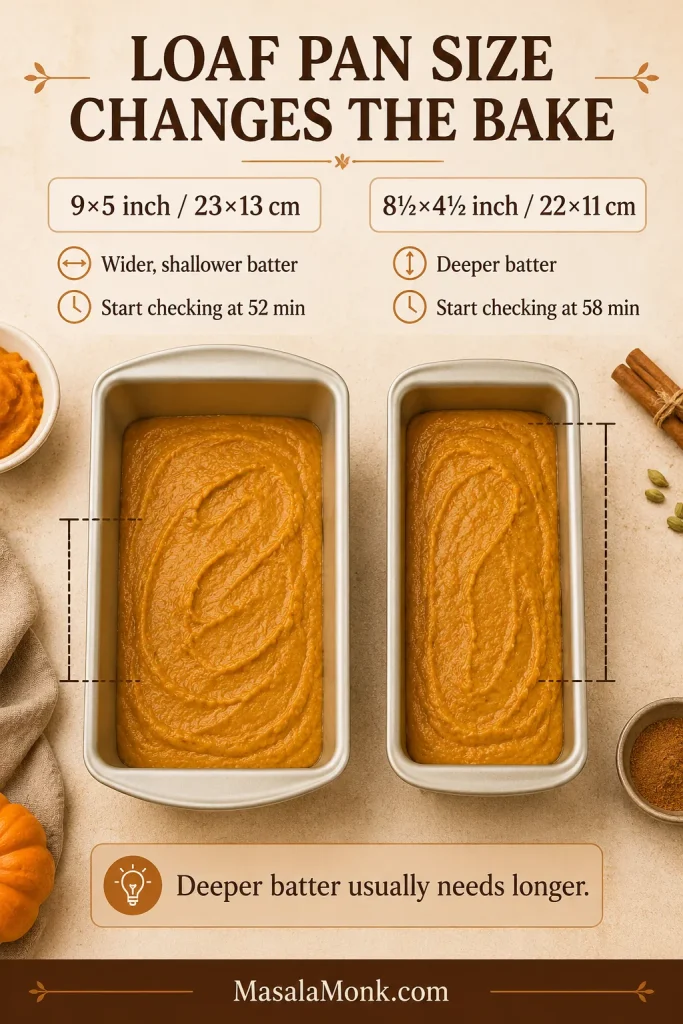
A light-colored metal 9×5-inch / 23×13 cm loaf pan is the most dependable choice. Measure across the inside of the top edge. An 8½×4½-inch pan holds the batter more deeply and usually needs extra time.

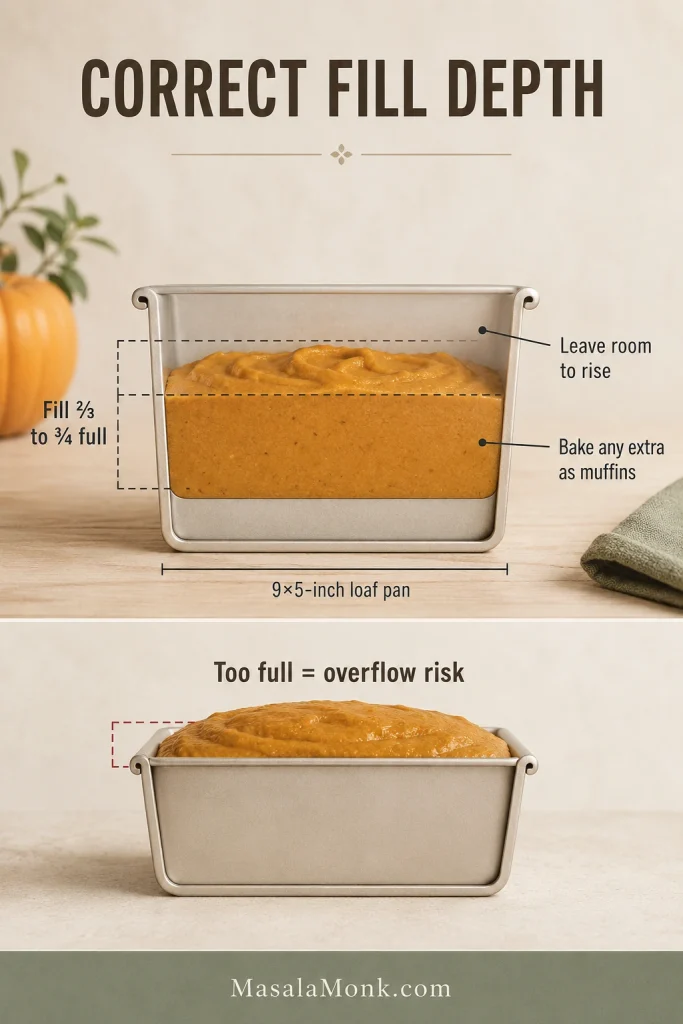
Pan Fill and Pan Size

Batter depth affects both rise and bake time.

Loaf pan fill-depth guide showing pumpkin bread batter filled two-thirds to three-quarters full with a too-full warning.
Keep the pan two-thirds to three-quarters full so the batter can rise and bake through.

Deeper batter usually needs more time in the center.

Comparison of 9×5 inch and 8½×4½ inch loaf pans showing shallower and deeper pumpkin bread batter.
A narrower pan holds deeper batter, so the center usually needs more time.

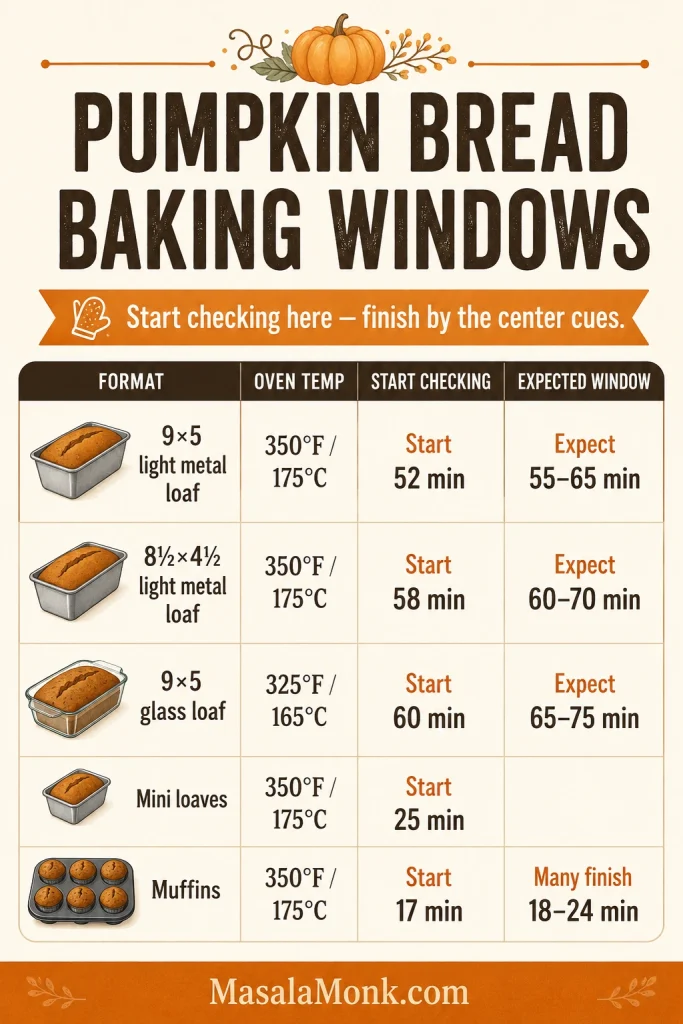
Bake Windows by Format

The following times are starting windows, not fixed finish times. How deeply the batter sits, the pan material and the behavior of your oven matter more than the label on the pan.

FormatOvenStarting guidance
9×5-inch light metal loaf350°F / 175°CStart at 52 minutes; expect roughly 55–65 minutes.
8½×4½-inch light metal loaf350°F / 175°CStart at 58 minutes; expect roughly 60–70 minutes, with more time possible in a deep pan.
9×5-inch glass loaf325°F / 165°CStart around 60 minutes; expect roughly 65–75 minutes and follow the center cues.
Small 5¾×3¼-inch mini loaves350°F / 175°CStart at 25 minutes. Bake until the centers spring back and a tester shows moist crumbs.
Standard muffins350°F / 175°CStart at 17 minutes; many batches fall around 18–24 minutes.

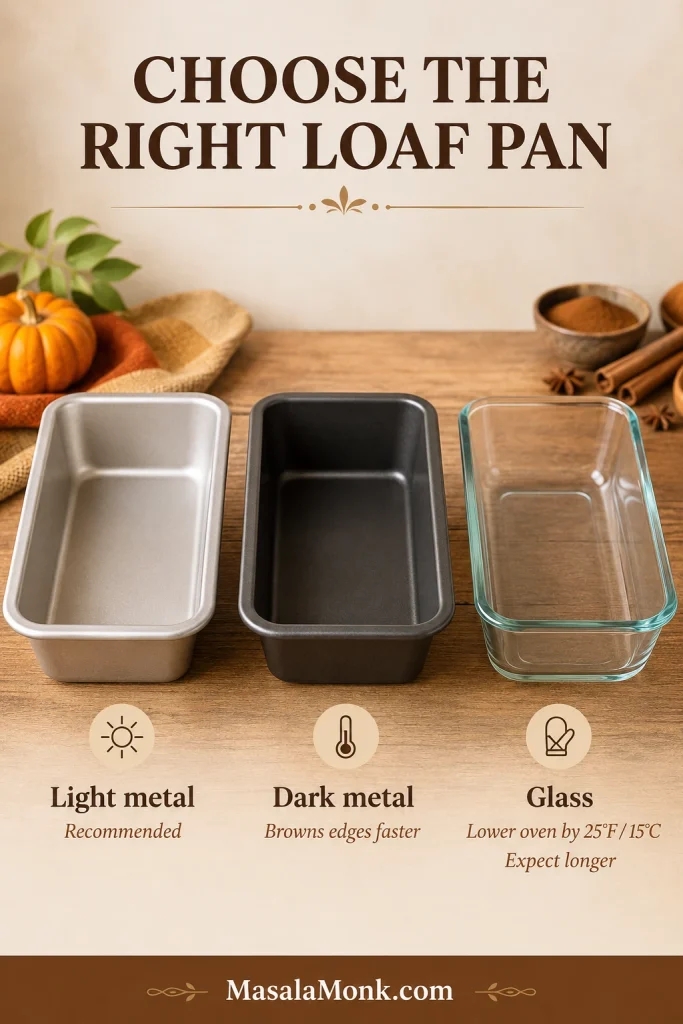
Pan Material Notes

Light metal allows the middle to finish without darkening the sides too aggressively. Glass warms more slowly and retains heat for longer, so reduce the oven by 25°F and expect additional time. King Arthur Baking explains the difference in its comparison of glass, metal and stoneware baking pans.

Pan material changes browning and timing.

Pan material guide showing light metal, dark metal and glass loaf pans with baking notes for pumpkin bread.
Light metal is the safest default; dark metal browns faster and glass bakes differently.

Fill mini loaf pans and muffin cups about two-thirds full. Move finished muffins to a rack or another dry, heatproof surface after a short rest so their bottoms do not become damp.

Bake-Windows Visual Guide

Start with the timing window, then trust the center.

Pumpkin bread baking chart showing start-check times for a 9×5 loaf, 8½×4½ loaf, glass loaf, mini loaves and muffins.
Use timing as a starting window, then finish with center cues.

Four Batter and Baking Cues That Matter

What the Batter Should Look Like

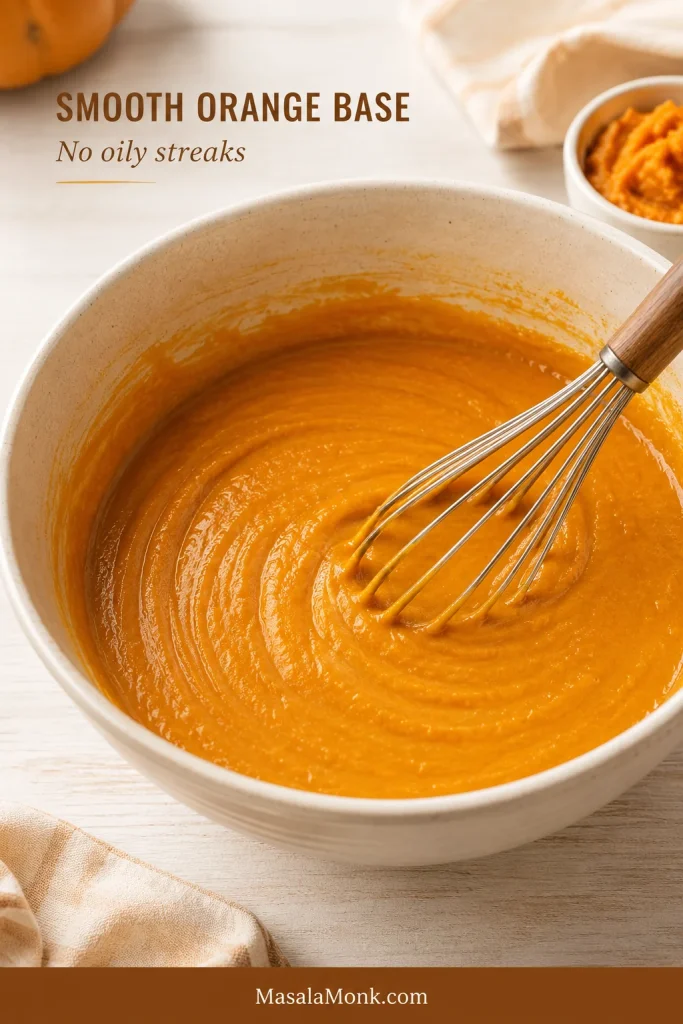
  1. Smooth orange base: the eggs, sugars, pumpkin, oil and vanilla should look evenly blended, without oily streaks around the bowl.
  2. Thick but mobile batter: it should fall from the spatula in a slow, broad ribbon. A slightly rough surface is fine; a glossy batter that immediately runs flat may be too loose.
  3. Safe batter depth: leave roughly one-quarter to one-third of the pan empty. A deeper layer takes longer to set through the middle.
  4. Protected crust: the cinnamon-and-pumpkin aroma may arrive before the loaf is ready. If the top darkens early, cover it loosely with foil and let the center continue baking.

The wet base should look smooth before the flour goes in.

Cream mixing bowl with smooth orange pumpkin bread wet mixture and a whisk, labeled no oily streaks.
Whisk until the pumpkin mixture is smooth, orange and free of oily streaks.

Distribute the small dry ingredients before adding flour.

Overhead bowl of pumpkin wet mixture with small amounts of spices, salt and leaveners scattered across the surface.
Scatter spices and leaveners across the wet mix so they distribute evenly.

Stop mixing as soon as the flour disappears.

Hands folding thick pumpkin bread batter with a spatula while a few final dry flour streaks remain in the bowl.
Fold just until the last dry flour streak disappears, then stop.

The finished batter should move slowly, not pour loosely.

Pumpkin bread batter test showing thick batter falling in a slow broad ribbon compared with looser batter that runs flat.
Finished batter should fall in a slow, broad ribbon instead of running flat.

How to Tell When Pumpkin Bread Is Done

Visual Doneness Cues

Color alone is unreliable in a loaf made with pumpkin, brown sugar and spices. Check the deepest part with these four signs:

The center crack tells you when to start checking.

Three-stage pumpkin bread center-crack guide showing glossy wet crack, partly set crack and matte crack ready to check.
A matte center crack means the loaf is ready for crumb, spring and temperature checks.
  • Center crack: the visible crumb looks matte and set, without a glossy pool underneath.
  • Gentle press: the surface beside the crack springs back instead of holding a deep indentation.
  • Toothpick or skewer: a few moist crumbs are ideal. Liquid batter or a thick coating of pumpkin mixture needs longer. When one spot looks clean but the crack remains glossy, test again slightly beside it.
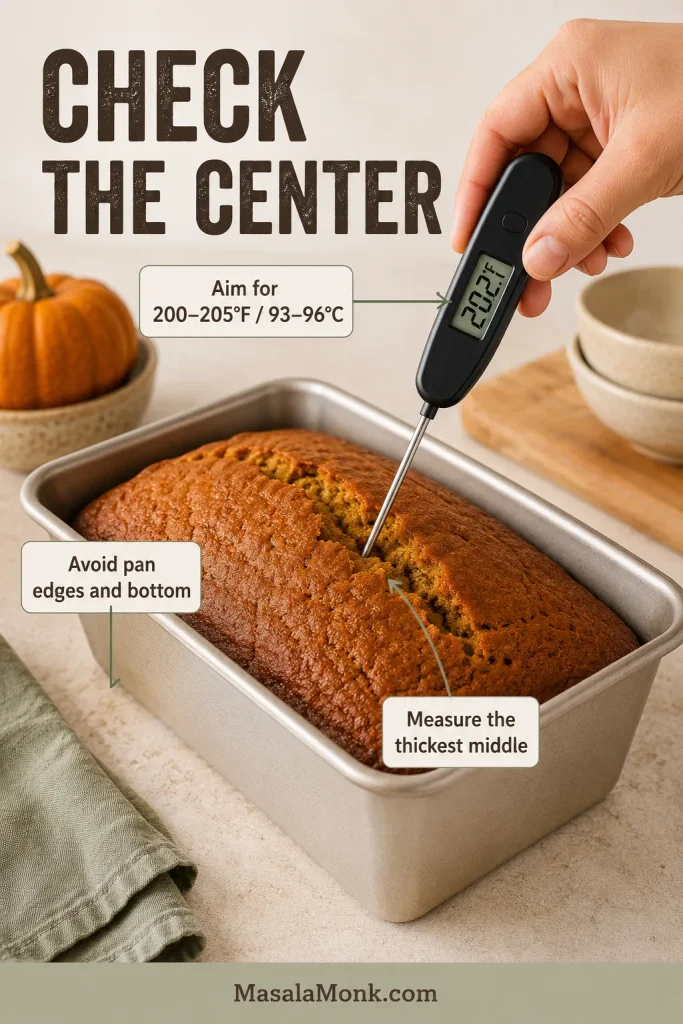
  • Optional temperature: use 200–205°F / 93–96°C as final confirmation after the visual checks look right. Insert the probe through the center crack and place the tip in the deepest part of the loaf, away from the pan. ThermoWorks gives the same range in its guidance for quick-bread doneness temperatures.

Tester and Temperature Checks

Read what the tester brings out of the loaf.

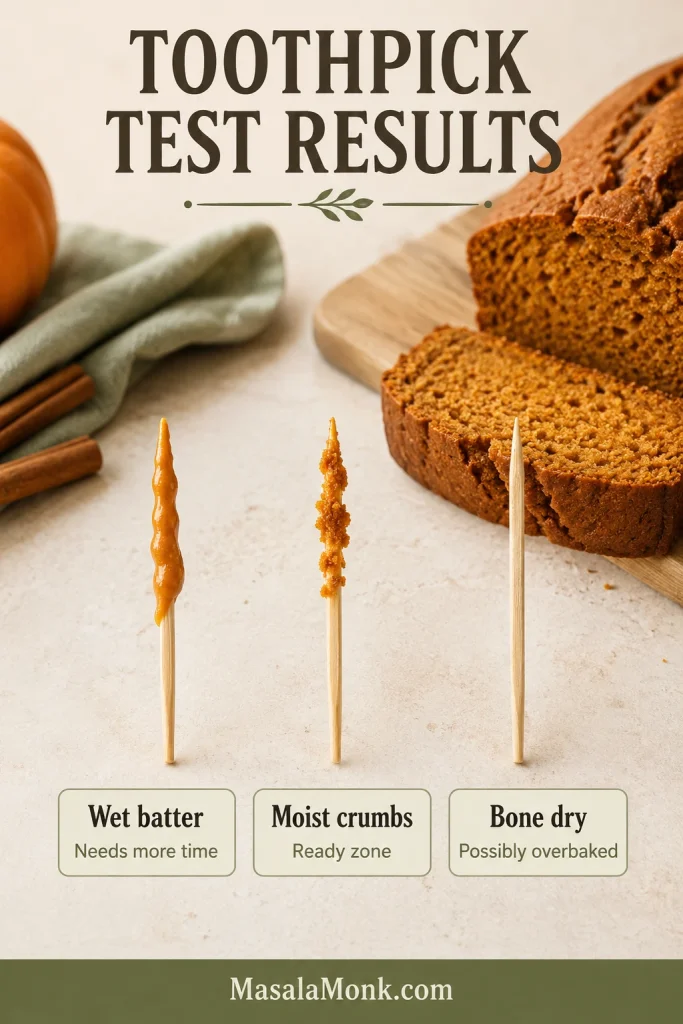
Three toothpicks showing wet batter, moist crumbs and a dry tester beside sliced pumpkin bread.
Wet batter needs more time; moist crumbs usually mean the center is ready.

Temperature is most useful in the deepest center.

Instant-read thermometer inserted into the center of a pumpkin bread loaf with labels for 200–205°F and avoiding pan edges.
Check the thickest center and avoid the pan edges; aim for 200–205°F / 93–96°C.

Use the final cues together, not one by itself.

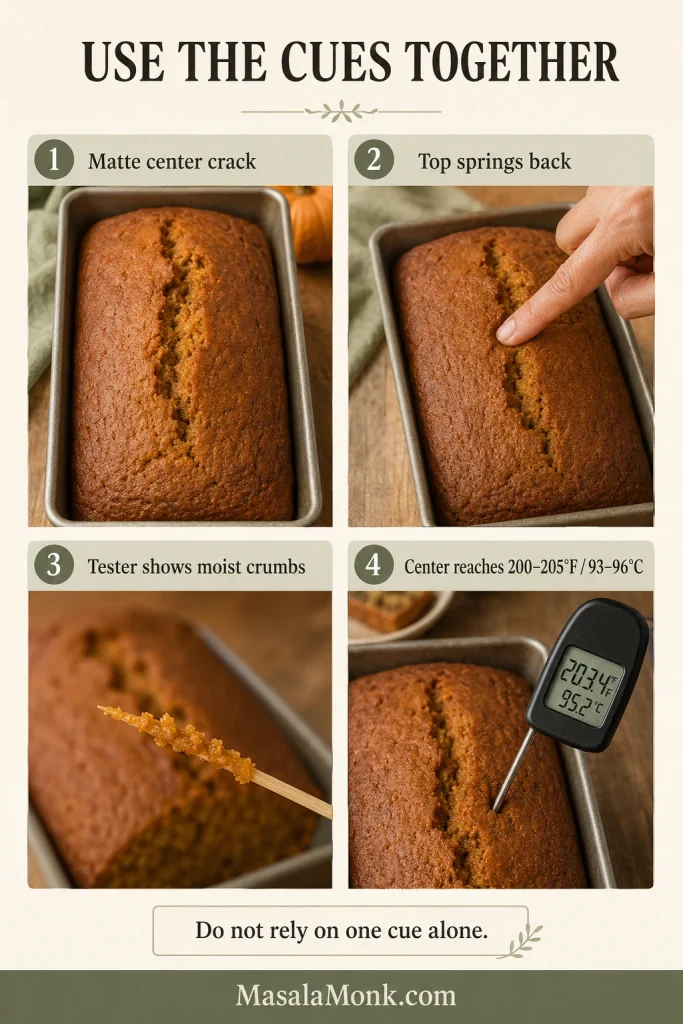
Four-panel doneness guide showing matte center crack, spring-back test, moist crumbs on a skewer and thermometer reading about 203°F.
Use the cues together: matte crack, gentle spring, moist crumbs and 200–205°F.

Pumpkin Bread Troubleshooting: Gummy, Sunken, Dry or Dark

Match the symptom before changing the whole recipe. Wet puree, inaccurate flour measurement, pan depth, uneven batter and an unfinished center explain many common problems.

If the loaf is still in the oven, check the doneness cues before diagnosing it as a failed loaf.

Wet, Gummy or Sunken Center

Compare the center only after the loaf has cooled.

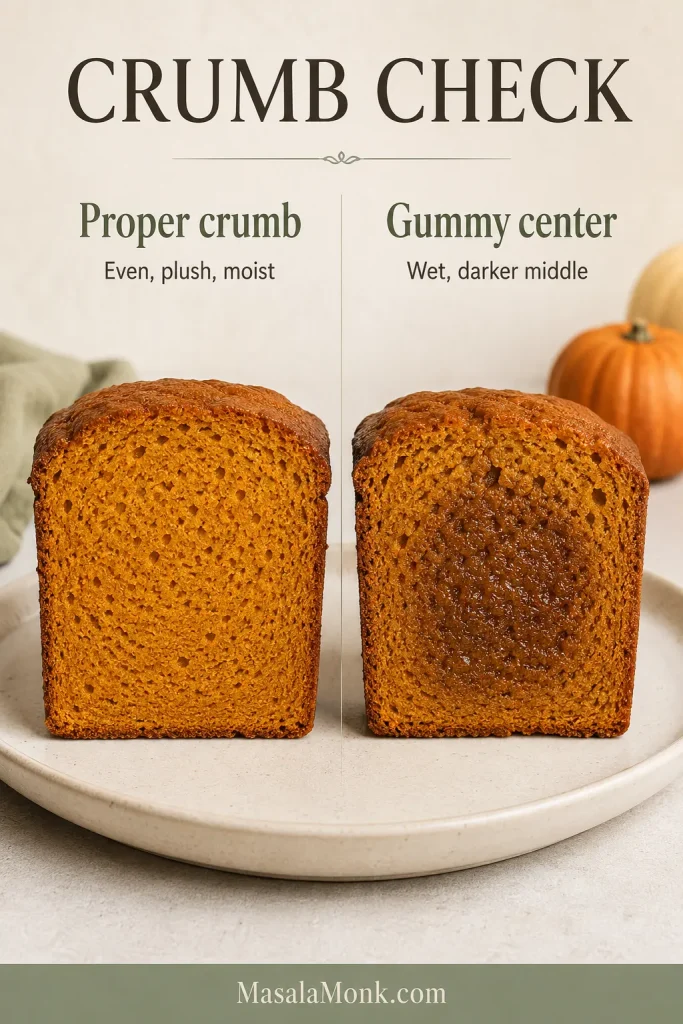
Side-by-side pumpkin bread slices showing a proper even crumb and a gummy darker wet center.
A wet-looking, darker center usually means the loaf needed more time or thicker puree.

For a bottom stripe, check moisture and the lower crumb.

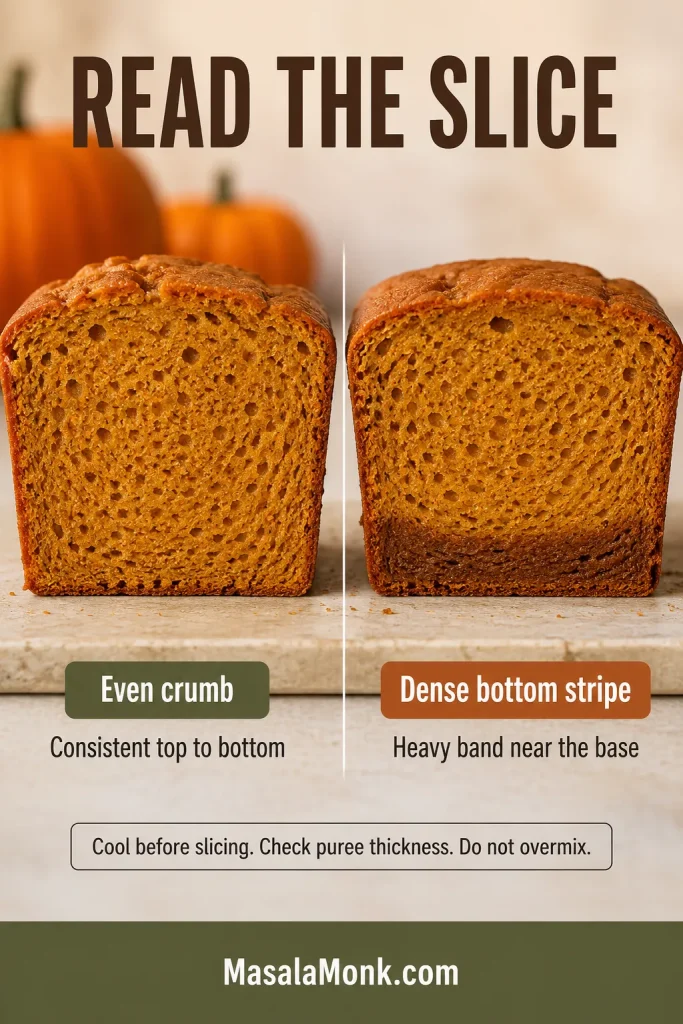
Comparison of pumpkin bread slices showing even crumb on one side and a dense darker bottom stripe on the other.
A dense bottom stripe usually points to excess moisture, uneven batter or an underbaked lower crumb.
ProblemLikely causesWhat to do next
Wet or gummy middleLoose puree, too much pumpkin, too little flour, deep pan, early removal or slicing while hotDrain fresh puree, weigh the key ingredients and bake until the deepest section no longer shows liquid batter.
Dense stripe along the bottomExcess liquid, separation in the batter or an underbaked lower crumbBlend the wet mixture evenly, confirm the puree is thick and give the lower center enough time.
Sunken middleCenter not set, too much liquid, excess leavening or repeated early oven openingKeep the oven closed during the rise and confirm the center before removing the pan.

Dry, Tough, Dark or Stored Too Soon

Match the symptom before changing the recipe.

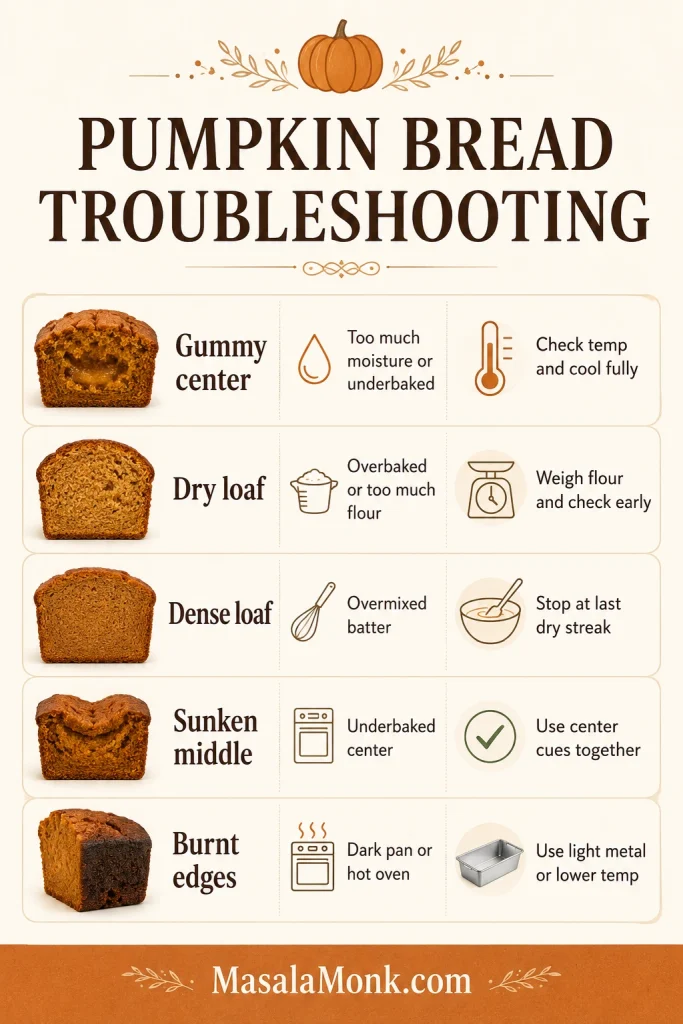
Pumpkin bread troubleshooting chart listing gummy center, dry loaf, dense loaf, sunken middle and burnt edges with causes and fixes.
Most fixes trace back to moisture, flour, mixing, pan depth or bake time.
ProblemLikely causesWhat to do next
Dry or crumbly breadToo much flour, excessive baking, dark pan or major reductions in sugar or oilMeasure flour carefully, begin checking on time and protect the crust if it darkens early.
Tough or rubbery crumbVigorous mixing after the flour was addedFold only until the final dry streak disappears.
Dark crust with a wet middleDark pan, strong heat above the loaf, high oven temperature or batter sitting too deeplyUse light metal, move the pan one level away from the strongest heat source and tent the top once it has enough color.
Overflowing batterPan too small or filled too highKeep the batter below three-quarters full and bake excess as muffins.
Repeatedly wet middle despite normal timingOven running cool or not fully preheatedVerify the oven temperature with a separate thermometer before changing the formula.
Sticky bottom after storageLoaf wrapped before it was fully coolCool completely before storing and use parchment or a replaceable paper towel in humid conditions.

Substitutions and What They Change

Bake the original loaf once before changing several structural ingredients together. These exact substitutions have not been validated as separate versions of this formula, so change one structural ingredient at a time and expect the texture to shift.

Once the basic loaf is baking evenly, small changes are easier to judge. For topping ideas instead of structural swaps, jump to easy variations.

Use these swaps as texture direction, not tested ratios.

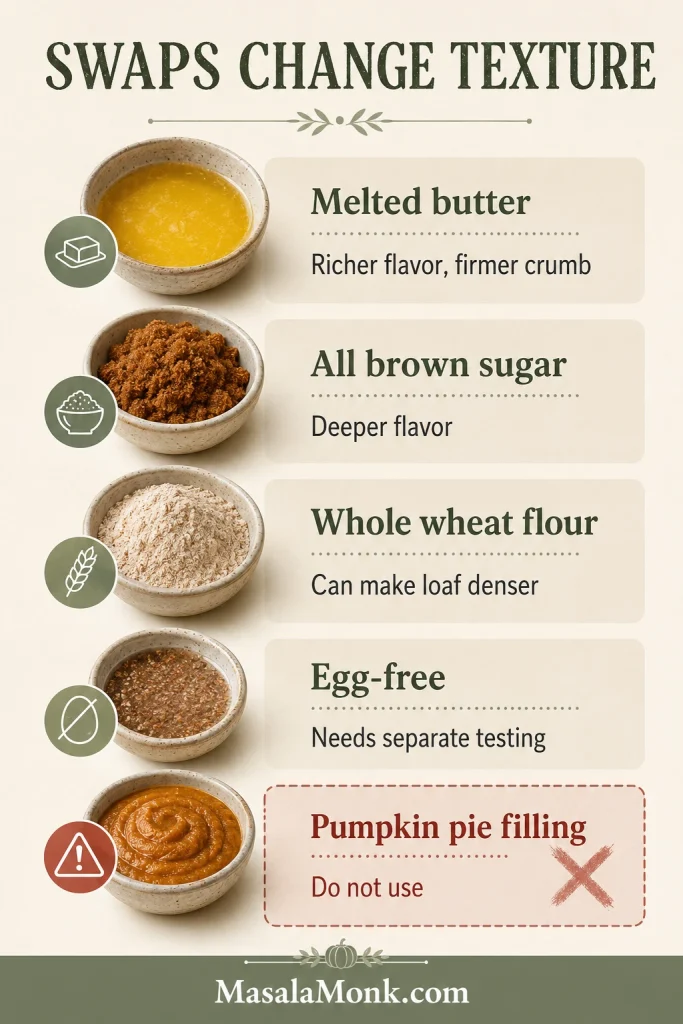
Substitutions board for pumpkin bread showing melted butter, brown sugar, whole wheat flour, egg-free caution and pumpkin pie filling warning.
Texture direction, not tested ratios: change one structural ingredient at a time.
  • Melted butter: creates a more buttery flavor and a firmer crumb after cooling.
  • Applesauce: adds water and fruit solids without oil’s tenderizing effect. Replace only a small portion rather than all the oil.
  • Yogurt or sour cream: brings richness and acidity, but a large amount can make an already-moist batter heavier.
  • Less sugar: reduces browning, moisture retention and tenderness. A modest reduction is gentler than removing half.
  • Honey or maple syrup: adds liquid as well as sweetness, so neither should replace the granulated sugars cup for cup.
  • Whole-wheat flour: creates a more robust, less delicate crumb. Begin with a partial replacement.
  • Oat, almond or coconut flour: behaves too differently from wheat flour for a dependable cup-for-cup swap here. Use a formula designed around the flour you want.
Gluten-free, vegan, keto and high-protein conversions change several structural parts of the loaf at once. They need separate formulas rather than a chain of small swaps.

Easy Variations

  • Pumpkin seeds: scatter 2 tablespoons over the batter and press lightly so they stay attached.
  • Cinnamon-sugar top: mix 1 tablespoon sugar with ¼ teaspoon cinnamon and sprinkle evenly over the surface.
  • Walnuts or pecans: fold in up to ¾ cup chopped toasted nuts.
  • Raisins: add ½ cup. Soak very dry raisins briefly, then drain and pat them dry.
  • Orange zest: add the finely grated zest of one small orange.
  • Maple glaze: whisk ½ cup / 60 g powdered sugar with 1 tablespoon maple syrup and 1–2 teaspoons milk, adding the milk gradually.

Banana, cream-cheese filling and sourdough change the batter more substantially. For a quick bread built around discard, use this sourdough banana bread recipe.

Keep the topping simple or add nothing at all; this loaf does not need a glaze to feel complete.

Keep the batter steady and change only the finish.

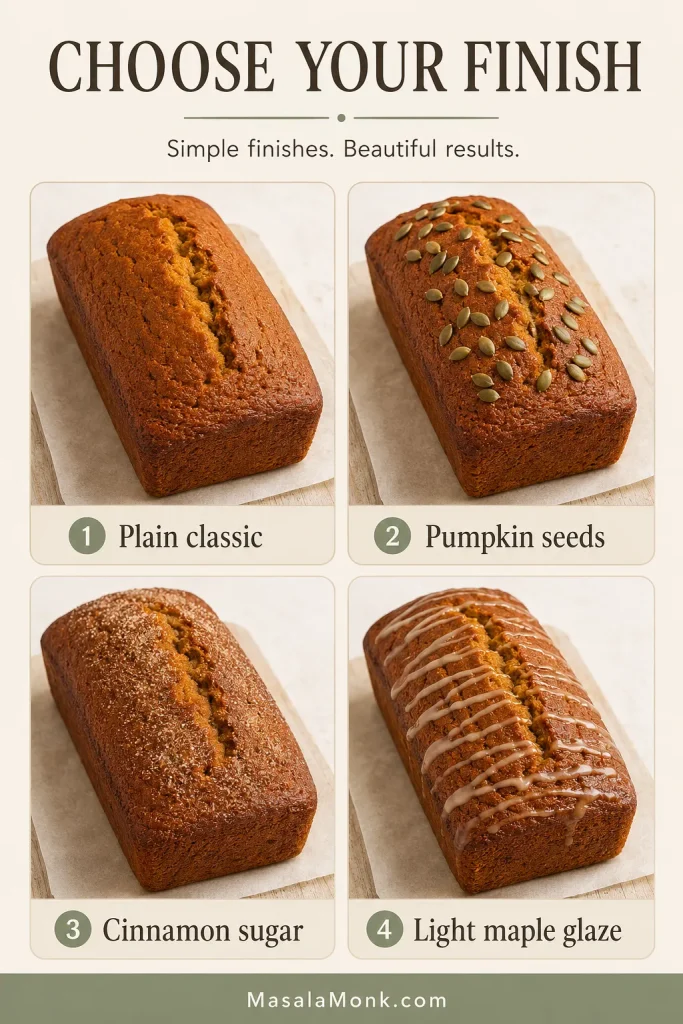
Four pumpkin bread finish options showing plain classic, pumpkin seeds, cinnamon sugar and light maple glaze.
Choose plain, seeded, cinnamon-sugar or lightly glazed depending on the finish you want.

How to Serve Pumpkin Bread

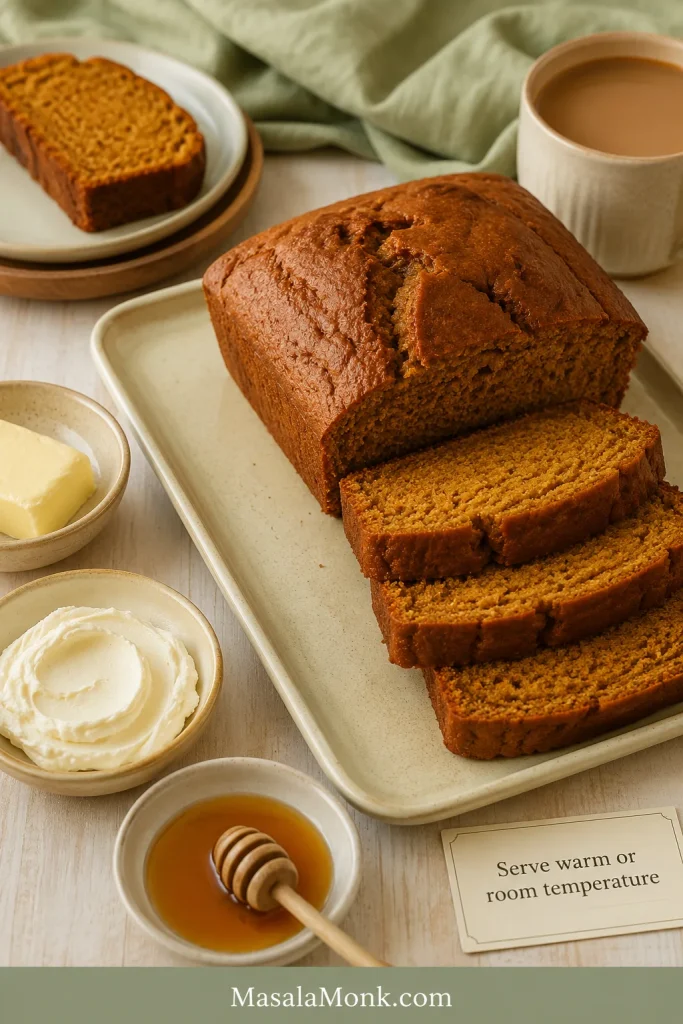
At room temperature, the pumpkin tastes fuller and the spices feel rounder. Serve the loaf plain with coffee, chai or black tea. A warm slice also works beautifully with salted butter, cream cheese or maple butter.

Cool first for clean slices, then rewarm if you like.

Sliced pumpkin bread served with butter, cream cheese, honey and a cup of coffee or tea on a light table.
Cool for clean slices, then serve plain, buttered, or with cream cheese and coffee or tea.
  • Toast day-old slices until the edges are lightly crisp.
  • Use older slices for pumpkin French toast.
  • Wrap a fully cooled loaf as an autumn or holiday gift.

For a richer warm-spice dessert with a tangy finish, try this spice cake with cream cheese frosting.

Why the Second-Day Slice Can Be Even Better

By the next morning, the crust has softened slightly and the loaf cuts more cleanly. Cinnamon, ginger and nutmeg also taste more unified. The first warm slice is hard to resist, but the loaf shows its best crumb after it has cooled completely.

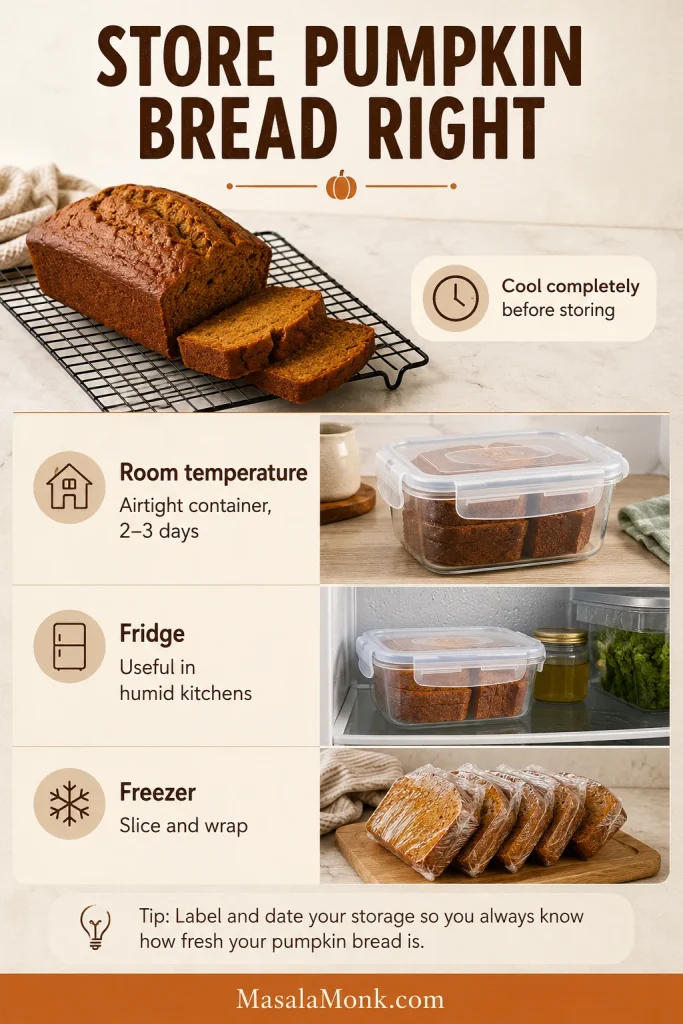
Storage and Freezing

  • Cool room: wrap the completely cooled loaf or place it in an airtight container and keep it at room temperature for up to 3 days.
  • Hot or humid kitchen: refrigerate the loaf sooner. Let slices return toward room temperature or warm them gently before serving.
  • Freezer: wrap the loaf whole or as individual slices, place it in a freezer-safe container and label it with the date. Separate slices with parchment and use within about three months for the best texture.
Thaw pumpkin bread while it is still wrapped so condensation forms on the wrapping rather than soaking into the crumb.

Let steam escape before wrapping the loaf.

Pumpkin bread storage guide showing cooled loaf, airtight container, fridge storage and individually wrapped freezer slices.
Cool completely before wrapping; then store airtight, refrigerate if humid or freeze slices.

Frequently Asked Questions

Can I Prepare the Batter Ahead?

Prepare the wet and dry components separately, then combine them shortly before baking. Once the flour and leaveners meet the wet mixture, get the batter into the oven promptly.

Can I Make Pumpkin Bread Without a Loaf Pan?

Yes. A standard muffin tin is the easiest alternative. Fill the cups about two-thirds full and begin checking at 17 minutes.
Can I Freeze Leftover Pumpkin Puree?

Yes. Freeze it in a small airtight container or measured portion, label the amount and thaw it in the refrigerator. Stir before using and drain briefly if it releases water.

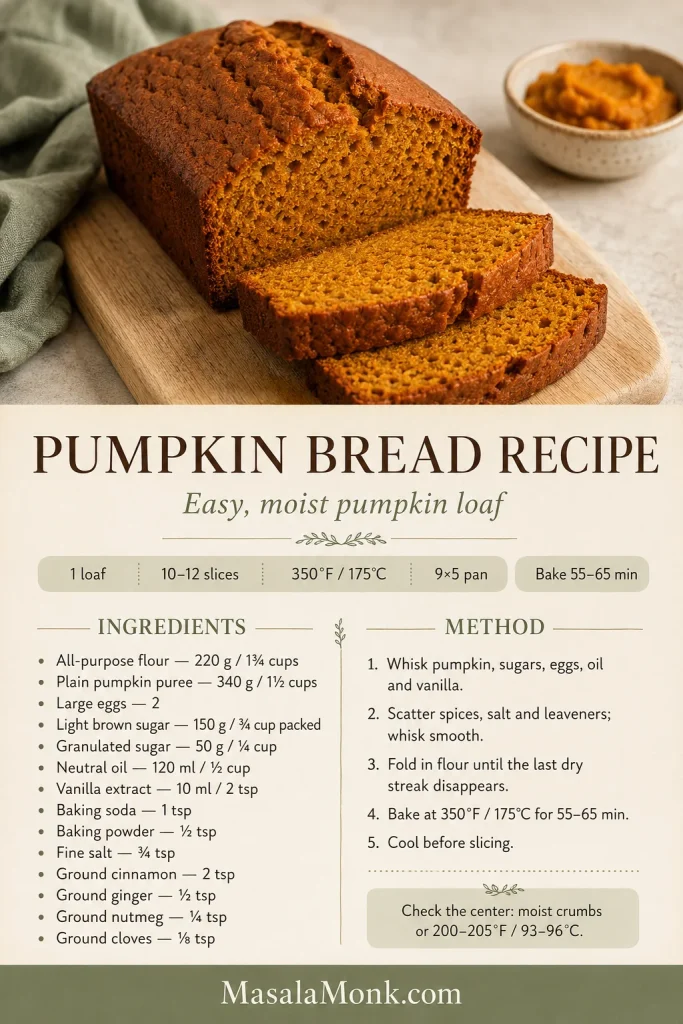
Save the short version once you know the full method.

Pumpkin bread recipe card with sliced loaf, ingredient list, method steps, bake time and doneness note for 200–205°F.
The saveable version: pumpkin amount, flour, pan size, bake window and doneness cue in one place.

Once the loaf is cool, cut a thick slice and notice the contrast: a lightly firm crust, a soft orange crumb and cinnamon arriving just after the pumpkin. Eat it plain, add a little salted butter or wrap part of the loaf for someone else.

Did you use canned or fresh pumpkin? Share your pan size, pan material and actual bake time—it may help the next reader using a similar setup.

Back to recipe ↑ · Back to top ↑