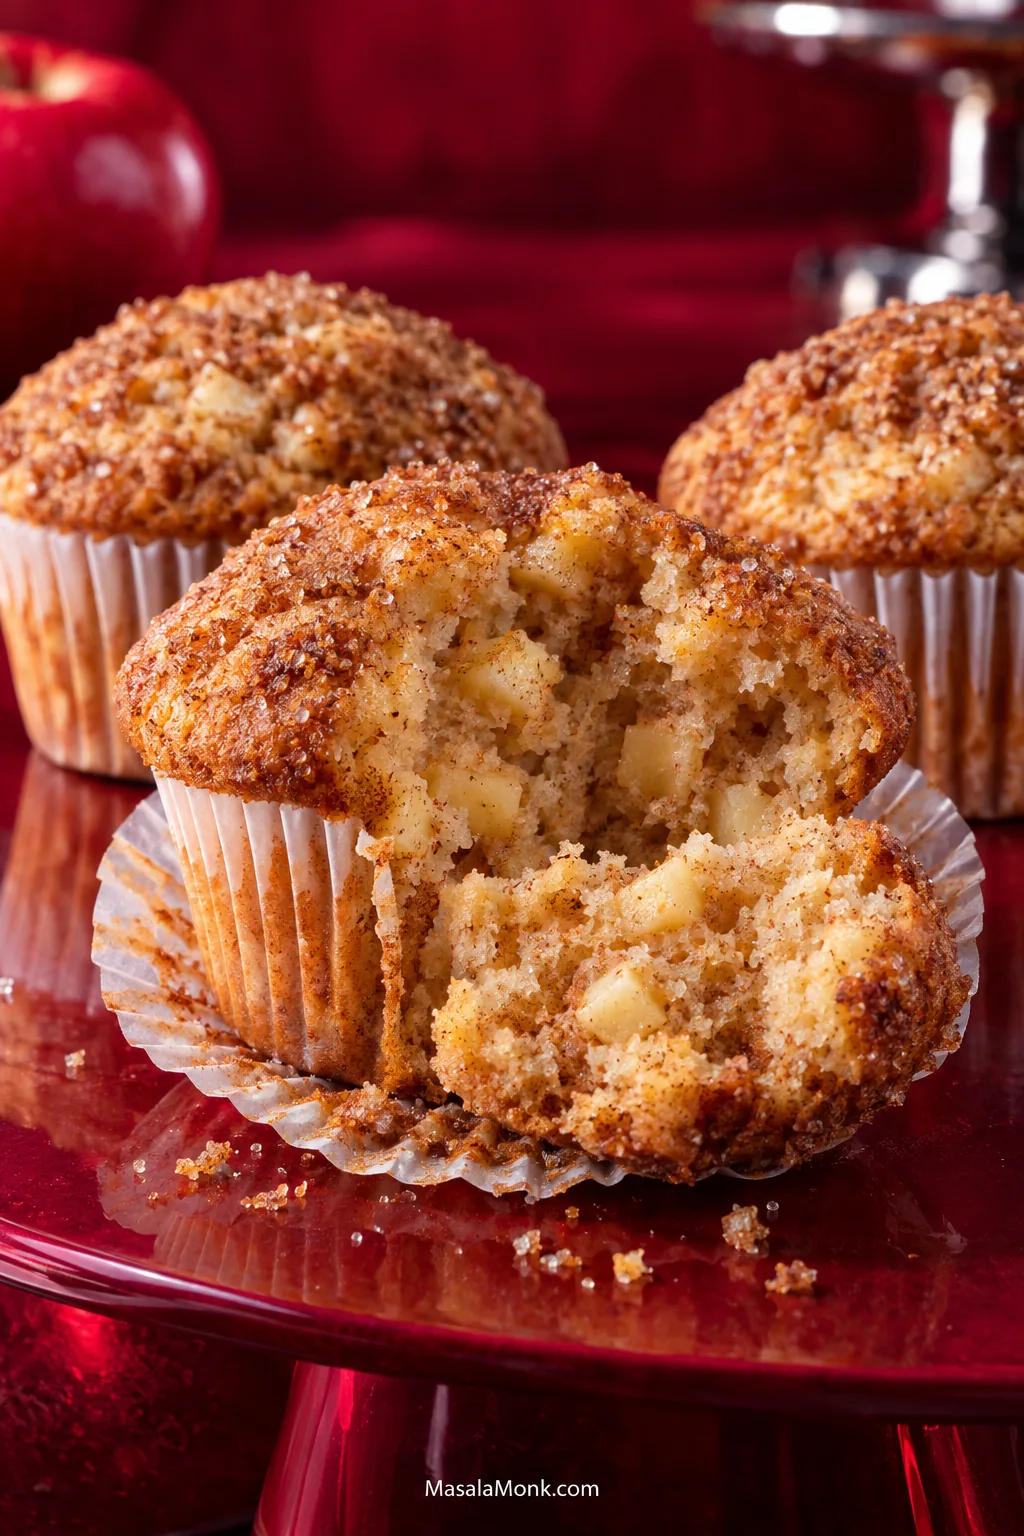
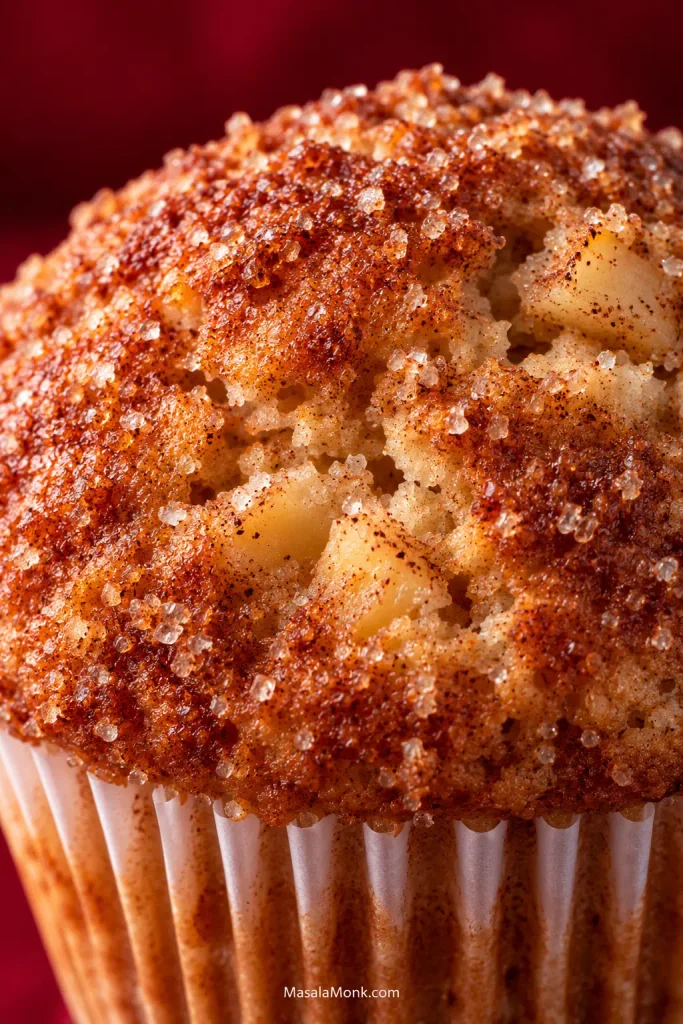
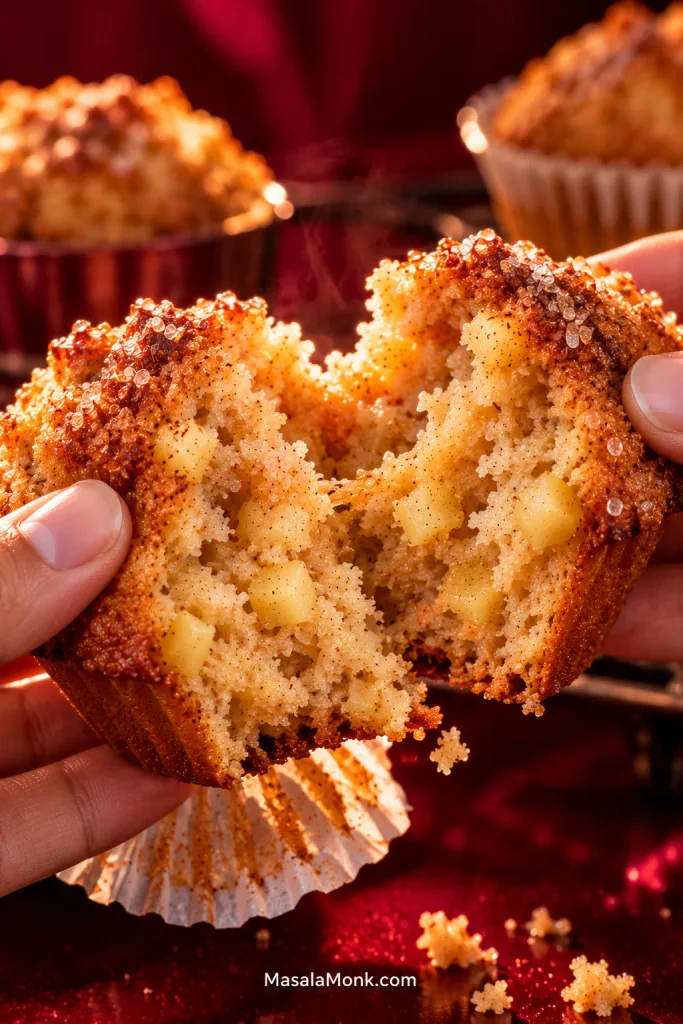
Break one open while it’s still warm. These apple cinnamon muffins have tender pieces of fresh apple through a moist crumb, with a thin cinnamon-sugar crackle over the top.
The apple still tastes like apple. Cinnamon warms it without taking over.
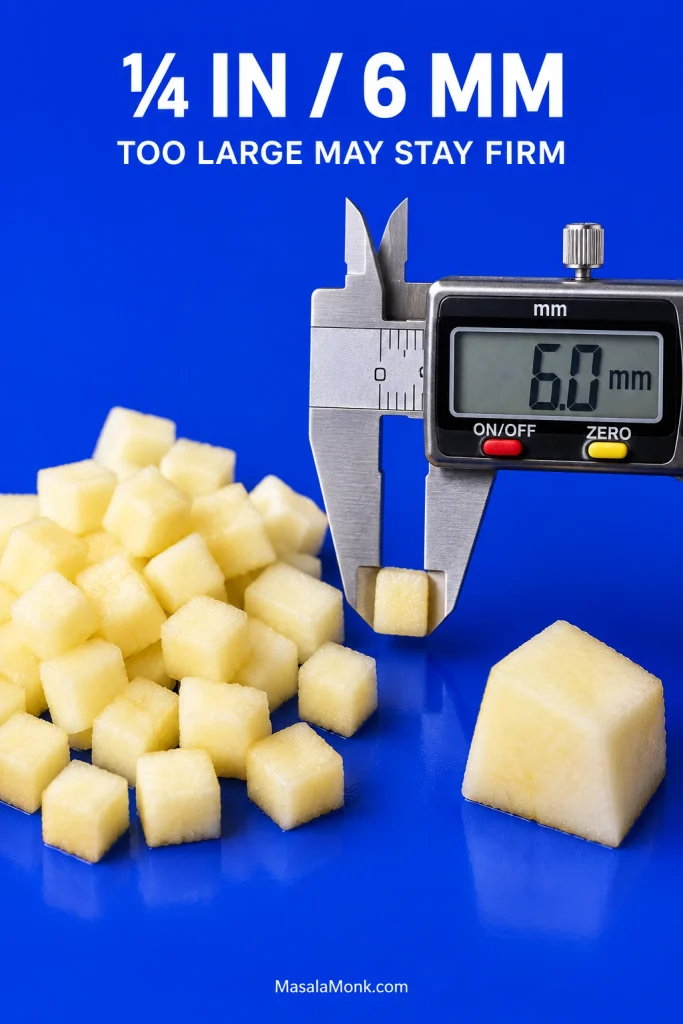
The tricky part is getting the fruit and the muffin ready at the same time. Oversized apple pieces can still be firm when the crumb is done; push the moisture too far and the center turns heavy instead. Small pieces and a thick batter do most of the work.
Before you start: there’s no mixer and no separate streusel. Dice the apples small, and don’t thin the batter when it looks thicker than cake batter.
Yield 12 standard muffins
Prep About 20 minutes, including a 10-minute batter rest
Bake About 18–21 minutes
Cool 5 minutes in the pan, then transfer to a rack
Equipment
Standard 12-cup muffin tin
Parchment-style liners or a lightly greased pan
Large mixing bowl, medium mixing bowl and small bowl
Whisk and flexible spatula
Kitchen scale, recommended
Wire cooling rack
Ingredients
For the muffins
250 g (about 2 cups) all-purpose flour
2 teaspoons baking powder
½ teaspoon baking soda
½ teaspoon fine salt
2 teaspoons ground cinnamon
150 g (¾ cup packed) light brown sugar
2 large eggs
120 ml (½ cup) neutral oil, such as canola, sunflower or vegetable oil
120 g (½ cup) plain Greek yogurt
60 ml (¼ cup) milk
2 teaspoons vanilla extract
250 g (about 9 oz) peeled and cored apple, cut into roughly ¼-inch (6 mm) pieces
For the cinnamon-sugar top
2 tablespoons coarse sugar, such as Demerara or turbinado
½ teaspoon ground cinnamon
Mix and Rest the Batter
Heat the oven. Place a rack near the middle and heat to 425°F (220°C). Line a 12-cup muffin tin or lightly grease the wells. Mix the coarse sugar and ½ teaspoon cinnamon in the small bowl.
Mix the dry ingredients. Whisk the flour, baking powder, baking soda, salt and 2 teaspoons cinnamon together in the medium bowl.
Mix the wet ingredients. In the large bowl, whisk the brown sugar and eggs until smooth. Whisk in the oil, Greek yogurt, milk and vanilla.
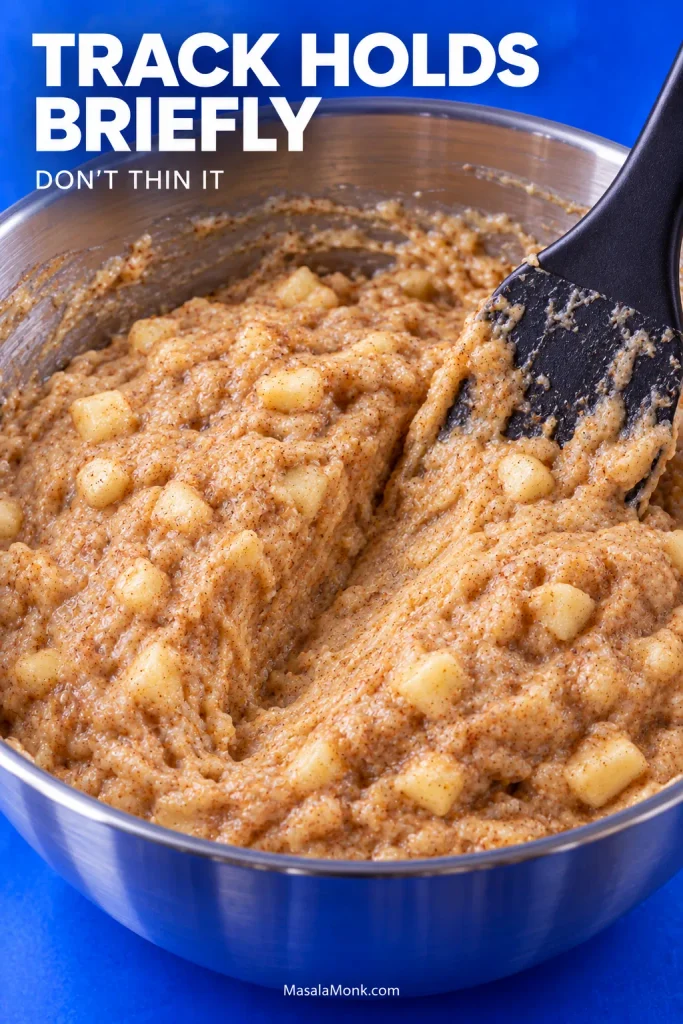
Bring the batter together. Add the dry ingredients and switch to a spatula. Fold until the last dry streaks disappear. The batter will be thick: lift the spatula and it should fall back heavily, leaving a track for a moment before settling. Fold in the apples with as few extra strokes as possible.
Once the flour disappears, stop mixing; a slightly rough apple muffin batter with a soft furrow is exactly where you want to be.
Rest briefly. Leave the batter at room temperature for about 10 minutes. This short pause lets the already-thick batter settle before you portion it into the pan.
Portion, Bake and Cool
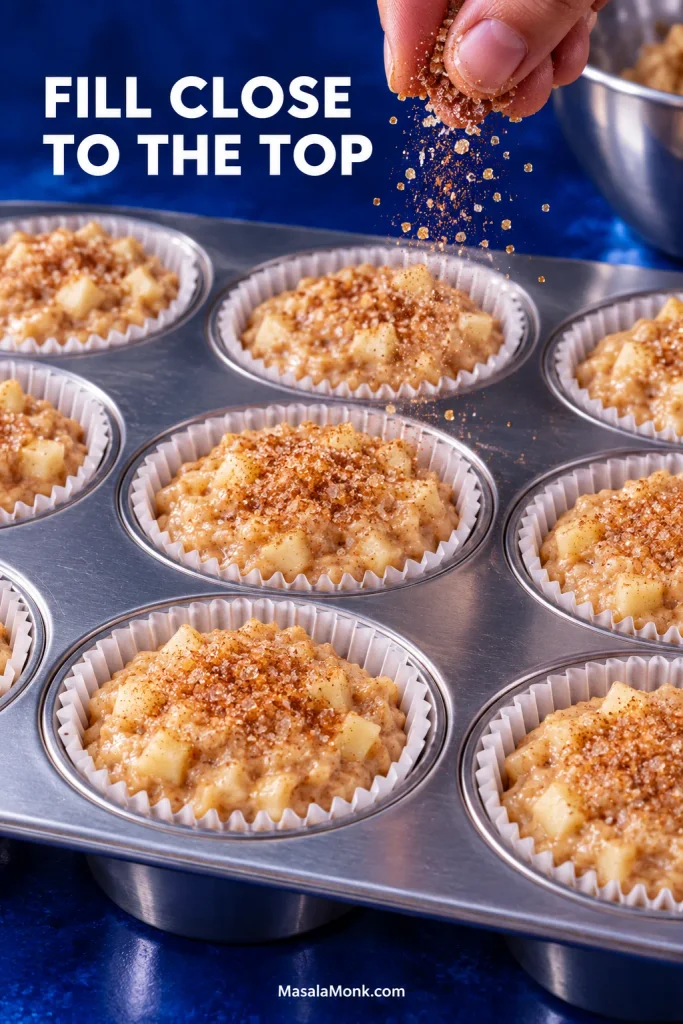
Fill the pan. Divide the batter evenly among the 12 wells, filling each close to the top. Scatter the cinnamon sugar loosely over them.
Judge the fill by height, not scoop count. Keeping all 12 cups near the liner rim helps them finish together even when the crowns are not identical.
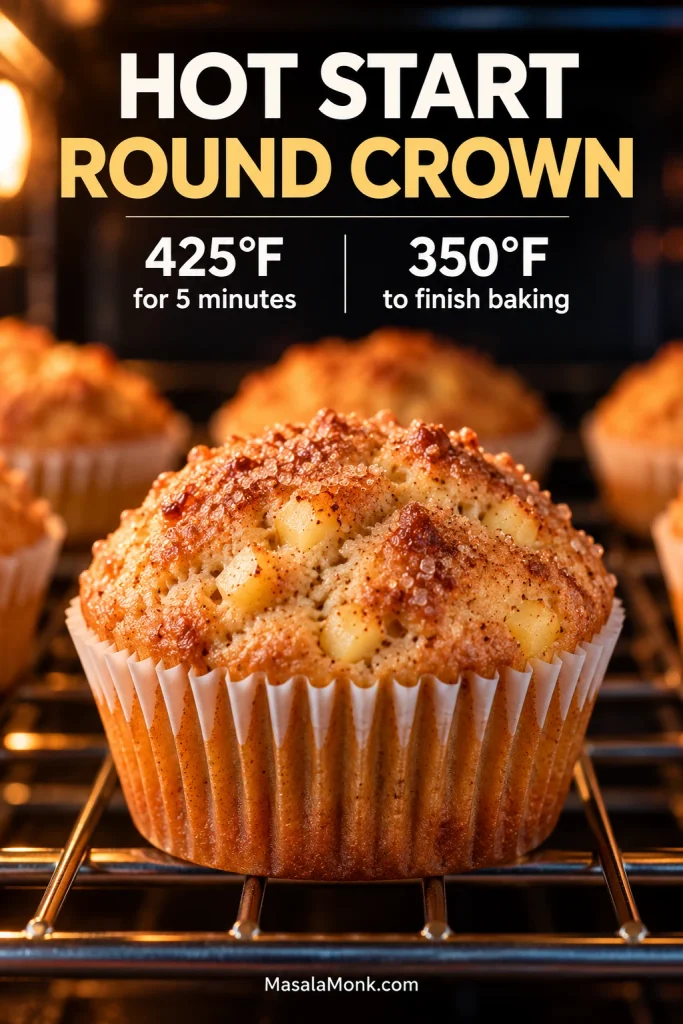
Bake. Start at 425°F (220°C) for 5 minutes. Lower the oven to 350°F (180°C) and continue for about 13–16 minutes. Check with a toothpick: raw batter means more time, while moist crumbs are fine. If the tester goes through apple, try another spot.
Cool. Leave the muffins in the pan for about 5 minutes, then move them to a rack. Give them a few more minutes before pulling one apart—the apple stays much hotter than the crumb.
After baking, compare set centers and browning rather than crown height; small differences from muffin to muffin are completely normal.
That’s enough to bake them. The notes below cover the few details that make the biggest difference.
Aim for pieces about ¼ inch (6 mm) across. They soften during the short bake without disappearing into the muffin. Break one open and you should see small pockets of apple through the crumb, not one wet cavity around a large chunk.
Measure one 6 mm apple cube and leave it on the board as your reference. It is the fastest way to keep the rest of the dice consistently small.
Which apples are best for apple muffins?
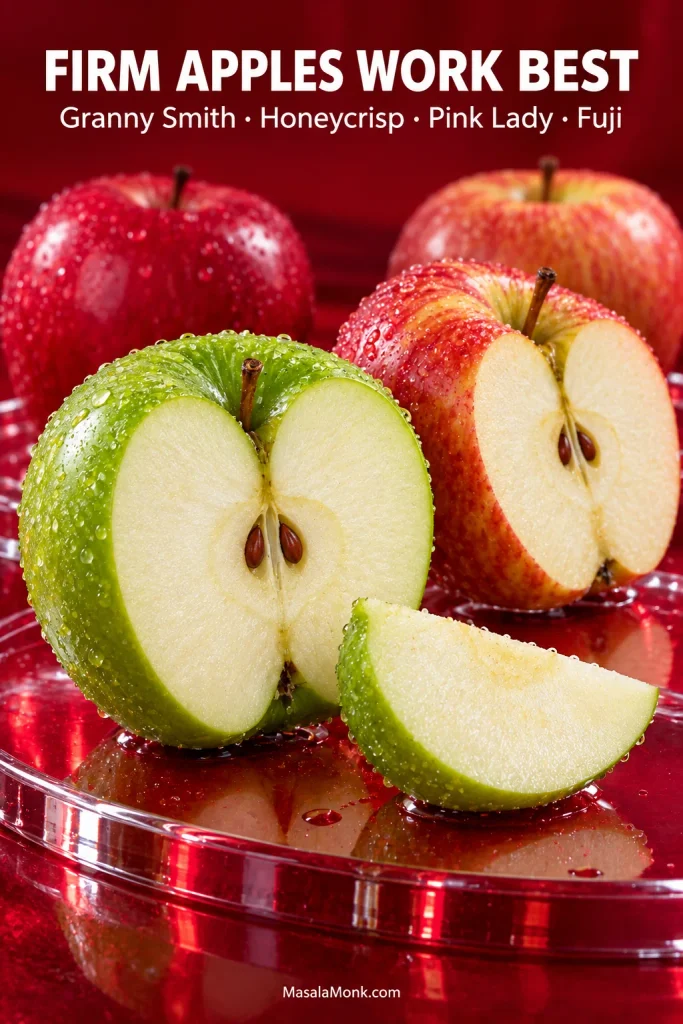
Firm apples such as Granny Smith, Honeycrisp and Pink Lady are good choices for apple muffins. Granny Smith is sharper and tarter; Honeycrisp and Pink Lady are sweeter and more fragrant. Fuji works if you prefer a gentler, sweeter apple flavor.
Firmness matters as much as the name on the sticker. Taste a piece before it goes into the bowl. A bland or mealy apple will not suddenly become more flavorful in the oven.
When choosing apples for muffins, crisp, dense flesh matters more than the variety name; soft or grainy fruit will lose definition faster.
Whole apples vary so much in size that the useful number here is the prepared weight: 250 g (9 oz) after peeling and coring.
The cut changes with the bake. A fresh apple cake has enough oven time to handle larger pieces. Muffins need smaller ones.
About the peel: remove it for the softest, most even bite. Thin apple skin is perfectly edible, but it stays more noticeable than the cooked flesh.
Grated apple and applesauce behave differently
Grating releases much more juice into the batter, so dice the apple for this recipe. If you want the fruit less noticeable, cut the dice finer instead.
Grated apple exposes more cut surface, so its juice enters the batter sooner; small dice hold more of that moisture inside.
Applesauce is a bigger change. It blends through the batter rather than remaining as pieces, so it is not a direct replacement for the fresh apple here. A recipe built around applesauce, such as this moist applesauce cake, starts with a different moisture balance.
Expect the batter to look surprisingly thick the first time you make it. Leave it alone.
Drag a spatula through the bowl. The line should remain visible for a second before slowly closing. Once the apples go in, the batter will look crowded with fruit without turning wet or loose.
If you have a scale, use it for the flour. Too much flour is one of the easiest ways to make these muffins dry.
Using cups? Loosen the flour, spoon it into the cup and level the top rather than packing it down. King Arthur Baking has a useful visual guide to measuring flour.
The thick batter helps keep the apple distributed instead of letting it sink toward the bottom. Oil keeps the crumb soft after cooling; Greek yogurt adds moisture and body.
The 10-minute rest is a short pause, not a make-ahead step. During that pause, the batter may thicken a little, but don’t turn it into an overnight rest. If you want a head start, measure the dry ingredients and cinnamon sugar ahead of time instead.
Get the Crown Without Drying the Center
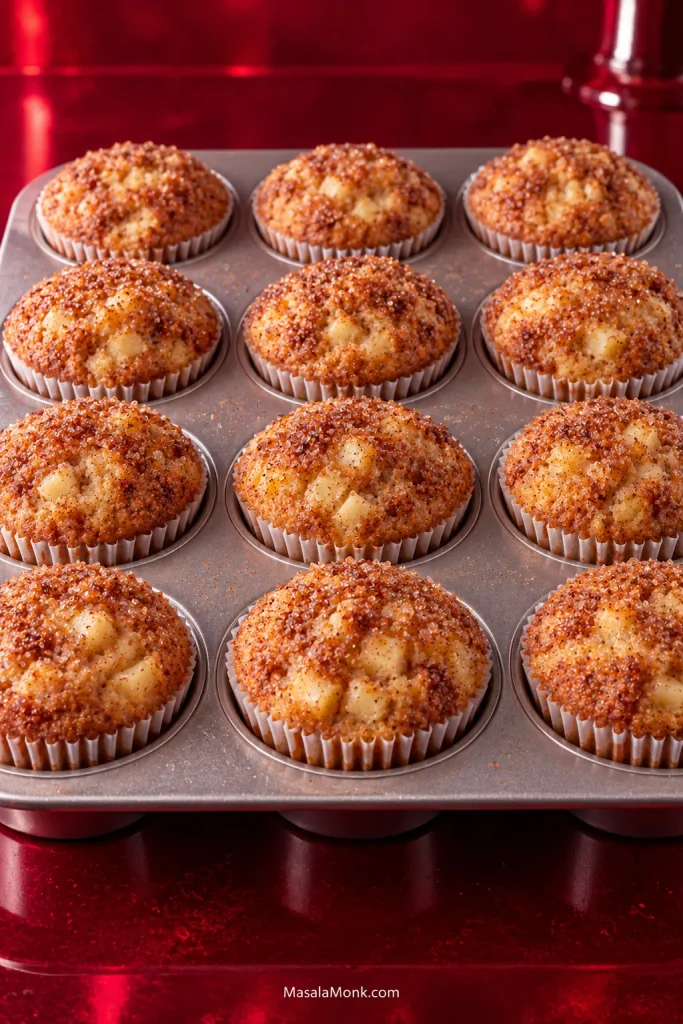
The tops don’t need to tower over the liners. A good crown here is rounded and lightly crisp, with a center that stays tender.
Thick batter, generously filled cups and the first 5 minutes at 425°F (220°C) help build that rounded crown. Lowering the temperature afterward gives the center more time to finish without chasing a taller top at the expense of the crumb; ThermoWorks explains the role of that initial oven heat in more detail.
At the 5-minute mark, lower the oven setting without opening the door.
The cinnamon sugar makes a thinner crust than streusel. Some melts into the surface as the muffins rise, while crystals caught on the high points remain crisp against the softer crumb. If that contrast is your favorite part, apple cider donuts take it in a much crunchier direction.
A patchy cinnamon-sugar surface is the goal: some bare muffin between the crystals keeps the topping thin rather than candy-like.
How to Tell When Apple Muffins Are Done
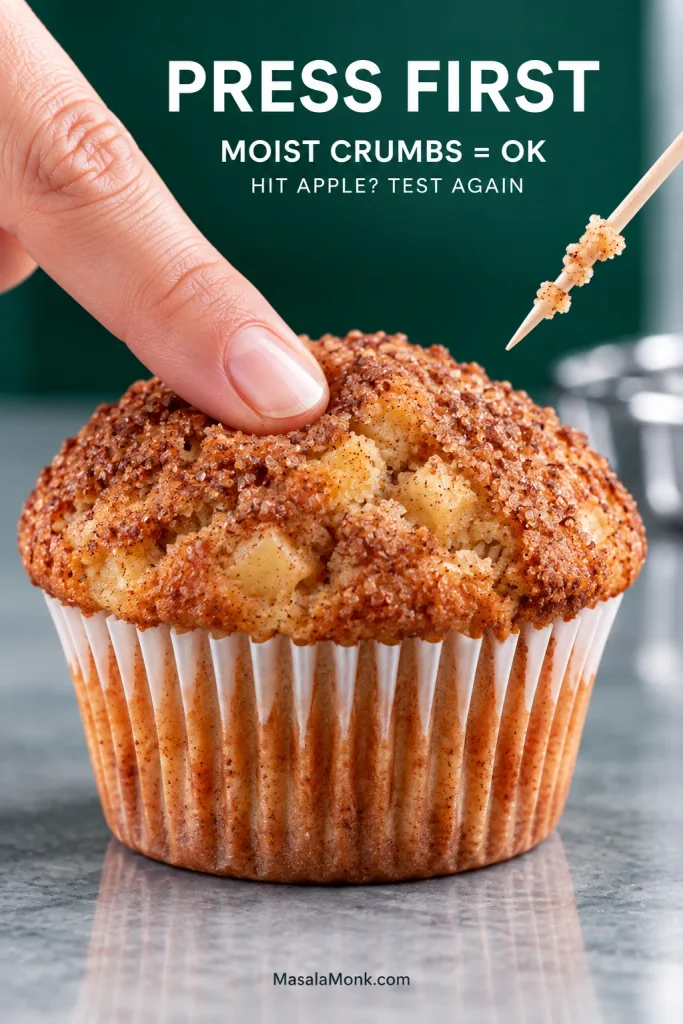
Start checking once the tops are rounded and set. Give one a light press near the center; it should spring back rather than hold the dent.
Then use a toothpick. Raw batter needs more time. Moist crumbs are fine. Hit apple? Try another spot.
Use the clues together: spring at the center, no raw batter, and a second toothpick spot if the first one hits apple.
Apple Muffin Troubleshooting
If something is off, start with what actually happened. Change one thing next time rather than changing the fruit, flour and oven all at once.
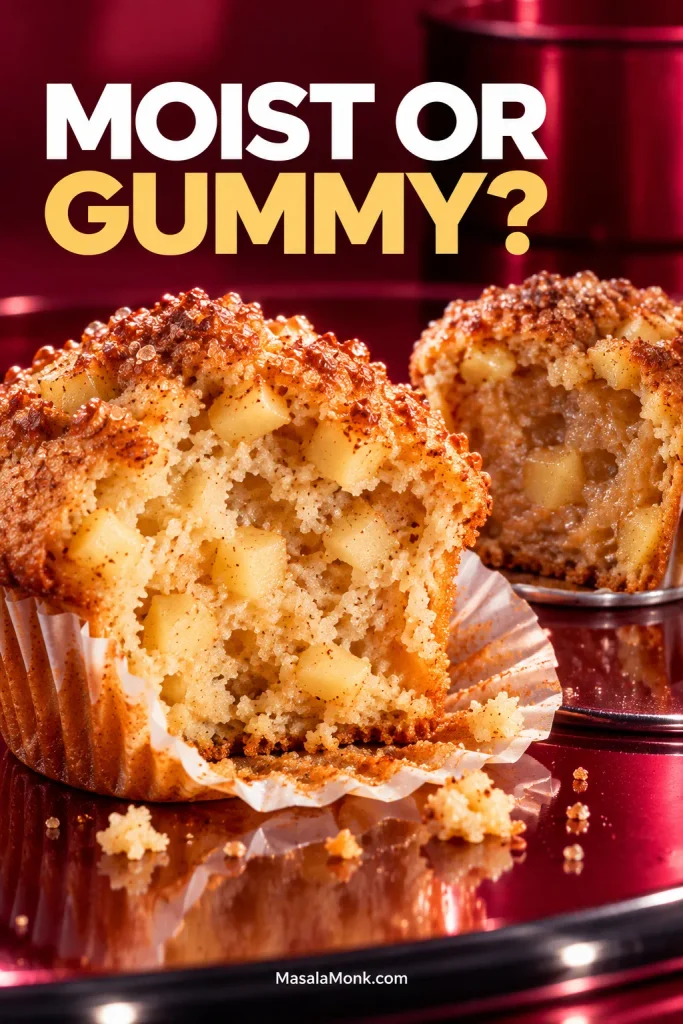
Read the Crumb: Moist or Gummy?
Moist crumb still shows little air cells around the apple. By contrast, gummy crumb looks compressed, glossy and almost fused together.
Match the Symptom Before You Change the Recipe
What happened?
Likely reason
Try this next time
Dry muffin, firm apple
The apple pieces were probably too large, so the muffins stayed in the oven longer while you waited for the fruit to soften
Cut the apple smaller and judge doneness by the crumb rather than waiting for large pieces of fruit
Dry all the way through
Too much flour or too much oven time
Weigh the flour and begin checking earlier
Wet or gummy center
The center may be underbaked, or the batter may contain too much fruit or free juice
Use the stated apple weight and dice size, and check the crumb in more than one spot before taking the pan out
Dense, chewy crumb or long tunnels
The batter was mixed too much after the flour went in
Fold only until the dry flour disappears
Apple sank toward the bottom
The batter may have been too loose, the fruit too large or heavy, or there may have been excess moisture
Measure the liquids and apple carefully, keep the dice small and do not thin the batter
Rose high, then sank
The center may not have set, or the leavener may have been overmeasured
Measure the leavener carefully and bake until the center is set
Flat or low tops
The oven may not have been fully hot, the leavener may be weak, or the cups may have been underfilled
Preheat thoroughly, use fresh leavener and fill the cups as directed
Bottoms browned too fast
Dark bakeware, a low rack or a hot-running oven
Use the middle rack, try a lighter pan and check the oven temperature if it keeps happening
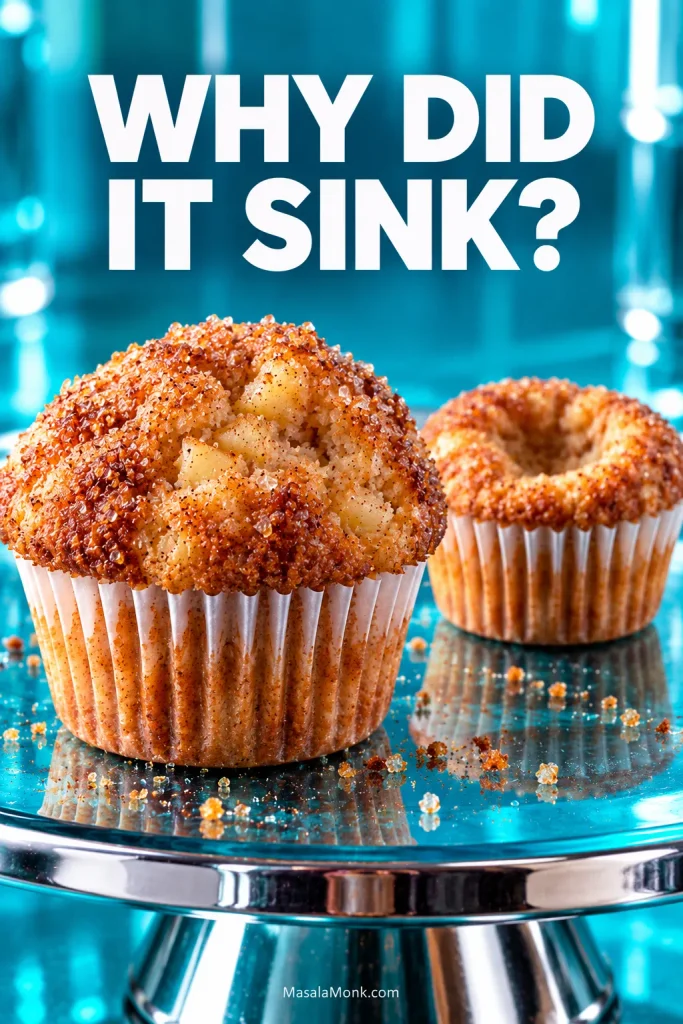
Why Apple Muffins Sink
After cooling, a sunken muffin often keeps a higher rim around a depressed center, showing that it rose before losing support. A uniformly low top tells a different story.
What changes by tomorrow is mostly the top. The cinnamon sugar has its best crackle on the day the muffins are baked; once they sit covered, some of that crispness fades.
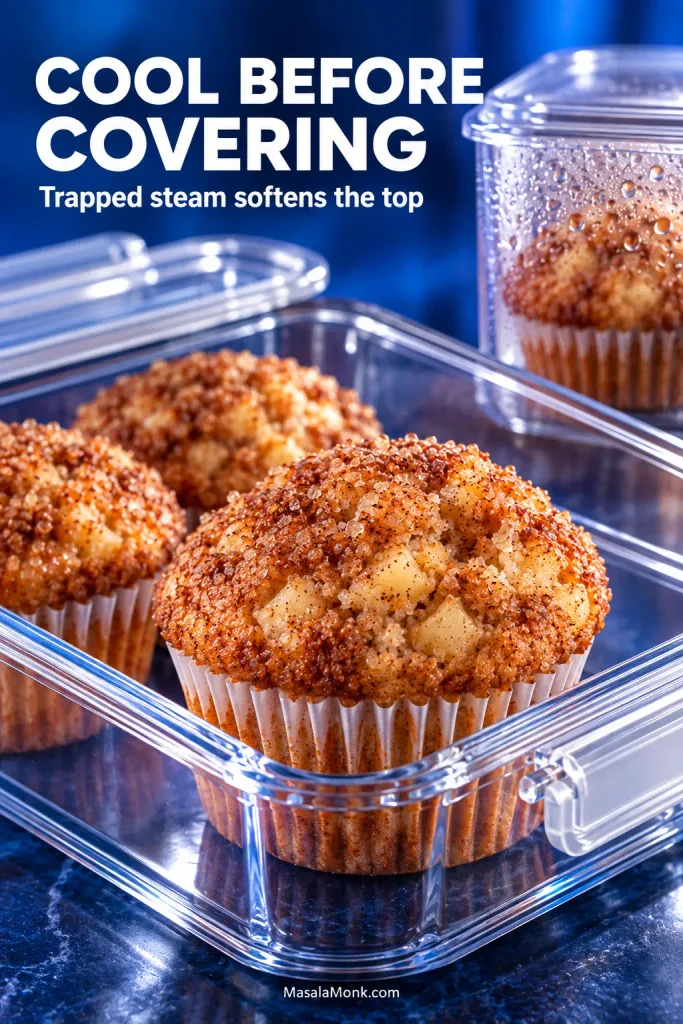
Let the muffins cool completely before covering them. In a cool, dry kitchen, keep them airtight at room temperature for about 2 days. If your kitchen is very warm or humid, refrigerate them instead and let them sit at room temperature for a little while before eating.
Once the muffins are cool, the lid should stay clear. If it fogs, uncover them and let the remaining heat escape before sealing again.
For anything beyond that short window, freezing is the better option for preserving the crumb. Freeze the cooled muffins airtight, thaw at room temperature and warm briefly if you like. The cinnamon-sugar top will be softer after freezing, but the muffin warms well.
Pull one apart and the crumb should separate softly around small pockets of apple.
Warm, tender crumb with little apple pockets and a crisp cinnamon-sugar edge.
The coarse sugar hits first, then warm cinnamon and tender apple through the center.
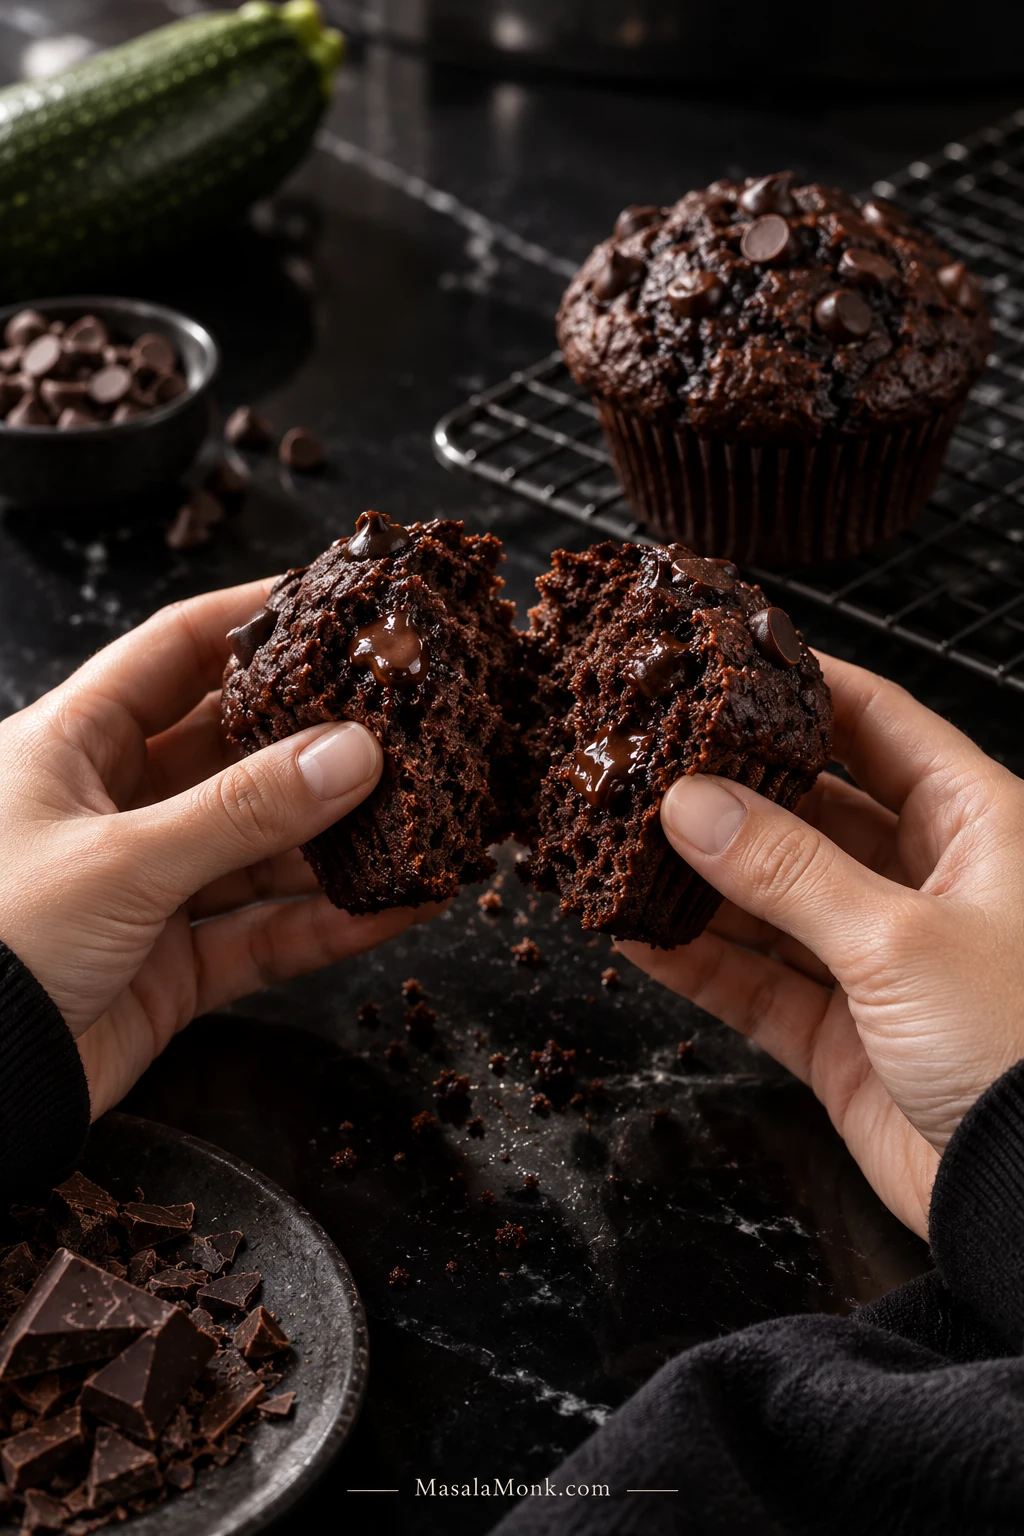
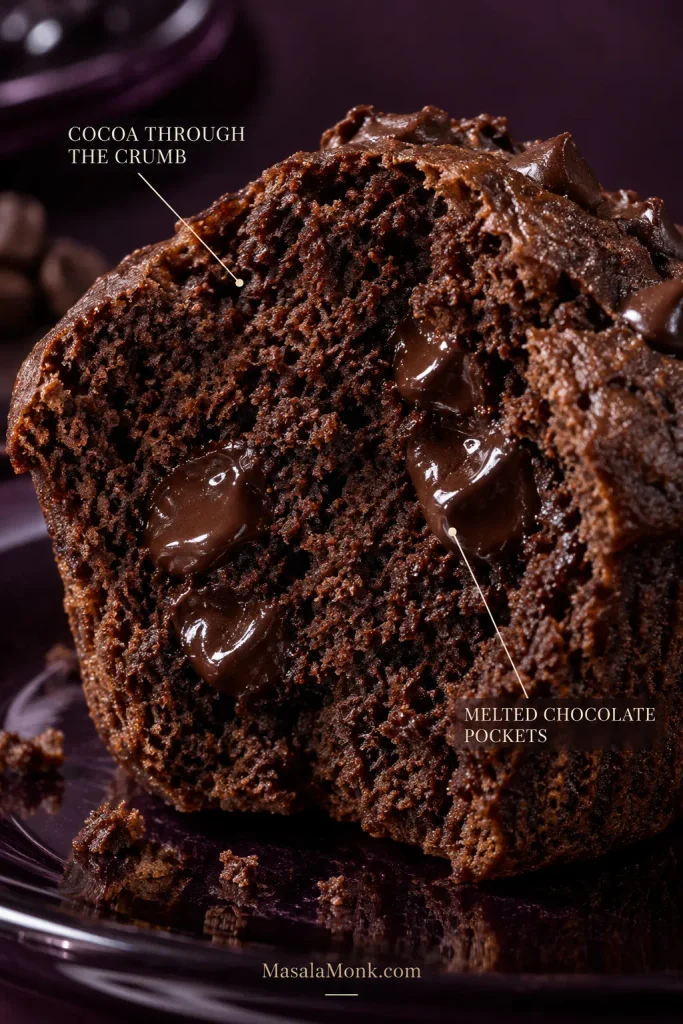
These chocolate zucchini muffins should eat like rich chocolate muffins that happen to contain zucchini—not vegetable muffins that happen to contain cocoa. Break one open and the center should be dark, soft and tender, with melted chocolate tucked through the crumb.
The double chocolate comes from cocoa baked through the crumb and semisweet chips that stay soft and melty while the muffins are warm. Finely shredded zucchini works quietly underneath, keeping the center tender while contributing very little flavor of its own.
The one part worth watching is the zucchini’s water. Exceptionally juicy zucchini or an extra handful of shreds can leave the middle heavy. Squeeze the zucchini bone-dry, though, and you give up some of the softness it brings to the crumb.
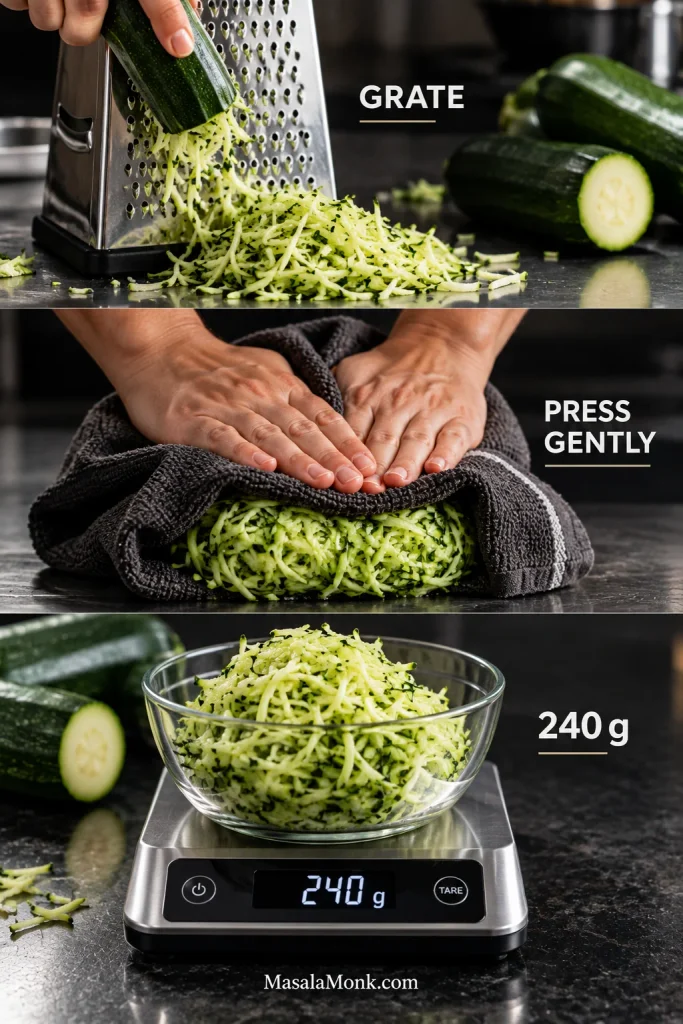
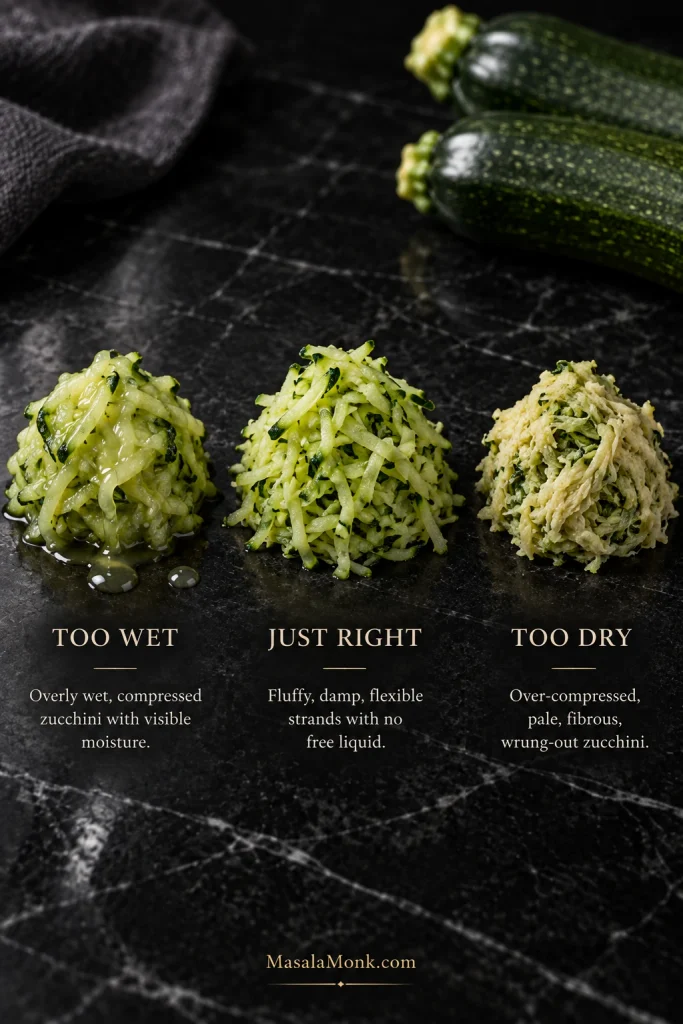
Finely shredded, with loose surface water pressed away while the shreds remain damp.
Batter
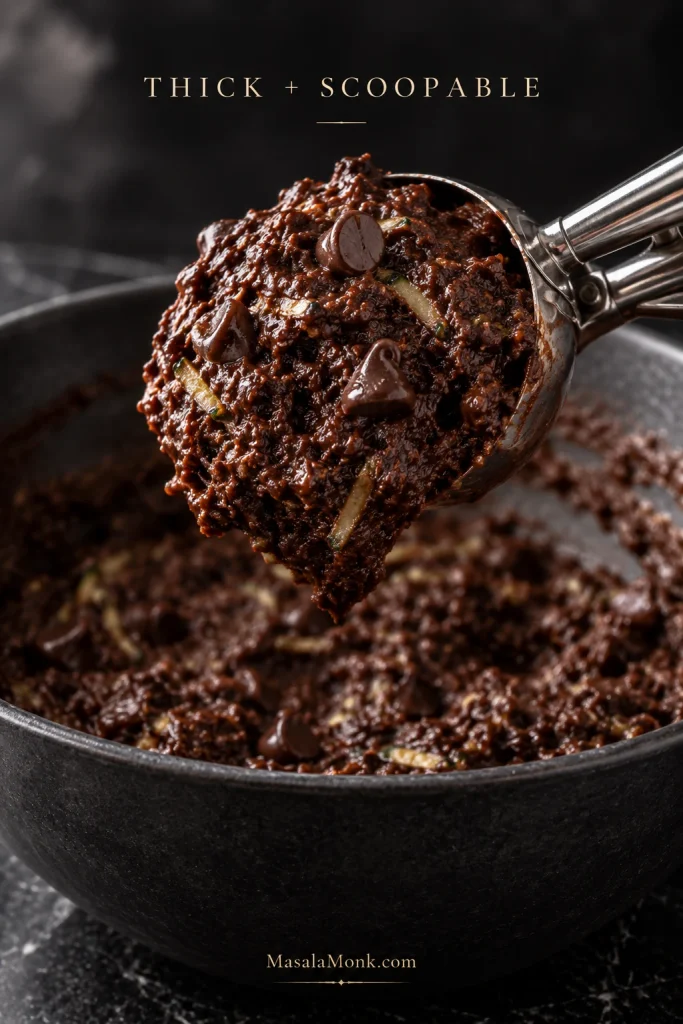
Thick + scoopable
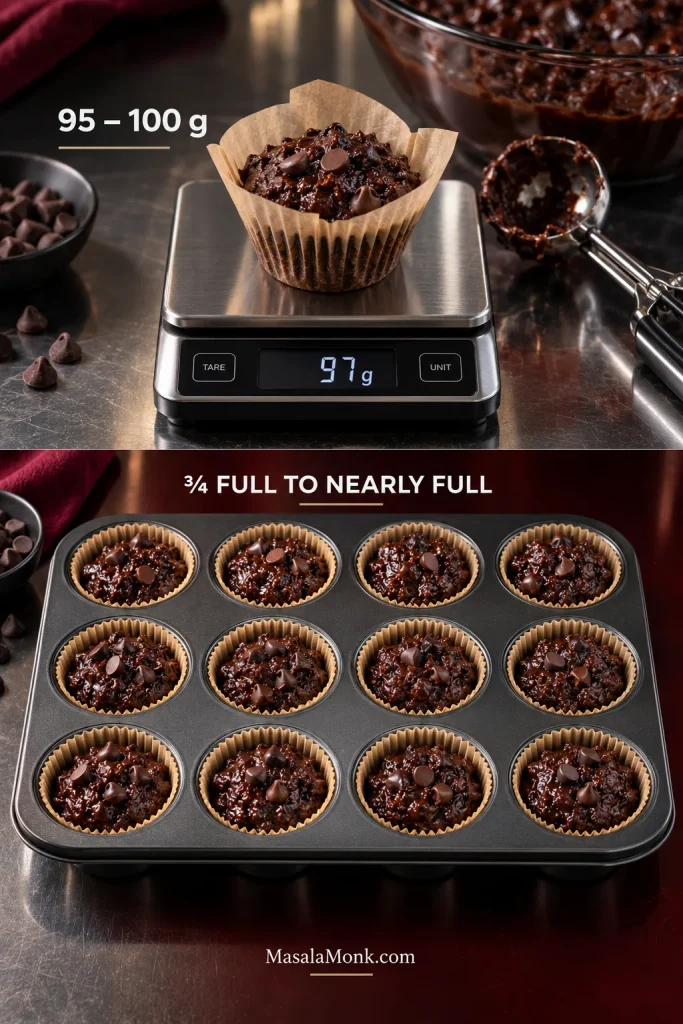
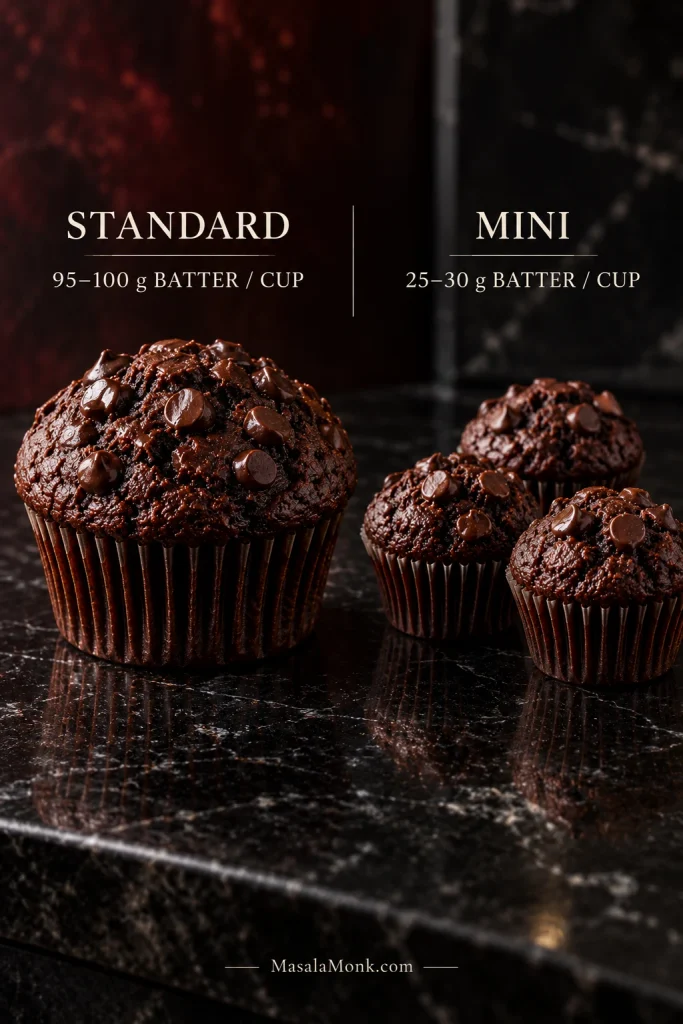
About 95–100 g / 3.4–3.5 oz in each standard muffin cup.
Baked Center
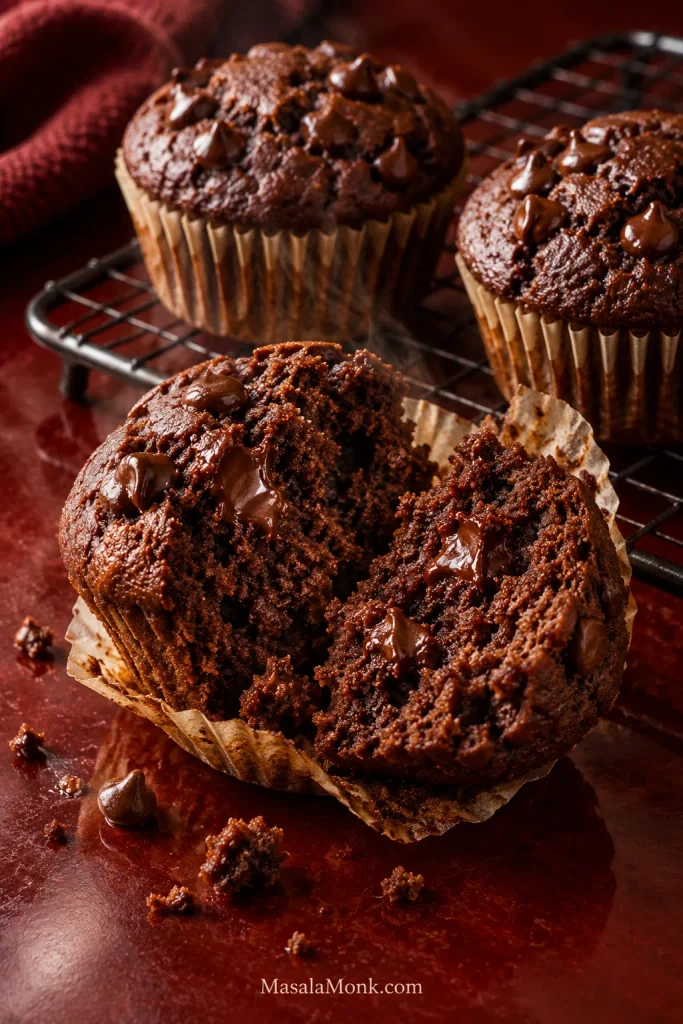
Moist + fully set
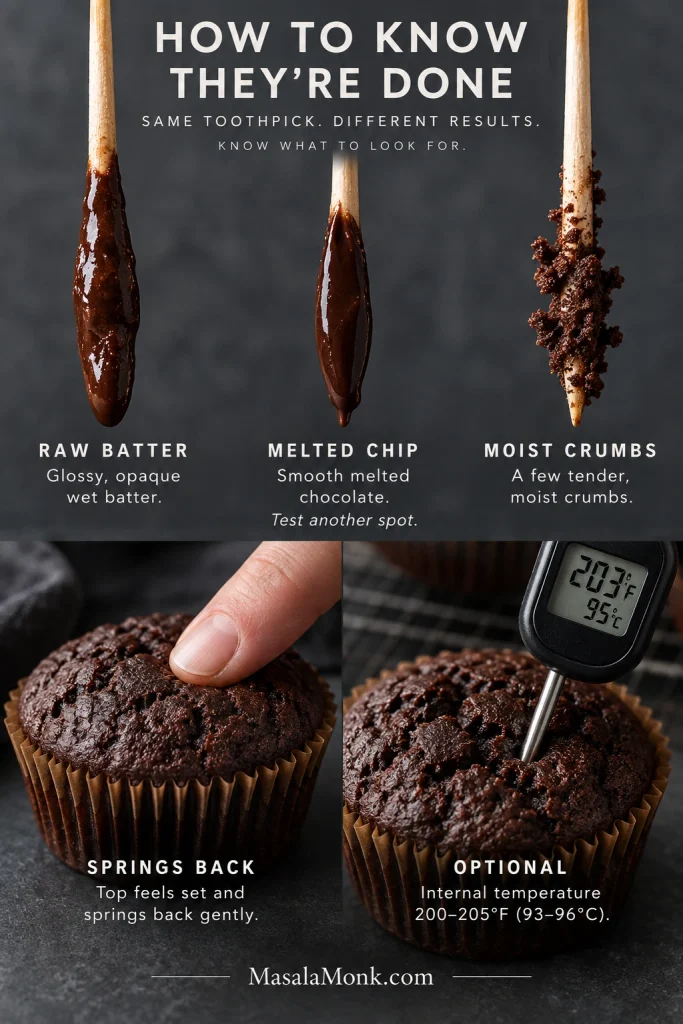
The top springs back and a tester shows tender crumbs with no raw batter.
Chocolate Zucchini Muffins Recipe
No mixer is needed—a whisk and spatula are enough.
Yield12 standard muffins
PrepAbout 20 minutes
TotalAbout 45–50 minutes
Oven375°F / 190°C
BakeAbout 20–24 minutes
Cool5 minutes in pan
Useful equipment: a standard 12-cup muffin pan, parchment-style liners, box grater, two mixing bowls, whisk, flexible spatula and wire rack. A digital kitchen scale is strongly recommended for the zucchini and portioning; an instant-read thermometer is optional.
Use the small shredding holes of the box grater. The tiny rasp or zester face tends to turn zucchini into wet pulp. A light-colored metal muffin pan works well here; dark nonstick pans brown the bottoms and sides faster, so check them earlier.
Ingredients
Dry Ingredients
200 g / 7 oz all-purpose flour, about 1⅔ cups when spooned and leveled
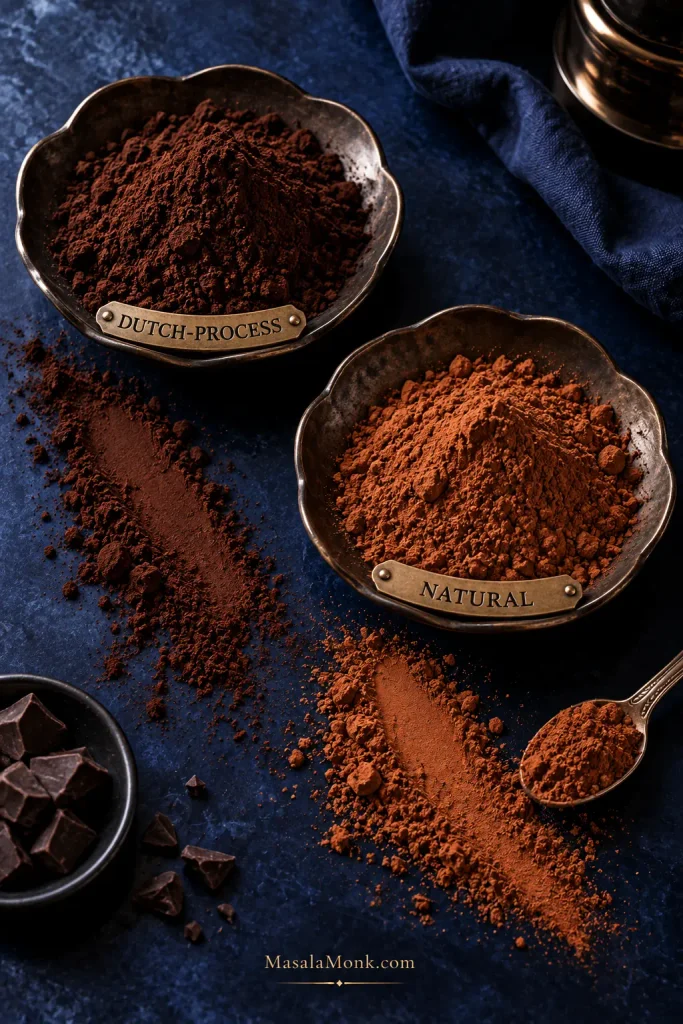
40 g / 1.4 oz Dutch-process unsweetened cocoa powder, about ½ cup
1½ teaspoons baking powder
½ teaspoon baking soda
½ teaspoon fine salt
1 teaspoon instant espresso powder, optional
Wet Ingredients
150 g / 5.3 oz light or dark brown sugar, a scant ¾ cup packed
50 g / 1.8 oz granulated sugar, about ¼ cup
2 large eggs, about 100 g without shells
110 g / 120 ml neutral oil (½ cup / 4 fl oz)
80 g / 2.8 oz sour cream, about ⅓ cup
10 ml / 2 teaspoons vanilla extract
Zucchini & Chocolate
240 g / 8.5 oz prepared zucchini, finely shredded and weighed after pressing away loose surface water. No scale? Expect roughly 1¾–2 cups after pressing, and use the damp, no-drip cue in the method as your final check.
170 g / 6 oz semisweet chocolate chips, about 1 cup, divided
Method
Prep and Mix
Heat the oven to 375°F / 190°C. Put a rack in the middle and line a standard 12-cup muffin pan with parchment-style liners. Let the oven fully preheat before the batter goes in.
Prepare the zucchini. Leave the tender peel on and shred it on the small shredding holes of a box grater. Spread the shreds over a clean kitchen towel, fold another section over the top and press firmly with flat hands. Lift the towel and check them. Press again if there is still loose water on the surface. The zucchini should feel damp and flexible. If you can, weigh 240 g / 8.5 oz.
Weigh the zucchini after pressing, not before, so the 240 g target controls both the amount of zucchini and how much loose water reaches the batter.
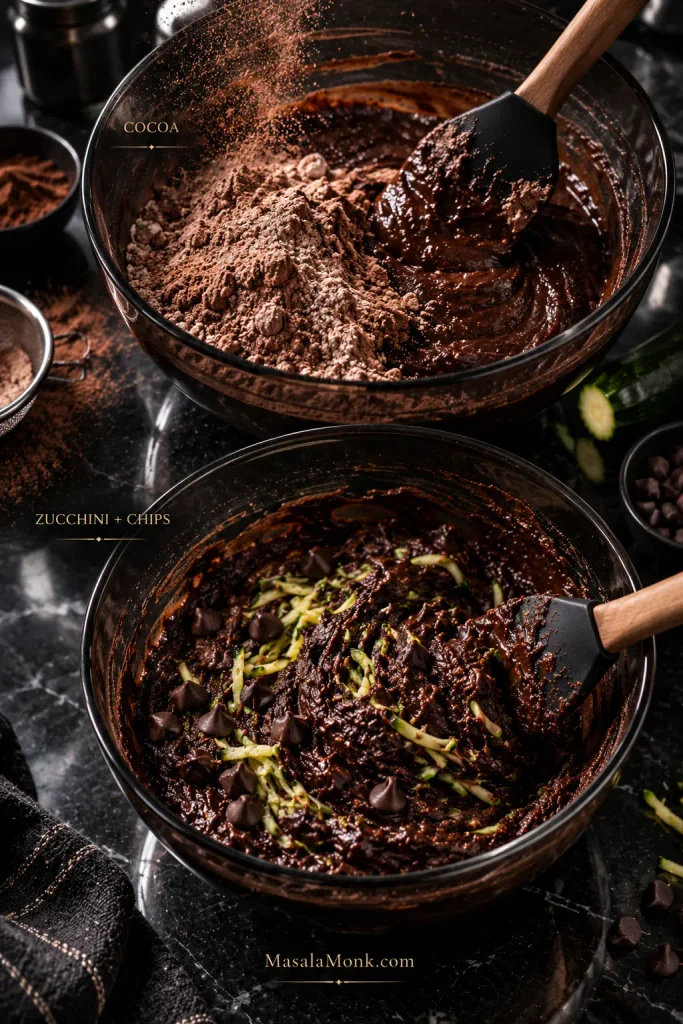
Mix the dry ingredients. Whisk the flour, cocoa powder, baking powder, baking soda, salt and optional espresso powder until the cocoa is evenly dispersed and no obvious lumps remain.
Mix the wet ingredients. In a large bowl, whisk the brown sugar, granulated sugar and eggs until evenly combined. Whisk in the oil, sour cream and vanilla until smooth.
Bring the batter together gently. Add the dry mixture to the wet mixture and fold until only a few flour or cocoa streaks remain. Then add the prepared zucchini and 140 g / 5 oz chocolate chips, folding just until combined. The batter should look dark, thick and slightly glossy.
A few faint flour streaks before the final fold are preferable to overmixing; the zucchini and chocolate chips finish distributing everything as they go in.
Check, Portion and Bake
Still looks almost too thick? That is okay. The batter should be thick enough to scoop. It may loosen as the zucchini releases moisture, so don’t add milk just because it looks thick. If yours already looks loose, leave the flour alone and move on.
Watch how the batter behaves, not just how thick it looks: a scoop should leave soft ridges that relax slowly rather than disappearing immediately.
Portion evenly. Divide the batter among the 12 muffin cups, aiming for about 95–100 g / 3.4–3.5 oz per cup. Without a scale, fill the cups roughly ¾ full to nearly full. Scatter the remaining 30 g / 1 oz chocolate chips over the tops.
Even portions help synchronize doneness across the pan, so weighing roughly 95–100 g per standard cup can keep smaller muffins from drying out while larger ones are still setting.
Bake for about 20–24 minutes. Start checking at 19 minutes. Pan color, zucchini moisture and individual ovens can shift the timing.
Check the center. The tops should look set and spring back gently. A tester should show moist crumbs with no raw batter. Hit a pocket of melted chocolate? Test another spot. If you use a thermometer, about 200–205°F / 93–96°C is another useful check.
With chocolate muffins, use several doneness cues together: a springy top, moist crumbs and a second toothpick spot are more reliable than one chocolate-streaked test.
Cool Before Judging the Crumb
Cool for 5 minutes in the pan, then move to a wire rack. Give the crumb a few more minutes to settle before deciding whether the middle is fully set. A muffin cut open piping hot will look softer than one that has cooled slightly.
Making them ahead? Measure the dry ingredients and chocolate in advance, but mix the batter close to baking time. Once the zucchini is in the bowl and the leaveners are wet, the batter is better off heading for the oven.
Let one cool long enough for the crumb to settle, then pull it apart. The center should be soft and dark, with little pockets of chocolate still yielding where the muffin is warm.
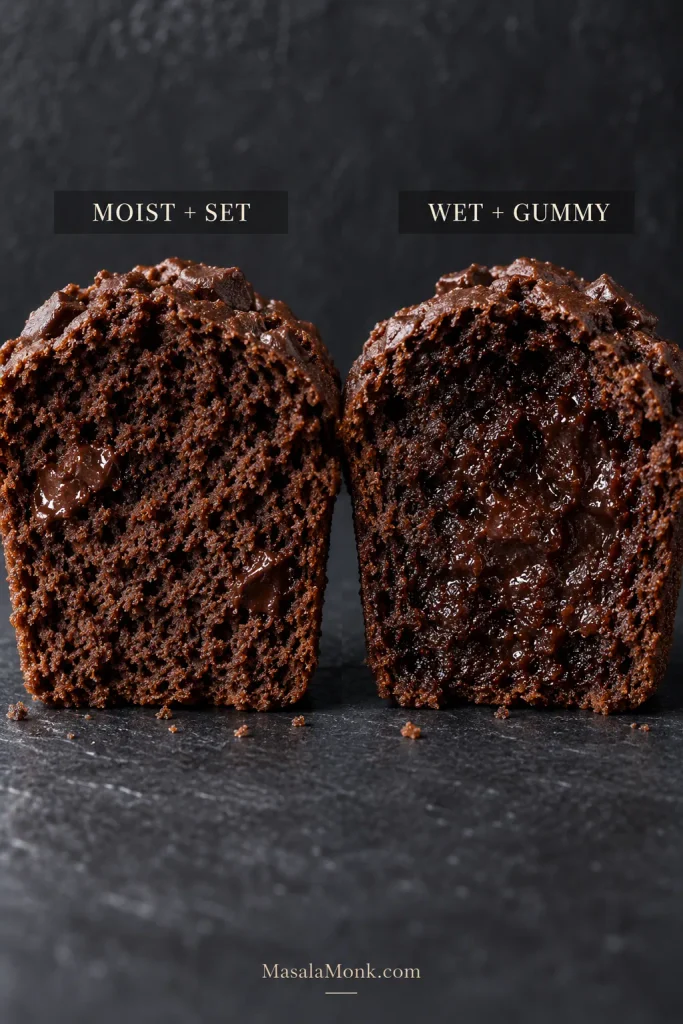
This is the texture to look for once the crumb has set: visible aeration and a mostly matte interior, with gloss confined mainly to actual pockets of melted chocolate.
For the Next Batch
If the muffins are already in the oven, you have everything you need. Come back here when you want to handle a different kind of zucchini, change an ingredient, make minis or work out what happened to the crumb.
So, should you squeeze zucchini for muffins? For this recipe, yes—but gently. Pick up a small handful of the shredded zucchini and squeeze. Nothing should drip, but the strands should still feel soft, damp and flexible. That’s the state you want before weighing the 240 g / 8.5 oz for this recipe.
The goal is not dry zucchini; it is zucchini without free water. Damp, flexible shreds still carry the moisture that helps the finished muffins stay tender.
No liquid should drip when you gently squeeze a handful
Very large mature zucchini
Remove tough developed seeds if needed, then shred the firmer flesh
The large central seed area can be wetter and coarser than young zucchini
Frozen, then thawed zucchini
Thaw fully, drain well, press away the released liquid, then weigh
Thawed zucchini releases considerably more water, so drain and press it before weighing
Why Extra Zucchini Can Make the Centers Gummy
That last handful may look harmless, but it still brings water into the batter. Add enough and the middle can lag behind while the outside keeps baking.
Have enough left for another bake? Save it for the Zucchini Bread Recipe instead of adding more here.
The goal is depth without drying the crumb. Cocoa absorbs water as well as adding flavor, so simply piling in more doesn’t automatically make a better chocolate muffin.
Cocoa Flavors the Whole Crumb
The recipe uses 40 g / 1.4 oz cocoa powder. That’s enough for a dark, unmistakably chocolate crumb while leaving room for the zucchini, oil and sour cream to keep it soft.
Dutch-process cocoa is the intended choice for its dark color and smooth chocolate flavor. Natural unsweetened cocoa can also be used here; expect a lighter color and a slightly sharper cocoa taste.
Cocoa choice changes the chocolate profile, but quantity changes the batter too; adding extra cocoa simply for darker color can also make the crumb drier.
Keep the baking soda and baking powder as written if you change cocoa. Their balance belongs to the whole batter, not the cocoa alone.
Chocolate Chips Make It Double Chocolate
The chips add what cocoa cannot: pockets of actual melted chocolate. Pull a muffin apart while it is still warm and those pockets stay softer and richer than the surrounding cocoa crumb.
Semisweet keeps the sweetness balanced. Dark chocolate makes the muffins more intense, while milk chocolate pushes them further toward dessert. Reserve a few chips for the tops so the finished muffins look as chocolatey as they taste.
Look for a mostly matte cocoa crumb interrupted by glossier pockets where the chocolate chips have melted.
For a frosted muffin-style cupcake, cool the standard-size muffins completely and top them with Chocolate Cream Cheese Frosting. If you want a lighter, finer cake crumb, start with a cupcake-specific batter.
Substitutions Without Wrecking the Batter
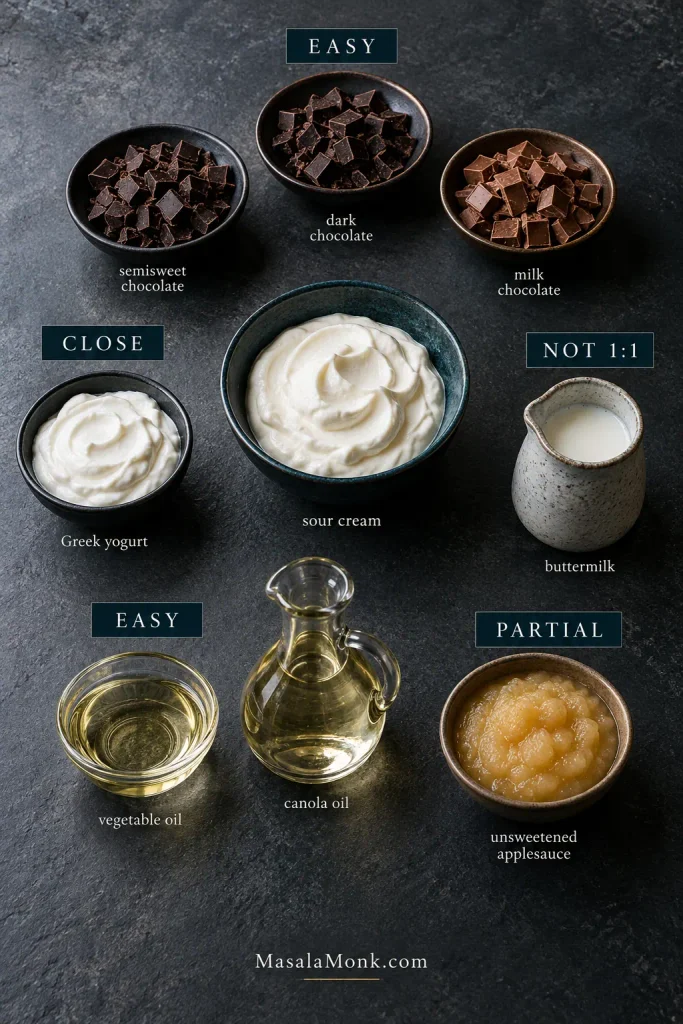
You do not need to treat the recipe as untouchable. A different chocolate or another mild neutral oil is easy. Changes to cultured dairy or flour affect the batter more, so keep the experiments simple.
Replacing part of the oil with unsweetened applesauce is one of the gentler changes. Replace no more than about half the oil. The crumb will be less rich and a bit heavier, but it should remain soft. For a bake where applesauce is built in from the start, Banana Bread With Applesauce takes that approach deliberately.
Easy Swaps That Keep the Batter Close
Chocolate: dark or milk chocolate chips can replace semisweet directly. Dark makes the muffins more intense; milk makes them sweeter.
Neutral oil: another mild neutral oil is an easy swap.
Greek yogurt: thick full-fat Greek yogurt is a reasonable substitute for the sour cream, with a tangier and slightly less rich result.
Buttermilk: it is considerably thinner than sour cream, so it is not a straight 1:1 swap. Greek yogurt is the closer substitute.
1:1 gluten-free baking blend: a true cup-for-cup blend may work, but absorption, texture and bake time vary between brands.
For chocolate zucchini muffin substitutions, judge a swap by what it does to batter thickness, fat and water—not merely by whether two ingredients seem similar.
When a Swap Becomes a Different Recipe
Want the muffins less sweet? Reduce the sugar conservatively. Bigger cuts change tenderness and moisture as well as sweetness. For a much lower-sugar muffin, start with a recipe designed around that change.
One substitution is a variation. Replacing the flour, fat, sugar and egg at the same time is a new recipe.
Once you’re replacing the flour entirely, removing the eggs or switching to specialty sweeteners, those changes need a different formula. If higher protein is the goal, use High Protein Muffins instead of forcing extra protein into this batter.
For minis, use about 25–30 g / 0.9–1.1 oz batter per cup and start checking around 9 minutes. Expect roughly 40 minis, give or take a few, because mini pans vary more than standard muffin tins.
Bake them at 375°F / 190°C for about 9–12 minutes. They move from moist to dry quickly, so use the same doneness cues and check early.
Because mini chocolate zucchini muffins hold only 25–30 g of batter per cup, the window between moist and dry is narrower; start checking early rather than scaling the standard bake time proportionally.
For Taller Muffin Tops
Fully preheat the oven, use fresh leaveners, portion the cups evenly and fill them generously. Those basics already give the batter a strong start.
Some bakery-style methods begin with a burst of higher heat and then finish cooler. That can create a more dramatic crown, but it also makes browning and oven hot spots more influential.
This recipe stays at 375°F / 190°C from start to finish. If taller bakery-style crowns are the priority, the Blueberry Muffin Recipe goes further with generous filling and a hot-start method.
Why Are My Chocolate Zucchini Muffins Gummy, Dry, Dense or Flat?
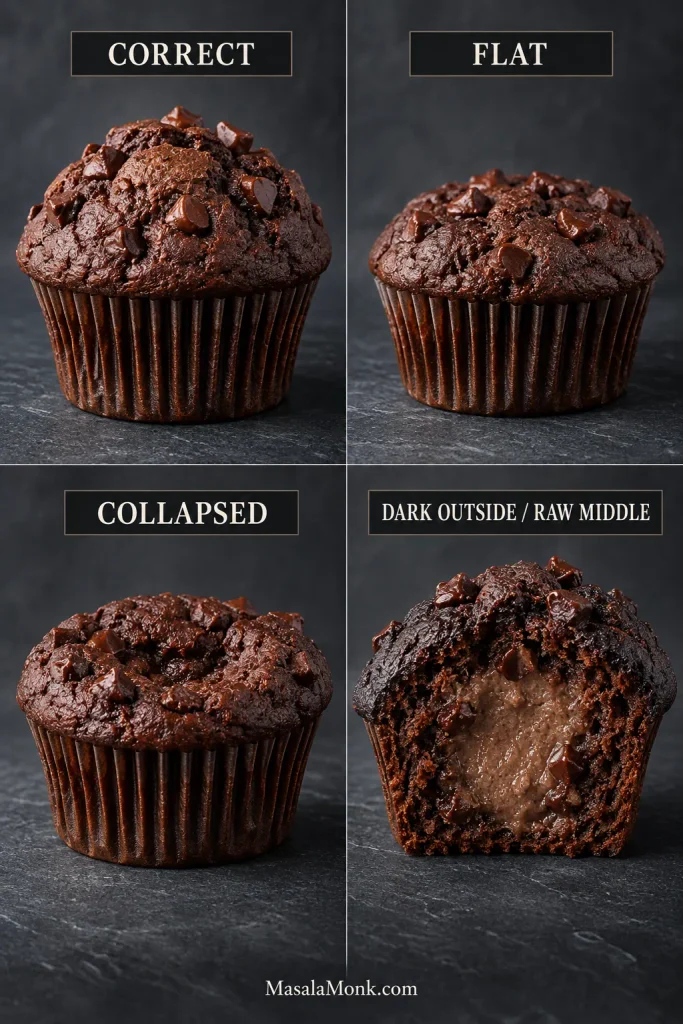
Most texture problems are easiest to troubleshoot one likely cause at a time. Find the symptom closest to yours, change that first, and leave the rest of the recipe alone on the next batch.
Problem
Likely cause
What to do
Wet or gummy center
Very wet zucchini, extra zucchini, moisture-heavy substitutions, oversized portions or underbaking
Check the zucchini amount and preparation first; extra oven time cannot always rescue a batter carrying too much water
Dense or rubbery
Overmixing, protein powder or a flour swap that absorbs differently
Fold only until combined and change one major ingredient at a time
Dry
Too much flour, zucchini pressed extremely dry, large sugar/fat reductions or overbaking
Weigh the flour and start checking sooner
Rose, then collapsed
Wet batter, several major substitutions at once, too much leavener or a center that had not set
Correct the batter before adding more baking powder
Flat tops
Old leavener, underheated oven, heavy batter or underfilled cups
Use fresh leaveners, fully preheat and portion consistently
Dark outside, raw middle
Oversized portions, dark pan, oven running hot or excess batter moisture
Check the pan, oven, portion size and zucchini before simply extending the bake
Bitter or chemical
Too much baking soda or baking powder, or an improvised leavener swap
Measure carefully and keep the leaveners as written
Tester looks wet
You may have pierced a melted chocolate chip
Test another spot before deciding the center is raw
Treat the muffin’s shape as a clue rather than a verdict: flat, collapsed and raw-centered muffins point you toward different moisture, heat, leavening or portioning checks.
Wet or Gummy in the Middle
Extra zucchini, a large applesauce substitution, a different flour or unusually large portions can all leave the center struggling to set before the outside is ready. A genuinely underbaked muffin may only need a few more minutes. When the batter itself carries too much water, however, the edges can dry while the middle stays sticky.
A moist crumb still has structure—visible pores, clean separation and a mostly matte surface—whereas a gummy center compresses into shiny, paste-like crumb away from the chocolate pockets.
Bitter or Chemical Taste
Chemical or metallic bitterness usually points to too much baking soda or baking powder, or an incorrect swap between the two. Very dark cocoa can also taste harsher after a large sugar reduction.
How to Store and Freeze Chocolate Zucchini Muffins
Cool the muffins completely before sealing them up. They are at their best for about 2–3 days at room temperature; packing them while warm traps steam and can make the tops sticky.
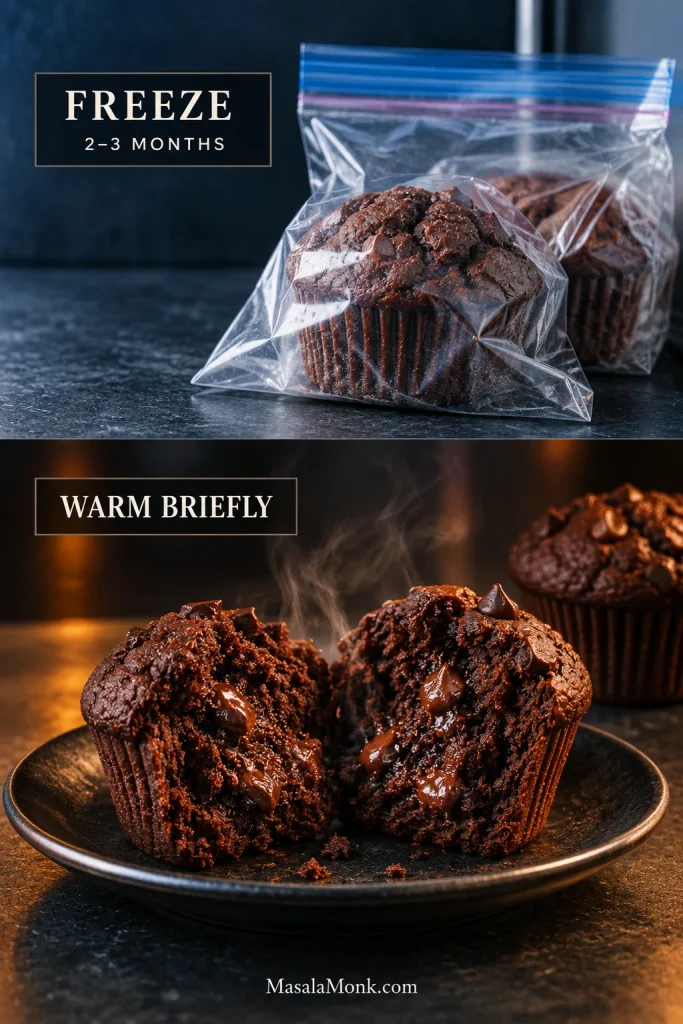
For longer storage, refrigerate them in an airtight container for about 5–6 days, or freeze them for about 2–3 months. To freeze them, cool them fully and wrap them individually or transfer them to a well-sealed freezer bag or container.
Thaw at room temperature or warm one briefly in the microwave. The crumb softens again, and the chocolate chips turn melty at the edges.
Individual wrapping turns a frozen batch into single servings: take out one muffin, warm it briefly, and leave the rest sealed until you need them.
Baking a big garden-zucchini batch? If the centers seemed borderline, cut one muffin open after it has cooled before freezing the entire batch. It is much better to catch a wet middle before thirty muffins disappear into the freezer. If the crumb looks compressed or shiny, compare it with Wet or Gummy in the Middle before storing the batch.
Discard muffins with visible mold, an off smell or an unusual slimy texture.
Warm one just enough for the chips to soften again, and the thing you notice first is still the chocolate: a dark, tender crumb with the zucchini quietly doing the work that keeps it soft.
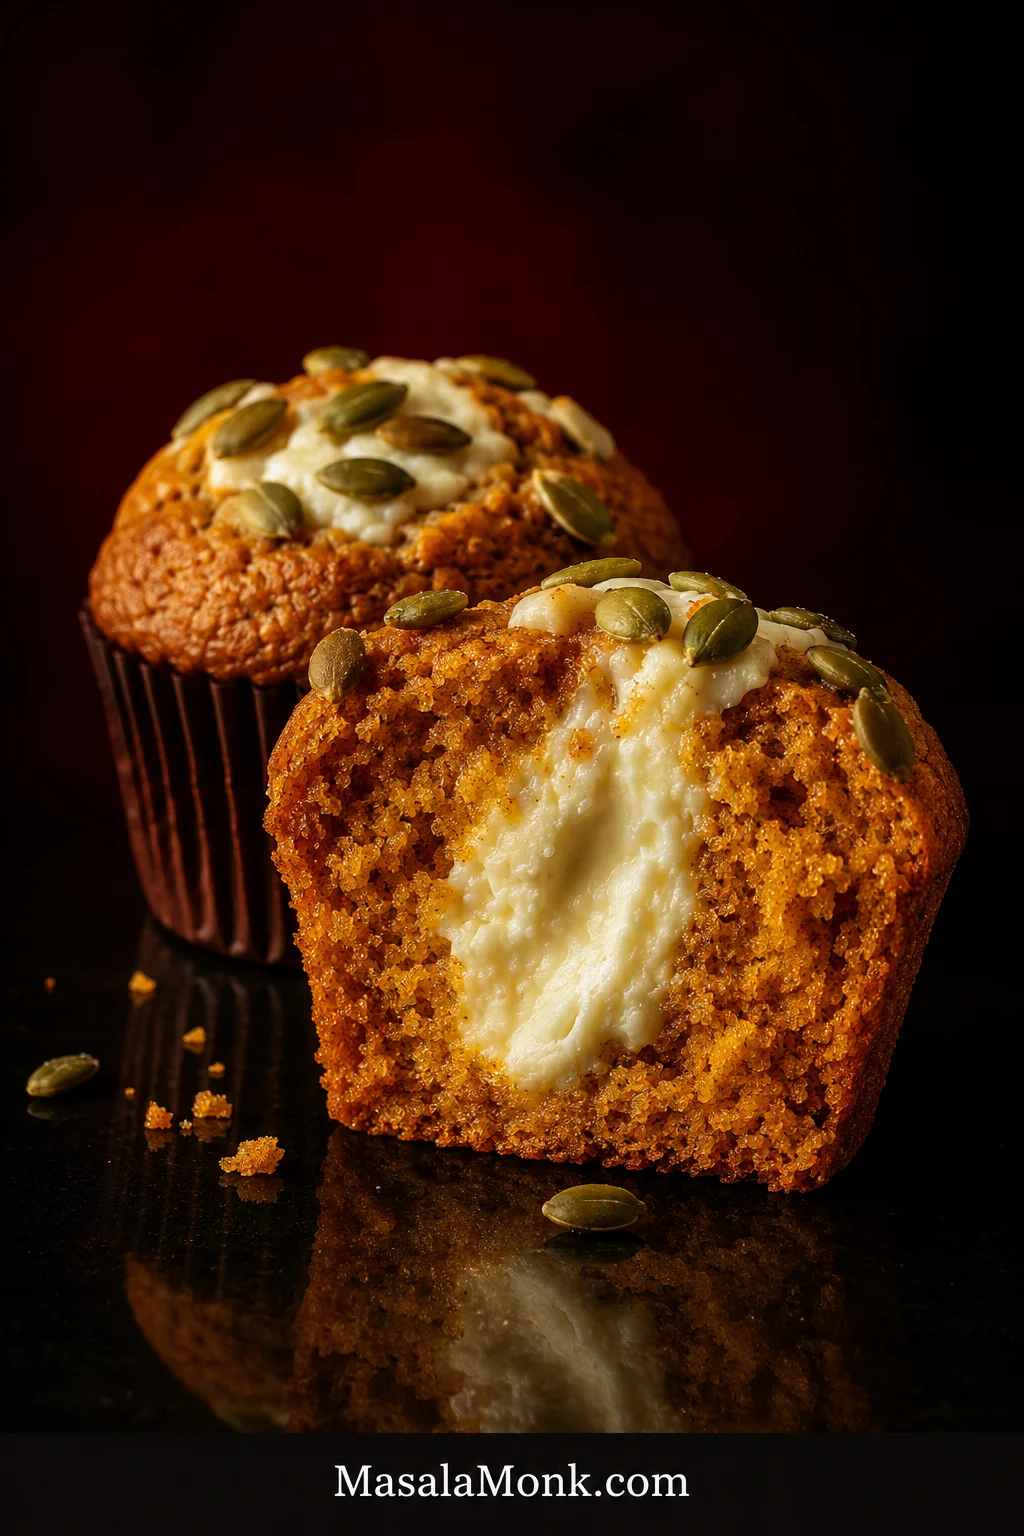
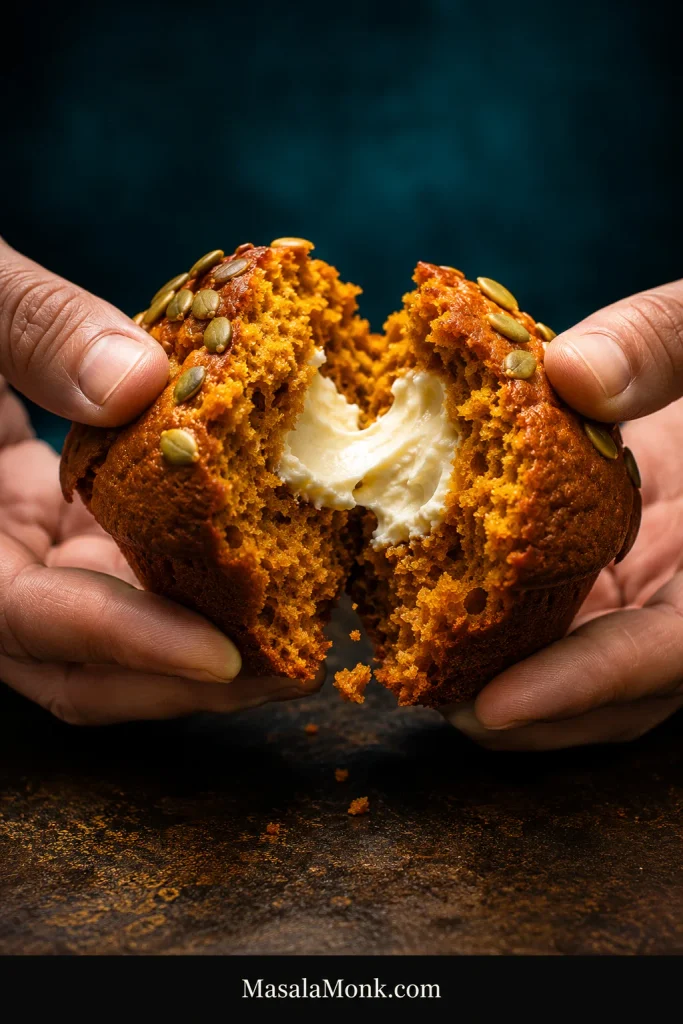
Cut one of these pumpkin cream cheese muffins open after it has cooled a little and the best part should be obvious: a creamy white filling inside a tender, warmly spiced pumpkin muffin. Roasted pepitas bring a salty crunch to the top, while tangy cream cheese keeps the sweetness in balance.
The disappointing version looks promising from above and then gives you bite after bite of pumpkin with barely a streak of cream cheese inside. Here, each standard muffin gets about 1 1/2 tablespoons of filling, piped into the raw batter rather than left as a small dollop at the crown.
There’s no need to freeze the filling first or rest the batter. Once the cream cheese is smooth, the rest is whisk, fold, pipe and bake.
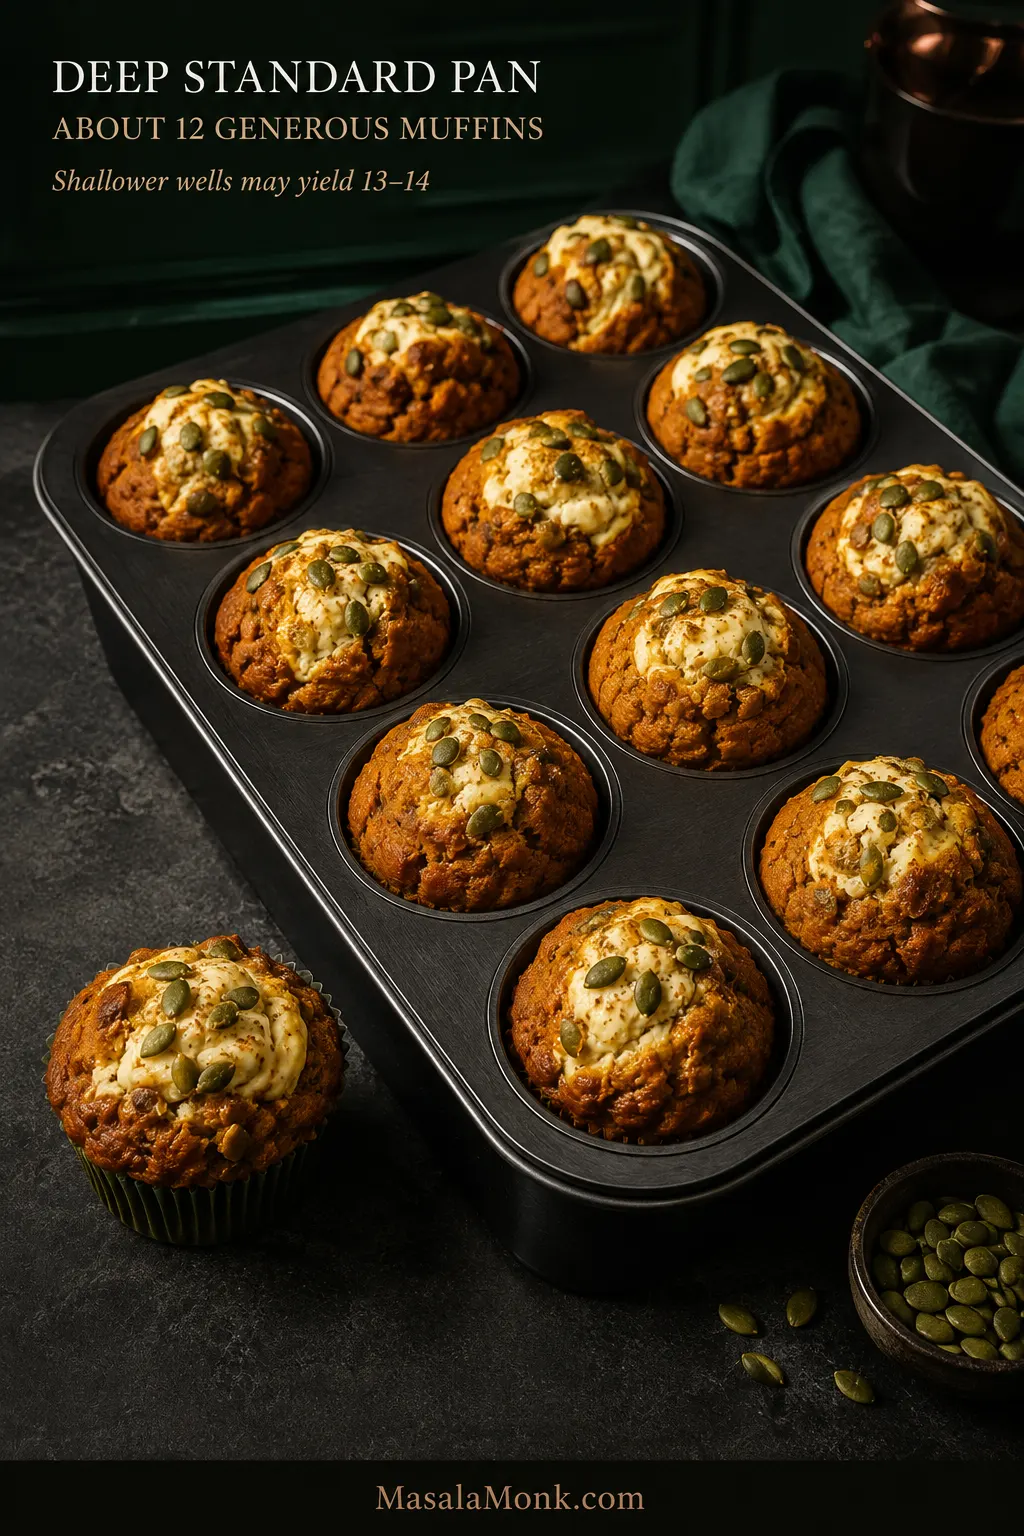
This batch makes about 12 generously filled muffins in a deep standard 12-cup pan. Shallower wells may give you 13 or 14. Let the pan decide the final yield instead of forcing every bit of batter into 12 cups.
Use the pan, not the recipe yield, as the final portioning guide. If a shallower cup already looks comfortably full around 85–90 g of batter, move the rest into another liner rather than forcing a taller muffin into too little space.
The target is a tender, warmly spiced pumpkin crumb with enough structure to hold the cream cheese without turning dense or gummy.
Yield: about 12 standard muffins; 13–14 in shallower wells
Prep: about 25 minutes
Bake: about 19–23 minutes
Cool before a clean first cut: about 20–30 minutes
Conventional oven: 425°F / 220°C, then 350°F / 175°C
Fan/convection: as a starting point, reduce both temperatures by about 25°F / 15°C—roughly 400°F / 205°C, then 325°F / 165°C—and begin checking a little earlier; ovens vary
Batter rest: none
You will need: a standard muffin pan, liners, two large mixing bowls, a small bowl for the filling, a whisk, a flexible spatula and a piping bag or sturdy zip-top bag. A handheld mixer is convenient for smoothing the cream cheese, but properly softened cream cheese can also be stirred smooth by hand. A kitchen scale is especially useful for the flour and filling.
Cream Cheese Filling
8 oz (226 g) full-fat block cream cheese, softened until pliable but still cool
1/2 cup (60 g) confectioners’ sugar (powdered or icing sugar)
1 tablespoon (8 g) all-purpose flour
1 teaspoon (5 ml) vanilla extract
1/8 teaspoon fine salt
Pumpkin Muffin Batter
2 1/4 cups (280 g) all-purpose flour
2 teaspoons pumpkin pie spice
1 teaspoon ground cinnamon
1 teaspoon baking powder
1 teaspoon baking soda
1/2 teaspoon fine salt
2 large eggs
3/4 cup packed light brown sugar (150 g); dark brown sugar also works
1/3 cup granulated sugar (67 g)
1 1/3 cups (330 g) 100% pumpkin purée
1/2 cup (120 ml) neutral oil, such as vegetable, canola, sunflower or mild avocado oil
Heat the oven. Position a rack in the middle and preheat a conventional oven to 425°F / 220°C. Line the muffin pan.
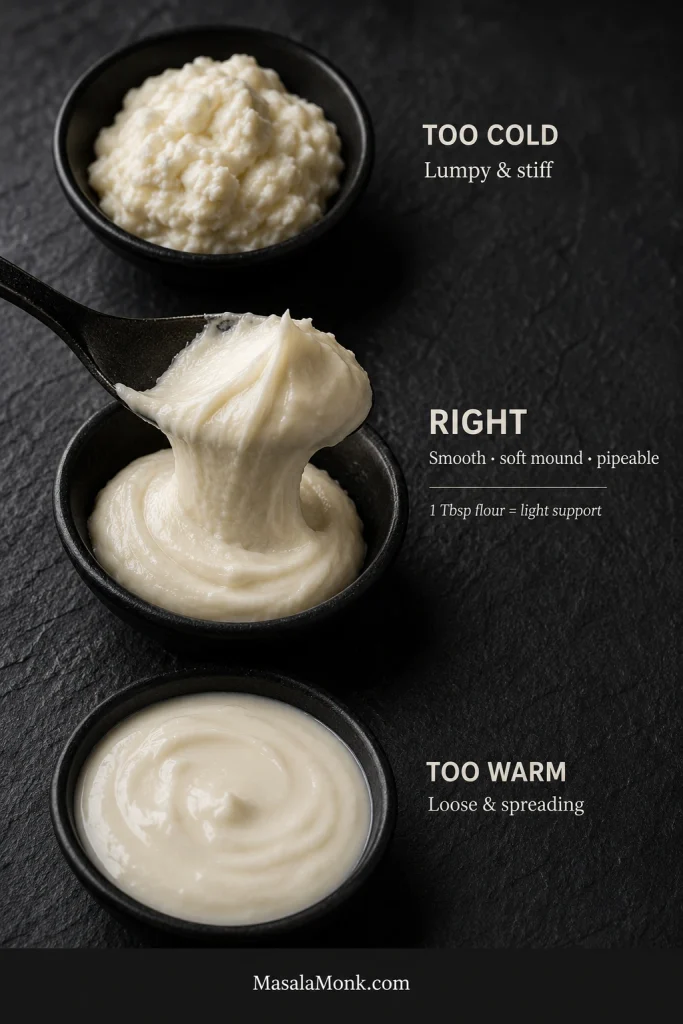
Mix the filling. Smooth the softened cream cheese, then mix in the confectioners’ sugar, flour, vanilla and salt. Scoop some up with a spoon: it should sit in a soft mound briefly instead of running flat. Chill for 15–20 minutes if it has become loose. Transfer to a piping bag or sturdy zip-top bag and cut an opening about 1/2 inch / 1–1.5 cm wide.
Temperature usually explains the filling before flour does. Lumpy filling is often still too cold; filling that spreads immediately has usually become too warm. Correct the temperature first so the center stays creamy rather than turning pasty.
Whisk the dry ingredients. Combine the flour, pumpkin pie spice, cinnamon, baking powder, baking soda and salt.
Mix the pumpkin base. In the second large bowl, whisk the eggs and both sugars until smooth. Add the pumpkin purée, oil, milk and vanilla and whisk again.
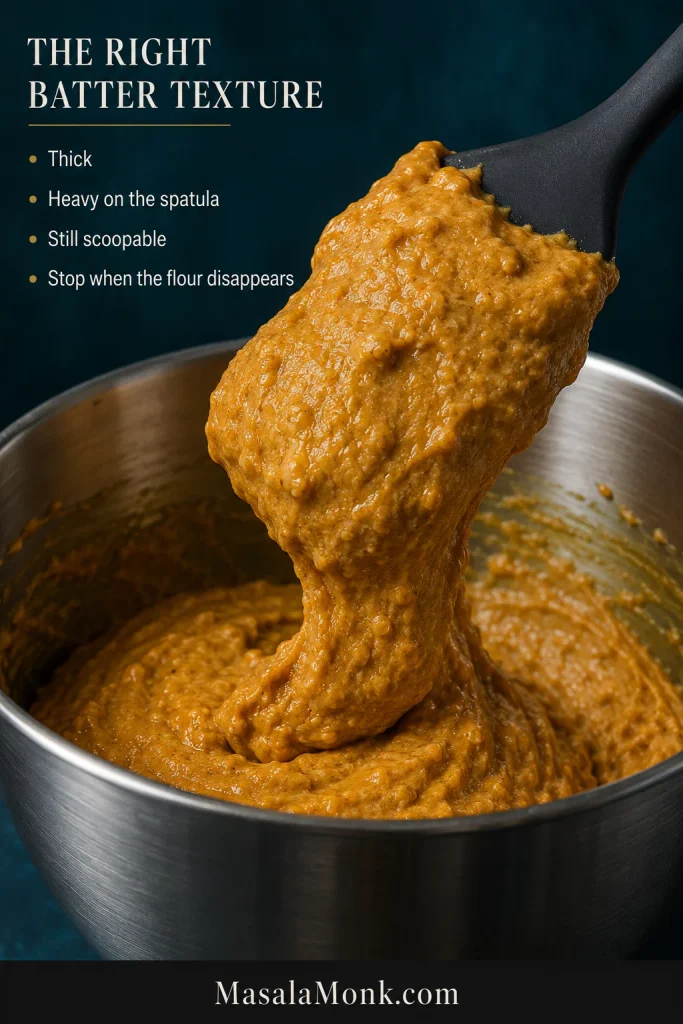
Fold the batter. Add the dry ingredients to the pumpkin mixture and switch to a spatula. Fold until the last visible flour disappears. The batter should sit heavily on the spatula but still scoop easily. A few small lumps are fine. Stop there.
A few small lumps are a better stopping point than a perfectly smooth batter. Once the flour is incorporated, extra folding can tighten the pumpkin crumb long before the batter starts looking obviously overmixed.
Fill and Top the Muffins
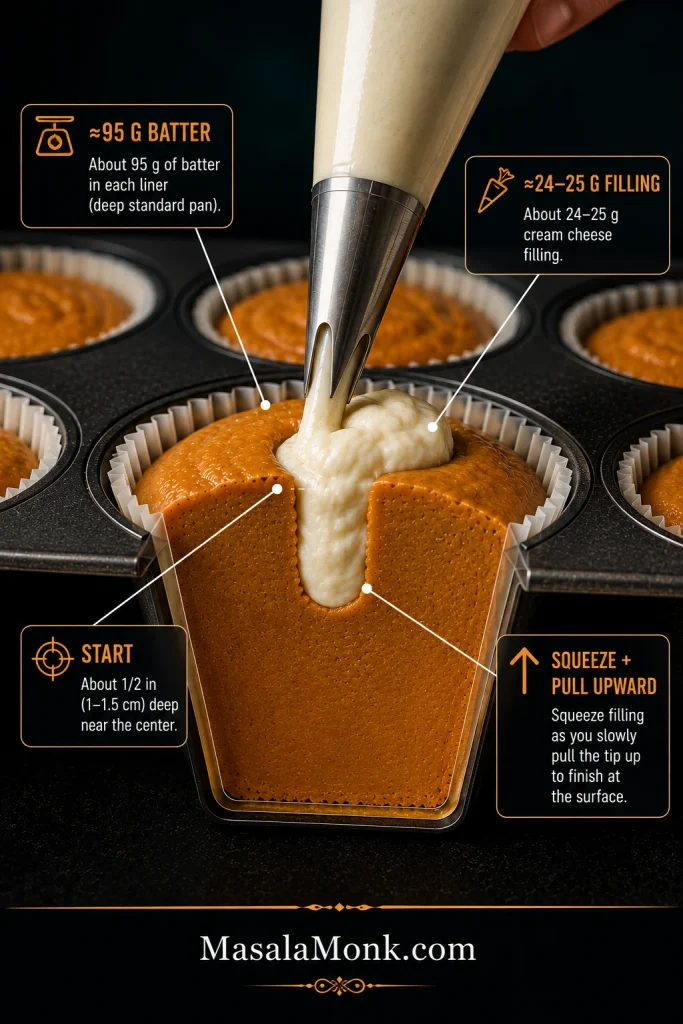
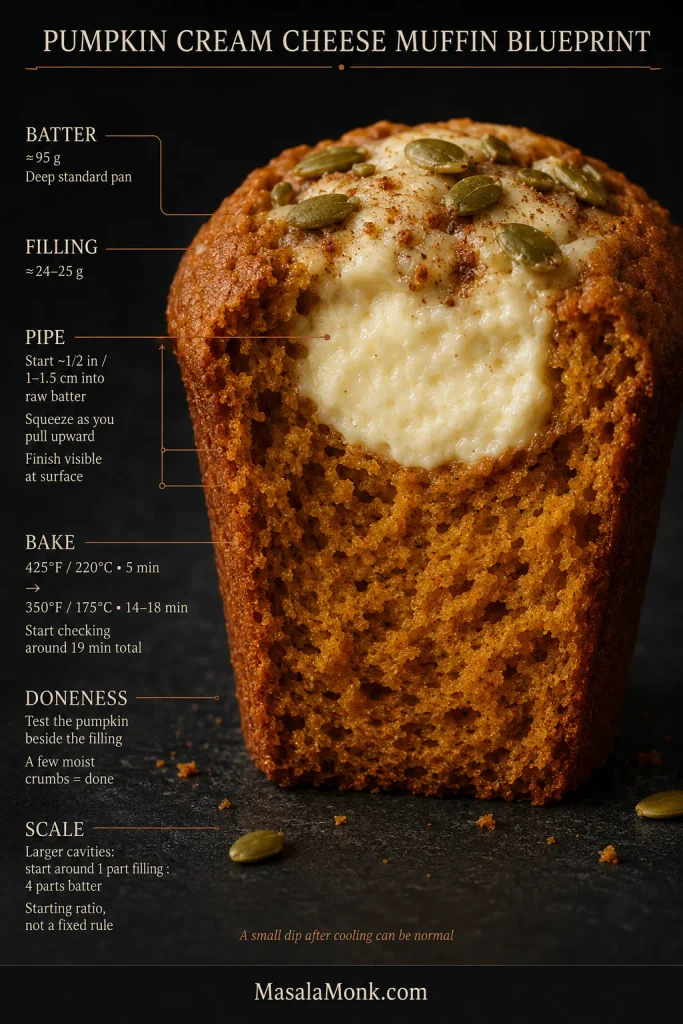
Fill the muffin wells. In a deep standard pan, divide the batter among 12 wells, about 95 g each. Shallower cups may already look full at 85–90 g; use a 13th or 14th liner instead of squeezing in the rest.
Pipe in the cream cheese. Divide the filling among the muffins, about 24–25 g each when making 12. Insert the tip about 1/2 inch / 1–1.5 cm into the batter. Squeeze as you slowly pull the bag upward, finishing with some cream cheese visible at the surface. Keep the filling away from the liner.
Piping upward creates a narrower vertical pocket instead of a broad cheese layer. That helps preserve pumpkin underneath and around the filling, which matters just as much as getting plenty of cream cheese into the muffin.
Add the pepitas. Toss the pepitas with the optional 1/4 teaspoon pumpkin pie spice, if using, then scatter them around the exposed cream cheese and press very lightly. The white crowns will vary a bit from muffin to muffin. That’s fine.
Bake, Check and Cool
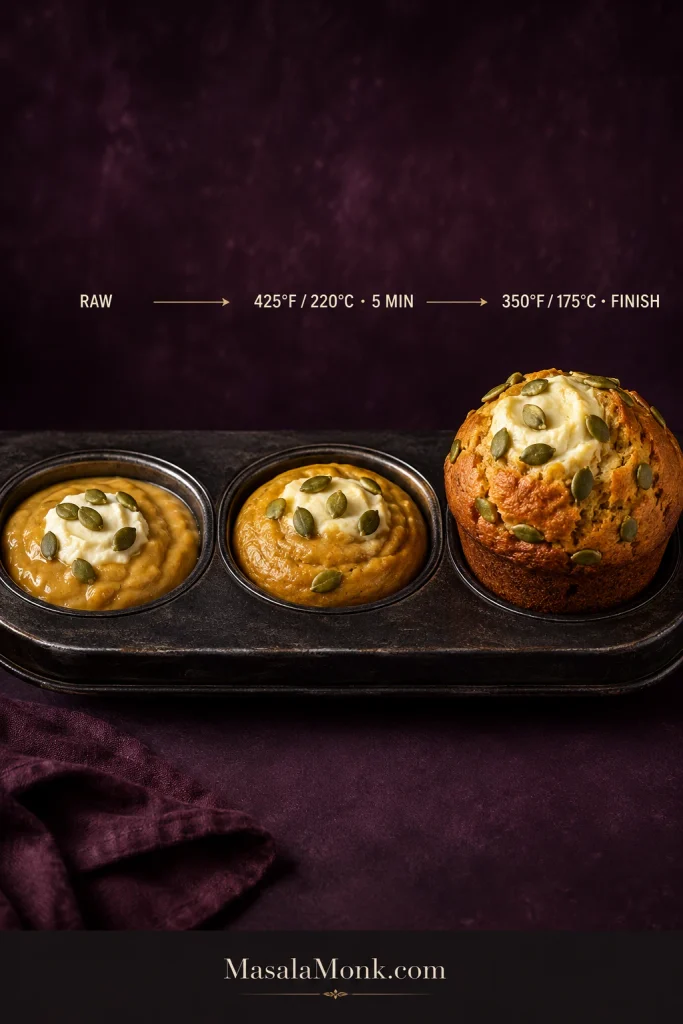
Start hot. Bake at 425°F / 220°C for 5 minutes. The early heat encourages the thick batter to rise quickly. Without opening the oven, reduce the temperature to 350°F / 175°C so the centers can finish without overbaking the tops.
Finish baking. Continue for another 14–18 minutes. Start checking near the early end of the range.
The two-temperature bake works as part of the whole system, not as a shortcut. Thick batter, sensible portioning and fresh leaveners still determine whether the muffin rises well; the hot start simply gives them an early advantage.
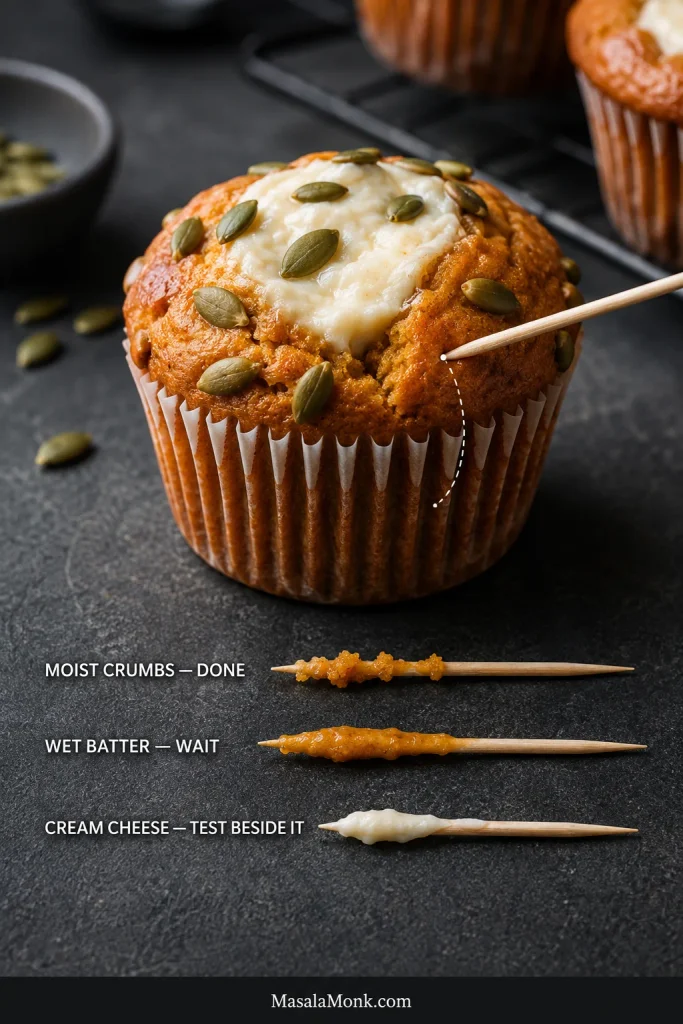
Check beside the filling. Insert a toothpick into the pumpkin portion just off-center. A few moist crumbs are fine; wet batter isn’t. The top should spring back lightly and the exposed cream cheese should look set and more matte than glossy.
Cool before cutting. Leave the muffins in the pan for about 5–10 minutes, then move them to a wire rack. Give the filling another 15–20 minutes to settle if you want a cleaner first cut.
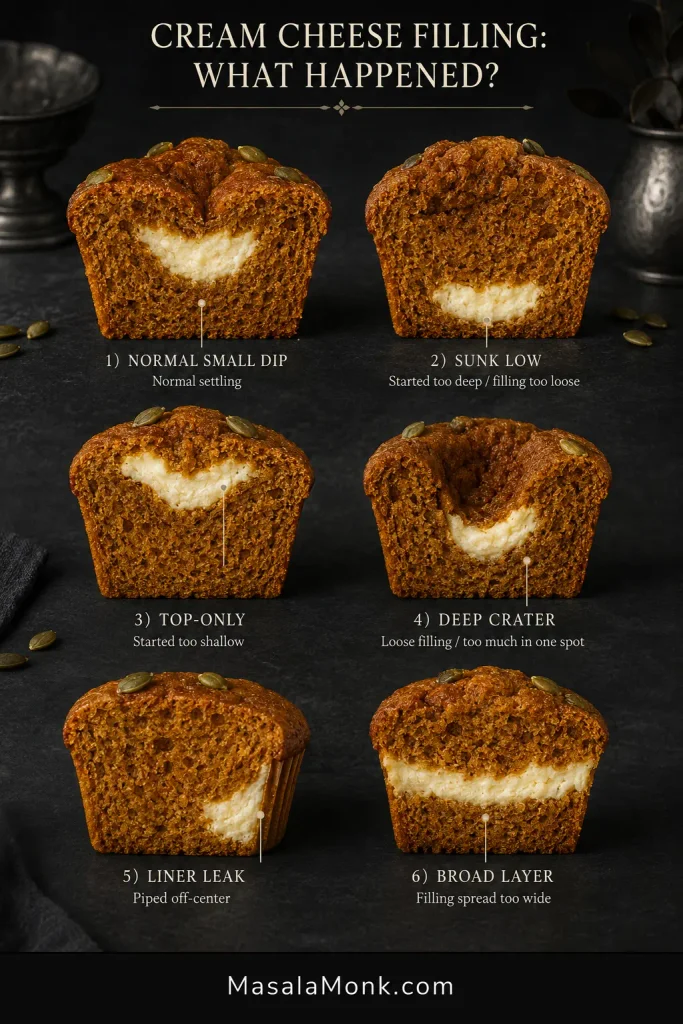
That first cut tells you more than the top does. Cream cheese settling slightly to one side is normal; a deep crater or filling pooled near the bottom is a different story.
The pumpkin crumb around the center should stay open and tender; a shiny, compressed band suggests excess moisture or underbaking.
That white center and pepita crown may look familiar.
Are These Starbucks Pumpkin Cream Cheese Muffins a Copycat?
They’re Starbucks-inspired rather than an exact replica. Starbucks’ 2026 Pumpkin Cream Cheese Muffin combines spiced pumpkin muffin, sweet cream-cheese filling and spiced pepitas. This recipe keeps that recognizable white center and pumpkin-seed top while using its own eggless filling, proportions and method.
If that seasonal coffee-shop muffin is what brought you here, homemade has one obvious advantage: you decide when the season starts—and how much cream cheese goes into the middle.
What Keeps the Muffins Tender and the Filling Creamy
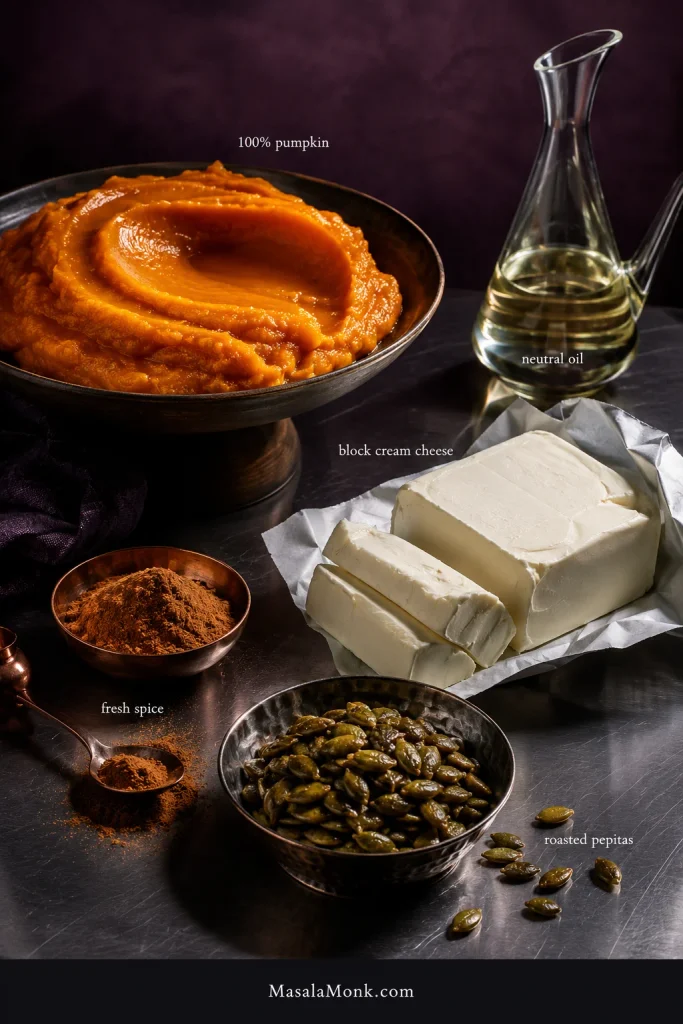
A few ingredient choices do most of the work here: thick pumpkin keeps excess water in check, block cream cheese makes the center more predictable, oil helps the crumb stay tender after chilling, and fresh spices keep the pumpkin tasting lively after baking.
Ingredient form matters more than brand here: thick purée, block cream cheese and neutral oil give the recipe its intended balance.
Use Thick Pumpkin Purée
Use plain 100% pumpkin purée, not pumpkin pie filling. Pie filling already contains sugar, spices and other ingredients, so it changes both flavor and moisture.
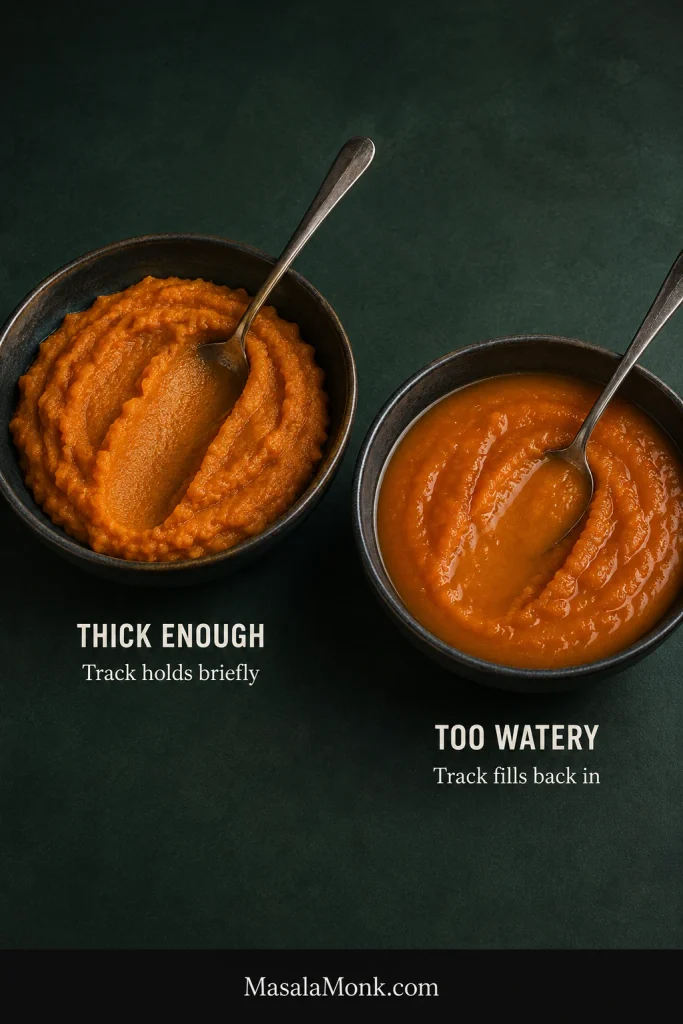
Homemade purée works when it is roughly as thick as canned pumpkin. Drag a spoon through it; the track should stay visible briefly instead of flooding straight back in. Our pumpkin bread recipe has more detail on canned versus fresh pumpkin and handling a watery homemade purée.
If homemade pumpkin purée closes over the spoon track almost immediately, deal with the excess water at the source. Draining or gently reducing it protects pumpkin flavor better than correcting a wet batter later with extra flour.
A typical 15 oz / 425 g can leaves roughly 95 g after you measure what this recipe needs. Save it for oatmeal, pancakes, soup, smoothies or a healthy pumpkin spice latte. Adding the remainder here would throw off the moisture balance.
Keep the Cream Cheese Cool Enough to Hold Its Shape
Use full-fat block or brick-style cream cheese. Tub-style, whipped and reduced-fat products may contain more water, stabilizers or incorporated air, making the filling less predictable.
You want the block pliable enough to mix without stubborn lumps while it still feels cool. Leave it in a hot kitchen too long and the mixture loosens noticeably.
Oil for Tenderness, Flour Measured Carefully
Neutral oil helps these muffins stay tender after cooling and refrigeration. Melted butter brings more buttery richness, but the texture firms more once chilled.
Weigh the flour if you can: 280 g. With cups, loosen it, spoon it in and level without packing. Extra flour makes this batter heavy surprisingly quickly.
Use Spices You Can Actually Smell
Smell your pumpkin pie spice before measuring it.
Pumpkin and cream cheese can mute a timid blend, so stale spices leave the finished muffins noticeably flat. Fresh cinnamon and ginger should announce themselves as soon as the jar opens and become even more noticeable once the pan is in the oven.
If you need a fresh blend, use our homemade pumpkin pie spice. In a pinch, replace the 2 teaspoons here with approximately 1 teaspoon cinnamon, 1/2 teaspoon ginger, 1/4 teaspoon nutmeg, 1/8 teaspoon cloves and 1/8 teaspoon allspice, then keep the additional teaspoon of cinnamon already listed in the batter.
How to Get a Creamy Center That Stays Put
Keep the filling creamy but pipeable. The tablespoon of flour already in the recipe gives the eggless center enough support; adding more can make it pasty. If the mixture stops holding a soft mound in a warm kitchen, chill it briefly instead of adding extra flour.
Pipe through the center. Start around the middle and squeeze as you pull upward, keeping pumpkin batter between the filling and liner. A small dip or slightly off-center cream-cheese crown after cooling is normal.
How to Tell When Pumpkin Cream Cheese Muffins Are Done
A toothpick pushed straight through the cream cheese may come back coated even when the muffin is fully baked. Test just beside it.
Press the top. It should spring back lightly.
Check the pumpkin portion. A few moist crumbs are fine; wet batter isn’t.
Look at the exposed cream cheese. It should appear set and more matte than glossy.
Do not wait for a bone-dry tester. A few moist crumbs from the pumpkin portion are a better endpoint than baking until every trace disappears, especially with a cream cheese center that naturally stays soft.
Troubleshooting Pumpkin Cream Cheese Muffins
The hardest part is sometimes knowing when to stop fixing something that isn’t broken. A small dip, an off-center white crown or two muffins that rise differently can still be completely good muffins.
For a real problem, match the symptom you saw and change one thing at a time.
Leave it alone if the surrounding muffin is baked.
Cream cheese sinks toward the bottom
Piping started too deep, or the filling was very loose
Start nearer the middle and briefly chill loose filling.
Most cream cheese stays on top
Piping began too close to the surface
Insert the bag a little farther before squeezing.
Deep crater
Loose filling or too much filling concentrated in one spot
Chill the filling and spread it vertically as you withdraw the bag.
Filling leaks to the liner
It was piped off-center
Keep pumpkin batter between the cream cheese and paper.
Lumpy filling
Cream cheese was too cold
Soften it until pliable before mixing.
Muffin separates around the cream-cheese layer
The filling spread into a broad horizontal layer
Keep the pocket narrower and more central.
Treat filling position as evidence. A problem that is mostly about where the cream cheese ended up usually points toward piping depth or direction; a loose cratered center suggests you should look at filling consistency instead.
Muffin Texture & Rise Problems: Dense, Gummy, Dry or Flat
What you see
Likely cause
Next time
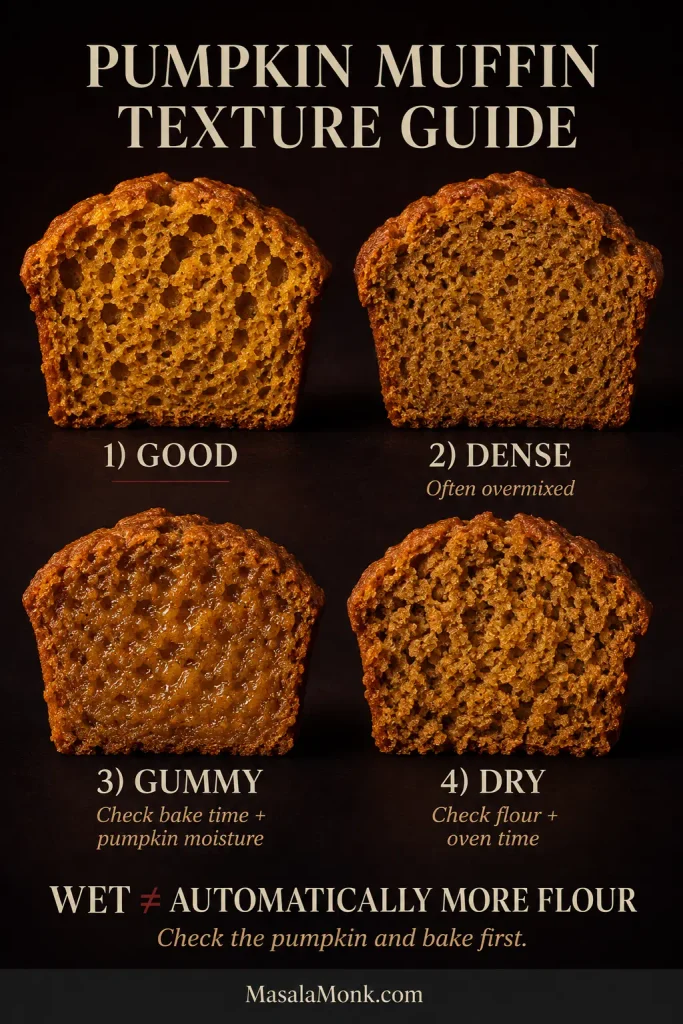
Dense or rubbery
Too much mixing after the flour went in
Fold only until the last dry streak disappears.
Dry and heavy
Too much flour or too much oven time
Weigh the flour and begin checking earlier.
Wet or gummy
Underbaking or watery pumpkin purée
Use thick purée and test beside the filling.
Flat tops
Weak leavener, underheated oven or very loose batter
Use fresh baking powder and soda and fully preheat the oven.
Lopsided tops
Uneven portions, off-center filling or uneven oven heat
Portion carefully and keep the filling near the middle.
The crumb tells you which direction to investigate. Tight pores suggest density, a shiny compressed interior points toward gumminess, and rough fragile crumb suggests dryness—three different problems that should not receive one generic fix.
A wet, heavy muffin doesn’t automatically need more flour. Check the pumpkin and baking time first, or an underbaking problem can easily become a dry-muffin problem on the next batch.
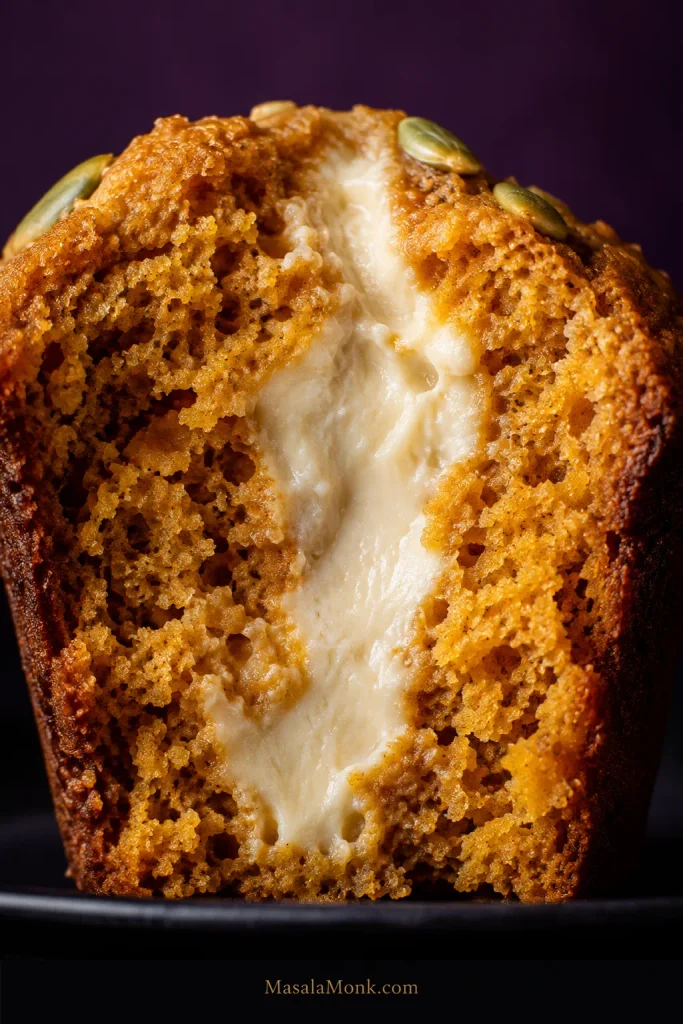
Once the muffin is baked through, the center should still be creamy while the pumpkin around it pulls apart cleanly rather than compressing into a wet, gummy band.
This is the payoff: soft pumpkin crumb pulling away from a thick creamy center, with pepitas adding crunch at the top.
Once the base muffin works for you, these variations change one element at a time—the center, the crown or the mix-ins—without rebuilding the whole recipe.
Filled, Cheesecake-Style or Swirled?
They’re related, but they don’t give you the same muffin. The main recipe is a filled or stuffed pumpkin cream cheese muffin with a distinct creamy pocket inside. Add egg or egg yolk to a filling and it sets more firmly, closer to baked cheesecake. A surface swirl keeps more of the cream cheese near the top and gives the crown a marbled look.
Filled gives the strongest cream-cheese pocket, cheesecake-style sets firmer, and a swirl spreads the tangy richness through more of the crown.
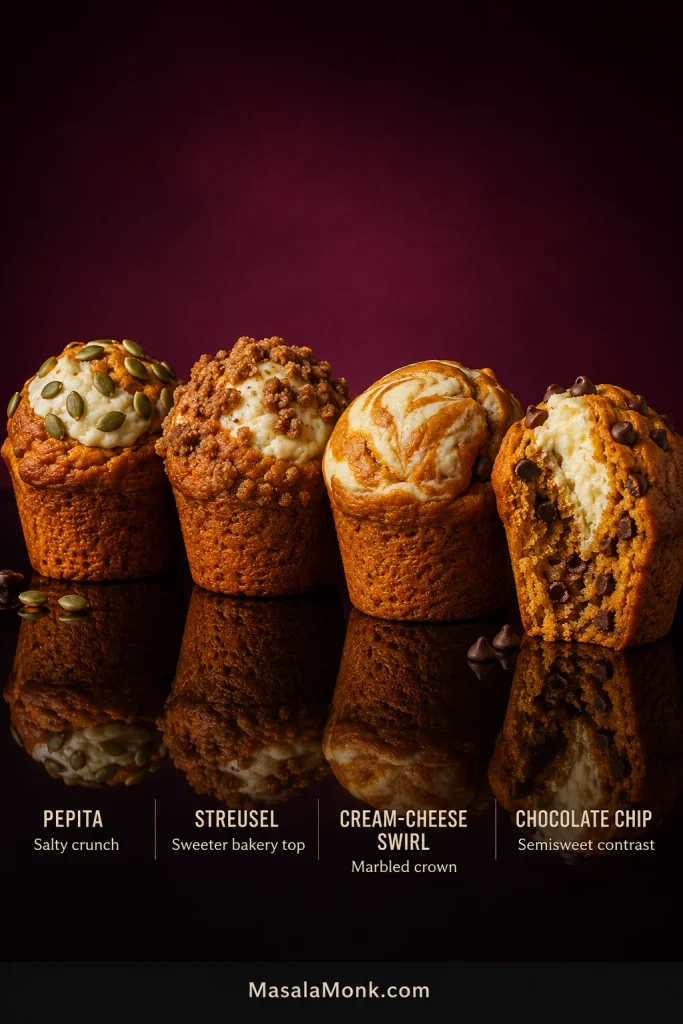
Keep the Pepitas for Salty Crunch
The muffin and filling are already sweet, so roasted salted pepitas bring welcome contrast without adding another sugary layer. Toss them with the optional pumpkin pie spice for a slightly more aromatic top.
Use Streusel for a Sweeter Bakery Muffin
Leave off the pepitas and mix:
1/2 cup (63 g) all-purpose flour
1/4 cup packed brown sugar (50 g)
1 teaspoon cinnamon
3 tablespoons (42 g) melted unsalted butter
Stir with a fork until irregular crumbs form, then divide the streusel evenly among the muffins, scattering it around rather than directly over the cream cheese.
Swirl the Cream Cheese for a Creamier Crown
A surface swirl needs only half of the main filling: 113 g cream cheese, 30 g confectioners’ sugar, about 1 1/2 teaspoons (4 g) flour, 1/2 teaspoon vanilla and a pinch of salt.
Divide it over the pumpkin batter and make a few loose passes with a toothpick or thin skewer. Stop while clear streaks of white and orange remain. Bake on the same standard-muffin schedule and test the pumpkin portion for doneness.
Chocolate Chip Pumpkin Cream Cheese Muffins
Fold 1/2 cup (about 85 g) semisweet chocolate chips into the pumpkin batter before filling the pan. Keep the cream-cheese quantity and baking method unchanged.
If you’re deciding which version to make, this final lineup shows how the four easiest finishes change the look and balance of the same pumpkin cream cheese muffin.
Pepitas keep the top least sweet; streusel makes it richer, a cream-cheese swirl emphasizes tang, and semisweet chocolate adds deeper contrast.
Mini and Jumbo Pumpkin Cream Cheese Muffins
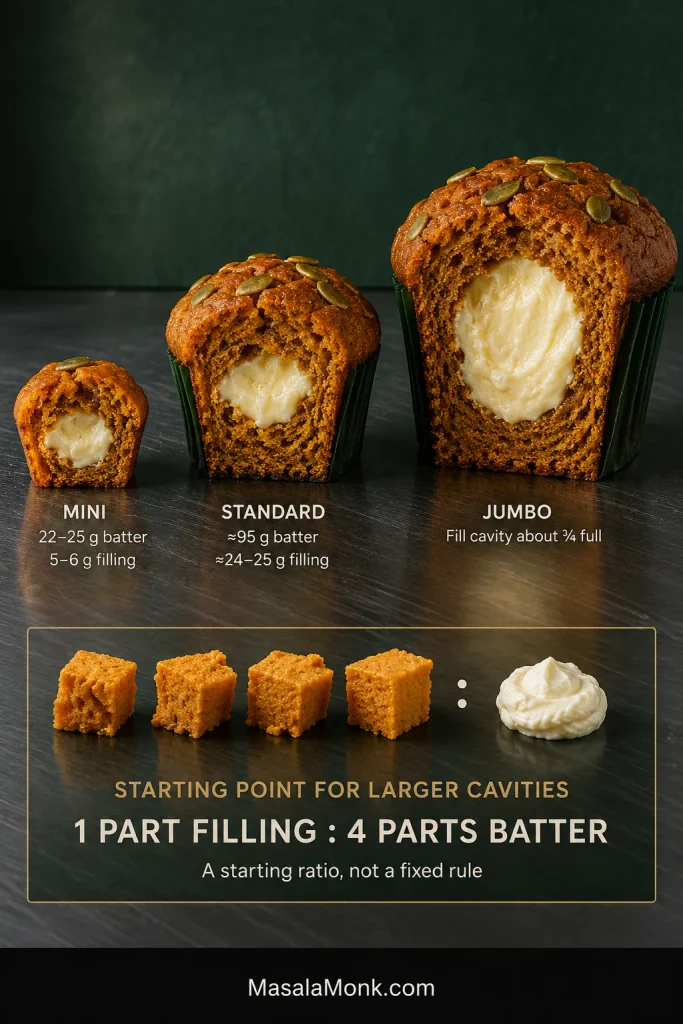
The standard and mini portions suggest a useful starting point for larger muffins: roughly 1 part cream-cheese filling for every 4 parts batter by weight. Use that as a starting point for larger cavities, not a fixed rule.
Scaling up is not just a matter of adding more filling. If cream cheese increases faster than the pumpkin batter around it, the shell becomes thinner and craters or leaks become more likely—so both parts should grow together.
Size
Starting point
Bake
Standard
About 95 g batter + 24–25 g filling in a deep 12-cup pan
425°F / 220°C for 5 min, then 350°F / 175°C; start checking around 19 min total
Mini
About 22–25 g batter + 5–6 g filling; roughly 48 minis from the full batch, depending on the pan
350°F / 175°C throughout; start checking at 11–12 min, with many pans finishing around 12–14 min
Jumbo
Fill each cavity roughly three-quarters full, then use the 1:4 filling-to-batter ratio as a starting point
425°F / 220°C for 5 min, then 350°F / 175°C; begin checking around 27 min total, with deeper pans sometimes needing longer
Jumbo cavities vary too much for one universal gram amount or bake time to be genuinely useful. Let the pan and the same doneness cues from the standard muffins guide you.
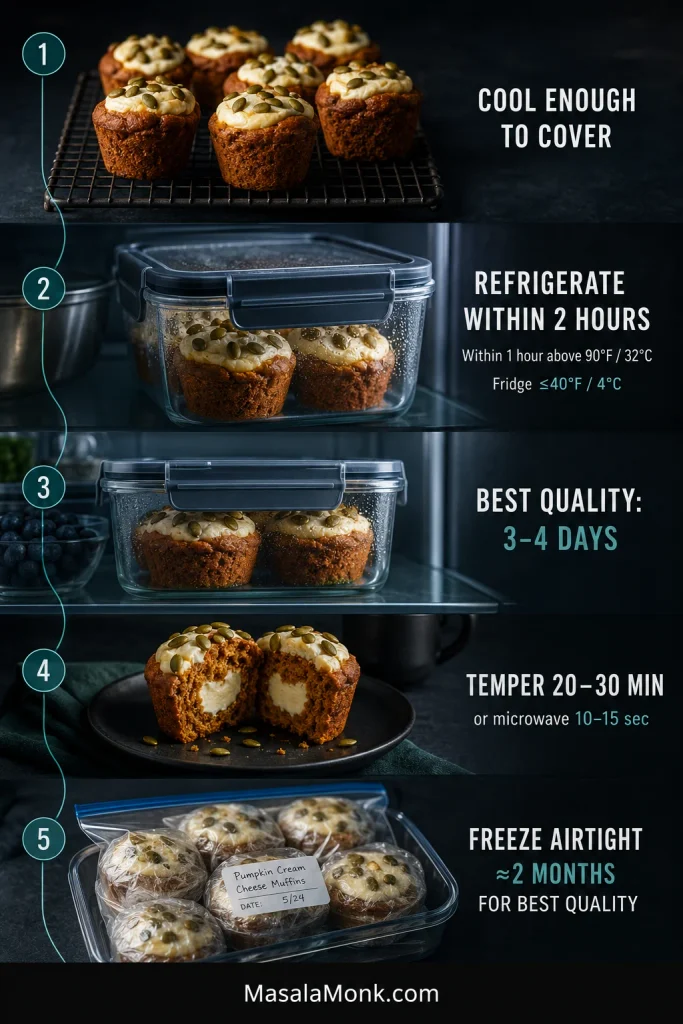
Because the filling is dairy-based, the timeline below separates cooling, refrigeration, serving and freezing so each stage is easy to follow.
Storage changes texture as well as shelf life. Once chilled, the pumpkin crumb firms and the cream cheese loses some softness; a short temper at room temperature restores much of the freshly baked eating texture.
Do Pumpkin Cream Cheese Muffins Need to Be Refrigerated?
Yes. Let the muffins stop steaming and cool enough to cover, then refrigerate them while keeping the total room-temperature time under 2 hours. If the room or outdoor temperature is above 90°F / 32°C, keep that time under 1 hour. The FDA recommends keeping the refrigerator at 40°F / 4°C or below.
For the best quality, use the refrigerated muffins within about 3–4 days, consistent with USDA guidance for refrigerated leftovers. Give a chilled muffin 20–30 minutes at room temperature and it softens again while the filling loses its hard chill. A brief 10–15 second microwave warm-up works too.
Can You Freeze Pumpkin Cream Cheese Muffins?
Yes. Cool them completely, wrap well and freeze airtight for up to about 2 months for best quality. The filling may thaw slightly softer or a bit more granular than it was fresh.
Can You Make Them Ahead?
The cream-cheese filling can be mixed ahead and refrigerated separately; let it loosen just enough to pipe before assembling. For the muffins themselves, bake ahead rather than holding the fully mixed pumpkin batter overnight.
Pumpkin Cream Cheese Muffins FAQ
Can I Make Them Without a Piping Bag?
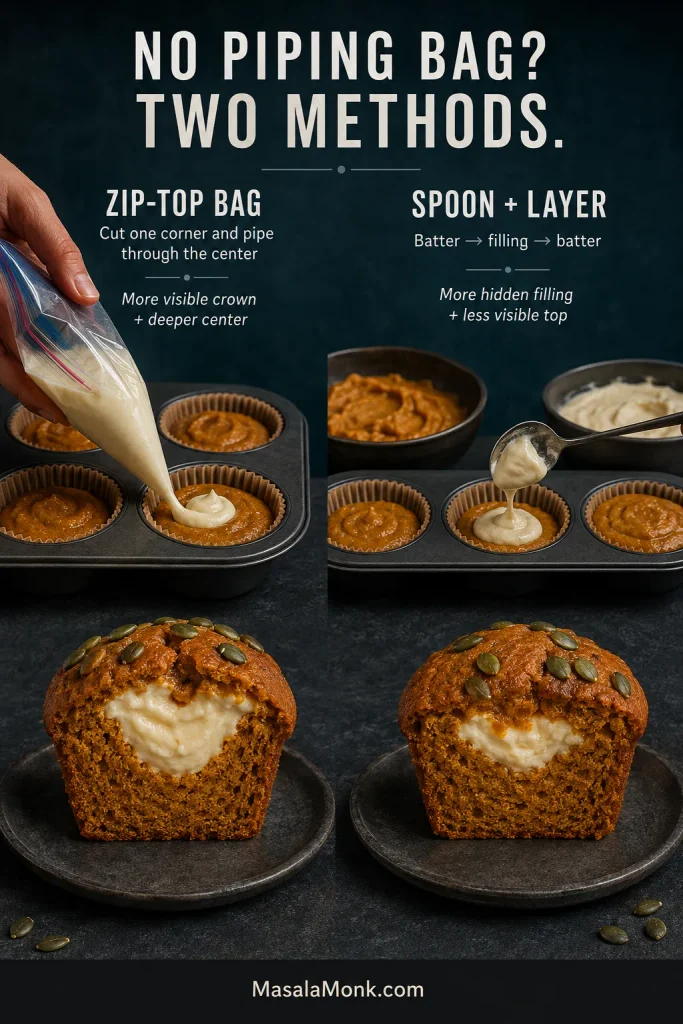
Yes. A sturdy zip-top bag with a corner cut off works well. You can also spoon in some pumpkin batter, add cream cheese to the middle and cover it with more batter. That gives you a more hidden pocket with less filling visible on top.
Choose the workaround according to the result you want. A cut zip-top bag gives better control over a visible crown and central filling path; spoon-and-layer assembly is simpler when a hidden cream cheese pocket is perfectly fine.
Can I Replace the Oil With Butter?
Yes. Replace the 1/2 cup oil with 1/2 cup (113 g) melted unsalted butter and let it cool slightly before mixing it with the wet ingredients. You’ll get more buttery richness, but the muffin will firm somewhat more after cooling and refrigeration.
Can I Add Even More Cream Cheese?
The main recipe already uses a generous amount. Packing substantially more cream cheese into the same-size muffin leaves less pumpkin batter around it and makes craters, leaks and gummy edges more likely. For a bigger cream-cheese pocket, move to a larger muffin and scale the batter and filling together.
If you want one visual reference to keep beside the pan, the blueprint below is the most useful place to start.
Use this as a troubleshooting map rather than a second recipe card. When a batch looks different, compare the batter-to-filling balance, piping position, bake sequence and doneness check before changing the formula itself.
Let the first one cool enough for the filling to settle, then cut straight through the middle. The tender pumpkin crumb should pull apart around a creamy white center, with salty pepitas cracking across the top. Take another bite, and there should still be cream cheese there.
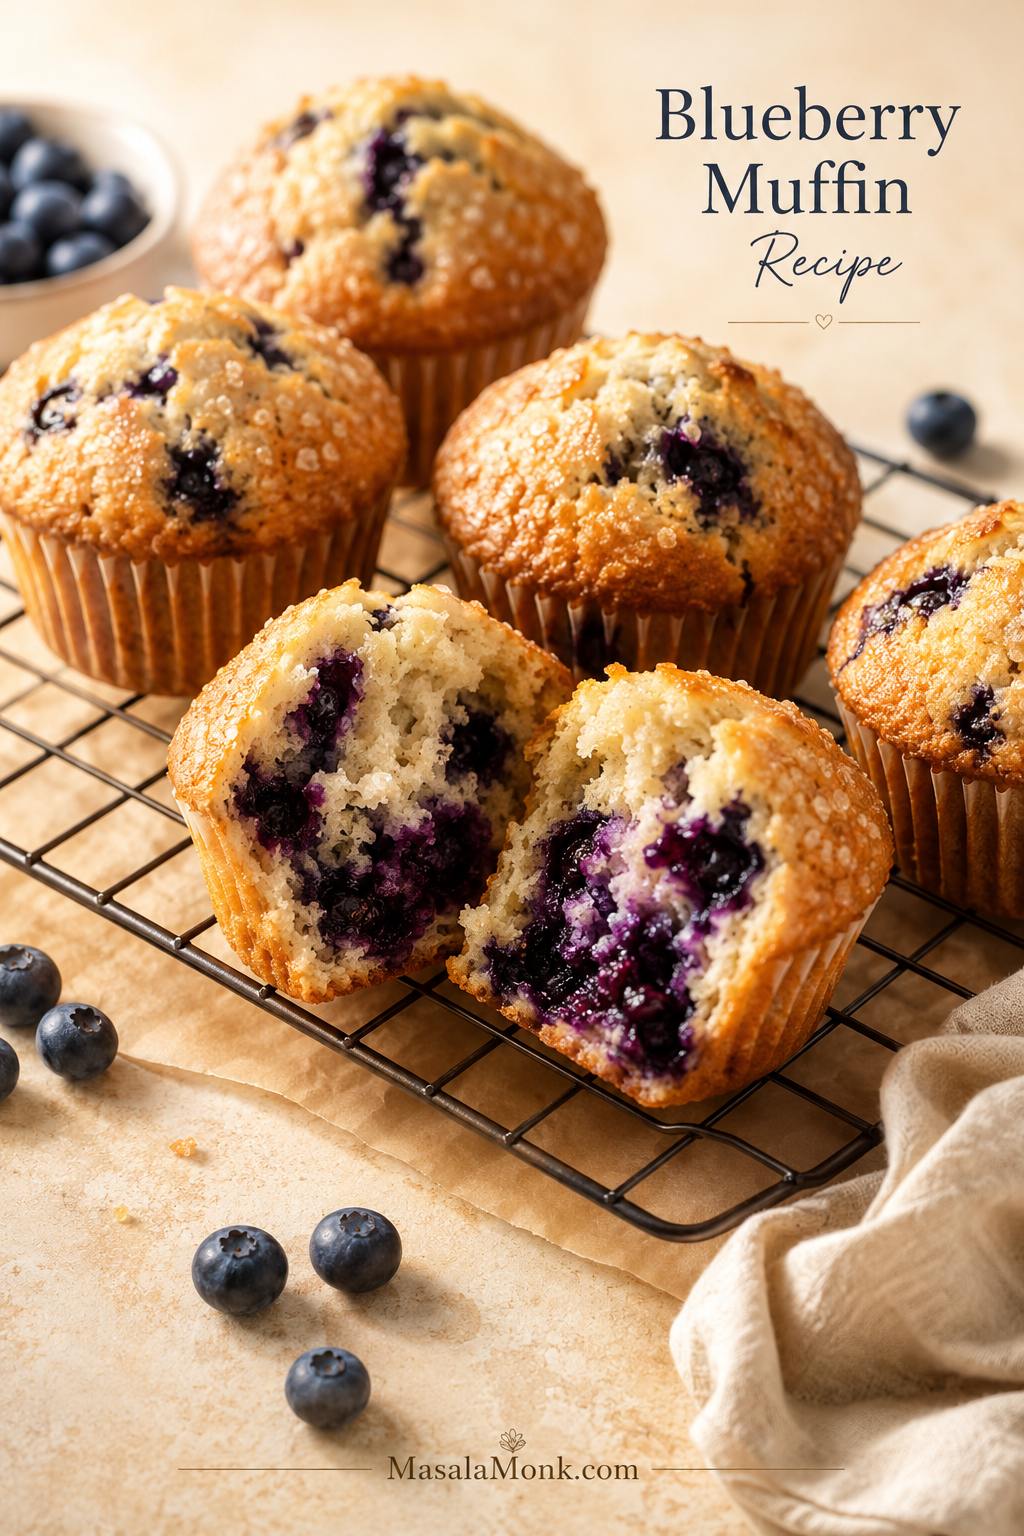
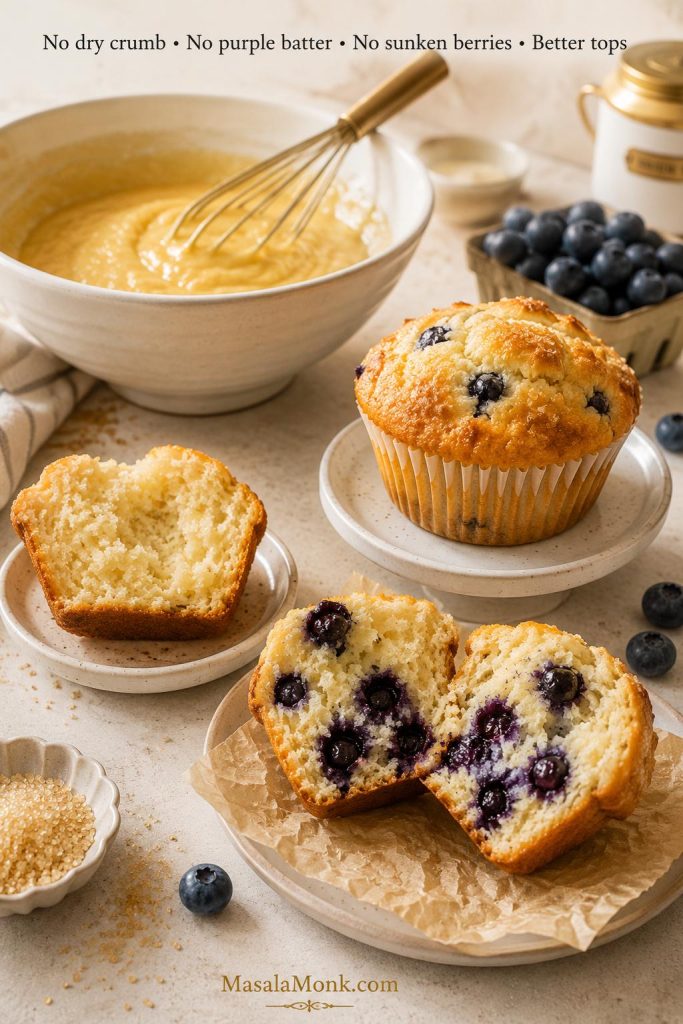
A good blueberry muffin recipe should give you that warm bakery moment at home: golden tops, soft centers, juicy blueberries, and a crumb tender enough to pull apart while the muffin is still a little warm. The top should have a light sugar crunch, the center should stay plush, and the berries should burst into little jammy pockets instead of sinking into one wet layer.
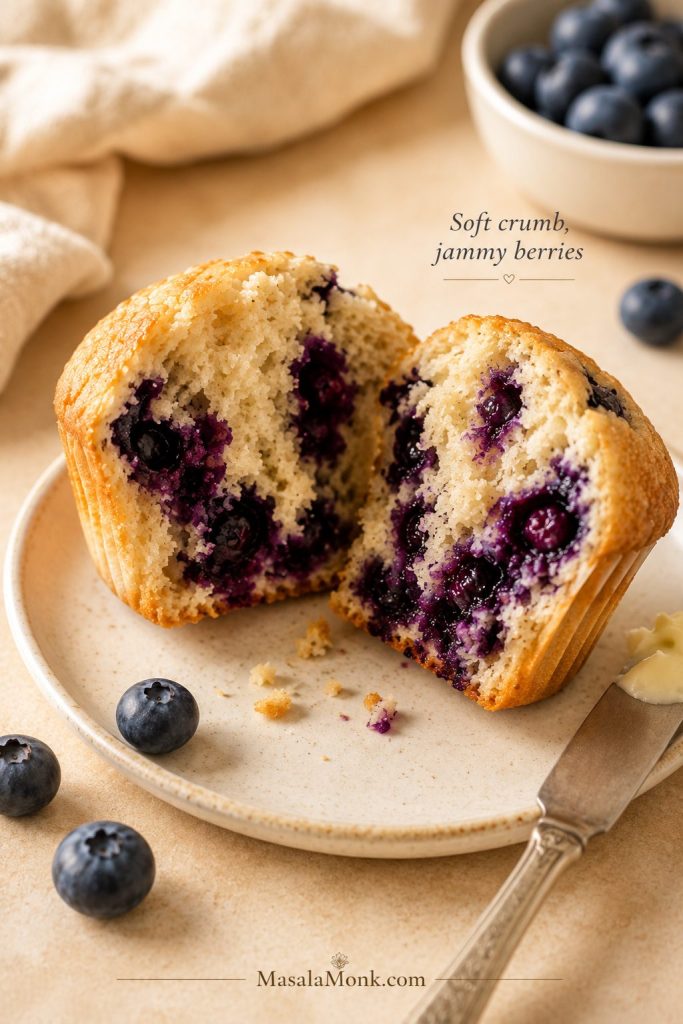
Look for a crumb that pulls apart softly but still holds together. When the berries look jammy instead of watery, the muffins have enough moisture without turning soggy.
Blueberry muffins can look simple and still go wrong in familiar ways: dry, flat, dense, or streaked purple. Usually, the difference comes down to small choices — how much flour you use, how gently you mix, how cold the berries are, and how hot the oven starts.
The method stays easy. First, melted butter brings the flavor; then a small amount of oil keeps the crumb soft, sour cream adds tenderness, and a hot-start oven helps the tops rise tall and golden. Finally, use fresh berries when you have them, frozen berries when you need them, and coarse sugar or streusel depending on the kind of muffin you want today.
Think of this as the comfort of classic blueberry muffins with fewer of the usual disappointments: no dry crumb, no purple batter, no sunken berry layer, and no flat little tops hiding under the liner.
This is the promise of the recipe: fewer dry crumbs, fewer purple streaks, fewer sunken berries, and better tops. The method stays simple, but each step protects the final texture.
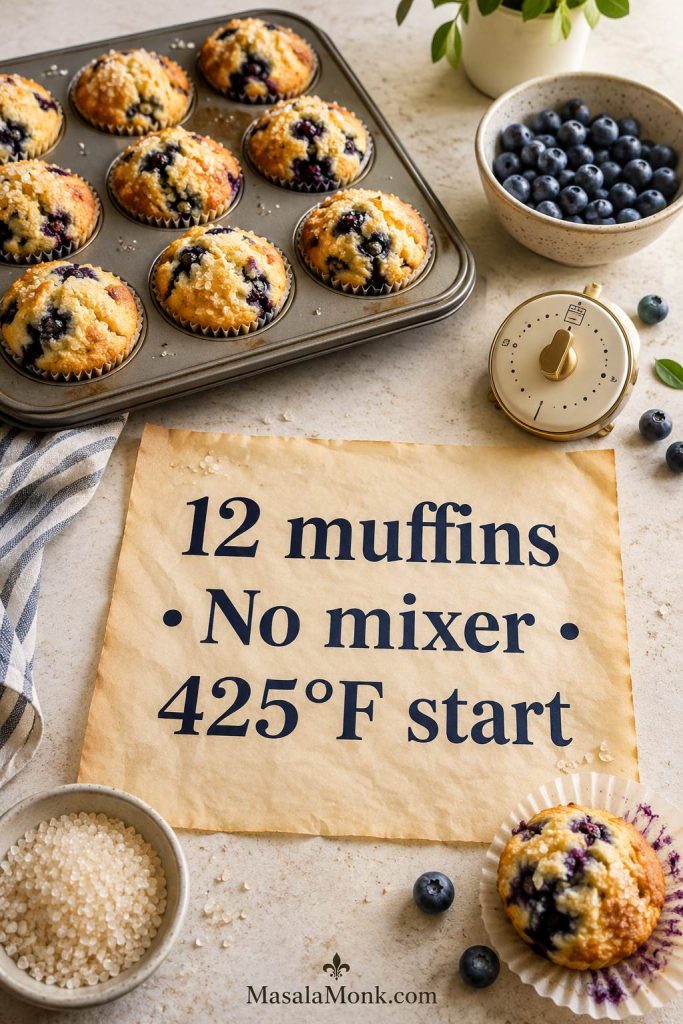
For moist, fluffy blueberry muffins, this recipe uses a thick, scoopable batter made with melted butter, a little oil, sour cream, milk, and 1½ cups of blueberries. Then, fill the muffin cups almost to the top, bake at 425°F / 220°C for 5 minutes, and reduce the oven to 375°F / 190°C until the tops are golden and the centers are set.
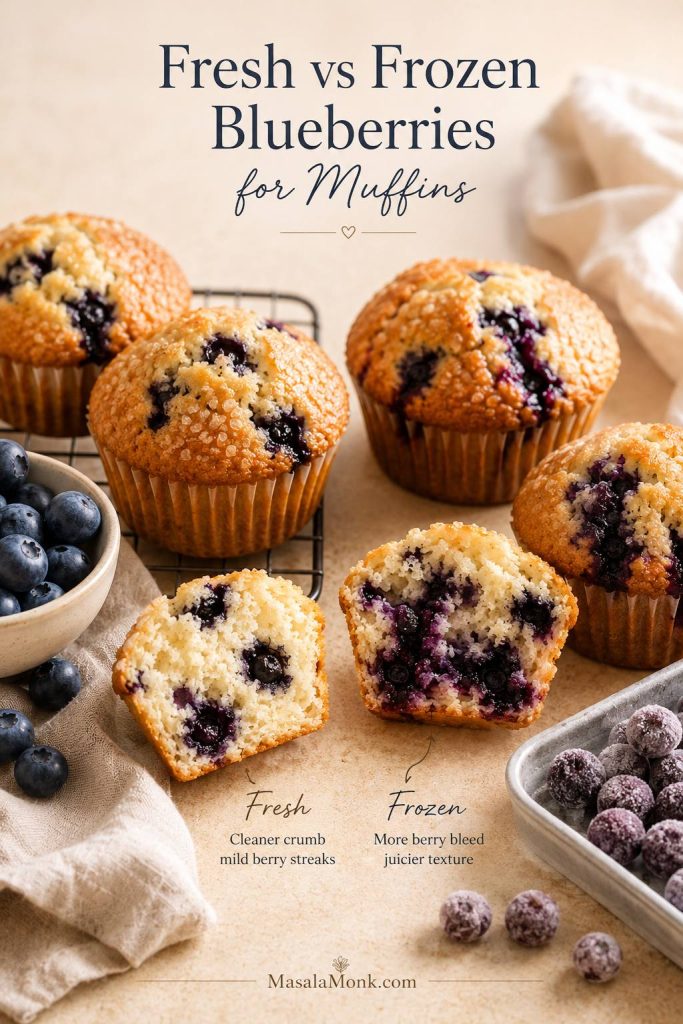
Fresh blueberries give the cleanest-looking crumb, but frozen blueberries work well too. Keep them frozen until the last moment, fold them in gently, and bake right away so the batter stays bright instead of turning streaky purple.
The result should feel like a real bakery muffin: domed, golden, soft in the middle, and full of berries without turning wet at the bottom.
The key idea: you do not need a mixer or a bakery kitchen to get soft, tall blueberry muffins. A batter with enough body, a hot-start oven, and gentle blueberry folding do most of the work.
Blueberry Muffins at a Glance
Dry, flat, dense, or streaky muffins usually come from a few fixable choices. This quick overview shows what keeps the batch on track before you start mixing.
Yield
12 standard blueberry muffins
Prep time
15 minutes; add 3–5 minutes if making streusel
Optional rest
10–15 minutes for slightly taller tops
Bake time
18–22 minutes
Total time
35–40 minutes without rest; 45–55 minutes with optional rest; add 3–5 minutes if making streusel
Oven method
425°F / 220°C for 5 minutes, then 375°F / 190°C
Blueberries
Fresh or frozen
Texture
Soft, tender, golden, and blueberry-packed
Topping
Coarse sugar by default, optional streusel
Mixer needed?
No
Before mixing, lock in the big decisions: 12 muffins, no mixer, and a hot 425°F start. That simple structure keeps the recipe easy while helping the muffins rise higher.
Why This Blueberry Muffin Recipe Works
Because this muffin recipe balances butter, oil, sour cream, and a hot-start bake, the blueberry muffins come out soft, lifted, and flavorful without needing a mixer.
Butter gives flavor, oil keeps the crumb soft
Butter gives blueberry muffins that rich homemade flavor. A small amount of oil keeps the crumb soft after cooling. The amount is small on purpose: enough for tenderness, not so much that the muffins feel greasy.
Sour cream gives the batter enough body
Sour cream adds richness, tenderness, and light tang. Full-fat sour cream gives the softest crumb, while low-fat sour cream can work if that is what you have. It also gives the batter enough structure to hold the berries instead of letting them slide straight to the bottom. The finished muffin should taste soft and buttery, not wet or oily.
A hot-start bake helps create taller tops
The muffins begin in a hot oven, which gives the batter an early lift. After 5 minutes, the temperature drops so the centers can bake through without drying out. That first burst of heat helps create a taller, more golden top without making the method complicated.
The plain-batter cushion keeps berries from sinking
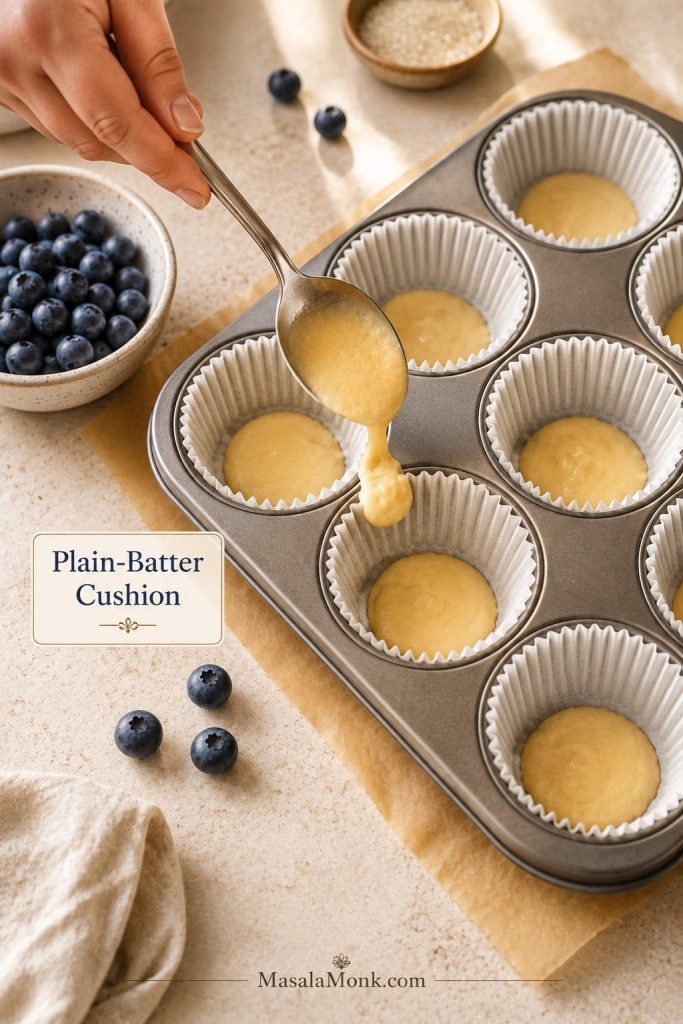
This is the little step most blueberry muffin recipes skip. Before the blueberries go into the batter, spoon a small amount of plain batter into the bottom of each muffin cup. Then fold the berries into the remaining batter and fill the cups. It takes less than a minute, but it helps prevent that wet, sticky berry layer that can glue itself to the liner.
This idea is also discussed in Serious Eats’ blueberry muffin testing, and it is more useful than relying only on the old “toss the berries in flour” trick.
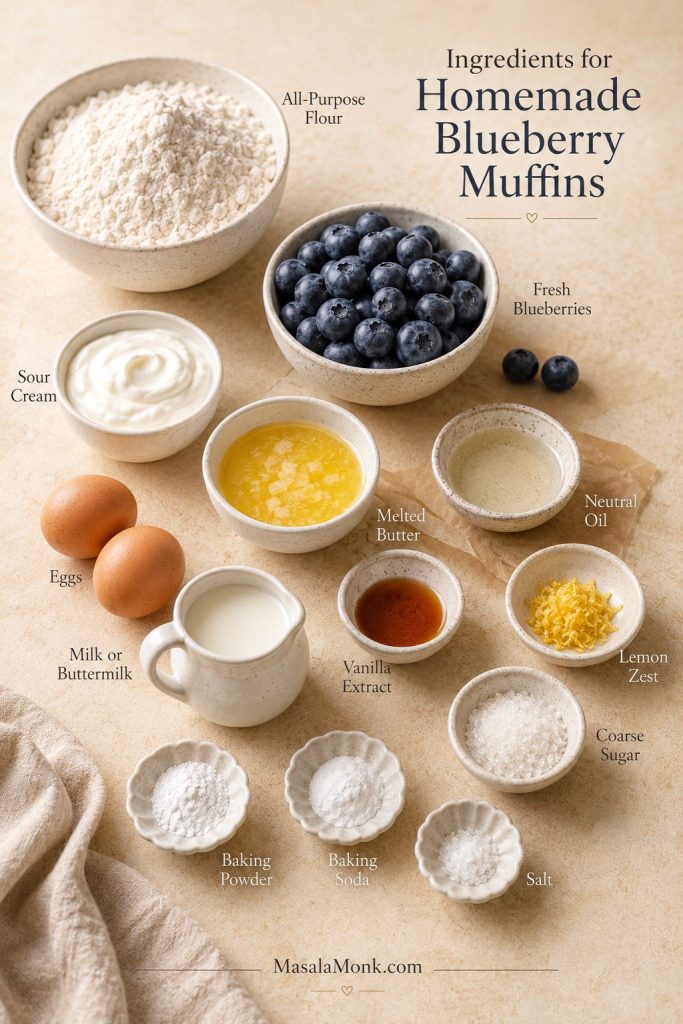
Ingredients for Homemade Blueberry Muffins
The ingredients are simple, but each one has a job. Together, they create a soft crumb, steady lift, and enough support to keep the blueberries evenly distributed.
Every ingredient has a job. Butter and vanilla build flavor, sour cream and oil protect softness, and the flour-liquid balance helps the blueberries stay suspended in the batter.
All-purpose flour
Use regular all-purpose flour for a tender, familiar muffin crumb. Weigh the flour if possible, because too much flour is one of the fastest ways to make muffins dry, dense, or heavy. When measuring by cups, spoon the flour into the cup and level it off instead of scooping directly from the bag.
Baking powder and baking soda
Baking powder gives the muffins lift, while baking soda works with the sour cream to help the batter rise and brown. Make sure both are fresh. Old leavening can give you flat muffins even when the mixture looks right.
Sugar
Three-quarters cup of granulated sugar keeps these muffins sweet enough for breakfast or brunch without pushing them into cupcake territory. Coarse sugar on top adds a light crunch and a bakeshop-style finish.
Melted butter and neutral oil
Melted butter keeps the method easy because you do not need a mixer. A small amount of neutral oil adds softness. Use a mild oil such as canola, vegetable, sunflower, or another neutral baking oil.
Eggs
Two large eggs help the muffins rise and hold together. Very cold eggs can be placed in a bowl of warm water for a few minutes while you prepare the dry ingredients.
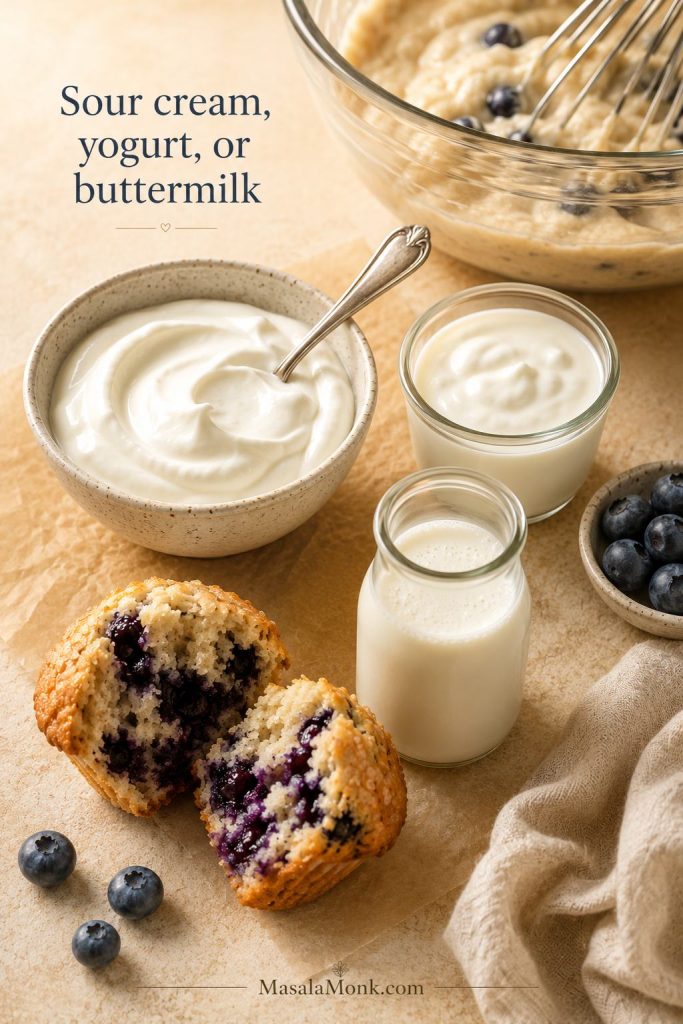
Sour cream, milk, buttermilk, or Greek yogurt
Sour cream gives the muffins tenderness and moisture. Milk loosens the batter just enough so it folds together without becoming runny. Buttermilk can replace the milk if you want a slightly tangier crumb, and plain Greek yogurt can replace the sour cream if it is thick rather than watery.
Sour cream gives the richest crumb, while thick Greek yogurt or buttermilk adds a gentle tang. Either way, the batter needs enough body so the muffins bake plush, not loose.
If you are mainly trying to make muffins more filling, keep this classic version as the texture benchmark first. Then use our high protein muffins guide for versions built around Greek yogurt, protein powder, cottage cheese, and freezer-friendly breakfast prep.
Blueberries
Use 1½ cups of blueberries for juicy muffins that still bake evenly. Smaller berries distribute more evenly, while large berries give bigger jammy pockets. Fresh blueberries are easiest, though frozen berries are completely fine when handled gently. For an extra berry-packed batch, you can increase to 1¾ cups, but the muffins will be softer and a little more delicate.
Using frozen berries today? Read the fresh vs frozen blueberry guide before folding them in, because handling matters more than the berries themselves.
If blueberries are the breakfast flavor you keep coming back to, these blueberry pancakes are another easy way to use fresh or frozen berries without turning breakfast into a project.
Coarse sugar or streusel
Coarse sugar is the cleanest default topping because it gives the muffins a light crunch without making them heavy. Use the quick streusel variation in the recipe card when you want a sweeter bakery-style crumb topping.
Fresh vs Frozen Blueberries for Muffins
Both fresh and frozen blueberries work in this muffin recipe. The real difference is how much color and moisture they release into the batter.
Use fresh berries when presentation matters most. Use frozen berries when convenience matters most. If you want the cleanest crumb with frozen berries, use the rinse-and-dry method; otherwise, frozen-from-the-freezer is the fastest reliable route.
Fresh blueberries usually give the cleanest-looking crumb. Frozen berries are just as useful, but they need colder handling because they release color and juice quickly once they soften.
Blueberry type
Best use
How to handle it
Fresh blueberries
Cleanest batter and easiest folding
Rinse, dry well, and fold gently
Frozen blueberries, fast method
Convenience and year-round baking
Add straight from the freezer
Frozen blueberries, cleanest batter method
Less purple streaking
Rinse briefly, dry very well, fold gently, and bake right away
Wild blueberries
More even berry distribution
Use slightly less if they are very small or juicy
For the fastest method, use frozen blueberries straight from the freezer. Once they thaw, they release juice quickly, which can turn the batter purple and make the muffins wetter.
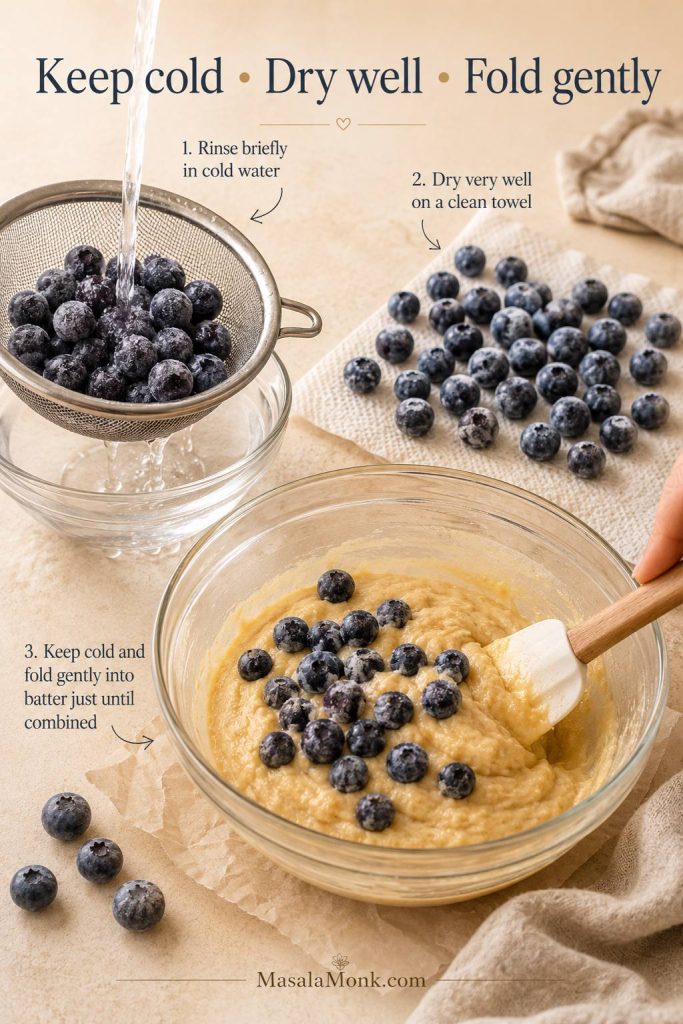
For the cleanest golden batter, you can briefly rinse frozen blueberries in cold water, dry them very well, and fold them in gently. King Arthur Baking’s frozen-blueberry guide explains this method in more detail.
For frozen blueberries, cold and dry is the rule. Add them at the end, fold gently, and bake soon after mixing so the batter stays golden instead of turning purple.
Best practical rule: fresh berries should be dry, and frozen berries should be cold. Wet berries and overmixing are what usually lead to streaky purple batter.
How to Make Blueberry Muffins
Before you start: preheat the oven fully, dry fresh blueberries well, keep frozen blueberries frozen, mix the batter gently, and fill the muffin cups almost to the top. These five steps prevent most dry, dense, flat, purple, or sunken blueberry muffins.
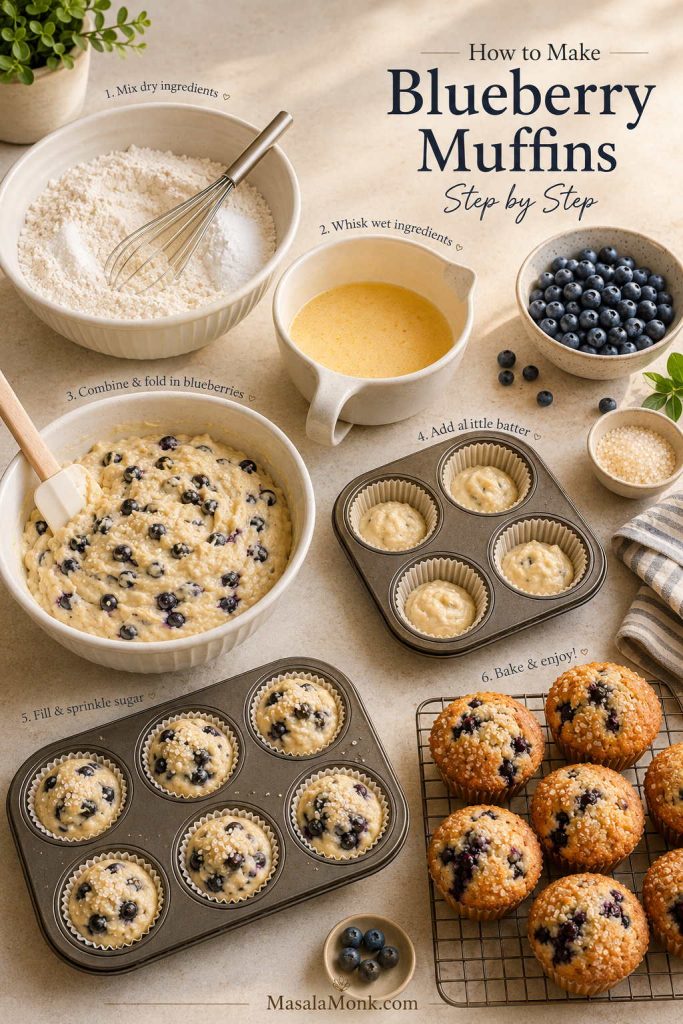
The method is simple, but the order matters. First, mix the dry and wet ingredients separately; then fold them together gently so the muffins stay tender.
The order is what makes this method different. Add the plain-batter cushion before folding in the blueberries, then fill the cups high so the fruit stays better distributed.
1. Prepare the pan and oven
Line a standard 12-cup muffin pan with paper liners. Then, heat the oven to 425°F / 220°C. To protect high muffin tops from sticking, lightly spray the top surface of the pan before filling the cups.
2. Mix the dry ingredients
In a large bowl, whisk together the flour, baking powder, baking soda, and salt. This helps distribute the leavening evenly so the muffins rise consistently.
3. Whisk the wet ingredients
In another bowl or large measuring jug, whisk the sugar, melted butter, oil, eggs, sour cream, milk, vanilla, and lemon zest if using until smooth. Let the butter cool slightly first, so it does not scramble the eggs.
4. Combine into a heavy, spoonable batter
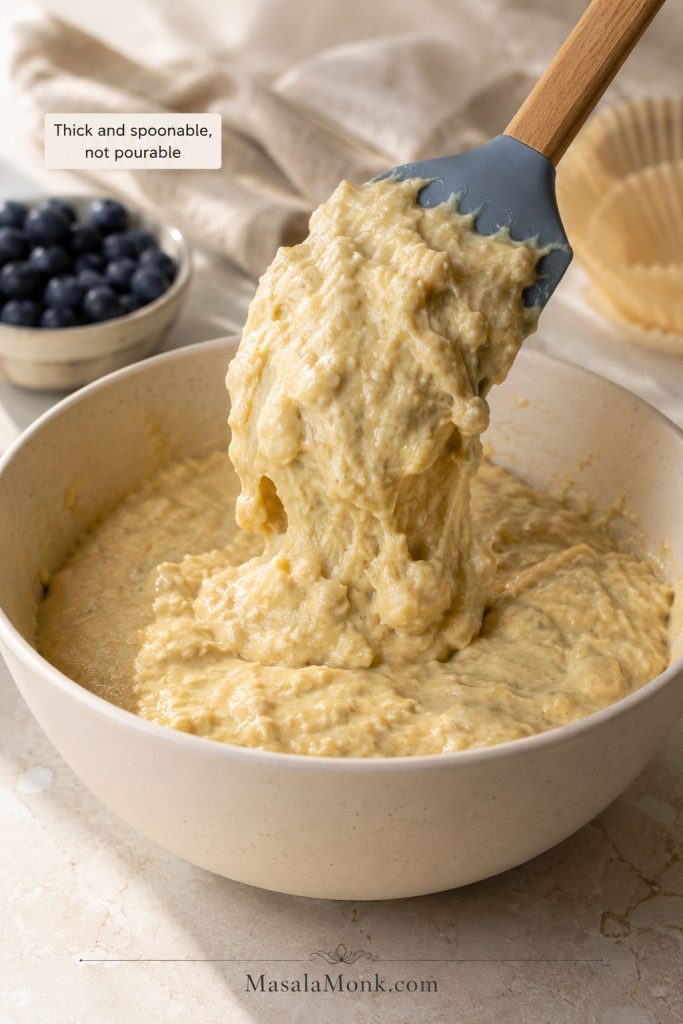
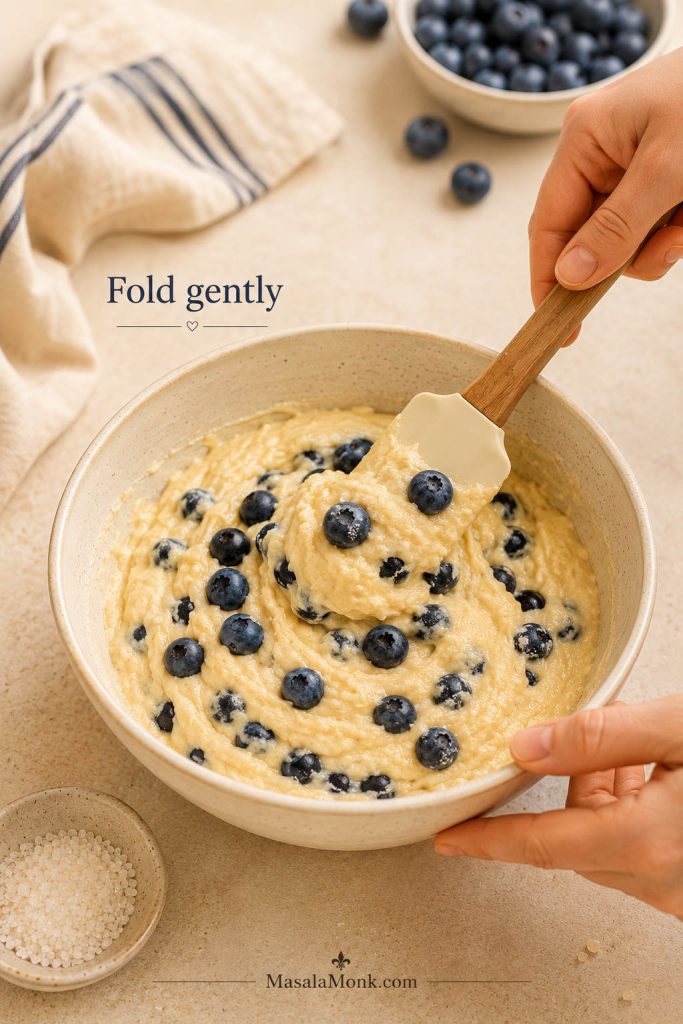
Pour the wet ingredients into the dry ingredients and fold with a spatula until no dry pockets of flour remain. A few small lumps are fine. At this point, the batter should look thick and spoonable, not pourable; when you lift the spatula, it should fall slowly in heavy ribbons.
The batter should mound on the spatula and fall slowly. That thick, spoonable texture helps create taller muffin tops and keeps the blueberries from sliding straight down.
A 10–15 minute rest can help if you have time. Let the plain batter sit before filling the muffin cups or folding in the blueberries; the short rest lets the flour hydrate and can make the batter bake up a little taller. The muffins still work without it.
5. Add the plain-batter cushion
Before adding blueberries to the bowl, spoon about 1 tablespoon of plain batter into the bottom of each muffin cup. You are not filling the cup yet — just covering the bottom so the first berries do not bake directly against the liner.
This small base layer helps protect the muffin bottoms. Because the first spoonful has no berries, the fruit is less likely to bake into one sticky layer against the liner.
Want to see why this matters? The blueberries sinking section shows how this step keeps the fruit from collecting at the bottom.
6. Fold in the blueberries
Add the blueberries to the remaining batter and fold gently. Use as few strokes as possible, especially with frozen berries. The goal is to distribute the fruit without crushing it or staining the batter.
Fold gently once the blueberries go in. Overmixing can burst the berries, stain the batter purple, and make the finished muffins denser than they need to be.
7. Fill and top
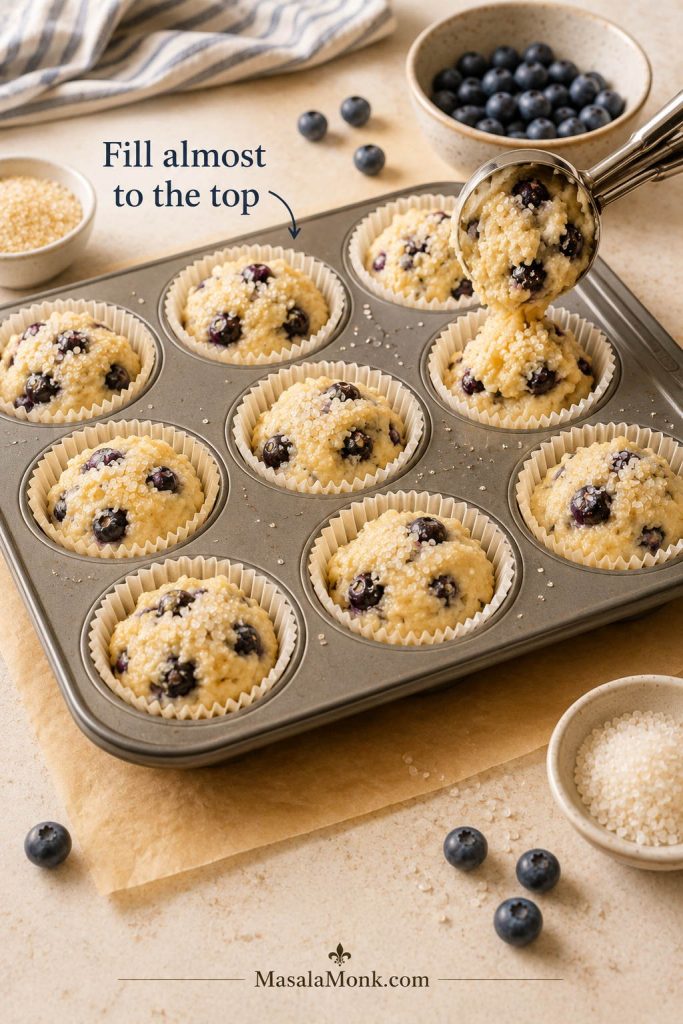
Divide the batter between the muffin cups, filling each one almost to the top. Then, sprinkle with coarse sugar, or add the streusel topping if using.
Fill level matters more than most people think. For bakery-style blueberry muffin tops, the batter needs to sit close to the top of the liner before it goes into the oven.
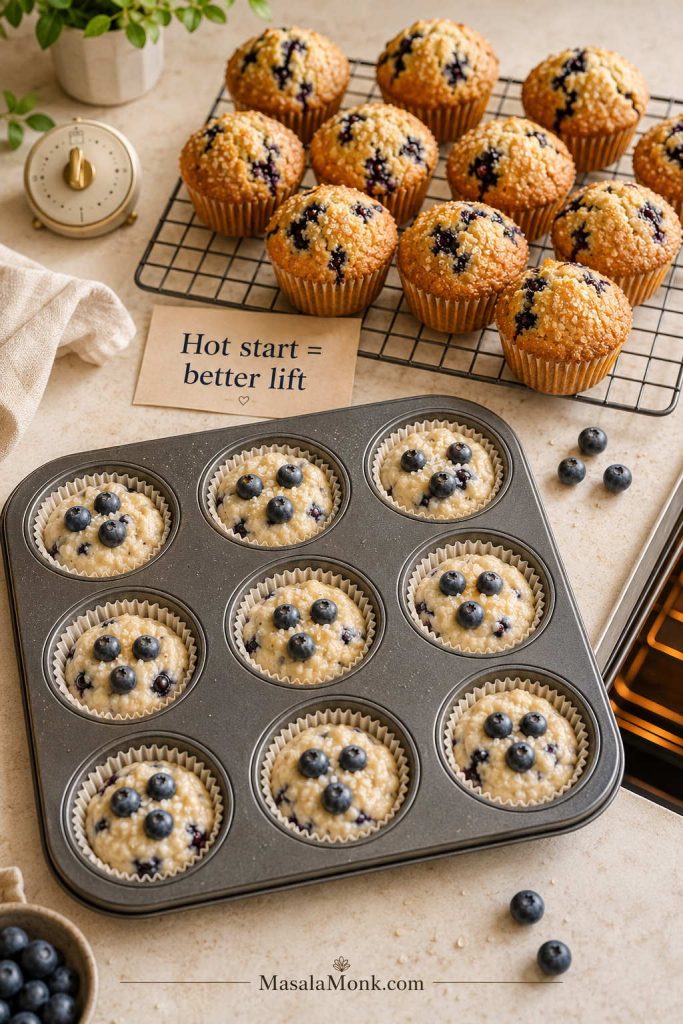
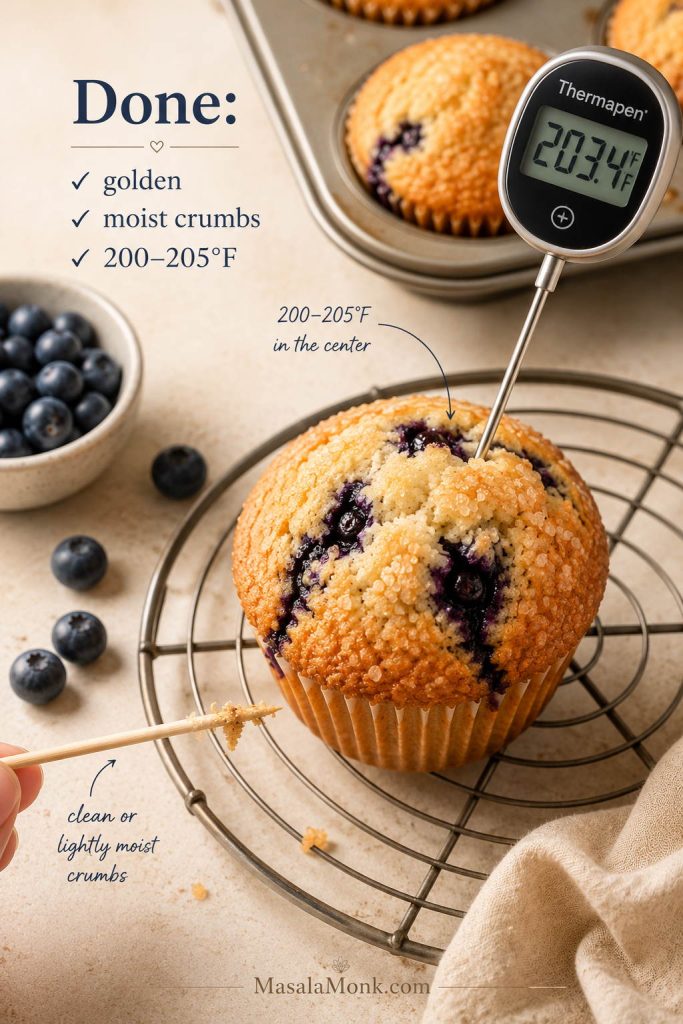
Bake at 425°F / 220°C for 5 minutes. Without opening the oven door, reduce the temperature to 375°F / 190°C and bake for another 13–17 minutes, or until the tops are golden and a toothpick inserted into the center comes out clean or with a few moist crumbs. Start checking at the early end of the range if your oven runs hot, and expect the upper end if your berries are frozen or very large.
The hot-start bake gives the batter its first lift, while the lower temperature finishes the centers more gently. Together, those two stages help prevent flat, dry muffins.
When they are ready, the tops should look set and lightly golden, and the muffins should spring back gently when touched near the center. For extra precision, the center of a fully baked muffin should register about 200–205°F / 93–96°C on an instant-read thermometer.
Use more than color to check doneness. A finished muffin should spring back lightly, show clean or moist crumbs on a toothpick, and read about 200–205°F in the center.
9. Cool before serving
Let the muffins cool in the pan for 5–10 minutes, then move them to a wire rack. Although they are wonderful warm, the crumb sets better if they get a few minutes to settle before you tear one open.
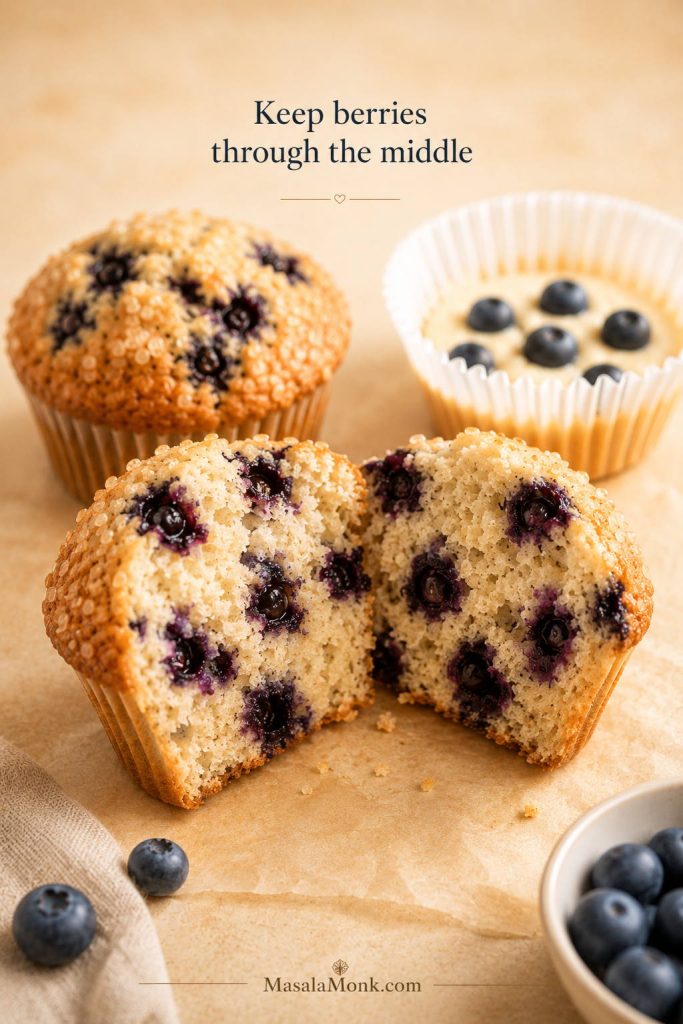
The first muffin is worth eating while it is still a little warm. Split it open, let the steam escape, and you should see a soft crumb with blueberries tucked through the center instead of pooled at the bottom.
Blueberry Muffin Recipe Card
Keep the core method simple: 12 muffins, fresh or frozen berries, and a hot oven start. Once those are right, sugar tops, streusel, or lemon zest become easy choices.
Blueberry Muffin Recipe
This blueberry muffin recipe makes soft, fluffy muffins with golden tops, juicy blueberries, and a simple no-mixer batter. Use fresh or frozen blueberries, finish with coarse sugar, or add the optional streusel topping.
Yield12 muffins
Prep15 minutes
Bake18–22 minutes
Total35–40 minutes, or 45–55 minutes with optional rest
Equipment
Standard 12-cup muffin pan
Paper liners
Large mixing bowl
Medium bowl or large measuring jug
Whisk
Silicone spatula
Large cookie scoop or ⅓-cup measure, optional
Wire cooling rack
Ingredients
2 cups / 250g all-purpose flour
2 teaspoons / about 8g baking powder
½ teaspoon / about 2–3g baking soda
½ teaspoon / about 3g fine salt
¾ cup / 150g granulated sugar
½ cup / 113g unsalted butter, melted and slightly cooled
2 tablespoons / 30ml neutral oil
2 large eggs, about 100g without shells
½ cup / 120g sour cream
¼ cup / 60ml milk or buttermilk
2 teaspoons / 10ml vanilla extract
Optional: 1 teaspoon finely grated lemon zest, for a brighter blueberry flavor
1½ cups / 210–225g / about 7½–8 oz blueberries, fresh or frozen
1–2 tablespoons coarse sugar or turbinado sugar, for topping
Optional Streusel Topping
⅓ cup / 42g all-purpose flour
⅓ cup / 65g brown sugar or granulated sugar
½ teaspoon cinnamon
3 tablespoons / 42g melted butter
Instructions
Line a standard 12-cup muffin pan with paper liners. Heat the oven to 425°F / 220°C.
In a large bowl, whisk together the flour, baking powder, baking soda, and salt.
In a separate bowl, whisk the sugar, melted butter, oil, eggs, sour cream, milk, vanilla, and lemon zest if using until smooth.
Pour the wet ingredients into the dry ingredients. Fold gently with a spatula until no dry pockets of flour remain. A few small lumps are fine. The batter should be thick and spoonable, not dry or pourable.
For slightly taller tops, let the plain batter rest for 10–15 minutes before folding in the blueberries. This step helps, but the muffins still work without it.
Spoon about 1 tablespoon of plain batter into the bottom of each muffin cup.
Fold the blueberries into the remaining batter with as few strokes as possible.
Divide the batter among the muffin cups, filling each almost to the top.
Sprinkle with coarse sugar. For streusel, stir the flour, sugar, cinnamon, and melted butter together until crumbly, then sprinkle over the muffins instead.
Bake at 425°F / 220°C for 5 minutes. Without opening the oven, reduce the temperature to 375°F / 190°C and bake for another 13–17 minutes, until the tops are golden and a toothpick inserted in the center comes out clean or with a few moist crumbs. The center should be about 200–205°F / 93–96°C if checked with an instant-read thermometer.
Cool in the pan for 5–10 minutes, then transfer to a wire rack.
Recipe Notes
Frozen blueberries: use straight from the freezer for the fastest method.
Cleanest batter with frozen berries: rinse briefly, dry very well, fold gently, and bake right away.
Plain-batter cushion: spoon a little plain batter into each cup before folding in the blueberries. This helps keep berries from baking directly against the liner.
For taller tops: let the plain batter rest for 10–15 minutes before folding in the blueberries.
With streusel: add about 3–5 minutes to the prep time.
For extra-tall bakery-style muffins: bake only 6 muffins at a time, using every other cup in the pan.
For more berries: increase to 1¾ cups / about 245g blueberries, but the muffins will be softer and slightly more delicate.
If the batter feels unusually stiff: fold in 1 extra tablespoon of milk. The batter should be thick and spoonable, not dry.
Storage
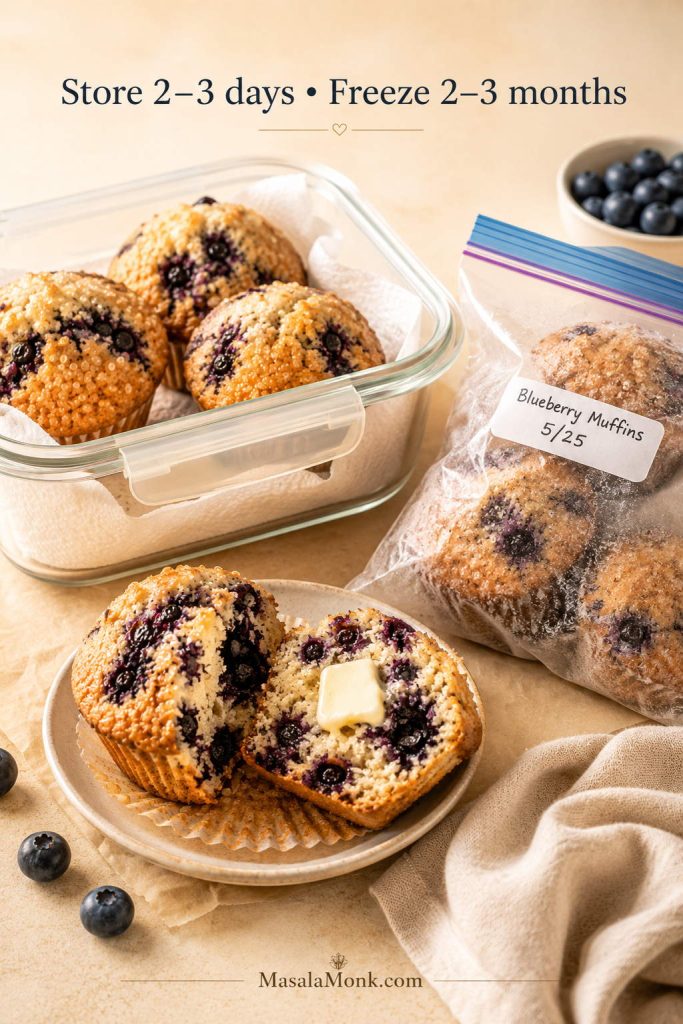
Store cooled muffins in an airtight container at room temperature for 2–3 days. Add a paper towel to absorb extra moisture and keep the tops from turning sticky. Freeze for up to 2–3 months.
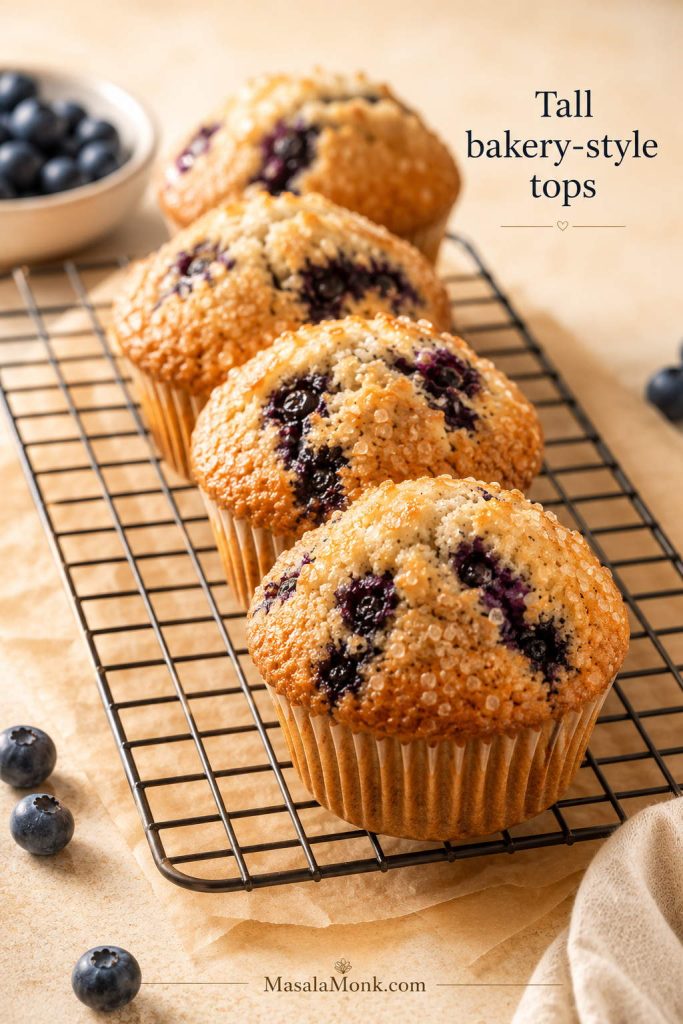
How to Get Tall Bakery-Style Blueberry Muffin Tops
Tall muffin tops come from a few small habits working together: a batter with enough body, full muffin cups, and a hot oven at the beginning. This is the difference between a good homemade muffin and the one people reach for first on the brunch table.
Bakery-style blueberry muffin tops come from stacking small advantages: thick batter, high fill, a hot oven start, and enough sugar on top for light crunch.
Use a batter that mounds instead of pours. Thin batter spreads before it rises.
Fill the cups almost to the top. Underfilled cups make shorter muffins.
Start with high heat. The first 5 minutes at 425°F / 220°C help push the tops upward.
Keep the oven closed when lowering the temperature. Just reduce the dial and let the muffins keep baking.
Use coarse sugar. It helps the tops bake with a light crunch.
Rest the plain batter for 10–15 minutes if you have time. This lets the flour hydrate and the batter thicken slightly before the berries go in.
For an extra bakery-style lift, bake only 6 muffins at a time and use every other cup in the muffin pan. This gives each muffin more heat circulation. It is optional, but helpful when you want especially tall domes.
If your muffins still bake up flat, the troubleshooting table will help you check oven heat, fill level, and leavening.
How to Keep Blueberries from Sinking
The most common advice is to toss blueberries in flour, but that is not always enough. Instead, the better approach is to build a batter that can actually support the berries and use the plain-batter cushion before the fruit goes in.
When blueberries stay through the middle, the batter had enough support. The plain-batter cushion adds one more safeguard by keeping the first berries off the bottom.
Use a heavy, spoonable batter. This is the biggest help.
Dry fresh berries well. Wet berries slide and bleed more easily.
Keep frozen berries frozen. Once they thaw, they release juice quickly.
Use a reasonable amount of fruit. More berries are delicious, but too many can make muffins wet or fragile.
Add plain batter to the cups first. This keeps berries from sitting directly on the bottom.
A teaspoon of flour can help a little, but the plain-batter cushion does more of the real work.
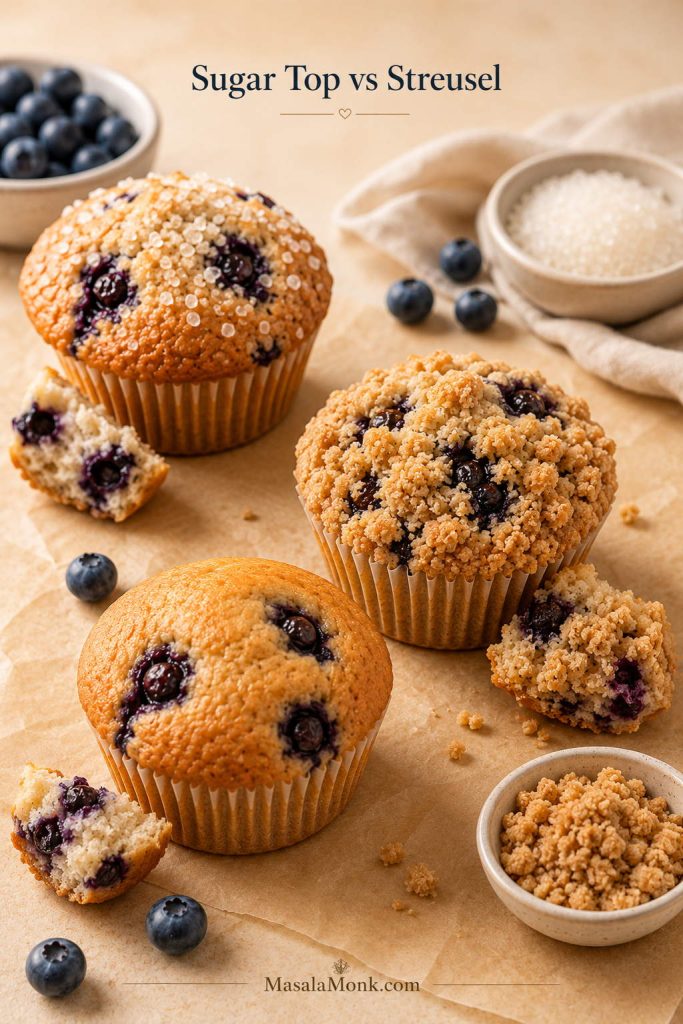
Sugar Top vs Streusel Topping
Choose the topping based on the kind of muffin you want today: a simple breakfast muffin, a sweeter bakery-style muffin, or a soft everyday snack.
Coarse sugar is the everyday choice. Streusel is the “people will ask where you bought these” choice. Either way, the topping should make the muffin more inviting without hiding the blueberries.
Coarse sugar keeps muffins crisp, simple, and breakfast-friendly. Streusel makes them sweeter and more bakery-style, so the best topping depends on the mood of the batch.
Topping
Best for
Texture
Coarse sugar
Simple breakfast muffins
Light crunch, golden top, not too sweet
Streusel
Bakery-style muffins
Buttery crumb topping, sweeter finish
No topping
Everyday breakfast muffins
Softer top, less sweetness
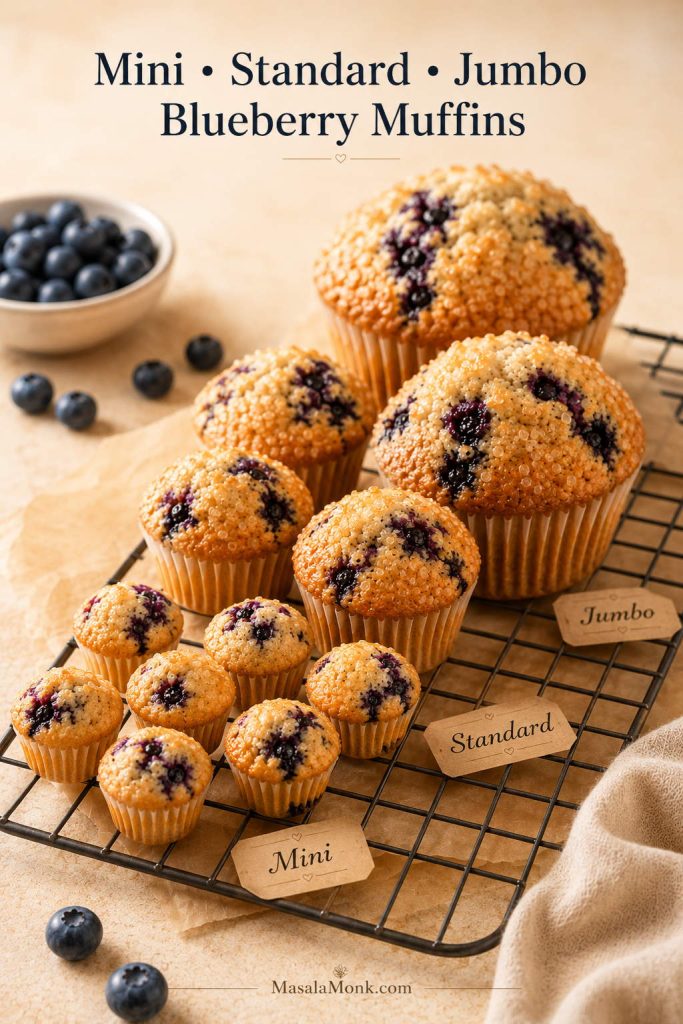
Mini, Standard, and Jumbo Blueberry Muffin Bake Times
The amounts below fit a regular 12-cup muffin pan, but you can use the same mixture for mini or jumbo muffins with a few timing changes.
The same batter can work in mini, standard, or jumbo pans. Smaller muffins finish fast, while jumbo muffins need more time for the centers to set properly.
Muffin size
Fill level
Temperature
Bake time
Mini muffins
About ¾ full
350°F / 175°C throughout
11–14 minutes
Standard muffins
Almost to the top
425°F / 220°C for 5 minutes, then 375°F / 190°C
18–22 minutes total
Jumbo muffins
Almost to the top
425°F / 220°C for 5 minutes, then 350°F / 175°C
26–30 minutes total
Always check early the first time you use a new pan. Dark pans, thin pans, and frozen blueberries can all change the bake time slightly.
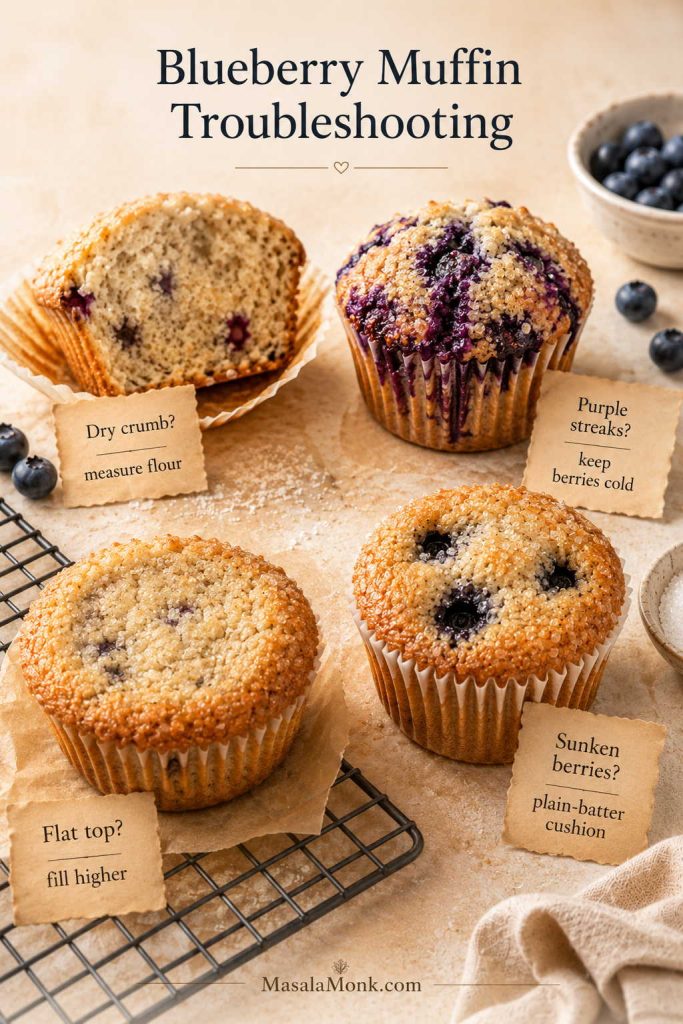
Blueberry Muffin Troubleshooting
Most blueberry muffin problems are fixable once you know what caused them. So, if a batch from this recipe ever turns out differently than expected, use this table to adjust the next one.
If your last batch was dry and purple, start with flour measurement and frozen-berry handling before changing the whole recipe. If it was flat, look first at fill level, oven heat, and whether your leavening is still fresh.
Blueberry muffin troubleshooting usually starts with five things: flour measurement, mixing, berry temperature, fill level, and oven heat. Fix those before changing the full recipe.
Problem
Likely cause
Fix next time
Dry muffins
Too much flour or overbaking
Use grams if possible, spoon-and-level flour, and check the muffins early
Dense muffins
Overmixed batter
Fold gently and stop when no dry pockets of flour remain
Flat tops
Oven not hot enough or cups underfilled
Preheat fully, fill cups almost to the top, and use the hot-start bake
Purple batter
Frozen berries thawed or batter overmixed after berries were added
Add frozen berries cold, fold gently, and bake right away
Sunken blueberries
Thin batter, wet berries, or berries sitting at the bottom
Add a spoonful of plain batter to each cup first and avoid thinning the batter
Soggy bottoms
Too many berries or wet berries at the base
Dry berries well and use the plain-batter cushion
Pale tops
Low oven heat or no topping
Use the hot start and sprinkle with coarse sugar
Muffins stuck to the pan
Pan not lined or greased enough
Use liners or grease the pan well, including the top surface if filling high
How to Store and Freeze Blueberry Muffins
Room temperature
Once the muffins cool completely, store them in an airtight container at room temperature for 2–3 days. When stacking, add a paper towel to the bottom of the container and another between layers. This helps absorb moisture from the blueberries and keeps the tops from turning sticky too quickly.
They are best the day they are baked, but the next morning they should still be soft enough to split and warm with a little butter.
Cool muffins fully before storing, or trapped steam can make the tops sticky. For longer storage, freeze them once cool and reheat gently when you want a quick breakfast.
Refrigerator
The refrigerator is not ideal because it can dry out the crumb. Use it only if your kitchen is very warm or humid.
Freezer
Freeze fully cooled muffins in a freezer-safe bag or container for up to 2–3 months. For the neatest muffins, freeze them in a single layer first, then pack them together once firm.
Reheating
Warm a room-temperature muffin in the microwave for 10–15 seconds. Meanwhile, warm a frozen muffin for 25–40 seconds, or reheat in a low oven until soft and warmed through.
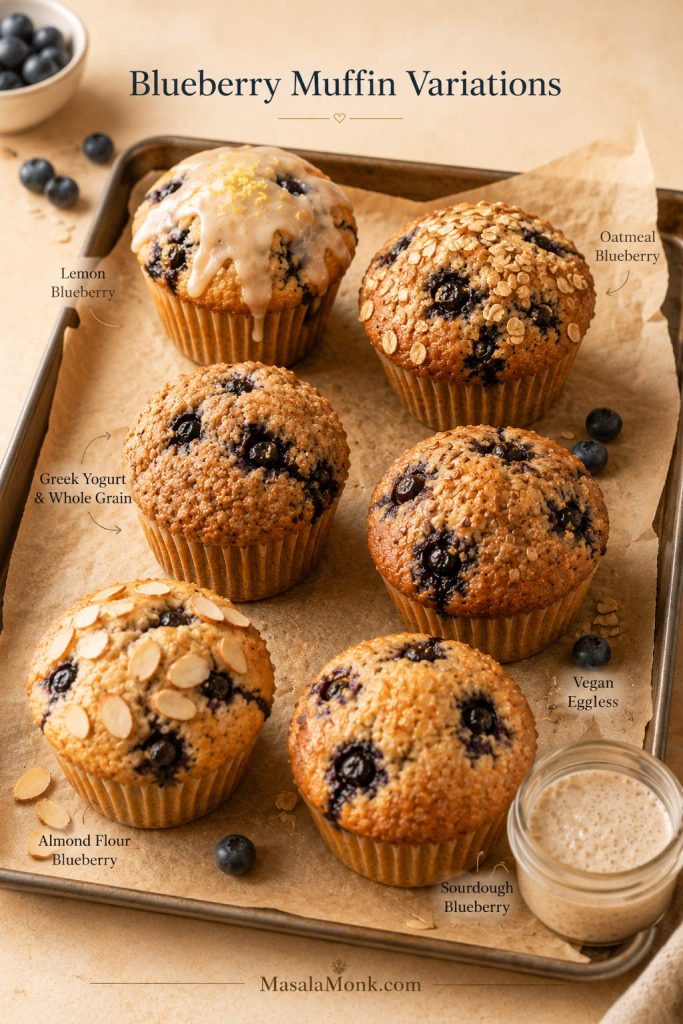
Blueberry Muffin Variations
Once you have the basic method down, you can take blueberry muffins in several directions. Lemon zest and topping changes are easy. Oats, almond flour, eggless, vegan, cottage cheese, and sourdough versions need more adjustment, but the same goal stays the same: a soft crumb, berries through the middle, and a top that rises instead of spreading.
Lemon zest, oats, yogurt, and streusel are easy ways to change the flavor. Bigger swaps like almond flour, eggless, vegan, or sourdough need a batter balanced for that style.
Lemon Blueberry Muffins
Add 1–2 teaspoons of fresh lemon zest to the batter for a brighter muffin. If you want a sweeter bakery finish, skip the coarse sugar and use a light lemon glaze after the muffins cool. Keep the lemon modest if you want blueberry to stay in front.
Blueberry Oatmeal Muffins
For a light oatmeal direction, replace ¼ cup of the flour with quick oats and add 1–2 tablespoons extra milk if the batter feels too stiff. For a true oat-heavy muffin, use a dedicated formula because oats absorb more moisture than flour. If you are choosing between rolled, quick, or oat-flour-style baking, this guide to oats will help you pick the right type before making an oatmeal version.
Healthy Blueberry Muffins
A lighter blueberry muffin usually leans on whole wheat flour, oats, Greek yogurt, applesauce, maple syrup, or less refined sugar. Do not cut all the fat at once; a little butter or oil is what keeps the crumb from tasting dry. The goal is a muffin that feels soft and satisfying, not worthy-but-disappointing.
Eggless Blueberry Muffins
Eggless blueberry muffins need enough moisture, lift, and structure to replace what eggs do. Yogurt, milk, vinegar, baking soda, and flax can all help, depending on the formula. If you are testing egg-free bakes, start with this flax egg guide so the swap is measured instead of guessed.
Vegan Blueberry Muffins
For vegan blueberry muffins, keep the spirit of this recipe — tender crumb, enough fat, and a batter that can hold berries — but use a formula built around plant milk and oil from the start. A straight swap for the butter, sour cream, milk, and eggs may work in small tweaks, but a fully vegan version needs its own balance.
Almond Flour Blueberry Muffins
Almond flour is not a 1:1 swap for all-purpose flour because it has no gluten and carries more fat. It can make tender low-carb bakes, but the batter needs more structural support. Before adapting this recipe, read this keto flour for baking guide so you understand how almond flour, coconut flour, binders, moisture, and lift work together.
Blueberry Cottage Cheese Muffins
Cottage cheese can add protein and moisture, especially when blended smooth before mixing. It works best when the batter is adjusted around it, because too much cottage cheese can make muffins heavy or damp instead of tender.
Blueberry Sourdough Muffins
Sourdough discard can add light tang and moisture to blueberry muffins, but it changes the flour-liquid balance. Add it only when the rest of the batter has been adjusted for the extra moisture and acidity. If you are still building or maintaining your starter, start with this sourdough starter recipe before using discard in sweet bakes.
What to Serve with Blueberry Muffins
For a cozy breakfast, split one warm and let a little butter melt into the center. For brunch, pile the muffins into a basket with fruit, yogurt, eggs, and coffee so they feel like part of the table rather than a quick side.
Blueberry muffins feel more complete when the table has contrast. Pair them with something savory, something creamy, and something fresh so brunch does not lean only sweet.
Blueberry muffins also work well with something savory, especially if you are serving them for brunch or meal prep. Try them with breakfast egg muffins, soft scrambled eggs, a simple yogurt bowl, or freezer-friendly meal prep breakfast burritos so the table has something sweet, something savory, and something fresh.
FAQs About Blueberry Muffins
Fresh or frozen blueberries: which is better for muffins?
Fresh blueberries are easiest because they release less color into the batter. Frozen blueberries are still a good option, especially when berries are out of season. Keep them cold, fold gently, and bake the muffins soon after mixing.
Should frozen blueberries be thawed before baking?
Keep them frozen until the last moment. Once frozen berries soften, they leak into the batter before the oven can set the crumb, which is why thawed berries often create purple streaks and wetter pockets.
Why did my blueberry muffin batter turn purple?
This usually happens when frozen berries thaw, when berries are wet, or when the batter is mixed too much after the fruit is added. Add blueberries last and fold with as few strokes as possible.
What keeps blueberry muffins moist?
These blueberry muffins stay moist because the recipe uses butter for flavor, a little oil for softness, sour cream for tenderness, and careful baking so the centers set without drying out.
Can I make these blueberry muffins with buttermilk?
Yes. Buttermilk can replace the milk in this recipe. It gives the muffins a slightly tangier flavor and works well with the baking soda and sour cream. The batter should still look thick and spoonable, so add only a small splash more milk if it feels unusually stiff.
Can I use Greek yogurt instead of sour cream?
Yes. Plain Greek yogurt can replace the sour cream in this recipe. Use full-fat or 2% yogurt for the softest crumb, and avoid very thin yogurt because it can loosen the batter too much.
How full should muffin cups be?
For tall standard muffins, fill the cups almost to the top. If you fill them only halfway, the muffins will usually bake up shorter and flatter.
Why are my blueberry muffins dense?
Dense muffins usually come from overmixing, too much flour, or old baking powder. Fold the batter gently, use grams if possible, and stop mixing as soon as no dry pockets of flour remain.
How do I make the muffin tops taller?
Fill the cups almost to the top and start the muffins in a hot oven. A short batter rest and baking every other cup can help even more if you want extra-tall tops.
Is streusel necessary?
No. Coarse sugar is enough for a blueberry muffin with a light crunchy top. Streusel is the sweeter bakery-style option when you want a crumb topping.
How do I know when blueberry muffins are done?
The tops should be golden and set, and a toothpick inserted into the center should come out clean or with a few moist crumbs. If you use an instant-read thermometer, aim for about 200–205°F / 93–96°C in the center.
Do blueberry muffins freeze well?
They freeze very well. Cool them completely first, then pack them in a freezer-safe bag or container for up to 2–3 months. Reheat gently in the microwave or a low oven.
Once you understand the batter texture, berry handling, and hot-start bake, blueberry muffins stop feeling unpredictable. The first batch gives you soft centers, golden tops, and berries through the middle; the next one lets you decide whether you are a coarse-sugar person, a streusel person, or a lemon-zest person.