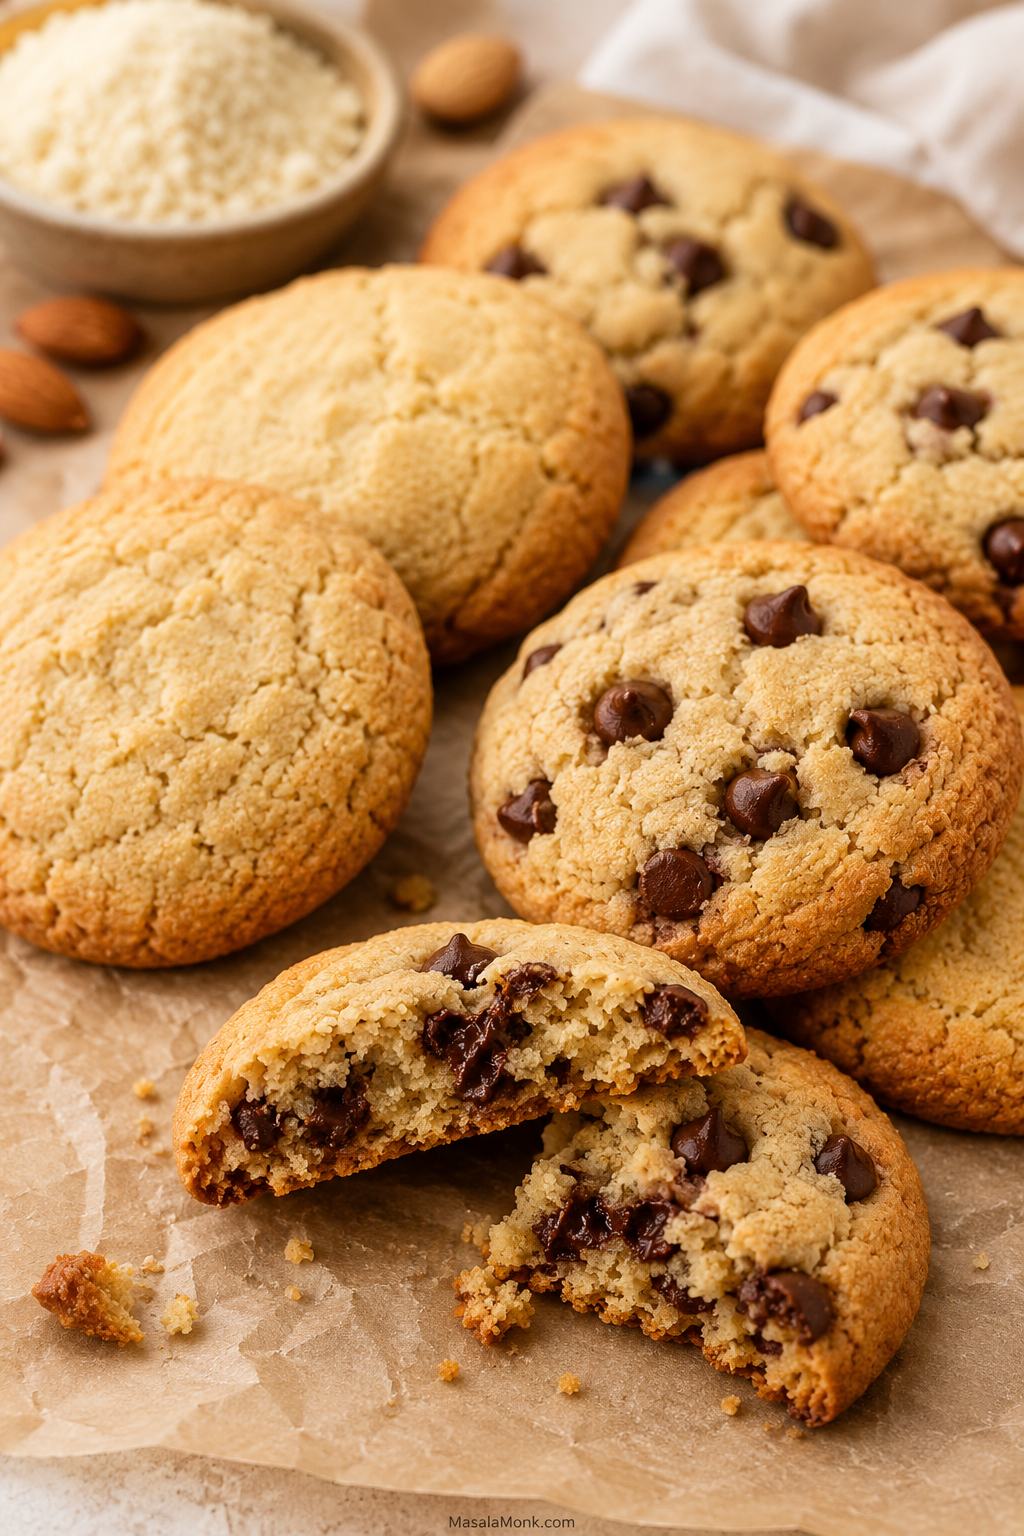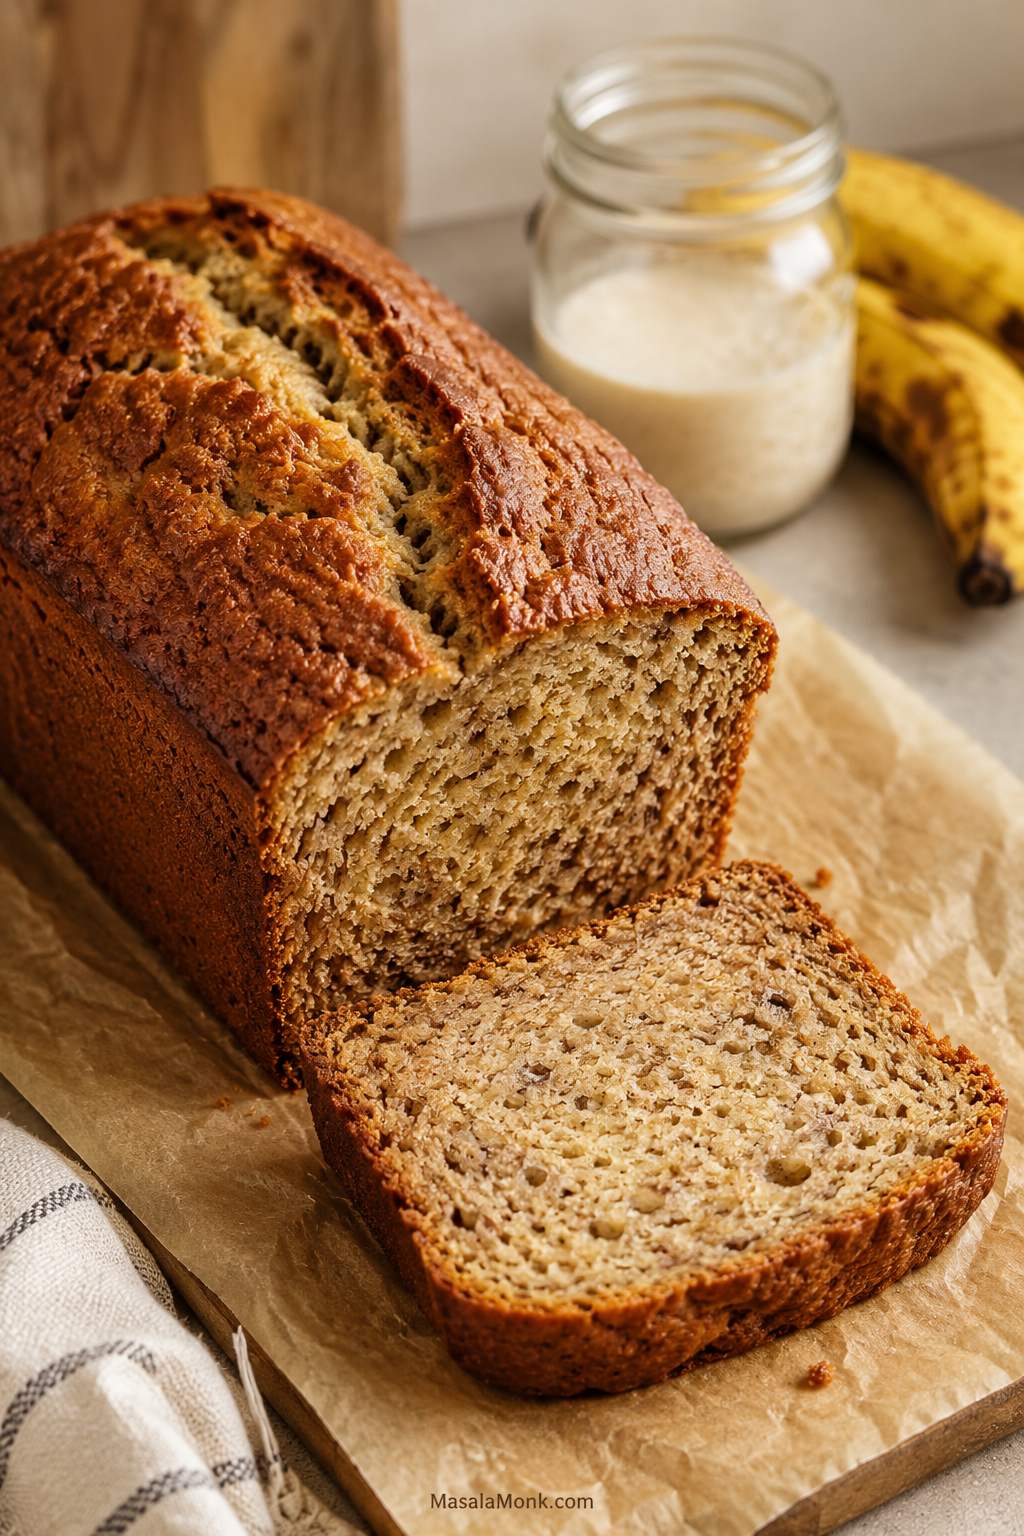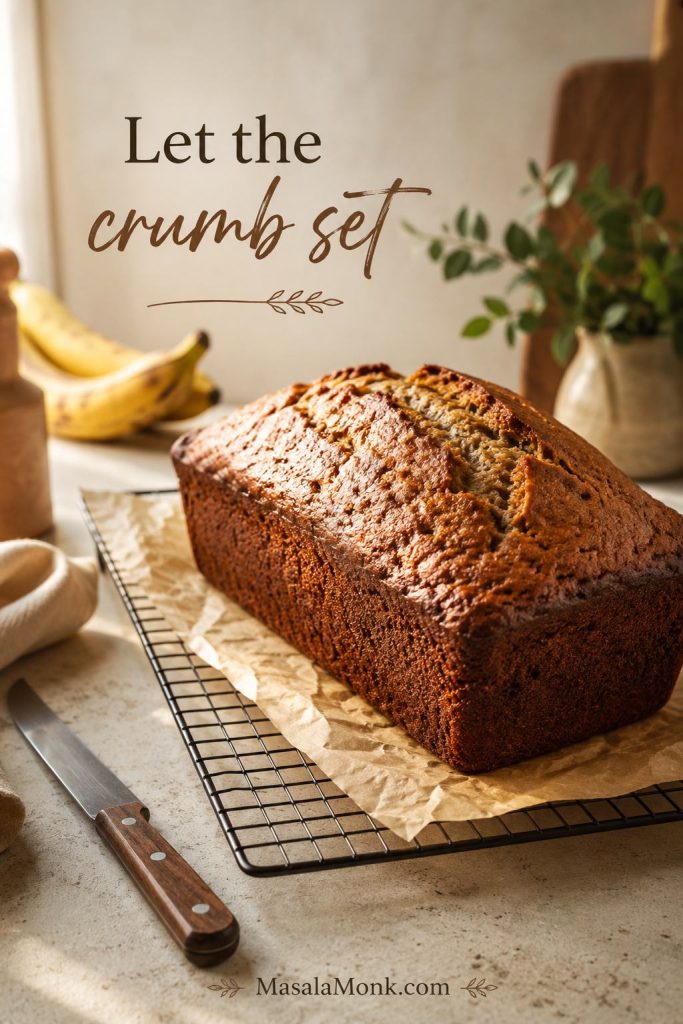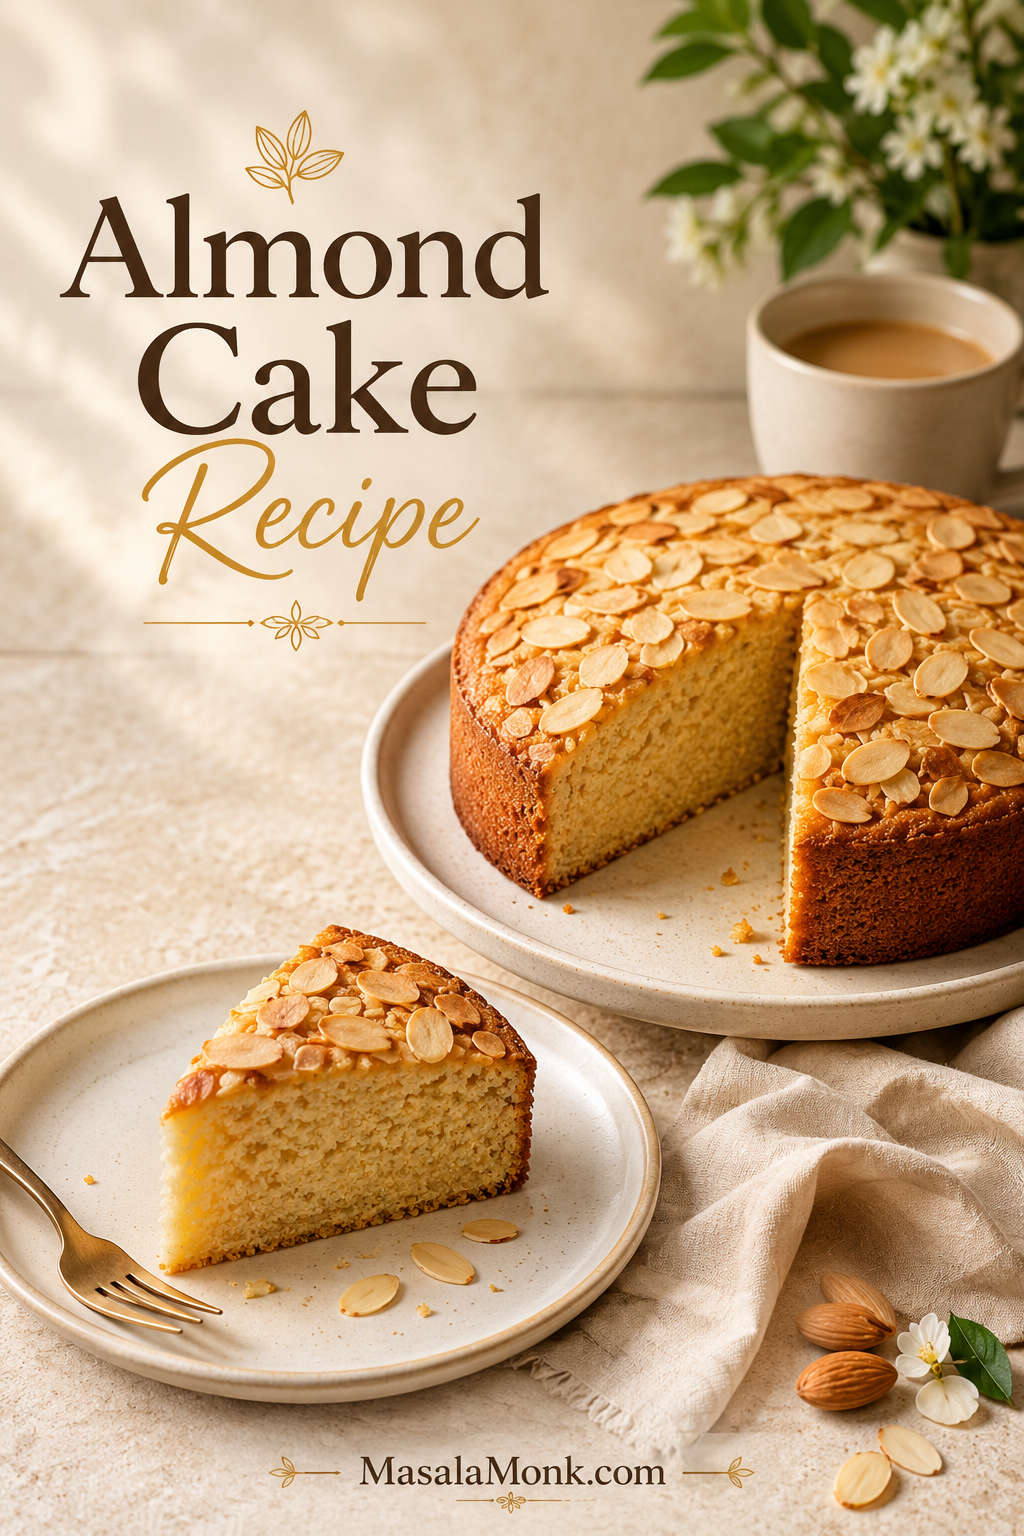
This almond cake recipe is for the moment when you want a golden, tender dessert that feels elegant without frosting. It has a sliced-almond top, a gently rich middle, and just enough lemon or orange zest to keep every bite bright. Once cooled, it cuts cleanly and looks simple, polished, and special on the table without needing much decoration.
Almond flour cakes can be beautiful, but they reward a lighter hand than wheat cakes. Packed flour makes the batter heavy. Cold eggs do not whip as well. A thin pan can brown the edges before the middle is ready. And if you cut the cake while it is still warm, the slice can look damp even when the bake was close.
This version is built around those common almond cake problems: dense centers, oily texture, gritty almond meal, overheated edges, weak egg whites, and cakes that look golden before they are fully baked. The goal is a single-layer almond flour cake that is naturally gluten-free when made with certified gluten-free ingredients, easy enough for tea or brunch, and reliable enough for a guest dessert with berries and cream.
Quick warning for Indian shoppers: if your packet says badam powder, check the label carefully. This recipe needs plain ground almonds, not sweetened badam drink mix, malted almond powder, or milk-powder blends. For the full comparison, see almond flour vs almond meal vs badam powder.
The finished cake should smell like toasted almonds and citrus, feel delicate without falling apart, and settle into clean slices after a few hours. It is the kind of cake that works with powdered sugar, coffee, fruit, cream, or nothing at all.
Table of Contents
Make the Almond Cake
Quick Answer: How to Make a Tender Almond Flour Cake
To make a tender almond flour cake, use fine blanched almond flour, room-temperature eggs, sugar, baking powder, salt, vanilla, a little almond extract, and lemon or orange zest. Separate the eggs, beat the yolks with sugar, fold in the almond flour, then fold in softly whipped egg whites. Bake in a lined 8-inch / 20 cm round pan at 180°C / 350°F until the top is golden, the middle no longer wobbles, and a toothpick shows moist crumbs rather than wet batter.
The two most important success points are measuring the almond flour lightly, preferably by weight, and letting the cake cool before slicing. Those two details prevent most dense, oily, or fragile results.
| Question | Best answer for this recipe |
|---|---|
| Best ground almond product | Fine blanched almond flour for the cleanest, most delicate result. |
| Almond meal | Works by weight, but the cake will be darker, nuttier, and more rustic. |
| Almond powder | Use only plain unsweetened ground almonds, never badam drink mix. |
| Best pan | 8-inch / 20 cm round for a taller cake; 9-inch / 23 cm for a thinner cake. |
| Oven temperature | 180°C / 350°F conventional or OTG; 160°C / 320°F fan. |
| Bake time | 26–32 minutes in an 8-inch pan; 23–28 minutes in a 9-inch pan. |
| Gluten-free status | Naturally gluten-free if every ingredient is certified gluten-free. |
| Eggless swap | Not a direct swap; this batter needs eggs to rise, set, and slice cleanly. |
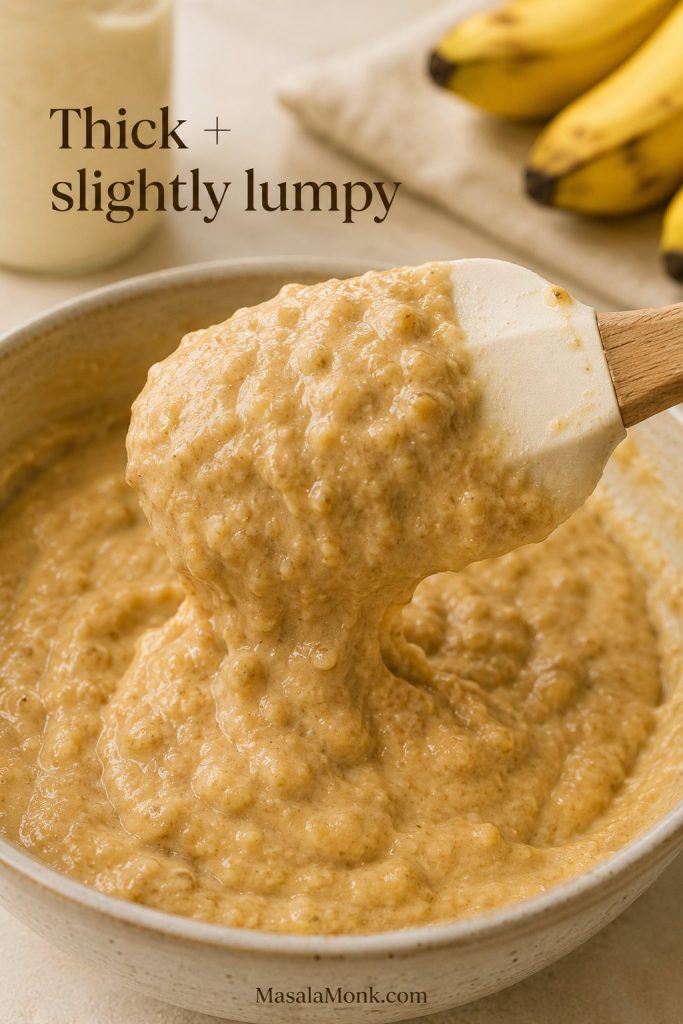
Quick success cue: the batter will be thicker than wheat cake batter, the top should bake to a soft gold, and the toothpick should show moist crumbs, not shiny wet batter. Near the end, the cake should smell lightly toasty and citrusy.
Need help choosing the right ground almond product? Jump to almond flour vs almond meal before mixing.
Almond Cake Recipe Snapshot
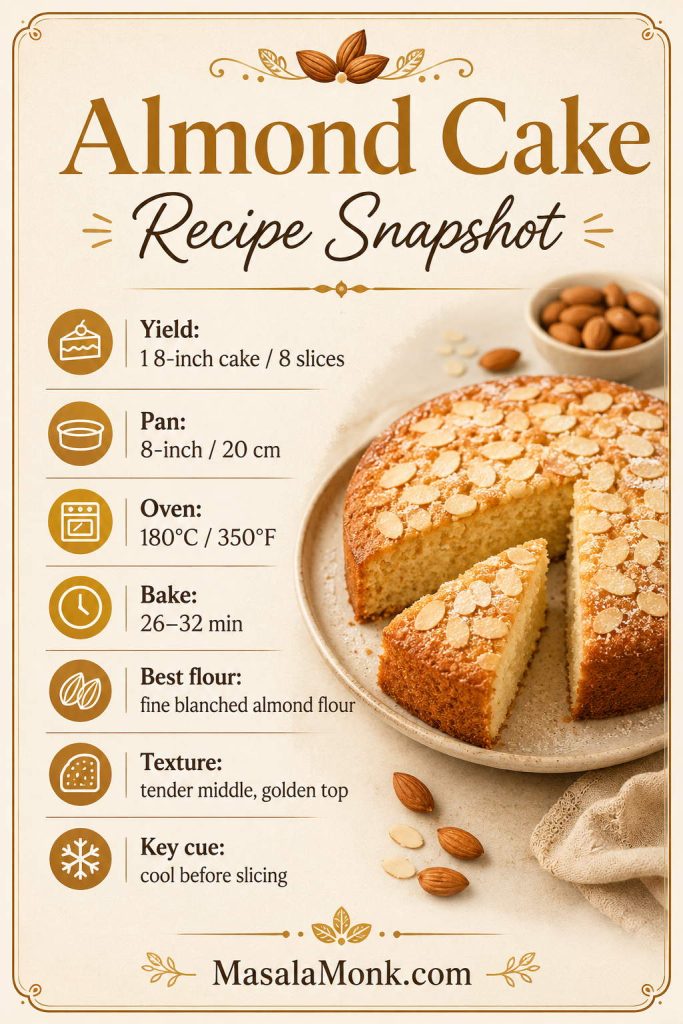
Keep these details in mind before you start. The safest first bake uses fine almond flour, a sturdy 8-inch pan, and a full cooling time. For ingredient confusion, jump to flour vs meal; for timing doubts, use the doneness cues.
What Kind of Almond Cake Is This?
This is a simple, single-layer almond flour cake made mainly with ground almonds instead of wheat flour. It is closer to a tender tea cake than a tall sponge cake or frosted celebration cake.
| If you want… | This recipe gives you… |
|---|---|
| A simple almond flour cake | Yes — a single-layer cake with a tender, clean-cut center. |
| A naturally gluten-free dessert | Yes, when all ingredients are certified gluten-free. |
| A tea cake, brunch cake, or coffee cake | Yes — this is where the recipe works best. |
| A frosted birthday-style almond cake | Use a bakery-style layer cake instead. |
| A whole-orange almond cake | Use a whole-orange method with boiled oranges and a longer bake. |
| An eggless almond cake | Use a separate eggless formula rather than removing the eggs here. |
Almond cake can mean several different things. Some versions are wheat cakes flavored with almond extract; others use boiled oranges, yogurt, or mixed flours. This one stays focused on a dependable almond flour base, so the final texture is easier to predict.
What This Almond Cake Tastes Like
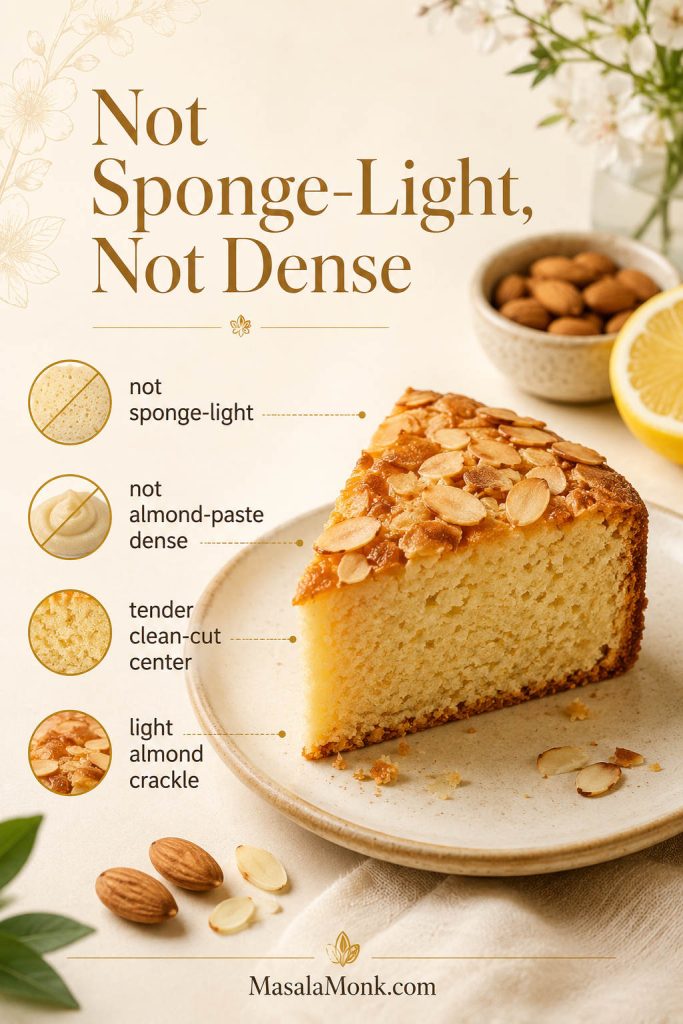
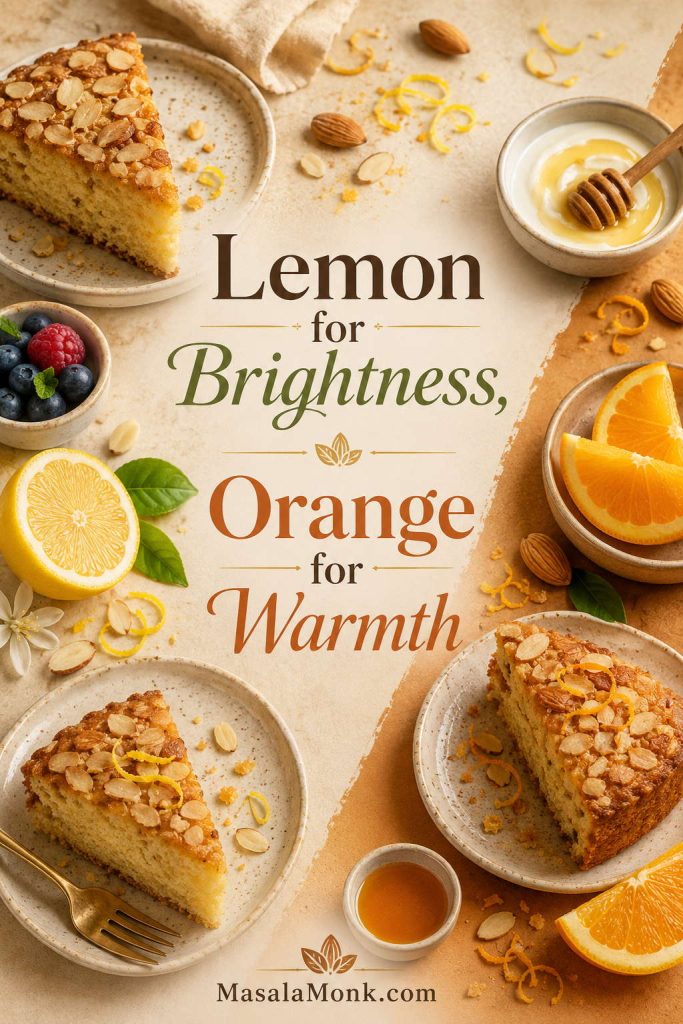
The slice should feel tender and gently rich, not airy like a sponge cake and not dense like almond paste. Almond flour gives the middle a plush, nutty texture, while the sliced almonds on top add a light crackle. Lemon zest makes the cake brighter and more tea-cake-like; orange zest makes it warmer and more dessert-like.
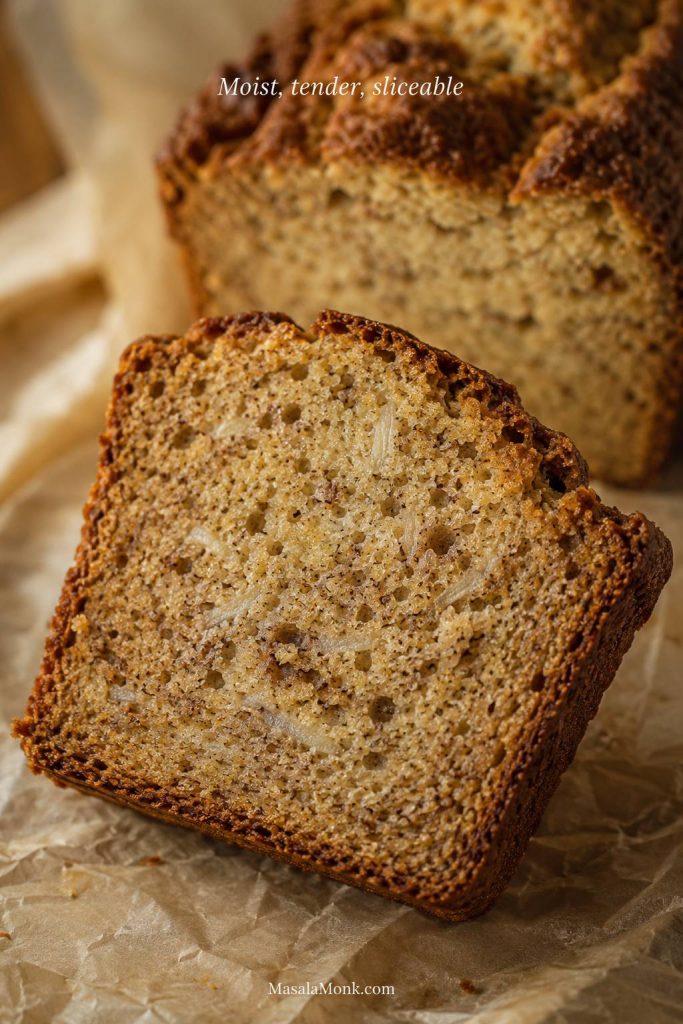
Almond Cake Slice Texture
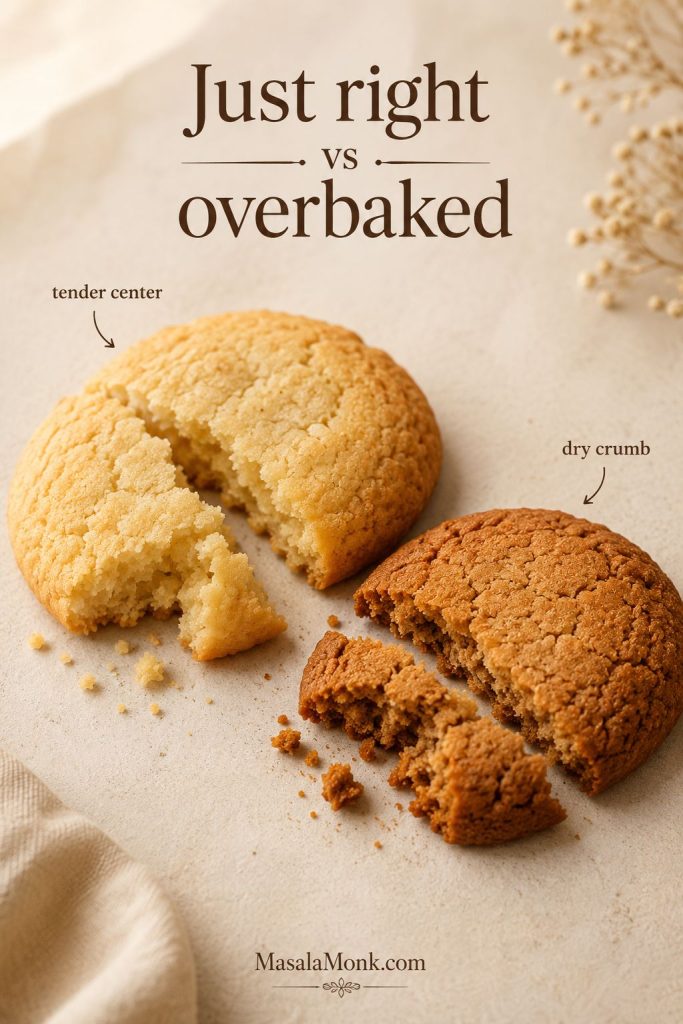
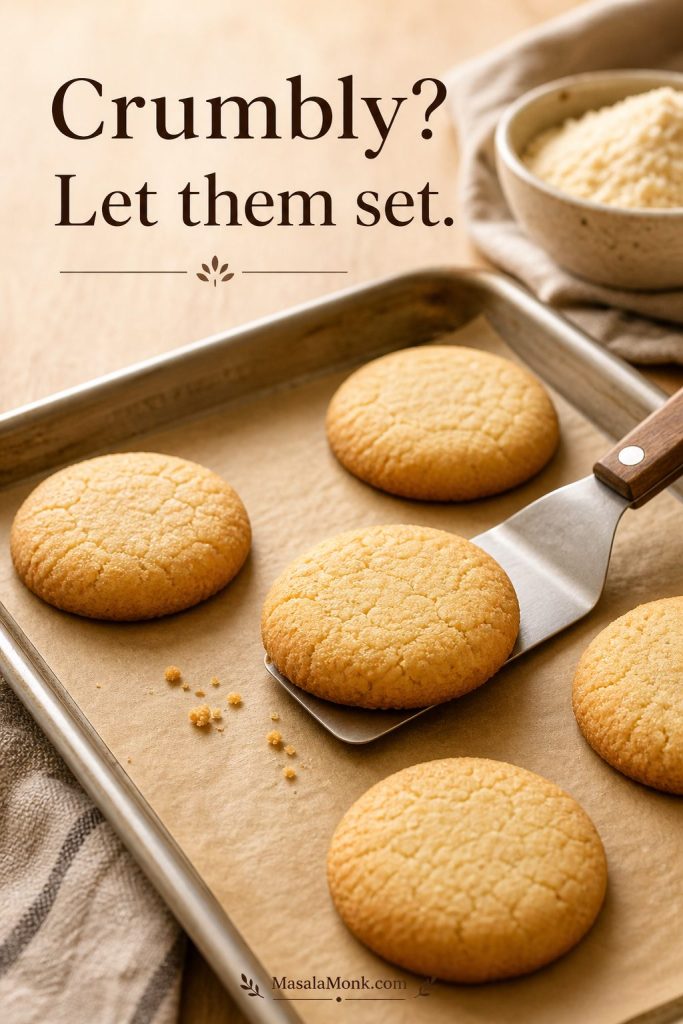
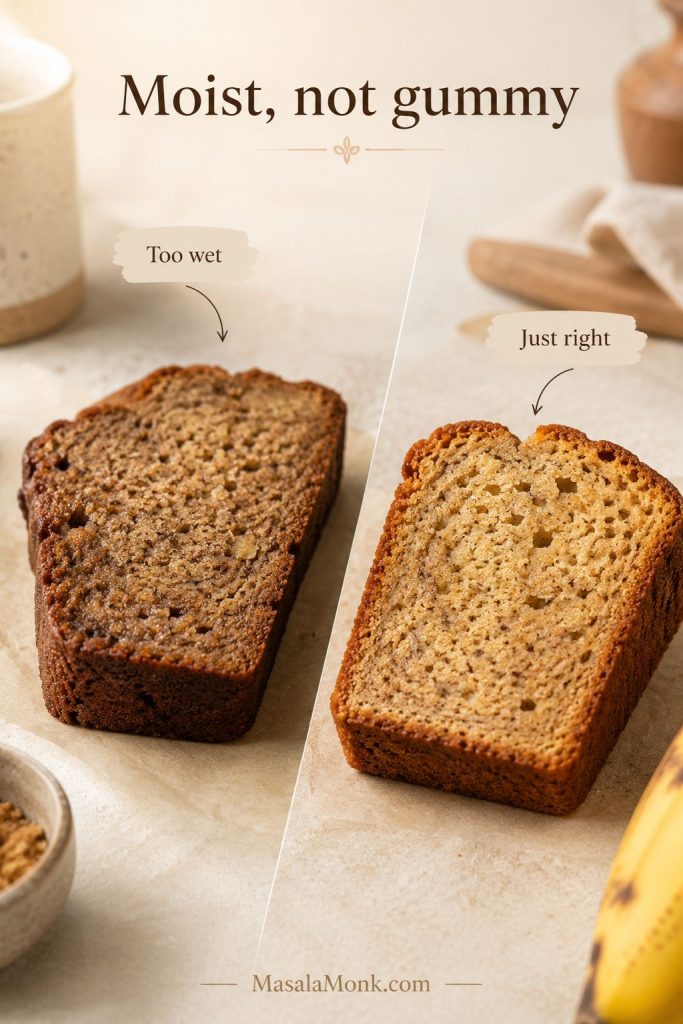
The slice should bend tender rather than crumble apart. If it looks wet in the center, the cake may be underbaked or cut too warm; if it falls apart, the batter may have been overmeasured, overbaked, or sliced before cooling.
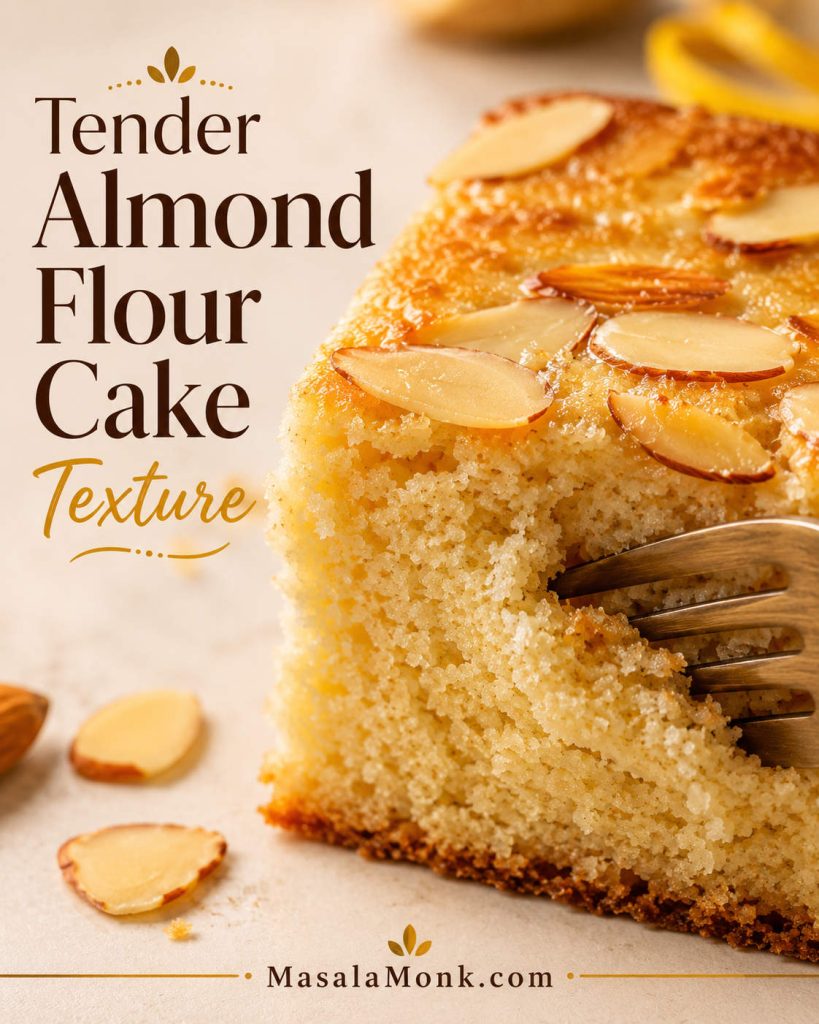
Texture Target for Almond Flour Cake
As the cake cools, the center settles and the flavor rounds out. That resting time is part of why the slice cuts neatly instead of crumbling. The best bite has a fragrant almond top, a clean-cut center, and enough citrus lift to keep the richness from feeling heavy.
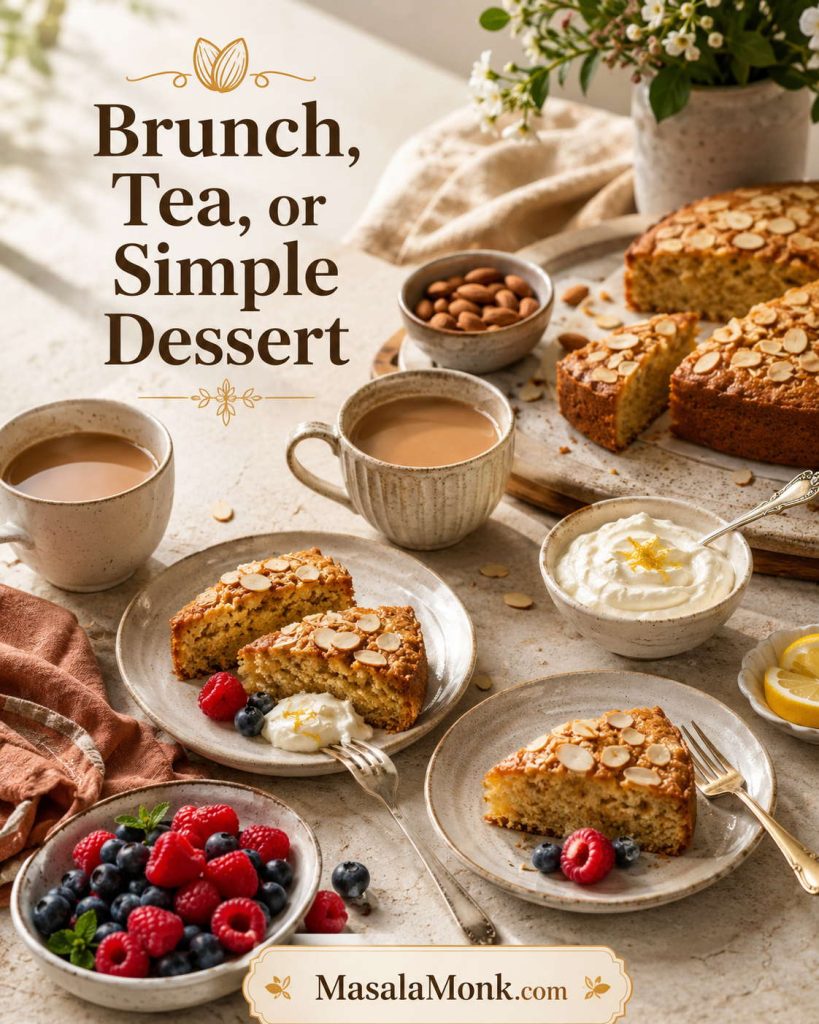
A light dusting of powdered sugar is enough. Add berries and cream if you want dessert, or serve it plain with coffee and let the toasted almond top do the work.
When to Make This Almond Cake
Make it when you need a cake that feels special without frosting: a weekend coffee slice, a brunch cake with berries, or a simple gluten-free dessert that does not taste like a compromise. It is also a good choice when frosting feels like too much work but you still want something polished enough for guests.
This is a useful make-ahead cake because it slices better after resting. Bake it in the morning, carry it without worrying about frosting, and serve it later with powdered sugar, fruit, yogurt, or cream. It works for quiet tea, a dessert plate, or the kind of table where you want the cake to look pretty without needing much decoration.
Before You Bake: 5 Things That Matter
- Weigh the almond flour if you can. If using cups, spoon it lightly and level it.
- Use room-temperature eggs. They whip better and blend more smoothly.
- Keep the egg-white bowl clean and grease-free. Even a little yolk or oil can stop the whites from whipping properly.
- Line the pan with parchment. Almond cakes are delicate and need help releasing cleanly.
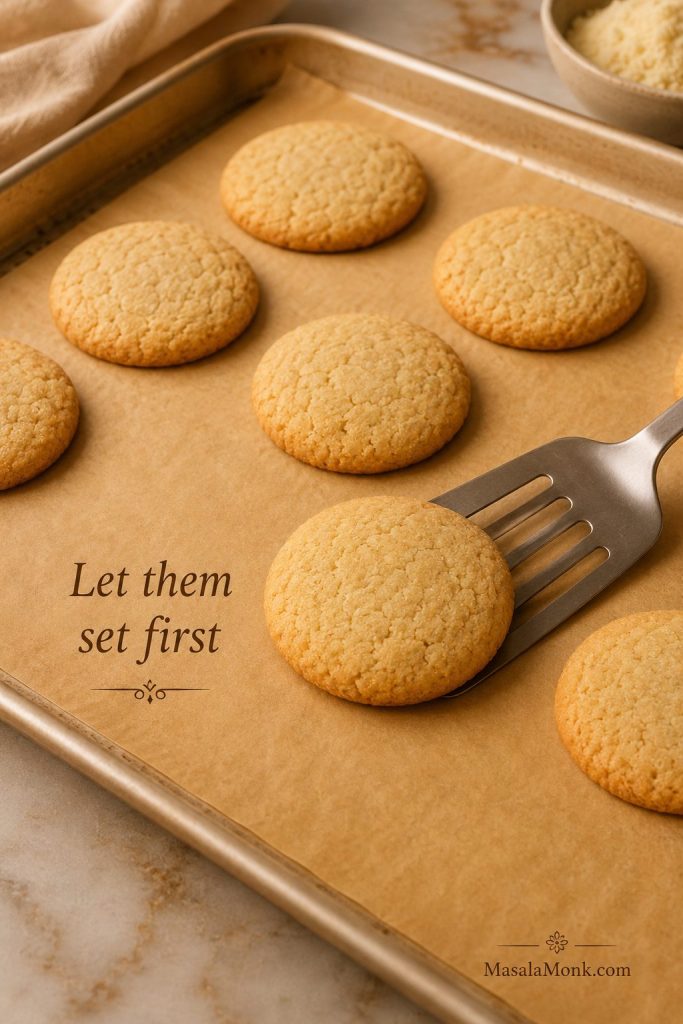
- Cool before slicing. The center firms as it rests, so warm slices can look damp or broken.
Think of cooling as part of the recipe, not just waiting. A lined pan, a steady oven, and a full rest make the difference between a fragile cake and one that lifts, cuts, and serves cleanly. Already worried about timing or pan size? Check pan size and bake time before you preheat.
Recipe Card: Tender Almond Flour Cake
A tender almond flour cake with a golden sliced-almond top, clean-cut center, and bright lemon or orange zest. This cake is naturally gluten-free when made with certified gluten-free ingredients.
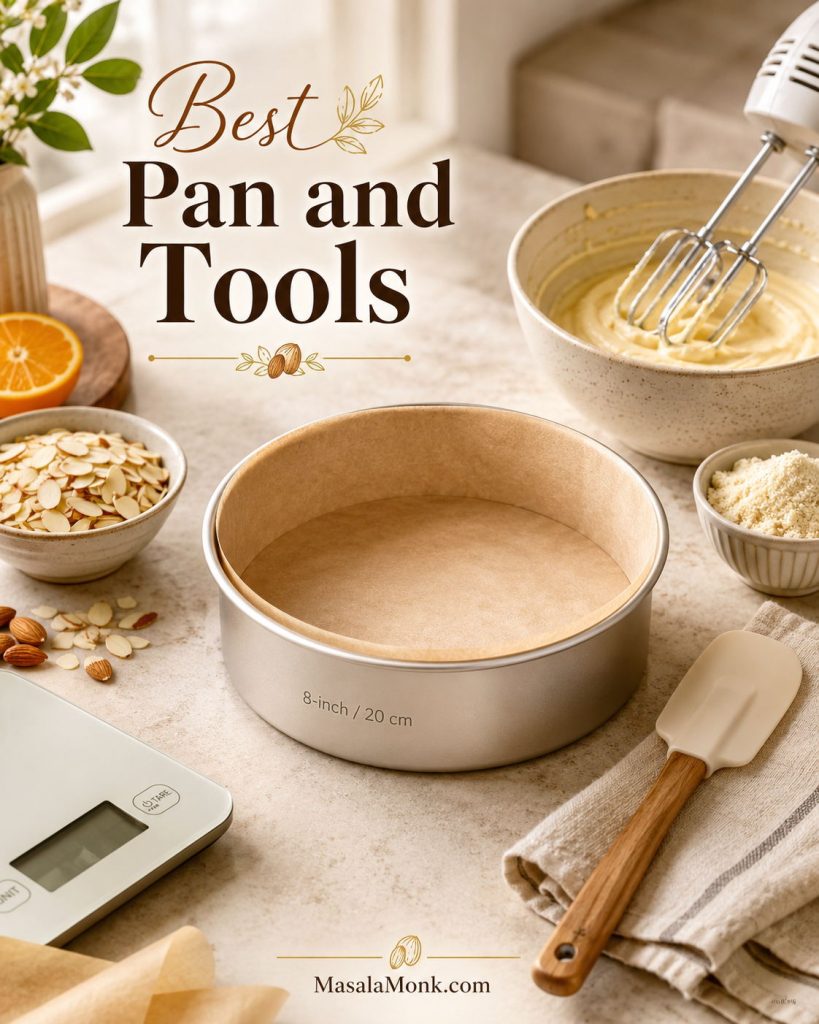
Equipment
- 8-inch / 20 cm light-colored metal round cake pan
- Parchment paper
- Two mixing bowls
- Hand mixer or balloon whisk
- Flexible spatula
- Kitchen scale, strongly recommended
- Wire rack
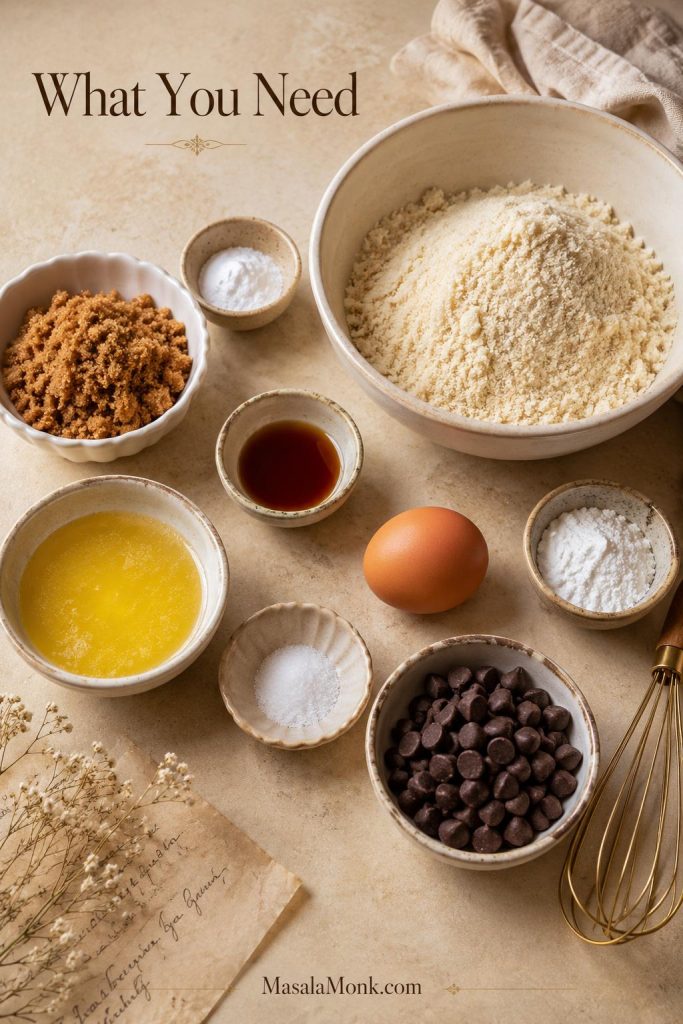
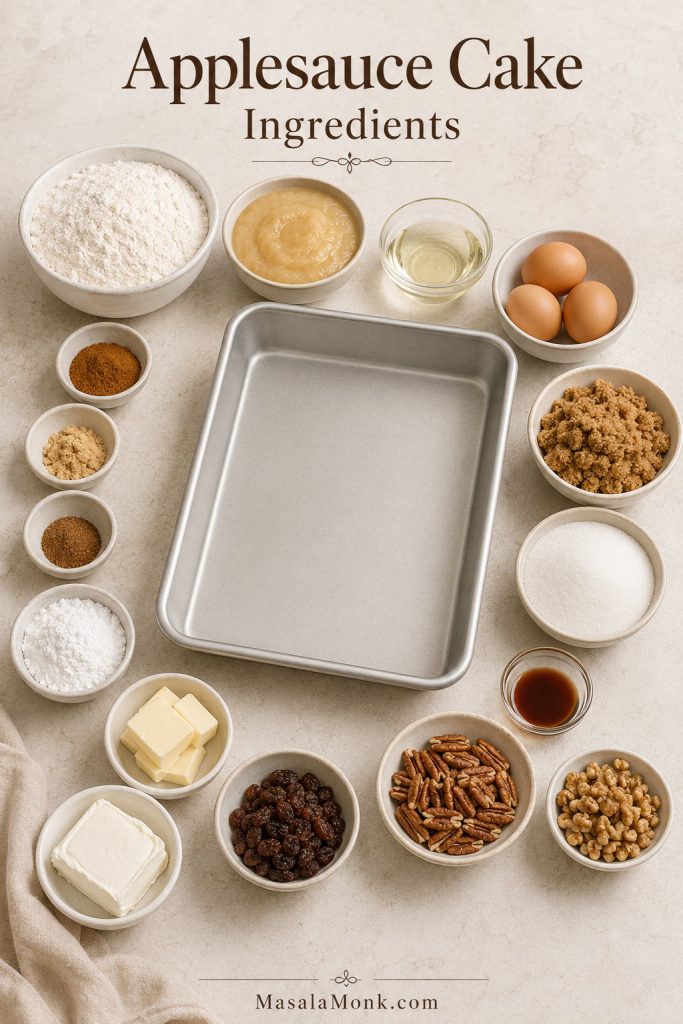
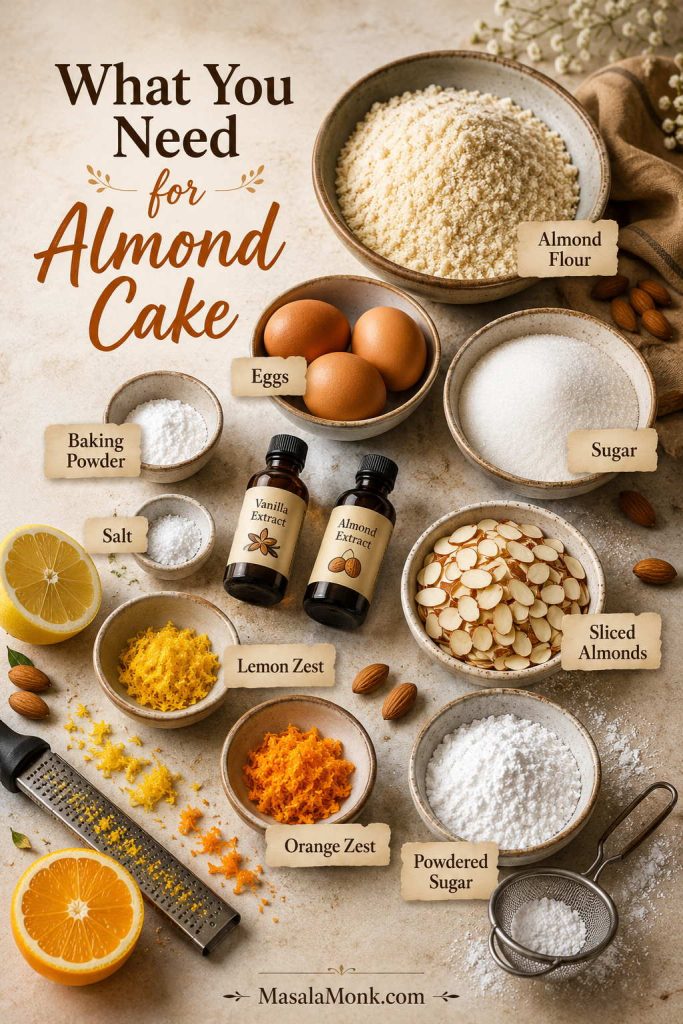
Ingredients
- 150 g / 5.3 oz fine blanched almond flour, about 1 1/2 cups lightly spooned and leveled
- 1 teaspoon / 4 g baking powder
- 1/4 teaspoon fine salt
- 4 large eggs, room temperature, separated
- 100 g / 3.5 oz granulated sugar, about 1/2 cup
- 1 teaspoon / 5 ml vanilla extract
- 1/4 teaspoon / 1.25 ml almond extract, optional but useful
- 1 tablespoon finely grated lemon zest or orange zest
- 25 g / 0.9 oz sliced almonds, about 1/4 cup, for topping
- 1 tablespoon powdered sugar, optional, for serving
Method
- Preheat the oven to 180°C / 350°F. For fan or convection ovens, use 160°C / 320°F. Grease an 8-inch / 20 cm round cake pan, line the base with parchment paper, and lightly grease the sides.
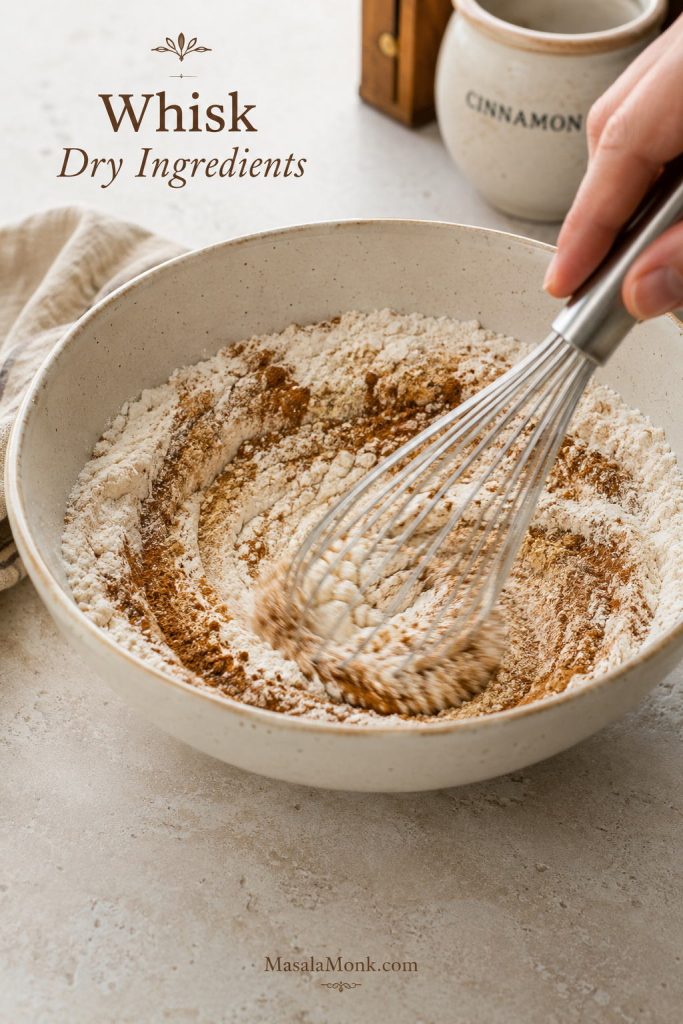
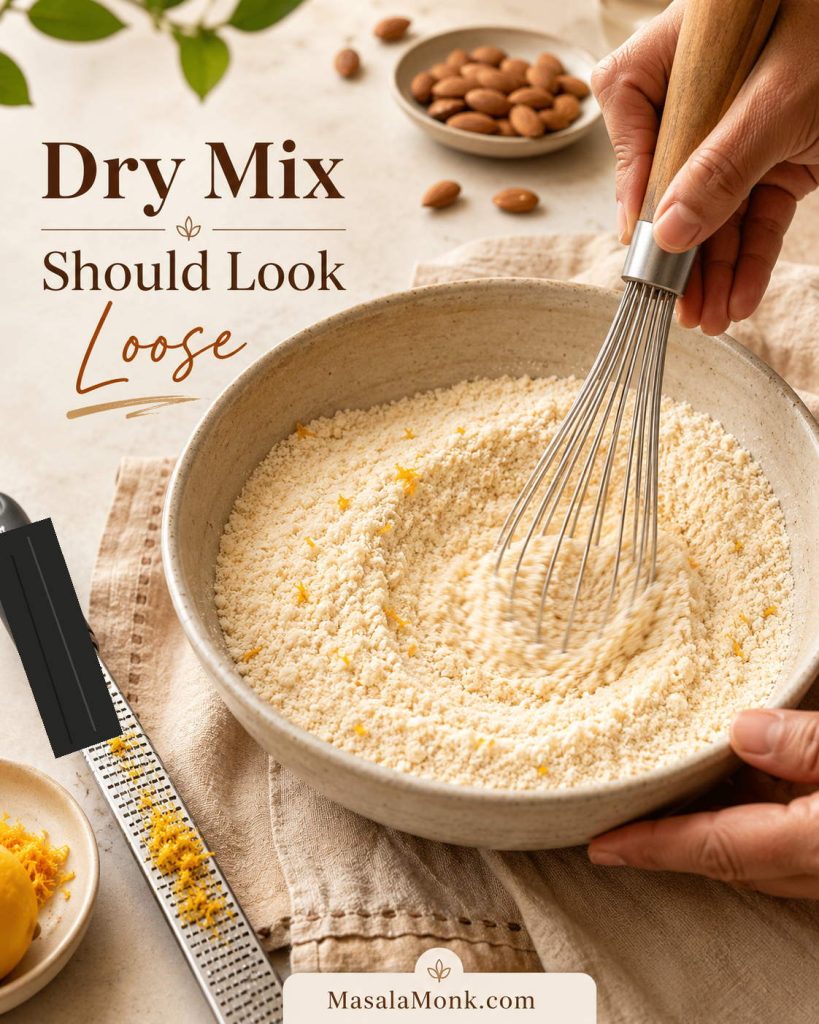
- Whisk together the almond flour, baking powder, salt, and citrus zest. Break up any clumps so the mixture looks loose, not packed.
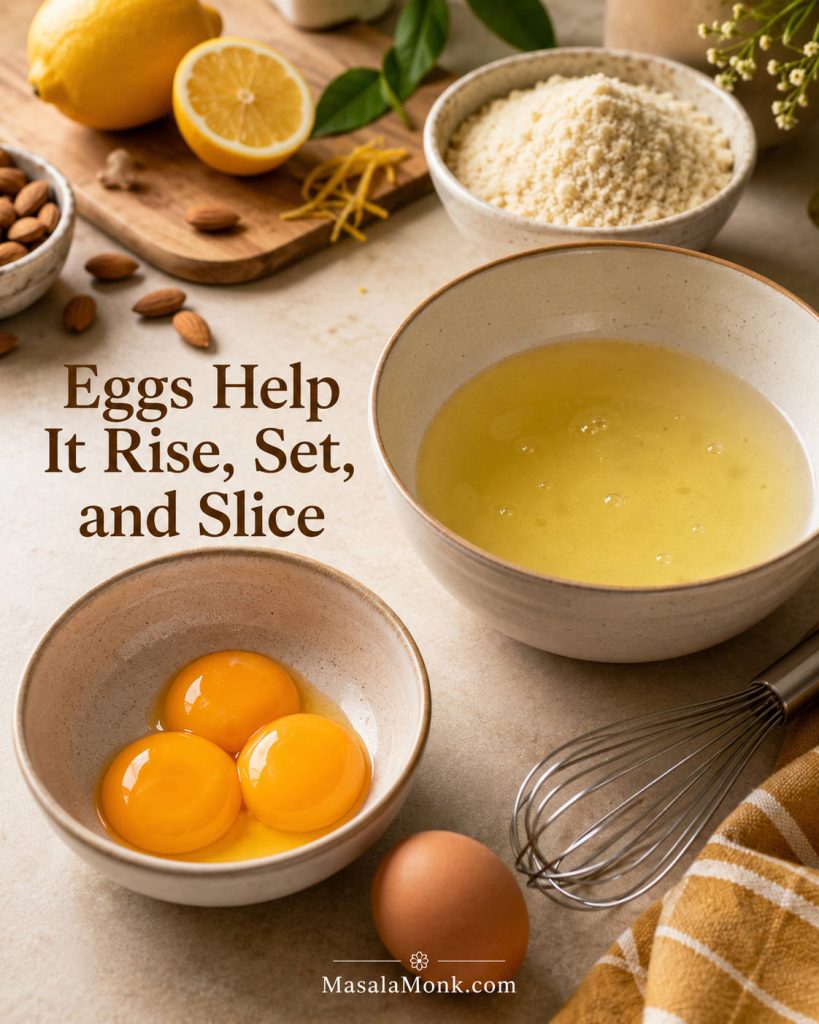
- Separate the eggs. Put the yolks in one large bowl and the whites in a clean, dry, grease-free bowl.
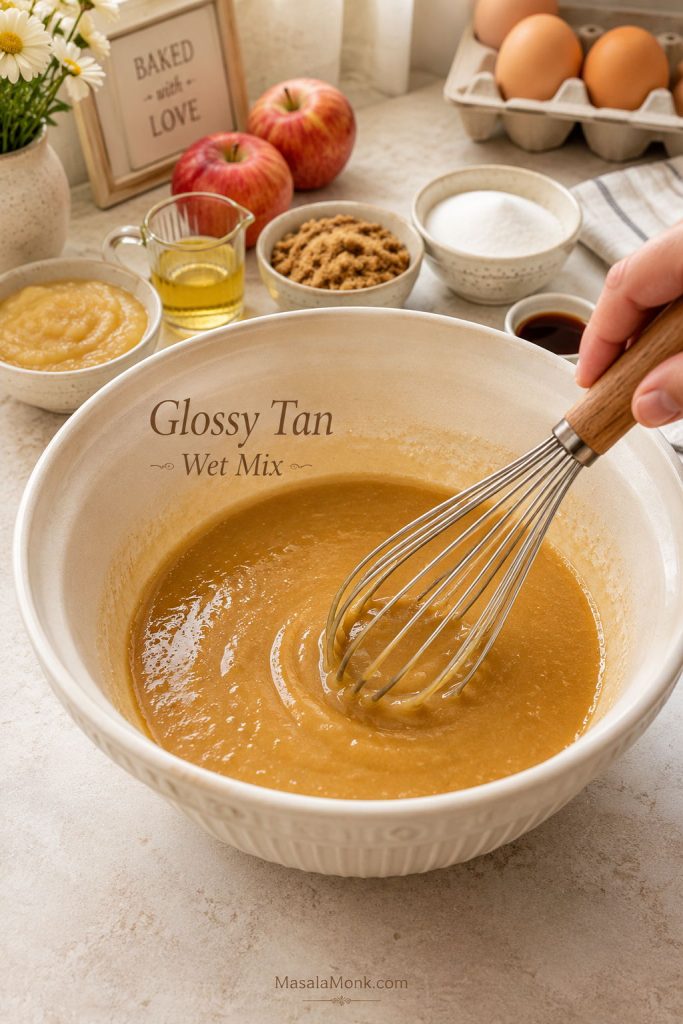
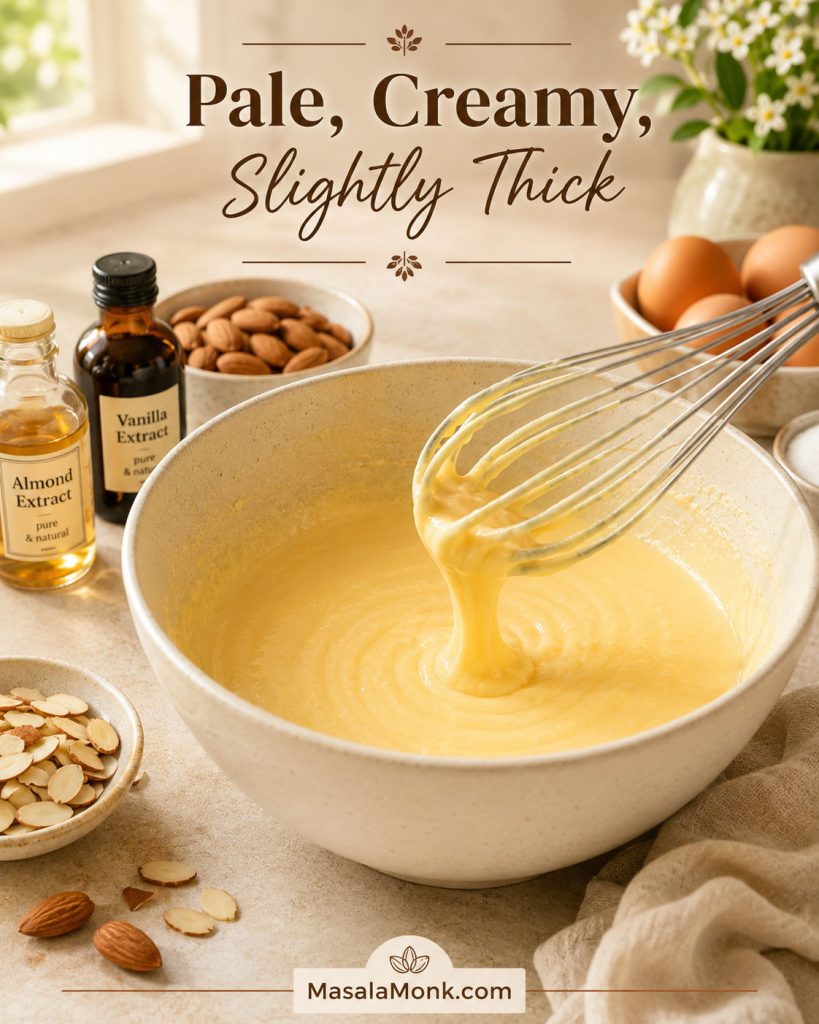
- Beat the yolks with the sugar, vanilla, and almond extract for 2–3 minutes, until paler, creamy, and slightly thickened.
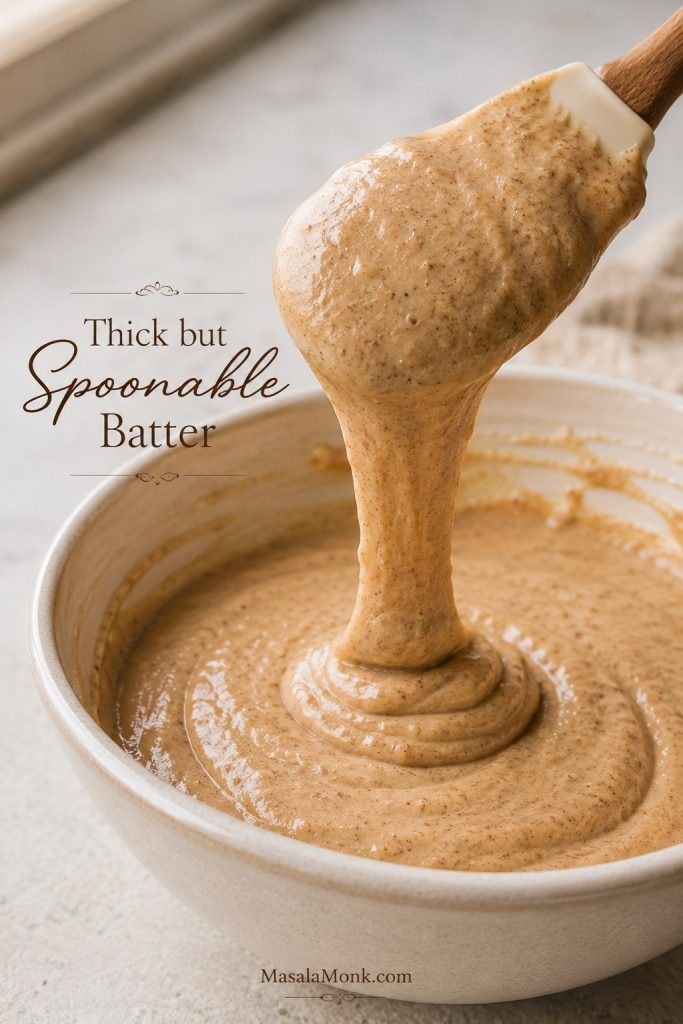
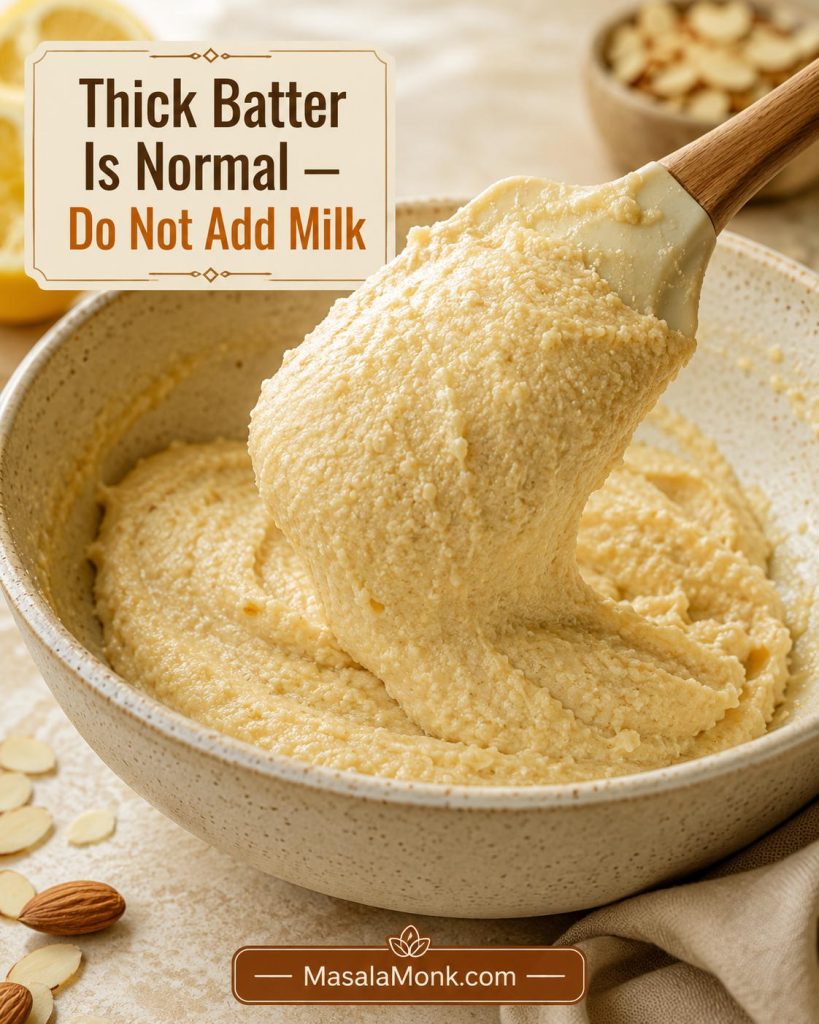
- Fold the almond flour mixture into the yolk mixture. The batter will look thick, almost like a soft almond paste. That is normal.
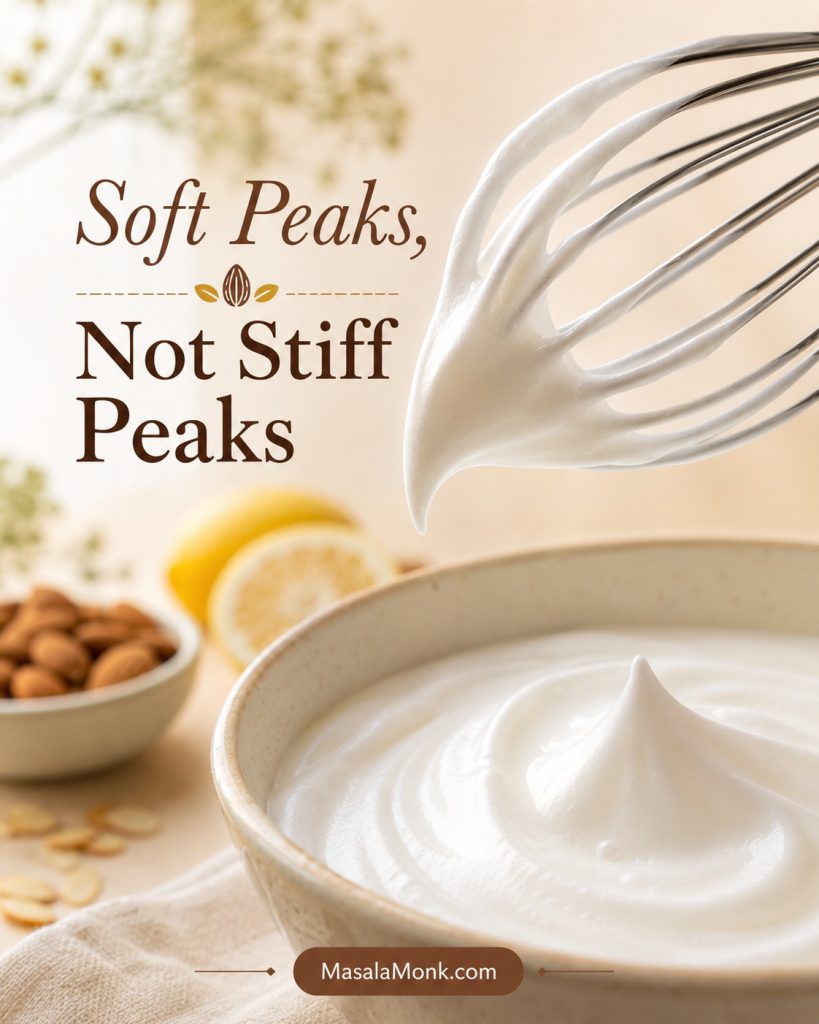
- Beat the egg whites until they hold soft peaks. They should look glossy, and the peaks should bend slightly when you lift the whisk.
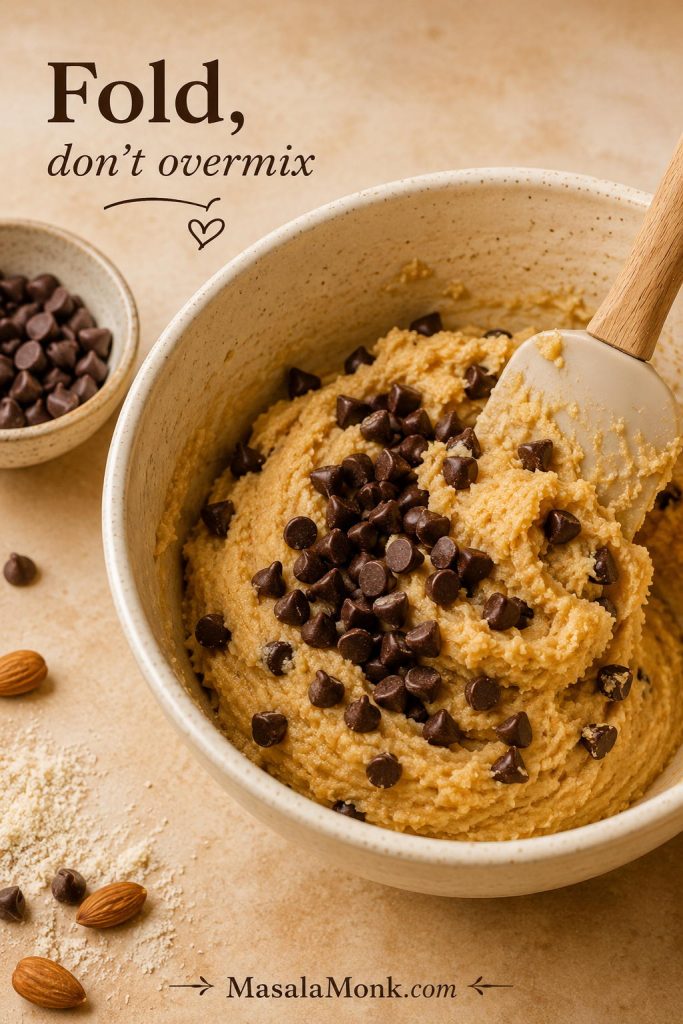
- Fold one-third of the whites into the almond batter first to loosen it. Gently fold in the remaining whites in two additions. The final batter should be thick, airy, and spreadable, with no large white streaks.
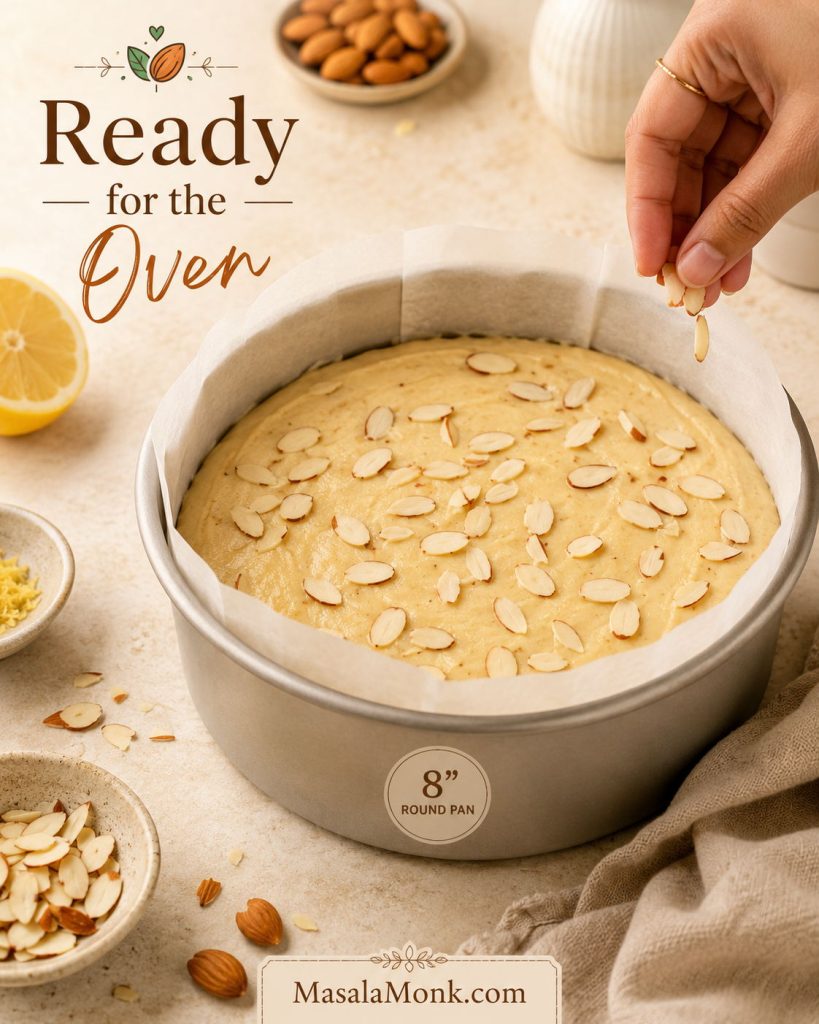
- Spread the batter into the prepared pan and smooth the top. Scatter sliced almonds over the surface.
- Bake for 26–32 minutes, until the top is golden, the center feels set, and a toothpick inserted into the middle comes out with moist crumbs but no wet batter.
- Cool in the pan for 15 minutes, then remove carefully and cool fully on a wire rack before slicing. A slight settling on top is normal.
- Dust lightly with powdered sugar before serving, if you like.
Recipe Notes
- For a 9-inch / 23 cm pan, start checking around 23 minutes. The cake will be thinner.
- Almond meal can be used by weight, but the result will be coarser and more rustic.
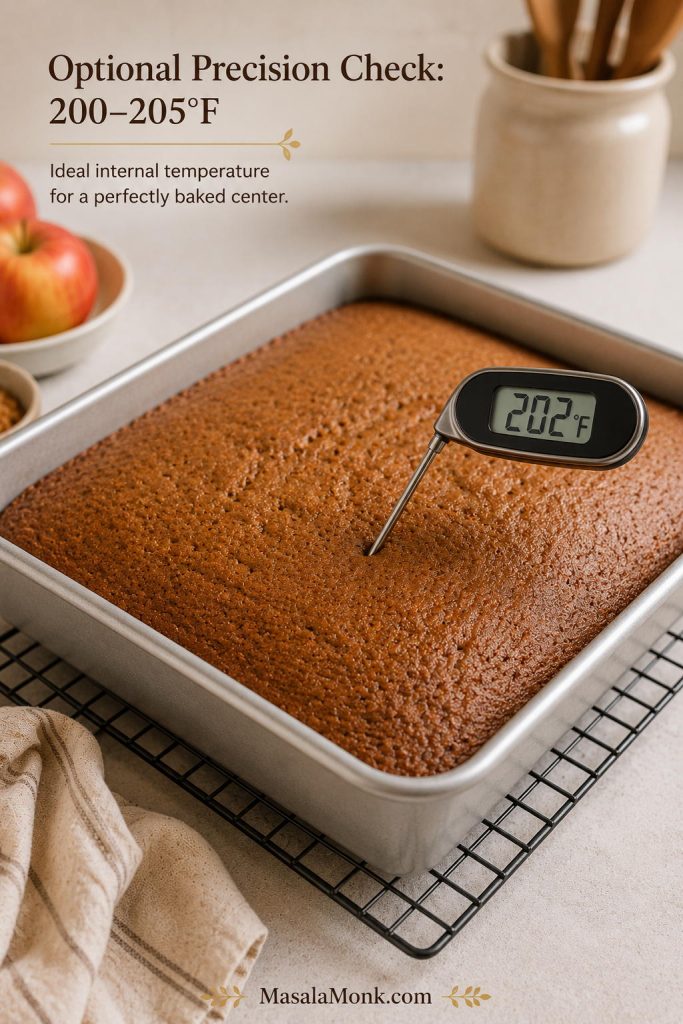
- If using an instant-read thermometer, the center should be about 93–96°C / 200–205°F.
- This batter makes about 9–10 standard cupcakes; bake them for 13–17 minutes.
- If the sliced almonds brown too quickly, tent the cake loosely with foil near the end of baking.
For visual cues while baking, use the step-by-step method and doneness guide below.
Why This Almond Cake Recipe Works
Almond flour brings flavor, tenderness, and natural richness, but it does not bring gluten. That means the cake depends on eggs, gentle folding, the right pan, and cooling time to hold a clean slice.
- Almond flour keeps the middle tender without needing a butter-heavy batter.
- Egg yolks add richness, while the whites help lighten the batter.
- Whipped egg whites prevent the center from feeling heavy when they are folded in gently.
- Sugar supports browning and texture, not just sweetness.
- Lemon or orange zest lifts the almond flavor so the cake does not taste flat or oily.
Added fat stays low on purpose. Ground almonds already contain natural oils, so extra butter or oil can push the texture toward greasy. In this recipe, moisture comes from the almonds and eggs; lightness comes from the whipped whites; and the clean slice comes from baking the center fully, then letting it rest.
What shaped this version: the structure is built around the places almond flour cakes usually go wrong — packed flour, cold eggs, weak whites, hot pans, and slicing before the center has settled. That is why the recipe focuses less on adding more liquid or fat and more on measurement, egg structure, pan heat, and cooling time.
If you enjoy almond flour in other bakes, almond flour cookies are a useful comparison because the same ingredient can turn crisp, chewy, tender, or heavy depending on the formula.
Ingredients for Almond Cake
The ingredient list is short, so each item has a real job. Keep the base steady on the first bake; once you know how the batter should feel, the flavor variations are easier.
Almond Cake Ingredients at a Glance
Before you start, check that your almond flour is plain and finely ground, your eggs are at room temperature, and your citrus zest is ready. With a short ingredient list, small details affect the final cake more than they would in a heavier wheat-flour batter.
Almond Flour
Fine blanched almond flour gives the most delicate result. It is made from almonds without skins and is usually ground more finely than almond meal. If measuring by volume, spoon it lightly into the cup and level it rather than scooping from the bag. For a broader baking reference, King Arthur Baking’s ingredient weight chart lists almond flour and almond meal separately.
If you have extra almond flour after making this cake, use it in almond flour pancakes, where the same ingredient gives a softer breakfast-style texture.
Eggs
Eggs do the main structural work here. They help the cake rise, set, and hold together without wheat flour. Room-temperature eggs whip more easily; if you forget to take them out early, place the whole eggs in a bowl of warm water for 5–10 minutes before cracking them.
Need an egg-free version? Read the eggless almond cake note before trying a flax, chia, or yogurt swap.
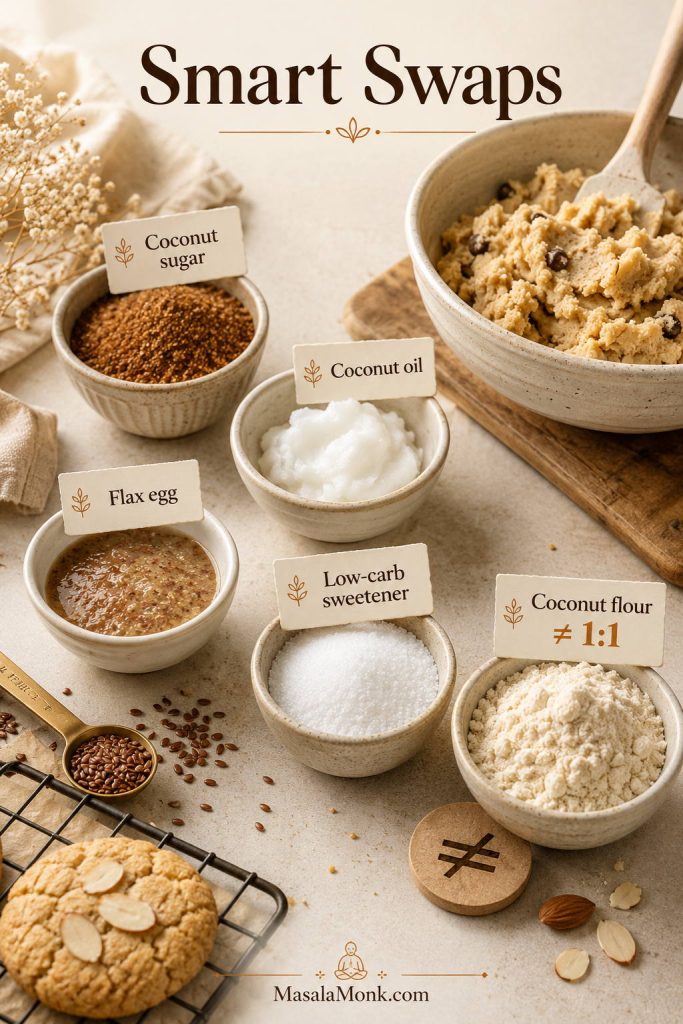
Sugar
Sugar is not only for sweetness. It helps the top brown, supports the texture, and keeps the cake from tasting flat. Coconut sugar or light brown sugar can work, although the cake will bake darker and taste more caramel-like. Honey or maple syrup need a different formula because liquid sweeteners change the moisture balance.
Vanilla and Almond Extract
Vanilla makes the flavor rounder. Almond extract is optional, but a tiny amount makes the almond note more noticeable. Use it carefully; a few drops can taste bakery-like, while too much can turn bitter, artificial, or perfume-like.
Lemon Zest or Orange Zest
Use lemon zest for a brighter tea-cake flavor or orange zest for a warmer dessert-style cake. In both cases, zest only the colored part of the peel, not the bitter white pith underneath.
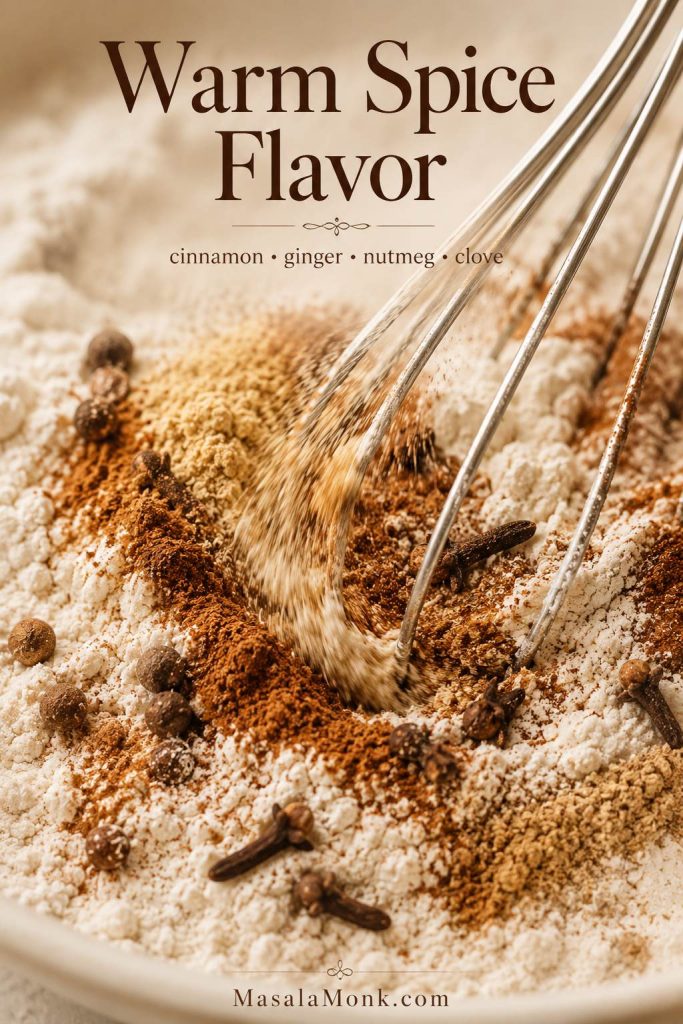
Baking Powder and Salt
Baking powder supports the lift from the eggs. Salt balances the sweetness and makes the almond flavor taste fuller. If you need a strictly gluten-free cake, check that your baking powder is labeled gluten-free.
Sliced Almonds
Sliced almonds give the top a classic look and a delicate crunch. They also make the cake feel finished without frosting. If they brown too quickly, loosely tent the pan with foil near the end of baking.
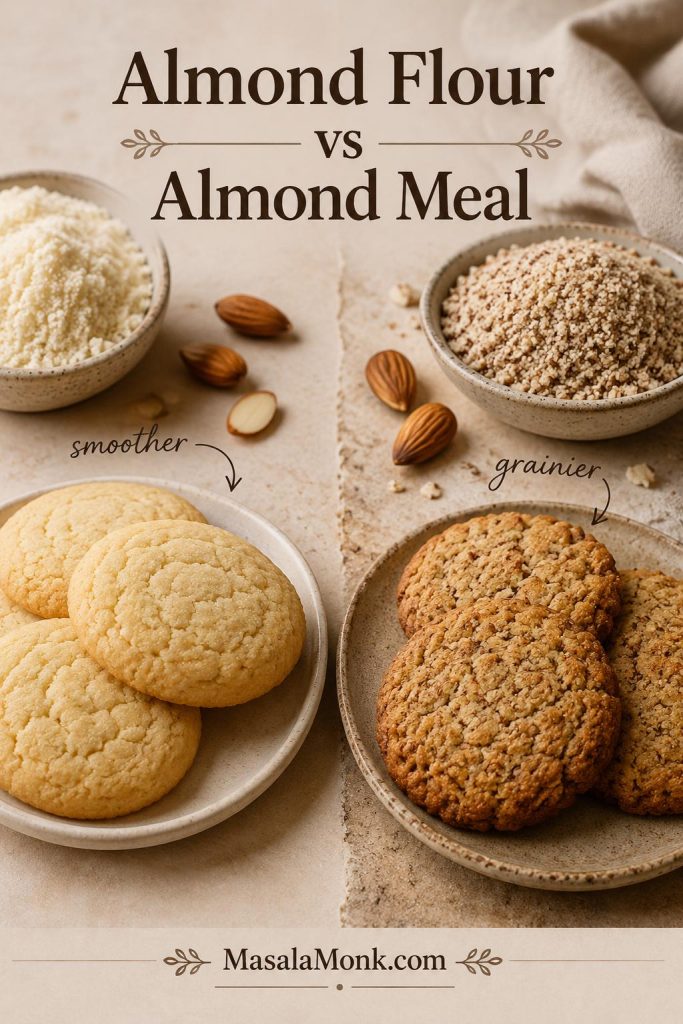
Almond Flour vs Almond Meal vs Almond Powder for Almond Cake
Almond flour, almond meal, ground almonds, and almond powder are often used loosely, but they do not always behave the same way in cake.
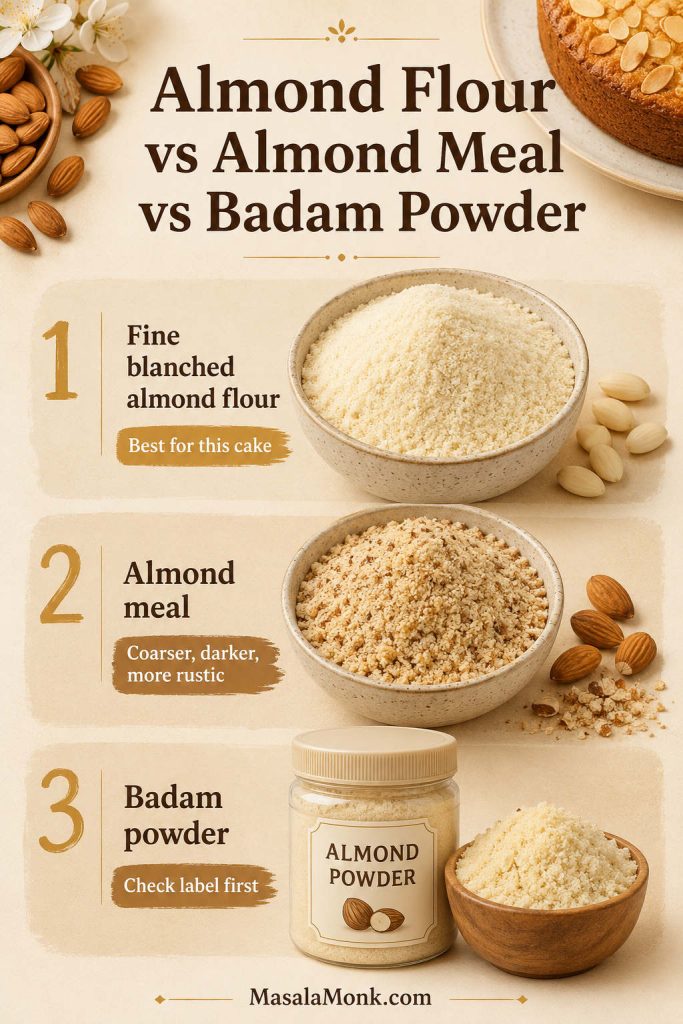
| Ingredient | What it usually means | Best use in this cake | Texture result |
|---|---|---|---|
| Fine blanched almond flour | Almonds without skins, ground finely | Best choice for the recipe | Lightest, most delicate result |
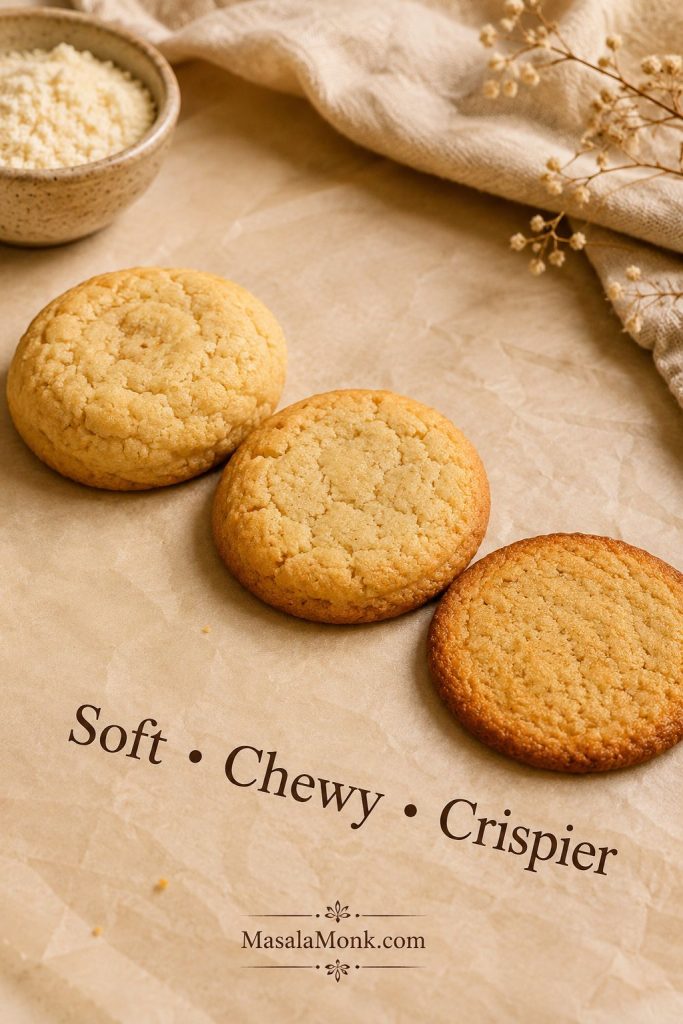
| Almond meal / ground almonds | Often coarser; may include almond skins | Works by weight, but gives a rustic cake | Darker, nuttier, slightly grainier texture |
| Almond powder / badam powder | Can mean ground almonds, but sometimes means sweetened drink mix | Use only if unsweetened and finely ground | Depends on grind; sift if clumpy |
For the cleanest first bake, use fine blanched almond flour. If you use almond meal, use the same weight, not a packed cup-for-cup swap. Almond meal is often heavier by volume, and it may include skins, so the finished cake will be darker and more textured.
Badam Powder Check for Almond Cake
Almond powder needs extra caution. If you are in India and buying “badam powder,” read the label carefully. You want plain unsweetened ground almonds, not badam milk mix, malted almond drink powder, milk-powder blend, or sweetened beverage mix. Those mixes can make a warm badam drink taste rich, but they do not behave like plain ground almonds in cake batter.
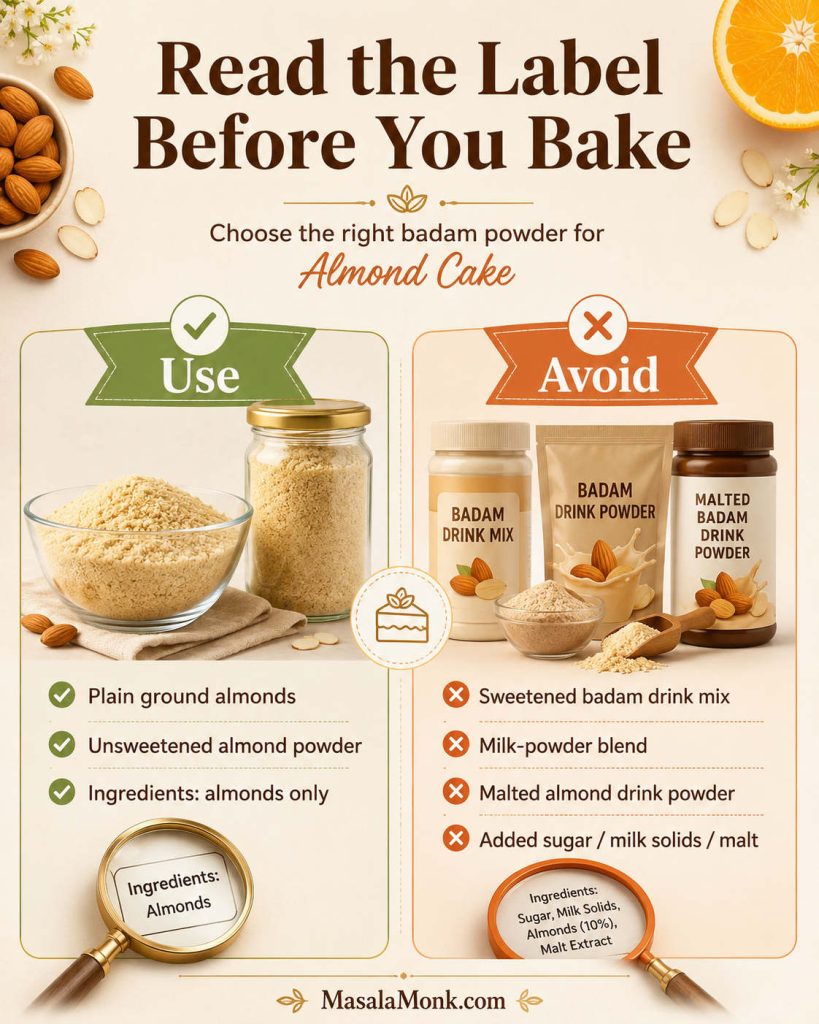
Simple rule: fine almond flour gives the cleanest cake. Almond meal gives a rustic cake. Sweetened badam drink mix does not belong in this recipe.
How to Make Almond Cake
The recipe card gives the short method. These cues show what the mixture should look and feel like at each stage, which matters more with almond flour than with a regular wheat batter.
1. Prepare the pan first
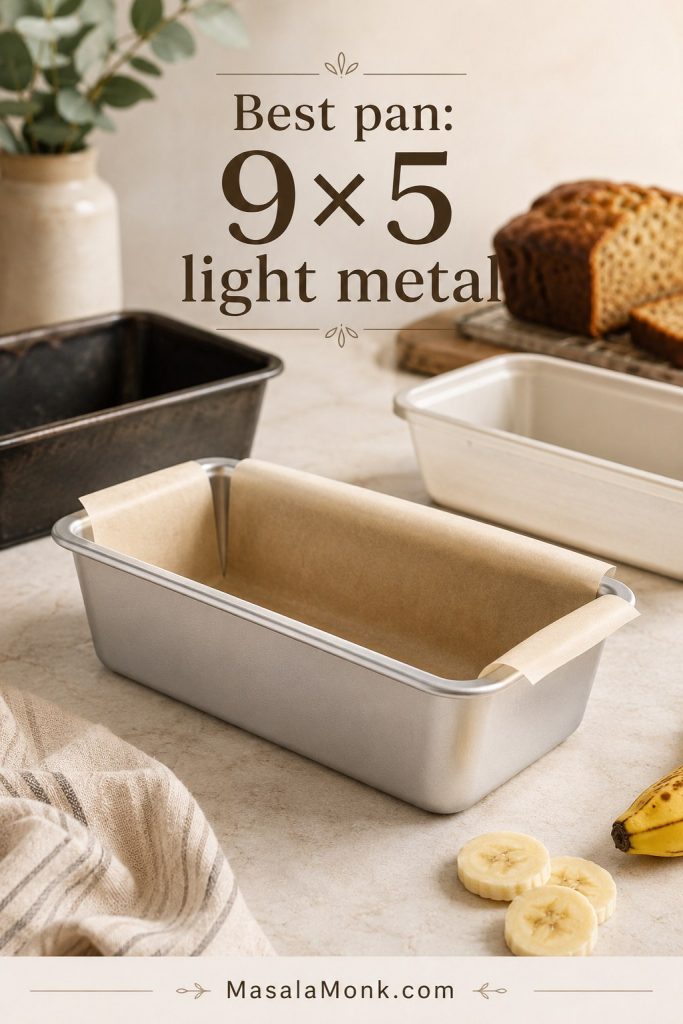
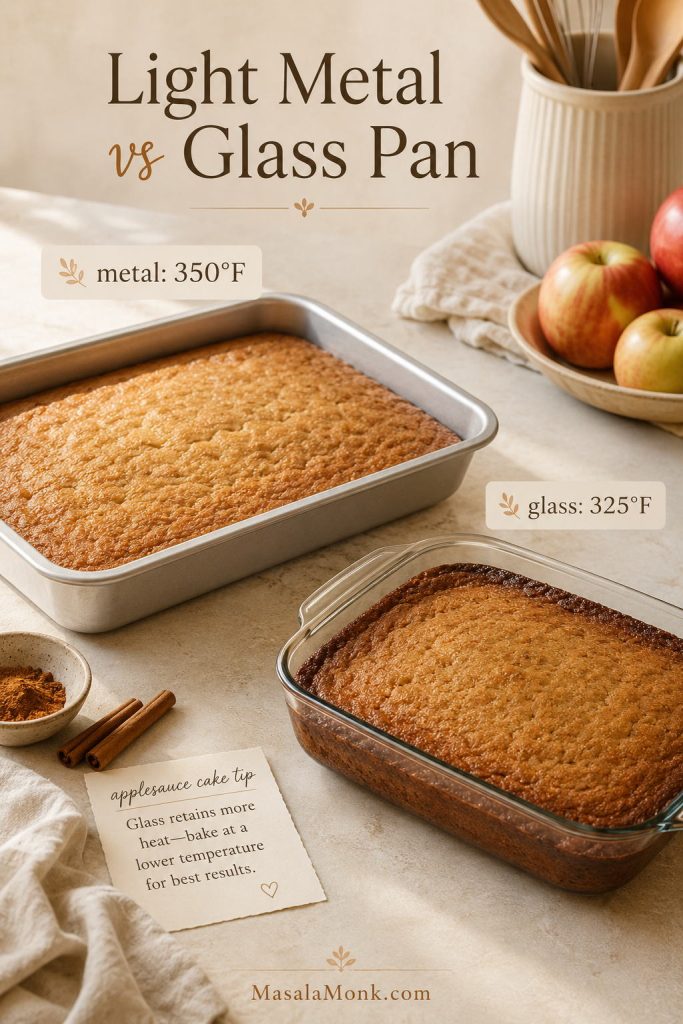
Grease the pan and line the base with parchment before you start mixing. A light-colored metal 8-inch / 20 cm round pan gives the most even result. Glass and ceramic hold heat differently and may need extra time, so metal is the safest first choice.
2. Mix the dry ingredients
Whisk almond flour, baking powder, salt, and citrus zest together. The mixture should look loose and clump-free, not compacted. If the flour has small lumps, break them up now so the finished texture is smoother.
3. Beat the yolks with sugar
Beat the egg yolks with sugar, vanilla, and almond extract for 2–3 minutes, until the mixture looks paler, creamy, and slightly thick. It does not need to be fluffy like whipped cream, but it should no longer look dry or grainy.
4. Fold in the almond flour
Add the dry mixture to the yolks and fold until combined. The batter will look thick, almost like a soft almond paste. That is normal; do not loosen it with milk or water. The egg whites will lighten it in the next step.
5. Whip the egg whites to soft peaks
Beat the egg whites until they hold soft peaks. The whites should look glossy, and the peak should bend slightly when you lift the whisk. Stop before the whites become stiff, dry, or clumpy.
6. Fold until the batter is thick, airy, and spreadable
Fold one-third of the whites into the thick batter first; it should visibly loosen. Then fold in the rest gently until the mixture is thick, airy, and spreadable, with no large white streaks. Do not beat the batter at this point.

7. Fill the pan and bake
Spread the batter into the pan, add sliced almonds, and bake on the middle rack. The top may settle slightly as the cake cools; that is normal. Let it rest in the pan for 15 minutes, then move it to a wire rack. The slice will be cleaner once the center has fully settled.
Pan Size, Oven Temperature, and Bake Time
Pan size matters because the edges can brown before the center finishes baking. A deeper cake needs more time; a wider cake bakes faster and can dry out if you use the same timing.
8-Inch vs 9-Inch Pan for Almond Cake
The 8-inch pan is the safest first choice because it gives the cake a little height. A 9-inch pan still works, but it spreads the batter thinner, so the cake finishes sooner and needs earlier checking.

Best first pan: use an 8-inch / 20 cm light-colored metal round pan. A 9-inch pan works, but the cake will be thinner and will bake faster.
| Pan | Result | Approximate bake time | Notes |
|---|---|---|---|
| 8-inch / 20 cm round | Taller cake with a tender center | 26–32 minutes | Best default for this recipe. |
| 9-inch / 23 cm round | Thinner cake, slightly faster bake | 23–28 minutes | Start checking early. |
| 8-inch square | Easy square slices | 24–30 minutes | Good for snack-cake style serving. |
| Cupcake pan | About 9–10 small cakes | 13–17 minutes | Fill cups about two-thirds full. |
| Loaf pan | Deeper center | Not ideal for this exact batter | Higher risk of dark edges and underbaked middle. |
For a conventional oven or OTG, use 180°C / 350°F. For fan or convection ovens, use 160°C / 320°F and start checking early. Bake on the middle rack so the top does not brown before the center is ready.
If you use a springform pan, choose a sturdy one. Very thin pans can overbake the edges while leaving the middle slightly underdone. If your oven runs hot or the almond topping browns too fast, loosely tent the cake with foil for the final 5–10 minutes.
Once you choose the pan, use the doneness section rather than bake time alone.
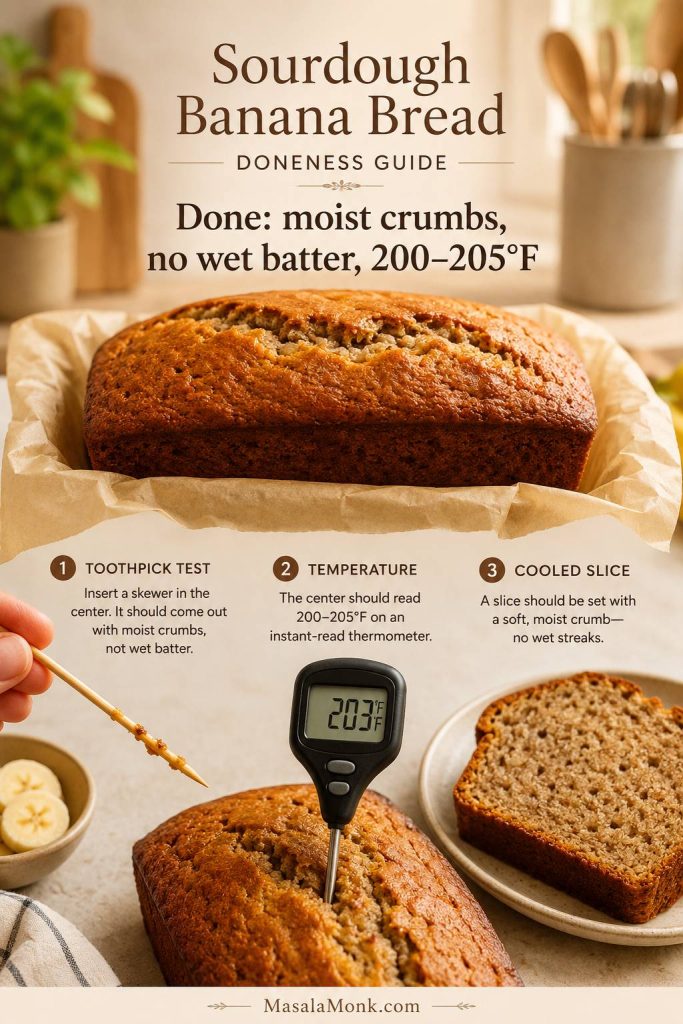
How to Know Almond Cake Is Done
The top may look golden before the middle is fully baked, so use more than color as your guide.
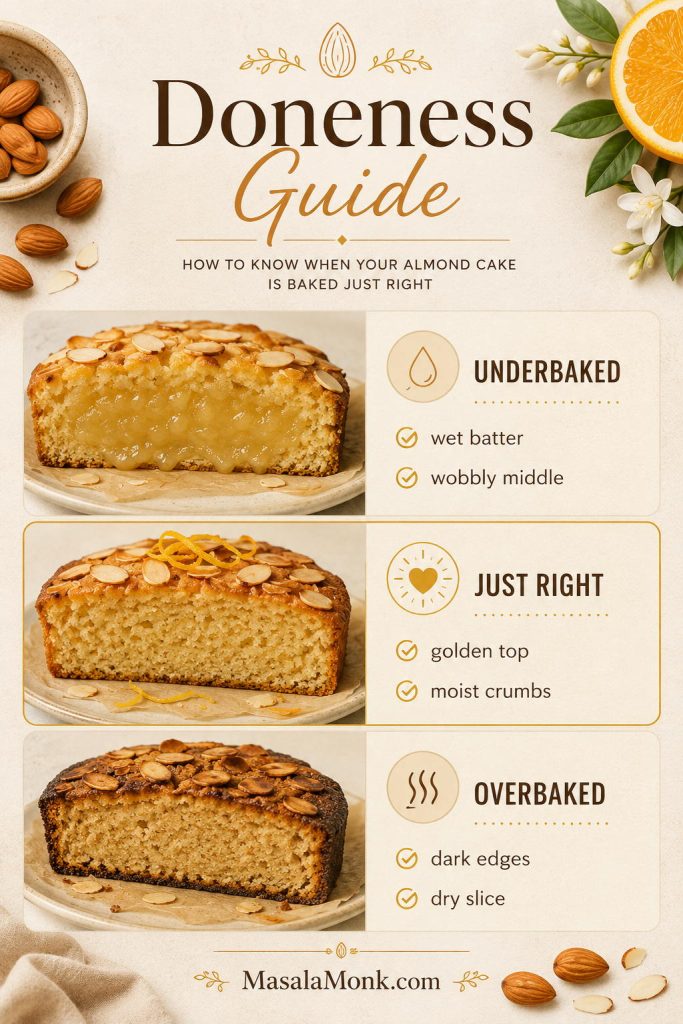
- The top is golden and the sliced almonds are lightly toasted.
- The center feels set when touched gently.
- The edges pull slightly away from the pan.
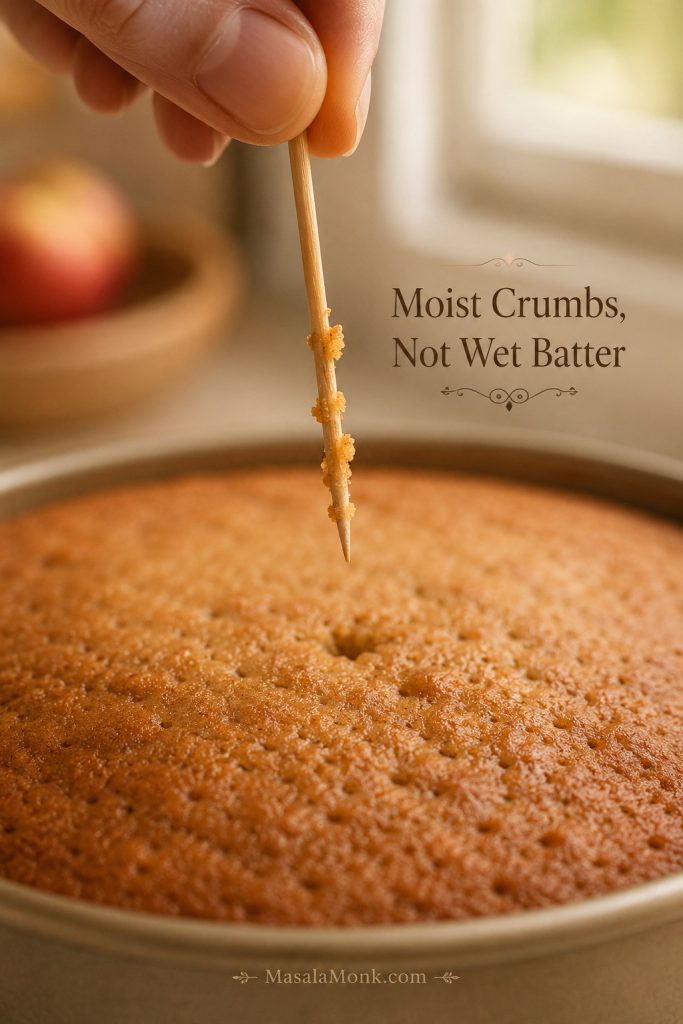
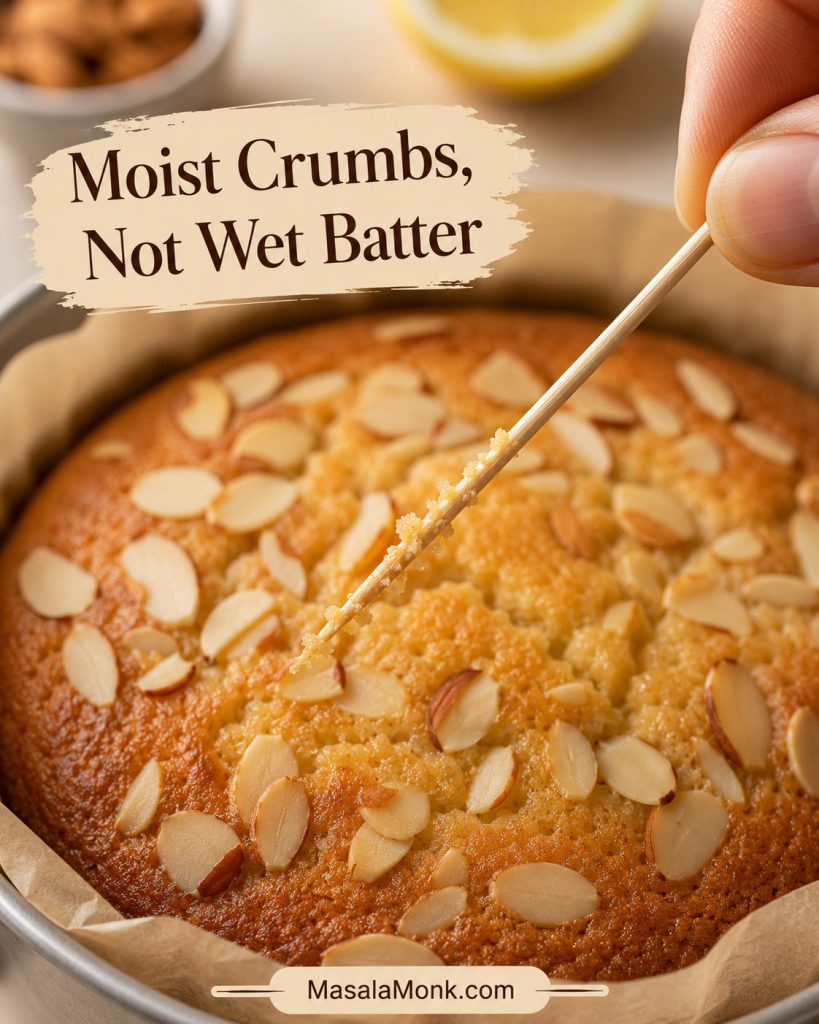
- A toothpick inserted into the center comes out with moist crumbs, not shiny batter.
- The cake does not wobble in the middle when the pan is gently moved.
A few damp-looking crumbs are fine. Shiny wet batter means the cake needs more time. If the top is already brown, tent it loosely with foil and continue baking. For extra precision, the center should be about 93–96°C / 200–205°F on an instant-read thermometer.
Toothpick Test for Almond Cake
Insert the toothpick into the center, not the edge. The edge sets first, so it can make the cake seem done while the middle still needs a few more minutes.
The cake does not need to look dramatic when it comes out of the oven. A softly golden surface, lightly toasted almonds, and a middle that no longer wobbles are enough. The finished texture shows after cooling, when the center has had time to settle.
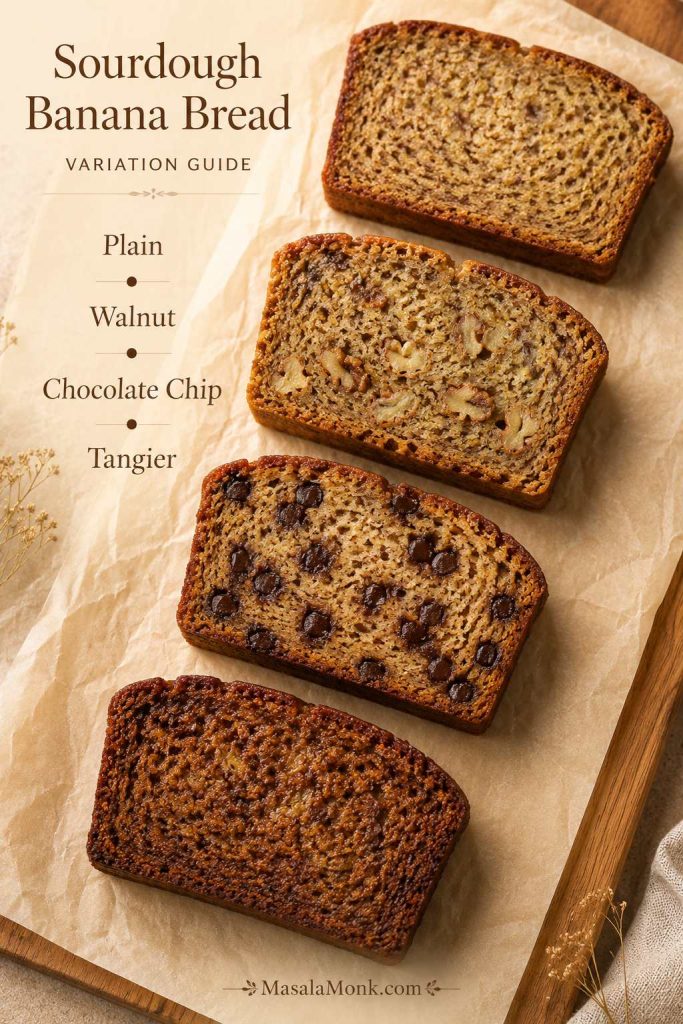
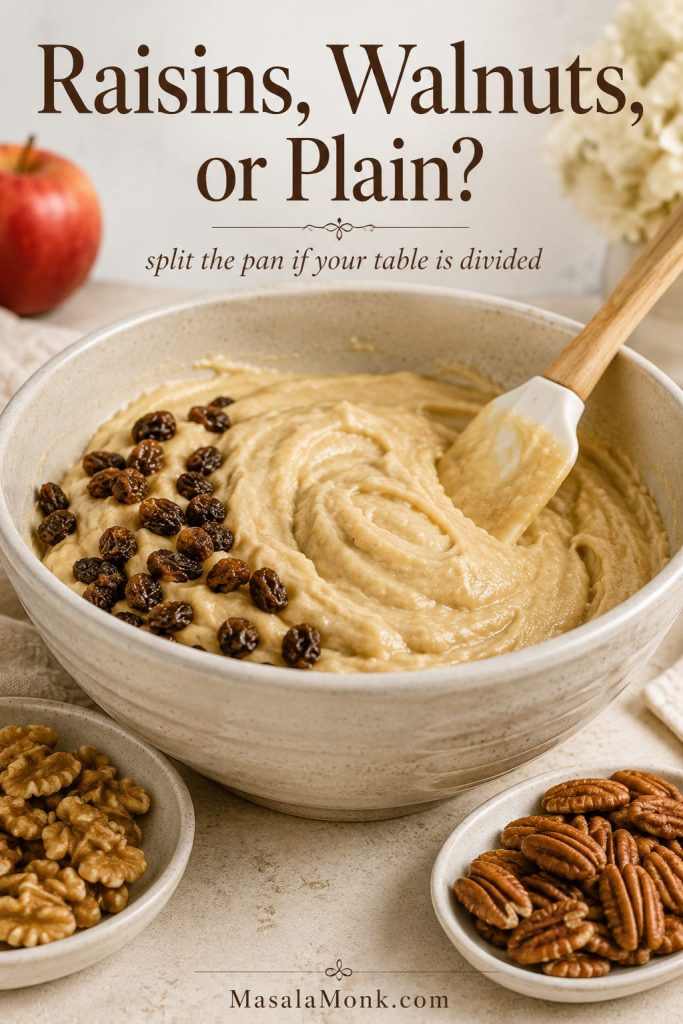
Almond Cake Variations
Keep the first bake simple, then change flavorings and toppings in small ways. That way the cake stays familiar even when you shift the flavor.
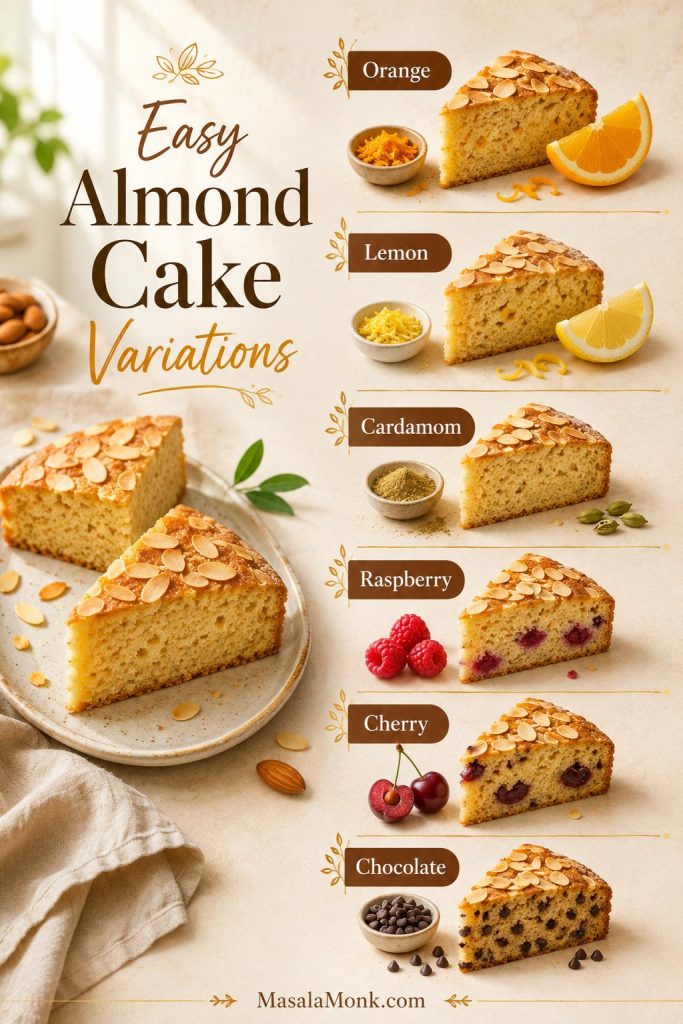
| Variation | How to do it | Important note |
|---|---|---|
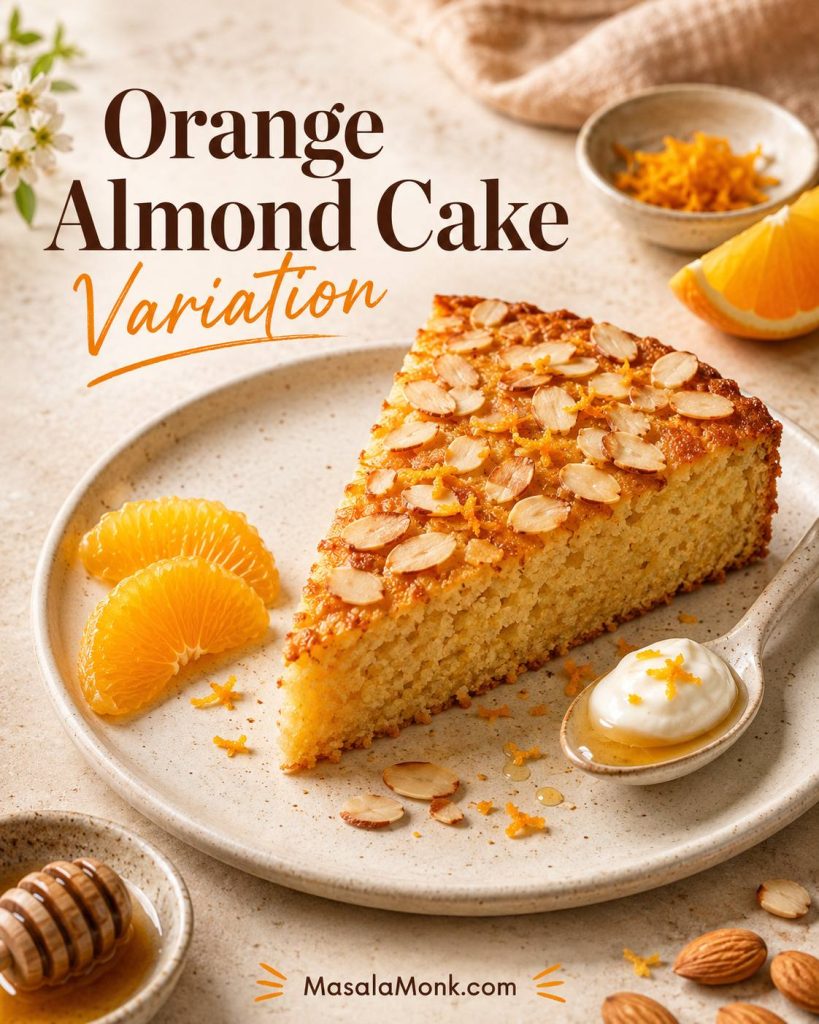
| Orange almond cake | Use 1 tablespoon orange zest. Optional glaze: 60 g powdered sugar + 1–2 teaspoons orange juice. | Warmer and more dessert-like than lemon. |
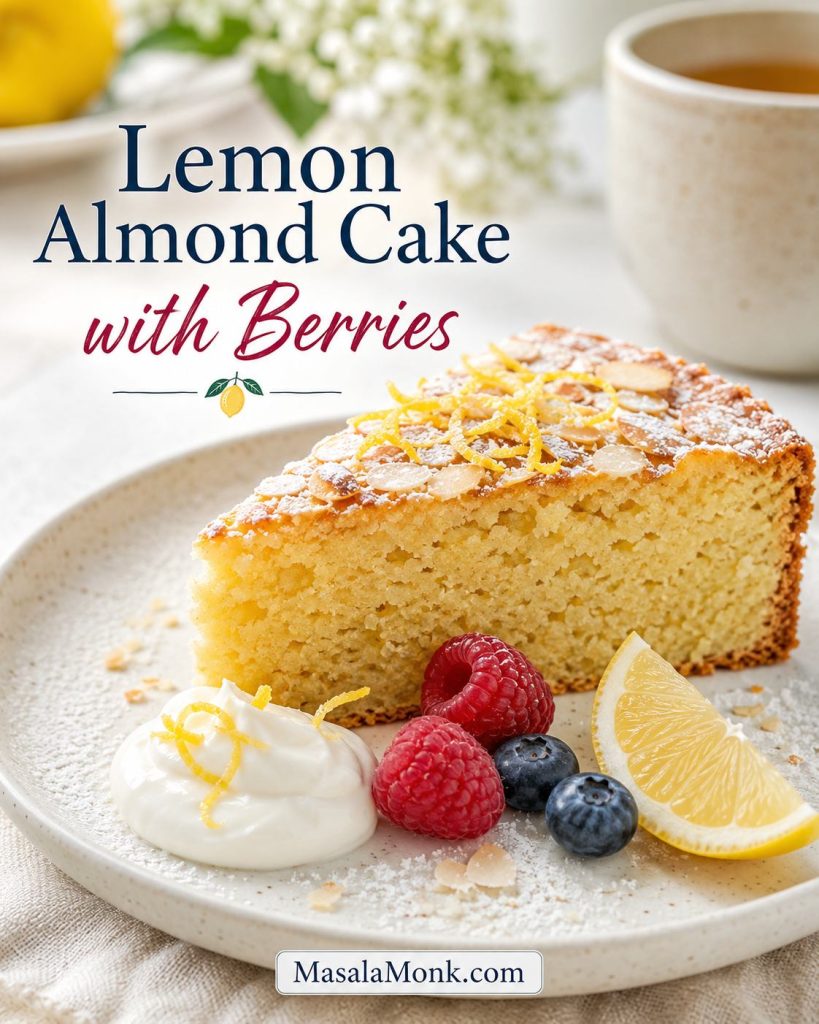
| Lemon almond cake | Use 1 tablespoon lemon zest. Optional glaze: 60 g powdered sugar + 1–2 teaspoons lemon juice. | Best first variation because it adds brightness without much moisture. |
| Cardamom almond cake | Add 1/4 teaspoon ground cardamom with the dry ingredients. | Good for a badam-style note; do not overdo it. |
| Raspberry almond cake | Scatter 1/3 cup raspberries over the top before baking. | Too many berries can make the center sink. |
| Cherry almond cake | Use 1/3 cup pitted, halved cherries on top of the batter. | Keep cherries near the top because they release moisture. |
| Chocolate almond cake | Fold in 1/4 cup mini chocolate chips after the egg whites are mostly incorporated. | For a true chocolate cake, use a separate cocoa-based formula. |
| Almond meal cake | Use 150 g almond meal instead of fine almond flour. | Expect a darker, nuttier, more rustic result. |
| Olive oil almond cake | Add 1 tablespoon mild olive oil to the yolk mixture. | Do not add more on the first attempt; ground almonds already contain fat. |
Orange Almond Cake Variation
For orange almond cake, use orange zest instead of lemon zest. A very light glaze can work after cooling, but do not cover the sliced-almond top so heavily that the cake turns sticky.
Lemon Almond Cake with Berries
For lemon almond cake, use lemon zest and keep the serving style bright. Berries and cream make the cake feel fresh without adding extra moisture to the batter itself.
Whole-orange almond cake is different: that style usually uses boiled whole oranges, almond meal, eggs, sugar, and a longer, lower bake. It has a damp, marmalade-like texture and often needs a blender or food processor.
Can This Almond Cake Be Made Eggless?
For this exact cake, eggs are structural. They help the almond flour rise, set, and hold a clean slice, so flax eggs, chia eggs, or only yogurt will not behave like a simple one-for-one swap.
Eggless almond cake usually needs a recipe built differently from the start. It often uses yogurt, all-purpose flour or a gluten-free flour blend, extra leavening, and sometimes milk or oil to help the cake rise, set, and cut cleanly. A 100% almond flour eggless cake is especially difficult because ground almonds do not have enough starch or gluten-like binding on their own.
Honest baking note: if you need an eggless almond cake, use a recipe built for that job. A yogurt-based version with some flour support will usually perform better than removing the eggs from this batter.
Is This a Keto Almond Cake?
This recipe uses almond flour, but it is not a keto cake because it uses regular sugar. Almond flour lowers the wheat-flour load, but sugar still makes this a standard dessert. Sugar also affects browning, moisture, and structure, so a keto version needs its own sweetener formula rather than a direct cup-for-cup swap.
For low-carb baking context, this guide to keto-friendly flours explains how almond flour behaves compared with other low-carb flour options. If blood sugar is a concern, dessert still needs portion awareness; this guide on almond flour and diabetes covers the ingredient side in more detail.
How to Serve Almond Cake
This cake does not need frosting. A light dusting of powdered sugar is enough for a simple tea cake, but you can dress it up depending on the occasion.
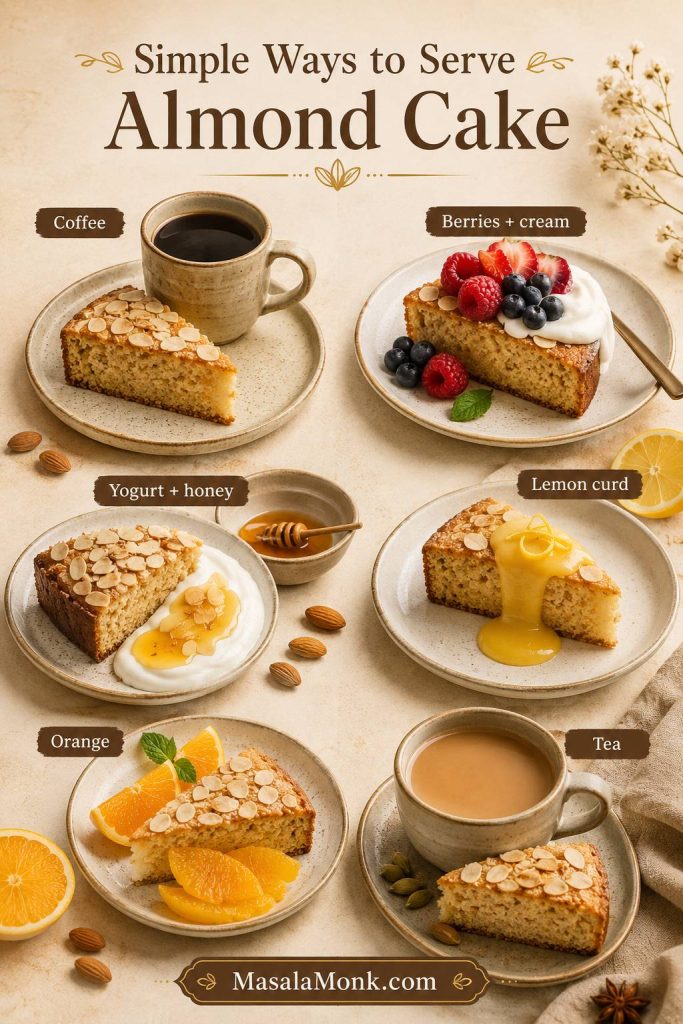
- Serve plain with tea, coffee, or masala chai.
- Add powdered sugar and fresh berries.
- Serve with Greek yogurt or lightly whipped cream.
- Add orange segments and a little honey for an orange almond dessert plate.
- Pair lemon almond cake with lemon curd.
- Serve cardamom almond cake with saffron cream or vanilla ice cream.
- Toast leftover slices lightly and serve with homemade almond milk or coffee.
Because the middle is already rich and tender, keep toppings light. A little cream, fruit, citrus, or honey works better than heavy frosting and keeps the toasted almond flavor in front. Choose lemon with berries and cream for a brighter tea-cake finish; choose orange with honey or yogurt for a warmer dessert plate.
Choosing between lemon and orange? The variation table gives the easiest flavor adjustments.
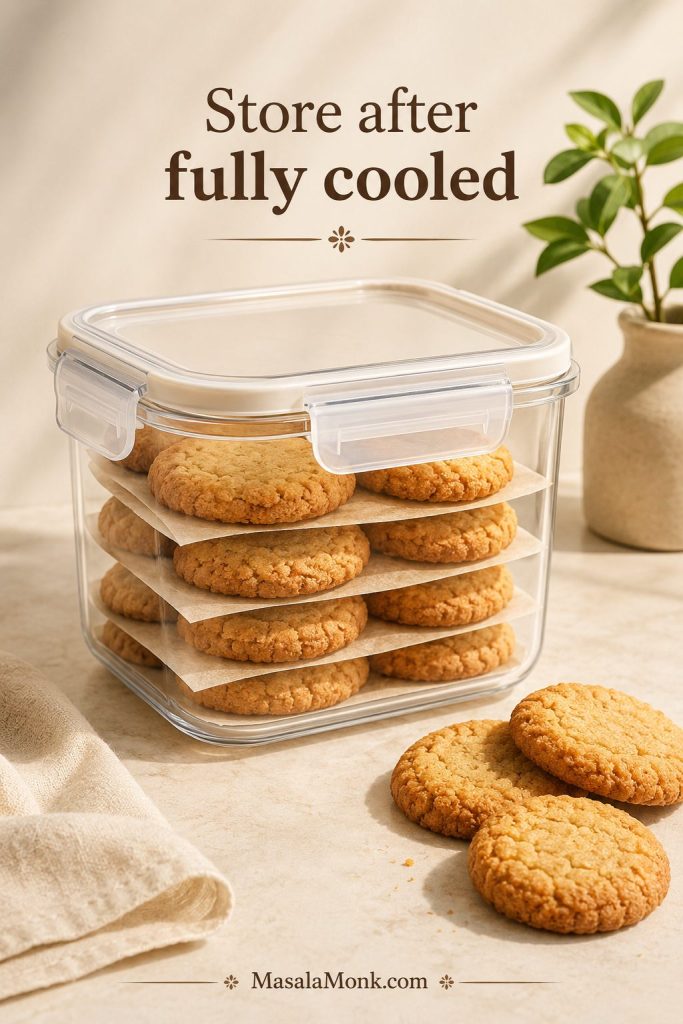
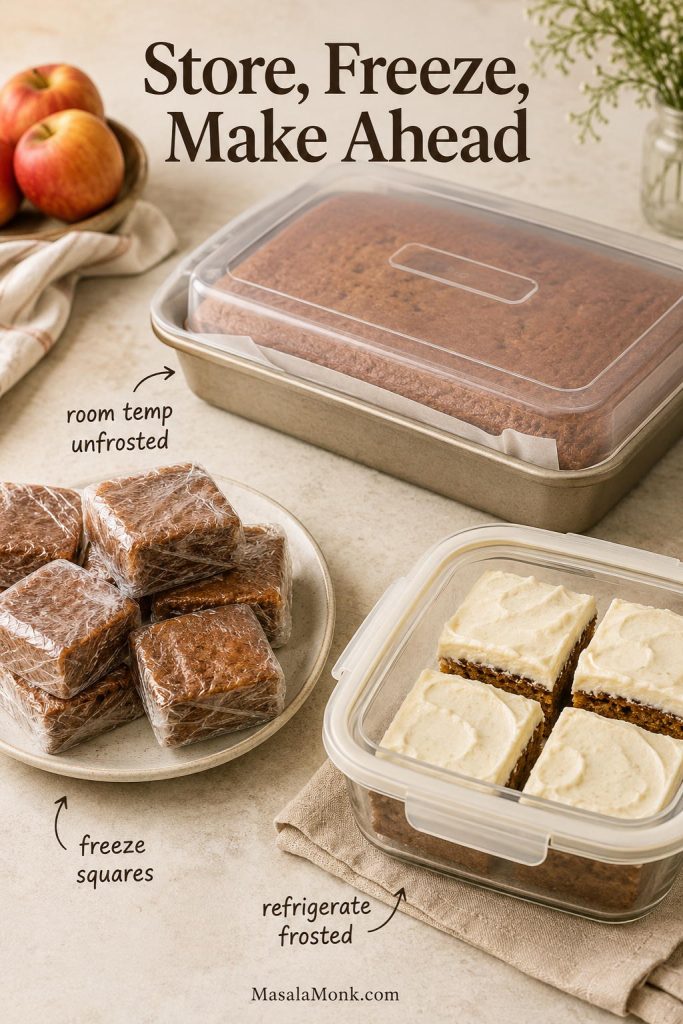
How to Store Almond Cake
Almond cake keeps well because ground almonds naturally hold moisture. In fact, the cake often tastes better after a few hours of resting because the texture settles and the flavor becomes rounder.
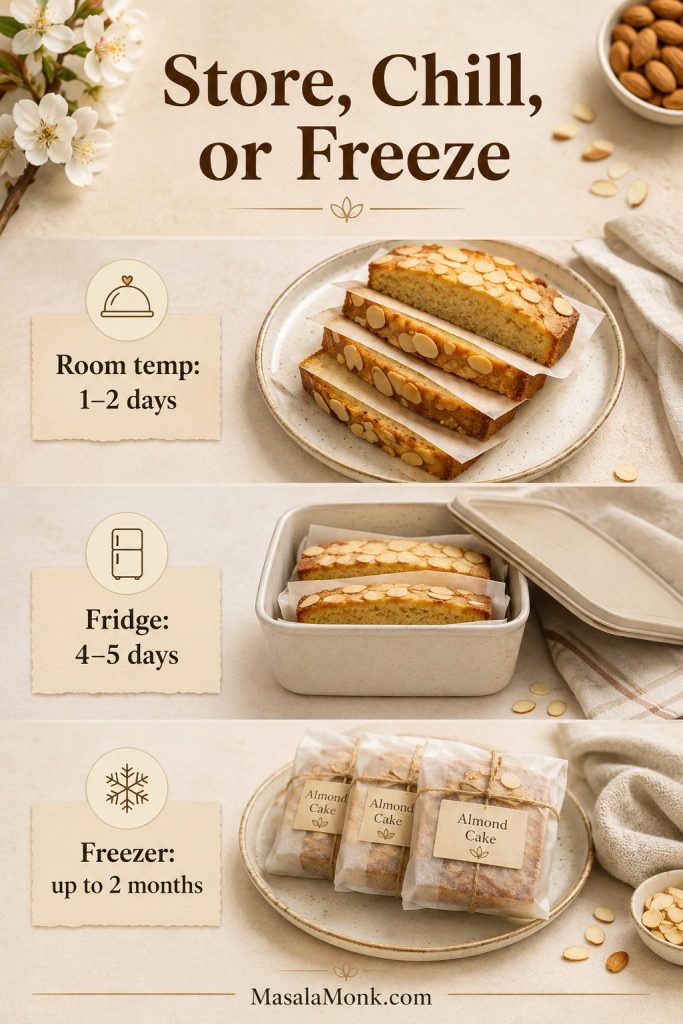
- Room temperature: store in an airtight container for 1–2 days.
- Fridge: store for 4–5 days. Bring slices to room temperature before serving.
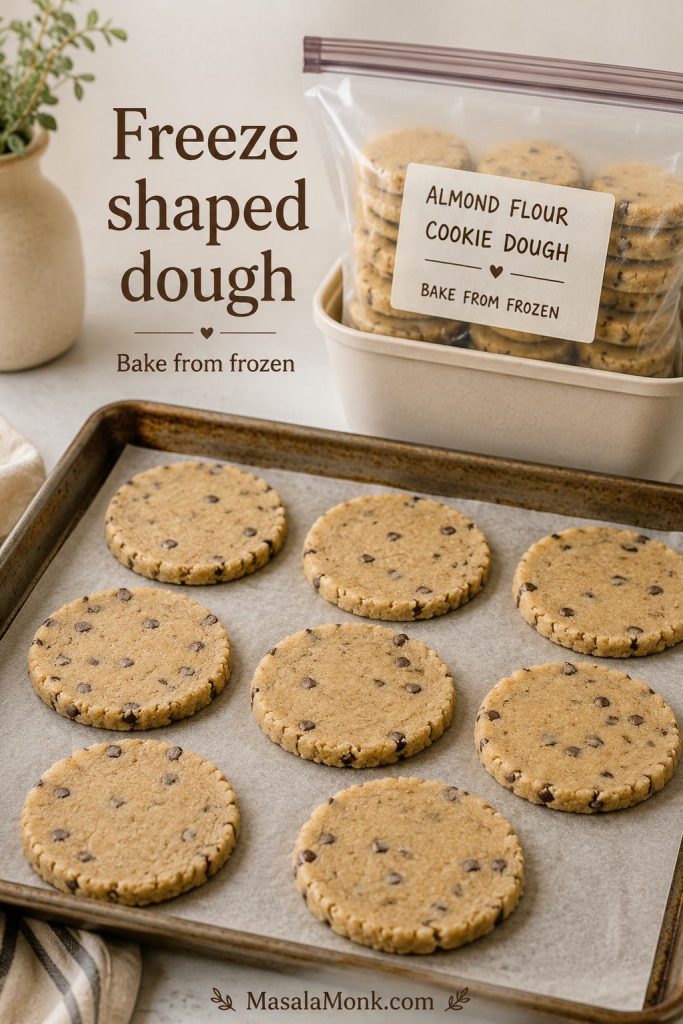
- Freezer: freeze slices for up to 2 months. Place parchment between slices so they do not stick together.
- Make-ahead: bake the cake one day ahead, cool completely, wrap well, and dust with powdered sugar just before serving.
If the cake has been refrigerated, let it sit at room temperature for 20–30 minutes before serving. Cold almond cake can taste firmer and less fragrant than a room-temperature slice.
If a stored slice tastes dry, the troubleshooting guide has quick serving fixes.
Almond Cake Troubleshooting
Most almond cake problems come from too much almond flour, an underbaked center, or cutting the cake before the middle has settled. If you are still mixing, check the step-by-step cues; if the cake is already in the oven, go straight to doneness.
Fix-now mindset: if the cake is already baked, cool it fully, dust with powdered sugar, serve with yogurt or cream, or cut smaller slices. For the next bake, focus on flour weight, egg whites, pan size, oven heat, and cooling time.
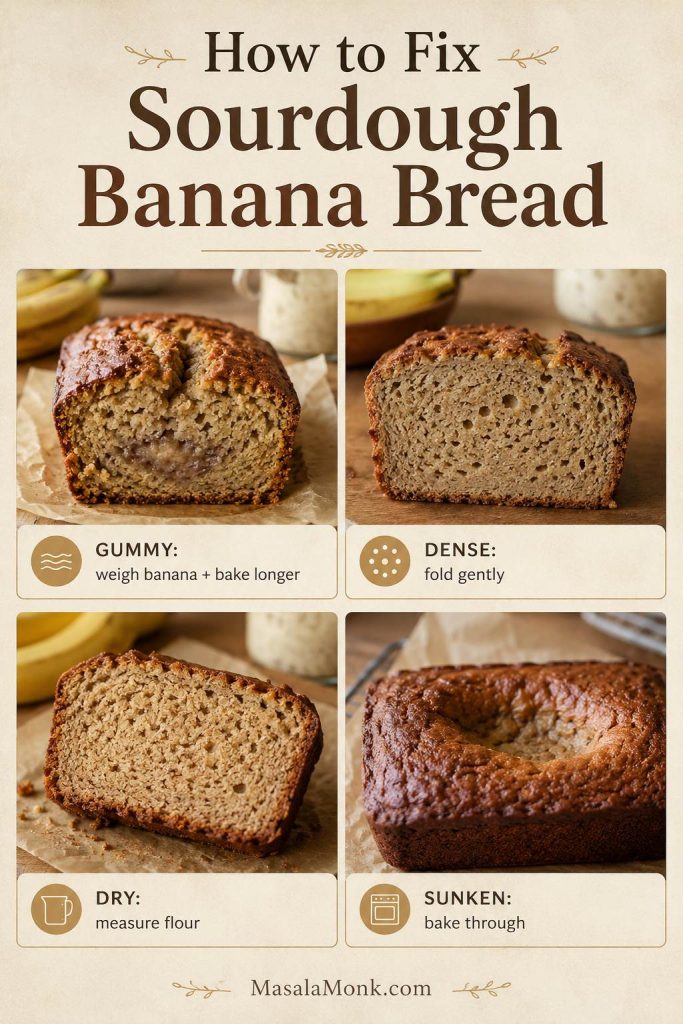
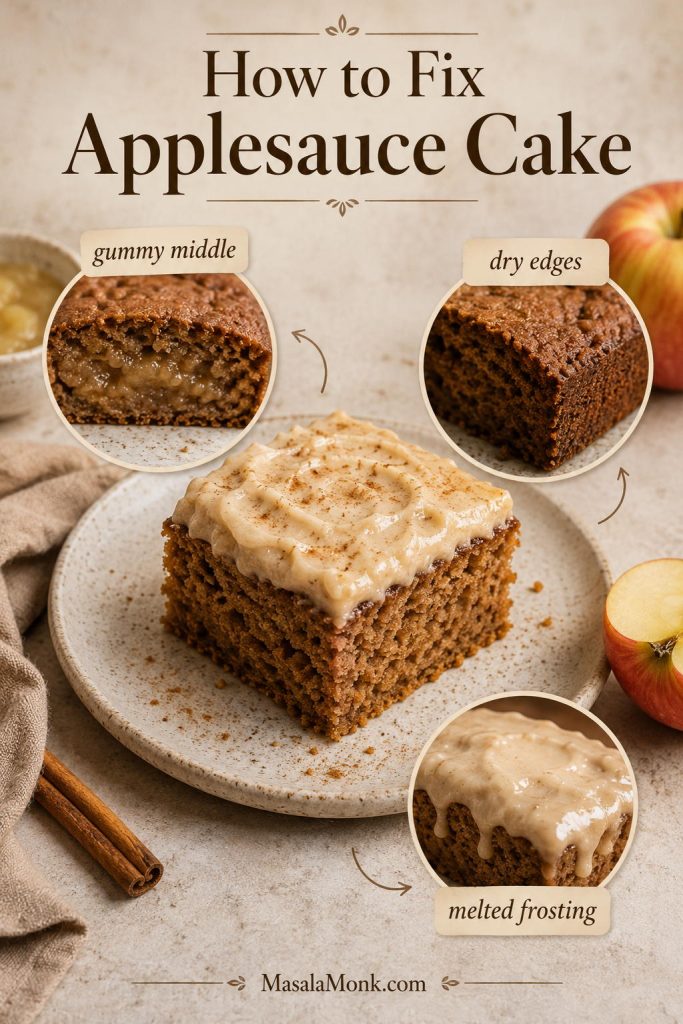
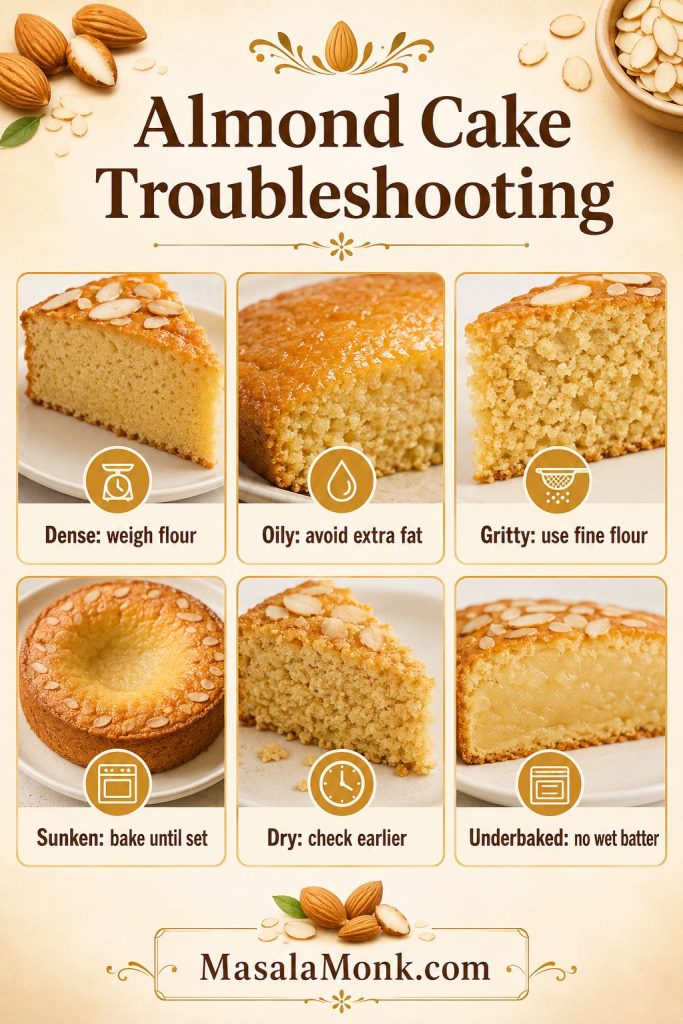
Texture Problems: Dense, Oily, Gritty, or Dry Almond Cake
| Problem | Likely reason | Fix now | Fix next time |
|---|---|---|---|
| Cake is dense | Too much almond flour, deflated whites, or overmixed batter. | Serve thin slices with cream, yogurt, or berries. | Weigh the flour, whip whites to soft peaks, and fold gently. |
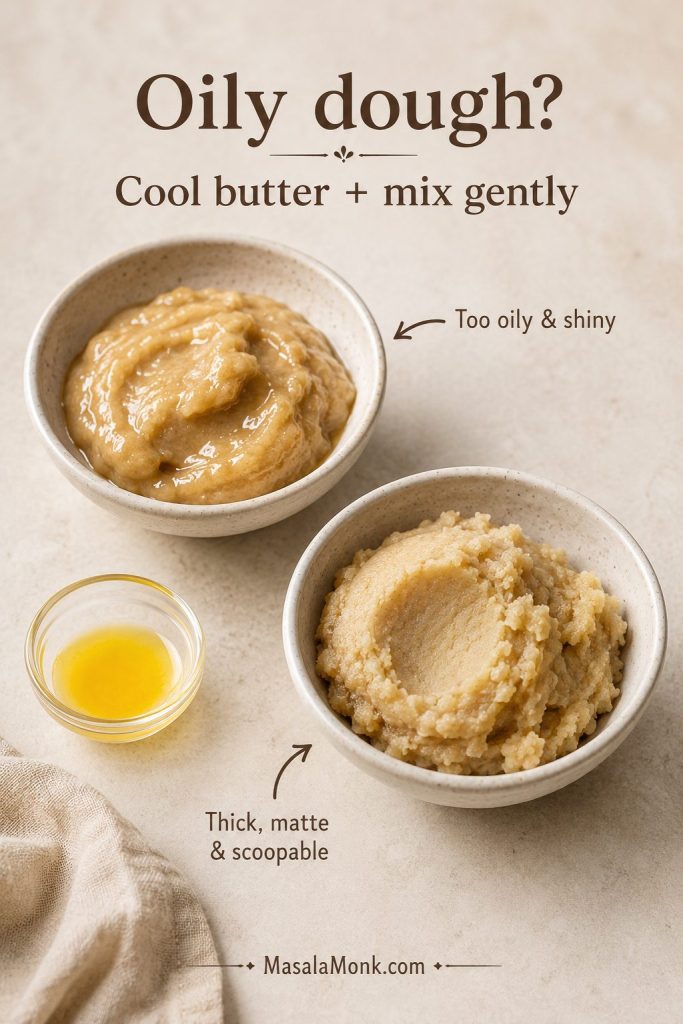
| Cake is oily | Coarse/oily almond flour, packed flour, or too much added fat. | Chill briefly and serve small slices. | Use fresh fine almond flour and avoid extra oil in the base recipe. |
| Cake is gritty | Coarse almond meal or clumpy almond powder. | Serve with whipped cream or yogurt to soften the bite. | Use fine blanched almond flour or sift almond powder before mixing. |
| Cake is dry | Overbaked, too wide a pan, or fan oven too hot. | Serve with yogurt, cream, honey, or fruit. | Check earlier, use an 8-inch pan, and reduce fan oven temperature. |
| Cake smells eggy | Slightly underbaked, weak flavor balance, or served too warm. | Cool fully and serve with citrus or cream. | Bake fully, use zest and vanilla, and cool before serving. |
| Cake tastes bitter | Too much almond extract, citrus pith, old almond flour, or burnt sliced almonds. | Serve with sweetened cream or powdered sugar. | Use only 1/4 teaspoon almond extract, zest lightly, and tent the top if needed. |
Baking and Cooling Problems: Sunken, Raw, Cracked, or Stuck Cake
| Problem | Likely reason | Fix now | Fix next time |
|---|---|---|---|
| Center sank | Underbaked center, early oven opening, or overmixed batter. | Dust with powdered sugar or cover with berries. | Bake until the middle is set and avoid opening the oven too soon. |
| Edges browned but center stayed raw | Pan too thin, oven too hot, or cake baked too high in the oven. | Return to oven loosely covered with foil if still very wet. | Use a sturdy pan, bake on the middle rack, and tent with foil if needed. |
| Almond slices burned | Oven runs hot or cake was baked too high. | Brush off the darkest almonds before serving. | Bake on the middle rack and tent once the top is golden. |
| Top cracked | Oven heat was strong or batter rose quickly. | Dust with powdered sugar; a small crack is normal. | Use the correct temperature and avoid overbeating the whites. |
| Cake is too flat | Wide pan, deflated whites, or old baking powder. | Serve as a thin tea cake. | Use an 8-inch pan, fresh baking powder, and fold gently. |
| Cake stuck to the pan | No parchment or cake was removed too hot. | Serve rustic pieces with cream or fruit. | Line the base with parchment and cool 15 minutes before removing. |
| Bottom feels wet | Underbaked, cooled too long in the pan, or stored before fully cool. | Let slices air out briefly before serving. | Bake until set, cool 15 minutes in pan, then move to a wire rack. |
FAQs About Almond Cake
Is almond cake the same as almond flour cake?
Often, yes. In this recipe, almond cake means a cake made mainly with almond flour instead of wheat flour. Some bakery-style almond cakes use wheat flour and almond extract, so they have a different texture.
Almond meal instead of almond flour: what changes?
Use the same weight of almond meal, but expect a darker, nuttier, more rustic cake. Fine blanched almond flour gives the most delicate result.
Is almond powder the same as almond flour?
Sometimes. Plain finely ground almonds can work. Sweetened badam drink mix, malted almond powder, or milk-powder blends should not be used for this cake.
Is this almond cake gluten-free?
It is naturally gluten-free if every ingredient is gluten-free. Check baking powder, extracts, toppings, and cross-contact if you are baking for someone with strict gluten-free needs. The Celiac Disease Foundation’s gluten-free foods guide is a helpful reference.
Why did my almond cake sink in the middle?
The center was likely underbaked, the oven was opened too early, or the egg whites deflated during mixing. Bake until the middle feels set and the toothpick shows moist crumbs, not wet batter.
Why is my almond cake oily?
Almond flour contains natural fat, so the cake can feel oily if the flour is packed, the almond meal is coarse, or extra fat is added. Use fresh fine almond flour, avoid extra oil in the base recipe, and measure by weight when possible.
Why eggs matter in this almond flour cake
Eggs are doing the structure work here. They help the almond flour batter lift, set, and hold a clean slice. That is why a flax, chia, or yogurt swap will not behave the same way.
How to turn this into orange almond cake
Use orange zest instead of lemon zest for a simple orange almond cake. You can also drizzle the cooled cake with a light orange glaze. A whole-orange almond cake is a different recipe with a longer bake time.
Best pan size if you do not have an 8-inch pan
A 9-inch pan works, but the cake will be thinner and bake faster. Start checking around 23 minutes and remove it when the center is set.
Freezing almond cake without drying it out
Freeze the cake only after it has cooled completely. Slice it first, place parchment between the slices, and store airtight for up to 2 months.
Final Notes
Once the cake has cooled, the reward is in its simplicity: a golden almond top, a clean slice, and a citrus-almond flavor that works with coffee, berries, cream, or nothing at all. It does not need frosting or complicated decoration to feel finished.
Give the batter a light hand, give the cake enough time to settle, and the result is a tender almond flour cake that feels special without trying too hard.