You know the moment: you’re halfway through a cookie dough, you reach for the egg carton, and it’s empty. Alternatively, you’re baking for someone who avoids eggs—whether for vegan eating, allergies, or simply preference—and you want a solution that doesn’t feel like a compromise. That’s exactly where a flax egg comes in.
Once you learn how to make a flax egg, you’ll have a reliable, pantry-friendly answer for a huge range of recipes—especially the kind of everyday bakes most of us actually make: cookies, muffins, quick breads, pancakes, and waffles. Even better, it’s simple enough to memorize, yet flexible enough to scale for two eggs, three eggs, or more.
Ahead, you’ll get the classic flax egg ratio, easy flaxseed meal to egg conversion for bigger batches, and a few small adjustments that make the gel set reliably in real-world baking. You’ll also see what to use when you need a substitute for flax egg, plus when a different egg replacement makes more sense.
How to Make a Flax Egg (Step-by-Step)
At its core, a flax egg is just ground flaxseed mixed with water. After a short rest, it thickens into a gel. That gel helps bind ingredients together, which is why flaxseed is such a popular egg substitute in baking.
How to Make 1 Flax Egg (the classic flax egg recipe)
For one flax egg:
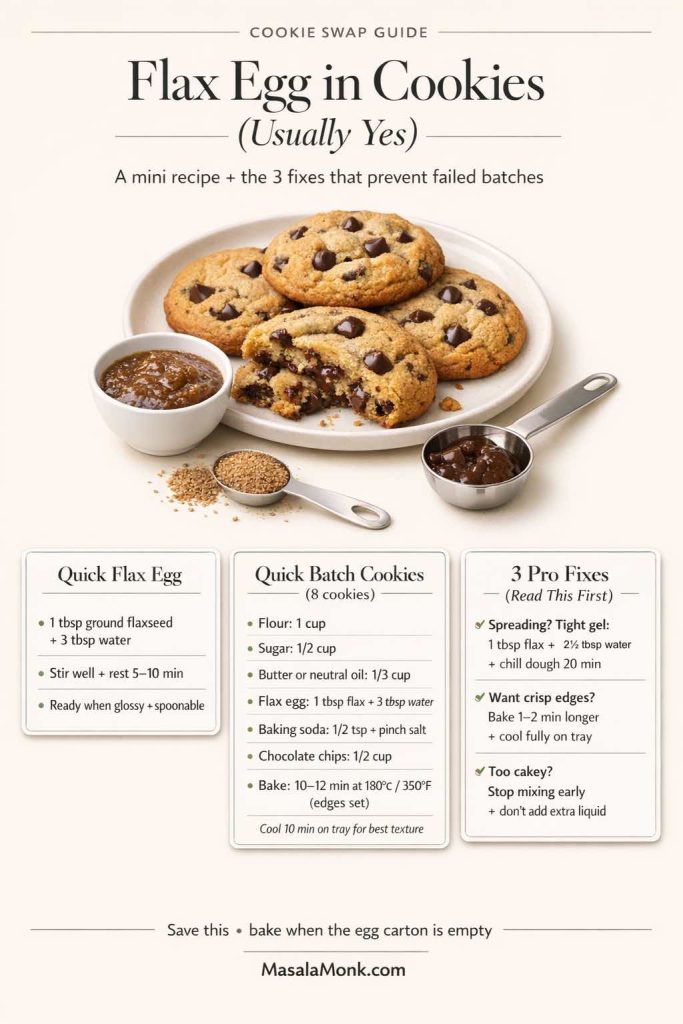
- 1 tablespoon ground flaxseed (flax meal)
- 3 tablespoons water
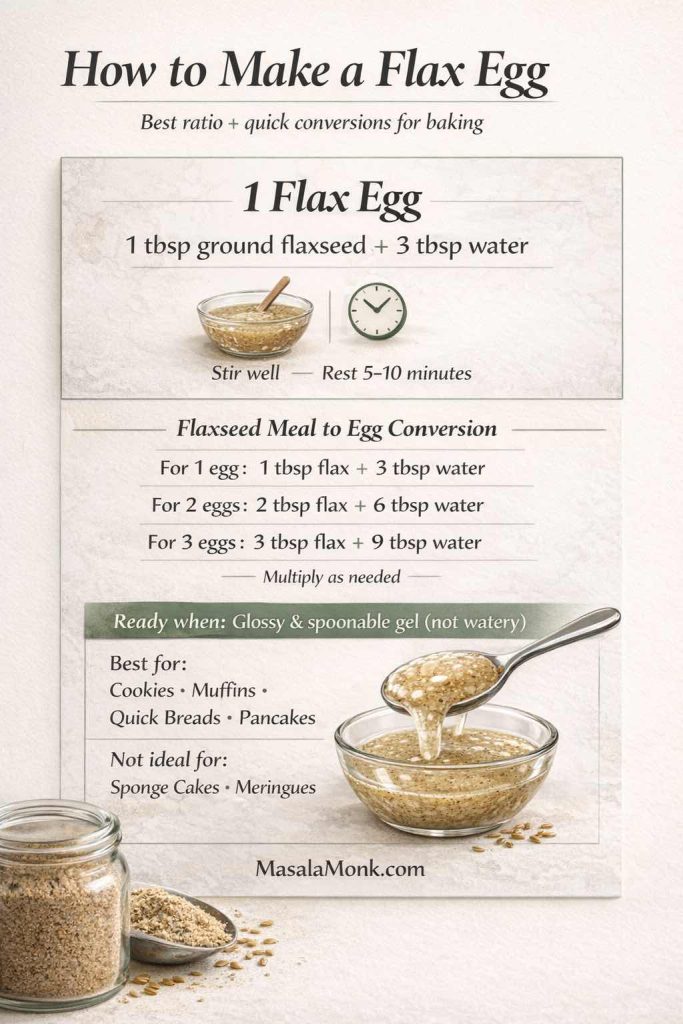
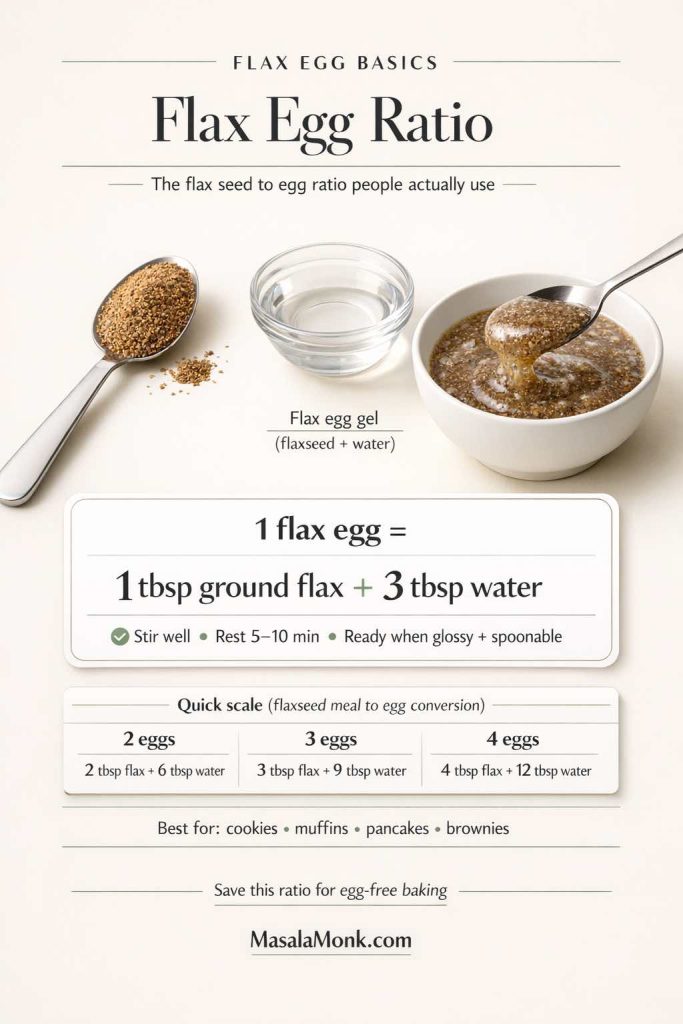
Stir them together until the mixture looks evenly combined. Then, set it aside for about 5–10 minutes. As it sits, it thickens into a gel-like texture. If it still looks watery after 10 minutes, jump to the troubleshooting section—usually it’s a grind or freshness issue, and it’s easy to fix.
The same simple method shows up in everyday baking advice for a reason: it works. If you’d like more practical ways to use ground flax—both as a flaxseed egg substitute and in everyday meals—see Benefits of Flax Seeds and How to Incorporate Them into the Indian Diet.
Now, if you’re thinking, “That’s it?”—yes, that’s basically it. However, the details matter, and those details are what separate “it sort of worked” from “I can swap this confidently.”
How to make a flax egg with ground flax (what actually matters)
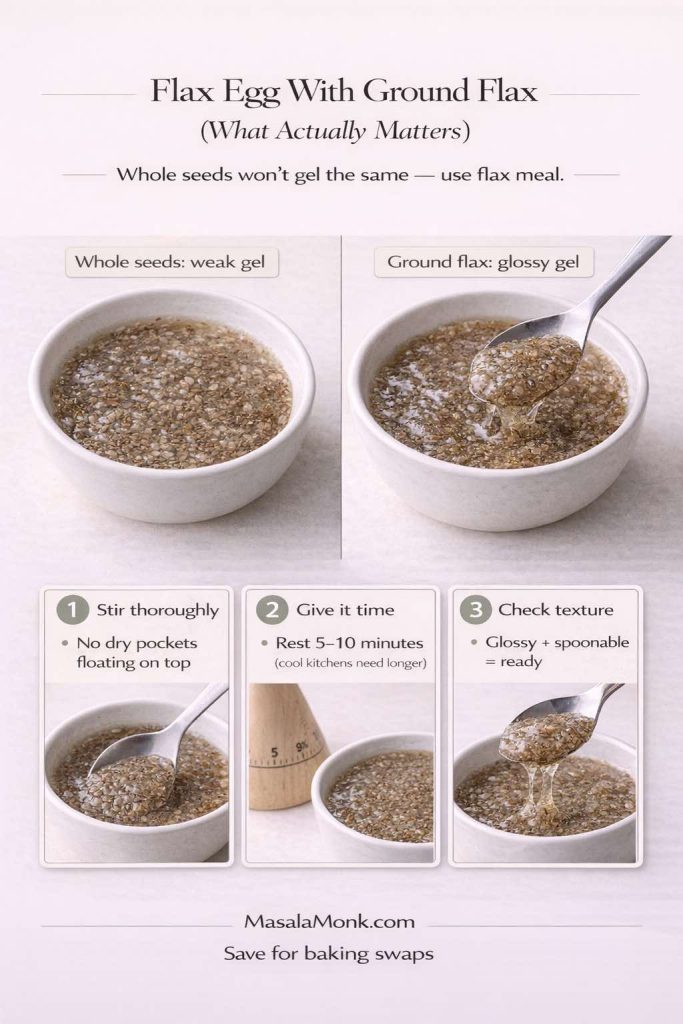
Use ground flaxseed, not whole seeds. Whole flax often stays stubbornly seed-like, even after sitting, and the mixture won’t gel properly. Ground flaxseed (flax meal) hydrates more evenly, which is the whole point.
Ground flax is also the better pick nutritionally and practically, since whole seeds can pass through without breaking down much. Mayo Clinic explains why ground flax is generally preferred in Flaxseed: Is ground better than whole?.
Stir thoroughly. A quick swirl is rarely enough. Instead, stir until you don’t see dry pockets of flax floating on top.
Give it time. Some flax thickens in five minutes. Other batches need closer to ten, particularly if your kitchen is cool.
Check the texture. A ready flax egg should look glossy and slightly thick—somewhere between loose gel and a lightly thickened sauce. If it’s still watery, a couple quick tweaks usually thicken it up (see troubleshooting below).
Is a flax egg the right substitute for your recipe?
Now that you’ve got the flax egg ratio down, the next question is the one that actually saves batches: will it work in this recipe? The simplest way to decide is to think about what the egg was doing in the first place.
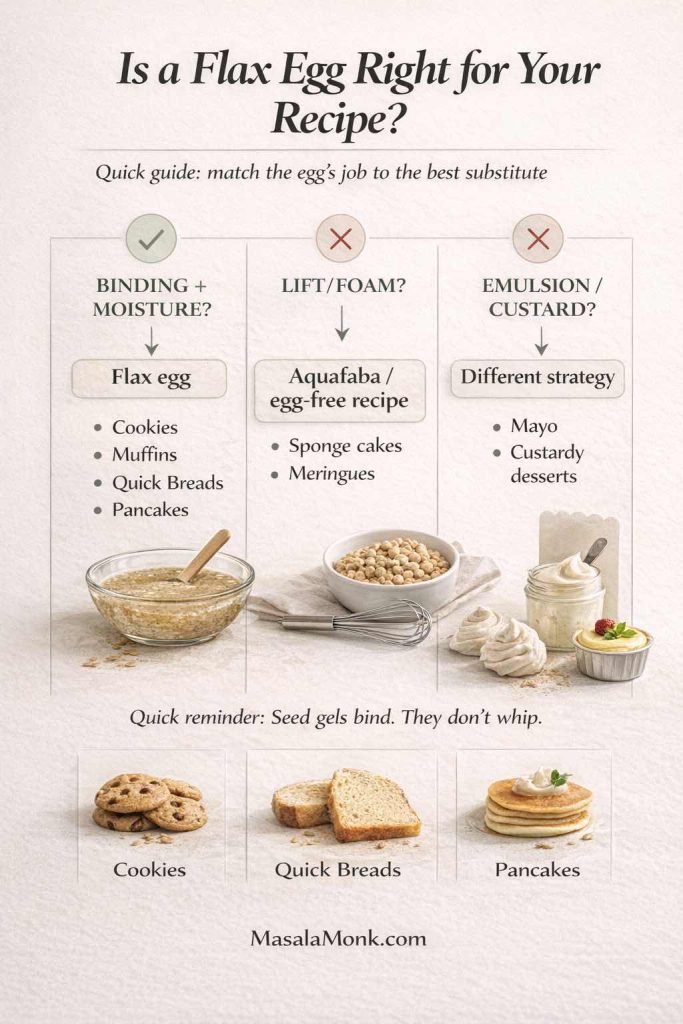
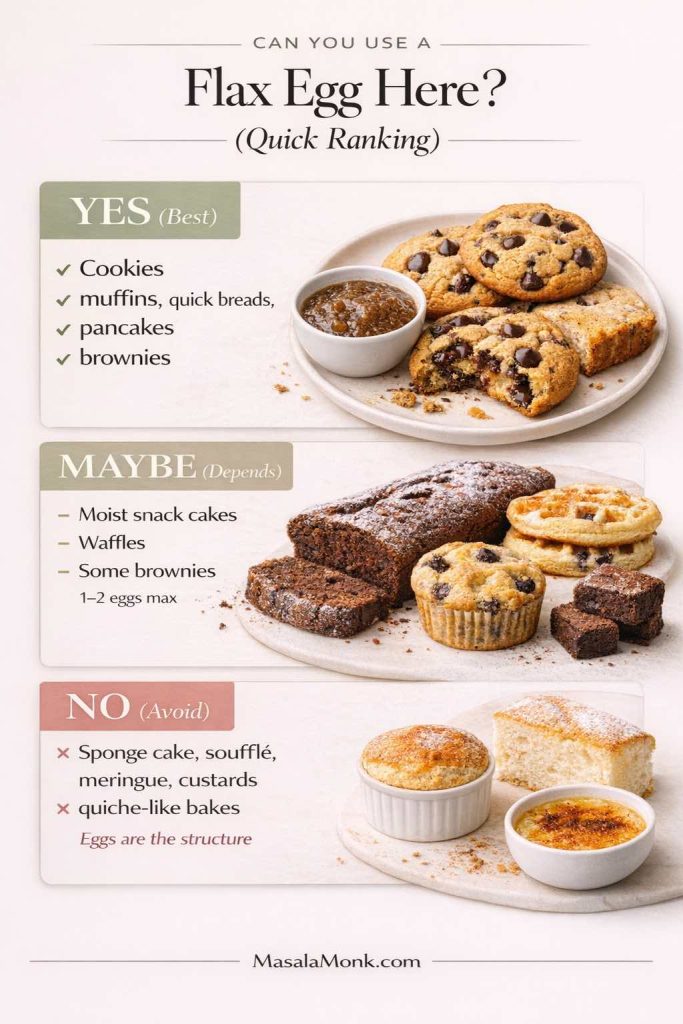
- Use a flax egg when the egg is mostly a binder. This is where flax shines: cookies, brownies, muffins, quick breads, pancakes, and waffles—recipes where you want the batter to hold together and stay pleasantly moist.
- Skip flax when the egg is doing the heavy lifting for lift. If the recipe relies on whipped eggs or airy structure—think sponge cakes, angel-food style bakes, meringues, or anything “foam-based”—a seed gel won’t recreate that height.
- Be cautious when the recipe calls for several eggs. Replacing one egg is usually straightforward. Replacing two can still work in sturdier bakes. However, once you’re replacing three or more, the texture can drift toward heavier and denser unless the recipe was designed for egg-free baking.
- When in doubt, pick the more forgiving path. If you’re experimenting, start with cookie doughs and quick breads first. They’re easier to read and adjust, so you learn the “flax egg feel” without risking a fragile cake.
Also Read: Croquettes Recipe: One Master Method + 10 Popular Variations
Flax Egg Ratio (and the flax seed to egg ratio people actually use)
“Flax egg ratio” is one of the most common questions for a reason. Everyone wants a clean answer they can plug into any recipe.
So here it is:
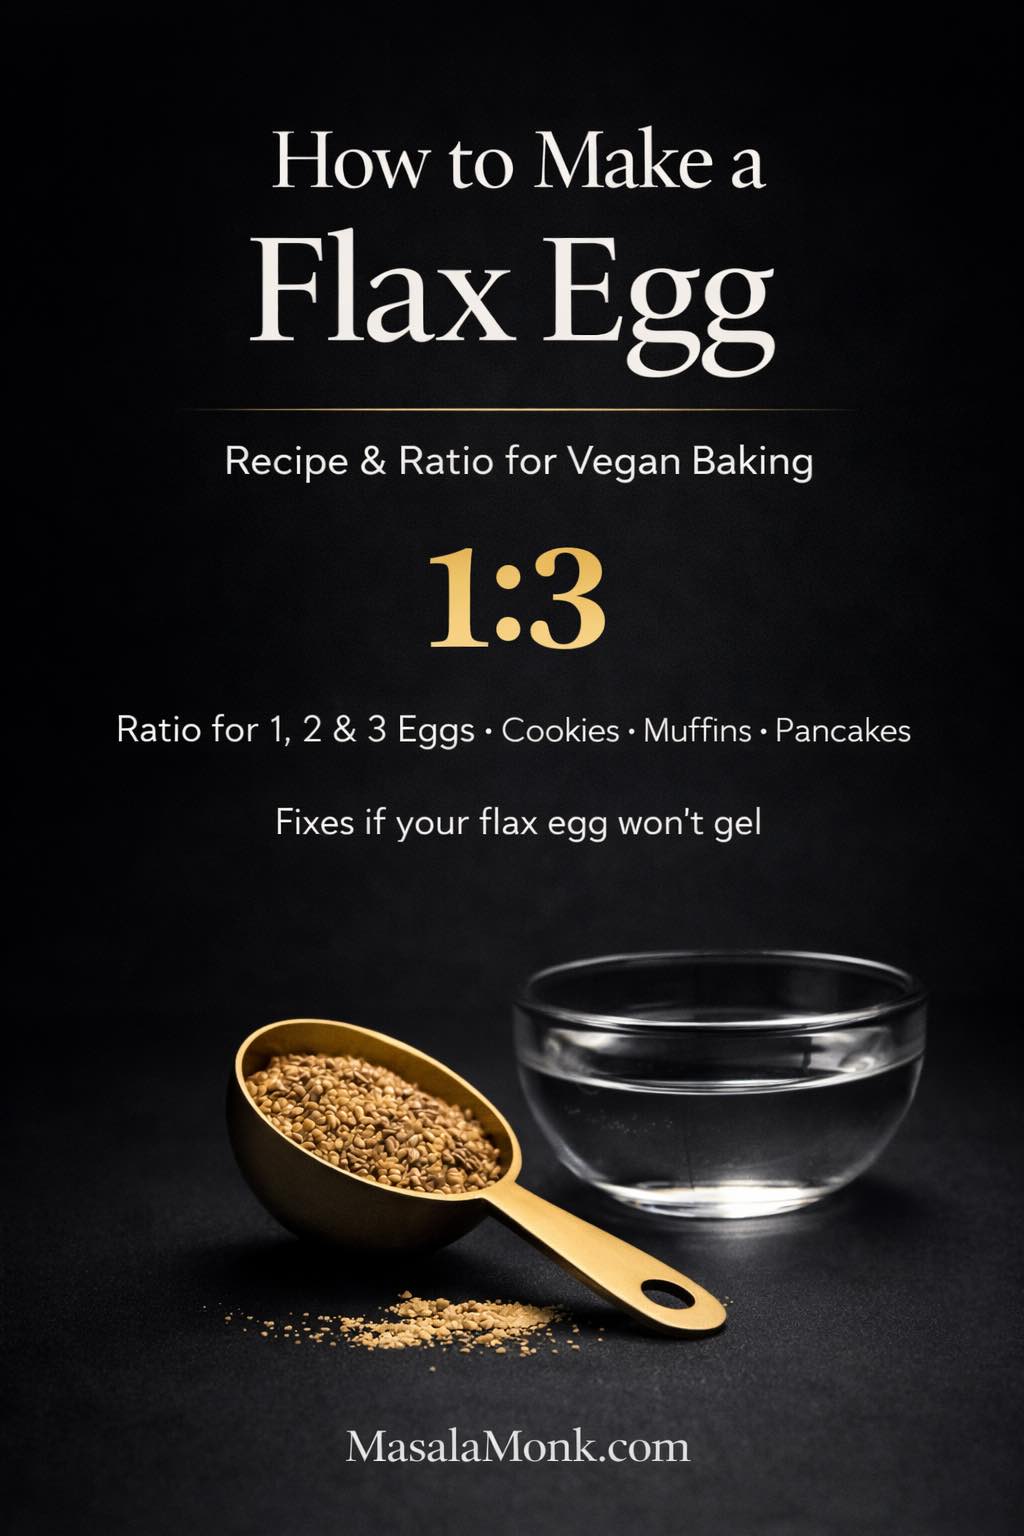
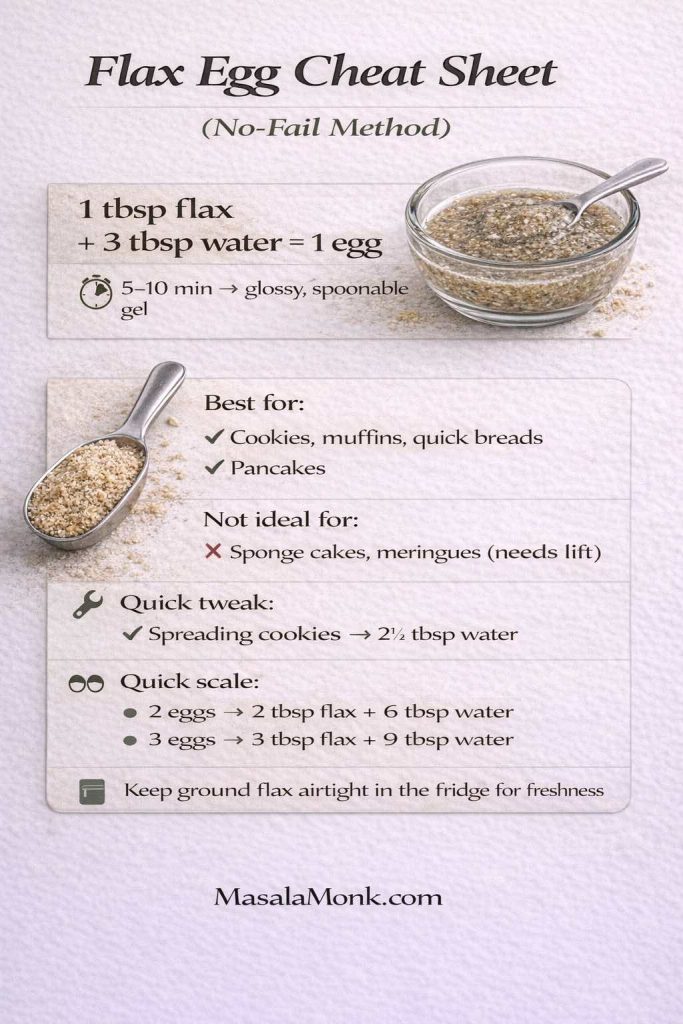
- 1 flax egg = 1 tablespoon ground flaxseed + 3 tablespoons water
That’s the standard flax seed egg substitute ratio you’ll see repeated across many reputable sources. Healthline, for example, describes using 1 tablespoon ground flaxseed (or chia) with 3 tablespoons water as a replacement for one egg in baking. You can see that ratio in the ground flax/chia section of 13 Effective Substitutes for Eggs.
Minimalist Baker also teaches the same basic approach for how to make flax eggs for baking—mix, rest, then use in place of one egg—while noting that it isn’t a perfect 1:1 match for every recipe. That nuance is important, and it’s explained well in this post here.
Even so, baking isn’t only about ratios; it’s also about what the recipe needs from the egg. That’s why, beyond the classic ratio, it helps to think about how “tight” or “loose” your flax egg should be.
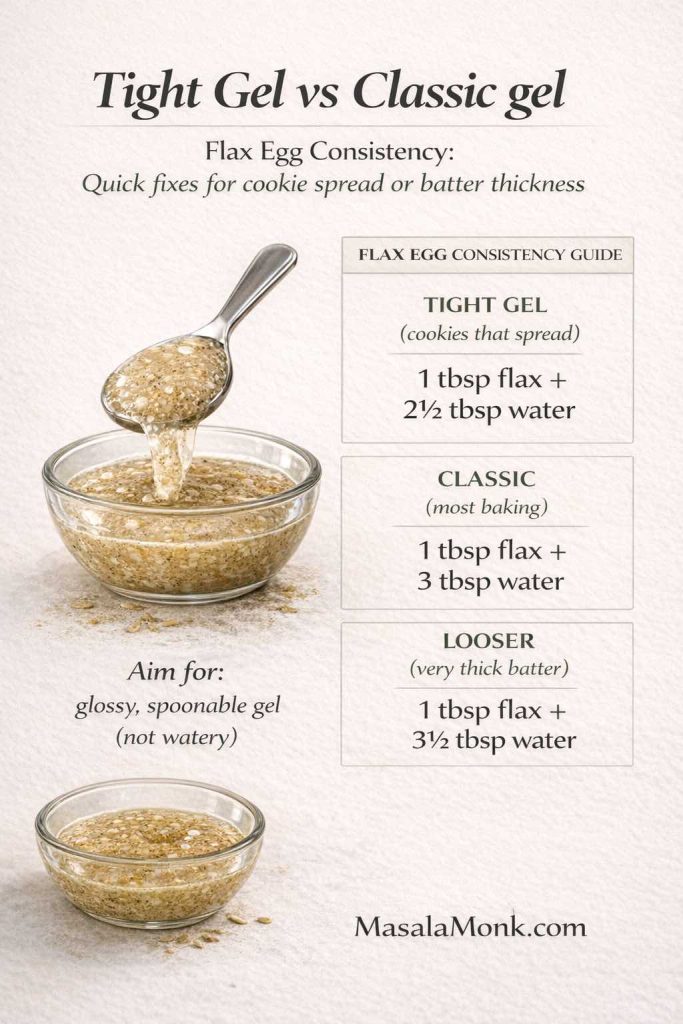
A useful tweak: the “tight gel” vs “looser gel” approach
Most of the time, 1:3 works perfectly. Still, if you’re making something that already spreads easily—certain cookies, for example—you may prefer a slightly tighter gel. Meanwhile, for muffins and quick breads where moisture is welcome, the classic ratio is ideal.
You don’t need to overcomplicate this. Just remember the direction:
- For spread-prone cookies, use a slightly tighter gel: 1 tablespoon flax meal + 2½ tablespoons water.
- For muffins and quick breads, stick with the classic: 1 tablespoon flax meal + 3 tablespoons water.
- If your batter is unusually thick, loosen it gently: 1 tablespoon flax meal + 3½ tablespoons water.
That small shift is often enough to reduce cookie spread or keep a loaf from feeling heavy. No matter which version you choose, the goal is the same: a cohesive, spoonable gel—never watery.
Also Read: Ravioli Recipe Reinvented: 5 Indian-Inspired Twists on the Italian Classic
Flaxseed Meal to Egg Conversion (1 egg, 2 eggs, 3 eggs)
Once you’re comfortable with one flax egg, scaling becomes easy. Because it’s linear, you can multiply it without a calculator.
Flaxseed meal to egg conversion: quick scale
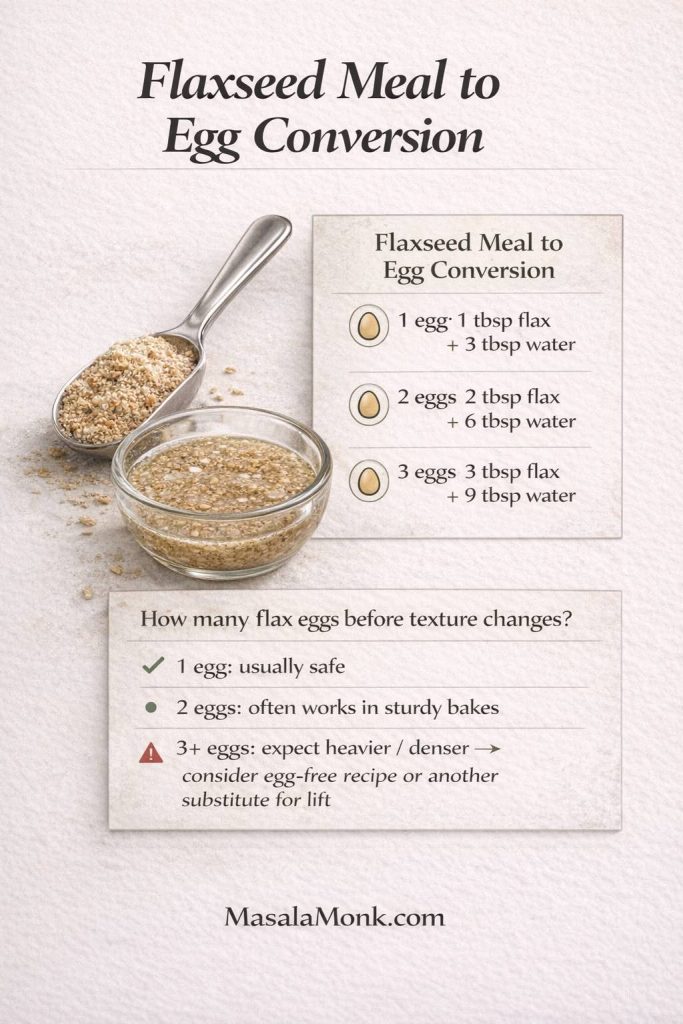
- For 1 egg: 1 tablespoon flax meal + 3 tablespoons water
- For 2 eggs: 2 tablespoons flax meal + 6 tablespoons water
- For 3 eggs: 3 tablespoons flax meal + 9 tablespoons water
This is the flax egg conversion you’ll rely on most.
However, there’s a practical caution: the more eggs you replace, the more your baked good may drift away from the original texture. King Arthur Baking is direct about this: some egg-heavy recipes simply won’t behave the same with substitutions, and even in everyday bakes, the results depend on what the eggs were doing in the original formula. Their breakdown in Guide for substituting eggs is a helpful reality check.
How many flax eggs can you use before texture changes?
Scaling the flaxseed meal to egg conversion is easy. Still, the results don’t always scale as neatly as the math. The more eggs you replace, the more likely the final texture shifts—especially in recipes where eggs were doing more than just binding.
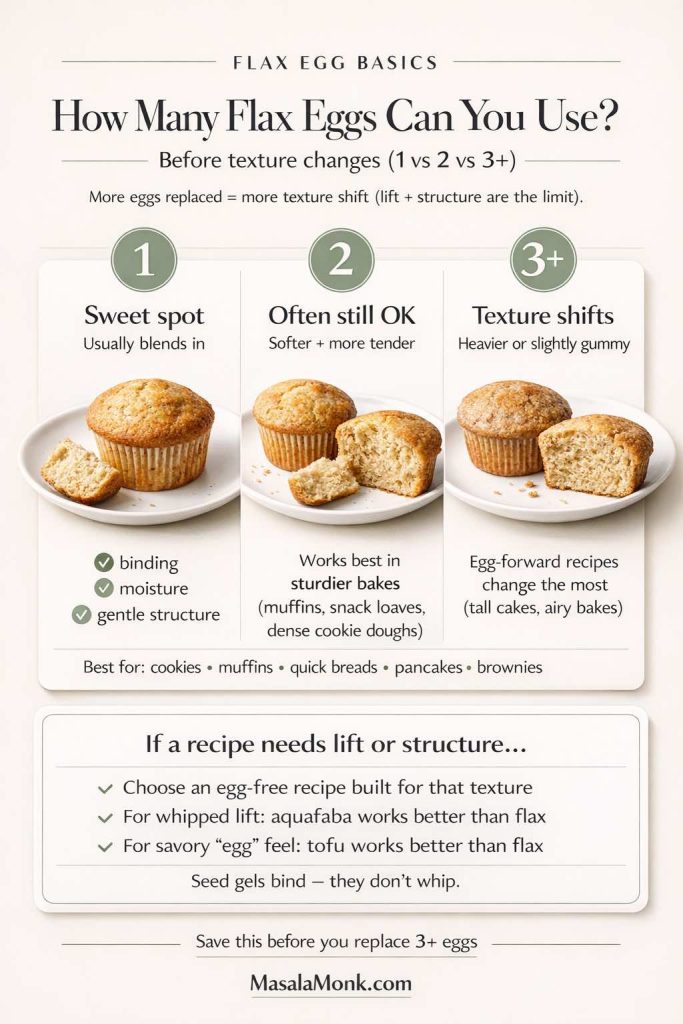
- Replacing 1 egg: This is usually the sweet spot. In cookies, muffins, quick breads, pancakes, and brownies, one flax egg tends to blend in without drama.
- Replacing 2 eggs: Often still successful in sturdier bakes, particularly muffins, snack cakes, and denser cookie doughs. The crumb may be a little more tender and moist, yet it should still feel “right” if the recipe isn’t egg-forward.
- Replacing 3 eggs or more: This is where you’ll notice bigger changes. At that point, bakes can start to feel heavier or slightly gummy, not because flax is “bad,” but because it can’t replicate the lift and structure multiple eggs provide.
If a recipe calls for several eggs and the texture matters—think tall cakes or anything meant to be airy—your best bet is either choosing an egg-free recipe built for that style or switching to a different substitute that matches the job the eggs were doing.
Also Read: Oat Pancakes Recipe (Healthy Oatmeal Pancakes)
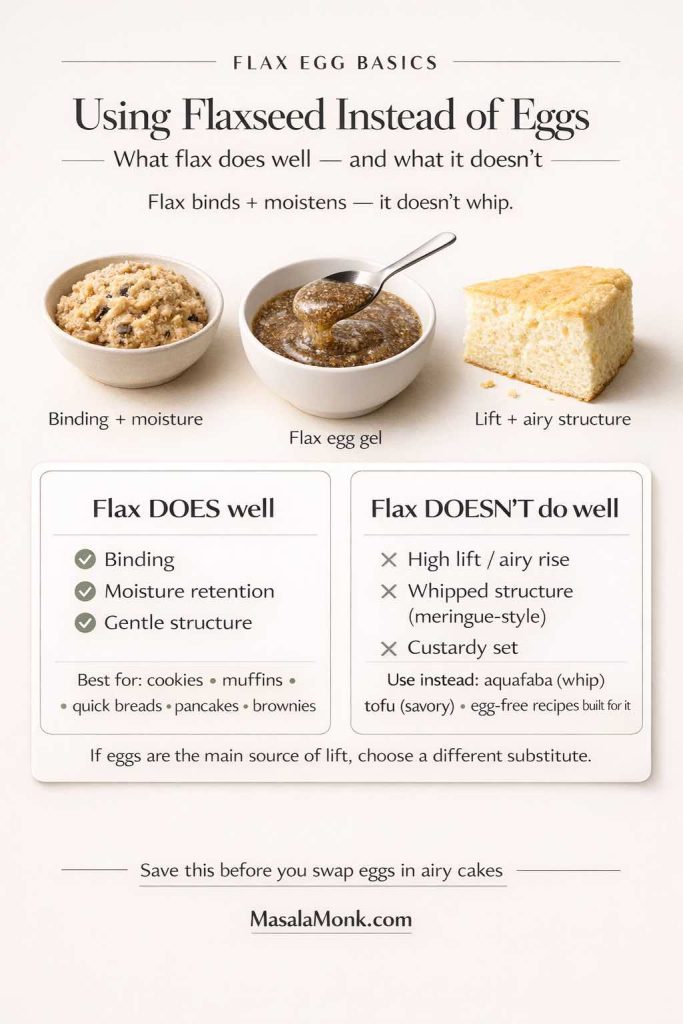
Using Flaxseed Instead of Eggs (what flax does well, and what it doesn’t)
The reason flax works as an egg substitute ground flaxseed method is simple: when hydrated, it becomes gel-like. That gel helps hold ingredients together and keeps moisture in the bake.
Yet eggs are not just “one job.” Eggs can bind, emulsify, add moisture, contribute structure, and help with lift depending on the recipe. Consequently, no single substitute perfectly replaces every egg function in every context. Because of that, the best substitute changes from recipe to recipe. If you enjoy that practical way of thinking, Eater’s guide from vegan pastry chefs explains how to match substitutes to the job eggs were doing.
Now, here’s the practical translation:
- Flax excels at binding and moisture
- Flax is weaker at adding lift and airy structure
So, when you’re looking for a flaxseed egg substitute baking solution, flax is best in recipes where eggs are not the main source of volume.
Also Read: Keto Flour: Guide to Low-Carb Flours That Bakes Like the Real Thing
Baking With Flax Eggs (what works best, and why)
A flax egg can be surprisingly “invisible” in the right recipe. On the other hand, it can be noticeably dense or gummy in the wrong one. Let’s talk about where it usually performs beautifully.
Flax egg for cookies (one of the best use cases)
If you’re specifically wondering about a flax egg for cookies, you’re in luck. Cookies tend to benefit from binding and moisture; they don’t usually require eggs to create high lift.
Serious Eats tested multiple egg substitutes in cookies, muffins, and pancakes and found that flaxseed stood out particularly in cookies, delivering a chewy texture and a result that didn’t taste obviously “substituted.” That outcome is part of the testing roundup in Out of eggs? The best replacement might already be in your pantry.
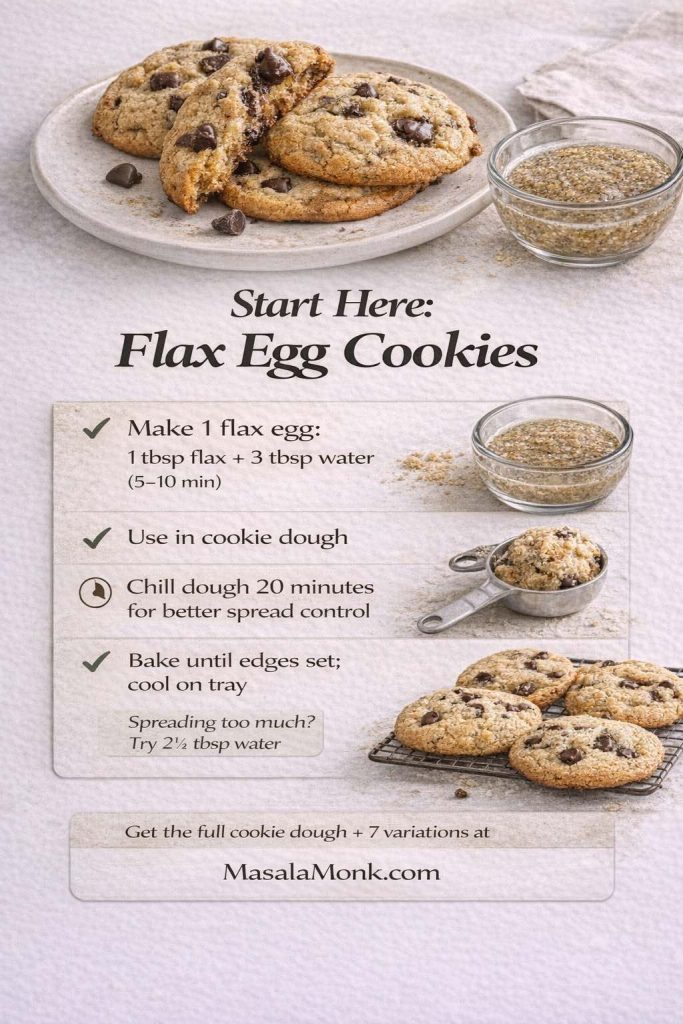
If you want to see flax eggs at their best, start with cookies. In many doughs, the swap gives you a cohesive mix and a pleasantly chewy bite—without making the cookie taste “egg-free.” For a flexible base you can riff on, try Double Chocolate Chip Cookies Recipe – One Dough, 7 Ways and use a flax egg in place of one egg in the base dough.
As you bake cookies with flax eggs, a few patterns tend to show up:
- The texture often leans chewier rather than ultra-crisp
- The dough may feel slightly softer at first
- The cookies can benefit from a brief rest so the flour hydrates
Instead of fighting those traits, work with them. If you want crispness, you can often adjust bake time, sugar ratios, or resting/chilling. Still, the easiest win is choosing cookie styles where chew is the goal.
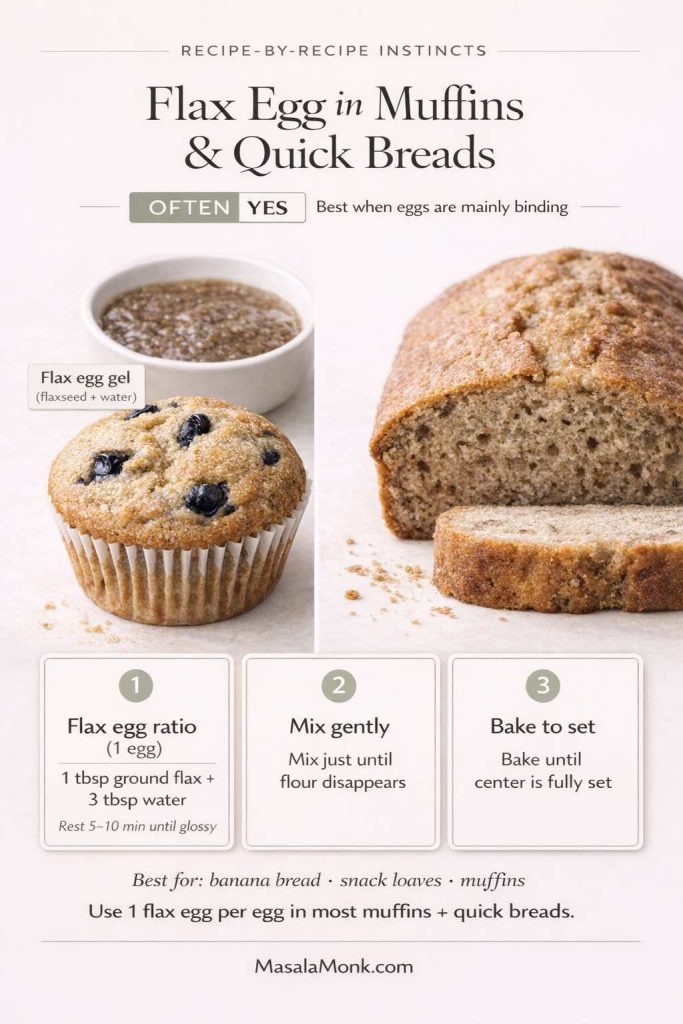
Flax egg for muffins and quick breads (quietly reliable)
Muffins, banana-style quick breads, and snack loaves are where flax eggs often feel effortless. These bakes typically want moisture and cohesion, and flax provides both.
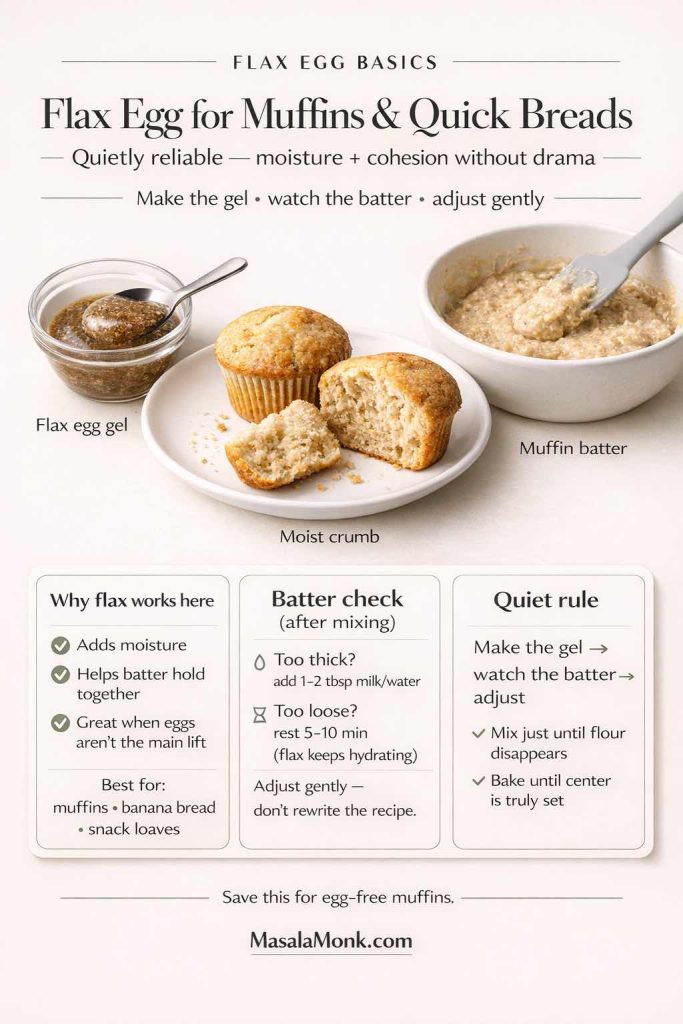
Moreover, quick breads are usually forgiving. If your batter is slightly thicker than expected, you can add a splash of the recipe’s liquid. Conversely, if it’s looser, give it a minute—flax continues to hydrate, and batters often thicken slightly as they sit.
At this point, it’s worth repeating a helpful mindset: don’t treat flax eggs like a lab experiment. Make the gel, watch the batter, then adjust gently.
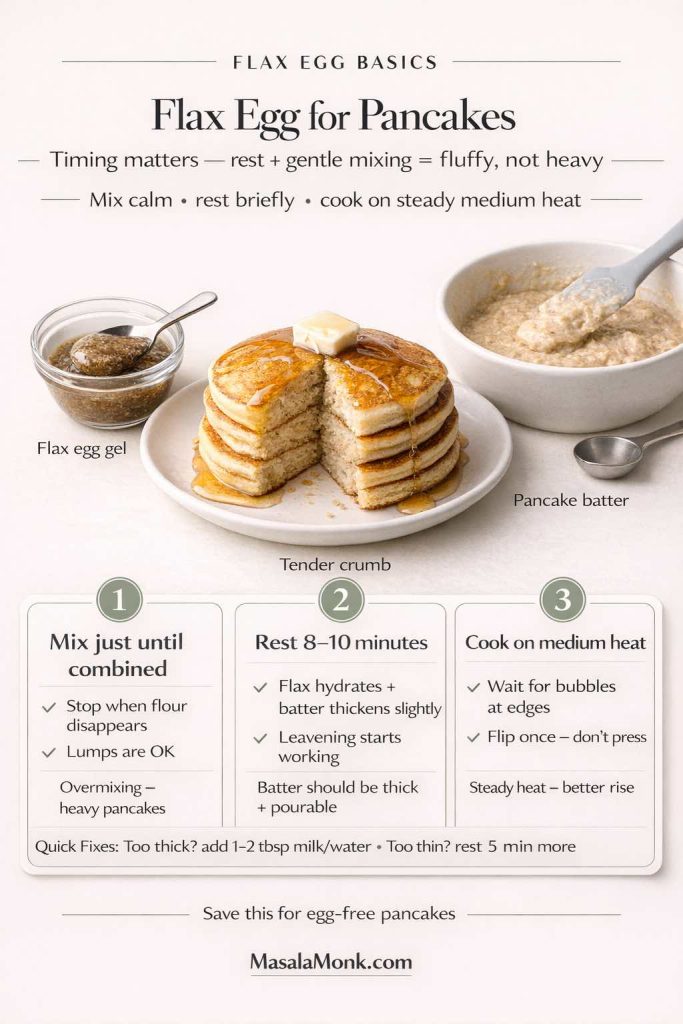
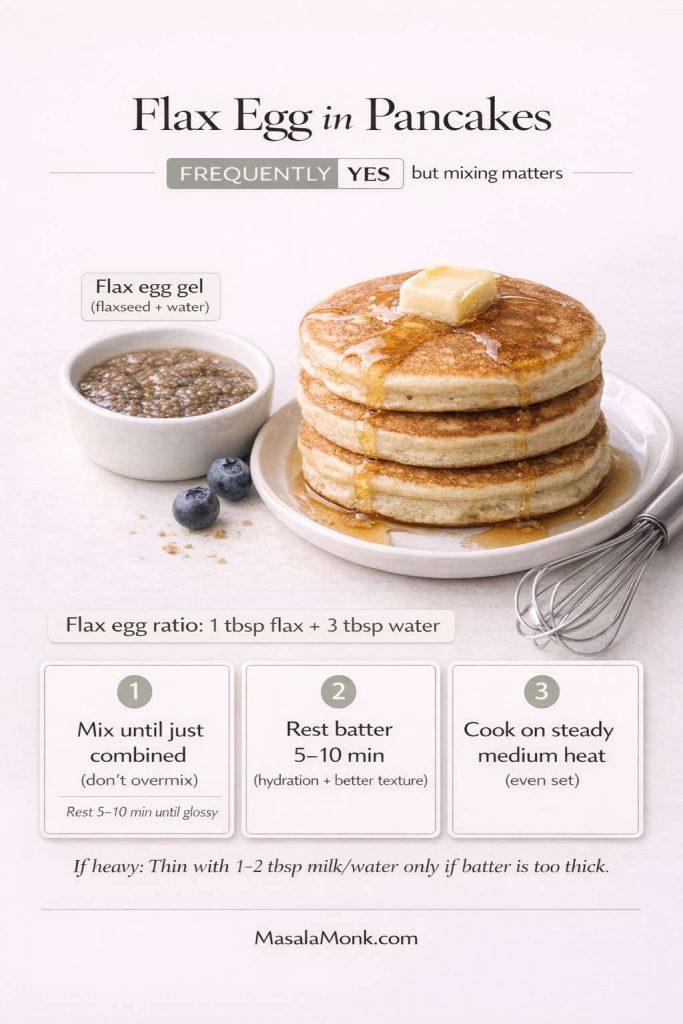
Flax egg for pancakes (and why timing matters)
Pancakes are another common destination for flax eggs. The gel helps bind, while the batter’s chemistry (baking powder or baking soda) still delivers lift. Even so, pancakes can swing from fluffy to dense depending on how they’re mixed and rested. So, if you’re using flaxseed instead of eggs, it helps to keep the batter calm:
- Mix until just combined
- Rest the batter briefly so the flour hydrates
- Cook on a steady, medium heat
Once you’re comfortable swapping eggs in pancakes, it’s worth trying sturdier batters that benefit from extra binding. Millet-based pancakes, for instance, pair well with a flax egg because the gel helps the batter hold together while still cooking up tender. If you’d like a solid recipe to start with, make Healthy Millet Protein Packed Pancakes and replace the egg with a flax egg.
Flax eggs to real eggs (what to expect in texture)
Many people want flax eggs to behave exactly like eggs. Sometimes the match is close. Other times, the difference is obvious. Rather than promising perfection, it’s better to know what you’re trading.
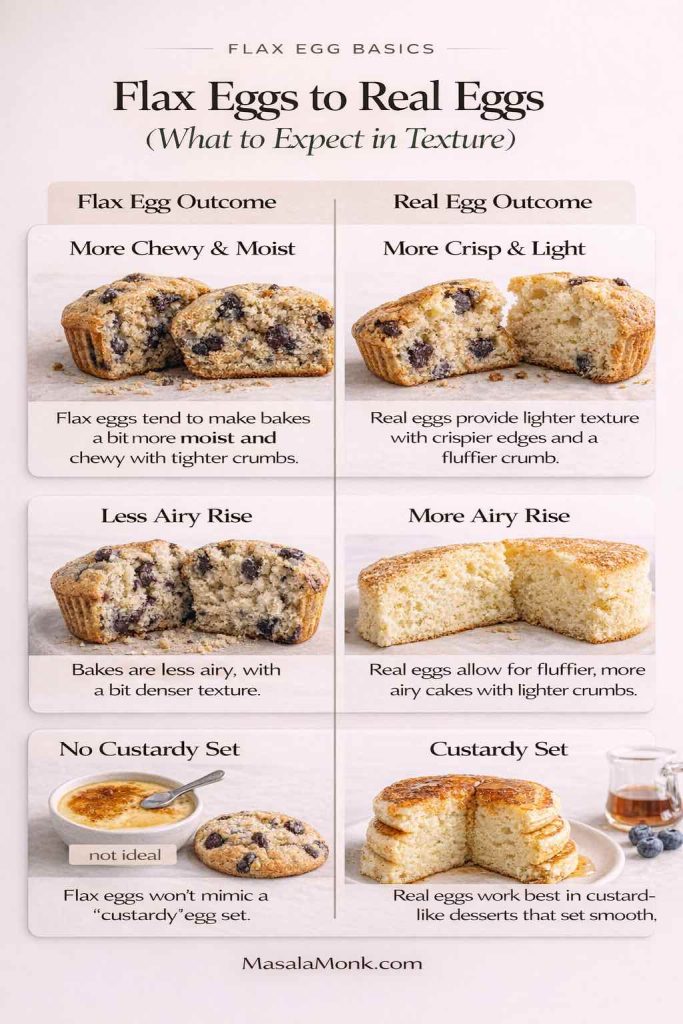
In general:
- Flax eggs tend to give a slightly more tender, moist crumb
- They can produce a bit more density than eggs in airy bakes
- They rarely create the same “egg set” feel you get in custardy textures
Therefore, the best results come from using flax eggs in recipes where eggs are primarily binders, not the backbone.
Also Read: 10 Vegetarian And High Protein Meal Prep Ideas from Indian Cuisine
Flax eggs with different flours (why results vary)
Even with the right flax egg ratio, flour choice can change the outcome. That’s because some flours absorb more water, while others rely on extra binders for structure.
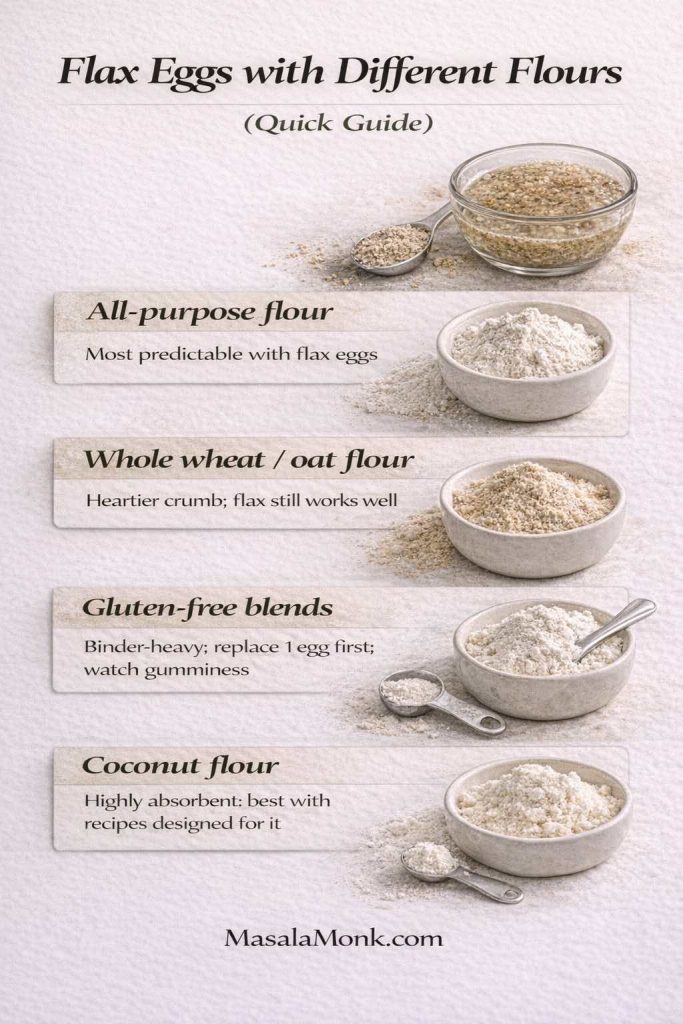
- All-purpose flour: Flax eggs are typically most predictable here, especially in cookies, muffins, and quick breads.
- Whole wheat and oat flour: Expect a slightly heartier crumb. Flax usually still works well, yet you may notice a bit more density—especially if the recipe already leans “sturdy.”
- Gluten-free blends: Many gluten-free mixes already include binders and starches. Adding flax can sometimes tip the texture toward heavier or a little gummy, so it’s smart to start by replacing only one egg and see how the batter behaves.
- Coconut flour: This flour drinks liquid aggressively. A flax egg may not provide enough structure on its own, and the batter can swing from thick to dry quickly. For coconut-flour baking, you’ll usually get the best result from recipes designed specifically for that flour rather than trying a simple swap.
The takeaway is simple: when flours are highly absorbent or binder-heavy, flax eggs may need a lighter hand—or a recipe that’s already built for egg-free structure.
Also Read: Fish and Chips Reimagined: 5 Indian Twists (Recipe + Method)
Egg Substitute Ground Flaxseed: choosing the best flax meal (and why freshness matters)
A flax egg is easy, but the flax itself can make or break it.
Ground flax vs whole flax (and why it matters)
Ground flax hydrates quickly and forms the gel you need. Whole flax often doesn’t, at least not in a way that works as an egg replacer.
From a nutrition standpoint, Mayo Clinic recommends ground flax because it’s easier to digest; from a baking standpoint, ground flax is also what gives you reliable gelling. That point is covered succinctly in Flaxseed: Is ground better than whole?.
Storage is a real issue (because ground flax can go stale)
Ground flax has more exposed surface area, which means it can spoil faster than whole seeds. If your flax smells bitter, paint-like, or unpleasantly sharp, it’s not going to improve your cookies.
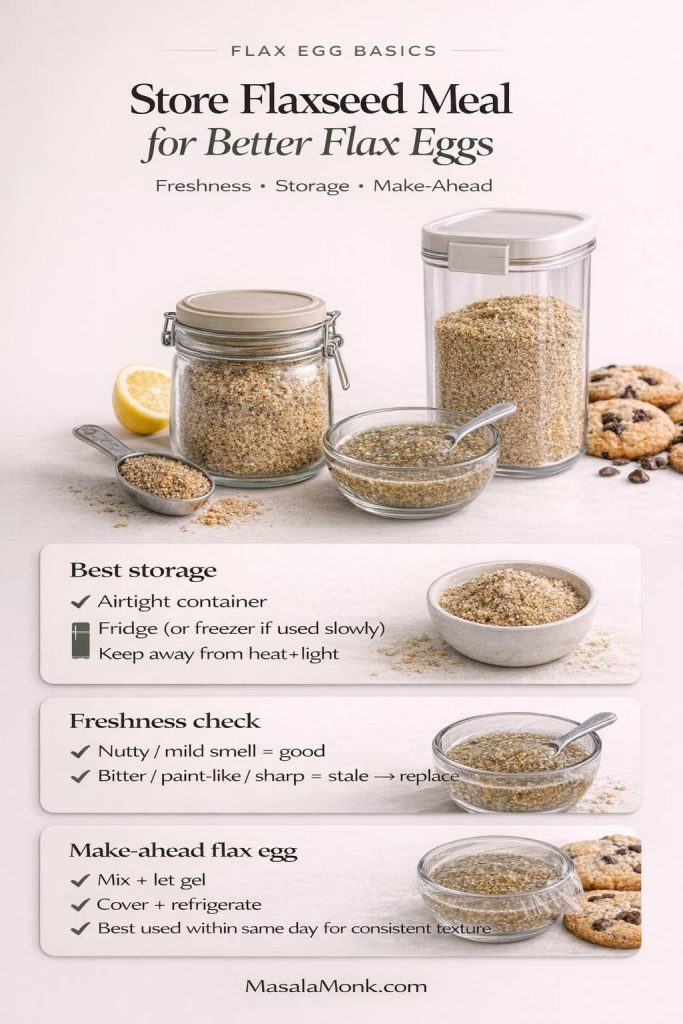
Mayo Clinic Health System notes practical storage guidance for flaxseed meal—keeping it refrigerated in an airtight container to prevent spoiling—in Flaxseed is nutritionally powerful.
That’s not meant to scare you. It’s simply the difference between a flax egg that disappears into the bake and one that leaves a lingering bitter aftertaste.
Also Read: Dirty Martini Recipe (Classic, Extra Dirty, No Vermouth, Spicy, Blue Cheese, Tequila + Batched)
Flaxseed Egg Substitute Baking: why your results vary (and how to make them consistent)
If you’ve tried flax eggs once and felt underwhelmed, it usually comes down to one of three things:
- the flax didn’t gel properly
- the recipe needed lift rather than binding
- too many eggs were replaced in a recipe that depends on eggs for structure
Instead of guessing, you can diagnose your result and adjust.
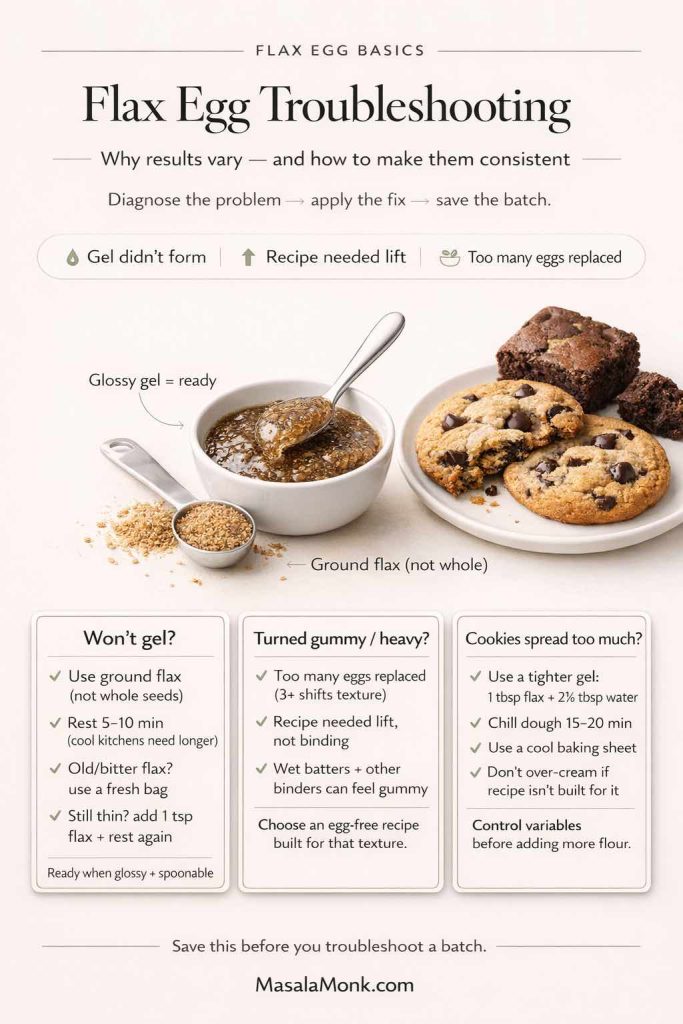
If your flax egg won’t gel
This is common, yet fixable.
- If you used whole seeds, grind them and try again.
- If your flax is old, try a fresher bag.
- If you didn’t wait long enough, give it a few more minutes.
- If it’s still thin, stir in a little extra ground flax and rest again.
Even with the same flax egg ratio, the gel can vary depending on how finely the flax is ground. A finer meal thickens faster, while a coarser grind may need a little extra time to hydrate. If you’d like another baked example where flax swaps in smoothly, see Wholewheat Carrot Orange Tea Cake.
If your bake turned gummy
Gumminess often happens when flax is asked to do too much—especially when replacing multiple eggs or when the recipe already has other gel-formers (certain gluten-free blends, heavy starches, or very wet batters).
At that point, switching strategies is often wiser than forcing the swap. King Arthur’s substitution guide is helpful because it gives you multiple options and also explains when egg substitutions simply won’t deliver the intended results. That perspective is in Guide for substituting eggs.
Eater’s pastry-chef framing adds another layer: sometimes recipe reformulation makes more sense than substitution, because you can adjust leavening, acid, and structure intentionally rather than trying to mimic an egg in a context where eggs do too much. That discussion is in Of course you can bake without eggs. Vegan pastry chefs tell us how.
If your cookies spread too much
When cookies spread, most people assume they need more flour. Occasionally that’s true, although it’s not the only solution.
Instead, try these gentle adjustments:
- Use a slightly tighter flax gel (a bit less water)
- Chill the dough briefly
- Ensure your baking sheet isn’t warm
- Don’t over-cream fat and sugar if the recipe isn’t built for it
In other words, control the variables that affect spread before you start changing the recipe’s foundation.
Also Read: Keto Hot Chocolate Recipe (Sugar-Free Hot Cocoa) + Best Homemade Mix
Vegan Egg Substitute Flaxseed: when flax is the right choice—and when it isn’t
Flax is a strong vegan egg substitute because it’s easy, cheap, and consistent when used appropriately. Still, it isn’t the universal answer.
When flax is a great vegan egg substitute
Choose flax when the recipe needs:
- binding
- moisture retention
- gentle structure
That’s why flax eggs are so popular for cookies, muffins, pancakes, and brownies.
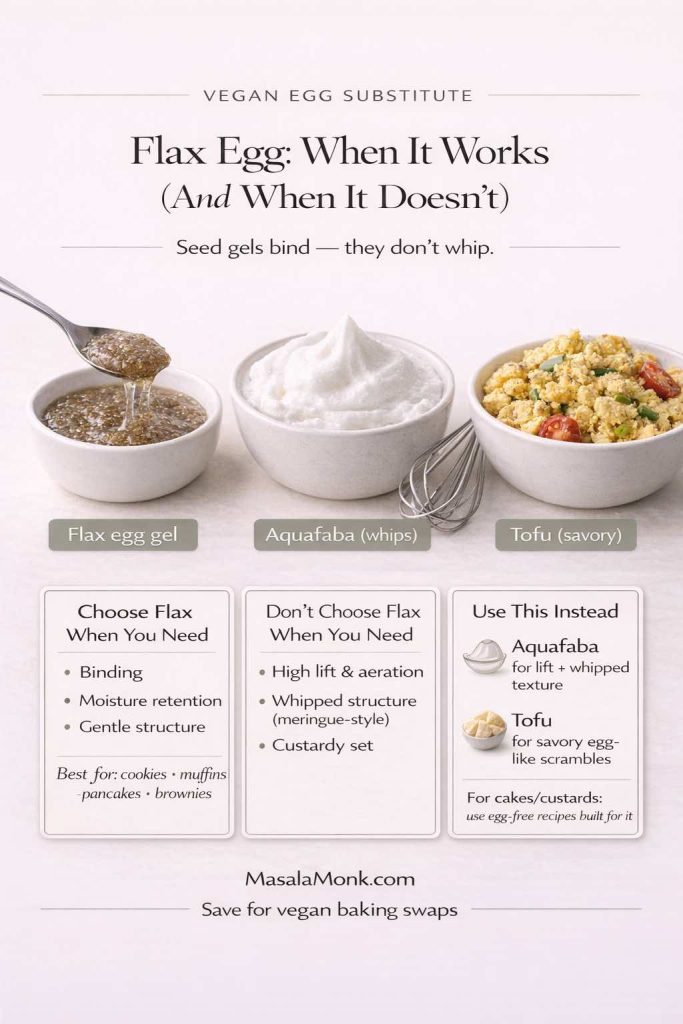
When you should use a different egg substitute
Choose something else when the recipe needs:
- high lift and aeration
- whipped structure (like meringues)
- a custardy set
If you want a fast way to remember this: seed gels bind, but they don’t whip.
When a recipe needs lift—think lighter cakes or anything that benefits from a whipped, airy structure—a seed gel won’t deliver the same result. In those cases, aquafaba (the liquid from cooked chickpeas or a can of chickpeas) is often the better option because it can be whipped and folded in like egg whites.
Flax eggs shine in baking-style mixtures—batters, doughs, and quick breads. On the other hand, if you’re craving a savory breakfast where you’d normally scramble eggs, tofu is usually the better choice because it can be seasoned and cooked into a satisfying egg-like texture. If you want ideas that go beyond baking, start with ‘Tofu’ Instead of ‘Eggs’: 5 High Protein Plant-Based Breakfast Ideas.
Also Read: Garlic & Paprika Cabbage Rolls (Keto-Friendly Recipes) – 5 Bold Savory Twists
Substitute for Flax Egg (when you don’t have flaxseed)
Eventually, you’ll run into the exact opposite problem: you want to bake egg-free, but the flax jar is empty. Luckily, you have options.
A close cousin: chia seed “egg”
Chia works in a similar way to flax because it gels when hydrated. However, it can behave differently in texture, sometimes creating denser or crunchier results depending on the recipe.
Serious Eats’ testing found chia produced denser outcomes in certain bakes compared to flax, which is a useful heads-up if you’re aiming for a soft crumb. That comparison appears in Out of eggs? The best replacement might already be in your pantry.
If you keep chia seeds around as well, they’re useful far beyond baking—think meal prep puddings, overnight oats, and quick add-ins for smoothies. For simple ideas that make chia easy to use week to week, check out The Power of Chia Seeds: 5 Plant-Based High-Protein Meal Prep Ideas.
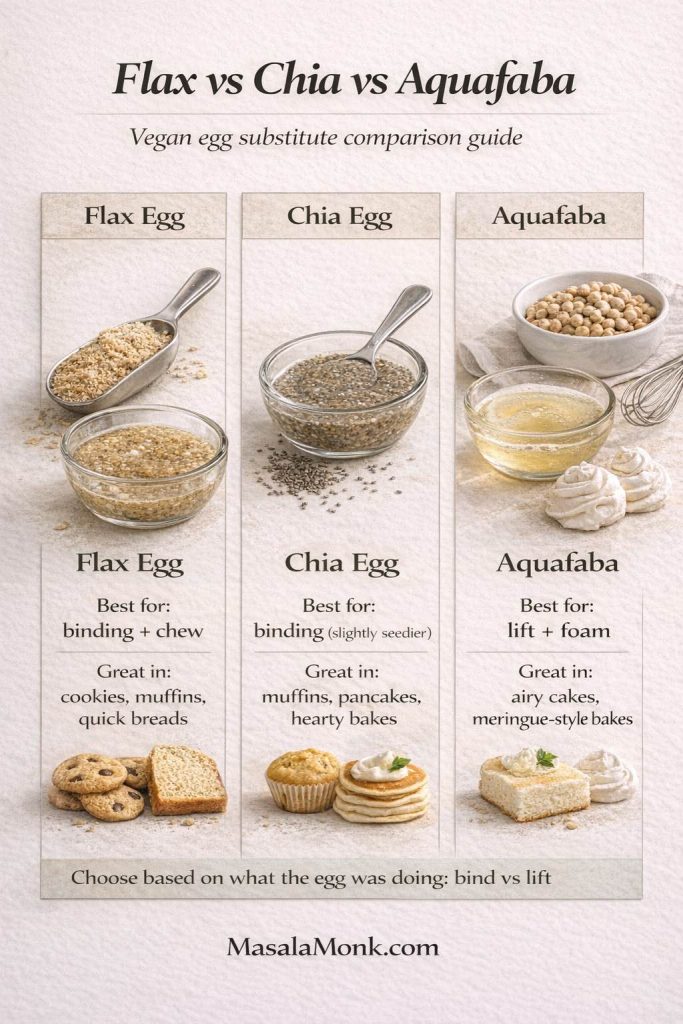
When you’re not trying to be “neutral”: fruit purées and other options
Sometimes you don’t need an egg substitute that disappears. Instead, you want moisture + softness, and you’re totally fine if the swap brings a little personality with it. That’s where fruit purées shine.
Quick rule of thumb: what fruit purées actually replace
Fruit purées are best when the egg’s job is mostly moisture and tenderness, not lift. In other words, they can help keep bakes soft and cohesive, yet they won’t give you the same airy structure eggs can.
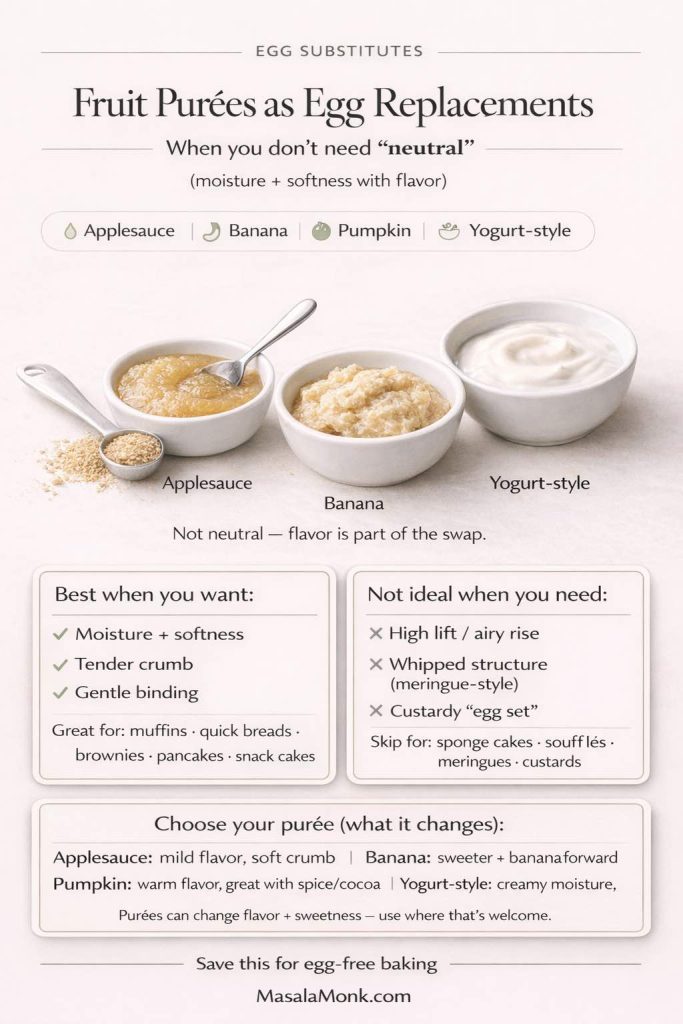
Best picks (and what each one changes)
- Applesauce: Mild flavor, adds moisture, keeps crumb tender. Great when you want the swap to stay relatively subtle.
- Mashed banana: Stronger flavor and aroma, adds sweetness, can make bakes taste “banana-forward.” Use when that’s a plus.
- Pumpkin purée: Moisture + gentle structure with a warm, earthy flavor. Works beautifully with spices, cocoa, and autumn-style bakes.
- Yogurt-style substitutes: Creamy moisture and richness; tends to keep cakes and muffins soft. (If you’re keeping it vegan, use plant-based yogurt.)
Where they work best
Because they change flavor and sweetness, fruit purées are most reliable in bakes that welcome that shift: muffins, snack cakes, quick breads, brownies, pancakes, and spiced loaves.
On the other hand, if a recipe is meant to be light and airy—or the egg is doing major structure work—these swaps can turn the texture heavier than you wanted. In that case, flax egg, aquafaba, or an egg-free recipe designed for the result will usually be a better fit.
A practical alternative mindset: different substitutes for different “egg jobs”
Not every egg substitute behaves the same, so the best choice depends on the texture you’re trying to get. Sometimes they bind; other times they add moisture, help with lift, or create structure. That’s why one substitute can work beautifully in cookies yet fall flat in a sponge cake. If you like this recipe-by-recipe approach, Eater’s guide from vegan pastry chefs breaks down how to choose an egg substitute based on what the recipe actually needs.
How to Replace Egg With Flax (recipe-by-recipe instincts)
By now you know the method. Next, you want confidence. This section is about building instincts so you can look at a recipe and know whether flax is likely to work.
Cookies: usually yes
If the recipe calls for one egg in a batch of cookies, flax is usually a safe bet. If it calls for multiple eggs, you can still try, but your texture may drift more.
For a cookie recipe that’s easy to adapt, try Double Chocolate Chip Cookies Recipe – One Dough, 7 Ways. It’s a great place to swap in a flax egg because the dough is sturdy, forgiving, and designed for variations—so you can focus on texture and bake time without stressing about the structure.
Muffins and quick breads: often yes
These bakes are where flax eggs feel effortless—especially when replacing one or two eggs. Because the recipe already contains baking powder or baking soda, you’re not depending on eggs for lift.
Pancakes: frequently yes, but mixing matters
Pancakes can be forgiving, although they’re sensitive to overmixing and batter thickness. If your pancakes feel heavy, rest the batter briefly and cook on steady heat.
If you want to try the flax-egg swap in a sturdier batter, Healthy Millet Protein Packed Pancakes is a satisfying option—the flax gel helps the pancakes hold together while keeping the inside tender.
Egg-heavy bakes: proceed carefully
Soufflés, quiche-like bakes, or anything where eggs are the main structure will not behave like the original with flax. This is exactly the limitation King Arthur points out in Guide for substituting eggs.
Instead of forcing a flax swap, choose an egg-free recipe that’s built for that texture.
Also Read: Crock Pot Chicken Breast Recipes: 10 Easy Slow Cooker Dinners (Juicy Every Time)
Flax meal as egg substitute: small upgrades that make a big difference
A flax egg is already simple. Still, a few small upgrades can make it more consistent, especially if you bake egg-free regularly.
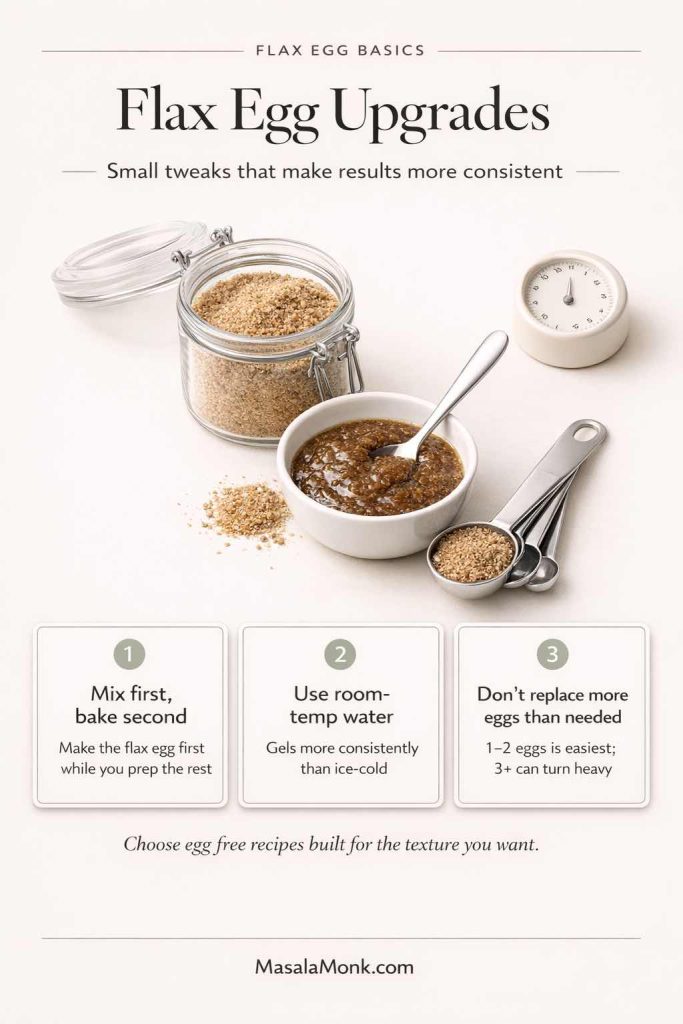
Mix flax eggs first, then start your recipe
This is the easiest improvement. Make your flax and water mixture, stir, then set it aside. While it gels, measure your dry ingredients, prep your pan, and set up your mixing bowl.
By the time you’re ready to mix, the flax egg will be ready too. As a result, you’re not rushing or guessing.
Use room-temperature water (or at least not ice-cold)
Cold water can slow down gelling. Room-temperature water helps the gel form more consistently.
Don’t replace more eggs than you need to
If your goal is to avoid eggs entirely, flax eggs can get you far. Still, replacing three or four eggs in a recipe designed around eggs can lead to dense results. At that point, switching to a recipe designed to be egg-free is often the cleaner path.
Sometimes the best move is choosing an egg-free recipe built for the texture you want rather than forcing a swap into a formula that depends heavily on eggs. If you like this recipe-first approach, Eater’s guide explains why it often works better.
Also Read: Eggless Yorkshire Pudding (No Milk) Recipe
A short detour: flax beyond baking (because many people use it both ways)
Interestingly, ground flax tends to earn a permanent spot in the kitchen once you start baking with it. Beyond flax eggs, you can stir a spoonful into oats, blend it into smoothies, or mix it into yogurt bowls for an easy boost—without changing the flavor much. If you’d like more everyday ideas, Benefits of Flax Seeds and How to Incorporate Them into the Indian Diet walks through simple, practical ways to use flax regularly. Also, if you’re aiming for meals that are higher in protein and fiber, flax fits nicely into that routine too—How Does a High Protein, High Fiber Diet Support Weight Loss? explains why that combination can be helpful and where ingredients like seeds come in.
Troubleshooting: common flax egg problems and fixes
Even good bakers occasionally get weird results with flax eggs. Fortunately, the fixes are usually simple.
“My flax egg didn’t thicken”
Start with the obvious:
- Was the flax ground?
- Was it fresh enough to smell pleasantly nutty?
- Did it sit long enough?
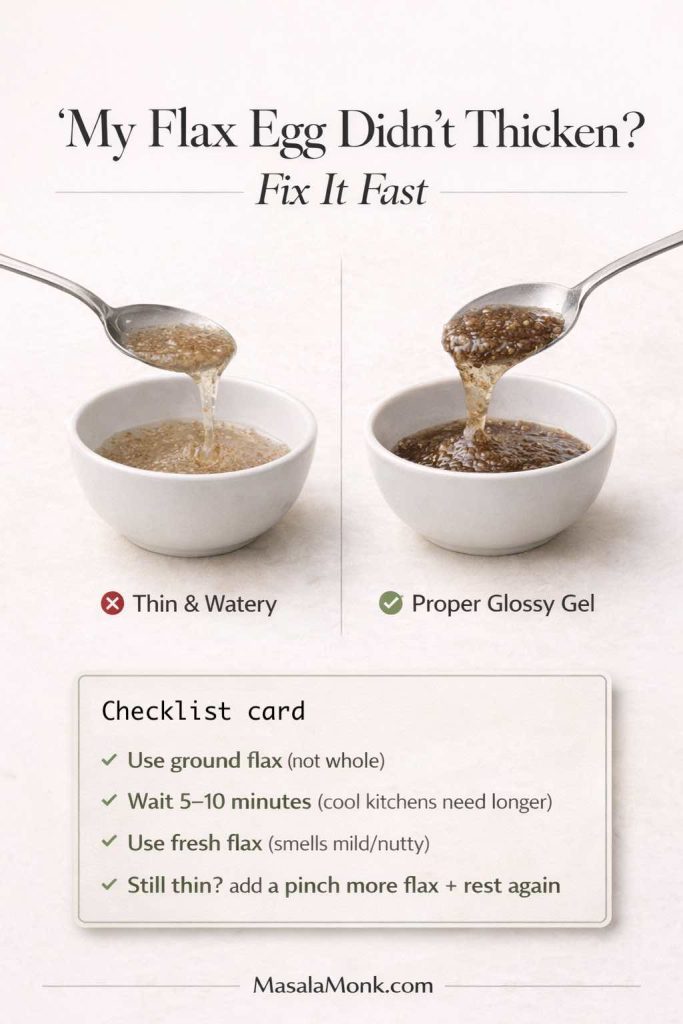
If everything looks right and it still seems thin, stir again and wait a little longer. If it remains watery, add a small pinch more flax meal and rest again.
Even when you follow the standard flax egg ratio, the gel can vary depending on how finely the flax is ground. A finer meal thickens faster, whereas a coarser grind may need a little more time to hydrate fully. For another egg-swap example that uses flax in a baked recipe, see Wholewheat Carrot Orange Tea Cake.
“My bake turned dense”
Density usually means the recipe needed lift, or the eggs were doing more structure work than flax can replicate.
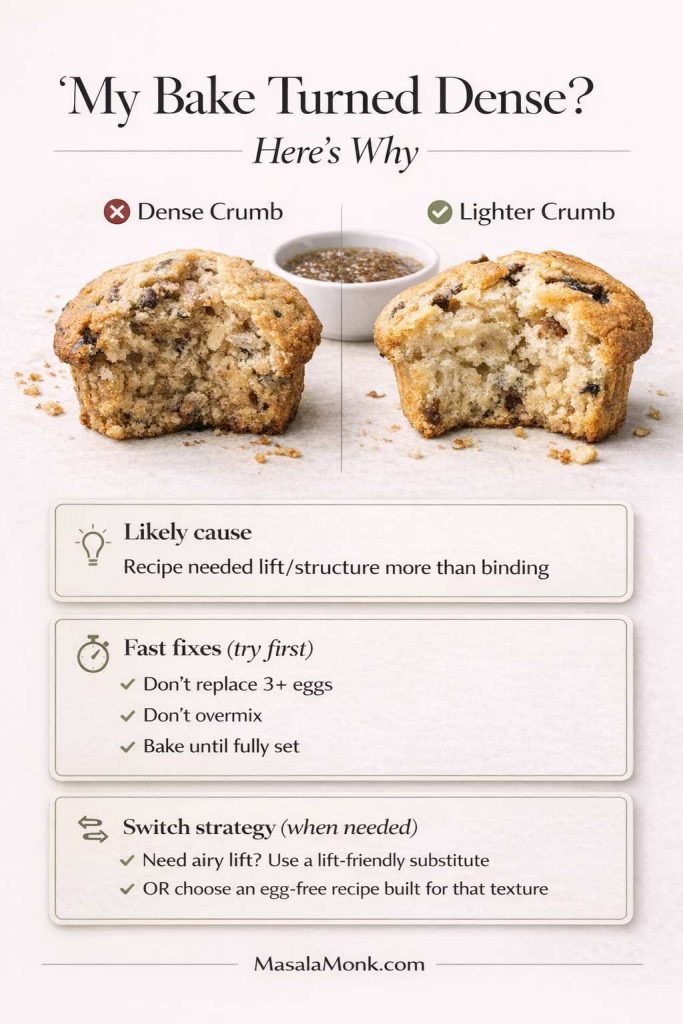
In that case, your best move is to choose a different substitute based on what the bake needs. King Arthur’s guide is useful for this because it outlines multiple options and also explains the limits of substitutions in egg-forward bakes. That’s in Guide for substituting eggs.
“My muffins are sinking”
If your muffins rise, then collapse as they cool, it’s usually not the flax egg alone. More often, the batter was either too wet or overmixed, so it couldn’t hold the structure once steam escaped.
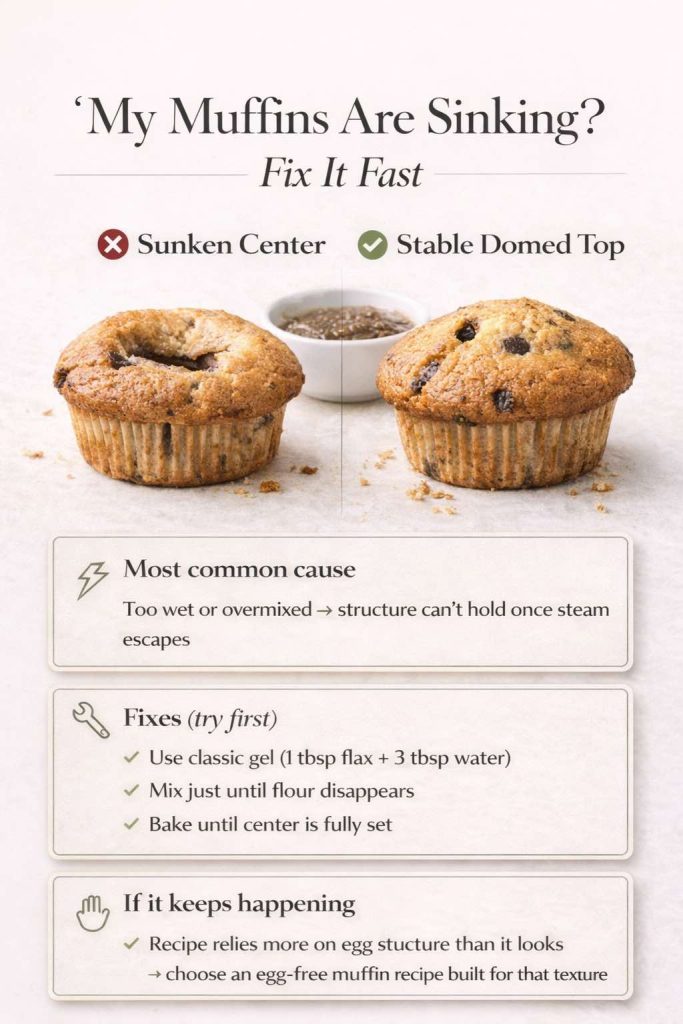
Start with these fixes:
- Use the classic gel (1 tablespoon flax + 3 tablespoons water) instead of a looser mix, especially for fruity or very moist batters.
- Mix only until the flour disappears—overmixing makes muffins tunnel and weaken.
- Bake until the center is truly set. If the tops look done but the middles feel soft, give them a few more minutes; flax-based batters often need that “fully set” finish.
If sinking keeps happening, it’s a sign the recipe depends more on egg structure than it seems. In that case, an egg-free muffin recipe (built for the texture) often performs better than forcing a swap.
“My cookies came out soft when I wanted crisp”
Flax tends to hold moisture. So, rather than blaming the flax, adjust the cookie strategy:
- bake a little longer (without burning)
- cool fully on the tray before moving
- aim for cookie recipes designed for crispness if that’s your priority

If crispness is a must, you can still bake egg-free; it just may not be flax’s strongest lane.
“My cookies are too cakey”
Cakey cookies are usually a moisture-and-mix issue. Flax holds moisture, so if the dough is already soft, the final texture can tilt more “puffy” than “chewy.”
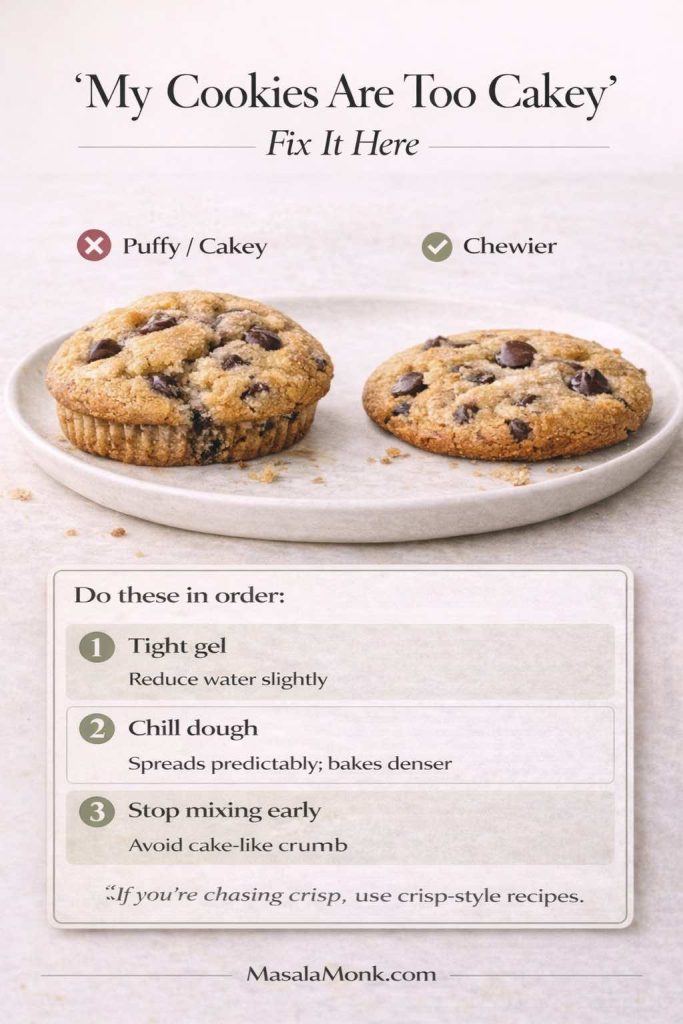
Try these small changes before you rewrite the recipe:
- Use a slightly tighter flax gel (a little less water) so you’re not adding extra moisture.
- Chill the dough briefly; colder dough spreads more predictably and bakes up denser rather than cakey.
- Stop mixing as soon as everything comes together—overmixing encourages a more cake-like crumb.
If you’re aiming for crisp cookies, flax can still work, but it’s easier with cookie styles that are already designed for crispness rather than softness.
“The flavor feels off”
To keep flax meal tasting fresh, store it airtight in the fridge (or freezer if you use it slowly). Mayo Clinic Health System covers simple storage tips in Flaxseed is nutritionally powerful.
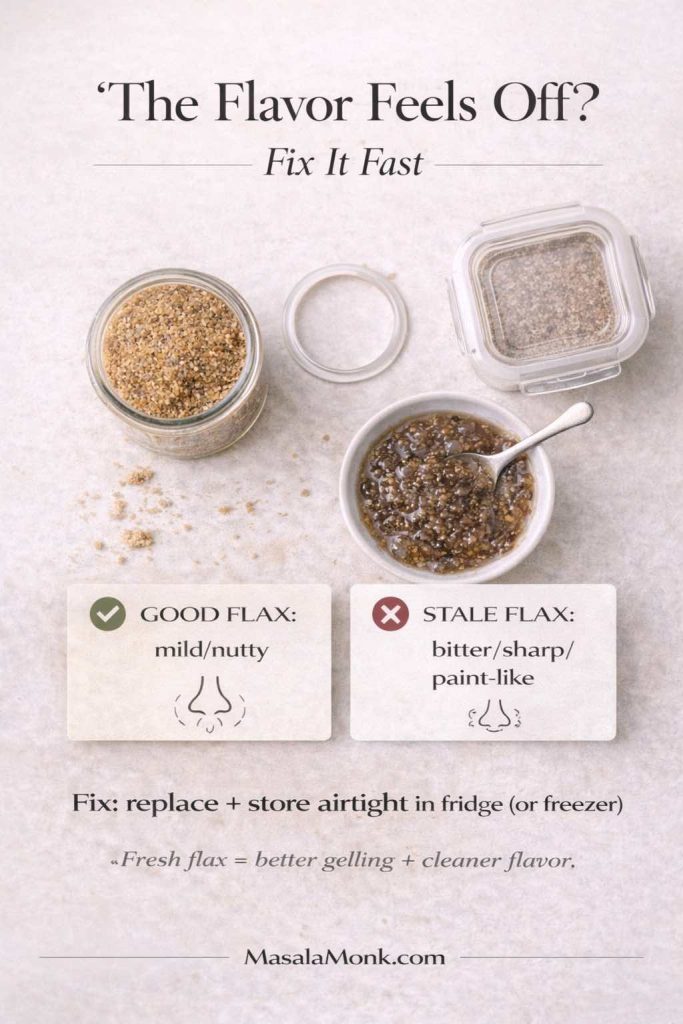
Sometimes, the fix is simply buying a fresh bag.
Also Read: Sourdough Starter Recipe: Make, Feed, Store & Fix Your Starter (Beginner Guide)
Bringing it all together: a simple, confident flax egg approach
If you want one clean routine you can follow every time, do this:
- Use ground flaxseed (flax meal)
- Mix 1 tablespoon flax meal with 3 tablespoons water for one egg
- Rest 5–10 minutes until gel-like
- Use it as your egg replacement in batter-based baking
Then, as you gain confidence, add the two “pro instincts”:
- If the batter is already very loose, use a slightly tighter gel
- If the recipe relies heavily on eggs for lift or structure, choose a different substitute or an egg-free recipe
That’s it. No drama, no panic, no wasted batch.
If you want flax eggs to feel effortless, use them in recipes you’ll repeat. Cookies are a straightforward place to begin—try Double Chocolate Chip Cookies Recipe – One Dough, 7 Ways for an easy batch that welcomes substitutions. For everyday, non-baking ways to use ground flax, Benefits of Flax Seeds and How to Incorporate Them into the Indian Diet is full of practical ideas. Then, whenever you want a savory, egg-free breakfast, ‘Tofu’ Instead of ‘Eggs’: 5 High Protein Plant-Based Breakfast Ideas is a great option.
Once you bake with flax eggs a few times, it stops feeling like a workaround. Instead, it just becomes another dependable method—one you can reach for whenever you need an egg substitute, whether it’s a single egg replacement or a batch conversion for two eggs or three.
Also Read: 19 Essential Kitchen Tools That Make Cooking Easier
FAQs
1) How do I make a flax egg?
Combine 1 tablespoon ground flaxseed (flax meal) with 3 tablespoons water, stir well, and let it sit until it thickens into a gel—usually 5 to 10 minutes. Once it looks glossy and spoonable, use it right away as your egg replacement in baking.
2) How to make a flax egg with ground flaxseed (step-by-step)?
First, add ground flaxseed to a small bowl. Next, pour in water and whisk until no dry pockets remain. Then, rest the mixture briefly so it can gel. Finally, stir once more and add it to your batter where the egg would normally go.
3) What is the flax egg ratio for 1 egg?
The most common flax egg ratio for 1 egg is 1 tablespoon ground flaxseed to 3 tablespoons water. That’s the standard flax seed to egg ratio most bakers use for muffins, quick breads, pancakes, and many cookie recipes.
4) What is the flax egg ratio for 2 eggs?
For two eggs, double the base ratio: 2 tablespoons ground flaxseed plus 6 tablespoons water. After mixing, allow enough time for the gel to develop before adding it to the bowl with your other wet ingredients.
5) How do I make 3 flax eggs (or more) for a bigger batch?
Scale the flaxseed meal to egg conversion by multiplying the standard ratio. In other words, for three eggs, use 3 tablespoons ground flaxseed with 9 tablespoons water. For larger batches, mix thoroughly and give it a slightly longer rest so the gel thickens evenly.
6) How much flaxseed for egg substitute in baking if I’m using flax meal?
Use 1 tablespoon flax meal per egg, paired with 3 tablespoons water. Even so, if your batter is already very loose, slightly less water can help the texture stay balanced rather than overly soft.
7) Can I use whole flax seeds instead of ground flaxseed for an egg substitute?
Whole seeds usually don’t gel the same way because the water can’t fully hydrate the interior. Therefore, for the most reliable flaxseed egg replacement, use ground flaxseed or flax meal, not whole seeds.
8) My flax egg won’t gel—what should I do?
Start by waiting a few extra minutes, because some flax takes longer to hydrate. If it still looks watery, stir again and add a small pinch more ground flaxseed, then rest it a second time. Additionally, very old flax meal can perform poorly, so freshness matters more than people expect.
9) Can I make a flax egg ahead of time?
Yes, you can make a flax egg shortly ahead—often 30 to 60 minutes is fine—then cover and refrigerate it. However, for best consistency, many bakers prefer mixing it fresh right before baking, since the gel can thicken more as it sits.
10) How do I use flaxseed instead of eggs in recipes—do I add it with wet or dry ingredients?
Typically, add the prepared flax and water mixture with the wet ingredients. That way, it disperses smoothly and doesn’t clump. Meanwhile, keep the dry mix unchanged unless your batter looks noticeably too thick or too thin once everything is combined.
11) Is flaxseed meal to egg conversion always a 1:1 swap?
It’s a 1:1 swap in quantity (one flax egg replaces one egg), yet it’s not always a perfect swap in function. Since flax acts mainly as a binder and moisture holder, it works best when eggs aren’t the primary source of lift or structure.
12) When is a flax egg substitute for baking the best choice?
Flax eggs usually work best in cookies, brownies, muffins, quick breads, pancakes, and waffles—basically, recipes where binding matters more than a lofty rise. As a result, they’re a favorite vegan egg substitute for everyday baking.
13) Does a flax egg work for cookies?
Yes, a flax egg for cookies is often a strong match, especially for chewy styles. Still, if you want a very crisp cookie, you may need to tweak bake time or choose a cookie recipe designed to crisp up without relying on eggs.
14) Can I use flaxseed instead of eggs in cakes?
Sometimes, yes—particularly in moist, oil-based cakes and snack cakes. Nonetheless, in very airy sponge-style cakes, eggs provide lift that flax can’t replicate, so the result may be denser than the original.
15) What’s the difference between ground flax as egg substitute and chia as egg substitute?
Both form a gel with water, so both can replace eggs as binders. However, chia can feel slightly more “seedy” in texture depending on grind and soak time, whereas flax meal tends to blend in more smoothly.
16) What is a good substitute for flax egg if I don’t have flaxseed?
If you’re out of flax, you can often use a chia “egg” (chia seeds + water) as a close alternative. Otherwise, options like applesauce, mashed banana, yogurt-style substitutes, or commercial egg replacers can work depending on the recipe and whether you’re aiming for a vegan substitute.
17) How do I substitute flax for eggs without making the batter gummy?
Avoid replacing too many eggs in recipes that depend heavily on eggs for structure. Also, measure carefully, allow the gel to form, and don’t overmix the batter. If gumminess keeps happening, try a different egg replacement better suited to the recipe style.
18) Can I use flax eggs in gluten-free baking?
You can, although results vary because gluten-free batters often already rely on binders and starches. Consequently, flax may make some gluten-free bakes feel heavier. In that case, using a smaller amount, improving leavening, or choosing a different egg substitute can help.
19) Is flax seed as egg substitute the same as egg replacement flaxseed meal?
They’re used similarly, yet flaxseed meal (ground flaxseed) is the form that works most reliably for a flaxseed egg substitute baking method. Whole flax seeds can work only if they’re finely ground first.
20) How many flax eggs can I use in one recipe?
It depends on the recipe. Replacing one egg is usually straightforward; replacing two often works in muffins and cookies; replacing three or more can noticeably change texture, especially in cakes. If the original recipe is very egg-forward, consider an alternative to flax egg or an egg-free recipe built for that outcome.