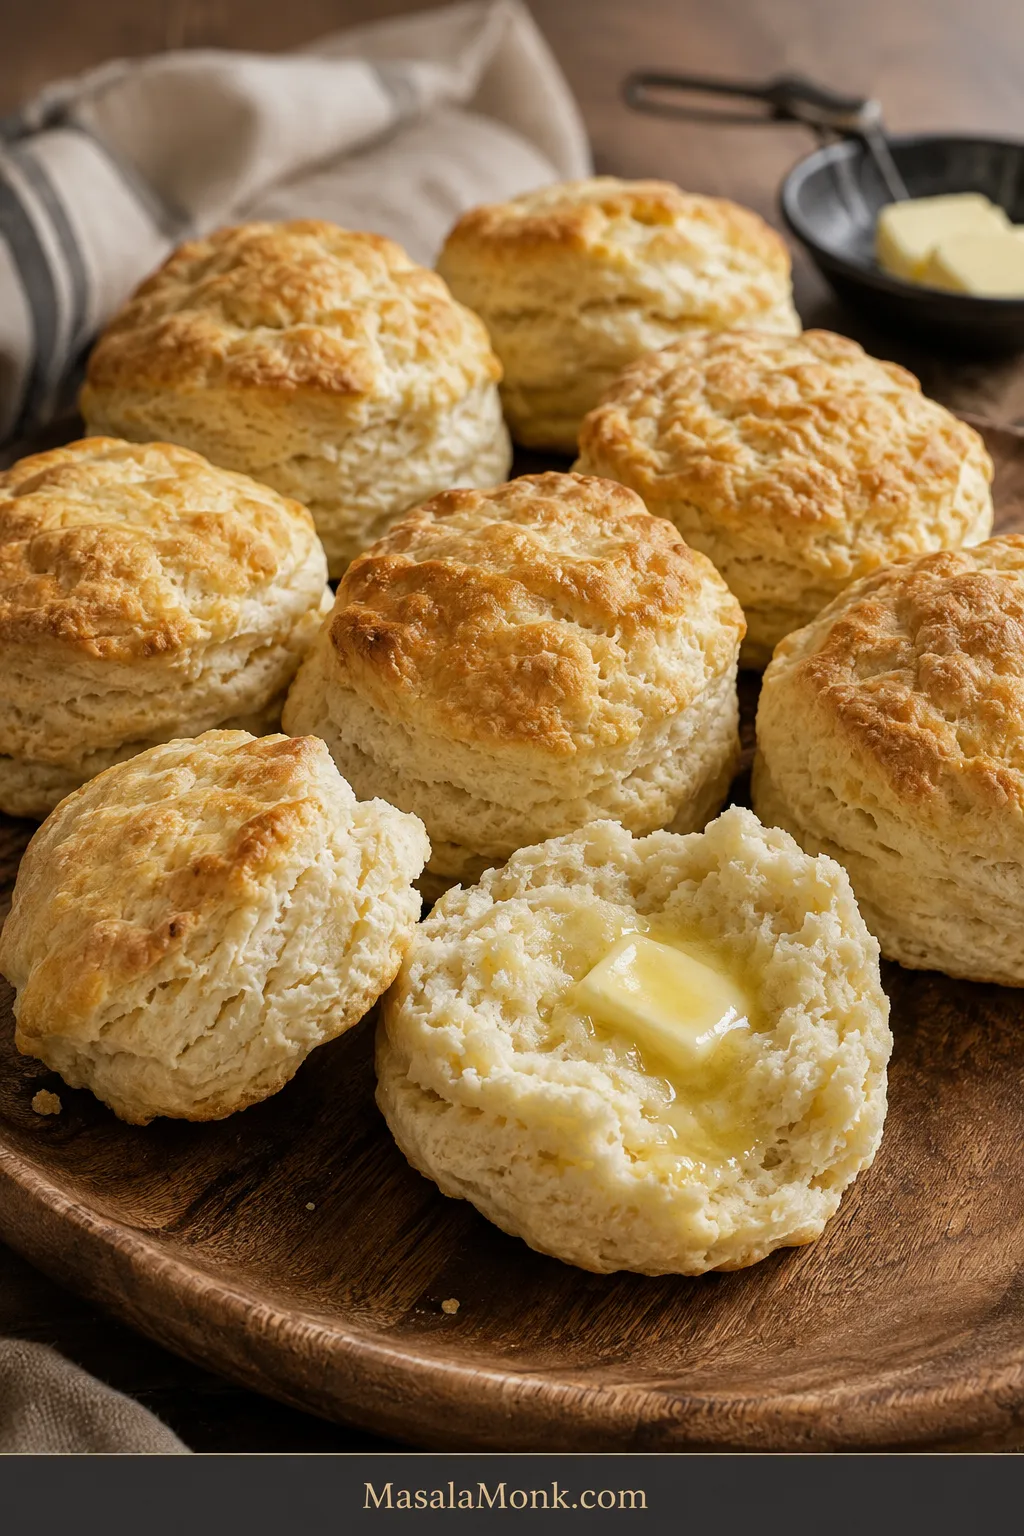
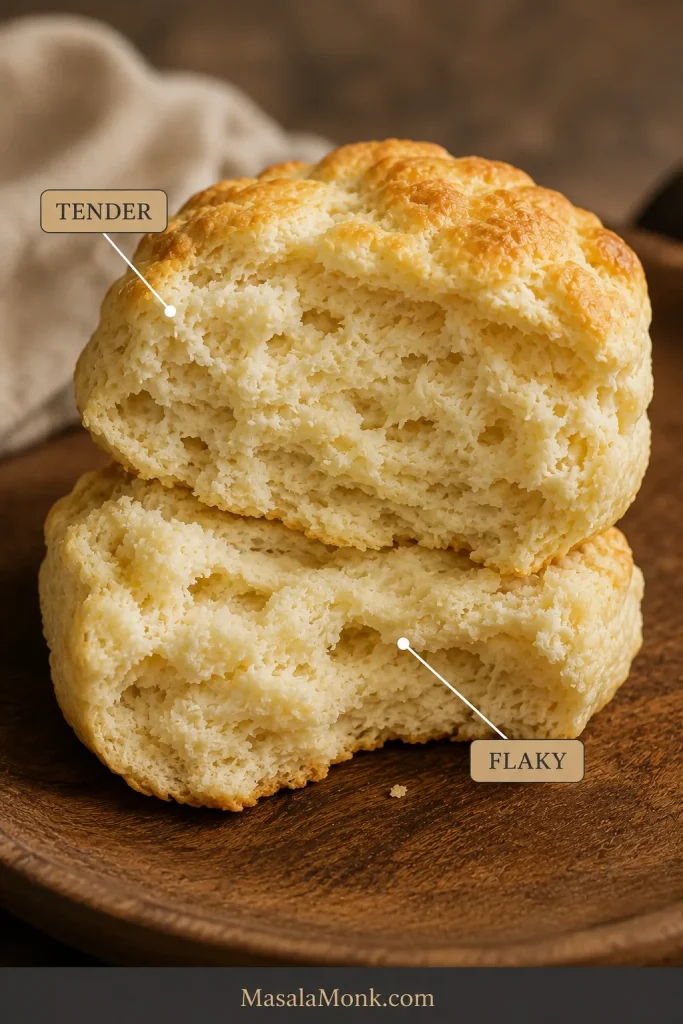
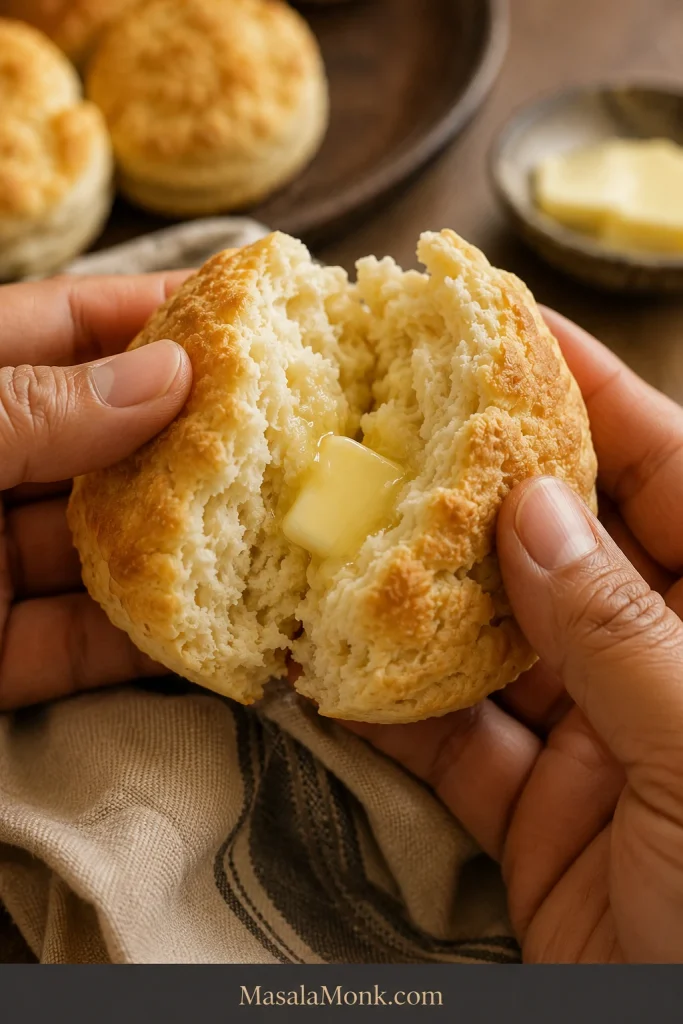
Pull apart a hot Southern biscuit and the center should open in tender, buttery layers, with the top golden and the middle moist enough to catch a melting swipe of butter.
These are the biscuits we’re making here: tall enough for visible layers, with a soft, tender center and buttery seams that separate easily while warm. You don’t need a food processor or rolling pin, and chilling only comes into play if the butter begins to soften while you work.
The whole batch takes about 35 minutes. Once you know what the butter and dough are supposed to feel like, biscuit-making becomes much less mysterious.
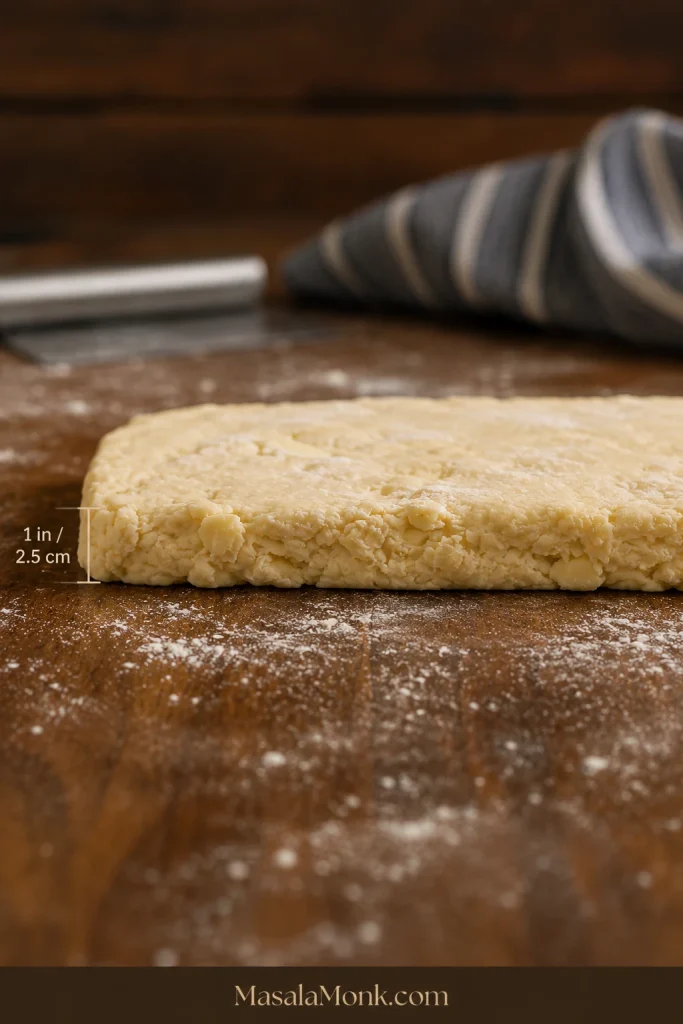
For tall, flaky Southern buttermilk biscuits, keep the butter and buttermilk cold, mix until the dough is rough and lightly tacky, then fold and turn the dough four times before patting it to a full 1 inch / 2.5 cm thick.
Cut straight down with a sharp cutter, arrange the biscuits almost touching, and bake at 450°F / 230°C conventional until the tops are golden and the centers are baked through.
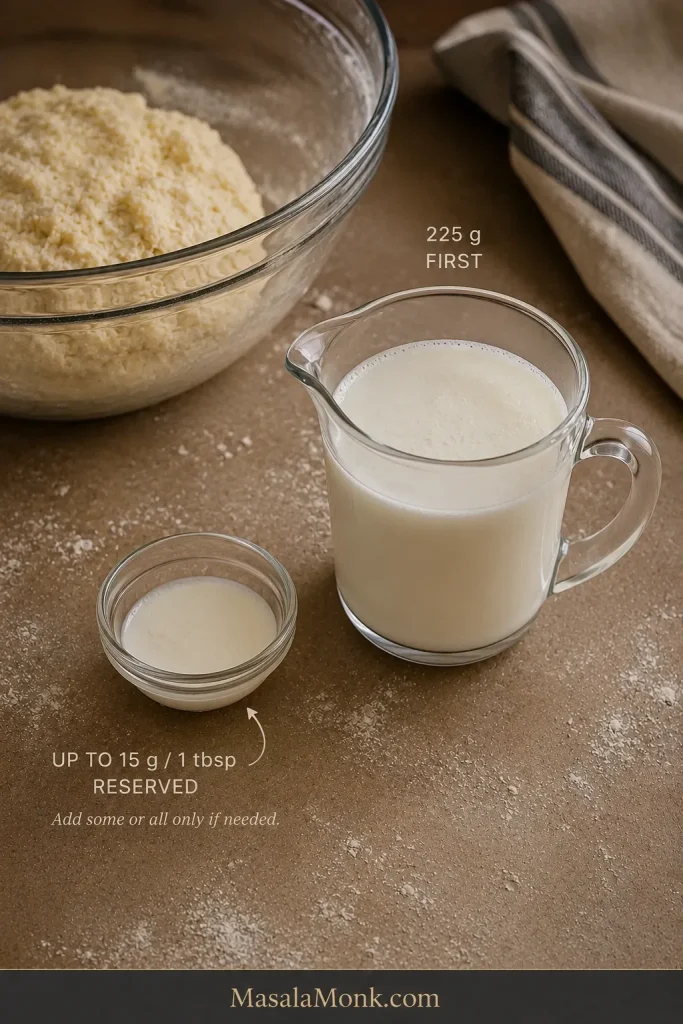
Start with 225 g of the buttermilk and reserve the final 15 g / 1 tablespoon. If dry flour still falls away when you press the mixture, add some or all of the reserve until the dough holds together.
Cold fat. Soft dough. Four folds. One-inch thickness. Hot oven. Those are the five things worth remembering.
Southern Buttermilk Biscuits Recipe
Makes about 8 biscuits with a 2½-inch / 6.4-cm cutter.
Ingredients
300 g / 10.6 oz / about 2½ cups all-purpose flour, spooned and leveled if measuring by cups, plus a little for the counter
14 g / 1 tablespoon + ½ teaspoon double-acting baking powder
2 g / ½ teaspoon baking soda
6 g fine sea salt or table salt / about 1 teaspoon
8 g / 2 teaspoons granulated sugar
113 g / 4 oz / ½ cup unsalted butter, very cold and cut into small cubes
240 g / about 1 cup cold cultured buttermilk, divided — start with 225 g and reserve 15 g / about 1 tablespoon
15 g / 1 tablespoon melted butter, for brushing after baking
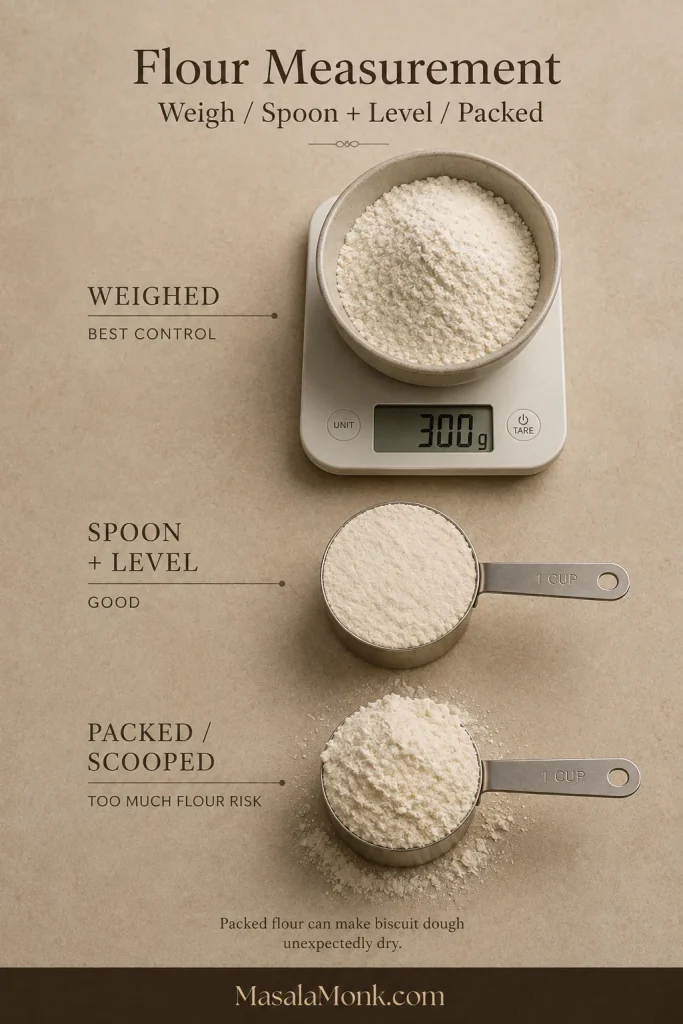
Use the gram measurements when possible. Flour is easy to overmeasure by volume, and even a modest extra scoop changes how much liquid the dough needs.
What You’ll Need
A digital kitchen scale is the most useful extra, along with a large bowl, pastry blender, fork or flexible spatula, sharp biscuit cutter, and sturdy baking sheet. A bench scraper is handy for handling the dough and for cutting square biscuits, but it isn’t essential.
No pastry blender? Use your fingertips to work the cold butter into the flour. Warm hands soften butter quickly, so work briefly and stop while distinct pieces remain.
Method
Heat the oven. Set a rack in the center and preheat to 450°F / 230°C conventional. Line a sturdy, light-colored baking sheet with parchment rated for that temperature, or use a clean unlined sheet. A dark pan browns the bottoms faster, so check underneath a little earlier.
Mix the dry ingredients. Whisk the flour, baking powder, baking soda, salt, and sugar thoroughly.
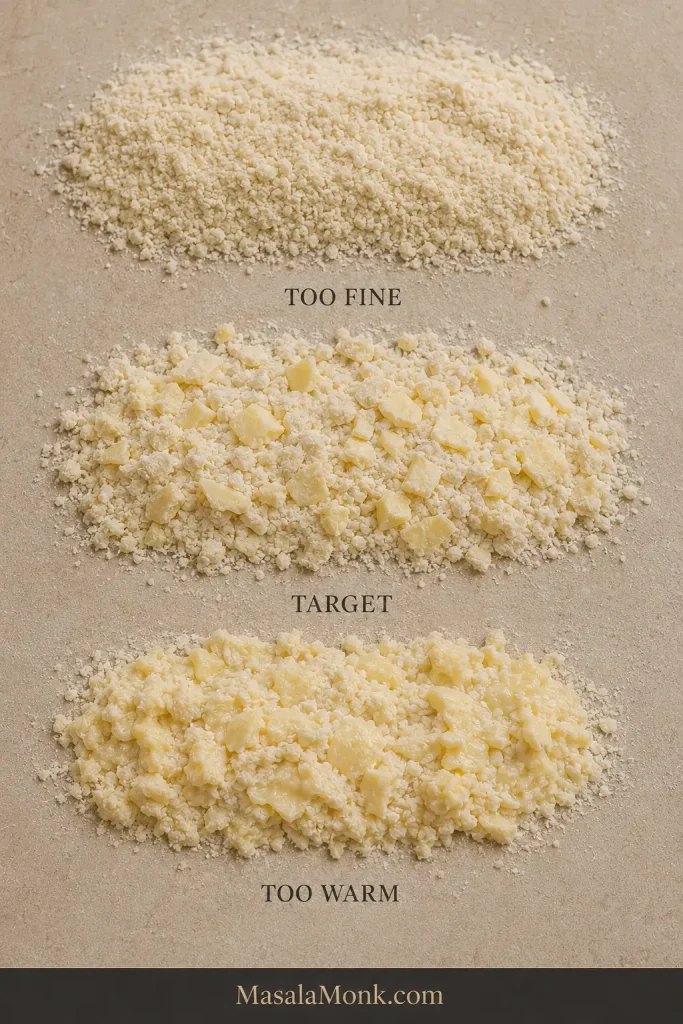
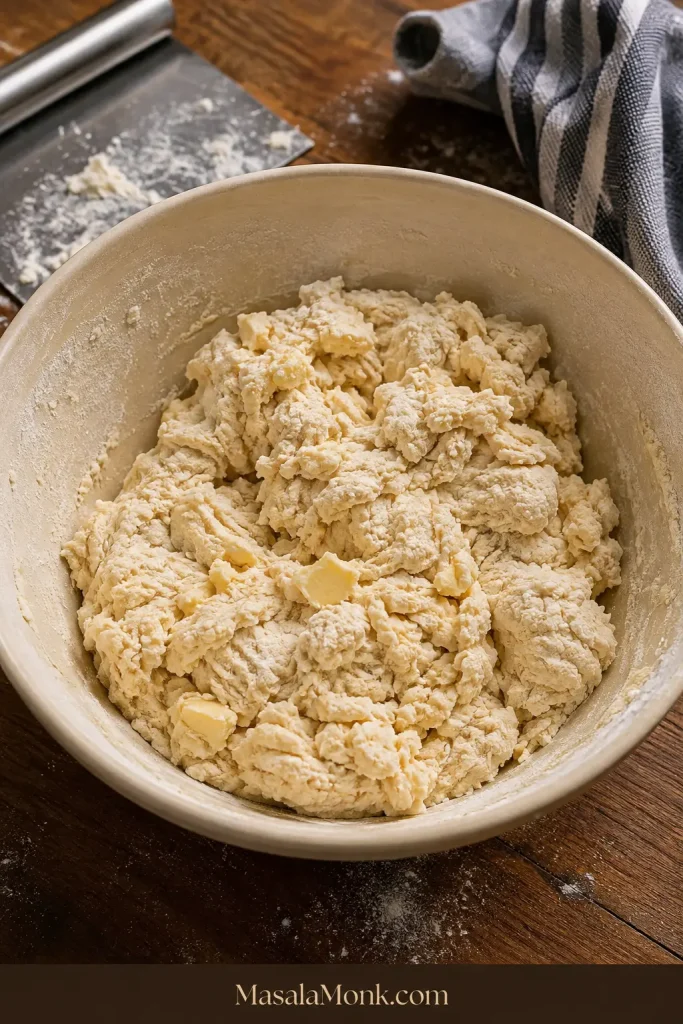
Cut in the butter. Work until most pieces are roughly pea-size, with a few larger flat flakes visible. The mixture will look uneven.
Add 225 g of buttermilk. Stir with a fork or flexible spatula until shaggy clumps form. Press a handful together. If dry flour still falls away, add some of the reserved 15 g / 1 tablespoon. Use the rest only if the mixture still needs it to hold together.
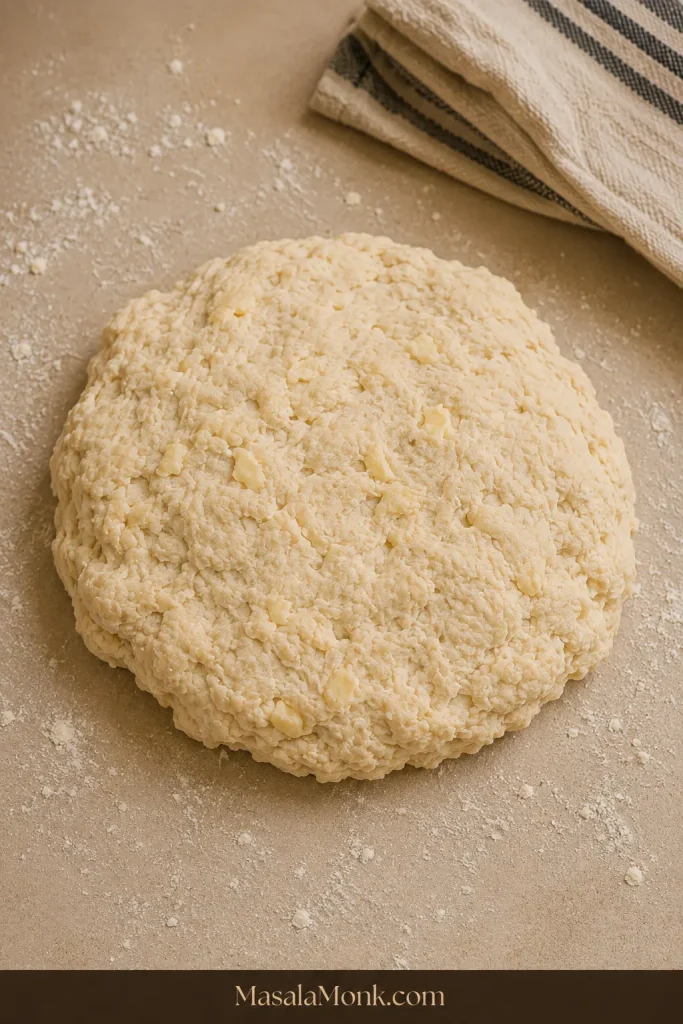
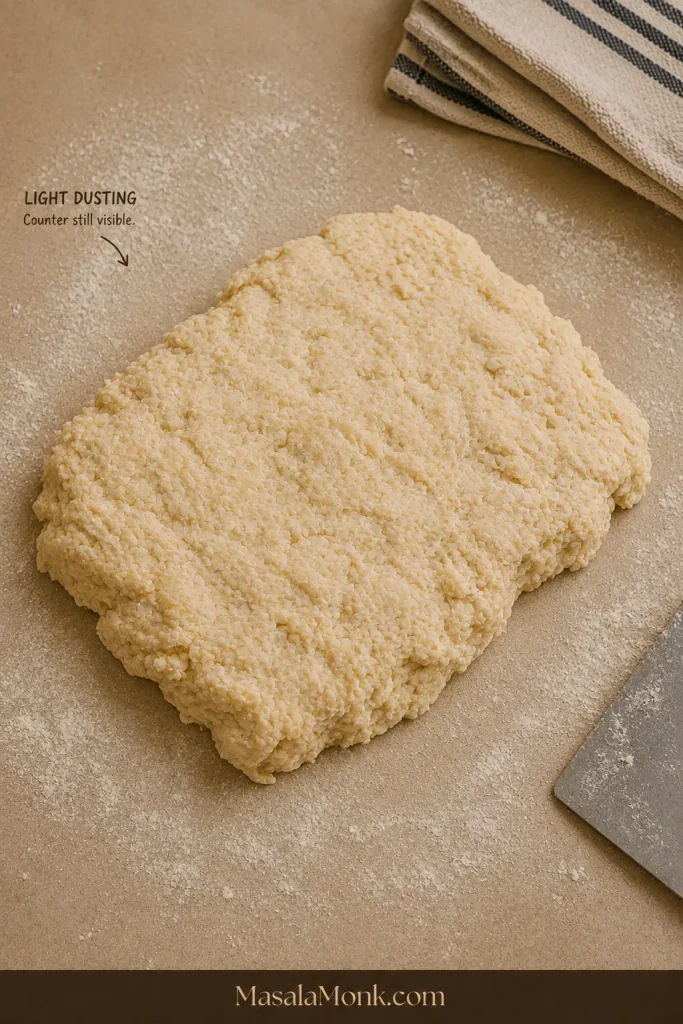
Bring it together. Dust the counter with just enough flour to prevent obvious sticking—you should still be able to see the counter through it. Turn out the shaggy mixture and press the loose pieces into a rough rectangle.
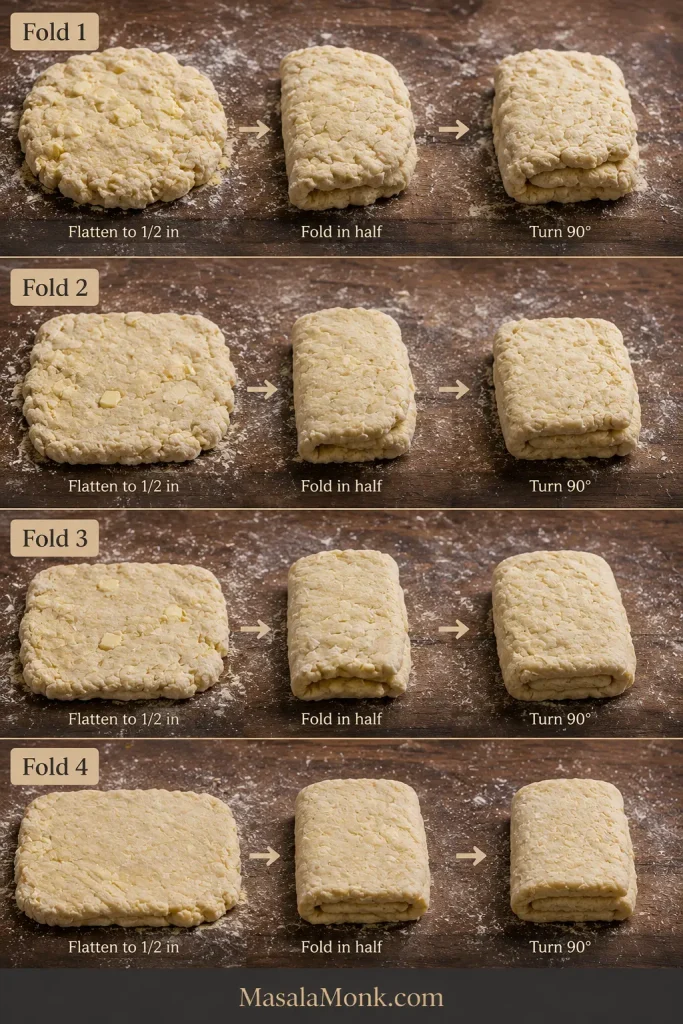
Fold and turn four times. Flatten the rectangle to roughly ½ inch / 1.25 cm thick, fold it in half, then turn it 90 degrees. Flatten it again and repeat the fold-and-turn process three more times, for four folds total. By the later folds, the scruffy pile starts looking recognizably like biscuit dough while pieces of butter remain visible.
Shape, Cut and Bake
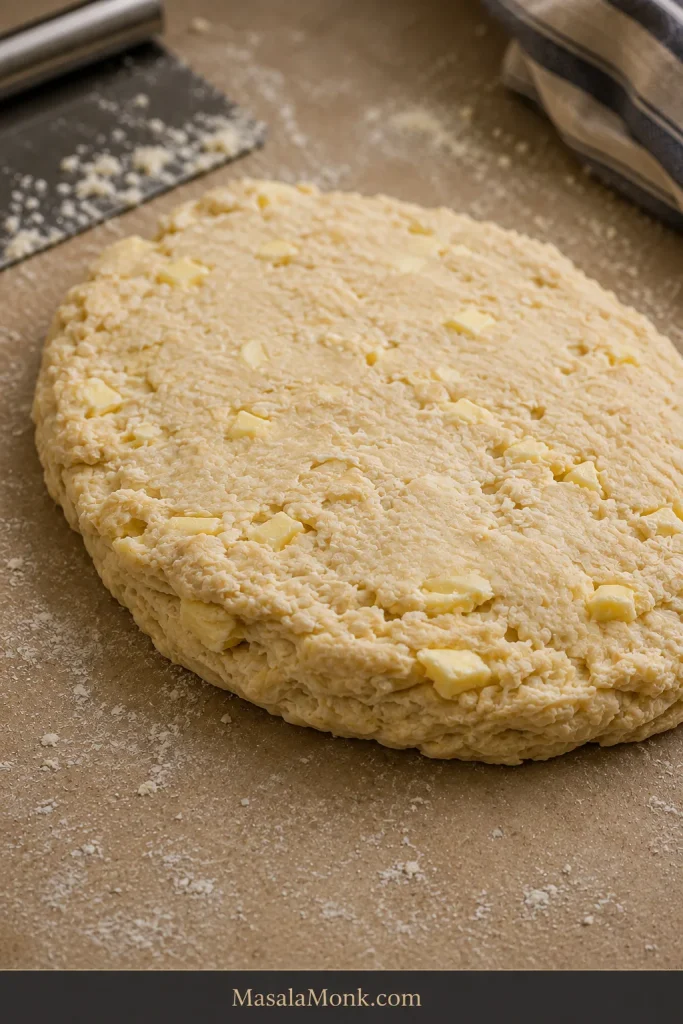
Pat to 1 inch / 2.5 cm thick. Keep the slab reasonably even; the edges can stay rustic.
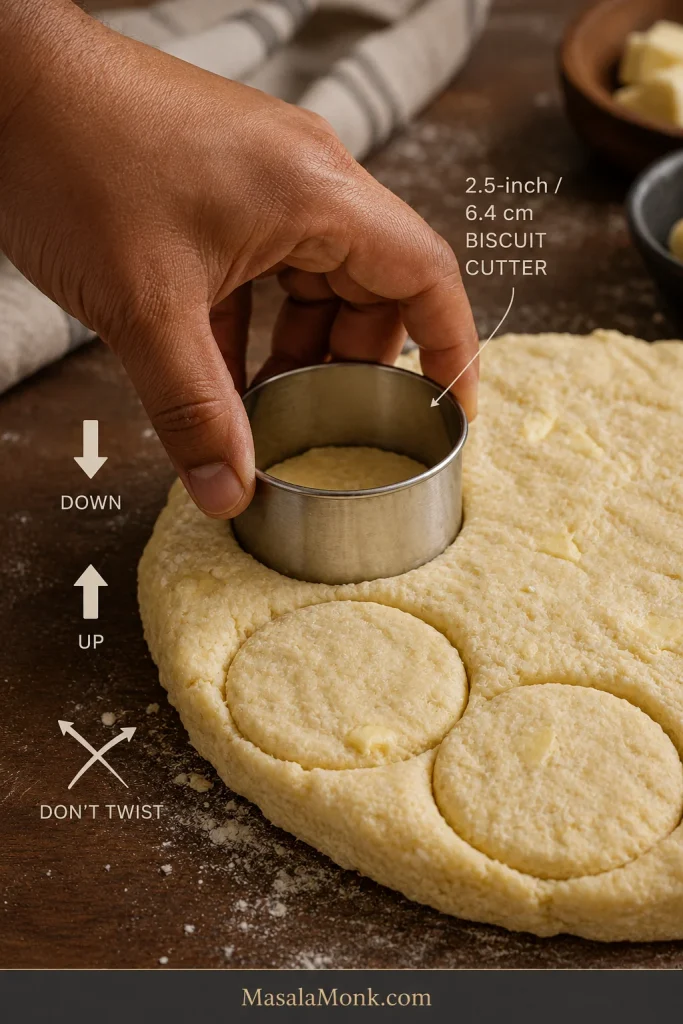
Cut straight down. Lightly flour a sharp 2½-inch / 6.4-cm biscuit cutter, press straight through the dough, and lift straight up. Don’t twist the cutter.
A clean vertical cut leaves the layered edge open. Pinched or dragged rims usually mean the cutter twisted.
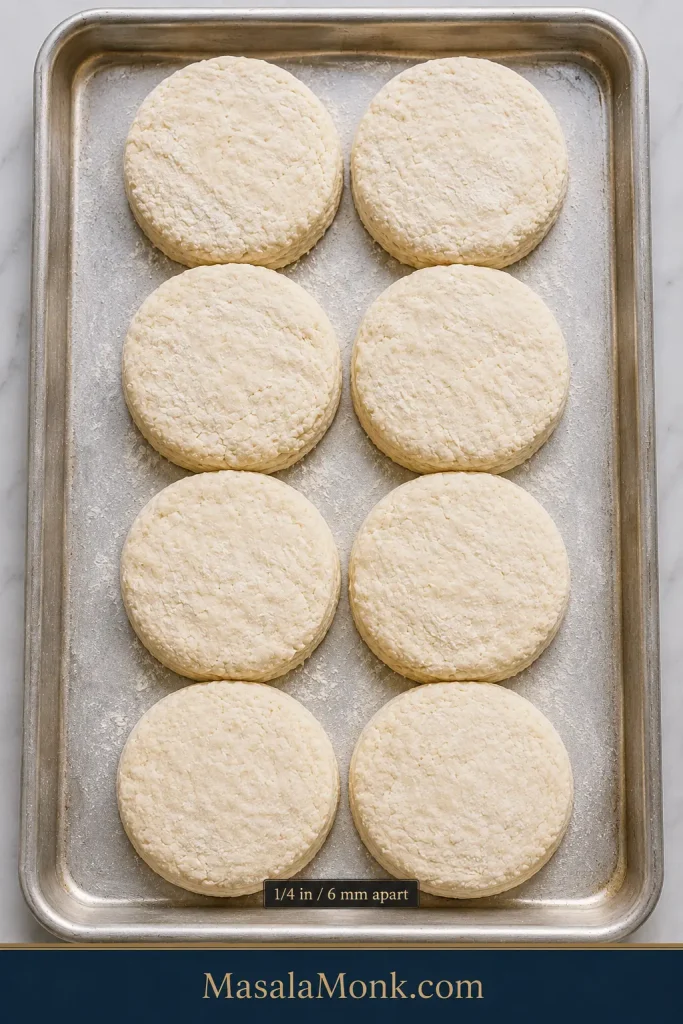
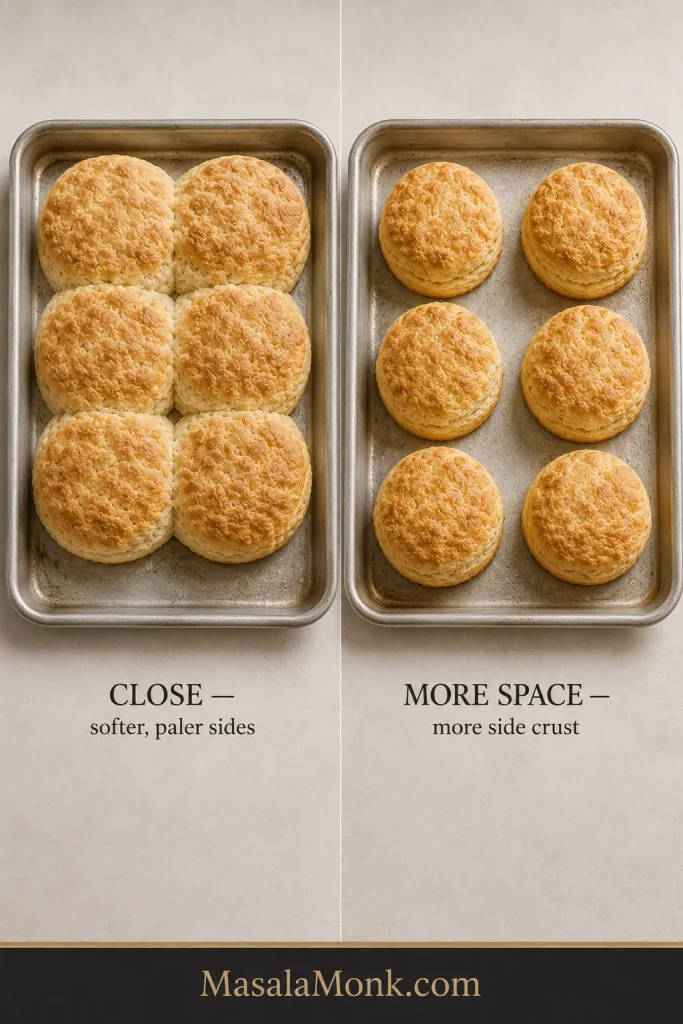
Arrange almost touching. Place the biscuits about ¼ inch / 6 mm apart. Press the scraps together once and cut the remaining biscuits.
Leave narrow visible gaps—about ¼ inch / 6 mm. Slumping rounds signal warm dough, not a need for wider spacing.
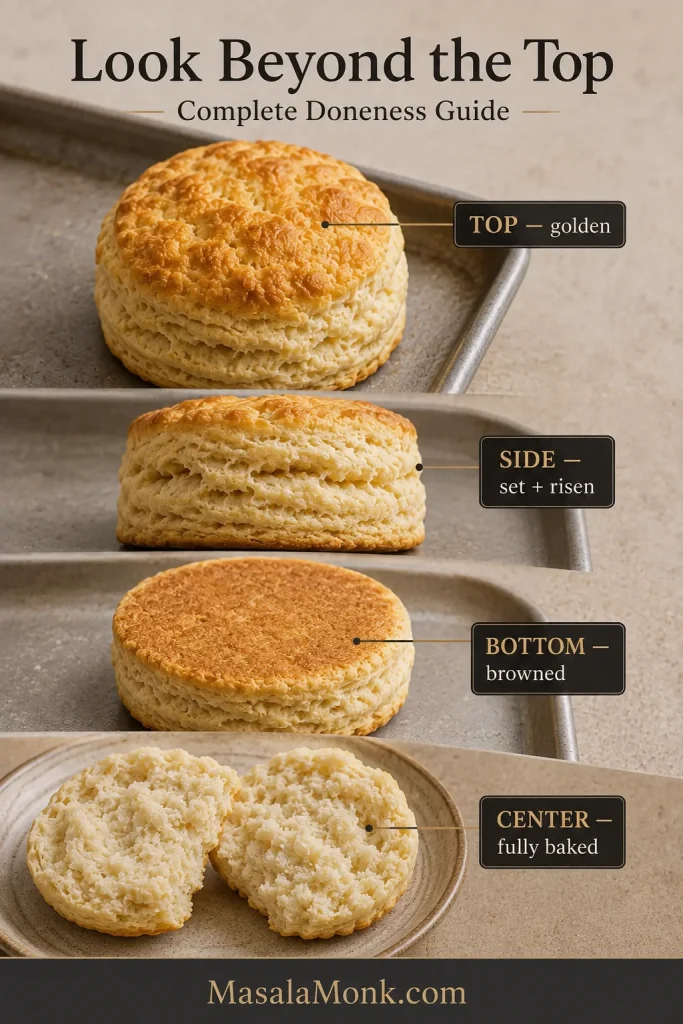
Bake. Bake for 12–15 minutes, beginning to check at 12 minutes. Look for golden tops, set sides, browned bottoms, and centers without a gummy stripe.
Brush and serve. Brush the hot tops with melted butter and serve warm.
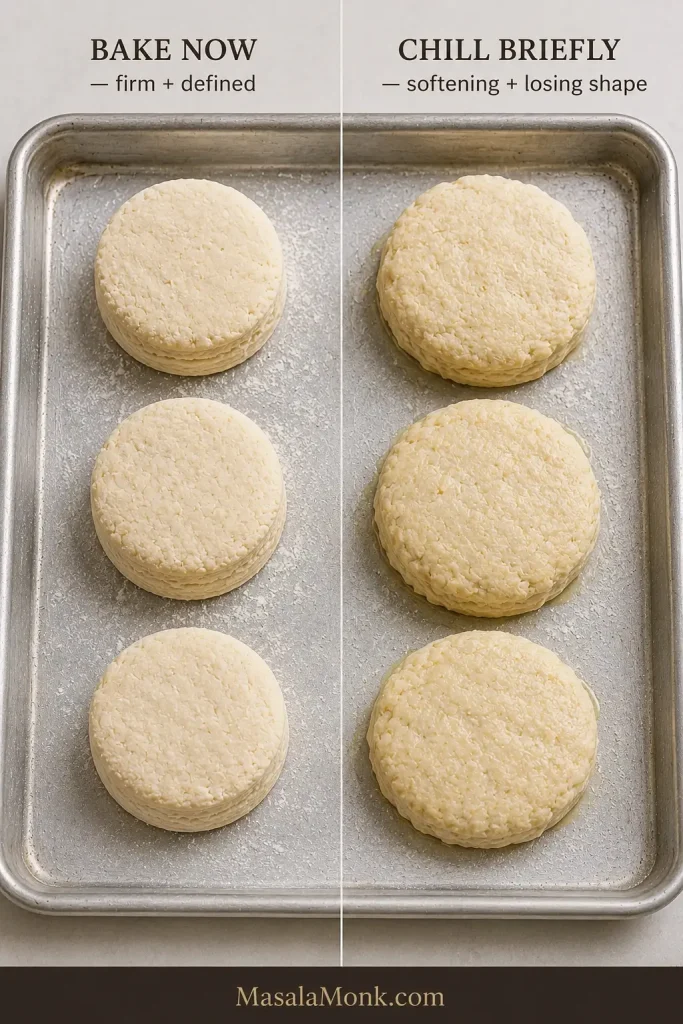
Warm-kitchen check: Cool, firm cut biscuits can go straight into the oven. When they become soft enough to lose their clean shape or start looking greasy, chill the tray briefly until the butter firms again.
Firm, upright cut edges can go straight to the oven; softened or slightly greasy rounds benefit from a brief chill.
Using fan/convection? If you normally reduce conventional baking temperatures for your oven, use around 425°F / 220°C and begin checking early.
There is no single ingredient that gets to decide. Southern biscuits belong to a broad tradition of tender quick breads, with flour, fat, shaping, and preferred crust varying from kitchen to kitchen.
Across Southern kitchens, you’ll find soft-wheat and self-rising flours, butter, lard, shortening, buttermilk, hand-shaped cathead biscuits, neatly cut rounds, soft pull-apart sides, and biscuits baked farther apart for more crust.
Some people picture a tall cut biscuit with obvious layers. Others grew up eating softer biscuits baked shoulder-to-shoulder in a pan. Both belong at the table.
This version sits between old-fashioned tenderness and heavily laminated bakery-style biscuits. The folds create visible buttery seams and good height, while the center stays soft and distinctly biscuit-like. Tender describes how softly the crumb yields; flaky describes how easily the biscuit separates along buttery seams.
Tenderness is the soft crumb; flakiness is the few buttery seams that pull apart. You want both without croissant-like sheets.
Ingredients That Change the Biscuit
With only a handful of ingredients, small changes show up clearly in the finished biscuit. Flour builds the crumb. Baking powder supplies most of the rise, while baking soda works with tangy buttermilk and helps with browning.
Butter brings flavor and helps create the seams that separate as the biscuit rises.
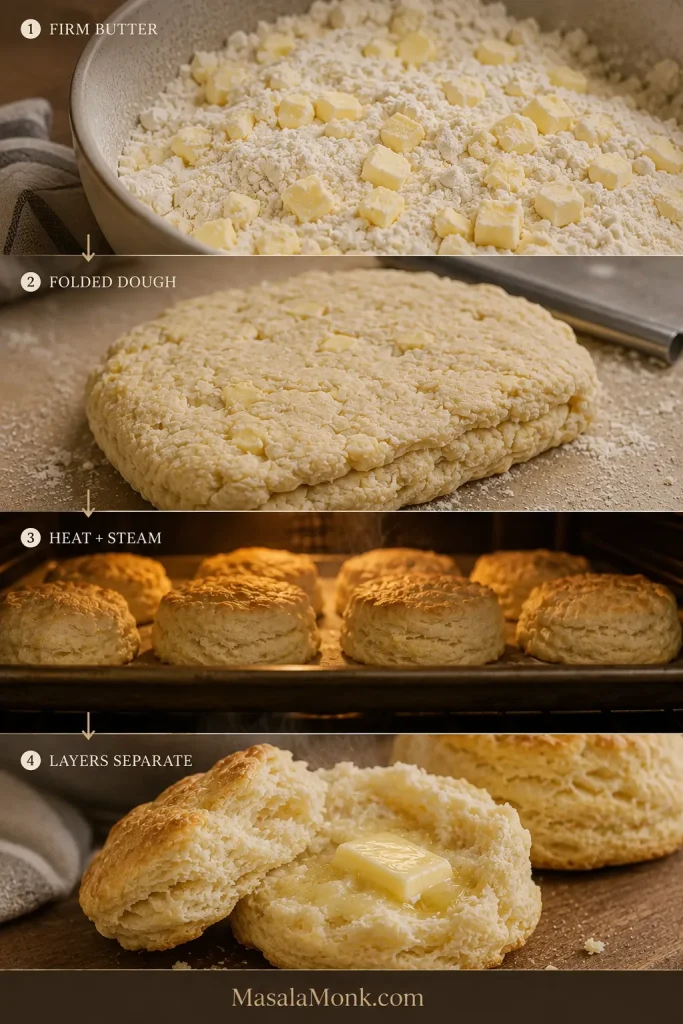
Keeping those butter pieces firm lets them stay distinct until baking; as the butter melts and releases steam, it helps the folded layers separate.
Firm butter stays distinct long enough to create steam and separation in the oven, leaving biscuit-like seams rather than pastry layers.
Buttermilk brings moisture, acidity, and dairy flavor. Salt makes everything taste fuller, while two teaspoons of sugar encourage browning without making the biscuits sweet.
Flour: All-Purpose, Soft Wheat and White Lily
For this recipe, regular all-purpose flour is the default. You do not need White Lily to make a tender Southern biscuit.
Soft-wheat flour has a long association with Southern biscuits because its lower protein content makes a delicate crumb easier to achieve. White Lily’s place in Southern baking comes from its soft red winter wheat, but this recipe was written for ordinary all-purpose flour.
If White Lily or another soft Southern flour isn’t sold where you live, there is no reason to postpone breakfast.
Flour
What It Tends to Give You
Best Approach
Regular all-purpose flour
Tender crumb with enough structure for visible layers
Follow the recipe as written
Soft-wheat all-purpose flour
Especially delicate crumb
Watch the buttermilk because absorption can differ
Self-rising flour
A convenient, classic Southern route
Use a biscuit recipe written for the particular self-rising flour you have
Flour packed into a measuring cup can weigh considerably more than flour spooned in and leveled. Extra flour needs extra liquid; without it, the raw mixture starts dry and the baked crumb often does too.
A packed cup can quietly add extra flour. Weighing 300 g removes that variable before hydration even begins.
What About Self-Rising Flour?
Self-rising flour can make excellent Southern biscuits, but brands vary in their leavening and salt. It isn’t an exact substitute for the flour, baking powder, baking soda, and salt used here, so use a biscuit recipe written specifically for the self-rising flour you have.
Butter, Lard or Shortening?
Fat
What Changes
Why Use It
Butter
Rich flavor with obvious flaky seams
The best fit for this version
Lard
Very tender crumb with good flake
Classic savory richness
Shortening
Soft, tender crumb with less buttery flavor
Stable and easy to handle
Blend
Balanced tenderness and layering
A middle ground between flavor and stability
Butter is the fat used for this version, but how it is worked into the flour matters just as much as which fat you choose. This is the point where the mixture is easiest to assess before any liquid goes in.
Stop while individual butter pieces are still easy to see. Fine crumbs or greasy smears have gone too far.
Start With Cold Cultured Buttermilk
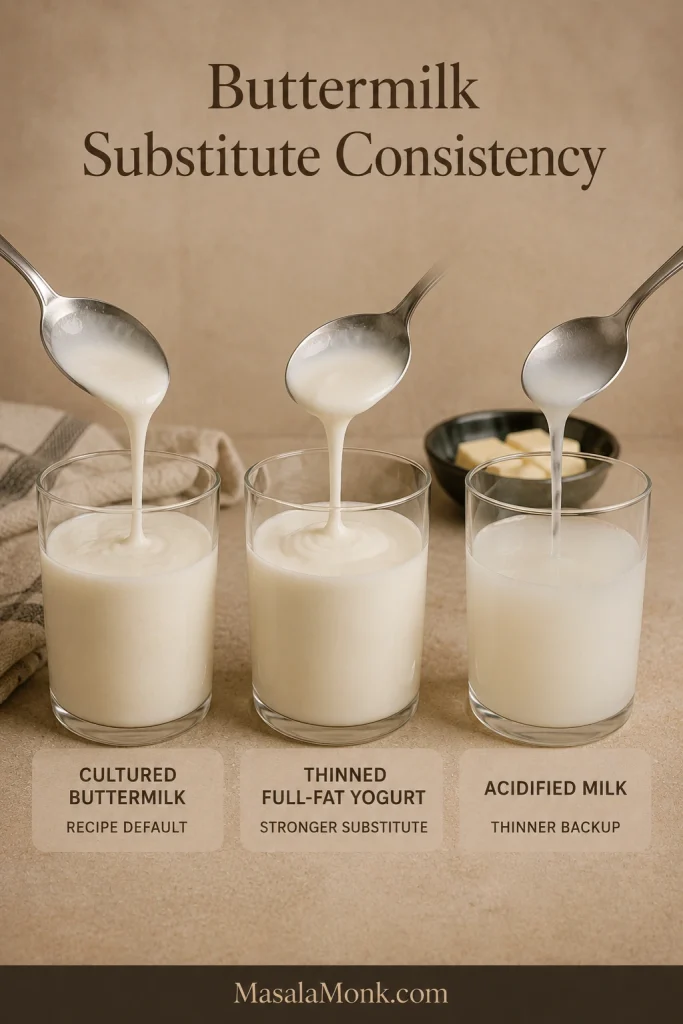
Cultured buttermilk brings acidity, dairy flavor, and a thicker body than ordinary milk. Its consistency varies from carton to carton, and flour absorption varies too, which is why the final tablespoon stays in reserve until you see whether the mixture needs it.
Hold back the final tablespoon so you can correct a dry mixture without making the whole dough too wet.
No buttermilk today? For an emergency substitute, thin full-fat plain yogurt with whole milk until it is pourable but still creamy. Use the consistency as your guide because this isn’t an exact one-for-one substitution.
Whole milk mixed with lemon juice or vinegar can also work in a pinch, although the mixture is thinner than cultured buttermilk. If buttermilk is rarely available to you, a biscuit recipe designed around milk or another dairy will be easier to repeat.
Match cultured buttermilk’s creamy pour as closely as you can; a thin substitute changes how quickly the flour hydrates.
Learn the Dough by Feel
If biscuit dough has made you second-guess yourself before, this is usually the moment. Good biscuit dough looks rougher and feels softer than many people expect.
“Do not overmix” is easy advice to repeat. Knowing what to look for when you stop is far more useful.
A few dry-looking patches are fine if a squeezed handful holds together. Don’t stir to a smooth dough.
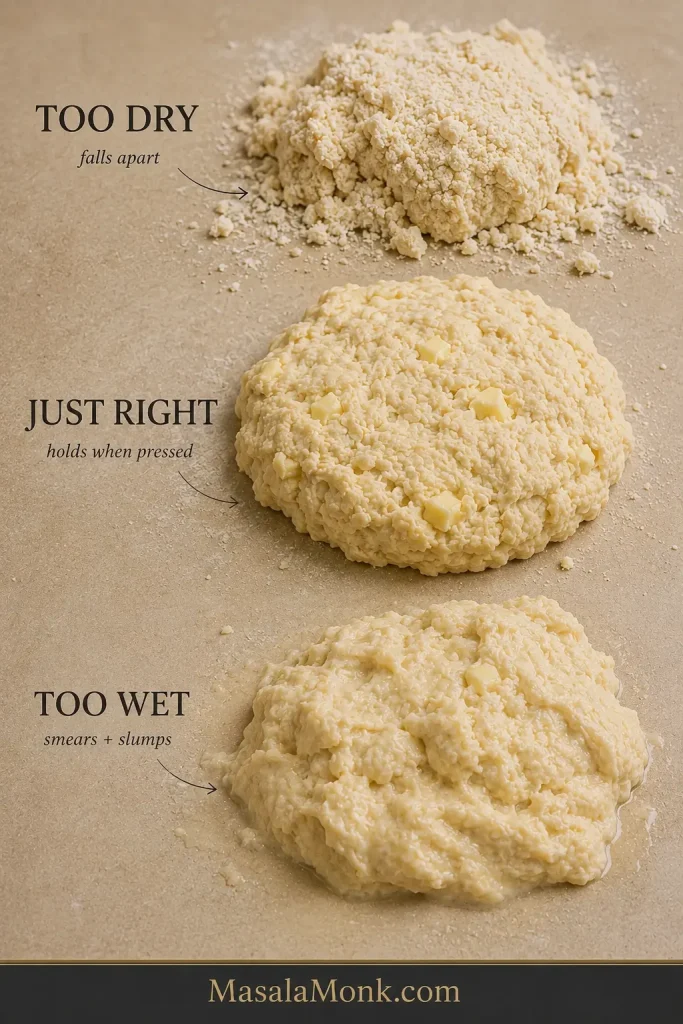
Too Dry
The shaggy mixture breaks into dusty pieces, loose flour sits underneath, and a handful refuses to stay together when squeezed.
Add a little of the reserved buttermilk and press again. Use the rest only if loose dry flour remains and the mixture still refuses to hold together.
Just Right
The mixture looks rough and uneven. It feels lightly tacky and holds when pressed without becoming smooth or elastic. Pieces and flat streaks of butter remain visible.
This is the stage people often accidentally “fix” with extra flour. Leave it alone. Biscuit dough does not need to become neat before it becomes good.
The target is rough, soft and lightly tacky—not smooth, elastic or paste-like.
Too Wet
A mixture that smears across the counter, slumps instead of holding a rectangle, or clings to your hands in thick paste has moved beyond light tackiness.
When the dough is only slightly sticky, correct the surface rather than changing the dough itself. A small dusting of flour on the counter is usually enough.
You only need enough flour to prevent sticking. White ridges or a heavily coated underside mean too much.
Once you can recognize this texture by feel, the recipe stops being something you follow nervously and starts becoming something you know how to make.
Dry dough fractures, good dough presses together, and overly wet dough sticks heavily and slumps or smears.
The folds create seams, starting thickness gives the biscuit room to rise, and cutting and spacing shape the final height and crust.
Four Folds Build Layers Without Overworking the Dough
Each fold stacks pieces of butter and dough over one another. In the oven, those rough layers separate into the seams that make a warm biscuit easy to pull apart.
Later folds should feel slightly more structured while the surface stays rustic. Stop if the dough turns springy or polished.
A biscuit with very little folding has a softer, more even crumb. More elaborate lamination creates increasingly dramatic sheets. Four simple folds give this version a middle ground: visible flake and good height with a soft biscuit crumb.
Pale butter flecks should remain visible after folding; greasy translucent smears mean the dough has warmed too much.
Thickness and a Clean Cut Set Up the Rise
Starting thickness limits how tall a biscuit can become. A thin biscuit can rise beautifully and finish short simply because it had less height at the beginning.
Check from the side: an even 1-inch slab gives every biscuit the same starting chance to rise.
A sharp cut also leaves the folded edge open to rise. Twisting presses those edges together, which is why the recipe uses one straight downward cut and a straight lift. King Arthur Baking’s guide to higher-rising biscuits goes deeper into the relationship between cutting and rise.
Shape and Spacing Change the Crust
If You Want…
Choose…
Soft pull-apart sides
Biscuits touching or almost touching
More browned crust around each biscuit
More space between the biscuits
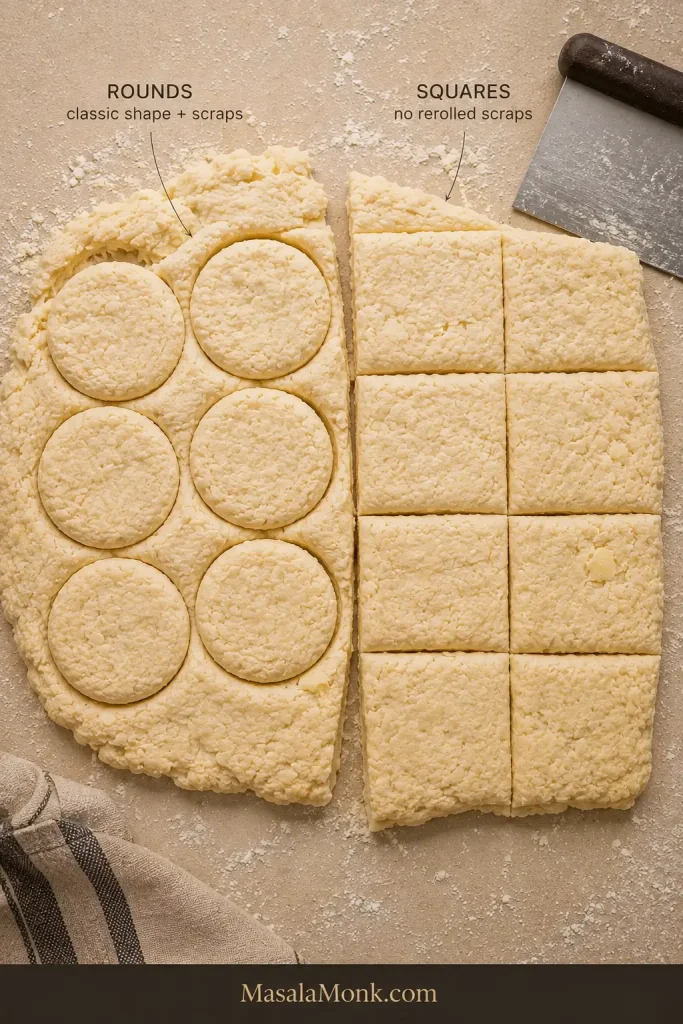
Classic round biscuits
A sharp round cutter
No rerolled scraps
Squares cut with a sharp knife or bench scraper
Close biscuits support one another as they rise and shield their sides from some direct oven heat, leaving those sides pale and soft. More room exposes additional surface to heat and creates more crust.
Close spacing gives softer sides; more room gives more browned crust. Choose one result and keep spacing consistent.
Rounds leave scraps between the cuts. Press them together once and cut again. Biscuits cut from the scraps may rise a little less evenly because that dough has already been handled. Squares avoid scraps altogether.
A biscuit can lean or split unevenly and still be excellent inside. Height gives you useful feedback; perfection is not the goal.
Bake Hot and Look Beyond the Top
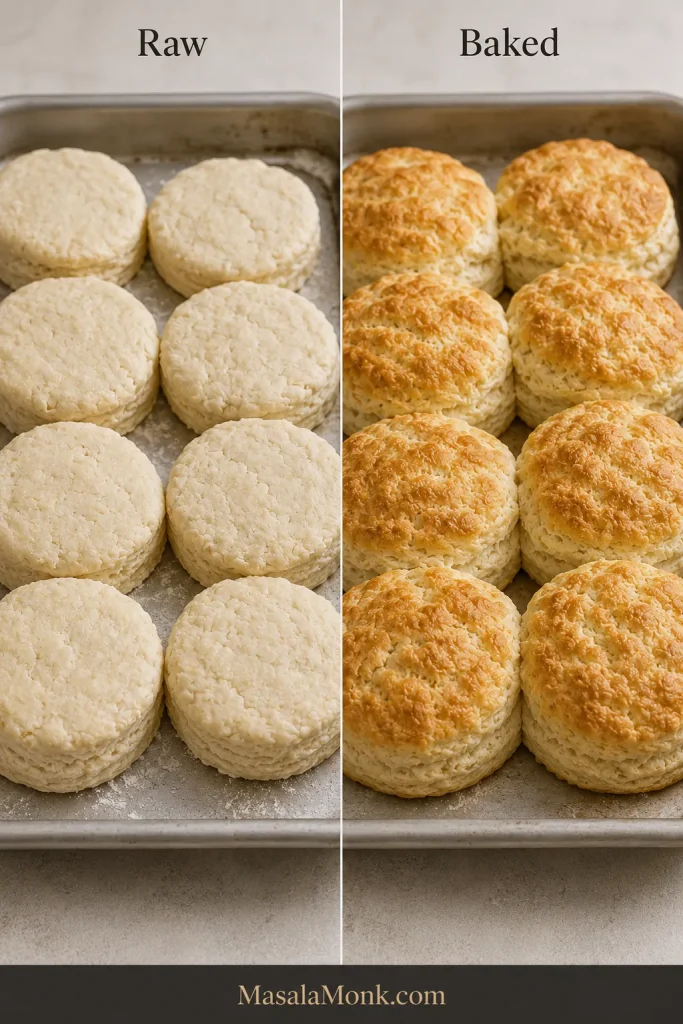
Oven heat affects more than browning: it also controls how quickly the biscuit structure sets while the dough expands. That makes the before-and-after shape worth watching alongside color.
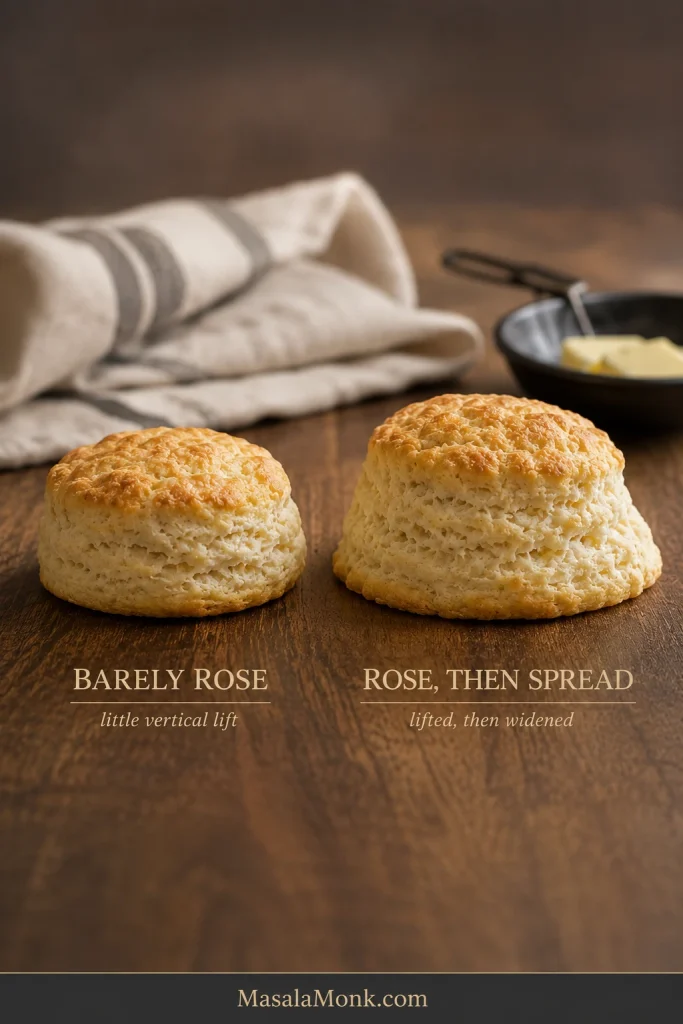
Successful biscuits gain much more height than width. A spreading footprint is a useful clue even when the tops brown well.
For this size and thickness, use 450°F / 230°C conventional. Begin checking around 12 minutes, and look at the whole biscuit instead of judging it by the top alone.
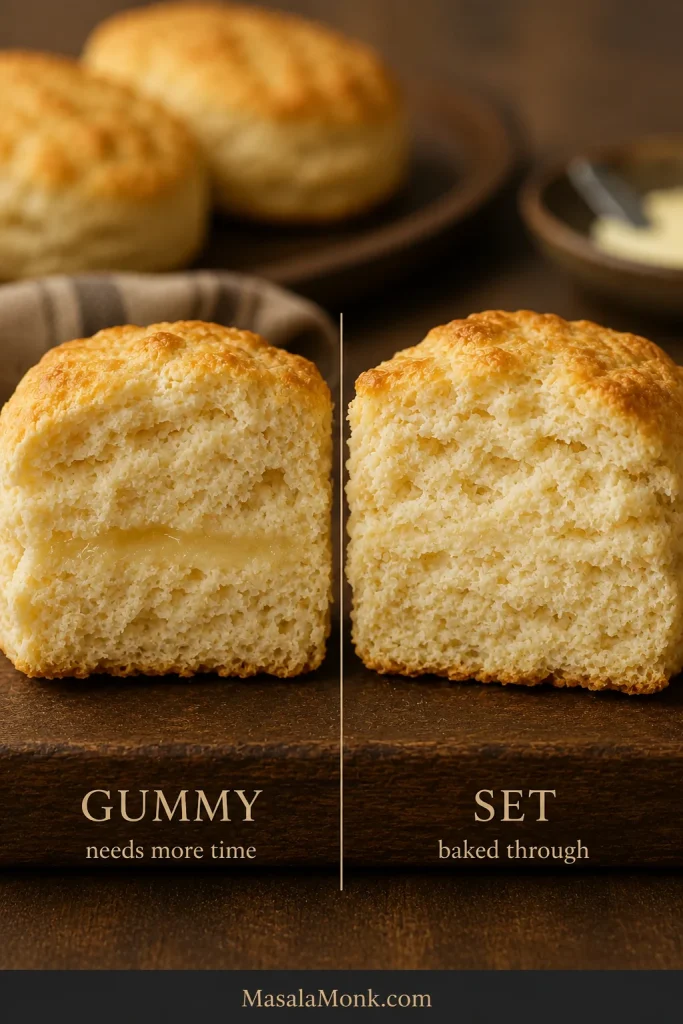
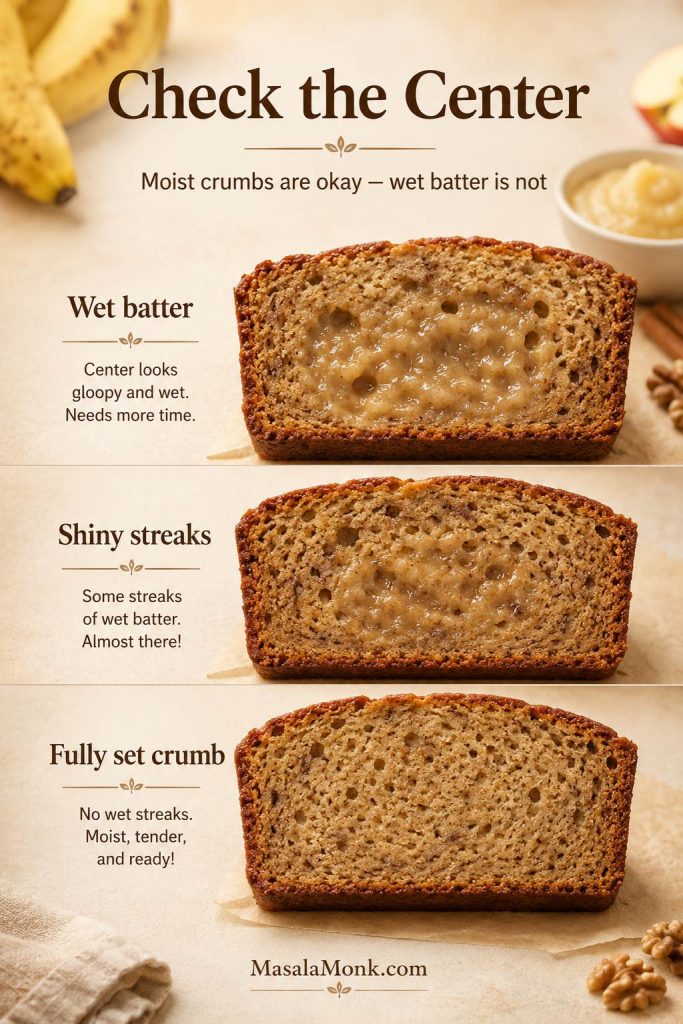
When color and center disagree, trust the center. Golden tops cannot rescue a glossy, compressed middle.
Top: golden, with no raw-looking floury patches.
Sides: set and risen, with visible separation through the layers.
Bottom: evenly browned, not scorched.
Center: fully set, without glossy raw dough or a gummy stripe.
A large or extra-thick biscuit can become beautifully golden before its center is completely baked. When in doubt, split one of the less-perfect biscuits and look inside.
A gummy center often looks slightly glossy and compressed rather than obviously raw.
If they rose well, split easily, and are tender through the middle, they’re done. Eat one while it’s hot.
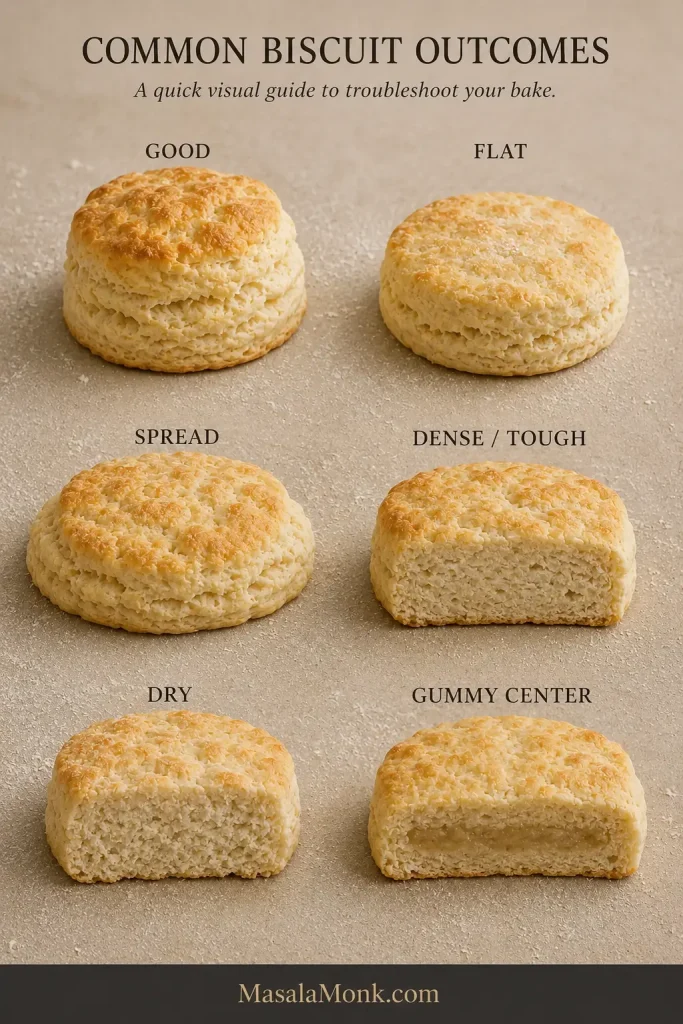
A low, dry, or oddly shaped batch usually leaves clues about what happened.
Read the shape first, then the crumb: together they usually point back to the stage that went wrong.
Baking powder that has been open for a long time is worth replacing when repeated batches stay unusually low. When browning or timing consistently seems far from what the recipe describes, an inexpensive oven thermometer can also tell you whether the oven is reaching the temperature you set.
What You See
Where to Look
Next Batch
Flat and wide
Warm butter, tired leavener, thin starting slab, oven not fully hot
Keep the fat firm, use fresh baking powder, start thick, preheat fully
Tough or bread-like
Extra flour, prolonged mixing or kneading
Weigh the flour and stop while the mixture is rough
Dry
Too much flour, too little buttermilk, long bake
Check hydration before shaping and begin checking the oven sooner
Tender but no obvious layers
Butter worked in finely, less folding
Leave some butter pieces visible and use the four folds
Spread sideways
Warm butter, overly loose dough, oven not fully hot
Firm the shaped biscuits before baking and check the oven
Leaning or crooked
Uneven slab or angled cut
Pat evenly and cut vertically
Dark bottoms
Dark or thin pan, low rack, hot-running oven
Check earlier, use a heavier pan if possible, or move the rack higher
Gummy middle
Thick or large biscuit pulled before the center set
Give the middle more time and verify oven temperature
Flat: No Rise or Too Much Spread?
A biscuit that barely gains height points toward tired leavening, a thin starting slab, or an oven that never became fully hot. A biscuit that lifts and then widens points more toward warm butter or dough too loose to hold itself upright.
Short and narrow points to poor lift; noticeably wider points more toward spread. Similar height can hide different failures.
Tough Is Different From Crisp
A browned edge can be pleasantly crisp. Toughness shows up through the center as a firm, bread-like chew where the crumb ought to yield. Extra flour and continued mixing after the dough has come together are common reasons.
Dry: Dough Problem or Oven Problem?
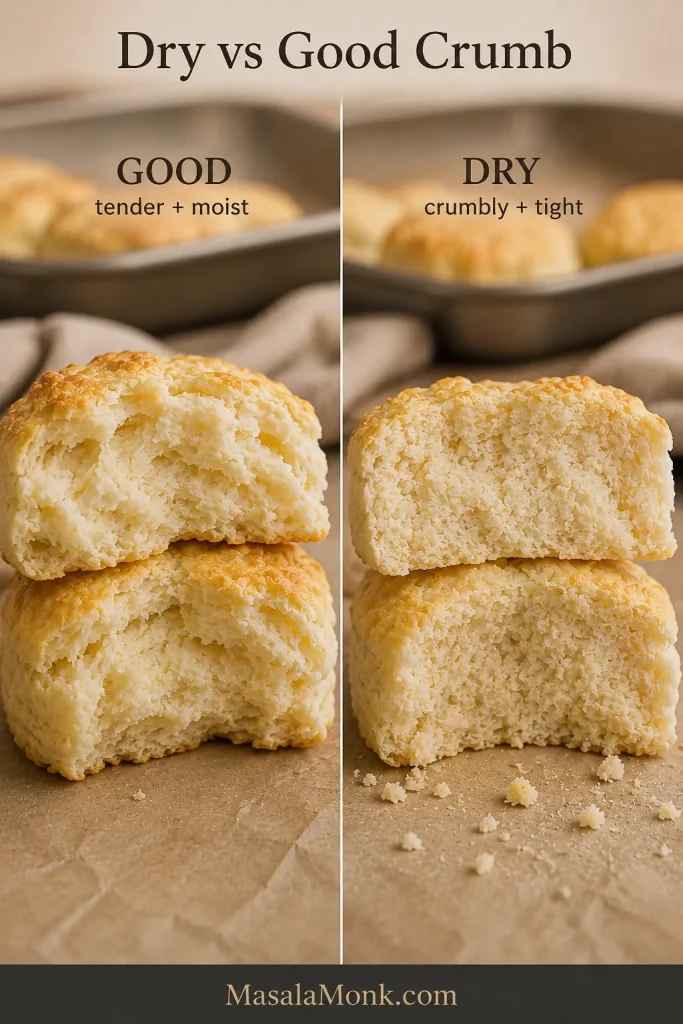
Raw dough that crumbles and needs firm pressure to stay together started too dry. Dough that went into the oven cohesive and came out dry points more toward baking time. Even a couple of unnecessary minutes can change the crumb noticeably.
Good crumb bends and separates softly; dry crumb fractures and sheds small loose pieces.
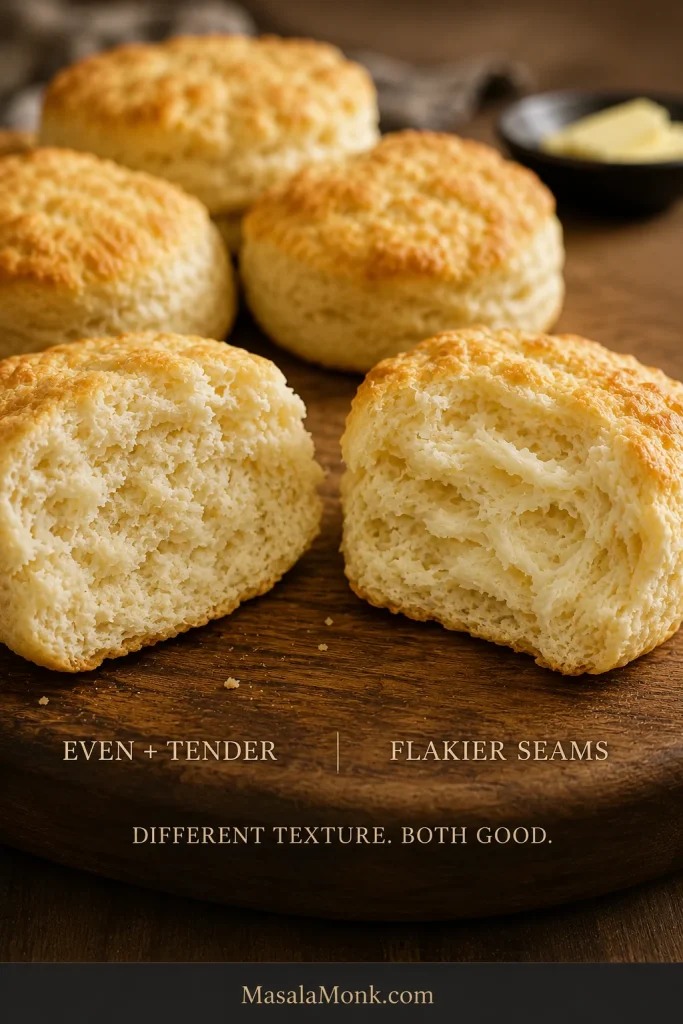
Tender Without Layers Can Still Be a Good Biscuit
A tender biscuit with a soft, even crumb may simply have had its butter worked in more finely. That’s a perfectly good biscuit with a different texture.
Tenderness matters more than layer count. An even, soft crumb can be every bit as successful as a flakier one.
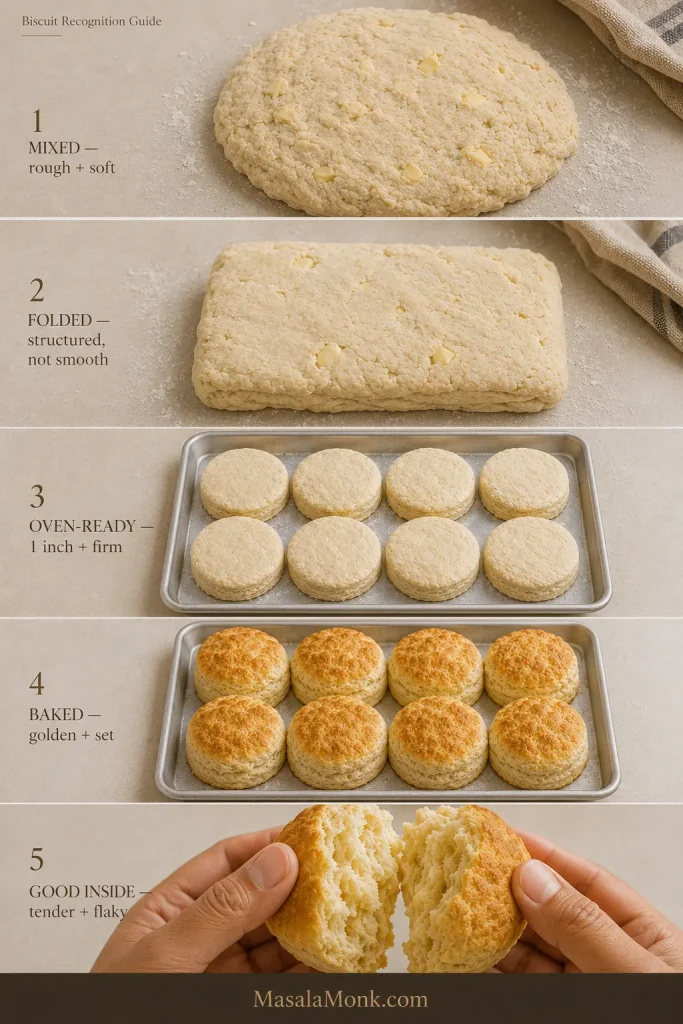
Before moving into make-ahead, this recognition guide gathers the recipe’s main visual checkpoints in one place—from mixed dough through the finished crumb.
Match your dough or biscuit to the closest stage here, then continue from that visual checkpoint instead of guessing.
Make Ahead, Freeze, Store and Reheat
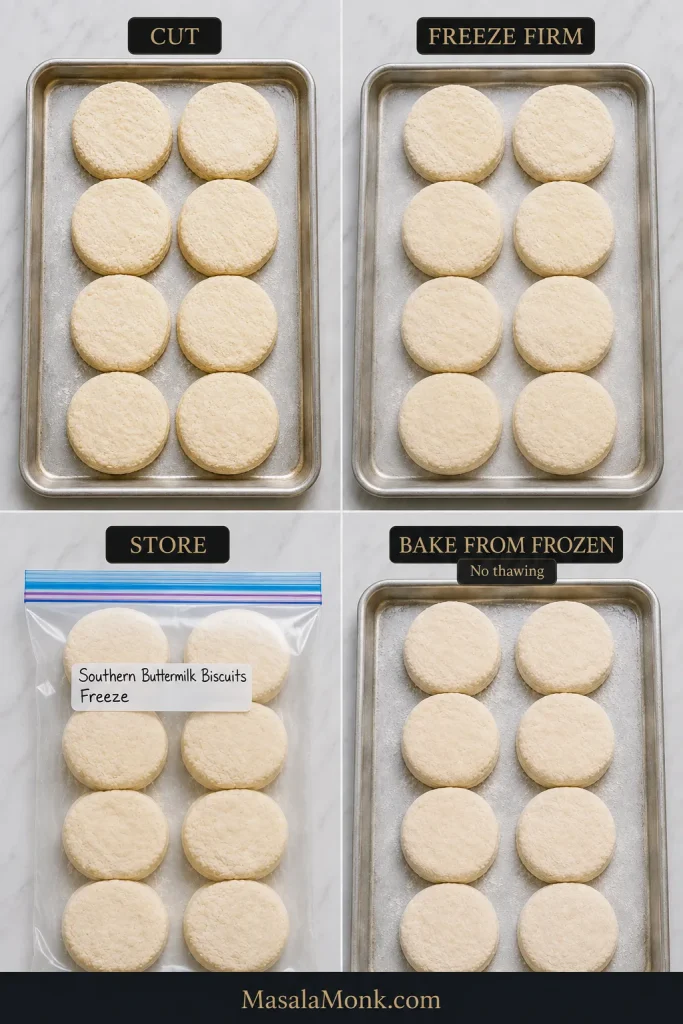
If flouring the counter first thing in the morning is the only thing standing between you and homemade biscuits, freeze the cut biscuits before baking.
Freeze until the rounds are firm enough to transfer without denting, then bag them.
Freeze Before Baking
Prepare and cut the biscuits normally.
Place them on a lined tray with space between them.
Freeze until completely firm.
Transfer to a freezer-safe bag or airtight container.
Use within 2 months for best quality.
Bake Straight From Frozen
Put the biscuits straight into the 450°F / 230°C conventional oven without thawing. Frozen biscuits take longer than fresh ones, so use the same top, side, bottom, and center cues instead of assuming another recipe’s timing will fit this dough.
Store and Reheat Baked Biscuits
Room temperature: Cool completely and keep airtight for up to 2 days.
Longer storage: Freeze them instead of refrigerating them for several days.
Freeze baked biscuits: Wrap well once cool and use within 2 months for best quality.
Oven: Reheat at 350°F / 175°C for 5–8 minutes, until warm through the center.
Microwave: For one biscuit, start with 10–15 seconds and add another short burst only if needed.
A reheated biscuit that seems a little dry usually comes back nicely when split hot and spread with butter.
What to Serve With Southern Biscuits
The first biscuit off the tray barely needs anything. Salted butter, honey, or a spoonful of homemade pear jam are enough.
If potatoes belong on the breakfast plate too, crispy air-fryer hash browns keep the stovetop free while the rest of breakfast comes together.
Biscuits also make excellent breakfast sandwiches with eggs and sausage, country ham, or fried chicken. For a bigger Sunday or holiday table, a brown sugar honey glazed ham turns them into the bread everyone keeps reaching for between bites.
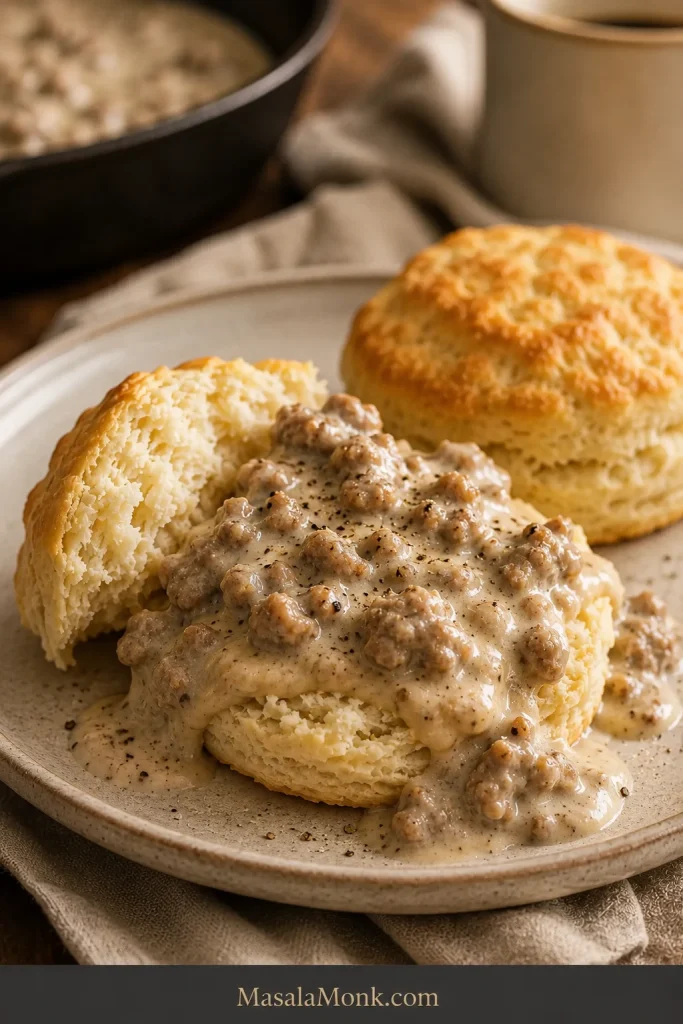
And, of course, a soft but sturdy biscuit is exactly what you want underneath peppery sausage gravy, where the gravy can settle into the torn layers without turning the whole biscuit to mush.
Split rather than crush the biscuit so gravy soaks into the crumb while some baked crust stays intact.
Southern Buttermilk Biscuit FAQs
Do I need White Lily flour for Southern biscuits?
No. Soft-wheat flour can make especially delicate biscuits, but ordinary all-purpose flour works very well when the recipe is designed around it. This recipe uses all-purpose flour deliberately.
Why is my biscuit dough sticky?
A little tackiness is normal. Dough that sticks lightly to your fingers but holds its shape is in the right zone. Heavy smearing and slumping call for a small dusting of flour.
Can I make biscuits without a biscuit cutter?
Yes. Cut the final rectangle into squares with a sharp knife or bench scraper. Squares give you clean edges and leave no scraps.
Can I make the biscuits the night before?
The easiest make-ahead route is to cut and freeze the raw biscuits, then bake them directly from frozen. That keeps morning work minimal while preserving the cold butter and freshly mixed dough structure.
The next batch should feel less mysterious. You now know what firm butter, soft dough that holds together, and a fully baked center look like.
Pull one apart while it is still warm. The center should give along the folds, and a little butter should disappear straight into the crumb. Then decide whether the first biscuit needs honey, jam, or nothing at all.
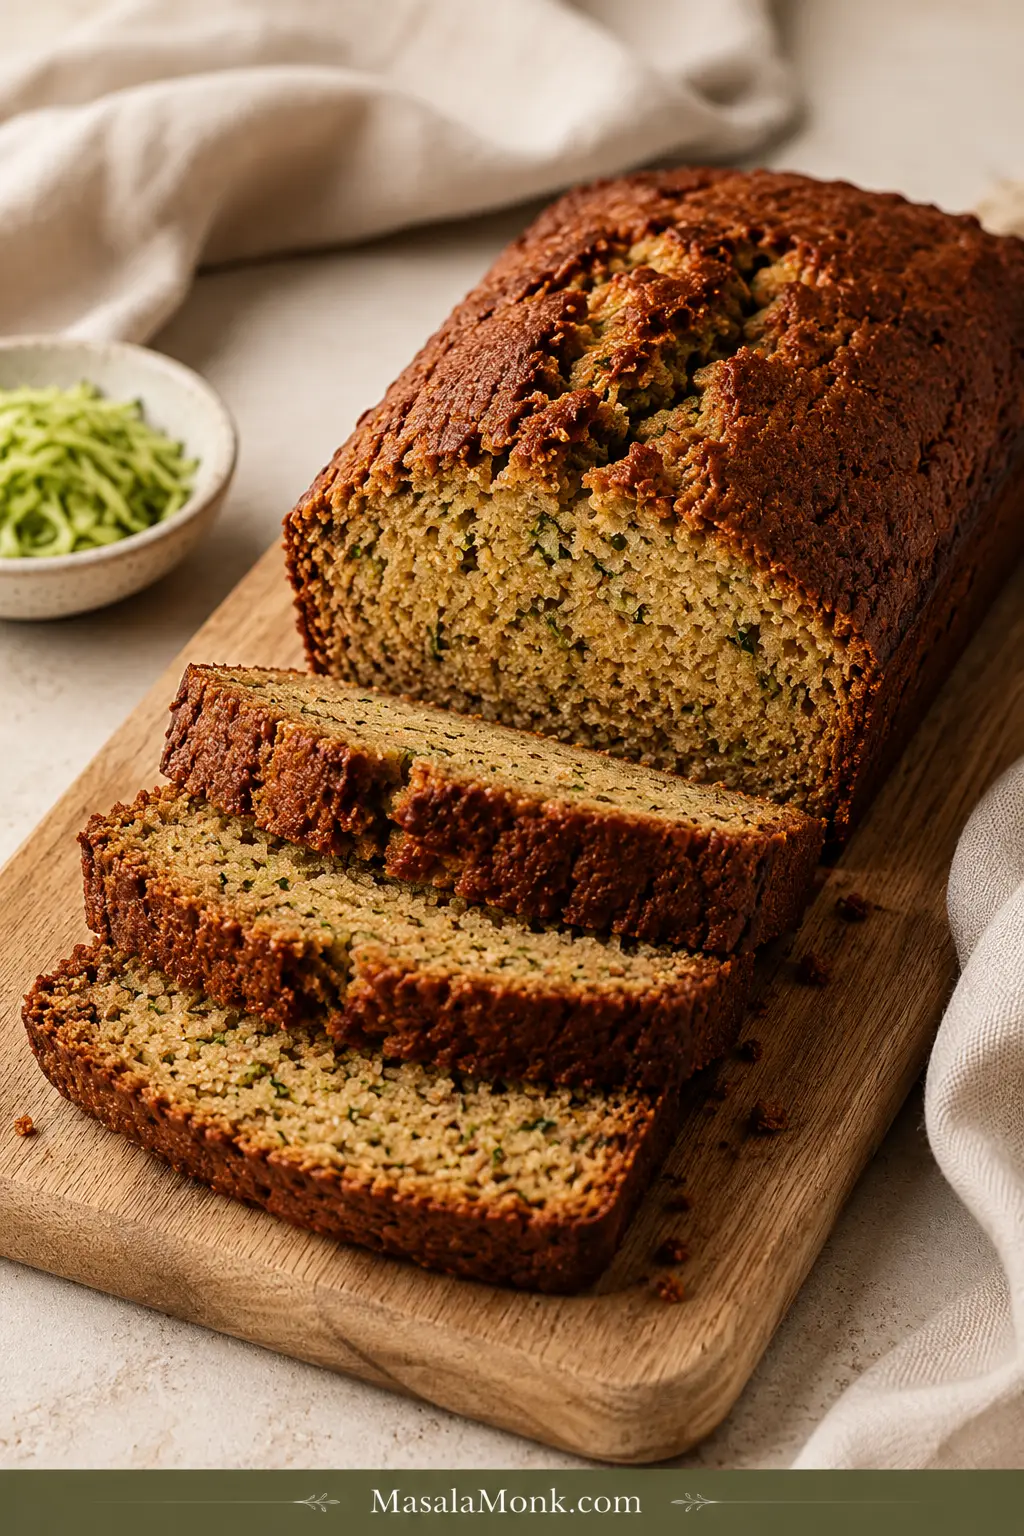
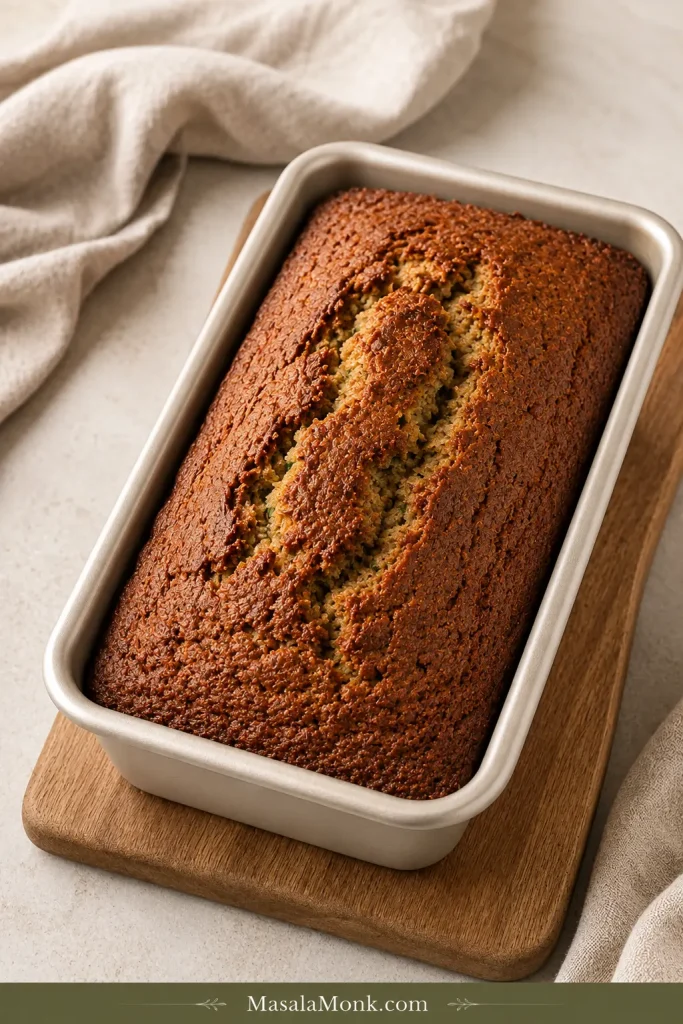
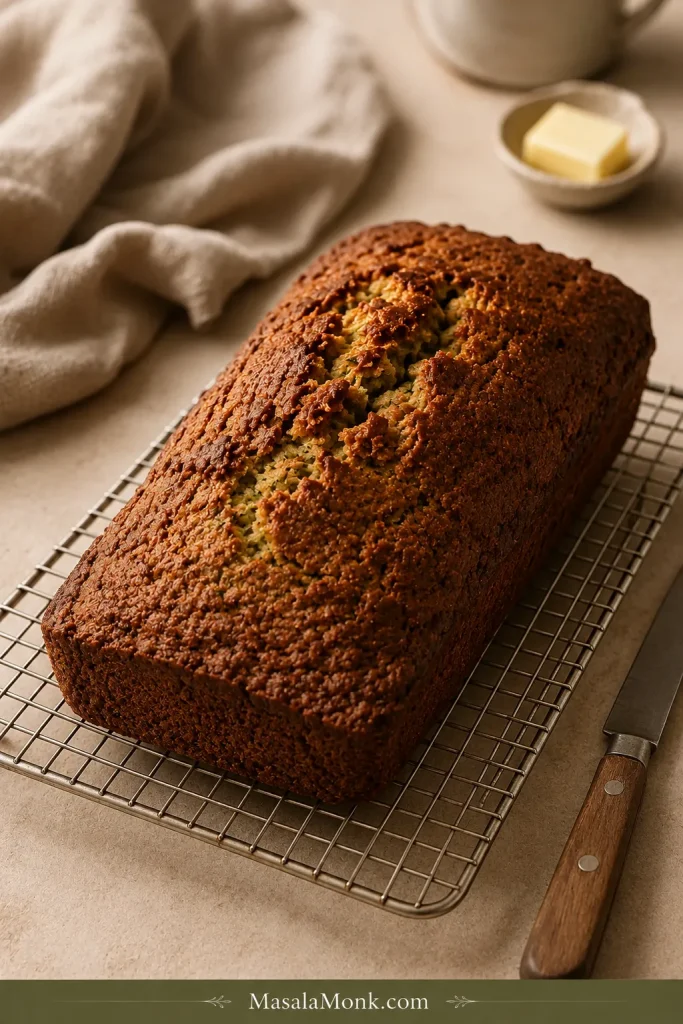
A good zucchini bread has a deeply golden top with a natural split down the middle, warm cinnamon in the first bite, and a tender crumb dotted with little green flecks. A slice should bend gently without falling apart, with enough moisture to stay lovely today and still be worth reaching for tomorrow.
Zucchini creates that tenderness, but it can also make the middle deceptive. The crust may look beautifully baked while the batter underneath still needs a few more minutes.
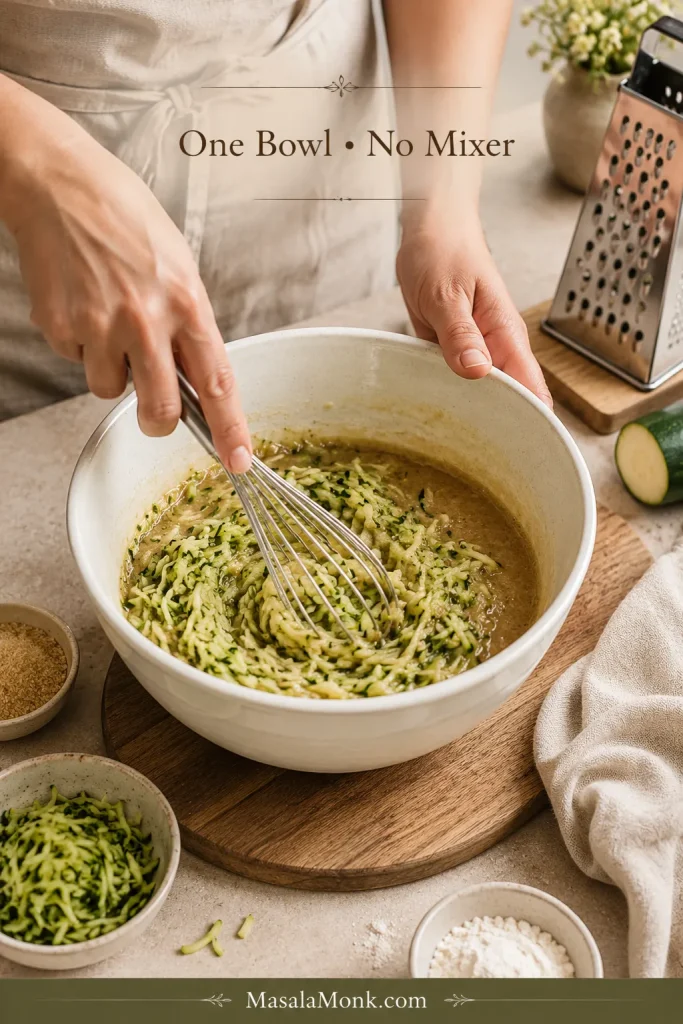
This version keeps the process easy: one bowl, no mixer, no peeling small or medium zucchini, and no wringing fresh shreds dry. You grate, stir, fold and bake.
Keep the moisture in the shreds, leave the puddle behind, and bake until the middle is set.
Quick Answer: How Do You Make Moist Zucchini Bread Without a Wet Middle?
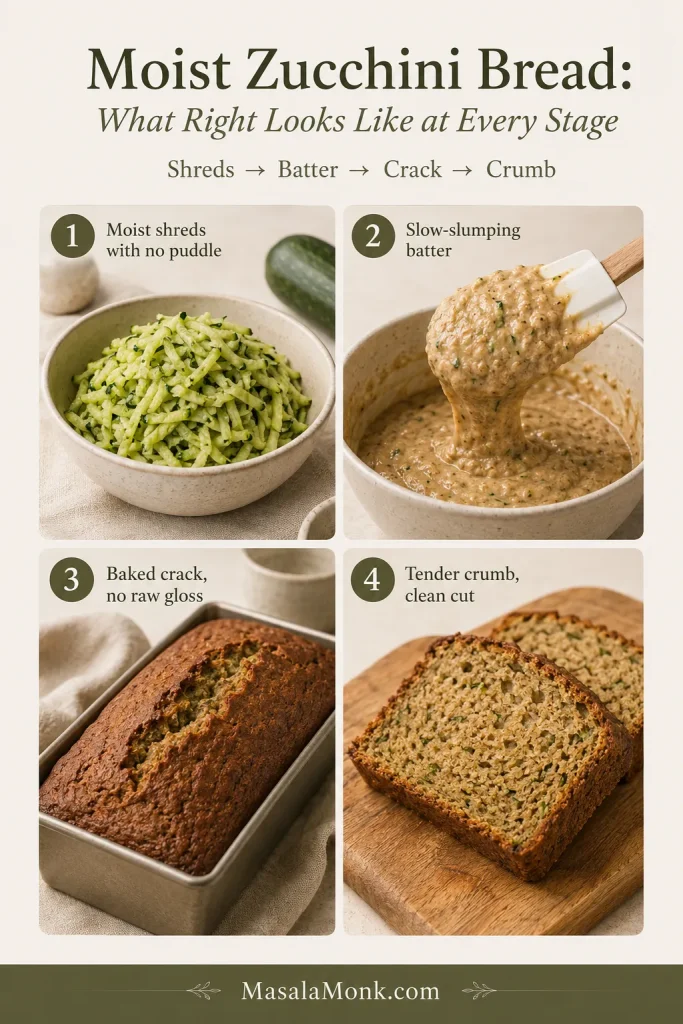
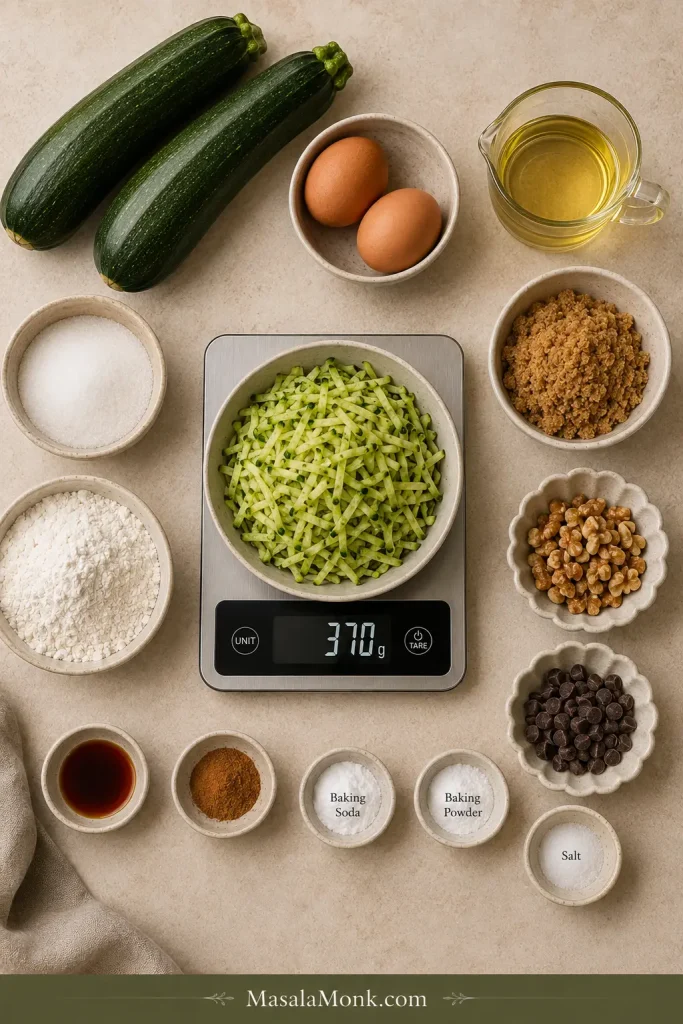
Do not squeeze fresh zucchini dry for this recipe. Grate it on the large holes of a box grater and use 370g / 13 oz, about 2 firmly packed cups. Weigh the shreds themselves; if liquid has collected separately beneath them, leave that puddle behind.
Bake the thick batter in a 9 × 5-inch / 23 × 13 cm loaf pan at 350°F / 175°C. The crack across the top should reveal baked crumb, and a thin skewer or knife pushed into the loaf should show no raw batter.
You can make good zucchini bread without a thermometer. If you have one, it gives you the most objective final check when the crack or tester leaves any doubt. Around 200–205°F / 93–96°C indicates the loaf is baked through.
Use the sequence as checkpoints: moist shreds → thick batter → baked crack → settled crumb. Problems are easier to correct before the loaf reaches the oven.
Zucchini Bread Recipe
This is a cinnamon-forward, oil-based loaf with plenty of zucchini, a golden split top and a crumb that stays tender without feeling wet. Make it plain, or fold in nuts or chocolate when that sounds better.
About 55–60 minutes; check the loaf itself for doneness
Zucchini
370g / 13 oz freshly grated zucchini, not wrung dry
Cooling
15 minutes in the pan, then completely on a rack
You will need: one large mixing bowl, a box grater, fork or whisk, flexible spatula, 9 × 5-inch loaf pan, parchment paper and a cooling rack. A digital scale is particularly helpful; an instant-read thermometer is optional.
Ingredients
Weigh 370g of the grated flesh you will actually use, especially if an oversized zucchini needs trimming first.
370g / 13 oz freshly grated zucchini, about 2 firmly packed cups, not wrung dry
2 large eggs
160ml / ⅔ cup neutral oil, such as sunflower, canola or vegetable oil
95g / 3.4 oz (½ cup packed) brown sugar, light or dark
100g / 3.5 oz (½ cup) granulated sugar
1 teaspoon vanilla extract
1 teaspoon fine salt
¾ teaspoon baking soda
½ teaspoon baking powder
1¼ teaspoons ground cinnamon
⅛ teaspoon ground nutmeg, optional
260g / 9.2 oz (2 cups) all-purpose flour, spooned and leveled if using cups
Up to 85g / 3 oz chopped walnuts, pecans or chocolate chips, optional
Instructions
Hand mixing makes it easier to stop as soon as the batter comes together.
Prep and Mix the Batter
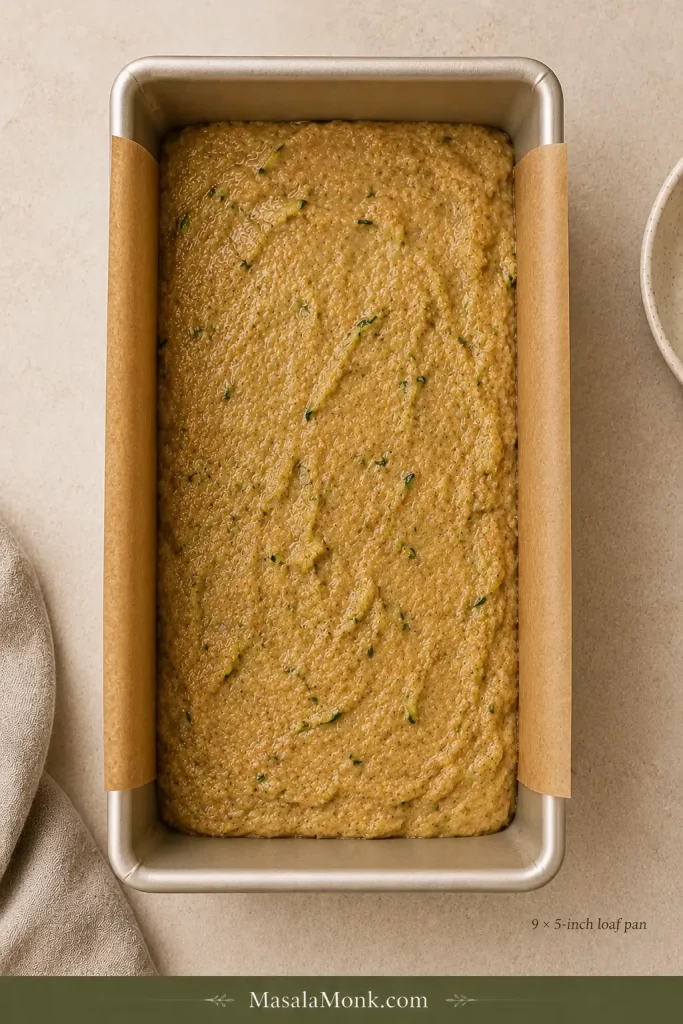
Heat the oven. Set a rack in the center and preheat to 350°F / 175°C. Lightly grease a 9 × 5-inch / 23 × 13 cm loaf pan and line the long sides with a parchment sling.
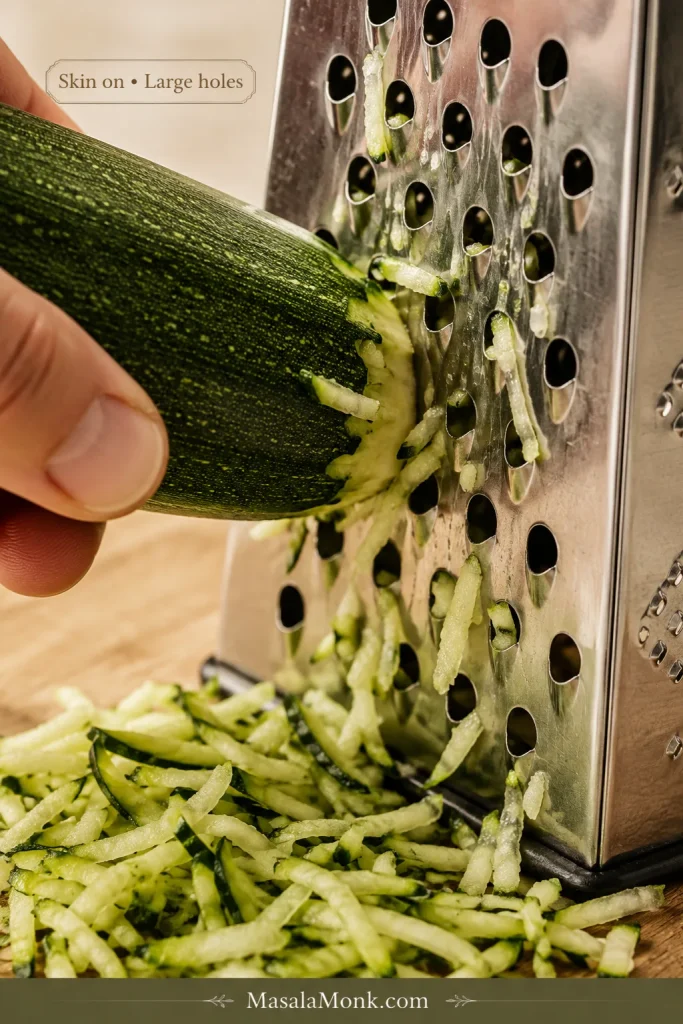
Grate the zucchini. Leave small and medium zucchini unpeeled and grate them on the large holes of a box grater. Measure 370g / 13 oz. Keep the moisture in the shreds, but leave behind any liquid that has pooled separately. Using oversized or frozen zucchini?See the prep notes first.
Mix the wet ingredients. Put the grated zucchini in a large bowl. Add the eggs, oil, brown sugar, granulated sugar, vanilla and salt. Stir until evenly combined.
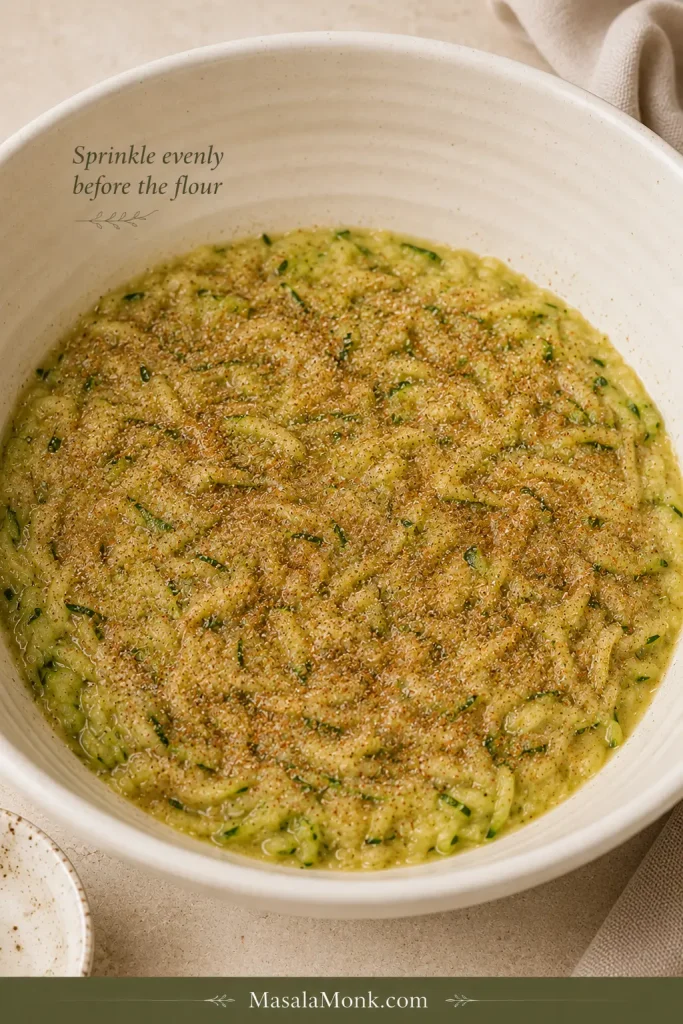
Add the spices and leaveners. Sprinkle the cinnamon, nutmeg, baking soda and baking powder evenly across the surface. Stir thoroughly, scraping around the bowl, so everything is well distributed before the flour goes in.
Scatter the leaveners broadly before the flour goes in so they distribute evenly through the loaf.
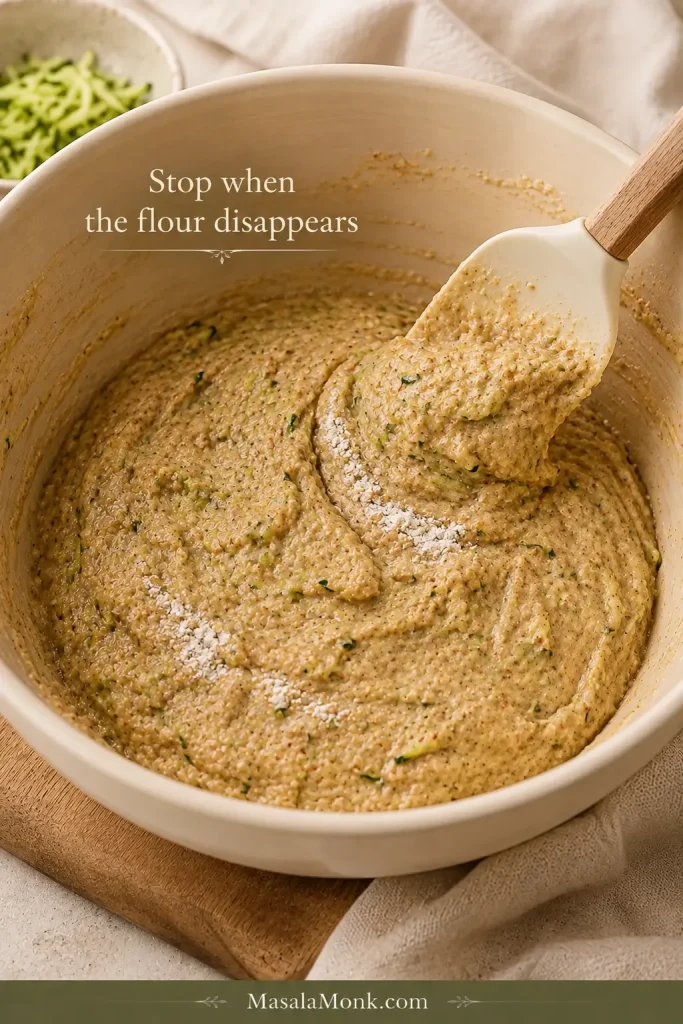
Fold in the flour. Add the flour and fold just until the last dry streak disappears. Fold in nuts or chocolate chips now, if using. The batter should spread easily with a spatula and slump slowly when lifted.
Stop when the last dry flour streak disappears; extra folding only works the batter harder.
Fill, Bake and Cool
Fill the pan. Scrape the entire batch into the prepared pan and smooth the top lightly.
Use the full batch in the intended 9×5-inch pan so the center bakes at the expected depth.
Bake. Bake for about 55–60 minutes. Near the end of that window, the top will usually be deeply golden with a natural crack running across it.
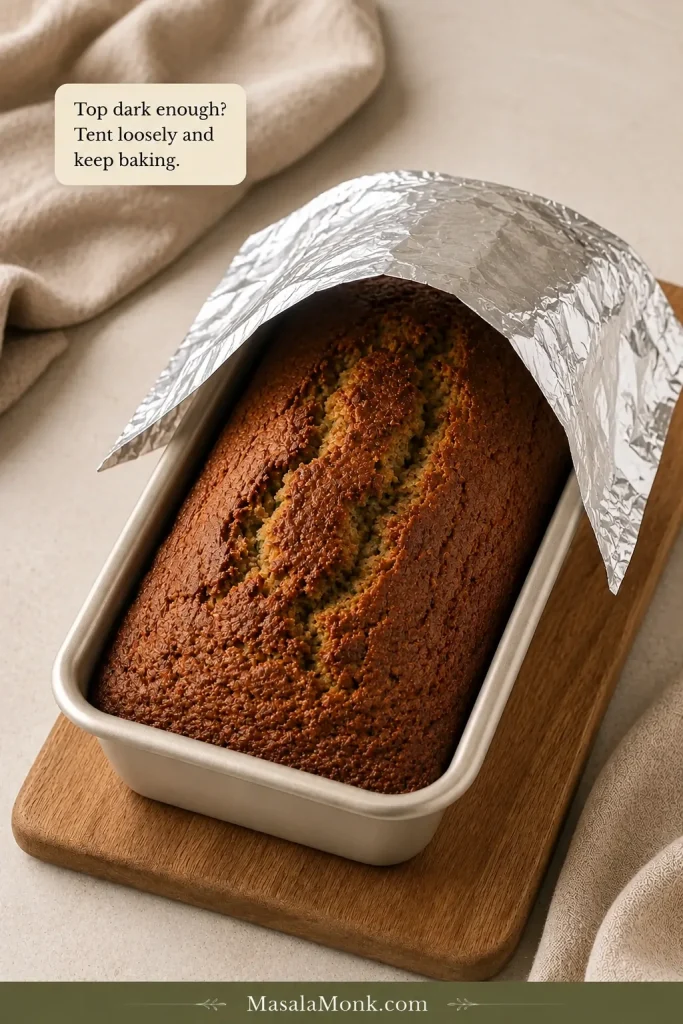
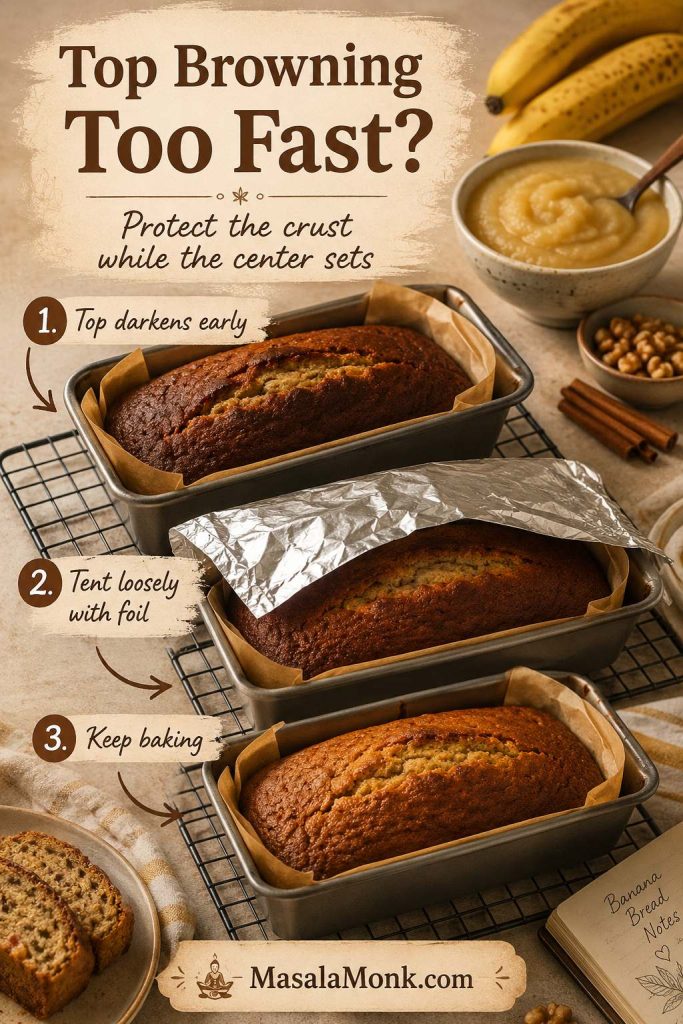
Check before removing it. Look into the crack and test the loaf with a thin skewer or knife. A few tender crumbs are fine; shiny raw batter needs more time. Loosely tent the top with foil if it already has enough color.
Once the top is golden and split, the center—not surface color—decides whether the loaf is done.
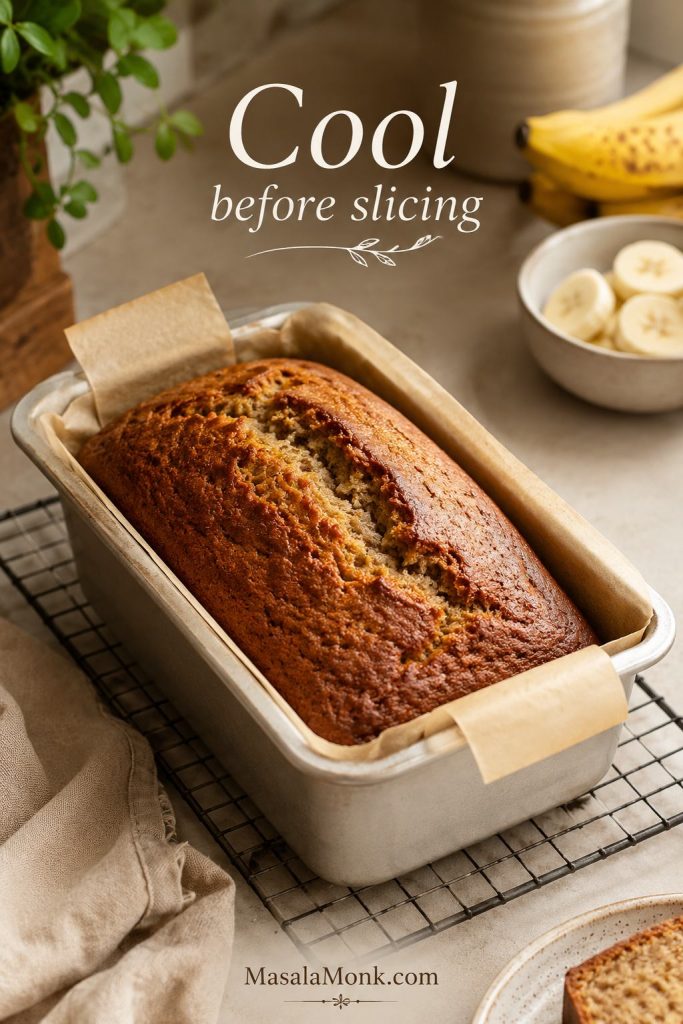
Cool. Leave the bread in its pan for about 15 minutes, then lift it onto a rack. Cool completely for clean slices and a fully settled crumb.
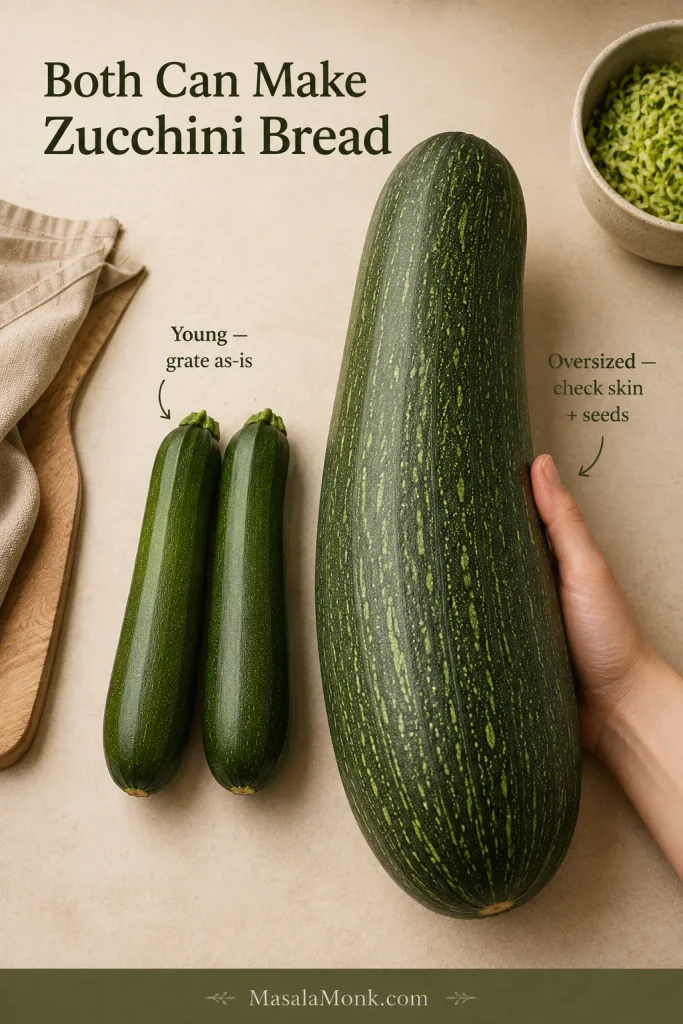
Freshly grated zucchini is the reference point for this loaf. Small supermarket zucchini are the simplest route, but the oversized one hiding beneath the garden leaves can work too.
Prep changes with zucchini size; the target stays 370g of usable grated flesh.
You have
What to do
Small or medium fresh zucchini
Leave the skin and seeds in place. Grate and measure 370g.
Large garden zucchini
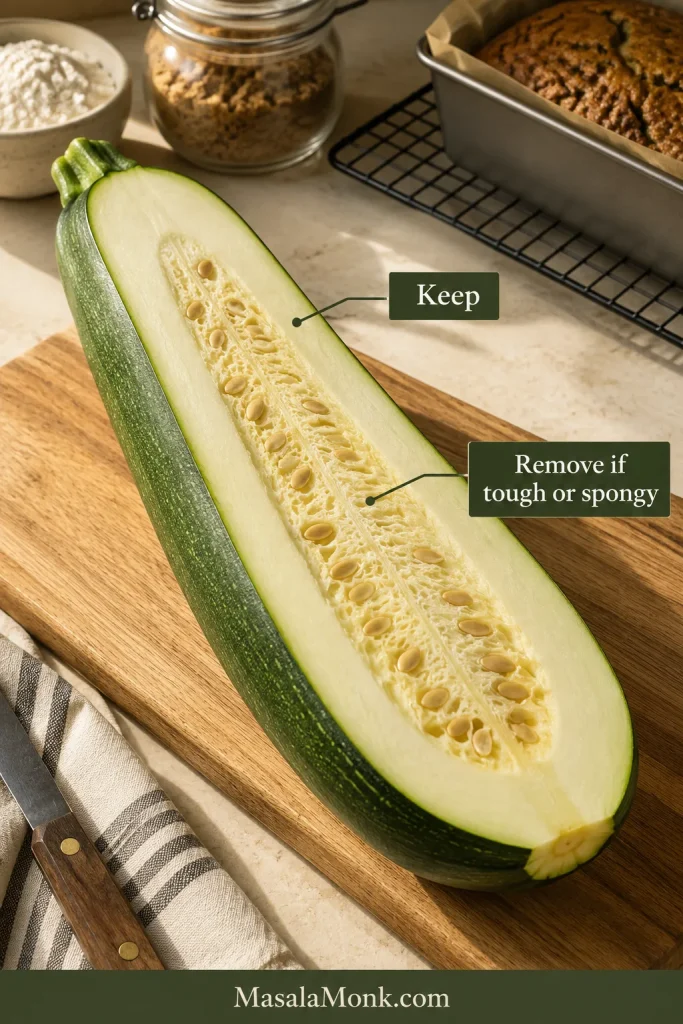
Cut it open first. Remove tough skin or a pale, spongy cavity full of hard seeds if necessary, then grate and measure 370g of the usable flesh.
Frozen shredded zucchini
It can work, but it will not behave exactly like fresh zucchini after thawing. See the note below.
How to Prepare Zucchini for Bread
Peel, Seeds and Grating
Do you need to peel it? No. Thin zucchini skin softens during baking and leaves the familiar green flecks through each slice. Peel only an oversized mature zucchini whose skin has become leathery.
What about the seeds? Leave young seeds alone. With a huge garden zucchini, scoop out the middle only when it has become pale, spongy and filled with hard mature seeds.
Remove a hard-seeded, spongy center before weighing so the 370g reflects usable flesh.
Which grater? Use the large holes of a box grater. They produce strands that disappear comfortably into the baked crumb without turning the raw zucchini into pulp.
Grate over a plate or shallow bowl so separately pooled liquid is easy to leave behind.
Should You Squeeze Zucchini for Zucchini Bread?
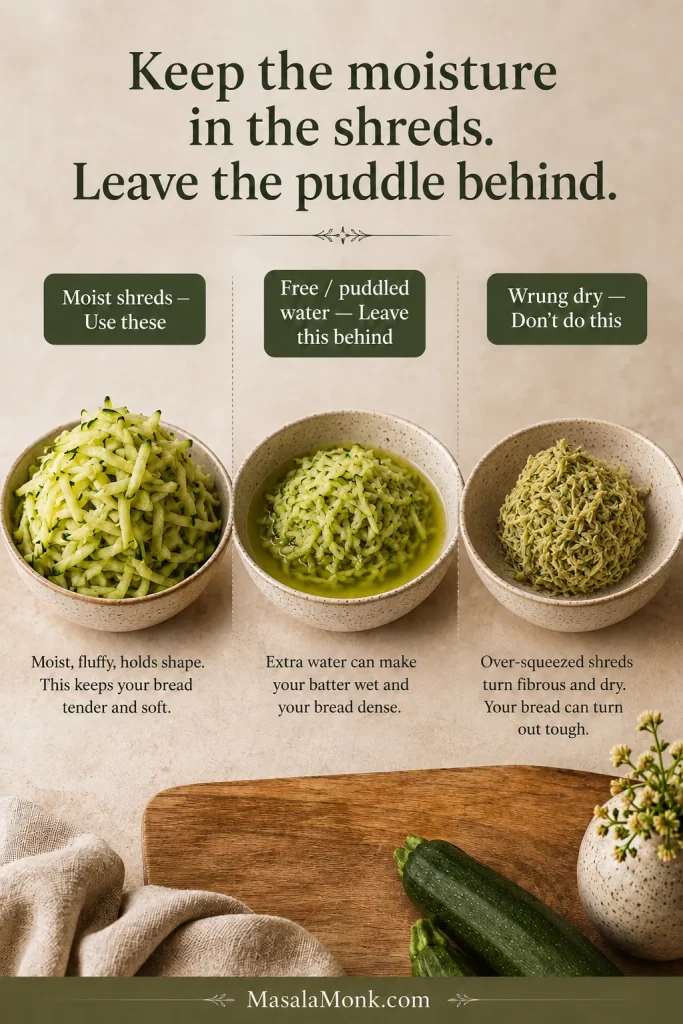
No—fresh zucchini should not be squeezed dry for this loaf. Its moisture is part of what keeps the crumb tender.
A bowl of freshly grated zucchini can look surprisingly wet. That alone does not mean anything has gone wrong.
Moisture held inside and on the shreds belongs in the recipe. Water that has collected separately as a puddle does not. Leave that free liquid behind, but do not twist or wring the zucchini into a dry, fibrous mass.
Keep the moisture in the shreds; leave the puddle behind.
Judge separated liquid, not simple dampness: keep moist shreds, leave the puddle, and don’t wring them dry.
Grated too much? Keep the extra out of the batter so the ratio stays intact. These crispy zucchini chips turn the surplus into something thin, salty and crunchy instead.
Can You Use Frozen Zucchini for Zucchini Bread?
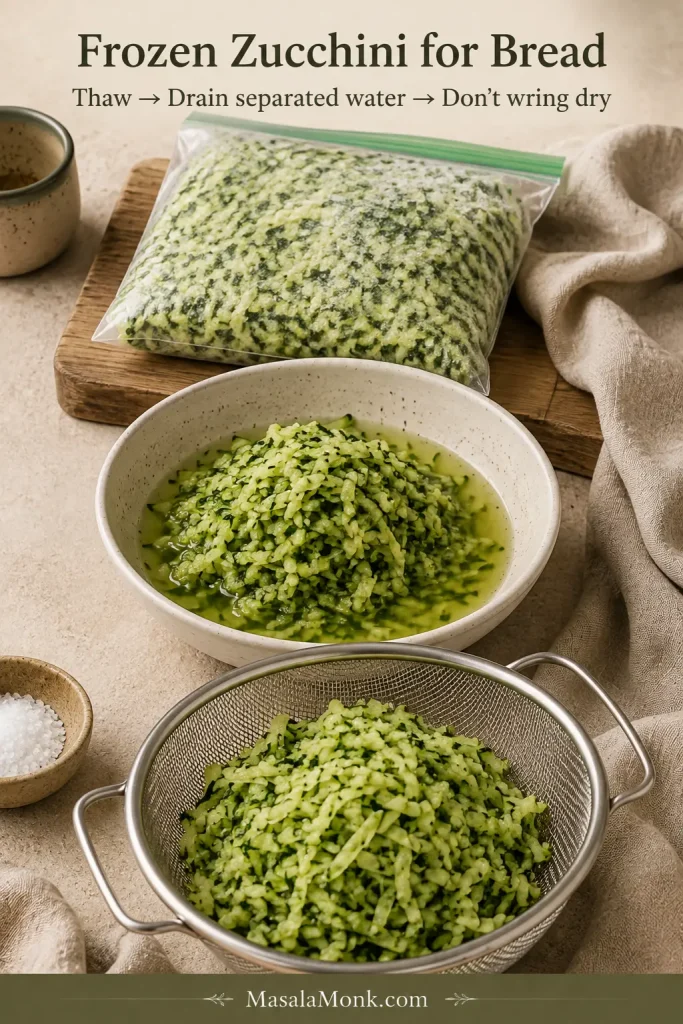
Yes, but fresh zucchini gives the most predictable result here. Freezing breaks down the shreds and makes them release considerably more water as they thaw.
Thaw frozen zucchini completely and let any liquid that has separated freely drain away. Do not wring the remaining shreds dry. Drained frozen zucchini is not a gram-for-gram equivalent to the fresh amount in the recipe, so some variation is unavoidable.
The batter checkpoint matters more when you use frozen zucchini. It should still spread easily, slump slowly from the spatula and have no distinct layer of liquid collecting around it. A bag of summer zucchini saved for later can still make a good loaf; it simply asks you to pay closer attention to the bowl.
After thawing, drain freely separated liquid without wringing the shreds; then use batter consistency as the better checkpoint.
What Should Zucchini Bread Batter Look Like?
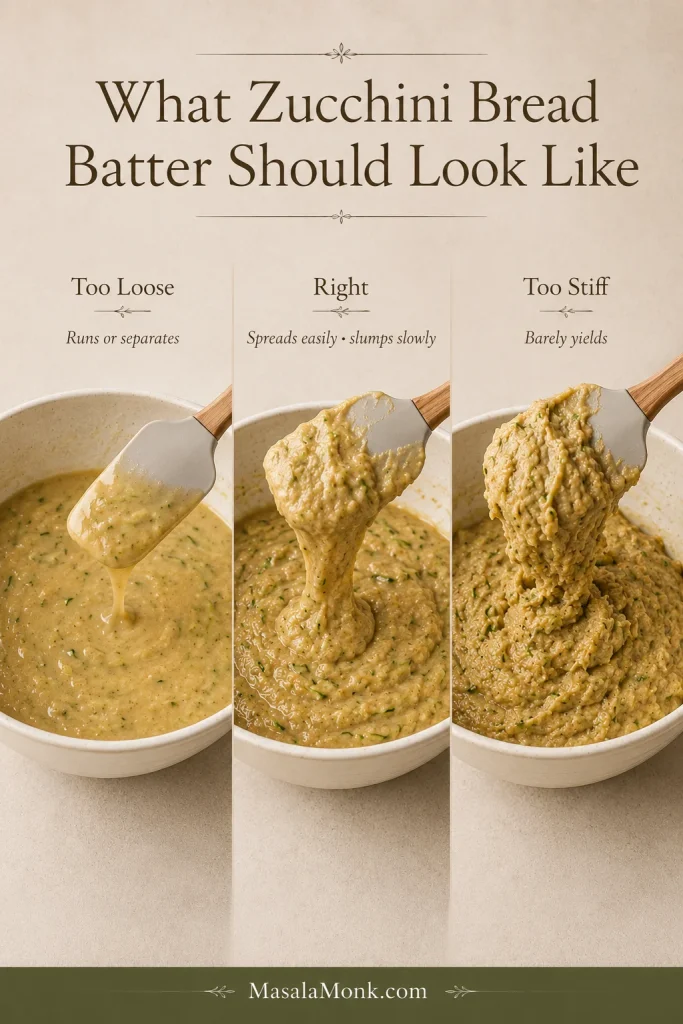
The batter should be thick enough to spread into the pan and loose enough to slump slowly from the spatula. Green strands of zucchini will still be visible through the cinnamon-speckled mixture.
A little visible moisture from the grated zucchini is normal. A distinct layer of liquid separating around the batter is different; check whether free zucchini water went into the bowl and recheck the measurements before baking.
If the batter is too loose or stiff, recheck zucchini water and flour before adding anything.
A mixture that barely yields to the spatula can point to too much flour.
How to Know Zucchini Bread Is Done
Zucchini bread is done when the crack through the top reveals baked crumb and a tester pushed into the loaf carries no raw batter. The clock tells you when to begin looking; these cues tell you when to stop baking.
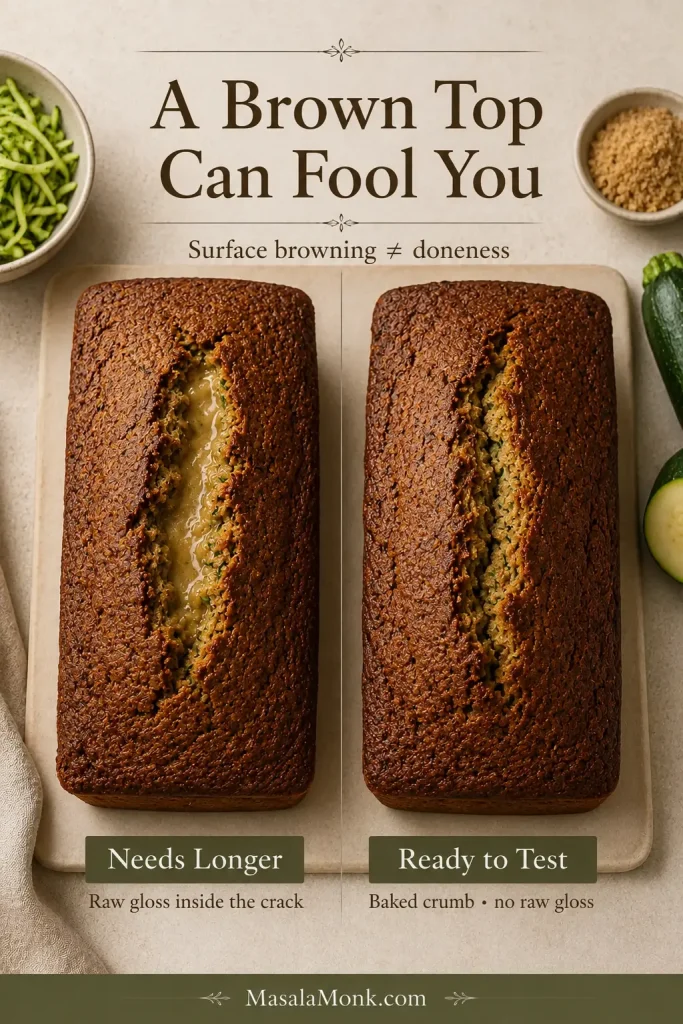
Check the Crack, Then Use a Tester
A deeply golden top is persuasive, especially once the kitchen smells like the loaf must be done. Check the crack anyway.
Shiny batter down inside that opening needs more oven time. Baked crumb has lost the raw gloss.
Once the crust is brown enough, judge the center—not the surface color or the clock.
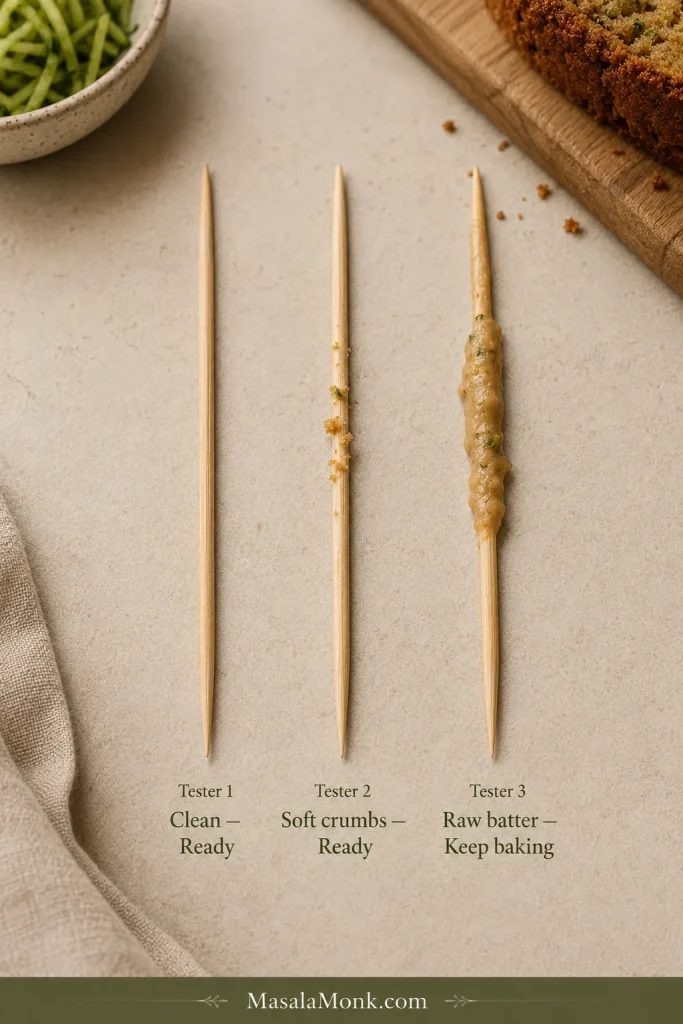
Next, push a thin skewer or knife into the thickest part. A clean tester or a few tender crumbs are both fine. A streak of uncooked batter is not.
Test the thickest center; an edge can look done while the deepest batter still needs time.
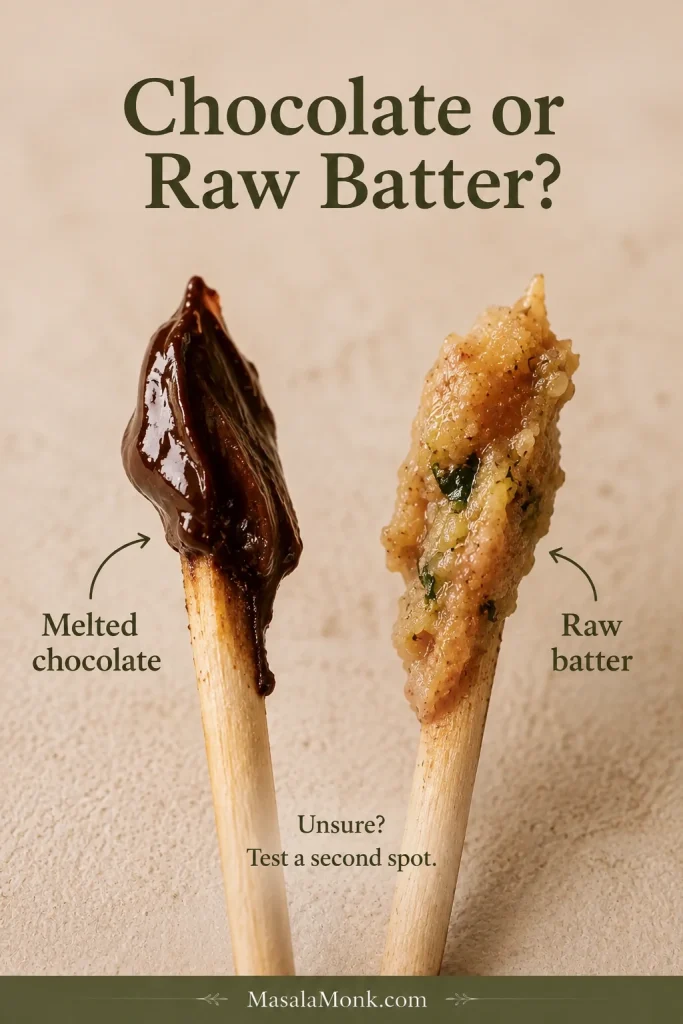
Chocolate chips can imitate wet batter, so test another spot before deciding.
If a tester hits melted chocolate, test a nearby spot before extending the bake.
A Thermometer Gives You One More Check
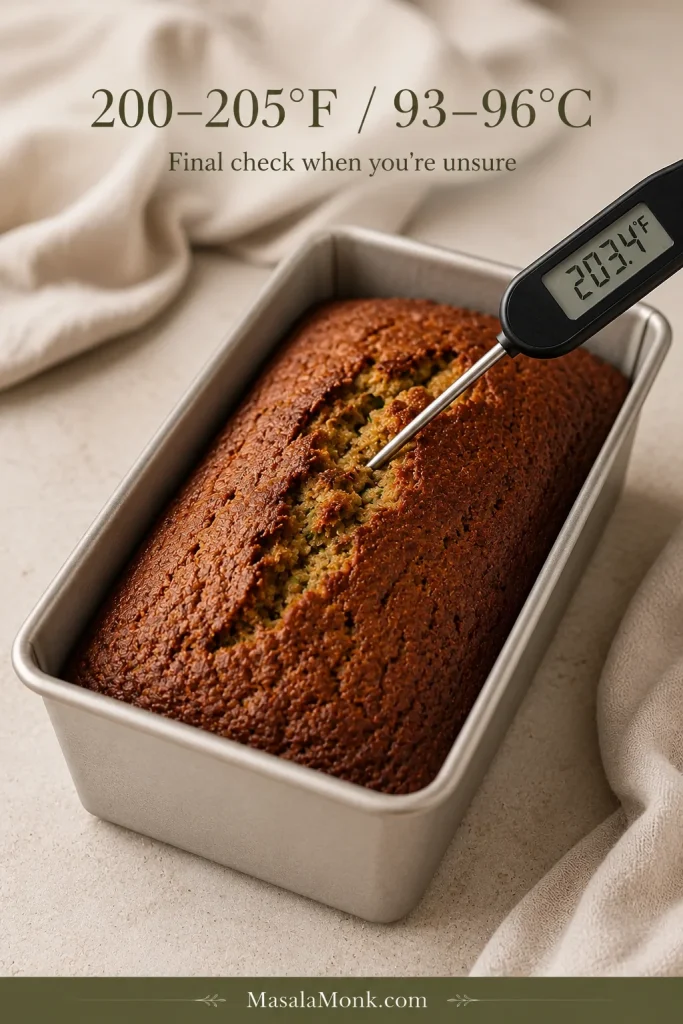
You can make good zucchini bread without a thermometer. If you have one, it gives you the most objective final check when the crack or tester leaves any doubt.
Move an instant-read probe slowly through the loaf and note the lowest reading. Around 200–205°F / 93–96°C indicates that the bread is baked through.
Keep the probe off the pan and read the thickest part of the loaf.
This is the instruction nobody wants when the kitchen smells like cinnamon and the loaf is sitting three feet away.
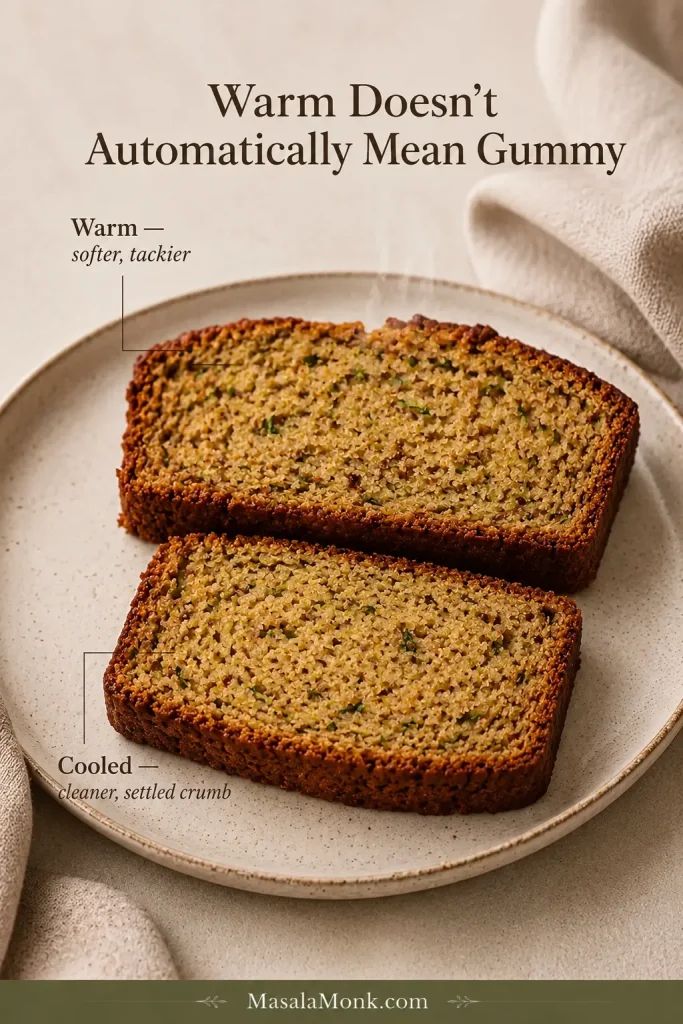
Give it about 15 minutes in the pan, then move it to a rack. Steam continues to escape while the crumb settles, so a just-baked slice naturally feels tackier than one cut later.
You can steal a warm slice. Just wait until the loaf has cooled before deciding that its tender middle is actually gummy.
Judge gumminess on a cooled slice; warmth and trapped steam can temporarily make a fully baked crumb feel tackier.
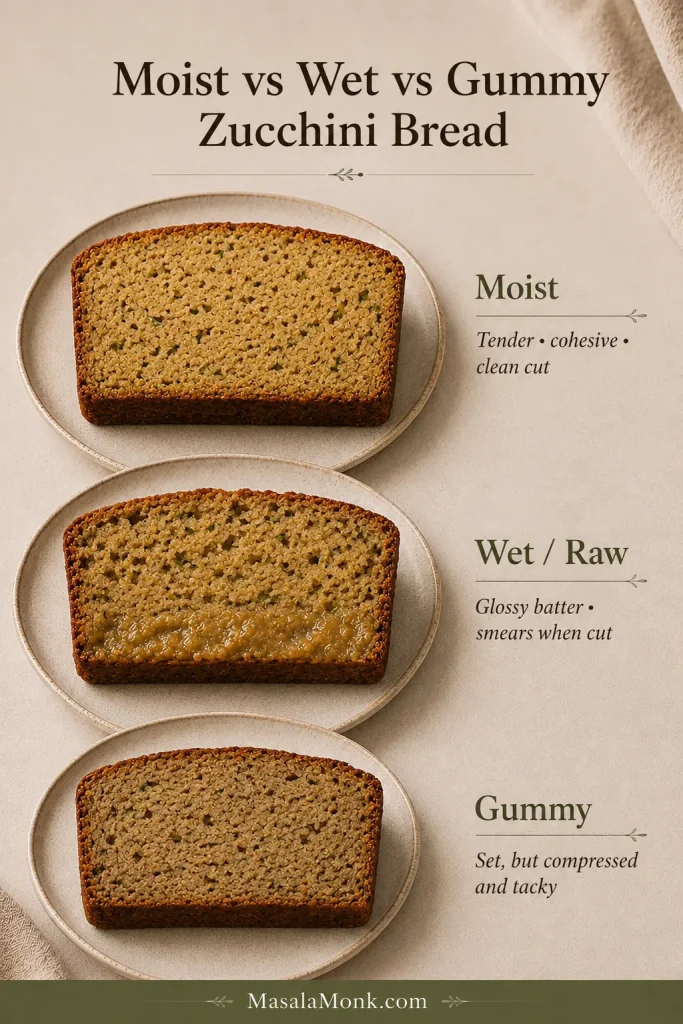
Moist, Wet or Gummy?
Moist: The cooled crumb is tender, holds together and cuts cleanly. That’s the texture you’re after.
Wet: Raw-looking or paste-like batter remains through the loaf and smears onto the knife. It needed more baking.
Gummy: The bread holds together but feels tacky, compressed or rubbery. Underbaking can cause it, but excess free water, heavy mixing or cutting while very hot can contribute too.
A slightly tacky patch directly beneath the top crust is different from a stripe of raw batter running through the loaf.
Wet or raw points back to doneness; a fully set but gummy crumb points to moisture, mixing or cooling.
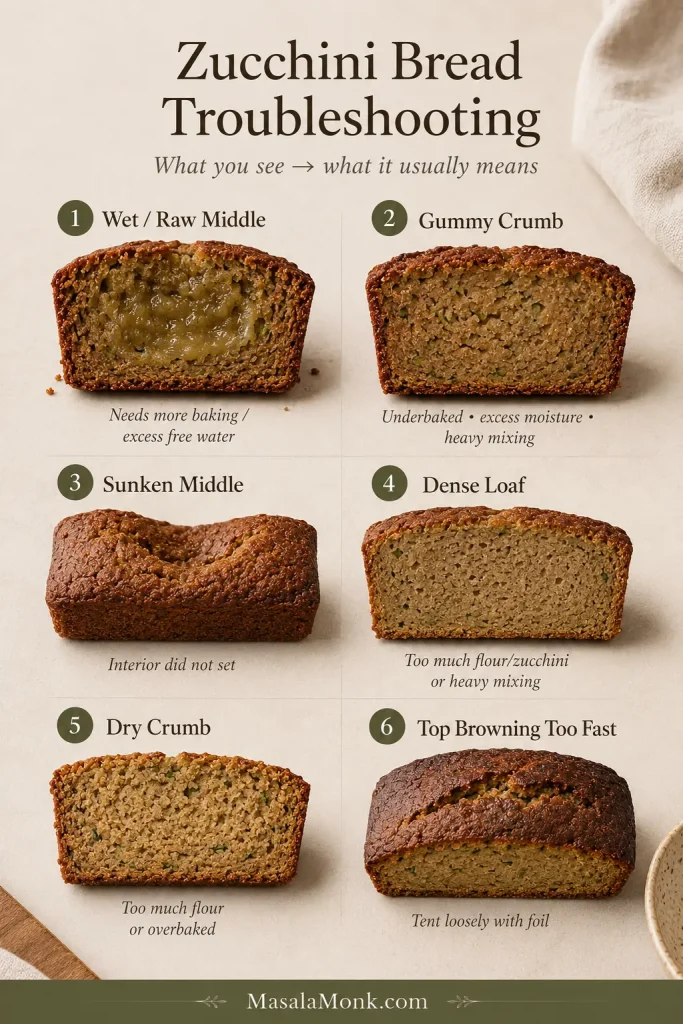
Zucchini Bread Troubleshooting
Start with the symptom you can see and change one variable at a time.
Problem
Likely cause
Next move
Wet or raw middle
More baking time needed; excess free water; oven running cool
Keep a whole, hot loaf baking until the raw batter is gone
Gummy crumb
Underbaking, excess moisture, heavy mixing or cutting very hot
Mix only until combined, bake fully and cool before judging
Sunken middle
Interior had not set; inaccurate leavener; pan too small or overfilled
Check measurements, pan size and doneness
Dense loaf
Too much flour, too much zucchini or heavy mixing
Weigh the key ingredients and stop folding once combined
Dry crumb
Too much flour, zucchini wrung dry or loaf overbaked
Keep the zucchini’s natural moisture and remove the loaf once baked through
Top browning too quickly
Dark pan or strong top heat
Loosely tent with foil while the loaf finishes
If the top is already dark enough while the center still needs time, loosely tent the loaf with foil and continue baking. The foil is a shield for the crust, not a signal that the middle is finished.
Keep the foil loose with an air gap; shield the browned crust without wrapping the loaf.
Why Is My Zucchini Bread Raw in the Middle?
Usually because the loaf needed more time, excess free water entered the batter, or the oven was running cooler than expected.
A loaf that is still whole and hot can go back into the oven. Cover the top loosely with foil when it already has enough color and continue until the raw batter is gone.
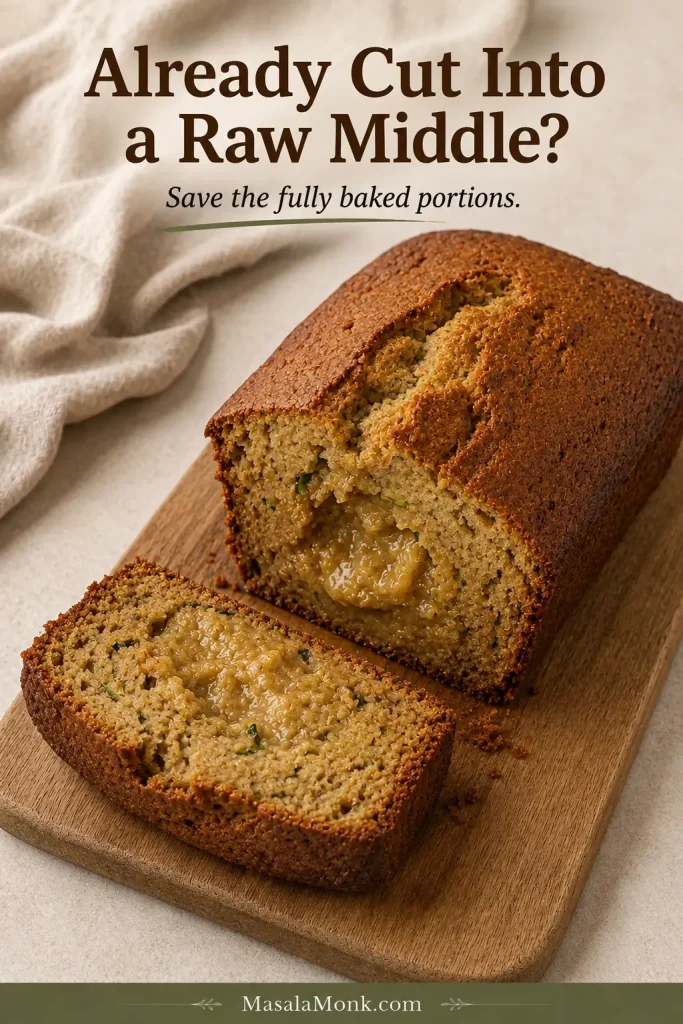
If you’ve already cut into it and found a genuinely raw middle, the options are unfortunately narrower. Save the fully baked portions. Continuing to bake the whole cut loaf tends to dry the parts that were already done before the exposed batter cooks evenly.
Once the loaf is cut open, protect the baked portions rather than trying to finish it like an intact loaf.
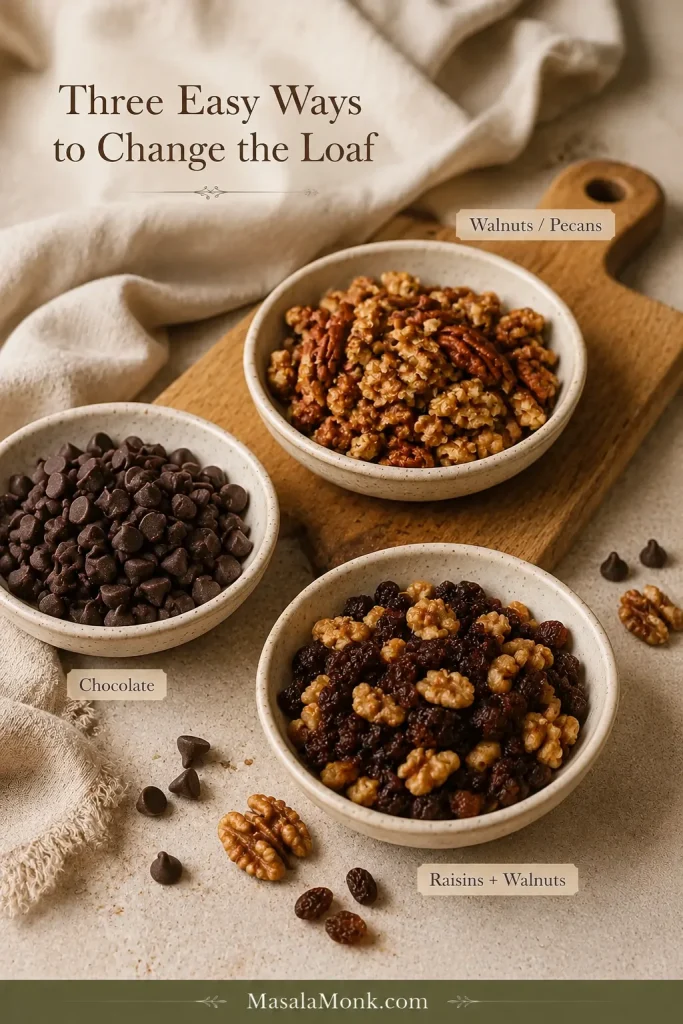
Walnuts or pecans: Fold in up to 85g / 3 oz. Walnuts give the loaf the more familiar old-fashioned crunch; pecans are slightly sweeter.
Chocolate chips: Use up to 85g / 3 oz semi-sweet or dark chocolate. In a slightly warm slice, the chips soften into little melted pockets against the cinnamon crumb.
Raisins: About 75g / 2.6 oz, roughly ½ cup, gives the loaf a more old-fashioned recipe-box feel. Raisins and walnuts work especially well together.
Distribute add-ins evenly so every slice gets some without heavy clusters weakening the crumb.
If that combination of grated vegetables, cinnamon and nuts is the part you love most, it takes a richer turn in this carrot cake with cream cheese frosting.
Before You Start Swapping Ingredients
Zucchini bread is forgiving, but flour, eggs, sugar, oil and zucchini moisture all help determine the final crumb. Change several at once and you’re effectively making a different recipe.
For the first loaf, keep the eggs and oil as written. Butter and applesauce both work in zucchini breads designed around them, but they do not perform exactly the same job as neutral oil here.
If applesauce is the change you are considering, this banana bread made with applesauce shows how a quick bread can be built around fruit puree from the start.
Eggless, vegan, gluten-free, keto and almond-flour versions change the structure enough that they are better treated as their own recipes instead of casual swaps inside this one.
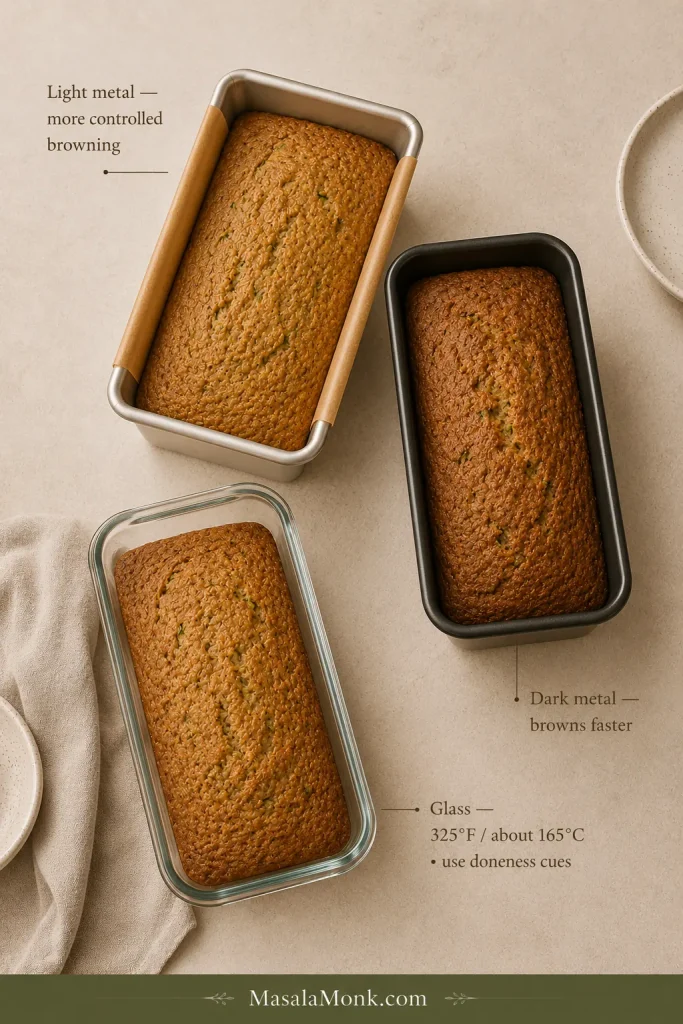
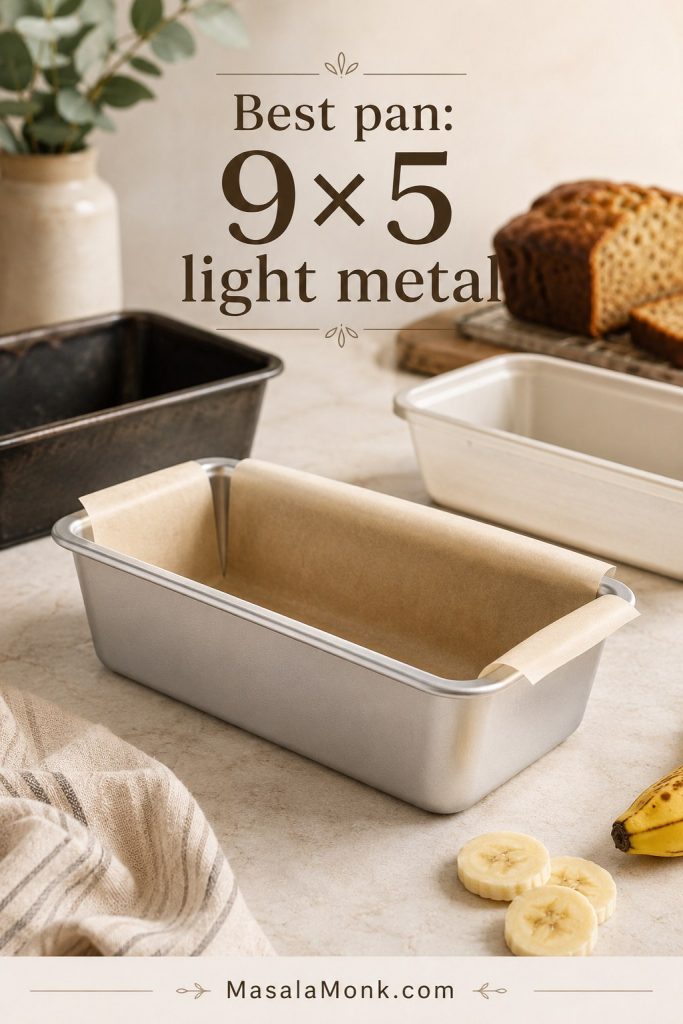
The full batch fits a 9 × 5-inch / 23 × 13 cm loaf pan. A light-colored metal pan gives you more control over browning during the long bake.
Dark metal usually browns the crust faster. When the top has enough color before the loaf is finished, cover it loosely with foil and keep baking.
Glass behaves differently from metal and holds heat longer. If glass is what you have, King Arthur Baking recommends reducing the oven temperature by 25°F; for this loaf, that means 325°F / about 165°C. Expect the timing to change and use the same doneness cues instead of relying on the original clock time.
Keep the 9×5 size constant when comparing pan materials so batter depth does not become a second variable.
A noticeably smaller loaf pan makes the batter deeper and changes the bake. Use the specified 9 × 5-inch pan when possible instead of forcing the full batch into something smaller. Muffins and mini loaves need their own baking times, so the full-loaf timing should not be used for either.
Storing and Freezing Zucchini Bread
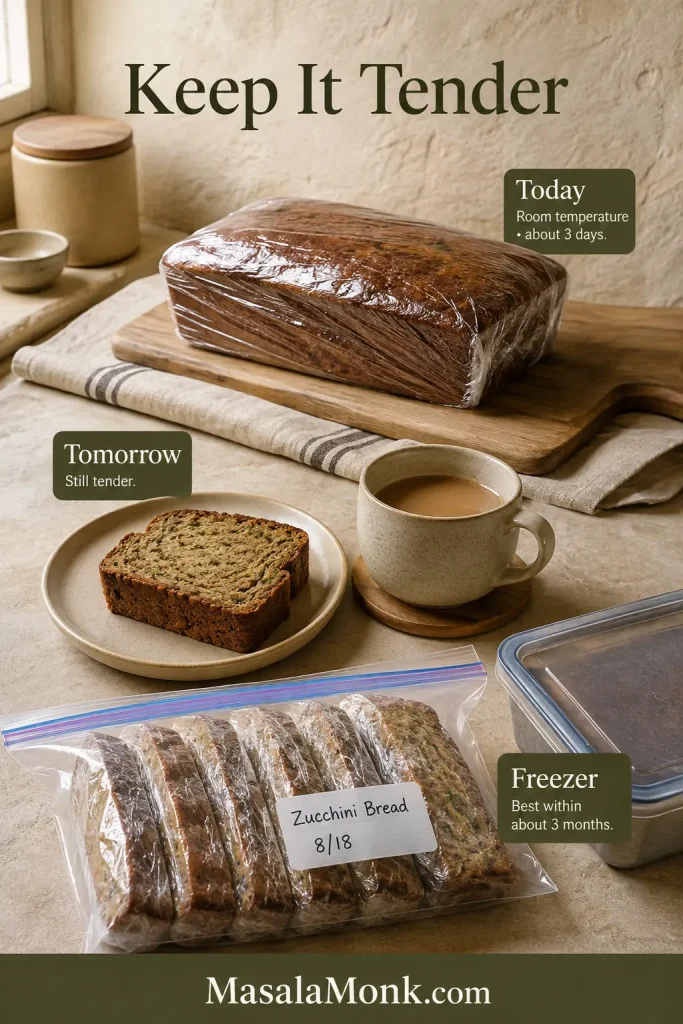
Room temperature: Cool the loaf completely before covering it. Keep it well wrapped or in an airtight container for about 3 days. Wrapping while warm traps steam against the crust.
Refrigerator: A very hot or humid kitchen is the main reason to refrigerate it. Chilled quick bread firms up, so let a slice lose its chill or warm it gently before eating.
Freezer: Wrap the completely cooled loaf or individual slices tightly and place them in a freezer-safe bag or container. For best quality, use them within about 3 months. Individual slices are especially handy: pull one out, let it thaw on the counter, and breakfast is mostly handled.
Freeze the cooled loaf in portions so you can thaw one slice without repeatedly exposing the rest.
For another simple cinnamon bake that keeps well for the next day, try this fresh apple cake.
Frequently Asked Questions
Can You Taste the Zucchini in Zucchini Bread?
Not strongly. Cinnamon, vanilla and brown sugar reach you first. The zucchini mostly contributes moisture, tenderness and little green flecks instead of an obvious vegetable flavor.
Can You Use Yellow Summer Squash Instead?
A young, firm yellow summer squash can work much like zucchini. Grate it the same way. An oversized mature squash may need tough skin or a coarse seed cavity removed first.
Once the loaf has cooled, the knife should pass through without dragging a wet streak behind it. The slice bends gently, the crumb holds together, and cinnamon reaches you before zucchini ever does.
That’s the balance this bread is after: the zucchini keeps the crumb tender, while enough oven time turns the middle from batter into bread.
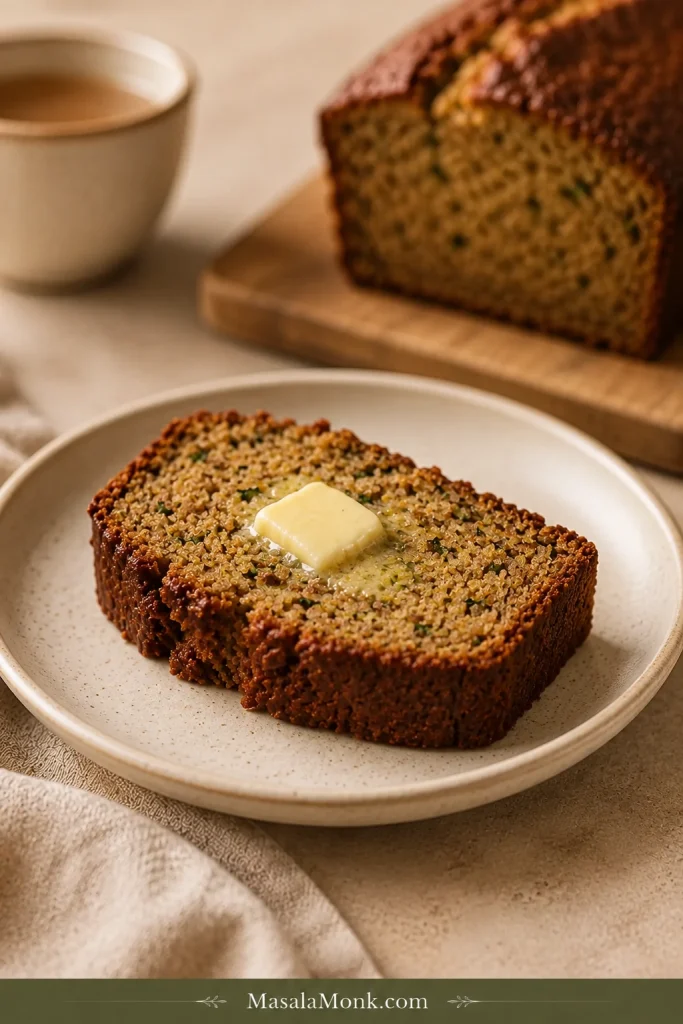
Add butter if you like. It does not need much else.
What did you make yours with: small fresh zucchini, one of those enormous garden zucchini, or zucchini from the freezer?
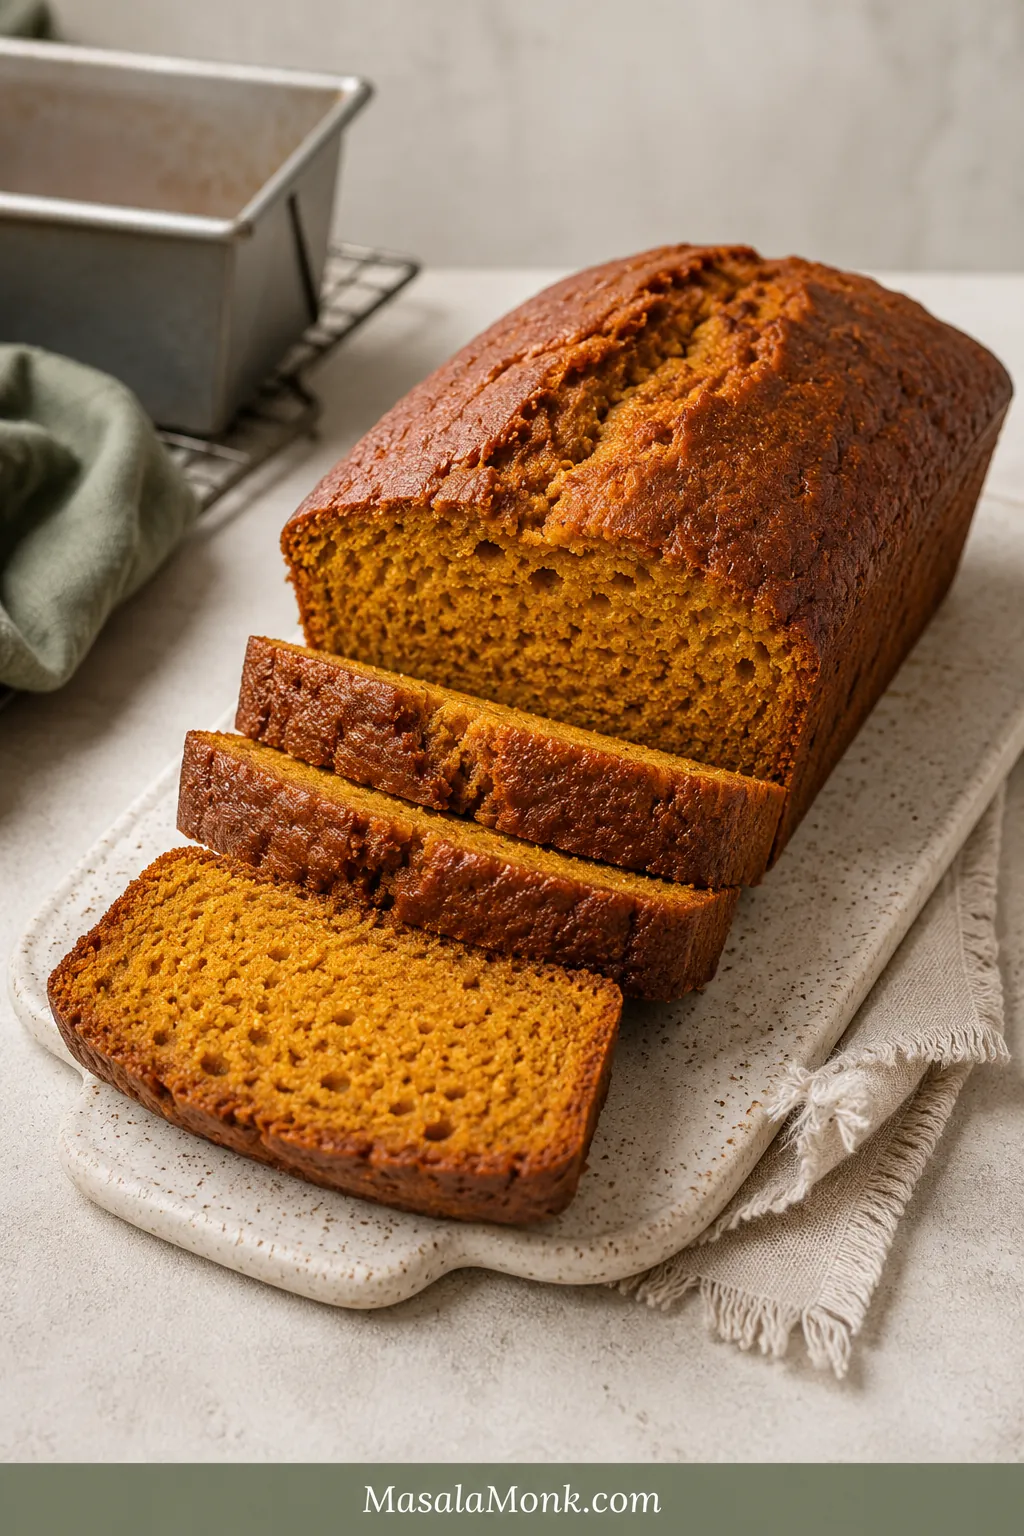
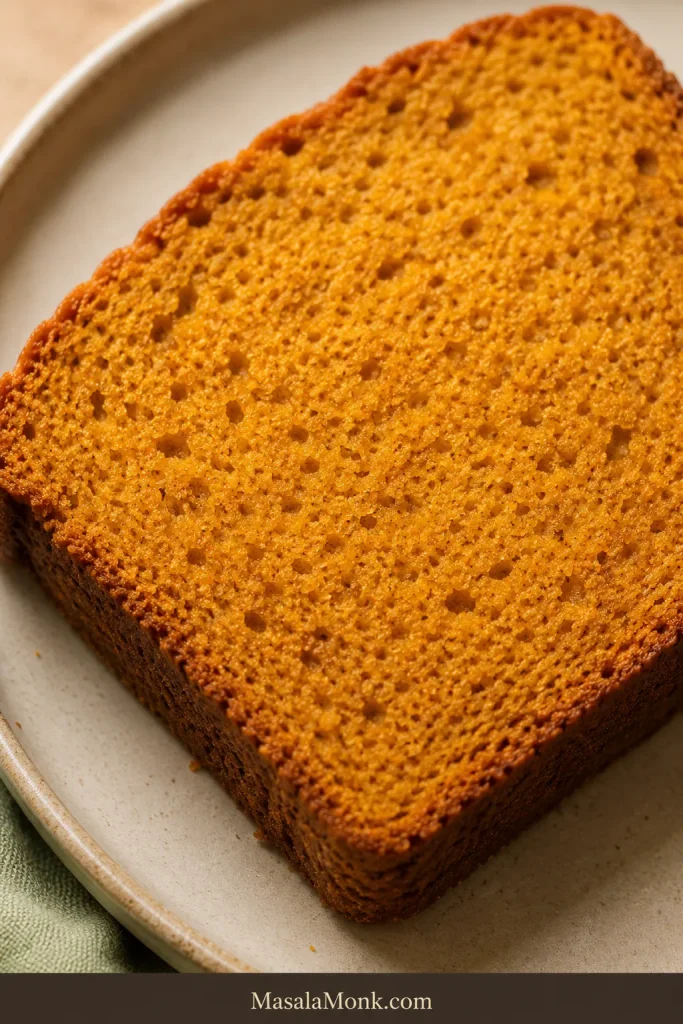
Pumpkin bread should feel soft and generous when you cut into it: warmly spiced, unmistakably pumpkin and moist enough to stay tender after cooling. The challenge is getting that softness without leaving a heavy, wet stripe through the center.
A loaf that looks beautifully baked on top and turns wet when sliced is especially frustrating. The good news is that the middle gives you clues before the knife goes in. The thickness of the puree, the way the batter falls and the appearance of the center crack all help you judge what is happening inside.
This easy pumpkin bread recipe uses one bowl, a whisk and a spatula—no electric mixer and no complicated technique. It is simple enough for breakfast, warm enough for an autumn afternoon and sturdy enough to wrap and take to someone else. The first slice feels like a treat; the loaf often cuts even more cleanly the next morning.
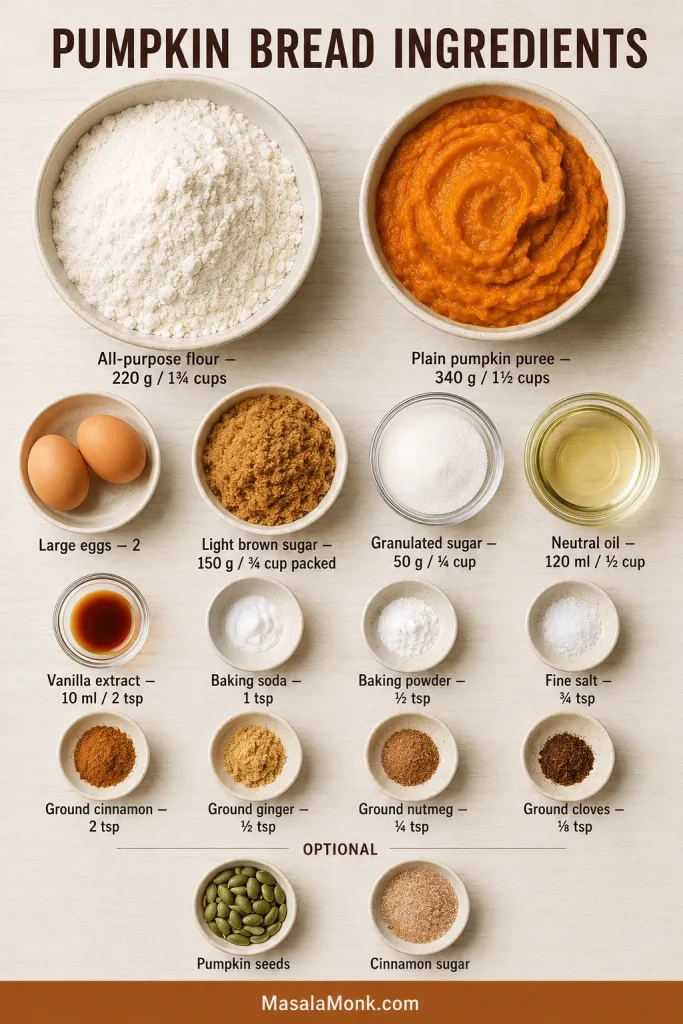
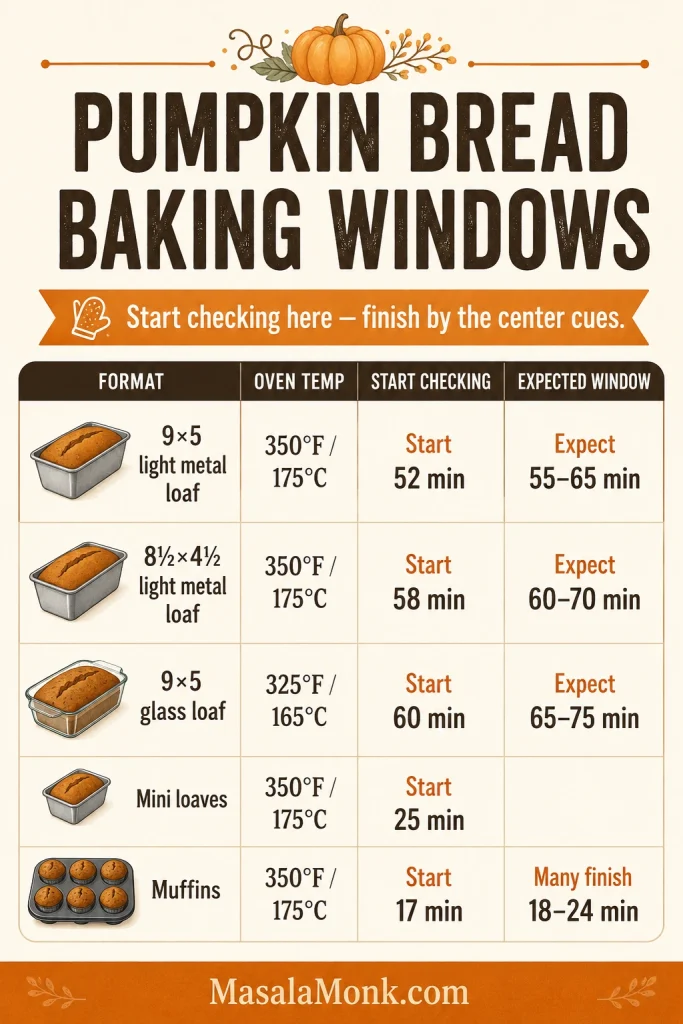
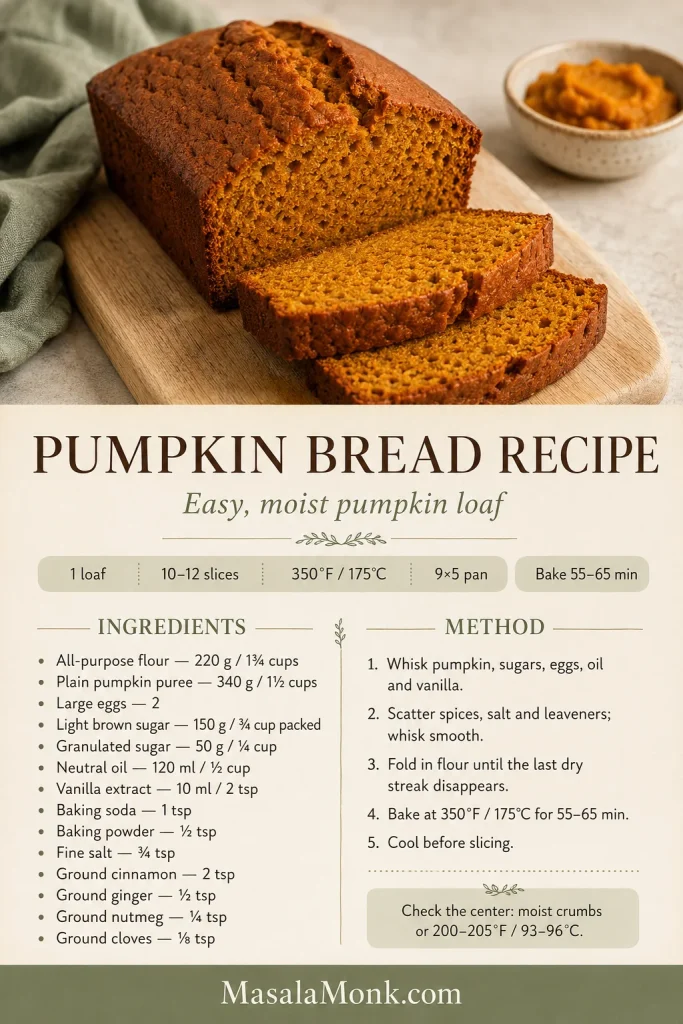
Use 340 g / 1½ cups plain pumpkin puree with 220 g / 1¾ cups all-purpose flour. Bake the batter in a light-colored 9×5-inch / 23×13 cm metal loaf pan at 350°F / 175°C and begin checking at 52 minutes.
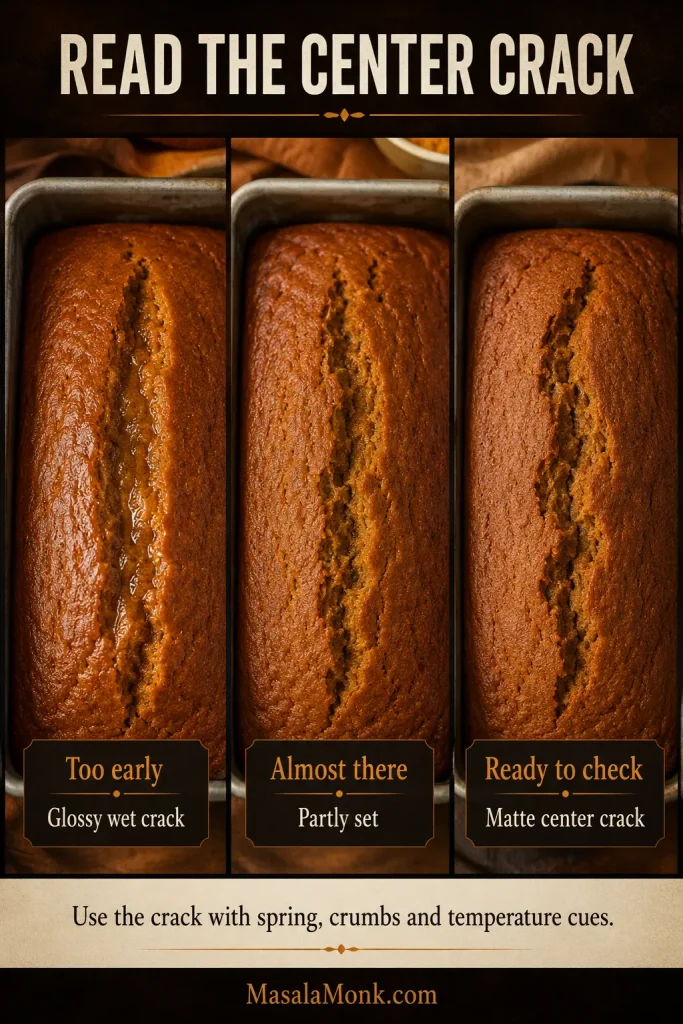
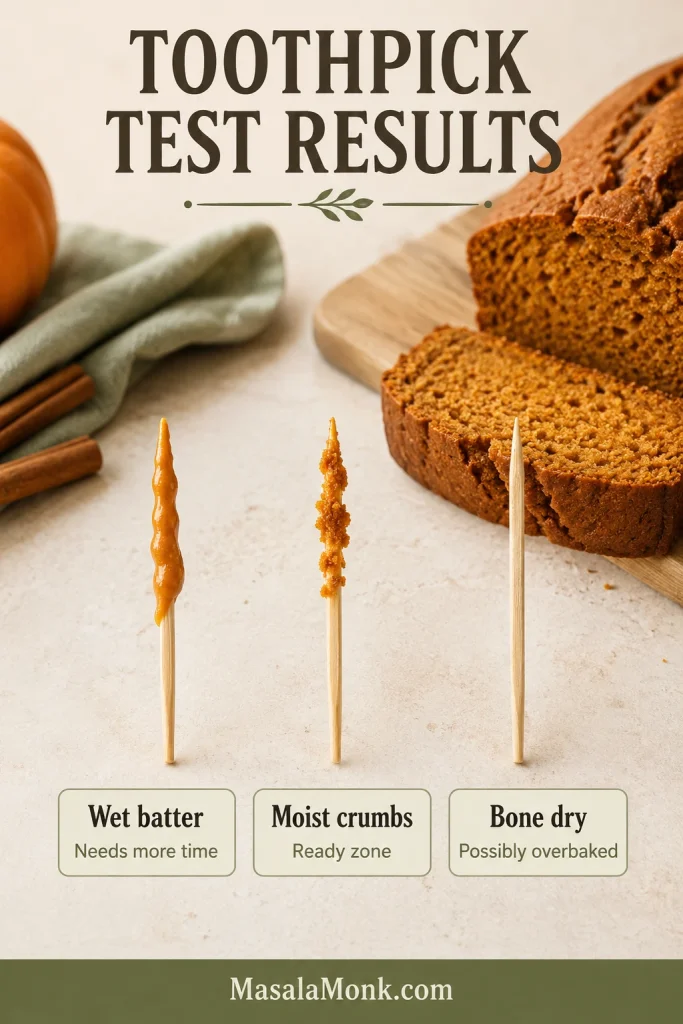
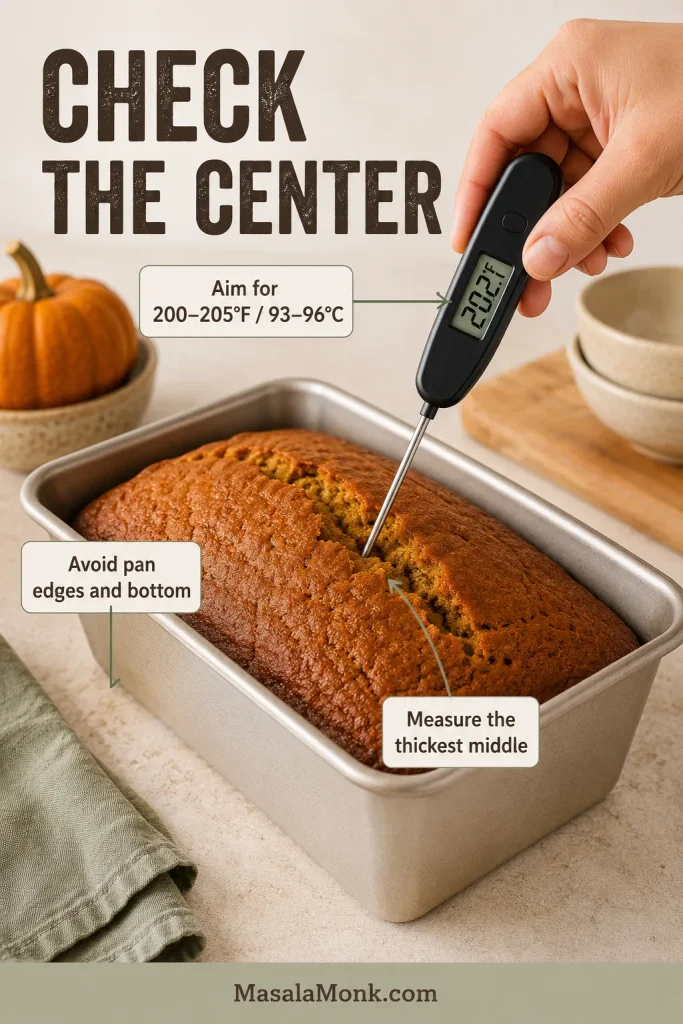
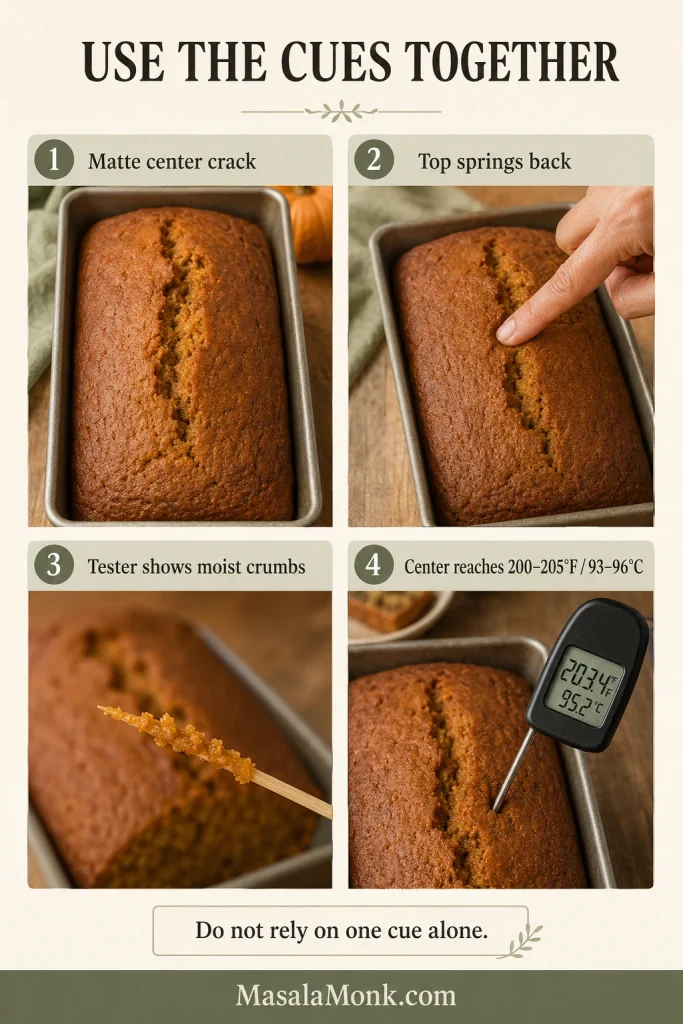
The center crack should look matte rather than glossy. Press beside it for a gentle spring, then check that a toothpick or thin skewer shows moist crumbs instead of liquid batter. For final confirmation, an optional thermometer usually reads 200–205°F / 93–96°C.
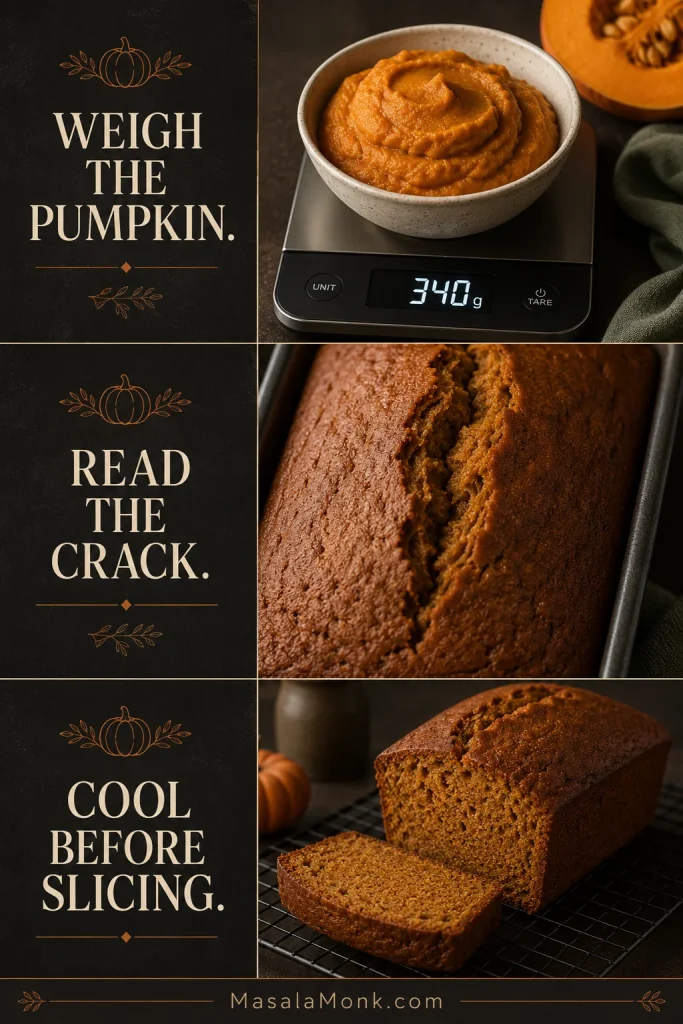
Weigh the pumpkin. Read the crack. Cool before slicing.
These are the three checks to remember before baking.
Weigh the pumpkin, read the crack and cool before slicing—three checks that protect texture.
Easy, Moist Pumpkin Bread Recipe
A lightly firm top gives way to a plush orange crumb. Pumpkin comes first, cinnamon follows, and ginger, nutmeg and cloves stay quietly in the background. The loaf itself is dairy-free, so serve it plain or choose a dairy-free topping when needed.
Judge the crumb after the loaf has cooled.
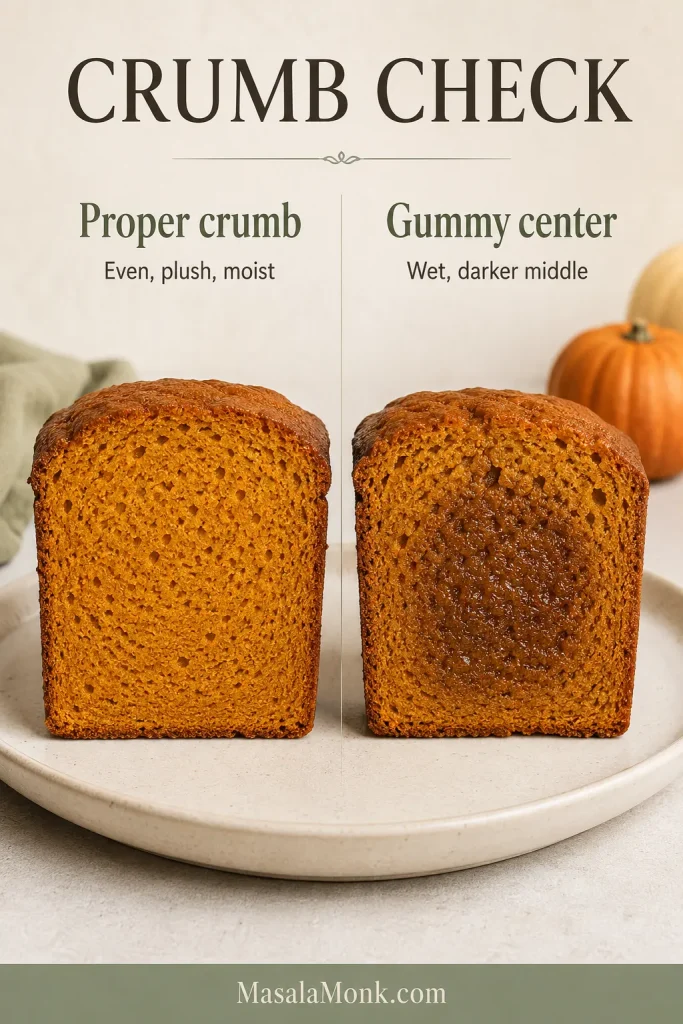
The crumb should look plush and moist, not shiny, wet or compressed.
Prep: 15 minutes Bake: about 55–65 minutes Cooling: 1½–2 hours
Total: about 2 hours 10 minutes–2 hours 30 minutes Yield: 1 loaf / about 10 slices Pan: 9×5 inches / 23×13 cm
Equipment
Light-colored metal 9×5-inch / 23×13 cm loaf pan
Large mixing bowl
Whisk
Flexible spatula
A kitchen scale is the most useful extra. Parchment paper and a cooling rack are strongly recommended. Use a toothpick or thin skewer for checking the middle; an instant-read thermometer is optional.
Pumpkin pie spice option: Replace the cinnamon, ginger, nutmeg and cloves with about 1 tablespoon of homemade pumpkin pie spice.
Keep the main formula steady before changing add-ins.
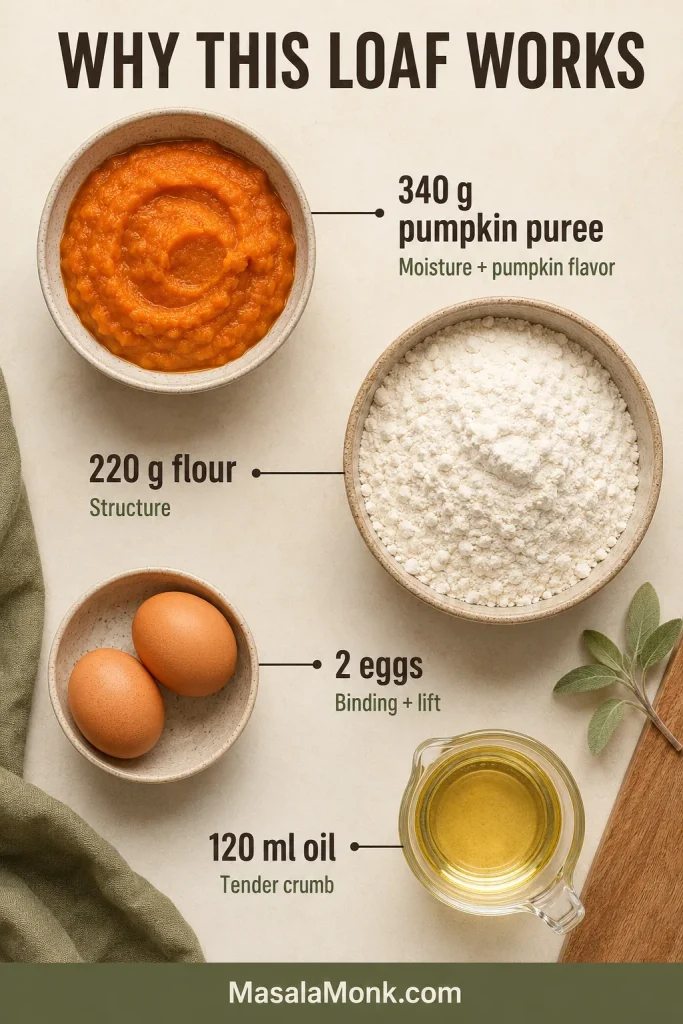
Pumpkin brings moisture, flour and eggs provide structure, and oil keeps the cooled crumb tender.
Instructions
Set Up the Oven and Pan
Preheat the oven. Heat the oven to 350°F / 175°C. Position a rack in the center. When the top regularly browns too quickly, move the pan one level away from the oven’s strongest heat source. In many ovens, that means one level below center.
Prepare the pan. Lightly grease a 9×5-inch loaf pan. If using parchment, line the base and long sides, leaving enough overhang to lift out the bread.
Mix the Batter
Whisk the eggs and sugars. Whisk the eggs, brown sugar and granulated sugar in a large bowl until smooth and slightly lighter.
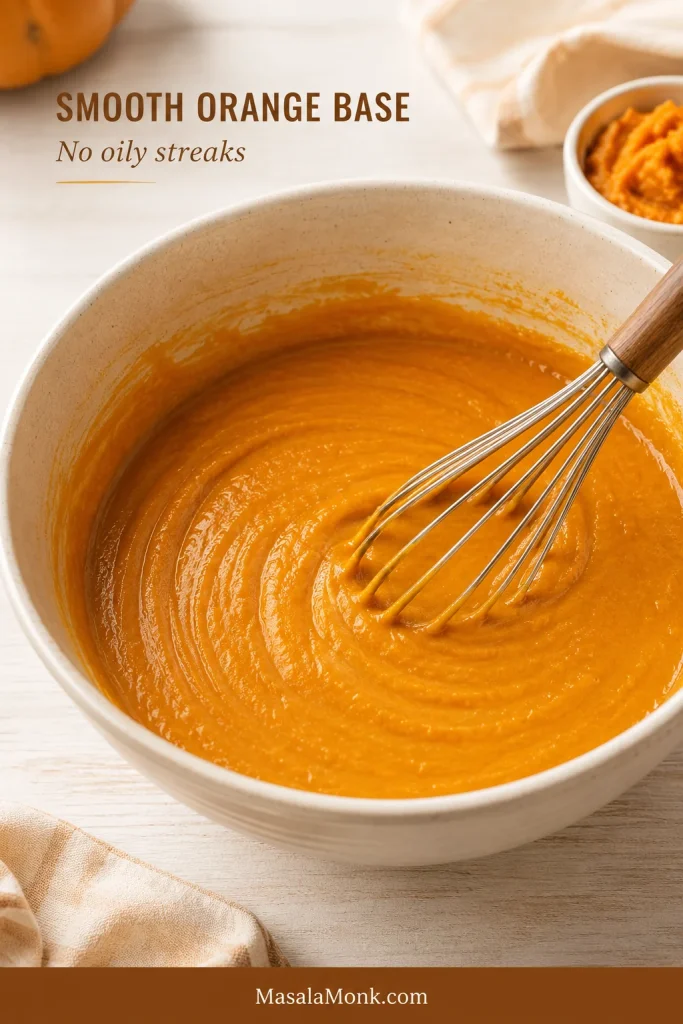
Add the pumpkin and oil. Whisk in the pumpkin puree, oil and vanilla until the mixture looks evenly orange and no oily streaks remain.
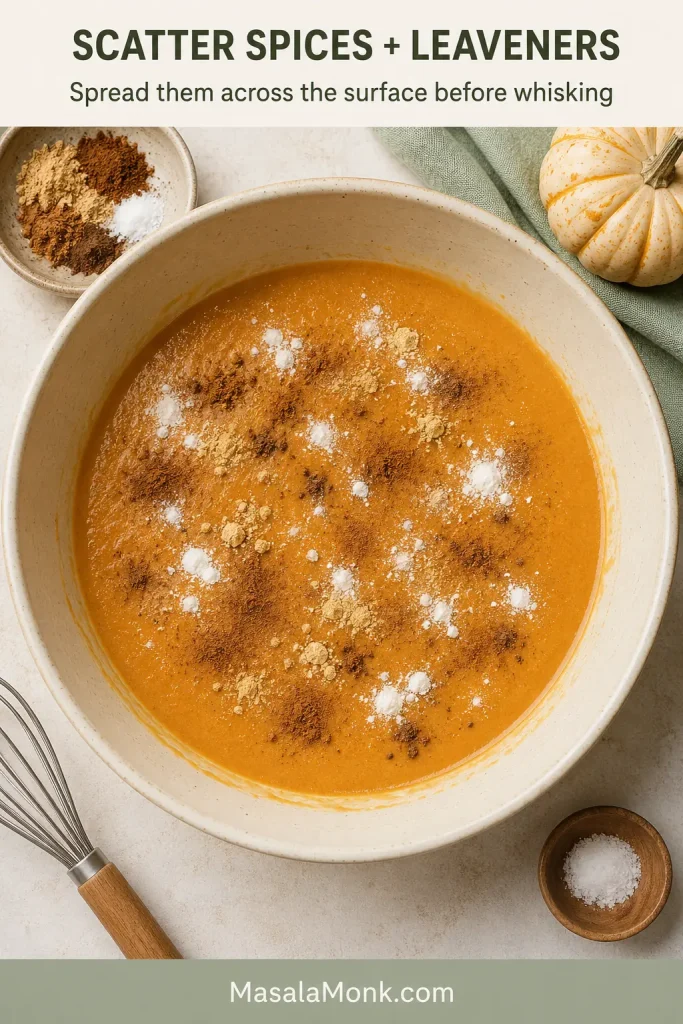
Add the leaveners and spices. Break up any lumps in the baking soda and baking powder. Sprinkle the leaveners, salt and spices across the entire surface, then whisk for about 20 seconds while scraping around the bowl.
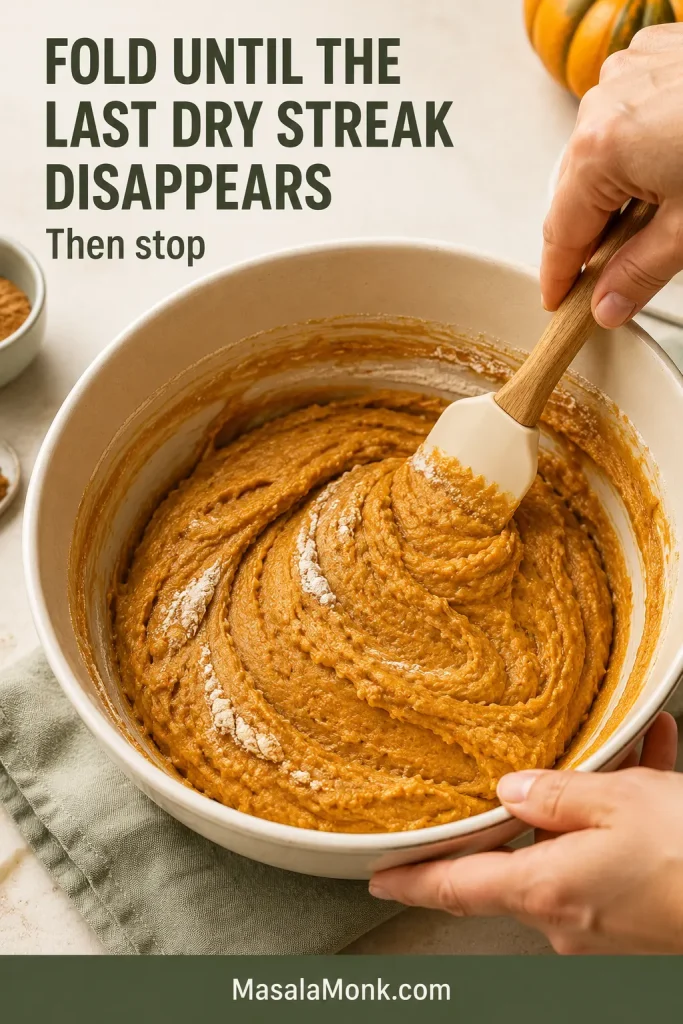
Fold in the flour. Add the flour and switch to a spatula. Fold from the bottom until the final dry streak disappears. Scrape across the base once, then stop.
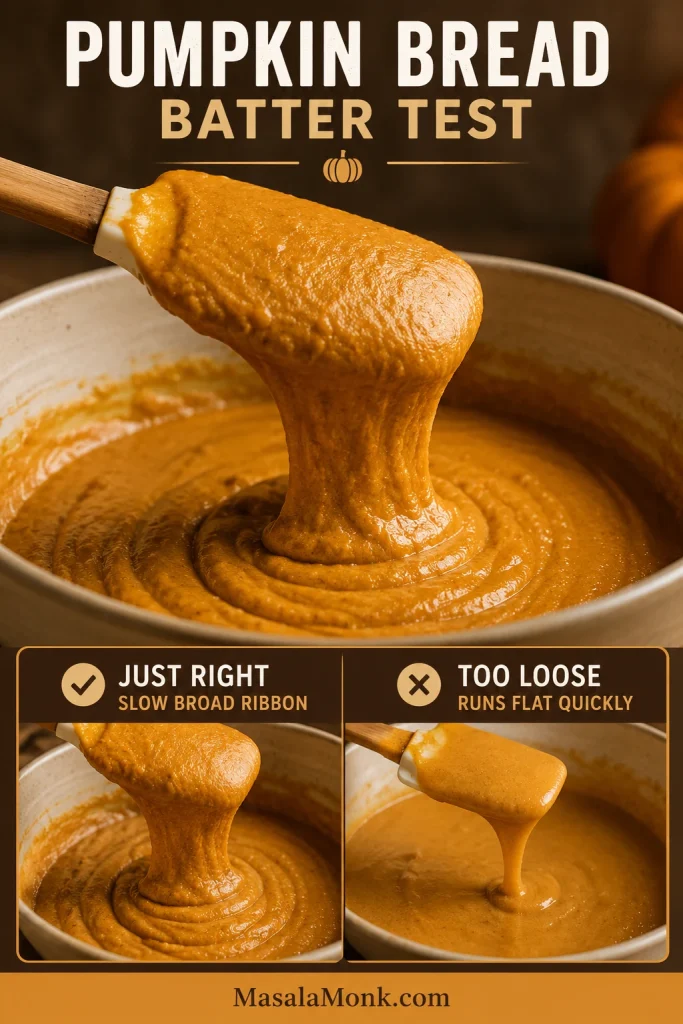
Check the batter. Lift the spatula. The mixture should fall in a slow, broad ribbon and settle back into the bowl. A rough-looking surface and a few small lumps are harmless.
Fill, Bake and Cool
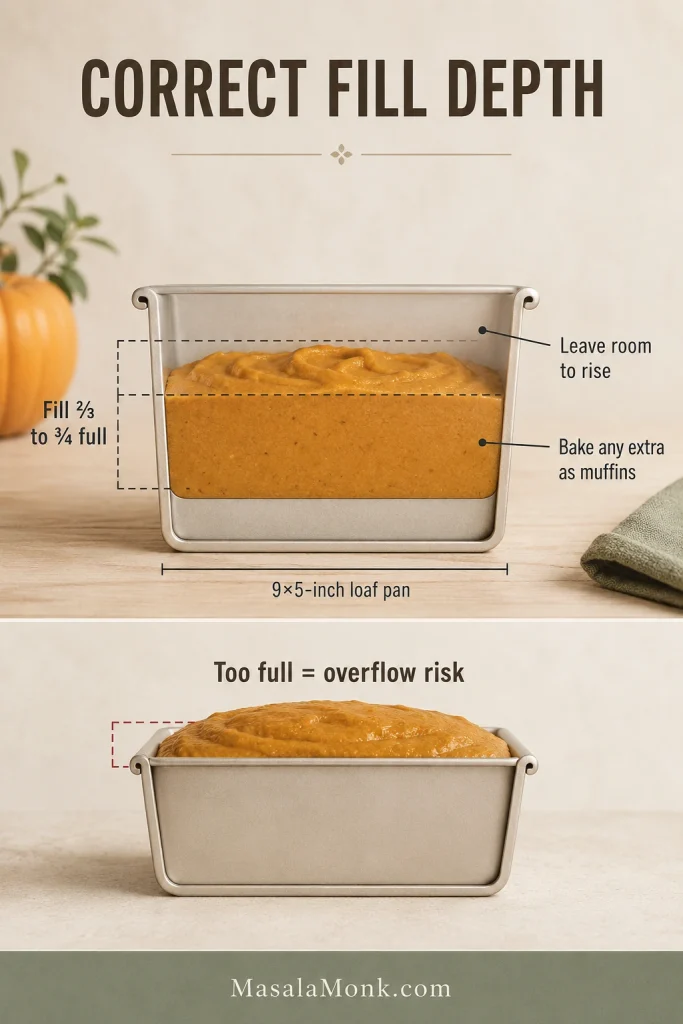
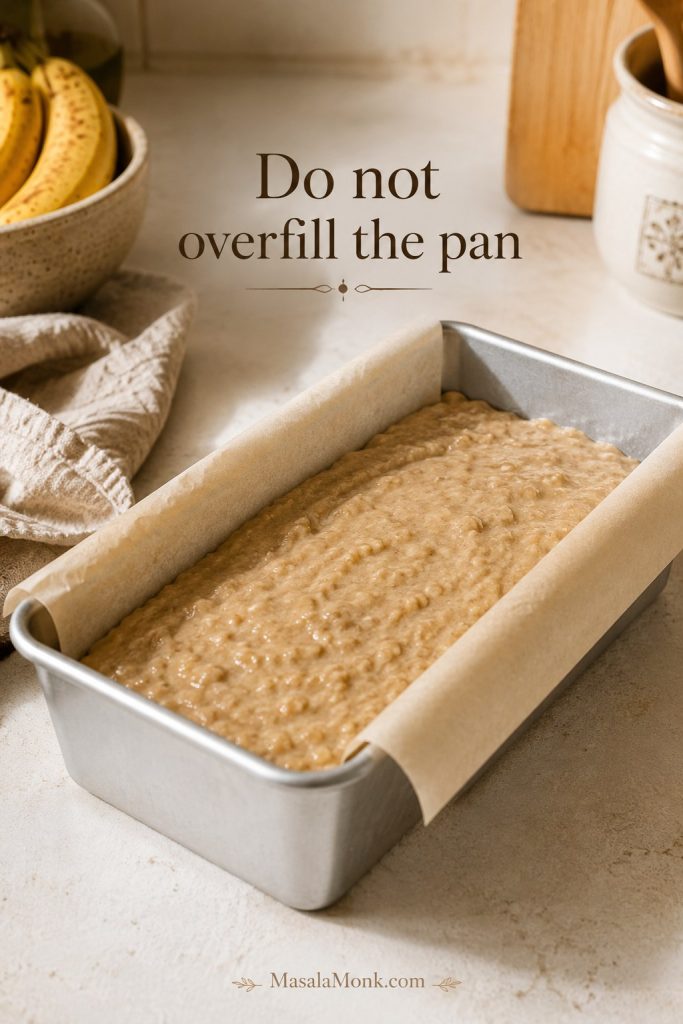
Fill the pan. Scrape in the batter and level the top lightly. Leave the pan about one-quarter to one-third empty so the loaf has room to rise. Add pumpkin seeds or cinnamon sugar, if using.
Bake and protect the crust. Begin checking at 52 minutes. A 9×5-inch metal loaf generally needs about 55–65 minutes. Avoid opening the oven during the first 40 minutes. If the top has enough color before the middle is ready, tent it loosely with foil.
Check the middle. Look for a matte center crack and gentle spring beside it. A toothpick or thin skewer should show moist crumbs rather than liquid batter. If one spot looks clean but the crack still appears glossy, test again slightly beside it.
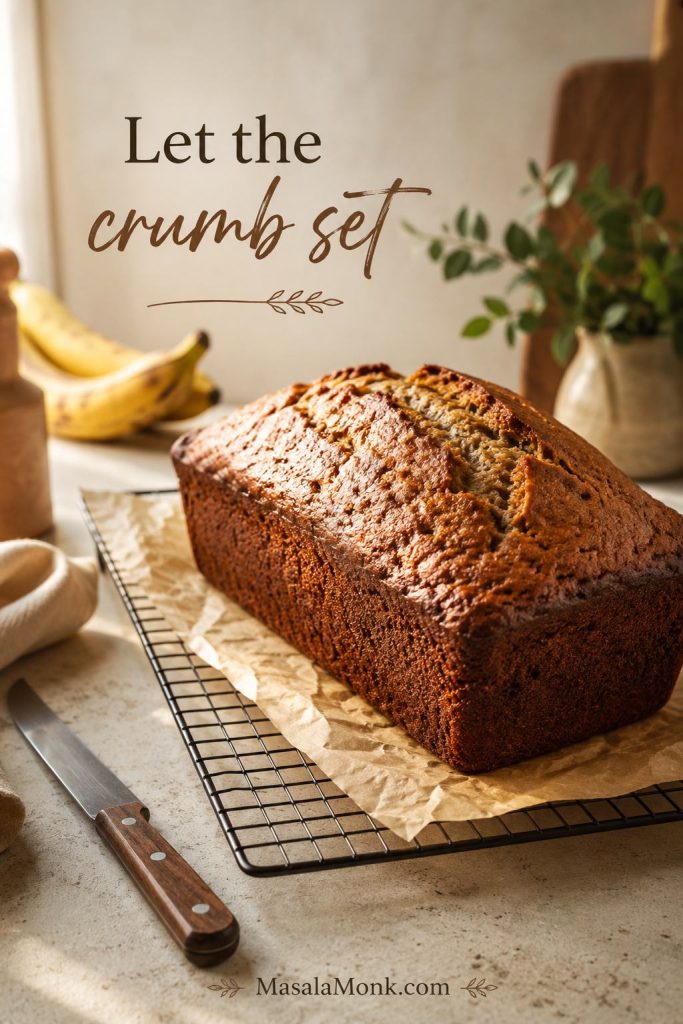
Cool completely. Leave the bread in the pan for 15 minutes, then transfer it to a wire rack or another dry, heatproof surface. Wait 1½–2 hours before judging the crumb or cutting clean slices.
A successful loaf: risen above the pan, matte inside the center crack and tender enough to bend slightly when sliced, with no wet stripe through the crumb. Moist crumbs are welcome; liquid batter or thick pumpkin paste needs more oven time.
Testing note: This loaf is written around a light-colored 9×5-inch metal pan and 340 g thick pumpkin puree. Treat other pan sizes and formats as starting windows, then finish with the center cues.
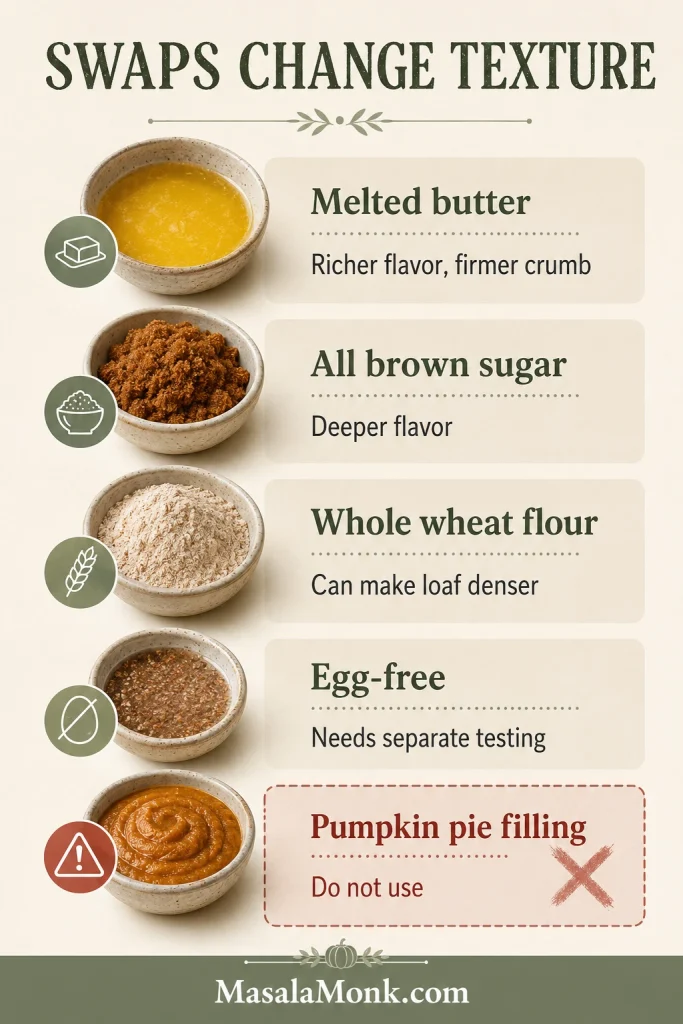
Canned Pumpkin, Fresh Pumpkin and Pumpkin Pie Filling
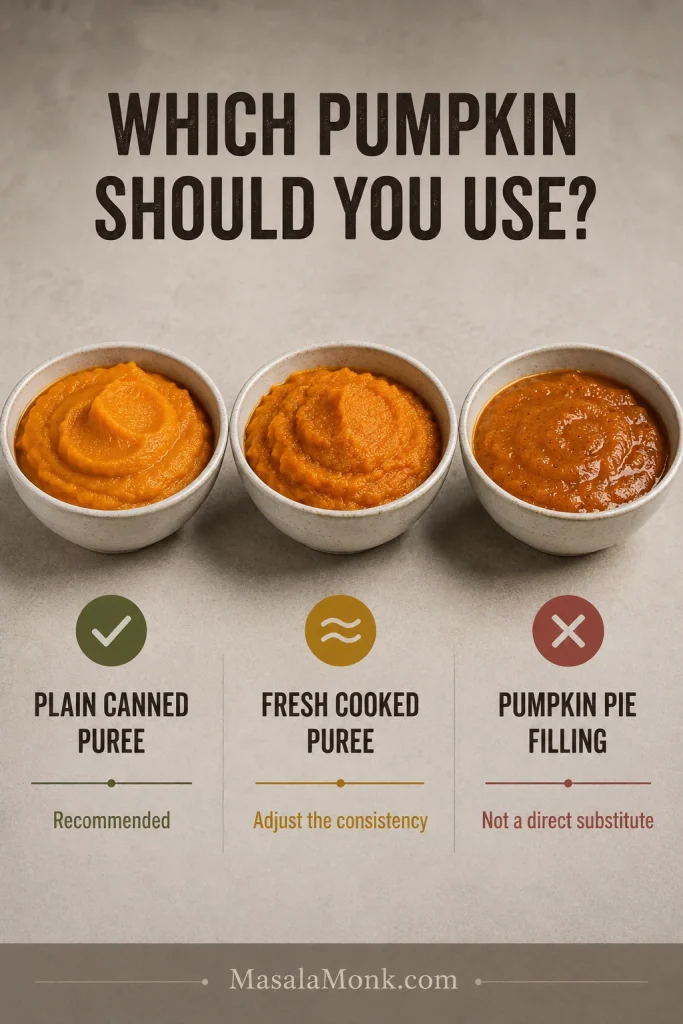
The puree controls more of the final texture than any other wet ingredient. Plain canned pumpkin is the most predictable option because it is smooth and usually thick enough for quick-bread batter. Fresh pumpkin works too, but its water content varies, so adjust the consistency before measuring.
Plain pumpkin puree and pumpkin pie filling behave differently.
Use plain pumpkin puree; pie filling already contains sugar and spices.
Pumpkin product
Best use
Preparation
Plain canned pumpkin puree
Recommended first choice
Measure 340 g and use directly.
Homemade cooked puree
Good alternative
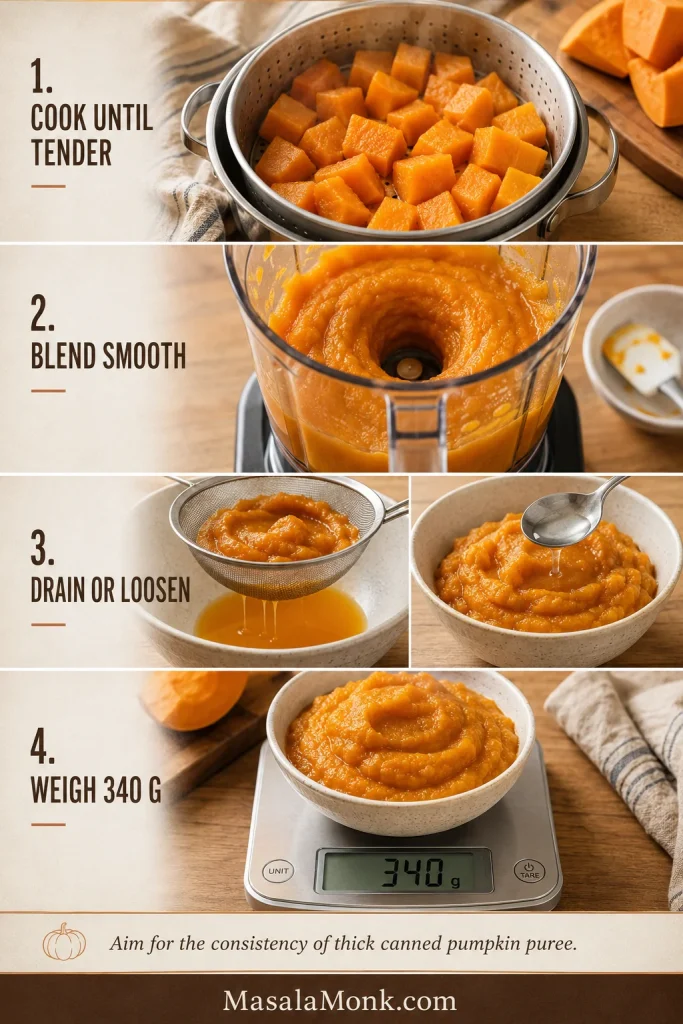
Blend until smooth, drain or loosen to match thick canned puree, then weigh 340 g.
Pumpkin pie filling
Not a direct swap
It already contains sugar, spices and other ingredients.
Fresh steamed pumpkin
Usually needs draining
Puree smoothly, drain and weigh 340 g.
Fresh roasted pumpkin
Often naturally thicker
Puree until smooth and loosen only when unusually dry.
Raw grated pumpkin
Use a different formula
It behaves differently from cooked puree.
Can You Use Pumpkin Pie Filling?
Not as a direct substitute here. Plain puree is cooked and blended pumpkin. Pumpkin pie filling has already been sweetened and seasoned and may contain additional ingredients, so it changes the flavor and moisture balance.
Look for plain pumpkin, pumpkin puree or 100% pumpkin on the label.
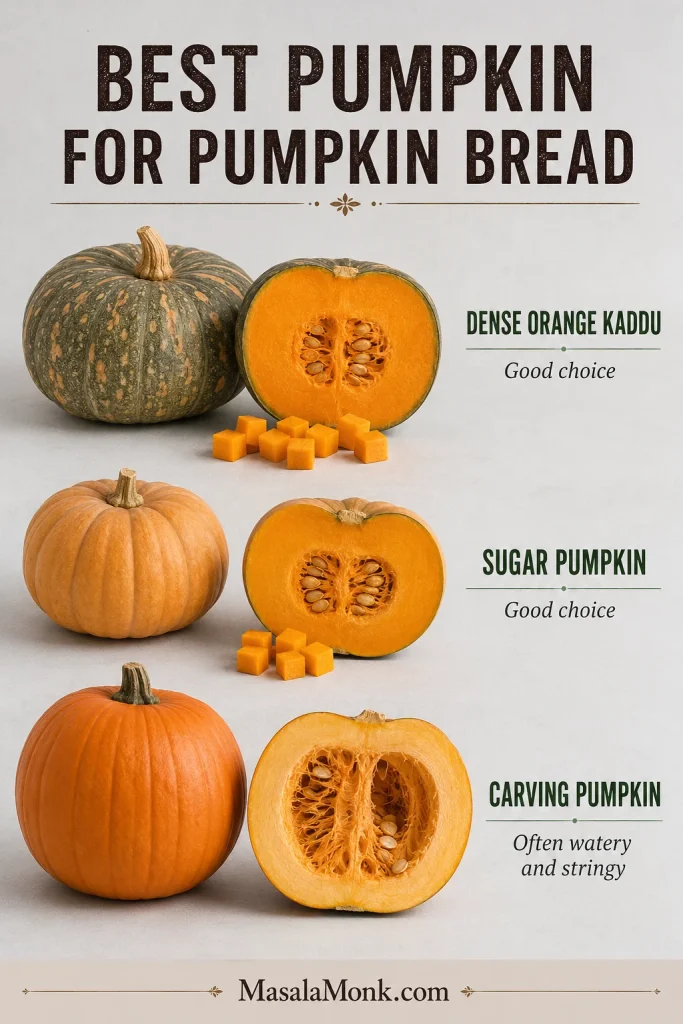
For fresh puree, choose dense cooking pumpkin when possible.
Dense cooking pumpkin makes thicker puree; watery carving pumpkin can loosen the batter.
How to Prepare Fresh Pumpkin Puree
Dense, orange-fleshed kaddu, sugar pumpkin or another cooking pumpkin works best. Large carving pumpkins tend to be stringier and more watery.
Steam or roast peeled pumpkin pieces until completely tender.
Blend until smooth.
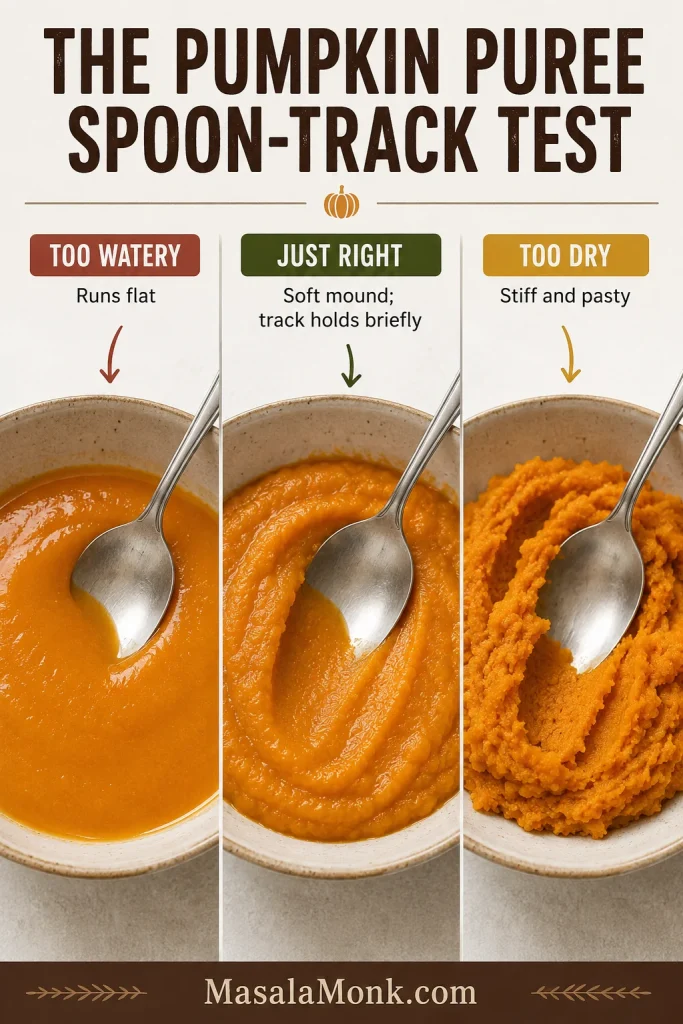
Drain puree that pours or spreads quickly. If roasted puree is dry and pasty, blend in water 1 teaspoon at a time.
Once it resembles thick canned pumpkin, weigh 340 g.
Fresh puree needs thickness control before it goes into batter.
Cook, blend, adjust thickness and weigh 340 g before adding fresh puree to the batter.
Drag a spoon through the puree. The track should remain visible for a moment. A soft mound that holds briefly is a better sign than a glossy puree that immediately runs flat.
Check the puree texture before measuring it.
A spoon track should hold briefly; runny puree can make the loaf heavy.
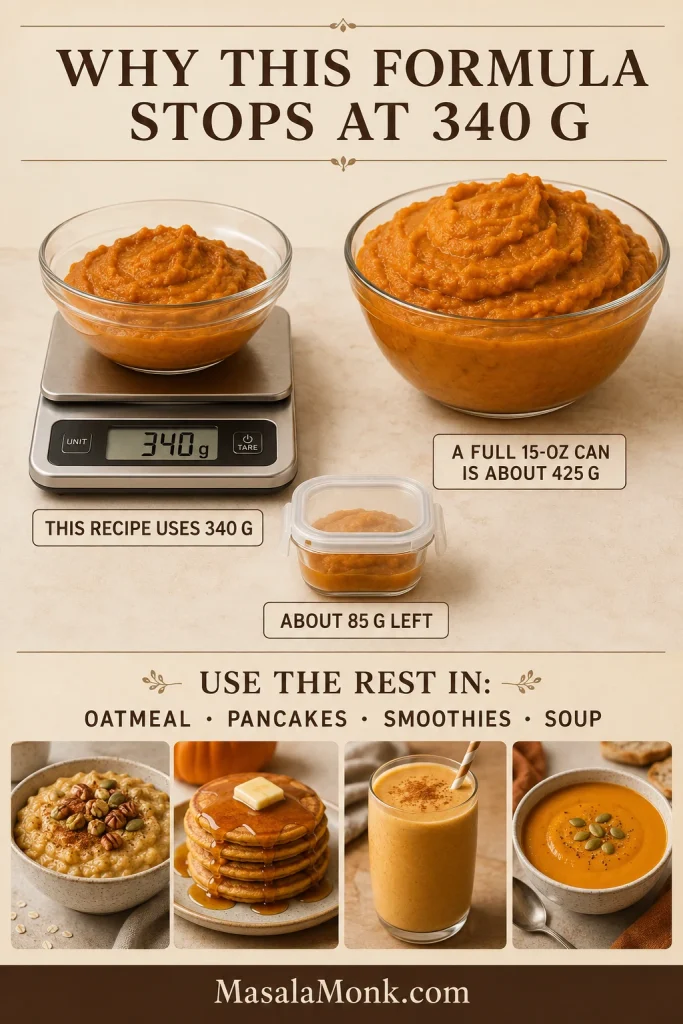
Can You Use the Whole Can? Why This Recipe Stops at 1½ Cups
A full 15-ounce / 425 g can adds more moisture and more batter than this formula is designed to hold. Whole-can pumpkin breads can be excellent, but they need their own balance of flour, egg, pan capacity and baking time.
This recipe leaves about 85 g, or roughly one-third cup. Keep it covered in the refrigerator for a few days, or freeze it in a labeled portion for oatmeal, pancakes, smoothies or soup.
The extra pumpkin is useful, but not in this loaf.
Use 340 g pumpkin puree; save the small leftover from a full can for another dish.
Why This Pumpkin Bread Stays Moist Without Turning Gummy
Using 340 g of puree keeps the pumpkin flavor clear while leaving enough flour and egg to support the moisture. The loaf stays pumpkin-first rather than tasting like a spice cake with pumpkin added to it.
Neutral oil keeps the cooled crumb soft. Brown sugar adds caramel depth and helps the bread retain moisture, while the smaller amount of granulated sugar rounds out the sweetness without bringing more molasses flavor.
Baking soda helps with early lift and browning. The small amount of baking powder supports the thick batter while the middle catches up. Because ovens and loaf pans vary, the timer tells you when to start looking; the center tells you when to stop.
This is the formula logic in one glance.
Pumpkin adds moisture, flour and eggs set structure, and oil keeps the crumb tender.
Ingredient Notes
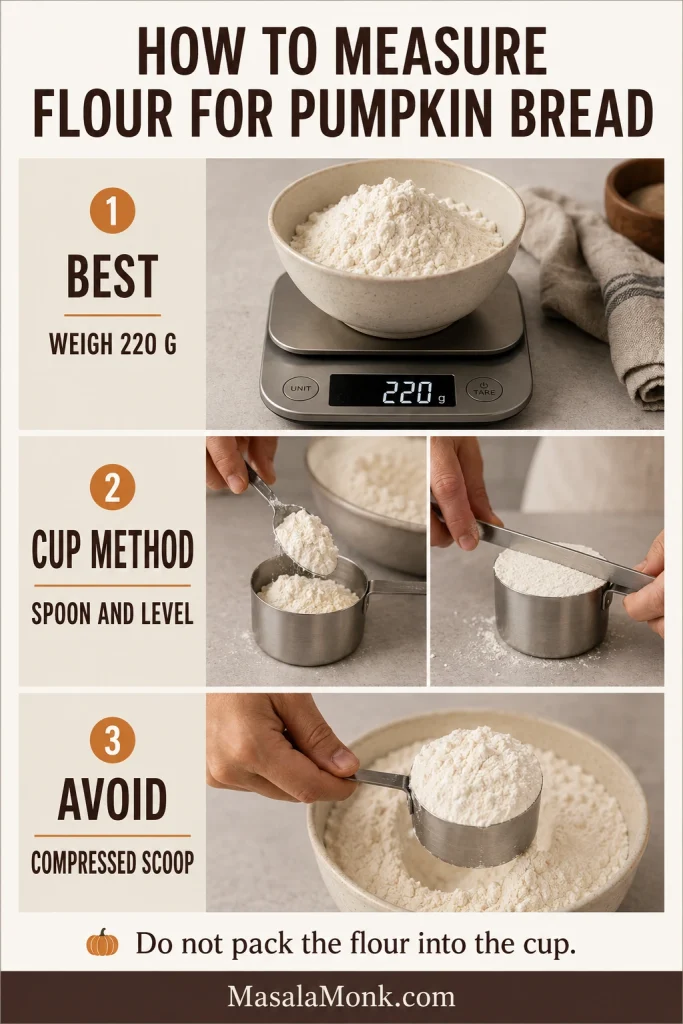
Flour: 220 g gives the most repeatable result. When measuring by cups, loosen the flour, spoon it into the measure and level without pressing.
Brown sugar: light brown sugar keeps the pumpkin and spices clear. Dark brown sugar gives the loaf a deeper molasses note and darker color.
Oil: vegetable, canola, sunflower, grapeseed or mild avocado oil all suit this loaf.
Spices: use cinnamon or a spice blend that still smells lively in the jar. Faint spices become even quieter after baking.
A packed cup can quietly change the loaf.
Weigh 220 g flour, or spoon and level it gently to avoid a dry loaf.
Apple pie spice can work when that is what you already have, although its balance is usually softer and less clove-forward. Add a tiny pinch of cloves for a more familiar pumpkin-spice finish.
The Best Pumpkin Bread Pan—and How Other Sizes Change the Bake
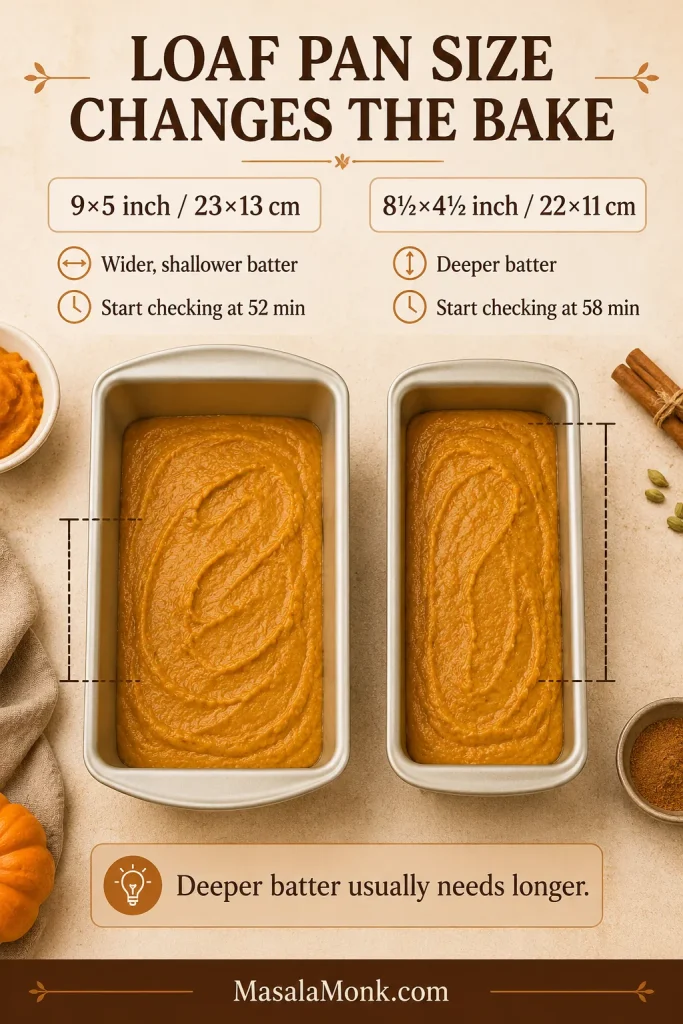
A light-colored metal 9×5-inch / 23×13 cm loaf pan is the most dependable choice. Measure across the inside of the top edge. An 8½×4½-inch pan holds the batter more deeply and usually needs extra time.
Pan Fill and Pan Size
Batter depth affects both rise and bake time.
Keep the pan two-thirds to three-quarters full so the batter can rise and bake through.
Deeper batter usually needs more time in the center.
A narrower pan holds deeper batter, so the center usually needs more time.
Bake Windows by Format
The following times are starting windows, not fixed finish times. How deeply the batter sits, the pan material and the behavior of your oven matter more than the label on the pan.
Format
Oven
Starting guidance
9×5-inch light metal loaf
350°F / 175°C
Start at 52 minutes; expect roughly 55–65 minutes.
8½×4½-inch light metal loaf
350°F / 175°C
Start at 58 minutes; expect roughly 60–70 minutes, with more time possible in a deep pan.
9×5-inch glass loaf
325°F / 165°C
Start around 60 minutes; expect roughly 65–75 minutes and follow the center cues.
Small 5¾×3¼-inch mini loaves
350°F / 175°C
Start at 25 minutes. Bake until the centers spring back and a tester shows moist crumbs.
Standard muffins
350°F / 175°C
Start at 17 minutes; many batches fall around 18–24 minutes.
Pan Material Notes
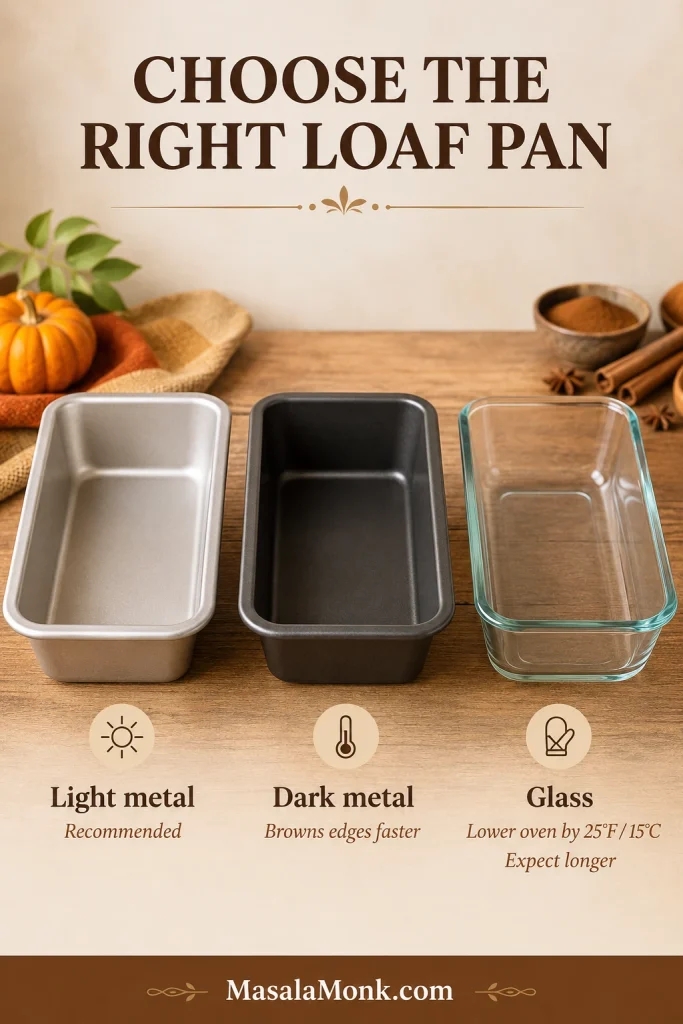
Light metal allows the middle to finish without darkening the sides too aggressively. Glass warms more slowly and retains heat for longer, so reduce the oven by 25°F and expect additional time. King Arthur Baking explains the difference in its comparison of glass, metal and stoneware baking pans.
Pan material changes browning and timing.
Light metal is the safest default; dark metal browns faster and glass bakes differently.
Fill mini loaf pans and muffin cups about two-thirds full. Move finished muffins to a rack or another dry, heatproof surface after a short rest so their bottoms do not become damp.
Bake-Windows Visual Guide
Start with the timing window, then trust the center.
Use timing as a starting window, then finish with center cues.
Four Batter and Baking Cues That Matter
What the Batter Should Look Like
Smooth orange base: the eggs, sugars, pumpkin, oil and vanilla should look evenly blended, without oily streaks around the bowl.
Thick but mobile batter: it should fall from the spatula in a slow, broad ribbon. A slightly rough surface is fine; a glossy batter that immediately runs flat may be too loose.
Safe batter depth: leave roughly one-quarter to one-third of the pan empty. A deeper layer takes longer to set through the middle.
Protected crust: the cinnamon-and-pumpkin aroma may arrive before the loaf is ready. If the top darkens early, cover it loosely with foil and let the center continue baking.
The wet base should look smooth before the flour goes in.
Whisk until the pumpkin mixture is smooth, orange and free of oily streaks.
Distribute the small dry ingredients before adding flour.
Scatter spices and leaveners across the wet mix so they distribute evenly.
Stop mixing as soon as the flour disappears.
Fold just until the last dry flour streak disappears, then stop.
The finished batter should move slowly, not pour loosely.
Finished batter should fall in a slow, broad ribbon instead of running flat.
How to Tell When Pumpkin Bread Is Done
Visual Doneness Cues
Color alone is unreliable in a loaf made with pumpkin, brown sugar and spices. Check the deepest part with these four signs:
The center crack tells you when to start checking.
A matte center crack means the loaf is ready for crumb, spring and temperature checks.
Center crack: the visible crumb looks matte and set, without a glossy pool underneath.
Gentle press: the surface beside the crack springs back instead of holding a deep indentation.
Toothpick or skewer: a few moist crumbs are ideal. Liquid batter or a thick coating of pumpkin mixture needs longer. When one spot looks clean but the crack remains glossy, test again slightly beside it.
Optional temperature: use 200–205°F / 93–96°C as final confirmation after the visual checks look right. Insert the probe through the center crack and place the tip in the deepest part of the loaf, away from the pan. ThermoWorks gives the same range in its guidance for quick-bread doneness temperatures.
Tester and Temperature Checks
Read what the tester brings out of the loaf.
Wet batter needs more time; moist crumbs usually mean the center is ready.
Temperature is most useful in the deepest center.
Check the thickest center and avoid the pan edges; aim for 200–205°F / 93–96°C.
Use the final cues together, not one by itself.
Use the cues together: matte crack, gentle spring, moist crumbs and 200–205°F.
Pumpkin Bread Troubleshooting: Gummy, Sunken, Dry or Dark
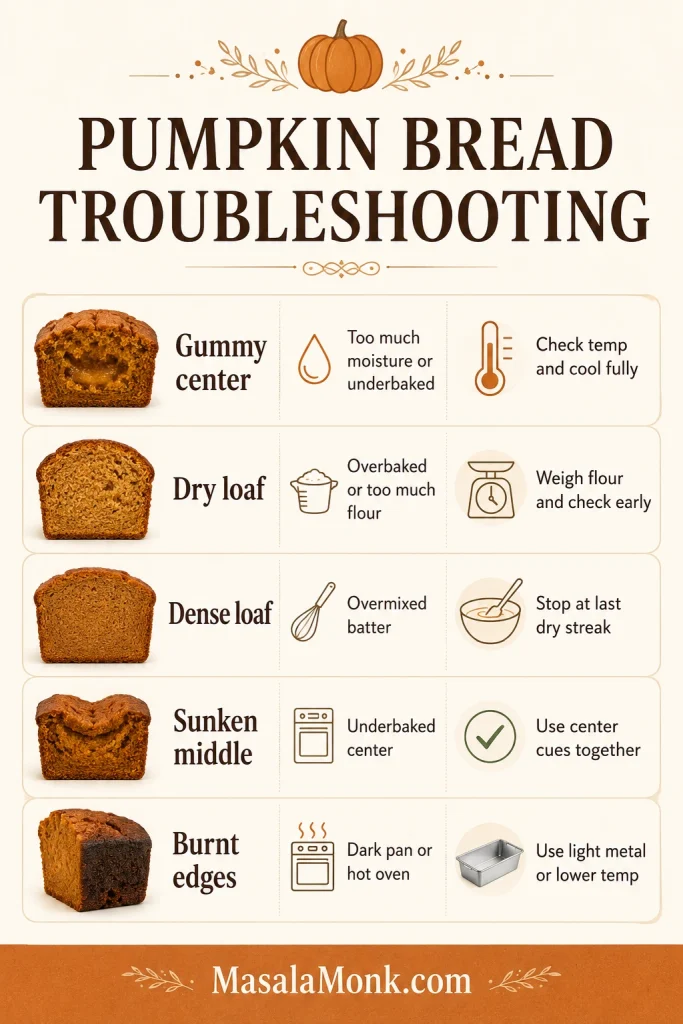
Match the symptom before changing the whole recipe. Wet puree, inaccurate flour measurement, pan depth, uneven batter and an unfinished center explain many common problems.
If the loaf is still in the oven, check the doneness cues before diagnosing it as a failed loaf.
Wet, Gummy or Sunken Center
Compare the center only after the loaf has cooled.
A wet-looking, darker center usually means the loaf needed more time or thicker puree.
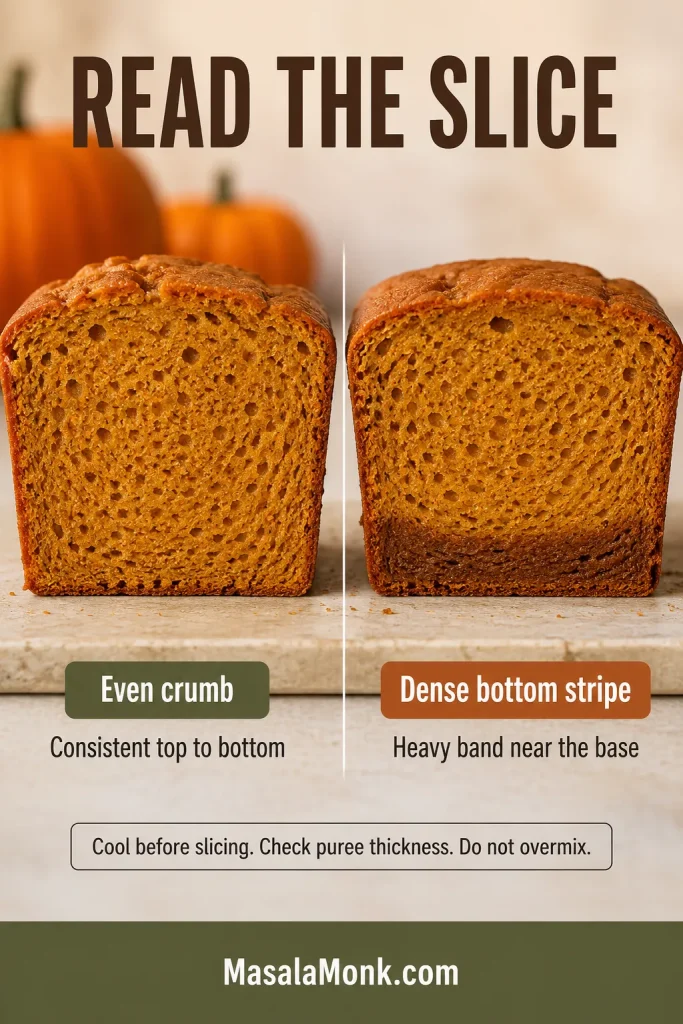
For a bottom stripe, check moisture and the lower crumb.
A dense bottom stripe usually points to excess moisture, uneven batter or an underbaked lower crumb.
Problem
Likely causes
What to do next
Wet or gummy middle
Loose puree, too much pumpkin, too little flour, deep pan, early removal or slicing while hot
Drain fresh puree, weigh the key ingredients and bake until the deepest section no longer shows liquid batter.
Dense stripe along the bottom
Excess liquid, separation in the batter or an underbaked lower crumb
Blend the wet mixture evenly, confirm the puree is thick and give the lower center enough time.
Sunken middle
Center not set, too much liquid, excess leavening or repeated early oven opening
Keep the oven closed during the rise and confirm the center before removing the pan.
Dry, Tough, Dark or Stored Too Soon
Match the symptom before changing the recipe.
Most fixes trace back to moisture, flour, mixing, pan depth or bake time.
Problem
Likely causes
What to do next
Dry or crumbly bread
Too much flour, excessive baking, dark pan or major reductions in sugar or oil
Measure flour carefully, begin checking on time and protect the crust if it darkens early.
Tough or rubbery crumb
Vigorous mixing after the flour was added
Fold only until the final dry streak disappears.
Dark crust with a wet middle
Dark pan, strong heat above the loaf, high oven temperature or batter sitting too deeply
Use light metal, move the pan one level away from the strongest heat source and tent the top once it has enough color.
Overflowing batter
Pan too small or filled too high
Keep the batter below three-quarters full and bake excess as muffins.
Repeatedly wet middle despite normal timing
Oven running cool or not fully preheated
Verify the oven temperature with a separate thermometer before changing the formula.
Sticky bottom after storage
Loaf wrapped before it was fully cool
Cool completely before storing and use parchment or a replaceable paper towel in humid conditions.
Substitutions and What They Change
Bake the original loaf once before changing several structural ingredients together. These exact substitutions have not been validated as separate versions of this formula, so change one structural ingredient at a time and expect the texture to shift.
Once the basic loaf is baking evenly, small changes are easier to judge. For topping ideas instead of structural swaps, jump to easy variations.
Use these swaps as texture direction, not tested ratios.
Texture direction, not tested ratios: change one structural ingredient at a time.
Melted butter: creates a more buttery flavor and a firmer crumb after cooling.
Applesauce: adds water and fruit solids without oil’s tenderizing effect. Replace only a small portion rather than all the oil.
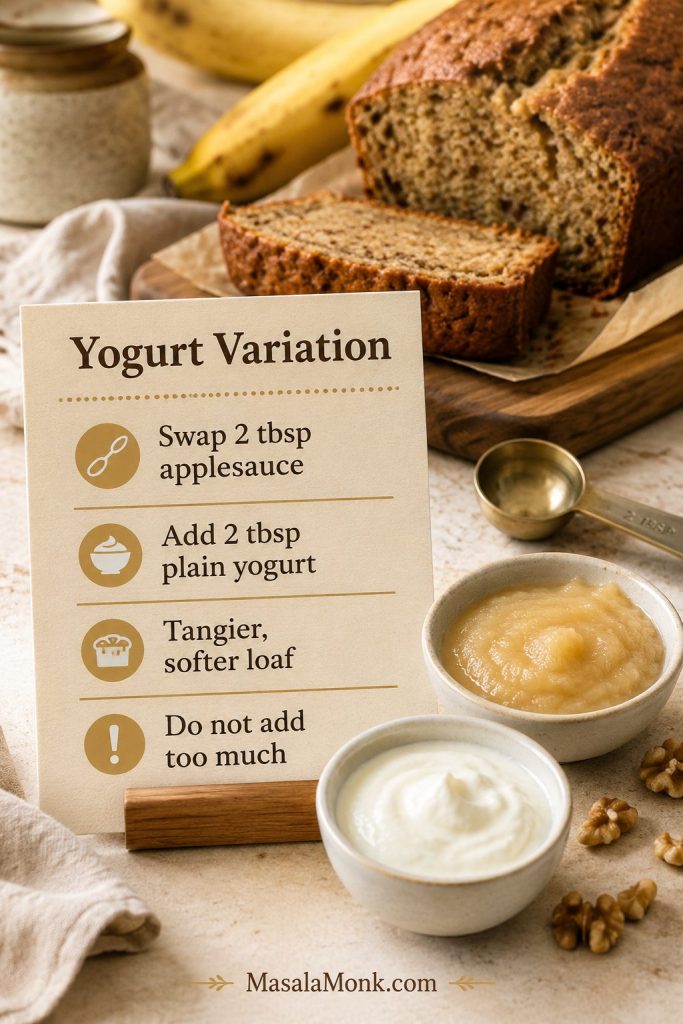
Yogurt or sour cream: brings richness and acidity, but a large amount can make an already-moist batter heavier.
Less sugar: reduces browning, moisture retention and tenderness. A modest reduction is gentler than removing half.
Honey or maple syrup: adds liquid as well as sweetness, so neither should replace the granulated sugars cup for cup.
Whole-wheat flour: creates a more robust, less delicate crumb. Begin with a partial replacement.
Oat, almond or coconut flour: behaves too differently from wheat flour for a dependable cup-for-cup swap here. Use a formula designed around the flour you want.
Gluten-free, vegan, keto and high-protein conversions change several structural parts of the loaf at once. They need separate formulas rather than a chain of small swaps.
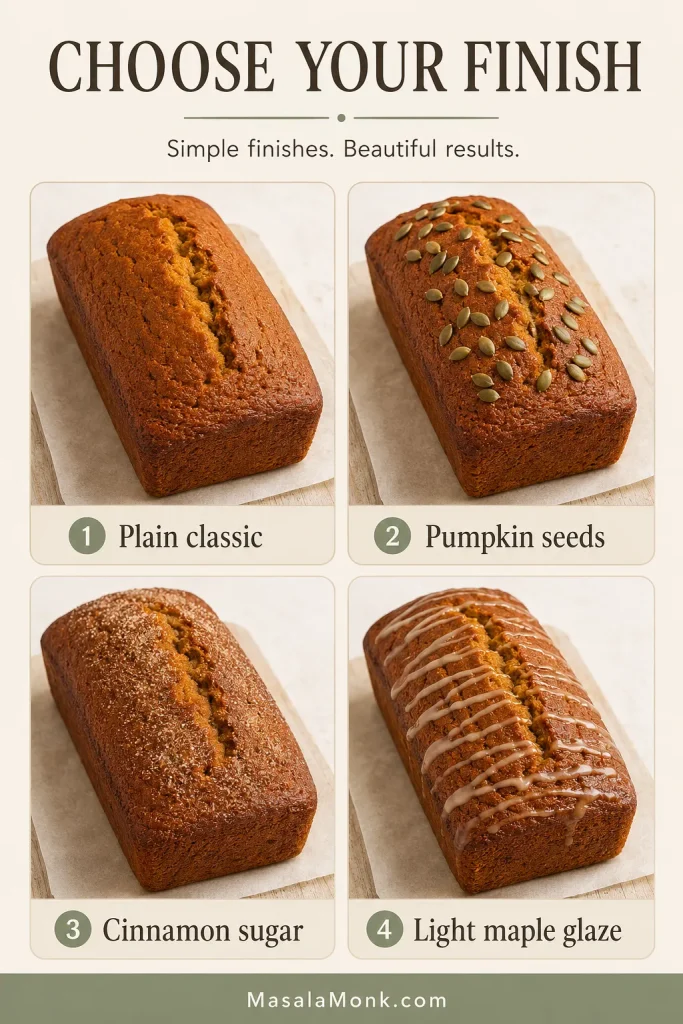
Easy Variations
Pumpkin seeds: scatter 2 tablespoons over the batter and press lightly so they stay attached.
Cinnamon-sugar top: mix 1 tablespoon sugar with ¼ teaspoon cinnamon and sprinkle evenly over the surface.
Walnuts or pecans: fold in up to ¾ cup chopped toasted nuts.
Raisins: add ½ cup. Soak very dry raisins briefly, then drain and pat them dry.
Orange zest: add the finely grated zest of one small orange.
Maple glaze: whisk ½ cup / 60 g powdered sugar with 1 tablespoon maple syrup and 1–2 teaspoons milk, adding the milk gradually.
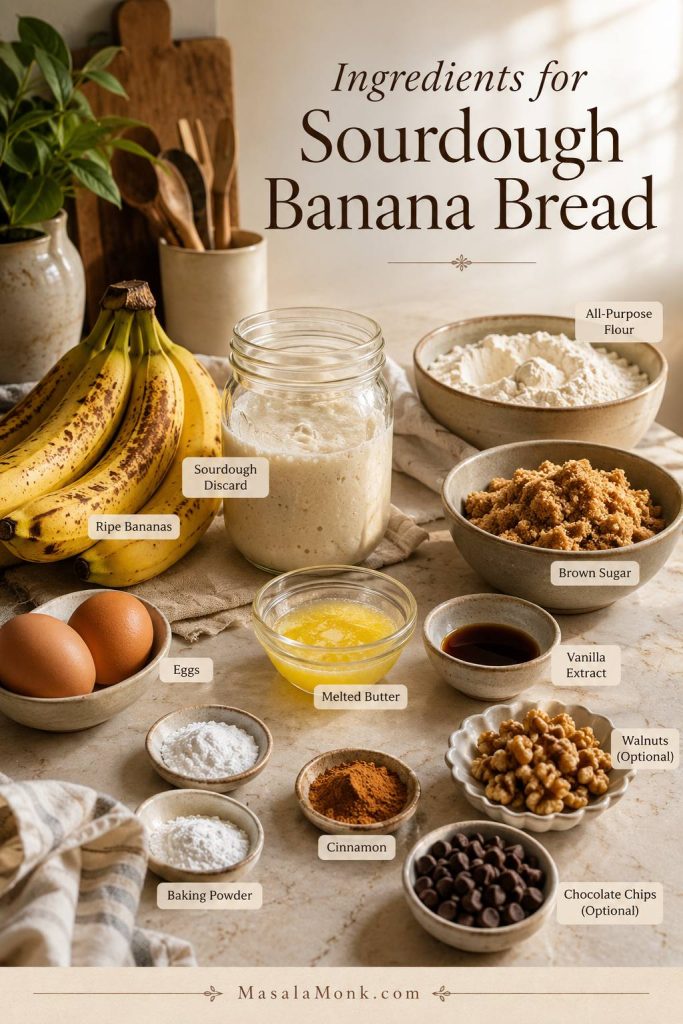
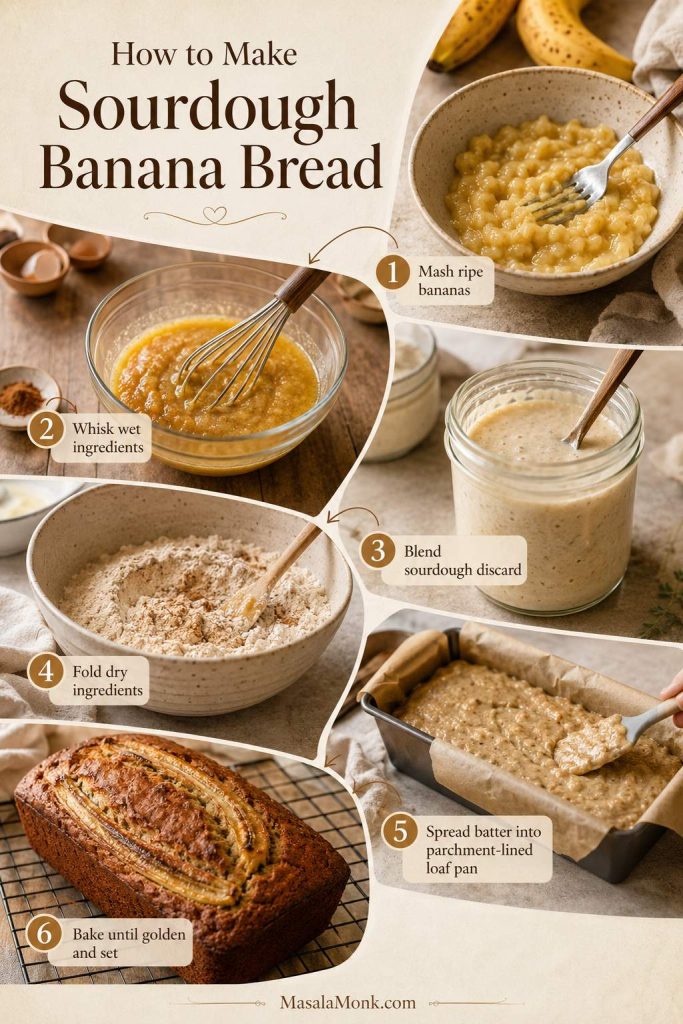
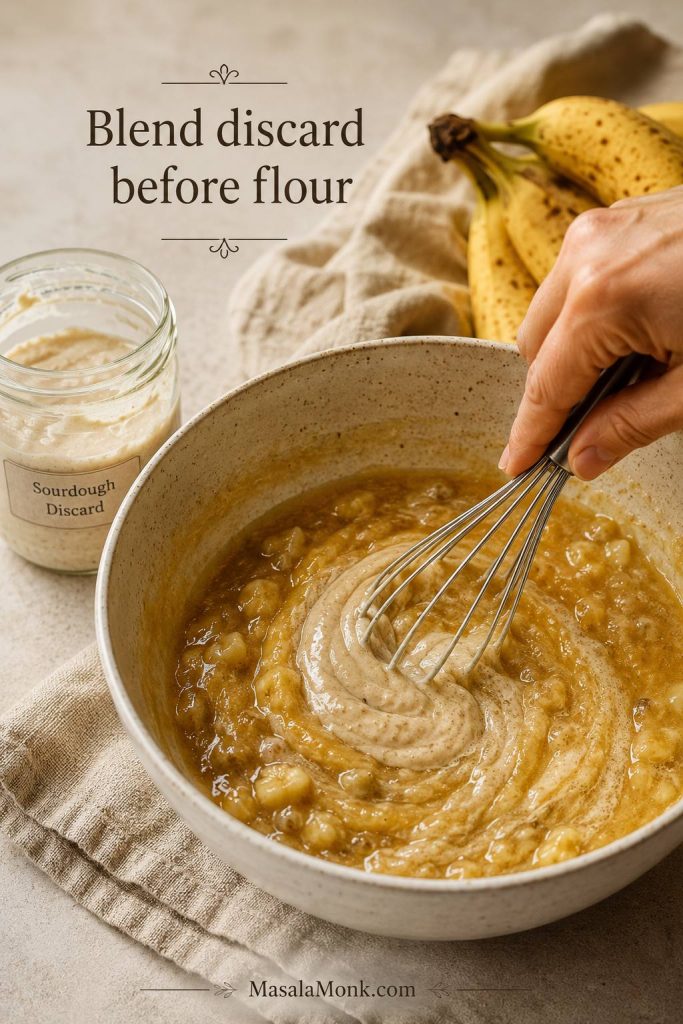
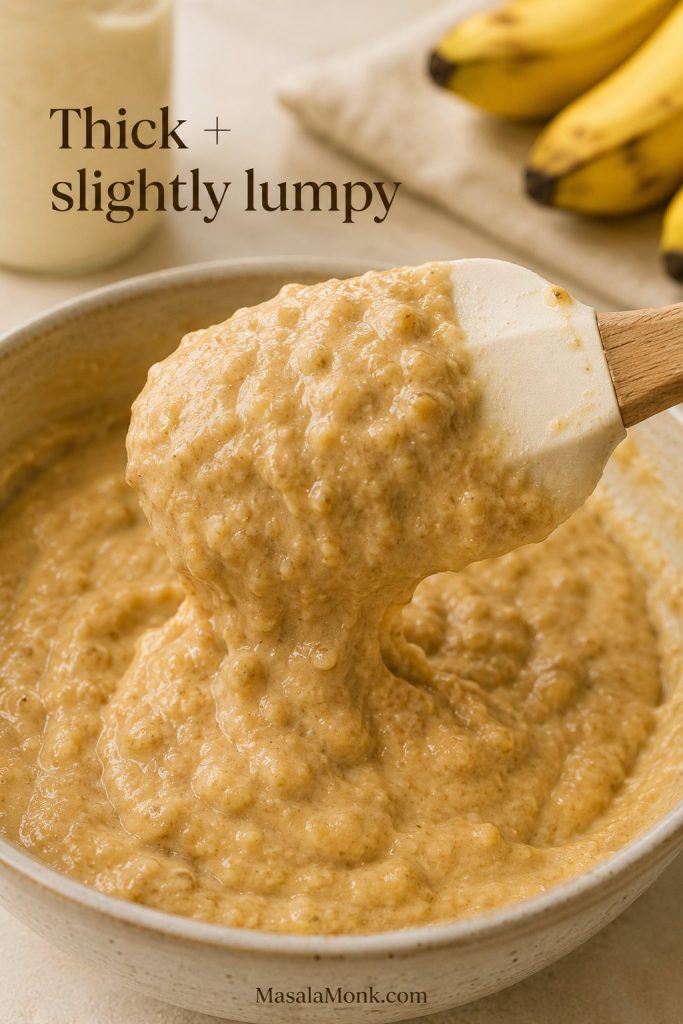
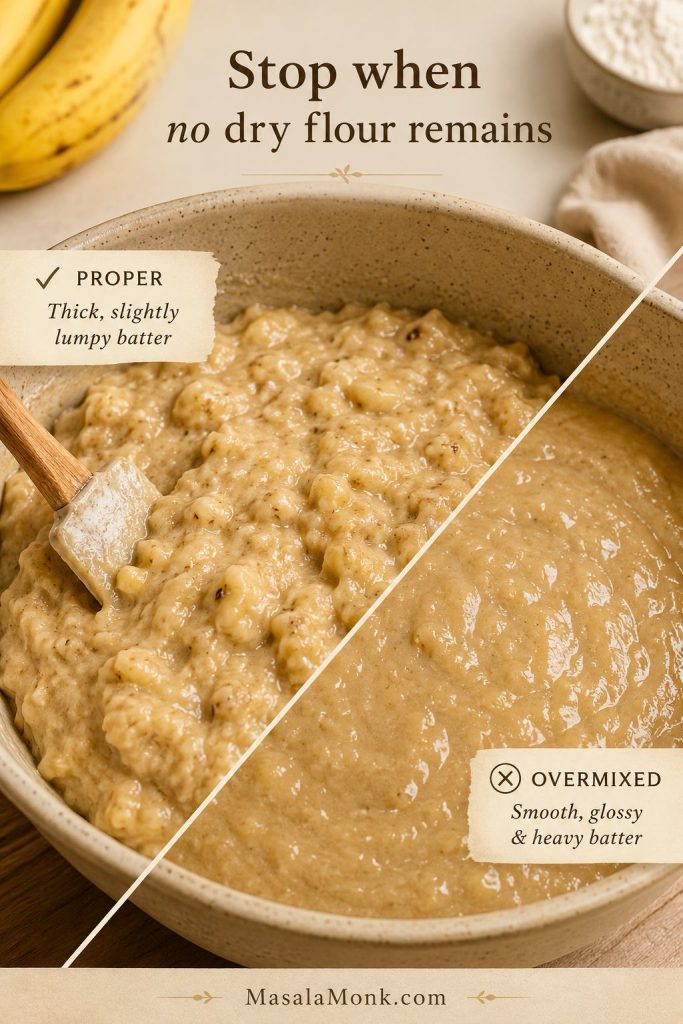
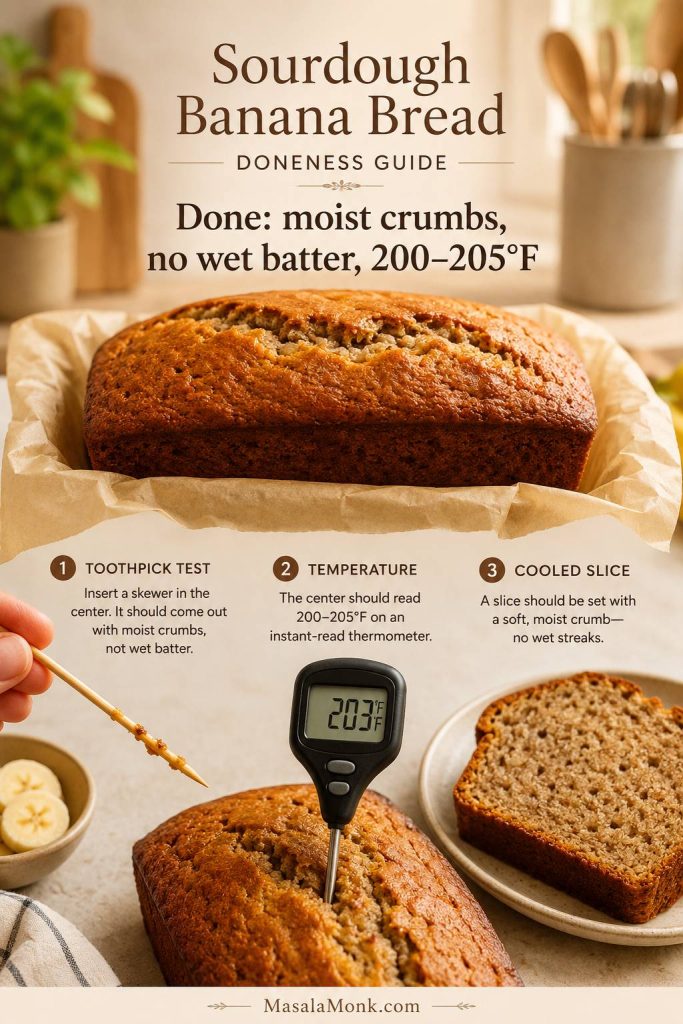
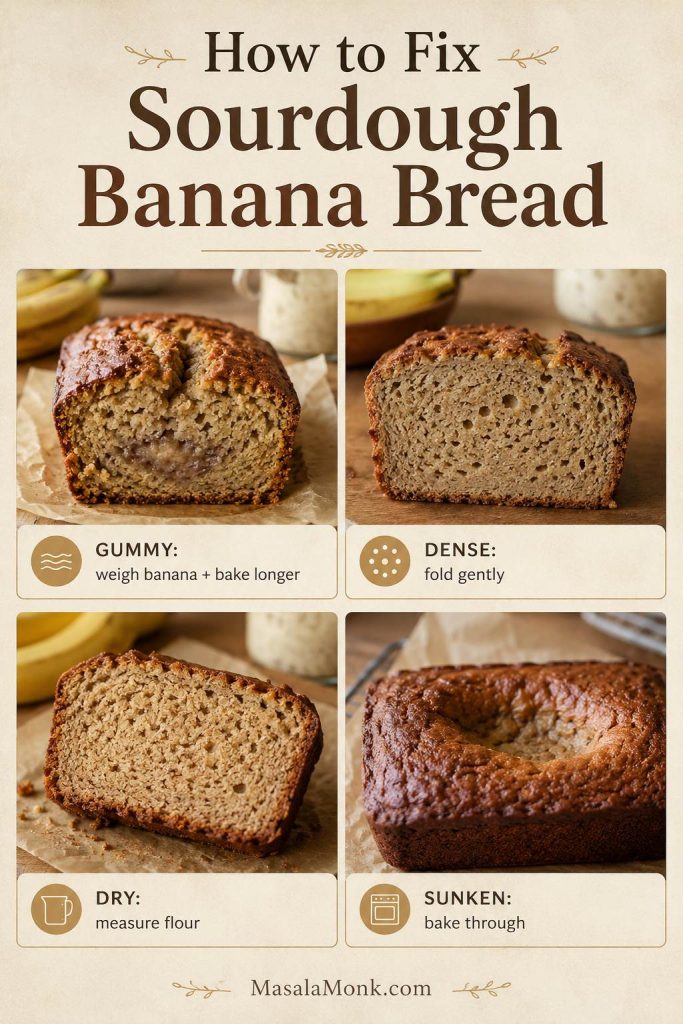
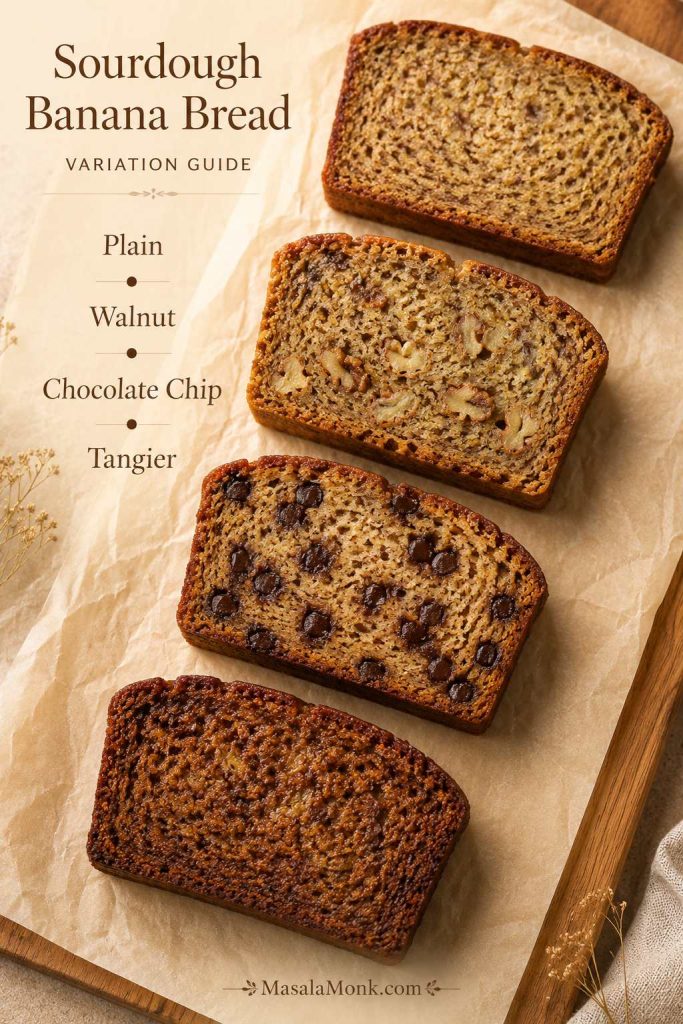
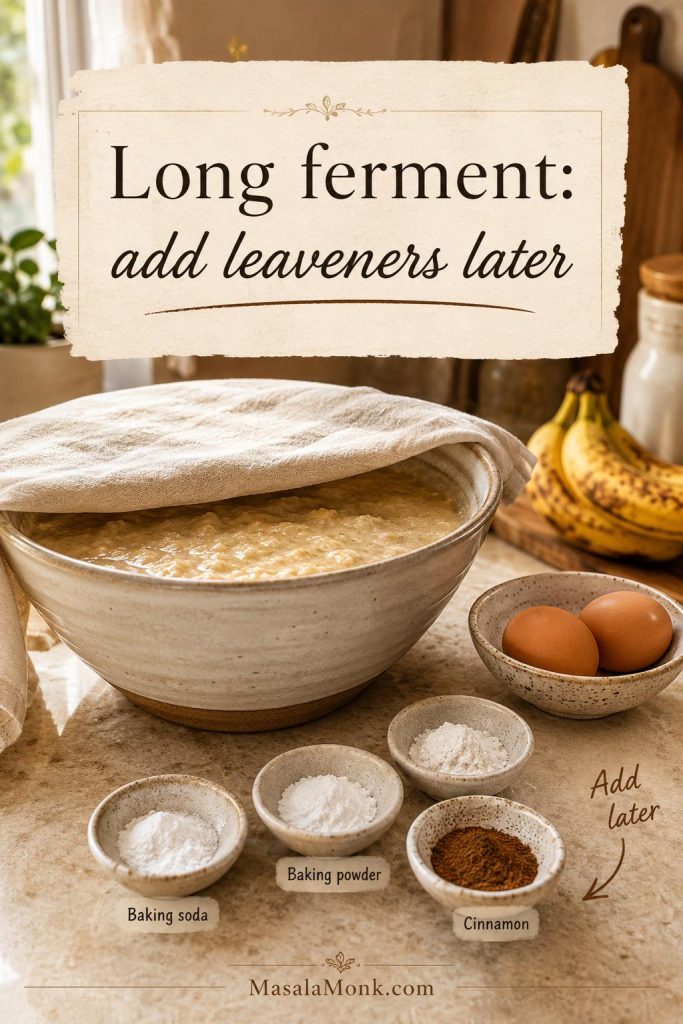
Banana, cream-cheese filling and sourdough change the batter more substantially. For a quick bread built around discard, use this sourdough banana bread recipe.
Keep the topping simple or add nothing at all; this loaf does not need a glaze to feel complete.
Keep the batter steady and change only the finish.
Choose plain, seeded, cinnamon-sugar or lightly glazed depending on the finish you want.
How to Serve Pumpkin Bread
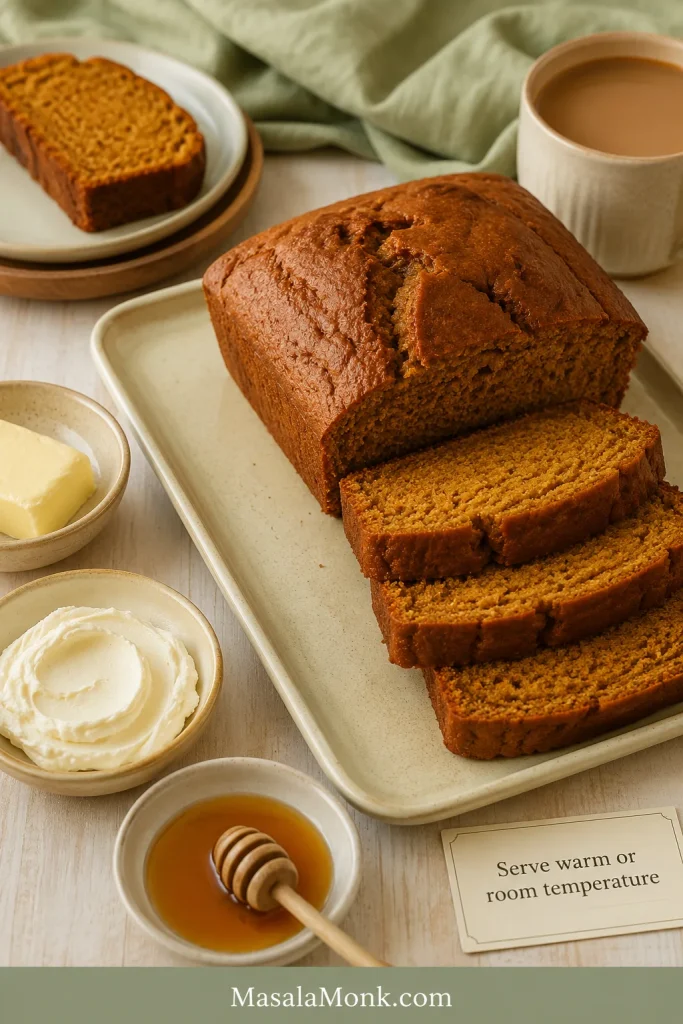
At room temperature, the pumpkin tastes fuller and the spices feel rounder. Serve the loaf plain with coffee, chai or black tea. A warm slice also works beautifully with salted butter, cream cheese or maple butter.
Cool first for clean slices, then rewarm if you like.
Cool for clean slices, then serve plain, buttered, or with cream cheese and coffee or tea.
Toast day-old slices until the edges are lightly crisp.
Use older slices for pumpkin French toast.
Wrap a fully cooled loaf as an autumn or holiday gift.
By the next morning, the crust has softened slightly and the loaf cuts more cleanly. Cinnamon, ginger and nutmeg also taste more unified. The first warm slice is hard to resist, but the loaf shows its best crumb after it has cooled completely.
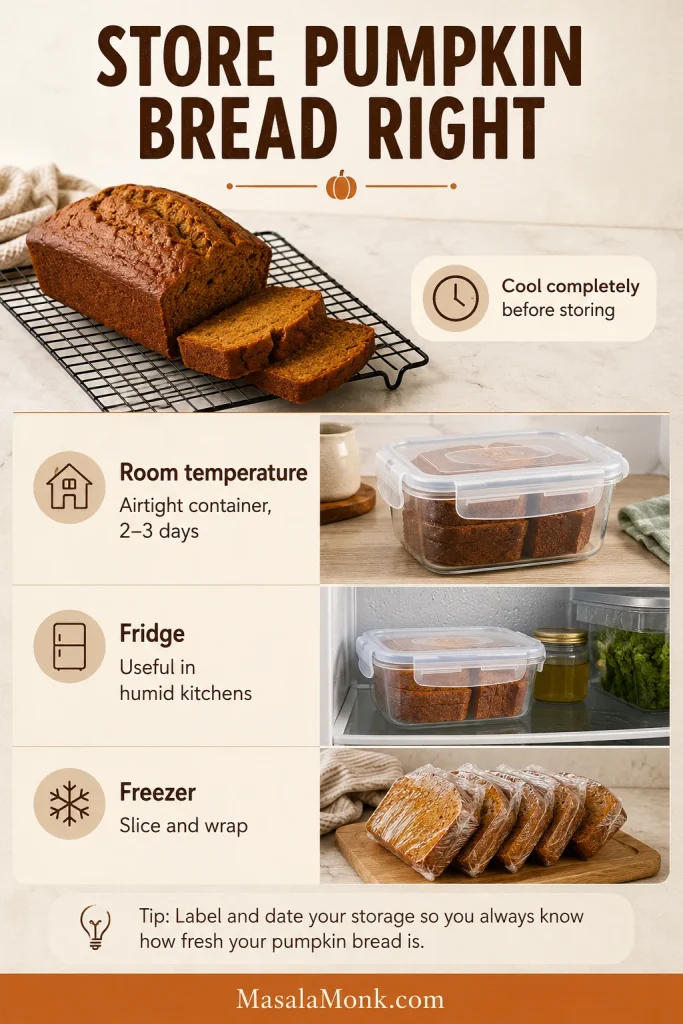
Storage and Freezing
Cool room: wrap the completely cooled loaf or place it in an airtight container and keep it at room temperature for up to 3 days.
Hot or humid kitchen: refrigerate the loaf sooner. Let slices return toward room temperature or warm them gently before serving.
Freezer: wrap the loaf whole or as individual slices, place it in a freezer-safe container and label it with the date. Separate slices with parchment and use within about three months for the best texture.
Thaw pumpkin bread while it is still wrapped so condensation forms on the wrapping rather than soaking into the crumb.
Let steam escape before wrapping the loaf.
Cool completely before wrapping; then store airtight, refrigerate if humid or freeze slices.
Frequently Asked Questions
Can I Prepare the Batter Ahead?
Prepare the wet and dry components separately, then combine them shortly before baking. Once the flour and leaveners meet the wet mixture, get the batter into the oven promptly.
Can I Make Pumpkin Bread Without a Loaf Pan?
Yes. A standard muffin tin is the easiest alternative. Fill the cups about two-thirds full and begin checking at 17 minutes.
Can I Freeze Leftover Pumpkin Puree?
Yes. Freeze it in a small airtight container or measured portion, label the amount and thaw it in the refrigerator. Stir before using and drain briefly if it releases water.
Save the short version once you know the full method.
The saveable version: pumpkin amount, flour, pan size, bake window and doneness cue in one place.
Once the loaf is cool, cut a thick slice and notice the contrast: a lightly firm crust, a soft orange crumb and cinnamon arriving just after the pumpkin. Eat it plain, add a little salted butter or wrap part of the loaf for someone else.
Did you use canned or fresh pumpkin? Share your pan size, pan material and actual bake time—it may help the next reader using a similar setup.
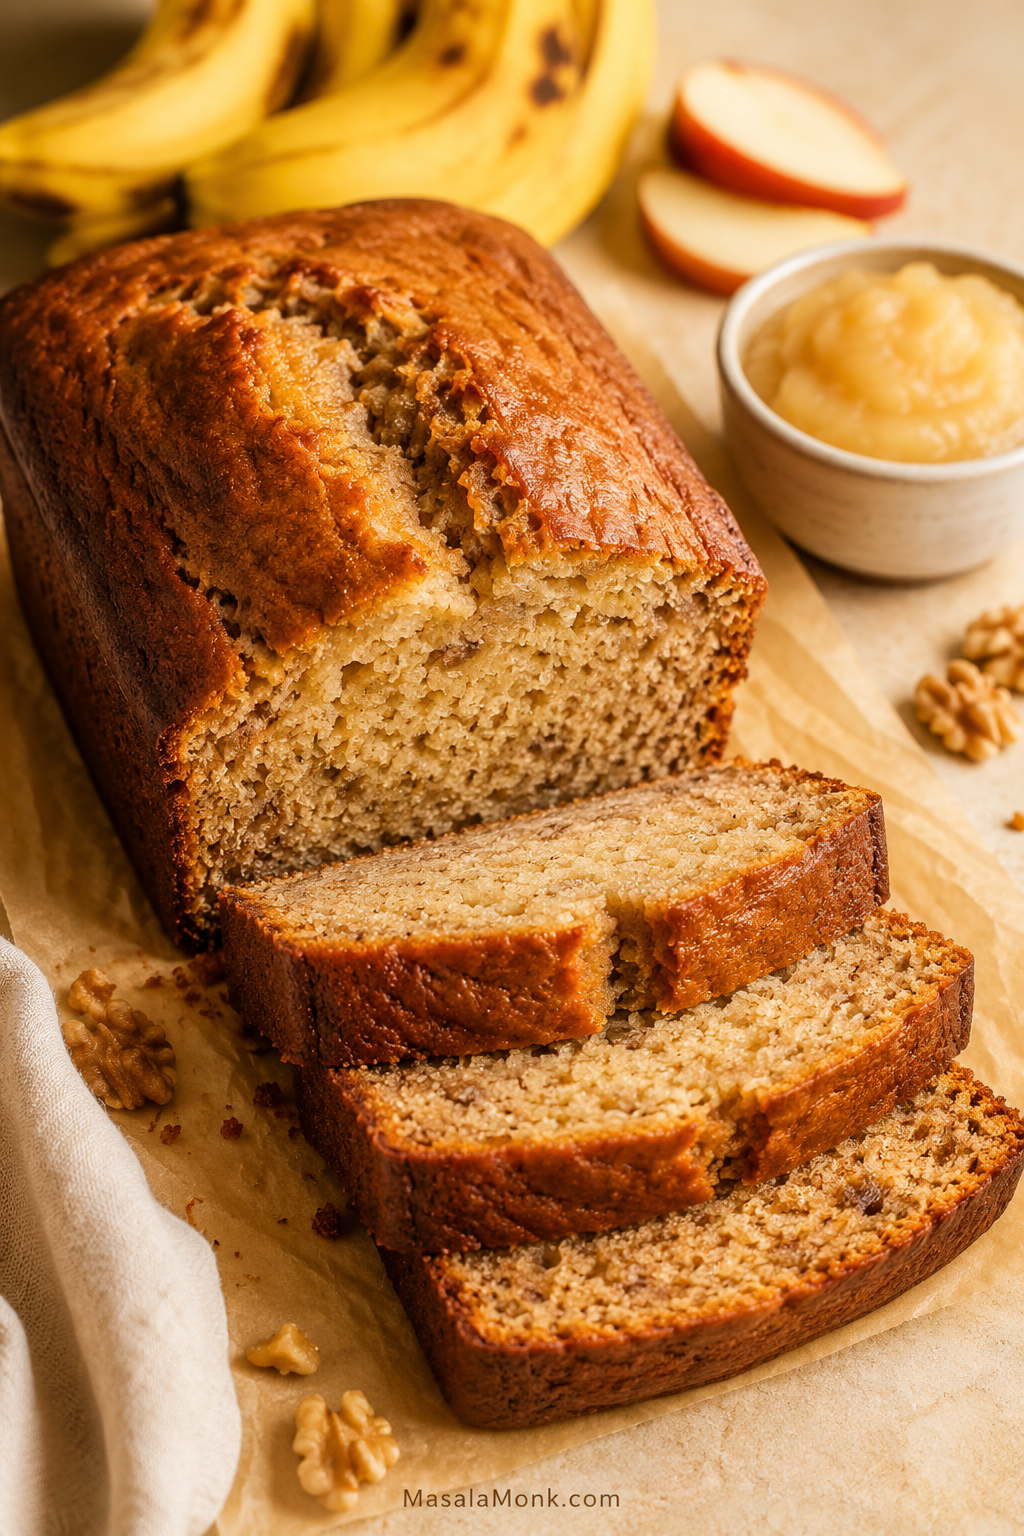
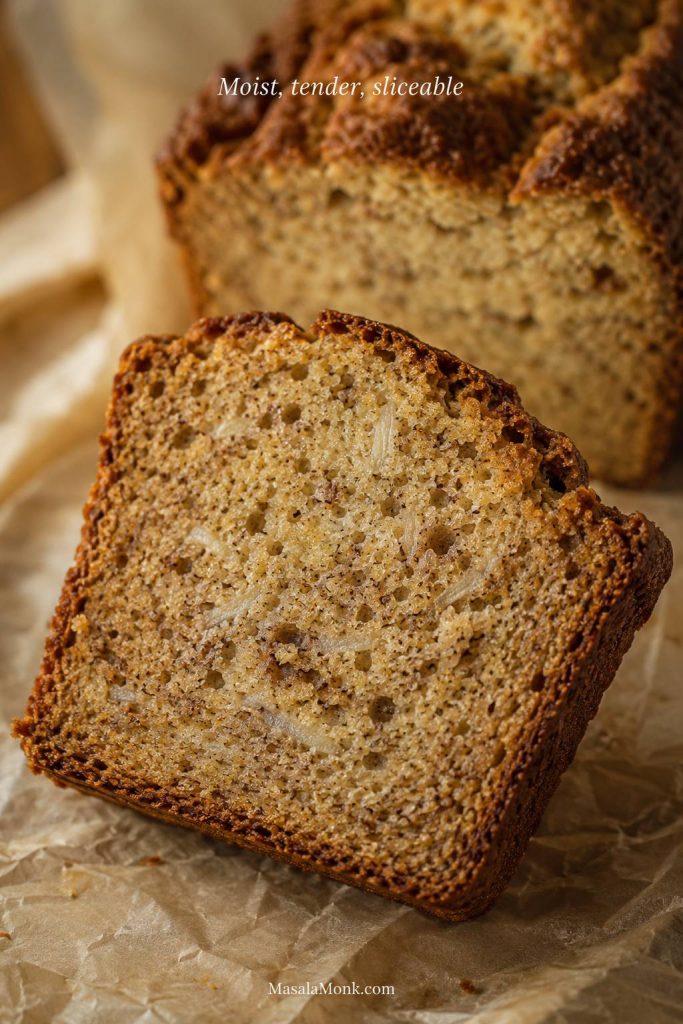
This banana bread with applesauce recipe is for the moment when the bananas on the counter are almost too soft for the fruit bowl but perfect for baking. The loaf comes out moist, sliceable, and a little lighter than classic banana bread, while still holding together after it cools.
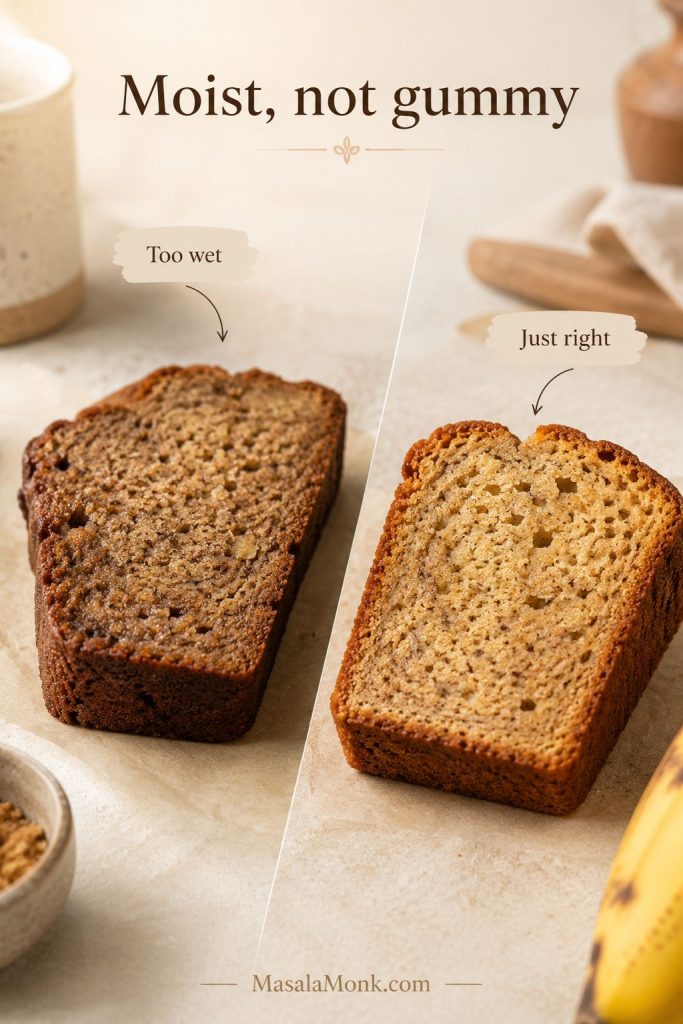
The texture comes down to balance. Applesauce is wonderful in banana bread because it adds moisture and lets you use less fat, but it also brings water into the batter. With the wrong ratio, the top can look beautifully baked while the center stays heavy, damp, or gummy.
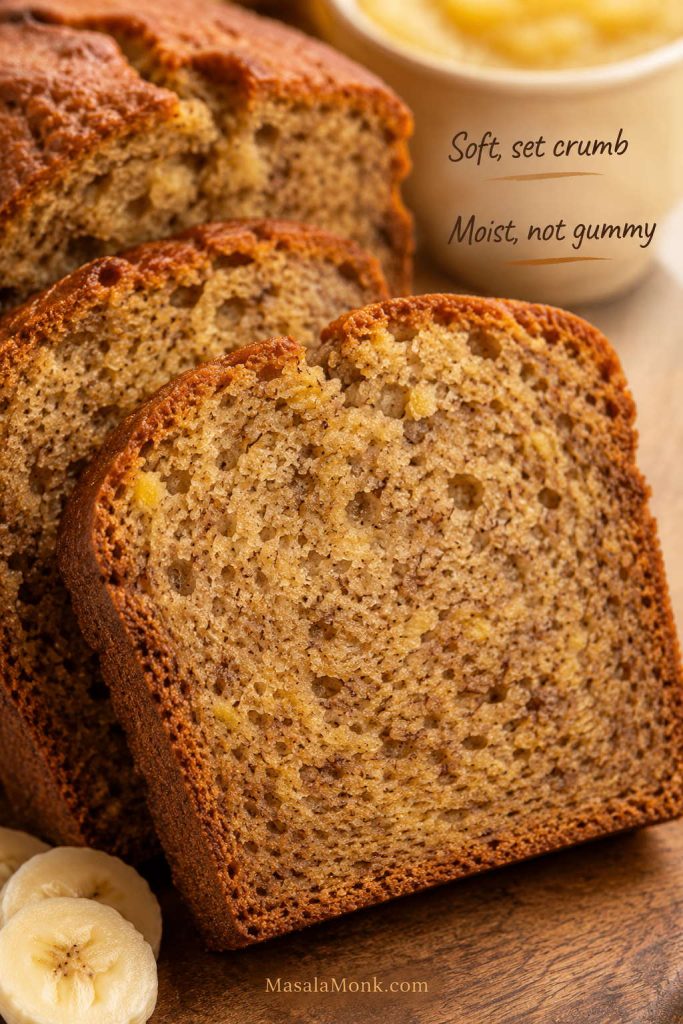
The goal is a loaf that smells like ripe bananas and cinnamon, slices without dragging, and feels plush rather than damp when you pick up a piece.
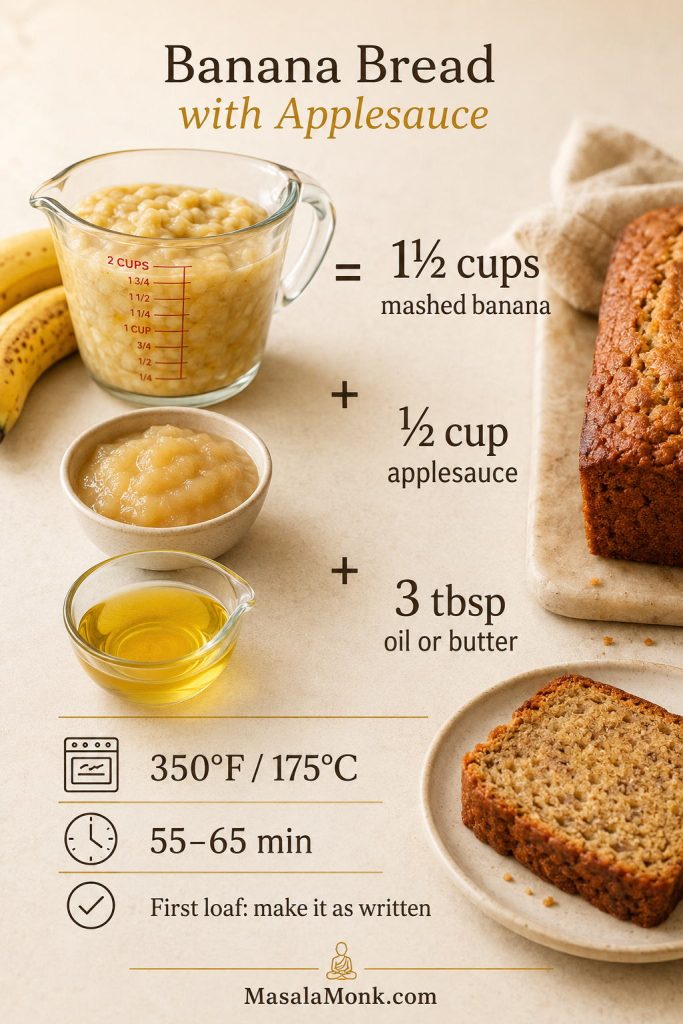
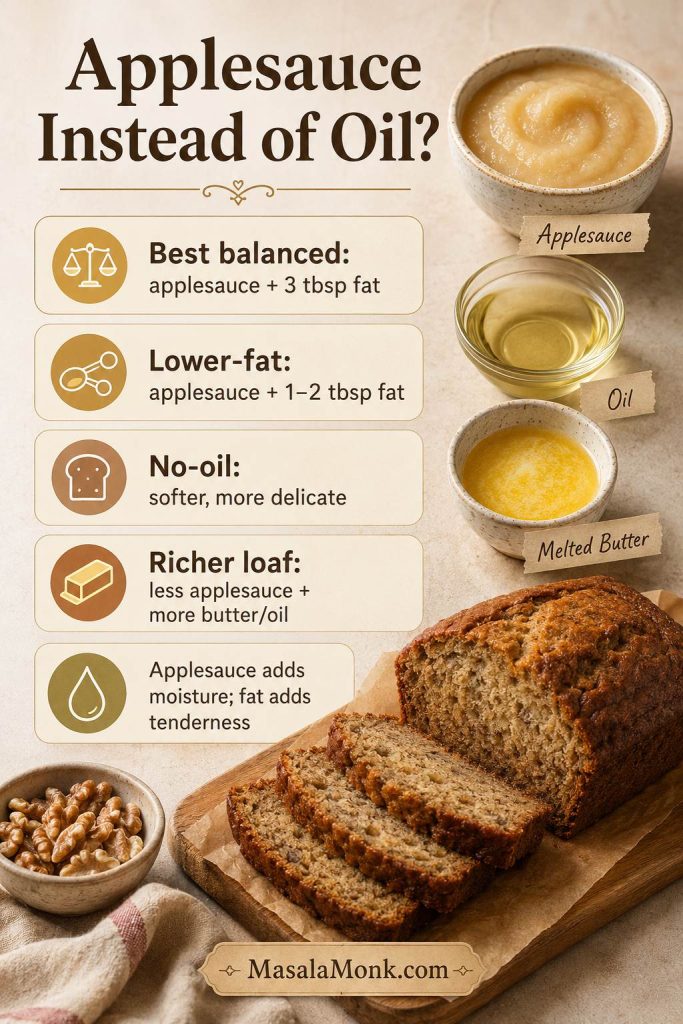
For one moist loaf, the sweet spot is 1½ cups mashed ripe banana plus ½ cup unsweetened applesauce, with 3 tablespoons oil or melted butter to keep each slice from feeling rubbery or fragile. Bake it in a 9×5-inch loaf pan at 350°F / 175°C until the middle bakes through and the crumb looks even, not shiny or wet.
This is not a fully no-oil loaf by default because applesauce replaces moisture better than it replaces tenderness. The small amount of fat keeps the crumb softer, cleaner, and easier to slice neatly.
This version is built around the texture problem applesauce banana bread often has: plenty of moisture, but not enough structure to slice cleanly. That is why the banana and applesauce are measured, a little fat stays in the batter, and the loaf gets time to bake through and cool before slicing.
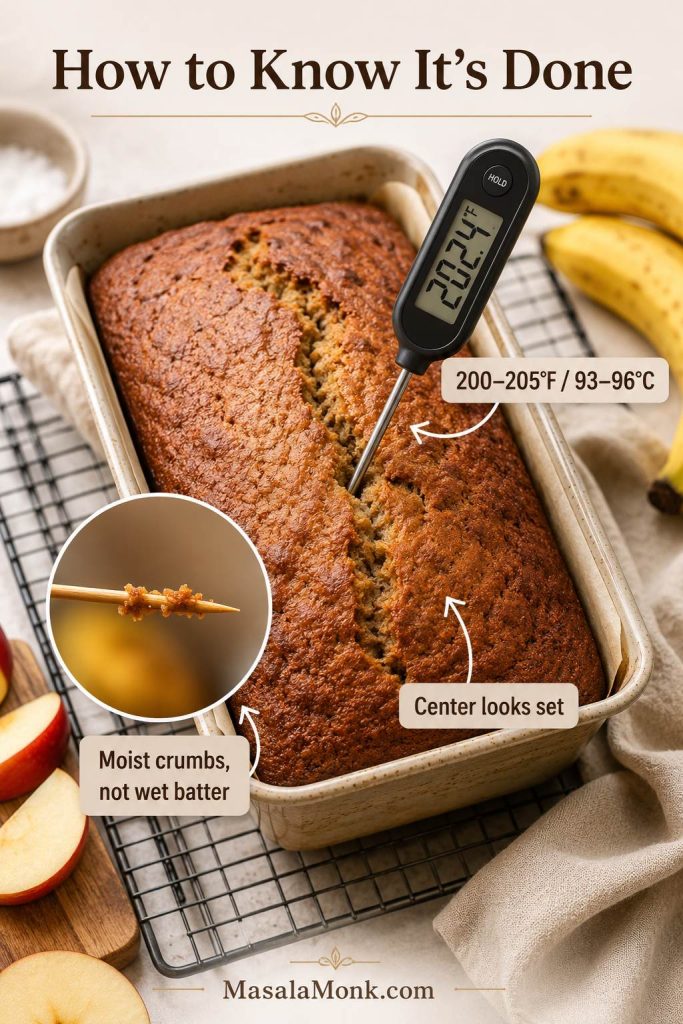
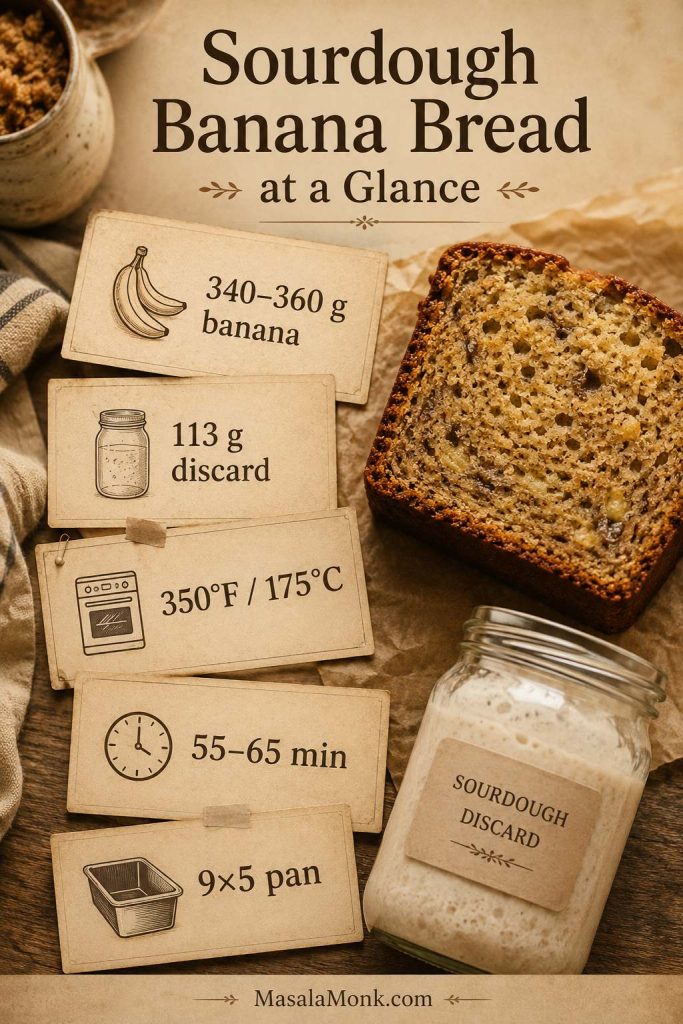
At a glance: For one 9×5-inch loaf, use 1½ cups mashed ripe banana, ½ cup unsweetened applesauce, 2 cups flour, 2 eggs, and 3 tablespoons oil or melted butter. Bake at 350°F / 175°C for 55–65 minutes, until the center reaches about 200–205°F / 93–96°C.
For the first bake, make the recipe as written before reducing the oil, cutting the sugar further, or swapping in more whole wheat flour. Once you know how the batter should look and how the cooled loaf should slice, the variations become much easier to control.
Make the first loaf with the full ratio before tweaking. Once you know this baseline, lower-fat and variation decisions become much easier.
What This Loaf Tastes Like
This is a banana-forward loaf first, with gentle apple sweetness in the background. It does not taste like apple cake. The applesauce mostly shows up in the texture: an even crumb, a little extra moisture, and slices that still taste pleasant the next day.
Cinnamon, vanilla, and brown sugar make the banana flavor warmer. If you add walnuts or pecans, the loaf becomes more classic and bakery-style. If you skip them, it stays simple, easy to slice, and lunchbox-friendly.
It should taste like a cozy banana loaf with a softer crumb, not like applesauce trying to take over. It is still a quick bread, so expect a soft, sturdy crumb rather than an airy cake texture.
Look for a crumb that is evenly baked from edge to middle. That is the difference between fruit-rich banana bread and underdone banana bread.
Why You’ll Love This Recipe
Moist without the gummy middle: the banana, applesauce, flour, fat, and bake time are balanced so the loaf sets properly.
Still tastes like real banana bread: applesauce lightens the loaf, but a small amount of oil or butter keeps each slice from feeling rubbery or fragile.
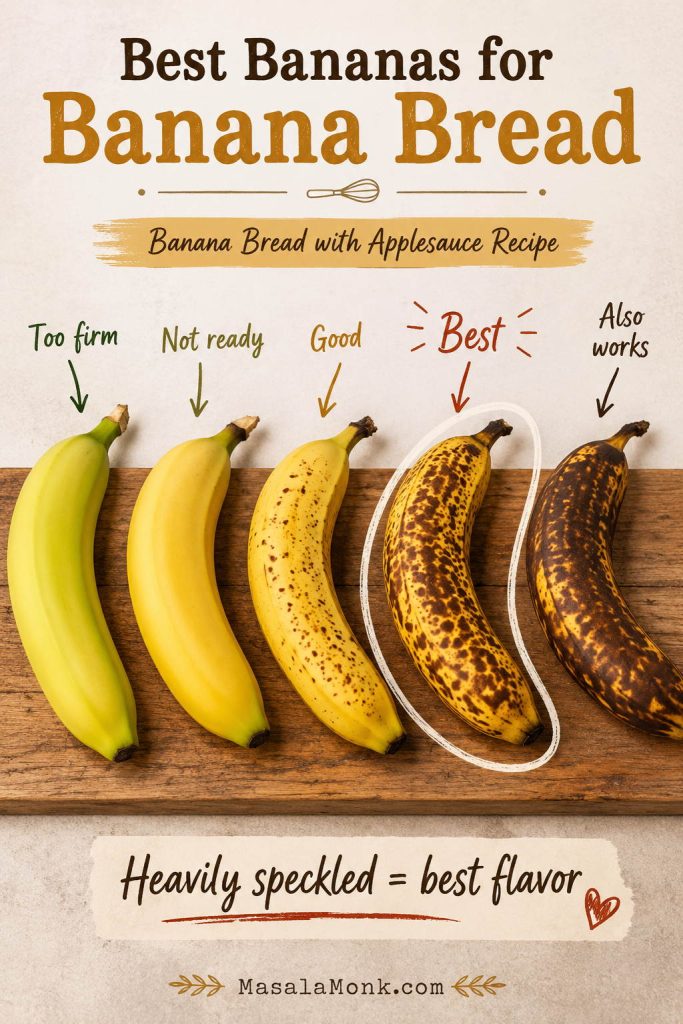
Uses the bananas you were about to lose: heavily speckled bananas give the deepest flavor and natural sweetness.
Easy to adjust after the first bake: make it nuttier, less sweet, lower fat, dairy-free, vegan, or muffin-style without starting from scratch.
Why Applesauce Works in Banana Bread
Banana bread already depends on fruit puree, so applesauce fits naturally into the batter. It adds gentle sweetness and helps the loaf stay fresh-tasting for longer.
The catch is that applesauce is not the same as butter or oil. Fat helps coat the flour, which gives the crumb a softer bite. Applesauce brings extra water and fruit solids, which is why the batter needs the right balance. When the batter gets too wet, quick breads can turn dense, chewy, or gummy.
For that reason, this recipe keeps a small amount of oil or melted butter in the batter. It still feels lighter than a classic loaf, but it slices more cleanly once cooled.
You see the same idea in a good applesauce cake, where the applesauce keeps the crumb moist and even without making the cake feel wet.
Ingredients for Banana Bread with Applesauce
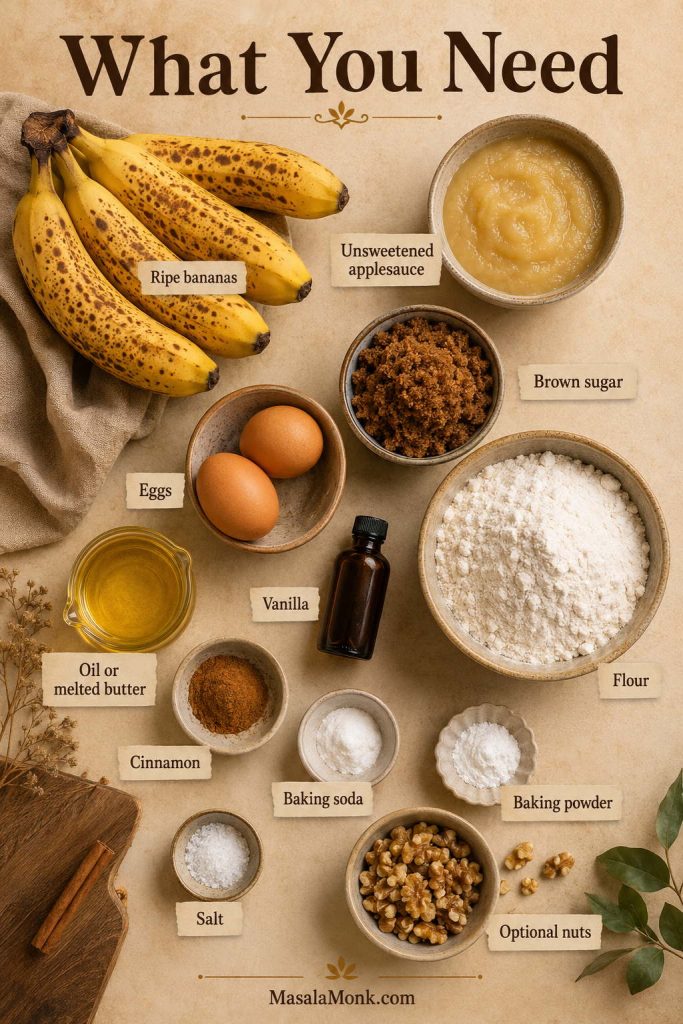
The ingredients are familiar, but measuring them makes the loaf much more reliable. A little too much banana or applesauce can make the crumb feel compressed instead of tender.
The ingredient list is simple, but the recipe depends on balance: ripe bananas for flavor, applesauce for moisture, and a little fat for tenderness.
Very Ripe Bananas
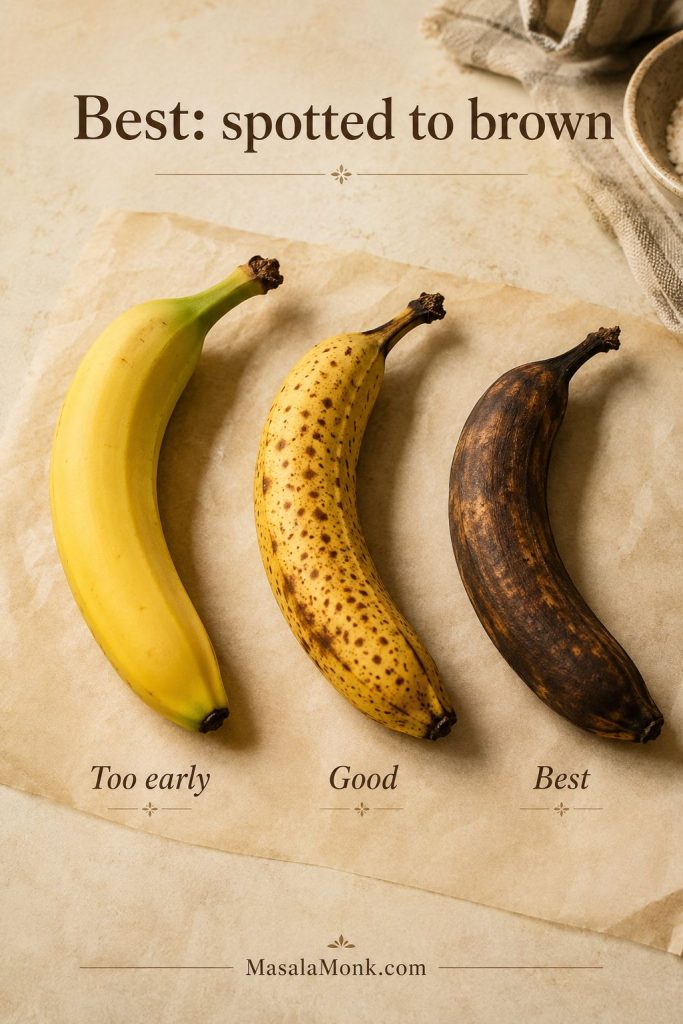
Use bananas that are heavily speckled or mostly brown on the outside. They mash easily, taste sweeter, and give the loaf its deep banana flavor. If the bananas are still too yellow, use the ripening shortcuts before you start.
Heavily speckled bananas give banana bread the deepest flavor. However, measuring the mashed fruit still keeps the applesauce loaf from getting too wet.
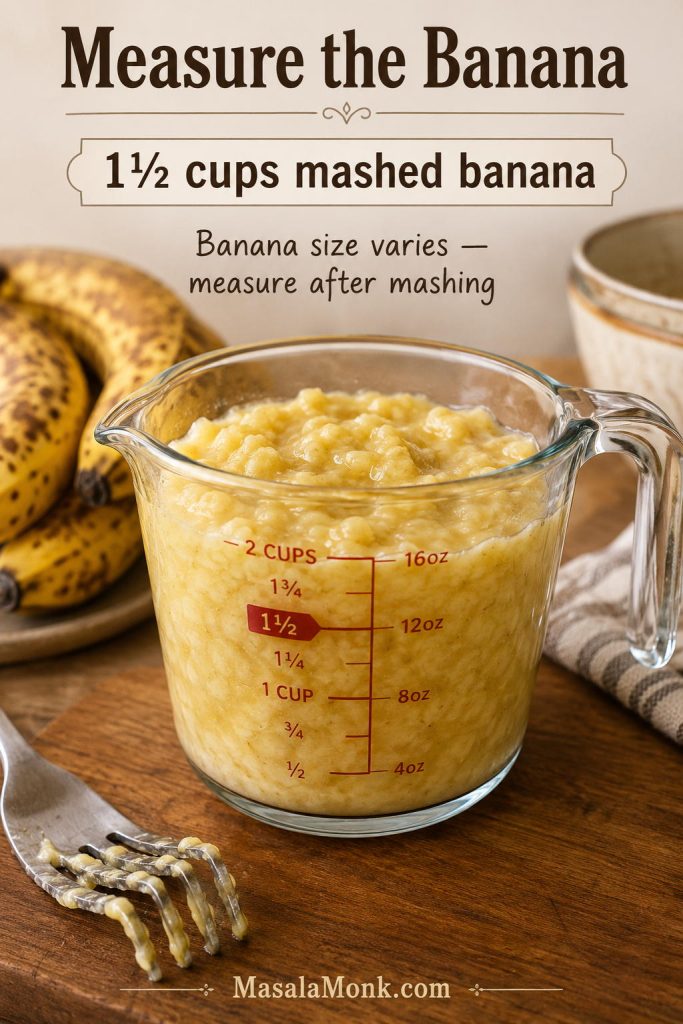
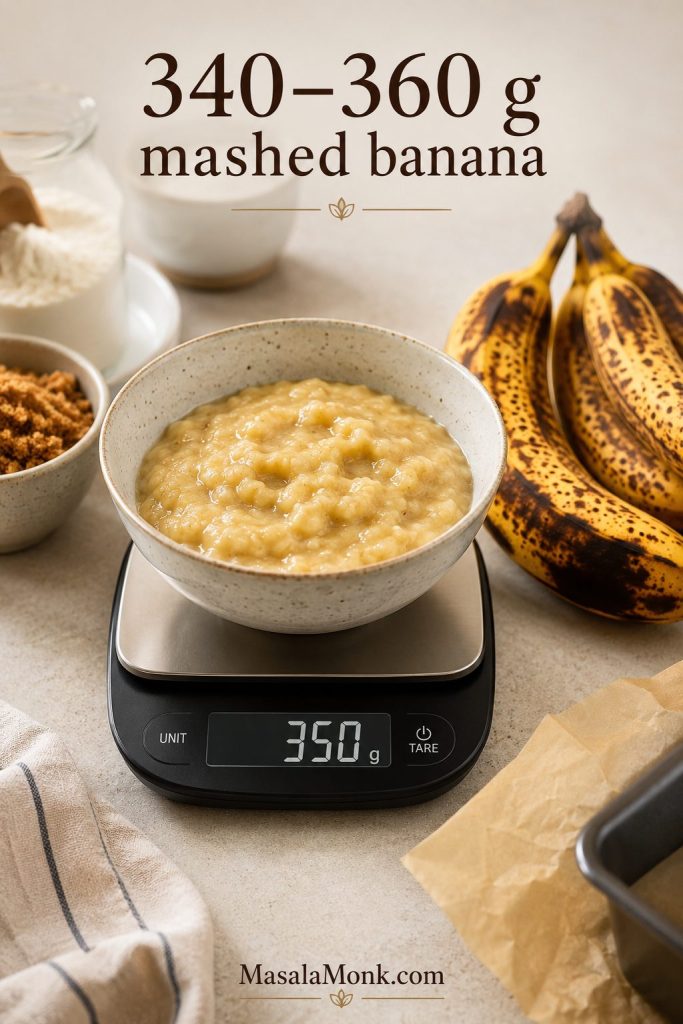
If a banana looks too far gone for eating out of hand, it may be exactly right for this batter. For this recipe, measure 1½ cups mashed banana, which is usually about 3 large bananas or 4 smaller ones. Too little banana gives a bland loaf, while too much can make the middle heavy, especially with applesauce in the batter. Using freezer bananas? Drain them before measuring.
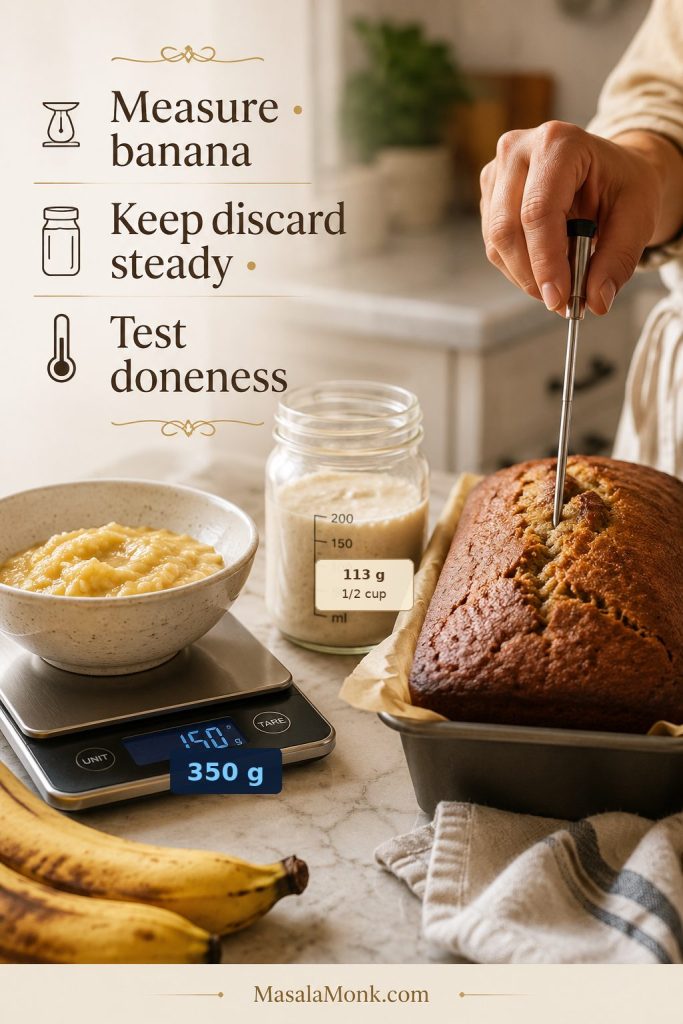
Banana size changes from bunch to bunch, so measure after mashing. This one step makes banana bread with applesauce much more reliable.
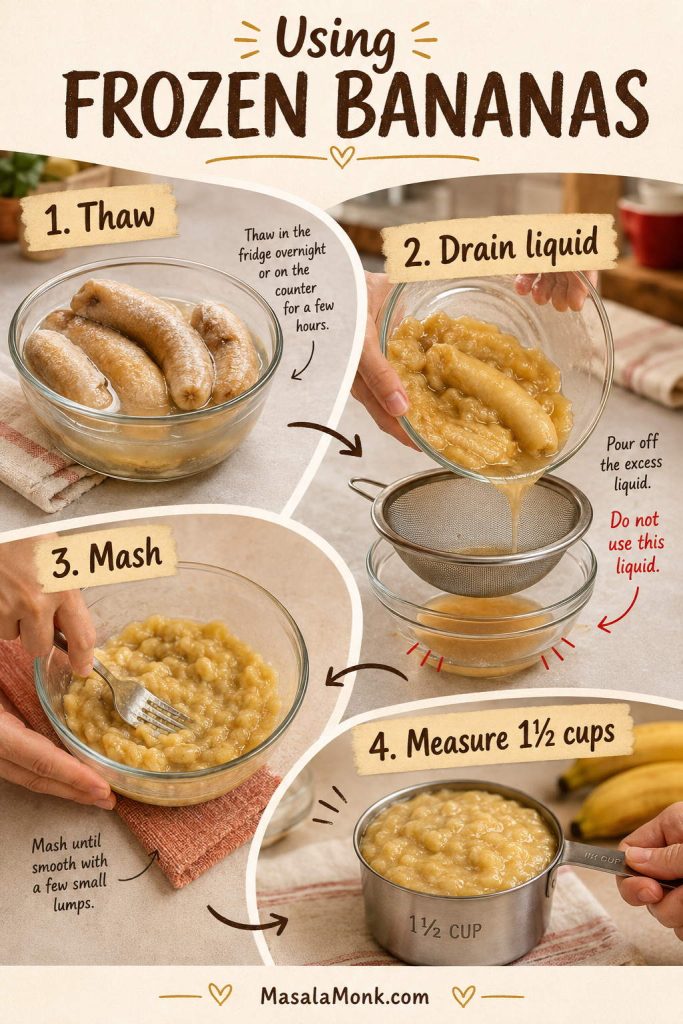
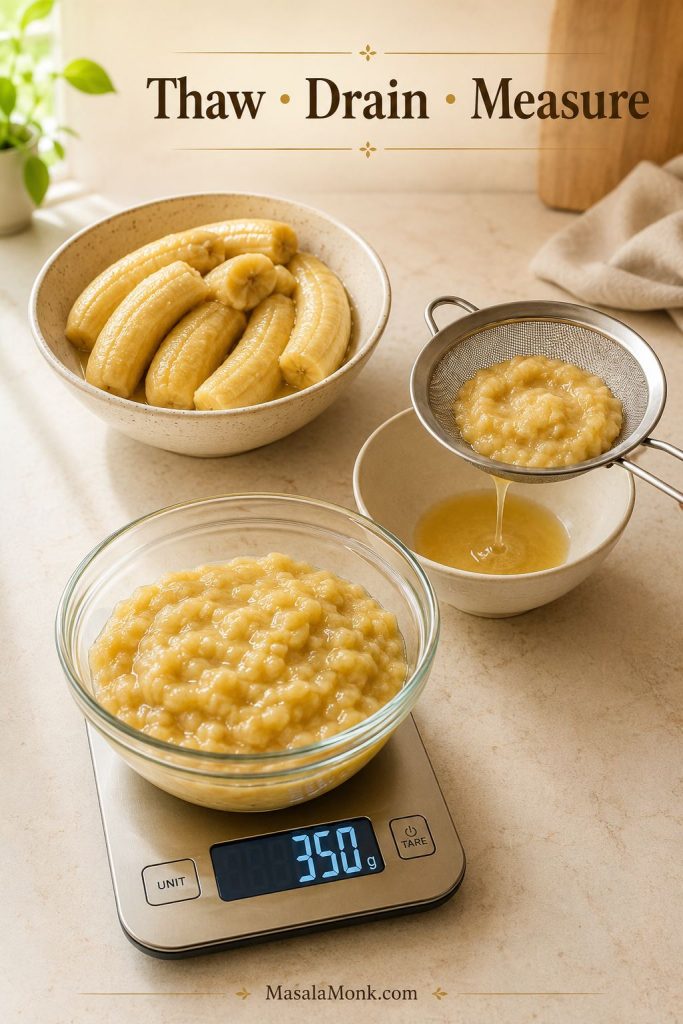
Frozen bananas also work. Thaw them first, drain off excess liquid, then mash and measure. They can release a lot of moisture, so measuring is even more important if you are using bananas from the freezer.
Frozen bananas work well, but they release extra liquid. Drain first, then mash and measure so the loaf stays soft instead of gummy.
How to Ripen Bananas Faster
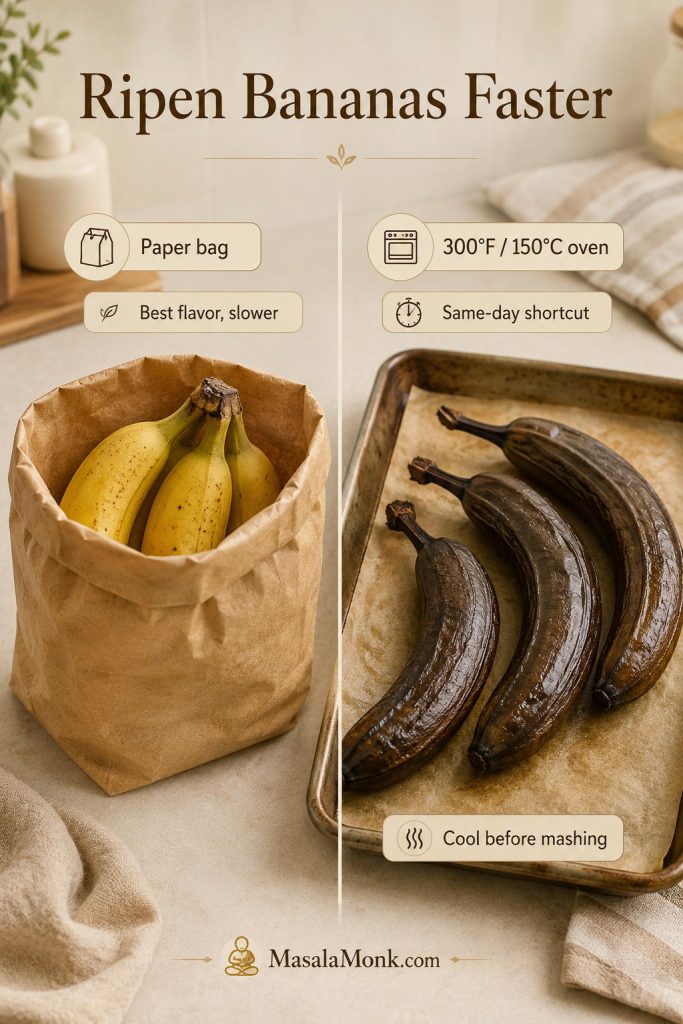
If your bananas are yellow but not soft yet, place them in a paper bag and leave them at room temperature until the peels become heavily speckled. For a same-day option, bake unpeeled bananas on a lined baking sheet at 300°F / 150°C until the peels darken and the fruit softens, then cool before mashing.
This shortcut helps with texture, but it does not create the same deep flavor as bananas that ripen naturally over several days. Use it when you need banana bread today, not when you are chasing the strongest banana flavor.
If the bananas release liquid as they cool, leave that liquid behind before measuring so you do not add extra water to the batter.
A paper bag is better when you have time; meanwhile, the oven shortcut helps when banana bread needs to happen today.
Unsweetened Applesauce
Plain unsweetened applesauce is best because it adds moisture without making the loaf too sweet. Homemade or store-bought both work, as long as the applesauce is smooth enough to blend evenly into the batter.
Sweetened applesauce is fine, but reduce the brown sugar slightly if you prefer a less sweet loaf. Cinnamon applesauce works too, especially if you want a warmer, spiced flavor.
A Small Amount of Oil or Melted Butter
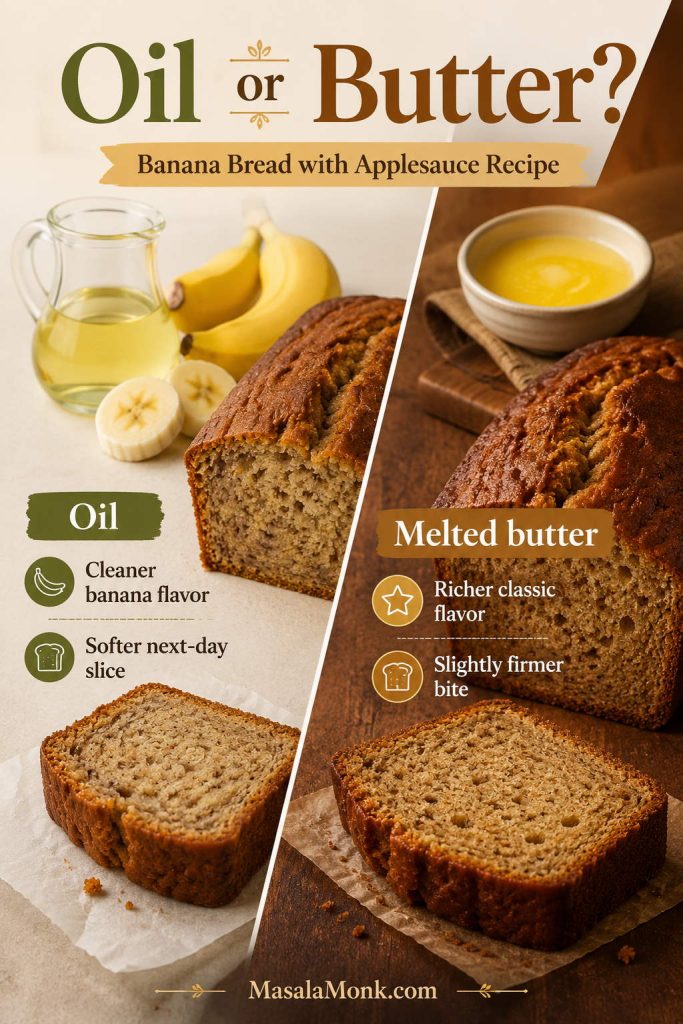
The few tablespoons of fat are not there by accident. You can make a no-oil version, but the texture is usually more fragile. Three tablespoons of neutral oil or melted butter give the crumb a better bite while keeping the recipe lighter than a traditional butter-heavy loaf.
Use neutral oil when you want the banana flavor to stay clean and simple, with a softer next-day slice. Use melted butter if you want a richer, more classic banana bread flavor and a slightly firmer bite once the loaf cools. Trying to reduce more fat? Compare the applesauce-oil options later in the post.
Oil keeps the banana flavor cleaner and softer the next day, while melted butter gives the loaf a richer, more classic banana bread taste.
Flour, Eggs, Sugar, and Leavening
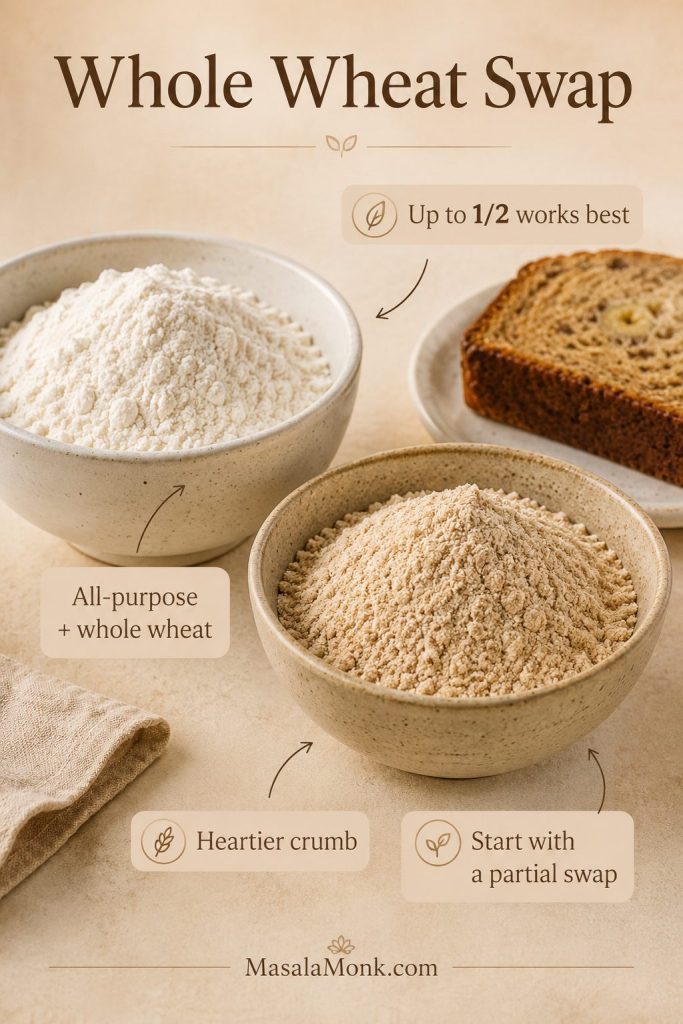
All-purpose flour gives the most reliable loaf. You can replace up to half of it with whole wheat flour for a heartier flavor, but using all whole wheat flour will make the bread denser and may need a little extra moisture.
A partial whole wheat swap adds heartier flavor without taking over the loaf. Start with half so the crumb still stays tender.
If you want a banana loaf built around oats instead of regular flour, try this healthy banana bread with oat flour for a more oat-forward version.
Brown sugar is doing more than sweetening here. It brings a light caramel note that makes the banana taste rounder, especially when the applesauce is plain and unsweetened. Eggs help the batter set, and a mix of baking soda plus a little baking powder helps lift the fruit-heavy batter.
Walnuts, Pecans, or Chocolate Chips
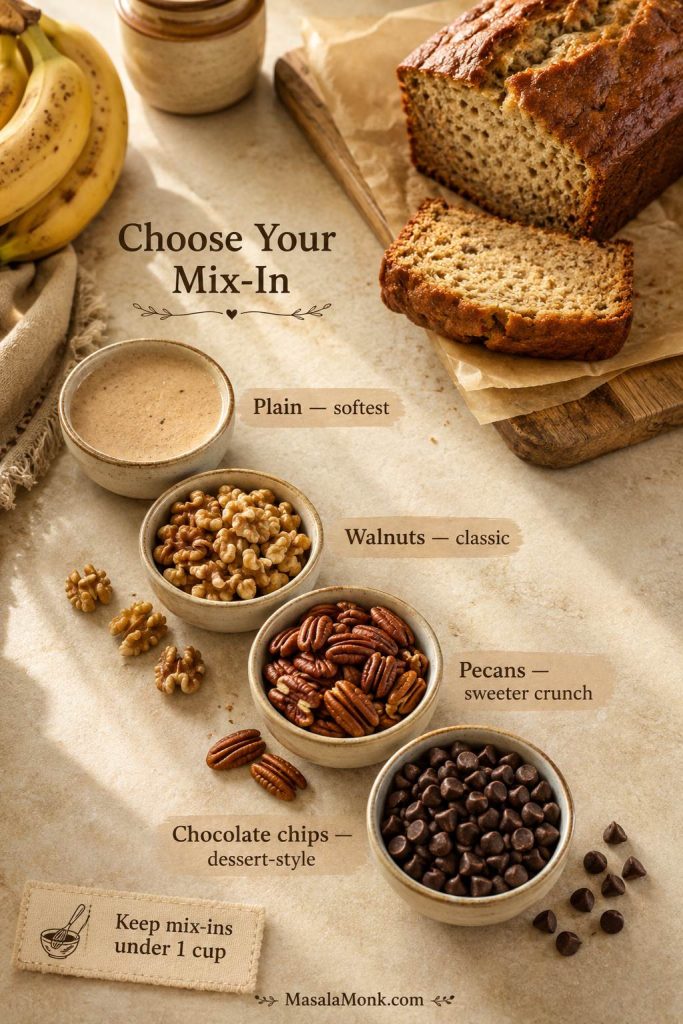
Walnuts and pecans turn this into banana nut bread with applesauce. Use ½ cup for a lighter crunch or up to ¾ cup for a more classic banana nut loaf. Chocolate chips also work, but they make the bread sweeter and more dessert-like.
Mix-ins change the personality of the loaf. Still, keep them under 1 cup so the banana-applesauce batter stays balanced and sliceable.
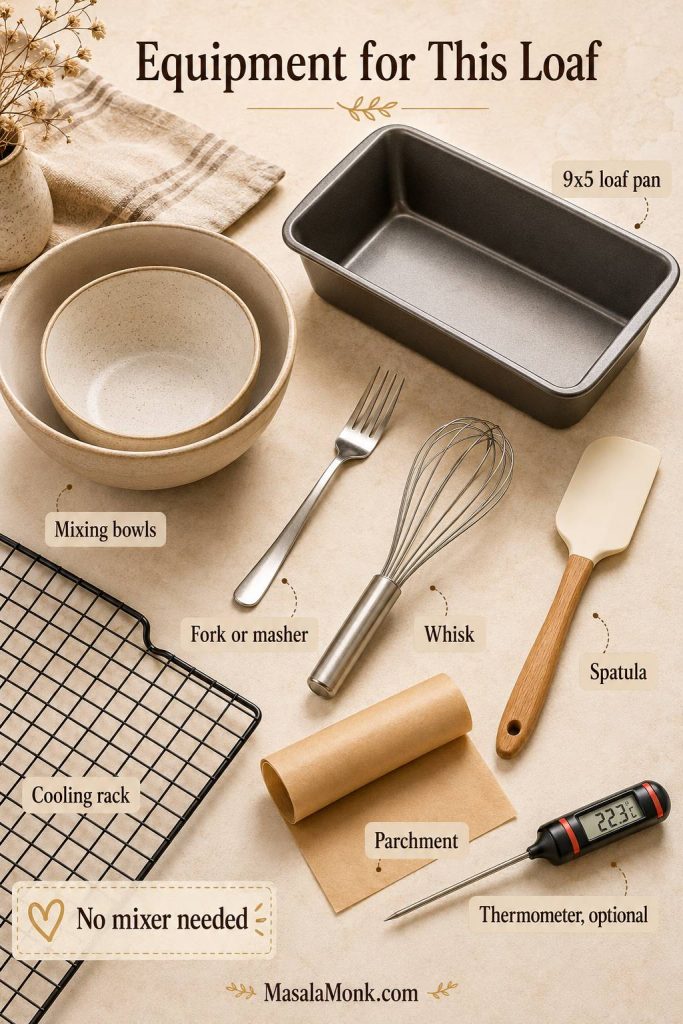
Equipment for This Loaf
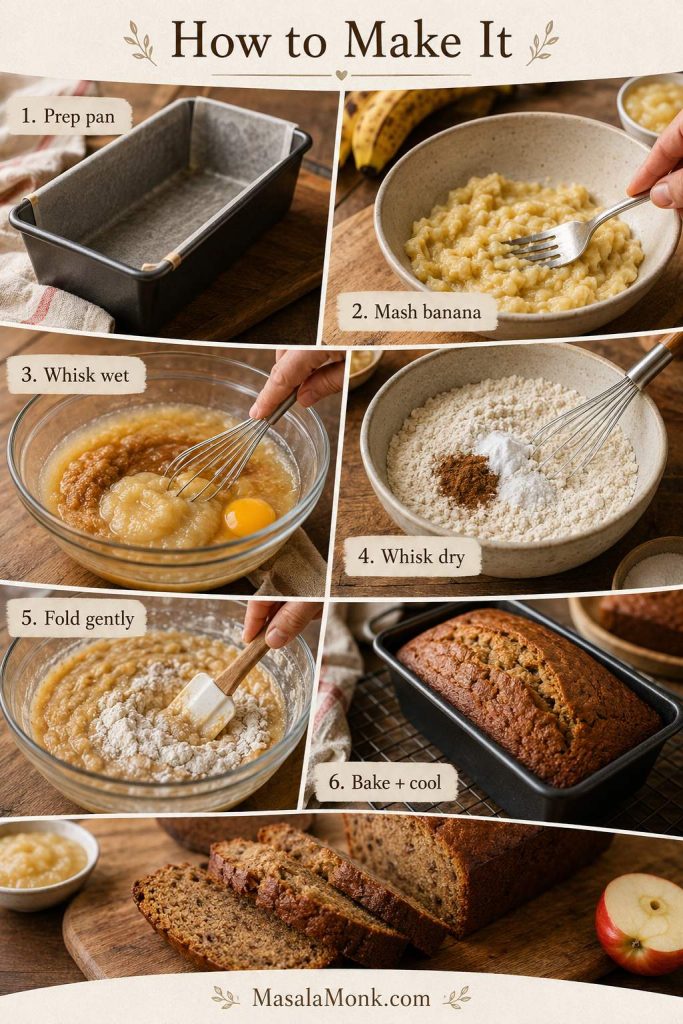
You do not need a mixer for this loaf. In fact, mixing by hand is better because it helps prevent a rubbery crumb. A few small banana lumps are fine; beaten batter is not what you want here.
9×5-inch loaf pan
Large mixing bowl
Medium bowl for dry ingredients
Fork or potato masher for the bananas
Whisk
Flexible spatula
Parchment paper, optional
Cooling rack
Digital thermometer, optional
The important part is not special equipment. It is gentle mixing, the right pan, and enough cooling time before slicing. A digital thermometer removes the guesswork from fruit-heavy loaves, where the top can brown before the center is ready.
A bowl, whisk, spatula, and loaf pan are enough. The thermometer is the only optional tool that can save an uncertain center.
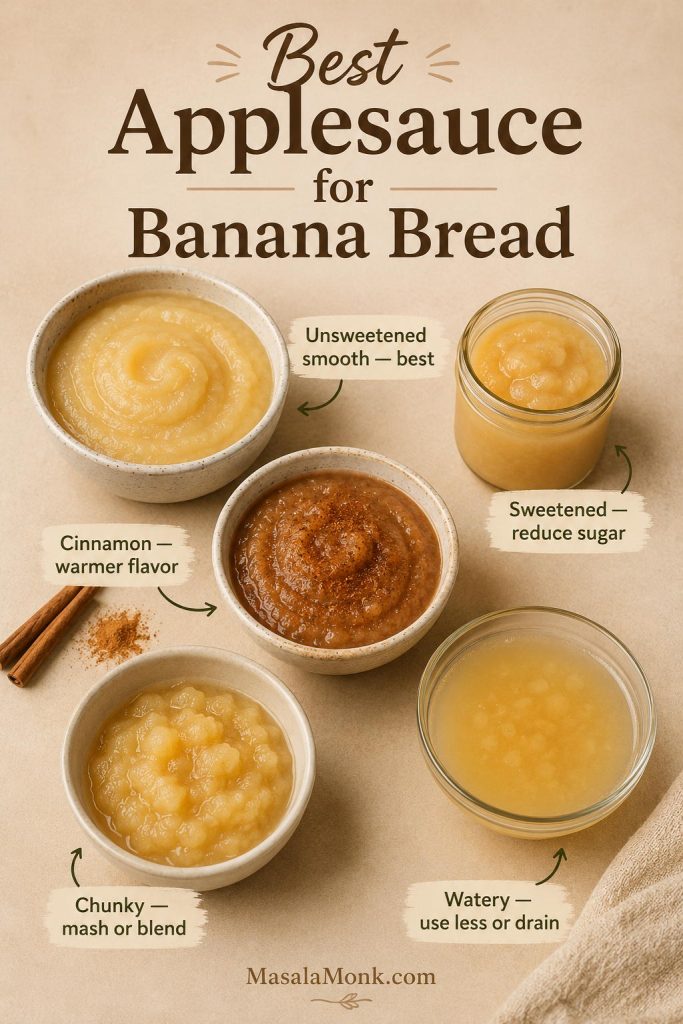
What Kind of Applesauce Should You Use?
The applesauce you use changes more than sweetness. It can change how loose the batter feels and how quickly the middle bakes through. If you are trying to avoid a damp center, this is one of the easiest places to stay in control.
Smooth unsweetened applesauce is the safest choice. If your applesauce is chunky or watery, adjust it before mixing so the crumb bakes evenly.
Applesauce Type
Works?
What to Adjust
Unsweetened smooth applesauce
Best choice
No change needed
Sweetened applesauce
Yes
Reduce the brown sugar slightly if you want a less sweet loaf
Cinnamon applesauce
Yes
Reduce or skip the extra cinnamon if needed
Homemade applesauce
Yes
Use smooth applesauce that is not watery
Chunky applesauce
Sometimes
Mash or blend first for a more even crumb
Very watery applesauce
Risky
Drain slightly or use 1–2 tablespoons less
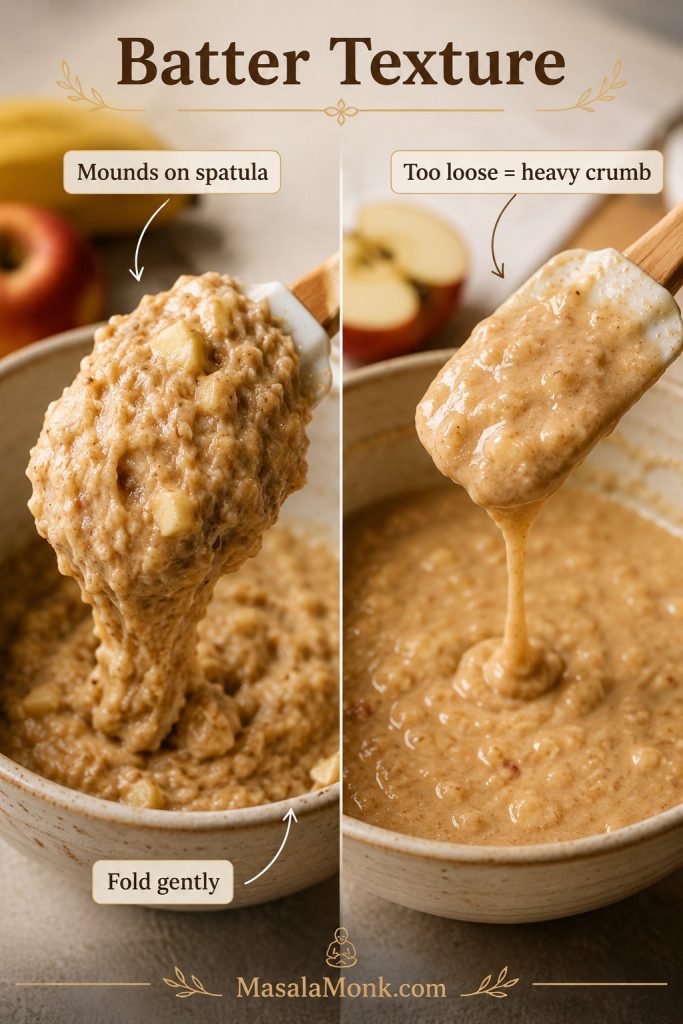
If your applesauce looks loose and watery, hold back a little instead of adding extra. The batter may seem thick at first, but extra water shows up later in the baked crumb. The finished batter should mound softly in the pan, not pour like pancake batter.
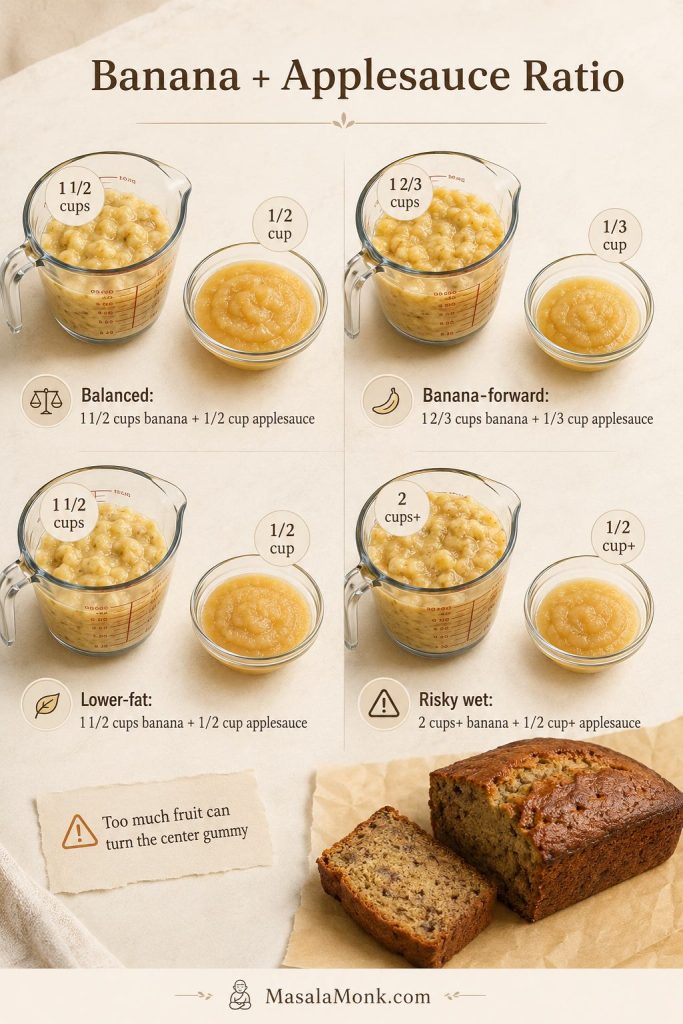
Best Banana-to-Applesauce Ratio
The best starting ratio for one standard loaf is 1½ cups mashed banana to ½ cup applesauce. That gives enough banana flavor and enough applesauce moisture without flooding the batter.
Applesauce is not the problem. The problem is stacking too much banana and applesauce without giving the loaf enough flour, eggs, bake time, and cooling time.
Loaf Style
Mashed Banana
Applesauce
Result
Balanced classic
1½ cups
½ cup
Moist and sliceable
More banana-forward
1⅔ cups
⅓ cup
Stronger banana flavor with slightly less added moisture
Lower-fat style
1½ cups
½ cup
Lighter and more delicate, especially if you reduce the oil
Risky wet loaf
2 cups or more
½ cup or more
More likely to bake up dense or gummy in the center
When the balance is right, the loaf tastes fruit-rich without feeling heavy. The first slice should smell warm, hold together, and look set rather than damp or compressed.
The banana-to-applesauce ratio controls moisture before the loaf ever reaches the oven. Too much fruit can make the crumb slow to set.
That balance is what keeps the loaf tasting like real banana bread, not like a lighter version where the texture feels like a compromise.
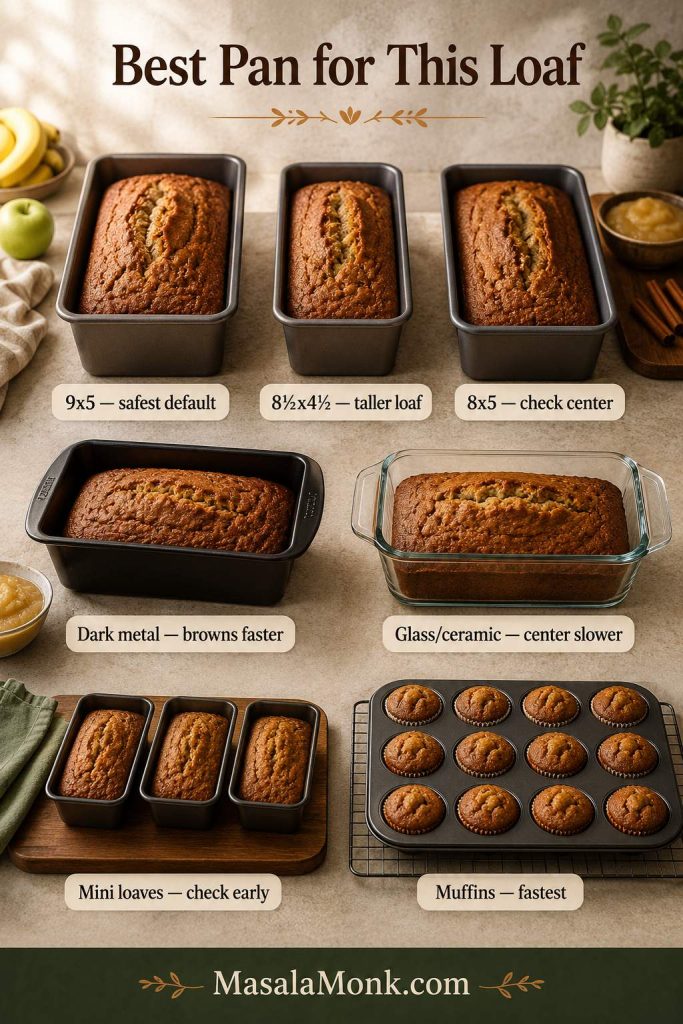
Best Pan Size and Pan Type for Banana Bread with Applesauce
Pan size changes how deep the batter sits, which changes how quickly the center sets. For this fruit-rich batter, a 9×5-inch loaf pan is the safest default.
Pan
What Changes
How to Bake It
9×5-inch loaf pan
Best default; bakes most evenly
55–65 minutes at 350°F / 175°C
8½x4½-inch loaf pan
Taller loaf; center takes longer
Start checking around 55 minutes, but expect extra time
8×5-inch loaf pan
Works, but the center can be slower
Use a thermometer if possible and avoid pulling early
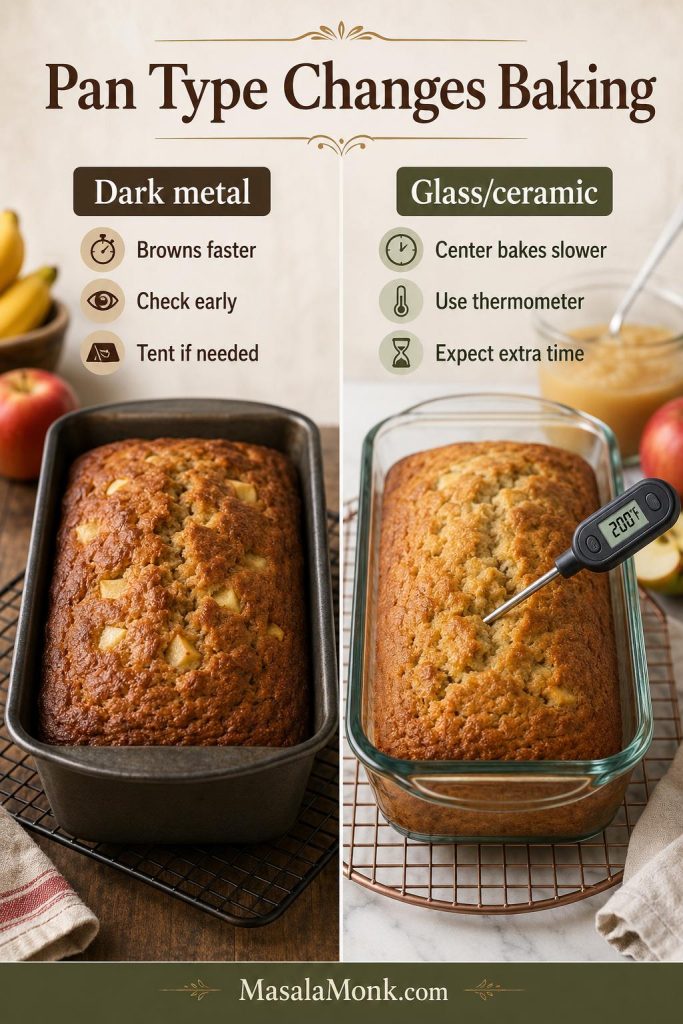
Dark metal loaf pan
Browns faster on the outside
Check early, tent if needed, and reduce the oven by 25°F / about 15°C if it over-browns
Glass or ceramic loaf pan
Can bake more slowly through the center
Expect extra time and use a thermometer; tent if the top browns before the middle is done
Mini loaf pans
Smaller loaves bake faster
Start checking around 30–35 minutes
Muffin tin
Fastest bake with more edges
20–25 minutes at 350°F, or 18–20 minutes at 375°F
Pan size and material change how the middle bakes. Because this batter is fruit-rich, the safest default is a 9×5-inch loaf pan.
If the top browns before the middle is done, tent the loaf loosely with foil and continue baking. This is especially useful with smaller loaf pans, dark metal pans, glass pans, ceramic pans, or very ripe bananas.
Dark metal browns faster, while glass and ceramic can bake more slowly through the center. As a result, doneness cues matter more than color alone.
How to Make Banana Bread with Applesauce
Once the fruit and applesauce are measured, the method is simple. The main thing is to mix gently and give the center enough time to bake through. If you are unsure near the end, use the doneness guide instead of judging by color alone.
The method is simple, but the order helps: measure the fruit, mix wet and dry separately, fold gently, then let the loaf cool before slicing.
1. Prepare the Pan
Heat the oven to 350°F / 175°C. Grease a 9×5-inch loaf pan and line it with parchment if you want to lift the loaf out easily.
2. Mash and Measure the Bananas
Mash the ripe bananas with a fork, then measure 1½ cups. A few small banana lumps are fine. They make the loaf feel homemade and keep the crumb from becoming too uniform.
3. Mix the Wet Ingredients
Whisk the mashed banana, applesauce, eggs, brown sugar, oil or melted butter, and vanilla until combined. The mixture will look loose and glossy.
4. Mix the Dry Ingredients Separately
In another bowl, whisk the flour, baking soda, baking powder, cinnamon, and salt. This helps the leavening spread evenly through the thick fruit-based batter.
5. Fold Gently
Add the dry ingredients to the wet ingredients and fold with a spatula until no dry flour remains. A mixer is not needed here; overmixing is one of the easiest ways to make the crumb rubbery.
The batter should be thick enough to mound on the spatula. If it looks loose before it goes into the oven, the finished crumb is more likely to feel heavy.
The batter should mound instead of pour. If it spreads too easily, the baked banana bread is more likely to feel compressed.
6. Add Nuts if Using
Fold in walnuts or pecans at the end. For a prettier top, save a small handful and scatter them over the batter before baking.
7. Bake Until the Center Is Set
Spread the batter into the prepared pan and bake for 55 to 65 minutes. A browned top is only part of the story; this fruit-heavy batter still needs time for the center to finish baking.
Near the end, the loaf should smell deeply banana-rich, and the center should look set rather than glossy. The bread is done when a toothpick inserted into the center comes out with moist crumbs but no wet batter. For the most reliable check, use a digital thermometer; the center should register about 200°F to 205°F / 93°C to 96°C. King Arthur Baking also recommends this internal-temperature range for banana bread doneness in its banana bread doneness guide.
A few moist crumbs are fine, but wet batter is not. For extra confidence, check for 200–205°F in the center before cooling the loaf.
8. Cool Before Slicing
Let the loaf cool in the pan for 10 to 15 minutes, then move it to a rack. Banana bread continues to set as it cools, especially when applesauce is in the batter.
Cutting too early can make a properly baked loaf look underdone, because the crumb has not had time to settle. Waiting is annoying, but it is one of the easiest ways to get clean slices.
Once cooled, the slices should look even and plush, with tiny banana flecks through the crumb instead of a shiny wet line in the center.
Cooling is part of the recipe, not an afterthought. Once the crumb settles, the slices cut cleaner and hold their shape.
Before you use the recipe card, remember the three texture cues that matter most: measured banana, batter that mounds instead of pours, and a fully cooled loaf before the first cut.
This is the texture to look for after cooling: even crumb, clean edges, and slices that hold together without crumbling.
Banana Bread with Applesauce Recipe
This fruit-rich loaf is lighter than classic banana bread but still soft, fragrant, and sturdy enough to slice cleanly once cooled.
Yield1 standard loaf
Prep Time15 minutes
Cook Time55–65 minutes
Total TimeAbout 1 hour 20 minutes, plus 45–60 minutes cooling
Pan: 9×5-inch loaf pan Oven: 350°F / 175°C
Ingredients
1½ cups mashed very ripe banana, about 340 g
½ cup unsweetened applesauce, about 120 g
2 large eggs
½ cup packed light brown sugar, about 105 g
3 tablespoons neutral oil, about 45 ml, or 3 tablespoons melted butter, about 42 g
2 teaspoons vanilla extract
2 cups all-purpose flour, 240 g
1 teaspoon baking soda
½ teaspoon baking powder
1 teaspoon ground cinnamon
½ teaspoon fine salt
½ cup chopped walnuts or pecans, optional, about 55–65 g
Method
Heat the oven to 350°F / 175°C. Grease a 9×5-inch loaf pan and line it with parchment if you want easier lifting.
Mash the bananas, then measure 1½ cups. Banana size varies so much that measuring gives you a more reliable loaf than counting bananas alone.
In a large bowl, whisk the mashed banana, applesauce, eggs, brown sugar, oil or melted butter, and vanilla.
In a separate bowl, whisk the flour, baking soda, baking powder, cinnamon, and salt.
Add the dry ingredients to the wet ingredients and fold gently until no dry flour remains. The batter should be thick enough to mound on the spatula, not runny.
Fold in walnuts or pecans if using.
Spread the batter into the prepared pan. Bake for 55–65 minutes, or until a toothpick inserted in the center comes out with moist crumbs but no wet batter. For the most reliable check, the center should read about 200–205°F / 93–96°C.
If the top browns before the center is done, tent the loaf loosely with foil and keep baking.
Cool in the pan for 10–15 minutes, then move to a rack. Let the loaf cool for at least 45–60 minutes before slicing so the crumb can finish setting.
Notes
For your first loaf, use the full 3 tablespoons oil or melted butter. Once you know the texture, you can reduce it to 2 tablespoons for a lighter but more delicate loaf.
Use up to ¾ cup nuts, about 85 g, if you want a more classic banana nut loaf.
For a less sweet loaf, reduce the brown sugar to ⅓ cup if your bananas are very ripe.
If using frozen bananas, thaw and drain off excess liquid before measuring.
For the cleanest slices, cool the loaf fully before cutting.
After the first loaf, the best tweak is personal: richer with butter, cleaner with oil, crunchier with walnuts, softer as muffins, or lighter with a little less fat. The sections below help you adjust without losing the clean-slicing texture.
How to Avoid Gummy Banana Bread with Applesauce
A good slice should hold together, with an even crumb and a set center. If your last loaf looked beautiful on top but cut into a compressed middle, you probably do not need a completely different recipe. You usually need better measurement, a little more bake time, and enough cooling before cutting.
Most gummy loaves come from a combination of too much wet fruit, heavy mixing, not enough time in the oven, or slicing before the crumb has set. The good news is that it usually does not mean you are bad at banana bread; it comes down to one of a few fixable choices.
Most gummy banana bread problems come from moisture, mixing, bake time, or cooling. Once you know the cause, the fix is usually simple.
Texture Problems and Fixes
Problem
Likely Cause
How to Fix It
Gummy middle
Too much banana or applesauce, or the loaf was underbaked
Measure the banana, keep applesauce to ½ cup, and bake until the middle no longer looks shiny or wet
Rubbery texture
The batter was overmixed
Fold gently by hand and stop when the flour disappears
Top browns too fast
The outside is browning before the center finishes
Tent loosely with foil and continue baking
Dense loaf
Too much wet ingredient or weak leavening
Use fresh baking soda and baking powder, and follow the banana-to-applesauce ratio
Wet-looking slices
The loaf was sliced too hot
Cool at least 45 minutes before slicing
Dry edges
Dark pan, overbaking, or too little wet ingredient
Check earlier, use parchment, and try a lighter pan next time if the edges keep drying out
A compressed crumb is a clue, not a disaster. Next time, check the fruit amount, bake time, and cooling window.
Wet Center vs Fully Baked Crumb
A clean toothpick is not always the best goal for banana bread. A few soft crumbs on the toothpick are fine. Wet batter, shiny streaks, or a sunken center mean the loaf needs more time.
Moist crumbs are normal in banana bread, but shiny streaks or wet batter mean the center still needs more time.
What to Do If the Top Browns Too Fast
If the top is dark but the center still has wet batter, lay a loose piece of foil over the loaf and continue baking. This keeps the crust from getting too dark while the middle finishes.
If the top browns early, do not pull the loaf too soon. Tent it loosely with foil so the crust is protected while the center finishes.
Can Applesauce Replace Oil or Butter in Banana Bread?
Applesauce can lighten banana bread beautifully, but it cannot do everything butter or oil does. It brings moisture; fat brings richness, tenderness, and a cleaner bite.
Because banana bread already contains mashed fruit, it handles applesauce better than many cakes or cookies. Even so, a small amount of oil or melted butter helps prevent the loaf from becoming springy, tough, or too delicate in the middle.
½ cup applesauce + 3 tablespoons oil or melted butter
Moist, rich enough, and sliceable
Lower-fat
½ cup applesauce + 1–2 tablespoons oil
Lighter and more delicate
No-oil
½ cup applesauce and no added fat
Moist but more delicate, with a higher risk of a soft center
Richer loaf
⅓ cup applesauce + ¼ cup melted butter or oil
More classic banana bread texture
After the first loaf, you can reduce the oil slightly if you prefer a softer, lower-fat version.
Applesauce adds moisture, but fat adds tenderness. That is why the best banana bread with applesauce usually keeps a small amount of oil or butter.
Banana Bread with Applesauce and Yogurt
Yogurt works best as a small swap, not a big extra addition, because banana, applesauce, and yogurt all bring moisture. For a tangier, softer loaf, replace 2 tablespoons of the applesauce with plain Greek yogurt or regular plain yogurt.
Use yogurt as a swap, not an add-on. A small amount adds tang, while too much extra moisture can slow the center.
It gives the loaf a little tang and softness without turning it into a completely different bake.
Adding a full extra ½ cup yogurt can make this batter too wet unless you also adjust the flour or bake time. The flavor may be good, but the center can turn heavy.
Banana Nut Bread with Applesauce
For banana nut bread with applesauce, fold ½ to ¾ cup chopped walnuts or pecans, about 55–85 g, into the batter just before baking. Walnuts make the loaf taste more old-school; pecans make it a little softer and sweeter.
Toast the nuts, cool them, then fold them in last. That keeps the crunch clear without overworking the batter.
This is the version to make when you want the loaf to feel more classic and bakery-style, with a little crunch against the soft fruit-rich crumb.
Toasting the nuts first gives deeper flavor without changing the recipe. Warm them in a dry skillet for 3–5 minutes, or on a baking sheet for 6–8 minutes at 350°F / 175°C, then cool before folding them into the batter.
Too many nuts can make the loaf crumbly and weigh down an already-moist batter. Keep it under 1 cup if you want neat slices.
No Added Sugar Banana Bread with Applesauce
A no-added-sugar version works best when the bananas are deeply ripe, but it will taste more like a breakfast loaf than a dessert loaf. The bananas carry most of the sweetness, so this is not the place for pale, barely ripe fruit.
This version is not truly sugar-free because bananas and applesauce contain natural sugars. However, you can skip the brown sugar or reduce it to 2 to 3 tablespoons if your bananas are very sweet and heavily speckled.
For a no-added-sugar version, very ripe bananas do the heavy lifting. However, the loaf will taste more breakfast-style than dessert-like.
For better flavor in a no-added-sugar loaf, use extra cinnamon, vanilla, and a pinch more salt. These small touches make the banana flavor taste fuller even without much added sugar.
Eggless or Vegan Banana Bread with Applesauce
For a vegan version, use neutral oil instead of butter and replace the eggs with 2 flax eggs. To make 2 flax eggs, mix 2 tablespoons ground flaxseed with 5 tablespoons water and let it thicken for about 10 minutes before adding it to the batter.
Flax eggs help bind the batter, but the crumb is more delicate. Let the loaf cool fully before slicing for the cleanest texture.
It is a helpful option when the loaf needs to work for more people at the table, but full cooling matters even more because the crumb is more delicate.
Applesauce helps with moisture and a little binding, but it does not behave exactly like eggs. An eggless loaf will usually be more delicate and slightly denser, so let it cool completely before slicing.
If you only need the recipe to be dairy-free, the fix is easier: use neutral oil instead of melted butter. The rest of the main recipe can stay the same.
Banana Muffins with Applesauce
This batter also works as banana muffins with applesauce. Divide it into a lined muffin tin, filling each cup about ¾ full. Bake at 350°F / 175°C for about 20 to 25 minutes, or until the tops spring back and a toothpick comes out with moist crumbs.
The same banana-applesauce batter can become muffins. Because they bake faster than a loaf, check early and let them rest briefly in the pan.
Muffins are the better choice when you want faster cooling, easy freezing, or smaller grab-and-go portions with the same banana-applesauce flavor. Overbaking while waiting for a dark top can dry the edges, so look for tops that are set and spring back lightly.
For slightly taller muffin tops, bake at 375°F / 190°C and start checking around 18 to 20 minutes. Muffins bake faster than a loaf, so watch them closely near the end.
This recipe usually makes about 12 standard muffins. Let them sit in the pan for 5 minutes, then move them to a rack so the bottoms do not steam and turn damp.
For a more filling meal-prep bake, these high protein muffins are a good next step.
Storage and Freezing
How to Store the Loaf
Because this loaf is fruit-rich, storage matters almost as much as baking. Wrap it too soon and the outside can turn sticky; cool it fully and the slices keep beautifully. Want smaller portions instead? Use the muffin conversion.
Room temperature: keep tightly wrapped or in an airtight container for 2–3 days once fully cool.
Refrigerator: store for 5–6 days if your kitchen is warm, though the crumb may firm slightly.
Freezer: freeze slices for up to 3 months with parchment between them for easier thawing. For the cleanest setup, use the slice-freezing method below.
Cool the loaf fully before storing. Otherwise, trapped steam can soften the crust and make the slices feel sticky.
How to Freeze Slices
To serve frozen slices, thaw at room temperature or warm gently. A quick warm-up makes the banana flavor taste fresher and softens the crumb again.
Freeze slices with parchment between them so you can thaw one piece at a time. Then warm gently to bring back the soft crumb.
It is especially good the next day, when the banana flavor has had time to settle into the crumb.
If you are baking through ripe bananas often, this sourdough banana bread recipe is another good make-ahead loaf for the same breakfast-and-snack lane.
The Next-Day Slice
Once you know the texture cues, this becomes the kind of banana bread you stop overthinking: ripe bananas, a measured scoop of applesauce, a thick batter, and enough cooling time for clean slices. The first slice is soft and fragrant, but the next-day slice may be even better — more settled, more banana-rich, and exactly the reason those spotted bananas were worth saving.
The next-day slice is often the reward for waiting: the banana flavor deepens, the crumb settles, and the loaf feels even easier to enjoy.
After the first bake, pay attention to your favorite version: oil for a cleaner banana flavor, melted butter for a richer slice, walnuts for a classic banana bread feel, or plain for a softer breakfast loaf. That little preference is what turns the recipe into your house version.
FAQs About Banana Bread with Applesauce
How much applesauce belongs in one loaf of banana bread?
For one standard 9×5-inch loaf, ½ cup applesauce is the best starting point. It adds moisture without making the batter too loose, especially when paired with about 1½ cups mashed banana.
Does applesauce replace all the oil or butter?
Applesauce can replace some of the fat, but the best texture usually comes from keeping a small amount of oil or melted butter in the batter. A fully no-oil loaf can work, although it will be more delicate.
Why did my applesauce banana bread turn gummy?
The usual causes are too much wet ingredient, overmixing, underbaking, or slicing while the loaf is still hot. Measure the banana, keep the applesauce to ½ cup, fold gently, and bake until the middle no longer looks shiny or wet.
Do frozen bananas work?
They do, but thawing and draining matter. Frozen bananas release extra liquid, so drain off the excess, mash the fruit, and then measure the 1½ cups.
How much whole wheat flour can I use?
Up to half is the safest swap. Replacing all the all-purpose flour with whole wheat flour makes the loaf heartier and denser, so start with a partial swap before changing the whole recipe.
What happens if I skip the added sugar?
The loaf will taste more breakfast-style than dessert-style. Very ripe bananas help, but bananas and applesauce still contain natural sugars, so “no added sugar” is the more accurate description.
How do I make this into banana nut bread?
Fold ½ to ¾ cup chopped walnuts or pecans into the batter before baking. Toasted walnuts give the most classic banana nut bread flavor.
Which applesauce types work best?
Unsweetened smooth applesauce is the easiest choice. Sweetened applesauce works if you reduce the sugar slightly, cinnamon applesauce adds warmth, and chunky applesauce should be mashed or blended first.
How do I make it eggless or vegan?
For a vegan loaf, use neutral oil instead of butter and replace the eggs with 2 flax eggs. The loaf will be more delicate and slightly denser, so cool it completely before slicing.
Where does yogurt fit into the recipe?
A small amount works best. Replace 2 tablespoons of the applesauce with plain yogurt for a tangier loaf, but avoid adding much more unless you adjust the flour or bake time.
How do I know the middle is fully baked?
A toothpick should come out with moist crumbs, not wet batter or shiny streaks. For a more precise check, the center should register about 200°F to 205°F / 93°C to 96°C on a digital thermometer.
{
“@context”: “https://schema.org”,
“@graph”: [
{
“@type”: “Organization”,
“@id”: “https://masalamonk.com/#organization”,
“name”: “MasalaMonk.com”,
“url”: “https://masalamonk.com/”,
“logo”: {
“@type”: “ImageObject”,
“@id”: “https://masalamonk.com/#logo”,
“url”: “https://masalamonk.com/wp-content/uploads/2018/04/masala-monk-logo.png”,
“contentUrl”: “https://masalamonk.com/wp-content/uploads/2018/04/masala-monk-logo.png”
}
},
{
“@type”: “WebSite”,
“@id”: “https://masalamonk.com/#website”,
“url”: “https://masalamonk.com/”,
“name”: “MasalaMonk.com”,
“publisher”: {
“@id”: “https://masalamonk.com/#organization”
},
“inLanguage”: “en-US”
},
{
“@type”: “ImageObject”,
“@id”: “https://masalamonk.com/banana-bread-with-applesauce-recipe/#primaryimage”,
“url”: “https://masalamonk.com/wp-content/uploads/2026/05/banana-bread-with-applesauce-recipe.jpg”,
“contentUrl”: “https://masalamonk.com/wp-content/uploads/2026/05/banana-bread-with-applesauce-recipe.jpg”,
“caption”: “Banana bread with applesauce sliced to show a soft, set crumb.”
},
{
“@type”: “WebPage”,
“@id”: “https://masalamonk.com/banana-bread-with-applesauce-recipe/#webpage”,
“url”: “https://masalamonk.com/banana-bread-with-applesauce-recipe/”,
“name”: “Banana Bread with Applesauce Recipe”,
“headline”: “Banana Bread with Applesauce Recipe”,
“description”: “A moist banana bread with applesauce recipe that uses ripe bananas, measured applesauce, and a little oil or butter for tender slices without a gummy center.”,
“isPartOf”: {
“@id”: “https://masalamonk.com/#website”
},
“publisher”: {
“@id”: “https://masalamonk.com/#organization”
},
“primaryImageOfPage”: {
“@id”: “https://masalamonk.com/banana-bread-with-applesauce-recipe/#primaryimage”
},
“mainEntity”: {
“@id”: “https://masalamonk.com/banana-bread-with-applesauce-recipe/#recipe”
},
“datePublished”: “2026-05-28”,
“dateModified”: “2026-05-28”,
“isAccessibleForFree”: true,
“inLanguage”: “en-US”
},
{
“@type”: “Recipe”,
“@id”: “https://masalamonk.com/banana-bread-with-applesauce-recipe/#recipe”,
“mainEntityOfPage”: {
“@id”: “https://masalamonk.com/banana-bread-with-applesauce-recipe/#webpage”
},
“url”: “https://masalamonk.com/banana-bread-with-applesauce-recipe/”,
“name”: “Banana Bread with Applesauce Recipe”,
“headline”: “Banana Bread with Applesauce Recipe”,
“description”: “Moist banana bread with applesauce, ripe bananas, and a small amount of oil or butter for tender slices without a gummy center.”,
“image”: [
{
“@type”: “ImageObject”,
“@id”: “https://masalamonk.com/banana-bread-with-applesauce-recipe/#image-finished-loaf”,
“url”: “https://masalamonk.com/wp-content/uploads/2026/05/banana-bread-with-applesauce-recipe.jpg”,
“contentUrl”: “https://masalamonk.com/wp-content/uploads/2026/05/banana-bread-with-applesauce-recipe.jpg”,
“caption”: “Sliced banana bread with applesauce showing a soft, set crumb.”
},
{
“@type”: “ImageObject”,
“@id”: “https://masalamonk.com/banana-bread-with-applesauce-recipe/#image-slice-texture”,
“url”: “https://masalamonk.com/wp-content/uploads/2026/05/banana-bread-with-applesauce-slice-texture-683×1024.jpg”,
“contentUrl”: “https://masalamonk.com/wp-content/uploads/2026/05/banana-bread-with-applesauce-slice-texture-683×1024.jpg”,
“caption”: “Close-up of banana bread with applesauce slices showing an even crumb.”
},
{
“@type”: “ImageObject”,
“@id”: “https://masalamonk.com/banana-bread-with-applesauce-recipe/#image-clean-slices”,
“url”: “https://masalamonk.com/wp-content/uploads/2026/05/clean-slices-of-banana-bread-with-applesauce-683×1024.jpg”,
“contentUrl”: “https://masalamonk.com/wp-content/uploads/2026/05/clean-slices-of-banana-bread-with-applesauce-683×1024.jpg”,
“caption”: “Clean slices of banana bread with applesauce showing no wet line.”
},
{
“@type”: “ImageObject”,
“@id”: “https://masalamonk.com/banana-bread-with-applesauce-recipe/#image-next-day-slice”,
“url”: “https://masalamonk.com/wp-content/uploads/2026/05/banana-bread-with-applesauce-next-day-slice-683×1024.jpg”,
“contentUrl”: “https://masalamonk.com/wp-content/uploads/2026/05/banana-bread-with-applesauce-next-day-slice-683×1024.jpg”,
“caption”: “Next-day banana bread with applesauce served as a breakfast slice.”
}
],
“thumbnailUrl”: “https://masalamonk.com/wp-content/uploads/2026/05/banana-bread-with-applesauce-recipe.jpg”,
“author”: {
“@id”: “https://masalamonk.com/#organization”
},
“publisher”: {
“@id”: “https://masalamonk.com/#organization”
},
“datePublished”: “2026-05-28”,
“dateModified”: “2026-05-28”,
“inLanguage”: “en-US”,
“prepTime”: “PT15M”,
“cookTime”: “PT1H5M”,
“totalTime”: “PT2H20M”,
“recipeYield”: “1 standard loaf (about 10 slices)”,
“recipeCategory”: [
“Quick Bread”,
“Breakfast”,
“Snack”
],
“recipeCuisine”: “American”,
“keywords”: “banana bread with applesauce, applesauce banana bread, moist banana bread, banana bread recipe, banana nut bread with applesauce, no added sugar banana bread, eggless banana bread, vegan banana bread, banana muffins with applesauce”,
“recipeIngredient”: [
“1½ cups mashed very ripe banana, about 340 g”,
“½ cup unsweetened applesauce, about 120 g”,
“2 large eggs”,
“½ cup packed light brown sugar, about 105 g”,
“3 tablespoons neutral oil, about 45 ml, or 3 tablespoons melted butter, about 42 g”,
“2 teaspoons vanilla extract”,
“2 cups all-purpose flour, 240 g”,
“1 teaspoon baking soda”,
“½ teaspoon baking powder”,
“1 teaspoon ground cinnamon”,
“½ teaspoon fine salt”,
“½ cup chopped walnuts or pecans, optional, about 55–65 g”
],
“recipeInstructions”: [
{
“@type”: “HowToStep”,
“@id”: “https://masalamonk.com/banana-bread-with-applesauce-recipe/#prepare-the-pan”,
“position”: 1,
“name”: “Prepare the pan”,
“url”: “https://masalamonk.com/banana-bread-with-applesauce-recipe/#prepare-the-pan”,
“text”: “Heat the oven to 350°F / 175°C. Grease a 9×5-inch loaf pan and line it with parchment if you want easier lifting.”,
“image”: “https://masalamonk.com/wp-content/uploads/2026/05/how-to-make-banana-bread-with-applesauce-step-by-step-683×1024.jpg”
},
{
“@type”: “HowToStep”,
“@id”: “https://masalamonk.com/banana-bread-with-applesauce-recipe/#mash-and-measure-bananas”,
“position”: 2,
“name”: “Mash and measure the bananas”,
“url”: “https://masalamonk.com/banana-bread-with-applesauce-recipe/#mash-and-measure-bananas”,
“text”: “Mash the bananas, then measure 1½ cups. Banana size varies, so measuring gives you a more reliable loaf than counting bananas alone.”,
“image”: “https://masalamonk.com/wp-content/uploads/2026/05/measure-mashed-bananas-for-banana-bread-683×1024.jpg”
},
{
“@type”: “HowToStep”,
“@id”: “https://masalamonk.com/banana-bread-with-applesauce-recipe/#mix-wet-ingredients”,
“position”: 3,
“name”: “Mix the wet ingredients”,
“url”: “https://masalamonk.com/banana-bread-with-applesauce-recipe/#mix-wet-ingredients”,
“text”: “In a large bowl, whisk the mashed banana, applesauce, eggs, brown sugar, oil or melted butter, and vanilla.”,
“image”: “https://masalamonk.com/wp-content/uploads/2026/05/how-to-make-banana-bread-with-applesauce-step-by-step-683×1024.jpg”
},
{
“@type”: “HowToStep”,
“@id”: “https://masalamonk.com/banana-bread-with-applesauce-recipe/#mix-dry-ingredients”,
“position”: 4,
“name”: “Mix the dry ingredients”,
“url”: “https://masalamonk.com/banana-bread-with-applesauce-recipe/#mix-dry-ingredients”,
“text”: “In a separate bowl, whisk the flour, baking soda, baking powder, cinnamon, and salt.”,
“image”: “https://masalamonk.com/wp-content/uploads/2026/05/how-to-make-banana-bread-with-applesauce-step-by-step-683×1024.jpg”
},
{
“@type”: “HowToStep”,
“@id”: “https://masalamonk.com/banana-bread-with-applesauce-recipe/#fold-gently”,
“position”: 5,
“name”: “Fold the batter gently”,
“url”: “https://masalamonk.com/banana-bread-with-applesauce-recipe/#fold-gently”,
“text”: “Add the dry ingredients to the wet ingredients and fold gently until no dry flour remains. The batter should be thick enough to mound on the spatula, not runny.”,
“image”: “https://masalamonk.com/wp-content/uploads/2026/05/banana-bread-batter-texture-guide-683×1024.jpg”
},
{
“@type”: “HowToStep”,
“@id”: “https://masalamonk.com/banana-bread-with-applesauce-recipe/#add-nuts-if-using”,
“position”: 6,
“name”: “Add nuts if using”,
“url”: “https://masalamonk.com/banana-bread-with-applesauce-recipe/#add-nuts-if-using”,
“text”: “Fold in walnuts or pecans if using.”,
“image”: “https://masalamonk.com/wp-content/uploads/2026/05/mix-ins-for-banana-bread-with-applesauce-683×1024.jpg”
},
{
“@type”: “HowToStep”,
“@id”: “https://masalamonk.com/banana-bread-with-applesauce-recipe/#bake-until-center-is-set”,
“position”: 7,
“name”: “Bake until the center is set”,
“url”: “https://masalamonk.com/banana-bread-with-applesauce-recipe/#bake-until-center-is-set”,
“text”: “Spread the batter into the prepared pan. Bake for 55–65 minutes, or until a toothpick inserted in the center comes out with moist crumbs but no wet batter. For the most reliable check, the center should read about 200–205°F / 93–96°C.”,
“image”: “https://masalamonk.com/wp-content/uploads/2026/05/banana-bread-doneness-guide-683×1024.jpg”
},
{
“@type”: “HowToStep”,
“@id”: “https://masalamonk.com/banana-bread-with-applesauce-recipe/#foil-tent-banana-bread”,
“position”: 8,
“name”: “Tent with foil if needed”,
“url”: “https://masalamonk.com/banana-bread-with-applesauce-recipe/#foil-tent-banana-bread”,
“text”: “If the top browns before the center is done, tent the loaf loosely with foil and keep baking.”,
“image”: “https://masalamonk.com/wp-content/uploads/2026/05/top-browning-too-fast-banana-bread-fix-683×1024.jpg”
},
{
“@type”: “HowToStep”,
“@id”: “https://masalamonk.com/banana-bread-with-applesauce-recipe/#cool-before-slicing-step”,
“position”: 9,
“name”: “Cool before slicing”,
“url”: “https://masalamonk.com/banana-bread-with-applesauce-recipe/#cool-before-slicing-step”,
“text”: “Cool in the pan for 10–15 minutes, then move to a rack. Let the loaf cool for at least 45–60 minutes before slicing so the crumb can finish setting.”,
“image”: “https://masalamonk.com/wp-content/uploads/2026/05/cool-banana-bread-before-slicing-683×1024.jpg”
}
]
}
]
}
This sourdough banana bread recipe is for the two things home bakers hate wasting most: overripe bananas and sourdough discard. The loaf bakes up soft, fragrant, and deeply banana-forward, with brown sugar warmth, a tender crumb, and just enough sourdough tang to make each slice taste more rounded and interesting.
This is the bread you make when the bananas are too far gone for snacking but exactly right for baking. It is the kind of loaf that smells like a good decision before it even leaves the oven, especially if you plan to eat the first slice warm with butter.
Why This Sourdough Banana Bread Is Different
The batter comes together like a regular quick bread: no kneading, no shaping, no rise time, no mixer, and no complicated sourdough schedule. You only need about 15 minutes of hands-on prep, one main mixing bowl, and a standard loaf pan.
Meanwhile, the discard adds flavor, moisture, acidity, and a little tang, while baking soda and baking powder do the lifting. This sourdough banana bread recipe is designed to feel familiar first and sourdough-smart second, so the discard improves the loaf without making it complicated.
What makes this loaf especially reliable is the way it handles moisture. Ripe bananas and sourdough discard both make banana bread taste better, but too much of either can leave the middle gummy. This recipe keeps the banana and discard in a safe range, then gives you clear doneness cues so the loaf bakes up moist, tender, and sliceable.
A good sourdough discard banana bread slice should look tender and slightly plush, while still holding together when you pick it up.
So instead of guessing whether your bananas are “about right” or whether the loaf just needs five more minutes, you get clear amounts, clear texture cues, and a better chance at a loaf that slices the way banana bread should.
This sourdough discard banana bread is a same-day quick bread made with ripe bananas and sourdough discard or active starter. The discard gives the loaf a mild tang, deeper flavor, and extra moisture, but baking soda and baking powder do the lifting, so there is no rise time.
In this sourdough banana bread recipe, you can mix the batter and bake it right away. For the best texture, use very ripe bananas, measure the mashed banana instead of guessing, whisk the discard fully into the wet ingredients, and bake until no wet batter remains in the thickest part.
A good slice should feel soft and moist, but still hold together when you pick it up. It should taste like banana bread first, with just enough sourdough depth to make it more interesting than the usual loaf.
Because ripe bananas and discard both add moisture, the best loaf needs enough structure and bake time to stay soft without turning heavy.
For exact quantities, pan size, and bake time, you can jump straight to the printable recipe card.
Sourdough Banana Bread Recipe at a Glance
Best pan: 9×5-inch light metal loaf pan
Oven: 350°F / 175°C
Bake time: 55–65 minutes
Banana amount: 340–360 g mashed ripe banana
Discard amount: 113 g / ½ cup sourdough discard
Texture goal: moist, tender, sliceable, and baked cleanly through the center
Keep these core numbers close: measured banana, steady discard, the right pan, and clear bake cues make the recipe easier to repeat.
What This Sourdough Banana Bread Tastes Like
This is not a sharp or sour loaf. Instead, it tastes like classic banana bread with more depth: sweet ripe banana first, then brown sugar, vanilla, butter, and a gentle sourdough note in the background.
The crumb should be moist and tender, not wet or pudding-like. Once cooled, the slices should hold together cleanly, with enough softness to feel cozy and enough structure to toast the next day.
Walnuts make it feel more breakfast-like and nutty. Chocolate chips, on the other hand, push it toward dessert. Either way, the base loaf stays simple enough for a weekday bake.
The Three Things That Make This Loaf Reliable
Measure the mashed banana, whisk the discard fully into the wet ingredients, and bake until the loaf tests clean at its tallest point. Together, those three small steps help it stay tender while still slicing neatly.
Why This Sourdough Banana Bread Recipe Works
You will like this loaf if you want banana bread that still feels familiar, just a little more grown-up. The discard does not take over. Instead, it deepens the flavor, softens the crumb, and gives you one more reason not to waste a jar of starter.
Why Moisture Control Matters
Although banana bread looks simple, the best loaves depend on balance. Too little moisture and the loaf feels dry. Too much banana or discard, however, and the center can take longer to bake through. The sweet spot is enough banana for flavor, enough flour for structure, and enough leavening to lift a dense, moist batter.
The recipe is built around the problem that makes sourdough banana bread tricky: ripe bananas and discard both add moisture, so the loaf needs enough structure, enough lift, and clear doneness cues to finish properly.
The key is moisture control: measure the banana by weight, keep the discard steady at 113 g, and bake by doneness cues instead of the clock alone. That is what gives you a slice that feels soft in the hand instead of fragile or underbaked.
Very ripe bananas bring natural sweetness, aroma, and moisture.
Sourdough discard adds gentle tang, acidity, and deeper flavor.
Brown sugar gives a warmer, caramel-like banana bread flavor.
Melted butter keeps the loaf rich and classic.
Baking soda plus baking powder gives more reliable lift than baking soda alone.
Measured banana helps the loaf bake through cleanly.
The Moisture-Control Rule
For this loaf, do not measure bananas by count alone. Measure the mashed banana, keep the discard steady, and bake by doneness cues. That is the difference between moist banana bread and a loaf that stays heavy in the middle.
Instead of guessing by banana count, this recipe controls the main moisture points before the loaf ever goes into the oven.
If you only remember one thing, remember this rule; then use the doneness section to confirm the loaf is fully baked before slicing.
Think of this as classic banana bread with a sourdough-discard upgrade. It is not trying to be chewy sandwich bread, and it is not trying to be aggressively tangy. Rather, it is soft, sliceable, fragrant, and practical.
Before You Start
Mash and measure the bananas first. If you have more than 360 g mashed banana, save the extra for oatmeal, pancakes, or a smoothie instead of adding it all to the loaf. That one step keeps the bread moist while helping the center bake through cleanly.
Ingredients for Sourdough Banana Bread
The ingredient list for this sourdough banana bread recipe is familiar, but a few details matter more because sourdough discard adds both moisture and acidity.
The ingredients are familiar, yet the balance matters: bananas bring flavor, discard adds depth, and the leaveners support a steady rise.
Very Ripe Bananas
Use bananas with plenty of brown spots, or bananas that are fully soft and deeply fragrant. They should mash easily with a fork.
For the best banana bread flavor, choose bananas that smell sweet and mash easily; however, avoid fruit that smells fermented or spoiled.
Measure the Mashed Banana
The best range is 340–360 g peeled mashed banana, which is about 1½ cups. That is usually 3 medium-to-large bananas; however, a scale saves you from guessing here, because three bananas can mean very different things depending on their size.
Banana size varies a lot, so weighing the mashed fruit is the easiest way to avoid an overly loose banana bread batter.
You do not need perfect-looking bananas for this recipe. You just need ripe, fragrant bananas and a measured amount, so the loaf gets banana flavor without turning heavy.
Banana Bread Texture Tip
Extra banana sounds harmless, but it can make the middle take much longer to set. Therefore, when your bananas are extra large, mash them first and measure the amount instead of adding every banana on the counter.
Can You Use Frozen Bananas?
Yes. First, thaw frozen bananas; then drain off any watery liquid before measuring. Frozen bananas release more moisture than fresh ripe bananas, so measure the mashed fruit after thawing and keep it in the 340–360 g range.
Frozen bananas work well in sourdough banana bread, but draining the extra liquid first keeps the batter from becoming too wet.
Use 113 g / ½ cup sourdough discard. A discard from a starter fed with equal weights of flour and water works best here.
Fresh discard gives a milder loaf. Older fridge discard gives a stronger sourdough note. Active starter also works, and it may make the loaf slightly lighter. However, this recipe does not rely on the starter for rise.
Discard gives this loaf a deeper tang, while active starter can make the flavor milder and the crumb slightly lighter.
All-purpose flour gives the cleanest structure. Brown sugar keeps the loaf moist and gives the flavor a caramel edge. Meanwhile, melted butter makes the loaf rich and familiar, while eggs help bind the batter and support the crumb.
If you measure flour by cups, spoon it into the cup and level it off instead of scooping directly from the bag, because scooped flour packs down easily. Too much packed flour can make the loaf dry, heavy, or dense.
Fat
Best For
Texture
Melted butter
Classic banana bread flavor
Rich, tender, slightly denser
Neutral oil
Softest crumb and longer moistness
Softer, lighter, less buttery
Use a neutral oil such as avocado, canola, sunflower, or light olive oil if you choose the oil version. Avoid strongly flavored oils unless you already know you like them in sweet bakes.
Butter gives a classic banana bread flavor, whereas oil creates a softer crumb that can stay tender a little longer.
If you are choosing a version before baking, the version guide gives the quickest way to decide between classic, softer, tangier, walnut, or chocolate chip.
Baking Soda and Baking Powder
This recipe uses both for a steadier rise. Baking soda reacts with the acidity from the bananas, brown sugar, and sourdough discard, while baking powder adds backup lift so the loaf does not feel heavy for how moist the batter is.
Even though this loaf uses sourdough discard, baking soda and baking powder still do the lifting for a steadier quick bread rise.
Optional Mix-Ins
Walnuts, pecans, and chocolate chips all work well. Keep mix-ins to about 85–115 g so the loaf does not become too heavy.
Blueberries can be added, but they bring extra moisture. For that reason, keep them to about 75–100 g, use them straight from the fridge or freezer, and avoid adding extra banana at the same time.
Sourdough Discard vs Active Starter
This is one of the most common questions when making banana bread with sourdough discard: does the starter need to be active? For this recipe, no. Discard is the easiest default.
In this loaf, discard is mostly a flavor and moisture ingredient. The baking soda and baking powder do the main lifting, so you do not need to wait for the starter to rise the batter.
Older discard can add more sourdough character, but it should smell pleasantly tangy rather than harsh, moldy, or unpleasant.
Stronger sourdough note. Good for people who like more tang.
Active starter
Yes
Slightly lighter loaf and usually less sour flavor.
Very runny discard
Yes
Batter may be looser and the loaf may need a few extra minutes.
Very thick discard
Yes
Bring closer to room temperature and whisk well into the wet ingredients.
Brand-new starter discard
Not ideal
Early starter discard can smell harsh or unstable. Use mature discard for better flavor.
For more ways to use starter and discard in baking, keep this page on more sourdough bread recipes handy. It is useful when you want to move from quick discard bakes to focaccia, pizza dough, and simple bread projects.
Which Sourdough Banana Bread Version Should You Make?
Use the base recipe if you want a classic moist loaf. Then adjust only one or two things depending on the flavor or texture you want. Banana bread is forgiving, but the best versions come from changing one thing at a time.
If You Want…
Use This Direction
Mild classic banana bread
Use fresh discard or active starter.
More sourdough tang
Use older but healthy fridge discard.
Softer crumb
Use neutral oil instead of melted butter.
Richer flavor
Use melted butter and dark brown sugar.
Less sweetness
Reduce brown sugar to about 125 g.
Better structure
Do not skip the baking powder.
Nutty banana bread
Add 85–115 g walnuts or pecans.
Dessert-style loaf
Add 85–115 g chocolate chips.
Eggless loaf
Use flax eggs and cool the loaf completely before slicing.
Lowest risk of a wet center
Weigh the banana and bake to 200–205°F / 93–96°C.
Choose One Direction First
For a first bake, choose one direction and keep the rest of the loaf simple. Then you will know whether your repeat version is the buttery classic, the softer oil loaf, the walnut breakfast loaf, or the chocolate-chip treat.
What Not to Change the First Time
For your first loaf, do not increase the banana, increase the discard, remove the baking powder, and switch flour types all at once. Make the base version once, then adjust sweetness, fat, mix-ins, or tang after you know how your pan and oven behave.
If you already know your favorite banana bread style — walnut, chocolate chip, less sweet, extra tangy, or warm with butter — choose that direction first. Most people find their house version after two bakes: one classic loaf, then one small adjustment based on what they liked most.
How to Make Sourdough Banana Bread
The method for this sourdough banana bread recipe is straightforward, but the order matters. Blend the discard into the wet ingredients before adding flour. That way, you avoid sticky sourdough streaks and get a more even crumb.
Once the discard is fully blended into the wet mixture, the flour can be folded in gently without leaving sticky starter streaks.
1. Prepare the Pan and Oven
Preheat the oven to 350°F / 175°C. Then line a 9×5-inch / 23×13 cm loaf pan with parchment paper, leaving a little overhang so the baked loaf is easy to lift out.
If your loaf pan looks more than about three-quarters full after adding the batter, set a small amount aside and bake it as 1–2 muffins. An overfilled pan can rise unevenly or stay wet in the center.
2. Mash and Measure the Bananas
Mash the bananas until mostly smooth with a few small lumps. Then measure out 340–360 g. A few soft banana pieces are fine; however, large chunks can create wet pockets in the loaf.
3. Mix the Wet Ingredients
Whisk melted butter and brown sugar until glossy. Next, add the eggs, vanilla, mashed banana, and sourdough discard. Whisk until the discard is fully blended into the mixture.
At this point, the mixture should look glossy and loose, with no visible streaks of discard.
At this stage, look for a glossy banana mixture with no visible discard streaks before the dry ingredients go in.
4. Fold in the Dry Ingredients
Add flour, baking soda, baking powder, salt, and cinnamon. Sprinkle the baking soda, baking powder, salt, and cinnamon evenly over the flour before folding so they distribute more evenly. Then fold gently with a spatula until no dry flour remains. Stop as soon as the batter comes together.
A thick, slightly lumpy batter is exactly what you want because it means the flour has been mixed in without overworking the loaf.
The batter should look thick and slightly lumpy, not smooth like cake batter. It should mound slightly in the pan; if it pours like pancake batter, the loaf may need longer to bake. A slightly uneven batter is a good sign here. Smooth, overworked batter is more likely to bake up heavy.
A few small lumps are fine because overmixing can make banana bread dense, especially in a moist sourdough discard batter.
In fact, overmixing develops gluten and can make banana bread dense, tough, or heavy. If your past banana bread turned dense or gummy, compare your batter to the troubleshooting section before changing the recipe.
5. Add Mix-Ins
Fold in walnuts, pecans, or chocolate chips, if using. Keep the amount moderate so the loaf still rises and slices cleanly.
6. Bake and Cool
Spread the batter into the prepared pan and smooth the top. The batter should sit below the rim of the pan, with room to rise.
A 9×5 light metal loaf pan gives the batter enough room to rise, while parchment makes the cooled loaf easier to lift out.
Bake for 55–65 minutes, or until the highest part of the loaf feels firm and no wet batter remains. When it is done, the top should look set and gently domed, not jiggly.
Finally, cool in the pan for 10–20 minutes. After that, lift the loaf onto a rack and let it cool before slicing.
The loaf keeps firming as it cools, so this resting time is part of the texture — not just a waiting step.
Important Cooling Note
Warm banana bread is tempting, but slicing too early can make the middle seem wetter than it really is. Let it cool until the crumb has time to set.
Cutting too soon can make a finished loaf seem underbaked, so give the crumb time to settle before the first slice.
Best Pan, Oven Temperature, and Bake Time for Sourdough Banana Bread
For this sourdough banana bread recipe, the most reliable setup is a 9×5-inch light metal loaf pan at 350°F / 175°C. Light metal helps the loaf bake evenly without the sides darkening too quickly.
Pan choice affects bake time: a light metal 9×5 pan helps the sides and center finish more evenly.
Banana bread is naturally dense and moist, so bake time is only a guide. The real test is whether the loaf is baked through at its tallest point.
That is why the doneness test matters more than the exact minute on the timer.
Pan or Oven Situation
What to Do
9×5-inch light metal pan
Most reliable setup for this recipe. Start checking around 55 minutes.
8½×4½-inch pan
The loaf will be taller and may need extra time in the middle.
Dark metal pan
Browns faster. Tent with foil if the top darkens before the middle is done.
Glass or ceramic pan
May bake differently and often needs a few extra minutes. Check the thickest part carefully.
Top browning too fast
Tent loosely with foil during the last part of baking.
Outside dark but middle wet
Next time, bake at 325°F / 163°C for longer so the loaf has more time to bake through.
How to Tell When the Loaf Is Done
If your first worry is a wet middle, you are not alone. Banana bread often looks done on top before the loaf has finished baking through, so test the tallest part instead of trusting the browned crust.
Because banana bread browns before the center always finishes, the thermometer and crumb test are more reliable than color alone.
A browned top is a clue, not a guarantee. The inside still needs time to settle into a soft, sliceable crumb.
A skewer inserted into the center should come out without wet batter.
A few moist crumbs are fine.
The top should spring back lightly when pressed.
The thickest part of the loaf should read about 200–205°F / 93–96°C on an instant-read thermometer.
Because banana smears on a skewer can look wet, look for raw batter rather than soft banana. When in doubt, give the loaf a few more minutes, especially if you used a smaller pan, extra banana, or runny discard.
How to Fix Gummy, Dense, or Dry Sourdough Banana Bread
Most texture problems in sourdough discard banana bread come down to moisture, mixing, or bake time. Once you know which one caused the problem, the next loaf is much easier to fix.
If your loaf failed once, do not assume the recipe is hopeless. Sourdough banana bread usually goes wrong for one of four reasons: too much banana, very wet discard, overmixing after flour, or pulling the loaf before the thickest part has finished baking.
Match the Problem Before You Change the Recipe
If a loaf fails, the fix is usually practical: adjust banana moisture, mix more gently, measure flour carefully, or bake a little longer.
Problem
Likely Cause
Fix
Gummy center
Too much banana, underbaking, overmixing, or slicing too soon
Weigh the banana, bake longer, fold the flour gently, and cool before slicing.
Dense loaf
Discard not blended well or batter overmixed after flour
Whisk discard fully into wet ingredients, then fold dry ingredients lightly.
Dry loaf
Too much flour or overbaking
Weigh flour or spoon-and-level it. Check a few minutes earlier next time.
Too sour
Older, very acidic discard
Use fresher discard or active starter for a milder loaf.
Sunken middle
Underbaked center or too much moisture
Bake until the thickest part tests clean and avoid adding extra banana beyond the recipe range.
Dark outside, raw middle
Oven too hot, pan too dark, or loaf too tall
Tent with foil, use a lighter pan, or bake lower and longer next time.
Sticky sourdough streaks
Discard not fully mixed into wet ingredients
Whisk the discard with banana, eggs, butter, and sugar before adding flour.
If you only change one thing next time, weigh the mashed banana. It is the small, unglamorous step that solves more banana bread texture problems than almost anything else.
Once this sourdough banana bread recipe works for you, the variations are easy. Keep mix-ins moderate and avoid adding extra wet ingredients unless you adjust the bake time.
Start with the base loaf first; then, once you know the texture, choose a walnut, chocolate chip, or tangier discard version.
Walnut Sourdough Banana Bread
Fold in 85–115 g chopped walnuts. Toasting the walnuts first gives a deeper flavor and helps them stay crisp inside the loaf.
Chocolate Chip Sourdough Banana Bread
Fold in 85–115 g chocolate chips. For a more dessert-like loaf, sprinkle a few extra chips on top before baking.
Less-Sweet Version
Reduce the brown sugar to about 125 g. The loaf will be less moist and less caramel-like, but still pleasant if your bananas are very ripe. However, avoid cutting the sugar too aggressively because sugar affects softness, browning, and shelf life.
Eggless Version
For an eggless version, use 2 flax eggs and expect a slightly softer, denser crumb. Let the loaf cool completely before slicing so the structure has time to set. This flax egg for quick breads guide explains the basic ratio and when flax eggs work best.
Healthier Banana Bread Direction
For a more wholesome loaf, replace up to half the all-purpose flour with whole wheat flour, reduce the sugar slightly, or use part Greek yogurt in place of a little butter. For a separate banana-bread style built around oat flour, see this healthy banana bread with oat flour.
Optional Long-Fermented Version
The same-day version gives the most classic banana bread texture, so start there if this is your first loaf. However, if you want deeper sourdough flavor, you can use a long-fermented method as long as the final leaveners are added close to baking.
For a true long-fermented version, mix the flour, sourdough discard, mashed banana, melted butter, and brown sugar first. Cover and refrigerate overnight. The next day, let the mixture sit at room temperature for 20–30 minutes so it softens slightly. Beat the eggs and vanilla together first, then stir them into the fermented mixture. Sprinkle in the baking soda, baking powder, salt, and cinnamon, then fold until evenly combined and bake right away.
The overnight rest is for flavor and fermentation, while the eggs, baking soda, and baking powder wait until baking day for better lift.
If the mixture looks very stiff the next day, do not panic. Let it soften at room temperature, then stir gently after adding the beaten eggs and vanilla.
The texture will be tangier and slightly less cake-like than the same-day loaf. Do not add the baking soda or baking powder before the overnight rest, because they give the loaf its best lift when added closer to baking.
Can This Become Muffins?
The flavor works beautifully as muffins, but the pan, fill level, and bake time change. Use this loaf as the flavor base, then bake muffin versions separately rather than treating the loaf timing as a direct swap. For another portioned breakfast-bake idea, these high protein muffins with banana or applesauce are useful when you want something meal-prep friendly.
How to Serve Sourdough Banana Bread
The first day, this loaf is soft enough to eat plain once it has cooled. For a warmer, richer slice, add salted butter, cream cheese, peanut butter, or a little honey.
The next day, toast a slice lightly until the edges crisp and the banana aroma comes back. That is also the best way to revive a frozen slice.
It is humble enough for a weekday breakfast and good enough to wrap up for someone who needs a little comfort. It also disappears slice by slice: breakfast, afternoon tea, lunchbox treat, late-night snack.
How to Store and Freeze Sourdough Banana Bread
Let the loaf cool completely before wrapping. Otherwise, warm banana bread traps steam, and that can make the crust sticky and the middle feel wetter than it should.
Wrap the loaf once it is fully cool, and freeze slices separately so you can toast one piece whenever you need it.
Room temperature: Wrap well and keep for 3–4 days.
Refrigerator: Useful in hot or humid weather, but the loaf may dry out faster.
Freezer: Freeze slices for up to 3 months for best texture.
To reheat: Warm gently, toast lightly, or microwave a slice briefly until soft.
Instead of freezing only the whole loaf, freeze slices so you can warm one piece at a time for breakfast, tea, or a quick sweet snack.
If you are baking ahead, the recipe card has the core times, pan size, and storage note in one place.
For general food-safe freezer guidance, the USDA’s overview of freezing and food safety is a helpful reference.
Printable Sourdough Banana Bread Recipe Card
Sourdough Banana Bread Recipe
This moist sourdough discard banana bread turns ripe bananas and starter discard into a soft, sliceable loaf with brown sugar warmth, gentle tang, and classic banana bread comfort.
Prep Time15 minutes
Cook Time55–65 minutes
Total Time1 hour 10 minutes to 1 hour 20 minutes, plus cooling
Yield1 loaf
Equipment
9×5-inch / 23×13 cm loaf pan
Parchment paper
Mixing bowl
Whisk
Rubber spatula
Kitchen scale, recommended
Cooling rack
Instant-read thermometer, optional but helpful
Ingredients
340–360 g very ripe bananas, peeled and mashed, about 1½ cups
113 g sourdough discard, about ½ cup, ideally from a starter fed with equal weights flour and water
240 g all-purpose flour, about 2 cups
150 g packed brown sugar, about ¾ cup
113 g unsalted butter, melted and cooled, about ½ cup
2 large eggs
2 teaspoons vanilla extract
1 teaspoon baking soda
1 teaspoon baking powder
½ teaspoon fine salt
1 teaspoon ground cinnamon, optional
85–115 g chopped walnuts, pecans, or chocolate chips, optional
Instructions
Preheat the oven to 350°F / 175°C. Line a 9×5-inch loaf pan with parchment paper.
Mash the bananas and measure out 340–360 g. Set aside.
In a large bowl, whisk melted butter and brown sugar until glossy.
Add eggs, vanilla, mashed banana, and sourdough discard. Whisk until the discard is fully blended into the wet ingredients.
Add flour, baking soda, baking powder, salt, and cinnamon. Sprinkle the leaveners and salt evenly over the flour, then fold gently with a spatula until no dry flour remains.
Fold in walnuts, pecans, or chocolate chips, if using.
Spread the batter into the prepared loaf pan and smooth the top.
Bake for 55–65 minutes, or until the top is domed, the thickest part feels set, and a skewer inserted into the center shows moist crumbs but no wet batter. If the top browns too quickly, tent loosely with foil.
The loaf is done when the thickest part reads about 200–205°F / 93–96°C.
Cool in the pan for 10–20 minutes, then lift onto a rack and cool before slicing.
Recipe Notes
Fresh discard gives a mild flavor. Older discard gives a stronger sourdough note.
Active starter can be used in the same amount by weight.
Do not add extra banana without expecting a longer bake time.
For a less-sweet loaf, reduce brown sugar to about 125 g.
For a softer oil-based loaf, replace the melted butter with 100–110 g neutral oil.
For blueberries, use 75–100 g and avoid adding extra banana at the same time.
For a long-fermented version, use a separate method where the flour, discard, banana, butter, and sugar rest first, then add the eggs and final leaveners closer to baking.
Store wrapped at room temperature for 3–4 days, or freeze slices for up to 3 months.
Save these core cues for repeat bakes: measured banana, 113 g discard, a 9×5 pan, and a 200–205°F finish.
Save the core cues for later: measured banana, 113 g discard, a 9×5 pan, and a 200–205°F finish make the loaf easier to repeat.
More Ways to Use Ripe Bananas
If you still have bananas on the counter after this loaf, this banoffee pie recipe takes them in a caramel-and-cream dessert direction. For a no-oven breakfast, banana oatmeal pancakes use ripe banana for natural sweetness and moisture.
Once this base loaf works for you, it becomes a reliable discard recipe to return to whenever bananas go brown. After that, the walnut, chocolate chip, oil-based, and extra-tangy versions become easy little adjustments rather than brand-new recipes.
Once you know how your oven bakes this loaf, it becomes one of those quiet kitchen recipes you do not need a special occasion for: brown bananas, a little discard, one bowl, and a loaf that makes the next morning easier.
FAQs
Does sourdough banana bread taste sour?
It should taste like banana bread with a little extra depth, not like sour bread. Fresh discard gives the mildest flavor. Older fridge discard creates a stronger tang, especially if it has been sitting for several days.
Can I use active sourdough starter instead of discard?
Yes. Use the same amount by weight. Active starter usually gives a slightly lighter loaf and a milder sourdough flavor, while older discard gives more tang.
Is this a sourdough starter banana bread?
Yes. You can make it with sourdough discard or active starter. However, it is still a quick bread, so baking soda and baking powder do the main lifting while the starter adds moisture, acidity, tenderness, and flavor.
Why is my loaf gummy in the middle?
The most common causes are too much banana, underbaking, overmixing, or slicing before the loaf has cooled. Use 340–360 g mashed banana, fold the flour gently, and bake until no wet batter remains in the thickest part.
How ripe should bananas be for banana bread?
Use bananas with brown spots or fully brown skins. They should smell sweet and mash easily. Firm yellow bananas do not give the same sweetness, moisture, or banana flavor.
Can I use frozen bananas?
Yes. Thaw them first, drain off the watery liquid, then measure the mashed banana. Frozen bananas release more moisture than fresh ripe bananas, so keeping the amount in the 340–360 g range matters even more.
Should I use baking soda, baking powder, or both?
Both work best in this recipe. Baking soda reacts with the acidity in the bananas, brown sugar, and discard, while baking powder adds backup lift for a more reliable loaf.
What happens when the discard is very old?
Older discard can make the loaf tangier. That can be delicious when the discard smells pleasantly sour, but avoid discard that smells spoiled, moldy, or sharply unpleasant. For a mild loaf, use fresh discard or active starter.
Does the discard make the bread rise?
Not much. In this quick bread, baking soda and baking powder do the main lifting. The discard mostly adds moisture, acidity, tenderness, and flavor.
Can I make this dairy-free?
Yes. Replace the melted butter with 100–110 g neutral oil. The loaf will taste less buttery, but the crumb will stay soft and moist. This makes the loaf dairy-free, but not egg-free unless you also use the flax egg option.
Can I use whole wheat flour?
Yes, but start by replacing only half the all-purpose flour with whole wheat flour. A full whole-wheat loaf can taste heavier and absorb more moisture. If the batter feels unusually stiff, add 1–2 tablespoons of milk, yogurt, or water.
Can this sourdough banana bread recipe be made ahead?
Yes. The loaf keeps well at room temperature for 3–4 days and freezes nicely in slices. In fact, the flavor often tastes even better the next day because the banana, brown sugar, and sourdough notes settle together.
Can I bake this as muffins?
The batter can inspire muffins, but loaf timing does not translate directly. Muffins need a different pan, shorter bake time, and careful fill level. For the cleanest result, treat sourdough banana muffins as their own recipe rather than simply shrinking the loaf.
If you make this sourdough banana bread recipe, leave a comment with three details: fresh discard or older discard, butter or oil, and plain, walnut, or chocolate chip. Those notes help the next baker choose a version — and I would love to know which one becomes your repeat loaf.