Posted on Leave a comment

Jalapeño Popper Corn Dip Recipe: Creamy, Cheesy & Easy

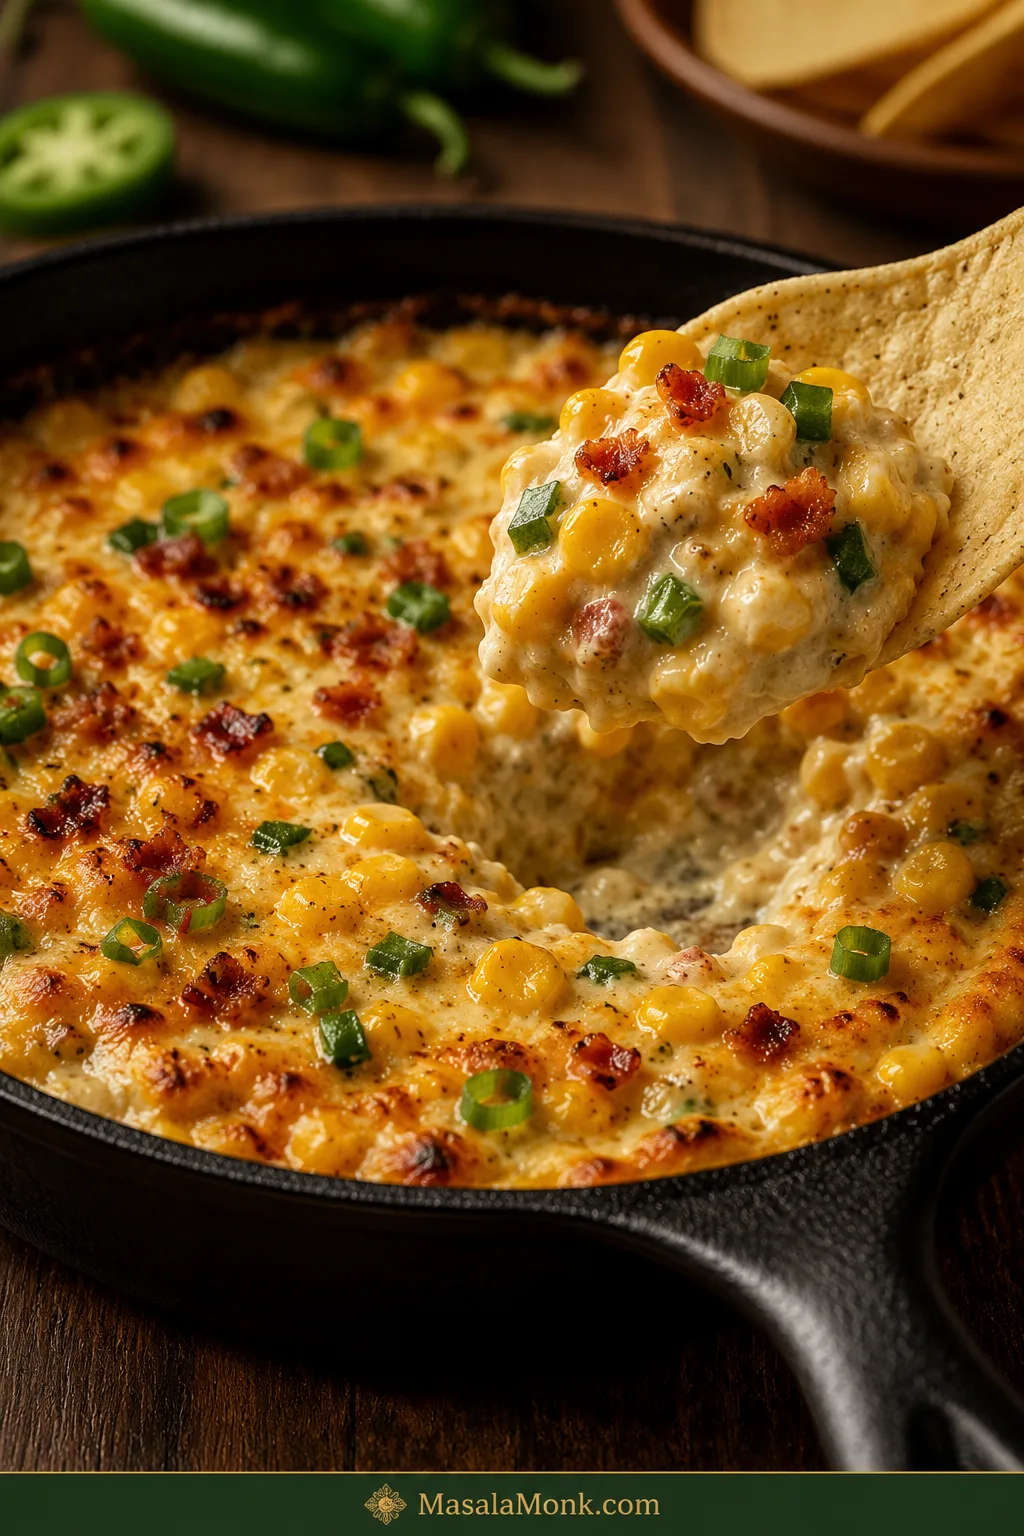
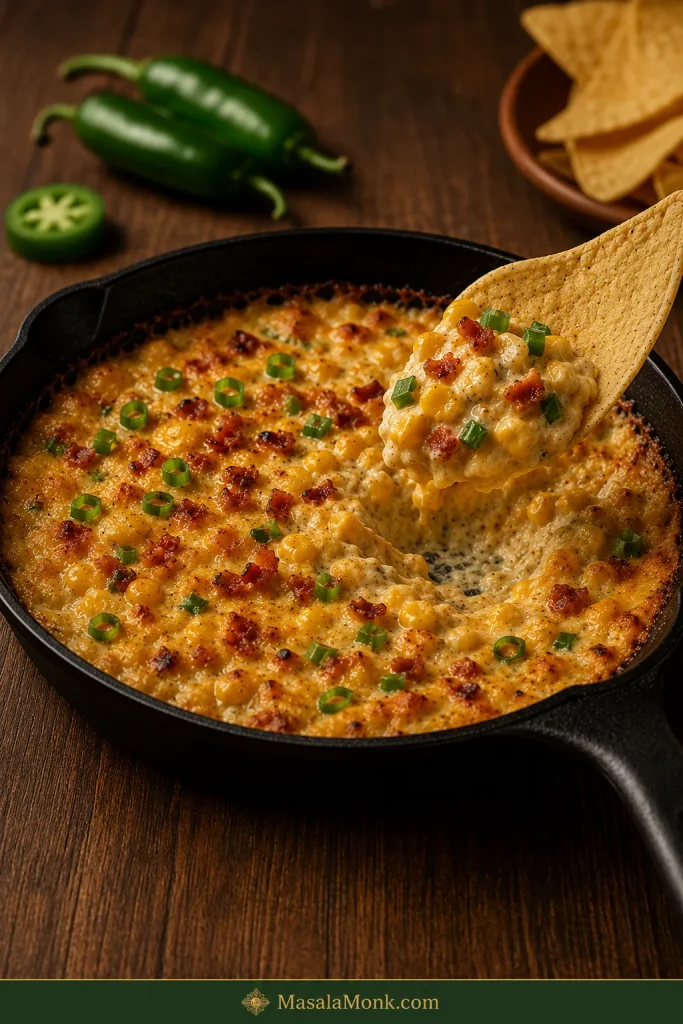
Cast-iron skillet filled with creamy baked corn dip, topped with jalapeño, scallion and bacon, with a tortilla chip lifting a scoop containing visible corn kernels.

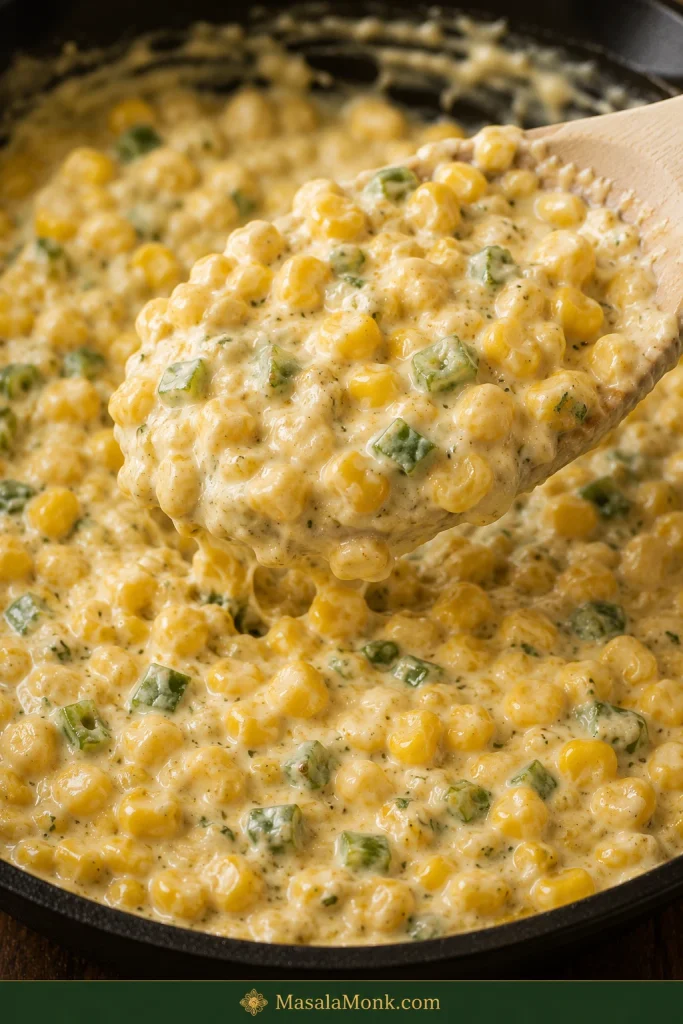
The first scoop tells you whether jalapeño popper corn dip is working. A good one brings sweet corn, fresh jalapeño and creamy cheese up with the chip. It feels rich without turning heavy, and you taste the pepper before the heat starts to build.

The annoying batches tend to go wrong in opposite directions. Too much water and the edges turn loose. Too much cream cheese or shredded cheese—or too much time cooling on the table—and the dip firms up until even a sturdy tortilla chip has to work too hard.

This one aims for the middle: enough corn to remain unmistakably a corn dip, enough cream cheese for the jalapeño-popper character, and enough sour cream and melting cheese to keep a warm scoop creamy without swallowing the kernels. The corn and jalapeños get a quick turn in the pan first, where the peppers lose some of their raw grassy smell, the corn starts smelling sweeter and loose water has somewhere to go before the dairy arrives.

Fresh, frozen and well-drained canned corn all work, and you can keep the heat gentle or let it build. Bacon is optional, as is the crisp panko finish. For a longer gathering, the finished dip can move to a slow cooker to stay warm.

Start here

Quick Answer: How to Make Jalapeño Popper Corn Dip

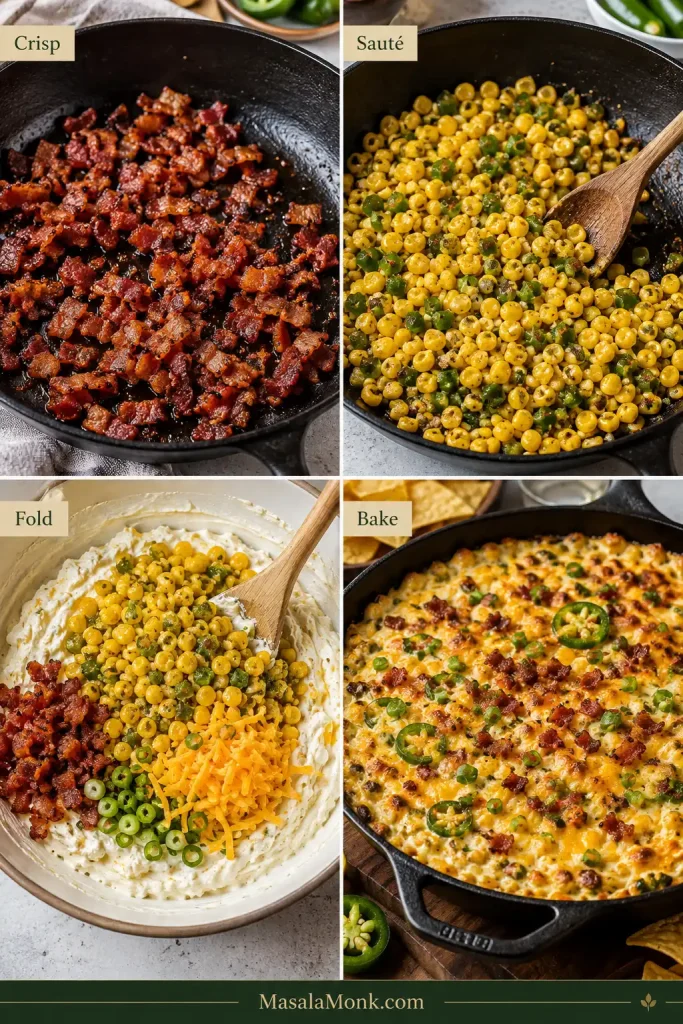
To make jalapeño popper corn dip, crisp the bacon if using, sauté the corn and jalapeños, fold them into the creamy cheese base, then bake until the edges bubble and the center is hot. The quick skillet step cooks off loose corn moisture, brings out the corn’s sweetness and takes the raw edge off the jalapeños before the dairy goes in.

Cook 400 g / about 2½ cups corn kernels with chopped jalapeños until the pan has lost its wet sheen and a few kernels begin turning golden. Fold them into 227 g / 8 oz softened block cream cheese, sour cream and freshly shredded cheese, then add green onion and crisp bacon if using.

Spread the mixture in a 10-inch / 25 cm oven-safe skillet or roughly 2-quart / 2-litre baking dish. Bake uncovered at 375°F / 190°C for about 18–22 minutes, until the edges bubble gently and the center is hot and creamy. Let it rest for 5–10 minutes; that short pause takes it from molten to much easier to scoop.

Four-step guide showing bacon crisping, corn and jalapeño sautéing, the corn mixture being folded into a creamy cheese base, and the assembled dip baking.
Keeping the early jobs separate matters: bacon can crisp and corn can shed moisture before the dairy arrives. Once the creamy base goes in, the goal shifts from evaporation to gentle heating.

Choose Your Corn, Heat and Finish

Start with the balanced combination, then change only the part that matters to you.

Swipe or scroll sideways to see the full table.

Decision Start here Change it when…
Corn Fresh or frozen Use thoroughly drained canned corn for convenience or fire-roasted corn for a smokier edge.
Heat As a balanced starting point, trim two jalapeños well and leave a little of the hotter inner ribs in the third Trim all three more thoroughly for mild heat, or leave more of the inner ribs attached for a hotter batch.
Bacon Optional, but good for smoky popper flavor Leave it out for a vegetarian dip; fire-roasted corn can bring back some of that smoky character.
Top Melty cheese Add buttered panko for the creamy-inside, crisp-outside contrast of a breaded popper.
Decision guide comparing fresh, frozen, canned and fire-roasted corn; mild, balanced and hotter jalapeño preparation; and melty, panko and crushed-chip toppings.
Think of these as separate levers: the corn changes bite and smokiness, jalapeño prep controls the heat, and the topping changes crunch. You can adjust one without rebuilding the dip.

The balanced version

Creamy Jalapeño Popper Corn Dip

Sweet kernels folded through a creamy jalapeño-cheese base, with bacon if you want the extra smoky edge. The bite should start sweet from the corn, turn rich and tangy through the cheese, then finish with fresh jalapeño warmth and whatever crisp edge you chose—bacon, panko or both.

Prep
About 15 minutes

Cook
About 30–40 minutes

Ready in
About 50–65 minutes, including the 5–10 minute rest

Serves
About 8–10 as one of several appetizers

Best pan
10-inch / 25 cm oven-safe skillet or about 2-quart / 2-litre baking dish

Finished texture
Creamy and corn-studded; easy to scoop while warm but substantial enough to stay on a sturdy tortilla chip

Equipment

  • 10-inch / 25 cm oven-safe skillet or roughly 2-quart / 2-litre baking dish
  • Large mixing bowl
  • Flexible spatula or sturdy spoon
  • Box grater if shredding cheese from a block

Ingredients

For the Dip

  • 400 g / about 2½ cups corn kernels, fresh, frozen or thoroughly drained canned corn
  • 15 ml / 1 tablespoon neutral oil, or reserved bacon fat
  • 3 medium fresh jalapeños, about 50–60 g total before trimming, finely chopped
  • 227 g / 8 oz full-fat block cream cheese, softened
  • 120 g / ½ cup sour cream
  • 115 g / 1 cup freshly shredded Monterey Jack or Colby Jack
  • 55 g / ½ cup freshly shredded sharp cheddar
  • ½ teaspoon garlic powder
  • ¼ teaspoon onion powder
  • ¼ teaspoon freshly ground black pepper
  • ¼ teaspoon fine salt, plus more only if needed; start lighter when the bacon or cheese is especially salty
  • 115 g / 4 oz raw bacon, optional
  • 2 green onions / scallions, thinly sliced, divided

Optional Crunchy Popper Topping

  • 25 g / ⅓ cup panko breadcrumbs
  • 14 g / 1 tablespoon butter, melted

For Serving

  • Thick tortilla chips or corn chips
  • Celery, bell pepper strips or toasted baguette, optional

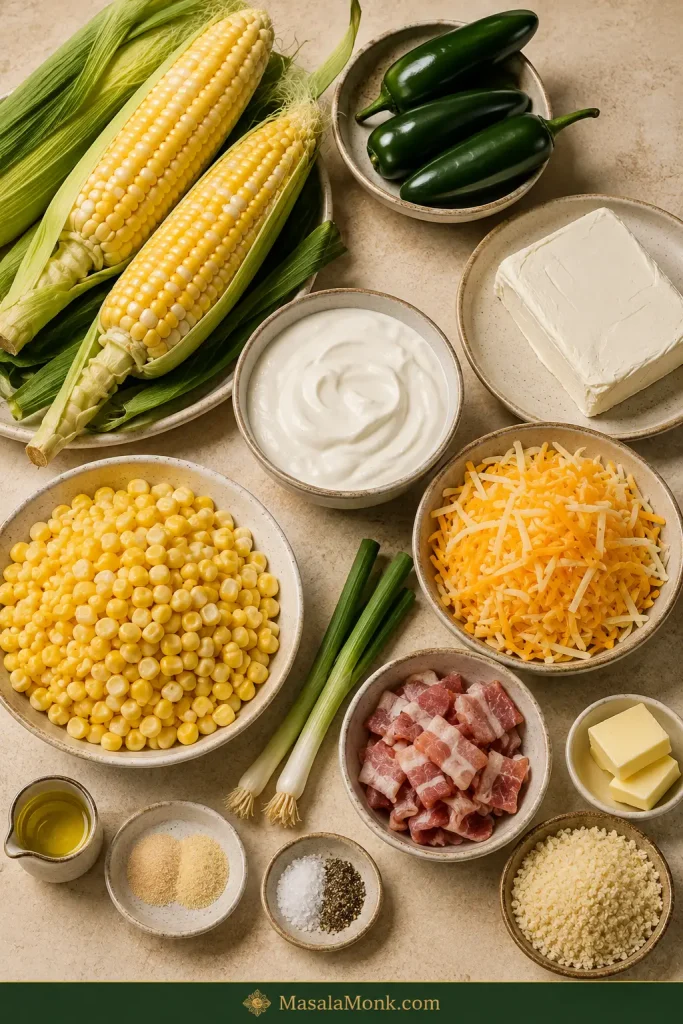
Measure the corn after prep. The target is about 400 g / 14 oz ready-to-cook kernels. Fresh corn works out to roughly 4–5 medium ears, depending on size and how deeply you cut. Frozen corn is easiest to weigh at 400 g. With canned corn, use the drained kernel weight, not the weight of the can and its liquid.

Overhead arrangement of corn, three fresh jalapeños, cream cheese, sour cream, shredded cheeses, raw bacon, scallions, panko, butter, oil and seasonings for jalapeño popper corn dip.
The useful ratio is visible even before cooking: corn should still be the dominant ingredient, while the dairy and cheeses are there to coat, bind and enrich the kernels rather than replace them.

Method

Prep and Cook Off Moisture

  1. Heat the oven. Preheat to 375°F / 190°C. If you are not using an oven-safe skillet, lightly grease a roughly 2-quart / 2-litre baking dish.
  2. Cook the bacon, if using. Cook the bacon in the skillet over medium heat until crisp. Transfer it to a paper-towel-lined plate and crumble when cool enough to handle. Reserve up to 1 tablespoon of the rendered fat for the corn if you like; otherwise discard the fat safely and use neutral oil.
  3. Cook the corn and jalapeños. Heat the oil or reserved bacon fat over medium-high. Add the corn and chopped jalapeños and cook for 4–6 minutes, stirring occasionally, until the corn is hot, the pan no longer looks watery and a few kernels begin turning golden. Fresh kernels should still look plump rather than wrinkled. Remove the skillet from the heat while you mix the dairy.
Close-up of sautéed yellow corn and chopped green jalapeño in a cast-iron skillet with a dry pan surface and a few lightly golden kernels.
A few golden spots are enough. Once the skillet is dry, chasing deeper color starts trading the plump corn bite for a drier, more roasted texture.

Build the Creamy Dip

  1. Mix the creamy base. Press the softened cream cheese with a spatula; it should yield easily without looking shiny or melted. Stir in the sour cream, then mix in about two-thirds of both shredded cheeses, the garlic powder, onion powder, black pepper and salt.
  2. Fold everything together. Add the warm corn and jalapeños, about two-thirds of the crumbled bacon if using and half of the green onions. Fold until the kernels are evenly coated. Taste before deciding whether it needs more salt.
Thick creamy corn and jalapeño mixture being lifted with a spatula, with many yellow corn kernels remaining clearly visible throughout.
Drag a spatula through the mixture: it should leave a clear track but still move easily. That middle ground keeps the kernels suspended while the finished corn dip stays scoopable.

Fill, Bake and Rest

  1. Fill the pan. Spread the mixture evenly in the skillet or prepared baking dish. Scatter over the remaining shredded cheese. For the crunchy version, combine the panko and melted butter and sprinkle that over the top.
Overhead view of unbaked jalapeño corn dip spread evenly in a baking vessel and topped with shredded cheese.
Let some corn and jalapeño remain visible through the cheese. If the surface disappears beneath a thick cheese blanket, you lose one of the easiest visual checks while the dip bakes.
  1. Bake uncovered. Bake for 18–22 minutes, until the edges are gently bubbling and the center is hot and creamy. Yellow kernels and green flecks of jalapeño should still be visible through the melted cheese. If the top browns before the middle is ready, tent it loosely with foil. If the center is ready but the surface still looks pale, broil for 1–2 minutes only in broiler-safe cookware, watching continuously.
  2. Rest and serve. Leave the dip alone for 5–10 minutes. Scatter over the reserved bacon and green onions. Straight from the oven it will be looser; after a few minutes the cheese settles more closely around the kernels and the texture becomes easier to serve.

Recipe Notes

  • For a bacon-free batch: leave the bacon out and taste the salt again before baking; fire-roasted corn is especially good here.
  • For a smaller, deeper dish: expect a longer bake. A wider, shallower dish heats faster and exposes more cheese to browning.
  • To make it ahead: assemble, cover and refrigerate for up to one day. Keep any crisp topping separate until baking.

Fresh vs Frozen vs Canned Corn: Which Is Best?

Fresh corn gives the clearest bite, frozen corn is the easiest year-round choice, and well-drained canned corn is the quickest pantry option. All three work well here; the target stays at about 400 g / 14 oz prepared kernels.

Swipe or scroll sideways to see the full table.

Corn Amount for this recipe Prep What you get
Fresh About 400 g kernels; roughly 4–5 medium ears Cut from the cob and sauté until hot with a few golden spots Firm, juicy kernels and the freshest corn flavor
Frozen 400 g / 14 oz Remove loose ice or pooled thawing water, then sauté Excellent year-round texture with little prep
Canned About 400 g / 14 oz after draining Drain thoroughly before weighing, then sauté Softer kernels and the easiest pantry route
Fire-roasted 400 g / 14 oz prepared kernels Drain or thaw as needed, then heat through A smokier dip with almost no extra work
Four-part comparison of fresh corn kernels, frozen corn, drained canned corn and fire-roasted corn.
Fresh, frozen and canned corn mainly change moisture and bite; fire-roasted corn also changes the flavor. That smoky edge is especially useful when you are making the dip without bacon.

Fresh Corn

You want the kernels to keep that tiny burst when you bite them. Cook until the raw starchiness fades and a few spots turn golden, but stop while the corn still looks plump and juicy. That juicy contrast against the creamy cheese is the reason this tastes like corn dip rather than ordinary jalapeño popper dip with a handful of kernels mixed in.

Frozen Corn

Loose kernels with only a little frost can go straight into the skillet. A solid icy clump or a puddle of thawing water needs a little attention first.

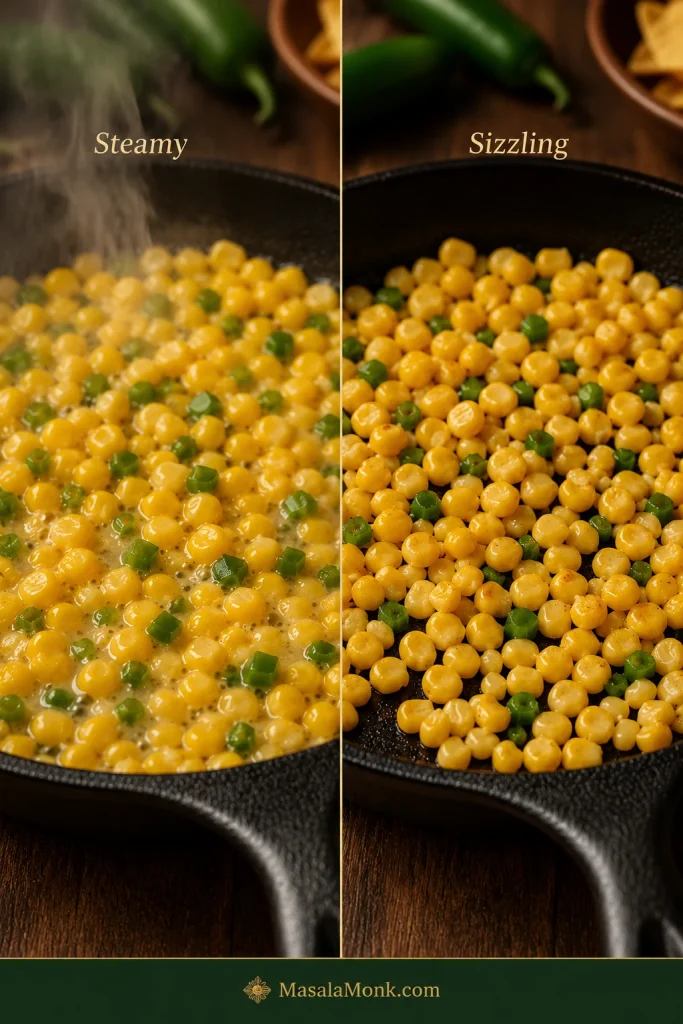
Listen as it cooks. The pan starts damp and steamy, then shifts toward a clearer sizzle. That sound change is often more useful than watching the clock.

Side-by-side skillet comparison showing wet, steamy corn and jalapeño early in cooking versus a drier sizzling stage with a few golden kernels.
Sound works as a second moisture gauge when color is hard to judge: loose water muffles the pan, while a cleaner sizzle tells you evaporation is nearly finished.

Canned Corn

Measure the drained kernels, not the weight of corn plus packing liquid. Can sizes and drained yields vary enough that the scale is more dependable than promising every kitchen will need exactly two cans.

Two-step guide showing canned corn draining in a fine-mesh strainer and then being weighed after draining, with the scale reading 400 grams.
Can sizes vary, so count the prepared corn rather than the cans: after draining, the target for this recipe is about 400 g / 14 oz of kernels.

The same moisture lesson matters in other creamy vegetable dips too. In this spinach artichoke dip, loose vegetable water is much easier to deal with before it reaches the creamy base.

How to Control Jalapeño Flavor and Heat

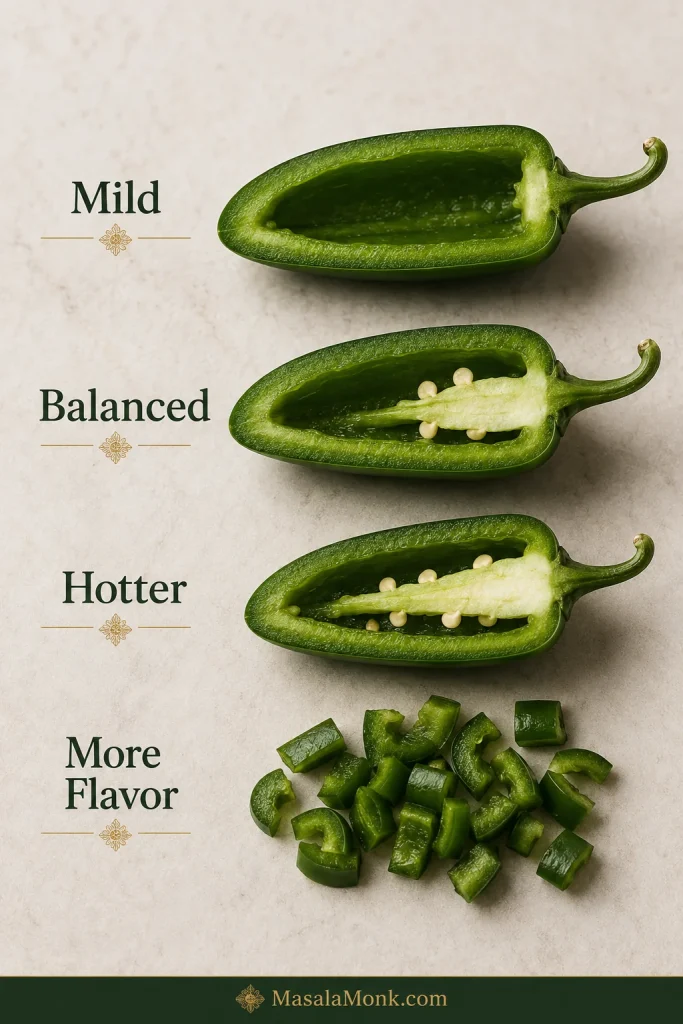
For a milder dip, trim most of the pale inner ribs from all three jalapeños. For a balanced starting point, leave a little attached in one pepper; for a hotter batch, leave more attached.

Heat is only half the question. You may want more fresh jalapeño flavor without dramatically increasing the burn.

Why the Pale Inner Tissue Matters

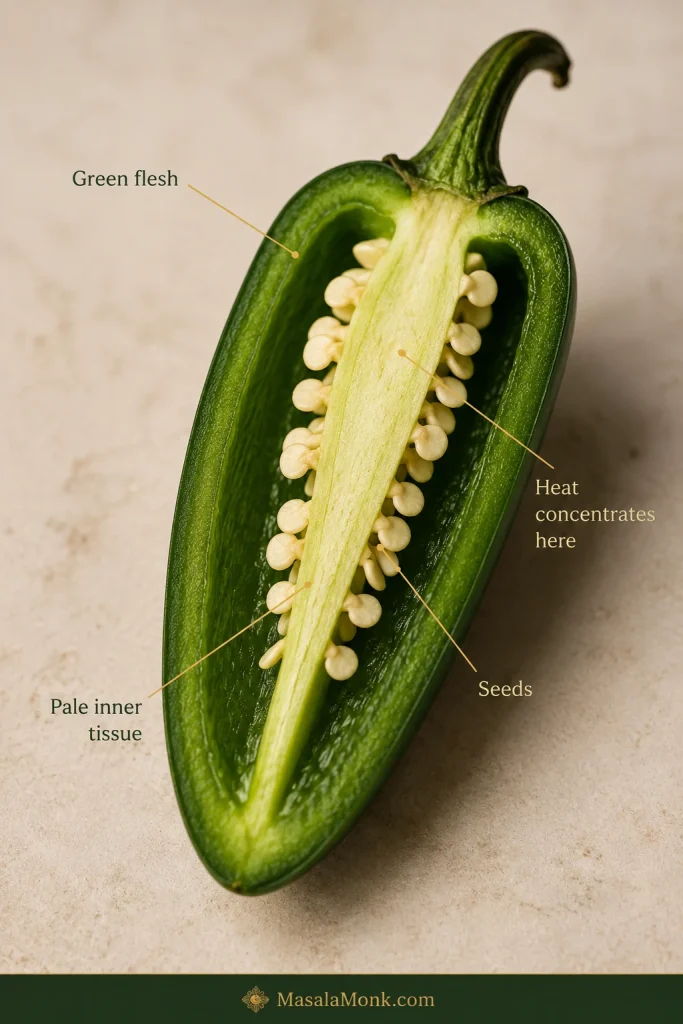
Most of a jalapeño’s heat is concentrated around the pale inner placental tissue, not produced by the seeds themselves. The seeds can still taste hot because they sit against that tissue. Individual peppers vary too, which is why three jalapeños do not guarantee exactly the same heat every time. New Mexico State University’s chile research explains that anatomy and natural variation in more detail.

Cut-open green jalapeño labeled to show green flesh, pale inner tissue and seeds, with an annotation pointing to the pale tissue as the area where heat concentrates.
A jalapeño can be nearly seedless and still carry plenty of heat if much of the pale inner tissue remains. Conversely, a few loose seeds alone tell you very little about how hot the pepper will taste.

In kitchen terms, trimming the pale inner ribs and attached tissue changes the heat far more reliably than chasing every loose seed around the cutting board.

Control Heat Without Losing Jalapeño Flavor

Swipe or scroll sideways to see the full table.

You want… What to do What changes
Mild Trim away most of the pale inner ribs from all three peppers Fresh green-pepper character with much less heat
Balanced starting point Trim two well and leave a little inner rib attached in the third Noticeable warmth without deliberately pushing the heat
Hot Leave more of the inner ribs attached A stronger heat that builds through the bite
More jalapeño flavor, not much more heat Add more well-trimmed green flesh More fresh pepper flavor without simply turning up the burn
Tangier pepper flavor Replace part of the fresh jalapeño with well-drained pickled jalapeño More acid, salt and softness
Four-part jalapeño guide showing most inner tissue removed for mild, a little retained for balanced, more retained for hotter, and additional trimmed green flesh for more pepper flavor.
If a batch tastes hot but oddly not very jalapeño-forward, more inner rib is not the answer. Instead, add more well-trimmed green flesh for stronger fresh-pepper character without deliberately adding more burn.

When the balance is right, the jalapeño shows up before the heat does: fresh and green at first, then warmer as you finish the bite.

A hotter batch is especially good beside this cold cucumber salad, which gives the table something crisp and vinegary between rich, peppery bites.

Fresh or Pickled Jalapeño?

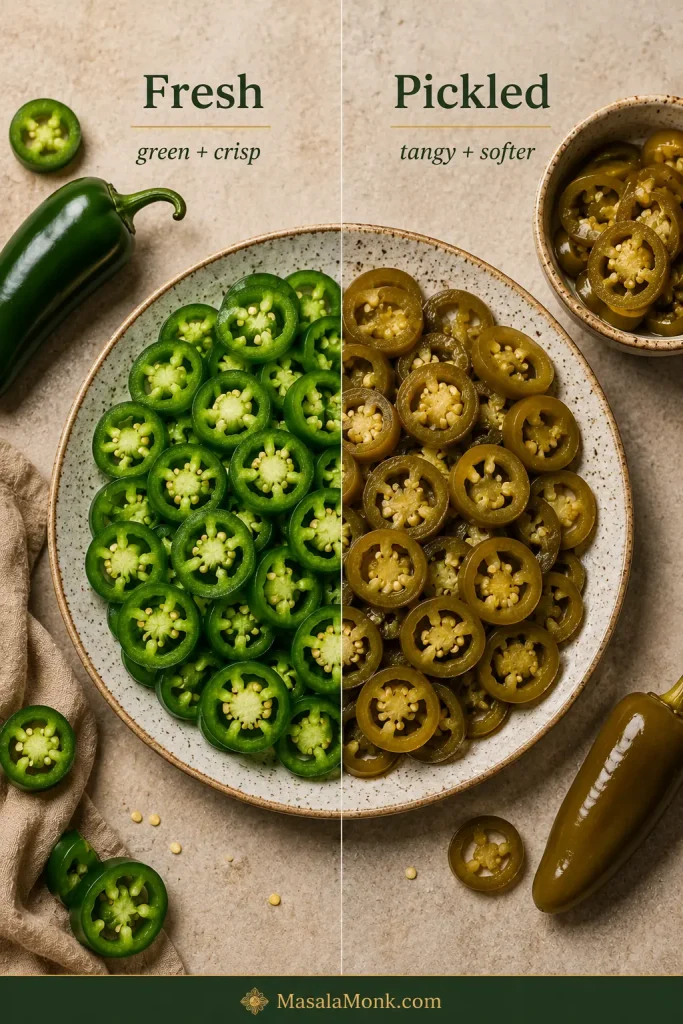
Fresh jalapeños give the cleanest green-pepper flavor and a little bite. Pickled jalapeños bring more acidity, salt and a softer texture, so drain them before measuring. Using mostly fresh pepper with a smaller amount of pickled jalapeño gives you both green flavor and a brighter tang.

Comparison of bright fresh green jalapeño slices beside softer olive-green drained pickled jalapeño slices.
Pickled jalapeño softens into the creamy base more readily, while fresh pieces keep more bite and definition. That texture difference matters as much as the extra tang.

Handling hot peppers? Avoid touching your eyes or face while chopping. Wash your knife, board and hands well afterward; gloves are useful if chile oils tend to irritate your skin.

Why the Creamy Base Works

Cream Cheese, Sour Cream and the Right Consistency

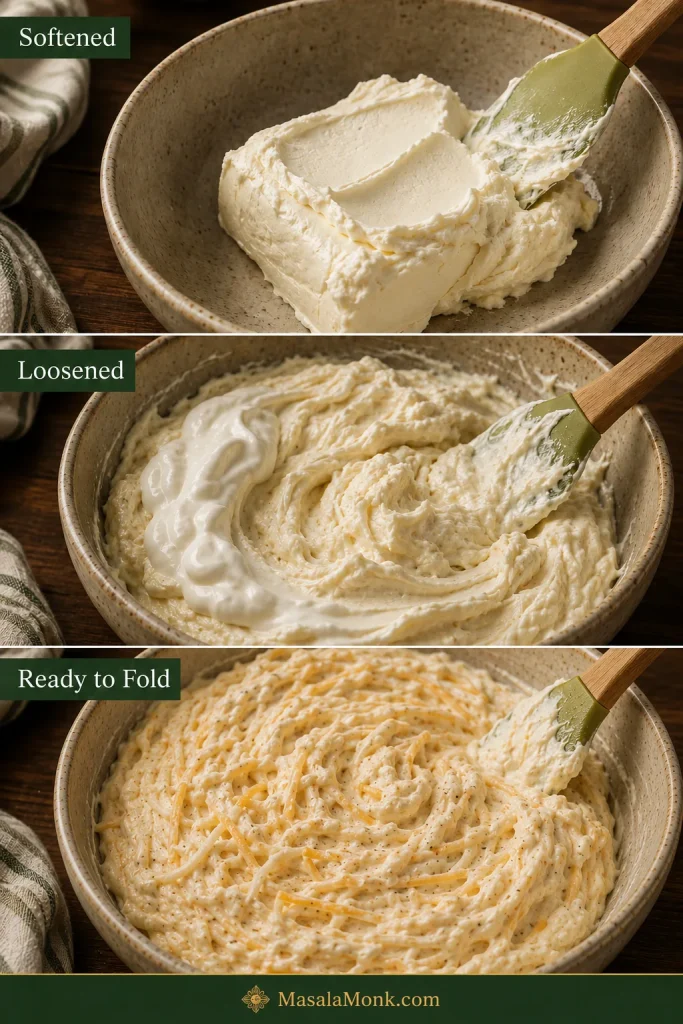
One 227 g / 8 oz block of cream cheese gives the dip the tangy richness associated with jalapeño poppers without burying 400 g of corn. The ½ cup sour cream loosens the base just enough and adds another layer of tang, helping the warm dip stay pleasant to serve as the cream cheese naturally firms.

The result should feel creamy around the kernels rather than like the corn has disappeared into a bowl of melted cheese. The kernels should still taste sweet and distinct inside all that richness.

Three-stage guide showing softened cream cheese, sour cream being mixed into it, and a thick pale cheese base with shredded cheese and seasonings ready for the corn.
Look for a base that holds a soft ridge when the spatula passes through it. That gives the corn somewhere to sit rather than letting the kernels disappear into a loose cheese sauce.

Monterey Jack Melts; Cheddar Brings the Cheese Flavor

Monterey Jack or Colby Jack melts quietly into the background, while sharp cheddar brings the more noticeable cheese flavor. Freshly shredded block cheese generally melts more smoothly than heavily coated pre-shredded cheese, though bagged cheese is fine when that is what you have.

Bacon Is Here for Smoke and Crunch

Bacon is optional here. It brings smoke, salt and crisp little pieces that stand out against the creamy cheese. Stir most of it through and save a little for the top, where it has a better chance of staying crisp.

How to Make Jalapeño Popper Corn Dip: What to Look For

The timings help, but your eyes, ears and spoon tell you more.

Before the Dairy Goes In: Listen for the Sizzle

At first, especially with frozen or canned corn, the skillet may look steamy and damp. As the loose water cooks away, the sound becomes a clearer sizzle. A few kernels will catch golden spots, the corn will smell sweeter and the jalapeño will smell less raw.

Stop there. You want hot corn with some bite left, not dried-out kernels.

Before and During Baking

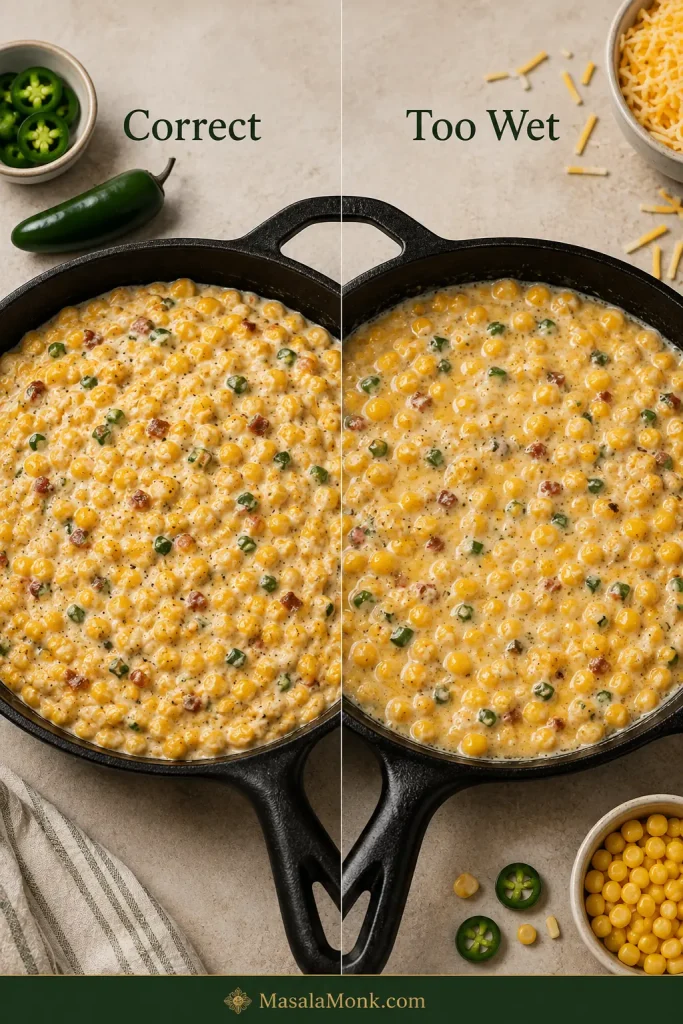
Before it goes into the oven, the mixture should hold kernels throughout but still spread without wrestling the spatula. A little softness is fine. A genuinely soupy mixture needs attention before baking.

Side-by-side comparison of a thick corn-rich pre-bake dip with no pooled liquid and a looser mixture with visible liquid collecting around it.
Gloss from the dairy is normal; free liquid is the warning. Look for actual pooling around or between the kernels before deciding the pre-bake mixture is too wet.

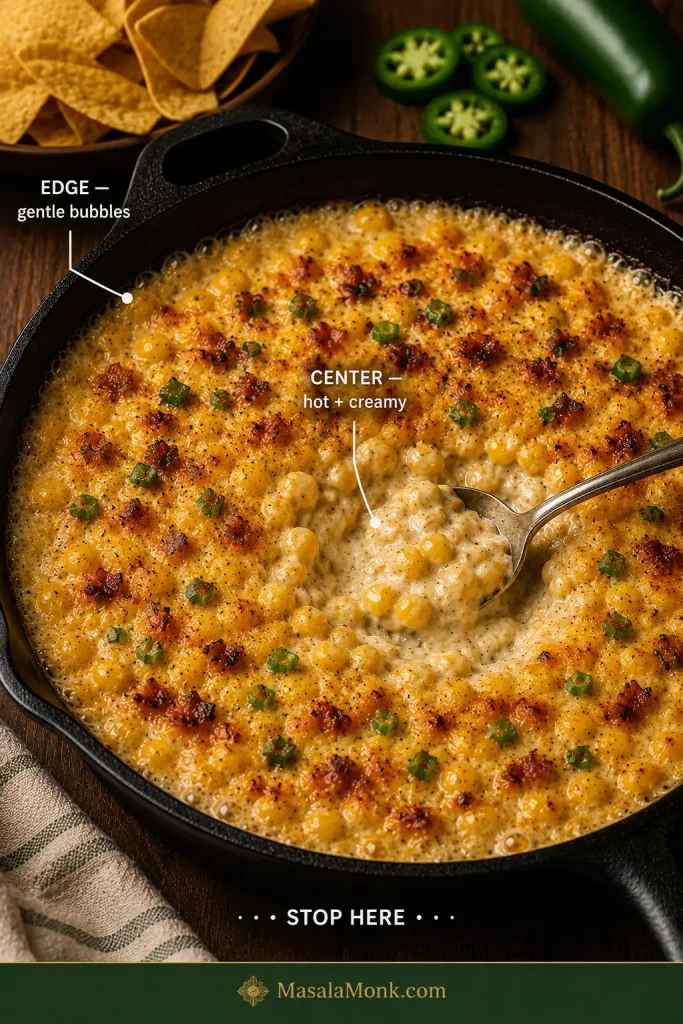
In the oven, watch the edge and center separately. Gentle bubbles around the perimeter tell you the outside is hot. Disturb the middle with a spoon: it should feel creamy and fully heated rather than dense and cool.

The top does not need to look perfectly smooth. Yellow corn should still peek through the cheese, green jalapeño should be visible, and the skillet edge may have a few browned spots where everything met the hot pan.

Once the center is there, stop.

Baked corn dip in a cast-iron skillet with callouts identifying gentle bubbles at the edge and a spoon-revealed hot creamy center, plus a Stop here instruction.
Browning can lag behind doneness. If the center is already hot and creamy, waiting for a uniformly golden top can tighten the cheese and encourage greasy separation.

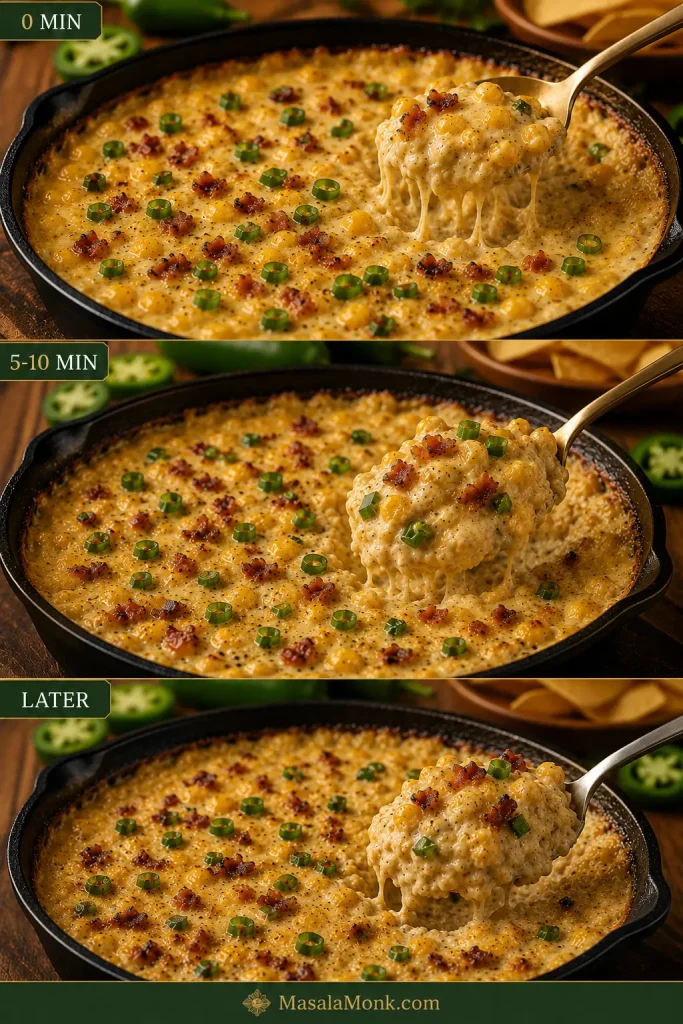
Give It Five Minutes Before You Judge It

Fresh from the oven, hot dairy and melted cheese are at their loosest. If the dip looks a little more relaxed than you expected, give it several minutes before changing anything.

As it settles, the cheese hugs the corn more closely and the serving texture gets fuller. Left on a cool table long enough, it eventually heads the other way and starts firming up.

Three-stage timeline of the same baked corn dip labeled 0 minutes, 5–10 minutes and later, showing the texture becoming progressively firmer as it rests.
Resting fixes temperature-driven looseness, not excess water. If a real puddle remains after the planned rest, waiting longer is unlikely to solve the same problem.

The useful test

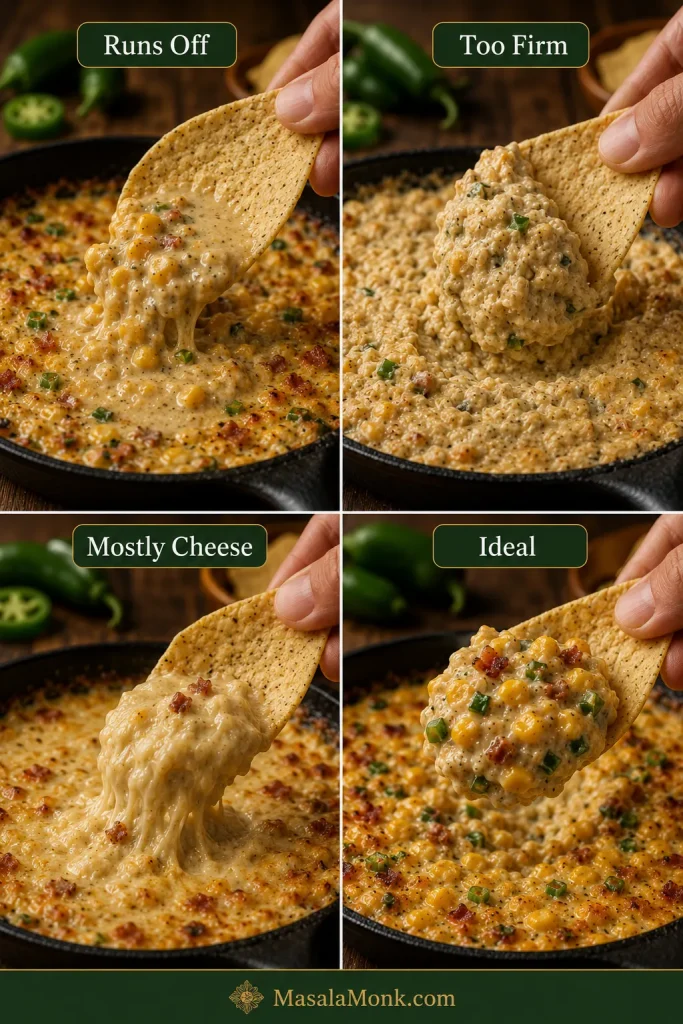
The Scoopability Test

Push a sturdy tortilla chip through the warm dip. A good scoop should bring up creamy cheese, several kernels and visible jalapeño.

  • A dip that runs straight off the chip may simply need the planned few minutes of rest.
  • A dip you have to force the chip through may have cooled too far.
  • A bite that is mostly cheese with almost no corn has lost the part that makes this corn dip.

The sweet spot is substantial but easy to scoop: the dip stays on the chip and the kernels come with it. That matters even more at a party, where the people coming back twenty minutes later deserve a good scoop too.

Four-panel scoopability comparison labeled Runs Off, Too Firm, Mostly Cheese and Ideal, using tortilla chips to show visibly different corn-dip textures.
This test separates temperature problems from balance problems: looseness or stiffness can change with resting and warming, while a scoop that is mostly cheese has lost the corn-dip ratio itself.

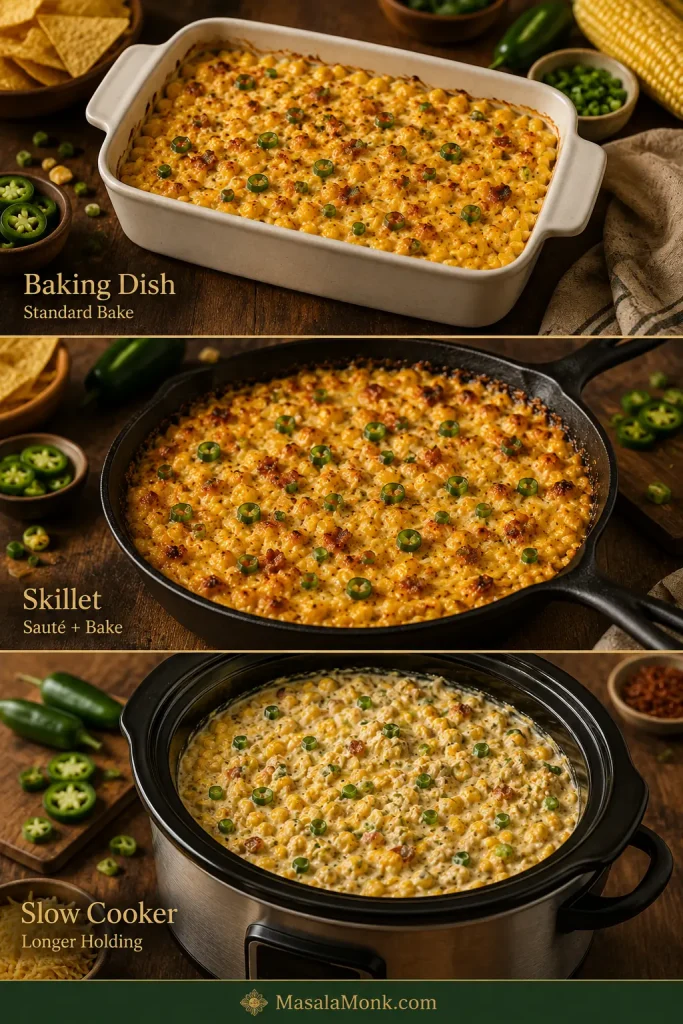
Baking Dish, Oven-Safe Skillet or Slow Cooker?

A baking dish and an oven-safe skillet both give you the oven-baked version; the difference is mostly cleanup and presentation. The slow cooker earns its place when the dip needs to stay hot for a longer gathering.

Swipe or scroll sideways to see the full table.

Setup Best for Main advantage Watch for
Baking dish The standard version Easy assembly and even oven heating A deeper dish can take longer than a wide, shallow one
Oven-safe skillet Fewer dishes Sauté and bake in the same pan Take the skillet off the burner before the dairy goes back in
Slow cooker Parties and potlucks Easy hot holding after the dip is ready Overheated edges and gradual thickening during a long hold
Three-way comparison of jalapeño corn dip in a ceramic baking dish, cast-iron skillet and slow cooker; the baked versions are browned while the slow-cooker version remains creamy.
The slow cooker is the outlier: choose it for a long, creamy serving window rather than expecting the browned surface of an oven-baked dip.

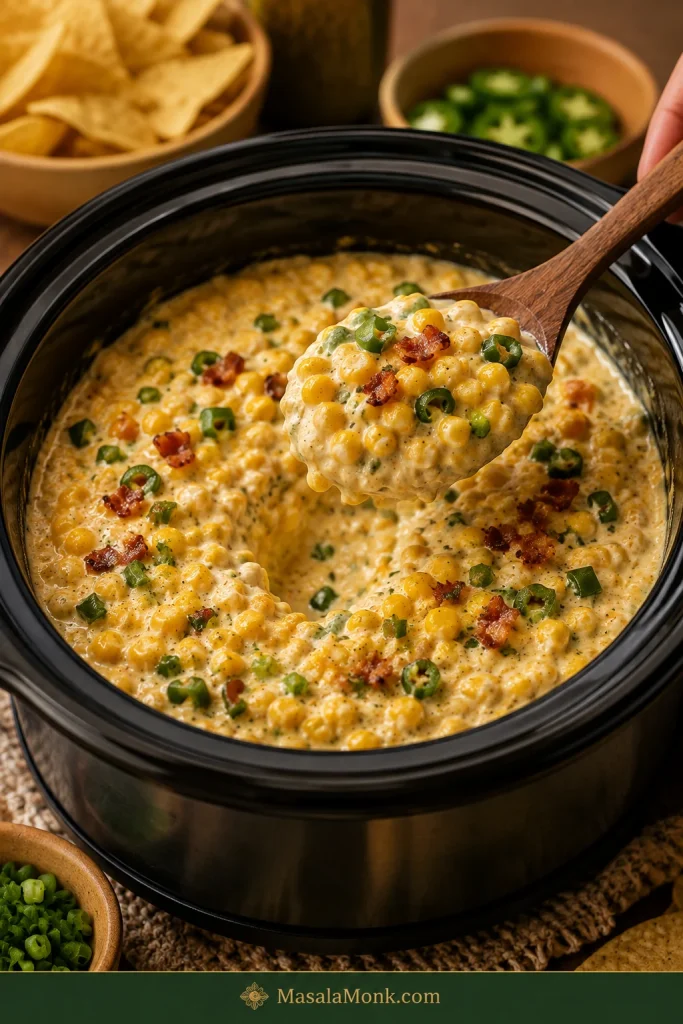
Slow Cooker: Best for a Longer Party

Use roughly a 3- to 4-quart slow cooker. Cook the corn and jalapeños first if possible, then combine them with the cream cheese, sour cream, shredded cheese, seasonings and optional cooked, crumbled bacon.

Cook on LOW and start checking around 1½ hours. Stir once the cheese has softened enough to combine, then continue until the center is thoroughly hot and creamy. Slow cookers vary enough that those cues matter more than a promised finish time.

Once hot, switch to WARM and stir periodically. Crockpot buffalo chicken dip gives the table something tangier alongside it when you want a second warm dip.

Open slow cooker containing creamy corn and jalapeño dip with visible stir marks, yellow kernels and green pepper pieces, without a browned crust.
A spoon trail should slowly fill back in rather than leaving a dry, crusted channel. Stir periodically so the hotter edges do not thicken long before the center does.

Melty Cheese or Crunchy Jalapeño Popper Finish?

A simple layer of melted cheese gives you the easiest serving texture. Nothing else is required.

If the crisp shell of a breaded jalapeño popper is part of the appeal, mix 25 g / ⅓ cup panko with 14 g / 1 tablespoon melted butter and scatter it over the cheese before baking.

Crushed tortilla chips work too. Add them closer to the end so they keep more crunch.

Three versions of baked corn dip labeled Melty, Panko and Crushed-Chip, showing melted cheese, golden breadcrumbs and irregular broken tortilla-chip toppings.
Panko gives a fine, even crunch; crushed tortilla chips give larger salty shards but soften faster. That makes the crushed-chip finish best when it goes on late.

If you would rather keep the creamy filling inside the peppers, these baked jalapeño poppers give you that crisp-edged, cheesy bite in a more traditional form.

Make Ahead, Transport and Keep Warm

A hot dip earns its place at a party when most of the work happens before people walk through the door. Ideally, you are slicing green onions or opening chips when the doorbell rings—not standing over the stove trying to rescue the texture.

Make It Up to a Day Ahead

Cook the bacon, corn and jalapeños, assemble the dip in its baking dish, cover and refrigerate for up to one day. Keep panko, crushed chips, reserved bacon and fresh green onion separate so they stay crisp and bright.

An easy cheese ball can handle the cold-appetizer slot while this dip waits for its turn in the oven.

Baking From Refrigerator-Cold

A refrigerated batch will need more time than one you have just assembled. Start checking about 5 minutes later, then follow the bubbling edges and hot, creamy center rather than adding a fixed number of extra minutes. Deep, very cold dishes can take longer.

Using glass bakeware? Follow the manufacturer’s instructions for moving it from refrigerator temperature into a hot oven; avoid sudden temperature changes unless the manufacturer specifically says the dish is designed for them.

Taking It Somewhere Else

An oven at the destination makes life easiest: carry the assembled dip cold, keep it properly chilled and bake it when you arrive.

For food that needs to travel hot, use a suitable insulated hot-food carrier and check that it stays at a safe temperature. At the destination, a plugged-in, preheated slow cooker can take over the hot-holding job.

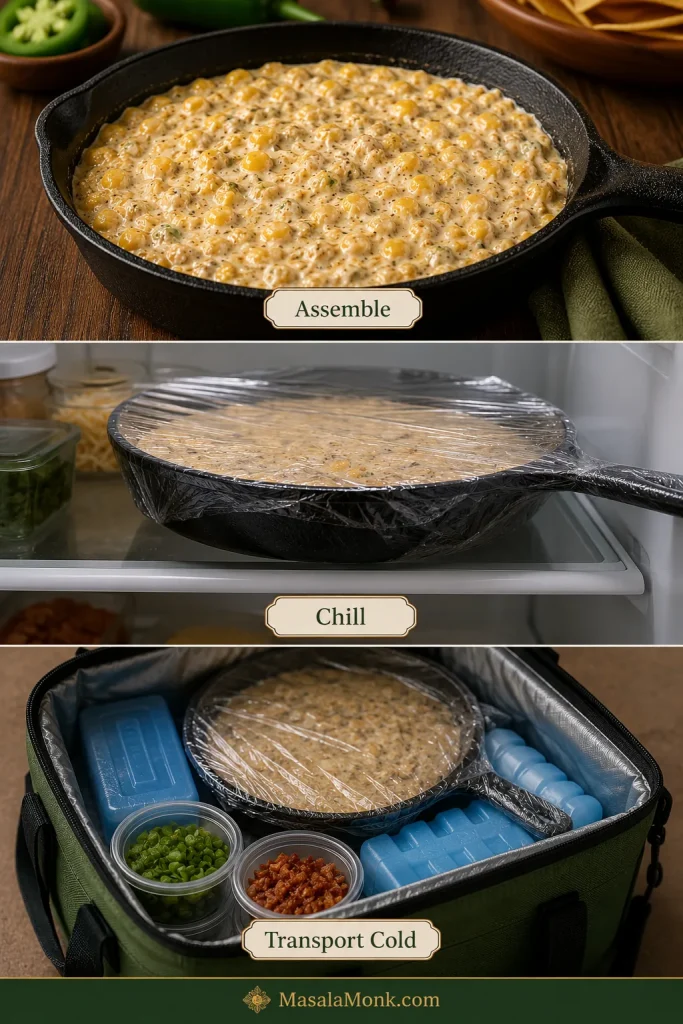
Three-stage guide showing an assembled corn dip, the covered skillet chilling in a refrigerator, and the covered dip packed in an insulated cooler with blue ice packs and separate garnish containers.
Pack garnishes and crisp toppings separately from the chilled dip. The carrier protects temperature; keeping those finishing pieces apart protects their crunch and freshness.

Keep It Safely Hot

Keeping it out for a long party?

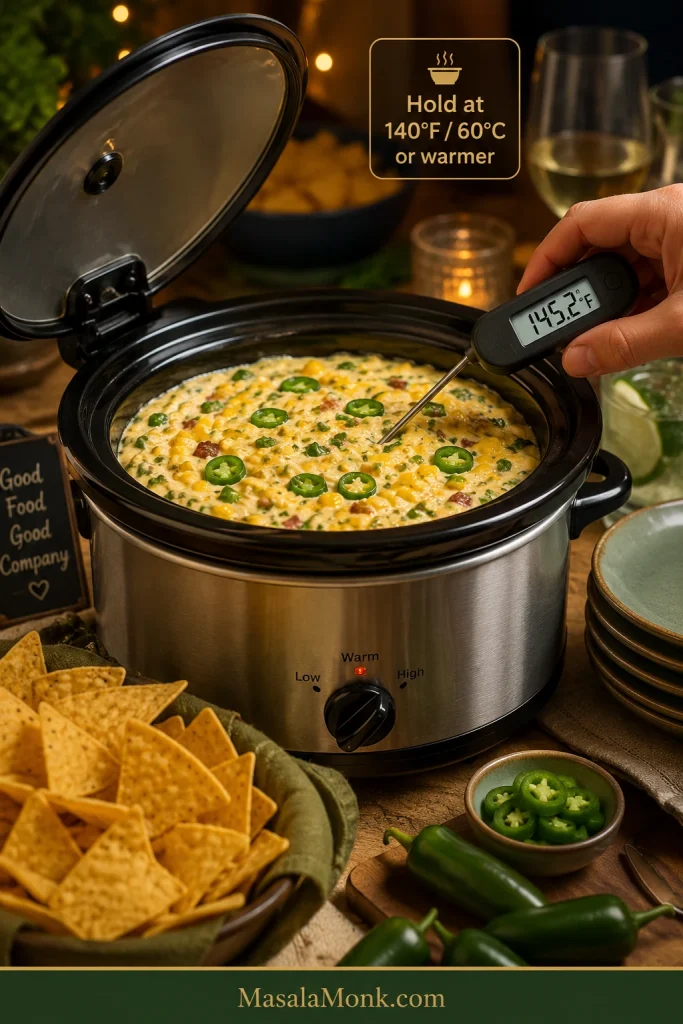
Keep hot dip at 140°F / 60°C or warmer. A slow cooker or warmer can help, but the word Warm on the control is not a temperature reading, so use a food thermometer when the dip will be sitting for a while.

Slow cooker filled with creamy corn dip at a party table while a digital probe thermometer in the dip reads 145.2 degrees Fahrenheit; text says to hold at 140°F or 60°C or warmer.
For a long serving window, stir periodically and recheck the dip’s temperature. The slow-cooker dial tells you the appliance setting; the thermometer tells you what is happening in the dip.

If the dip is not being kept safely hot, do not leave it at room temperature for more than 2 hours; that drops to 1 hour above 90°F / 32°C. The same timing matters before leftovers return to the refrigerator. See the USDA food-safety guidance for the underlying holding and leftover recommendations.

For a second dip on a long grazing table, I would go cold rather than add another hot-holding job. A 7 layer dip gives you beans, salsa, sour cream and fresh toppings beside this hot skillet.

Reheating Leftovers for Hot Holding

Using yesterday’s dip in a slow cooker? Reheat the refrigerated dip first in the oven, microwave or on the stovetop until the center reaches 165°F / 74°C. Then transfer it to a preheated slow cooker for safe hot holding.

Jalapeño Popper Corn Dip Troubleshooting

If the texture or heat is not where you wanted it, the fix is usually simple. Most problems come back to water, temperature, fat or pepper balance.

Texture and Consistency Problems

Swipe or scroll sideways to see the full troubleshooting table.

Problem Likely cause Fix now Next time
Watery Wet canned/frozen corn or another loose addition Keep it uncovered and hot briefly, then stir Drain well and sauté until the pan no longer looks wet
Loose straight from oven The dairy and cheese are extremely hot Rest 5–10 minutes first Judge the texture after the short rest
Too thick The dip has cooled or the base is overly firm Warm and stir first. If a full batch is still too thick once hot, mix in 1 tablespoon sour cream or milk and check again. Keep it warm during a longer serving window
Greasy Excess bacon fat, too much cheese or prolonged heat Blot obvious surface fat and stir gently Drain bacon well and stop baking once the center is hot
Grainy Overheated cheese or a less-smooth melting cheese Lower the heat and stir gently Use freshly shredded melting cheese and avoid extended high heat
Chips keep breaking The dip has cooled too far or the chips are too delicate Warm the dip and switch to sturdy chips Keep the dip warm and serve with thicker tortilla or corn chips
Six-panel troubleshooting guide comparing watery, molten-normal, too-firm or cold, greasy, grainy or separated, and correct jalapeño corn dip textures.
Read the appearance before choosing a fix: pooled liquid points toward water, visible oil toward fat separation, graininess toward broken cheese, while a glossy molten dip can still be completely normal.

Heat and Pepper Balance Problems

Problem Likely cause Fix now Next time
Bland Not enough seasoning or fresh pepper character Add salt cautiously, green onion or finely chopped jalapeño Taste the fully mixed base before baking
Too spicy Hot peppers or too much inner rib/tissue Fold in more corn and creamy base if available Trim the peppers more thoroughly
Not spicy enough Mild peppers or heavily trimmed jalapeños Add jalapeño, pickled jalapeño or hot sauce at the table Leave more inner rib attached in one pepper
Hot but not jalapeño-forward Heat is present but there is not enough green pepper flesh Add finely chopped, well-trimmed fresh jalapeño Increase the green flesh while controlling heat separately

Substitutions and Variations That Still Make Sense

  • Pickled jalapeño for some of the fresh: drain it well and expect more tang, salt and softness.
  • Pepper Jack for part of the Monterey Jack: adds more chile heat while keeping a similarly melty texture.
  • Crushed tortilla chips for panko: more corn flavor and a chunkier crunch. Add them late enough that they do not soften completely.

Those swaps still taste like the same dip. Once tomatoes, lime, cotija, salsa or a lot of extra liquid start piling in, you are heading toward a different recipe—and that is fine.

Can I add Rotel? You can, but tomatoes and green chiles pull the dish in a different direction and bring extra liquid with them. If that molten tomato-and-chile combination is what you are after, a Rotel dip is built around it from the start.

What to Serve With Jalapeño Popper Corn Dip

Do not overthink the dippers. Put out a generous bowl of sturdy tortilla chips and one fresh, crunchy option and you are basically done.

  • Thick tortilla chips: the default. They cut through a warm cheese dip far better than delicate restaurant-style ones.
  • Corn chips: compact, strong and especially useful once the dip becomes a little firmer.
  • Toasted baguette or crostini: substantial enough for a panko-topped batch.
  • Celery: cold and crisp against the rich dairy.
  • Bell pepper strips: sturdy, fresh and naturally sweet.
  • Carrot sticks: cut them thick enough to dip rather than into delicate matchsticks.
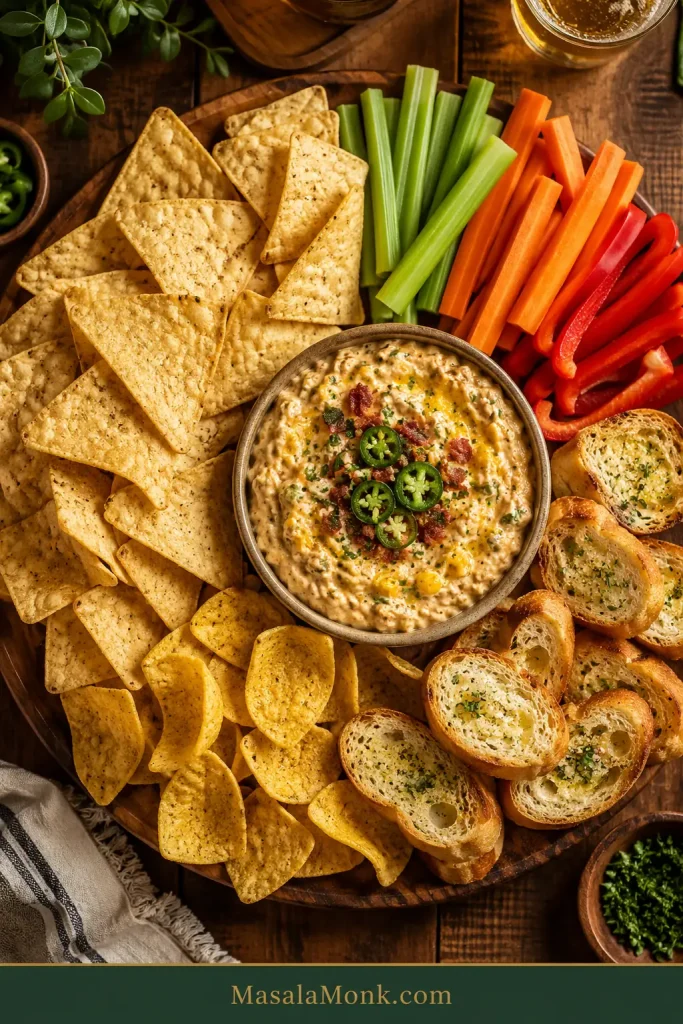
Overhead party platter with creamy jalapeño corn dip surrounded by thick tortilla chips, corn chips, celery sticks, carrot sticks, red bell pepper strips and toasted baguette slices.
As the dip cools and firms, corn chips and crostini become especially forgiving because they resist snapping better than delicate chips; crisp vegetables keep providing a fresh contrast throughout the serving window.

Air fryer chicken wings bring crackly skin and browned edges to a table that already has plenty of soft, melted cheese.

A fresh mango salsa takes things in the other direction, with lime, fruit, onion and jalapeño giving the same tortilla chips something cool and bright to pick up.

How to Store, Freeze and Reheat the Dip

Refrigerator: Refrigerate leftovers promptly in shallow covered containers and use them within 3–4 days.

Oven: Place the dip in an oven-safe dish, cover loosely and warm at about 325°F / 165°C until the center reaches 165°F / 74°C. Uncover near the end if you want to refresh the surface.

Microwave: Heat smaller portions in short bursts, stirring between rounds so the edge does not become greasy while the middle stays cold. Reheated leftovers should reach 165°F / 74°C.

If the texture needs help after reheating: stir first. If a full batch is still too thick once hot, begin with 1 tablespoon sour cream or milk. For a small bowl, start with a teaspoon and mix completely before adding more.

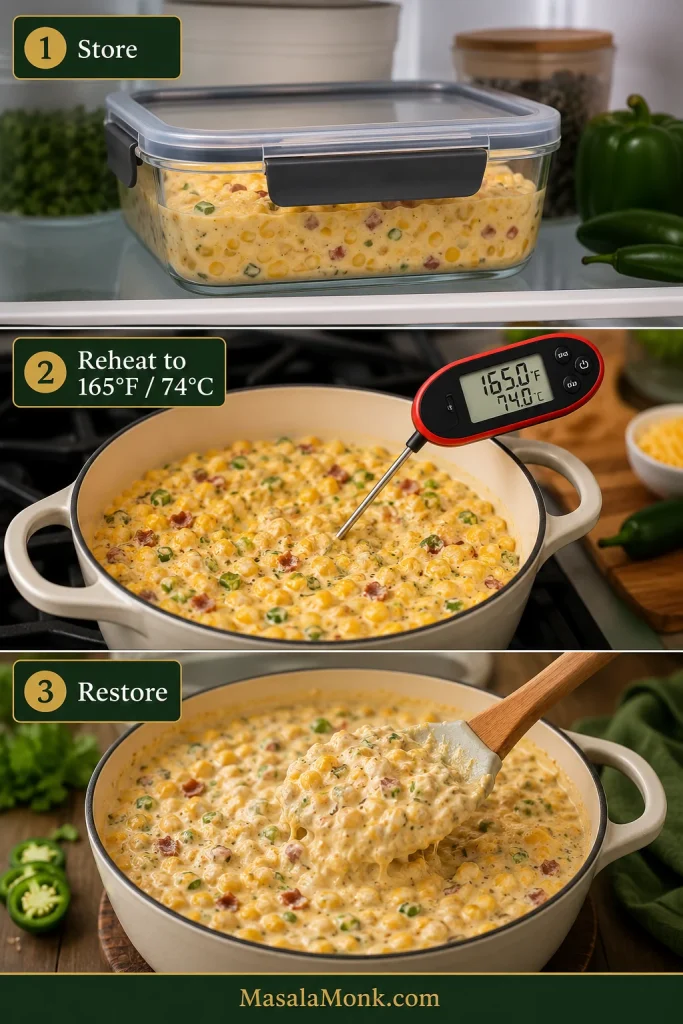
Three-step guide showing leftover corn dip in a covered glass container, reheating in a pot with a thermometer reading 165°F and 74°C, and the creamy dip being stirred after reheating.
Judge leftover texture only after reheating and stirring. A cold cream-cheese dip naturally looks firmer, so thinning it before it is fully hot can leave you with a looser dip than you intended.

Can You Freeze It?

I would not freeze this dip when the smoothest texture matters. It can be frozen, but cream cheese and sour cream may look grainier or slightly separated after freezing and thawing.

For a party, assembling the dip a day ahead and refrigerating it is the better plan. If you do freeze it, leave off the crisp topping, thaw in the refrigerator and expect some texture change after reheating.

When the First Scoop Is Right

This dip does not need the biggest possible pile of cheese to feel indulgent. It needs sweet kernels that still have a little bite, jalapeño that tastes green and lively, and enough creamy cheese to hold everything together without turning the bowl into one heavy, uniform mouthful.

When those pieces line up, you notice it immediately: corn in every scoop, jalapeño before the heat, browned cheese around the edge and little crisp bits of bacon or panko against the creamy center. Give it a few quiet minutes out of the oven, scatter over the scallions and bring it to the table warm.

Warm baked jalapeño corn dip in a cast-iron skillet with a large scoop removed and a tortilla chip holding a creamy scoop of corn, bacon and green garnish.
The goal is not a dramatic cheese pull; it is a skillet that still gives up a clean, corn-rich scoop after the first rush at the table has passed.

And put the thicker chips out from the beginning. Nobody should have to excavate this with a broken triangle.

Posted on Leave a comment

Salt Bread Recipe (Shio Pan): Crispy-Bottomed Buttery Rolls

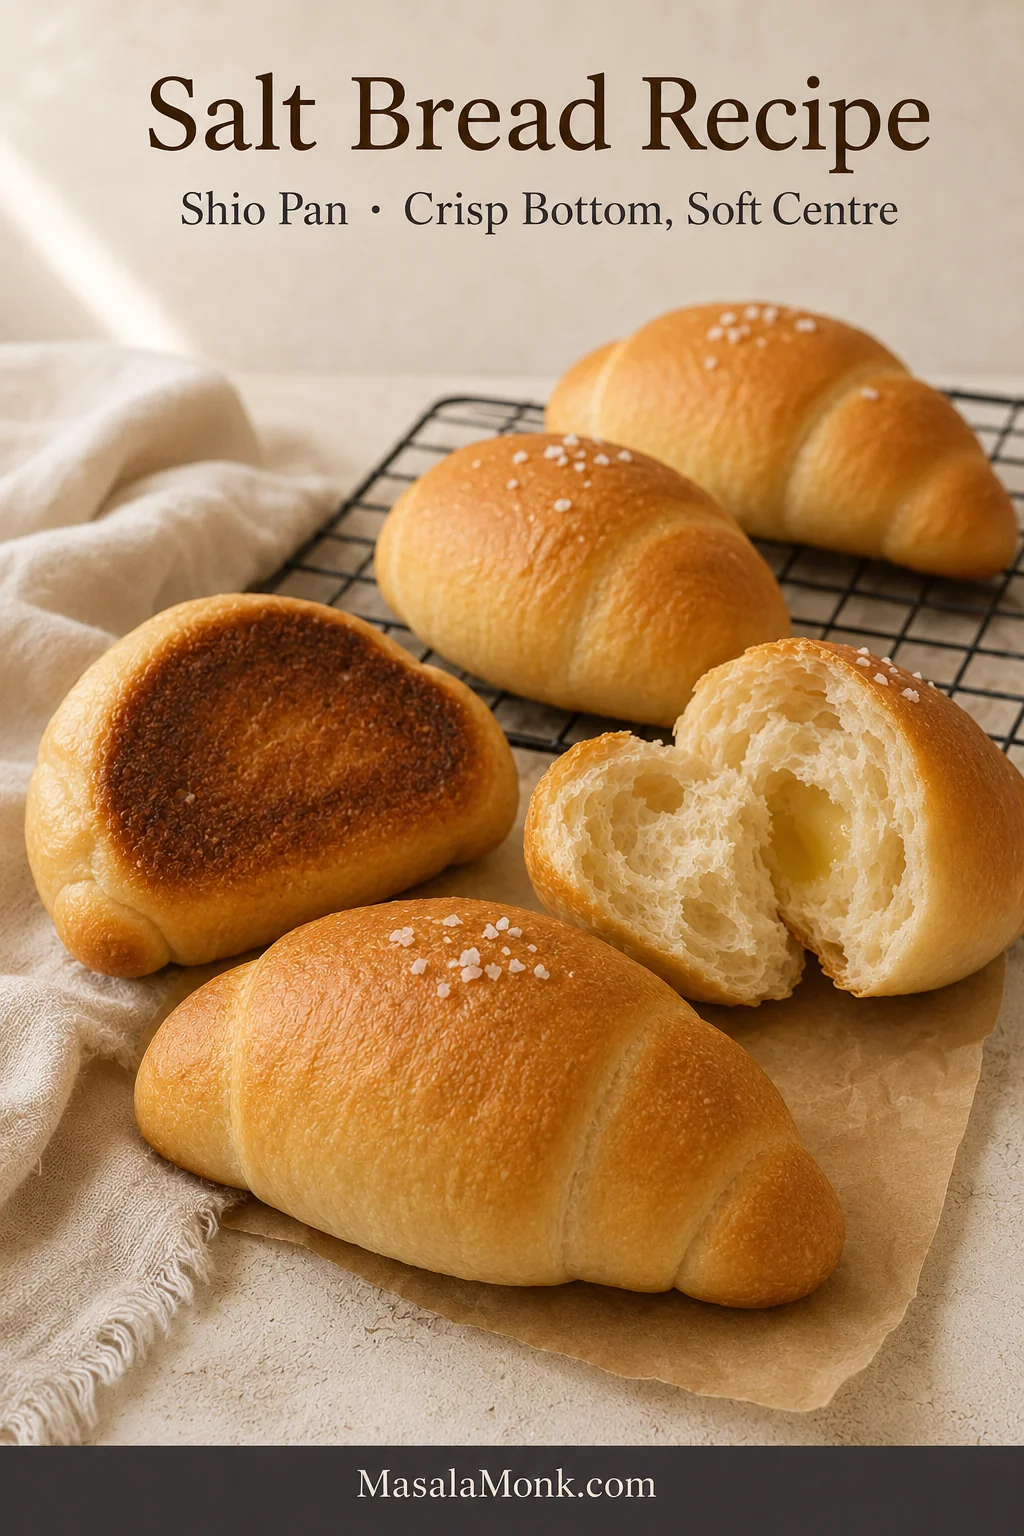
Golden crescent-shaped salt bread rolls on a cooling rack, with one roll torn open to show the crumb and another turned over to show the browned underside.

The first warm roll rarely waits for the rest to reach the table. Its underside is deep golden and lightly crisp, almost fried in the butter that escaped during baking. Pull it apart and the crumb stretches before it tears, revealing a small hollow where the cold butter used to be.

That contrast is the point of this salt bread recipe: a thin shell, a butter-crisped base, a soft middle with a gentle chew, and enough salt to sharpen the richness without turning the bread harsh.

Called shio pan in Japan and commonly known as sogeum-ppang in Korea, salt bread resembles a croissant but is much more approachable at home. It asks for patience more than advanced pastry skill: there is no lamination, and a short rest usually solves dough that resists the rolling pin.

Keep one rule in mind: the butter may soften during proofing, but it should remain wrapped inside the dough until the rolls begin rising in the oven. Once it melts, steam opens the hollow and some butter slips beneath the bread to crisp the base. A little butter on the tray is not defeat.

Salt bread feels special enough to tear open beside coffee, yet simple enough to serve with soup or turn into a small breakfast sandwich. What looks like a bakery showpiece is really an everyday pleasure: warm bread, melted butter, a little salt and an underside worth turning over to inspect.

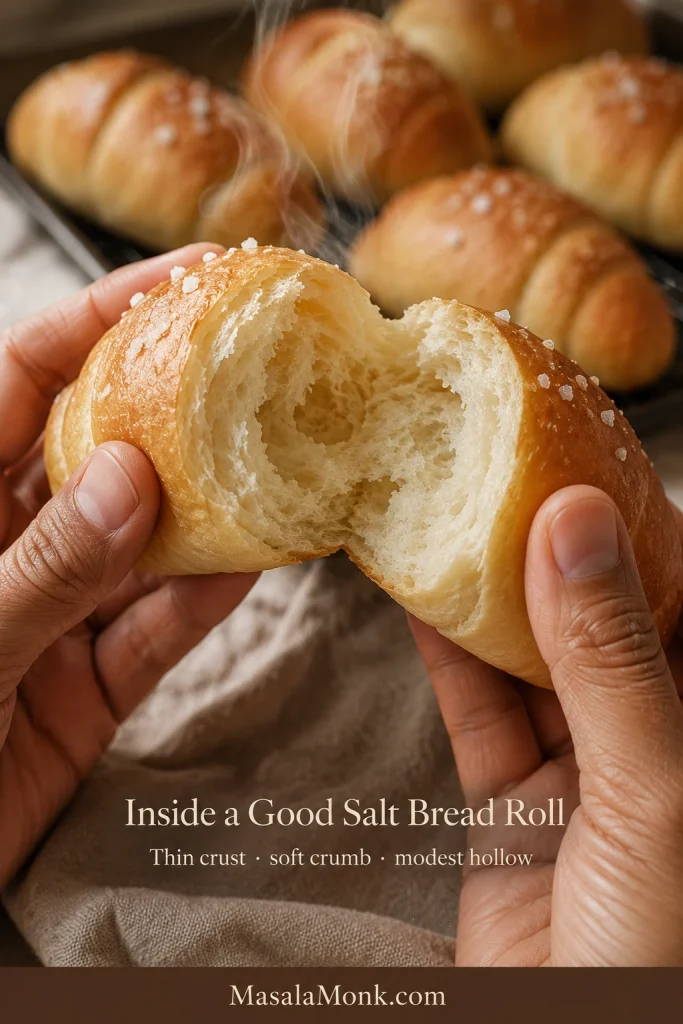
Hands holding a freshly torn salt bread roll with a pale soft crumb, thin crust and small hollow, with more rolls blurred in the background.
Once the roll is torn open, look for bread-like softness rather than croissant layers: a thin crust, pale crumb and modest butter pocket.

Start here

Make the Crisp-Bottomed Bakery Style First

This is the classic version to make first and the clearest place to learn how the dough, butter and hot tray work together before exploring softer milk-bread or no-knead variations.

  • Use 200 g water first; add the reserved 10 g only after the dough has rested and begun developing strength, and only when it still feels unusually firm.
  • Keep the final proof moderate; the rolls should become puffy without a greasy sheen or butter seeping onto the tray.
  • Lift first, butter second; let the rolls begin expanding before a substantial butter pool appears, then bake until the underside is deeply browned.

For a softer roll that stays tender longer, use a separate tangzhong- or egg-enriched version.

Most of the time is hands-off. Pay closest attention when deciding on the final water, rolling the long triangles and judging the proof; uneven first crescents and a modest hollow can still make excellent salt bread.

Make it now

Salt Bread Recipe (Shio Pan)

This eggless dough uses water and milk powder rather than fresh milk. It makes eight rolls with crisp buttered bases and soft, lightly chewy centres. Use the gram measurements for the most dependable dough; cup and spoon measures are included for convenience.

Recipe at a Glance

  • Yield: 8 rolls
  • Preparation and shaping: About 55–75 minutes, including short rests
  • Skill level: Beginner-friendly; allow time for shaping
  • First rise: About 60–90 minutes
  • Final proof: About 60–120 minutes; begin checking at 60
  • Bake: About 17–20 minutes; begin checking at 15
  • Total time: About 3¾–5½ hours

Ingredients

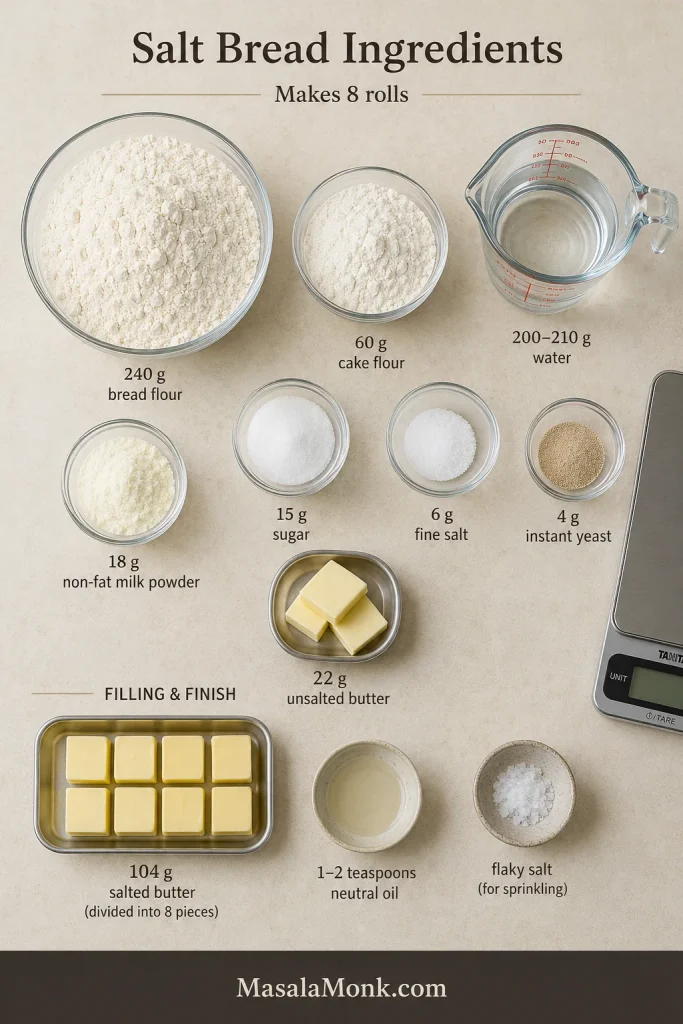
Overhead ingredient board showing bread flour, cake flour, water, milk powder, sugar, salt, instant yeast, butter, neutral oil and flaky salt.
Weigh the salt bread ingredients before mixing so the flour blend, water, dough butter and 13 g filling batons stay balanced from the start.

For the Dough

  • 240 g bread flour (about 2 cups, spooned and levelled)
  • 60 g cake flour (about ½ cup)
  • 18 g non-fat milk powder (about 2½ tablespoons)
  • 15 g granulated sugar (about 1 tablespoon plus ½ teaspoon)
  • 4 g instant yeast (about 1¼ teaspoons)
  • 6 g fine sea salt (about 1 teaspoon, depending on crystal size)
  • 200–210 g water
    Start with 200 g / 200 ml (about ¾ cup plus 1½ tablespoons); reserve the final 10 g / 10 ml (about 2 teaspoons).
  • 22 g unsalted butter, softened but not greasy (about 1½ tablespoons)

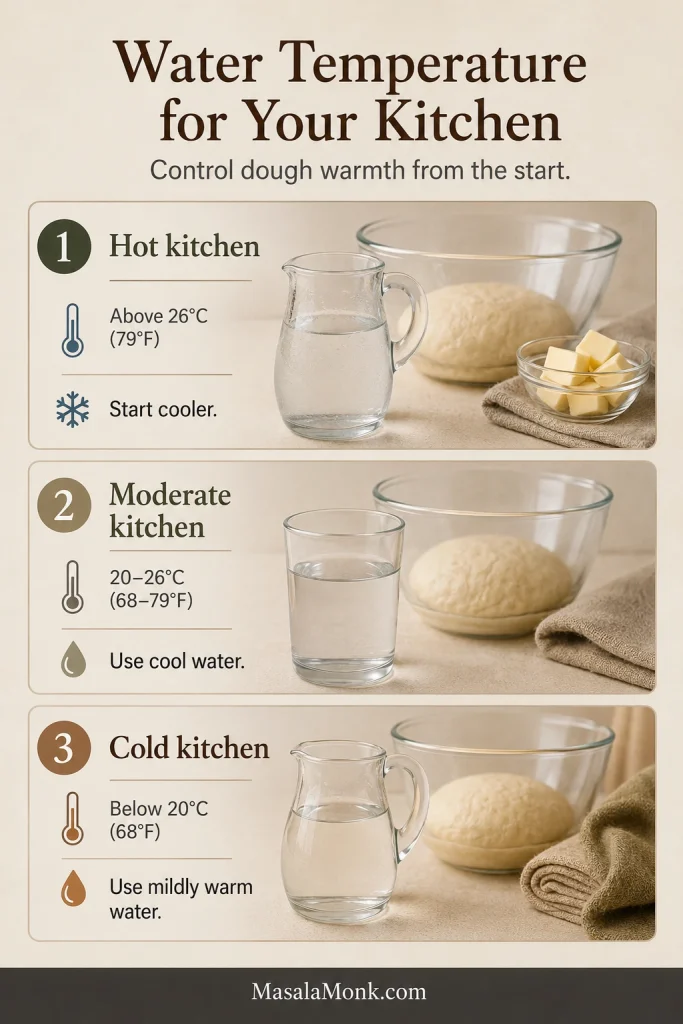
Choose the water temperature for your kitchen: chilled in a hot room, cool in a moderate room or mildly warm in a cold room. The goal is a finished dough near 24–26°C / 75–79°F.

For the Filling and Finish

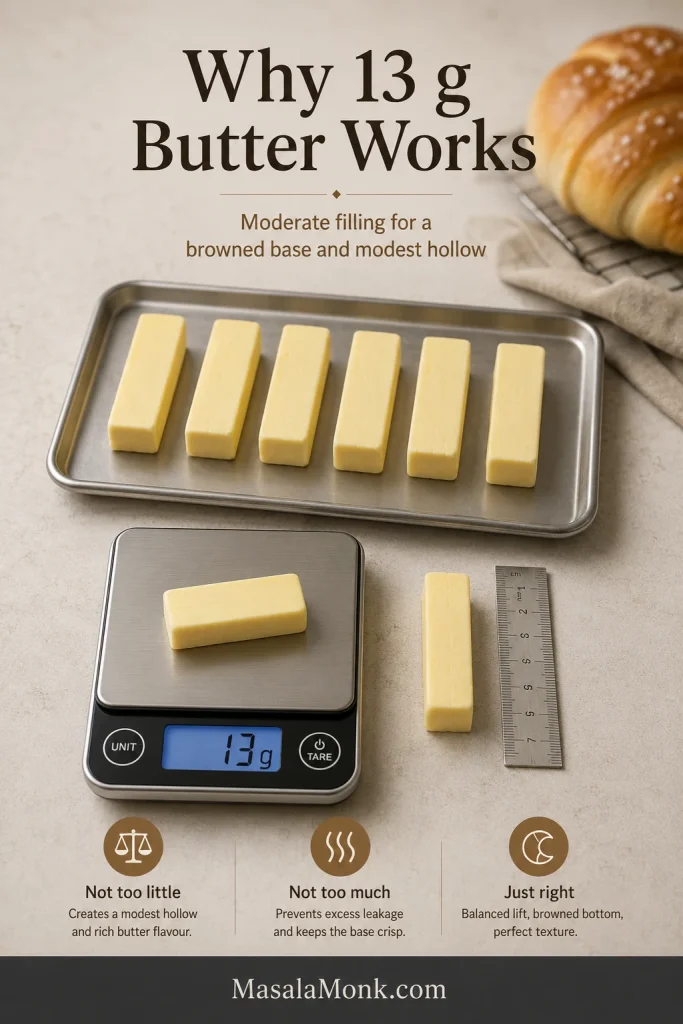
  • 104 g cold salted butter, divided into eight 13 g pieces, about 3.7 oz total
  • 1–2 teaspoons neutral oil, for the rising bowl and a bare metal baking sheet
  • Water for lightly misting the shaped rolls
  • About ½ teaspoon flaky sea salt, or enough for a restrained finish
  • Optional: butter collected from the hot tray, for brushing over the baked rolls

The 13 g filling is deliberate: it is intended to create a modest hollow and help brown the base without making cavity size the main measure of success.

Essential Equipment

  • Digital kitchen scale
  • Stand mixer with dough hook, or a clean work surface for hand kneading; the full hand method appears beneath the main instructions
  • Large bowl and cover for fermentation
  • Bench scraper or flexible dough scraper
  • Rolling pin
  • Large rimmed, light-coloured metal baking sheet, about 33 × 46 cm / 13 × 18 inches
  • Wire cooling rack

Helpful, but not required: an instant-read thermometer, oven thermometer, fine-mist spray bottle, pastry brush and ruler. Without a thermometer, the finished dough should feel cool to neutral against the inside of your wrist—not distinctly warm.

Instructions

Prepare and Mix

  1. Prepare the filling butter. Divide it into eight 13 g / 0.46 oz pieces and shape short batons roughly 4 cm / 1½ inches long. Aim for 13 g each; the batons do not need to look identical. Refrigerate until firm but not frozen hard.
Butter batons arranged on a tray, with one piece on a digital scale reading 13 g and another piece beside a ruler.
The 13 g butter baton is intentionally moderate; it encourages a small hollow and browned base without turning the tray greasy.
  1. Begin the dough. Place the bread flour, cake flour, milk powder, sugar and instant yeast in the mixer bowl. Add 200 g water at the temperature suited to your kitchen and mix on low until no dry flour remains. Cover and rest for 15 minutes.
  2. Add salt, build strength and decide on the final water. Knead with the fine salt on low to medium-low for about 5 minutes. If the dough still feels unusually firm, add the reserved water 2–3 g at a time, allowing each addition to disappear before adding more. Do not worry if the dough still looks sticky and uneven.
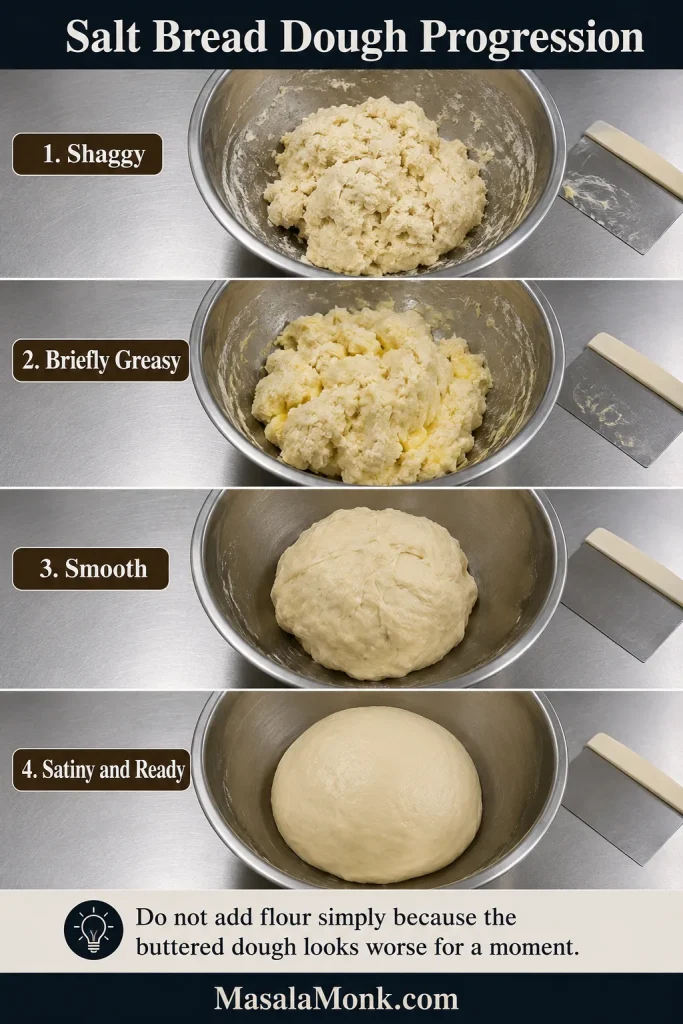
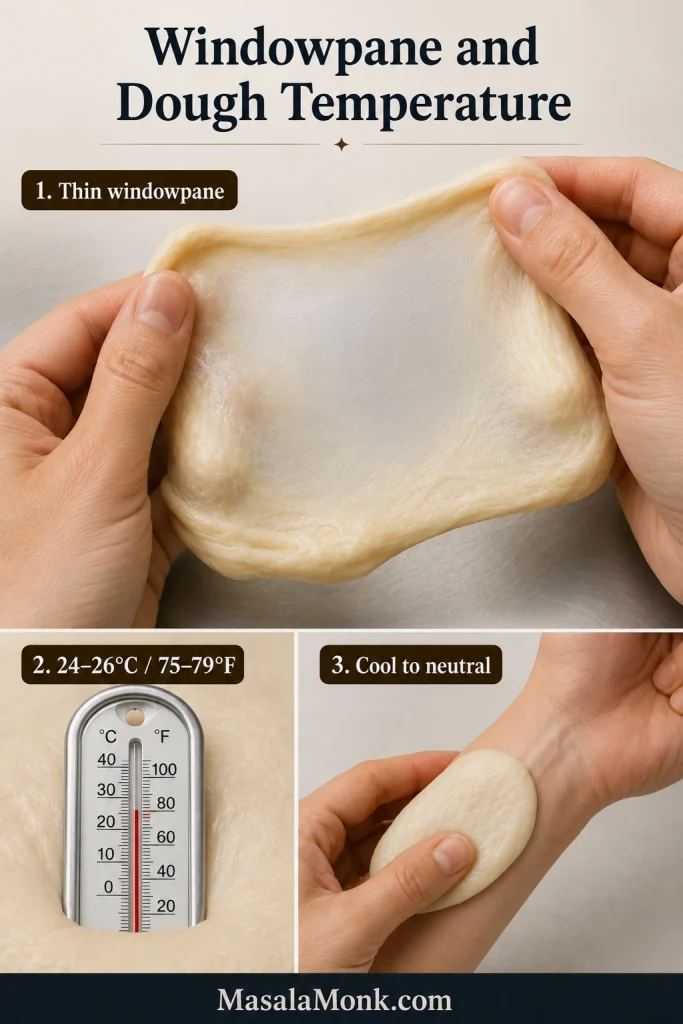
  1. Work in the dough butter. Add the softened butter gradually. The dough may briefly look greasy and broken; keep kneading instead of adding flour. Continue for 7–10 minutes, until smooth, elastic and able to pass a windowpane test: a small piece stretches into a thin film before tearing. Once it turns smooth again, the hardest mixing stage is over.
  2. Check the temperature. A useful final dough temperature is 24–26°C / 75–79°F. If it is much warmer, cover and refrigerate for 10–15 minutes. Without a thermometer, it should feel cool to neutral against your wrist, not distinctly warm.
Four-stage board showing salt bread dough changing from shaggy to briefly greasy, then smooth, then satiny and ready.
At first the dough looks shaggy; after butter is added, it may briefly look worse. Keep kneading until it turns smooth, satiny and elastic.

Rise, Divide and Shape

  1. Let the dough rise. Place it in a lightly oiled bowl, cover and leave at about 24–26°C / 75–79°F until noticeably fuller, close to doubled and lighter when you lift an edge, commonly 60–90 minutes.
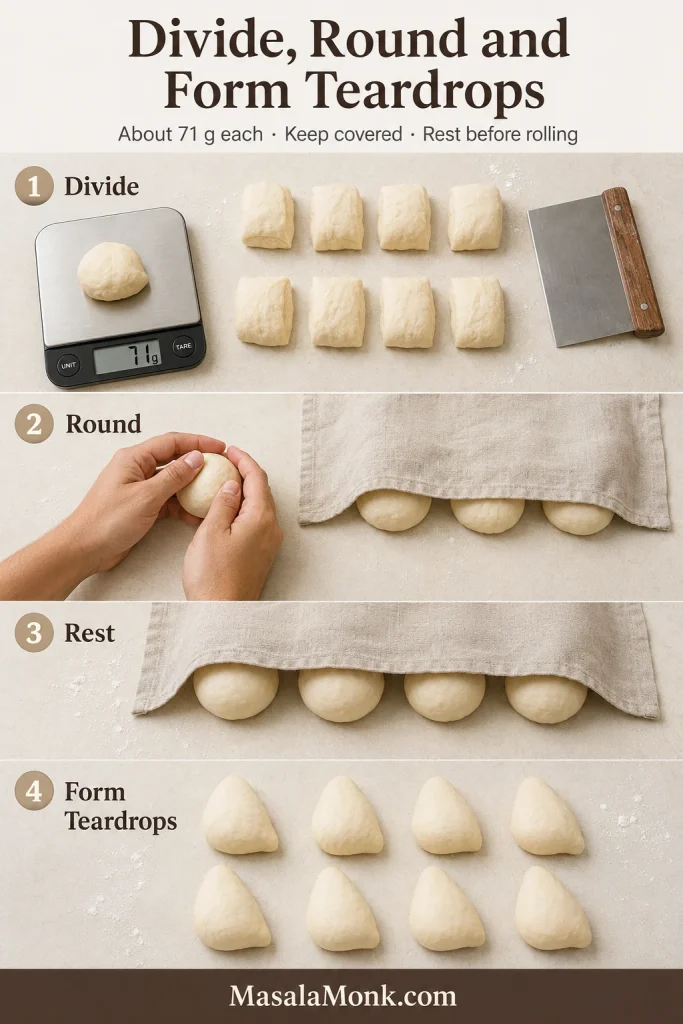
  2. Gently deflate, divide and round. Turn out the dough and press out only the largest gas pockets; do not flatten it aggressively. Divide into eight pieces of about 70–72 g / 2.5 oz, shape into balls and cover. Rest for 15 minutes, keeping pieces covered whenever they are waiting.
  1. Form tapered pieces. Roll each ball into a short carrot or teardrop about 10–12 cm / 4–5 inches long. Cover and rest another 10 minutes if the dough pulls back strongly.
Four-stage guide showing dough divided into eight portions, rounded by hand, rested under a cloth and shaped into teardrops.
After the first rise, divide evenly, keep each piece covered and shape short teardrops before rolling them into long triangles.
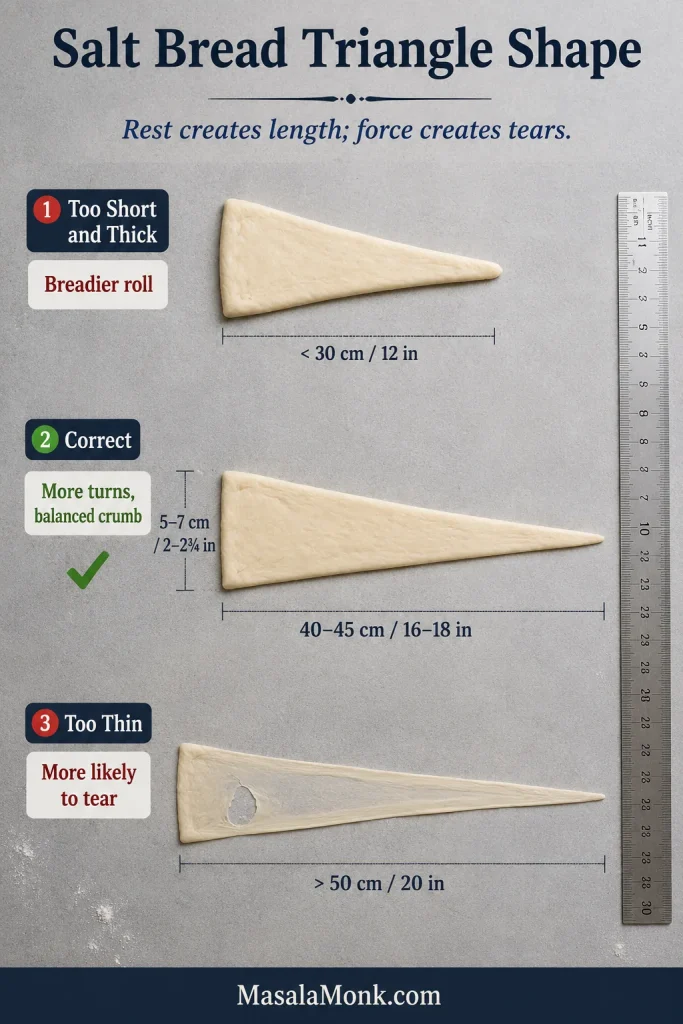
  1. Roll long triangles. Aim for 40–45 cm / 16–18 inches long and 5–7 cm / 2–2¾ inches wide at the base. Use only enough flour to prevent sticking. If the dough pulls back, cover it for five minutes before continuing.
    Why the length matters: A longer triangle creates more turns; a short, thick one produces a breadier roll, while translucent dough is more likely to tear. Rest creates length; force creates tears. Shaping usually feels easier by the third or fourth roll.
Comparison board showing a short thick dough triangle, a correct long triangle with measurements and an over-thin triangle with a tear.
For classic salt bread shaping, length matters more than force. A rested 40–45 cm triangle gives more turns without thin, tear-prone patches.
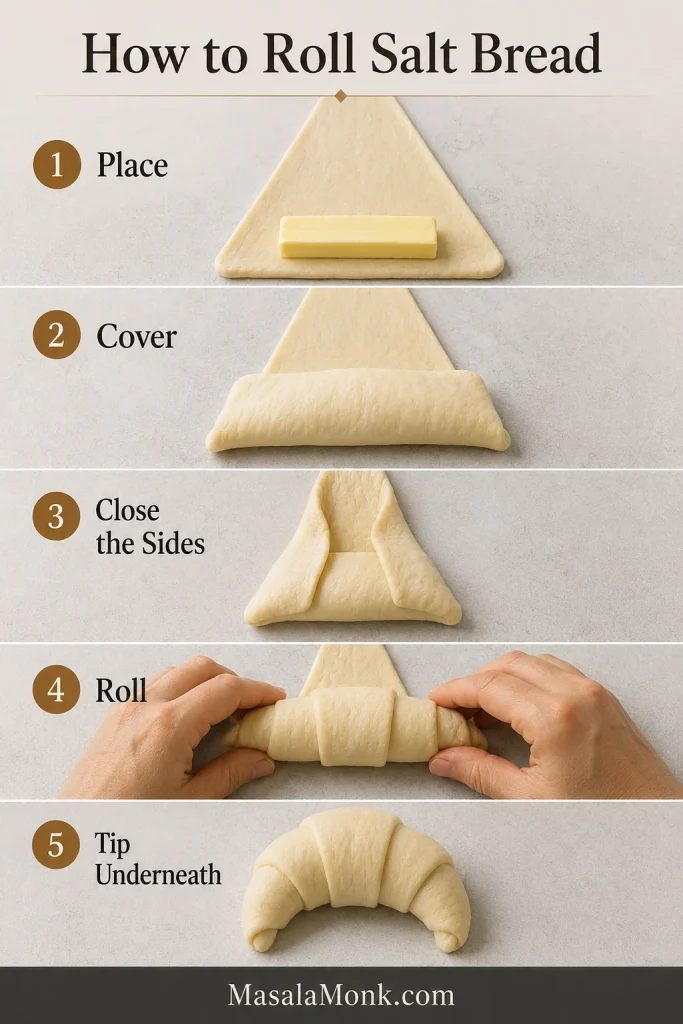
  1. Enclose the butter. Place one cold baton across the broad end, leaving enough dough at both sides to cover it. Roll forward with light tension, keep the butter centred and finish with the pointed tip beneath the roll.
Five-step salt bread rolling guide showing butter placed on the dough, covered, sealed at the sides, rolled and finished tip-side down.
Before rolling, cover the butter completely and close the sides gently; then finish with the final dough tip underneath.

Proof and Bake

  1. Arrange and proof. Lightly oil a bare 33 × 46 cm / 13 × 18-inch metal sheet, or use parchment for gentler browning. Stagger the rolls 5–7 cm / 2–3 inches apart, cover and proof at 23–25°C / 73–77°F. Begin checking at 60 minutes. Ready rolls feel lighter and softer, jiggle gently and return slowly and partly after a light press; dramatic doubling is unnecessary.
    Butter warning: The tray should ideally remain dry during proofing. A faint greasy sheen means the butter is becoming too warm; visible puddling or butter running from an end means it has begun escaping.
Eight unbaked crescent rolls spaced on a light metal baking tray with labels for tip underneath, spacing and staggered arrangement.
Before proofing, check two things: the tip should sit underneath, and the rolls need enough space to expand without crowding.
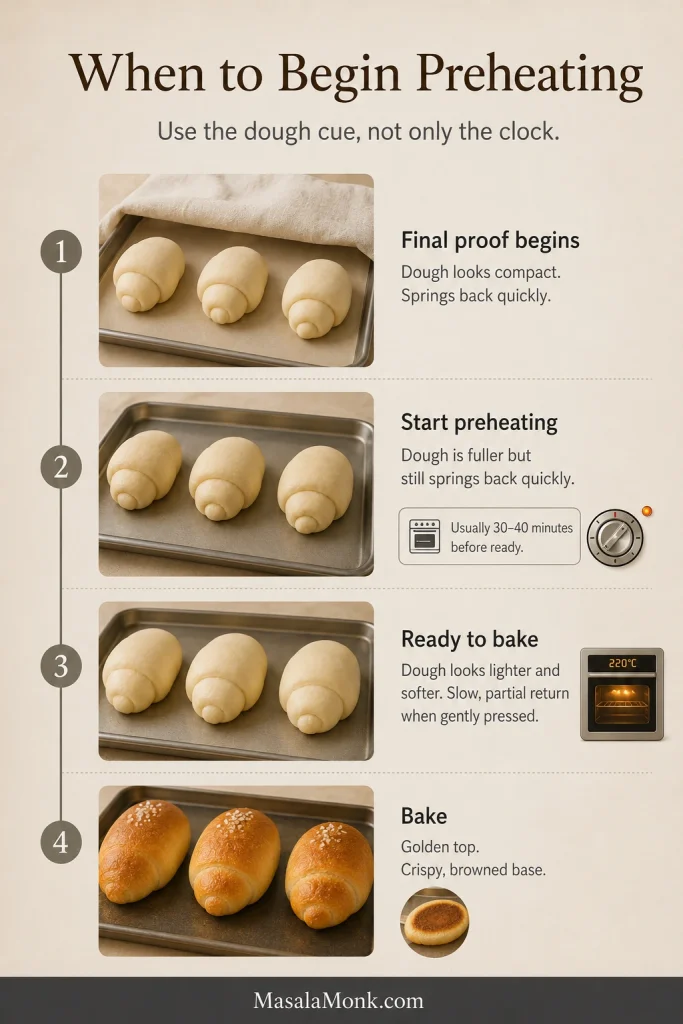
  1. Preheat while the rolls finish proofing. When they are visibly fuller but still spring back quickly—usually 30–40 minutes before readiness—set a rack in the middle or slightly below. Heat to 220°C / 425°F conventional or 205°C / 400°F fan.
  2. Mist and salt. Once the rolls are ready and the oven is fully heated, mist them lightly so the surfaces look evenly damp, not wet. Add a restrained pinch of flaky salt. If the filling butter tastes distinctly salty, use only a few flakes—or skip the topping on the first batch.
  1. Bake. Load the tray and immediately reduce to 205°C / 400°F conventional or 190°C / 375°F fan. Watch through the door during the early rise. Begin checking at 15 minutes; most batches finish in 17–20. Near the end, lift one: the underside should be firm and browned. As an optional backup, the crumb beside the hollow should reach about 91–93°C / 195–200°F.
  2. Cool correctly. Rest on the pan for 3–5 minutes, brush with pooled butter if desired, then move the rolls to a wire rack before trapped steam softens the bottoms.
Board comparing a golden salt bread top, a browned underside and a pale underside that needs more bottom heat.
A golden top is not enough for shio pan. Turn one roll over and confirm the underside is firm, browned and crisp.

Hand-Kneading Method

Making the dough by hand

Mix the flours, milk powder, sugar, yeast and 200 g water until shaggy; cover and rest for 20 minutes. Add the salt and knead briefly. If the dough remains firm, add the reserved water a teaspoon or less at a time before adding the softened butter.

Knead the butter in gradually for 10–15 minutes, using short covered rests when the dough becomes slippery or tight. A bench scraper and lightly damp hands are better than extra flour. Stop when the dough is elastic and passes the same windowpane test.

Four-panel hand-kneading guide showing dough being mixed, rested, combined with butter and kneaded until smooth and elastic.
If kneading by hand, use short rests instead of extra flour. The enriched dough becomes easier to handle without drying out.

Five Signs the Batch Worked

  • Top: deep golden, not merely blond.
  • Underside: browned, crisp and glossy from the butter.
  • Inside: soft and airy with a gentle chew, not cakey or dense.
  • Hollow: modest and butter-made; it does not need to occupy half the roll.
  • Flavour: buttery and savoury, with flaky salt appearing in small bright bursts.

Prioritise a browned base and light crumb over an oversized cavity.

Five-part board showing close-ups of a golden top, browned base, soft crumb, modest hollow and light flaky salt on salt bread.
A successful salt bread batch does not need a giant cavity. Judge the top, base, crumb, hollow and salt balance together.

The recipe above is enough to begin. The guide below explains how the flour, butter, proofing and tray work together—and what to change when your batch looks different.

What Is Salt Bread?

Japanese salt bread, or shio pan, is a lightly enriched yeast roll wrapped around cold butter. In the oven, steam opens a small space inside while some butter reaches the metal sheet and browns the underside. King Arthur Baking’s guide shows the same classic crescent-and-butter structure.

The flavour should be buttery and savoury, not sharply salty. Developed dough holds the butter long enough to create the hollow, while direct tray heat turns later leakage into a crisp base. Despite the similar name, shio pan is unrelated to American salt-rising bread.

Shio Pan, Sogeum-Ppang and Croissants

Shio pan is the Japanese name most often used in English-language recipes; Korean salt bread is commonly called sogeum-ppang. The styles overlap, though Korean café versions often lean softer, milkier or more heavily filled. This recipe targets the classic crisp-bottomed style associated most closely with Japanese shio pan. Eater’s account of the Korean salt-bread boom follows its spread through bakeries and cafés.

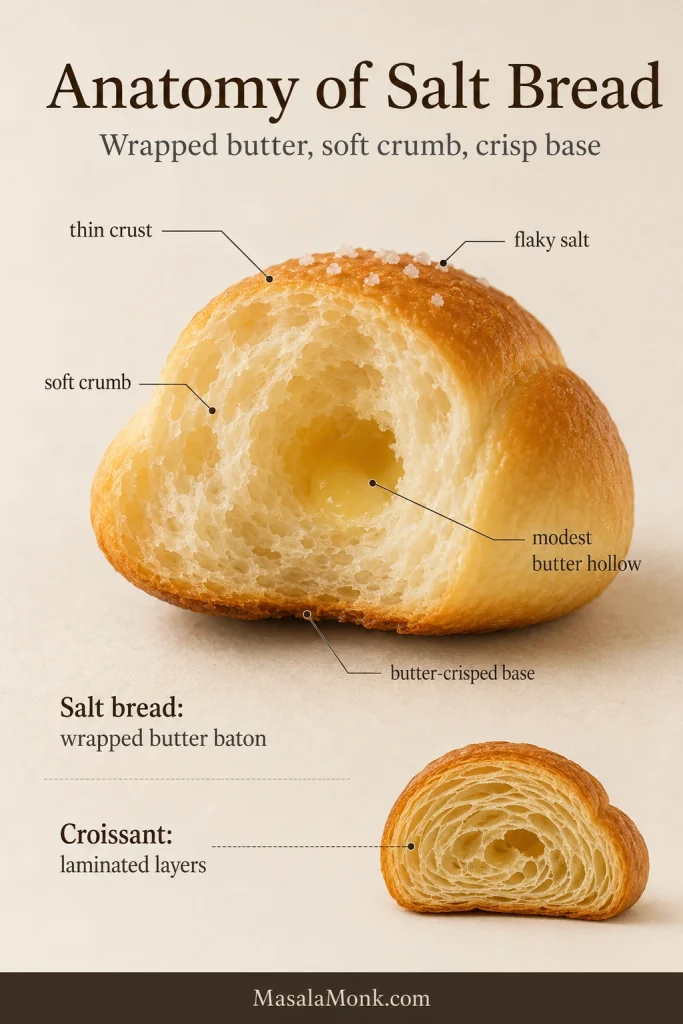
The crescent shape resembles a croissant, but the method is simpler. Croissants use repeated folds of dough and butter; salt bread is rolled once around one butter baton and has no laminated flaky layers.

Cutaway diagram of salt bread with labels for thin crust, soft crumb, butter hollow, butter-crisped base and flaky salt, plus a small croissant inset.
Salt bread is not laminated like a croissant. Instead, wrapped butter melts inside soft dough while the base fries against the tray.

Choose the Texture You Want

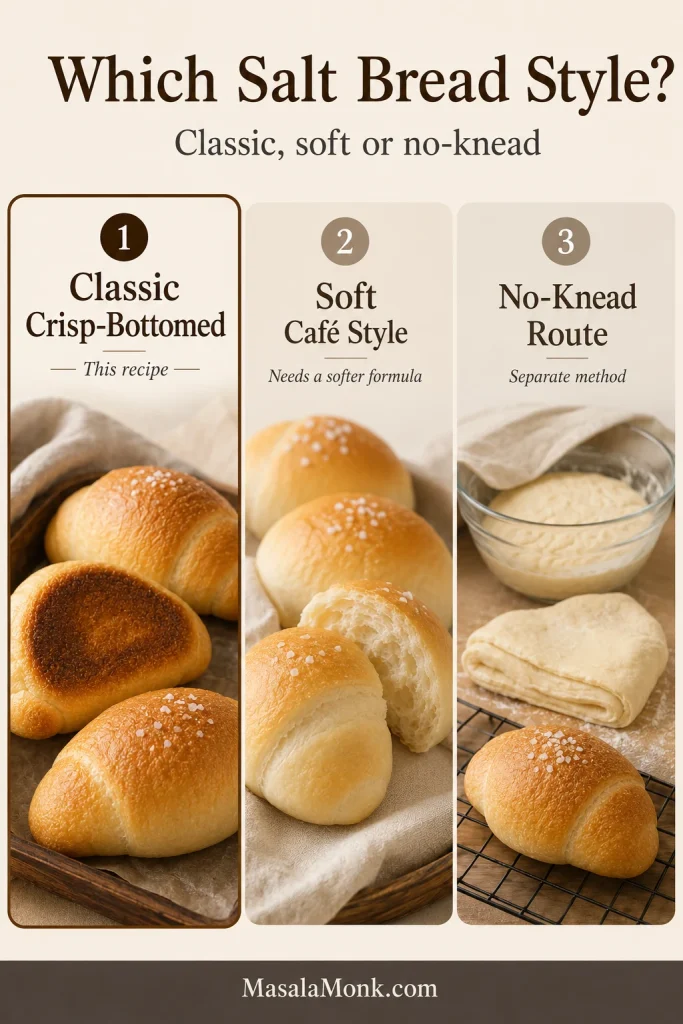
Salt bread recipes can look contradictory because they are aiming at different textures. The same crescent can feel chewy and crusty or milky and pillowy, depending on the dough beneath it.

Three-column board comparing classic crisp-bottomed salt bread, soft café-style salt bread and a no-knead salt bread route.
This recipe targets classic crisp-bottomed salt bread. However, softer café-style rolls and no-knead versions need different formulas or workflows.

The Classic Crisp-Bottomed Style

This lightly enriched dough is soft inside but keeps more chew and crust than a pillowy milk roll. Some bakeries describe that balance as semi-hard salt bread.

When to Choose a Softer Version

Tangzhong, milk, egg or more sugar can produce a softer Korean café-style roll, but they also change hydration, proofing and browning. Use a formula built for that result. Our soft cinnamon roll recipe shows how richer dough trades crust contrast for a plush crumb.

When to Choose No-Knead

No-knead salt bread relies on time, folds and usually refrigeration to build strength. It is a separate method, not this dough with the mixer step removed.

Ingredients, Swaps and What Changes

Once you know the texture you want, most first batches involve three decisions: which flour you have, whether milk powder is available and how salty the filling butter tastes. For the intended result, use the listed flour blend, plain milk powder and firm salted butter.

Bread Flour and Cake Flour

Bread flour supplies the strength needed for long shaping and butter containment; roughly 11.5–13 percent protein is useful when the package lists it. Our guide to what gluten is explains why that protein network gives dough its stretch.

Cake flour softens the dough and makes it easier to lengthen. All-purpose flour can replace it, though the roll may be slightly firmer.

Can You Use Only All-Purpose Flour?

Yes, but all-purpose flour varies widely. Begin with 195–200 g water, let the dough rest and start developing strength before deciding whether it needs more.

Milk Powder: What It Adds and How to Omit It

Plain non-fat milk powder adds dairy flavour, browning and tenderness without much extra liquid. Whole-milk powder is usually workable; malted or sweetened powders are not direct gram-for-gram substitutes.

You can omit it without replacing its weight with flour. Begin with 195–200 g water because the dough may feel looser, then add more only after the rest if needed. Expect less dairy flavour and lighter browning. A milk- or tangzhong-based roll needs its own balanced formula.

Sugar, Salt and Yeast

The small sugar quantity supports fermentation and browning without making the bread sweet. Fine salt seasons the dough evenly; flaky salt belongs on top.

Using active dry yeast: use 4 g and follow the packet. Many modern products can be mixed directly with the flour; when proofing is required, dissolve the yeast in 30 g / 2 tablespoons of the recipe water at the manufacturer’s stated temperature and count it in the total.

Butter in the Dough and Butter Inside

Softened unsalted butter tenderises the dough; add it only after some gluten has developed. Salted filling butter gives stronger savoury contrast, while unsalted butter gives tighter salt control. Avoid whipped, tub and spreadable butters because they melt and leak differently.

ChangeWhat to Expect
Use only bread flourA stronger, chewier roll that may resist shaping
Replace cake flour with all-purposeA slightly firmer inside, depending on protein level
Use only all-purpose flourVariable strength and water absorption; begin with less water
Omit milk powderA looser dough, less dairy flavour and lighter browning; begin with less water
Use a balanced milk-based doughA softer, richer roll with different liquid needs and faster browning
Use a tangzhong-based formulaA more pillowy crumb that stays soft longer
Each substitution changes dough strength, softness, browning or butter behaviour.
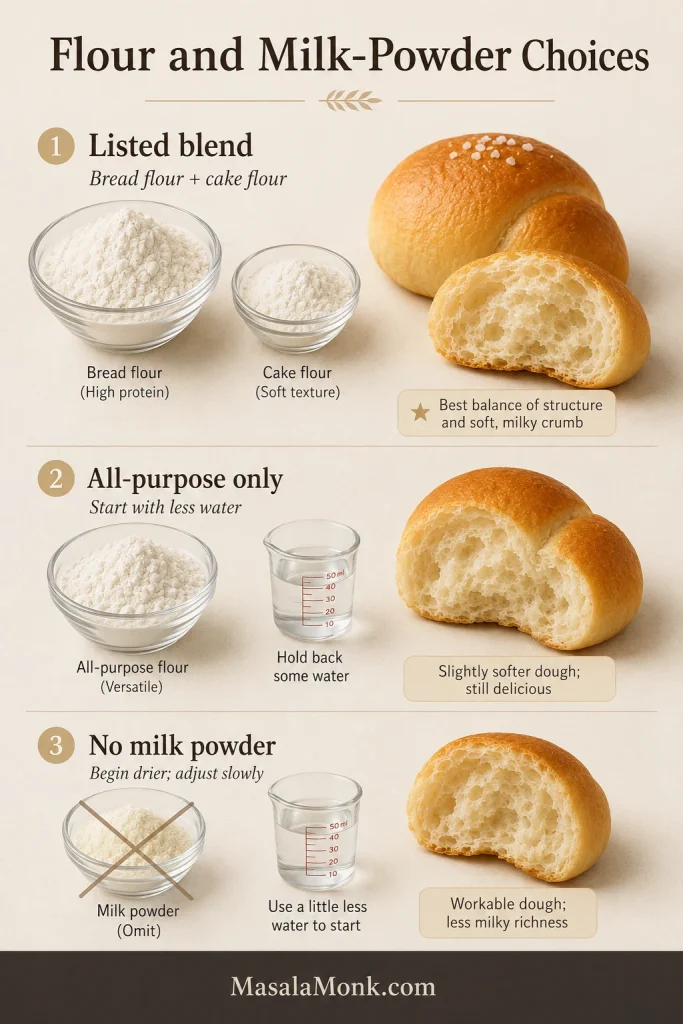
Decision board showing the listed flour blend, an all-purpose flour option with less water and a no-milk-powder option with adjusted hydration.
The listed flour blend is the most dependable path. If using all-purpose flour or skipping milk powder, adjust water slowly instead of guessing.

Equipment and Baking-Tray Choices

For a first batch, use a light-coloured bare metal sheet brushed with a thin film of oil. A scale keeps the rolls balanced; the tray determines whether escaped butter browns the base or leaves it greasy.

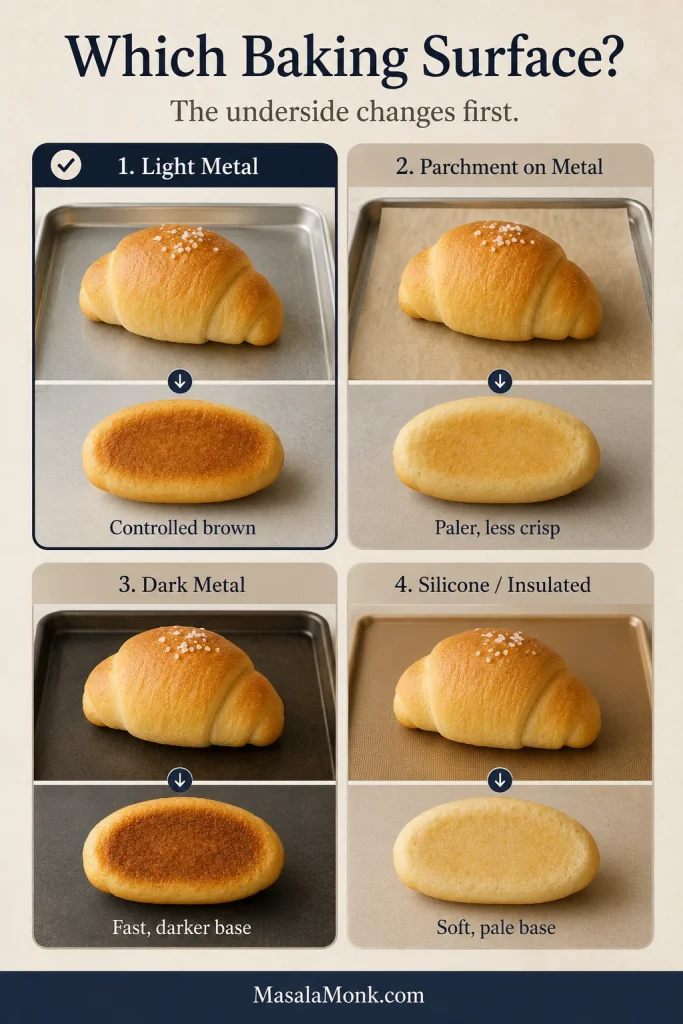
Baking SurfaceLikely ResultBest Use
Dark metalFast, strong base browningCheck early to prevent burning
Light metalCrispness with more controlled colourMost forgiving first choice
Parchment on metalEasy release with a slightly paler, less crisp baseWhen sticking is a concern
Silicone or insulated sheetPaler, softer baseNot preferred for this recipe
Tray material changes how quickly leaked butter browns the underside.
Four-way comparison board showing salt bread baked on light metal, parchment on metal, dark metal and silicone or insulated surfaces with different underside results.
The baking surface changes the underside first. Light metal gives controlled browning, while parchment, dark metal and insulated surfaces shift the texture.

A 33 × 46 cm / 13 × 18-inch sheet fits eight staggered rolls with roughly 5–7 cm / 2–3 inches between them. Use two batches on a smaller tray.

A light mist helps the salt adhere and slows early surface drying. Aim for evenly damp, not dripping; elaborate steam methods vary too much between home ovens to be necessary here.

Four Cues That Decide the Batch

The recipe gives the sequence. These four moments tell you whether the dough is ready to move on.

1. The Buttered Dough Turns Satiny Again

The dough may look greasy after the butter goes in. Keep kneading rather than adding flour. It is ready when the greasy film disappears, the surface becomes smooth and satiny, and a small piece stretches into a thin windowpane.

Hands stretching salt bread dough into a thin windowpane, with insets showing a dough thermometer range of 24–26°C and a wrist-touch cue.
Once the buttered dough turns smooth again, check for a thin windowpane and a cool-to-neutral feel before moving on.

2. The Triangle Stops Fighting the Rolling Pin

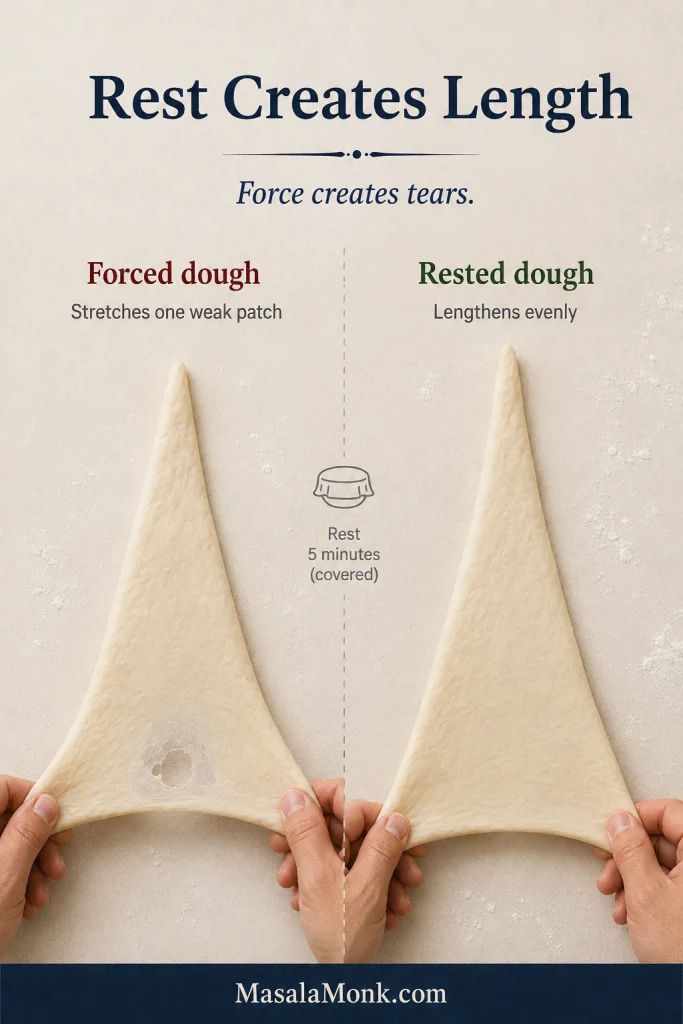
If the dough still shrinks, cover it for five minutes. It is tense, not failed; the triangle should lengthen without becoming translucent. More pressure usually stretches one weak patch, while rest relaxes the whole piece more evenly.

Split image showing forced dough with a weak torn patch beside rested dough stretched into a longer, smoother triangle.
If the triangle fights back, pause. Rest relaxes the whole piece, while extra pressure often stretches one weak patch.

Wrap the cold butter with light tension and tuck the pointed tail underneath. Once all eight are shaped, the difficult handwork is finished; the dough now needs time.

3. The Rolls Feel Light and Alive

Ready rolls feel lighter and softer, not merely larger. Dramatic doubling is unnecessary.

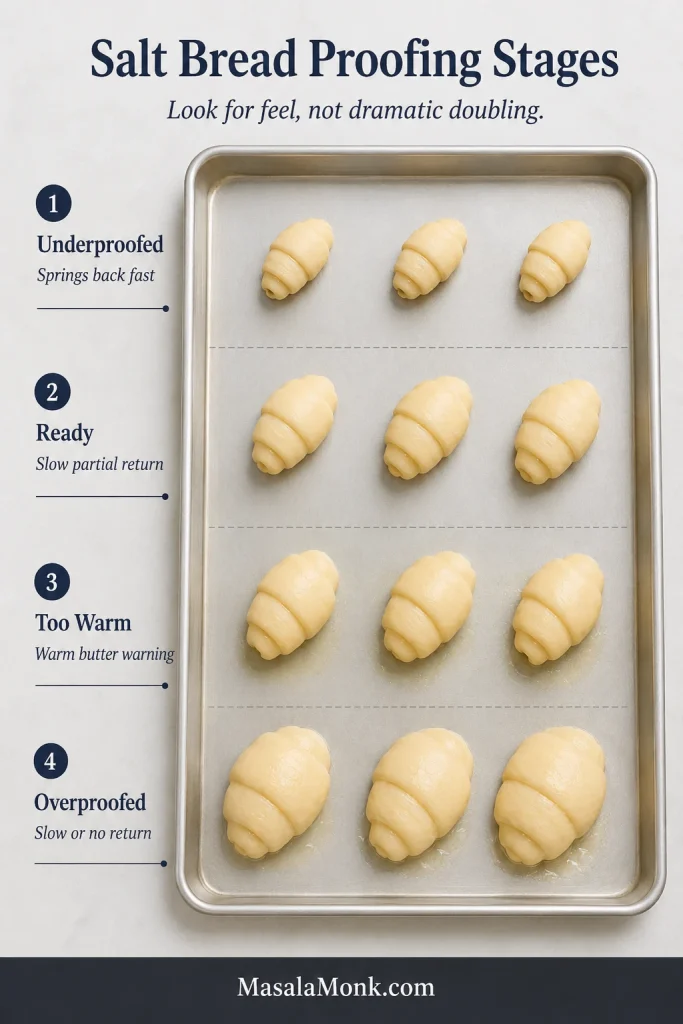
StageWhat the Press DoesWhat You SeeNext Move
UnderproofedSprings back quicklyCompact, firm and barely jigglyCover and continue proofing
ReadyReturns slowly and partlyClearly fuller, soft and gently jiggly; tray ideally dryMist, salt and bake
Warm but not readyStill returns with resilienceNeeds more lift, but butter is softening or a faint sheen appearsChill 5–10 minutes, then continue cooler
OverproofedDent remainsVery swollen, fragile and easy to deflateBake promptly
Begin checking at 60 minutes; dough condition matters more than strict doubling.
Four-stage proofing board showing underproofed, ready, too-warm and overproofed salt bread rolls on a metal tray.
Ready salt bread rolls look fuller and softer, not dramatically doubled. If the tray turns shiny, the butter is warming faster than the dough is proofing.

4. The Underside Turns Firm and Brown

The rolls should lift before butter begins hissing around their bases. Near the finish, lift one carefully: the underside should be firm, brown and glossy rather than pale and soft.

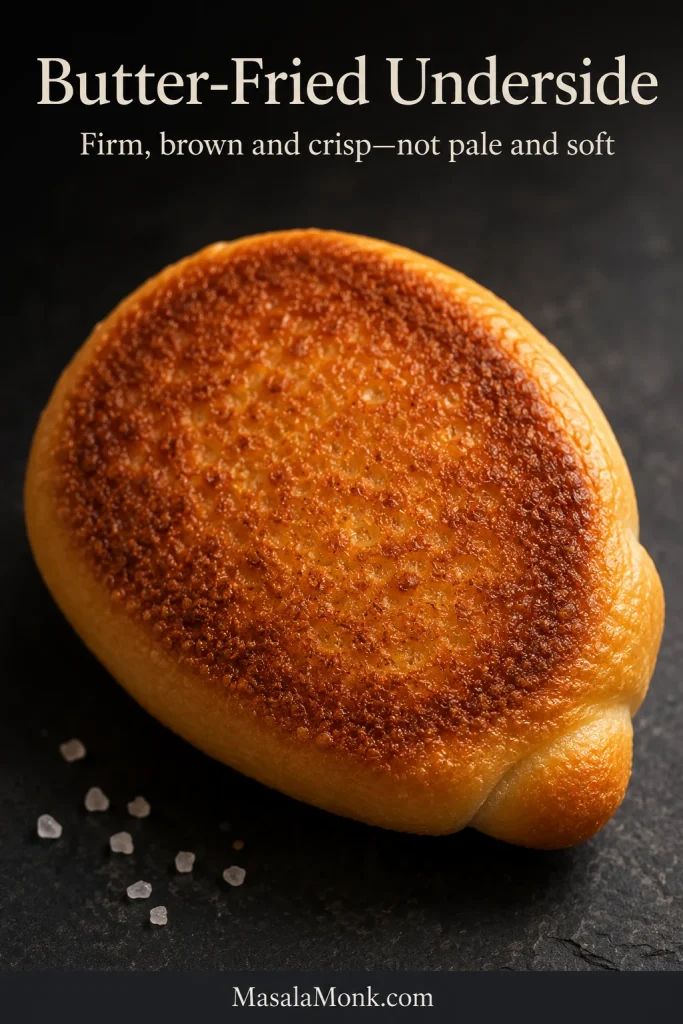
Extreme close-up of the deeply browned butter-fried underside of a salt bread roll on a dark surface.
The defining shio pan texture is underneath: a firm, browned base where melted butter crisps the dough against the hot tray.

Leave the rolls on the hot sheet for 3–5 minutes, then move them to a rack. Cutting immediately compresses the crumb; lingering on the tray lets condensation soften the base.

When Butter on the Tray Is Normal—and When It Is Not

Once baking begins, the tray does not need to remain dry. During this stage, the useful question is when the butter appeared: later leakage helps build the crisp base, while butter lost during proofing escaped before the roll could hold it.

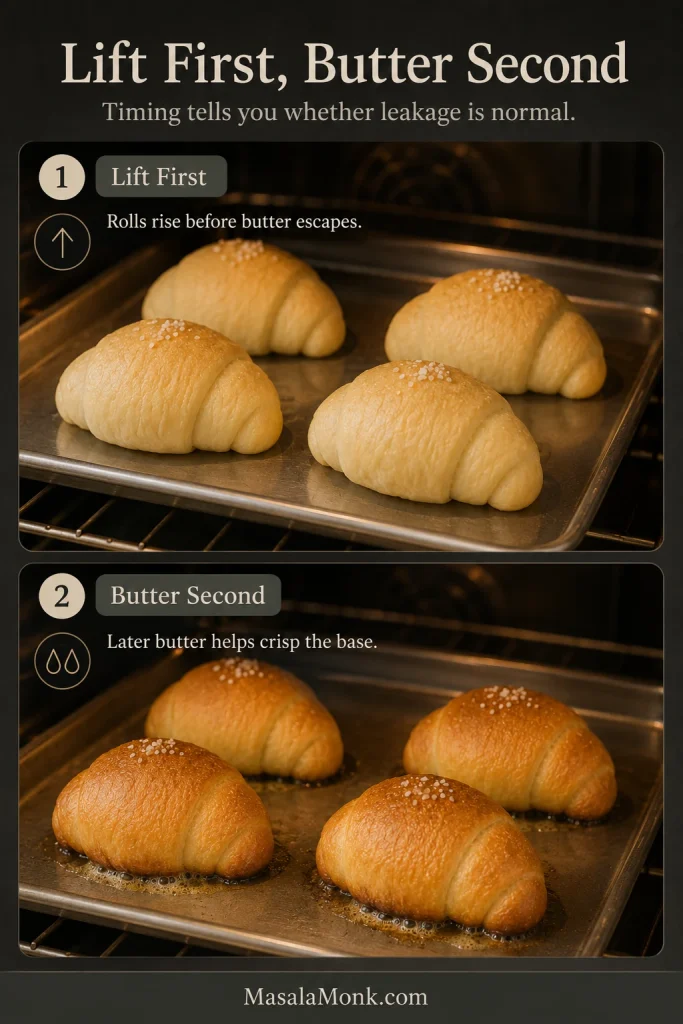
Lift First, Butter Second

The butter rule

Lift first, butter second. The tray should ideally stay dry during proofing. A faint sheen is a warning to cool the rolls; visible puddling or butter running from an end means the filling is escaping too early. Once the rolls have lifted in the oven, later sizzling is usually doing useful work.

Two-stage board showing salt bread rolls rising cleanly early in baking and later browning as butter bubbles lightly around the bases.
The key is timing. If the rolls lift first and butter appears later, that butter can help crisp the base instead of ruining the batch.

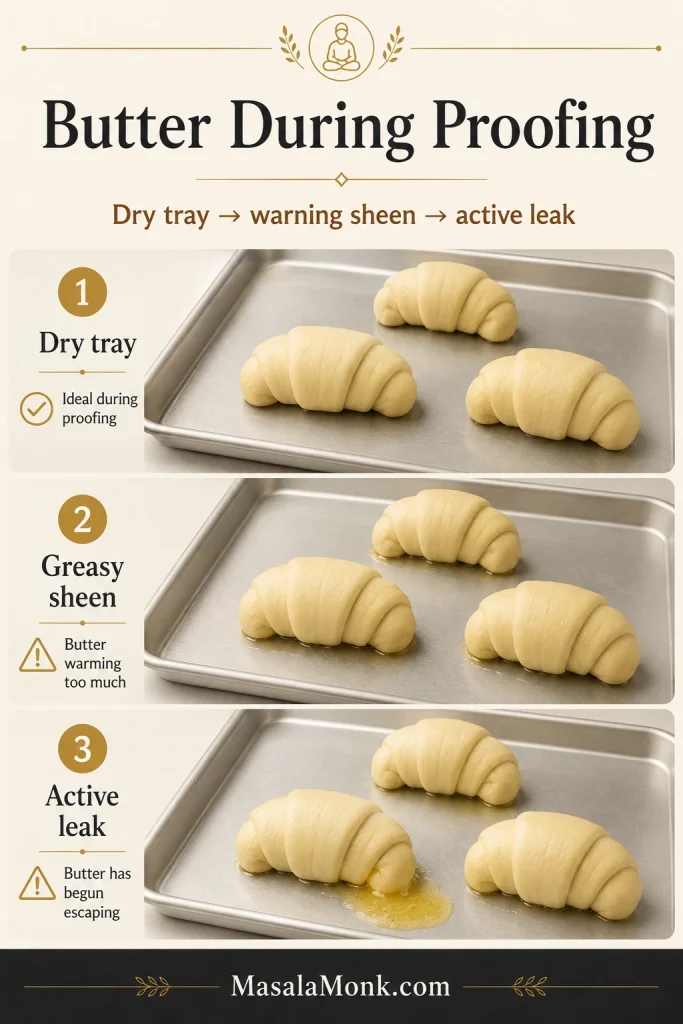
Proofing Leakage Cues

Three-stage proofing board showing unbaked salt bread rolls on a dry tray, then with a faint greasy sheen, then with visible butter leakage.
During proofing, a dry tray is ideal. A faint greasy sheen is a warning; visible butter running from the roll means leakage has started.

Use Timing to Diagnose the Butter

When the Butter AppearsWhat It Probably MeansWhat to Do
During final proofingToo early. The room or filling is too warm, the dough is overproofed, thin or open at one side.Move the tray somewhere cooler. If the rolls still need time, chill for 5–10 minutes, then continue proofing more moderately.
In a large rush immediately after loadingUsually too early. Look for exposed butter, a tear, warm dough, loose wrapping or an oven that was not fully heated.Continue baking this batch, then correct the weak spot, temperature or preheat on the next one.
Later, after the rolls expand and begin colouringUsually desirable. The dough has begun setting and the later butter pool is browning the base.Let the butter sizzle around the rolls, but watch that it does not turn black or smoke.
A large greasy pool with no hollowThe butter escaped before producing enough steam inside, often because the filling was warm, the dough weak or the wrapping loose.Keep the filling colder, develop the dough fully and cover the butter more securely. Do not add more butter simply to chase a larger hollow.
No visible leakageNot necessarily a problem; more butter may have remained inside the roll.Check the crumb and underside. A pale base and greasy interior point to insufficient tray heat or bake depth.
A useful butter pool appears after expansion, not while the shaped rolls are still proofing. Watch through the oven door where possible; repeated opening during the early rise costs heat.

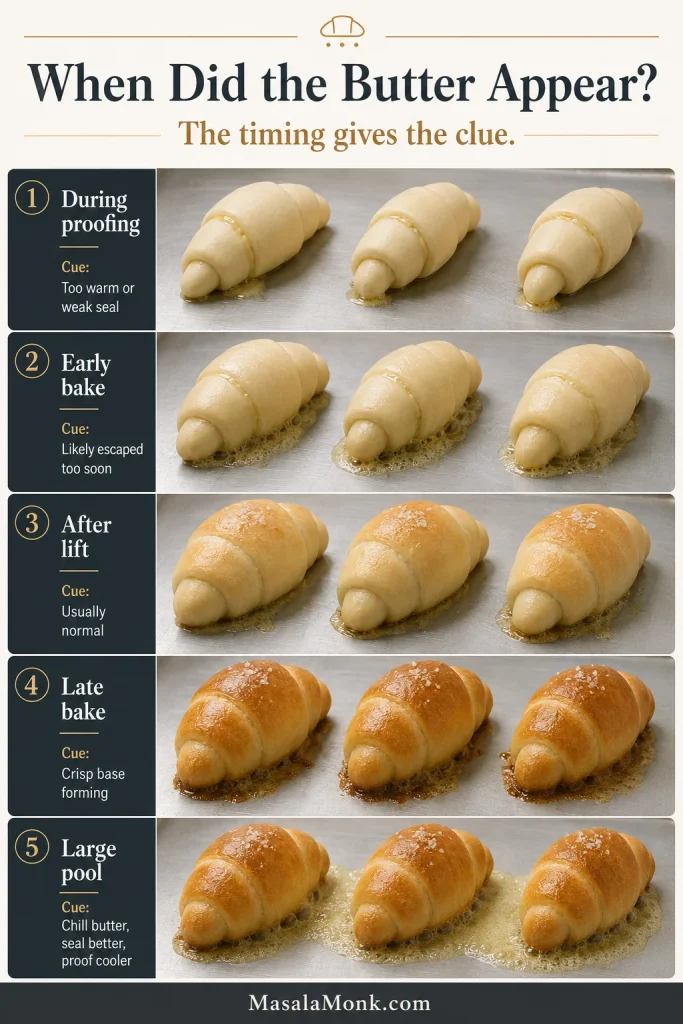
Butter Timing Visual Guide

Five-stage butter timing guide showing leakage during proofing, early bake, after oven lift, late bake and a large butter pool.
Butter leakage means different things at different stages. So before changing the recipe, first check when the butter appeared.

Salt Bread in a Hot or Cold Kitchen

Three-zone guide showing water choices for hot, moderate and cold kitchens with dough bowls and temperature cues.
Water temperature is one of the easiest ways to control enriched dough. Start cooler in a hot kitchen and use only mild warmth in a cold one.
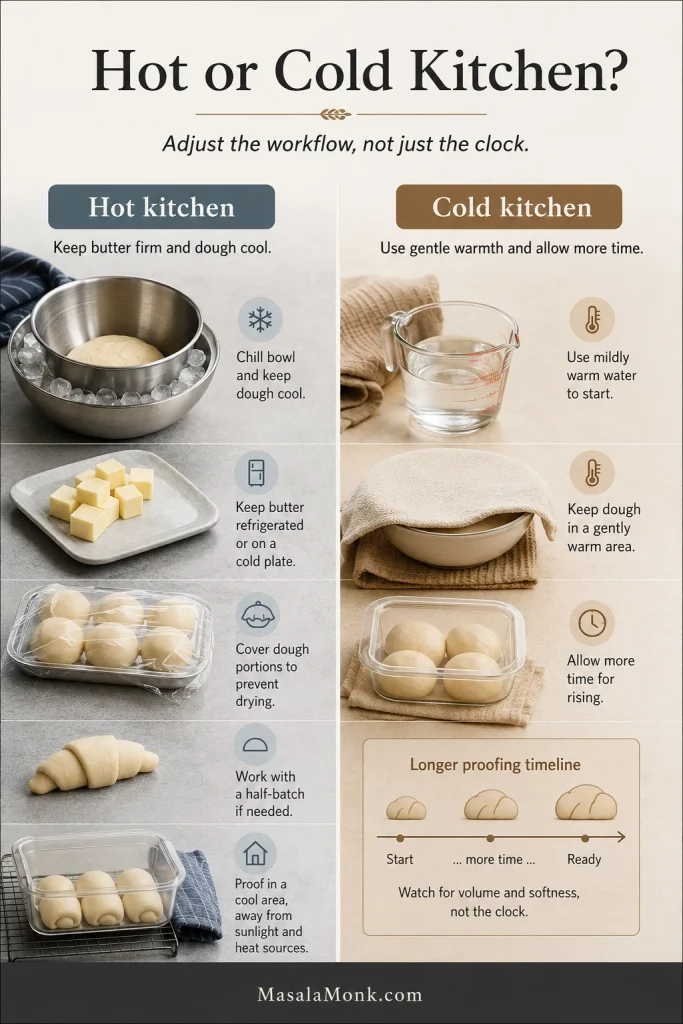
Split guide showing hot-kitchen controls with chilled tools and covered dough, and cold-kitchen controls with mildly warm water and longer proofing.
Instead of relying only on the clock, adjust the workflow: keep butter firm in a hot kitchen and give dough gentler time in a cold kitchen.

Hot-Kitchen Guidance

In a room above about 27°C / 81°F, fixed times become much less useful. Dough ferments faster, mixer friction matters more and the filling can soften while the next roll is still being shaped.

  • Start with cold water; chill the mixer bowl as well when the room is especially hot.
  • Keep unused butter refrigerated and shape in two batches when working slowly.
  • Check the dough temperature after mixing and proof in the coolest practical place.
  • Briefly chill shaped rolls if a greasy sheen begins appearing.
  • Avoid aggressively warm oven-proofing settings.

A hot room is not a reason to add handfuls of flour. Cool the dough first, then reassess it.

Cold-Kitchen Guidance

  • Use mildly warm—not hot—water.
  • Allow fermentation to take longer.
  • Use a gently warm location away from direct heat.
  • Let expansion and softness decide the timing; a cool kitchen may simply need longer.

A slower rise is usually safer than overheating the dough. Give the yeast time to work while the butter stays neatly inside the rolls.

Salt Bread Troubleshooting: Dough, Butter and Browning Problems

An imperfect first tray rarely means the whole recipe is wrong. The earliest moment it differed from the cues above usually gives the clearest clue.

Match the First Visible Problem to the Fix

ProblemWhat Probably HappenedWhat to Change Next Time
Dough is extremely stickyGluten is underdeveloped or the dough is too warmRest it, continue mixing and cool it before adding flour
Dough snaps backThe gluten is tenseCover and rest for 10–15 minutes
Dough tears into thin patchesIt was rolled too quickly or still lacks strengthRoll gradually and allow another rest
Rolls unwindLoose shaping or the pointed tip faces upwardRoll with light tension and place the tip underneath
Bread is denseUnderproofing, weak yeast, underdeveloped gluten or too much flourDevelop the dough fully, then let volume, softness and feel guide the timing
Bread spreads instead of risingWeak gluten, overproofing or warm doughDevelop the dough fully and shorten or cool the final proof
Bottom stays paleInsulated tray, low heat, insufficient contact or a rack set too highUse a non-insulated metal sheet that browns the base more readily, or move the tray lower. If the top is already brown, shield it loosely while the underside finishes.
Bottom burnsVery dark tray, low rack or too much exposed butterRaise the tray, use light metal or reduce heat slightly
Inside feels greasyUnderbaking, premature leakage or filling pieces larger than 13 gBake more fully and confirm the filling weight. Reduce the butter only when larger pieces were used or a particular butter repeatedly leaves an excessively greasy crumb.

For butter leakage or a missing hollow, use the timing guide above. When a correctly baked base softens later, move to the storage and reheating section.

Visual Troubleshooting Guide

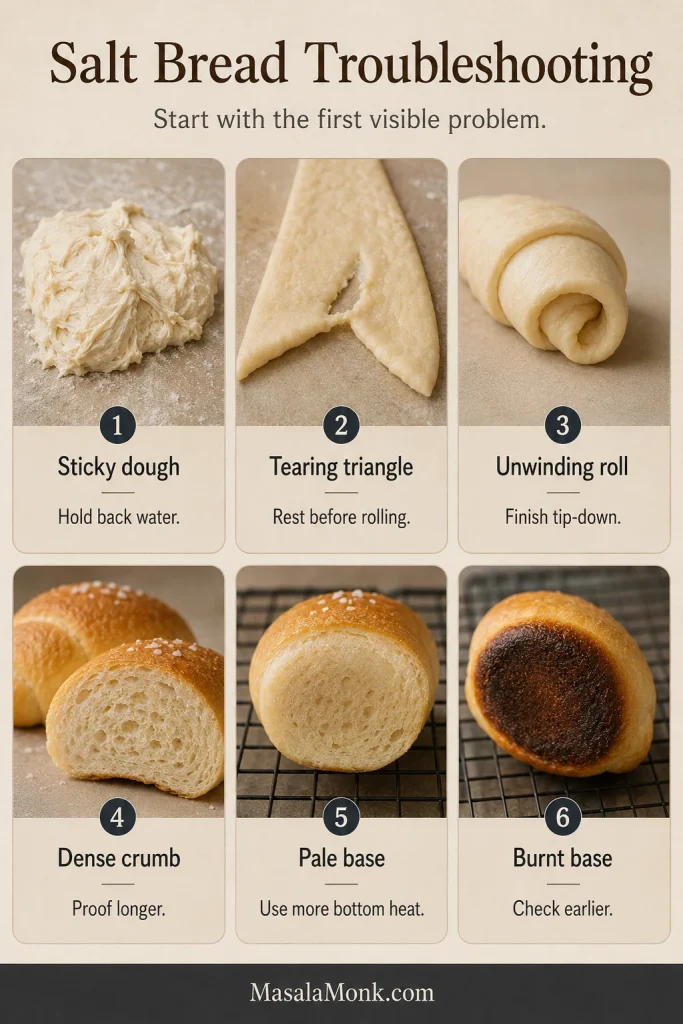
Six-panel troubleshooting board showing sticky dough, torn triangle, unwinding roll, dense crumb, pale base and burnt base with short corrections.
Salt bread troubleshooting starts with the first visible clue: sticky dough, tearing, unwinding, dense crumb, pale base or burnt base.

Make-Ahead, Storage and Reheating

An Example Four-and-a-Half-Hour Timeline

  • 0:00–0:30: portion the butter, mix and knead
  • 0:30–1:45: first rise, ending when the dough is close to doubled and lighter
  • 1:45–2:30: divide, rest and shape
  • 2:30–4:00: final proof, looking for soft, gently jiggly rolls
  • Around 3:20: begin preheating while the rolls finish proofing
  • 4:00–4:20: mist, salt and bake
  • 4:20–4:30: settle briefly, rack and serve warm

This example assumes a 75-minute first rise and a 90-minute final proof. Use the clock to plan your day, not to overrule the dough. Move the later times according to how quickly the dough develops.

Vertical timeline showing final proof beginning, when to start preheating, ready-to-bake rolls and baked salt bread with browned bases.
Begin preheating when the rolls are fuller but not ready yet; the oven should be hot before proofed, butter-filled dough has to wait.

Making the Dough the Night Before

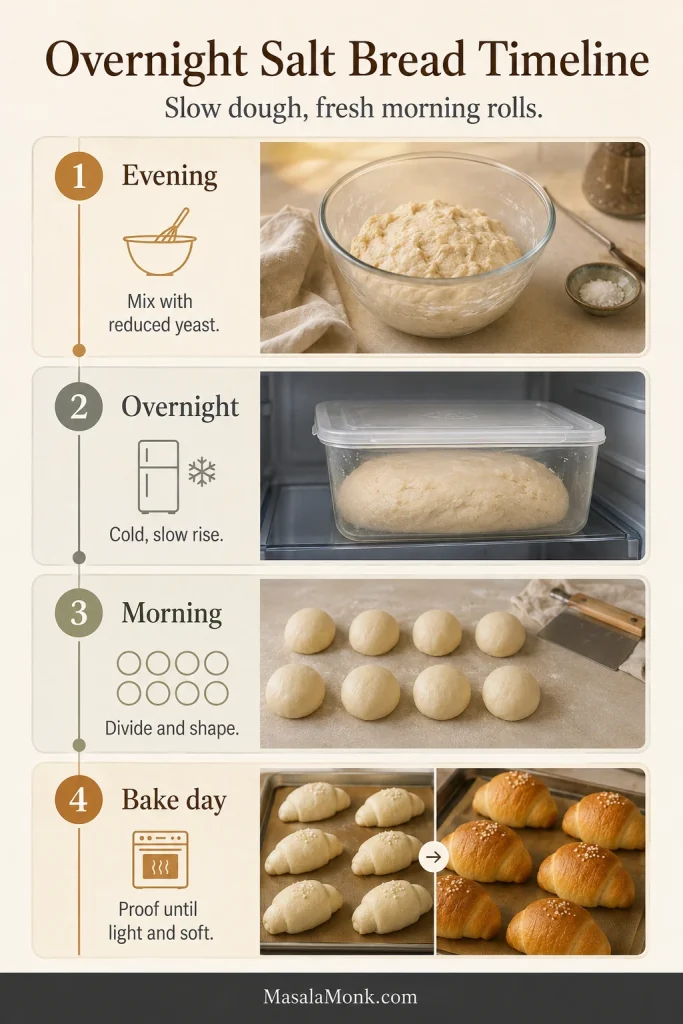
For morning shaping and baking, reduce the yeast so the dough does not outrun the refrigerator. As a cautious starting point, use 1.5 g instant yeast for a warmer refrigerator or a hold approaching 12 hours, and up to 2 g for a reliably cold refrigerator and a hold closer to 8 hours.

  1. Mix and knead, then leave the covered dough at room temperature for 15–20 minutes.
  2. Refrigerate for 8–12 hours at about 4°C / 40°F or colder.
  3. Divide while cool and rest until the pieces relax enough to shape.
  4. Use freshly chilled filling butter and proof by the same readiness cues; expect a longer final proof.
Timeline showing evening mixing, overnight dough in the refrigerator, morning dough portions and bake-day shaped and baked salt bread rolls.
For overnight salt bread, chill the dough before shaping. In the morning, divide, shape, proof until light and bake fresh.

Keep the butter-filled final proof on the day of baking. Shaped rolls held overnight leave less room between a good proof and softened filling.

Doubling the Recipe

Check the mixer’s dough capacity before doubling; when uncertain, mix two batches. Shape and proof the 16 rolls in staggered groups so the first tray does not finish proofing while the second is still being rolled.

Storage

  • Best texture: within the first hour
  • Room temperature: airtight for one day, or two days with some loss of crispness
  • Refrigerator: not preferred because bread stales faster
  • Freezer: freeze fully cooled rolls airtight while fresh
  • Day-old rolls: toast or turn into French-toast-style slices

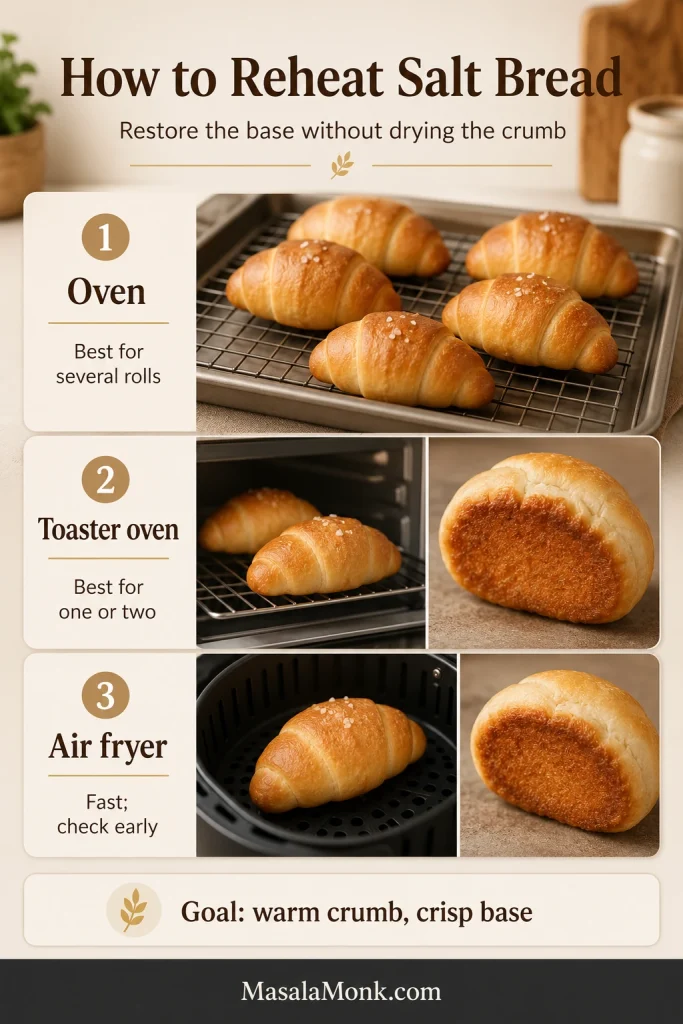
How to Reheat Salt Bread

MethodStarting GuidanceResult
Air fryer175°C / 350°F for 2–4 minutesFast, strong recrisping
Toaster oven175°C / 350°F for 4–6 minutesEven warming and crispness
Conventional oven175°C / 350°F for 5–8 minutesBest for several rolls
MicrowaveUse a very brief intervalWarm and soft, not crisp
Times are starting ranges; compact appliances may brown the salt and thin ends sooner.
Reheating guide showing salt bread warmed in an oven, toaster oven and air fryer, with close-ups of crisp browned undersides.
Reheat salt bread with dry heat, not steam. The goal is a warm crumb while the butter-crisped underside firms back up.

Serving Ideas and Easy Variations

Salt bread is at its best before it becomes a serving suggestion at all—torn open beside coffee while the underside still crackles. Once it reaches the table, its savoury butteriness makes it just as comfortable beside soup, eggs or something sweet.

  • Serve with coffee or tea.
  • Pair with a creamy bowl such as tomato bisque, keeping the roll above the broth until the moment you eat.
  • Split for a small egg sandwich while the crumb is still soft and the base remains crisp.
  • Add a thin layer of orange marmalade for a bright sweet-salty contrast that cuts through the butter.
  • Toast a day-old roll for a compact savoury sandwich.

Once the classic batch feels familiar, these are the easiest ways to change the flavour without losing the crescent shape and crisp base.

  • Garlic butter: use a firm, chilled garlic-herb butter; exposed garlic can scorch.
  • Cheese: tuck in a small piece of low-moisture cheese and resist overfilling.
  • Red bean and butter: use a modest spoonful of sweet red-bean paste and slightly less butter so the filling stays balanced.
  • Softer milk-bread style: use a separately balanced dough with milk, egg or tangzhong; those additions change hydration, proofing and browning together.

Frequently Asked Questions

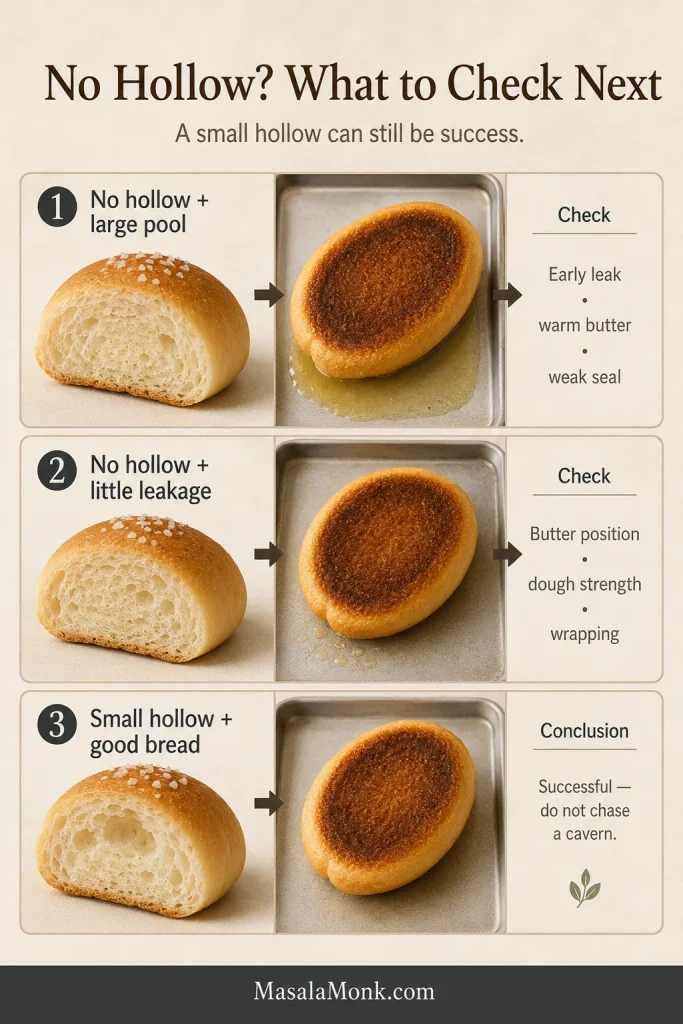
Why Did My Salt Bread Not Form a Hollow?

A modest hollow is enough. When there is no hollow and a large greasy pool forms, use the butter-timing guide, then review dough strength, wrapping and proofing.

Diagnostic board showing three salt bread outcomes: no hollow with a large butter pool, no hollow with little leakage, and a small hollow with good bread.
No hollow does not automatically mean failure. Check leakage, butter position and dough strength, then judge the crumb and base before chasing a bigger cavity.

Can You Make Salt Bread Without a Stand Mixer?

Yes. Use the hand-kneading instructions beneath the main method, adding covered rests whenever the dough becomes slippery or tight. A true no-knead version needs its own fold-and-refrigerate formula.

Can the Dough Be Refrigerated Overnight?

Yes. Use the reduced-yeast method above, keep the refrigerator near 4°C / 40°F or colder and shape the cool dough the next day.

Can Salt Bread Be Frozen Before or After Baking?

Baked rolls are the dependable option: cool, wrap airtight and freeze while fresh. Shaped butter-filled dough needs a method developed specifically for freezing because yeast activity, proofing and leakage can change.

Is This Salt Bread Dairy-Free?

No. Milk powder and butter both affect flavour, browning and filling behaviour. Use a dedicated dairy-free formula instead of replacing both casually.

Can Salt Bread Be Baked in an Air Fryer?

Some air fryers can bake small trial batches, but basket size, element distance and fan strength vary too widely for one dependable timing. This formula is designed for a conventional oven and metal tray; use the air fryer primarily for reheating.


When the First Batch Comes Together

The first batch teaches you more than the timer can. Notice whether the dough relaxed under the rolling pin, whether the shaped rolls reached a light, resilient proof, and whether the underside browned before the top became too dark. Those moments tell you what to adjust next time.

Your first tray will tell its own story. Did the butter appear during proofing, immediately after loading, or only once the rolls had lifted? Share what you saw and which tray you used; those details may help another baker understand their batch.

Then pull one roll apart while it is still warm. The crumb should stretch before it tears, the warm centre should release a deep butter aroma, and the underside should give a light crackle between your fingers. That is the moment the extra rests, careful shaping and patient proofing stop feeling fussy and start feeling worthwhile.

Posted on Leave a comment

Crab Rangoon Recipe: Crispy Cream Cheese Wontons (Fried, Baked or Air Fryer)

Golden triangle and purse-shaped crab rangoons arranged around red-orange sweet-and-sour sauce, with one broken open to reveal the creamy crab filling.

Crab rangoon is the kind of appetizer that disappears before anyone admits how many they have eaten. The wrapper cracks first, the warm cream cheese filling follows, and everyone reaches past the dipping sauce for one more.

At home, though, the same little wonton can become surprisingly frustrating. One overfilled piece opens in the oil. A wet filling slips through a seam. Air-fryer corners turn dark while the middle stays pale. Or the wrapper comes out crisp but almost empty.

Here, you can match the filling to the version you remember, keep the seams closed, and choose the kind of crunch that works for your kitchen.

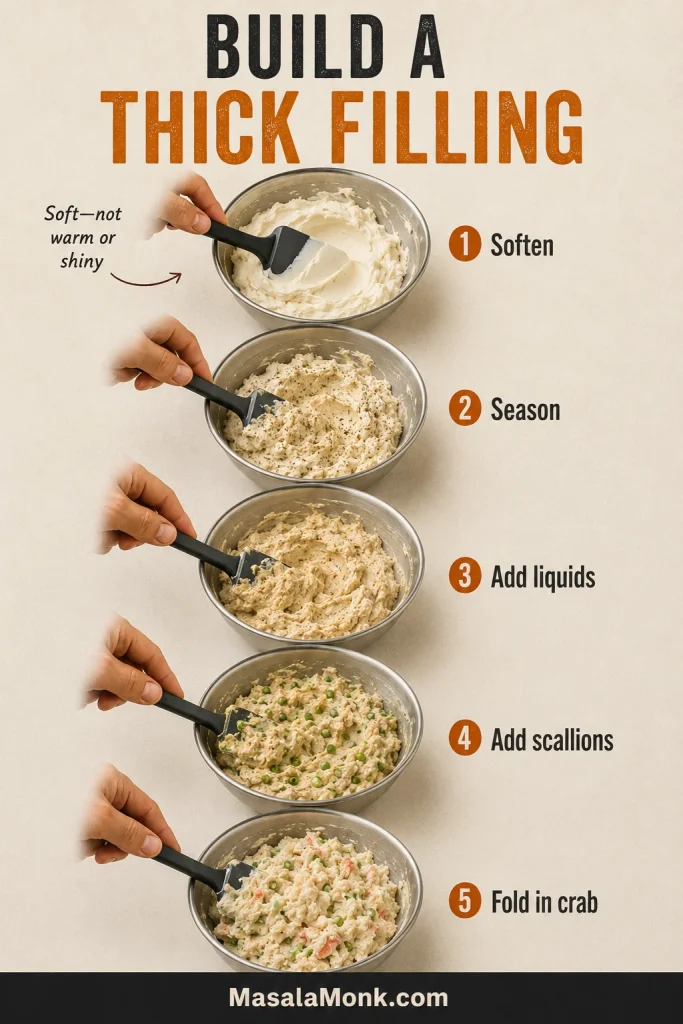
The rule that keeps everything under control is simple: thick filling, modest portions, clean seams. Drain the crab, chill the filling until it holds its shape, and leave enough bare wrapper around it to push out the air and close every edge.

Deep frying gives you the thinnest, most blistered restaurant-style shell. The air fryer produces crisp batches with less oil. Baking lets you cook more pieces at once without standing over a pot. Each method gives you a different kind of crunch.

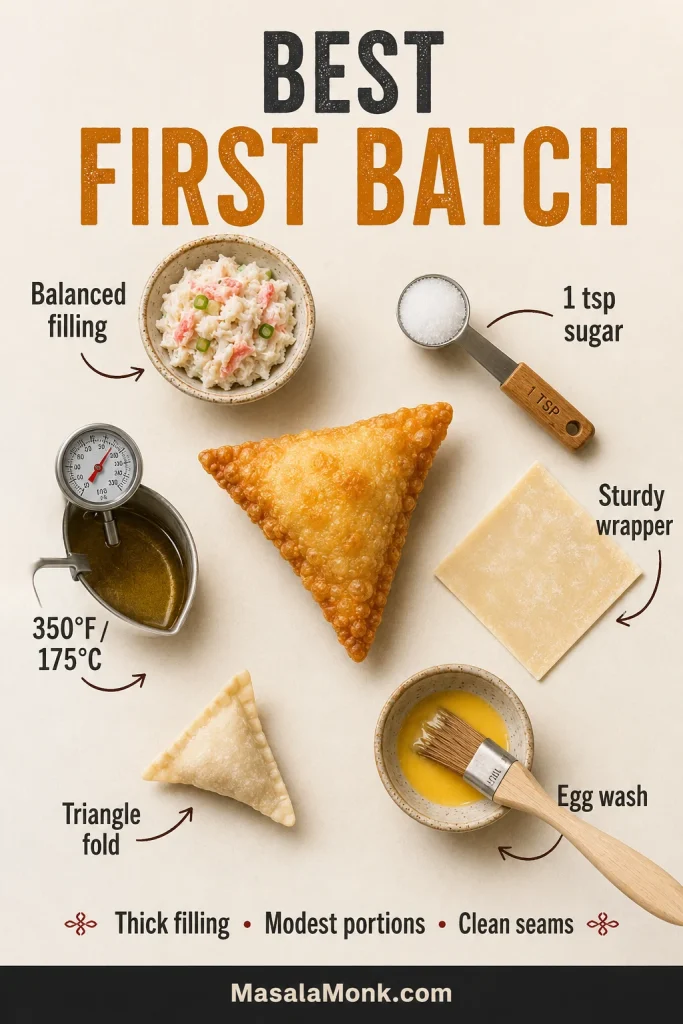
Best First Batch

For a dependable restaurant-style first batch, use the balanced imitation-crab filling with 1 teaspoon sugar, sturdy square wonton wrappers, triangle folds, egg wash, and deep frying at 350°F / 175°C.

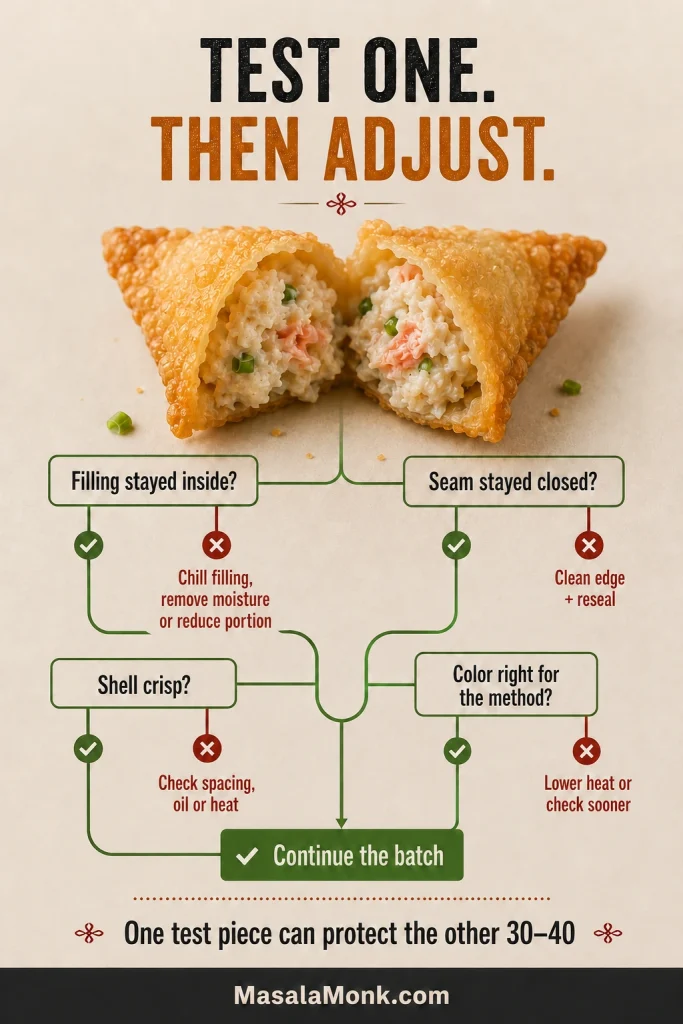
Keep each portion modest, press out the air before sealing, and cook one test rangoon before continuing. That first piece will tell you whether the remaining batch needs a little less filling, a firmer seam, or a shorter cooking time.

First-batch guide surrounding a finished triangle rangoon with balanced filling, one teaspoon sugar, a sturdy wrapper, egg wash, triangle folding and 350°F frying guidance.
Keep the first batch predictable. Then adjust sweetness or crab quantity without confusing the cause of any change.

Crab Rangoon Recipe

Crispy crab and cream cheese wontons, with complete instructions for deep frying, air frying, or baking.

Mix, chill, fold, then cook. The filling and sauce come together quickly. Most of the hands-on time is folding, and the first few wrappers are the slowest.

Hands-on preparation and foldingAbout 50–60 minutes
Chilling20–30 minutes, while the sauce and setup are completed
Deep-frying the full batchAbout 20–30 minutes
Resting before serving3–5 minutes
Total elapsed timeAbout 1 hour 25 minutes–1 hour 55 minutes
YieldAbout 30–35 rangoons with 3½-inch wrappers, or 36–40 smaller rangoons with thin 3-inch wrappers
Servings8 servings as written; roughly 8–10 with other appetizers, or 5–7 as the main hot appetizer

This is a party-size batch of roughly 30–40 rangoons. A half batch makes approximately 15–20 pieces—enough for about four people with other appetizers, or two to three people when these are the main hot appetizer.

For a half batch, halve the filling, sauce, and wrapper quantity, but keep the same frying-oil depth and temperature. You can still use one egg for the wash, or use plain water for simple triangle folds.

Equipment

  • All methods: mixing bowl, spatula, measuring teaspoons or a small scoop, lined tray, small bowl for egg wash, and a clean towel for covering the wrappers
  • Deep frying: heavy pot, frying thermometer, slotted spoon or spider strainer, and wire rack
  • Air frying: air fryer and oil mister or pastry brush
  • Baking: rimmed sheet pans, parchment, and oil mister or pastry brush

Ingredients

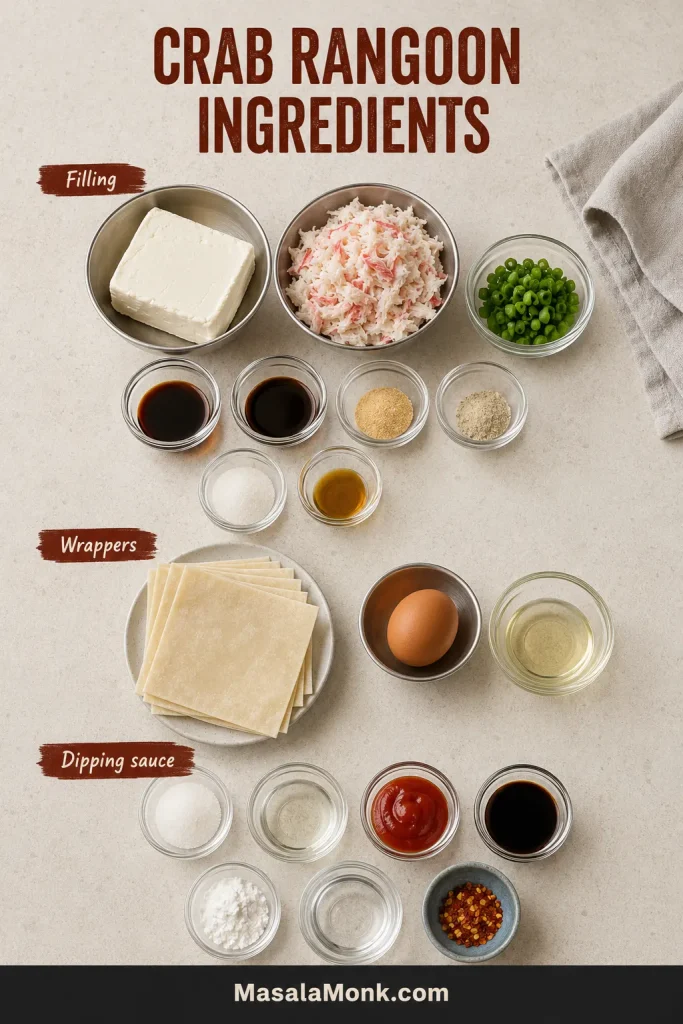
Overhead arrangement of cream cheese, crab, scallions, seasonings, wonton wrappers, egg, cooking oil and ingredients for homemade sweet-and-sour sauce.
Separate filling, sealing and sauce ingredients before mixing. Meanwhile, keep unused wrappers covered so their edges stay flexible.

Crab and Cream Cheese Filling

IngredientUS amountMetric amount
Full-fat block cream cheese, softened but not warm8 oz227 g
Ready-to-eat imitation crab, recommended for the first batch; or cooked lump or well-drained canned crab6 oz170 g
Medium scallions, very finely chopped2 mediumAbout 18–20 g
Low-sodium soy sauce1 tsp5 ml
Worcestershire sauce1 tsp5 ml
Garlic powder½ tspAbout 1.5 g
White pepper or finely ground black pepper¼ tspAbout 0.5 g
Granulated sugar—1 tsp for the recommended first batch; use 0–1 tsp to taste1 tsp4 g
Toasted sesame oil, optional¼ tsp1 ml
Fine saltSmall pinch, only if needed

For Wrapping and Cooking

  • One 40–50-count package square wonton wrappers, approximately 3–3½ inches / 7.5–9 cm wide
  • 1 large egg mixed with 1 teaspoon water, or plain water for simple triangle folds; you may not need all the egg wash
  • For deep frying: neutral high-heat oil, approximately 1½–2 inches / 4–5 cm deep
  • For air frying or baking: enough neutral oil to mist or brush every exposed part of the wrapper lightly

Package counts vary, and a few extra wrappers are useful in case some tear, dry out, or stick together.

Quick Red-Orange Sweet-and-Sour Sauce

IngredientUS amountMetric amount
Granulated sugar⅓ cup67 g
Water¼ cup60 ml
Unseasoned rice vinegar or white vinegar3 tbsp45 ml
Ketchup1 tbsp15 g
Low-sodium soy sauce1 tsp5 ml
Cornstarch2 tspAbout 5–6 g
Cold water for the slurry1 tbsp15 ml
Chili flakes, optionalSmall pinch

Make and Chill the Filling

  1. Finely chop imitation crab. For canned or lump crab, drain thoroughly, blot away visible moisture, and check carefully for shell fragments. Thaw previously frozen cooked crab completely before drying it.
  2. Mix the softened cream cheese, garlic powder, pepper, and the sugar, if using, until smooth.
  3. Add the soy sauce, Worcestershire sauce, and optional sesame oil.
  4. Stir in the scallions, then fold in the crab gently so the mixture stays thick and some crab texture remains.
  5. Taste and add a small pinch of salt only when needed.
  6. Cover and refrigerate for 20–30 minutes. Properly chilled filling holds a rounded scoop on the spoon.
Five-stage preparation guide showing softened cream cheese combined with seasonings, liquid sauces, scallions and crab to produce a thick, evenly mixed filling.
Add sauces and seasonings before the crab. Once the seafood goes in, stir only enough to distribute it.

Use cooked crab or ready-to-eat imitation crab. These short cooking methods crisp the wrapper and warm the filling; they are not intended to cook raw seafood safely.

Make the Sweet-and-Sour Sauce

  1. Simmer the sugar, ¼ cup water, vinegar, ketchup, soy sauce, and optional chili flakes until the sugar dissolves.
  2. Mix the cornstarch with 1 tablespoon cold water, then whisk the slurry into the saucepan.
  3. Cook for 30–60 seconds, until glossy and lightly thickened. Thin the cooled sauce with warm water, 1 teaspoon at a time, if needed.
Three-stage guide showing red-orange sauce simmering, cornstarch slurry being whisked in and the finished glossy sauce lightly coating a spoon.
Sweet-and-sour sauce thickens as it cools. If it turns gel-like, whisk in warm water one teaspoon at a time.

Fill and Fold

  1. Line a tray with parchment. Keep the wrapper stack covered and remove only four to six at a time.
  2. Add about 2 level teaspoons, or 10–12 g, to a thin 3-inch wrapper. Use about 2 rounded teaspoons, or 12–14 g, in a sturdy 3½-inch wrapper.
  3. Lightly moisten the edge with egg wash or water.
  4. Fold into a triangle or four-corner purse.
  5. Press the wrapper close around the filling, push out trapped air, and close every seam firmly.
  6. Run a fingertip along the seam. It should feel smooth and uninterrupted, with no soft air pocket beside the filling.
  7. Return each finished rangoon to the lined tray and keep it covered while you continue folding.

Deep-Fry

  1. Pour enough oil into a heavy pot to reach 1½–2 inches / 4–5 cm deep. Do not fill the pot more than halfway.
  2. Heat the oil to 350°F / 175°C.
  3. Lower four or five rangoons gently into the oil.
  4. Fry for approximately 2–3 minutes, turning only when needed for even color.
  5. Remove them when the wrappers are evenly golden, tiny blisters cover the flat sides, and the seams feel firm.
  6. Drain on a wire rack and let the oil return to 350°F / 175°C before the next batch.

Air Fry

  1. Preheat the air fryer to 370°F / 190°C for about 3 minutes, unless the manufacturer advises otherwise.
  2. Coat every exposed part of the wrapper lightly with oil.
  3. Arrange the rangoons in one uncrowded layer.
  4. Air fry for 6–8 minutes, beginning to check at 5 minutes.
  5. Tap the center panel gently with the tongs. It should feel dry and sound crisp, even when the wrapper remains lighter than a fried one.
  6. Purse shapes usually do not need flipping. Turn flat triangles once only when their undersides remain noticeably pale.

Bake

  1. Heat the oven to 400°F / 200°C. Line one or two rimmed baking sheets with parchment.
  2. Spray or brush every exposed part of the wrapper lightly with oil.
  3. Arrange the rangoons in one layer with at least 1 inch / 2.5 cm between them.
  4. Bake for 10–14 minutes, rotating the tray after about 7 minutes.
  5. When using two trays, switch their positions and turn them front to back.
  6. Remove them when the edges snap, the wrapper around the center feels firm, and no floury-looking patches remain.

Before eating: Let the rangoons rest for 3–5 minutes. The crisp shell cools before the creamy center does.

Allergen note: This recipe may contain milk, wheat, egg, soy, fish, crustacean shellfish, sesame, or peanut, depending on the packaged ingredients and cooking oil used. See the detailed allergen guidance below.

Once the first rangoon cracks cleanly and stays full, the rest of the batch becomes mostly repetition rather than guesswork. The guide below helps you choose a different filling, understand the wrappers, compare methods, or solve anything the test piece revealed.

Decision tree centered on a split-open crab rangoon, checking whether the filling stayed inside, the seam stayed closed, the shell crisped and the color suits the cooking method.
Rest the test rangoon for 3–5 minutes before opening it. Otherwise, hot filling can look looser than it will eat.
Guide contents

Choose and Prepare the Filling

Maybe the version you remember came in a paper takeout bag beside egg rolls, with a tiny cup of bright-red sauce. Maybe the center was almost entirely creamy, or full enough that you could see the crab when you broke it open. There is no single version everyone is trying to recreate.

For many people, crab rangoon is less about one official formula than a particular balance of sweetness, creaminess, and crackle attached to a familiar meal.

Crab rangoon is a Chinese-American restaurant appetizer rather than a traditional Chinese dish, which helps explain why fillings vary so widely.

Choose Your Crab Rangoon Filling

If you want…Use this fillingRecommended crab
Sweet takeout or buffet-style8 oz cream cheese + 4–5 oz crab + 1–1½ tsp sugarImitation crab
Balanced and creamy8 oz cream cheese + 6 oz crab + 0–1 tsp sugarImitation, canned, or lump crab
More distinct crab flavor8 oz cream cheese + 8 oz crab; omit sugarLump or well-drained canned crab

Because the total amount of filling changes, the sweet version makes slightly fewer rangoons and the crab-forward version slightly more. Wrapper size and portioning still have the greatest effect on yield.

Three plates showing finely chopped imitation crab, drained canned crab resting on paper towel and larger lump crab flakes being checked for shell fragments.
Treat each crab differently. Chop imitation crab, blot canned crab and fold lump crab gently to preserve texture.

Smooth takeout-style center: Finely chopped imitation crab blends into the cream cheese, while 1–1½ teaspoons of sugar recreates the gentle sweetness found at many takeout restaurants. Add ⅛–¼ teaspoon MSG (monosodium glutamate) for a slightly deeper savory note.

Balanced and creamy: The filling stays creamy while the crab remains noticeable. Omit the sugar for a savory center, or add up to 1 teaspoon for gentle sweetness.

More crab in every bite: Omit the sugar, drain the crab especially well, and fold it in at the end so some flakes remain visible.

To add a little crunch, fold in 2 tablespoons finely diced, thoroughly drained water chestnuts.

Ingredients and Why They Matter

This filling does not need a long ingredient list. Moisture and texture matter more than piling in extra seasoning.

Full-fat block cream cheese gives the filling its most stable texture. Soften it until a spatula moves through it easily, but stop before it becomes warm, shiny, or runny. Spreadable tubs and whipped cream cheese may contain more moisture or air, while reduced-fat cream cheese generally produces a softer filling.

Imitation crab gives the mild, lightly sweet flavor many people associate with takeout crab rangoon. Lump crab provides the clearest seafood flavor and more visible flakes. Canned crab is convenient and crab-forward, but it must be drained thoroughly and checked for shell fragments.

Scallions add freshness without much moisture. Garlic powder adds flavor without introducing liquid, while soy sauce and Worcestershire sauce bring salt, savoriness, and tang in small enough amounts to keep the mixture thick.

What Should the Filling Look Like?

A properly chilled filling should hold its mound on the spoon, then relax into a creamy pocket once heated. It should not run, release visible liquid, or spread across the wrapper before you begin folding.

Close-up of chilled crab and cream cheese filling holding a rounded mound on a metal spoon, with small crab pieces and scallion flecks visible.
If chilled filling slides off the spoon, chill it longer or reduce the portion. If it cracks, let it soften briefly.
  • Too soft but not watery: refrigerate for another 15–20 minutes.
  • Visibly wet: chill the filling, spoon away any liquid that gathers, and avoid adding more liquid seasoning. If it still slumps after chilling, use slightly smaller portions and choose triangle folds.
  • Too stiff: let it stand at room temperature for a few minutes.
  • Long crab strands remain: break them up gently with kitchen scissors or the edge of a spatula.
  • Large cream cheese lumps remain: let the filling stand for about five minutes, then press the remaining lumps gently against the bowl with a spatula. Avoid vigorous beating once the crab has been added.
Check allergens and packaged ingredients
  • Wheat: standard wonton wrappers and most conventional soy sauces
  • Milk: cream cheese
  • Egg: egg wash and some imitation-crab products
  • Soy: soy sauce and some imitation-crab products
  • Fish: imitation crab and some Worcestershire sauces
  • Crustacean shellfish: real crab, crab extract, and some imitation-crab products
  • Sesame: optional sesame oil
  • Peanut: only when peanut oil is chosen for frying

Check every packaged ingredient, consider cross-contact in shared cooking oil, and follow the FDA guidance on reading complete ingredient and allergen information.

Wrappers, Portions, and Folding

The wrapper is doing more than holding the filling. Its size determines how much you can add without asking the seam to stretch.

Wonton wrappers are usually sold refrigerated near tofu, fresh noodles, or produce, and may be stocked in the freezer section of Asian supermarkets. Frozen wrappers should thaw completely in their sealed package in the refrigerator before you separate the stack.

  • Standard supermarket wonton wrapper: the most manageable all-purpose choice
  • Thin Hong Kong-style wrapper: delicate and deeply blistered, but easier to tear or overfill
  • Thicker wonton wrapper: sturdier and easier to handle, with a slightly chewier shell

Egg-roll wrappers can be cut into squares, while spring-roll sheets and rice paper behave differently. MasalaMonk’s crispy vegetable spring roll guide explains those alternatives in more detail.

How Much Filling Goes in Each Wrapper?

A properly filled wrapper should feel plump but relaxed, never stretched tightly over the filling. Leave enough clean space around the mound to release trapped air and close the seam.

  • Thin 3-inch / 7.5 cm wrapper: about 2 level teaspoons, or 10–12 g
  • Sturdy 3½-inch / 9 cm wrapper: about 2 rounded teaspoons, or 12–14 g
  • Four-corner purse: stay near the lower end of the range
  • Broad triangle: a sturdy larger wrapper can usually hold the higher end
A 3-inch wonton wrapper holding 10 to 12 grams of filling beside a 3½-inch wrapper holding 12 to 14 grams, with size and weight labels.
Measure the first few portions. Once your hand recognizes the volume, you can work faster without gradually overfilling wrappers.

Which Fold Works Best?

FoldMain advantageWorks especially well forMain risk
TriangleEasiest and strongest sealBeginners, air frying, and bakingSlightly flatter filling pocket
Four-corner purseClassic shape and fuller centerDeep fryingMore seams and faster-browning points

How to Fold and Seal Them

Pretty folds are optional. Closed folds are not. The first one may look awkward; it only needs to stay sealed. Once the portion and motion feel familiar, the tray usually fills much faster.

Triangle Fold

  1. Place the wrapper like a diamond with one point facing you.
  2. Add the measured filling to the center.
  3. Brush a thin film of water or egg wash around the edges.
  4. Bring the bottom point to the top point.
  5. Press close to the filling and push air toward the open edges.
  6. Seal from the center toward each corner.
Six-step overhead guide showing a square wonton wrapper filled, moistened, folded into a triangle, pressed to remove air and sealed along the edges.
Seal a triangle with one firm pass. Repeated pinching can thin the wrapper and create tiny cracks.

Four-Corner Purse

  1. Add the measured filling to the center.
  2. Brush a thin film of egg wash around the border.
  3. Bring two opposite corners together and pinch.
  4. Bring the remaining corners to the center.
  5. Press the wrapper close around the filling to remove air.
  6. Seal the four diagonal seams from the center outward.
  7. Check the point where all four seams meet.
Five-step guide showing a filled wonton wrapper formed into a four-corner purse by joining opposite corners, raising the remaining corners and sealing the seams.
Lift each purse gently by its center junction before cooking a full tray. Weak joins usually separate there first.

Water is usually enough for fresh wrappers and simple triangles. Egg wash provides extra grip for purse folds and deep frying. Use only a thin film; a soaked edge becomes slippery.

Close comparison of a properly sealed wrapper edge, filling caught along the sealing border and an air pocket trapped beside the filling.
A slightly damp edge becomes tacky; a soaked edge slides. Apply only a thin film of egg wash.

Back to the recipe · Compare cooking methods · Troubleshoot sealing

Compare the Three Cooking Methods

The filling stays the same. What changes now is the shell you want around it and the number of pieces you need to cook at once.

MethodResultFull-batch timeWorks especially well for
Deep fryThinnest, most blistered, and evenly crispAbout 20–30 minutesRestaurant-style texture; triangles or purses
Air fryCrisp, lighter shell with faster-browning pointsAbout 25–55 minutes; allow roughly 35–55 minutes with a five-piece basketSmaller lower-oil batches; triangles
BakeCrisp edges with a more tender center10–14 minutes when two trays bake together, or 20–28 minutes in two roundsLarger batches; triangles
Fried, air-fried and baked crab rangoons shown whole and cut open, with different wrapper colors, surface textures, temperatures and cooking times.
Keep the filling amount and fold consistent when comparing methods. Otherwise, wrapper shape can be mistaken for a cooking difference.

Deep-Fried Crab Rangoon

Deep frying produces the thinnest shell and the most even blistering because the hot oil reaches the seams, points, and flat sides at the same time. Triangle folds are easy to manage, while four-corner purses give the familiar restaurant shape.

The oil temperature matters more than chasing an exact shade of gold. When the oil falls too far below 350°F / 175°C, the wrappers absorb more fat before they become crisp. Let the pot recover between batches rather than adding more pieces to save a minute.

Five folded crab rangoons being carefully lowered into a heavy pot containing 1½ to 2 inches of oil at 350°F or 175°C.
Lower each piece close to the oil surface. This reduces splashing and helps prevent the fold from striking the pot.

Properly fried wrappers should feel light and brittle rather than thick or oily. Look for tiny blisters, firm seams, and even color before the points become dark.

Golden fried crab rangoons cooling in one layer on an elevated wire rack, with small wrapper blisters, firm seams and crisp pointed edges visible.
Freshly fried crab rangoon may feel slightly flexible. It should become brittle within a minute on the rack.

Frying Safety

  • Use a stable, heavy pot and do not fill it more than halfway with oil.
  • Keep water, damp wrappers, wet utensils, children, and pets away from the cooking area.
  • Lower the rangoons gently, remove any leaking piece promptly, and keep pot handles turned away from the edge of the stove.
  • Drain the cooked rangoons on a wire rack so steam does not soften the bottoms.

Air Fryer Crab Rangoon

For the air fryer, the triangle is the more forgiving shape. It has fewer seams and fewer exposed points competing with the hot circulating air. Purse-shaped rangoons still work, but their tips may crisp before the wrapper around the center.

Five uncooked triangle crab rangoons arranged without touching in a lightly oiled air-fryer basket, with open vents and space around every piece.
Leave the basket vents exposed and space the triangles apart. Crowding blocks hot air from reaching the bottoms and center panels.

A lighter shell is not a failed shell. A pale air-fried wrapper can still crack cleanly when you bite it. Trust the dry, crisp texture rather than waiting for the deep color produced by frying.

Two air-fried crab rangoons compared: one light-golden and crisp with a firm center, and one with dark points surrounding a softer pale center.
Do not wait for deep-fried color. Instead, tap the wrapper over the filling; it should feel dry and firm.

When the tips darken too quickly, lower the setting to 360°F / 180°C. The extra minute or two gives the center panel time to crisp without hardening the points.

Baked Crab Rangoon

On a sheet pan, triangles sit steadily and expose more wrapper to the heat. Baking is also the most practical option when you want to cook a large batch without standing over oil.

The wrapper around the center stays slightly more tender than the edges. That is part of the baked texture, not a sign that the batch failed. Look for crisp points, firm seams, and no dry floury patches.

Uneven oil coverage is the usual reason baked wrappers stay pale or leathery. Mist or brush any dry-looking areas and return the tray to the oven briefly rather than continuing until the points become hard.

Two trays of triangle crab rangoons baking on different oven shelves, with arrows showing tray rotation, shelf switching and different levels of oil coverage.
Remove a finished tray instead of waiting for both to match. Oven shelves rarely brown at exactly the same rate.

Which Dipping Sauce Do You Remember?

The sauce is often the part people remember most clearly and name least accurately. The red or orange dip may be sweet-and-sour, duck sauce, sweet chili, or plum sauce.

SauceAppearanceFlavor
Clear bright-red restaurant sauceThin, translucent, glossySimple vinegar-and-sugar sweet-and-sour
Red-orange sweet-and-sourGlossy and slightly opaqueTangy, sweet, lightly tomato- or fruit-based
Duck or apricot sauceOrange and jam-likeFruity and mild
Sweet chili sauceRed with visible chili piecesSweet with gentle heat
Plum sauceDarker and thickerFruitier and less sharply acidic
Five ceramic bowls containing clear red sauce, red-orange sweet-and-sour sauce, orange duck sauce, flecked sweet chili sauce and dark plum sauce.
Identify crab rangoon dipping sauce by texture before color. Brands vary in shade, but thickness remains more revealing.

The sauce included in the recipe is glossy, red-orange, and sweet-and-sour. Its vinegar cuts through the rich cream cheese and crisp wrapper. Duck or plum sauce provides a softer fruit contrast, while sweet chili adds gentle heat.

A hand dipping one corner of a broken-open crab rangoon into smooth red-orange sweet-and-sour sauce while the creamy center remains visible.
Use a shallow bowl for crab rangoon dipping sauce. It encourages a light corner dip and preserves more crunch.

For guests who prefer a less tangy dip, homemade yum yum sauce gives the platter a cool, creamy alternative.

Troubleshooting: What to Do Now

A few imperfect rangoons do not mean the batch is lost. Start with the symptom you can see. Most batches need one adjustment, not a complete restart.

Most problems lead back to thick filling, modest portions, or clean seams. The tables below separate issues you can catch before cooking from the ones that appear after the wrappers hit the heat.

Jump to: Before cooking · After cooking · Reheat softened leftovers

Before Cooking

Pre-cooking crab rangoon troubleshooting guide showing watery filling, long crab strands, cream cheese lumps, filling on a seam, a cracked wrapper and trapped air around a correctly folded piece labelled ready to cook.
Inspect the last pieces you folded first. Wrappers exposed longest are most likely to dry, crack or need resealing.
What you seeWhat to do now
Filling is wateryThe crab may have carried too much moisture, or the filling may be warm. Chill it for 15–20 minutes, spoon away visible liquid, and avoid adding more liquid seasoning. If it still slumps, use smaller portions and triangle folds.
Long crab strands remainBreak them up gently in the mixed filling with kitchen scissors or the edge of a spatula.
Cream cheese remains lumpyLet the filling stand for about five minutes, then press the remaining lumps gently against the bowl with a spatula. Avoid vigorous beating once the crab has been added.
Seam will not stickWipe the border clean, let it dry briefly, lightly moisten it again, and pinch.
Wrapper crackedPatch a small crack with a dampened scrap of wrapper. Discard badly split pieces.
Air remains around the fillingPress the wrapper closer to the mound and push the air toward the open edge before sealing.

Most sealing problems are easier to correct before the first batch cooks. Once the rangoons hit the heat, color, texture, and leakage become the useful clues.

After Cooking

Six-row crab rangoon troubleshooting guide comparing leaked filling, an opened seam, a greasy fried shell, air-fryer points burned, a pale baked wrapper and a hollow center with corrected results.
The failure location matters. A leaking seam suggests sealing trouble, while a split panel often points to overfilling.
What happenedWhat to do now
Filling leaked outThe portion may be too large, the filling too wet, or the border dirty. Reduce the remaining portions, clean each edge, and reseal.
Wrapper openedPress the remaining wrappers close to the filling, push the air outward, and pinch every seam again.
Fried rangoons are greasyBring the oil back to 350°F / 175°C and cook smaller batches.
Outside browned too quicklyLower the heat, let the oil or appliance temperature settle, and check the next batch sooner.
Air-fryer points burnedReduce the setting to 360°F / 180°C and add 1–2 minutes if the center panel still needs crisping.
Baked wrappers stayed paleBrush or mist the dry areas lightly and bake for another 1–2 minutes.
Bottom stayed softReturn the pieces in one layer for 1–2 minutes, then cool them on a rack.
Center feels hollowUse the measured portion, press the wrapper close around it, inspect every seam, and stop cooking once the shell is crisp.
Cooked rangoons softenedRe-crisp at 350°F / 175°C in the air fryer for 2–3 minutes or at 375°F / 190°C in the oven for 4–6 minutes.

Party Timeline and Quantities

The goal is to serve crisp rangoons—not spend the whole party trapped beside the stove. Smaller fresh batches stay crisper than one large pile slowly steaming itself soft.

To reduce last-minute cooking, let a make-ahead cheese ball cover the cold-appetizer slot while the rangoons come out in smaller fresh batches.

How Many Crab Rangoons Per Person?

Plan on 3–4 rangoons per person when several appetizers are available, or 5–6 when they are the main hot appetizer. Count the recipe as 8 servings; in practice, one balanced batch usually serves about 8–10 with other appetizers or 5–7 when these are the main hot appetizer.

Serving guide showing four crab rangoons for a mixed appetizer spread and six for a main hot appetizer, with full- and half-batch quantity guidance.
Count cooking capacity as well as appetite. A small air-fryer basket may serve only a few guests at once.

For a larger group, double the filling, but open and fill the second package of wrappers only when needed so the unused stack stays supple.

Make-Ahead Crab Rangoon Timeline

Up to 24 hours ahead: Prepare the filling and store it in an airtight container in the refrigerator. Make the dipping sauce and refrigerate it separately.

For the best wrapper texture, up to four hours ahead: Fold the rangoons, arrange them on parchment-lined trays, cover them carefully so the wrappers do not dry out, and keep them refrigerated until cooking.

For overnight or longer preparation: Freeze the assembled rangoons rather than refrigerating them.

Before guests arrive: Set out wire racks, sheet pans, dipping bowls, and serving platters. Take the sauce out of the refrigerator early enough to lose its deep chill, or warm it gently if preferred. Heat the oil, oven, or air fryer shortly before cooking.

During service: Cook the first batch before everyone is waiting at the platter. After that, smaller fresh batches can arrive while people are already eating. Hold finished rangoons uncovered on a wire rack in a 200°F / 95°C oven for no more than about 15 minutes.

Party timeline showing filling and sauce prepared up to 24 hours ahead, folding up to four hours ahead, freezing, setup, fresh-batch cooking and a short warm hold.
Plan the party backward from the first serving time. Cold preparation is flexible, but crisp holding time is limited.

Freeze and Cook From Frozen

Once frozen solid, the rangoons can be stored compactly and cooked whenever needed. Keep them frozen until they go directly into the oil, air fryer, or oven.

  1. Arrange the uncooked rangoons in one layer on a parchment-lined tray.
  2. Freeze until firm, usually 1–2 hours.
  3. Transfer them to an airtight freezer container or freezer bag.
  4. Separate layers with parchment to protect the seams and points.
  5. Use within two months for the best wrapper quality.

Do not thaw before cooking. Condensation can soften the wrappers and weaken the seams.

Four-stage guide showing uncooked crab rangoons frozen flat on a tray, placed in a freezer, packed airtight with parchment and cooked directly from frozen.
Label the fold and intended cooking method before freezing. Triangles and purses may finish at different times from frozen.

When deep frying frozen rangoons: Brush away visible ice crystals, lower them into the oil carefully, and cook smaller batches because frozen pieces lower the oil temperature more sharply.

MethodTiming from frozenLook for
Deep fry at 350°F / 175°C3–4 minutesEvenly golden wrapper and firm seams
Air fry at 370°F / 190°CCheck at 8 minutes; usually 8–12 minutesDry center panel and crisp points; the shell may remain lighter than a fried rangoon
Bake at 400°F / 200°CCheck at 14 minutes; usually 14–18 minutesCrisp edges and a firm center

Cook one frozen rangoon first because wrapper thickness, fold shape, filling amount, freezer temperature, and appliance performance all affect the timing.

Storage and Reheating

Freshly cooked rangoons have the most delicate shell, but dry heat restores enough crunch to make leftovers worth saving.

Refrigerate cooked crab rangoon within two hours. Once the heaviest steam has subsided, arrange the pieces in a shallow container and refrigerate promptly. Cover the container once the rangoons have cooled.

Use refrigerated leftovers within 3–4 days, but reheat and eat them within two days for the best wrapper texture. The USDA leftovers guide recommends reheating leftovers to 165°F / 74°C.

  • Air fryer: 350°F / 175°C for 3–5 minutes
  • Oven: 375°F / 190°C for 6–10 minutes
  • Microwave: the filling becomes hot, but the wrapper remains soft
Crab rangoons compared after reheating in an air fryer, oven and microwave, with crisp dry-heat results and a visibly softer microwaved wrapper.
Leave crab rangoon uncovered while reheating. Foil and lids trap steam, undoing the wrapper’s restored crunch.

What to serve with them · Back to top

What to Serve With It

Pair the rich, creamy rangoons with one substantial dish and one sharp or vegetable-led side. That gives the meal contrast without turning the table into a list of competing fried foods.

  • Takeout-style dinner: shrimp fried rice with a cool cucumber salad
  • Noodle dinner: lo mein or chow mein with stir-fried vegetables
  • Lighter spread: hot-and-sour soup with lettuce cups or smashed cucumber salad

The cucumber salad is especially useful between rich bites: rice vinegar, sesame, garlic, and chili reset the palate before the next rangoon.

Shared dinner table with a central platter of crab rangoons, smooth red-orange sauce, shrimp fried rice, cucumber salad and several hands serving food.
Keep the crab rangoon platter away from steaming rice and dressed salad. Nearby moisture can soften wrappers before serving.

For another Chinese-American takeout classic, try MasalaMonk’s Egg Foo Young with brown gravy.

Frequently Asked Questions

Is crab rangoon made with real crab?

It can be made with real crab, canned crab, imitation crab, or a mixture. Imitation crab often gives the mild, lightly sweet flavor associated with takeout crab rangoon.

Is crab rangoon supposed to be sweet?

Some takeout and buffet versions are gently sweet, while others are savory. The filling guide includes exact sugar ranges for sweet, balanced, and crab-forward versions.

Can crab rangoon be made gluten-free?

It requires dedicated gluten-free wrappers and individually checked sauces, imitation crab, and seasonings. Standard wonton wrappers contain wheat, and packaged ingredients vary by brand.

Why does crab rangoon keep opening?

Too much filling, trapped air, or filling on the sealing edge are the usual causes. See the troubleshooting section for the correction that matches what happened.
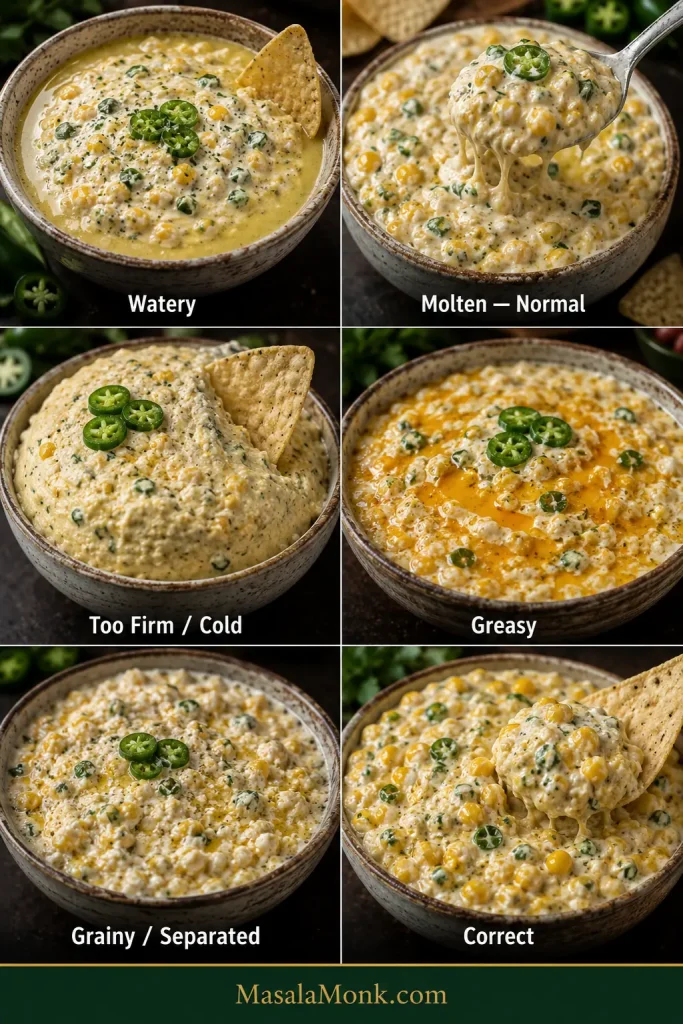
What is the red sauce served with crab rangoon?

It is usually a sweet-and-sour sauce, although some restaurants serve duck sauce, plum sauce, or sweet chili sauce. The dipping-sauce guide can help identify the version you remember.

The last two pieces rarely stay on the platter for long.

Almost-empty platter holding one triangle crab rangoon and one purse-shaped rangoon beside crumbs and sauce streaks, with a hand reaching for a final piece.
By the time the last batch arrives, the first platter may already be down to crumbs and sauce streaks.

The Rule to Remember

Thick filling, modest portions, clean seams.

Drain the crab, chill the filling until it holds a mound, and push out trapped air before sealing. Those three decisions do more for the finished rangoon than an elaborate fold or a longer ingredient list.

After the short rest, the shell should crack cleanly around a warm, creamy center—and the person who said they only wanted one may already be reaching for another.

Which version are you making: sweet and creamy, balanced, or packed with real crab?

Back to the top · Back to the recipe

Posted on Leave a comment

Baked Brie Recipe: Easy, Gooey, With Honey, Jam, Cranberry or Puff Pastry

Warm baked brie with honey, nuts, herbs, crackers, crostini, pear slices, grapes, and a serving knife on a wooden board.

Baked brie is the appetizer that makes people drift toward the table before dinner is ready: a warm wheel of cheese, a soft center, something glossy on top, and crackers or bread waiting for the first scoop.

The trick is not making baked brie complicated. What matters most is knowing when to stop. Brie should be warm and soft in the middle, not collapsed into oil; easy to scoop, not so runny that it escapes before guests reach the board.

Start with the easy no-pastry version. It gets to the table in about 15 minutes, teaches you exactly how baked brie should feel, and lets toppings like honey, jam, cranberry sauce, fig jam, nuts, and herbs do the work.

That kind of appetizer looks generous before anyone realizes how little work it took; most of the magic is just heat, timing, and one good topping.

Quick Answer: How to Bake Brie

For easy baked brie without pastry, bake a cold 8 oz / 225 g wheel at 350°F / 175°C for 8–12 minutes, until the center feels soft when gently pressed. Leave the rind on so the cheese holds its shape.

Finish with honey, jam, cranberry sauce, fig jam, pepper jelly, nuts, herbs, or flaky salt. Keep crackers, crostini, baguette, apples, pears, or grapes ready so the brie can be served while warm. For baked brie in puff pastry, use 400°F / 200°C, bake until the pastry is golden, usually 35–40 minutes, and rest for 5–10 minutes before cutting.

Infographic showing how to bake brie at 350°F for 8 to 12 minutes with the rind on and the center soft but not collapsed.
A standard 8 oz wheel usually needs 8–12 minutes at 350°F; then stop when the center feels soft rather than waiting for the cheese to collapse.

First-scoop check: the center should move easily while the rind still keeps the wheel mostly together.

Close-up of a cracker scooping soft baked brie with honey, nuts, herbs, and melted cheese in the center.
The first scoop should move smoothly through the creamy center while the rind keeps the baked brie neat enough for serving.

Need the next step? Go to the easy baked brie recipe, check the bake time chart, or compare baked brie toppings.

Jump to What You Need

Make It

Choose a Version

Serve and Fix

Easy No-Pastry Baked Brie

No-pastry baked brie is the best first version because it teaches timing, shows off toppings, and reaches the table fast. There is no wrapping dough, no sealing pastry, no waiting for a crust to brown — just warm cheese, a good topping, and something sturdy to scoop it with.

No-pastry baked brie in a cream ceramic dish with honey, walnuts, thyme, crackers, and a small serving knife.
Because the rind contains the cheese, no-pastry baked brie is the easiest version to master while honey, nuts, and herbs add flavor without extra dough.

Easy Baked Brie: Ingredients and Instructions

A fast no-pastry baked brie that lands on the table warm, soft-centered, and ready for crackers. This is the version to make when you want an easy appetizer that still feels generous.

  • Prep time: 5 minutes
  • Bake time: 8–12 minutes
  • Total time: 15–20 minutes
  • Servings: 4–6
  • Brie size: 8 oz / 225 g wheel
  • Oven: 350°F / 175°C
  • Texture: soft-centered, scoopable, not collapsed

Baked Brie Ingredients

Ingredients for baked brie arranged on a board, including brie, honey, jam, nuts, herbs, crackers, apples, pears, and grapes.
A reliable baked brie appetizer starts with one wheel of brie, one sweet topping, one crunchy element, fresh herbs, and dippers ready before the cheese leaves the oven.
  • 1 cold brie wheel, about 8 oz / 225 g
  • 2–3 tablespoons / 30–45 ml honey, fig jam, cranberry sauce, raspberry jam, apricot preserves, or pepper jelly
  • 2–4 tablespoons / about 15–30 g chopped pecans, walnuts, almonds, or pistachios
  • 1–2 teaspoons / about 1–2 g fresh thyme or rosemary, optional
  • Pinch of flaky salt, optional
  • Crackers, crostini, sliced baguette, apple slices, pear slices, or grapes, for serving

Instructions

  1. Preheat the oven to 350°F / 175°C.
  2. Keep the brie cold until baking. Leave the rind on; it helps contain the soft center.
  3. Place the brie on parchment, in a shallow oven-safe dish, or in a small cast iron skillet.
  4. For thick jam or cranberry sauce warmed into the top, spoon it over the brie now. Honey, loose jam, fresh herbs, and flaky salt usually look better after baking.
  5. Bake for 8–12 minutes, until the center feels soft when gently pressed.
  6. Finish with honey, jam, cranberry sauce, fig jam, nuts, herbs, and a small pinch of flaky salt as needed.
  7. Rest for 2–3 minutes if the cheese looks very runny, then serve warm with crackers, bread, or fruit.

Recipe note: Start checking early. Soft and gently wobbly is better than burst and oily. This is the part to check, not the clock.

Before you bake: Check how long to bake brie, confirm doneness cues, or jump to what to serve with baked brie.

Fastest 3-Ingredient Baked Brie

Use brie + honey or jam + nuts. Bake the cold brie until soft, spoon honey or jam over the top, add chopped pecans or walnuts, and serve warm. That is enough to put something warm, golden, and generous on the table in about 15 minutes.

Minimal three-ingredient baked brie setup with a cold brie wheel, honey, chopped walnuts, crackers, and fresh thyme.
When time is short, brie, honey or jam, and chopped nuts are enough to make a warm baked brie appetizer that still feels generous.

Bake the brie last, not first. The board can wait; the cheese cannot. Have the crackers, bread, fruit, topping, and spreader ready before the brie leaves the oven, and the whole appetizer feels calm instead of rushed.

What Makes This Baked Brie Work

Baked brie is a timing recipe more than an ingredient recipe. The cheese needs just enough heat to turn soft in the center, while the rind still holds everything together.

That is why the no-pastry version is the best place to start. It teaches you how baked brie should feel: warm, scoopable, gently wobbly, and still neat enough to bring to the table.

  • Keep the rind on: it acts like a small edible bowl.
  • Check early: soft and wobbly is better than burst and oily.
  • Use contrast: honey, jam, cranberry, fig, nuts, herbs, or flaky salt keep the cheese from feeling too rich.
  • Serve immediately: baked brie is at its best while the first scoop is still warm.
Baked brie with a soft center being scooped while the rind holds the round wheel of cheese in place.
The rind helps baked brie keep its round shape while the center warms into a creamy layer that is easy to scoop.

How Long to Bake Brie at 350°F

At 350°F / 175°C, a standard 8 oz / 225 g wheel of brie usually takes 8–12 minutes. Smaller wheels soften faster, while larger wheels need more time for the center to warm through.

Brie SizeMetricOven TempBake TimeUse For
Small wheel4–5 oz / 125 g350°F / 175°C6–8 min2–4 people
Standard wheel7–8 oz / 200–225 g350°F / 175°C8–12 min4–6 people
Medium wheel12–13 oz / 340–370 g350°F / 175°C12–18 min6–8 people
Large wheel16 oz / 450–500 g350°F / 175°C18–25 min8–10 people
Baked brie bake time chart showing small, standard, medium, and large brie wheels with baking times at 350°F.
Use the size of the wheel to choose a bake-time range, then check for a soft center before adding toppings or moving the brie to the board.

If your brie takes longer than the chart, nothing is wrong. Some wheels are thicker, colder, or packed more firmly. Use the chart as a starting point and the soft-center test as the final check.

How to Know When Baked Brie Is Done

Baked brie is done when the center feels soft under the rind and the wheel relaxes slightly at the edges. Look for wobble, not collapse.

Perfectly done baked brie with relaxed edges, a soft center, walnuts, thyme, and a serving knife in a shallow dish.
Baked brie is done when the edges relax, the center gives gently under a spoon, and the rind still looks intact.
  • Too firm: bake 2–3 minutes more and check again.
  • Soft and gently wobbly: ready.
  • Split, leaking, or oily: overbaked, but still fine to serve from the dish.

Too Firm, Perfect, or Overbaked

Use the visual cues together: a firm wheel needs a few minutes, a gentle wobble is ready, and a split rind means it is time to serve from the dish.

Doneness guide comparing three baked brie wheels labeled too firm, perfect, and overbaked.
This baked brie doneness guide shows why you want wobble, not collapse: too firm needs more time, while overbaked brie can split and turn oily.

For an 8 oz wheel, 8–10 minutes gives you a neater brie. Around 10–12 minutes gives you a gooier center. After that, leaking becomes more likely.

A tiny bit of cheese escaping is not a disaster. The real problem is when the whole wheel splits and floods the dish, so check early and stop when the center feels soft.

Should You Score Brie Before Baking?

You can score the top rind before baking brie, but keep the cuts shallow. Scoring helps honey, jam, herbs, and nuts settle into the top of the cheese, but cutting too deeply gives the melted center a place to leak.

Hand using a small knife to score shallow lines across the top rind of a cold brie wheel on parchment.
Score only the top rind lightly so honey or jam can settle in; deep side cuts can make melted brie leak too early.

For no-pastry baked brie, make shallow lines only across the top. Do not cut down the sides. For puff pastry baked brie, keep the wheel mostly intact so the cheese stays contained inside the pastry.

The rind is edible and helps the brie hold its shape. If you dislike the flavor, lightly scrape or shallow-score the top, but do not remove the rind or cut into the sides before baking.

Worried about leaks? See the puff pastry baked brie tips or jump to troubleshooting baked brie.

Choose Your Baked Brie Version

Now choose the style that fits the kind of table you are building. If you are unsure, choose honey for easy, cranberry for festive, fig jam for elegant, and puff pastry for drama.

Guide showing four baked brie versions with honey, cranberry, fig jam, and puff pastry.
Match the topping to the occasion: honey keeps things simple, cranberry adds holiday color, fig jam feels polished, and puff pastry makes it a centerpiece.
VersionUse WhenApprox. TimeTopping Idea
No-pastry baked brieYou want the fastest appetizer10–15 minHoney, nuts, thyme
Baked brie with jamYou want easy sweet-savory flavor10–15 minFig, raspberry, apricot, pepper jelly
Cranberry baked brieYou are making a holiday board15–20 minCranberry sauce, pecans, orange zest
Baked brie with honeyYou want something classic and simple10–15 minHoney, walnuts, flaky salt
Baked brie with fig jamYou want a cheese-board feel10–15 minFig jam, walnuts, rosemary
Puff pastry baked brieYou want a dramatic centerpiece35–45 minFig jam, cranberry, honey
Crescent roll baked brieYou want a shortcut dough option25–35 minJam or cranberry sauce
Phyllo baked brieYou want a crisp, flaky wrapper25–35 minHoney, fig jam, walnuts
Air fryer baked brieYou are making a small batch6–10 minHoney or jam
Brie bitesYou want party-tray finger food20–30 minCranberry, fig jam, pepper jelly

Ingredients and Topping Basics

Brie

Use a round wheel of brie if possible. A standard wheel is usually 7–8 oz / 200–225 g and serves 4–6 people as an appetizer. For a party or holiday board, a larger 12–16 oz wheel works better. Wedges can be warmed, but a wheel holds its shape better and looks cleaner when guests start scooping.

You do not need the most expensive brie for baking. A good everyday wheel works well because the cheese is being warmed and topped; save very delicate or expensive brie for a room-temperature cheese board.

Honey, Jam, Cranberry Sauce, or Fig Jam

For an 8 oz / 225 g wheel, use 2–3 tablespoons / 30–45 ml honey, jam, cranberry sauce, fig jam, or pepper jelly, plus 2–4 tablespoons / about 15–30 g chopped nuts if using. That is enough to flavor the cheese without drowning it.

If you already have homemade jam, preserves, or leftover cranberry sauce, baked brie is one of the easiest ways to turn it into an appetizer.

Nuts, Herbs, and Dippers

Pecans, walnuts, almonds, and pistachios add the crunch that keeps each bite interesting. Thyme and rosemary add aroma. Crackers, crostini, baguette, apples, pears, and grapes should be ready before the cheese goes into the oven. Warm brie should never be waiting on crackers.

Best Baked Brie Toppings

Use this chart like a shortcut to the mood you want: simple, festive, elegant, spicy, or savory.

The best bite has all three things: creamy cheese, glossy topping, and something crisp enough to carry it.

Overhead board of baked brie toppings including honey, fig jam, cranberry sauce, pepper jelly, nuts, herbs, fruit, crackers, and flaky salt.
Great baked brie toppings add contrast, so pair creamy cheese with something sweet, tart, crunchy, herby, salty, or lightly spicy.
ToppingPair WithFlavor
HoneyPecans, walnuts, thymeSweet, simple, glossy
Fig jamWalnuts, pistachios, rosemaryRich, elegant, cheese-board style
Cranberry saucePecans, orange zest, rosemaryTart, festive, holiday-ready
Raspberry jamAlmonds, pistachiosBright and sweet-tart
Apricot preservesAlmonds, honeyMild, fruity, crowd-friendly
Pepper jellyPecans, crackers, charcuterie boardsSweet-spicy and bold
Hot honeyWalnuts, pecans, plain crackersSweet-spicy and bold
Apple or pearWalnuts, honey, thymeFresh and fall-style
Garlic and herbsOlive oil, rosemary, thymeSavory and aromatic

Nut-Free Baked Brie Toppings

For a nut-free baked brie, use honey with flaky salt, cranberry sauce with orange zest, fig jam with rosemary, pepper jelly with herbs, or apple slices and pomegranate seeds around the board.

Nut-free baked brie board with honey, cranberry sauce, fig jam, pomegranate seeds, apples, pears, grapes, herbs, crackers, and crostini.
For nut-free baked brie, lean on fruit, herbs, pomegranate, honey, cranberry sauce, fig jam, and sturdy crackers to keep the board full and balanced.

Baked Brie With Jam

Jam turns warm brie into a sweet-savory appetizer with almost no extra work. When the jam warms slightly, it softens into the top of the brie and gives each cracker a little sweet-tart edge.

Baked brie with ruby red jam melting over the top, served with crostini, crackers, and fresh thyme.
A thicker jam works best here because it warms into the top of the cheese without immediately sliding off or flooding the dish.

Baked Brie With Jam: Before or After Baking?

Add thick jam before baking if you want it warmed into the top of the cheese. For a brighter, glossier finish, spoon loose jam on after baking. Either way, keep the layer modest so the topping does not slide off or flood the dish.

Split guide showing thick jam on brie before baking and loose jam spooned onto warm baked brie after baking.
Add thick jam before baking for a warmer topping; spoon loose or glossy jam on after baking when you want a cleaner finish.

Fig jam, raspberry jam, apricot preserves, cherry jam, blackberry jam, cranberry sauce, and pepper jelly all work. For a sweeter, brighter twist, especially if you like sweet-fruity pairings, a small spoon of pineapple jam can also work with plain crackers or toasted baguette.

Use fig jam with walnuts and rosemary for a deeper cheese-board flavor. Raspberry jam with pistachios makes a brighter party appetizer, while apricot preserves with almonds are mild and crowd-friendly. Pepper jelly with sturdy crackers gives the brie a sweet-spicy edge.

Baked Brie With Honey

Honey is the easiest pretty choice: simple, golden, and good with almost any cracker or bread. Bake the brie first, then drizzle honey over the top and finish with nuts, herbs, and a small pinch of flaky salt.

Honey being drizzled from a wooden dipper over baked brie with pecans, thyme, crackers, and a soft center.
After baking, drizzle honey so it stays golden on top, then add nuts, herbs, and a pinch of salt to balance the rich cheese.

The honey should sit on top in a thin shiny layer, not drown the cheese. A little flaky salt and a few toasted nuts make each scoop taste fuller.

Maple syrup can stand in for honey when you want a deeper, cozier flavor. Pair it with pecans or walnuts, especially for fall or holiday appetizer boards.

Cranberry Baked Brie

Cranberry baked brie is the holiday choice that brings color to the board. For Thanksgiving, Christmas, New Year’s Eve, or any winter table, cranberry sauce gives the cheese tartness and brightness.

Cranberry baked brie with pecans, orange zest, rosemary, crackers, and melted cheese in a cream dish.
Cranberry baked brie works especially well for holiday boards because tart cranberry sauce, orange zest, rosemary, and pecans brighten the creamy cheese.

Add chopped pecans or walnuts, a little orange zest, and a few rosemary leaves for a more holiday-ready look and flavor. Leftover cranberry sauce works beautifully here, especially with orange or warm spices.

Homemade cranberry sauce with orange juice is especially good because the orange brightens the warm cheese and keeps the topping from feeling too heavy.

Baked Brie With Fig Jam

For the most cheese-board-style choice, reach for fig jam. It tastes rich and elegant with warm brie, especially when paired with walnuts, pistachios, rosemary, thyme, apples, grapes, or crostini.

Baked brie with dark fig jam, fresh figs, pistachios, walnuts, rosemary, crostini, and melted cheese.
Fig jam gives baked brie a richer cheese-board flavor, while fresh figs, rosemary, nuts, and crostini make the board feel elegant without extra work.

Bake the brie until soft, spoon the fig jam over the top, then finish with nuts and herbs. A tiny drizzle of honey can make it glossier, but you do not need much.

This is also a useful way to turn homemade fig jam into a party appetizer without making anything complicated.

Baked Brie With or Without Puff Pastry

You can bake brie with or without puff pastry. No pastry is faster and lets the topping shine. Puff pastry turns baked brie from easy appetizer into a golden centerpiece, but it also asks for a little more patience.

VersionOven TempTimeKey Tip
No pastry350°F / 175°C8–12 minKeep brie cold and check early
Puff pastry400°F / 200°C35–40 minSeal pastry well and rest before cutting
Crescent rolls350°F / 175°C20–24 minSeal every seam
Phyllo375°F / 190°C20–30 minBrush layers with butter
Air fryer350°F / 175°C6–10 minUse parchment or a small air-fryer-safe dish
Brie bites375°F / 190°C18–22 minUse a mini muffin tin

Puff Pastry Baked Brie

Use puff pastry when you want the dramatic version. You will need 1 thawed puff pastry sheet, an 8–12 oz brie wheel, egg wash, and optional jam, honey, cranberry sauce, or nuts.

How to Wrap Brie in Puff Pastry

Keep the pastry cold and the filling thin before sealing, because puff pastry bakes cleaner when it is not stretched or overloaded.

Hands folding puff pastry around a brie wheel with egg wash, jam, parchment, flour, and a pastry brush nearby.
Keep puff pastry cold, use only a thin layer of filling, and seal the seams well so the brie stays contained while the crust turns golden.
  1. Heat the oven to 400°F / 200°C.
  2. Roll the puff pastry into a square large enough to wrap the brie, usually about 10–11 inches wide.
  3. Place the brie in the center and add a thin layer of jam, honey, or cranberry sauce if using.
  4. Wrap the pastry around the brie and seal the seams well.
  5. Brush with beaten egg.
  6. Bake for 35–40 minutes, or until the pastry is golden.
  7. Rest for 5–10 minutes before cutting.

Here is where people usually go wrong: too much filling, warm pastry, or cutting too soon. Use less jam than you think, chill the wrapped brie if the pastry gets soft, and let the baked pastry rest before slicing so the cheese does not gush out before guests can scoop it.

Warm pastry stretches and tears more easily, which is why chilling the wrapped brie helps it bake up cleaner and leak less.

Rest Before Cutting Puff Pastry Baked Brie

Resting gives the pastry a cleaner cut and gives the melted brie a moment to settle before the first scoop.

Golden puff pastry baked brie cut open with melted brie inside, crostini, cranberry jam, thyme, and a knife nearby.
After resting, puff pastry baked brie slices more neatly while the crust stays crisp and the melted cheese remains scoopable.

If you are building a non-vegetarian puff pastry appetizer tray, these puff pastry sausage rolls make a heartier companion beside the brie.

Crescent Roll Baked Brie

Crescent dough is the casual shortcut. Wrap the brie completely, add jam or cranberry sauce if you like, brush with egg wash, and bake at 350°F / 175°C for 20–24 minutes. Let it rest for about 15 minutes before cutting.

Phyllo Baked Brie

Phyllo gives baked brie a crisp, flaky shell that feels lighter than puff pastry. Brush the phyllo sheets with melted butter, layer them around the brie, add a small amount of jam or honey, and bake until golden and crisp. Keep the filling modest so the layers stay crisp.

Air Fryer Baked Brie

For a quick few-people option, air fryer baked brie works well with a small wheel. Use parchment or a small air-fryer-safe dish, keep the rind on, and air fry at 350°F / 175°C for 6–10 minutes, depending on the size and thickness of the brie. Check early because air fryers heat quickly.

Baked Brie Bites

For a grazing table or party tray, brie bites are easier than asking everyone to gather around one wheel. Cut puff pastry into small squares, press them into a mini muffin tin, add small pieces of cold brie, and bake until the pastry is golden.

For a full party tray, cut the pastry and brie into 24 small pieces, keep the brie cold until assembly, and use only a small spoon of jam, cranberry sauce, fig jam, or pepper jelly in each cup so the bites stay neat.

Air Fryer Brie or Brie Bites?

Choose air fryer brie for a small wheel, or use brie bites when you want tidy portions for a party tray.

Split guide showing air fryer baked brie in parchment and baked brie bites in a mini muffin tin with jam.
Use the air fryer for a small brie wheel, or make brie bites in a mini muffin tin when you want easier party-size servings.

What to Bake Brie In

You do not need a special brie baker, but the right dish makes serving easier. Baked brie is hot, soft, and delicate when it comes out of the oven, so use something that helps you move or serve it without stress.

Equipment guide showing parchment, shallow dish, cast iron skillet, brie baker, pie plate, and mini muffin tin for baking brie.
Choose a shallow dish, skillet, or brie baker when you want to catch melted cheese and serve the baked brie straight from oven to table.
EquipmentUse It For
Parchment-lined baking sheetEasy cleanup and transfer
Shallow oven-safe dishServing directly from the oven
Small cast iron skilletRustic presentation and better heat retention
Ceramic brie bakerHolding toppings and melted cheese neatly
Pie platePuff pastry baked brie
Mini muffin tinBaked brie bites

If you are serving guests, a small dish or skillet is less stressful than trying to move a soft wheel from a flat pan. Serve the brie straight from the dish if you are nervous; it looks relaxed, catches any melted cheese, and keeps the appetizer warmer for a little longer.

What to Serve With Baked Brie

This is the kind of appetizer people naturally gather around, so make the scooping easy and the board relaxed.

Place the brie down first, then build around it. Tuck crackers and bread close enough for scooping, add fruit where the board needs color, nuts where it needs crunch, and one salty bite so the whole board does not feel too sweet.

Baked brie serving board with crackers, sliced baguette, apples, pears, grapes, olives, dried fruit, honey, herbs, and crostini.
Build the board around the brie with sturdy crackers, bread, fruit, and savory bites so every scoop has contrast.

Keep the dippers close. People should be able to scoop without chasing the cheese across the board.

Simple Baked Brie Board Formula

Use one warm brie + one crunchy cracker + one bread + one fresh fruit + one sweet topping + one salty or savory bite. That gives the board enough contrast without making it crowded.

For a fuller grazing board, the 3-3-3-3 charcuterie board rule is a useful way to balance cheeses, crackers or breads, fruit, nuts, pickles, and savory bites without overcrowding the board.

Good Dippers for Baked Brie

  • Crunchy: water crackers, butter crackers, seeded crackers, crostini
  • Bread: sliced baguette, toasted sourdough, crusty bread
  • Fresh: apple slices, pear slices, grapes
  • Sweet: dried apricots, dried cherries, fresh figs, pomegranate seeds

Apples and pears are especially useful because they cut through the richness of the cheese, while grapes and dried fruit make the board feel fuller with almost no prep.

Savory Board Additions

  • Olives
  • Roasted nuts
  • Caramelized onions
  • Roasted peppers
  • Prosciutto or salami, if you are making a non-vegetarian board

If people are standing around the board instead of asking when dinner is ready, the brie did its job.

Back to quick answer · Jump to recipe

Make-Ahead, Storage, and Reheating

Can You Make Baked Brie Ahead?

You can do almost everything ahead except the actual melting. Get the topping, nuts, herbs, crackers, bread, and fruit ready first, then bake the cheese close to serving time.

For guests, set the board first, bake the brie 10–15 minutes before serving, and let the warm cheese be the last thing that lands on the table.

Do not fully bake no-pastry brie hours ahead for a party. It firms as it cools, and reheating works, but it never feels quite as fresh as baking it close to serving.

VersionMake-Ahead Advice
No-pastry briePrep toppings ahead; bake close to serving
Puff pastry brieWrap up to 1 day ahead; brush with egg before baking
Crescent roll brieAssemble and chill; bake fresh
Brie bitesAssemble ahead if needed; bake close to serving
LeftoversRefrigerate and reheat gently

For another appetizer that can be shaped and chilled ahead, a make-ahead cheese ball works well with many of the same crackers, nuts, herbs, and board items.

If you are building a warmer appetizer table, a creamy spinach artichoke dip gives guests another scoopable option while the brie is at its melty best.

How Long Does Baked Brie Stay Gooey?

Baked brie is at its gooey best for about 10–15 minutes after baking. It stays warm a little longer in a ceramic dish or cast iron skillet. As it cools, it becomes thicker and more spreadable rather than runny.

If the brie cools before everyone gets to it, do not worry. It becomes spreadable rather than ruined, and a few gentle minutes in the oven can soften it again.

How to Store Leftovers

Store leftover baked brie in an airtight container in the refrigerator for 2–3 days. This stays within the USDA’s general guidance for refrigerated leftovers. The texture will be firmer once chilled, but it can be warmed again.

For safety, do not leave baked brie sitting out for hours. Once the appetizer has cooled and the serving window is over, refrigerate leftovers rather than keeping the cheese on the table all evening.

How to Reheat Baked Brie

Reheat no-pastry baked brie gently in a low oven until soft again. A temperature between 300°F and 350°F / 150°C and 175°C works well. Low heat is better because brie can turn oily when it is warmed too aggressively a second time.

If the brie is wrapped in puff pastry, reheat it in the oven instead of the microwave so the pastry does not turn soft and soggy.

Troubleshooting Baked Brie

A messy baked brie is still baked brie. Most problems come from too much heat, cuts that are too deep, or a board that is not ready when the cheese is warm.

Leaked baked brie served from a shallow dish with a cracker lifting melted cheese, honey, walnuts, and herbs nearby.
A leaking brie is still useful; instead of moving it, add crackers to the dish and serve the extra-melty cheese while warm.

My Brie Did Not Melt

It probably needed more time. Larger wheels take longer, and some brie is thicker than others. Return it to the oven for 2–5 minutes and check again. The center should feel soft when gently pressed.

My Brie Leaked Everywhere

If the brie leaked everywhere, it was probably overbaked, cut too deeply, or given an escape route through an unsealed pastry seam. Next time, keep the rind intact, avoid cutting down the sides, and use a shallow dish to catch any melted cheese.

My Puff Pastry Is Soggy

The pastry may have been too warm, the filling may have been too wet, or the brie may have been cut too soon after baking. Use less jam inside, keep the pastry cold, bake until deeply golden, and let it rest before slicing.

My Brie Turned Oily or Rubbery

That usually means it was baked or reheated too long. Brie should be warmed until soft, not cooked until it fully collapses. Start checking early, especially with smaller wheels.

The Topping Slid Off

Use less topping or add some of it after baking. A small amount of jam or honey goes a long way. Chopped nuts can also help hold the topping in place.

The Brie Cooled Too Fast

Bake it close to serving time and serve it in the dish it was baked in. A small cast iron skillet or ceramic dish helps the cheese stay warm longer than a flat sheet pan.

The Flavor Is Too Sweet

Add balance. Use less honey or jam next time, finish with flaky salt, add fresh herbs, and serve with plain crackers, tart apple slices, or savory board items.

Trying again? Go back to the easy baked brie recipe, check the timing chart, or return to the quick answer.

Baked Brie FAQ

Do you remove the rind before baking brie?

No. The rind is edible and helps the brie hold its shape while the inside melts. US Dairy notes that bloomy rinds like brie are generally edible. You can lightly score or scrape the top if you prefer, but avoid cutting deeply into the sides.

How long do you bake brie?

A standard 8 oz / 225 g wheel usually takes 8–12 minutes at 350°F / 175°C. Larger wheels can take 18–25 minutes. If the center still feels firm, bake it a few minutes more and check again.

What temperature is best for baked brie?

Use 350°F / 175°C for no-pastry baked brie. Puff pastry baked brie needs 400°F / 200°C so the pastry can brown properly.

Do you bake brie covered or uncovered?

Bake no-pastry brie uncovered so you can see when the edges relax and the center softens. Puff pastry baked brie is also baked uncovered so the pastry can turn golden and crisp.

Can you bake brie without puff pastry?

Yes. No-pastry baked brie is often the easiest and most reliable version. It is usually ready in about 10–15 minutes and lets honey, jam, cranberry sauce, nuts, and herbs shine without needing dough.

What jam goes best with baked brie?

Fig jam is rich and elegant, cranberry sauce is tart and festive, raspberry jam is bright, apricot preserves are mild and crowd-friendly, and pepper jelly gives the brie a sweet-spicy edge.

Should toppings go on before or after baking?

Thick jam or cranberry sauce can go on before baking. Honey, loose sauces, fresh herbs, and flaky salt usually look better after baking. Nuts can go on before baking if you want them lightly toasted, or after baking if you want more crunch.

Can you make baked brie ahead of time?

For no-pastry brie, prep the toppings ahead but bake the cheese close to serving. Puff pastry brie can be wrapped ahead and refrigerated, then brushed with egg wash and baked fresh.

Can you bake Camembert instead of brie?

Yes. Camembert can be baked in a similar way, but it usually has a stronger, earthier flavor. Use the same soft-center test and check early, especially with small wheels.

Can you microwave brie?

You can microwave brie briefly, but the oven gives better control and presentation. If using the microwave, warm it in short bursts on a microwave-safe plate and stop as soon as the center softens.

What crackers go with baked brie?

Water crackers, butter crackers, seeded crackers, crostini, and toasted baguette all work well. Choose sturdy crackers that can scoop warm cheese without breaking.

How long does baked brie stay gooey?

Baked brie is usually gooey for about 10–15 minutes. It stays warm longer in a small cast iron skillet, ceramic dish, or brie baker.

Can you bake brie in an air fryer?

Yes. A small wheel of brie can usually be warmed in an air fryer at 350°F / 175°C for 6–10 minutes, depending on size. Use parchment or an air-fryer-safe dish to keep the cheese contained.
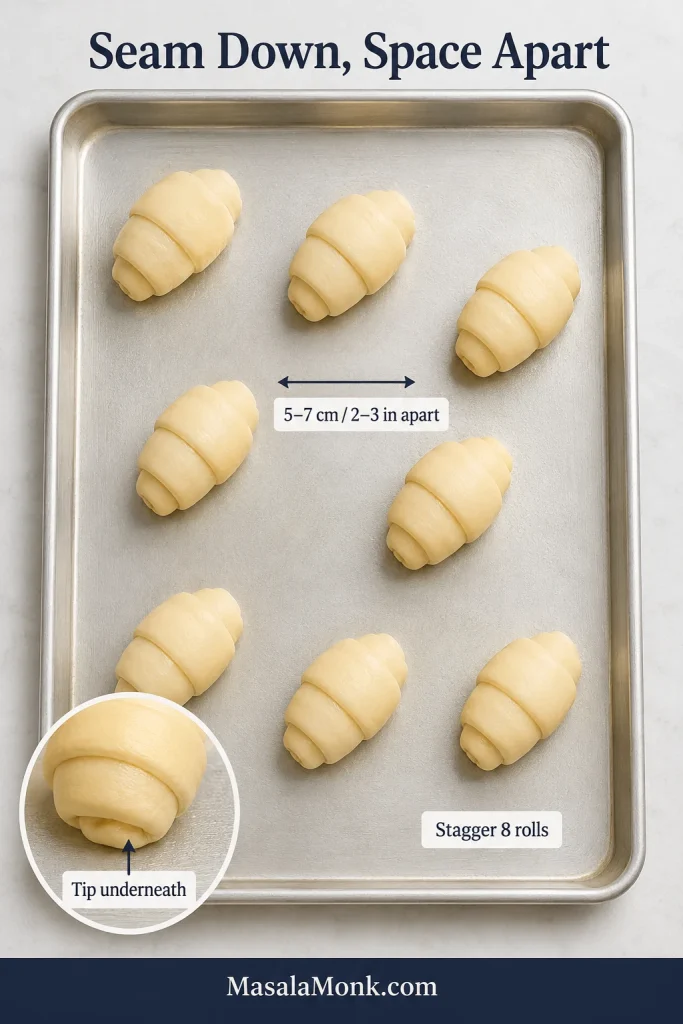
The Easiest Fancy Appetizer

Baked brie works because it gives you a lot of payoff for very little effort. Keep the cheese cold, bake it gently, choose one good topping, and have your crackers or bread ready before it comes out of the oven.

Bake it last, serve it warm, and let the first scoop do the work.

Posted on Leave a comment

Blackberry Jam Recipe That Sets | No Pectin, Seedless, Frozen Berries & Canning Notes

Homemade blackberry jam spread on golden toast with an open jar, spoon, and fresh blackberries on a wooden board.

Blackberry jam sounds simple until the berries hit the pan. Then the real questions begin: will it set, should you use pectin, what about the seeds, can frozen blackberries work, and what changes if you want pantry jars?

This blackberry jam recipe is for the bowl of berries from the market, the frozen bag you forgot about, the wild blackberries that came home with leaves still attached, and the cook who wants jam that tastes like fruit instead of just sugar.

The main method is a no-pectin blackberry jam with deep berry flavor, a spoonable set, and clear cues for when to stop cooking. Make the main cold-storage version first, then use the seedless, pectin, canning, freezer, low-sugar, and troubleshooting sections only as needed.
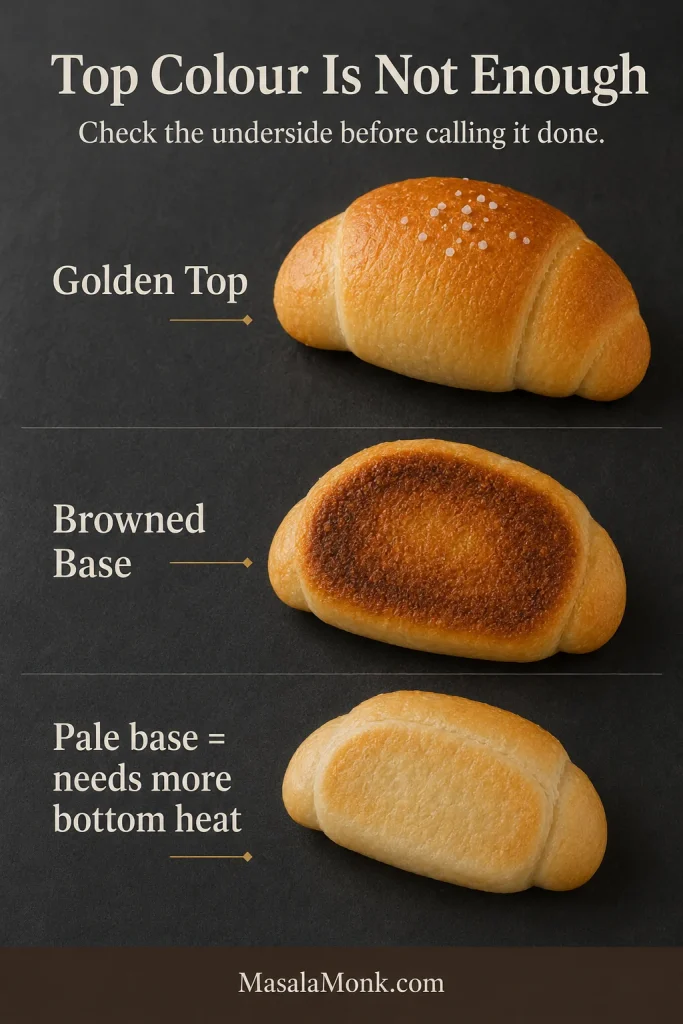
The best blackberry jam is glossy, dark, and just loose enough to spread. It should taste like the berries first: tart at the edges, sweet through the middle, and rich enough to make plain toast feel like something special.
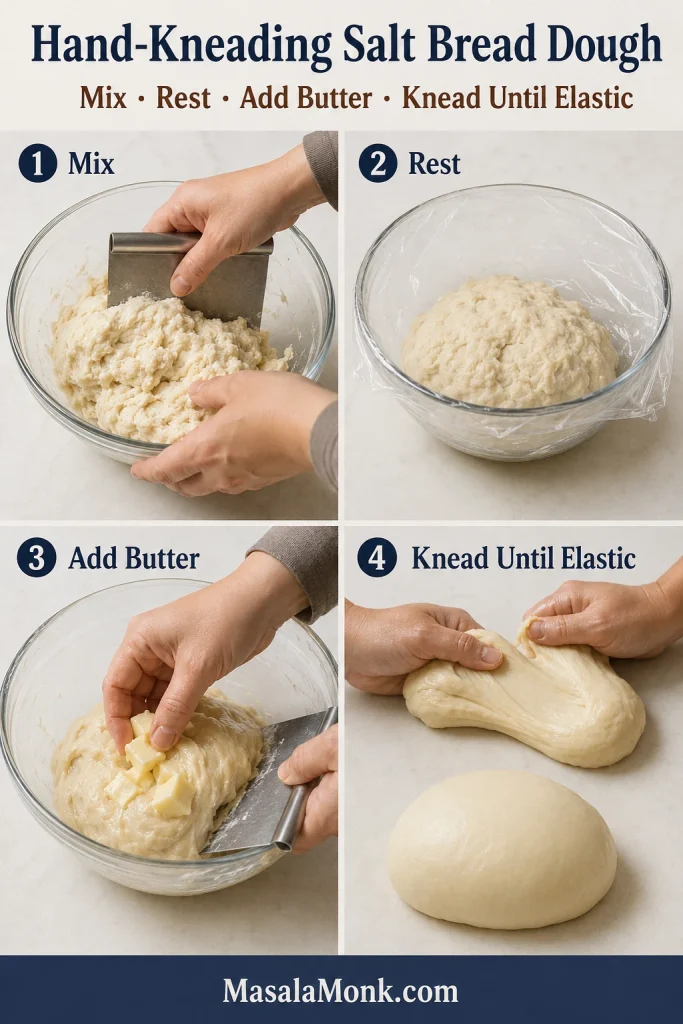
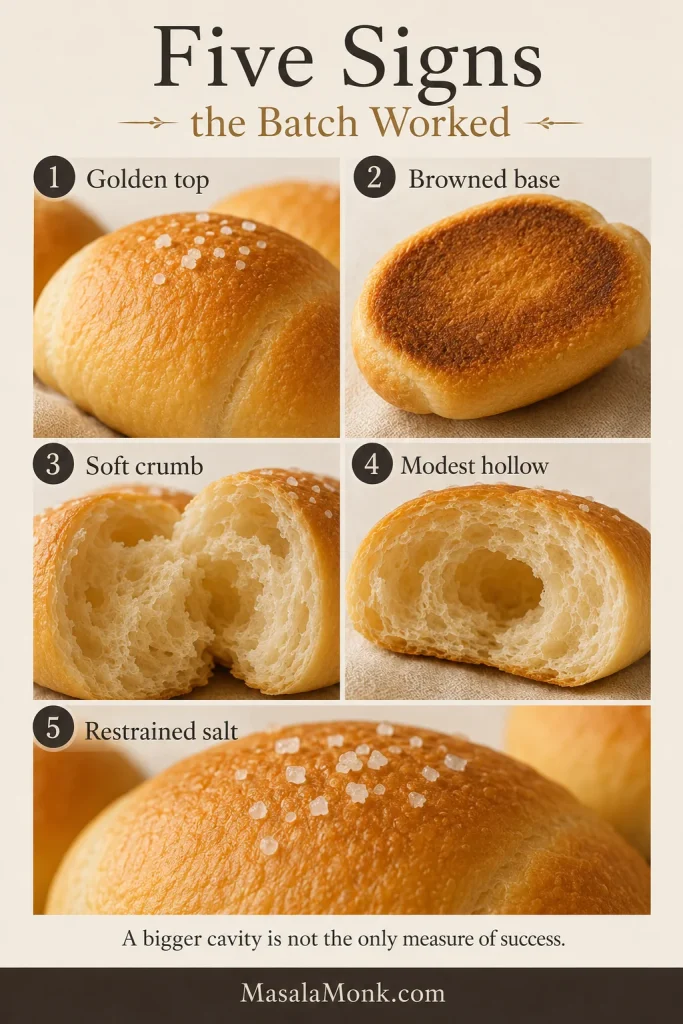
Most of all, it should be the kind of jar you reach for again the next morning, even if all you have is toast.

Quick Answer: Blackberry Jam That Sets

To make blackberry jam without pectin, cook crushed blackberries with sugar and lemon juice in a wide pan until the mixture turns glossy, darker, and thick enough to pass the cold plate test. At sea level, jam usually sets around 105°C / 220–221°F, but the cold plate test is often the easiest way to judge texture at home.

MasalaMonk’s best default path: use 1 kg blackberries, 600 g sugar, 2 tablespoons lemon juice, a wide pan, and the cold plate test. Strain half the berries if you want fewer seeds without losing jammy body.

For a flexible no-pectin batch, use about 1 kg / 6½–7 cups blackberries, 500–650 g / 2½–3¼ cups sugar, and 2 tablespoons lemon juice. Use the lower sugar range for a sharper cold-storage jam and the higher range for a sweeter, firmer, more classic set.

Fresh blackberries give the brightest result, but thawed frozen blackberries also work. Frozen berries may give a slightly softer set or smaller yield because they release more liquid. For shelf-stable jars, switch to a proper canning method with the correct jar size, headspace, processing time, and altitude adjustment.

If this is your first batch, do not worry about every variation yet. Make the main no-pectin version, store it in the fridge or freezer, and remember this: stop when the cooled spoonful wrinkles, not when the bubbling pot looks thick.

Best Default Blackberry Jam Path

If you are unsure where to begin, start with the default path: a balanced fruit-to-sugar ratio, a wide pan, and a cold plate test.

Blackberry jam ingredient board showing blackberries, sugar, lemon juice, a wide pan, and a cold plate test with the ratio 1 kg blackberries, 600 g sugar, and 2 tablespoons lemon juice.
For the easiest first batch, begin with the balanced blackberry jam ratio shown here: fruit, sugar, lemon, a wide pan, and a cold plate test.

Blackberry Jam Recipe

Blackberry Jam Without Pectin

This is the main stovetop version: ripe blackberries cooked with sugar and lemon juice until glossy, thick, and spreadable. It is written as a cold-storage jam unless you follow a shelf-stable canning recipe.

Recipe Details

Prep time10 minutes
Optional rest10 minutes
Cook time25–40 minutes after the sugar dissolves
Total time45–60 minutes, including optional rest
YieldAbout 720–960 ml / 3–4 cups / 3–4 half-pint jars, depending on cook-down and straining
Set cue105°C / 220–221°F or cold plate wrinkle test
StorageRefrigerate or freeze unless using shelf-stable canning instructions

Ingredients

  • 1 kg / about 6½–7 cups blackberries, fresh or thawed frozen
  • 500–650 g / about 2½–3¼ cups granulated sugar
  • 30 ml / 2 tablespoons lemon juice
  • Pinch of salt, optional

Best beginner version: Use 600 g sugar, strain half the softened berries if seeds bother you, and stop cooking when a chilled spoonful wrinkles softly instead of running back like syrup.

Texture cue: Finished blackberry jam should be thick enough to mound on a spoon once cooled, but still soft enough to spread without tearing toast.

Sugar note: Use 500 g sugar for a sharper, softer cold-storage jam. Use 650 g for a sweeter, firmer, more classic set. Berry cup measurements are approximate because blackberries vary in size; weight is more reliable.

Instructions

  1. Sort and rinse the berries. Remove stems, leaves, spoiled berries, and anything moldy. Rinse gently and drain well.
  2. Crush the fruit. Add the blackberries to a wide, heavy-bottomed pan. Mash with a potato masher until juicy but not completely smooth.
  3. Add sugar and lemon juice. Stir in the sugar, lemon juice, and optional pinch of salt. Let the mixture sit for 10 minutes if you have time.
  4. Dissolve the sugar gently. Warm over medium heat, stirring often, until the sugar dissolves and the mixture looks syrupy rather than gritty. This helps prevent grainy jam.
  5. Boil the jam. Increase the heat and bring the mixture to a lively boil. Stir often, scraping the bottom and sides as it thickens. Lower the heat slightly near the end if the jam starts catching on the bottom.
  6. Watch the texture. The jam will foam first, then darken and turn glossy. Near the end, the bubbles look slower and heavier.
  7. Test for set. Start testing after 20–25 minutes. Use a cold plate or cook to about 105°C / 220–221°F at sea level. Do not wait for the hot jam to look as thick as cooled jam.
  8. Jar and cool. Remove from heat. Skim foam if desired. Ladle into clean jars, let the jam cool until no longer steaming, then cover and refrigerate or freeze.

For seedless jam: strain half or all of the softened fruit before the final cook-down. See the seedless section below for details.

Do not miss: Use a wide pan, make two batches instead of doubling in one pot, and treat this as cold-storage jam unless you follow a proper shelf-stable canning method.

What the Finished Blackberry Jam Should Look Like

Use this cooled spoon cue as your texture target: the jam should mound, drip slowly, and still spread softly after the boil is over.

Spoon lifting thick glossy blackberry jam from a glass jar, showing a soft mound and slow drip.
The spoon tells you what the jar should feel like after cooling: thick enough to mound, yet soft enough to spread without turning rubbery.

Find What You Need

The recipe above gives you the basic batch. Below, the no-pectin fridge/freezer version can be adjusted for texture, sweetness, storage, pectin, jelly, or canning needs.

At a Glance: Choose Your Blackberry Jam Version

DecisionBest Choice
Want classic no-pectin jamStart with the main recipe above
Want a good first-batch sugar levelUse 600 g sugar per 1 kg blackberries
Want fewer seedsStrain half the cooked berries for the best balance
Using frozen berriesThaw first and expect a slightly longer cook time
Want a firmer, sweeter setUse the higher sugar range
Want less sugarTreat it as cold-storage jam unless using a canning-safe low-sugar method
Want pantry storageFollow a proper canning method with full processing instructions
Want clear jellyA clear jelly needs a separate strained-juice method

Pick the Best Path for Your Batch

Before choosing your version, separate flexible jam from pantry-safe jam. A fridge or freezer batch gives you room to adjust sweetness and texture; a shelf-stable jar needs a proper canning method.

This recipe is for the flexible no-pectin version. If your goal is clear jelly, sugar-free pantry storage, brand-specific pectin jam, or full shelf-stable canning, use a dedicated method built for that purpose.

Use This Recipe For

  • Blackberry jam without pectin
  • Fresh or frozen blackberries
  • Rustic, half-strained, or seedless texture
  • Fridge or freezer storage
  • Learning the cold plate set test
  • A flexible sweetness range

Use a Separate Method For

  • A clear blackberry jelly with no pulp
  • A sugar-free pantry jam without a tested low/no-sugar method
  • A commercial-style firm gel
  • A pectin-brand recipe with exact packet instructions
  • A pantry-stable canning recipe with full processing instructions
  • Any wax-sealed or paraffin-sealed jar method

Blackberry Jam Rules That Matter

You do not need perfect berries or special pectin to make a good jar. Most blackberry jam problems come from the same few things: a crowded pan, undissolved sugar, judging the jam while it is still hot, or trying to make a flexible batch behave like a canned preserve.

Do ThisNot This
Use a wide panDo not crowd a deep pot
Dissolve sugar before boiling hardDo not rush into a hard boil while the mixture is still gritty
Test on a cold plateDo not judge hot jam by thickness alone
Make two batches if neededDo not double everything in one pot
Use cold storage for flexible ratiosDo not pantry-store an improvised low-sugar jam
Strain half for balanced textureDo not strain all the fruit unless you want a very smooth jar

Ingredients You Need

The base is simple, but every ingredient has a job: berries bring flavor, sugar builds body, lemon brightens, and a tiny pinch of salt deepens the fruit.

Fresh blackberries, sugar, lemon halves, and a small bowl of salt arranged on a wooden surface for making blackberry jam.
Before the jam boils, the flavor is already taking shape: ripe blackberries bring depth, while sugar and lemon help with shine, balance, and set.

Blackberries

Use ripe blackberries that taste sweet-tart and smell fruity. Fully ripe berries give the best flavor. A few slightly underripe berries can help the jam set because underripe fruit usually has more natural pectin.

Good jam starts before the stove. If the berries taste flat in your hand, they will taste flat in the jar. Avoid moldy, fermented, or collapsing berries because cooking concentrates both the good flavor and the tired one.

If you bought extra blackberries and want more ways to use them beyond jam, MasalaMonk’s blackberry nutrition guide is a useful follow-up beyond the jam pot.

Sugar

Sugar sweetens the jam, but it also helps with body, shine, and set. Reducing sugar can be useful, especially for a sharper fridge or freezer batch, but the texture will usually be softer and the yield smaller.

The goal is not the least sugar possible; it is enough sugar to help the berries become jam without burying their tartness. For this no-pectin version, the most useful range is 500–650 g sugar per 1 kg blackberries.

Lemon Juice

Lemon juice brightens the flavor and helps the jam set. Fresh lemon juice is fine for fridge and freezer jam. For canning recipes, follow the recipe’s specified acid. Many tested recipes use bottled lemon juice because its acidity is consistent.

Salt

A small pinch of salt is optional. It does not make the jam salty; it simply rounds the sweetness and makes the blackberry flavor taste deeper.

Equipment for Blackberry Jam

The jam itself is simple, but a wide pan and a way to test the set make the whole process calmer, especially the first time you watch a loose purple pot slowly turn into jam.

  • Wide heavy-bottomed pan: helps water cook off quickly, so the jam reaches set before the fruit tastes dull or overcooked.
  • Potato masher: crushes the berries while keeping some fruit texture.
  • Wooden spoon or silicone spatula: helps you stir and scrape the bottom as the jam thickens.
  • Cold plates or thermometer: help you test the set instead of relying only on time.
  • Fine mesh sieve, food mill, or chinois: useful if you want seedless blackberry jam.
  • Clean jars: needed for fridge or freezer storage.
  • Canning tools: needed only for a proper shelf-stable canning process.

Fresh vs Frozen Blackberries

This comparison matters before cooking because frozen berries bring extra liquid into the pan, which changes timing more than the basic method.

Fresh blackberries compared with thawed frozen blackberries that have released juice, with labels about fresh berries being brighter and frozen berries cooking longer.
Peak-season fresh blackberries usually give the brightest flavor; however, frozen fruit still makes good jam once its extra juice has time to reduce.

During peak season, fresh blackberries make beautiful jam when they are ripe but still firm. The flavor is bright, and the berries usually cook down evenly.

Frozen blackberries work too. Thaw them first, then use the berries and their juices unless they release a large amount of watery liquid. Frozen fruit breaks down faster in the pan, but because it releases more moisture, the batch may take a few extra minutes before the bubbles turn glossy and heavy.

When thawed berries taste mild, use the higher end of the sugar and lemon range. If they taste sharp and concentrated, start lower and adjust after the fruit warms.

Leftover frozen berries can go into a thick berry smoothie recipe instead of being thawed for more jam than you need.

Best Blackberry Jam Ratio

The best ratio depends on how you want the jam to taste and how you plan to store it. Traditional jam uses more sugar and sets more firmly. Lower-sugar jam tastes fruitier but may cook longer and set softer.

Blackberry Jam Ratio Guide

The ratio guide turns the sugar range into practical choices: a small test batch, the balanced default batch, or a softer low-sugar jar.

Blackberry jam ratio guide showing small batch, best default, and low-sugar versions with bowls of blackberries, sugar, and lemon.
Match the ratio to the jar you want: small batch for testing, the default ratio for balance, or less sugar for softer cold-storage blackberry jam.
Batch StyleBlackberriesSugarLemon JuiceBest Use
Small batch500 g / about 3¼–3½ cups250–325 g / about 1¼–1⅝ cups1 tbspTesting the recipe or making 1–2 jars
Main batch1 kg / about 6½–7 cups500–650 g / about 2½–3¼ cups2 tbspBalanced no-pectin jam
Best default1 kg / about 6½–7 cups600 g / about 3 cups2 tbspFirst batch with balanced flavor and set
Traditional sweeter set1 kg / about 6½–7 cupsUp to 1 kg / about 5 cups2–3 tbspClassic firmer jam
Low-sugar fridge/freezer style1 kg / about 6½–7 cups250–400 g / about 1¼–2 cups2 tbspSofter, fruit-forward cold-storage jam

For a small batch, use the higher end of the sugar range if you want a firmer, more classic set.

Do not double casually: Need more jam? Make two smaller batches instead of crowding one pot. A crowded pan slows evaporation, stretches the cooking time, and can leave you with jam that is runny, scorched, or overcooked before it sets.

Low-sugar reminder: Reducing sugar does not only change sweetness. It changes how fast the jam sets, how glossy it looks, how much it yields, and how long it keeps.

Why This Blackberry Jam Works

  • A wide pan speeds up evaporation. The batch sets faster when excess water can cook off efficiently.
  • Lemon keeps the flavor bright. It balances the sugar and helps the fruit’s natural gel structure.
  • Moderate sugar keeps the berry flavor alive. The recipe is sweet enough to set but not so sweet that the fruit disappears.
  • A cold plate test prevents guessing. It shows how the jam behaves once cooled, not just how it looks while boiling.
  • Seed control is built in. You can leave the spread rustic, strain half for balance, or strain all for a smoother jar.
  • The method fits blackberries. Blackberries are naturally seedy and tart, so the recipe builds in both seed control and acid balance.

The same fridge/freezer-first logic also works well in MasalaMonk’s fig jam recipe, where the flexible no-pectin method stays separate from canning-safe notes.

How to Make Blackberry Jam Without Pectin

The no-pectin method is less about complicated ingredients and more about watching the pan. The mixture begins loose and syrupy, then foams, reduces, darkens, and finally moves more slowly as the water cooks off.

1. Sort and Crush the Berries

Pick through the blackberries and remove leaves, stems, spoiled berries, or anything moldy. Rinse gently and drain well. Place the berries in a wide pan and crush them with a potato masher until the juices release.

2. Add Sugar and Lemon Juice

Stir in the sugar and lemon juice. Let the mixture sit for about 10 minutes if time allows. This short rest pulls juice from the berries and helps the sugar dissolve more evenly.

3. Dissolve the Sugar Gently

Warm the mixture over medium heat, stirring often. The goal is to dissolve the sugar before the jam reaches a hard boil. If sugar crystals remain on the sides of the pan, try not to scrape them back into the pot.

4. Boil Until the Jam Thickens

Increase the heat and bring the mixture to a lively boil. Stir regularly, especially once it begins to thicken. The bubbles will look light and foamy at first. Later, they become slower, glossier, and heavier.

5. Test Before You Stop

Start testing after 20–25 minutes for a main batch, sooner for a small batch. Do not rely only on time. Frozen berries, watery berries, low sugar, and narrow pans can all change the cooking time.

What the Jam Looks Like as It Cooks

This is the part that makes many first batches feel uncertain. Early on, the jam looks too loose before it looks right, and that does not mean anything has gone wrong.

  • At first, the berries look loose, purple, juicy, and foamy. This is normal because the fruit is releasing water.
  • In the middle, the bubbles rise quickly, the fruit softens, and the color deepens. The pan may still look more like syrup than jam.
  • Near the set point, the bubbles slow down, the surface looks glossier, and a spoon begins to leave a brief trail through the mixture.
  • If it goes too far, the jam starts looking dull, sticky, and heavy. It may drag across the pan instead of bubbling freely.

The pot does not go from syrup to jam all at once. It changes in small signs: the bubbles slow, the color deepens, the spoon drags, and the chilled spoonful finally wrinkles.

Early Foamy Boil

The early boil looks messy because water is cooking off; keep stirring, then watch for darker, heavier bubbles as the jam reduces.

Blackberry jam bubbling loosely and foaming in a wide pan during the early cooking stage.
Foam at this stage is normal because the berries are giving off water; next, the loose bubbles reduce into a darker, heavier blackberry jam.

Glossy Bubbles Near Set

After the foam settles, darker and slower bubbles tell you the jam is close enough to test.

Close-up of dark glossy blackberry jam bubbles near the setting point in a pan.
When the bubbles slow down, darken, and look glossy, the jam is close enough to test instead of cooking blindly by the clock.

Spoon Trail Before Testing

Treat the spoon trail as a warning light, not the finish line; it tells you the jam is close enough to test, not automatically done.

Spoon pulled through thickening blackberry jam in a wide pan, leaving a visible trail through the mixture.
A spoon trail is a useful thickening cue; still, the cold plate test gives the final answer because hot jam always looks looser in the pan.

As the jam gets close, the kitchen starts to smell darker and more berry-rich, not just sweet. The color deepens from bright purple to a glossy blackberry wine shade, and the spoon feels a little more resistance as you stir.

This is the moment many beginners are tempted to keep cooking. Test first.

You are not waiting for the jam to look solid in the pot. The goal is a jam that cools into a spread.

How to Know Blackberry Jam Is Set

Jam thickens as it cools, so it will not look completely finished while it is bubbling in the pan. Use a test instead of waiting until it looks stiff. By then, it may already be overcooked.

Cold Plate Test

Put two small plates in the freezer before cooking. To test, remove the pan from the heat, spoon a little jam onto a chilled plate, and wait 30–60 seconds. Push the jam with your finger. If it wrinkles, mounds, or moves slowly instead of flooding back like syrup, the jam is ready.

Cold plate wrinkle test showing cooled blackberry jam being pushed on a white plate until it wrinkles and mounds.
This little wrinkle matters: it shows how the blackberry jam will set after cooling, before you accidentally cook it too thick.

When the spoonful on the cold plate wrinkles for the first time, the whole batch suddenly makes sense. That is the moment you stop guessing and start trusting the jam.

Thermometer Test

At sea level, blackberry jam usually sets around 105°C / 220–221°F. This number is useful, but not perfect for every kitchen. Altitude, sugar level, batch size, and berry moisture can all affect the final texture.

Spoon Test

Lift a spoonful of jam and let it fall back into the pan. Early in cooking, it drips quickly. As it gets close to set, it falls more slowly in thicker drops or sheets.

Better slightly soft than overcooked: If you are unsure, stop a little early and test again. Runny jam can often be simmered longer. Jam that has cooked into a stiff, rubbery paste is harder to rescue.

The first batch teaches you what the bubbles look like. After that, blackberry jam becomes much less mysterious.

Seedless Blackberry Jam

Blackberry seeds are part of the fruit, but they do not have to dominate the jar. This is where homemade jam becomes personal: some people love the old-fashioned seediness, while others want the fruit without the crunch.

For most readers, straining half the berries is the best default. It reduces grit while keeping enough pulp and body for real jam texture. Half-strained jam is often the sweet spot because it still feels homemade without making every bite about seeds.

Seed MethodResultBest For
Leave all seeds inRustic, thick, full fruit textureFastest old-fashioned jam
Strain half the berriesSmoother but still jammyBest balance for most people
Strain all the cooked berriesVery smooth seedless jamPeople who dislike blackberry seeds
Drain through a jelly bag without pressingClear blackberry jellyJelly, not jam

Seedless Straining Step

For seedless jam with real body, press the softened fruit firmly enough to capture thick pulp, not just thin juice.

Cooked blackberries being pressed through a fine mesh sieve into a bowl, with seeds and pulp visible in the sieve.
Straining changes the eating experience: seeds stay in the sieve, while the thick berry pulp below keeps seedless blackberry jam from feeling thin.

To strain half, cook the berries until softened, then press half the fruit through a fine mesh sieve, food mill, or chinois. Return the strained pulp and juice to the pan with the unstrained half. This keeps the jam thick and fruity without letting the seeds take over.

If you strain all the berries, press firmly enough to capture pulp, not just juice. For clear blackberry jelly, do not press the bag. Let the juice drip naturally so the jelly stays clearer.

Rustic, Half-Strained, or Seedless Texture

Compare the textures before straining all the fruit, because rustic, half-strained, and fully seedless jam each eat differently.

Three jars of blackberry jam labeled Rustic, Half-Strained, and Seedless, showing chunky, smoother, and fully smooth textures.
Texture is not one-size-fits-all: rustic jam keeps crunch, half-strained jam keeps body, and seedless jam gives the smoothest spoonful.

What Is Blackberry Jam?

Blackberry jam is crushed fruit cooked with sugar until it thickens into a spread. Unlike jelly, jam keeps some fruit body. Compared with preserves, it is usually less chunky and more evenly spreadable.

The best jar keeps the berry’s natural tartness. If it is undercooked, it runs like syrup. When overcooked, it can turn stiff and sticky. The sweet spot is glossy, spoonable, and thick enough to mound softly on toast.

Blackberry Jam vs Jelly vs Preserves

Once you start removing seeds, this distinction becomes important. Seedless jam still keeps fruit pulp, while blackberry jelly is built from strained juice.

Blackberry jam, blackberry jelly, and blackberry preserves compared by texture, showing crushed fruit, strained juice, and chunkier fruit pieces.
Look at the fruit first: blackberry jam has pulp, blackberry jelly is strained smooth, and preserves keep larger berry pieces.
TypeWhat It IsTextureBest Use
Blackberry jamCrushed fruit cooked with sugarThick, spreadable, fruit textureToast, biscuits, cakes, yogurt
Blackberry jellyStrained blackberry juice cooked to gelSmooth, clear, no seeds or pulpToast, glazing, clean seedless texture
Blackberry preservesLarger fruit pieces in a syrupy setChunkier and looserDesserts, spooning, cheese boards
Blackberry freezer jamJam stored frozen instead of cannedUsually softer and fresherBeginners, small batches, quick storage

For another fruit-spread example, MasalaMonk’s pineapple jam and preserves shows how a smoother jam and chunkier preserve can come from the same fruit but eat very differently.

A smooth, clear, seedless spread may be better as blackberry jelly. Jam keeps fruit pulp; jelly starts with strained juice. For clear jelly, strain the cooked berries through a jelly bag or damp cheesecloth and avoid pressing the solids. With seedless jam, you can press softened fruit through a sieve or food mill because pulp belongs in the jar.

Blackberry Jam With Pectin

Pectin is useful when you want a faster, more predictable set, especially with very ripe, watery, or low-pectin berries. It is not better or worse than no-pectin jam; it is simply a less flexible method with its own order and ratios.

No-pectin jam gives deeper cooked-berry flavor and more flexibility, while pectin recipes trade that flexibility for speed and predictability. If you are using Sure-Jell, Ball, Certo, Pomona, or another pectin brand, follow that product’s fruit amount, sugar amount, acid, pectin type, and boiling order. In many pectin recipes, the order matters as much as the ingredients.

  • Use pectin if you want a faster, more predictable set.
  • Skip pectin if you want a deeper cooked berry flavor and do not mind a longer cook.
  • Use low/no-sugar pectin if you want reduced sugar with a more reliable set.
  • Do not guess conversions between liquid, powdered, regular, and low-sugar pectin.

Pectin can help with texture, but it does not replace safe canning steps. Pantry storage is a separate decision.

Canning Blackberry Jam Safely

If your jars are going into the fridge or freezer, the recipe can stay flexible. Pantry shelves are different: storage becomes part of the recipe.

Safety note: The main no-pectin recipe is written for fridge or freezer storage. For shelf-stable blackberry jam, use a tested canning recipe and follow the correct jar size, headspace, processing time, and altitude adjustment.

Can you can this exact lower-sugar recipe? Not as written. Use it for the fridge or freezer, or switch to a tested canning formula.

Canning is where jam-making becomes less flexible. That is not because canning is scary; it is because room-temperature storage needs a recipe built for it.

In other words, the jar is not the safety step; the full process is.

Tested No-Pectin Berry Jam Reference

For shelf-stable berry jam without added pectin, the National Center for Home Food Preservation gives a tested berry jam formula using 9 cups crushed berries and 6 cups sugar, yielding about 7–8 half-pint jars. The hot jam is packed into hot sterile jars with ¼ inch headspace and processed in a boiling-water canner with timing adjusted by altitude.

That canning ratio is different from the flexible lower-sugar fridge/freezer recipe in this post. This reference is included to show how shelf-stable jam differs; it is not a substitute for following full canning instructions from start to finish.

  • Use half-pint / 8 oz / about 240 ml jars unless the canning recipe says otherwise.
  • Choose proper canning jars and new lids.
  • Fill hot jam into hot jars.
  • Leave ¼ inch headspace for canned jam or jelly.
  • Wipe rims before adding lids.
  • Process in a boiling-water canner.
  • Adjust processing time for altitude.
  • Use low/no-sugar pectin instructions written for canning if preserving reduced-sugar jam.
  • Do not use paraffin or wax seals for modern home-canned jam.

For detailed safety guidance, use a trusted home-preservation source such as the National Center for Home Food Preservation’s jam and jelly canning guidance. If you specifically want a tested berry jam method, their berry jams without pectin guidance is the better reference than improvising a pantry-stable version from a flexible fridge jam.

For many small batches, freezing is the easier answer. You still get homemade jam, but you do not have to turn it into a pantry-stable preserve.

Blackberry Freezer Jam

Blackberry freezer jam is the low-stress route when you want the homemade jar without the full canning afternoon. It is stored in the freezer instead of the pantry, so the process is more forgiving.

This post uses the cooked-jam route. Classic pectin freezer jam follows the pectin package method instead, so use those instructions if you are working from a freezer-pectin recipe.

Freezer jam is usually softer and fresher-tasting than canned jam. Some versions use pectin, while others are simply cooked down and frozen. Either way, use freezer-safe jars or containers and leave about ½ inch headspace so the jam can expand as it freezes.

  • Cool jam before freezing.
  • Use freezer-safe containers.
  • Leave expansion space at the top.
  • Thaw in the refrigerator.
  • Keep thawed jam refrigerated.

Low-Sugar, No-Sugar, and Sugar-Free Blackberry Jam

Low-sugar blackberry jam can taste wonderfully fruit-forward. This is often the version people want when the berries are especially good and they do not want sugar to cover them up.

Low sugar is not just less sweet. It is a different texture. Less sugar usually means a softer set, longer cooking time, smaller yield, and shorter storage unless you use a reliable low-sugar canning method.

  • Low sugar: less sugar, softer set, and fridge/freezer storage unless you follow a canning-safe method.
  • No sugar or sugar-free: usually needs special pectin, chia seeds, or cold storage.
  • Pantry-safe low sugar: requires a tested low/no-sugar canning method with its own processing instructions.

For fridge or freezer jam, start with 250–400 g sugar per 1 kg blackberries if you want a sharper, less sweet spread. Cook it until thickened, then rely on the cold plate test rather than the clock.

No-sugar or sugar-free blackberry jam usually needs special low/no-sugar pectin, chia seeds, or refrigerator/freezer storage. Do not assume a sugar-free jam is pantry-safe just because it looks thick; use the canning notes if shelf storage is the goal.

For a softer, small-batch preserve idea with apple and berries, MasalaMonk’s quick strawberry and apple preserve is a useful comparison.

Blackberry Jam Variations

These are flavor ideas for small fridge/freezer batches unless you are following a tested canning recipe for that exact combination.

Apple Blackberry Jam or Bramble Jam

Apple softens blackberry’s sharp edge and gives the jam a cozy autumn feel, especially when the berries are very ripe. In the UK, blackberry jam is often discussed as bramble jam, especially when made with foraged berries.

Blackberry Rhubarb Jam

Rhubarb pushes the jar brighter and sharper, which is lovely if you like tart jam. It also changes acidity, water content, and texture, so use a dedicated tested recipe if you want to can it.

Blackberry Jalapeño Jelly

Blackberry jalapeño jelly belongs on the savory-sweet side: cheese boards, crackers, sandwiches, and holiday appetizers. Treat it as its own jelly recipe rather than a small tweak to breakfast jam.

Blackberry Chia Jam

Blackberry chia jam is the quick breakfast version, soft-set and refrigerator-only. It uses berries, a little sweetener, lemon, and chia seeds instead of a traditional jam set.

Blackberry Vanilla Jam

Vanilla turns blackberry jam into more of a dessert spooning jam, especially for yogurt, cheesecake, oatmeal, and cake layers. Add vanilla near the end so it stays fragrant instead of cooked away.

Blackberry Lemon Jam

Blackberry lemon jam is the brighter jar. Lemon zest gives the fruit a fresher edge, as long as you use only the yellow zest and avoid the bitter white pith.

If your jam is not perfect the first time, you probably still have something useful: syrup, sauce, cake filling, yogurt topping, or a batch that just needs a few more minutes.

Troubleshooting Blackberry Jam

Most jam problems are not disasters; they usually come from water, sugar, heat, or patience falling slightly out of balance.

Blackberry jam troubleshooting guide showing runny jam, too-thick jam, grainy jam, and too-seedy jam with suggested fixes.
Soft, stiff, grainy, or seedy jam does not have to be wasted; with the right fix, it can still become a spread, sauce, filling, or topping.

Why Is My Blackberry Jam Runny?

Runny blackberry jam usually means it needed more cooking, the berries were watery, the sugar was reduced too much, or the batch was too large. Frozen berries and low-sugar batches often need extra time.

To fix soft fridge jam, return it to a wide pan and simmer again. Stir often and use the cold plate test. If it stays loose, use it as blackberry syrup for pancakes, yogurt, oatmeal, or desserts.

Why Is My Jam Too Thick?

Jam becomes too thick when it is overcooked or cooked too aggressively near the end. For immediate use, warm it gently with a spoonful of water or lemon juice to loosen it. Do not casually re-can adjusted jam without safe canning guidance.

Why Is My Jam Grainy?

Grainy jam often comes from undissolved sugar or sugar crystals. Warm the fruit, sugar, and lemon gently at first, and stir until the sugar dissolves before boiling hard.

Why Is My Jam Foamy?

Foam is normal when berries and sugar boil. Skim it near the end if you want a cleaner-looking jar. A tiny amount of butter is sometimes used in pectin recipes to reduce foam, but it is not needed for this no-pectin version.

Why Is My Jam Too Seedy?

Blackberries are naturally seedy. Next time, strain half the cooked fruit for a balanced texture or strain all of it for smoother seedless blackberry jam. For clear jelly, drain the juice without pressing the pulp.

Why Did My Jam Scorch?

Jam can scorch if the heat is too high near the end, the pan is too thin, or the batch is too large. Use a wide heavy pan, stir more often as the jam thickens, and avoid oversized batches.

Storage and Freezing

Storage depends on how the jam was made. Flexible no-pectin and low-sugar batches belong in cold storage unless they were prepared with a tested canning process.

Blackberry jam storage guide showing a fridge jar, a freezer container with headspace, and a pantry jar for full canning process only.
Fridge and freezer jars suit flexible jam, while pantry storage needs a recipe and process built for safe canning.
Storage TypeHow to StoreNotes
Fridge jamCool, cover, and refrigerateBest within 2–3 weeks
Freezer jamUse freezer-safe jars or containersBest within 3–6 months for flavor; leave ½ inch headspace
Canned jamStore sealed jars in a cool, dark placeFollow the canning recipe’s shelf-life guidance
Opened canned jarRefrigerate after openingUse within a few weeks
Moldy or fermented jamDiscardDo not scrape mold off jam and keep eating

A fridge jar is for the next few breakfasts, a freezer jar is for later, and a pantry jar only belongs on the shelf when the full canning process was built for it.

Once the jar has cooled, the real reward is how easily it fits into breakfast, dessert, and the small snacks in between.

How to Use Blackberry Jam

Blackberry jam is sweet enough for breakfast but tart enough for desserts and cheese boards. A good jar cuts through creamy, buttery, and sweet foods instead of tasting flat.

It is especially good anywhere you want something sweet but not flat: buttery toast, plain yogurt, sharp cheese, or a simple cake that needs a little fruit.

Blackberry jam served on toast, scones, yogurt, and a cheese board in four labeled serving scenes.
Once the jar is ready, use that tart blackberry flavor beyond toast: scones, yogurt, oats, cheese boards, and simple desserts all benefit from it.
  • Spread on toast, biscuits, croissants, or easy English scones.
  • Spoon over Japanese pancakes, waffles, oatmeal, yogurt, or ice cream.
  • Swirl a spoonful into overnight oats or layer it with plain yogurt and granola.
  • Use as a cake filling, cheesecake topping, or spooned dessert sauce with homemade whipped cream.
  • Swirl into thumbprint cookies or shortbread bars.
  • Serve with sharp cheddar, goat cheese, crackers, or warm biscuits.
  • Warm gently and brush over a simple cake as a berry glaze.
  • Stir into sparkling water, mocktails, or cocktails for a berry syrup effect.

FAQ

Most of the big decisions happen before the jar cools. These quick answers cover the questions that usually come up while cooking, storing, or planning the next batch.

Does blackberry jam need pectin?

No. It can set without added pectin when cooked with sugar and lemon juice until thick enough. Use the cold plate test or thermometer test instead of relying only on time.

Do frozen blackberries work for jam?

Yes. Thaw them first, then use the berries and their juices unless the liquid looks thin and watery. Frozen berries may take a little longer to cook down.

How long should blackberry jam cook?

A main batch usually takes 25–40 minutes after the sugar dissolves. Small batches cook faster; frozen, watery, or low-sugar batches often take longer.

What temperature makes blackberry jam set?

At sea level, it usually sets around 105°C / 220–221°F. Because altitude and sugar level affect the exact set point, the cold plate test is still useful.

Why did my blackberry jam stay runny?

It may need more cooking, or the berries may be watery, low in pectin, low in sugar, or crowded in the pan. Return soft fridge jam to a wide pan and cook again, testing often.

What is the best way to make seedless blackberry jam?

Cook the berries until soft, then press some or all of the fruit through a fine mesh sieve, food mill, or chinois. Straining half gives a smoother jam while keeping enough body.

Should blackberry seeds be removed?

No. Leave them in for rustic jam, or strain some of the fruit if you prefer a smoother texture.

How much sugar can be reduced?

For fridge or freezer jam, you can reduce the sugar to about 250–400 g per 1 kg blackberries. The jam will usually set softer and keep for less time.

Is low-sugar blackberry jam safe for canning?

Only when made with a tested low-sugar canning recipe or a low/no-sugar pectin method with its own processing instructions.

Blackberry jam or blackberry jelly: what is the difference?

Jam uses crushed fruit, so it has body and texture. Jelly uses strained juice, so it is smoother, clearer, and seedless.

How are blackberry preserves different?

Preserves are usually chunkier and looser than jam, with more whole or partial berries in the spread.

How long does homemade blackberry jam last?

Fridge jam is best within 2–3 weeks. Freezer jam is best within 3–6 months for flavor. Canned jam depends on proper processing and a good seal.

Does blackberry jam freeze well?

Yes. Cool it first, use freezer-safe containers, leave about ½ inch space for expansion, and thaw in the refrigerator.

Which pectin works best?

The best pectin is the one your recipe was written for: powdered, liquid, regular, or low/no-sugar. They are not always interchangeable, so follow that product’s order and ratios.

Should this recipe be doubled?

No. Make two separate batches. Doubling in one pot slows evaporation and can make the final set less reliable.

What tastes good with blackberry jam?

Toast, scones, pancakes, yogurt, oatmeal, cakes, cheesecake, ice cream, cheese boards, and whipped cream all work well.

Final Thought

A good blackberry jam should taste like the fruit led the recipe and the sugar only helped it along.

Once you learn the signs — glossy bubbles, a slower spoon, and that little wrinkle on a cold plate — the process stops feeling like guesswork. Then every batch becomes your choice: rustic or seedless, soft or firm, fresh or frozen, fridge jam or properly canned. That is when blackberry jam becomes less of a guessing game and more of a jar you know how to make again.
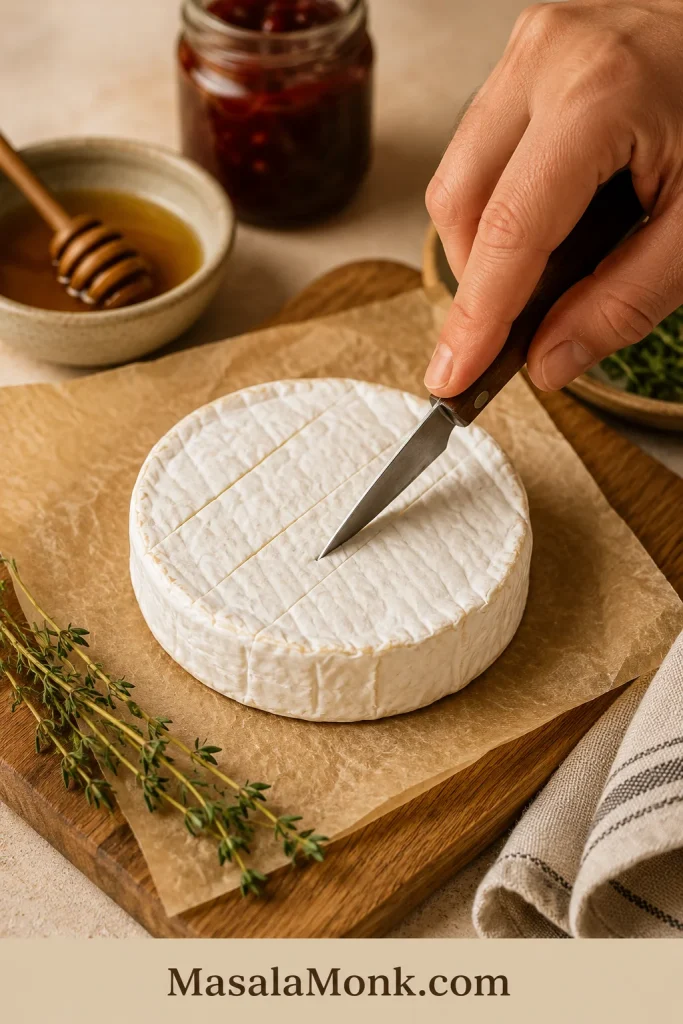
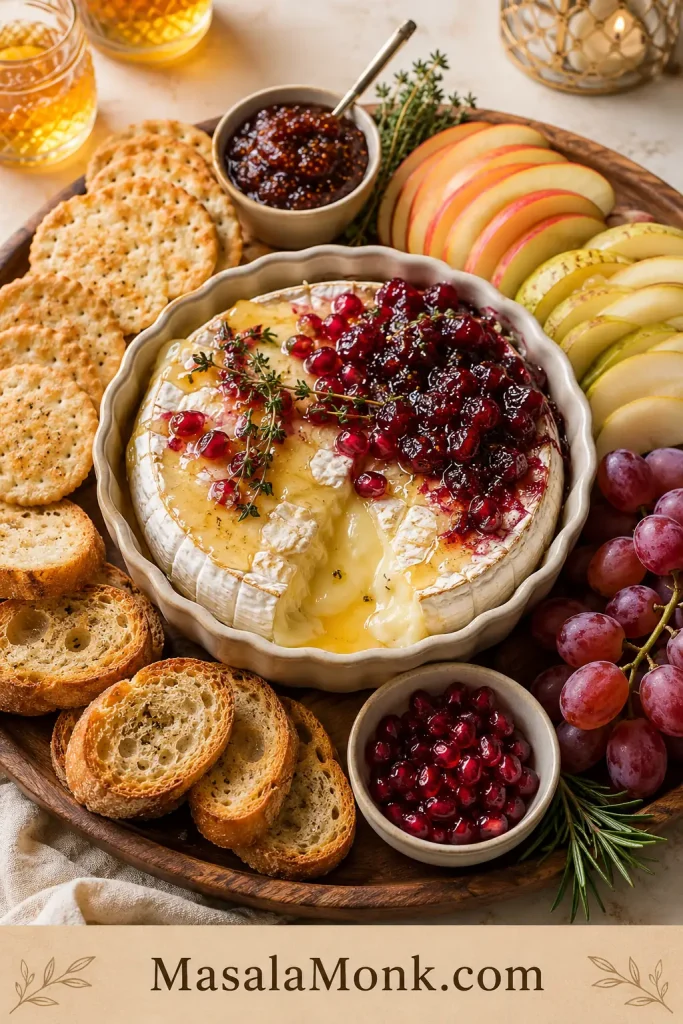
Back to top · Jump to recipe card · Find what you need