Posted on — Leave a comment

Sausage Balls Recipe: Easy, Cheesy Bisquick Sausage Balls

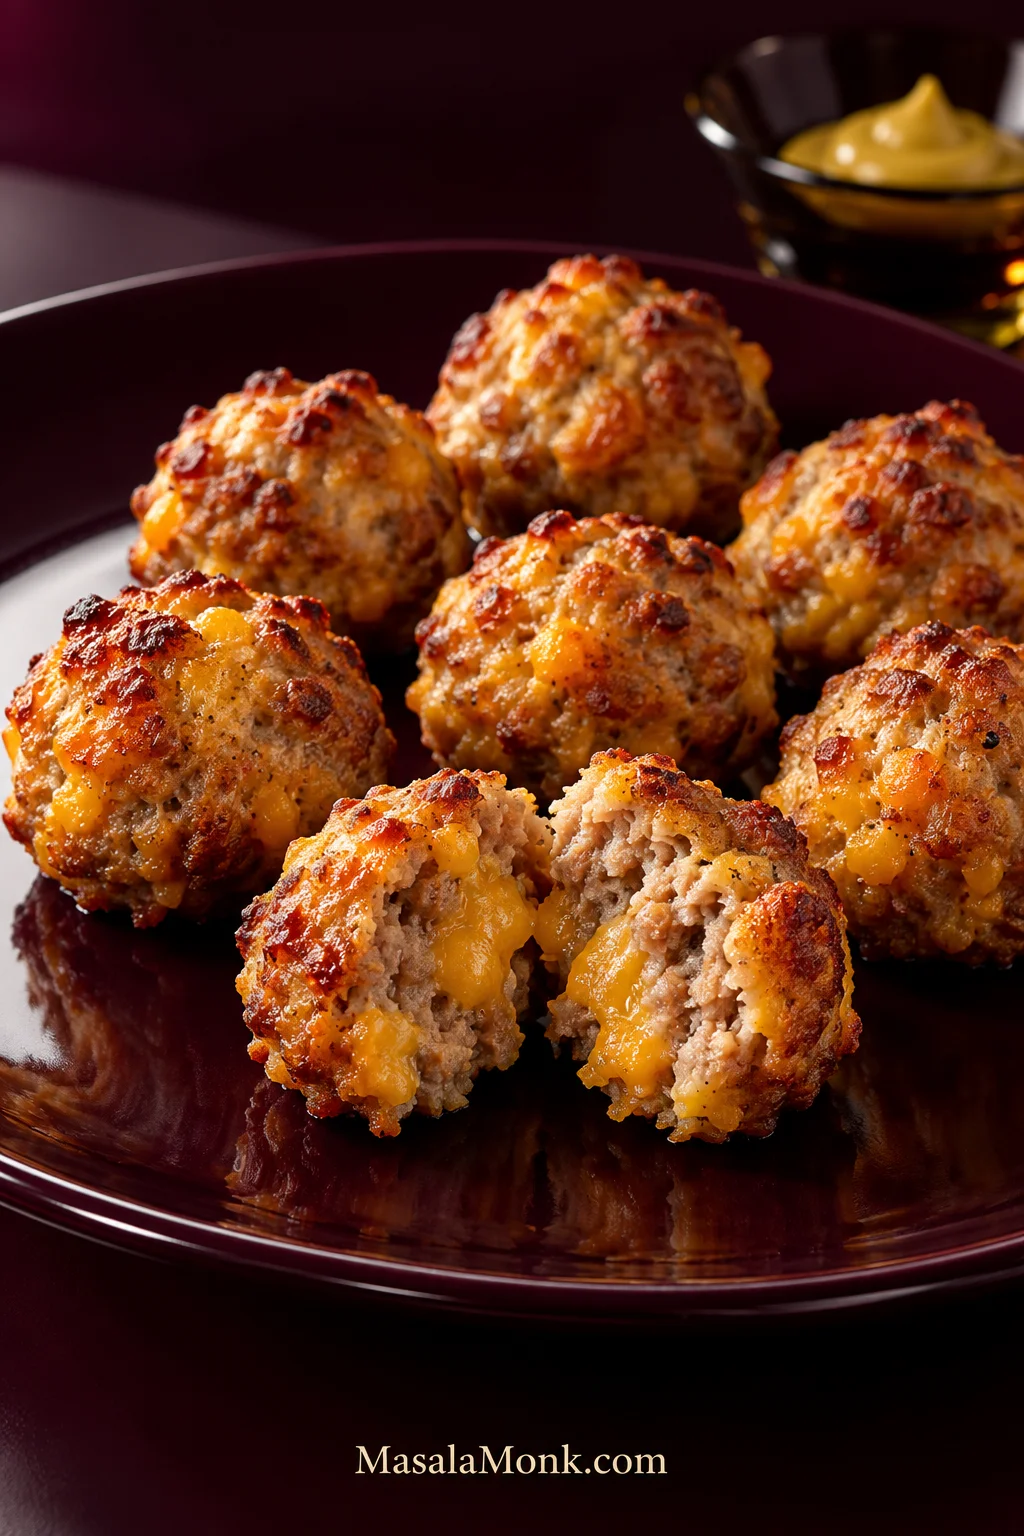
Golden-brown sausage balls on a burgundy plate, with one split open to show the moist sausage and cheddar interior.

Good sausage balls should taste like sausage and sharp cheddar, not like biscuits with a little meat mixed in. The outside should be lightly golden, the middle tender and cheesy, with little browned edges where the cheddar meets the pan.

They are also exactly the kind of food that disappears from a Christmas breakfast tray or game-day table before anyone thinks to count how many they have eaten.

This sausage balls recipe stays close to the old-school three-ingredient idea—raw breakfast sausage, Bisquick and cheddar—but gives you a better way to judge the one thing that changes from batch to batch: moisture.

Three main ingredients, roughly 35–40 minutes, and no automatic splash of milk. Mix everything first. Then squeeze a handful. The texture will usually tell you what to do next.

Quick Answer: Mix First, Adjust Second

Mix the sausage, Bisquick and cheddar completely before reaching for milk. If a firmly squeezed handful still crumbles, add milk 1 tablespoon / 15 ml at a time.

The right texture feels dense and tacky and stays together with slightly ragged edges. If it already holds, leave it alone. A shiny mixture that feels soft enough to slump is better chilled for 15–20 minutes.

And if everything looks crumbly during the first minute of mixing, don’t panic. That is normal here.
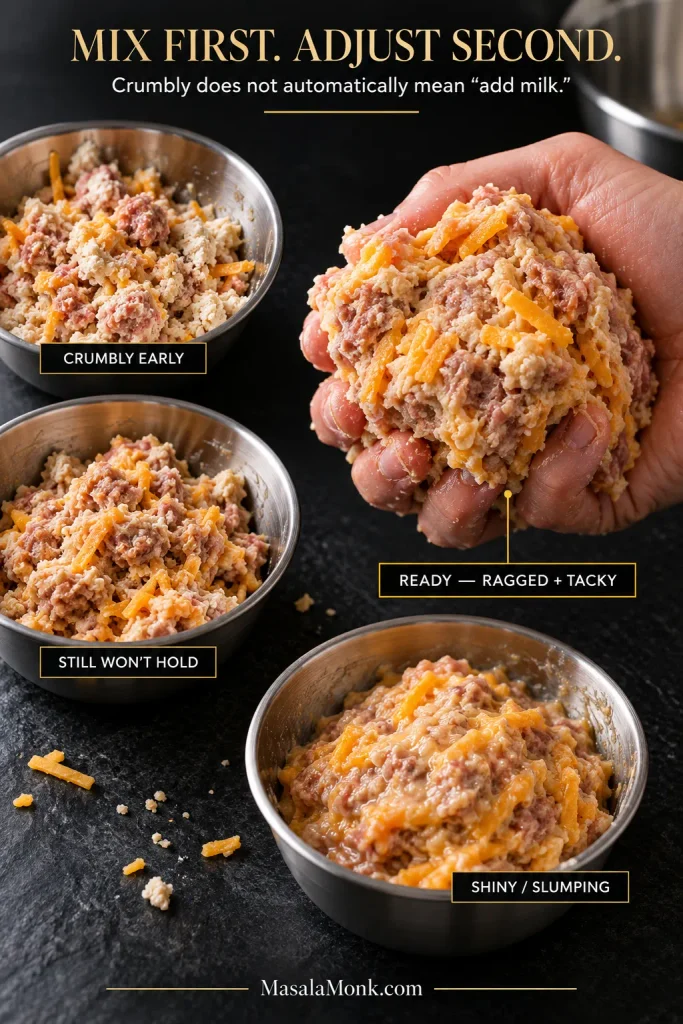
Four raw sausage-ball mixture textures labeled crumbly early, still won’t hold, ready and ragged plus tacky, and shiny or slumping, with the ready mixture squeezed in a hand.
Judge the mixture by what happens when you squeeze it, not by loose crumbs in the bowl; a ready sausage-ball mixture should compress into one cohesive, slightly ragged mass.

Two Things Worth Knowing Before You Start

  • Cheddar: full-fat sharp or extra-sharp brings better flavor and richness. Freshly grated melts more smoothly, but bagged shredded cheddar still works.
  • Bisquick: weigh it if possible. A packed cup can quietly add much more dry mix than you intended.

Make It Now: Easy Cheesy Bisquick Sausage Balls

These Bisquick sausage balls use 1 1/2 cups / 180 g baking mix for every pound of sausage. That is enough to help them stay round while keeping the bite more sausage-and-cheddar than biscuit.

Ingredients: 3 main + optional milk
Prep: about 15 minutes
Bake: about 18–22 minutes
Rest: 2–3 minutes
Total: about 35–40 minutes
Yield: about 38–40 sausage balls
Oven: 350°F / 175°C

Equipment

  • large mixing bowl or stand mixer with paddle attachment
  • large rimmed baking sheet
  • parchment paper
  • small cookie scoop, optional
  • digital kitchen scale, recommended for consistent 22 g portions
  • instant-read thermometer

Ingredients

  • 1 lb / 454 g raw bulk pork breakfast sausage — mild, hot, or half mild and half hot
  • 1 1/2 cups / 180 g Bisquick Original baking mix
  • 8 oz / 227 g full-fat sharp or extra-sharp cheddar, shredded
  • 1–2 tbsp / 15–30 ml milk, only if needed after mixing

Instructions

  1. Heat and line. Preheat the oven to 350°F / 175°C. Line a large rimmed baking sheet with parchment. The rim catches sausage fat, while the parchment keeps melted cheddar from sticking stubbornly to the pan.
  2. Mix completely. Combine the raw sausage, Bisquick and cheddar with clean hands or a stand mixer fitted with the paddle on low. At first it may look hopelessly crumbly. Keep going. As the sausage and cheese work through the Bisquick, everything should begin to come together.
  3. Squeeze before adding milk. Compress a small handful firmly. If it stays together, it is ready. If it still falls apart in your hand, add 1 tbsp / 15 ml milk, mix again and check before adding more.
  4. Roll 22 g balls. Portion about 22 g each, roughly a heaping tablespoon and about 1 1/4 inches across. They don’t need to be perfectly round; slightly rough edges brown beautifully.
  5. Bake until lightly golden. Leave a little room between the balls and bake for about 18–22 minutes. Start checking at 18 minutes. You should smell browned sausage and toasted cheddar, and the tops should be lightly golden.
  6. Check the center. Pork sausage should reach 160°F / 71°C; poultry sausage needs 165°F / 74°C. If the center is not there yet, bake another 2 minutes and check again. A thermometer beats guessing from color.
  7. Rest and split one. Give them 2–3 minutes, then check the center. It should be cooked through but still visibly moist, with melted cheddar and no dry biscuit-like crumb.

How to Know When Sausage Balls Are Done

Golden is enough. Once the raw sausage mixture held together before baking and the center has reached the safe temperature, stop there.

If your first tray already looks right, you can stop here. Otherwise, see why the Bisquick ratio changes the texture, troubleshoot a dry batch, or jump to the cream cheese and other variations below.
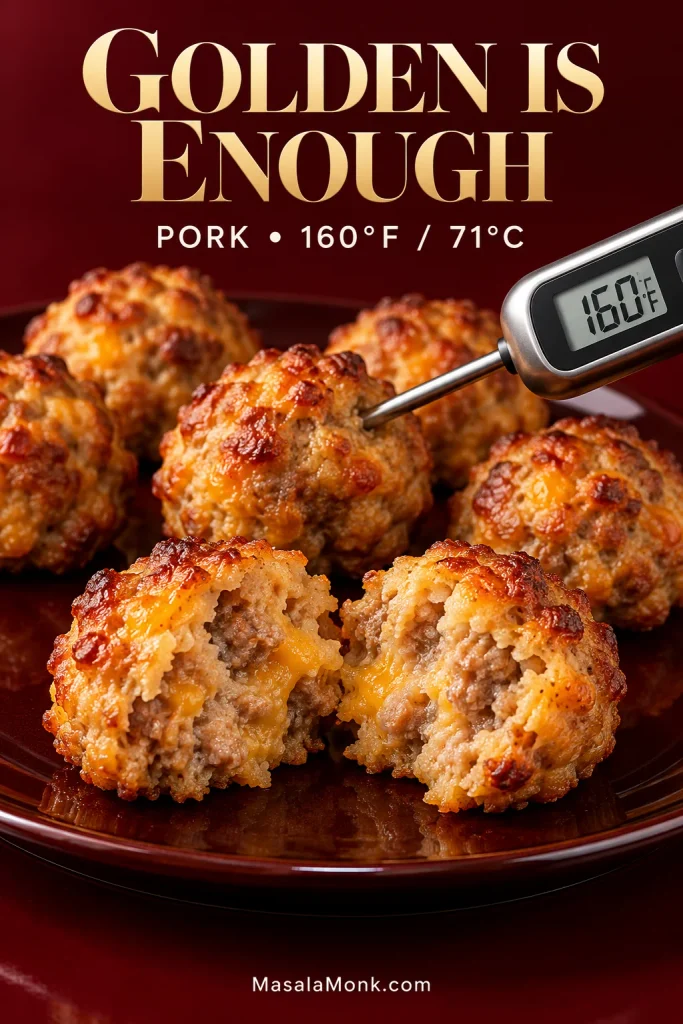
Golden sausage balls on a dark red plate, with one split open and another checked by a digital thermometer reading 160°F.
Temperature answers the safety question; meanwhile, splitting one open tells you whether you stopped soon enough to preserve a tender, moist center.

How Much Bisquick Should You Use per Pound of Sausage?

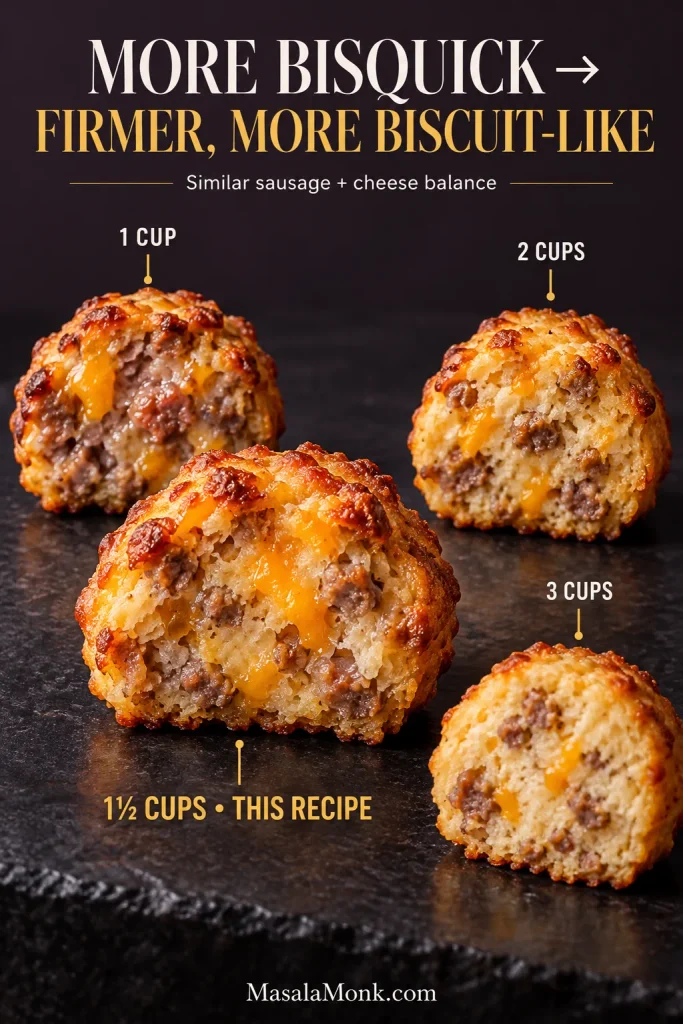
With similar amounts of sausage and cheese, less Bisquick gives you a meatier sausage ball; more pushes the texture toward firmer and more biscuit-like. This recipe uses 1 1/2 cups / 180 g per pound of sausage.

There is no single universal “original” ratio. Three cups of Bisquick give you a much more biscuit-forward result than 1 or 1 1/2 cups, although recipes built around that larger amount often balance it with substantially more cheese, milk or both.

Bisquick per 1 lb sausageWhat to expect
Around 1 cupVery meaty and rich; fatty sausage can leave the balls softer or more prone to spreading.
Around 1 1/2 cupsThe amount used here: enough Bisquick to help them stay round while sausage and cheddar remain prominent.
Around 2 cupsFirmer and more biscuit-like. With lean sausage or less cheese, dryness becomes easier to notice.
Around 3 cupsMuch more biscuit-forward and usually paired with substantially more cheese and/or liquid.
Four cut-open sausage balls comparing one cup, one and a half cups, two cups, and three cups of Bisquick, with the interiors becoming progressively more biscuit-like.
Think of Bisquick as a texture dial: more dry mix adds structure, but it also shifts the bite farther from sausage-and-cheddar and closer to biscuit-like.

Why Do Sausage Balls Turn Out Dry?

Sausage balls usually turn out dry because there is too much Bisquick, the sausage is very lean, the cheese is reduced-fat, or they bake too long. Floury dryness points more strongly to the Bisquick ratio; hard but not floury usually points to fat level or overbaking.

The raw ingredients look dry and crumbly

Keep mixing. Bisquick can look stubbornly separate at first, but sausage fat and cheese gradually pull it together. If a firmly squeezed handful still falls apart after that, add a little milk.

The baked balls taste floury

Floury usually means too much Bisquick for the amount of sausage and cheese. A packed measuring cup can create the same problem. Weighing the mix removes that guesswork.

They are hard and dry, but not floury

Look at the sausage, cheese, ball size and oven time. Very lean sausage, reduced-fat cheddar, tiny portions and overbaking can all pull moisture out of the center.

If the center has reached 160°F / 71°C and is still moist, stop there. More oven time will only push it toward dry.

Three cut-open sausage balls labeled floury or biscuit-like, correct, and hard or dry, showing visibly different interior textures.
The cut surface helps narrow the cause: floury dryness looks pale and crumbly, while hard-dry sausage balls stay tighter, denser and more compact.

If They Spread Instead of Staying Round

If sausage balls spread flat, chill the shaped balls before changing the ingredient ratio. A shiny, greasy mixture does not need more milk. Very fatty sausage can soften the mix, while cutting the Bisquick too far can leave the balls without enough structure to hold their shape.

Some grease on the parchment is completely normal. Flattened discs sitting in a large puddle are not.
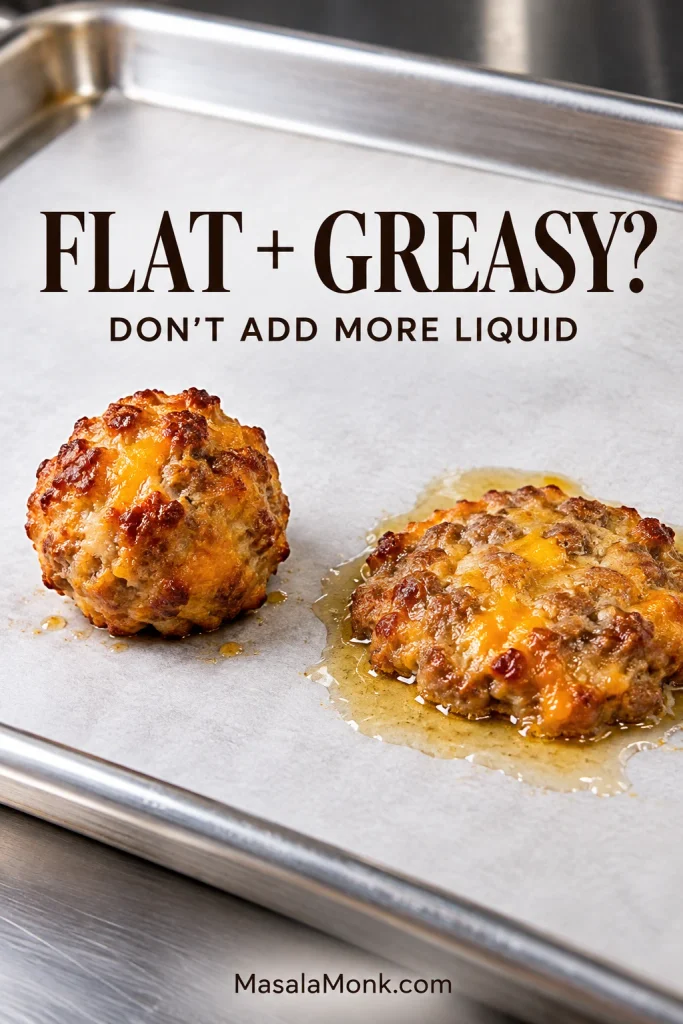
Two baked sausage balls on a metal sheet pan, with one staying round and the other spreading flat into a puddle of grease.
Rendered fat by itself is not the failure; instead, watch the shape. One that holds its height is behaving very differently from a sausage ball spreading into a greasy disc.

What Sausage Works Best for Sausage Balls?

Raw bulk pork breakfast sausage is the classic choice, and its fat and moisture help bring the Bisquick together as the balls bake.

SausageWhat it does
MildFamiliar breakfast-sausage flavor with little heat.
Half mild + half hotMore seasoning and a gentle kick while staying broadly crowd-friendly.
HotA noticeably spicier appetizer.
MapleA sweeter breakfast version that pairs naturally with maple syrup.
Turkey or chickenLeaner and more likely to need moisture adjustment; cook to 165°F / 74°C.
Precooked crumblesNot a direct swap because some fat and moisture have already been cooked away.

A very lean sausage may need some of the optional milk. A fatty one may benefit more from chilling before baking. Your sausage can simply behave differently from somebody else’s; that does not mean you measured anything wrong.

Three bowls of raw sausage-ball mixture labeled leaner, balanced, and fattier, showing progressively softer and shinier textures.
If another brand of breakfast sausage makes the same recipe feel noticeably different, trust the texture in your bowl rather than copying somebody else’s exact milk adjustment.

What Does Cream Cheese Do to Sausage Balls?

Cream cheese makes the center softer, richer and more tender. It changes the texture more than the flavor, while the sausage and cheddar can still brown around the outside.

Mix the cream cheese with the raw sausage first so it distributes evenly, then add the Bisquick and cheddar.

Cream-cheese versions vary in baking mix and ball size, so don’t assume they’ll bake in the same 18–22 minute window as the main recipe. The mixture should still hold when squeezed; for pork, use 160°F / 71°C in the center rather than the clock to decide when they’re done.
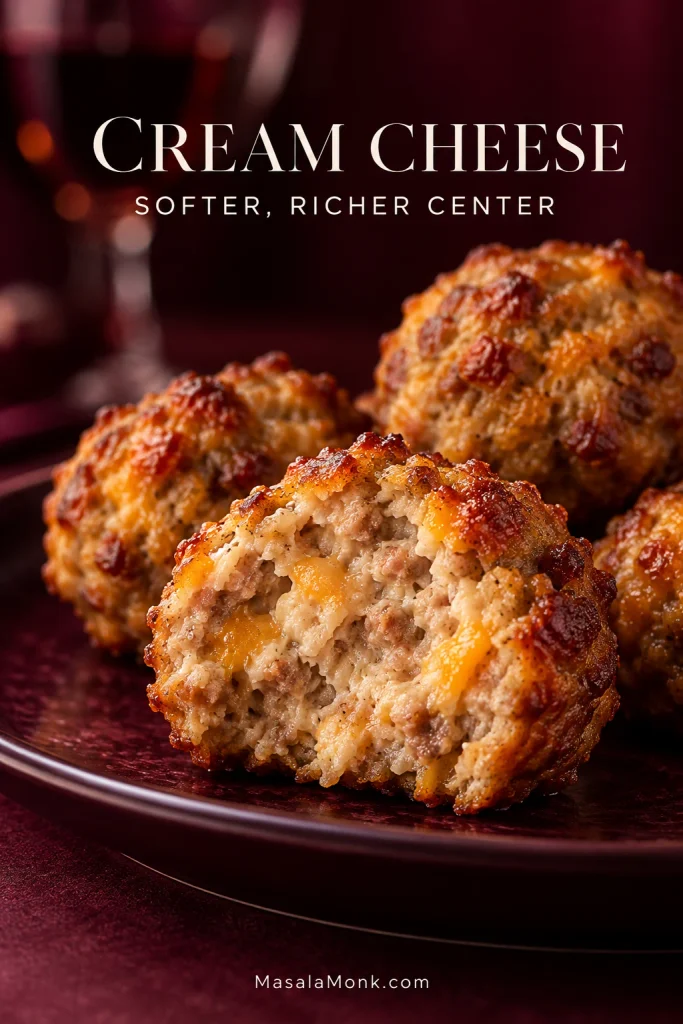
Close-up of a cream cheese sausage ball cut open to show a soft, moist sausage-and-cheddar center and browned exterior.
Cream cheese should change the texture throughout the sausage ball, not sit in a pocket; an evenly softer center is the visual sign that it was distributed properly.

Can You Use Cheddar Bay Biscuit Mix for Sausage Balls?

Yes, but a full 11.36 oz / 322 g box of Cheddar Bay Biscuit Mix brings substantially more dry mix plus its own cheddar, garlic and herb flavor, so treat it as its own formulation rather than a gram-for-gram Bisquick swap. Mix everything fully before deciding it needs additional moisture.

The included garlic-herb seasoning packet can go into the sausage mixture for stronger flavor throughout, or into melted butter brushed over the baked balls. With salty sausage, go easy at first.

Keep the portions consistent and cook pork to 160°F / 71°C rather than relying on browning alone.

Golden sausage balls with cheddar and herb flecks on a red plate, with seasoned biscuit mix and a butter brush in the background.
Cheddar Bay sausage balls give you two seasoning routes: work the garlic-herb mix through the sausage, or use it in melted butter for a stronger surface flavor.

Can You Add Rotel to Sausage Balls?

Undrained Rotel can make sausage balls spread because the tomato liquid loosens the mixture. Drain it hard. Rotel is easier to manage in a cream-cheese version, where the cream cheese gives the mixture more body.

If what you really want is the same sausage-and-tomato combination in something scoopable, make Rotel dip with Velveeta and sausage. There, the tomato liquid actually helps.
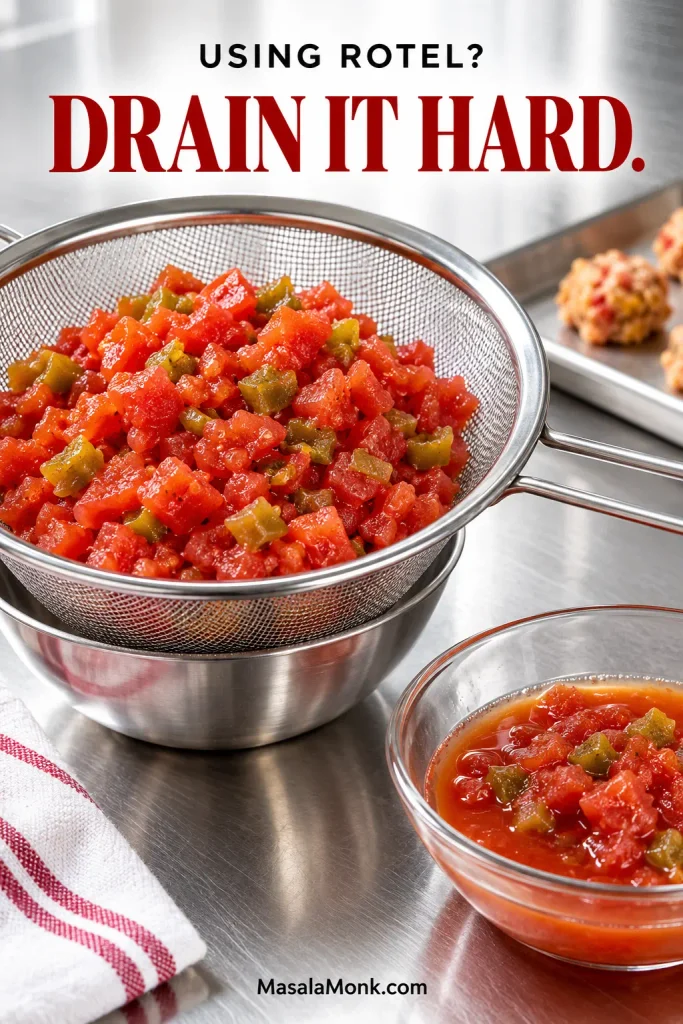
Diced tomatoes and green chiles draining in a fine-mesh strainer beside a bowl containing the same mixture with visible liquid.
For Rotel sausage balls, the useful visual is what stays behind: moist tomato-and-chile pieces in the sieve, while the loose canning liquid drains away.

Can You Make Sausage Balls Without Bisquick?

Plain flour is not a 1:1 substitute for Bisquick in sausage balls. Bisquick also supplies fat, leavening and salt, so replacing it with plain flour alone changes both the texture and the way the balls bake.

The easiest substitution is another all-purpose baking or biscuit mix. A truly from-scratch version needs its own balanced combination of flour, fat, leavening and seasoning rather than a cup-for-cup flour swap.

Make Ahead, Freeze and Reheat Sausage Balls

Raw sausage balls can be shaped about a day ahead and refrigerated, or frozen before baking. Cooked ones can be chilled, frozen and reheated later too.

On a holiday morning, you can pull a tray from the refrigerator, slide it into the oven, and have something hot on the table while coffee is going and the rest of breakfast comes together.
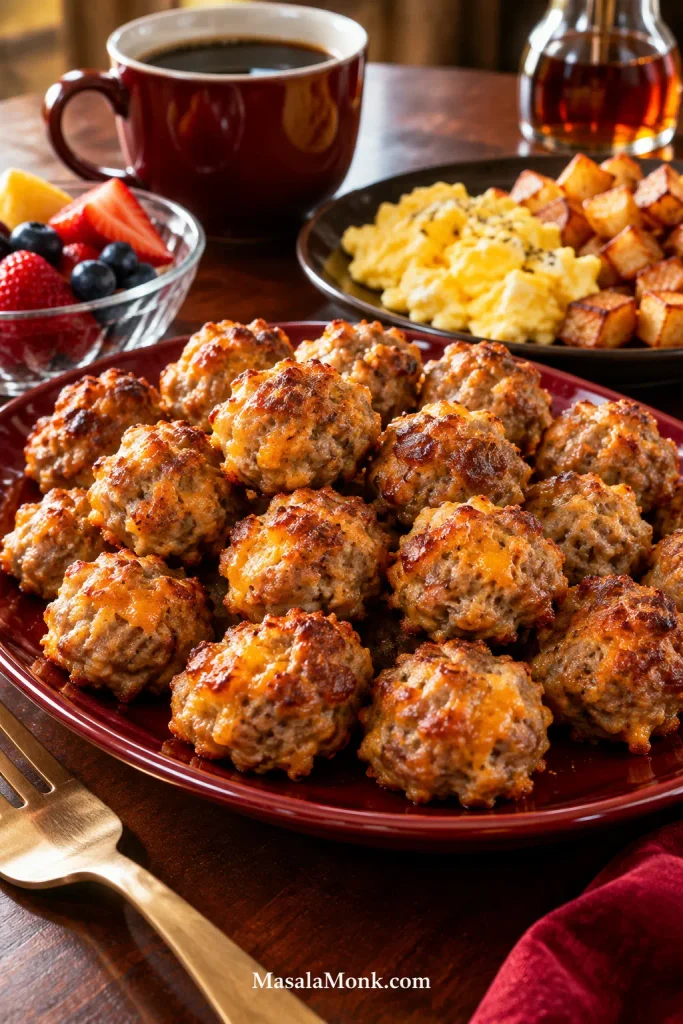
Red platter of golden sausage balls on a dark wood breakfast table with scrambled eggs, roasted potatoes, berries, coffee, and maple syrup.
Make-ahead sausage balls work as the hot handheld part of breakfast, adding something savory beside eggs, potatoes and fruit without demanding another pan on the stove.

Make Them Ahead

Shape the uncooked balls, cover and refrigerate for up to about 24 hours. Bake them straight from the refrigerator and expect a cold tray to take a little longer.

For a bigger holiday breakfast, a make-ahead tater tot breakfast casserole can be prepped the same evening, leaving very little work for the morning.

Freeze and Reheat

Freeze raw shaped balls on a parchment-lined tray first so they stay separate. Once firm, transfer them to a freezer-safe bag or container. They can go into the oven frozen; begin checking a few minutes beyond the normal bake window. Depending on your freezer and oven, they may need roughly 5–10 minutes longer. Center temperature decides.
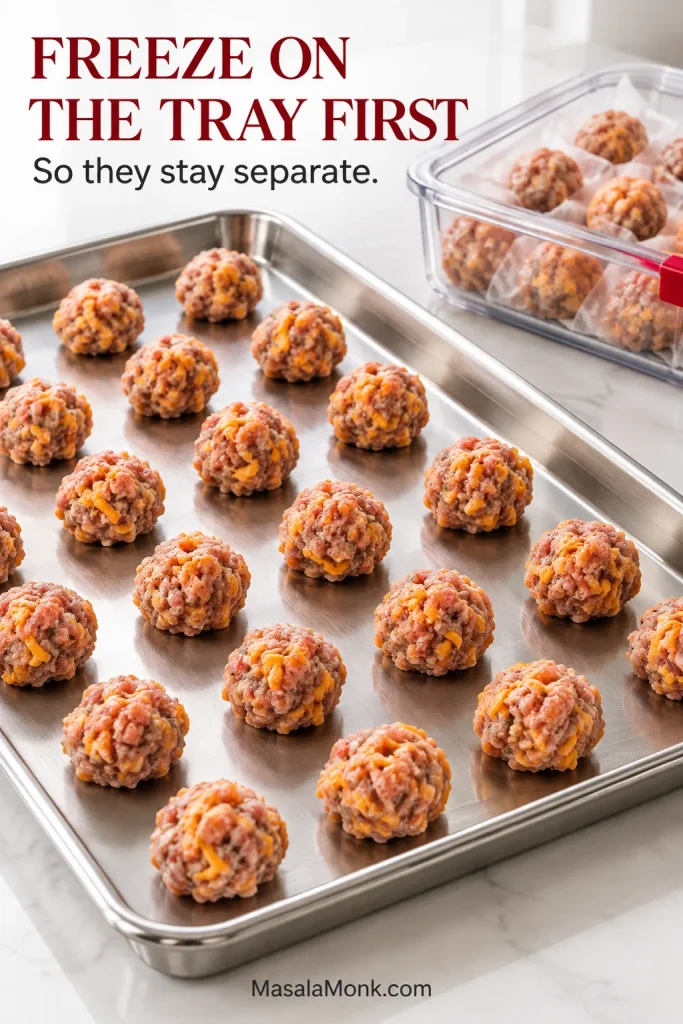
Raw cheddar sausage balls spaced apart on a stainless-steel sheet pan, with more raw balls stored separately in a clear container behind them.
Spacing only matters until the raw sausage balls are firm; after the first freeze, they can share a compact freezer container without sticking into one solid block.

For best quality, aim to use raw frozen sausage balls within 1–2 months and cooked frozen sausage balls within 2–3 months. Those are quality windows rather than hard safety cutoffs for food kept continuously frozen.

Cool cooked sausage balls promptly, refrigerate until chilled, then freeze.

For refrigerated leftovers, reheat to 165°F / 74°C. The microwave is fastest for a few pieces. For a larger tray, cover loosely and warm in a 325°F / 165°C oven until hot throughout. An air fryer restores more crispness around the outside, but check early so the exterior does not dry out.

If you like keeping party food in the freezer, homemade sausage rolls can also be frozen before baking.

Feeding a Crowd

A double batch makes roughly 76–80 small sausage balls. How far a batch goes depends on the rest of the table: they stretch much further as one appetizer among several than when they are the main hot bite.
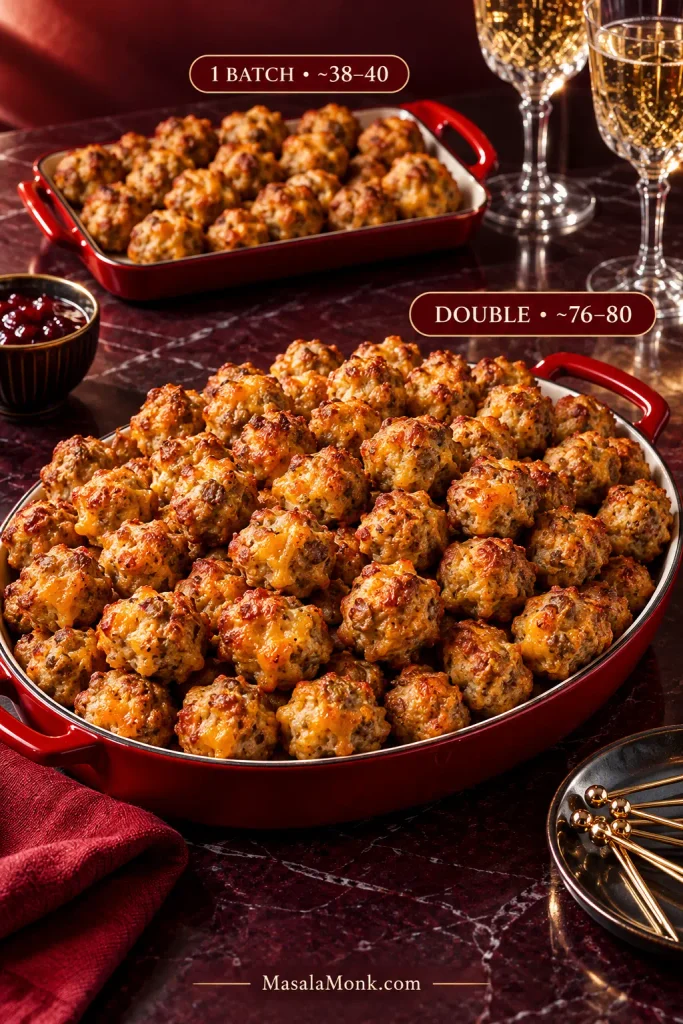
Large red platter of sausage balls labeled double batch, about 76 to 80, with a smaller one-batch tray labeled about 38 to 40 behind it.
When you double a sausage balls recipe, keep the individual portions the same size and scale the tray or platter instead; that preserves the same baking behavior.

Double the sausage, Bisquick and cheddar as written. Adjust the optional milk only after mixing, exactly as you would for a single batch. If one bowl gets crowded, divide the mixture between two. Keep the individual balls the same size and leave the oven temperature alone.

With two trays in the oven, swap their positions partway through if yours has obvious hot spots. Otherwise, successive trays give more predictable browning.

At a party, nobody wants to babysit appetizers all afternoon. Reheat the sausage balls first, then use a slow cooker or warming tray only to hold them hot at 140°F / 60°C or warmer. Even safely held food gradually dries with hours of heat, so smaller, freshly reheated batches usually taste better.

A chilled make-ahead dish also takes pressure off the oven. Classic deviled eggs can be finished beforehand and give the table something cool and creamy beside the hot sausage.

Refrigerate leftovers within 2 hours—or within 1 hour if the temperature is above 90°F / 32°C—and use them within about 3–4 days, according to USDA pork-storage guidance.

What to Serve With Sausage Balls

Once the texture is right, they do not need much dressing up. Serve them warm enough for the cheese to stay soft and let the sausage do most of the work.

For breakfast, eggs, crisp potatoes, fresh fruit or warm maple syrup all make sense.

For a party tray, tangy and lightly sweet sauces cut through the pork and cheddar nicely. Spicy brown mustard needs no work at all; for something creamier, use a thicker honey mustard dipping sauce. Homemade hot honey sauce and pepper jelly are good with mild sausage too.
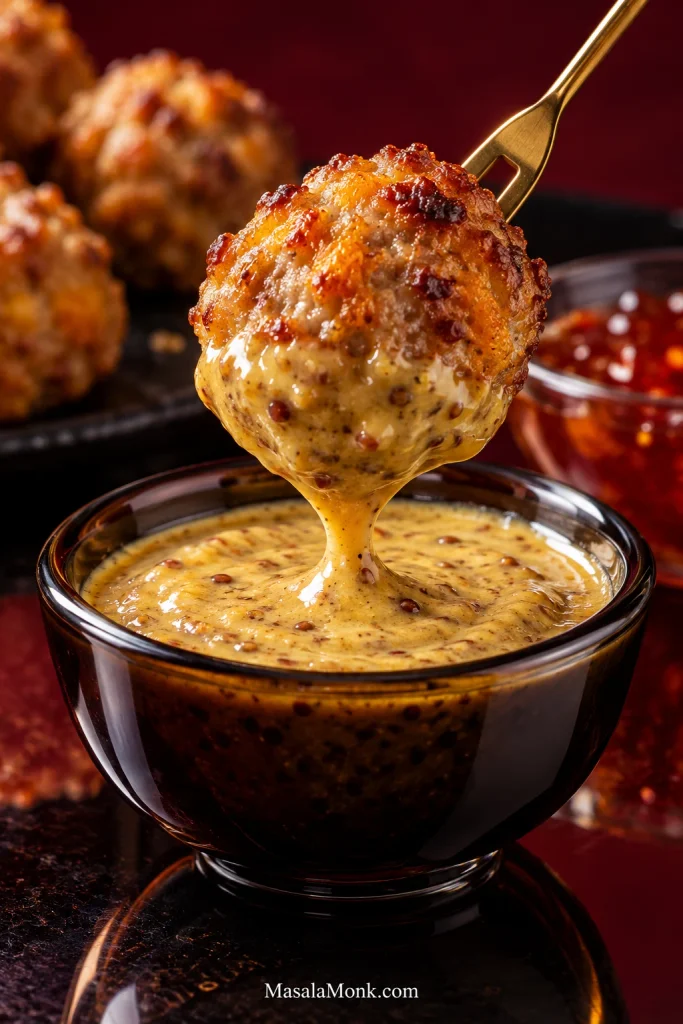
Golden sausage ball on a small fork being lifted from thick grainy mustard sauce, with a red pepper jelly dish blurred in the background.
For a sausage ball dipping sauce, cling matters as much as flavor: thick mustard or honey mustard coats the craggy surface instead of immediately running off.

Sausage Ball Troubleshooting

If everything worked, you are done. Keep this table for the batch that does not.

What you seeWhy it happens + what to do
Mixture looks crumbly early in mixing It may simply need more mixing. Keep mixing before adding milk.
Mixture still won’t hold together after mixing The sausage and cheese are not supplying quite enough moisture. Add milk 1 tbsp / 15 ml at a time.
Dry, floury or too biscuit-like There may be too much Bisquick for the amount of sausage and cheese. Weigh the mix and avoid packed cups; if you prefer a meatier result, reduce the Bisquick next time.
Hard but not floury Overbaking, lean sausage, reduced-fat cheese or very small balls can all dry the center. Use fuller-fat ingredients and stop once the center is safely cooked and still moist.
They spread flat Very fatty sausage, too much milk, warm dough or too little Bisquick can soften the structure. Chill the shaped balls and avoid adding more liquid.
Bland Mild cheese, mild sausage or too much baking mix can mute the flavor. Use sharp cheddar first; for more punch, try half mild and half hot sausage.
Too salty Sausage, cheese and seasoned mixes can stack a lot of salt. Skip extra salt and go easier on seasoning packets.
Rotel version is loose Too much tomato liquid loosens the mixture. Drain it thoroughly and use it with the cream-cheese version.
Leftovers turn hard They were reheated too long. Warm only until the centers are hot.

Sausage Balls FAQ

Do you cook the sausage before making sausage balls?

No—use raw sausage for classic sausage balls. Browning it first removes fat and moisture that the Bisquick would otherwise absorb, so cooked sausage crumbles behave differently in the same recipe.

What temperature are sausage balls done?

Cook pork sausage balls to 160°F / 71°C and ground chicken or turkey sausage balls to 165°F / 74°C, according to USDA safe-temperature guidance. Use a thermometer instead of waiting for the outside to turn dark brown.

How long can sausage balls sit out?

Two hours at room temperature is the usual maximum, or 1 hour above 90°F / 32°C. If you are holding them hot for serving, keep them at 140°F / 60°C or warmer; otherwise refrigerate leftovers promptly.

Once the mixture feels right, there isn’t much left to overthink: roll, bake, and put them out while the cheddar is still soft and the browned edges are at their best.
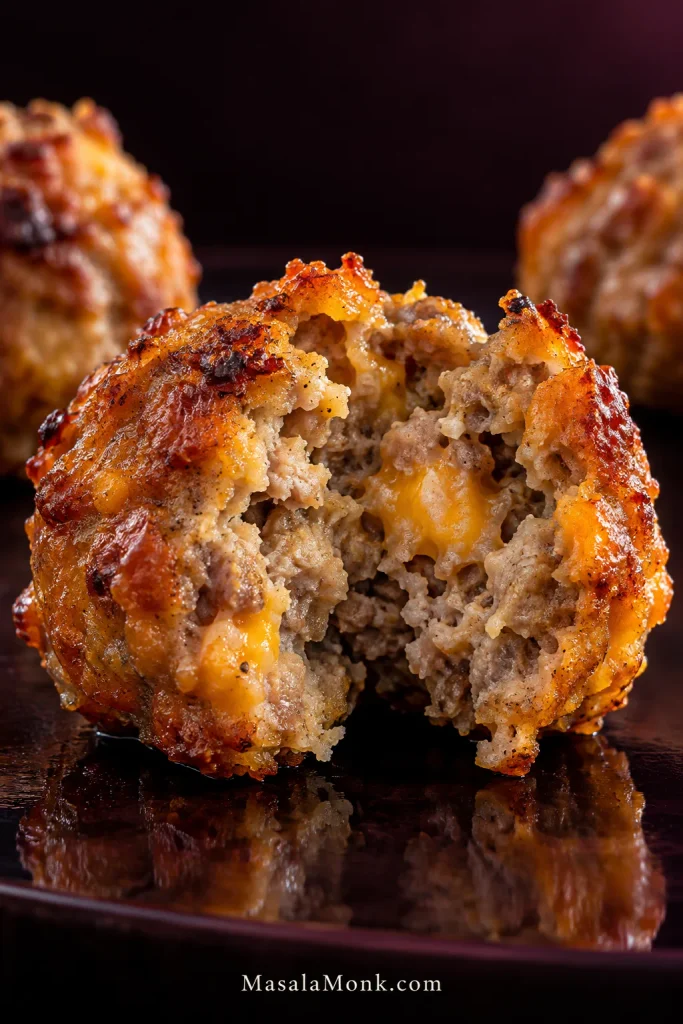
Extreme close-up of a broken-open sausage ball with a browned craggy exterior, moist cooked sausage center, and small pockets of melted cheddar.
Browned cheddar crags on the outside give way to a tender, sausage-forward center with little pockets of melted cheese.
Posted on — Leave a comment

Korean Corn Dog Recipe: Crispy, Cheesy Korean Hot Dogs

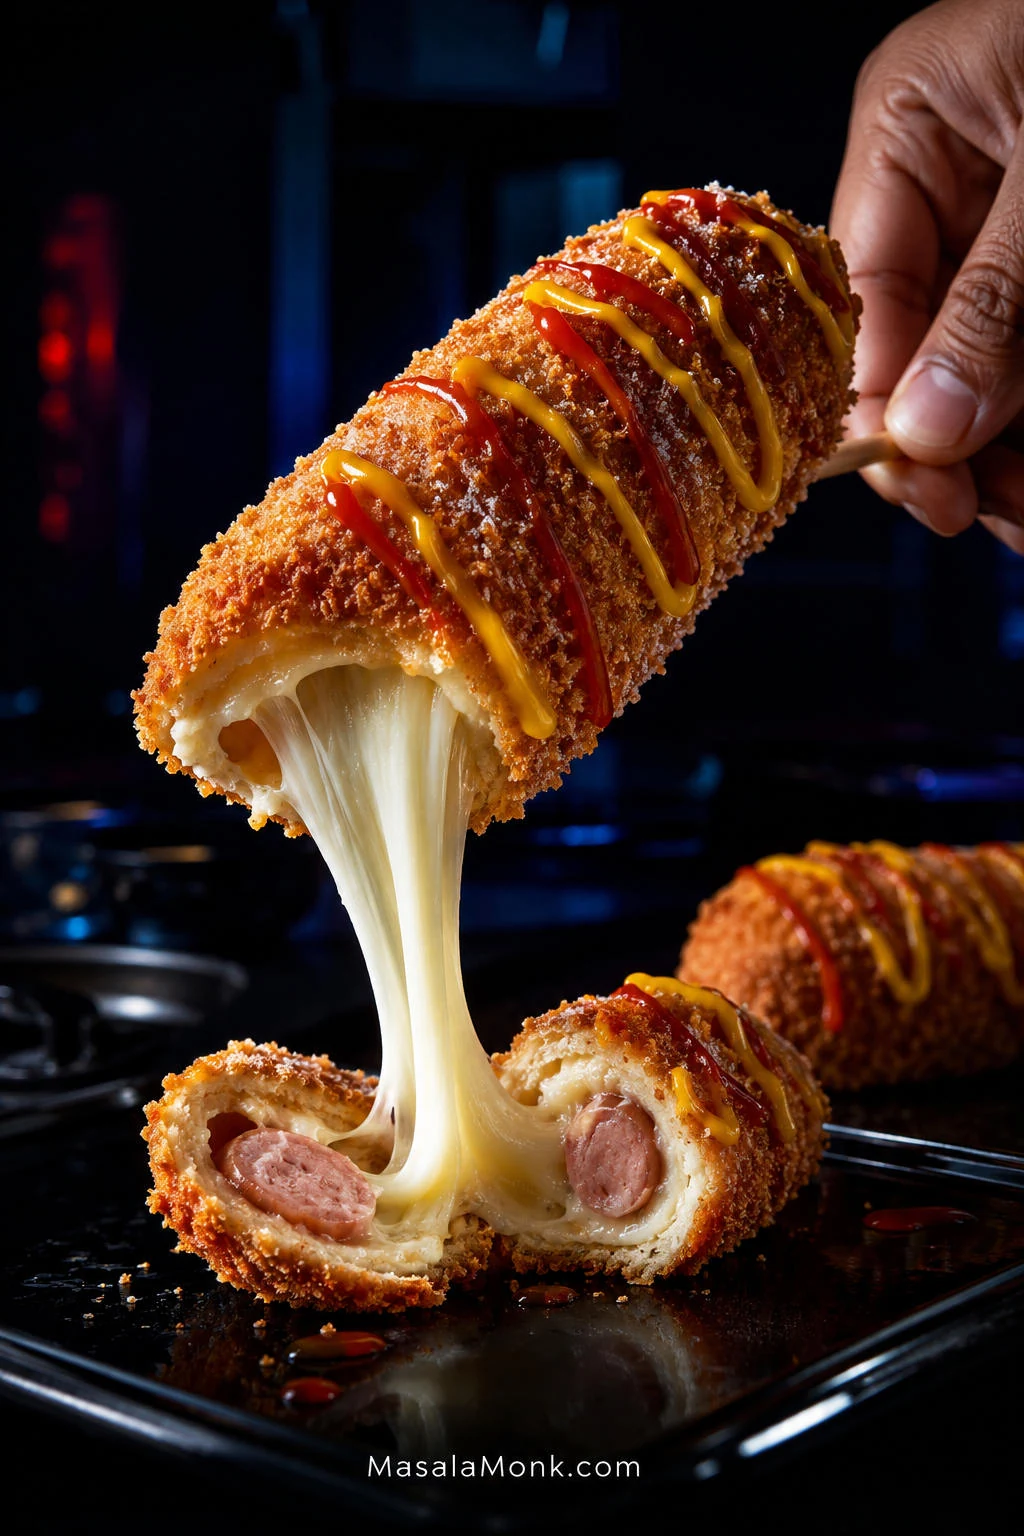
Golden panko-coated Korean corn dog on a wooden skewer with ketchup and mustard, beside a cut corn dog with sausage, melted mozzarella and a crisp breadcrumb shell.

A good Korean corn dog recipe is really about that first bite: crisp, craggy panko; a soft, slightly chewy layer underneath; then hot mozzarella stretching away from the skewer while ketchup and mustard cut through the richness.

Korean corn dogs look wonderfully simple when someone else is making them. At home, trouble tends to start somewhere less glamorous: condensation beads on the cheese, sticky dough slides down the skewer, the coating gets much thicker than expected, or the mozzarella finds a way into the frying oil.

Most of those problems are easier to fix before the next skewer goes in. Dry damp cheese, adjust dough that has gone too loose, and give cooled oil another minute instead of carrying the same problem through the whole batch. This recipe uses a lightly sweet yeasted dough, low-moisture mozzarella, fully cooked hot dogs and panko to get you there.

Make It Now: Korean Corn Dogs

Recipe at a Glance

Makes6 large corn dogs
Active prep25–30 minutes
Rise45–60 minutes, or until doubled and bubbly
Fry3–5 minutes per corn dog; about 20–30 minutes for the batch
Total elapsedAbout 1 hour 30 minutes to 1 hour 45 minutes
Oil350°F / 175°C

Some skewer prep happens while the dough rises, so the prep and rise times overlap.

Three Things Before You Start

  • Keep the filling cold and dry. Condensation makes sticky dough much harder to keep in place.
  • Keep the dough layer thin. It needs to cling and stretch now because it will puff in the oil.
  • Coat and fry one at a time at first. Once the panko is on, get that skewer into the oil.

Get those three things right and the rough panko shell crackles over soft, chewy dough. More importantly, there is still plenty of sausage or cheese inside—not a giant piece of fried bread with the filling lost somewhere in the middle.

Pick Your Filling

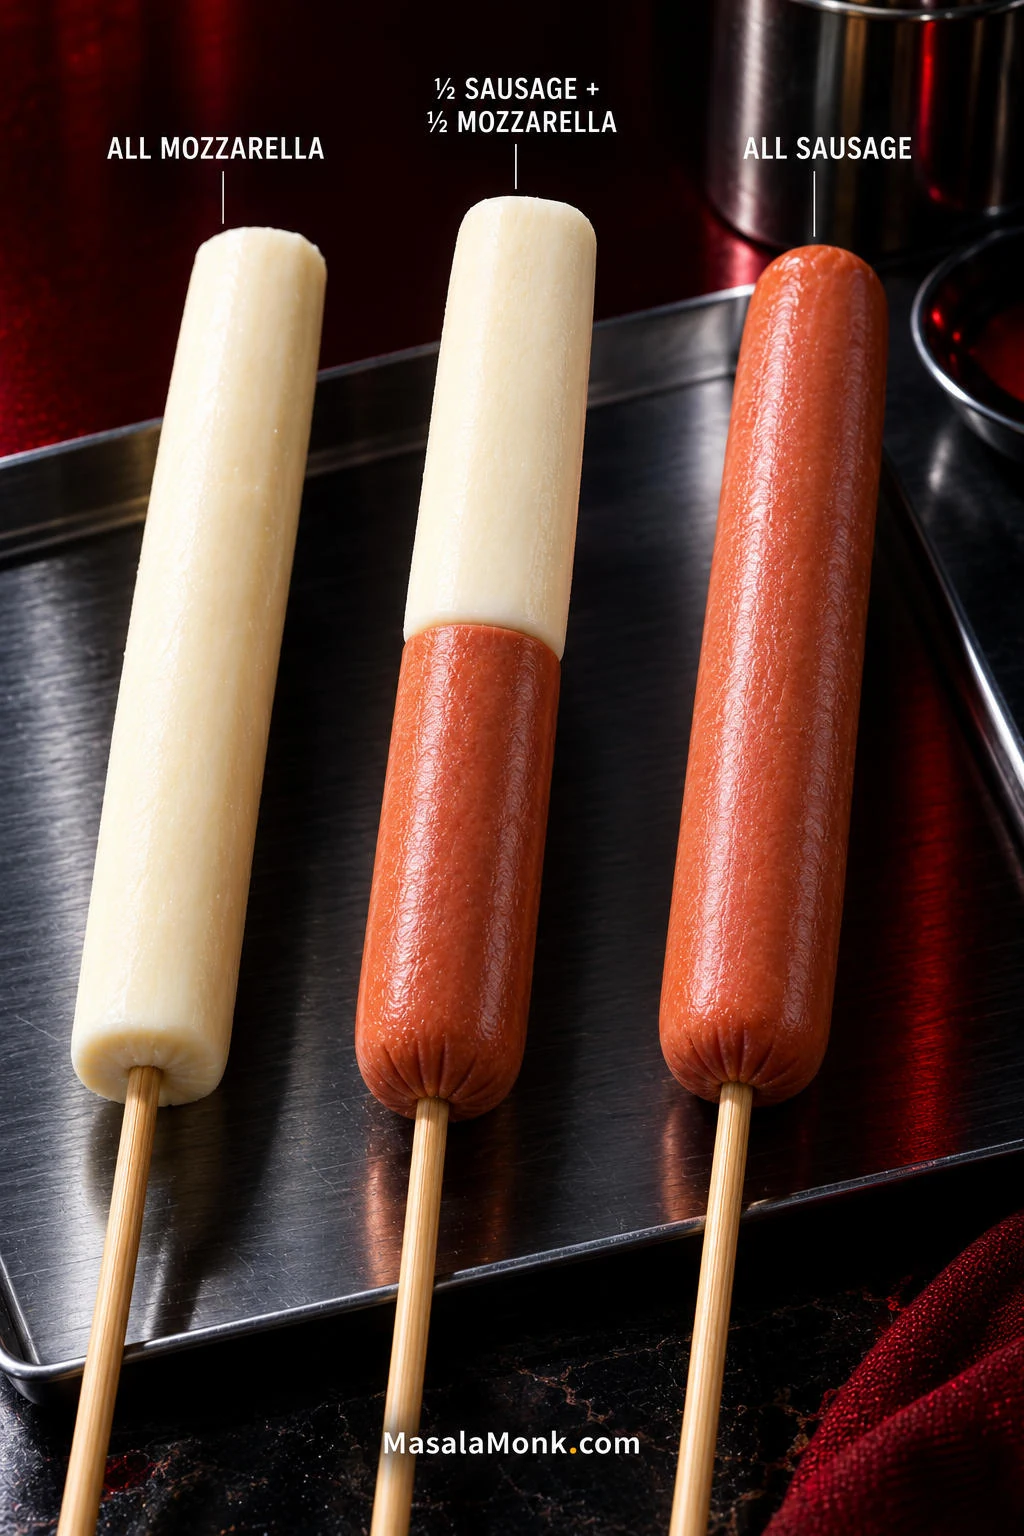
For a first batch, put half a hot dog and one mozzarella baton on each skewer, end to end. You get the signature cheese pull without making the entire filling as leak-prone as an all-cheese corn dog. For 6 corn dogs, that means 3 fully cooked hot dogs, halved, plus 170–180 g / 6–6½ oz mozzarella.

Three uncooked Korean corn dog skewers showing all mozzarella, half sausage and half mozzarella, and all sausage filling options on a metal tray.
Arrange the hot dog and mozzarella end to end on the skewer, keeping both centered so the filling stays balanced while you wrap it in sticky dough. A centered skewer is also easier to rotate evenly during coating.
  • All mozzarella: use 330–360 g / 12–13 oz. Cut 6 longer batons about the same overall length and thickness as the standard sausage-and-cheese filling.
  • All sausage: use 6 fully cooked hot dogs. This is the easiest filling to fry and the least likely to leak.
  • Mozzarella + cheddar: keep mozzarella as the main cheese and add a smaller amount of firm cheddar when stronger cheese flavor matters more than the longest possible pull.

Going all-in on cheese? See what a cheese leak can tell you before you fry the rest of the batch.

Ingredients

Sticky Yeast Dough

  • 220 g (7¾ oz / 1¾ cups + 1 tablespoon) all-purpose flour, plus a little more only if needed
  • 225 ml (scant 1 cup) warm water, 100–110°F / 38–43°C
  • 25 g (2 tablespoons) granulated sugar
  • 5 g instant yeast
  • 4 g fine salt

Filling

  • 3 fully cooked hot dogs, cut in half crosswise
  • 170–180 g (6–6½ oz) firm low-moisture mozzarella, cut into 6 sturdy batons 2–2½ inches / 5–6 cm long

Look for a firm block labeled low-moisture mozzarella; in some shops it is sold as pizza mozzarella. Whole-milk mozzarella gives especially good flavor and stretch, but low moisture matters more than the exact label. Fresh mozzarella packed in water or brine is much harder to keep inside the crust.

Mozzarella string cheese is a handy fallback, though its thinner shape gives you a smaller cheese center.

Coating and Frying

  • 30 g (¼ cup) all-purpose flour, for dusting
  • 120–140 g panko, enough for a generous shallow tray
  • Neutral frying oil such as canola, vegetable or rice-bran oil, enough for 3 inches / 7–8 cm depth
  • Granulated sugar, optional
  • Ketchup and yellow mustard, for serving

Panko’s larger flakes give the shell its rough, brittle crunch. Regular breadcrumbs can substitute, but the crust will be finer and less craggy.

Useful equipment: a kitchen scale, deep-fry thermometer, heavy deep pot, 6 sturdy wooden chopsticks or thick bamboo skewers, a shallow dish for the dough and a wire rack. Before adding oil, check that the coated part of a full skewer can lie comfortably inside the pot.

1. Mix a Sticky, Stretchy Dough

Stir together the flour, sugar, instant yeast and salt. Add the warm water and mix firmly until no dry flour remains.

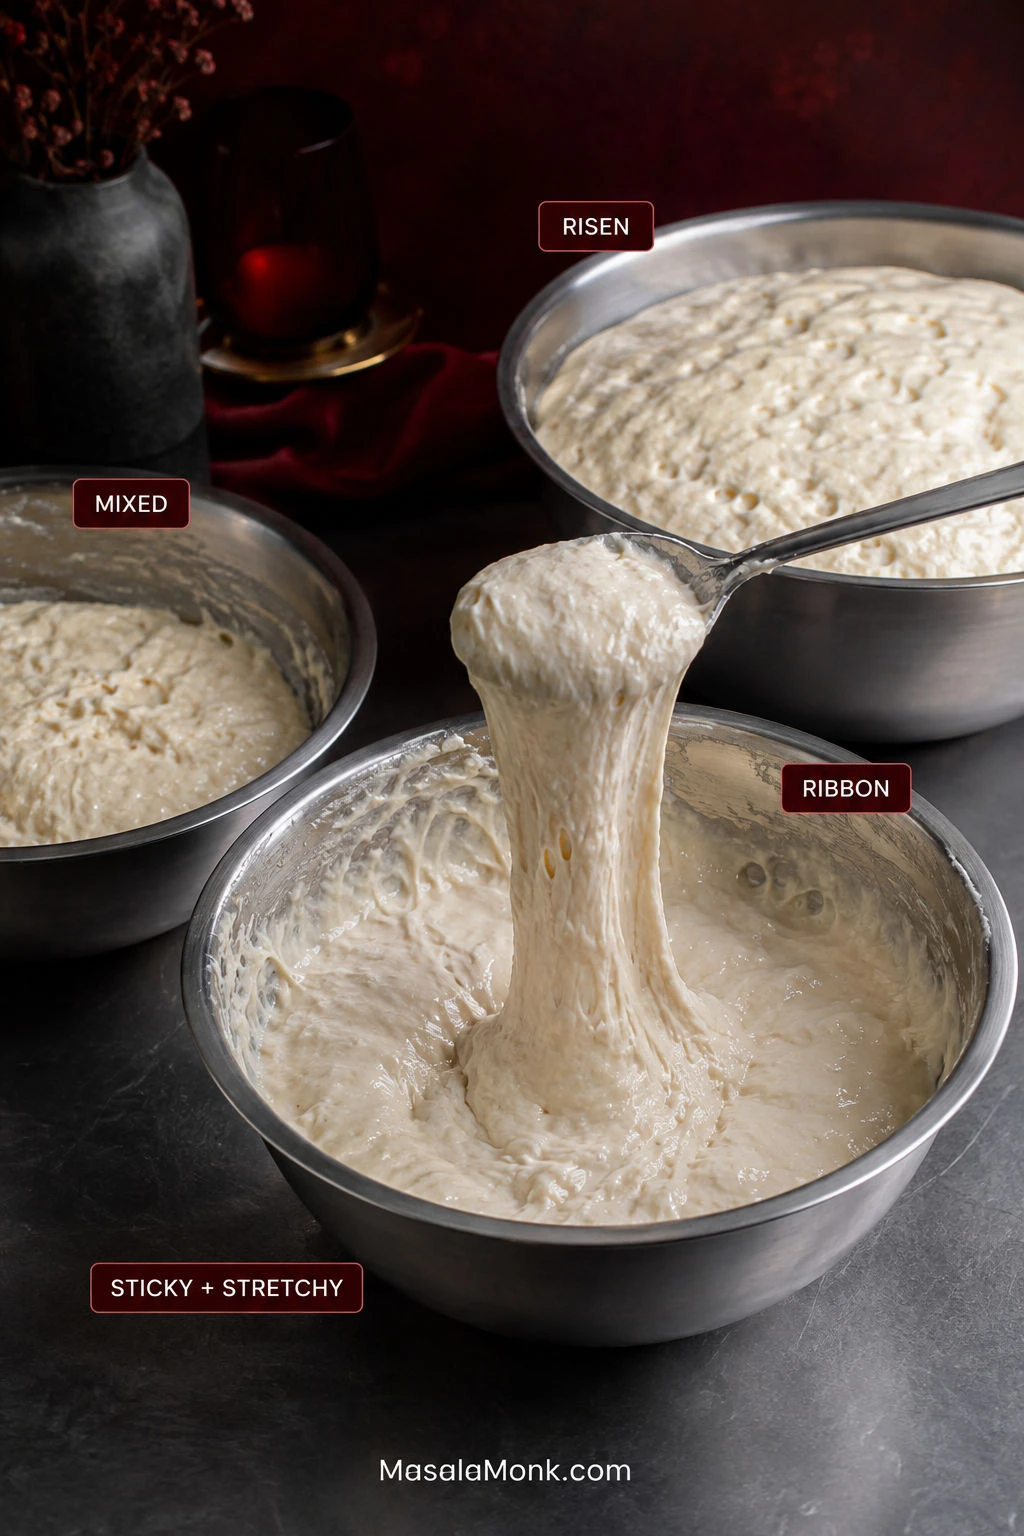
Instant yeast does not need to sit in the water waiting to foam. What you want now is very wet bread dough: sticky, stretchy and slightly unruly.

Lift some with a spoon. It should pull into a sticky ribbon and cling to itself.

  • Flowing instead of stretching? Add flour 1 tablespoon / 8 g at a time.
  • Tearing instead of stretching? Add water 1 teaspoon / 5 ml at a time.

Humidity changes how this dough feels. Let the cling and stretch guide you; it does not have to look identical from one kitchen to the next.

2. Let It Rise Until Puffy

Cover the bowl and leave it for 45–60 minutes, until the dough has doubled and looks visibly bubbly and aerated.

Watch the dough more closely than the clock. A cool room can take longer. Active dry yeast can replace instant yeast in the same weight; give it whatever extra time it needs to reach the same puffy stage.

Three metal bowls showing Korean corn dog yeast dough freshly mixed, stretching in a thick ribbon, and risen with visible bubbles.
The dough starts very sticky, stretches into a ribbon, then becomes visibly bubbly and aerated after rising. Use the ribbon stage as your consistency checkpoint before proofing: it should stretch rather than simply pour.

3. Build and Chill the Skewers

While the dough rises, thread half a hot dog onto each skewer, followed by one mozzarella baton so the cheese sits toward the eating end.

Keep the sausage and mozzarella fairly similar in thickness. A skinny strip of cheese melts much faster than a substantial baton.

If firm mozzarella cracks when you push in the wooden skewer, make a narrow pilot hole with a thin metal skewer first. Thin, smooth barbecue skewers can also spin inside the sausage while you try to coat it; a wooden chopstick or broader bamboo skewer gives you much better control.

Keep the assembled skewers refrigerated until the dough is ready. In a hot kitchen, or with all-cheese corn dogs, a 10-minute freezer chill immediately before coating can help. The cheese needs to be very cold, not frozen solid.

4. Heat the Oil and Set Up the Coating Line

Pour 3 inches / 7–8 cm of oil into a heavy pot, leaving plenty of empty space above it. Heat to 350°F / 175°C.

Keep water away from the pot and never leave heating oil unattended. If deep frying is unfamiliar, the USDA deep-fat frying safety guidance is worth reading before you start.

Set everything up in this order: cold skewers → flour → dough → panko → oil → wire rack.

5. Dry, Flour and Wrap One Skewer

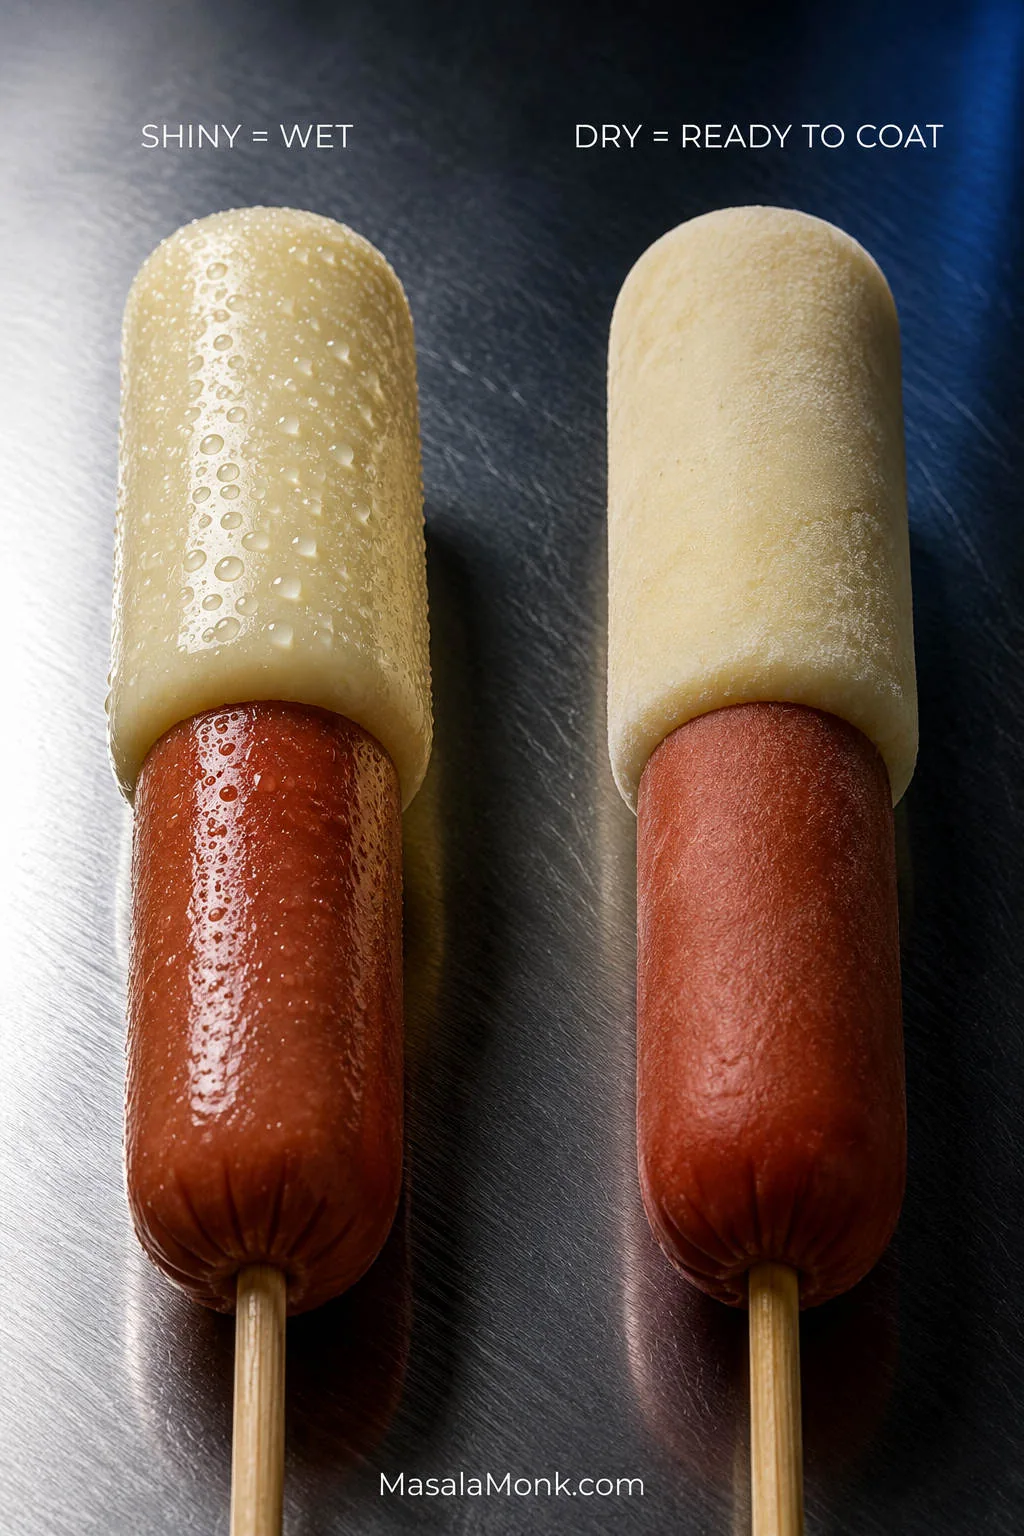
Take one cold skewer from the refrigerator and look at it before it touches the dough. A shiny surface means condensation.

Blot the cheese and sausage dry, dust with just enough flour to remove the shine, then tap off anything loose.

Two sausage-and-mozzarella skewers side by side, one shiny with visible condensation and the other dry and matte before coating.
Before changing an entire bowl of Korean corn dog batter, test one properly dried skewer. If that one coats cleanly, moisture—not the dough—was the problem. It is a useful way to avoid “fixing” a batter that was already working.

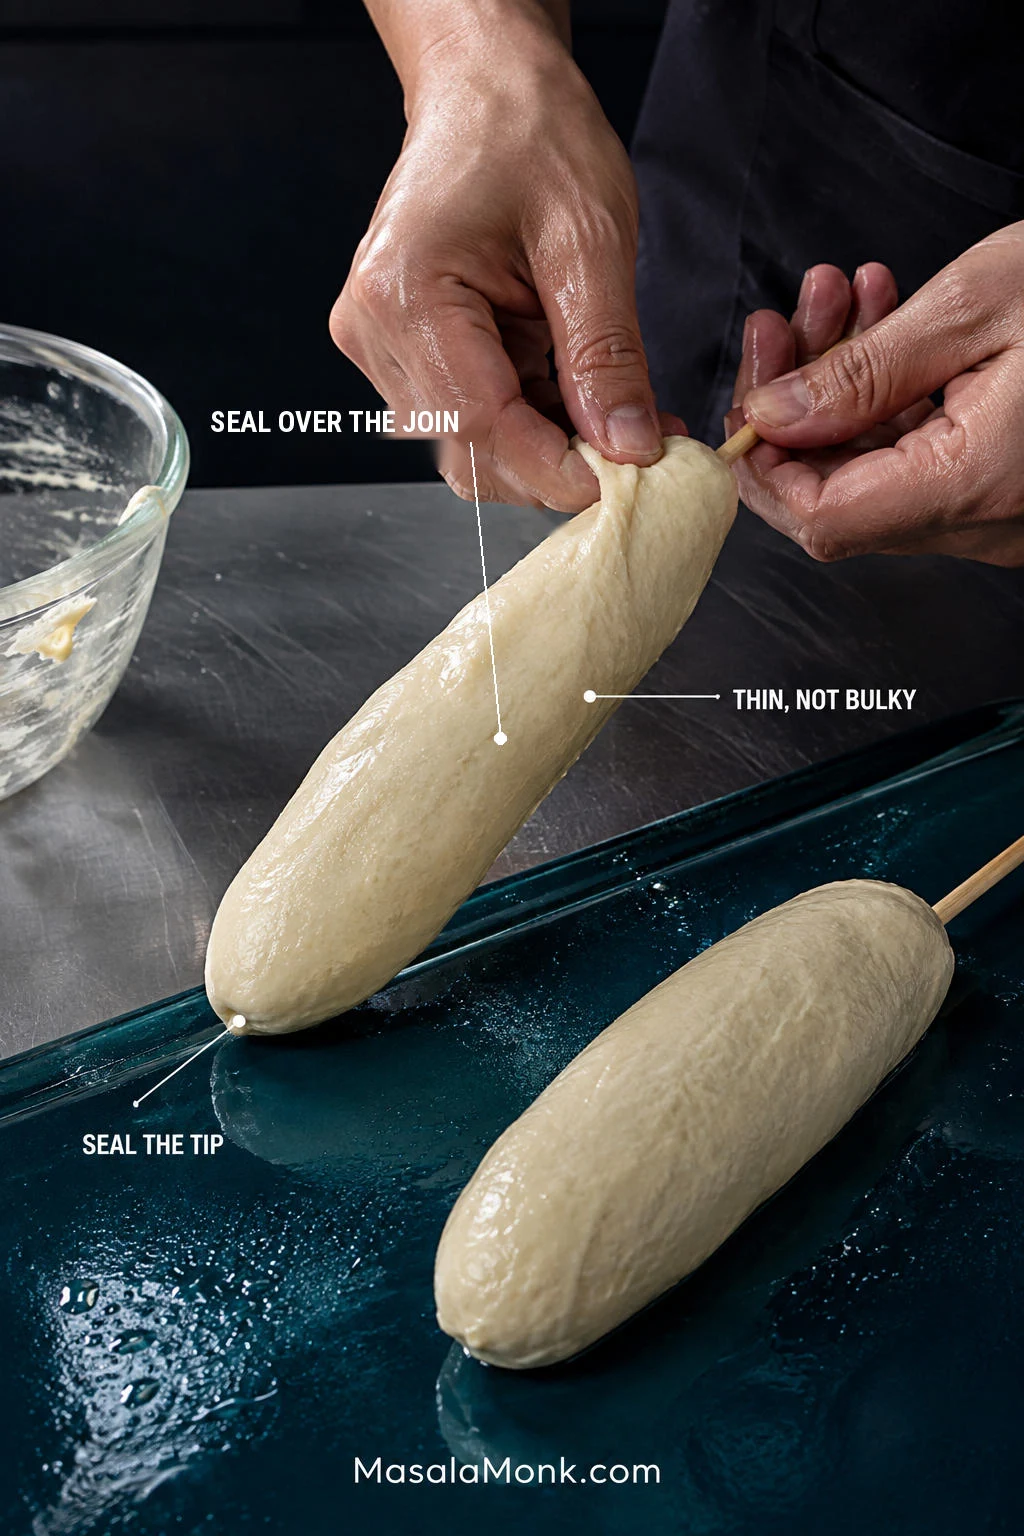
Now comes the messy bit. Lay the skewer in the dough and rotate it while pulling and stretching the dough around the filling. Your fingers may get sticky and the first wrap may look uneven. Keep turning, patch thin spots and smooth them with slightly damp fingertips.

Think thin shell—roughly ⅛ inch / 3 mm as a visual guide, not a thick blanket of dough. Seal the cheese tip and the join between cheese and sausage particularly well.

Hands wrapping sticky dough around a sausage-and-mozzarella skewer, showing a thin coating with the tip and filling join fully covered.
Use the silhouette as a final check before adding panko. The coated skewer should still resemble the filling underneath rather than developing thick shoulders around the mozzarella tip or sausage-cheese join; smooth excess away while every part of the cheese remains enclosed.

If the corn dog already looks enormous, take some dough off.

6. Press On the Panko

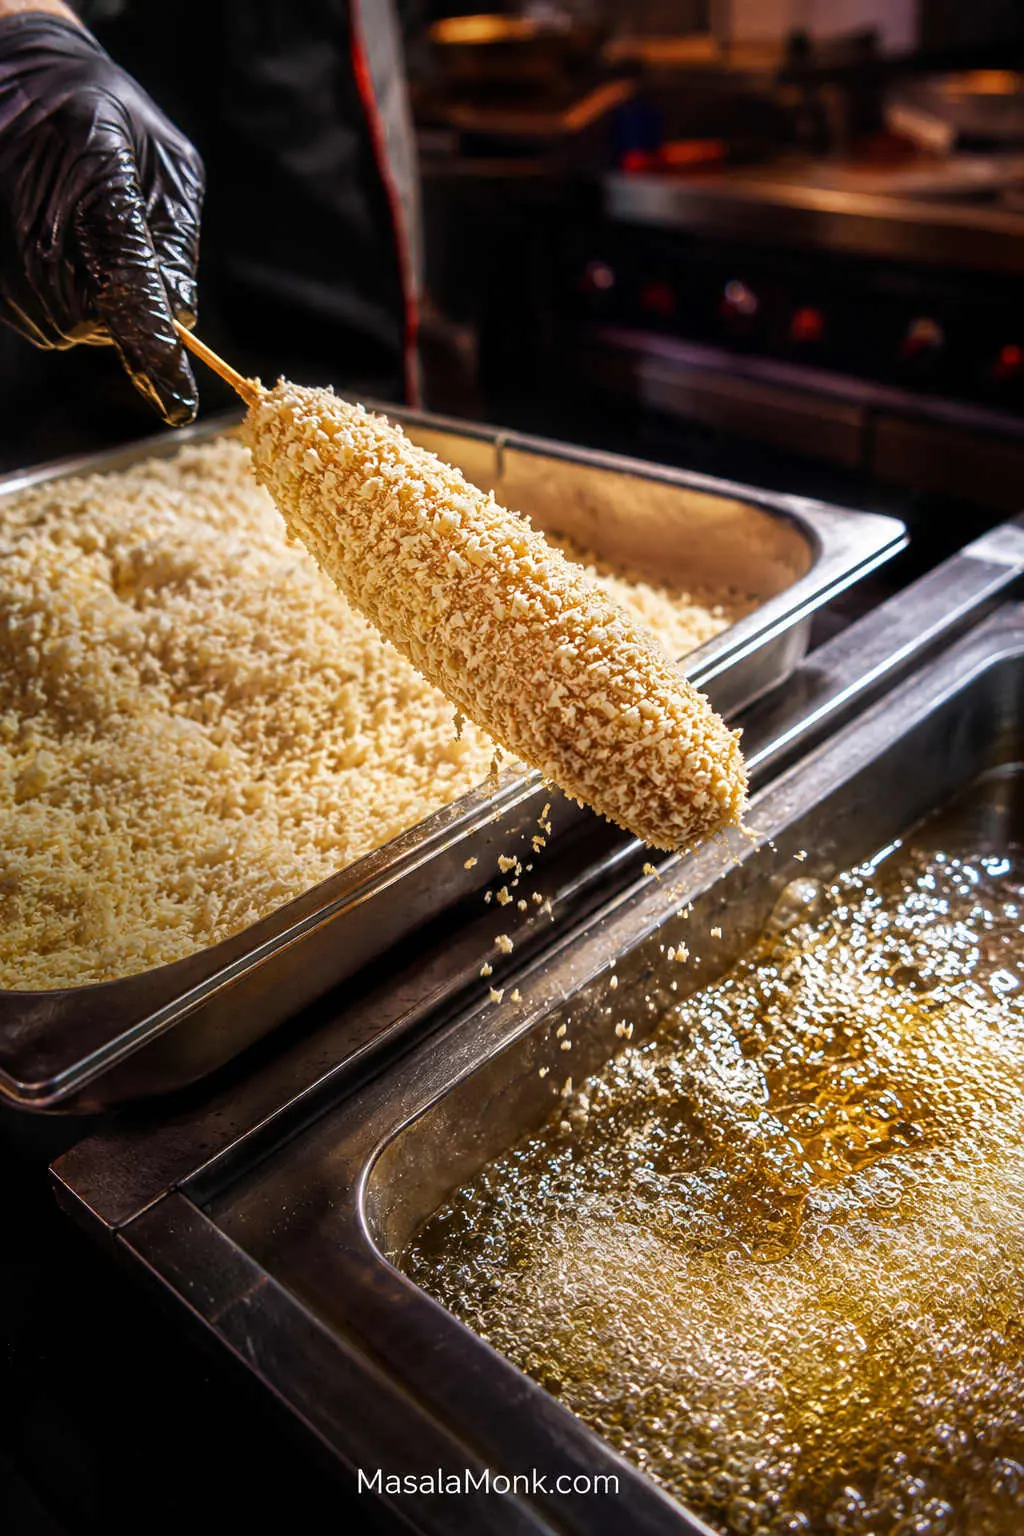
Set the dough-covered skewer in the panko and press the crumbs over the entire surface. Look for complete coverage, especially around the cheese tip—no shiny patches of sticky dough peeking through.

Once the panko is on, fry it straight away.

Coat one → panko one → fry one.

Panko-coated Korean corn dog lifted from breadcrumbs beside a pot of bubbling frying oil, ready to fry.
Panko coverage doubles as a last leak check. Pay particular attention to any shiny dough near the mozzarella tip or join: if a bare patch is easy to see now, it is also one of the first places worth inspecting if cheese escapes during frying.

7. Fry the First One and Calibrate the Batch

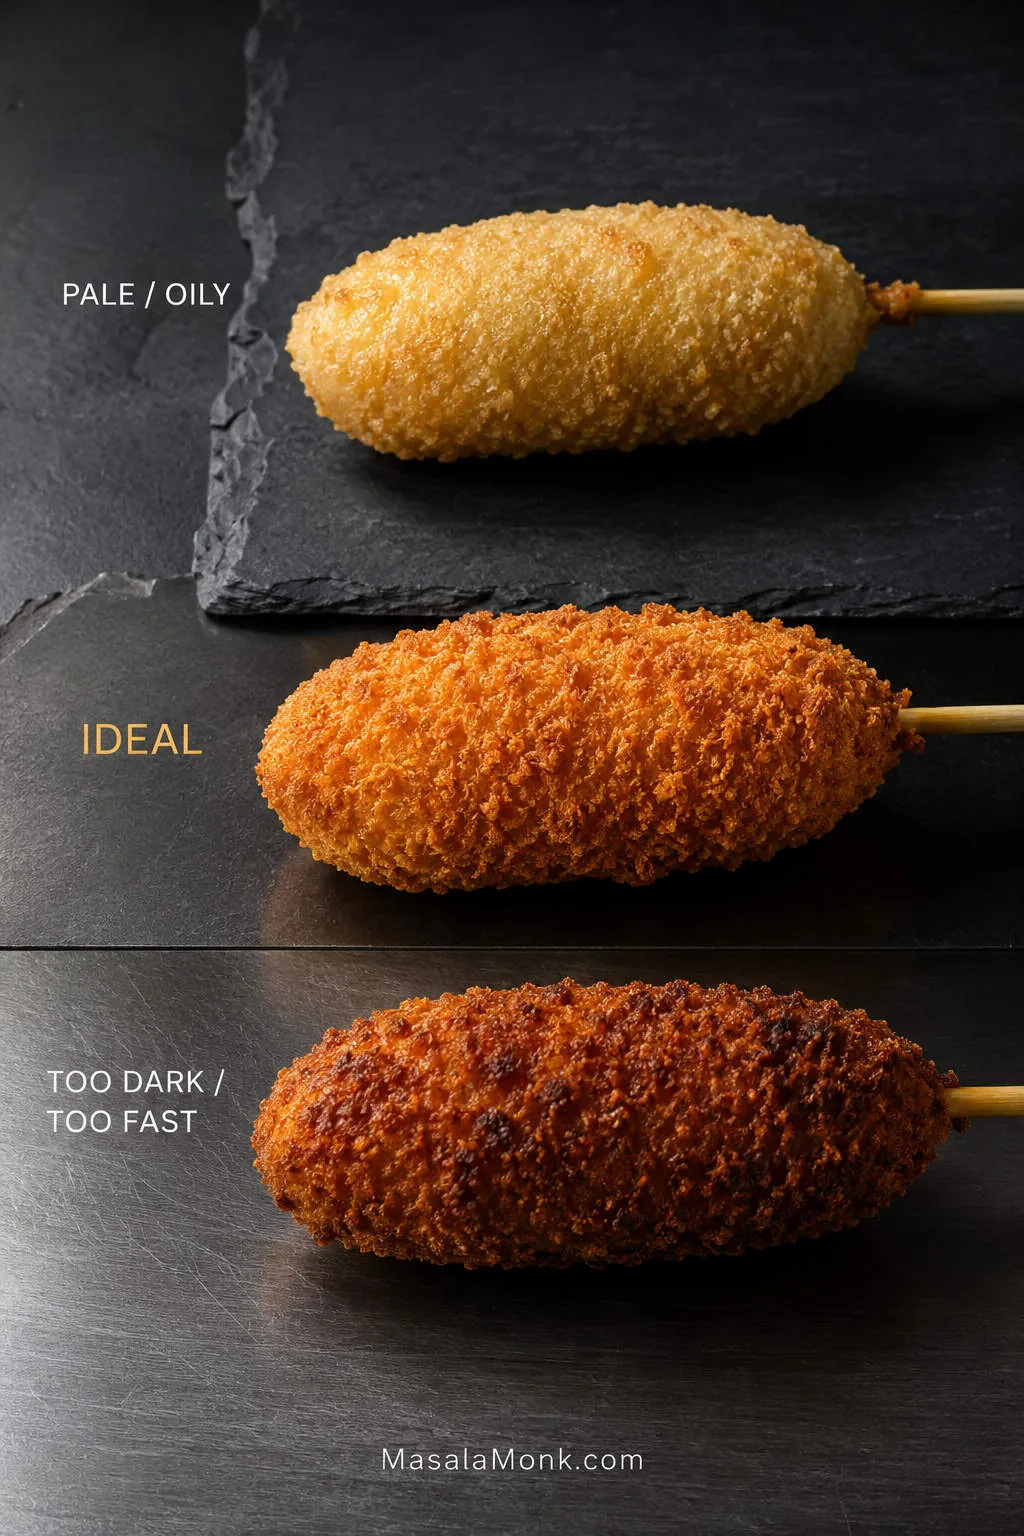
Lower the first corn dog gently into the oil away from you. Fry at 350°F / 175°C for 3–5 minutes, turning as needed.

Look for steady bubbles around the shell. Violent, racing bubbles mean things are moving too fast. Weak bubbling and a pale coating tell you the oil has cooled.

The clock gives you a window. Browning tells you what the oil is actually doing.

  • Dark brown in only 2 minutes: check both the oil temperature and whether the dough layer is too thick.
  • Pale and increasingly oily: let the oil recover before continuing.
  • Deep golden in 3–5 minutes: that’s what you’re looking for.
Three fried Korean corn dogs with pale blond, deep golden, and dark brown panko crusts for comparison.
Good frying is about the speed of browning as well as the final color. If one side darkens while another stays pale, think turning and oil contact; if the entire Korean corn dog races toward brown, check the heat before coating the next one.

Let the First One Teach You Something

The first corn dog is allowed to be wonky.

Fry it anyway.

While it cools, keep an eye on the thermometer and adjust the burner as needed to hold the oil around 350°F / 175°C. Do not leave the hot oil unattended while you inspect the first corn dog.

If it browned at a normal pace, stayed intact and still looks reasonably thin around the filling, there is no need to cut it just for the sake of checking. Keep going.

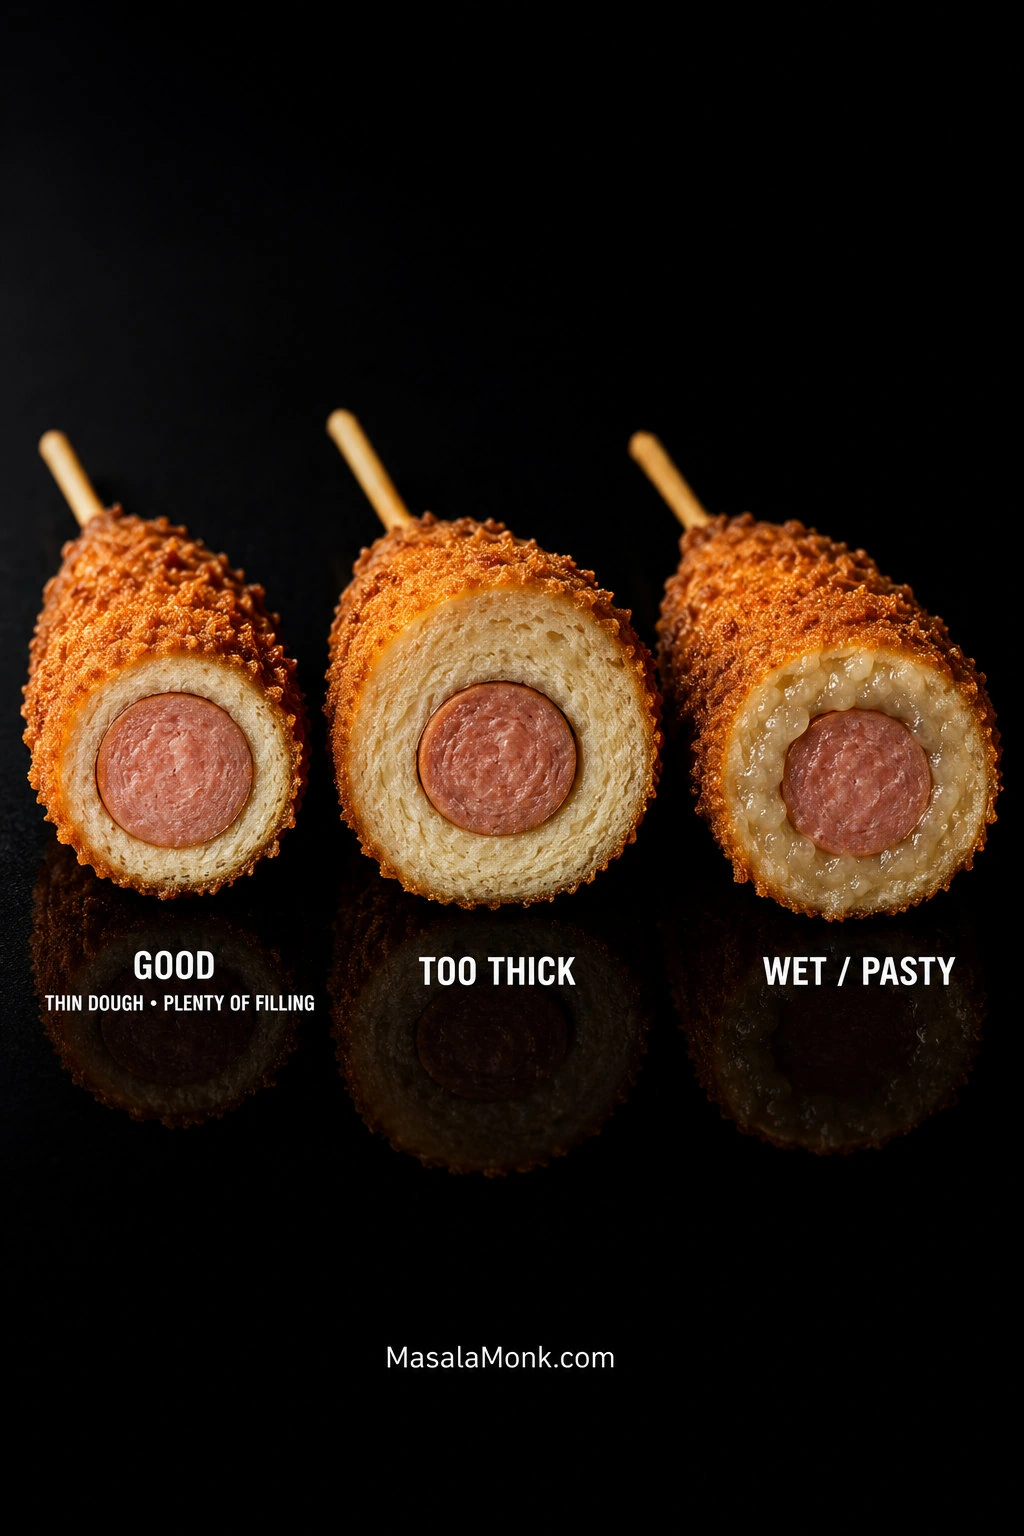
If it browned strangely, leaked, or looks thicker than you expected, let it cool enough to handle and cut it open. Under the panko, you’re looking for soft, bread-like dough rather than a wet or pasty layer. The filling should still look substantial, surrounded by a relatively thin band of dough.

A cheese leak shows you where the next skewer needs a better seal. Heavy bread around the filling means less dough next time. Fast browning means checking both the oil temperature and the thickness of the coating before the next one goes in.

Three Korean corn dog cross-sections showing a thin cooked dough layer, an overly thick bread layer, and a browned crust with wet dough inside.
If the first Korean corn dog needs investigating, cut through the middle third rather than judging it at the sealed tip. The center gives you a fairer look at how much cooked dough actually surrounds the filling—and therefore a better guide for the remaining batch.

Once the first one is right, you can fry two at a time if the pot is roomy and you can get both coated and into the oil promptly. Otherwise, keep working one at a time. Skim dark panko and dough fragments from the oil between batches.

8. Finish With Sugar and Sauce

Let each corn dog drain briefly on a wire rack, then dust or lightly roll the hot shell in granulated sugar if you want the sweet-savory shop-style finish.

A little sugar lands first, then the salty sausage and molten cheese take over; sharp yellow mustard keeps the whole thing from feeling too rich. Ketchup and mustard are hard to beat, but the sugar can stay off entirely if savory is more your thing.

Add the toppings while the shell is hot, then let the center cool just enough to bite safely. Molten mozzarella can stay much hotter than the crust around it.

Serving Six at Once

The best corn dog is the one that just left the fryer. If people are already hovering near the stove, hand them out as they come. That’s when the panko is crispest, the little crust shards break away at the first bite and the cheese still pulls.

If they need to wait, keep them uncovered on a wire rack in a 200°F / 95°C oven for 5–10 minutes. Stacking or covering them traps steam and softens the crust.

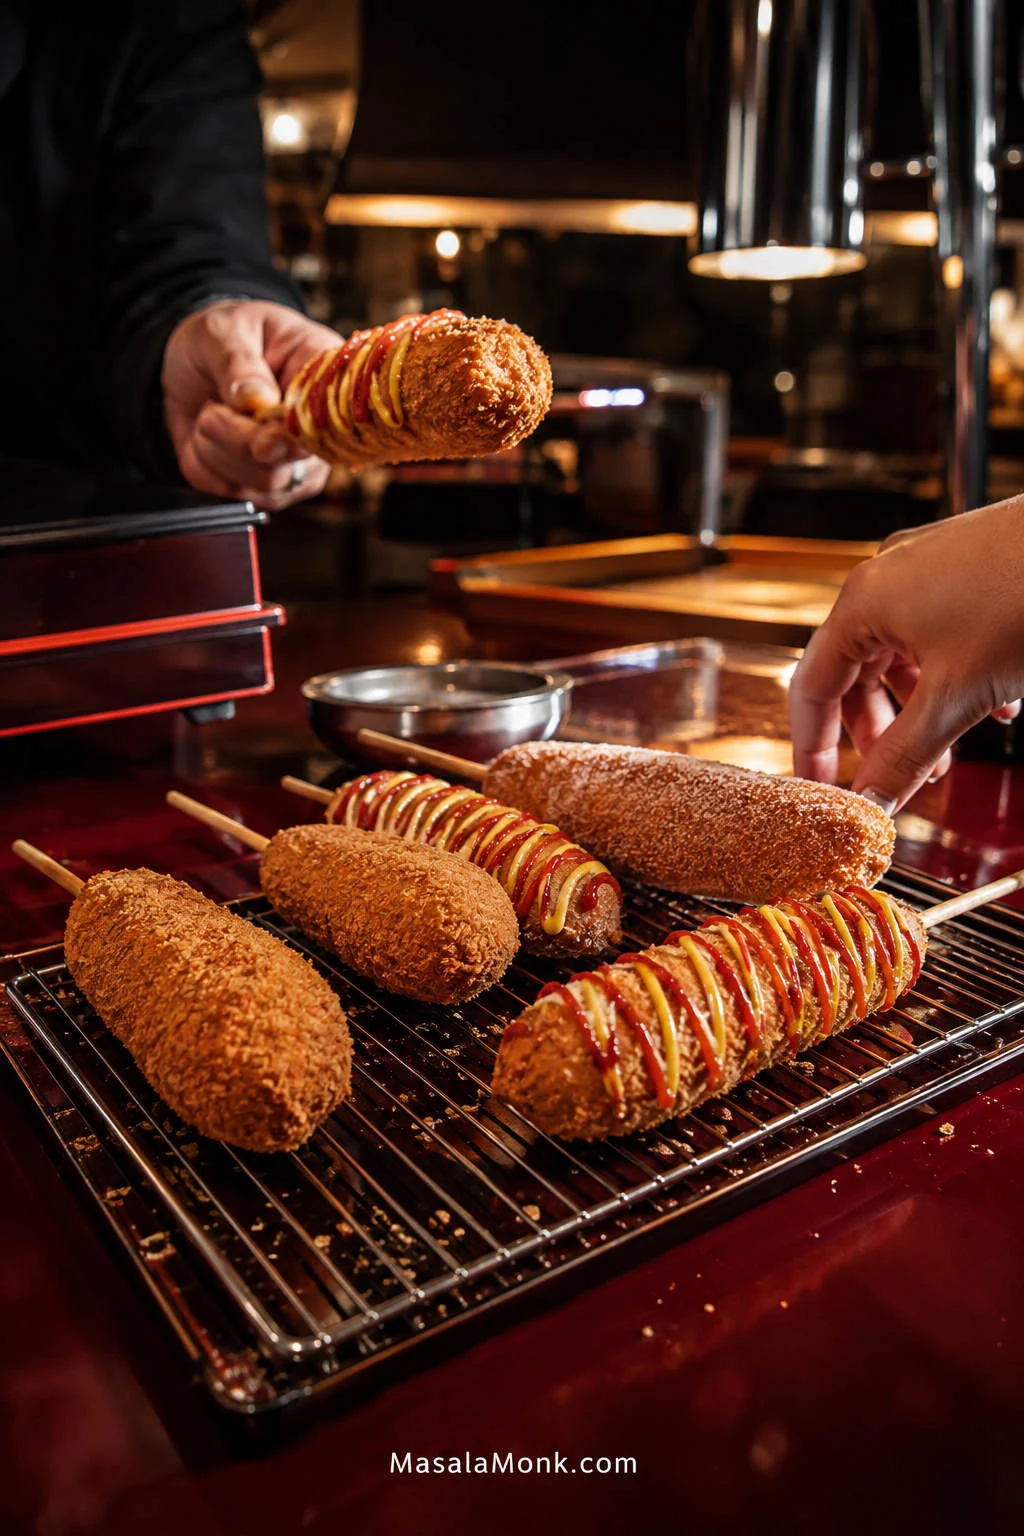
Several freshly fried Korean corn dogs on a wire rack, some drizzled with ketchup and mustard, while hands reach toward the batch.
Hold first, sauce last. Korean corn dogs waiting briefly on a rack keep their panko crisper when they remain unsauced; add ketchup, mustard or creamy toppings only as each one is about to be eaten rather than dressing the entire batch in advance.

Once the classic batch is finished, the other options become much easier to play with: try the no-yeast version, potato corn dogs, or one of the crunchier coatings below.


Korean Corn Dog Batter and Cheese

Why the “Batter” Behaves Like Dough

The word batter is a little misleading here. This yeasted coating behaves more like very wet bread dough: it stretches around the skewer instead of pouring over it.

That is why the method focuses on cling and stretch rather than a perfectly smooth consistency. The corrections in Step 1 are simply there to bring the dough back to that behavior.

Some Korean hotdog recipes include rice flour or glutinous rice flour alongside wheat flour; plenty do not. This all-purpose-flour dough gives you a soft, chewy layer without requiring either one.

Can You Make Korean Corn Dogs Without Yeast?

Yes. You lose some of the yeasted chew, but you also lose the hour-long wait.

Use this batter in place of the yeast dough. Keep the same cold skewers, light flour dusting, panko coating and frying setup.

For 6 corn dogs, mix:

  • 160 g (1⅓ cups) all-purpose flour
  • 18 g (1½ tablespoons) sugar
  • 8 g (2 teaspoons) baking powder
  • 3 g fine salt
  • 1 large cold egg
  • 100–120 ml cold milk, starting with 100 ml

Whisk the dry ingredients, then add the egg and 100 ml milk. Add more milk only until the batter is thick enough to cling to a cold, lightly floured skewer instead of running off it.

If it softens while you work in a warm kitchen, chill it briefly. There is no proofing step. Fry at 350°F / 175°C until the coating is browned and set, with a bread-like interior rather than a wet or pasty layer.

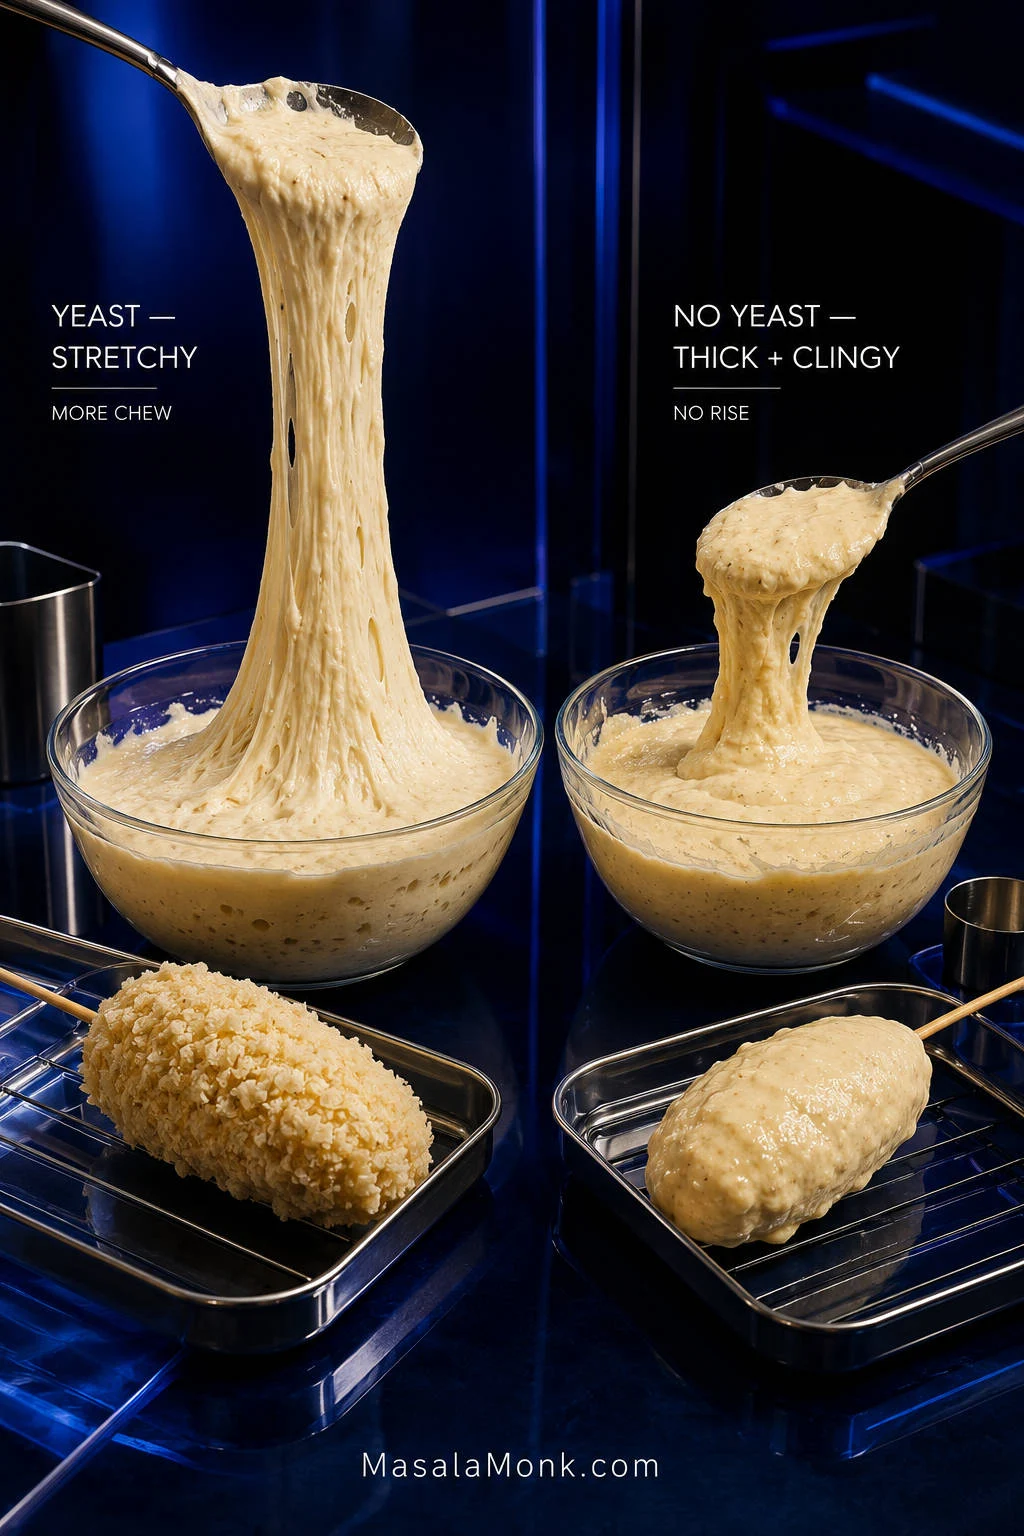
Two bowls comparing stretchy bubbly yeast dough and a thicker smooth no-yeast batter for Korean corn dogs.
Don’t force the quick batter to imitate the yeast dough. No-yeast Korean corn dogs begin with a thicker, colder coating, while the yeasted version relies more on stretch; what matters is that each formula stays evenly attached to a cold skewer in its own way.

Prefer the classic yeasted version? Go back to the main Korean corn dog method.

Choosing Cheese for Stretch or Flavor

Mozzarella gives you the longest pull. Keep it as the main cheese when stretch matters most.

For stronger cheese flavor, add a smaller piece of firm cheddar alongside it. The center tastes richer, but the pull becomes a little shorter.

What Makes a Korean Corn Dog Different?

Korean hotdogs differ most clearly from American corn dogs in their coating, fillings and finish.

Korean corn dogAmerican corn dog
CoatingWheat- or rice-based, often with pankoUsually cornmeal-based batter
FillingSausage, mozzarella or both; other fillings existUsually a hot dog
CrunchPanko, potato and other coatingsUsually comes from the fried batter itself
FinishOften sugar plus savory saucesUsually savory condiments

In Korea, these battered snacks on sticks are commonly called hotdogs (핫도그). Gamja (감자) means potato, so gamja-hotdog refers to the potato-coated style. Maangchi’s gamja-hotdog recipe is a useful Korean reference for both the terminology and the potato variation.

Korean Potato Corn Dogs (Gamja Hotdogs)

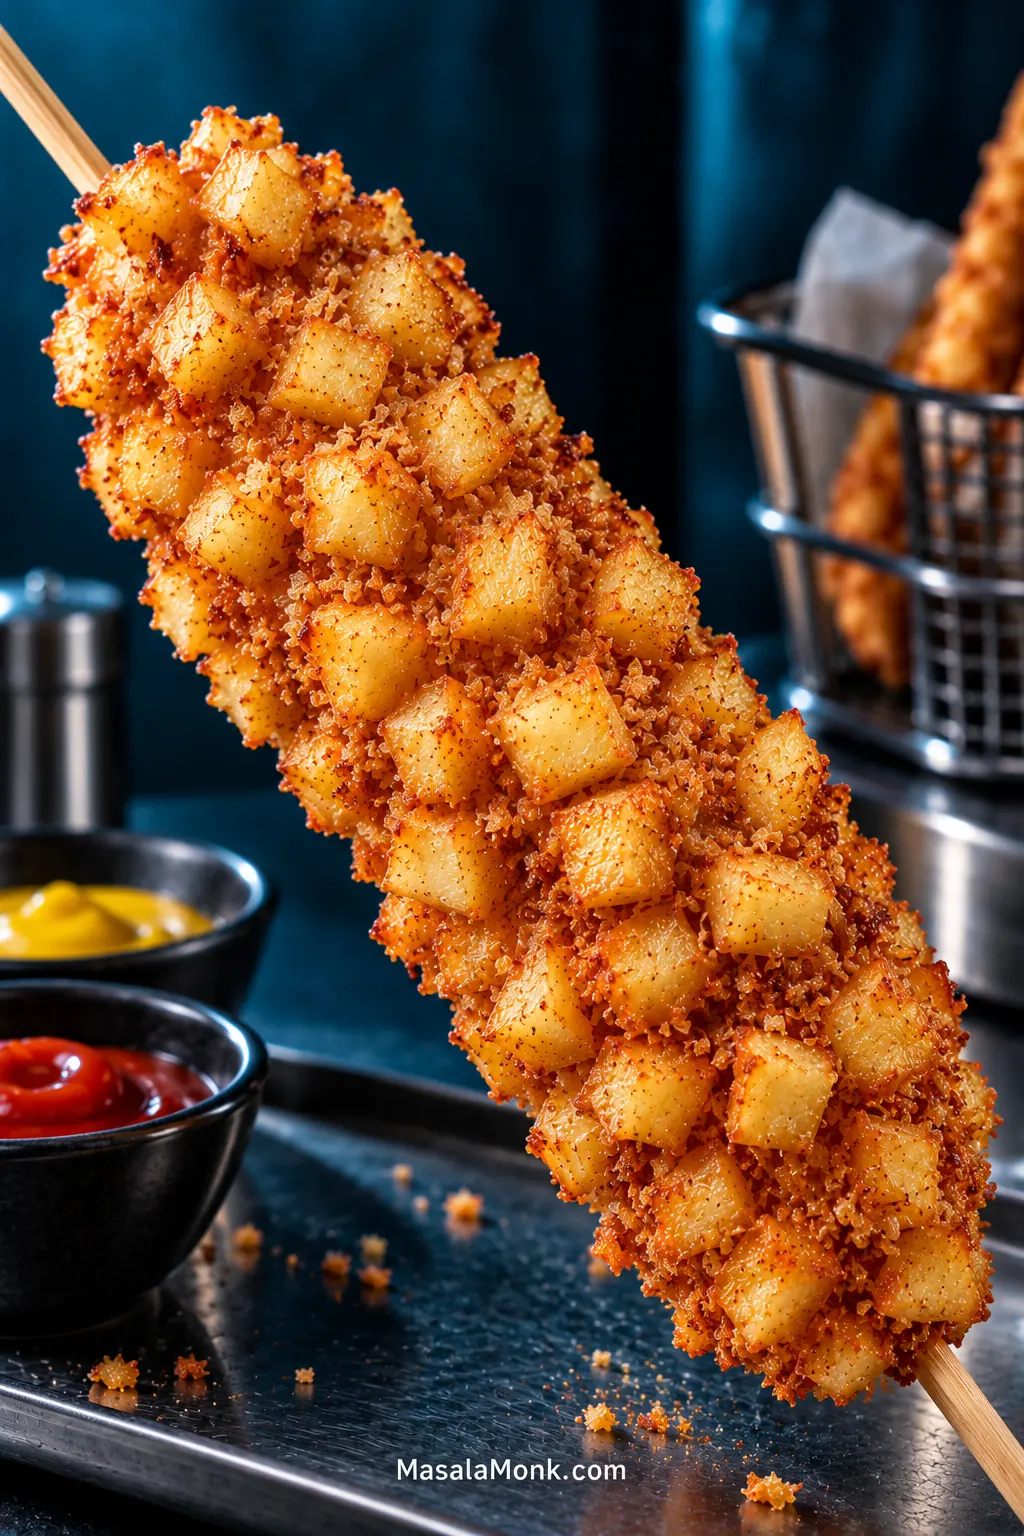
Golden Korean potato corn dog on a wooden skewer covered with small crisp potato cubes and panko against a dark restaurant-style background.
Gamja changes more than the appearance of the corn dog. Once fresh potato becomes part of the coating, the vegetable needs time to soften before the outside goes too far—which is why a Korean potato corn dog benefits from gentler frying than the plain panko version.

Prep the Potato

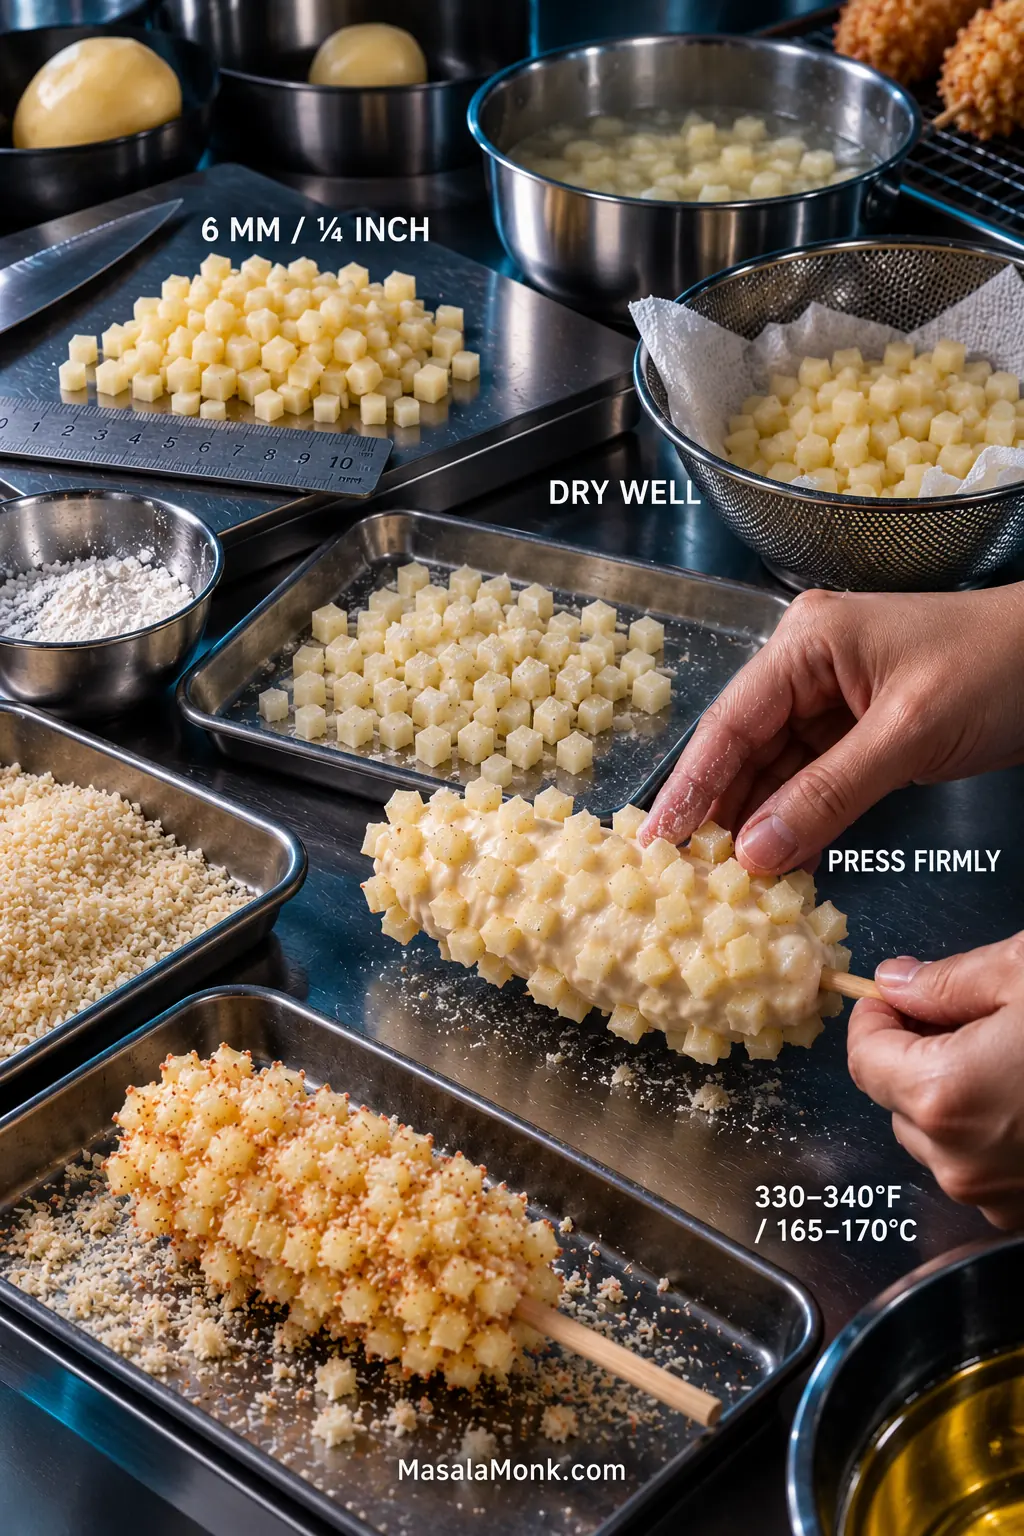
To make 3 of the 6 corn dogs potato-coated, use 250 g / 9 oz peeled potato and 1–2 tablespoons flour or cornstarch, plus panko. Double the potato if you want all six coated this way.

Cut the potato into ¼-inch / 6-mm cubes. Big chunks are harder to attach, slower to soften and awkward to bite once fried.

Rinse the cubes, blanch for 2–3 minutes, then drain and dry them very well. The edges are just beginning to soften, but the cubes still hold their shape. Toss with a light dusting of flour or cornstarch.

Small diced potato cubes beside a ruler, blanched potatoes drying on paper, lightly dusted cubes, and hands pressing them onto a dough-covered skewer.
After blanching, spread the potato cubes out instead of leaving them in a steaming pile. Trapped moisture can wet their surfaces again; letting that steam escape gives the small cubes a drier exterior before they are pressed onto the dough.

Coat and Fry

Wrap the skewer with dough, press the potato cubes firmly into the surface, then fill exposed sticky gaps with panko.

Once the little cubes cover the whole skewer, a couple of playful Korean nicknames Maangchi records—roughly “ugly hotdog” and “goblin’s club hotdog”—suddenly make sense.

A few cubes may fall into the oil. Skim them out and press the next coating more firmly.

For fresh potato, lower the oil to 330–340°F / 165–170°C and begin checking near 5 minutes. Many take 5–7 minutes.

The best bite has crisp potato corners and panko ridges outside, then tender potato, soft dough and hot filling underneath. With cheese-heavy corn dogs, take them out as soon as the potato and dough are done; extra frying rarely does molten mozzarella any favors.

Frozen French Fry Shortcut

Chop frozen French fries into small pieces and press them into the dough straight from frozen. Because the fries are already partially cooked, skip the blanch and use the regular 350°F / 175°C frying temperature. Cook until the dough is set and the outside is crisp.

Back to the main method or see more coatings and toppings.

Coatings, Sauces and Other Variations

Flamin’ Hot Cheetos Coating

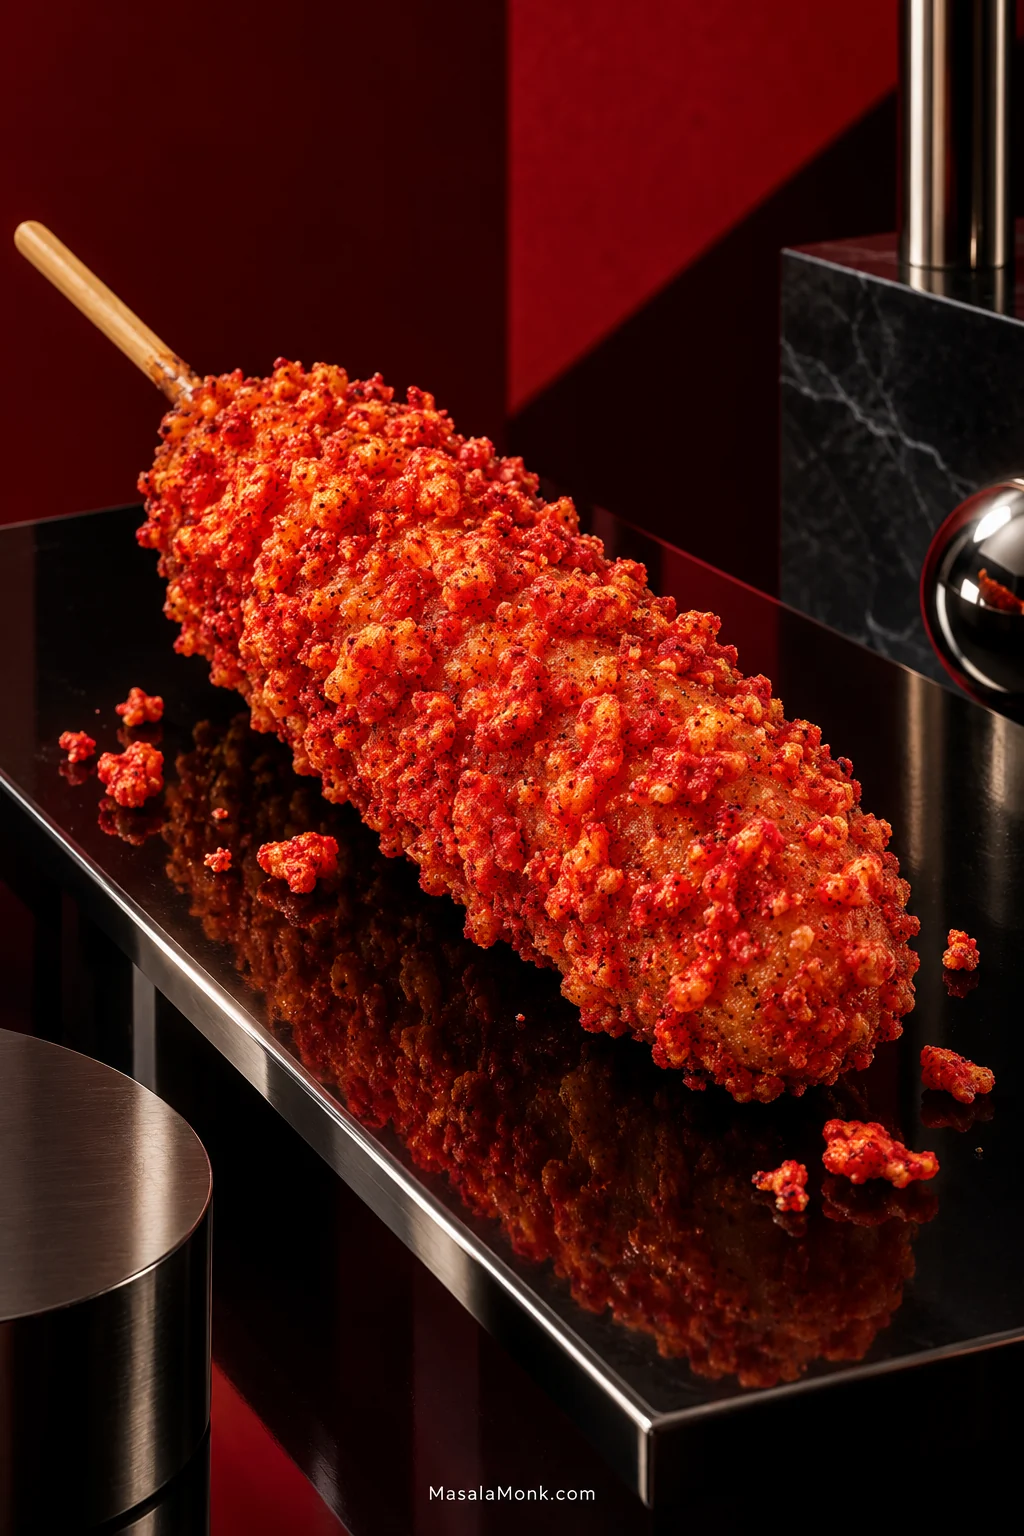
For a modern shop-style variation, Flamin’ Hot Cheetos make the coating loud on purpose: bright red, salty and spicy.

Keep enough panko in the mixture to build a complete shell, then add finely crushed Cheetos until the color and seasoning are where you want them. For the brightest red finish, you can fry in panko first, then press fine Cheeto crumbs onto the hot finished crust while there is still enough surface oil for them to cling.

If the red crumbs go into the fryer, watch the crust itself instead of waiting for ordinary golden-brown color; the seasoning makes color a poor doneness guide.

Korean corn dog coated in irregular red-orange crushed spicy corn snack crumbs on a glossy black surface against a deep red background.
In a Flamin’ Hot Cheetos Korean corn dog, let the two crumbs do different jobs: panko helps build a complete shell, while the crushed snack brings the intense red color, salt and chile flavor. That balance works better than asking Cheetos alone to provide all the structure.

Ramen and Crispy Rice Coatings

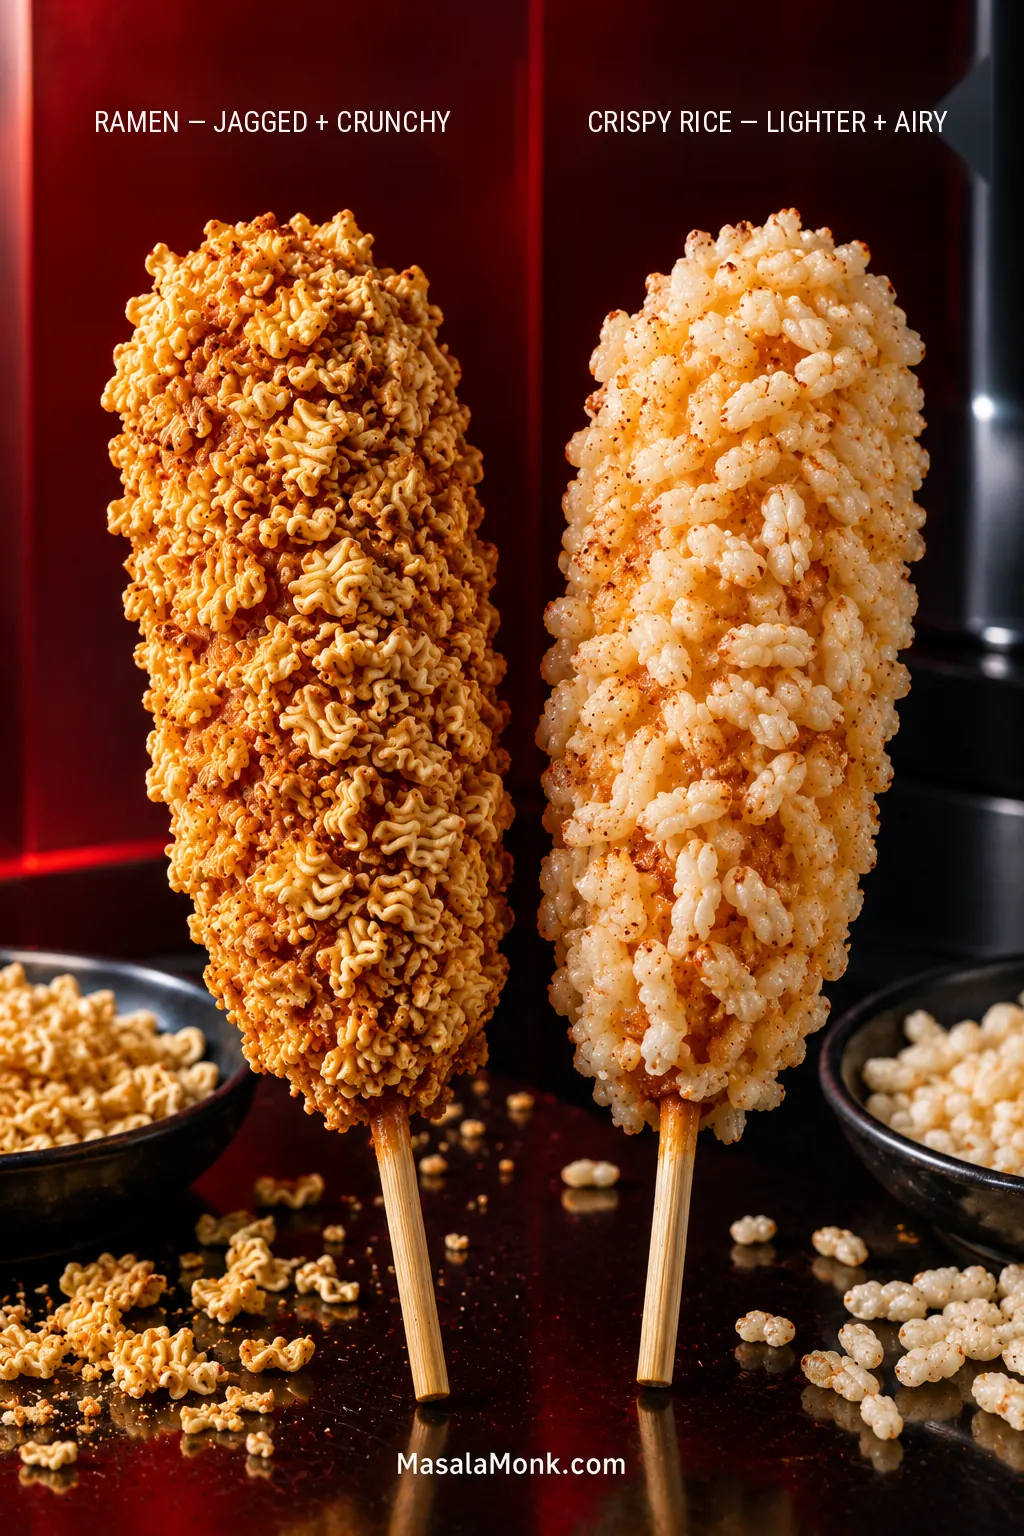
Crushed uncooked ramen gives the outside a jagged, extra-crunchy shell. Break it fairly small so the pieces can press into the sticky dough. Crispy or puffed rice makes a lighter coating; press it on firmly and use some panko to cover any bare sticky patches.

Two Korean corn dogs side by side, one coated with jagged crushed dry ramen pieces and the other with pale puffed crispy rice.
Choose by how much you want the coating to dominate the bite. Crushed ramen gives a Korean corn dog a more aggressive, jagged crunch, whereas crispy rice is lighter and lets the dough and filling stay more prominent underneath.

More Sauces and Toppings

For something creamy, try spicy mayo or gochujang mayo. Sweet chili sauce gives you a sweeter, tangier option without hiding the fried crust.

Our homemade mayonnaise guide includes spicy mayo and gochujang-mayo options if you want to make those yourself.

Something not behaving? Jump to the troubleshooting guide for coating, frying and cheese problems.

When Something Goes Wrong

Start with the moment the problem appeared. That often tells you more than the problem itself.

ProblemWhat to Check or Do
Dough slides offTouch the filling first. If it is shiny or damp, blot it dry and dust lightly with flour. Only then adjust the dough if it still will not cling.
Cheese leaks immediatelyChill the filling well and look for an exposed patch around the cheese tip or join.
Later corn dogs start leakingKeep waiting skewers cold and let the oil return to frying temperature.
Corn dog becomes mostly breadUse less raw dough on the next skewer.
Dark outside, gummy insideVery fast browning points to excessive heat; normal browning with a pasty center points more toward too much dough.
Pale and greasyLet the oil recover before continuing.
Potato falls offDry the cubes thoroughly, dust lightly and press them firmly into the dough.
Potato stays hardCut smaller cubes and give them the brief blanch before coating.
Skewer spins inside the sausageSwitch to a wooden chopstick or broader bamboo skewer.
Black flecks appear on later batchesSkim burnt crumbs from the oil between batches.
Weak cheese pullUse a substantial mozzarella baton and serve while the center is still hot.

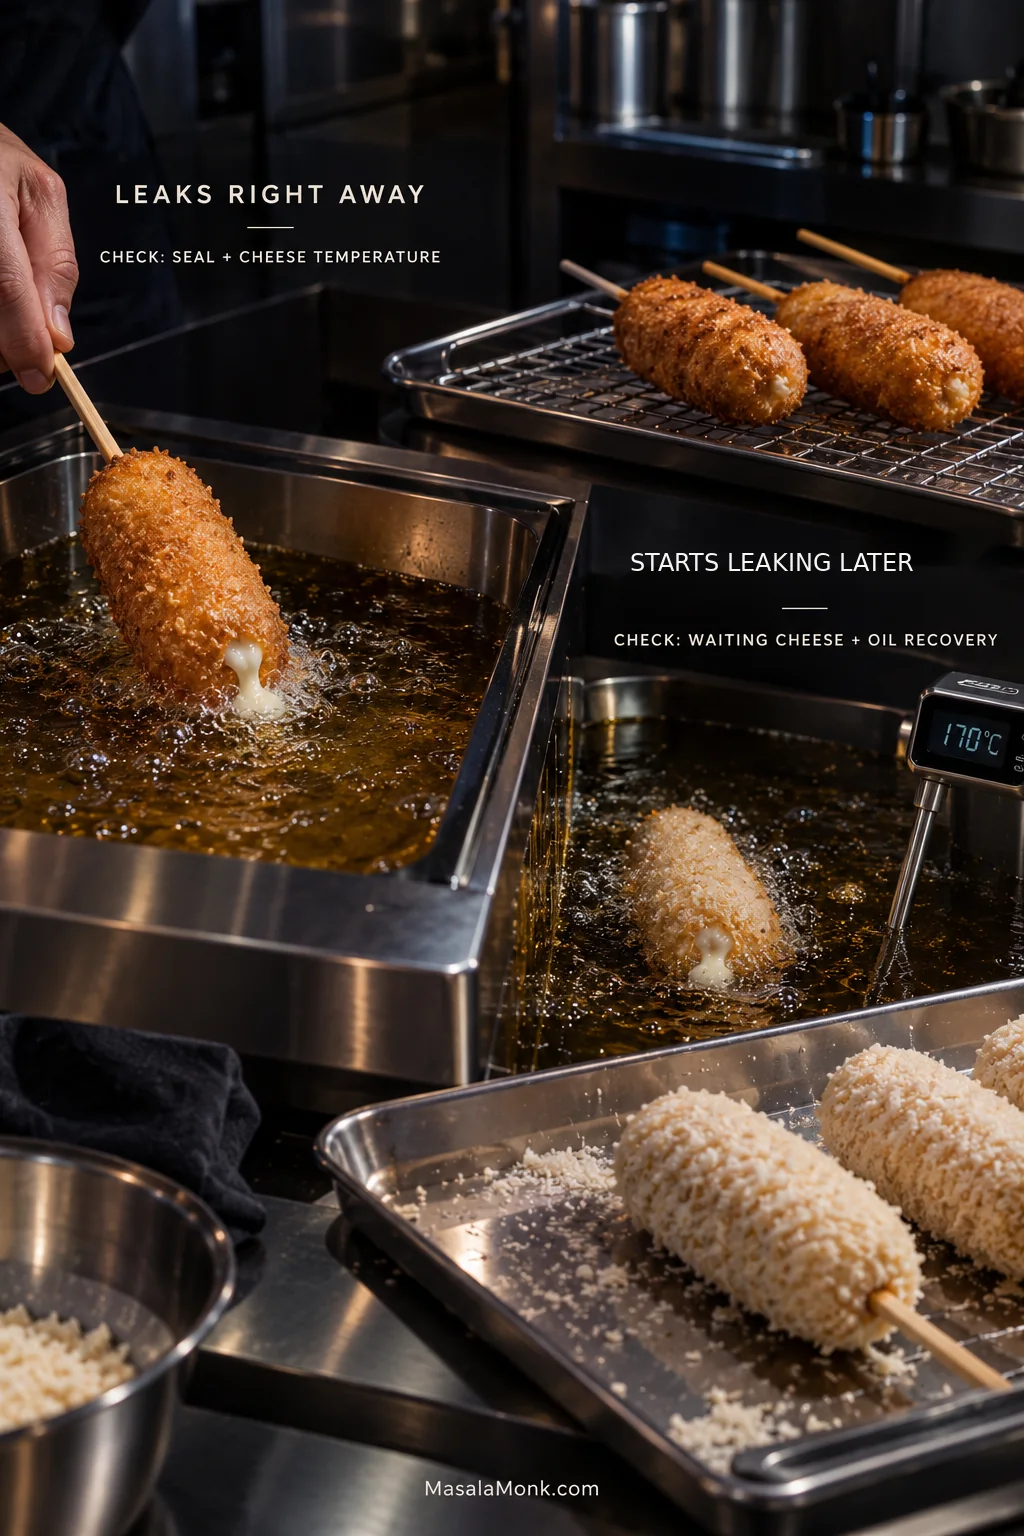
Why Did the Cheese Start Leaking Later?

An immediate leak and one halfway through the batch tell different stories. Cheese escaping almost at once points toward warmth or a hole in the coating. If the first few work and later corn dogs begin leaking, something changed while you were frying: the waiting cheese may have warmed, or the oil may need another minute to recover.

Two frying scenes showing mozzarella leaking from a Korean corn dog immediately and after later batches, with finished corn dogs, waiting skewers, and an oil thermometer nearby.
One leak is a skewer clue; several later leaks are a batch clue. An isolated failure sends you back to that corn dog’s seal and filling, whereas repeated problems after earlier successes suggest something in the working conditions has changed.

Back to the main method · Skip to storage and reheating · Back to top

Make Ahead, Air Fry, Freeze and Reheat

You can assemble the sausage-and-cheese skewers earlier the same day, cover them and keep them refrigerated. Make the dough on frying day too; this dough is built for a short same-day rise rather than an overnight rest. Keep dough, panko and filling separate until close to frying time.

Can You Air Fry Homemade Korean Corn Dogs?

For this raw sticky yeast dough, deep frying works better. Hot oil sets the soft exterior quickly; in an air fryer, the coating has more time to sag before it firms.

The air fryer becomes much more useful after the corn dogs are already cooked. It crisps refrigerated leftovers well and is also a good fit for commercially frozen corn dogs designed for reheating.

Leftovers

Refrigerate cooked corn dogs within 2 hours. They are at their best within 2–3 days. For longer storage, freeze them after cooling and use them within 1–2 months for best quality.

Reheating

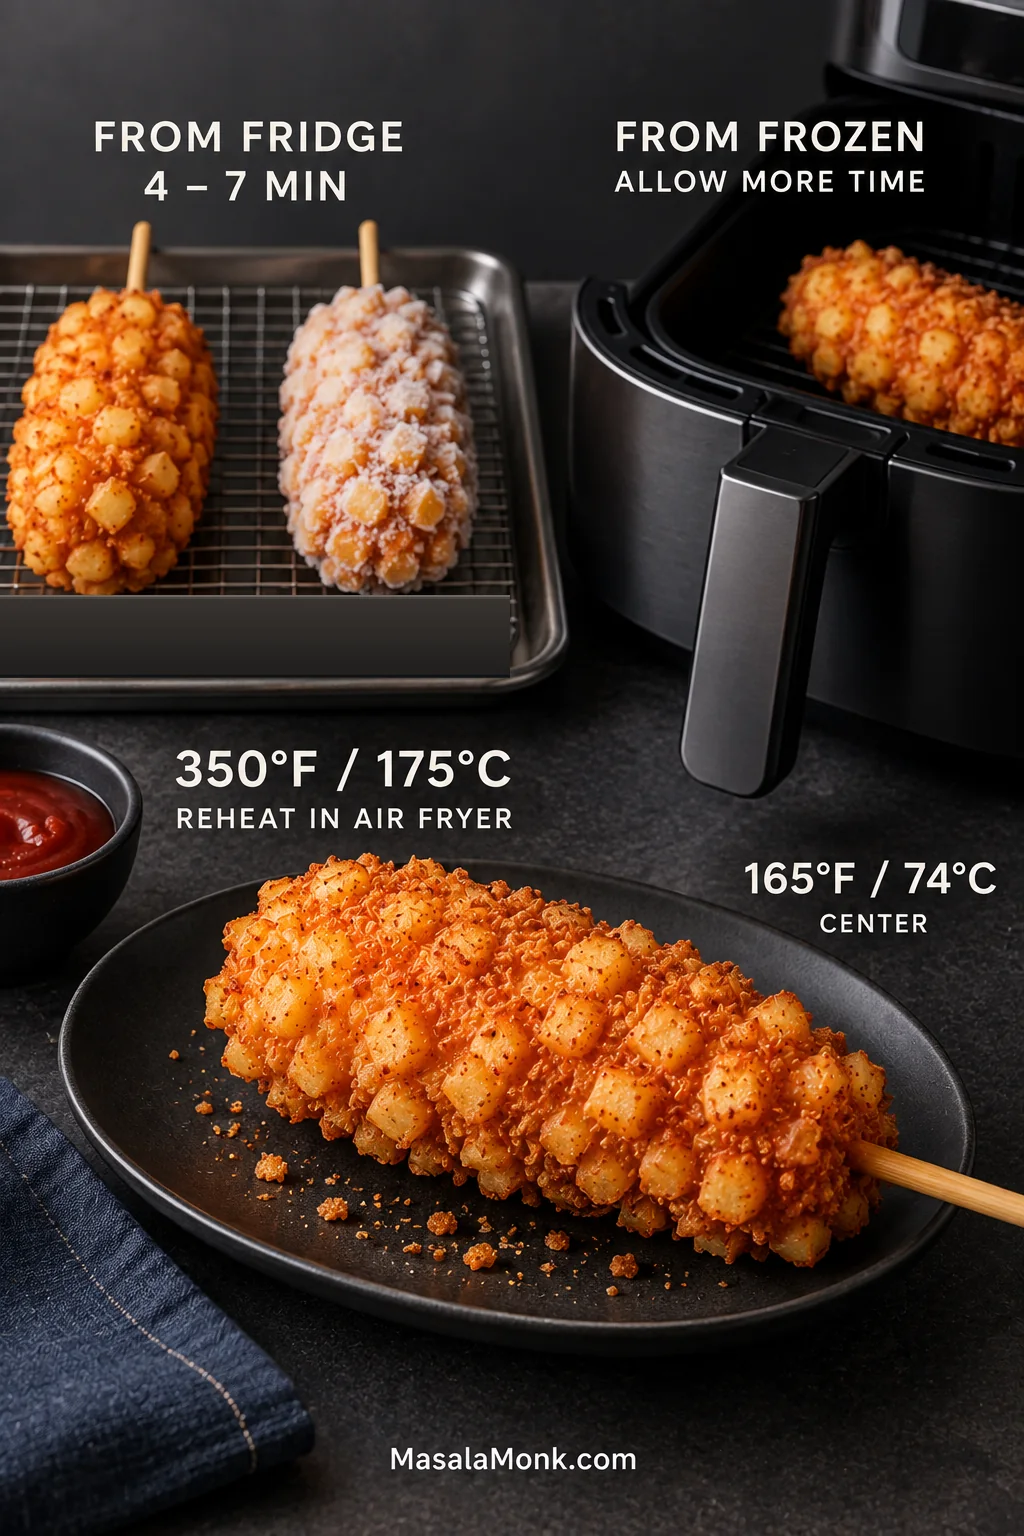
When reheating a refrigerated corn dog, air fry at 350°F / 175°C for 4–7 minutes, continuing until the shell is crisp again and the center reaches 165°F / 74°C. An oven works too; a microwave warms the center quickly but softens the panko.

Frozen leftovers can go into the air fryer from frozen at the same starting temperature. Give them more time until the outside is crisp and the center reaches 165°F / 74°C. For broader storage and reheating guidance, see the USDA leftovers and food-safety guidance.

A cooked corn dog in an open air fryer beside refrigerated and frozen examples, with a crisp reheated potato-coated corn dog in the foreground.
A crisp-looking shell is not proof that the center is hot. When you reheat Korean corn dogs in the air fryer, treat exterior crunch and internal temperature as two separate checks—the panko can recover before a cold sausage-and-cheese center has fully reheated.

Once the coating rhythm clicks, the rest of the batch moves surprisingly quickly. The panko is at its crispest and the cheese at its most satisfying when you eat the corn dogs soon after frying—just give the molten center a moment before the first bite.

What did your first one do when it hit the oil? Tell us what happened.

Back to top

Posted on — Leave a comment

How to make Korean Rice Corn Dogs: A Delicious Day’s Guide 🌽🌭

happy woman with rolling pin cooking at home

Welcome to another culinary adventure with 매일맛나 delicious day, a YouTube channel dedicated to bringing you the most mouthwatering recipes from around the world. In this episode, we’re diving into the world of Korean street food with a focus on the ever-popular Korean Rice Corn Dogs. This isn’t your average corn dog; it’s a unique fusion of flavors and textures that will leave you craving for more.

If you’re a fan of street food or just love trying out new recipes, this is a must-try! The video tutorial can be found here. But before we delve into the recipe, let’s take a moment to appreciate the creativity and culinary expertise of 매일맛나 delicious day. Their channel is a treasure trove of delectable recipes that are easy to follow and absolutely delightful to taste.

🌽 The Magic of Korean Rice Corn Dogs 🌭

Korean Rice Corn Dogs, also known as Myungrang Hot Dogs, are a popular street food in Korea. Unlike the traditional corn dogs, these are made with a blend of wheat flour and rice flour, giving them a unique texture that’s crispy on the outside and chewy on the inside. But the real magic lies in the variety of toppings and fillings that you can experiment with. From cheese and sausage to potatoes and ramen, the possibilities are endless!

📝 The Recipe: How to Make Korean Rice Corn Dogs 🍡

The recipe starts with a simple dough made from strong bread flour, rice flour, sugar, salt, yeast, an egg, and warm water. The dough is then left to ferment, which helps it rise and develop a light, airy texture.

Once the dough is ready, it’s time to prepare the fillings. The video tutorial shows how to make three different types of corn dogs: sausage, mozzarella cheese, and a combination of both. The sausages and cheese are skewered on wooden sticks, then coated in the dough.

Next comes the fun part: the toppings! One version is coated in small diced potatoes, another in crushed ramen noodles, and the third is left plain. All three versions are then rolled in bread crumbs for an extra layer of crunch.

The corn dogs are then deep-fried until golden brown and crispy. The final touch is a sprinkle of sugar and a drizzle of ketchup and mustard. The result is a deliciously crunchy, cheesy, and satisfying snack that’s perfect for any time of the day!

🍽️ Enjoying Korean Rice Corn Dogs: Tips and Suggestions 🌭

When making Korean Rice Corn Dogs at home, here are a few tips and suggestions to keep in mind:

  • Feel free to experiment with different fillings and toppings. You can try using different types of cheese, or even add some veggies for a healthier twist.
  • When frying the corn dogs, start with high heat to seal the outside, then lower the heat to ensure the inside is cooked through without burning the outside.
  • Serve the corn dogs while they’re still hot to enjoy the maximum crunch and melty cheese goodness!

🎉 Join the Foodie Community! 🍽️

If you try this recipe or have other delicious recipes to share, join the vibrant and engaging food lovers community on Facebook. It’s a place where you can share your culinary experiments, discover new recipes, and connect with fellow food enthusiasts.

So, are you ready to bring a taste of Korean street food into your kitchen? With this Korean Rice Corn Dogs recipe, you can enjoy a delicious and unique snack right at home. Happy cooking! 🍽️🎉

Remember to check out more amazing recipes on 매일맛나 delicious day‘s YouTube channel. Enjoy the delicious day! 🌞🍡🌭