Posted on — Leave a comment

Korean BBQ Chicken Recipe: Easy Chicken Bulgogi

Korean BBQ chicken pieces in a dark skillet, coated in a glossy brown glaze with darker edges, sesame seeds and sliced scallions.

Good Korean BBQ chicken is juicy in the middle, glossy on the outside and deeply browned around the edges, with garlic, ginger and sesame coming through the savoury-sweet soy marinade. Spoon it over hot rice, or wrap it in cool lettuce or perilla with something sharp or fermented—homemade napa-cabbage kimchi is particularly good here.

This chicken bulgogi uses boneless thighs and a simple soy-garlic marinade. Leave it mild and savoury-sweet, or add gochujang for fermented chilli depth and a little more heat. Either way, we’re cooking it in a skillet.

The one part worth paying attention to is the pan. Marinated chicken often releases moisture before it browns, so the first minute can look disappointingly pale and wet. Then the bubbling subsides, the sizzle gets stronger and those glossy caramelized edges start appearing. That change is the useful thing to recognise.

Quick Answer: Korean BBQ Chicken

Chicken bulgogi, or dak bulgogi, is Korean bulgogi made with chicken. For this skillet version, marinate boneless chicken thighs with soy sauce, garlic, ginger, brown sugar, honey and sesame oil for 30 minutes to 2 hours, then cook in batches over medium-high heat until browned and caramelized. Start checking small pieces at about 4–6 minutes per batch, allowing longer if needed. The thickest pieces must reach 165°F / 74°C.

Want it spicy? Add gochujang to the marinade. You can make the whole batch spicy or divide the marinade first and keep half mild.

Korean BBQ Chicken Recipe

The method uses bite-size chicken thighs and a hot skillet; allow enough pan space for browning rather than trying to cook all 900 g at once.

Recipe at a Glance

Prep timeAbout 15 minutes
Marinating time30 minutes to 2 hours
Cook timeAbout 12–18 minutes for roughly three batches; longer with a smaller pan
Total timeAbout 1 hour with the shorter marinating time
Servings4 generous servings, or up to 6 smaller servings with rice and sides
Main methodSkillet

Equipment

  • Large heavy skillet: a 12-inch / 30 cm skillet is ideal for giving the chicken room to brown. A smaller pan is fine; you will simply need more batches.
  • Instant-read thermometer: useful for checking the thickest pieces without guessing.
  • Mixing bowl, knife, cutting board and tongs.

Ingredients

For the chicken

  • 900 g / 2 lb boneless, skinless chicken thighs
  • 1–2 teaspoons neutral oil, as needed for the skillet
  • 2 scallions, thinly sliced
  • 1 teaspoon toasted sesame seeds

For the marinade

  • 4 tablespoons / 60 ml regular soy sauce
  • 1½ tablespoons packed brown sugar / 20 g
  • 2 teaspoons honey / 15 g
  • 5–6 garlic cloves / about 18 g, finely grated or minced
  • 2 teaspoons / about 8 g fresh ginger, finely grated
  • 2 teaspoons / 10 ml toasted sesame oil
  • 1 tablespoon / 15 ml mirin or Korean cooking rice wine, optional
  • ¼ teaspoon black pepper

Soy sauces vary in saltiness, but the finished marinade should taste savoury first, with enough sweetness to round out the soy and help the chicken caramelize. The sesame oil is there for its nutty aroma rather than as the cooking oil.

Raw boneless chicken thighs arranged with bowls of soy sauce, brown sugar, honey, garlic, ginger, sesame oil, seasonings and garnishes.
Mirin is optional, and gochujang belongs to the spicy variation. The soy, garlic, ginger and sweeteners form the base glaze.

For spicy chicken bulgogi

Add 25 g gochujang to the full batch of marinade. For half mild and half spicy, divide the marinade before adding the chicken and stir about 12 g gochujang into one half. For more direct chilli heat, add up to ½ teaspoon gochugaru to a full spicy batch. Gochujang varies quite a bit between brands, so taste yours before deciding how far to push the heat.

Two pans of chicken bulgogi, one with a brown soy-based glaze and the other coated in a deeper red spicy sauce.
Keep the two bowls and coating utensils separate so gochujang does not find its way into the mild chicken.

How to Make Korean BBQ Chicken

1. Make the marinade

Mix the soy sauce, brown sugar, honey, garlic, ginger, sesame oil, optional mirin and black pepper until the sugar has mostly dissolved. If you are making both mild and spicy chicken, divide the marinade now and mix the gochujang into the spicy portion.

A hand stirring brown soy-garlic chicken marinade in a bowl, with small pieces of garlic and ginger visible in the liquid.
Before adding the chicken, drag your spoon across the bottom of the mixing bowl. If you still feel a layer of sugar, stir a little longer so the sweetness distributes through the soy-garlic marinade instead of settling underneath it.

2. Cut and marinate the chicken

Trim any large loose pieces of fat or connective tissue from the thighs, then cut the chicken into large bite-size pieces, roughly 1½–2 inches / 4–5 cm across. Keep the pieces reasonably similar in size so they cook at about the same rate.

Add the chicken to the marinade and turn until well coated. If making both mild and spicy versions, divide the chicken between the two bowls. Cover and refrigerate for 30 minutes to 2 hours.

Raw boneless chicken thigh being cut with a knife into large, irregular bite-size pieces on a cutting board.
Thin flaps cook faster than thick chunks. Trim loose edges so the pieces are easier to turn and check for doneness.

3. Heat the skillet

Heat a large heavy skillet over medium-high heat and add about 1 teaspoon neutral oil. Lift enough chicken for the first batch from the marinade, letting the excess drip back into the bowl, and arrange the pieces in a single layer. Keep the remaining chicken refrigerated until its turn. Do not pour the bowl of marinade into the skillet; discard the used marinade after removing the last batch of raw chicken.

Metal tongs holding raw, soy-marinated chicken above a mixing bowl while excess brown marinade drips downward.
Let the freely dripping marinade fall back into the bowl, but leave a thin coating on the chicken. You want the soy-garlic glaze without a pool of liquid in the skillet.

4. Brown the chicken in batches

Leave some room between the pieces and let the first side cook without constantly moving it. The chicken may look pale and release liquid at first. That’s fine. As the liquid cooks away, the bubbling becomes a stronger sizzle and the surface starts picking up glossy brown patches.

Turn and continue cooking until caramelized around the edges. Start checking at about 4–6 minutes total per batch, but thicker pieces or a cooler skillet may take longer. Use the thermometer in Step 5 to confirm doneness. If the sugars begin catching before the chicken is cooked, lower the heat instead of allowing the residue to burn.

Pale marinated chicken cooking in a dark skillet surrounded by bubbling liquid, before the chicken has developed browned edges.
Bubbling is the wet stage, not the browning stage. Watch for patches of exposed skillet surface as the sizzle sharpens.

5. Finish and serve

Check the thickest pieces with an instant-read thermometer. Chicken must reach 165°F / 74°C, the USDA FSIS minimum internal temperature for poultry. Continue cooking any pieces that are not yet there. Transfer finished batches to a clean plate and clear genuinely burnt residue from the skillet before adding more chicken.

An instant-read thermometer probe inserted into a browned piece of chicken, with the digital display reading 165°F and 74°C.
For small chicken bulgogi pieces, a sideways thermometer insertion can make it easier to reach the centre without touching the hot skillet underneath. Check a thick piece and confirm 165°F / 74°C rather than relying on the colour of the glaze.

Finish with sliced scallions and sesame seeds. You are looking for juicy chicken with glossy browned patches, darker caramelized edges and that warm garlic-ginger-sesame aroma coming off the plate.

Close-up of a sliced piece of glazed chicken showing its cooked interior, browned surface and dark caramelized edges.
A moist-looking interior is reassuring, but colour and texture cannot confirm safety. Use a thermometer in the thickest piece.

How to Brown Chicken Without Burning the Marinade

This is the part that makes the biggest difference between chicken that tastes merely marinated and chicken with those sticky, browned Korean BBQ edges. The pan does not necessarily start with an immediate hard sear. Moisture often comes out first; browning gathers speed after that moisture has mostly gone.

Four stages of chicken bulgogi browning in a skillet: wet and bubbling, drying with early golden patches, glossy caramelized chicken, and scorched glaze, with a 165°F / 74°C safety reminder.
First the chicken bubbles in its juices; then the pan dries, the sizzle sharpens and glossy edges develop. Blackened residue means the glaze has gone too far. Browning creates flavour, but only a thermometer can confirm 165°F / 74°C inside.

When the pan turns watery

A crowded pan loses heat while several pieces release moisture at once. Instead of sizzling against the hot surface, the chicken starts sitting in its own liquid and steaming. This is why several uncrowded batches work better than trying to cook all 900 g at once.

Already have liquid in the pan? Stop adding chicken. Let the liquid cook away and keep the existing batch moving only as needed. Once the excess moisture is gone, the sound becomes sharper and browning happens much faster. If you are cooking along, return to Step 4 of the skillet method.

Several soy-glazed chicken pieces cooking apart from one another in a dark skillet, with visible pan surface and caramelized edges.
The visible gaps give each piece room to brown and let you turn one without disturbing the others.

When the marinade starts burning

Brown sugar, honey and gochujang can move quickly from caramelized to scorched after the pan dries out. Once you see good colour developing, pay closer attention and reduce the heat if the residue underneath is darkening faster than the chicken.

Why later batches can turn bitter

Bits of garlic, sugar and marinade accumulate in the skillet as you cook. Deep brown is useful; black and bitter is not. Scrape or wipe out burnt residue before the next batch. Adding fresh oil over burnt sugar will not rescue the flavour.

Close-up of browned chicken in a dark skillet with blackened marinade residue and scorched bits on the cooking surface.
These blackened patches show where the marinade sugars and garlic have scorched. Clear the burnt residue before the next batch so it does not transfer bitterness.

Getting the Chicken and Marinade Right

Thighs or breast?

Boneless, skinless thighs are especially forgiving here. They stay juicy while the outside has time to caramelize and are less likely than breast meat to dry out while you chase browned edges.

Chicken breast still works. Cut it into similar bite-size pieces and start checking it a little earlier than thighs. Once it is cooked through, get it out of the pan; extra cooking will not improve it. For a visual guide to the cut, see how to size the chicken pieces.

Raw boneless chicken thigh and chicken breast displayed side by side, showing the thigh’s irregular folds and the breast’s smoother shape.
Chicken breast can dry out faster, especially at thin edges. Cut evenly and remove pieces as soon as they reach 165°F / 74°C.

Do you need Asian pear?

No. Asian pear appears in many bulgogi marinades and can bring sweetness, aroma and tenderizing enzymes, but tender boneless chicken thighs do not depend on it. You can make very good chicken bulgogi without buying a pear specifically for the recipe.

How long should chicken bulgogi marinate?

Thirty minutes to 2 hours is plenty for these pieces. A short marinade gives the savoury-sweet seasoning time to coat and flavour the chicken without turning an easy dinner into an overnight project. There is no prize for leaving it overnight.

Why Chicken Bulgogi Recipes Can Look So Different

Search for chicken bulgogi and you will find both brown, soy-forward versions and vivid red versions built around gochujang. That does not mean one of them has to be an impostor.

This recipe takes a soy-forward route and makes gochujang optional, so the same base can become either mild or spicy. Korean references also show chile-containing preparations; the Korea Tourism Organization’s dak bulgogi is one example.

Chicken bulgogi is also distinct from dak-galbi, buldak and Korean fried chicken, even where some ingredients or flavours overlap.

Making a Larger Batch

The marinade scales easily. The skillet does not. If you double the chicken to 1.8 kg / 4 lb, double the marinade but keep roughly the same amount of chicken in each batch. More chicken means more batches, not a fuller pan. The pan-spacing example shows why that extra room matters.

Other Ways to Cook Korean BBQ Chicken

If you would rather cook larger pieces instead of working through skillet batches, chicken bulgogi also takes well to a grill or broiler. Leave the thighs whole or use larger flattened pieces instead of the smaller skillet pieces. You get more char and smoke, while the main thing to watch shifts from trapped moisture to scorching.

Comparison of soy-glazed chicken thighs cooking over outdoor grill grates and on a rack beneath an oven broiler.
Grilled Korean chicken browns where the meat contacts hot grates, while the broiler heats it intensely from above. Therefore, watch the upper surface under the broiler and move the tray farther from the heat if the glaze darkens too quickly.

Outdoor grill

Preheat the grill to medium-high and lightly oil the grates. Grill larger boneless thighs for approximately 4–6 minutes per side, turning as needed. Move them to a cooler part of the grill if the sweet marinade darkens too quickly, and continue until the thickest part reaches 165°F / 74°C.

Oven broiler

Set an oven rack about 5–6 inches / 13–15 cm below the broiler. Arrange larger marinated thighs in one layer on a lightly oiled rack over a foil-lined tray. Broil for approximately 4–5 minutes per side, watching closely once the edges begin to char. Adjust the tray distance if the glaze darkens too quickly, and check the thickest piece for 165°F / 74°C before serving.

What to Serve With Korean BBQ Chicken

Hot, sticky-edged chicken wants something plain and something fresh beside it. Soft rice catches the savoury-sweet juices; cool lettuce or perilla freshens each bite, while sour kimchi or crisp cucumber cuts through the richer caramelized coating. If you want a dependable pot alongside, our guide to cooking rice covers stovetop, cooker and Instant Pot methods.

Korean BBQ chicken served with bowls of steamed rice, kimchi, cucumber, leafy greens and small side dishes on a dining table.
Keep the chicken hot and the rice plain; let everyone add cool leaves, cucumber and kimchi at the table.

For a simple meal, choose one of these approaches:

  • Quick dinner: chicken, steamed rice, sliced cucumber and kimchi. A crisp cucumber salad works particularly well against the sweet-savoury chicken.
  • Korean-style table: rice, kimchi and one or two vegetable banchan alongside the chicken.

Chicken Bulgogi Lettuce or Perilla Wraps

Use cool lettuce for a mild crunch or perilla for a more herbal note. Set out rice, chicken and a little ssamjang so everyone can make their own wraps.

Hands holding an open green leaf filled with steamed rice, glazed chicken bulgogi pieces and a small amount of condiment.
Leave enough leaf exposed to fold over the filling. A small dab of ssamjang is plenty beside the already savoury-sweet chicken.

Chicken Bulgogi Rice Bowl

Pile the chicken over rice with cucumber, carrot, scallions and sesame seeds for a quick, colourful bowl.

Rice bowl topped with brown-glazed chicken bulgogi, cucumber slices, carrot, scallions and sesame seeds.
Add the cucumber and carrot just before serving so they stay crisp against the warm rice and sticky chicken.

Make-Ahead, Storage and Reheating

Make the marinade ahead

You can mix the marinade ahead and keep it covered in the refrigerator until needed. If you want extra sauce for serving, make it separately rather than saving marinade that has been in contact with raw chicken.

Store cooked chicken

Cool leftovers promptly and refrigerate them in a covered container within 2 hours of cooking, or within 1 hour if the surrounding temperature is above 90°F / 32°C. Keep the refrigerator at 40°F / 4°C or below and use the chicken within 3–4 days.

Leftover chicken bulgogi is particularly easy to turn into lunch: spoon it over rice with cucumber and kimchi, tuck it into lettuce wraps, or slice it and fold it through homemade fried rice near the end of cooking.

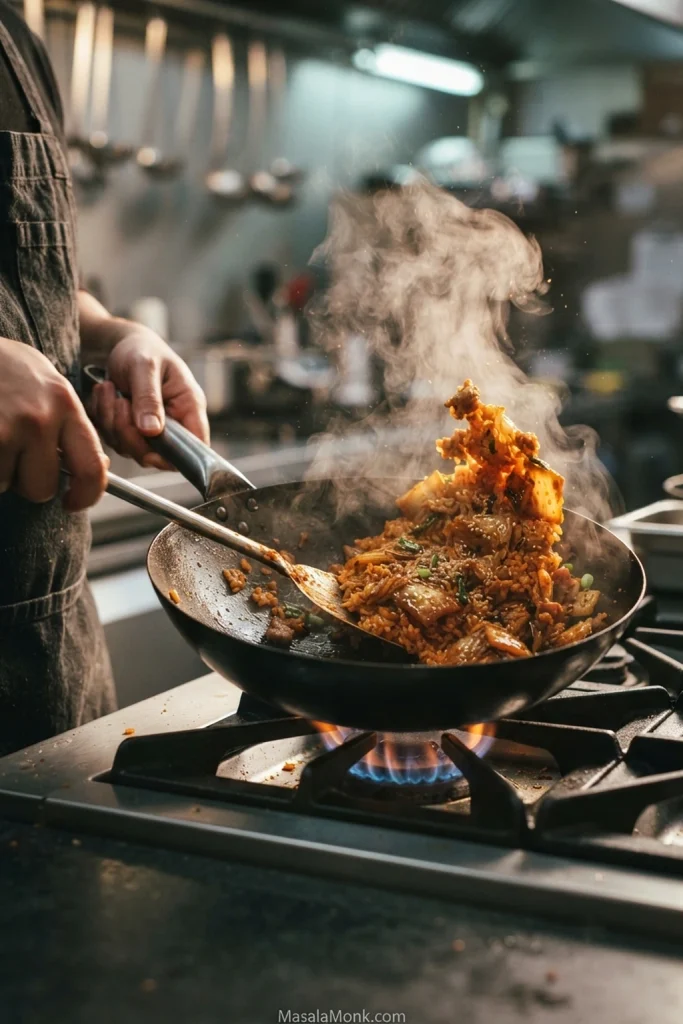
Cook tossing rice, egg, scallions and pieces of chicken bulgogi in a wok over a hot stove.
Break up clumps of properly chilled cooked rice as it fries; fold in the leftover chicken toward the end to heat it thoroughly without drying it out.

Freeze and reheat

Freeze cooked chicken in airtight portions. Thaw overnight in the refrigerator and reheat until piping hot throughout and back to 165°F / 74°C. A covered skillet over moderate heat with a small splash of water helps warm the chicken without scorching the sweet coating, although the edges will naturally be softer than they were straight from the pan.

Korean BBQ Chicken Troubleshooting

If dinner is already in the pan, start here. For the full sequence, jump back to the recipe; for the pan’s wet-to-brown transition, see browning without burning.

What you seeLikely causeWhat to do
Chicken sits in liquidToo much chicken or marinade in the panStop adding chicken and let the liquid cook away.
Chicken stays paleWet surface or crowded piecesGive it more space and leave the first side alone long enough to colour.
Marinade starts burningThe moisture has gone and the sugars are scorchingLower the heat and remove badly burnt residue.
Chicken is dryIt cooked too longTake later batches off sooner; breast is less forgiving than thigh.
Chicken tastes too saltyStrong soy sauce or too much reductionServe it with plain rice now and use a little less soy next time.
Chicken tastes too sweetToo much sweetener or a sweet gochujangAdd plain rice, kimchi or cucumber to the plate; reduce the sweetener next time.
Chicken is too spicyToo much gochujang or gochugaruPair it with rice and mild sides; pull back the chilli next time.
Later batches taste bitterBurnt marinade residueClear the skillet before continuing.
Some pieces finish before othersVery different piece sizesRemove cooked pieces first and cut the next batch more evenly.

A Good Plate of Chicken Bulgogi

The marinade is straightforward; the pan asks for a little patience. What starts out pale and wet can become beautifully browned once the moisture reduces and the sizzle sharpens.

Serve the chicken while the edges are still sticky and hot, with rice and something cool or fermented alongside. If you try it, tell us how the browning went in your skillet.

Back to the recipe · Back to top

Posted on — Leave a comment

Kimchi Jjigae Recipe: Easy Korean Kimchi Stew with Pork & Tofu

Steaming kimchi jjigae in a black earthenware pot with napa cabbage kimchi, pork belly, tofu, spring onion and red broth, with a bowl of white rice nearby.

Kimchi jjigae is the kind of stew that should reach the table still bubbling, with tender kimchi, pork and tofu sitting in a red broth made for spooning over hot rice. The broth should taste deeply of fermented kimchi, with richness from the pork and chilli warmth behind it—not like thick chilli paste and not like cabbage floating in hot water.

You don’t need a Korean earthenware pot, homemade stock or a long list of seasonings to make this work. A heavy saucepan and properly sour kimchi will take you a long way. The details that follow help you recognise when the stew is ready—and how to adjust it when your kimchi behaves differently from the last jar.

Quick Answer

Use well-fermented napa cabbage kimchi, thinly sliced pork belly and medium-firm tofu. Cook the pork and kimchi together before adding the liquid, then simmer until the cabbage is tender. Add the tofu for the last few minutes and taste before adding any final seasoning. The finished stew should be rich and concentrated while still having plenty of broth.

What Is Kimchi Jjigae?

Kimchi jjigae (김치찌개) is a Korean stew built around fermented kimchi, often with pork and tofu. You may also see it written as kimchi chigae or simply called kimchi stew. It is different from sundubu jjigae, where very soft tofu is the defining ingredient.

Kimchi jjigae varies from kitchen to kitchen. Pork belly or shoulder can be used; water, rice-rinsing water or anchovy stock can form the broth; and gochujang may or may not be included. KBS WORLD’s kimchi-jjigae guide likewise centres well-fermented cabbage kimchi while allowing the meat and seasonings to vary.

Kimchi Jjigae Recipe

This version serves four with rice. Once everything is chopped, most of the cooking happens in one pot: pork and kimchi first, broth next, tofu near the end. Allow about 45–55 minutes from chopping to serving.

Recipe detailAmount
Yield4 servings, with steamed rice
PreparationAbout 15 minutes
CookingAbout 30–40 minutes
Total timeAbout 45–55 minutes
EquipmentHeavy-bottomed 2.5–3 litre saucepan or small Dutch oven

Ingredients

For the stew

  • 450 g (about 1 lb) ripe napa cabbage kimchi: Lift it from the jar, let the excess brine drip back and cut into roughly 3–4 cm pieces. Keep the seasoning on the cabbage.
  • 250 g (about 9 oz) skinless pork belly: Slice about 3–5 mm thick and cut into bite-sized pieces.
  • 250 g (about 9 oz) medium-firm tofu: Cut into roughly 1.5–2 cm cubes or thick rectangles.
  • 1 small onion (about 100 g): Thinly sliced.
  • 4 small garlic cloves: Finely minced.
  • 2 spring onions: Slice them and keep the darker green tops for finishing.
Overhead arrangement of kimchi jjigae ingredients: pork belly, napa cabbage kimchi, tofu cubes, spring onions, garlic, onion, chilli flakes, chilli paste, dried anchovies, kelp, radish and rice.
The supporting ingredients are deliberately restrained. If the kimchi itself lacks fermented character, extra chilli paste, garlic or seasoning cannot fully replace what fermentation would have supplied.

For the broth and seasoning

  • 550 ml (about 2¼ US cups) water or unsalted stock, plus a little more if needed
  • 3 tablespoons kimchi brine, plus more to taste
  • 2 teaspoons gochugaru: Korean red-pepper flakes. Use less if your kimchi is already particularly hot.
  • 1 tablespoon gochujang, optional: Useful if you want a slightly fuller, sweeter chilli base.
  • Soy sauce, if needed
  • Sugar, optional: A small pinch can soften unusually harsh acidity.
  • Neutral cooking oil, if needed: Well-marbled pork belly usually provides enough fat.

Optional: homemade anchovy-kelp stock

If you are using plain water or ready-made unsalted stock, skip this completely.

  • 6–8 medium dried anchovies, heads and guts removed
  • 1 piece dried kelp, about 5 × 5 cm
  • About 50 g Korean radish, thinly sliced
  • 750 ml water

To serve

  • Steamed short-grain rice
  • Reserved spring-onion greens
  • A small drizzle of toasted sesame oil, optional

There is no salt or fish sauce in the starting mixture because the kimchi, brine and gochujang may already bring plenty of seasoning. Taste near the end and decide then.

Equipment

A heavy-bottomed 2.5–3 litre saucepan or small Dutch oven works well. If you have a Korean earthenware pot, or ttukbaegi, you can use it for cooking or serving, but you do not need one.

How to Make Kimchi Jjigae

  1. Prepare everything. Cut the kimchi into roughly 3–4 cm pieces, keeping the seasoning on the cabbage. Slice the pork belly about 3–5 mm thick and cut it into bite-sized pieces. Cut the tofu into 1.5–2 cm cubes or thick rectangles. Thinly slice the onion and spring onions, reserving the dark green spring-onion tops for finishing, and mince the garlic. Keep the tofu aside until near the end. After handling raw pork, wash your hands, knife and board; there is no need to rinse the pork.
  2. Start with the pork. Set the pot over medium heat and add the pork belly. Cook for about 4–5 minutes, turning occasionally, until some of its fat has rendered. Add a small splash of neutral oil only if the pan remains dry. You want the pork beginning to colour and flavour the base rather than becoming crisp and dry.
  3. Cook the kimchi. Add the onion, the white and pale-green parts of the spring onions and the kimchi. Cook for about 5–7 minutes, stirring regularly. The cabbage will soften and some of its edges will start to look translucent. If the bottom catches, loosen it with a splash of water or stock.
Sliced pork belly cooking in a black pot, with pale golden edges and a shallow layer of rendered fat around the pieces.
First, watch the pan rather than chasing deep browning: a thin sheen of clear rendered fat tells you the pork has started enriching the base.
Pork belly, napa kimchi, sliced onion and spring onion cooking together in a black pot before broth is added.
Next, the goal is softening and flavour exchange rather than browning the cabbage. The kimchi should relax into the pork fat while remaining visibly recognisable.

Build the Red Broth

  1. Add the garlic and chilli. Stir in the garlic and gochugaru for about 20–30 seconds, until fragrant. If using gochujang, stir it in now.
  2. Add the broth. Pour in 550 ml water or unsalted stock and 3 tablespoons kimchi brine. Scrape up the flavourful bits from the bottom. Bring the pot to a boil, then lower the heat to a steady simmer.
A spoon holding minced garlic and Korean chilli flakes above a black pot of partially cooked kimchi, pork and onions.
At this stage, keep an eye on pan moisture. Garlic and chilli turn bitter quickly in dry hot fat, so once they smell fragrant, the liquid should follow soon after.
Clear liquid being poured from a metal measuring cup into a black pot of kimchi, pork and aromatics to form the stew broth.
Once the liquid goes in, the concentrated base should open into a red, freely moving broth. If it already resembles a thick sauce, more chilli paste is unlikely to help.

Simmer and Finish

  1. Simmer until the kimchi is tender. Partially cover and cook for about 15–20 minutes. Bite into one of the thicker cabbage ribs: it should be tender, with no raw crunch. Give it another 5 minutes if it needs it. Add a splash of hot water or stock if the stew is reducing more than you want.
  2. Add the tofu. Set the tofu pieces into the stew and simmer gently for another 4–5 minutes. Move them with a spoon or ladle rather than vigorously stirring. By now the cabbage should be soft, the pork easy to bite and the tofu hot through.
A pot of red kimchi jjigae simmering with softened napa cabbage and pork, with steam rising and a bowl of rice in the background.
Test the thick white napa-cabbage rib, not a leafy edge. Leaves soften first, so they can make the kimchi appear ready several minutes before its firmest part is tender.
A hand using metal chopsticks to lower pale tofu cubes into a steaming black pot of kimchi jjigae.
Near the end, place tofu into open spaces and spoon hot broth over exposed pieces instead of repeatedly stirring them under. You get hot tofu with far fewer broken edges.
  1. Finish the stew. Taste a spoonful with some kimchi and pork. Add more kimchi brine for a stronger fermented flavour, soy sauce for salt, or a small pinch of sugar if unusually sour kimchi still tastes harsh. Finish with the spring-onion greens and, if you like, a small drizzle of sesame oil. Serve hot with steamed short-grain rice.

If you’re unsure about the final texture or flavour, use the finished-stew checklist. Otherwise, the most important choice happens before the pot reaches the stove: selecting the right kimchi.

Choosing the Right Kimchi

For a full-flavoured kimchi jjigae, use napa cabbage kimchi that has fermented until it tastes distinctly sour. It does not need to be the oldest jar in the refrigerator, and counting fermentation days is not particularly useful. Temperature, salt and storage all change how quickly kimchi matures. Taste and texture tell you more.

Three portions of napa cabbage kimchi on dark stone labelled young, ripe best for this stew, and very sour; the cabbage appears progressively softer and darker.
Redness alone cannot tell you whether kimchi is ready for stew—young and well-fermented batches can look surprisingly similar. Sour aroma, flavour and softened cabbage are better clues.
  • Young or fresh: Crisp cabbage, bright seasoning and little fermented tang. It can be used, but the stew will taste fresher and lighter.
  • Ripe and sour: Clear acidity, a developed fermented aroma and cabbage that has softened while still holding together. This is the kimchi I would choose for this recipe.
  • Very sour and soft: Excellent for jjigae. Its brine can be strong, so begin with the amount in the recipe and taste before adding more.
  • Deeply aged (mukeunji): Kimchi aged for months at low temperature can be especially good in stews and braises. Expect a deeper, more assertive fermented flavour.
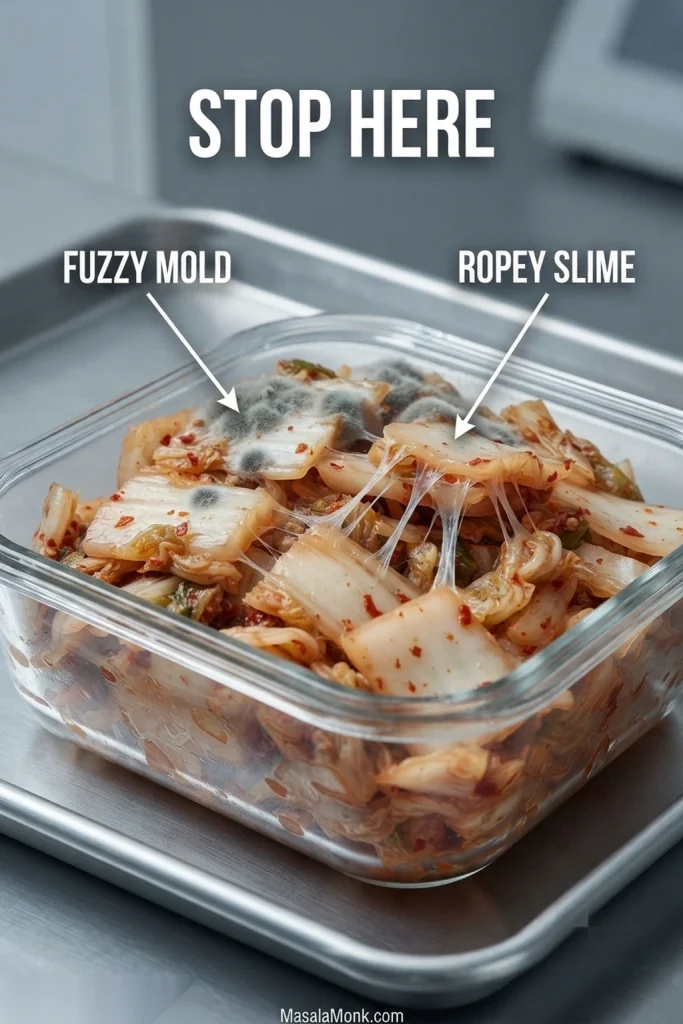
  • Spoiled or visibly mouldy: Fuzzy mould, a putrid smell or an unusually unpleasant slimy or ropy texture are reasons to discard the kimchi. Do not taste kimchi showing obvious signs of spoilage.

Can You Use Fresh Kimchi?

Yes, but the stew will be milder. Cook the kimchi well with the pork and let everything simmer before deciding what it lacks. If it needs more acidity at the end, add rice vinegar ½ teaspoon at a time. It will brighten the stew, although it cannot reproduce the deeper flavour of fermented kimchi. If the finished pot still tastes flat, use the flavour troubleshooting to identify what is missing.

Why the Kimchi Brine Matters

Kimchi brine carries salt, chilli, garlic and fermented flavour from the cabbage. A few spoonfuls tie the liquid back to the kimchi instead of leaving you with pork and cabbage in red water. Because one jar can be much saltier than another, use 3 tablespoons to start and add more only after tasting. If you make your own kimchi, our Easy Kimchi Recipe explains the chopped napa-cabbage method and what to look for as it matures.

Spoon holding reddish-orange kimchi brine beside a pile of fermented napa cabbage, with the instruction 3 tablespoons to start, then taste before adding more.
Measure kimchi brine separately instead of pouring freely from the jar. Its saltiness and acidity vary considerably, so controlled additions make the final seasoning easier to judge.

Ready to cook? Return to the recipe.

What the Ingredients Change

Pork Belly or Pork Shoulder?

Pork belly is the choice here because its rendered fat gives the stew richness without requiring much else. Thinly sliced pork shoulder is a good leaner alternative. Thick shoulder cubes, ribs and other tougher cuts need longer cooking, so give them the time they require rather than expecting them to behave like thin belly slices. If the pork is still chewy at serving time, consult the texture troubleshooting before extending the simmer.

Raw pork belly on a dark cutting board showing thin 3–5 mm slices beside much thicker pieces, with labels comparing quick-cooking and longer-cooking cuts.
Aim for evenly thin pork belly, not merely an approximate measurement. Uniform slices cook together instead of leaving the thinnest pieces dry while thicker ones remain chewy.

Which Tofu Works Best?

Medium-firm tofu is my pick for this version. It stays tender but is sturdy enough to lift from the stew without falling apart. Firm tofu is fine too; if you prefer soft tofu, add larger pieces near the end and disturb them as little as possible.

Tofu comparison on slate with a large medium-firm tofu block and cubes, a firmer block and cut pieces, and a small spoonful of soft tofu, with type labels.
Tofu firmness changes the eating experience as much as its durability: medium-firm stays tender and juicy, while firmer tofu gives a denser, more substantial bite.

Water, Anchovy-Kelp Stock or Rice-Rinsing Water?

Plain water is enough when the kimchi is good. Anchovy-kelp stock makes the stew more savoury, but it is an upgrade rather than a requirement. Fresh water from the second or third rice rinse is another useful option when rice is already being prepared alongside the stew; it gives the broth a little extra body.

Three glasses side by side contain clear water, amber anchovy-kelp stock and cloudy second or third rice-rinsing water, each labelled as a kimchi jjigae broth option.
These are alternative liquids, not three additions to combine. Pick one for the base, then use the kimchi and brine to decide what seasoning is still needed.

If using rice-rinsing water, discard the first rinse and collect the second or third rinse using potable water.

To make anchovy-kelp stock: Put 6–8 dried anchovies (heads and guts removed), a 5 × 5 cm piece of dried kelp and about 50 g thinly sliced Korean radish in 750 ml water. Add a spring-onion trim if one is lying around. Bring to a gentle simmer, remove the kelp after about 5–10 minutes, then cook the anchovies and radish for another 10 minutes. Strain the stock, measure 550 ml for the stew and top it up with water if evaporation has left you short. Do not add salt. If the finished stew seems watery, thick or greasy, the broth troubleshooting explains which adjustment fits.

Gochugaru and Gochujang Are Not the Same

Gochugaru is Korean red-pepper flake; it brings chilli aroma, colour and heat. Gochujang is fermented chilli paste; it brings sweetness, salt, heat and body. Gochujang is optional here. Good kimchi jjigae does not need to become a paste-heavy stew.

Two dark bowls on slate, one holding flaky red gochugaru and the other thick red gochujang paste, with labels explaining their different effects on heat and body.
Need more chilli without noticeably increasing sweetness or thickness? Add gochugaru first. Gochujang changes the broth’s body and seasoning as well as its heat.

If you use gochujang, taste before adding soy sauce or salt. There is rarely any benefit in piling gochujang, doenjang, stock powder and sugar into the same stew simply because the flavour seems weak. Usually the better question is whether the kimchi itself has enough character. For another dish where gochujang plays a much bigger role, our Rose Tteokbokki recipe takes it in a creamy, sweet-spicy direction.

How to Know When Kimchi Jjigae Is Right

A good bowl has several things happening at once: fermented depth from the kimchi, richness from the pork, warmth from the chilli and soft cabbage against mild tofu. The broth should be concentrated and savoury while still moving freely around the ingredients.

  • Kimchi: Tender, including the thicker cabbage ribs, but still recognisably cabbage.
  • Pork: Cooked through and easy to bite.
  • Tofu: Hot throughout and intact enough to lift from the stew.
  • Broth: Savoury, fermented and free-flowing rather than watery or gravy-thick.
Finished kimchi jjigae in a black pot with callouts pointing to tender kimchi, easy-to-bite pork, hot intact tofu and rich broth that still flows.
Deep red colour alone is not a doneness test: even a vivid-looking stew can hide crunchy cabbage ribs or weak, diluted broth. Taste before serving.

For the final taste, lift kimchi, pork and a little tofu together rather than judging the broth in isolation. The mild tofu and richer pork change how sharply the acidity and chilli come through.

Metal ladle lifting kimchi, sliced pork and a pale tofu cube above bubbling red kimchi jjigae, with broth dripping back into the pot.
Taste the stew with its tofu and pork before adding sugar: a broth that seems sharp on its own may already taste balanced as a complete bite.

Kimchi Jjigae Troubleshooting

Kimchi varies enormously from jar to jar, so two batches made from the same recipe can still need slightly different finishing touches. Work out what is actually wrong before changing anything.

Flavour Problems

  • Bland but spicy: More chilli will only make it hotter. Let the kimchi cook until properly tender. If the stew is still flat, mature kimchi or a splash of unsalted anchovy stock will do more for it than another spoonful of chilli paste.
  • Too sour: Add a little unsalted water or stock. If the acidity is still unusually sharp, a small pinch of sugar can round it out without making the stew sweet.
  • Not sour enough: More mature kimchi is the best fix. If none is available, a small splash of rice vinegar can supply acidity, though not fermented depth.
  • Too salty: Dilute gradually with unsalted water or stock and add plain tofu or another unseasoned ingredient if useful. Do not reduce an already salty stew; that only concentrates the salt.
  • Too sweet or paste-heavy: Loosen it with unsalted water or stock. Mature kimchi can help restore balance if the stew is not already salty. Next time, let the kimchi and pork build the base before reaching for extra paste.
  • Too spicy: Add unsalted liquid and more tofu if there is room. Serve it with plenty of rice. Sugar can make the stew sweeter, but it does not remove chilli heat.
Kimchi jjigae troubleshooting graphic headed Bland but spicy? More chilli only makes it hotter, above a bowl of stew and short advice to check the kimchi and broth first.
When correcting kimchi jjigae, change one thing at a time. Otherwise, extra chilli, salt and sugar can mask the original problem without solving it.

Broth and Richness Problems

  • Watery but flavourful: The flavour is there; there is simply too much liquid. Once the cabbage is tender, simmer uncovered for a few minutes.
  • Watery and bland: This is a different problem. The kimchi may be too young, the base may not have cooked long enough, or too much liquid may have diluted everything. Check the kimchi first. More chilli will not create the fermented flavour that is missing.
  • Too thick: Add hot water or unsalted stock until the broth moves freely around the ingredients again.
  • Greasy or heavy: Spoon off some of the excess fat from the surface. A little pork fat makes the stew richer; a thick oil slick does not improve it.
Troubleshooting graphic with a ladle of kimchi jjigae under the heading Watery? Taste it first, showing fixes for watery flavourful, watery bland, too thick and greasy broth.
Taste the kimchi stew before reducing it: evaporation concentrates salt, chilli and acidity along with savouriness, so a thin-looking broth does not always need more cooking.

Pork, Kimchi and Tofu Texture

  • Pork is tough: Thin pork belly should cook quickly. Thick shoulder, ribs and other tougher cuts need a longer, gentler simmer. Thin belly that has already become firm and dry will not improve through prolonged cooking.
  • Kimchi is still crunchy: Keep simmering until the thicker cabbage ribs are tender. Add a splash of hot water or stock if the stew is getting dry.
  • Tofu is breaking: Add it near the end and move the pieces with a spoon or ladle instead of stirring everything together.
Close-up of kimchi jjigae with text callouts identifying tough pork, a crunchy kimchi cabbage rib and broken tofu, each with a short corrective note.
Longer simmering is not a universal fix: it can soften thick cabbage ribs while making already-cooked thin pork firmer. Check the troublesome ingredient before changing the heat.

Bitter or Burnt Aftertaste

Garlic, chilli flakes and gochujang can become bitter if they scorch in hot, dry fat. If the bottom burns, move the unburnt stew into a clean pan without scraping up the dark layer. Once burnt flavour has spread through the broth, adding sugar will not remove it.

Back to the recipe

Tuna, Mushrooms and Meatless Versions

Tuna Kimchi Jjigae

Replace the pork with one small can of tuna, about 120–150 g drained. Add it during the last few minutes for distinct pieces, or earlier with the liquid if you prefer it to break down into the stew. Tuna packed in oil will provide enough fat on its own.

Bowl of red tuna kimchi jjigae with tuna flakes, napa cabbage, tofu and sliced spring onion, served on a table beside rice and small side dishes.
Using tuna packed in water instead? Drain it well and add a little oil when cooking the kimchi, since you will not have rendered pork fat for the base.

Vegetarian or Vegan Kimchi Jjigae

Leave out the pork and use water or a savoury vegetable, kombu or shiitake-mushroom broth. Mushrooms bring extra texture and umami, while tofu gives the stew substance. Most importantly, check the kimchi itself: many traditional versions contain fish sauce, salted shrimp or other seafood.

For a mushroom-heavy version, brown the mushrooms until they have released most of their moisture before adding the kimchi. This gives the base more savoury depth without watering it down.

Vegan kimchi jjigae with sliced mushrooms, tofu and napa cabbage in red broth, beside rice and a label advising seafood-free kimchi and broth.
For deeper vegan kimchi jjigae, give mushrooms enough pan space to brown before the liquid arrives; crowded mushrooms release water and steam instead of developing the same savoury crust.

What to Serve with Kimchi Jjigae

Steamed short-grain rice is the natural partner. Ladle some of the red broth over the rice, then pick up tender kimchi, pork and tofu together. The plain rice catches the spicy, fermented broth and turns the bubbling stew into a complete everyday meal. If you need help with rinsing, water ratios or resting, our guide to cooking rice covers the method step by step.

Korean-style meal of kimchi jjigae in a black pot with a separate bowl of white rice, cucumber salad, seasoned greens, spoon and metal chopsticks.
Serving rice separately lets each person control the balance: a little rice softens an intense spoonful without diluting the entire pot of kimchi jjigae.

Seasoned spinach, cucumber salad, bean sprouts or pickled vegetables are all welcome alongside, but jjigae and rice are enough on their own.

Bring the stew to the table while it is still bubbling. If you are using an earthenware pot, set it on a trivet and remember that the vessel stays extremely hot long after the bubbling settles.

Storage and Reheating

Divide a large batch into shallow containers so it cools faster, then refrigerate promptly. Refrigerate within 2 hours of cooking, or within 1 hour when the room is hotter than 32°C / 90°F. Keep the refrigerator at 4°C / 40°F or colder and use the stew within 3–4 days.

Reheat only the portion you plan to eat and heat leftovers to 74°C / 165°F throughout. Stir gently so the centre heats evenly without smashing the tofu. These limits follow FoodSafety.gov’s guidance on cooling, storing and reheating leftovers.

Kimchi jjigae can be frozen, although tofu becomes more porous or spongy after thawing. If you know you are freezing a batch, the nicest option is to freeze the stew without tofu and add fresh tofu when reheating.

Kimchi jjigae storage infographic showing glass containers of tofu and kimchi stew, refrigerate within two hours, keep at 4°C or colder for 3–4 days, reheat to 74°C, and freeze with possible tofu texture changes.
Date each leftover container before refrigerating; that makes the 3–4-day window easy to track without guessing which night you made the stew.

Frequently Asked Questions

Can I Make Kimchi Jjigae Without Kimchi Brine?

Yes. Use well-fermented kimchi and start with slightly less water or stock. If the finished stew needs more intensity, add more mature kimchi. A small splash of rice vinegar can provide acidity if necessary, although it will not replace fermented kimchi flavour.

Should I Rinse Kimchi Before Cooking?

No. Let excess brine drip back into the jar, but leave the seasoning on the cabbage. Rinsing washes away flavour that belongs in the stew. If your kimchi is particularly salty, simply use less brine and be cautious with additional soy sauce or salt.

Does Kimchi Jjigae Need Fish Sauce?

No. Some kimchi already contains fish sauce or salted seafood, and a good pork-and-kimchi base has plenty of savoury flavour without adding more. For a vegetarian or vegan version, choose kimchi made without seafood.

Is Kimchi Jjigae Always Very Spicy?

No. The heat depends on the kimchi and the amount of gochugaru and gochujang you use. If your kimchi is already fiery, start with less gochugaru. The stew should taste of fermented kimchi first; sheer chilli heat is not the goal.

The final check is simple: tender kimchi, hot tofu, pork that is easy to bite and red broth you want to spoon over rice. Once those are in place, stop adjusting and serve.

Back to the recipe · Back to top

Posted on — Leave a comment

Rose Tteokbokki Recipe: Creamy, Spicy & Easy

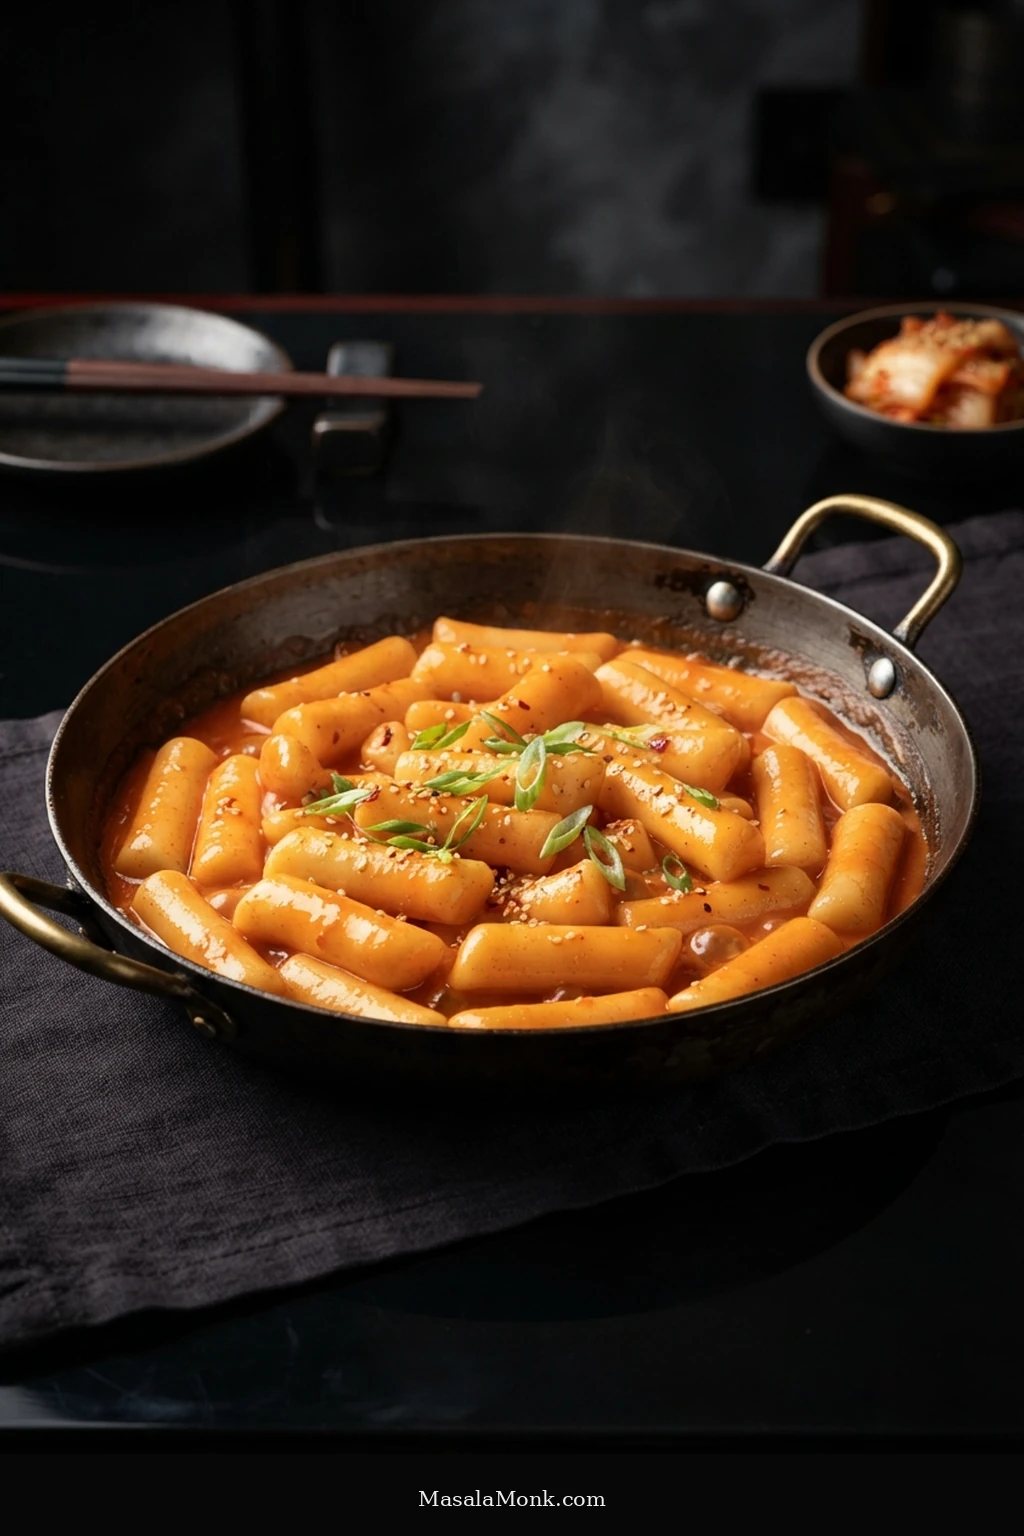
Shallow pan of cylindrical Korean rice cakes coated in glossy orange-pink rose tteokbokki sauce, topped with sliced green onions and a few sesame seeds, with steam rising from the pan.

Springy Korean rice cakes coated in a glossy orange-red sauce are the reason rose tteokbokki is so easy to crave. Gochujang brings its fermented chilli depth, while milk and cream turn the sauce silky enough to cling to every piece.

Rose tteokbokki is a creamy variation of classic Korean tteokbokki, using an Italian-inspired rosé-style sauce built around a Korean chilli base. Dairy softens the red sauce into its familiar pink-orange colour. Some versions also use tomato, but this one does not need it.

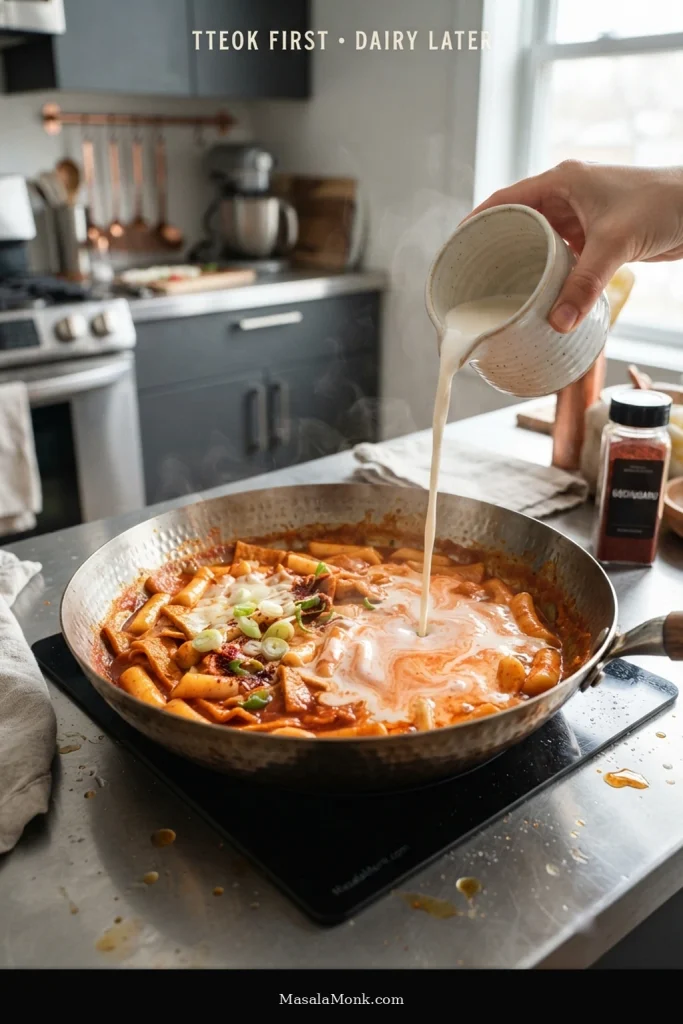
The real cooking problem is that the tteok and the sauce are running on separate clocks. Fresh rice cakes can soften in minutes; a firm refrigerated, vacuum-packed or frozen batch may still be dense in the centre while a cream-heavy sauce is already getting too thick. This method gives the tteok most of its cooking time in seasoned chilli liquid first, then brings in the milk and cream only when the centre is almost tender.

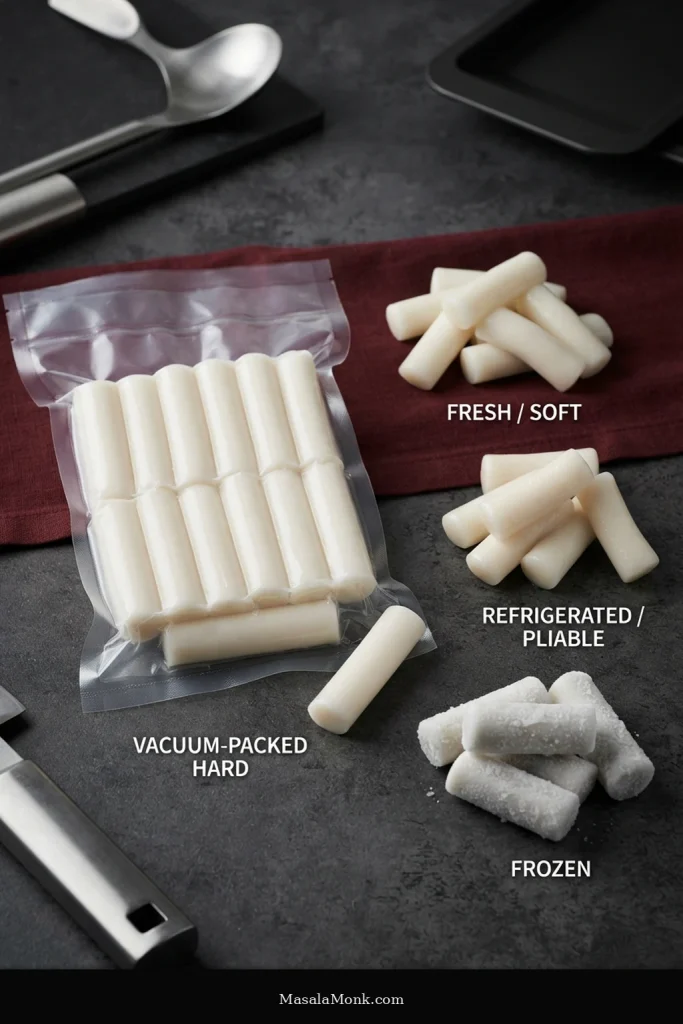
First, What Kind of Tteok Do You Have?

Rice cakes that look almost identical can behave very differently in the pan, so check what you have before you start.

Your rice cakesBefore they go into the pan
Fresh and softSeparate the pieces and rinse if needed. Usually no soaking.
Refrigerated but pliableUsually use directly. A brief soak can help if the centres feel quite firm.
Vacuum-packed and hardSoak in warm water while you prepare the other ingredients, until the pieces loosen and feel less rigid.
FrozenThaw or soak until the pieces separate and are no longer frozen solid through the centre.

If your package gives different preparation instructions, follow those first. Use soaking when needed to loosen firm tteok, then cook to texture rather than to a fixed time. Rice cakes that are already soft and flexible can go straight into the pan.

Most cylindrical tteokbokki rice cakes are rice-based. If your packet says mil-tteok, it is wheat-based and usually has a somewhat softer, different chew. It is also not gluten-free.

Four preparations of cylindrical Korean rice cakes labeled “Fresh / Soft,” “Refrigerated / Pliable,” “Vacuum-Packed / Hard,” and “Frozen,” including loose rice cakes, packaged rice cakes and frosty frozen pieces.
Soaking only changes the starting condition. Once the pieces separate and lose their frozen-solid rigidity, let the simmer—and later the centre texture—decide doneness.

Rose Tteokbokki Recipe

Recipe development note: This exact MasalaMonk formula has not yet been kitchen-tested.

Yield2 generous or 3 moderate servings
PrepAbout 10 minutes
CookAbout 10–18 minutes for most tteok; longer if very firm
Total prep + cookRoughly 20–30 minutes, plus soaking or thawing if needed
Spice levelAdjustable
Pan10–12 inch / 25–30 cm skillet or shallow sauté pan; a wider pan will reduce the sauce faster

Rice Cakes & Aromatics

  • 400 g / 14 oz Korean tteokbokki rice cakes (tteok)
  • 1 tablespoon neutral cooking oil
  • 1 small onion, about 100 g, thinly sliced
  • 3 large garlic cloves, about 12 g, finely minced

For the Rose Sauce

  • 2 tablespoons gochujang (Korean fermented chilli paste), about 35–40 g
  • Gochugaru (Korean red pepper flakes), to taste — as a rough starting point: none for the lowest heat; ¼–½ teaspoon for mild; 1 teaspoon for medium; up to 2 teaspoons for hot. Brands and chilli tolerance vary.
  • 15 ml / 1 tablespoon regular or all-purpose soy sauce, not dark soy sauce
  • 10 g / about 2½ teaspoons sugar
  • 180 ml / ¾ cup water
  • Hot water for adjusting, as needed — keep about 240 ml / 1 cup nearby; you may use very little or none, and an unusually firm batch may need more
  • 180 ml / ¾ cup whole milk
  • 120 ml / ½ cup heavy cream or whipping cream
  • 2 scallions, thinly sliced, for finishing
  • Toasted sesame seeds, optional

Optional Additions

  • 100 g / 3½ oz Korean fish cake, cut into bite-size pieces
  • 75 g / 2½ oz bacon, cut small
  • 100–120 g / 3½–4 oz fully cooked sausage, sliced
  • 60 g / 2 oz mozzarella
  • 1–2 tablespoons finely grated Parmesan or Pecorino

Hold the extra salt until you have tasted the finished sauce. Gochujang, soy sauce and salty add-ins may already provide all you need.

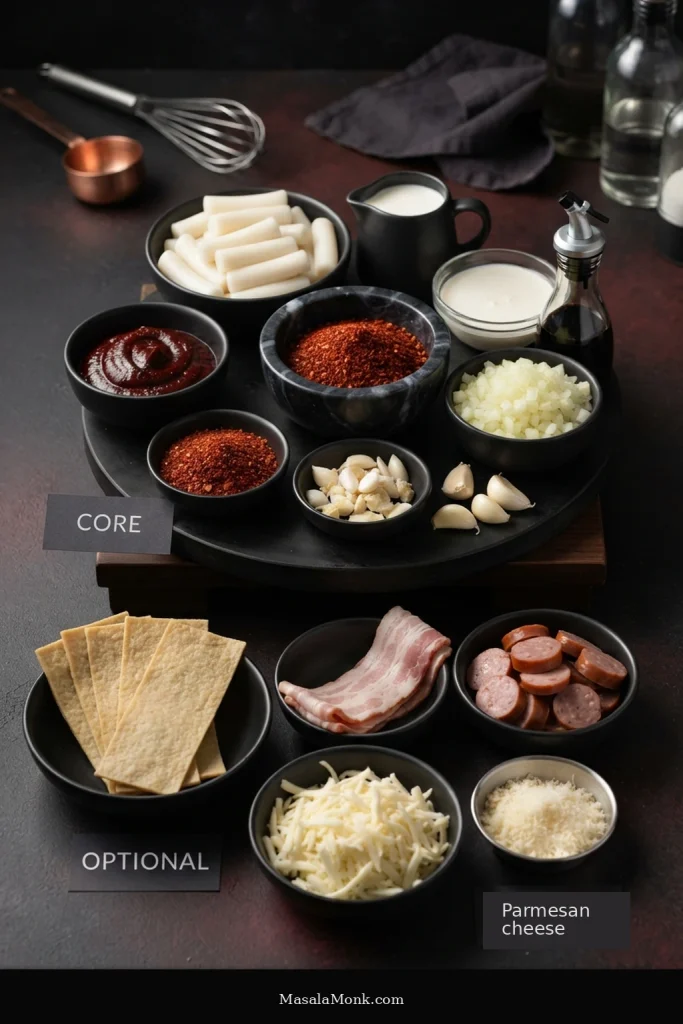
Ingredient arrangement divided into “Core” and “Optional” groups. Core ingredients include Korean rice cakes, gochujang, chilli flakes, milk, cream, onion, garlic and soy sauce; optional ingredients include fish cake, bacon, cooked sausage, mozzarella and Parmesan cheese.
The base sauce does not depend on fish cake, bacon, sausage or cheese; use those additions when you want more richness, saltiness or heft.

1. Prepare the Tteok

If your tteok needed soaking or thawing, drain it now. Fresh, soft rice cakes can go straight into the pan.

Frozen pieces do not need to become completely soft before cooking. Get them separated and free of a frozen-solid centre; the pan can handle the rest.

2. Soften the Onion and Garlic

Heat the oil over medium heat. Add the onion and cook for 2–3 minutes, until it begins to soften and smell sweet. Add the garlic and cook for about 30 seconds, just until fragrant.

Using bacon? Start with it instead of the oil. Let the fat render and the bacon begin to brown, pour off most of the excess fat, then add the onion.

3. Cook the Gochujang Briefly

Add the gochujang and your chosen amount of gochugaru. Stir for about 30 seconds. The paste should loosen, become fragrant and coat the onion and garlic; keep it moving so it does not scorch.

4. Give the Tteok a Head Start

Pour in 180 ml / ¾ cup water, then add the soy sauce and sugar. Stir until the gochujang dissolves into an even red sauce.

Add the rice cakes. Fish cake or sliced fully cooked sausage can go in now too.

Bring the pan to a lively simmer and stir regularly. Soft fresh tteok may need only a few minutes. Firmer rice cakes can take considerably longer.

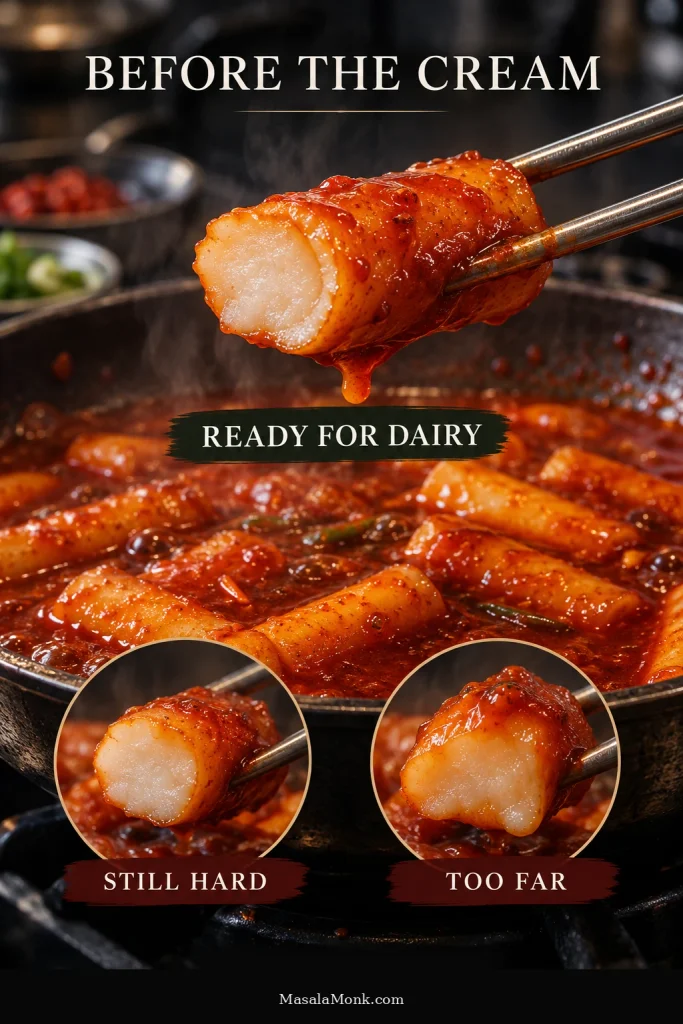
Bite one before the dairy goes in. The centre should have lost its hard or chalky core but still feel slightly firmer than you ultimately want to eat it.

Still hard: the outside may feel soft, but the centre is dense or resistant. Give it more moisture and time.

Ready for the dairy: no hard or chalky centre, but still slightly firmer than the final serving texture.

Gone too far: noticeably swollen, gummy or slimy, with edges beginning to lose their shape.

Close-up guide titled “Before the Cream” showing a rice cake held with metal chopsticks above deep red tteokbokki sauce. The main piece is labeled “Ready for Dairy,” with smaller examples labeled “Still Hard” and “Too Far.”
A softened exterior can hide a firm centre. Bite or cut one: dairy-ready tteok should have no hard or chalky core.

If the sauce starts thickening while the centre is still firm, add hot water a few tablespoons at a time and keep cooking. This is normal with firmer rice cakes.

Hard rice cake + thickening sauce = more water.

Do not move on to the dairy stage while the centre is still hard or chalky. Once it is almost tender, let any obvious excess water simmer away. There should still be red sauce around the tteok, but not a panful of thin broth when the milk and cream go in.

Pan already going off track? Jump to troubleshooting →

5. Add the Milk and Cream

Lower the heat to medium-low. Stir in the milk and cream and bring the sauce back to a gentle simmer.

Simmer only until the rice cakes are fully tender and the sauce begins to cling to them, usually about 1–4 minutes. A wider pan may get there faster, so trust the texture and appearance more than the clock.

This is when the pan changes character: the loose red sauce turns softer in colour, glossier and fuller, while the fermented chilli flavour still comes through underneath the dairy.

Milk or cream being poured into a pan of red tteokbokki sauce, creating visible swirls that change from deep red to creamy orange-pink around the rice cakes.
Once dairy enters, the sauce becomes richer and reduces faster; keep the simmer gentle so the creamy gochujang base stays smooth and controllable.

6. Taste and Adjust

Now taste the sauce. Dairy changes how the chilli, sweetness and salt register, so this is the moment to make small corrections.

More gochugaru increases the heat. If the fermented chilli flavour itself feels weak, start with another ½ teaspoon gochujang. Mix it first with a spoonful of sauce from the pan, stir it back in and simmer briefly before tasting again.

If you used a lot of reserve water to soften firm tteok, the seasoning may need a little attention too. Taste first, then change one thing at a time.

7. Stop While the Sauce Still Moves

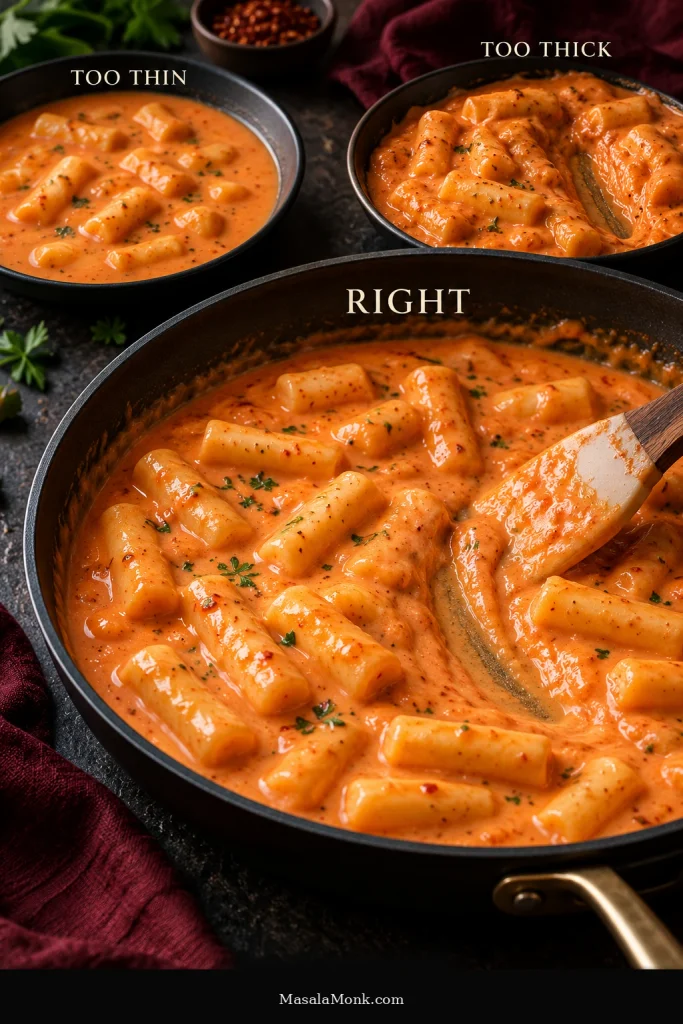
Rose tteokbokki sauce is ready when it coats the rice cakes, still pools in the pan, and a spatula trail slowly closes behind it.

Drag the spatula across the bottom. A clear path should appear for a moment, then fill back in. If the trail stays like a trench and the tteok sits in a heavy paste, the sauce has gone further than it needs to.

Take the pan off the heat slightly looser than you want the final dish. It will continue thickening as it stands.

Sauce-consistency comparison labeled “Too Thin,” “Right,” and “Too Thick.” The largest pan shows Korean rice cakes in creamy orange sauce with a spatula trail, while the smaller examples show a looser sauce and a much thicker sauce.
At the right consistency, sauce still settles between individual rice cakes; heavy ridges or bridges between pieces mean reduction has gone further than necessary.

8. Finish and Serve

If using mozzarella, melt it into or over the finished pan. Finish with Parmesan or Pecorino instead if you prefer a sharper, saltier note.

Add scallions and sesame seeds if using, and serve while the sauce still moves easily around the tteok.

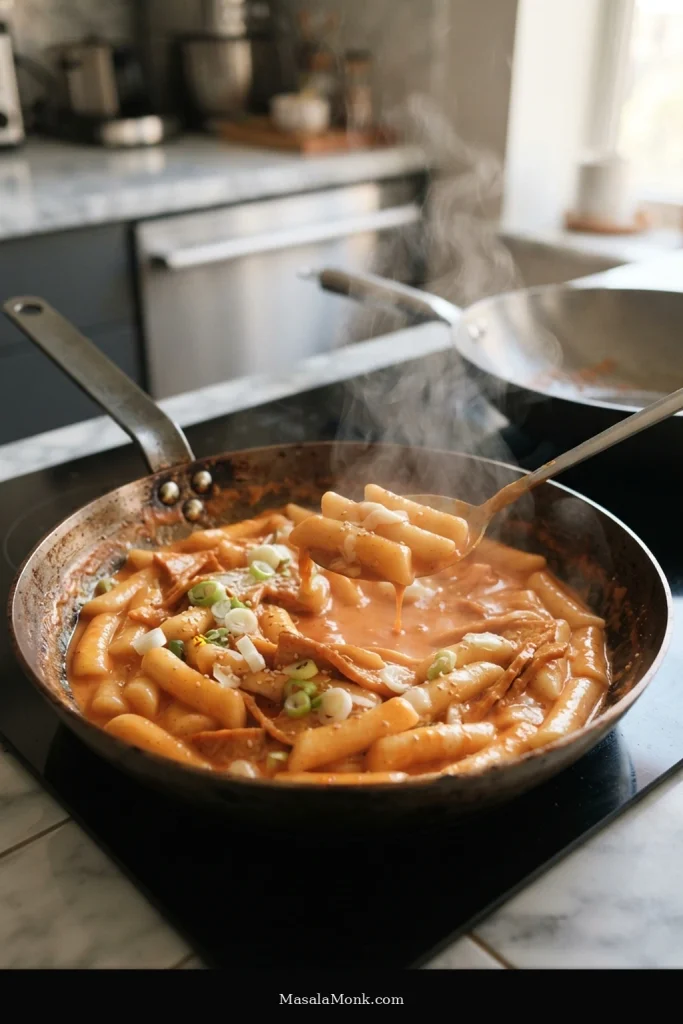
Finished rose tteokbokki in a shallow pan, with glossy orange-pink sauce coating cylindrical Korean rice cakes, sliced green onions on top and steam rising from the hot pan.
Serve while the sauce still moves freely around distinct rice cakes; residual heat in a wide pan will continue tightening it after the burner is off.

If the Pan Looks Wrong Right Now

If something has gone off course, most batches are still recoverable. First work out whether the rice cakes need help, the sauce needs help, or both.

A thin sauce is easy to reduce, and a thick one can usually be loosened. The rice-cake texture deserves more attention because once tteok becomes gummy and overcooked, there is much less you can do to bring that springy chew back.

Hot water being poured into a pan of deep red tteokbokki sauce with Korean rice cakes. On-image text reads “Tteok still hard? Add water. Dairy waits.”
Hard centre plus thickening sauce is a moisture problem: hot water extends the cook without making an already-rich rose sauce heavier.

Match the Pan to the Fix

What is happeningWhat to do
Tteok hard, sauce getting thickAdd hot water and keep the simmer gentle until the centre softens.
Tteok tender, sauce still thinReduce uncovered. If the rice cakes are already perfect, lift them out briefly while the sauce thickens.
Tteok getting gummy or losing clean edgesGet the rice cakes out of the heat. Finish the sauce separately if necessary.
Sauce too thickAdd water or milk 1–2 tablespoons at a time.
Too spicyAdd milk a tablespoon or two at a time. Use cream instead only if you also want a richer sauce.
Creamy but blandIf the gochujang flavour is weak, add a small amount more. If the chilli is already present but the sauce still tastes flat, try a small splash of soy sauce or a tiny pinch of stock powder.
Too sweetIf it is only slightly sweet, a little more gochugaru or savouriness can bring the balance back. If it is genuinely oversweetened, dilute with unsalted water or milk, then rebuild the seasoning gradually.
Too saltyDilute with unsalted water or milk and stop adding salty toppings or seasonings.
Too greasySkim obvious excess fat if possible, then loosen with a little milk or water. Next time, drain rendered bacon more thoroughly.
Sauce slides off the tteokGive it a short uncovered simmer while stirring. Reduction and rice-cake starch should provide enough body without a cornstarch slurry.

Back in control? Continue with Step 5 if the tteok still needed cooking, or return to Step 7 if you were only correcting the final sauce.

Milk, Cream and Cheese

Milk keeps the sauce moving around the pan. Cream gives it the fuller, clingier finish that makes rose tteokbokki feel rich without needing a blanket of melted cheese. An all-cream sauce becomes heavy quickly, especially once tteok starch, bacon or cheese enter the picture.

Mozzarella adds stretch; Parmesan or Pecorino adds a sharper, saltier savouriness. Neither is required for a good rose sauce.

No Heavy Cream?

Replace the cream with an equal volume of whole milk. The sauce will be lighter and looser, so expect a little more gentle reduction once the tteok is tender. Half-and-half is an easy middle ground.

Adjusting the Sauce to Your Taste

Rose tteokbokki varies widely from one shop or recipe to another, so use the base as a starting point and adjust the part you care about.

Gochujang is doing more than making the dish hot. It brings fermented flavour, sweetness, colour and body. Gochugaru is the cleaner tool when you simply want more chilli, which is why the recipe keeps the paste fairly steady and lets you adjust the flakes.

Sugar should round the chilli and dairy rather than dominate them. With salt, taste the finished pan before adding more—especially when fish cake, bacon, sausage or cheese is involved.

  • More savoury / snack-shop style: fish cake or well-rendered bacon brings its own flavour; a small amount of Korean stock powder, bouillon or MSG can deepen the background seasoning. Add a little, taste, then decide whether it needs more.
  • More saucy: start with another 60 ml / ¼ cup water if you want more sauce without extra richness, or milk for a creamier result. Add more only as needed, then retaste the seasoning.

Adding Ramen and Other Extras

Noodles change the pan most because they absorb sauce as they soften. Vegetables can add bulk while releasing some moisture of their own.

  • Instant ramen, about 80–100 g / 3–3½ oz: Branch from the base recipe near the end of Step 4. When the tteok has lost its hard or chalky centre but is still slightly firmer than final serving texture, add the ramen with about 180 ml / ¾ cup extra hot water. Let the noodles begin softening, adding more hot water if they absorb the sauce too quickly, then proceed with the milk and cream. Thick or air-dried noodles may need more liquid; very quick-cooking noodles may need less.
  • Udon: Precooked udon usually absorbs less than dry ramen. Add near the end and loosen the sauce only if needed.
  • Dangmyeon / glass noodles: Soak or cook them according to the package first, then add near the end.
  • Mushrooms: Cook with the onion. They add savouriness and release some moisture.
  • Cabbage: Adds sweetness, bulk and moisture. Keep the amount modest unless you are also increasing the sauce.
  • Hard-boiled egg: Serve alongside or add near the end. It barely changes the sauce but makes the meal more substantial.

Rose Rabokki

Add a full block of instant ramen and you are moving into rose rabokki territory: the noodles are now competing with the tteok for liquid, and the dish becomes more substantial than the base 2–3 serving recipe. Keep extra hot water nearby and judge the pan as the noodles soften.

Metal chopsticks lifting curly instant ramen noodles from creamy orange rose rabokki, with cylindrical Korean rice cakes visible in the sauce below.
Ramen cooks and absorbs liquid faster than firm tteok, so let the rice cakes get their head start before the noodles join the pan.

Making the base version? Return to the main recipe →

Making It Vegetarian, Vegan or Gluten-Free

Vegetarian

Leave out fish cake, bacon and sausage. Mushrooms, tofu or yubu (fried tofu pockets) can add texture and savoury depth. Use vegetarian stock if adding any, and choose a vegetarian-labelled hard cheese if avoiding animal rennet matters to you.

Vegan

Leave out the meat, fish cake and cheese, then replace the milk and cream with unsweetened, unflavoured plant versions that have some body. Barista-style soy, oat or cashew products often work better than very thin drinking milks. Plant milk or cream restores richness; mushrooms, yubu, mushroom seasoning, vegetable bouillon or nutritional yeast can rebuild savoury depth. Coconut cream also works, but it gives the dish a noticeable coconut flavour.

Gluten-Free

Rose tteokbokki can be gluten-free, but it is not automatically gluten-free. Check the labels on the tteok, gochujang, soy sauce, fish cake, sausage and any prepared stock seasoning. Mil-tteok is made from wheat.

Storing and Reheating Rose Tteokbokki

This dish is best fresh. Cooked tteok firms considerably after chilling, and the sauce thickens at the same time.

Refrigerate leftovers promptly in a covered container. For the best texture, eat them within a day or two.

How to Reheat It

  1. Put the leftover tteokbokki in a skillet and add 1–2 tablespoons water or milk per serving.
  2. Cover and warm over medium-low heat, stirring occasionally as the sauce loosens.
  3. If the sauce tightens before the centres of the rice cakes soften, add another small splash of liquid.
  4. Keep heating until the tteok itself is tender through the middle.
Reheating guide showing rose tteokbokki changing from chilled, thickened leftovers to a glossy hot pan after a small amount of liquid is added. On-image text reads “Low heat + a splash of liquid.”
Covering the pan first helps steam soften chilled tteok before the loosened sauce has time to reduce and thicken again.

For a microwave fallback, add a small splash of water or milk, cover loosely and heat in short intervals, stirring between each one. Keep going until the sauce is hot and the centres of the rice cakes have softened again.

For food safety, the USDA recommends reheating leftovers to 165°F / 74°C throughout.

This is not a dish worth making in a huge batch for the freezer. Freezing and reheating can change both the texture of the rice cakes and the creamy sauce.

What to Serve with Rose Tteokbokki

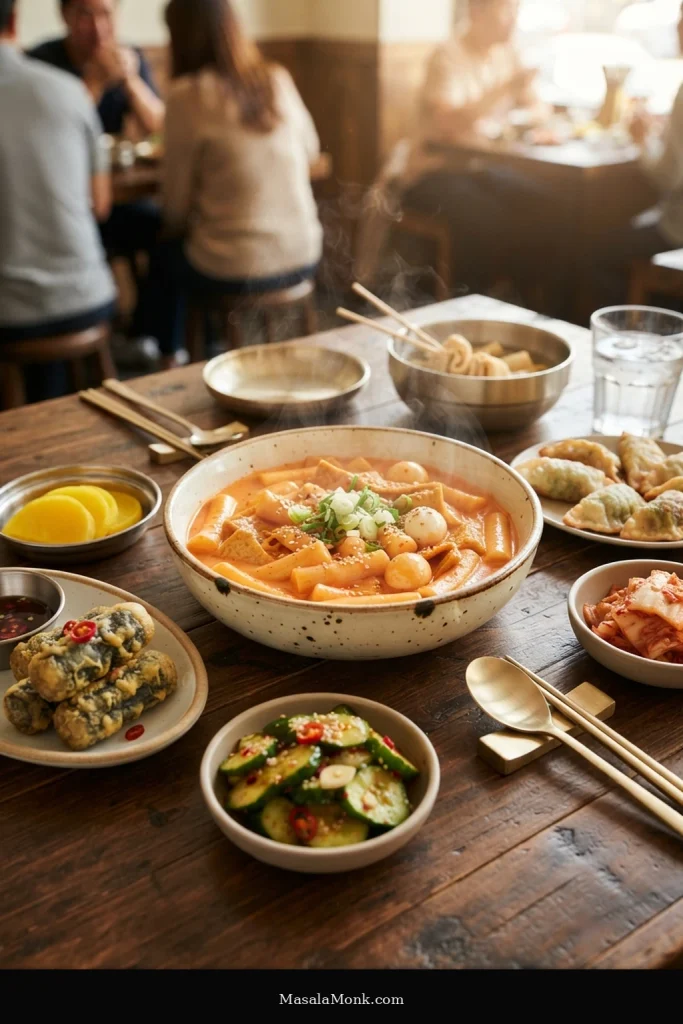
Rose tteokbokki is rich enough that the best companions usually bring freshness, acidity or a completely different texture. A cold, crisp cucumber salad does exactly that without making the meal heavier.

Danmuji (yellow pickled radish) is especially good beside the creamy chilli sauce: cold, crisp, sweet-sour and sharp enough to reset your palate between bites. Kimchi or a hard-boiled egg work well too.

If you want more of a Korean snack-shop spread, crisp gimmari (fried seaweed rolls) or our Korean corn dogs bring the crunchy, chewy contrast that the soft rice cakes do not.

For a larger Korean dinner, bulgogi adds sweet-savoury beef and browned edges without repeating the creamy texture of the main dish.

Korean snack-table spread centered on a bowl of rose tteokbokki, surrounded by yellow pickled radish, cucumber side dishes, fried snacks and other small Korean dishes on a dark wooden table.
A useful pairing formula: one cool or acidic side plus one crisp side to cut through the creamy sauce.

There is a short sweet spot with tteokbokki: the centres are completely tender, the chew still has some bounce, and every rice cake drags a little glossy orange-red sauce behind it.

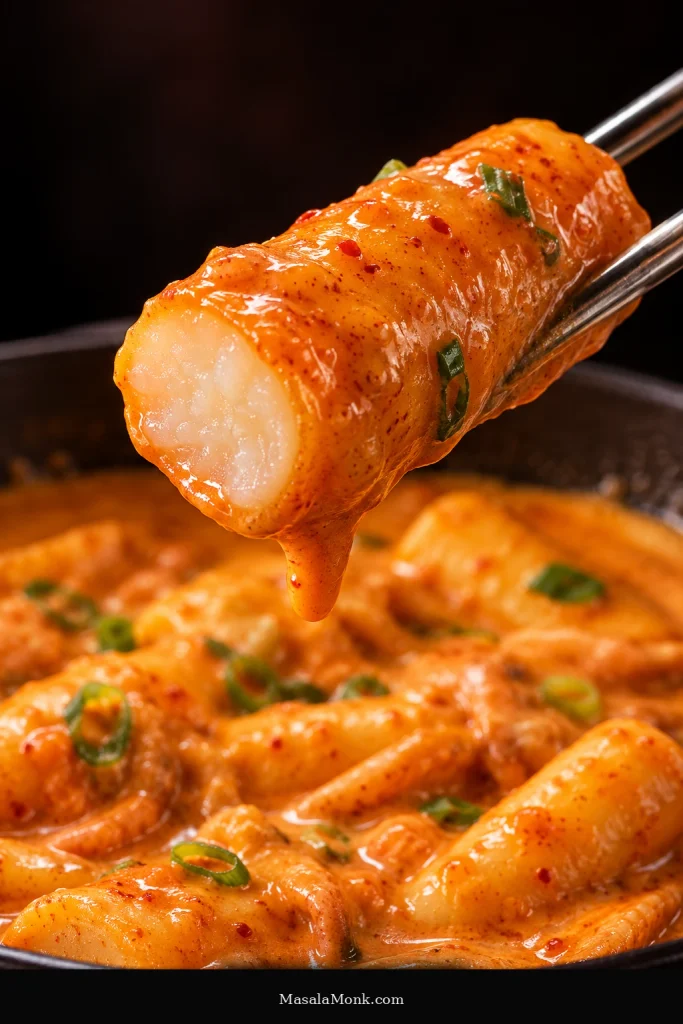
Extreme close-up of a sauce-coated cylindrical Korean rice cake held in metal chopsticks above a pan of rose tteokbokki, showing a smooth, dense white interior and glossy orange-pink sauce on the surface.
The target is tender, springy tteok with a smooth centre and a thin glossy coat of rose sauce.

Serve it then, while the tteok still pushes back gently against the bite and the sauce is loose enough to follow it onto the spoon.

Posted on — Leave a comment

Easy Kimchi Recipe: Homemade Korean Kimchi with Napa Cabbage

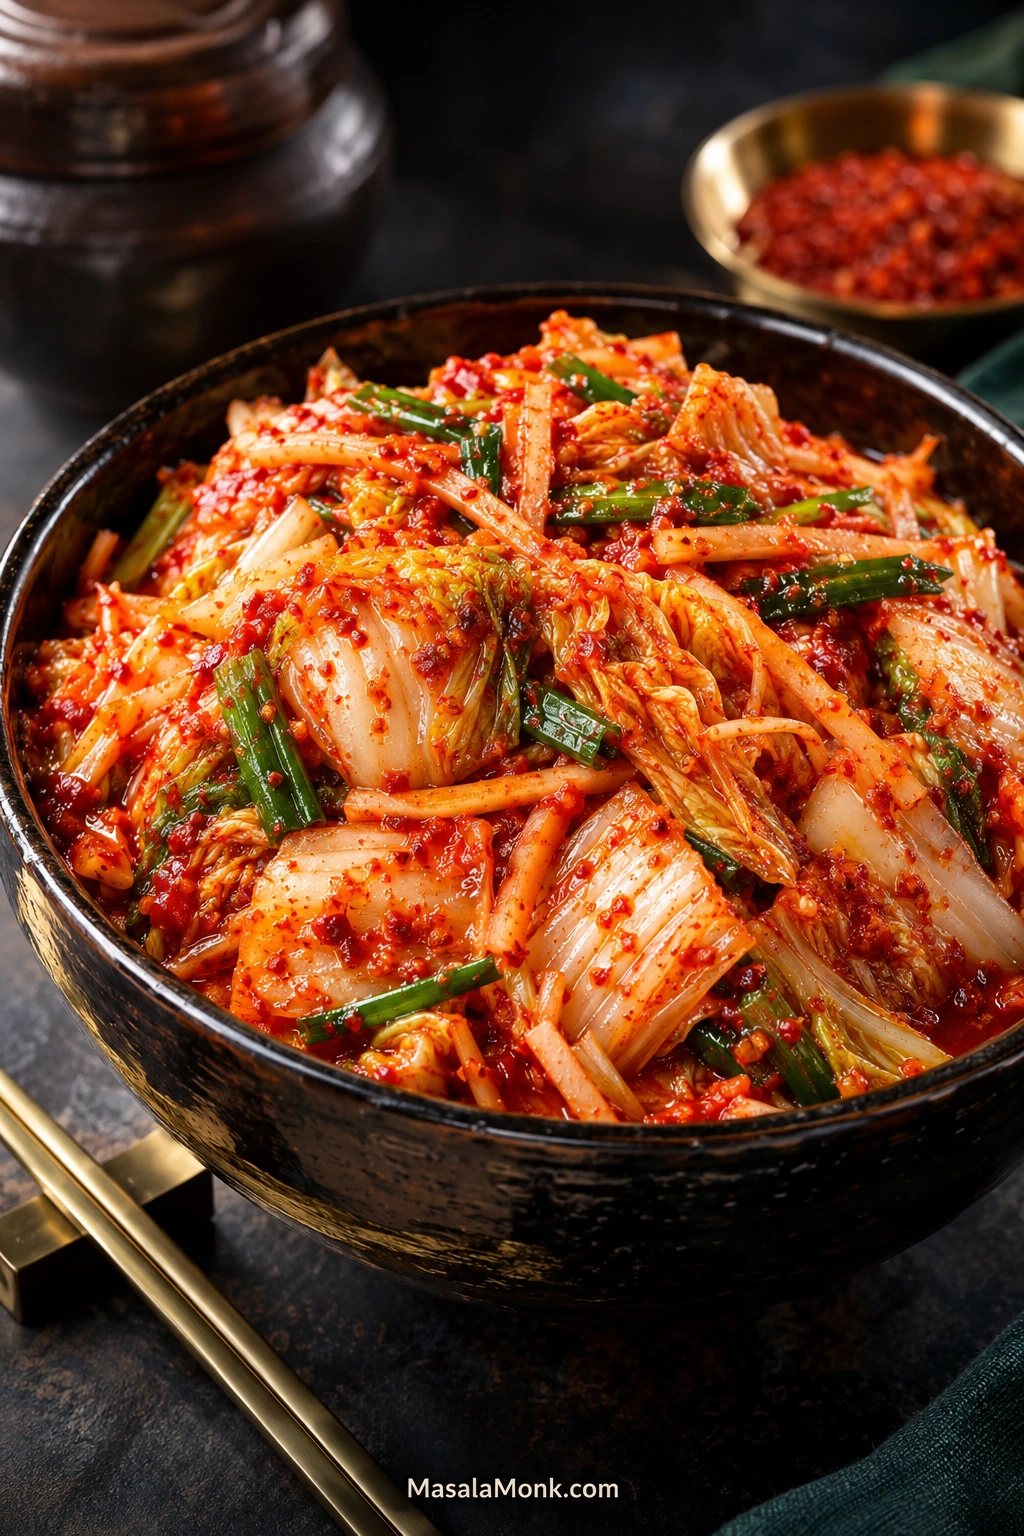
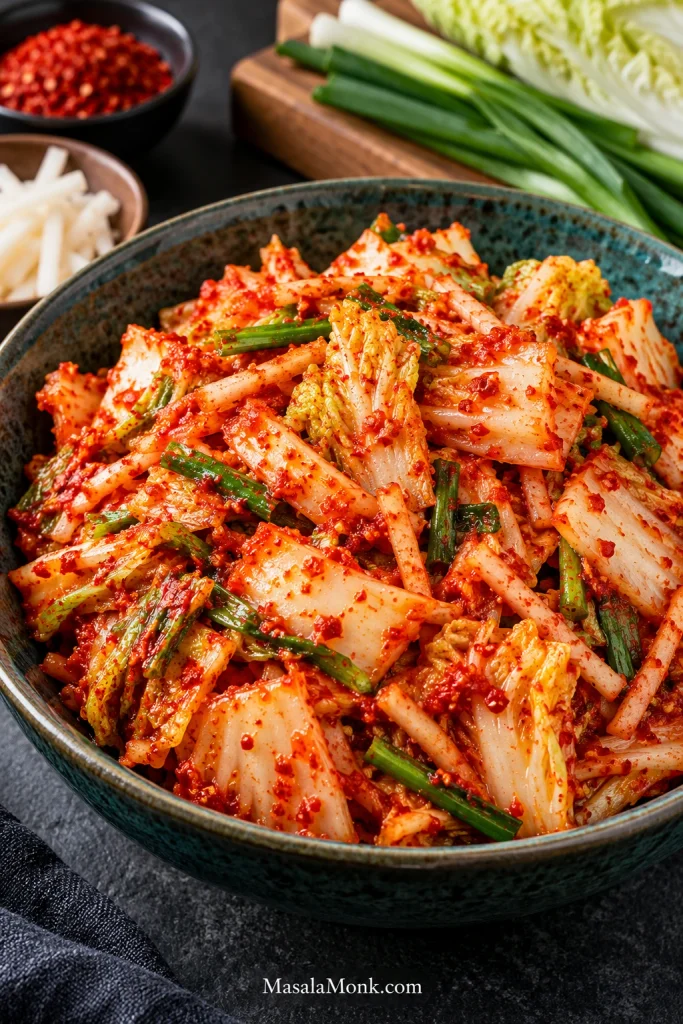
Ripe homemade napa cabbage kimchi should look integrated, not homogenized. The seasoning settles into the folds and more juice gathers as it matures, yet pale cabbage ribs remain visible and structured—a useful reminder that deeper fermentation does not automatically mean mushy kimchi.

Freshly mixed kimchi has a pleasure of its own. The napa cabbage is cold and juicy, the thick ribs still have a firm crunch, and garlic, scallion and gochugaru cling to every fold. As the kimchi matures, the same cabbage becomes tangier, deeper and more distinctly fermented.

This easy kimchi recipe starts with one manageable head of napa cabbage and uses the chopped mak-kimchi method. Because the cabbage is cut before salting and seasoning, it is easier to handle than a whole-leaf batch. There are many kinds of kimchi; this is the spicy red napa-cabbage style.

The first time you make kimchi, some of the changes can look more dramatic than they really are. The cabbage collapses in the bowl, liquid appears in the container, and later the lid may hiss when you open it. You do not need specialist fermentation equipment for this batch. What matters more is learning how the cabbage should bend, taste and drain—and what the kimchi is telling you once fermentation begins.

Four Checks Before You Trust the Clock

The clock gets you close; the cabbage tells you when you are there. Every head carries a slightly different amount of water, and different salts behave differently too.

StageWhat to Look For
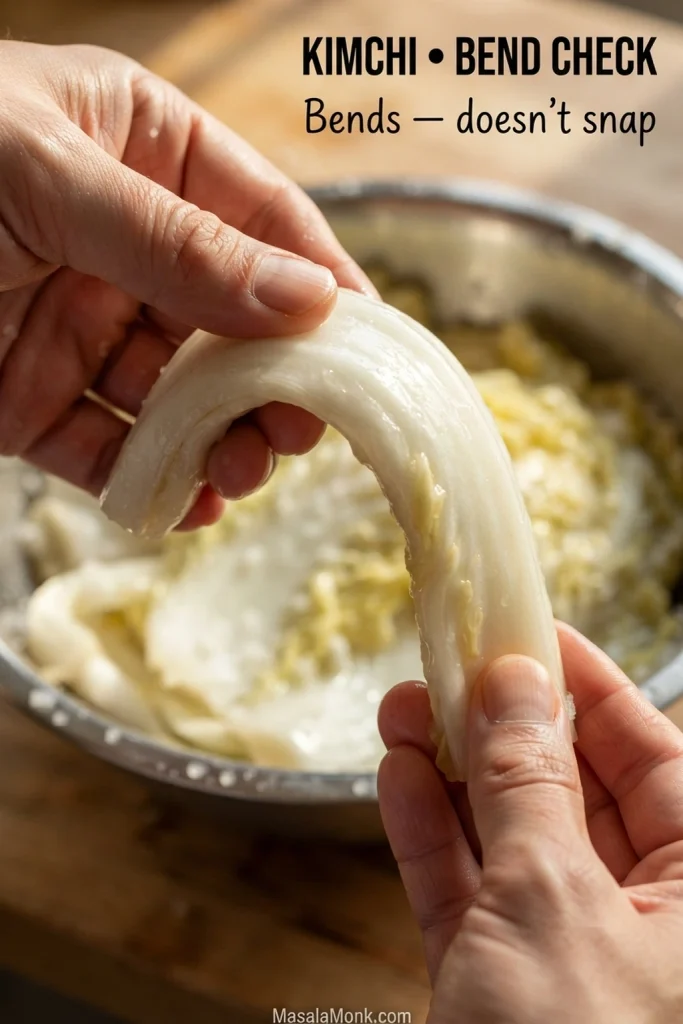
Salted cabbageA thick white rib bends readily instead of snapping, but still has some structure.
Rinsed cabbageA piece with some of the thick white rib tastes pleasantly salty, not like concentrated brine.
Drained cabbageThe leaves are damp, but water is no longer trapped in the folds or pooling underneath.
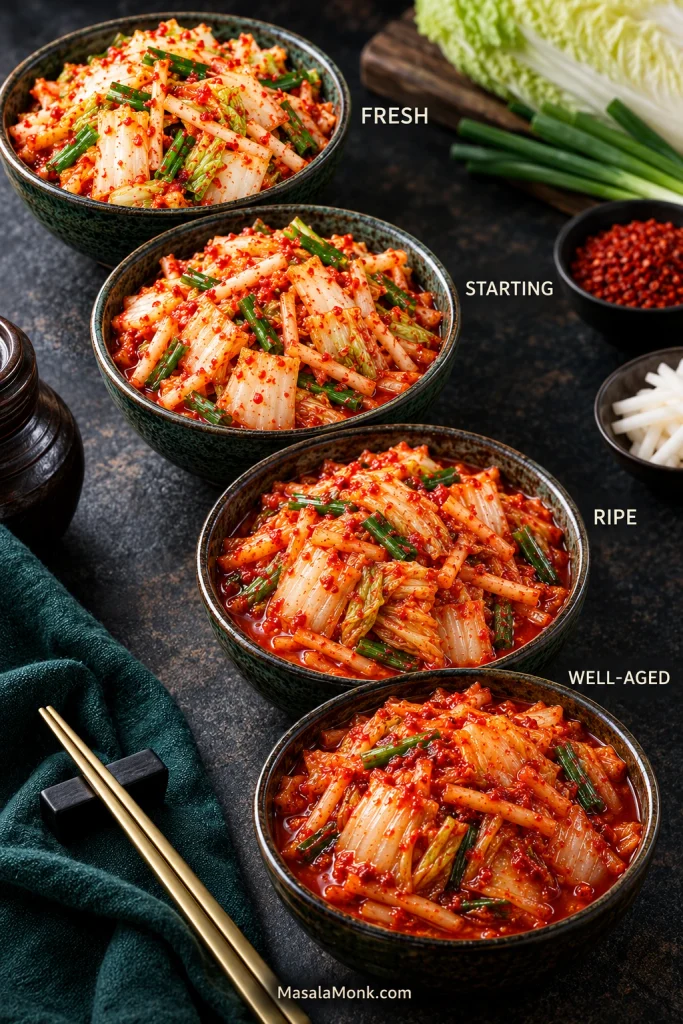
Fermenting kimchiTemperature and increasing acidity tell you more than a fixed number of days.
Hands bending a salted napa cabbage rib to show that it flexes without snapping.
Use the thick white rib as your salting checkpoint because it is the most substantial part of the napa cabbage. Once that rib bends smoothly without snapping or collapsing, you have a much better signal to move on than a rigid salting time alone.

Easy Kimchi Recipe

  • Batch: 1 medium napa cabbage, 1.3–1.4 kg / about 3 lb
  • Hands-on time: about 30–40 minutes
  • Time before fermentation: about 2½–3 hours, much of it unattended
  • Packed volume: usually around 2 L / 2 qt; cabbage size and packing will shift this a little
  • Container: 3–4 L / 3–4 qt capacity, leaving generous room for liquid and gas

This formula is built around 1.3–1.4 kg / about 3 lb of cabbage. If your head is substantially smaller or larger, scale the ingredient amounts rather than using the listed quantities unchanged.

Before you begin: wash your hands and start with clean equipment and work surfaces.

Equipment

You will need a large nonreactive bowl, colander, kitchen scale, sharp knife and cutting board, small saucepan and a clean 3–4 L / 3–4 qt glass or food-safe plastic container. Food-safe gloves are useful when mixing the chile seasoning, and a plate or tray under the container will catch any overflow.

Kimchi Ingredients

Napa cabbage, gochugaru, Korean radish, scallions, garlic, ginger, sea salt, salted shrimp, fish sauce and rice flour arranged as kimchi ingredients.
Think about kimchi ingredients by function rather than as a list of interchangeable flavors. Gochugaru, radish, seafood seasonings and sweet rice flour each affect a different part of the result—heat, crunch, savoriness or seasoning texture—which is why casual one-for-one substitutions can change the whole balance.

Napa Cabbage and Salt

  • 1 medium napa cabbage, 1.3–1.4 kg / about 3 lb
  • 70 g / 2.5 oz Korean coarse sea salt, preferably non-iodized and without anti-caking additives

Choose a head that feels heavy for its size, with crisp pale ribs and fresh-looking leaves. Skip badly wilted cabbage, extensive bruising or slimy damaged spots. Napa cabbage may also be sold as Chinese cabbage. Softer warm-season cabbage can salt faster than dense cold-weather heads, so begin checking the ribs early.

Use the salt weight if you can. Coarse Korean sea salt, kosher salt and fine sea salt occupy very different amounts of space, so volume measurements do not translate neatly between them.

Rice Slurry

  • 150 ml water, about ⅔ cup
  • 15 g sweet rice flour, about 1½ tablespoons; also sold as glutinous or sticky rice flour
  • 8 g sugar, about 2 teaspoons, optional

Sweet rice flour gives the seasoning body so it clings to the cabbage. Kimchi can ferment without it. “Glutinous” means sticky here; it does not mean the flour contains gluten. The optional sugar rounds the seasoning; it is not required to start fermentation.

Seasoning

  • 50 g gochugaru, roughly ½ cup depending on the flakes, for a medium-hot batch; use 30–35 g for milder kimchi or 60–65 g if your gochugaru is mild and you want more heat
  • 25 g garlic, about 6 large cloves, finely grated or minced
  • 7 g fresh ginger, about 1½ teaspoons finely grated
  • 30 ml Korean anchovy fish sauce, 2 tablespoons
  • 15 g saeujeot, about 1 tablespoon of Korean salted shrimp, finely chopped
  • 200 g / 7 oz Korean radish, cut into thin matchsticks
  • 60 g scallions, about 4–5 scallions, cut into 4–5 cm / 1½–2 inch lengths

Gochugaru vs Gochujang

Look for Korean red pepper flakes labeled for kimchi, usually coarse or medium rather than powder-fine. Taste a tiny pinch before deciding how much to use because heat varies considerably between brands. Gochugaru is very different from gochujang, the thick fermented chile paste used in dishes such as the glaze on our Korean fried chicken.

Bowl of coarse red gochugaru flakes beside a bowl of thick red gochujang paste, with gochujang lifted on a spoon.
Gochugaru and gochujang solve different cooking problems. Dry Korean red-pepper flakes disperse through the kimchi seasoning while still leaving it loose and textured; substituting thick fermented gochujang would change not only the chile flavor but also the consistency and overall seasoning balance.

Ingredient Notes and Substitutions

Korean radish is ideal here. Daikon works when that is what you can find, though it is generally a little less dense and more watery.

If you cannot find saeujeot, leave it out and increase the fish sauce to about 40 ml / 2 tablespoons plus 2 teaspoons. The finished kimchi will have a little less fermented-shrimp depth, but the seasoning will still be plenty savory.

Seafood-free note: this exact formula is not calibrated for simply omitting both fish sauce and saeujeot. A vegan or vegetarian version needs its own salt-balanced seasoning, so do not treat white miso as a 1:1 replacement here.

How to Make Kimchi

Cut and Salt the Cabbage

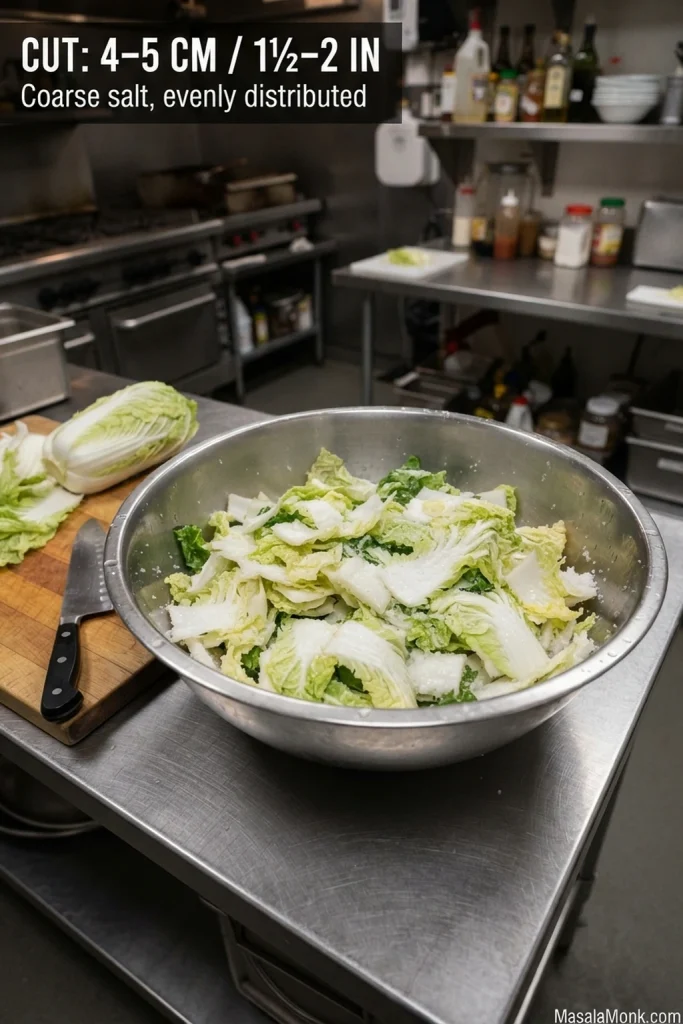
  1. Cut the cabbage. Remove badly damaged outer leaves. Quarter the cabbage lengthwise, trim away most of the dense core, then cut across the leaves into pieces about 4–5 cm / 1½–2 inches wide. Keep plenty of the pale ribs in the mix; they give the finished kimchi much of its crunch. Rinse once under cool water and drain briefly so the leaves remain damp.
  2. Salt it and check the bend. Layer the cabbage and salt in the bowl, then toss thoroughly. Leave for roughly 1½–2 hours, turning every 30 minutes. The pile will shrink dramatically as water leaves the cabbage. Bend check: start testing before the full 2 hours. A thick white rib should bend easily instead of snapping while still retaining some structure.
Irregular chopped napa cabbage pieces with thick white ribs and leafy sections in a stainless-steel bowl, with coarse salt scattered through them.
Chopped mak-kimchi contains both sturdy rib pieces and delicate leafy sections, so even salt distribution matters. Toss from the bottom and turn the cabbage as it salts; otherwise, pieces sitting in different parts of the bowl can reach the flexible stage at noticeably different times.

Rinse, Taste and Drain

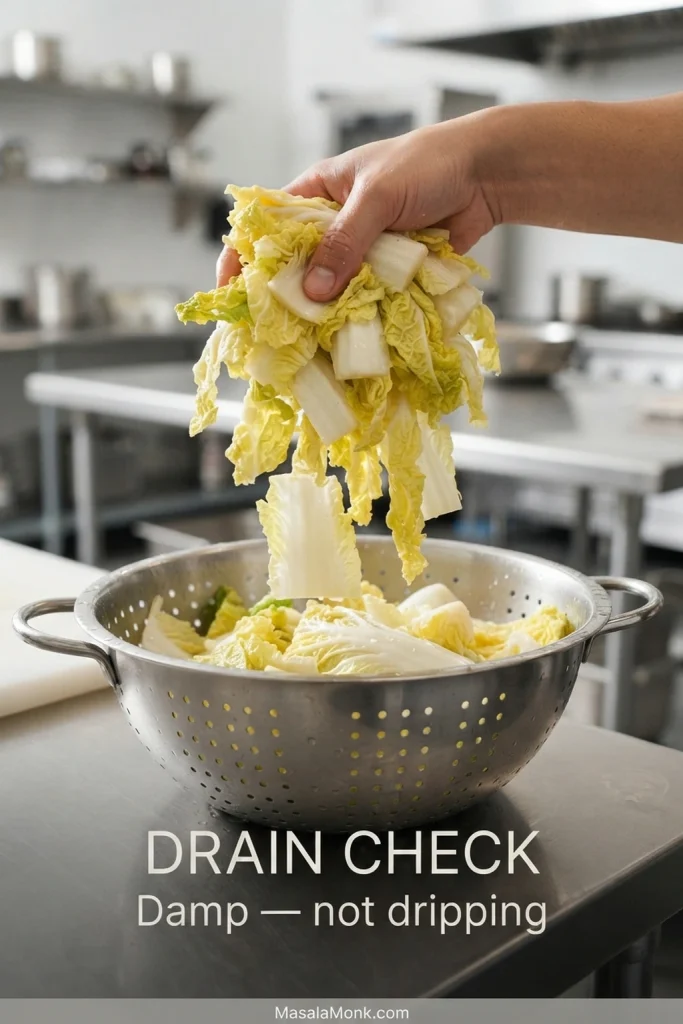
  1. Rinse, taste and drain. Rinse thoroughly three times with cool water, opening the folds so trapped salt washes away. Taste check: a piece with some thick white rib should taste pleasantly salty, not like concentrated brine; rinse again if necessary. Drain for 20–30 minutes, turning once or twice. Water hides surprisingly well between napa-cabbage leaves. Drain check: the cabbage should feel damp without streaming water when you lift a handful.
Hand holding rinsed napa cabbage above a stainless-steel colander; the leaves are damp and flexible without visible water streaming from them.
The goal after rinsing is not dry cabbage—it is cabbage without excess free water. Glossy, damp leaves are completely fine; what you do not want is water streaming from the folds, because that hidden rinse water can later turn a well-seasoned batch into watery kimchi.

Make the Kimchi Seasoning

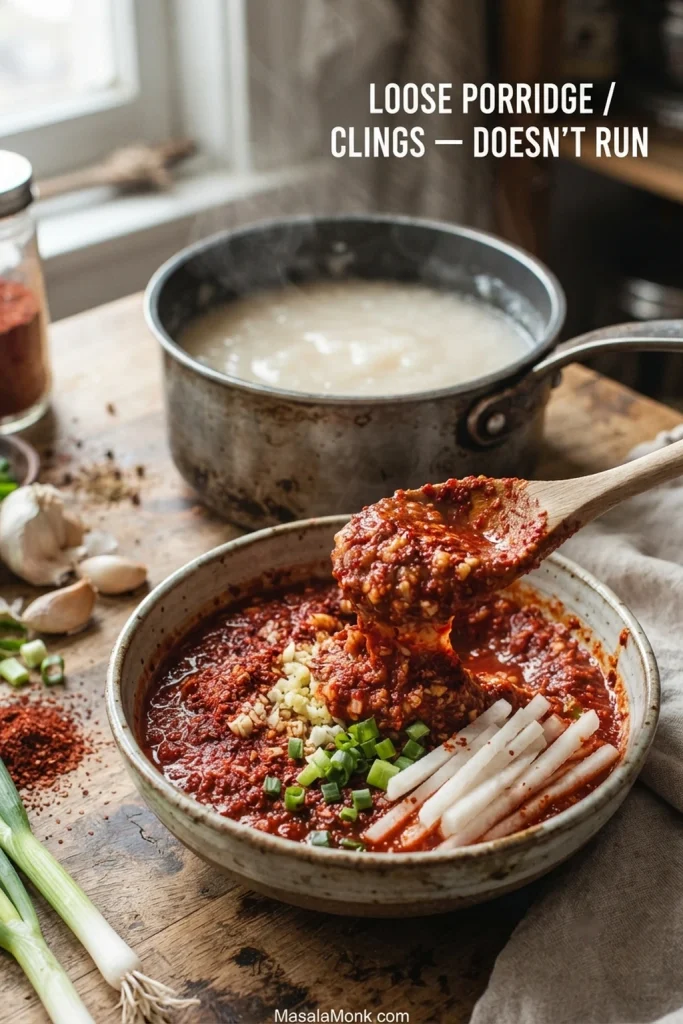
  1. Cook the rice slurry. Whisk the water and sweet rice flour together in the saucepan. Cook gently, stirring, until it thickens into a loose porridge. Stir in the sugar if using, then let the slurry cool to room temperature.
  2. Make the seasoning. Mix the cooled slurry with the gochugaru, garlic, ginger, fish sauce and saeujeot. Fold in the radish and scallions. Consistency check: the seasoning should spread easily but stay on a cabbage leaf instead of running straight back off.
Pale cooked rice-flour slurry in a saucepan beside thick red kimchi seasoning with radish and scallion pieces, with seasoning clinging to a spoon.
Judge the rice slurry by what happens after the kimchi seasoning is mixed, not by thickness in the saucepan alone. The finished paste should travel easily into cabbage folds but remain there instead of sliding straight off and leaving most of the seasoning behind in the bowl.

Coat the Cabbage and Check the Bowl

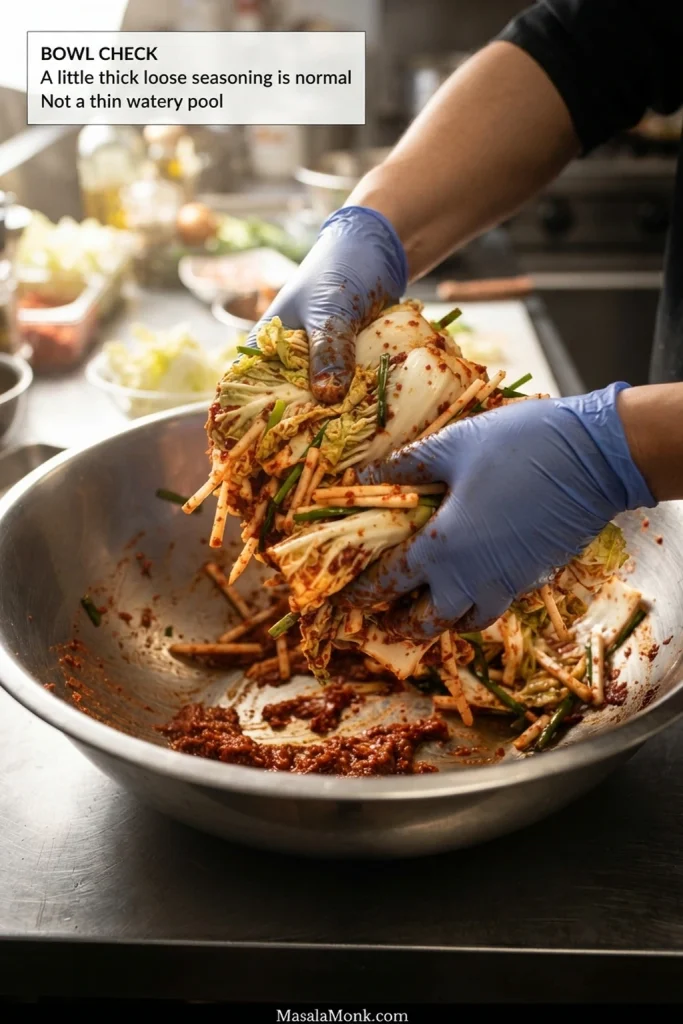
  1. Coat the cabbage and check the bowl. Put on gloves and fold the drained cabbage through the seasoning until every piece is coated. Fresh garlic and ginger are at their loudest now, so the mixture will taste sharper than it does later. A little loose seasoning in the bowl is expected. Bowl check: a large pool of very thin liquid immediately after mixing can point to excess rinse water. Do not strain the seasoned kimchi now; just drain more thoroughly next time.
Gloved hands mixing chopped napa cabbage with red kimchi seasoning in a stainless-steel bowl, with a small amount of thick seasoning at the bottom.
The timing of the liquid tells you something. A thin pool appearing immediately after the cabbage is seasoned often points back to incomplete draining; by contrast, extra liquid developing after the kimchi has been packed is an expected part of the cabbage releasing moisture during fermentation.

Pack the Kimchi

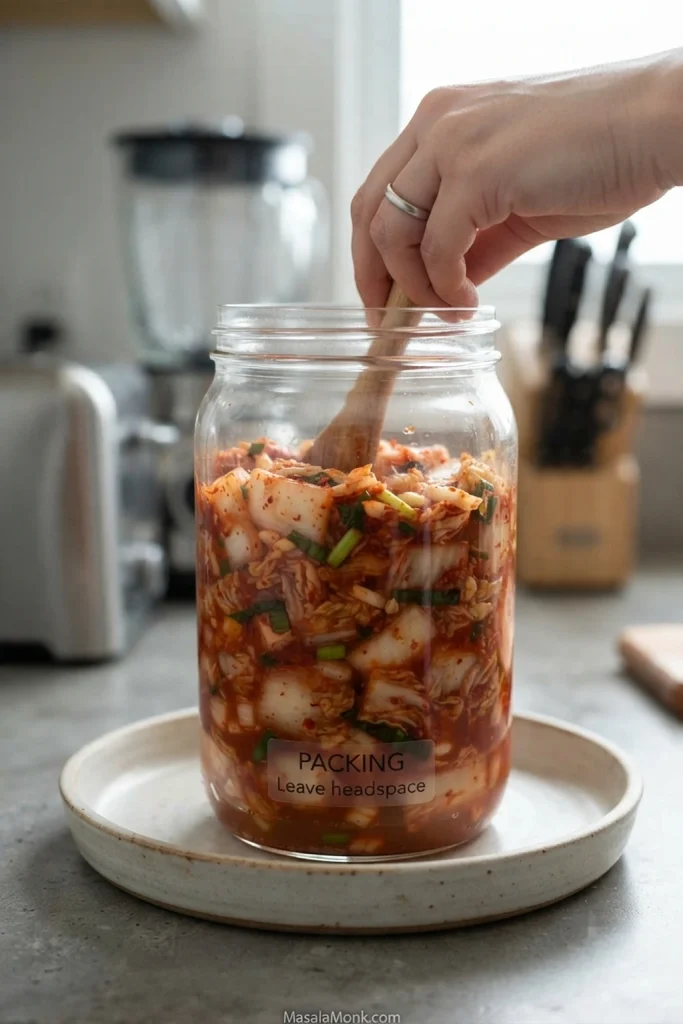
  1. Pack the container. Transfer the kimchi to the clean container and press it down firmly enough to remove large pockets of air without crushing the cabbage. Do not fill the container more than about two-thirds to three-quarters full, leaving room for additional liquid and fermentation gas. Set it on a plate or tray.
A hand presses chopped kimchi down with a wooden utensil in a clear glass jar, leaving headspace above the cabbage as red liquid gathers lower in the jar.
Freshly packed kimchi does not need to look fully submerged on Day 0. Press the cabbage firmly into its seasoning, minimize dry exposed pieces and leave generous headspace; as the cabbage sits, more liquid usually develops and an active ferment may need that extra room.
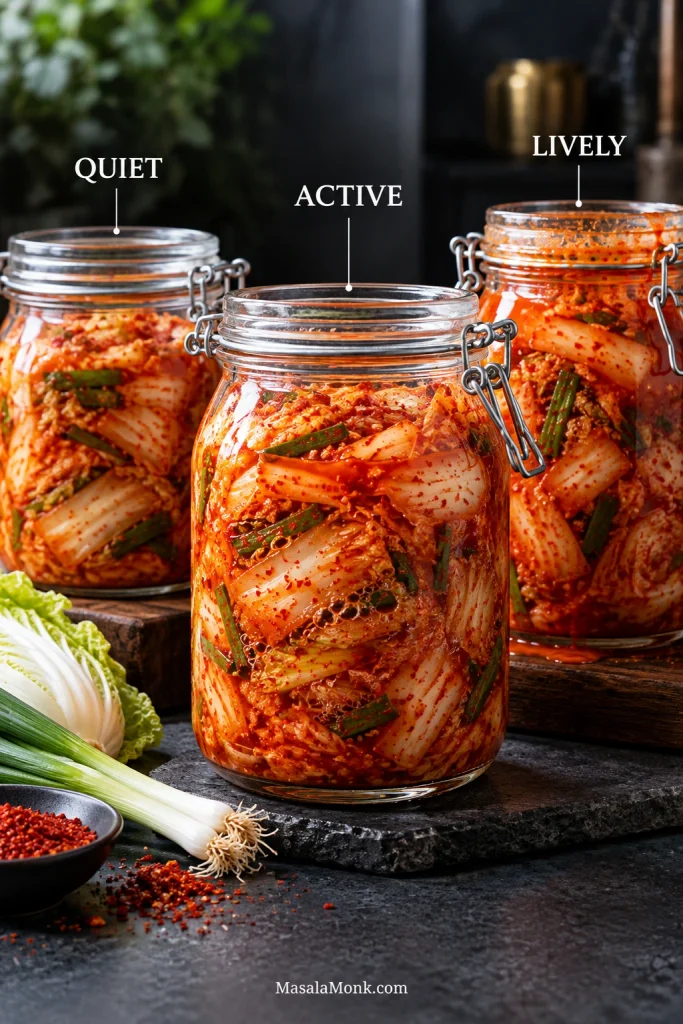
  1. Close the container. During an active room-temperature ferment, close an ordinary screw-top lid without cranking it excessively tight. Carbon dioxide builds as kimchi ferments. Follow the manufacturer’s directions for an airlock or fermentation lid. Even refrigerated kimchi can remain lively, so open a pressurized container carefully.

Once the kimchi is packed, the hands-on work is mostly over. You can eat some fresh now or let it ferment; from here, time and temperature do most of the work.

Fresh Kimchi: Eat Some Now

Kimchi is also eaten fresh, before full fermentation. If you want to eat some at this stage, keep that portion continuously refrigerated and use it within three days.

Freshly seasoned chopped napa cabbage kimchi with pale crisp ribs, green scallions and radish strips coated in bright red pepper seasoning.
Taste some fresh kimchi before the batch changes and you create your own fermentation reference point. Notice the crisp ribs, vivid garlic and almost absent fermented tang; later, those sensory differences make it much easier to recognize what fermentation has actually changed.

How to Ferment Kimchi

How long does kimchi take to ferment? At a cool room temperature around 18–22°C / 64–72°F, noticeable fermentation often develops within about 1–2 days. Refrigerator-first kimchi changes much more slowly, with sourness developing over several days and continuing to deepen afterward.

Refrigerator-First

For the simplest route, put the packed kimchi directly into the refrigerator. The raw garlic edge settles first. Then acidity becomes easier to taste and the seasoning starts feeling less like separate ingredients and more like one flavor. Cold fermentation moves slowly, so a quiet container can still be changing.

Cool-Room Fermentation

For a faster start, keep the packed kimchi somewhere cool, around 18–22°C / 64–72°F, and begin checking it within the first day. A warmer kitchen speeds things up and may soften the cabbage sooner, so refrigerate the kimchi earlier if it is developing faster than you want.

For fermented kimchi, Colorado State University Extension recommends verifying a pH of 4.6 or lower before eating it. Follow the instructions for a suitable food-safe pH strip or calibrated meter and test the surrounding liquid. If the pH is not falling as expected, do not simply keep extending room-temperature fermentation.

How the Flavor Changes

StageWhat You May Notice
FreshCrunchy pale ribs, vivid garlic and chile, and almost no fermented acidity.
Starting to fermentA first clean tang appears, more liquid gathers and you may notice a little fizz or gas.
RipeSeasoning tastes rounder and more unified, sourness is clear and the cabbage still keeps some crunch.
Well-agedCabbage softens, acidity becomes stronger and the deeper fermented flavor becomes particularly useful for cooking.
Four bowls of chopped kimchi labeled Fresh, Starting, Ripe and Well-Aged, showing progressively more liquid, deeper color and softer cabbage.
Use kimchi fermentation stages as a progression, not a calendar. Increasing liquid, softer folds, deeper integration and greater translucency can tell you more than color alone—and the same batch can move from crunchy table kimchi to excellent cooking kimchi without one single “perfect” day in between.

The first real tang is often easier to taste than to see. No single bubble, smell or spoonful of liquid tells the whole story; read time, temperature, acidity and texture together.

An active ferment can make a harmless hiss or sudden rise in liquid look surprisingly dramatic. Before assuming something went wrong, look at what the kimchi is actually doing.

Is This Normal? Signs Your Kimchi Is Fermenting

What You NoticeWhat It Usually Means
More liquidThe cabbage is continuing to release moisture. This is expected.
Not completely submerged on Day 0Freshly packed kimchi may not have much free liquid yet. Press the cabbage firmly into its seasoning and minimize dry exposed pieces; more juice usually appears as it sits.
Small bubbles or fizzFermentation is producing carbon dioxide.
No visible bubblesA cold ferment can be surprisingly quiet. Bubbles are only one clue.
A hiss when you open itGas has accumulated inside the container.
A little overflowThe kimchi released liquid, fermentation became active or the container needed more headspace.
A powerful sour, garlic or sulfur smellMature kimchi can smell extremely strong while remaining perfectly sound.
Three glass jars of chopped kimchi labeled Quiet, Active and Lively, showing increasing fermentation activity and rising liquid.
Compare a fermenting jar with its own earlier state rather than somebody else’s photograph. Refrigerator-first kimchi may remain visually quiet while a warmer batch looks lively, so bubble count alone is neither a success score nor a complete answer to whether your kimchi is fermenting normally.

If the container repeatedly pushes liquid out, give the kimchi more room. Moving some into a second clean container is better than repeatedly forcing an overfilled batch back under the lid.

Fix My Kimchi

Before fermentation, salt, seasoning and drainage are still relatively easy to correct. Once fermentation begins, time and temperature matter more.

Before Fermentation: Salt, Seasoning and Water

Too salty after rinsing? Fix it now. Rinse once more before the seasoning goes on.

Tastes underseasoned before packing? Add a small measured amount of fish sauce or salt, mix thoroughly and taste again. This is much easier to adjust now than after the kimchi has fermented.

Watery and bland? This usually starts before fermentation. Cabbage that was not salted enough or did not drain well can release enough water to dilute the seasoning. Juicy kimchi is part of the process; washed-out flavor points to a balance problem. On the next batch, repeat the bend check and drainage check carefully.

After Fermentation Starts

Not sour yet—or seeing no bubbles? Bubbles alone tell you very little. Recheck the signs your kimchi is fermenting, then look at how long the batch has been fermenting, its temperature, whether the flavor is becoming more acidic and whether the texture is changing. Use the pH check above when you need an objective acidification check.

Soured much faster than expected? Warmth is the likely reason. Compare the fermentation routes and temperature guidance above, refrigerate the batch now and shorten or skip the countertop stage next time.

Already fermented and a little too salty? Do not rinse finished kimchi; you will wash away much of the seasoning along with the salt. Cook with it instead. Chopped into egg fried rice, the kimchi can provide much of the salt and flavor for the pan.

Tastes bitter? Sometimes a very young batch tastes rough before the flavors settle. Too much ginger or garlic can add bitterness too. If everything else looks and smells sound, refrigerate it and taste again after a few days. Fermentation continues more slowly in the cold, and some of that rough young flavor may settle as the batch matures.

Too spicy? There is no practical way to remove the chile once it is mixed throughout the kimchi. Eat it with plain rice, eggs or tofu, or cook with it so the heat is spread through a larger dish.

Mushy already? Gradual softening as kimchi ages is expected; a young batch turning unexpectedly mushy is different. Improper salting, excessive warmth or faulty fermentation can cause it. If a young ferment becomes abnormally mushy rather than simply softer with age, discard it rather than trying to rescue the texture.

How to Tell if Kimchi Has Gone Bad

This is when to stop trying to rescue the batch. Kimchi can be sour, fizzy, pungent and full of cloudy red liquid without being spoiled.

  • Fuzzy or colored mold
  • Ropey or stringy slime stretching in threads between pieces
  • An unmistakably rotten or putrid odor
Close views of kimchi showing fuzzy mold growth and thick ropey slime stretching between cabbage pieces.
When learning how to tell if kimchi has gone bad, visible texture changes are more useful than judging sourness alone. Fuzzy growth or ropey slime is not something to skim, rinse away or cook through; discard the batch.

Kimchi liquid can naturally become thick with chile paste and vegetable juices. Ropey slime is different. If you see suspicious surface growth and are not sure what it is, discard the batch rather than taste-testing it.

If none of those warning signs are present and the kimchi is simply becoming sourer, that is usually maturation—not a reason to throw the batch away.

What to Do as Your Kimchi Gets Sour

A batch of kimchi does not have one perfect eating day. Its best use simply changes as the acidity develops.

Young Kimchi: Serve It Cold

While it is young and sharply crunchy, eat it cold with hot steamed rice, eggs, tofu or something rich such as bulgogi. The cool cabbage and growing acidity are especially good against sweet-savory beef.

Young napa cabbage kimchi served beside white rice and Korean bulgogi on a dark table setting.
Young kimchi earns its place when you want crunch more than acidity. Use it as a cold contrast to warm, soft or rich foods; meanwhile, let another portion mature for dishes where sourness matters more than crispness.

Sour Kimchi: Cook With It

Once the kimchi becomes properly sour, start cooking with it. Chop it into fried rice, fold it into kimchi pancakes or add it to noodles. In a hot pan, the sharp sourness mellows and the flavor becomes deeper and rounder. Mature kimchi also brings moisture, so dry rice and a hot pan become especially useful.

Mature kimchi cooking with rice in a dark pan, with visible cabbage pieces, red seasoning and steam rising from the pan.
Think of mature sour kimchi as a seasoning ingredient as well as a vegetable. It contributes acidity, saltiness, seasoned liquid and fermented depth, so when using it in kimchi fried rice, noodles or kimchi jjigae, taste the dish before automatically adding more salt or other sharp seasonings.

When the kimchi tastes almost too sharp to enjoy cold, it may be exactly right for kimchi jjigae. That strong acidity becomes deep and savory once the cabbage simmers with pork, tofu and broth.

How Long Does Homemade Kimchi Last in the Fridge?

Properly fermented kimchi can continue maturing in the refrigerator for months, although its crispest texture is usually in the first few weeks. As it ages, it becomes progressively sourer and softer; use the spoilage signs above rather than expecting one universal expiration day.

Keep fermented kimchi covered and refrigerated at 4°C / 40°F or colder. Use clean utensils when taking kimchi from the container and, where practical, press the vegetables back into their seasoning and liquid instead of leaving dry pieces exposed at the top.

Freezing is possible, but it damages the cabbage’s crisp texture. Thawed kimchi is much better for cooking than serving cold.

If your first batch does something you were not expecting, leave a comment with the room temperature, how long the kimchi has been fermenting, and what you are seeing, smelling or tasting. Those details make fermentation problems much easier to work through.

The first batch makes every hiss, extra spoonful of liquid and powerful smell feel important. After one successful batch, the pattern becomes much easier to read. You do not need to catch the kimchi at one perfect moment: eat some while it is crunchy, keep some long enough to turn tangy, and let the rest become properly sour. By then, the kimchi you no longer reach for straight from the container may be exactly what you want beside the stove.

← Back to the kimchi recipe

Posted on — Leave a comment

Bulgogi Recipe: Tender, Caramelized & Easy Korean Beef BBQ

Thin slices of cooked bulgogi in a dark skillet, browned at the edges and lifted with metal chopsticks, with rice and kimchi in the background.

Bulgogi is Korean thinly sliced marinated beef, usually seasoned with soy sauce, sweetness, garlic and sesame before being grilled or quickly pan-cooked. For this skillet version, we’re after tender ribbons of beef with a light gloss and irregular caramelized edges, with very little free liquid left in the pan.

The payoff is savory-sweet browned edges on beef that still bends easily, with hot rice ready to catch the juices clinging to each slice. Once cold, wet, very thin beef hits the skillet, slice thickness, surface moisture, pan heat and batch size decide whether it browns quickly or starts steaming.

Slice Thin. Let It Drip. Give It Space.

Slice thin: aim for 2–3 mm (about ⅛ inch), across the grain. Thin beef cooks quickly enough to stay supple.

Let it drip: the beef should reach the skillet coated in marinade, while obvious excess stays in the bowl.

Give it space: divide 24 oz / 680 g beef into 3 roughly equal batches of about 8 oz / 225 g each for a 12-inch skillet. If the pieces cannot sit loosely with visible pan around them, use smaller batches.
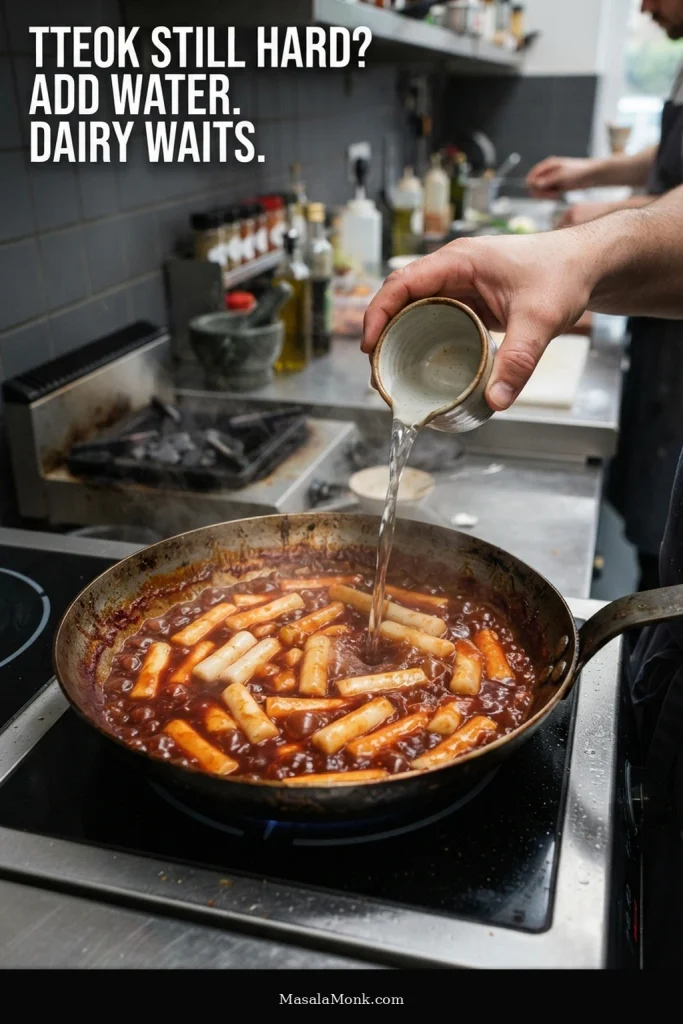
Bulgogi Recipe

Thinly sliced Korean-style beef in a soy, pear, garlic and sesame marinade, cooked in small hot batches so the meat stays tender while the edges caramelize.

  • Serves: 4 with rice and sides
  • Active prep: about 20–25 minutes
  • Quick route: about 60–70 minutes with pre-sliced beef and a 30-minute marinade
  • Preferred marinating time: 1–2 hours
  • Cook time: about 10–15 minutes, slightly longer if your skillet needs 4 batches
  • Preferred total time: about 1½–2¾ hours, plus optional beef-firming time if slicing the steak yourself

Equipment

  • Sharp chef’s knife
  • Cutting board
  • Large mixing bowl or covered container
  • Fine grater, microplane or small blender
  • Tongs
  • Large, heavy 12-inch skillet, such as cast iron, carbon steel or heavy stainless steel

Ingredients

For the Beef & Marinade

  • 24 oz / 680 g ribeye or top sirloin, sliced across the grain 2–3 mm (about ⅛ inch) thick
  • ¼ cup / 4 Tbsp / 60 ml regular brewed soy sauce
  • 2 Tbsp / about 25 g packed brown sugar
  • 2 Tbsp / 30 ml mirin
  • 3½ oz / 100 g peeled Asian pear, finely grated or blended
  • 2 oz / 60 g onion, finely grated or blended
  • 4–5 garlic cloves / about 15 g, finely grated or minced
  • 1 tsp / about 5 g fresh ginger, finely grated
  • 1½ Tbsp / 22 ml toasted sesame oil
  • ½ tsp freshly ground black pepper
  • 3 scallions / about 30 g, thinly sliced and divided

For Cooking & Finishing

  • Up to 1 Tbsp / 15 ml neutral high-heat oil, as needed
  • 1 Tbsp / about 9 g toasted sesame seeds

How to Make Bulgogi

1. Firm the Beef if You Are Slicing It Yourself

Place the steak in the freezer until it feels very firm but remains sliceable. Start checking after about 20–30 minutes; a thick steak may need much longer.

The beef is ready when it holds its shape under the knife without folding or compressing. Beef already sliced close to the target thickness can go straight to the marinade.

A hand steadies a partially chilled raw steak while a chef’s knife cuts a thin slice on a dark work surface.
The knife should glide through firm beef without compressing it. If you need to saw through the steak, let it soften slightly.

Frozen pre-sliced beef should thaw in the refrigerator first. Separate the slices gently and drain away obvious thawing liquid before marinating so that extra moisture does not follow the beef into the skillet.
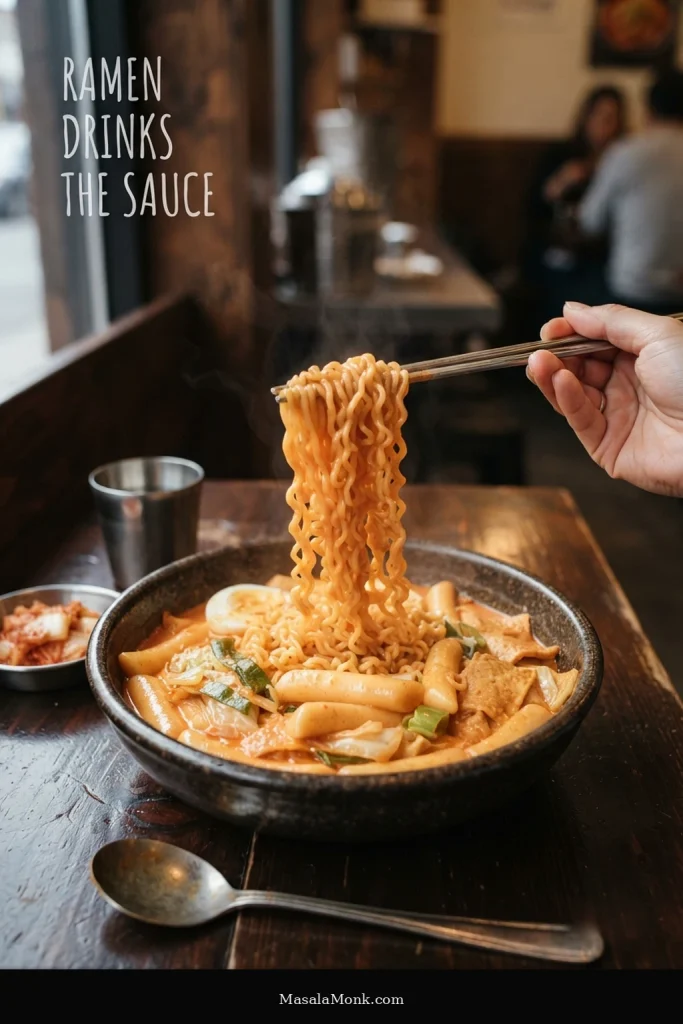
2. Slice Across the Grain

Find the direction in which the muscle fibers run, then cut across them into slices 2–3 mm (about ⅛ inch) thick. Aim for reasonably even thickness; the pieces themselves do not need identical shapes.

Raw top sirloin being cut across visible muscle fibers into very thin slices marked as 2–3 mm, about one eighth inch thick.
A properly thin bulgogi slice should drape instead of standing like a steak strip. That flexibility is a quick visual check before the beef reaches the pan.

3. Make the Marinade

Combine the soy sauce, brown sugar, mirin, pear, onion, garlic, ginger, toasted sesame oil and black pepper. Stir until the sugar dissolves and the mixture is evenly combined.

A slightly pulpy marinade is completely fine. If using a small blender, do not add water simply to make the blades run.

Taste the marinade now, before raw beef enters the bowl. Soy should lead, followed by gentle sweetness, garlic and sesame. It should taste a little stronger than the finished meat without being aggressively salty or syrupy.

Thin dark brown bulgogi marinade with fine aromatic pulp dripping from a metal spoon into a glass bowl.
Bulgogi marinade should drain quickly from a spoon, leaving only fine pear, onion and aromatics behind. A slow, rope-like pour means the mixture is thicker than this recipe needs.

4. Marinate the Beef

Add the sliced beef and about half of the scallions. Separate folded slices as you turn everything together so the marinade reaches the hidden surfaces too. Cover and refrigerate for 1–2 hours.

Thirty minutes can still work when dinner needs to move. Tender ribeye or sirloin sliced this thin does not need an overnight soak.

5. Get the Skillet Properly Hot

Heat a wide, heavy 12-inch skillet over medium-high heat until thoroughly hot. Add about 1 tsp / 5 ml neutral oil and spread it into a thin film. Use more between batches only if the surface looks dry.

The first piece of beef should give an immediate, confident sizzle. If it lands quietly, give the skillet more time.

6. Start with One of Three Batches

Divide the marinated beef into 3 rough portions of about 8 oz / 225 g each. Lift the first portion with tongs and hold it over the bowl for several seconds so obvious excess marinade drips away.

The beef should still look glossy and coated. If an 8 oz / 225 g portion cannot sit loosely in your skillet with visible metal around it, use 4 smaller batches.

Raw marinated beef held with metal tongs above a sparsely filled 12-inch skillet, with widely spaced slices and visible bare pan.
Both moves protect skillet heat. Less clinging marinade reduces the water to boil away, while bare pan gives moisture room to evaporate.

7. Spread It Out and Give the First Side Contact

Spread the beef in a loose layer and leave it mostly undisturbed for about 45–60 seconds. Bare skillet should remain visible between at least some of the pieces.

If a puddle forms almost immediately, stop adding beef to that batch.

Thin bulgogi beef cooking in a dark skillet, with lighter reddish-brown areas and several developing caramelized patches.
Uneven browning is normal with very thin bulgogi. Chasing the same dark color on every surface can dry the smallest folds first.

8. Toss and Finish Quickly

Turn or toss the slices and continue cooking until the raw color has disappeared and some edges have browned, usually another 1–3 minutes.

Pull the beef while it is still flexible, with medium-brown surfaces and darker caramelized edges. As the wet marinade cooks away, the aroma should shift toward browned beef, garlic and toasted sesame, and the pan should have little or no free liquid.

9. Let the Skillet Heat Back Up

Transfer the cooked beef to a plate and give the empty skillet a moment over the heat before the next cold batch goes in.

Mostly empty hot skillet with a few brown fond spots while a bowl of raw marinated beef waits nearby for the next batch.
The pause matters most after the first batch. Without it, residual moisture plus another load of cold beef can turn a sear into a simmer.

A few deep-brown sticky spots are normal. Black residue tastes burnt, but it does not mean you need to abandon the next batch. Wipe those patches away carefully, add another small amount of oil if needed and let the skillet heat again.

10. Finish and Serve

Have the rice and sides ready before the final batch goes into the skillet; bulgogi is at its best served straight away.

Cook the remaining batches the same way. If the first beef needs warming, return everything to the skillet only briefly at the end. Finish with the remaining scallions and toasted sesame seeds.

Quick Recipe Notes

  • No Asian pear? Replace the 100 g Asian pear with 100 g ripe regular pear or sweet apple, or leave the fruit out and keep the sugar unchanged.
  • No mirin? Mix 2 Tbsp / 30 ml sake with 2 tsp sugar. Water can replace the sake in a pinch, although the flavor will be flatter.
  • Only have kiwi or fresh pineapple? Omit the fruit instead of substituting either one 1:1. Their natural enzymes can soften thin beef much more aggressively.
  • Using paper-thin hot-pot beef? It needs much less time in both the marinade and the skillet.
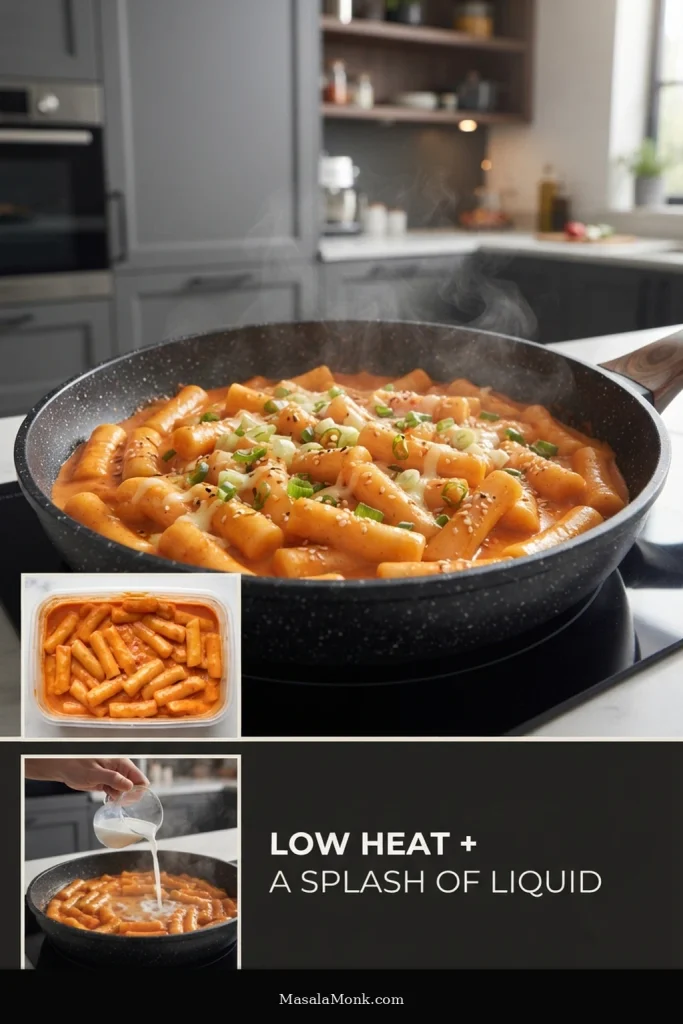
  • Discard marinade left after contact with raw beef. Do not use it uncooked as a finishing sauce.

How to Know Bulgogi Is Done

The clock tells you when to start looking closely; the beef itself tells you when to stop. A thermometer is not especially useful for slices this thin because there is too little thickness to probe reliably.

  • Beef: cooked through but still flexible, with a light surface gloss.
  • Edges: scattered caramelized brown patches rather than an even dark crust.
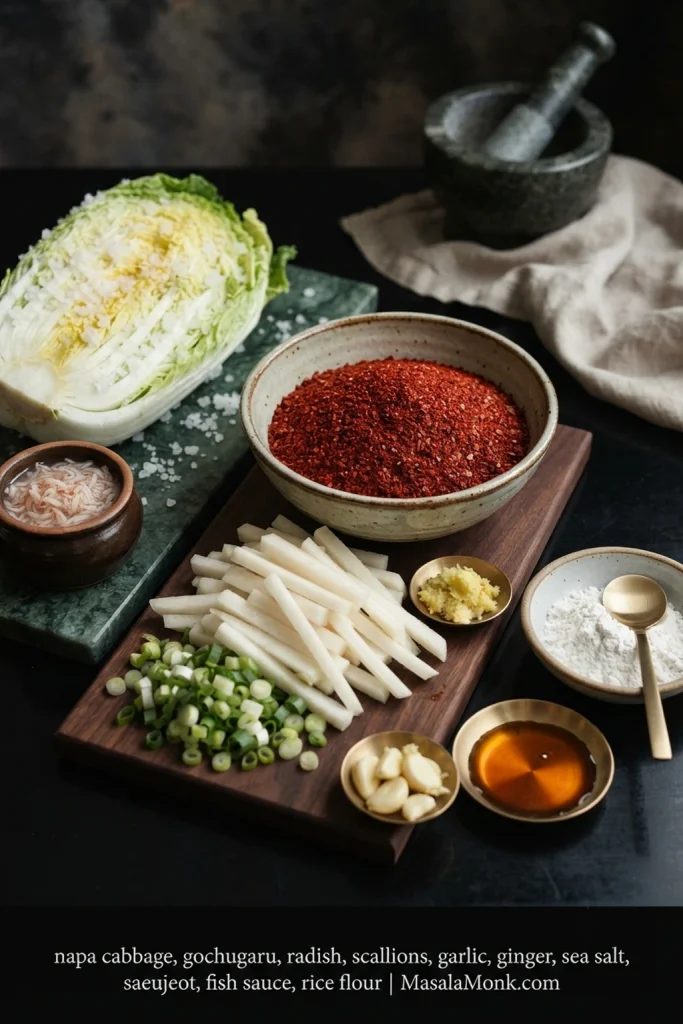
  • Pan: little or no free liquid around the finished batch.
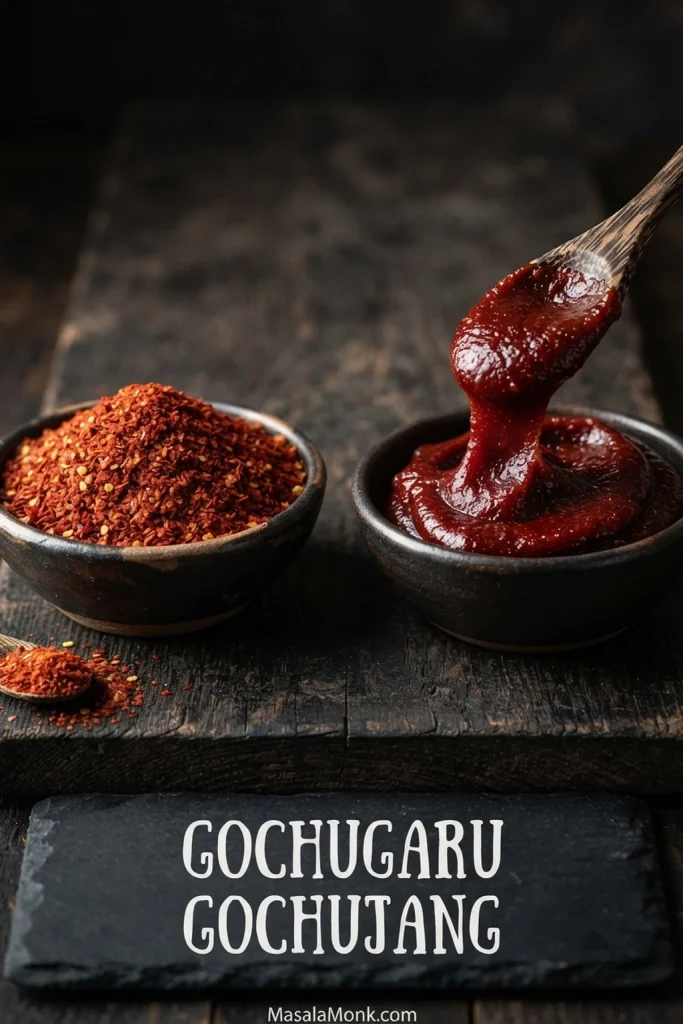
A thin cooked slice of bulgogi bending into a soft curve between metal chopsticks, with browned edges and a light surface sheen.
Once the raw color is gone, look at flexibility. A bulgogi ribbon that turns rigid usually stayed over the heat too long.

If you’re cooking now, you have everything you need above. The rest of the guide explains why those choices work, what to buy when the exact ingredients are unavailable, and what to change when the pan behaves differently from the plan.

Why Bulgogi Doesn’t Always Look the Same

Bulgogi literally means “fire meat”: bul means fire and gogi means meat. Modern bulgogi can be grilled over flame, seared quickly in a skillet, or cooked more gently with enough marinade to leave flavorful juices behind.

One plate may have dark caramelized edges and almost no liquid; another may be paler and soft, with savory juices meant to meet the rice. There isn’t a single household formula for bulgogi, which is why family, restaurant and regional versions can look quite different. Maangchi’s bulgogi guide is another example of how cooking and serving styles can vary.

Here, we’re after the browned version: quick cooking, caramelized patches and very little liquid left in the pan. Beef bulgogi also tends to be sweet-savory rather than chile-hot; gochujang is an optional direction, not a requirement.

Choose the Beef, Then Slice It Right

Ribeye is the most forgiving choice; top sirloin gives you better everyday value. Slice either 2–3 mm (about ⅛ inch) thick across the grain.

Raw ribeye and top sirloin displayed side by side, showing heavier marbling in the ribeye and a leaner structure in the sirloin.
Marbling gives ribeye a wider margin during high-heat bulgogi cooking. Leaner top sirloin benefits even more from accurate slicing and an earlier pull.
Beef CutBest UseWhat to Know
RibeyeBest overallMarbled, tender and forgiving during very fast cooking.
Top sirloinBest everyday/value optionLeaner than ribeye but excellent when sliced thinly across the grain.
TenderloinMaximum tendernessVery tender but expensive and somewhat less richly beefy.
Boneless short ribRich alternativeWell marbled and flavorful; trim any obvious tough connective seams before slicing.
Hanger steakBeefy alternativeDeep beef flavor; trim the central membrane if present and slice carefully across the grain.
Flat iron or chuck eyeValue alternativesCan be excellent once obvious connective tissue is trimmed away.
Flank or skirtFirmer, beefy alternativesPronounced grain makes across-the-grain slicing and quick cooking especially important.

Marbling, Gristle, Grain and Thickness

Fine white streaks running through the muscle are marbling. They soften during cooking and help the beef stay juicy. Thick white seams of silverskin or connective tissue are different: trim them where practical because they can remain rubbery even when the surrounding meat is tender.

Close-up comparison of fine white marbling inside raw beef and a pearly sheet of silverskin being lifted from another piece of beef.
These white tissues behave differently under heat. Fine marbling softens inside the beef, whereas silverskin can stay firm enough to make a tender bite chewy.

Then find the long parallel muscle fibers and cut across them. Shortening those fibers makes each bite easier to chew. At 2–3 mm (about ⅛ inch), the slices also cook quickly enough to stay supple while the marinade on the surface reduces and browns.

Thicker pieces behave more like small steaks and have a narrower window between browned outside and chewy inside. Paper-thin shabu or hot-pot beef goes the other way: it seasons and cooks much faster, so use shorter marinade and cooking times.

Need the knife step? Return to Step 2: Slice Across the Grain.

Build a Marinade That Seasons the Beef

Beef bulgogi marinade usually starts with soy sauce, sugar, garlic and sesame oil, often with mirin or rice wine. Onion and Asian pear add aroma, sweetness and tenderness. Beef and soy should still lead, with garlic, ginger and toasted sesame behind them. Mirin rounds out the salty-sweet balance.

If you want the marinade as a standalone sauce, the bulgogi sauce recipe covers scaling, storage and other uses.

Keep the Sweetness Behind the Beef

Brown sugar is only part of the sweetness here; pear, onion and mirin contribute too. The finished beef should still taste savory and beefy first.

Sugar also helps with browning, but concentrated sugary residue moves quickly from deep brown to bitter black once the pan dries out. A thick, sticky soy-sugar glaze is a different target; teriyaki sauce is designed to cling much more heavily.

Close-up skillet comparison with deep brown sticky residue labeled ‘Keep’ and black carbonized residue labeled ‘Wipe.’
Useful fond stays deep brown and tacky. By contrast, burnt sugary residue turns opaque black, dry and bitter.

Use regular brewed soy sauce here. Dark soy sauce and sweet soy sauce change the balance, while regular soy brands can still vary noticeably in saltiness. Taste the marinade before adding raw beef and adjust while you still can.

Asian Pear and Easy Substitutes

Asian pear contributes moisture, mild sweetness and gentle tenderizing, but the recipe does not depend on it. Replace the 100 g peeled Asian pear with the same weight of ripe regular pear or sweet apple, or leave the fruit out and keep the sugar unchanged.

Kiwi and fresh pineapple behave differently: their natural enzymes soften meat much more aggressively than pear does. If either is your only fruit option, omit the fruit for this recipe. A direct 1:1 substitution can leave very thin beef soft, ragged or mushy.

Asian pear, regular pear, apple and an empty bowl shown as bulgogi marinade options, with kiwi and fresh pineapple marked as unsuitable one-to-one substitutes.
Asian pear brings mild sweetness, moisture and gentle tenderizing power to bulgogi marinade. Ripe pear or sweet apple matches that role better than kiwi or fresh pineapple.

How Long Should Bulgogi Marinate?

For ribeye or top sirloin sliced 2–3 mm thick, 1–2 hours is the preferred everyday marinating time. Thirty minutes works when you’re short on time, while 2–4 hours is fine when that better fits your schedule.

An overnight marinade is generally unnecessary for tender ribeye or sirloin. Firmer cuts can tolerate more time, but longer is not automatically better.

Ready to cook? Jump to Step 5: Get the Skillet Properly Hot.

Why Bulgogi Goes Watery Instead of Brown

Bulgogi turns watery when too much cold, wet beef cools the skillet faster than its moisture can evaporate—usually because the pan is crowded, the beef carried in too much marinade, or the skillet was not hot enough.

Marinated beef already carries water from the meat itself, soy sauce, pear and onion. Once that moisture arrives faster than the pan can get rid of it, the skillet cools down.

You’ll often hear the change before you fully see it: the sharp sizzle fades into wetter bubbling, and the beef starts turning gray instead of catching brown spots.

Keep simmering and the puddle eventually disappears, but slices this thin may already be dry by then. Meanwhile, the concentrated sugar left behind is much closer to burning.

Side-by-side skillet comparison showing browned bulgogi with little liquid under ‘Searing’ and paler beef bubbling in liquid under ‘Steaming.’
The warning arrives before a deep puddle forms. Once a sharp sizzle turns into wet bubbling, the skillet has reached its moisture capacity.

What Browning Looks Like in the Pan

When the pan is working well, the beef keeps a sharp sizzle, some bare skillet stays visible and surface moisture disappears quickly. The coating tightens into a gloss as scattered edges begin to brown.

A hot skillet is only half the equation. It also needs enough open surface to handle the cold, wet beef you add.

Think of it as a capacity problem before it is a temperature problem. Doubling the recipe does not make your skillet larger or your burner more powerful.

If the Pan Is Already Flooded

If the pan is already flooded, dinner isn’t ruined. Lift the beef out with tongs, carefully pour off the excess liquid, then put the skillet back over the heat until it is hot again.

Finish the beef briefly in smaller portions. You may not recover exactly the same crust you would have had from the beginning, but this gives you a much better chance of adding some browning without drying every slice while a puddle boils away.

Metal tongs lifting pale partially cooked beef from a skillet filled with bubbling brown liquid beneath the words ‘Flooded pan? Lift the beef out.’
Removing the beef gives the skillet time to recover. At the same time, the thin slices avoid overcooking while excess marinade and juices boil away.

Still troubleshooting? See the full Bulgogi Troubleshooting table.

Caramelized Bulgogi and Juicy Bulgogi

A wet pan is only a problem when you were trying to make browned, relatively dry-pan bulgogi. Some Korean preparations intentionally cook the beef more gently with enough marinade to leave savory juices behind for the rice.

For that style, transfer some marinade into the skillet with the raw beef at the beginning and cook the meat and liquid together thoroughly. Marinade left in the bowl after touching raw beef should never be poured uncooked over the finished dish.

Both styles are legitimate; this recipe is aimed at the browned version with very little liquid left in the pan.

Two finished bulgogi preparations, one deeply caramelized with little liquid and the other softer with visible savory cooking juices.
The difference is intent. Juicier bulgogi cooks with flavorful liquid from the start; accidental steaming happens when a browning pan loses too much heat.

Bulgogi Troubleshooting

ProblemLikely CauseWhat to Do
Watery or gray beefToo much wet beef cooled the skillet.Remove excess liquid if needed, reheat the pan and finish in smaller batches.
First batch browned; next one did notThe skillet had not heated back up.Give the empty pan a short recovery period before adding more cold beef.
Black sticky residueSugary marinade residue burned.Wipe away black patches, add fresh oil if needed and ease the heat slightly.
Flat or bland flavorThe seasoning was diluted or the amount of beef increased.Keep the stated beef-to-marinade quantities and taste the marinade before the raw beef goes in.
Too sweetSugar plus very ripe fruit or sweet mirin pushed the balance too far.Reduce the added sugar next time instead of trying to correct sweetness with extra soy.
Too saltyThe soy sauce was especially salty or there was too much marinade for the amount of beef.Use regular brewed soy sauce and keep the beef and marinade quantities proportional.
Chewy beefGristle, thick slices, cutting with the grain or overcooking.Check the cut, then thickness, grain direction and cooking time.
Dry beefThin slices stayed over the heat too long.Pull the beef sooner, especially when using a leaner cut or grill.
Mushy beefA strongly tenderizing fruit or excessive marinating time broke the meat down too far.Avoid direct kiwi or pineapple substitution and shorten exposure to strong fruit tenderizers.
Vegetables make everything wetThey released more water than the pan could evaporate.Cook larger amounts of vegetables separately and combine at the end.

For chewy beef, diagnose in this order: gristle → thickness → grain direction → cooking time. An overnight soak cannot make a thick connective seam tender.

Other Ways to Cook Bulgogi

Grill: released moisture can drain away, which helps with smoky browned edges. Because the slices are thin, use a grill topper with small openings or a grill basket and cook them quickly.

Thin slices of marinated bulgogi cooking in a metal grill basket over glowing coals while tongs turn the beef.
A grill basket changes the handling, not the cut. Keep grilled bulgogi just as thin, and watch the edges because direct heat browns them quickly.

Broiler: spread well-drained beef in a single layer on a broiler-safe pan and watch it closely from an upper rack. Oven intensity varies, so use browning rather than the skillet timing as your guide.

Change It Without Losing What Matters

More heat. Add 1–2 tsp gochugaru for mild-to-moderate chile heat. If you want gochujang to be a major flavor, you’ll also need to adjust the salt and sweetness; a large spoonful changes more than the heat.

More vegetables. Cook larger amounts of mushrooms, carrots or onion separately, let the skillet heat back up, then return them for the final 30–60 seconds after the beef is cooked.

Make Bulgogi a Meal

For the easiest dinner, serve bulgogi with hot steamed rice and kimchi. That’s enough. Lettuce or perilla leaves, ssamjang (Korean dipping paste), cucumber and other Korean side dishes (banchan) can turn it into a fuller Korean BBQ-style spread. If you want a rice refresher, the guide to how to cook rice covers stovetop and other common methods.

Thin browned bulgogi ribbons being lowered with metal chopsticks onto a blue bowl of steaming white rice, with kimchi blurred in the background.
For bulgogi over rice, serve both while hot. The warm grains catch the concentrated soy, garlic and sesame juices before the beef cools and tightens.

For lettuce wraps, set out lettuce or perilla/kkaennip leaves, rice, ssamjang, sliced garlic, kimchi and any other banchan you are serving. A little rice, one or two pieces of beef and a small dab of ssamjang make a compact bite that is easier to eat than an overloaded leaf.

A hand holds an open lettuce and perilla wrap filled with a small amount of rice, bulgogi, ssamjang and a thin slice of garlic.
Build a bulgogi ssam in the center of the leaf. Then leave a generous green border so the wrap folds closed instead of spilling.

For a rice bowl, add sliced cucumber, kimchi and scallions over warm rice, then pile the bulgogi on top. A fried egg is optional. Something cool and sharp works especially well beside the sweet-savory beef; this cucumber salad adds crunch and several vinegar-based options.

Or simply put the beef, rice, kimchi and lettuce on the table and let everyone build the bites they want. Once the beef is cooked, dinner does not need much ceremony.

Make Ahead, Freeze & Reheat

Make ahead: marinating earlier the same day is plenty for tender, thinly sliced beef. There is little advantage in leaving good ribeye in a fruit-based marinade for several days.

Freeze: for longer planning, freeze the sliced marinated beef instead of extending refrigerator marination indefinitely. Thaw it safely in the refrigerator before cooking.

Store cooked bulgogi: cool leftovers promptly, refrigerate in a covered container and use within about 3–4 days, consistent with general USDA leftovers guidance.

Reheat: reheat gently in a skillet just until hot throughout; USDA guidance for reheated leftovers uses 165°F / 74°C. Avoid trying to create a second hard sear.

Leftover bulgogi is also excellent folded into fried rice. Even a small amount carries enough garlic, soy and sesame to make tomorrow’s rice feel like a new dinner instead of a reheated copy of the first one.