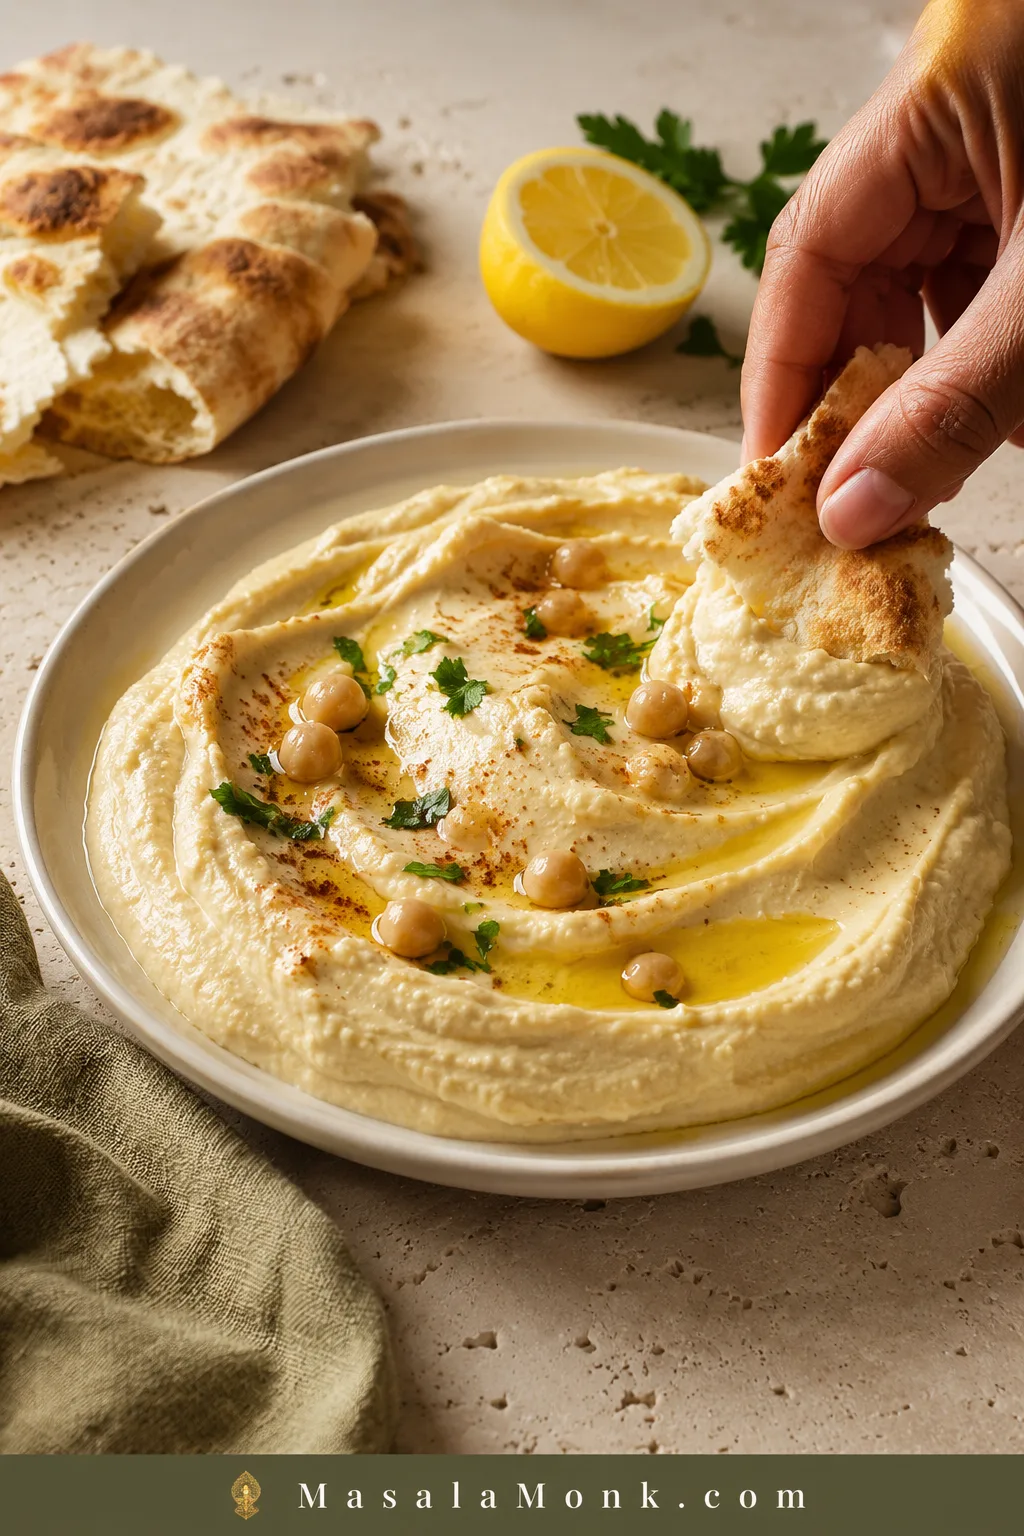
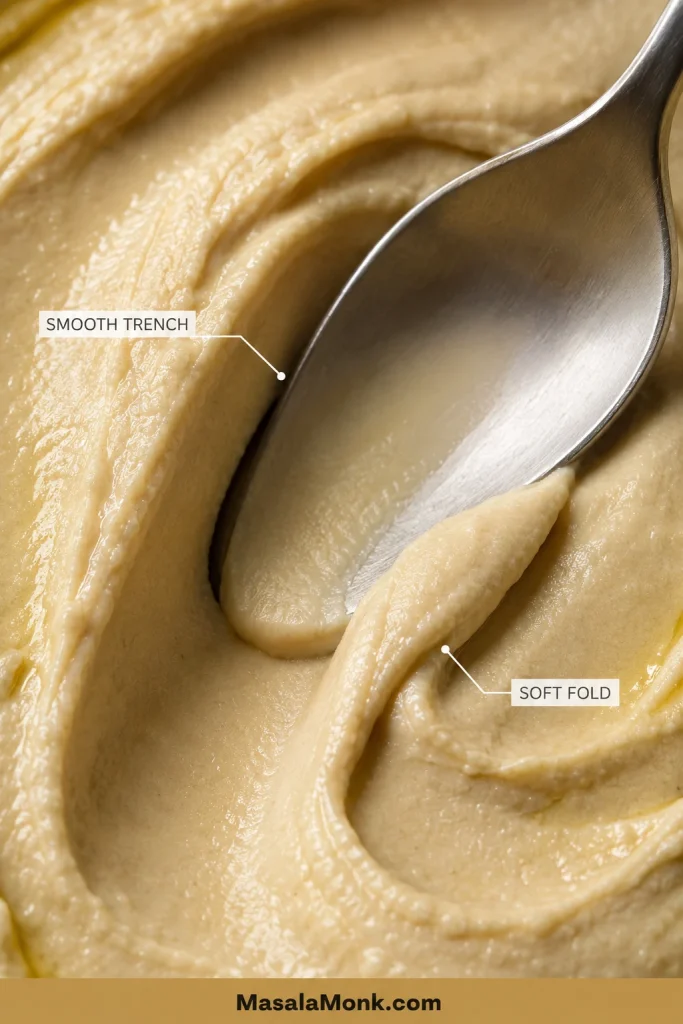
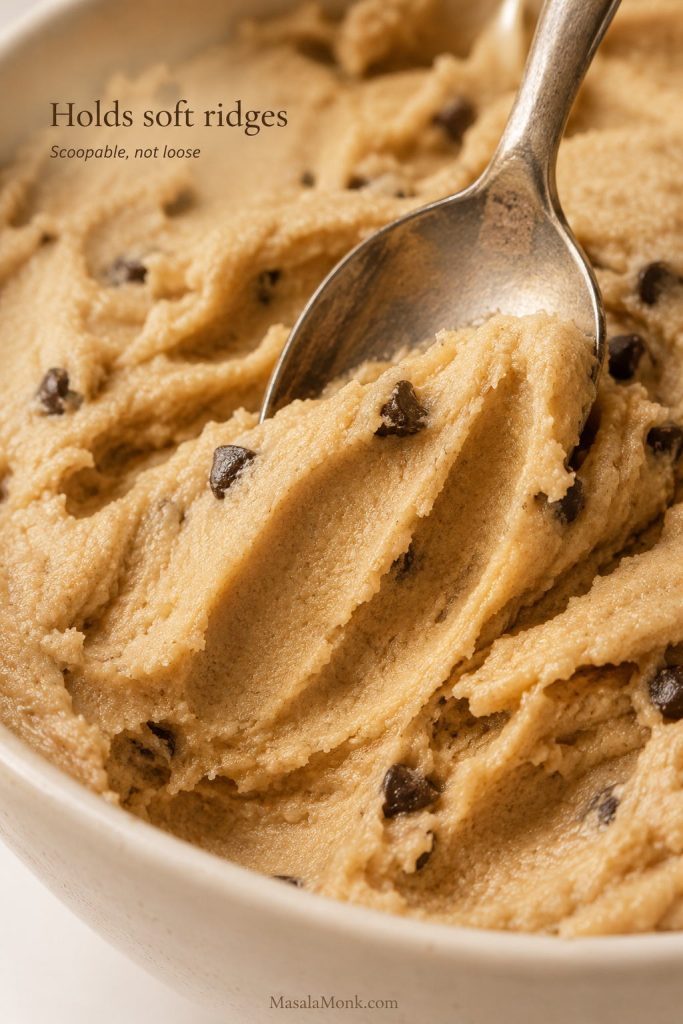
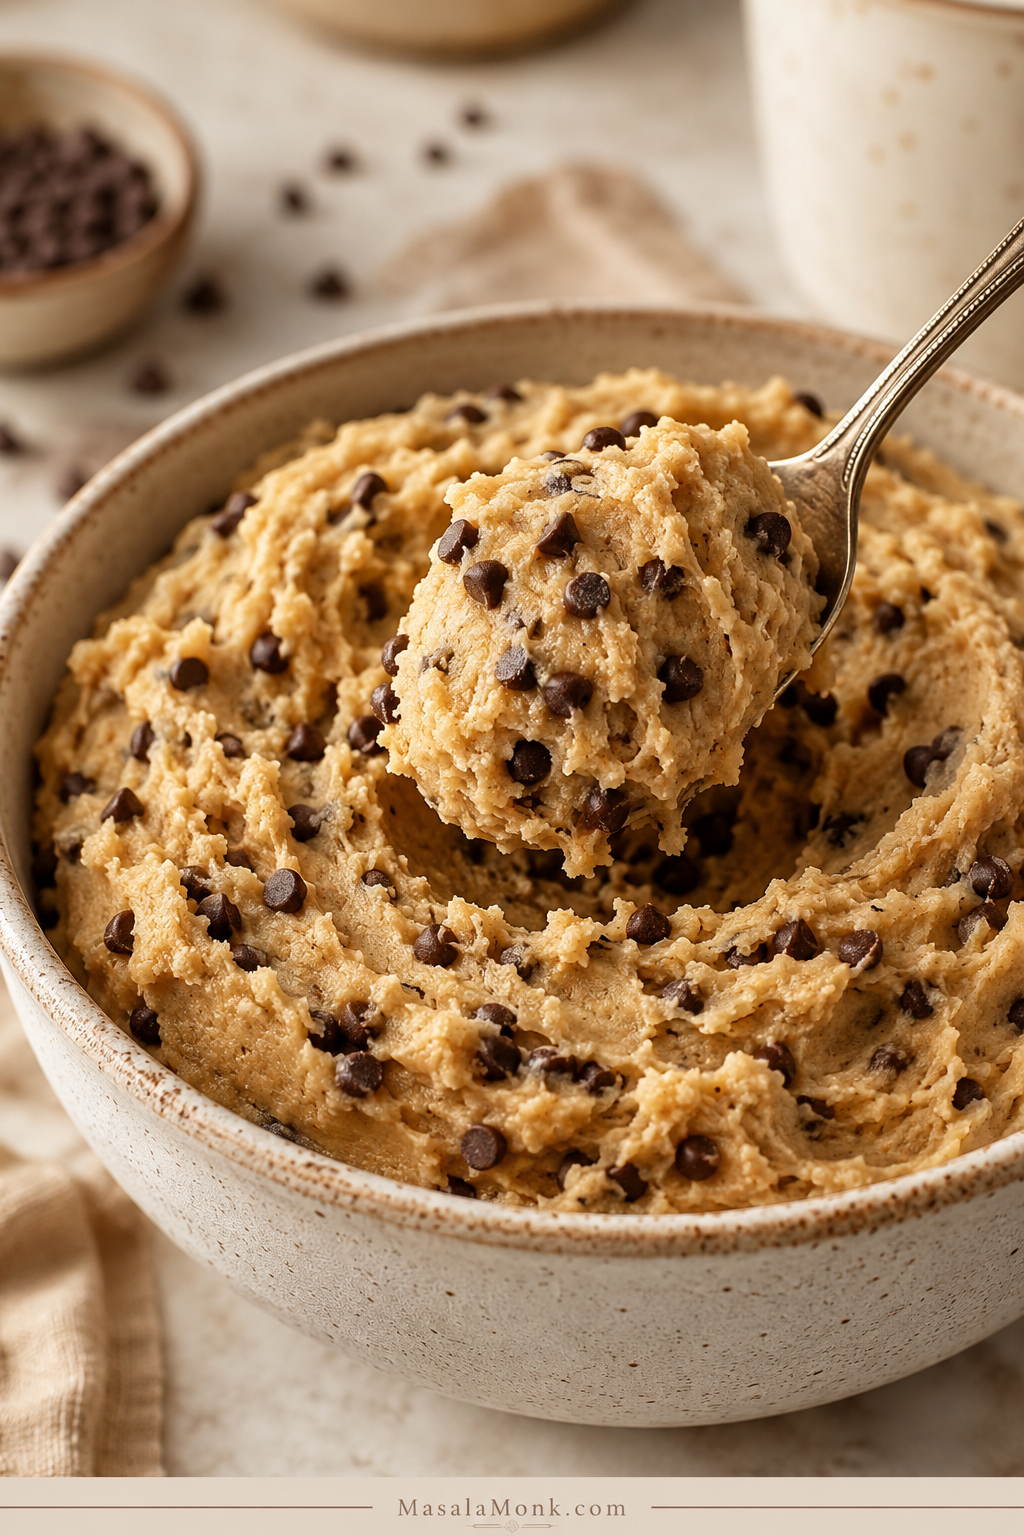
A good bowl of hummus without tahini should still feel generous. The spoon should leave a smooth trench, the surface should fold back softly, and the first bite should taste bright with lemon and garlic—not dry, sandy or strangely oily.
A smooth spoon trail should hold for a moment, then relax at the edges. Cracks mean too stiff; an instantly vanishing trail means looser hummus.
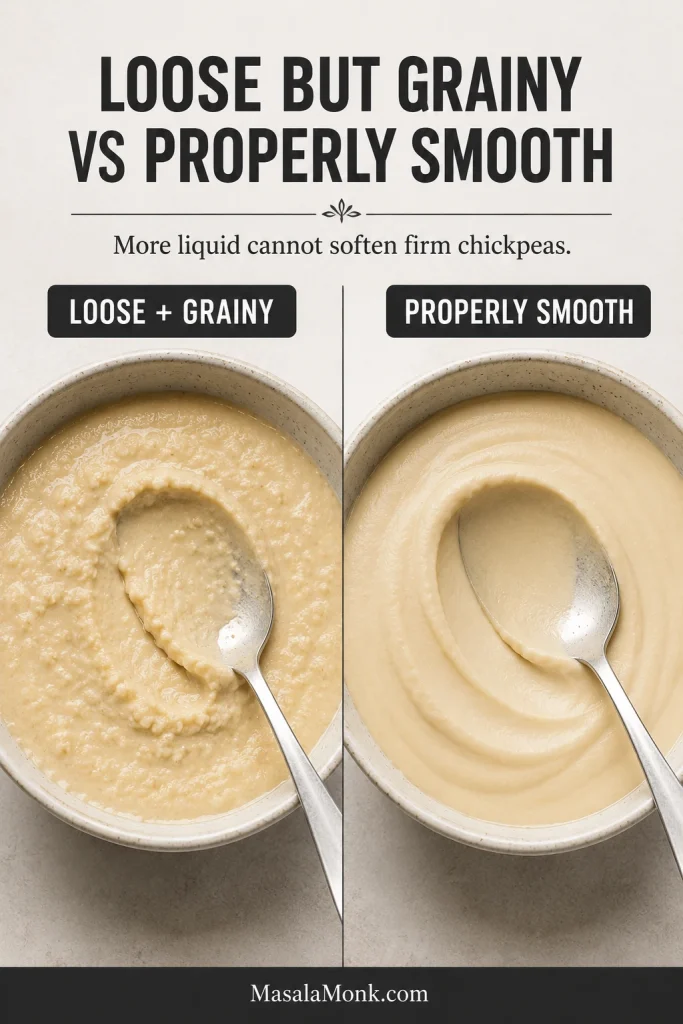
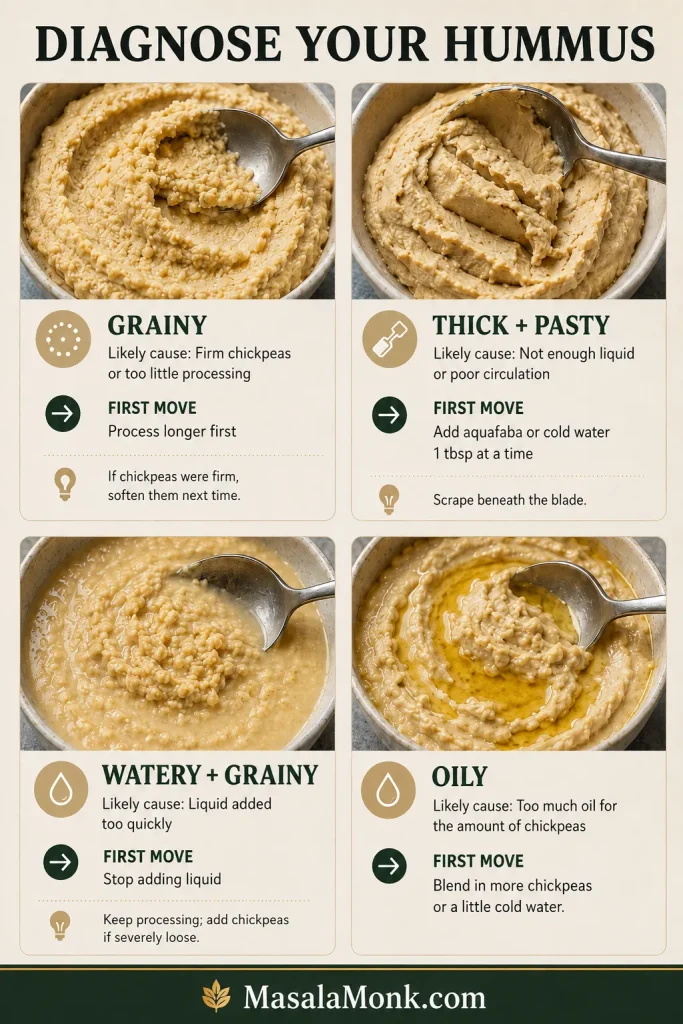
If your last tahini-free batch turned loose but somehow stayed grainy, adding more water was probably never going to fix it. Smoothness starts with the chickpeas themselves.
Tahini normally brings toasted sesame flavor, richness and body. Leave it out without adjusting the method and the chickpeas can become a heavy paste that never quite turns creamy. Fortunately, you do not need peanut butter, yogurt, seed butter or another specialty substitute to make the recipe work.
This homemade version is for days when the tahini jar is empty, tahini is difficult or expensive to find, you dislike its flavor or you need a dip made without sesame ingredients. It tastes lighter and more chickpea-forward than classic hummus, with the lemon and garlic coming through more clearly.
The MasalaMonk rule: softness decides whether the chickpeas can become creamy; liquid decides whether that creamy hummus ends up thick, spoonable or loose.
If you came here looking for a tahini substitute, the simplest answer may be the best one: you do not need one.
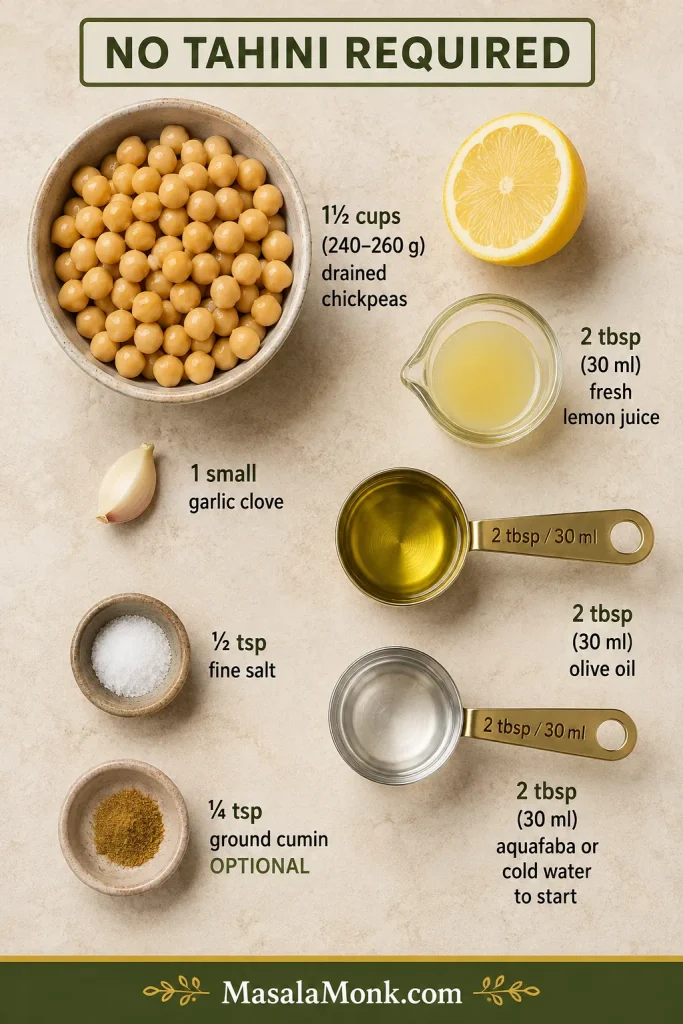
For one standard can, blend about 1½ cups (240–260 g) drained chickpeas with 2 tablespoons (30 ml) fresh lemon juice, 1 small garlic clove, ½ teaspoon fine salt, 2 tablespoons (30 ml) olive oil and 2 tablespoons (30 ml) reserved chickpea liquid or cold water.
Use the measured ingredients as the starting point, then adjust only the liquid. The chickpeas need to become smooth before you decide the final thickness.
Process for several minutes, stopping to scrape underneath the blade. Add more liquid only 1 tablespoon (15 ml) at a time. If a chickpea does not flatten easily between your fingers, simmer the drained chickpeas in fresh water before blending.
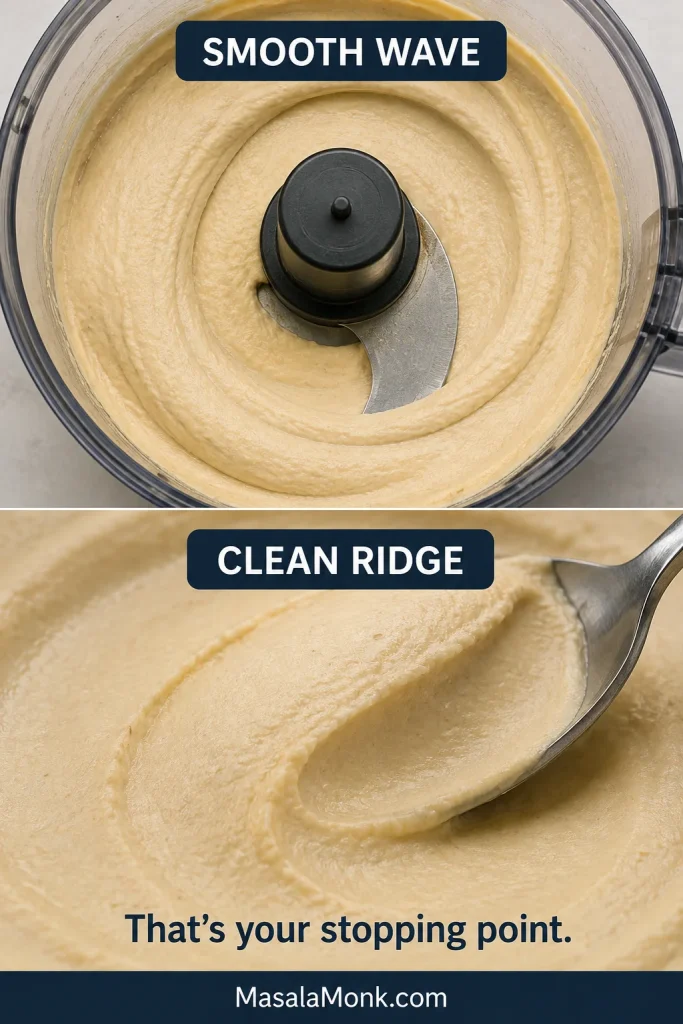
The hummus is ready when the mixture follows the blade in a soft wave and a spoon leaves a smooth ridge rather than a cracked or sandy trail.
Hummus Recipe Without Tahini
This base contains no tahini, sesame seeds or sesame oil. Chickpeas provide the body, olive oil adds restrained richness, and aquafaba or cold water lets you choose the final thickness.
Recipe at a glance
Yield: about 1½ cups, depending on the final consistency
Serves: 4–6 as a dip or spread
Preparation: about 10 minutes
Cooking: none when the canned chickpeas are already soft
Total time: about 10 minutes, or roughly 15–30 minutes when the chickpeas need softening
Dietary notes: vegan; no tahini, sesame ingredients, dairy, peanuts or tree nuts are used in the base recipe. No gluten-containing ingredients are added, but check packaged ingredients when needed.
Equipment
A food processor is the easiest option for a thick, controlled texture. A full-size blender, personal blender, Indian mixer-grinder or stick blender can also work with a few adjustments.
Ingredients
Chickpeas: 1 can, 14–15 oz (400–425 g) before draining, usually yielding about 8½–9 oz (240–260 g), or roughly 1½ cups
Fresh lemon juice: 2 tablespoons (30 ml)
Garlic: 1 small clove, about 2–3 g after peeling; use ½ clove for a milder version
Fine salt: ½ teaspoon, about 2½–3 g depending on the salt, plus more after tasting
Ground cumin: ¼ teaspoon, optional
Extra-virgin olive oil: 2 tablespoons (30 ml)
Reserved chickpea liquid or cold water: start with 2 tablespoons (30 ml), then add up to 3 tablespoons (45 ml) more as needed
Optional for serving: a small drizzle of olive oil, paprika or sumac, chopped parsley, whole chickpeas, chili flakes or finely chopped herbs.
Instructions
Build the hummus base
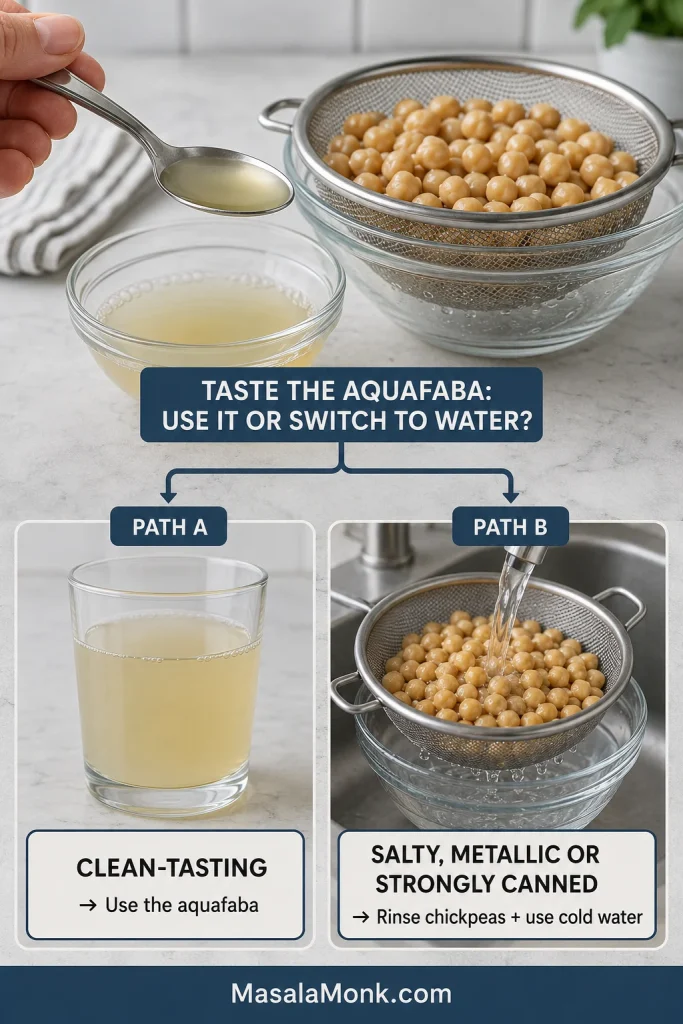
Reserve and taste the chickpea liquid. Drain the chickpeas over a bowl, keeping at least ½ cup of the liquid. Taste a drop. If it tastes very salty, metallic or strongly canned, rinse the drained chickpeas briefly and use cold water for blending instead.
Taste the aquafaba before using it. If it is very salty, metallic or strongly canned, rinse the chickpeas and blend with cold water instead.
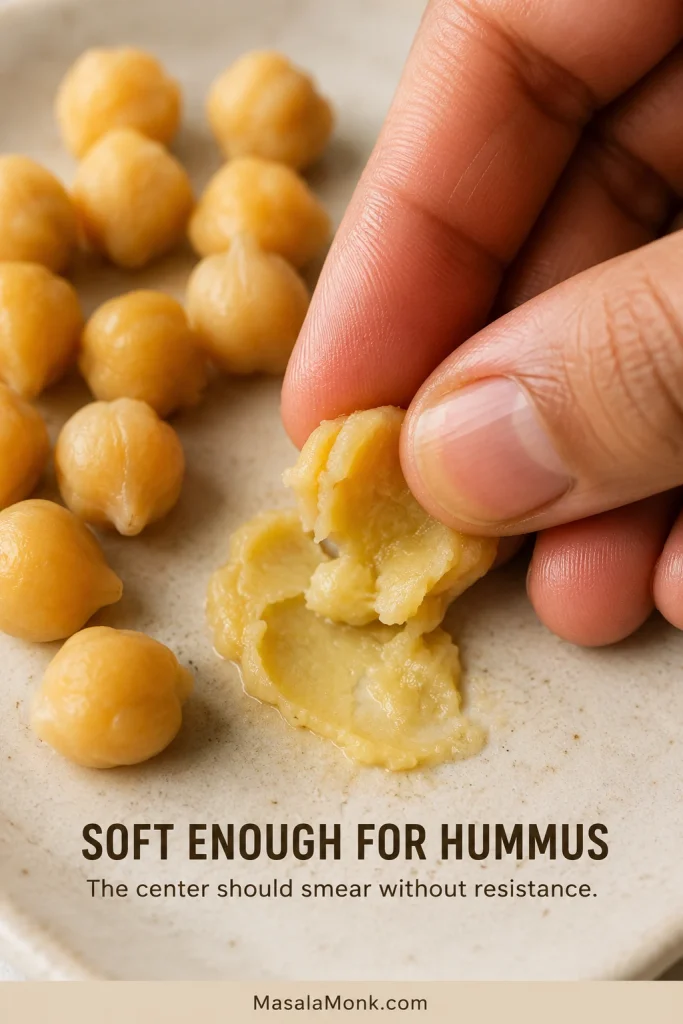
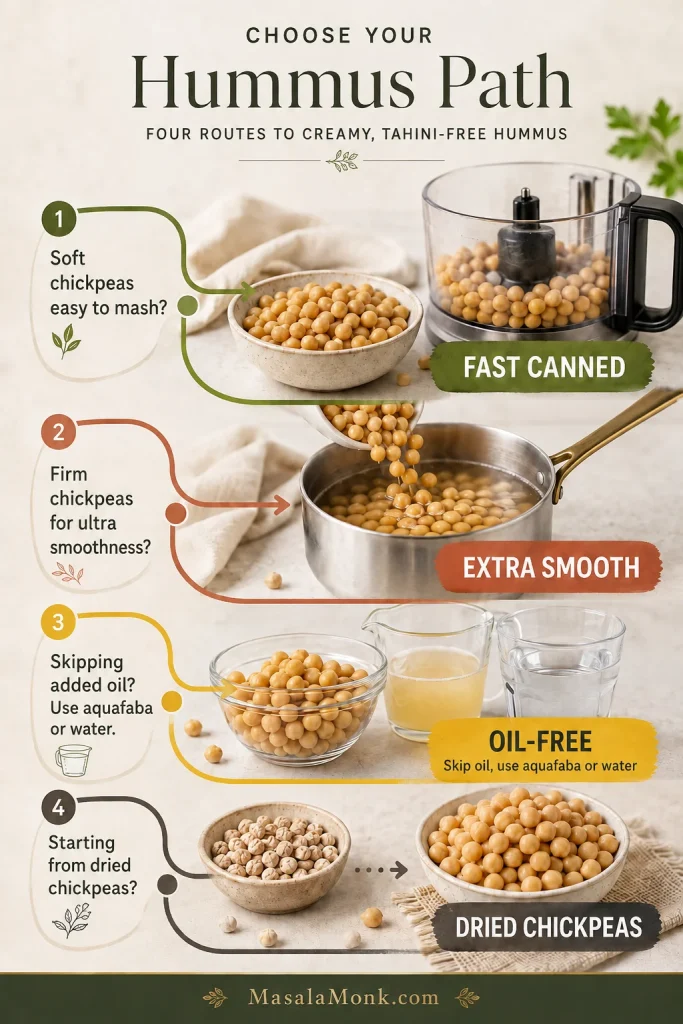
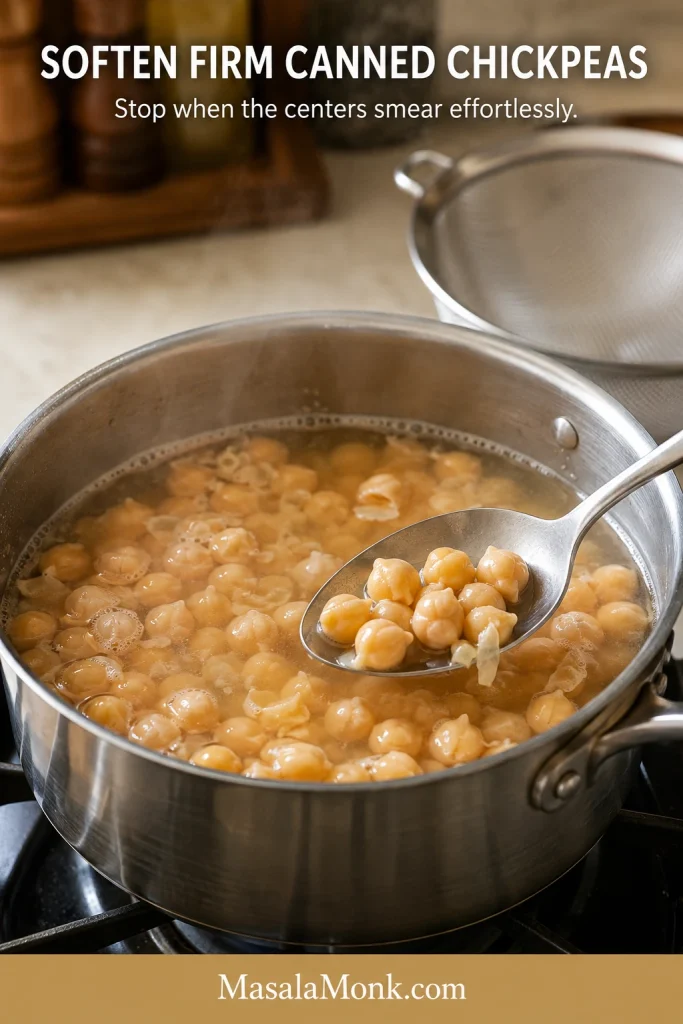
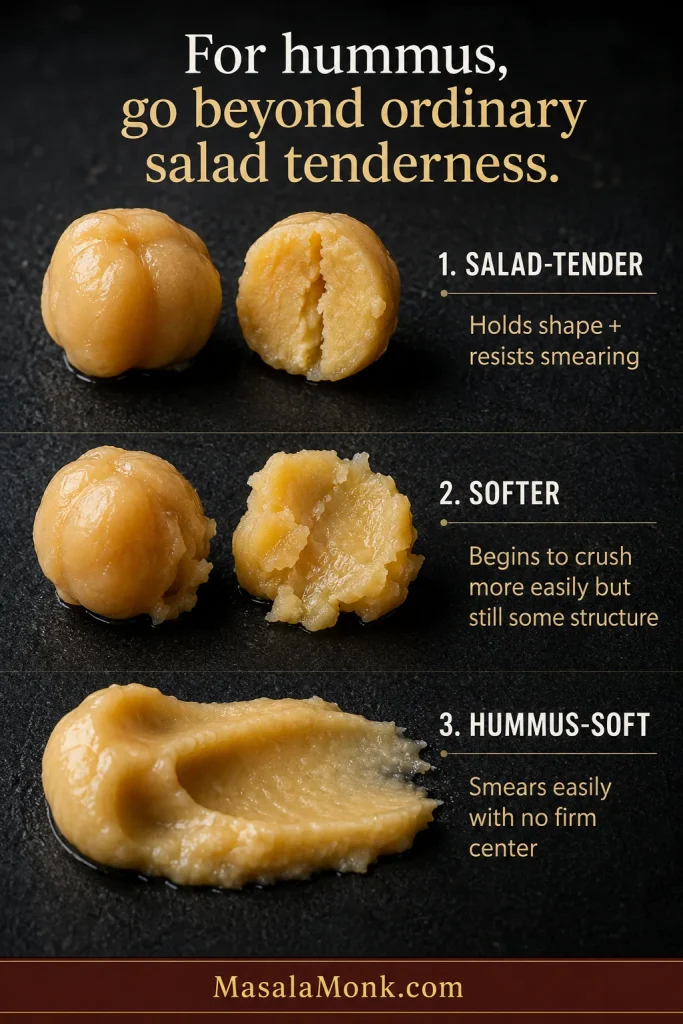
Check the chickpeas. Press one between your fingers. It should flatten easily through the center. If it feels springy, firm or chalky, soften the batch using the simmering method later in the guide.
Press the chickpea through the center. If it smears easily, it is soft enough; a firm or chalky core will stay gritty in the hummus.
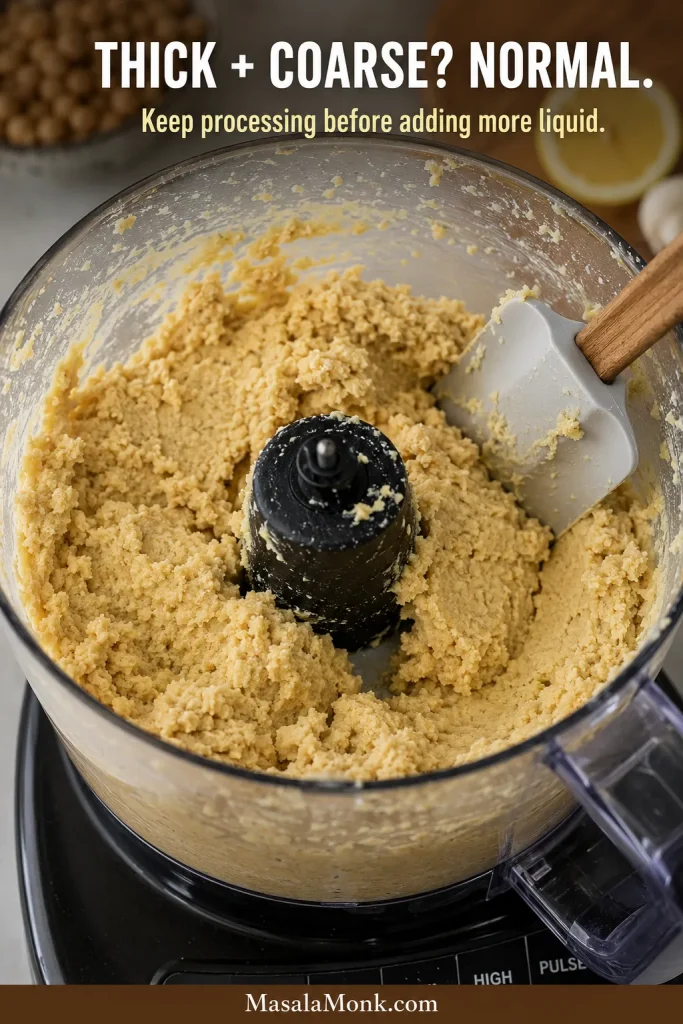
Start the paste. Add the chickpeas, lemon juice, garlic, salt and optional cumin to a food processor. Process for 45–60 seconds, then scrape the sides, bottom and area beneath the blade. It may look alarmingly thick and coarse at this point; do not fix it yet. Give the chickpeas more time in the processor first.
That thick, coarse first stage is normal. If each scrape-and-process cycle makes the paste finer, keep going before adding anything else.
Add the olive oil. Run the processor and pour in the oil gradually. Process for another 45–60 seconds, then stop and scrape again.
Loosen, smooth and finish
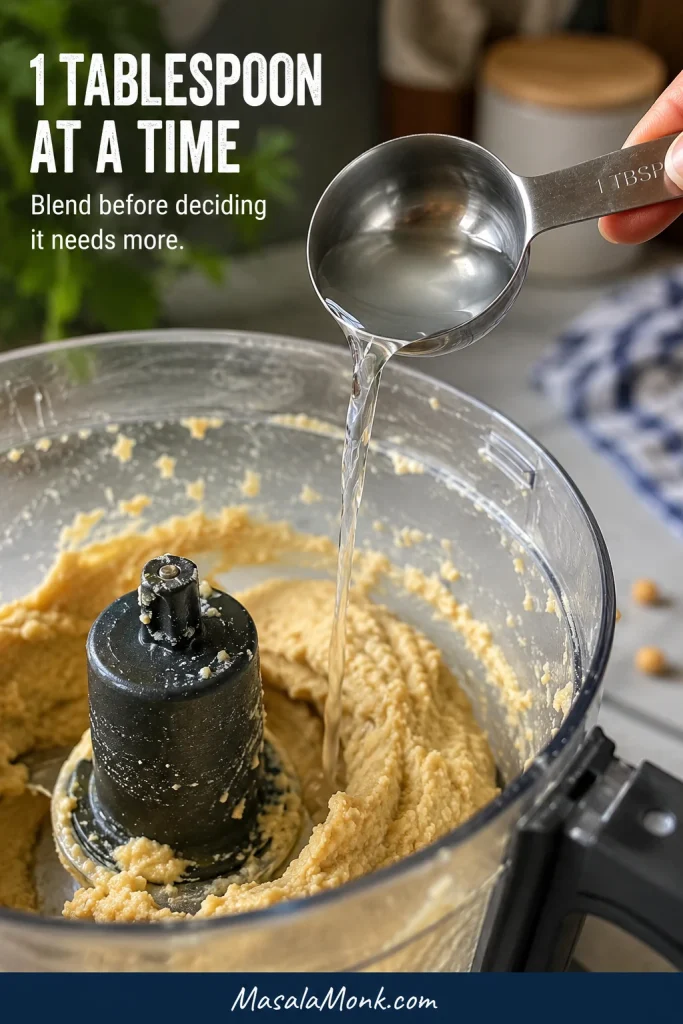
Loosen it slowly. Add 2 tablespoons (30 ml) aquafaba or cold water. Process for 30–45 seconds before deciding whether it needs more. Continue 1 tablespoon (15 ml) at a time.
Add one tablespoon, process, then look again. Hummus often loosens after a short run, so slow additions keep you from overshooting.
Watch the movement. Keep processing until the visible graininess disappears and the hummus follows the blade in a smooth wave. Most food-processor batches need about 3–5 minutes in total, including pauses for scraping.
Once the graininess is gone, stop judging smoothness and start judging use: firmer for toast, a little looser for dipping.
Taste and serve. Make the final salt, lemon and texture adjustment, then serve immediately. If time allows, let the hummus rest for 5–10 minutes and taste once more before serving; the garlic and acidity become easier to judge after a short rest. Taste it with the bread, vegetables or crackers you plan to serve, because the right thickness is easier to judge in context than from the spoon alone.
Blender and personal-blender adjustments
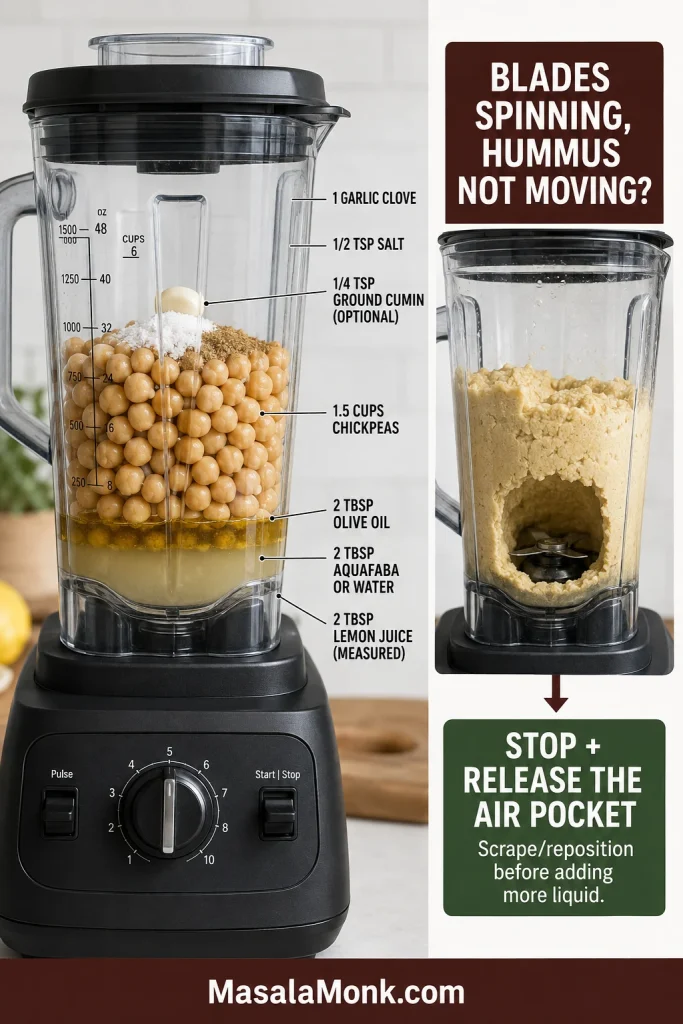
Place the lemon juice, olive oil and first 2 tablespoons of aquafaba or water near the blades, then add the chickpeas and seasonings. Stop and release trapped air before adding more liquid. Let simmered chickpeas cool before placing them in a sealed personal-blender cup, and never blend hot ingredients in a sealed container unless the manufacturer specifically says it is safe.
If the blades spin but the hummus sits still, release the trapped air pocket before adding more water. The problem may be circulation, not dryness.
Recipe notes
Hold back the remaining liquid until the first 2 tablespoons have been fully incorporated. A thick mixture is much easier to loosen than an over-thinned one is to repair.
Cumin is optional. Leaving it out changes the flavor, not the texture.
A strongly peppery olive oil can taste bitter after prolonged high-speed blending. Use a milder oil in the mixture and save the stronger one for serving.
Tahini-Free and Sesame-Free Are Different Promises
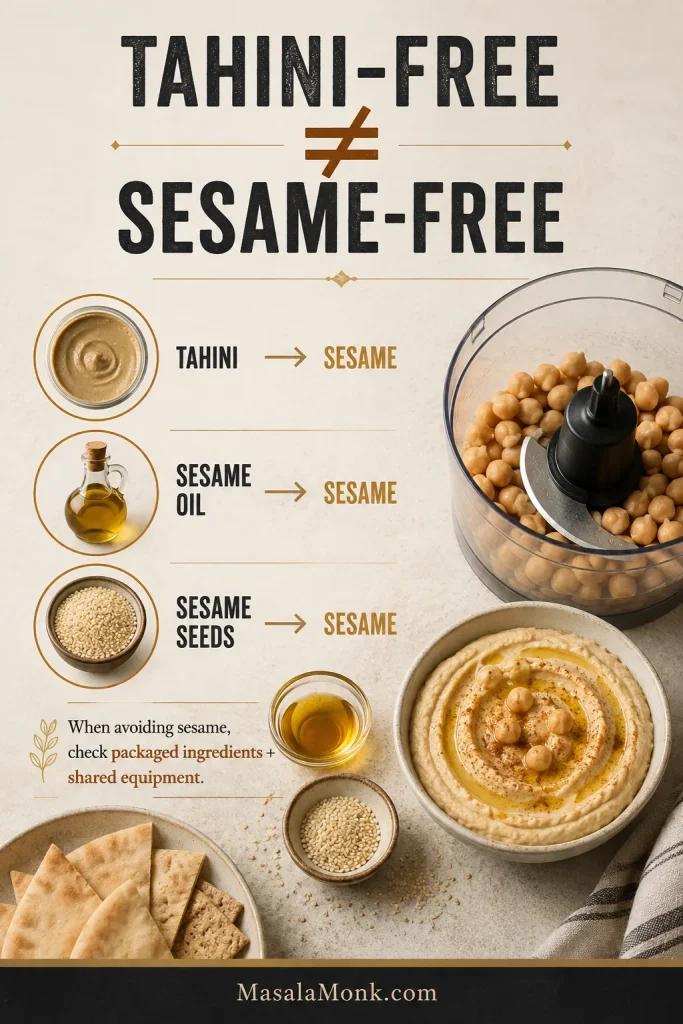
Tahini is made from sesame seeds. A recipe can leave out the prepared paste while still using sesame oil or whole sesame seeds. That recipe may be tahini-free, but it still contains sesame.
The base recipe here contains no tahini, sesame seeds or sesame oil. It also avoids yogurt, peanut butter, tree-nut butter and sunflower butter, so skipping tahini does not automatically introduce another ingredient you may also need to avoid.
Tahini-free does not automatically mean sesame-free. Bread, seasonings, packaged foods and shared equipment can still introduce sesame.
Classic hummus commonly contains tahini, so do not assume restaurant or packaged hummus is free from sesame ingredients unless you have verified it.
Why the Recipe Works
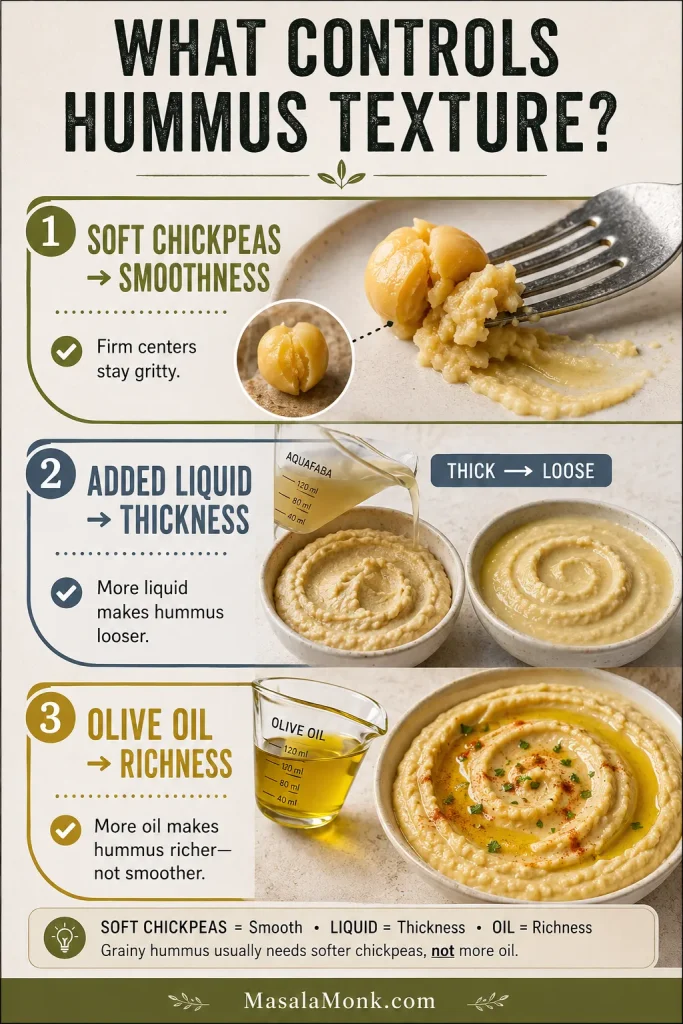
Three qualities that often get lumped together are different: soft chickpeas create smoothness, added liquid controls thickness, and olive oil adds richness. Once those jobs are clear, the recipe becomes much easier to adjust.
Think in three separate controls: chickpea softness for smoothness, liquid for thickness, olive oil for richness.
Soft chickpeas make a smoother paste
A soft chickpea collapses under the blade. A firm one breaks into tiny gritty pieces. That is why hummus can become increasingly watery while stubbornly remaining grainy.
If the chickpeas are still firm, more liquid simply makes those gritty pieces easier to move around.
Thin and grainy is still grainy. Fix the texture problem first instead of trying to wash firm chickpea particles away with more liquid.
Aquafaba helps the mixture move
Aquafaba is the liquid from canned or home-cooked chickpeas. It helps a dense chickpea paste circulate around the blade while contributing some chickpea body of its own. Firm centers still need softening.
Cold water works too, and it can be the better choice when canned aquafaba tastes overly salty, metallic or strongly canned.
Olive oil makes the hummus richer
Olive oil carries the garlic and cumin and gives the hummus a rounder mouthfeel. More oil will make it richer, but it will not smooth firm chickpea centers.
How the flavors should land
The finished hummus should taste of chickpeas first, followed by lemon and garlic. Salt brings those flavors into focus, while cumin adds optional warmth rather than taking over.
Fresh lemon juice gives the cleanest flavor. Bottled juice can work in a pinch, but it may taste flatter or more sharply acidic, so add it gradually.
Let this version be its own thing: a bright, smooth chickpea dip rather than an imitation of tahini hummus.
The Extra-Smooth Canned-Chickpea Method
Peeling every chickpea can refine the finish, but it turns an easy recipe into a fiddly project. Softening the whole batch usually makes a larger difference for much less effort.
You do not need to peel every chickpea. What matters is getting the centers soft enough to smear easily before blending.
Plain-water softening
Place the drained chickpeas in a small saucepan and cover them with fresh water.
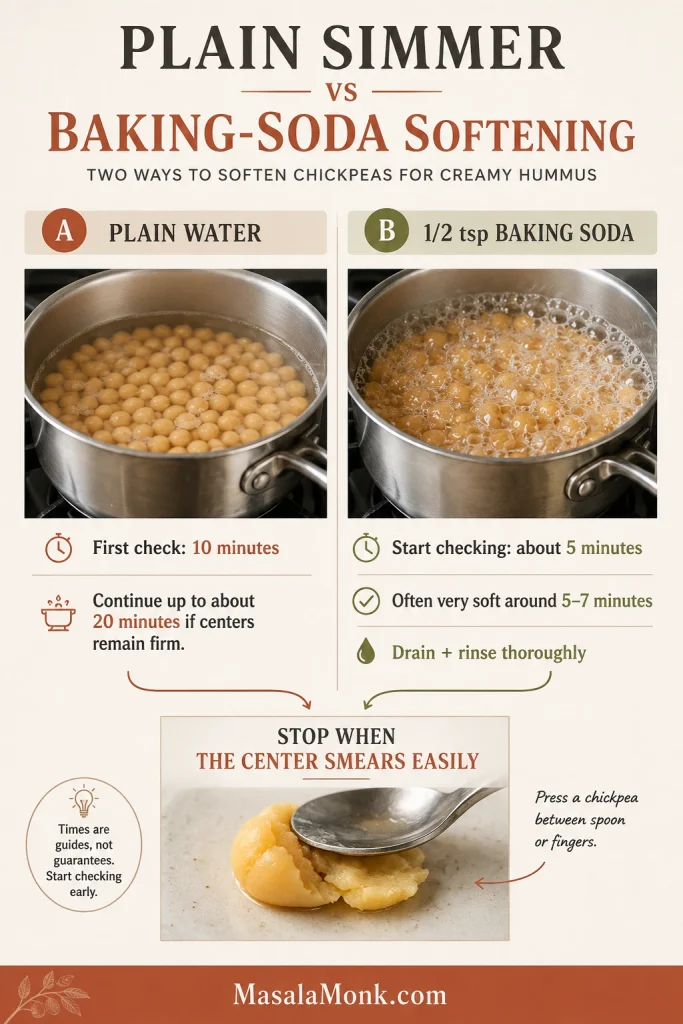
Bring to a steady simmer. Without baking soda, check after 10 minutes and continue for up to about 20 minutes if the centers still feel firm.
Stop when the chickpeas look swollen and smear immediately between your fingers, with no firm center.
Drain thoroughly. If a few skins float free, remove them. There is no need to turn dinner into a chickpea-peeling project.
Process the chickpeas while they are warm in a food processor or suitable vented blender. Cool them before using a sealed personal-blender cup.
Faster baking-soda softening
For roughly 1½ cups drained chickpeas, simmer them in fresh water with ½ teaspoon baking soda and start checking at about 5 minutes. Around 5–7 minutes is often enough to make canned chickpeas very soft; once the centers smear effortlessly, drain and rinse them thoroughly before blending. Longer cooking can make the chickpeas begin to break apart, which is unnecessary once they are already soft enough for hummus.
Plain water is slower; baking soda speeds things up. In either case, stop when the centers smear easily—and rinse a baking-soda batch well.
When the chickpeas already crush effortlessly, skip the extra simmer. This step earns its place only when the beans need help.
Properly softened chickpeas let the spoon glide through the hummus instead of dragging across a cracked, grainy surface.
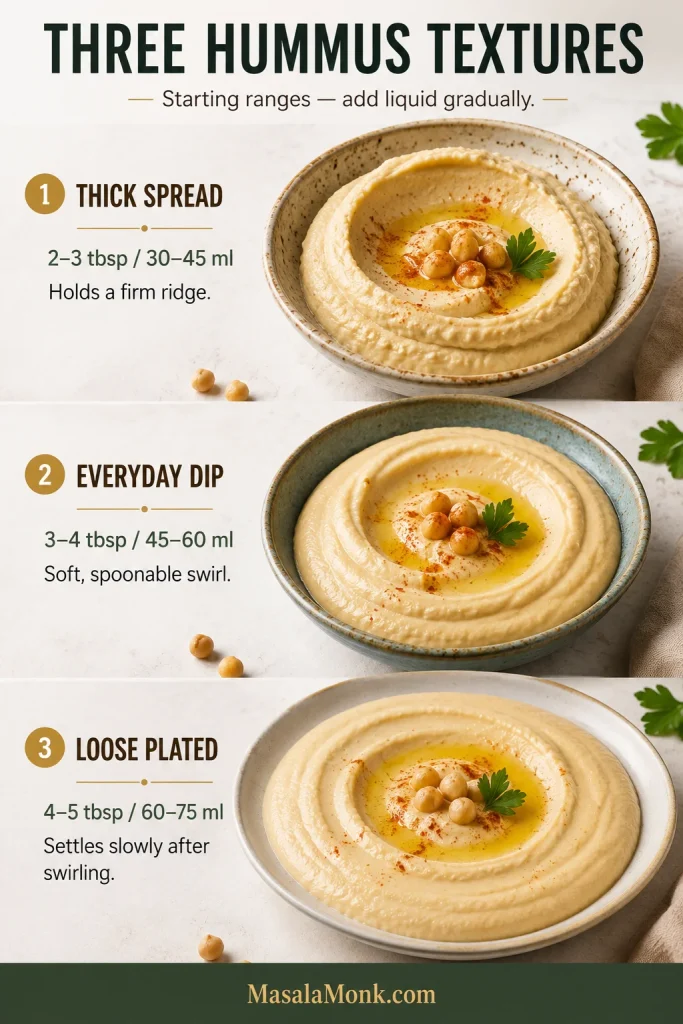
The right consistency depends on how you plan to eat it. A wrap needs firmer hummus than a mezze plate, and neither version is wrong.
Finish
Typical total added liquid
Best use and visual cue
Thick spread
About 2–3 tablespoons (30–45 ml)
Holds a firm ridge for sandwiches, wraps and toast
Everyday dip
About 3–4 tablespoons (45–60 ml)
Holds a soft swirl while letting pita pass through easily
Loose plated hummus
About 4–5 tablespoons (60–75 ml)
Settles slowly after swirling for falafel plates and grain bowls
One smooth batch can finish three ways: thick for sandwiches, medium for dipping, or looser for plating.
These are starting ranges for the total aquafaba or water added to the batch. Warm chickpeas may need less; a narrow blender may need slightly more before the mixture begins circulating.
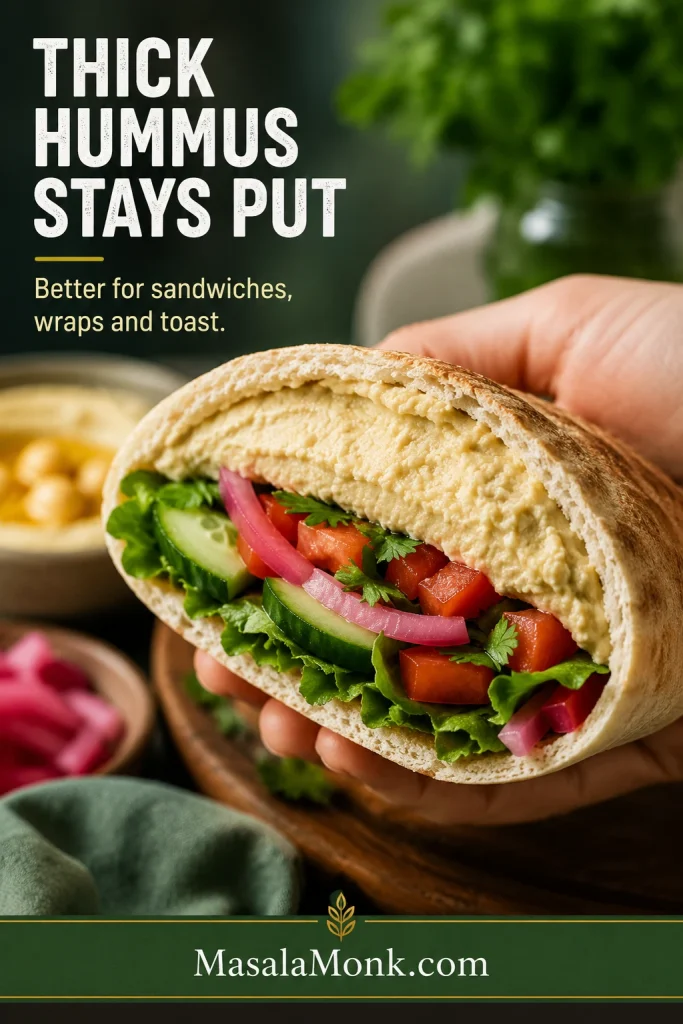
If tonight’s hummus is going into a sandwich, stop while it still holds a firm ridge. A loose restaurant-style swirl is useful only when that is the texture you want.
For sandwiches and wraps, thicker hummus is useful: it clings to the bread and is less likely to squeeze out with the filling.
For dipping, aim for the middle texture and serve it with warm wedges from this homemade pita bread recipe. The hummus should yield easily without running off the bread.
Garlic: Mild to Bold
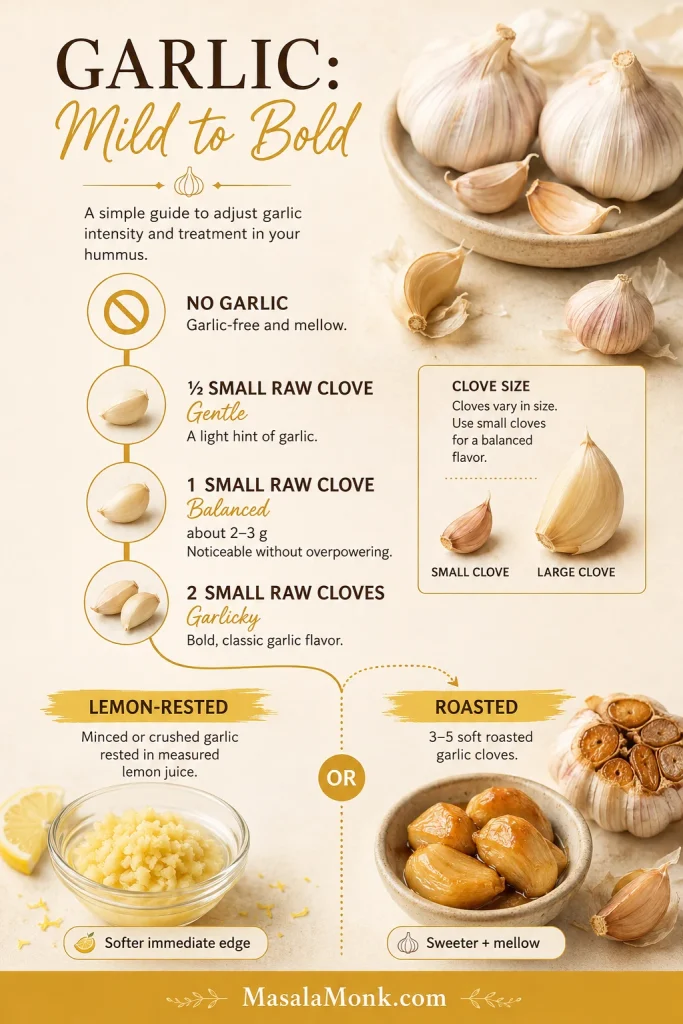
Garlic stands out more clearly when tahini is absent. A large raw clove can become sharp, especially after the hummus has rested overnight.
One clove is a surprisingly loose measurement: a tiny clove and a large one can produce completely different results.
Style
Amount per standard can
How it tastes
No garlic
None
Clean, lemony and chickpea-forward
Gentle
½ small clove
Mild, with very little raw-garlic bite
Balanced
1 small clove, about 2–3 g
Clear garlic flavor without excessive burn
Garlicky
2 small cloves
Bold raw-garlic hummus
Lemon-mellowed
1–2 cloves rested in the measured lemon juice for 10 minutes
Raw garlic flavor with a softer immediate edge
Roasted
3–5 soft roasted cloves
Sweet, mellow and deeper
Raw garlic is sharpest, a lemon rest softens the edge, and roasting turns it sweeter and rounder.
When preparing the hummus ahead, choose one level gentler than you think you need. Garlic preparation changes its strength, too: our garlic aioli guide compares grated, pressed, minced and roasted garlic and explains how a short lemon rest softens its bite.
Food Processor, Blender or Mixer-Grinder?
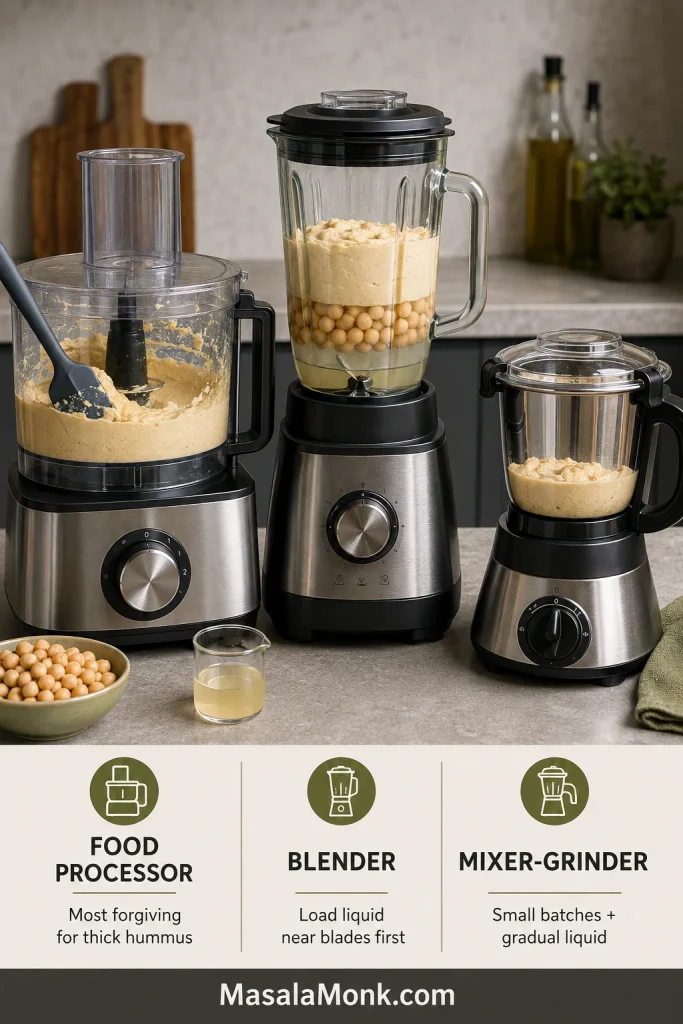
Every machine needs enough movement to smooth the chickpeas without forcing you to pour in unnecessary liquid. The loading order, batch size and amount of scraping are what change.
The recipe stays the same, but the machine changes the technique. Blenders need better circulation; food processors tolerate thicker mixtures.
How each machine behaves
Food processor: the most forgiving choice for thick hummus. Start with the chickpeas and flavorings, then add the oil and liquid gradually. Scrape beneath the blade when dense paste gathers there.
Full-size blender: put the lemon, oil and starting liquid near the blades first. When a hollow pocket forms, stop and release the trapped air before deciding it needs more water.
Personal blender: place liquid nearest the blade and make half a batch when the cup is narrow. Use short runs, redistribute the mixture and never seal hot ingredients inside.
Stick blender: use very soft chickpeas in a tall, narrow vessel and move the blender around the container rather than holding it in one place.
Fork or masher: warm chickpeas can become a satisfying rustic spread, but the texture will stay coarser than machine-blended hummus.
Indian mixer-grinder technique
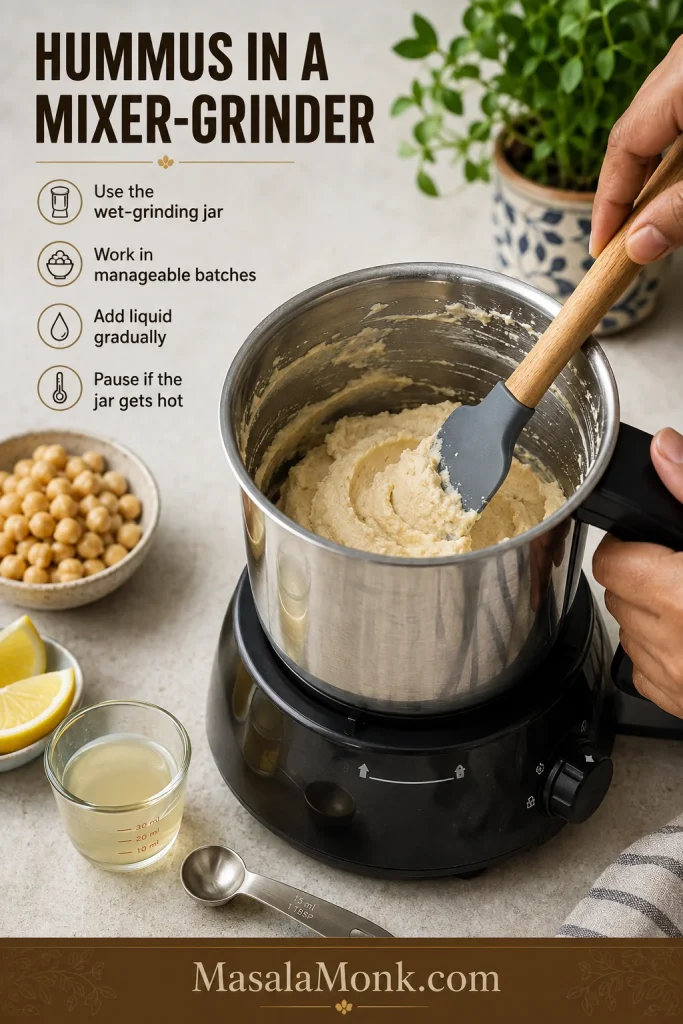
Use a wet-grinding jar and work in manageable batches. Pulse first, add liquid gradually and pause when the jar becomes hot.
With an Indian mixer-grinder, smaller batches and short pauses help the hummus move without heating the jar or forcing in too much liquid.
A powerful blender may finish much faster than a food processor. Once the hummus is smooth, there is no benefit in running the motor simply to match a written time.
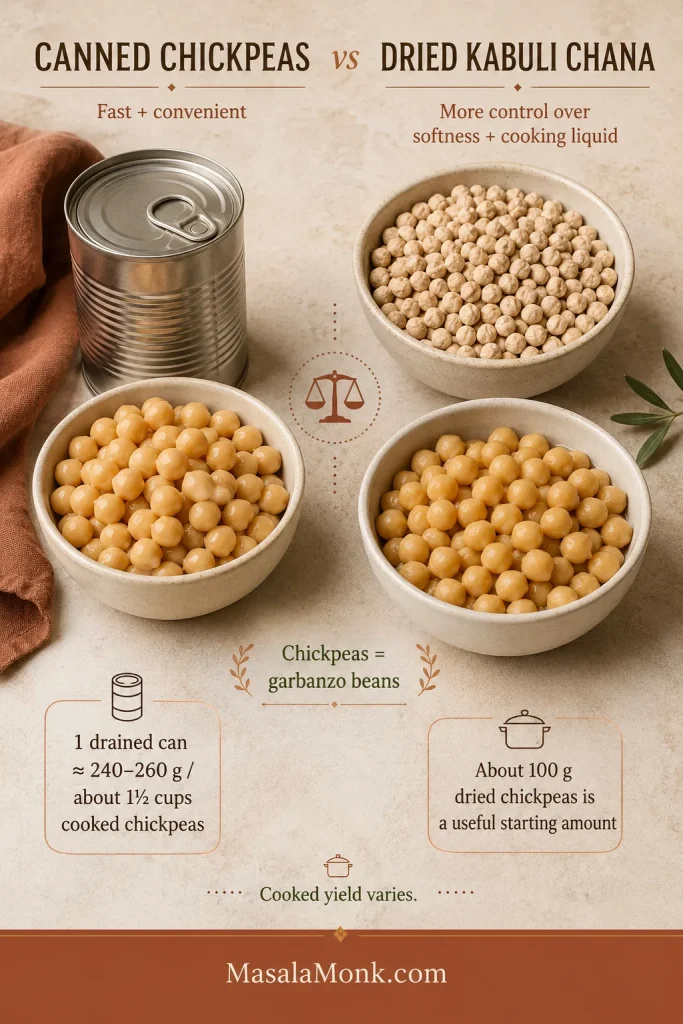
Chickpeas and garbanzo beans are two names for the same legume. In India, the large pale chickpeas commonly used for hummus are usually sold as kabuli chana.
Canned chickpeas are the weeknight answer. Dried kabuli chana takes longer, but you control exactly how soft and salty the chickpeas become and how the cooking liquid tastes.
Canned chickpeas save time; dried kabuli chana gives you more control. Once cooked soft enough, either can feed the same hummus formula.
For hummus, take chickpeas beyond ordinary salad tenderness. The center should crush into a smooth paste without resistance. Use the timings below as first checks; the chickpea itself decides when it is soft enough.
Salad-tender is not always hummus-soft. Keep cooking until the center smears rather than merely splits.
One drained can can be replaced with 8½–9 oz (240–260 g), or about 1½ cups, cooked chickpeas. About 3½ oz (100 g), or a little over ½ cup, dried chickpeas is a useful starting amount, although the final cooked yield varies with age, soaking and cooking.
Falafel can begin with soaked, uncooked chickpeas; hummus needs them fully cooked and soft. If you are making both, this homemade falafel guide explains the different texture and handling.
Choose a cooking method
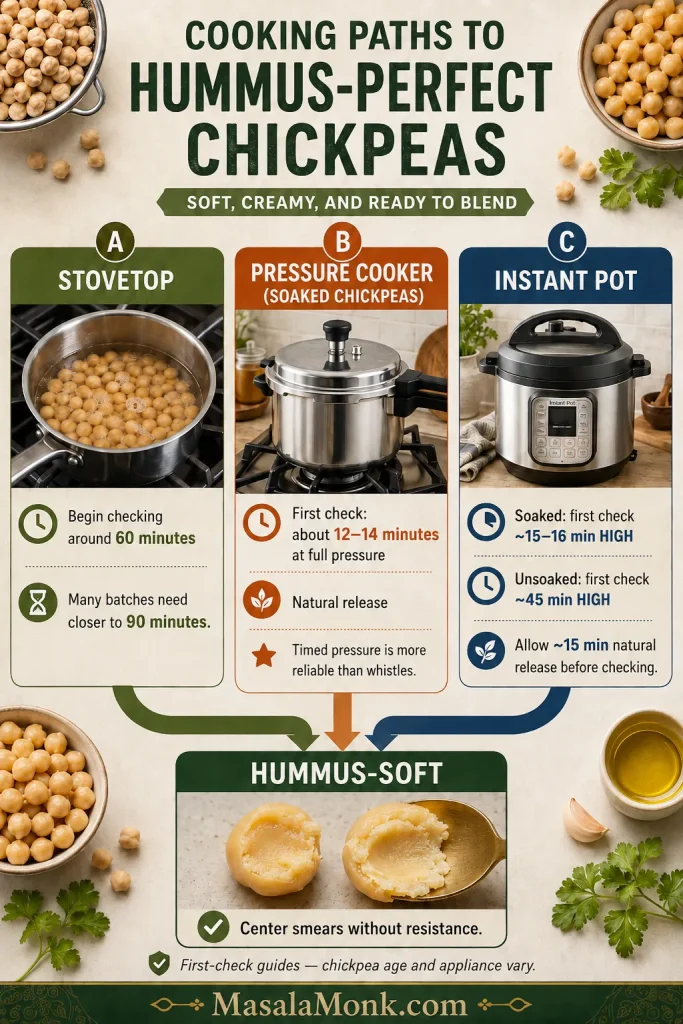
The cooker changes the timing, not the endpoint. Start checking by the clock; stop when the chickpea center smears without resistance.
Stovetop
Soak the chickpeas in plenty of water for 8–12 hours.
Drain, rinse and cover with several inches of fresh water.
Bring to a boil, then simmer. Begin checking around 60 minutes; many batches need closer to 90 minutes, and older chickpeas can take longer.
Reserve some cooking liquid, then drain and weigh the chickpeas once they pass the softness test above.
Indian stovetop pressure cooker
For about 3½ oz (100 g) soaked kabuli chana, add enough fresh water to cover the chickpeas by about 1½ inches (4 cm). As a first check, cook for about 12–14 minutes at full pressure, then allow a natural release. Continue for another few minutes under pressure if the centers still resist crushing.
Timed pressure is more dependable than whistle count because burner strength, cooker design and operating pressure vary.
Instant Pot
Place the chickpeas in the inner pot and cover them with fresh water by at least 2 inches (5 cm), while meeting the minimum liquid requirement for your model.
For chickpeas deliberately cooked soft enough for hummus, begin checking soaked chickpeas after about 15–16 minutes on high pressure, followed by about 15 minutes of natural release. For unsoaked chickpeas, begin around 45 minutes on high pressure, again allowing about 15 minutes of natural release before checking. Cooker models and chickpea age vary, so give them additional pressure time when the centers still feel firm.
Substitutes and Easy Variations
What Can I Use Instead of Tahini in Hummus?
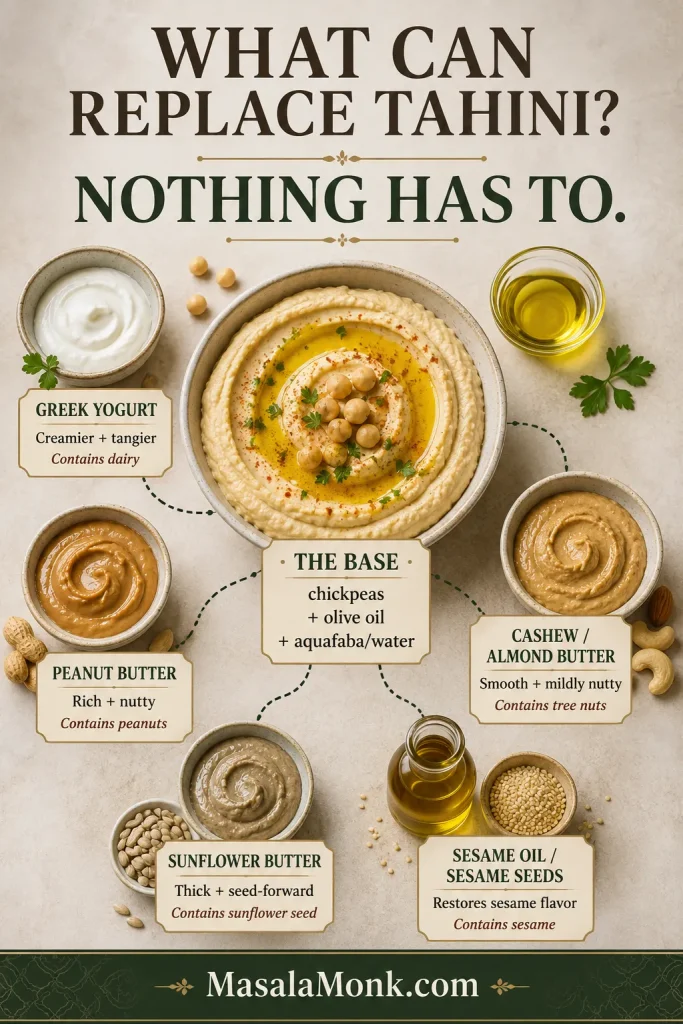
Nothing has to replace it. Soft chickpeas, olive oil and enough aquafaba or water already produce a creamy dip. Other ingredients can add richness or change the flavor, so use them because you want what they bring.
Option
What it changes
Dietary note
No substitute — base recipe
Olive oil and aquafaba or water keep the flavor light and chickpea-forward
Vegan; the base contains no sesame ingredients
Greek yogurt
Softer, creamier and tangier
Contains dairy and is not vegan
Peanut butter
Rich and distinctly nutty
Contains peanuts
Cashew or almond butter
Smooth and mildly nutty
Contains tree nuts
Sunflower butter
Thick and seed-forward
Contains sunflower seed
Sesame oil or sesame seeds
Restores sesame aroma and flavor
Contains sesame
Nothing has to replace tahini. Add yogurt, nut butter or seed butter only when you actually want the flavor and texture it brings.
A substitute is only useful if you like what it does to the hummus.
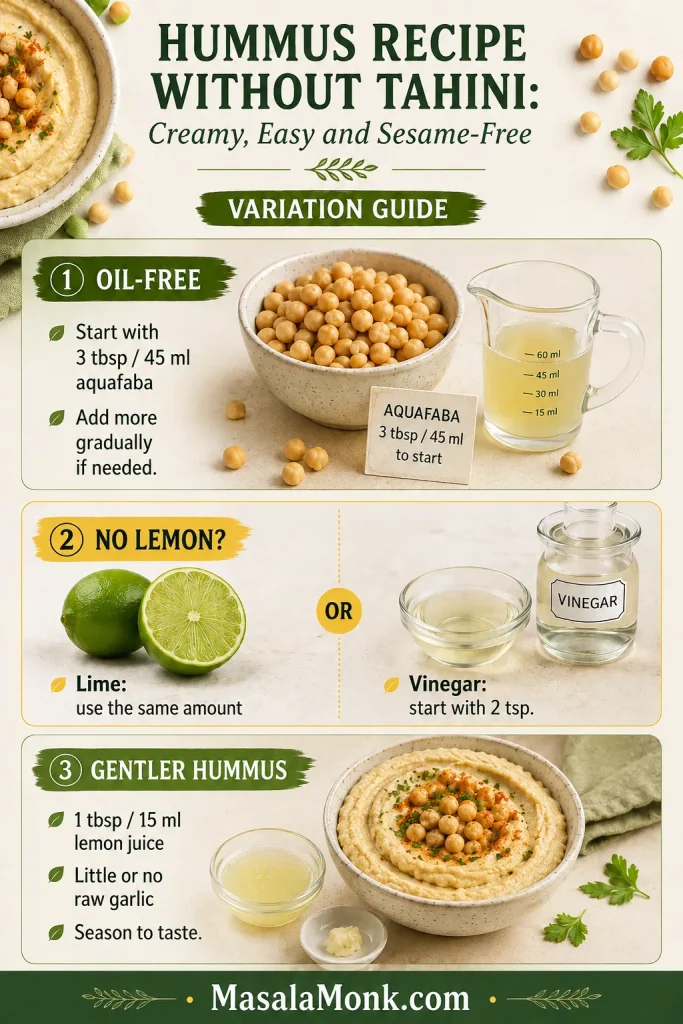
Oil-free hummus without tahini
Leave out the olive oil and add 3 tablespoons (45 ml) aquafaba first. Process fully, then add more aquafaba or cold water 1 tablespoon (15 ml) at a time. The finish will be lighter, so chickpea tenderness and seasoning become even more noticeable.
Hummus without lemon
Lime juice can replace the lemon in the same amount, but the citrus flavor will be noticeably different. For apple-cider or white-wine vinegar, start with 2 teaspoons, then blend and taste before adding more.
Mild hummus without garlic or cumin
Leave out the garlic for a cleaner, gentler dip, or omit the cumin for a brighter lemon-and-chickpea flavor. For an especially gentle version, use 1 tablespoon (15 ml) lemon juice and little or no raw garlic, then season to taste.
For cleaner troubleshooting, change one thing at a time: oil, acid or garlic. Then taste before making another adjustment.
Greek-yogurt hummus
Add 1–2 tablespoons thick plain Greek yogurt after the chickpeas have become smooth. Hold back some aquafaba and adjust the thickness afterwards. The result is softer and tangier, but no longer vegan or dairy-free.
When you want yogurt and cucumber to lead rather than chickpeas, make this Greek tzatziki sauce recipe instead.
Peanut, nut or sunflower-butter hummus
Add 1–2 teaspoons smooth unsweetened peanut, cashew, almond or sunflower butter first. Blend and taste before using more. None disappears completely into the hummus, so choose the one whose flavor you want.
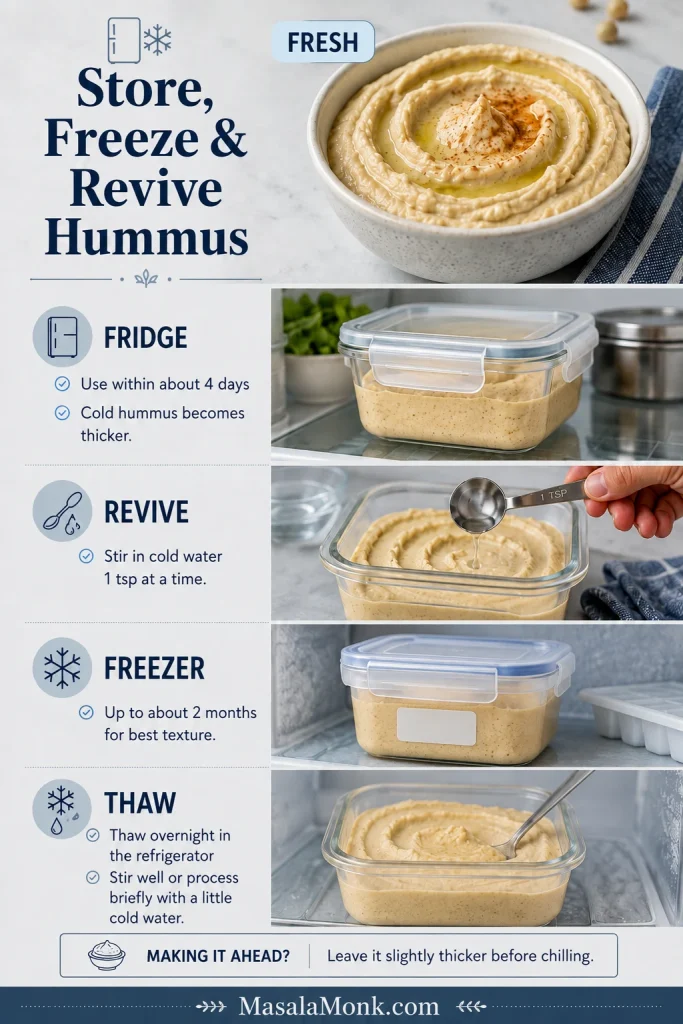
Cold hummus almost always feels thicker than freshly blended hummus, but it usually needs only a good stir and a little water to come back to life. Raw garlic can also become more noticeable as the dip rests.
Chilled hummus often firms up. Stir first, then loosen with cold water a teaspoon at a time rather than thinning it before storage.
Transfer the hummus to a clean airtight container and refrigerate it promptly. For a conservative home-storage window, use it within about four days. The USDA’s general leftovers guidance recommends keeping refrigerated cooked leftovers for about three to four days.
If the hummus becomes too thick, stir in cold water 1 teaspoon at a time. A dry surface usually means too much air exposure; smooth the hummus into a smaller airtight container before refrigerating it.
Freeze plain hummus in small airtight portions for up to about two months for the best texture. Leave a little room for expansion, thaw overnight in the refrigerator, then stir vigorously or process briefly with a spoonful of cold water.
Versions containing yogurt, fresh herbs or watery vegetables may thaw less evenly than the plain base. When making the hummus a day ahead, leave it slightly thicker and make the final adjustment after chilling.
Yes. Soft chickpeas, enough time in the processor and gradually added liquid can produce creamy hummus. Without tahini, the flavor is lighter and more directly of chickpeas, lemon and garlic.
Can I use water instead of aquafaba?
Yes. Cold water is especially useful when the canned chickpea liquid tastes very salty, metallic or strongly flavored by the can. In that case, rinse the drained chickpeas briefly as well.
Do I need to peel the chickpeas?
No. Very soft chickpeas and enough processing provide a large improvement without the extra work. Remove skins that loosen naturally after simmering if convenient.
Can I make hummus in a blender or NutriBullet?
Yes. Put the liquid near the blades, reduce the batch when the jar is narrow and stop to redistribute the mixture. Let warm chickpeas cool before placing them in a sealed personal-blender cup.
Serving Ideas
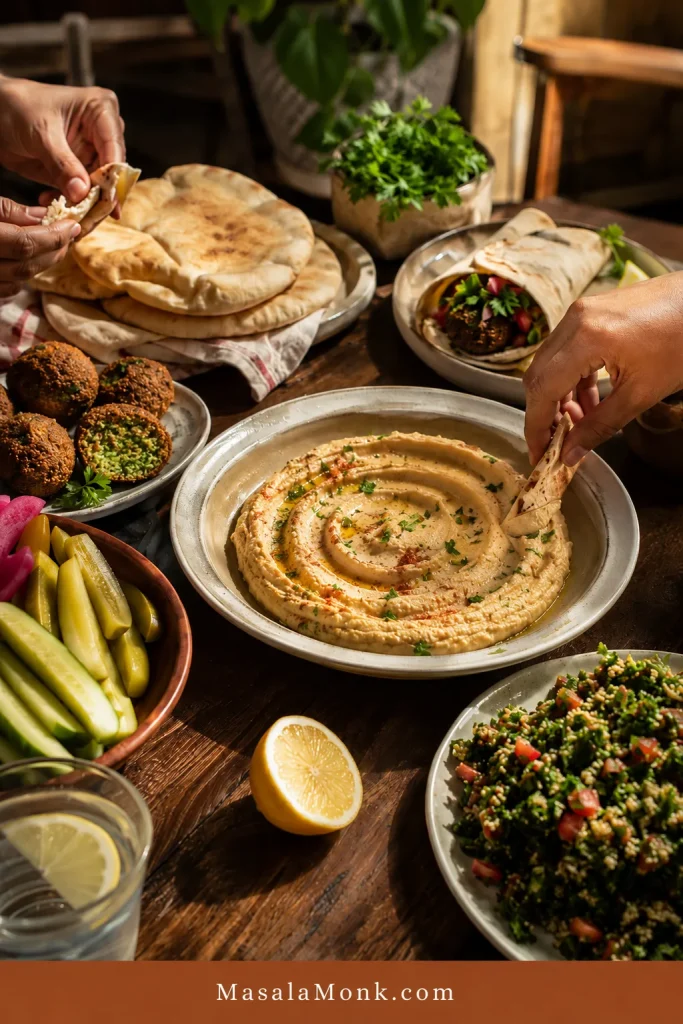
Warm pita against cool hummus; crisp cucumber adds snap, while a sharp pickle cuts through the chickpeas and olive oil. Those contrasts are often more satisfying than piling on extra toppings.
For a fresher mezze plate, add this parsley-heavy tabbouleh recipe. Its lemon, tomato and herbs balance the creamy hummus and keep the plate bright rather than heavy.
Dipping: warm pita, cucumber, carrots, radishes, peppers or crackers
Lunch: sandwiches, wraps, toast or stuffed pita
Dinner: falafel plates, grain bowls and roasted vegetables
Dressing: thin with cold water and lemon until it falls from a spoon in a steady ribbon
Warm pita, crisp vegetables, pickles, falafel and tabbouleh bring contrast. Let the hummus stay the creamy center of the table.
To plate it, spoon the hummus into a shallow dish and push outward with the back of the spoon. Finish with just enough olive oil, herbs or paprika to complement the flavor while the surface is still soft and freshly swirled.
Give the hummus one final stir, then taste it with the bread, vegetables or crackers you plan to serve. A texture that seems slightly loose on the spoon may feel exactly right once warm pita passes through it.
If the chickpeas are soft, the seasoning is balanced and the texture suits the meal, the hummus has already done its job.
Zucchini chips sound easy until you pull them from the oven or air fryer and find the same annoying problem: browned edges, soft centers, and slices that look like chips but bend like roasted zucchini.
If that has happened to you, the problem was probably not just the cooking time. Zucchini is naturally tender and water-rich, so it needs a little help before it can become crisp. Even slicing, a short salting step, proper drying, light oil, enough space, and the right heat make the difference between limp slices and a snack you actually want to keep reaching for.
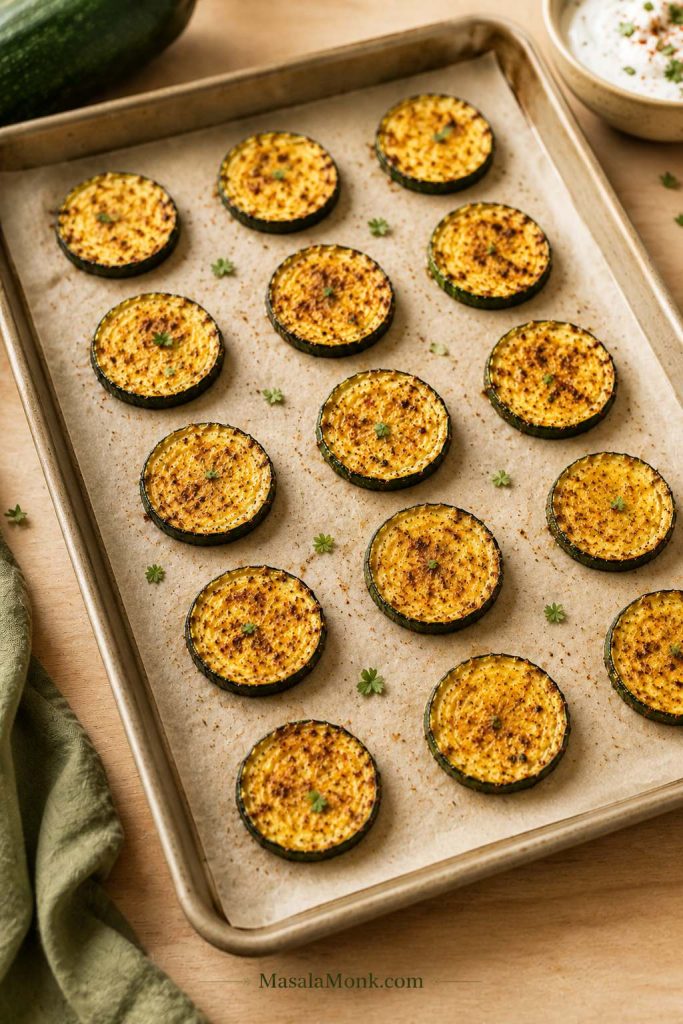
Most zucchini chips recipes are not actually disagreeing with each other. They are making different snacks. This guide starts with the easiest crisp-edged air fryer parmesan version, then shows when to use the oven, panko, keto/no-breadcrumb, or dehydrator method for the texture you actually want. If you already know the texture you want, compare the styles first.
These will not behave exactly like packaged potato chips, and that is okay. The win is a crisp-edged, salty bite that lets zucchini be zucchini without turning limp.
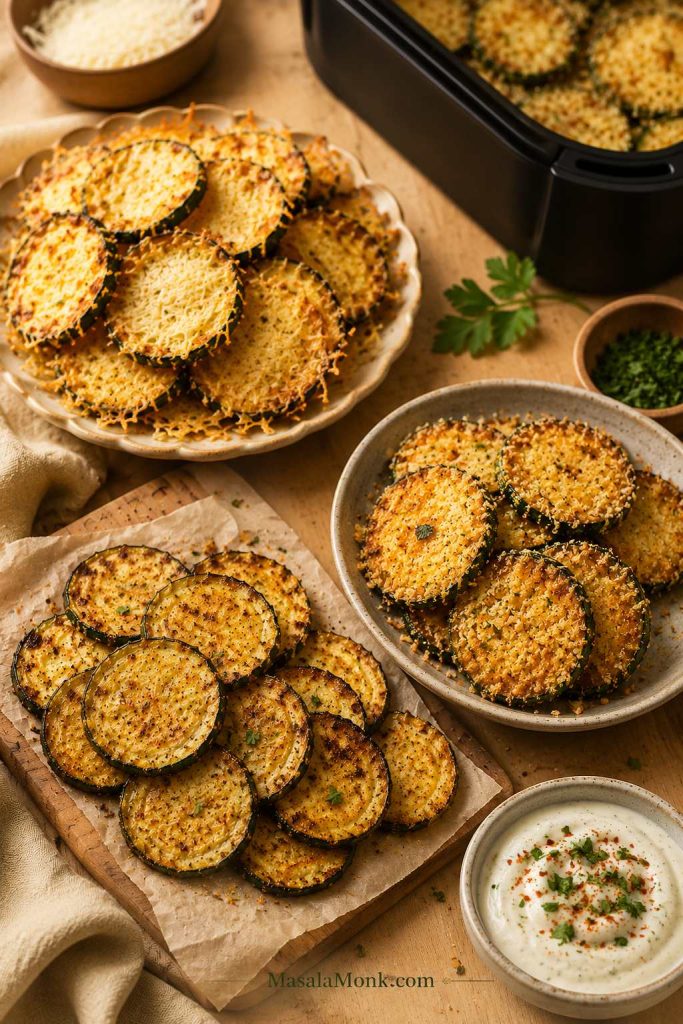
To make crispy zucchini chips, slice the zucchini evenly, salt the slices briefly, pat them very dry, season lightly, and cook in a single layer. Start with air fryer parmesan zucchini chips at 370°F / 188°C for 10–12 minutes, then cool them spread out for a few minutes so the cheese can firm. Need amounts and steps? Jump to the recipe card.
Seasoning helps, but the real win happens before the zucchini hits the heat. If the slices go in wet, they soften before the edges can firm up. Use only a little oil or oil spray, avoid crowding, and do not judge the final texture until the chips have cooled for a few minutes.
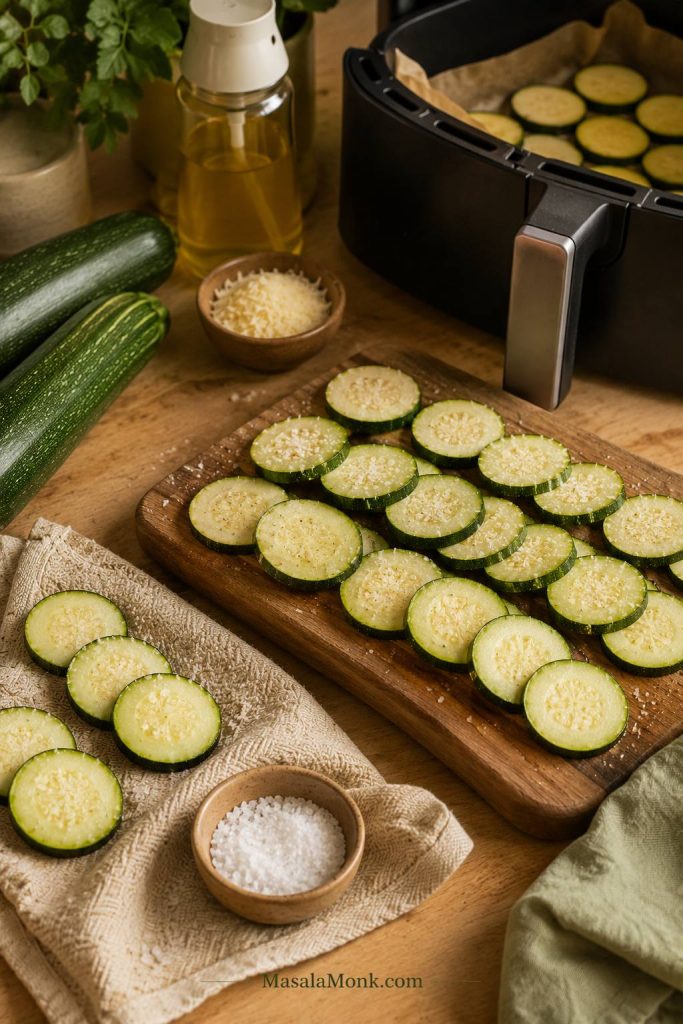
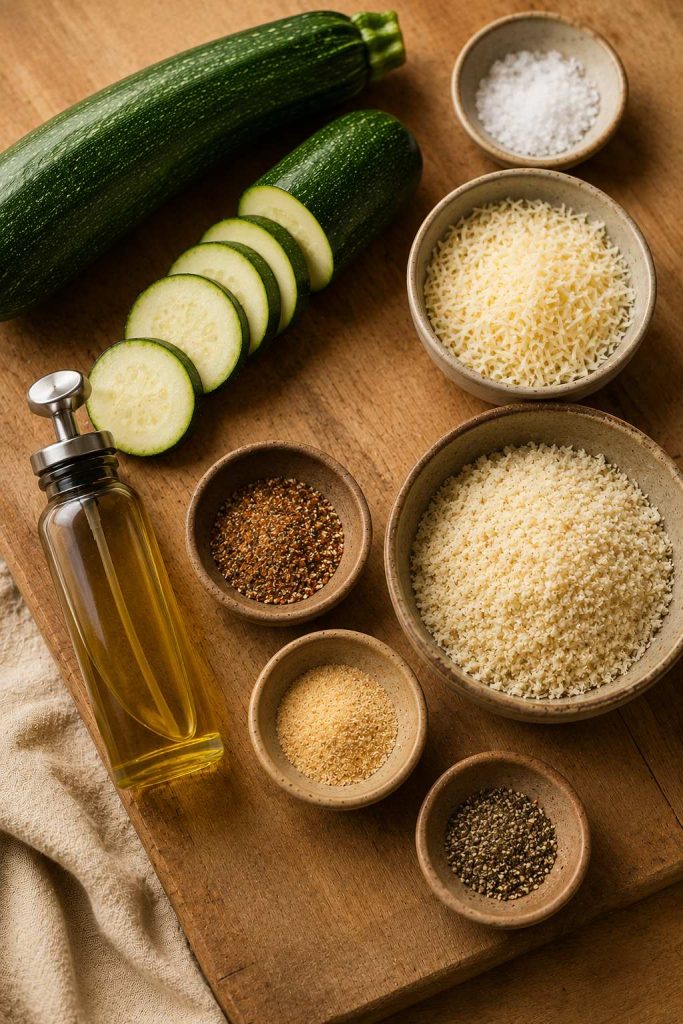
Before the air fryer or oven does any work, set the zucchini up for success with even slices, salt, towels, light oil, and parmesan.
Best first batch: air fryer parmesan zucchini chips.
The crispness rule: slice evenly, salt briefly, pat very dry, cook in one layer, and cool spread out.
Crispy Air Fryer Parmesan Zucchini Chips Recipe
This is the first batch to make because parmesan gives zucchini a shortcut to crisp edges. The slices still need salting and drying, but the cheese browns quickly, firms as it cools, and turns a soft vegetable into something snackable without breadcrumbs or a long oven bake.
Texture: crisp parmesan edges, tender centers, and a salty snack bite. Not packaged potato-chip snap, but much better than limp zucchini rounds.
Yield4 servings
Prep Time20 minutes
Cook Time10–12 minutes
Total Time30–35 minutes
Ingredients
2 medium zucchini, about 400 g / 14 oz total
½ tsp fine salt, about 3 g, for salting the zucchini
1 tbsp olive oil or avocado oil, 15 ml, or use oil spray
½ tsp garlic powder, about 1.5 g
½ tsp paprika or smoked paprika, about 1 g
¼ tsp black pepper, about 0.5 g
⅓ cup finely grated parmesan, about 30 g
Extra salt only if needed, after cooking
Instructions
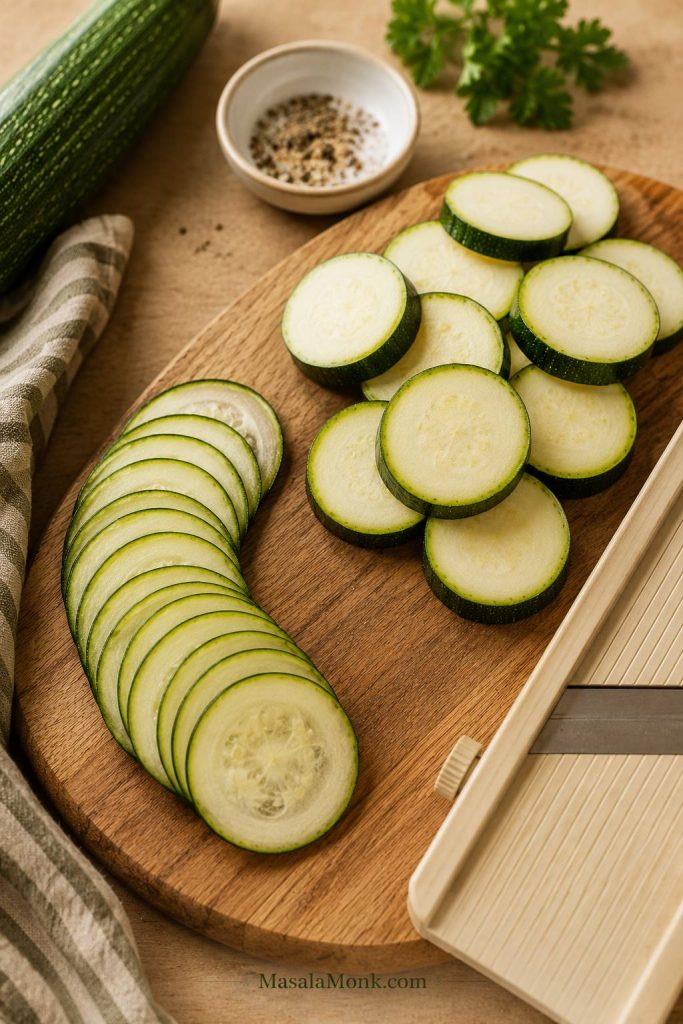
Slice the zucchini. Slice into even rounds, about ⅛ inch / 3 mm for thinner chips or slightly thicker if your air fryer tends to blow thin slices around.
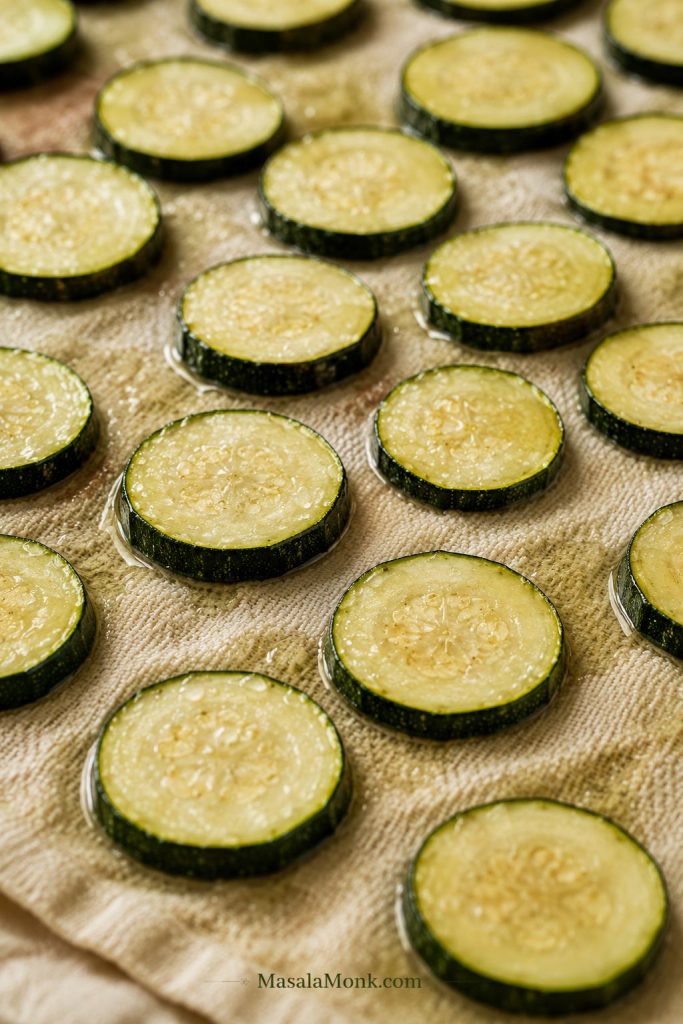
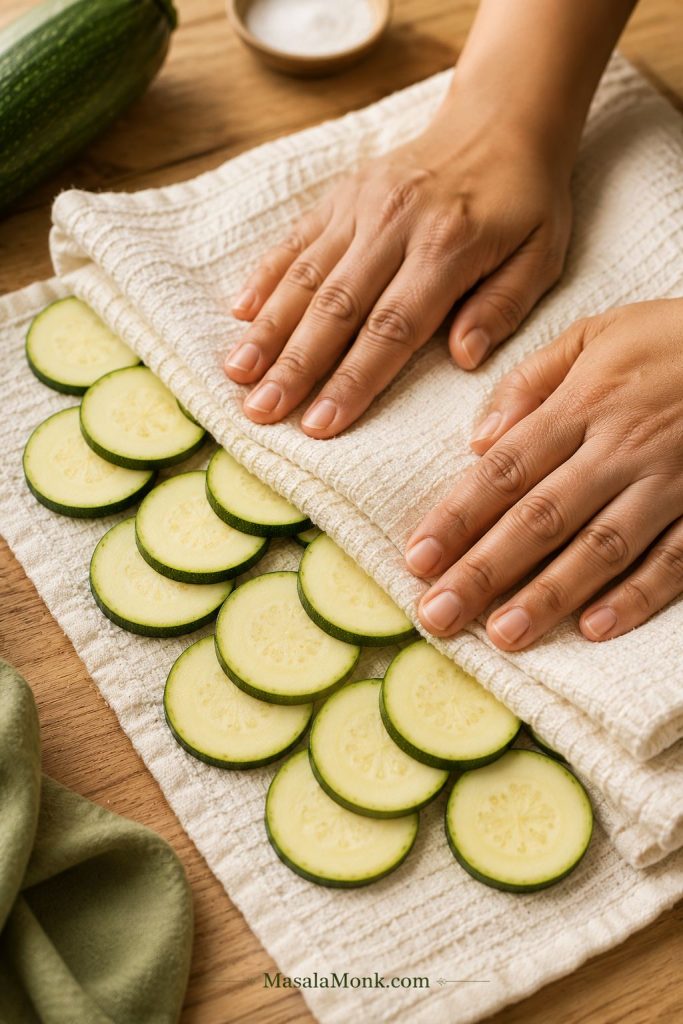
Salt the slices. Arrange the zucchini on a towel or in a colander. Sprinkle with the salt and let rest for 15–20 minutes.
Dry very well. Pat the slices dry with a clean kitchen towel or paper towels. The surface should look matte, not shiny-wet.
Season lightly. Toss the zucchini with oil, garlic powder, paprika, black pepper, and finely grated parmesan. The slices should look lightly glossy, with seasoning clinging to the surface instead of sliding around.
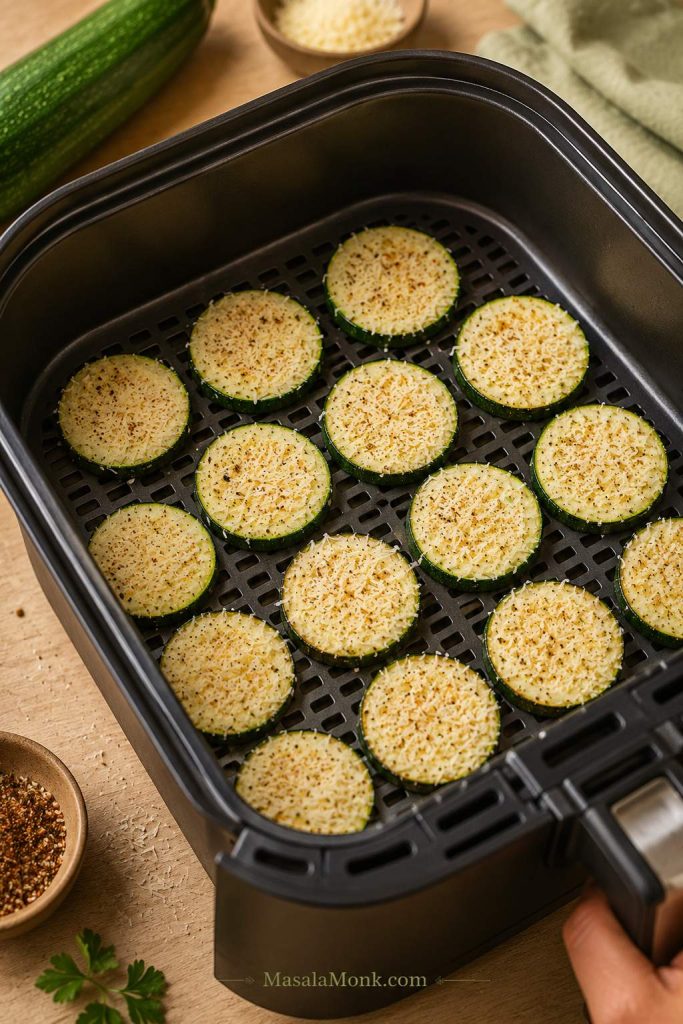
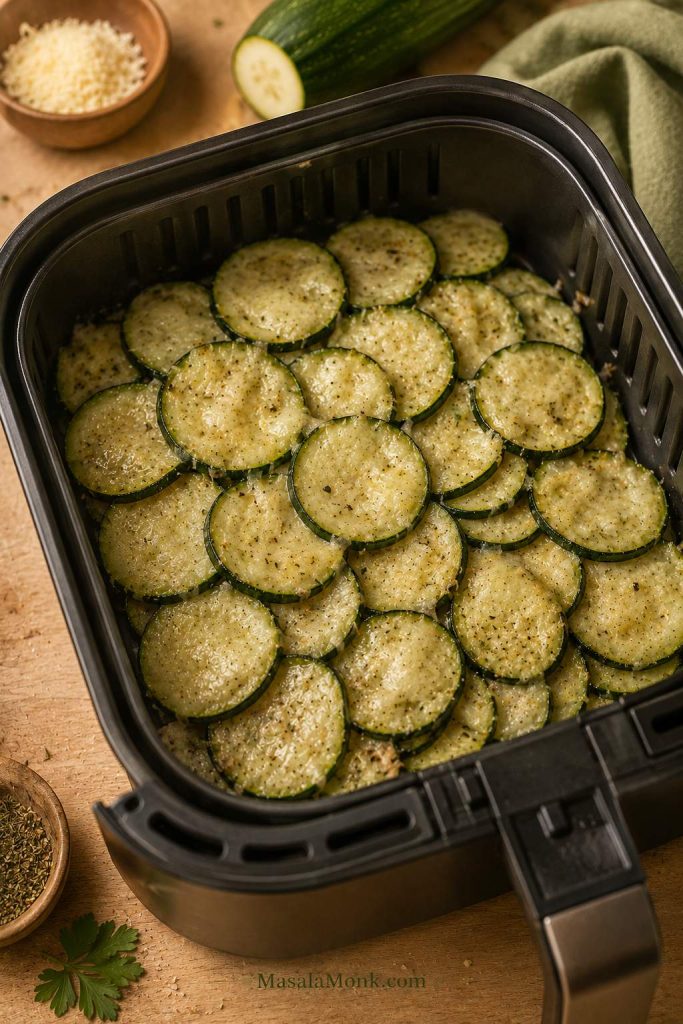
Arrange in the air fryer. Place slices in a single layer in the basket. Cook in batches if needed; it is better to cook two quick batches than one crowded soft batch.
Air fry. Cook at 370°F / 188°C for 10–12 minutes, flipping or shaking gently halfway, until the parmesan smells toasted, the edges look dry, and the slices feel lighter. Start checking around 8 minutes.
Remove finished chips early. If some slices are golden before others, remove them and keep cooking the softer pieces.
Cool before serving. Spread the chips out for a few minutes. The parmesan firms up and the edges crisp more as they cool.
For air fryer zucchini chips, keep the rounds in one layer. Hot air needs open gaps to dry the edges instead of steaming the centers.
Recipe Notes
Use finely grated parmesan for the most reliable crisping.
Smaller or thinner slices may finish first; pull them out early.
Do not add extra salt until after cooking, especially if using parmesan.
Serve soon after cooling, while the parmesan edges are still crisp.
Re-crisp leftovers in the air fryer or oven, not the microwave.
Why this works: salting gives the slices a better start, parmesan browns quickly, and cooling lets the cheese firm up. That is why the chips often feel crisper after a few minutes on the plate than they do straight from the air fryer. If they still come out soft, use the soggy-chip fixes.
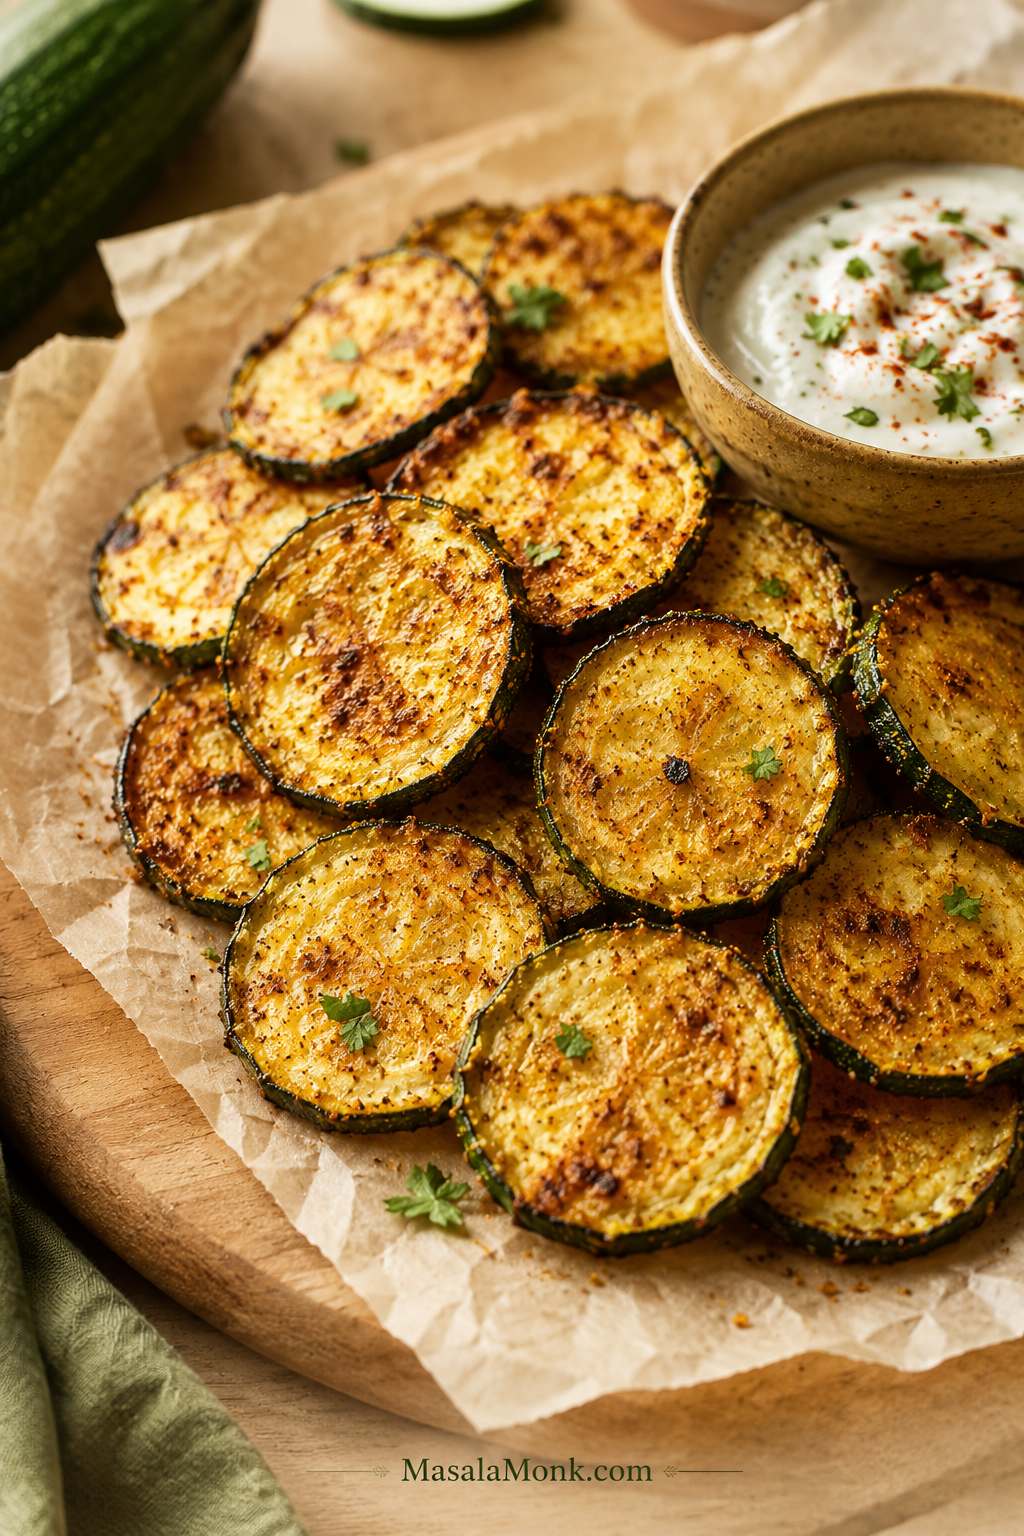
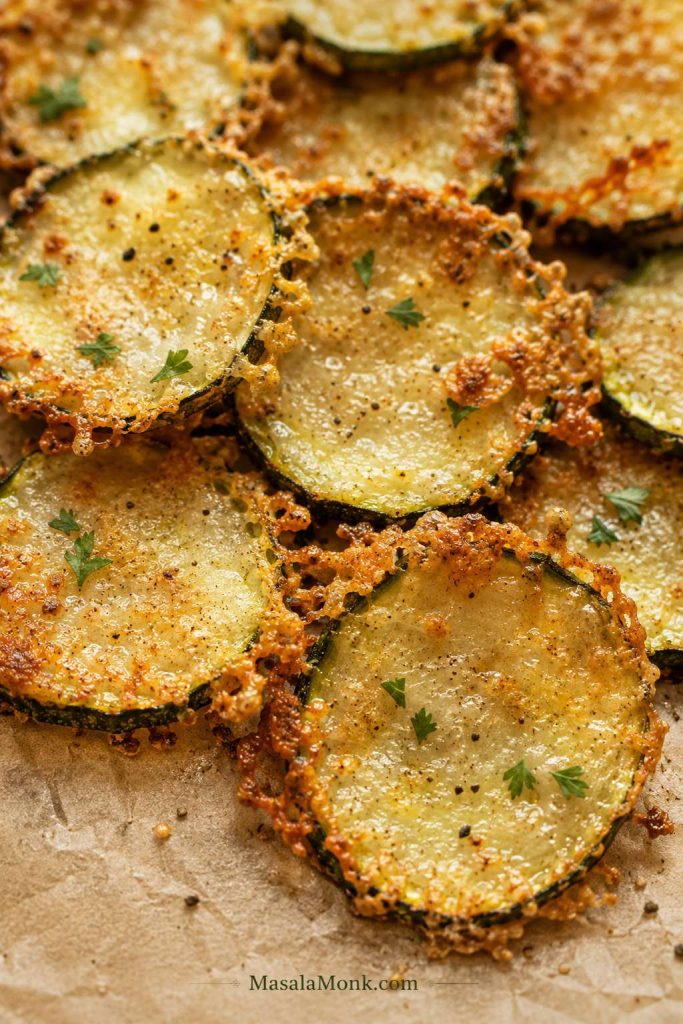
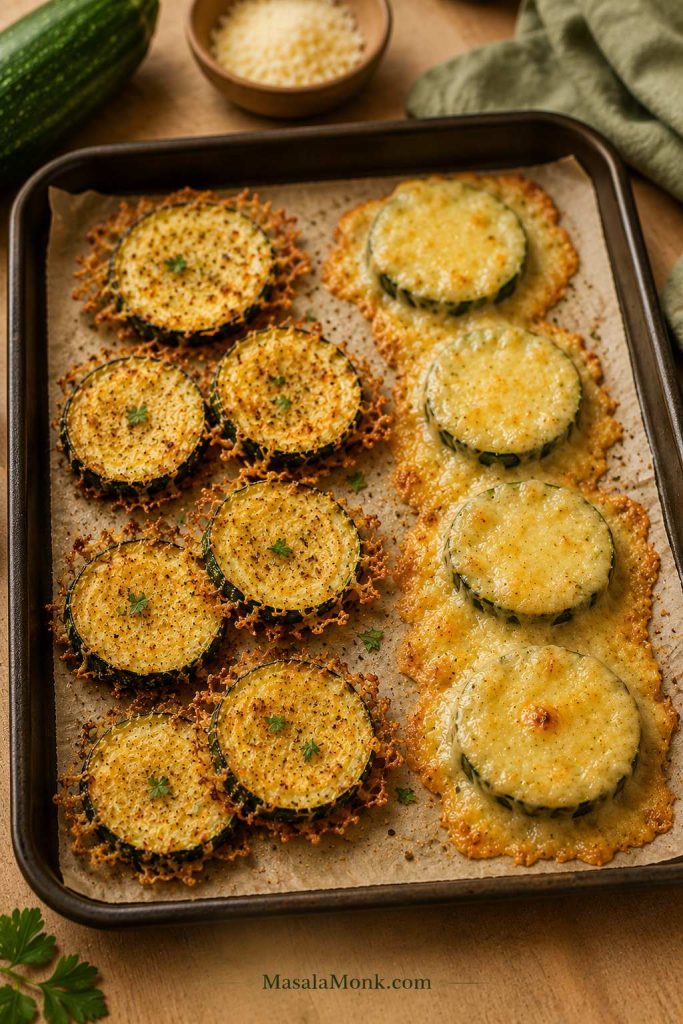
With parmesan zucchini chips, the best sign is a lacy golden edge. Let them cool briefly so the cheese can firm and crisp.
The first successful batch feels obvious in hindsight: the slices look lighter, the parmesan smells toasted, and the edges firm up while you are getting the dip. A few softer pieces are normal. At their best, they taste salty and cheesy, with crisp edges and tender centers.
The first crisp one is the cook’s tax. Eat it while the edges are still at their best.
Want a Different Texture? Choose Your Zucchini Chip Style
From here, the same idea can shift into oven trays, panko coating, keto chips, or make-ahead dehydrated chips. You do not need to master every version today. Choose the one that matches what you want to eat: the air fryer method for speed, the panko method for crunch, or the dehydrator method for make-ahead chips.
Thin chips dry. Parmesan rounds crisp. Panko rounds crunch. Once you know which style you are making, the times stop looking random.
Not every zucchini chip should look the same: thin chips dry, parmesan rounds crisp at the edges, and panko rounds bring the loudest crunch.
If You Want…
Make This
Why It Works
The easiest first try
Fast cheesy: air fryer parmesan
Parmesan helps the edges crisp quickly and adds salty, snacky flavor.
The crunchiest appetizer
Crunchy appetizer: panko rounds
Panko creates a crisp coating while the zucchini stays tender inside.
Keto or no-breadcrumb snack
Low-carb: plain or parmesan
Parmesan gives better low-carb crispness than almond flour alone.
Larger sheet-pan batch
Sheet-pan: oven-baked
A baking sheet gives the slices more room than most air fryer baskets.
The most chip-like thin slices
Thin veggie chips: low oven or dehydrator
Slower heat gives thin slices time to turn light and crisp.
A sturdy dipper
Sturdy dippers: panko or thick parmesan
Thin plain chips are delicate; coated rounds hold up better.
Best choice guide: air fryer parmesan for the first batch, low oven or dehydrator for the most chip-like thin texture, panko for party crunch, parmesan for keto, and dehydrator or low-and-slow oven for better storage.
This is the kind of tray that disappears by the edges first: the lacy parmesan pieces, the extra-golden rounds, the ones everyone says they are “just testing.”
Most failed batches come down to one problem: the slices steam before they crisp. Already dealing with a limp tray? Skip to the troubleshooting table.
Zucchini carries a lot of moisture. When the slices are too thick, too crowded, or too wet, that moisture gets trapped. Instead of crisping at the edges, the zucchini softens. That is how you get chips that look browned but still bend in the middle.
If your last batch came out limp, you are not alone. This vegetable can make even a good recipe feel unpredictable until you give the slices a better start.
If zucchini chips brown but still bend, they probably steamed before they crisped. Next time, go thinner, drier, or less crowded.
The rule that saves most batches: slice evenly, salt briefly, pat very dry, cook with space, and cool the chips spread out. That matters more than adding extra oil.
Once you solve that, the reward is simple: golden edges, better seasoning, and chips that feel like a snack instead of a side dish.
The Mistakes That Keep Zucchini Chips Soft
If a batch stays limp, the fix usually points back to one of these habits. This is not about being fussy; it is about giving zucchini a fair chance to crisp.
You salted but did not dry. Salting brings moisture to the surface; drying removes it. If the slices still look shiny, press them between towels before cooking.
You used too much oil. Glossy is good. Wet or slick is not. Too much oil coats the surface and keeps the chip soft.
You crowded the basket or pan. Overlapping slices steam each other. Cook in batches if needed.
You sliced unevenly. Thin pieces brown first while thick pieces stay soft. Pull the crisp ones early instead of waiting for the whole tray to match.
You used wet flavors too early. Lemon juice, hot sauce, fresh garlic paste, and watery marinades belong after cooking.
You piled them hot. Stacked chips lose their edge quickly. Spread them out for a few minutes first.
You expected every method to crunch the same way. Thin chips dry, parmesan rounds crisp, and panko rounds crunch. Choose the texture first.
Why These Ingredients Help Zucchini Chips Crisp
The ingredient list is short, but every item has a job. Medium zucchini gives you neat slices, salt draws moisture to the surface so you can pat it away, oil helps browning, parmesan firms into crisp edges, and panko gives the loudest crunch.
Keep the ingredient list simple, but choose each one for a job: salt manages moisture, parmesan builds crisp edges, and panko adds crunch.
Best zucchini: medium, firm zucchini with fewer watery seeds. Oversized zucchini can stay soft in the center.
Best crisping helper: finely grated parmesan. It clings better than large shreds and sets as it cools.
Best crunch coating: panko. Use it for appetizer-style rounds, not thin delicate chips that need to stay light.
Best oil approach: a light toss or spray. Glossy is enough; greasy slices soften.
Best seasoning type: dry spices and dried herbs. Save lemon juice, hot sauce, and fresh garlic paste for after cooking.
If you only have a very large zucchini, cut it lengthwise and scoop out the soft, seedy center if it looks watery. Use the firmer outer flesh for chips. And if you are comparing it with cucumber, remember that zucchini and cucumber are different vegetables, even though they can look similar at first glance.
Equipment That Actually Helps
You do not need a perfect kitchen setup here. A sharp knife, a clean towel, and enough space on the tray will get you most of the way there.
Mandoline or sharp knife: for even thickness.
Kitchen towels or paper towels: for drying after salting.
Parchment or wire rack: for oven batches and cooling.
Oil spray: for a light coating without greasiness.
Tongs: for pulling finished chips early.
Dehydrator: optional, but helpful for dry, make-ahead veggie chips.
Dry towels, even slices, and a little patience will do more for crispness than another spoonful of seasoning.
How Thin Should You Slice Zucchini for Chips?
Thickness decides whether you get a delicate chip, a cheesy round, or a sturdy dipper.
Slice thickness decides the snack: thin rounds make delicate chips, while thicker rounds hold parmesan or panko coatings better.
For thin plain chips, aim for about ⅛ inch / 3 mm. These slices dry better, but they can burn quickly or fly around in some air fryer baskets.
For breaded or panko chips, slice closer to ¼ inch / 6 mm. Thicker rounds hold the coating better and are less fragile. They will be crunchy outside and tender inside, not dry all the way through; see the panko method if that is the texture you want.
For parmesan chips, either thickness can work. Choose thinner slices for a more chip-like result, or slightly thicker slices for a snacky zucchini round with crisp cheese edges.
A good batch will not all finish at the same second. Pull the crisp ones early. That is not fussiness; that is how zucchini behaves.
Should You Salt Zucchini First?
Yes. It is the small step that makes the biggest difference, especially if your zucchini is juicy or your last batch came out soft.
Salt draws moisture to the surface so you can pat it away before the zucchini hits the air fryer, oven, or dehydrator. It also helps breaded coatings stick because the slices are not slippery.
Here is the simple way to do it:
Slice the zucchini evenly.
Spread the slices on a clean towel or place them in a colander.
Sprinkle with salt.
Let them rest for 15–30 minutes.
Pat very dry with a clean kitchen towel or paper towels.
You should see moisture on the surface after the rest. That is good. It means the water is on the towel instead of trapped in the chip.
After salting, moisture should bead on the zucchini surface. That is the water you want on the towel, not trapped inside the chip.
You do not need to rinse if you used a light amount of salt. If you salted heavily, rinse quickly and dry extremely well. For thin low-and-slow chips, you can rest the zucchini longer, even up to 45–60 minutes, but for most batches, 20–30 minutes is enough.
Do not skip the drying after salting. Pat away the surface moisture before cooking, or the slices will steam. Next, see how spacing changes the result in the air fryer and oven methods.
Once the slices release moisture, press them until they look matte. Shiny zucchini usually means softer chips later.
Air Fryer Zucchini Chips: What Matters Most
The air fryer moves hot air, not magic. If the slices overlap, steam wins.
A crowded air fryer basket traps steam fast. Even well-seasoned zucchini chips stay soft when the slices overlap this much.
This is the weeknight version: quick heat, toasted parmesan, and a snack that is ready before anyone gets impatient. Good air fryer chips have browned parmesan around the edges, a garlic-paprika aroma, and enough firmness to dip gently after they cool for a few minutes.
Air Fryer Style
Temperature
Time
What to Look For
Plain thin chips
370°F / 188°C
12–18 minutes
Edges dry and lightly browned
Parmesan chips
370°F / 188°C
10–12 minutes
Cheese is golden and edges are crisp
Panko chips
400°F / 204°C
10–12 minutes
Panko is golden and crunchy
Very thin slices may finish early; thicker slices may need a few more minutes. Pull the early winners. Waiting for the whole basket to match is how the best chips become bitter.
The second batch is usually better because you already know how fast your air fryer runs.
If very thin chips fly around: slice them slightly thicker next time or use an air fryer rack or mesh insert if your model allows it. Overcrowding the basket will hold them down, but it will also trap steam.
Oven Zucchini Chips: Hot and Fast vs Low and Slow
The oven only looks confusing because thin chips and coated rounds need completely different treatment. Use a hot oven, around 425°F / 218°C, for parmesan or panko-coated rounds that need quick browning. For thin plain slices, a low oven around 225–235°F / 107–113°C gives the zucchini time to dry out.
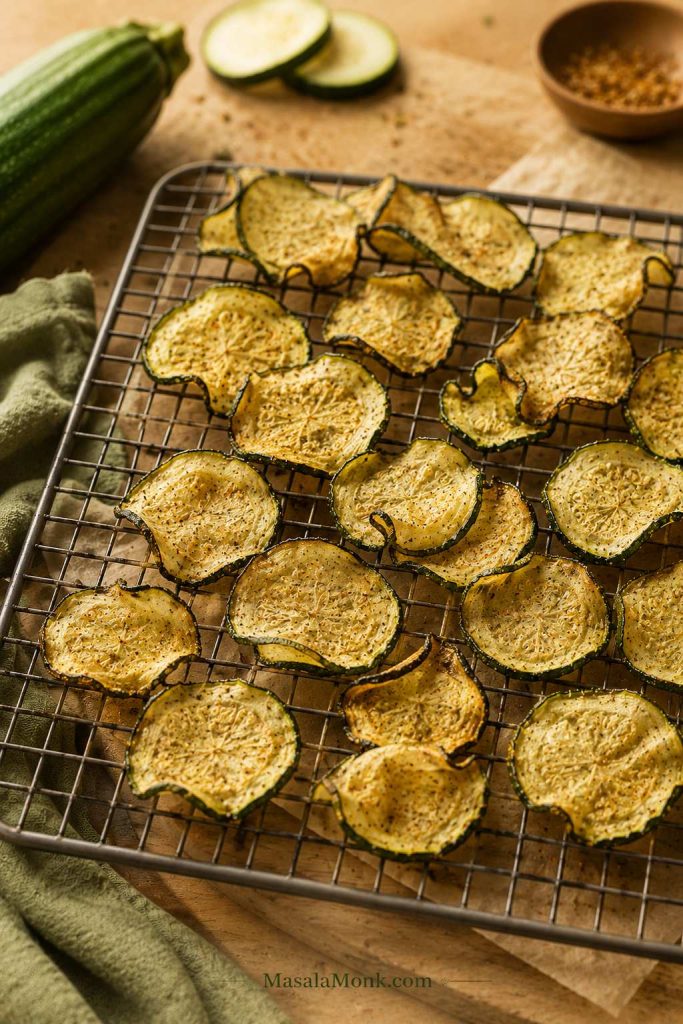
Hot oven batches should smell toasted and look golden at the edges. Low oven batches should look drier, lighter, and slightly curled.
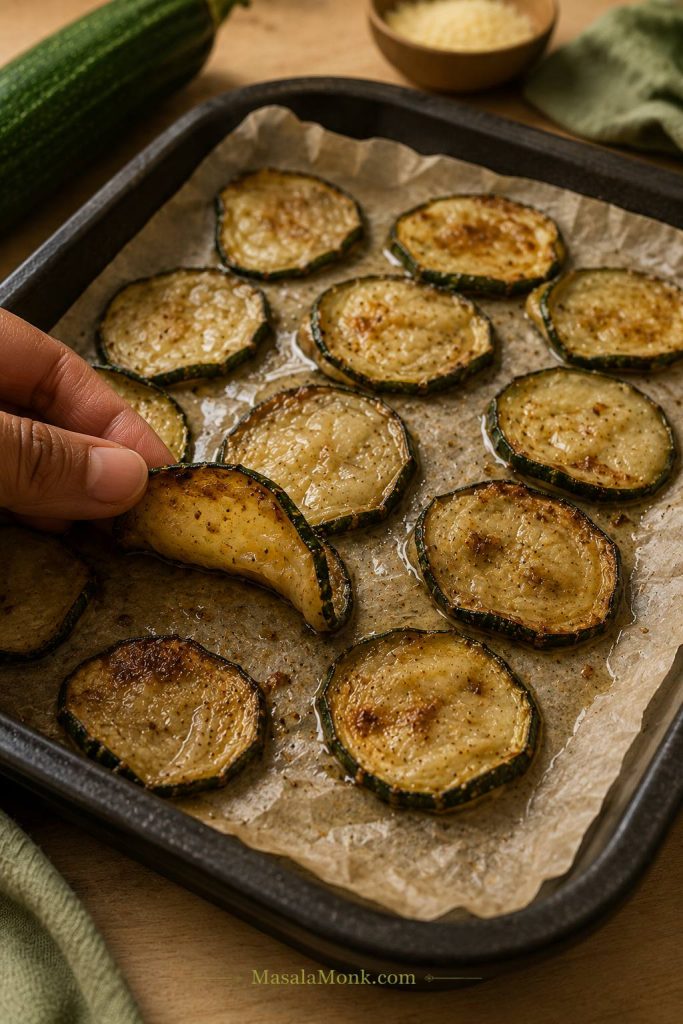
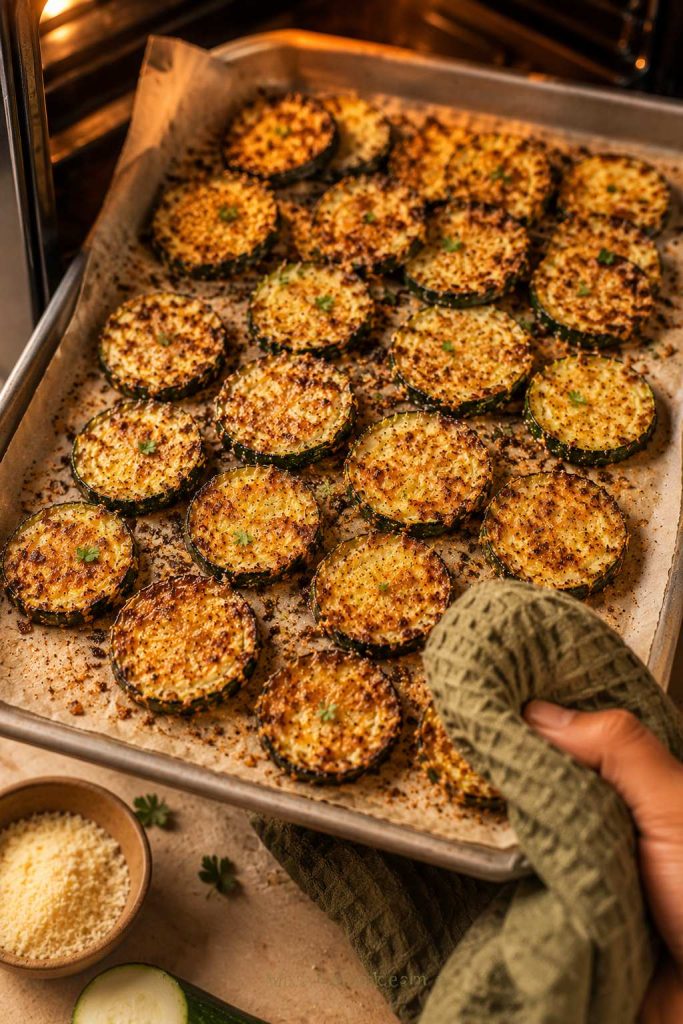
Baked zucchini chips need steady heat and enough tray room. Look for golden tops, drier centers, and edges that lift slightly.
Hot Oven Parmesan or Panko Chips
Preheat the oven to 425°F / 218°C.
Slice zucchini into ¼-inch / 6 mm rounds for panko chips, or slightly thinner for parmesan chips.
Salt, rest, and dry the slices.
Coat with parmesan or panko mixture.
Arrange in a single layer on a parchment-lined baking sheet.
Spray lightly with oil.
Bake for 25–30 minutes, flipping halfway, until golden and crisp at the edges.
The chips should look lighter, slightly curled at the edges, and golden where the cheese or coating touches the heat. If they only look browned but still bend like roasted zucchini, give them more time.
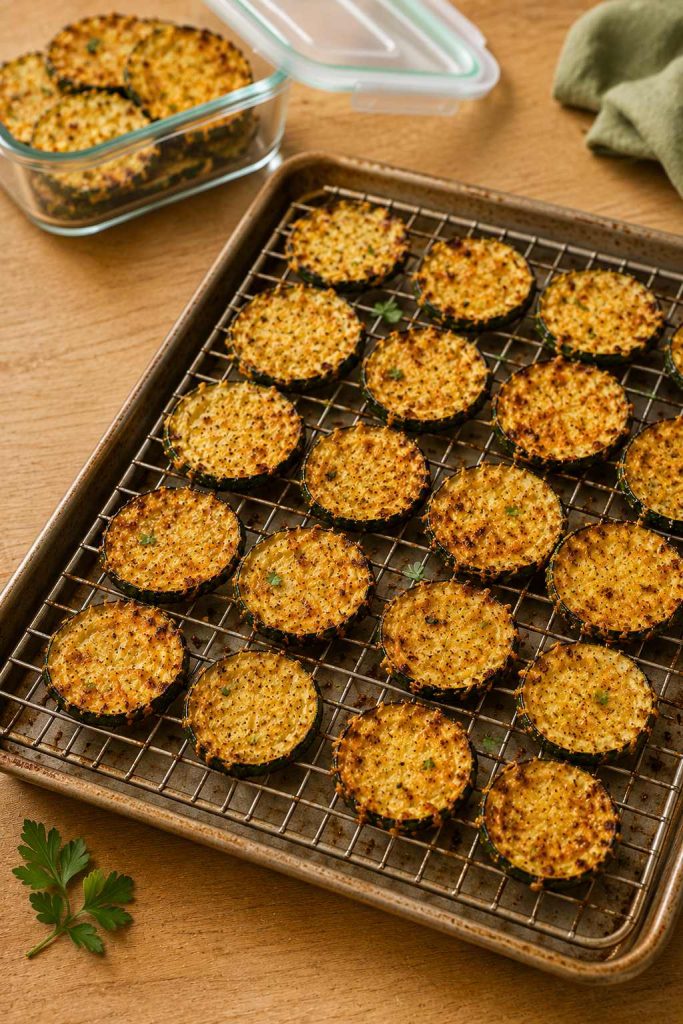
On a sheet pan, visible gaps are not wasted space. They let heat move around each zucchini slice so the edges can firm.
Low-and-Slow Thin Zucchini Chips
Preheat the oven to 225–235°F / 107–113°C.
Slice zucchini thinly, about ⅛ inch / 3 mm.
Salt for 20–30 minutes, then pat very dry.
Use very little oil, or just a light spray, then add dry seasoning.
Spread in a single layer on parchment or a wire rack set over a baking sheet.
Bake for 70–120 minutes, rotating trays halfway.
Start checking around 70 minutes, then remove dry pieces every 10–15 minutes as needed.
Cool completely before serving.
They are done when the centers stop looking wet, the edges curl slightly, and the slices feel light. If they still bend like roasted zucchini, they need more time.
Low-and-slow zucchini chips should look light, thin, and slightly curled. Cooling them on a rack keeps the undersides from softening.
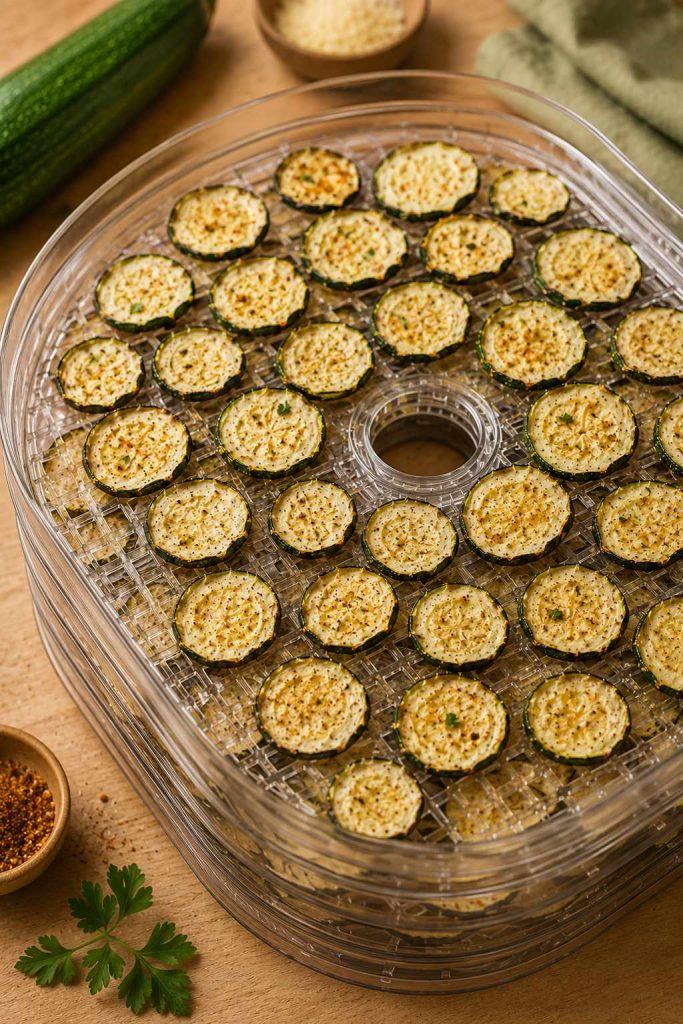
Dehydrator Zucchini Chips
The dehydrator is not the fastest route, but it is the one to choose if you want chips that stay crisp after the first hour. This is the quiet, patient version: less hot-snack energy, more crisp pantry-snack payoff.
Slice zucchini very thin and even.
Salt lightly for 20–30 minutes, then pat dry very well.
Use very little oil or skip oil completely.
Season lightly with garlic powder, paprika, pepper, or dried herbs.
Arrange in a single layer on dehydrator trays.
Dehydrate at 135–150°F / 57–66°C for 4–8 hours.
Rotate trays if your dehydrator heats unevenly.
Cool completely before storing.
For dehydrator zucchini chips, single-layer spacing is the method. Thin slices dry more evenly and store better after they cool.
Use salt lightly here; dehydrated chips taste saltier as they dry. Humid kitchens, thicker slices, and crowded trays will push the timing toward the longer end.
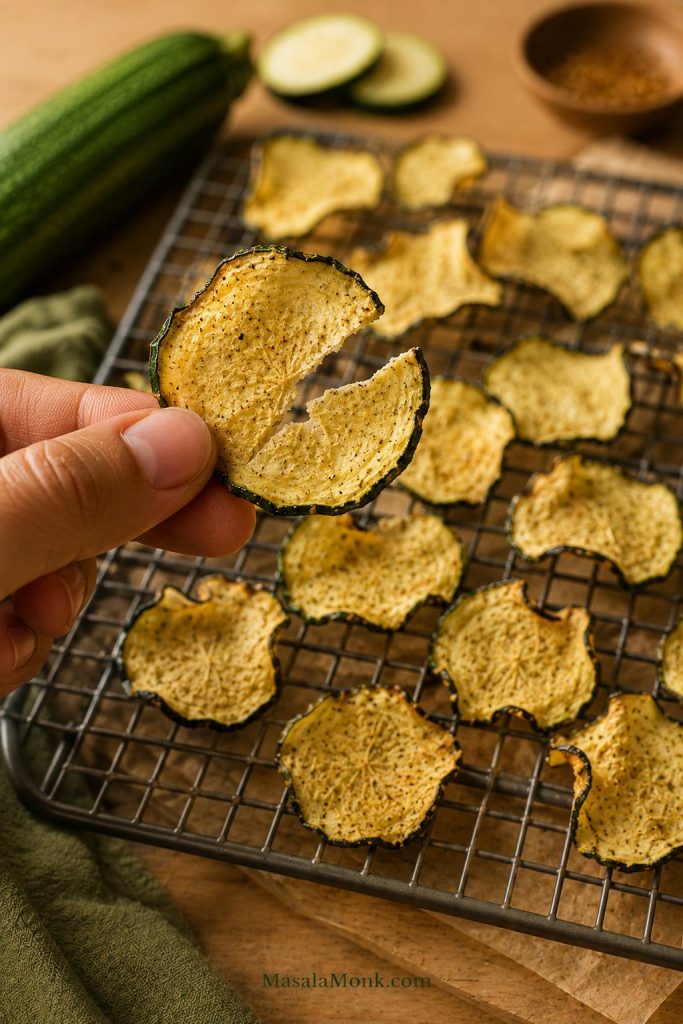
Cool one chip, then test it. Warm zucchini can lie to you. Fully dried chips should snap or feel crisp after cooling, not leathery. For keeping that texture, use the storage and re-crisping guide.
Cool one chip before testing. A dehydrated zucchini chip should feel dry and crisp, not warm, leathery, or bendy.
Parmesan Zucchini Chips: How to Get Lacy, Crisp Edges
Parmesan chips are done when the cheese looks golden and lacy at the edges, not pale and melted. If the parmesan smells sharp, bitter, or turns dark brown before the zucchini looks lighter, the heat is too high or the slices need more drying before cooking.
Finely grated parmesan works best because it clings in a thin layer and firms as it cools. Big shreds melt into patches. Too much cheese can also form a heavy blanket instead of a crisp edge, so use enough to coat lightly, not bury the zucchini.
Parmesan helps, but too much can act like a blanket. A lighter coating gives zucchini chips better lacy edges and cleaner crisping.
Use finely grated parmesan, not big shreds.
Look for golden, lacy edges instead of dark brown spots.
Pull the tray or basket if the cheese smells bitter.
Let the chips cool spread out so the cheese can firm.
Add extra salt only after tasting; parmesan already brings salt.
Parmesan chips are especially good with something tomatoey on the side. A small bowl of marinara sauce makes them feel closer to a crispy zucchini appetizer than a plain vegetable snack.
Breaded or Panko Zucchini Chips
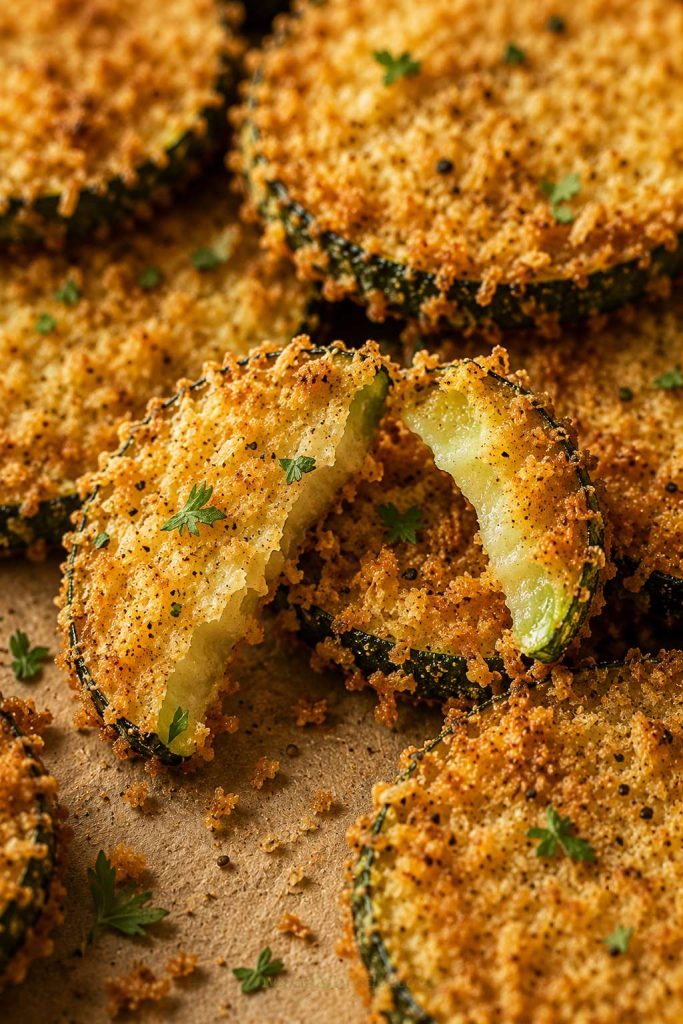
When you want the kind of crunch people hear across the table, use panko. Treat this version as crispy zucchini rounds, not thin vegetable chips. They are golden outside, tender inside, and strong enough for thick dips.
Panko crisps better than regular breadcrumbs because the flakes are larger and airier. Finished panko rounds should sound crisp when tapped with tongs, even though the zucchini inside stays tender.
This is the party version: golden crumbs outside, soft zucchini inside, and enough crunch to scoop a thick dip without collapsing.
With panko zucchini chips, the coating turns golden and crisp while the zucchini inside stays tender.
Panko Ingredients
2 medium zucchini, sliced into ¼-inch / 6 mm rounds
½ cup all-purpose flour, about 60 g
2 large eggs, beaten
1 cup panko breadcrumbs, about 55–60 g
½ cup finely grated parmesan, about 45 g
1 tsp Italian seasoning or dried oregano
½ tsp garlic powder
Oil spray
Panko Method
Salt the zucchini rounds briefly and pat them dry.
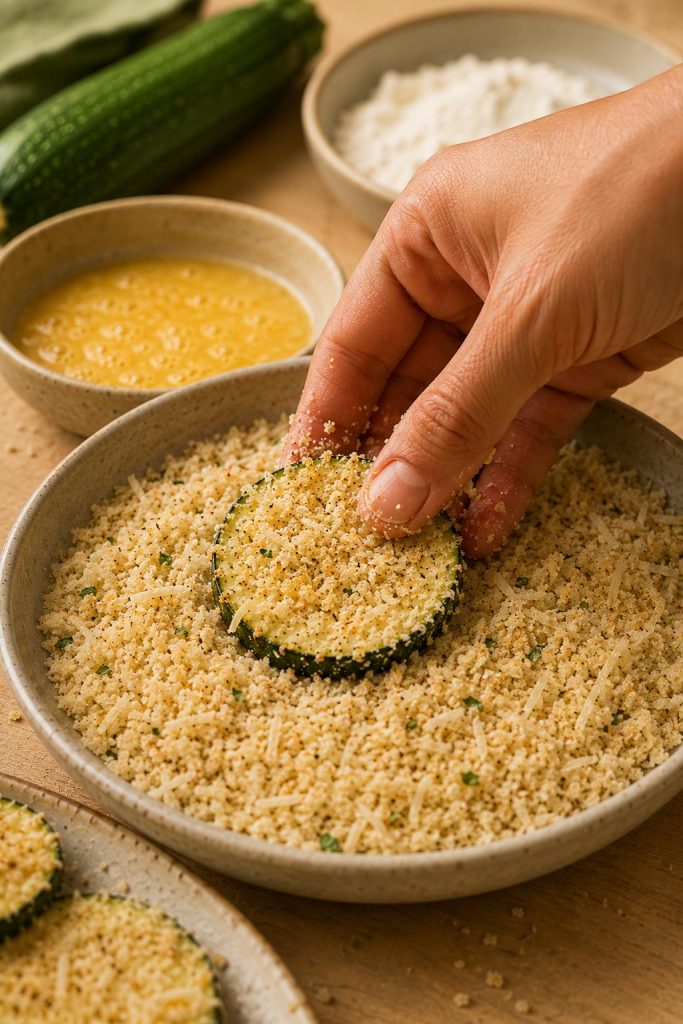
Set up three bowls: flour, beaten eggs, and panko mixed with parmesan and seasoning.
Coat each slice in flour, then egg, then panko mixture.
Press gently so the coating sticks.
Arrange in a single layer and spray lightly with oil.
Bake at 425°F / 218°C for 25–30 minutes, or air fry at 400°F / 204°C for 10–12 minutes, checking early because panko can brown quickly.
For panko zucchini chips, press the crumbs onto dry slices gently. That contact helps the coating cling and brown into a crunchy shell.
If the coating falls off, the zucchini was probably too wet before breading. Salt, drain, and dry the slices well before coating. For more soft-chip fixes, check the troubleshooting table.
If breadcrumbs are off the table, parmesan is the easiest way to get real edge crispness. Plain zucchini can dry nicely, but parmesan gives the snack more structure and a salty bite.
Almond flour can work, but it does not behave like panko. It tends to feel heavier and less crisp, so use it lightly or pair it with parmesan instead of expecting a breadcrumb-style crunch.
If you are building a bigger low-carb snack plate, these parmesan chips can sit alongside other keto chips, cucumber sticks, olives, cheese, and a creamy ranch or garlic yogurt dip.
Dry Seasonings That Work Best
Keep the wet flavors for later. Before cooking, dry spices are your friend.
Garlic parmesan: garlic powder, black pepper, and finely grated parmesan.
Ranch-style: garlic powder, onion powder, dried dill, parsley, and black pepper.
Chili lime: chili powder, garlic powder, lime zest, and a squeeze of lime after cooking.
Smoky paprika: smoked paprika, garlic powder, black pepper, and a little parmesan.
Italian herb: dried oregano, basil, garlic powder, black pepper, and parmesan.
Spicy parmesan: garlic powder, paprika, cayenne, black pepper, and finely grated parmesan.
Taste before adding more salt at the end, especially with parmesan. If you like heat, keep hot sauce or other wet sauces for after cooking; they work better as a finishing touch than as a pre-cook coating.
What to Serve with Zucchini Chips
The dip depends on the style of chip. Thin plain chips are delicate, so they work better with lighter dips like ranch, garlic yogurt, or tzatziki. Parmesan chips are great with marinara or salsa verde. If you want something sweeter and brighter, mango salsa also works.
For a snack board, pair warm zucchini chips with one creamy dip, one bright dip, and a few crunchy extras like cucumber sticks, carrot sticks, crackers, or olives. The contrast is what makes the board work: warm chips, cool dip, crisp edge, creamy finish.
How to Store and Re-Crisp Zucchini Chips
Fresh is best, but leftovers are not hopeless. You just have to bring the dry heat back.
They are best while the cheese has just firmed, the edges still crackle lightly, and the centers are still warm. As they sit, zucchini continues to soften, so even a crisp batch can lose some texture.
Do not seal in the steam you just worked so hard to remove. Spread hot chips out for a few minutes before piling them into a bowl or container.
Same-Day Storage
If you are serving them within a few hours, cool them completely first. Keep them loosely covered rather than sealing them while warm.
Overnight Storage
Refrigerate parmesan or panko chips in an airtight container once fully cool. They will lose some crispness, but you can revive them in the oven or air fryer.
Make-Ahead Chips
Choose low-and-slow oven chips or dehydrator chips if you need something that stores better. They hold up longer because they are dried more thoroughly.
How to Re-Crisp Them
To re-crisp zucchini chips, spread them out and bring back dry heat. The air fryer or oven works better than a microwave.
Air fryer: re-crisp at 350–370°F / 175–188°C for 3–5 minutes, checking often.
Oven: bake at 350°F / 175°C for 8–10 minutes, uncovered, until the edges crisp again.
Re-crisped chips will not be exactly like fresh, but dry heat can still bring back that salty edge. The microwave is the one option to skip; it softens zucchini instead of reviving it.
Troubleshooting: Soggy, Burnt, Oily, or Uneven Chips
A soft tray is not a failed recipe. It is usually one adjustment away: drier slices, less oil, more space, or a few more minutes.
Quick Fixes for Soft or Uneven Zucchini Chips
Problem
Right Now
Next Batch
Chips are soggy
Re-crisp uncovered in the air fryer or oven.
Salt longer, pat very dry, use less oil, and avoid crowding.
Chips are soft in the middle
Cook a few minutes longer at moderate heat.
Slice thinner or use a lower, slower oven method.
Edges burned but centers stayed soft
Remove the burnt pieces and lower the heat slightly.
Slice more evenly and check earlier.
Chips stayed soft
Spread them out and cook a few minutes more.
Use a single layer and cook in batches.
Chips feel oily
Drain briefly on a towel and re-crisp with dry heat.
Use oil spray or toss with less oil.
Fixes for Coating, Salt, and Air Fryer Problems
Problem
Right Now
Next Batch
Parmesan burned
Pull the basket or tray before the cheese turns bitter.
Use finely grated parmesan, less cheese, or slightly lower heat.
Parmesan stuck to the tray
Let it cool briefly before lifting.
Use parchment for oven chips or a light oil spray for air fryer chips.
Panko coating fell off
Serve the loose crumbs as a crunchy topping.
Dry zucchini well before breading and press the coating gently.
Panko browned but zucchini stayed watery
Return the soft pieces to the oven or air fryer for a few minutes.
Use ¼-inch / 6 mm slices and dry them better before coating.
Chips taste too salty
Serve with an unsalted dip or yogurt sauce.
Use less salt before cooking, especially with parmesan.
Chips taste bitter
Remove dark pieces and serve the lighter ones.
Lower heat slightly and add delicate seasonings after cooking.
Air fryer chips flew around
Pause and settle the chips if needed.
Slice slightly thicker or use a rack/mesh insert.
Chips softened after cooling
Re-crisp in the air fryer or oven.
Cool spread out before storing or serving.
If the first tray bends, do not panic. Moisture usually won the first round, and the next batch often only needs one or two adjustments.
Frequently Asked Questions
Why are my zucchini chips soggy?
Zucchini chips turn soggy when moisture gets trapped. Slice evenly, salt briefly, pat very dry, use little oil, and cook in a single layer.
Why are my air fryer zucchini chips not crispy?
The slices may be wet, thick, crowded, or coated with too much oil. Cook in batches and pull finished pieces early instead of waiting for every slice to match.
Do you have to salt zucchini first?
You do not absolutely have to, but it helps a lot. Even a 15–20 minute rest gives the slices a better start before they hit the heat.
Do they get crispier as they cool?
Yes, especially parmesan chips. The cheese firms as it cools, so give the chips a few minutes before judging the texture.
Air fryer or oven: which is better?
Choose the air fryer for speed and small batches. Use the oven for larger trays, panko-coated chips, and low-and-slow thin chips.
Can I bake zucchini chips without breadcrumbs?
Yes. Use thin slices, salt and dry them well, then bake low and slow at 225–235°F / 107–113°C. Add finely grated parmesan if you want crisp edges without breadcrumbs.
What is the best no-breadcrumb coating?
Finely grated parmesan is the easiest no-breadcrumb coating because it browns, firms as it cools, and adds salty flavor.
How thin should I slice the zucchini?
Slice about ⅛ inch / 3 mm for thin plain chips and about ¼ inch / 6 mm for breaded or panko rounds.
Are zucchini chips keto?
Plain and parmesan versions can be keto-friendly. Panko or regular breadcrumb-coated chips are not keto unless you use a low-carb coating.
Can I use yellow squash or courgette?
Yes. Courgette is another name for zucchini, and yellow summer squash can also work. If you actually have cucumber, use it fresh in a cucumber salad instead of baking it into chips.
Should I peel the zucchini?
No. The skin adds color, helps the slices hold together, and gives better texture.
Can I use frozen zucchini?
Frozen zucchini is not ideal for chips because it releases too much liquid after thawing. Use fresh zucchini for this recipe.
Are these the same as zucchini fries?
No. Chips are usually sliced into rounds, while zucchini fries are cut into thicker sticks and often breaded.
Can I use a dehydrator for zucchini chips?
Yes. Slice very thin, salt and dry the slices, season lightly, and dehydrate at 135–150°F / 57–66°C for 4–8 hours.
How do I store zucchini chips?
Cool them completely first. Store fully dried chips airtight, refrigerate parmesan or panko leftovers, and re-crisp in the air fryer or oven.
Final Thoughts
Zucchini chips stop feeling random once you stop treating every version like the same snack. Thin chips need drying time, parmesan rounds need a light coating and a cool-down, and panko rounds need enough thickness to hold their crunch.
Your first batch teaches you what your zucchini and air fryer are doing. Usually, the next one is the keeper.
When the edges finally crisp, the whole thing clicks: not a packaged potato chip, not a limp roasted round, but a golden, salty zucchini snack that actually earns its dip.
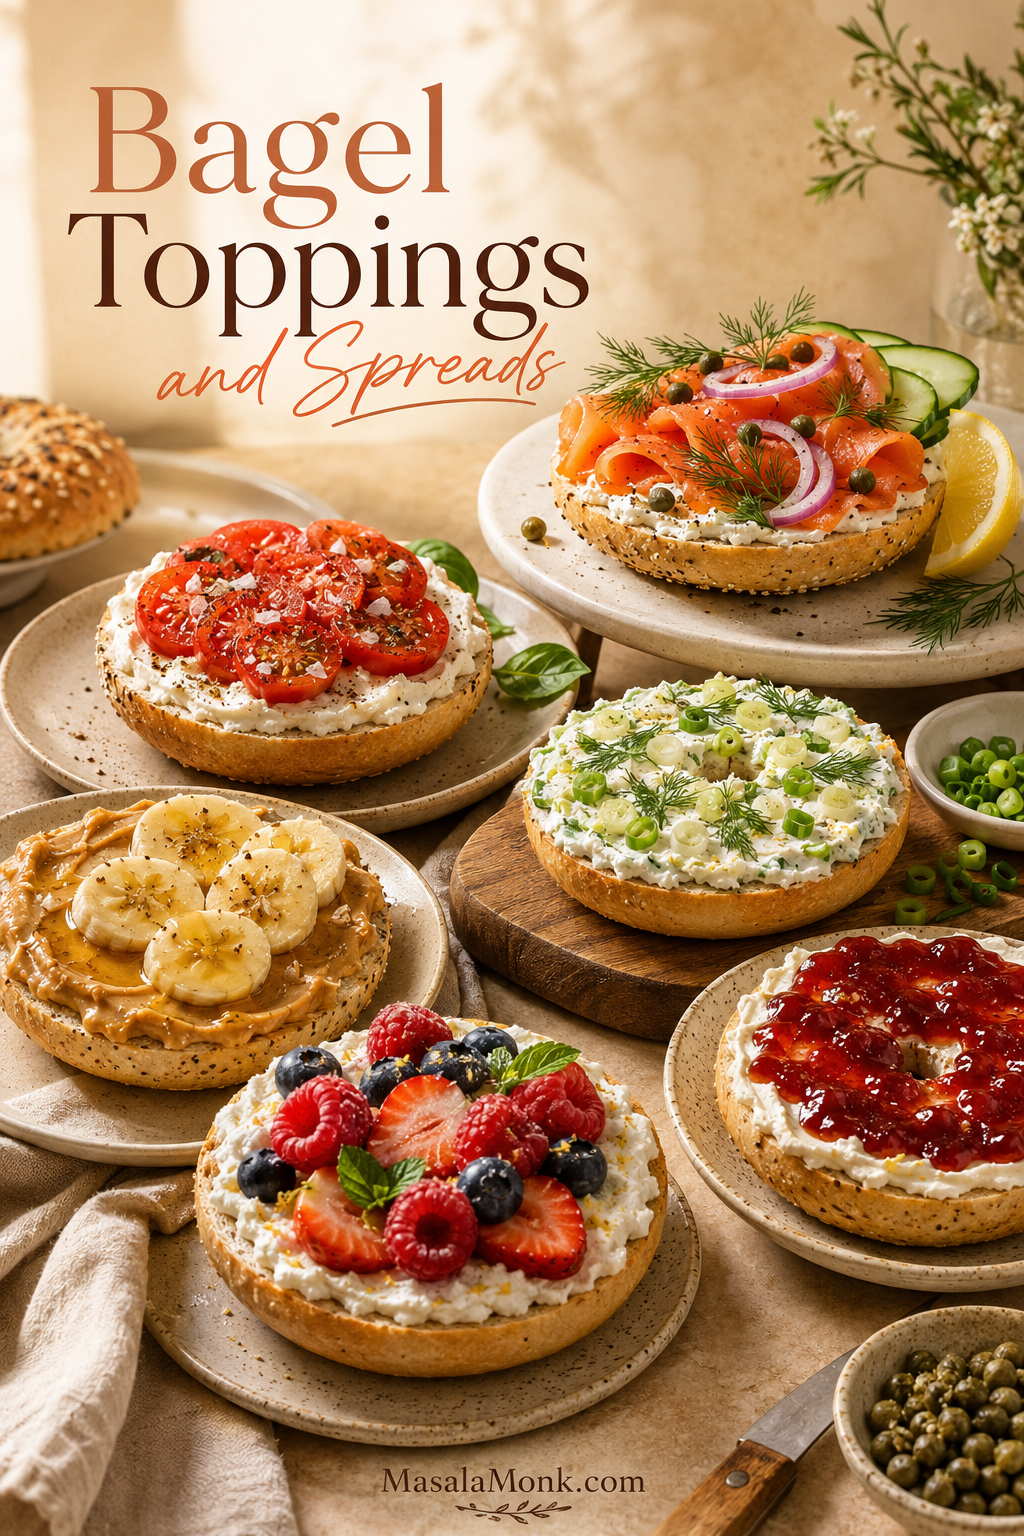
Bagel toppings and spreads can make the difference between dry bread with stuff on it and the bagel everyone reaches for first. A plain bagel can become breakfast, lunch, a sweet snack, or a full brunch board with one good spread, one useful topping, and one small finish. Usually, the best ones have the right mix of creamy, crisp, salty, sweet, fresh, or bright.
Along the way, this guide covers the best bagel toppings and spreads for every kind of craving: classic cream cheese schmear, smoked salmon and lox, sweet bagel toppings, savory combinations, healthy ideas, breakfast bagels, and bagel bar toppings for brunch. You will also get an easy homemade bagel schmear recipe with sweet and savory flavor variations, plus exact amounts for schmear, smoked salmon, and brunch boards.
Whether you are using a fresh bakery bagel, a freezer bagel, or the last plain bagel in the bag, the right spread and one good finish can make it feel intentional. In practice, the spread does more than add flavor; it gives the toppings something to hold onto and helps the whole bagel eat better.
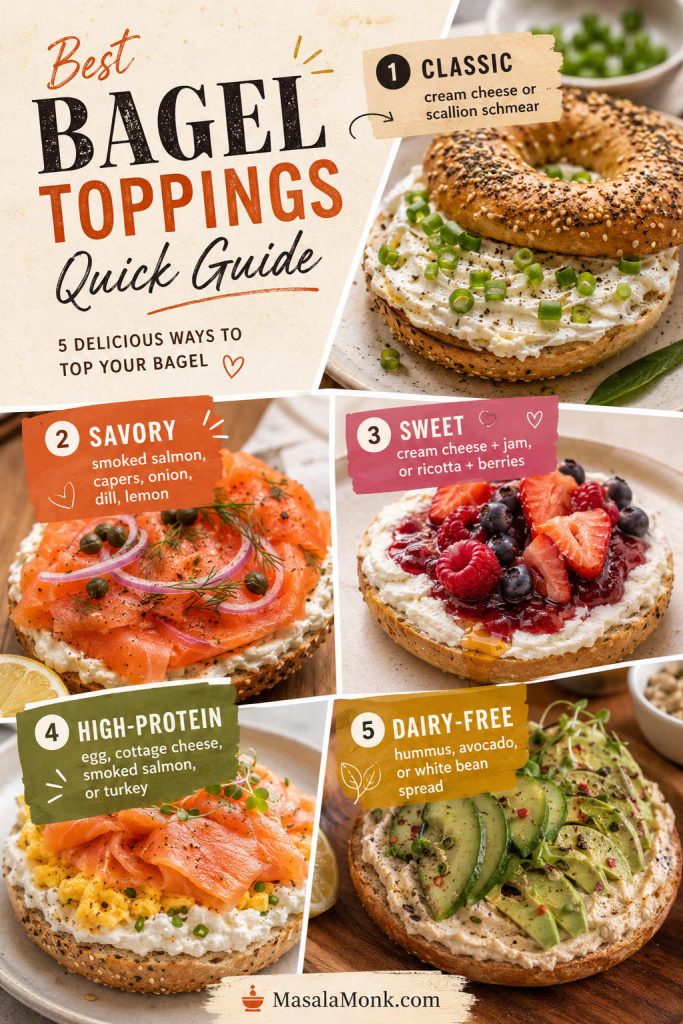
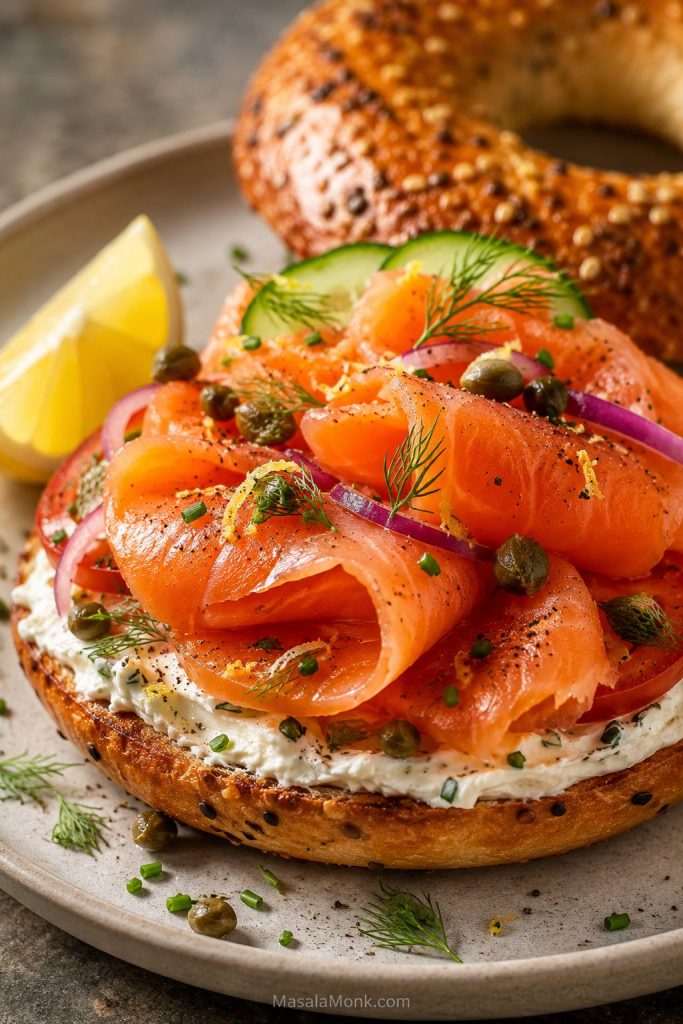
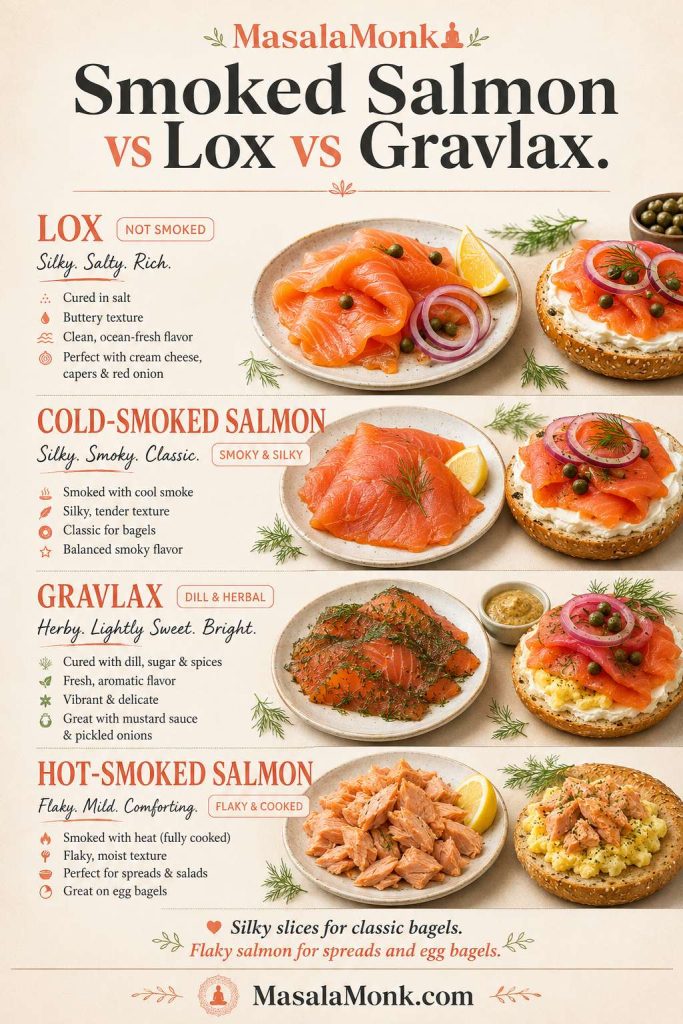
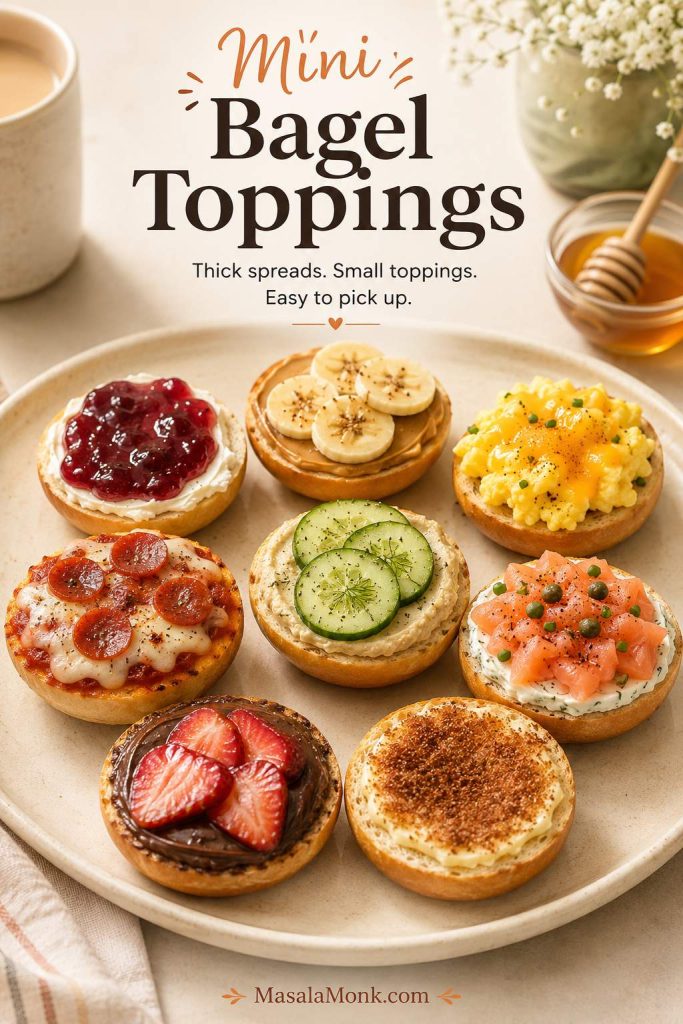
Start a classic bagel with cream cheese or scallion schmear. When you want something savory, it is hard to beat a tangy spread with smoked salmon, capers, red onion, dill, and lemon. For a sweet bagel, try cream cheese with jam, peanut butter with banana and honey, or ricotta with berries.
If you only remember one rule, choose the spread first. The best bagel toppings and spreads usually work together: the spread gives moisture, while the toppings add flavor, texture, and a final finish.
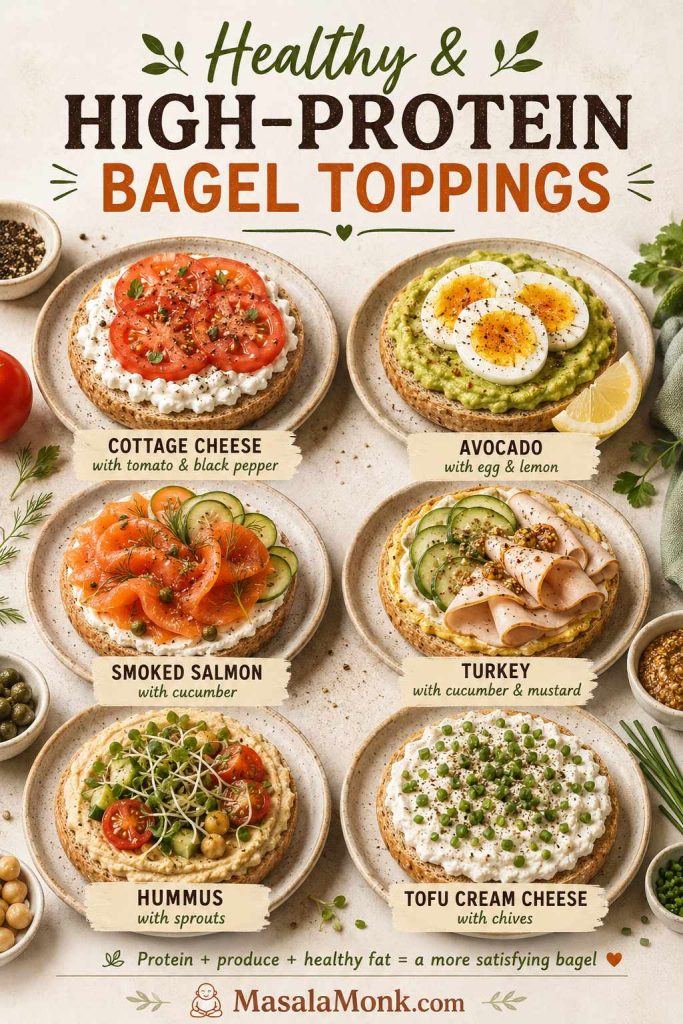
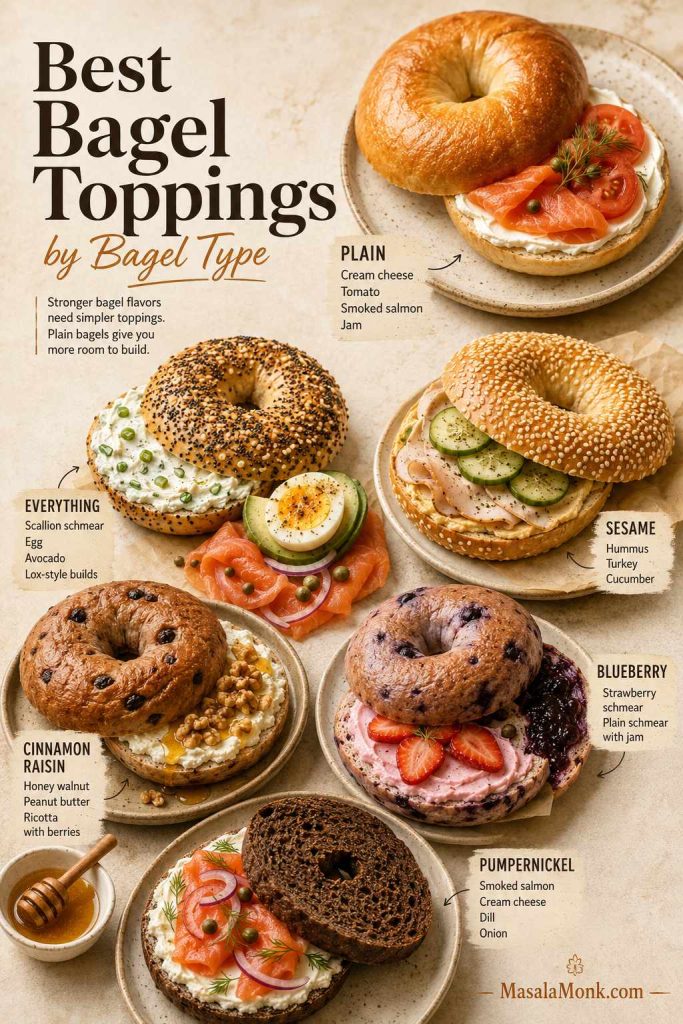
Beyond that, other easy bagel toppings include butter, avocado, eggs, hummus, tuna salad, egg salad, turkey, cucumber, tomato, cottage cheese, Nutella, berries, apple slices, honey walnut cream cheese, and everything bagel seasoning.
Use this quick guide when you know you want a bagel but not the direction. A classic schmear, smoked salmon, ricotta berries, egg, hummus, or avocado can each turn the same bagel into a different kind of meal.
Craving
Reliable bagel topping idea
Classic
Cream cheese, scallion schmear, butter, or jam
Deli-style
Cream cheese, smoked salmon, capers, red onion, dill, lemon
Breakfast
Egg, cheese, bacon, avocado, tomato, sausage, or turkey
Sweet
Cream cheese and jam, peanut butter and banana, ricotta and honey, Nutella and strawberries
Dairy-free pick: hummus with cucumber, tomato, sprouts, olive oil, and paprika.
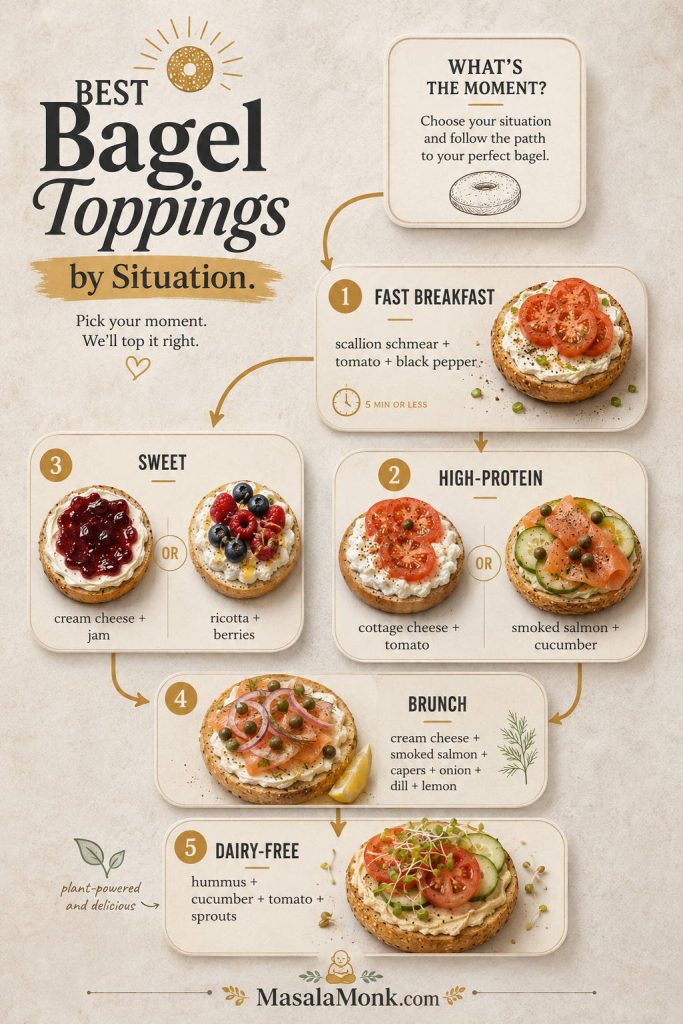
Instead of choosing toppings at random, start with the situation: fast breakfast, brunch, packed lunch, sweet snack, or dairy-free meal. From there, the best bagel toppings become much easier to narrow down.
Quick fix: if a bagel tastes unfinished, do not automatically add more toppings. Instead, add the missing piece: lemon for lift, capers for sharpness, flaky salt for tomato, herbs for creaminess, honey for sweet spreads, or crunch for soft fillings.
How to Build a Better Bagel
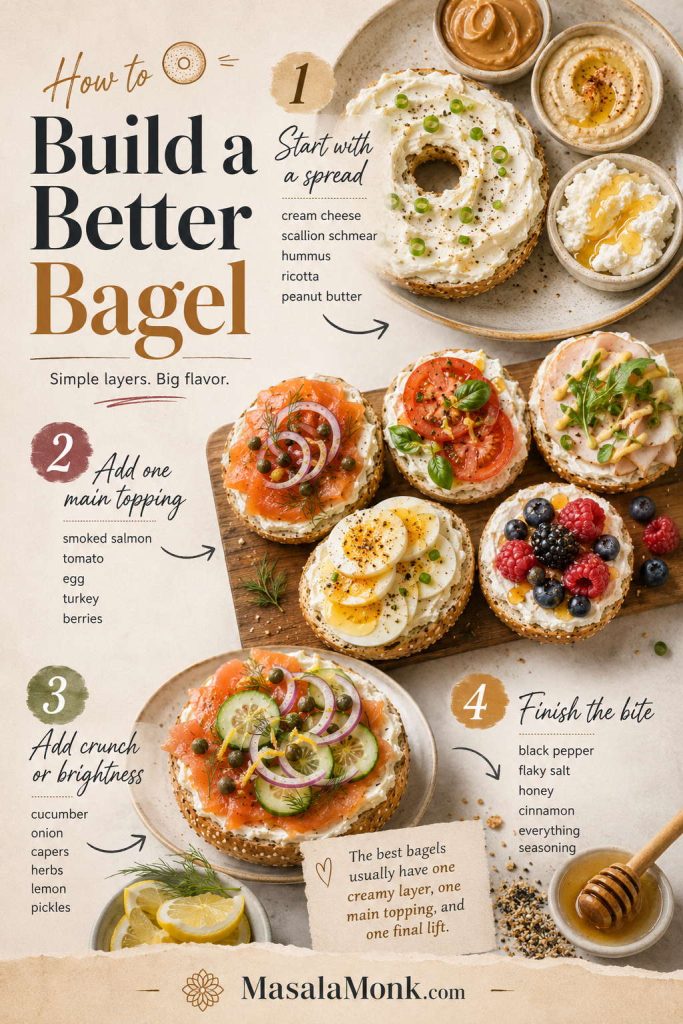
A good bagel is not just a pile of toppings. It tastes better when the layers make sense together. Use this simple formula:
Spread + main topping + crunch + brightness + seasoning.
Once the spread is chosen, the bagel becomes easier to build. Add one main topping, then use cucumber, onion, lemon, capers, honey, herbs, or seasoning to shape the final bite.
However, you do not need all five parts every time. Even two or three good layers can keep the bagel from becoming dry, heavy, soggy, or one-note.
Start with a bagel spread
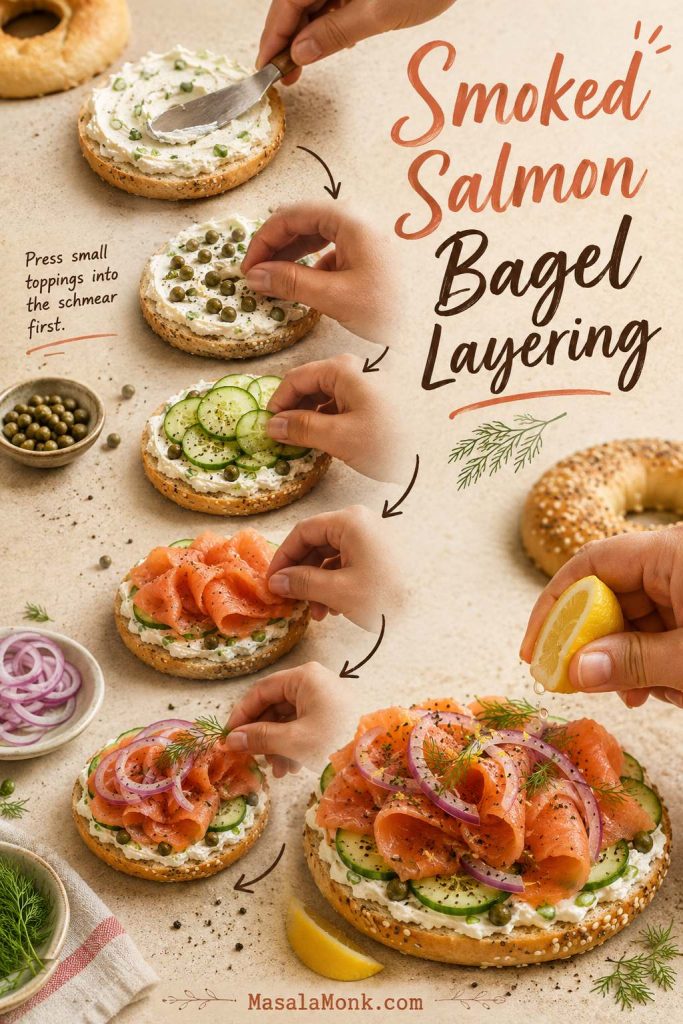
The spread gives the bagel moisture and flavor. It also helps small toppings stay in place.
The main topping decides whether the bagel feels like breakfast, lunch, snack, or brunch. It can be as simple as an egg, a few slices of tomato, smoked salmon, tuna salad, turkey, banana, berries, or roasted vegetables.
For a quick weekday bagel, one spread and one main topping may be enough. However, for a brunch bagel or open-faced bagel, a finishing layer helps every bite feel more complete.
Finish bagel toppings with crunch, brightness, or seasoning
This is the small step that makes a bagel taste finished. A plain schmear becomes brighter with chives or lemon. Smoked salmon becomes cleaner and sharper with capers, onion, and a squeeze of lemon. Peanut butter becomes more interesting with banana, honey, cinnamon, or a tiny pinch of salt.
When a bagel tastes dull, it usually needs a small finisher rather than another full topping. Lemon, capers, pepper, herbs, honey, cinnamon, or everything seasoning can add lift without crowding the bagel.
Brightness: lemon, pickled onions, capers, tomatoes, berries, apple slices
Seasoning: black pepper, chili flakes, flaky salt, everything bagel seasoning, cinnamon, herbs
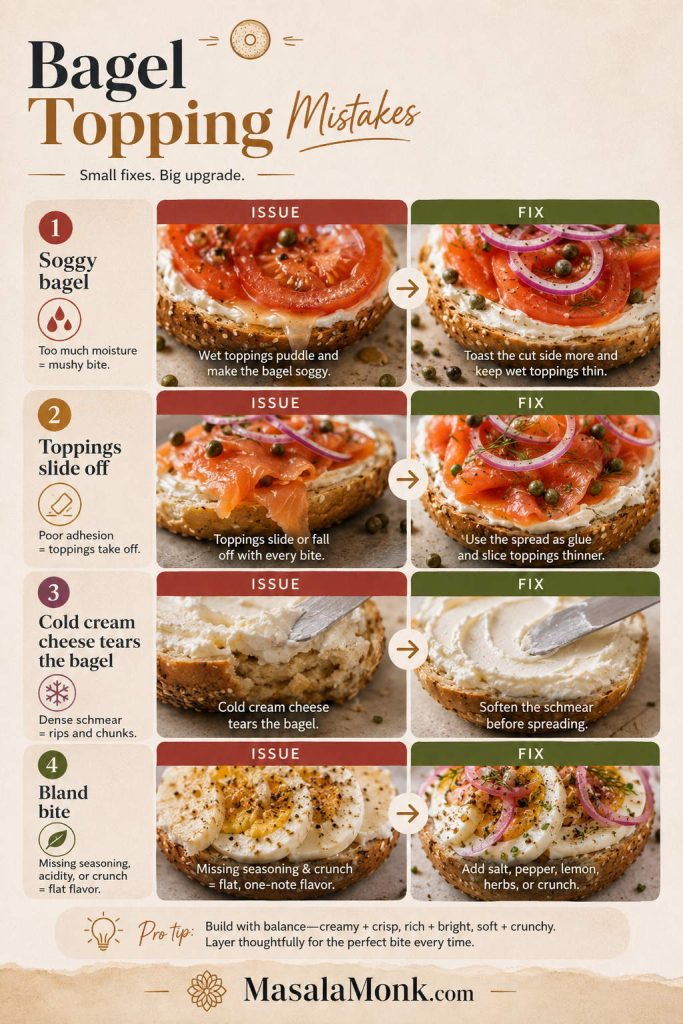
The bagel test: When the bite feels too rich, add cucumber, tomato, herbs, lemon, or pickled onion. An unfinished bite usually needs one small finish: flaky salt, black pepper, capers, chili flakes, honey, cinnamon, or everything seasoning. Messy builds are easier to control when toppings are sliced thinner and the spread works like glue.
When bagels turn soggy, messy, or dull, the bagel topping mistakes section will help you fix the texture before adding more ingredients.
One small detail makes a big difference: press capers gently into the creamy layer before adding smoked salmon so they stick instead of rolling off. For wet toppings like tomato or cucumber, slice thinly and pat dry before layering.
Bagel Topping Mistakes That Make Bagels Soggy, Messy, or Flat
A bagel can have great toppings and still eat badly if the texture is off. These are the small mistakes that turn a good idea into a soggy, slippery, or bland bagel.
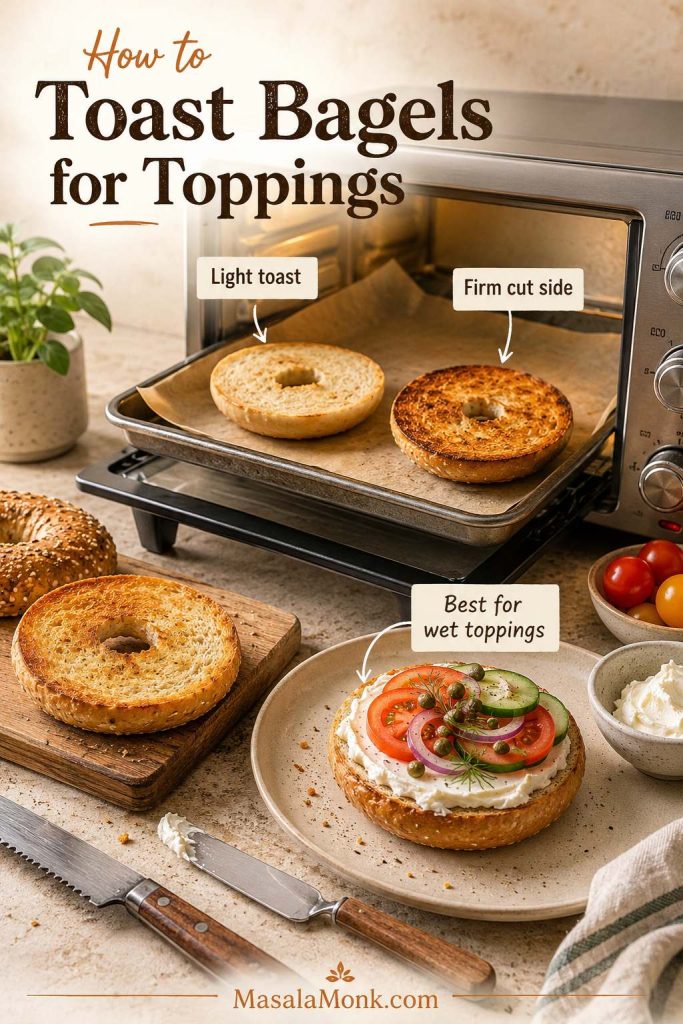
Most disappointing bagels fail because of texture, not flavor. Toast the cut side, soften the schmear, slice wet toppings thinly, and use small finishes so the bagel stays crisp, stable, and satisfying.
Mistake
What happens
Better move
Using cold block cream cheese
It tears the bagel and spreads unevenly.
Let cream cheese soften first, or beat it into a schmear.
Piling on wet tomatoes or cucumbers
The cut side gets soggy before you finish eating.
Slice thinly, pat dry, and use a thick spread, hummus, avocado, or butter as a barrier.
Adding delicate toppings to a piping-hot bagel
The spread melts, herbs wilt, and smoked salmon can feel greasy.
Let the bagel cool for a minute before adding schmear, fish, herbs, or fresh vegetables.
Overloading a closed sandwich
The filling slides out and the bagel becomes hard to bite.
Keep tall builds open-faced, or use fewer toppings and slice them thinner.
Skipping the final finish
The bagel tastes like bread plus spread instead of a finished bite.
Add lemon, herbs, black pepper, flaky salt, capers, honey, cinnamon, or chili flakes.
Using loose tuna, egg, or chicken salad
The filling slides off the bagel.
Use a thicker salad, add lettuce as a barrier, or serve it open-faced.
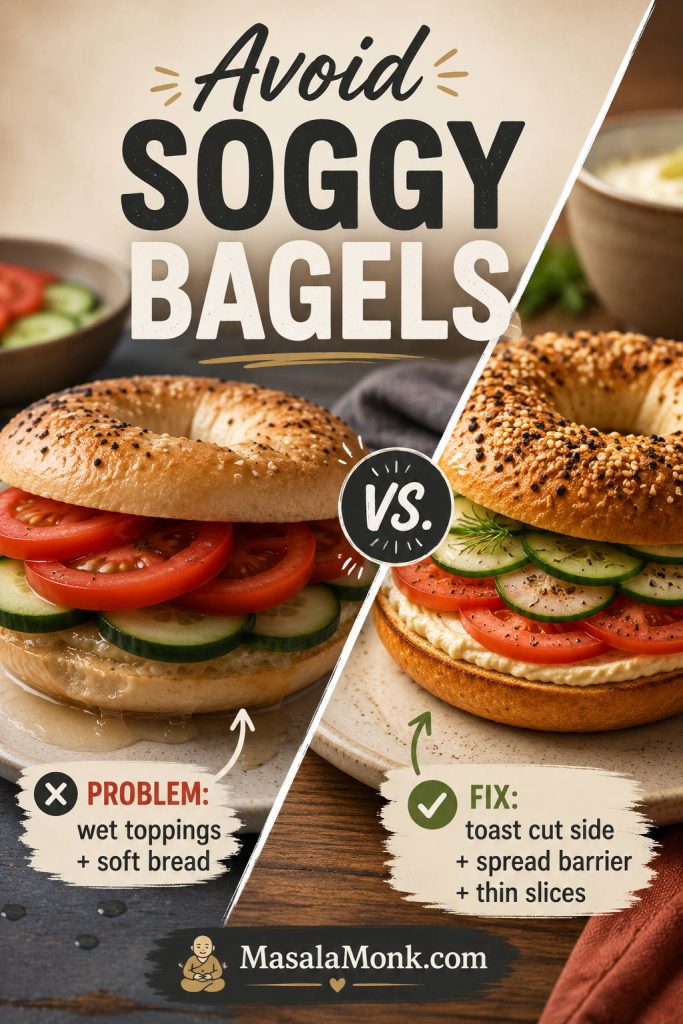
How to keep wet toppings from making bagels soggy
In most cases, the two biggest fixes are simple: toast the cut side enough to create a barrier, and keep wet toppings thin. Tomato, cucumber, avocado, pickles, and loose salads are all good on bagels, but they need structure underneath them. A thick schmear, hummus, avocado, butter, or even lettuce can help protect the bread from turning soft too quickly.
For more detail on getting the cut side sturdy, see the toasting guide before adding tomato, cucumber, eggs, avocado, hummus, or smoked salmon.
Juicy tomato and cucumber are great on bagels, but they need a toasted surface and a creamy barrier underneath so the bread stays firm.
Texture rule: the wetter the topping, the sturdier the bagel needs to be. Toast a little longer, use a thicker spread, and keep juicy toppings thin.
15 Bagel Topping Ideas to Try First
Think of these as the safe bets — the combinations to try before you start inventing anything complicated. They cover the classics, quick breakfasts, sweet cravings, and the “I need this to feel like lunch” moments.
These are the bagels I would put in front of someone who says, “Just tell me what works.” They are not the weirdest ideas; instead, they are the bagel toppings and spreads that taste complete without needing ten toppings.
To keep this practical, effort is rated from 1 to 5, with 1 being almost no prep and 5 needing more cooking or assembly.
Classic bagel toppings and spreads to try first
Start with these before getting creative; each one gives the bagel a clear base, one main topping, and a small detail that makes the bite feel intentional.
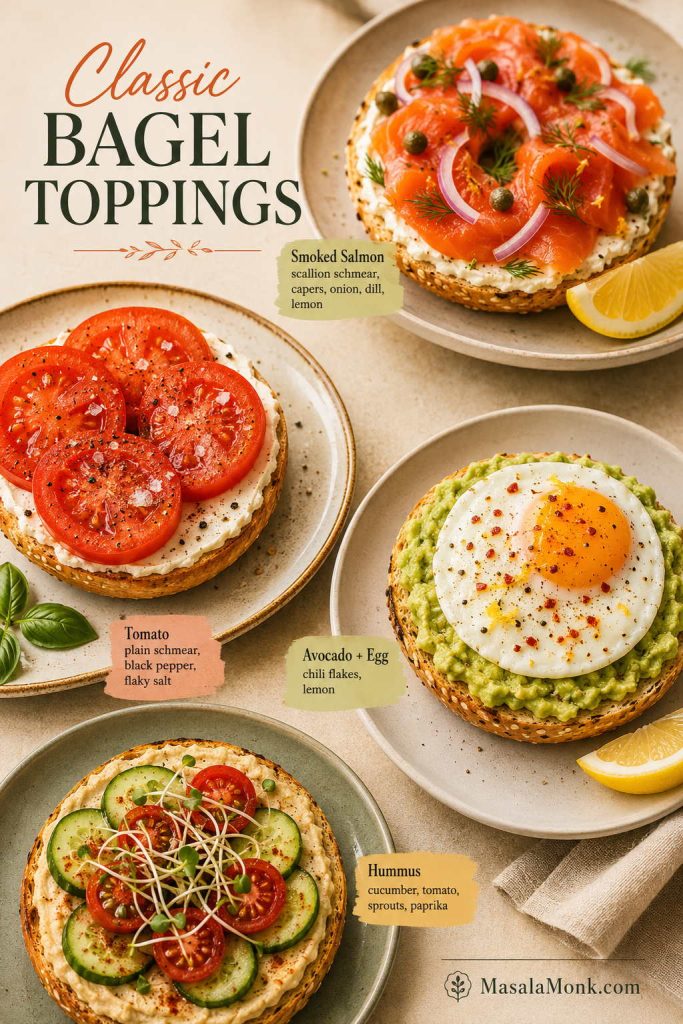
Classic bagel toppings work because they cover the essentials: creamy schmear, salty or fresh toppings, crisp vegetables, and a small finish. Start here before moving into more creative spreads.
Salmon brings salt, capers and onion add bite, and the schmear keeps the bagel rich without feeling dry.
Plain schmear + tomato + black pepper + flaky salt
Fast breakfast
1/5
Plain, sesame, onion
Juicy tomato, creamy spread, and enough salt make it feel complete.
Avocado + fried egg + chili flakes + lemon
Filling breakfast
3/5
Everything, whole wheat, sesame
Egg makes it filling, avocado keeps it creamy, and lemon/chili stop it from feeling heavy.
Hummus + cucumber + tomato + sprouts
Light lunch
1/5
Sesame, whole wheat, plain
Cool cucumber and sprouts keep the hummus from feeling dense.
Breakfast and lunch bagel topping ideas
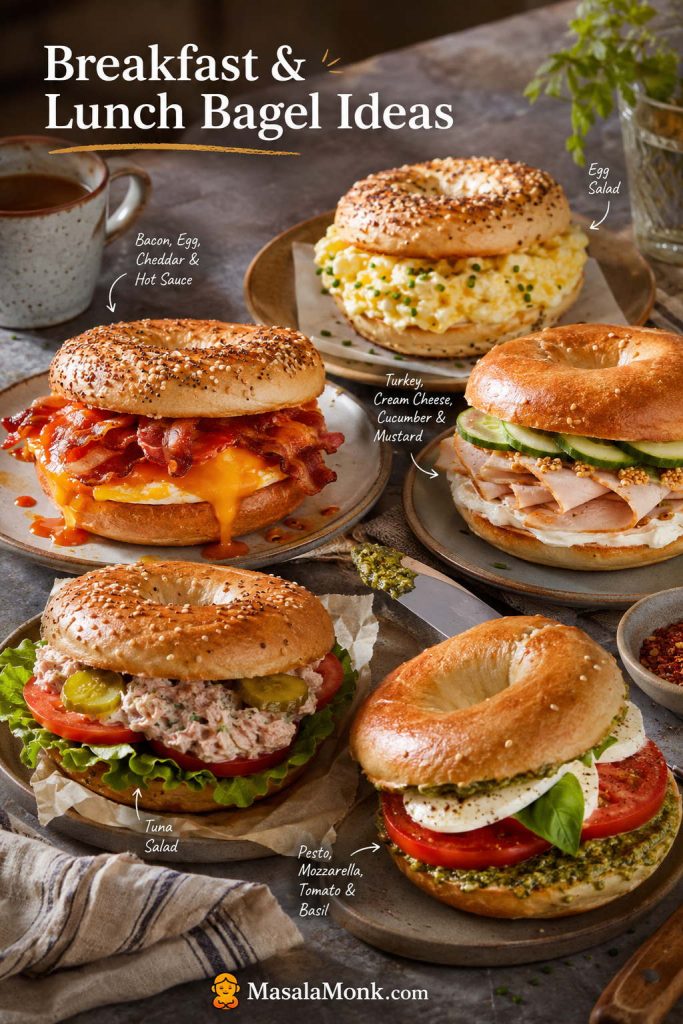
These builds are meant to eat like real meals, so the spread, protein, vegetables, and toast level need to help the bagel hold together.
Meal-style bagels hold together better when the cut side is toasted, the spread is thick, and crisp vegetables sit between the bread and creamy fillings.
Bagel combination
Best moment
Effort
Good bagel choices
Why it tastes balanced
Bacon + egg + cheddar + hot sauce
Weekend breakfast
3/5
Plain, everything, Asiago
Cheddar and egg make it rich; hot sauce cuts through the breakfast heaviness.
Turkey + cream cheese + cucumber + mustard
Easy lunch
1/5
Plain, sesame, whole wheat
Cucumber keeps the turkey from eating dry, while mustard gives the sandwich some bite.
Tuna salad + tomato + lettuce + pickles
Meal-style lunch
2/5
Plain, poppy, whole wheat
Creamy filling tastes better with crisp, briny, and juicy layers.
Egg salad + chives + everything seasoning
Make-ahead lunch
2/5
Plain, everything, poppy
Chives and everything seasoning make soft egg salad taste more like a proper deli bagel.
Pesto + mozzarella + tomato + basil
Vegetarian lunch
2/5
Plain, sesame, Asiago
Pesto seasons the cheese, tomato adds juiciness, and basil keeps it from feeling flat.
Sweet bagel toppings and spreads to try
Sweet bagels taste better when the topping has a little tang, salt, nuttiness, or fruit instead of only more sugar.
A sweet bagel should still feel like breakfast, not frosting on bread. Tangy cream cheese, soft ricotta, berries, toasted nuts, cinnamon, lemon zest, or a pinch of salt keep the sweetness in check.
Bagel combination
Best moment
Effort
Good bagel choices
Why it tastes balanced
Honey walnut cream cheese + banana
Sweet breakfast
1/5
Cinnamon raisin, plain, whole wheat
Banana makes it filling, honey walnut schmear adds sweetness, and cinnamon keeps it cozy.
Peanut butter + banana + honey + cinnamon
Fast filling snack
1/5
Plain, cinnamon raisin, whole wheat
Peanut butter gives staying power, banana softens the bite, and honey/cinnamon make it feel finished.
Ricotta + berries + honey + lemon zest
Sweet brunch
1/5
Plain, blueberry, whole wheat
Ricotta gives softness, berries add juice, and lemon zest keeps the sweetness clean.
Strawberry cream cheese + fresh berries
Bakery-style breakfast
1/5
Plain, blueberry
Fresh berries keep the strawberry spread from tasting too candy-sweet.
Butter + cinnamon sugar + toasted walnuts
Cozy snack
1/5
Cinnamon raisin, plain
Butter melts into the toasted cut side, while cinnamon sugar and walnuts add cozy crunch.
Nutella + strawberries + pinch of salt
Dessert-style bagel
1/5
Plain, blueberry, mini bagels
Strawberries brighten the chocolate spread, and salt keeps it from tasting one-note.
How to choose from this list
If the Caprese-style bagel is the one you want to build, use a thick pesto rather than a loose sauce so it spreads cleanly. This homemade pesto recipe and variations guide has basil pesto, red pesto, vegan pesto, nut-free pesto, pesto dip, pesto butter, and sandwich-friendly ideas.
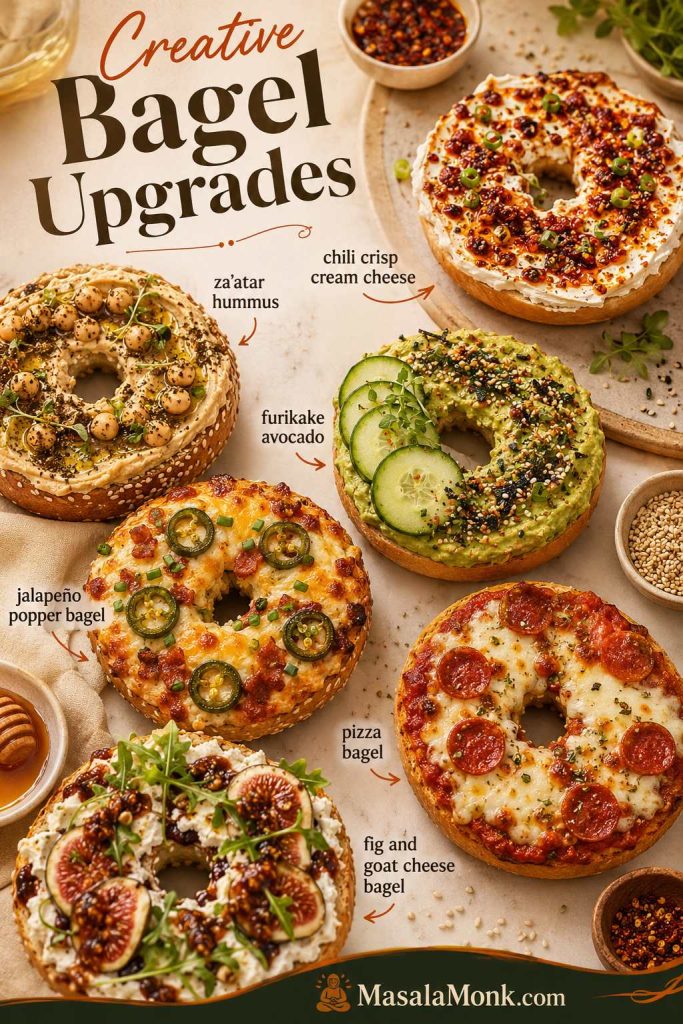
Creative bagel upgrades when you want something different
After the basics, these are the bagels to try when plain cream cheese is not enough and you want something more snacky, brunchy, global, or restaurant-style without making the whole thing complicated.
After the classics, creative bagel upgrades make a simple bagel feel restaurant-style. Chili crisp, za’atar, furikake, fig, goat cheese, jalapeño, and pizza toppings bring big flavor without needing a complicated build.
Pizza bagel: marinara, mozzarella, Parmesan, basil, and a quick toast until the cheese melts.
Maple bacon breakfast bagel: cream cheese, crispy bacon, maple drizzle, and black pepper.
Tuna melt bagel: thick tuna salad, cheddar, tomato, and a short toast until the cheese softens.
Warm toppings taste best when they melt into a firm toasted cut side. That is why pizza bagels, tuna melts, jalapeño popper bagels, and bacon breakfast bagels need heat before the toppings go on.
Roasted red pepper bagel: goat cheese or hummus, roasted red peppers, basil, and a little olive oil.
Bold and snacky
Chili crisp cream cheese bagel: plain schmear, chili crisp, scallions, cucumber, and sesame seeds.
Furikake avocado bagel: mashed avocado, furikake, cucumber, lime, and a little chili oil.
Pickle-everything schmear: cream cheese, chopped pickles, everything seasoning, and scallion.
Sun-dried tomato cream cheese: cream cheese, chopped sun-dried tomatoes, basil, black pepper, and lemon zest.
Sweet-salty
Honey pecan bagel: cream cheese, honey, cinnamon, and toasted pecans.
Fig and goat cheese bagel: goat cheese, fig jam, walnuts, honey, and black pepper.
Easy Bagel Schmear Recipe
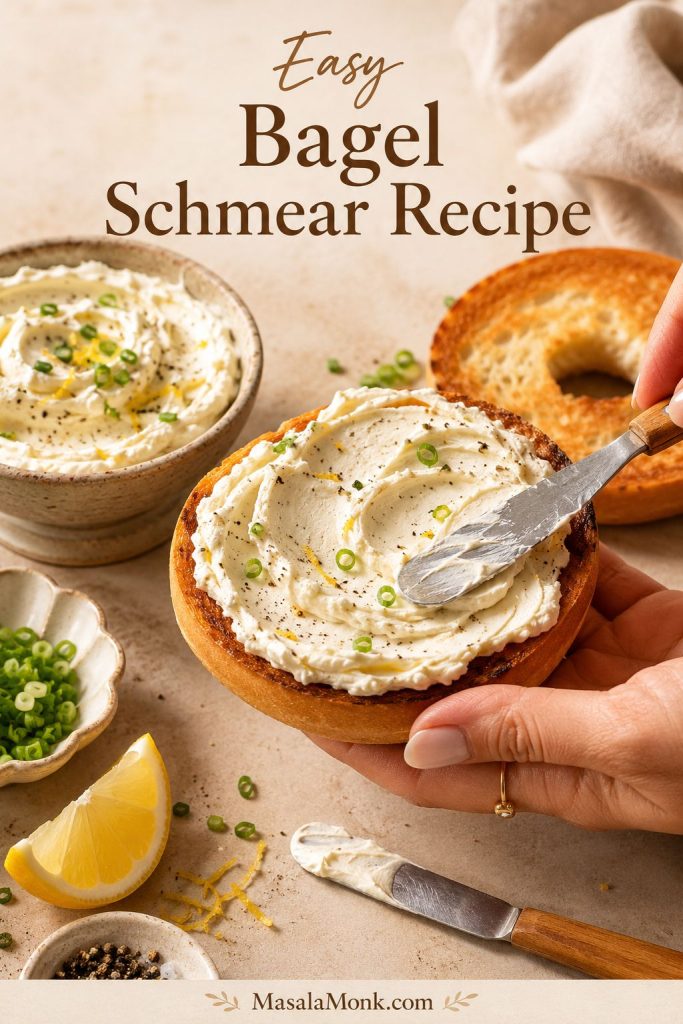
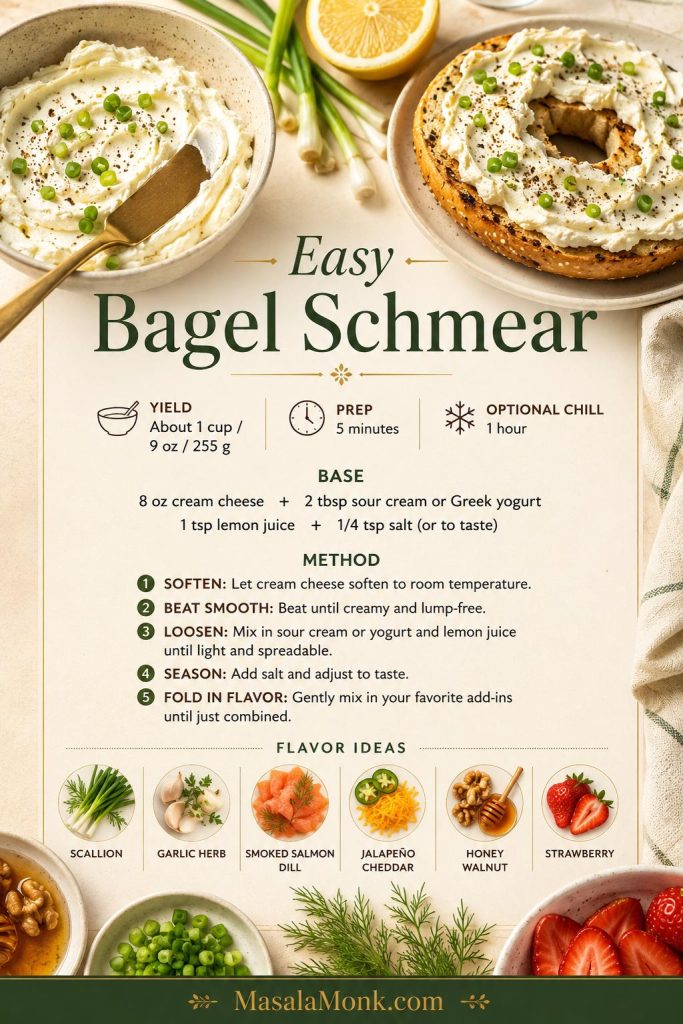
A good bagel schmear is softer and more spreadable than cold cream cheese straight from the block. It should glide over a toasted bagel without tearing it apart, and it should taste lightly seasoned even before you add toppings.
Soft schmear should spread in smooth strokes instead of tearing the bagel. Let the cream cheese soften first, then loosen it with lemon, herbs, or tangy dairy before adding toppings.
This base recipe makes about 1 cup / 9 oz / 255 g, enough for roughly 4 to 6 bagels, depending on how generously you spread it. Because schmear is one of the most useful bagel spreads, it also works as the base for many sweet and savory toppings.
The finished texture should be soft enough to spread easily but thick enough to hold herbs, capers, onions, or chopped salmon without turning loose.
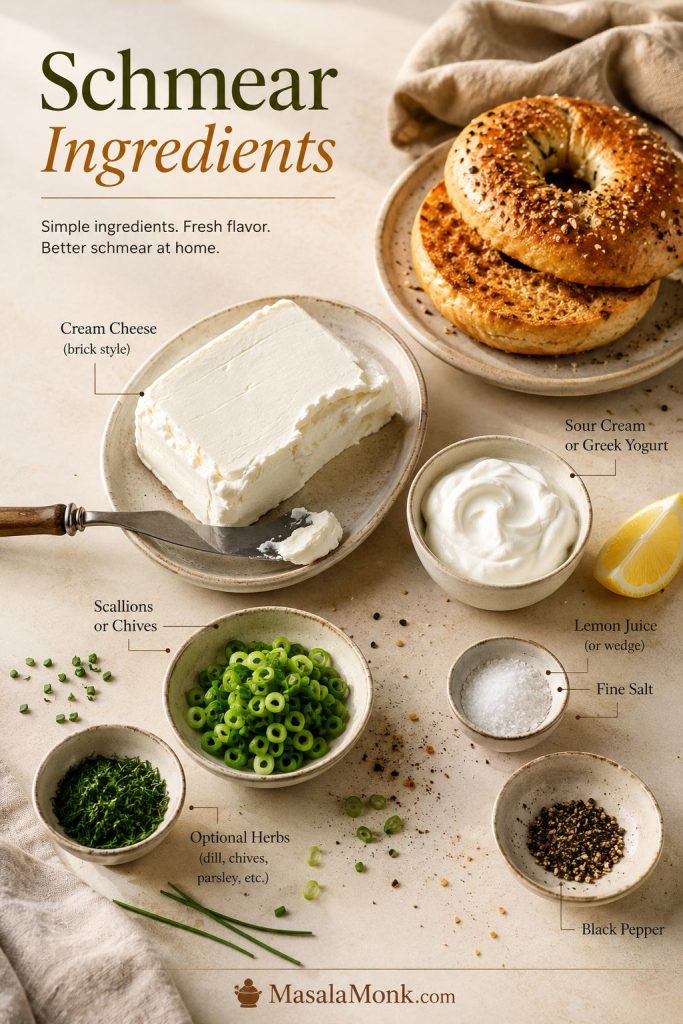
Bagel schmear ingredients
The base is simple, but each small addition changes how the schmear spreads, tastes, and holds toppings.
A simple bagel schmear does not need many ingredients. However, lemon, salt, pepper, scallions, and a little Greek yogurt or sour cream make cream cheese softer, brighter, and easier to pair with toppings.
Ingredient
US amount
Metric amount
Brick cream cheese, softened
8 oz
225 g
Sour cream, Greek yogurt, or crème fraîche
2 tbsp
30 g / 30 ml
Fresh lemon juice
½ tsp
2.5 ml
Fine salt
Pinch to ⅛ tsp
To taste
Black pepper
Optional
Optional
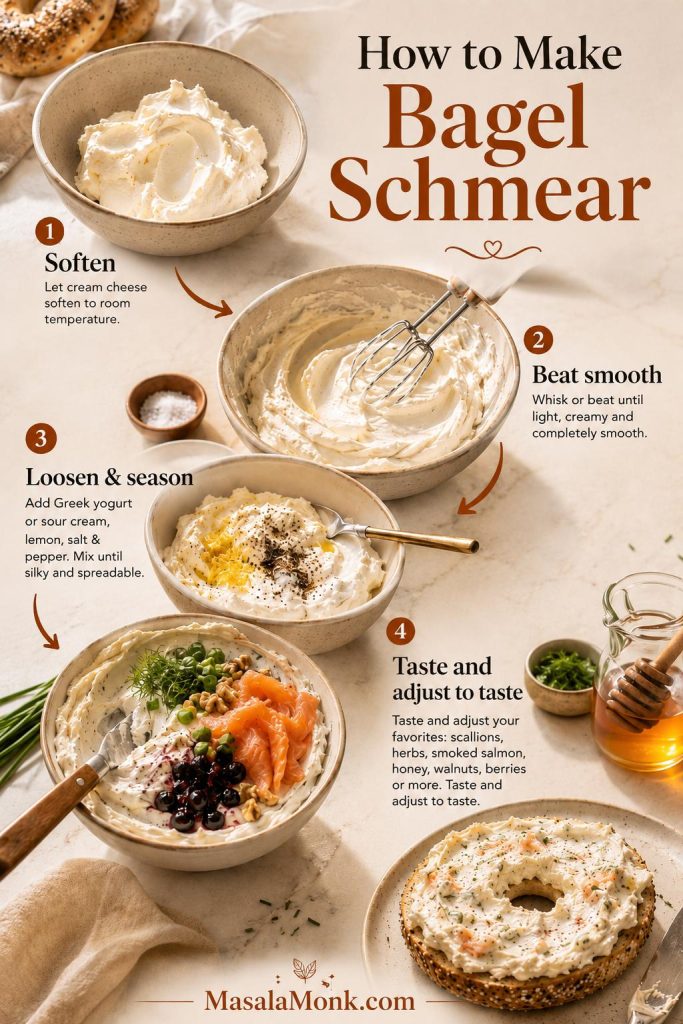
How to make bagel schmear
The goal is a spreadable texture first; once the base is smooth, herbs, smoked salmon, honey walnut, or berries fold in more evenly.
Homemade schmear is easiest when you build it in stages: soften, beat smooth, loosen and season, then fold in flavor. After that, the same base can become scallion, smoked salmon dill, honey walnut, or berry schmear.
Soften the cream cheese. Leave it at room temperature for about 30 minutes, or until it gives slightly when pressed.
Beat until smooth. Use a hand mixer, stand mixer, or sturdy spoon. The texture should look creamy, not lumpy.
Loosen it slightly. Mix in sour cream, Greek yogurt, or crème fraîche.
Season it. Add lemon juice and salt. Then taste before adding more salt, especially if you plan to add smoked salmon, capers, bacon, cheddar, or everything seasoning.
Keep it plain or add flavor. Finally, fold in one of the flavored cream cheese ideas below.
Once the base is smooth, use the flavored cream cheese ideas to turn one batch into savory, sweet, or smoked salmon schmear.
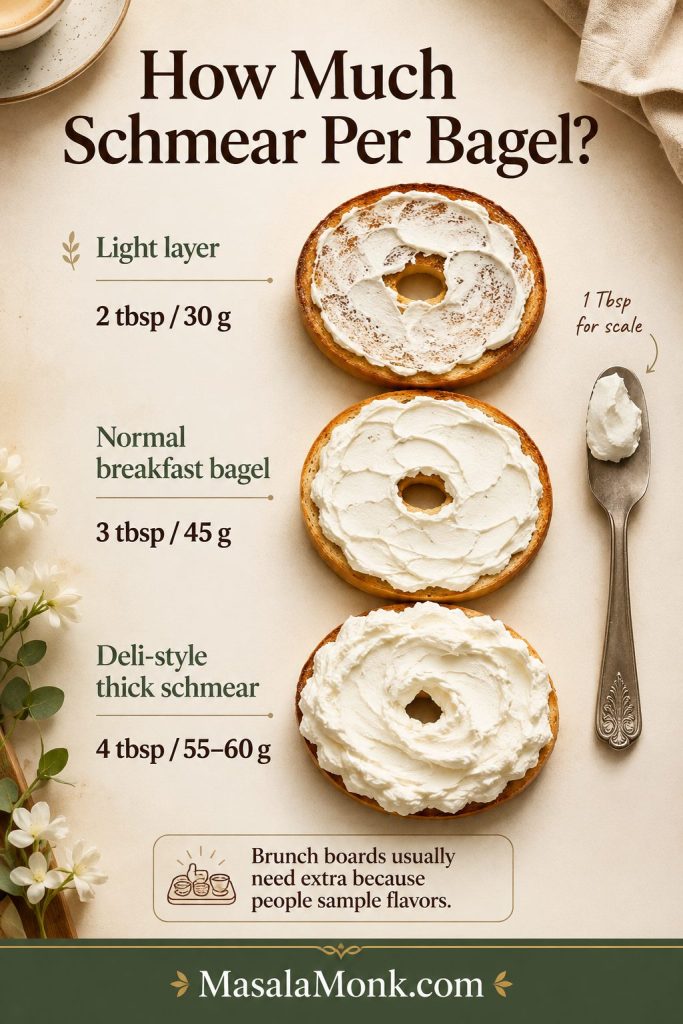
How much schmear do you need per bagel?
Use the amount as a texture decision: lighter for everyday breakfasts, thicker for deli-style bagels, and a little extra when guests are sampling flavors.
Schmear amount changes the whole bagel. Use a light layer for quick breakfasts, a normal layer for everyday bagels, and a thicker deli-style schmear for smoked salmon bagels or brunch boards.
Style
Amount per whole bagel
Light layer
2 tbsp / 30 g
Normal breakfast bagel
3 tbsp / 45 g
Deli-style thick schmear
4 tbsp / 55–60 g
Open-faced bagel halves
1–2 tbsp / 15–30 g per half
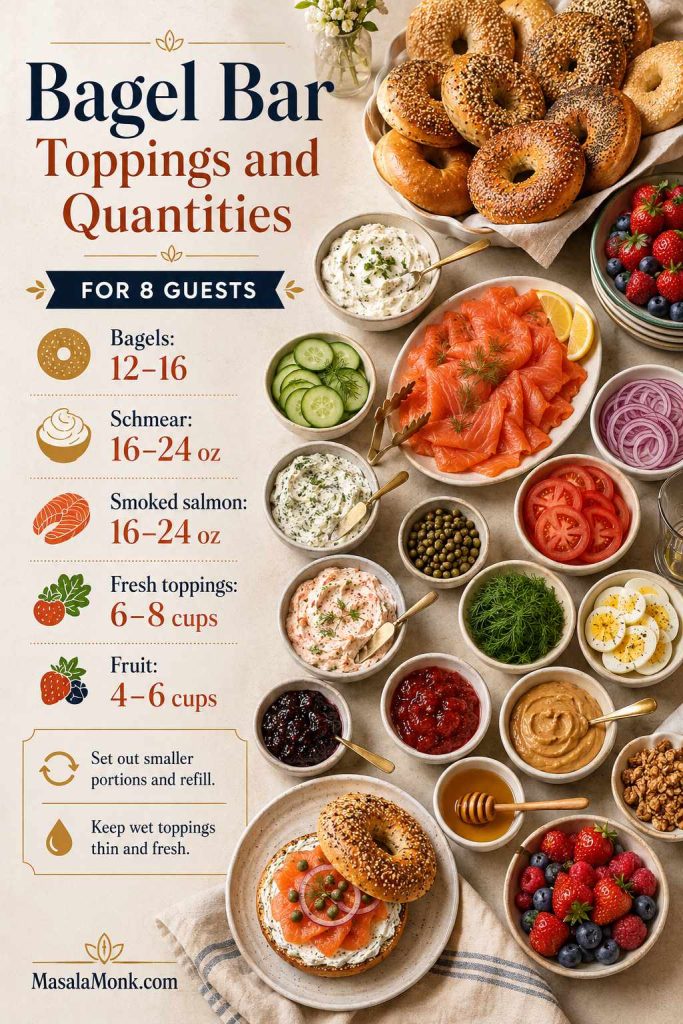
If you are serving a bagel bar, plan slightly more spread than you think you need. People usually take more schmear when there are several flavors to try.
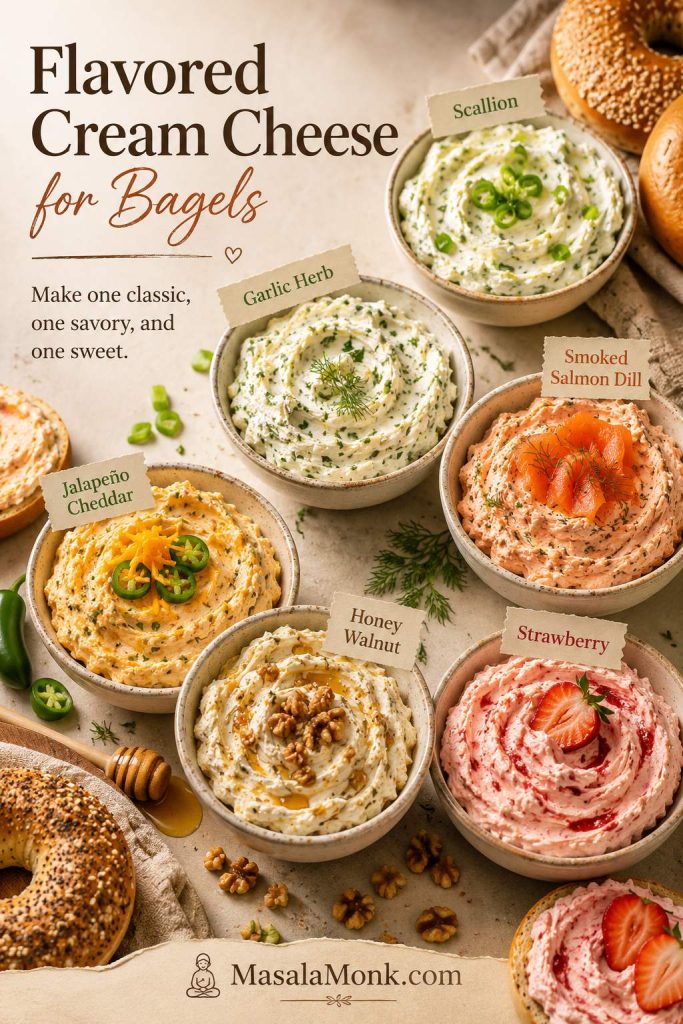
Flavored Cream Cheese Ideas for Bagels
Think of flavored cream cheese as the easiest way to make a plain bagel feel planned. One good mix-in can do the work of several loose toppings.
Flavored cream cheese can do the work of several loose toppings. For a balanced bagel bar, make one classic flavor, one savory flavor, and one sweet flavor so every guest has an easy starting point.
Once the base is smooth, flavored cream cheese is easy. Start with 8 oz / 225 g cream cheese, then fold in one flavor direction. If you are making more than one flavor, keep one plain or scallion, one savory, and one sweet. That way, the board works for both breakfast people and dessert-leaning people.
If you are only making two flavors, make one scallion or garlic-herb schmear and one honey walnut or strawberry cream cheese. That way, you cover the savory people, the sweet people, and the person who wants to try both.
Best flavored cream cheese ideas for bagels
Flavor
Add to 8 oz / 225 g schmear base
Good bagel choices
Scallion schmear
¼ cup finely sliced scallions or chives + black pepper
Everything, sesame, plain
Garlic herb
1 small grated garlic clove + 2 tbsp chopped dill, parsley, or chives + lemon zest
Plain, sesame, whole wheat
Smoked salmon dill
3–4 oz / 85–115 g chopped smoked salmon + dill + lemon
Plain, poppy, pumpernickel
Jalapeño cheddar
1 minced jalapeño + ½ cup shredded cheddar + scallion
Everything, cheese, plain
Honey walnut
2 tbsp honey + ¼ cup chopped walnuts + pinch of cinnamon
Cinnamon raisin, plain, whole wheat
Strawberry
2–3 tbsp strawberry jam or ½ cup chopped berries + 1 tbsp powdered sugar if needed
Plain, blueberry, whole wheat
Everything bagel
1–2 tbsp everything bagel seasoning
Plain, sesame
Veggie cream cheese
⅓ cup finely diced cucumber, carrot, bell pepper, or celery + herbs
Plain, whole wheat, sesame
How to make one cream cheese base work harder
Once you understand the base formula, you can also play with sun-dried tomato, olive-herb, maple cinnamon, cranberry orange walnut, lemon pepper, or pickle-everything cream cheese. One simple base can cover several bagel toppings and spreads without much extra work.
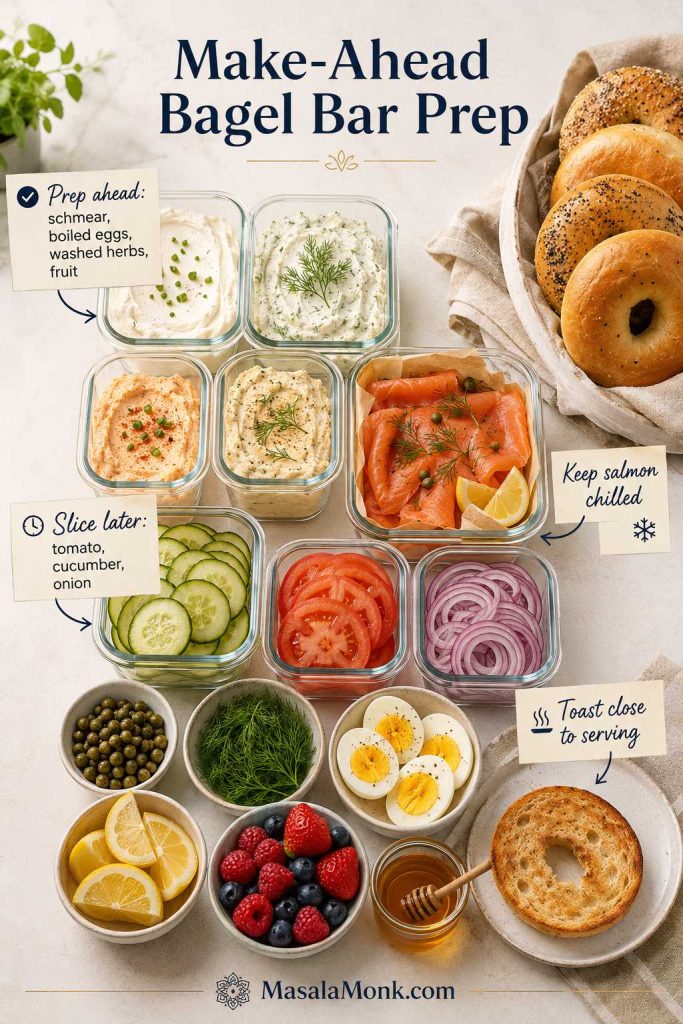
Make-ahead tip: flavored cream cheese usually tastes better after chilling for at least 1 hour. For brunch, make the schmears the night before, then let them soften for 15–30 minutes before serving.
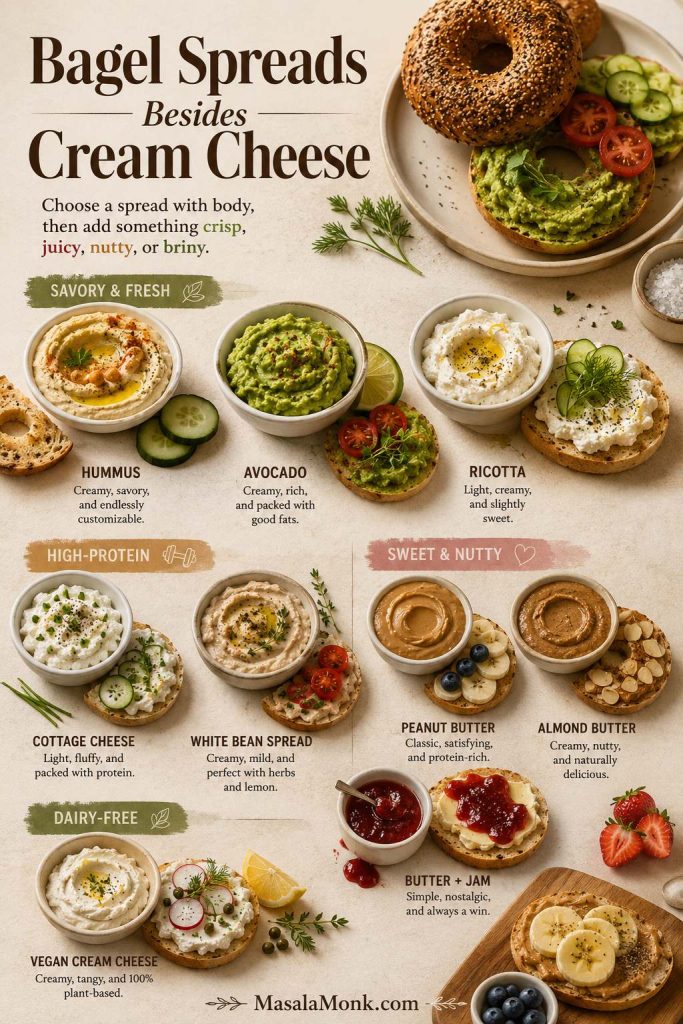
Bagel Spreads Besides Cream Cheese When You Want Something Different
What bagel spreads to use when cream cheese is not the answer
This is the section for the morning when the cream cheese tub is empty, or when you want the bagel to feel more like lunch than a bakery breakfast.
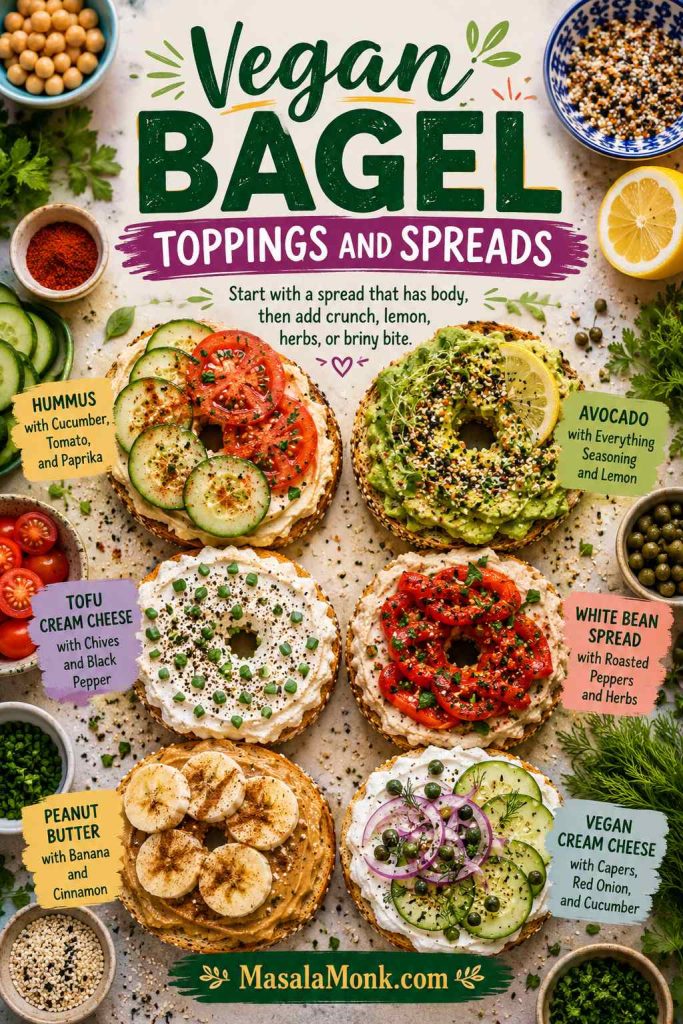
Cream cheese is classic, although hummus, avocado, ricotta, cottage cheese, nut butter, white bean spread, jam, and vegan cream cheese can each push the same bagel in a new direction.
Of course, cream cheese is the classic, but it is not the only spread that belongs on a bagel. The easiest way to replace it is to choose another spread that gives the bagel moisture: hummus for savory crunch, avocado for breakfast, ricotta for sweet toppings, peanut butter for a filling snack, and white bean spread for a dairy-free lunch bagel.
If you want the bagel to feel like lunch, choose hummus, avocado, white bean spread, tuna salad, turkey, or a thick savory salad. On the other hand, if you want it to feel like breakfast, choose butter, ricotta, peanut butter, cottage cheese, egg, or a fruit-friendly spread.
For plant-based builds, the vegan bagel toppings section has hummus, avocado, tofu cream cheese, white bean spread, and nut butter ideas.
For example, hummus works best when cucumber, tomato, sprouts, or paprika keep the bite from feeling dense. Meanwhile, ricotta and cottage cheese work better when fruit, honey, lemon zest, pepper, or herbs give them a clear direction.
Best bagel spreads to pair with toppings
Spread
Toppings to add
Good bagel choices
Hummus
Cucumber, tomato, sprouts, paprika, olive oil
Sesame, plain, whole wheat
Avocado
Egg, chili flakes, lemon, tomato, everything seasoning
Everything, sesame, whole wheat
Ricotta
Honey, berries, lemon zest, pistachios
Plain, blueberry, whole wheat
Peanut butter
Banana, honey, cinnamon, chia seeds, jam
Plain, cinnamon raisin, whole wheat
Cottage cheese
Tomato, black pepper, cucumber, berries, honey
Plain, whole wheat, sesame
Butter
Jam, cinnamon sugar, honey, flaky salt
Plain, cinnamon raisin, blueberry
White bean spread
Tomato, herbs, olive oil, lemon, roasted peppers
Plain, sesame, whole wheat
Mascarpone
Berries, honey, citrus zest, toasted nuts
Plain, blueberry, mini bagels
How to make mild bagel spreads taste finished
Spread first, then toppings: a mild spread like ricotta, cottage cheese, or white bean spread usually needs a stronger finish. Add lemon, herbs, pepper, honey, cinnamon, flaky salt, or fruit so the bagel does not taste unfinished.
Savory Bagel Toppings
If your savory bagel tastes heavy after three bites, it usually does not need more meat or more cheese. Instead, it needs something crisp, sharp, juicy, or herbal to cut through the richness. A classic schmear and smoked salmon are iconic, but hummus, avocado, eggs, tuna salad, turkey, chicken salad, pesto, goat cheese, and crisp vegetables can be just as satisfying.
Savory bagel toppings taste better with contrast: crisp cucumber, juicy tomato, sharp onion, lemon, herbs, mustard, or capers can cut through smoked salmon, turkey, pesto, tuna, or egg salad.
At the same time, the lunch bagel should not collapse halfway through. If you are using tomato, cucumber, pickles, roasted peppers, or avocado, keep the slices thin and use a creamy spread underneath to protect the toasted surface.
Classic savory topping ideas
Plain schmear + tomato + black pepper
Scallion schmear + cucumber + dill
Smoked salmon + capers + red onion + lemon
Hummus + cucumber + tomato + paprika
Avocado + fried egg + chili flakes
Tuna salad + lettuce + pickles
Egg salad + chives + everything seasoning
Turkey + cream cheese + cucumber + mustard
Chicken salad + celery + herbs
Pesto + tomato + mozzarella
Goat cheese + roasted peppers + basil
Bacon + cream cheese + tomato
If tuna salad is your easy lunch topping, this healthy tuna salad guide has lighter deli-style, avocado, Mediterranean, no-mayo, tuna-and-egg, and sandwich-friendly variations you can spoon onto toasted bagels.
Savory combinations worth making
Use these when you want a bagel that eats more like a meal than a snack. Each one has creaminess, a main topping, and a sharper or fresher finish. In other words, these bagel toppings and spreads are built to hold up beyond the first bite.
Combination
Build
Lox-style bagel
Cream cheese, smoked salmon, capers, red onion, dill, lemon
Avocado egg bagel
Mashed avocado, fried or scrambled egg, chili flakes, lemon, salt
Cream cheese, turkey, cucumber, lettuce, mustard, black pepper
Tuna melt bagel
Tuna salad, cheddar, tomato, toasted until warm
Caprese bagel
Mozzarella, tomato, pesto, basil, black pepper
Chicken salad, tuna salad, and egg salad all need the same thing on a bagel: a thick enough texture to stay put. If the filling is loose, serve the bagel open-faced or add lettuce as a barrier.
Packing a savory bagel for later? Use the work and lunchbox toppings guide so juicy or slippery toppings do not soak the bread.
Bagel Toppings That Travel Well for Work or Lunchboxes
For packed lunches, choose bagel toppings that stay firm and do not leak into the bread. Thick hummus, cream cheese, turkey, peanut butter, firm egg salad, thick tuna salad, and sliced cheese travel better than watery tomatoes, loose salads, avocado, or overfilled smoked salmon builds.
A good lunchbox bagel should still taste good a few hours later: a sturdy toasted base, a spread that acts like a barrier, and fresh toppings packed separately when they are juicy or slippery.
For work or lunchbox bagels, sturdy spreads matter most. Pack tomato, cucumber, pickles, capers, lemon, and other juicy toppings separately so the bread stays firm until lunch.
Watery tomatoes, loose salads, overfilled lox bagels, very wet spreads
Sweet Bagel Toppings
In general, sweet bagel toppings are more satisfying when they have a little contrast instead of tasting only sweet. Tangy cream cheese, toasted nuts, salt, lemon zest, cinnamon, berries, and honey can make a sweet bagel feel more like breakfast and less like frosting on bread.
Sweet and savory bagel toppings need different kinds of contrast. Savory bagels usually want crunch, herbs, lemon, or briny toppings, while sweet bagels benefit from tangy cheese, fruit, nuts, honey, cinnamon, or salt.
That said, sweet bagels need a lighter hand when the bagel itself already has cinnamon, raisins, or blueberries. Start with tangy or lightly salted toppings first, then move sweeter only if the bagel itself is plain.
If you are starting with cinnamon raisin, blueberry, or another flavored bagel, check the bagel type pairings before adding a very sweet spread.
Easy sweet bagel ideas
Plain cream cheese + strawberry jam
Butter + cinnamon sugar
Peanut butter + banana + honey
Almond butter + apple slices + cinnamon
Ricotta + honey + pistachios
Mascarpone + berries
Nutella + strawberries
Cream cheese + brown sugar + cinnamon
Greek yogurt cream cheese + berries + granola
Honey walnut cream cheese + banana
Apple butter + cream cheese
Peanut butter + jam + flaky salt
If you want a fruit spread that feels brighter than regular strawberry jam, this pineapple jam recipe makes a glossy sweet-tart spread for toast, scones, waffles, yogurt, and breakfast-style bagels.
Fruit spreads are especially good on plain or lightly toasted bagels because they bring both sweetness and brightness. A warm toasted cut side with cream cheese and glossy fruit spread feels completely different from a cold, overloaded sweet bagel.
Sweet topping tip: cinnamon raisin and blueberry bagels already bring sweetness, so they usually taste best with tangy or lightly salted toppings like plain cream cheese, butter, peanut butter, ricotta, or honey walnut cream cheese rather than very sugary spreads alone.
In fact, for sweet bagels, a tiny pinch of salt often does more than extra sugar. It makes peanut butter, honey, berries, chocolate-hazelnut spread, and sweet cream cheese taste fuller without making the bagel heavy.
Sweet bagel combinations by mood
Choose the topping based on whether you want the bagel to feel like breakfast, dessert, or something in between. This is also where bagel spreads matter most, because a tangy or lightly salted base keeps sweet toppings from becoming too much.
Healthy and High-Protein Bagel Toppings That Still Taste Good
A bagel is best treated like a bigger, denser bread base, not a breakfast problem to apologize for. The toppings matter because they decide whether it feels like a quick carb moment or a breakfast that holds you for a while. For a lighter plate, use one half open-faced instead of building a heavy closed sandwich.
The goal is not to make the bagel smaller; it is to make the topping smarter, more satisfying, and still good enough to look forward to.
Healthy bagel toppings should still taste like something you want to eat. Cottage cheese, egg, smoked salmon, turkey, hummus, tofu cream cheese, avocado, and vegetables add protein, texture, and staying power.
For dairy-free or higher-protein variations, tofu cream cheese, cashew cream cheese, white bean spread, egg whites, turkey slices, smoked salmon, and Greek yogurt-style spreads all work with the same spread-plus-finish formula.
Balanced bagel toppings for protein, produce, and healthy fats
Idea
Why it feels balanced
Cottage cheese + tomato + pepper
Creamy, fresh, and high in protein
Avocado + egg + lemon
Rich, filling, and bright
Hummus + cucumber + sprouts
Dairy-free, crunchy, and easy
Smoked salmon + cucumber
Protein-rich and classic
Greek yogurt cream cheese
Tangier and lighter than a heavy spread
Tuna salad with Greek yogurt
More protein and less heaviness
Turkey + cucumber + mustard
Lean, savory, and crisp
Ricotta + berries
Sweet, creamy, and lighter than frosting-like spreads
White bean spread + tomato
Vegan, filling, and good with herbs
Tofu cream cheese + chives
Dairy-free and bagel-friendly
If you want a warmer high-protein breakfast bagel, spoon soft eggs over a toasted half and finish with chives, tomato, or hot sauce. These scrambled eggs with cottage cheese are especially useful when you want creamy eggs with more protein.
Balance tip: if the bagel itself is large, use an open-faced style. One bagel split into two halves with protein and vegetables often feels more satisfying than a closed sandwich overloaded with spread.
Vegan bagel toppings and spreads
Vegan bagel toppings do not need to feel like substitutes. A thick swipe of hummus with cucumber and paprika, avocado with lemon and everything seasoning, or white bean spread with roasted peppers can taste just as complete as a cream cheese bagel.
Vegan bagel toppings do not need to feel like substitutes. Start with hummus, avocado, tofu cream cheese, white bean spread, or nut butter, then add crunch, lemon, herbs, or briny bite.
Start with a spread that already has body, then add something crisp, juicy, nutty, or briny. Hummus, avocado, tofu cream cheese, white bean spread, peanut butter, almond butter, jam, olive tapenade, and vegan cream cheese all give the bagel enough moisture before you add fresh toppings.
Hummus + cucumber + tomato + paprika
Avocado + everything seasoning + lemon
Tofu cream cheese + chives + black pepper
White bean spread + roasted peppers + herbs
Peanut butter + banana + cinnamon
Vegan cream cheese + capers + red onion + cucumber
How to Toast Bagels for Toppings and Boards
Because many toppings are wet, creamy, or warm, toasting matters more than it seems. A lightly toasted bagel is fine for butter and jam, but a bagel with cream cheese, tomato, egg, avocado, smoked salmon, or hummus needs a firmer surface.
Toast level should match the toppings. Butter and jam only need light toast, but wet or creamy toppings like tomato, cucumber, avocado, hummus, eggs, or smoked salmon need a firmer cut side.
For a soft-but-sturdy bagel, toast only the cut side. For a loaded open-faced bagel, toast a little longer so the surface can hold cream cheese, tomato, cucumber, avocado, or eggs without going soggy.
Day-old bagels only need enough heat to firm the cut side. Over-toasting makes thick schmear and dry toppings feel heavier.
Breakfast Bagel Ideas
For breakfast, the bagel needs to do a little more than taste good for five minutes. A spread plus protein — eggs, smoked salmon, cottage cheese, turkey, peanut butter, or Greek yogurt cream cheese — makes it feel more like a real meal.
Breakfast bagels become more satisfying when protein, fruit, vegetables, or warmth join the spread. Egg, cheese, avocado, cottage cheese, peanut butter, banana, tomato, and smoked salmon all make the bite more filling.
This is where a bagel is especially useful: it can hold eggs, cheese, avocado, hash browns, or smoked salmon without needing much cooking beyond the filling.
For more morning ideas, this breakfast sandwich recipe guide has more ways to build a hearty breakfast around eggs, cheese, spreads, and add-ons.
For kids, keep the bagel toppings simple, familiar, and easy to hold. Cream cheese with jam, peanut butter with banana, butter with cinnamon sugar, strawberry cream cheese, egg and cheese, mini bagel pizzas, and Nutella with strawberries all work because they are flavorful without being hard to bite.
Kid-friendly bagel toppings should be simple, familiar, and easy to hold. Cream cheese with jam, peanut butter banana, egg and cheese, mini pizza bagels, cinnamon sugar, and strawberry chocolate spread all keep the choices approachable.
For a crisp diner-style breakfast bagel, add a small hash brown patty or a thin layer of crispy shredded potatoes with egg and cheese. This air fryer hash browns guide is useful when you want golden potatoes without babysitting a skillet.
Toasting tip: toast the cut sides well if you are adding egg, avocado, tomato, or warm fillings. A firmer toasted surface keeps the bagel from turning soggy.
Smoked Salmon, Lox, and Cream Cheese Bagels
A smoked salmon bagel is one of the most reliable savory combinations because every piece has a job. Cream cheese adds richness, salmon adds salt and protein, cucumber or tomato adds freshness, capers add sharpness, onion adds bite, dill adds fragrance, and lemon wakes everything up.
Ideally, the best bites have cool cucumber, soft cream cheese, salty salmon, sharp onion, and a little lemon all at once. A smoked salmon bagel should taste like a deli order, not just fish on bread.
A smoked salmon bagel should taste creamy, salty, crisp, sharp, and lemony in the same bite. Thin onion, capers, cucumber, dill, pepper, and lemon keep the silky salmon feeling fresh.
Smoked salmon vs lox vs gravlax: which one goes on a bagel?
People often use these names loosely, but they do not taste exactly the same. The best choice depends on whether you want smoky, salty, herbal, or flaky fish.
Lox, cold-smoked salmon, gravlax, and hot-smoked salmon are not interchangeable. Silky slices suit classic cream cheese bagels, while flaky hot-smoked salmon works better in spreads, salads, and egg bagels.
Type
What it tastes like
Best bagel build
Smoked salmon
Silky or firmer depending on style, with a smoky flavor
Cream cheese, cucumber, red onion, capers, dill, lemon
Lox
Salty, silky, rich, and usually not smoky
Plain schmear, tomato or cucumber, red onion, capers
Gravlax
Herbal, slightly sweet, and dill-forward
Labneh or cream cheese, cucumber, dill, lemon zest
Hot-smoked salmon
Flaky, cooked-tasting, and more robust
Flaked into schmear, added to egg bagels, or served on brunch boards
For the easiest first smoked salmon bagel, buy cold-smoked salmon or lox-style salmon if you want silky folds. Use hot-smoked salmon when you want a flakier, more filling brunch spread, egg bagel, or smoked salmon schmear. For a deeper breakdown of the terms, this Food & Wine guide to lox, gravlax, and smoked salmon explains how the curing and smoking methods differ.
Layering matters because the smallest toppings are the easiest to lose; press them into the schmear before adding larger salmon folds.
Layer a smoked salmon bagel from small to large. Press capers and herbs into the schmear first, then add cucumber, salmon folds, onion, dill, pepper, and lemon so the toppings stay in place.
Toast the bagel and let it cool for a minute so the spread does not melt immediately.
Spread cream cheese or scallion schmear on both cut sides.
Press capers lightly into the creamy layer.
Add cucumber or tomato if using.
Layer smoked salmon in loose folds instead of flat sheets.
Finish with red onion, dill, black pepper, and lemon.
Loose folds of salmon make the bagel feel fuller without needing a huge amount of fish. For a softer, spreadable version, chop smoked salmon and fold it into the schmear base with dill, lemon zest, and chives. This is especially useful for a bagel bar because guests can spread it quickly without pulling apart delicate salmon slices.
If you have extra smoked salmon, cucumber, avocado, or lemony sauce after brunch, turn the same flavors into a simple bowl later. This salmon bowl recipe includes a no-cook smoked salmon direction with cucumber, avocado, and a bright yogurt-style sauce.
Best Bagel Toppings by Bagel Type
At this point, bagel choice really matters. A cinnamon raisin bagel needs a different topping than an everything bagel, and a pumpernickel bagel can handle stronger, saltier flavors.
The bagel itself already brings flavor. Plain bagels can handle almost anything, while everything, cinnamon raisin, blueberry, sesame, and pumpernickel bagels usually shine with more focused toppings.
Because stronger bagels already have personality, the topping should usually be simpler. Everything, onion, cheese, cinnamon raisin, blueberry, and pumpernickel bagels bring flavor on their own; plain and whole wheat bagels give you more room to build.
If the bagel is already salty or garlicky, keep the spread calmer and let the toppings do less work. If the bagel is sweet, use tangy, creamy, or lightly salted toppings so the whole bite does not become sugary.
Bagel type
Toppings that pair well
Plain
Any cream cheese, smoked salmon, egg, avocado, butter, jam
Everything
Scallion cream cheese, lox, egg and cheese, avocado, hummus
When in doubt, let the bagel lead. Plain and whole wheat bagels are flexible; everything, onion, cheese, blueberry, cinnamon raisin, and pumpernickel bagels already have a point of view.
Bagel Bar Toppings, Spreads, and Brunch Board Quantities
A bagel bar should feel generous without becoming chaotic. You do not need every topping on the table at once; you need the right mix of bagels, spreads, proteins, fresh toppings, and small bowls that are easy to refill.
This is low-pressure brunch food. Instead of cooking every guest a separate breakfast, you are giving everyone enough good pieces to build the bagel they actually want.
A bagel bar should look generous without turning messy. For eight guests, plan 12–16 bagels, 16–24 oz schmear, 16–24 oz smoked salmon, and plenty of fresh toppings, then refill smaller bowls as needed.
How many bagels per person?
Serving style
Bagels per person
Good for
Light brunch
1 bagel
When serving fruit, salad, eggs, pastries, or sides
Main meal
1½ bagels
Hungry guests or fewer side dishes
Mini bagels
2 mini bagels
Grazing boards and mixed toppings
Bagel bar quantity table
The bagels are easy. The part people misjudge is the spread, salmon, and fresh toppings. A good board should look full when it lands on the table, but still be easy to refill without everything getting wet or messy.
The exact mix depends on your crowd, but these numbers keep you from underbuying the expensive parts and overbuying the things that wilt or get soggy. If your guests love smoked salmon, eggs, or thick cream cheese, round up slightly.
Sliced fresh toppings means cucumber, tomato, onion, radish, lettuce, herbs, fruit, or similar add-ons.
For make-ahead timing, use the storage and prep guide so schmear, salmon, sliced vegetables, and bagels stay fresh.
Mini Bagel Toppings for Brunch Boards and Kids
Mini bagels work best with toppings that do not slide around. Use thick schmears, small slices, and easy spreads so guests can pick them up without losing half the topping on the board.
Mini bagels are best for brunch boards, kids, and grazing because guests can try more than one topping. Use thick spreads, small slices, and toppings that stay put when picked up.
The board should look abundant, but it should still feel easy to use: spreads in bowls, wet toppings contained, bagels sliced, and the brightest ingredients where people can see them.
For the egg option on a bagel bar, cook the eggs ahead and slice them right before serving. This air fryer hard-boiled eggs guide is handy when you want easy peeled eggs for brunch plates, toast, deviled eggs, or snack boards.
Bagel bar equipment
Large board, tray, platter, or sheet pan
Small bowls or ramekins for capers, onions, jams, nuts, and seasonings
Spreader knives for each cream cheese flavor
Serrated knife for slicing bagels
Toaster or toaster oven
Serving spoons and small tongs
Parchment paper for easy cleanup
Airtight containers for make-ahead spreads
For a bagel bar, smaller bowls are not just prettier. They keep wet toppings from soaking into the bread and make the board easier to refill.
Hosting tip: do not put every topping directly on the board if it will make things wet. Keep capers, jams, honey, pickled onions, and chopped herbs in small bowls so guests can build cleaner bagels.
Make-Ahead, Storage, and Food Safety
Most bagel toppings are easy to prep ahead. However, they do not all hold the same way. Cream cheese spreads are great make-ahead items, while sliced tomatoes, cucumbers, avocado, and toasted bagels are better closer to serving time.
To keep a bagel bar calm, prep the sturdy things early and leave the wet, fresh, or delicate things for last.
Make-ahead bagel bar prep works best when sturdy items are done early and delicate toppings wait. Prep schmear, eggs, herbs, and fruit ahead; slice wet toppings later, keep salmon chilled, and toast bagels close to serving.
Storage guide
Item
Best storage
Plain schmear
About 5–7 days refrigerated in an airtight container
Flavored cream cheese
Best within 3–5 days
Smoked salmon cream cheese
Best within 2–3 days, or sooner if the smoked salmon package says so
Cut tomatoes and cucumbers
Best same day; pat dry before serving
Pickled onions
3–5 days refrigerated
Toasted bagels
Best fresh
Frozen bagels
Slice first, then freeze in a sealed bag
What to prep ahead
1 day ahead: schmear flavors, pickled onions, boiled eggs, washed herbs, washed fruit
Morning of serving: slice tomatoes, cucumbers, onions, radishes, fruit, and bagels
Right before serving: toast bagels, slice avocado, arrange smoked salmon, add lemon wedges
How long can a bagel bar sit out?
If your bagel bar includes cream cheese, smoked salmon, eggs, meat, or cut produce, keep everything chilled until serving. According to FDA food safety guidance, perishable foods that need refrigeration should not sit at room temperature for more than 2 hours, or more than 1 hour when the temperature is above 90°F / 32°C.
During a longer brunch, set out smaller portions and refill from the refrigerator as needed. That keeps the board fresher and the toppings do not sit out longer than they should.
Recipe Card: Easy Bagel Schmear with 6 Flavor Variations
Use this as the base recipe for the schmear ideas above. It starts with softened cream cheese, a little sour cream or Greek yogurt, lemon, and salt, then turns into sweet or savory flavored cream cheese.
Keep one batch of plain schmear, then flavor smaller portions for different bagel toppings. That way, one easy cream cheese base can support savory, sweet, smoked salmon, and brunch-board combinations.
Prep Time5 minutes
Optional Chill1 hour
YieldAbout 1 cup / 9 oz / 255 g
Serves4–6 bagels
Equipment
Medium mixing bowl
Hand mixer, stand mixer, or sturdy spoon
Rubber spatula
Measuring spoons
Airtight container
Ingredients
8 oz / 225 g brick cream cheese, softened
2 tbsp / 30 g sour cream, Greek yogurt, or crème fraîche
½ tsp / 2.5 ml fresh lemon juice
Pinch to ⅛ tsp fine salt, to taste
Black pepper, optional
Instructions
Add softened cream cheese to a mixing bowl.
Beat until smooth, creamy, and slightly lighter.
Add sour cream, Greek yogurt, or crème fraîche.
Add lemon juice and salt, then mix again until spreadable.
Fold in one flavor variation from the list below.
Taste and adjust with more lemon, salt, herbs, honey, or seasoning as needed.
Chill for 1 hour if you want the flavor to deepen.
3–4 oz / 85–115 g chopped smoked salmon + dill + lemon
Jalapeño cheddar schmear
1 minced jalapeño + ½ cup shredded cheddar + scallion
Honey walnut schmear
2 tbsp honey + ¼ cup chopped walnuts + pinch of cinnamon
Strawberry cream cheese
2–3 tbsp strawberry jam or ½ cup chopped berries + 1 tbsp powdered sugar if needed
Notes
Use brick-style cream cheese for the thickest, creamiest result.
Greek yogurt makes the schmear tangier; sour cream makes it softer and richer.
Add salty mix-ins slowly. Smoked salmon, capers, bacon, cheddar, and everything seasoning can make the spread salty fast.
For a bagel bar, make 2–3 different schmear flavors so guests can build sweet and savory bagels.
For a full bagel build, pair this schmear with one main topping, one crunchy or fresh topping, and one finishing detail such as lemon, pepper, herbs, honey, or flaky salt.
Still deciding? Start with the bagel type, then choose the spread. Plain bagels give you the most freedom, everything bagels want creamy or savory toppings, and sweet bagels usually need something tangy, salty, or nutty to stay balanced.
FAQs About Bagel Toppings and Spreads
What are the most popular bagel toppings?
The most popular bagel toppings are cream cheese, butter, jam, smoked salmon or lox, capers, red onion, egg and cheese, avocado, peanut butter, tuna salad, egg salad, hummus, tomato, cucumber, and everything bagel seasoning. However, the best choice depends on the bagel itself: plain bagels can take almost anything, while everything, cinnamon raisin, blueberry, and pumpernickel bagels usually need more thoughtful pairings.
What goes on a bagel besides cream cheese?
For a simple breakfast bagel, use butter or jam. For a savory dairy-free option, choose hummus or white bean spread; for something filling, use avocado or eggs; and for sweet or high-protein builds, try ricotta, cottage cheese, peanut butter, or almond butter. Tuna salad, egg salad, turkey, smoked salmon, pesto, goat cheese, honey, Nutella, and fresh fruit also work when the spread and toppings support each other.
What is schmear?
Schmear usually means a spread for bagels, especially cream cheese. In everyday bagel-shop language, asking for a schmear usually means you want a generous layer of cream cheese, not a thin scrape. A good homemade schmear is softer and easier to spread because it is mixed until creamy and sometimes loosened with sour cream, Greek yogurt, crème fraîche, lemon, herbs, or seasonings.
What is the best spread for an everything bagel?
Everything bagels pair especially well with scallion cream cheese, plain schmear, lox spread, garlic herb cream cheese, avocado, egg, hummus, or tuna salad. Since the bagel already has garlic, onion, sesame, poppy, and salt, the spread can stay simple.
What goes best on a plain bagel?
Plain bagels are the most flexible because they do not compete with the toppings. Use them when you want the spread or filling to stand out: scallion schmear, smoked salmon, egg and cheese, avocado, butter and jam, hummus with cucumber, ricotta and honey, or peanut butter with banana.
What goes best on an everything bagel?
Everything bagels already bring garlic, onion, sesame, poppy, and salt, so the best toppings are creamy, fresh, or protein-rich rather than heavily seasoned. Scallion cream cheese, smoked salmon, egg and cheese, avocado, hummus, tuna salad, cucumber, and plain spread with tomato all work because they support the seasoning instead of fighting it.
What goes best on a cinnamon raisin bagel?
Cinnamon raisin bagels are already sweet and spiced, so they usually need tangy, creamy, nutty, or lightly salted toppings. Plain cream cheese, butter, peanut butter, ricotta, honey walnut schmear, apple slices, and a small pinch of flaky salt all keep the sweetness from feeling too heavy.
What goes best on a blueberry bagel?
Blueberry bagels work best with toppings that either sharpen the fruit or keep it creamy. Try plain schmear, lemon cream cheese, strawberry cream cheese, butter, ricotta, mascarpone, honey, fresh berries, or almond butter.
What are good sweet bagel toppings?
Good sweet bagel toppings include cream cheese and jam, honey walnut cream cheese, peanut butter and banana, almond butter and apple, ricotta and honey, Nutella and strawberries, butter and cinnamon sugar, mascarpone with berries, and Greek yogurt cream cheese with granola. That said, a pinch of salt, lemon zest, cinnamon, or toasted nuts helps sweet toppings taste more complete.
What are healthy bagel toppings?
The healthiest bagel toppings are usually the ones that add protein, produce, or healthy fat instead of only more spread. Eggs, avocado, smoked salmon, hummus, cottage cheese, Greek yogurt cream cheese, turkey, tuna, tofu cream cheese, white bean spread, cucumber, tomato, sprouts, herbs, and fresh fruit can all make a bagel more satisfying.
How much cream cheese do you need per bagel?
Use about 2 tbsp / 30 g for a light layer, 3 tbsp / 45 g for a normal breakfast bagel, and 4 tbsp / 55–60 g for a thick deli-style schmear. For open-faced bagel halves, use 1–2 tbsp / 15–30 g per half.
Should bagels be toasted before adding toppings?
Toast bagels when the toppings are wet, creamy, warm, or heavy. A firmer cut side helps hold cream cheese, tomato, cucumber, eggs, avocado, hummus, tuna salad, and smoked salmon without turning soggy.
How do you keep bagel toppings from sliding off?
Use the spread as glue, slice toppings thinly, and press small toppings like capers, scallions, herbs, seeds, or everything seasoning into the creamy layer. If the build is tall, wet, or slippery, serve the bagel open-faced instead of closing it.
How long can a bagel bar sit out?
A bagel bar with cream cheese, smoked salmon, eggs, meat, or cut produce should not sit out for more than 2 hours. In hot weather above 90°F / 32°C, keep it to 1 hour. For longer gatherings, set out smaller portions and refill from the refrigerator.
Final Thoughts
Ultimately, a better bagel does not always need more toppings. Often, it needs one smarter finishing detail: lemon on smoked salmon, flaky salt on tomato, cinnamon with peanut butter, herbs in cream cheese, or cucumber with hummus.
Start with the spread, then let the rest of the bagel answer one simple question: what would make this bite more satisfying? A plain bagel with cream cheese and tomato may only need black pepper and flaky salt. A smoked salmon bagel comes alive with capers, onion, dill, and lemon. Peanut butter feels more finished with banana, cinnamon, and a tiny pinch of salt.
Once you know the rhythm, almost any bagel in the kitchen can become something worth sitting down for: a fast breakfast, a proper lunch, a sweet snack, or a brunch board that feels generous without being complicated.
This protein cookie dough recipe is edible, no-bake, ready in about 5 minutes, and built to taste like cookie dough — not protein paste. It is egg-free, made without raw all-purpose flour, and gives you a scoopable, chocolate-studded dough with about 15–22g protein per serving when divided into 3–4 portions.
No oven, no mixer, no waiting for cookies to cool — just one bowl, a spoon, and a sweet snack that feels more like dessert than a protein shake.
The difference between good protein cookie dough and chalky protein paste is balance. Protein powder adds structure, nut butter gives richness, Greek yogurt softens the dough, and almond flour or oat flour makes it thick enough to scoop. Then vanilla, salt, and mini chocolate chips bring it closer to a real cookie dough bite. If you like this kind of high-protein dessert, this dough gives you the same treat-like feeling without needing a freezer or blender.
It should feel like sneaking a spoonful of cookie dough from the bowl, only with enough protein to make it feel more satisfying than a random bite of dessert.
Texture check: Before you start, look for a dough that feels creamy, sturdy, and scoopable rather than loose or stiff.
This spoon-lift shows the texture you want: creamy, sturdy, and able to hold its shape without turning stiff.
For edible protein cookie dough that holds its shape, start with ½ cup almond or oat flour, ½ cup vanilla protein powder, 3 tablespoons nut butter, ⅓ cup Greek yogurt, 2–3 teaspoons maple syrup, and 3–6 tablespoons milk. Mix the dry ingredients first, stir in the creamy ingredients, loosen the dough gradually with milk, then fold in mini chocolate chips.
This quick ratio works because the dry base, creamy ingredients, and milk are balanced before the chocolate chips go in.
Use less milk for a firmer dough and more milk for a softer, scoop-and-eat texture. Divide the batch into 3 portions for a higher-protein snack, or 4 portions for smaller dessert-style servings.
Best first version: Use a vanilla whey-casein blend if you have one, almond flour for a softer rich dough, and mini chocolate chips for the most cookie-dough-like bite.
Do not add all the milk at once. Protein powders absorb moisture differently, and a dough that looks dry at first can loosen quickly after mixing. Add liquid gradually and stop as soon as the dough holds together.
Why this works fast: This is a one-bowl, no-bake dough, so the important work happens while you mix and adjust the texture.
Since this is a 5-minute no-bake recipe, the key is adjusting texture in the bowl instead of relying on baking time.
Prep time
5 minutes
Cook time
0 minutes
Chill time
Optional 20–30 minutes for firmer dough
Servings
3–4 servings
Protein estimate
About 15–22g per serving, depending on powder and serving size
Best texture
Scoopable, sturdy, and easy to eat with a spoon
Best flour
Almond flour for soft/rich, oat flour for more cookie-like
Main fix
Add liquid slowly, then fine-tune the texture in small spoonfuls
Storage
4–5 days in the fridge or 2–3 months frozen in portions
The best part is that the recipe is forgiving. If the first mix looks too dry, too sticky, or too thick, you do not have to start over — you just adjust the bowl in small steps.
Estimated Protein, Calories, and Serving Size
Protein and calorie estimate: This recipe is easiest to estimate by serving size. Dividing the batch into 3 larger portions gives a higher-protein snack, while 4 smaller portions gives a lighter dessert-style serving. With most vanilla protein powders, the batch usually lands around 15–22g protein per serving.
For macro tracking, portion size matters: three larger servings feel more snack-like, while four smaller servings keep the calories lighter.
As a rough range, the full batch often lands around 900–1,200 calories, depending on the protein powder, nut butter, yogurt, milk, syrup, and chocolate chips used. That works out to about 300–400 calories if divided into 3 larger servings, or about 225–300 calories if divided into 4 smaller servings. Use your own ingredient labels for the most accurate number.
Calories vary most from the nut butter, chocolate chips, protein powder, syrup, and yogurt you use. A richer dessert bowl usually comes from regular nut butter, maple syrup or honey, and the full chocolate chip amount. If you want a lighter version, use powdered peanut butter, nonfat Greek yogurt, almond milk, and fewer mini chocolate chips.
A good high-protein cookie dough has to solve the real problem: it needs enough protein to feel worth making, but it still has to satisfy the part of you that wanted cookie dough in the first place. When the balance is off, the texture changes quickly. Extra protein powder can make the dough dry or chalky, too much liquid can turn it sticky, and not enough fat can make it taste like sweet paste instead of cookie dough.
This version works because each ingredient protects the dough from the usual protein-dessert problems: dry, sticky, chalky, or bland. Protein powder gives the snack its purpose, almond flour or oat flour keeps it from turning loose, nut butter makes it taste richer, and Greek yogurt softens the bite so it feels more like dessert than a scoop of powder. Vanilla, salt, and mini chocolate chips finish the flavor so it tastes more like cookie dough and less like a protein shake in a bowl.
When that balance is right, the dough tastes sweet and familiar instead of “healthy” in the disappointing way.
The finished dough should hold ridges when stirred, scoop cleanly, and firm up slightly after chilling. It should not pour like batter, crumble like dry powder, or cling aggressively to the spoon.
Why readers usually love this: It gives you the cookie-dough feeling without turning into a full baking project. No oven, no mixer, no waiting for cookies to cool — just a thick, sweet, chocolate-studded bowl you can adjust until it tastes right.
Ingredients You Need
Think of the ingredients as texture controls: dry ingredients build the dough, creamy ingredients soften it, and the small flavor ingredients make it taste like dessert instead of a protein bowl.
Each ingredient controls something important: body, creaminess, sweetness, flavor, or chocolate in every bite.
Protein powder
Vanilla protein powder is the easiest choice because it already brings sweetness and dessert flavor. Whey protein can make a smoother dough, but it may become sticky if you add too much liquid. Casein and plant protein usually thicken more aggressively, so they often need extra milk or yogurt. A whey-casein blend is often the easiest option for a classic cookie dough texture.
Almond flour or oat flour
Almond flour gives the dough a soft, rich texture and keeps it lower in carbs than oat flour. Oat flour makes the dough taste a little more familiar and cookie-like, but it can absorb more moisture. Use whichever fits your taste and dietary needs. For a deeper look at almond flour, coconut flour, and other low-carb baking options, see this low-carb flour guide.
Almond flour gives a softer, richer dough; meanwhile, oat flour brings a more cookie-like chew and usually needs a little more moisture.
Do not use regular raw all-purpose flour in this no-bake recipe. The safety section below explains why.
Peanut butter gives the strongest flavor and the richest dough. Almond butter is milder. Cashew butter gives a softer, almost bakery-style sweetness. Sunflower seed butter works if you need a nut-free option, though it has a more noticeable flavor.
Greek yogurt
Greek yogurt keeps the dough creamy while adding more protein. Thick plain Greek yogurt works best. If your yogurt is thin or watery, start with less milk. If your yogurt is very thick, you may need an extra spoonful of milk to bring the dough together.
Maple syrup or honey
Maple syrup and honey do more than sweeten the dough. They also add moisture and help the texture feel less powdery. Sugar-free syrup can work, but the texture may be thinner or less rich depending on the brand.
Vanilla, salt, and mini chocolate chips
These small ingredients make a big difference. Vanilla gives the dough a dessert-like aroma, salt keeps the flavor from tasting flat, and mini chocolate chips spread more evenly than large chips, especially in a single-serving bowl.
Is Protein Cookie Dough Safe to Eat Raw?
This recipe is designed as edible cookie dough because it avoids the two biggest classic raw-dough concerns: raw eggs and raw all-purpose wheat flour. That matters because regular flour is usually a raw ingredient, and raw dough or batter made with uncooked flour is not considered safe to taste before cooking.
Edible protein cookie dough works best when the no-bake base avoids raw eggs and raw wheat flour from the start.
For this no-bake dough, use fresh almond flour, oat flour from a trusted package, or a flour product specifically labeled for edible dough. Do not swap in regular raw wheat flour.
If you want the classic version without protein powder, this edible cookie dough recipe follows the same no-bake, spoonable dessert idea with a more traditional cookie-dough flavor.
Important: This recipe avoids raw all-purpose wheat flour. Keep the finished dough chilled, use fresh ingredients, and do not leave yogurt-based cookie dough sitting out for long.
Best Protein Powder for Cookie Dough
The best protein powder is the one that tastes good to you and thickens predictably. Because this recipe is not baked, there is nowhere for a harsh protein-powder flavor to hide. Use a vanilla powder you already like in smoothies, yogurt bowls, or protein shakes.
The best powder depends on texture as much as flavor, because each type thickens the bowl differently.
Texture matters just as much as flavor. Whey, casein, plant protein, collagen, and blends all absorb moisture at a different pace, which is why the recipe gives a range for milk instead of one fixed amount.
This is why two people can use the same recipe and get different results. The recipe may not be the problem — the powder may simply need more or less moisture.
Protein powder texture guide
Protein powder
Texture in cookie dough
Best fix
Whey protein
Smooth, but can become sticky or wet if overhydrated.
Add milk slowly. Thicken with almond flour, oat flour, or a little more protein powder.
Casein protein
Thick, doughy, and very absorbent.
Add milk or Greek yogurt 1 teaspoon at a time until spoonable.
Whey-casein blend
Usually the most balanced cookie dough texture.
Best first choice for a balanced, cookie-dough-like texture.
Plant protein
Thick, sometimes chalky or earthy.
Add nut butter, yogurt, vanilla, salt, and enough milk to soften the texture.
Collagen powder
Adds protein but does not give much dough structure.
Use it with almond flour or oat flour, not as the only dry ingredient.
Powdered peanut butter
Lower in fat, peanut-forward, and slightly dry.
Pair with Greek yogurt or milk to keep the dough creamy.
Why protein powder changes the texture: Whey, casein, and plant protein all work, but they do not absorb liquid the same way.
Whey, casein, and plant protein can all work, but each one changes how much liquid the bowl needs before it becomes scoopable.
For the first batch, use the recipe as written but hold back some of the milk. Once you see how your protein powder thickens, the recipe becomes easy to repeat.
You only need one bowl for the classic version. A spatula or sturdy spoon is better than a whisk because the mixture becomes thick quickly.
The method stays simple: build the dry base, add richness, loosen carefully, fold in chocolate, then chill only if you want a firmer bite.
Step 1: Mix the dry ingredients
Place the almond flour or oat flour, protein powder, and salt in a medium bowl. Stir them together first so the protein powder is evenly distributed before the wet ingredients go in.
Step 2: Add the creamy ingredients
Stir in the nut butter, Greek yogurt, maple syrup or honey, and vanilla. The dough may start to clump together and look too thick at this point, which is fine.
Step 3: Loosen the dough gradually
Pour in milk or almond milk 1 tablespoon / 15ml at a time. Mix well after each addition and stop when the dough is soft but sturdy. You may not need all the milk, especially if your yogurt is loose or your protein powder is whey-based.
Add milk slowly so the dough softens gradually; otherwise, a small bowl can turn loose before the protein powder has time to absorb it.
At the right point, the dough should drag slightly against the spoon, hold soft ridges, and scoop cleanly without sliding back into the bowl.
Look for spoon marks that stay visible for a moment; that is the easiest sign your protein cookie dough is thick enough without being dry.
If your dough does not look like this yet, use the texture guide to fix it before folding in the chocolate chips.
Step 4: Fold in mini chocolate chips
Fold in the mini chocolate chips once the texture is right. Adding them at the end keeps them evenly distributed and prevents the dough from becoming overmixed.
Mini chocolate chips work better than larger chips because they spread through the dough evenly and make each spoonful taste more like dessert.
Step 5: Eat right away or chill
You can eat the dough immediately if you like a softer, freshly mixed texture. For a firmer, more classic cookie dough feel, cover the bowl and chill it for 20–30 minutes.
Protein Cookie Dough Texture Guide
If your first spoonful does not look perfect, do not panic. Protein cookie dough is easy to fix because most texture problems come down to one thing: the dough either needs a little more moisture or a little more dry structure.
Once you recognize the difference between crumbly, scoopable, and loose, fixing the texture becomes much easier.
Problem
Why it happened
How to fix it
Too wet
Too much milk, loose yogurt, or a whey protein that does not absorb much liquid.
Stir in 1 teaspoon almond flour, oat flour, or protein powder at a time.
Too dry
Casein or plant protein absorbed the liquid quickly.
Loosen it with 1 teaspoon milk or Greek yogurt at a time.
Chalky
Too much protein powder, plant protein, or not enough fat/moisture.
Work in 1–2 teaspoons nut butter or Greek yogurt, plus vanilla and a pinch of salt.
Too sticky
Too much syrup, nut butter, or liquid.
Chill 20–30 minutes, or sprinkle in a little almond/oat flour.
Not sweet enough
Unsweetened protein powder or not enough syrup.
Sweeten with 1 teaspoon maple syrup, honey, or your preferred sweetener.
Too protein-y
The protein powder flavor is too strong.
Balance it with vanilla, salt, mini chocolate chips, or a better-tasting vanilla protein powder next time.
Best texture rule: Adjust slowly. One teaspoon can change a small batch more than you expect.
Once the texture is right, the bowl stops feeling like a protein workaround and starts feeling like what you actually wanted: cold, sweet cookie dough with little pockets of chocolate in every spoonful.
How to Make It Taste More Like Cookie Dough
If the dough tastes too much like protein powder, do not add more milk first. Milk changes the texture, but it does not always fix the flavor. Start with the little things that make cookie dough taste like cookie dough.
If the flavor feels too protein-heavy, vanilla, salt, nut butter, syrup, and mini chips can improve the dough without making it runnier.
Add a little more vanilla if the flavor tastes flat.
Add a tiny pinch of salt if the dough tastes too sweet, bland, or protein-heavy.
Use mini chocolate chips so every spoonful gets chocolate.
Add 1 teaspoon maple syrup or honey if your protein powder is not very sweet.
Add 1 teaspoon nut butter if the dough tastes chalky or thin.
Chill the dough for 20–30 minutes if the flavor feels sharp right after mixing.
Craving check: A good high-protein dough should still feel like dessert, not a bowl of sweet protein paste.
The best high-protein cookie dough still needs dessert appeal, so texture and flavor matter just as much as the protein number.
Once the base texture is right, the easiest way to change the dough is with mix-ins and small flavor cues. Keep the same dough formula, then adjust the add-ins based on whether you want it more dessert-like, lower-sugar, or macro-friendly.
Once the base dough is balanced, small mix-ins can take it toward peanut butter chip, birthday cake, double chocolate, cookies and cream, or cinnamon roll.
Peanut butter chocolate chip: Use peanut butter as the nut butter and keep the mini chocolate chips.
Birthday cake: Use vanilla protein powder, cashew butter, and a small spoonful of sprinkles.
Double chocolate: Add 1 tablespoon cocoa powder and a little extra milk if the dough gets too thick.
Cookies and cream: Fold in crushed chocolate sandwich cookies or a lighter cookie-style mix-in.
Cinnamon roll: Add cinnamon, vanilla, and a tiny pinch more salt.
For any dry mix-in like cocoa powder or crushed cookies, add a tiny splash of milk only after the dough is mixed so you do not accidentally make it loose.
Which Protein Cookie Dough Version Should You Make?
Start with the classic version when you want the easiest bowl. Once the base dough works, the variations are simple: make it creamier for dessert, lighter for macros, dairy-free for plant-based snacking, higher-fiber with chickpeas, or firm enough to slice into bars.
Use this guide by need: single-serve for speed, Greek yogurt or cottage cheese for creaminess, low-calorie for lighter macros, vegan for dairy-free, or bars for meal prep.
Version
Best for
Texture
Use this base
Classic protein cookie dough
Best overall
Thick enough to scoop, soft enough to eat with a spoon
Protein powder + flour + nut butter + Greek yogurt
For a quick one-bowl snack, make a single serving instead of a full batch. This version is useful when you want a sweet high-protein bite without storing leftovers.
The single-serve version is ideal when you want one quick bowl now, especially if you do not want extra dough waiting in the fridge.
Ingredient
Amount
Vanilla protein powder
30g
Almond flour or oat flour
2–3 tablespoons
Nut butter
1½ tablespoons
Greek yogurt or milk
1–2 tablespoons
Maple syrup or honey
1–2 teaspoons, optional
Vanilla extract
¼ teaspoon
Salt
Pinch
Mini chocolate chips
1–2 tablespoons
Mix the dry ingredients first, stir in the nut butter and yogurt, then adjust with tiny splashes of milk until the dough is scoopable but not loose. This version can be higher in protein than the main recipe because it uses a full scoop of protein powder in one serving.
Greek Yogurt Protein Cookie Dough
If you like a softer, creamier bowl, Greek yogurt is the easiest way to get there. It gives the dough a smoother bite and a little tang, without making it feel heavy. If you like Greek-yogurt-based meal prep, these high-protein overnight oats use the same creamy, filling idea in breakfast form.
Greek yogurt gives the dough a softer, tangier bite, which helps balance the dryness some protein powders can bring.
To make the Greek yogurt version, increase the Greek yogurt to ½ cup and reduce the milk. Stir the dough well, then chill it for 20–30 minutes so the flour and protein powder can absorb the moisture. If the yogurt is very thick, add milk 1 teaspoon at a time. If the yogurt is loose, add a little more almond flour or oat flour.
Cottage Cheese Protein Cookie Dough
Cottage cheese works well when you want a creamy, high-protein base with a little extra body. The key is to blend it smooth before adding it to the dough. If you skip that step, the texture can taste curdy instead of cookie-dough-like.
The cottage cheese version depends on one important step: blend the cottage cheese smooth before mixing it into the dry base.
For a cottage cheese version, blend ½ cup cottage cheese with vanilla and 2–3 teaspoons maple syrup until smooth. Then stir it by hand into the protein powder, almond flour or oat flour, nut butter, salt, and chocolate chips. Add the chips after blending, not before.
If your blended cottage cheese is very loose, start with less milk or skip the milk completely until the dough is mixed.
Cottage cheese texture tip: Blend the cottage cheese first, then mix by hand after the dry ingredients go in. Over-blending the full dough can make it runnier.
If you enjoy creamy low-carb desserts, this keto cheesecake recipe is another good one to keep nearby, especially when you want something chilled and richer than a snack bowl.
Low-Calorie Protein Cookie Dough
For a lighter bowl, the goal is not to strip the dough down until it tastes sad. Keep enough creaminess, sweetness, and chocolate to make it feel like dessert, then use a few smart swaps to bring the calories down.
A lighter bowl should still taste satisfying, so use macro-friendly swaps without removing all the creaminess and chocolate.
Swap
What it does
Powdered peanut butter
Reduces fat and calories while keeping peanut flavor.
Nonfat Greek yogurt
Adds creaminess and protein with fewer calories.
Mini chocolate chips
Gives more chocolate in every bite with a smaller amount.
Sugar-free syrup, carefully
Can reduce sugar, but may make the dough thinner or less rich.
Single-serving batch
Helps with portion control and avoids extra leftovers.
For one lighter serving, start with 30g vanilla protein powder, 2 tablespoons powdered peanut butter, ¼ cup nonfat Greek yogurt, 1–2 teaspoons syrup or sweetener, vanilla, salt, and 1 tablespoon mini chocolate chips. Add almond milk 1 teaspoon at a time until the dough becomes scoopable.
For another creamy dessert with a lighter, healthier feel, this avocado chocolate mousse is a good next option when you want chocolate without baking.
Vegan Protein Cookie Dough
The vegan version works best when the dough has enough fat and moisture to balance the plant protein. Plant powders usually make the mixture thicker than whey, and some can taste earthy if the dough is too dry.
The vegan version usually needs a little more moisture and fat because plant protein can thicken quickly as it sits.
For a vegan batch, use ½ cup almond or oat flour, ½ cup plant protein powder, 2–3 tablespoons almond or cashew butter, 2–3 teaspoons maple syrup, vanilla, salt, dairy-free milk as needed, and dairy-free mini chocolate chips. Add the milk slowly because plant protein often thickens fast.
When plant protein tastes earthy, extra vanilla, a tiny pinch of salt, and mini chocolate chips help a lot. A little more nut butter can also soften the chalky edge without making the dough too loose.
Chickpea Protein Cookie Dough
Chickpea protein cookie dough is a plant-based variation with more fiber and a thicker dip-like texture. It works best in a food processor, not by hand.
The chickpea version works best as a blended variation, since a food processor gives the base a smoother, dip-like texture.
For a chickpea version, start with 1 cup well-rinsed chickpeas, 30g vanilla protein powder, 2 tablespoons nut butter or sunflower seed butter, 1–2 tablespoons maple syrup, vanilla, salt, and 1–2 tablespoons milk as needed. Blend everything except the chocolate chips until smooth, then fold in the chips.
For the smoothest texture, rinse the chickpeas very well and remove the skins if you have time. Chilling the dough for 20–30 minutes also helps the flavor mellow and the texture thicken.
Can You Turn This Into Protein Cookie Dough Bars?
Yes. For cookie dough bars, make the mixture thicker by using only 1–2 tablespoons milk and adding a little more almond flour or oat flour if needed. Press the dough firmly into a parchment-lined loaf pan or small square pan, chill for 1 hour, then slice into bars.
Protein cookie dough bars need a firmer base than the spoonable version, so they can chill, hold their shape, and slice cleanly.
A loaf pan works well for a thicker small batch. Use an 8-inch square pan only if you are doubling the recipe, otherwise the bars may be too thin.
For a more dessert-like bar, spread melted chocolate over the chilled dough and chill again until set. For a softer snack bar, skip the chocolate coating and keep the chocolate chips mixed into the dough.
Storage and Freezer Tips
This dough stores well, which makes it useful for snack prep. Keep it chilled because it contains yogurt and nut butter. Like a no-bake cheesecake, the texture gets better when the mixture has time to firm up in the refrigerator.
For easy snack prep, keep protein cookie dough chilled in a container or freeze small portions that soften after a few minutes.
Storage method
How long
Best tip
Airtight container in the fridge
4–5 days
Stir before serving if it firms up.
Rolled balls in the fridge
4–5 days
Use a small cookie scoop for even portions.
Freezer portions
2–3 months
Freeze on a tray first, then move to a container.
Cookie dough bars
Up to 1 week chilled
Keep parchment between layers if stacking.
Protein cookie dough bites
For bites, chill the dough until it is firm enough to scoop, then roll it into small balls and store them in the fridge or freezer. They are easier to portion than a full bowl and work well for snack prep.
Frozen portions taste best after sitting at room temperature for 5–10 minutes. They should soften slightly but still hold their shape.
What to Eat With Protein Cookie Dough
You can absolutely eat this straight from the bowl. That is the point. But if you make extra, it also turns into an easy topping, dip, or freezer snack.
Think of it as a spoonable snack first, then use leftovers anywhere you would normally want a sweet, cookie-dough-style topping.
Once you understand the texture, this becomes the kind of recipe you can make by feel: a little more milk for spoonable, a little more flour for scoopable, and a little more vanilla and salt when the protein powder tries to take over.
Different protein powders can change this dough a lot. If you try it with whey, casein, collagen, or plant protein, note how much milk it needed and whether the final texture turned out scoopable, sticky, dry, or firm. That is the kind of detail other readers actually want before they open a new tub of protein powder, so it is worth sharing if your powder behaved differently.
After one batch, you will probably know exactly how your protein powder behaves. From there, this becomes an easy fridge snack you can make by feel — thicker for cookie dough bites, softer for spooning, sweeter when it is dessert, and lighter when you just want a quick protein treat.
Your protein powder probably absorbed more liquid than expected. Casein and plant-based protein powders are especially thirsty, so add milk or Greek yogurt 1 teaspoon at a time until the dough softens.
Why did my protein cookie dough turn sticky?
Sticky dough usually means too much syrup, nut butter, or milk. First, chill it for 20–30 minutes. After that, add almond flour or oat flour 1 teaspoon at a time if the mixture still feels too loose.
Which protein powder tastes best in cookie dough?
A good vanilla whey-casein blend is usually the easiest choice for a balanced dough texture. Whey can be smooth but sticky, casein can be thick and dry, and plant protein may need more moisture and flavor support.
Best peanut butter substitutes for protein cookie dough
Peanut butter is not required. Almond butter, cashew butter, sunflower seed butter, tahini, or a mix of Greek yogurt and powdered peanut butter can all work. The flavor and texture will change slightly, but the recipe still holds together.
Using powdered peanut butter in protein cookie dough
Powdered peanut butter works best in the low-calorie version because it keeps peanut flavor while reducing fat. Since it can taste drier than regular nut butter, pair it with Greek yogurt and add milk slowly until the dough is scoopable.
No Greek yogurt? Use this texture fix
Greek yogurt helps with creaminess, but the recipe can work without it. Replace it with more nut butter and a little milk, or use dairy-free yogurt for a vegan version. Since yogurt also adds thickness, add the liquid slowly so the dough does not become loose.
Is almond flour safe in no-bake cookie dough?
This recipe avoids raw all-purpose wheat flour, which is the main flour concern in classic raw cookie dough. Use fresh almond flour or oat flour from a reputable source, keep the finished dough chilled, and do not swap in regular raw wheat flour unless it is specifically labeled for edible dough.
Freezing protein cookie dough without ruining the texture
Roll the dough into balls or portion it into small scoops, freeze on a tray, then transfer to an airtight container. Let frozen portions sit for 5–10 minutes before eating so they soften slightly without turning mushy.
Should you bake this dough into cookies?
This recipe is designed as edible no-bake dough. Protein powder behaves differently when baked, so a dedicated protein cookie recipe will give you a better baked texture.
Lower-calorie protein cookie dough swaps that still taste good
Use powdered peanut butter, nonfat Greek yogurt, sugar-free syrup if you like it, and a smaller amount of mini chocolate chips. A single-serving batch is usually the easiest way to keep the calories controlled without making a large bowl of leftovers.
Vegan protein cookie dough: what changes?
Plant-based protein powder usually thickens more and can taste earthier than whey. Use almond or oat flour, nut butter, maple syrup, dairy-free milk, and dairy-free chocolate chips, then add extra milk or nut butter if the dough tastes chalky.
Save the base formula: Keep this quick ratio, texture target, and storage guide nearby for the next time a cookie-dough craving hits.
Save the base formula as a texture guide: equal parts flour and protein powder, creamy ingredients for richness, then milk only until scoopable.
Protein Cookie Dough Recipe Card
This edible protein cookie dough is no-bake, egg-free, creamy, and ready in about 5 minutes. Chill it for a firmer cookie-dough bite, or eat it right away while it is softer and freshly mixed.
Texture target: The dough should hold ridges when stirred, scoop cleanly, and feel thick but not dry. Pourable dough needs more dry structure, while crumbly dough needs a little more moisture.
Servings
3–4
Prep Time
5 minutes
Chill Time
Optional 20–30 minutes
Cook Time
0 minutes
Equipment
Medium mixing bowl
Spatula or sturdy spoon
Measuring cups and spoons
Kitchen scale, optional but helpful
Airtight container for storage
Ingredients
Ingredient
US amount
Metric amount
Almond flour or oat flour
½ cup
50–56g
Vanilla protein powder
½ cup
50–60g
Creamy peanut, almond, or cashew butter
3 tablespoons
About 48g
Plain thick Greek yogurt
⅓ cup
About 80g
Maple syrup or honey
2–3 teaspoons
10–15ml
Milk or almond milk
3–6 tablespoons, added gradually
45–90ml
Vanilla extract
½ teaspoon
2.5ml
Fine salt
¼ teaspoon
About 1.5g
Mini chocolate chips
3 tablespoons
30–40g
Instructions
Stir the almond flour or oat flour, protein powder, and salt together in a medium bowl.
Mix in the nut butter, Greek yogurt, maple syrup or honey, and vanilla until a thick dough starts to form.
Add milk or almond milk 1 tablespoon / 15ml at a time, mixing well after each addition, until the dough holds ridges when stirred and scoops cleanly.
Fold in the mini chocolate chips.
Eat immediately for a softer dough, or cover and chill for 20–30 minutes for a firmer cookie-dough bite.
Notes
Protein powders absorb liquid differently, so start with less milk and add more gradually.
Chilling is optional, but it improves both texture and flavor because the flour and protein powder have time to hydrate.
Divide the batch into 3 servings for a higher-protein snack or 4 servings for smaller dessert portions.
Use 3 teaspoons maple syrup or honey for a sweeter dessert-style dough, or start with 2 teaspoons for a less sweet snack.
When the dough is wet, build it back up with almond flour, oat flour, or protein powder 1 teaspoon at a time.
For dry dough, add milk or Greek yogurt 1 teaspoon at a time until it softens.
Strong protein-powder flavor usually improves with extra vanilla, a tiny pinch of salt, or 1 teaspoon nut butter before adding more milk.
Do not use regular raw all-purpose flour in this no-bake recipe.
Storage
Store protein cookie dough in an airtight container in the fridge for 4–5 days. For longer storage, portion it into balls or scoops and freeze for 2–3 months. Let frozen portions sit for 5–10 minutes before eating.
Estimated Protein and Calories
Protein and calories will vary by powder, yogurt, flour, nut butter, milk, syrup, chocolate chips, and serving size. As a rough guide, this batch usually lands around 15–22g protein per serving when divided into 3–4 portions, with about 225–400 calories per serving depending on portion size and ingredients. Use your own labels for the most accurate numbers.
This edible cookie dough recipe is for the spoonful you wanted before the cookies ever reached the oven: soft brown-sugar dough, creamy butter, vanilla, a little salt, and tiny chocolate chips in every bite. It tastes like classic chocolate chip cookie dough, but it is made for eating straight from the bowl — no baking tray, no waiting, no pretending you only wanted “one taste.”
The important difference is safety. This version skips raw eggs and treats flour as something that needs attention, not an ingredient to casually stir in raw. For the most cautious batch, use commercially heat-treated flour labeled ready-to-eat; if you use a home flour-heating method, the notes below explain the limits clearly.
Before You Start: Texture and Safety
The good news is that edible cookie dough does not need to be complicated. Once you understand the flour piece, the rest is simple: cream butter and sugar, add vanilla and salt, mix in the flour, then adjust the texture until it tastes like the middle of a chocolate chip cookie.
Once the base is right, you can keep it classic with mini chocolate chips, make a single-serving bowl, turn it into sugar cookie dough, add peanut butter, roll it into bites, or chill little pieces for ice cream. Start with the chocolate chip version first; it teaches you what the texture should feel like.
Before you start mixing, use the texture cue below as your visual target: the dough should look thick, creamy, and spoonable, not dry, runny, or frosting-soft.
For the smoothest result, the dough should look dense but not dry; in other words, it should stay on the spoon without turning crumbly, stiff, or frosting-soft.
If the craving is really for warm cookies from the oven, use a proper cookie recipe like MasalaMonk’s double chocolate chip cookies instead. This one is built for one job: cookie dough you can enjoy by the spoonful.
What You’ll Find in This Edible Cookie Dough Guide
Use the quick answer if you already know the basics, or go straight to the safety notes if you want to understand the flour and egg issue before mixing.
Quick Answer: How to Make This Edible Cookie Dough Recipe
To make this edible cookie dough recipe, start with ready-to-eat flour or handle the flour using the safety notes below. Let the flour cool completely, then sift it so the dough does not taste lumpy or floury. Cream softened butter with brown sugar and a little granulated sugar, mix in vanilla and salt, add the flour, loosen the dough with milk or cream, and fold in mini chocolate chips.
The texture should be soft and scoopable, like the center of chocolate chip cookie dough before baking. It should not be runny, greasy, sandy, or crumbly. If it feels too thick, add milk one teaspoon at a time. If it feels too soft, chill it for 15 to 20 minutes before serving.
Quick texture cue: the dough should hold on a spoon, but still press easily when you scoop it. If it cracks apart, it needs a little more milk. If it slumps like frosting, it needs chilling or a spoonful of sifted flour.
Edible Cookie Dough Recipe at a Glance
Best flour option: commercially heat-treated flour labeled ready-to-eat
Eggs: none
Texture: creamy, spoonable, and thick enough to hold on a spoon
Best chips: mini semisweet chocolate chips
Chill time: optional, 10–20 minutes if the dough feels soft
Storage: 4–5 days refrigerated, 1–2 months frozen
If you only remember the essentials, keep these in mind first: no eggs, ready-to-eat flour preferred, mini chips for a better bite, and short cold storage for the best texture.
Why This Edible Cookie Dough Works
A good edible cookie dough recipe should not taste like sweet flour paste. It should taste like the spoonful you wanted from a real chocolate chip cookie batch: buttery, brown-sugary, vanilla-scented, lightly salty, and soft enough to scoop.
No eggs: the dough is made for eating, not baking, so eggs are left out completely.
Better flour handling: ready-to-eat flour is the cleanest choice, and the home flour-heating note is explained honestly.
Brown sugar leads: it gives the deeper chocolate chip cookie flavor that plain white sugar cannot.
Softened butter, not melted: softened butter keeps the texture creamy instead of greasy or loose.
Mini chips: smaller chips spread through the dough better, so every spoonful tastes balanced.
Adjustable milk: flour behaves differently after heating, so milk is added slowly instead of dumped in all at once.
Is Edible Cookie Dough Safe to Eat?
The safety piece gets much less confusing once you remember one thing: regular cookie dough is meant to be baked, and this dough is not. A safer edible cookie dough recipe starts with no raw eggs and a better flour choice from the beginning.
According to the CDC, raw dough and batter should not be eaten because uncooked flour and raw eggs can contain germs that may cause food poisoning. Commercial edible dough products, the CDC notes, are made with heat-treated flour and pasteurized eggs or no eggs.
So, is this kind of dough safer than sneaking a spoonful from a regular cookie batch? Yes, when it is made without raw eggs and with ready-to-eat flour. The safest route is commercially heat-treated flour labeled ready-to-eat. Home flour-heating methods are common in recipes, but they are not the same as validated commercial heat-treatment.
Why This Recipe Has No Eggs
Eggs stay out because the bowl is not going into the oven. They help baked cookies with structure, richness, and spread, but raw or lightly cooked eggs can carry food-safety risks. Since this is a spoonable dessert, the simplest direction is to leave eggs out completely.
That also means the dough will not bake like regular cookie dough. It has no eggs for structure and no leavening for lift, so treat it as a no-bake dessert rather than a shortcut cookie recipe.
What to Know About Raw Flour
Flour is easy to overlook because it does not look like a risky ingredient. However, the FDA explains that most flour is a raw food and has not been treated to kill bacteria. Baking or cooking is what normally makes flour-containing doughs safe to eat.
That is why the flour choice matters here. If you can get commercially heat-treated flour labeled ready-to-eat, use it. It gives you the cleanest safety story and keeps the method simple.
That does not mean homemade edible cookie dough is off the table; it just means the flour step deserves a little honesty. Ready-to-eat flour is the strongest option. If you choose to heat flour yourself, treat that step as risk reduction rather than the same thing as commercially processed flour.
Commercially heat-treated ready-to-eat flour keeps the no-bake dough approach cleaner, especially because regular flour is normally made safer through baking or cooking.
About Heating Flour at Home
Many edible cookie dough recipes include a home flour-heating step, but this should be framed carefully. The most cautious choice is still commercially heat-treated flour labeled ready-to-eat. The FDA notes that home flour treatments may not reliably kill all bacteria or make raw flour safe to eat, so treat any home method as a recipe-blog risk-reduction step rather than a validated food-safety process.
For readers who still choose to follow a home flour-heating method, use an instant-read thermometer, spread the flour thinly, stir it during heating, check more than one spot, cool it completely, and sift before mixing.
If you heat flour at home, use the thermometer cue as a careful kitchen step, not a promise; the safest route is still flour processed for ready-to-eat use.
Oven Method Used by Many Recipe Blogs
Preheat the oven to 350°F / 175°C. Spread a little more flour than you need in a thin layer on a parchment-lined rimmed baking sheet. Bake for 7 to 10 minutes, stirring once or twice, until the flour reaches 165°F / 74°C when checked in multiple spots with an instant-read thermometer. Cool completely, sift, then measure or weigh the amount needed for the dough.
Microwave Method Used by Many Recipe Blogs
Place flour in a wide microwave-safe bowl. Microwave for 30 seconds, stir well, then continue in 15-second bursts, stirring and checking the temperature in more than one spot. Let it cool completely and sift before using.
Simple takeaway: use ready-to-eat flour if you can find it. If not, read the home-heating note carefully and understand that it is a common recipe-blog risk-reduction step, not the same as commercial heat treatment.
Ingredients for Edible Cookie Dough
The ingredient list stays close to classic chocolate chip cookie dough, but each item has a job. Since the dough is not baked, little details matter more than usual: softened butter works better than melted butter, mini chips are easier to eat than large chips, and milk should be added slowly.
Because this no-bake dough is eaten as-is, the ingredient balance matters more than usual: softened butter keeps it creamy, brown sugar adds depth, and milk helps fine-tune the consistency.
Ready-to-Eat or Properly Handled Flour
Flour gives the dough its familiar body. Use 1¼ cups / 150g commercially heat-treated all-purpose flour if you can find it. If you use a home flour-heating method, cool the flour completely, sift it, and then measure the final amount into the bowl.
Softened Butter
Use ½ cup / 113g / 4 oz unsalted butter, softened but not melted. Softened butter creams into the sugar and gives the dough a classic texture. Melted butter can make it greasy, loose, or frosting-like.
Brown Sugar and Granulated Sugar
Brown sugar gives the dough that deep chocolate chip cookie flavor. Granulated sugar adds familiar sweetness, but too much can make the texture gritty. This recipe uses mostly brown sugar with just a small amount of granulated sugar for balance.
Vanilla and Salt
Vanilla makes the dough taste like dessert instead of sweet butter and flour. Salt is just as important because it keeps the sweetness from feeling flat. Do not skip it, especially if you are using unsalted butter.
Milk or Cream
Milk or cream loosens the dough after the flour goes in. Start with 1 tablespoon and add more only if needed. Flour can absorb differently after heating, so the best amount is the one that gives you a scoopable texture.
Mini Chocolate Chips
Mini chocolate chips work better than large chips because this dough is eaten soft, not baked. They distribute evenly, so each spoonful has chocolate without turning the bowl into mostly hard chunks.
Optional Baking Soda for Flavor Only
A tiny pinch of baking soda can make the dough taste more like classic cookie dough, but it is optional. If you use it, add only ⅛ teaspoon. It is there for flavor, not because the dough should be baked.
Tools That Make the Texture Better
You can make this with a bowl and spatula, so do not let the tool list make the recipe feel fussy. A few extras simply make the result more reliable: an instant-read thermometer for the flour if you are using a home-heating method, a fine-mesh sieve for lumps, and a scale so the dough does not turn dry from too much flour.
Rimmed baking sheet
Parchment paper
Instant-read thermometer
Mixing bowl
Electric hand mixer or stand mixer
Rubber spatula
Fine-mesh sieve
Digital scale, strongly recommended
Small cookie scoop, optional
Airtight container for storage
A scale is especially useful because flour gets compacted easily. If you scoop too much into the bowl, the dough can turn dry, chalky, or too thick before you even start troubleshooting.
How to Make This Edible Cookie Dough Recipe
The method is easy, but the order makes a big difference. Handle the flour first, let it cool, then build the dough slowly. Warm flour and melted butter are two of the fastest ways to turn a good bowl of cookie dough into something greasy.
The method works best in sequence: prepare the flour first, cream the butter and sugars well, then mix, adjust, and fold in the chips once the texture already feels close.
Step 1: Prepare the Flour
If you are using commercially heat-treated flour, measure or weigh it and move on. If you are using a home flour-heating method, follow the note above, cool the flour completely, and sift it before mixing. Do not add warm flour to the butter mixture.
Step 2: Cream the Butter and Sugars
Add softened butter, brown sugar, and granulated sugar to a bowl. Beat until the mixture looks creamy, lighter, and slightly fluffy. You should still see a thick butter-sugar mixture, not melted butter pooling around the edges. This step helps soften the sugar crystals and gives the dough a smoother bite.
Step 3: Add Vanilla, Salt, and Flour
Mix in the vanilla and salt, then add the cooled, sifted flour. Add the flour gradually if you are mixing by hand. At first, the mixture may look a little thick; that is normal.
Step 4: Adjust the Texture
Add milk or cream one teaspoon at a time. Stir, pause, and check the texture before adding more. The dough should hold its shape on a spoon but still press easily when you scoop it. Stop before it starts looking like frosting.
Add milk slowly, then stir before deciding on more; the dough often softens after a few turns, so patience helps keep it thick and spoonable.
Step 5: Fold in Mini Chocolate Chips
Fold in the mini chocolate chips with a spatula. Taste and adjust with a tiny pinch of salt if it tastes too sweet, or a few extra drops of vanilla if it tastes flat.
Serving cue: this dough is best after a 10-minute rest. That short pause lets the sugar soften slightly and the flour hydrate, so each spoonful tastes smoother.
Spoon test: The dough should lift cleanly and still look creamy before you move to the recipe card.
The spoon test is one of the easiest checks in the whole recipe: if the dough lifts cleanly and still looks creamy, you are usually very close to the ideal finish.
Edible Cookie Dough Recipe Card
This edible cookie dough recipe is a classic chocolate chip version made without eggs and with a safer flour approach. It is designed for eating by the spoonful, rolling into bites, or folding into desserts.
YieldAbout 2½ cups
Servings12–16 small servings
Prep Time10 minutes
Total Time20–25 minutes
Ingredients
1¼ cups / 150g commercially heat-treated all-purpose flour, preferred; or flour handled using the home-heating note above, cooled completely and sifted
½ cup / 113g / 4 oz unsalted butter, softened
½ cup / 100–110g packed light brown sugar
2 tablespoons / 25g granulated sugar
1½ teaspoons / 7ml vanilla extract
½ teaspoon fine salt, or to taste
1–2 tablespoons / 15–30ml milk or cream, added as needed
¾ cup / 120–130g mini semisweet chocolate chips
Optional: ⅛ teaspoon baking soda, for classic cookie-dough flavor only
Method
Prepare the flour. Use commercially heat-treated flour if available. If using a home flour-heating method, follow the safety note above, cool the flour completely, sift it, then measure 150g for the recipe.
Cream the butter and sugars. In a mixing bowl, beat softened butter, brown sugar, and granulated sugar until creamy and slightly fluffy.
Add flavor. Mix in vanilla, salt, and optional baking soda if using.
Add flour. Add the cooled, sifted flour and mix until a thick dough forms.
Adjust texture. Add milk or cream 1 teaspoon at a time until the dough is soft and scoopable.
Add chocolate. Fold in mini chocolate chips. Let the dough rest for about 10 minutes before serving for the smoothest texture.
Notes
This dough is for eating as edible cookie dough, not for baking into cookies.
For the most cautious version, use commercially heat-treated flour labeled ready-to-eat.
If you choose to heat flour at home, use an instant-read thermometer, stir well, check multiple spots, cool completely, and sift before mixing.
If the dough is too dry, add milk 1 teaspoon at a time. If it is too sticky, chill it for 15–20 minutes.
Store refrigerated in an airtight container for 4–5 days, or freeze portions for 1–2 months.
Use the recipe card as your baseline, then adjust only the milk or chill time first; those two small changes usually fix the texture without changing the flavor.
Which Batch Size Should You Make?
Choose the batch based on the kind of cookie dough moment you want. The single-serve version is best for one quick craving, the for-two version is perfect for a small dessert, and the full edible cookie dough recipe works better when you want cookie dough bites, ice cream mix-ins, dessert cups, or a make-ahead treat in the fridge.
Batch size changes the experience as much as flavor does: a single serve suits one craving, a for-two version feels more dessert-like, while a full batch works better for bites or mix-ins.
Make This
Best For
Texture Tip
Single serve
One craving, no leftovers
Add milk slowly because small bowls loosen fast.
For two
Movie night, date night, small dessert
Rest 10 minutes before eating for a smoother bite.
The single-serve version is the bowl to make when you want cookie dough now and do not want leftovers calling your name from the fridge. Because the batch is small, measure the flour and milk carefully; a tiny extra splash can change the texture quickly.
Choose the single-serve bowl when you want cookie dough for one and nothing left over, but add milk carefully because small batches loosen faster than larger ones.
Single-Serve Formula
6 tablespoons / 48g ready-to-eat flour, preferred; or flour handled using the safety note above
2 tablespoons / 28g / 1 oz softened butter
2 tablespoons / 25–28g light brown sugar
1 tablespoon / 12g granulated sugar
¼–½ teaspoon vanilla extract
Small pinch of fine salt
½–1 tablespoon / 7–15ml milk or cream
2 tablespoons / 20–25g mini chocolate chips
Mix it the same way as the main batch: cream the softened butter and sugars, add vanilla and salt, stir in the flour, loosen with milk, and fold in the chips. If you want a firmer scoop, chill it for 10 minutes before eating.
Edible Cookie Dough for Two
This small-batch version makes enough for two dessert portions without leaving a full container in the fridge. That size works especially well for a movie night, date night, or quick no-bake dessert when you want something sweet without baking a tray of cookies.
This small batch is a practical middle ground: enough for a shared dessert, yet still easy to mix without committing to a full container in the fridge.
For-Two Formula
½ cup + 1 tablespoon / about 68g ready-to-eat flour, preferred; or flour handled using the safety note above
4 tablespoons / 56g / 2 oz softened butter
¼ cup / 50–55g light brown sugar
1½–2 tablespoons / 18–25g granulated sugar
½–1 teaspoon vanilla extract
⅛–¼ teaspoon fine salt
1–1½ tablespoons / 15–22ml milk or cream
¼ cup / 40–45g mini chocolate chips
Start with the lower amount of milk, then add more only if the mixture feels too thick. Small batches can go from crumbly to loose quickly, so adjust slowly and give the bowl a minute before adding another splash.
Edible Cookie Dough Variations
Once the base is right, the dough is easy to customize. Keep the same safety logic: no raw eggs, avoid regular raw flour, and adjust the texture slowly because different add-ins change how soft or thick the mixture feels.
Not sure where to start? Make the classic chocolate chip version first, then decide what you want more of next time: extra vanilla, more chocolate, a salty peanut butter edge, a firmer bite for rolling, or a lighter dairy-free version.
Once the base recipe feels right, use the variations to choose your next direction, whether that means sweeter, nuttier, dairy-free, higher-protein, or lower-carb.
If You Want…
Make This Variation
Small Adjustment
Classic chocolate chip flavor
Chocolate chip edible cookie dough
Use mostly brown sugar and mini chips.
A sweeter bakery-style bowl
Sugar cookie dough
Use more granulated sugar and add sprinkles at the end.
A richer, saltier bite
Peanut butter cookie dough
Add creamy peanut butter and reduce the milk slightly.
A firmer bite for rolling
Cookie dough bites
Chill before scooping or dipping.
A lighter dairy-free option
Vegan edible cookie dough
Use vegan butter, dairy-free milk, and dairy-free chips.
Chocolate Chip Edible Cookie Dough
Start here if you want the classic chocolate chip version. Brown sugar, vanilla, salt, softened butter, and mini chocolate chips give you the familiar cookie dough flavor without needing to bake anything.
Classic chocolate chip remains the best place to start, since brown sugar, vanilla, and mini chips come closest to the flavor most people expect from cookie dough.
For deeper chocolate flavor, add 1 to 2 tablespoons of cocoa powder and a splash more milk. For a chunkier bowl, use a mix of mini chips and finely chopped chocolate.
Edible Sugar Cookie Dough
Choose this variation when you want the vanilla-sprinkle side of cookie dough instead of the brown-sugar chocolate chip side. It tastes lighter, sweeter, and more bakery-style.
Use more granulated sugar and less brown sugar. You can replace the brown sugar with granulated sugar for a cleaner vanilla flavor, then add a tiny splash of almond extract if you like bakery-style sugar cookies. Sprinkles, white chocolate chips, and a little extra vanilla work well here. Add sprinkles at the end so they do not bleed too much color into the dough.
Peanut Butter Edible Cookie Dough
This is the richer, saltier variation — the one that tastes like peanut butter cookie dough met chocolate chip cookie dough in the same bowl. Mix ¼ cup creamy peanut butter into the butter and sugar mixture, then reduce the milk slightly. Peanut butter adds richness and salt, so taste before adding extra salt.
Meanwhile, the peanut butter version turns richer and slightly firmer, so it is a smart choice when you want a saltier edge and a more substantial bite.
Mini chocolate chips are great here, but chopped roasted peanuts also work if you want crunch. For a baked version of this flavor, MasalaMonk’s peanut butter cookies are the better route.
Gluten-Free Edible Cookie Dough
For a gluten-free version, use a gluten-free flour blend you already like in no-bake or raw-style applications. Different blends behave differently when they are not baked, so texture matters more than usual here.
If the dough tastes gummy, try a gum-free gluten-free blend next time. If it tastes grainy, let it rest for 10 to 15 minutes before serving. Almond flour can also work, but it gives a softer, nuttier dough rather than a classic all-purpose-flour texture.
Vegan and Dairy-Free Edible Cookie Dough
To make the dough vegan or dairy-free, use vegan butter, dairy-free milk, and dairy-free chocolate chips. The same method works, but the mixture may soften faster depending on the vegan butter you use.
The dairy-free version should still feel like dessert first: creamy, scoopable, and close to the original texture, just made with vegan butter, dairy-free milk, and dairy-free chips.
If you want a dairy-free frozen dessert to pair with cookie dough bites, MasalaMonk’s coconut ice cream is a natural next recipe.
Protein Edible Cookie Dough
The protein version goes in a different direction from the classic butter-and-brown-sugar dough, but it is useful when you want the cookie dough idea in a higher-protein snack. For a quick version, blend cottage cheese until completely smooth, then stir it with almond flour or oat flour, vanilla protein powder, a little maple syrup or sweetener, vanilla, salt, and mini chocolate chips.
Protein cookie dough goes in a different direction from the classic bowl; still, it can be useful when you want the same dessert idea in a more filling, snack-like version.
Chill it before eating so the texture firms up. If you like high-protein desserts, MasalaMonk’s protein ice cream goes deeper into protein powder, Greek yogurt, dairy-free, low-calorie, and sugar-free frozen dessert options.
Keto or Sugar-Free Edible Cookie Dough
Expect a nuttier, softer dough than the classic chocolate chip version. For a keto-style bowl, use almond flour instead of wheat flour, a low-carb sweetener instead of sugar, and sugar-free chocolate chips. Because almond flour has more fat and less starch than all-purpose flour, start with less added milk and adjust slowly.
Because almond flour behaves differently from all-purpose flour, keto edible cookie dough usually turns out softer and nuttier, with a flavor that feels less classic but still satisfying.
For another low-carb dessert direction, MasalaMonk’s keto hot chocolate is a good companion recipe.
How to Fix Edible Cookie Dough Texture
If your first spoonful is not perfect, do not panic. Edible cookie dough is one of the easiest desserts to adjust because nothing has been baked yet. Most texture problems come down to flour, butter temperature, or adding the milk too quickly.
The easiest way to fix the dough is to change only one thing at a time. Add milk slowly, chill before adding more flour, and taste again after a short rest.
Look at the texture before changing the recipe: crumbly dough needs slow moisture, loose dough needs chilling, and the best bowl sits somewhere in between.
Problem
Likely Cause
Fix
Dry or crumbly texture
Too much flour, packed flour, or not enough milk
Add milk or cream 1 teaspoon at a time until scoopable.
Sticky dough
Butter too warm or too much milk
Chill 15–20 minutes, or add 1 tablespoon sifted flour.
Gritty bite
Sugar has not softened into the butter enough
Cream the butter and sugars longer, or let the dough rest 10 minutes.
Floury flavor
Flour was overmeasured or not sifted after heating
Use grams, sift after heating, and add a little vanilla or salt to balance.
Overly sweet dough
Too much sugar or too many chips
Add a pinch of salt and 1–2 tablespoons flour.
Greasy or soupy texture
Butter was melted instead of softened
Chill, then stir. Next time, use softened butter.
Very firm after chilling
Butter hardened in the fridge
Let the dough sit at room temperature for 10–15 minutes before serving.
How to Fix Dry or Crumbly Dough
Start with a teaspoon of milk or cream, then stir before adding more. Small corrections work better here because dry dough can move from crumbly to loose surprisingly quickly.
If the dough turns dry or crumbly, fix it gradually rather than all at once; a teaspoon of milk or cream is usually enough to start bringing it back together.
How to Fix Sticky or Too-Soft Dough
Chill first so the butter firms up before you add more flour. After a short rest in the fridge, the same bowl often becomes scoopable without turning heavy or floury.
Chilling gives the butter time to firm up again; as a result, soft dough often becomes scoopable without needing extra flour.
Can You Bake Edible Cookie Dough?
No, this edible cookie dough is made for spooning, scooping, and rolling into bites — not for baking. It has no eggs and no leavening, so it will not behave like regular cookie dough in the oven. Instead of turning into chewy cookies, it may spread, turn greasy, stay dense, or bake up flat.
Edible cookie dough is made for spooning and scooping, not for baking; therefore, use a proper cookie recipe whenever the goal is warm cookies from the oven.
Think of this as a no-bake dessert, not a shortcut cookie dough. If the craving is really for warm cookies from the oven, use a recipe designed for baking, like MasalaMonk’s double chocolate chip cookies. If you want a roll-and-cut dough, MasalaMonk’s gingerbread cookies are a better example of dough built for shaping and baking.
Ways to Use Edible Cookie Dough
Eating it by the spoonful is the obvious answer, but this dough can do more. Because it is eggless and made with a safer flour approach, you can use it as a no-bake dessert component instead of treating it like leftover raw cookie dough.
Easy No-Bake Ways to Serve It
Eat it by the spoonful after a 10-minute rest for smoother texture.
Roll it into bites and chill until firm.
Dip the bites in melted chocolate and finish with flaky salt.
Fold chilled pieces into ice cream for homemade cookie dough ice cream.
Blend a spoonful into a milkshake for cookie dough flavor.
Use it as a brownie topping after brownies have cooled.
Layer it into dessert cups with whipped cream, chocolate sauce, or berries.
Press it into mini tart shells for a no-bake cookie dough dessert.
Beyond the spoonful, this dough can become bites, brownie topping, milkshake flavor, or ice cream mix-ins, so one batch can stretch into several no-bake dessert ideas.
Cookie Dough Ice Cream and Mix-In Safety
Ice cream note: only use dough made with ready-to-eat ingredients for ice cream mix-ins. Do not fold regular raw cookie dough into ice cream; the pieces should be made without raw eggs and with a safer flour approach.
Small chilled pieces are especially good folded into homemade ice cream. For a chocolate-chip frozen dessert direction, see MasalaMonk’s mint chocolate chip ice cream.
If you want another no-bake spoonable dessert, MasalaMonk’s avocado chocolate mousse gives you a chocolate-rich option with a completely different texture.
How to Store and Freeze Edible Cookie Dough
Because the dough contains butter and milk or cream, it should be stored cold. Do not leave it sitting out for long serving windows, especially in a warm kitchen.
Refrigerator: Store in an airtight container for 4–5 days.
Freezer: Freeze portioned balls or scoops for 1–2 months.
To serve from the fridge: Let it sit at room temperature for 10 minutes so the butter softens slightly.
To freeze neatly: Scoop into balls, freeze on a lined tray until firm, then transfer to a freezer-safe container.
Cold storage firms the butter, so let refrigerated scoops rest briefly before serving; meanwhile, freezing in portions makes later dessert bowls much easier.
If you are making cookie dough bites for a party, keep them chilled until close to serving time. For the best texture, portion them small enough that people can eat them in one or two bites.
Protein versions made with cottage cheese or yogurt should be treated as more perishable. Keep them refrigerated, use clean utensils, and aim to eat them within 2–3 days rather than keeping them as long as the classic butter-based version.
FAQs
Is this edible cookie dough recipe safe to eat?
Edible cookie dough is safest when it is made without raw eggs and with commercially heat-treated flour labeled ready-to-eat. Regular raw cookie dough is not meant to be eaten because it usually contains raw flour and raw eggs. Home flour-heating methods are common in recipes, but they are not the same as commercially validated heat treatment.
What is the safest flour for edible cookie dough?
The safest flour choice is commercially heat-treated flour labeled ready-to-eat. Regular all-purpose flour is raw and is normally made safe through baking or cooking, not by being stirred directly into a no-bake dessert.
Why does edible cookie dough need safer flour handling?
Most flour is raw and has not been treated to kill bacteria. Regular cookie dough becomes safer when baked, but edible cookie dough is not baked. That is why this recipe uses ready-to-eat flour guidance instead of asking you to stir plain raw flour into dessert.
How do I make edible cookie dough without eggs?
This recipe is eggless by design. Eggs are useful in baked cookies, but they are not needed here because the dough is made for spooning, not for going into the oven.
How does almond flour change the texture?
Almond flour makes a softer, nuttier dough and works best in keto, gluten-free, or vegan-style edible cookie dough. It will not taste exactly like classic chocolate chip cookie dough made with all-purpose flour, so start with less milk and adjust slowly.
How do I make this edible cookie dough recipe gluten-free?
Use a gluten-free flour blend you already like in no-bake applications, or use almond flour for a softer variation. If your gluten-free dough feels gummy, try a gum-free blend next time. If it feels grainy, let it rest for 10 to 15 minutes before eating.
How do I make a vegan version?
For a vegan version, use vegan butter, dairy-free milk, and dairy-free chocolate chips. The dough may soften more quickly depending on the vegan butter, so chill it if it feels too loose.
How do I make edible cookie dough for one?
For one serving, use 6 tablespoons / 48g ready-to-eat flour, preferred; or flour handled using the safety note above, plus 2 tablespoons softened butter, 2 tablespoons brown sugar, 1 tablespoon granulated sugar, vanilla, salt, ½ to 1 tablespoon milk, and 2 tablespoons mini chocolate chips. Mix, adjust the texture, and chill briefly if needed.
Why should this dough not be baked?
This dough is made for eating, not baking. It has no eggs and no leavening, so it can bake up flat, greasy, dense, or crumbly. Use a real cookie recipe if you want baked cookies.
How long does edible cookie dough last in the fridge?
Store edible cookie dough in an airtight container in the refrigerator for 4–5 days. Let it sit at room temperature for about 10 minutes before eating if it becomes too firm.
How should you freeze edible cookie dough?
Freezing works best when the dough is portioned first. Scoop it into small balls, freeze them on a lined tray until firm, then move them to a freezer-safe container. Use within 1–2 months for the best texture.
Once you have the base texture right, this edible cookie dough recipe becomes the kind of dessert you can make your own: extra vanilla, darker chocolate, sprinkles, peanut butter, or chilled bite-size scoops tucked into ice cream. Start with the classic chocolate chip version first, then let the next batch follow your craving.
Make a quick note of what you changed — more salt, less milk, extra chips, longer chill time. The best edible cookie dough is the one you can repeat exactly when the craving hits again.