Posted on Leave a comment

Charcuterie Boards: History, Assembly, Health, and the 3-3-3-3 Rule

CHARCUTERIE BOARD

A well-crafted charcuterie board is more than just food—it’s a statement piece, a conversation starter, and a delicious way to bring people together. Whether for a cozy family gathering or a festive celebration, the art of arranging meats, cheeses, and their accompaniments is timeless and endlessly creative.

Let’s dive deep into the world of charcuterie boards—what they are, where they come from, how to make them healthy, and, most importantly, how to build a show-stopping spread at home.


What Is a Charcuterie Board?

At its core, a charcuterie board is an artful arrangement of cured meats (charcuterie), cheeses, bread, crackers, fruits, nuts, pickles, and spreads—all beautifully presented on a platter or wooden board. The word “charcuterie” is French, originally referring to shops that sold cured pork products. Today, charcuterie has expanded to encompass a much wider variety of meats, cheeses, and snacks.

Modern charcuterie boards are as diverse as their creators, often blending traditions from around the world. They’re now a mainstay at parties, wine nights, and even as a casual dinner option for families.


The History & Evolution of Charcuterie

  • European Roots: The tradition of curing meats began in France and Italy centuries ago as a way to preserve food before refrigeration. Meats were salted, air-dried, and sometimes smoked, then enjoyed with bread and local cheese.
  • Charcuterie Shops: In 15th-century France, “charcutiers” specialized in preparing and selling pork products—everything from pâté to sausage and rillettes.
  • The Modern Board: In recent decades, charcuterie boards have evolved, especially in the US, to include a wide array of cheeses, fruits, nuts, and even sweet elements like chocolate or honeycomb.

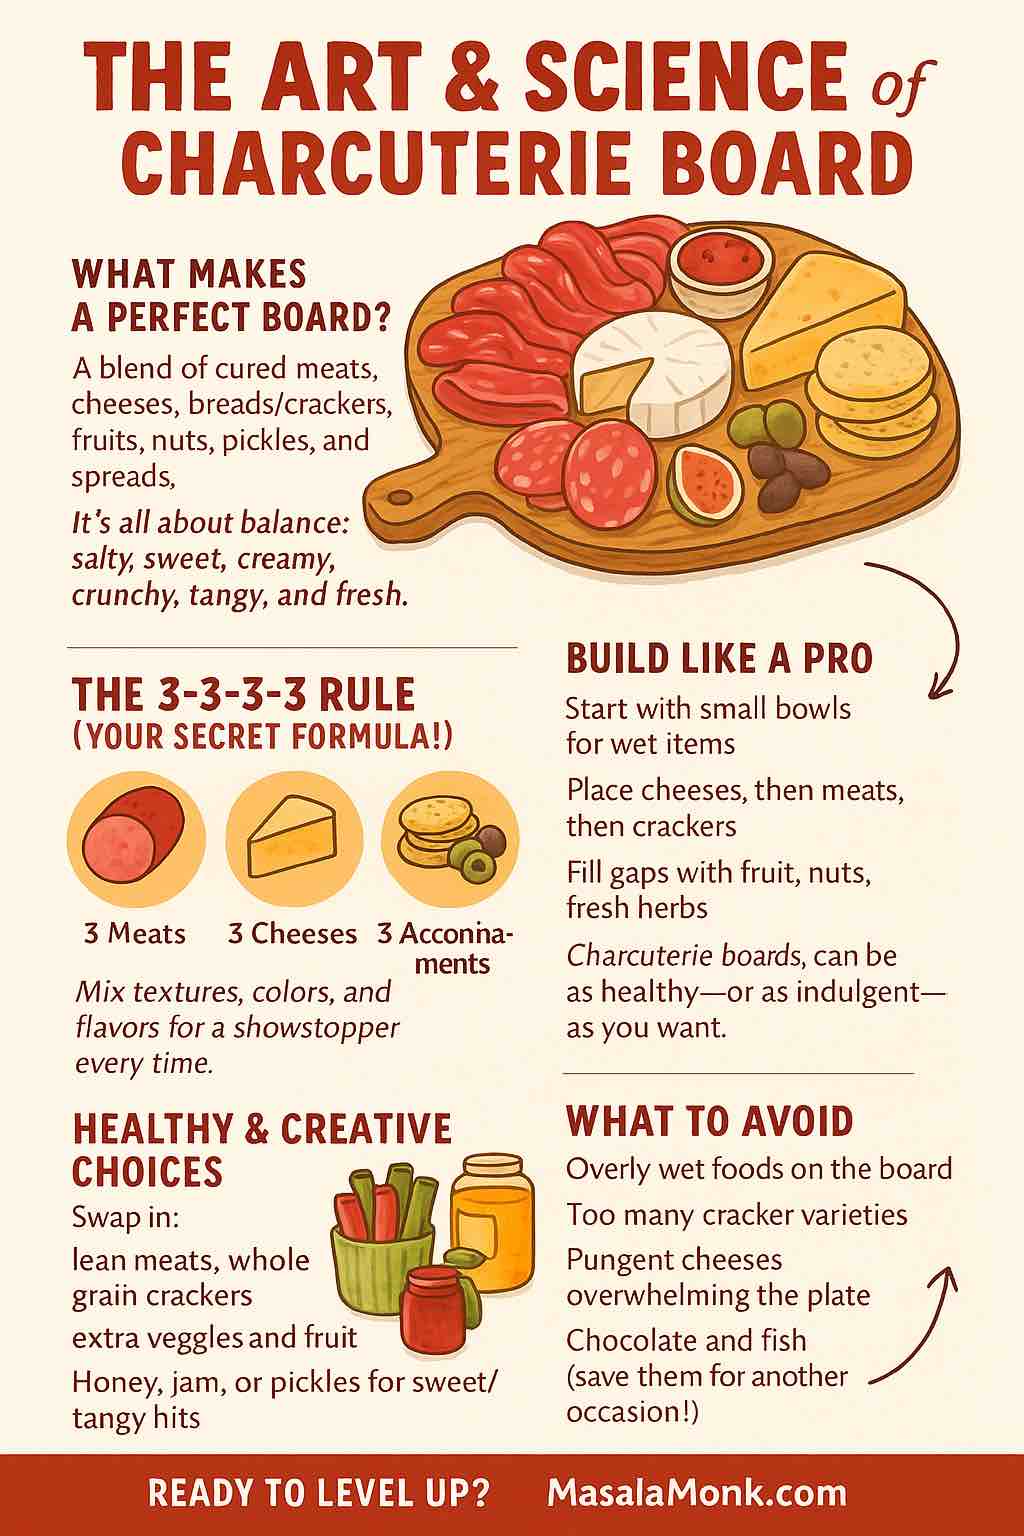
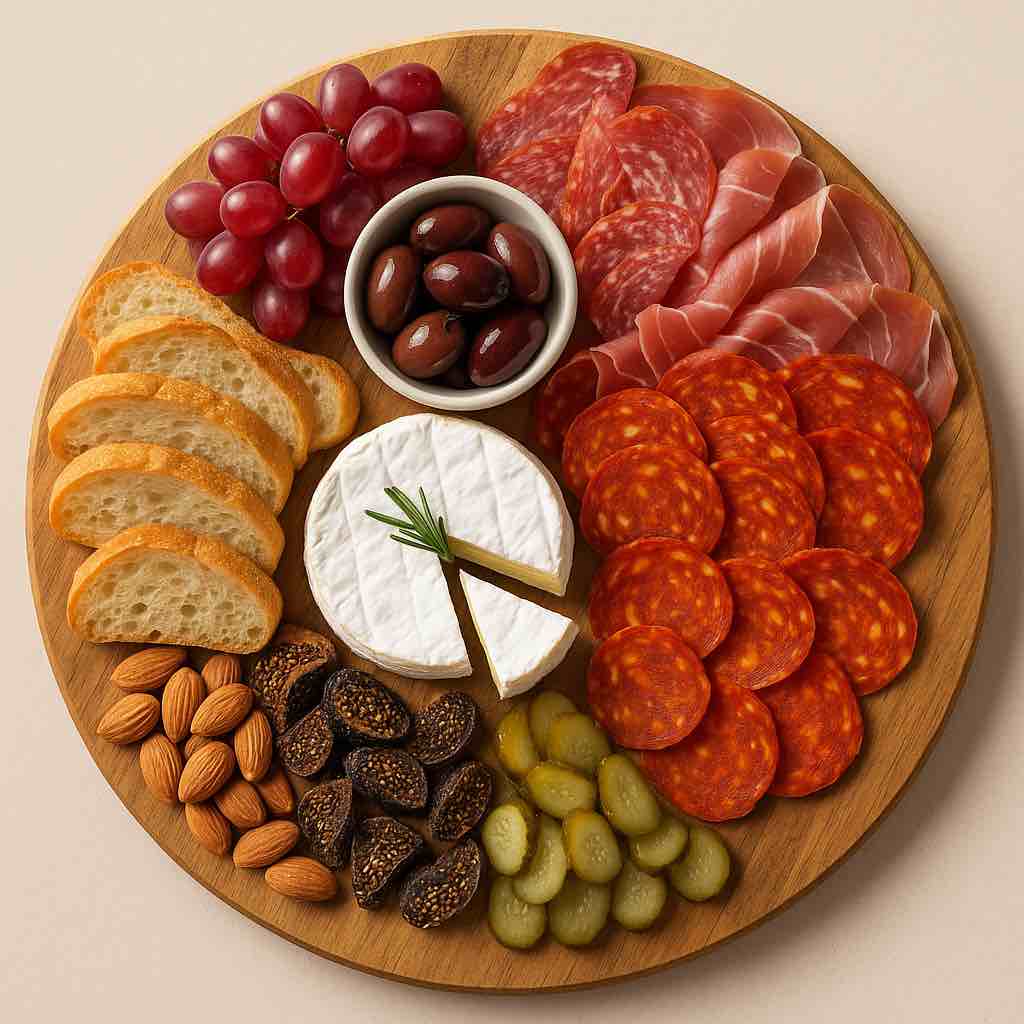
The Anatomy of a Charcuterie Board

A truly great charcuterie board offers balance, variety, and visual appeal. Here’s what usually makes the cut:

  • Cured Meats: Salami, prosciutto, coppa, soppressata, chorizo, turkey or chicken salami, pâté.
  • Cheeses: Soft (brie, camembert, goat), semi-hard (manchego, gouda), hard (aged cheddar, parmesan), blue cheese.
  • Bread & Crackers: Baguette slices, rustic bread, grissini (breadsticks), artisanal crackers, crostini.
  • Accompaniments: Fresh/dried fruits (grapes, figs, apricots), olives, pickles, nuts (almonds, walnuts, pistachios), jams, honey, mustards, and fresh herbs for garnish.

The secret: Mix flavors and textures—salty, sweet, tangy, creamy, crunchy.


The 3-3-3-3 Rule: Your Charcuterie Blueprint

Feeling overwhelmed by all the options? Use the 3-3-3-3 rule to guarantee a well-rounded, visually stunning board:

  • 3 Meats: (e.g., prosciutto, salami, chorizo)
  • 3 Cheeses: (e.g., brie, aged cheddar, blue cheese)
  • 3 Starches: (e.g., crackers, sliced baguette, breadsticks)
  • 3 Accompaniments: (e.g., olives, fruit, nuts)

This formula makes shopping simple and ensures a good mix without overloading the board.


How to Arrange Your Charcuterie Board Like a Pro

  1. Start Big: Place small bowls for olives, jams, and spreads on the board first.
  2. Add Cheese: Arrange cheese in different corners. Vary the shape—wedge, block, crumbled.
  3. Meats: Fold or fan out slices of meat for volume and easy grabbing. Group different meats together.
  4. Starches: Add stacks of crackers and bread in gaps, fanned or leaning for height.
  5. Fill Gaps: Tuck in fruits, nuts, and pickles to fill empty spaces and add pops of color.
  6. Finishing Touches: Garnish with fresh herbs (rosemary, thyme, basil) or edible flowers.

Tip: Serve at room temperature (let the board sit out for 15-30 minutes) to bring out the best flavors and textures.

CategoryClassic OptionVeg/Vegan OptionBudget-Friendly
MeatsProsciutto, SalamiRoasted Veggies, HummusTurkey slices
CheesesBrie, CheddarPlant-based cheeseLocal fresh cheese
StarchesBaguette, CrackersSeed crackers, PitaPopcorn, Breadsticks
AccompanimentsOlives, Grapes, NutsFruit, Pickles, NutsDried fruit
“Build-Your-Own Board” table for easy planning
CHARCUTERIE BOARD

5 Things to Avoid on a Charcuterie Board

  1. Overly Wet Foods: Juicy fruits or olives without bowls can make crackers soggy and messy.
  2. Super-Pungent Cheeses or Meats: Very strong flavors (like aged blue cheese or spicy sausage) can dominate—use sparingly and keep separate.
  3. Pre-Sliced Cheese: It dries out fast. Use blocks or wedges and slice just before serving.
  4. Too Many Crackers/Breads: Stick to 2-3 types so the board isn’t overwhelming.
  5. Chocolate or Fish: Chocolate can clash with savory items, and seafood flavors may overpower the board.

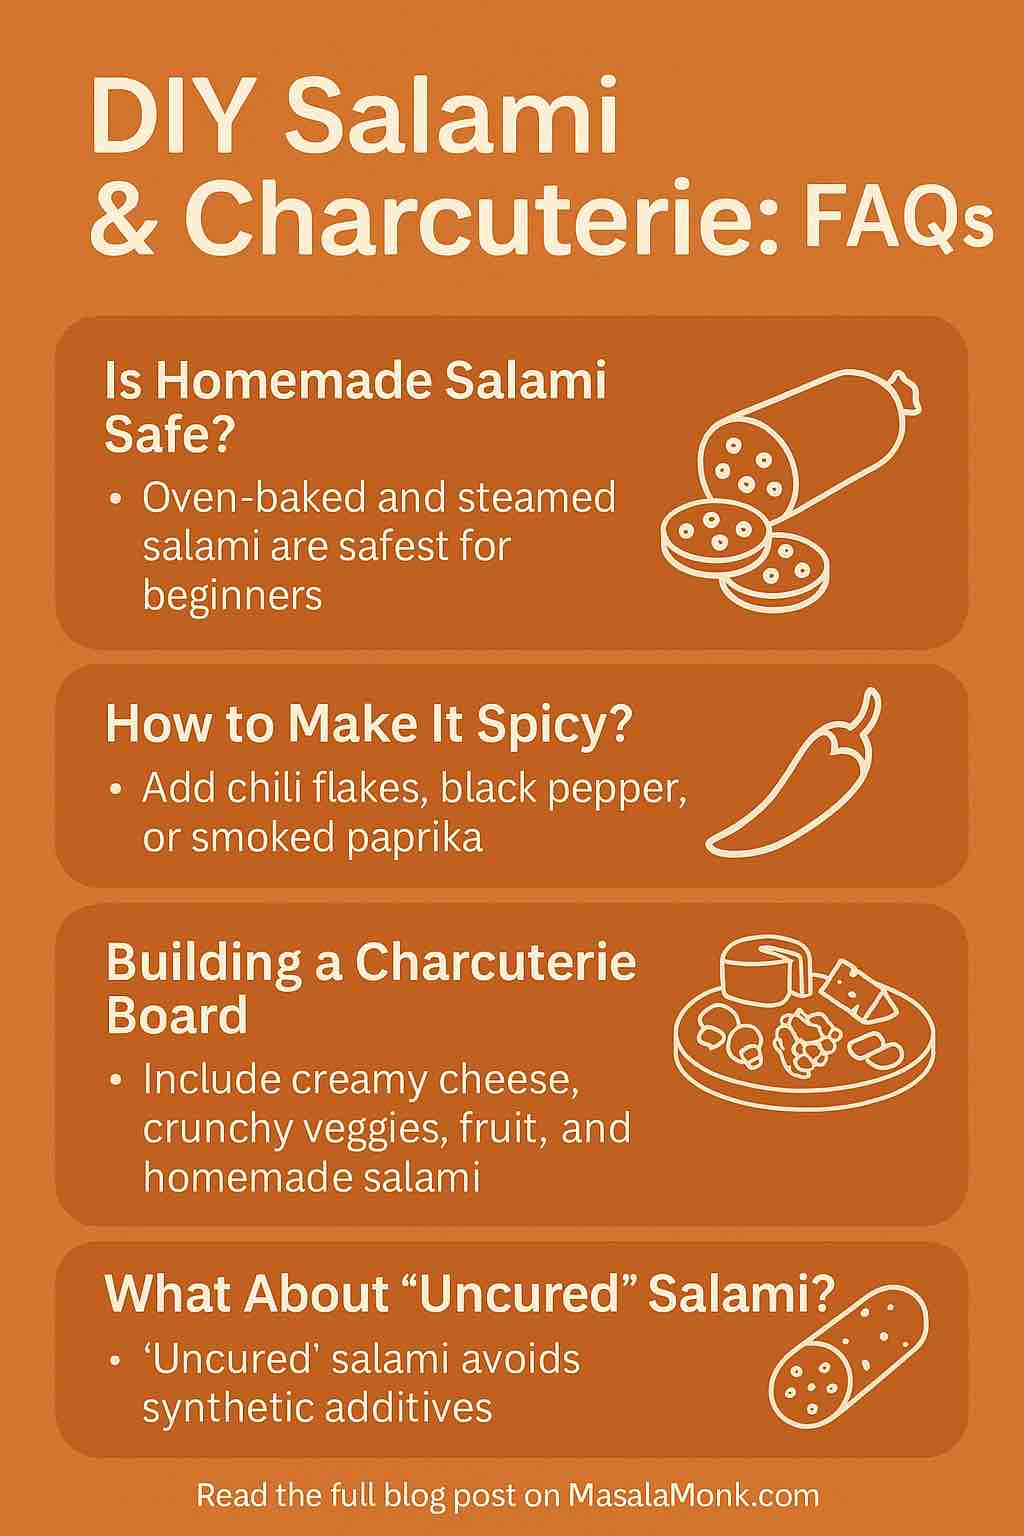
Are Charcuterie Boards Healthy?

Charcuterie boards can be healthy—or indulgent—depending on what you include. Tips for a more nutritious board:

  • Opt for lean, minimally processed meats (turkey, chicken, nitrate-free options).
  • Include fresh fruits and veggies for fiber, color, and vitamins.
  • Choose whole-grain crackers for more nutrients and fiber.
  • Add nuts for healthy fats and crunch.
  • Use cheese in moderation (watch out for high-fat, high-sodium varieties).

Remember: Processed meats, even those cured “naturally,” should be enjoyed in moderation. Pair with fresh foods and plenty of hydration.


Pro Tips & Pairing Ideas

  • Balance is Key: Always have something salty, something sweet, something creamy, and something crunchy.
  • Regional Pairings: Pair Italian meats with Italian cheeses and crackers; Spanish chorizo with Manchego and Marcona almonds.
  • Wine Pairings: White wines pair well with softer cheeses and lighter meats; bold reds with hard cheeses and spicy cured meats.

Charcuterie Board FAQ

1. What is a charcuterie board?
A charcuterie board is a platter featuring an assortment of cured meats, cheeses, breads or crackers, fruits, nuts, pickles, and spreads, arranged artfully for sharing.

2. How do I use the 3-3-3-3 rule for charcuterie boards?
Include 3 meats, 3 cheeses, 3 starches (crackers or breads), and 3 accompaniments (such as fruit, nuts, or pickles) for a well-balanced, visually pleasing board.

3. What should I avoid putting on a charcuterie board?
Avoid overly wet foods, very pungent cheeses or meats, pre-sliced cheese, too many types of crackers, and chocolate or fish, which can clash with other flavors.

4. How far in advance can I prepare a charcuterie board?
Prep ingredients a few hours in advance, but assemble the board just before serving to keep everything fresh and prevent drying out.

5. How much should I serve per person?
As an appetizer, plan for about 2 ounces of meat and 2 ounces of cheese per person.

6. Are charcuterie boards healthy?
They can be! Choose lean meats, lots of fruits and vegetables, whole grain crackers, and limit high-fat cheeses and processed meats for a more nutritious board.

7. What’s the best way to arrange a charcuterie board?
Start with bowls for spreads and olives, place cheeses and meats next, then fill in with breads, crackers, fruits, nuts, and garnishes for color and balance.

8. Can I include vegetarian or vegan options?
Yes! Add hummus, plant-based cheeses, marinated veggies, roasted nuts, and fruit for vegetarian or vegan guests.

9. What drinks pair best with a charcuterie board?
Wine is classic (red, white, or sparkling), but craft beers, ciders, and even mocktails pair well depending on the board’s flavors.

10. How do I keep the board looking fresh?
Keep wet foods in small bowls, use herbs for garnish, and avoid overcrowding—leave a little space so each item stands out.


Conclusion: The Joy of Sharing

Charcuterie boards celebrate abundance, flavor, and togetherness. With the right mix of elements—and a few pro tips—you can create a spread that delights the eyes as much as the tastebuds. Whether you’re a purist or a creative host, the charcuterie board is your canvas.

Want more tips, recipes, or printable guides?
Visit MasalaMonk.com for in-depth how-tos, shopping lists, and inspiration!


What’s your favorite element on a charcuterie board? Share your thoughts or questions below!

Posted on Leave a comment

DIY Salami: Low Sodium, Spicy, Dry-Cured, and Charcuterie Perfection

DIY Salami & Charcuterie

There’s a reason salami has been a staple in kitchens around the world for centuries. Its bold flavors, satisfying texture, and impressive shelf life make it a superstar—whether you enjoy it as a snack, in a sandwich, or as the star of your next charcuterie board. But what if you want to make your own salami at home—with lower sodium, more spice, less processing, or custom flavors? What if you want to build the ultimate, health-forward charcuterie experience?

Let’s dive into everything you need to know, with actionable tips, DIY ideas, and pairing inspiration you can use right away.


Why Make Salami at Home?

  • Control the salt and spices: Perfect for low-sodium diets or those who love extra heat.
  • Avoid additives and preservatives: Skip synthetic nitrites or questionable fillers.
  • Endless creativity: Experiment with meat blends, herbs, heat, and even plant-based versions.
  • Impress at gatherings: Nothing says “wow” like homemade charcuterie.

1. DIY Low-Sodium Salami: Satisfy Your Cravings, Not Your Salt Meter

Why try it?
Most commercial salami is loaded with salt—sometimes 600 mg or more per serving. But you can easily make your own version with 30–50% less sodium and plenty of flavor.

How to DIY:

  • Use lean beef, chicken, or turkey for the base.
  • Add salt at 30–50% of typical recipes (start with 1/2 teaspoon per pound and adjust to taste).
  • Punch up flavor with garlic, black pepper, fresh herbs (rosemary, parsley), and a squeeze of lemon for brightness.
  • Skip sodium-heavy extras like cheese or soy sauce in the mix.
  • Bake or steam your log (wrapped in foil or baking paper) at 160°C (325°F) until cooked through. Cool before slicing.

Pairing tips:

  • Serve with crunchy, fresh veggies and unsalted nuts.
  • Choose mild, low-sodium cheeses like fresh mozzarella or ricotta.
  • Avoid pairing with aged cheeses and salted crackers—balance is key!

2. Spicy DIY Salami: Bring the Heat!

Why try it?
Traditional spicy salamis—like Calabrese or Ventricina—are legendary, but homemade means you control the fire!

How to DIY:

  • Start with any basic ground meat salami recipe.
  • Add chili flakes, black pepper, cayenne, or smoked paprika to taste.
  • For smoky depth, add a touch of liquid smoke or smoked paprika.
  • Optional: Add minced jalapeño or chili paste for extra heat.
  • Steam or bake your log, then chill before slicing thin.

Pairing tips:

  • Serve with creamy cheeses (brie, burrata) to balance the spice.
  • Add fruit like figs, dates, or honey for a sweet counterpoint.
  • Use with mild pickles or fresh bread; avoid pairing with sharp/spicy cheeses that can overwhelm.

3. Salami for Charcuterie Boards: Flavor, Texture, and Balance

Why DIY for charcuterie?
Nothing is more impressive (or fun) than a board filled with your own creations.

How to DIY:

  • Make two or three small-batch salamis: one classic (garlic, black pepper), one herby (fennel seed, thyme), one spicy (see above).
  • Mix textures—try one leaner, one with a touch more fat.
  • For color, roll some logs in cracked pepper, chopped herbs, or smoked paprika before cooking.

Building the board:

  • Pair with a variety of cheeses: soft (goat), semi-firm (manchego), hard (aged cheddar).
  • Add olives, nuts, fresh fruit, pickles, and something sweet (fig jam, honey).
  • Use a mix of crackers and crusty bread, but leave space so each element stands out.

What to avoid:

  • Too many salty or spicy ingredients together.
  • Overcrowding—simplicity and balance always win.

4. Dry-Cured Salami: The Traditional Artisan’s Route

Why try it?
Dry-cured salami has the deepest flavor, the most tradition, and—if made safely—the longest shelf life. This style takes patience and care but is incredibly rewarding.

How to DIY (basic method):

  • Mix pork shoulder (or blend of pork and beef), pork fat, salt, black pepper, garlic, red wine, and your favorite spices.
  • Use natural casings (from a butcher) and a starter culture (for safe fermentation).
  • Stuff mixture into casings, tie, and hang in a cool (15–20°C), humid (80–90%) environment for 3–6 weeks.
  • Dry until the log loses about 30% of its weight.
  • Always follow proven recipes and food safety guidelines!

Pairing tips:

  • Thinly slice and serve with crusty bread, olives, and a sharp, nutty cheese.
  • Pair with juicy tomatoes or simple greens for freshness.
  • Don’t pair with other strong, funky cured meats—let your dry-cured masterpiece shine.

What to avoid:

  • Attempting dry-curing without proper temp/humidity control.
  • Skipping starter cultures or curing salts—safety first!

5. Uncured Salami: What Does It Really Mean?

What is it?
“Uncured” means it’s made without synthetic nitrites or nitrates—using natural sources like celery powder instead. Some home recipes simply skip curing salts altogether and use baking/steaming for safety.

How to DIY:

  • Use lean meat, sea salt, celery powder (if desired), black pepper, garlic, and vinegar or wine.
  • Bake or steam until fully cooked—no need for extra preservatives.

Pairing tips:

  • Great with crunchy veggies, soft cheeses, and fresh herbs.
  • Enjoy as part of a healthy lunchbox with whole grain crackers and fruit.

What to avoid:

  • Assuming “uncured” means preservative-free—it’s still a preserved meat.
  • Storing homemade uncured salami too long—consume within a week if not dry-cured.

6. General DIY & Pairing Tips

  • Start small: Try mini logs with different spices and meats.
  • Stay safe: If fermenting or curing, always use a tested recipe and proper food safety measures.
  • Experiment: Mix meats (turkey and pork; beef and chicken), add seeds, chopped nuts, or even dried cranberries for creative twists.
  • Variety matters: For your charcuterie, always include something fresh (veggies or fruit), something creamy, something crunchy, and your show-stopping salami.

Common Mistakes to Avoid

  • Over-salting or under-seasoning: Always taste-test with a mini patty before shaping your whole log.
  • Rushing the chilling or drying stage: Let flavors develop and the texture firm up!
  • Using poor-quality meat: The flavor of your salami is only as good as what you start with.
  • Ignoring food safety: When in doubt, stick to cooked (not cured) recipes.

Conclusion: Your DIY Salami Journey Starts Here

Whether you want to cut sodium, dial up the spice, try traditional dry-curing, or impress your friends with a custom charcuterie board, homemade salami puts you in control. You get healthier results, unique flavors, and the satisfaction of true kitchen creativity.

Ready to try?
Mix up a batch, slice it thin, and build your board. Share your results, ask questions, and keep experimenting—your salami adventure is just beginning!


Explore more recipes and guides on MasalaMonk.com, and tag us with your homemade creations!
What’s your favorite salami style? Have you ever made your own? Let us know in the comments!

10 FAQs for DIY Salami & Charcuterie

1. Can I really make salami at home safely?
Yes! Oven-baked and steamed salami recipes are safest for beginners. If you try dry-curing, always use a trusted recipe, proper salt, and (if possible) a starter culture and curing chamber.

2. How do I lower the sodium in homemade salami?
Simply use less salt—start with about half the amount most recipes recommend and boost flavor with fresh herbs, garlic, pepper, and lemon zest.

3. What’s the difference between cured, uncured, and dry-cured salami?
Cured salami uses synthetic nitrates/nitrites for preservation; uncured uses natural sources like celery powder; dry-cured is fermented and aged for weeks using salt and sometimes a starter culture.

4. Can I make spicy salami at home?
Absolutely! Just add chili flakes, black pepper, smoked paprika, or minced chilies to your favorite base recipe.

5. How long does homemade salami last?
Oven-baked and steamed salami lasts up to a week in the fridge. Dry-cured salami can last for weeks to months if stored properly.

6. Do I need special equipment for homemade salami?
No special equipment for baked/steamed recipes. For dry-curing, a sausage stuffer, casings, and (ideally) a curing chamber or temperature- and humidity-controlled fridge help.

7. What meats work best for DIY salami?
Traditional salami uses pork, but beef, chicken, turkey, and even plant-based options work well. Leaner meats make lighter salamis.

8. How do I build a balanced charcuterie board with homemade salami?
Mix flavors and textures: include creamy cheese, crunchy veggies or nuts, a sweet element (fruit or jam), and your homemade salami, sliced thin.

9. What should I avoid when making or pairing salami?
Avoid excess salt or spice, overcrowding your board, using low-quality meats, or skipping food safety steps. Don’t pair all salty or all spicy items—balance is key.

10. Is uncured salami healthier?
Uncured salami avoids synthetic additives but still uses natural curing agents. For the healthiest option, make your own with minimal salt, no fillers, and lots of fresh flavor.

Posted on Leave a comment

Homemade Salami: Minimal Processing, Maximum Flavor

low sodium salami spicy salami salami for charcuterie board dry cured salami uncured salami salami for charcuterie

A Complete Guide for Food Lovers, Health Seekers, and DIY Cooks


Salami—the word conjures up visions of rustic Italian kitchens, spicy aromas, and mouthwatering slices enjoyed with cheese or olives. But if you care about health, clean eating, or just want to avoid additives, the question is: Can you make healthy, minimally processed salami at home?

The answer is YES—and it’s easier than you might think.

This post covers the what, why, and how of homemade salami, along with several practical, delicious recipes for any kitchen. Let’s dive in!


What is Salami, Really?

Salami is a family of cured sausages made by fermenting and air-drying meat, usually pork or beef, with spices and salt. Traditionally, salami was made to preserve meat for long periods without refrigeration.

Why make it yourself?

  • Control every ingredient: Choose your own meat, salt, and spices.
  • Skip preservatives: No unnecessary nitrates, nitrites, or chemical flavors.
  • Customize for health: Go leaner, lower-sodium, or even plant-based!

The Basics: How is Salami Made?

  1. Meat Selection
    Start with fresh, high-quality meat—pork, beef, chicken, or even game. For classic salami, a bit of fat (about 20%) is ideal for flavor and texture.
  2. Seasoning
    Salt, black pepper, garlic, wine, fennel seeds, or chili are common. Use what you love.
  3. Curing or Cooking
    Traditional salami is cured—fermented and air-dried for weeks or months. But home cooks can make oven-baked, steamed, or even instant “semi-cured” versions for speed and safety.
  4. Casing
    Either use natural/edible casings (from the butcher), plastic wrap, or simply foil for no-casing versions.

Is Homemade Salami Healthier?

It can be—IF you control the process:

  • Use leaner meats, fresh spices, and skip artificial preservatives.
  • Control salt levels.
  • Choose oven-baked or steamed versions if you want to avoid nitrites or worry about curing at home.
  • Add extra flavor and nutrition with herbs, veggies, or even plant-based swaps.

4 Healthy, Easy Salami Recipes for Home

1. Simple Oven-Baked Beef Salami

Best for: Fast, fuss-free, high-protein snacking
No fermentation, no casing, no preservatives!

You’ll need:

  • 500g (1 lb) lean ground beef (or chicken/turkey)
  • 1.5 tsp salt
  • 1 tsp black pepper
  • 1 tsp garlic powder
  • 1 tsp mustard seeds
  • ½ tsp smoked paprika or a few drops liquid smoke (optional)
  • Pinch of sugar or honey (optional, helps flavor—not needed for keto)

Steps:

  1. Mix everything very well in a bowl (knead with hands for best texture).
  2. Shape into a thick log.
  3. Wrap tightly in plastic wrap, then foil.
  4. Chill in fridge 24 hours for flavors to meld.
  5. Remove wrap, place on rack in baking tray. Bake at 160°C (325°F) until internal temp is 70°C (160°F), about 45–60 mins.
  6. Cool fully before slicing thin.

Why it’s healthy:

  • No chemicals, minimal salt, your meat and your flavors!

2. Preservative-Free Chicken Salami

Best for: Lean protein, lower fat, quick lunchboxes

You’ll need:

  • 500g ground chicken
  • 1 tsp salt
  • 1 tsp black pepper
  • 1 tsp red chili flakes
  • 1 tsp garlic powder
  • ½ tsp ground coriander
  • 1 tbsp finely chopped bell pepper (optional for color)

Steps:

  1. Mix ingredients well.
  2. Shape into log, wrap tightly in baking paper and then foil.
  3. Steam for 25–30 mins or until cooked through, or bake at 160°C for 40 mins.
  4. Cool, unwrap, and chill before slicing.

Why it’s healthy:

  • No nitrites or additives, high in protein, lower in fat.

3. Traditional-Style “Milano” Semi-Cured Salami (Short Ferment)

Best for: Classic salami fans with some patience, probiotic benefits

You’ll need:

  • 400g pork shoulder (finely minced)
  • 100g pork fat
  • 2 tsp salt
  • 1 tsp black pepper
  • ½ tsp garlic powder
  • 1 tbsp red wine
  • Natural casing (from butcher)
  • Optional: 1/4 tsp starter culture (for safe fermentation, see butchers or online)

Steps:

  1. Mix meat, fat, salt, pepper, garlic, wine. Add starter culture if using.
  2. Stuff tightly into soaked casing.
  3. Hang in cool, humid place (15–20°C, 80–90% humidity) for 3 days to ferment.
  4. Move to cooler, less humid area to dry for 2–4 weeks until firm.
  5. Slice thin and enjoy.

Note: Always follow food safety for curing (see trusted online guides).

Why it’s healthy:

  • No commercial chemicals, natural fermentation for gut health, real ingredients.

4. Spicy Vegan “Salami” (No Meat, All Flavor)

Best for: Plant-based eaters, anyone avoiding meat or preservatives

You’ll need:

  • 1 cup vital wheat gluten
  • 1 tbsp chickpea flour
  • 2 tbsp tomato paste
  • 1 tbsp olive oil
  • 2 tbsp nutritional yeast
  • 1 tsp smoked paprika
  • ½ tsp garlic powder
  • ½ tsp onion powder
  • 1 tsp black pepper
  • 1 tbsp soy sauce or tamari
  • 1 tsp miso paste (optional)
  • ¾ cup water

Steps:

  1. Mix all dry ingredients.
  2. Whisk wet ingredients separately, then combine.
  3. Knead into a dough, shape into log, wrap tightly in foil.
  4. Steam for 40–50 mins.
  5. Cool and slice thin.

Why it’s healthy:

  • No nitrates, cholesterol, or processed meat—just plant power and fiber!

Tips for Success & Safety

  • Oven-baked/steamed salami is safest for beginners—no risk of unsafe fermentation.
  • If curing, use a starter culture for reliable results.
  • Cool and chill before slicing for best texture.
  • Experiment! Add herbs, seeds, or chopped nuts for variety.

Final Thoughts

Homemade salami gives you real control, flavor, and nutrition with minimal fuss. Whether you want classic beef or chicken, probiotic-rich “semi-cured,” or a plant-powered version, there’s a healthy salami for every kitchen.

Why settle for store-bought with additives when you can make your own—clean, tasty, and tailored to your health goals?


Hungry for More?

Want step-by-step photos, video tutorials, or a printable recipe card? Or are you ready for an in-depth guide to fermentation safety and flavor mastery?
Let us know in the comments or read more on MasalaMonk.com!


Ready to slice into your own homemade salami? Try a recipe and share your creations—tag us @MasalaMonk!

10 FAQs for Healthy Homemade Salami

1. Is it safe to make salami at home?
Yes, if you follow proper recipes, hygiene, and temperature guidelines. Oven-baked or steamed salami is safest for beginners, while fermentation or curing requires more care and experience.

2. Do I need curing salts (nitrates/nitrites) for homemade salami?
For oven-baked or steamed salami, you can skip curing salts. For dry-cured or fermented salami, curing salts are recommended to prevent harmful bacteria—unless you’re very experienced with safe fermentation.

3. What meats can I use for healthy homemade salami?
Lean beef, chicken, turkey, pork, and even wild game. For healthier versions, choose lean cuts and trim excess fat.

4. Can I make salami without any preservatives or additives?
Yes! Use only meat, salt, herbs, and spices for oven or steamed salami. For dry-cured types, the process itself preserves the meat with salt, but food safety is essential.

5. How long does homemade salami last?
Oven-baked or steamed salami lasts up to 7–10 days in the fridge. Dry-cured salami can last several weeks or even months if stored properly.

6. Is homemade salami healthier than store-bought?
Usually, yes. You control the meat quality, salt, and spices, and avoid commercial additives, preservatives, and excess sodium.

7. Are there plant-based or vegan salami options?
Absolutely! You can make vegan salami using vital wheat gluten, spices, tomato paste, and olive oil, steamed or baked for firm texture.

8. Can I customize the flavor of my homemade salami?
Definitely. Add any herbs, spices, seeds, chili flakes, or even chopped nuts to suit your taste preferences.

9. What’s the easiest salami to make at home for beginners?
Oven-baked or steamed chicken or beef salami—no casing, no fermentation, just mix, shape, cook, and slice.

10. Do I need special equipment to make salami at home?
No special tools are required for oven or steamed recipes. For traditional cured salami, you’ll need casings and a cool, humid place for drying.

Posted on Leave a comment

5 Keto-Friendly Salami Dishes That Promote Weight Loss

Keto-Friendly Salami Dishes

If you’re following a keto lifestyle and want variety, satisfaction, and simplicity in your meals, salami can be your secret weapon. Salami isn’t just for charcuterie boards—it’s a high-protein, high-fat, ultra-low-carb ingredient that can transform everyday keto cooking. But there’s more to it than just taste: let’s explore the latest science, answer common questions, and discover 5 delicious keto-friendly salami dishes that support real, sustainable weight loss.


Why Salami on Keto? Science & Nutrition Breakdown

Salami is a cured sausage made primarily from pork or beef, salt, and spices. For keto eaters, it offers:

  • Very low net carbs: Typically <1g per 100g.
  • High in fat & protein: 31g fat and 21g protein per 100g, supporting ketosis and satiety.
  • B-vitamins, iron, and zinc: Supporting metabolism and immune health.
  • Convenience: No cooking required for most recipes; portable and satisfying.

Recent studies and nutritionists agree: Foods that are high in protein and fat, but low in carbs, help suppress appetite and preserve muscle mass during weight loss. Salami fits these macros perfectly. The key is moderation and ingredient quality—look for nitrate/nitrite-free options, and don’t rely solely on processed meats.


1. Salami & Cheese Crisps (The Ultimate Keto Snack)

Why this works:
Baking salami and cheese together creates crunchy, flavorful crisps that curb cravings for chips—without the carbs or guilt. They’re perfect for snacking or party platters.

How to make it:

  • Preheat oven to 400°F (200°C).
  • Lay thin salami slices on a parchment-lined tray.
  • Top each with shredded Parmesan or mozzarella.
  • Bake for 5-8 minutes, or until golden and crisp.
  • Cool and enjoy!

Macros:
<1g net carb per serving. High in protein and fat.

Practical tip:
Store in an airtight container for grab-and-go snacks. Kids love them, too!


2. Salami Egg Muffins (Easy Keto Breakfast Meal Prep)

Why this works:
Eggs and salami provide protein, fat, and micronutrients—keeping you full for hours and helping avoid mid-morning cravings.

How to make it:

  • Preheat oven to 375°F (190°C).
  • Line muffin tin cups with salami slices.
  • Crack in one egg per cup (or scramble if preferred).
  • Add spinach, herbs, and a sprinkle of cheese.
  • Bake 12-15 minutes, until eggs are set.

Macros:
~2g net carbs per muffin (varies by add-ins).

Practical tip:
Make ahead for busy mornings—these store well in the fridge for up to 4 days.


3. Zoodle Salami Alfredo (Pasta Without the Guilt)

Why this works:
Zucchini noodles (“zoodles”) swap out high-carb pasta for fiber and hydration. Creamy Alfredo sauce and savory salami add richness and flavor—making this dish deeply satisfying.

How to make it:

  • Spiralize 2-3 zucchini and sauté briefly in olive oil.
  • Add 1/4 cup heavy cream, 2 tbsp butter, and 1/2 cup Parmesan for Alfredo sauce.
  • Toss in sliced salami (about 2 oz per serving) and cook until warmed through.
  • Season with pepper, garnish with parsley.

Macros:
~4g net carbs per bowl (mainly from zucchini).

Practical tip:
For extra nutrition, toss in spinach, mushrooms, or chopped olives.


4. Mini Keto Salami “Pizza” Bites

Why this works:
Mini salami “pizzas” capture all the flavor of your favorite slice—without dough, gluten, or carbs.

How to make it:

  • Arrange salami slices on a baking sheet.
  • Spread each with a teaspoon of low-carb marinara or tomato paste.
  • Add shredded mozzarella and a sprinkle of Italian herbs.
  • Broil for 2-3 minutes, until bubbly.

Macros:
~1g net carb per pizza bite (depends on sauce).

Practical tip:
Perfect for party trays or kid-friendly snacks!


5. Salami, Olive & Cheese Keto Platter (Lunch or Snack Box)

Why this works:
This balanced “charcuterie box” provides protein, fat, and fiber—excellent for lunchboxes, travel, or office snacks. Olives add healthy fats and micronutrients.

How to make it:

  • Arrange 4-6 slices of salami, 2 oz cubed cheese, a handful of olives, and sliced cucumber or celery on a plate or in a bento box.
  • Optionally add nuts (macadamia or almonds) for extra crunch.

Macros:
~2-3g net carbs per serving (from veggies/olives).

Practical tip:
Pre-pack several boxes at the start of the week for “keto fast food” on busy days.


The Latest Science: Does Salami Help With Weight Loss?

  • Keto diets work by reducing carbs, so your body burns fat for fuel. Salami supports this with high fat and protein, nearly zero carbs, and high satiety.
  • Appetite control: Research shows that protein- and fat-rich foods like salami, eggs, and cheese can help reduce hunger, making it easier to maintain a calorie deficit for weight loss.
  • Portion control is key: While keto-friendly, salami is also calorie-dense and high in sodium. Use as part of a balanced plate, not the sole protein source.

Tip: Always choose the highest-quality, minimally processed salami you can find—ideally organic, nitrate/nitrite-free, and with clear labeling.


Practical Tips for Including Salami in a Healthy Keto Diet

  • Balance processed meats with fresh vegetables and whole-food fats (avocado, olives, nuts).
  • Stay hydrated: Keto and salty foods can increase water loss.
  • Watch sodium and portion size: Too much can stall weight loss for some people.
  • Mix and match: Pair salami with a variety of cheeses, veggies, and sauces for endless combinations.

Conclusion: Salami Can Be Keto Gold—With the Right Approach

When used mindfully, salami is a versatile, satisfying ingredient that fits perfectly into a keto weight loss plan. The five recipes above are just the start—experiment, enjoy, and keep your meals interesting and convenient.

Remember: Keto works best when it’s sustainable, balanced, and delicious. Let salami add flavor and variety, but always aim for a colorful, nutrient-dense plate.


Want More Recipes or Tips?

Let me know if you want printable recipes, weekly meal plans, or a shopping guide for the best keto-friendly salami brands. Your keto journey should be tasty, practical, and full of real results!


Have you tried any keto salami dishes? Which is your favorite? Share your tips or questions below!

10 FAQs for Keto-Friendly Salami Dishes

1. Is salami really keto-friendly?
Yes, most traditional salami is very low in carbohydrates—often less than 1 gram per serving—making it a great fit for keto. Always check the label for added sugars or fillers.

2. How much salami can I eat on keto?
Moderation is key. While salami is low in carbs, it is calorie-dense and high in sodium. A reasonable serving is 1–2 ounces (about 4–6 slices) as part of a balanced meal.

3. What should I look for when buying salami for keto?
Choose nitrate/nitrite-free, minimally processed options with simple ingredients (meat, salt, spices). Avoid salamis with added sugars or starches.

4. Is it okay to eat salami every day on keto?
It’s best to enjoy salami a few times a week and not as your main protein source. Combine it with a variety of other proteins and plenty of non-starchy vegetables.

5. Does eating salami help with weight loss?
Salami’s high protein and fat content can boost satiety and help control appetite. However, weight loss depends on overall calorie intake and lifestyle habits.

6. Can I eat pre-sliced packaged salami?
Yes, but check the ingredients list for added sugars or unnecessary additives. When possible, buy from the deli counter for fresher, cleaner options.

7. What are some good foods to pair with salami on keto?
Cheese, olives, avocado, nuts, leafy greens, and low-carb veggies like cucumbers and bell peppers all pair well with salami and keep meals balanced.

8. How can I reduce sodium intake when eating salami?
Balance your diet with fresh, unsalted foods like vegetables and drink plenty of water. If sodium is a concern, choose lower-sodium brands or limit portion sizes.

9. Are there vegetarian or vegan alternatives to salami for keto?
There are plant-based deli slices made from tofu or seitan, but check carb counts and ingredients, as many contain higher carbs and added fillers.

10. Can I meal prep with salami?
Absolutely! Salami keeps well and is perfect for prepping snack boxes, wraps, or egg muffins ahead of time. Store in an airtight container in the fridge.

Posted on Leave a comment

The Grapefruit – Nutrition, Benefits, and 5 Practical Ways for Weight Loss

GRAPEFRUIT FOR WEIGHT LOSS

If you’ve ever browsed health blogs or scrolled fitness forums, you’ve seen grapefruit at the center of weight-loss conversations. Is it just hype, or is there real science behind this tangy citrus fruit’s reputation for helping people slim down? The answer is nuanced: grapefruit does offer real benefits for weight management, but understanding how, why, and when to use it is essential—especially as research continues to evolve.

Whether you’re hoping to drop a few pounds or simply optimize your health, this guide will take you deeper into grapefruit’s nutritional profile, proven (and unproven) benefits, and five smart, practical ways to add it to your routine for sustainable results.


The Nutritional Power of Grapefruit

First, let’s start with what you’re eating. A typical half grapefruit (about 120g) contains:

  • Calories: ~50 kcal
  • Carbs: 13g (including ~8g sugars)
  • Fiber: 2g (mainly soluble, great for satiety)
  • Protein: 1g
  • Fat: 0g
  • Vitamin C: Over 60% of daily needs
  • Potassium, Vitamin A, Folate, Magnesium, Antioxidants: All present in meaningful amounts

Key Takeaway: Grapefruit is nutrient-dense but low in calories—making it a “high-return” food for those aiming to lose or manage weight.


What the Latest Science Says About Grapefruit and Weight Loss

1. Clinical Trials on Whole Grapefruit

A landmark 12-week clinical trial found that people who ate half a grapefruit before meals lost, on average, 1.6 kg (about 3.5 lbs), compared to just 0.3 kg in the control group. Grapefruit juice and capsules had benefits too, but fresh grapefruit performed best. Importantly, participants also showed improved insulin levels after meals, which may help regulate fat storage.

Why does this work?

  • The high fiber and water content help fill you up, so you eat less at meals.
  • Grapefruit may reduce insulin spikes after eating, subtly shifting your body toward burning rather than storing fat.

2. Cutting-Edge Supplements: Sinetrol® Xpur and Naringenin

Newer research focuses on grapefruit-derived flavonoids—particularly in supplements like Sinetrol® Xpur and the compound naringenin.

  • Sinetrol® Xpur (2024 trial): Over 16 weeks, participants saw reductions in body weight, BMI, and visceral fat, with improvements in “good” HDL cholesterol and insulin sensitivity. The supplement also appeared to boost healthy gut bacteria linked to fat loss.
  • Naringenin: This natural flavonoid from grapefruit is being studied for its ability to regulate appetite, improve fat metabolism, and even reduce liver fat in people with fatty liver disease.

But caution: Supplements may have stronger effects—but also greater risk of medication interactions. (More on this below.)

3. Meta-Analysis: What’s the Real-World Impact?

  • Fat loss: 5–10% reduction in body fat has been observed in multiple studies over 12–16 weeks, especially when grapefruit or its extracts are paired with calorie control and exercise.
  • No “magic” results: Grapefruit helps, but it won’t melt fat by itself. It’s a tool—best used with an overall healthy lifestyle.

5 Practical, Science-Backed Ways to Use Grapefruit for Weight Management

1. Eat Half a Grapefruit Before Meals

Clinical trials show that eating half a fresh grapefruit about 10–15 minutes before meals can naturally reduce appetite and lower the number of calories you eat at that meal. This “preloading” method works best with whole fruit, not juice.

2. Toss Segments Into Salads

Add grapefruit sections to green salads—combine with spinach, avocado, grilled chicken, or nuts. It boosts flavor, adds hydration, and turns a plain salad into a satisfying meal.

3. Blend It Into Smoothies

Grapefruit pairs well with berries, leafy greens, and Greek yogurt. Its tartness balances sweet fruits, while the fiber and water content help you feel full for hours.

4. Swap Sugary Snacks for Grapefruit

Craving a snack? Reach for half a grapefruit instead of cookies or chips. It satisfies a sweet tooth but only delivers about 50 calories and tons of nutrients.

5. Experiment With Supplements—But Be Cautious

If you’re curious about next-level results, look into Sinetrol® Xpur or pure naringenin supplements—but only after talking with your doctor. These are showing real promise for metabolic health and fat loss, but they can interact with many medications (especially cholesterol drugs, blood pressure meds, and immunosuppressants).


Grapefruit and Medications: A Critical Warning

Grapefruit (and its juice) contains natural compounds that block the CYP3A4 enzyme in your intestines. This can dramatically increase the absorption of certain medications—raising their levels in your blood to dangerous heights.

Common drugs that may interact include:

  • Statins (for cholesterol)
  • Calcium channel blockers (for blood pressure)
  • Immunosuppressants
  • Benzodiazepines (for anxiety/sleep)

If you take prescription meds, always ask your doctor or pharmacist before adding grapefruit or its supplements to your diet.


Beyond the Hype: The Bottom Line

Grapefruit isn’t a miracle cure, but it is a proven tool in a healthy weight management plan. Here’s why:

  • It’s low-calorie and filling.
  • Clinical studies confirm it can help you eat less and lose weight, especially before meals.
  • Supplements based on grapefruit’s natural compounds are showing promise for fat loss and metabolic health—but with more risk, and still under research.

Best Practices:

  • Use grapefruit as a “volume food” to crowd out higher-calorie choices.
  • Try to make it part of balanced meals or snacks.
  • Monitor your body’s response, and always prioritize medication safety.

Final Thoughts

Grapefruit can be a refreshing, practical tool for weight loss—grounded in real science. Pair it with healthy eating habits, exercise, and smart supplementation (if needed) to see the best results.

If you’re ready to make grapefruit part of your journey, try one of the five methods above this week—and let us know how it goes!


Disclaimer:
Always consult with a healthcare provider before making significant dietary changes or starting new supplements, especially if you take medication.


10 FAQs About Grapefruit and Weight Loss

1. Is grapefruit really effective for weight loss?

Answer:
Yes, but the effect is modest. Clinical studies show that eating half a grapefruit before meals can lead to a weight loss of 1–4 kg (2–9 lbs) over 12–16 weeks, mainly by helping you feel full and reducing calorie intake.


2. Can I use grapefruit juice instead of whole fruit?

Answer:
Whole grapefruit is more effective because it contains more fiber and fewer calories per serving. Unsweetened juice may help, but it spikes blood sugar more quickly and isn’t as filling.


3. Are there any health risks or side effects of eating grapefruit daily?

Answer:
Grapefruit is generally safe for healthy individuals. The main risk is for those on medications that interact with grapefruit, as it can increase drug levels in your blood and cause serious side effects. Always consult your doctor if you’re on medication.


4. How does grapefruit help with weight loss?

Answer:
Grapefruit is high in water and fiber, which help fill you up and curb appetite. It may also slightly reduce insulin spikes after meals, encouraging your body to burn fat rather than store it.


5. Are grapefruit supplements (like Sinetrol® or naringenin) more effective than eating the fruit?

Answer:
Early research suggests supplements may provide additional metabolic benefits, like reducing belly fat or improving cholesterol. However, they come with a greater risk of drug interactions and side effects, so always consult a healthcare provider first.


6. Who should not eat grapefruit?

Answer:
People taking certain medications—including many statins, blood pressure drugs, and immunosuppressants—should avoid grapefruit. Grapefruit can dangerously boost the levels of these drugs in your bloodstream.


7. What is the best time to eat grapefruit for weight loss?

Answer:
Eating half a grapefruit about 10–15 minutes before main meals (especially lunch or dinner) is most effective for reducing appetite and total calorie intake.


8. How long does it take to see results from eating grapefruit?

Answer:
Most studies show noticeable results in 12–16 weeks, with gradual weight loss and improved metabolic markers if combined with a healthy diet and regular exercise.


9. Can grapefruit help reduce belly fat specifically?

Answer:
Some studies and supplements (like Sinetrol® Xpur) have shown reductions in visceral fat (the “belly fat” around your organs), though effects are modest and work best when paired with overall lifestyle changes.


10. Is grapefruit safe for people with diabetes or prediabetes?

Answer:
Grapefruit has a low glycemic index and may help regulate blood sugar, but check with your doctor or dietitian, especially if you are on blood sugar-lowering medications.