Grilled lobster tails should feel like a treat, not a test. You want sweet meat, smoky edges, and garlic butter melting into the shell — not a tense few minutes wondering if dinner is already overcooked.
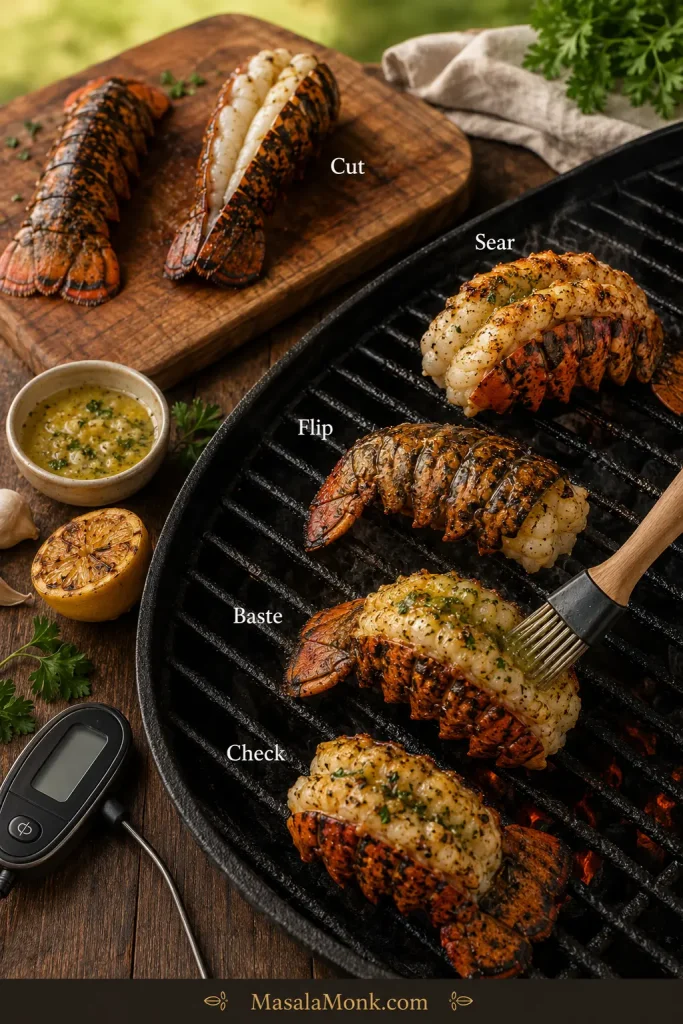
This lobster tail recipe uses a no-panic method: sear for flavor, finish for control. Thaw the tails well, cut the shell cleanly, sear briefly on the hot grates, flip shell-side down with the meat facing up, baste with lemon garlic butter, and pull by temperature while the lobster is still tender.
Keep the flavor classic: sweet lobster meat with lightly charred edges, warm butter, fresh herbs, and enough lemon to make the whole plate feel bright. At the table, it tastes rich and special, but the cooking feels much easier than it looks.
Quick Answer: How to Grill Lobster Tails
To grill lobster tails, thaw them first if frozen, cut the top shell with kitchen shears, loosen the meat, and brush the exposed meat lightly with oil, salt, and pepper. For the most reliable first try, split the tail open like a book.
Grill flesh-side down for a short sear, then flip shell-side down, brush with lemon garlic butter, and cook until the thickest part reaches about 140°F / 60°C. Use 145°F / 63°C if you prefer a firmer, more conservative finish.
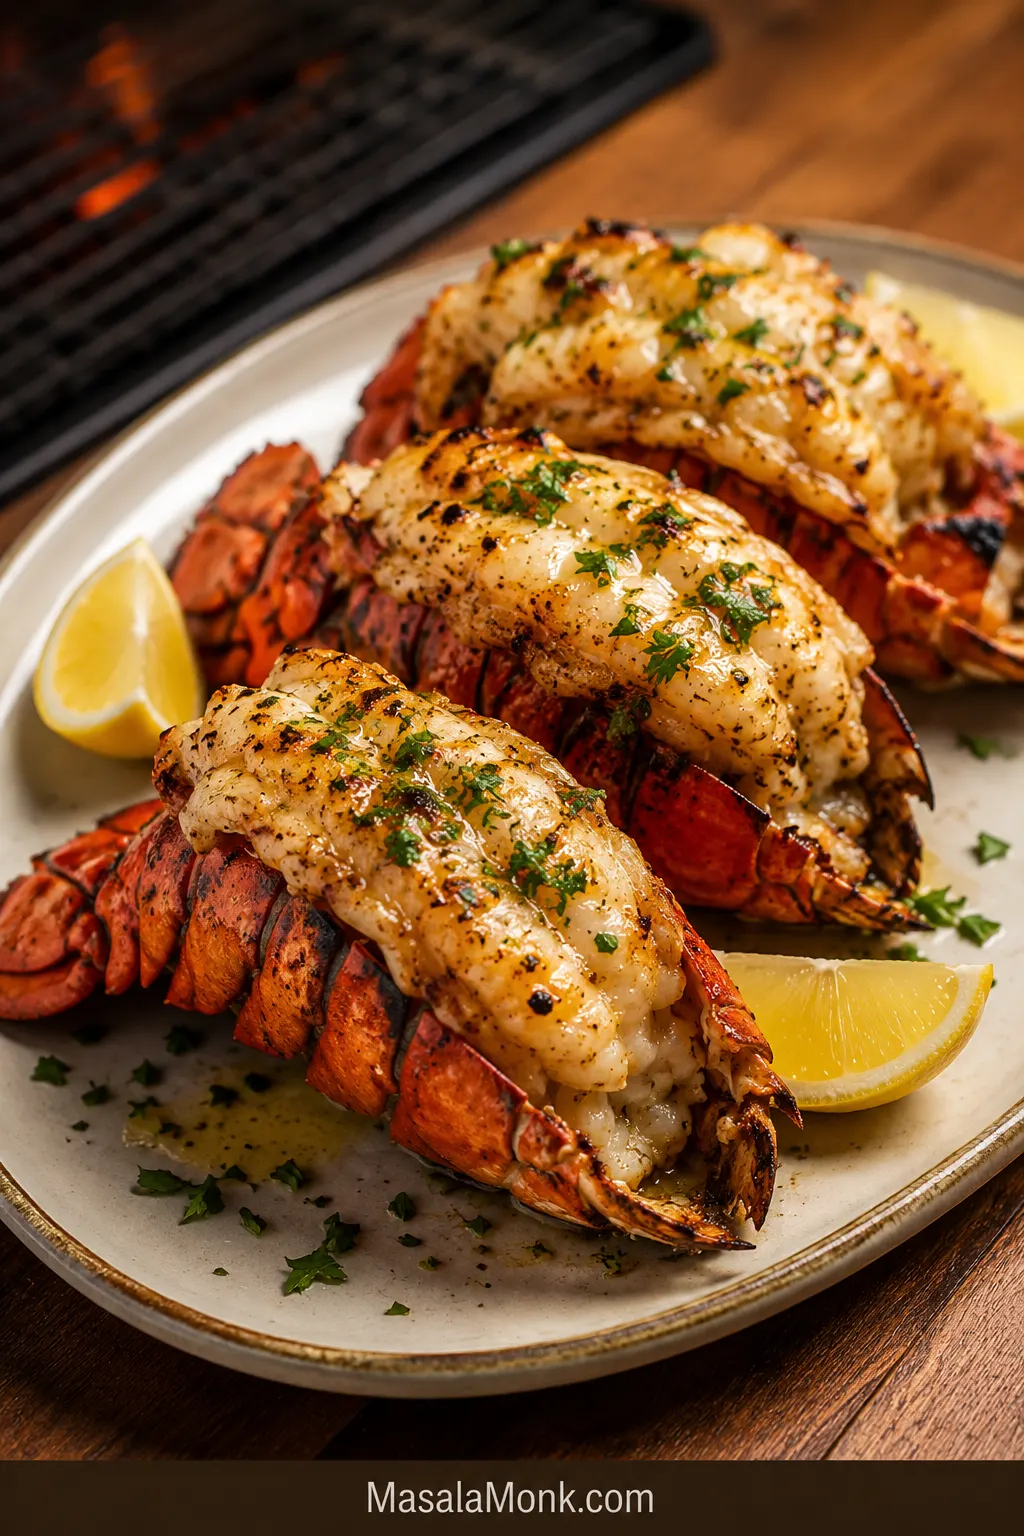
The shell turning red is not your finish line. The lobster is ready when the meat is opaque, tender, and hot in the thickest part. Done right, you get lobster that tastes sweet and clean, with smoky edges, lemon cutting through the butter, and enough garlic to make the whole plate feel like a special dinner.
Grilled Lobster Tails With Garlic Butter
This version makes four lobster tails with lemon garlic butter and gives you a clear pull point, so you are not guessing during the final minute. It works well with 5–8 oz / 140–225 g tails, but the timing section below includes smaller and larger sizes too.
| Prep time | 15 minutes |
| Cook time | 5–12 minutes, depending on size |
| Most common cook time | 6–10 minutes for 5–8 oz / 140–225 g tails |
| Total time | About 25 minutes |
| Servings | 4 lobster tails |
| Good tail size | 5–8 oz / 140–225 g each |
| Grill heat | 400–450°F / 204–232°C |
| Target pull temperature | About 140°F / 60°C, or 145°F / 63°C for a firmer finish |
| Method | Grill / BBQ |
Ingredients
| Ingredient | US measure | Metric |
|---|---|---|
| Lobster tails | 4 tails, 5–8 oz each | 140–225 g each |
| Olive oil | 1 tablespoon | 15 ml |
| Unsalted butter | 4 tablespoons / ½ stick | 56 g |
| Garlic | 2–3 cloves, finely minced | 6–9 g |
| Lemon juice | 2 teaspoons to 1 tablespoon | 10–15 ml |
| Lemon zest | ½ teaspoon, optional | About 1 g |
| Fresh parsley or chives | 1 tablespoon chopped | 3–4 g |
| Fine sea salt | ½ teaspoon total, divided | About 3 g |
| Black pepper | ¼ teaspoon | About 0.5 g |
| Smoked paprika | ¼–½ teaspoon, optional | 0.5–1 g |
| Cayenne or chili flakes | A pinch, optional | To taste |
| Lemon wedges | For serving | For serving |
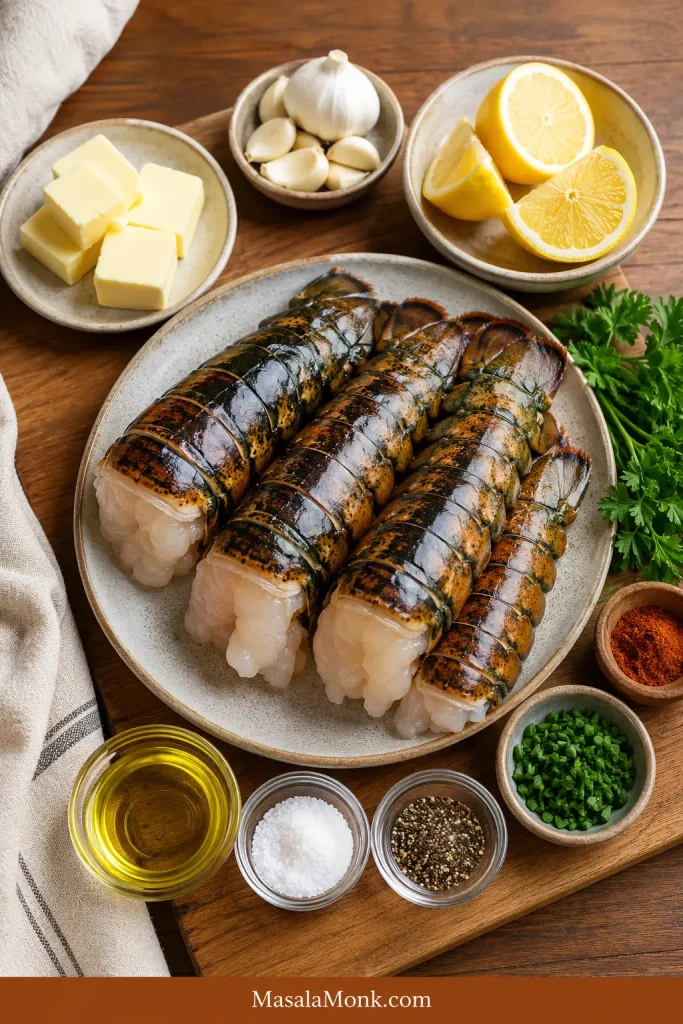
Have the tails cut, the butter melted, and your thermometer nearby before you turn toward the grill. Once lobster hits the heat, the cooking moves quickly.
Method
- Thaw and dry the lobster tails. Thaw frozen tails fully. Pat the shells and meat dry before cutting.
- Make the lemon garlic butter. Melt the butter gently. Stir in garlic, lemon juice, lemon zest if using, herbs, and optional smoked paprika or chili.
- Cut the shells. Use kitchen shears to cut down the top shell, stopping before the tail fan. For the simplest grill control, loosen the meat and split the tail open like a book.
- Season the meat. Brush the exposed lobster meat with olive oil. Season with salt and pepper.
- Preheat the grill. Heat the grill to 400–450°F / 204–232°C. Clean and oil the grates.
- Sear flesh-side down. Grill the tails flesh-side down until lightly marked and beginning to release from the grates.
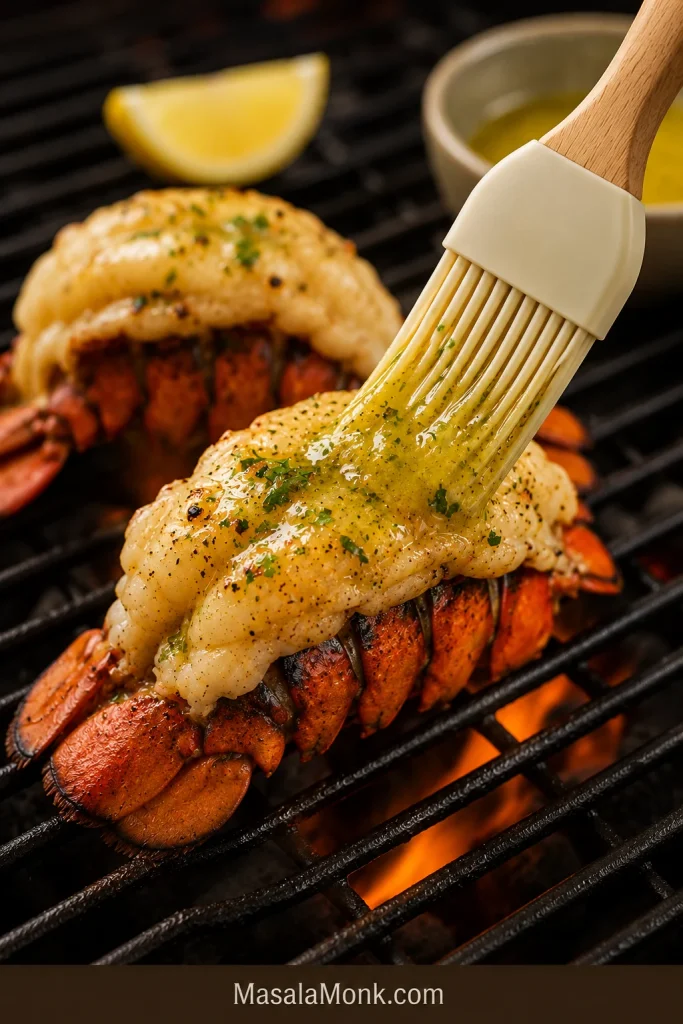
- Flip and butter. Turn the tails shell-side down, with the meat facing up. Brush generously with the melted butter.
- Check and pull. Close the lid and cook until the meat is opaque and the thickest part reaches about 140°F / 60°C. Use 145°F / 63°C if you prefer.
- Serve right away. Rest for 1–2 minutes, not much longer, then serve with extra butter, lemon wedges, and fresh herbs.
Recipe Notes
- Do not grill lobster tails while they are still frozen in the center.
- Use oil before the first hot contact and butter after flipping.
- Take the reading in the thickest part of the tail, not the thin tapered end.
- On a very hot grill, large tails can brown before the center finishes, so move them away from the strongest heat after the first sear.
- For a lifted restaurant-style butterfly, grill mostly with the meat facing up and baste the exposed surface instead of forcing it flat onto the grates.
Helpful Sections
- Best lobster tail size
- How to cut lobster tails
- Grill time by size
- Internal temperature
- Garlic butter
- What to do if something goes wrong
- What to serve with lobster tails
- FAQs
The Best Way to Grill Lobster Tails Without Overcooking Them
Sear for flavor, finish for control. That is the whole rhythm of this grilled lobster tail recipe.
- Start flesh-side down for fast grill flavor. The meat gets light char before it has time to dry out.
- Flip shell-side down for a steadier finish. After the first sear, the shell gives the meat a little protection while the center catches up.
- Use oil first and butter second. Oil handles the hot grates better; lemon garlic butter tastes best after the first sear.
- Pull by temperature, not shell color. Red shells help, but opaque meat and an instant-read thermometer are more reliable.
That sequence gives you the best parts of grilled lobster: a little smoke at the edge, sweet meat in the center, and warm butter that does not taste scorched.
For a first try, split the tail open like a book. It is less dramatic-looking than a lifted butterfly, but it is easier to grill well and still gives you the smoky edge you came for.
Ingredients, Buying Notes, and Substitutions
Lobster tails
Use fresh or frozen-thawed lobster tails. For most people, 5–8 oz / 140–225 g is the sweet spot: impressive enough for dinner, small enough to cook before the edges toughen.
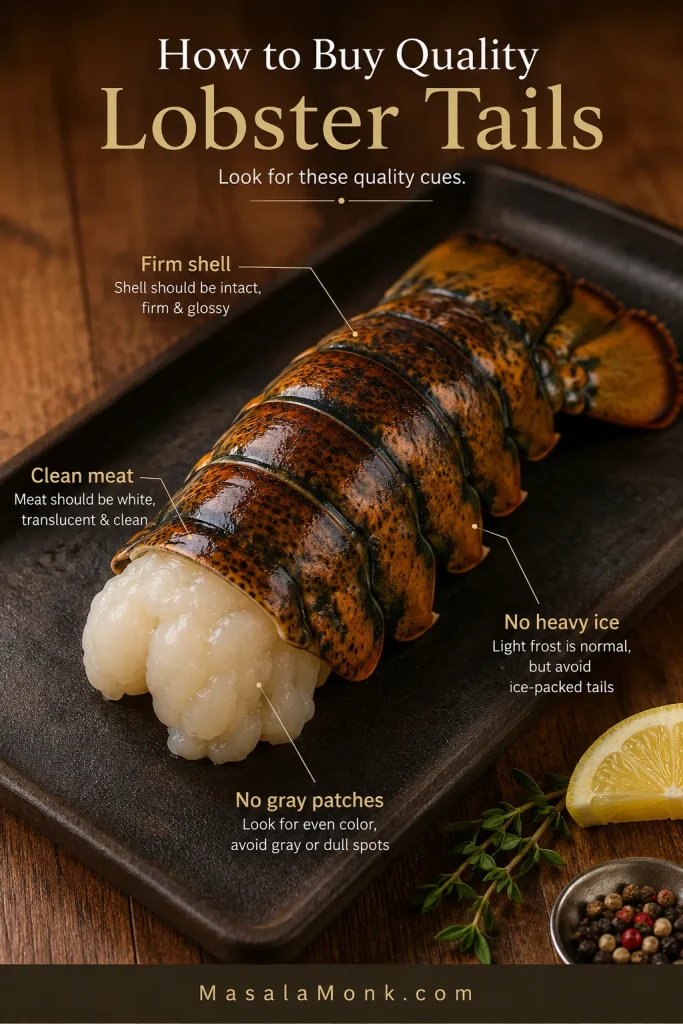
When buying lobster tails, pay attention to texture, smell, and freezer condition before you worry about presentation. The best tails look clean and firm, smell mild, and are sealed well instead of sitting loose in a frosty bag.
This method works for most lobster tails, including cold-water, warm-water, Florida, Caribbean, and spiny lobster tails. Thin or lean tails cook faster, so baste well and start checking early.
Butter
Unsalted butter gives you better control over seasoning. If using salted butter, reduce the added salt slightly. Melt the butter slowly so the garlic can warm through and perfume the sauce without turning bitter.
Garlic
Fresh garlic gives the butter its best flavor. Mince it finely so it melts into the sauce instead of sitting in sharp little pieces on top of the lobster. Raw garlic can taste harsh, and burned garlic tastes bitter, so keep the heat gentle when making the butter.
Lemon
Lemon juice brightens the butter and keeps the lobster from tasting too heavy. Add some lemon to the butter, then serve extra wedges at the table so the final squeeze tastes fresh instead of flat.
Parsley or chives
Fresh herbs make the butter taste brighter. Parsley is classic. Chives are softer and slightly oniony. Cilantro works nicely with the chili-lime variation.
Olive oil
Use olive oil or another neutral cooking oil before the first sear. Butter before the first sear is tempting, but oil is the better first move because it helps prevent sticking without burning as quickly.
Smoked paprika, cayenne, or chili flakes
These are optional. Smoked paprika adds gentle BBQ depth. Cayenne or chili flakes add a little heat. Keep the first batch mild if you mainly want classic garlic butter lobster.
Fresh or Frozen Lobster Tails: How to Thaw Them
Frozen lobster tails are completely fine for grilling, especially if they were frozen soon after processing. What matters is that they are fully thawed, patted dry, and prepared properly before they go on the grill.
For the best texture, thaw frozen lobster tails overnight in the refrigerator on a plate or tray. For a faster same-day option, keep the tails sealed and place them in cold water for 30–60 minutes, depending on size. Do not use hot water, and do not grill the tails if the center still feels icy.
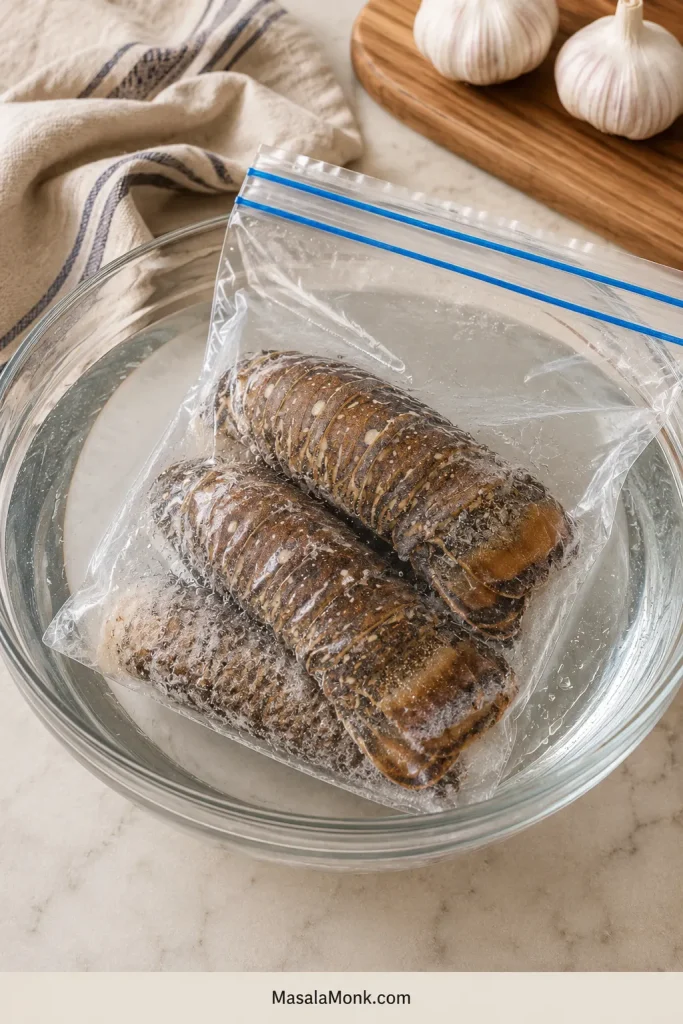
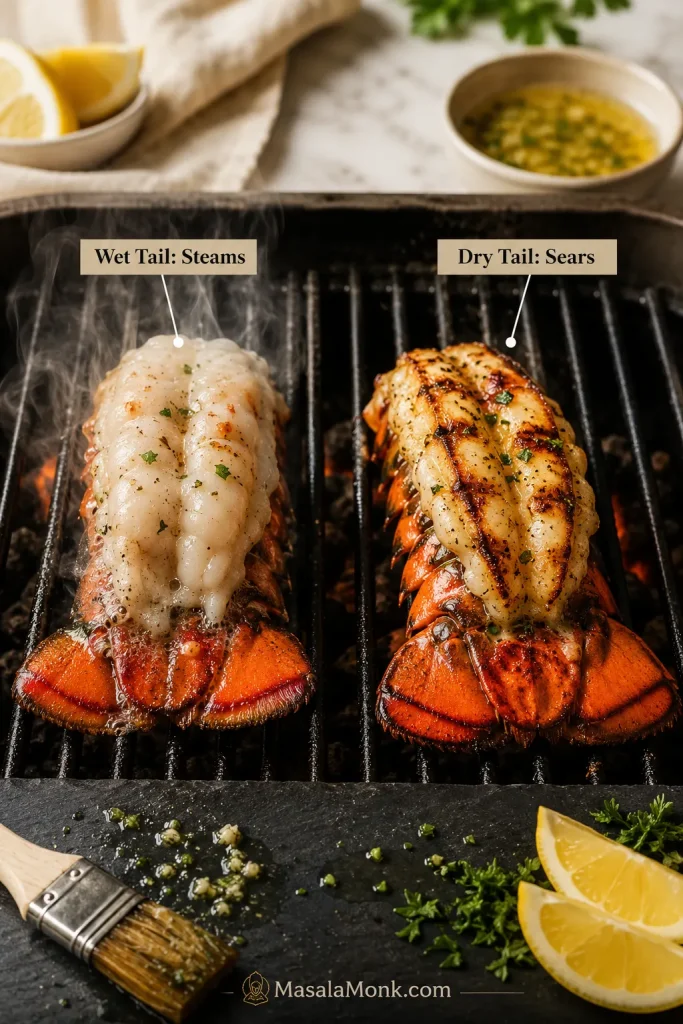
If the tail bends slightly and the meat is no longer icy in the center, it is ready to cut. At that point, drying the tails matters as much as thawing them because surface moisture can dull browning on the grill.
Dry the thawed lobster tails before grilling
Surface moisture is the hidden reason lobster sometimes looks pale instead of lightly marked. Press the meat and shell dry with towels so the first side touches the hot grates cleanly.
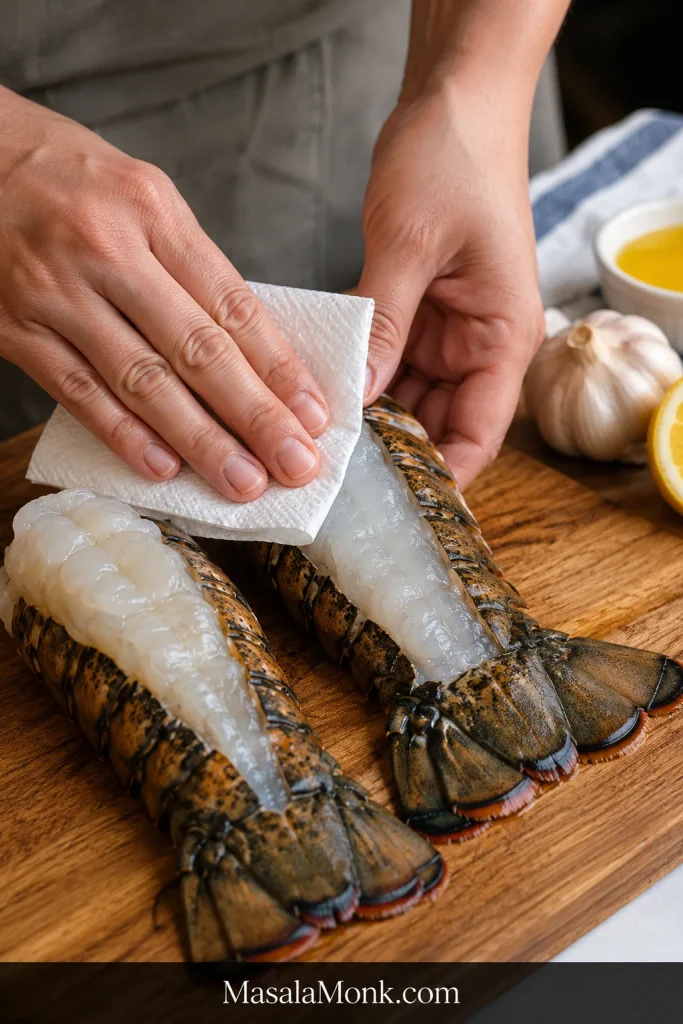
Once the tails are thawed and dry, the recipe starts to feel less like a gamble. The lobster is ready, the butter can be made, and the grill only has to give you smoke, heat, and a few minutes of attention.
Best Lobster Tail Size for Grilling
The best lobster tail size for grilling is usually 5–8 oz / 140–225 g per tail. Smaller tails cook quickly and are great for surf and turf. Larger tails feel impressive, but they need more controlled heat after the first sear.
Use this table as a starting point. A small tail and a jumbo tail should not be treated the same way.
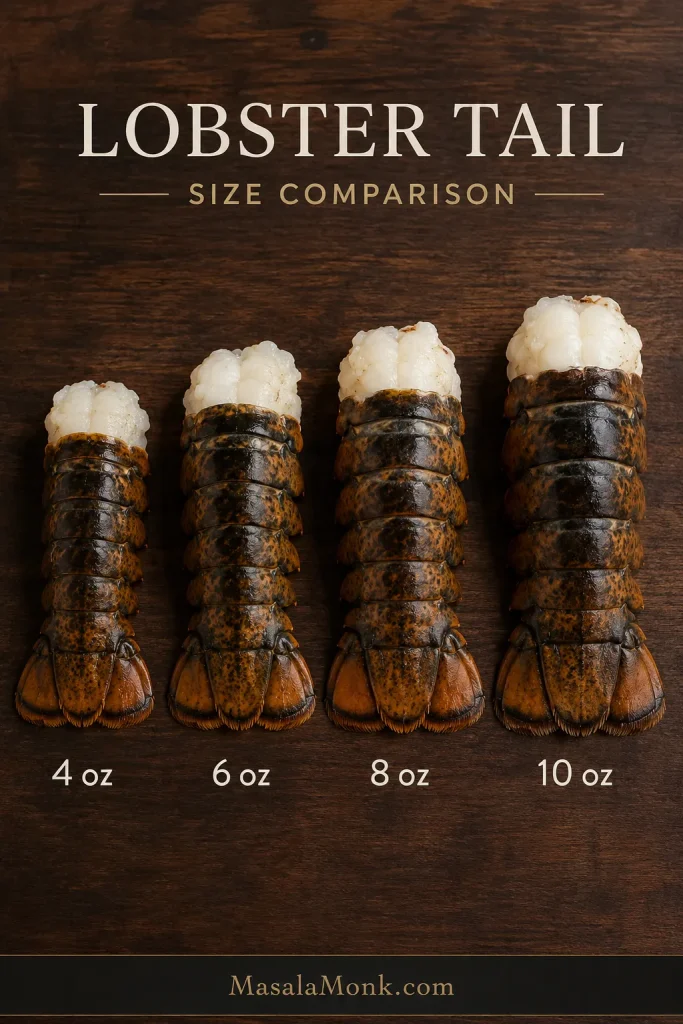
| Lobster tail size | Good use | What to watch |
|---|---|---|
| 4 oz / 115 g | Small portions, surf and turf, appetizers | Cooks quickly; check early |
| 5–6 oz / 140–170 g | Everyday grilling size | Easy to handle and hard to overcomplicate |
| 7–8 oz / 200–225 g | Generous dinner portion | Give it a little more time after flipping |
| 9–10 oz / 255–285 g | Large entrée-style tail | Move away from the hottest heat if the edges brown early |
| 10 oz+ / 285 g+ | Jumbo or special-occasion lobster | Use indirect heat after searing; do not blast the whole time |
Bigger lobster tails do not simply need more direct heat. They need a longer, steadier finish. Once you know the size, the timing stops feeling mysterious and starts feeling manageable.
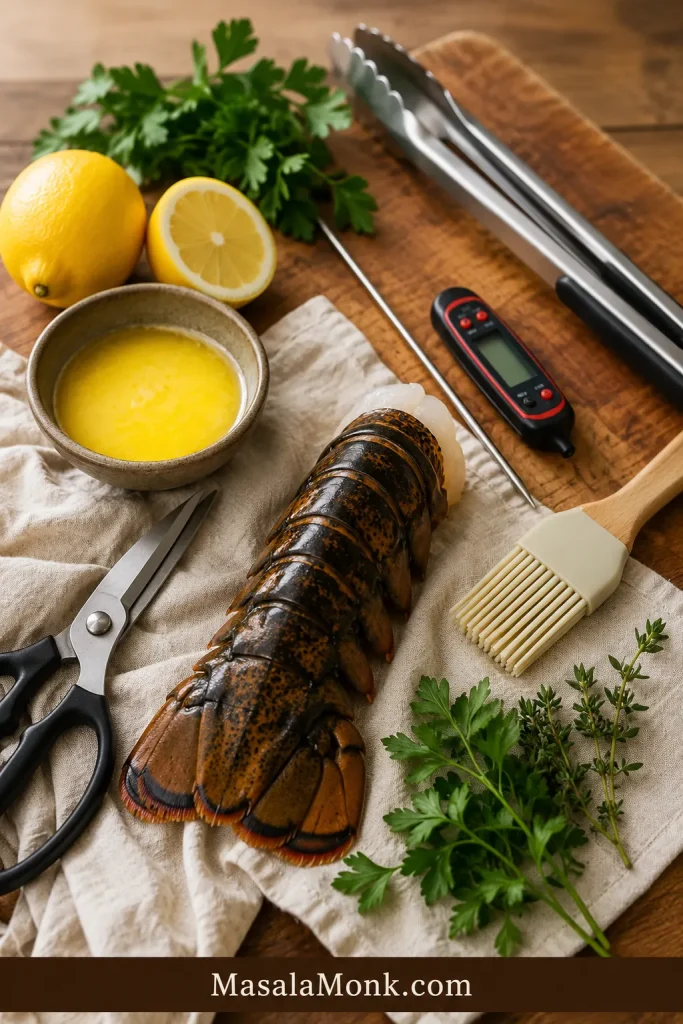
Before You Start: Tools That Make This Easier
Before you cut anything, set yourself up so the lobster feels manageable instead of slippery and rushed. You do not need much, but kitchen shears and an instant-read thermometer make the biggest difference.
- Kitchen shears: Most useful for cutting the shell without crushing it.
- Sharp knife: Helpful for splitting the meat partway after the shell is cut.
- Instant-read thermometer: The simplest way to avoid overcooked lobster.
- Grill tongs and basting brush: Helpful for turning and brushing without piercing the meat.
- Skewers: Optional, but useful if the tails curl.
Set the tools out before preheating, and the grill work feels calmer. The shears handle the shell, while the thermometer takes pressure off the final minute.
How to Cut Lobster Tails for the Grill
Once you know the size and have the tools ready, the next step is getting the shell open without mangling the meat. The easiest choice is a split-open tail, but here is how the main options compare.
| Cut style | Use it when you want | Grill position | Difficulty |
|---|---|---|---|
| Split open like a book | Beginner-friendly grilling, better sear, easier temperature control | Flesh-side down first, then shell-side down | Easier |
| Lifted butterfly | Restaurant-style presentation | Mostly meat facing up, baste often | More delicate |
| Fully halved tail | Very large tails or stronger char | Cut-side down briefly, then finish over cooler or indirect heat | Less forgiving |
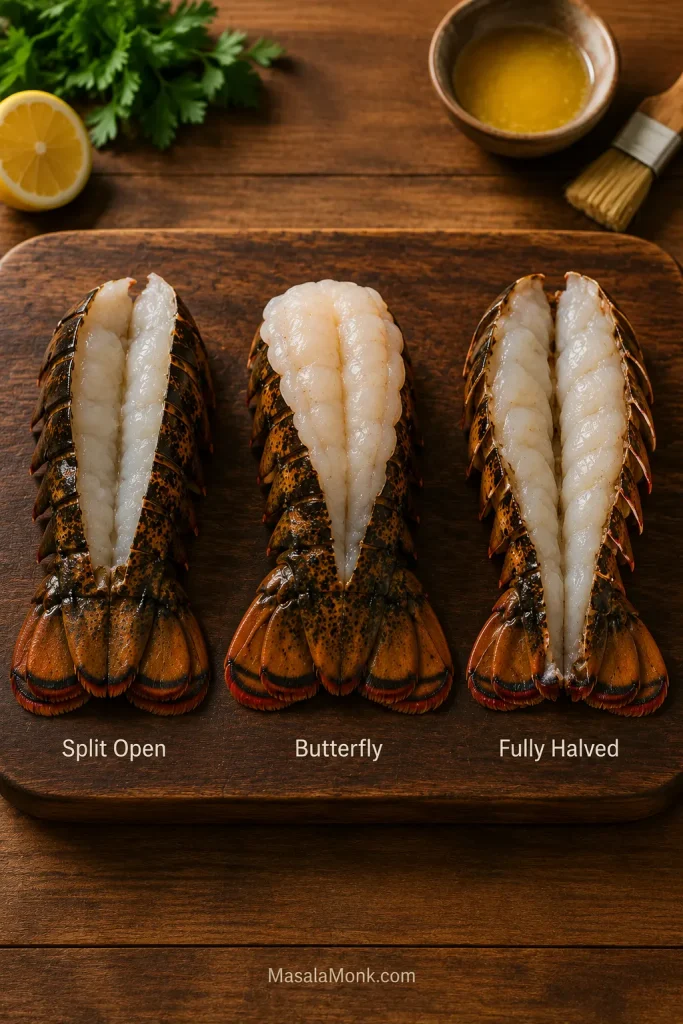
For this recipe, choose the split-open method unless you specifically want the lifted restaurant presentation. It gives the meat better contact with the grates, makes the sear easier, and gives you more control as the lobster finishes.
The shell may feel stiff the first time. That is normal. Work slowly, use kitchen shears instead of forcing the shell apart, and do not worry if the first tail is not picture-perfect. By the second one, the shell usually makes more sense.
Once the tails are open, the most intimidating part is behind you. From here, you are mostly managing heat, butter, and timing.
Cut the top shell with kitchen shears
The cleanest cut starts at the top of the shell and stops before the tail fan. Keep the shears centered so the shell opens evenly and the meat stays protected underneath.
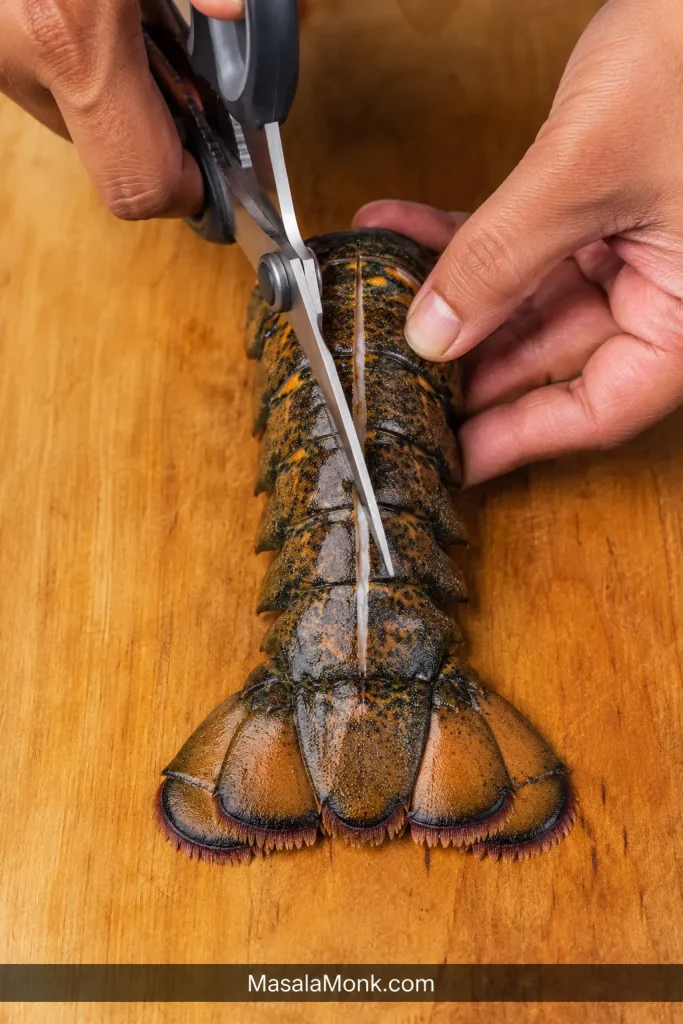
Loosen the lobster meat without tearing it
Once the shell is open, loosen the meat slowly along the sides. This gives the lobster room to open for grilling while keeping the tail attached and easier to move.

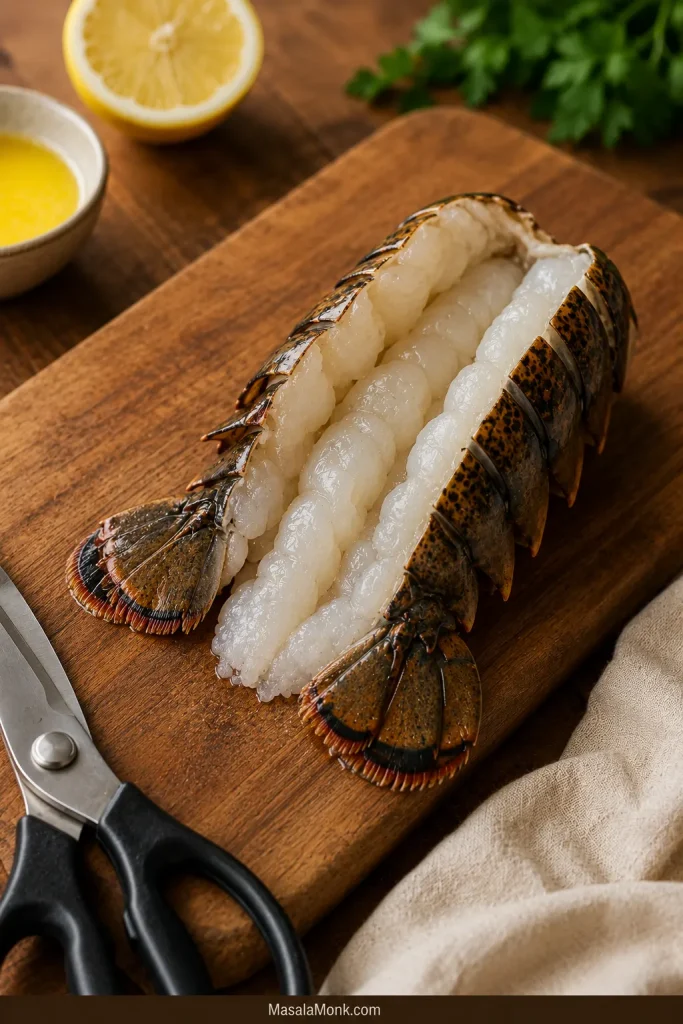
Option 1: Split open like a book
Cut through the top shell lengthwise with kitchen shears, stopping before the tail fan. Use a sharp knife to cut partway into the meat without slicing through the bottom shell. Open the tail like a book and press with light pressure so it sits flatter on the grill.
If the meat is very thick, keep the cut shallow enough that the tail stays together. You want to open it, not divide it into two loose pieces.
Option 2: Butterfly on top of the shell
This is the prettiest option and the one many people picture when they think of lobster tails. Cut down the center of the top shell, pull the shell apart slowly, loosen the meat from the sides, and lift the meat over the shell while keeping it attached at the base.
With the lifted butterfly style, do not force the meat flat onto the grates. Grill mostly with the meat facing up, baste the exposed surface as it cooks, and sear very briefly only if the meat sits securely.
Option 3: Fully halved lobster tail
A fully halved tail gives strong grill contact and works well for very large tails, but it is easier to overcook because more meat is exposed. Use this only if you want a stronger char and are comfortable taking an early reading.
Gas Grill, Charcoal Grill, BBQ, or Pellet Grill
Once the tails are cut, the grill setup is the last big decision — and it does not need to be complicated. Most grills can handle this recipe as long as the heat is steady and you have a cooler area available when the lobster needs more time.
- Gas grill: Easiest for heat control. Preheat to 400–450°F / 204–232°C, then clean and oil the grates.
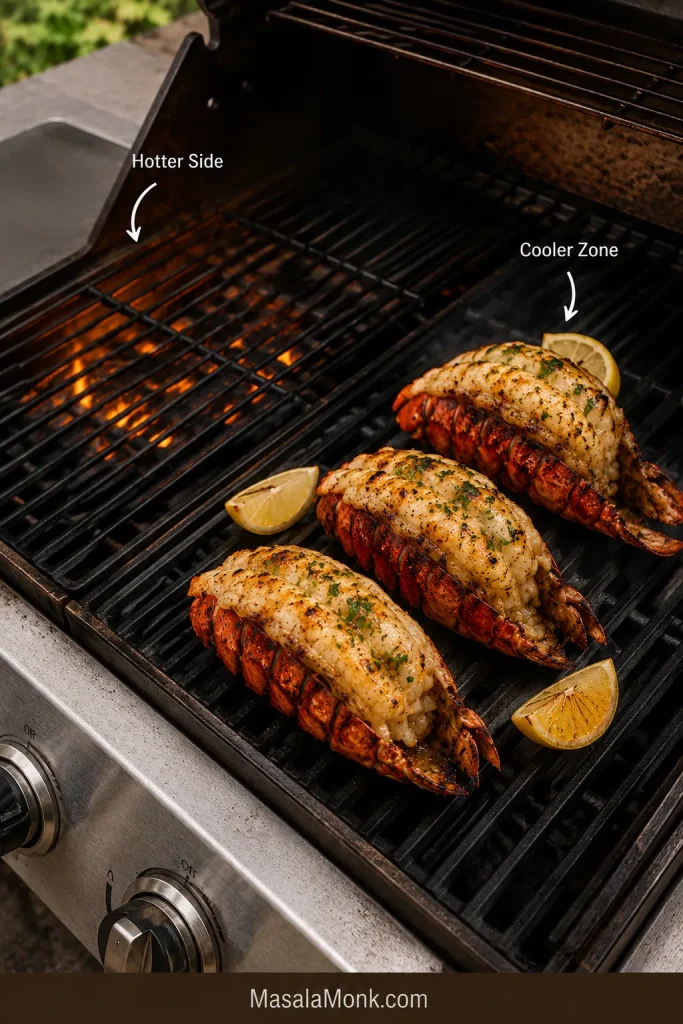
- Charcoal grill or BBQ: Great for smoky flavor. Use a two-zone setup if possible so you can sear over direct heat and move the tails away from the strongest flames later.
- Pellet grill on high heat: Works for a grilled result if you use enough heat. For a true smoked lobster tail, use lower indirect heat and a separate smoker method.
- Very hot grill: Sear briefly, then move the tails away from the hottest area so the meat does not firm up too quickly.
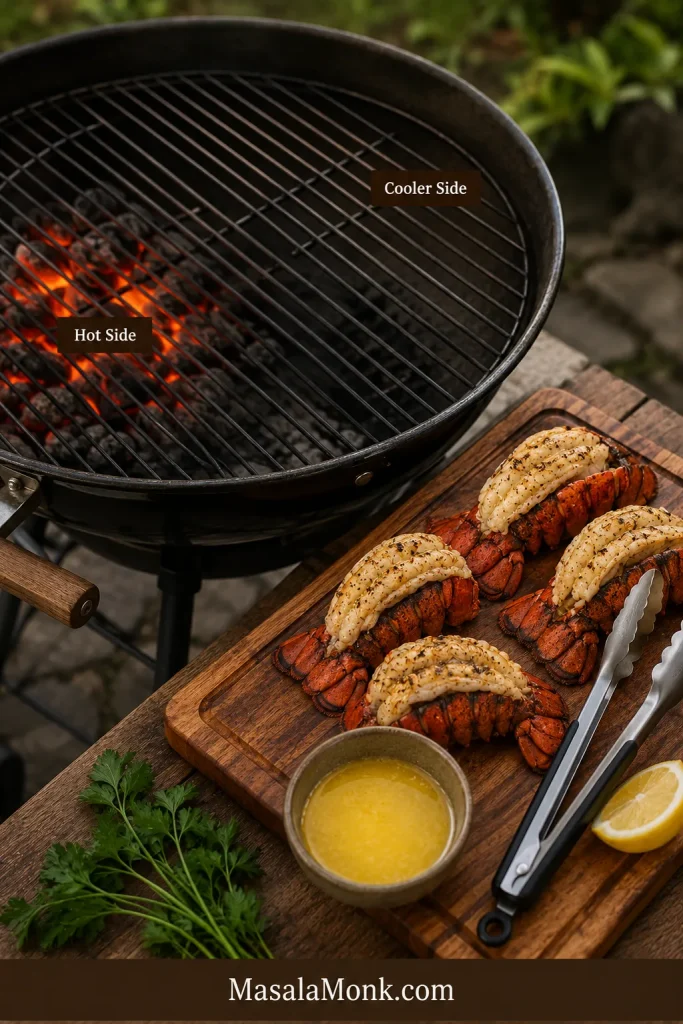
If your grill has obvious hot spots, use them for the sear, then move the lobster to a slightly cooler area after flipping. You still get the smoky edge you came for, but the center has time to stay sweet and tender.
How to Grill Lobster Tails Step by Step
The recipe card above gives you the fast version. This section gives you the live cues that matter once the lobster is on the grill.
If you are grilling for guests, prep the tails and the basting butter before anyone arrives. Once the lobster hits the grill, your job is mostly to watch, baste, and stop at the right moment.
1. Preheat and clean the grill
Preheat the grill to medium-high heat, about 400–450°F / 204–232°C. Clean the grates well and oil them lightly. Lobster meat is delicate, so dirty or dry grates can cause sticking and tearing.
2. Make the lemon garlic butter
Melt the butter gently, then stir in the garlic, lemon juice, lemon zest if using, herbs, and any optional spices. It should smell warm and garlicky, with enough lemon to keep the lobster bright instead of heavy.
3. Cut and season the lobster tails
Cut the shell using the method above. Pat the meat dry, brush with olive oil, and season lightly with salt and pepper. Keep the butter nearby, but do not brush it on heavily before the first contact with the grates.
4. Sear flesh-side down
Place split lobster tails flesh-side down on the hot grates. Let them cook without constant moving. When the meat has light grill marks, it should begin to release and be ready to flip.
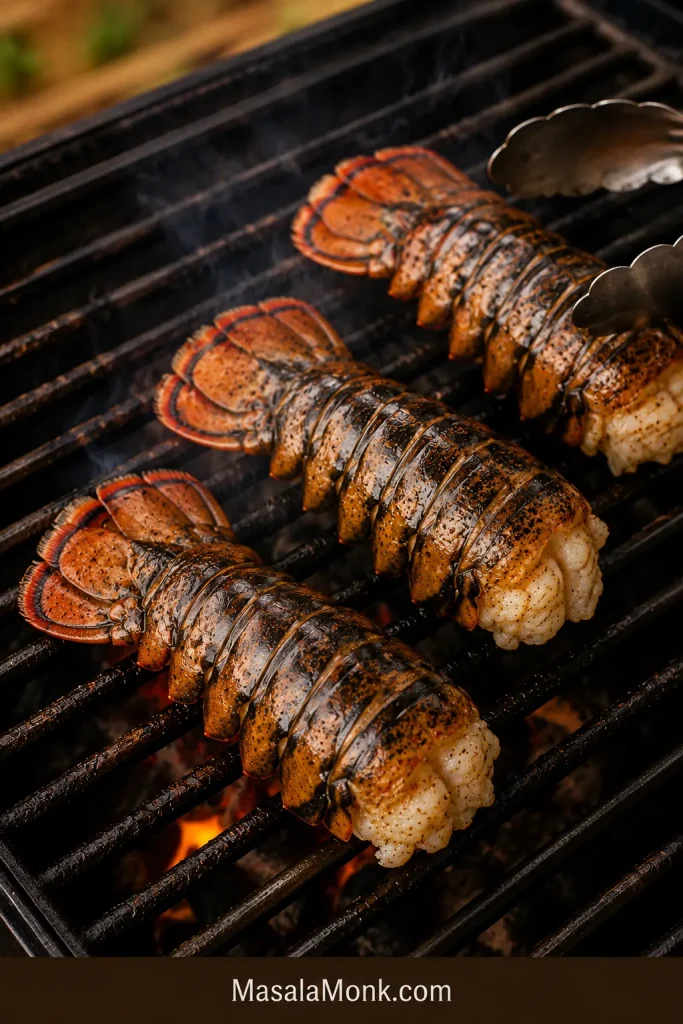
Let the lobster release from the grates
Do not pry a tail that feels glued to the grate. Give the sear a little longer, then lift gently with tongs so the marked meat stays intact.
With a lifted butterfly tail, skip the hard flesh-side-down sear or keep it very brief. That style is more delicate and usually does better with the meat facing up.
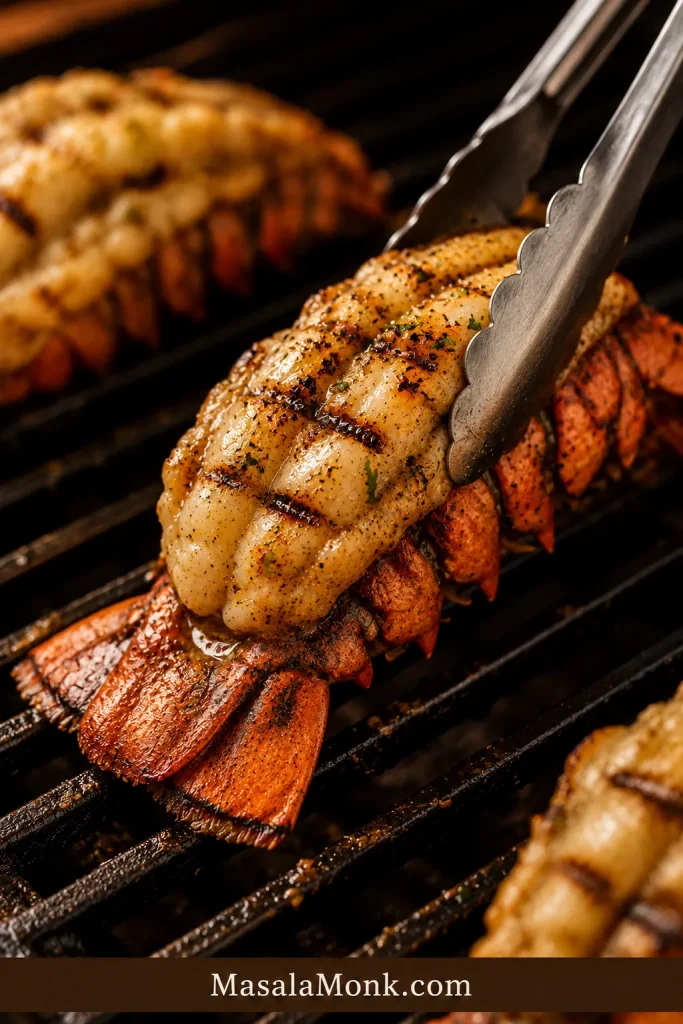
5. Flip shell-side down and baste
Flip the tails shell-side down, with the meat facing up. A little sizzling is good; bitter smoke means the heat is too harsh, not that the lobster needs to cook faster.
Brush garlic butter after flipping
Now brush the exposed lobster with lemon garlic butter. This timing gives the meat the glossy flavor you want while keeping minced garlic away from the harshest first contact with the grates.
When the shells are bright, the butter is sizzling gently, and the meat has turned pearly at the edges, the lobster starts to feel less intimidating and more like the dinner you hoped it would be.
6. Finish over steadier heat
Close the lid so the lobster cooks evenly. Opaque edges with a translucent center mean the outside is moving faster than the middle. Move the tails away from the hottest grates and give the center a little more time.
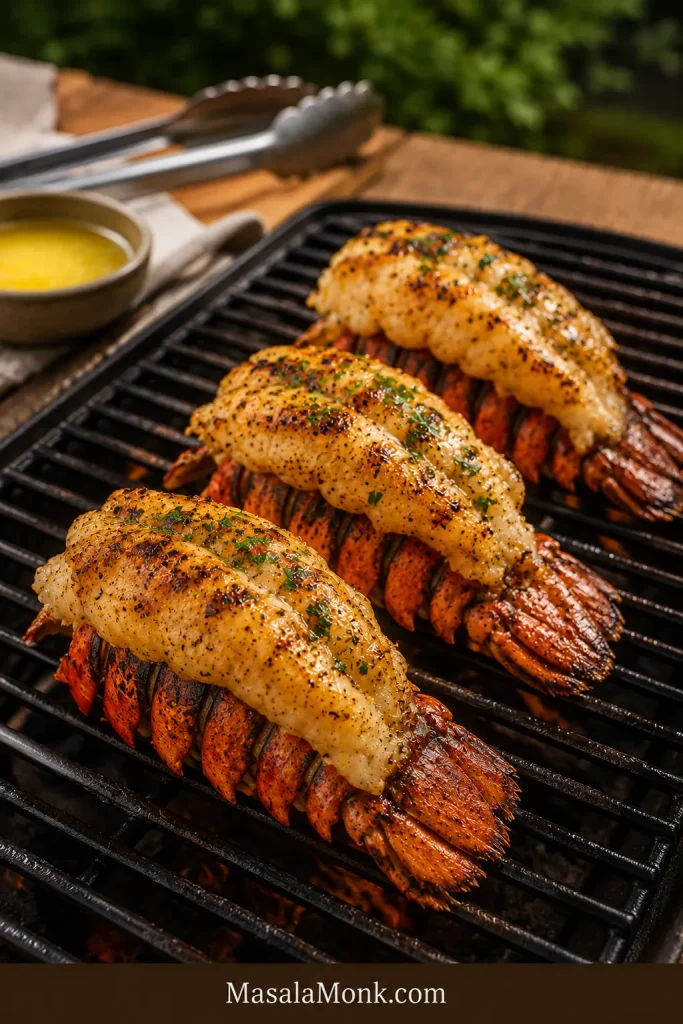
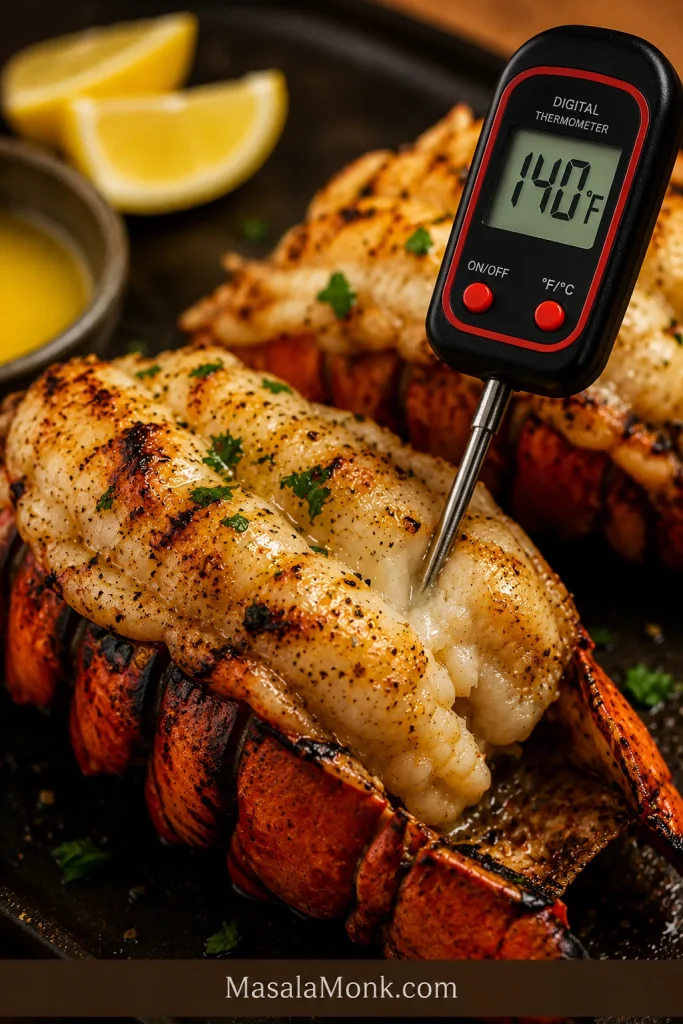
7. Check and serve
Insert an instant-read thermometer into the thickest part of the lobster meat without touching the shell. Pull the tails around 140°F / 60°C for juicy results, or 145°F / 63°C if you prefer a firmer finish. Brush with a little more butter, add lemon, and serve right away.
How Long to Grill Lobster Tails
Timing is mostly about size. A small 4 oz tail cooks much faster than a thick 10 oz tail, even if they are on the same grill.
| Tail size | Approx total grill time | First side | After flipping |
|---|---|---|---|
| 4 oz / 115 g | 5–6 minutes | 3–4 minutes | 1–2 minutes |
| 5–6 oz / 140–170 g | 6–8 minutes | 4–5 minutes | 2–3 minutes |
| 7–8 oz / 200–225 g | 8–10 minutes | 5–6 minutes | 3–4 minutes |
| 9–10 oz / 255–285 g | 10–12 minutes | 5–6 minutes | 4–6 minutes, often partly indirect |
| 10 oz+ / 285 g+ | 12+ minutes | 5–6 minutes | Finish more steadily, preferably with indirect heat |
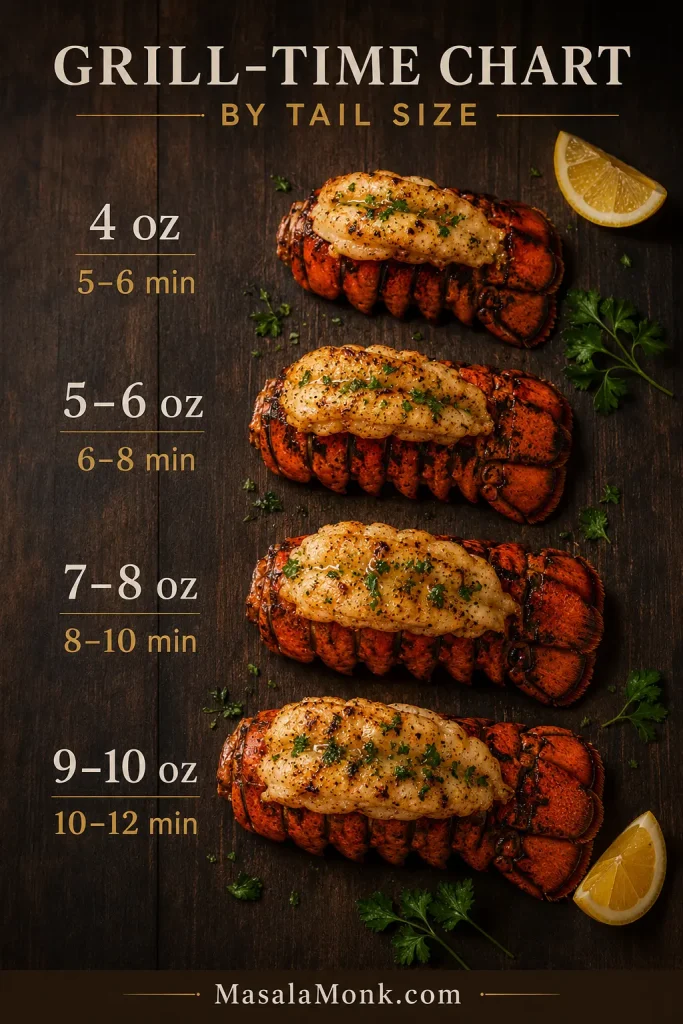
As a loose shortcut, most lobster tails need about 1 minute per ounce total on a hot grill, but thickness, grill heat, and how deeply you split the tail can change the final minute.
The table gets you close; the thermometer gets you calm. Lobster can go from tender to firm quickly, so use time as a guide and the thickest-part reading as the final call.
Grilled Lobster Tail Temperature
For the grill itself, aim for 400–450°F / 204–232°C. That gives you enough heat for grilled flavor without forcing the lobster to cook too aggressively.
For this recipe, 140°F / 60°C is the practical pull point for juicy grilled lobster tails. For a more conservative food-safety target, cook to 145°F / 63°C; FoodSafety.gov uses that number in seafood guidance, and lobster should look pearly or white and opaque.
The important thing is not to drift far past that point. You are looking for pearly, juicy meat that still feels soft when it leaves the grill.
| Temperature | What it means |
|---|---|
| 135°F / 57°C | Tender pull point if serving immediately and allowing for carryover |
| 140°F / 60°C | Best practical target for juicy grilled lobster tails |
| 145°F / 63°C | More conservative food-safety target |
| Over 145°F / 63°C | Higher risk of firm, dry, rubbery lobster |
Do not cook lobster like chicken. The lobster does not need deeper color. It needs you to stop at the right moment.
Garlic Butter for Lobster Tails
Garlic butter is the flavor anchor of this recipe. It should taste rich, bright, and savory without covering the natural sweetness of the lobster. You want warm garlic, enough lemon to lift the butter, and just enough herbs to make each bite feel fresh.
For four lobster tails, use 4 tablespoons / 56 g butter, 2–3 cloves minced garlic, 2 teaspoons to 1 tablespoon lemon juice, a little lemon zest if you like, and 1 tablespoon chopped parsley or chives. Add smoked paprika or a pinch of chili only if you want a warmer BBQ-style flavor.
The butter should not taste flat or greasy. It should be garlicky, lightly lemony, and salty enough that one brush over the hot lobster makes the meat taste sweeter.
Brush the lobster with oil before the first grill contact, then use the basting butter after flipping. If too much butter hits the hottest grates too early, it can drip, flare, and burn before the lobster is finished.
Once the butter is ready, the recipe starts to feel like dinner instead of a task. The garlic is warm, the lemon is bright, and every brush over the lobster gives you more of that rich, glossy finish.
If garlic, lemon, and butter are the flavors you love most with seafood, this shrimp scampi recipe follows the same bright, buttery path in a stovetop dinner.
Butter and Seasoning Variations
The classic lemon garlic butter is the best starting point, especially for a first batch. Once you understand the timing, you can change the flavor without changing the cooking method.
- Classic lemon garlic butter: Garlic, lemon, parsley, and butter.
- Chili garlic butter: Add chili flakes or cayenne for gentle heat.
- Smoked paprika butter: Add smoked paprika for a warmer BBQ flavor.
- Cajun garlic butter: Add Cajun seasoning, garlic, and lemon.
- Garlic herb butter: Add parsley, chives, thyme, or a little tarragon.
- Chili-lime butter: Use lime, garlic, chili, and cilantro for a brighter finish.
If using a salty seasoning blend, reduce the added salt in the recipe. Lobster does not need heavy seasoning; it needs enough butter, acid, and salt to bring out its sweetness.
How to Tell When Lobster Tail Is Done
Grilled lobster tail is done when the meat is opaque, white, and springy, but not hard. Properly cooked lobster looks pearly and juicy. Undercooked lobster can look translucent in the center. Overcooked lobster often looks shrunken, tightly curled, cottony, or dry at the edges.
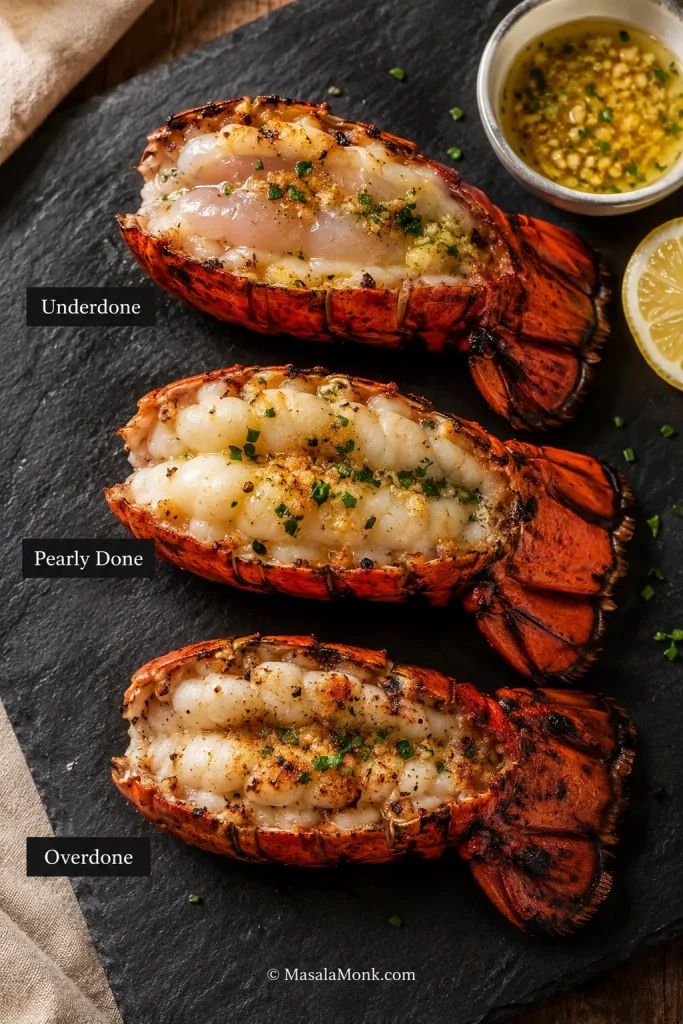
- Translucent center: give it another minute shell-side down.
- Tight edges with a cooler center: move the tails away from the strongest heat.
- Flaring butter: move the tails and baste more lightly.
- Meat at temperature: pull it instead of waiting for deeper shell color.
- Tightly curled tail with shrunken meat: take a reading immediately.
What properly cooked lobster meat should look like
A perfectly cooked tail should still look moist when you cut into it. The color turns pearly and opaque, but the meat should not look chalky, tight, or dry around the edges.
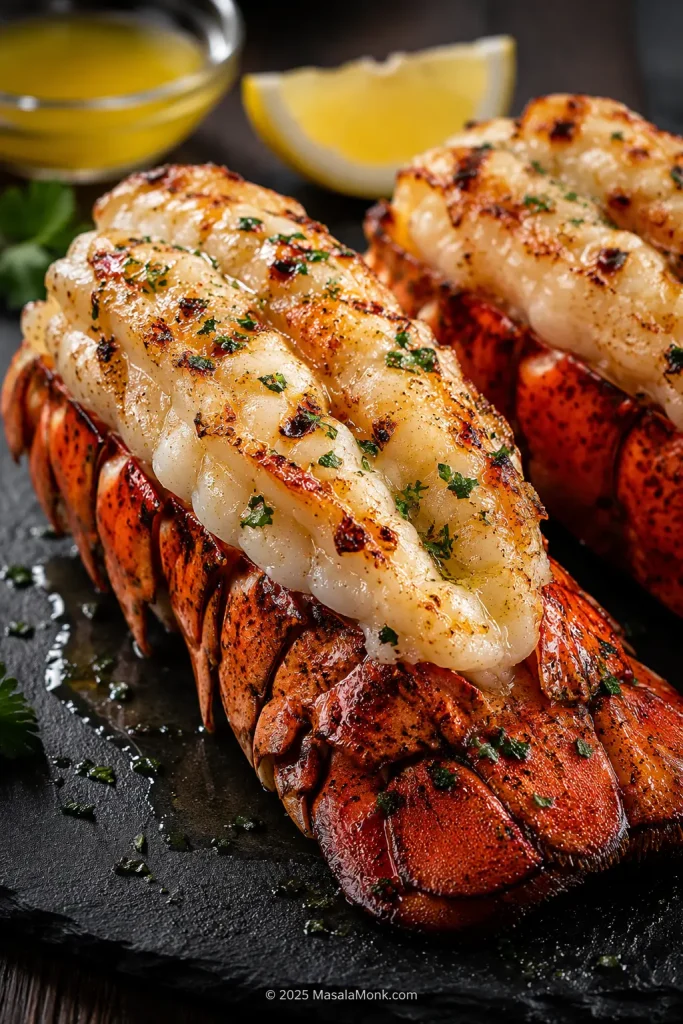
Think opaque and tender — not hard, dry, or bouncy. That is the moment you want: the meat just opaque, the butter still warm, and the lemon ready to squeeze over the top.
What to Do If Something Goes Wrong on the Grill
This is the minute where people usually panic. Don’t. Most lobster problems have a simple fix when you catch them early.
| What is happening | What it means | What to do immediately |
|---|---|---|
| Meat sticks hard to the grates | It has not released yet | Wait 30–60 seconds; do not tear it loose |
| Butter flares or smokes hard | Heat is too aggressive | Move tails to a cooler zone and baste lighter |
| Garlic smells bitter | The butter is burning | Stop basting with that butter and use fresh butter for serving |
| Shell is bright but center is translucent | Shell color is ahead of the meat | Finish shell-side down with the lid closed |
| Edges are firming fast | Heat is too direct | Move away from the strongest heat and take a reading |
| Tail curls tightly | It may be close to overdone | Check temperature immediately |
| Jumbo tail browns early | Outside is ahead of center | Move to indirect heat and finish more slowly |
Once you move the lobster away from harsh heat, most problems slow down. The butter settles, the center finishes, and the meat has a better chance to stay sweet instead of snapping firm.
Common Mistakes to Avoid
The rescue table helps when you are already at the grill. These are the mistakes to avoid before you get there.
- Starting with frozen-solid tails: Thaw fully so the outside and center cook evenly.
- Leaving the meat wet: Pat dry so the first side sears instead of steaming.
- Using butter too early: Oil is better for the first hot contact; butter belongs after the flip.
- Cooking jumbo tails like small tails: Big tails need a steadier finish after the first sear.
- Cutting too deeply: Open the tail without turning it into loose pieces that dry faster.
Once the heat is steady and the butter is under control, the recipe becomes simple again: let the lobster cook gently, pull it while it is still juicy, and serve it before the gloss leaves the butter.
Should You Grill Lobster Tails in Foil?
Foil is a safety net, not the best flavor method. You can use it if your grill runs very hot or you are worried about flare-ups, but foil steams the lobster more than it grills it.
Do not start with foil unless your grill is truly unruly. For better grilled flavor, cook the tails directly on clean, oiled grates, then finish shell-side down in a cooler zone to protect the meat after flipping.
What to Serve With Grilled Lobster Tails
Once the tails are off the grill, do not make them wait. Lobster is at its best while the butter is glossy, the lemon is sharp, and the meat still pulls cleanly from the shell.
Grilled lobster tails are rich, so the best sides either catch the butter, cut through it, or make the plate feel like a proper summer dinner. Use the table below to build the kind of meal you want.
| Meal style | Serve with |
|---|---|
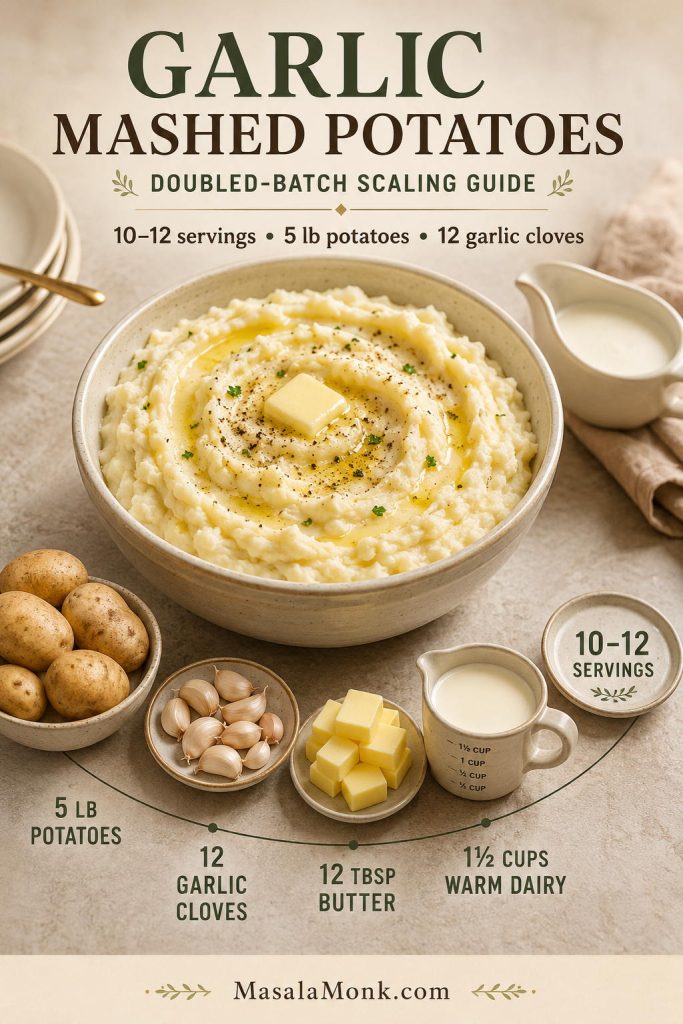
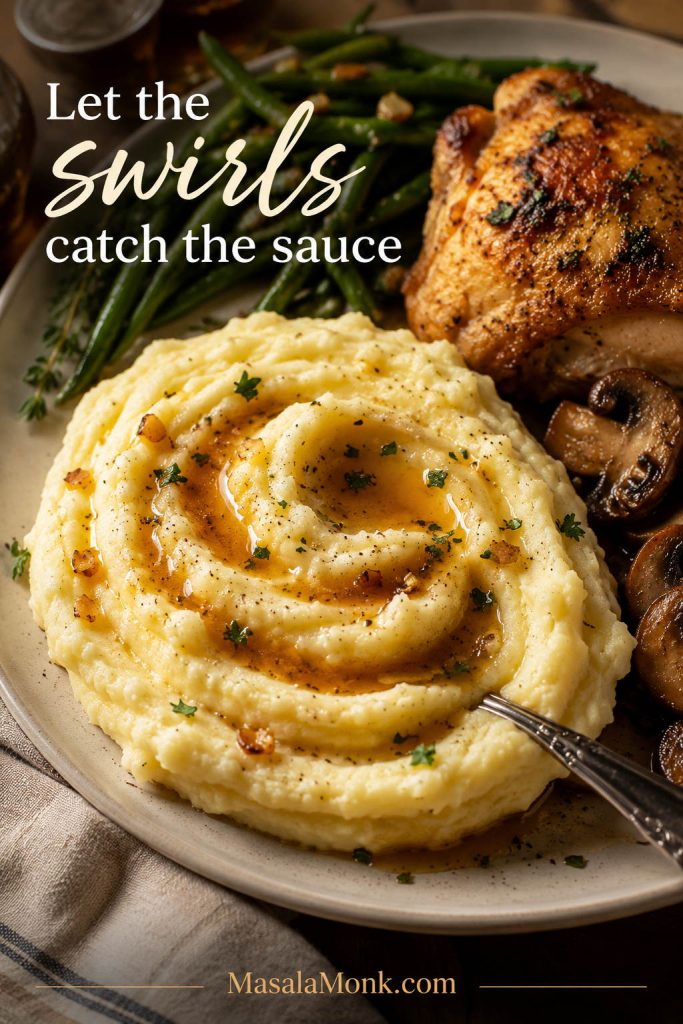
| Steakhouse dinner | Garlic mashed potatoes, wedge salad, steak, and extra lemon butter |
| Summer BBQ | Grilled corn, coleslaw, grilled asparagus, potato salad, and lemon wedges |
| Light seafood dinner | Lemon rice, tomato salad, green beans, or a simple crisp salad |
| Date-night plate | Homemade garlic bread loaf, a cold salad, and one bright drink like a lemon drop or lychee martini |
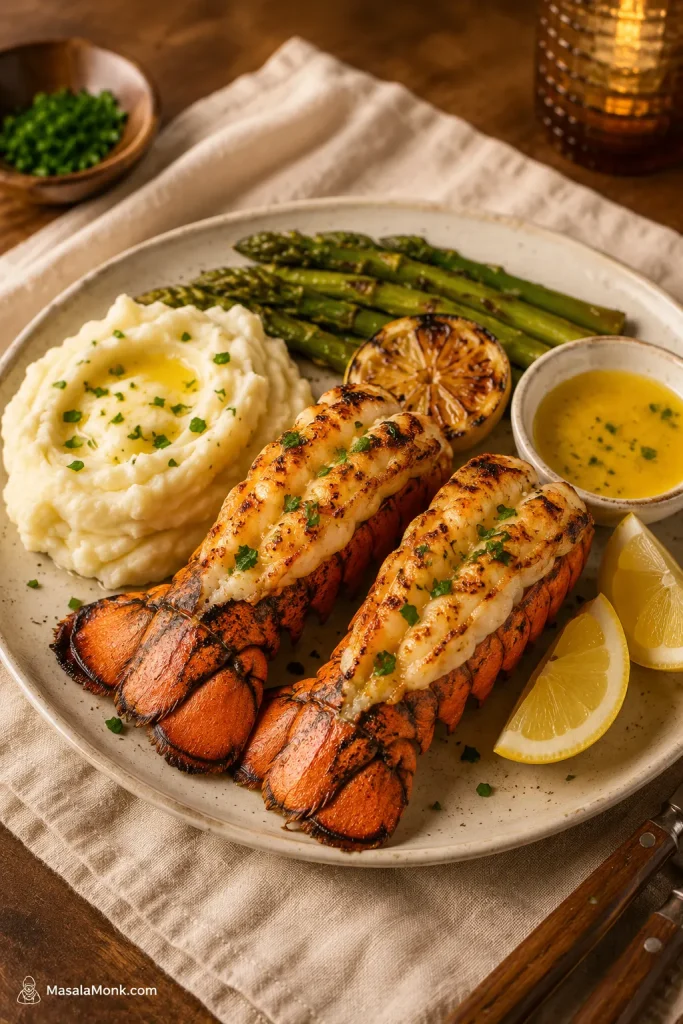
For the easiest plate, pair the lobster with one crisp side, one lemony element, and one soft side that can catch the extra garlic butter. That keeps the meal rich without making it feel heavy.
Storage and Reheating
Grilled lobster tails are best eaten right away, while the meat is tender and the garlic butter is warm. Leftover lobster is useful, but it will never be quite as tender as it was off the grill.
- Refrigerate: Remove cooked lobster meat from the shell and store it in an airtight container for up to 2 days.
- Reheat gently: Warm with a little butter over low heat until just heated through.
- Avoid harsh microwaving: High heat can make leftover lobster tough.
- Use leftovers: Add to pasta, tacos, salads, omelets, rice bowls, or turn the meat into a buttery lobster roll recipe.
If you expect leftovers, save extra garlic butter separately for reheating. Warm the meat just enough to bring back the butter and aroma, not enough to cook it again.
FAQs About Grilled Lobster Tails
How long do lobster tails take on the grill?
Most 4–8 oz lobster tails take 5–10 minutes. Very large tails can take 12 minutes or more and should finish over lower or indirect heat.
What temperature should grilled lobster tails reach?
Aim for about 140°F / 60°C in the thickest part for juicy lobster, or 145°F / 63°C if you prefer a firmer, more conservative finish.
Should lobster tails be grilled meat-side down or shell-side down?
For split lobster tails, start meat-side down for grill marks and flavor, then flip shell-side down with the meat facing up. Lifted butterfly tails usually cook mostly meat-side up.
Do you have to thaw frozen lobster tails before grilling?
Yes. Thaw frozen lobster tails before grilling for better texture, easier cutting, and more even cooking.
What is the best size lobster tail for grilling?
The best size is usually 5–8 oz / 140–225 g per tail. It feels generous but still cooks evenly without much fuss.
Why did my lobster tail stick to the grill?
It likely had not released yet. Clean and oil the grates, pat the meat dry, and wait another 30–60 seconds before lifting again.
Why did my garlic butter burn?
The heat was likely too aggressive or the butter hit the grates too early. Use oil first, add butter after flipping, and move the tails away from harsh heat when the butter smokes hard.
Why is my lobster tail tough even though I followed the time?
Grill heat, tail thickness, and starting temperature can all change the timing. Use time as a guide, then pull by thermometer before the meat firms too much.
What goes well with grilled lobster tails?
Grilled lobster tails go well with corn, potatoes, garlic bread, lemon rice, green salad, grilled asparagus, pasta, or steak for surf and turf.
Final Tip
Once you remember the rhythm — cut, sear, flip, baste, check — grilled lobster tails stop feeling fragile. They become what they should be: sweet, smoky, buttery, and ready for lemon while the meat is still tender.