Posted on Leave a comment

Grilled Shrimp Recipe: Juicy, Easy & Never Rubbery

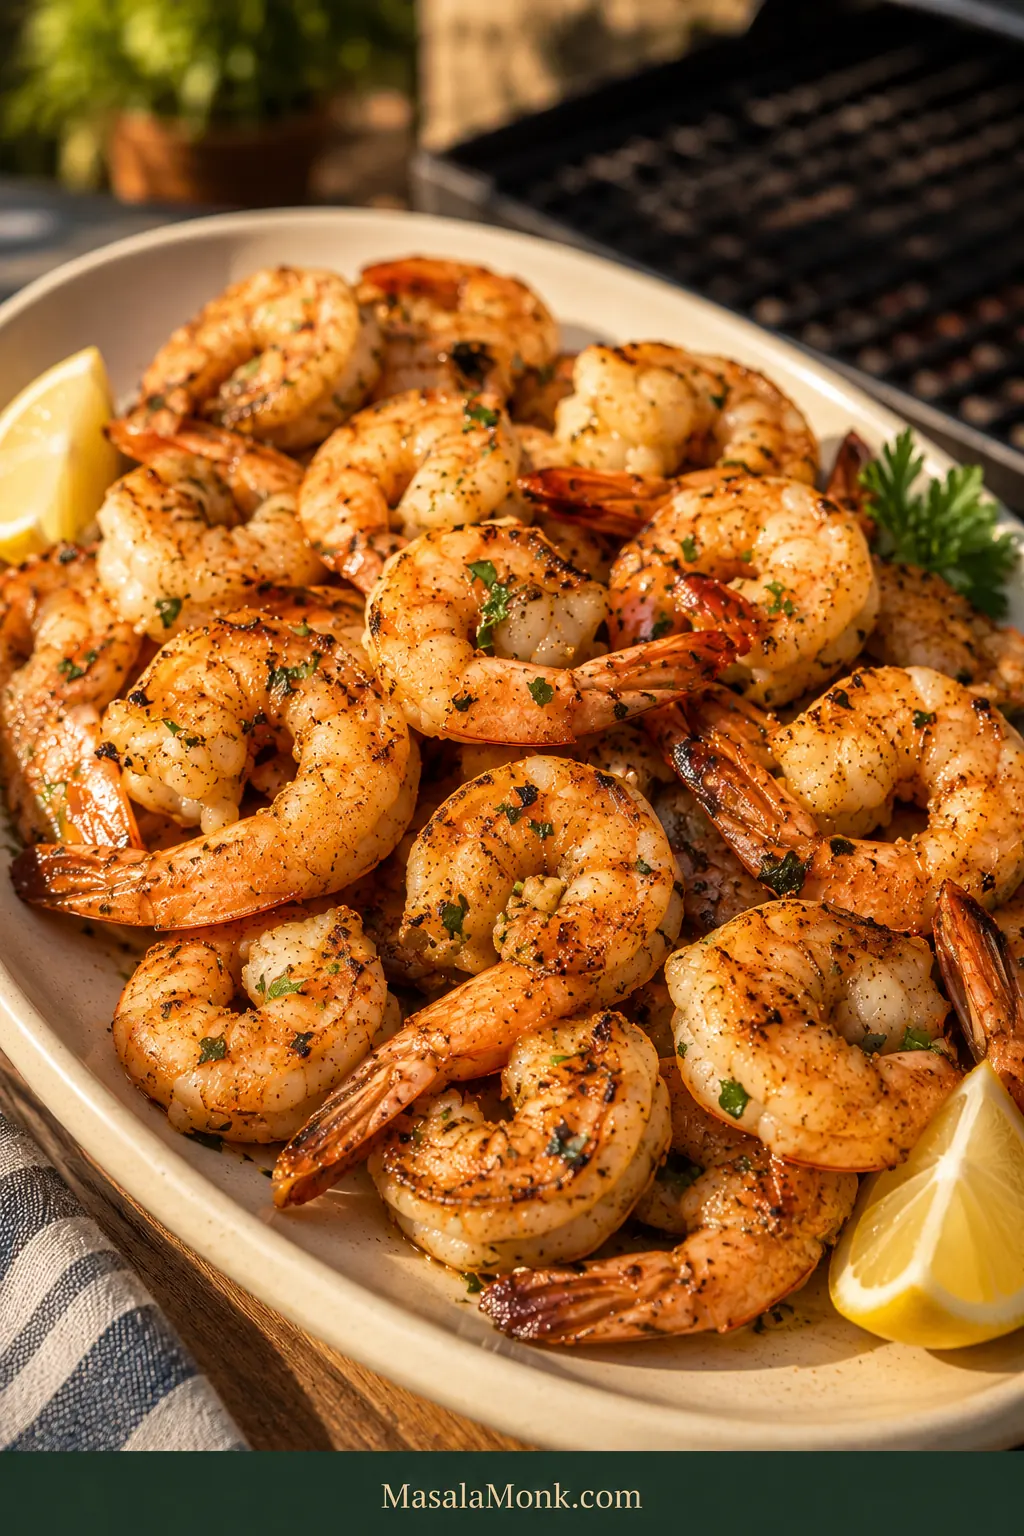
Platter piled with large grilled shrimp with lightly charred edges, lemon wedges and a small amount of parsley on a warm outdoor table.

Grilled shrimp can feel a little luxurious for something that takes only minutes to cook: smoky edges, a plump juicy center, fresh lemon and garlic, all straight from a hot grill.

The only catch is speed. A pound of good shrimp is not something you want to sacrifice to two distracted minutes beside the grill. Shrimp can move from underdone to perfect to rubbery remarkably quickly.

This grilled shrimp recipe keeps that narrow window manageable. The recipe itself is easy. What matters is knowing when to start looking, what “done” actually looks like, and when to stop adding heat.

Quick Answer: How to Grill Shrimp Without Making Them Rubbery

The method at a glance

For large shrimp—about 16/20 or 21/25 count per pound—expect roughly 3–6 minutes total on a well-preheated medium-high grill. Start checking after about 1½–2 minutes on the first side.

You can season and grill immediately; marinating is optional. If the shrimp were frozen, thaw them completely and dry the surface before seasoning.

Check the thickest part of the body rather than the thin tail. When the center is firm, pearly and opaque and the shrimp still feel juicy and springy, get them off the heat.

The clock tells you when to look. The shrimp tell you when to stop.
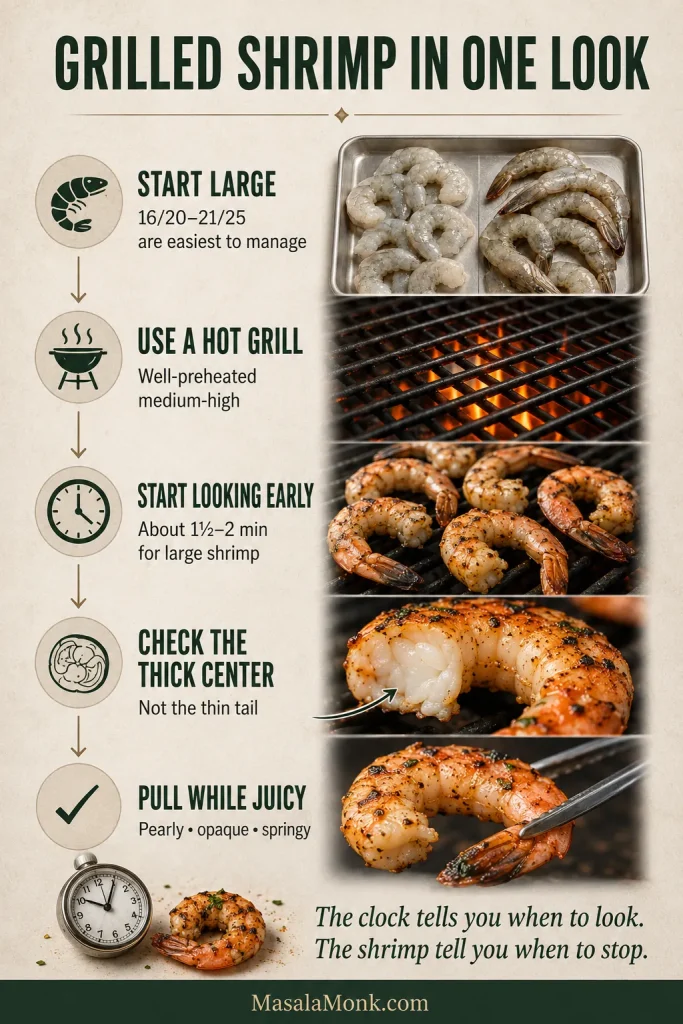
Illustrated grilled shrimp guide showing five steps: choose large shrimp, use a hot grill, check early, inspect the thick center and remove the shrimp while juicy.
Think of grilling shrimp as a chain of decisions: size sets the margin, heat starts the cook, and the thick center ends it.

Easy Lemon-Garlic Grilled Shrimp Recipe

The first bite is smoky and lightly charred; then the lemon and garlic arrive fresh at the finish. The coating stays deliberately light so the grill can brown the shrimp before their juicy centers have time to overcook.

Actual grilling takes only a few minutes. Most of the clock below is prep and optional marinating.

Prep10 minutes

Marinate (optional)15–30 minutes

GrillAbout 3–6 minutes, depending on size

Yield2 generous or 3 lighter mains; 4 appetizer portions, or up to 6 lighter appetizers with generous sides

Useful Equipment

  • Skewers for smaller shrimp or faster batch flipping
  • Grill basket for small shrimp that are awkward on open grates
  • Instant-read thermometer, optional and most practical with jumbo shrimp

Ingredients

  • 1 lb / 454 g raw shrimp, peeled and deveined, preferably 16/20 or 21/25 count
  • 2 tablespoons / 30 ml olive oil
  • 1 tablespoon / 15 ml fresh lemon juice
  • 1 teaspoon finely grated lemon zest
  • 1 teaspoon garlic powder
  • 1 teaspoon smoked or sweet paprika
  • 3 g fine sea salt, about ½ teaspoon
  • ¼ teaspoon freshly ground black pepper
  • Pinch of cayenne or red pepper flakes, optional
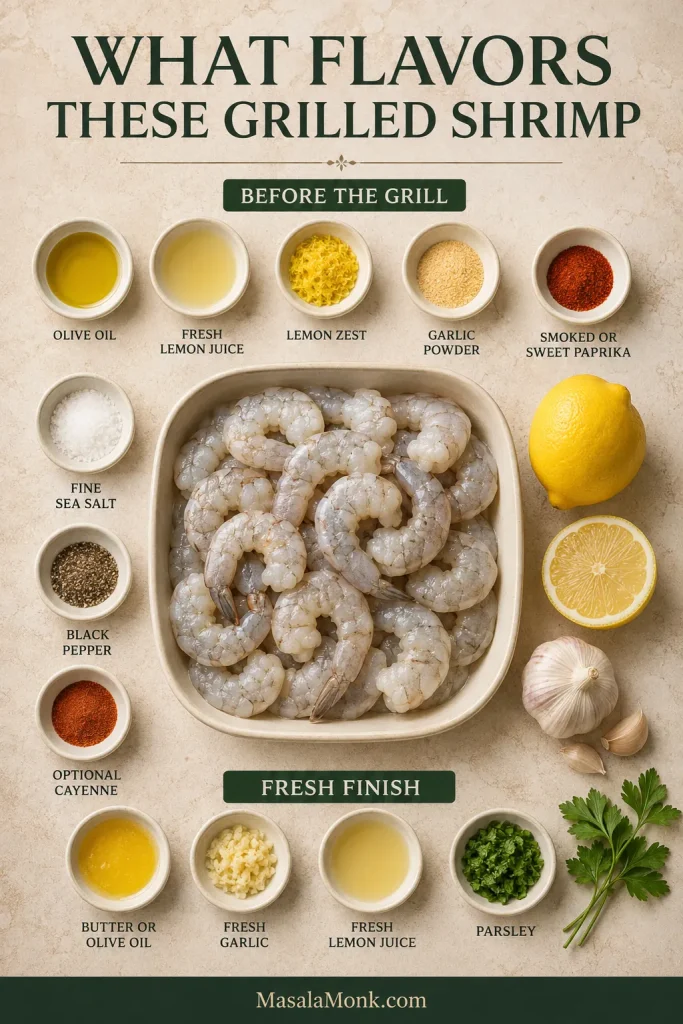
Overhead arrangement of raw shrimp with olive oil, lemon, zest, paprika, garlic powder, salt and pepper grouped separately from butter, fresh garlic, lemon and parsley for finishing.
Use garlic powder, paprika and lemon zest before grilling; save the fresh garlic and final squeeze of lemon for after the heat.

Optional Fresh Garlic-Lemon Finish

  • 1 tablespoon / 14 g unsalted butter or 1 tablespoon / 15 ml olive oil
  • 1 small garlic clove, very finely grated or minced
  • 2 teaspoons / 10 ml fresh lemon juice
  • 1 tablespoon chopped parsley

Before grilling, look for a light, even sheen rather than a wet coating. The shrimp should look glossy enough to carry the seasoning, but not sit in excess liquid.
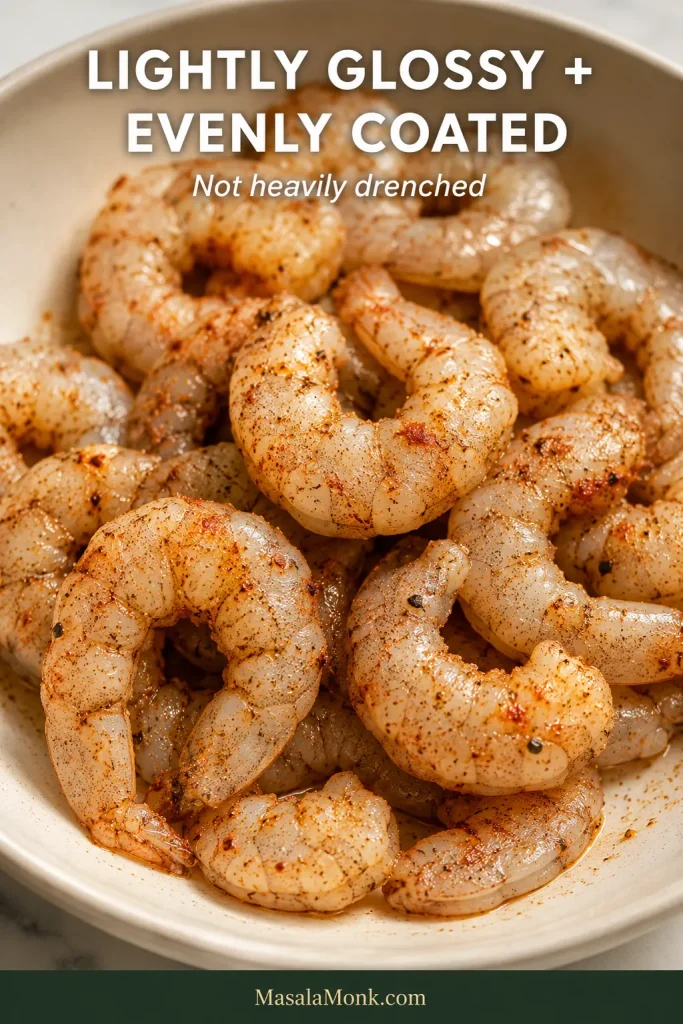
Close-up of raw peeled shrimp in a bowl with a thin, even coating of seasoned oil and lemon, with the shrimp glossy but not submerged in liquid.
That light sheen is enough. Less surface liquid means the grill can start browning sooner instead of spending precious time evaporating marinade.

How to Make Grilled Shrimp

  1. Dry the shrimp. If frozen, thaw and drain first. Pat away visible surface water.
  2. Season. Mix the olive oil, lemon juice, zest, garlic powder, paprika, salt, pepper and optional cayenne. Toss until the shrimp look lightly glossy and evenly coated rather than heavily drenched.
  3. Marinate briefly—or grill now. Refrigerate for 15–30 minutes, or skip the wait and cook immediately. For an even drier surface, omit the 1 tablespoon / 15 ml lemon juice before grilling and add extra fresh lemon to taste after cooking.
  4. Preheat the grill. Use well-preheated medium-high heat. Brush the grates clean and let them heat fully.
  5. Grill. Arrange large shrimp directly on the grates or thread them onto skewers. You should hear an immediate, lively sizzle. Let the first side brown before flipping once.
  6. Pull them as soon as they’re done. Check the thickest part of the body and move the shrimp to a clean serving platter—not the plate or tray that held them raw.
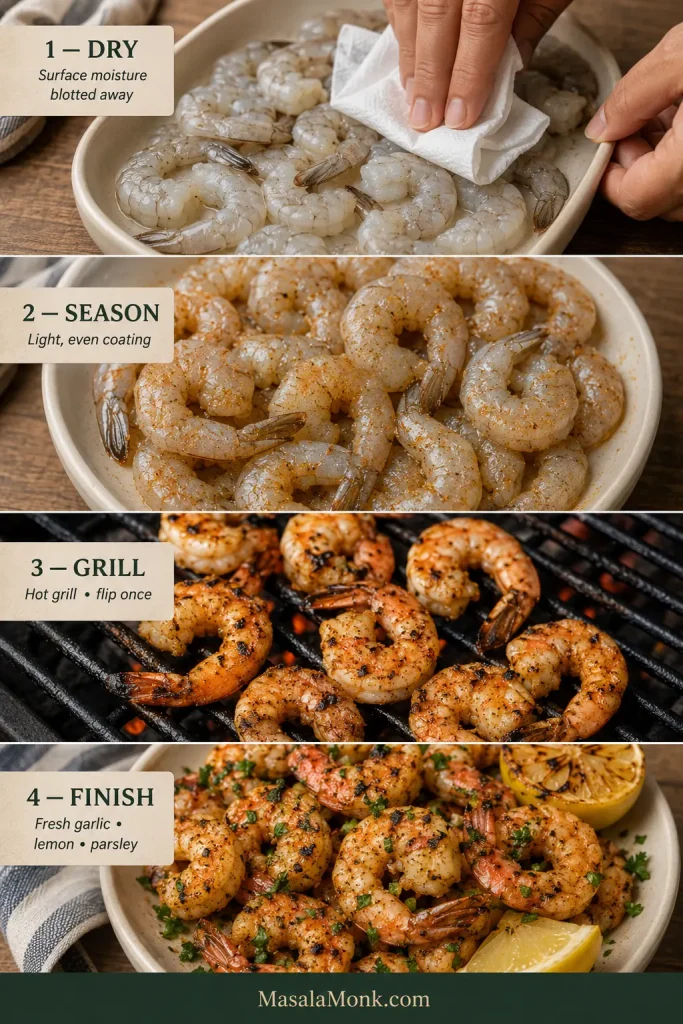
Four-step cooking sequence showing raw shrimp being dried, lightly seasoned, grilled over hot grates and finished with lemon, fresh garlic and parsley.
Dry first, season lightly, grill fast, then finish off the heat—that order keeps browning and fresh flavor working together.

Finish

Melt the butter and take it off direct heat before stirring in the fresh garlic. The garlic should smell fresh and fragrant, not browned. Add the lemon juice and parsley, then spoon or toss the mixture with the hot shrimp.

Garlic powder survives the grill; fresh garlic gets the last word.
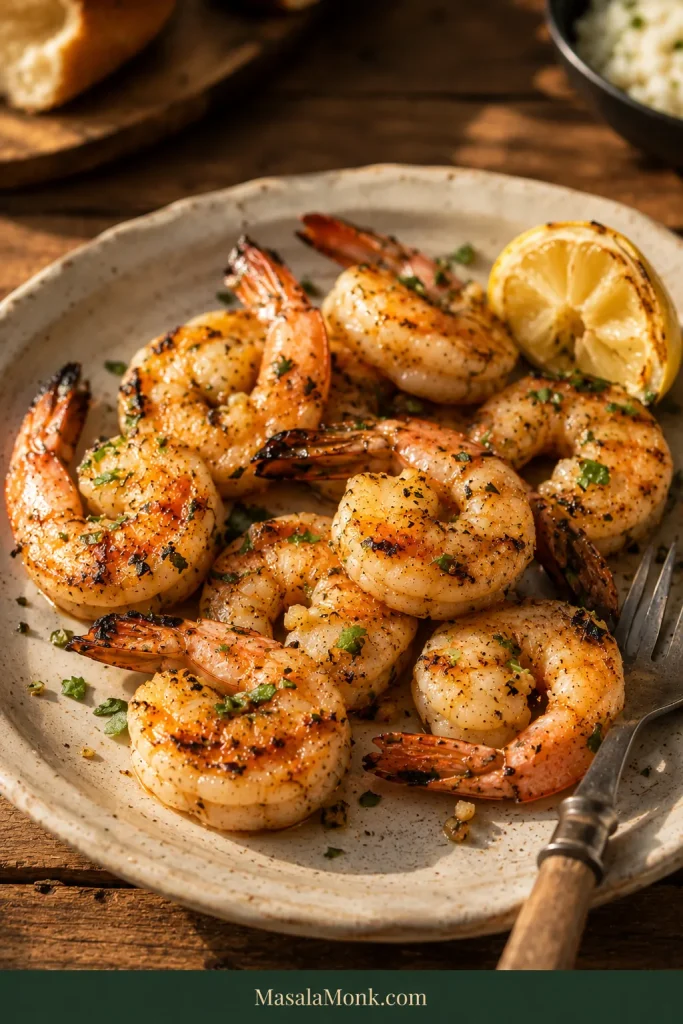
Dinner plate of grilled shrimp with light browning, lemon and a small amount of parsley on a rustic wooden table.
After grilling, a restrained lemon-garlic finish should sharpen the shrimp’s smoky flavor, not bury it under butter or sauce.

Recipe Notes

  • Using a salty seasoning blend? Reduce the separate salt.
  • Using wooden skewers? Soak them for about 30 minutes first.
  • Using commercially precooked shrimp? Warm them only briefly and let the grill add a little char; the raw-shrimp timings below do not apply.
  • Want marinade for serving? Reserve a clean portion before adding the raw shrimp. Otherwise discard the used marinade or boil it before using it as a sauce.

Need More Help With Your Shrimp?

You’ve got the recipe above. If you’re already cooking, jump to timing, doneness or troubleshooting. If you’re planning ahead, start with shrimp size and prep.

Choose the Best Shrimp for Grilling

For the easiest grilling, buy raw 16/20 or 21/25 shrimp if you can. They’re large enough to handle comfortably and give you a little more breathing room before they overcook.

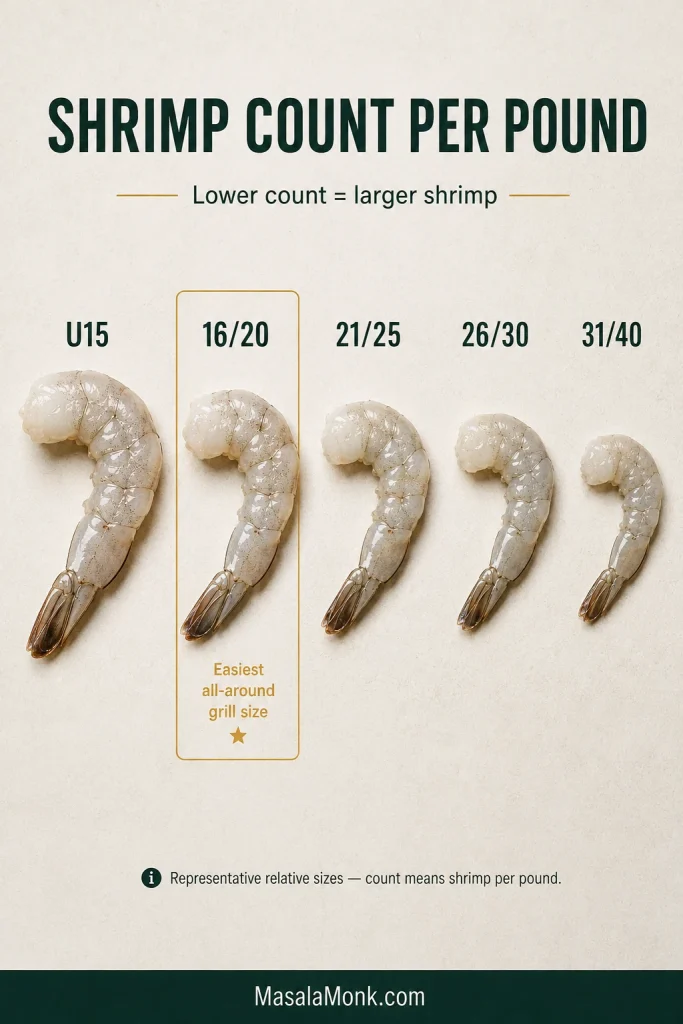
The useful number at the seafood counter is the count per pound. A 16/20 label means roughly 16–20 shrimp make up one pound; lower numbers mean larger shrimp.

Shrimp countRelative sizeBuying note
U15Very largeMost forgiving timing on the grill
16/20LargeEasiest all-around choice for grilling
21/25LargeExcellent balance of size, price and easy handling
26/30Medium-largeStill very grillable, but they cook more quickly
31/40SmallerFast cooking, so you’ll want everything ready before they go on
If you’re buying specifically for the grill and don’t want to overthink it, 16/20 is an excellent place to start.
Raw shrimp shown in decreasing representative sizes labeled U15, 16/20, 21/25, 26/30 and 31/40, with 16/20 highlighted as an easy grilling size.

If the package says prawns, king prawns or tiger prawns, use the actual size and thickness as your guide. Very large prawns behave much like jumbo shrimp.

Raw Shrimp Are Best for Grilling

Raw shrimp give you the most control over browning and doneness, and all of the main timing guidance in this article is written for them.

Commercially precooked shrimp only need enough heat to warm through and pick up a little grill flavor. The same idea helps with shrimp fried rice: get the rest of the dish nearly ready before the cooked shrimp go in.

Frozen Shrimp Work Beautifully

Frozen is not the problem. Surface water is.

Fully thawed frozen shrimp grill very well once excess moisture is blotted from the surface. They can brown and taste every bit as lively as shrimp that never saw the freezer.
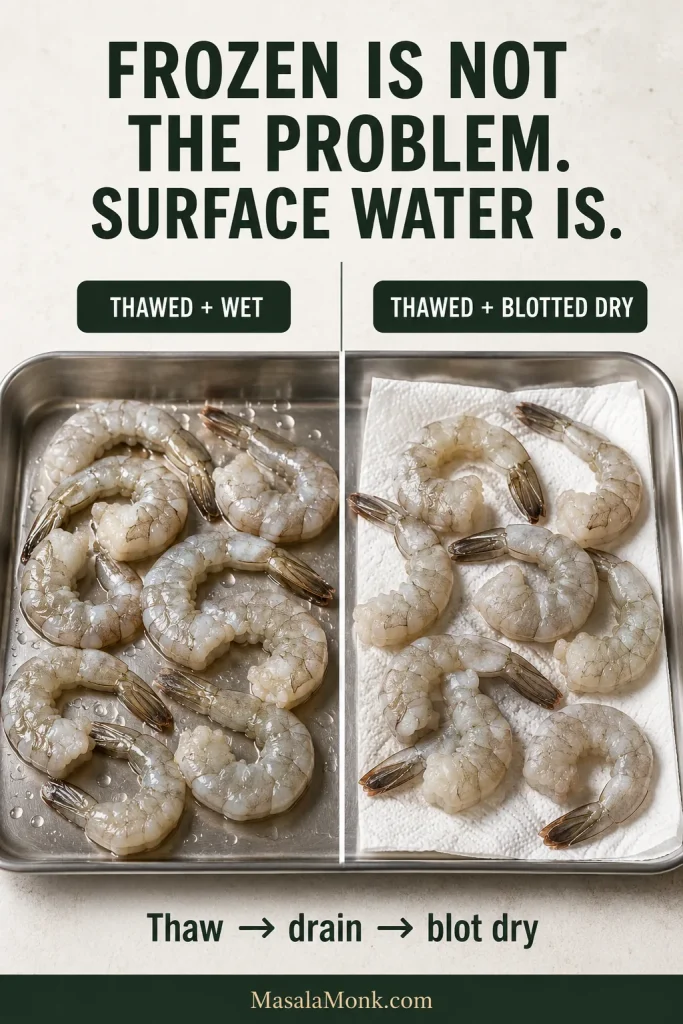
Side-by-side comparison of thawed shrimp that are wet with surface droplets and thawed shrimp that have been thoroughly blotted dry with paper towels.
Thawed frozen shrimp can brown beautifully; the real advantage comes from getting their surface dry before they ever meet the hot grate.

No time to thaw? Our frozen shrimp in the air fryer guide is designed for cooking them straight from frozen.

Should You Grill Shrimp With the Shell On or Off?

Peeled shrimp are the easiest default: seasoning reaches the flesh directly, more surface touches the grill, and they’re easier to eat.

Shell-on shrimp trade some direct seasoning and browning for a little extra protection from intense heat. With jumbo shrimp, you can slit the shell along the back and devein while leaving most of it intact.
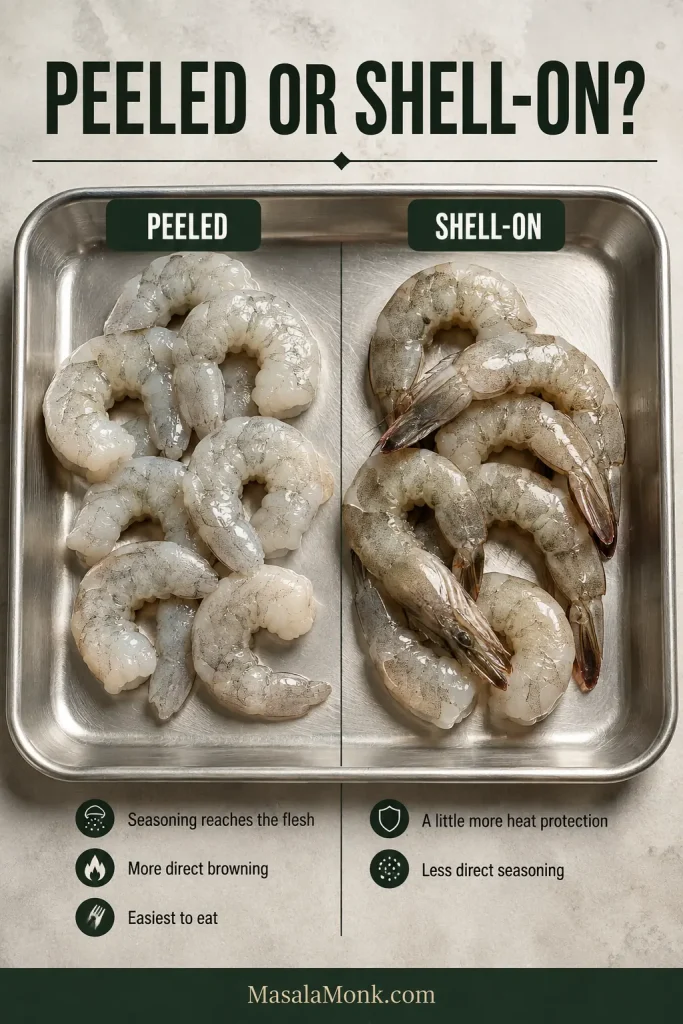
Side-by-side raw shrimp comparison showing peeled and deveined shrimp on one side and similar-sized shell-on shrimp on the other.

How to Prep Shrimp for the Grill

The prep itself is short:

  1. Thaw if needed. Use the refrigerator when you have time. For a faster thaw, keep the shrimp sealed in a leakproof bag in cold water, then cook them promptly.
  2. Peel and devein if needed. Leave the shell in place if you’re deliberately grilling shell-on.
  3. Choose the tails. Leave them on for finger food and presentation; remove them for easier shrimp tacos, pasta or rice bowls.
  4. Drain and dry. Blot away obvious surface moisture before seasoning.
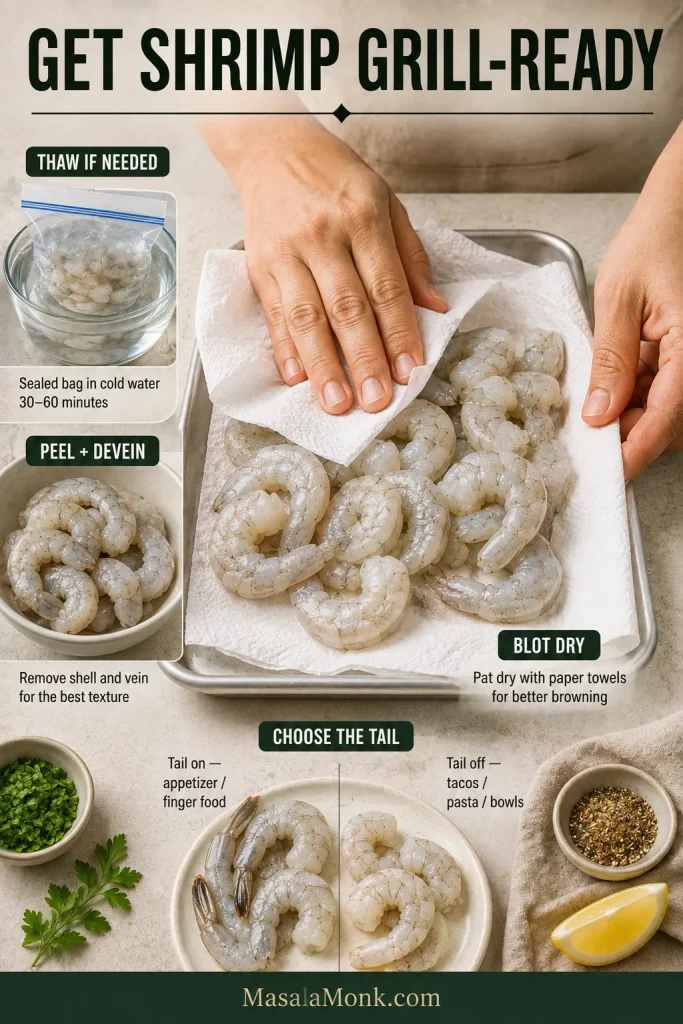
Overhead preparation scene with hands blotting raw peeled shrimp dry, alongside cues for thawing, peeling and deveining, tail choice and drying.
Do the small jobs before the grill gets hot, so the few minutes of actual cooking stay calm and easy to manage.

Butterflying jumbo shrimp is optional. Cut along the back without slicing all the way through, then open the flesh slightly. More surface can touch the grill, which means more browned edges—but also a shorter cooking window, so check butterflied shrimp sooner than intact shrimp of the same size.
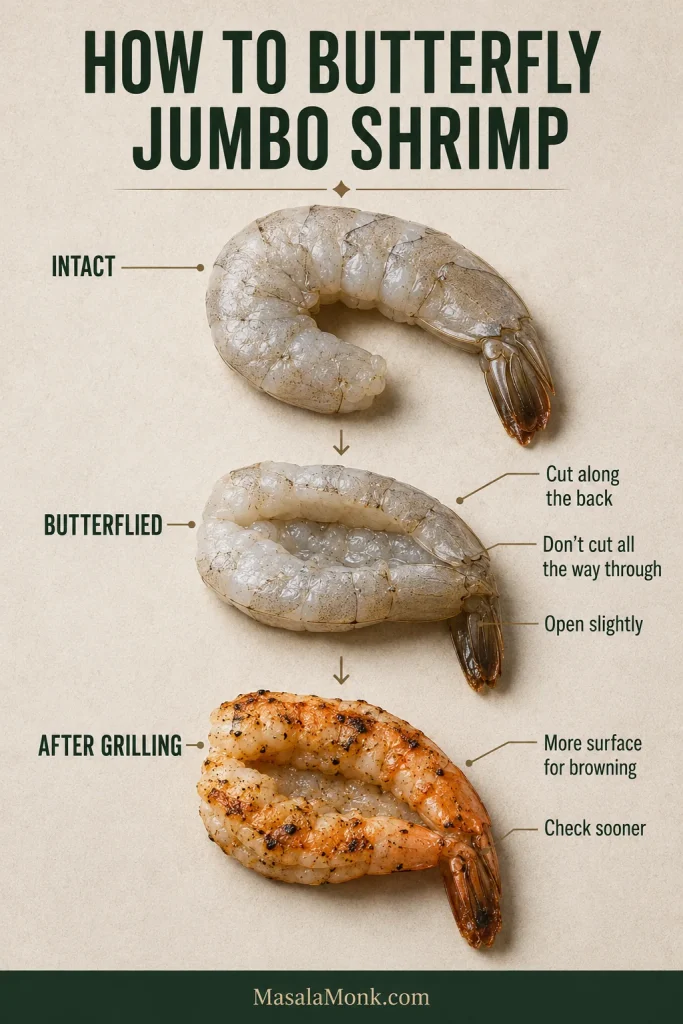
Three-stage view of a jumbo raw shrimp intact, the shrimp cut along the back and opened without splitting apart, and a butterflied shrimp after grilling.
Butterflying jumbo shrimp exposes more flesh to the grate, so you gain browning while giving up a little timing margin.

Marinade or Seasoning? Choose What Fits Dinner

Choose your route

  • Need dinner now? Season and grill immediately.
  • Want to season the shrimp a little ahead of time? Use the short lemon-garlic marinade below.
  • Want stronger fresh-garlic flavor? Keep most of the fresh garlic for the finish.
  • Using a sweet glaze? Brush it on late in grilling so the sugar has less time to scorch.
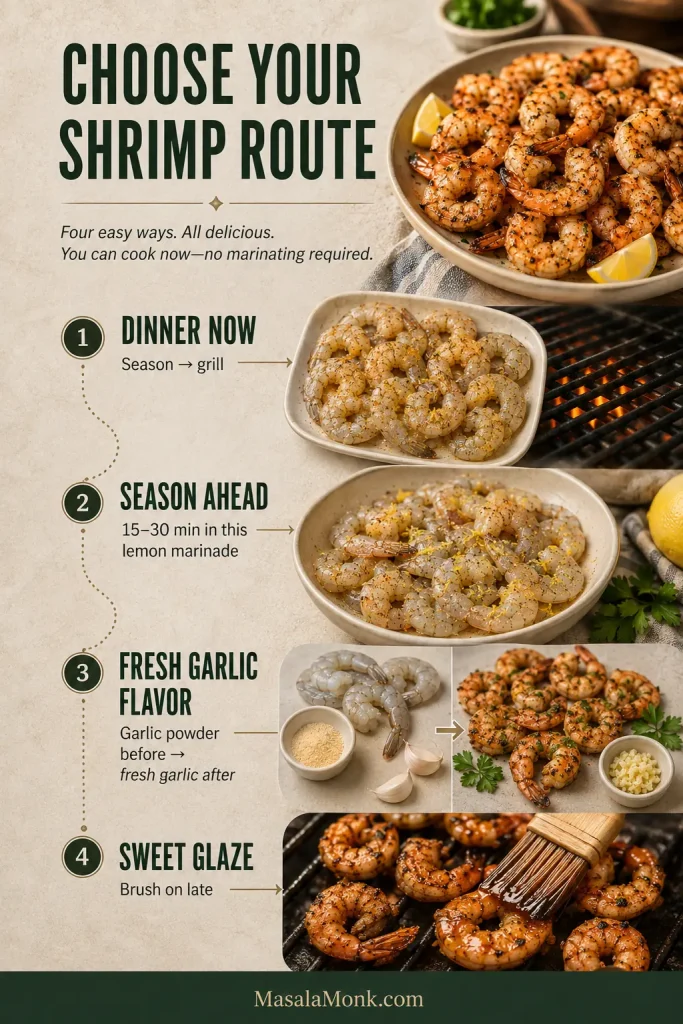
Four-route grilled shrimp guide showing immediate seasoning, a short lemon marinade, garlic powder before with fresh garlic after, and a sweet glaze brushed on late.

How Long Should Shrimp Marinate?

For this lemon marinade, 15–30 minutes is ideal. Keep the shrimp refrigerated while they sit.

If dinner gets delayed, drain the shrimp instead of leaving them in a strongly acidic mixture for hours. You can mix the marinade earlier and add the shrimp closer to cooking.

Reserve any portion you want to serve later before the raw shrimp goes in. Otherwise discard the used marinade or boil it before using it as a sauce.

No marinade? A simple seasoning works perfectly well. For a richer sauce at the table, try this Cajun garlic butter seafood sauce.
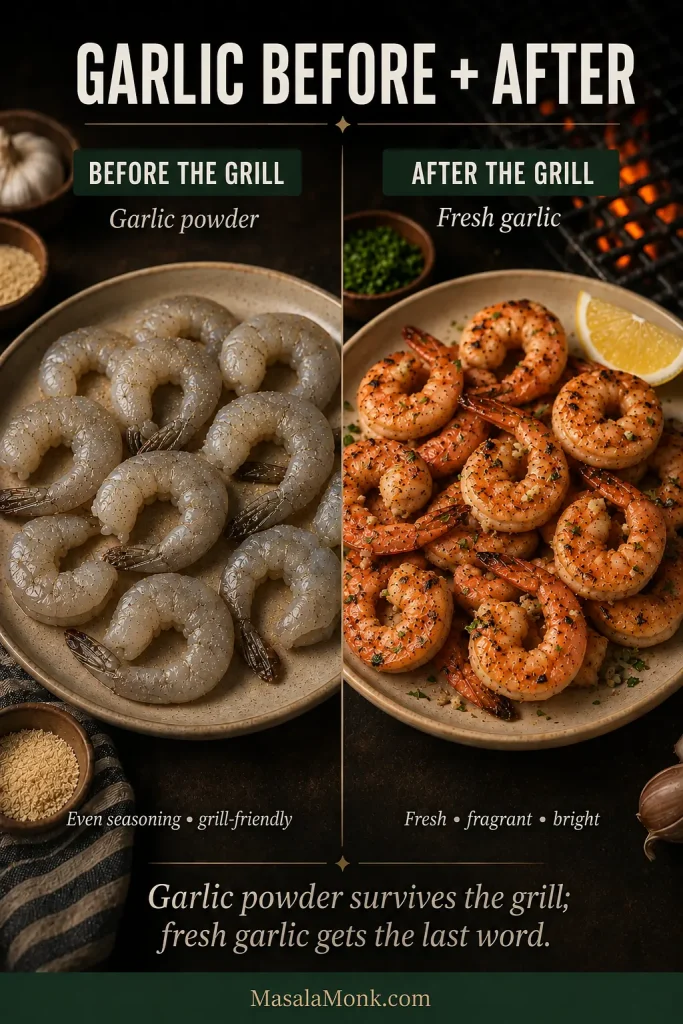
Split image with lightly seasoned raw shrimp and garlic powder before grilling on the left, and finished grilled shrimp with finely minced fresh garlic, lemon and herbs on the right.
Garlic powder distributes through the pre-grill seasoning; meanwhile, fresh garlic added later keeps more of its aroma and bite.

Choose Your Grill Setup

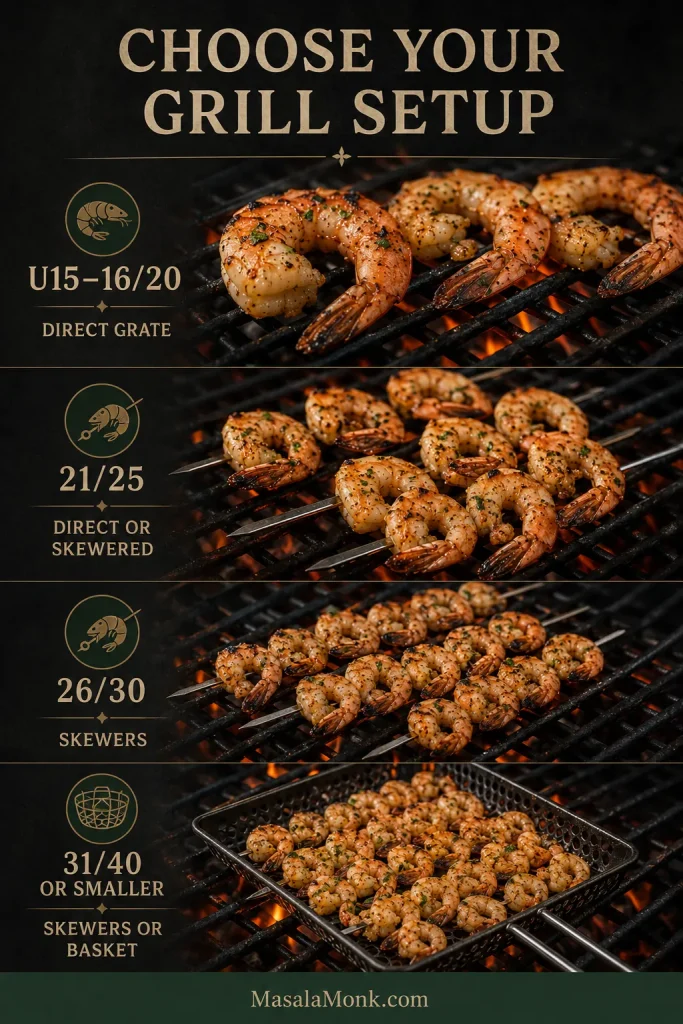
Use 16/20 shrimp directly on the grates; 21/25 can go direct or onto skewers, while smaller shrimp become easier to handle on skewers or in a grill basket.

Shrimp sizeBest setupWhy
U15–16/20Direct grateEasy to handle individually
21/25Direct or skeweredEither works; skewers speed up batch flipping
26/30SkewersSeveral shrimp can move at once during a short cooking window
31/40 or smallerSkewers or basketMuch easier to contain and turn
Grilled shrimp setup guide showing large shrimp directly on grill grates, shrimp on skewers and smaller shrimp cooking in a grill basket.
As shrimp get smaller, skewers and baskets make them much easier to turn and remove before they overcook.

What Temperature Should You Grill Shrimp At?

For most raw large shrimp, use a well-preheated medium-high grill. If your grill has a lid thermometer, about 425–475°F / 220–245°C is a useful reference range. That gets the grill into the right neighborhood, but actual heat at the grate still varies, so don’t treat the number as a finish signal.
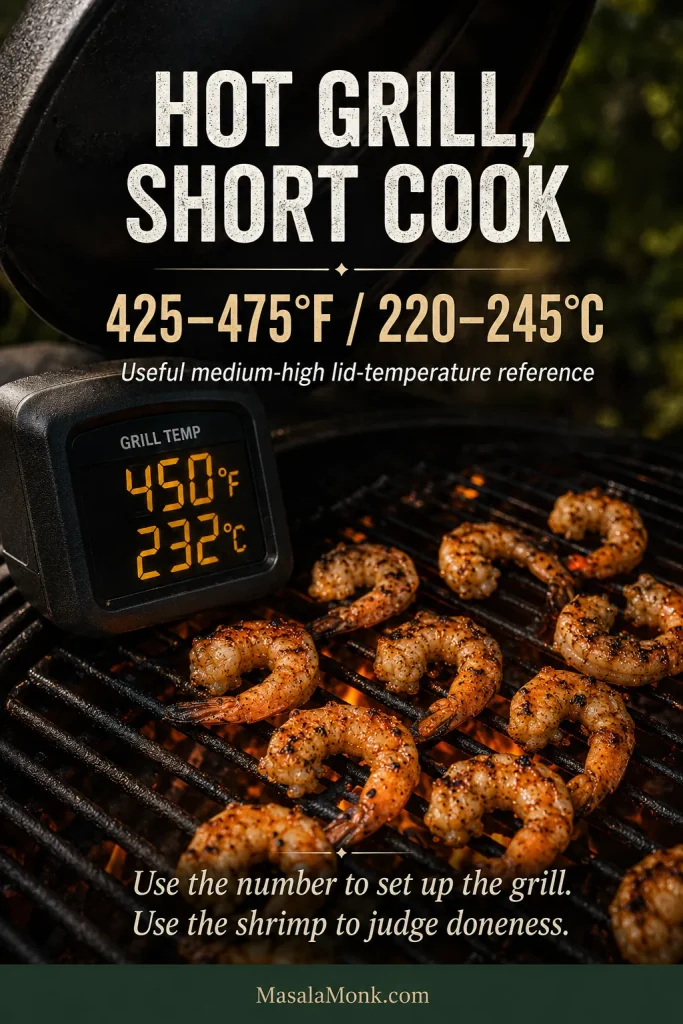
Hot outdoor grill with a temperature reading in the 425 to 475 degree Fahrenheit range and shrimp cooking over the grates.
A 425–475°F grill gets you into the right heat zone; however, wind, grate position and grill design still change the actual cook.

How to Skewer Shrimp for Grilling

Pierce each shrimp through the thick body and again near the tail so it lies flat. If the row still wants to rotate when you turn it, use two parallel skewers.

Large shrimp on skewers usually stay in the same roughly 3–6 minute total window as loose shrimp. Skewers make the batch easier to turn; shrimp size still determines how soon you should begin checking.
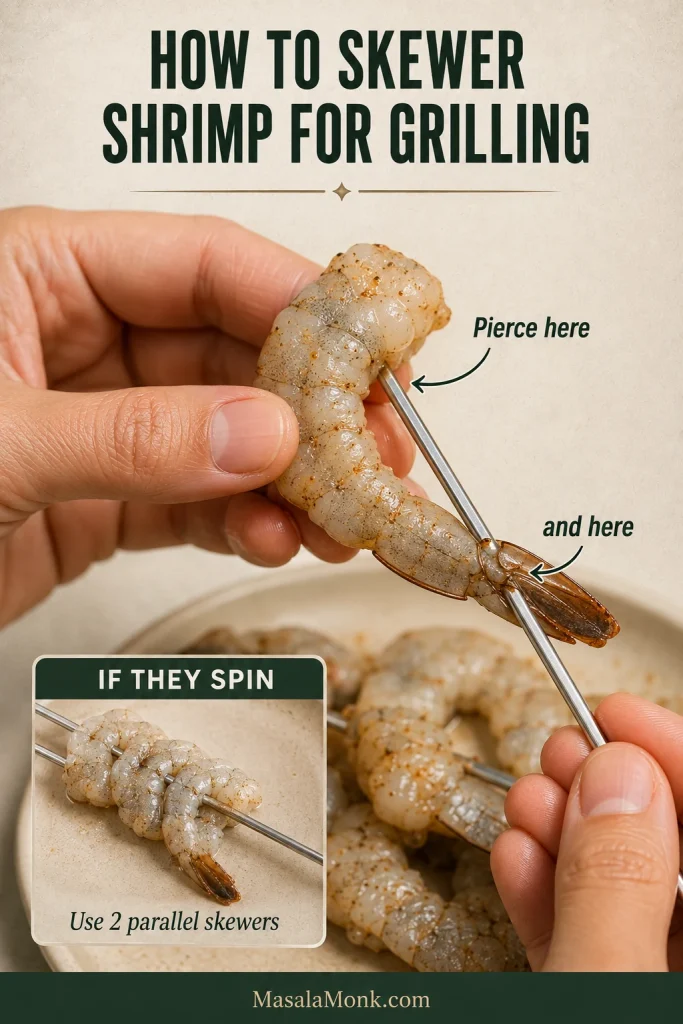
Hands threading large raw shrimp onto a metal skewer through the thick body and near the tail, with a smaller example showing two parallel skewers.
Two-point threading keeps shrimp flat, while parallel skewers let several pieces turn together instead of spinning independently.

If you’re adding vegetables, pair the shrimp with ingredients that cook just as quickly. Thick peppers, onion or bacon are usually easier on their own skewers.

Other Grill Setups

A grill basket is handy for smaller shrimp. Give them enough room to sizzle and brown; if liquid starts pooling underneath, spread them out or cook in two batches.
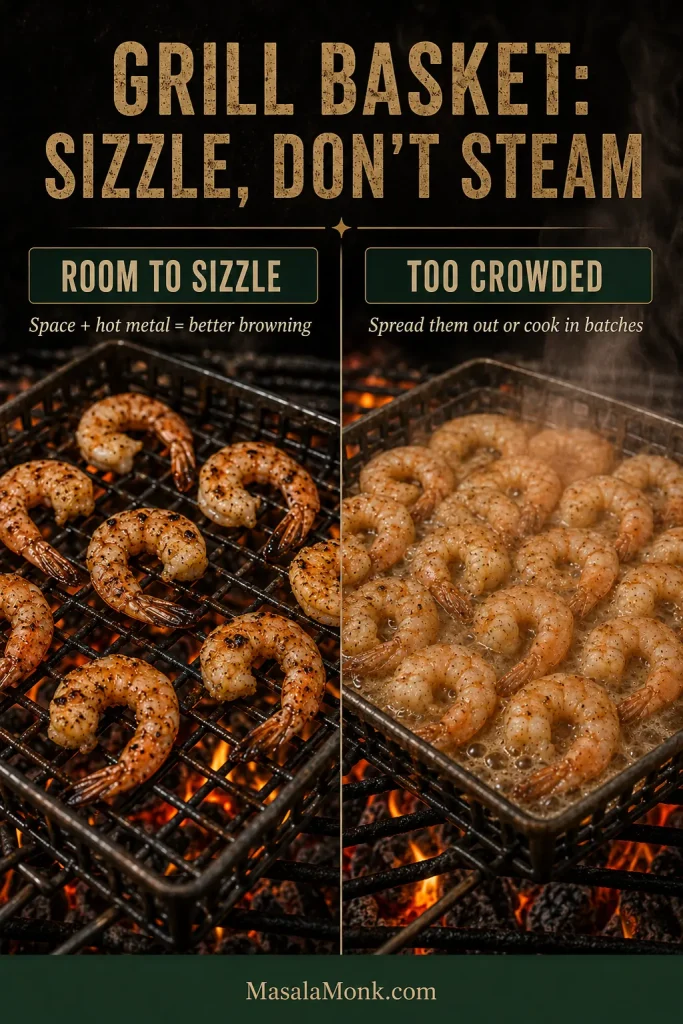
Two grill baskets compared side by side, one with shrimp spaced apart and browning and the other overcrowded with visible steam and moisture.
Steam in a grill basket is usually a spacing problem before it is a timing problem—create room first, then reassess.

Gas grills make the heat easy to control. With charcoal, keep a cooler patch available in case of flare-ups. A hot grill pan or broiler works indoors, while pellet grills vary enough that the visual cues matter more than copying gas-grill timing minute for minute.

How to Grill Shrimp: Four Cues to Watch

1. Listen When They Hit the Grill

You want a definite sizzle. If the shrimp sit quietly in released liquid, the surface is steaming more than browning.

2. Watch the First Side Change

The edges turn pink-orange and opaque while browned spots develop underneath. Once the first side has browned and releases cleanly from the grate, you’re right where you want to be.
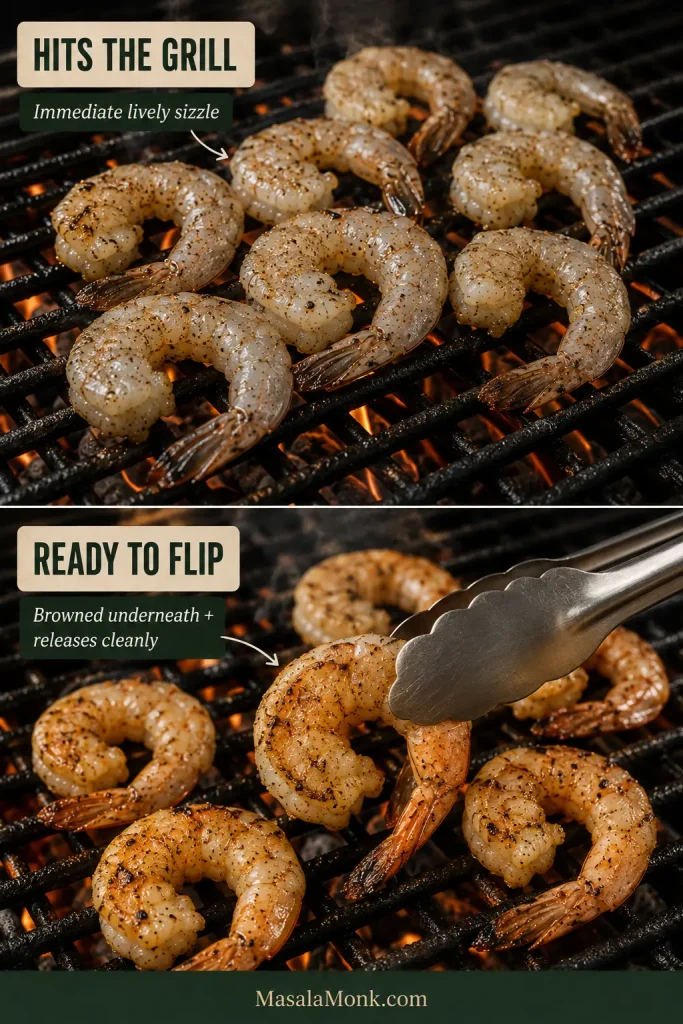
Two-stage grill scene showing raw shrimp sizzling as they hit hot grates and later a shrimp being lifted to reveal a browned underside that releases cleanly.
Sizzle tells you the surface is hot; clean release tells you the first side has actually set and browned.

3. Flip in the Same Order You Loaded

With a full grill, lay the shrimp down in a predictable sequence and follow the same path when flipping and removing them.

First on → first flipped → first off.
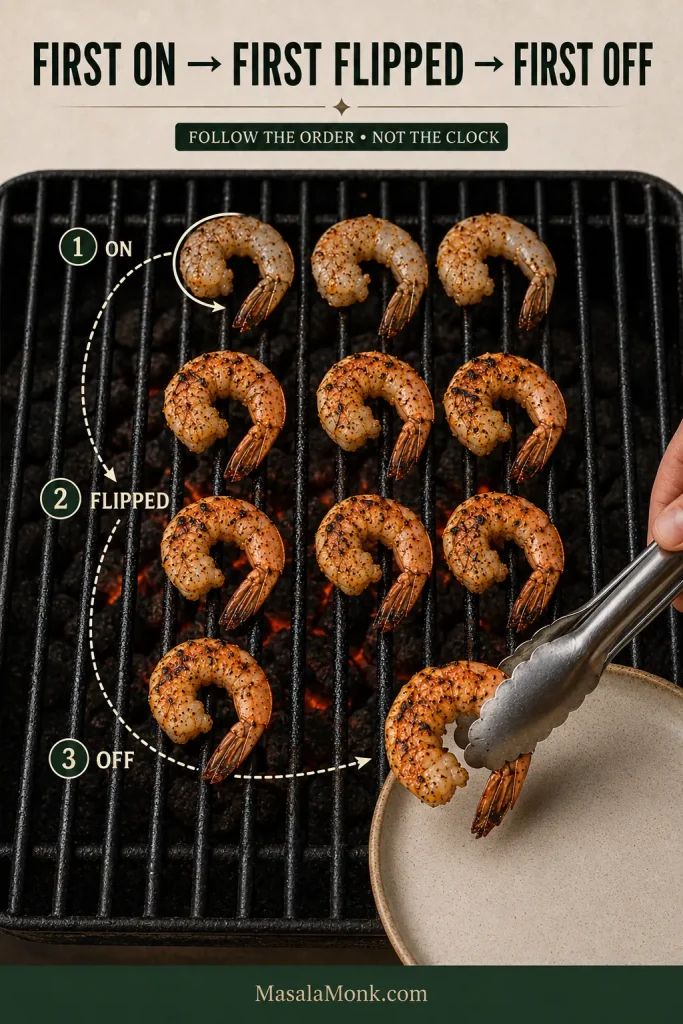
Overhead grill sequence showing shrimp placed, flipped and removed in the same orderly path, with the first shrimp transferred to a clean plate.
Loading order becomes your batch timer: follow the same path for flipping and removal so early shrimp do not quietly overcook.

4. Watch the Thick Center

The thin tail can look cooked before the thickest part of the body is ready. As the second side finishes, watch that center and use the doneness cues below.
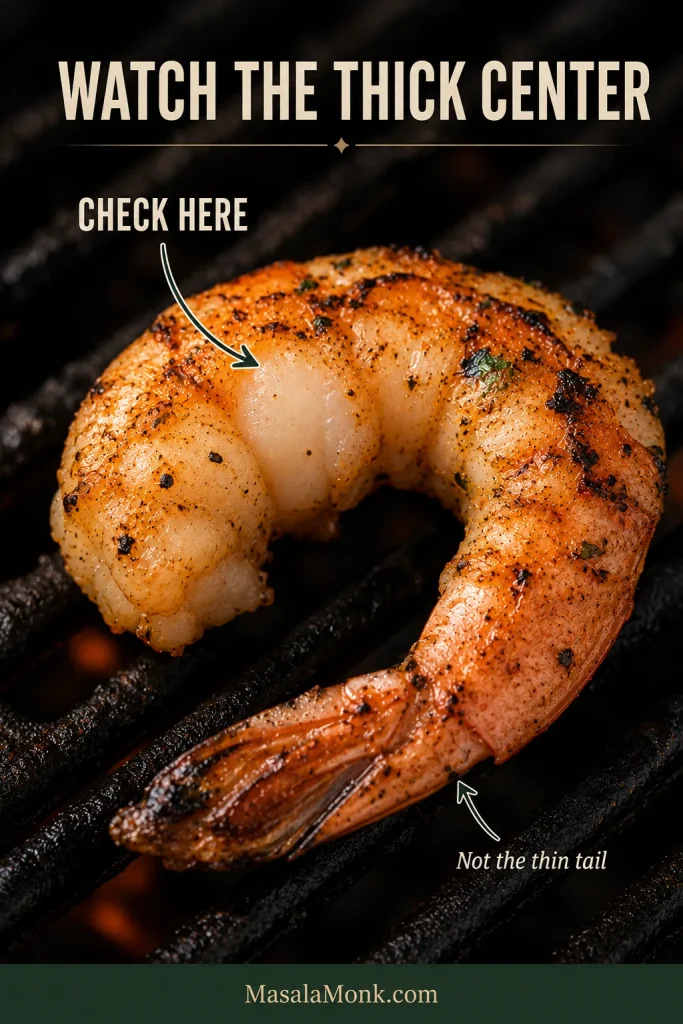
Extreme close-up of a grilled shrimp with an arrow pointing to the thickest part of the body and a note indicating not to judge by the thin tail.
The tail changes color fast, but the thickest body section is the better checkpoint for what is happening inside.

How Long to Grill Shrimp: Timing by Size

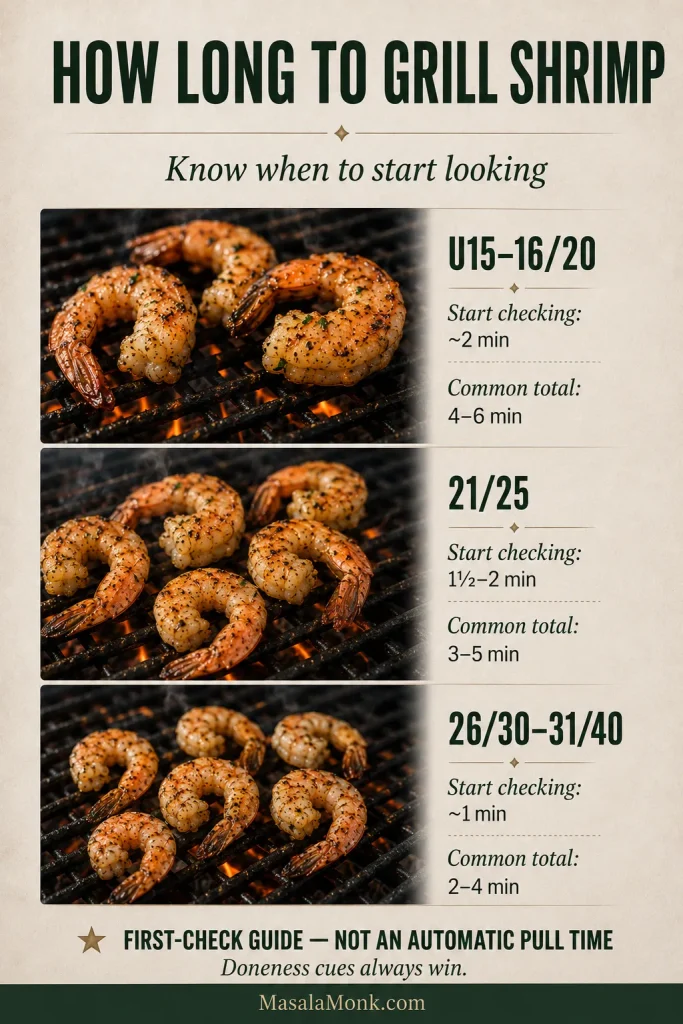
Most large shrimp grill in about 3–6 minutes total. Use the chart to decide when to start checking, then judge the finish from the shrimp themselves.

Shrimp sizeStart checkingCommon total window
U15–16/20Around 2 minutesRoughly 4–6 minutes
21/25Around 1½–2 minutesRoughly 3–5 minutes
26/30–31/40Around 1 minuteRoughly 2–4 minutes
These are first-check guides for raw, thawed shrimp—not automatic pull times.
Grilled shrimp timing guide showing first-check and common total cooking ranges for U15 to 16/20, 21/25, and 26/30 to 31/40 shrimp.
The smaller the shrimp, the sooner you need to start looking; use the chart as a cue, not a countdown.

Shell-on shrimp may take a little longer; butterflied shrimp may finish sooner. Cooler grills, cold weather and crowded baskets can also stretch the window. If some shrimp are noticeably smaller than the rest, take those off as soon as they’re ready.

How to Tell When Grilled Shrimp Are Done

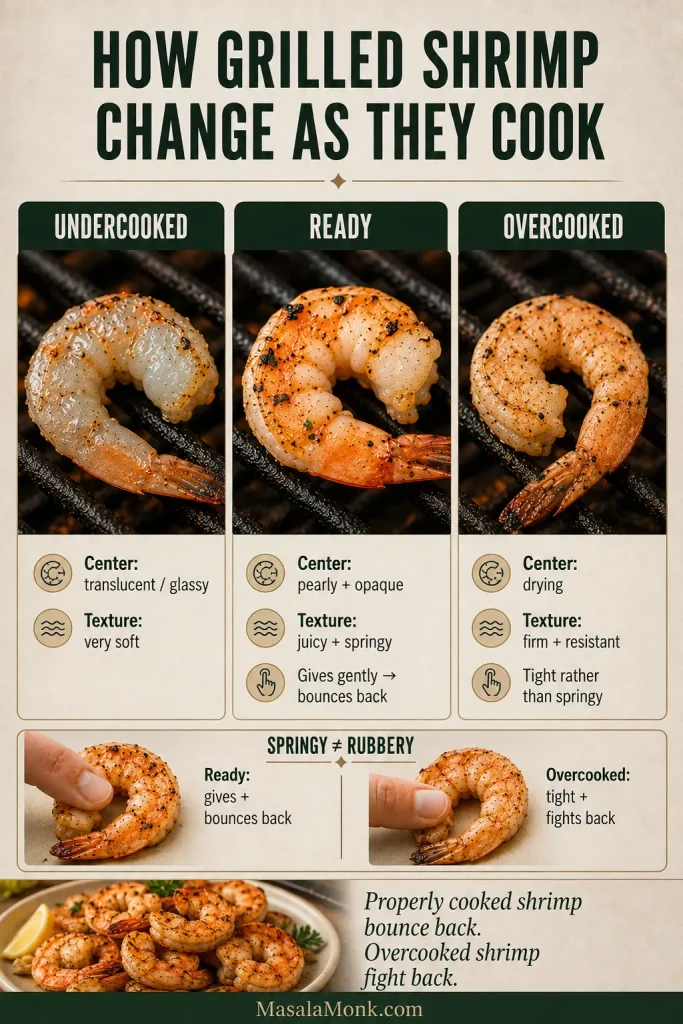
Grilled shrimp are done when the thickest part is firm, pearly and opaque while the texture is still juicy and springy.

StageCenterTexture
UndercookedTranslucent or glassyVery soft
ReadyPearly and opaqueJuicy, tender and springy with a clean snap
OvercookedOpaque but dryingHard, resistant or rubbery
Three close-up grilled shrimp examples labeled undercooked, ready and overcooked, showing changes in center opacity, moisture, curl and texture.
Opacity tells you the center has cooked through; springiness tells you whether the texture still feels juicy instead of tight.

A properly cooked shrimp should feel tender and juicy when you bite into it, with a clean little snap rather than a hard chew. Springy is not the same as rubbery. Properly cooked shrimp bounce back; overcooked shrimp fight back.

The C-vs-O Rule Is a Hint, Not a Test

A gently curved shrimp is usually more promising than one contracted into a tight ring, but shape alone cannot tell you whether the thick center is ready.
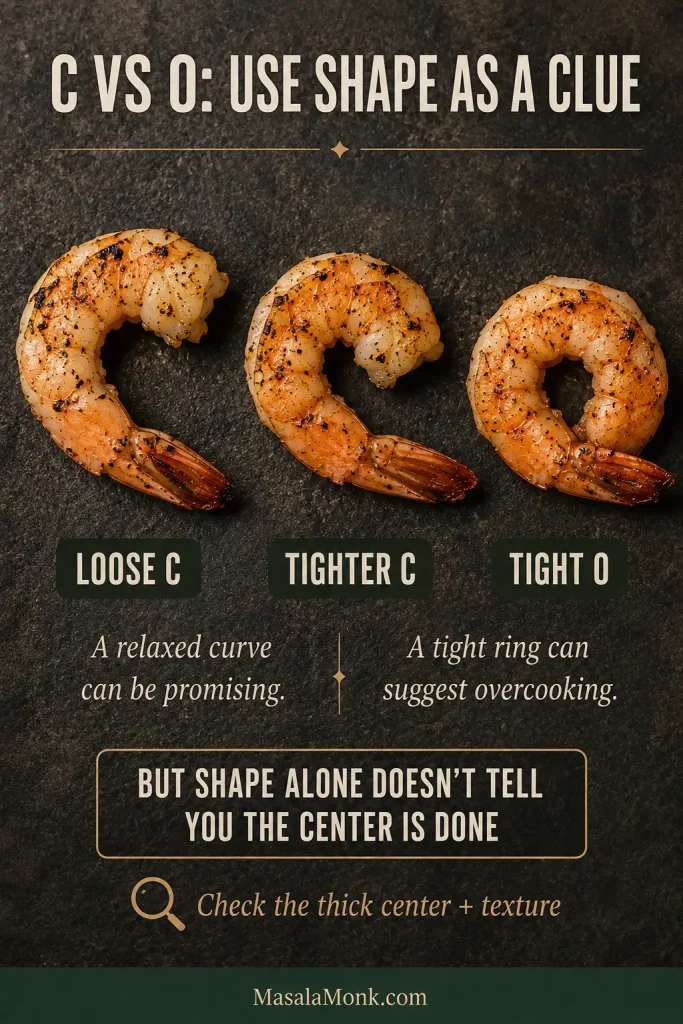
Three cooked shrimp arranged as a loose C, tighter C and tight O, with a reminder to check the thick center and texture rather than relying on shape alone.
Curl shows contraction, not certainty. Use the C-vs-O clue alongside the thick center and texture, never as the final verdict.

FDA guidance recommends cooking most seafood to 145°F / 63°C and describes properly cooked shrimp as firm, pearly and opaque. With jumbo shrimp, an instant-read thermometer can be inserted sideways into the thickest section. FDA seafood safety guidance.
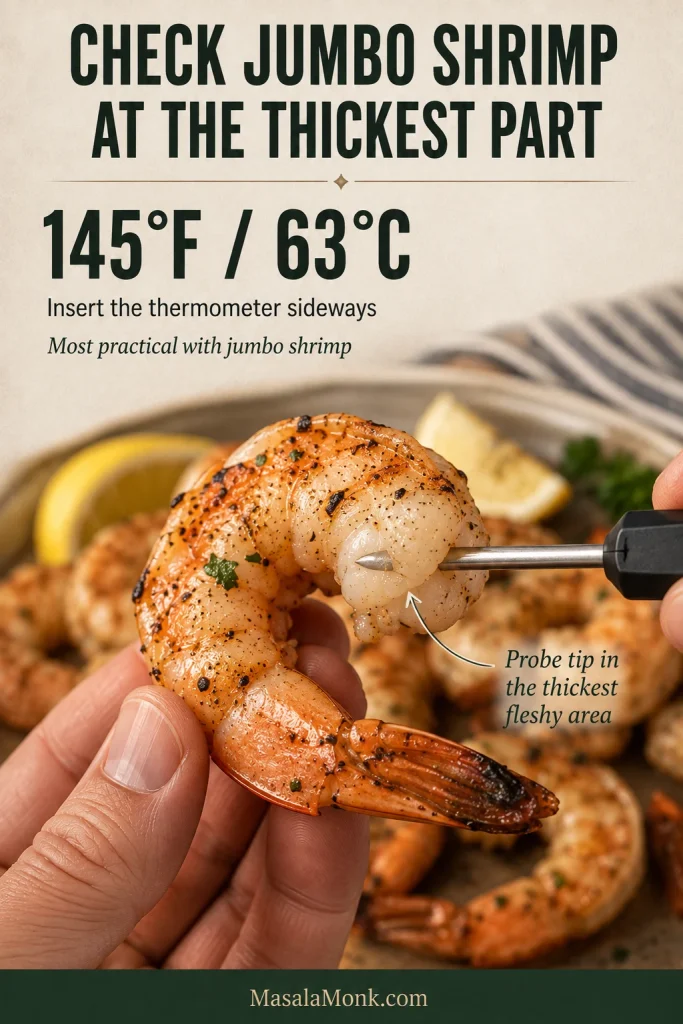
Hand holding a jumbo grilled shrimp while an instant-read thermometer probe enters sideways into the thickest fleshy part, with a 145°F or 63°C reference.
For jumbo shrimp, an accurate internal temperature depends on probe placement as much as the number—aim sideways into the thickest flesh.

Grilled Shrimp Troubleshooting: Fix This Batch Without Making It Worse

Some problems can be fixed now. Others can only be prevented next time. Most importantly, don’t keep cooking shrimp that are already done simply to improve their color.
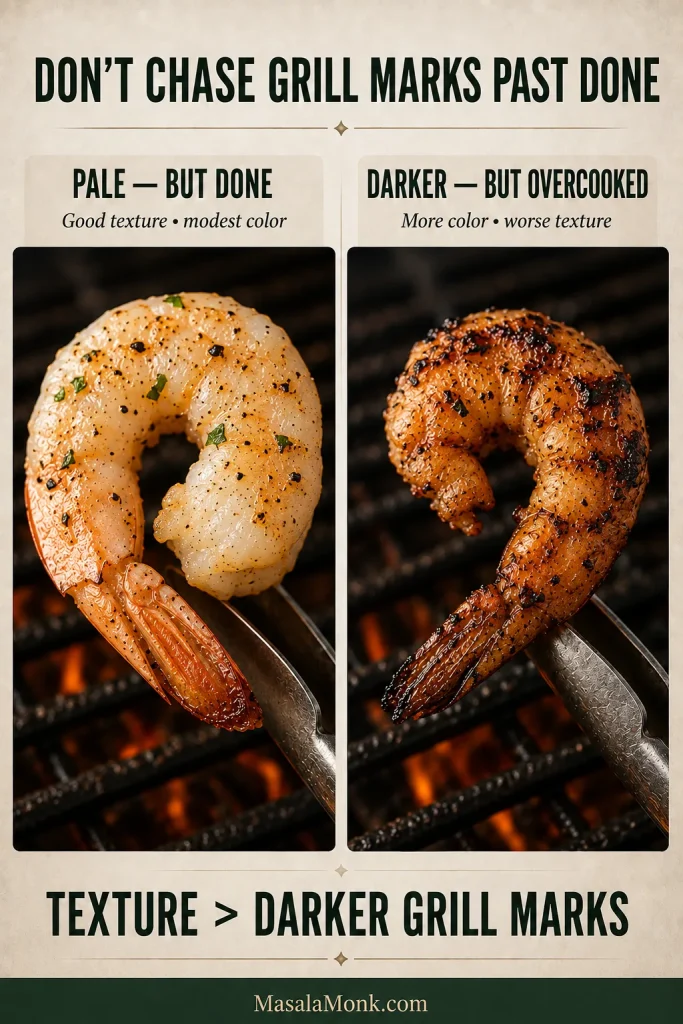
Side-by-side grilled shrimp comparison with a paler but plump cooked shrimp and a darker, more tightly curled and overcooked shrimp.
If the center is already juicy and opaque, don’t keep grilling just to chase darker marks.

Before or While Grilling

What you seeLikely causeWhat to do nowNext time
Mushy or oddly soft before grilling Long acidic soaking, or shrimp that were already unusually soft after thawing Drain immediately. If the shrimp are already badly mushy, grilling won’t make them firm again. Keep citrus exposure brief and start with shrimp that feel firm.
Pale but already cooked Wet surface or grill not hot enough Take them off. Good texture matters more than darker grill marks. Dry more thoroughly and preheat longer.
Still translucent in the thick center Not done yet Return to the heat briefly and check again after a short interval. Use the timing chart to know when to look, then judge the center before pulling them.
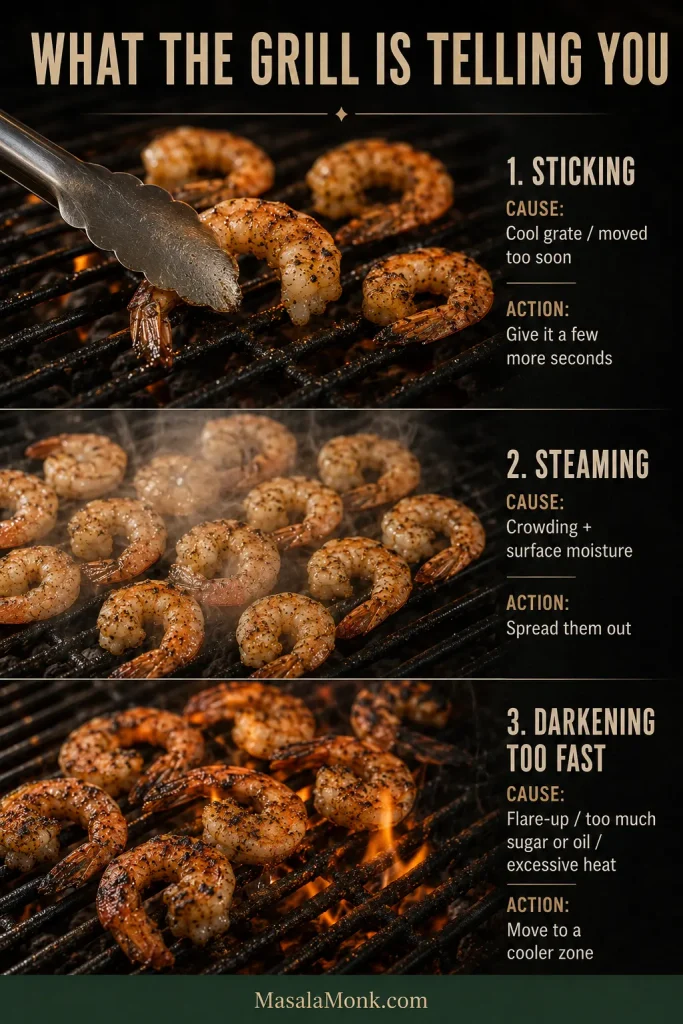
Shrimp sticking Cool or dirty grates, or flipping before the first side has set Give them a few more seconds before lifting again. Preheat well, clean the grates and let the first side sear.
Shrimp steaming in a basket Too many shrimp releasing moisture together Spread them out or remove part of the batch. Keep the basket closer to a single layer.
Outside darkening too fast Flare-ups, excess oily or sugary coating, or overly aggressive heat Move the shrimp to a cooler part of the grill. Use a lighter coating and brush sweet glazes on during the final part of grilling.
Bitter burnt garlic Fresh garlic spent too long over direct heat Finish with fresh lemon or herbs instead of adding more browned garlic. Use garlic powder before grilling and fresh garlic afterward.
Three-part grill troubleshooting image showing shrimp sticking to grates, crowded shrimp steaming and shrimp darkening too quickly near stronger heat.
Read the symptom before changing the cook: sticking needs patience, steaming needs space, and rapid darkening needs gentler heat.

After Grilling

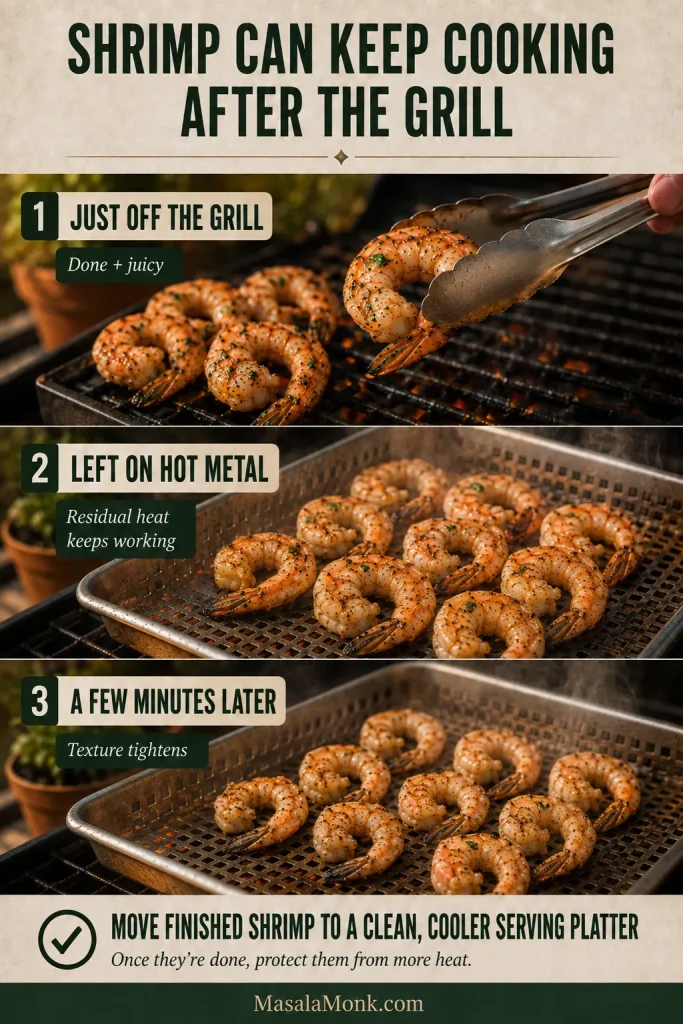
Three-stage sequence showing juicy shrimp leaving the grill, resting on a hot metal basket, and becoming tighter after several minutes from residual heat.
A cooler serving platter helps end the cook; hot metal keeps transferring heat even after the shrimp leave the grate.
What happenedLikely causeWhat to do nowNext time
Perfect off the grill, rubbery later Carryover heat or being held warm too long Get them off the hot pan, basket or tray and onto a clean serving platter away from the heat. Serve finished shrimp close to cooking instead of keeping them warm beside the grill.
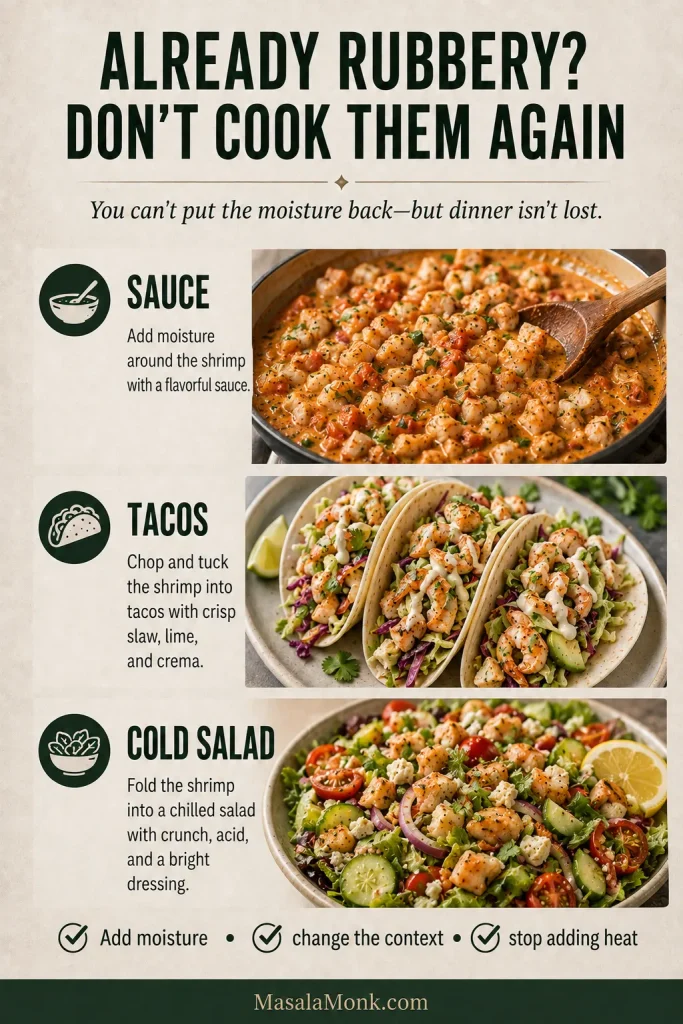
Already rubbery Too much cooking somewhere along the way Once they’re rubbery, you can’t put the moisture back. Add sauce, tuck them into tacos, or chill them for a salad instead of cooking them again. Begin checking earlier and get finished shrimp away from residual heat sooner.
Too salty Salt plus a salty seasoning blend Serve with unsalted rice, bread, salad or extra lemon. Use less separate salt when the seasoning blend already contains plenty.
Once the texture is right, don’t sacrifice it just to fix the color.
Three rescue uses for overcooked shrimp: chopped shrimp in sauce, shrimp tacos with fresh toppings and shrimp folded into a cold salad.
Sauce, tacos and chilled salad can make overcooked shrimp much more enjoyable without pretending the lost moisture can be restored.

Easy Ways to Change the Flavor

Once the basic method feels comfortable, the grill can stay almost exactly the same while the flavors go in very different directions.

  • Garlic Butter: richer and rounder, especially good with crusty bread for catching the buttery lemon juices.
  • Cajun: smoky, savory heat that works especially well with rice, corn or a cookout plate. Account for any salt already in the seasoning blend.
  • Cilantro Lime: bright and sharp, with the kind of freshness that works beautifully in tacos or rice bowls.
  • Old Bay: swap it for the paprika when you want that classic savory Old Bay flavor.
  • Sweet-Spicy: hot honey or another sweet chile glaze gives the shrimp a glossy sweet heat; brush it on late enough to caramelize without scorching.
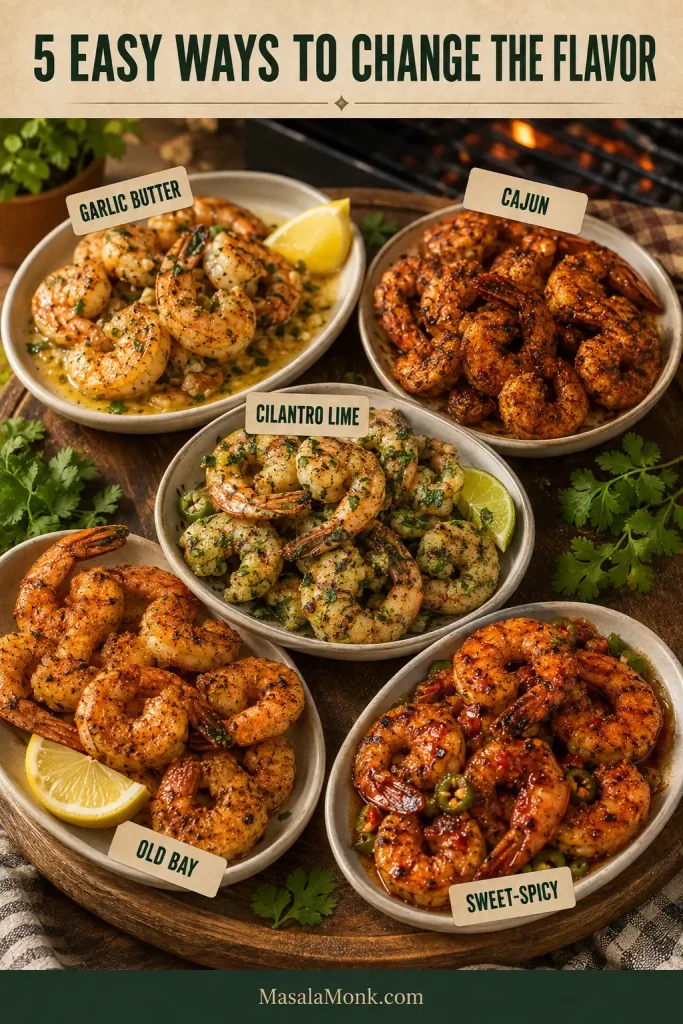
Five bowls of grilled shrimp labeled garlic butter, Cajun, cilantro lime, Old Bay and sweet-spicy, each with visibly different seasoning and garnish.

For something greener and sharper, spoon chimichurri over the shrimp after grilling.

Grilling Shrimp for a Crowd

A large cookout doesn’t require longer shrimp cooking times; it requires a little organization before the first batch hits the grill.

Have the sides, sauces and serving platter ready first. Shrimp cook so quickly that they’re better as the last thing dinner is waiting for, not the first thing sitting around.

How much shrimp should you buy? As a planning range, allow about 3–4 oz / 85–115 g of raw, peeled shrimp per person for appetizers or a buffet, or roughly 6–8 oz / 170–225 g per person when shrimp are the main dish. Generous sides can pull that number down; if you’re buying shell-on shrimp, buy a little extra to account for the shells.
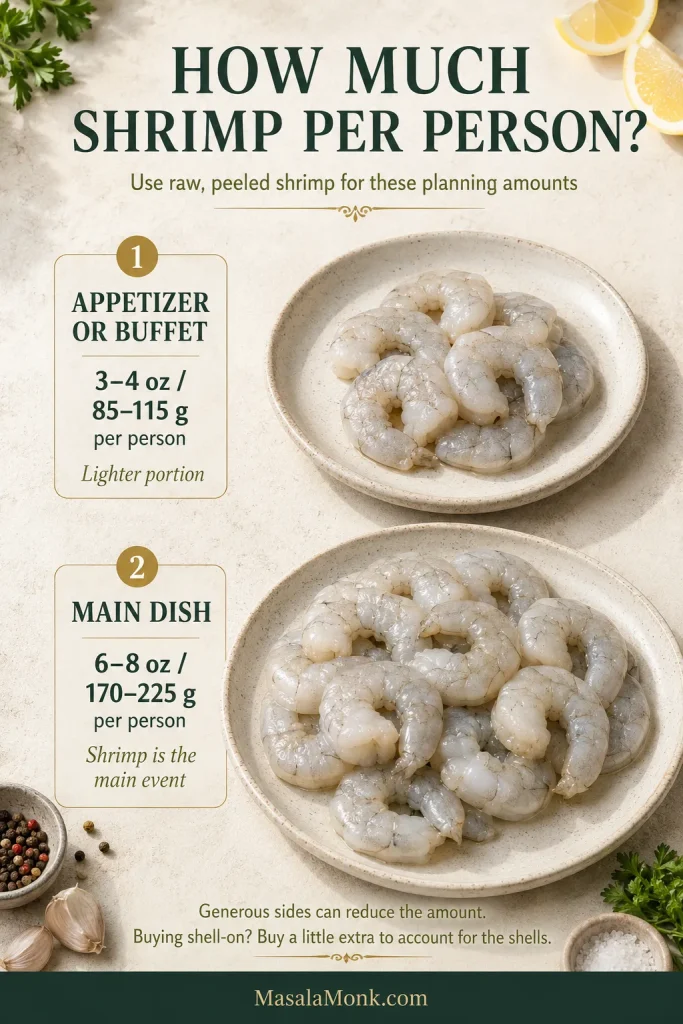
Portion guide comparing raw peeled shrimp amounts of 3 to 4 ounces per person for appetizers or buffets and 6 to 8 ounces per person for a main dish.
  • Do the fiddly work early. Peel, devein, portion seasoning and prepare skewers before cooking begins.
  • Keep raw shrimp cold. Bring out only the batch that’s about to hit the grill.
  • Leave breathing room. Crowding slows browning and makes the batch harder to control.
  • Load in a predictable order. That makes flipping and removing each batch evenly much easier.
  • Serve as you go when practical. Freshly grilled shrimp are at their best before residual heat has time to tighten them.
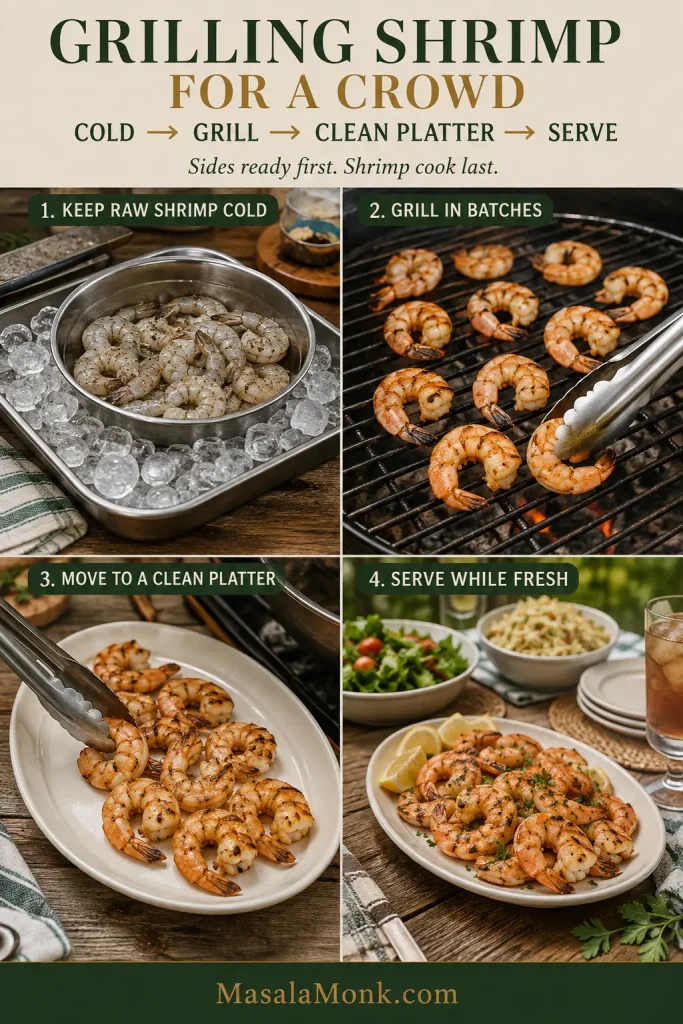
Four-step crowd-grilling guide showing raw shrimp kept in a dry metal container nested over ice, shrimp grilled in batches, cooked shrimp moved to a clean platter and the finished platter served fresh.
For a crowd, keep the raw shrimp cold, grill in small batches, and move each finished batch straight to a clean platter.

A cold crisp coleslaw works especially well because it can be completely ready before the shrimp go on.

What to Serve With Grilled Shrimp

For a quick dinner, serve the shrimp over rice or orzo with grilled zucchini or asparagus. A crisp cucumber salad gives you a particularly good contrast: hot smoky shrimp, cool crunchy cucumber and bright lemon.
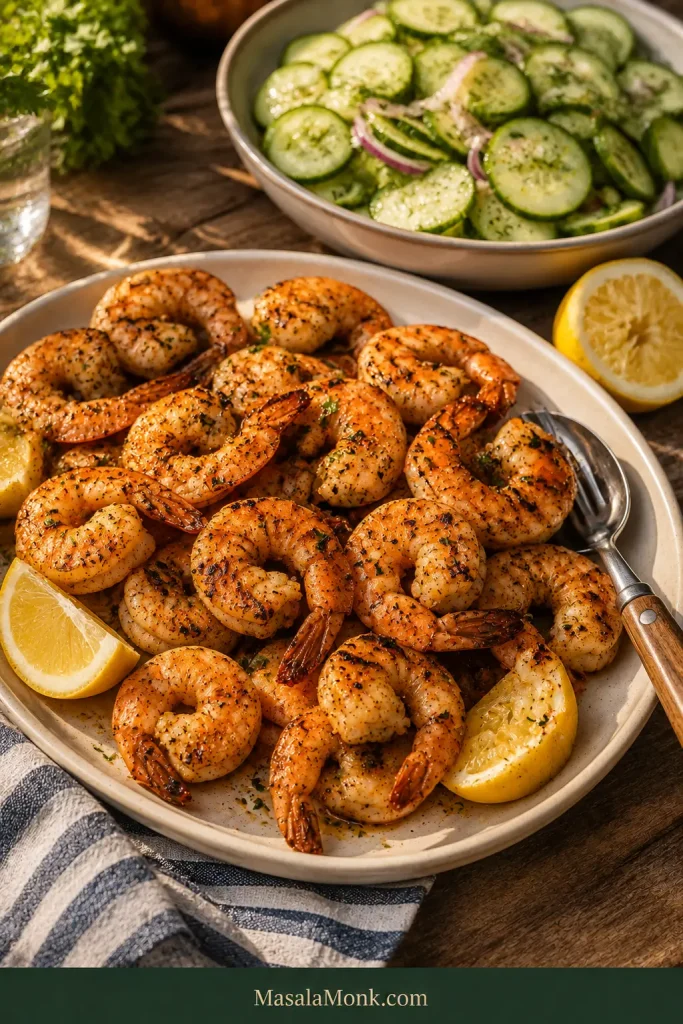
Plate of hot grilled shrimp with lemon beside a bowl of chilled cucumber and red onion salad on a sunny wooden table.
A make-ahead cucumber salad does double duty: it cools the plate and keeps your last-minute attention on the shrimp.

For a cookout, you hardly need to complicate things. Charred shrimp, sweet corn, ripe tomatoes, crusty bread and one cold salad make a generous summer plate.
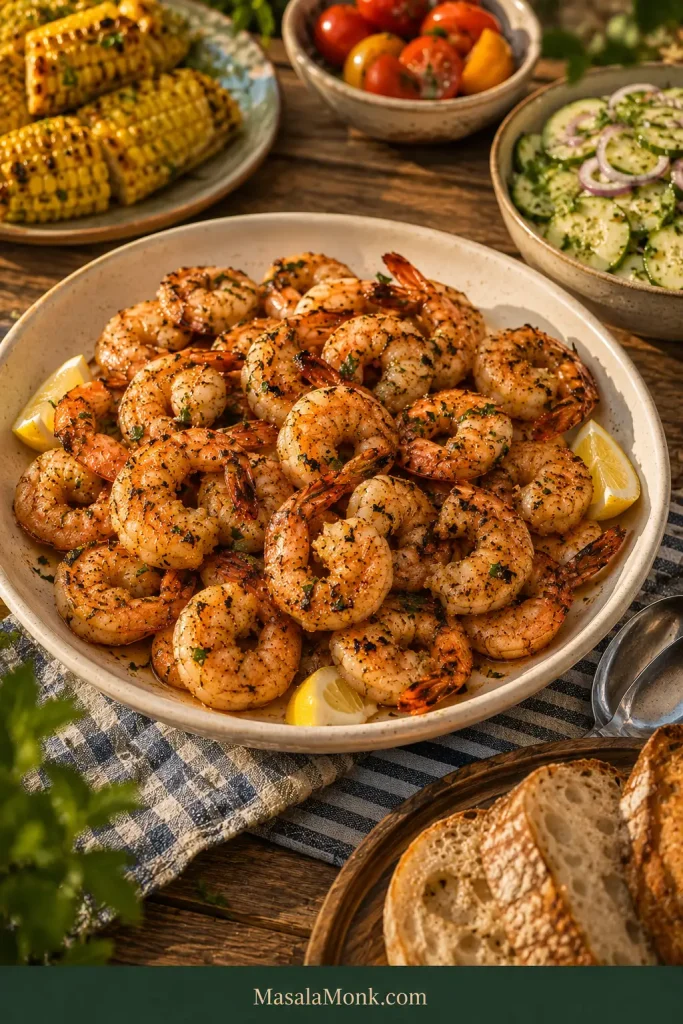
Large platter of grilled shrimp with lemon surrounded by grilled corn, tomatoes, cucumber salad and sliced crusty bread on an outdoor summer table.

Pasta works too—finish the pasta and sauce first, then fold the cooked shrimp through once everything else is ready. If garlic butter and noodles are the main attraction, our shrimp scampi takes that route from the beginning.

Sauces and dips. Garlic-lemon butter, cilantro-lime sauce, spicy mayo and garlic aioli all work well. Keep the sauce bright enough that you can still taste the smoky shrimp underneath.

Make Ahead, Store and Reheat Grilled Shrimp

Prep ahead. Peel and devein the shrimp, mix the seasoning or marinade, and prepare the finishing sauce earlier in the day. Keep everything refrigerated and combine a citrus-heavy marinade with the shrimp closer to grilling.

Store. Refrigerate cooked shrimp promptly in a covered container and use them within 3–4 days. Do not leave cooked seafood at room temperature for more than 2 hours, or more than 1 hour when the surrounding temperature is above 90°F / 32°C.

Can you freeze grilled shrimp? Yes. Refrigerate them promptly, then freeze the chilled shrimp in an airtight container or freezer bag. USDA lists about 3–4 months for best quality when cooked leftovers are frozen, although shrimp usually have better texture when used sooner.

For the best leftover texture, consider serving them cold. Properly stored grilled shrimp work well in salads, wraps and grain bowls without another round of cooking. They can also turn a lemony chickpea salad into a fuller lunch.

If You Reheat Leftover Shrimp

USDA recommends reheating leftovers to 165°F / 74°C. Reheat them quickly, then stop once they’re hot enough. If they’re going into another hot dish, prepare the rest first and stir the shrimp in only for the final heating.

For official storage and reheating guidance, see the USDA leftovers guidance.
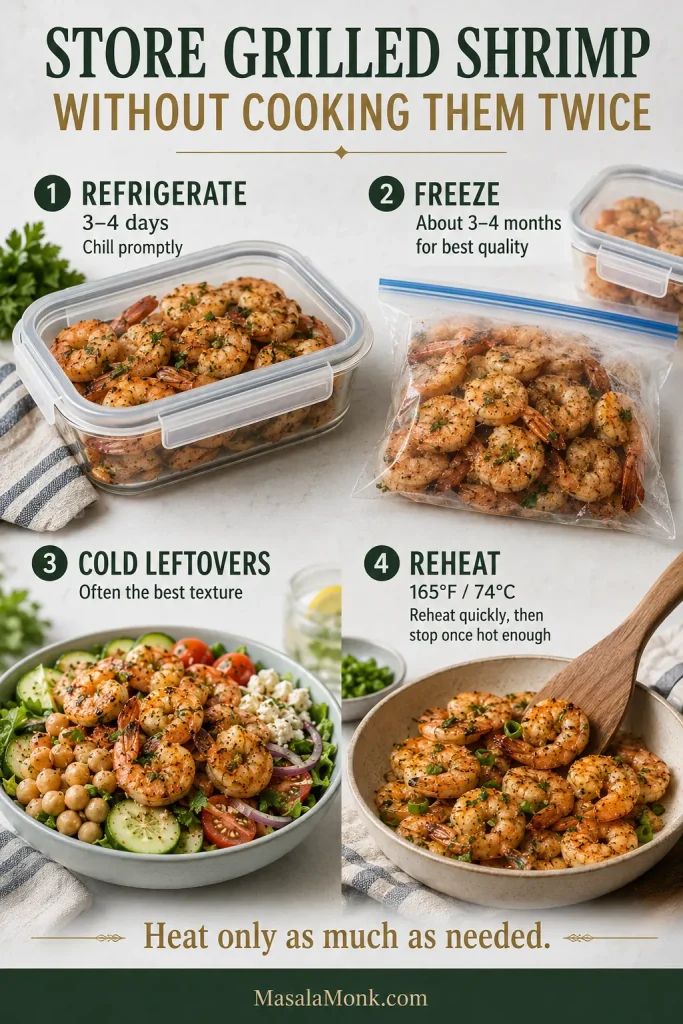
Four-part storage guide showing grilled shrimp refrigerated in an airtight container, frozen in a freezer bag, served cold in a salad and reheated in a bowl.
Cold leftovers often stay juicier; if reheating, warm the rest of the dish first and add the shrimp at the very end.

How Did Your Grilled Shrimp Turn Out?

What size shrimp did you use, and did you grill them directly, on skewers or in a basket? Tell us your approximate cooking time too. Those details can help the next cook judge their own batch.

And when everything goes right, the reward is wonderfully simple: a little smoky char at the edges, a juicy pearly center, and lemon and garlic still bright enough to make the next shrimp very hard to leave alone.
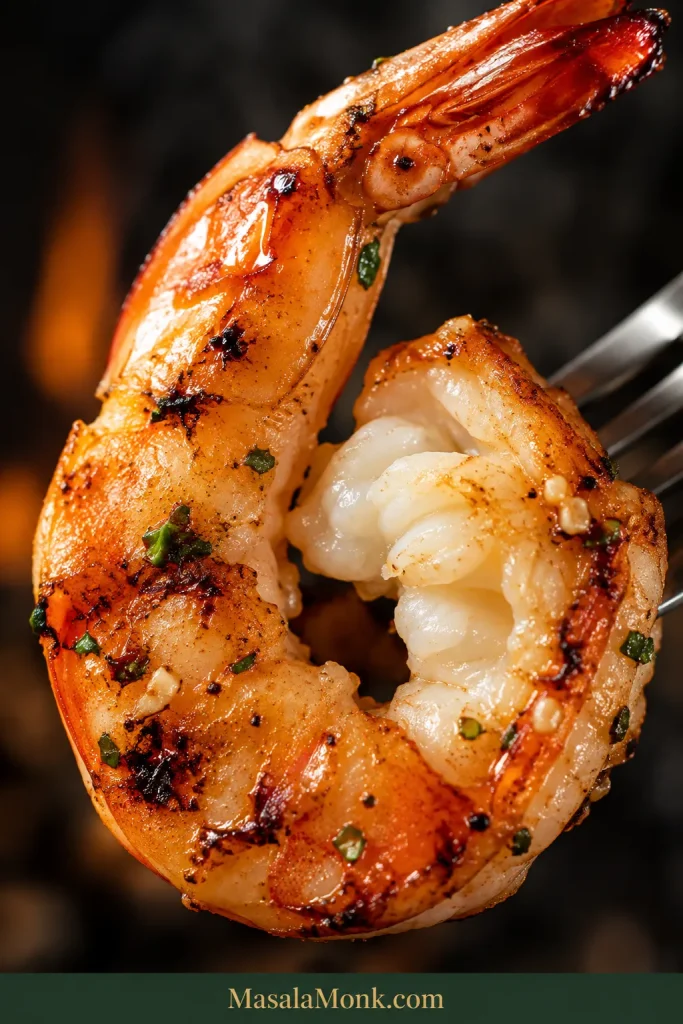
Extreme close-up of one grilled shrimp with a coral lightly charred exterior and an exposed thick center that is opaque, pearly white and moist.
Posted on Leave a comment

Grilled Lobster Tails With Garlic Butter

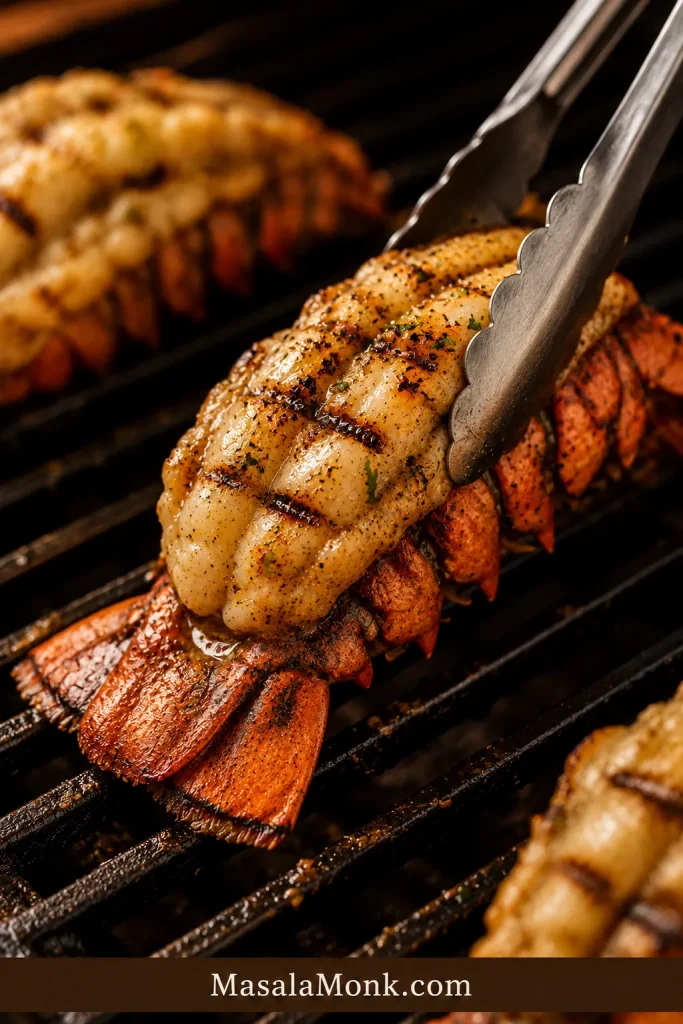
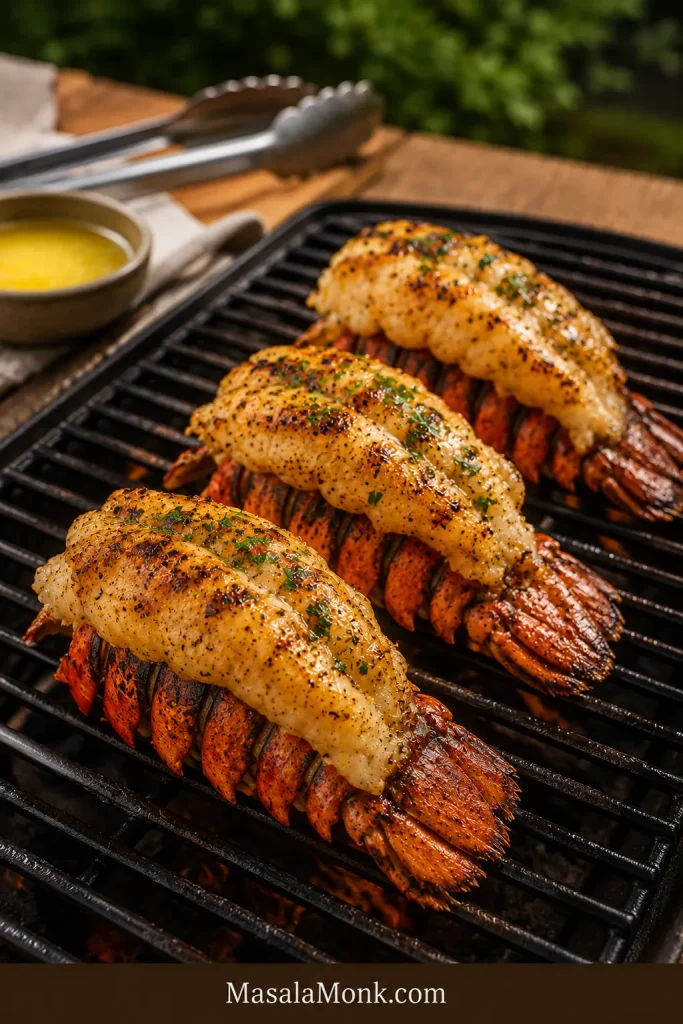
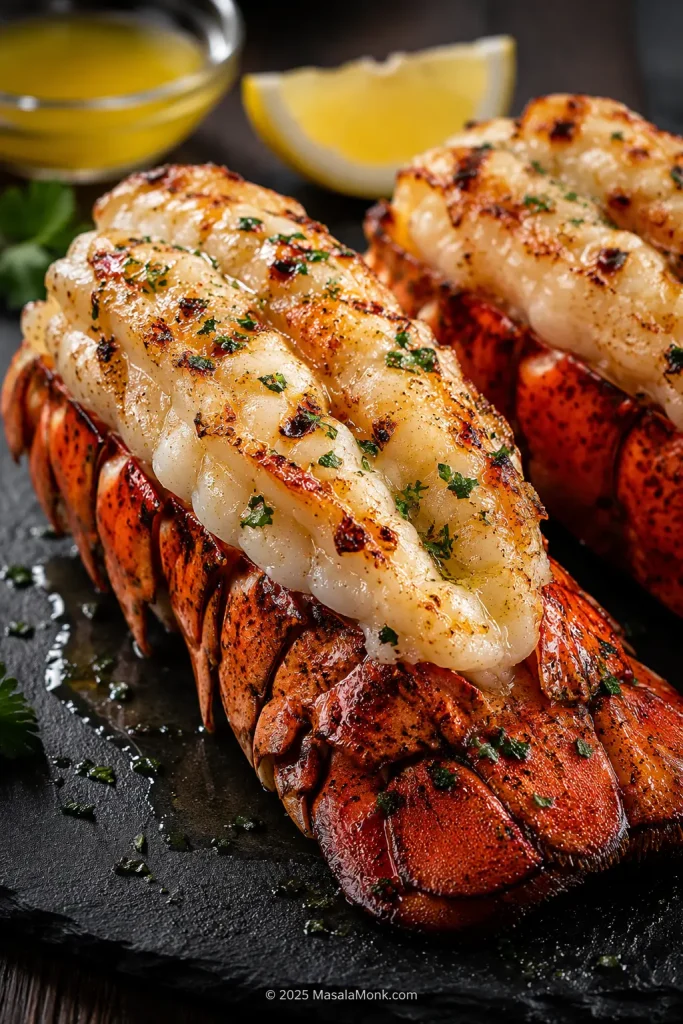
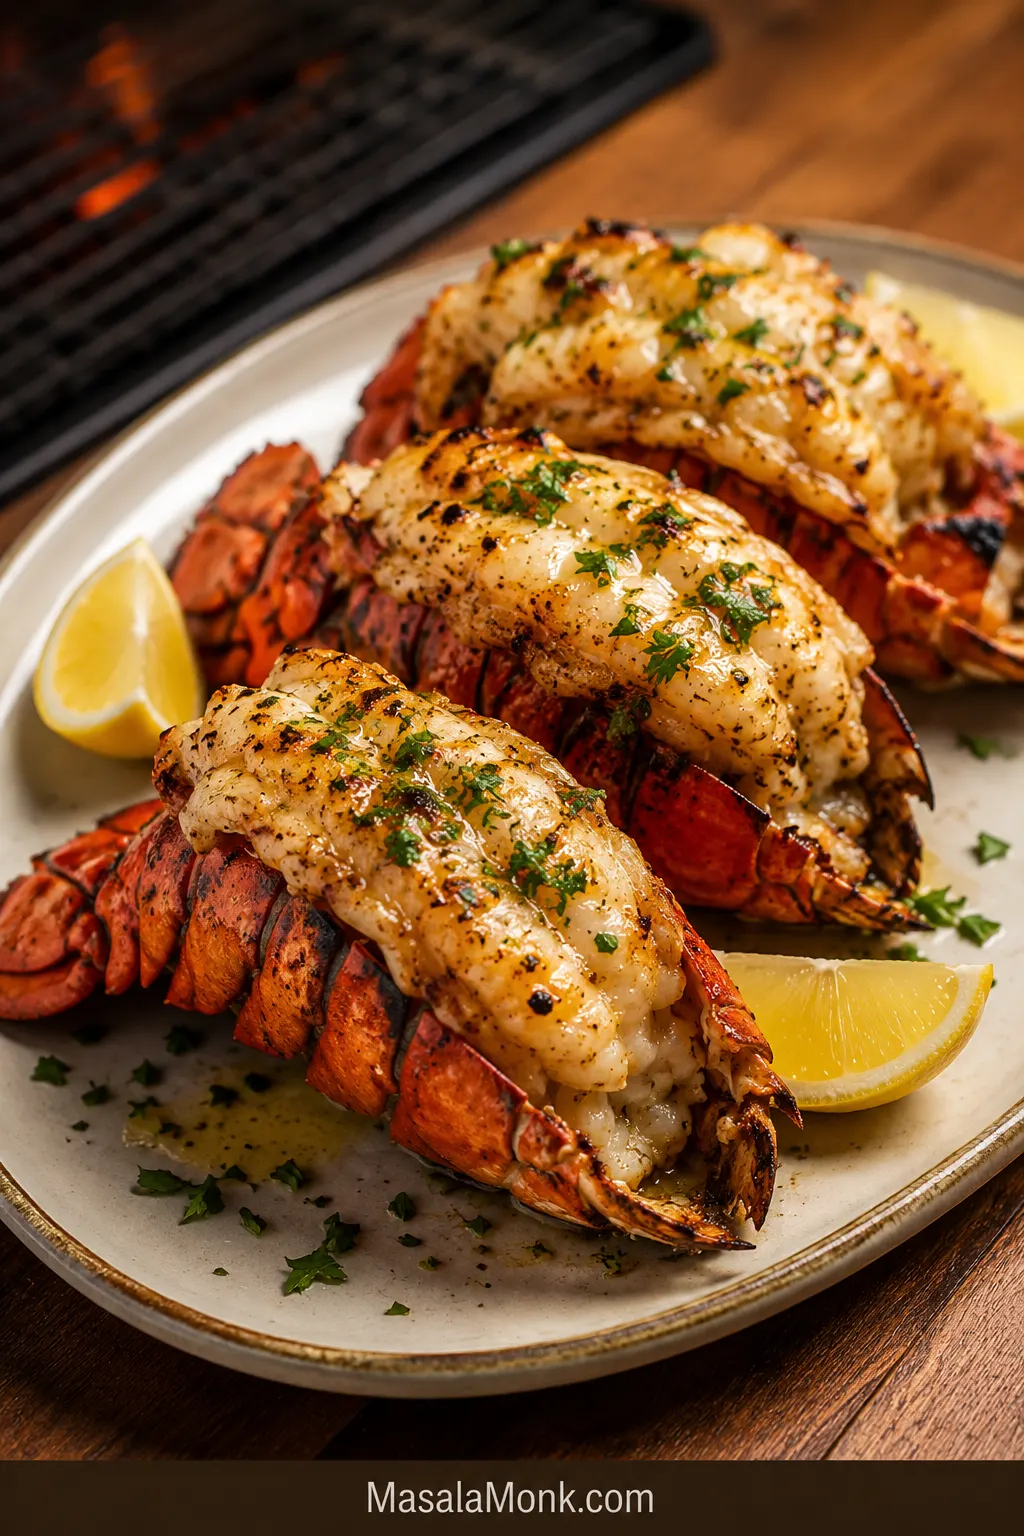
Grilled lobster tails with lemon garlic butter, herbs, and lemon wedges on a warm serving plate.

Grilled lobster tails should feel like a treat, not a test. You want sweet meat, smoky edges, and garlic butter melting into the shell — not a tense few minutes wondering if dinner is already overcooked.

This lobster tail recipe uses a no-panic method: sear for flavor, finish for control. Thaw the tails well, cut the shell cleanly, sear briefly on the hot grates, flip shell-side down with the meat facing up, baste with lemon garlic butter, and pull by temperature while the lobster is still tender.

Keep the flavor classic: sweet lobster meat with lightly charred edges, warm butter, fresh herbs, and enough lemon to make the whole plate feel bright. At the table, it tastes rich and special, but the cooking feels much easier than it looks.

Quick Answer: How to Grill Lobster Tails

To grill lobster tails, thaw them first if frozen, cut the top shell with kitchen shears, loosen the meat, and brush the exposed meat lightly with oil, salt, and pepper. For the most reliable first try, split the tail open like a book.

Grill flesh-side down for a short sear, then flip shell-side down, brush with lemon garlic butter, and cook until the thickest part reaches about 140°F / 60°C. Use 145°F / 63°C if you prefer a firmer, more conservative finish.

The shell turning red is not your finish line. The lobster is ready when the meat is opaque, tender, and hot in the thickest part. Done right, you get lobster that tastes sweet and clean, with smoky edges, lemon cutting through the butter, and enough garlic to make the whole plate feel like a special dinner.

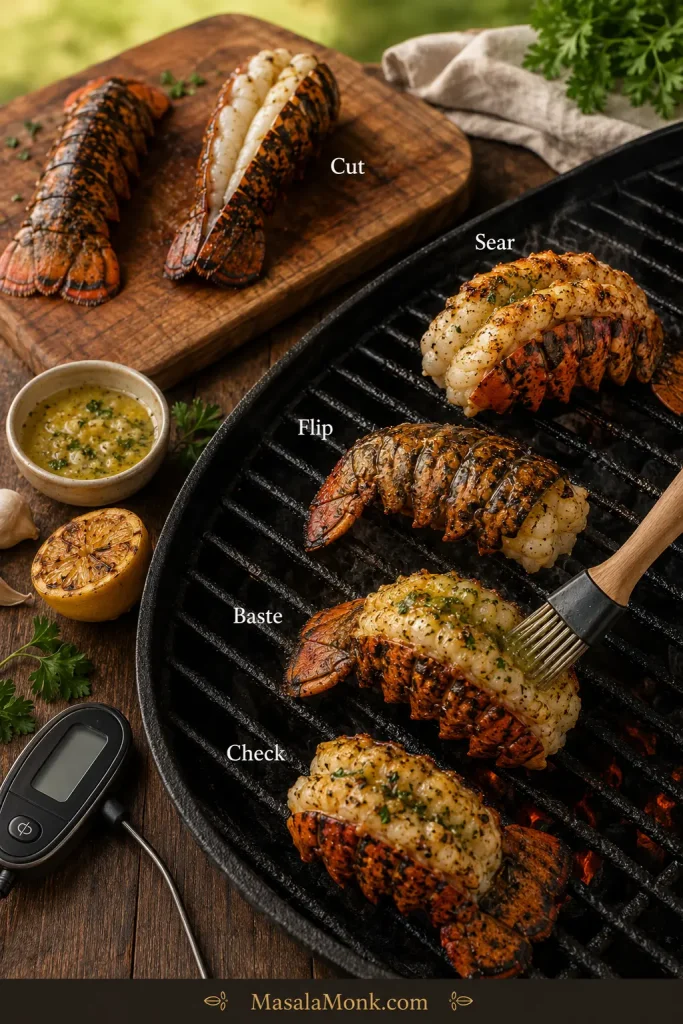
Step-by-step grilled lobster tail method showing cut, sear, flip, baste, and check stages.
Start with the simple rhythm: cut the shell, sear for flavor, flip shell-side down, baste with garlic butter, and check the thickest part before the meat tightens.

Grilled Lobster Tails With Garlic Butter

This version makes four lobster tails with lemon garlic butter and gives you a clear pull point, so you are not guessing during the final minute. It works well with 5–8 oz / 140–225 g tails, but the timing section below includes smaller and larger sizes too.

Prep time15 minutes
Cook time5–12 minutes, depending on size
Most common cook time6–10 minutes for 5–8 oz / 140–225 g tails
Total timeAbout 25 minutes
Servings4 lobster tails
Good tail size5–8 oz / 140–225 g each
Grill heat400–450°F / 204–232°C
Target pull temperatureAbout 140°F / 60°C, or 145°F / 63°C for a firmer finish
MethodGrill / BBQ

Ingredients

IngredientUS measureMetric
Lobster tails4 tails, 5–8 oz each140–225 g each
Olive oil1 tablespoon15 ml
Unsalted butter4 tablespoons / ½ stick56 g
Garlic2–3 cloves, finely minced6–9 g
Lemon juice2 teaspoons to 1 tablespoon10–15 ml
Lemon zest½ teaspoon, optionalAbout 1 g
Fresh parsley or chives1 tablespoon chopped3–4 g
Fine sea salt½ teaspoon total, dividedAbout 3 g
Black pepper¼ teaspoonAbout 0.5 g
Smoked paprika¼–½ teaspoon, optional0.5–1 g
Cayenne or chili flakesA pinch, optionalTo taste
Lemon wedgesFor servingFor serving
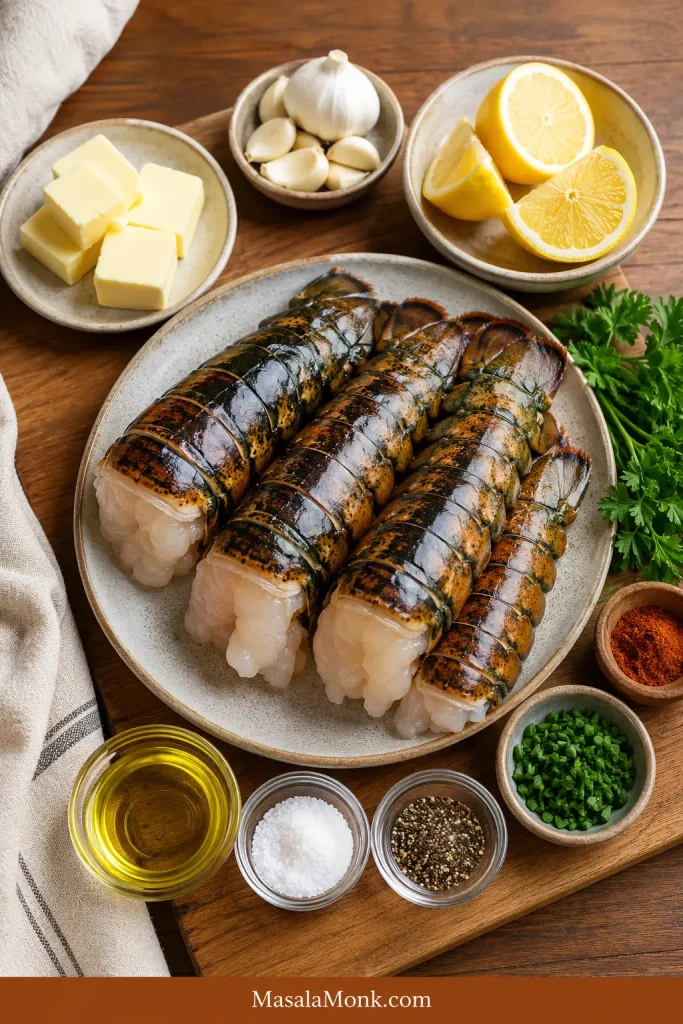
Lobster tails, butter, garlic, lemon, herbs, oil, salt, pepper, and smoked paprika arranged on a wooden board.
Before the grill heats up, keep the flavor focused. Lobster tails need butter, garlic, lemon, herbs, oil, salt, and pepper — not a crowded seasoning blend.

Have the tails cut, the butter melted, and your thermometer nearby before you turn toward the grill. Once lobster hits the heat, the cooking moves quickly.

Method

  1. Thaw and dry the lobster tails. Thaw frozen tails fully. Pat the shells and meat dry before cutting.
  2. Make the lemon garlic butter. Melt the butter gently. Stir in garlic, lemon juice, lemon zest if using, herbs, and optional smoked paprika or chili.
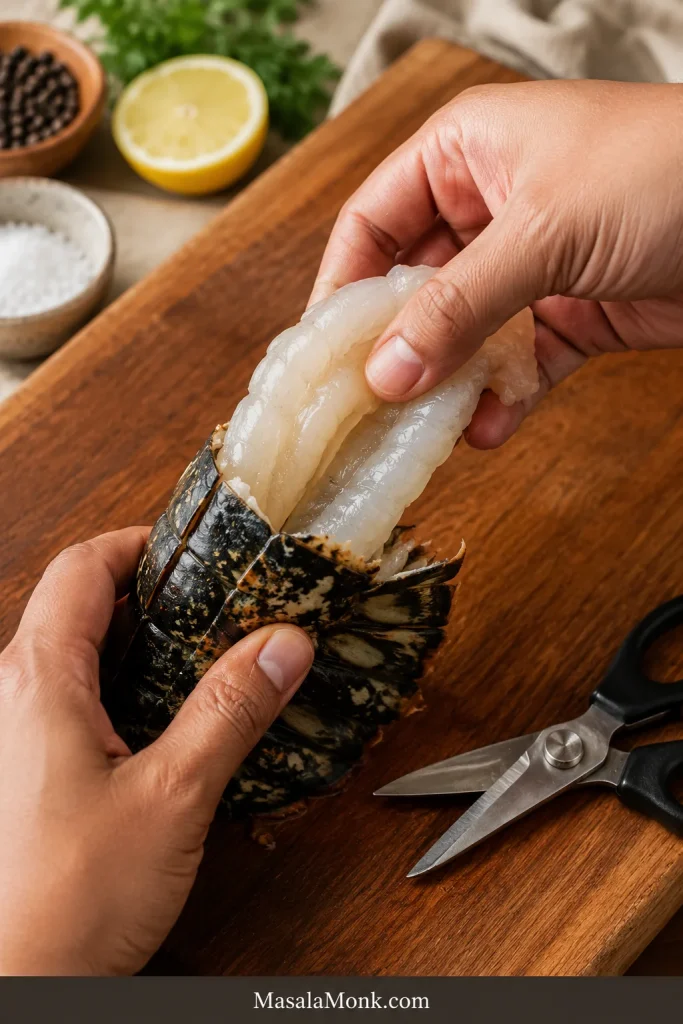
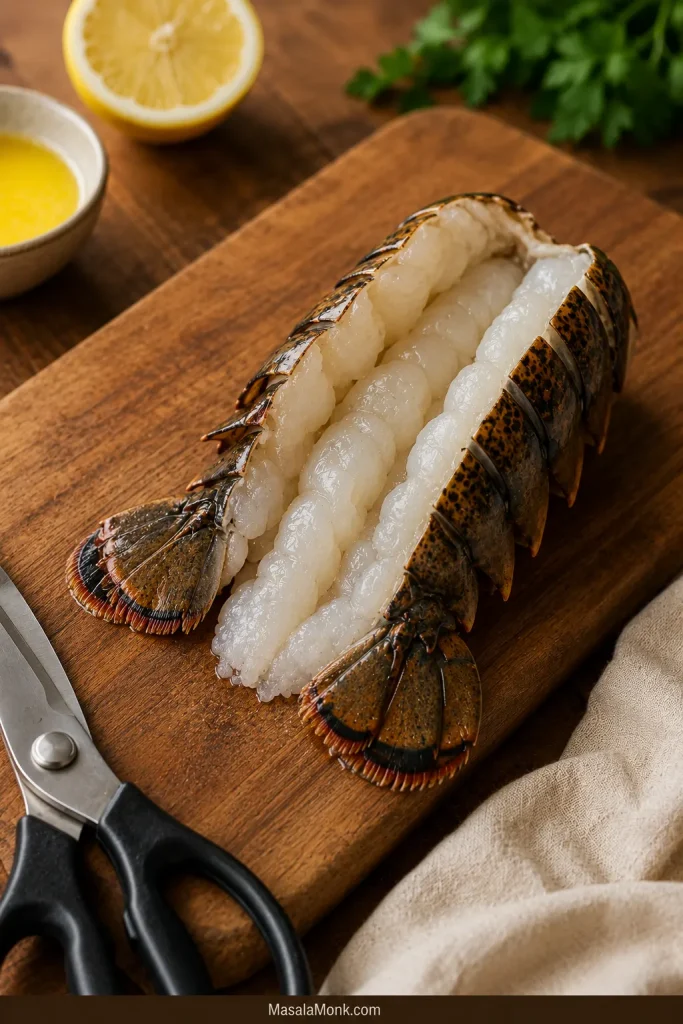
  3. Cut the shells. Use kitchen shears to cut down the top shell, stopping before the tail fan. For the simplest grill control, loosen the meat and split the tail open like a book.
  4. Season the meat. Brush the exposed lobster meat with olive oil. Season with salt and pepper.
  5. Preheat the grill. Heat the grill to 400–450°F / 204–232°C. Clean and oil the grates.
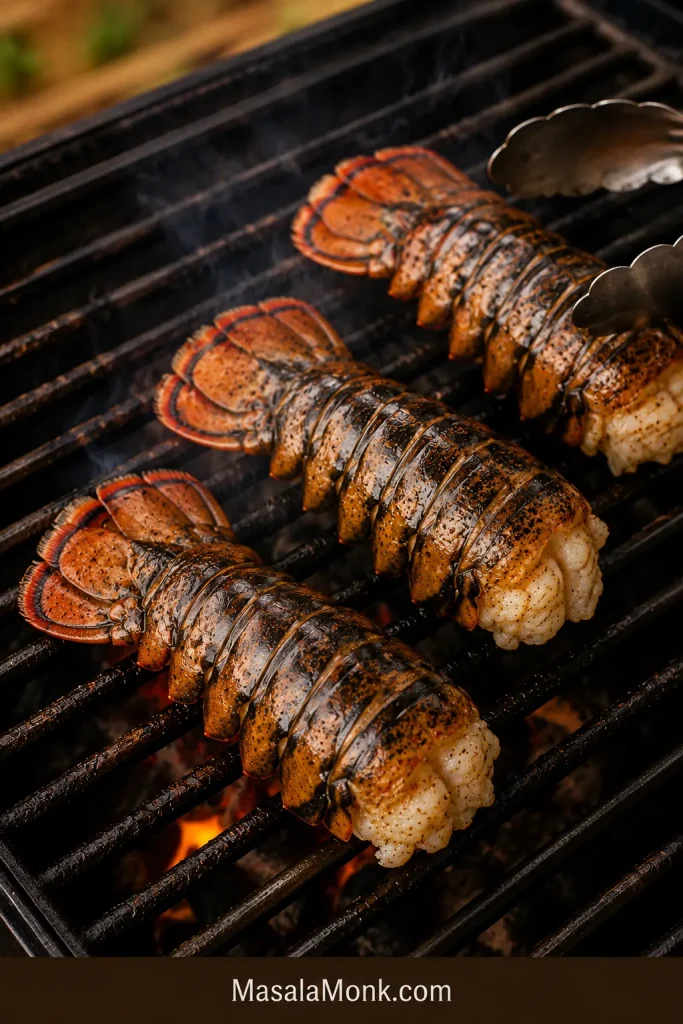
  6. Sear flesh-side down. Grill the tails flesh-side down until lightly marked and beginning to release from the grates.
  7. Flip and butter. Turn the tails shell-side down, with the meat facing up. Brush generously with the melted butter.
  8. Check and pull. Close the lid and cook until the meat is opaque and the thickest part reaches about 140°F / 60°C. Use 145°F / 63°C if you prefer.
  9. Serve right away. Rest for 1–2 minutes, not much longer, then serve with extra butter, lemon wedges, and fresh herbs.

Recipe Notes

  • Do not grill lobster tails while they are still frozen in the center.
  • Use oil before the first hot contact and butter after flipping.
  • Take the reading in the thickest part of the tail, not the thin tapered end.
  • On a very hot grill, large tails can brown before the center finishes, so move them away from the strongest heat after the first sear.
  • For a lifted restaurant-style butterfly, grill mostly with the meat facing up and baste the exposed surface instead of forcing it flat onto the grates.

Helpful Sections

The Best Way to Grill Lobster Tails Without Overcooking Them

Sear for flavor, finish for control. That is the whole rhythm of this grilled lobster tail recipe.

  • Start flesh-side down for fast grill flavor. The meat gets light char before it has time to dry out.
  • Flip shell-side down for a steadier finish. After the first sear, the shell gives the meat a little protection while the center catches up.
  • Use oil first and butter second. Oil handles the hot grates better; lemon garlic butter tastes best after the first sear.
  • Pull by temperature, not shell color. Red shells help, but opaque meat and an instant-read thermometer are more reliable.

That sequence gives you the best parts of grilled lobster: a little smoke at the edge, sweet meat in the center, and warm butter that does not taste scorched.

For a first try, split the tail open like a book. It is less dramatic-looking than a lifted butterfly, but it is easier to grill well and still gives you the smoky edge you came for.

Ingredients, Buying Notes, and Substitutions

Lobster tails

Use fresh or frozen-thawed lobster tails. For most people, 5–8 oz / 140–225 g is the sweet spot: impressive enough for dinner, small enough to cook before the edges toughen.

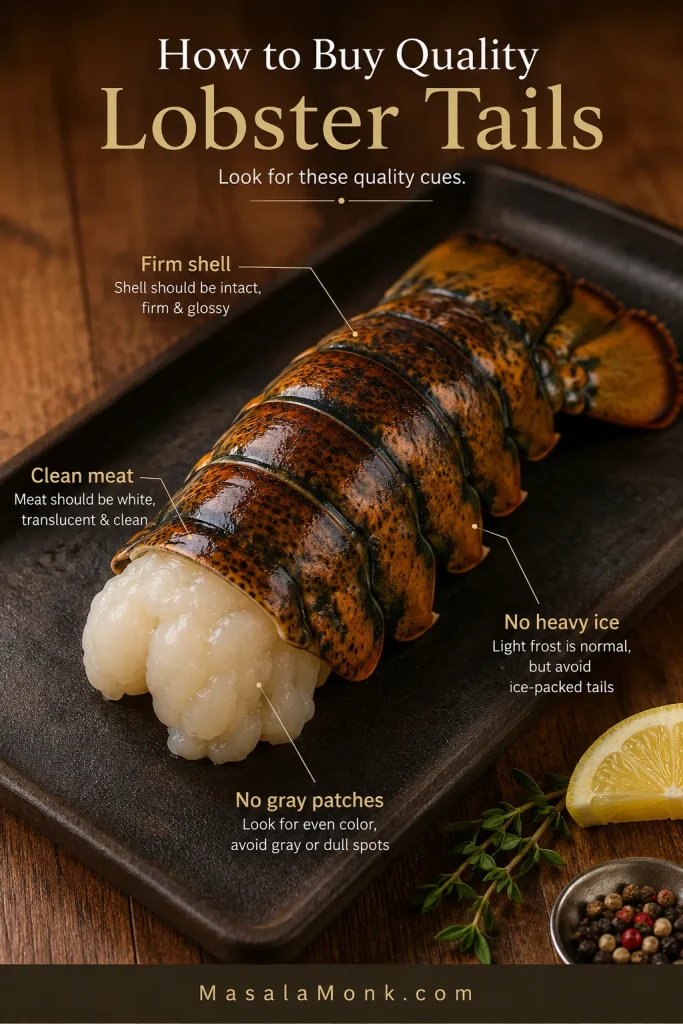
When buying lobster tails, pay attention to texture, smell, and freezer condition before you worry about presentation. The best tails look clean and firm, smell mild, and are sealed well instead of sitting loose in a frosty bag.

Clean firm lobster tail with callouts for firm shell, clean meat, no heavy ice, and no gray patches.
Better grilled lobster tails start at the store. Firm shells, clean meat, and minimal ice usually lead to sweeter texture on the grill.

This method works for most lobster tails, including cold-water, warm-water, Florida, Caribbean, and spiny lobster tails. Thin or lean tails cook faster, so baste well and start checking early.

Butter

Unsalted butter gives you better control over seasoning. If using salted butter, reduce the added salt slightly. Melt the butter slowly so the garlic can warm through and perfume the sauce without turning bitter.

Garlic

Fresh garlic gives the butter its best flavor. Mince it finely so it melts into the sauce instead of sitting in sharp little pieces on top of the lobster. Raw garlic can taste harsh, and burned garlic tastes bitter, so keep the heat gentle when making the butter.

Lemon

Lemon juice brightens the butter and keeps the lobster from tasting too heavy. Add some lemon to the butter, then serve extra wedges at the table so the final squeeze tastes fresh instead of flat.

Parsley or chives

Fresh herbs make the butter taste brighter. Parsley is classic. Chives are softer and slightly oniony. Cilantro works nicely with the chili-lime variation.

Olive oil

Use olive oil or another neutral cooking oil before the first sear. Butter before the first sear is tempting, but oil is the better first move because it helps prevent sticking without burning as quickly.

Smoked paprika, cayenne, or chili flakes

These are optional. Smoked paprika adds gentle BBQ depth. Cayenne or chili flakes add a little heat. Keep the first batch mild if you mainly want classic garlic butter lobster.

Fresh or Frozen Lobster Tails: How to Thaw Them

Frozen lobster tails are completely fine for grilling, especially if they were frozen soon after processing. What matters is that they are fully thawed, patted dry, and prepared properly before they go on the grill.

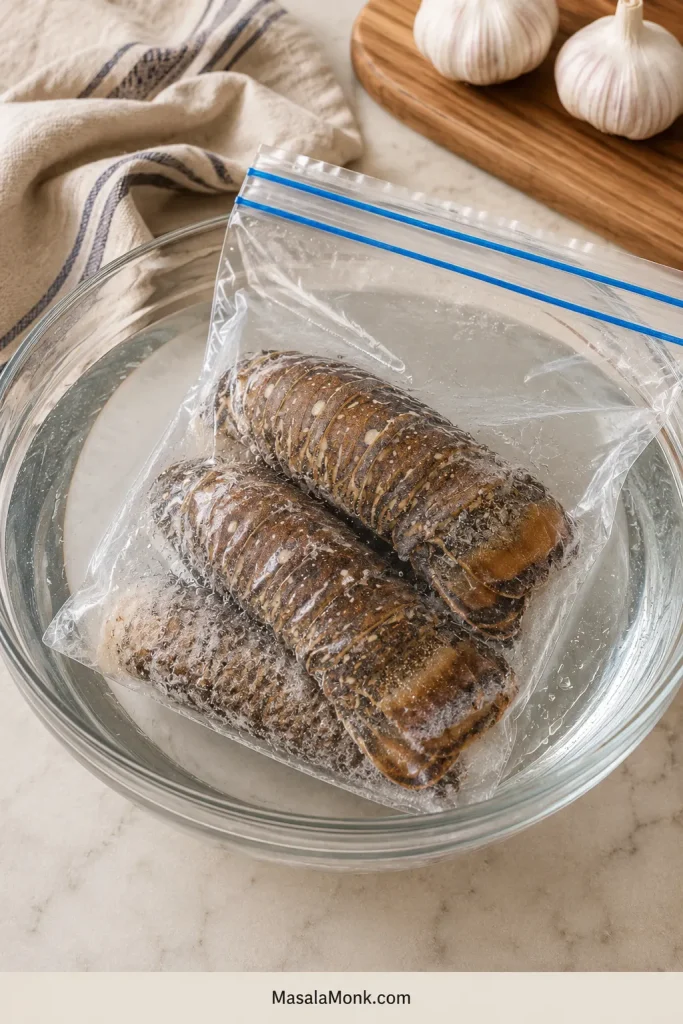
For the best texture, thaw frozen lobster tails overnight in the refrigerator on a plate or tray. For a faster same-day option, keep the tails sealed and place them in cold water for 30–60 minutes, depending on size. Do not use hot water, and do not grill the tails if the center still feels icy.

Frozen lobster tails sealed in a clear bag thawing in a bowl of cold water.
For faster thawing, keep frozen lobster tails sealed while they sit in cold water. The bag helps the meat thaw without absorbing extra water.

If the tail bends slightly and the meat is no longer icy in the center, it is ready to cut. At that point, drying the tails matters as much as thawing them because surface moisture can dull browning on the grill.

Dry the thawed lobster tails before grilling

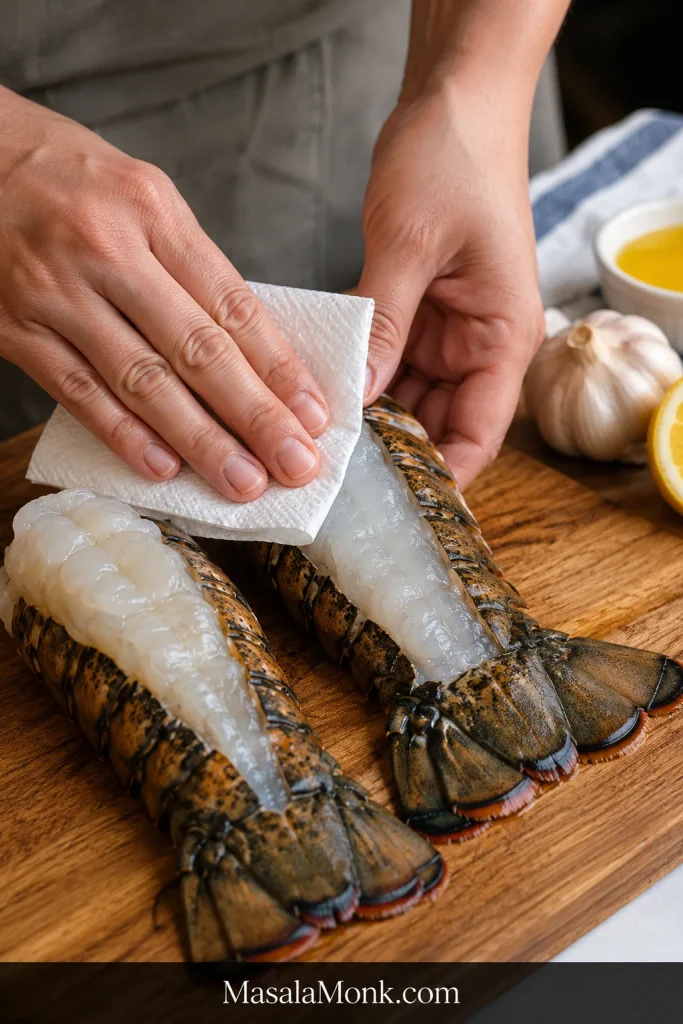
Surface moisture is the hidden reason lobster sometimes looks pale instead of lightly marked. Press the meat and shell dry with towels so the first side touches the hot grates cleanly.

Hands patting thawed lobster tails dry on a towel before grilling.
Dry surfaces give the hot grates a better chance to mark the meat. Wet lobster steams first and browns later.

Once the tails are thawed and dry, the recipe starts to feel less like a gamble. The lobster is ready, the butter can be made, and the grill only has to give you smoke, heat, and a few minutes of attention.

Best Lobster Tail Size for Grilling

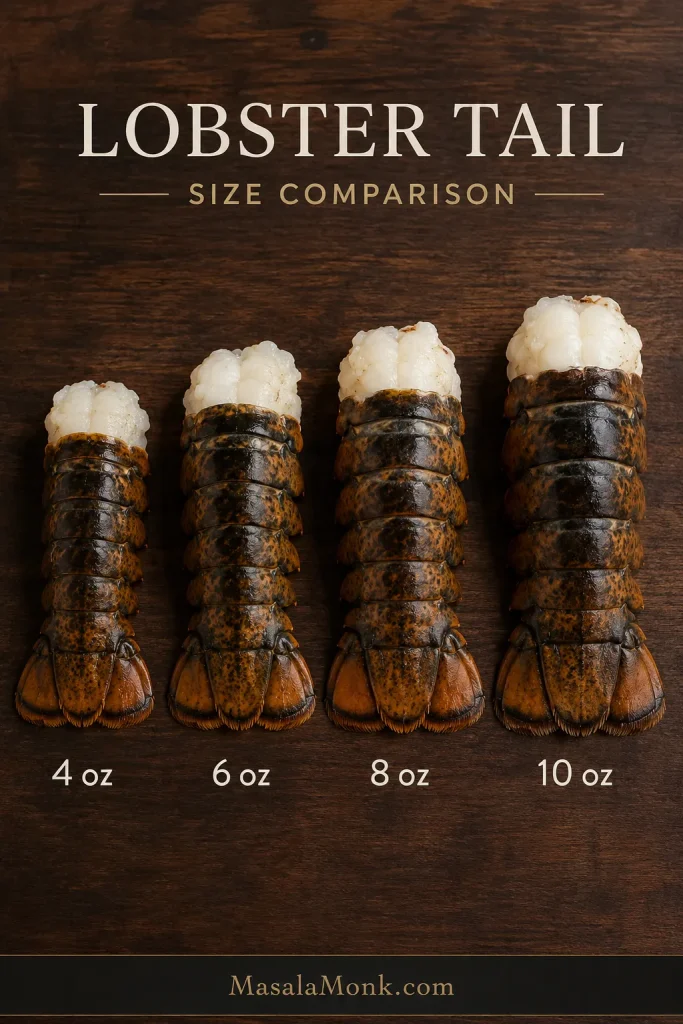
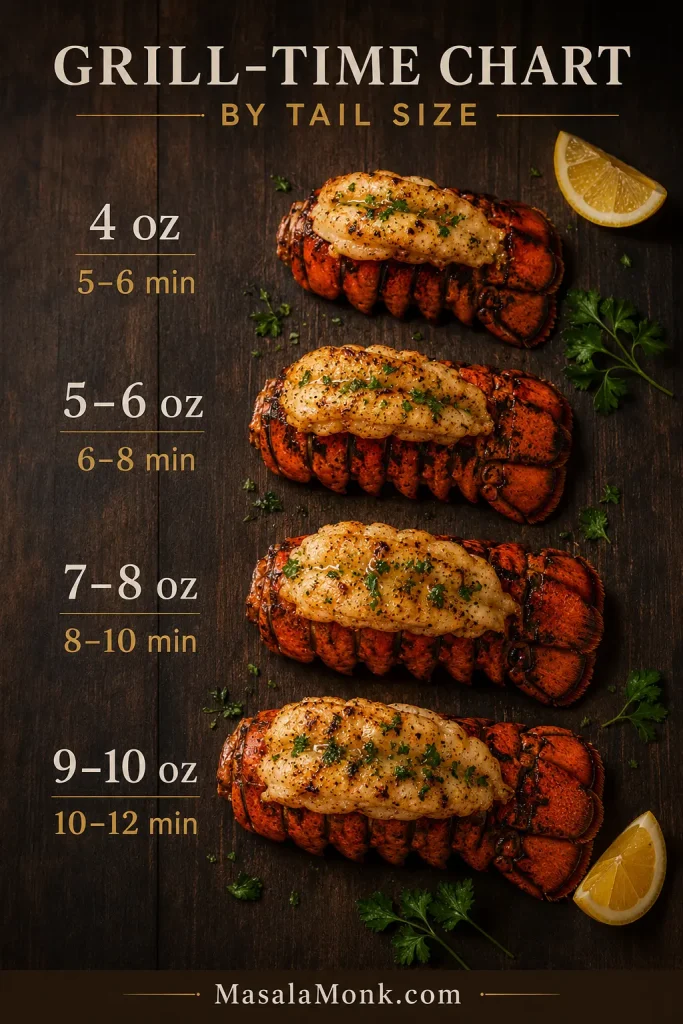
The best lobster tail size for grilling is usually 5–8 oz / 140–225 g per tail. Smaller tails cook quickly and are great for surf and turf. Larger tails feel impressive, but they need more controlled heat after the first sear.

Use this table as a starting point. A small tail and a jumbo tail should not be treated the same way.

Four lobster tails arranged by size from 4 ounces to 10 ounces.
Tail size changes grill time. A 4 oz lobster tail cooks fast, while a 10 oz tail needs a slower, steadier finish after searing.
Lobster tail sizeGood useWhat to watch
4 oz / 115 gSmall portions, surf and turf, appetizersCooks quickly; check early
5–6 oz / 140–170 gEveryday grilling sizeEasy to handle and hard to overcomplicate
7–8 oz / 200–225 gGenerous dinner portionGive it a little more time after flipping
9–10 oz / 255–285 gLarge entrée-style tailMove away from the hottest heat if the edges brown early
10 oz+ / 285 g+Jumbo or special-occasion lobsterUse indirect heat after searing; do not blast the whole time

Bigger lobster tails do not simply need more direct heat. They need a longer, steadier finish. Once you know the size, the timing stops feeling mysterious and starts feeling manageable.

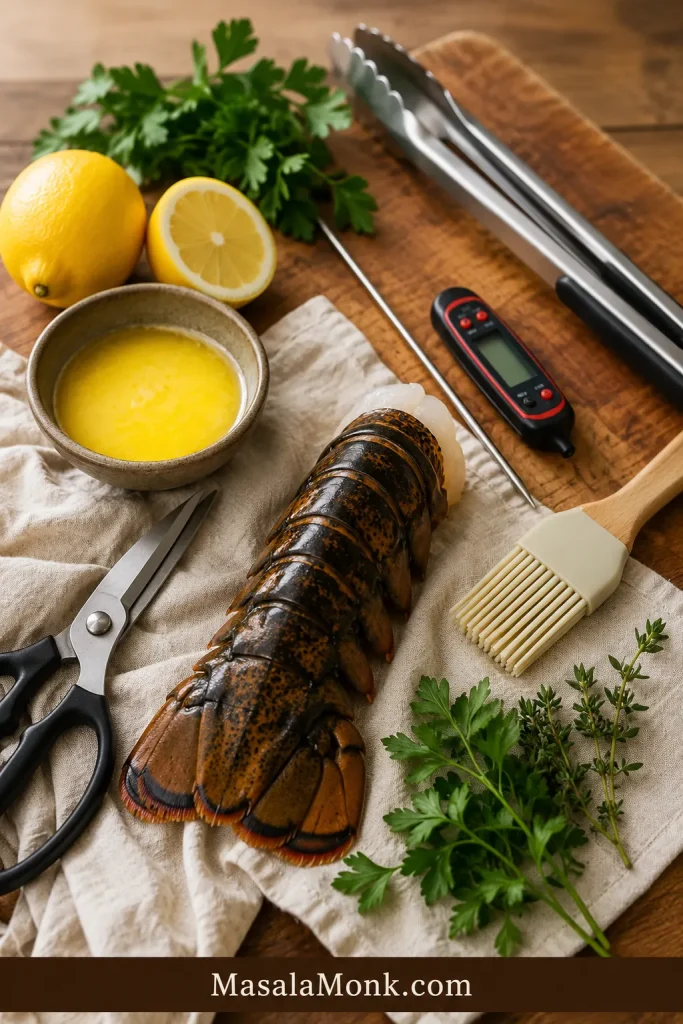
Before You Start: Tools That Make This Easier

Before you cut anything, set yourself up so the lobster feels manageable instead of slippery and rushed. You do not need much, but kitchen shears and an instant-read thermometer make the biggest difference.

  • Kitchen shears: Most useful for cutting the shell without crushing it.
  • Sharp knife: Helpful for splitting the meat partway after the shell is cut.
  • Instant-read thermometer: The simplest way to avoid overcooked lobster.
  • Grill tongs and basting brush: Helpful for turning and brushing without piercing the meat.
  • Skewers: Optional, but useful if the tails curl.

Set the tools out before preheating, and the grill work feels calmer. The shears handle the shell, while the thermometer takes pressure off the final minute.

Tools for grilling lobster tails including kitchen shears, thermometer, tongs, basting brush, butter, lemon, and herbs.
Kitchen shears make the shell work cleaner, while the thermometer protects the final texture when the lobster cooks quickly.

How to Cut Lobster Tails for the Grill

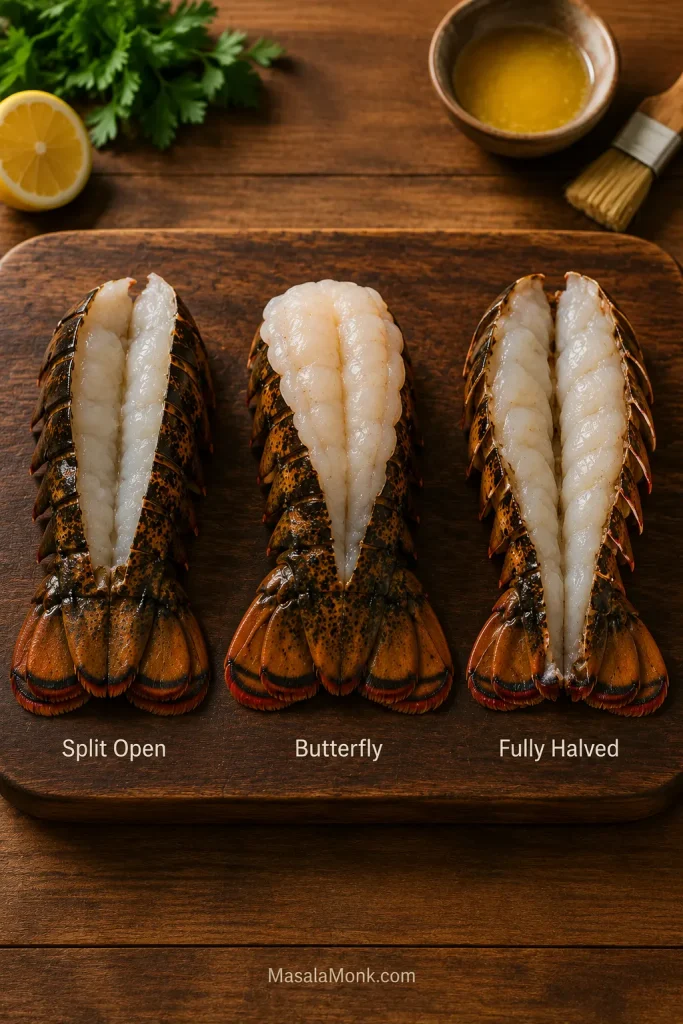
Once you know the size and have the tools ready, the next step is getting the shell open without mangling the meat. The easiest choice is a split-open tail, but here is how the main options compare.

Cut styleUse it when you wantGrill positionDifficulty
Split open like a bookBeginner-friendly grilling, better sear, easier temperature controlFlesh-side down first, then shell-side downEasier
Lifted butterflyRestaurant-style presentationMostly meat facing up, baste oftenMore delicate
Fully halved tailVery large tails or stronger charCut-side down briefly, then finish over cooler or indirect heatLess forgiving
Comparison of split-open, butterfly, and fully halved lobster tail cuts for grilling.
Choose the cut based on your goal: split-open is easiest, butterfly gives a dramatic look, and fully halved tails get stronger grill contact.

For this recipe, choose the split-open method unless you specifically want the lifted restaurant presentation. It gives the meat better contact with the grates, makes the sear easier, and gives you more control as the lobster finishes.

The shell may feel stiff the first time. That is normal. Work slowly, use kitchen shears instead of forcing the shell apart, and do not worry if the first tail is not picture-perfect. By the second one, the shell usually makes more sense.

Once the tails are open, the most intimidating part is behind you. From here, you are mostly managing heat, butter, and timing.

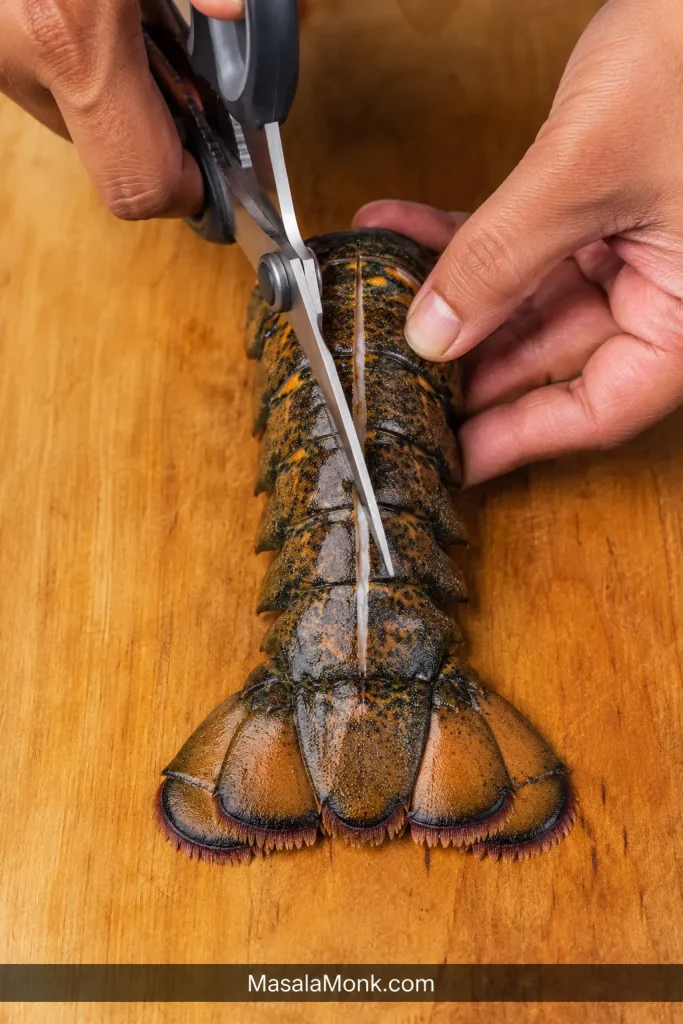
Cut the top shell with kitchen shears

The cleanest cut starts at the top of the shell and stops before the tail fan. Keep the shears centered so the shell opens evenly and the meat stays protected underneath.

Kitchen shears cutting down the top shell of a raw lobster tail on a wooden board.
First, cut down the top shell with kitchen shears and stop before the tail fan. This opens the lobster without breaking the tail apart.

Loosen the lobster meat without tearing it

Once the shell is open, loosen the meat slowly along the sides. This gives the lobster room to open for grilling while keeping the tail attached and easier to move.

Hands loosening raw lobster tail meat from the shell after cutting the top shell.
Next, loosen the meat gently from the shell. The goal is to open the lobster tail for grilling, not pull the meat completely free.

Option 1: Split open like a book

Cut through the top shell lengthwise with kitchen shears, stopping before the tail fan. Use a sharp knife to cut partway into the meat without slicing through the bottom shell. Open the tail like a book and press with light pressure so it sits flatter on the grill.

If the meat is very thick, keep the cut shallow enough that the tail stays together. You want to open it, not divide it into two loose pieces.

Raw lobster tail split open like a book on a wooden board before grilling.
For beginners, the split-open book method is the easiest cut. The meat gets grill contact while the shell still helps hold the tail together.

Option 2: Butterfly on top of the shell

This is the prettiest option and the one many people picture when they think of lobster tails. Cut down the center of the top shell, pull the shell apart slowly, loosen the meat from the sides, and lift the meat over the shell while keeping it attached at the base.

With the lifted butterfly style, do not force the meat flat onto the grates. Grill mostly with the meat facing up, baste the exposed surface as it cooks, and sear very briefly only if the meat sits securely.

Option 3: Fully halved lobster tail

A fully halved tail gives strong grill contact and works well for very large tails, but it is easier to overcook because more meat is exposed. Use this only if you want a stronger char and are comfortable taking an early reading.

Gas Grill, Charcoal Grill, BBQ, or Pellet Grill

Once the tails are cut, the grill setup is the last big decision — and it does not need to be complicated. Most grills can handle this recipe as long as the heat is steady and you have a cooler area available when the lobster needs more time.

  • Gas grill: Easiest for heat control. Preheat to 400–450°F / 204–232°C, then clean and oil the grates.
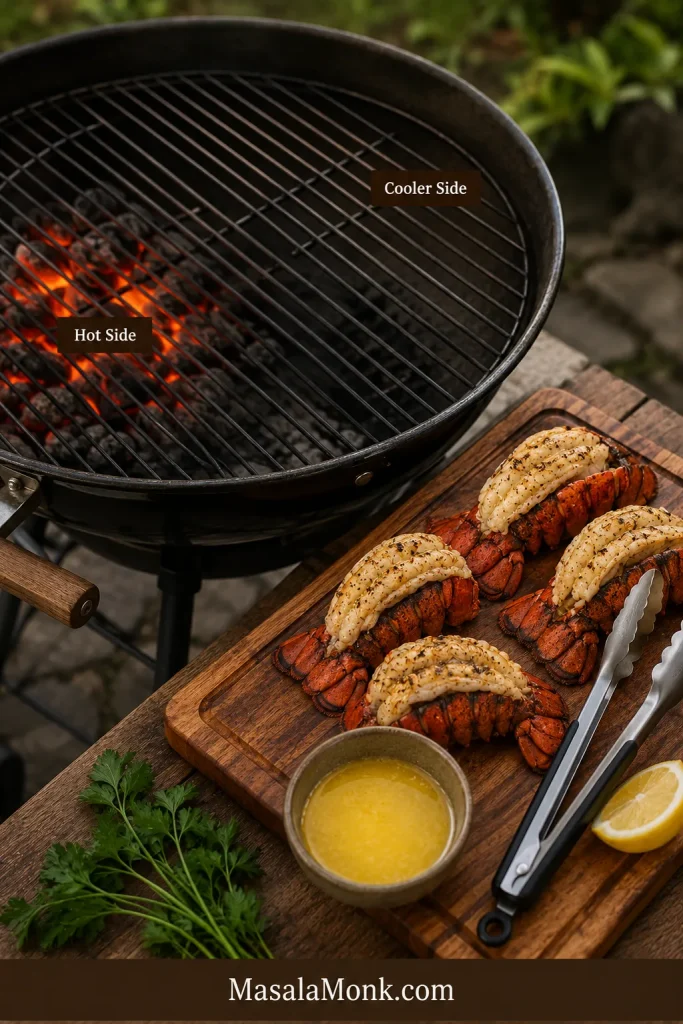
  • Charcoal grill or BBQ: Great for smoky flavor. Use a two-zone setup if possible so you can sear over direct heat and move the tails away from the strongest flames later.
  • Pellet grill on high heat: Works for a grilled result if you use enough heat. For a true smoked lobster tail, use lower indirect heat and a separate smoker method.
  • Very hot grill: Sear briefly, then move the tails away from the hottest area so the meat does not firm up too quickly.
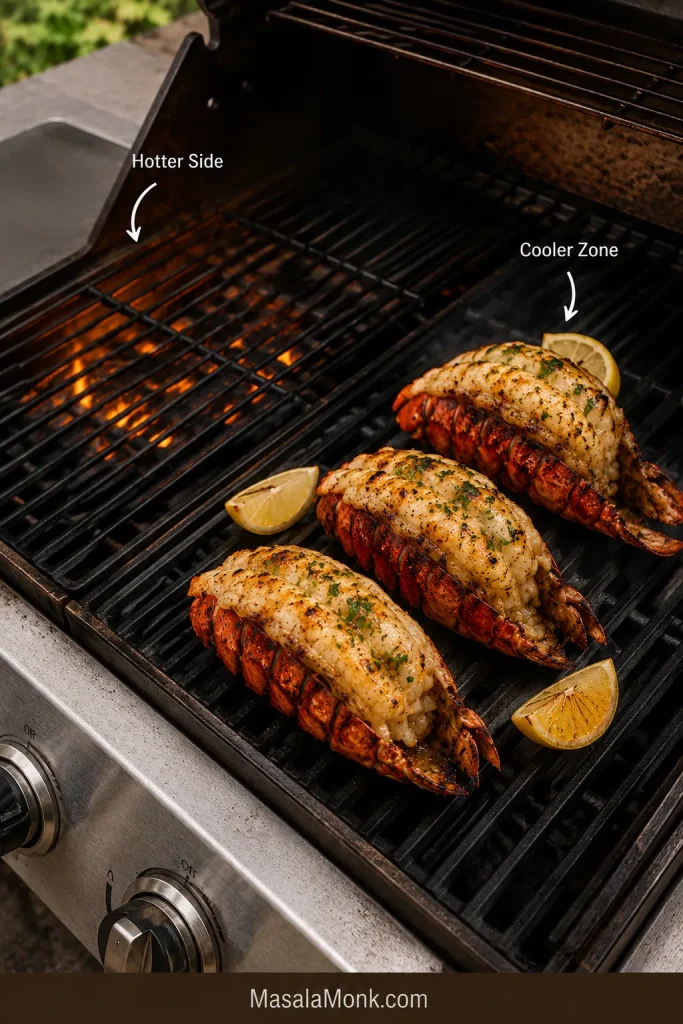
Two-zone grill setup showing a hot side and cooler side for grilling lobster tails.
A two-zone grill gives you room to react. Use the hotter side for quick color, then shift lobster cooler before the meat tightens.

If your grill has obvious hot spots, use them for the sear, then move the lobster to a slightly cooler area after flipping. You still get the smoky edge you came for, but the center has time to stay sweet and tender.

How to Grill Lobster Tails Step by Step

The recipe card above gives you the fast version. This section gives you the live cues that matter once the lobster is on the grill.

If you are grilling for guests, prep the tails and the basting butter before anyone arrives. Once the lobster hits the grill, your job is mostly to watch, baste, and stop at the right moment.

1. Preheat and clean the grill

Preheat the grill to medium-high heat, about 400–450°F / 204–232°C. Clean the grates well and oil them lightly. Lobster meat is delicate, so dirty or dry grates can cause sticking and tearing.

2. Make the lemon garlic butter

Melt the butter gently, then stir in the garlic, lemon juice, lemon zest if using, herbs, and any optional spices. It should smell warm and garlicky, with enough lemon to keep the lobster bright instead of heavy.

3. Cut and season the lobster tails

Cut the shell using the method above. Pat the meat dry, brush with olive oil, and season lightly with salt and pepper. Keep the butter nearby, but do not brush it on heavily before the first contact with the grates.

4. Sear flesh-side down

Place split lobster tails flesh-side down on the hot grates. Let them cook without constant moving. When the meat has light grill marks, it should begin to release and be ready to flip.

Split lobster tails placed flesh-side down on hot grill grates.
Place split lobster tails flesh-side down for the first sear. Direct contact builds light grill marks before any butter hits the heat.

Let the lobster release from the grates

Do not pry a tail that feels glued to the grate. Give the sear a little longer, then lift gently with tongs so the marked meat stays intact.

Tongs lifting a lobster tail from grill grates with light grill marks visible.
When lobster sticks, wait another moment instead of tearing it loose. Once the meat sears, it releases more cleanly from the grill grates.

With a lifted butterfly tail, skip the hard flesh-side-down sear or keep it very brief. That style is more delicate and usually does better with the meat facing up.

5. Flip shell-side down and baste

Flip the tails shell-side down, with the meat facing up. A little sizzling is good; bitter smoke means the heat is too harsh, not that the lobster needs to cook faster.

Lobster tails flipped shell-side down with the meat facing up on a grill.
Once flipped, the shell becomes a heat shield. The exposed lobster stays easy to baste while the center finishes more gently.

Brush garlic butter after flipping

Now brush the exposed lobster with lemon garlic butter. This timing gives the meat the glossy flavor you want while keeping minced garlic away from the harshest first contact with the grates.

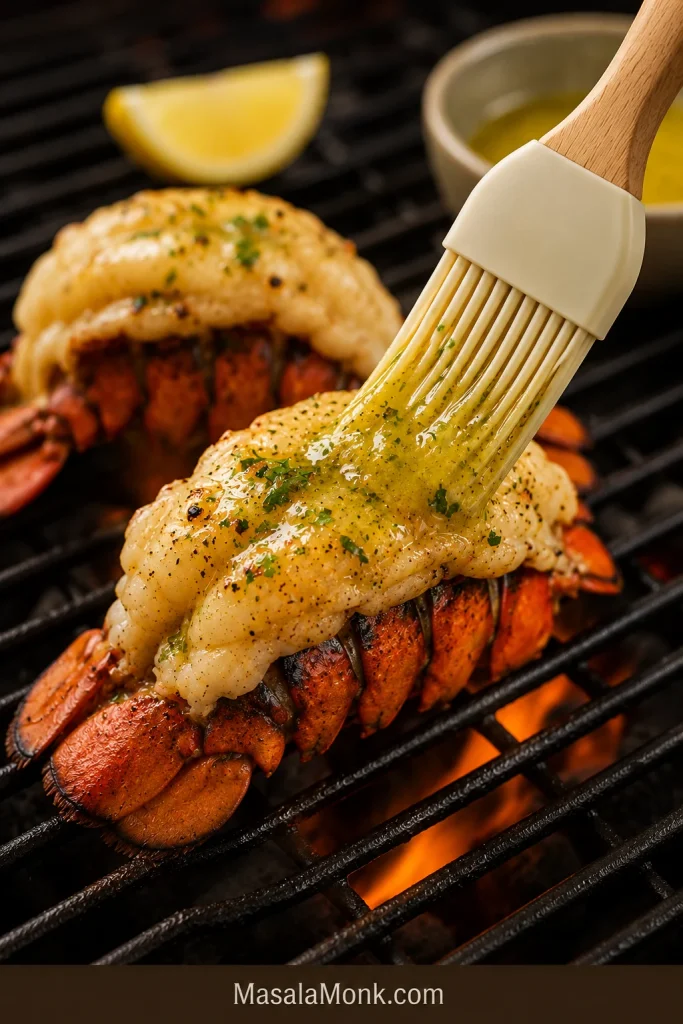
Lemon garlic butter being brushed over lobster tails on the grill.
Brush the lemon garlic butter over exposed meat after flipping. You get glossy flavor without scorching the garlic on the hottest grates.

When the shells are bright, the butter is sizzling gently, and the meat has turned pearly at the edges, the lobster starts to feel less intimidating and more like the dinner you hoped it would be.

6. Finish over steadier heat

Close the lid so the lobster cooks evenly. Opaque edges with a translucent center mean the outside is moving faster than the middle. Move the tails away from the hottest grates and give the center a little more time.

Lobster tails finishing shell-side down in the cooler zone of a grill.
If the edges are racing ahead of the center, slide the tails to the cooler zone. Slower heat protects the sweet, tender texture.

7. Check and serve

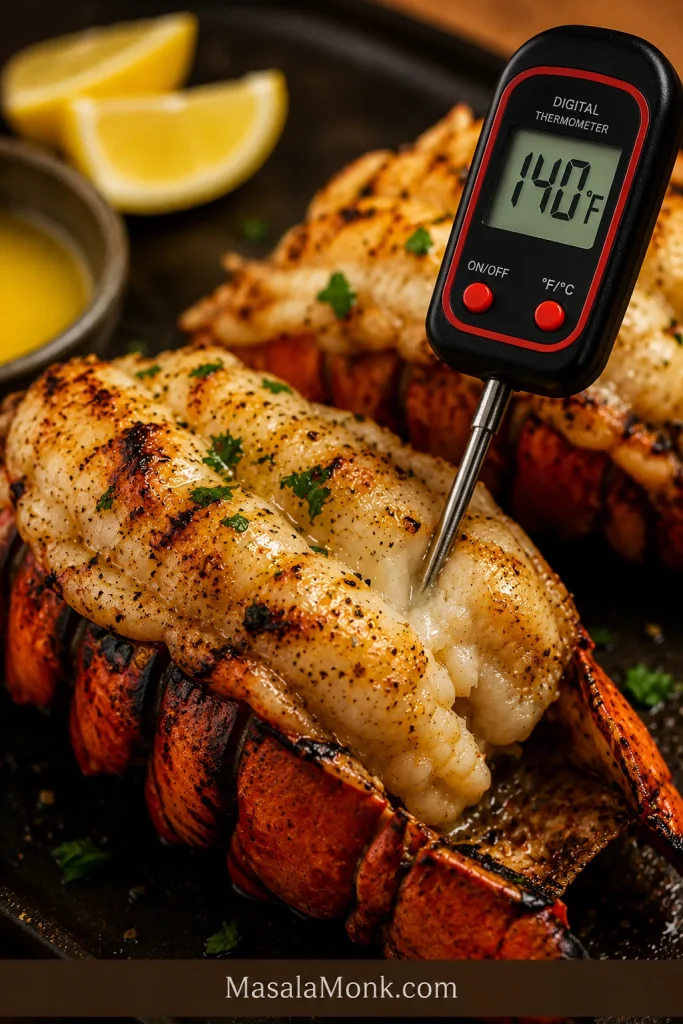
Insert an instant-read thermometer into the thickest part of the lobster meat without touching the shell. Pull the tails around 140°F / 60°C for juicy results, or 145°F / 63°C if you prefer a firmer finish. Brush with a little more butter, add lemon, and serve right away.

How Long to Grill Lobster Tails

Timing is mostly about size. A small 4 oz tail cooks much faster than a thick 10 oz tail, even if they are on the same grill.

Tail sizeApprox total grill timeFirst sideAfter flipping
4 oz / 115 g5–6 minutes3–4 minutes1–2 minutes
5–6 oz / 140–170 g6–8 minutes4–5 minutes2–3 minutes
7–8 oz / 200–225 g8–10 minutes5–6 minutes3–4 minutes
9–10 oz / 255–285 g10–12 minutes5–6 minutes4–6 minutes, often partly indirect
10 oz+ / 285 g+12+ minutes5–6 minutesFinish more steadily, preferably with indirect heat
Grill time chart showing lobster tail sizes from 4 ounces to 10 ounces with cooking times.
Use grill time as a guide, not a guarantee. Size gets you close, but the thickest-part temperature makes the final call.

As a loose shortcut, most lobster tails need about 1 minute per ounce total on a hot grill, but thickness, grill heat, and how deeply you split the tail can change the final minute.

The table gets you close; the thermometer gets you calm. Lobster can go from tender to firm quickly, so use time as a guide and the thickest-part reading as the final call.

Grilled Lobster Tail Temperature

For the grill itself, aim for 400–450°F / 204–232°C. That gives you enough heat for grilled flavor without forcing the lobster to cook too aggressively.

For this recipe, 140°F / 60°C is the practical pull point for juicy grilled lobster tails. For a more conservative food-safety target, cook to 145°F / 63°C; FoodSafety.gov uses that number in seafood guidance, and lobster should look pearly or white and opaque.

The important thing is not to drift far past that point. You are looking for pearly, juicy meat that still feels soft when it leaves the grill.

TemperatureWhat it means
135°F / 57°CTender pull point if serving immediately and allowing for carryover
140°F / 60°CBest practical target for juicy grilled lobster tails
145°F / 63°CMore conservative food-safety target
Over 145°F / 63°CHigher risk of firm, dry, rubbery lobster
Instant-read thermometer inserted into the thickest part of a grilled lobster tail showing 140 degrees Fahrenheit.
Aim the thermometer into the meatiest section, away from shell and thin edges. Around 140°F keeps grilled lobster juicy and tender.

Do not cook lobster like chicken. The lobster does not need deeper color. It needs you to stop at the right moment.

Garlic Butter for Lobster Tails

Garlic butter is the flavor anchor of this recipe. It should taste rich, bright, and savory without covering the natural sweetness of the lobster. You want warm garlic, enough lemon to lift the butter, and just enough herbs to make each bite feel fresh.

For four lobster tails, use 4 tablespoons / 56 g butter, 2–3 cloves minced garlic, 2 teaspoons to 1 tablespoon lemon juice, a little lemon zest if you like, and 1 tablespoon chopped parsley or chives. Add smoked paprika or a pinch of chili only if you want a warmer BBQ-style flavor.

The butter should not taste flat or greasy. It should be garlicky, lightly lemony, and salty enough that one brush over the hot lobster makes the meat taste sweeter.

Brush the lobster with oil before the first grill contact, then use the basting butter after flipping. If too much butter hits the hottest grates too early, it can drip, flare, and burn before the lobster is finished.

Once the butter is ready, the recipe starts to feel like dinner instead of a task. The garlic is warm, the lemon is bright, and every brush over the lobster gives you more of that rich, glossy finish.

If garlic, lemon, and butter are the flavors you love most with seafood, this shrimp scampi recipe follows the same bright, buttery path in a stovetop dinner.

Butter and Seasoning Variations

The classic lemon garlic butter is the best starting point, especially for a first batch. Once you understand the timing, you can change the flavor without changing the cooking method.

  • Classic lemon garlic butter: Garlic, lemon, parsley, and butter.
  • Chili garlic butter: Add chili flakes or cayenne for gentle heat.
  • Smoked paprika butter: Add smoked paprika for a warmer BBQ flavor.
  • Cajun garlic butter: Add Cajun seasoning, garlic, and lemon.
  • Garlic herb butter: Add parsley, chives, thyme, or a little tarragon.
  • Chili-lime butter: Use lime, garlic, chili, and cilantro for a brighter finish.

If using a salty seasoning blend, reduce the added salt in the recipe. Lobster does not need heavy seasoning; it needs enough butter, acid, and salt to bring out its sweetness.

How to Tell When Lobster Tail Is Done

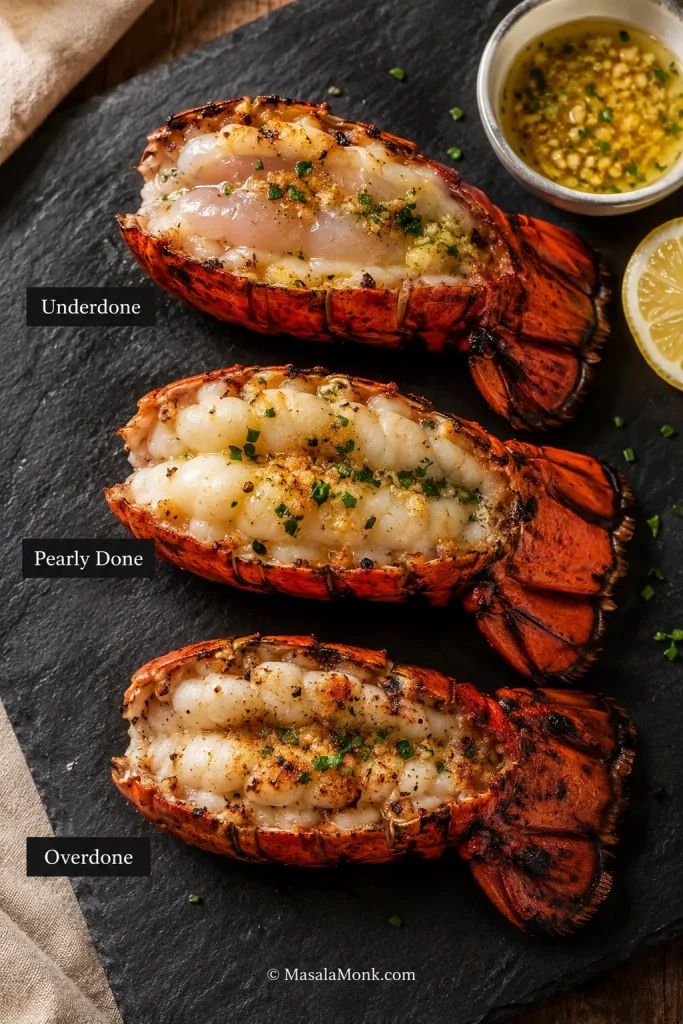
Grilled lobster tail is done when the meat is opaque, white, and springy, but not hard. Properly cooked lobster looks pearly and juicy. Undercooked lobster can look translucent in the center. Overcooked lobster often looks shrunken, tightly curled, cottony, or dry at the edges.

Comparison of underdone, pearly done, and overdone grilled lobster tail meat.
Use visual cues with temperature. Translucent centers need more time, pearly meat is ready, and shrunken tight meat has gone too far.
  • Translucent center: give it another minute shell-side down.
  • Tight edges with a cooler center: move the tails away from the strongest heat.
  • Flaring butter: move the tails and baste more lightly.
  • Meat at temperature: pull it instead of waiting for deeper shell color.
  • Tightly curled tail with shrunken meat: take a reading immediately.

What properly cooked lobster meat should look like

A perfectly cooked tail should still look moist when you cut into it. The color turns pearly and opaque, but the meat should not look chalky, tight, or dry around the edges.

Close-up of properly cooked grilled lobster tail meat that looks pearly, juicy, and lightly charred.
At the ideal point, grilled lobster meat looks pearly and tender, with light char and just enough butter gloss to keep each bite rich.

Think opaque and tender — not hard, dry, or bouncy. That is the moment you want: the meat just opaque, the butter still warm, and the lemon ready to squeeze over the top.

What to Do If Something Goes Wrong on the Grill

This is the minute where people usually panic. Don’t. Most lobster problems have a simple fix when you catch them early.

What is happeningWhat it meansWhat to do immediately
Meat sticks hard to the gratesIt has not released yetWait 30–60 seconds; do not tear it loose
Butter flares or smokes hardHeat is too aggressiveMove tails to a cooler zone and baste lighter
Garlic smells bitterThe butter is burningStop basting with that butter and use fresh butter for serving
Shell is bright but center is translucentShell color is ahead of the meatFinish shell-side down with the lid closed
Edges are firming fastHeat is too directMove away from the strongest heat and take a reading
Tail curls tightlyIt may be close to overdoneCheck temperature immediately
Jumbo tail browns earlyOutside is ahead of centerMove to indirect heat and finish more slowly

Once you move the lobster away from harsh heat, most problems slow down. The butter settles, the center finishes, and the meat has a better chance to stay sweet instead of snapping firm.

Common Mistakes to Avoid

The rescue table helps when you are already at the grill. These are the mistakes to avoid before you get there.

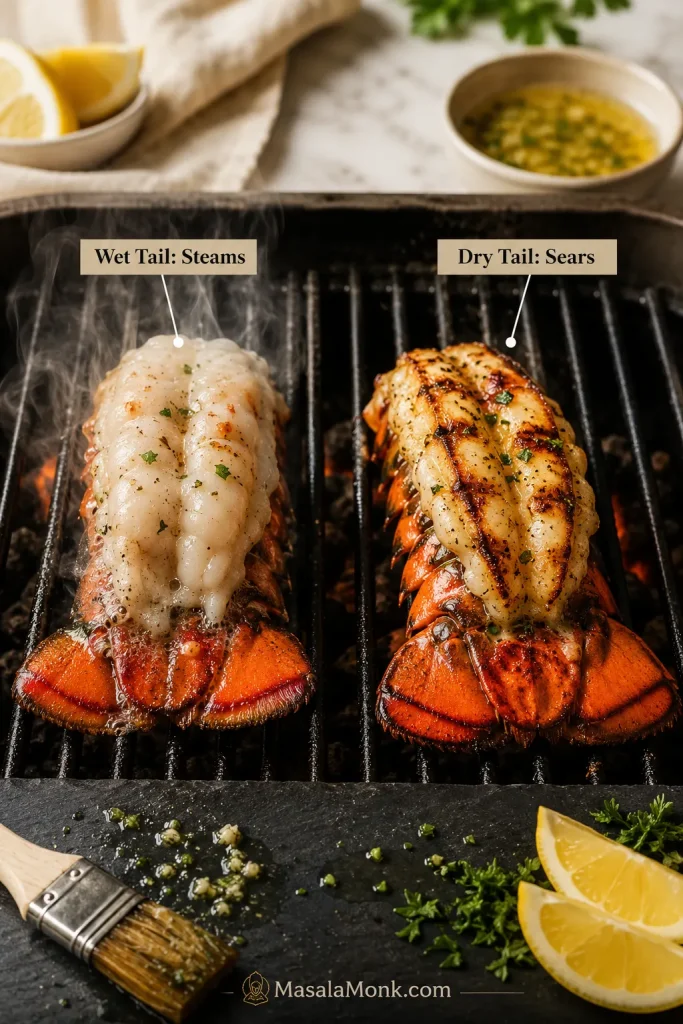
Wet lobster tail steaming compared with dry lobster tail searing on a grill.
This is the drying lesson in one glance: moisture delays browning, while a dry surface helps lobster sear cleanly.
  • Starting with frozen-solid tails: Thaw fully so the outside and center cook evenly.
  • Leaving the meat wet: Pat dry so the first side sears instead of steaming.
  • Using butter too early: Oil is better for the first hot contact; butter belongs after the flip.
  • Cooking jumbo tails like small tails: Big tails need a steadier finish after the first sear.
  • Cutting too deeply: Open the tail without turning it into loose pieces that dry faster.

Once the heat is steady and the butter is under control, the recipe becomes simple again: let the lobster cook gently, pull it while it is still juicy, and serve it before the gloss leaves the butter.

Should You Grill Lobster Tails in Foil?

Foil is a safety net, not the best flavor method. You can use it if your grill runs very hot or you are worried about flare-ups, but foil steams the lobster more than it grills it.

Do not start with foil unless your grill is truly unruly. For better grilled flavor, cook the tails directly on clean, oiled grates, then finish shell-side down in a cooler zone to protect the meat after flipping.

What to Serve With Grilled Lobster Tails

Once the tails are off the grill, do not make them wait. Lobster is at its best while the butter is glossy, the lemon is sharp, and the meat still pulls cleanly from the shell.

Grilled lobster tails are rich, so the best sides either catch the butter, cut through it, or make the plate feel like a proper summer dinner. Use the table below to build the kind of meal you want.

Meal styleServe with
Steakhouse dinnerGarlic mashed potatoes, wedge salad, steak, and extra lemon butter
Summer BBQGrilled corn, coleslaw, grilled asparagus, potato salad, and lemon wedges
Light seafood dinnerLemon rice, tomato salad, green beans, or a simple crisp salad
Date-night plateHomemade garlic bread loaf, a cold salad, and one bright drink like a lemon drop or lychee martini
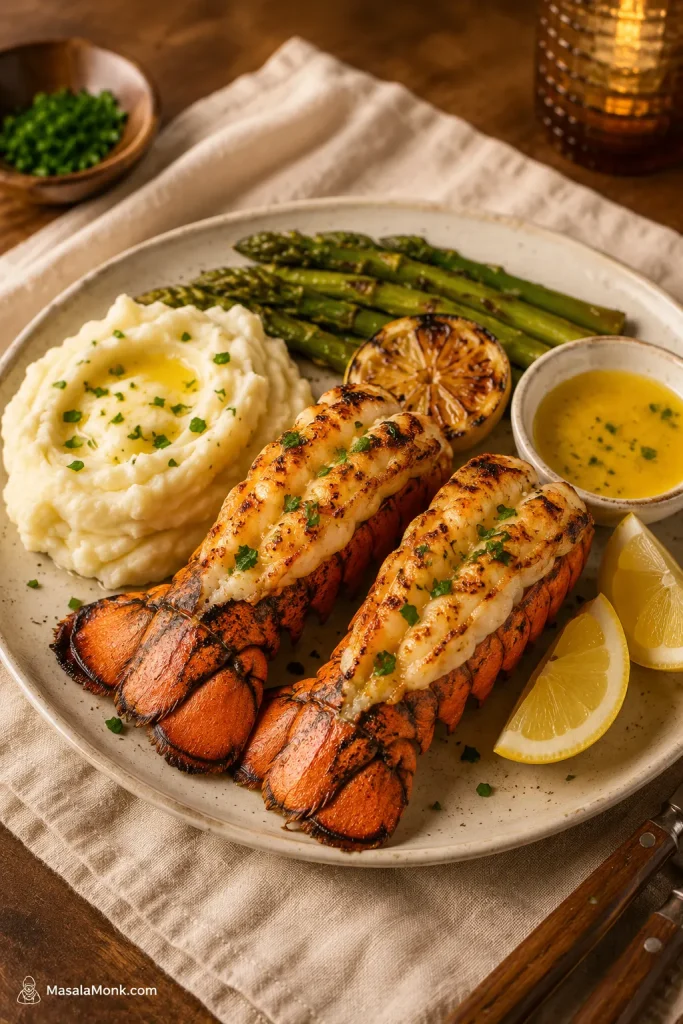
Grilled lobster tails served with mashed potatoes, asparagus, lemon butter, and lemon wedges.
Build the plate around contrast: rich lobster, a crisp green side, sharp lemon, and something soft enough to catch the extra butter.

For the easiest plate, pair the lobster with one crisp side, one lemony element, and one soft side that can catch the extra garlic butter. That keeps the meal rich without making it feel heavy.

Storage and Reheating

Grilled lobster tails are best eaten right away, while the meat is tender and the garlic butter is warm. Leftover lobster is useful, but it will never be quite as tender as it was off the grill.

  • Refrigerate: Remove cooked lobster meat from the shell and store it in an airtight container for up to 2 days.
  • Reheat gently: Warm with a little butter over low heat until just heated through.
  • Avoid harsh microwaving: High heat can make leftover lobster tough.
  • Use leftovers: Add to pasta, tacos, salads, omelets, rice bowls, or turn the meat into a buttery lobster roll recipe.

If you expect leftovers, save extra garlic butter separately for reheating. Warm the meat just enough to bring back the butter and aroma, not enough to cook it again.

FAQs About Grilled Lobster Tails

How long do lobster tails take on the grill?

Most 4–8 oz lobster tails take 5–10 minutes. Very large tails can take 12 minutes or more and should finish over lower or indirect heat.

What temperature should grilled lobster tails reach?

Aim for about 140°F / 60°C in the thickest part for juicy lobster, or 145°F / 63°C if you prefer a firmer, more conservative finish.

Should lobster tails be grilled meat-side down or shell-side down?

For split lobster tails, start meat-side down for grill marks and flavor, then flip shell-side down with the meat facing up. Lifted butterfly tails usually cook mostly meat-side up.

Do you have to thaw frozen lobster tails before grilling?

Yes. Thaw frozen lobster tails before grilling for better texture, easier cutting, and more even cooking.

What is the best size lobster tail for grilling?

The best size is usually 5–8 oz / 140–225 g per tail. It feels generous but still cooks evenly without much fuss.

Why did my lobster tail stick to the grill?

It likely had not released yet. Clean and oil the grates, pat the meat dry, and wait another 30–60 seconds before lifting again.

Why did my garlic butter burn?

The heat was likely too aggressive or the butter hit the grates too early. Use oil first, add butter after flipping, and move the tails away from harsh heat when the butter smokes hard.

Why is my lobster tail tough even though I followed the time?

Grill heat, tail thickness, and starting temperature can all change the timing. Use time as a guide, then pull by thermometer before the meat firms too much.

What goes well with grilled lobster tails?

Grilled lobster tails go well with corn, potatoes, garlic bread, lemon rice, green salad, grilled asparagus, pasta, or steak for surf and turf.

Final Tip

Once you remember the rhythm — cut, sear, flip, baste, check — grilled lobster tails stop feeling fragile. They become what they should be: sweet, smoky, buttery, and ready for lemon while the meat is still tender.