
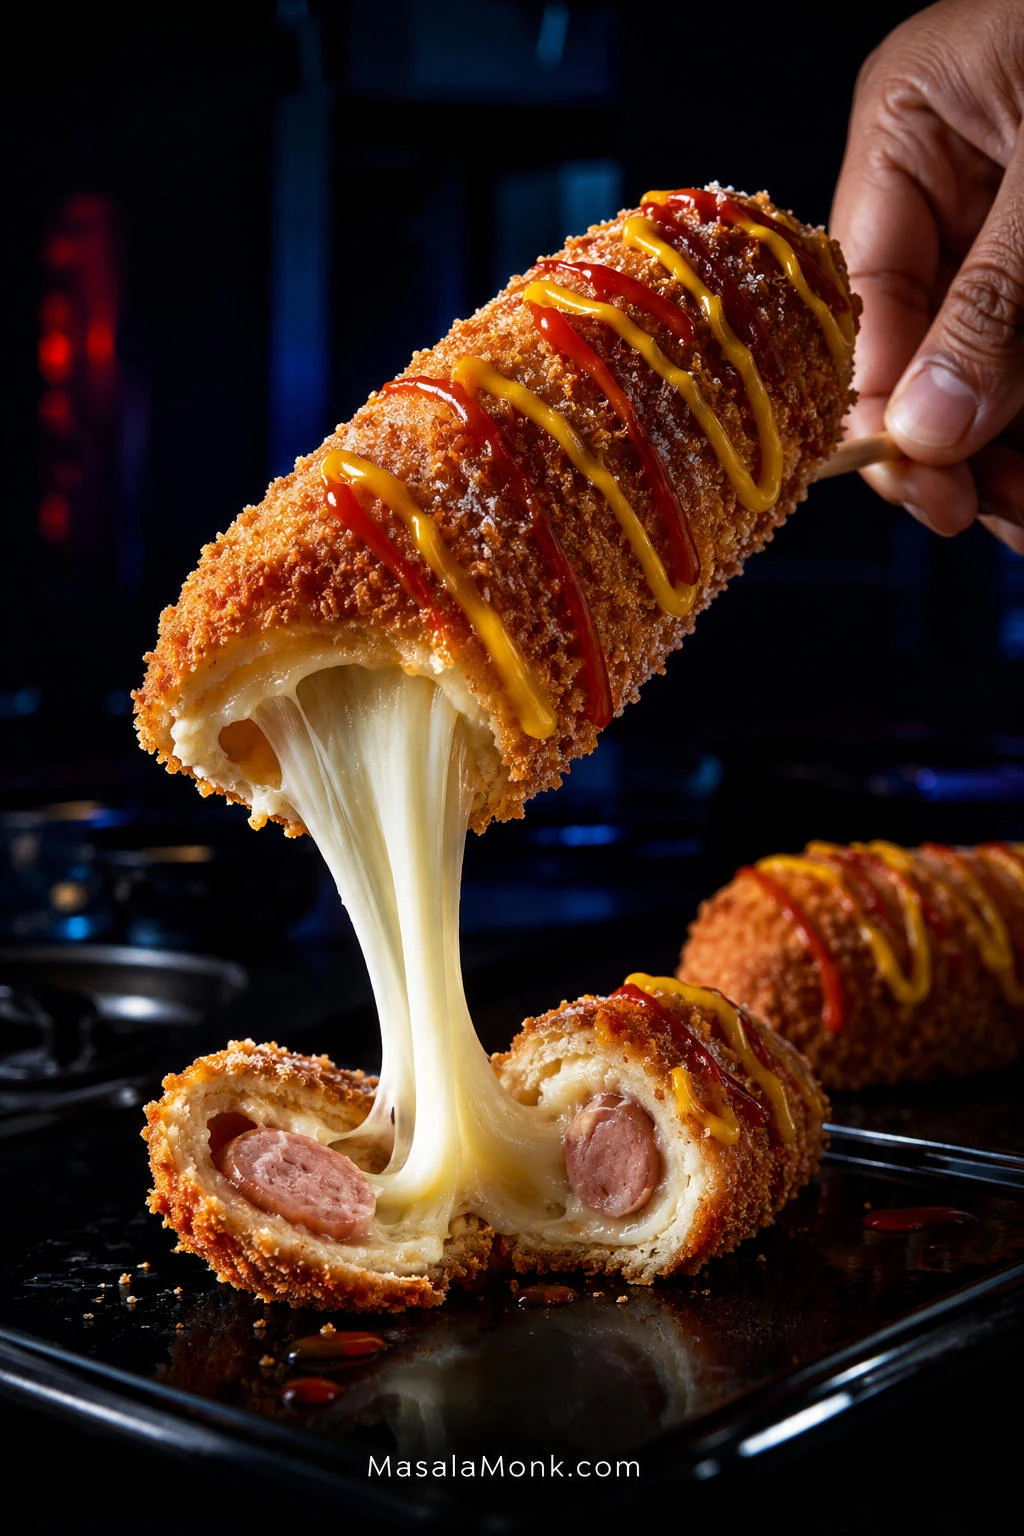
A good Korean corn dog recipe is really about that first bite: crisp, craggy panko; a soft, slightly chewy layer underneath; then hot mozzarella stretching away from the skewer while ketchup and mustard cut through the richness.
Korean corn dogs look wonderfully simple when someone else is making them. At home, trouble tends to start somewhere less glamorous: condensation beads on the cheese, sticky dough slides down the skewer, the coating gets much thicker than expected, or the mozzarella finds a way into the frying oil.
Most of those problems are easier to fix before the next skewer goes in. Dry damp cheese, adjust dough that has gone too loose, and give cooled oil another minute instead of carrying the same problem through the whole batch. This recipe uses a lightly sweet yeasted dough, low-moisture mozzarella, fully cooked hot dogs and panko to get you there.
Make It Now: Korean Corn Dogs
Recipe at a Glance
| Makes | 6 large corn dogs |
|---|---|
| Active prep | 25–30 minutes |
| Rise | 45–60 minutes, or until doubled and bubbly |
| Fry | 3–5 minutes per corn dog; about 20–30 minutes for the batch |
| Total elapsed | About 1 hour 30 minutes to 1 hour 45 minutes |
| Oil | 350°F / 175°C |
Some skewer prep happens while the dough rises, so the prep and rise times overlap.
Three Things Before You Start
- Keep the filling cold and dry. Condensation makes sticky dough much harder to keep in place.
- Keep the dough layer thin. It needs to cling and stretch now because it will puff in the oil.
- Coat and fry one at a time at first. Once the panko is on, get that skewer into the oil.
Get those three things right and the rough panko shell crackles over soft, chewy dough. More importantly, there is still plenty of sausage or cheese inside—not a giant piece of fried bread with the filling lost somewhere in the middle.
Pick Your Filling
For a first batch, put half a hot dog and one mozzarella baton on each skewer, end to end. You get the signature cheese pull without making the entire filling as leak-prone as an all-cheese corn dog. For 6 corn dogs, that means 3 fully cooked hot dogs, halved, plus 170–180 g / 6–6½ oz mozzarella.
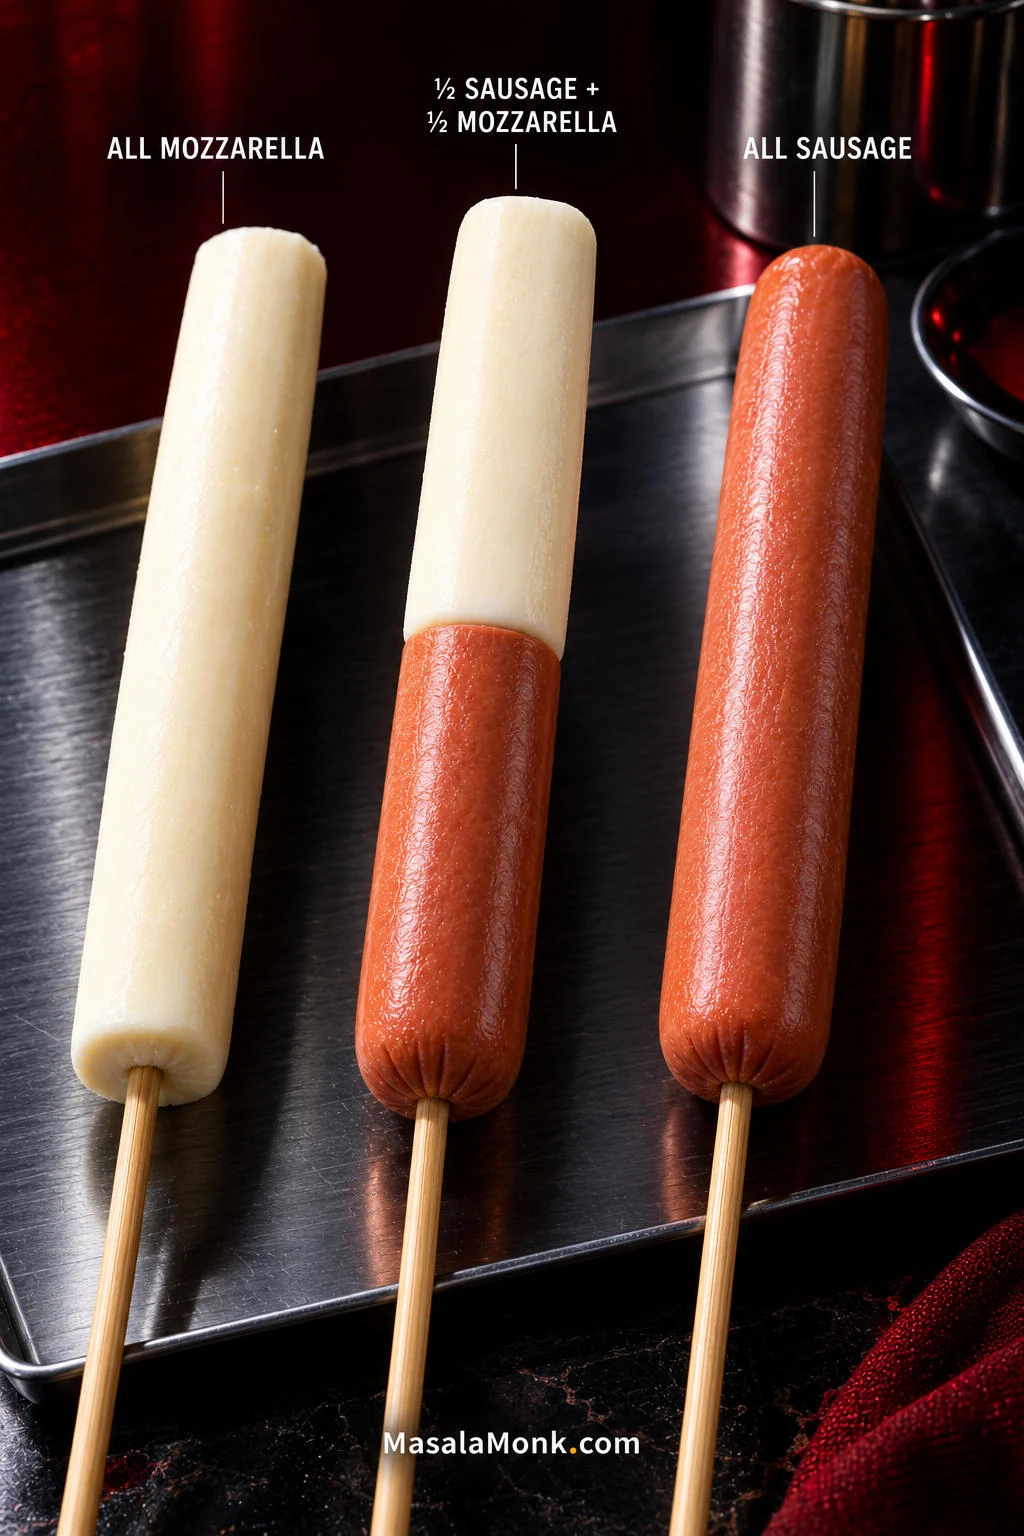
- All mozzarella: use 330–360 g / 12–13 oz. Cut 6 longer batons about the same overall length and thickness as the standard sausage-and-cheese filling.
- All sausage: use 6 fully cooked hot dogs. This is the easiest filling to fry and the least likely to leak.
- Mozzarella + cheddar: keep mozzarella as the main cheese and add a smaller amount of firm cheddar when stronger cheese flavor matters more than the longest possible pull.
Going all-in on cheese? See what a cheese leak can tell you before you fry the rest of the batch.
Ingredients
Sticky Yeast Dough
- 220 g (7¾ oz / 1¾ cups + 1 tablespoon) all-purpose flour, plus a little more only if needed
- 225 ml (scant 1 cup) warm water, 100–110°F / 38–43°C
- 25 g (2 tablespoons) granulated sugar
- 5 g instant yeast
- 4 g fine salt
Filling
- 3 fully cooked hot dogs, cut in half crosswise
- 170–180 g (6–6½ oz) firm low-moisture mozzarella, cut into 6 sturdy batons 2–2½ inches / 5–6 cm long
Look for a firm block labeled low-moisture mozzarella; in some shops it is sold as pizza mozzarella. Whole-milk mozzarella gives especially good flavor and stretch, but low moisture matters more than the exact label. Fresh mozzarella packed in water or brine is much harder to keep inside the crust.
Mozzarella string cheese is a handy fallback, though its thinner shape gives you a smaller cheese center.
Coating and Frying
- 30 g (¼ cup) all-purpose flour, for dusting
- 120–140 g panko, enough for a generous shallow tray
- Neutral frying oil such as canola, vegetable or rice-bran oil, enough for 3 inches / 7–8 cm depth
- Granulated sugar, optional
- Ketchup and yellow mustard, for serving
Panko’s larger flakes give the shell its rough, brittle crunch. Regular breadcrumbs can substitute, but the crust will be finer and less craggy.
Useful equipment: a kitchen scale, deep-fry thermometer, heavy deep pot, 6 sturdy wooden chopsticks or thick bamboo skewers, a shallow dish for the dough and a wire rack. Before adding oil, check that the coated part of a full skewer can lie comfortably inside the pot.
1. Mix a Sticky, Stretchy Dough
Stir together the flour, sugar, instant yeast and salt. Add the warm water and mix firmly until no dry flour remains.
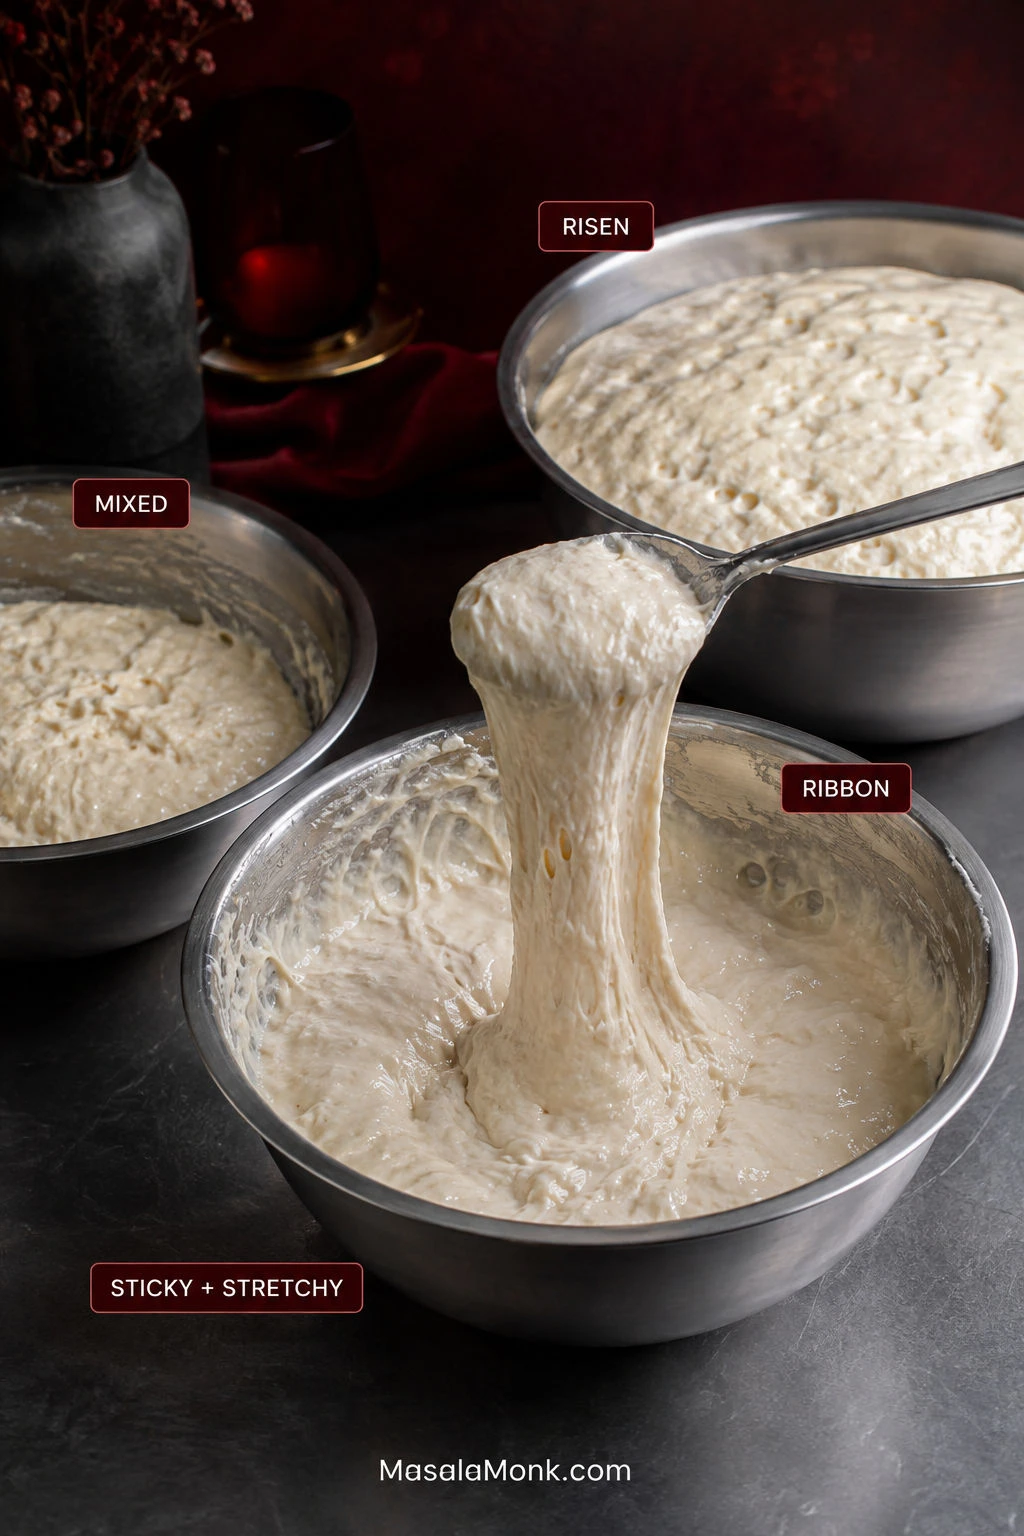
Instant yeast does not need to sit in the water waiting to foam. What you want now is very wet bread dough: sticky, stretchy and slightly unruly.
Lift some with a spoon. It should pull into a sticky ribbon and cling to itself.
- Flowing instead of stretching? Add flour 1 tablespoon / 8 g at a time.
- Tearing instead of stretching? Add water 1 teaspoon / 5 ml at a time.
Humidity changes how this dough feels. Let the cling and stretch guide you; it does not have to look identical from one kitchen to the next.
2. Let It Rise Until Puffy
Cover the bowl and leave it for 45–60 minutes, until the dough has doubled and looks visibly bubbly and aerated.
Watch the dough more closely than the clock. A cool room can take longer. Active dry yeast can replace instant yeast in the same weight; give it whatever extra time it needs to reach the same puffy stage.
3. Build and Chill the Skewers
While the dough rises, thread half a hot dog onto each skewer, followed by one mozzarella baton so the cheese sits toward the eating end.
Keep the sausage and mozzarella fairly similar in thickness. A skinny strip of cheese melts much faster than a substantial baton.
If firm mozzarella cracks when you push in the wooden skewer, make a narrow pilot hole with a thin metal skewer first. Thin, smooth barbecue skewers can also spin inside the sausage while you try to coat it; a wooden chopstick or broader bamboo skewer gives you much better control.
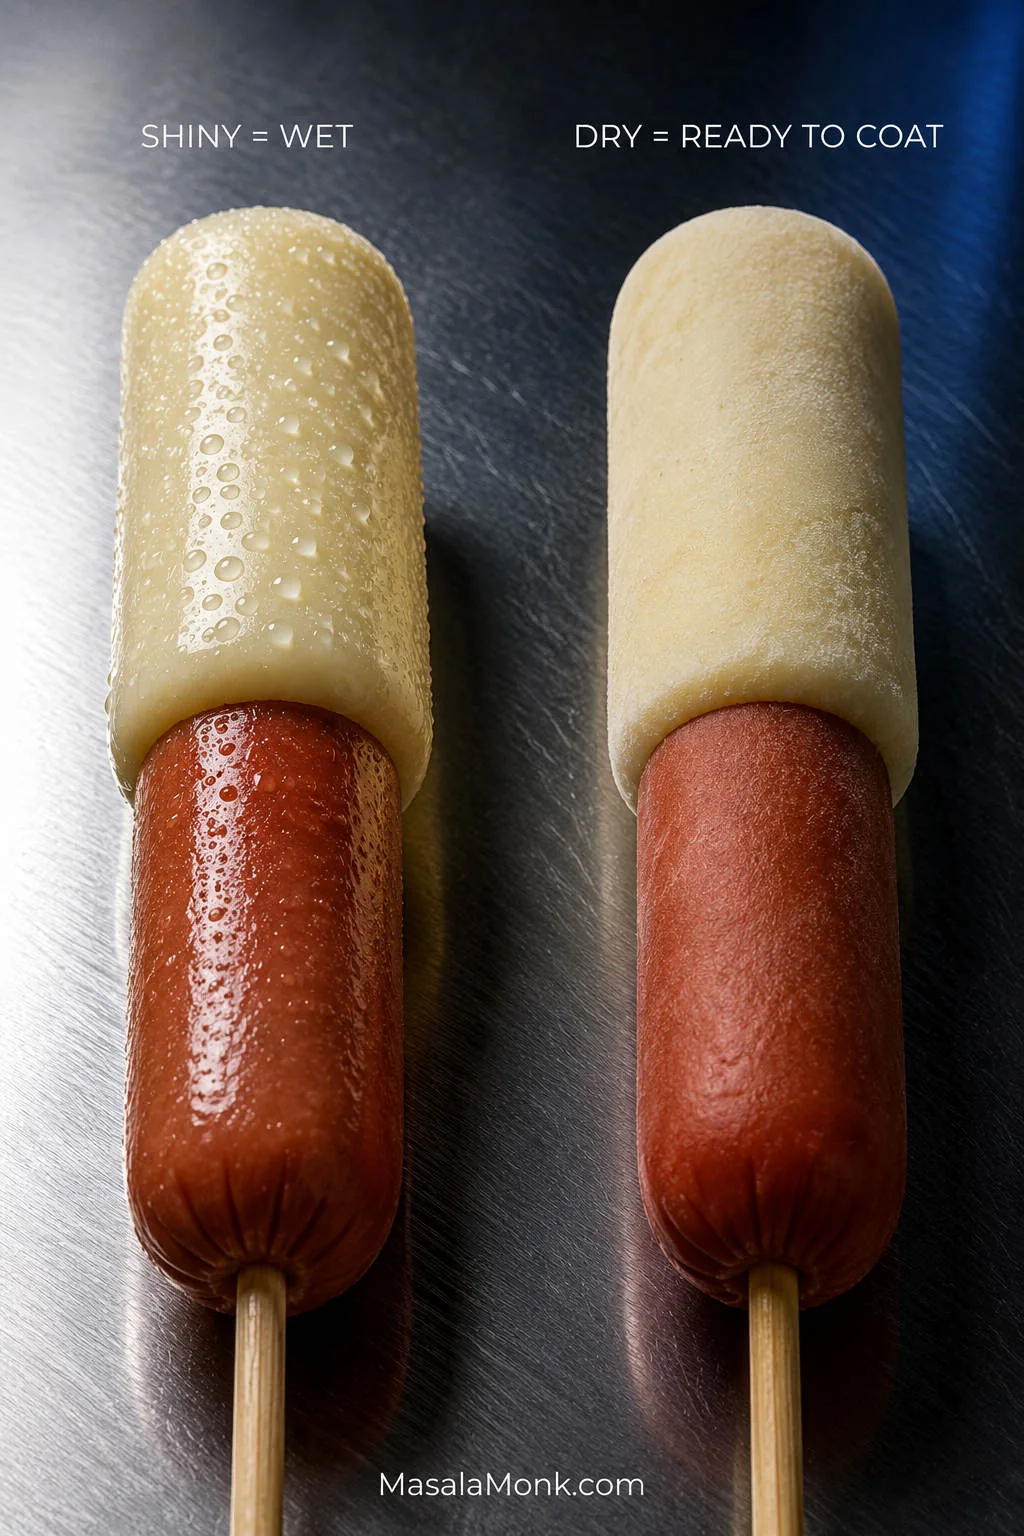
Keep the assembled skewers refrigerated until the dough is ready. In a hot kitchen, or with all-cheese corn dogs, a 10-minute freezer chill immediately before coating can help. The cheese needs to be very cold, not frozen solid.
4. Heat the Oil and Set Up the Coating Line
Pour 3 inches / 7–8 cm of oil into a heavy pot, leaving plenty of empty space above it. Heat to 350°F / 175°C.
Keep water away from the pot and never leave heating oil unattended. If deep frying is unfamiliar, the USDA deep-fat frying safety guidance is worth reading before you start.
Set everything up in this order: cold skewers → flour → dough → panko → oil → wire rack.
5. Dry, Flour and Wrap One Skewer
Take one cold skewer from the refrigerator and look at it before it touches the dough. A shiny surface means condensation.
Blot the cheese and sausage dry, dust with just enough flour to remove the shine, then tap off anything loose.
Now comes the messy bit. Lay the skewer in the dough and rotate it while pulling and stretching the dough around the filling. Your fingers may get sticky and the first wrap may look uneven. Keep turning, patch thin spots and smooth them with slightly damp fingertips.
Think thin shell—roughly ⅛ inch / 3 mm as a visual guide, not a thick blanket of dough. Seal the cheese tip and the join between cheese and sausage particularly well.
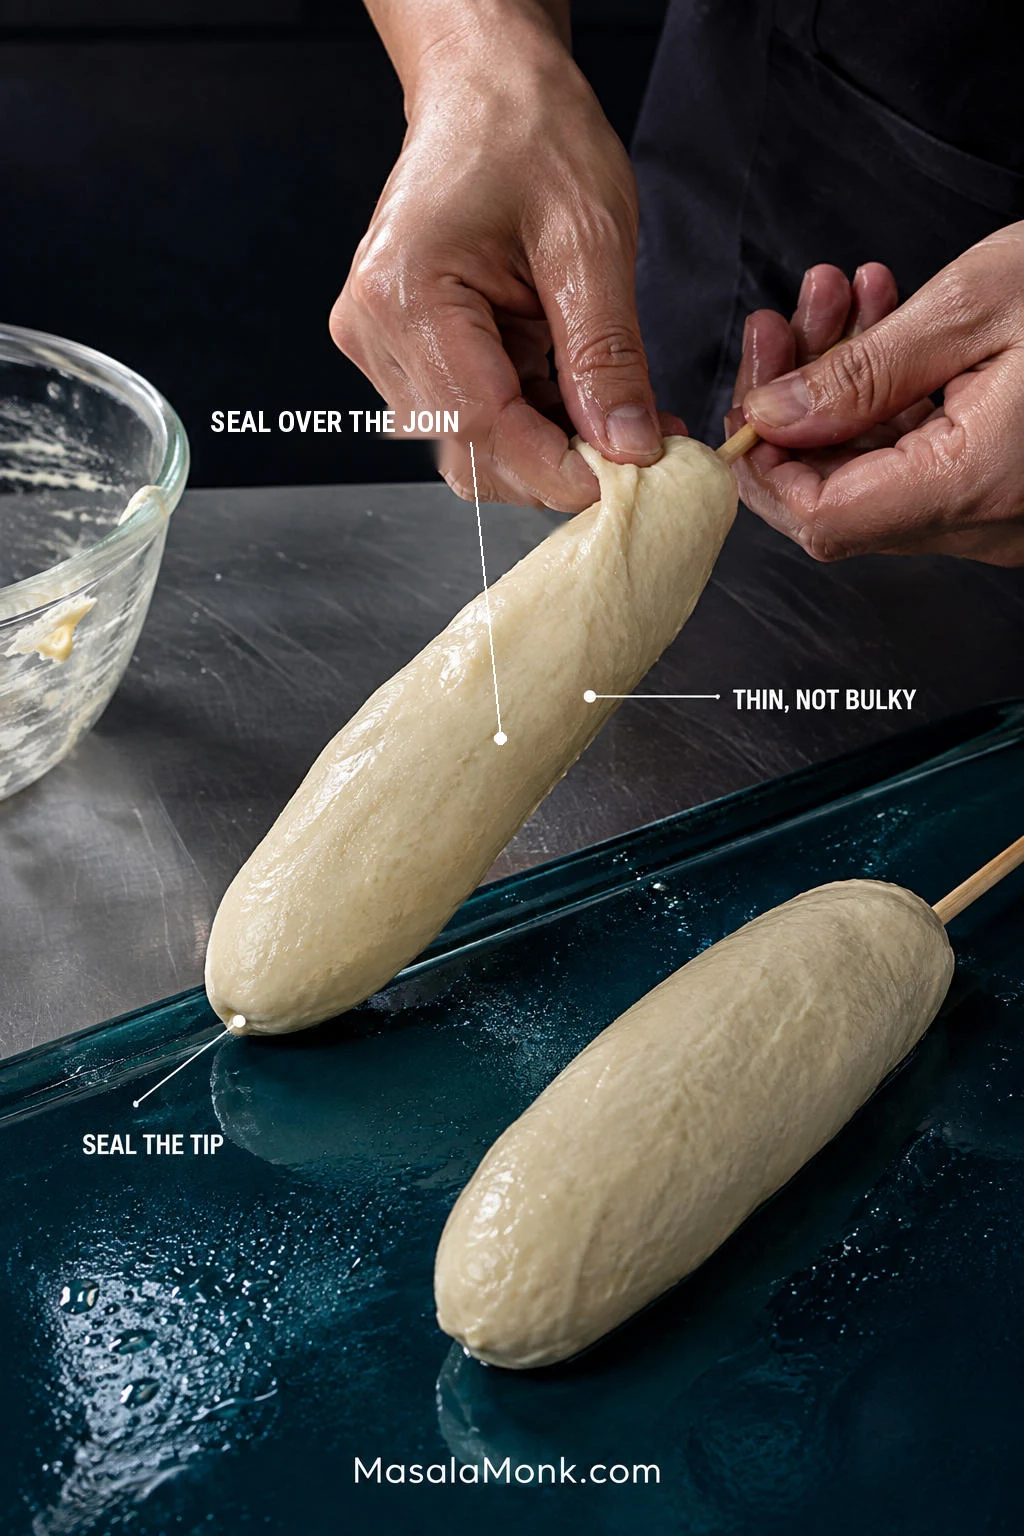
If the corn dog already looks enormous, take some dough off.
6. Press On the Panko
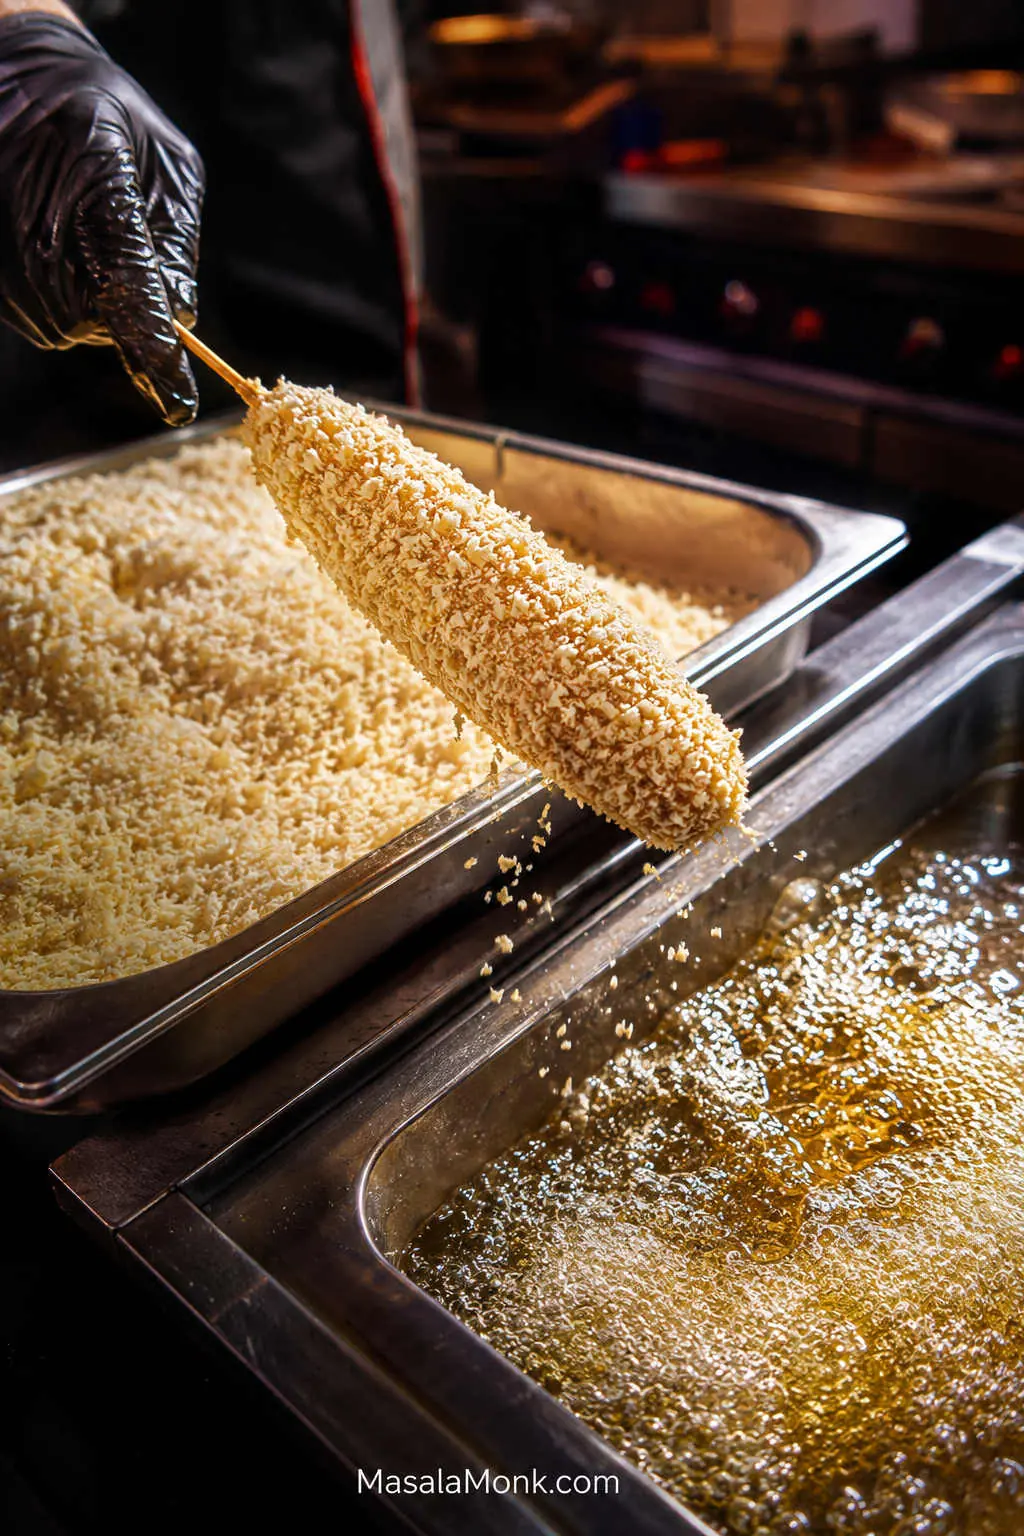
Set the dough-covered skewer in the panko and press the crumbs over the entire surface. Look for complete coverage, especially around the cheese tip—no shiny patches of sticky dough peeking through.
Once the panko is on, fry it straight away.
Coat one → panko one → fry one.
7. Fry the First One and Calibrate the Batch
Lower the first corn dog gently into the oil away from you. Fry at 350°F / 175°C for 3–5 minutes, turning as needed.
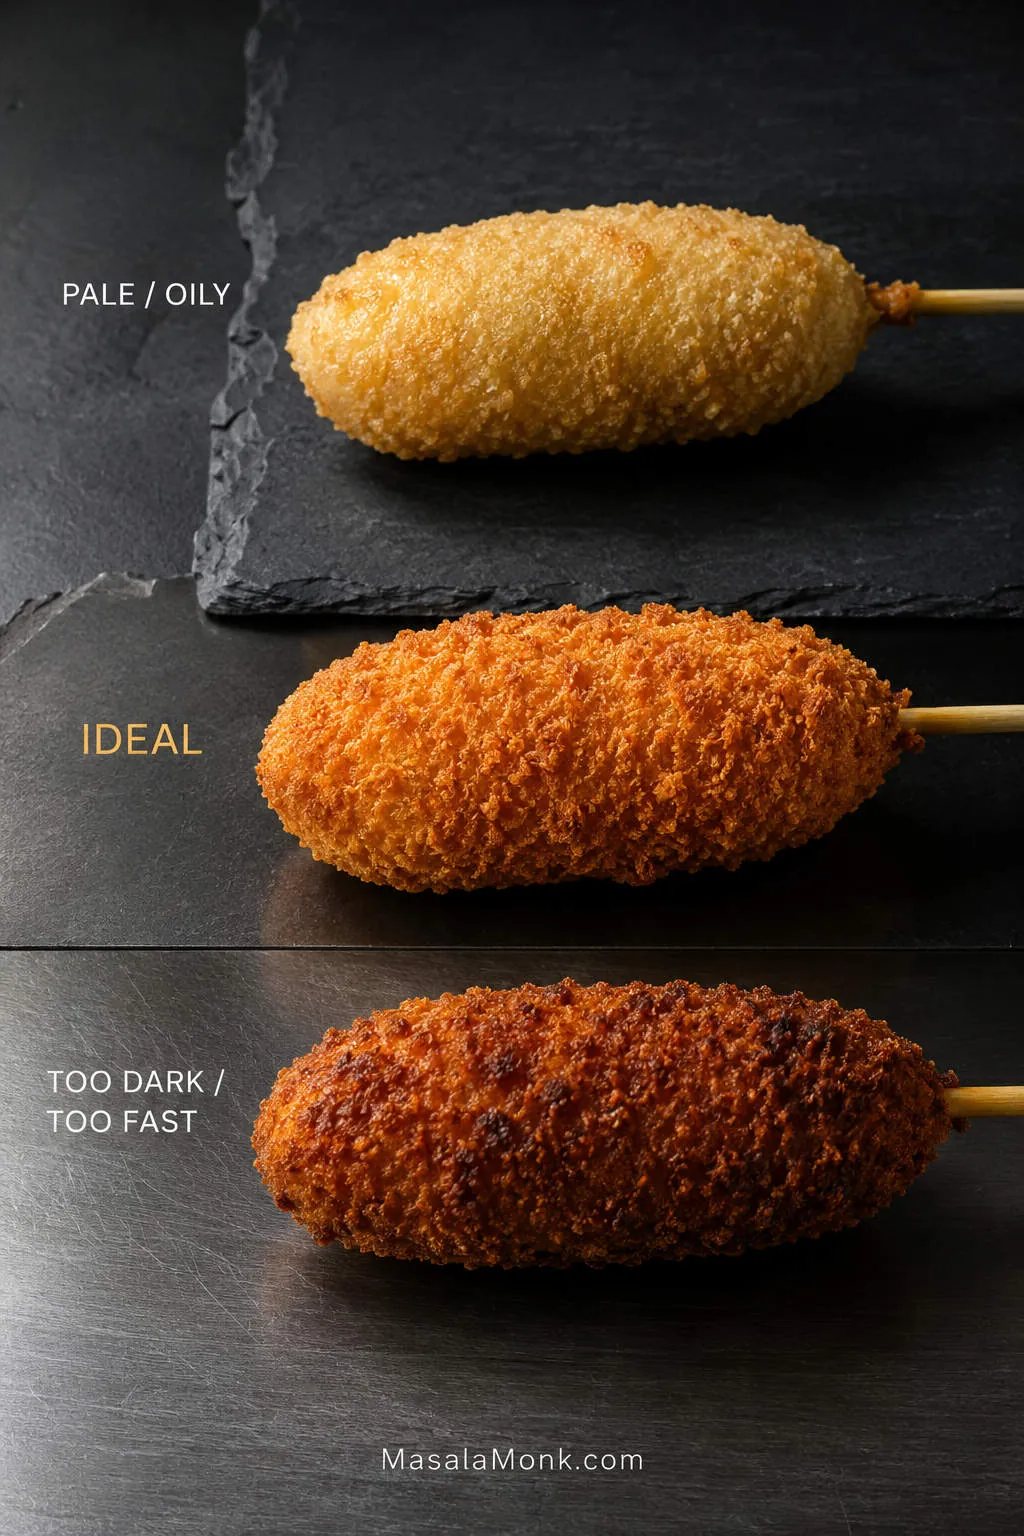
Look for steady bubbles around the shell. Violent, racing bubbles mean things are moving too fast. Weak bubbling and a pale coating tell you the oil has cooled.
The clock gives you a window. Browning tells you what the oil is actually doing.
- Dark brown in only 2 minutes: check both the oil temperature and whether the dough layer is too thick.
- Pale and increasingly oily: let the oil recover before continuing.
- Deep golden in 3–5 minutes: that’s what you’re looking for.
Let the First One Teach You Something
The first corn dog is allowed to be wonky.
Fry it anyway.
While it cools, keep an eye on the thermometer and adjust the burner as needed to hold the oil around 350°F / 175°C. Do not leave the hot oil unattended while you inspect the first corn dog.
If it browned at a normal pace, stayed intact and still looks reasonably thin around the filling, there is no need to cut it just for the sake of checking. Keep going.
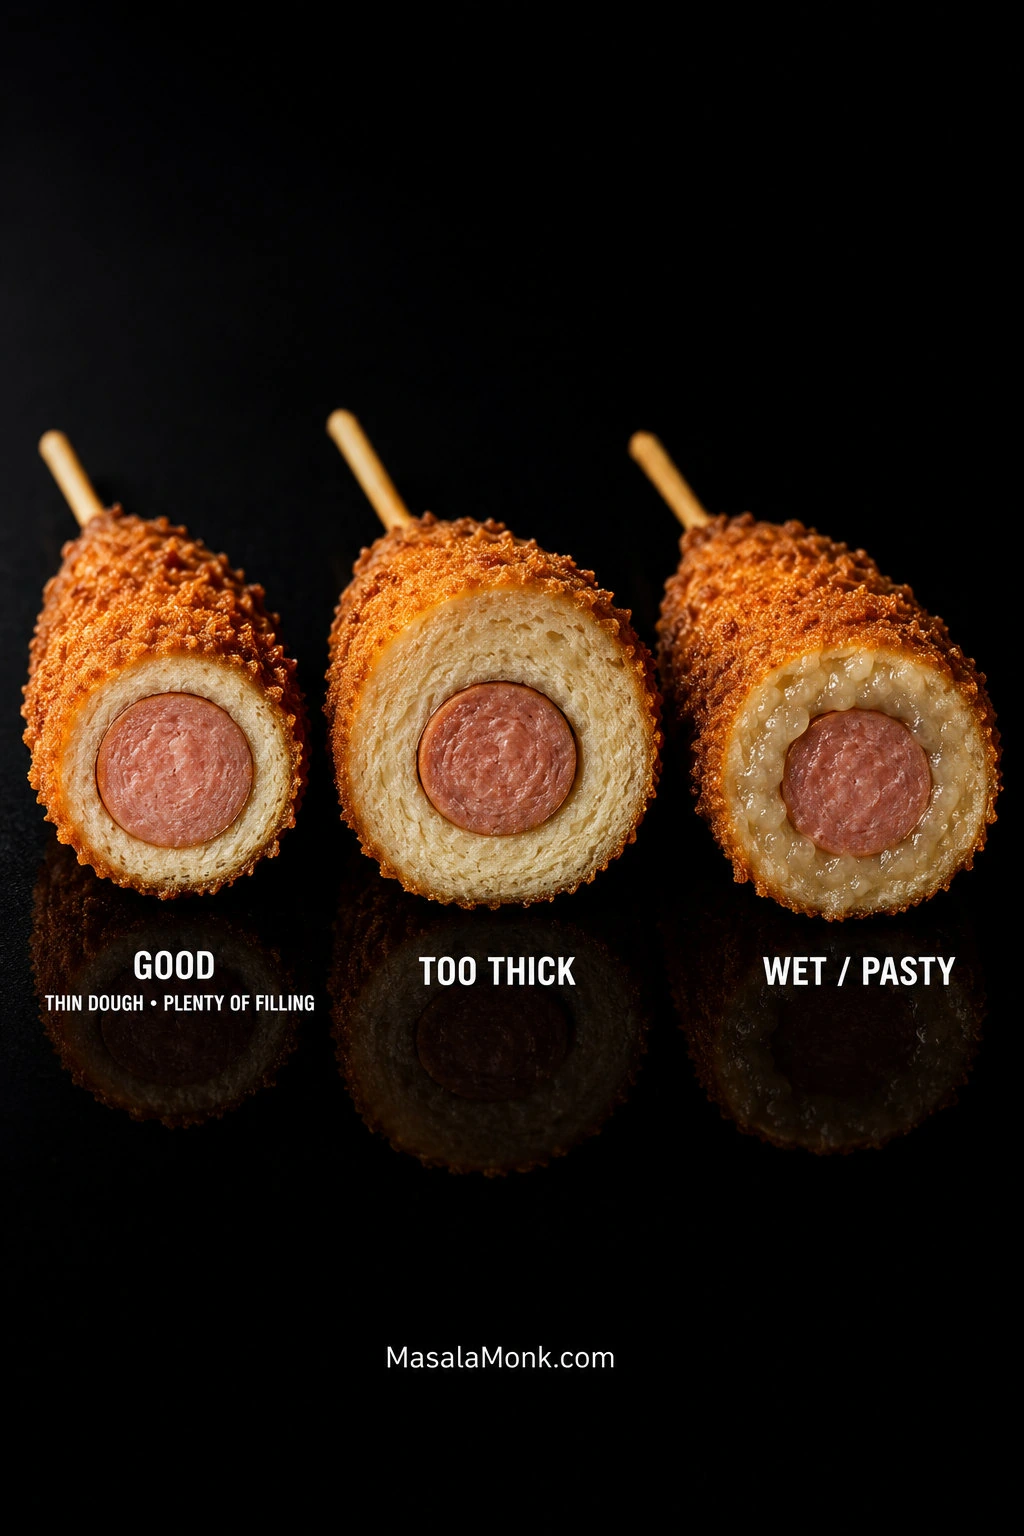
If it browned strangely, leaked, or looks thicker than you expected, let it cool enough to handle and cut it open. Under the panko, you’re looking for soft, bread-like dough rather than a wet or pasty layer. The filling should still look substantial, surrounded by a relatively thin band of dough.
A cheese leak shows you where the next skewer needs a better seal. Heavy bread around the filling means less dough next time. Fast browning means checking both the oil temperature and the thickness of the coating before the next one goes in.
Once the first one is right, you can fry two at a time if the pot is roomy and you can get both coated and into the oil promptly. Otherwise, keep working one at a time. Skim dark panko and dough fragments from the oil between batches.
8. Finish With Sugar and Sauce
Let each corn dog drain briefly on a wire rack, then dust or lightly roll the hot shell in granulated sugar if you want the sweet-savory shop-style finish.
A little sugar lands first, then the salty sausage and molten cheese take over; sharp yellow mustard keeps the whole thing from feeling too rich. Ketchup and mustard are hard to beat, but the sugar can stay off entirely if savory is more your thing.
Add the toppings while the shell is hot, then let the center cool just enough to bite safely. Molten mozzarella can stay much hotter than the crust around it.
Serving Six at Once
The best corn dog is the one that just left the fryer. If people are already hovering near the stove, hand them out as they come. That’s when the panko is crispest, the little crust shards break away at the first bite and the cheese still pulls.
If they need to wait, keep them uncovered on a wire rack in a 200°F / 95°C oven for 5–10 minutes. Stacking or covering them traps steam and softens the crust.
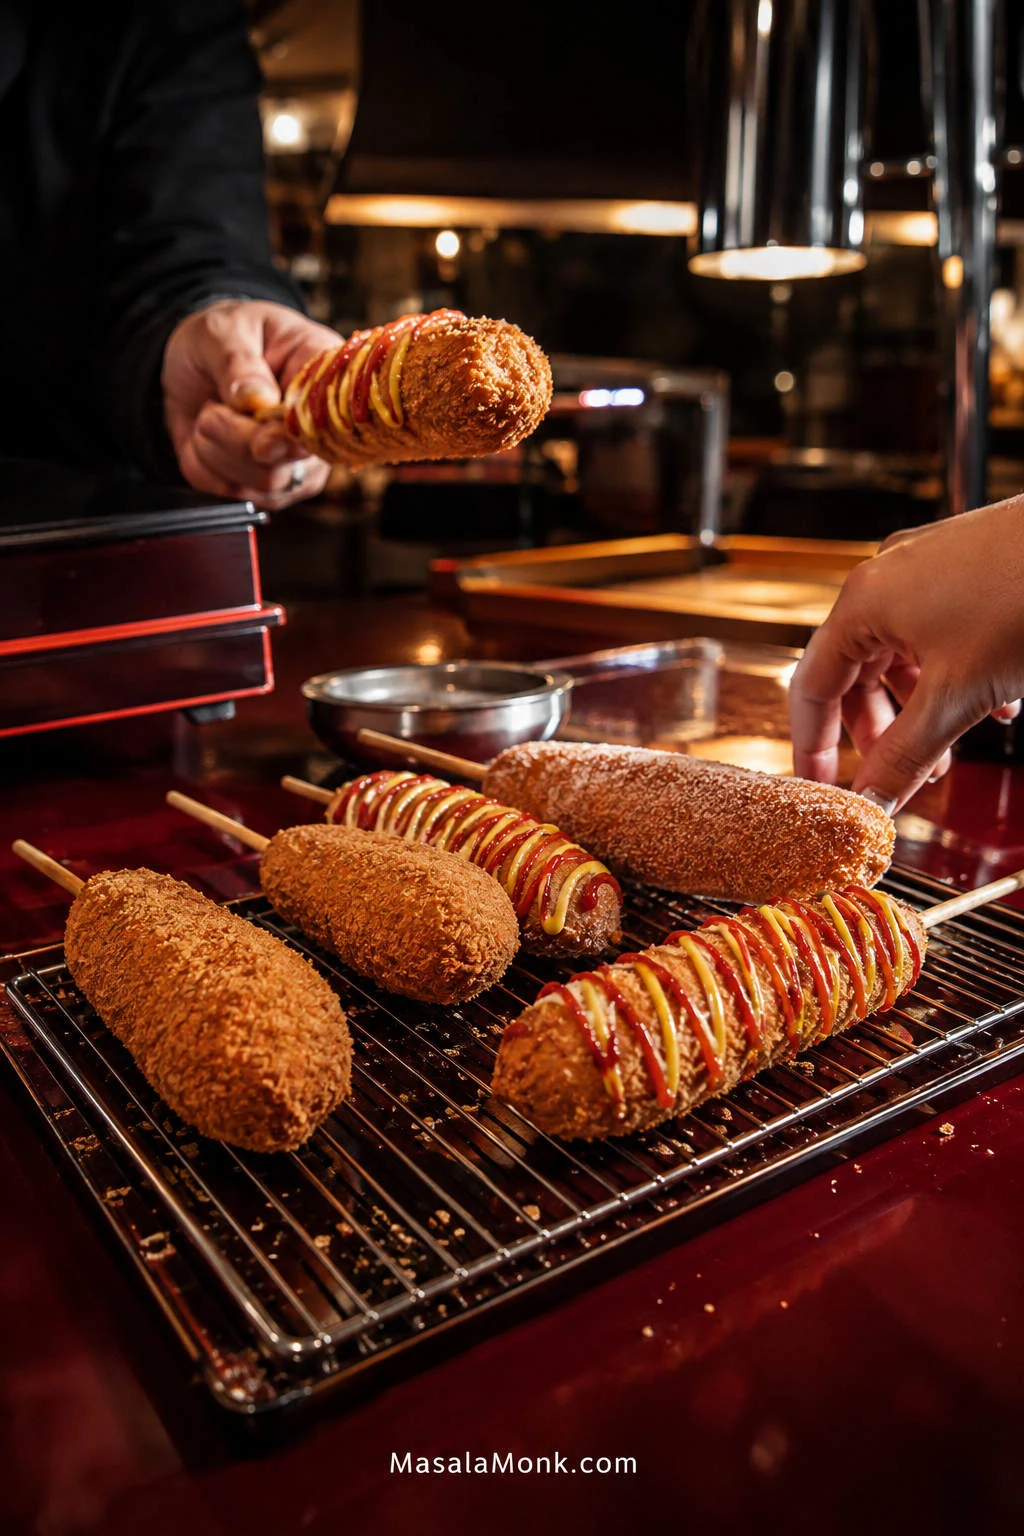
Once the classic batch is finished, the other options become much easier to play with: try the no-yeast version, potato corn dogs, or one of the crunchier coatings below.
Korean Corn Dog Batter and Cheese
Why the “Batter” Behaves Like Dough
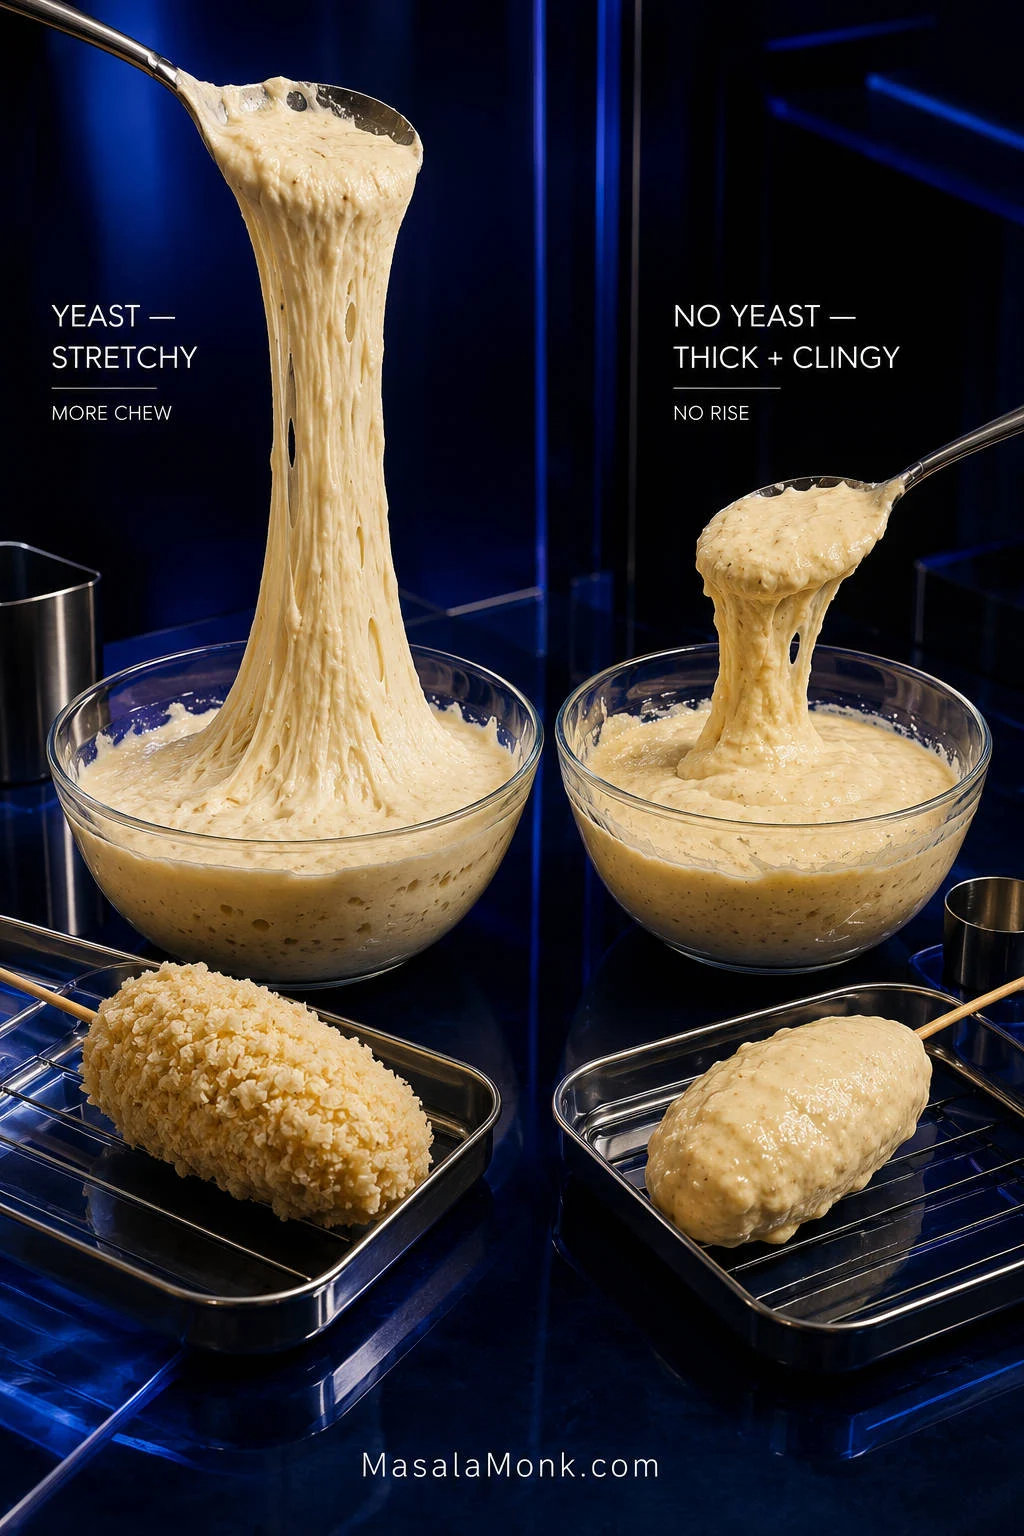
The word batter is a little misleading here. This yeasted coating behaves more like very wet bread dough: it stretches around the skewer instead of pouring over it.
That is why the method focuses on cling and stretch rather than a perfectly smooth consistency. The corrections in Step 1 are simply there to bring the dough back to that behavior.
Some Korean hotdog recipes include rice flour or glutinous rice flour alongside wheat flour; plenty do not. This all-purpose-flour dough gives you a soft, chewy layer without requiring either one.
Can You Make Korean Corn Dogs Without Yeast?
Yes. You lose some of the yeasted chew, but you also lose the hour-long wait.
Use this batter in place of the yeast dough. Keep the same cold skewers, light flour dusting, panko coating and frying setup.
For 6 corn dogs, mix:
- 160 g (1⅓ cups) all-purpose flour
- 18 g (1½ tablespoons) sugar
- 8 g (2 teaspoons) baking powder
- 3 g fine salt
- 1 large cold egg
- 100–120 ml cold milk, starting with 100 ml
Whisk the dry ingredients, then add the egg and 100 ml milk. Add more milk only until the batter is thick enough to cling to a cold, lightly floured skewer instead of running off it.
If it softens while you work in a warm kitchen, chill it briefly. There is no proofing step. Fry at 350°F / 175°C until the coating is browned and set, with a bread-like interior rather than a wet or pasty layer.
Prefer the classic yeasted version? Go back to the main Korean corn dog method.
Choosing Cheese for Stretch or Flavor
Mozzarella gives you the longest pull. Keep it as the main cheese when stretch matters most.
For stronger cheese flavor, add a smaller piece of firm cheddar alongside it. The center tastes richer, but the pull becomes a little shorter.
What Makes a Korean Corn Dog Different?
Korean hotdogs differ most clearly from American corn dogs in their coating, fillings and finish.
| Korean corn dog | American corn dog | |
|---|---|---|
| Coating | Wheat- or rice-based, often with panko | Usually cornmeal-based batter |
| Filling | Sausage, mozzarella or both; other fillings exist | Usually a hot dog |
| Crunch | Panko, potato and other coatings | Usually comes from the fried batter itself |
| Finish | Often sugar plus savory sauces | Usually savory condiments |
In Korea, these battered snacks on sticks are commonly called hotdogs (핫도그). Gamja (감자) means potato, so gamja-hotdog refers to the potato-coated style. Maangchi’s gamja-hotdog recipe is a useful Korean reference for both the terminology and the potato variation.
Korean Potato Corn Dogs (Gamja Hotdogs)
Prep the Potato
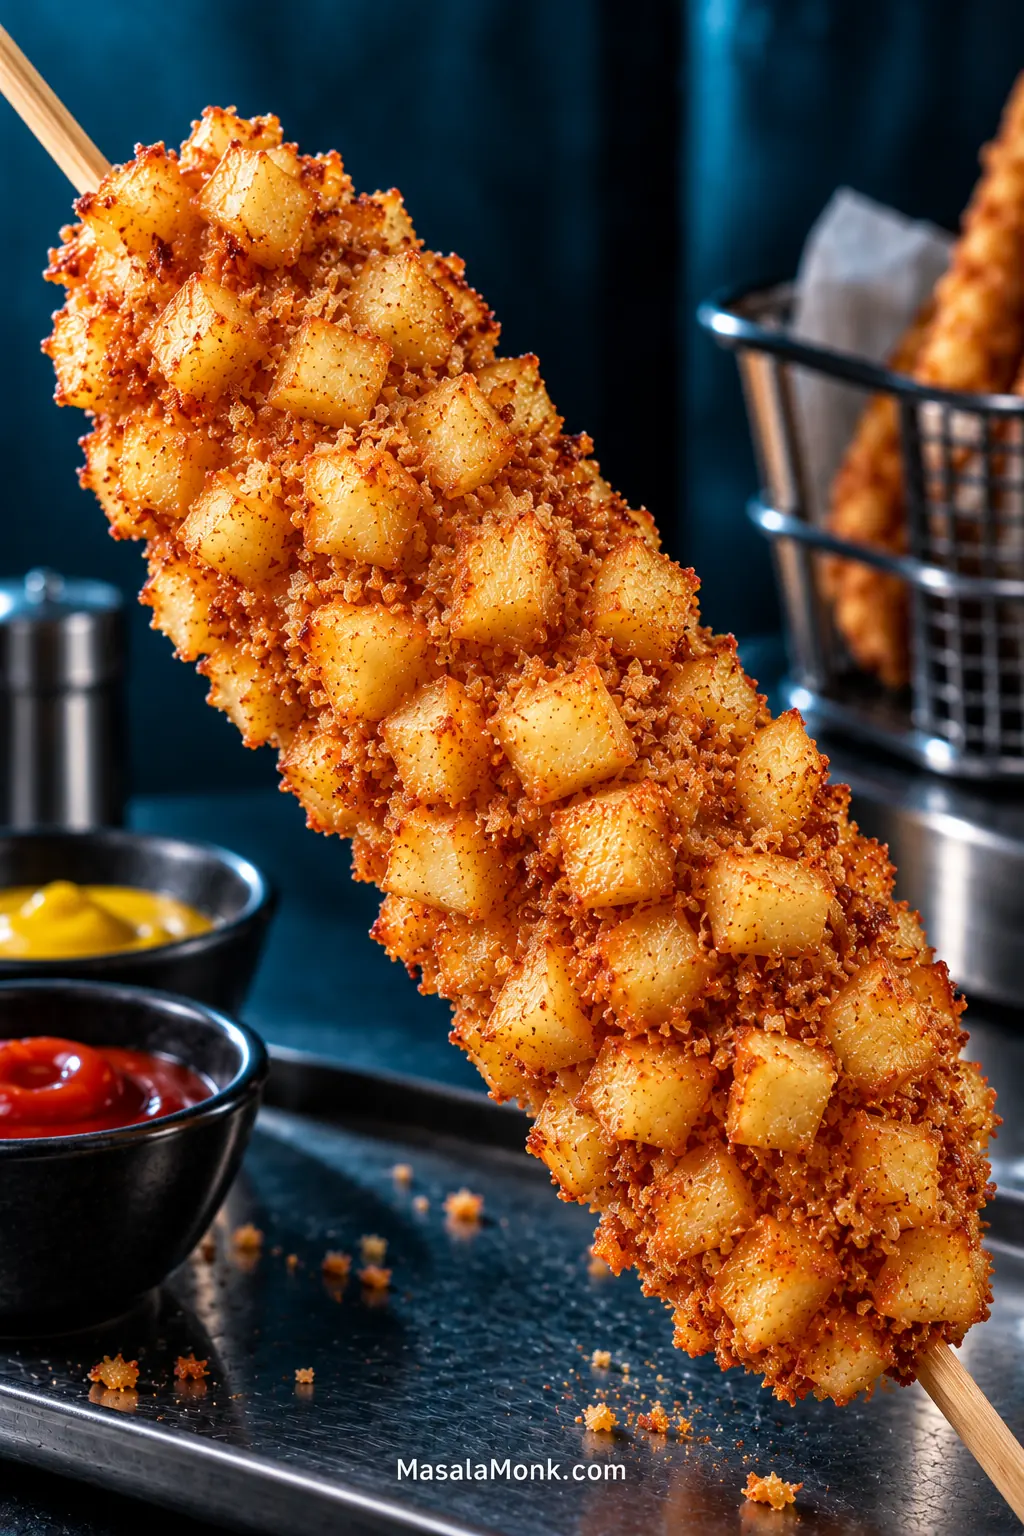
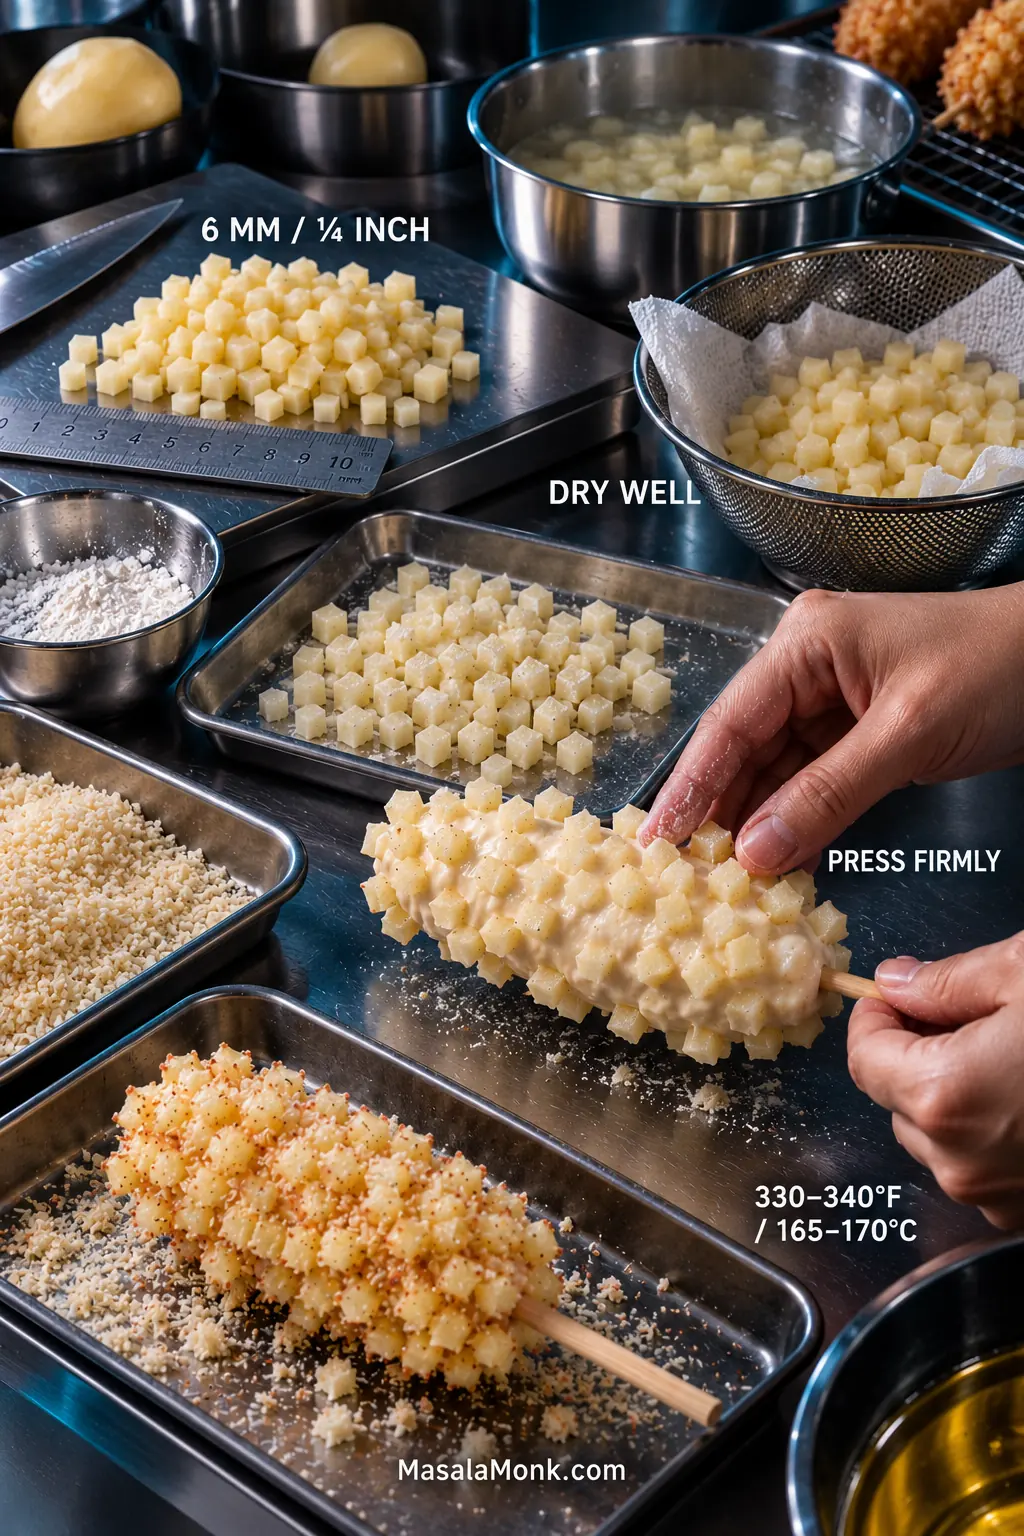
To make 3 of the 6 corn dogs potato-coated, use 250 g / 9 oz peeled potato and 1–2 tablespoons flour or cornstarch, plus panko. Double the potato if you want all six coated this way.
Cut the potato into ¼-inch / 6-mm cubes. Big chunks are harder to attach, slower to soften and awkward to bite once fried.
Rinse the cubes, blanch for 2–3 minutes, then drain and dry them very well. The edges are just beginning to soften, but the cubes still hold their shape. Toss with a light dusting of flour or cornstarch.
Coat and Fry
Wrap the skewer with dough, press the potato cubes firmly into the surface, then fill exposed sticky gaps with panko.
Once the little cubes cover the whole skewer, a couple of playful Korean nicknames Maangchi records—roughly “ugly hotdog” and “goblin’s club hotdog”—suddenly make sense.
A few cubes may fall into the oil. Skim them out and press the next coating more firmly.
For fresh potato, lower the oil to 330–340°F / 165–170°C and begin checking near 5 minutes. Many take 5–7 minutes.
The best bite has crisp potato corners and panko ridges outside, then tender potato, soft dough and hot filling underneath. With cheese-heavy corn dogs, take them out as soon as the potato and dough are done; extra frying rarely does molten mozzarella any favors.
Frozen French Fry Shortcut
Chop frozen French fries into small pieces and press them into the dough straight from frozen. Because the fries are already partially cooked, skip the blanch and use the regular 350°F / 175°C frying temperature. Cook until the dough is set and the outside is crisp.
Back to the main method or see more coatings and toppings.
Coatings, Sauces and Other Variations
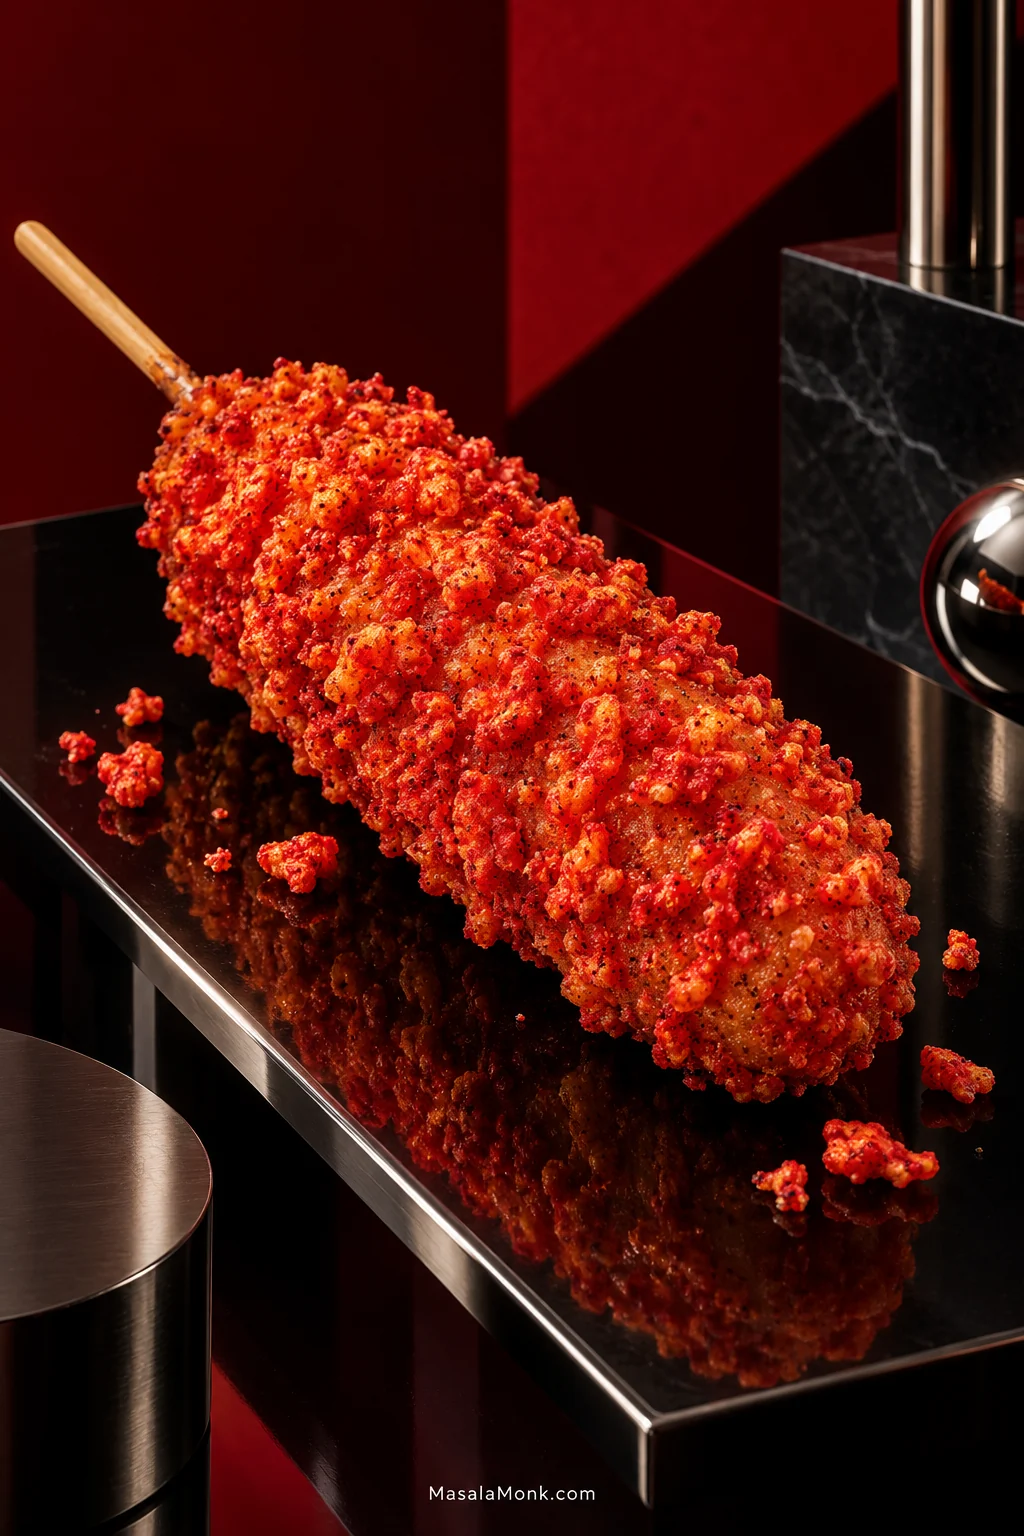
Flamin’ Hot Cheetos Coating
For a modern shop-style variation, Flamin’ Hot Cheetos make the coating loud on purpose: bright red, salty and spicy.
Keep enough panko in the mixture to build a complete shell, then add finely crushed Cheetos until the color and seasoning are where you want them. For the brightest red finish, you can fry in panko first, then press fine Cheeto crumbs onto the hot finished crust while there is still enough surface oil for them to cling.
If the red crumbs go into the fryer, watch the crust itself instead of waiting for ordinary golden-brown color; the seasoning makes color a poor doneness guide.
Ramen and Crispy Rice Coatings
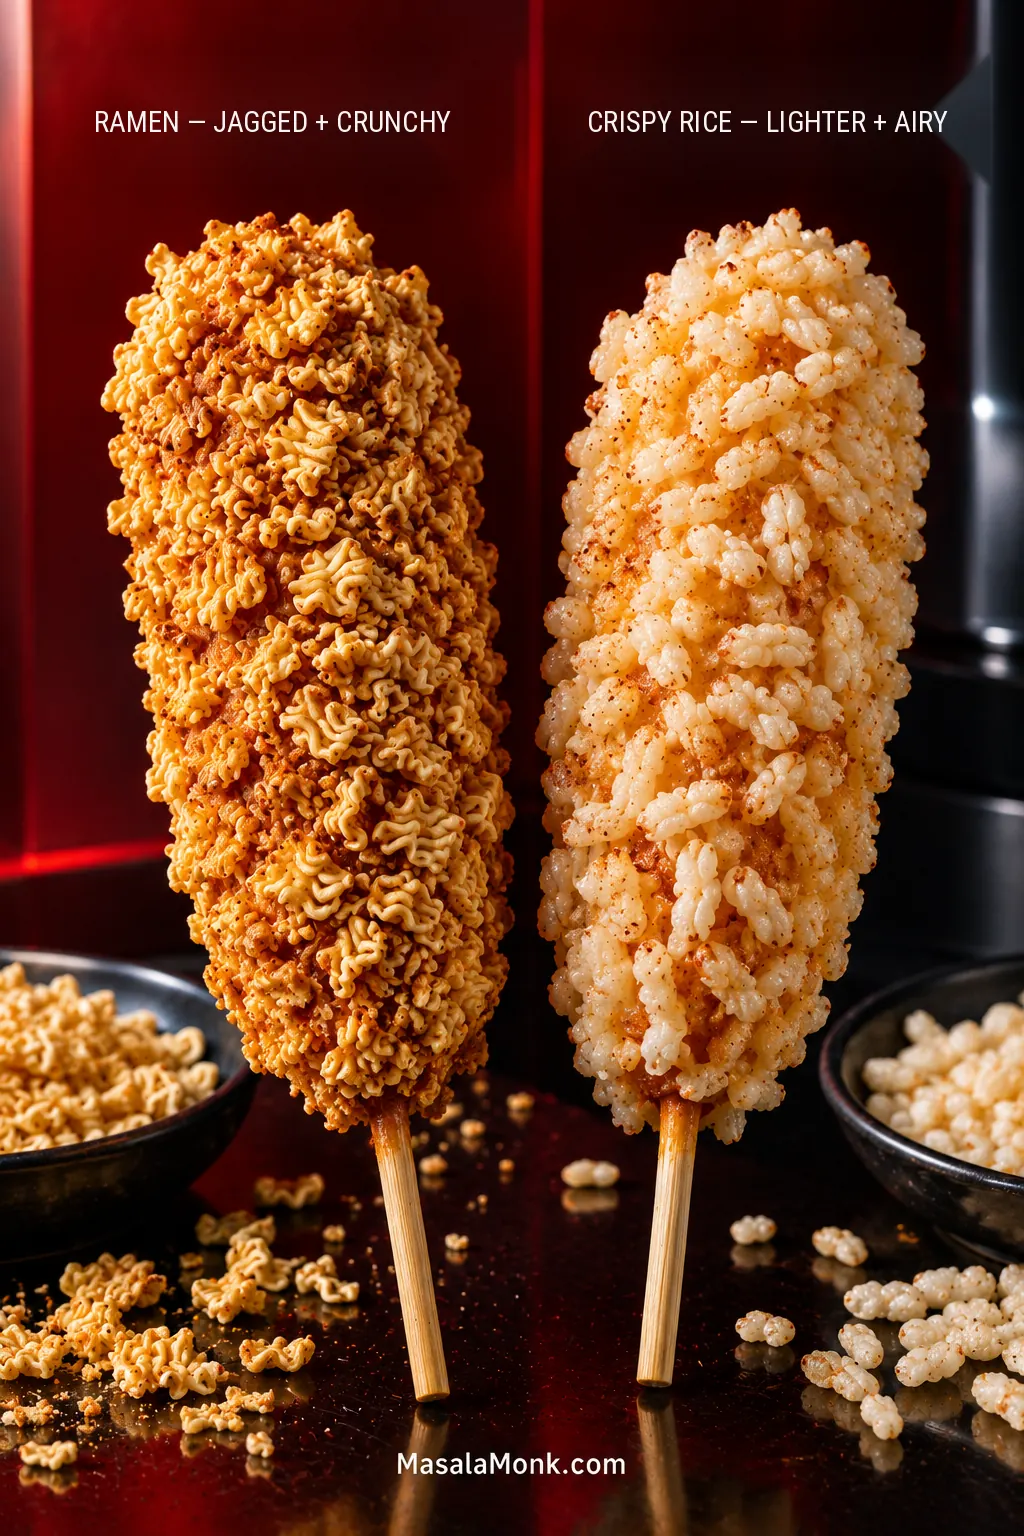
Crushed uncooked ramen gives the outside a jagged, extra-crunchy shell. Break it fairly small so the pieces can press into the sticky dough. Crispy or puffed rice makes a lighter coating; press it on firmly and use some panko to cover any bare sticky patches.
More Sauces and Toppings
For something creamy, try spicy mayo or gochujang mayo. Sweet chili sauce gives you a sweeter, tangier option without hiding the fried crust.
Our homemade mayonnaise guide includes spicy mayo and gochujang-mayo options if you want to make those yourself.
Something not behaving? Jump to the troubleshooting guide for coating, frying and cheese problems.
When Something Goes Wrong
Start with the moment the problem appeared. That often tells you more than the problem itself.
| Problem | What to Check or Do |
|---|---|
| Dough slides off | Touch the filling first. If it is shiny or damp, blot it dry and dust lightly with flour. Only then adjust the dough if it still will not cling. |
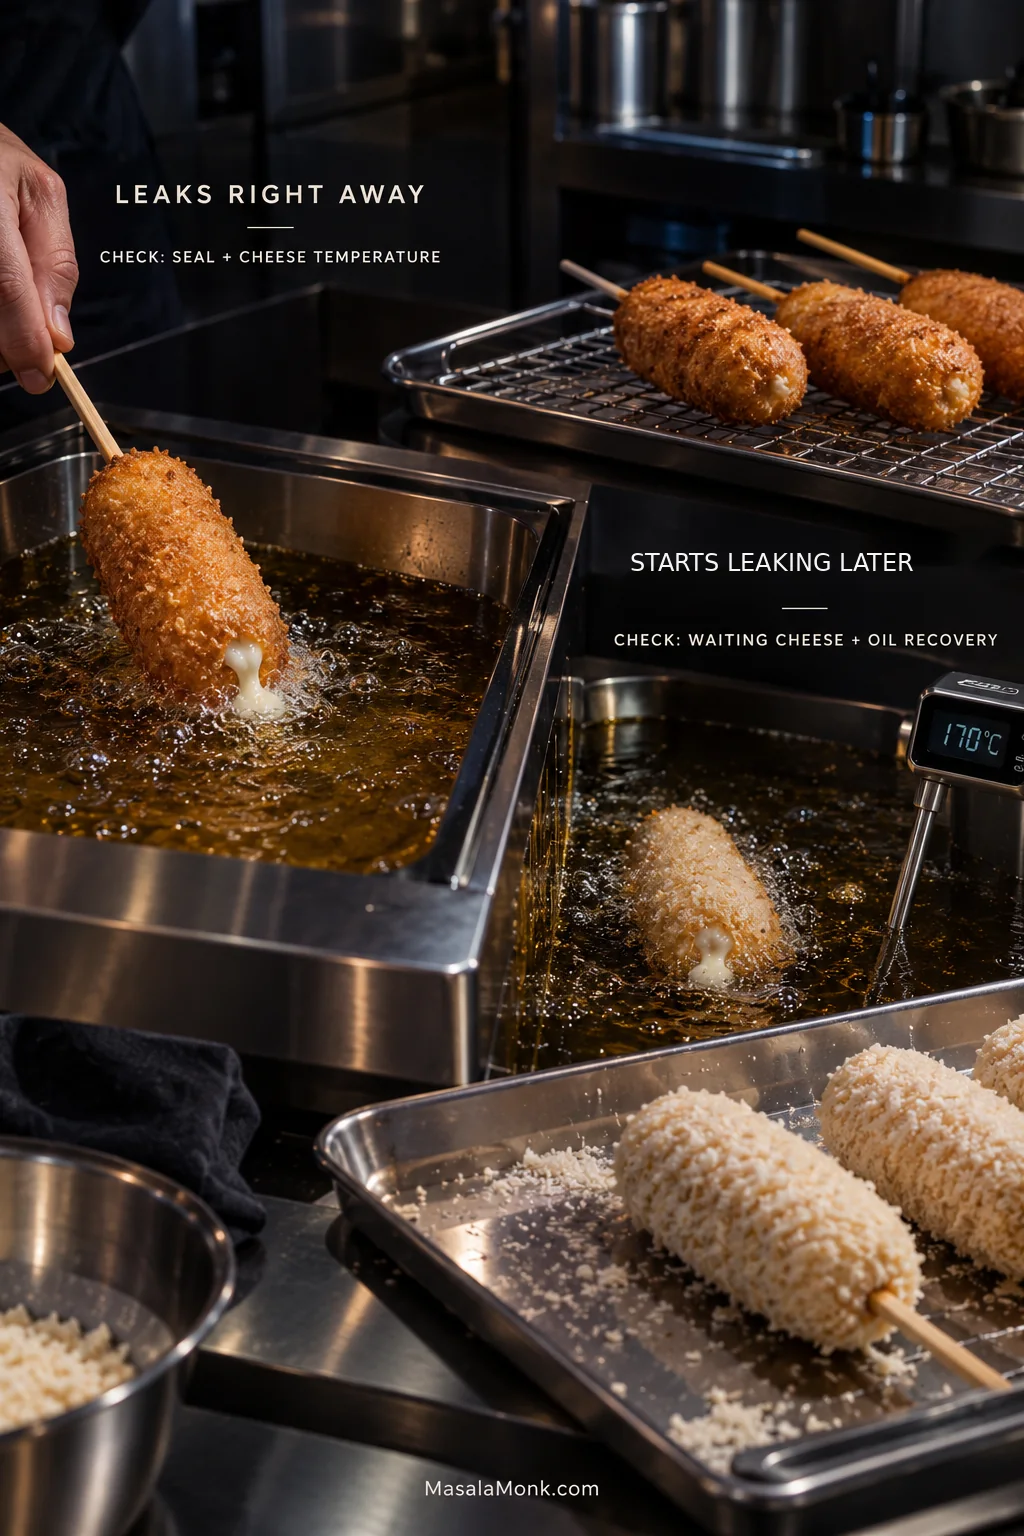
| Cheese leaks immediately | Chill the filling well and look for an exposed patch around the cheese tip or join. |
| Later corn dogs start leaking | Keep waiting skewers cold and let the oil return to frying temperature. |
| Corn dog becomes mostly bread | Use less raw dough on the next skewer. |
| Dark outside, gummy inside | Very fast browning points to excessive heat; normal browning with a pasty center points more toward too much dough. |
| Pale and greasy | Let the oil recover before continuing. |
| Potato falls off | Dry the cubes thoroughly, dust lightly and press them firmly into the dough. |
| Potato stays hard | Cut smaller cubes and give them the brief blanch before coating. |
| Skewer spins inside the sausage | Switch to a wooden chopstick or broader bamboo skewer. |
| Black flecks appear on later batches | Skim burnt crumbs from the oil between batches. |
| Weak cheese pull | Use a substantial mozzarella baton and serve while the center is still hot. |
Why Did the Cheese Start Leaking Later?
An immediate leak and one halfway through the batch tell different stories. Cheese escaping almost at once points toward warmth or a hole in the coating. If the first few work and later corn dogs begin leaking, something changed while you were frying: the waiting cheese may have warmed, or the oil may need another minute to recover.
Back to the main method · Skip to storage and reheating · Back to top
Make Ahead, Air Fry, Freeze and Reheat
You can assemble the sausage-and-cheese skewers earlier the same day, cover them and keep them refrigerated. Make the dough on frying day too; this dough is built for a short same-day rise rather than an overnight rest. Keep dough, panko and filling separate until close to frying time.
Can You Air Fry Homemade Korean Corn Dogs?
For this raw sticky yeast dough, deep frying works better. Hot oil sets the soft exterior quickly; in an air fryer, the coating has more time to sag before it firms.
The air fryer becomes much more useful after the corn dogs are already cooked. It crisps refrigerated leftovers well and is also a good fit for commercially frozen corn dogs designed for reheating.
Leftovers
Refrigerate cooked corn dogs within 2 hours. They are at their best within 2–3 days. For longer storage, freeze them after cooling and use them within 1–2 months for best quality.
Reheating
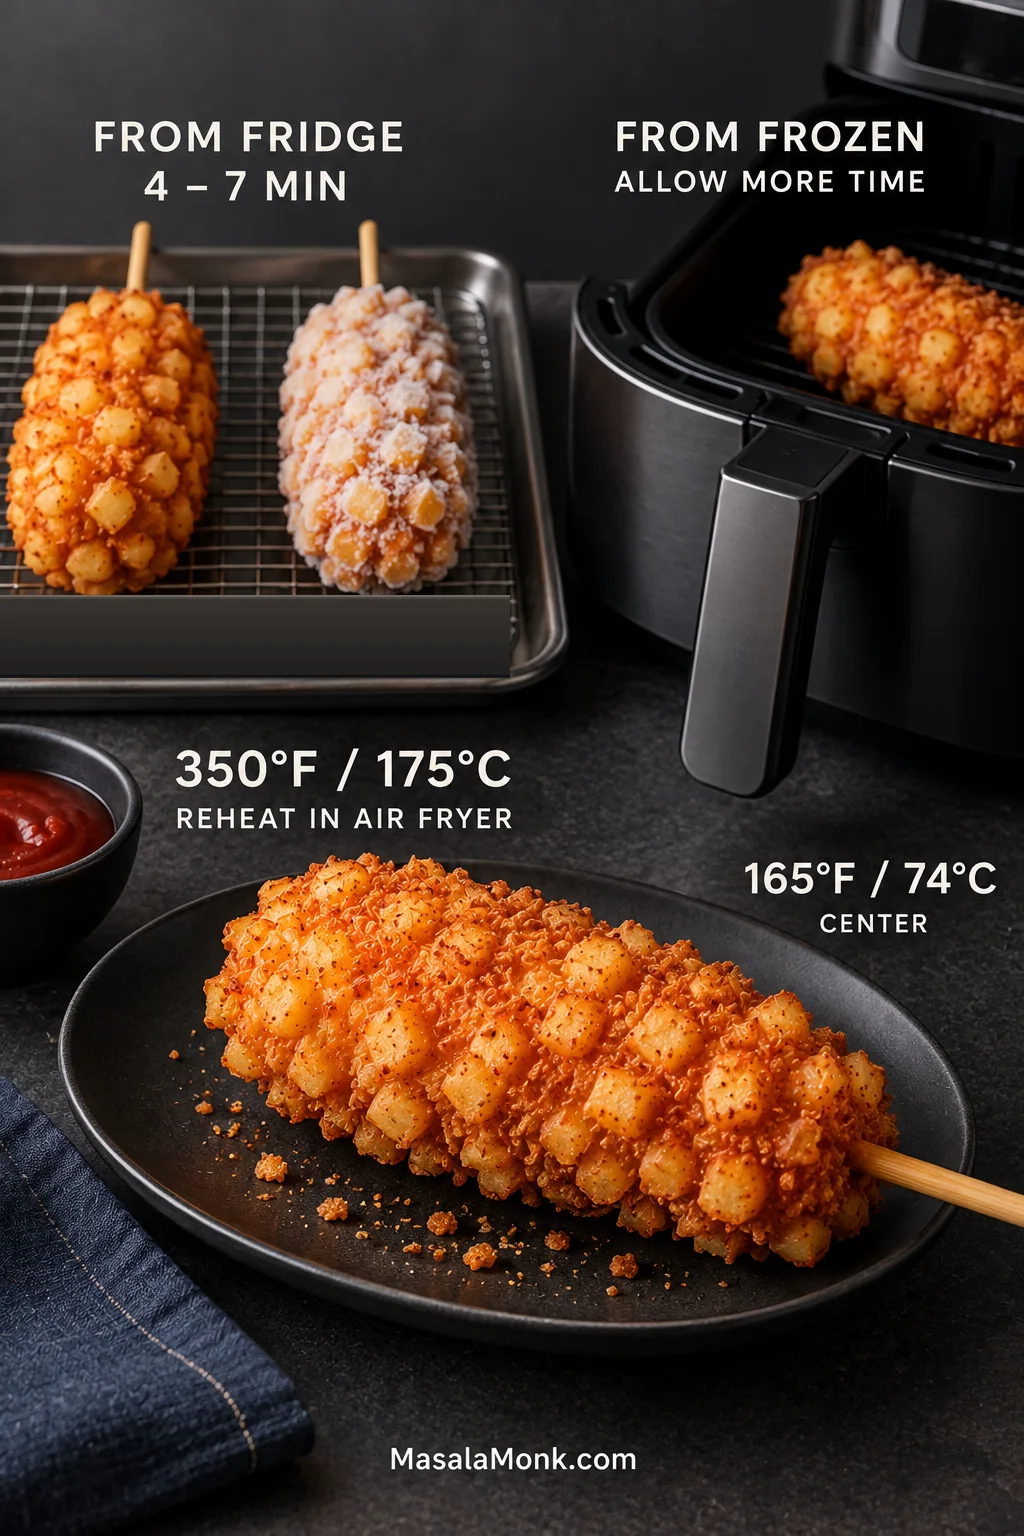
When reheating a refrigerated corn dog, air fry at 350°F / 175°C for 4–7 minutes, continuing until the shell is crisp again and the center reaches 165°F / 74°C. An oven works too; a microwave warms the center quickly but softens the panko.
Frozen leftovers can go into the air fryer from frozen at the same starting temperature. Give them more time until the outside is crisp and the center reaches 165°F / 74°C. For broader storage and reheating guidance, see the USDA leftovers and food-safety guidance.
Once the coating rhythm clicks, the rest of the batch moves surprisingly quickly. The panko is at its crispest and the cheese at its most satisfying when you eat the corn dogs soon after frying—just give the molten center a moment before the first bite.
What did your first one do when it hit the oil? Tell us what happened.








