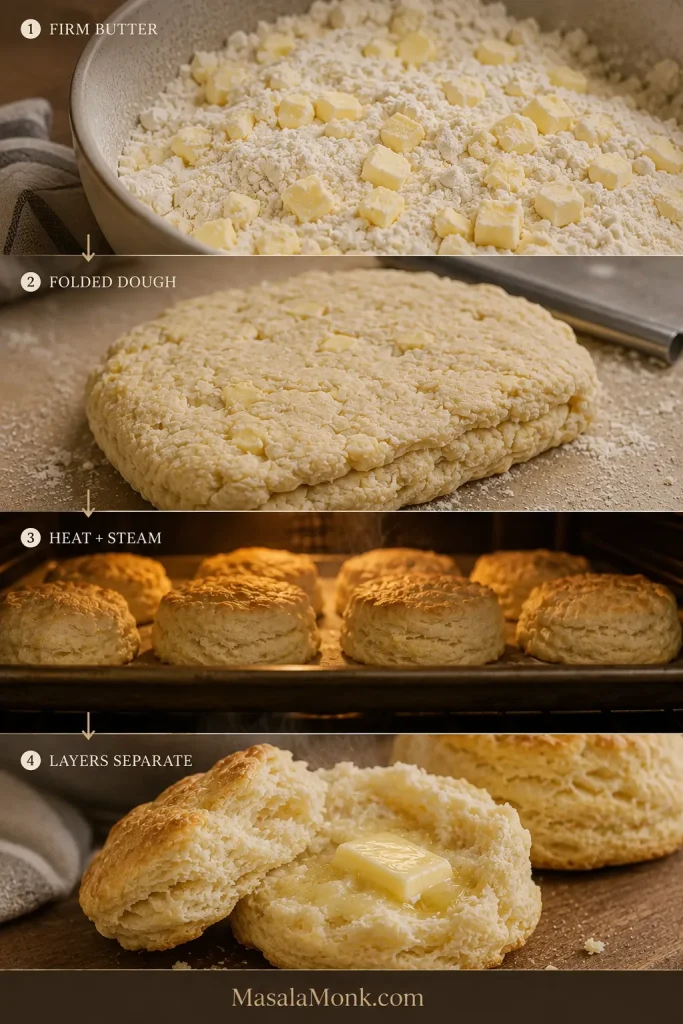
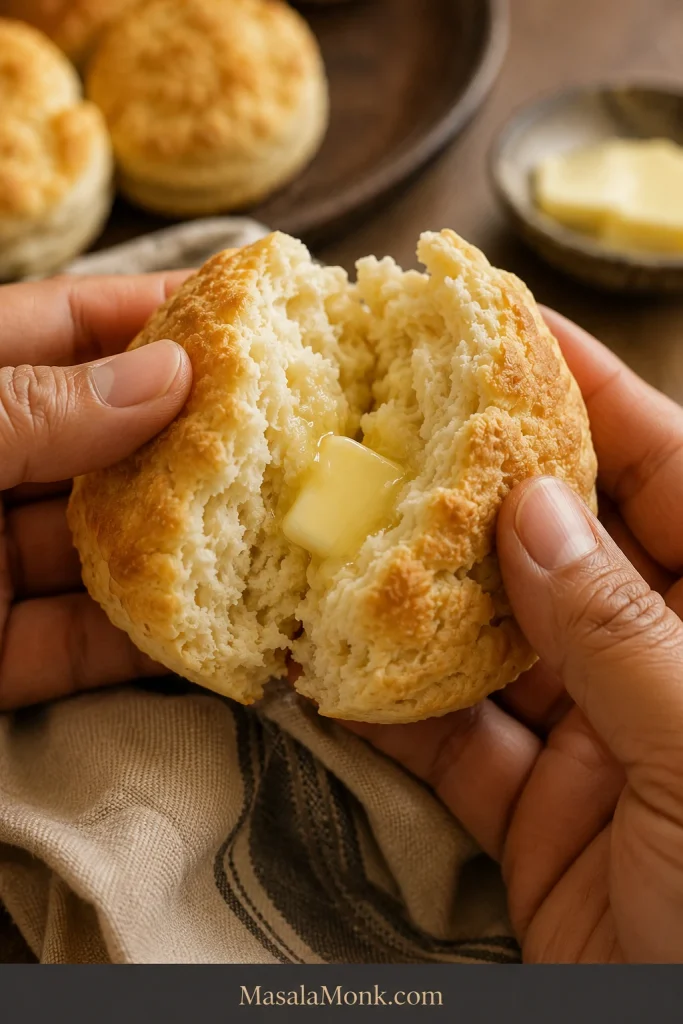
Pull apart a hot Southern biscuit and the center should open in tender, buttery layers, with the top golden and the middle moist enough to catch a melting swipe of butter.
These are the biscuits we’re making here: tall enough for visible layers, with a soft, tender center and buttery seams that separate easily while warm. You don’t need a food processor or rolling pin, and chilling only comes into play if the butter begins to soften while you work.
The whole batch takes about 35 minutes. Once you know what the butter and dough are supposed to feel like, biscuit-making becomes much less mysterious.
For tall, flaky Southern buttermilk biscuits, keep the butter and buttermilk cold, mix until the dough is rough and lightly tacky, then fold and turn the dough four times before patting it to a full 1 inch / 2.5 cm thick.
Cut straight down with a sharp cutter, arrange the biscuits almost touching, and bake at 450°F / 230°C conventional until the tops are golden and the centers are baked through.
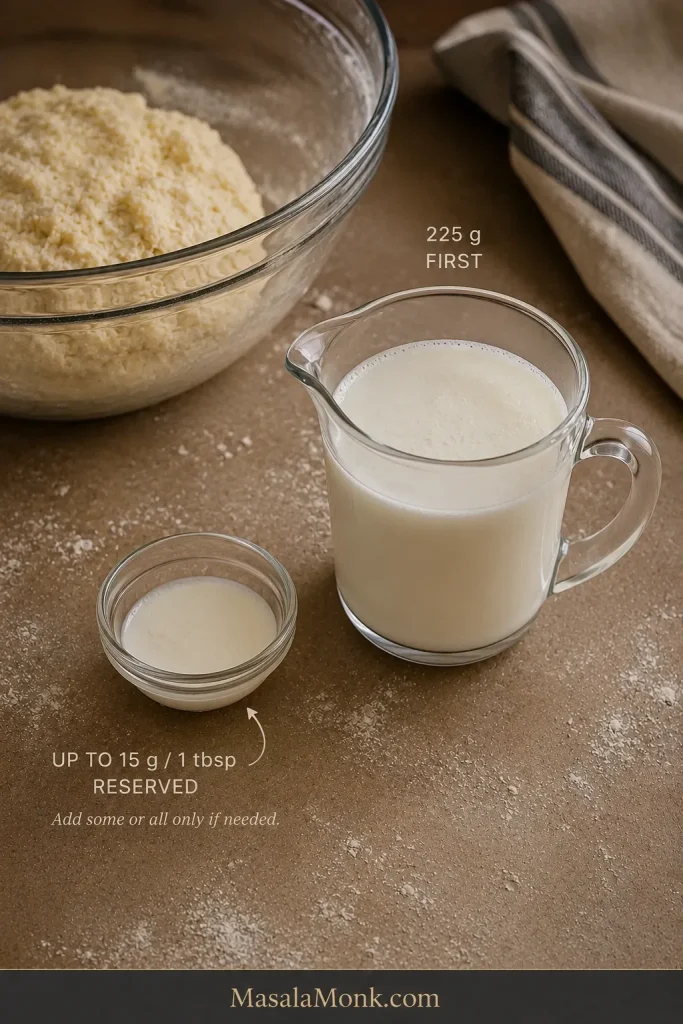
Start with 225 g of the buttermilk and reserve the final 15 g / 1 tablespoon. If dry flour still falls away when you press the mixture, add some or all of the reserve until the dough holds together.
Cold fat. Soft dough. Four folds. One-inch thickness. Hot oven. Those are the five things worth remembering.
Southern Buttermilk Biscuits Recipe
Makes about 8 biscuits with a 2½-inch / 6.4-cm cutter.
Ingredients
300 g / 10.6 oz / about 2½ cups all-purpose flour, spooned and leveled if measuring by cups, plus a little for the counter
14 g / 1 tablespoon + ½ teaspoon double-acting baking powder
2 g / ½ teaspoon baking soda
6 g fine sea salt or table salt / about 1 teaspoon
8 g / 2 teaspoons granulated sugar
113 g / 4 oz / ½ cup unsalted butter, very cold and cut into small cubes
240 g / about 1 cup cold cultured buttermilk, divided — start with 225 g and reserve 15 g / about 1 tablespoon
15 g / 1 tablespoon melted butter, for brushing after baking
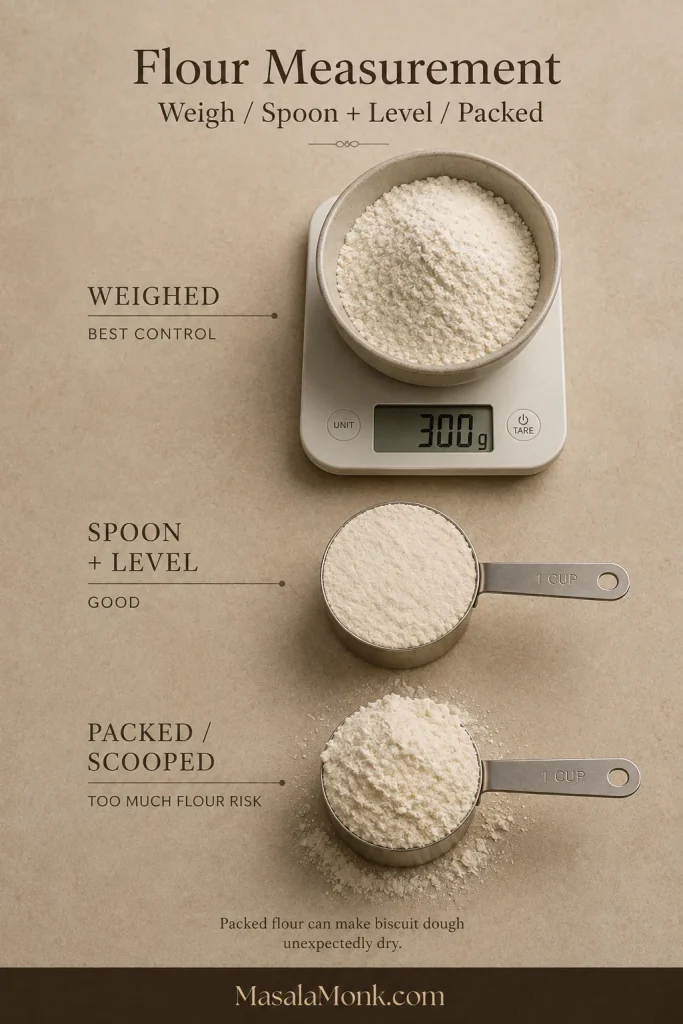
Use the gram measurements when possible. Flour is easy to overmeasure by volume, and even a modest extra scoop changes how much liquid the dough needs.
What You’ll Need
A digital kitchen scale is the most useful extra, along with a large bowl, pastry blender, fork or flexible spatula, sharp biscuit cutter, and sturdy baking sheet. A bench scraper is handy for handling the dough and for cutting square biscuits, but it isn’t essential.
No pastry blender? Use your fingertips to work the cold butter into the flour. Warm hands soften butter quickly, so work briefly and stop while distinct pieces remain.
Method
Heat the oven. Set a rack in the center and preheat to 450°F / 230°C conventional. Line a sturdy, light-colored baking sheet with parchment rated for that temperature, or use a clean unlined sheet. A dark pan browns the bottoms faster, so check underneath a little earlier.
Mix the dry ingredients. Whisk the flour, baking powder, baking soda, salt, and sugar thoroughly.
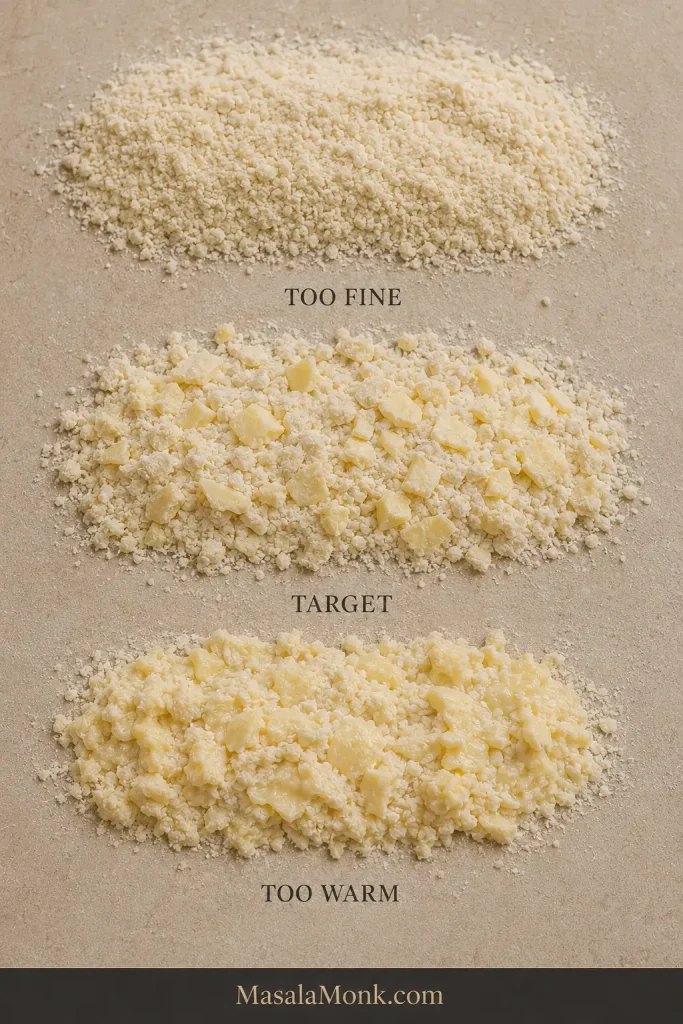
Cut in the butter. Work until most pieces are roughly pea-size, with a few larger flat flakes visible. The mixture will look uneven.
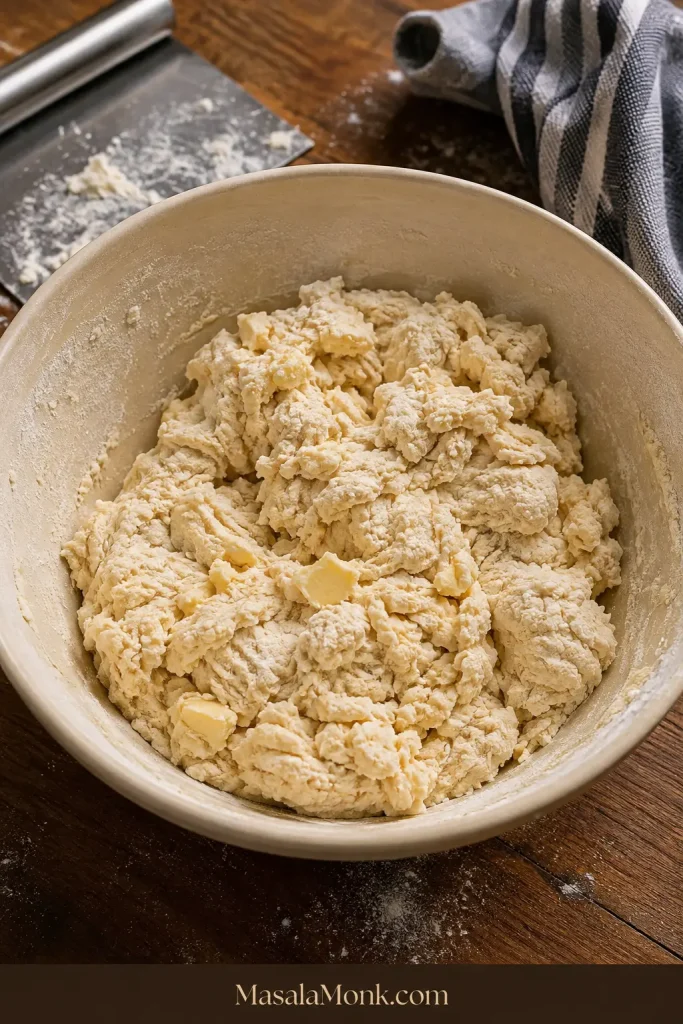
Add 225 g of buttermilk. Stir with a fork or flexible spatula until shaggy clumps form. Press a handful together. If dry flour still falls away, add some of the reserved 15 g / 1 tablespoon. Use the rest only if the mixture still needs it to hold together.
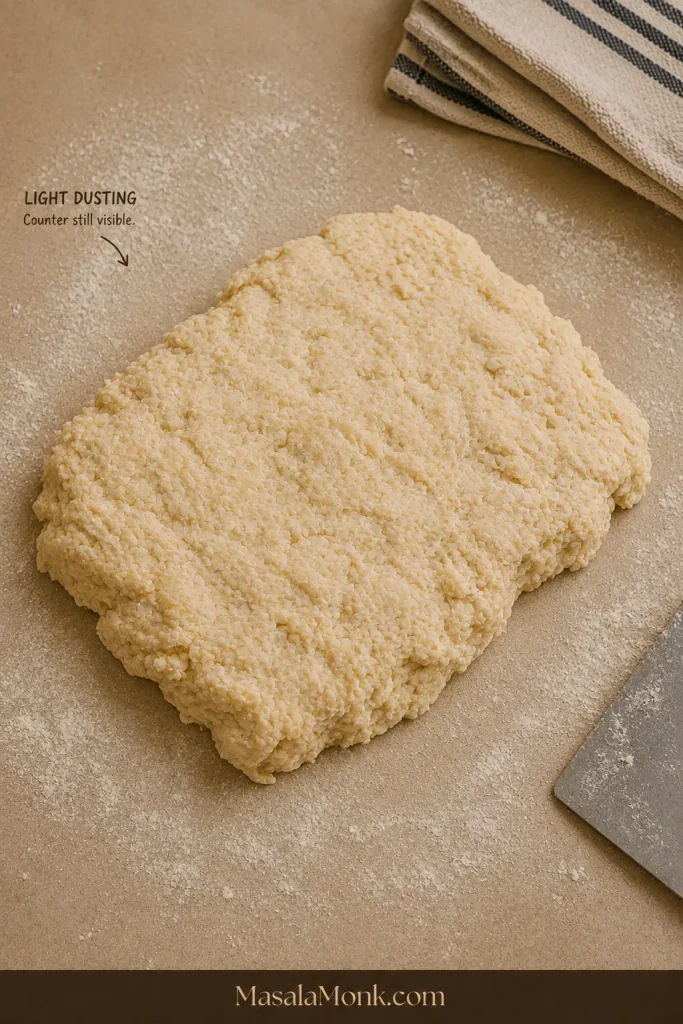
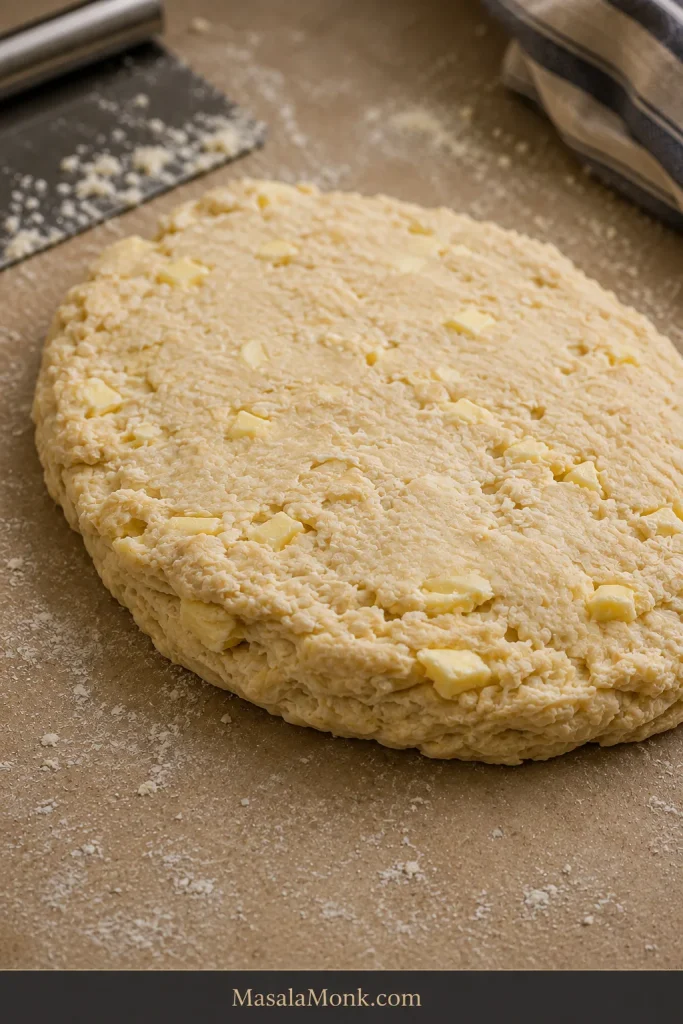
Bring it together. Dust the counter with just enough flour to prevent obvious sticking—you should still be able to see the counter through it. Turn out the shaggy mixture and press the loose pieces into a rough rectangle.
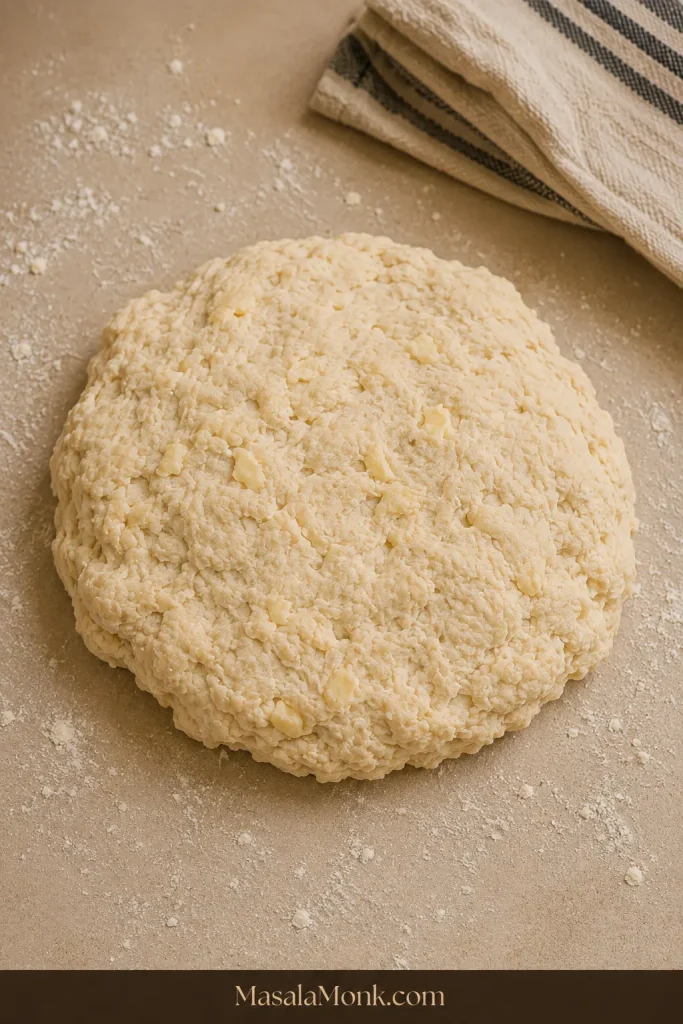
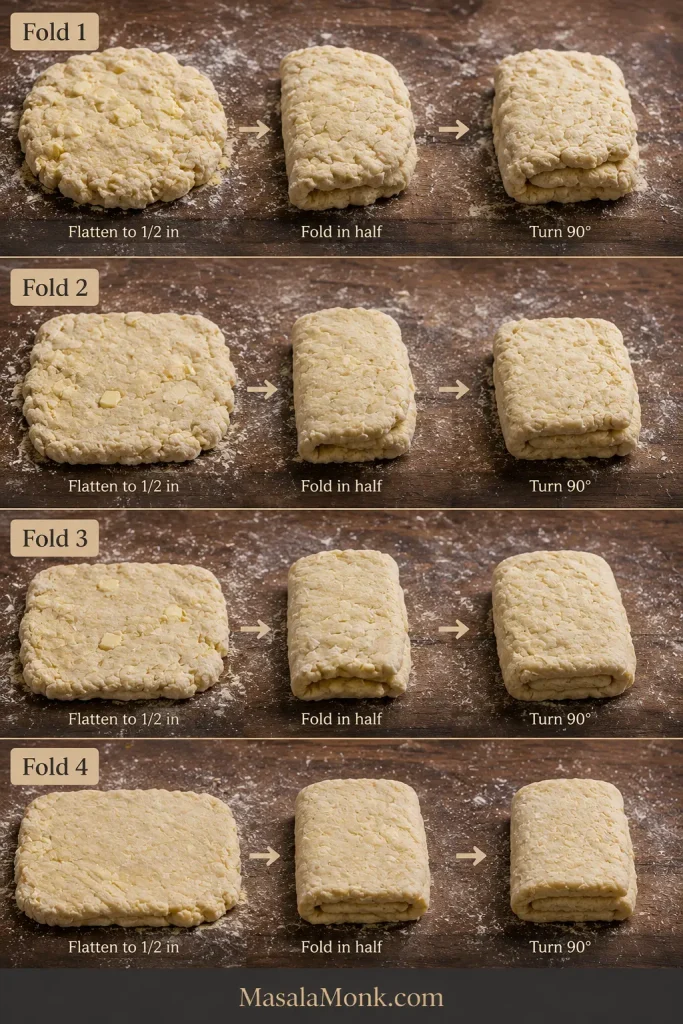
Fold and turn four times. Flatten the rectangle to roughly ½ inch / 1.25 cm thick, fold it in half, then turn it 90 degrees. Flatten it again and repeat the fold-and-turn process three more times, for four folds total. By the later folds, the scruffy pile starts looking recognizably like biscuit dough while pieces of butter remain visible.
Shape, Cut and Bake
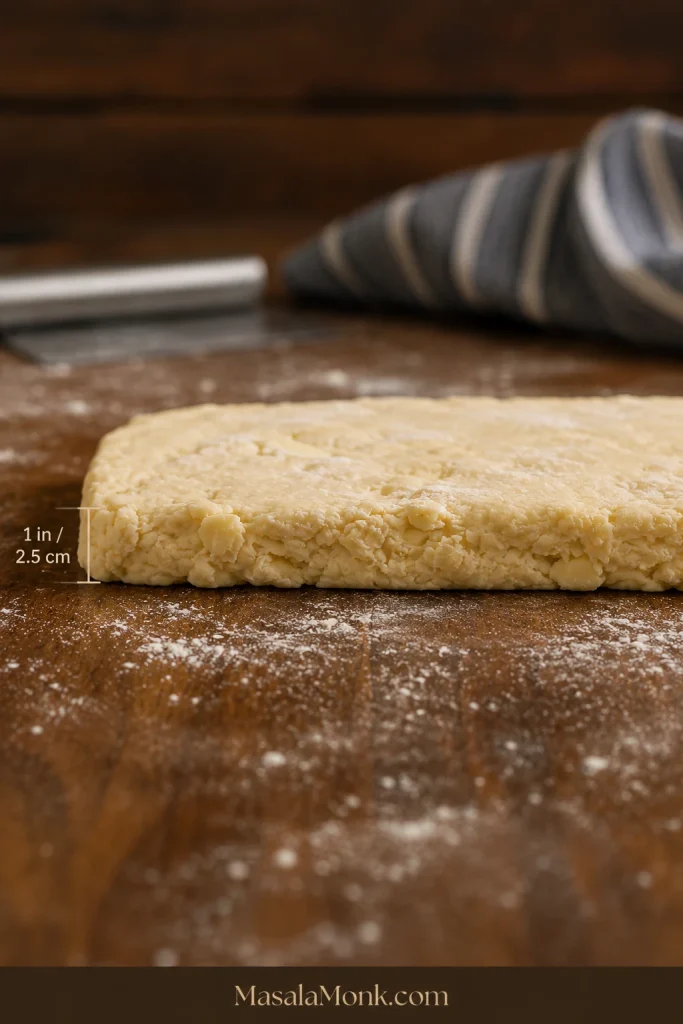
Pat to 1 inch / 2.5 cm thick. Keep the slab reasonably even; the edges can stay rustic.
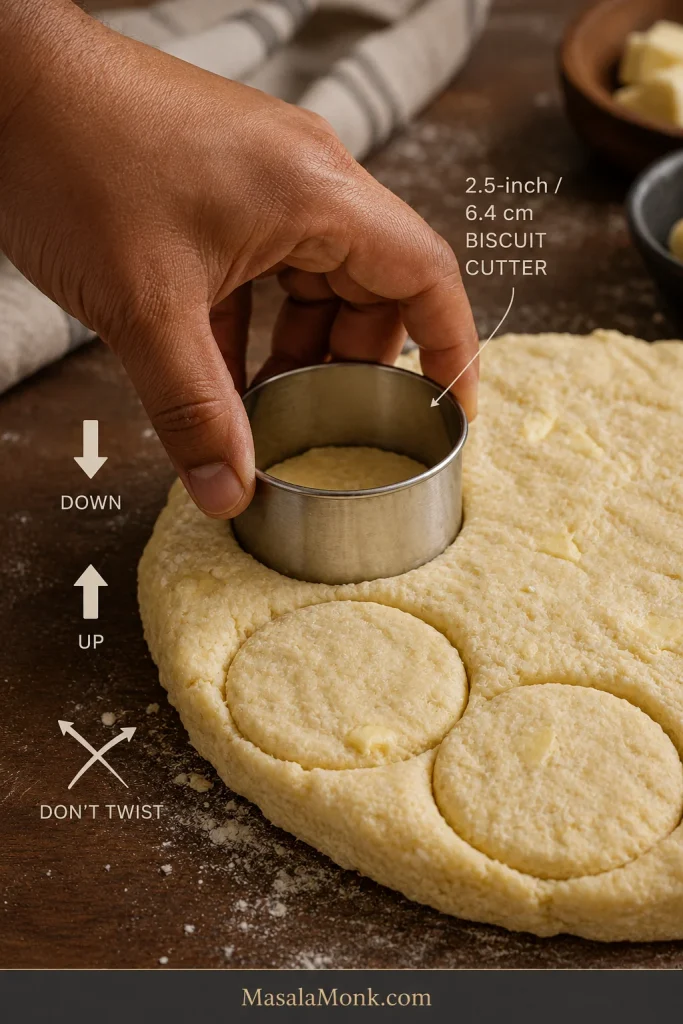
Cut straight down. Lightly flour a sharp 2½-inch / 6.4-cm biscuit cutter, press straight through the dough, and lift straight up. Don’t twist the cutter.
A clean vertical cut leaves the layered edge open. Pinched or dragged rims usually mean the cutter twisted.
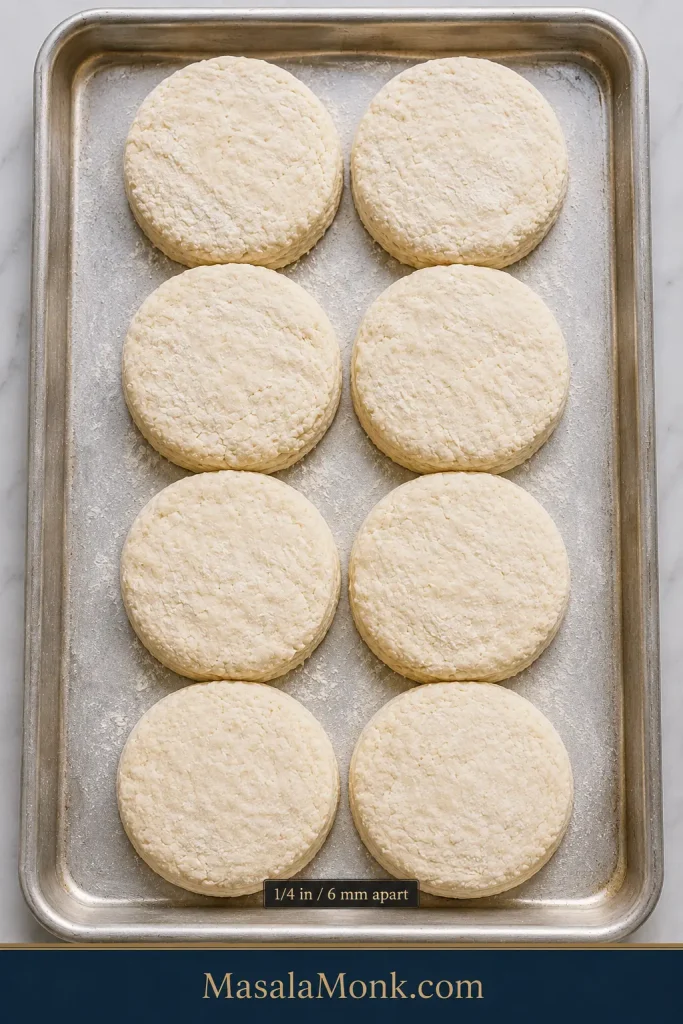
Arrange almost touching. Place the biscuits about ¼ inch / 6 mm apart. Press the scraps together once and cut the remaining biscuits.
Leave narrow visible gaps—about ¼ inch / 6 mm. Slumping rounds signal warm dough, not a need for wider spacing.
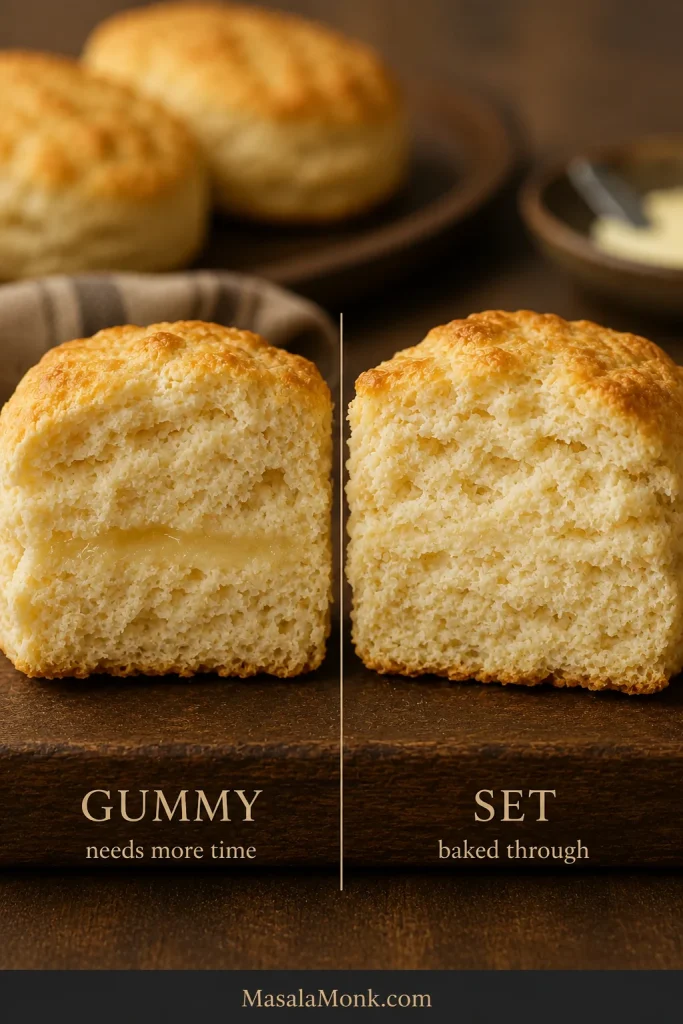
Bake. Bake for 12–15 minutes, beginning to check at 12 minutes. Look for golden tops, set sides, browned bottoms, and centers without a gummy stripe.
Brush and serve. Brush the hot tops with melted butter and serve warm.
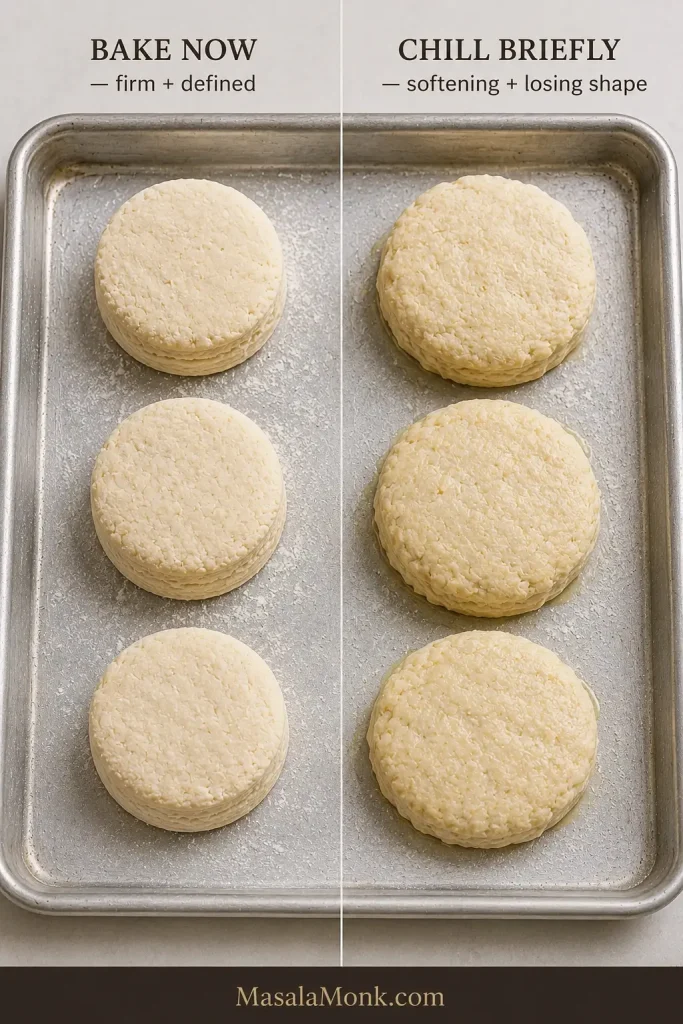
Warm-kitchen check: Cool, firm cut biscuits can go straight into the oven. When they become soft enough to lose their clean shape or start looking greasy, chill the tray briefly until the butter firms again.
Firm, upright cut edges can go straight to the oven; softened or slightly greasy rounds benefit from a brief chill.
Using fan/convection? If you normally reduce conventional baking temperatures for your oven, use around 425°F / 220°C and begin checking early.
There is no single ingredient that gets to decide. Southern biscuits belong to a broad tradition of tender quick breads, with flour, fat, shaping, and preferred crust varying from kitchen to kitchen.
Across Southern kitchens, you’ll find soft-wheat and self-rising flours, butter, lard, shortening, buttermilk, hand-shaped cathead biscuits, neatly cut rounds, soft pull-apart sides, and biscuits baked farther apart for more crust.
Some people picture a tall cut biscuit with obvious layers. Others grew up eating softer biscuits baked shoulder-to-shoulder in a pan. Both belong at the table.
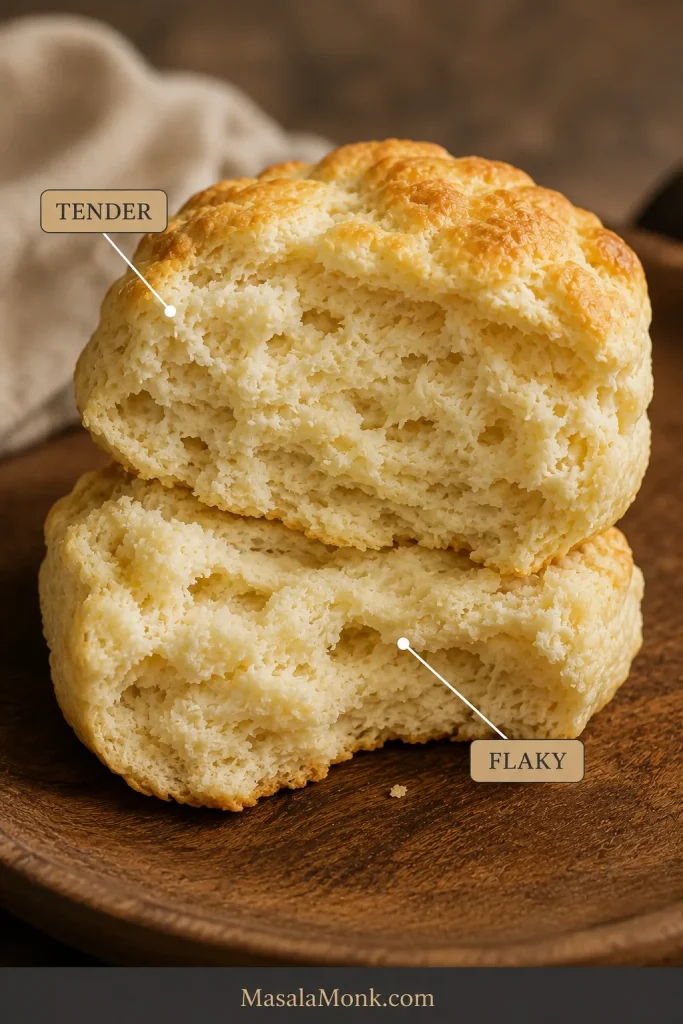
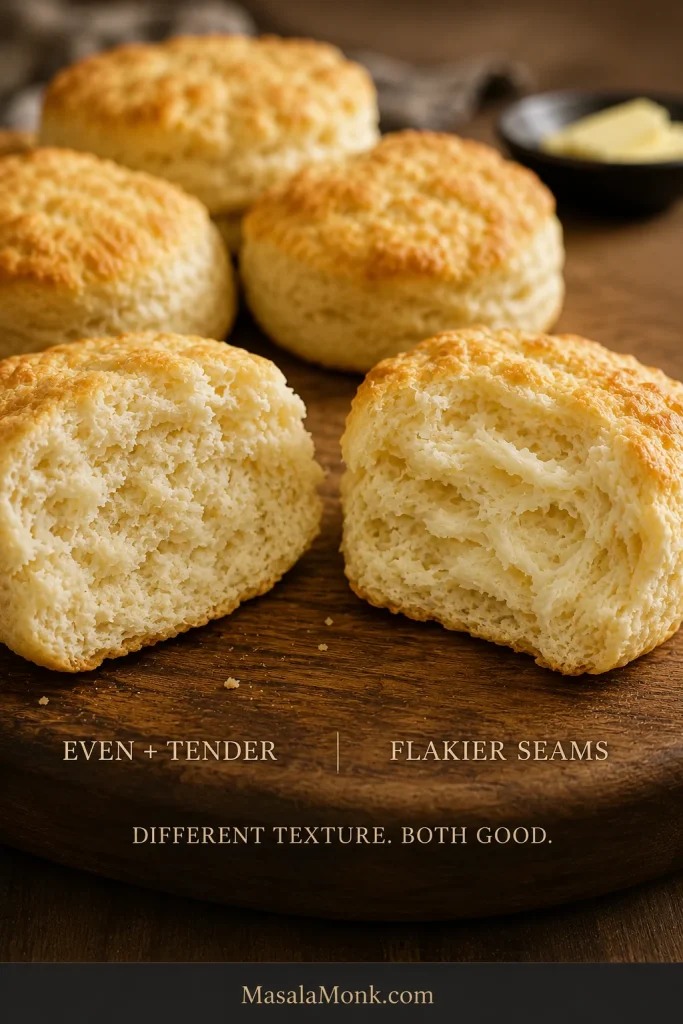
This version sits between old-fashioned tenderness and heavily laminated bakery-style biscuits. The folds create visible buttery seams and good height, while the center stays soft and distinctly biscuit-like. Tender describes how softly the crumb yields; flaky describes how easily the biscuit separates along buttery seams.
Tenderness is the soft crumb; flakiness is the few buttery seams that pull apart. You want both without croissant-like sheets.
Ingredients That Change the Biscuit
With only a handful of ingredients, small changes show up clearly in the finished biscuit. Flour builds the crumb. Baking powder supplies most of the rise, while baking soda works with tangy buttermilk and helps with browning.
Butter brings flavor and helps create the seams that separate as the biscuit rises.
Keeping those butter pieces firm lets them stay distinct until baking; as the butter melts and releases steam, it helps the folded layers separate.
Firm butter stays distinct long enough to create steam and separation in the oven, leaving biscuit-like seams rather than pastry layers.
Buttermilk brings moisture, acidity, and dairy flavor. Salt makes everything taste fuller, while two teaspoons of sugar encourage browning without making the biscuits sweet.
Flour: All-Purpose, Soft Wheat and White Lily
For this recipe, regular all-purpose flour is the default. You do not need White Lily to make a tender Southern biscuit.
Soft-wheat flour has a long association with Southern biscuits because its lower protein content makes a delicate crumb easier to achieve. White Lily’s place in Southern baking comes from its soft red winter wheat, but this recipe was written for ordinary all-purpose flour.
If White Lily or another soft Southern flour isn’t sold where you live, there is no reason to postpone breakfast.
Flour
What It Tends to Give You
Best Approach
Regular all-purpose flour
Tender crumb with enough structure for visible layers
Follow the recipe as written
Soft-wheat all-purpose flour
Especially delicate crumb
Watch the buttermilk because absorption can differ
Self-rising flour
A convenient, classic Southern route
Use a biscuit recipe written for the particular self-rising flour you have
Flour packed into a measuring cup can weigh considerably more than flour spooned in and leveled. Extra flour needs extra liquid; without it, the raw mixture starts dry and the baked crumb often does too.
A packed cup can quietly add extra flour. Weighing 300 g removes that variable before hydration even begins.
What About Self-Rising Flour?
Self-rising flour can make excellent Southern biscuits, but brands vary in their leavening and salt. It isn’t an exact substitute for the flour, baking powder, baking soda, and salt used here, so use a biscuit recipe written specifically for the self-rising flour you have.
Butter, Lard or Shortening?
Fat
What Changes
Why Use It
Butter
Rich flavor with obvious flaky seams
The best fit for this version
Lard
Very tender crumb with good flake
Classic savory richness
Shortening
Soft, tender crumb with less buttery flavor
Stable and easy to handle
Blend
Balanced tenderness and layering
A middle ground between flavor and stability
Butter is the fat used for this version, but how it is worked into the flour matters just as much as which fat you choose. This is the point where the mixture is easiest to assess before any liquid goes in.
Stop while individual butter pieces are still easy to see. Fine crumbs or greasy smears have gone too far.
Start With Cold Cultured Buttermilk
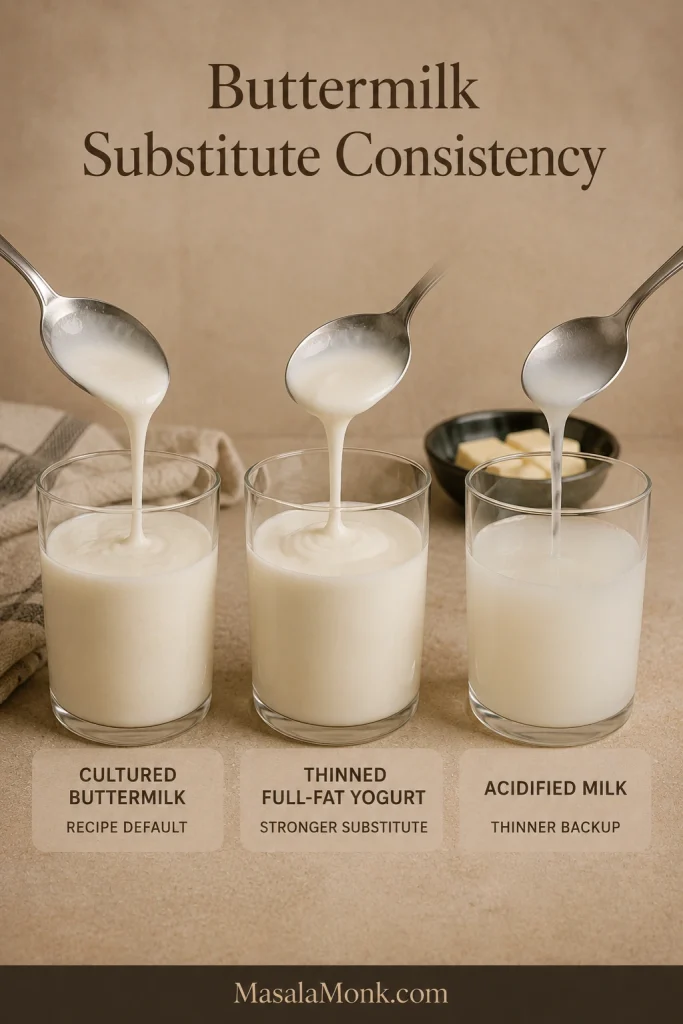
Cultured buttermilk brings acidity, dairy flavor, and a thicker body than ordinary milk. Its consistency varies from carton to carton, and flour absorption varies too, which is why the final tablespoon stays in reserve until you see whether the mixture needs it.
Hold back the final tablespoon so you can correct a dry mixture without making the whole dough too wet.
No buttermilk today? For an emergency substitute, thin full-fat plain yogurt with whole milk until it is pourable but still creamy. Use the consistency as your guide because this isn’t an exact one-for-one substitution.
Whole milk mixed with lemon juice or vinegar can also work in a pinch, although the mixture is thinner than cultured buttermilk. If buttermilk is rarely available to you, a biscuit recipe designed around milk or another dairy will be easier to repeat.
Match cultured buttermilk’s creamy pour as closely as you can; a thin substitute changes how quickly the flour hydrates.
Learn the Dough by Feel
If biscuit dough has made you second-guess yourself before, this is usually the moment. Good biscuit dough looks rougher and feels softer than many people expect.
“Do not overmix” is easy advice to repeat. Knowing what to look for when you stop is far more useful.
A few dry-looking patches are fine if a squeezed handful holds together. Don’t stir to a smooth dough.
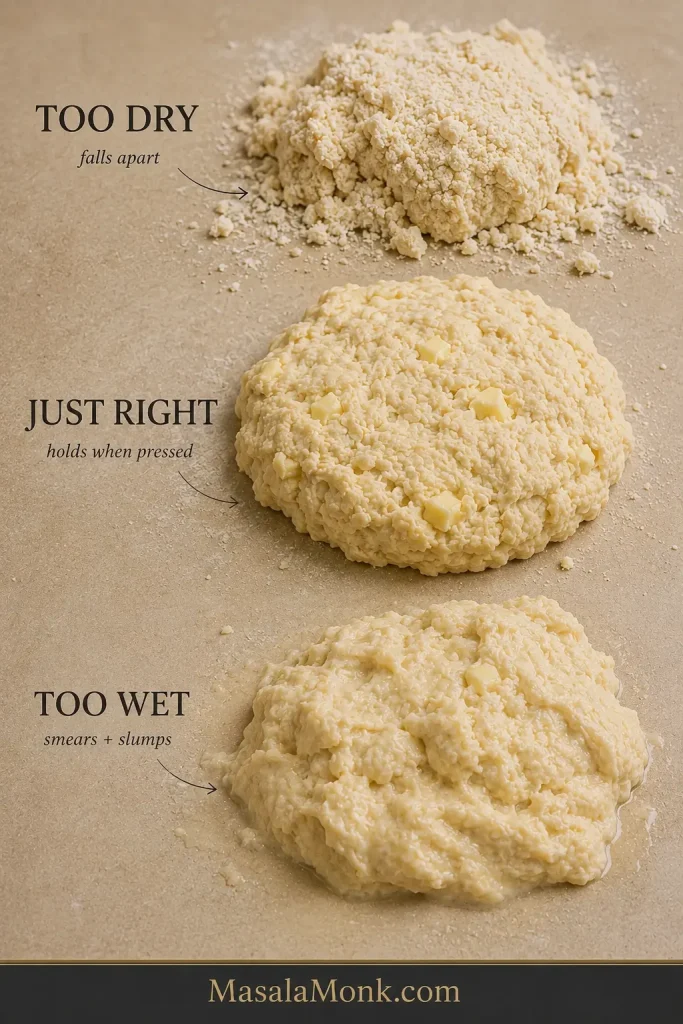
Too Dry
The shaggy mixture breaks into dusty pieces, loose flour sits underneath, and a handful refuses to stay together when squeezed.
Add a little of the reserved buttermilk and press again. Use the rest only if loose dry flour remains and the mixture still refuses to hold together.
Just Right
The mixture looks rough and uneven. It feels lightly tacky and holds when pressed without becoming smooth or elastic. Pieces and flat streaks of butter remain visible.
This is the stage people often accidentally “fix” with extra flour. Leave it alone. Biscuit dough does not need to become neat before it becomes good.
The target is rough, soft and lightly tacky—not smooth, elastic or paste-like.
Too Wet
A mixture that smears across the counter, slumps instead of holding a rectangle, or clings to your hands in thick paste has moved beyond light tackiness.
When the dough is only slightly sticky, correct the surface rather than changing the dough itself. A small dusting of flour on the counter is usually enough.
You only need enough flour to prevent sticking. White ridges or a heavily coated underside mean too much.
Once you can recognize this texture by feel, the recipe stops being something you follow nervously and starts becoming something you know how to make.
Dry dough fractures, good dough presses together, and overly wet dough sticks heavily and slumps or smears.
The folds create seams, starting thickness gives the biscuit room to rise, and cutting and spacing shape the final height and crust.
Four Folds Build Layers Without Overworking the Dough
Each fold stacks pieces of butter and dough over one another. In the oven, those rough layers separate into the seams that make a warm biscuit easy to pull apart.
Later folds should feel slightly more structured while the surface stays rustic. Stop if the dough turns springy or polished.
A biscuit with very little folding has a softer, more even crumb. More elaborate lamination creates increasingly dramatic sheets. Four simple folds give this version a middle ground: visible flake and good height with a soft biscuit crumb.
Pale butter flecks should remain visible after folding; greasy translucent smears mean the dough has warmed too much.
Thickness and a Clean Cut Set Up the Rise
Starting thickness limits how tall a biscuit can become. A thin biscuit can rise beautifully and finish short simply because it had less height at the beginning.
Check from the side: an even 1-inch slab gives every biscuit the same starting chance to rise.
A sharp cut also leaves the folded edge open to rise. Twisting presses those edges together, which is why the recipe uses one straight downward cut and a straight lift. King Arthur Baking’s guide to higher-rising biscuits goes deeper into the relationship between cutting and rise.
Shape and Spacing Change the Crust
If You Want…
Choose…
Soft pull-apart sides
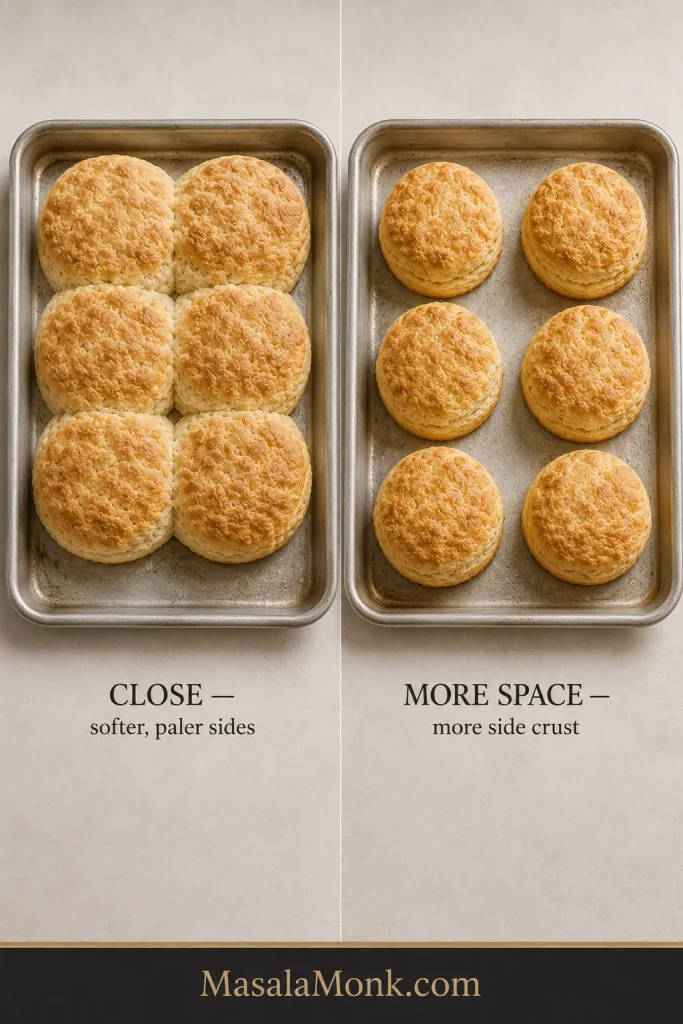
Biscuits touching or almost touching
More browned crust around each biscuit
More space between the biscuits
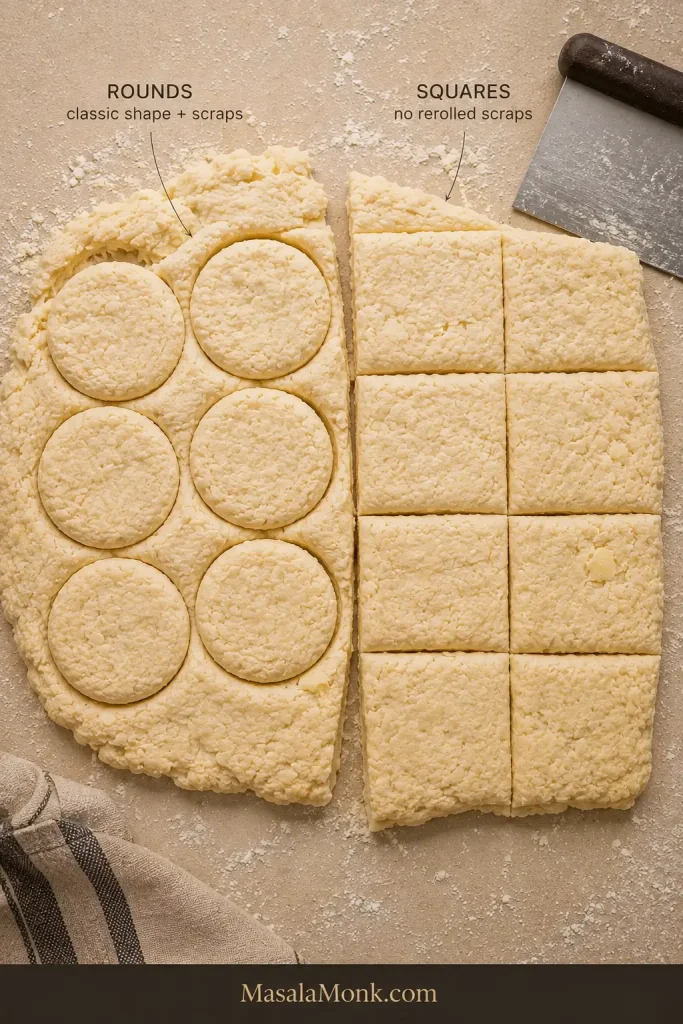
Classic round biscuits
A sharp round cutter
No rerolled scraps
Squares cut with a sharp knife or bench scraper
Close biscuits support one another as they rise and shield their sides from some direct oven heat, leaving those sides pale and soft. More room exposes additional surface to heat and creates more crust.
Close spacing gives softer sides; more room gives more browned crust. Choose one result and keep spacing consistent.
Rounds leave scraps between the cuts. Press them together once and cut again. Biscuits cut from the scraps may rise a little less evenly because that dough has already been handled. Squares avoid scraps altogether.
A biscuit can lean or split unevenly and still be excellent inside. Height gives you useful feedback; perfection is not the goal.
Bake Hot and Look Beyond the Top
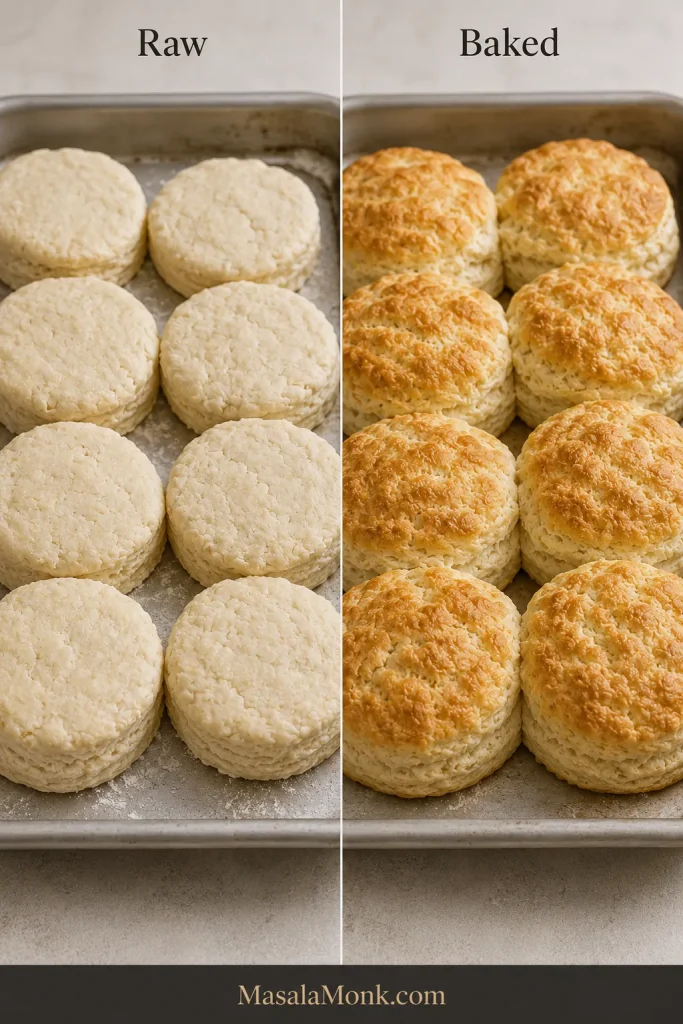
Oven heat affects more than browning: it also controls how quickly the biscuit structure sets while the dough expands. That makes the before-and-after shape worth watching alongside color.
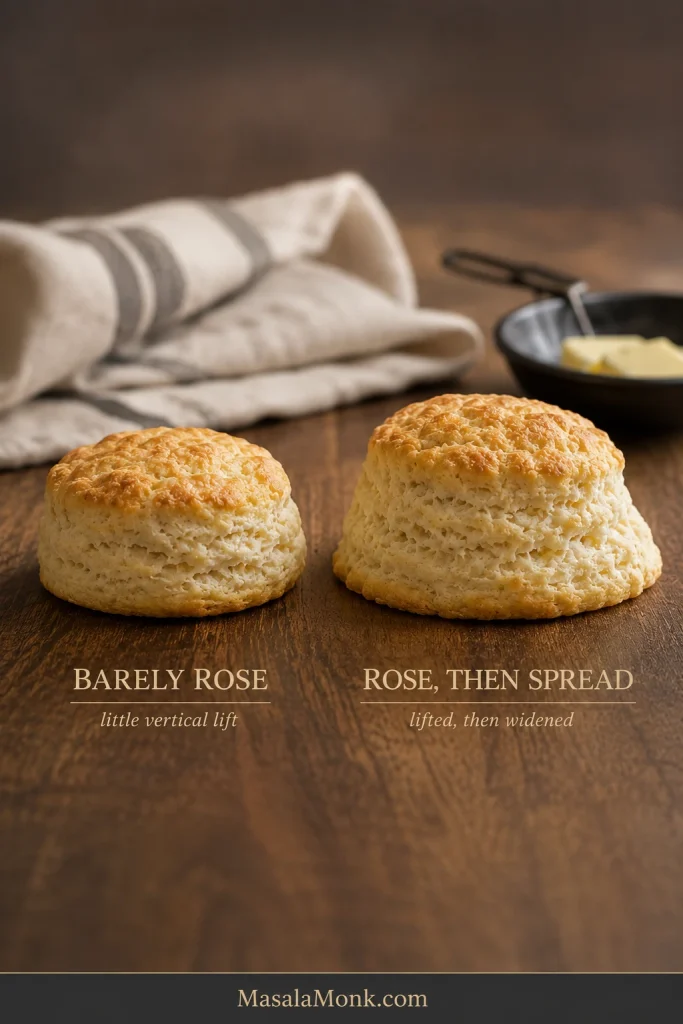
Successful biscuits gain much more height than width. A spreading footprint is a useful clue even when the tops brown well.
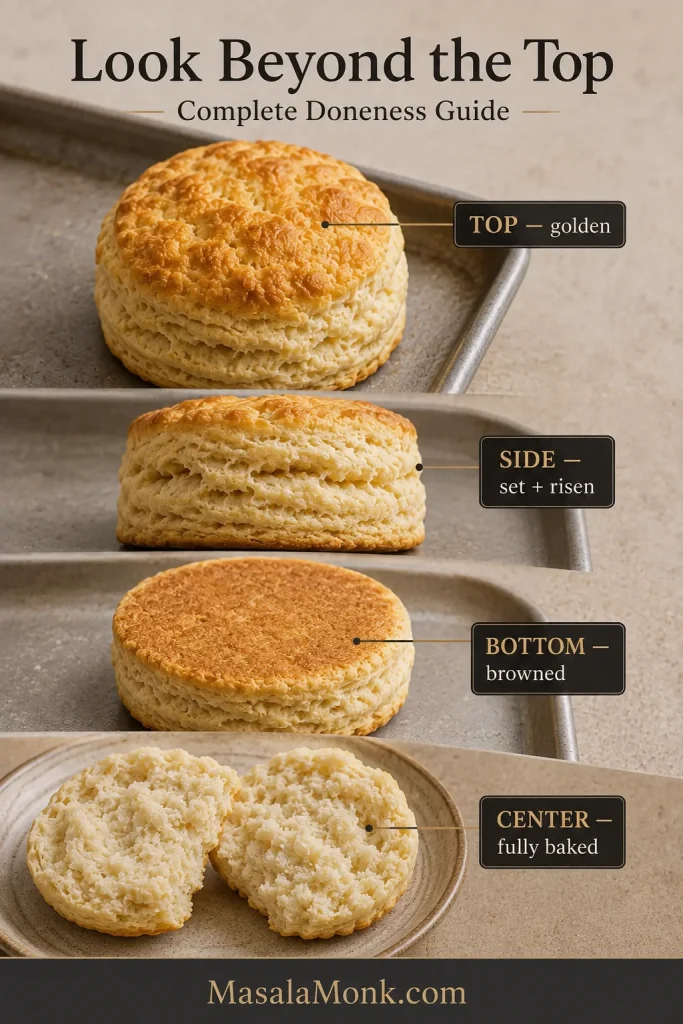
For this size and thickness, use 450°F / 230°C conventional. Begin checking around 12 minutes, and look at the whole biscuit instead of judging it by the top alone.
When color and center disagree, trust the center. Golden tops cannot rescue a glossy, compressed middle.
Top: golden, with no raw-looking floury patches.
Sides: set and risen, with visible separation through the layers.
Bottom: evenly browned, not scorched.
Center: fully set, without glossy raw dough or a gummy stripe.
A large or extra-thick biscuit can become beautifully golden before its center is completely baked. When in doubt, split one of the less-perfect biscuits and look inside.
A gummy center often looks slightly glossy and compressed rather than obviously raw.
If they rose well, split easily, and are tender through the middle, they’re done. Eat one while it’s hot.
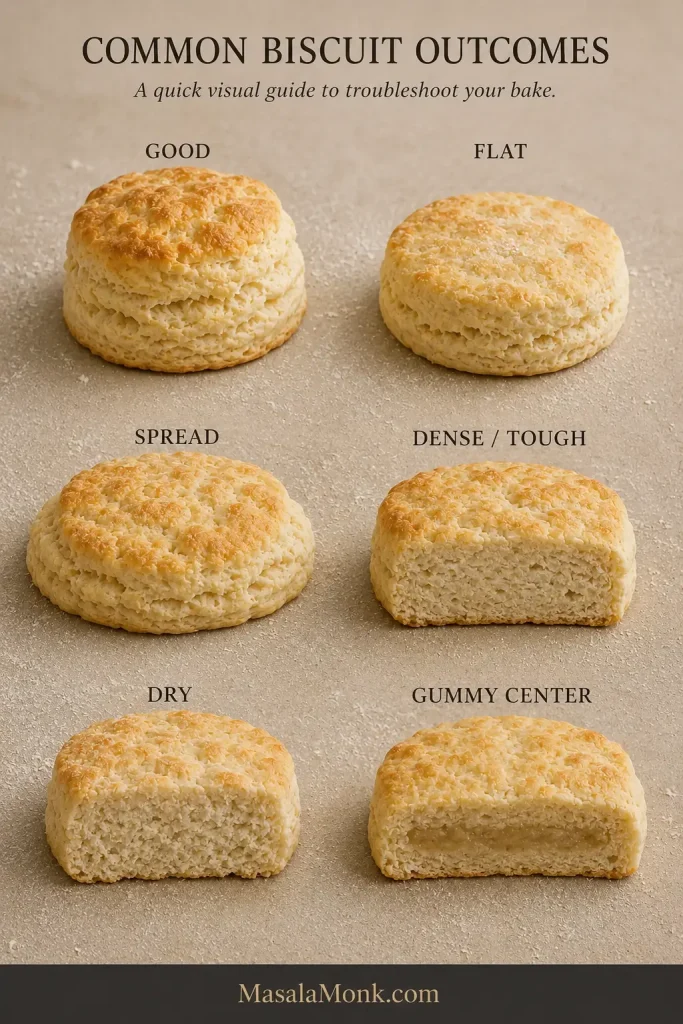
A low, dry, or oddly shaped batch usually leaves clues about what happened.
Read the shape first, then the crumb: together they usually point back to the stage that went wrong.
Baking powder that has been open for a long time is worth replacing when repeated batches stay unusually low. When browning or timing consistently seems far from what the recipe describes, an inexpensive oven thermometer can also tell you whether the oven is reaching the temperature you set.
What You See
Where to Look
Next Batch
Flat and wide
Warm butter, tired leavener, thin starting slab, oven not fully hot
Keep the fat firm, use fresh baking powder, start thick, preheat fully
Tough or bread-like
Extra flour, prolonged mixing or kneading
Weigh the flour and stop while the mixture is rough
Dry
Too much flour, too little buttermilk, long bake
Check hydration before shaping and begin checking the oven sooner
Tender but no obvious layers
Butter worked in finely, less folding
Leave some butter pieces visible and use the four folds
Spread sideways
Warm butter, overly loose dough, oven not fully hot
Firm the shaped biscuits before baking and check the oven
Leaning or crooked
Uneven slab or angled cut
Pat evenly and cut vertically
Dark bottoms
Dark or thin pan, low rack, hot-running oven
Check earlier, use a heavier pan if possible, or move the rack higher
Gummy middle
Thick or large biscuit pulled before the center set
Give the middle more time and verify oven temperature
Flat: No Rise or Too Much Spread?
A biscuit that barely gains height points toward tired leavening, a thin starting slab, or an oven that never became fully hot. A biscuit that lifts and then widens points more toward warm butter or dough too loose to hold itself upright.
Short and narrow points to poor lift; noticeably wider points more toward spread. Similar height can hide different failures.
Tough Is Different From Crisp
A browned edge can be pleasantly crisp. Toughness shows up through the center as a firm, bread-like chew where the crumb ought to yield. Extra flour and continued mixing after the dough has come together are common reasons.
Dry: Dough Problem or Oven Problem?
Raw dough that crumbles and needs firm pressure to stay together started too dry. Dough that went into the oven cohesive and came out dry points more toward baking time. Even a couple of unnecessary minutes can change the crumb noticeably.
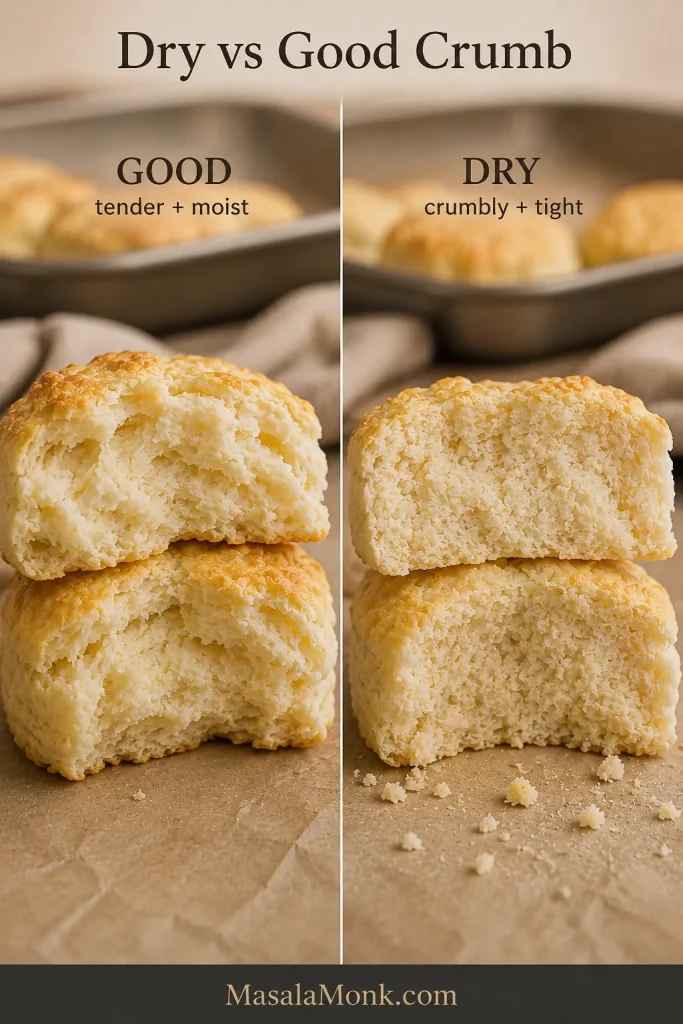
Good crumb bends and separates softly; dry crumb fractures and sheds small loose pieces.
Tender Without Layers Can Still Be a Good Biscuit
A tender biscuit with a soft, even crumb may simply have had its butter worked in more finely. That’s a perfectly good biscuit with a different texture.
Tenderness matters more than layer count. An even, soft crumb can be every bit as successful as a flakier one.
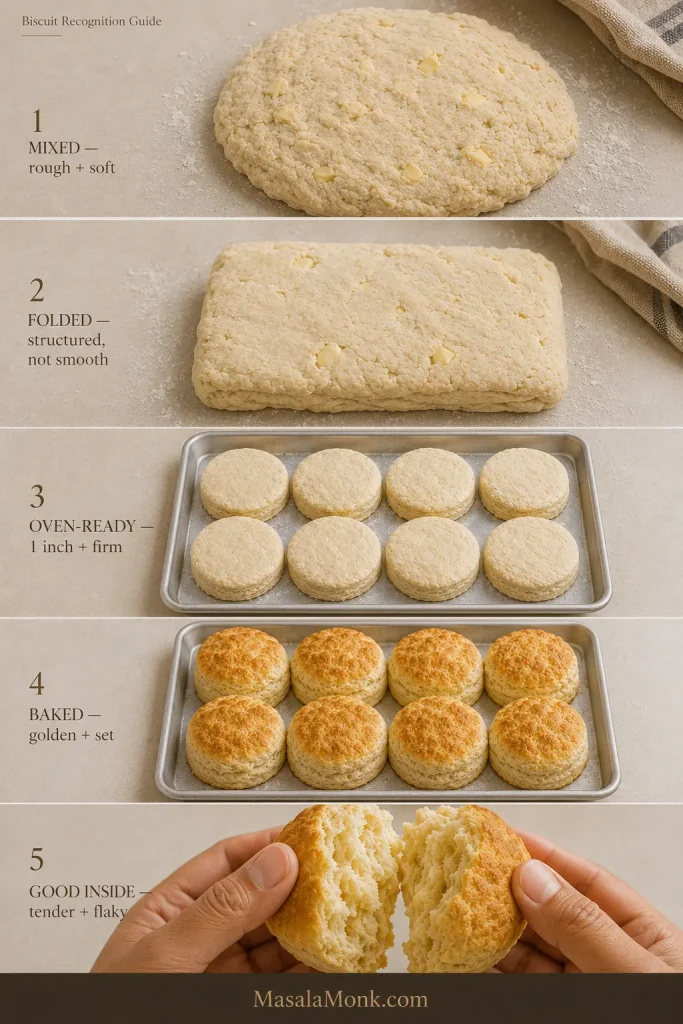
Before moving into make-ahead, this recognition guide gathers the recipe’s main visual checkpoints in one place—from mixed dough through the finished crumb.
Match your dough or biscuit to the closest stage here, then continue from that visual checkpoint instead of guessing.
Make Ahead, Freeze, Store and Reheat
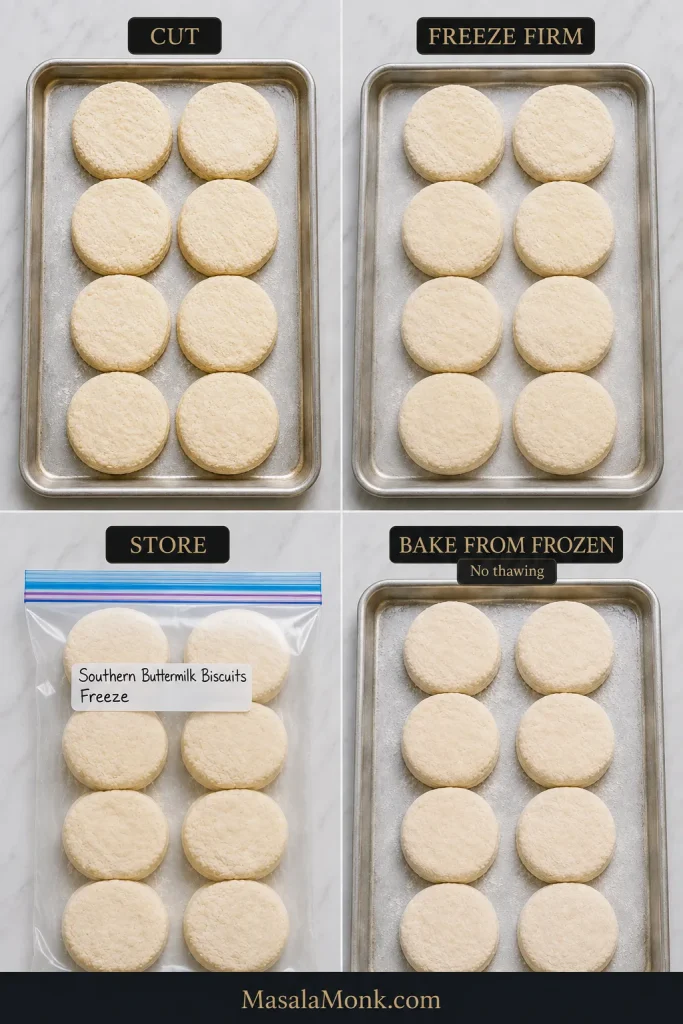
If flouring the counter first thing in the morning is the only thing standing between you and homemade biscuits, freeze the cut biscuits before baking.
Freeze until the rounds are firm enough to transfer without denting, then bag them.
Freeze Before Baking
Prepare and cut the biscuits normally.
Place them on a lined tray with space between them.
Freeze until completely firm.
Transfer to a freezer-safe bag or airtight container.
Use within 2 months for best quality.
Bake Straight From Frozen
Put the biscuits straight into the 450°F / 230°C conventional oven without thawing. Frozen biscuits take longer than fresh ones, so use the same top, side, bottom, and center cues instead of assuming another recipe’s timing will fit this dough.
Store and Reheat Baked Biscuits
Room temperature: Cool completely and keep airtight for up to 2 days.
Longer storage: Freeze them instead of refrigerating them for several days.
Freeze baked biscuits: Wrap well once cool and use within 2 months for best quality.
Oven: Reheat at 350°F / 175°C for 5–8 minutes, until warm through the center.
Microwave: For one biscuit, start with 10–15 seconds and add another short burst only if needed.
A reheated biscuit that seems a little dry usually comes back nicely when split hot and spread with butter.
What to Serve With Southern Biscuits
The first biscuit off the tray barely needs anything. Salted butter, honey, or a spoonful of homemade pear jam are enough.
If potatoes belong on the breakfast plate too, crispy air-fryer hash browns keep the stovetop free while the rest of breakfast comes together.
Biscuits also make excellent breakfast sandwiches with eggs and sausage, country ham, or fried chicken. For a bigger Sunday or holiday table, a brown sugar honey glazed ham turns them into the bread everyone keeps reaching for between bites.
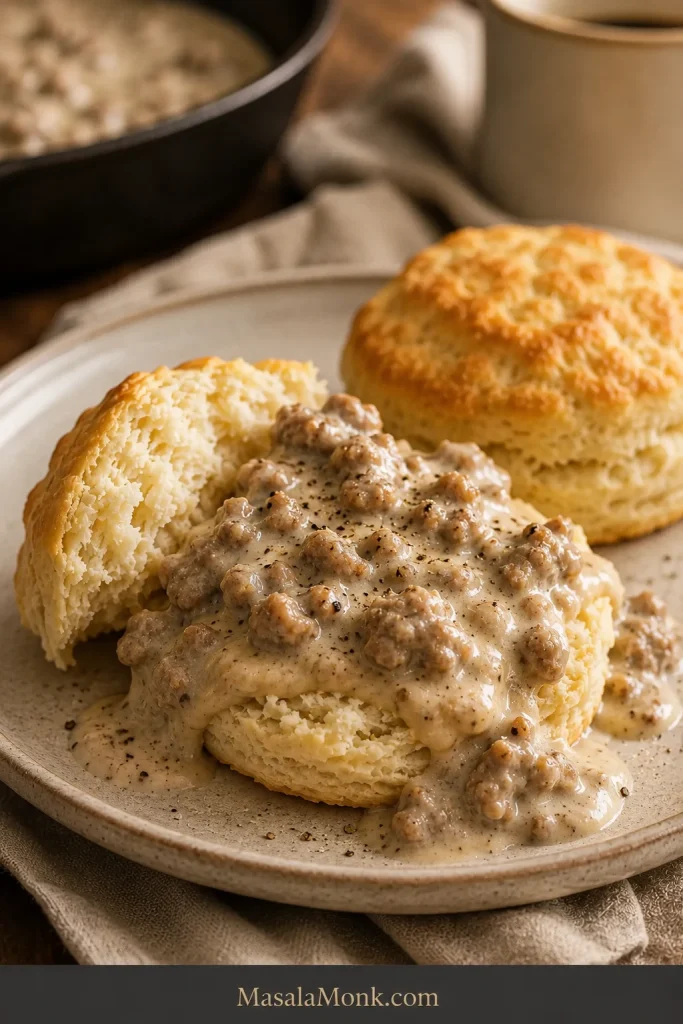
And, of course, a soft but sturdy biscuit is exactly what you want underneath peppery sausage gravy, where the gravy can settle into the torn layers without turning the whole biscuit to mush.
Split rather than crush the biscuit so gravy soaks into the crumb while some baked crust stays intact.
Southern Buttermilk Biscuit FAQs
Do I need White Lily flour for Southern biscuits?
No. Soft-wheat flour can make especially delicate biscuits, but ordinary all-purpose flour works very well when the recipe is designed around it. This recipe uses all-purpose flour deliberately.
Why is my biscuit dough sticky?
A little tackiness is normal. Dough that sticks lightly to your fingers but holds its shape is in the right zone. Heavy smearing and slumping call for a small dusting of flour.
Can I make biscuits without a biscuit cutter?
Yes. Cut the final rectangle into squares with a sharp knife or bench scraper. Squares give you clean edges and leave no scraps.
Can I make the biscuits the night before?
The easiest make-ahead route is to cut and freeze the raw biscuits, then bake them directly from frozen. That keeps morning work minimal while preserving the cold butter and freshly mixed dough structure.
The next batch should feel less mysterious. You now know what firm butter, soft dough that holds together, and a fully baked center look like.
Pull one apart while it is still warm. The center should give along the folds, and a little butter should disappear straight into the crumb. Then decide whether the first biscuit needs honey, jam, or nothing at all.
If you want sourdough English muffins with a chewy bite, deep toastability, and real nooks and crannies, this is the version to make. The dough is built around active starter for dependable natural lift, kept soft enough to open well inside, shaped thick enough to protect the crumb, and cooked slowly enough that the middles set before the outsides darken too fast. Once cooled and split with a fork, they toast the way a good English muffin should: crisp at the edges, rough in the middle, and ready to catch butter in every crevice.
This page does more than hand you one formula. It helps you choose the right route before you begin, whether that means active starter, fresh discard, overnight timing, same-day timing, or a small yeast assist for reliability. It also shows you how to avoid the problems that ruin texture: dense crumb, gummy middles, weak rise, flat rounds, or muffins that brown long before they cook through. If your culture still feels inconsistent, start with this guide on how to build a sourdough starter. If you already like baking with starter, save these sourdough bread recipes for later too.
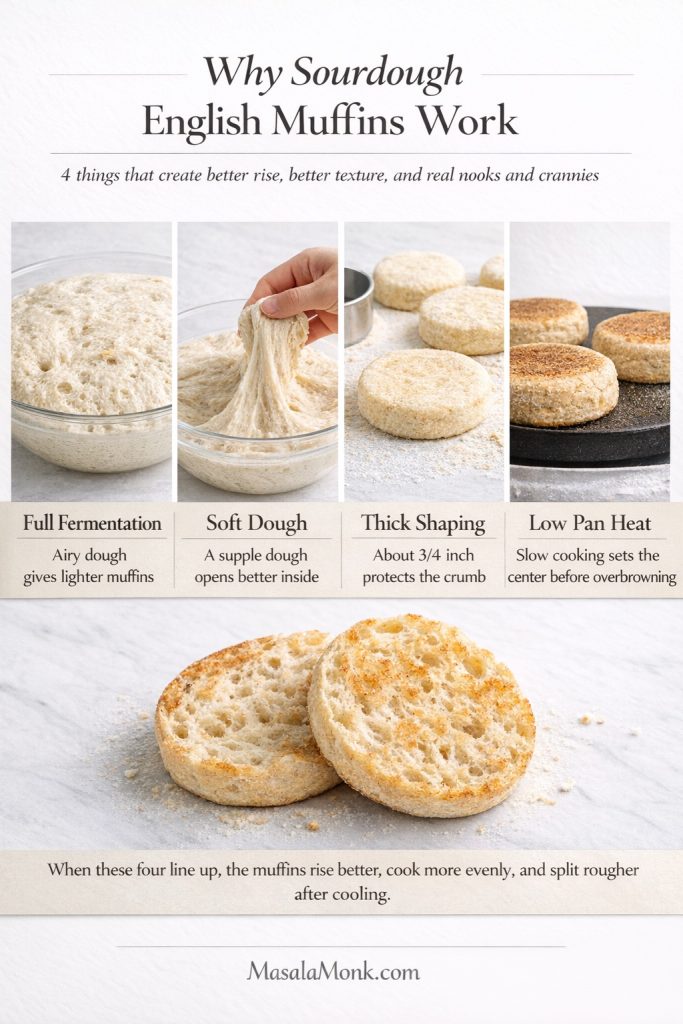
Why this sourdough English muffins recipe works
A strong sourdough English muffins recipe depends on four things working together:
full fermentation
a soft but manageable dough
enough thickness to create an open interior
low pan heat so the middles cook through before the crust browns too fast
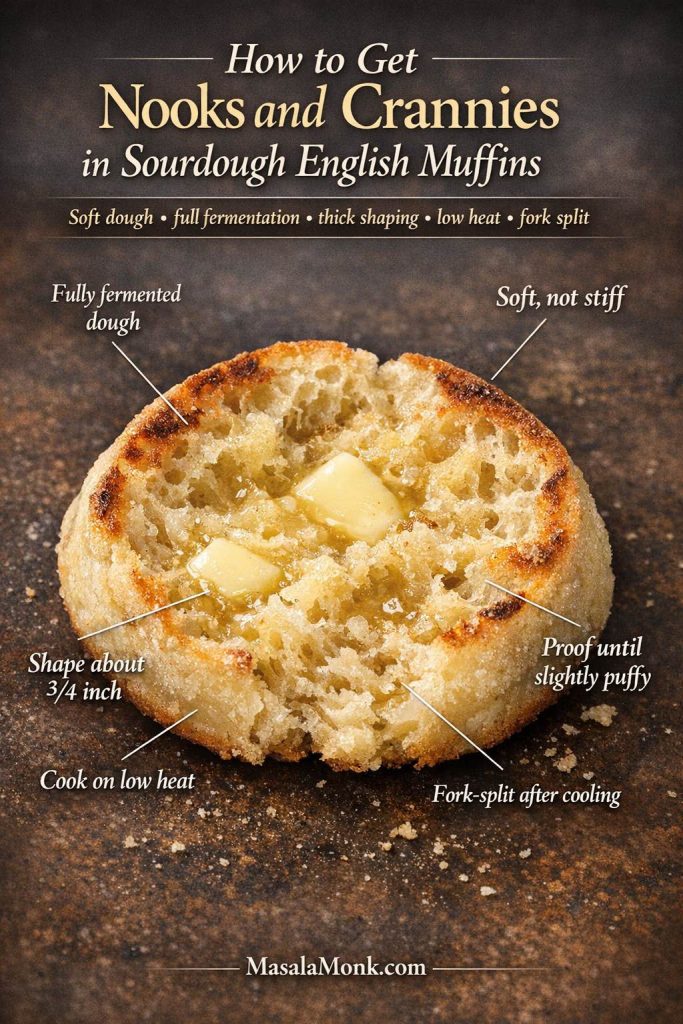
Great sourdough English muffins do not come from one trick alone. Full fermentation gives the dough enough internal life to rise well, a soft dough helps the crumb open instead of tightening up, thicker shaping protects the interior texture, and low pan heat gives the center time to set before the crust races ahead. When all those pieces line up, the muffins cook more evenly, split rougher after cooling, and deliver the nooks-and-crannies texture the whole recipe is built around.
When those four elements line up, the muffins rise better, cook more evenly, and split more raggedly after cooling. And when one slips, the batch usually shows it. Under-fermented dough stays tight and heavy. Dough rolled too thin cooks easily but loses interior texture. Dough handled too roughly loses gas. Heat that runs even a little too high gives you color before the middle is ready.
Texture is the real payoff. Good sourdough English muffins with nooks and crannies should not split open like soft sandwich bread. They should break into rough, irregular halves that toast crisp and hold butter properly. That open interior is part of what makes the format feel right, which is why King Arthur’s guide to nooks and crannies is worth reading if you want a clearer sense of the target.
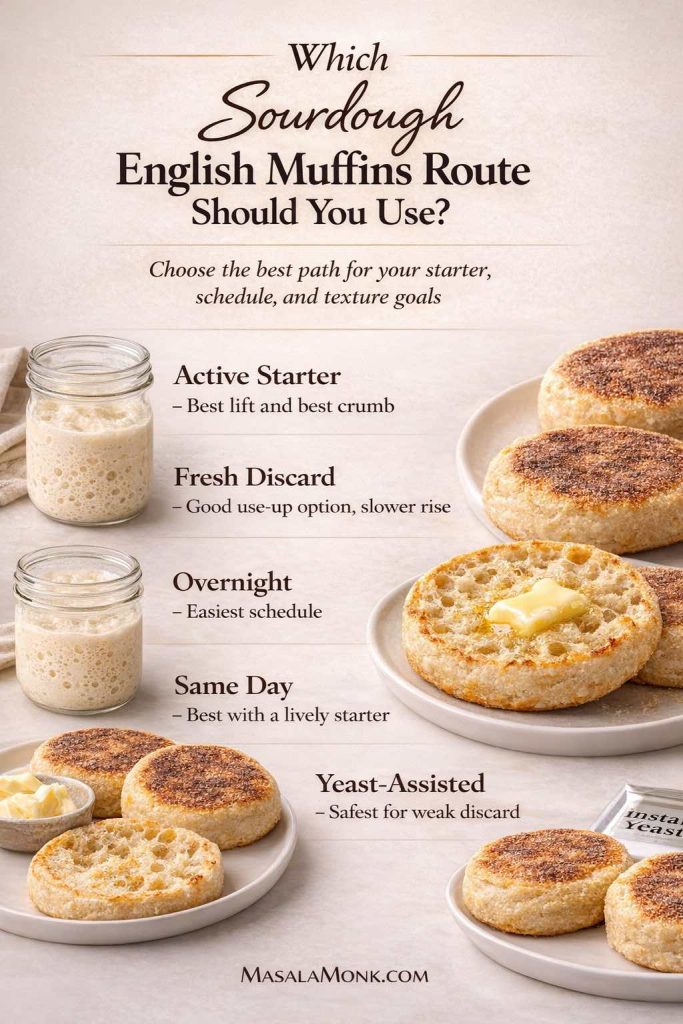
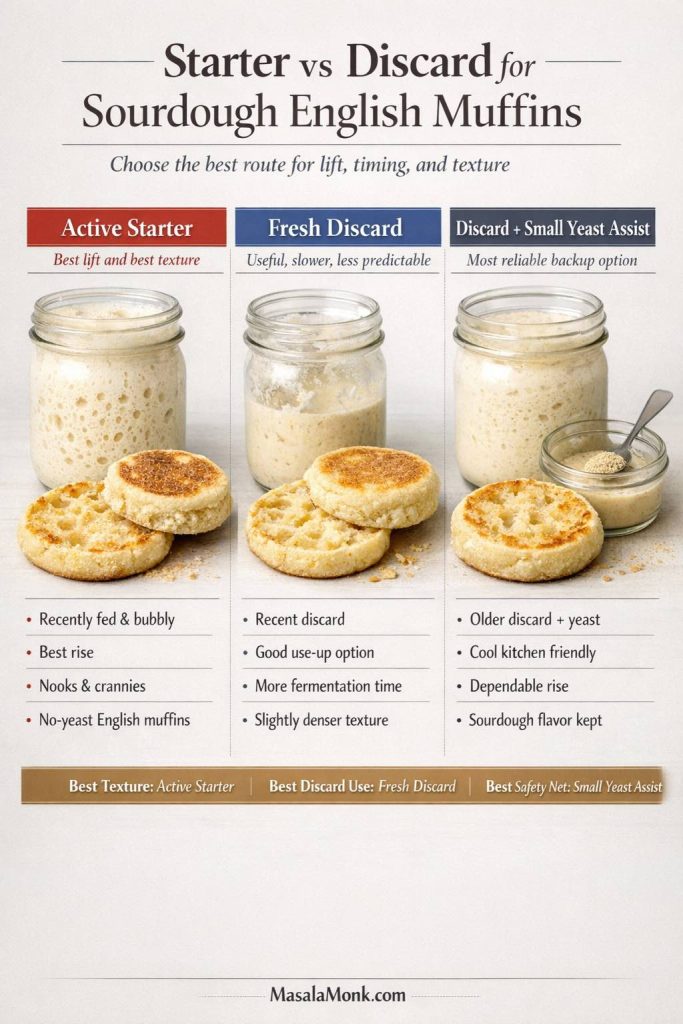
A disappointing batch often starts with the wrong route, not the wrong recipe. Choose the path that matches your starter, your schedule, and your kitchen.
Not every batch of sourdough English muffins should start the same way. This route guide helps you choose between active starter, fresh discard, overnight timing, same-day baking, and a yeast-assisted option, so the method fits your starter, your schedule, and the texture you want. Save it for quick reference, then use the full post for the detailed recipe and troubleshooting.
Active-starter sourdough English muffins
Use this route if:
your starter rises reliably after feeding
you want the best lift
you want the best chance of real nooks and crannies
you want sourdough English muffins no yeast
you want the strongest overall crumb
This is the main route on this page and the best path for sourdough starter English muffins.
Fresh-discard sourdough English muffins
Use this route if:
your discard is recent and still smells pleasantly tangy, not sharply harsh
you want to use it up instead of feeding again
you are willing to allow more fermentation time
you understand the rise may be less predictable
you are comfortable with a slightly less lofty result if needed
This can still make very good sourdough discard English muffins, especially when the discard comes from a healthy, recently maintained starter.
Overnight sourdough English muffins
Use this route if:
you want the easiest schedule
you want better flexibility the next morning
you prefer deeper flavor
you do not want to rush fermentation
you like shaping and cooking cooler dough
This is the easiest and most forgiving option for most readers. It is also the route I recommend first for overnight sourdough English muffins.
Same-day sourdough English muffins
Use this route if:
your starter is especially lively
your kitchen is warm enough to support a full rise
you want muffins today
you are willing to watch the dough, not just the clock
This can still produce easy sourdough English muffins, but it leaves much less room for a weak starter or a cool kitchen.
Yeast-assisted sourdough English muffins
Use this route if:
your discard is older or sluggish
your kitchen runs cool
you want more predictable rise
your schedule is tighter than your starter deserves
you still want sourdough flavor without relying on uncertain lift
Best discard use-up option: fresh discard with patience
Best safety net for weak discard: small yeast assist
Best path for no yeast: active starter with full fermentation
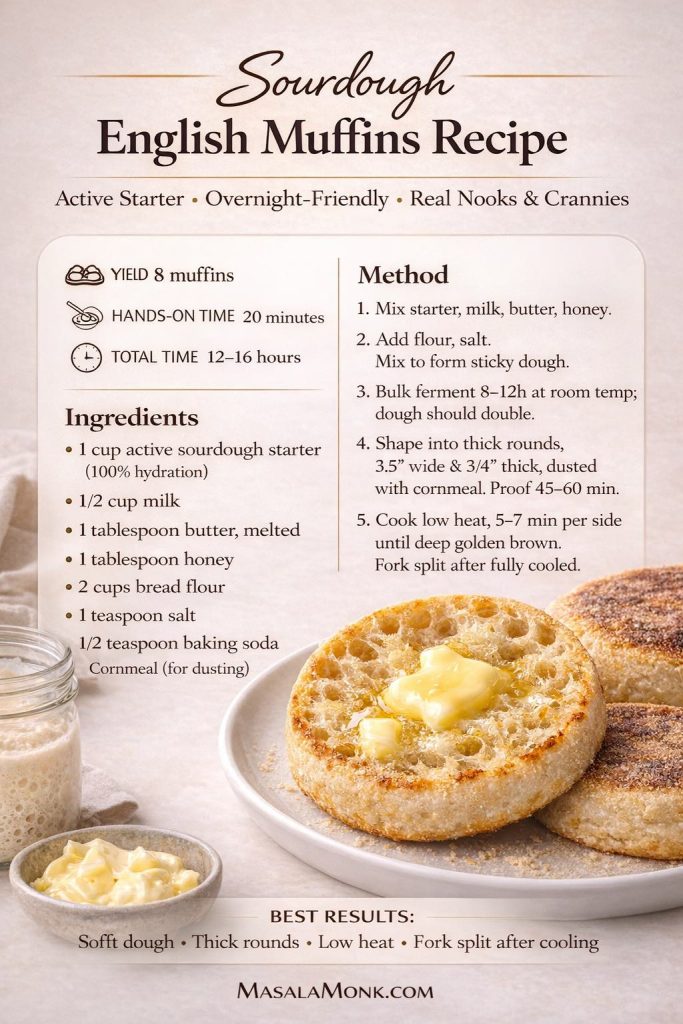
Sourdough English Muffins Recipe
This is the master version on the page: active starter, naturally leavened, overnight-friendly, skillet-cooked, and built for classic fork-split texture.
Use this as your quick-reference anchor for the batch: soft dough, thick rounds, low heat, and a fork-split finish are what give sourdough English muffins their best texture. Save it now, then come back to the full post for the route choices, troubleshooting, and variation details that make the recipe easier to get right.
Yield: 10 to 12 muffins Prep time: 20 minutes Rest and folds: 30 to 45 minutes Bulk fermentation: about 4 to 8 hours at room temperature, depending on starter strength and kitchen temperature Final proof: about 45 to 90 minutes Cook time: about 10 to 14 minutes per batch Total time: 8 to 14 hours, depending on whether you use the overnight route Best route: active starter, naturally leavened, overnight-friendly
Ingredients for sourdough English muffins
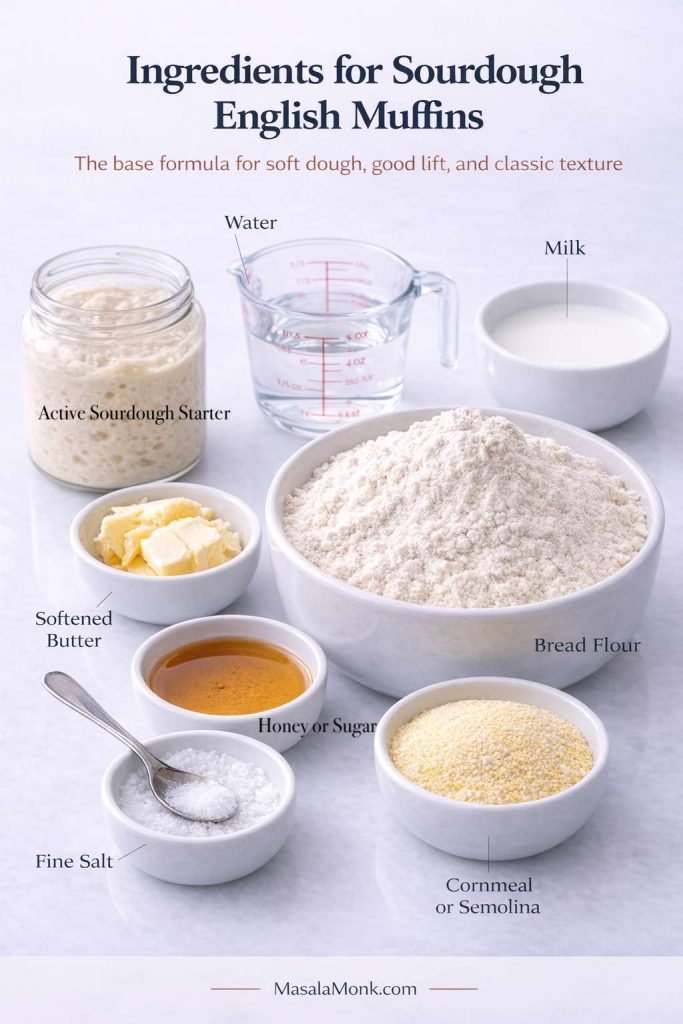
The base sourdough English muffins formula is simple, but each ingredient plays a specific role in the final texture. Active starter drives lift, bread flour gives structure and chew, milk and water balance tenderness and handling, butter softens the crumb, and honey or sugar helps with browning. Salt sharpens the flavor, while cornmeal or semolina helps with the classic finish and easier handling during proofing and cooking.
120 g active sourdough starter
180 g lukewarm milk
60 g lukewarm water
20 g honey or sugar
30 g softened butter
360 g bread flour
7 g fine salt
cornmeal or semolina, for dusting
Recipe notes before you start
The dough should feel soft and slightly tacky, not stiff.
Shape to about 3/4 inch thick if you want a better interior.
Proof until the rounds look a little fuller and softer, not dramatically doubled.
Cook over truly low heat. This is where many batches go wrong.
Cool fully, then fork-split, then toast for the best final texture.
Active sourdough starter Use starter that has been fed and is clearly lively. It should look airy, expanded, and capable of lifting dough on its own. If you are unsure what ready starter really looks like, go back to this guide on feeding and storing sourdough starter.
Milk and water Milk softens the crumb and supports browning. Water keeps the dough from becoming too rich. Together they give homemade sourdough English muffins that stay tender without drifting into bun territory.
Honey or sugar Either works. The amount is modest, so the dough will not taste sweet, but it helps browning and rounds out the flavor.
Butter Butter adds tenderness. The amount stays moderate, so the dough still behaves like English muffin dough rather than enriched roll dough.
Bread flour Bread flour gives the dough the strength to rise well and hold shape on the skillet. All-purpose flour can work, but bread flour is the better default for chew and structure.
Cornmeal or semolina This helps with sticking and gives the classic finish. It does not create the open crumb. Fermentation, thickness, heat, and fork-splitting do that.
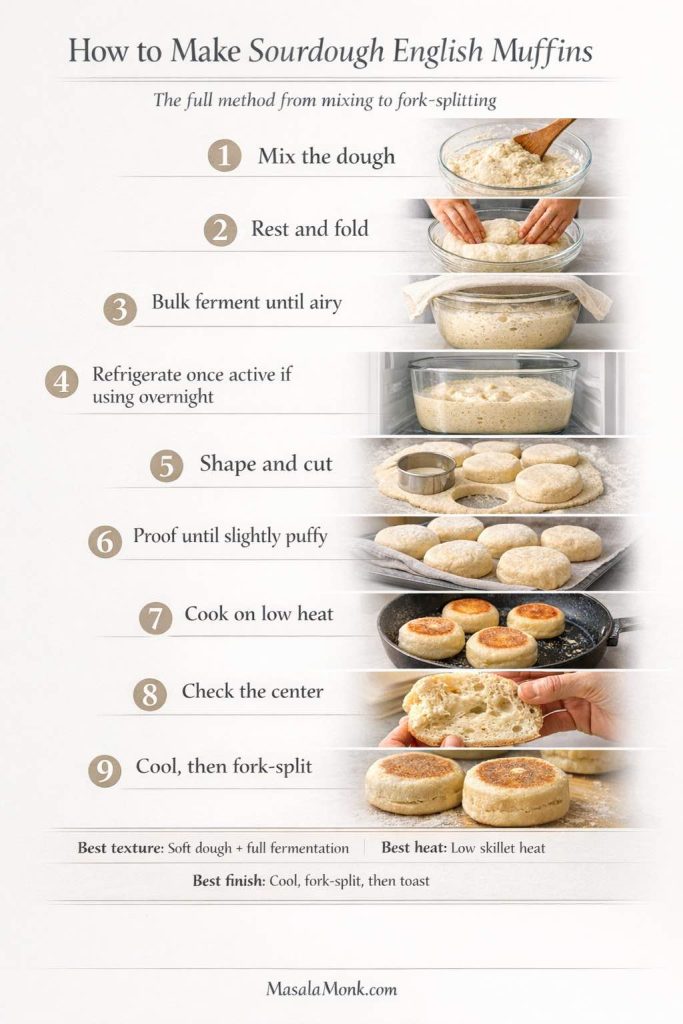
Making sourdough English muffins goes more smoothly when you can see the whole sequence before you start. This method guide walks through the full flow from mixing and folding to fermentation, shaping, proofing, skillet cooking, checking the center, and cooling before fork-splitting. Use it as your quick roadmap for the batch, then follow the detailed recipe for the exact dough cues, timing flexibility, and texture checkpoints that make the muffins come out light, cooked through, and ready to toast well.
How to make sourdough English muffins
1. Mix the dough
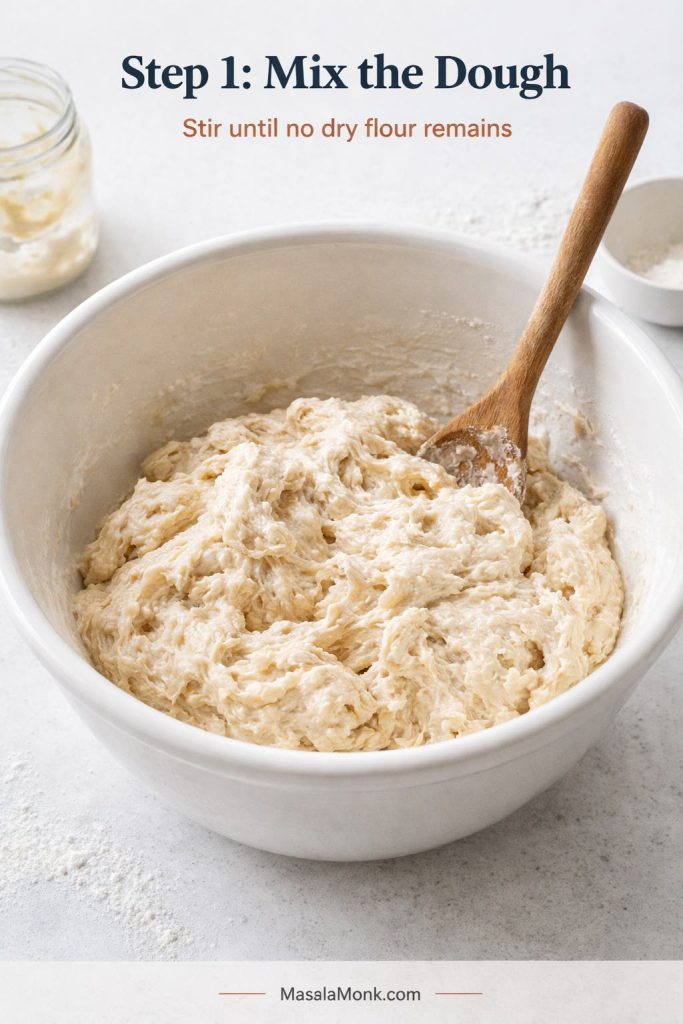
In a large bowl, stir together the active starter, milk, water, honey, and softened butter until mostly smooth. Add the bread flour and salt, then mix until no dry flour remains.
Do not chase a polished dough here. You only need even mixing, and a rough but cohesive dough is completely fine at this stage.
This is what properly mixed sourdough English muffin dough should look like before the first rest: soft, shaggy, cohesive, and fully combined, but not smooth or polished yet. At this stage, you are only bringing the ingredients together until no dry flour remains. If the dough looks rough, that is normal. The goal here is not to knead it into a finished dough, but to set up the rest-and-fold stage that helps it relax, smooth out, and strengthen naturally.
When the dough feels drier than expected, add only a very small splash of liquid. When it feels shaggy and awkward, let it rest before correcting it with more flour. That pause matters. Dough often settles after the first rest, and overcorrecting early makes the final crumb tighter than it needs to be. The same general logic helps with sourdough pizza dough too: pause before you fix.
2. Rest and strengthen the dough
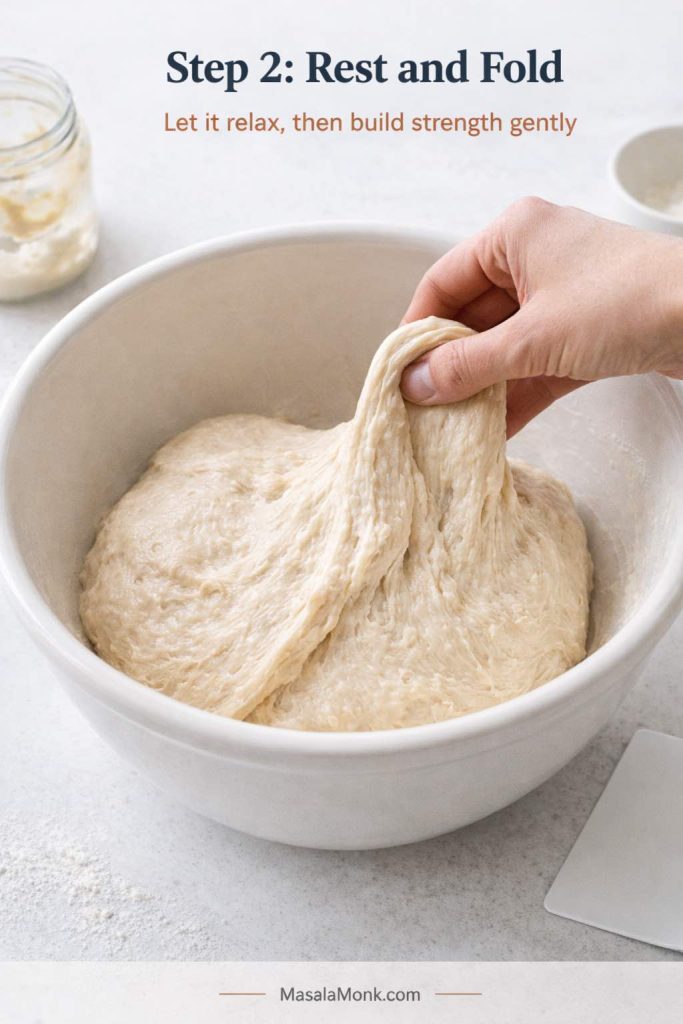
Cover the bowl and let the dough rest for 20 to 30 minutes. Then give it 3 to 4 folds in the bowl or on a lightly damp counter.
After the first rest, sourdough English muffin dough should look calmer and more organized than it did right after mixing. This is the stage where gentle folds begin building strength without turning the dough stiff or overworked. If the dough feels softer, stretches more easily, and already looks less rough, that is exactly what you want before bulk fermentation begins.
You do not need a hard knead. The goal is to help the dough feel smoother, calmer, and stronger than it did right after mixing.
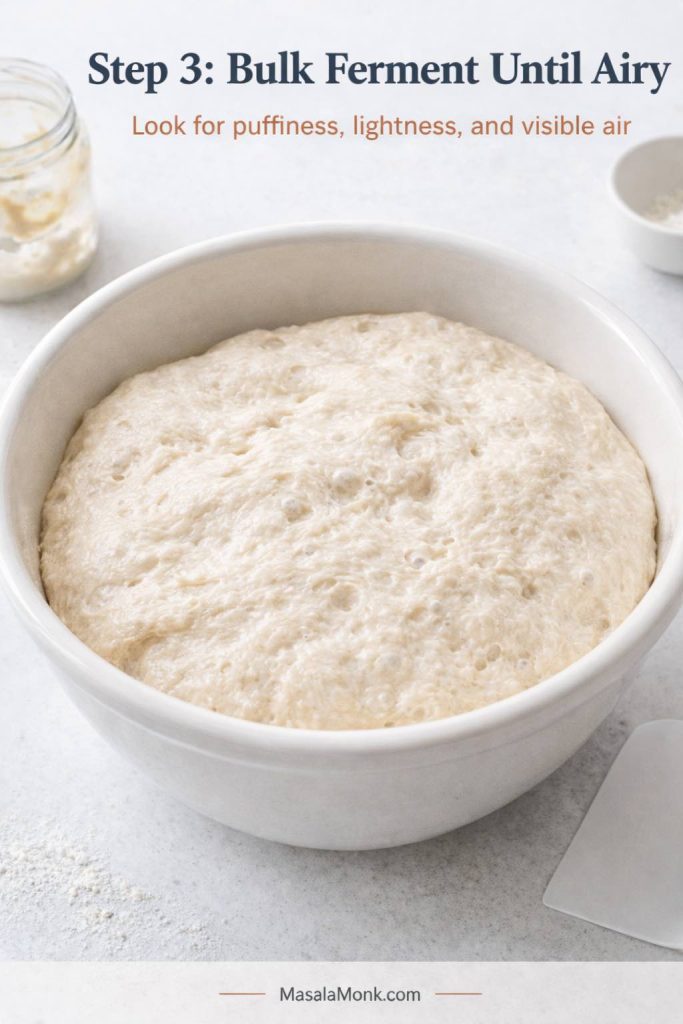
3. Bulk ferment until clearly airy
Cover the bowl again and let the dough rise until it is visibly puffier, lighter in feel, and more aerated. Use the dough, not the clock.
Signs it is ready:
it looks expanded rather than flat
the surface feels softer
the mass feels lighter under your hands
it shows visible airiness instead of a dense, heavy look
This is the look you want before shaping sourdough English muffins: the dough should feel lighter, look fuller, and show visible airiness across the surface. It should not seem dense, flat, or lifeless at this point. Bulk fermentation is one of the biggest texture drivers in the whole recipe, because dough that has not become properly airy usually bakes into tighter, heavier muffins with fewer nooks and crannies.
If you are making overnight sourdough English muffins, let the dough begin fermenting at room temperature until it shows clear activity, then refrigerate it. For a same-day batch, keep it at room temperature until it reaches those same cues.
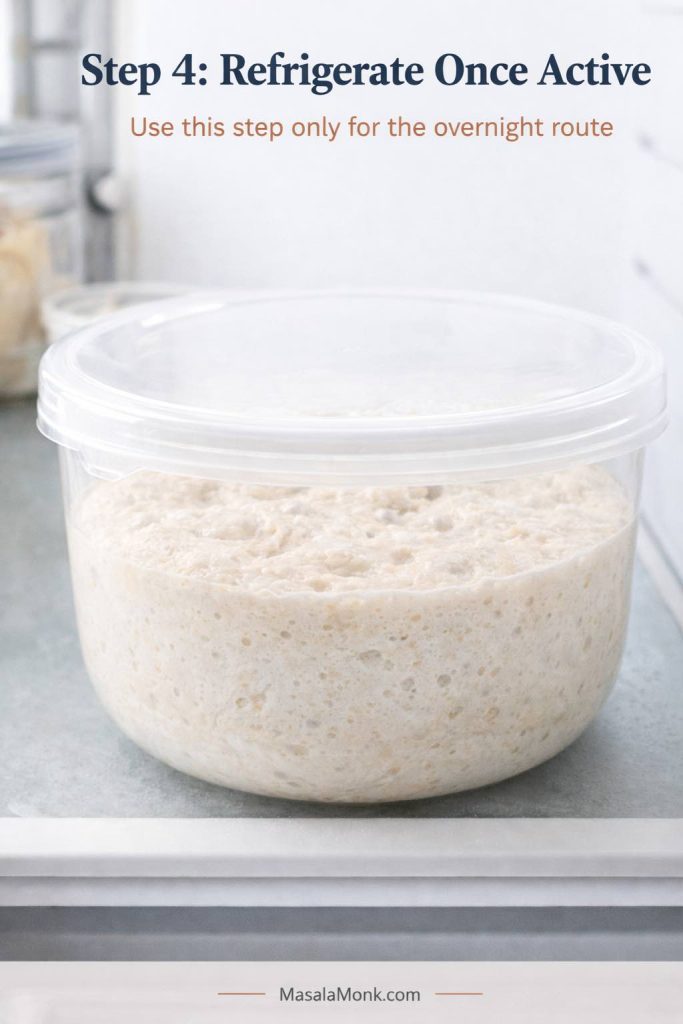
4. Refrigerate if using the overnight route
For the overnight route, chill the dough only after it has clearly started fermenting. Do not refrigerate a lifeless dough and expect the fridge to solve it.
For overnight sourdough English muffins, the dough should go into the refrigerator only after it already looks active and lightly puffed. This is the stage where cold fermentation helps with flexibility and flavor, but it does not replace early fermentation. If the dough still looks flat and lifeless, it is too soon to chill it. What you want here is a dough that already shows movement before the overnight rest.
The next day, let it sit just long enough that it is no longer stiff and stubborn, then shape.
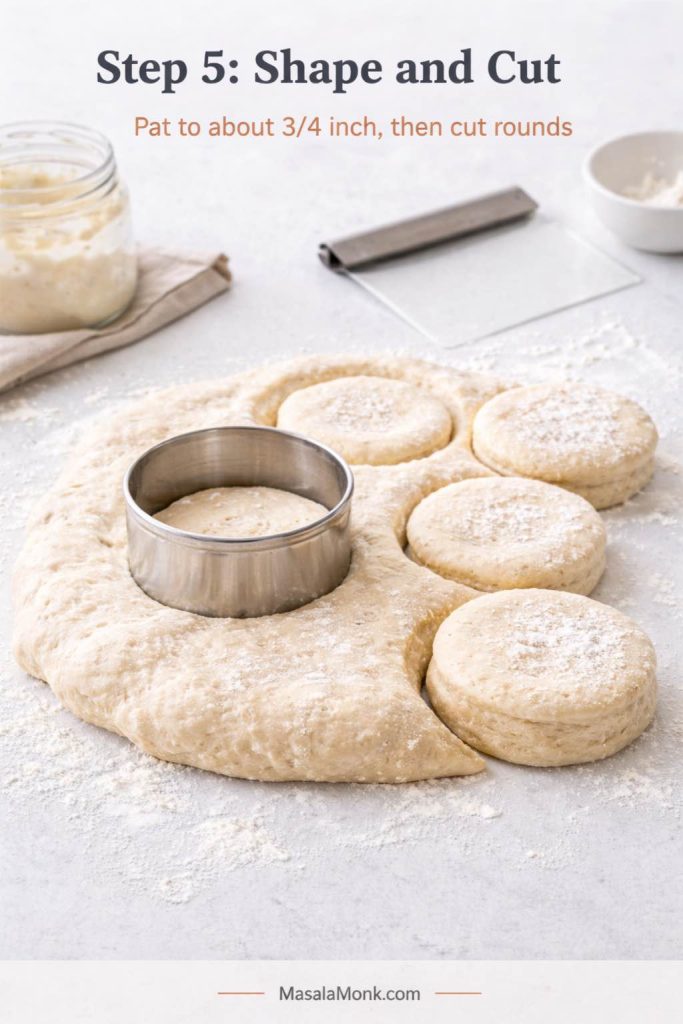
5. Shape and cut the muffins
Turn the dough onto a lightly floured surface and pat or roll it to about 3/4 inch thick. Keep the thickness as even as possible. A standard English muffin cutter size works well here and usually gives the most familiar result.
That thickness matters. Thinner rounds cook more easily but lose interior character. Thicker rounds create better texture but demand lower heat and more patience.
This is the shaping stage that helps protect the final texture of sourdough English muffins. The dough should be patted or rolled to about 3/4 inch thick before cutting, which gives the interior enough room to open instead of baking up flat and bread-like. The rounds should look soft and alive, not tight, dry, or heavily floured. This is also why repeated rerolling works against the crumb: every extra pass compresses the dough and makes it harder to get the rough fork-split texture you want later.
Cut rounds with a biscuit cutter or glass and transfer them to parchment or a tray dusted with cornmeal or semolina. Re-roll scraps once if needed, but not again and again. Every reroll compresses the dough and makes it harder to get the open interior you want.
If the dough sticks badly, lightly flour the surface and your cutter, but do not bury the dough under excess flour. Too much bench flour works directly against sourdough English muffins with nooks and crannies.
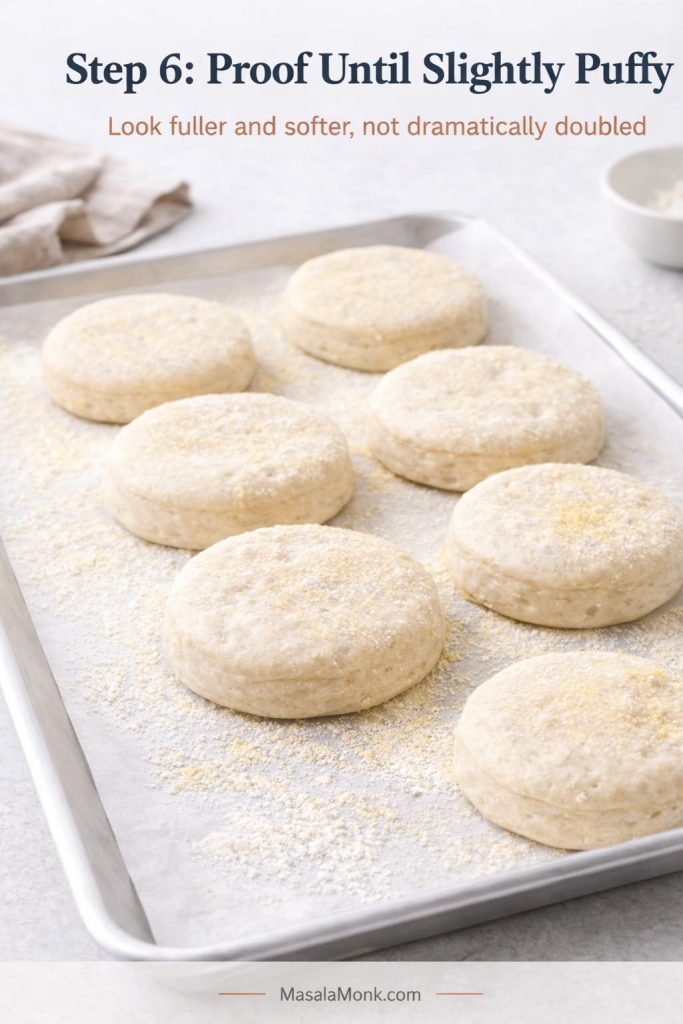
6. Proof the rounds
Let the cut rounds rest until they are slightly puffy and visibly softer. They should not double dramatically. They should simply look less dense and feel a little lighter.
This is the look to aim for before sourdough English muffins hit the skillet: the rounds should seem a little fuller, softer, and more relaxed than when they were first cut, but they should still hold their shape cleanly. Final proofing here is not about dramatic volume. It is about giving the dough enough time to loosen and lighten so the muffins cook with better lift and a more open interior instead of staying tight and compact.
A round that still looks tight will usually cook tight. A round that looks overblown, fragile, or hard to move cleanly is already beyond ideal and should go straight to the skillet.
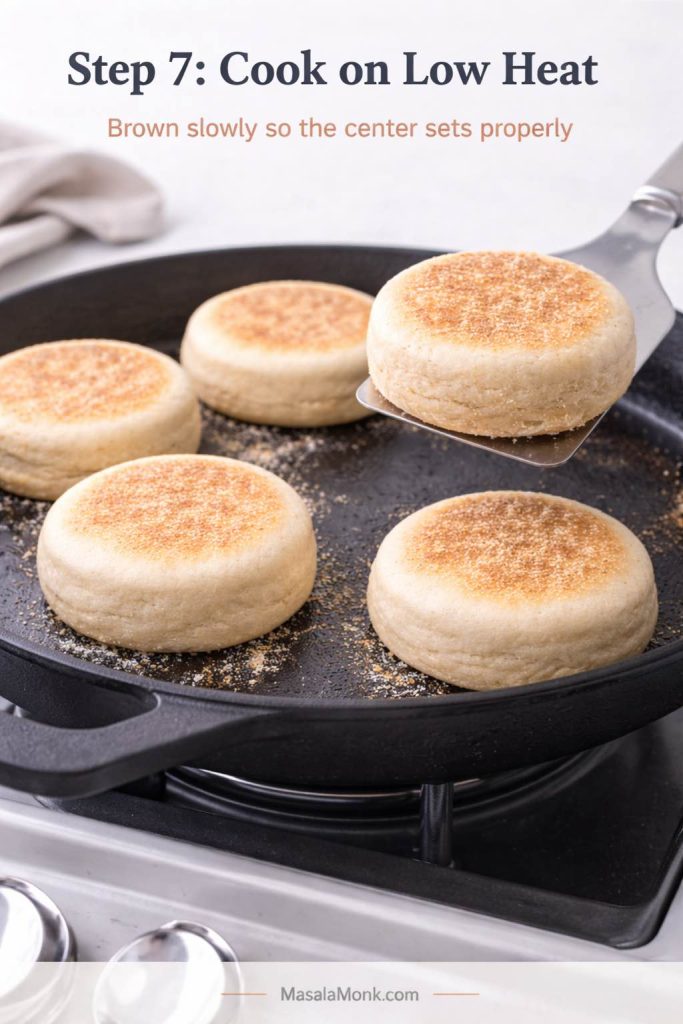
7. Cook low and patiently
Heat a heavy skillet or griddle over low heat. Low means low, not medium-low pretending to be low.
Place the muffins on the skillet and cook the first side slowly until evenly browned. Then flip and cook the second side just as gently. On many home stoves, expect roughly 5 to 7 minutes on the first side and 4 to 6 minutes on the second, though thickness, stove strength, and pan material can shift that a little.
Low skillet heat is what gives sourdough English muffins time to cook through before the outsides darken too fast. The bottoms should brown gradually and evenly, while the sides begin to look less raw and more set. When the pan runs too hot, the crust gets ahead of the center and the texture suffers. A patient cook here is what protects the crumb you built through fermentation, shaping, and proofing.
Watch for these signs before flipping:
the bottom is evenly browned
the sides are beginning to look more matte than raw
the muffin feels lighter when you lift an edge
the surface looks more set and less doughy
If the muffins are thick and the crust is coloring before the sides start to look set, cover the pan briefly to help trap enough heat for the center to catch up. If the muffins are well colored but still doubtful in the middle, move them to a low oven to finish gently instead of forcing more stovetop color.
That slow approach matters. Little Spoon Farm’s sourdough English muffins use similar low-heat logic for the same reason: English muffins need time to cook through, not just time to brown.
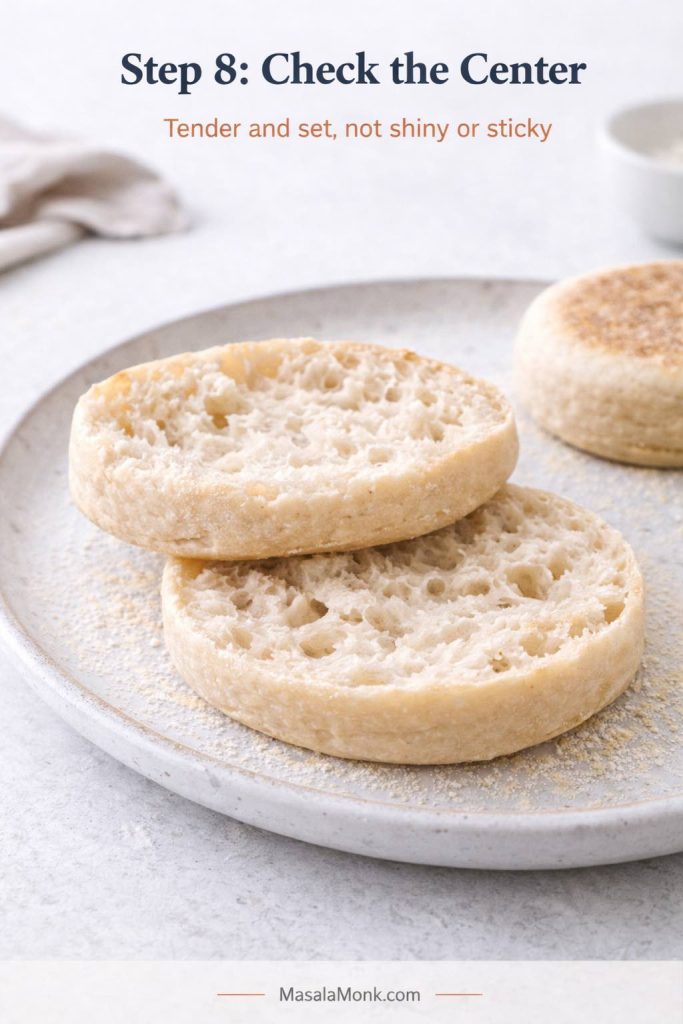
8. Check for doneness
A done muffin should feel lighter than it looks and set through the center. If you are unsure, pull one, let it rest briefly, then open it. The middle should look tender and cooked through, not shiny, sticky, or pasty.
A properly cooked sourdough English muffin should open to a crumb that looks set, tender, and lightly moist without any gummy or pasty center. What you are checking here is not whether the inside looks dry, but whether it has finished cooking through. If the middle still looks shiny or sticky, the muffins need more gentle heat. If it looks soft yet clearly set, you are ready to move on to cooling and fork-splitting.
A crumb that is fully set but slightly moist is not the same as a raw gummy center. Toasting finishes the texture beautifully. Raw gumminess is the problem, not tenderness.
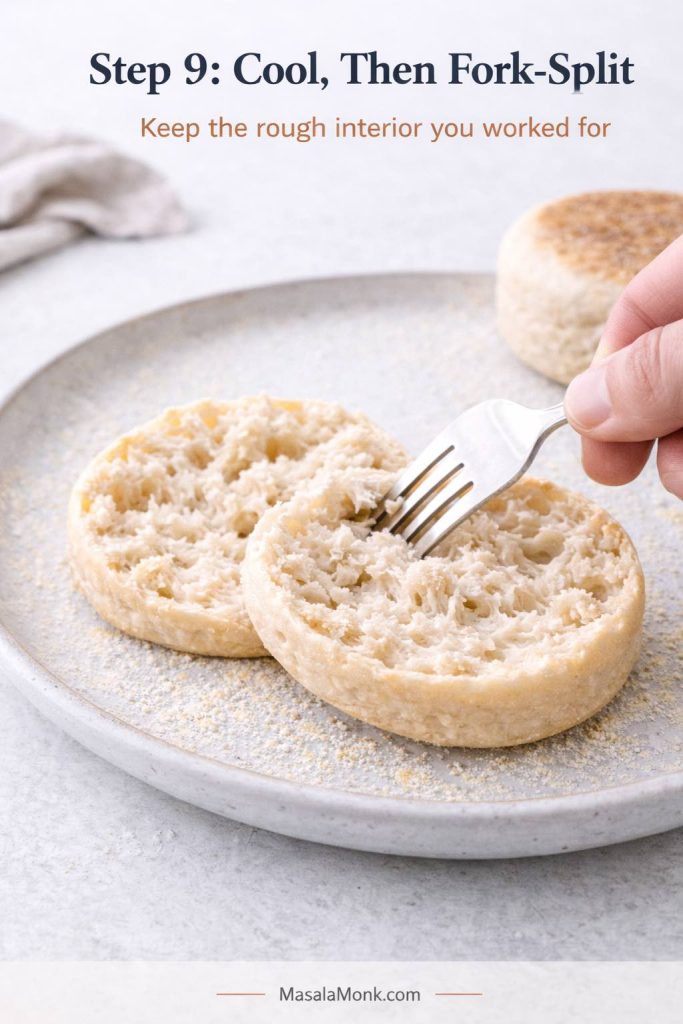
9. Cool completely, then fork-split
Let the muffins cool all the way before opening them. Then use a fork to work around the sides until they separate.
Fork-splitting is what helps sourdough English muffins keep the rough interior that makes them so good once toasted. A knife gives a cleaner cut, but it smooths away some of the texture you worked for through fermentation, shaping, proofing, and low-heat cooking. Once the muffins have cooled fully, use a fork around the seam to open them and preserve that more jagged, butter-catching crumb.
This is not decorative. It is part of the texture. Fork-splitting preserves the rough interior a knife smooths away, which is why both King Arthur’s sourdough English muffin recipe and their broader English muffin guidance emphasize splitting with a fork.
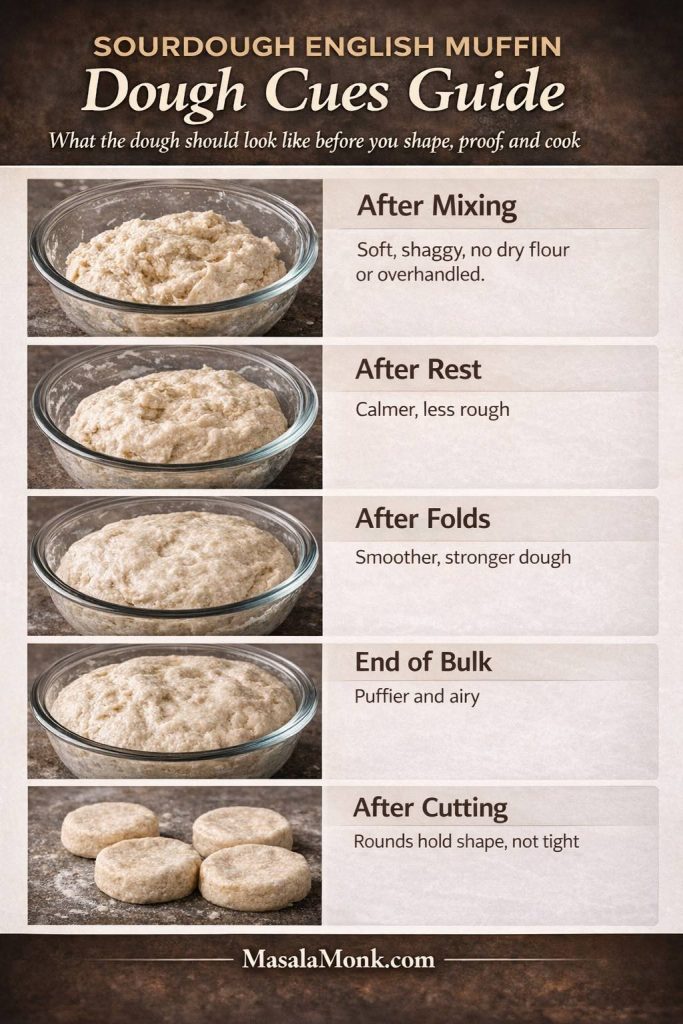
Reading the dough correctly matters more than chasing a fixed timeline. This sourdough English muffin dough cues guide shows what to look for at each stage, from a soft shaggy mix to a calmer rested dough, a stronger dough after folds, a puffier and airier dough at the end of bulk fermentation, and cut rounds that hold shape without looking tight. Use it alongside the full recipe so you can judge readiness by feel and appearance, not just the clock.
After mixing
The dough should feel soft and slightly tacky, not dry and tight, and not wet enough to slump like batter. A dough that already feels stiff usually bakes up denser than it should.
After the rest
It should feel calmer and less rough. That is one reason not to add too much flour too early.
After the folds
The dough should feel smoother, more elastic, and more organized. Do not expect it to look perfect. What matters is that it feels stronger than it did at first.
At the end of bulk fermentation
It should look puffier, feel lighter, and show visible airiness. If it still feels heavy and dull, it is not ready.
After cutting
The rounds should hold shape without feeling tight. If they still look compact after proofing, they usually cook compact.
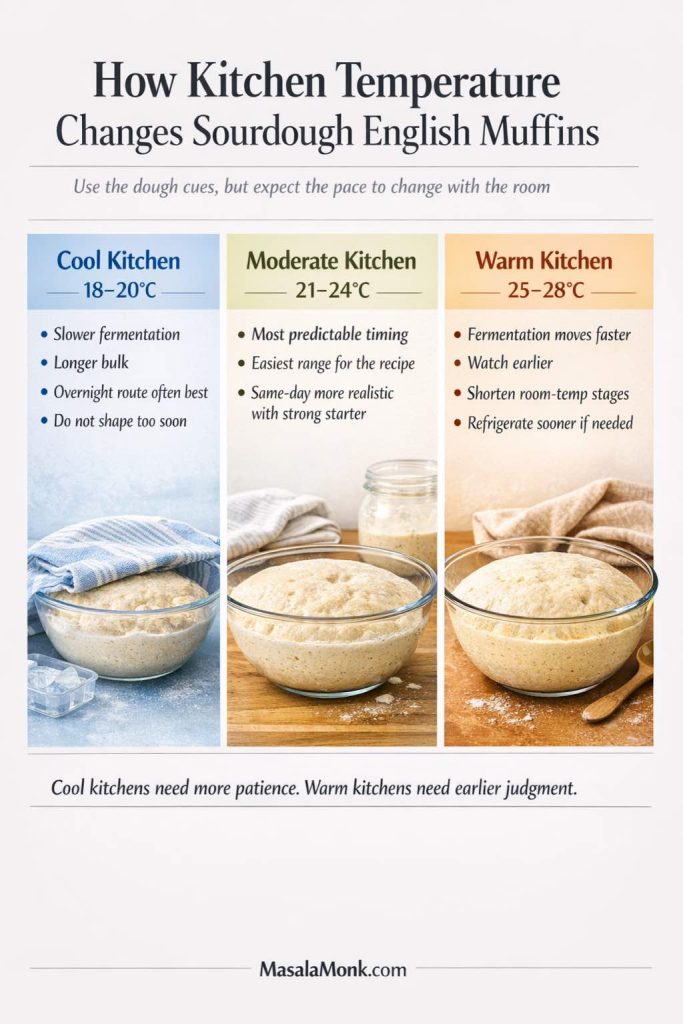
Use these as working expectations, not promises. Starter strength still matters, but room temperature changes the pace more than many bakers expect.
Room temperature changes how quickly sourdough English muffin dough moves, which is why timing should always be read through the dough instead of the clock alone. Cool kitchens usually need more patience and often suit the overnight route best, moderate kitchens are the most predictable, and warm kitchens can push fermentation along fast enough that earlier checks and shorter room-temperature stages matter. Use this guide to adjust the pace without losing the soft dough, proper proof, and low-heat cooking that give the muffins their best texture.
Cool kitchen, around 18 to 20°C
The dough will move slowly. Lean toward the overnight route, allow a longer bulk fermentation, and resist shaping too soon just because the clock says you should.
Moderate kitchen, around 21 to 24°C
This is the easiest range for the recipe. Most timing guidance behaves normally here, and same-day batches become more realistic when the starter is strong.
Warm kitchen, around 25 to 28°C
Fermentation can move surprisingly fast. Watch the dough earlier, shorten room-temperature stages where needed, and refrigerate sooner if the dough starts looking more inflated than airy.
This is one of the biggest search intents around the topic, so it deserves a direct answer.
Not every sourdough English muffin batch should start the same way. Active starter gives the best rise, the strongest chance of real nooks and crannies, and the clearest path to no-yeast sourdough English muffins. Fresh discard can still work well when it is recent and well kept, but it usually needs more time and may give a slightly less lofty result. If your discard is older, your kitchen runs cool, or you want a steadier rise, a small yeast assist is often the smartest backup.
When active starter is best
Use active starter when you want the best rise, the best crumb, and the cleanest path to sourdough English muffins no yeast. It is the strongest choice for english muffins with sourdough starter because it gives the dough the most dependable lift.
Use discard when it is fairly fresh and you are willing to allow extra time if the dough moves slowly. Sourdough discard English muffins can absolutely be flavorful and satisfying, especially if the discard comes from a healthy routine.
The real distinction is not starter versus discard as a label. It is active leavening power versus variable leavening power.
Can discard work alone?
Yes, but sourdough discard English muffins no yeast depend much more on the condition of the discard. Fresh discard has a much better chance than old, sharply acidic discard that has been sitting cold for too long.
If you go this route, watch the dough honestly. It may need more time than you hoped.
When a little yeast helps
A small yeast assist helps when the discard is older, the kitchen is cool, or the schedule is tight. It does not erase sourdough flavor. It simply makes the rise more dependable.
That is why recipes like Pantry Mama’s sourdough English muffins and other hybrid formulas treat a little commercial yeast as a practical tool rather than something to apologize for.
If you specifically came here for sourdough discard English muffin recipe intent, this is the simplest way to adapt the master version.
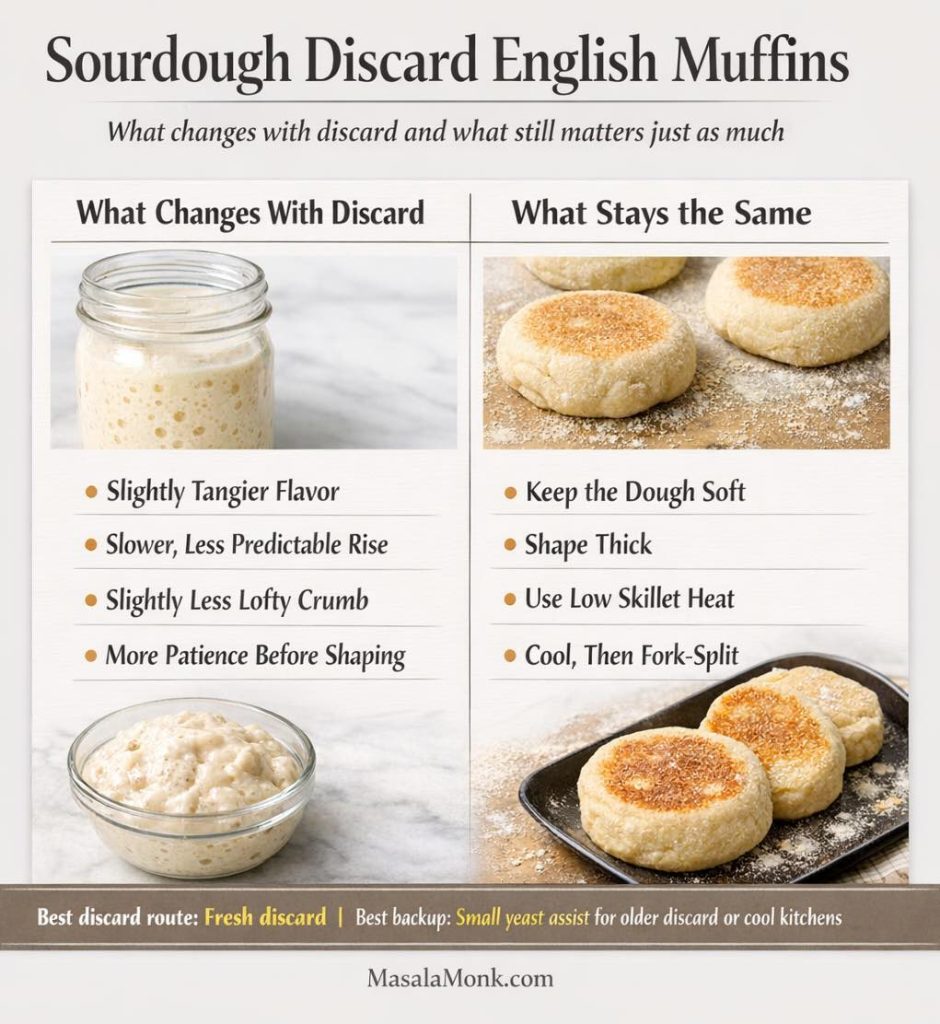
Use fresh discard in place of active starter when possible. Expect bulk fermentation to move more slowly. Do not cut rounds until the dough is genuinely airy. If your discard smells sharply acidic, has been sitting cold for a long time, or your kitchen is cool, a small yeast assist is the smarter choice.
Fresh sourdough discard can still make very good English muffins, but it changes the pace more than it changes the core method. The dough may rise more slowly, the crumb may come out a little less lofty, and shaping usually rewards more patience. What still matters just as much is keeping the dough soft, shaping thick enough to protect the interior, cooking over low skillet heat, and cooling before fork-splitting. When the discard is older or the kitchen runs cool, a small yeast assist is often the smarter safety net.
Overnight sourdough English muffins vs same-day timing
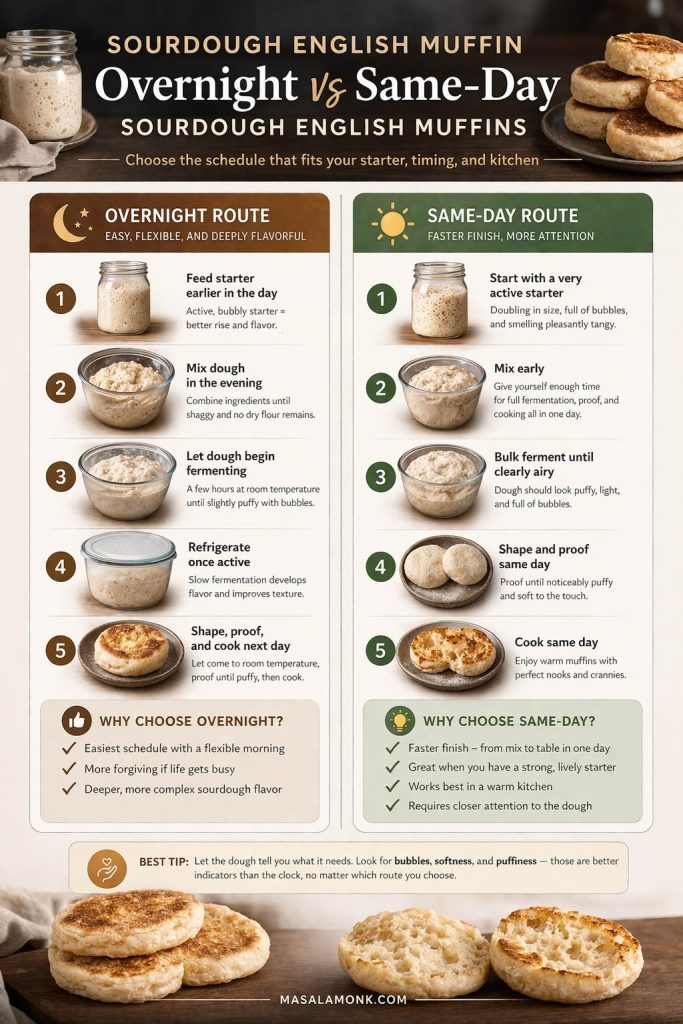
Not every batch of sourdough English muffins needs the same schedule. The overnight route is the easier, more forgiving option when you want flexibility and deeper flavor, while the same-day route works best with a very active starter, warmer conditions, and closer attention to dough cues. Use this guide to choose the timing that fits your kitchen and routine, then follow the full post for the detailed recipe, fermentation cues, and troubleshooting.
Overnight route
Feed the starter earlier in the day.
Mix the dough in the evening.
Let it begin fermenting at room temperature.
Refrigerate once it shows real activity.
Shape, proof, and cook the next day.
This is the calmest and most forgiving route for most bakers.
Same-day route
Start with a very lively fed starter.
Mix early enough that bulk fermentation has time to finish.
Shape only once the dough is clearly airy.
Proof the rounds fully before cooking.
Stay flexible rather than locking yourself to a rigid clock.
This can still produce easy sourdough English muffins, but it demands stronger conditions and closer attention.
How to get nooks and crannies in sourdough English muffins
This deserves its own section because it is the texture people actually want.
If you want sourdough English muffins with real nooks and crannies, focus on the combination that creates them: fully fermented dough, a soft texture that is not over-floured, thick shaping, a gentle final proof, low skillet heat, and fork-splitting only after the muffins have cooled. This is the texture roadmap for getting rough, toastable interiors instead of flat, bread-like middles.
Ferment fully
Underfermented dough is the fastest way to lose the texture you want. If the dough never becomes airy enough, the crumb usually stays tight no matter how careful you are later.
Keep the dough thick enough
If you want to know how to get nooks and crannies in sourdough English muffins, shaping thickness matters. Around 3/4 inch is a strong starting point because it gives the interior enough room to open while still being realistic to cook through.
Keep the dough soft, not stiff
A dough corrected too aggressively with flour often becomes easier to handle and worse to eat. English muffins need enough softness to open well later.
Handle the dough gently
Once the dough has fermented properly, your job is to preserve that structure. Avoid aggressively degassing it. Repeated rerolling also works against you. Do not press all the life out of it in pursuit of perfect-looking rounds.
Do not over-flour the bench
Too much bench flour makes shaping easier and texture worse. Use only enough to prevent sticking.
Use lower heat than you think
High heat gives fast color and weak middles. Low heat gives the interior time to set.
Proof the rounds properly
Too short and they stay tight. Too far and they spread too easily. You want the middle ground where the rounds look fuller and softer, not exhausted.
Fork-split after cooling
This is the final texture-preserving step. Split too early and you tear the crumb badly. Slice with a knife and you smooth away some of what you built.
turning a soft dough into a stiff one with too much correction flour
shaping too thin
cutting before bulk fermentation is truly complete
overhandling or rerolling too much
rushing the final proof
cooking over medium heat instead of truly low heat
splitting too early or slicing with a knife
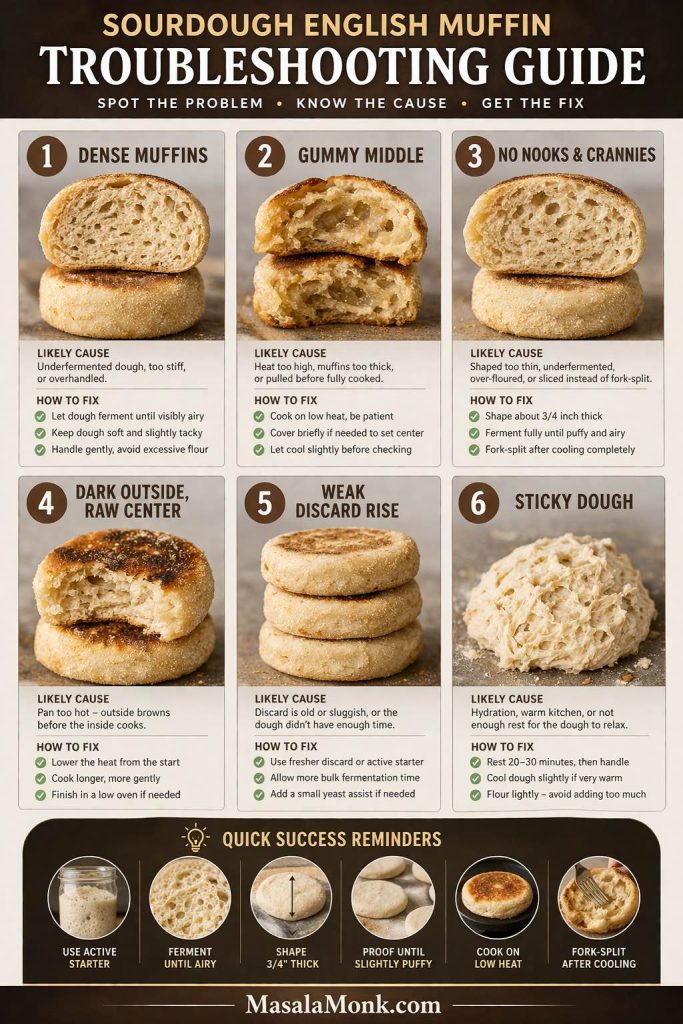
Troubleshooting sourdough English muffins
When sourdough English muffins go wrong, the problem is usually visible before the batch is beyond saving. Dense muffins point to underfermentation or stiff dough, gummy centers usually mean the heat was too high, and a lack of nooks and crannies often comes from thin shaping or rough handling. Use this troubleshooting guide to diagnose what happened, then adjust fermentation, dough softness, shaping thickness, and skillet heat so the next batch comes out lighter, rougher inside, and easier to toast well.
Why are my sourdough English muffins dense?
Likely cause: underfermentation, dough that is too stiff, or overhandling What the dough probably looked like earlier: heavy after bulk or cut too soon What it looks like after cooking: tight crumb, little spring, more like flat bread than English muffin Can this batch be rescued? Only partly. If the rounds are not cooked yet, proof longer. Once cooked, toasting helps but cannot fully reverse density. Fix next time: keep the dough softer, ferment more fully, and handle more gently
Why are my sourdough English muffins gummy in the center?
Likely cause: skillet heat too high, rounds too thick for the way they were cooked, or pulling them too early What the dough probably looked like earlier: often fine, though final proof may have been a bit tight What it looks like after cooking: browned outside, sticky or damp middle Can this batch be rescued? Yes. Finish gently in a low oven or toast split halves after cooling. Fix next time: keep the pan lower from the start and use doneness checks before pulling the batch
Why didn’t my sourdough English muffins get nooks and crannies?
Likely cause: underfermentation, thin shaping, rough handling, too much bench flour, or knife-splitting What the dough probably looked like earlier: compact after bulk or pressed too flat during shaping What it looks like after cooking: smoother, tighter interior instead of a rough open crumb Can this batch be rescued? Not fully. You can still fork-split and toast well, but the core crumb structure is mostly set already. Fix next time: ferment more fully, keep the dough thicker, preserve more gas, and cool before fork-splitting
Why are the outsides dark before the middles cook?
Likely cause: too much heat What the dough probably looked like earlier: often completely fine What it looks like after cooking: good color outside, underdone center Can this batch be rescued? Usually yes. Lower the heat and finish more gently or move them to a low oven. Fix next time: preheat gently and stay low from the beginning
Why is my discard batch not rising well?
Likely cause: weak or old discard What the dough probably looked like earlier: slow bulk fermentation, little real expansion, minimal puff after cutting What it looks like after cooking: flatter muffins with tighter crumb Can this batch be rescued? Sometimes. Give it more time if the dough still has life. Fix next time: use fresher discard, warmer conditions, the overnight route, or a small yeast assist
Why is my sourdough English muffin dough too sticky?
Likely cause: hydration, temperature, or not enough rest What it looks like during shaping: messy and sticking everywhere Can this batch be rescued? Usually yes. Rest the dough, cool it slightly, and flour lightly. Fix next time: resist adding too much flour too early and let the dough organize itself first
What changes in a warm kitchen?
Likely cause: faster fermentation What it looks like: the dough moves faster than expected and can overproof without much warning Can this batch be rescued? Usually yes, if you shorten room-temperature stages or refrigerate earlier Fix next time: trust the dough cues sooner
What do overproofed rounds look like?
They tend to look too inflated, delicate, and hard to move cleanly. They may spread more than they rise on the skillet. If that happens, cook them immediately and shorten the final proof next time.
How to store, freeze, and reheat sourdough English muffins
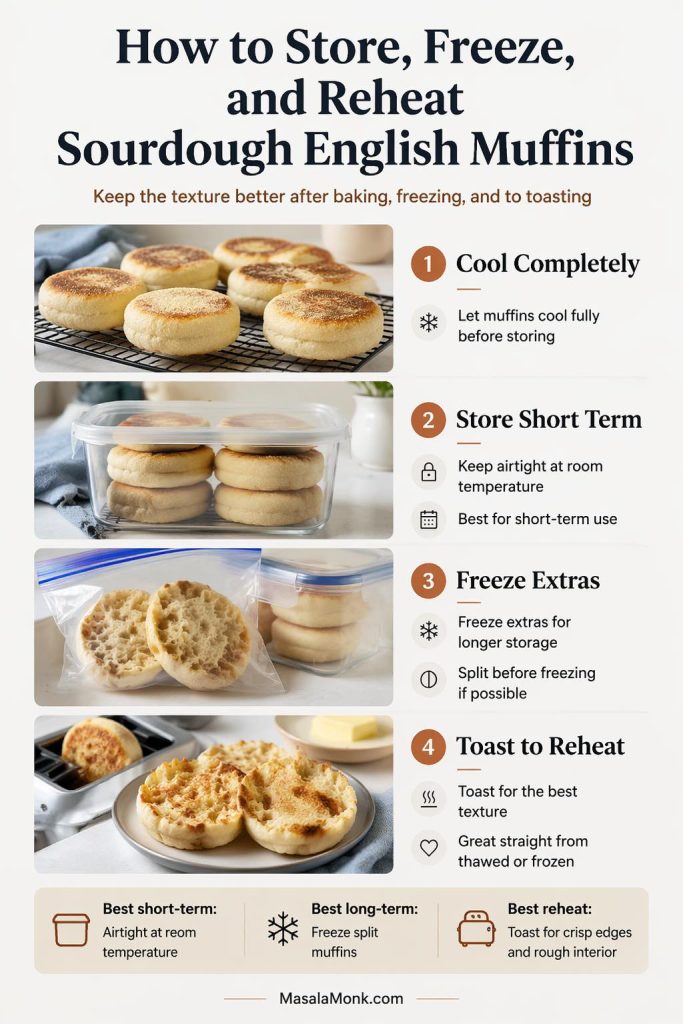
Cool the muffins fully before storing them. Keep them wrapped or in an airtight container for short room-temperature storage, then freeze the rest.
Sourdough English muffins keep their texture best when you handle them in stages. Let them cool completely before storing, keep short-term muffins airtight at room temperature, and freeze extras once split so they are easier to toast later. When you are ready to eat them, toasting is the best way to bring back crisp edges and that rough fork-split interior that makes homemade sourdough English muffins so satisfying.
Yes, you can freeze sourdough English muffins very well. In fact, freezing is often the smartest move because these shine when split and toasted. Splitting them before freezing makes reheating easier later.
To reheat, toast the fork-split halves until the rough interior crisps and the edges color well. That is when the texture really pays off.
Variations on this sourdough English muffins recipe
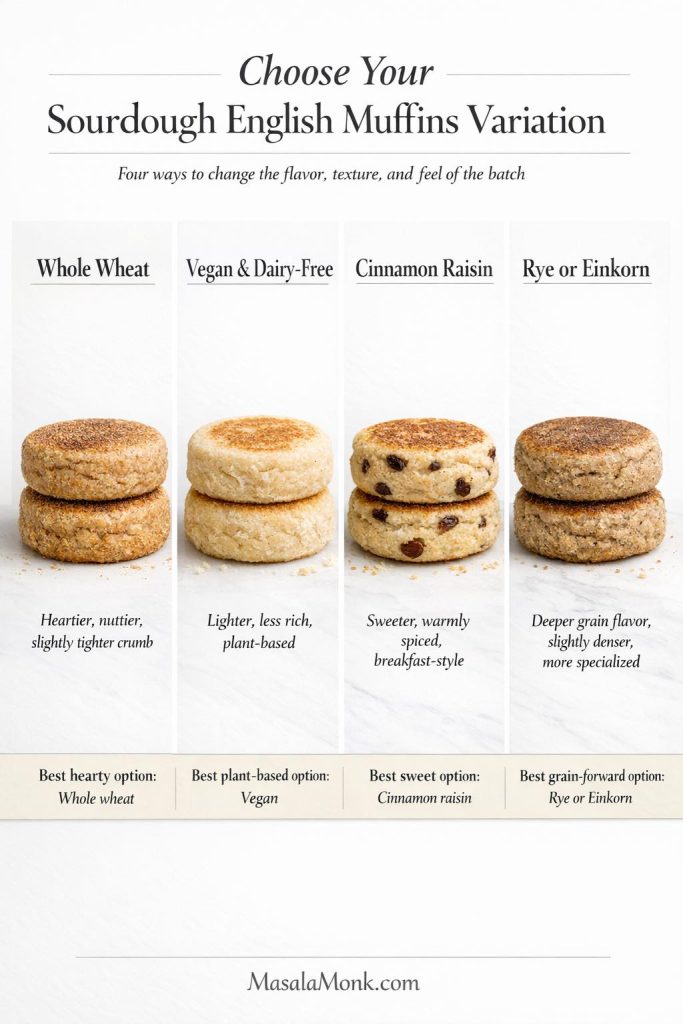
Sourdough English muffins do not all need to go in the same direction. Whole wheat makes the batch heartier and nuttier, the vegan version keeps it lighter and plant-based, cinnamon raisin turns it into a sweeter breakfast option, and rye or einkorn pushes the flavor deeper and more grain-forward. Use this guide to choose the variation that matches the kind of crumb, flavor, and overall feel you want before moving into the full standalone recipe card for that version.
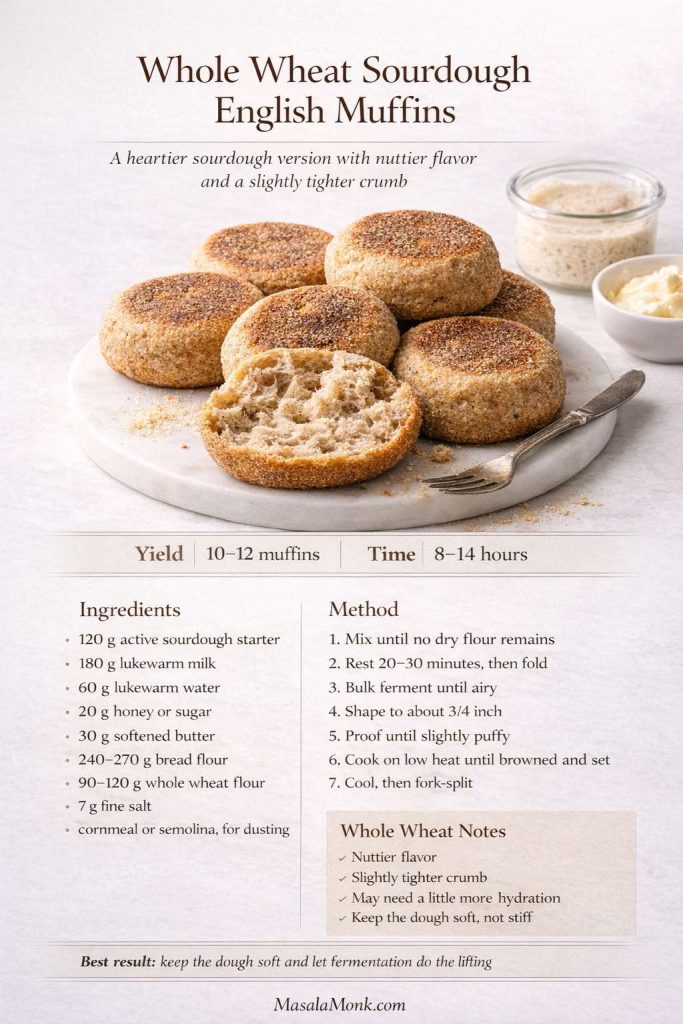
Whole wheat sourdough English muffins
Replace part of the bread flour with whole wheat flour rather than switching the full formula at once. Starting with about one-quarter to one-third whole wheat is usually the safest move.
What to expect:
nuttier flavor
slightly tighter crumb
a dough that may need a little more hydration
a heartier result overall
Whole wheat sourdough English muffins bring a nuttier flavor, a slightly tighter crumb, and a more wholesome chew while still keeping the core character of the original style. This card works as a full quick-reference version on its own, with the ingredient list, core method, timing, and the extra watch-outs that matter most for whole wheat dough. The biggest thing to protect here is softness: once the dough gets over-floured, the variation quickly turns heavier than it should.
What to watch:
do not overcorrect with lots of extra flour
expect a more wholesome texture and a slightly less open interior
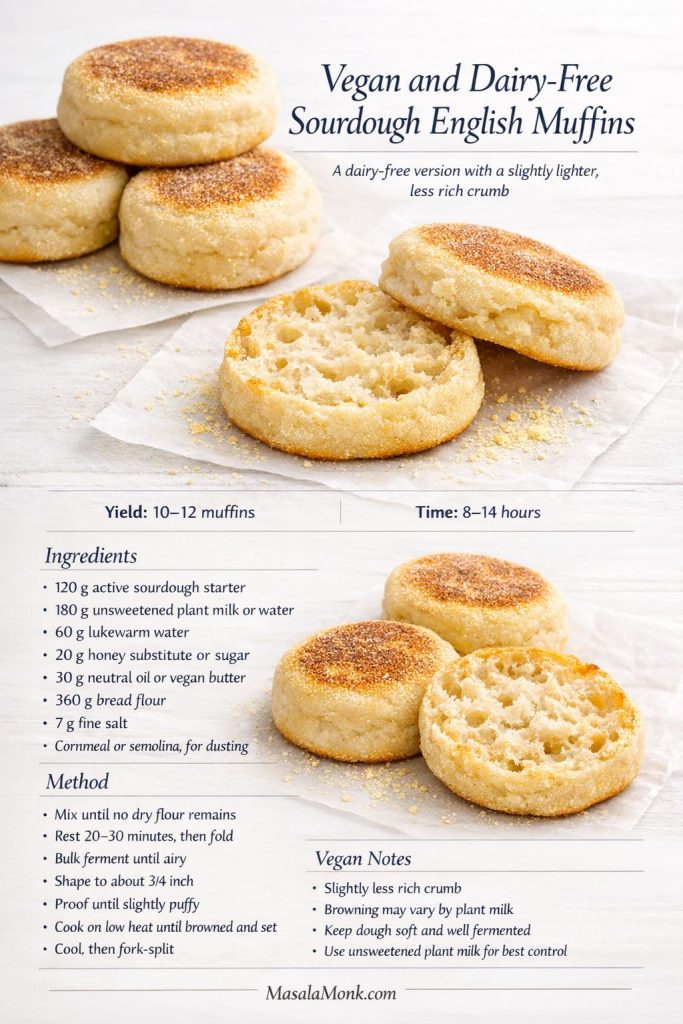
Vegan and dairy-free sourdough English muffins
Replace the milk with unsweetened plant milk or water, and use oil or vegan butter instead of butter.
Vegan and dairy-free sourdough English muffins can still turn out soft, well-risen, and nicely textured when the dough stays supple and fully fermented. Plant milk or water keeps the formula workable, while neutral oil or vegan butter replaces richness without changing the core method too much. Browning can vary depending on the milk you use, so gentle skillet heat matters even more here if you want the centers set before the outsides get ahead.
What to expect:
a slightly less rich crumb
browning that may vary depending on the milk substitute
very workable texture if the dough stays soft and well fermented
What to watch:
avoid sweetened plant milk unless you want extra sweetness and quicker browning
keep the skillet heat gentle because some milk alternatives color fast
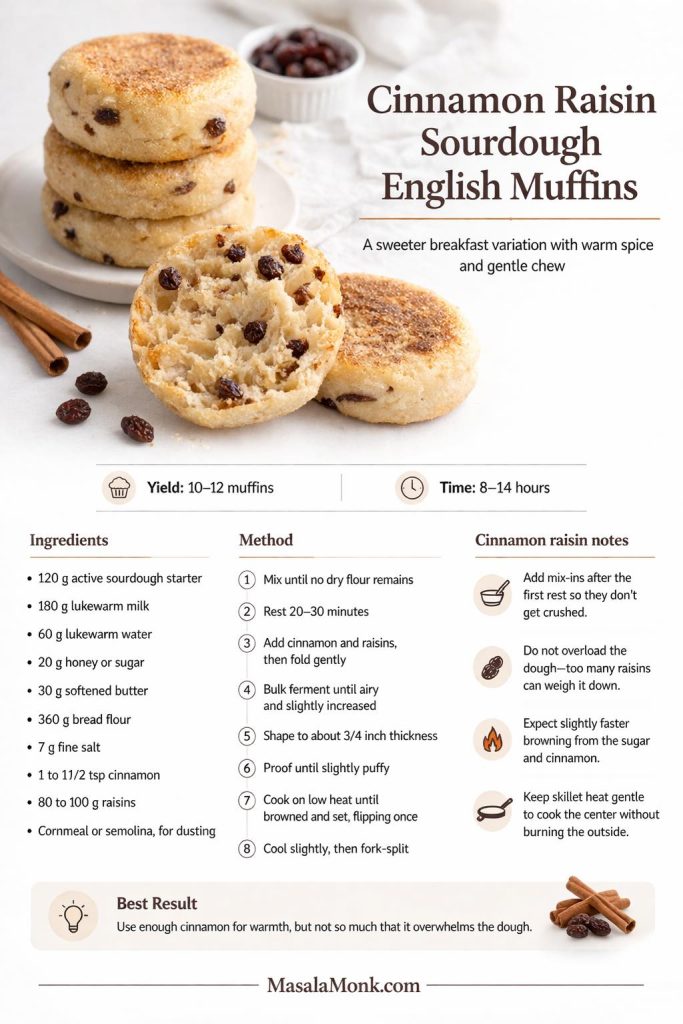
Cinnamon raisin sourdough English muffins
Add raisins and a moderate amount of cinnamon after the first rest so the dough can begin developing before the inclusions go in. This keeps the dough from getting weighed down too early.
Cinnamon raisin sourdough English muffins work best when the spice stays warm and balanced and the raisins support the crumb instead of overwhelming it. Adding the cinnamon and raisins after the first rest helps protect the dough structure, while gentle skillet heat keeps the sweeter dough from browning too fast. This card gives the full variation in one place, so you can make a breakfast-style batch with soft interiors, light chew, and enough cinnamon-raisin character to feel distinct without turning heavy.
What to expect:
a sweeter breakfast-style variation
slightly less even shaping
faster browning because of added sweetness in the mix-ins
What to watch:
do not overload the dough with raisins or the rounds become harder to shape and cook evenly
keep the heat especially gentle
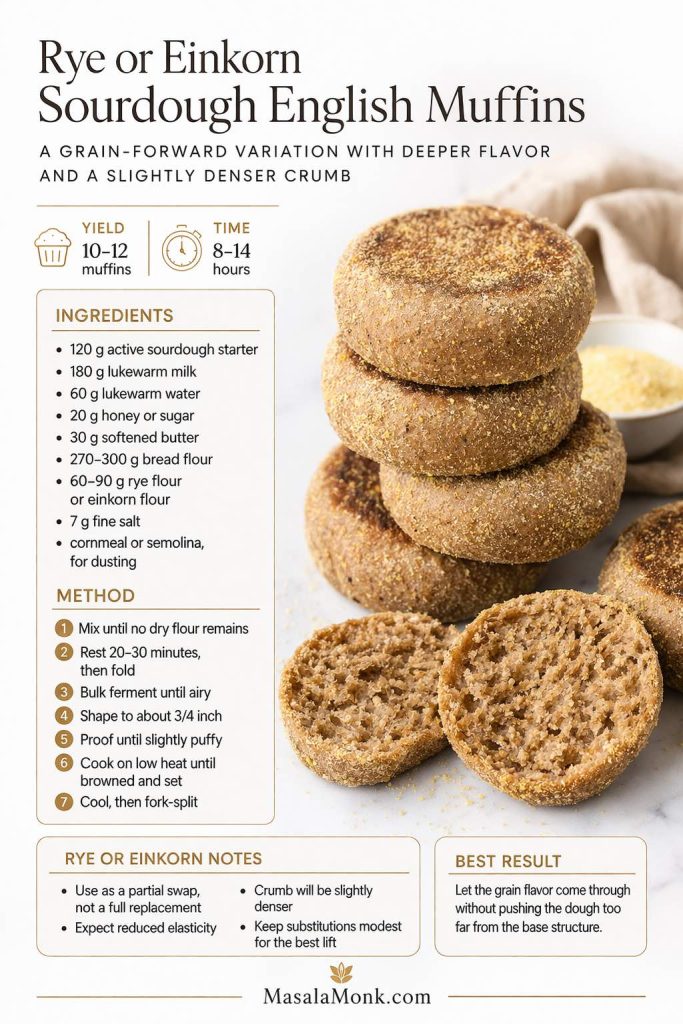
Rye or einkorn sourdough English muffins
Use rye or einkorn as partial substitutions rather than full replacements unless you are testing a dedicated formula.
Rye or einkorn sourdough English muffins work best when the grain adds character without taking over the dough completely. A partial swap keeps the flavor deeper and more distinctive while still giving the muffins enough structure to rise, cook through, and split well later. Expect a slightly denser crumb and less elasticity than the base version, but not a heavy result if the dough stays soft, the substitution stays modest, and the skillet heat remains gentle.
What to expect:
more distinctive grain flavor
somewhat reduced elasticity
a slightly denser and more specialized result
What to watch:
keep substitutions modest at first
do not expect the same lift as the base recipe
Can you bake them instead of griddling them?
You can, but the result moves away from classic English muffin texture. The skillet is part of what gives them their identity. If a loaf-pan or baked version is what you really want, it is better to treat that as a separate style and point readers toward English muffin bread and other sourdough bakes instead of pretending the two methods produce the same thing.
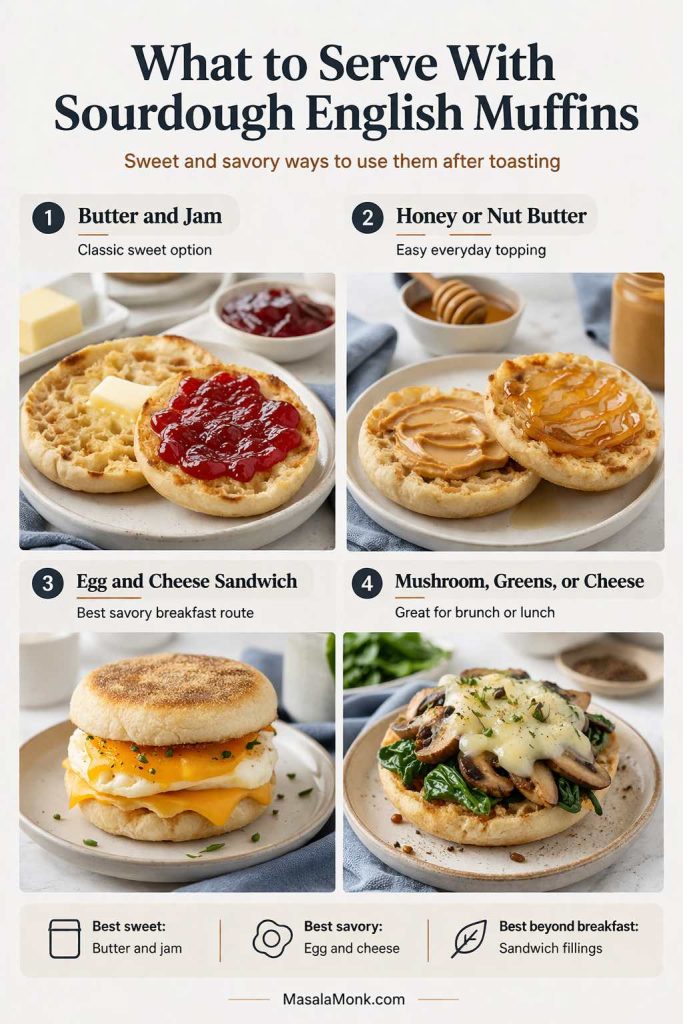
What to serve with sourdough English muffins
Use them with butter, jam, honey, or nut butter if you want the classic sweet route.
Sourdough English muffins are flexible enough to go sweet, savory, or fully meal-worthy once toasted. Butter and jam keep things classic, honey or nut butter makes an easy everyday option, and an egg and cheese sandwich turns them into a strong savory breakfast. For something more brunch-leaning, mushrooms, greens, and melted cheese work especially well because the rough fork-split interior holds toppings better than a smoother bread base.
For savory use, eggs, cheese, mushrooms, spinach, and breakfast meats all work naturally. If you want more serving direction, these breakfast sandwich ideas are the best next stop.
For more bakes in the same lane, start with the sourdough bread recipe roundup, which is the best next stop when you want to keep working with starter beyond this batch. Starter still giving you trouble? Go back to the sourdough starter guide for a clearer reset on feeding, strength, and consistency. And when you are ready to turn these muffins into something more practical, these easy breakfast sandwiches are the most useful next read.
Final notes before you bake
A good batch of sourdough English muffins does not come from one trick ingredient or one magic time stamp. It comes from choosing the right route, fermenting honestly, keeping the dough soft, shaping thick enough to protect the crumb, cooking low enough to set the center properly, and splitting with a fork after cooling. Those are the choices that turn a decent batch into one with real character.
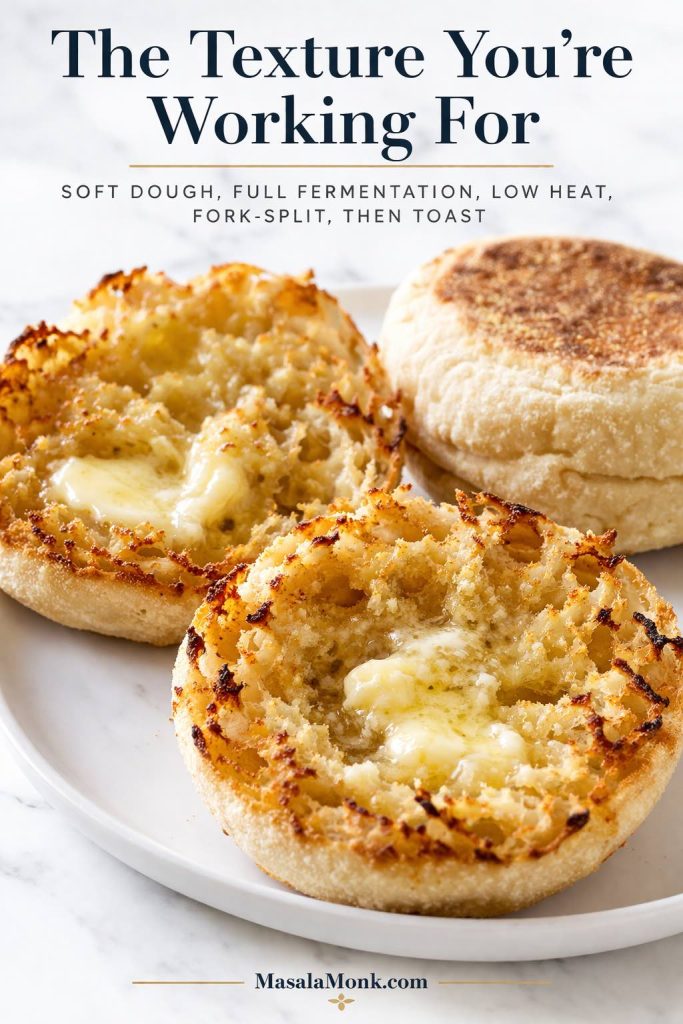
This is the homemade sourdough English muffin texture the whole recipe is built around: rough fork-split interiors, crisp toasted edges, and melted butter catching in the nooks and crannies instead of sliding off a smooth cut surface. Soft dough, full fermentation, thick shaping, low skillet heat, and cooling before splitting are what create this kind of crumb, which is exactly why homemade sourdough English muffins feel more alive and toast so much better than the average store-bought version.
That is why this recipe is worth making from scratch. Store-bought English muffins can be fine, but when homemade ones are done well, the texture is rougher, the flavor is deeper, and the toastability is far better. The butter catches differently. The edges crisp differently. The whole thing feels more alive.
If you remember only the essentials, remember these: soft dough, full fermentation, thick shaping, low heat, full cooling, fork split, then toast. That is the path to the kind of English muffin people actually want.
1. Can I make sourdough English muffins with discard instead of active starter?
Yes, you can make sourdough English muffins with discard, especially if the discard is fairly fresh and still comes from a healthy starter routine. The main difference is predictability. Active starter gives you the best rise and the strongest chance of a lighter crumb, while discard often moves more slowly and may need extra fermentation time. If your discard is older, sharply acidic, or clearly sluggish, a small yeast assist is usually the smarter choice.
2. Can I make sourdough English muffins without yeast?
Yes. If your starter is active, recently fed, and strong enough to lift dough on its own, you can absolutely make sourdough English muffins without commercial yeast. That is the best route when you want the most traditional naturally leavened result. The key is not just skipping yeast. The key is starting with a lively starter and giving the dough enough time to ferment properly.
3. Why are my sourdough English muffins gummy in the middle?
The most common reason is heat that is too high. The outsides brown quickly, but the center does not get enough time to set. Thick rounds can make that more obvious. If that happens, lower the skillet heat and finish the muffins more gently, or move them briefly to a low oven once they have enough color. A properly cooked muffin should feel lighter than it looks and should not have a shiny or sticky middle when opened.
4. Can I refrigerate the dough overnight?
Yes, and for many bakers that is the easiest route. Let the dough begin fermenting at room temperature first, then refrigerate it once it shows clear activity. That gives you better flexibility the next day and often makes shaping easier because the dough is cooler and calmer. Just do not refrigerate a dough that has barely started moving, because the fridge will not fix a weak fermentation.
5. Can I freeze sourdough English muffins?
Yes, sourdough English muffins freeze very well. Let them cool fully first, then freeze them whole or already split. Splitting before freezing makes them easier to toast straight from storage later. In many cases, freezing is the best option because these muffins are at their best when toasted, not when sitting at room temperature for too long.
6. Should I split sourdough English muffins with a knife or a fork?
Use a fork. That rough split helps preserve the irregular interior texture that makes English muffins toast so well. A knife gives you a much cleaner cut, but it also smooths away some of the nooks and crannies you worked to build. If texture is part of the goal, fork-splitting is the better choice.
7. Why didn’t my sourdough English muffins get nooks and crannies?
That usually comes down to underfermented dough, shaping too thin, too much extra flour during handling, rough degassing, or slicing with a knife instead of splitting with a fork. Good nooks and crannies depend on a soft dough, full fermentation, gentle handling, low heat, and a fork-split finish after cooling. If the dough never got airy enough, the interior usually stays tighter no matter what you do later.
8. Can I bake sourdough English muffins instead of cooking them on a skillet?
You can, but the result moves away from classic English muffin texture. Skillet cooking is part of what gives them their characteristic crust and interior. If you want a baked version, it is usually better to think of that as a separate style rather than a direct substitute. The classic result still comes from shaping, proofing, and cooking them low and slowly on a skillet or griddle.