Posted on — Leave a comment

Focaccia Pizza Recipe: Crispy, Airy Sheet Pan Pizza

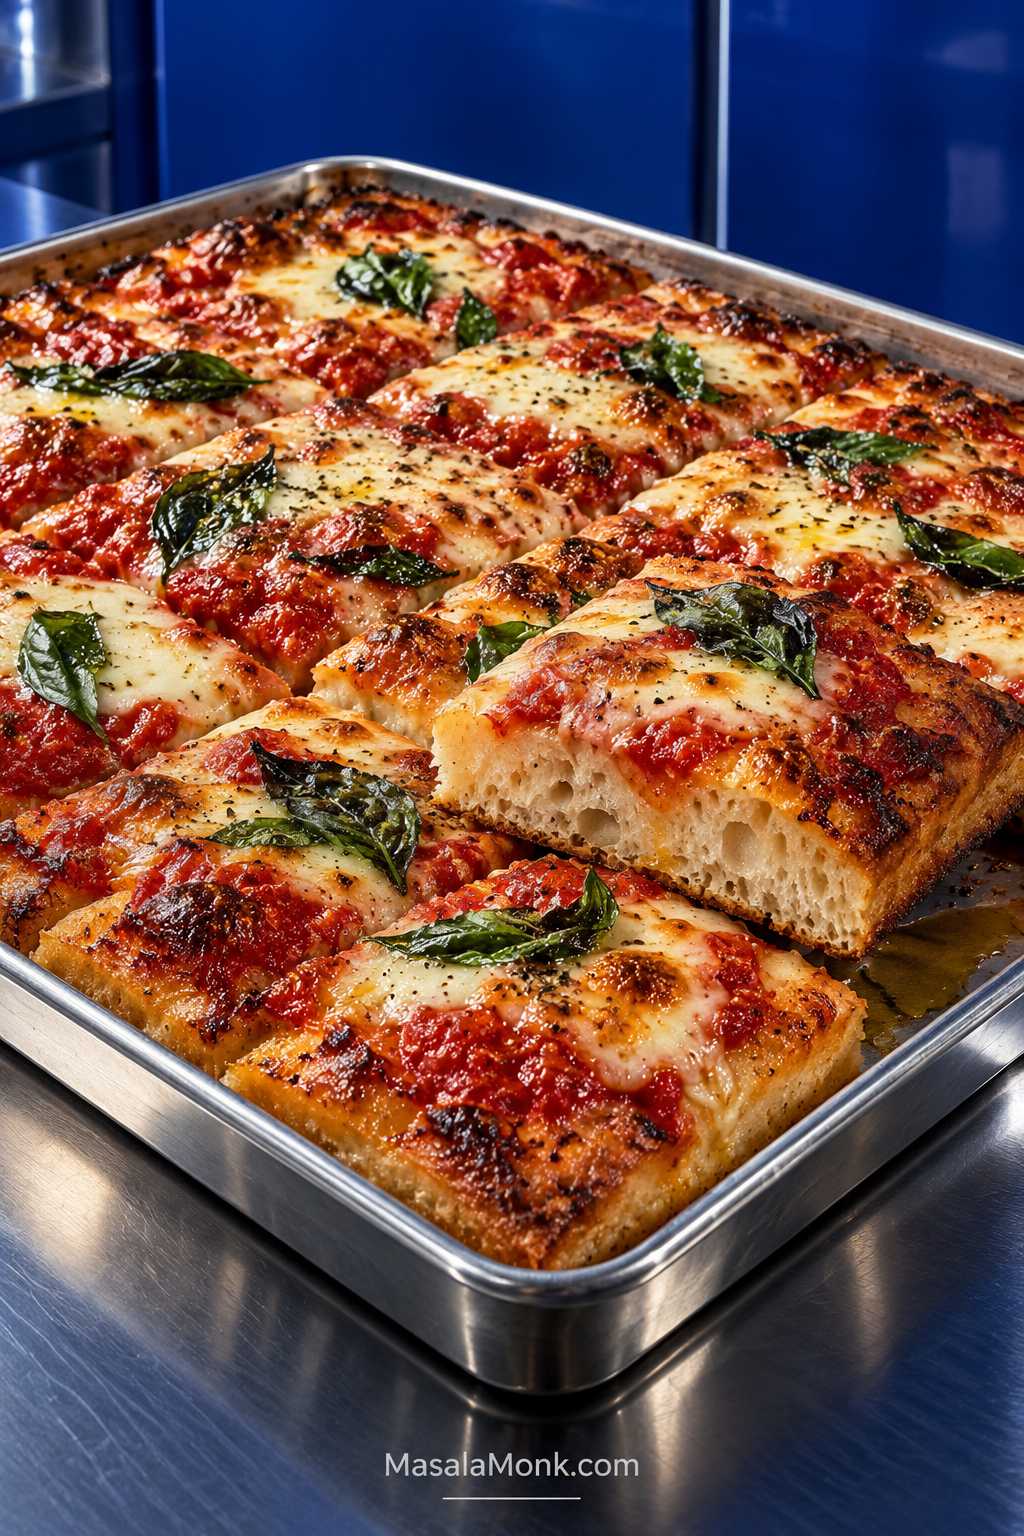
Sheet-pan focaccia pizza with browned edges, tomato sauce, melted mozzarella, basil, and one cut square showing the airy bread interior.

There is a particular moment when focaccia pizza gets everything right: the underside crackles as you cut through it, the middle stays airy and tender, and the sauce and bubbling mozzarella sit on top without leaving a wet band of dough underneath. The edges still have that olive-oil crunch, but the slice eats like proper pizza.

Most problems show up in the middle. Even spectacular edges can hide bread under the cheese that is still gummy. The usual culprits are too much dough for the pan, loose sauce, wet mozzarella, raw mushrooms, or simply not enough heat underneath.

This focaccia pizza recipe tackles that in two simple ways. About 1 kg of soft dough is spread across a 13 × 18-inch (33 × 46 cm) metal sheet pan, keeping it airy without making it excessively thick. Then the focaccia gets a short par-bake before the sauce and cheese go on.

This is the pizza to make when the crust is half the reason you’re excited about dinner. The bread is part of the meal, not merely something holding up the toppings. One half-sheet feeds six to eight comfortably, which also makes it useful for pizza night when one small round pie was never going to stretch far enough.

This is a no-knead focaccia pizza: three short sets of folds build the dough’s strength instead of conventional kneading. Make it in one afternoon or mix the dough the day before for an overnight cold ferment. You don’t need a stand mixer or pizza oven.

Quick Answer: How Do You Make Focaccia Pizza?

For a 13 × 18-inch sheet pan, this focaccia pizza recipe uses 550 g bread flour and 425 ml water—about 77% hydration. Proof the dough until puffy, par-bake it at 475°F (245°C) for 8–10 minutes, add the toppings, then finish for another 8–12 minutes.

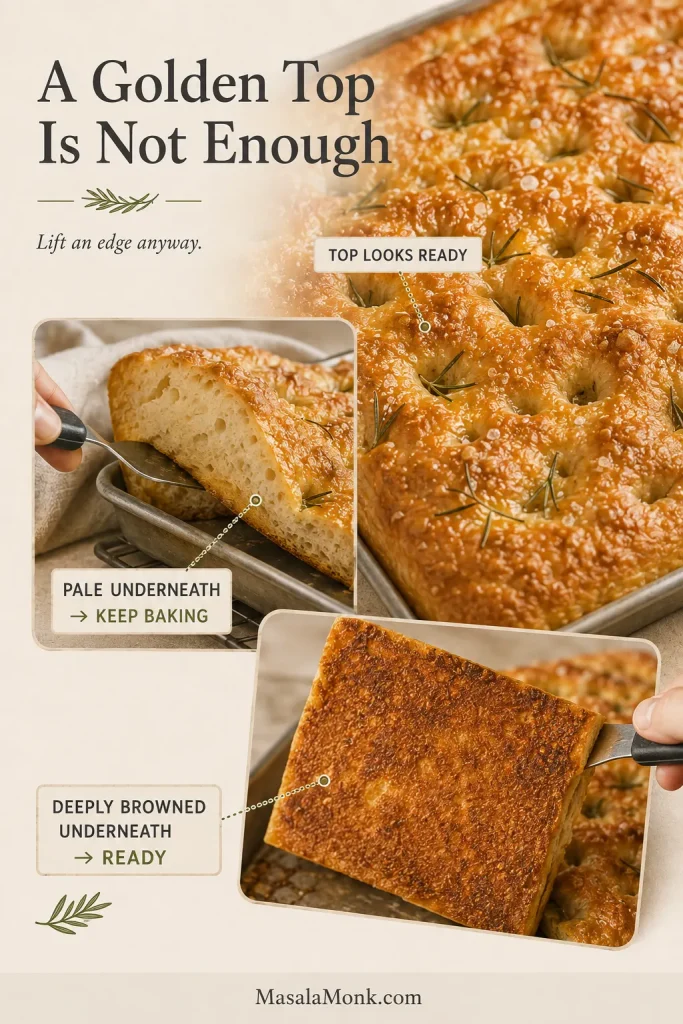
By the end of proofing, bubbles should sit beneath the surface and the whole sheet should give a slight jiggle when the pan moves. At the end, look past the browned cheese: the crumb beneath the toppings needs to be set and airy, with good color underneath.

Give the focaccia a head start before the wet toppings go on. That short first bake is the easiest way to protect the airy middle and browned base.
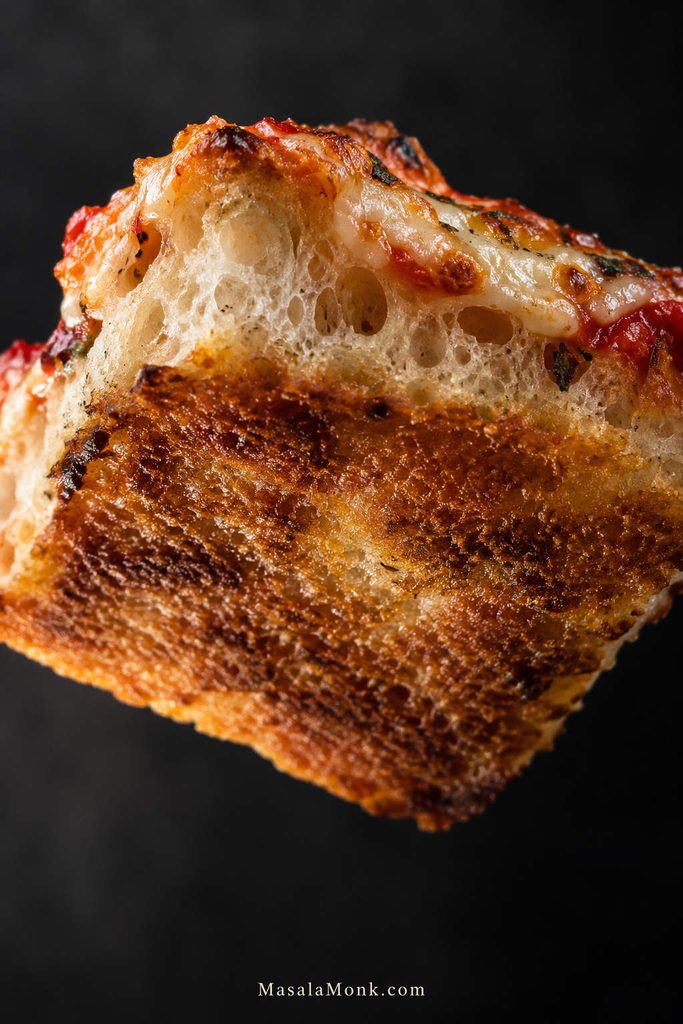
Focaccia pizza slice tilted upward to show a deeply browned underside, airy crumb, tomato sauce, and melted cheese.
Because cheese can look finished before the bread underneath is ready, the browned underside is one of the most reliable visual checks for a thick focaccia pizza.

Same-Day or Overnight?

Same-Day

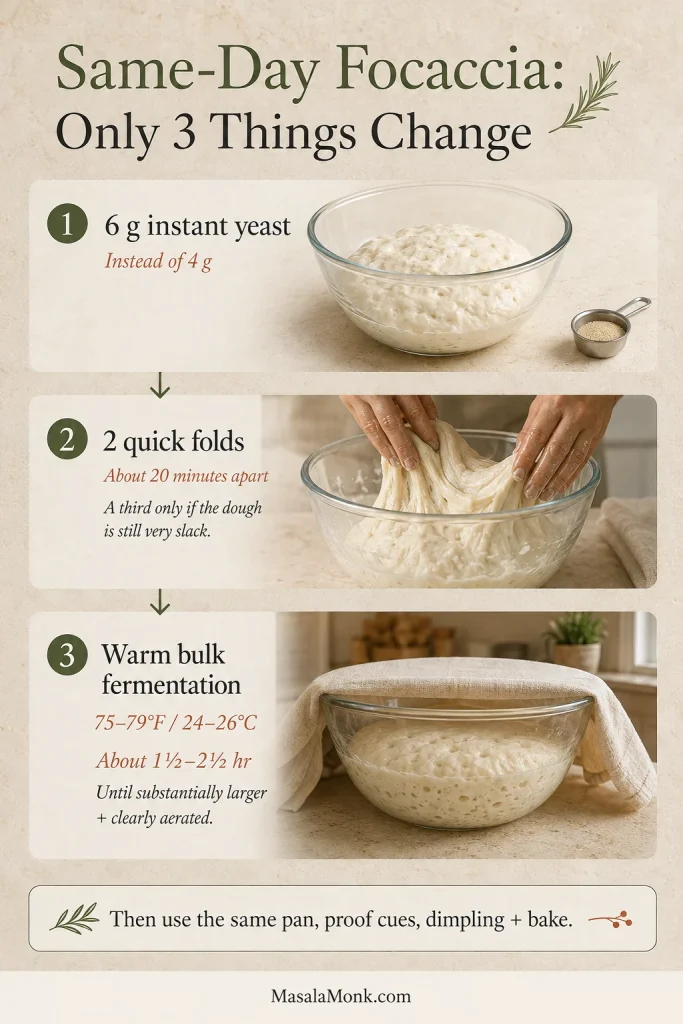
4 g instant or active dry yeast (1¼ tsp)
Water: 85–95°F / 29–35°C

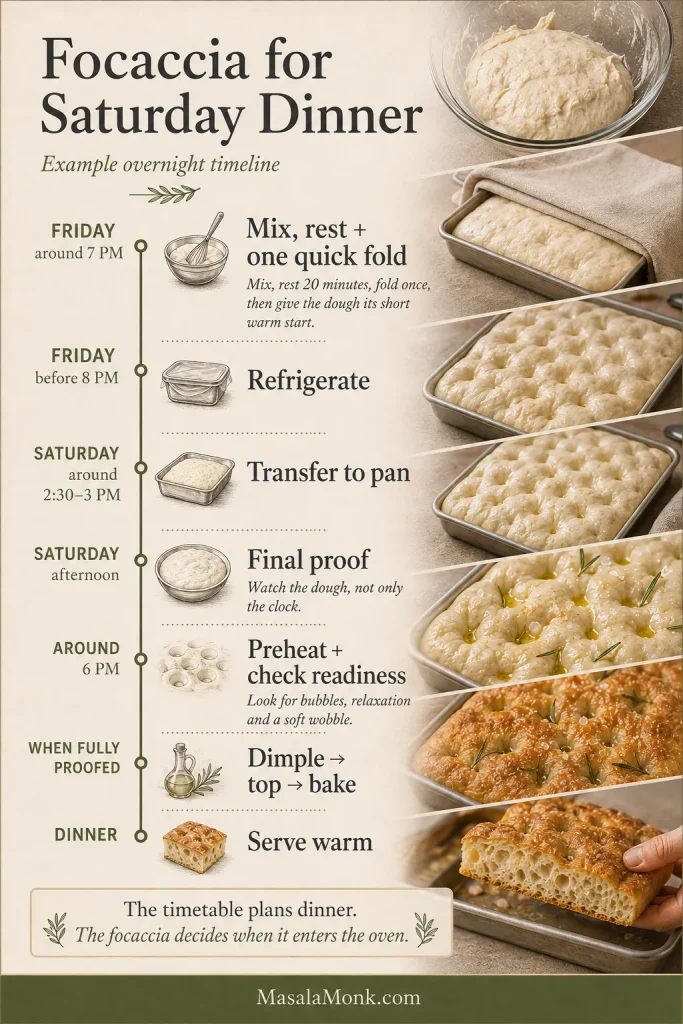
Choose this when the pizza needs to happen tonight. Plan on 3½–4½ hours from mixing to slicing. For a 7 PM dinner, starting around 2:30–3 PM gives you comfortable breathing room.

Overnight

1 g instant or active dry yeast (⅓ tsp)
Water: 68–75°F / 20–24°C

Choose this when planning ahead is easier and you want to give the dough more time to develop flavor slowly in the refrigerator. Complete the folds, chill for 12–24 hours, then pan and proof the next day.

Those times assume a kitchen around 70–75°F / 21–24°C. A warm room moves things along faster; a cool one stretches the schedule. Either way, let the dough’s changes make the final call rather than waiting for the clock to agree.

Make It Now: Sheet Pan Focaccia Pizza

Focaccia Pizza Recipe Snapshot

Pan13 × 18-inch / 33 × 46 cm rimmed metal half-sheet
Serves6–8
Yield8 generous or 12 smaller squares
Active time30–40 minutes
Same-day total3½–4½ hours
Overnight option12–24 hour cold ferment + final proof
HydrationAbout 77%
Oven475°F / 245°C
Bake8–10 min par-bake + 8–12 min finish

Equipment: large mixing bowl, digital scale, sturdy spoon or dough whisk, spatula or dough scraper, 13 × 18-inch sheet pan, and wire rack.

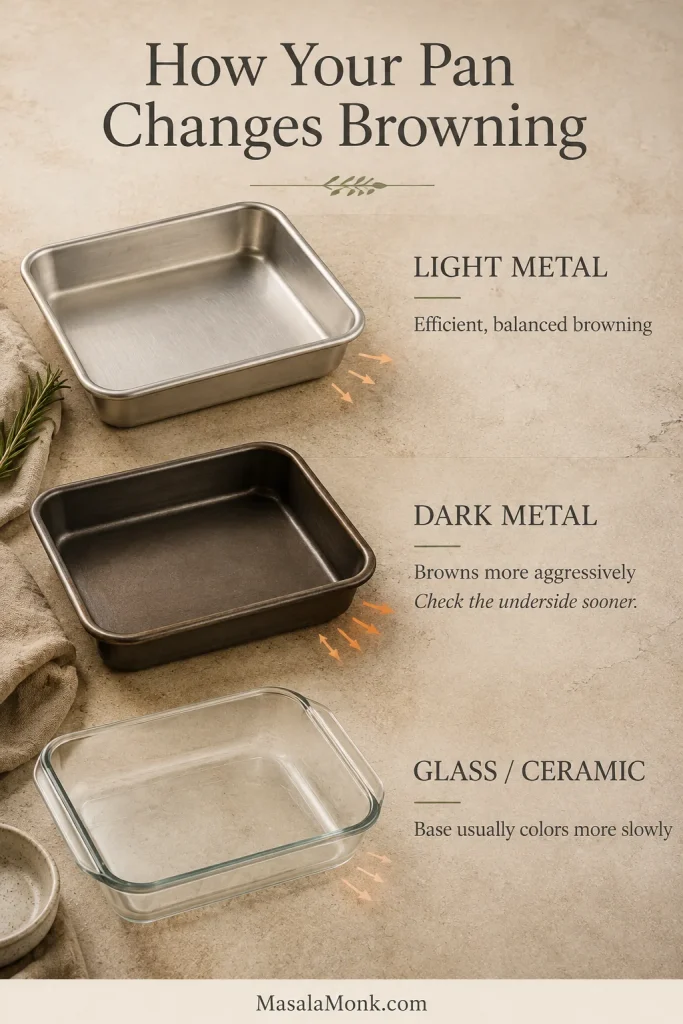
Pan choice: a heavy-gauge aluminum or aluminized-steel half-sheet is a reliable choice. Darker metal browns faster, so the underside may need an earlier check. Before using a nonstick-coated pan at 475°F / 245°C, confirm its maximum safe temperature.

A pizza steel or stone is optional.

Ingredients

Focaccia Pizza Dough

  • 550 g / 19.4 oz bread flour
  • 425 ml / 14.4 fl oz water — same-day: 85–95°F / 29–35°C; overnight: 68–75°F / 20–24°C
  • Same-day: 4 g instant or active dry yeast / 1¼ tsp
  • Overnight: 1 g instant or active dry yeast / ⅓ tsp
  • 11 g fine salt
  • 30 ml / 2 tbsp olive oil

Use instant or active dry yeast at the same weight. Active dry may begin a little more slowly, so let the dough cues—not the clock—decide when it is ready. Follow the package directions if your yeast specifically calls for dissolving first.

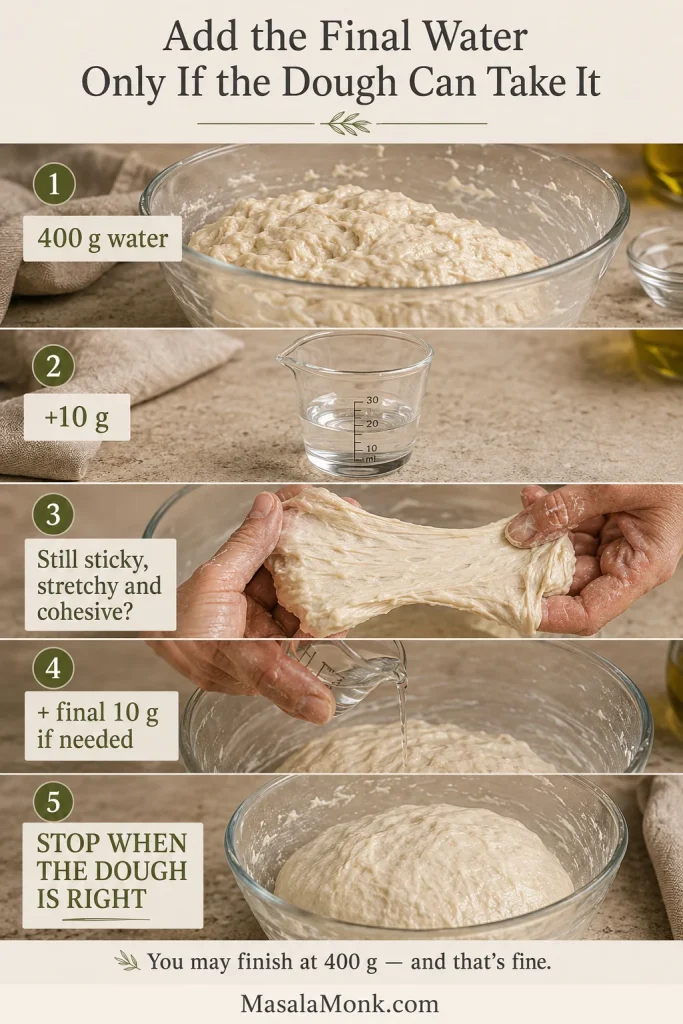
Using all-purpose flour? Start with 410 ml water and add the final 15 ml only if the dough is building strength comfortably.

For the Pan and Dimpling

  • Nonstick pan spray, optional
  • 30 ml / 2 tbsp olive oil for the pan
  • 15 ml / 1 tbsp olive oil for the surface

For the Pizza

  • 240–280 g / about 1 to 1¼ cups thick pizza sauce
  • 255 g / 9 oz low-moisture mozzarella, shredded
  • 30 g / 1 oz Parmesan or Pecorino, finely grated
  • 60–90 g / 2–3 oz pepperoni, cooked sausage, or another prepared topping, optional
  • Fresh basil, extra Parmesan or Pecorino, and olive oil for finishing
  • Red pepper flakes, optional

Quick Pizza Sauce

Start with 280 g thick crushed tomatoes or passata, then stir in 1 tsp olive oil, ½ tsp dried oregano, ¼ tsp garlic powder, and ¼–½ tsp fine salt. Start with less salt if the tomatoes are already seasoned, then taste.

Keep the sauce simple and tomato-forward; the focaccia already brings plenty of olive-oil richness. Drain watery crushed tomatoes in a fine sieve for 5–10 minutes, or briefly simmer loose passata. Use the concentrated amount you end up with rather than replacing the liquid you removed. The sauce should spread easily but stay where you put it.

How to Make Focaccia Pizza

1. Mix the Dough

Add the water, yeast, flour, salt, and 30 ml olive oil to a large bowl. Mix until no dry flour remains.

If you’re used to ordinary pizza dough, this can look unusually wet at first. That’s expected. It should be rough, loose, and sticky, but still behave like dough rather than something you could pour.

2. Rest and Fold

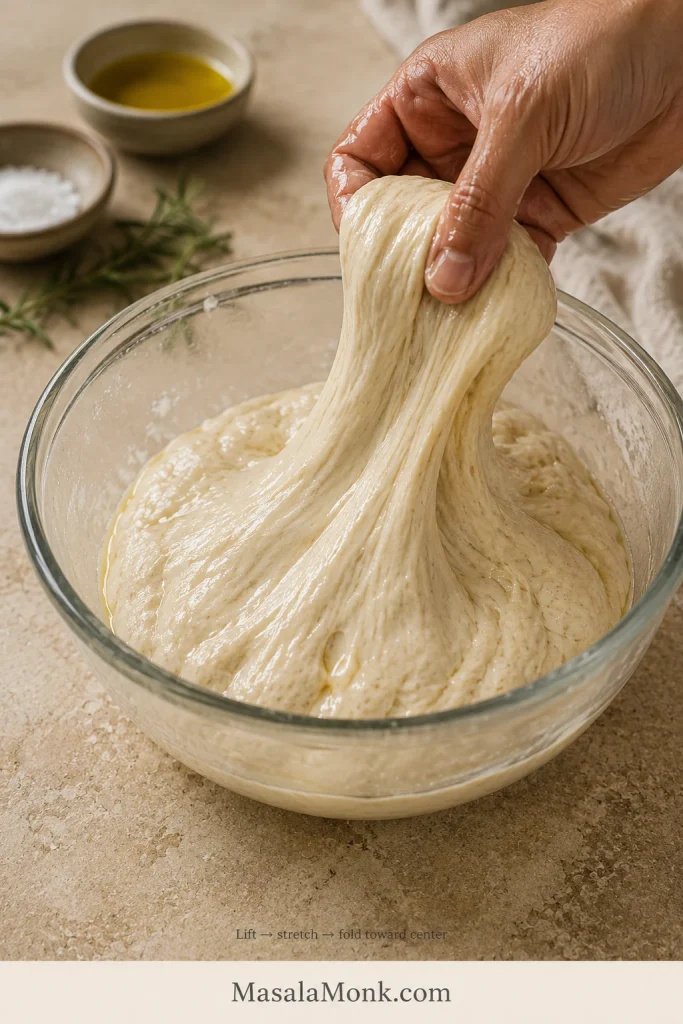
Cover the bowl and rest for 15 minutes. With a wet hand, pull one side of the dough upward and fold it across the center. Turn the bowl and repeat around the dough.

Complete 3 sets of folds 20 minutes apart. The first can feel messy. By the third, the dough lifts more cleanly, stretches farther, and feels springier while staying soft.

At that point, it should feel noticeably different: smoother, springier, and beginning to hold air without losing that soft, wet character.
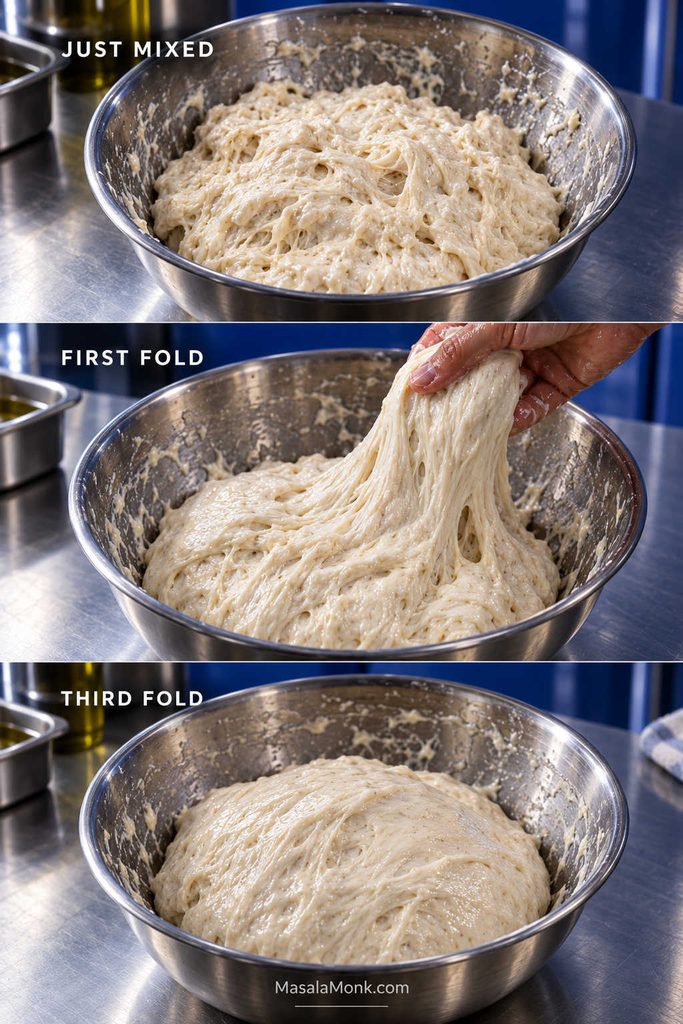
Three stages of focaccia pizza dough labeled just mixed, first fold, and third fold, showing the dough becoming smoother and more structured.
The goal of folding is stronger dough, not drier dough: even after the final fold, a high-hydration focaccia pizza dough should remain soft, supple, and slightly tacky.

3. Let It Rise

Same-day dough stays at room temperature for 60–90 minutes after the final fold. Look for visible expansion and a lighter, more aerated texture.

Cover overnight dough and refrigerate it for 12–24 hours after the folds.

4. Oil the Pan and Stretch

Coat a 13 × 18-inch metal half-sheet with nonstick spray if using it, then spread 30 ml / 2 tbsp olive oil across the base.

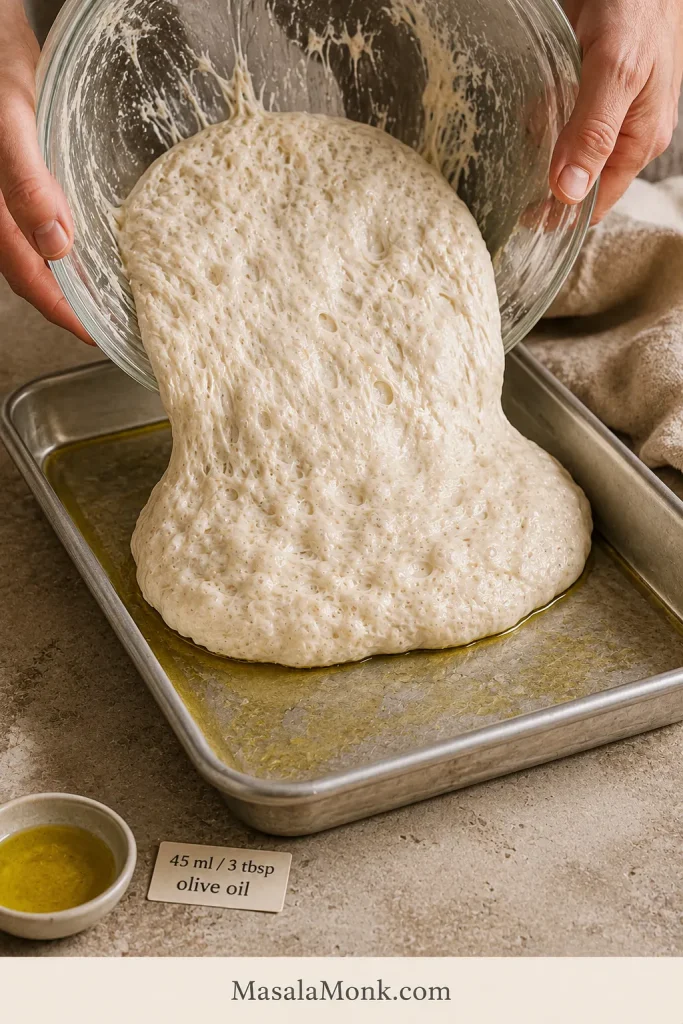
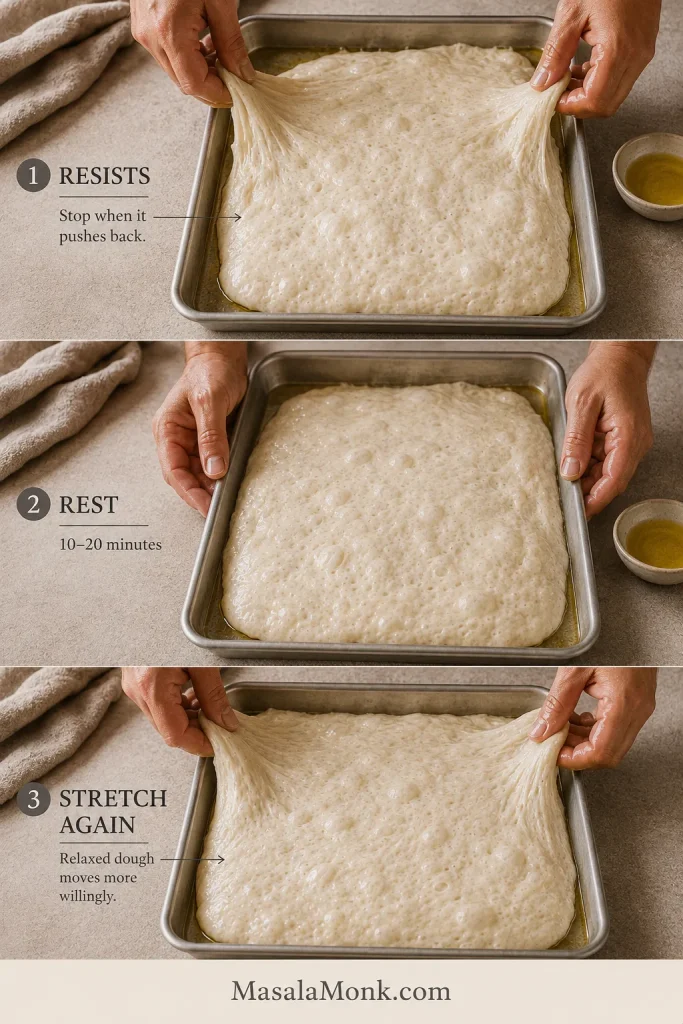
Transfer same-day dough into the pan and gently stretch it toward the corners with oiled fingertips. When it pulls back, cover it and wait 10–20 minutes before continuing.

For overnight dough, transfer it to the oiled pan straight from the refrigerator. It will relax as it warms. Stretch it gently in stages rather than forcing cold dough into the corners.

If the dough fights you, wait. Fifteen quiet minutes usually does more than fifteen seconds of wrestling.
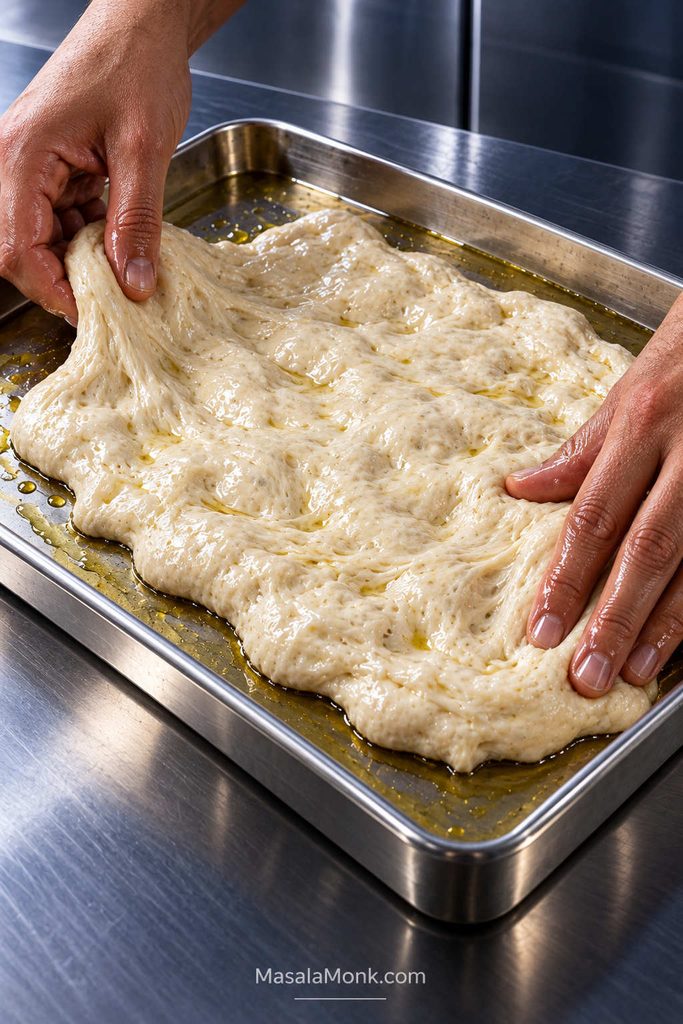
Hands gently stretching soft focaccia dough across an oiled metal sheet pan, with the dough still short of some corners.
If the dough keeps shrinking back, adding more flour can make the finished crumb heavier; instead, preserving the hydration and allowing the gluten to relax gives the dough more room to stretch.

5. Proof in the Pan

Cover the pan. Same-day dough may need another 45–75 minutes. Refrigerated dough commonly needs 1½–3 hours, depending on room temperature and how far it fermented overnight.

Start preheating the oven to 475°F (245°C) before the dough is fully ready. For a plain sheet-pan setup, allow 25–30 minutes of preheating. When using a steel or stone, give it 45–60 minutes to heat thoroughly.

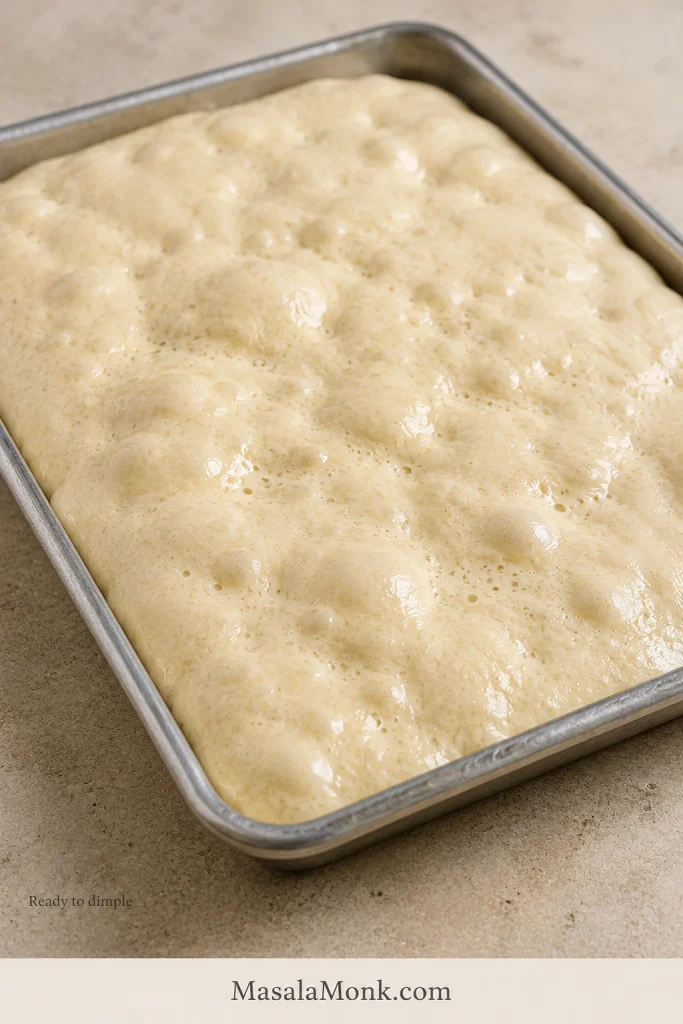
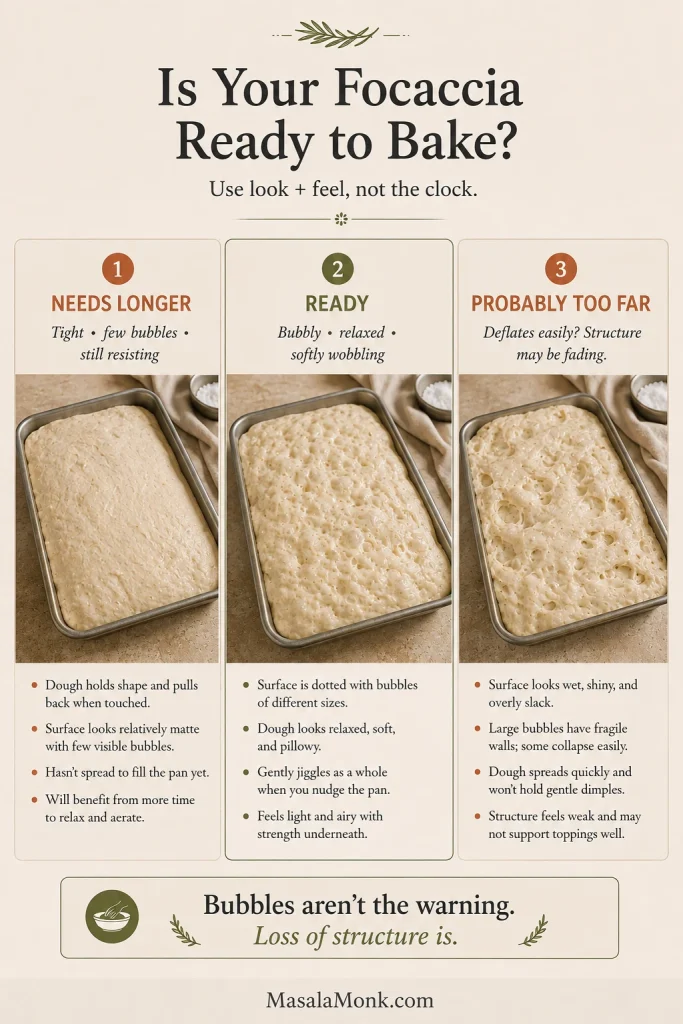
By the end, the dough should look almost marshmallow-soft. Bubbles sit just beneath the surface, and the whole sheet gives a slight tremble when you nudge the pan.
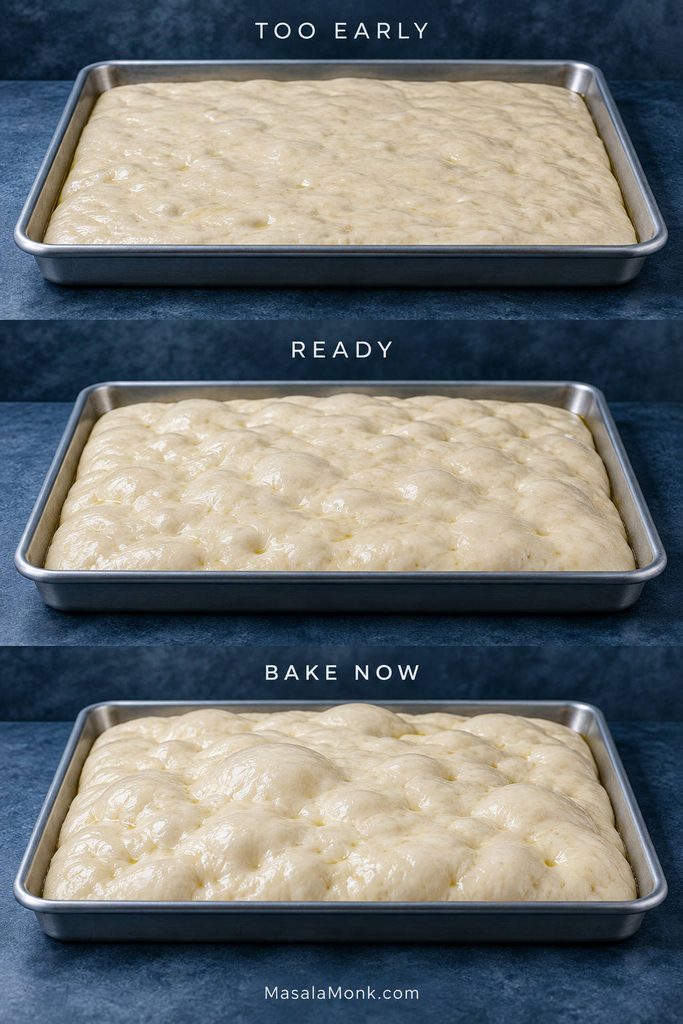
Three stages of focaccia dough in metal pans labeled too early, ready, and bake now, showing increasing puffiness and bubbling.
Use the clock to plan, but bake by the dough: puffy, bubbly, and gently jiggly.
  • Still flat and tight: keep waiting.
  • Puffy and jiggly: it is ready.
  • Very inflated and starting to sag: bake it now.

6. Set the Rack and Finish Preheating

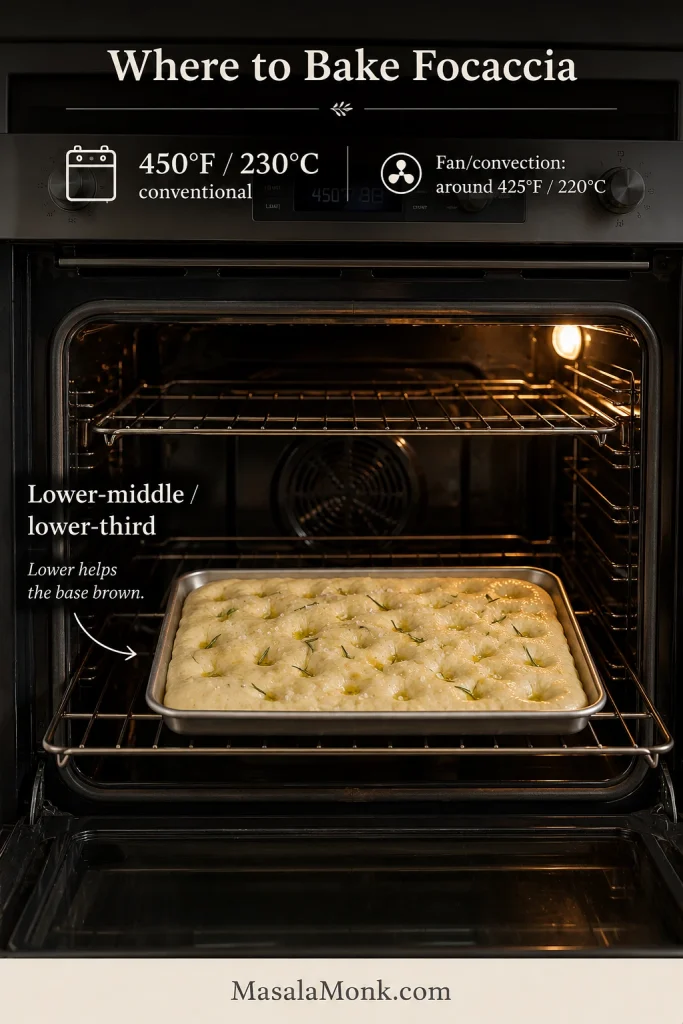
Keep a rack in the lower third of the oven. The oven—and any steel or stone you’re using—should be thoroughly hot by the time the dough reaches its final proof.

7. Dimple and Par-Bake

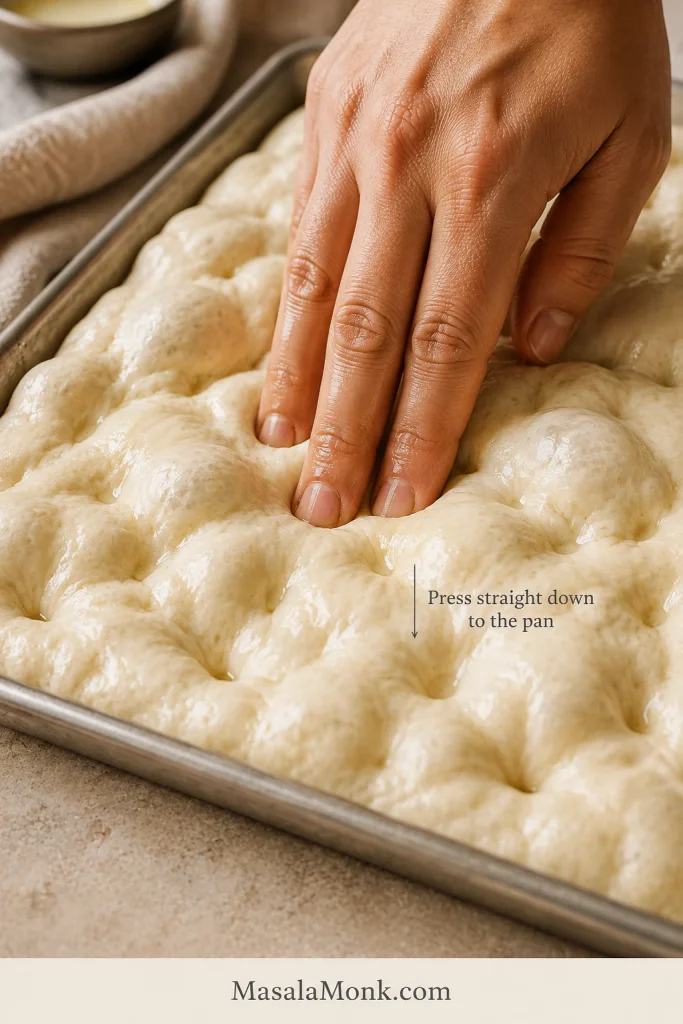
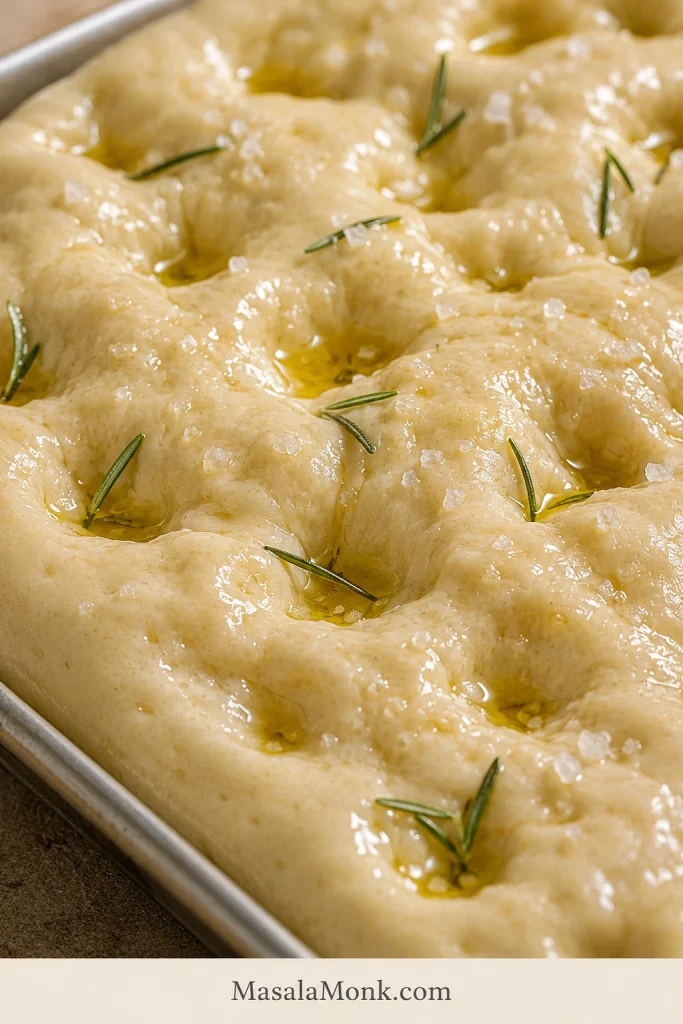
Drizzle the surface with the remaining 15 ml / 1 tbsp olive oil. Press your oiled fingertips straight down through the dough. It should feel pillowy, with little pockets of air shifting around your fingers; you’re creating dimples, not squeezing the life out of the dough.

Par-bake for 8–10 minutes. The glossy raw sheen disappears, the surface turns matte, and the outer edge takes on its first faint color. It will smell like bread now, not raw dough.
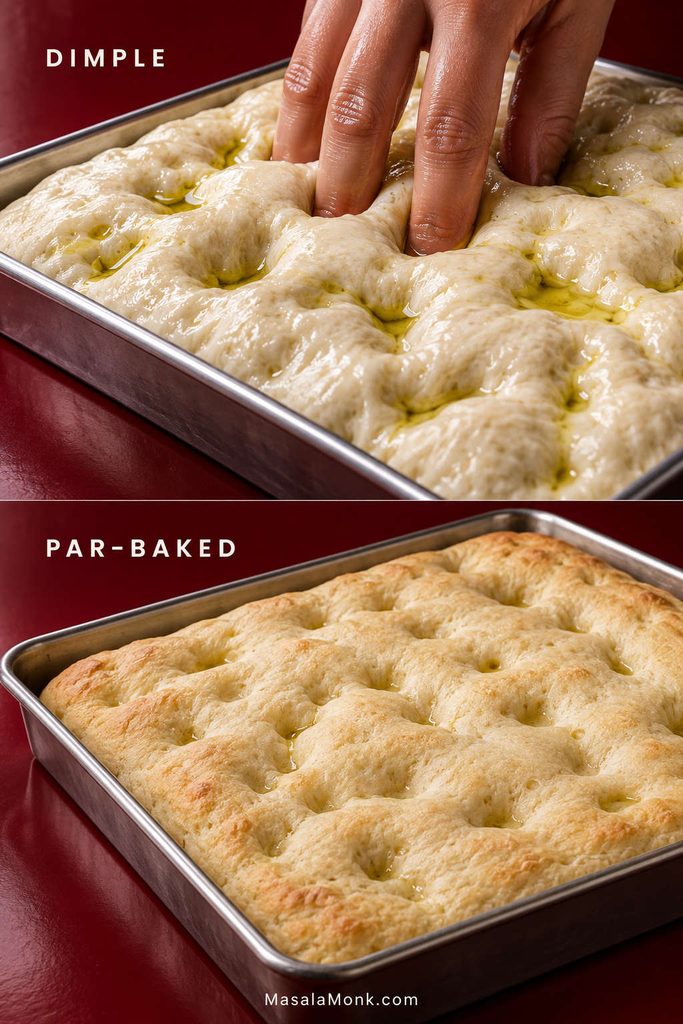
Oiled focaccia dough being pressed into dimples beside a lightly colored par-baked crust that is set but not fully finished.
Par-baking gives the focaccia a sturdier foundation before the sauce and cheese add their moisture.

8. Add the Toppings

Spread over 240–280 g / about 1 to 1¼ cups thick sauce, taking it close to the edges. Add the mozzarella, Parmesan or Pecorino, and any prepared toppings.

Low-moisture whole-milk mozzarella gives the classic bubbly, browned pizza top. Fresh mozzarella makes softer, creamier pockets; drain and blot it thoroughly and add it only for the final 5–7 minutes.
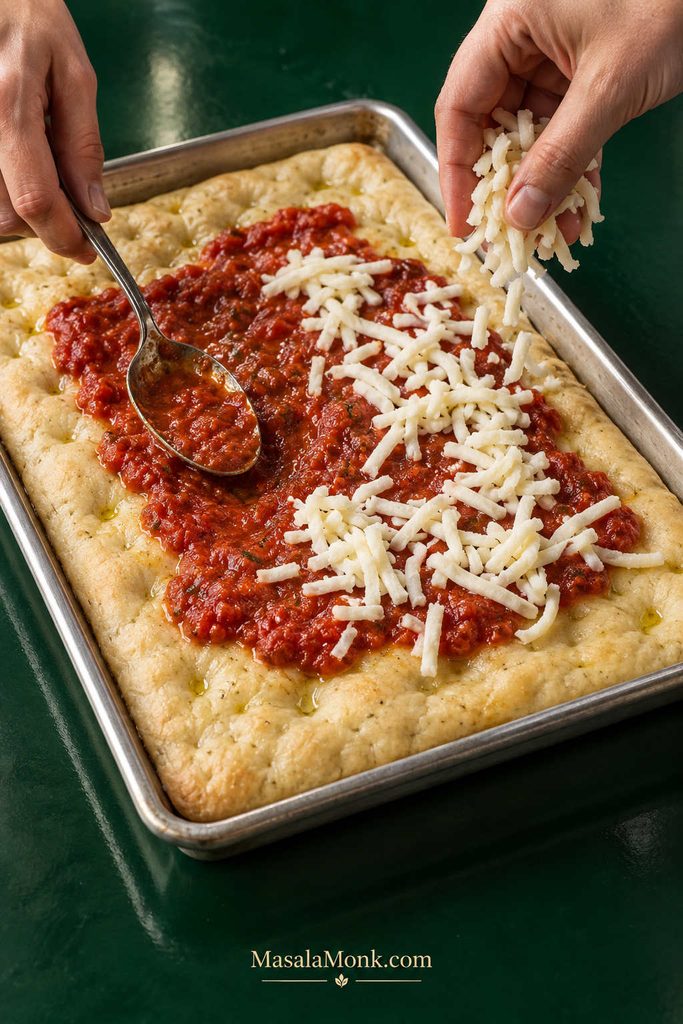
Thick tomato sauce and shredded mozzarella being added in a restrained layer to par-baked focaccia in a metal sheet pan.
Keeping the topping layer controlled protects both texture and identity: the bread still has room to rise, brown, and taste like focaccia instead of becoming only a thick base under pizza toppings.

9. Finish the Pizza

Bake for another 8–12 minutes. The cheese bubbles and blisters in places, the edges deepen toward bronze, and the kitchen starts smelling of toasted olive oil, tomato, and browned cheese.

It is tempting to pull the pizza as soon as the mozzarella looks ready. Check underneath first. The base needs color, while the bread beneath the toppings should look set and airy rather than shiny or compressed into a pasty band.

Finish the basic tomato-and-mozzarella version with torn basil, a light grating of Parmesan or Pecorino, and a thin drizzle of olive oil. Add red pepper flakes for heat.

10. Get It Out of the Pan

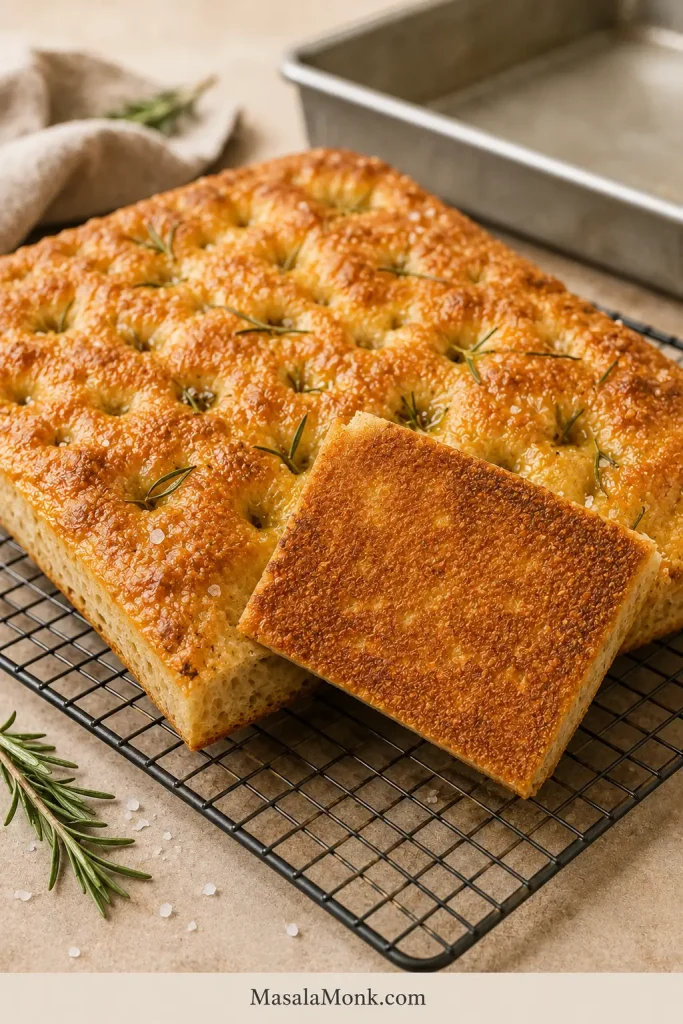
Rest the pizza in the pan for 2 minutes, then move it to a wire rack. Give it another 5–10 minutes before slicing so steam can escape instead of softening the bottom.

A good slice bends a little under its toppings, but the browned base still has enough structure to pick up in one hand. The corner pieces have the strongest olive-oil crunch; the center squares show off the biggest bubbles. Both belong on the platter.
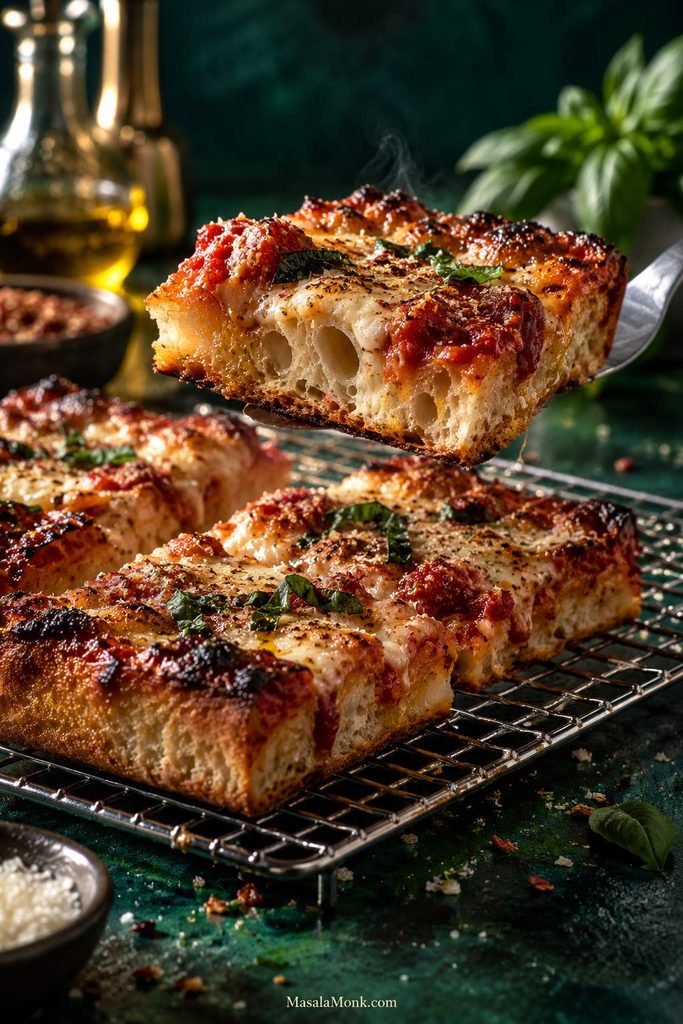
Fresh focaccia pizza resting on a wire rack while one square is lifted with a spatula, showing melted cheese, airy crumb, and browned crust.
A cooling rack preserves the contrast between crisp base and tender crumb, because steam can escape instead of collecting underneath the hot pizza.

Focaccia Pizza Topping Ideas

Different toppings change more than the flavor. Pepperoni is the easiest place to start; Margherita brings softer pockets of fresh mozzarella; mushrooms reward a little prep; and white or pesto versions put more attention back on the olive-oil crust.
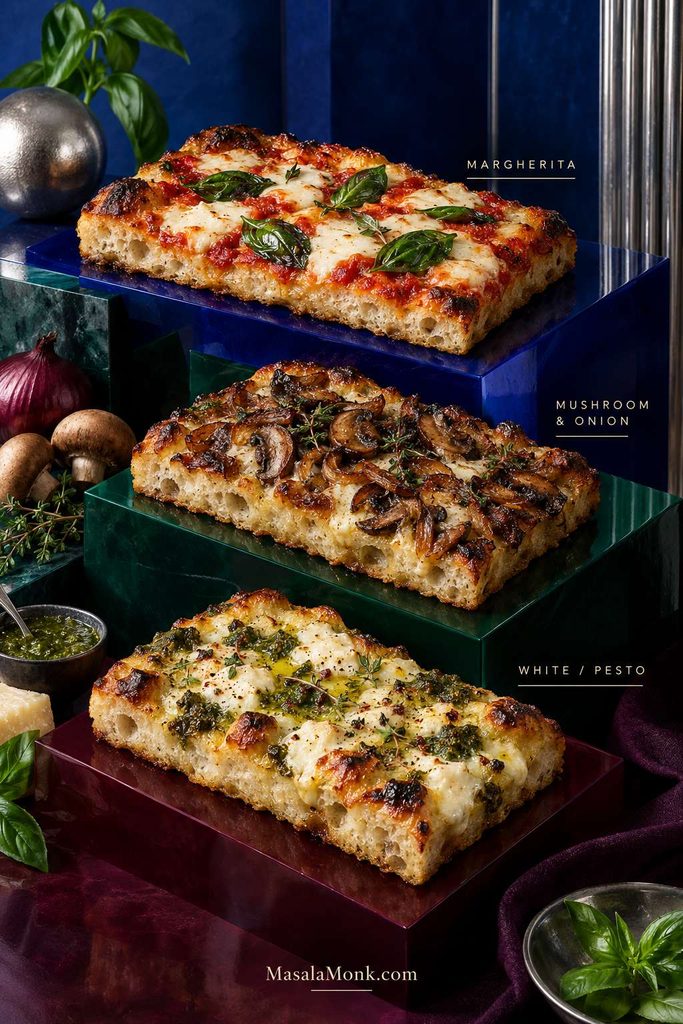
Three focaccia pizza variations shown together: Margherita with tomato, mozzarella and basil; mushroom and onion; and white pizza with pesto and cheese.
These variations show why topping choice changes more than flavor: fresh mozzarella adds moisture, cooked mushrooms concentrate before baking, and white or pesto toppings shift attention back toward the olive-oil crust.

Pepperoni

Pepperoni is the simplest place to start: salty cheese, curled slices with crunchy edges, little pools of spicy oil, and almost no extra water to worry about. Use the base sauce and mozzarella, then add 60–90 g / 2–3 oz pepperoni.

For sweet heat, finish with a thin drizzle of hot honey after baking, when it stays glossy and fragrant.
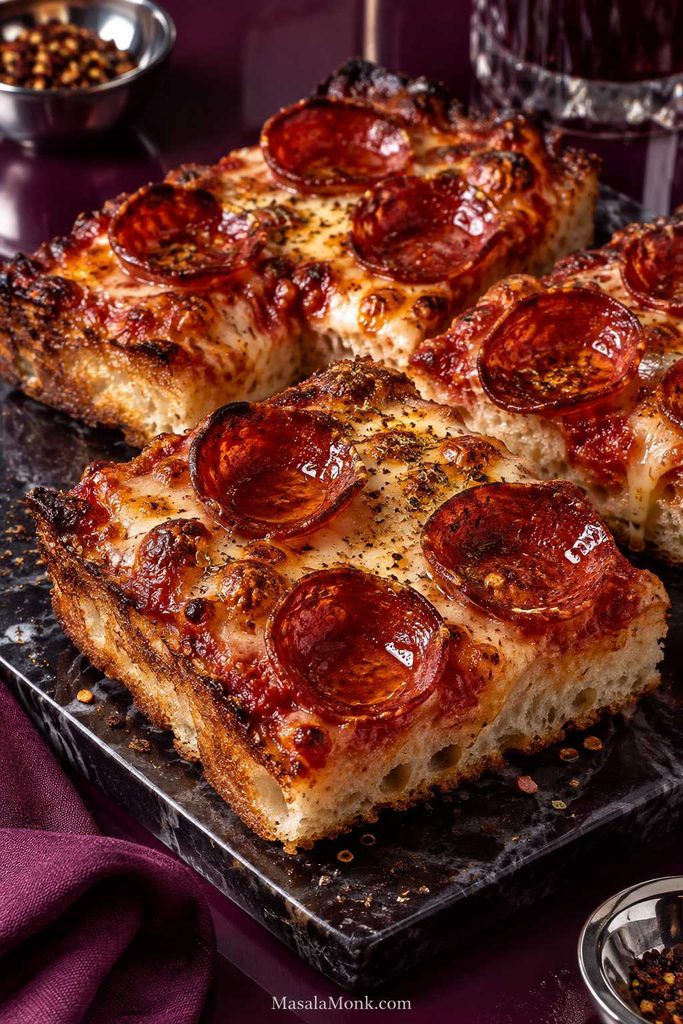
Pepperoni focaccia pizza with curled pepperoni slices, melted blistered cheese, tomato sauce, basil, and a browned airy crust.
Pepperoni is a useful reference topping for focaccia pizza because it contributes plenty of flavor without adding much extra water, making crust performance easier to judge.

Margherita

Tomato, creamy fresh mozzarella, basil, and olive oil make a brighter, softer pizza against the browned focaccia base. Use well-drained mozzarella and scatter basil over the pizza while it is still hot.

The Margherita pizza recipe takes the same tomato-mozzarella-basil combination onto a thinner conventional pizza crust.

Garlic Parmesan

Garlic carried through olive oil settles into the dimples while Parmesan browns over the top. Mix finely grated or minced garlic with a little olive oil, brush it over the par-baked crust, then add mozzarella and Parmesan.

Mushroom and Onion

Cook the mushrooms until their liquid has mostly disappeared and the edges begin to brown, then pair them with sautéed or caramelized onions. The sweet onions and browned mushrooms are especially good against the olive-oil crust.

Sausage and Pepper

Crumbled sausage browns at the edges while the peppers soften and sweeten beneath the cheese. Cook the sausage first; very juicy peppers benefit from a quick sauté too.

White or Pesto

White pizza uses mozzarella, Parmesan, black pepper, and small spoonfuls of ricotta instead of tomato sauce. The ricotta stays creamy in pockets while Parmesan browns across the top. Spinach, mushrooms, and caramelized onions all fit naturally here.

A thin layer of pesto adds a basil-and-garlic edge without hiding the focaccia underneath. Spread it on after the par-bake. The pesto recipe guide has classic basil pesto plus several variations.

How to Keep Focaccia Pizza Airy and Crisp

Once the basic pizza makes sense, you can start changing it without losing the crust that makes the whole thing worth doing.

A crisp, airy focaccia pizza comes down to three things: keep the dough thin enough for the pan, control the water going on top, and give the bottom enough heat to set before the surface gets too dark.

Get those three right and the recipe becomes flexible: you can change the pan, cheese, sauce, or toppings without losing the crust you came here for.
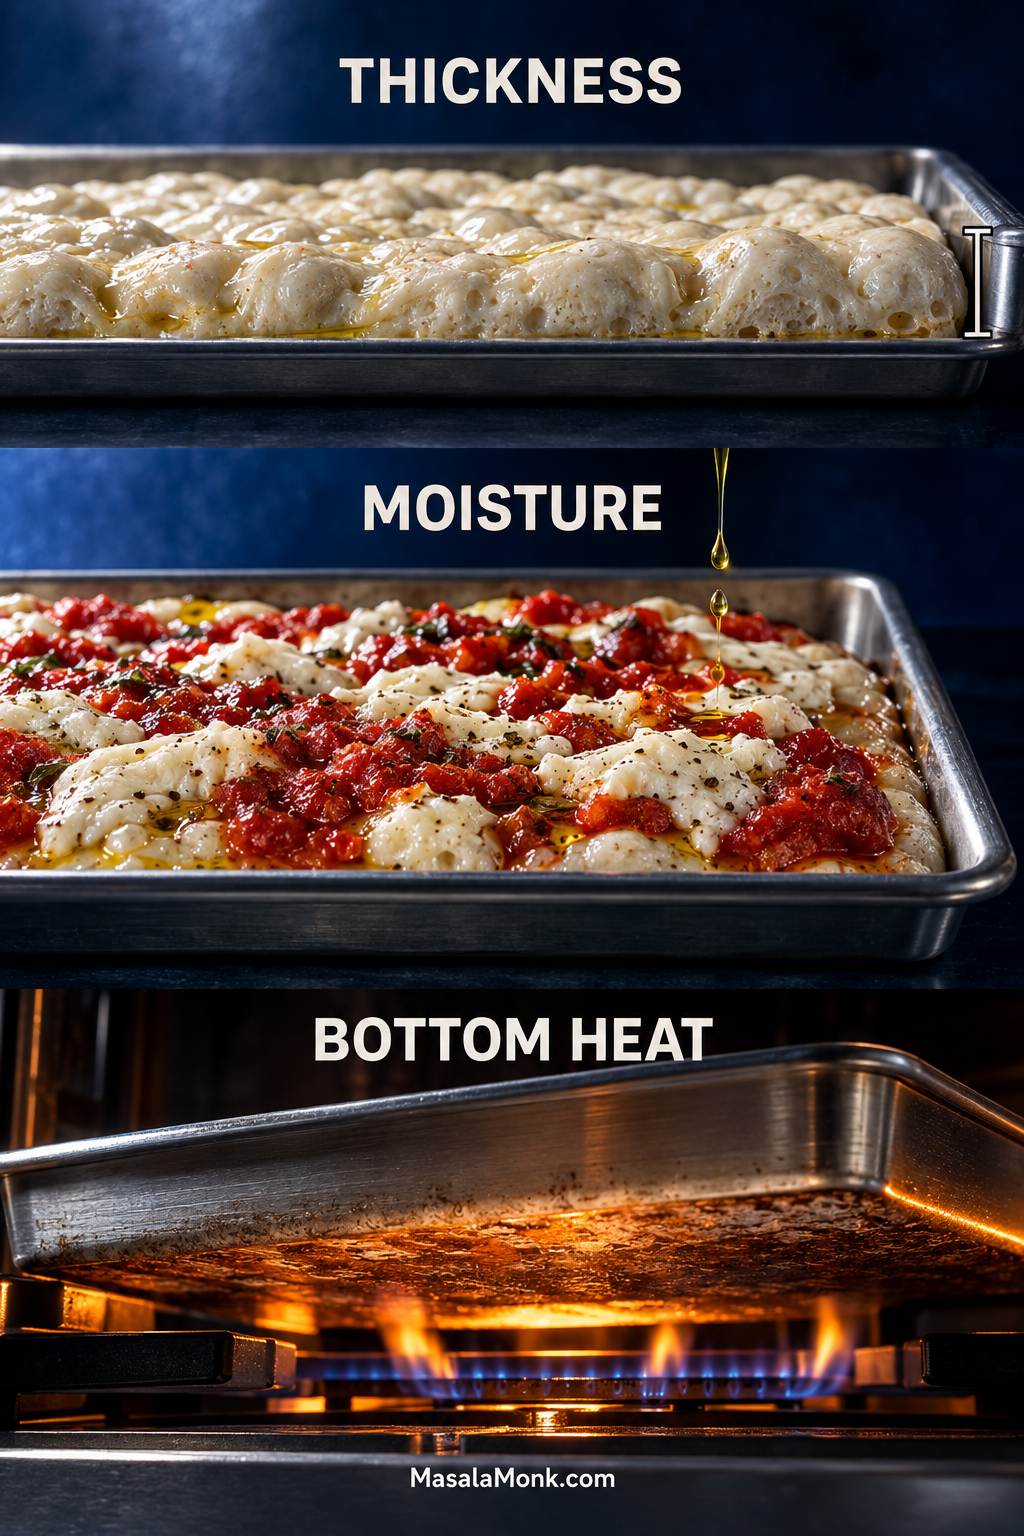
Three-part focaccia pizza guide illustrating dough thickness in the pan, moisture from sauce and toppings, and heat reaching the underside of the pan.
Thickness, topping moisture, and bottom heat are the three levers that control the crust.

Sticky or Actually Too Wet?

Before those three controls matter, the dough itself has to be behaving like dough. At about 77% hydration, it stays tacky. The important question is whether it becomes stronger as you fold it.

A healthy dough starts loose and awkward, then becomes more elastic and cohesive as the folds build strength. If it still pours like batter, tears immediately, and cannot hold itself together after several folds, the flour may simply be carrying more water than it can absorb comfortably.

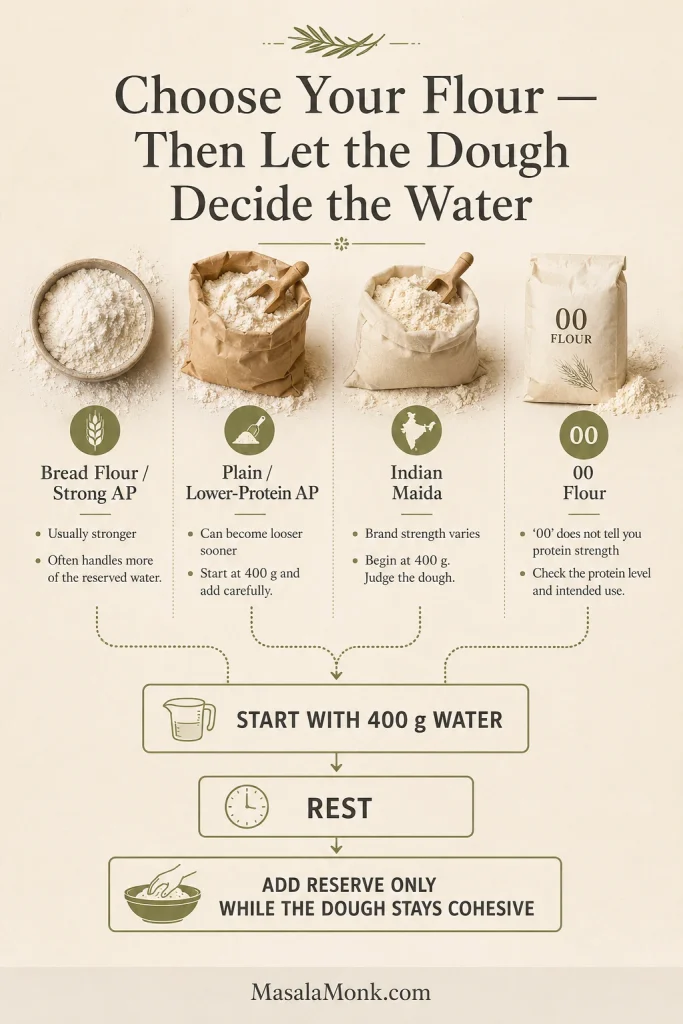
Bread flour gives you more margin. Softer all-purpose flour often does better when that final splash of water is added only after the dough begins to strengthen.
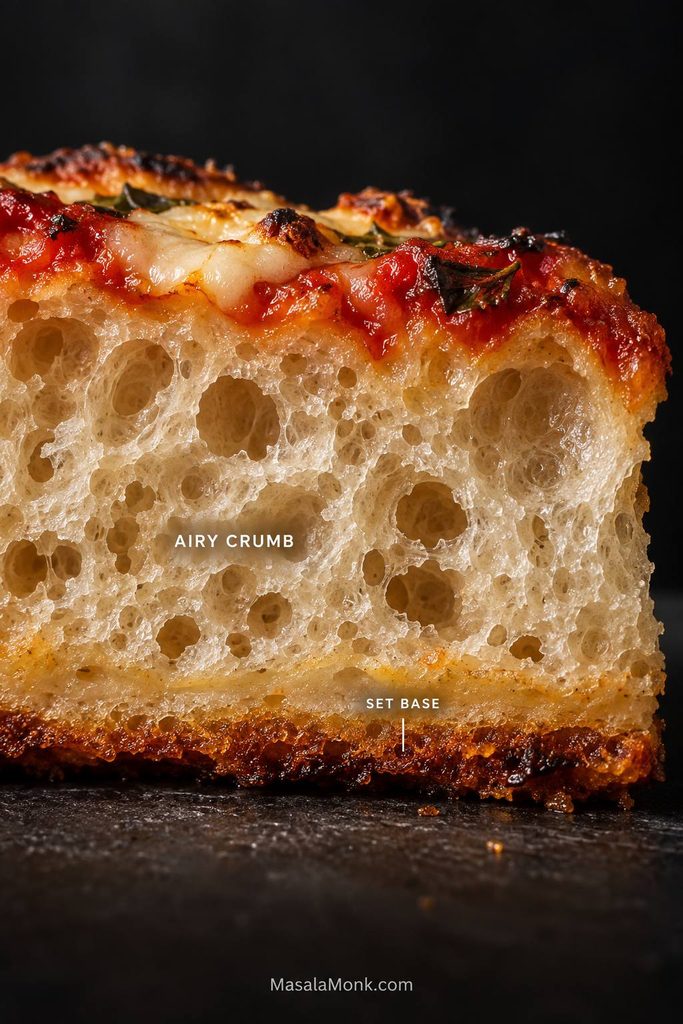
Macro cross-section of focaccia pizza showing irregular air pockets beneath tomato and melted cheese and above a browned, fully set base.
A good focaccia pizza crumb is not simply the one with the biggest holes; it is open enough to feel light, yet strong enough to support the toppings without leaving a gummy band above the crust.

Making the bread without sauce and cheese? That plain focaccia recipe goes deeper into proofing, dimpling, pan choice, and those golden olive-oil edges; it is the better place to start when the bread itself is the main event.

Use the Right Amount of Dough for Your Pan

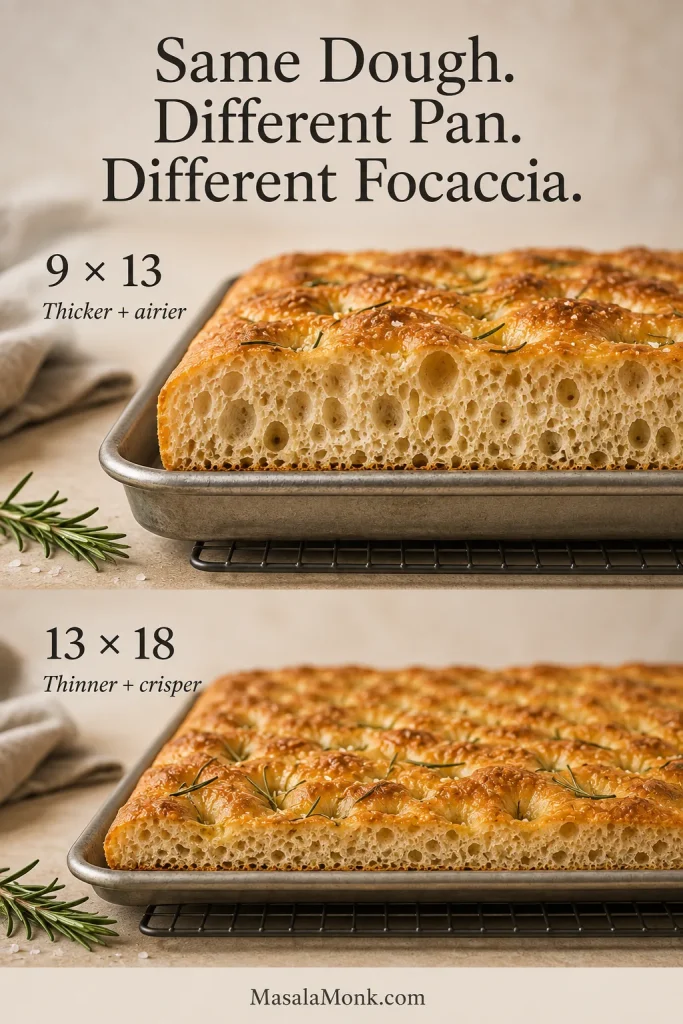
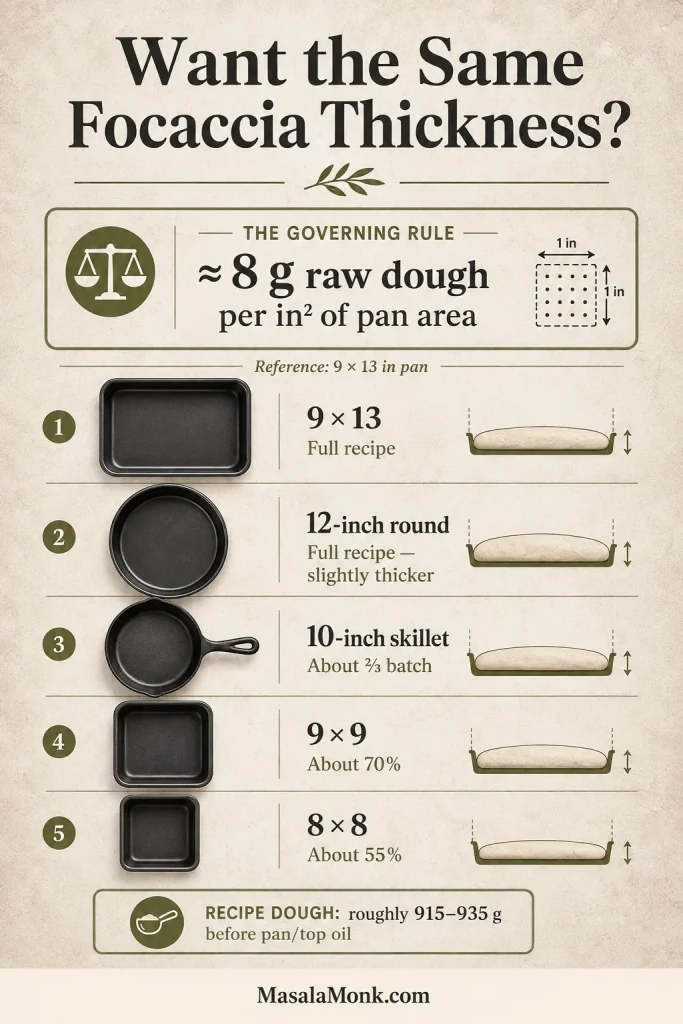
The same dough behaves very differently at ¾ inch thick than it does at 1½ inches. Move the dough into a smaller pan and the pizza gets deeper, so the bread under the toppings has farther to go before it is fully baked.

The full batch weighs about 1 kg. A standard 9 × 13-inch pan has exactly half the surface area of a 13 × 18-inch half-sheet, so half the dough preserves almost the same thickness.

Pan Approx. dough What to expect
13 × 18 in / 33 × 46 cm Full batch, about 1 kg The intended airy-but-pizza-like thickness
9 × 13 in / 23 × 33 cm 500–550 g Very similar thickness to the half-sheet version
9 × 13 with full batch About 1 kg Much thicker focaccia; expect a longer, less forgiving bake
12-inch cast iron skillet 450–550 g Near the intended thickness around 500 g, with a more fried, deeply browned underside; follow doneness rather than the half-sheet clock

The half-sheet gives the cleanest balance of airy center and browned base. Cast iron is more interesting when what you really want is that almost-fried underside.
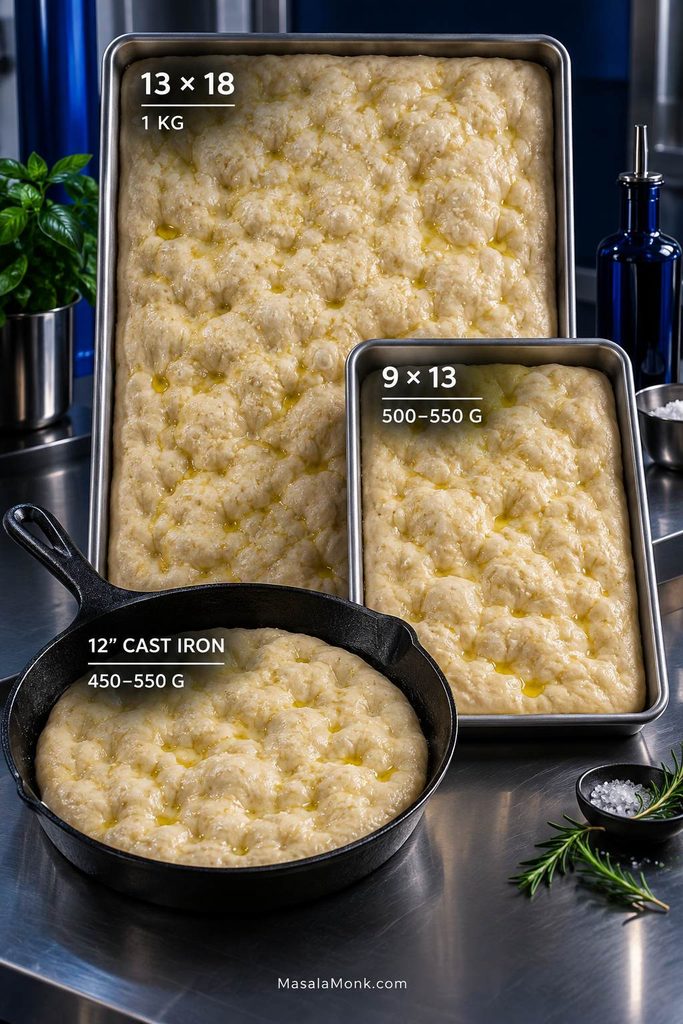
Comparison of a 13 × 18-inch half-sheet, 9 × 13-inch pan, and 12-inch skillet showing different focaccia dough amounts.
Smaller pan, deeper dough. Scale the dough with pan area to keep the bake closer to the original.

The Bottom Needs Heat

Once sauce and cheese cover the surface, the underside has to carry more of the bake. Metal helps. So does a thoroughly heated oven and a rack in the lower half.

Pale bottoms usually improve with a lower rack or a preheated steel or stone. A crust that burns before the bread finishes needs the opposite treatment: move the pizza higher or remove that extra thermal mass.
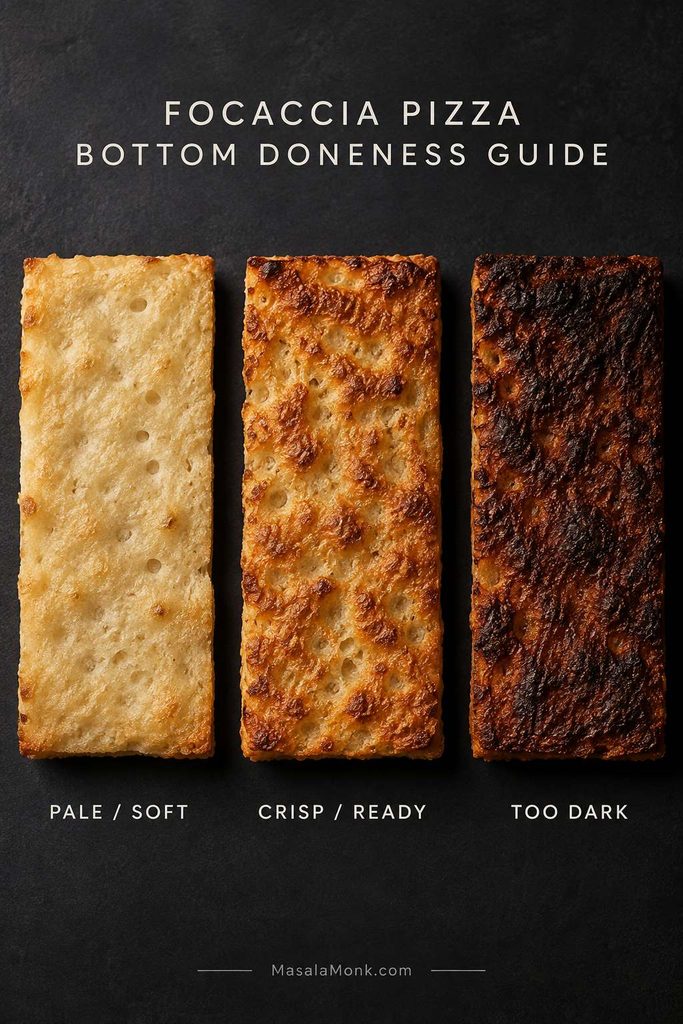
Three focaccia pizza bottoms labeled pale and soft, crisp and ready, and too dark, shown at the same angle for comparison.
Aim for even bronze: pale stays soft; very dark can outrun the middle.

Prep Toppings for a Better Crust

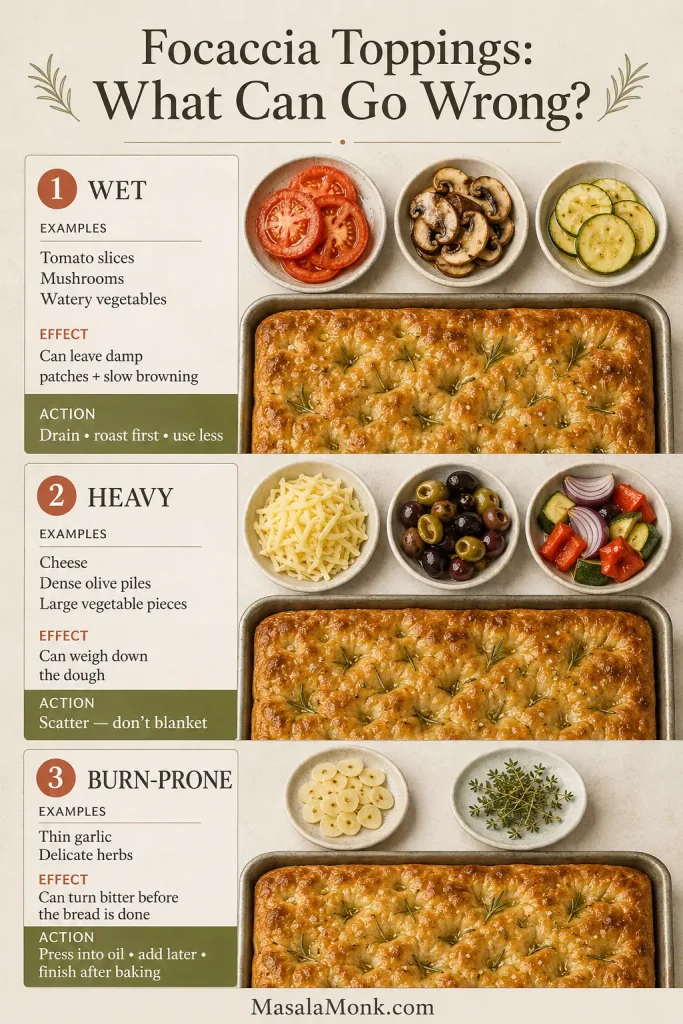
Sogginess is usually cumulative rather than mysterious. A little loose sauce may be fine, and so may a few mushrooms. Add fresh mozzarella and juicy tomatoes as well, though, and the bread suddenly has much more water to deal with.

The wetter the topping, the more preparation it needs before it reaches the dough. Keep the overall layer modest too. The focaccia should still feel like part of the pizza, not a thick bread base buried under everything else.
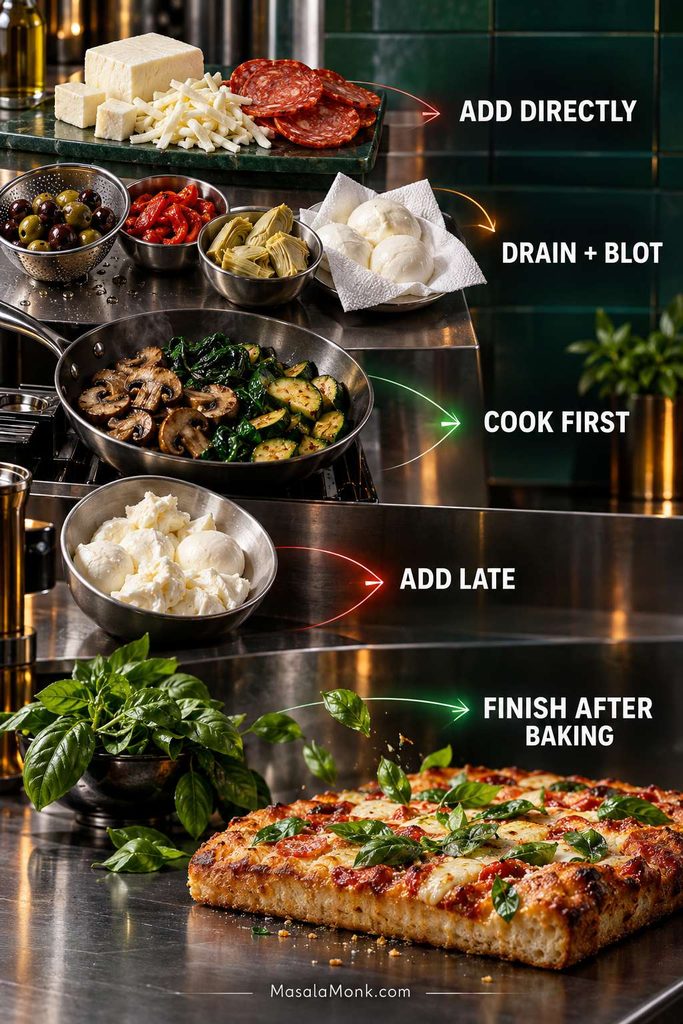
Topping guide grouping ingredients by preparation method, including add directly, drain and blot, cook first, add late, and finish after baking.
Prep by moisture: drain, blot, cook, or delay wet ingredients before they reach the crust.
Topping Prep Why
Low-moisture mozzarellaAdd directlyReliable melt with little excess water
PepperoniAdd directlyLow-moisture and forgiving
Cooked sausageAdd directlyAlready cooked and easier to control
OlivesDrainRemoves surface brine
Artichoke heartsDrain and pat dryJarred and canned pieces hold liquid
Roasted peppersDrain and pat dryKeeps packing liquid off the dough
MushroomsCook firstThey release water as they shrink
SpinachCook and squeeze dryRemoves water before it reaches the crust
ZucchiniPrecook or salt and dryHigh water content
Fresh tomatoesUse sparingly; drain juicy piecesFresh juice can soak the crumb
Fresh mozzarellaDrain, blot, add lateMuch wetter than low-moisture mozzarella
Fresh basilAdd after bakingBetter fragrance and color
Fresh garlicCoat with oil or tuck beneath cheeseExposed pieces scorch quickly
Sun-dried tomatoesProtect beneath cheese or add laterExposed edges can burn

Very juicy fresh tomatoes deserve particular attention. The fresh tomato sauce guide shows how draining and reduction can turn them into a richer, more concentrated base.

Want to Skip the Par-Bake? Put Cheese Down First

Par-baking is the default here because it gives the center more protection. A one-bake version can still work when the oven has strong bottom heat and the toppings are fairly dry.

After the dough has fully proofed and been dimpled, scatter most of the low-moisture mozzarella directly over the dough. Spoon a modest amount of thick sauce over the cheese, then finish with the remaining mozzarella and toppings. That first cheese layer slows the sauce from soaking straight into the raw dough.

The choice changes the eating experience slightly. A one-bake pizza lets sauce and cheese settle into the bread as everything cooks together. Par-baking, by contrast, gives you a more distinct focaccia layer underneath and a wider margin against a gummy middle.
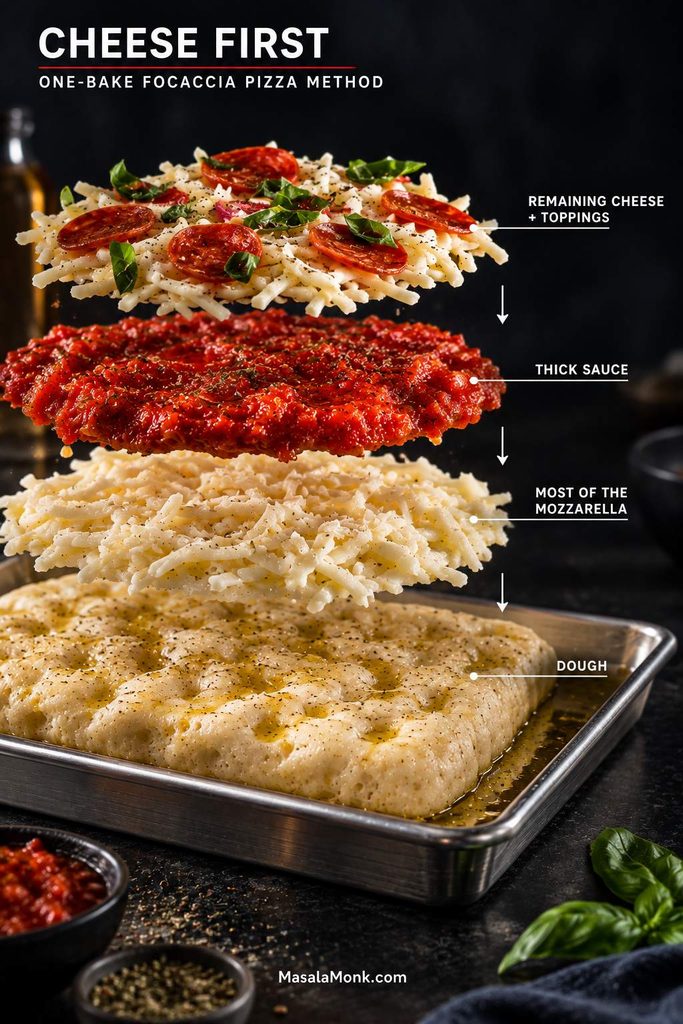
Exploded focaccia pizza assembly showing dough at the bottom, most of the mozzarella above it, thick tomato sauce, and remaining cheese and toppings at the top.
In the one-bake method, the first mozzarella layer acts as a moisture buffer, so the sauce reaches the raw focaccia more slowly while the bread begins to set underneath.

King Arthur Baking uses the cheese-first approach in its focaccia pizza method.

Shortcuts and Other Doughs

There are two useful shortcuts when you want the focaccia-pizza experience without starting from this exact dough: turn already-baked focaccia into pizza, or adapt conventional pizza dough to an oiled pan. Each route keeps the pan-pizza idea while changing how much dough work you need to do.
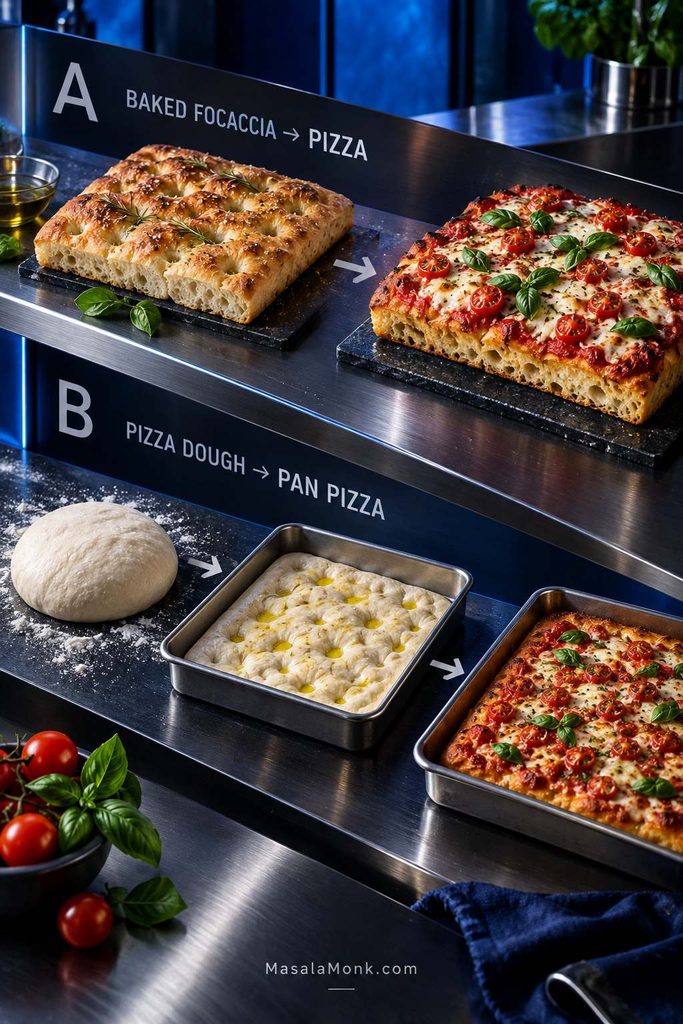
Two focaccia pizza routes shown together: baked focaccia turned into pizza, and pizza dough stretched into an oiled pan and baked as pan pizza.
Choose the shortcut by your starting point: baked focaccia is fastest, whereas conventional pizza dough keeps more of the dough-making process but can still be adapted to an oiled pan.

Already Have Baked Focaccia?

This is the quickest route to pizza on focaccia bread. Heat the oven to 425°F / 220°C. Focaccia thicker than 1½ inches / 4 cm is easier to turn into pizza if you split it horizontally.

For a 9 × 13-inch piece, use 120–150 g / ½–⅔ cup thick sauce and 90–120 g / 3–4 oz low-moisture mozzarella, plus cooked toppings.

Bake on a metal sheet pan for 8–12 minutes, until the cheese bubbles and the bread is hot and browned underneath. A base that needs more color can spend another minute or two directly on the oven rack once it is firm enough to move safely.

Day-old focaccia is excellent here. The edges recrisp at the same time the cheese melts, so leftovers suddenly feel intentional.

Using Pizza Dough

Conventional pizza dough is usually less hydrated and more elastic than focaccia dough, but it adapts well to an oiled pan.

For a 9 × 13-inch pan, start with 450–500 g / 16–18 oz pizza dough. Let refrigerated dough warm and relax, stretch it into the oiled pan in stages, and give it another 15–20 minutes whenever it snaps back.

Once the dough is visibly puffy, continue with the par-bake, topping, and finishing method. Start checking the color early because a lower-hydration dough may brown faster.

The easy pizza dough recipe gives you same-day and overnight options if you want to begin from scratch.

For sourdough: natural fermentation needs its own timing rather than a simple yeast swap. The sourdough focaccia recipe follows a starter-based dough through fermentation, proofing, dimpling, and baking.

Fix My Focaccia Pizza

Most of these problems look different, but they usually come back to fermentation, water on top, or heat underneath. If you want the logic first, revisit the three controls for an airy, crisp focaccia pizza. Something going wrong right now? Start with the rescue column; plenty can still be fixed before dinner reaches the table.

Dough and Proofing

Problem Likely cause Save this one Next time
Extremely sticky dough Often normal at this hydration Wet or oil your hands Let the folds build the strength
Dough behaves like soup Mismeasurement or flour unable to hold the water Give it another fold or two; add a little flour only if it cannot gain structure Weigh the flour and hold back 15 ml water with softer flour
Won’t reach the corners Cold or tight gluten Cover and wait 10–20 minutes Stretch in stages
Barely rises Cool room, slow fermentation, or weak yeast Give active dough more time somewhere comfortably warm Check yeast freshness and watch the dough rather than the clock
Dense crumb Underproofing, added flour, or heavy handling Enjoy it as a denser pan pizza Proof longer and handle mature dough gently
Rose and then collapsed Overproofing Bake it now; it may simply finish flatter Use less yeast for long ferments and catch the dough closer to its peak
One giant bubble A large trapped gas pocket Pierce that bubble gently Dimple evenly without crushing the rest

Baking and Crust

Problem Likely cause Save this one Next time
Gummy or raw middle Thick dough, weak bottom heat, wet toppings, or short bake Remove it from the pan. If the crust is firm enough to handle safely, finish it directly on the oven rack; loosely shield very dark cheese with foil Keep the par-bake, control wet toppings, and check the crumb beneath them
Pale, soft bottom Not enough heat underneath Once the crust is firm enough to move, finish it on the rack or a thoroughly heated steel or stone for 2–4 minutes Preheat longer, move lower, or add thermal mass
Burned bottom Strong lower heat, very dark pan, excess oil, or hot steel Move the pizza off the pan immediately Raise the rack or remove the steel/stone
Dark cheese, underdone bread The top is cooking faster than the bread Loosely cover with foil and keep baking Use the full par-bake or add vulnerable toppings later
Pizza sticks Pan surface or inadequate release layer Work a thin spatula gradually underneath Use spray plus oil on a suitable metal pan

Toppings and Cooling

Problem Likely cause Save this one Next time
Fresh mozzarella made it wet Too much water from the cheese Remove from the pan and continue baking briefly if needed Drain, blot, and add it late in the bake
Vegetables made the middle soggy They released water during baking Finish the crust out of the pan Cook and drain wet vegetables first
Garlic or sun-dried tomatoes burned Dry ingredients were exposed to high heat Remove badly scorched pieces Coat with oil, tuck beneath cheese, or add later
Firm bottom turned soft Steam became trapped under the pizza Recrisp slices in a skillet, air fryer, or oven Move the pizza to a rack soon after baking

Once you can read those three controls, the recipe stops feeling fragile and becomes much easier to steer.

Storage and Reheating

Let excess steam escape briefly, then cover and refrigerate promptly. Don’t leave pizza at room temperature for more than 2 hours.

  • Refrigerator: 3–4 days.
  • Freezer: best quality within 1–2 months. Freeze slices in a single layer first, then transfer them to a container or freezer bag.

USDA guidance lists pizza at 3–4 days refrigerated and 1–2 months frozen, and recommends reheating leftovers to 165°F / 74°C. See its food-safety guidance for more detail.

Best Ways to Reheat It

For the closest thing to a fresh slice, use the skillet or oven. Both restore the bottom instead of simply warming the cheese, which is what keeps focaccia pizza from turning soft and heavy the next day.

  • Skillet: heat over medium-low until the bottom firms and browns; cover briefly if the top still needs warming.
  • Oven: 375°F / 190°C for 8–12 minutes.
  • Air fryer: 350–375°F / 175–190°C for a few minutes.
  • Microwave: quickest, but the crust will be softer.
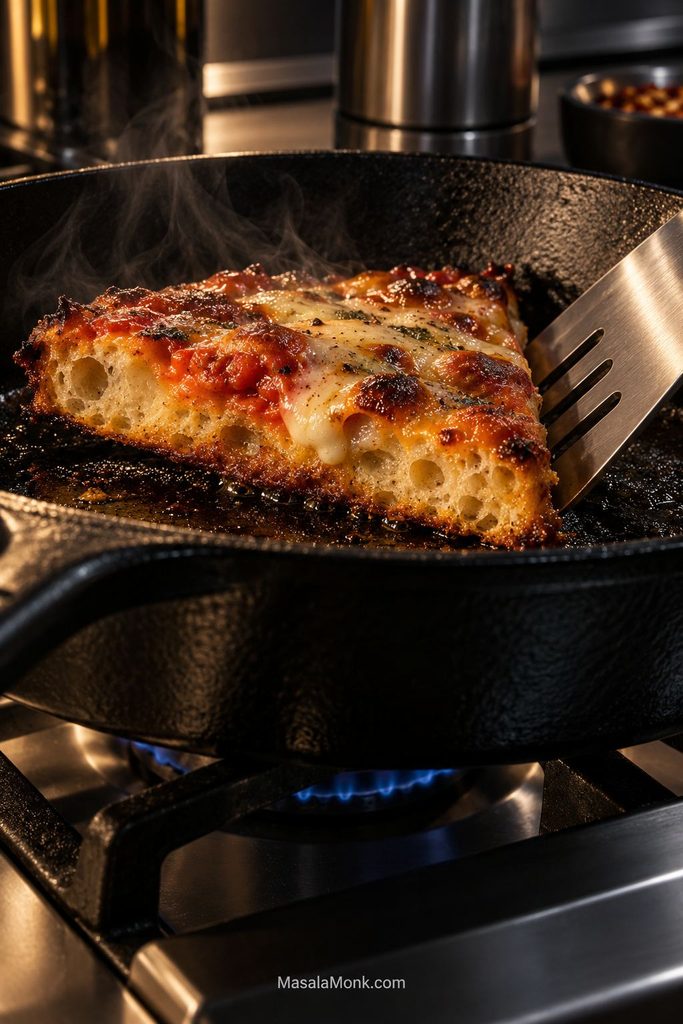
Cooked focaccia pizza slice reheating in a black cast-iron skillet with a metal spatula, browned crust against the pan and melted cheese on top.
A skillet changes the reheating method from passive warming to direct browning, so the bottom can regain crispness while the cheese warms more gradually above it.

Focaccia Pizza FAQs

1. What is focaccia pizza?

It is pizza made on a soft, olive-oil-rich focaccia-style dough. Compared with conventional pizza, the base is thicker and airier, with a browned underside and a tender crumb that still carries the toppings like pizza.

2. Is focaccia pizza the same as Sicilian pizza?

They overlap, but the names aren’t interchangeable. Traditional Sicily has several bread-based pizza and focaccia styles, including Palermo’s soft, spongy sfincione, while “Sicilian pizza” in the United States often means a thick rectangular Italian-American pan pizza. This recipe is specifically built around a high-hydration, olive-oil-rich focaccia dough with an airy crumb and dimpled structure.

3. Can I use Tipo 00 flour?

Yes, although you don’t need it. Tipo 00 describes how finely the flour is milled, not one fixed protein strength. Bread flour is the more predictable choice here because this wet dough also has to support pizza toppings.

4. Can I bake focaccia pizza in a pizza oven?

Yes, if the oven can safely accommodate the pan. Use the oven maker’s focaccia or bread guidance rather than Neapolitan-level heat. Keep the flame modest, rotate the pan as needed, watch the underside closely, and check the pan manufacturer’s maximum safe temperature. Many compact pizza ovens won’t fit a 13 × 18-inch half-sheet, so scale the dough to the pan you can use.


When the middle is airy and fully set, the underside is browned, and the knife meets a little resistance from that firm base, you’re there. Give the pizza a few minutes on the rack, cut it into squares, and listen to those olive-oil edges crackle. Here, the crust was never supposed to be an afterthought.
Posted on — Leave a comment

Homemade Soft Pretzel Recipe: Chewy, Buttery & Easy

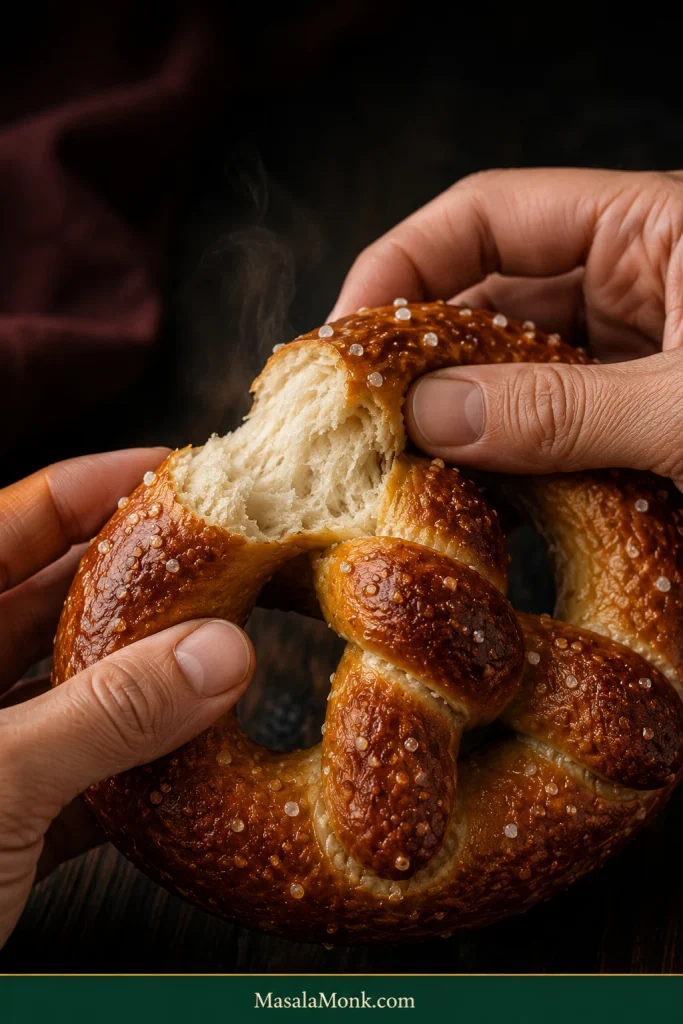
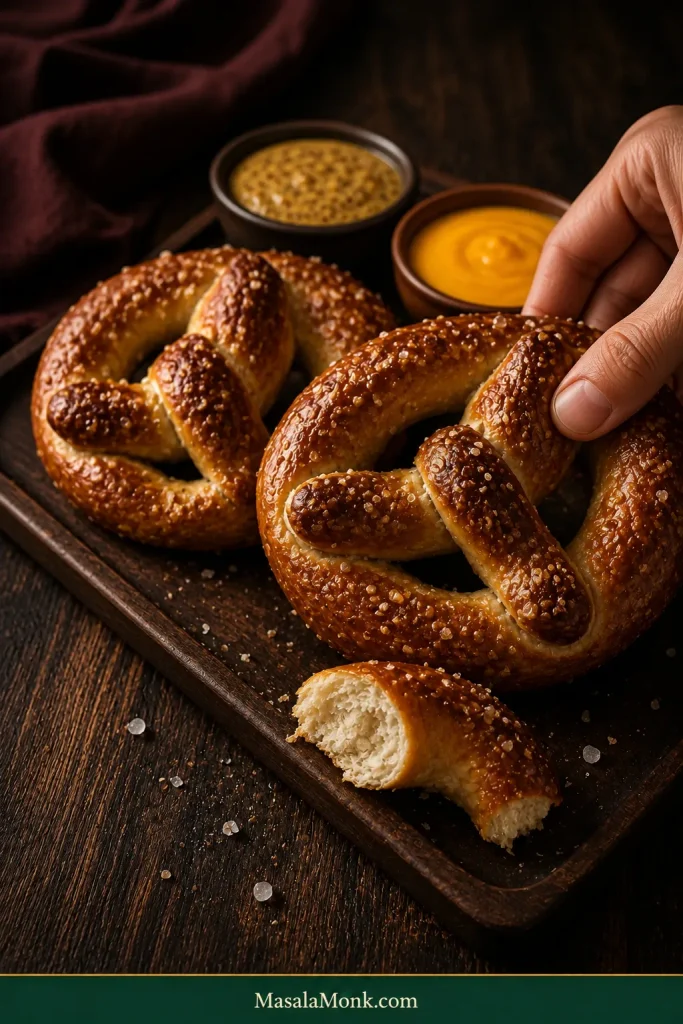
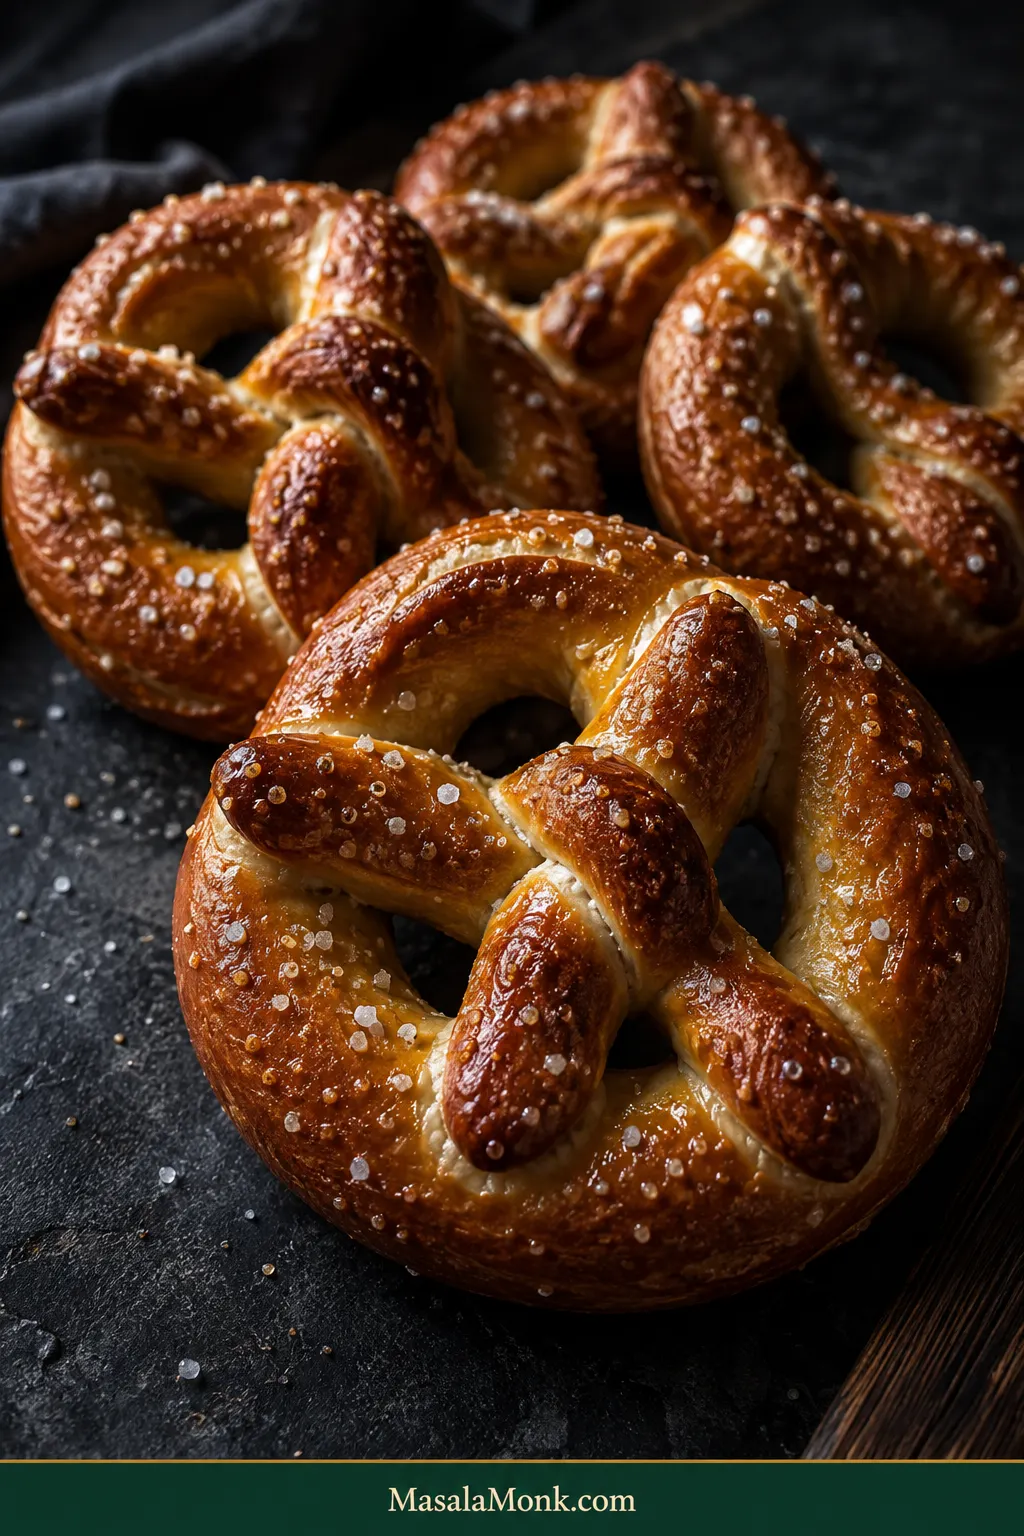
Several homemade soft pretzels with deep golden-brown crusts, darker raised curves, coarse salt and a light buttery sheen on a dark surface.

Pull apart a good soft pretzel and the browned crust should resist for just a moment before giving way to a warm, soft center. The surface has a little chew, salt arrives before sweetness, and enough melted butter clings to the hot crust that some of it ends up on your fingertips.

The best ones barely make it to the cooling rack. Give them five minutes, tear through the thick curve, and the center should compress gently between your fingers before slowly pushing back.

The shapes won’t all come out identical, especially on a first batch. Once a tray of browned pretzels is sitting there warm under a layer of melted butter, that suddenly matters a lot less.

Soft pretzels can look like the sort of thing that takes bakery training, but the awkward-looking parts become surprisingly ordinary once you know what to watch for. Is the dough actually too sticky? Why does the rope keep shrinking? Are those holes big enough? How long should the baking-soda bath take?

Nothing here depends on guessing what “enough flour,” “a long rope,” or “golden brown” is supposed to mean. Make a soft dough, give it time to puff, roll long ropes, dip them briefly, then bake until the crust looks properly browned.

The Method in One Minute

You don’t need lye, an egg wash, or a stand mixer.

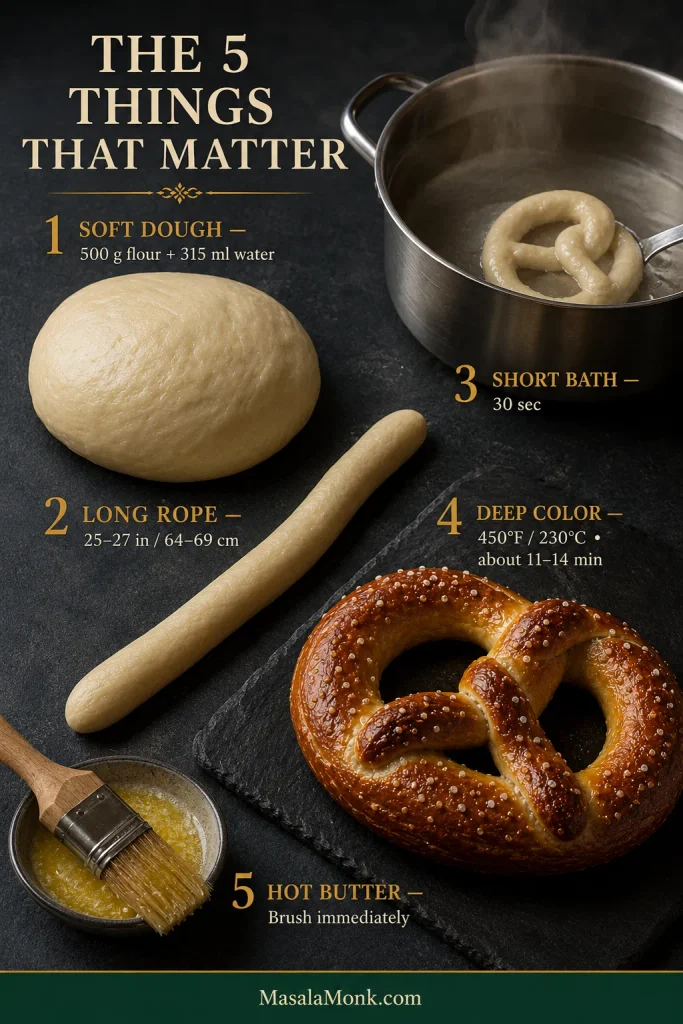
Soft dough. Long rope. Short bath. Deep color. Hot butter. Those are the five things worth remembering.

  • Soft dough: start with 500 g flour and 315 ml warm water. Rest for 10 minutes, knead fully, then decide whether the dough needs the reserved 10 ml water or a little extra flour.
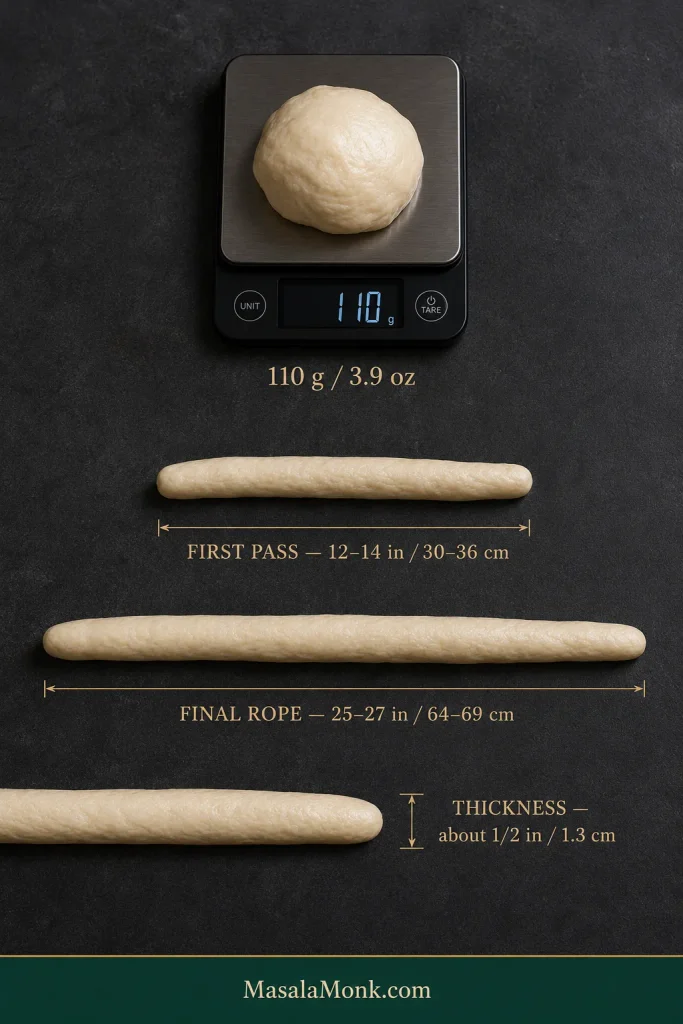
  • Long rope: divide into 8 pieces of about 110 g each. Roll partway, let them relax while you work through the batch, then finish at 25–27 inches / 64–69 cm.
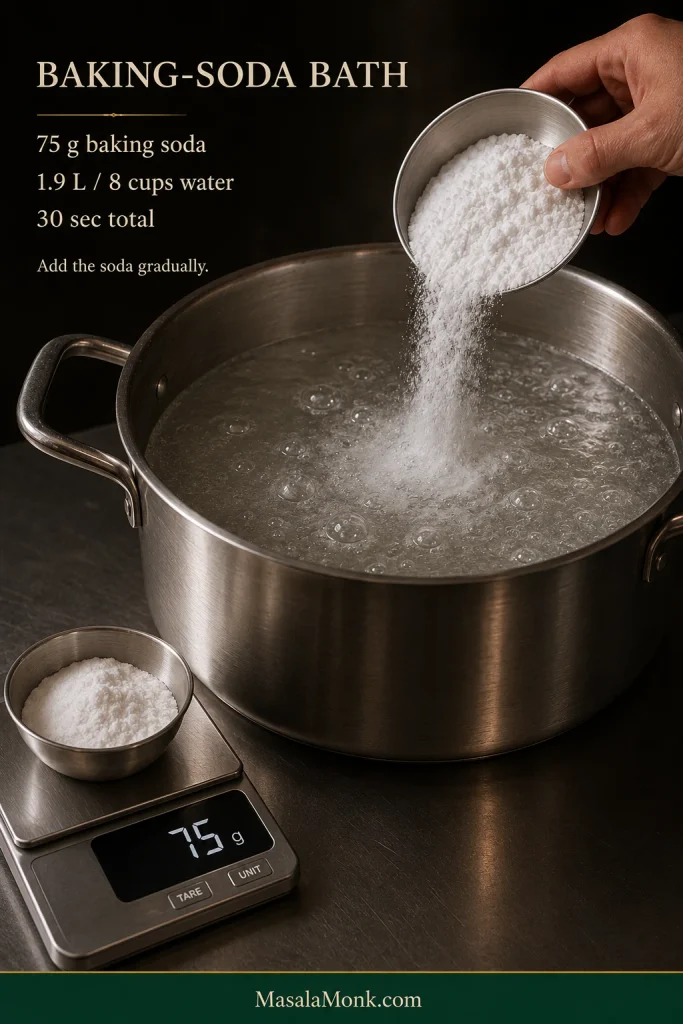
  • Short bath: use 1.9 L / 8 cups water with 75 g baking soda and give each pretzel 30 seconds total.
  • Deep color: bake at 450°F / 230°C. Start checking around 11 minutes and look for deep golden-brown crust with darker raised curves.
  • Hot butter: brush immediately after baking, then let the pretzels stand for 5 minutes before serving.
Soft pretzel guide showing five checkpoints: soft dough, a long rope, a short baking-soda bath, deep browning and butter added while hot.
Think of these as a sequence, not five separate tricks. Each soft-pretzel checkpoint sets up the next, so correcting problems early makes everything downstream easier.

Homemade Soft Pretzel Recipe

These are substantial pretzels rather than thin, crisp ones: deeply browned outside, lightly chewy through the crust, tender in the middle, and brushed with butter straight from the oven.

Plan on 40–50 minutes of hands-on work and about 2 hours from start to finish. Your part comes in short bursts—mix and knead, roll and shape, dip and bake—with most of the time between those stages spent waiting for the dough or the oven.

Yield8 large pretzels
Piece weightAbout 110 g / 3.9 oz each
Active time40–50 minutes
Rise45–60 minutes
BakeUsually 11–14 minutes
Oven450°F / 230°C
Total timeAbout 2 hours

Before You Start

  • A kitchen scale is strongly recommended, especially for the flour and eight equal portions.
  • Clear about 3 feet / 90 cm of counter space for the long ropes.
  • Use a wide, high-sided pot or Dutch oven and have a broad slotted spatula or spider ready for lifting the wet pretzels.
  • Set both prepared baking sheets beside the pot before dipping. Once you start, the drain-salt-transfer rhythm moves quickly.

Ingredients

For the dough

  • 500 g / 17.6 oz all-purpose flour; if measuring by volume, expect about 4 to 4¼ cups depending on how you fill the cup, so weighing is much more reliable
  • 315 ml / 1⅓ cups warm water, 100–110°F / 38–43°C
  • 10 ml / 2 teaspoons additional warm water, reserved and used only if needed
  • 7 g / 2¼ teaspoons instant yeast
  • 18 g / about 1½ tablespoons packed light brown sugar; granulated sugar can replace it at the same weight
  • 9 g / about 1½ teaspoons fine sea salt
  • 28 g / 2 tablespoons unsalted butter, melted and cooled until just warm

For the baking-soda bath

  • 1.9 L / 8 cups water
  • 75 g / about ⅓ cup baking soda

For finishing

  • Pretzel salt or coarse sea salt, as needed
  • 42 g / 3 tablespoons unsalted or salted butter, melted

Salted finishing butter is fine; just use a lighter hand with the coarse salt on top.

Instructions

1. Mix and rest

Combine the 315 ml / 1⅓ cups warm water, yeast, brown sugar, and melted butter in a large bowl. Add the flour and fine salt and mix until no large patches of dry flour remain.

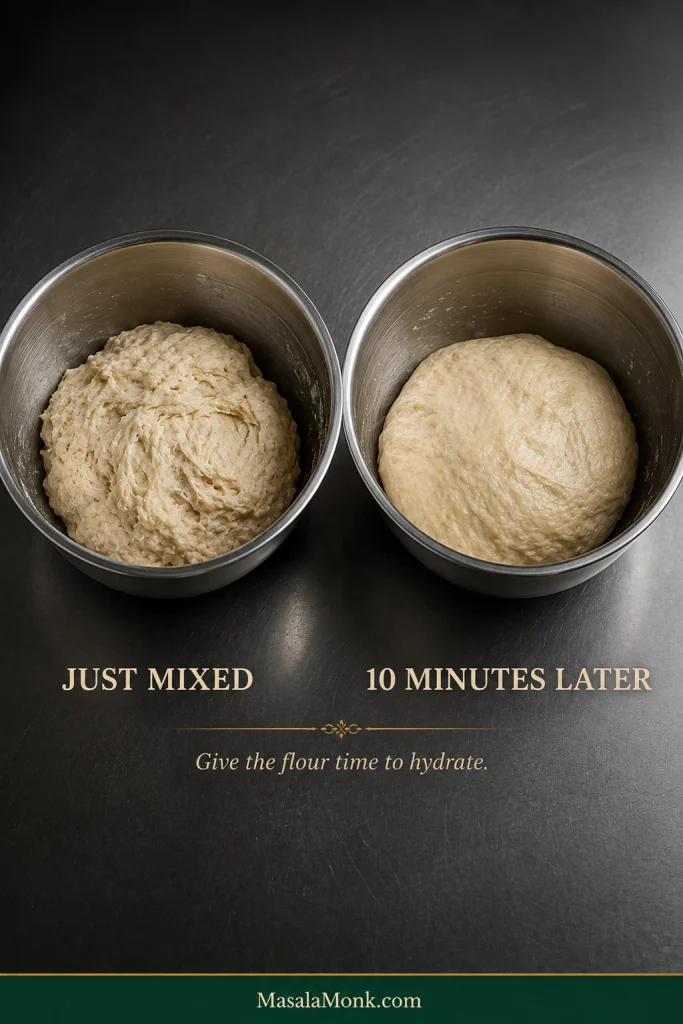
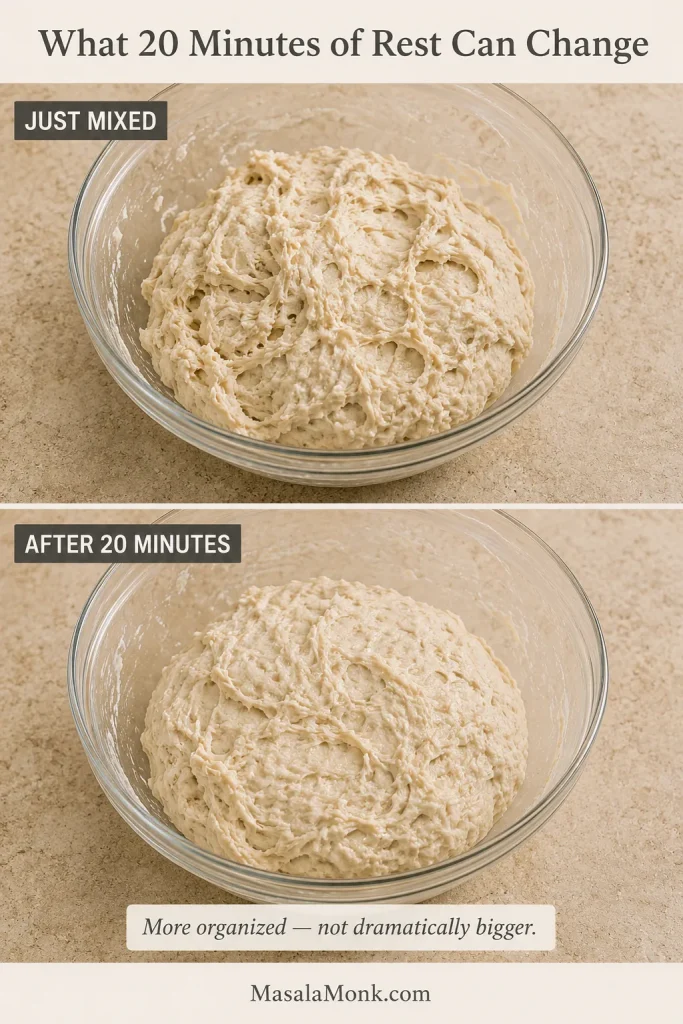
The mixture will look rough and shaggy. Cover it and leave it alone for 10 minutes. When you come back, it should already look a little calmer even though it isn’t smooth yet.

Pretzel dough immediately after mixing and after a 10-minute rest, with the rested dough looking calmer, more hydrated and less shaggy.
Before judging hydration, let the flour absorb the water it already has. That short rest can prevent an unnecessary correction later.

2. Knead and let it rise

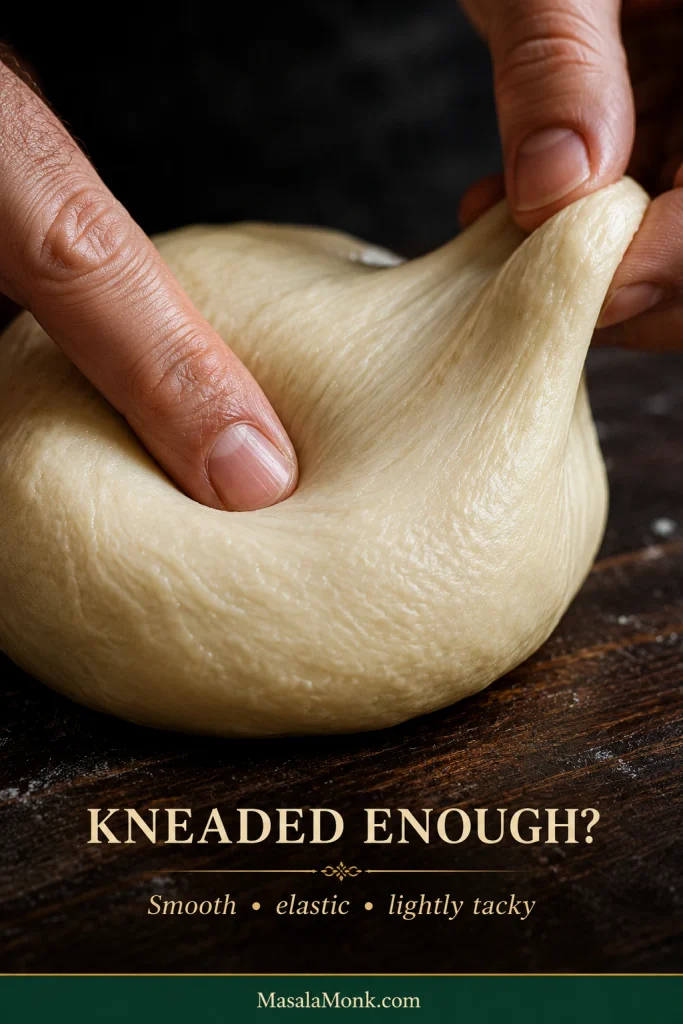
Knead with a dough hook for 6–8 minutes, or by hand for 8–10 minutes. The finished dough should feel smooth, elastic, soft, and lightly tacky.

Press a clean fingertip onto the surface. It should feel tacky without leaving your finger heavily coated. A stiff dough can take the reserved water 1 teaspoon at a time; a mixture that still smears heavily after the full knead can take flour 1 tablespoon at a time.

Knead first. Adjust second.

Fully kneaded pretzel dough with a smooth, elastic surface being pressed to demonstrate its soft, lightly tacky texture.
A finished knead gives you a fair texture test. Look for elastic rebound and a clean release rather than chasing a perfectly polished dough ball.

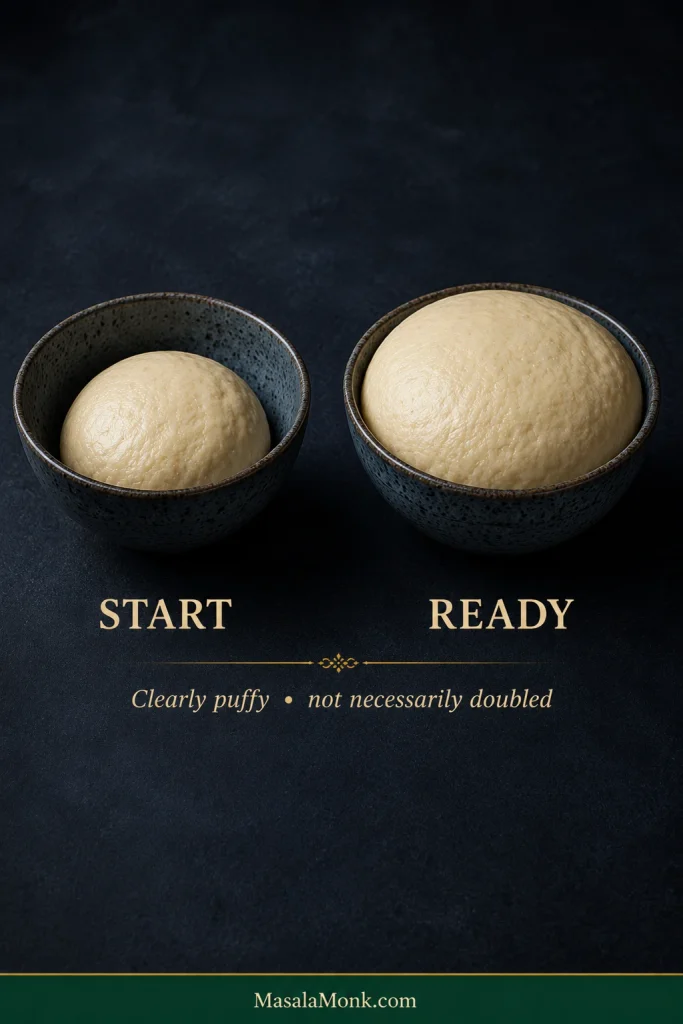
Place the dough in a lightly greased bowl, cover, and let it rise until clearly puffy and substantially larger, usually 45–60 minutes. It does not need to double.

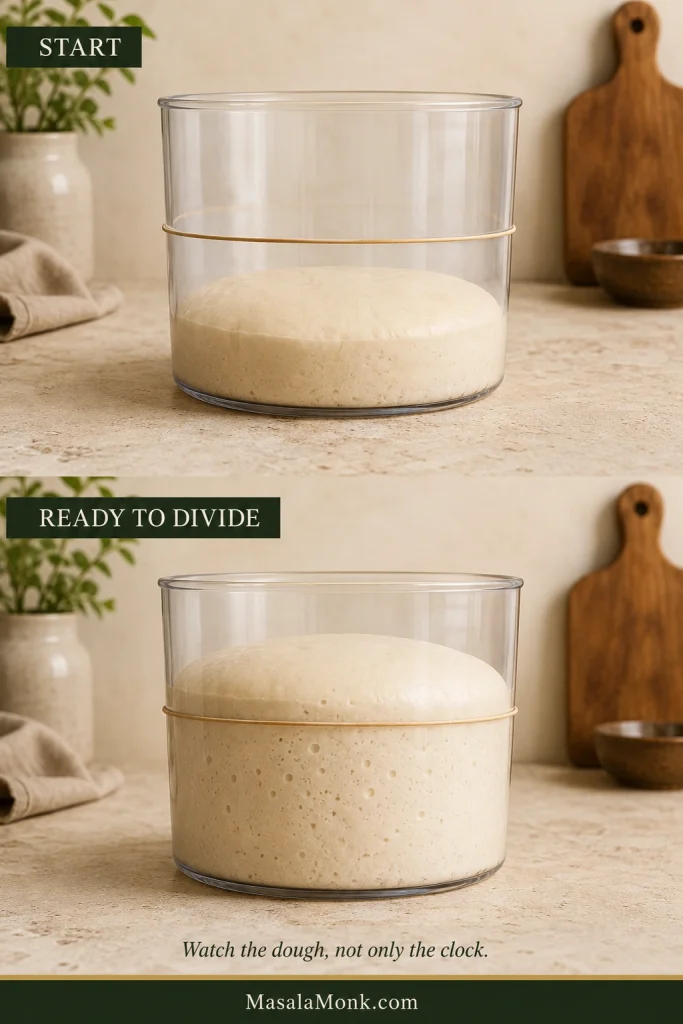
If the change is hard to judge, mark the starting height on the outside of the bowl with a small piece of tape or an elastic band. Use the mark as a visual reference, not a precise measure of volume.

3. Heat the oven and divide the dough

As the rise nears completion, heat the oven to 450°F / 230°C. If baking both trays together, position one rack in the upper-middle and one in the lower-middle of the oven.

Fill the wide pot with the 1.9 L / 8 cups water for the bath and begin heating it, but don’t add the baking soda yet. Prepare two baking sheets with silicone mats or parchment rated for 450°F / 230°C; lightly oil the parchment.

Turn out the risen dough, gently press away any obvious large gas pockets, and divide into 8 equal pieces of about 110 g / 3.9 oz each.

4. Roll and shape

Roll each portion first to 12–14 inches / 30–36 cm. Work through all eight, then return to the first and finish it at 25–27 inches / 64–69 cm, about ½ inch / 1.3 cm thick.

Treat those dimensions as a target, not a ruler test. What matters is a rope long and slender enough to leave generous openings, without thin weak spots that will bake much faster than the rest.

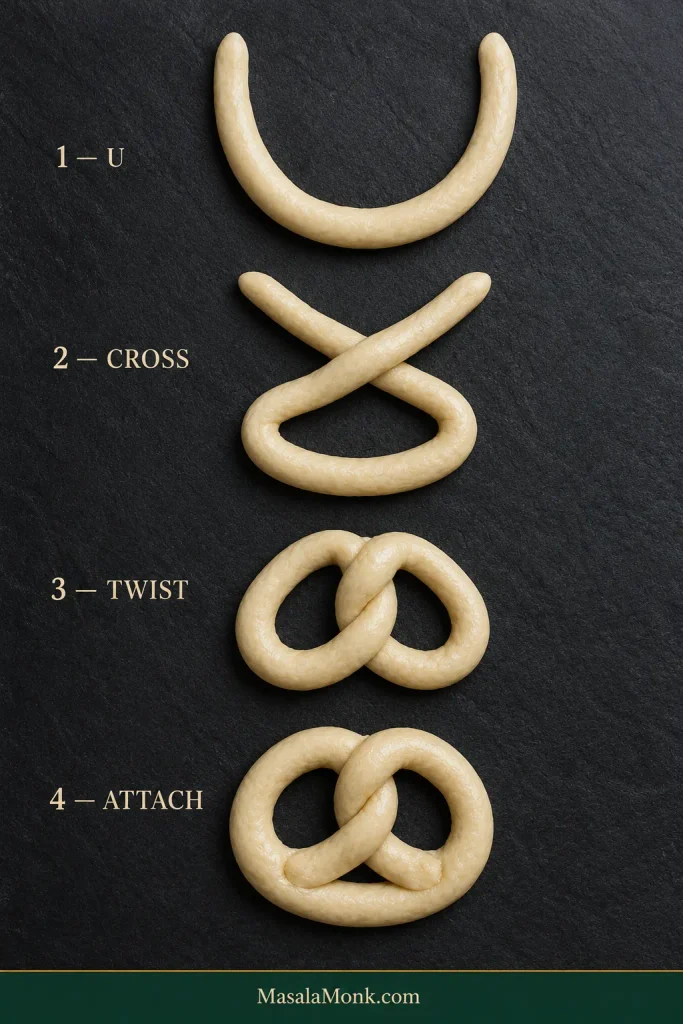
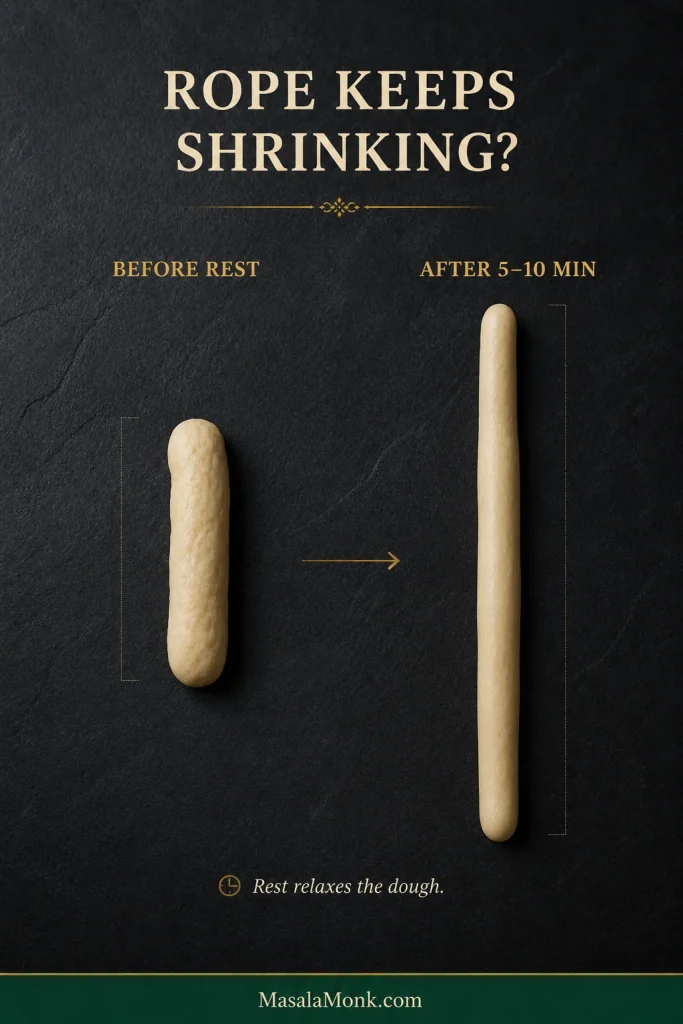
A rope that keeps shrinking needs another 5 minutes of rest. Shape it into a wide U, cross the ends, twist once, then bring them down onto the lower curve and press firmly.

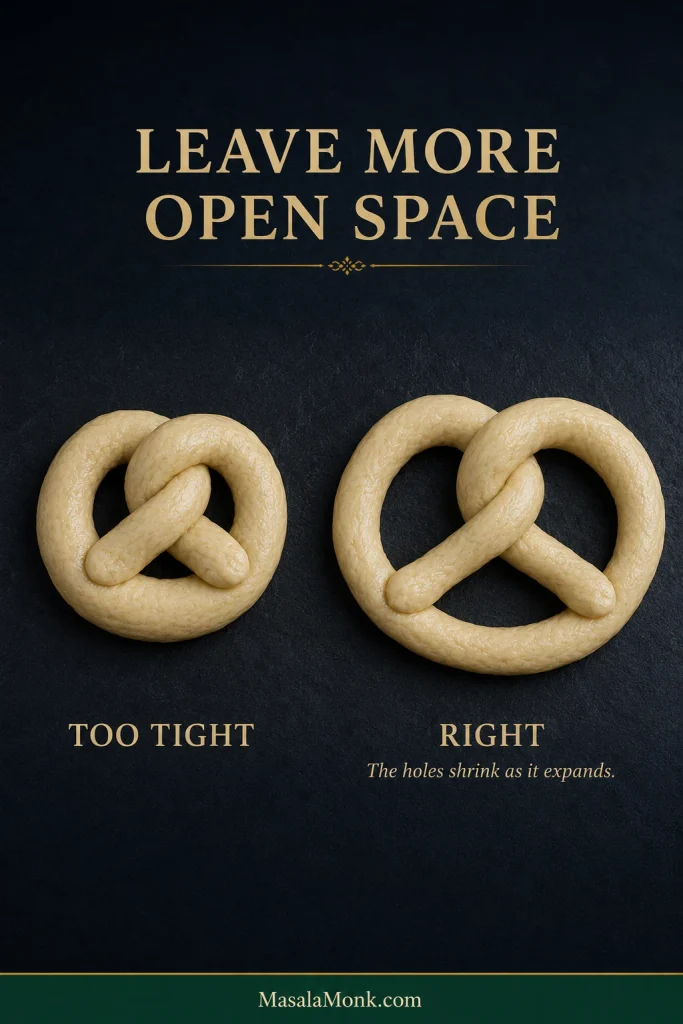
Keep the openings larger than you think you need; they shrink as the pretzel expands. Loosely cover finished shapes while you work through the batch.

Step-by-step sequence showing a pretzel dough rope formed into a U, crossed, twisted once and attached to the lower curve.
After the twist, the attachment points matter. Secure the ends against the lower curve while preserving enough open space for the pretzel to expand cleanly.

5. Prepare the baking-soda bath

When the water is almost boiling, reduce the heat slightly and add the 75 g / about ⅓ cup baking soda gradually. It may foam. Bring the bath back to a gentle, controlled boil.

6. Dip, drain, and salt

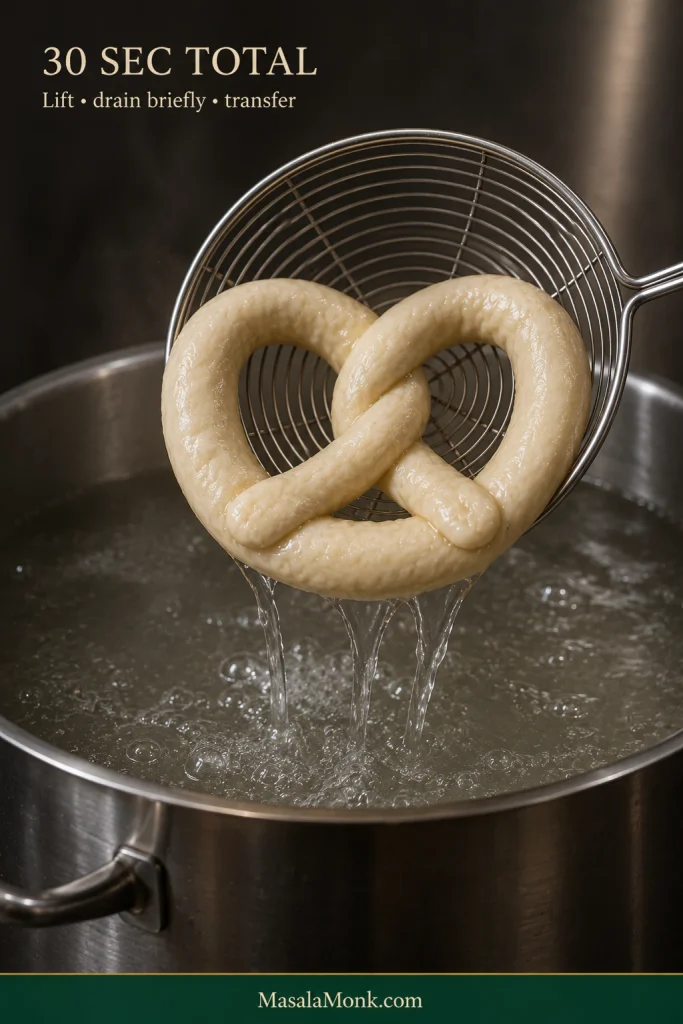
Lower 1–2 pretzels at a time into the bath and give each one 30 seconds total. If part floats above the surface, use about 15 seconds on one side, flip, then 15 seconds on the other.

Lift with a spider or broad slotted spatula, drain briefly over the pot, then transfer to the prepared sheet and add coarse salt while the surface is still damp.

A pale soft pretzel being lifted from a baking-soda bath and allowed to drain, with a damp, slightly swollen surface.
Once the pretzel leaves the bath, drainage matters too. Let excess water run off so the treated surface reaches the tray damp rather than puddled.

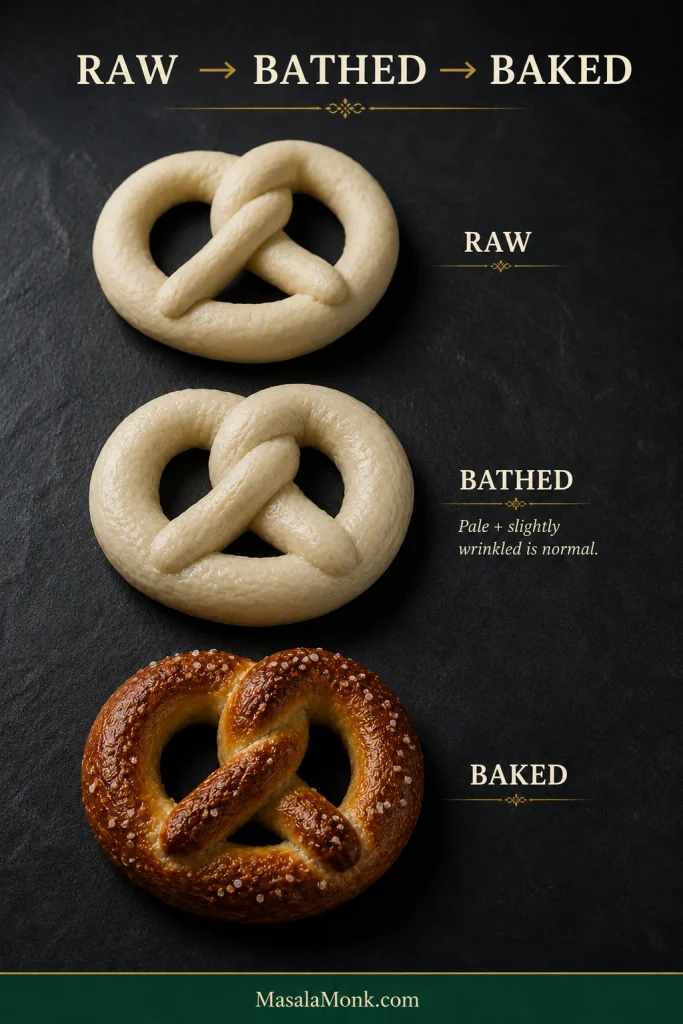
They may look puffier, wrinkled, and still surprisingly pale. Leave them alone. This is the moment ordinary-looking dough starts becoming recognizably pretzel-like; the dramatic color comes next.

7. Bake until deeply browned

Arrange 4 pretzels per tray. Start checking around 11 minutes; most batches need 11–14 minutes, although two trays can take a little longer in some ovens.

Swap the trays between the upper and lower racks and rotate them front to back only if your oven browns unevenly. Take the pretzels out when the crust is deep golden-brown with darker areas over the raised curves. Pale bread-gold is too early.

Only room for one tray? Bake four first. Keep the remaining shaped pretzels loosely covered in the refrigerator while the first tray bakes, then dip them immediately before the second tray goes into the oven.

8. Butter and serve

Brush the pretzels generously with melted butter as soon as they leave the oven.

The salt looks a little less stark once the butter hits it, the crust picks up that familiar bakery-counter sheen, and some of the butter disappears straight into the hot surface.

Give them 5 minutes, then serve.

Torn soft pretzel showing a fine-to-moderately-fine, tender interior crumb beneath a deep golden-brown salted crust.
Inside, the crumb should recover rather than shred or cling. Small-to-moderate pores signal a substantial soft pretzel instead of cottony bread or an underbaked center.

Need a deeper check? Read the dough guide ↓ · Fix shaping or springback ↓ · Back to top ↑


If something in the recipe made you hesitate, start with the section that matches it below. You don’t need to read every section before baking; the deeper guide is here for the moments when you want to understand what the dough is doing or fix something that doesn’t look quite right.
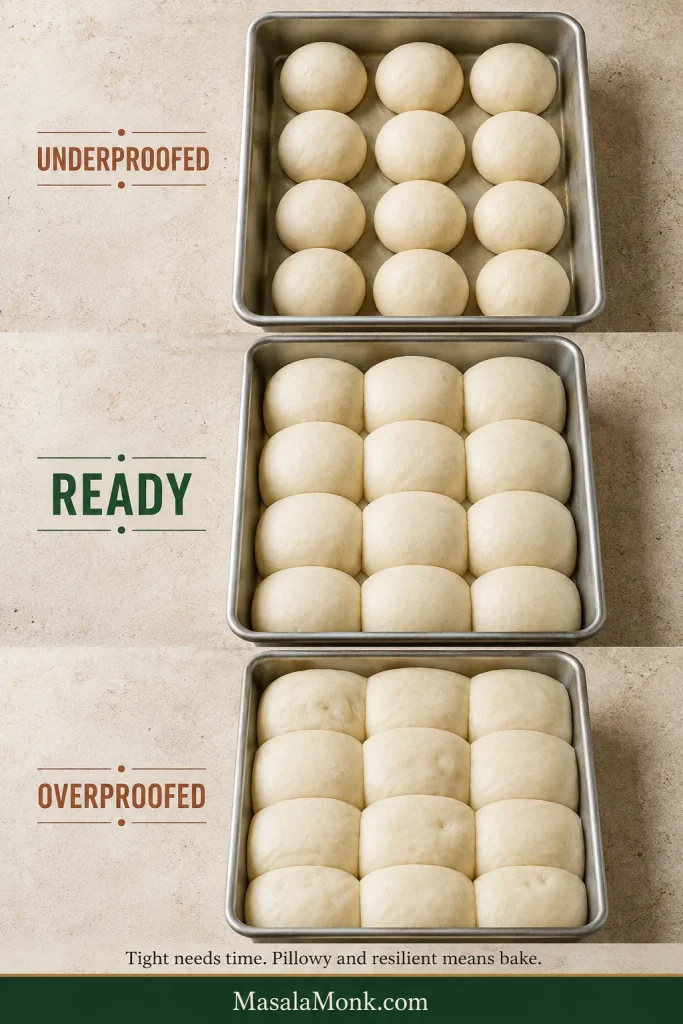
Table of Contents

What Makes a Pretzel Taste Like a Pretzel?

A pretzel should taste distinct from ordinary bread before the mustard ever touches it.

The baking-soda treatment changes the outside so it browns quickly in the oven and develops more roasted flavor and surface chew than untreated bread. The middle should still tear easily and stay tender, with enough structure that the thick curve feels like a pretzel rather than a fluffy dinner roll.

This is a buttery American soft pretzel. Bavarian lye pretzels are typically darker, firmer, and more intensely flavored.

Soft, not fluffy; chewy, not tough; buttery, not brioche-like.

Too bread-like: pale surface, very little crust chew, or an unusually fluffy center.

Right: browned exterior with a slight tug at the surface and a center that compresses when pinched, then slowly pushes back.

Too aggressive: hard or dry crust, or a noticeable mineral, bitter, or baking-soda-like flavor.

Do I need lye?

No. Traditional lye treatment can produce a darker, shinier and more intensely flavored crust, but baking soda is far simpler for a home kitchen and still gives plenty of browning and chew.

That difference matters in the oven too. A baking-soda pretzel does not need to become uniformly as dark as a lye-treated Bavarian one before it is finished.

What Each Ingredient Does

Flour

All-purpose flour gives enough strength for long ropes without making the dough unnecessarily resistant. Weigh it if possible; an overfilled measuring cup is one of the easiest ways to turn a soft batch dry and stubborn.

After kneading, the ball should still yield easily when you press your palm into it. That softness makes the long ropes easier to roll later.

Warm Water and Yeast

Start with 315 ml / 1⅓ cups water and keep another 10 ml / 2 teaspoons in reserve. Flour absorption varies, so the final splash goes in only if the dough still feels too firm after kneading.

Salt bread uses a similar reserve-water approach: give the flour time to hydrate and the gluten time to develop before deciding that the mixture needs correcting.

The water should feel comfortably warm, around 100–110°F / 38–43°C. If it feels genuinely hot to your hand, let it cool.

Instant yeast goes straight into the mixture. If you have active dry yeast, use the same 7 g / 2¼ teaspoons; dissolve it in the warm water with the sugar first and allow the rise a little more time if needed.

There isn’t a direct substitute for yeast in this dough. No-yeast pretzels use a different leavening system and behave differently enough to be treated as a separate recipe.

Sugar, Butter and Salt

Eighteen grams rounds the flavor and supports browning without making the pretzels noticeably sweet. Granulated sugar can replace it at the same weight.
A small amount in the dough keeps the bite tender. Most of the obvious butter flavor comes later, when melted butter hits the crust straight from the oven.

Unsalted butter gives the most predictable seasoning, but salted butter will still work. Because brands vary and the amount used in the dough is small, keep the fine salt as written and simply avoid going too heavy with the coarse finishing salt.
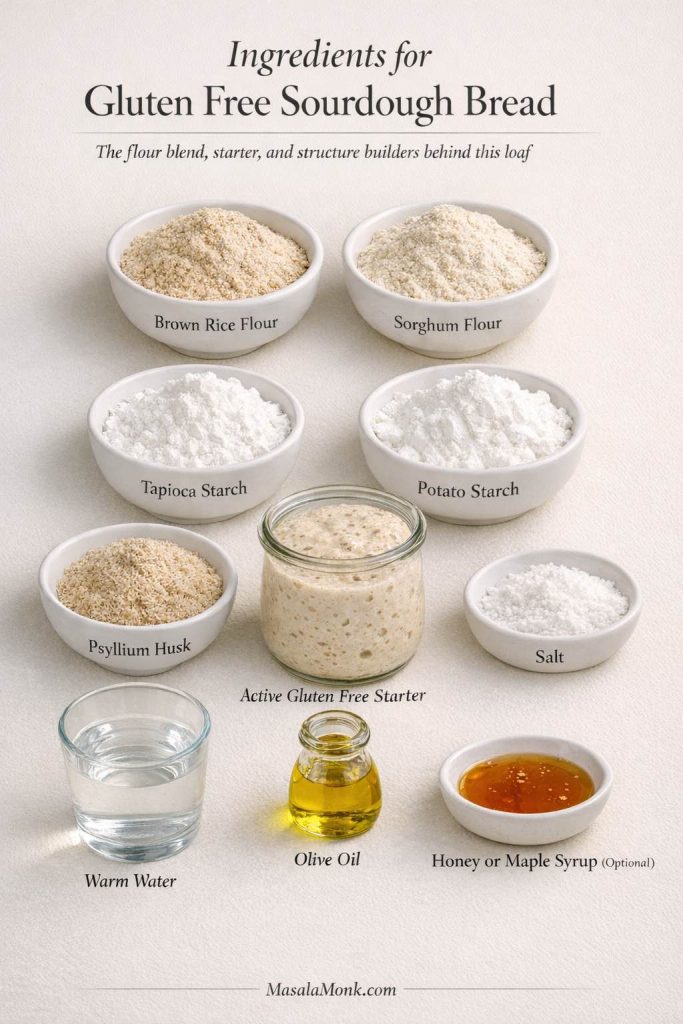
Fine salt disperses through the dough. Pretzel salt or coarse sea salt belongs on the damp surface after the soda bath.
If you’re deliberately baking part of the batch for the freezer, leave those pretzels unsalted. Large crystals attract moisture during storage and can partly dissolve into the crust.

Freezing part of the batch? Jump to the freezer guide →

Baking Soda

The bath needs baking soda. Baking powder is formulated differently and will not create the same surface treatment.

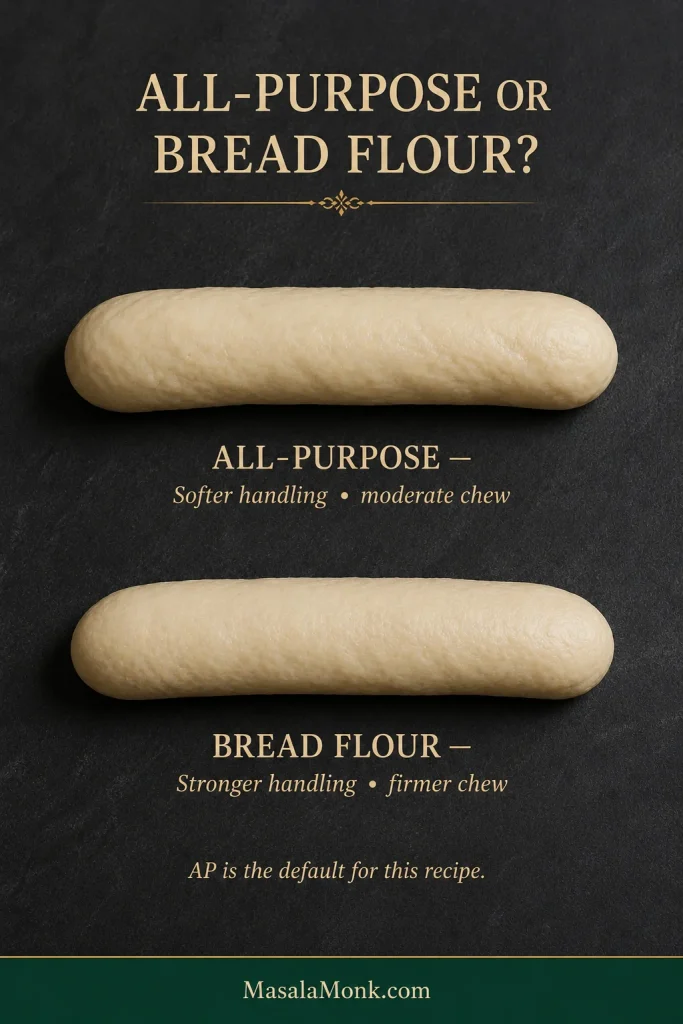
All-Purpose Flour or Bread Flour?

All-purpose flour makes a softer pretzel that is easier to roll; bread flour produces a stronger dough and a chewier finished bite.

FlourHow it handlesFinished pretzel
All-purposeSofter, easier to stretchTender middle, moderate chew
Bread flourStronger, more resistantFirmer, chewier bite
Two pretzel dough portions comparing the slightly softer appearance of all-purpose flour dough with the somewhat more taut appearance of bread-flour dough.
Choose bread flour because you want a firmer chew—not because a batch feels sticky. Stickiness is better diagnosed through kneading and hydration than by changing flour mid-recipe.

Cake flour isn’t a good direct substitute here; its lower protein makes it harder to build the structure needed for long ropes. Whole-wheat and gluten-free flours change the dough enough that they are not simple 1:1 swaps.

Read the Dough Before You Add More Flour

Why is my pretzel dough so sticky?

Pretzel dough should be soft and lightly tacky, but it should hold itself together and leave your fingertip mostly clean. Rest and knead it fully before reaching for more flour.

Freshly mixed dough often looks wetter than it will ten minutes later. The flour keeps absorbing water during the rest, while kneading builds enough strength for the shaggy mixture to become smooth and elastic.

When the balance is right, press it with a finger and the surface should give easily, then slowly rebound without smearing.

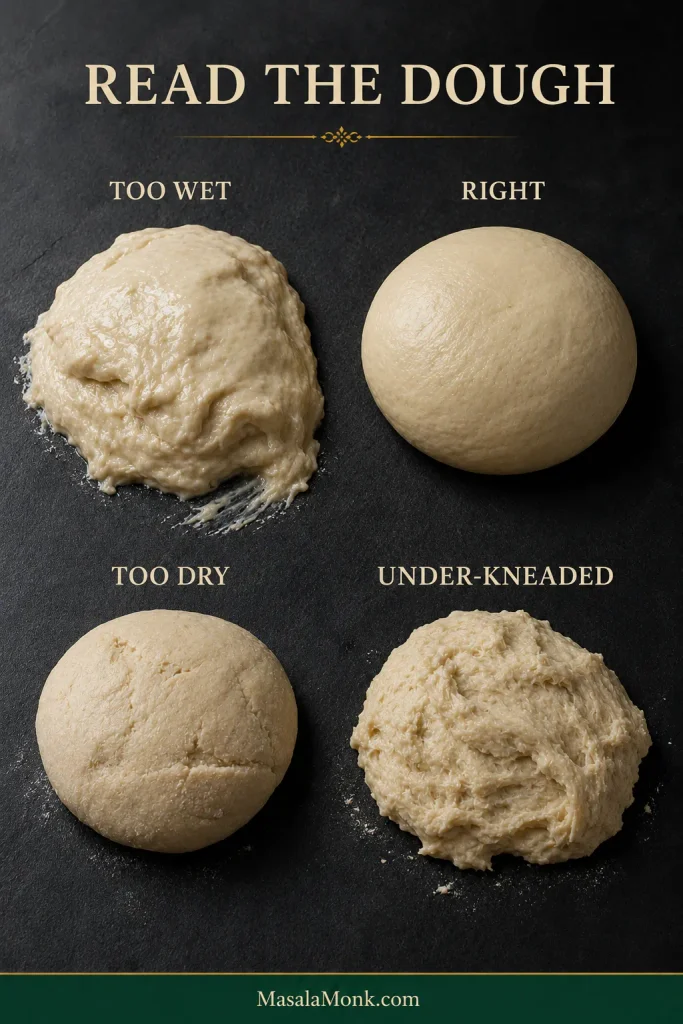
Dough stateWhat it feels likeWhat to do
Too wetSmears heavily, coats fingers, struggles to hold itselfKnead fully first; then add flour 1 tbsp at a time if needed
RightSmooth, elastic, lightly tacky; fingertip releases mostly cleanStop adjusting
Too dryStiff, rough, resistant; tears instead of stretchingAdd reserved water 1 tsp at a time
Under-kneadedShaggy, uneven, quick to tearKeep kneading before changing hydration
Four pretzel dough states labeled too wet, right, too dry and under-kneaded, showing smearing, smooth elastic, stiff and rough undeveloped dough.
Diagnose soft pretzel dough after it has actually been kneaded. Before then, rough under-developed dough can easily be mistaken for a hydration problem.

How do you know when kneading is finished?

The ball should look smoother, feel elastic, and stretch noticeably farther before it tears. A flawless bakery-style windowpane isn’t required.

Once it is smooth, stretchy, lightly tacky, and holding itself together well, move on.

How Much Should Pretzel Dough Rise?

Once the dough looks clearly puffier and substantially larger, it is ready to divide. It does not need to double.

Yeast moves faster in a warm kitchen and slower in a cool one, so use 45–60 minutes as a guide and let the dough’s appearance make the final call.

Lift the cover and the compact ball you left behind should now look softer, rounder, and noticeably fuller in the bowl. You’re building the soft middle here; the distinctive pretzel crust comes later in the bath and oven.

If you’re unsure how much it has grown, a piece of tape or elastic band marking the starting height makes the change much easier to see.

Letting the dough go much farther makes long ropes harder to control and can leave the finished middle fluffier than intended.

Making the dough tonight? See the overnight method →

Pretzel dough at the beginning and end of its rise, with the ready dough visibly expanded and puffier throughout the bowl.
Watch the whole mass, not just the top of the dough. Useful fermentation shows as broader expansion and a softer, airier look throughout the bowl.

Why Rope Length Changes the Finished Pretzel

For a 110 g pretzel, aim for a rope 25–27 inches / 64–69 cm long and about ½ inch / 1.3 cm thick.

Use those dimensions as practical targets. The amount of dough, rope length, and size of the openings need to work together.

A small portion stretched to 26 inches becomes thin; a heavier piece can remain thick enough to close its own holes as it expands.

That combination keeps the loops open while leaving enough dough through the curves for a substantial soft center.

A pretzel dough portion weighing about 110 grams beside a long, evenly rolled rope illustrating the amount of dough used for one pretzel.
Consistent portions remove one shaping variable. When every piece starts around the same size, an unusually stubborn rope is easier to recognize as tension rather than a portioning problem.

How to Roll the Dough Without Fighting It

Why does the rope keep shrinking?

If the rope keeps springing shorter, stop rolling and let it rest for 5–10 minutes. Tight gluten needs time, not more force.

The same amount of pretzel dough before and after resting, with the unrested rope shorter and thicker and the rested rope longer and smoother.
Springback is tension, not a request for more flour or harder rolling. A rope that repeatedly retracts is telling you the gluten needs to relax.

Take every portion to 12–14 inches / 30–36 cm before trying to make any one rope full length. By the time you return to the first piece, it should feel noticeably less springy and much easier to stretch.

Pizza dough behaves much the same way when it tightens during stretching: a short rest fixes what more pulling usually makes worse.

Roll evenly on a mostly bare counter

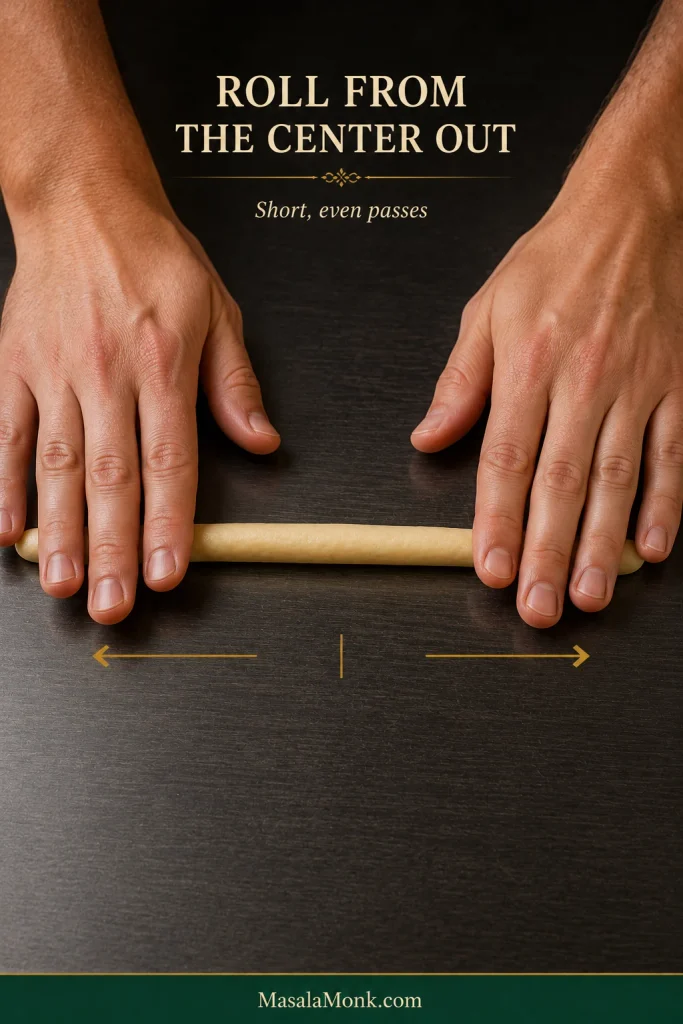
Place both palms near the middle and roll outward in short passes, gradually moving your hands toward the ends. Lengthen the whole rope a little at a time; concentrating pressure on one stubborn spot can make it skinny.

Slightly tapered ends are fine. What you want to avoid is a rope with thick bulges separated by paper-thin sections.

A heavily floured counter makes the rope skid beneath your palms. Keep the work surface mostly bare so the dough has enough grip to lengthen; if it starts sliding, wipe away loose flour and lightly dampen your hands.

Two hands rolling a long pretzel dough rope from its center toward the ends on a mostly bare dark work surface.
If the rope skates instead of lengthening, think traction before flour. Even outward pressure works best when the dough can gently grip the counter.

Keep the openings generous

This is one of those moments when the raw pretzel should look slightly wrong. Leave more open space than you think you need because the dough swells in the bath and again in the oven.

What looks almost comically open on the counter becomes much more familiar after baking.

Your first pretzel may be the least photogenic one on the tray. By number three or four, your hands usually understand the twist better than your brain does. That’s when shaping starts becoming fun.

Two raw pretzels comparing a compact shape with small openings to a correctly shaped pretzel with broad open spaces.
Empty space is part of the pretzel shape. Generous raw openings give the swelling curves somewhere to expand instead of closing into a tight knot.

The Baking-Soda Bath

How long should the pretzels stay in the bath?

For this recipe, give each pretzel 30 seconds total. Keep that timing tied to the stated ratio of 75 g baking soda in 1.9 L / 8 cups water.

Baking soda being added gradually to a wide stainless-steel pot of hot water, with a digital scale displaying 75 grams.
Keep the baking-soda bath controlled rather than violent. Gradual addition and a roomy pot make the inevitable fizz easier to manage around delicate shaped pretzels.

Need less bath liquid? Keep roughly the same concentration—about 40 g baking soda per liter of water—and use enough solution for the pretzel to float freely without folding against the pot or becoming crowded. Flip it if the upper surface remains exposed.

The first bath can look dramatic, but once the pot and timer are ready, it is one of the quickest parts of the whole recipe.

What the bath actually does

The alkaline bath changes the outside of the dough so it browns faster and develops a chewier skin. Skip it and the result moves much closer to ordinary bread tied into a pretzel shape.

This is the moment the recipe stops behaving quite like ordinary bread. The dough may still look pale when it comes out of the water, but the treated surface is now ready for the rapid browning that happens in the oven.

Three pretzels showing the progression from pale raw dough to a pale, damp, slightly swollen bathed pretzel and a deep golden-brown baked pretzel.
Compare texture and expansion as well as color. The bathed pretzel changes only modestly; the oven is where the major puffing and browning finally happen.

Something went wrong in the bath? Go straight to the shaping and bath fixes →

Thirty seconds is enough for this particular bath. Leaving the pretzels in much longer can make the surface gummy or tough and may introduce an unpleasant mineral or baking-soda taste.

The soda bath already does the important browning work. Egg wash can add more shine, but it isn’t necessary here, and the hot butter supplies plenty of gloss afterward.

Bake for Color, Not Just Time

At 450°F / 230°C, start checking around 11 minutes; most batches take 11–14 minutes.

For the first few minutes they mostly puff. Then the color catches up quickly, and the smell changes with it.

The timer gets you to the window. The crust tells you when to stop.

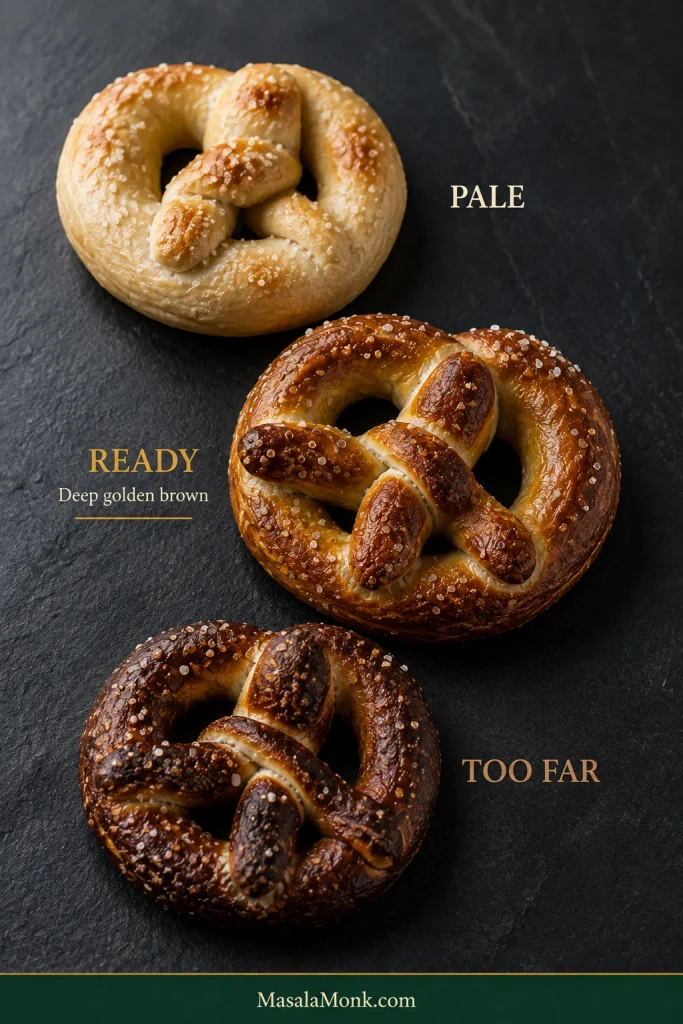
Too pale: beige or light bread-gold. Give them more time.

Ready: deep golden-brown with darker color over the raised curves. The surface should tug slightly against your teeth before the soft middle gives way.

Too far: very dark thin areas, a dry-feeling crust, or an underside beginning to scorch.

Three baked soft pretzels comparing pale, properly browned and overly dark crust stages.
Before pulling the tray, check more than the prettiest curve. The thick center should be richly browned without the thinner tips or underside beginning to scorch.

Bottoms darkening well before the tops usually means the pan or rack is giving them too much heat from below. A lighter sheet pan, a slightly higher rack, or stacking the loaded sheet over a second empty pan can help.

Need another baking fix? Jump to baking and storage troubleshooting →

An optional temperature check

Color is the better everyday guide. If the crust looks right but you’re worried about the thickest section being underbaked, an instant-read thermometer will generally land around 195–200°F / 91–93°C.

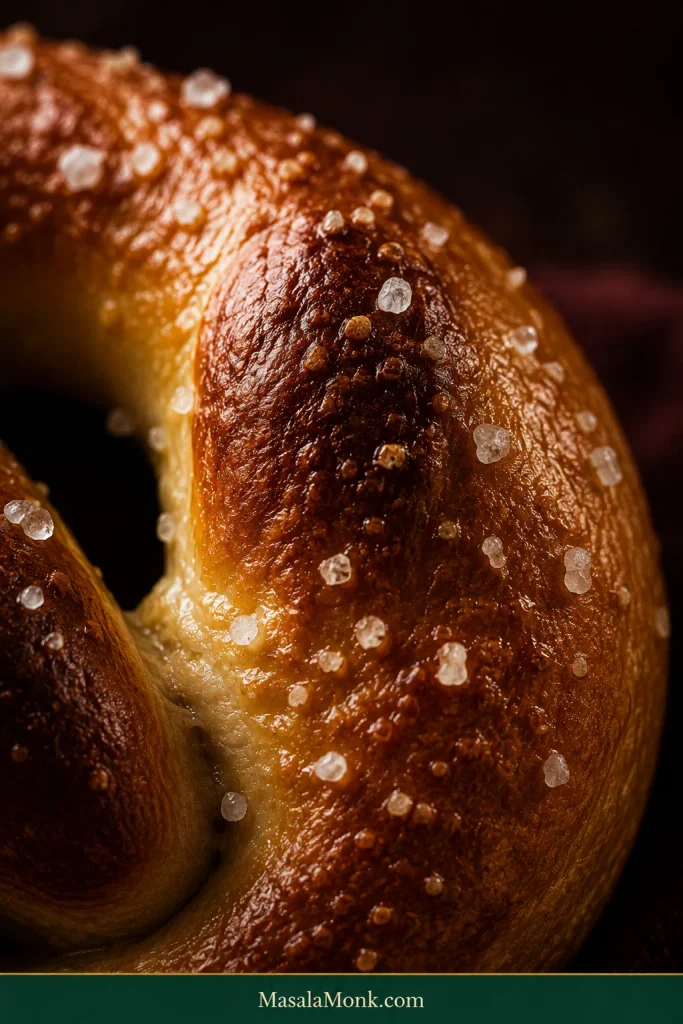
Once the overall color looks right, look more closely at the surface. A good soft-pretzel crust can show small blisters and natural tonal variation rather than a perfectly smooth shell.

Extreme close-up of a soft pretzel crust with deep golden browning, darker raised areas, coarse salt and small natural surface blisters.
Tiny blisters and uneven browning are welcome handmade texture. The target crust looks thin and chewy—not perfectly smooth, lacquered or uniformly dark.

Troubleshooting: What Went Wrong?

Most imperfect batches are still very edible. Start with the result you can see and change one thing next time; one imperfect detail rarely means the whole recipe failed.

Dough & Rise

What happenedMost likely causeTry this
Dough smears everywhereToo wet or not kneaded enoughFinish the rest and knead before adding flour
Dough feels stiffToo much flour or too little waterAdd reserved water gradually
Dough rises very slowlyCool room or sluggish but active yeastGive it more time in a comfortably warm spot
Dough shows no riseInactive yeast or water that was too hotStart again with fresh yeast and comfortably warm water
Dense and dryToo much flour or excessive bakingKeep the dough softer or shorten the bake
Dense and gummyUnderbaked centerBake longer

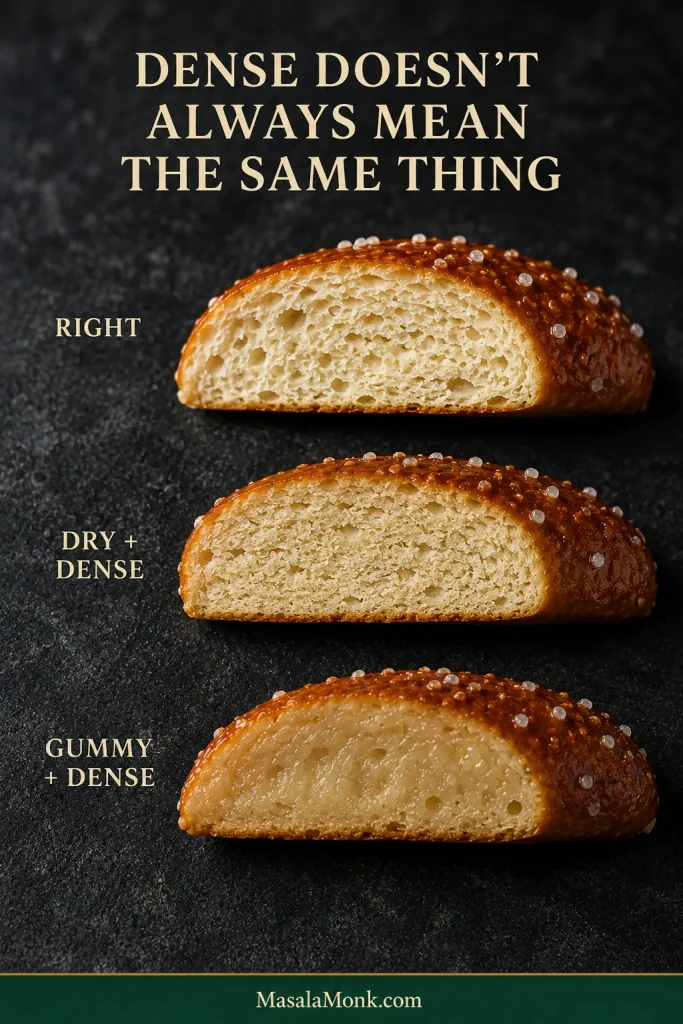
Dry density and gummy density are different problems. A tight, dry crumb points toward too much flour or too much oven time. A moist, tacky center usually means the pretzel simply needed longer to bake.

Three soft pretzel cross-sections labeled right, dry and dense, and gummy and dense, showing tender, dry compact and damp compressed crumbs.
Two pretzels can both feel “dense” for opposite reasons. The cross-section helps separate a moisture-starved crumb from one that simply needed more baking.

Rolling, Shaping & Bath

What happenedMost likely causeTry this
Rope keeps shrinkingGluten is tightRest another 5–10 minutes
Rope slides under your handsToo much flour on the counterRemove loose flour and lightly dampen palms
Rope gets thin in random spotsToo much pressure in one areaRoll outward in short, even passes
Holes disappearRope too short or openings too smallRoll longer and shape more openly
Ends come looseWeak sealDab with water and press firmly
Pretzel goes limp in the bathOverproofing or weak structureStop the first rise earlier and make sure the dough is fully kneaded
Shape distorts while liftingHandling issueUse a broad spider or slotted spatula
Slight wrinkles after bathUsually normalDon’t reshape; bake as usual
Surface feels gummyToo much bath time or poor drainingKeep to 30 seconds and drain briefly
Mineral or bitter tasteToo much soda exposureUse the measured ratio and timing

Baking & Storage

What happenedMost likely causeTry this
Pale and bread-likeIncomplete bath or not enough browningUse the full dip and bake beyond pale bread-gold
Nicely browned but very fluffy insideToo much proofing or overly thick ropesStop the rise earlier and roll longer
Bottom burns before top brownsDark pan, low rack, or strong bottom heatMove higher or use a lighter/doubled sheet pan
Crust is very toughOverbaking or too much bath exposureCheck oven time and 30-second dip
Pretzels stick to parchmentUntreated paper under wet doughUse a silicone mat rated for 450°F / 230°C or lightly oil parchment
Coarse salt becomes wet laterSalt pulled moisture to the surfaceFor planned storage or freezing, leave coarse salt off; already-salted leftovers can still be frozen

If the pretzel browned well, tasted good, and simply came out a little lopsided, that’s a shaping problem—not a bad batch.

Back to recipe ↑ · Store, freeze and reheat ↓

Make Ahead, Store, Freeze and Reheat

Soft pretzels are at their best fresh from the oven, but you don’t have to arrange your whole day around that moment. The easiest make-ahead route is to bake the pretzels first and freeze them; overnight dough works too, but its next-day timing depends on how much fermentation happened in the refrigerator.

Make the dough the night before

After kneading, place the dough in a lightly greased covered bowl and refrigerate overnight. The goal is an overnight rest rather than an extended cold ferment.
The next day, divide and shape while still cool, or let the dough sit briefly at room temperature first if it feels too firm to roll comfortably.

After shaping, let the pretzels lose some of their refrigerator chill and relax slightly before dipping. Don’t wait for a pronounced second rise; once the dough is easy to handle and the shapes are no longer fridge-cold, move on to the bath.

Storing baked pretzels

Store completely cooled pretzels airtight at room temperature for up to 3 days. The crust softens during storage, so reheating gives a much better result than eating one cold the next day.

For longer storage, freeze rather than refrigerate.

Freeze them baked

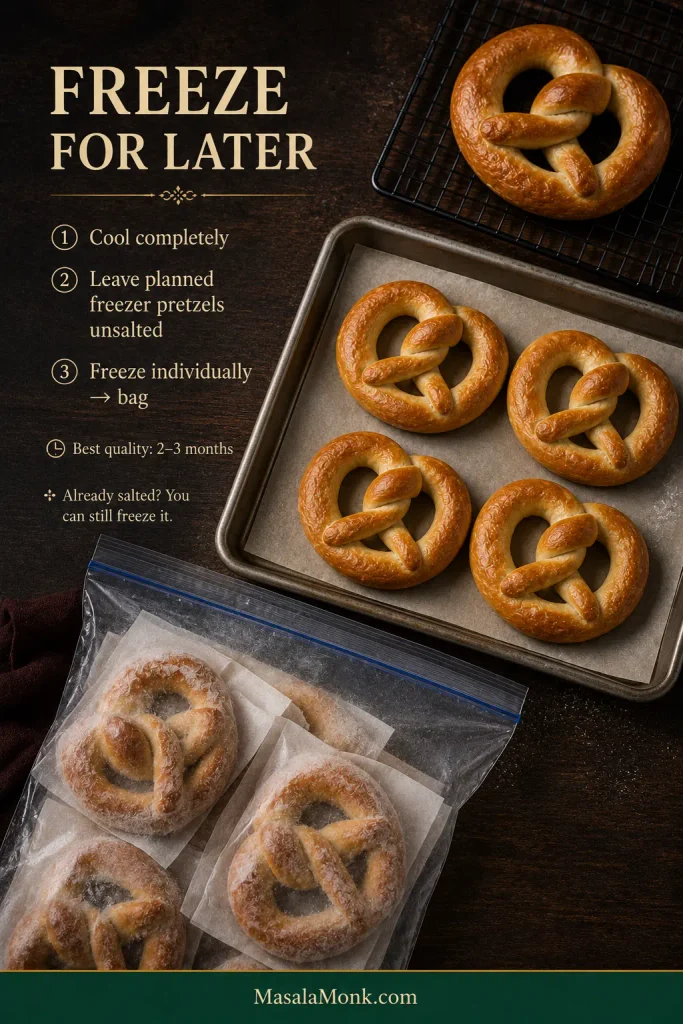
For a planned freezer batch, cool the pretzels completely and leave off the coarse salt. Freeze them individually until firm, then transfer to a freezer-safe bag or container. Already-salted leftovers can still be frozen, although some salt crystals may soften or partly dissolve. For best quality, use within 2–3 months.

Unsalted baked soft pretzels shown cooling, freezing separately on a tray and then stored together in a freezer-safe bag.
Freezing individually preserves shape and gives you options later. Once firm, the pretzels can share a bag while still coming apart one at a time.

How to reheat soft pretzels

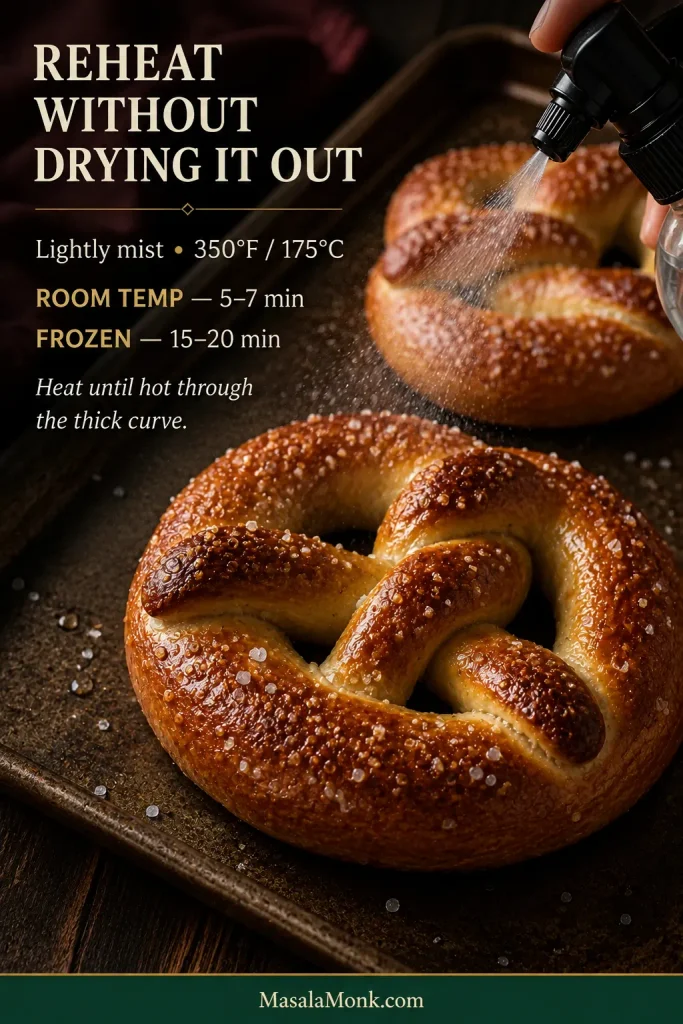
For a room-temperature pretzel, a 350°F / 175°C oven for 5–7 minutes gives the best balance of soft center and revived crust. Lightly mist or brush a dry surface with water first.

From frozen, lightly mist the surface, add fresh coarse salt if the pretzel was frozen unsalted, and heat at 350°F / 175°C for 15–20 minutes, until hot through the center.

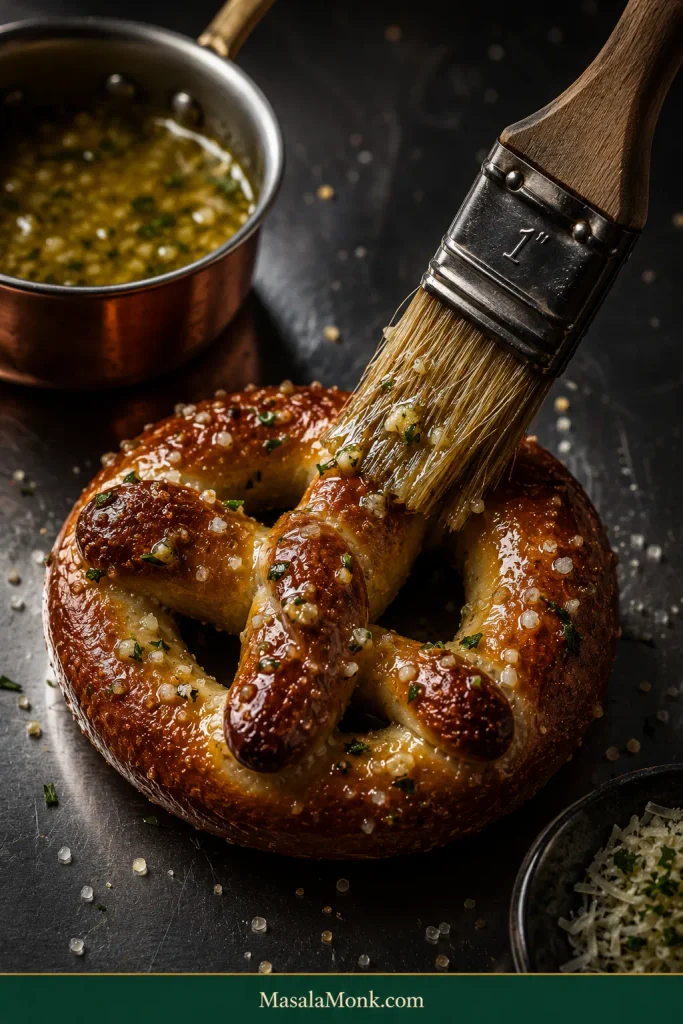
Golden soft pretzels on a dark baking tray being lightly misted with water before reheating, with oven temperature and timings printed beside them.
Use moderate heat so the center warms before the thinner ends turn hard.

Other reheating options

Air fryer, room-temperature pretzel: start around 325°F / 165°C and check after about 3 minutes. Air fryers vary, so check early before the thinner ends dry out.

Microwave, room-temperature pretzel: start with about 15 seconds, then add another 5–10 seconds only if needed. It is fast and soft, but you lose most of the crust.

Can I double the recipe?

The ingredient math doubles easily. Mixer capacity may not.

For an ordinary home stand mixer, two separate dough batches are more predictable than asking it to knead roughly a kilogram of flour at once.

Two Easy Finishes

Cinnamon Sugar

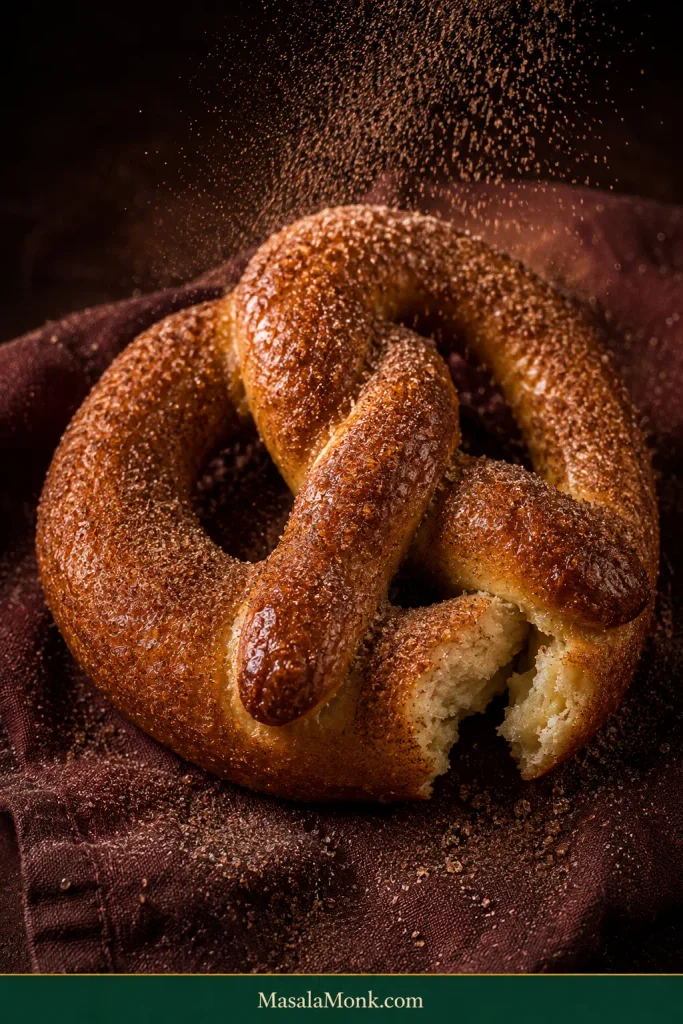
Skip the coarse salt. Brush the baked pretzel generously with butter, then coat it with cinnamon sugar while still warm.

The butter catches the sugar in a thin sandy layer instead of letting half of it fall onto the plate. Add the cinnamon sugar only after baking so it doesn’t scorch at 450°F.

Deep golden soft pretzel coated with a fine cinnamon-sugar layer as additional cinnamon sugar falls over the surface.
A cinnamon-sugar pretzel should still look like a pretzel underneath. Aim for a fine sparkling coat that complements the browned crust rather than burying it.

Garlic Butter

Mix the finishing butter with finely grated garlic or gently cooked minced garlic and brush it over the pretzel while the crust is still hot enough to absorb it. Parsley or a little finely grated Parmesan can go on afterward.

If warm bread and garlic butter is the combination you’re really after, this homemade garlic bread loaf takes that combination further.

Freshly baked soft pretzel being brushed with melted garlic butter containing small pieces of garlic and herbs.
Garlic butter works best as a thin savory finish. You want visible garlic and a warm sheen on the crust—not a pretzel saturated with butter.

What to Serve With Them

A warm salted pretzel doesn’t need much. Yellow mustard gives you the sharp, familiar version; Dijon is tangier and more assertive.

For something sweeter, honey mustard can be mixed a little thicker so it clings to the pretzel instead of running off.

If you’re firmly in the cheese-with-pretzels camp, a warm cheddar cheese sauce is hard to argue with. The creamy sauce against that salty browned crust is the whole point.

The best serving plan is simply to have people nearby when the tray comes out. Warm pretzels lose more by waiting than they gain from having a special occasion attached to them.

Freshly baked salted soft pretzels on a dark wooden tray with an exposed interior crumb, a hand reaching for a pretzel, and bowls of mustard and cheese sauce behind.
The final contrast is simple: salty browned crust outside, a warm soft center inside, and something sharp or creamy waiting at the side.

Give them five minutes, then tear into the thick curve while it is still warm. The browned skin should pull slightly before it opens, and the middle should feel soft rather than cottony. A little butter will probably end up on your fingers.

There can be mustard waiting nearby. The first pretzel rarely needs much convincing.

Posted on — Leave a comment

Soft Dinner Rolls Recipe: Fluffy, Buttery & Easy

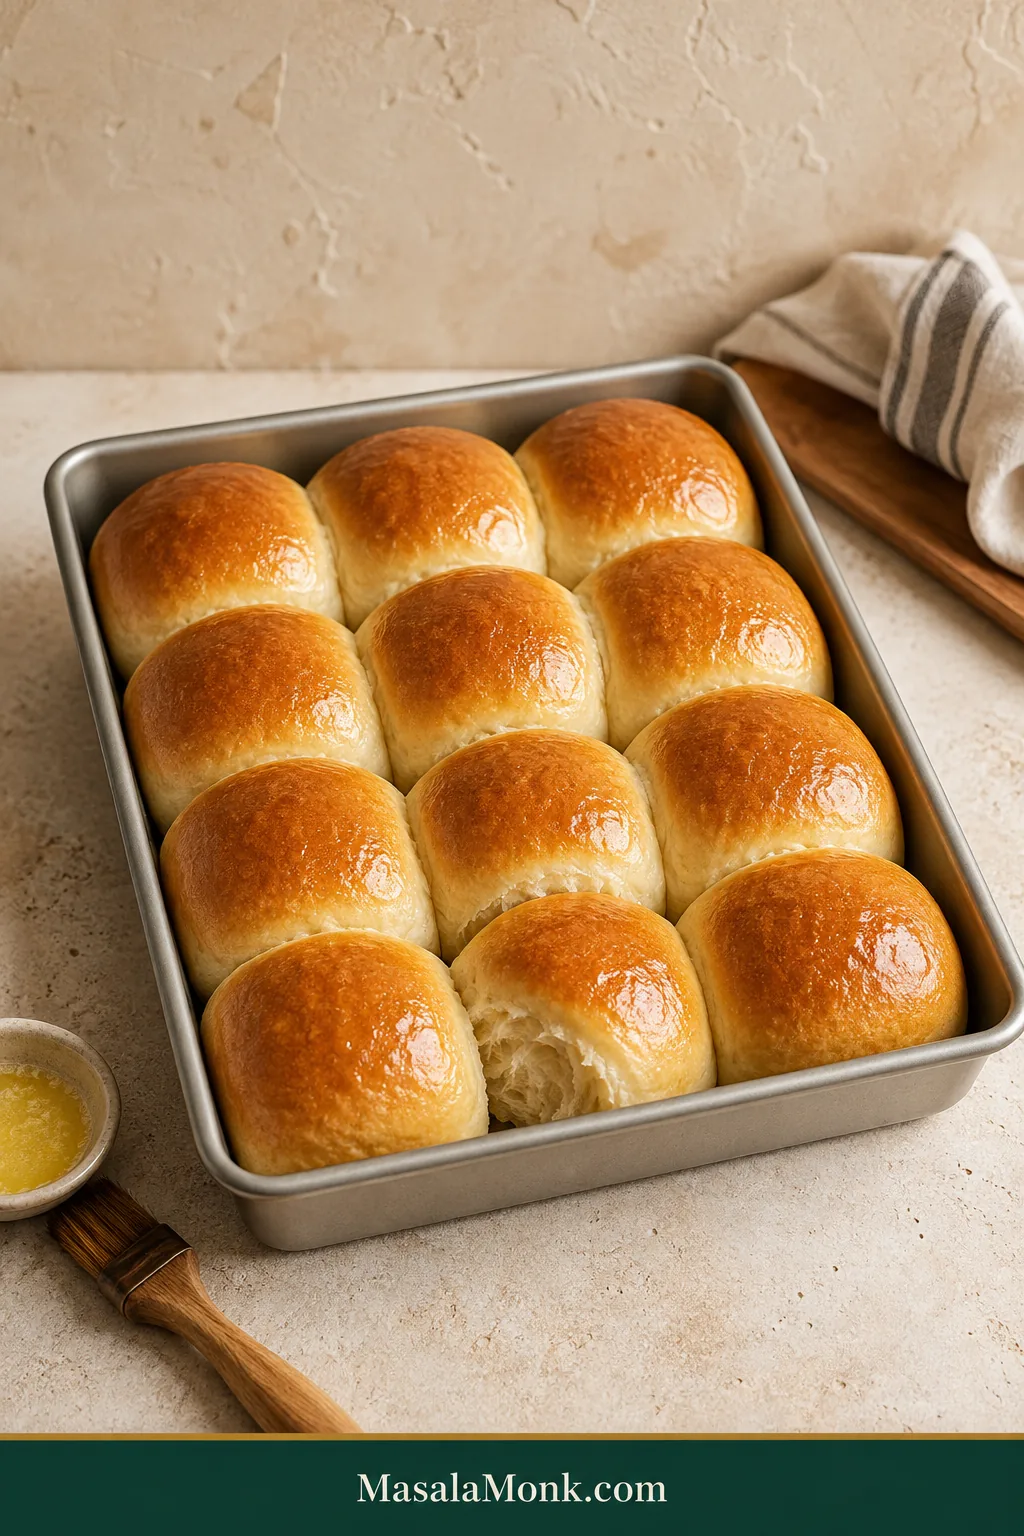
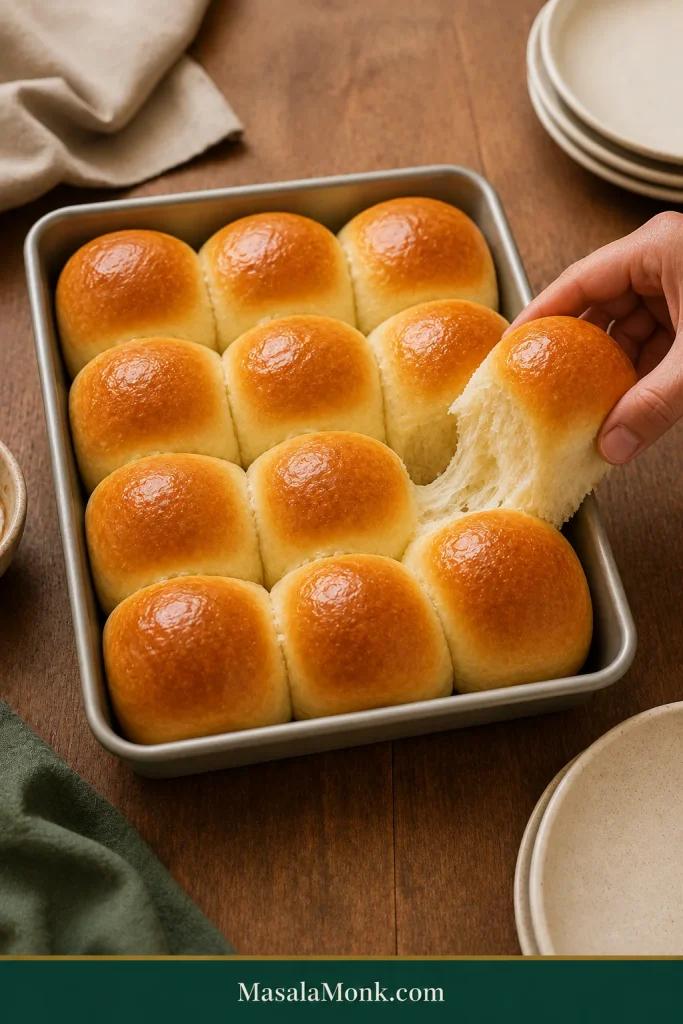
Twelve golden dinner rolls baked in four rows of three, with pale touching sides and one roll opened to show the soft interior.

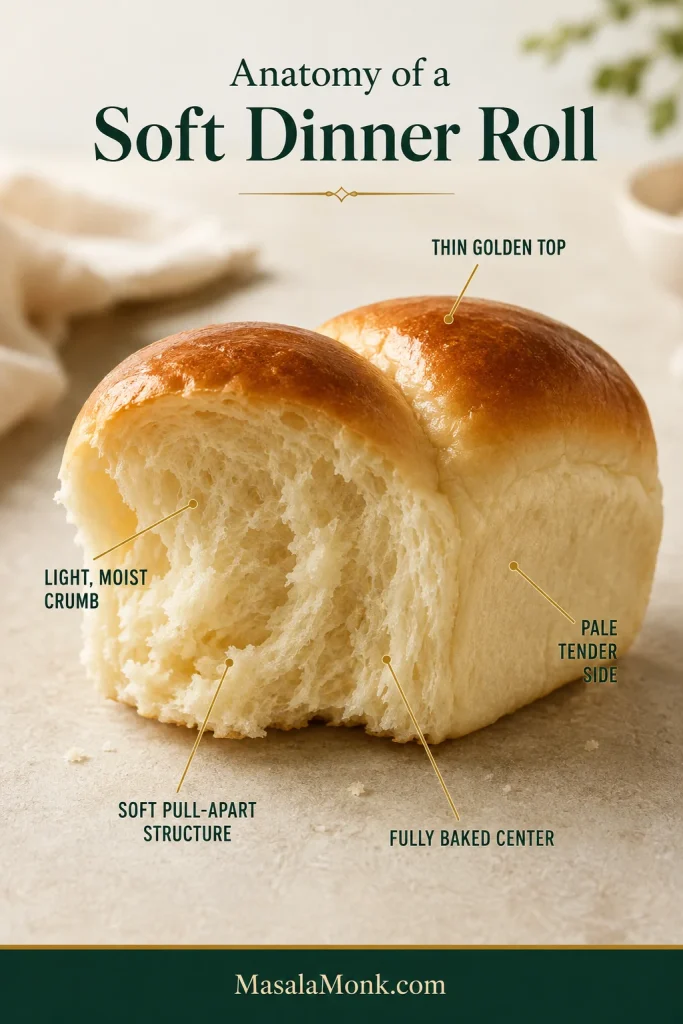
These soft dinner rolls have golden, buttery tops, pale pull-apart sides and a fluffy interior that tears into tender strands instead of feeling tight or heavy.

The dough is soft by design. If yeast rolls have turned dense on you before, the trouble may have started surprisingly early: a perfectly normal sticky dough gets enough extra flour to become comfortable to handle—and too firm to rise beautifully.

That softness is part of what gives these rolls their light, fluffy crumb. The trick is learning when sticky is perfectly normal—and when the dough genuinely needs a little more flour.

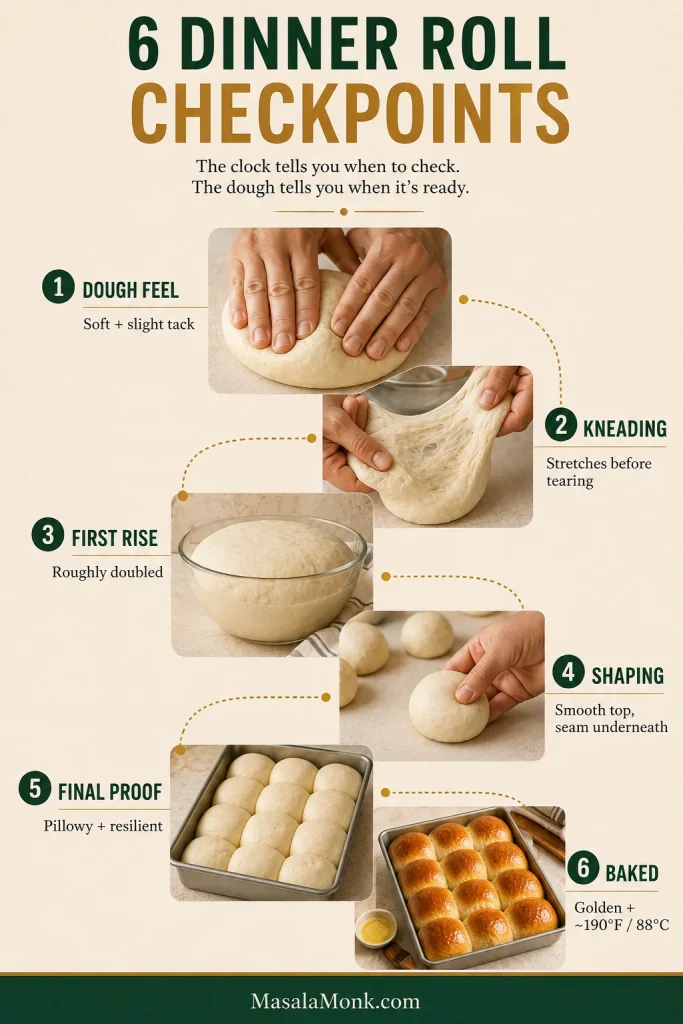
In practice, the process is simple: mix, knead, rise, shape, rise and bake. The extra detail is here for the moments when you look at the dough and wonder whether what you’re seeing is normal.

MasalaMonk rule: The clock tells you when to check; the dough tells you when it is ready.

What Makes Dinner Rolls Soft and Fluffy?

Soft dinner rolls stay light when the dough remains soft and slightly tacky, is kneaded until elastic, and gets enough time to become properly puffy during both rises.

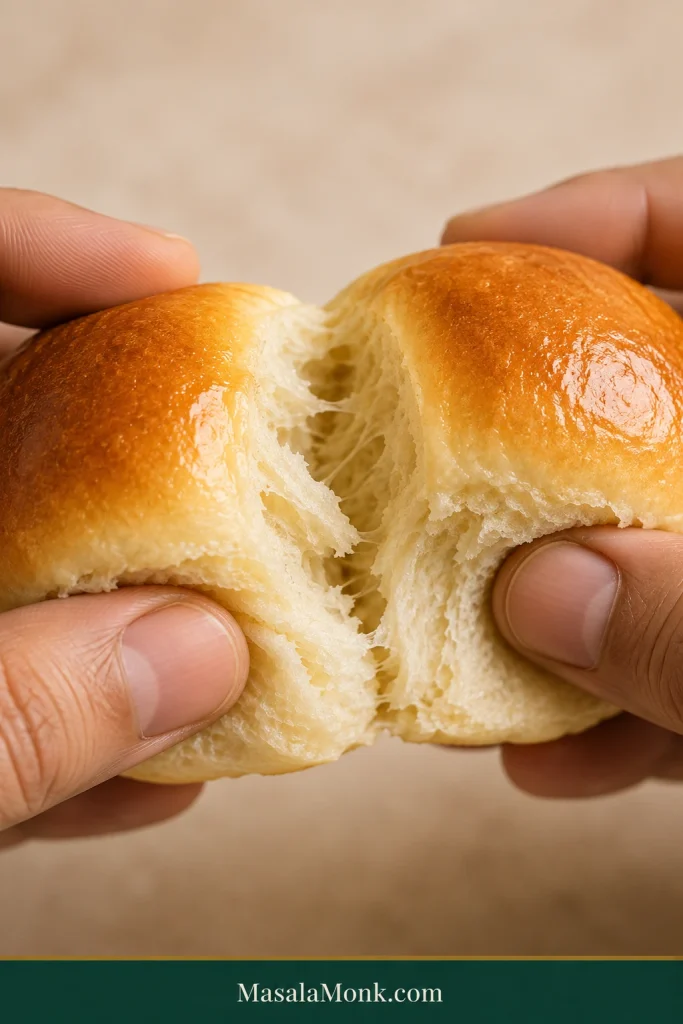
Hands pulling apart two golden dinner rolls to reveal a pale, fluffy crumb with delicate strands between them.
A fluffy dinner roll should pull into tender strands rather than crumble like cake or resist like chewy bread; that tear is one of the clearest texture checks.

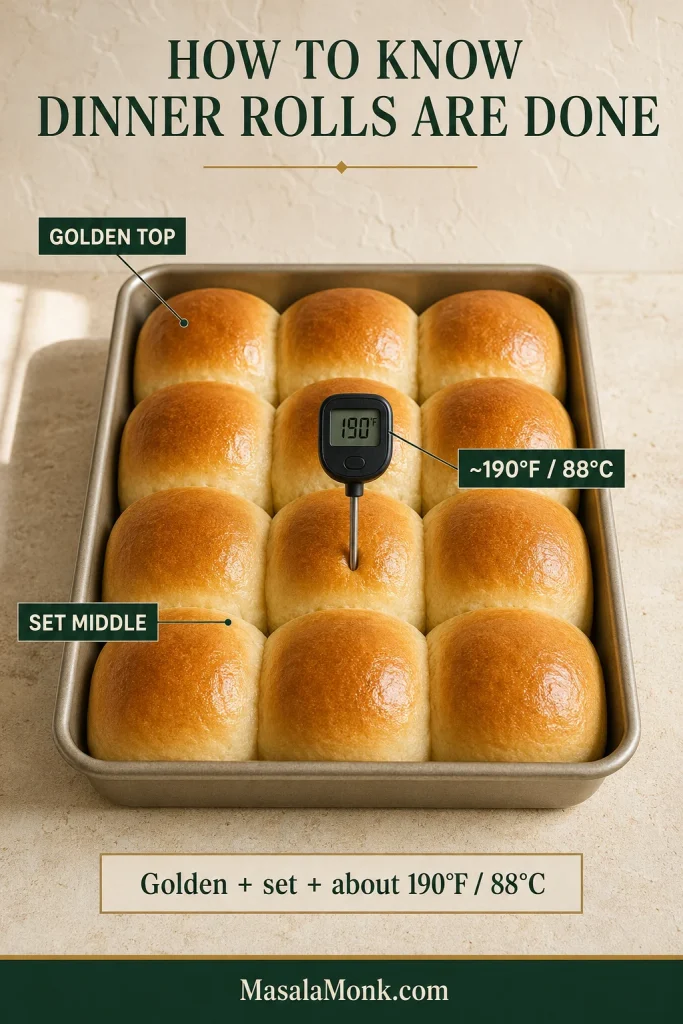
This recipe makes 12 buttery pull-apart rolls in a 9×13-inch / 23×33-cm pan. Bake at 350°F / 175°C in a conventional oven until the tops are golden and the center of a middle roll reaches about 190°F / 88°C.

Allow 2½–4 hours from start to finish. Most of that time is hands-off rising.

Jump to: Recipe · Dough Consistency · Proofing Guide · Troubleshooting

Soft, Fluffy & Buttery Dinner Rolls Recipe

Recipe at a Glance

Yield12 dinner rolls
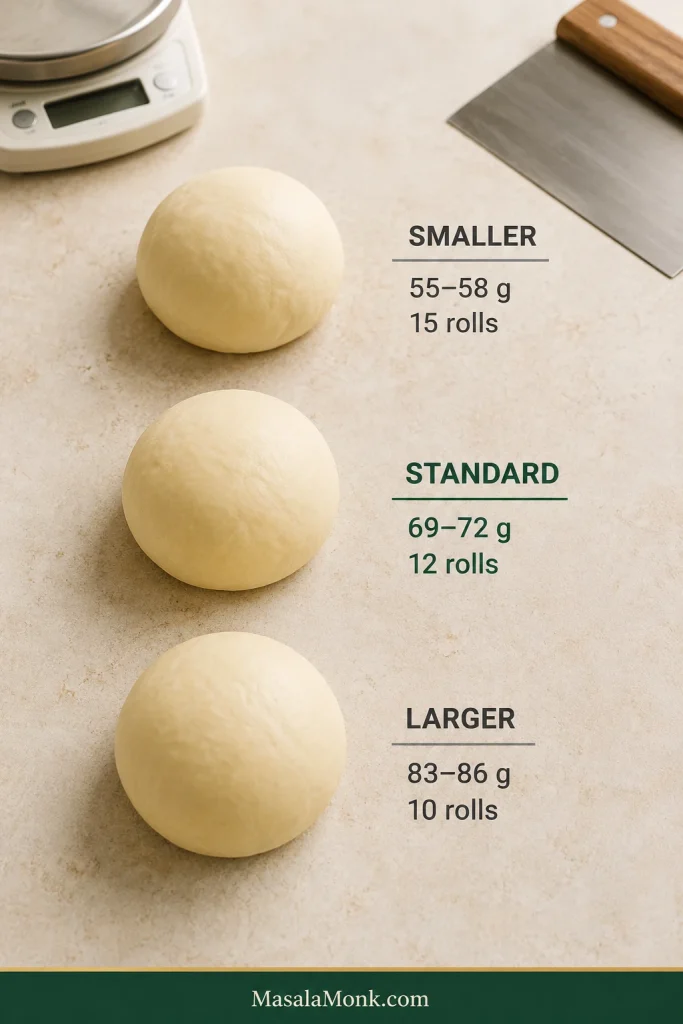
Dough per roll69–72 g / 2.4–2.5 oz
Hands-on, with mixer25–30 minutes
Hands-on, by hand35–40 minutes
First rise60–90 minutes
Final rise45–75 minutes
Bake time18–22 minutes
Total elapsed time2½–4 hours
Pan9×13-inch / 23×33-cm
Oven350°F / 175°C conventional
Stand mixer required?No
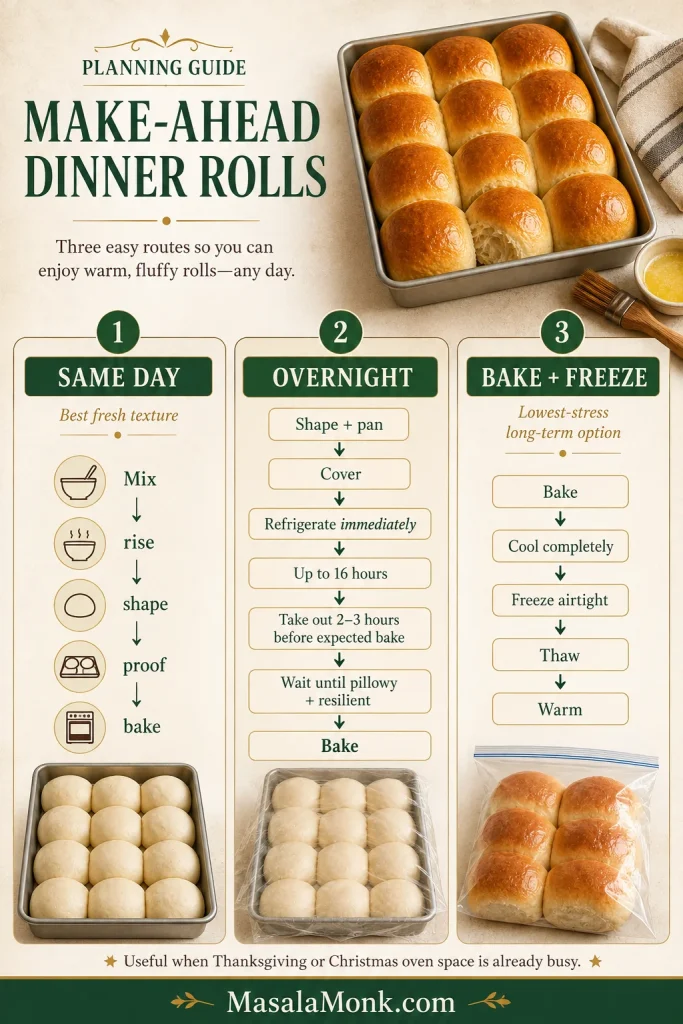
Make ahead?Yes

Equipment

  • large mixing bowl
  • stand mixer with dough hook, optional
  • digital kitchen scale, strongly recommended
  • bench scraper or flexible dough scraper
  • 9×13-inch / 23×33-cm baking pan
  • instant-read thermometer, useful but optional
  • pastry brush

Ingredients

For the dough

  • 240 ml / 1 cup whole milk, warmed to 105–110°F / 40–43°C
  • 45 g granulated sugar, about 3 tablespoons + 2 teaspoons
  • 7 g / 2¼ teaspoons instant yeast
  • 1 large egg, about 50 g without the shell
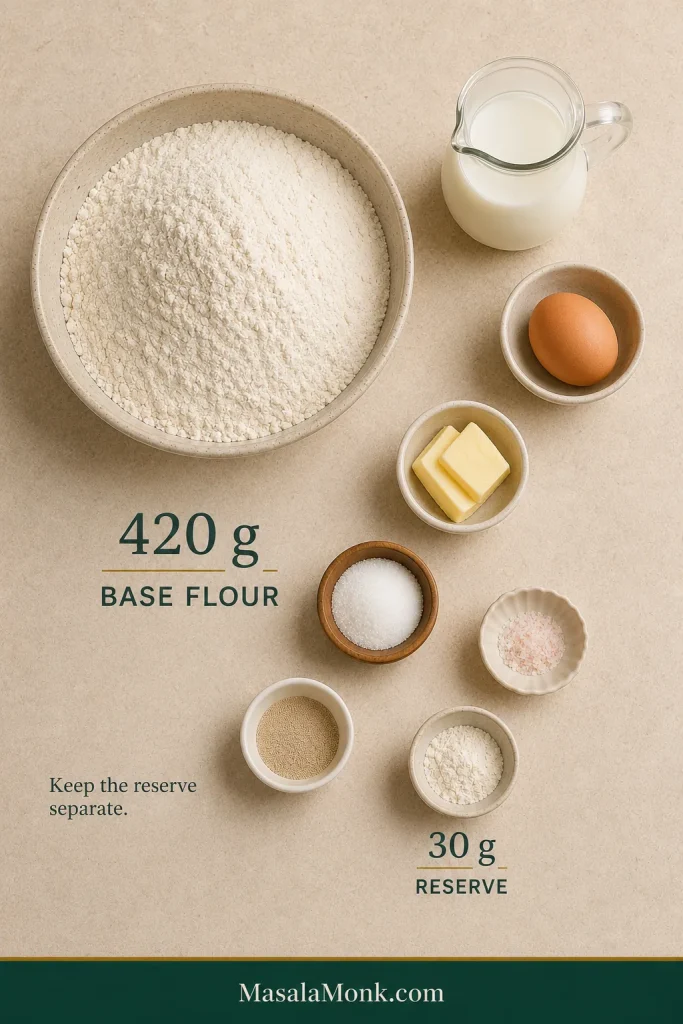
  • 420 g / about 3½ cups all-purpose flour
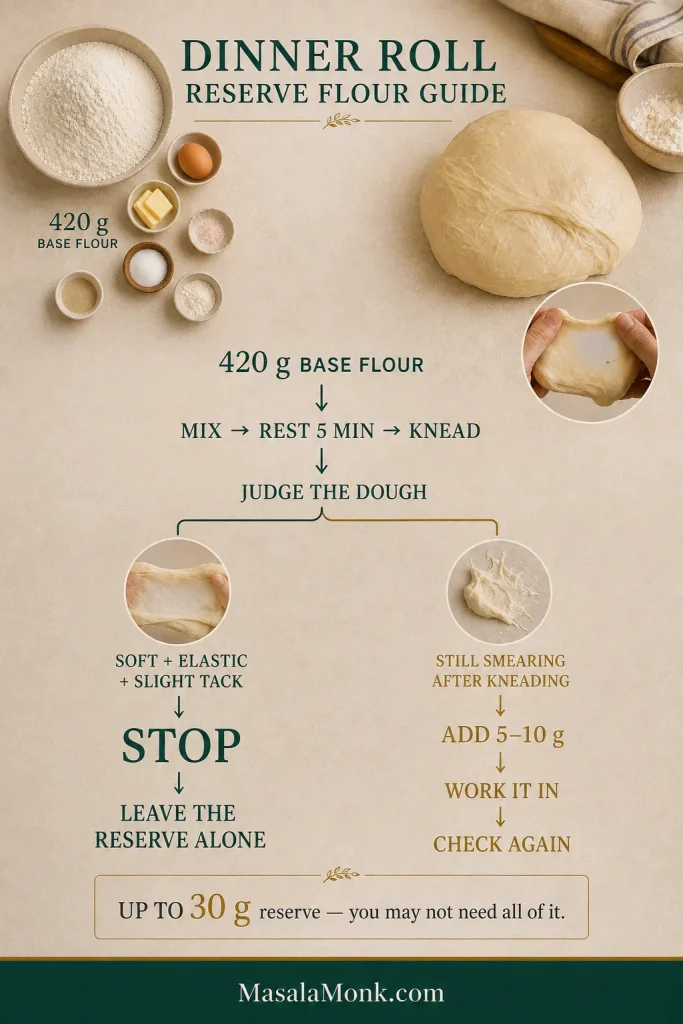
  • up to 30 g / about ¼ cup additional all-purpose flour, kept separate as a reserve
  • 8 g / about 1¼ teaspoons fine sea salt
  • 57 g / 4 tablespoons unsalted butter, softened
Overhead ingredient setup with 420 grams of base flour in a large bowl and 30 grams of reserve flour in a smaller bowl, with milk, egg, butter, sugar, yeast and salt nearby.
Keep the 30 g reserve separate. It is adjustment room, not flour you are expected to use.

The butter should be soft enough that a fingertip presses into it easily, but not glossy, oily or partly melted.

For finishing

  • 28 g / 2 tablespoons unsalted butter, melted

If you have a scale, use it for the flour and salt. Small measuring differences matter much more with those ingredients than they do with the milk or butter.

1. Mix the milk, sugar, yeast and egg

Pour the warm milk into the bowl.

Using active dry yeast? Stir the same 7 g / 2¼ teaspoons into the warm milk with a pinch of the measured sugar. Let it stand for 5–10 minutes, until creamy or lightly foamy, then add the remaining sugar and the egg.

Using instant yeast as written? Add the sugar and yeast directly to the warm milk, then add the egg.

Stir briefly to combine.

2. Add the base flour and salt

Add all 420 g of the base flour and the salt. Keep the separate 30 g flour reserve out of the bowl for now.

Mix on low speed or stir with a sturdy spoon until no large patches of dry flour remain.

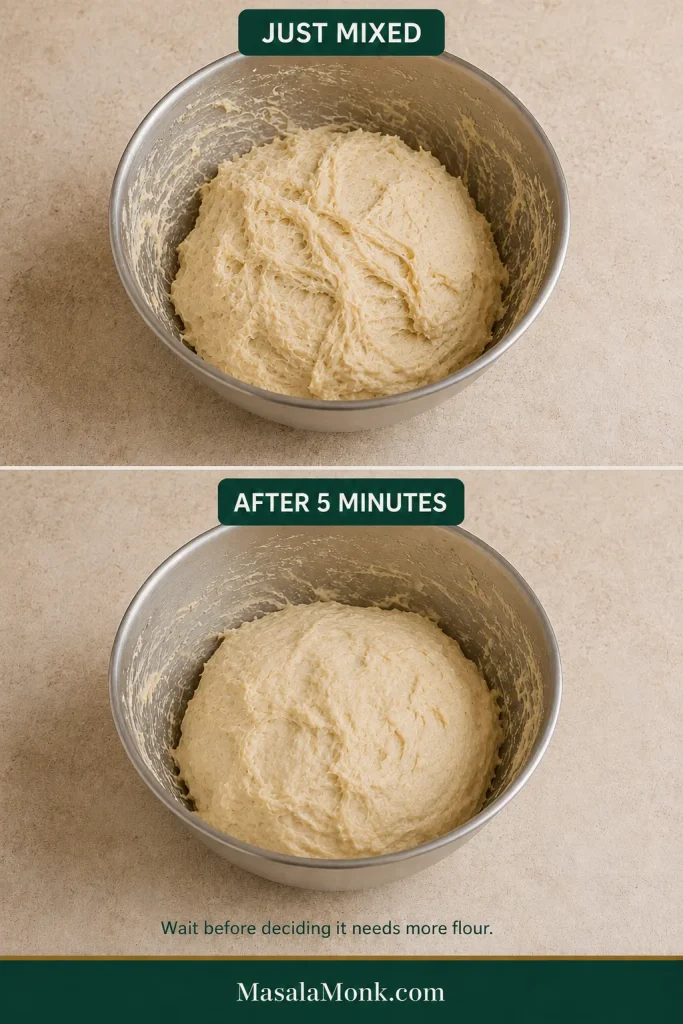
The dough will probably look rough and sticky. Give it 5 minutes before deciding anything needs correcting; the flour continues absorbing liquid during that short rest.

A sticky bowl at minute three is not a failed batch.

Two-stage comparison of the same dinner roll dough: rough and shaggy when first mixed, then slightly smoother and more cohesive after a five-minute rest.
After five minutes, the dough should look a little less ragged and more cohesive while still staying soft and sticky.

3. Start kneading

With a stand mixer, knead on low to medium-low speed for 3 minutes.

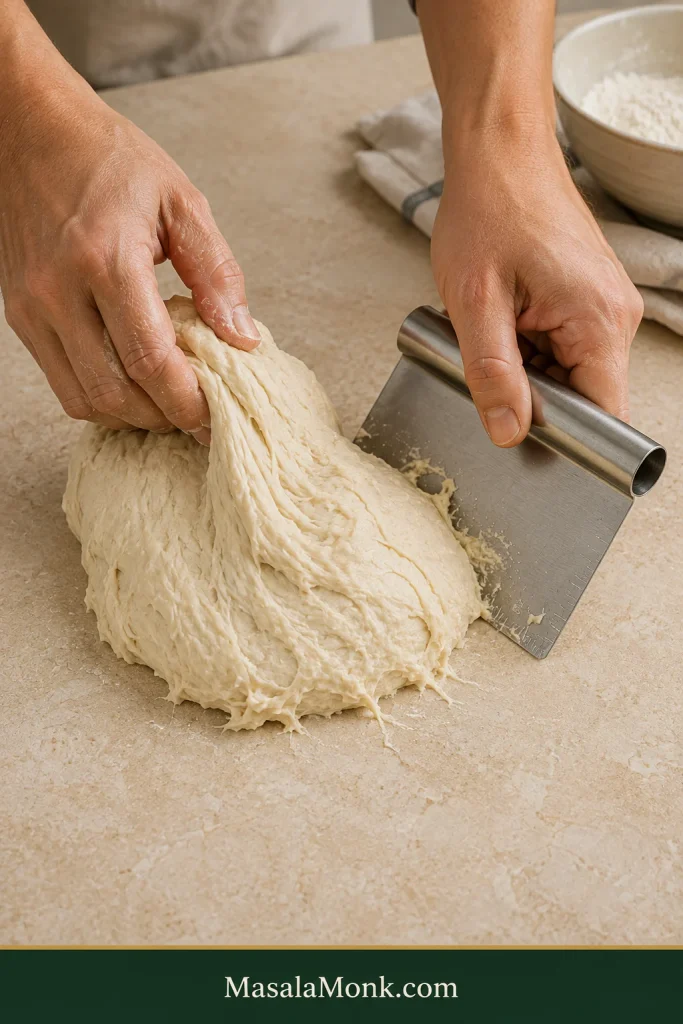
By hand, turn the dough onto a clean work surface and begin folding, stretching and pressing it. Use a dough scraper to gather sticky dough back together instead of reaching immediately for more flour.

You are not trying to make the dough tidy yet. You just want the rough mixture to begin becoming cohesive.

Hands kneading soft, tacky dinner roll dough on a stone counter while a metal bench scraper gathers dough from the surface.
A light smear is normal; most of the dough should still gather and move as one cohesive mass.

4. Work in the butter

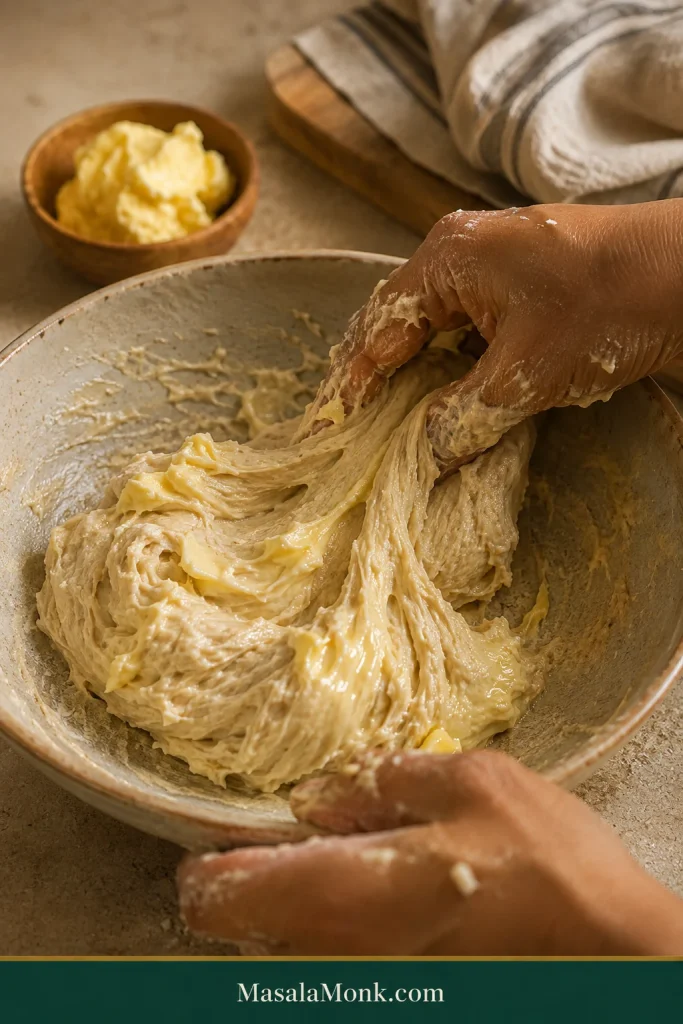
Add the 57 g softened butter in 3 or 4 additions, letting most of each addition disappear into the dough before adding the next.

This is probably the least convincing the dough will look all day. The butter can make it softer, shinier and messier before the dough comes back together.

Hands working softened butter into pale dinner roll dough, which looks glossy, slippery and temporarily messy during incorporation.
Once most of one butter addition disappears into the dough, add the next. Temporary greasy streaks are normal and do not need correcting with extra flour.

With a mixer, continue kneading for another 5–8 minutes. By hand, total kneading will generally take 10–15 minutes, sometimes longer.

5. Check the dough before adding reserve flour

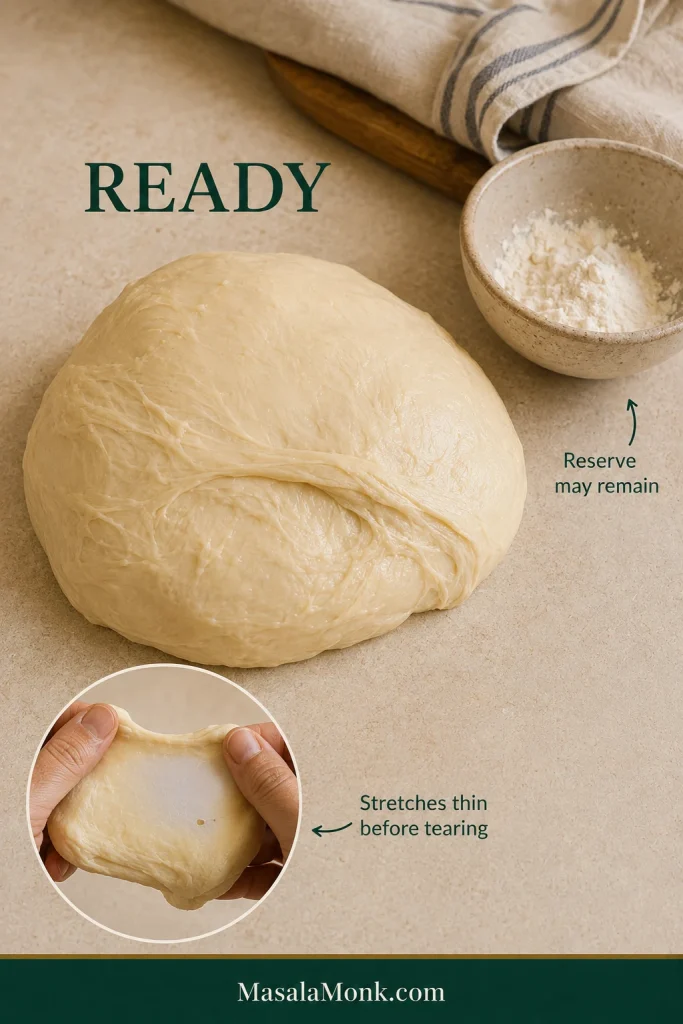
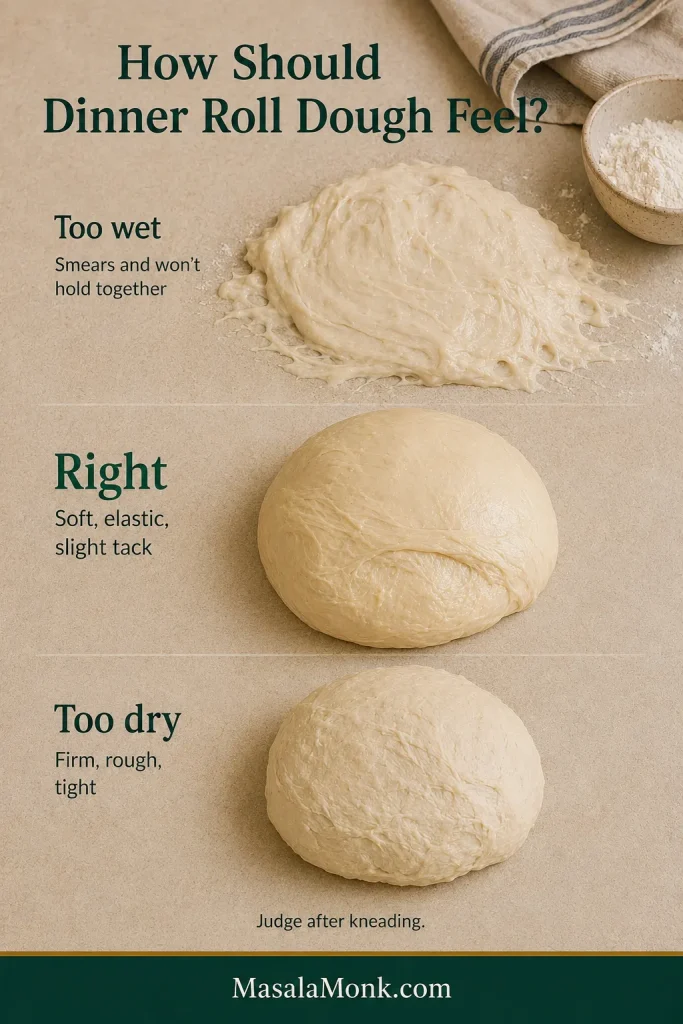
By the end of kneading, the dough should feel soft, stretchy and cohesive, with a slight tack but no wet smear.

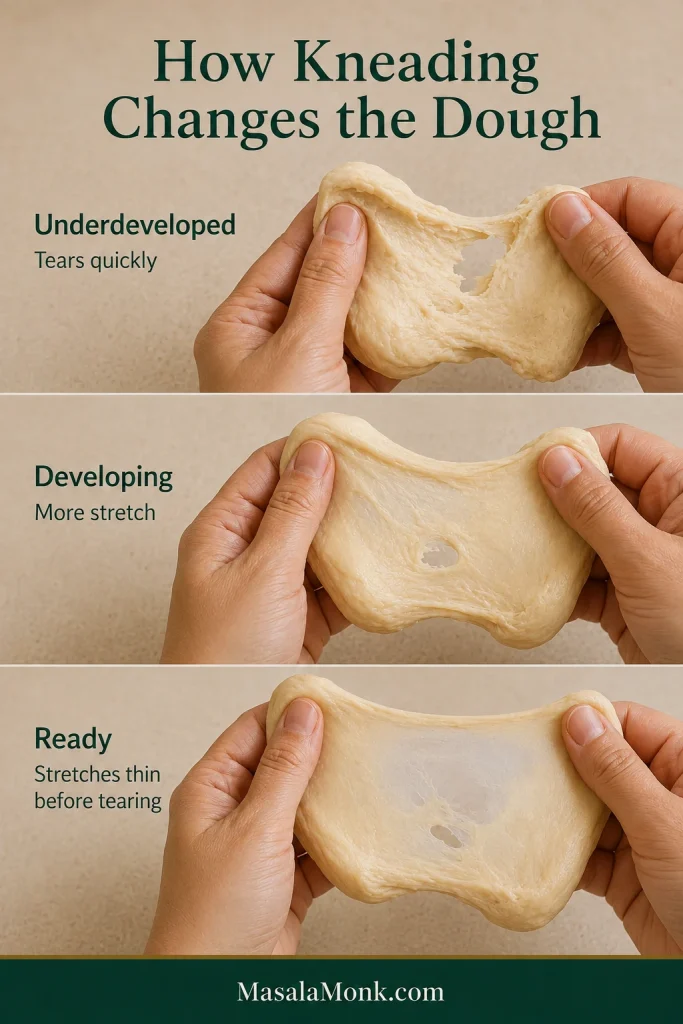
Stretch a small piece gently between your fingers. It should become noticeably thinner before tearing.

Smooth kneaded dinner roll dough beside unused reserve flour, with a small piece of dough stretched thin between fingers before tearing.
Use the whole dough and the stretch test together: a soft cohesive mound plus a thin elastic stretch matters more than achieving a flawless windowpane.

Only now should you decide whether any of the 30 g flour reserve is needed. Dough that still smears heavily and cannot hold itself together can take more flour in 5–10 g additions, worked in fully before you judge again.

Soft, elastic and only a little tacky? You’re there—leave the flour alone.

6. First rise

Lightly grease a clean bowl and place the dough inside. Cover so the surface does not dry out.

Let it rise until roughly doubled and visibly aerated. Start paying close attention around the 60-minute mark; cooler kitchens take longer and warm kitchens move faster.

Dinner roll dough in the same clear container before rising and after it has roughly doubled and become lighter and more aerated.
A straight-sided container makes the first rise easier to judge because the dough rises upward instead of spreading sideways across a wide bowl.

A kitchen already around 82°F / 28°C or above does not need an artificially warm rising spot. While the dough works, you can get the rest of dinner moving instead of hovering over the bowl.

7. Divide

Turn the risen dough onto a clean work surface and press gently to release the largest gas pockets.

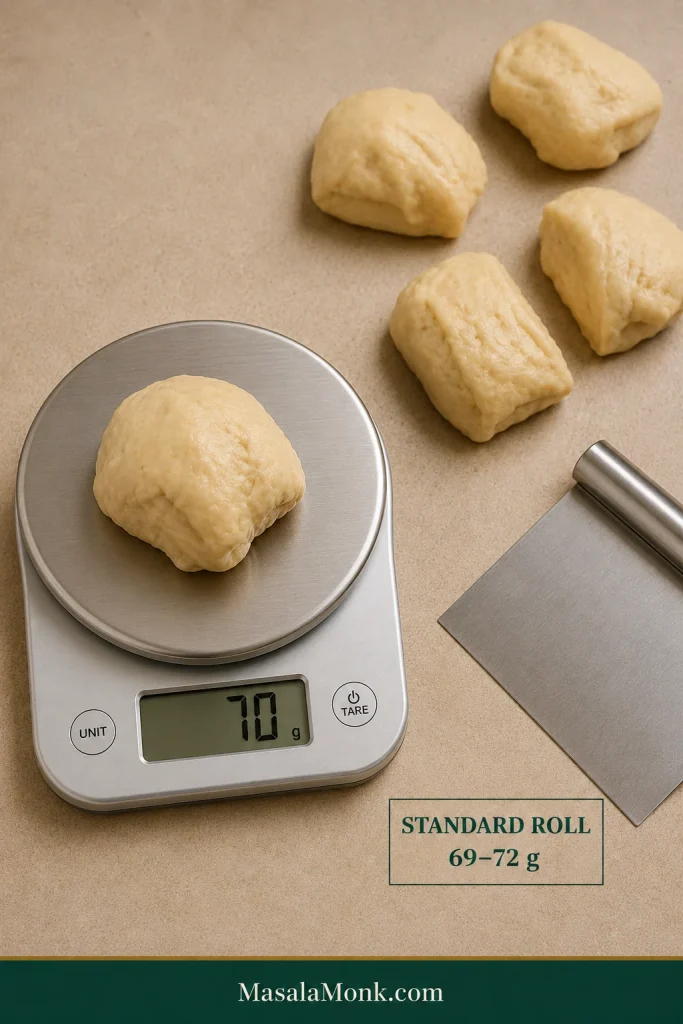
Weigh the whole piece and divide by 12. Expect pieces of approximately 69–72 g / 2.4–2.5 oz, depending on how much reserve flour the dough needed.

Digital kitchen scale showing a roughly 70-gram piece of dinner roll dough beside a bench scraper and several divided portions.
Weigh the finished dough and divide by 12; the exact portion weight can shift slightly with the reserve flour used.

That extra minute with the scale prevents a pan where one oversized roll is still raw while the smallest has already finished baking.

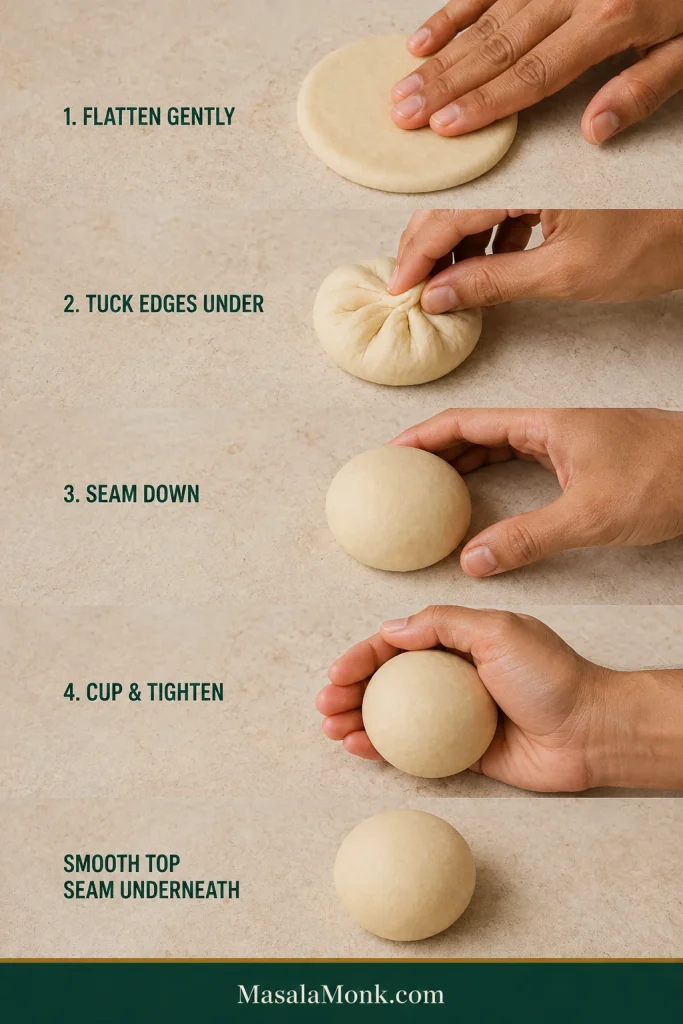
8. Shape smooth rounds

Working with one portion at a time:

  1. Flatten gently.
  2. Bring the outside edges underneath.
  3. Gather the seam below.
  4. Turn seam-side down.
  5. Cup your hand around the dough.
  6. Move it in small circles against the work surface until the top looks smooth and lightly tightened.
Step-by-step shaping sequence showing dough flattened gently, edges tucked underneath, seam placed down and the dough cupped into a smooth round.
Tucking the seam underneath creates gentle surface tension; as a result, each dinner roll is encouraged to rise upward instead of relaxing outward.

The surface should feel tidy, not stretched to the point of tearing. Use bench flour sparingly; a little grip against the counter helps create surface tension.

9. Arrange in the pan

Lightly butter or grease a 9×13-inch / 23×33-cm pan.

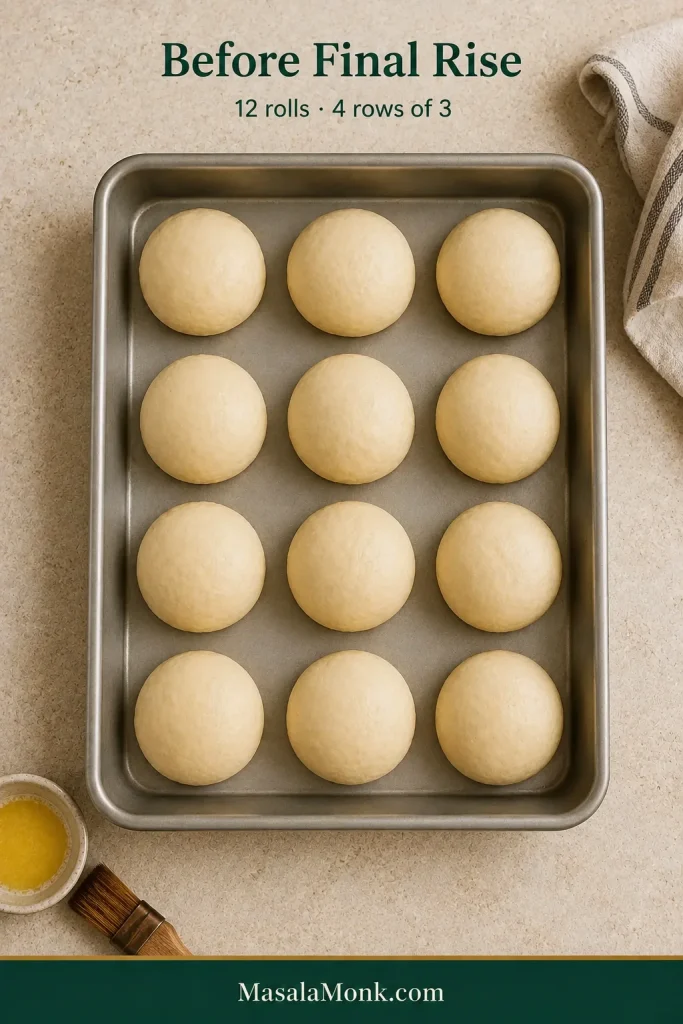
Arrange the rolls in 4 rows of 3, leaving visible gaps. Those spaces will narrow during the final rise until twelve separate rounds begin looking like one pan of dinner rolls.

Twelve shaped raw dinner rolls arranged in four rows of three in a rectangular pan, with visible gaps before the final rise.
Give every roll similar room to expand so the whole pan reaches final proof more evenly.

Where neighboring rolls meet, their sides stay pale and especially tender. Those protected edges become the soft pull-apart part that tears away with almost no crust.

10. Final rise

Cover with lightly greased plastic wrap or another roomy cover that will not stick to the tops as they expand.

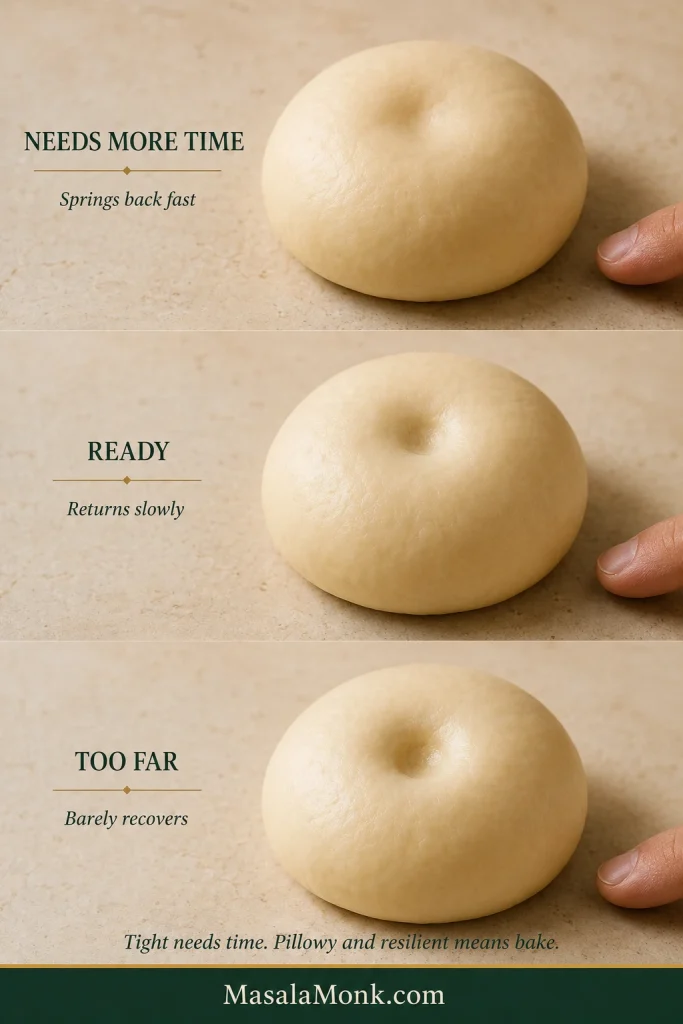
Let the rolls become clearly larger, rounded and pillowy. Begin looking closely around 45 minutes, then bake when the rolls look and feel ready—not simply because the timer says so.

Begin heating the oven to 350°F / 175°C conventional before the rise is finished.

Tight-looking rolls need more time. Once they look pillowy while still feeling resilient, they are ready for the oven.

Three-pan comparison of twelve dinner rolls: underproofed with clear gaps, ready when fuller and touching, and overproofed when slack and more flattened.
Compare the spaces between the rolls as well as their height: shrinking gaps give you a second proofing cue when judging size alone feels uncertain.

11. Bake

Bake in the preheated oven and begin checking at 18 minutes. Standard-size rolls will generally finish within 18–22 minutes.

The tops should be golden, the middle rolls should look set, and an instant-read thermometer inserted into the center of a middle roll should read about 190°F / 88°C.

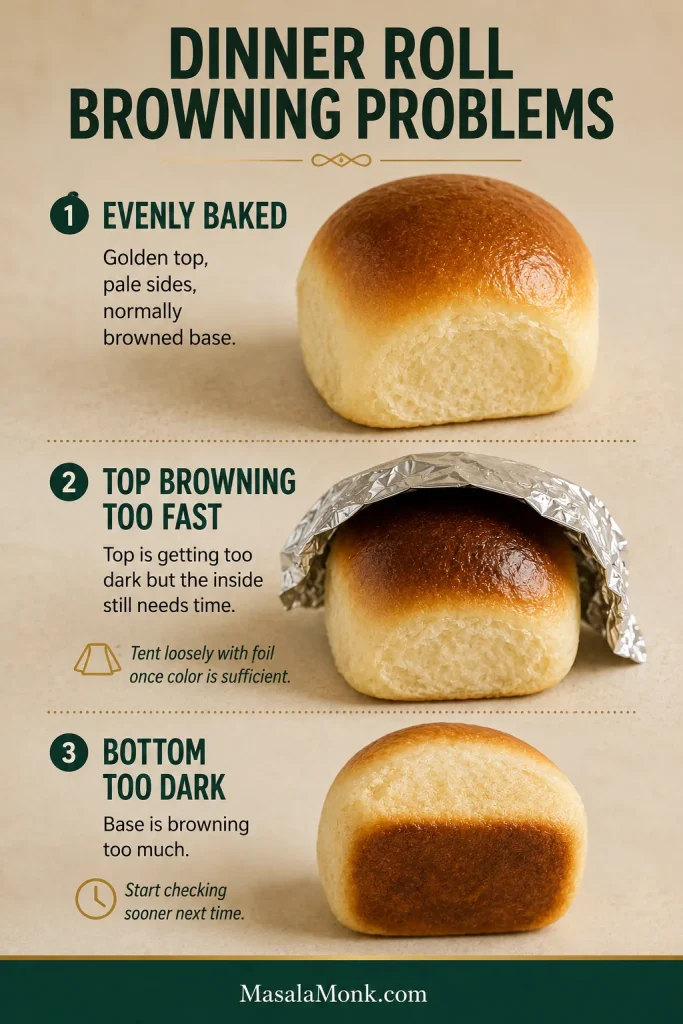
Already enough color on top while the centers still need time? Tent the pan loosely with foil. Once the middle is done, take the rolls out; deeper browning is not worth a drier crumb.

Still unsure about the center? See the doneness guide.

As the tops turn golden, the kitchen starts smelling buttery and freshly baked.

12. Butter and serve

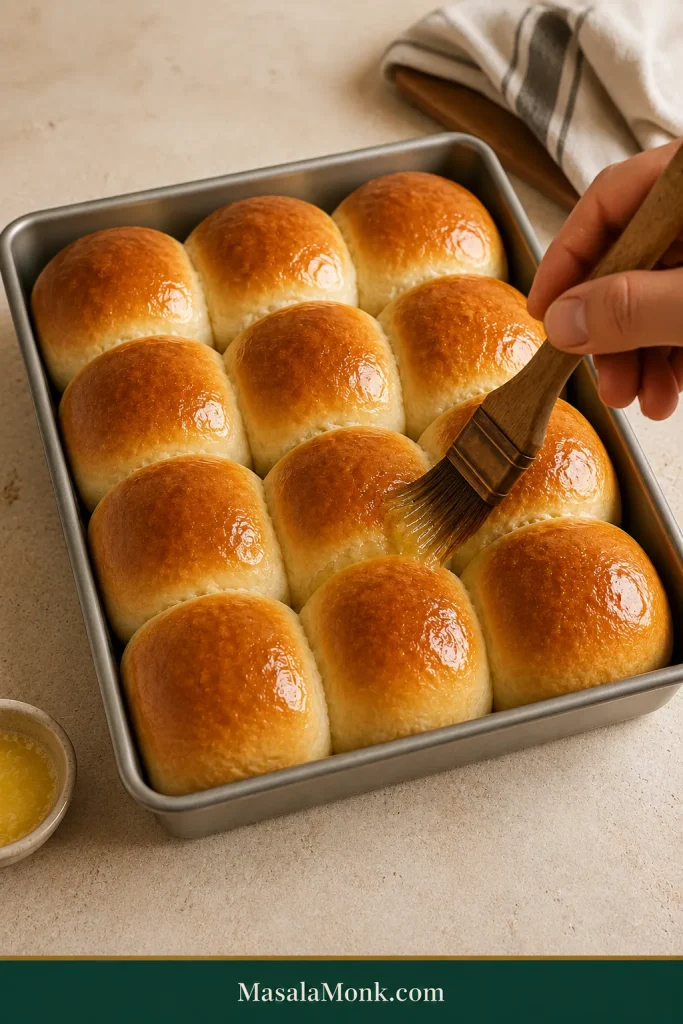
Brush the hot tops immediately with the 28 g melted butter, then let the rolls rest for 5–10 minutes.

A hand brushing melted butter over the golden tops of twelve freshly baked dinner rolls in their pan.
Brush the rolls while they are still hot; then a thin layer of butter melts into the crust instead of sitting heavily on top.

Keep the Rolls Together Until Serving

They stay warmer as a group, the touching sides remain tender, and everyone can simply pull one away at the table.

A hand pulling one golden dinner roll from a shared pan, exposing the pale tender side where it touched another roll.
Keeping the batch joined protects the pale, tender sides until each roll is pulled away to serve.

Saving them for later instead? Move them to a wire rack after about 10 minutes so steam does not collect underneath.

Tear one open while it is still warm. The crumb should give gently under your fingers and pull apart with a little stretch instead of breaking into a tight or crumbly mass.

Need help with a specific stage? Jump to sticky dough, kneading, the first rise, final proof, doneness, dense rolls or make-ahead timing.

Before troubleshooting individual stages, it helps to know what a successful roll should feel like.

The Texture We’re After

Soft and fluffy are related, but they are not the same thing.

A good dinner roll has a tender crust, moist crumb and light internal structure, with enough elasticity to pull apart cleanly instead of crumbling. The joined sides should peel apart with very little crust, while the top stays thin and golden.

Torn dinner roll annotated to show its thin golden top, pale side, moist crumb, pull-apart structure and fully baked center.
Look for a thin golden top, pale tender sides and a moist, airy crumb that pulls into soft strands instead of crumbling or feeling chewy.

The target flavor is buttery enough that a warm roll tastes good on its own, but restrained enough to sit beside gravy, soup or stew without competing with dinner. Mild sweetness and a pleasant yeast aroma should round things out without pushing the roll toward cake or heavy brioche.

Ingredient Choices That Matter

All-purpose vs. bread flour. All-purpose flour is the default because it gives the rolls enough strength to rise without making the crumb overly chewy. Bread flour can work, but expect a slightly stronger bite. Flour absorbs liquid differently from one brand to another, which is why a small reserve stays out of the bowl until after kneading.

Milk, Butter, Egg, Sugar, Salt & Yeast

Milk. Whole milk gives the dough a little more richness, but 2% works well too. If 2% is already in the fridge, use it. You do not need a grocery run to make good dinner rolls.

Butter and egg. Butter contributes tenderness and richness; the egg brings moisture, color and structure. A second brushing of butter after baking softens the hot tops further. For a sweeter enriched dough, our soft cinnamon roll recipe takes those ingredients in a different direction.

Sugar, salt and salted butter. These rolls should taste gently sweet, not dessert-like. Sugar helps with richness and browning; salt keeps the bread from tasting flat. Salted butter can work, but brands vary, so unsalted gives you better control over the 8 g salt in the recipe.

Yeast. Instant yeast goes straight into the mixture as written. Active dry yeast works too; Step 1 shows exactly how to use it. Red Star Yeast’s yeast FAQ has a deeper comparison if you want one.

No egg, gluten-free or no yeast. None is a simple one-for-one omission. Each changes the dough enough to need an adjusted formula.

Once those ingredients meet in the bowl, the first real judgment arrives quickly: is the dough supposed to feel this sticky?

How Sticky Should Dinner Roll Dough Be?

Dinner-roll dough should feel soft, elastic and slightly tacky after kneading—not wet enough to smear and not firm enough to feel stiff. Dough that still cannot hold itself together after proper kneading can take flour in 5–10 g additions.

Dough stateWhat it feels likeWhat to do
Too wetSmears heavily and cannot hold together after kneadingAdd reserved flour 5–10 g at a time
RightSupple, elastic and cohesive with a slight tackLeave it alone
Too dryFirm, rough, tight or reluctant to stretchStop adding flour
Three dough states labeled Too Wet, Right and Too Dry: wet dough smears and spreads, correct dough is soft and cohesive, and dry dough looks firm and tight.
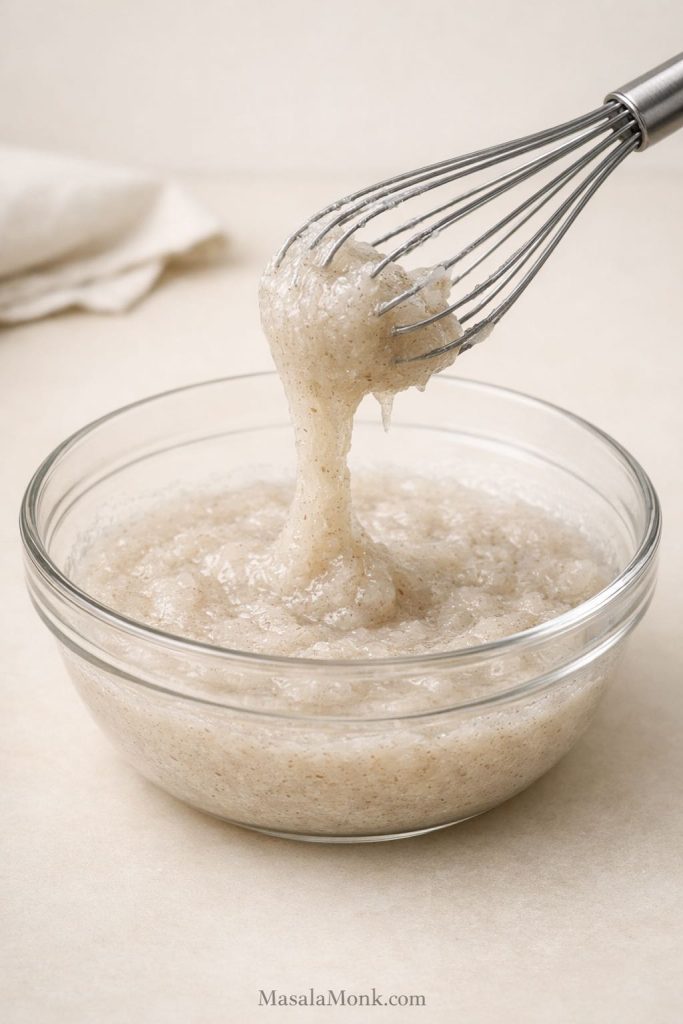
Use the dough’s contact with the work surface as a tie-breaker: slight tack is normal, whereas a persistent wet smear after kneading signals a different consistency.

Fresh enriched dough can feel considerably stickier than the finished dough. Kneading gives the flour more time to absorb liquid, develops elasticity and works the butter fully into the mixture. Humidity can shift the final feel too.

When to Add the Reserve Flour

Wait until the dough has rested and been properly kneaded before reaching for the reserve. If it still leaves a persistent wet smear and cannot hold itself together, add flour in 5–10 g increments; otherwise, leave the reserve alone.

Decision guide showing base flour followed by mixing, resting and kneading, with small additions of reserve flour only if the dough still smears.
Think of the 30 g reserve as a ceiling, not a target. Because flour absorption varies, properly developed dinner roll dough may need only part of it.
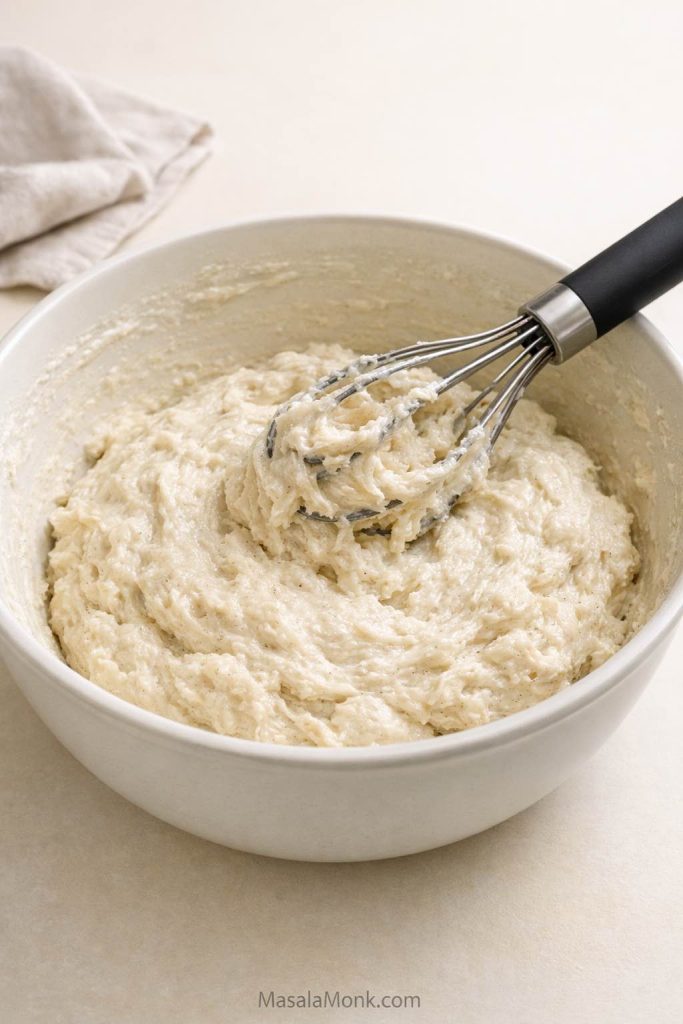
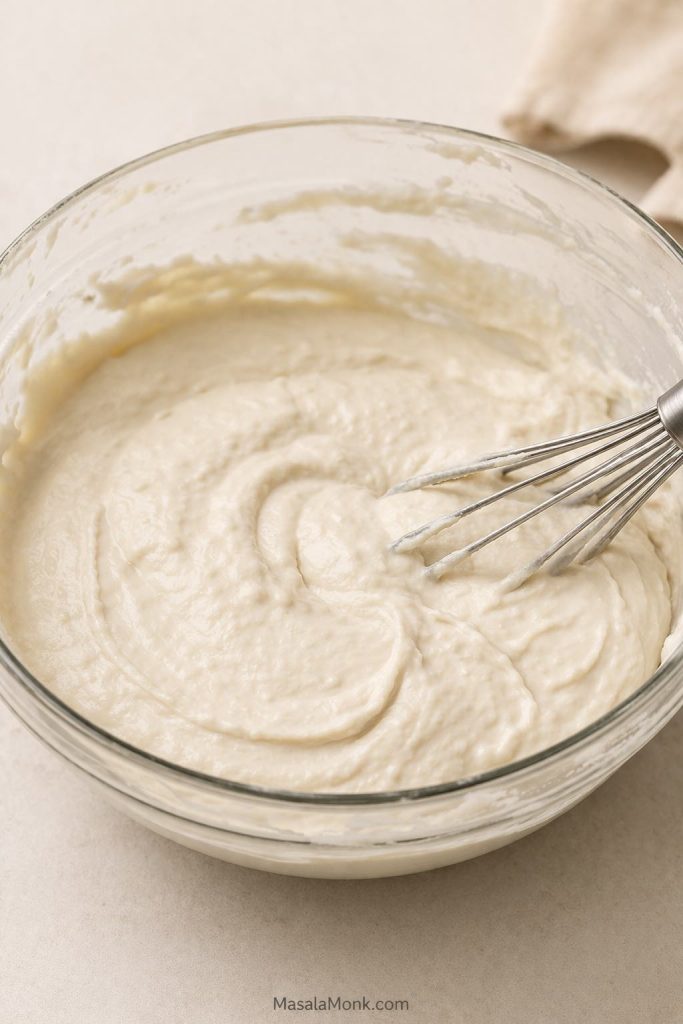
Already a little firmer than you wanted? Stop adding flour and carry on. A slightly firm dough can still rise and bake well, and repeatedly adjusting it in pursuit of a perfect texture can create a bigger problem than the one you started with.

Ready to continue? Return to Step 5: Check the dough.

How to Know When Kneading Is Done

Kneading is done when the dough has changed from rough and sticky to smoother, elastic and able to stretch noticeably thin before tearing.

Pull off a small piece and stretch it slowly. Dough that tears almost immediately with a rough edge still needs development. As it becomes ready, that same piece will stretch thinner and may begin to look slightly translucent before it tears.

Three-stage kneading comparison showing dough tearing quickly at first, stretching farther as it develops and stretching thin when ready.
Watch the tear edge as well as stretch length: rough, jagged tearing suggests less development, while a smoother elastic pull shows the dough gaining strength.

You do not need a flawless bakery-school windowpane every time you make dinner.

A small dough batch may still cling near the bottom of a large mixer bowl when it has developed properly, so a spotless bowl is not the goal. Judge the dough’s elasticity and stretch first.

Working by hand? Use a scraper to gather sticky dough from the counter and keep kneading without continually dusting in more flour. If a long mixer knead makes both the bowl and dough noticeably hot, especially on a warm day, give them a brief pause.

Dough developed? Return to Step 6: First rise.

First Rise: Let the Dough Set the Pace

The dough is ready to divide when it has roughly doubled, looks visibly aerated and feels much lighter under your hands than it did after kneading.

Not sure whether it has truly doubled? Look at the overall volume, not only the height. A wide bowl can make vertical change deceptive. A quick photograph at the beginning—or a straight-sided container when you have one—makes comparison much easier.

The 60–90 minute range tells you when to pay attention. A cool room stretches the wait; a hot kitchen shortens it.

By this point, the sticky mixture that made you suspicious at the beginning should feel calmer, airier and far easier to divide.

Risen and airy? Return to Step 7: Divide.

Choose Your Roll Size

The standard batch makes 12 rolls weighing about 69–72 g / 2.4–2.5 oz each. For a first batch, stick with this size.

Making 15 smaller rolls? Aim for 55–58 g / about 2 oz each and begin checking them earlier.

Making 10 larger rolls? Aim for 83–86 g / about 3 oz each. They will generally need longer in the oven, so judge the center to decide when they are finished.

Three shaped raw dinner roll portions with subtle size differences: smaller 55 to 58 grams, standard 69 to 72 grams and larger 83 to 86 grams.
Small weight differences are hard to judge by eye, so weigh portions when consistent roll size matters.

Half Batch or Double Batch

Half batch: For 6 standard rolls, halve every ingredient. Beat the egg first and use 25 g of it, then bake in a smaller dish that still allows the rolls to expand toward one another.

Double batch: For 24 rolls, double the ingredients, keep the individual portion size the same and use two pans. The bake time does not double just because the quantity of dough did.

Underproofed, Ready or Overproofed?

In this guide, final proof means the shaped rolls’ last rise before baking.

Dinner rolls are ready to bake when they look distinctly puffy, the gaps between them have mostly closed, and a shallow fingertip indentation returns very slowly. Fast springback means more time; fragile dough that barely recovers has gone too far.

Underproofed

The rolls still look compact and tight, and a shallow fingertip indentation springs back quickly.

Ready to bake

The gaps have narrowed dramatically, the tops look rounded and pillowy, and the whole pan appears fuller. A shallow indentation stays visible or returns only slowly while the dough still feels resilient.

Three proofed dough rounds after a shallow finger poke: one nearly springs back, one keeps a slight dent and one retains a deeper indentation.
Keep the poke shallow and judge recovery rather than dent depth; pressing too deeply can make even well-proofed dinner roll dough harder to interpret.

This is the moment the pan stops looking like twelve dough balls and starts looking like dinner rolls.

Overproofed

The rolls may look extremely swollen, slack or fragile. An indentation barely recovers, and the dough may begin to deflate when touched.

Once they reach this state, do not give them more room-temperature rise time. Bake promptly, handle the pan gently and expect less lift in the oven if they have already gone too far.

You do not have to turn the poke test into an examination. Tight needs time. Pillowy and resilient means bake.

Rolls pillowy and resilient? Return to Step 11: Bake.

How Do You Know Dinner Rolls Are Done?

Dinner rolls are done when the tops are golden, a center roll looks fully set, and its middle reaches about 190°F / 88°C.

Twelve golden dinner rolls with labels for golden top and set middle, plus an unbranded thermometer in a center roll reading 190 degrees Fahrenheit, about 88 degrees Celsius.
Check a middle roll rather than an edge roll: the outer rolls heat sooner, while the center gives a better read on whether the whole pan is baked through.

Begin checking standard rolls at 18 minutes. Tops that are coloring faster than the center is baking can be loosely tented with foil. Once a middle roll is done, remove the pan instead of leaving it in solely for deeper color.

Pan material also affects browning. Dark metal can color bread faster than lighter metal, while glass and ceramic behave differently again, so treat 18–22 minutes as a practical range and watch the rolls themselves.

For more on using internal temperature with yeast breads, King Arthur Baking’s thermometer guide explains the technique in more depth.

Center done? Return to Step 12: Butter and serve.

Dinner Roll Success Checkpoints

If you want one quick pass through the whole process, these are the six checkpoints worth remembering before you change the formula or blame the clock.

Six-step guide showing soft dough, developed stretch, a doubled first rise, smooth shaping, pillowy final proof and golden baked dinner rolls.
When timing feels uncertain, use these visual and tactile checkpoints to decide when to move on instead of forcing the dough to match the clock.

Dinner Roll Troubleshooting

When something goes wrong, the fastest clue is often when the batch changed direction.

Barely any rise: A cool room can simply make fermentation slow. Dough that shows no meaningful movement at all makes the yeast—and whether the milk was excessively hot—more important suspects.

Puffy rolls that spread, flatten or collapse: Very fast expansion followed by fragile, overinflated dough points toward a final rise that went too far. Rolls that spread before becoming properly puffy may have needed more kneading, or the rounds may not have been tightened enough during shaping.

Top browns before the middle is ready: Tent loosely with foil once the rolls have enough color and let the center finish. If the same surface or side keeps coloring first, pay attention to how your oven and pan are browning the batch before changing the dough.

Dark bottoms: A pan that browns the base quickly—or simply too much oven time—may be responsible. Start checking sooner on the next batch and note whether the bottoms consistently color well before the tops.

Three browning examples showing an evenly baked roll, a dark top protected with loose foil and a roll with an overly dark bottom.
A dark top and a dark bottom are different clues. First identify which surface is outpacing the center before changing anything about the dinner roll dough itself.

Damp bottoms after cooling: That is usually trapped steam. Move rolls you are saving to a rack after their short rest in the pan.

Dense rolls and hard rolls give even better clues when you replay the batch in order.

Why Dinner Rolls Turn Out Dense

Dense dinner rolls usually come back to too much flour, dough that wasn’t kneaded enough, rolls baked before they had puffed properly, or a center that needed more time in the oven. The stage where the problem first appeared tells you where to look.

Five-stage dense-roll troubleshooting timeline showing stiff dough, rough tearing, little first-rise growth, twelve tight underproofed rolls and a baked roll with a heavy center.
Don’t diagnose dense dinner rolls from the finished crumb alone; instead, replay the batch in order because the same heavy texture can begin during mixing, kneading, proofing or baking.

Stiff from the beginning? Excess flour moves to the top of the suspect list. Tight dough cannot expand as freely.

Rough and tearing after kneading? The dough probably needed more kneading. Yeast can produce gas, but the dough still needs enough elasticity to hold it.

Barely rose the first time? Yeast activity and temperature matter more here. Cold dough may simply be slow; dough that never moves points more strongly toward a yeast problem.

Good first rise, but tight-looking rolls at bake time? They probably went into the oven before the final rise was complete.

Huge, fragile rolls that later sagged? The final rise probably went too far.

Beautiful outside, wet and heavy inside? The centers needed more baking.

Dense is not one failure. The timeline tells you where to look.

Why Did My Dinner Rolls Turn Hard?

Hard straight from the oven usually points toward excess flour or overbaking. Rolls that were soft hot but firm after cooling were probably already borderline dry. If they become dry only the next day, storage and normal bread staling matter more.

Three-part guide comparing dinner rolls that are hard immediately after baking, become firmer after cooling or turn dry by the following day.
Don’t change the dough formula for a day-two storage problem. If the rolls were soft when fresh, cooling, sealing and reheating deserve more attention than flour or yeast.

Hard immediately: Revisit flour and bake time first.

Soft while piping hot, then noticeably firmer: Steam can temporarily make a slightly dry crumb feel more tender than it really is. Cooling reveals the true texture.

Good on day one, dry on day two: Cool the rolls completely before sealing them airtight, then warm leftovers before serving again.

Once the rolls are well risen and tender, keeping them that way is mostly a matter of cooling, storing and reheating gently.

Soft when fresh but dry later? Go to storage and reheating · Back to recipe.

Make-Ahead Dinner Rolls

Best fresh texture: make and bake the rolls the same day.

Planning to bake tomorrow? Shape the rolls, arrange them in the pan, cover well and refrigerate immediately instead of completing the room-temperature final rise. Keep them chilled for up to 16 hours.

The next day, bring the pan out 2–3 hours before you expect to bake and let the rolls finish rising. A warm kitchen may move faster; a cool one may need longer. Bake when they reach the same pillowy, resilient state described above.

Baking for Thanksgiving or Christmas? The overnight route can make the day considerably calmer when the oven and your attention are already busy.

Lowest-stress long-term option: bake the rolls first. Cool completely, freeze airtight, then thaw and warm when you need them.

Make-ahead dinner roll guide showing same-day preparation, shaped rolls refrigerated overnight and fully baked rolls cooled for freezing.
Overnight chilling is a scheduling tool, not a shortcut: the shaped rolls still need to become pillowy and resilient before they are ready to bake the next day.

Baking after an overnight chill? Check final proof before the oven.

Store, Freeze & Reheat

These rolls are at their best warm on the day they are baked. Airtight storage keeps leftovers good, but reheating is what brings back much of that fresh-baked tenderness.

Saving leftovers? Move the rolls to a rack after about 10 minutes, cool completely, then seal airtight. Keep at room temperature for 2–3 days or freeze for up to 2 months for best quality.

Room-temperature roll: microwave one for 10–15 seconds, just until pleasantly warm.

Frozen rolls: thaw them first. For several thawed rolls, cover loosely with foil and warm at 300°F / 150°C for 8–15 minutes, depending on the amount.

Storage and reheating guide showing dinner rolls stored airtight at room temperature, frozen, microwaved individually and reheated together in the oven.
Cool the rolls completely before sealing them: trapped steam can leave the bottoms damp, while exposed bread loses moisture surprisingly quickly.

A little melted butter afterward is optional.

A ten-second warm-up tomorrow is a far better bargain than overbaking the rolls today.

What to Serve With Soft Dinner Rolls

After all the dough talk, this part can stay simple.

Dinner Rolls with Roast, Gravy, Soup or Stew

Serve the rolls beside a roast, soup, stew or anything with enough gravy or sauce to make tearing off another piece seem sensible. Slow cooker brisket gives them exactly that sort of plate.

A torn golden dinner roll being dipped into brown gravy beside roast beef and mashed potatoes on a dinner plate.
Because the crumb is mild and tender, these soft dinner rolls absorb savory gravy without competing with the roast or turning the plate noticeably sweeter.

Dinner Rolls with Dal Tadka

They do not have to stay inside the American roast-dinner box, either. A warm roll is surprisingly good beside dal tadka, where the tender crumb can scoop up buttery lentils.

A hand dipping a torn golden dinner roll into yellow dal tadka topped with cumin, curry leaf and a dried red chile.
Tear the roll rather than slicing it smooth; the irregular fluffy crumb gives thick dal and its spiced tadka more surface to cling to.

Left the next day, split one for a small sandwich—or simply warm it, add butter and let breakfast be easy.

When the Dough Starts Making Sense

Soft enriched dough can look uncertain before it becomes reassuring.

At first it sticks. Butter makes it messier for a while. Rise times refuse to fit neatly into every kitchen.

Then the checkpoints begin to feel familiar.

You notice when tacky is perfectly normal and when wet really does mean wet. You feel the dough becoming elastic. The first rise makes the same dough that looked awkward in the bowl feel light under your hands. Later, the gaps in the pan disappear and you recognize that the rolls are ready without needing a timer to persuade you.

That is when homemade dinner rolls stop feeling like a gamble.

And when the pan finally comes out golden and the butter disappears into the hot tops, tear one open while it is still warm. The crumb should be light, tender and just stretchy enough to remind you why that softer dough was worth trusting in the first place.

Close-up of a freshly torn golden dinner roll showing a continuous pale, fluffy crumb with delicate strands and more rolls blurred behind it.
The final texture check is simple: a continuous, tender crumb should tear easily without revealing a gummy center, hollow pocket or dry, crumbly interior.

Back to recipe · Back to top

Posted on — Leave a comment

Focaccia Recipe: Easy, No-Knead, Crispy and Airy

Golden rosemary focaccia with a cut square in front showing an airy crumb and thin browned bottom crust.

There is a particular moment when homemade focaccia feels worth the wait: you lift one corner from the pan and find a deeply golden, crisp underside, while the bread above it still feels almost impossibly soft.

This is that kind of focaccia—deeply dimpled, olive-oil-rich and airy through the middle, with irregular bubbles and a light, open crumb.

This easy focaccia recipe keeps the work remarkably low: one mixing bowl, no mixer and no traditional kneading. Most of the time belongs to fermentation, not to you. Because wet dough behaves differently from one flour and kitchen to another, the method tells you what each important stage should look and feel like, not just how long to wait.

The first thing to know: focaccia dough should feel very sticky. The real question is whether it stretches and holds together as one connected mass.

Quick Answer

For airy focaccia with a crisp olive-oil bottom, use 500 g bread flour or strong all-purpose flour and begin with 400 g water. Hold back another 20 g water and add it only if the rested dough remains cohesive enough to take it.

Mix with 4 g instant yeast, rest for 20 minutes, give the dough one quick fold, then leave it at room temperature for a short 30-minute warm start.

Refrigerate for 18–36 hours, planning around 24. The next day, proof in a well-oiled 9 × 13-inch metal pan until bubbly and softly wobbling, then bake at 450°F / 230°C conventional until deeply golden above and crisp underneath.

The whole recipe comes down to three decisions: let your flour tell you whether it needs the final 20 g water, let the dough tell you when proofing is finished, and let the underside tell you when the loaf is truly done.

Guide showing sticky focaccia dough, bubbly proofed dough in a pan, and the browned underside of baked focaccia.
Water, proofing and doneness are separate checkpoints; getting one right cannot rescue another that has gone too far.

Overnight vs Same-Day Focaccia: Choose Your Route

Overnight — RecommendedSame-Day
Yeast4 g instant yeast6 g instant yeast
Hands-on workVery lowA little more
Main fermentation18–36 hours refrigerated; plan around 24About 1½–2½ hours warm
Typical elapsed timeAbout 27–30 hours on the 24-hour cold routeRoughly 4–6 hours
FlavorDeeper and more developedMilder and fresher
Best whenYou can start the day beforeYou want focaccia tonight

Choose overnight when you can. The longer fermentation develops more flavor while keeping the actual work very small.

Prefer natural fermentation? Use our sourdough focaccia recipe rather than trying to convert the yeast formula by guesswork.

Easy No-Knead Focaccia Recipe

Easy No-Knead Focaccia

An overnight focaccia with a crisp olive-oil bottom, deeply golden top and soft, irregularly airy crumb.

Yield: 1 large 9 × 13-inch focaccia; about 8 generous or 12 smaller pieces

Active time: about 25 minutes

Plan ahead: for about 24 hours in the refrigerator, start roughly 27–30 hours before serving. Starting the evening before can still work for next-day dinner using the early end of the 18–36-hour cold-ferment window.

Cold ferment: 18–36 hours; plan around 24 when your schedule allows

Final proof: at 70–75°F / 21–24°C, start checking after about 2 hours; many batches need 3–4

Bake: about 22–28 minutes

Pan: 9 × 13-inch / approximately 23 × 33 cm metal pan

Oven: 450°F / 230°C conventional/static; about 425°F / 220°C fan/convection, checking earlier

Ingredients

  • 500 g / 17.6 oz bread flour or strong all-purpose flour, about 4–4¼ cups by volume
  • 400 g / 400 ml water, about 1⅔ cups
  • Up to 20 g / 20 ml additional water, held back
  • 11 g fine sea salt, roughly 1¾–2 teaspoons depending on the salt
  • 4 g instant yeast, about 1¼ teaspoons
  • 45 ml / 3 tablespoons extra-virgin olive oil for the pan
  • 30 ml / 2 tablespoons extra-virgin olive oil for the top
  • Flaky finishing salt
  • 1 tablespoon fresh rosemary leaves, optional

Method

  1. Mix the water and instant yeast. Add the flour and fine sea salt and stir until no dry flour remains.
  2. Cover and rest for 20 minutes. Add the reserved water gradually, stopping as soon as the dough is very sticky, stretchy and cohesive. You may not need all 20 g.
  3. Give the dough one quick 30-second fold around the bowl.
  4. Cover and rest at room temperature for about 30 minutes, until slightly smoother and more relaxed. It doesn’t need to double.
  5. Refrigerate for 18–36 hours, preferably around 24.
  6. If your metal pan tends to stick, give it a whisper-thin coat of butter or nonstick spray. Pour in 3 tablespoons / 45 ml olive oil, transfer the chilled dough gently into the pan, and rest for 10–20 minutes whenever it resists stretching toward the corners.
  7. Cover and proof until visibly bubbly and soft enough to wobble when the pan is nudged.
  8. Preheat to 450°F / 230°C conventional/static for at least 30 minutes, with a rack in the lower-middle or lower third. For fan/convection, start around 425°F / 220°C and check earlier.
  9. Oil your fingertips and dimple deeply to the pan. Drizzle over the remaining 2 tablespoons / 30 ml olive oil, then add flaky salt and rosemary.
  10. Bake for about 22–28 minutes, until deeply golden on top, crisp and browned underneath, and set through the center.
  11. Rest in the pan for 3–5 minutes, then transfer to a wire rack.

Cooking now? The recipe card above is enough to cook from. Everything below is optional guidance for understanding the dough, adapting the recipe or fixing something that looks unusual.

Table of Contents


Focaccia Ingredients

Focaccia begins with flour, water, yeast, salt and olive oil. The bigger differences come from how much water your flour can handle, how far fermentation goes, how fully the dough proofs and how efficiently the pan browns it. Those are the variables worth learning to read.

For salt, trust the 11 g weight because teaspoon volume varies with crystal size. Extra-virgin olive oil gives the surface the most aroma and flavor, although regular olive oil works too.

Flour, water, yeast, salt, olive oil and rosemary arranged beside a rectangular metal baking pan.
Olive oil works twice here: 3 tablespoons beneath the dough encourage browning; 2 tablespoons on top settle into the dimples and season the crust.

How Wet Should Focaccia Dough Be?

This recipe starts at 80% hydration and can rise to 84%. The 400 g base is the dependable starting point; the held-back 20 g lets stronger flour take a little more water when it can support it.

Don’t chase 84% just because the water is there. A cohesive dough at 80% is better than forcing extra water into flour that can’t support it.

The first mixed dough may cling enthusiastically to your fingers and be exactly where it needs to be. If you have made our homemade pita bread, this will feel dramatically wetter: focaccia gets the support of a pan instead of having to hold itself as a free-standing flatbread.

What you want is dough that feels very sticky but stretches as one connected mass.

StateWhat you will noticeNext move
Too dryFirm, conventionally kneadable, resistant and prone to tearingAdd some reserved water
RightVery sticky, loose and soft, yet stretchy and cohesiveCarry on
Too wet for the flourFlows freely and develops little structure even after restingStop adding water and check flour/measurements
Three focaccia dough consistencies comparing firm dry dough, sticky cohesive dough, and very loose spreading dough.
Sticky is expected. If the dough still stretches as one connected mass, wet or lightly oiled hands are better than adding more flour.

How to Use the Reserved Water

Wait the full 20 minutes before judging it. Flour keeps absorbing water as it rests, and a rough sticky mixture can become noticeably more organized without kneading.

Add about 10 g of the reserved water. If it disappears into the dough and the mass stretches together, decide whether it can take the final 10 g.

Some batches will finish at 400 g water. Others will use all 420 g. Both can become excellent focaccia.

Step-by-step guide showing reserved water added gradually to sticky focaccia dough while checking its consistency.
That final 20 g is only 4% of the flour weight, yet it can decide whether the dough stays supple or loses support.

Dough already turned soupy? See what to check before changing the formula.

What Is the Best Flour for Focaccia?

For the easiest first batch, choose bread flour around 11–13% protein. It gives wet dough enough strength to stretch and hold fermentation gas while generally handling high hydration well.

Strong all-purpose flour is also excellent and can produce a slightly softer crumb. More important than the wording on the bag is the flour’s strength and how eagerly it absorbs water.

FlourWhat to expectWater approach
Bread flourStrong, stretchy dough; slightly chewier crumbOften handles the full amount comfortably
Strong all-purposeGood strength with a slightly softer crumbAdd reserved water gradually
Lower-protein plain/APLooser dough at the same hydrationExpect to leave some reserved water out
Indian maidaStrength and absorption vary greatly by brandBegin at 400 g and judge the dough
00 flourStrength varies from product to productCheck protein level and intended use
Flour guide comparing bread flour, all-purpose flour, Indian maida and 00 flour with a shared water-adjustment method.
Flours with the same label can absorb water differently; the reserved-water method makes this formula more reliable across brands.

You can see the same flour-strength trade-off in our sourdough pizza dough, although pizza also has to stretch and support itself without a pan.

A scale earns its place here. A heavily packed cup of flour can quietly turn the same formula into a much drier dough. Weighing 500 g removes that variable immediately.

Flour and Yeast Substitutions

  • All-purpose flour: yes, especially when it is reasonably strong. Hold back the final water and let the texture guide you.
  • Indian maida: also possible, but brands vary substantially. Begin with the base 400 g water and add more only while the dough keeps enough structure.
  • 00 flour: 00 tells you about the flour’s Italian milling/refinement classification, not its protein strength. Check the protein level and intended use.
  • Whole wheat: a modest partial substitution can work, but expect different water absorption and a tighter crumb. Make the white-flour version first so you know the texture you are aiming for.
  • Active dry yeast: yes. Follow the conversion and blooming directions on your package; if your brand permits a 1:1 swap for instant yeast, use 4 g. Fermentation may move a little more slowly, so use the same readiness cues rather than forcing the original timing.
  • Sourdough starter: starter contributes both flour and water and changes the fermentation schedule. If you are beginning from scratch, our sourdough starter recipe covers the first step; for the bread itself, use the sourdough focaccia linked above.
  • Gluten-free flour: this wheat-based formula is not designed for a direct gluten-free swap. Gluten-free focaccia needs its own structure system.

The Best Pan and Equipment for Focaccia

A bowl, digital scale, 9 × 13-inch metal pan and wire rack cover almost everything you need.

  • Digital scale: especially helpful for flour, water, salt and yeast.
  • Large covered bowl: an airtight lid makes the refrigerator stage easier.
  • 9 × 13-inch / approximately 23 × 33 cm metal pan: the reference pan for this recipe.
  • Flexible scraper or spatula: handy with wet dough, but optional.
  • Wire rack: important for keeping the underside crisp after baking.

Metal is the easiest route to the crisp bottom promised here because it transfers heat quickly into the oil and dough. A reliably nonstick pan needs only olive oil; an older or grabby pan benefits from the thinnest film of butter or nonstick spray first.

Dark metal browns faster. Begin checking the underside a little earlier if your pan is very dark.

Glass and ceramic can still make good focaccia, but the base generally colors more slowly. The King Arthur Baking focaccia pan comparison gives a clear demonstration of how pan material changes browning.

Light metal, dark metal, glass and ceramic baking pans compared for how they affect focaccia browning.
If the top is ready but the bottom stays pale, suspect the pan and heat path before changing the dough.

Using another pan size? See how to scale the dough by pan area.

How to Make Focaccia

Making focaccia is simple; the real skill is recognizing when the dough is ready for the next stage.

1. Mix the Dough

Pour 400 g water into a large bowl and stir in 4 g instant yeast. Room-temperature or slightly cool water is fine in a warm kitchen; use mildly lukewarm water around 80°F / 27°C when the room is cool.

Add 500 g flour and 11 g fine sea salt. Stir with a sturdy spoon, spatula or wet hand until no dry flour remains.

It may look messier than you hoped. Give it the full 20-minute rest before changing anything, then add reserved water only while the dough remains stretchy and cohesive.

Focaccia dough in the same glass bowl immediately after mixing and again after a 20-minute rest, looking more unified.
A short rest makes rough dough more connected before extra water is added, so hydration is easier to judge afterward.

2. Give It One Quick Fold

Wet one hand, lift an edge until you meet a little resistance, fold it toward the center, rotate the bowl and repeat around the remaining sides.

About 30 seconds is enough. Cover the bowl and leave it at room temperature for another 30 minutes. The surface should begin to look smoother and the mass more relaxed; it doesn’t need to grow dramatically.

From here, time does most of the work.

A hand lifting and stretching sticky focaccia dough in a glass bowl before folding it toward the center.
This quick fold is not kneading; it simply gives wet dough more organization with very little handling.

3. Cold Ferment

Cover the bowl airtight and refrigerate. Plan around 24 hours. The normal flexible window is 18–36 hours.

This assumes a properly cold refrigerator around 37–40°F / 3–4°C. A warmer fridge moves fermentation faster; a very cold one may leave the dough looking surprisingly quiet.

With a genuinely cold refrigerator and dough that looks strong, the ferment can sometimes stretch toward 48 hours. Think of that as an extension, not a target.

Keep the bowl well covered so the surface stays supple and doesn’t develop a dry skin.

A modest refrigerator rise is fine. The warm pan proof is where a quiet-looking dough often becomes much more visibly aerated.

Two bowls of refrigerated focaccia dough showing modest expansion in one and more bubbles and volume in the other.
Cold dough looks quieter and firmer, so judge it again after warming in the pan before assuming fermentation failed.

When the dough comes out, the job changes: you have built the air; now you want to preserve it.

Want Focaccia for Dinner? Here’s a Simple Timeline

Suppose you want to eat around 7 p.m. on Saturday. This schedule gives the dough roughly 19 hours in the refrigerator, comfortably inside the flexible 18–36-hour range.

  • Friday around 7 p.m.: mix, rest and fold.
  • Before 8 p.m.: cover and refrigerate.
  • Saturday around 2:30–3 p.m.: oil the pan and transfer the dough.
  • During the afternoon: let the final proof develop.
  • Around 6 p.m.: start preheating and check the dough.
  • When fully proofed: dimple, top and bake.

A warm kitchen may get there earlier; a cool one may need longer. The timetable plans dinner. The focaccia decides when it enters the oven.

Overnight focaccia timeline from Friday evening mixing through refrigeration, Saturday proofing, baking and dinner.
Plan backward from dinner and protect extra time for the final proof instead of trying to rush it.

Need focaccia today instead? Use the same-day route.

4. Prepare the Pan

Give a stick-prone metal pan a whisper-thin coat of butter or nonstick spray, then spread 45 ml / 3 tablespoons olive oil across the bottom and corners.

The oil is doing more than preventing sticking: against hot metal, it helps create the crisp, almost fried underside that makes this style of focaccia so satisfying.

5. Transfer Without Losing All That Air

Ease the chilled dough into the pan with wet or lightly oiled hands. Handle it gently. Those bubbles took hours to build.

Bubbly fermented focaccia dough being gently tipped from a glass bowl into an olive-oiled rectangular metal pan.
Fermentation has built gas worth keeping by now; let gravity and olive oil help move the dough instead of pressing it flat.

Stretch toward the corners until the dough begins pushing back, then stop.

Shrinking back? Wait 10–20 minutes, then try again. Relaxed gluten stretches far more willingly.

You don’t need to force every corner immediately. The final proof gives the dough more time to settle into the pan.

Three-stage guide showing focaccia dough resisting the pan corners, resting, then stretching farther after relaxing.
Forcing resistant dough can tear the surface and squeeze out gas; a short rest usually makes the next stretch easier.

6. Proof Until It Looks Full of Life

Ready focaccia looks visibly bubbly and wobbles softly when you nudge the pan.

This is where the visual cues matter more than the timetable. At 70–75°F / 21–24°C, start checking after about 2 hours; many batches need closer to 3–4 hours.

In kitchens warmer than about 75°F / 24°C, begin checking earlier. Above 80°F / 27°C, watch closely because the final proof can move quickly.

By the end, bubbles should be visible on or beneath the surface and the dough should feel light and relaxed. An almost comically bubbly pan is usually something to enjoy.

Close view of fully proofed focaccia dough filling a metal pan with a relaxed surface and many visible bubbles.
Watch the edges as well as the bubbles: relaxed dough settles toward the pan instead of pulling back.
Proof stateWhat you seeWhat to do
Needs longerTight surface, few bubbles, little wobble, still resisting the panKeep proofing
ReadyExpanded, relaxed, visibly aerated and softly wobblingDimple and bake
Probably too farVery fragile structure that loses substantial volume from gentle handlingHandle carefully and bake now
Three pans of focaccia dough showing underproofed, properly proofed and structurally weakened proofing stages.
Bubble count is not a proofing score; what matters is whether the aeration is still supported by soft, resilient dough.

Ready before dinner? Cover the pan and refrigerate it to slow fermentation until you are closer to baking.

Something looks wrong right now? Jump to Focaccia Rescue.

From here things move quickly: dimple, oil, salt, bake.

7. Dimple Deeply

While the proof finishes, preheat the oven for at least 30 minutes. In most ovens, moving the pan lower favors bottom browning; moving it higher favors the top.

Prepared focaccia in a rectangular pan placed on a lower-middle rack inside a home oven.
Pan color changes how rack position behaves; very dark metal may need an earlier underside check than lighter aluminum.

Oil your fingertips and press vertically through the dough until your fingers reach the pan. Make real dimples, but don’t drag sideways and flatten the trapped air.

A few large bubbles may pop. That’s fine. Dimpling redistributes oversized pockets and creates craters where the olive oil can collect.

A well-proofed dough feels wonderfully soft here—your fingers sink through, the surface rises around them and the pan finally starts looking unmistakably like focaccia.

Fingertips pressing vertically into soft, bubbly focaccia dough to make deep dimples in the pan.
Spread the presses across the pan rather than chasing the biggest bubbles; this keeps dimpling even without flattening the dough.

8. Add Olive Oil, Salt and Rosemary

Drizzle over the remaining 30 ml / 2 tablespoons olive oil, letting some collect in the dimples.

Add a light, even scattering of flaky salt. If using rosemary, press the leaves lightly into the oil so exposed tips are less likely to scorch.

Close-up of raw dimpled focaccia dough with olive oil pooled in the indentations, rosemary and flaky salt.
Olive oil settling into the dimples deepens browning and richness, while the raised dough stays softer and breadier.

9. Bake Until the Top and Bottom Agree

Bake for about 22–28 minutes. Rotate the pan once after the loaf has set if your oven has an obvious hot side.

As it gets close, the kitchen should smell of toasted bread, warm olive oil and rosemary. Slide a thin spatula under an edge and look underneath.

The top is the tempting part to trust. Lift an edge anyway. A beautiful golden surface does not guarantee a crisp bottom.

If the top is darkening faster than the base, move the pan lower and shield the surface loosely with foil if needed. A well-browned underside with a pale top calls for a brief finish higher in the oven.

Doneness guide comparing a golden focaccia top with a pale underside and a properly deep-browned underside.
If the top consistently outruns the base, treat it as a heat-balance problem rather than baking until the center dries.

Not sure whether it is finished? Use the doneness guide below.

10. Protect the Crust You Just Made

Let the focaccia sit in the pan for 3–5 minutes, then move it to a wire rack.

Hot bread keeps releasing steam. Trapped underneath, that steam can soften a crisp base surprisingly quickly.

Give the crumb another 15–20 minutes before slicing if you want the cleanest texture. By then the base should feel firm and lightly crackly while the middle remains tender.

Baked rosemary focaccia cooling on a wire rack with part of its crisp golden-brown underside visible.
A plate or board can trap steam beneath hot focaccia; airflow underneath helps preserve the crisp base.

Back to Recipe ↑ · Back to Quick Answer ↑

How to Know When Focaccia Is Done

Focaccia is done when the top is deeply golden, the edges and underside are crisp and browned, and the center is set without a gummy band.

Use the whole loaf instead of chasing one magic thermometer reading.

  • Top: deeply golden and dimpled, not pale blond.
  • Edges: browned and crisp.
  • Bottom: golden-brown, firm and crisp, never pale or steamed.
  • Center: set and springy without a wet gummy band.
  • Crumb: moist and tender with irregular holes of different sizes.
Guide showing golden top, crisp edges and browned underside before removal, then set center and airy crumb after slicing.
Top, edges and underside decide when the focaccia leaves the oven; center and crumb confirm the bake after resting. No mid-bake slicing needed.

One enormous social-media bubble is not required. Excellent focaccia can have small, medium and large pockets; what matters is a light, open crumb.

Close-up of sliced rosemary focaccia showing a moist crumb with small, medium and larger irregular air pockets.
Look at the walls between the holes as well as their size: an open crumb should look set, springy and fully baked.

Crispy is not the same as hard. The crust should crackle and then give way to a soft center.

If the center is fully cooked but the base needs only a little more crispness, remove the focaccia from its pan and return it directly to the oven rack for a few minutes. With an already-dark top, switch the oven off while the underside dries. A genuinely pale, underbaked base needs the oven left on and close attention.

Comparison of fully cooked focaccia with a browned but soft bottom and focaccia with a pale underbaked bottom.
A browned-but-soft base needs drying; a genuinely pale base still needs baking. They are different problems.

If the same crust or center problem keeps returning, jump to baking troubleshooting.


Focaccia Rescue: What to Do Right Now

This is the fast version for when you are already standing in the kitchen. Find what you see and keep moving.

Rescue guide for focaccia dough that resists stretching, rises slowly, proofs early, forms huge bubbles or browns too fast.
Most rescue moves buy time or preserve structure; few mid-process problems improve with sudden additions of flour or water.
What happened?Can I keep going?Do this now
Forgot the foldYesContinue with the cold ferment.
Dough is extremely stickyUsuallyIf it is cohesive and stretchy, use wet or oiled hands and continue.
Dough won’t reach the cornersYesRest 10–20 minutes, then stretch again.
Barely rose in the refrigeratorYesContinue to the warm pan proof.
Dough looks huge in the refrigeratorYesPan it earlier and shorten the final proof.
Dough is ready hours before dinnerYesCover and refrigerate the pan.
There are enormous bubblesYesRedistribute only the biggest balloons while dimpling.
Dough seems slightly overproofedUsuallyHandle gently and bake now.
Surface has begun to dryUsuallyRestore an airtight cover and handle the skin gently.
Top is getting dark too quicklyYesShield loosely with foil and keep baking.
Bottom is pale near the endYesMove lower or finish the cooked loaf briefly outside the pan.

Need It Today? Make Same-Day Focaccia

Allow roughly 4–6 hours from mixing to serving, depending on room temperature and fermentation speed.

The overnight recipe remains the master method. For same-day focaccia, only three things change:

  • Yeast: increase from 4 g to 6 g instant yeast.
  • Folds: use two quick folds about 20 minutes apart. If the dough still spreads like batter with very little structure after the second, give it one more fold 20 minutes later.
  • Fermentation: replace the overnight cold ferment with a warm bulk rise around 75–79°F / 24–26°C until the dough looks substantially larger and clearly aerated, commonly about 1½–2½ hours.

The pan, final-proof cues, dimpling and baking stay the same. After bulk fermentation, transfer to the prepared pan and proof until soft, bubbly and lively, commonly another 1–2 hours.

The flavor is a little younger than the overnight loaf, but warm from the oven with crisp edges and olive oil shining in the dimples, it hardly feels like a compromise.

Same-day focaccia guide showing 6 grams of yeast, two bowl folds and warm bulk fermentation in a covered glass bowl.
Warm fermentation makes room temperature more influential, so start checking early even though the readiness cues stay the same.

Back to the main recipe ↑

Can I Use a Different Pan?

Use the full recipe in a 9 × 13-inch pan for the reference thickness. Spread the same batch across a 13 × 18-inch half sheet when you intentionally want much thinner, crisper focaccia.

Side-by-side rosemary focaccia showing a thicker 9 by 13 version and a thinner 13 by 18 sheet-pan version.
A 13×18 half-sheet has twice the area of a 9×13 pan, so the same dough starts at roughly half the depth.

To keep roughly the same thickness as this 9 × 13-inch loaf in another pan, aim for about 8 g dough per square inch of pan area.

You don’t need to calculate it yourself. This recipe produces roughly 915–935 g dough before the pan and topping oil are added.

PanApproximate dough amountResult
9 × 13 inFull recipeReference thickness
12-inch roundFull recipeVery similar, slightly thicker
Two 8-inch roundsFull recipe divided between themAbout 15–17% thicker before baking
10-inch skilletAbout two-thirdsClose to reference thickness
9 × 9 inAbout 70%Close to reference thickness
8 × 8 inAbout 55%Close to reference thickness; 50% is slightly thinner
13 × 18 in half sheetFull recipeMuch thinner and crisper
Pan-size guide showing dough amounts for a 9 by 13 pan, round pan, skillet and smaller square pans using about 8 grams per square inch.
A 12-inch round and a 9×13 pan have almost the same area, so the full batch gives a similar dough depth.

Different shapes with similar dough depth should bake in roughly the same neighborhood. Thin focaccia finishes faster; a substantially deeper loaf needs more time through the center.

Focaccia Toppings That Bake Well

Once you know the basic dough, toppings are where focaccia becomes endlessly adaptable.

Wet toppings such as juicy tomatoes, mushrooms and watery vegetables can slow browning or leave damp patches. Drain them well, roast them first or use less.

For pizza-style focaccia, keep the tomato layer restrained and thick enough to cling without soaking into the dough. Our pizza sauce recipes go deeper into sauces designed to stay where you put them.

Heavy toppings—large amounts of cheese, olives or vegetables—can press down the dough. Scatter rather than blanket.

Burn-prone toppings such as thin garlic and delicate herbs may become bitter before the bread is done. Press them into oily dimples, add them partway through baking or finish afterward.

Topping guide grouping tomatoes and mushrooms as wet, cheese and olives as heavy, and garlic and herbs as burn-prone.
Toppings bake better when excess moisture, weight and burn risk are managed before they reach the oven.

A spoonful of basil pesto after baking adds fresh basil, garlic and olive oil without scorching the herbs.

For your first loaf, rosemary and flaky salt are still hard to beat. They let you taste what the focaccia itself is doing.

What About Traditional Focaccia Brine?

Some classic Genoese focaccia methods use a mixture of water and olive oil over the dimpled surface before baking, allowing the liquid to collect in the craters.

The treatment creates a characteristically moist, salty top and helps explain why focaccia Genovese can feel quite different from the thicker, open-crumb version on this page.

This loaf uses olive oil and finishing salt without that extra water treatment. If you want to see a traditional Genoese bakery method in context, La Cucina Italiana’s focaccia from Genoa shows the water-and-oil finish and a much hotter, faster regional bake.

How to Serve Focaccia

Warm focaccia rarely needs a formal plan. Put good olive oil on the table and pieces have a habit of disappearing.

The open crumb is excellent beside soup because it catches broth while the browned edges keep some bite. Try it with our tomato basil soup for an easy tomato-and-herb dinner.

For an appetizer, cut the bread into strips and serve it with olives and hummus without tahini. The crisp edges are particularly good for dipping.

Thicker pieces make excellent sandwiches once completely cool. Split them horizontally with a serrated knife so the airy crumb stays intact instead of being compressed from above.

Rosemary focaccia served with olive oil and tomato soup, with one piece split and filled as a sandwich.
Cut strips for dipping; keep larger pieces for sandwiches so the airy crumb stays resilient around the filling.

How to Store, Freeze and Reheat Focaccia

Focaccia is at its best the day it is baked, while the contrast between crisp crust and tender center is strongest.

Cool plain focaccia completely before wrapping or placing it in an airtight container. At room temperature, it is best within about 1–2 days. Refrigerate leftovers topped with cheese, meat or another perishable ingredient.

For longer storage, cut the cooled loaf into practical portions, wrap or seal them airtight and freeze for up to 1 month for best quality.

How to Make Focaccia Crispy Again

  • One or two pieces: about 5–8 minutes at 375°F / 190°C.
  • A larger slab: roughly 10–15 minutes at 375°F / 190°C, until crisp outside and hot through the middle.
  • From frozen: reheat directly from frozen and allow a few extra minutes.

The microwave warms focaccia but does very little for the underside. Dry oven heat is what brings the crackle back.

Three-stage guide showing focaccia cooling on a rack, portioned in a freezer container, and reheated in the oven.
Freeze smaller portions so you can restore crispness later without reheating the rest of the loaf.

Focaccia Troubleshooting: Why It Happened

The rescue table gets you through the current batch. This section explains what the result can tell you about the next one.

Dough, rise and crumb problems

Start by deciding whether the dough lacked gas, lost structure or simply spread too thin; those clues point toward different causes.

Troubleshooting guide comparing dense crumb, flat focaccia, overly loose dough, quiet warm-proofed dough and weakened bubbly dough.
Change one variable at a time; the failure pattern usually points toward hydration, fermentation, proofing or pan depth.

Why Is My Focaccia Dense?

A tight, dense crumb usually points to insufficient fermentation or final proof.

Think back to the dough just before it went into the oven. A tight surface with few bubbles needed more time. Dough that became extremely inflated and then collapsed tells a different story: fermentation probably outran its ability to hold the gas. A wet, gummy center points more toward baking than proofing.

Why Is My Focaccia Flat?

First check the pan size. A full batch spread across a large sheet tray will naturally bake much flatter than the same dough in a 9 × 13-inch pan.

If pan size wasn’t the issue, look next at fermentation, flour strength and handling. Too little fermentation, collapse after an overlong proof, weak flour or rough handling can all reduce height.

Why Did My Focaccia Dough Turn Soupy?

Dough that flows with little structure after its rest has probably exceeded what that flour can comfortably absorb—or a measurement went wrong.

On the next batch, begin at the 400 g water base and add the reserve only while the dough stays cohesive. Trying to rescue an overly loose dough with a large late addition of flour usually creates a different texture altogether.

Why Didn’t My Focaccia Rise?

A quiet refrigerator alone proves very little. If the dough stays inactive even after plenty of warm proofing, check the yeast, water temperature and room temperature.

Old yeast, excessively hot mixing water, a very cold room or a measuring error are the first places to look. Judge the dough after it has had a fair chance to warm before deciding the cold ferment failed.

Did I Overproof My Focaccia?

Bubbles aren’t the warning. Loss of structure is.

Dough that deflates dramatically from gentle handling and struggles to retain gas has probably gone farther than ideal. Next time, bake sooner or refrigerate the pan once it reaches that bubbly, softly wobbling stage.

Crust, pan and baking problems

Here, the location of the failure matters: the underside, center, pan contact and cooling environment each point you toward a different fix.

Troubleshooting guide showing pale, burnt, dry, gummy, sticking and steam-softened focaccia baking problems.
Identify the visible symptom first; the sections below explain the likely cause and next-batch fix.

Why Is the Bottom Pale or Soggy?

Start with three things: pan material, rack position and bake time.

Metal browns the base more efficiently than glass or ceramic, and a lower rack generally gives the underside more help. A deeper loaf or moisture-heavy toppings may simply need longer. Once baked, move the focaccia to a rack before trapped steam softens the crust.

Why Did the Bottom Burn Before the Middle Was Done?

The bottom heat was too aggressive for that pan and loaf thickness.

Very dark metal, a rack close to the lower heating element or an oven running hotter than its display can all make the underside race ahead. Next time, move the rack up one level and start checking sooner.

Why Is My Focaccia Hard Instead of Crisp?

Hard focaccia has usually dried too much before the crust browned efficiently. A thoroughly preheated oven and conductive pan create the contrast you want: crackly outside, soft inside.

Why Is the Middle Gummy?

A gummy center usually means the loaf needed more baking for its actual thickness.

Before changing the formula, compare the pan with the reference 9 × 13-inch size. A smaller pan makes a deeper focaccia, while glass, ceramic and wet toppings can leave the center lagging behind the top. Also give a high-hydration loaf a short rest before judging the crumb; cutting immediately can make a properly baked center look wetter than it will twenty minutes later.

Why Did My Focaccia Stick Even With Olive Oil?

Oil can’t compensate completely for a pan surface that consistently grabs bread. Crust development matters too.

When the same pan causes trouble repeatedly, give it a very thin butter or nonstick-spray layer beneath the olive oil on the next batch.

Why Did My Crisp Focaccia Turn Soft?

Steam is usually the culprit. Move the hot loaf to a rack promptly and cool it fully before wrapping. A few minutes of dry oven heat will restore much of the crackle later.


Once You Know What to Look For

The first batch can make wet focaccia dough feel strange. Then you watch it change: a sticky bowl becomes stretchy, the pan fills with trapped air, your fingers sink into the proofed surface, and eventually a browned loaf comes out with a crisp underside that crackles under the knife.

After that, the dough feels much less mysterious. You are no longer trying to make every batch obey an exact clock; you know which signs actually matter.

And if the loaf comes out a little lower, darker or less dramatically bubbled than the one you imagined, serve it warm anyway. Good focaccia has a generous margin for imperfection.

If you make this focaccia, tell us which flour you used, whether you needed the final 20 g water, and roughly how warm your kitchen was. Those three details help the next baker too.

Back to Recipe ↑ · Back to Quick Answer ↑

Posted on — 2 Comments

Gluten Free Sourdough Bread Recipe

Gluten free sourdough bread recipe loaf in a pan with sliced crumb visible.

A good gluten free sourdough bread recipe should give you a loaf that feels properly baked, slices cleanly, and tastes like real bread rather than a compromise. This version is built as a loaf-pan, psyllium-supported, custom-blend method because that is the most dependable way to get structure, flavor, and repeatable home results without asking the dough to behave like a dramatic free-form boule.

Gluten free sourdough can still be frustrating, though. Some loaves bake up dense, some stay gummy in the middle, and some look promising right until you cut into them too early. So this guide does more than hand you a formula. It shows you what the dough should look like, how to judge the starter, when to move forward, and what to fix if the loaf falls short.

If your culture still feels unpredictable, pause and strengthen that first with the sourdough starter guide before you bake a full loaf. A better starter solves more problems than most flour tweaks ever will.

Quick Answers for This Gluten Free Sourdough Bread Recipe

Best default route: custom flour blend, active starter, loaf pan. This is the safest place to start.

Best pan: an 8½ x 4½-inch loaf pan. It gives the most forgiving path to a well-set loaf.

Main proof cue: bake when the loaf looks modestly puffy and lighter than before, not dramatically doubled.

Main bake cue: the loaf should reach about 205°F to 210°F internally and look fully set, not pale and soft.

Expected dough feel: soft, sticky, cohesive, and more like a sculptable paste than kneadable wheat dough.

Biggest mistake: misreading a soft dough as “wrong” or slicing too early and blaming the recipe for a crumb that has not finished setting.

Also Read: Sourdough Focaccia Recipe

Who This Loaf Is For

  • Best for: readers making their first serious gluten free sourdough loaf and wanting a dependable pan bread for toast, sandwiches, and everyday slicing.
  • Best for: bakers who want visible dough cues, practical proofing guidance, and a method that prioritises consistency over drama.
  • Less ideal for: anyone chasing a lofty free-form artisan boule on the first try. This method is built around reliability first.

Tested direction: this loaf is written for an 8½ x 4½-inch metal loaf pan, whole psyllium husk, and a 100% hydration gluten free starter, with room-temperature fermentation in a normal home oven.

What Kind of Gluten Free Sourdough Bread to Expect

This loaf is meant to give you bread that feels genuinely useful at the table: a crust that looks properly baked, a crumb that stays moist without turning pasty, and slices sturdy enough for toast, sandwiches, or simple buttered bread. The sourness is usually present but not aggressively sharp, especially if your starter is healthy but your fermentation stays moderate.

It also helps to set one expectation early. This is not wheat dough, and it is not trying to behave like wheat dough. The loaf usually rises more modestly, the dough stays softer, and the best texture often shows up only after the bread has cooled completely. In many kitchens, day-two slices toast especially well.

Finished gluten free sourdough loaf with a moist crumb, clean slices, and a toasted slice, showing the everyday texture and use this bread is meant to have.
This gluten free sourdough is meant to bake up with a moist, properly set crumb and slices that work well for toast or everyday sandwiches, so this image shows the kind of loaf you should expect rather than a dramatic wheat-style boule.

Why Gluten Free Sourdough Bread Behaves Differently

In wheat sourdough, gluten gives the dough much of its stretch, gas-holding power, and structural resilience. Once fermentation begins, that network helps the loaf expand and keep shape. Gluten free dough does not have that advantage, so the bread has to build structure another way.

That does not mean a good rise is impossible. It means the loaf depends more heavily on flour balance, hydration, starter activity, binder support, proofing, and bake setup. As a result, gluten free bread tends to reveal mistakes faster. If the starter is weak, the dough is too tight, the hydration is too high for the blend, or the loaf is underbaked, the crumb usually tells on you.

That is why it should not be judged against wheat-dough cues. The dough often looks softer. The rise can be subtler. The shaping is gentler. The success markers are different.

For readers who want a quick refresher on the bigger picture, MasalaMonk’s what gluten is explainer makes the rest of this loaf easier to understand.

Structure comes from hydration, fermentation, and binders

Once gluten is out of the picture, hydration starts doing far more than people expect. Water is not just there to bring the dough together. It helps the flours absorb fully, supports fermentation, activates psyllium, and shapes the final crumb.

Fermentation matters just as much. A lively starter does more than add tang. It lightens the dough, brings internal aeration, and gives the loaf a better chance of baking into something open enough to feel like bread rather than a dense substitute.

Then there is the binder. In this loaf, psyllium husk is the quiet structural engine. When hydrated properly, it creates a gel that helps hold water, improves cohesion, and supports gas retention. It does not recreate gluten, yet it does give the dough enough internal support to rise and set more convincingly.

Gluten free dough should not feel like wheat dough

This is one of the most important mindset shifts in the whole recipe. Gluten free sourdough dough often feels softer, stickier, and more paste-like than wheat dough. That can be completely normal.

The best mental model is this: think sticky, sculptable paste rather than kneadable wheat dough. After mixing, it should not run like batter, yet it should not feel firm enough to knead confidently either. This is exactly where many readers panic and start adding flour they did not need.

The opposite mistake happens too. Some readers assume a very loose dough must be right because gluten free dough is “supposed to be wet,” and they end up with more hydration than the flour system can hold. So the goal is not to force this dough into a wheat template. The goal is to learn what it looks like when it is on track, then trust those cues.

What success looks like

A successful loaf is not defined by one dramatic sign. It is a combination of smaller, more dependable ones.

Before baking, the dough should look more aerated and lighter than it did after mixing. It may not double dramatically, and that is fine. After baking, the loaf should feel set rather than damp and heavy. The crumb should be moist but not wet, tender but not fragile, and structured enough to slice without tearing into paste. Finally, the flavor should have real development. Even a mild loaf should taste deeper than a fast yeast bread made from the same flour.

That is the standard here: not “good for gluten free,” but genuinely good bread.

Also Read: Easy English Scone Recipe

Choose the Right Flour Path for Gluten Free Sourdough Bread

Gluten free sourdough recipes vary widely because they often start from very different flour systems. Some use a 1:1 blend for convenience. Others build a custom blend for control. Both routes can work. They simply reward different priorities.

Comparison guide for gluten free sourdough bread showing 1:1 flour blend versus custom blend, with the 1:1 route framed as easier to start and the custom blend framed as offering more control.
Choosing between a 1:1 blend and a custom mix changes how predictable your dough feels, so this side-by-side guide helps you decide whether you want maximum convenience or better control before you start baking.

Route A: Use a 1:1 blend for convenience

A 1:1 gluten free flour blend is the easier place to start. It cuts down the shopping list, simplifies measuring, and gets you to mixing faster. For some readers, that simplicity matters enough to make it the right choice.

Even so, convenience comes with trade-offs. One 1:1 blend may absorb water beautifully. Another may turn gummy with the same hydration. Some contain gums already. Others lean starch-heavy and stay pale or under-set unless everything else is dialed in. The first thing that usually shifts is hydration and handling, which is why a dough made with one blend can feel noticeably different from the same formula made with another.

Route B: Use a custom blend for more control

A custom blend asks more from you at the start, yet it gives more control in return. You can decide how much whole-grain body, softness, absorbency, and starch support the loaf gets instead of inheriting a generic mix with unknown priorities.

That matters in sourdough because fermentation interacts with each flour differently. One flour may add flavor but weigh the loaf down when overused. Another can make the dough feel stronger. Others tighten more during resting than readers expect. A custom blend turns those variables into recipe decisions instead of accidental surprises.

Which route this recipe uses

This recipe uses a custom blend as the default because it produces a more dependable, brand-agnostic result. It also makes the dough cues easier to teach. When I tell you what the dough should feel like after mixing, after resting, or after proofing, those cues mean more when the flour system is built deliberately rather than borrowed from an unknown premade blend.

That does not mean you cannot adapt this loaf to a 1:1 blend later. It means the cleanest way to learn the method is to make it once as written in a loaf pan, then adjust from there once you understand how the dough should behave.

Also Read: White Russian Recipe: 7 Variants to Try, From Classic to Frozen

Ingredients That Matter Most in Gluten Free Sourdough Bread

In a strong gluten free sourdough loaf, some ingredients build structure, some drive fermentation, and some only refine the final result. Knowing which is which makes substitutions much safer.

Ingredient roles card for gluten free sourdough bread showing how brown rice flour, sorghum flour, tapioca starch, potato starch, psyllium husk, starter, water, salt, olive oil, and optional honey or maple syrup support the loaf.
A good loaf comes from balance: the whole-grain flours build body, the starches lighten the crumb, psyllium holds moisture, and the starter brings the lift and tang that make the bread feel alive.

The flour blend

This loaf uses brown rice flour, sorghum flour, tapioca starch, and potato starch.

Brown rice flour gives dependable everyday structure without pushing the flavor too dark. Sorghum adds more character and helps the bread taste like bread instead of starch. Tapioca starch adds flexibility and tenderness, which helps keep the crumb from feeling rigid once cooled. Potato starch softens the blend further and supports a lighter eating texture.

The ratio matters. Too much whole-grain flour and the loaf can turn heavy. Too much starch and the crumb can become too soft or stay under-set in the middle. The point of this blend is balance: enough body to taste satisfying, enough lightness to avoid density, and enough structure to slice well.

The starter behind a good loaf

The starter is both the flavor engine and the lift source. In gluten free sourdough, that matters even more because the dough has fewer structural advantages to hide a weak culture.

A strong starter helps lighten the dough, deepen the flavor, and create the internal activity that keeps the loaf from baking into a compact block. A sluggish starter often leaves readers adjusting proof times, flour amounts, and oven settings when the real problem was the culture from the start.

For this loaf, use an active 100 percent hydration gluten free starter that has clearly risen after feeding, shows bubbles throughout the jar, and smells pleasantly sour rather than harsh. If your culture still feels inconsistent, go back to the sourdough starter guide before changing the bread formula.

Hydration

Hydration shapes nearly everything here. It influences how the flours absorb, how psyllium sets, how fermentation moves through the dough, and whether the crumb bakes up moist or gummy.

Because gluten free flour systems vary so much, hydration is never one-size-fits-all. It also changes during resting. A dough that seems slightly soft right after mixing can become far better behaved after the flours and psyllium absorb water fully. On the other hand, a dough that already feels very stiff at mixing usually tightens more as it rests.

That is why this recipe includes a deliberate short rest before you judge the dough too harshly.

Psyllium husk

Psyllium is the structural key in this formula. Once hydrated, it helps the dough hold water, improves cohesion, supports gas retention, and makes the finished loaf much easier to slice cleanly.

Without enough binder support, a loaf may ferment and still spread too much, collapse, or cool into a crumb that feels wet and fragile. With a good psyllium gel, the dough behaves with much more confidence.

Because psyllium quality varies, color can vary too. Some brands produce a slightly darker or faintly purple-gray crumb. That can look strange the first time, but it does not automatically mean the loaf failed.

Salt and optional additions

Salt does more than season the loaf. It sharpens flavor and helps keep fermentation balanced. Without enough salt, the bread can taste dull even when the starter is healthy. Too much, on the other hand, can make the dough feel tighter and less balanced.

A little olive oil softens the crumb slightly and rounds out the eating texture. A small amount of honey or maple syrup can help with browning and add a little flavor depth. These are fine-tuning ingredients, though, not rescue ingredients. They only help once the flour, starter, hydration, and binder are already doing their jobs.

Also Read: Mango Sorbet Recipe: Healthy & Plant Based Dessert

Gluten Free Sourdough Bread Formula and Why It Works

This loaf is built around a simple but deliberate balance: enough whole-grain flour to taste like bread, enough starch to keep the crumb from turning heavy, and enough psyllium support to hold that hydration together in a loaf pan.

The full measured ingredient list appears in the recipe card, but the logic matters here just as much as the numbers. Brown rice flour gives dependable structure, sorghum brings more flavor, tapioca and potato starch keep the crumb lighter, and psyllium helps the dough hold moisture and slice cleanly once baked.

The water level is generous because gluten free sourdough needs more moisture than many readers expect, yet it is still restrained enough to work reliably in a loaf pan. That pan matters too. A free-form loaf or Dutch oven can work later, but the loaf pan is the smartest route when consistency is the priority.

Why this recipe is written in grams

This recipe is written in grams because gluten free flour blends vary too much by volume for cups to stay dependable. Measuring by weight gives you a far better shot at repeating the same dough texture, the same fermentation behavior, and the same loaf structure next time.

Equipment That Improves Your Gluten Free Sourdough Bread Results

You do not need a professional bakery setup to make good gluten free sourdough, but a few tools genuinely improve consistency.

A digital scale is essential, not optional. Gluten free flours vary too much by volume for cups to stay dependable. An 8½ x 4½-inch loaf pan is the most forgiving format for most readers because it supports the dough during proofing and baking. A Dutch oven can work, yet it asks more from the dough and from your handling. If your goal is a repeatable first success, the loaf pan is the smarter default.

Comparison guide showing loaf pan route versus free-form route for gluten free sourdough bread, with the loaf pan framed as more supportive and forgiving for beginners.
A loaf pan gives gluten free sourdough more support during proofing and baking, so this comparison helps show why it is the more reliable first choice before you move on to a less forgiving free-form loaf.

A sturdy spatula or dough whisk helps with mixing. A bowl scraper makes transfer neater. Most importantly, an instant-read thermometer gives you a much clearer finish line than crust color alone. Gluten free loaves can look done before the center has fully set, so temperature is one of the best protections against gumminess.

Essential tools guide for gluten free sourdough bread showing a digital scale, 8½ x 4½-inch loaf pan, instant-read thermometer, dough whisk, and bowl scraper.
Gluten free sourdough gets much easier to repeat when you rely on a scale, a loaf pan, and an instant-read thermometer, because those three tools do more for consistent mixing, proofing, and doneness than extra gear ever will.

Also Read: Protein Ice Cream Recipe: 10 Creamy Homemade Recipes

Starter Readiness for Gluten Free Sourdough Bread

“Use an active starter” sounds straightforward until you realize how loosely that phrase gets used. For this loaf, active needs to mean something visible.

Active gluten free sourdough starter in a glass jar with visible bubbles and rise.
A starter like this should look clearly risen and bubbly through the jar, because visible activity matters more than guessing whether it is “probably ready.”

What an active starter should look like

A ready starter should look aerated throughout the jar, not just bubbly on top. After feeding, it should rise clearly enough that you do not have to guess whether anything happened. If your starter usually doubles, great. If it does not fully double but reliably rises, loosens, and fills with bubbles after feeding, that can still be enough. What matters most is clear activity, not dramatic performance.

Visually, you want a jar that looks clearly lifted, bubbly through the middle rather than just foamy at the top, and still strong rather than flat or separated. If the top has fully collapsed and the starter looks slack, refresh it before baking.

A sourdough starter is a live culture of wild yeast and lactic acid bacteria, so visible rise, bubbles, and recovery after feeding matter more than starter myths or wishful thinking.

The best times to use it

There are three especially useful starter states to understand here.

Guide showing peak, just-past-peak, and not-ready gluten free sourdough starter in glass jars.
A gluten free starter can look active, usable, or still too weak within a fairly short window, so reading the jar correctly is often what separates a lively loaf from a disappointing one.
  • At peak: the starter has risen clearly, still looks domed or almost domed, and feels lively throughout. This is the easiest and safest state to use.
  • Just past peak: the starter still looks active and aerated, but the top may be starting to flatten slightly rather than sit high and rounded. This can still work very well, especially if it remains strong and bubbly.
  • Straight from the fridge: sometimes workable if the culture was strong before refrigeration, but far less dependable if there is any sign of weakness. When in doubt, refresh it first.

When your starter is not ready yet

What should make you stop? Weak bubbling, sluggish recovery after feeding, a starter that separates badly, or a culture that smells more harsh than pleasantly sour. In those cases, the problem is rarely the bread formula. The culture simply is not ready yet.

Also Read: Homemade Mango Ice Cream Recipe

Timing Framework: What This Process Usually Looks Like

Times vary by starter strength, room temperature, and flour behavior, so use these as orientation points rather than strict rules.

Timing framework guide for gluten free sourdough bread showing mix dough, rest, bulk ferment, pan and smooth, final proof, bake, and cool completely.
A good gluten free sourdough loaf gets easier to manage when you can see the full rhythm of the bake, so this timeline helps you plan the day from mixing and proofing through baking and full cooling.

Warm kitchen: roughly 26°C to 28°C / 79°F to 82°F

If your kitchen runs warm, bulk fermentation may move along in about 3 hours, and the final proof may be ready in roughly 1 hour. Watch the dough closely so it does not overproof.

Moderate kitchen: roughly 22°C to 24°C / 72°F to 75°F

In a moderate room, bulk fermentation often lands around 4 to 5 hours, with a final proof of about 1 to 2 hours.

Cooler kitchen: roughly 18°C to 20°C / 64°F to 68°F

If your room runs cool, bulk fermentation may need 5 to 6 hours or even a bit more, and the final proof may take closer to 2 hours.

Optional overnight route

For a slightly more developed flavor, you can refrigerate the shaped loaf after a modest room-temperature start to the final proof, then bake the next day once it no longer feels cold and inert. This is best used after you have already made the loaf once and understand what the dough looks like when it is on track.

Also Read: Cookie Pie Recipe: 10 Best Flavors, Fillings and Variations

Ingredients for This Gluten Free Sourdough Bread Recipe

Before you start mixing, gather everything first. This loaf uses a custom flour blend, active starter, psyllium husk, water, salt, olive oil, and an optional small amount of honey or maple syrup. For the full recipe card with yield, timing, and notes, you can also jump to the recipe card here.

One-glance formula snapshot

  • Pan: 8½ x 4½-inch loaf pan
  • Starter: active gluten free starter at 100% hydration
  • Expected dough feel: soft, sticky, cohesive, and smoothable
  • Bake target: 205°F to 210°F internal temperature
  • Proof target: modestly puffy and lighter than before, not dramatically doubled
  • Cooling minimum: 3 to 4 hours before slicing
Labeled ingredients for gluten free sourdough bread including brown rice flour, sorghum flour, tapioca starch, potato starch, psyllium husk, starter, salt, water, olive oil, and honey.
This loaf works best when the flour blend, psyllium, starter, and hydration are treated as a system, which is why getting the ingredients lined up correctly matters before you start mixing.
  • 150 g active gluten free sourdough starter, 100% hydration
  • 220 g brown rice flour
  • 120 g sorghum flour
  • 80 g tapioca starch
  • 40 g potato starch
  • 14 g whole psyllium husk
  • 10 g fine sea salt
  • 430 g warm water
  • 15 g olive oil
  • 10 g honey or maple syrup, optional

How to Make Gluten Free Sourdough Bread Step by Step

Step 1: Make the psyllium gel

Whisk the warm water and psyllium husk together in a medium bowl. Leave it for 2 to 3 minutes until it thickens into a gel.

Psyllium husk gel for gluten free sourdough bread thickened in a bowl before mixing
Psyllium should look thickened, cloudy, and easy to whisk through at this stage, because that hydrated gel is what helps the dough hold water and bake into a loaf that slices more cleanly.

This step does more than hydrate the binder. It helps distribute psyllium evenly through the dough, which improves cohesion and reduces the chance of dry patches later.

The gel should look thickened but still stirrable. It should not look watery, yet it should not feel like a solid rubber mass either.

Step 2: Mix the dough

In a large bowl, whisk together the brown rice flour, sorghum flour, tapioca starch, potato starch, and salt. Add the psyllium gel, active starter, olive oil, and optional honey or maple syrup. Mix thoroughly until no dry pockets remain.

At this stage, the dough should look sticky, soft, and cohesive. Think thick, supple paste leaning toward very soft dough rather than anything you would knead like wheat bread. It should hold together, but it should not feel firm.

Gluten free sourdough dough after mixing in a bowl with soft sticky texture.
Right after mixing, the dough should look soft, sticky, and cohesive, so this is the stage where adding extra flour too quickly usually does more harm than good.

If it resists mixing and feels stubbornly tight, it is probably too stiff already. If it pours or sloshes like batter, it has likely gone too far in the wet direction.

Step 3: Rest the dough

Cover the bowl and leave the dough for 15 to 20 minutes. This short rest gives the flours and psyllium time to absorb water more fully before you judge the texture.

After resting, the dough should feel smoother, more organised, and slightly stronger. It should still be soft, but it should no longer feel shapeless. This is often the point where readers realise the dough was not “wrong” after all; it simply needed time to hydrate.

Gluten free sourdough dough after resting in a bowl with smoother more settled texture.
After the short rest, the dough should still look soft, but it should feel more settled and slightly better organised than it did right after mixing.

If it becomes dramatically tighter than expected, add a small splash of water. If it still looks unusually loose, continue with the loaf-pan format and note that the blend may need slight adjustment next time.

Step 4: Bulk ferment

Leave the dough covered at room temperature until it looks visibly aerated and somewhat lighter. In many kitchens this takes 3 to 5 hours, but room temperature and starter strength matter more than the clock.

You are not waiting for dramatic doubling. Instead, look for a dough that seems about 50 to 75 percent more lively rather than massively larger. It should look puffier, hold a bit more internal air, and feel less heavy than when it started.

Gluten free sourdough dough after bulk fermentation looking lighter and more aerated in a bowl.
After bulk fermentation, the dough should look a little lighter and more aerated, but not dramatically doubled the way wheat dough often does.

If the dough still looks almost exactly the same several hours later, the starter is usually the first thing to question.

Step 5: Transfer to the pan

Scrape the dough into a parchment-lined or well-greased loaf pan. Smooth the top with wet fingers or a spatula. Add seeds on top here if you want them.

Gluten free sourdough dough smoothed into a loaf pan before final proof.
Once the dough is in the pan, it should still look soft and hydrated, but the pan gives it the support that makes this loaf much easier to handle well.

This is not a dramatic shaping step. You are guiding the dough into place and preserving whatever lightness fermentation created. Gluten free sourdough rewards calm handling more than aggressive shaping.

The dough should smooth willingly, even if it remains soft. It should not fight you like stiff dough, and it should not look like it has no internal support at all.

Step 6: Final proof

Cover the pan and let the loaf proof until it looks slightly expanded, a little airy, and visibly lighter than when it first went into the pan. In many kitchens this takes about 1 to 2 hours.

What does ready look like? The loaf should seem modestly puffed, not dramatically tall. The surface should look a little more alive, and if you gently touch it, it should not feel dense and immovable. What you are chasing here is a loaf that looks ready, not maxed out.

Proofed gluten free sourdough loaf in a loaf pan ready to bake.
A properly proofed loaf should look lightly puffed and a little more alive, not dramatically doubled or fragile.

Bake now if: the loaf looks modestly puffed, lighter than before, and softly aerated without seeming fragile.

Wait longer if: it still looks dense, heavy, flat, or almost unchanged from when it first went into the pan.

You have probably gone too far if: it starts looking fragile, overexpanded, or slightly unstable, as though it might sink rather than hold itself.

Step 7: Bake

While the loaf proofs, preheat the oven to 230°C / 445°F.

Bake the loaf for 20 minutes at 230°C / 445°F. Then lower the oven to 210°C / 410°F and bake for another 35 to 45 minutes, until the crust is deep golden and the internal temperature reaches about 96°C to 99°C / 205°F to 210°F.

Freshly baked gluten free sourdough loaf in a metal loaf pan with deep golden crust.
A fully baked loaf should look well set and deeply golden in the pan, because crust color and internal temperature together tell you much more than color alone.

If the top darkens too quickly, tent it loosely with foil during the second part of the bake.

The loaf should look fully set when done, not pale and soft. It should also feel lighter than a wet, underbaked loaf of the same size. When you tap the top gently, it should feel firm rather than damp and delicate.

Step 8: Cool completely

Leave the loaf in the pan for about 10 minutes, then move it to a rack and cool completely, ideally for at least 3 to 4 hours.

Gluten free sourdough loaf cooling on a wire rack after baking.
Cooling is part of the bake, so letting the loaf rest fully on a rack helps the crumb finish setting before you slice into it.
Crumb guide for gluten free sourdough bread comparing a properly set loaf, a gummy underbaked loaf, and a dense tight loaf.
A good gluten free sourdough crumb should look moist and tender rather than wet or tight, so this side-by-side guide helps you tell the difference between a properly set loaf, a gummy center, and a denser result.

This is not a fussy extra step. Cooling is part of the bake. Slice too early and even a properly baked loaf can seem falsely gummy because the crumb has not finished setting.

Fully cooled gluten free sourdough bread sliced to show a moist tender crumb.
Once the loaf has cooled fully, the crumb should look moist, tender, and properly set, with slices that hold together cleanly instead of turning gummy or pasty.

Also Read: Punjabi Mutton Bhuna – Amritsari Village-Style Gosht Recipe

What Gluten Free Sourdough Bread Dough Should Look Like at Every Stage

Timing helps, yet appearance and feel matter more.

Visual guide showing gluten free sourdough dough from mixing through ready-to-bake stage.
Gluten free sourdough usually changes more through texture, structure, and slight puffing than through dramatic rise, which is why these stage cues are more useful than the clock.
  • After mixing: the dough should look fully hydrated, sticky, and cohesive. It should not have dry flour pockets. It should not pour like cake batter either.
  • After the short rest: the dough should feel smoother, slightly stronger, and more organised. It should still be soft, but less sloppy than it looked at first.
  • During bulk fermentation: look for dough that seems lighter, more aerated, and a little puffy rather than one that is simply sitting in the bowl unchanged.
  • Ready to proof in the pan: after transfer, the surface should smooth out easily. The dough should still be soft, yet it should not look like it has no internal support at all.
  • Ready to bake: the loaf should look modestly expanded and clearly lighter than before. Think “puffy and ready,” not “maxed out and fragile.”
  • Fully baked and fully cooled: the crust should feel set. The loaf should not feel suspiciously heavy for its size. When sliced, the crumb should look moist and tender, not wet and sticky.

How to Tell If Gluten Free Sourdough Bread Needs More Proofing

Proofing is where many loaves succeed or fail, so it helps to separate the three most common states clearly.

Proofing guide for gluten free sourdough bread showing underproofed, ready-to-bake, and overproofed dough in loaf pans.
Gluten free sourdough is usually ready when the loaf looks modestly puffed and lighter than before, so this side-by-side guide helps you avoid baking too early or waiting until the dough turns fragile.
  • Underproofed: the dough still looks dense, heavy, and only faintly active. It may bake into a loaf with a tight crumb and weak lift.
  • Properly proofed: the loaf looks modestly puffy, lighter than before, and softly aerated without seeming fragile. This is the target.
  • Overproofed: the loaf starts to look too delicate, overexpanded, or a little unstable. It may sink, spread, or lose structure in the oven.

When in doubt, remember that gluten free sourdough usually rewards restraint. You are not waiting for an enormous rise. You are looking for a loaf that seems clearly more alive than before, but still stable.

Also Read: Peach Cobbler with Canned Peaches (Dessert Recipe)

Troubleshooting by Symptom

Most gluten free sourdough problems come back to a few repeated causes: weak starter, mismatched hydration, unbalanced flour, overproofing, underbaking, or slicing too soon.

Troubleshooting card for dense gummy collapsed pale wet and stiff gluten free sourdough bread.
Most problems come back to starter strength, hydration, proofing, or bake time, so reading the symptom correctly is usually the fastest way to fix the next loaf.

Why is my loaf dense?

Most likely cause: weak starter, dough that was too stiff, or fermentation that never got far enough.

What you likely saw before baking: the dough barely changed during bulk fermentation and still looked heavy when it went into the pan.

How to confirm it: the crumb came out tight and heavy without much internal openness.

What to change next time: strengthen the starter first, then check whether the dough tightened too much during resting. If it did, increase hydration slightly.

Why is the center gummy?

Most likely cause: underbaking, too much hydration for the chosen flour system, or slicing too early.

What you likely saw before baking: the loaf may have looked fine in the oven and browned reasonably well, but it still felt heavier than it should for its size.

How to confirm it: the center still felt wet, sticky, or pasty even after cooling.

What to change next time: trust the thermometer, extend the bake if needed, and cool the loaf fully before slicing. If the problem persists, reduce hydration slightly or revisit flour absorption.

Why did the loaf spread or collapse?

Most likely cause: overproofing, excessive hydration, or weak binder support.

What you likely saw before baking: the loaf looked puffy but also a little fragile, overinflated, or unstable in the pan.

How to confirm it: it sank or spread instead of holding shape in the oven.

What to change next time: shorten the final proof slightly, keep the loaf pan as the default format, and check whether the dough looked too loose even after resting.

Why is the crust pale or underbaked?

Most likely cause: insufficient bake time or weak preheating.

What you likely saw before baking: the loaf entered the oven looking fine, but the oven itself may not have been thoroughly heated or the bake may have been cut short once the top gained some colour.

How to confirm it: the loaf colours slowly, the crust stays soft, or the bottom feels under-set even when the top looks done.

What to change next time: preheat more thoroughly, keep the loaf in longer, and use the thermometer rather than crust color alone.

Why is the dough too wet?

Most likely cause: flour variability or slightly excessive hydration.

What you likely saw before baking: even after the short rest, the dough still looked unusually loose and hard to smooth into the pan cleanly.

How to confirm it: the dough feels overly slack rather than soft and cohesive.

What to change next time: reduce water slightly next time, or revisit whether a flour swap changed how the blend absorbs moisture.

Why is the dough too stiff?

Most likely cause: too little water, overly absorbent flour, or too much binder.

What you likely saw before baking: the dough felt stubbornly tight early on and became even tighter during resting instead of smoothing out.

How to confirm it: it resists mixing, smoothing, and expansion more than it should.

What to change next time: increase hydration a little, and avoid adding extra flour just because the dough does not feel like wheat dough.

Why is the flavor not sour enough?

Most likely cause: a mild starter or a fermentation schedule that moved too quickly.

What you likely saw before baking: the dough rose reasonably well, but fermentation stayed efficient rather than especially long or flavour-building.

How to confirm it: the loaf performs reasonably well but tastes gentler than you wanted.

What to change next time: extend fermentation modestly where appropriate or use the optional overnight route once you know the dough well.

Why does the crumb look purple or gray?

Most likely cause: psyllium color reaction rather than a failed loaf.

What you likely saw before baking: nothing especially alarming in the dough itself, but the final crumb later showed an odd tint.

How to confirm it: the structure and taste are otherwise fine, but the crumb carries an unusual hue.

What to change next time: try a different psyllium brand if the appearance bothers you.

Also Read: Avocado Chocolate Mousse Recipe

Substitutions: What Is Usually Safe and What Is Risky

Once a loaf works, it is tempting to start swapping ingredients casually. Some changes are manageable. Others can change structure, hydration, or proofing enough to make the dough feel like an entirely different recipe.

Guide to safe swaps and risky changes in gluten free sourdough bread showing usually safe changes, caution swaps, and riskier changes like changing psyllium, removing starches, or adding extra flour.
Not every gluten free sourdough swap carries the same risk, so this guide helps you separate small flexible changes from the ones that can quickly alter hydration, structure, and the feel of the loaf.
  • Usually safer: swapping honey for maple syrup, adding seeds on top, or making small flavor additions that do not change the dough’s structure much.
  • Use caution: replacing the custom blend with a 1:1 blend. This can work, but hydration may need adjustment and blends with added gums may handle differently.
  • Riskier: changing psyllium casually, removing starches wholesale, or adding extra flour just to make the dough feel more familiar.
  • Best first-bake rule: make the loaf once as written in the loaf pan, then experiment after you know what the dough should look like.

If you do adapt the flour route later, change one variable at a time. That makes it much easier to tell whether the difference came from flour absorption, starter behavior, proofing, or bake time.

How to Store and Freeze Gluten Free Sourdough Bread

Gluten free sourdough changes noticeably over time, so storage matters more than many readers expect.

Storage guide for gluten free sourdough bread showing room-temperature storage, freezing sliced bread, and toasting for best texture.
Gluten free sourdough usually keeps best when you treat it in stages: short room-temperature storage for immediate use, sliced freezing for longer holding, and toasting later to bring the crumb back to its best texture.

The loaf is often at its best once fully cool and settled, then again the next day when sliced and toasted. Store it wrapped at room temperature for short-term use if your kitchen is cool and dry. For longer holding, sliced freezing is the better option.

Freeze slices individually or with parchment between them so you can toast only what you need. Toasting or reheating slices usually restores the texture more effectively than letting the loaf sit on the counter for days. In many kitchens, this is where it tastes most convincing.

Also Read: Mango Margarita Recipe (Frozen or On the Rocks)

Variations That Make Sense

Once the base loaf works, small changes can make it more useful without rewriting the whole method.

Variation guide for gluten free sourdough bread showing a seeded loaf, a softer sandwich loaf, and a more earthy loaf.
Once the base gluten free sourdough loaf is working well, you can take it in a few practical directions by adding seeds for more texture, leaning softer for everyday sandwich slices, or going a little darker for a more earthy grain-forward loaf.

A seeded version adds texture and extra flavor to the crust. A softer sandwich-style loaf can be encouraged with a bit more oil and a gentler baking finish. For a more earthy whole-grain direction, adjust the darker flours thoughtfully rather than replacing the starches wholesale.

Once your starter is reliable, sourdough pizza dough is also an excellent next bake. Sourdough English muffins make another good follow-up when you want a different texture payoff without leaving the sourdough rhythm behind.

Frequently Asked Questions About Gluten Free Sourdough Bread

Can I make this without psyllium husk?

Not without rebuilding the formula. Psyllium is doing real structural work here, so removing it changes cohesion, hydration, and final texture all at once.

Can I use a 1:1 flour blend?

Yes, though hydration may need adjustment and the dough may behave differently depending on the blend. Some premade mixes also contain gums, which changes handling.

Can I use starter straight from the fridge?

Sometimes. A very healthy starter can still perform well after refrigeration, but refreshing it first is the safer choice when consistency matters.

Why didn’t my loaf double in size?

Because gluten free sourdough often does not need dramatic doubling to work well. Look for visible aeration and moderate expansion instead of a huge rise.

Why is it gummy even though it looks done?

The loaf may still be underbaked, or it may have been sliced too early. In this category, crust color alone is not enough. Internal temperature and full cooling matter.

Is sourdough bread gluten free?

Regular wheat sourdough is not automatically gluten free just because it ferments longer. For anyone managing celiac disease or a medically necessary gluten-free diet, this loaf needs to be made entirely with gluten free ingredients and handled carefully to avoid cross-contact. Packaged ingredients labeled gluten free and careful kitchen handling both matter.

Also Read: Falafel Recipe: Crispy Homemade, Air Fryer and Baked Falafel

Gluten Free Sourdough Bread Recipe Card

Gluten Free Sourdough Bread Recipe

Yield: 1 medium loaf
Prep time: about 20 minutes active work
Bulk fermentation: about 3 to 5 hours in many kitchens
Final proof: about 1 to 2 hours
Bake time: about 55 to 65 minutes
Cooling time: at least 3 to 4 hours

Tested format: 8½ x 4½-inch metal loaf pan, whole psyllium husk, active 100% hydration gluten free starter.

Ingredients

  • 150 g active gluten free sourdough starter, 100% hydration
  • 220 g brown rice flour
  • 120 g sorghum flour
  • 80 g tapioca starch
  • 40 g potato starch
  • 14 g whole psyllium husk
  • 10 g fine sea salt
  • 430 g warm water
  • 15 g olive oil
  • 10 g honey or maple syrup, optional

Method

  1. Whisk the warm water and psyllium husk together and let it thicken into a gel.
  2. Mix the flours, starches, and salt in a large bowl.
  3. Add the psyllium gel, starter, oil, and optional sweetener. Mix until no dry patches remain.
  4. Rest the dough for 15 to 20 minutes.
  5. Bulk ferment until visibly aerated and somewhat lighter, usually 3 to 5 hours.
  6. Transfer the dough to a prepared loaf pan and smooth the top.
  7. Proof until slightly expanded and modestly puffy, usually 1 to 2 hours.
  8. Bake at 230°C / 445°F for 20 minutes, then at 210°C / 410°F for 35 to 45 minutes more, until the loaf reaches about 96°C to 99°C / 205°F to 210°F internally.
  9. Cool completely before slicing.

Notes

  • A loaf pan is the most reliable format for this recipe.
  • This recipe is written in grams for consistency and easier troubleshooting.
  • Let the dough rest before deciding it is too wet or too stiff.
  • When the loaf seems unusually sluggish, fix the starter before changing the entire formula.
  • The loaf is ready to bake when it looks modestly puffy and lighter than before, not dramatically doubled.
  • The bread is fully baked when the crust looks set and the center reaches about 205°F to 210°F.

Final Notes for Making the Best Gluten Free Sourdough Bread

The best loaves usually come down to three things.

  • Use a genuinely ready starter.
  • Judge the dough by its own cues instead of by wheat expectations.
  • Bake and cool the loaf fully before slicing.

Once that rhythm is in place, this gluten free sourdough bread recipe becomes much less intimidating and much more repeatable. The next natural step is either strengthening your culture with the sourdough starter guide or branching into another starter bake such as sourdough pizza dough, Sourdough English muffins, or the broader sourdough bread recipes collection.