
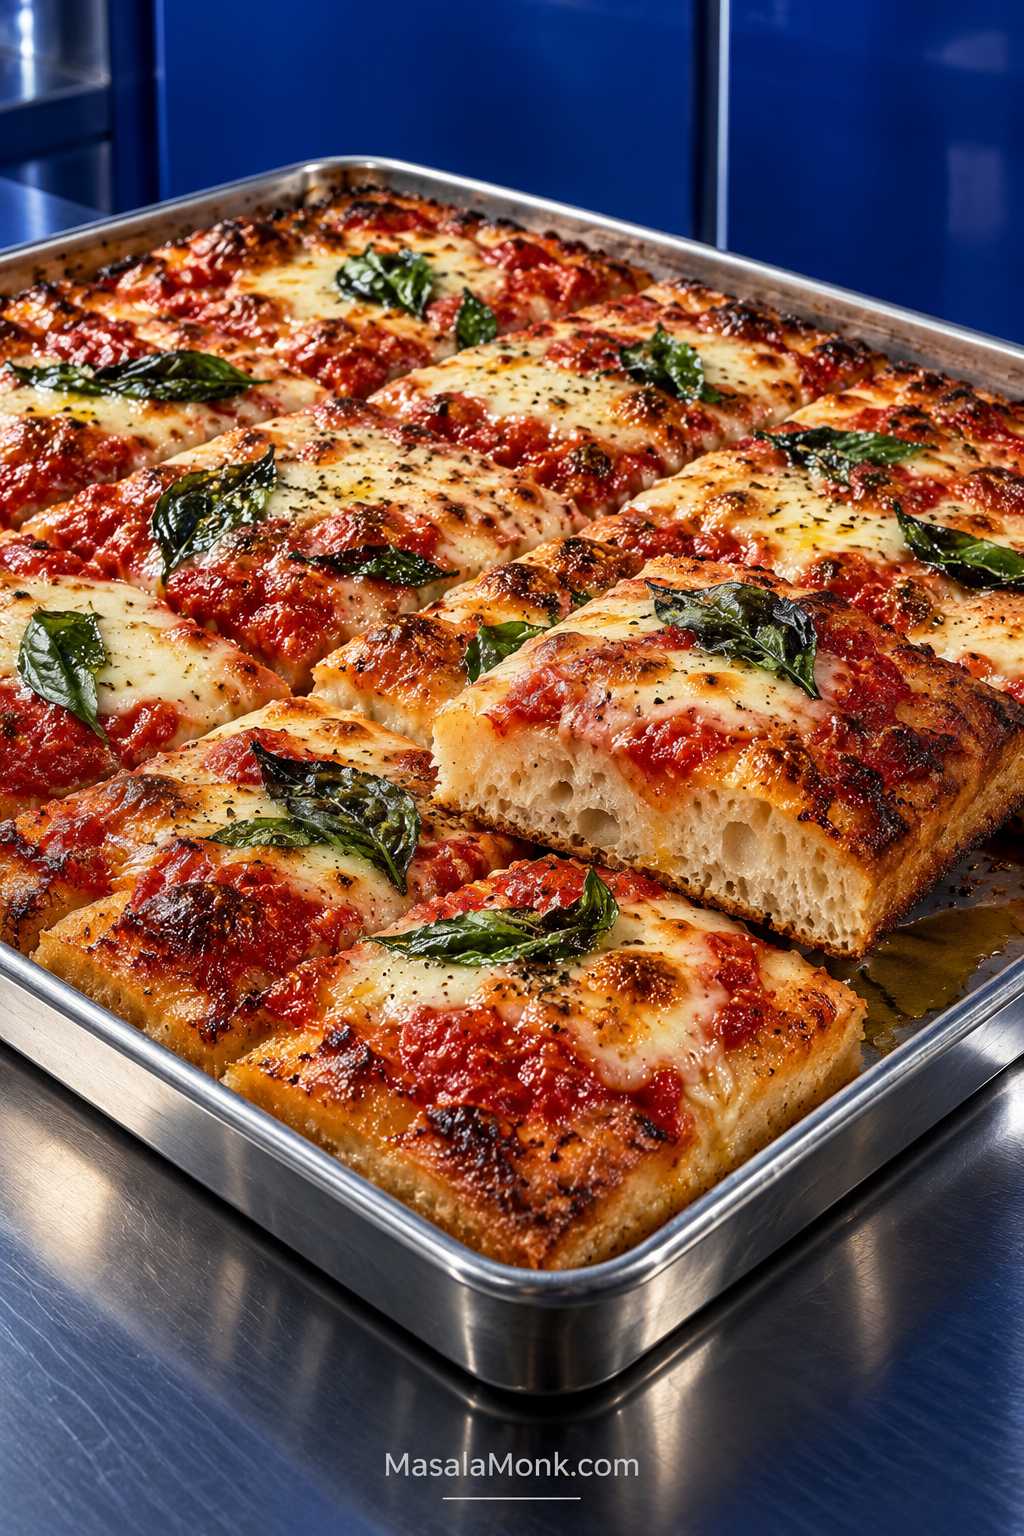
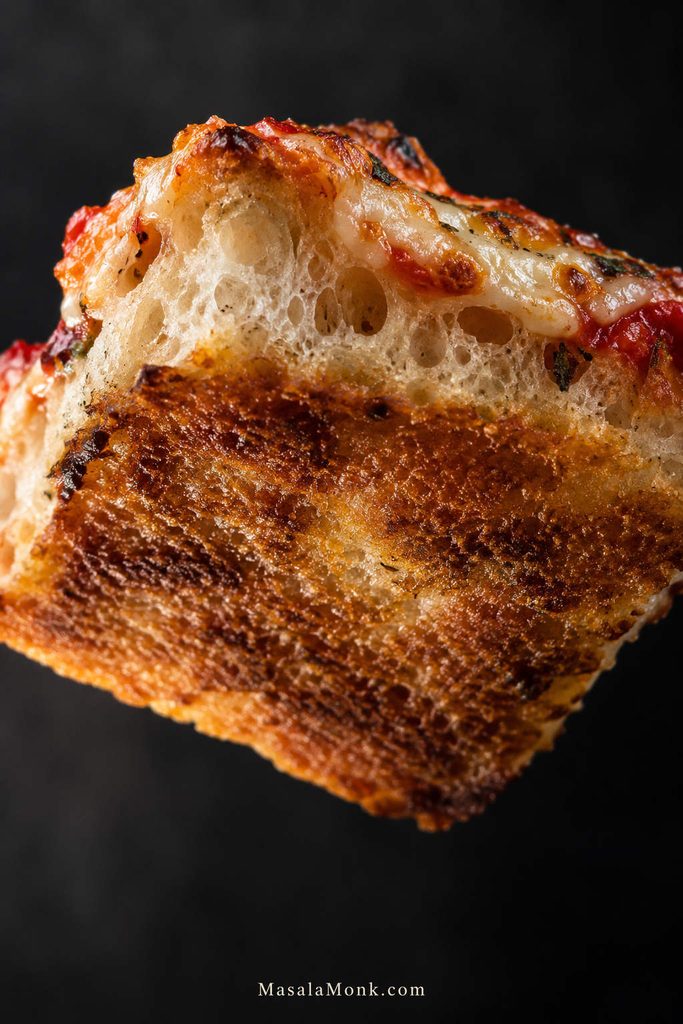
There is a particular moment when focaccia pizza gets everything right: the underside crackles as you cut through it, the middle stays airy and tender, and the sauce and bubbling mozzarella sit on top without leaving a wet band of dough underneath. The edges still have that olive-oil crunch, but the slice eats like proper pizza.
Most problems show up in the middle. Even spectacular edges can hide bread under the cheese that is still gummy. The usual culprits are too much dough for the pan, loose sauce, wet mozzarella, raw mushrooms, or simply not enough heat underneath.
This focaccia pizza recipe tackles that in two simple ways. About 1 kg of soft dough is spread across a 13 × 18-inch (33 × 46 cm) metal sheet pan, keeping it airy without making it excessively thick. Then the focaccia gets a short par-bake before the sauce and cheese go on.
This is the pizza to make when the crust is half the reason you’re excited about dinner. The bread is part of the meal, not merely something holding up the toppings. One half-sheet feeds six to eight comfortably, which also makes it useful for pizza night when one small round pie was never going to stretch far enough.
This is a no-knead focaccia pizza: three short sets of folds build the dough’s strength instead of conventional kneading. Make it in one afternoon or mix the dough the day before for an overnight cold ferment. You don’t need a stand mixer or pizza oven.
Quick Answer: How Do You Make Focaccia Pizza?
For a 13 × 18-inch sheet pan, this focaccia pizza recipe uses 550 g bread flour and 425 ml water—about 77% hydration. Proof the dough until puffy, par-bake it at 475°F (245°C) for 8–10 minutes, add the toppings, then finish for another 8–12 minutes.
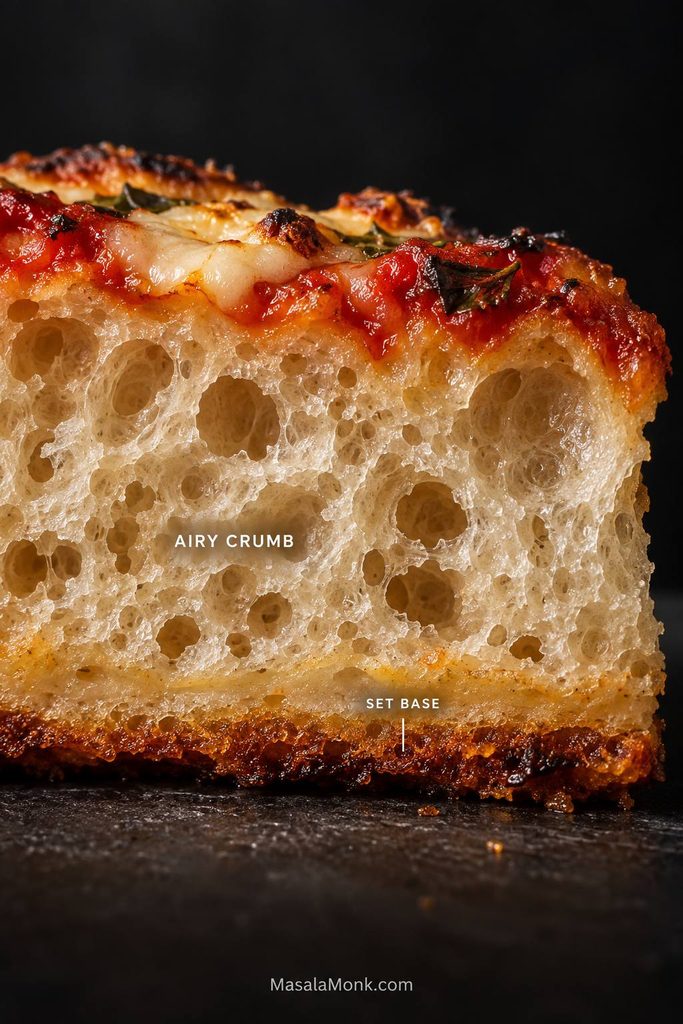
By the end of proofing, bubbles should sit beneath the surface and the whole sheet should give a slight jiggle when the pan moves. At the end, look past the browned cheese: the crumb beneath the toppings needs to be set and airy, with good color underneath.
Give the focaccia a head start before the wet toppings go on. That short first bake is the easiest way to protect the airy middle and browned base.
Same-Day or Overnight?
Same-Day
4 g instant or active dry yeast (1¼ tsp)
Water: 85–95°F / 29–35°C
Choose this when the pizza needs to happen tonight. Plan on 3½–4½ hours from mixing to slicing. For a 7 PM dinner, starting around 2:30–3 PM gives you comfortable breathing room.
Overnight
1 g instant or active dry yeast (⅓ tsp)
Water: 68–75°F / 20–24°C
Choose this when planning ahead is easier and you want to give the dough more time to develop flavor slowly in the refrigerator. Complete the folds, chill for 12–24 hours, then pan and proof the next day.
Those times assume a kitchen around 70–75°F / 21–24°C. A warm room moves things along faster; a cool one stretches the schedule. Either way, let the dough’s changes make the final call rather than waiting for the clock to agree.
Make It Now: Sheet Pan Focaccia Pizza
Focaccia Pizza Recipe Snapshot
| Pan | 13 × 18-inch / 33 × 46 cm rimmed metal half-sheet |
| Serves | 6–8 |
| Yield | 8 generous or 12 smaller squares |
| Active time | 30–40 minutes |
| Same-day total | 3½–4½ hours |
| Overnight option | 12–24 hour cold ferment + final proof |
| Hydration | About 77% |
| Oven | 475°F / 245°C |
| Bake | 8–10 min par-bake + 8–12 min finish |
Equipment: large mixing bowl, digital scale, sturdy spoon or dough whisk, spatula or dough scraper, 13 × 18-inch sheet pan, and wire rack.
Pan choice: a heavy-gauge aluminum or aluminized-steel half-sheet is a reliable choice. Darker metal browns faster, so the underside may need an earlier check. Before using a nonstick-coated pan at 475°F / 245°C, confirm its maximum safe temperature.
A pizza steel or stone is optional.
Ingredients
Focaccia Pizza Dough
- 550 g / 19.4 oz bread flour
- 425 ml / 14.4 fl oz water — same-day: 85–95°F / 29–35°C; overnight: 68–75°F / 20–24°C
- Same-day: 4 g instant or active dry yeast / 1¼ tsp
- Overnight: 1 g instant or active dry yeast / ⅓ tsp
- 11 g fine salt
- 30 ml / 2 tbsp olive oil
Use instant or active dry yeast at the same weight. Active dry may begin a little more slowly, so let the dough cues—not the clock—decide when it is ready. Follow the package directions if your yeast specifically calls for dissolving first.
Using all-purpose flour? Start with 410 ml water and add the final 15 ml only if the dough is building strength comfortably.
For the Pan and Dimpling
- Nonstick pan spray, optional
- 30 ml / 2 tbsp olive oil for the pan
- 15 ml / 1 tbsp olive oil for the surface
For the Pizza
- 240–280 g / about 1 to 1¼ cups thick pizza sauce
- 255 g / 9 oz low-moisture mozzarella, shredded
- 30 g / 1 oz Parmesan or Pecorino, finely grated
- 60–90 g / 2–3 oz pepperoni, cooked sausage, or another prepared topping, optional
- Fresh basil, extra Parmesan or Pecorino, and olive oil for finishing
- Red pepper flakes, optional
Quick Pizza Sauce
Start with 280 g thick crushed tomatoes or passata, then stir in 1 tsp olive oil, ½ tsp dried oregano, ¼ tsp garlic powder, and ¼–½ tsp fine salt. Start with less salt if the tomatoes are already seasoned, then taste.
Keep the sauce simple and tomato-forward; the focaccia already brings plenty of olive-oil richness. Drain watery crushed tomatoes in a fine sieve for 5–10 minutes, or briefly simmer loose passata. Use the concentrated amount you end up with rather than replacing the liquid you removed. The sauce should spread easily but stay where you put it.
How to Make Focaccia Pizza
1. Mix the Dough
Add the water, yeast, flour, salt, and 30 ml olive oil to a large bowl. Mix until no dry flour remains.
If you’re used to ordinary pizza dough, this can look unusually wet at first. That’s expected. It should be rough, loose, and sticky, but still behave like dough rather than something you could pour.
2. Rest and Fold
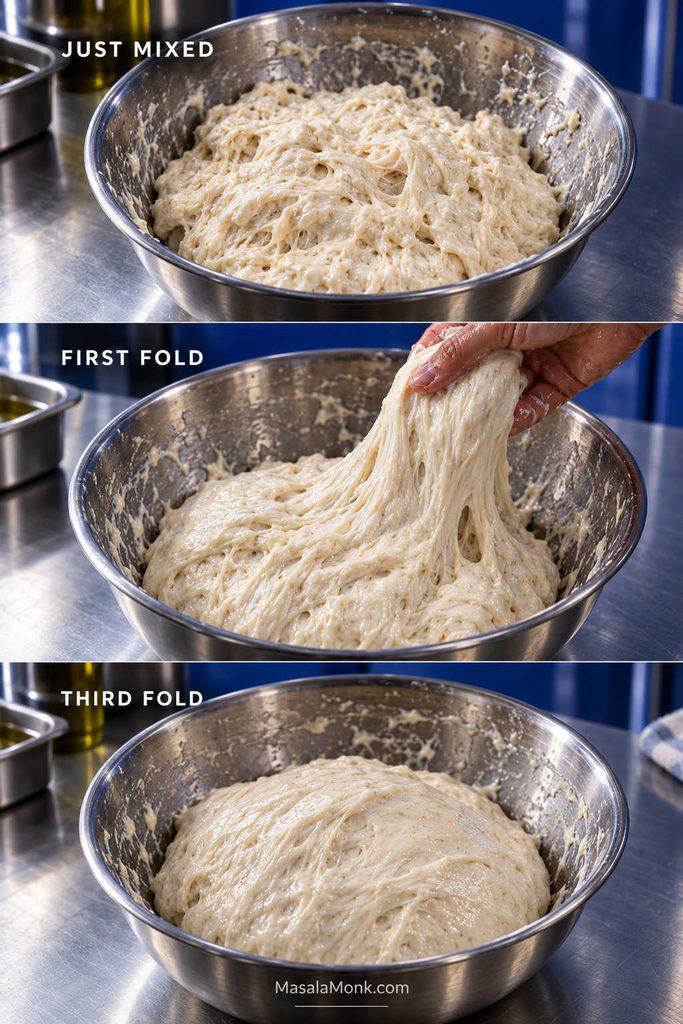
Cover the bowl and rest for 15 minutes. With a wet hand, pull one side of the dough upward and fold it across the center. Turn the bowl and repeat around the dough.
Complete 3 sets of folds 20 minutes apart. The first can feel messy. By the third, the dough lifts more cleanly, stretches farther, and feels springier while staying soft.
At that point, it should feel noticeably different: smoother, springier, and beginning to hold air without losing that soft, wet character.
3. Let It Rise
Same-day dough stays at room temperature for 60–90 minutes after the final fold. Look for visible expansion and a lighter, more aerated texture.
Cover overnight dough and refrigerate it for 12–24 hours after the folds.
4. Oil the Pan and Stretch
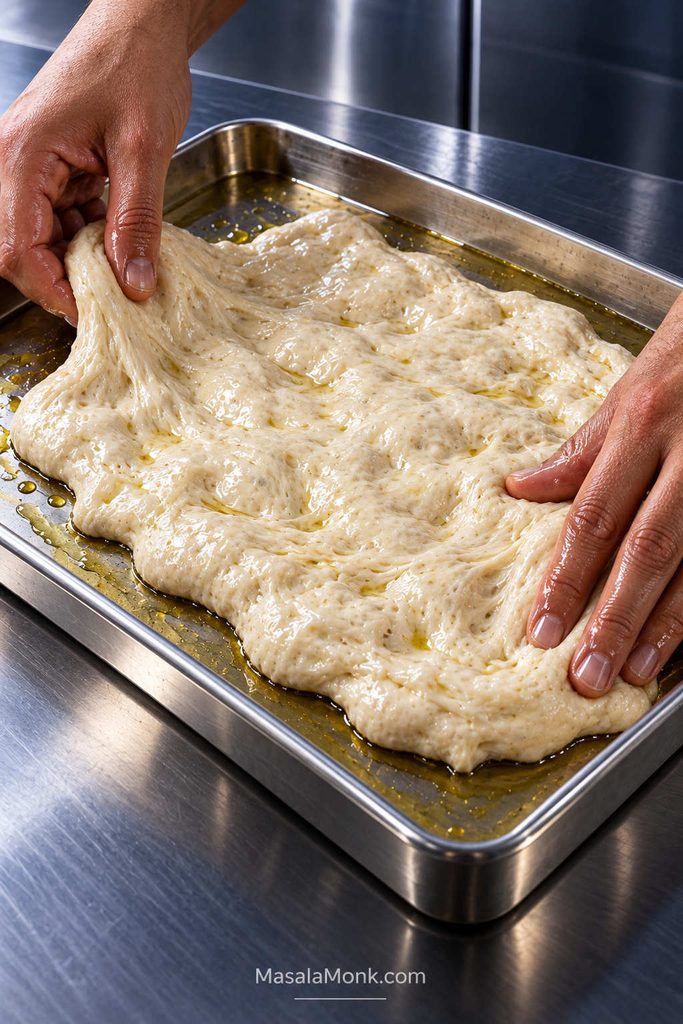
Coat a 13 × 18-inch metal half-sheet with nonstick spray if using it, then spread 30 ml / 2 tbsp olive oil across the base.
Transfer same-day dough into the pan and gently stretch it toward the corners with oiled fingertips. When it pulls back, cover it and wait 10–20 minutes before continuing.
For overnight dough, transfer it to the oiled pan straight from the refrigerator. It will relax as it warms. Stretch it gently in stages rather than forcing cold dough into the corners.
If the dough fights you, wait. Fifteen quiet minutes usually does more than fifteen seconds of wrestling.
5. Proof in the Pan
Cover the pan. Same-day dough may need another 45–75 minutes. Refrigerated dough commonly needs 1½–3 hours, depending on room temperature and how far it fermented overnight.
Start preheating the oven to 475°F (245°C) before the dough is fully ready. For a plain sheet-pan setup, allow 25–30 minutes of preheating. When using a steel or stone, give it 45–60 minutes to heat thoroughly.
By the end, the dough should look almost marshmallow-soft. Bubbles sit just beneath the surface, and the whole sheet gives a slight tremble when you nudge the pan.
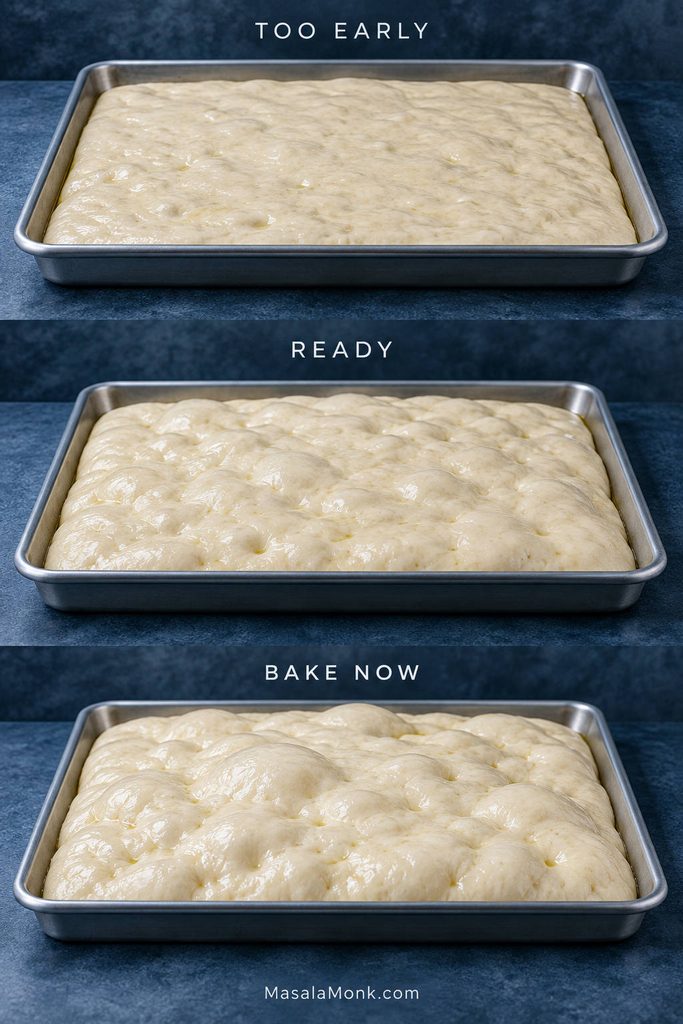
- Still flat and tight: keep waiting.
- Puffy and jiggly: it is ready.
- Very inflated and starting to sag: bake it now.
6. Set the Rack and Finish Preheating
Keep a rack in the lower third of the oven. The oven—and any steel or stone you’re using—should be thoroughly hot by the time the dough reaches its final proof.
7. Dimple and Par-Bake
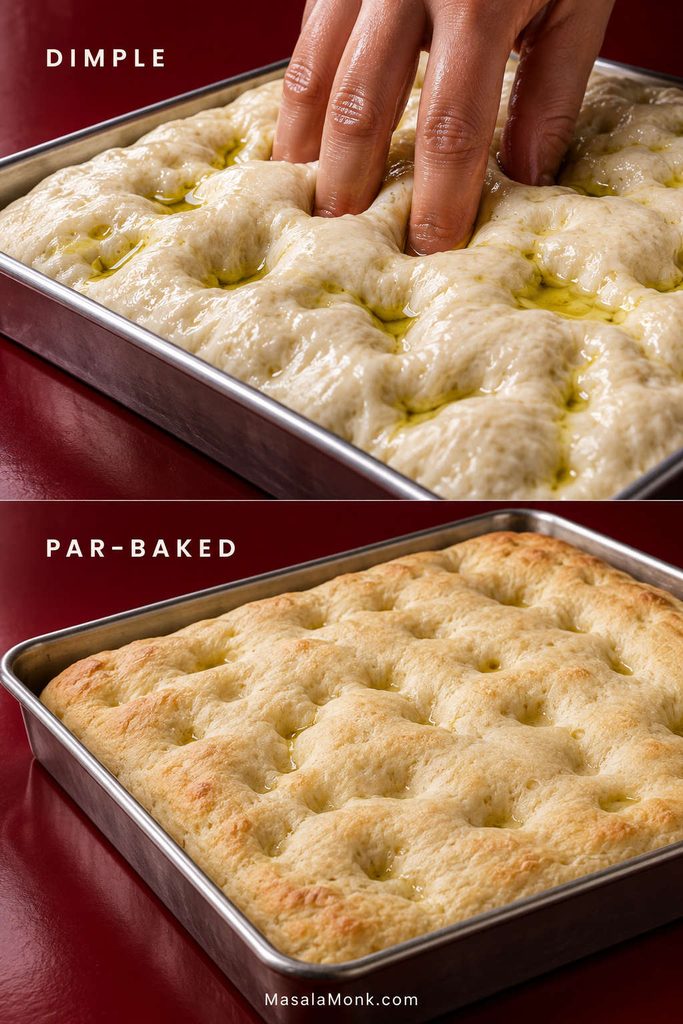
Drizzle the surface with the remaining 15 ml / 1 tbsp olive oil. Press your oiled fingertips straight down through the dough. It should feel pillowy, with little pockets of air shifting around your fingers; you’re creating dimples, not squeezing the life out of the dough.
Par-bake for 8–10 minutes. The glossy raw sheen disappears, the surface turns matte, and the outer edge takes on its first faint color. It will smell like bread now, not raw dough.
8. Add the Toppings
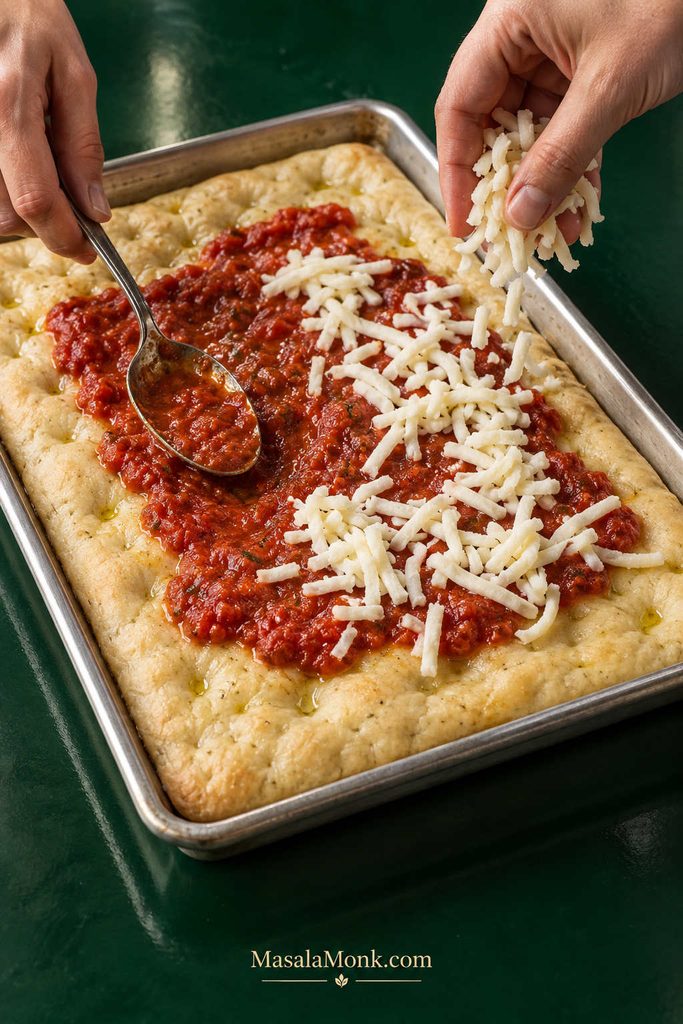
Spread over 240–280 g / about 1 to 1¼ cups thick sauce, taking it close to the edges. Add the mozzarella, Parmesan or Pecorino, and any prepared toppings.
Low-moisture whole-milk mozzarella gives the classic bubbly, browned pizza top. Fresh mozzarella makes softer, creamier pockets; drain and blot it thoroughly and add it only for the final 5–7 minutes.
9. Finish the Pizza
Bake for another 8–12 minutes. The cheese bubbles and blisters in places, the edges deepen toward bronze, and the kitchen starts smelling of toasted olive oil, tomato, and browned cheese.
It is tempting to pull the pizza as soon as the mozzarella looks ready. Check underneath first. The base needs color, while the bread beneath the toppings should look set and airy rather than shiny or compressed into a pasty band.
Finish the basic tomato-and-mozzarella version with torn basil, a light grating of Parmesan or Pecorino, and a thin drizzle of olive oil. Add red pepper flakes for heat.
10. Get It Out of the Pan
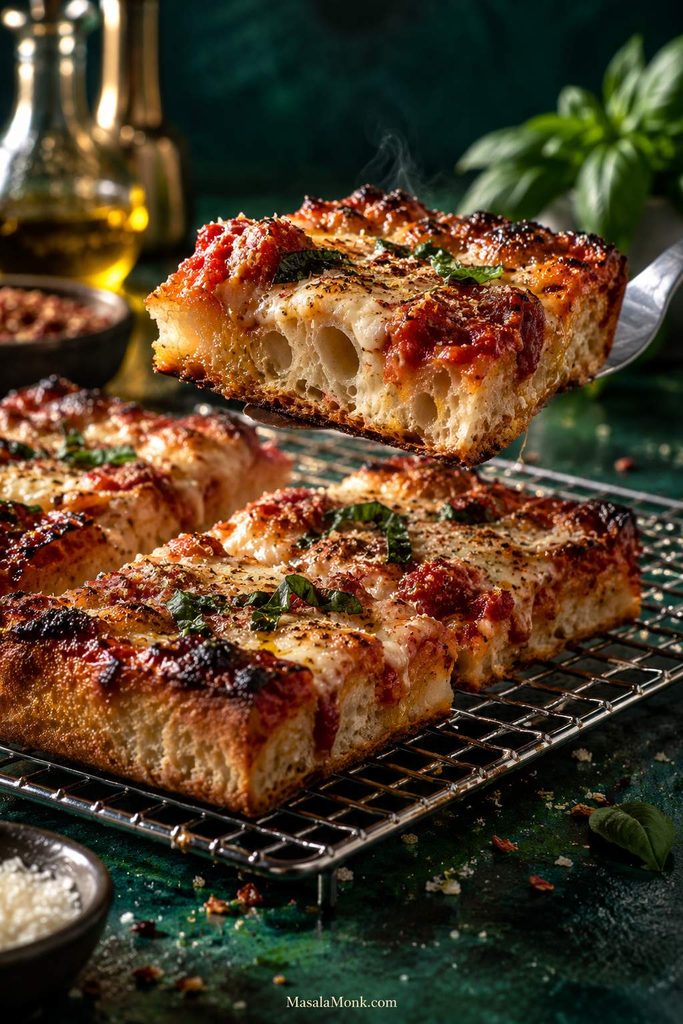
Rest the pizza in the pan for 2 minutes, then move it to a wire rack. Give it another 5–10 minutes before slicing so steam can escape instead of softening the bottom.
A good slice bends a little under its toppings, but the browned base still has enough structure to pick up in one hand. The corner pieces have the strongest olive-oil crunch; the center squares show off the biggest bubbles. Both belong on the platter.
Focaccia Pizza Topping Ideas
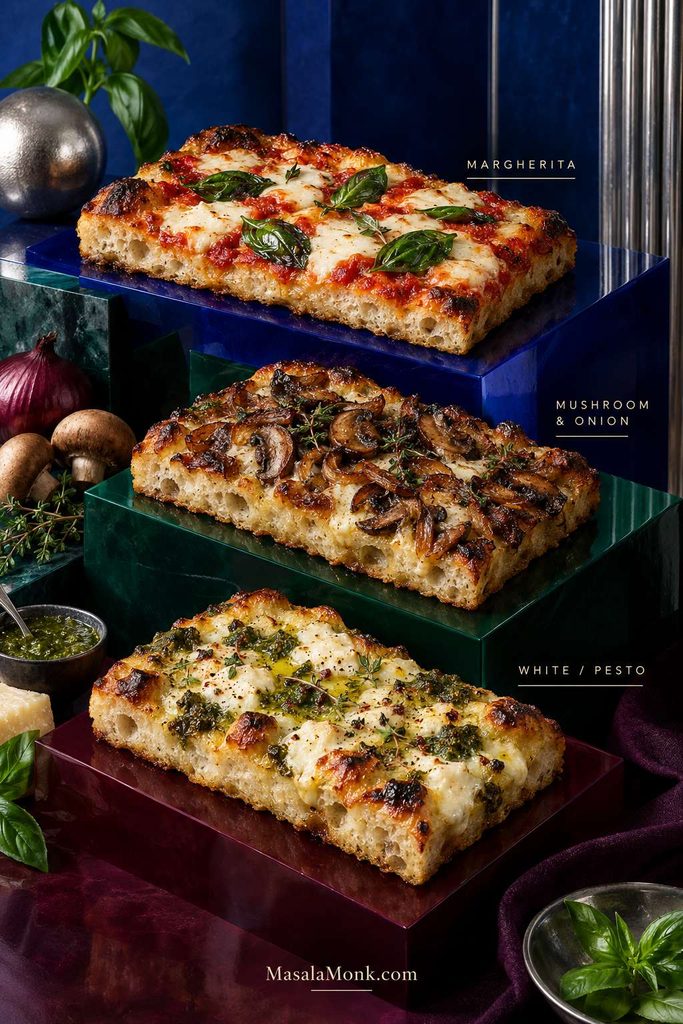
Different toppings change more than the flavor. Pepperoni is the easiest place to start; Margherita brings softer pockets of fresh mozzarella; mushrooms reward a little prep; and white or pesto versions put more attention back on the olive-oil crust.
Pepperoni
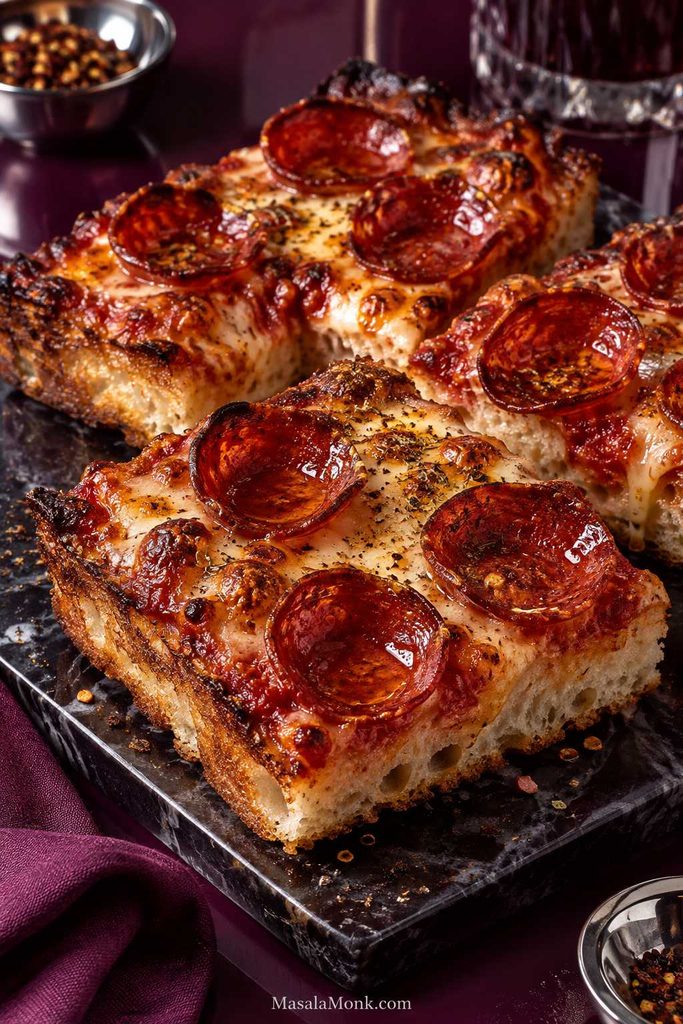
Pepperoni is the simplest place to start: salty cheese, curled slices with crunchy edges, little pools of spicy oil, and almost no extra water to worry about. Use the base sauce and mozzarella, then add 60–90 g / 2–3 oz pepperoni.
For sweet heat, finish with a thin drizzle of hot honey after baking, when it stays glossy and fragrant.
Margherita
Tomato, creamy fresh mozzarella, basil, and olive oil make a brighter, softer pizza against the browned focaccia base. Use well-drained mozzarella and scatter basil over the pizza while it is still hot.
The Margherita pizza recipe takes the same tomato-mozzarella-basil combination onto a thinner conventional pizza crust.
Garlic Parmesan
Garlic carried through olive oil settles into the dimples while Parmesan browns over the top. Mix finely grated or minced garlic with a little olive oil, brush it over the par-baked crust, then add mozzarella and Parmesan.
Mushroom and Onion
Cook the mushrooms until their liquid has mostly disappeared and the edges begin to brown, then pair them with sautéed or caramelized onions. The sweet onions and browned mushrooms are especially good against the olive-oil crust.
Sausage and Pepper
Crumbled sausage browns at the edges while the peppers soften and sweeten beneath the cheese. Cook the sausage first; very juicy peppers benefit from a quick sauté too.
White or Pesto
White pizza uses mozzarella, Parmesan, black pepper, and small spoonfuls of ricotta instead of tomato sauce. The ricotta stays creamy in pockets while Parmesan browns across the top. Spinach, mushrooms, and caramelized onions all fit naturally here.
A thin layer of pesto adds a basil-and-garlic edge without hiding the focaccia underneath. Spread it on after the par-bake. The pesto recipe guide has classic basil pesto plus several variations.
How to Keep Focaccia Pizza Airy and Crisp
Once the basic pizza makes sense, you can start changing it without losing the crust that makes the whole thing worth doing.
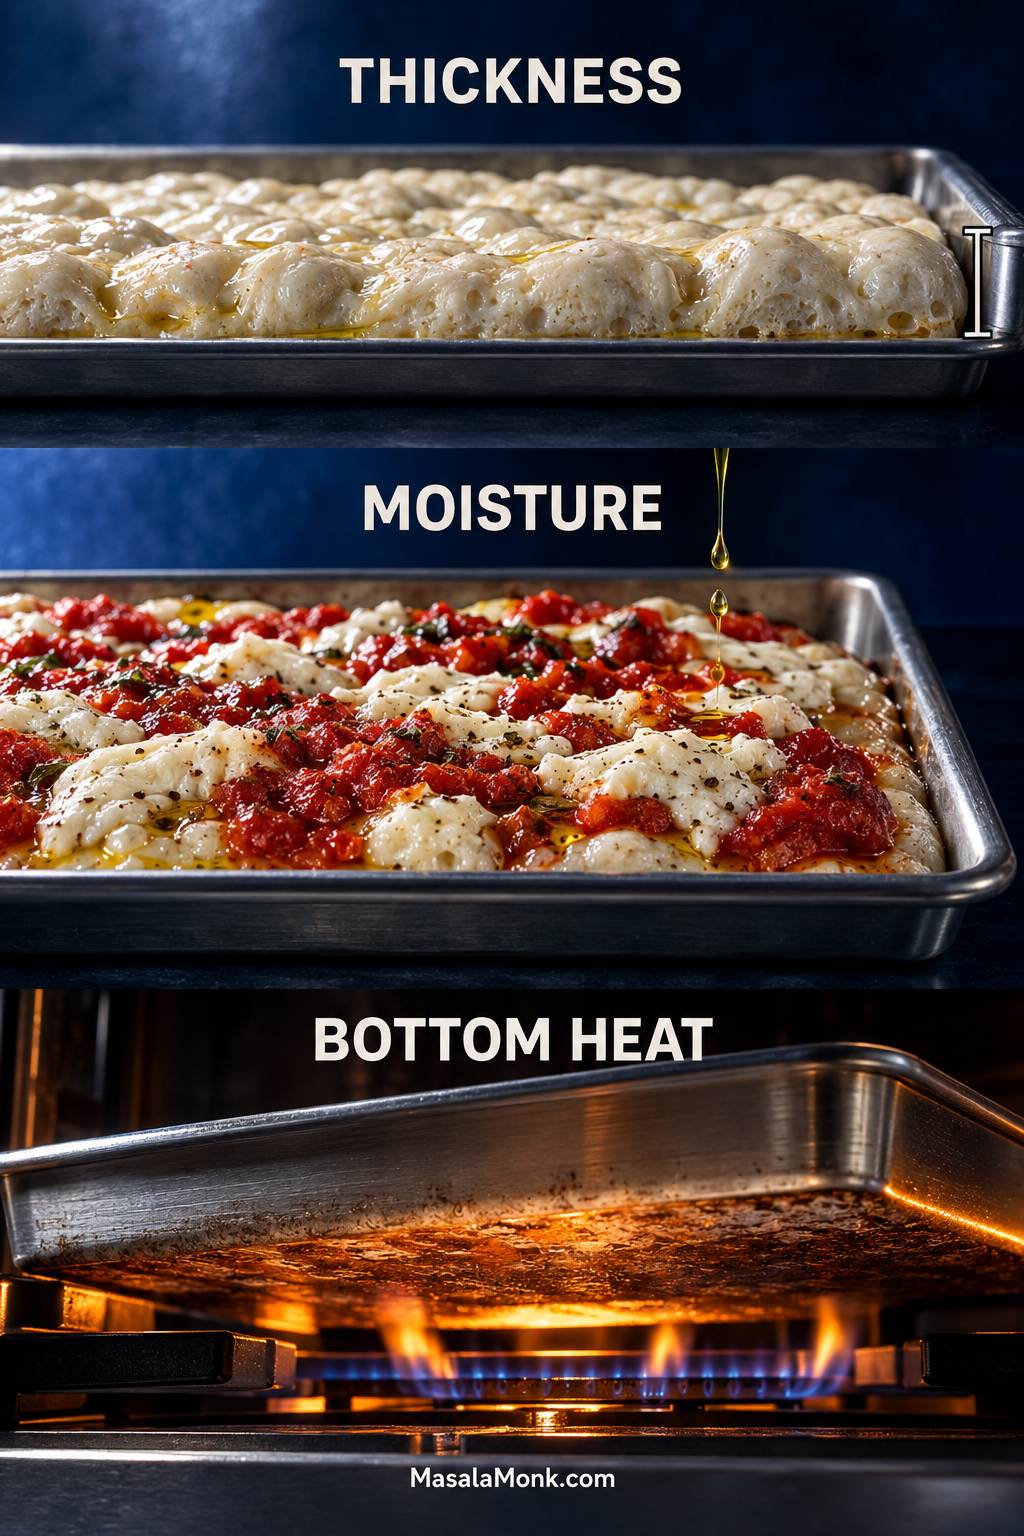
A crisp, airy focaccia pizza comes down to three things: keep the dough thin enough for the pan, control the water going on top, and give the bottom enough heat to set before the surface gets too dark.
Get those three right and the recipe becomes flexible: you can change the pan, cheese, sauce, or toppings without losing the crust you came here for.
Sticky or Actually Too Wet?
Before those three controls matter, the dough itself has to be behaving like dough. At about 77% hydration, it stays tacky. The important question is whether it becomes stronger as you fold it.
A healthy dough starts loose and awkward, then becomes more elastic and cohesive as the folds build strength. If it still pours like batter, tears immediately, and cannot hold itself together after several folds, the flour may simply be carrying more water than it can absorb comfortably.
Bread flour gives you more margin. Softer all-purpose flour often does better when that final splash of water is added only after the dough begins to strengthen.
Making the bread without sauce and cheese? That plain focaccia recipe goes deeper into proofing, dimpling, pan choice, and those golden olive-oil edges; it is the better place to start when the bread itself is the main event.
Use the Right Amount of Dough for Your Pan
The same dough behaves very differently at ¾ inch thick than it does at 1½ inches. Move the dough into a smaller pan and the pizza gets deeper, so the bread under the toppings has farther to go before it is fully baked.
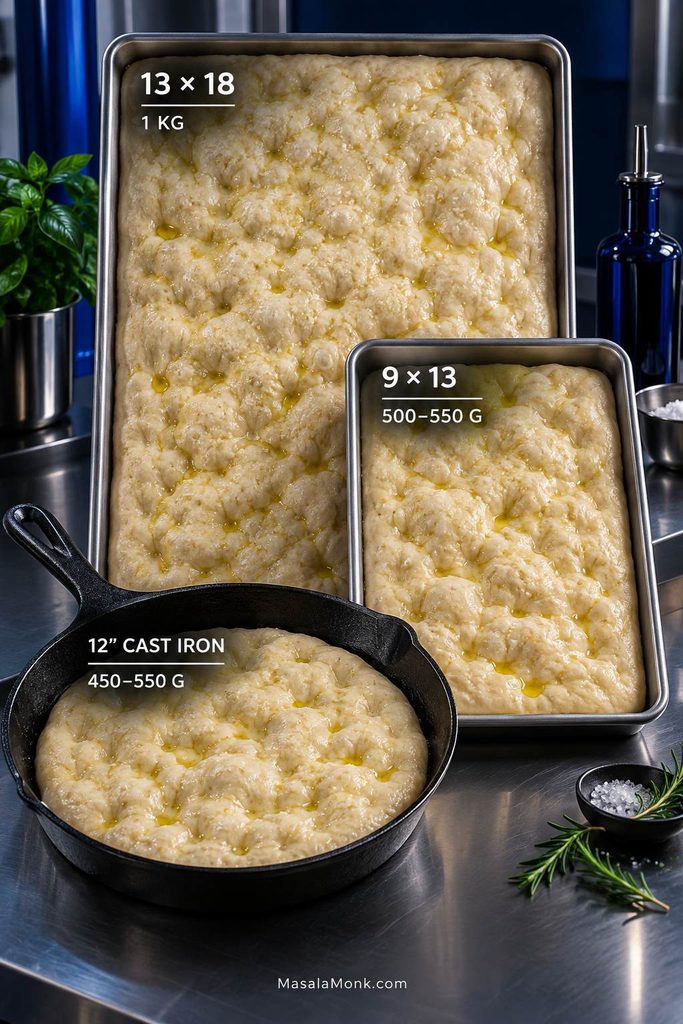
The full batch weighs about 1 kg. A standard 9 × 13-inch pan has exactly half the surface area of a 13 × 18-inch half-sheet, so half the dough preserves almost the same thickness.
| Pan | Approx. dough | What to expect |
|---|---|---|
| 13 × 18 in / 33 × 46 cm | Full batch, about 1 kg | The intended airy-but-pizza-like thickness |
| 9 × 13 in / 23 × 33 cm | 500–550 g | Very similar thickness to the half-sheet version |
| 9 × 13 with full batch | About 1 kg | Much thicker focaccia; expect a longer, less forgiving bake |
| 12-inch cast iron skillet | 450–550 g | Near the intended thickness around 500 g, with a more fried, deeply browned underside; follow doneness rather than the half-sheet clock |
The half-sheet gives the cleanest balance of airy center and browned base. Cast iron is more interesting when what you really want is that almost-fried underside.
The Bottom Needs Heat
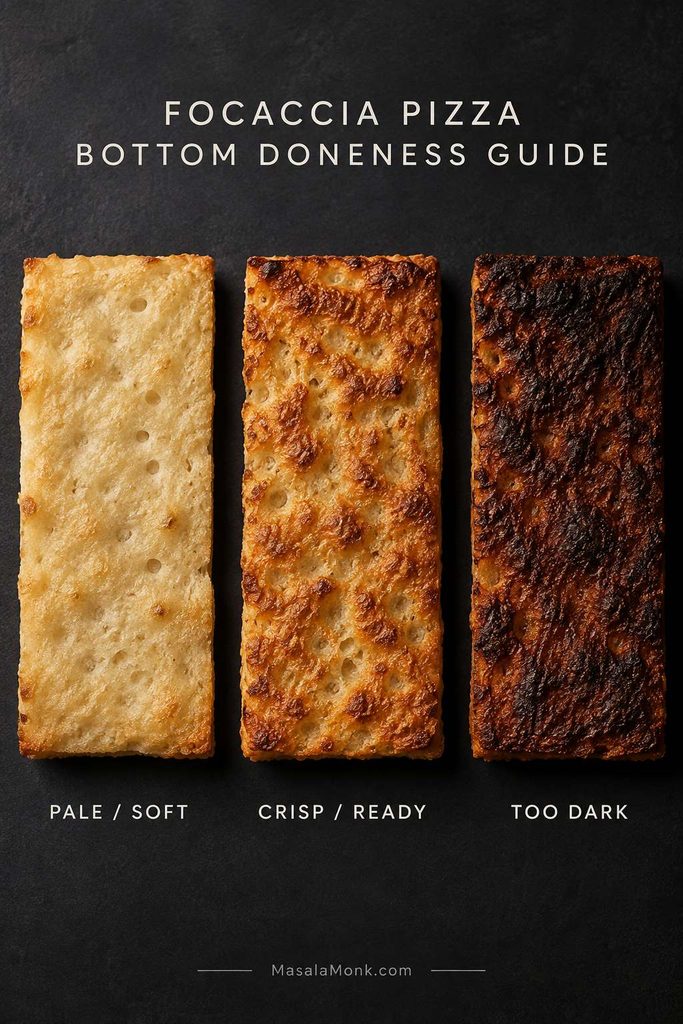
Once sauce and cheese cover the surface, the underside has to carry more of the bake. Metal helps. So does a thoroughly heated oven and a rack in the lower half.
Pale bottoms usually improve with a lower rack or a preheated steel or stone. A crust that burns before the bread finishes needs the opposite treatment: move the pizza higher or remove that extra thermal mass.
Prep Toppings for a Better Crust
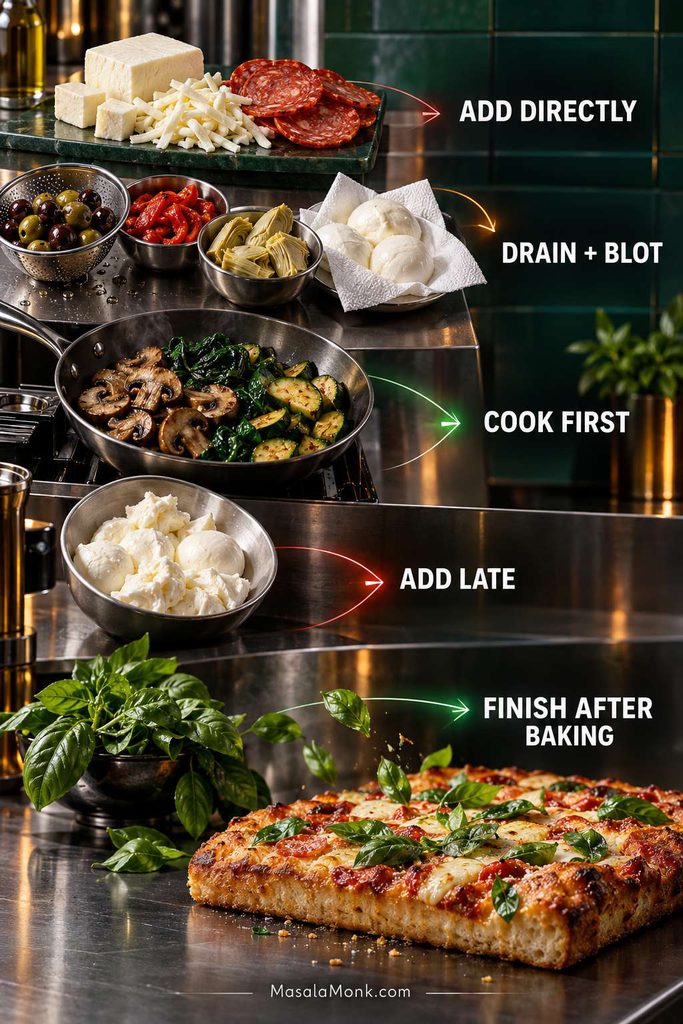
Sogginess is usually cumulative rather than mysterious. A little loose sauce may be fine, and so may a few mushrooms. Add fresh mozzarella and juicy tomatoes as well, though, and the bread suddenly has much more water to deal with.
The wetter the topping, the more preparation it needs before it reaches the dough. Keep the overall layer modest too. The focaccia should still feel like part of the pizza, not a thick bread base buried under everything else.
| Topping | Prep | Why |
|---|---|---|
| Low-moisture mozzarella | Add directly | Reliable melt with little excess water |
| Pepperoni | Add directly | Low-moisture and forgiving |
| Cooked sausage | Add directly | Already cooked and easier to control |
| Olives | Drain | Removes surface brine |
| Artichoke hearts | Drain and pat dry | Jarred and canned pieces hold liquid |
| Roasted peppers | Drain and pat dry | Keeps packing liquid off the dough |
| Mushrooms | Cook first | They release water as they shrink |
| Spinach | Cook and squeeze dry | Removes water before it reaches the crust |
| Zucchini | Precook or salt and dry | High water content |
| Fresh tomatoes | Use sparingly; drain juicy pieces | Fresh juice can soak the crumb |
| Fresh mozzarella | Drain, blot, add late | Much wetter than low-moisture mozzarella |
| Fresh basil | Add after baking | Better fragrance and color |
| Fresh garlic | Coat with oil or tuck beneath cheese | Exposed pieces scorch quickly |
| Sun-dried tomatoes | Protect beneath cheese or add later | Exposed edges can burn |
Very juicy fresh tomatoes deserve particular attention. The fresh tomato sauce guide shows how draining and reduction can turn them into a richer, more concentrated base.
Want to Skip the Par-Bake? Put Cheese Down First
Par-baking is the default here because it gives the center more protection. A one-bake version can still work when the oven has strong bottom heat and the toppings are fairly dry.
After the dough has fully proofed and been dimpled, scatter most of the low-moisture mozzarella directly over the dough. Spoon a modest amount of thick sauce over the cheese, then finish with the remaining mozzarella and toppings. That first cheese layer slows the sauce from soaking straight into the raw dough.
The choice changes the eating experience slightly. A one-bake pizza lets sauce and cheese settle into the bread as everything cooks together. Par-baking, by contrast, gives you a more distinct focaccia layer underneath and a wider margin against a gummy middle.
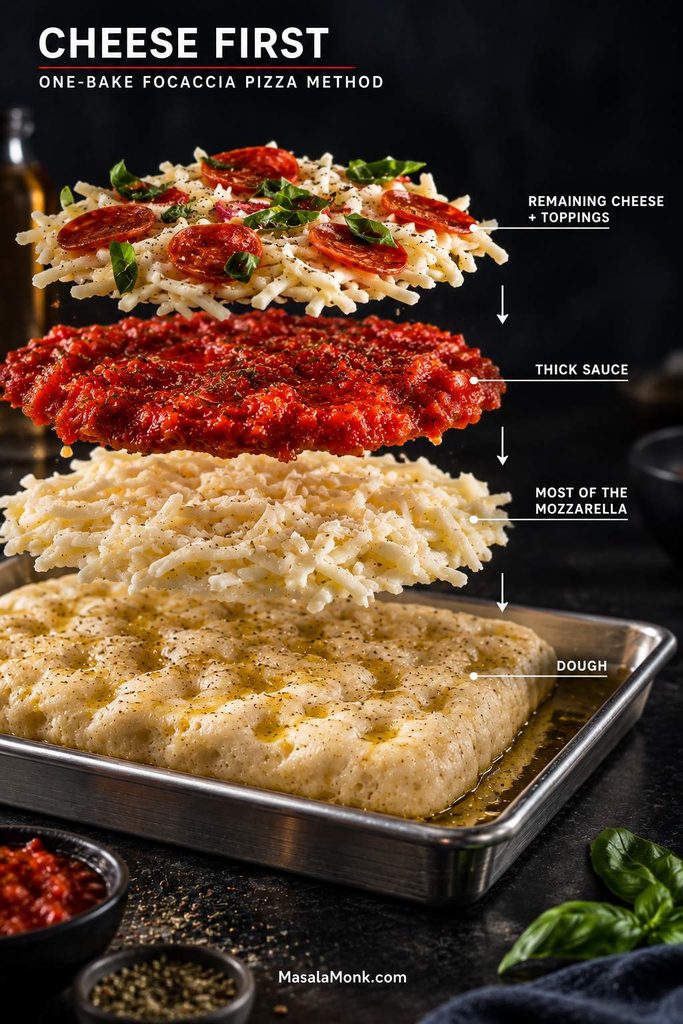
King Arthur Baking uses the cheese-first approach in its focaccia pizza method.
Shortcuts and Other Doughs
There are two useful shortcuts when you want the focaccia-pizza experience without starting from this exact dough: turn already-baked focaccia into pizza, or adapt conventional pizza dough to an oiled pan. Each route keeps the pan-pizza idea while changing how much dough work you need to do.
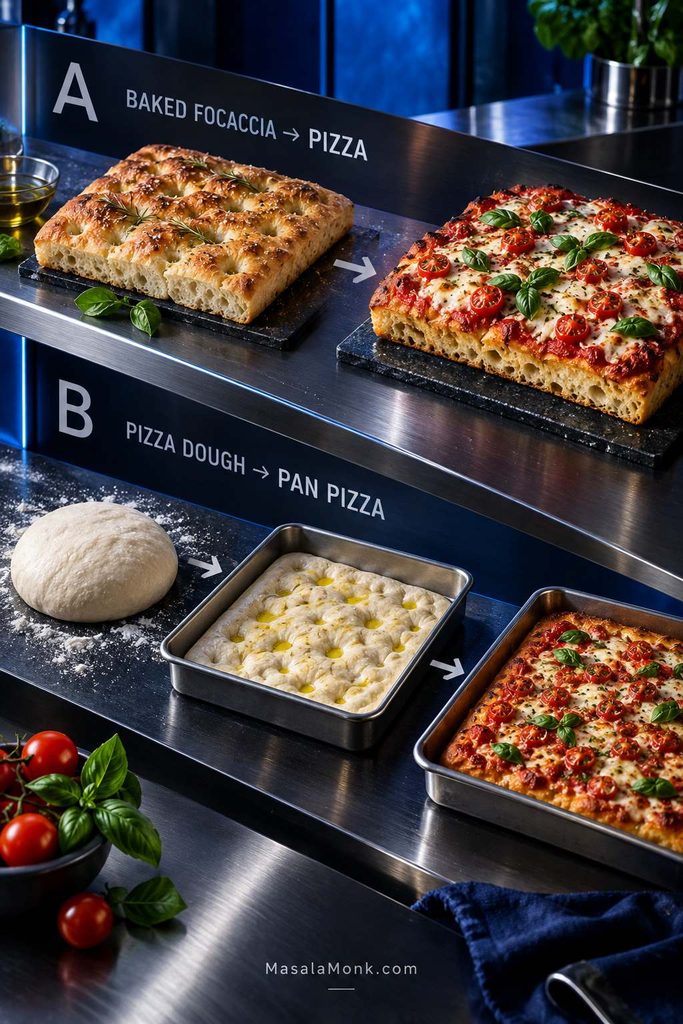
Already Have Baked Focaccia?
This is the quickest route to pizza on focaccia bread. Heat the oven to 425°F / 220°C. Focaccia thicker than 1½ inches / 4 cm is easier to turn into pizza if you split it horizontally.
For a 9 × 13-inch piece, use 120–150 g / ½–⅔ cup thick sauce and 90–120 g / 3–4 oz low-moisture mozzarella, plus cooked toppings.
Bake on a metal sheet pan for 8–12 minutes, until the cheese bubbles and the bread is hot and browned underneath. A base that needs more color can spend another minute or two directly on the oven rack once it is firm enough to move safely.
Day-old focaccia is excellent here. The edges recrisp at the same time the cheese melts, so leftovers suddenly feel intentional.
Using Pizza Dough
Conventional pizza dough is usually less hydrated and more elastic than focaccia dough, but it adapts well to an oiled pan.
For a 9 × 13-inch pan, start with 450–500 g / 16–18 oz pizza dough. Let refrigerated dough warm and relax, stretch it into the oiled pan in stages, and give it another 15–20 minutes whenever it snaps back.
Once the dough is visibly puffy, continue with the par-bake, topping, and finishing method. Start checking the color early because a lower-hydration dough may brown faster.
The easy pizza dough recipe gives you same-day and overnight options if you want to begin from scratch.
For sourdough: natural fermentation needs its own timing rather than a simple yeast swap. The sourdough focaccia recipe follows a starter-based dough through fermentation, proofing, dimpling, and baking.
Fix My Focaccia Pizza
Most of these problems look different, but they usually come back to fermentation, water on top, or heat underneath. If you want the logic first, revisit the three controls for an airy, crisp focaccia pizza. Something going wrong right now? Start with the rescue column; plenty can still be fixed before dinner reaches the table.
Dough and Proofing
| Problem | Likely cause | Save this one | Next time |
|---|---|---|---|
| Extremely sticky dough | Often normal at this hydration | Wet or oil your hands | Let the folds build the strength |
| Dough behaves like soup | Mismeasurement or flour unable to hold the water | Give it another fold or two; add a little flour only if it cannot gain structure | Weigh the flour and hold back 15 ml water with softer flour |
| Won’t reach the corners | Cold or tight gluten | Cover and wait 10–20 minutes | Stretch in stages |
| Barely rises | Cool room, slow fermentation, or weak yeast | Give active dough more time somewhere comfortably warm | Check yeast freshness and watch the dough rather than the clock |
| Dense crumb | Underproofing, added flour, or heavy handling | Enjoy it as a denser pan pizza | Proof longer and handle mature dough gently |
| Rose and then collapsed | Overproofing | Bake it now; it may simply finish flatter | Use less yeast for long ferments and catch the dough closer to its peak |
| One giant bubble | A large trapped gas pocket | Pierce that bubble gently | Dimple evenly without crushing the rest |
Baking and Crust
| Problem | Likely cause | Save this one | Next time |
|---|---|---|---|
| Gummy or raw middle | Thick dough, weak bottom heat, wet toppings, or short bake | Remove it from the pan. If the crust is firm enough to handle safely, finish it directly on the oven rack; loosely shield very dark cheese with foil | Keep the par-bake, control wet toppings, and check the crumb beneath them |
| Pale, soft bottom | Not enough heat underneath | Once the crust is firm enough to move, finish it on the rack or a thoroughly heated steel or stone for 2–4 minutes | Preheat longer, move lower, or add thermal mass |
| Burned bottom | Strong lower heat, very dark pan, excess oil, or hot steel | Move the pizza off the pan immediately | Raise the rack or remove the steel/stone |
| Dark cheese, underdone bread | The top is cooking faster than the bread | Loosely cover with foil and keep baking | Use the full par-bake or add vulnerable toppings later |
| Pizza sticks | Pan surface or inadequate release layer | Work a thin spatula gradually underneath | Use spray plus oil on a suitable metal pan |
Toppings and Cooling
| Problem | Likely cause | Save this one | Next time |
|---|---|---|---|
| Fresh mozzarella made it wet | Too much water from the cheese | Remove from the pan and continue baking briefly if needed | Drain, blot, and add it late in the bake |
| Vegetables made the middle soggy | They released water during baking | Finish the crust out of the pan | Cook and drain wet vegetables first |
| Garlic or sun-dried tomatoes burned | Dry ingredients were exposed to high heat | Remove badly scorched pieces | Coat with oil, tuck beneath cheese, or add later |
| Firm bottom turned soft | Steam became trapped under the pizza | Recrisp slices in a skillet, air fryer, or oven | Move the pizza to a rack soon after baking |
Once you can read those three controls, the recipe stops feeling fragile and becomes much easier to steer.
Storage and Reheating
Let excess steam escape briefly, then cover and refrigerate promptly. Don’t leave pizza at room temperature for more than 2 hours.
- Refrigerator: 3–4 days.
- Freezer: best quality within 1–2 months. Freeze slices in a single layer first, then transfer them to a container or freezer bag.
USDA guidance lists pizza at 3–4 days refrigerated and 1–2 months frozen, and recommends reheating leftovers to 165°F / 74°C. See its food-safety guidance for more detail.
Best Ways to Reheat It
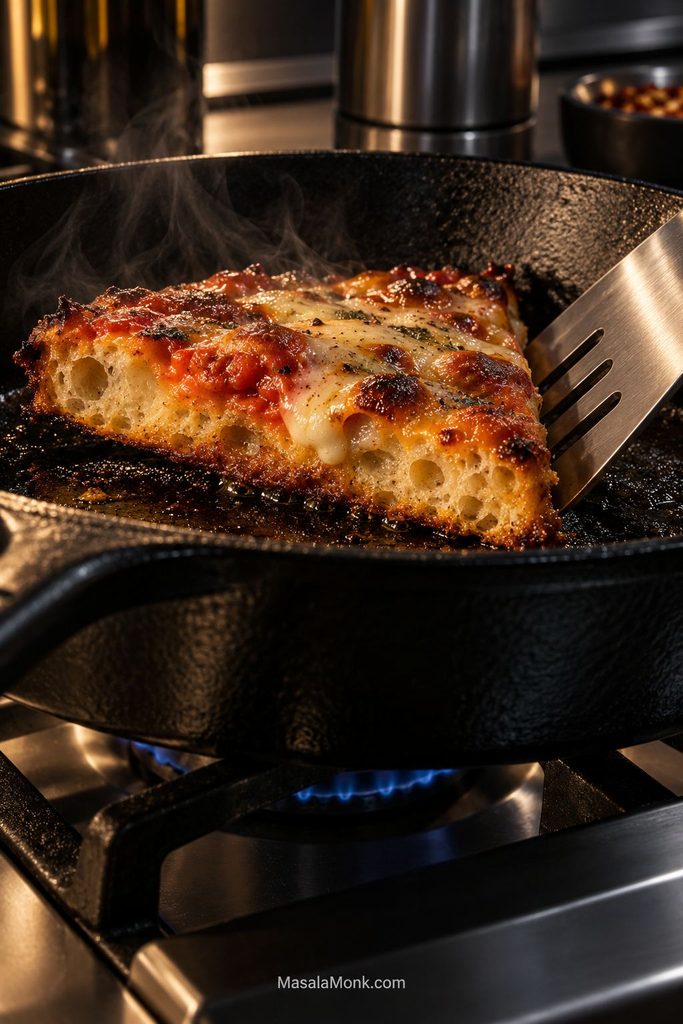
For the closest thing to a fresh slice, use the skillet or oven. Both restore the bottom instead of simply warming the cheese, which is what keeps focaccia pizza from turning soft and heavy the next day.
- Skillet: heat over medium-low until the bottom firms and browns; cover briefly if the top still needs warming.
- Oven: 375°F / 190°C for 8–12 minutes.
- Air fryer: 350–375°F / 175–190°C for a few minutes.
- Microwave: quickest, but the crust will be softer.
Focaccia Pizza FAQs
1. What is focaccia pizza?
It is pizza made on a soft, olive-oil-rich focaccia-style dough. Compared with conventional pizza, the base is thicker and airier, with a browned underside and a tender crumb that still carries the toppings like pizza.
2. Is focaccia pizza the same as Sicilian pizza?
They overlap, but the names aren’t interchangeable. Traditional Sicily has several bread-based pizza and focaccia styles, including Palermo’s soft, spongy sfincione, while “Sicilian pizza” in the United States often means a thick rectangular Italian-American pan pizza. This recipe is specifically built around a high-hydration, olive-oil-rich focaccia dough with an airy crumb and dimpled structure.
3. Can I use Tipo 00 flour?
Yes, although you don’t need it. Tipo 00 describes how finely the flour is milled, not one fixed protein strength. Bread flour is the more predictable choice here because this wet dough also has to support pizza toppings.
4. Can I bake focaccia pizza in a pizza oven?
Yes, if the oven can safely accommodate the pan. Use the oven maker’s focaccia or bread guidance rather than Neapolitan-level heat. Keep the flame modest, rotate the pan as needed, watch the underside closely, and check the pan manufacturer’s maximum safe temperature. Many compact pizza ovens won’t fit a 13 × 18-inch half-sheet, so scale the dough to the pan you can use.
When the middle is airy and fully set, the underside is browned, and the knife meets a little resistance from that firm base, you’re there. Give the pizza a few minutes on the rack, cut it into squares, and listen to those olive-oil edges crackle. Here, the crust was never supposed to be an afterthought.








