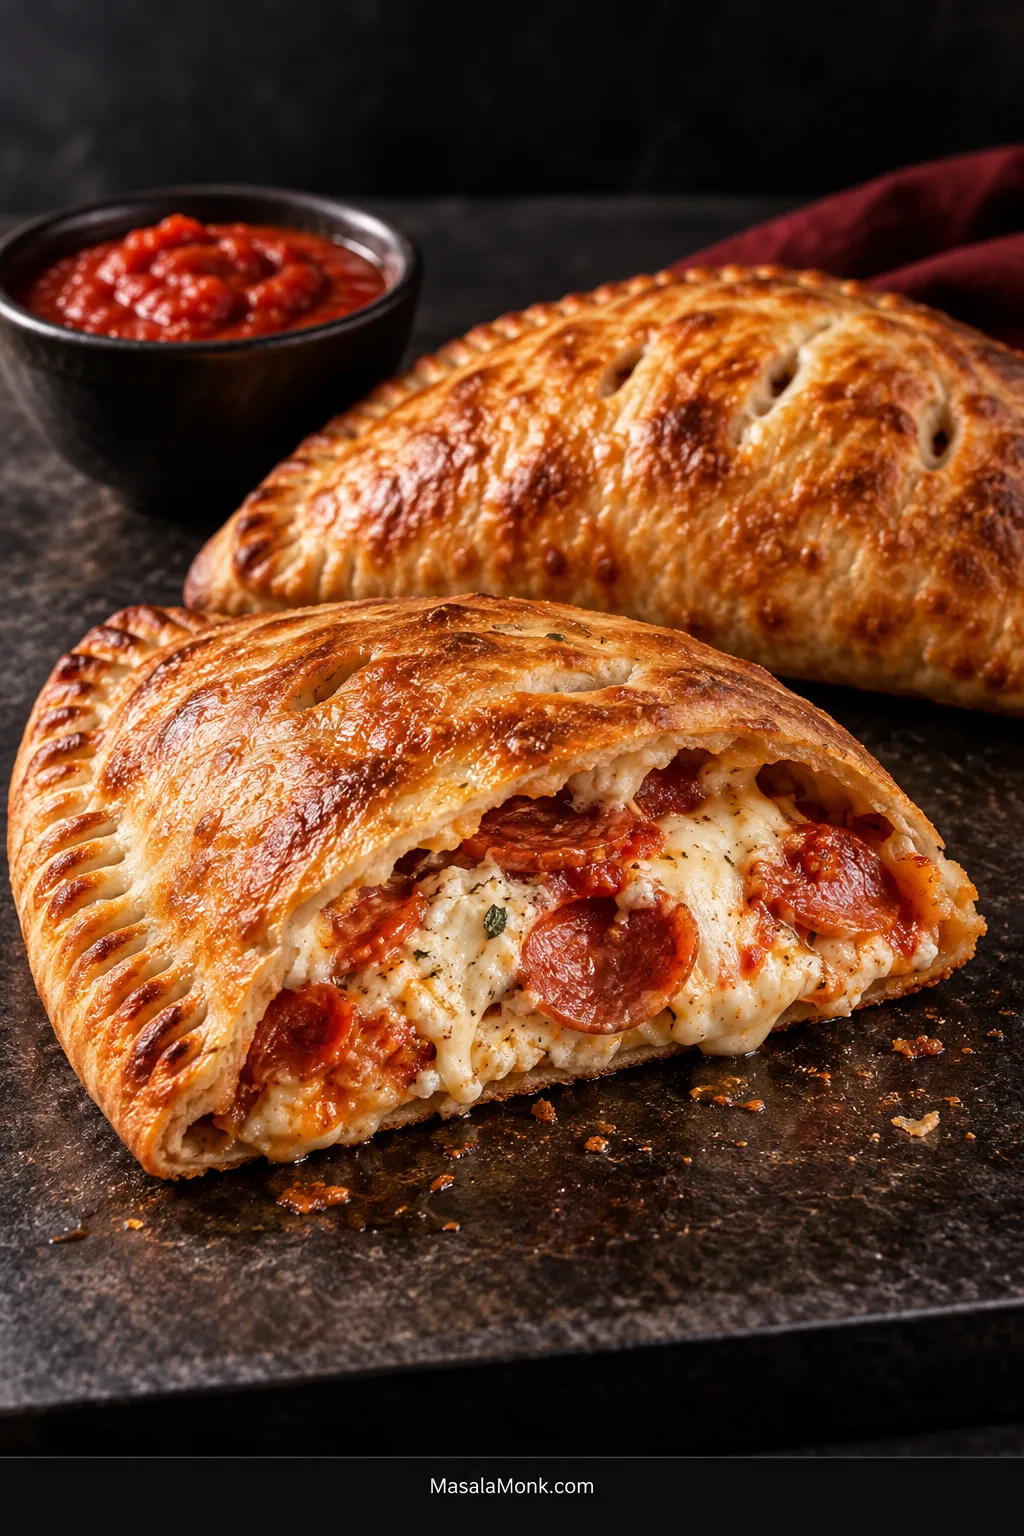
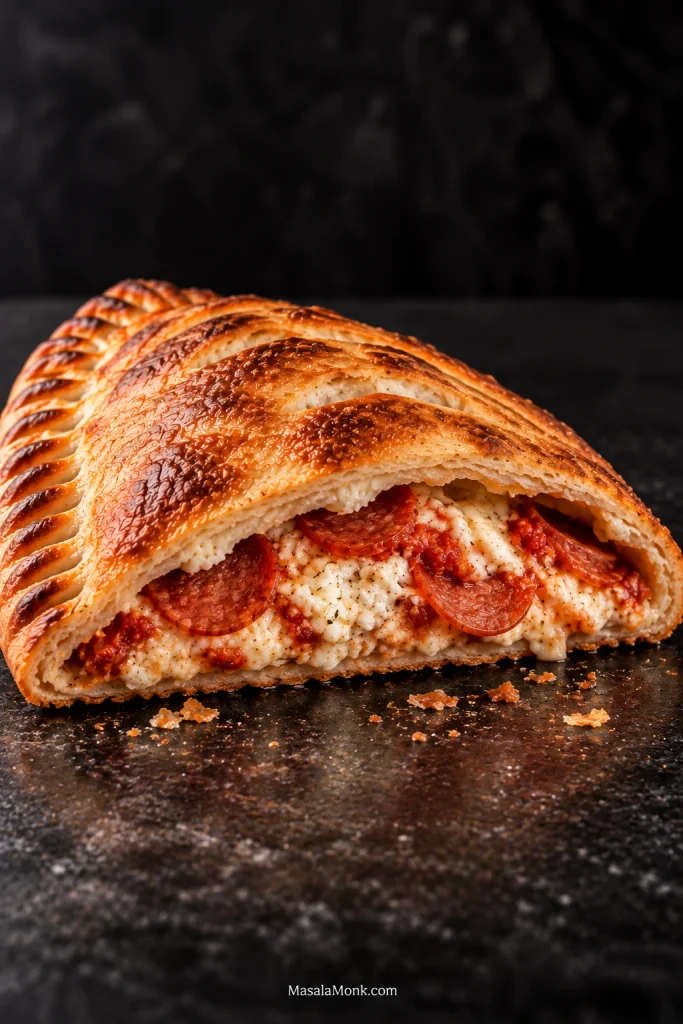
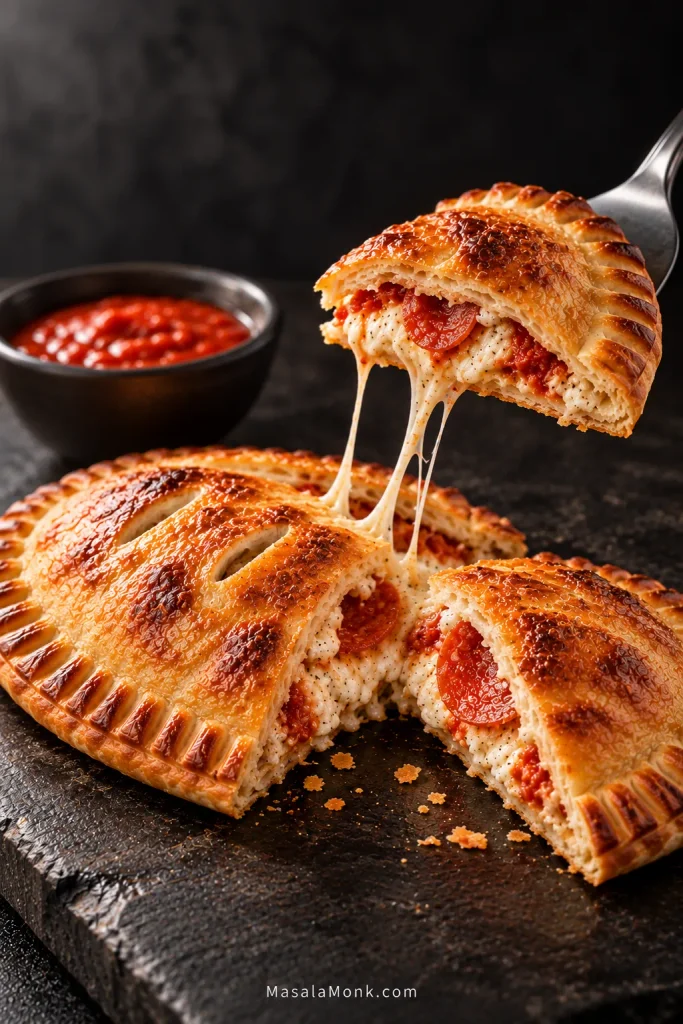
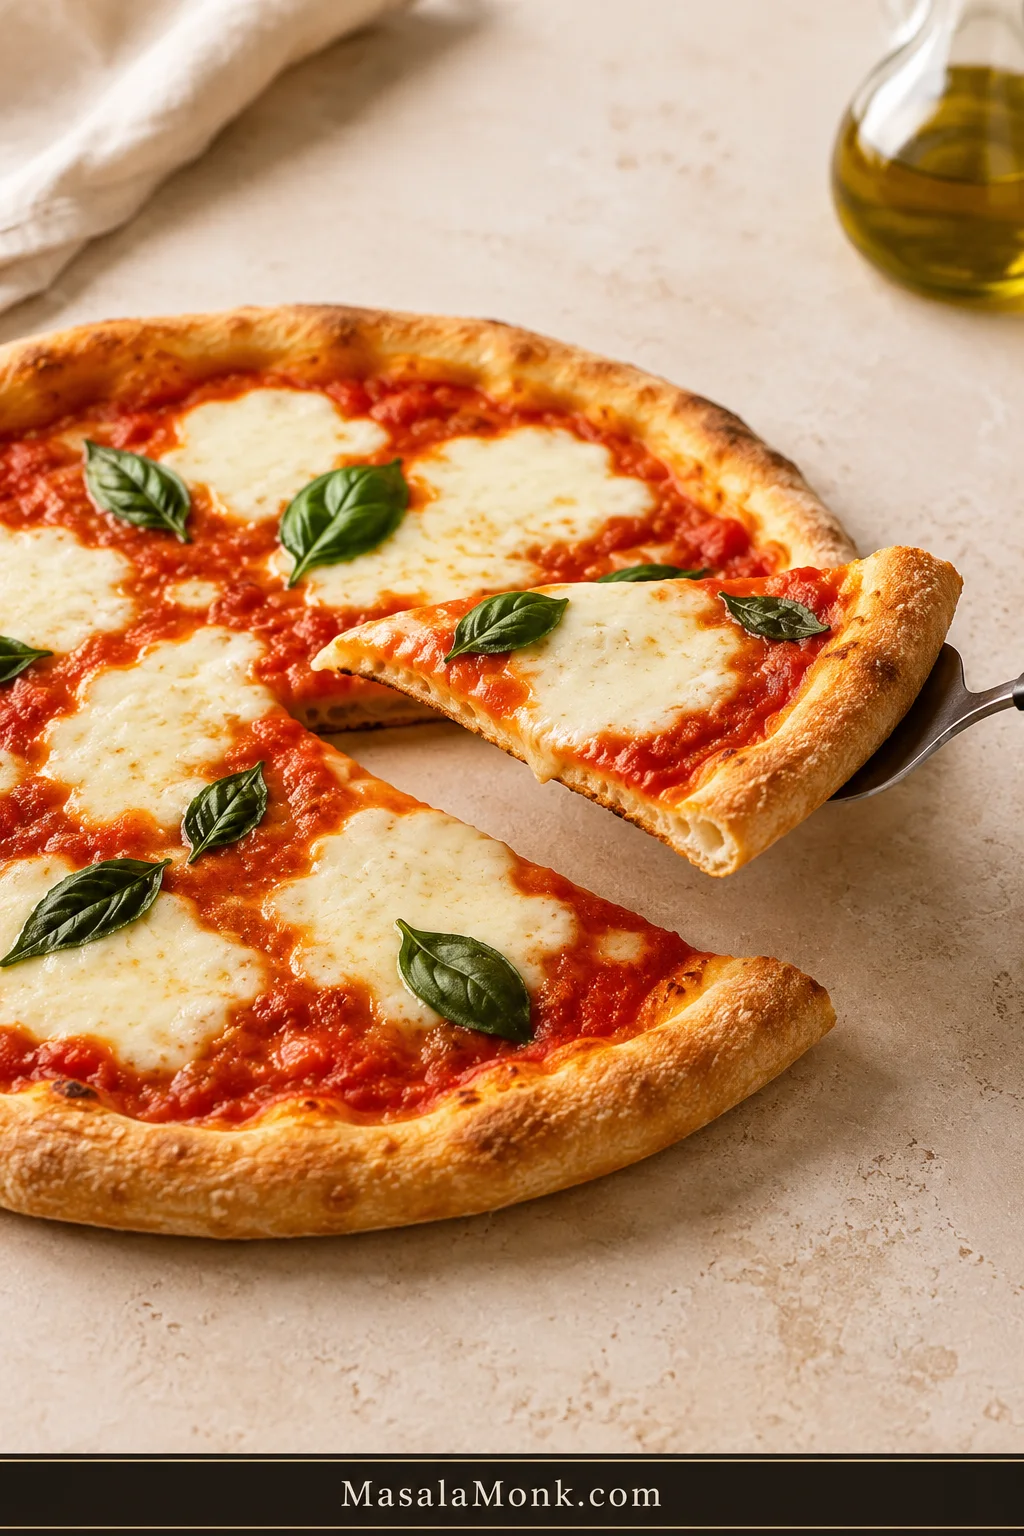
Cut into a good calzone while it is still warm and the crust gives a little crack before the cheese pulls apart underneath it. The outside is browned and crisp, the center is creamy and stretchy, and a little marinara on the side gives you all the comfort of pizza in one satisfying fold.
You can make that at home with regular pizza dough. No special calzone dough or pizza oven is required. What matters is leaving the dough enough room to close and keeping excess moisture out of the filling, so the crust can brown before trapped steam softens it.
This calzone recipe makes four generous calzones with a crisp, sturdy crust, ricotta-mozzarella filling and pepperoni. The measurements give you a reliable starting point, but they aren’t a reason to force an overfilled calzone shut. If the dough won’t come easily over the filling, take a little out.
Four things that help: let tight dough relax · control excess moisture in the filling · leave a clean border · vent before baking.
Calzone Recipe
A cheese-and-pepperoni calzone with a crisp browned crust, creamy ricotta-mozzarella center and marinara for dipping.
Yield 4 large calzones
Prep 25–30 minutes
Dough rest 30–60 minutes, or longer if needed
Bake 18–25 minutes
Oven: 450°F / 230°C Dough: 720 g total, divided into 4 × 180 g portions Finished size: about 7½–8 inches / 19–20 cm each Filling: about 160 g total per calzone, including sauce Total: about 1 hr 20 min–2 hr 5 min, plus extra dough-rest time if needed
Ingredients
Dough
720 g / 1 lb 9 oz pizza dough, homemade or refrigerated store-bought
Filling
240 g / 8½ oz whole-milk ricotta, after pouring off any obvious separated liquid
200 g / 7 oz low-moisture whole-milk mozzarella, shredded
40 g / 1½ oz finely grated Parmesan or Pecorino Romano
100 g / about 3½ oz thinly sliced pepperoni
60 g / ¼ cup thick marinara or pizza sauce, plus more for dipping
1 tsp dried oregano
¼ tsp freshly ground black pepper
¼ tsp crushed red pepper flakes, optional
Fine salt, only if needed
For finishing
1 large egg
1 tbsp / 15 ml water
1–2 tsp olive oil, for lightly greasing the baking sheet
Equipment
1–2 rimmed baking sheets, ideally about 13 × 18 inches / 33 × 46 cm
Kitchen scale
Fork for crimping
Sharp knife
Pastry brush
Rolling pin, optional
A pizza stone or baking steel is optional. It can give the underside stronger heat and deeper browning, but a baking sheet is all you need for the main method.
Method
1. Let the dough relax
Let refrigerated pizza dough sit covered at room temperature until the refrigerator chill has gone and the dough opens without immediately snapping back. For many doughs, 30–60 minutes is enough; a particularly cold or tight dough may need longer.
2. Heat the oven
Heat the oven to 450°F / 230°C with a rack slightly below the center. Lightly oil a baking sheet.
3. Mix the filling
Pour off any obvious whey around the ricotta; there’s no need to press a normally thick ricotta dry. Stir it with the mozzarella, Parmesan or Pecorino, oregano, black pepper and red pepper flakes if using.
Taste the cheese mixture before adding salt. Parmesan or Pecorino is already salty, while the pepperoni and sauce will add more once everything is assembled.
4. Portion the dough
Divide the dough into four 180 g / about 6⅓ oz portions. Shape them gently into loose balls and let them rest for about 5 minutes.
5. Stretch the dough
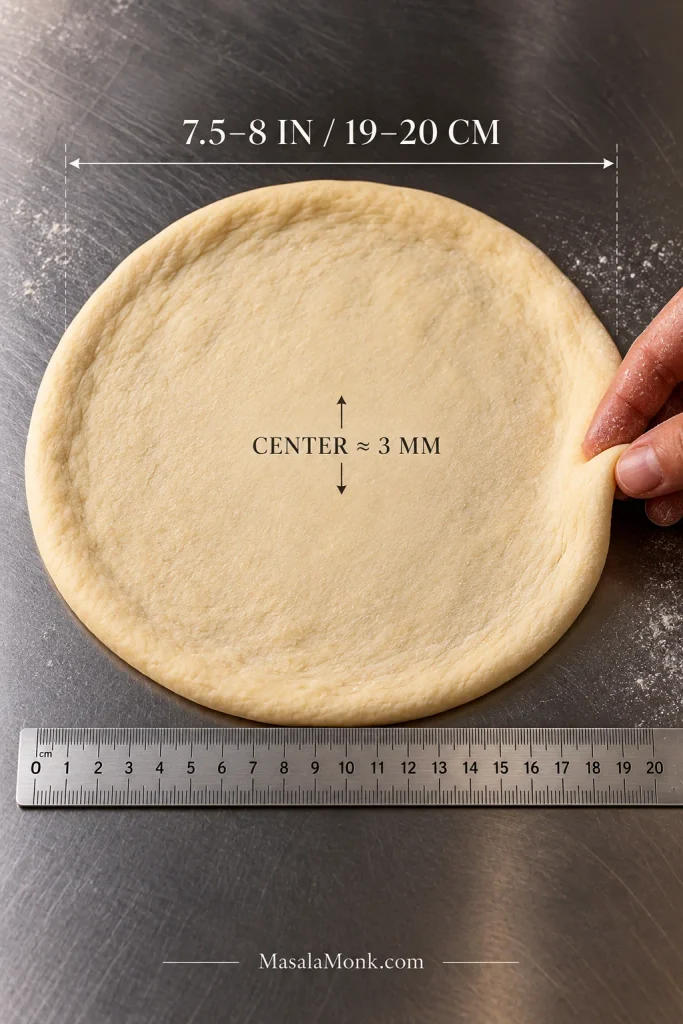
Work with one portion at a time. Stretch or roll it into a round about 7½–8 inches / 19–20 cm across, roughly ⅛ inch / 3 mm through most of the center with a slightly thicker outer edge.
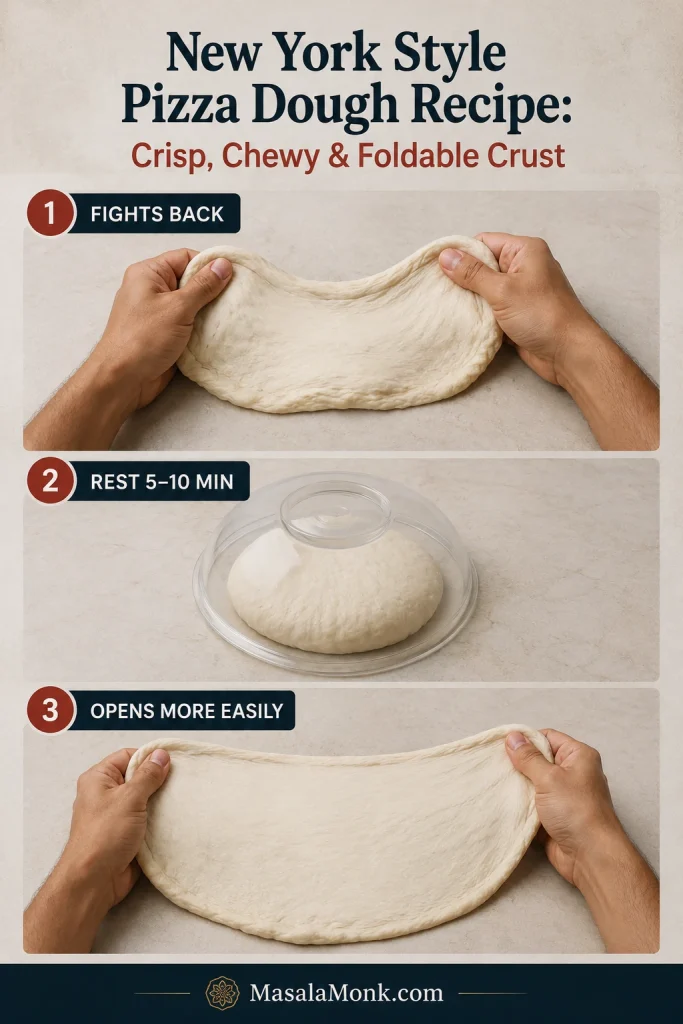
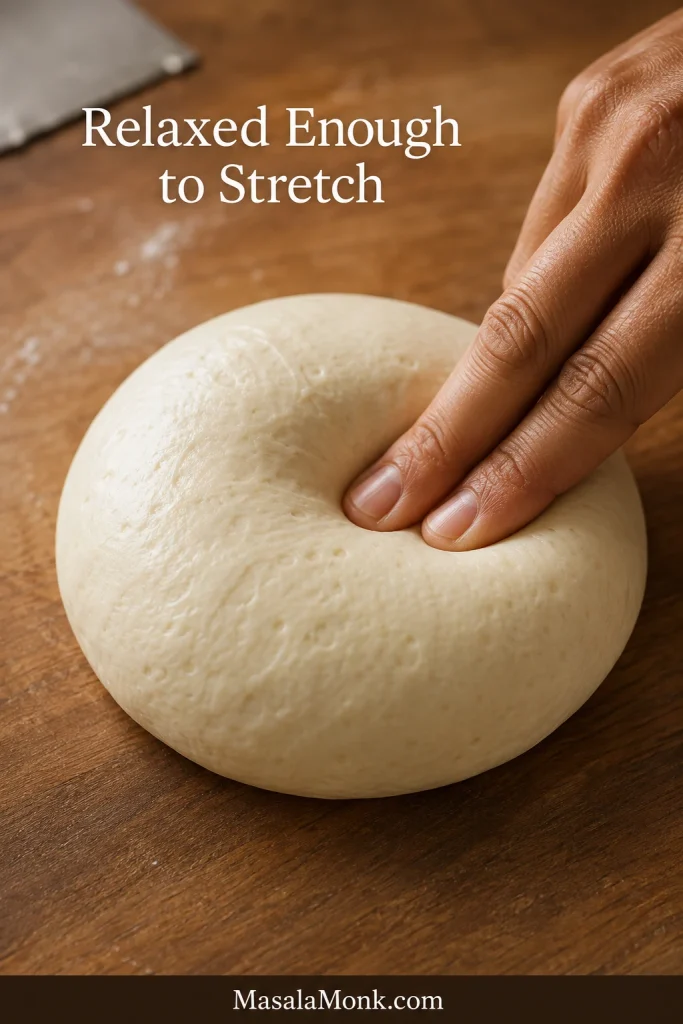
The dough is ready when it feels supple enough to fold but still strong enough to lift. If you can almost see the work surface through the center, stop. Dough that tightens again while you’re shaping it usually needs only a short 5–10 minute covered rest before you continue.
6. Fill one calzone
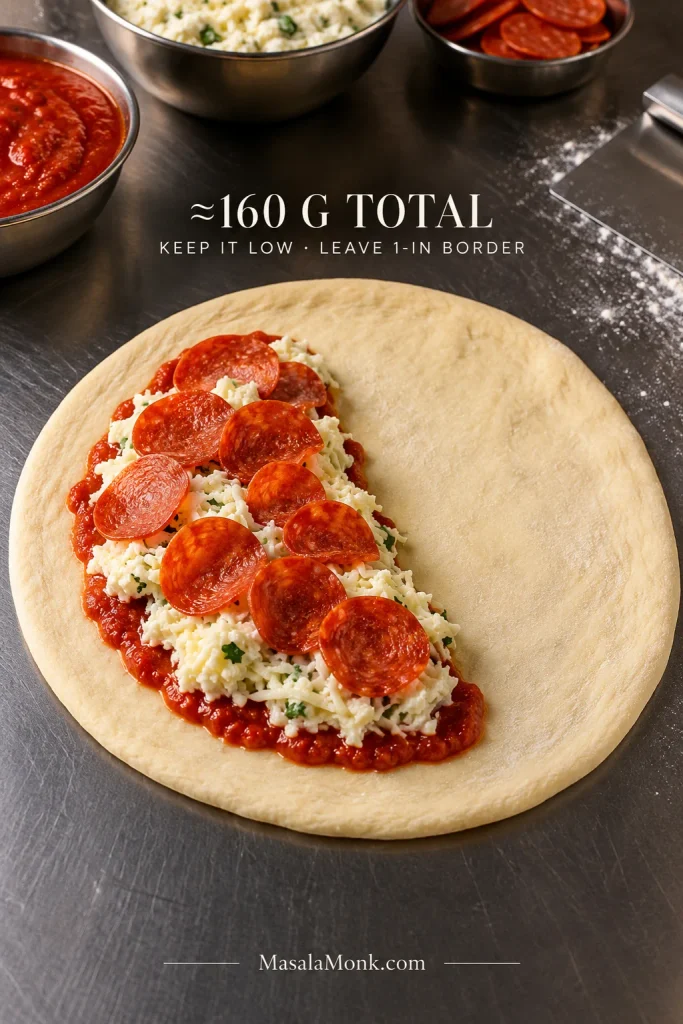
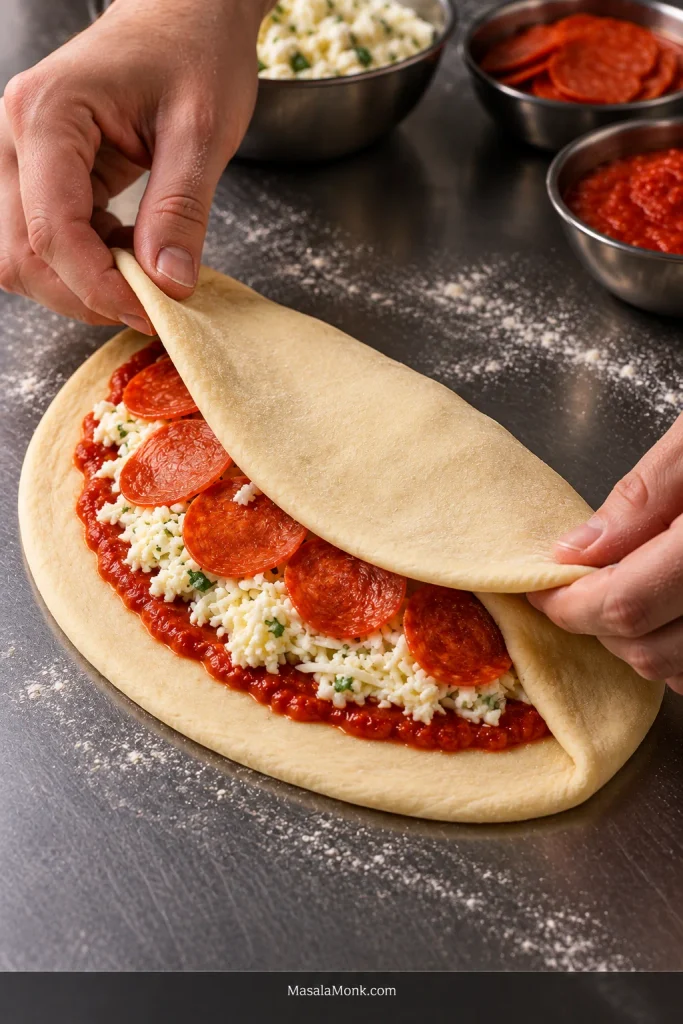
Set the stretched round on the lightly greased baking sheet. Spoon about 15 g / 1 tbsp sauce over one half, leaving a clean 1-inch / 2.5-cm border. Add one quarter of the cheese mixture—about 120 g / 4¼ oz—and about 25 g / 1 oz pepperoni.
That tablespoon of sauce is deliberately modest. For an even drier cheese filling, leave it out and serve all of the marinara alongside.
Spread the filling into a low mound. This recipe aims for about 160 g / 5⅔ oz total filling per calzone, including the sauce. If the empty half won’t reach comfortably over the filling, take some out.
Use the empty half of the dough as a capacity check: it should be able to fold over the mound without stretching tight. The bare border is not wasted space; it is the structure that lets the calzone close cleanly and stay sealed.
7. Fold and seal
Fold the empty half over the filling and ease out any obvious large pocket of air. Move sauce, cheese or pepperoni away from the border, then press the edges together all the way around. The strongest seal is dough against dough.
Crimp firmly with a fork, including the ends and corners. If the border feels dry, run a lightly moistened fingertip around it before sealing. For a sturdier rim, fold the narrow crimped edge over itself once and press lightly.
8. Repeat, egg wash and vent
Repeat with the remaining dough. Leave enough space around the calzones for hot air to circulate. If all four fit on one sheet without touching or crowding one another, bake them together. Otherwise, bake in two batches.
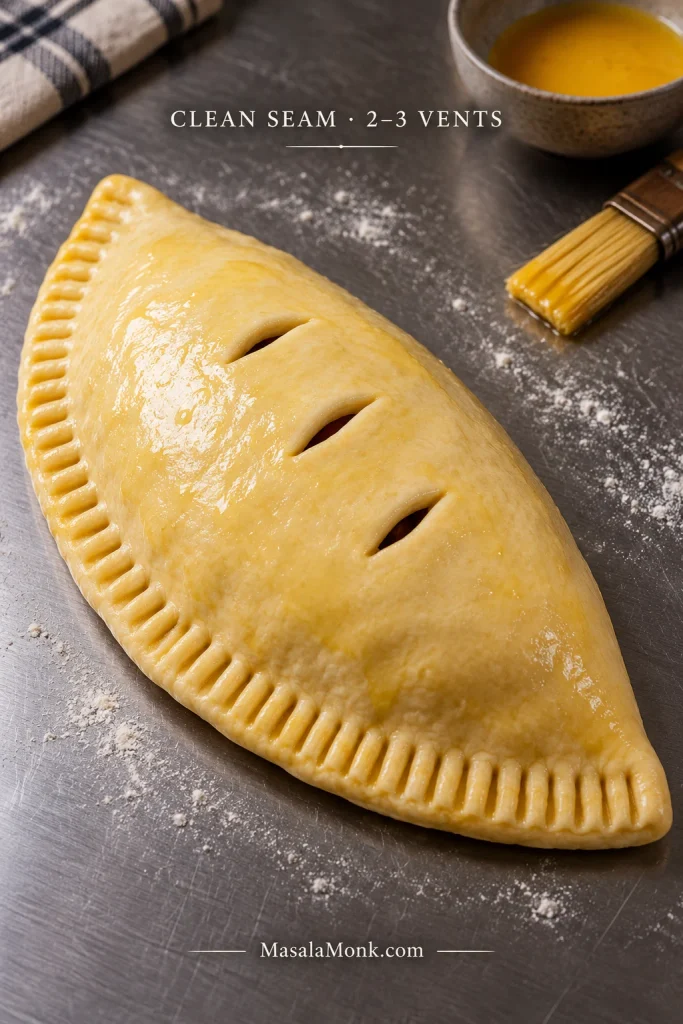
Beat the egg with 1 tbsp / 15 ml water and brush a thin layer over the tops. Cut 2–3 short vents into each calzone. Bake reasonably soon after filling and sealing so the raw dough isn’t sitting against the moist filling for long.
A fork crimp can reinforce a seal, but it cannot repair filling trapped between the dough layers. Clean contact comes first; the vents then handle steam pressure separately, which is why both details matter for a calzone that stays closed.
9. Bake until the top and bottom are browned
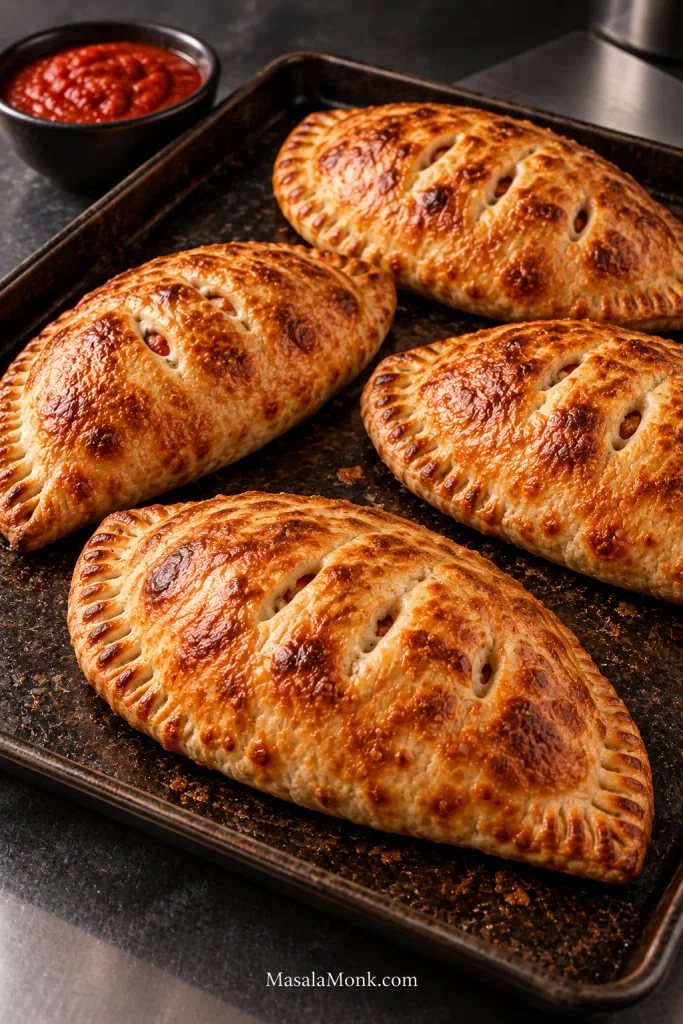
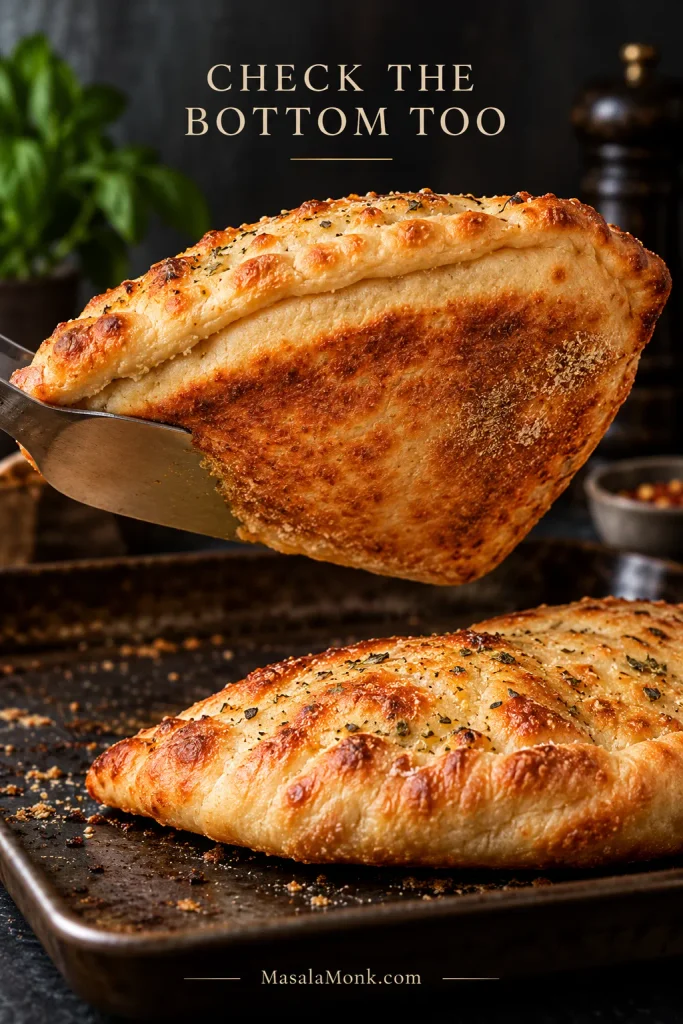
A calzone is done when the top is golden brown, the underside is firm and browned, and the filling is fully melted and may be bubbling at a vent. Start checking at about 15 minutes. In many ovens, the total bake will land somewhere around 18–25 minutes.
Finished calzones do not need identical browning to be done well. Look instead for intact seams, a set crust and broad golden color across the batch; noticeably darker calzones on one side can also reveal a hotter area of your oven.
10. Rest and serve
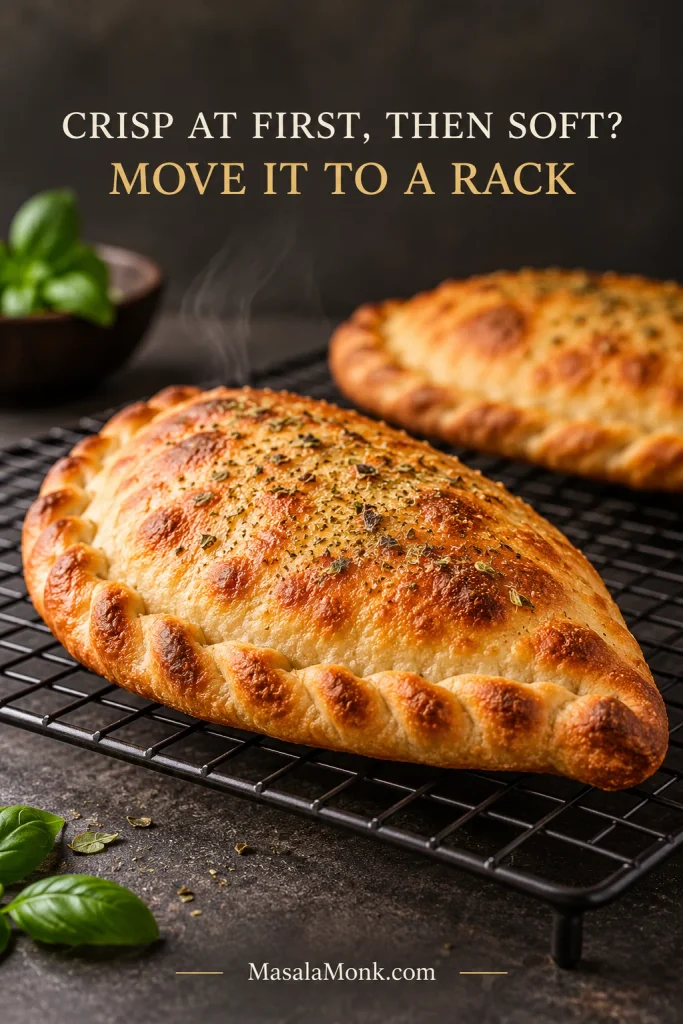
Let the calzones rest for 5–10 minutes. After the first few minutes, move them to a wire rack so steam doesn’t collect underneath and soften the crust. The filling will also settle a little before you slice.
Cut through the middle while they’re still warm and serve with extra marinara for dipping.
You can cook from the recipe above and get on with dinner. What follows is for the parts a list of steps can’t fully show: why dough keeps shrinking, what makes a filling behave inside folded dough, how to tell when the bottom is really baked and what to change if something goes wrong.
A good calzone has to survive the fold before it ever reaches the oven. The dough needs to be relaxed enough to close without strain, the filling needs to stay put instead of spreading toward the seam, and the bottom needs enough heat to set while everything inside becomes hot and melted.
Unlike an open pizza, a calzone traps much of the moisture released by its filling inside folded dough. Tight dough pulls against the seal, and extra filling adds even more strain.
Meanwhile, water from loose ricotta, vegetables or too much sauce turns to steam and can soften the crust from inside. Give the dough time and keep the filling within what it can hold, and the whole process becomes much easier.
Ingredients & Filling
In practice, that starts with a filling that’s creamy enough to stay soft after baking but firm enough to sit in a mound on the dough. Whole-milk ricotta gives it that creamy base, low-moisture whole-milk mozzarella supplies the melt and stretch without much extra water, and Parmesan or Pecorino brings concentrated savory flavor.
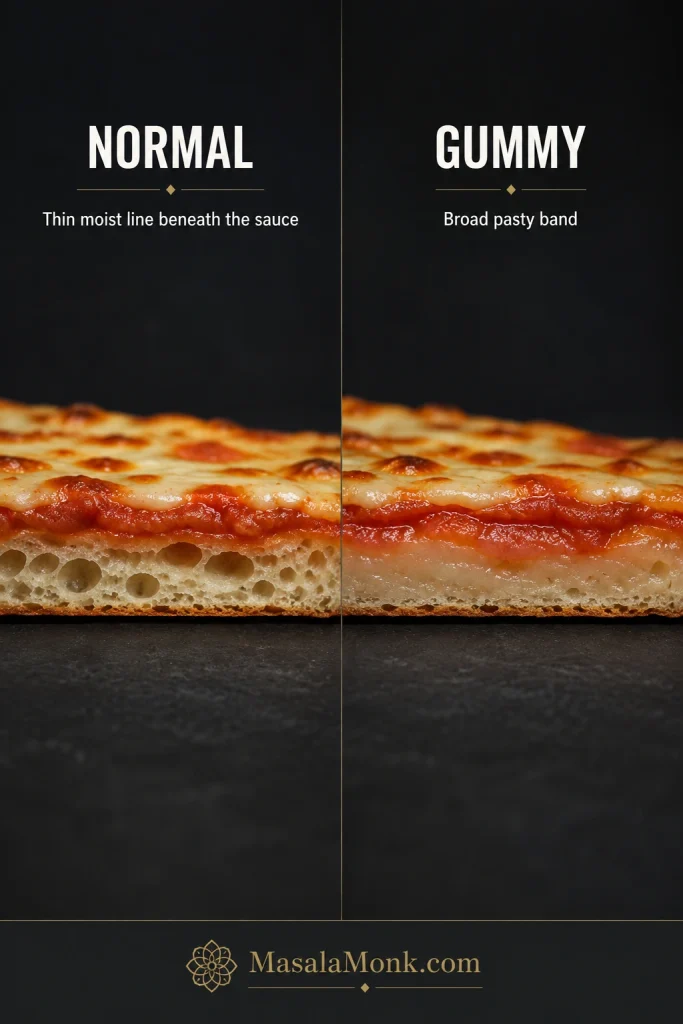
The cut face is a useful diagnostic tool. Cooked crumb surrounding a creamy, cohesive filling is what you want; meanwhile, a gummy strip, shiny wet pocket or liquid near the base can point to excess moisture, too much filling or an underbaked center.
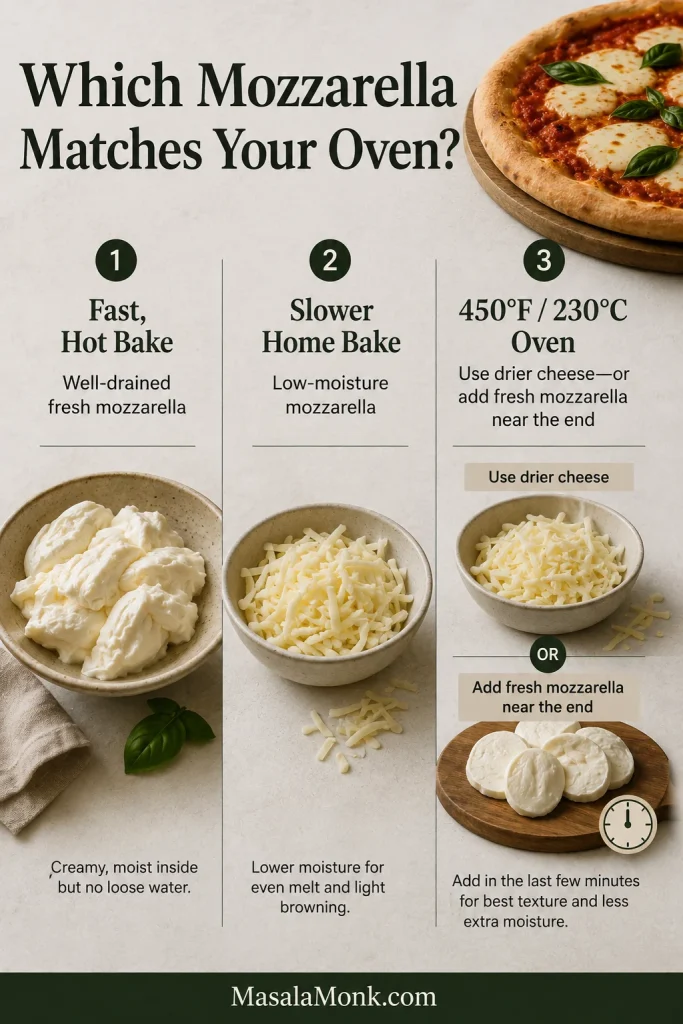
Pour off any obvious separated whey before weighing out the 240 g ricotta. A normal thick ricotta doesn’t need prolonged draining or pressing. Low-moisture mozzarella is the better choice here because fresh mozzarella contains considerably more water and isn’t a straight one-for-one substitute in an enclosed calzone.
Thin pepperoni distributes easily through the filling, while a thick marinara is easier to control than a loose sauce. Use only a little inside and save the rest for dipping. If you’d like to make your own, try our homemade marinara.
Other fillings follow the same physical rule: deal with excess water before it reaches the dough. Squeeze cooked spinach dry, cook mushrooms until their released liquid is gone, and sauté watery vegetables such as peppers or onions. Meat goes in already cooked and drained of excess grease. Let hot fillings cool before assembly.
Creamy is good; runny is not.
Work With the Dough
Store-bought pizza dough works perfectly well here, as does homemade dough. What matters more is how cold it is. Straight from the refrigerator, it often feels rubbery and keeps pulling itself back into a smaller round.
Give refrigerated dough its longer warm-up before you begin—often 30–60 minutes at room temperature, sometimes more. Once the chill has gone, it becomes noticeably easier to open.
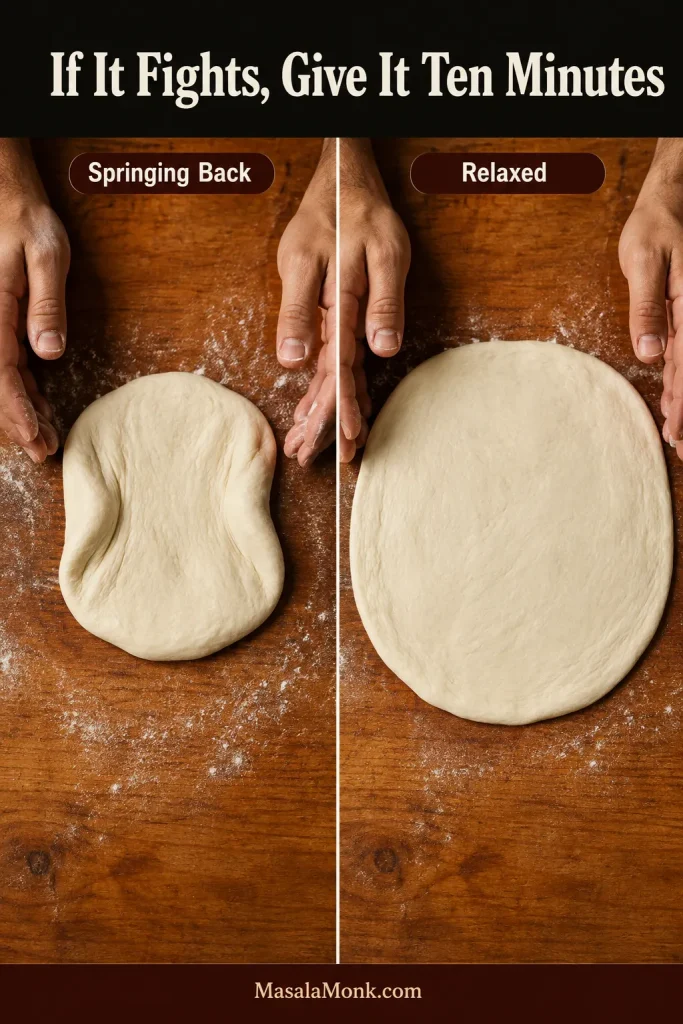
If it tightens again halfway through shaping, cover it and leave it alone for another 5–10 minutes. Flour helps when the surface is sticky; time is what relaxes a tight dough.
Stop stretching while the center still feels strong enough to lift. You want it thin enough to fold easily, but not so thin that the work surface is clearly visible through it. Leave the outer edge a little thicker so there’s enough dough to make a firm seal.
Measure the first calzone dough round so your hands learn the scale. After that, matching the remaining portions by feel is usually faster, and similar thickness matters more than perfectly round edges because it helps all four calzones bake more evenly.
There’s no need to knead or punch down refrigerated dough again just to make it cooperate. If you’d rather start from scratch, use our Easy Homemade Pizza Dough.
The easiest calzone to seal is one that still has some slack in the dough after it’s filled. Once folded, it should look like a neat half-moon, not a parcel stretched tightly around its contents. That little bit of slack also gives the seam a better chance of staying closed as the filling heats and pressure builds.
The fold is the last moment when overfilling becomes obvious. If pepperoni, cheese or sauce starts being pushed toward the border as the dough comes over, tuck it back before sealing instead of forcing the edge closed around it.
Give the filling room
Leave about 1 inch / 2.5 cm of clean dough around the edge and spread the filling in a low mound. A tall pile puts more strain on the top and makes it easier for sauce or cheese to reach the seam. If the empty half won’t reach comfortably over the filling, take some out.
Close the seam
As you fold, gently ease out any obvious large pocket of air. Clear stray filling from the border, press dough directly against dough and crimp firmly with a fork. Pay particular attention to the two ends, where a small gap is easy to miss. For an extra-sturdy rim, fold the narrow crimped edge over itself once.
Vent before baking
Cut 2–3 short vents through the top so expanding steam has a route out. Vents release steam; they don’t dry out a wet filling.
Bake Until the Bottom Is Ready Too
A calzone is done when the top is golden brown, the underside is firm and browned, and the filling is fully melted and may be bubbling at a vent. At 450°F / 230°C, start checking around 15 minutes; many calzones will need about 18–25 minutes in total.
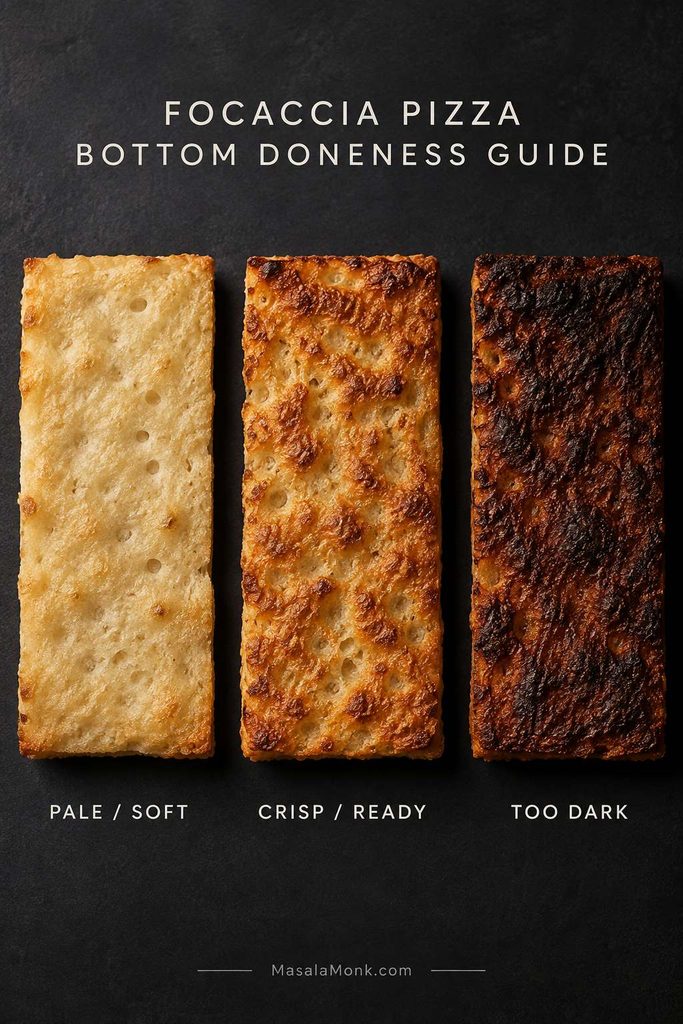
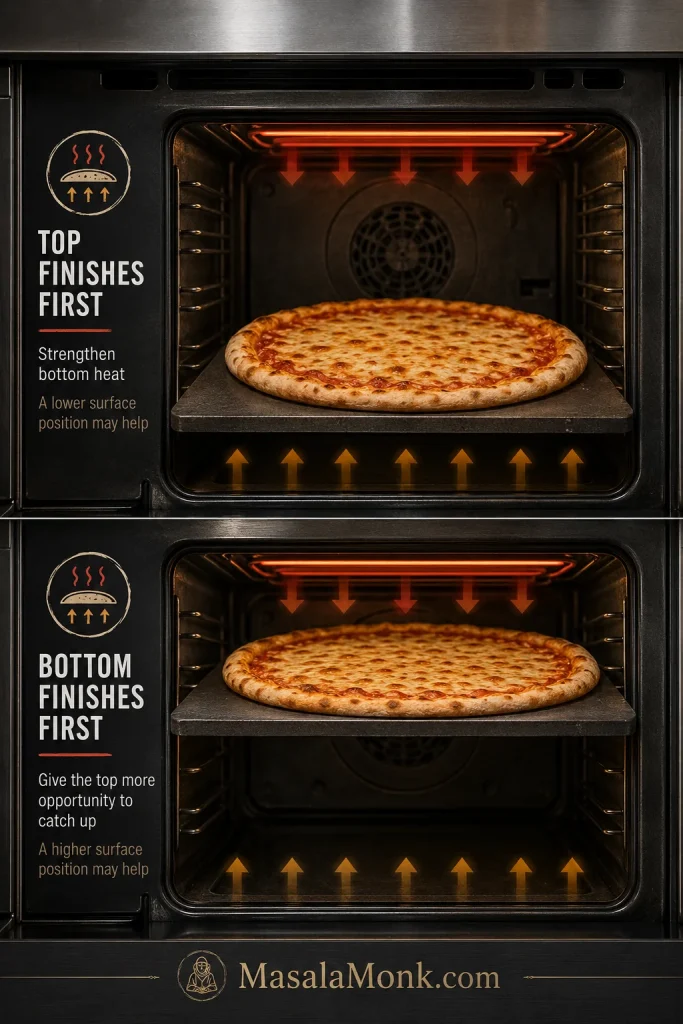
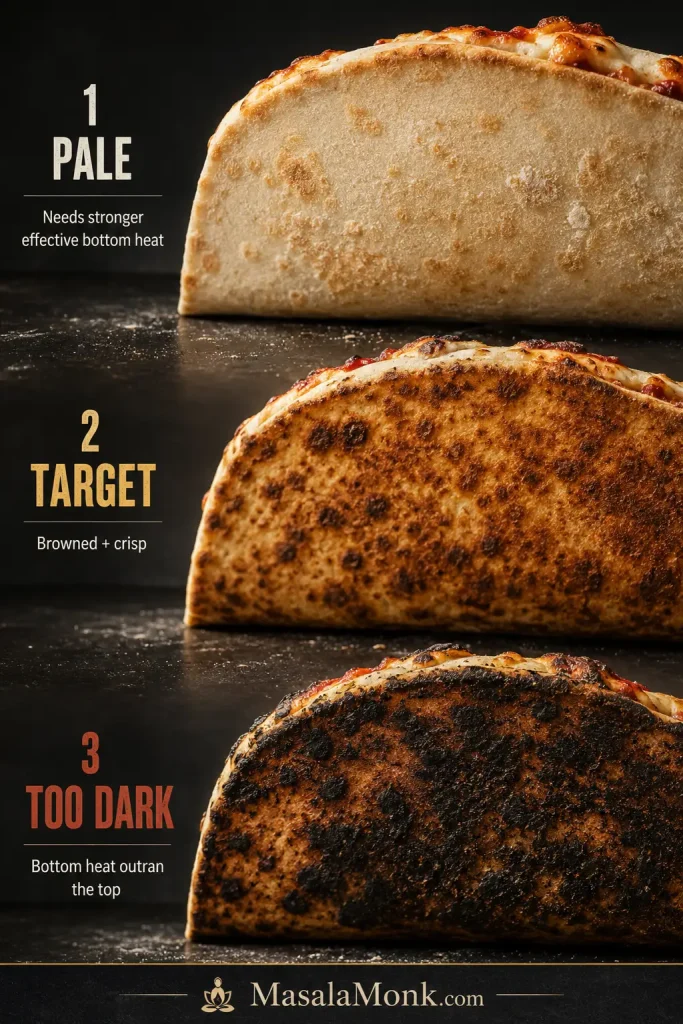
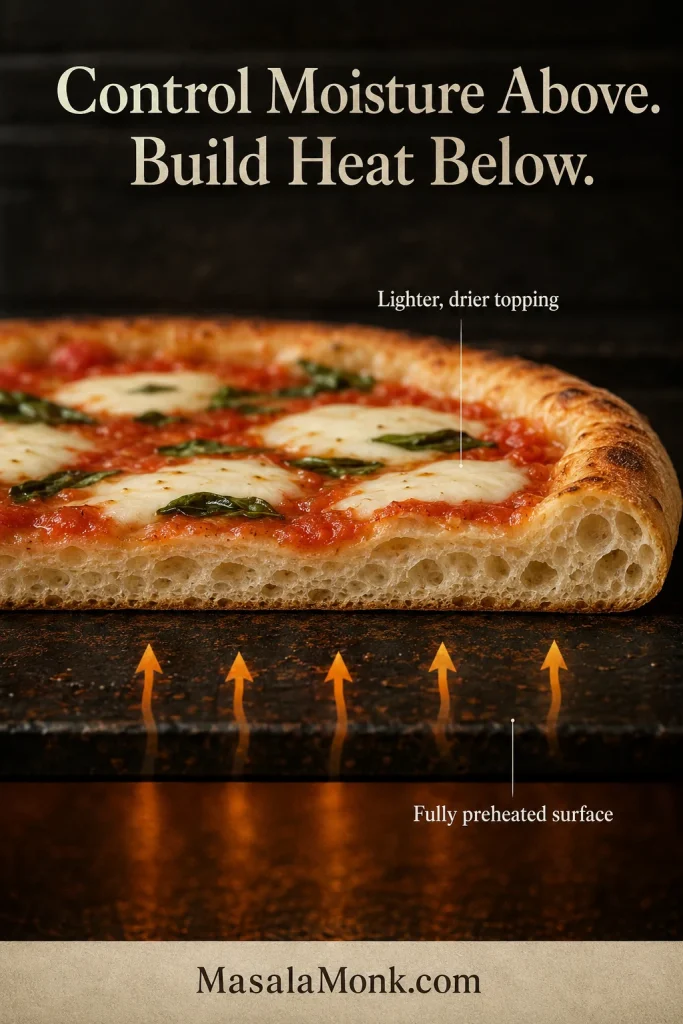
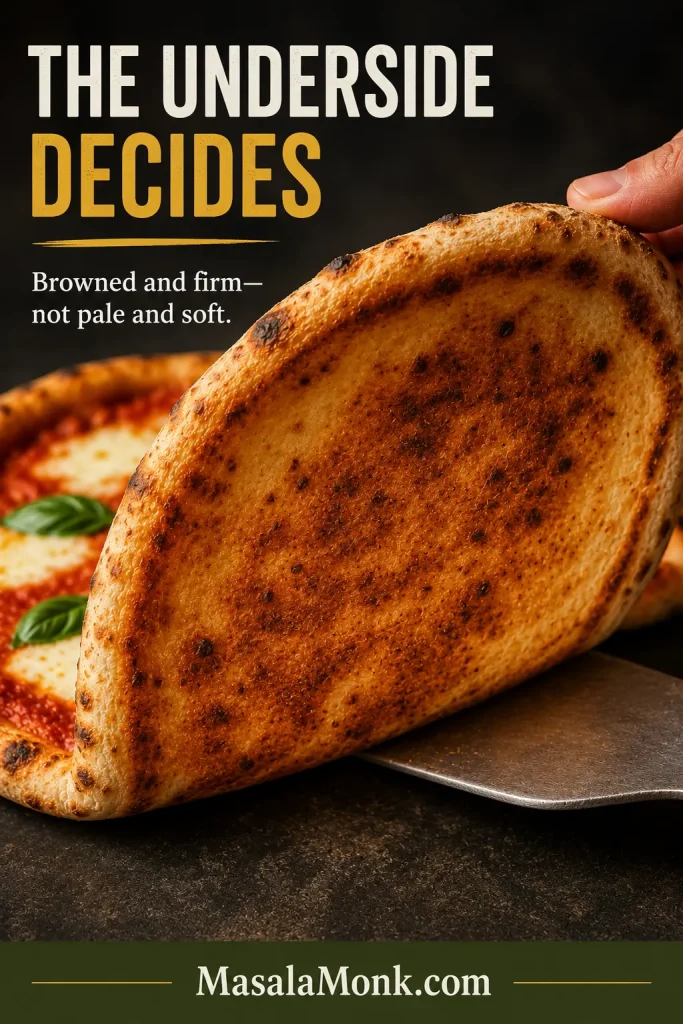
The underside can tell a different story from a beautifully browned top. Patchy golden-to-medium browning is completely normal; what matters more is avoiding a broad pale, soft area that suggests the base still needs stronger heat or more time.
If the top is browned but the base is still pale, move the tray lower for the remaining bake. Conversely, if the top is coloring too quickly before the bottom is ready, loosely shield it with foil.
For future batches, a thoroughly preheated pizza stone or steel can give the underside stronger heat from the start. Check the bottom earlier when using one because it may brown faster than it does on a sheet pan.
Once baked, rest the calzones for 5–10 minutes. Move them to a rack after the first few minutes so steam can escape underneath and the bottom stays crisp.
Then make the first cut while they’re still warm. You want a crust with some bite around a soft, melted center—not a flood of cheese escaping onto the plate.
The best cheese pull still leaves most of the creamy ricotta, mozzarella, pepperoni and marinara inside the crisp calzone.
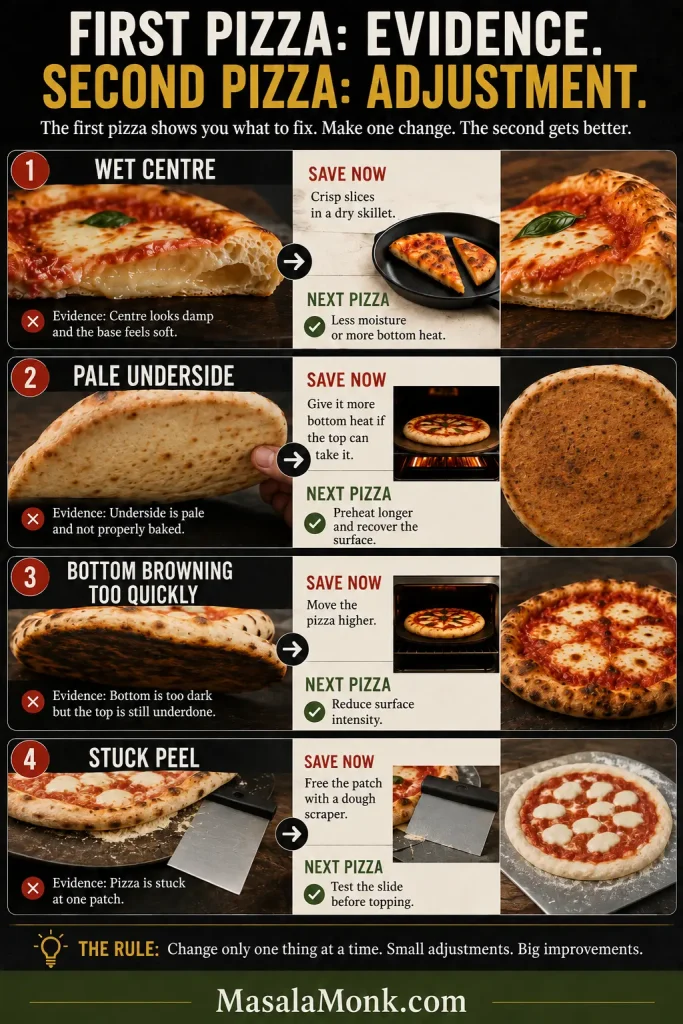
If something went wrong, the symptom usually points to the fix.
A crust that’s soft from the moment it leaves the oven usually points toward a wet filling or weak bottom heat. If it was crisp at first and softened while sitting on the tray, steam collecting underneath is the more likely culprit; move the next batch to a wire rack after its initial rest.
If the crust was crisp from the oven but softened as it sat, trapped steam underneath is the clue.
Leaks, Soggy Crust & Doneness
What happened?
Likely cause
What to change
The seam burst
Too much filling, filling caught in the border, a weak seal or pressure building inside
Use a little less filling, clear the border carefully, crimp the entire seam and cut clear vents.
The bottom is soggy
Wet filling, too much sauce, assembled calzones sitting too long, or weak bottom heat
Remove excess moisture, keep the sauce modest, bake soon after assembly and give the underside stronger heat.
The inner crust is gummy or doughy
The dough is thick around the filling, the filling is too wet or heavy, or the exterior is browning before the inner dough cooks through
Stretch the center more evenly, reduce excess moisture or filling, and shield the browned top if the calzone needs more oven time.
The filling isn’t fully melted or hot
The calzone needs more baking time or the filling went in very cold
Continue baking; if the crust is already well browned, shield the top loosely with foil.
Filling leaks onto the pan
Filling reached the seam or part of the edge didn’t seal
Keep the border clean and inspect the entire crimp before baking.
Dough, Browning & Serving Problems
What happened?
Likely cause
What to change
The bottom burns
Very strong bottom heat, a low rack, dark pan or a hot-running oven
Raise the rack first. If your oven consistently runs hot, reduce the temperature slightly.
The calzone balloons dramatically
A large pocket of air or expanding steam is trapped inside
Ease out obvious air before sealing and make sure the vents are open.
The dough keeps shrinking
It is still cold or tight
Cover it and give it another 5–10 minutes before stretching again.
The dough tears
It was stretched too thin or too aggressively
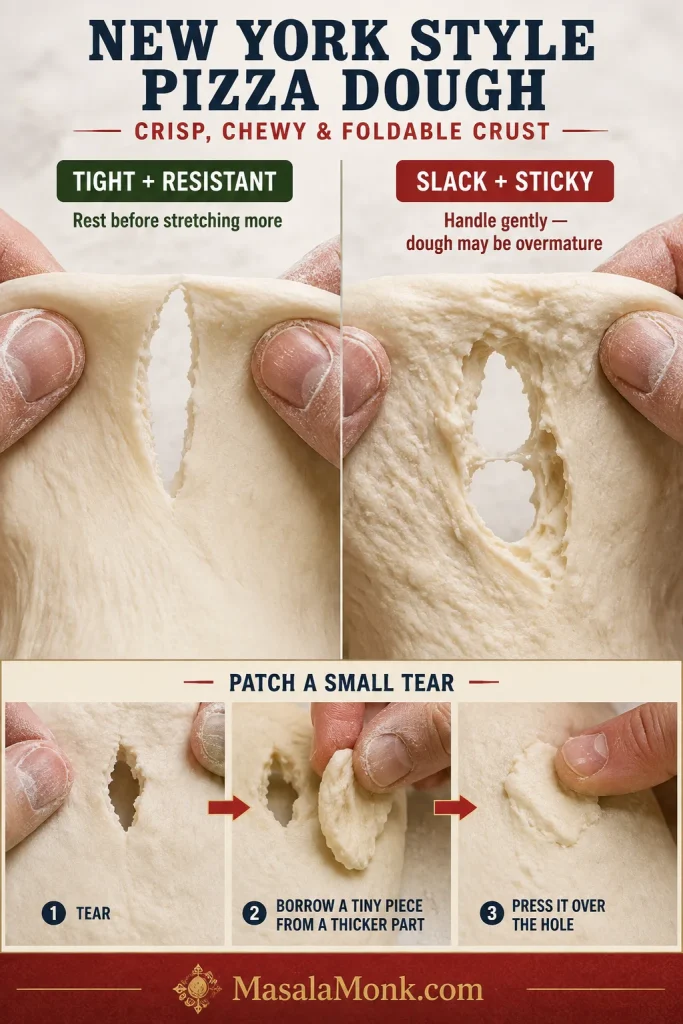
Give tight dough more time and stop while the center is still strong enough to lift.
The top browns too quickly
The surface is coloring before the rest finishes baking
Move the tray lower or loosely shield the top with foil.
Cheese gushes out when sliced
The filling is still extremely hot and fluid
Give the calzone 5–10 minutes to rest before cutting.
The main recipe gives each calzone about 120 g / 4¼ oz cheese filling + 25 g / 1 oz pepperoni + 15 g / 1 tbsp sauce. For the variations below, cheese filling means the ricotta-mozzarella mixture from the main recipe. Swap ingredients within that baseline so the finished calzone stays close to the original filling load.
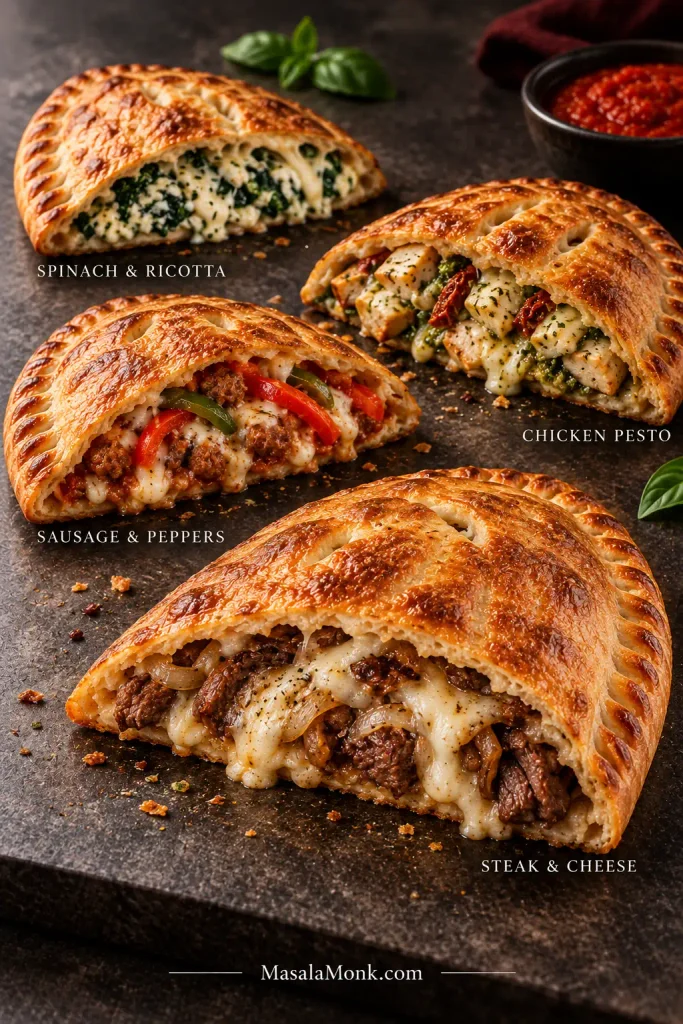
These calzone filling ideas also show what controlled moisture looks like. Spinach stays dry, peppers are cooked without pooled liquid, pesto lightly coats the chicken, and steak is well drained; as a result, each filling remains distinct without soaking the dough around it.
Spinach & Ricotta
For a creamy spinach filling, use about 105–110 g / about 3¾–4 oz cheese filling with 25–30 g / about 1 oz cooked spinach that has been squeezed very dry, plus the usual 15 g / 1 tbsp sauce. Leave out the pepperoni. If you want to keep it, reduce the cheese filling enough to make room.
Sausage, Peppers & Cheese
For savory sausage with sweet softened peppers, use 95 g / about 3⅓ oz cheese filling, 25 g / about 1 oz cooked, well-drained sausage, 20–25 g / about ¾–1 oz cooked peppers and the usual 15 g / 1 tbsp sauce. If you want those same flavors as a full meal, see our Sausage and Peppers.
Chicken Pesto
For a herby, garlicky filling, use about 100–105 g / about 3½–3¾ oz cheese filling, 35–40 g / about 1¼–1½ oz cooked chicken and about 10–15 g / 2–3 tsp pesto. Skip the marinara here; the pesto takes its place.
Steak & Cheese
For a richer steak-and-cheese calzone, use roughly 110–115 g / about 4 oz cheese filling, 30–35 g / about 1–1¼ oz thinly sliced cooked steak and the usual 15 g / 1 tbsp sauce. Adding cooked onions or peppers? Remove about the same weight of cheese filling to make room.
Whichever filling you choose, something cool and crisp is a good contrast to a hot, cheesy calzone. A cucumber salad brings freshness, acidity and crunch without making the meal heavier.
Make Ahead, Store & Reheat
Making them ahead: prepare the filling and portion the dough separately, then refrigerate them. Before assembling, let the dough lose its chill and relax as described above; keep the filling cold until you’re ready to use it. This avoids leaving moist filling against raw dough for an extended time.
Refrigerating: refrigerate baked calzones promptly and don’t leave them at room temperature for more than 2 hours. Store them in an airtight container and use within 3–4 days.
Freezing: let baked calzones cool, wrap them individually and freeze. For best quality, use within about 3 months.
Reheating: for the most even result, thaw frozen calzones in the refrigerator first. You can also reheat them from frozen; allow extra time. Reheat at about 350°F / 175°C until hot throughout—typically 10–15 minutes for refrigerated calzones, depending on size. If checking with a thermometer, aim for 165°F / 74°C in the center. An air fryer also works well for restoring the exterior; the microwave is quicker but leaves the crust much softer. For the underlying storage and reheating safety guidance, see the USDA Food Safety and Inspection Service guidance on leftovers.
Calzone vs. Stromboli
Folded pocket = calzone. Rolled log = Stromboli. Both can use pizza dough and similar fillings, but the construction—and the way those fillings sit inside—is different.
The best calzone isn’t the fullest one. Give the dough room to close, keep the filling under control and let the oven do the rest. After a few quiet minutes on the rack, cut through the browned crust while the center is still hot and stretchy.
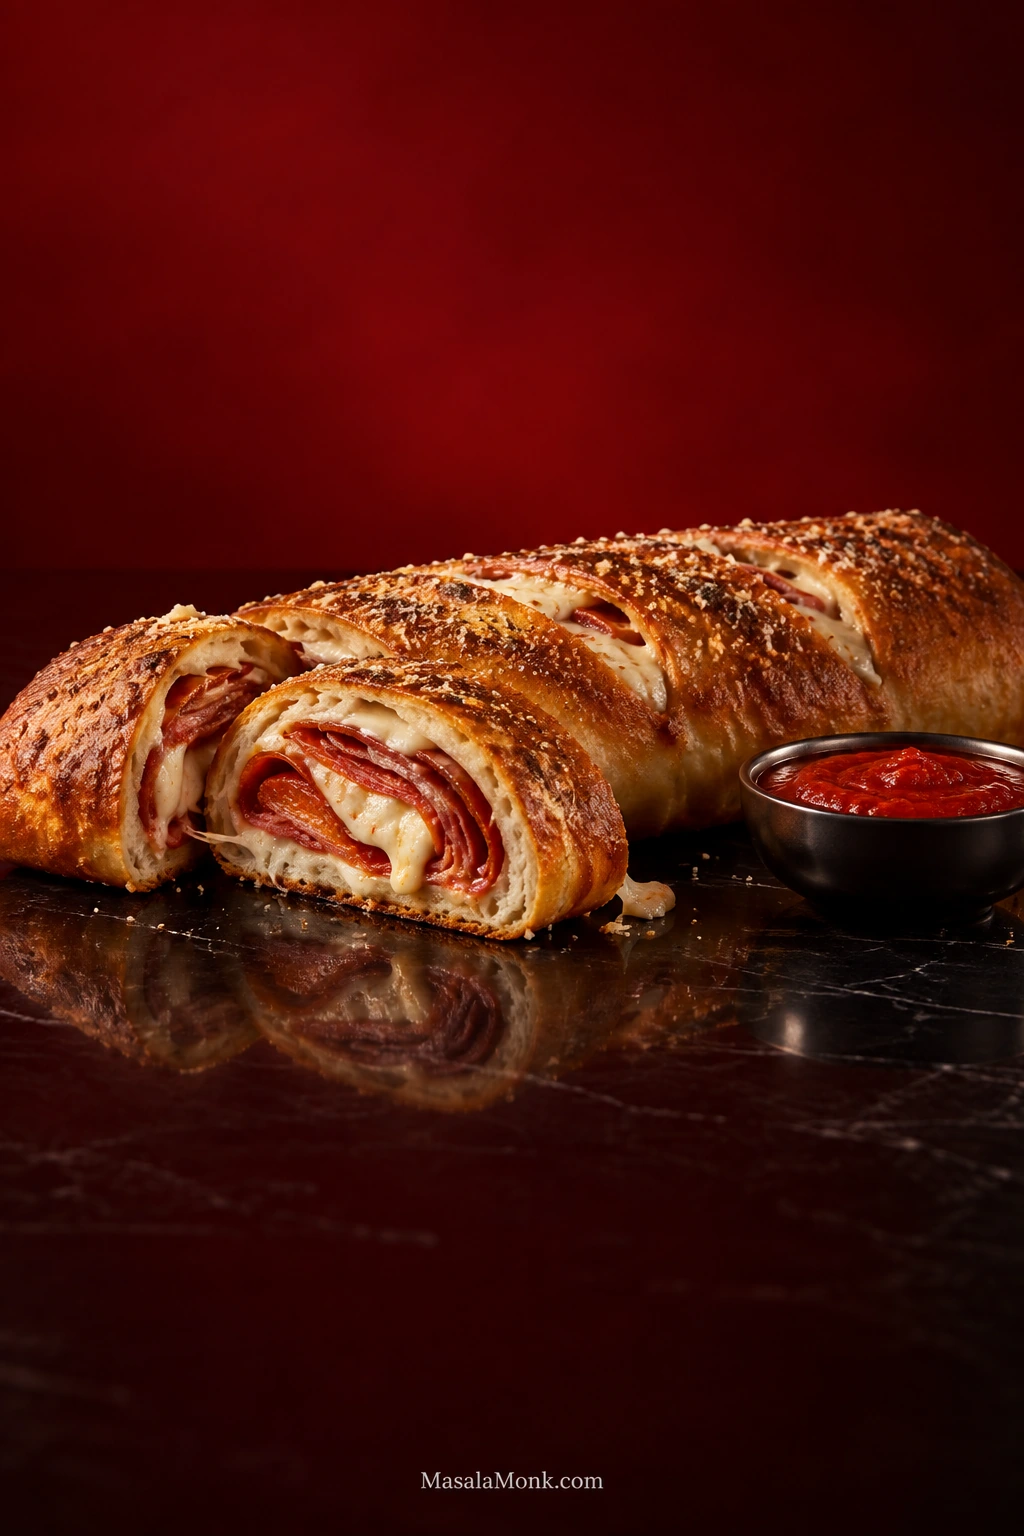
This Stromboli recipe starts with a pound of pizza dough, so if you’ve already got one ready, you’re most of the way there. Roll it thin, layer in pepperoni, salami and cheese, and it bakes into a long golden roll with crisp edges, melted cheese between the layers and warm marinara waiting on the side.
Regular homemade pizza dough, supermarket dough or fresh dough from a pizza shop will all work. You don’t need a special Stromboli dough. What matters is stretching the dough thin enough that the layers inside can bake through.
That is where Stromboli can fool you. The crust may look beautifully done while a thick patch of dough near the center is still gummy. Put too much inside and the roll can swell, split at the seam and leave its bottom sitting in rendered fat.
8 oz / 225 g meat + 8 oz / 225 g mozzarella and provolone, plus Parmesan
Oven
400°F / 200°C
Bake
25–30 minutes
Useful doneness check
Around 200°F / 93°C in the thickest central dough layer
Total time
About 1 hour with ready-to-shape dough; around 1½ hours, sometimes longer, when starting refrigerator-cold
For this version, the marinara stays outside the roll. That keeps the filling drier while it bakes and leaves plenty of hot sauce for dipping at the table.
Stromboli Recipe
Pepperoni and salami bring the salty, savory filling; mozzarella melts into long strands; provolone adds a deeper cheese flavor. One large Stromboli makes about 8–10 slices, serving roughly 4 as a main dish or more as part of a larger spread.
Hands-on time: about 20 minutes
Rest after baking: 10–15 minutes
Yield: 1 large Stromboli, about 8–10 slices
Equipment
13 × 18-inch / 33 × 46-cm metal baking sheet
Parchment paper
Rolling pin, if needed
Pastry brush
Sharp knife for cutting the vents
Instant-read thermometer
Serrated knife for slicing
Ingredients
Pizza dough: 1 lb / 16 oz / 454 g, homemade or store-bought
Pepperoni: 4 oz / 113 g, thinly sliced
Salami: 4 oz / 113 g, thinly sliced
Low-moisture mozzarella: 4 oz / 113 g, shredded or thinly sliced
Provolone: 4 oz / 113 g, thinly sliced
Parmesan or Pecorino Romano: ¼ cup / 25–30 g, finely grated, plus more for the top if you like
Egg: 1 large
Water: 1 tbsp / 15 ml
Italian seasoning: ½ tsp, optional
Marinara or pizza sauce: ¾ cup / 180 ml, warmed for serving
Method
Prepare the Dough
Let the dough relax. Leave refrigerated dough covered at room temperature for 30–45 minutes. Try stretching it gently. If it snaps back or quickly shrinks smaller, cover it again and give it another 5–10 minutes. Dough that is already soft and easy to stretch can go straight to the next step.
Heat the oven. Preheat to 400°F / 200°C. Line a 13 × 18-inch / 33 × 46-cm metal baking sheet with parchment paper.
Shape the dough. Stretch and roll it on the parchment to roughly 12 × 16 inches / 30 × 40 cm, with a long edge facing you. The corners don’t need to be neat. Aim for fairly even thickness, especially along the edge nearest you; that strip of dough will eventually sit close to the center of the roll.
Before adding anything, run your fingertips over the pizza dough and flatten an obvious ridge now. Once the meat and cheese cover it, that hidden thick patch becomes much harder to spot.
Fill and Roll
Layer the filling. Arrange the mozzarella, provolone, pepperoni and salami in thin overlapping layers. Scatter the Parmesan or Pecorino over the top. The filling should stay low enough that you can still see the shape of the rectangle beneath it. A mound down the middle is a sign to take some off.
Keep the deli slices flat rather than folded or ruffled. The first turn of dough can then travel over the Stromboli filling without catching a thick ridge and pushing it forward.
Leave room for the seam. Leave about 1 inch / 2.5 cm bare along the short sides and the long edge nearest you. At the far long edge, leave a clean strip roughly 2½–3 inches / 6–7.5 cm wide. The filling will creep forward as you roll.
If filling has already reached the far clean strip before you start rolling, move it back now. The first turn will carry some of it forward on its own.
Roll from the long side. Bring the edge nearest you over the filling and continue rolling away from yourself. Roll snugly so the layers stay together, but don’t squeeze the log or push the filling ahead of you. The finished roll should hold its shape without becoming a tight, bulky spiral.
Starting from the long edge keeps the finished Stromboli longer and reduces the number of dough turns around the center; by contrast, starting from the short edge creates a shorter, thicker spiral.
Seal and Vent
Seal it. Tuck the short ends inward only as far as needed to contain the filling. Beat the egg with 1 tbsp / 15 ml water. Brush egg wash over the clean final edge, finish rolling and pinch the seam closed. Set the Stromboli seam-side down.
Finish the top. Brush lightly with egg wash. Sprinkle with Italian seasoning and, if you like, extra Parmesan. Cut 3–4 shallow diagonal vents through the top layer. Once shaped, it can go straight into the oven.
Space the shallow vents along the length instead of clustering them in one area. Steam then has several escape points without one section of the crust becoming unnecessarily weak.
Bake It Through
Bake. Bake for 25–30 minutes, starting your checks around the 25-minute mark. The crust should be deeply golden and the underside set and baked, not soft or pale. Near the end, cheese may bubble through the vents and the Parmesan on top should begin to smell toasted. Insert an instant-read thermometer from the side toward the thickest part of the center, aiming for dough rather than a pocket of melted cheese. A reading around 200°F / 93°C is a useful confirmation. If the crust already has enough color but the center needs more time, cover the top loosely with foil and keep baking.
Do not chase perfectly uniform browning. Egg wash and Parmesan naturally create darker high spots, so judge the baked Stromboli by the whole crust rather than its darkest patch.
Rest, Slice and Serve
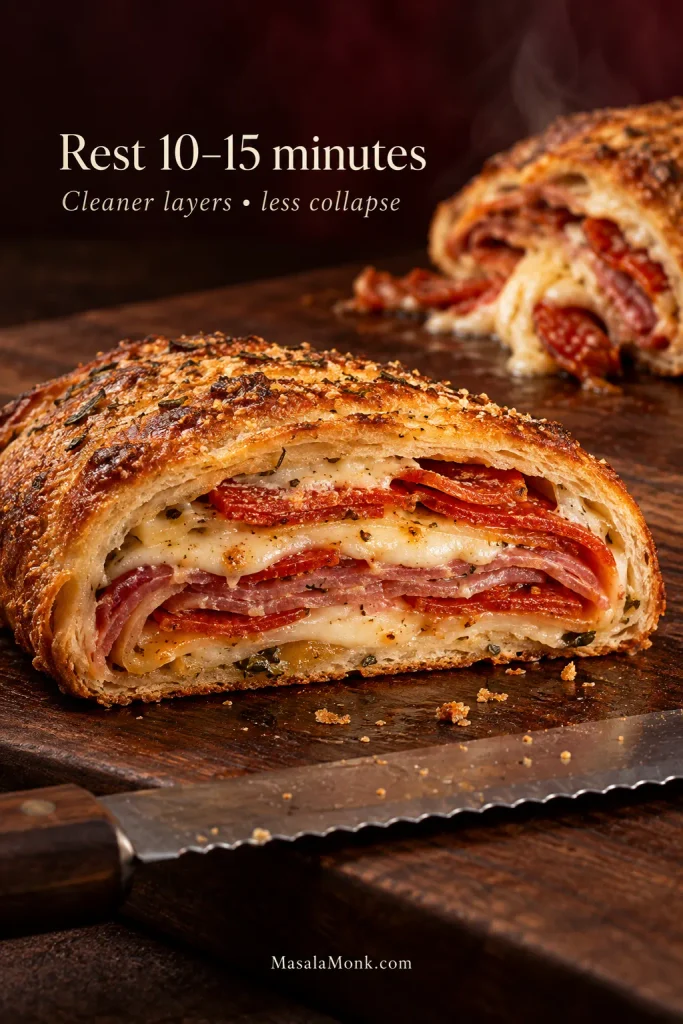
Rest and slice. Leave the Stromboli for 10–15 minutes. If rendered fat has collected on the tray, use the parchment or a wide spatula to move the roll onto a clean section of the pan or onto a board. Slice with a serrated knife and serve with warm marinara.
The center slice tells you a lot. You want baked dough separating distinct layers of meat and cheese, not a pale gummy stripe. After the rest, those layers should stay together when you lift a slice rather than spilling straight onto the board. Cheese escaping through a vent is fine. Let the bits touching the pan turn brown and crisp.
Check one of the thickest center slices rather than an end piece. The ends heat through sooner, so the middle gives you the more demanding test of whether the Stromboli baked through.
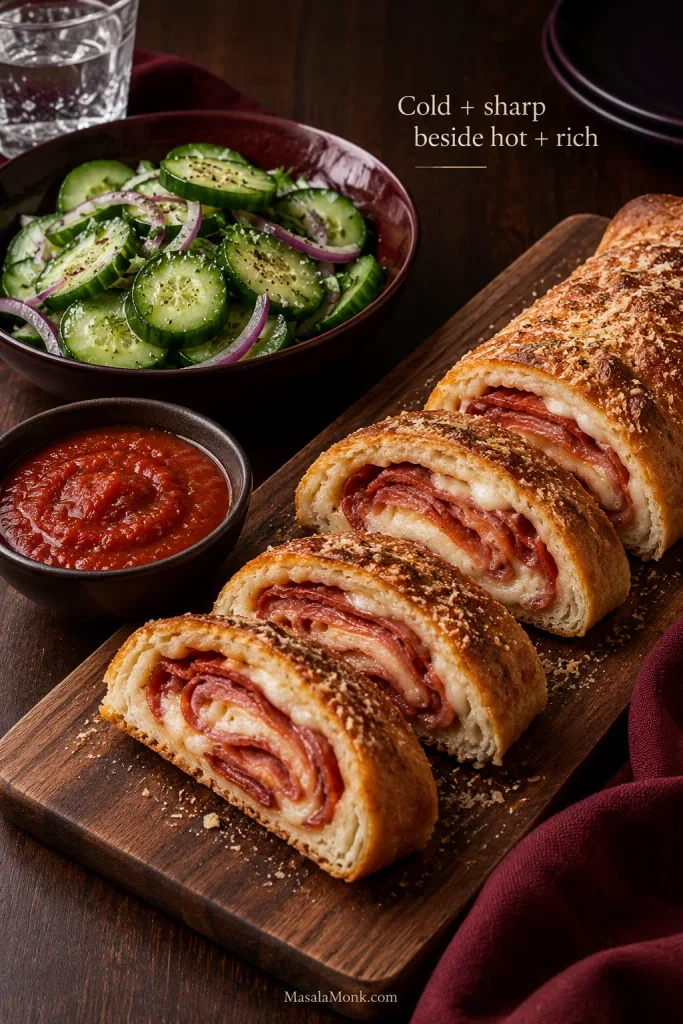
For a full dinner, something cold and sharp is good beside the warm slices. A crisp cucumber salad brings vinegar, herbs and crunch to a plate already rich with cured meat and melted cheese.
Keep the cucumber salad properly chilled until serving. That cold, crisp contrast makes the rich Stromboli feel lighter between bites.
Yes, store-bought pizza dough works well for Stromboli. If it is refrigerator-cold, let it sit at room temperature for 30–45 minutes so it becomes easier to stretch. Check the package weight too; this version is built around roughly a pound of dough.
Dough that keeps pulling itself smaller usually needs more time, not more flour or force. Cover it for another few minutes and try again.
Pizza dough is ready to shape when it can stretch a few inches without immediately pulling itself smaller. If the edges recoil within seconds, another short covered rest is usually worth more than more flour.
Other ready-made doughs won’t behave exactly like a standard pizza-dough ball. With refrigerated canned pizza crust, use the thinner sheet you have instead of forcing it to 12 × 16 inches. For frozen bread dough, follow the package’s thaw-and-rise directions until the dough is soft, relaxed and ready to shape. Sourdough pizza dough can work at a similar dough weight; let it relax fully before rolling.
How much filling to use
With a pound of pizza dough, 8 oz meat and 8 oz mozzarella/provolone makes a generous filling without building an oversized roll. Parmesan adds a salty layer without adding much bulk.
The numbers are useful, but the shape tells you more. Spread the filling broadly across the dough and keep it low rather than heaped. Too much creates a thick center and puts pressure on the seam; too little leaves you with plenty of bread and not much happening inside it.
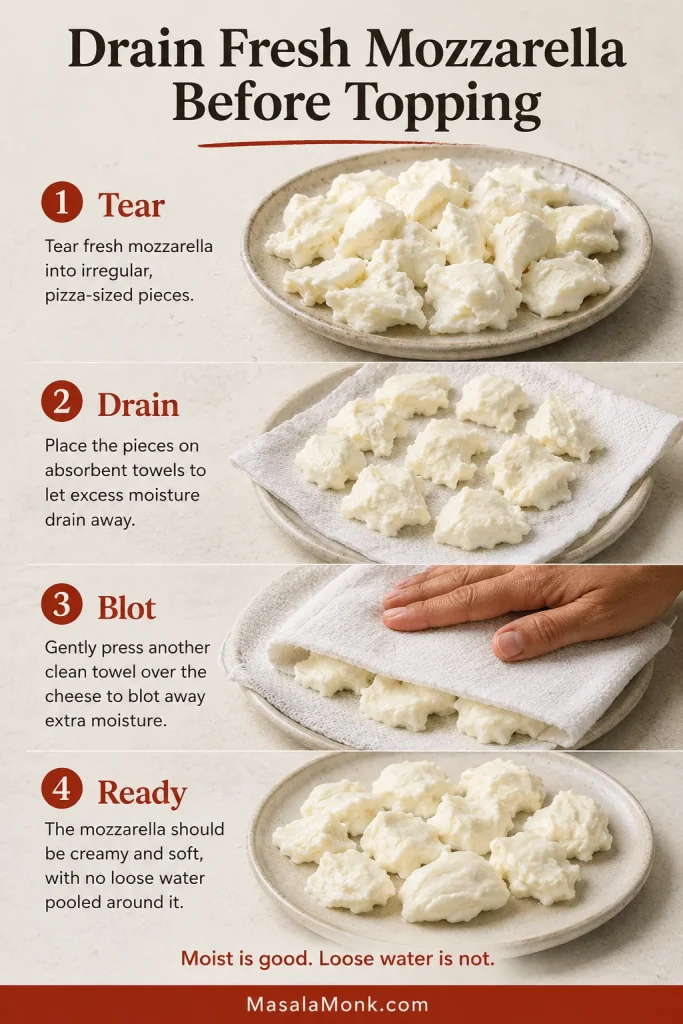
Low-moisture mozzarella melts into stretchy layers without releasing much water. Provolone melts alongside it and brings a fuller cheese flavor. Parmesan or Pecorino Romano seasons the filling, while Parmesan scattered on top can toast against the egg-washed crust. Fresh mozzarella can work too, but drain it well and blot the pieces first.
Keep the Filling Dry
Moisture doesn’t only come from cheese or sauce. Mushrooms release plenty of water. Spinach holds onto it. Sausage can leave fat behind, and some pepperoni is much oilier than others. Cook raw meat fillings fully before they go into the Stromboli, drain rendered fat and let hot fillings cool before assembly. Cook vegetables first when needed, let mushrooms shed their liquid and squeeze cooked spinach dry. Anything sitting in liquid in the skillet is better dealt with there than inside the Stromboli.
For any cooked Stromboli filling, tilt the pan before assembly. If liquid runs into a visible pool, drain it first and let the filling cool before it touches the dough.
Sauce Inside or on the Side?
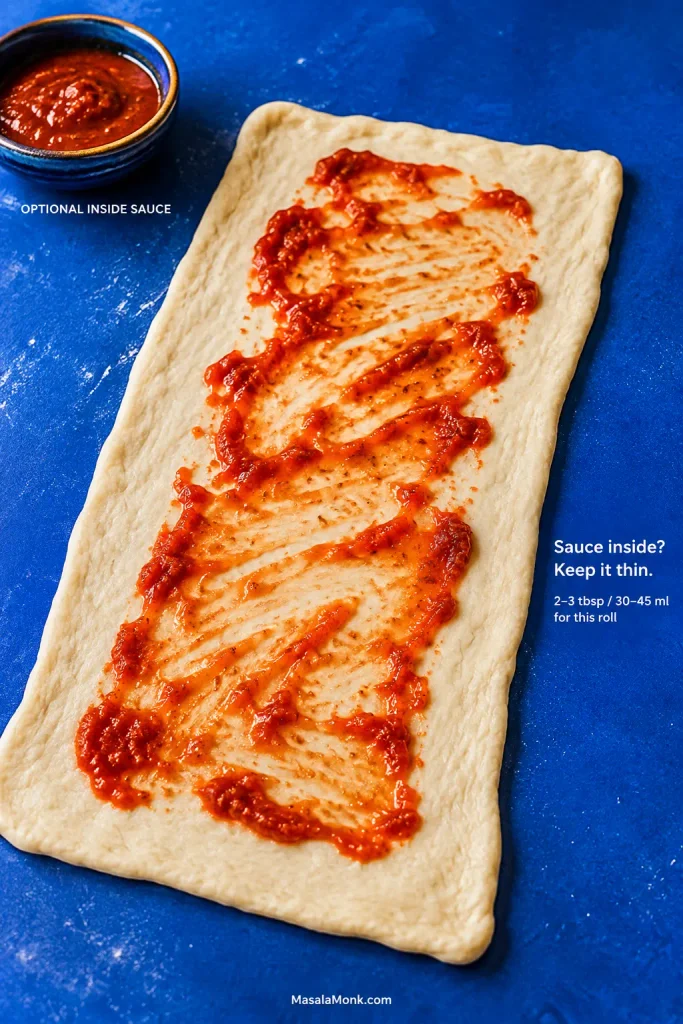
Yes, you can put sauce inside Stromboli. For this version, use about 2–3 tablespoons of thick sauce. Serving marinara on the side leaves the filling drier and the crust crisper.
A thick pizza sauce is easier to control than loose marinara. If yours runs quickly from a spoon, simmer it until it has more body. Leave the final sealing strip clean so the dough can stick to itself.
A thin sauce layer should look patchy rather than painted edge to edge. If the pizza dough disappears beneath a continuous red coating, you have added more moisture than this Stromboli needs.
Once pizza dough is wrapped around meat and cheese, the center heats more slowly than the exposed crust. Egg wash makes that difference easier to miss because the outside can take on a deep golden color before the dough buried inside has finished baking.
That is why color is only one doneness cue. Check the underside, then use the center temperature as a second opinion. If the crust is where you want it but the middle still needs time, a loose foil cover lets the center keep baking without pushing the top much darker.
Take the Stromboli temperature near its thickest central section because the ends finish sooner. A number is useful only when the probe is actually reading dough rather than a pocket of melted cheese.
Fix My Stromboli
Before It Goes In
Dough keeps shrinking? Cover it for another 5–10 minutes. Tight, chilly dough usually becomes much easier to stretch after a short rest.
The filled roll looks enormous? Take some filling out before you seal it if you still can. You want a substantial roll, not one already straining at the seams before it reaches the oven.
The seam will not stick? Check the dough itself. Sauce, cheese or rendered fat on that final strip can stop it sealing. Wipe it clean, brush the edge with egg wash, pinch it closed and turn the seam underneath.
The ends are mostly bread? Trim obvious excess and tuck in only what you need to enclose the filling. The ends don’t have to look perfectly symmetrical.
While It Bakes
The top is already dark? Check the center before taking the Stromboli out. If it still needs time, lay foil loosely over the top and keep baking.
The side split? Too much filling, a thin spot in the dough or a greasy seam are the usual causes. A small split isn’t the end of dinner. Let the Stromboli finish baking; next time, reduce the filling, watch for thin spots or make sure the seam is clean.
Cheese is coming through a vent? Some leakage is normal, and the bits that brown against the pan are hardly a tragedy. A seam opening wide enough for the filling to spill out usually points to overfilling, a weak seal or a thin patch of dough.
If only a little cheese escapes, leave it alone and let it brown. Trying to repair hot dough in the middle of baking is more likely to disturb the crust than improve a harmless leak.
Grease is collecting underneath? Move the baked Stromboli onto a dry area before it rests. Especially oily pepperoni or salami can also be blotted before assembly next time.
After You Slice It
The middle is gummy? The roll may have been too thick or simply needed more time in the oven. On the next one, avoid compressing the roll and check the center temperature before taking it out.
The bottom is soggy? Work backward from the filling. Wet vegetables, too much sauce, fresh mozzarella and rendered meat fat can all soften the dough from inside.
When the Stromboli bottom is soft, investigate moisture before simply extending the bake. Otherwise, the exterior can keep darkening while wet filling or rendered fat continues working against the crust.
Too much bread? Stretch the dough to about 12 × 16 inches and spread the filling across most of the surface. Making the rectangle smaller and simply stuffing more inside creates a thicker center, not a better ratio.
The filling falls out as you cut? Give the roll its full resting time. If the slices still collapse after 10–15 minutes, use less filling or spread it more evenly next time.
After the rest, use a serrated knife with a light sawing motion instead of pressing straight down. Less downward pressure helps the Stromboli layers stay where they belong.
Once the base Stromboli makes sense, changing the filling is the easy part. Keep the overall amount close to the base recipe, then pay attention to what the new ingredients bring with them: water, fat, residual heat or extra bulk.
Filling
What changes
How to handle it
Ham & cheese Ham, provolone, mozzarella or Swiss
Deli ham is easy to layer but can carry surface moisture
Use thin slices and blot noticeably wet ham before filling
Use only enough sauce to coat the chicken and serve extra alongside
Pesto works particularly well with chicken, spinach or mozzarella. Use a thin layer; homemade basil pesto already brings garlic, herbs and Parmesan with it.
Make Ahead, Store, Freeze & Reheat
To assemble ahead: fill and roll the Stromboli, cover it well and refrigerate for up to 8 hours. Add the exterior egg wash and cut the vents shortly before baking. Start checking at the usual time and leave it longer if the cold center needs it.
To freeze before baking: shape and seal the Stromboli but leave off the egg wash and vents. Wrap it well and freeze for up to 3 months for best quality. Thaw it completely in the refrigerator, allowing overnight to 24 hours for a dense filled roll, then brush, vent and bake. Use the crust and center temperature rather than the clock alone to judge when it is ready.
For leftovers: refrigerate promptly and use within 3–4 days, in line with USDA leftovers guidance.
To reheat: use an oven or air fryer at about 350°F / 175°C if you want the crust to crisp again. Reheat cooked leftovers until hot throughout; USDA reheating guidance uses 165°F / 74°C as the target.
To freeze after baking: cool the Stromboli completely, wrap it well and freeze for up to 3 months for best quality. Thaw it in the refrigerator, then reheat at about 350°F / 175°C until hot through and the crust has crisped again. Freezing individual slices makes it easier to reheat only what you need.
Stromboli vs Calzone & Where It Came From
Stromboli is rolled into a long log and sliced; a calzone is folded into a half-moon pocket. Both can use pizza dough and many of the same cheeses, meats and vegetables, but the different shape changes how the filling sits inside and how the finished dish is served.
A Stromboli slice exposes several rolled layers of dough and filling across the cut face; a calzone keeps one larger filling pocket enclosed by folded dough.
Despite its Italian name and flavors, Stromboli is an Italian-American creation closely associated with the Philadelphia area in the middle of the twentieth century. The Philadelphia Inquirer’s history of Stromboli traces the Romano family’s account of the dish at their pizzeria in Essington, Pennsylvania, around 1950. Deli meats and cheese remain classics, but sausage, chicken, steak and vegetables all fit naturally into the same rolled idea.
Give one of the center slices a dip while the crust is still crisp and the cheese is warm enough to stretch. Pepperoni, salami, provolone, mozzarella and hot marinara do the rest.
Dip the cut edge rather than soaking the whole slice. You get warm marinara against the filling while more of the baked Stromboli crust stays crisp for the next bite.
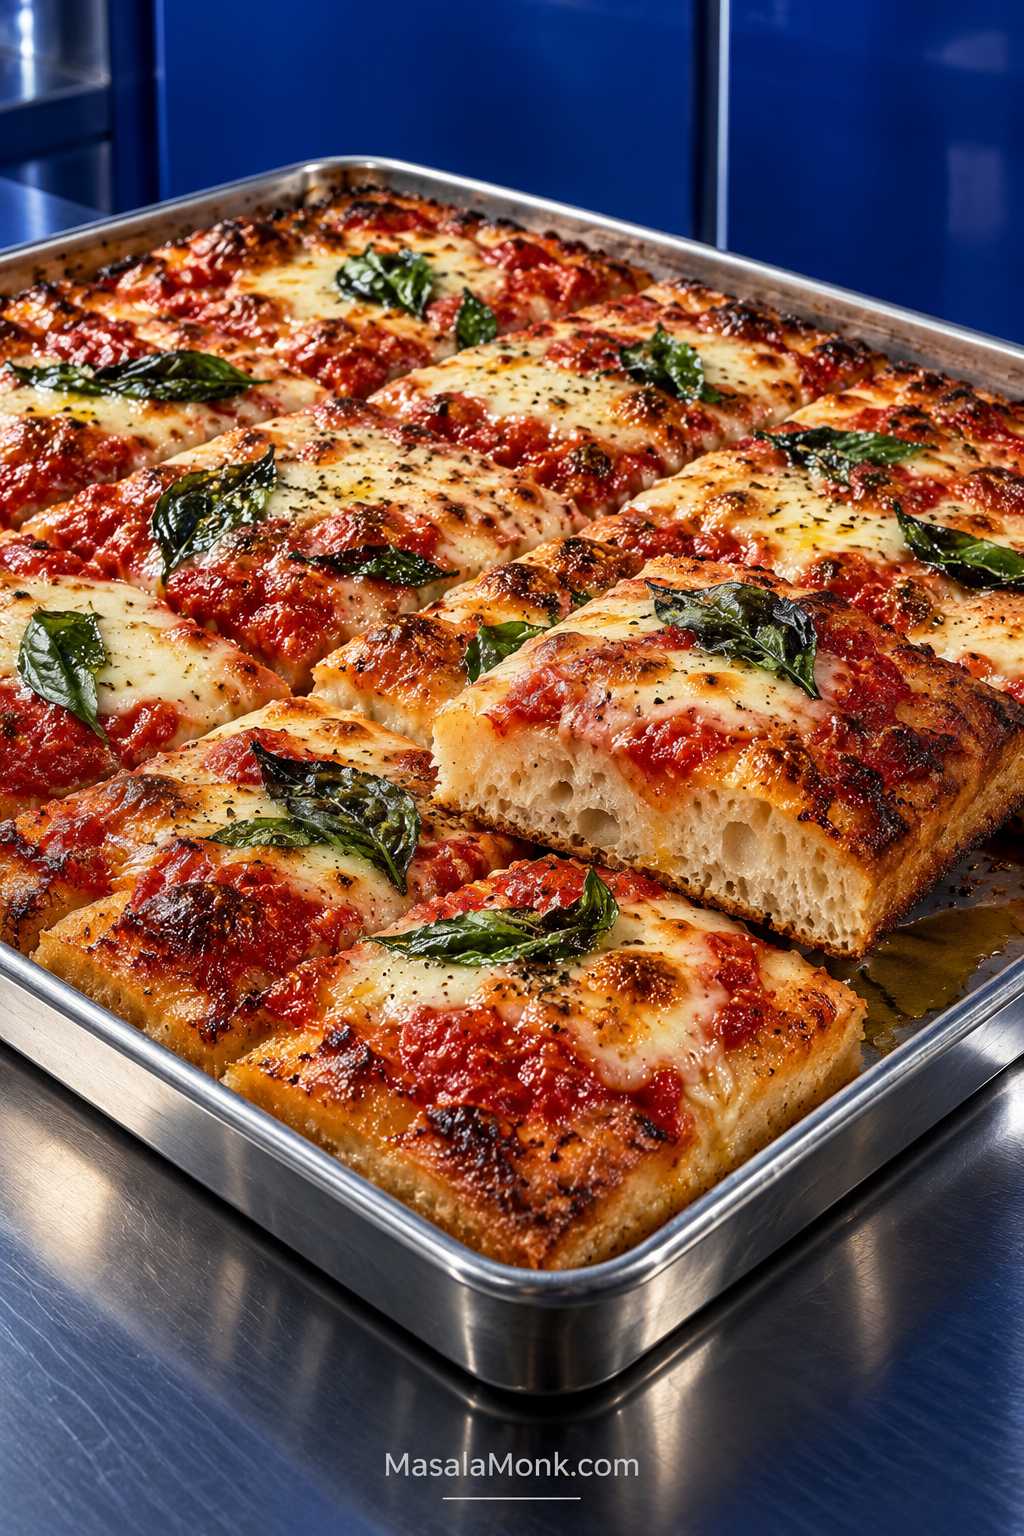
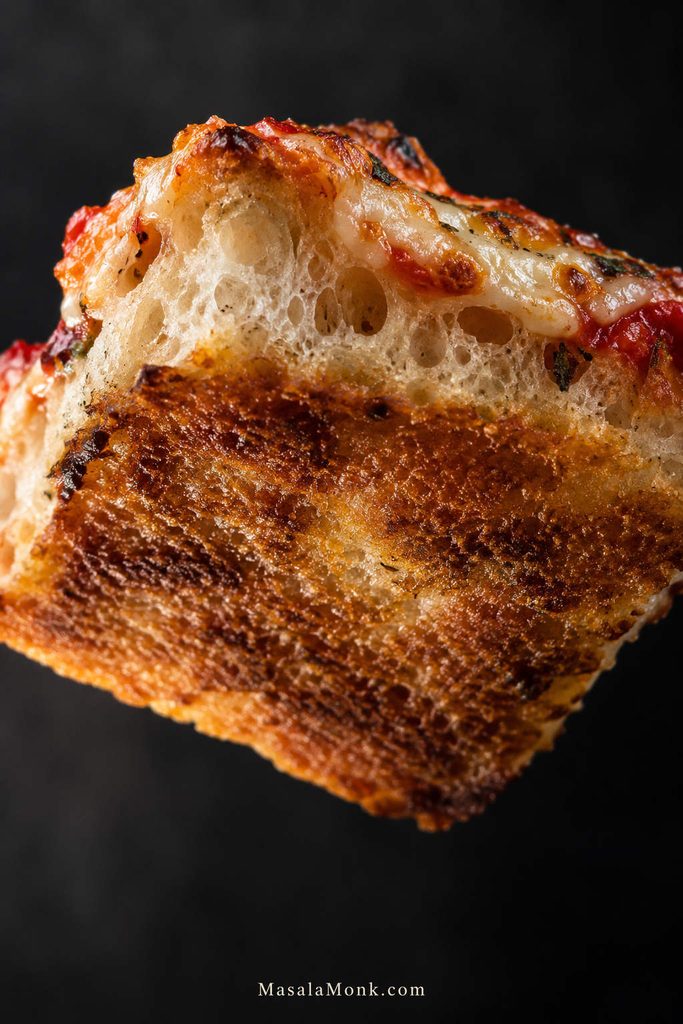
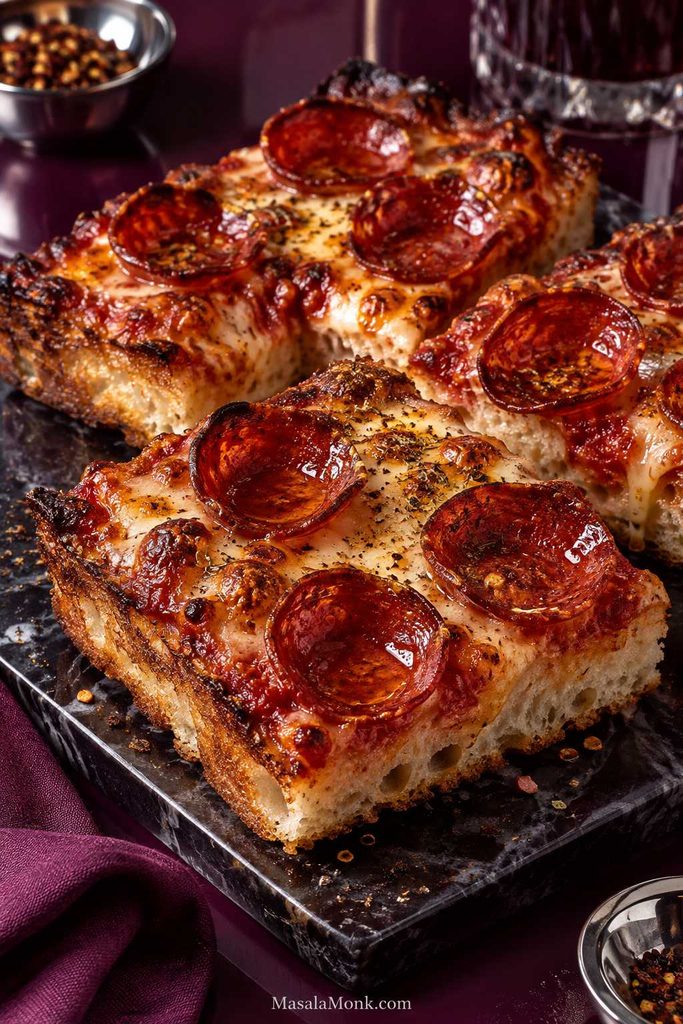
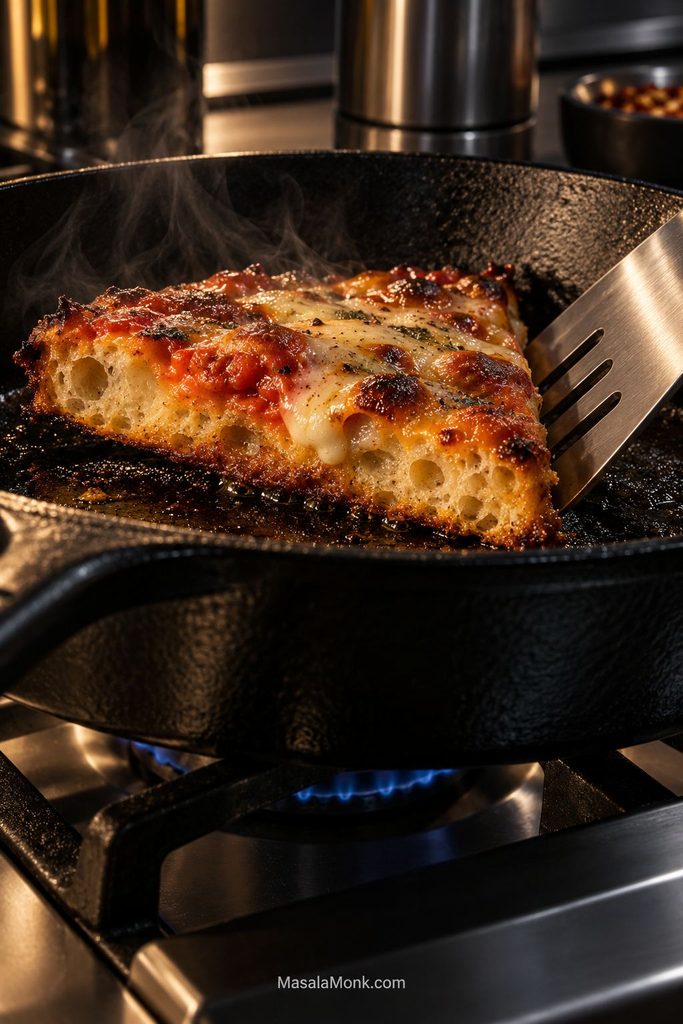
There is a particular moment when focaccia pizza gets everything right: the underside crackles as you cut through it, the middle stays airy and tender, and the sauce and bubbling mozzarella sit on top without leaving a wet band of dough underneath. The edges still have that olive-oil crunch, but the slice eats like proper pizza.
Most problems show up in the middle. Even spectacular edges can hide bread under the cheese that is still gummy. The usual culprits are too much dough for the pan, loose sauce, wet mozzarella, raw mushrooms, or simply not enough heat underneath.
This focaccia pizza recipe tackles that in two simple ways. About 1 kg of soft dough is spread across a 13 × 18-inch (33 × 46 cm) metal sheet pan, keeping it airy without making it excessively thick. Then the focaccia gets a short par-bake before the sauce and cheese go on.
This is the pizza to make when the crust is half the reason you’re excited about dinner. The bread is part of the meal, not merely something holding up the toppings. One half-sheet feeds six to eight comfortably, which also makes it useful for pizza night when one small round pie was never going to stretch far enough.
This is a no-knead focaccia pizza: three short sets of folds build the dough’s strength instead of conventional kneading. Make it in one afternoon or mix the dough the day before for an overnight cold ferment. You don’t need a stand mixer or pizza oven.
Quick Answer: How Do You Make Focaccia Pizza?
For a 13 × 18-inch sheet pan, this focaccia pizza recipe uses 550 g bread flour and 425 ml water—about 77% hydration. Proof the dough until puffy, par-bake it at 475°F (245°C) for 8–10 minutes, add the toppings, then finish for another 8–12 minutes.
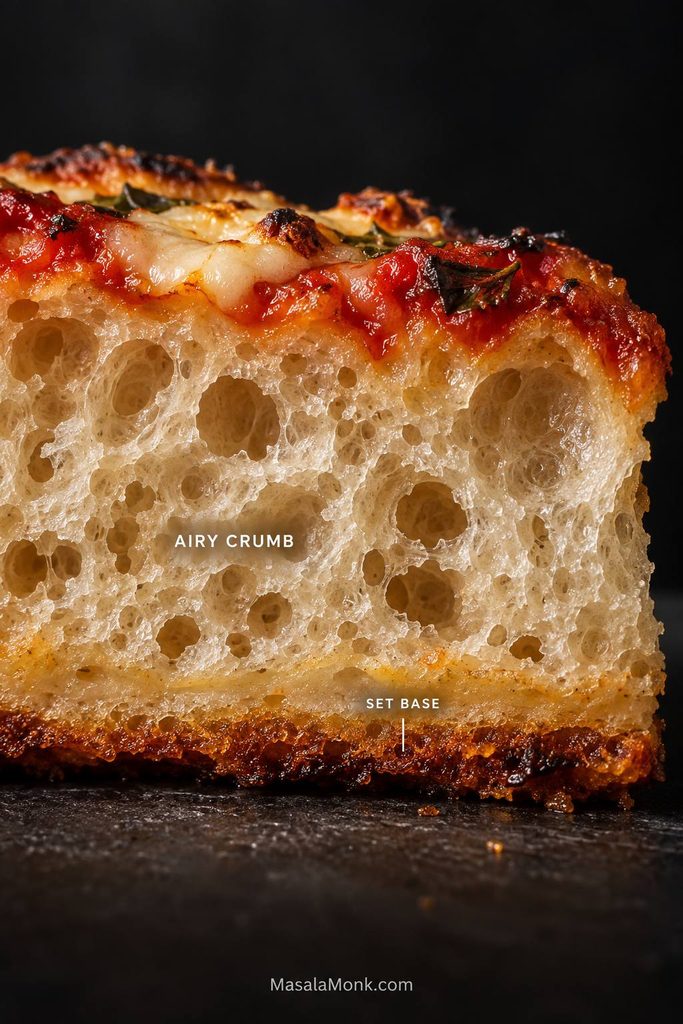
By the end of proofing, bubbles should sit beneath the surface and the whole sheet should give a slight jiggle when the pan moves. At the end, look past the browned cheese: the crumb beneath the toppings needs to be set and airy, with good color underneath.
Give the focaccia a head start before the wet toppings go on. That short first bake is the easiest way to protect the airy middle and browned base.
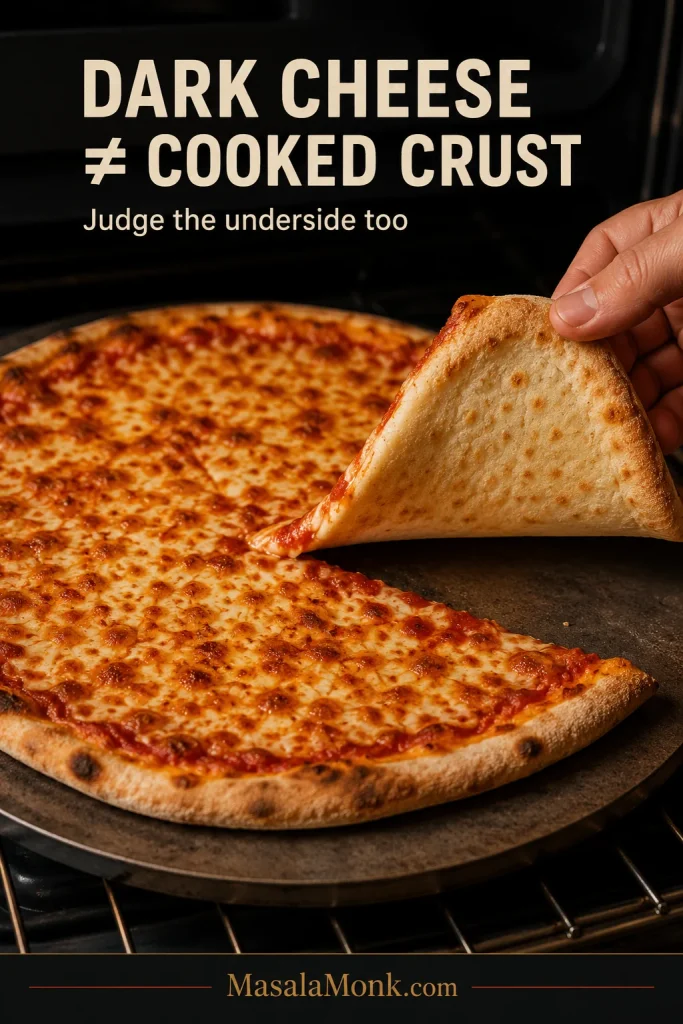
Because cheese can look finished before the bread underneath is ready, the browned underside is one of the most reliable visual checks for a thick focaccia pizza.
Same-Day or Overnight?
Same-Day
4 g instant or active dry yeast (1¼ tsp) Water: 85–95°F / 29–35°C
Choose this when the pizza needs to happen tonight. Plan on 3½–4½ hours from mixing to slicing. For a 7 PM dinner, starting around 2:30–3 PM gives you comfortable breathing room.
Overnight
1 g instant or active dry yeast (⅓ tsp) Water: 68–75°F / 20–24°C
Choose this when planning ahead is easier and you want to give the dough more time to develop flavor slowly in the refrigerator. Complete the folds, chill for 12–24 hours, then pan and proof the next day.
Those times assume a kitchen around 70–75°F / 21–24°C. A warm room moves things along faster; a cool one stretches the schedule. Either way, let the dough’s changes make the final call rather than waiting for the clock to agree.
Make It Now: Sheet Pan Focaccia Pizza
Focaccia Pizza Recipe Snapshot
Pan
13 × 18-inch / 33 × 46 cm rimmed metal half-sheet
Serves
6–8
Yield
8 generous or 12 smaller squares
Active time
30–40 minutes
Same-day total
3½–4½ hours
Overnight option
12–24 hour cold ferment + final proof
Hydration
About 77%
Oven
475°F / 245°C
Bake
8–10 min par-bake + 8–12 min finish
Equipment: large mixing bowl, digital scale, sturdy spoon or dough whisk, spatula or dough scraper, 13 × 18-inch sheet pan, and wire rack.
Pan choice: a heavy-gauge aluminum or aluminized-steel half-sheet is a reliable choice. Darker metal browns faster, so the underside may need an earlier check. Before using a nonstick-coated pan at 475°F / 245°C, confirm its maximum safe temperature.
A pizza steel or stone is optional.
Ingredients
Focaccia Pizza Dough
550 g / 19.4 oz bread flour
425 ml / 14.4 fl oz water — same-day: 85–95°F / 29–35°C; overnight: 68–75°F / 20–24°C
Same-day: 4 g instant or active dry yeast / 1¼ tsp
Overnight: 1 g instant or active dry yeast / ⅓ tsp
11 g fine salt
30 ml / 2 tbsp olive oil
Use instant or active dry yeast at the same weight. Active dry may begin a little more slowly, so let the dough cues—not the clock—decide when it is ready. Follow the package directions if your yeast specifically calls for dissolving first.
Using all-purpose flour? Start with 410 ml water and add the final 15 ml only if the dough is building strength comfortably.
For the Pan and Dimpling
Nonstick pan spray, optional
30 ml / 2 tbsp olive oil for the pan
15 ml / 1 tbsp olive oil for the surface
For the Pizza
240–280 g / about 1 to 1¼ cups thick pizza sauce
255 g / 9 oz low-moisture mozzarella, shredded
30 g / 1 oz Parmesan or Pecorino, finely grated
60–90 g / 2–3 oz pepperoni, cooked sausage, or another prepared topping, optional
Fresh basil, extra Parmesan or Pecorino, and olive oil for finishing
Red pepper flakes, optional
Quick Pizza Sauce
Start with 280 g thick crushed tomatoes or passata, then stir in 1 tsp olive oil, ½ tsp dried oregano, ¼ tsp garlic powder, and ¼–½ tsp fine salt. Start with less salt if the tomatoes are already seasoned, then taste.
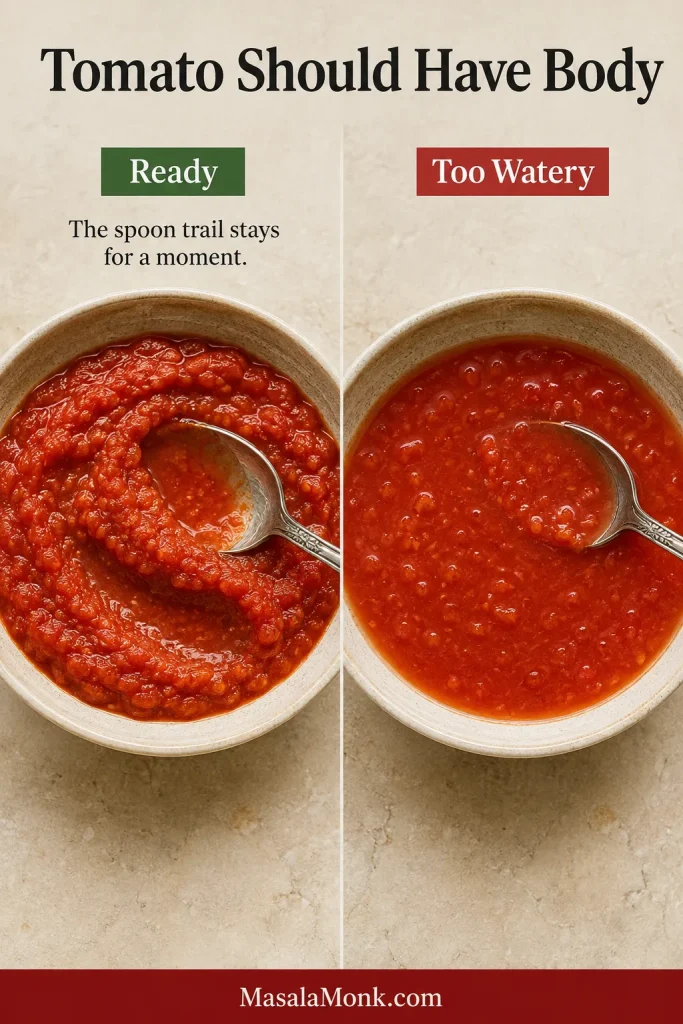
Keep the sauce simple and tomato-forward; the focaccia already brings plenty of olive-oil richness. Drain watery crushed tomatoes in a fine sieve for 5–10 minutes, or briefly simmer loose passata. Use the concentrated amount you end up with rather than replacing the liquid you removed. The sauce should spread easily but stay where you put it.
How to Make Focaccia Pizza
1. Mix the Dough
Add the water, yeast, flour, salt, and 30 ml olive oil to a large bowl. Mix until no dry flour remains.
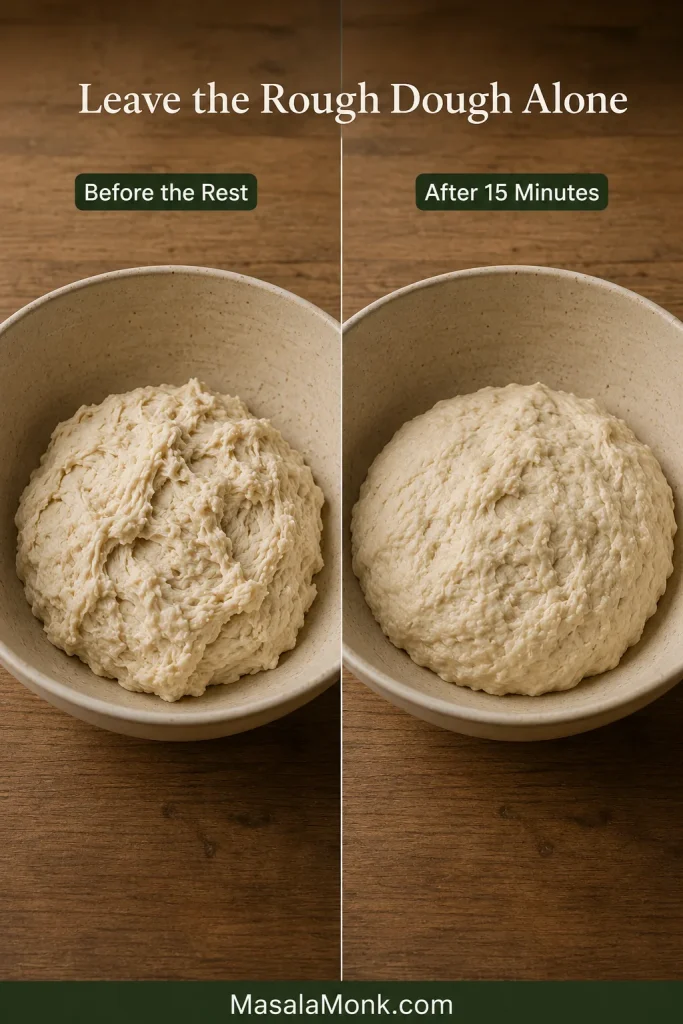
If you’re used to ordinary pizza dough, this can look unusually wet at first. That’s expected. It should be rough, loose, and sticky, but still behave like dough rather than something you could pour.
2. Rest and Fold
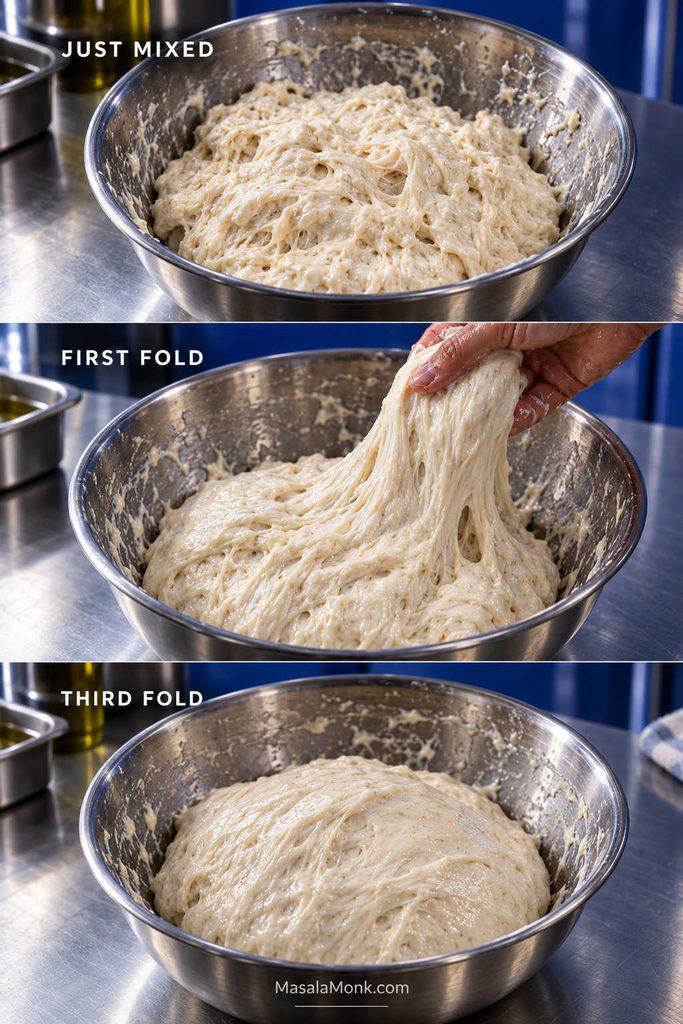
Cover the bowl and rest for 15 minutes. With a wet hand, pull one side of the dough upward and fold it across the center. Turn the bowl and repeat around the dough.
Complete 3 sets of folds 20 minutes apart. The first can feel messy. By the third, the dough lifts more cleanly, stretches farther, and feels springier while staying soft.
At that point, it should feel noticeably different: smoother, springier, and beginning to hold air without losing that soft, wet character.
The goal of folding is stronger dough, not drier dough: even after the final fold, a high-hydration focaccia pizza dough should remain soft, supple, and slightly tacky.
3. Let It Rise
Same-day dough stays at room temperature for 60–90 minutes after the final fold. Look for visible expansion and a lighter, more aerated texture.
Cover overnight dough and refrigerate it for 12–24 hours after the folds.
4. Oil the Pan and Stretch
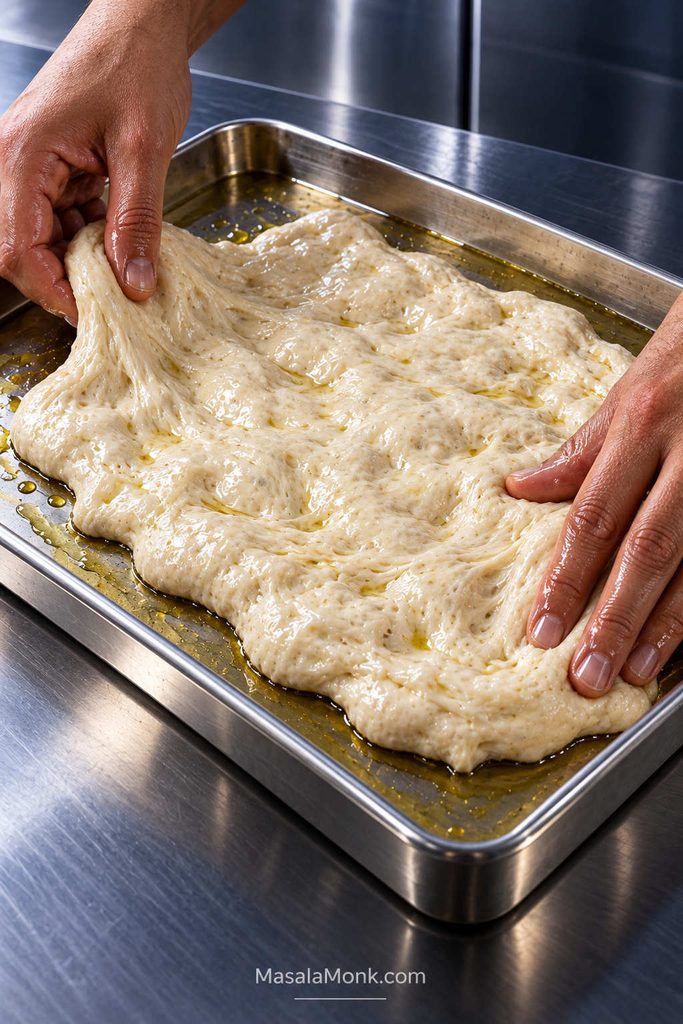
Coat a 13 × 18-inch metal half-sheet with nonstick spray if using it, then spread 30 ml / 2 tbsp olive oil across the base.
Transfer same-day dough into the pan and gently stretch it toward the corners with oiled fingertips. When it pulls back, cover it and wait 10–20 minutes before continuing.
For overnight dough, transfer it to the oiled pan straight from the refrigerator. It will relax as it warms. Stretch it gently in stages rather than forcing cold dough into the corners.
If the dough fights you, wait. Fifteen quiet minutes usually does more than fifteen seconds of wrestling.
If the dough keeps shrinking back, adding more flour can make the finished crumb heavier; instead, preserving the hydration and allowing the gluten to relax gives the dough more room to stretch.
5. Proof in the Pan
Cover the pan. Same-day dough may need another 45–75 minutes. Refrigerated dough commonly needs 1½–3 hours, depending on room temperature and how far it fermented overnight.
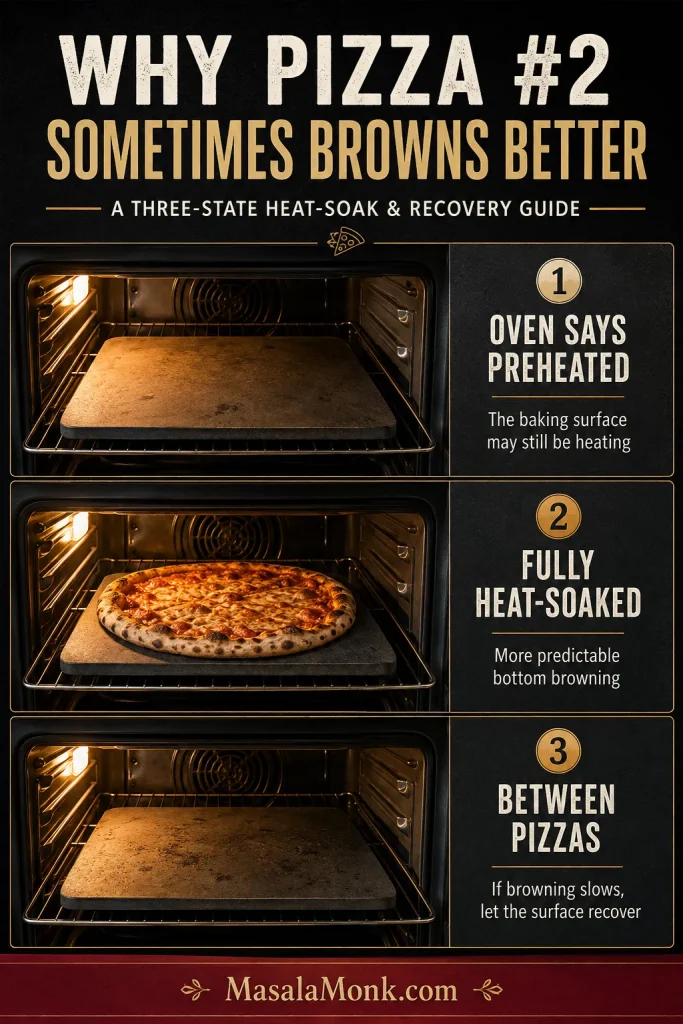
Start preheating the oven to 475°F (245°C) before the dough is fully ready. For a plain sheet-pan setup, allow 25–30 minutes of preheating. When using a steel or stone, give it 45–60 minutes to heat thoroughly.
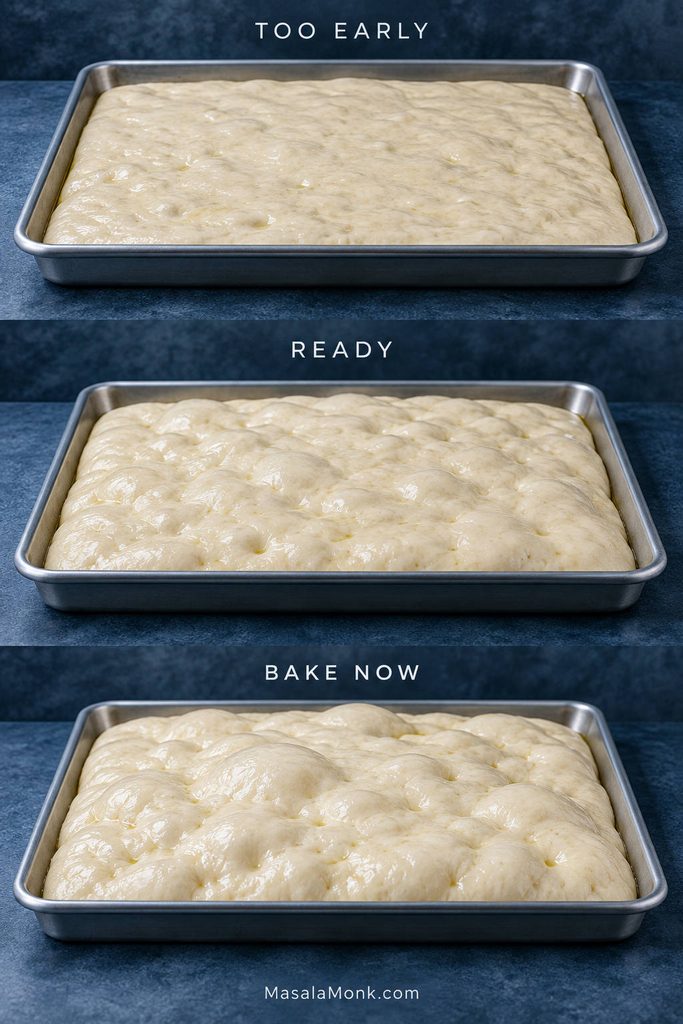
By the end, the dough should look almost marshmallow-soft. Bubbles sit just beneath the surface, and the whole sheet gives a slight tremble when you nudge the pan.
Use the clock to plan, but bake by the dough: puffy, bubbly, and gently jiggly.
Still flat and tight: keep waiting.
Puffy and jiggly: it is ready.
Very inflated and starting to sag: bake it now.
6. Set the Rack and Finish Preheating
Keep a rack in the lower third of the oven. The oven—and any steel or stone you’re using—should be thoroughly hot by the time the dough reaches its final proof.
7. Dimple and Par-Bake
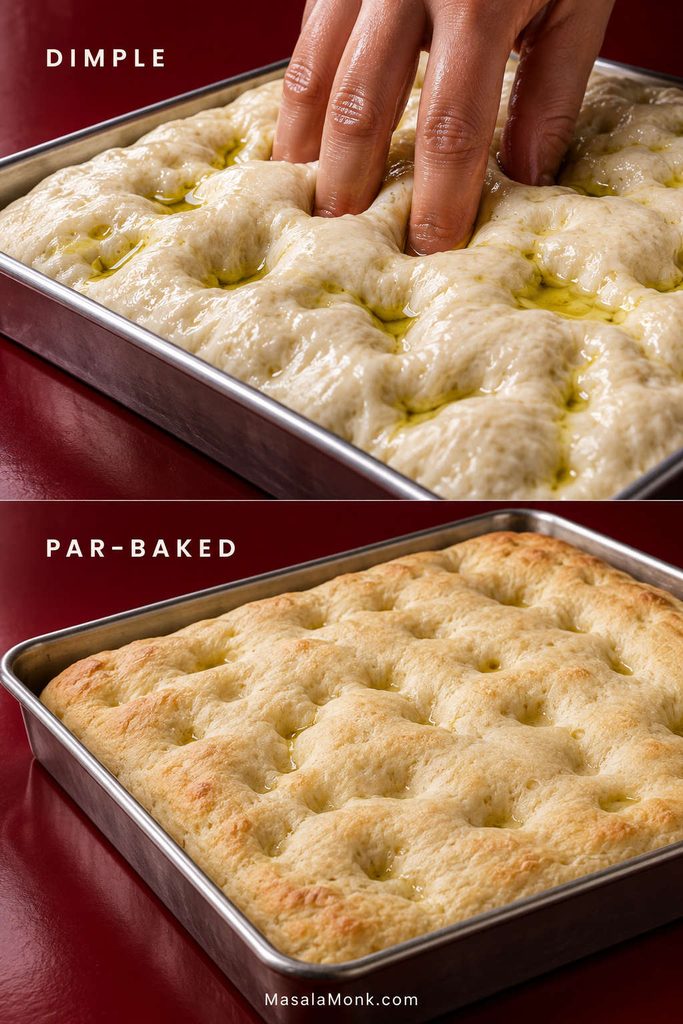
Drizzle the surface with the remaining 15 ml / 1 tbsp olive oil. Press your oiled fingertips straight down through the dough. It should feel pillowy, with little pockets of air shifting around your fingers; you’re creating dimples, not squeezing the life out of the dough.
Par-bake for 8–10 minutes. The glossy raw sheen disappears, the surface turns matte, and the outer edge takes on its first faint color. It will smell like bread now, not raw dough.
Par-baking gives the focaccia a sturdier foundation before the sauce and cheese add their moisture.
8. Add the Toppings
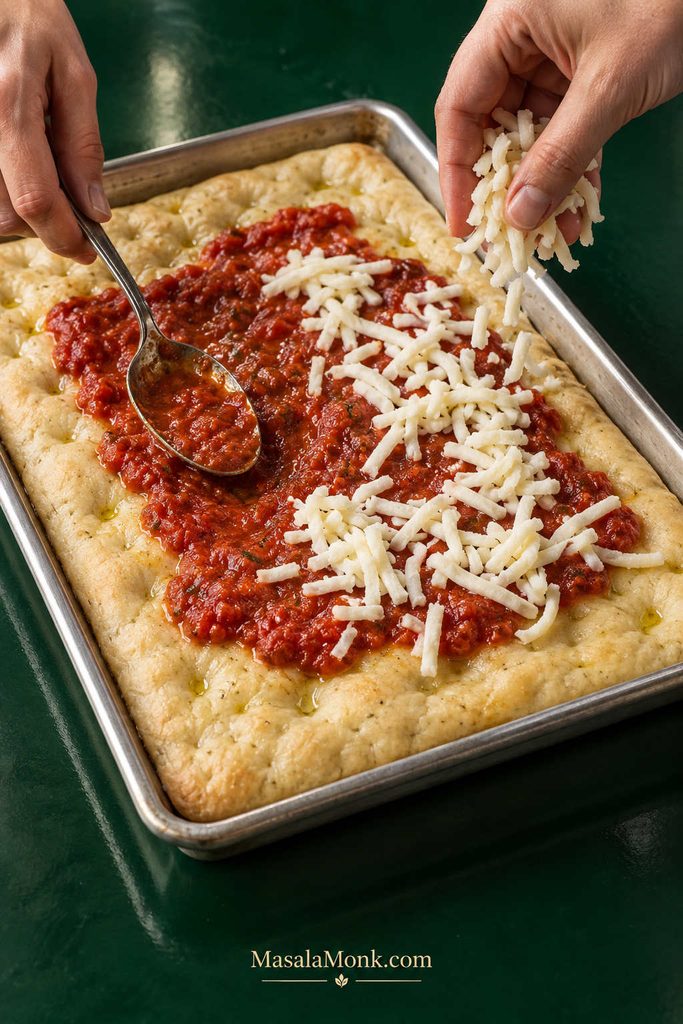
Spread over 240–280 g / about 1 to 1¼ cups thick sauce, taking it close to the edges. Add the mozzarella, Parmesan or Pecorino, and any prepared toppings.
Low-moisture whole-milk mozzarella gives the classic bubbly, browned pizza top. Fresh mozzarella makes softer, creamier pockets; drain and blot it thoroughly and add it only for the final 5–7 minutes.
Keeping the topping layer controlled protects both texture and identity: the bread still has room to rise, brown, and taste like focaccia instead of becoming only a thick base under pizza toppings.
9. Finish the Pizza
Bake for another 8–12 minutes. The cheese bubbles and blisters in places, the edges deepen toward bronze, and the kitchen starts smelling of toasted olive oil, tomato, and browned cheese.
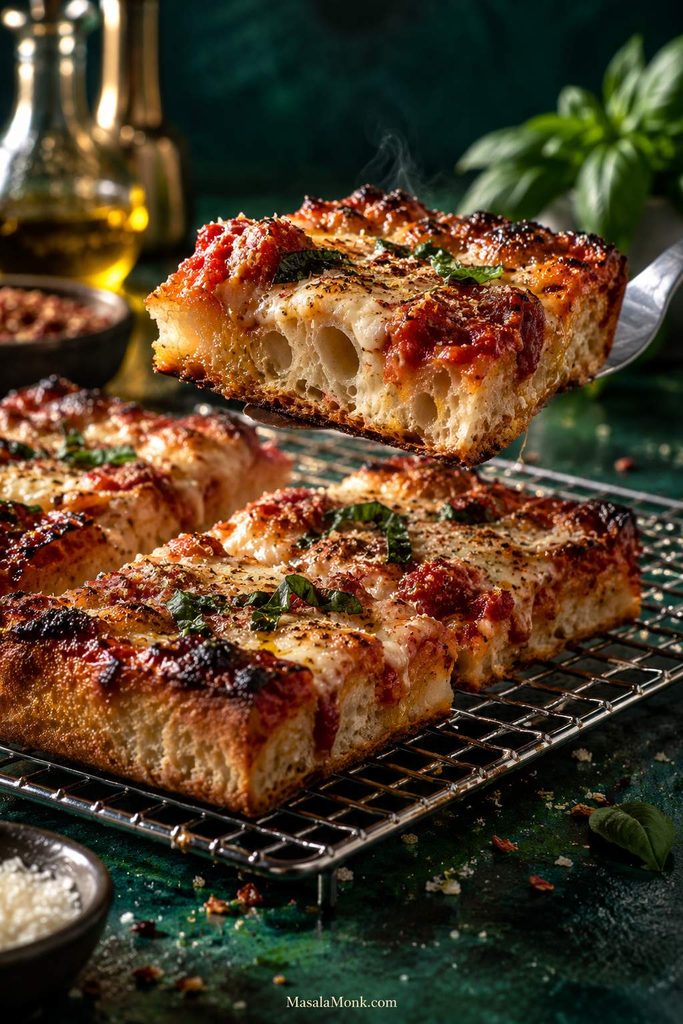
It is tempting to pull the pizza as soon as the mozzarella looks ready. Check underneath first. The base needs color, while the bread beneath the toppings should look set and airy rather than shiny or compressed into a pasty band.
Finish the basic tomato-and-mozzarella version with torn basil, a light grating of Parmesan or Pecorino, and a thin drizzle of olive oil. Add red pepper flakes for heat.
10. Get It Out of the Pan
Rest the pizza in the pan for 2 minutes, then move it to a wire rack. Give it another 5–10 minutes before slicing so steam can escape instead of softening the bottom.
A good slice bends a little under its toppings, but the browned base still has enough structure to pick up in one hand. The corner pieces have the strongest olive-oil crunch; the center squares show off the biggest bubbles. Both belong on the platter.
A cooling rack preserves the contrast between crisp base and tender crumb, because steam can escape instead of collecting underneath the hot pizza.
Focaccia Pizza Topping Ideas
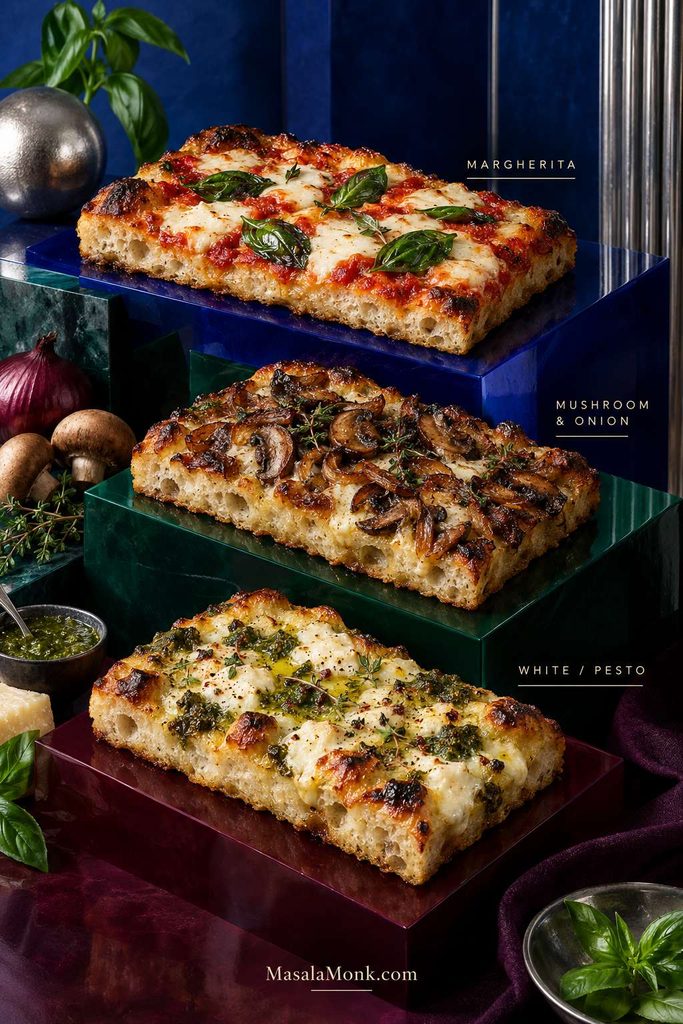
Different toppings change more than the flavor. Pepperoni is the easiest place to start; Margherita brings softer pockets of fresh mozzarella; mushrooms reward a little prep; and white or pesto versions put more attention back on the olive-oil crust.
These variations show why topping choice changes more than flavor: fresh mozzarella adds moisture, cooked mushrooms concentrate before baking, and white or pesto toppings shift attention back toward the olive-oil crust.
Pepperoni
Pepperoni is the simplest place to start: salty cheese, curled slices with crunchy edges, little pools of spicy oil, and almost no extra water to worry about. Use the base sauce and mozzarella, then add 60–90 g / 2–3 oz pepperoni.
For sweet heat, finish with a thin drizzle of hot honey after baking, when it stays glossy and fragrant.
Pepperoni is a useful reference topping for focaccia pizza because it contributes plenty of flavor without adding much extra water, making crust performance easier to judge.
Margherita
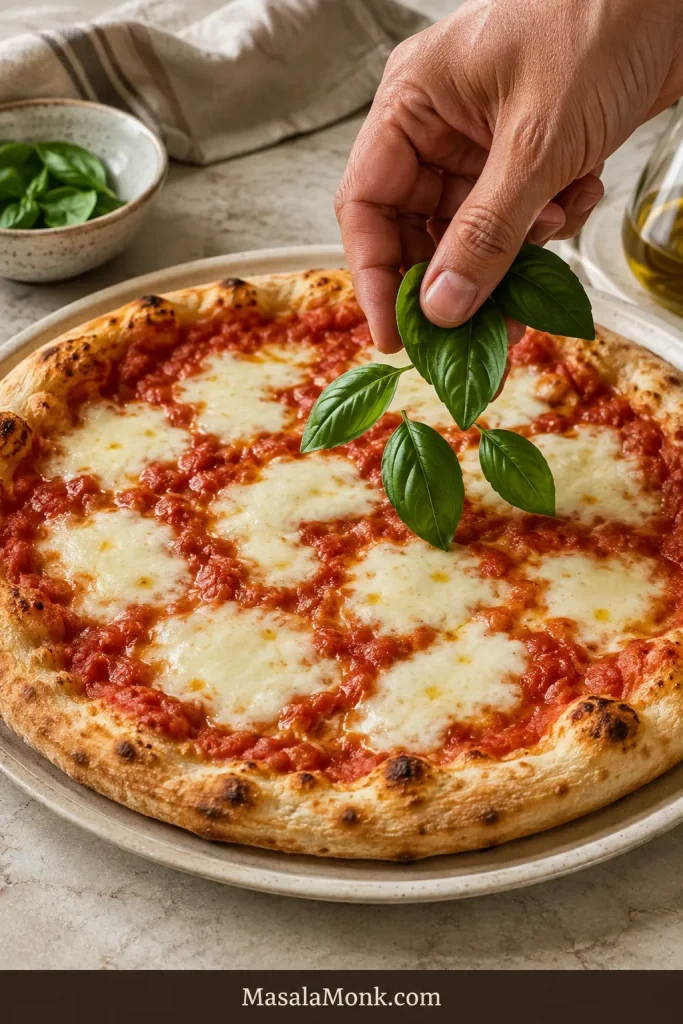
Tomato, creamy fresh mozzarella, basil, and olive oil make a brighter, softer pizza against the browned focaccia base. Use well-drained mozzarella and scatter basil over the pizza while it is still hot.
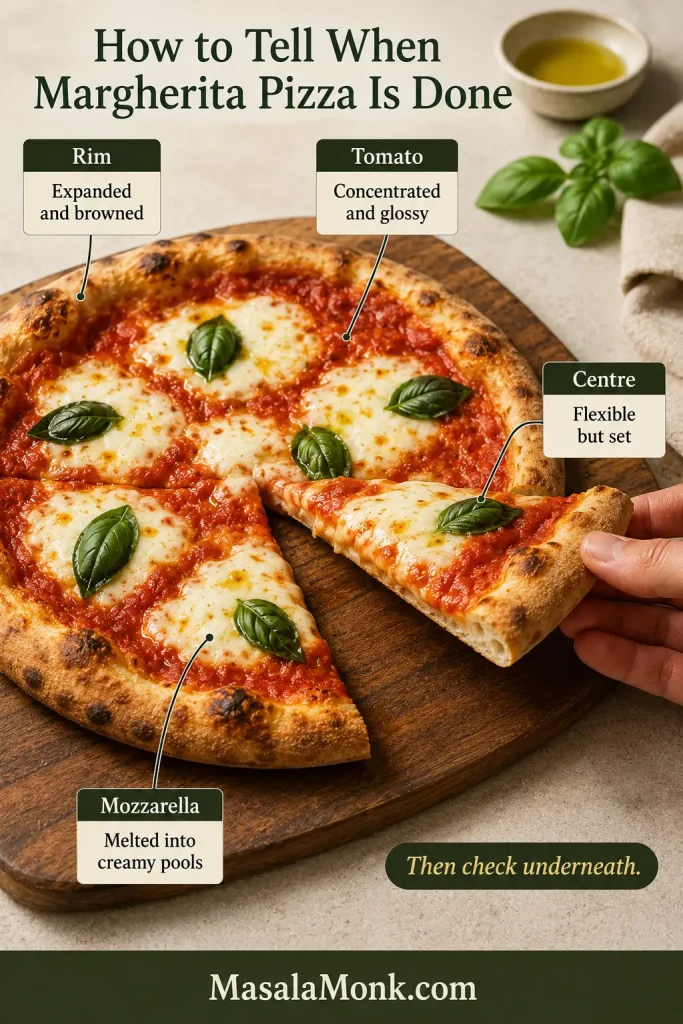
The Margherita pizza recipe takes the same tomato-mozzarella-basil combination onto a thinner conventional pizza crust.
Garlic Parmesan
Garlic carried through olive oil settles into the dimples while Parmesan browns over the top. Mix finely grated or minced garlic with a little olive oil, brush it over the par-baked crust, then add mozzarella and Parmesan.
Mushroom and Onion
Cook the mushrooms until their liquid has mostly disappeared and the edges begin to brown, then pair them with sautéed or caramelized onions. The sweet onions and browned mushrooms are especially good against the olive-oil crust.
Sausage and Pepper
Crumbled sausage browns at the edges while the peppers soften and sweeten beneath the cheese. Cook the sausage first; very juicy peppers benefit from a quick sauté too.
White or Pesto
White pizza uses mozzarella, Parmesan, black pepper, and small spoonfuls of ricotta instead of tomato sauce. The ricotta stays creamy in pockets while Parmesan browns across the top. Spinach, mushrooms, and caramelized onions all fit naturally here.
A thin layer of pesto adds a basil-and-garlic edge without hiding the focaccia underneath. Spread it on after the par-bake. The pesto recipe guide has classic basil pesto plus several variations.
How to Keep Focaccia Pizza Airy and Crisp
Once the basic pizza makes sense, you can start changing it without losing the crust that makes the whole thing worth doing.
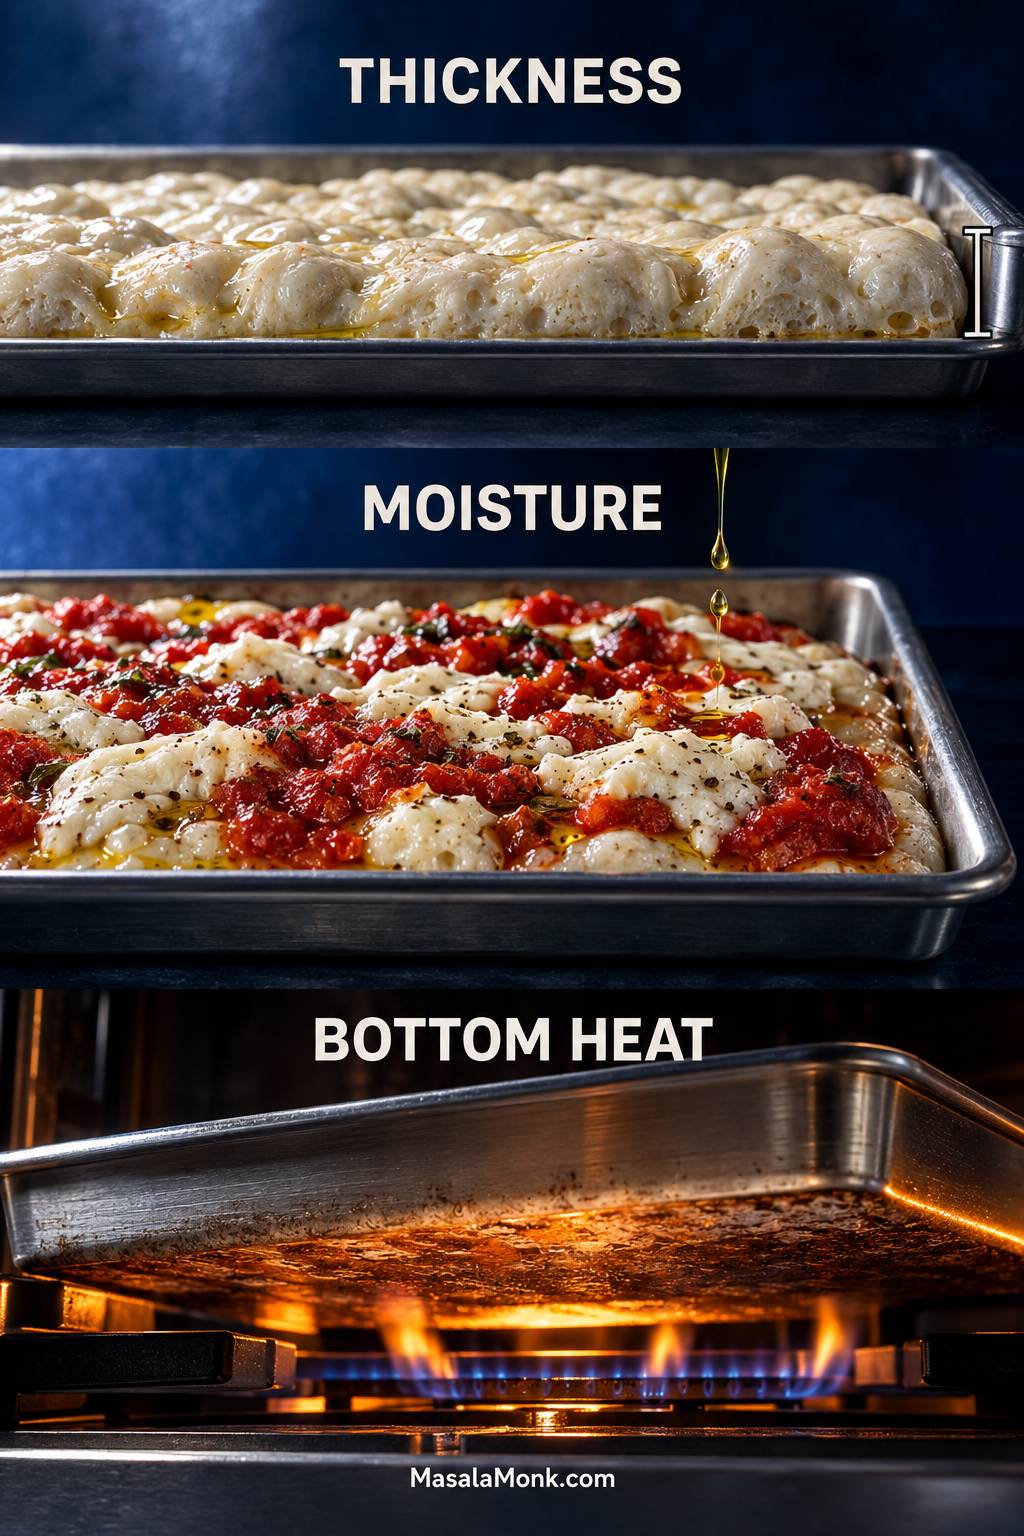
A crisp, airy focaccia pizza comes down to three things: keep the dough thin enough for the pan, control the water going on top, and give the bottom enough heat to set before the surface gets too dark.
Get those three right and the recipe becomes flexible: you can change the pan, cheese, sauce, or toppings without losing the crust you came here for.
Thickness, topping moisture, and bottom heat are the three levers that control the crust.
Sticky or Actually Too Wet?
Before those three controls matter, the dough itself has to be behaving like dough. At about 77% hydration, it stays tacky. The important question is whether it becomes stronger as you fold it.
A healthy dough starts loose and awkward, then becomes more elastic and cohesive as the folds build strength. If it still pours like batter, tears immediately, and cannot hold itself together after several folds, the flour may simply be carrying more water than it can absorb comfortably.
Bread flour gives you more margin. Softer all-purpose flour often does better when that final splash of water is added only after the dough begins to strengthen.
A good focaccia pizza crumb is not simply the one with the biggest holes; it is open enough to feel light, yet strong enough to support the toppings without leaving a gummy band above the crust.
Making the bread without sauce and cheese? That plain focaccia recipe goes deeper into proofing, dimpling, pan choice, and those golden olive-oil edges; it is the better place to start when the bread itself is the main event.
Use the Right Amount of Dough for Your Pan
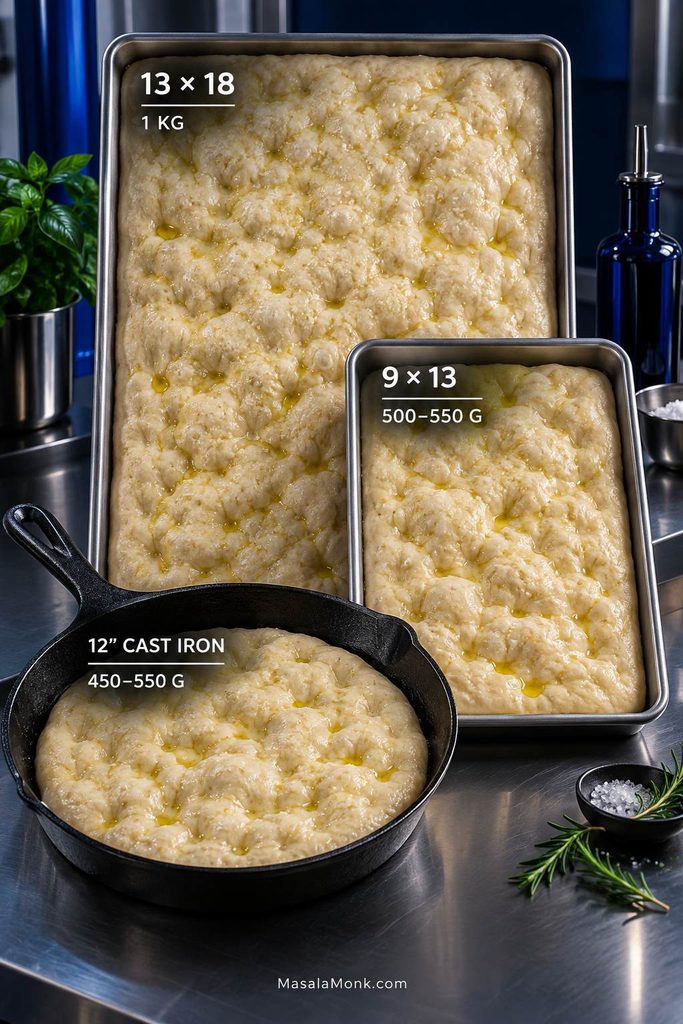
The same dough behaves very differently at ¾ inch thick than it does at 1½ inches. Move the dough into a smaller pan and the pizza gets deeper, so the bread under the toppings has farther to go before it is fully baked.
The full batch weighs about 1 kg. A standard 9 × 13-inch pan has exactly half the surface area of a 13 × 18-inch half-sheet, so half the dough preserves almost the same thickness.
Pan
Approx. dough
What to expect
13 × 18 in / 33 × 46 cm
Full batch, about 1 kg
The intended airy-but-pizza-like thickness
9 × 13 in / 23 × 33 cm
500–550 g
Very similar thickness to the half-sheet version
9 × 13 with full batch
About 1 kg
Much thicker focaccia; expect a longer, less forgiving bake
12-inch cast iron skillet
450–550 g
Near the intended thickness around 500 g, with a more fried, deeply browned underside; follow doneness rather than the half-sheet clock
The half-sheet gives the cleanest balance of airy center and browned base. Cast iron is more interesting when what you really want is that almost-fried underside.
Smaller pan, deeper dough. Scale the dough with pan area to keep the bake closer to the original.
The Bottom Needs Heat
Once sauce and cheese cover the surface, the underside has to carry more of the bake. Metal helps. So does a thoroughly heated oven and a rack in the lower half.
Pale bottoms usually improve with a lower rack or a preheated steel or stone. A crust that burns before the bread finishes needs the opposite treatment: move the pizza higher or remove that extra thermal mass.
Aim for even bronze: pale stays soft; very dark can outrun the middle.
Prep Toppings for a Better Crust
Sogginess is usually cumulative rather than mysterious. A little loose sauce may be fine, and so may a few mushrooms. Add fresh mozzarella and juicy tomatoes as well, though, and the bread suddenly has much more water to deal with.
The wetter the topping, the more preparation it needs before it reaches the dough. Keep the overall layer modest too. The focaccia should still feel like part of the pizza, not a thick bread base buried under everything else.
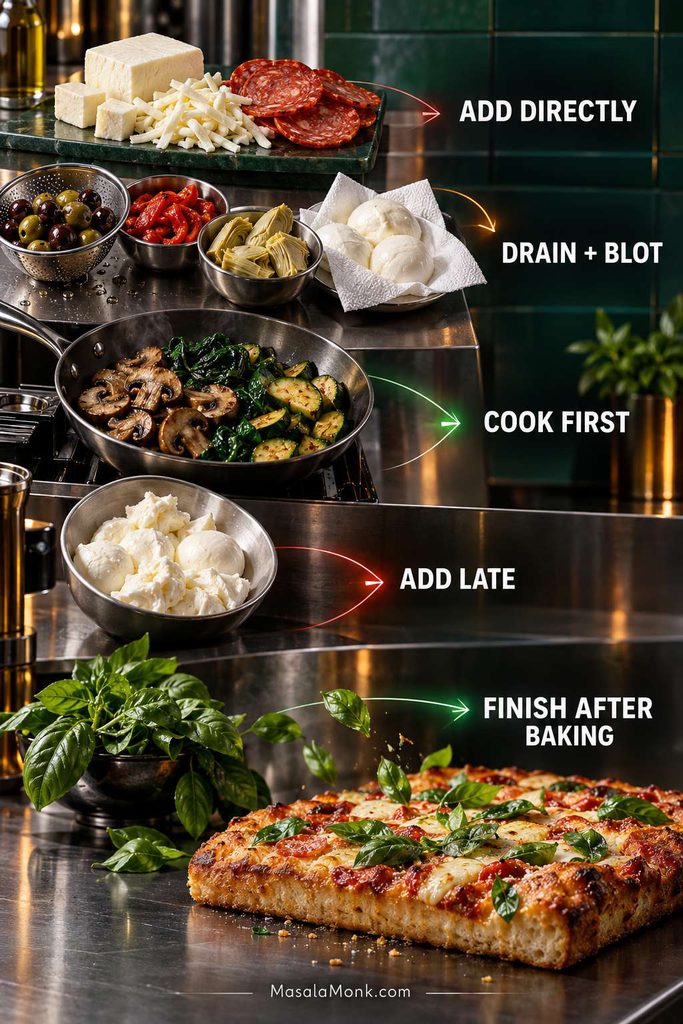
Prep by moisture: drain, blot, cook, or delay wet ingredients before they reach the crust.
Topping
Prep
Why
Low-moisture mozzarella
Add directly
Reliable melt with little excess water
Pepperoni
Add directly
Low-moisture and forgiving
Cooked sausage
Add directly
Already cooked and easier to control
Olives
Drain
Removes surface brine
Artichoke hearts
Drain and pat dry
Jarred and canned pieces hold liquid
Roasted peppers
Drain and pat dry
Keeps packing liquid off the dough
Mushrooms
Cook first
They release water as they shrink
Spinach
Cook and squeeze dry
Removes water before it reaches the crust
Zucchini
Precook or salt and dry
High water content
Fresh tomatoes
Use sparingly; drain juicy pieces
Fresh juice can soak the crumb
Fresh mozzarella
Drain, blot, add late
Much wetter than low-moisture mozzarella
Fresh basil
Add after baking
Better fragrance and color
Fresh garlic
Coat with oil or tuck beneath cheese
Exposed pieces scorch quickly
Sun-dried tomatoes
Protect beneath cheese or add later
Exposed edges can burn
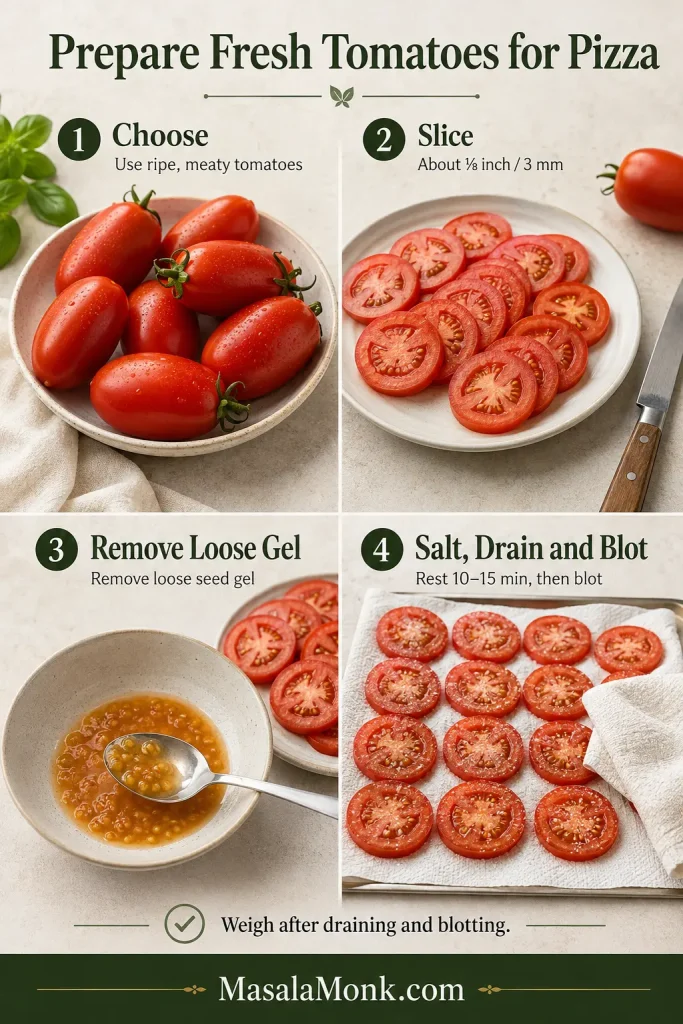
Very juicy fresh tomatoes deserve particular attention. The fresh tomato sauce guide shows how draining and reduction can turn them into a richer, more concentrated base.
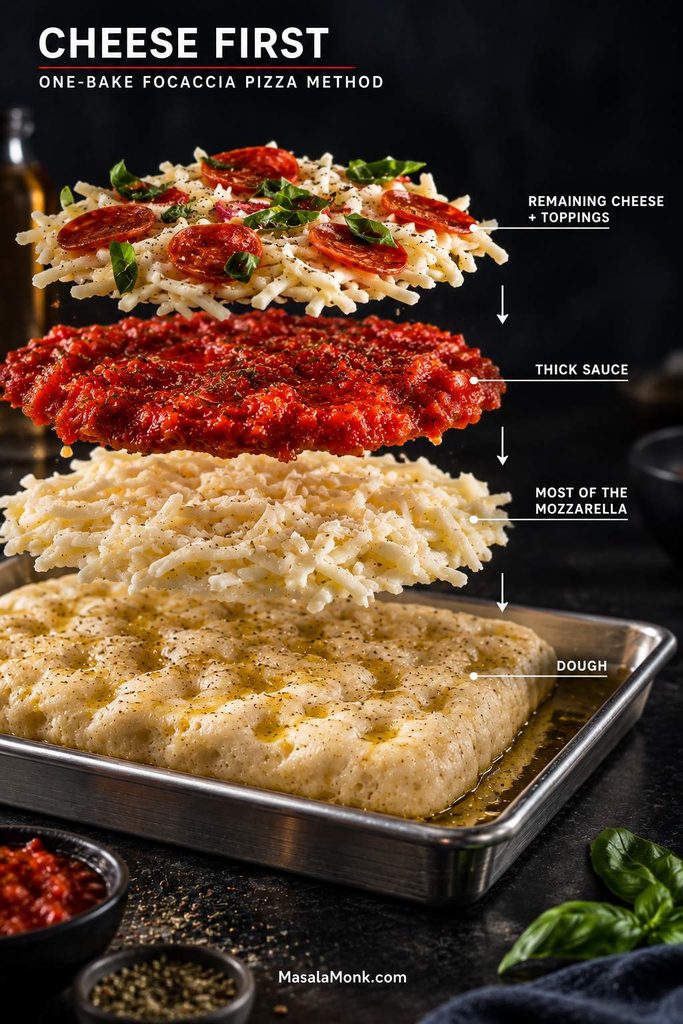
Want to Skip the Par-Bake? Put Cheese Down First
Par-baking is the default here because it gives the center more protection. A one-bake version can still work when the oven has strong bottom heat and the toppings are fairly dry.
After the dough has fully proofed and been dimpled, scatter most of the low-moisture mozzarella directly over the dough. Spoon a modest amount of thick sauce over the cheese, then finish with the remaining mozzarella and toppings. That first cheese layer slows the sauce from soaking straight into the raw dough.
The choice changes the eating experience slightly. A one-bake pizza lets sauce and cheese settle into the bread as everything cooks together. Par-baking, by contrast, gives you a more distinct focaccia layer underneath and a wider margin against a gummy middle.
In the one-bake method, the first mozzarella layer acts as a moisture buffer, so the sauce reaches the raw focaccia more slowly while the bread begins to set underneath.
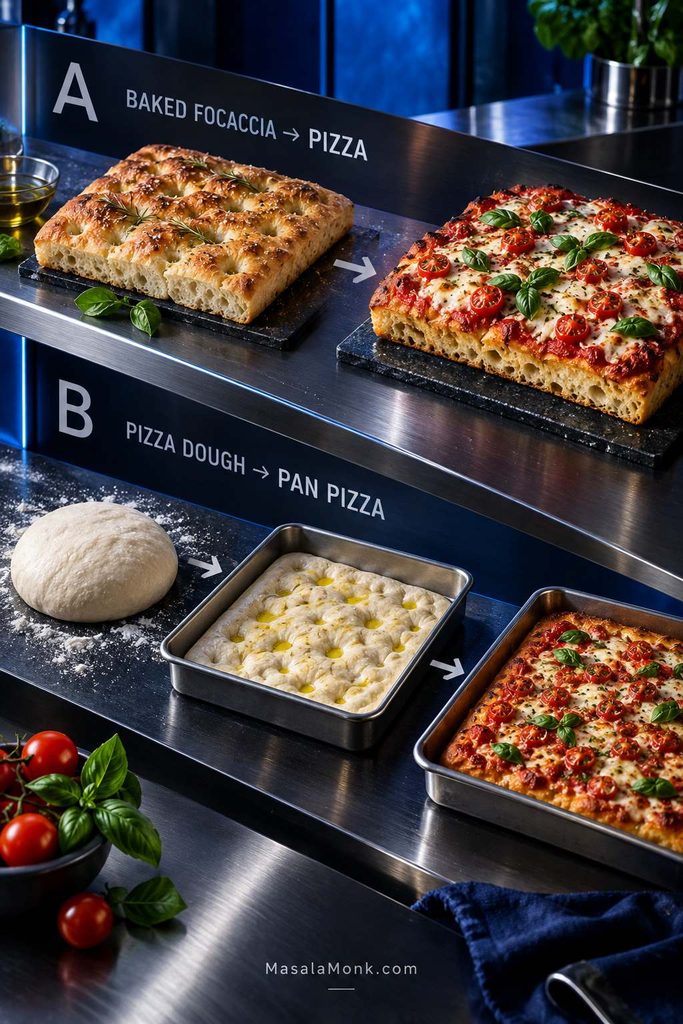
There are two useful shortcuts when you want the focaccia-pizza experience without starting from this exact dough: turn already-baked focaccia into pizza, or adapt conventional pizza dough to an oiled pan. Each route keeps the pan-pizza idea while changing how much dough work you need to do.
Choose the shortcut by your starting point: baked focaccia is fastest, whereas conventional pizza dough keeps more of the dough-making process but can still be adapted to an oiled pan.
Already Have Baked Focaccia?
This is the quickest route to pizza on focaccia bread. Heat the oven to 425°F / 220°C. Focaccia thicker than 1½ inches / 4 cm is easier to turn into pizza if you split it horizontally.
For a 9 × 13-inch piece, use 120–150 g / ½–⅔ cup thick sauce and 90–120 g / 3–4 oz low-moisture mozzarella, plus cooked toppings.
Bake on a metal sheet pan for 8–12 minutes, until the cheese bubbles and the bread is hot and browned underneath. A base that needs more color can spend another minute or two directly on the oven rack once it is firm enough to move safely.
Day-old focaccia is excellent here. The edges recrisp at the same time the cheese melts, so leftovers suddenly feel intentional.
Using Pizza Dough
Conventional pizza dough is usually less hydrated and more elastic than focaccia dough, but it adapts well to an oiled pan.
For a 9 × 13-inch pan, start with 450–500 g / 16–18 oz pizza dough. Let refrigerated dough warm and relax, stretch it into the oiled pan in stages, and give it another 15–20 minutes whenever it snaps back.
Once the dough is visibly puffy, continue with the par-bake, topping, and finishing method. Start checking the color early because a lower-hydration dough may brown faster.
The easy pizza dough recipe gives you same-day and overnight options if you want to begin from scratch.
For sourdough: natural fermentation needs its own timing rather than a simple yeast swap. The sourdough focaccia recipe follows a starter-based dough through fermentation, proofing, dimpling, and baking.
Fix My Focaccia Pizza
Most of these problems look different, but they usually come back to fermentation, water on top, or heat underneath. If you want the logic first, revisit the three controls for an airy, crisp focaccia pizza. Something going wrong right now? Start with the rescue column; plenty can still be fixed before dinner reaches the table.
Dough and Proofing
Problem
Likely cause
Save this one
Next time
Extremely sticky dough
Often normal at this hydration
Wet or oil your hands
Let the folds build the strength
Dough behaves like soup
Mismeasurement or flour unable to hold the water
Give it another fold or two; add a little flour only if it cannot gain structure
Weigh the flour and hold back 15 ml water with softer flour
Won’t reach the corners
Cold or tight gluten
Cover and wait 10–20 minutes
Stretch in stages
Barely rises
Cool room, slow fermentation, or weak yeast
Give active dough more time somewhere comfortably warm
Check yeast freshness and watch the dough rather than the clock
Dense crumb
Underproofing, added flour, or heavy handling
Enjoy it as a denser pan pizza
Proof longer and handle mature dough gently
Rose and then collapsed
Overproofing
Bake it now; it may simply finish flatter
Use less yeast for long ferments and catch the dough closer to its peak
One giant bubble
A large trapped gas pocket
Pierce that bubble gently
Dimple evenly without crushing the rest
Baking and Crust
Problem
Likely cause
Save this one
Next time
Gummy or raw middle
Thick dough, weak bottom heat, wet toppings, or short bake
Remove it from the pan. If the crust is firm enough to handle safely, finish it directly on the oven rack; loosely shield very dark cheese with foil
Keep the par-bake, control wet toppings, and check the crumb beneath them
Pale, soft bottom
Not enough heat underneath
Once the crust is firm enough to move, finish it on the rack or a thoroughly heated steel or stone for 2–4 minutes
Preheat longer, move lower, or add thermal mass
Burned bottom
Strong lower heat, very dark pan, excess oil, or hot steel
Move the pizza off the pan immediately
Raise the rack or remove the steel/stone
Dark cheese, underdone bread
The top is cooking faster than the bread
Loosely cover with foil and keep baking
Use the full par-bake or add vulnerable toppings later
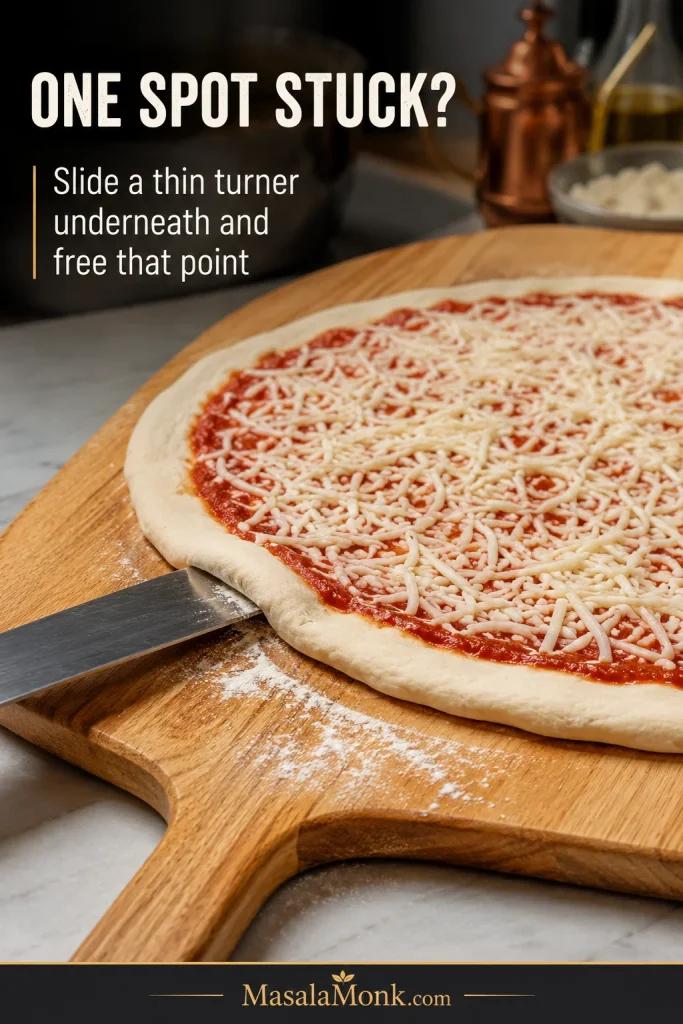
Pizza sticks
Pan surface or inadequate release layer
Work a thin spatula gradually underneath
Use spray plus oil on a suitable metal pan
Toppings and Cooling
Problem
Likely cause
Save this one
Next time
Fresh mozzarella made it wet
Too much water from the cheese
Remove from the pan and continue baking briefly if needed
Drain, blot, and add it late in the bake
Vegetables made the middle soggy
They released water during baking
Finish the crust out of the pan
Cook and drain wet vegetables first
Garlic or sun-dried tomatoes burned
Dry ingredients were exposed to high heat
Remove badly scorched pieces
Coat with oil, tuck beneath cheese, or add later
Firm bottom turned soft
Steam became trapped under the pizza
Recrisp slices in a skillet, air fryer, or oven
Move the pizza to a rack soon after baking
Once you can read those three controls, the recipe stops feeling fragile and becomes much easier to steer.
Storage and Reheating
Let excess steam escape briefly, then cover and refrigerate promptly. Don’t leave pizza at room temperature for more than 2 hours.
Refrigerator: 3–4 days.
Freezer: best quality within 1–2 months. Freeze slices in a single layer first, then transfer them to a container or freezer bag.
USDA guidance lists pizza at 3–4 days refrigerated and 1–2 months frozen, and recommends reheating leftovers to 165°F / 74°C. See its food-safety guidance for more detail.
Best Ways to Reheat It
For the closest thing to a fresh slice, use the skillet or oven. Both restore the bottom instead of simply warming the cheese, which is what keeps focaccia pizza from turning soft and heavy the next day.
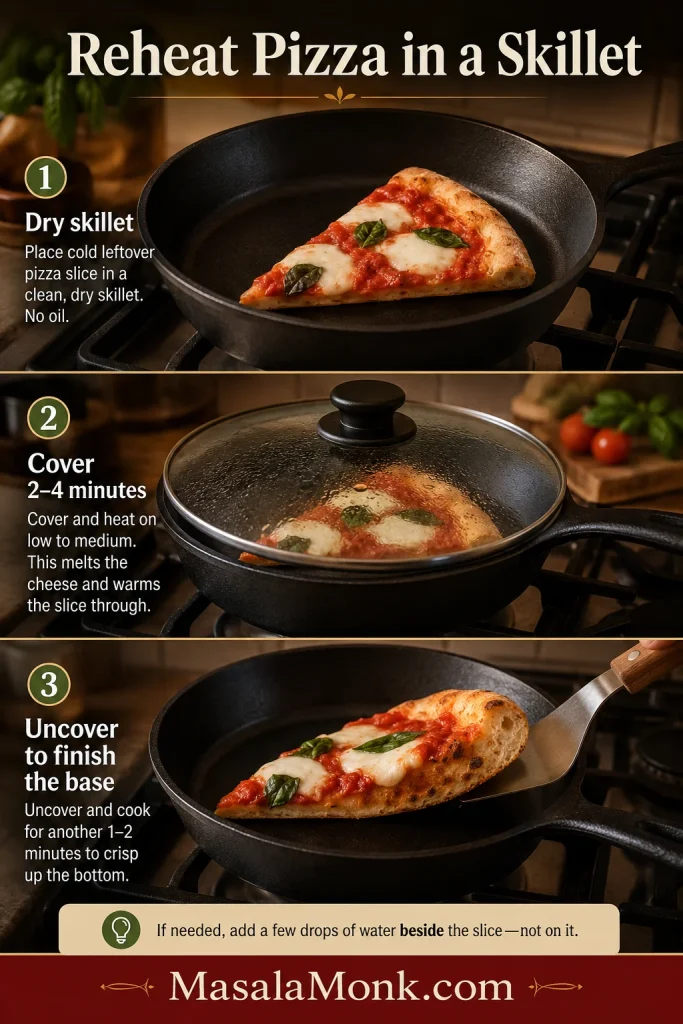
Skillet: heat over medium-low until the bottom firms and browns; cover briefly if the top still needs warming.
Oven: 375°F / 190°C for 8–12 minutes.
Air fryer: 350–375°F / 175–190°C for a few minutes.
Microwave: quickest, but the crust will be softer.
A skillet changes the reheating method from passive warming to direct browning, so the bottom can regain crispness while the cheese warms more gradually above it.
Focaccia Pizza FAQs
1. What is focaccia pizza?
It is pizza made on a soft, olive-oil-rich focaccia-style dough. Compared with conventional pizza, the base is thicker and airier, with a browned underside and a tender crumb that still carries the toppings like pizza.
2. Is focaccia pizza the same as Sicilian pizza?
They overlap, but the names aren’t interchangeable. Traditional Sicily has several bread-based pizza and focaccia styles, including Palermo’s soft, spongy sfincione, while “Sicilian pizza” in the United States often means a thick rectangular Italian-American pan pizza. This recipe is specifically built around a high-hydration, olive-oil-rich focaccia dough with an airy crumb and dimpled structure.
3. Can I use Tipo 00 flour?
Yes, although you don’t need it. Tipo 00 describes how finely the flour is milled, not one fixed protein strength. Bread flour is the more predictable choice here because this wet dough also has to support pizza toppings.
4. Can I bake focaccia pizza in a pizza oven?
Yes, if the oven can safely accommodate the pan. Use the oven maker’s focaccia or bread guidance rather than Neapolitan-level heat. Keep the flame modest, rotate the pan as needed, watch the underside closely, and check the pan manufacturer’s maximum safe temperature. Many compact pizza ovens won’t fit a 13 × 18-inch half-sheet, so scale the dough to the pan you can use.
When the middle is airy and fully set, the underside is browned, and the knife meets a little resistance from that firm base, you’re there. Give the pizza a few minutes on the rack, cut it into squares, and listen to those olive-oil edges crackle. Here, the crust was never supposed to be an afterthought.
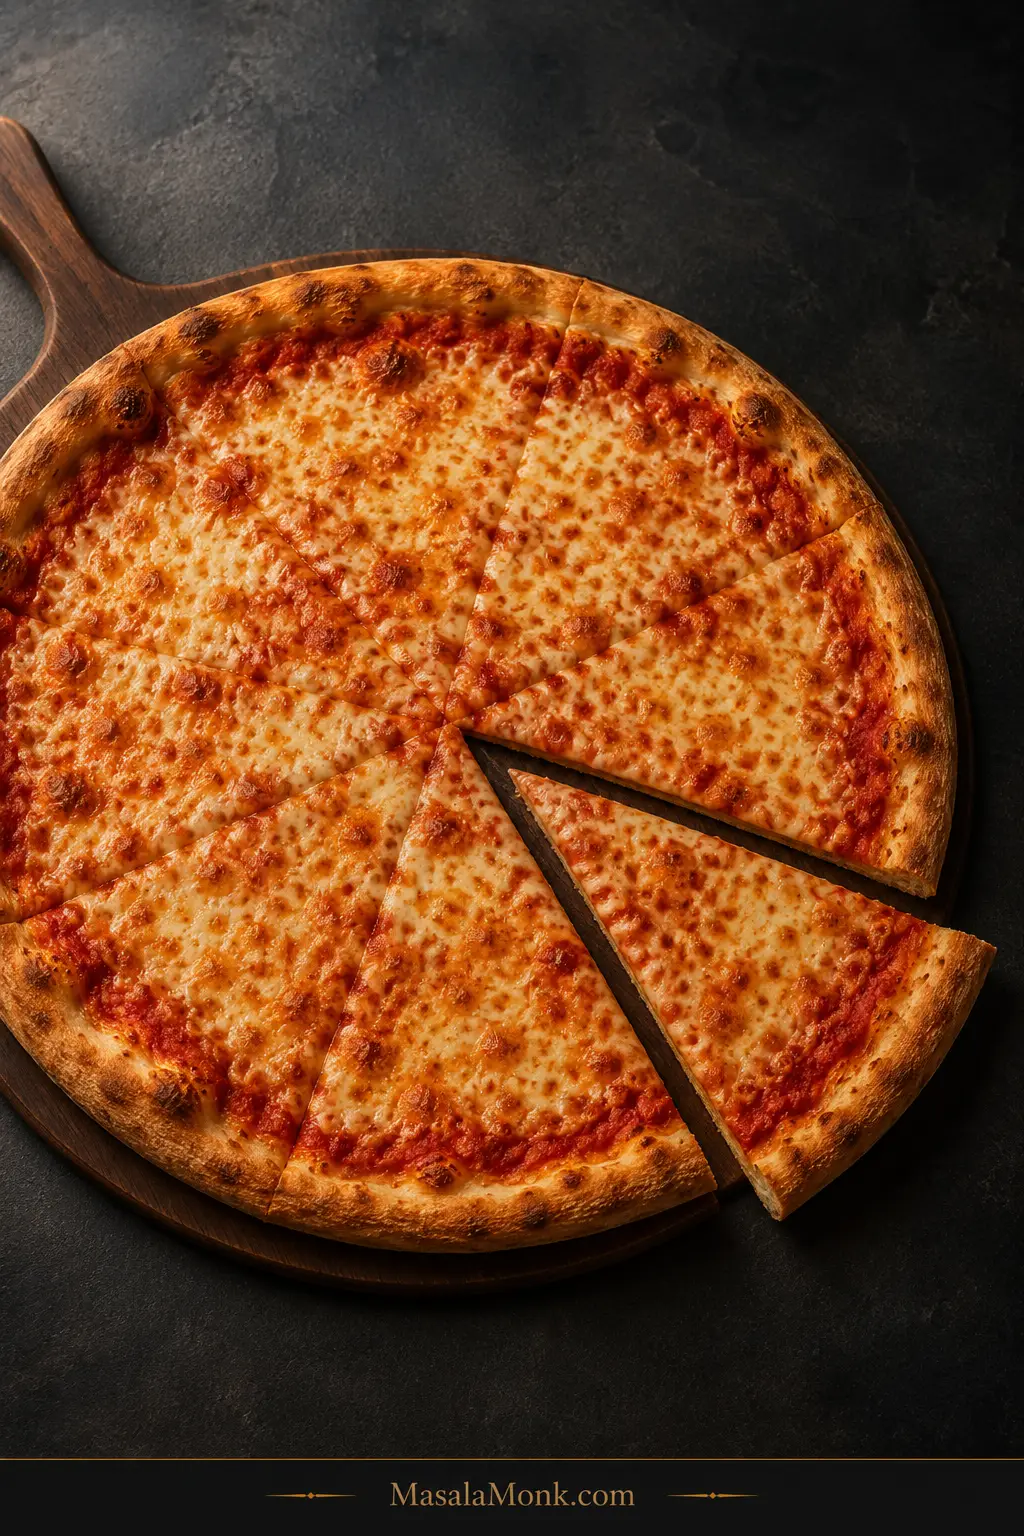
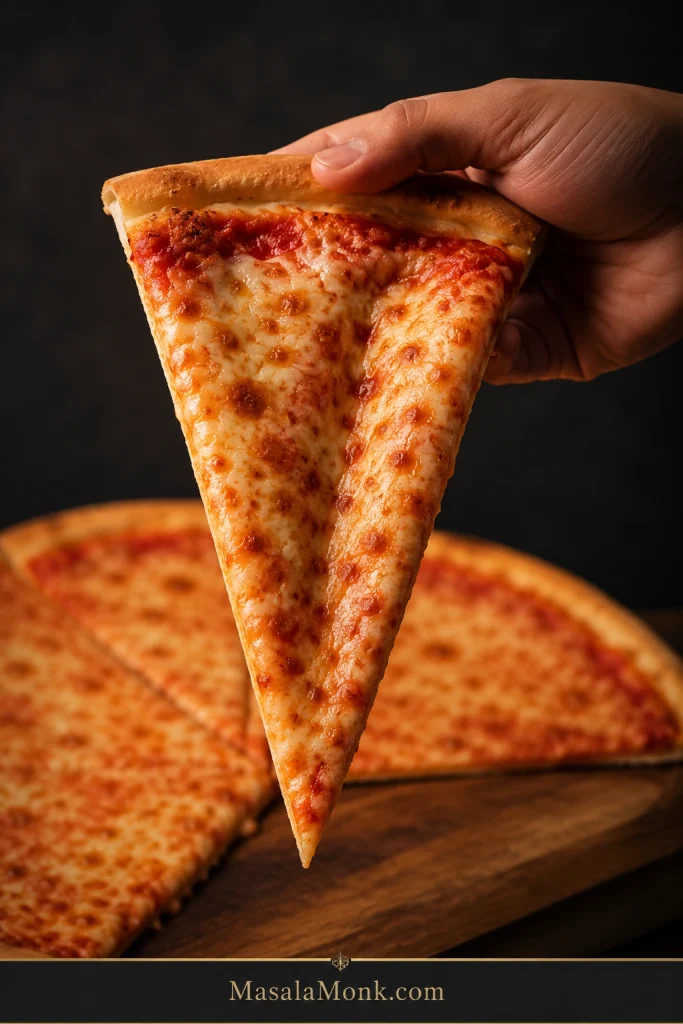
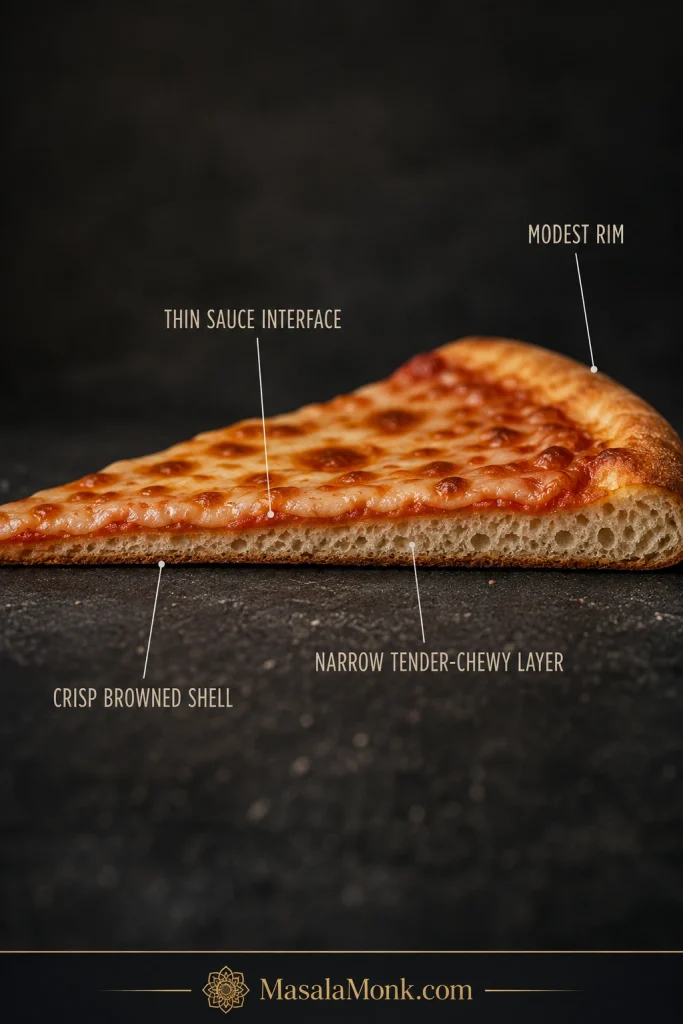
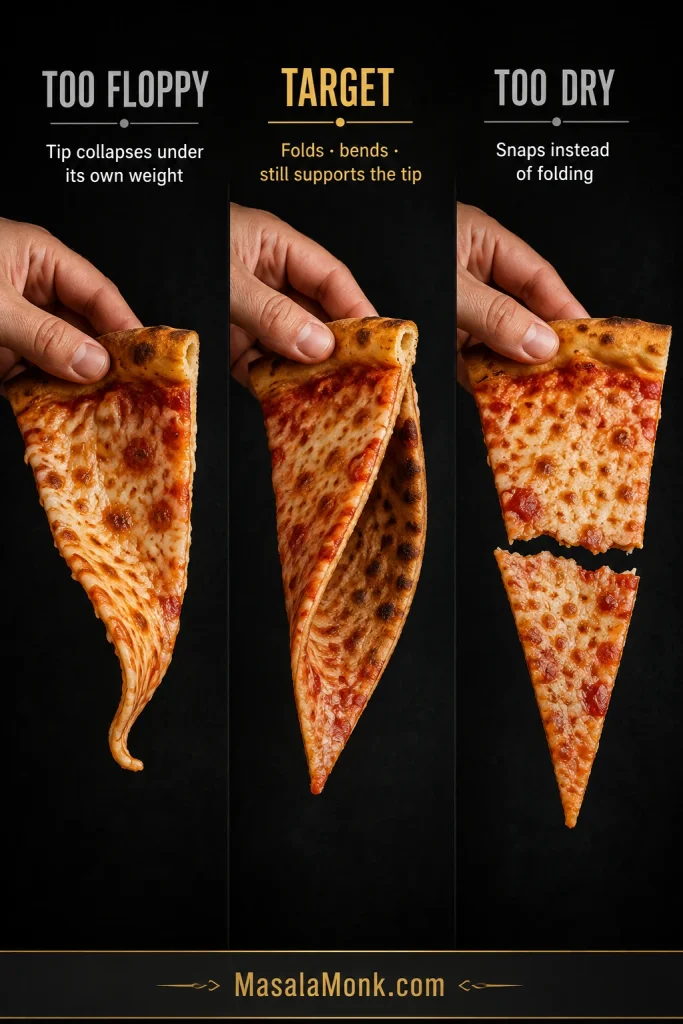
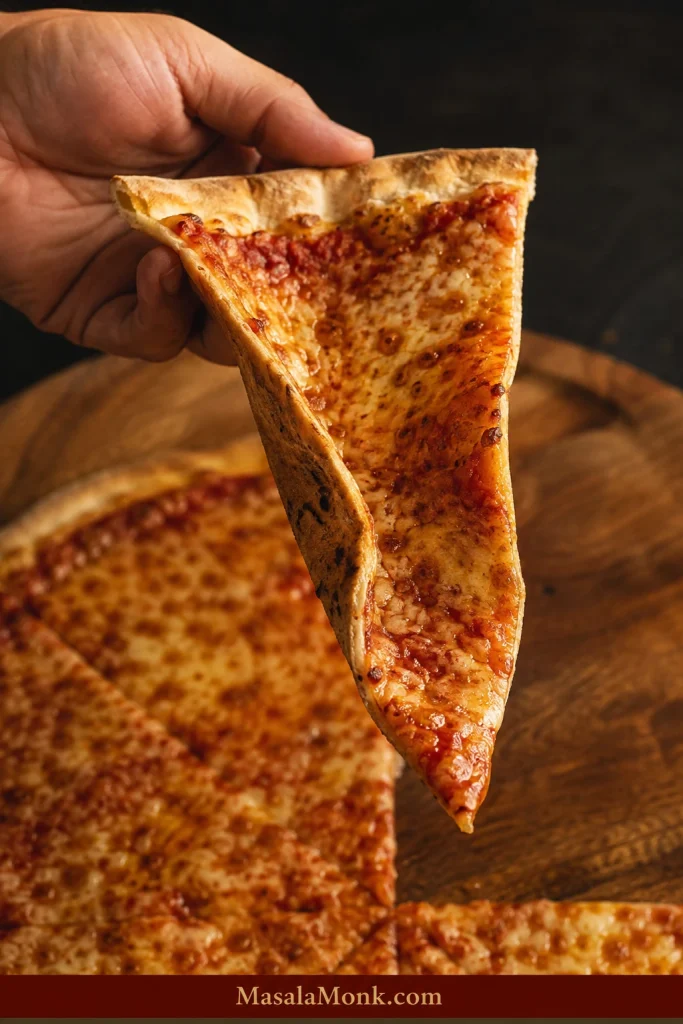
Lift a hot New York-style slice by the crust and the center should bend before it breaks. The underside should be browned and crisp, the rim should have a satisfying chew, and the slice should fold down the middle without snapping like a cracker or collapsing into a wet heap.
Folding a New York slice lengthwise is structural as much as cultural. It stiffens a thin center, making the slice easier to hold without turning the crust itself thick or rigid.
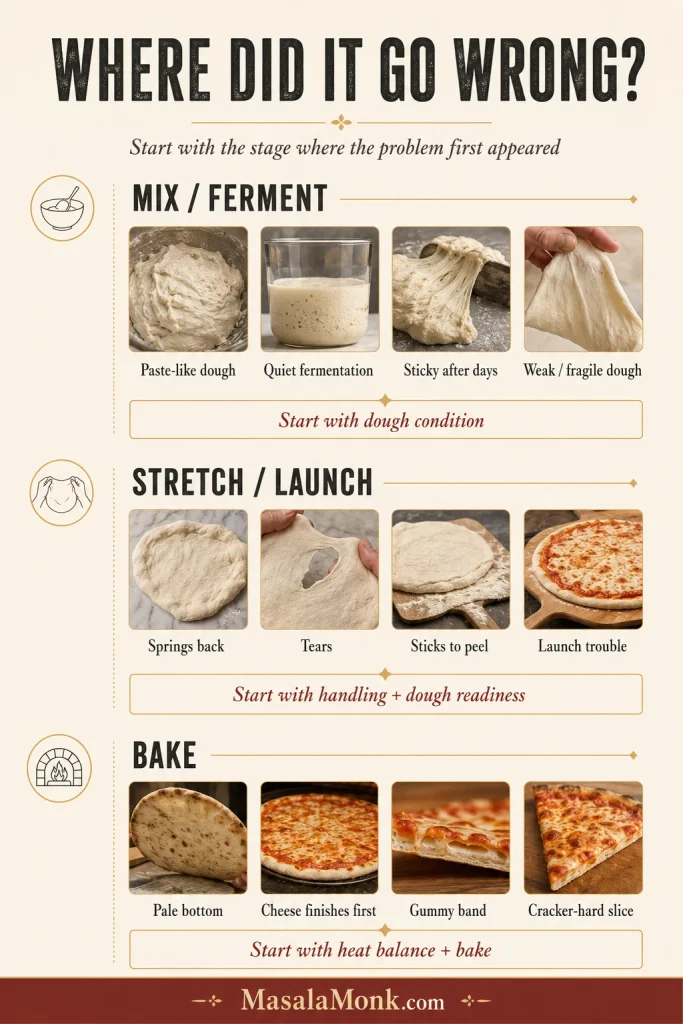
A perfectly respectable dough can turn out thick and bready if it stays too small, or rubbery if you stretch it while tight. A baking surface that is not ready leaves the bottom pale; a long bake in a cooler oven can make the crust dry and brittle.
This version uses a 48-hour cold ferment, bread flour, 63.5% hydration, and small amounts of sugar and olive oil that suit a home oven. Just as importantly, it shows you what normal looks and feels like along the way—so a quiet dough in the refrigerator, a tacky first mix, or a stubborn stretch does not send you into a round of fixes the dough never needed.
The finished crust should taste as good as it feels: toasted and wheaty, gently savory, with fermented depth but no obvious sweetness from the sugar. Even the bare rim should be worth eating.
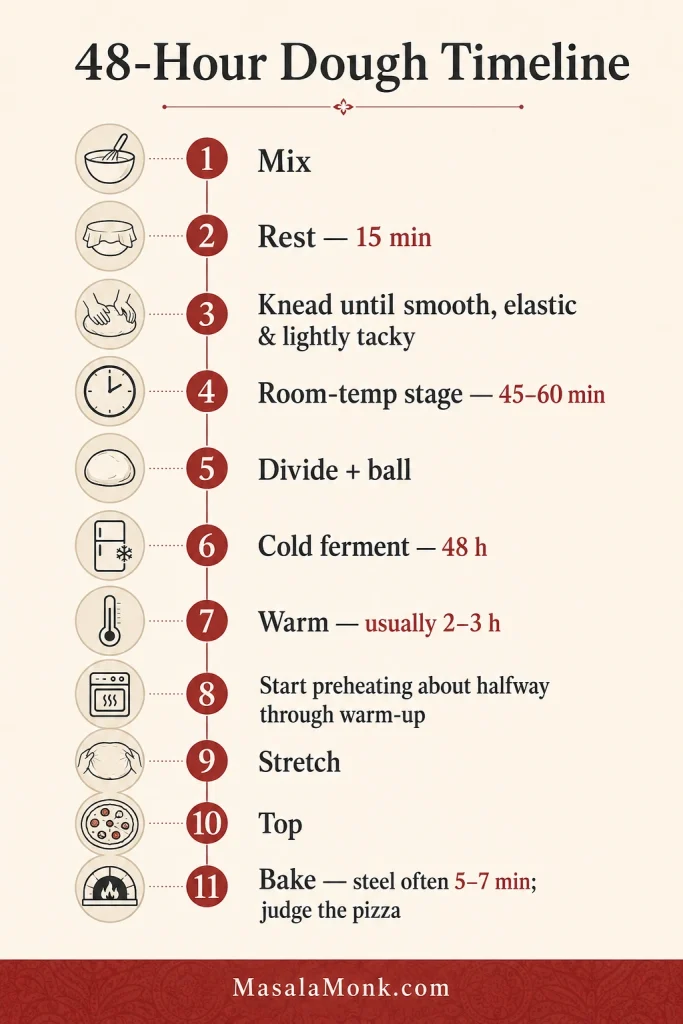
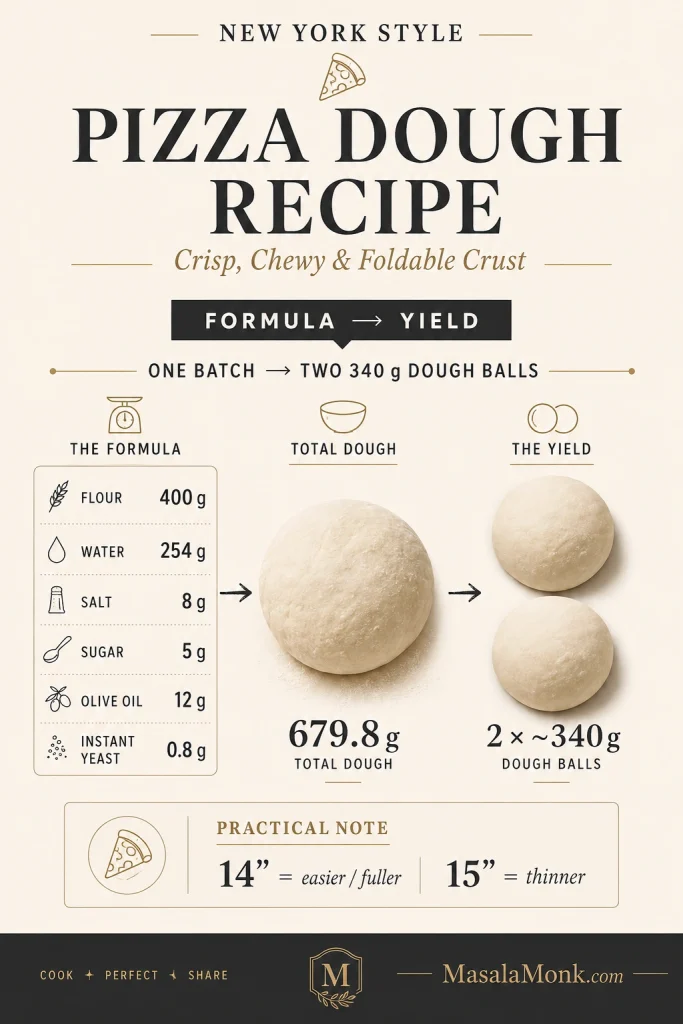
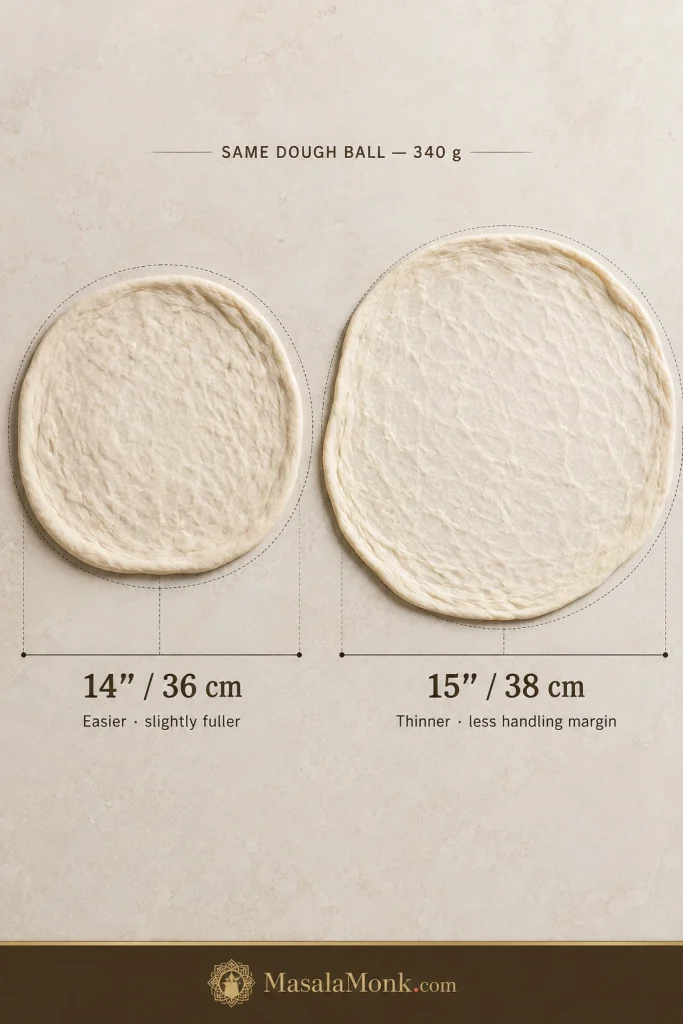
For two 14–15-inch New York-style pizzas, use 400 g bread flour, 254 g water, 8 g salt, 5 g sugar, 12 g olive oil and 0.8 g instant yeast. Divide into two dough balls of about 340 g / 12 oz each and cold-ferment them for about 48 hours.
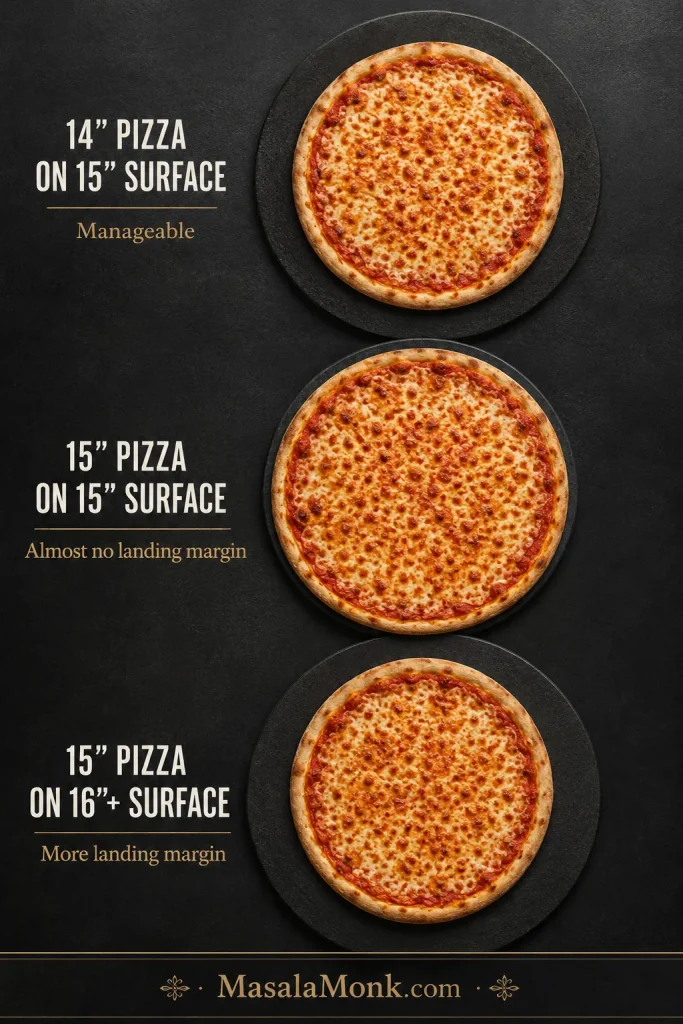
The finished pizza should be thin and browned underneath, crisp at the surface, chewy inside, and flexible enough to fold. A 14-inch pizza gives you more margin during stretching and launching; take the same ball closer to 15 inches when you want a thinner center and the dough is opening easily.
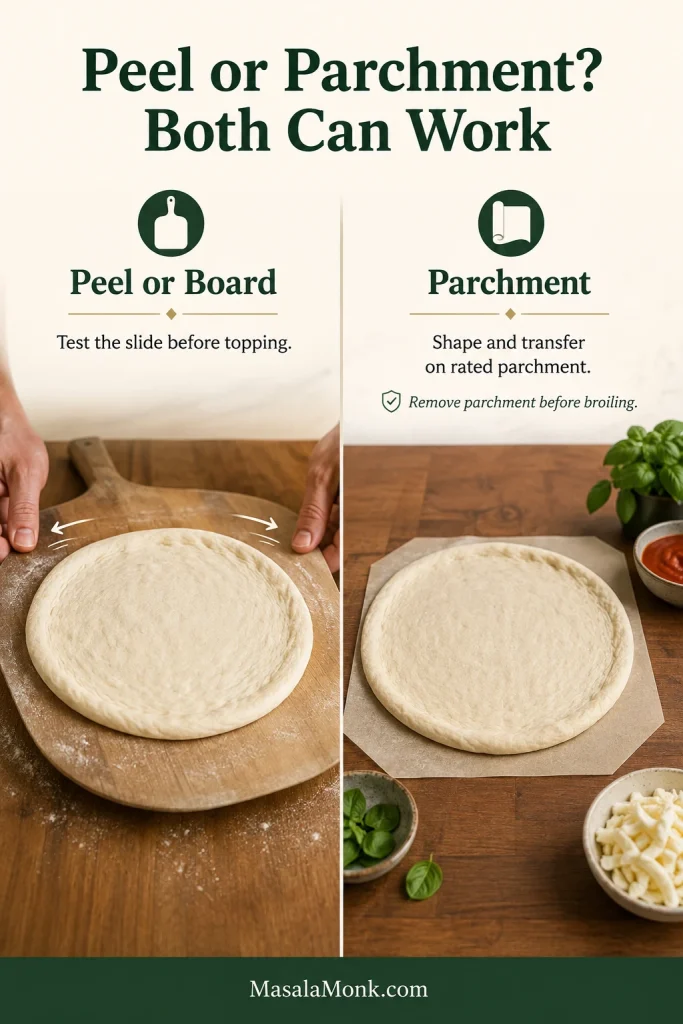
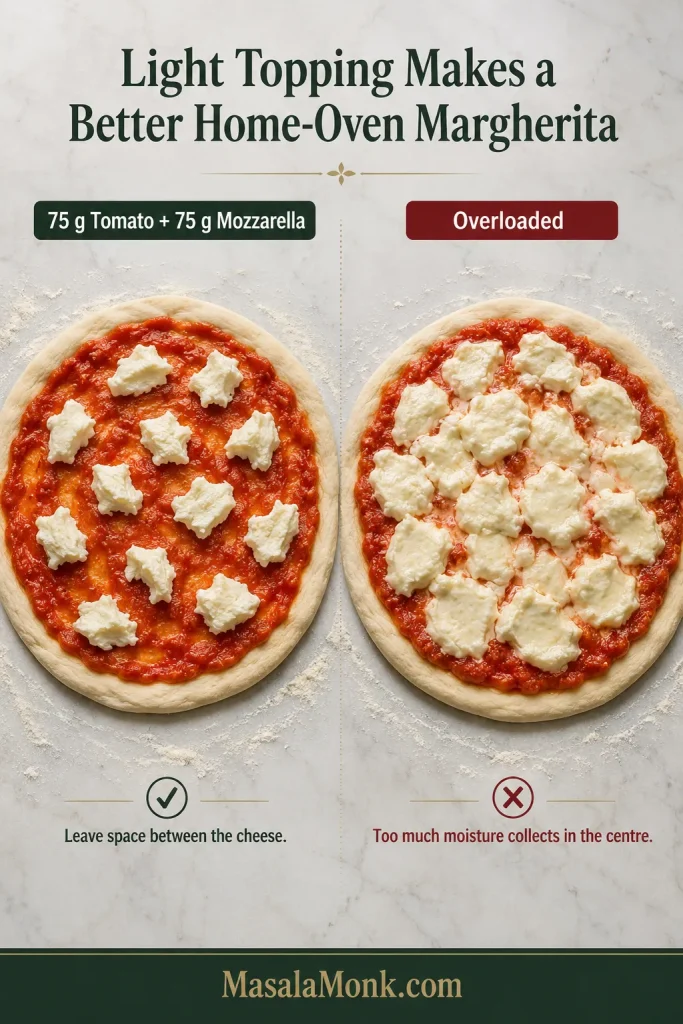
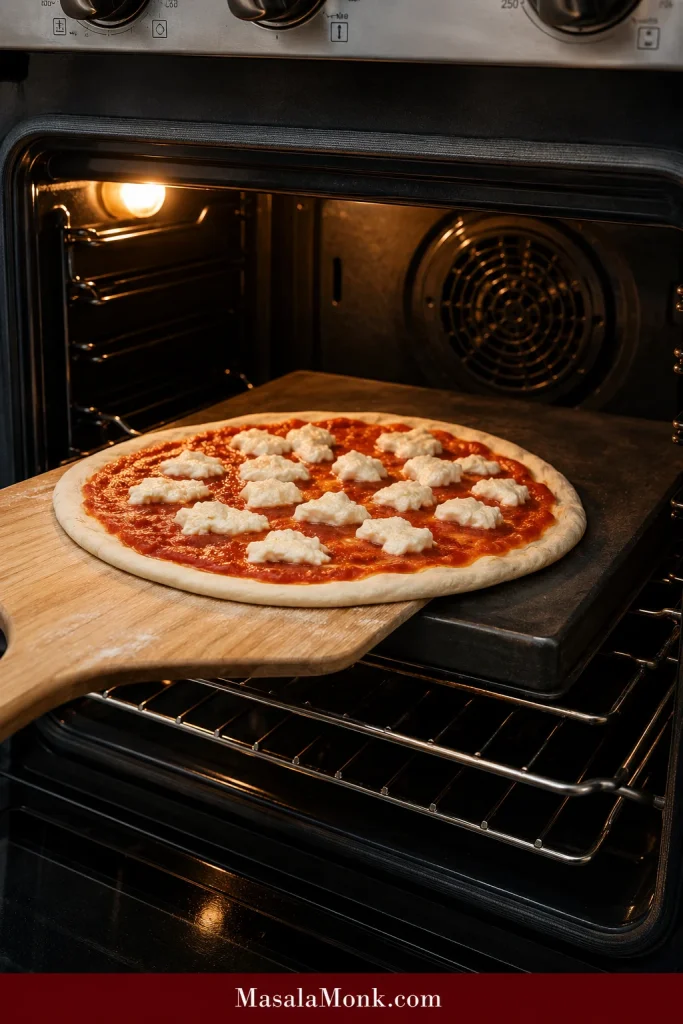
A small amount of sugar assists browning before a home-oven bake dries the crust out, while olive oil helps the interior stay tender. Stretch by hand, top with restraint, check that the pizza slides on the peel, and fully heat the steel or stone before baking.
The rule worth remembering: use the clock to plan pizza; use the dough to decide when it is ready.
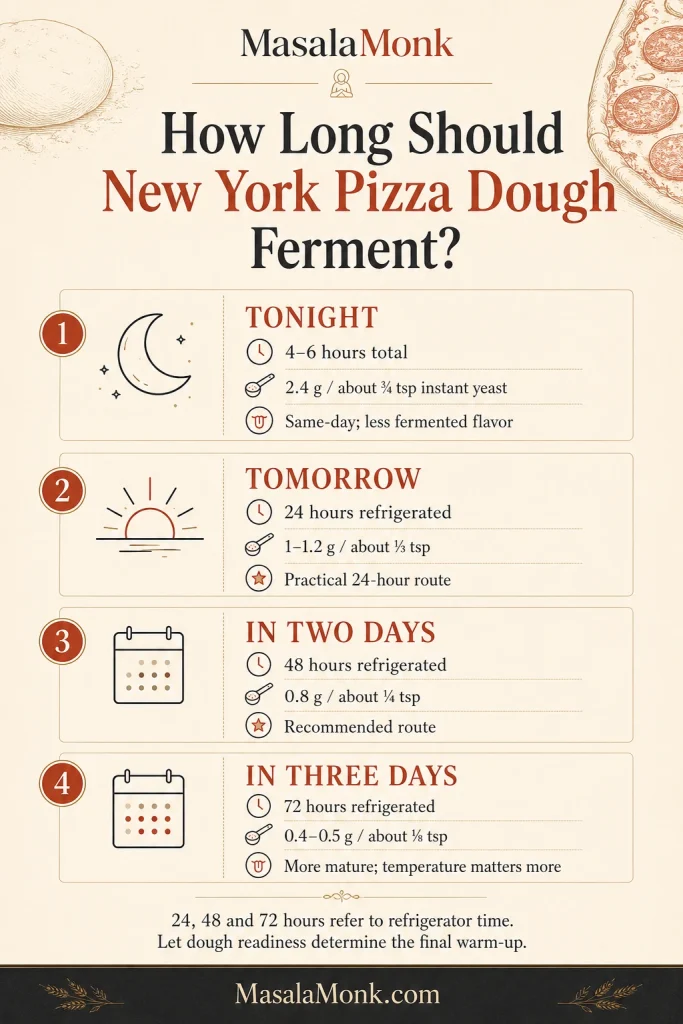
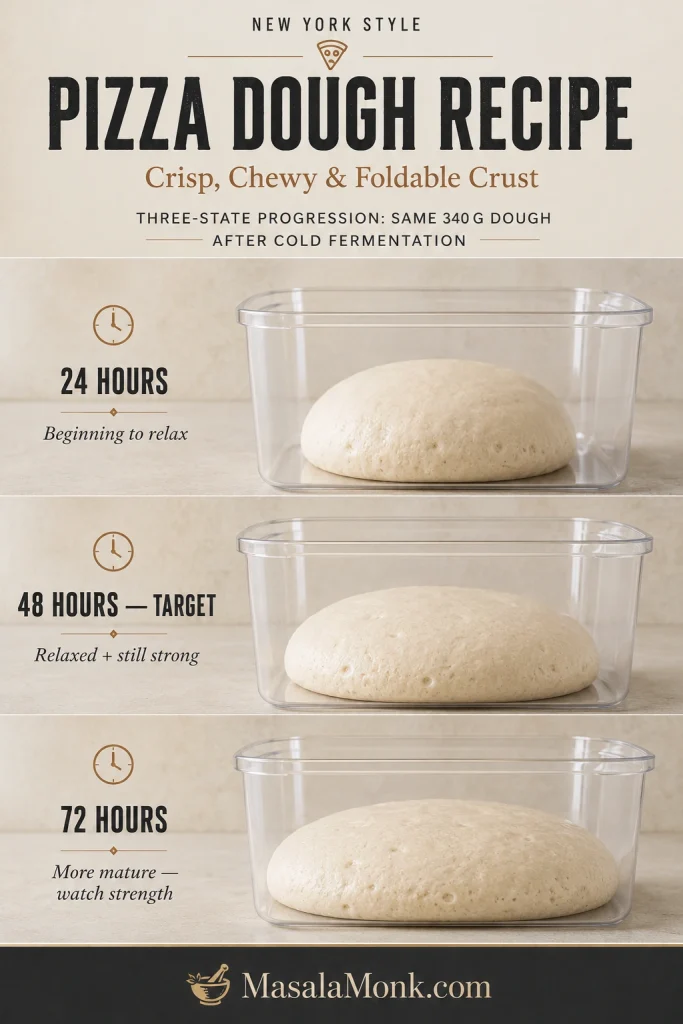
How Long Should New York Pizza Dough Ferment? 24 vs 48 vs 72 Hours
The 48-hour version is the main recipe here. It gives the dough time to develop flavor and relax while leaving a comfortable margin before fermentation becomes harder to control. Shorter and longer schedules work too; change the yeast to suit the schedule.
When you want pizza
Instant yeast for 400 g flour
What to expect
Tonight
2.4 g / about ¾ tsp
About 4–6 hours total; good same-day crust with less fermented flavor
Tomorrow
1–1.2 g / about ⅓ tsp
A practical 24-hour route
In two days
0.8 g / about ¼ tsp
Recommended 48-hour version
In three days
0.4–0.5 g / about ⅛ tsp
A more mature 72-hour dough; temperature matters more
For New York-style pizza dough, longer is not automatically better. Choose the ferment that fits your schedule, then watch relaxation and remaining strength. A well-timed dough is more useful than one kept cold simply because another day sounds better.
How to Plan Your Pizza Dough Fermentation Schedule
For the refrigerated routes, 24, 48 and 72 hours refer to time in the refrigerator, not the entire schedule. Change the yeast and cold-ferment time as shown, keep the mixing and balling method the same, then let the dough’s readiness cues determine the final warm-up.
The 24- and 72-hour routes are starting points, not stopwatch formulas. A warmer refrigerator moves fermentation faster. These schedules assume about 37–40°F / 3–4°C in the refrigerator and 68–72°F / 20–22°C in the kitchen.
Planning Friday evening pizza? Mix Wednesday mid-afternoon, refrigerate the shaped balls by late afternoon, then take them out at roughly the same time Friday for a 2–3 hour warm-up before dinner.
The 48-hour route is mostly waiting, not work. Once the dough is chilled, overlap the final warm-up with oven preheating. That keeps pizza night from feeling like a two-day project.
Need Pizza Tonight? Use the 4–6-Hour Version
Keep the flour, water, salt, sugar and oil unchanged, but increase the instant yeast to 2.4 g / about ¾ teaspoon. Plan on roughly 4–6 hours from mixing to baking.
Mix, rest and knead as directed in the main recipe.
Cover the whole dough and leave it around 70–75°F / 21–24°C for 60–90 minutes.
Divide and ball it.
Leave the balls covered for another 2½–4 hours, checking for soft, aerated dough that stretches willingly.
Stretch, top and bake as usual.
The same-day version makes a crisp, chewy pizza but develops less fermented flavor than the two-day dough. If even that is too much waiting, Greek Yogurt Pizza Dough skips yeast entirely.
The complete recipe below follows the 48-hour cold-ferment path.
New York Style Pizza Dough Recipe
Recipe at a Glance
Yield: 2 dough balls, about 340 g / 12 oz each
Pizza size: Two 14–15-inch pizzas
Hands-on dough prep: About 25 minutes
Initial room-temperature stage: 45–60 minutes
Cold ferment: About 48 hours
Warm-up before stretching: Usually 2–3 hours around 70°F / 21°C
Total elapsed planning time: Roughly 51–52 hours from mixing to baking
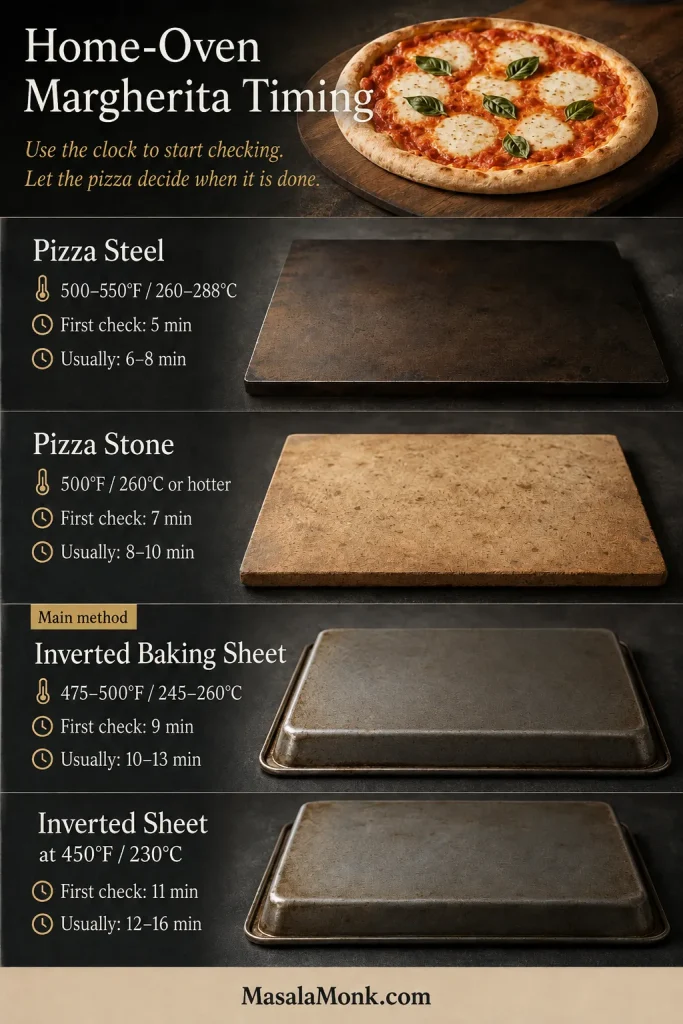
Oven: 500–550°F / 260–288°C, or the highest suitable setting your oven allows
Bake on steel: Often about 5–7 minutes
Hydration: 63.5%
Weights are the reference measurements for this dough; cup and spoon equivalents are approximate.
Dough Ingredients
400 g / 14.1 oz bread flour, preferably around 12–13% protein; about 3⅓ cups if spooned into the cup and leveled
254 g water, about 254 ml / 1 cup plus 1 tablespoon, cool to room temperature
8 g fine sea salt, about 1⅓–1½ teaspoons depending on the salt
5 g granulated sugar, about 1¼ teaspoons
12 g olive oil, about 13 ml / 2½–2¾ teaspoons
0.8 g instant yeast, about ¼ teaspoon
A ¼-teaspoon measure is more useful than a whole-gram kitchen scale for the yeast if you do not own a 0.1 g precision scale.
Active dry yeast works too. Use about 1 g / ⅓ teaspoon and activate it in a little of the recipe water according to the package directions.
Halving the formula works, but the instant yeast drops to about 0.4 g / ⅛ teaspoon. Without a precision scale, making both balls and freezing one after its first day of cold fermentation is usually easier.
Portion by weight, not by eye. Two evenly sized pizza dough balls make the finished pizzas easier to compare. That means differences in thickness, browning or handling are less likely to come from one ball simply being larger.
For Shaping and a Plain Cheese Pizza
For each 14–15-inch pizza, have ready:
Flour for the work surface
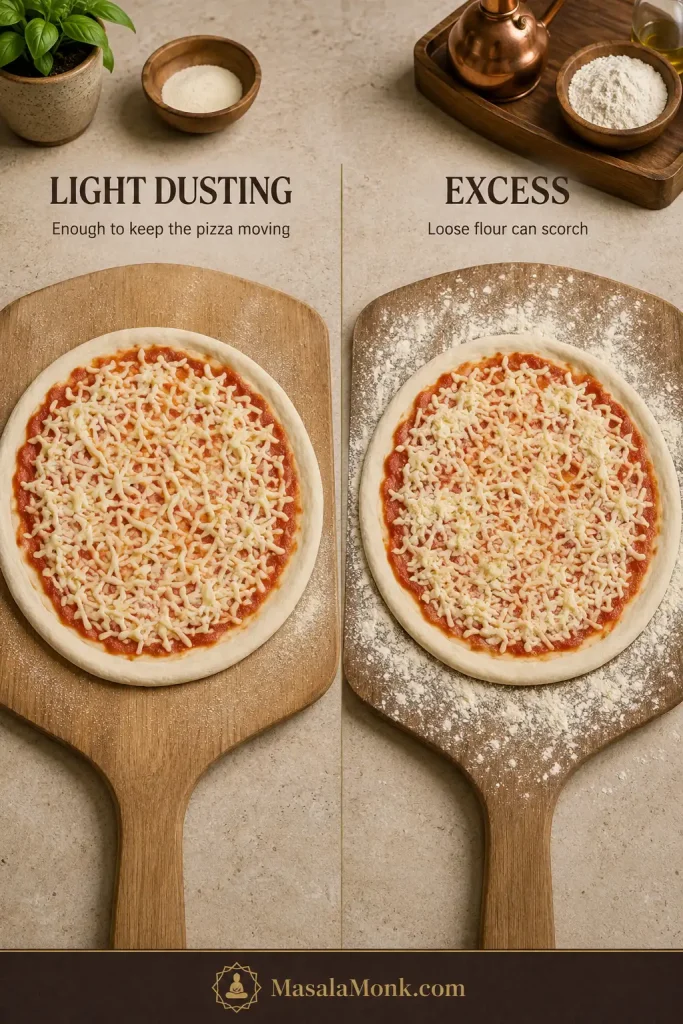
Flour or fine semolina for the peel
115–150 g / 4–5¼ oz thick pizza sauce
115–150 g / 4–5¼ oz whole-milk low-moisture mozzarella, grated from a block if possible
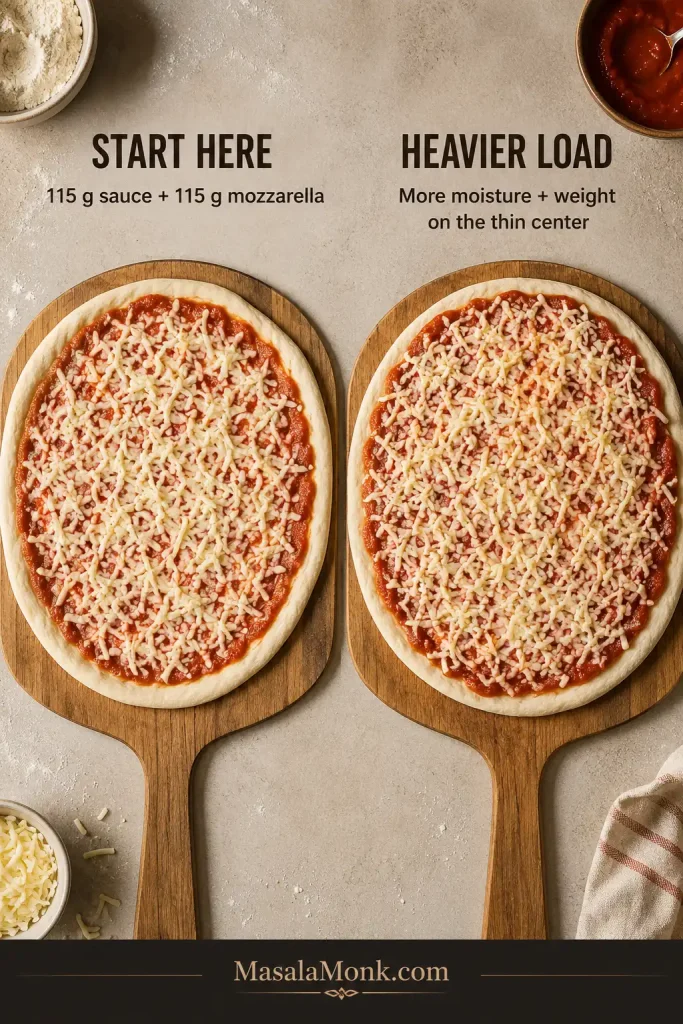
For your first pizza, start around 115 g sauce and 115 g mozzarella. Move toward 150 g once you know how your sauce, dough and oven handle the extra load.
Keep the sauce and cheese chilled until you need them. If mozzarella tends to brown before the crust is ready, chill the grated cheese for 10–15 minutes before topping.
Useful Equipment
Digital kitchen scale
0.1 g precision scale or measuring spoons for yeast
Large mixing bowl
Dough scraper or flexible spatula
Two covered containers, around 1 quart / 1 liter each
Pizza peel
Pizza steel, stone or heavy baking sheet
Wire cooling rack
Optional infrared thermometer
Mix and Develop the Dough
Whisk the flour, instant yeast, sugar and salt together in a large bowl. Add the water and stir until no large pockets of dry flour remain. The dough should look rough and shaggy.
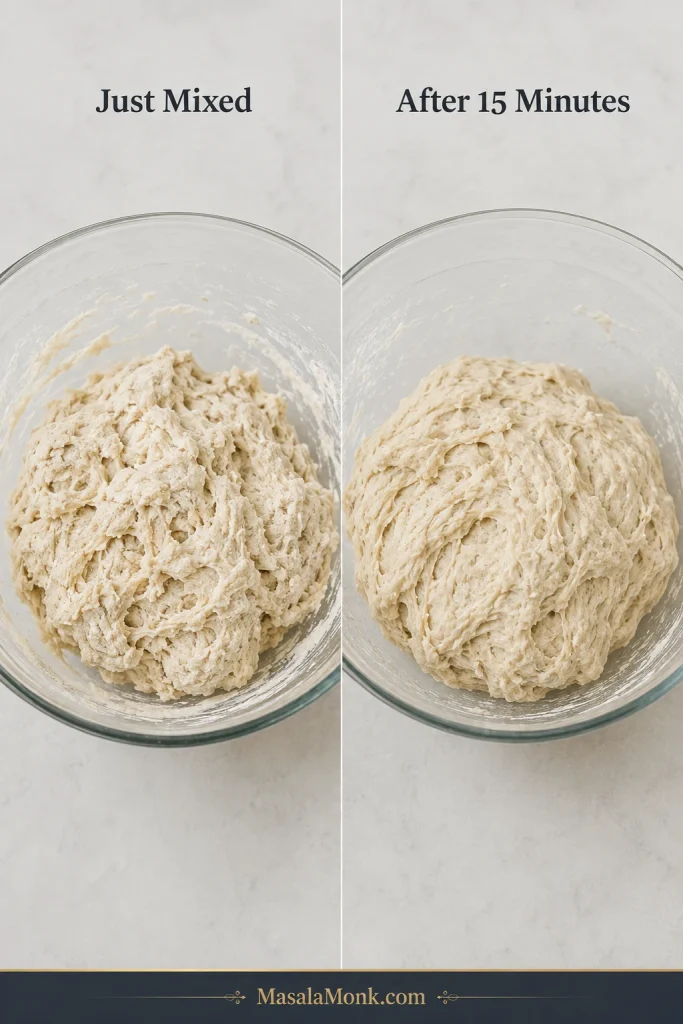
Cover and leave it alone for 15 minutes. During this short rest the flour absorbs water, and an awkward sticky mass often becomes much easier to handle.
Knead until the dough begins to smooth out, then work in the olive oil gradually.
Continue kneading until the dough is cohesive, elastic and lightly tacky—usually another 5–7 minutes by hand or 4–6 minutes on low speed in a stand mixer.
Look for a modest change after the rest: fewer dry ridges, better hydration and dough that feels more unified. It can still look rough; the smooth, elastic finish comes later during kneading.
How Tacky Should Pizza Dough Feel?
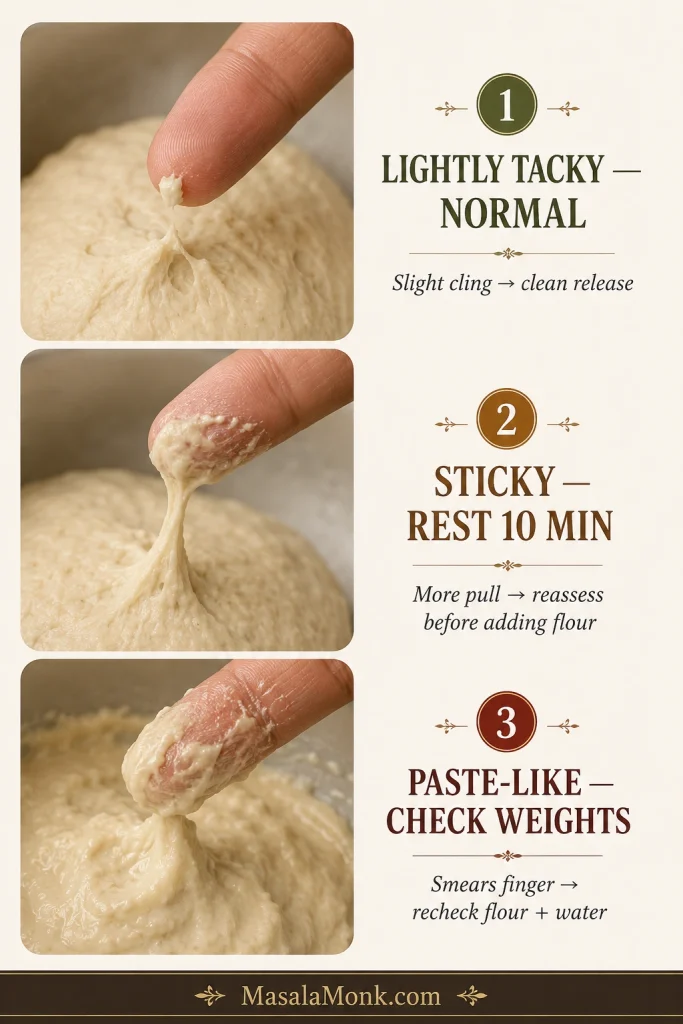
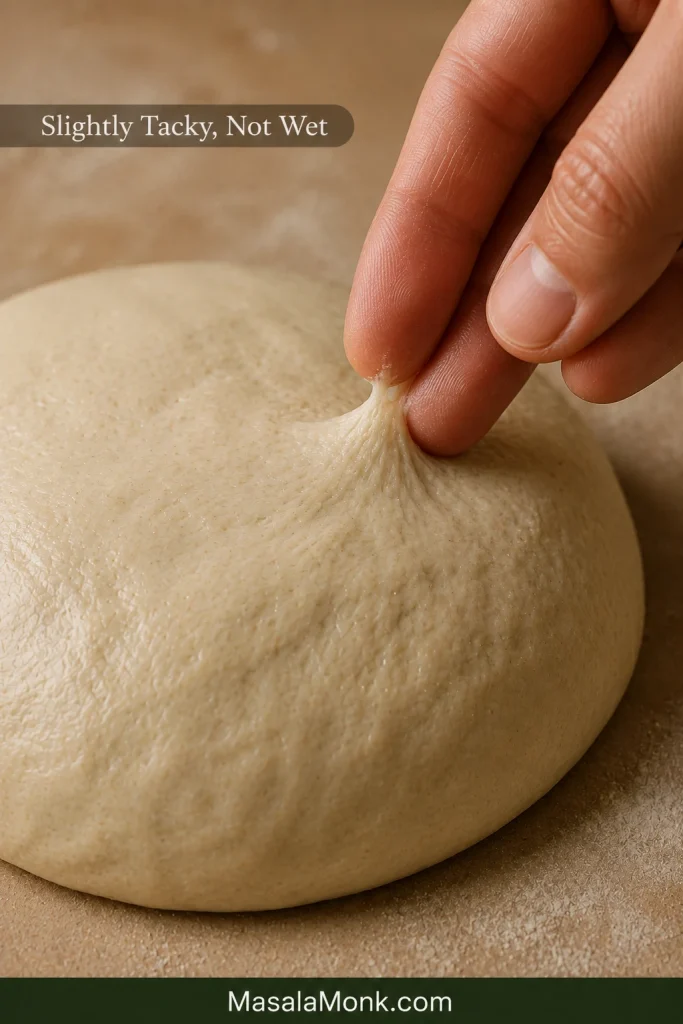
Checkpoint: press a clean finger against the dough. A little cling is fine. It should release without coating your finger in paste and feel soft and supple in your hands.
Judge the release, not just the touch. Slight cling followed by a mostly clean fingertip is manageable; a wet coating or smear left behind is the more useful warning that the dough needs another look.
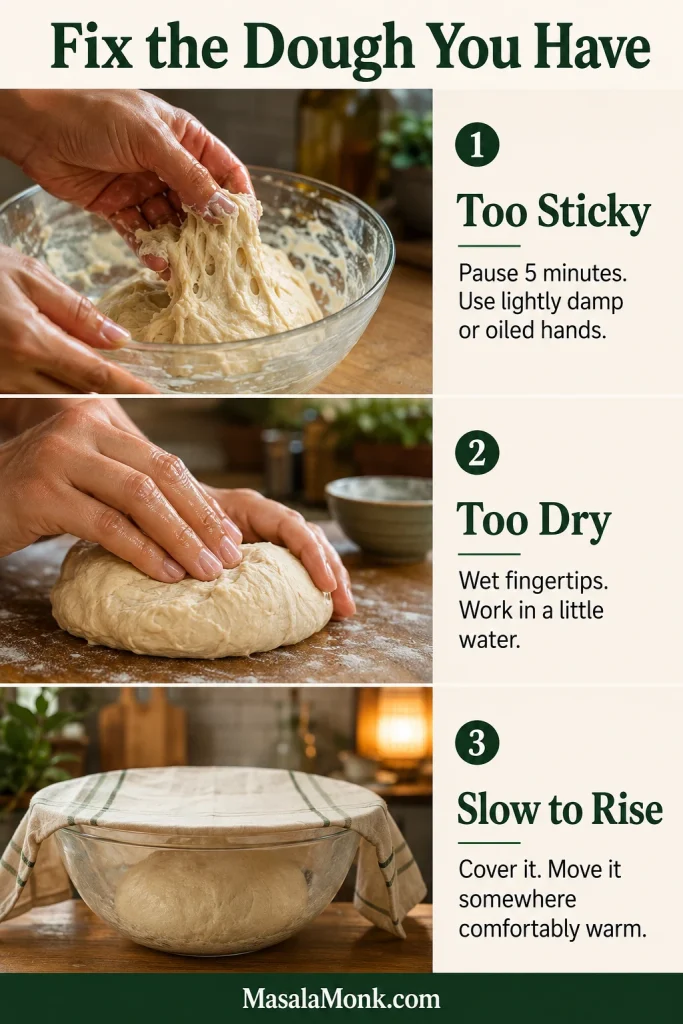
Still sticky enough to worry you? Cover it for another 10 minutes before reaching for flour. Time often solves what extra flour would only hide.
If it still smears instead of holding itself together, recheck the flour and water weights. When those are correct, work in flour 5 g at a time and stop as soon as the dough becomes manageable. Record how much you needed and use that as a reference for the next batch.
If you track dough temperature, aim for roughly 76–80°F / 24–27°C after mixing. Cooler water helps in a hot kitchen and warmer water helps in a cold one. Without a thermometer, stop mixing before the dough feels noticeably warm.
Using a Food Processor or Spiral Mixer?
Food processor: pulse the dry ingredients to combine, then add the water and oil together. Process until the dough forms a ball and continue only briefly—about another 15–20 seconds—until smooth and elastic. Stop before the dough becomes noticeably warm.
Spiral mixer: fixed stand-mixer minutes are less useful because spiral mixers develop dough differently. Stop when the dough is smooth, elastic and cohesive, using finished dough temperature as a guardrail.
Ball and Cold Ferment
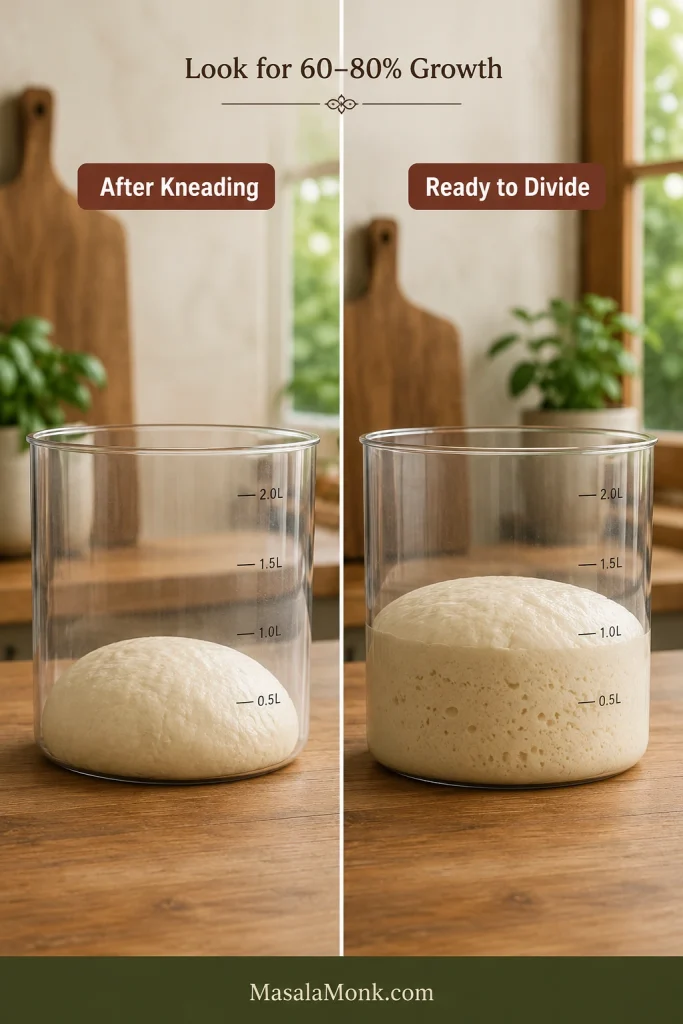
Cover the mixed dough and leave it at room temperature for 45–60 minutes. It does not need to double.
Divide it into two equal pieces of about 340 g / 12 oz each.
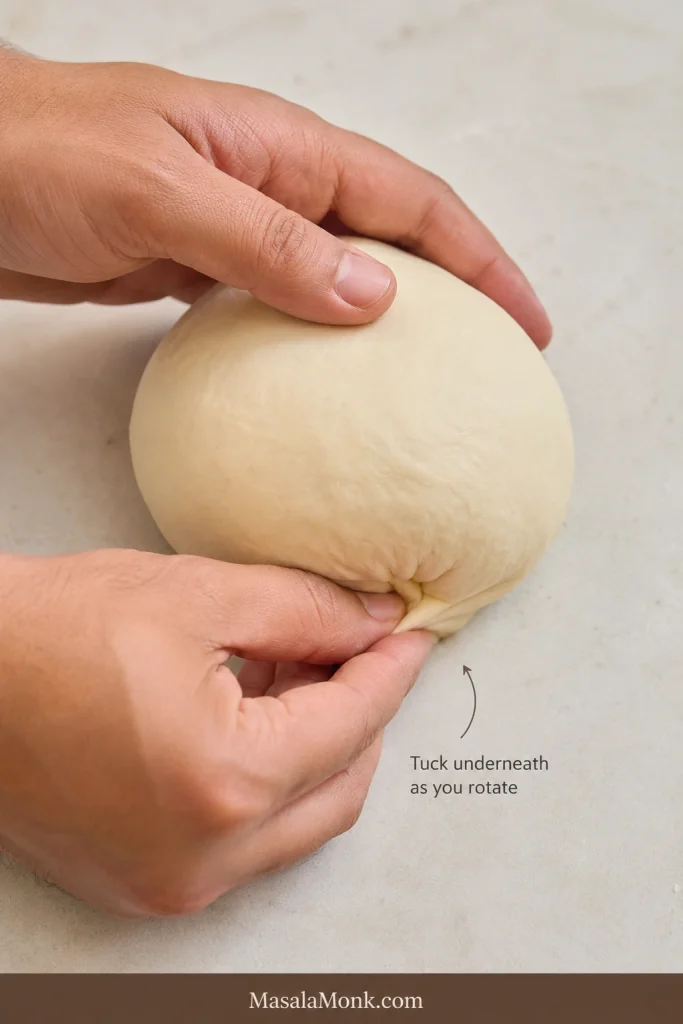
Shape each piece into a ball. Pull the outer edges underneath as you rotate the dough until the top becomes smooth, then pinch the seam lightly underneath. Create gentle surface tension and stop before the skin begins tearing.
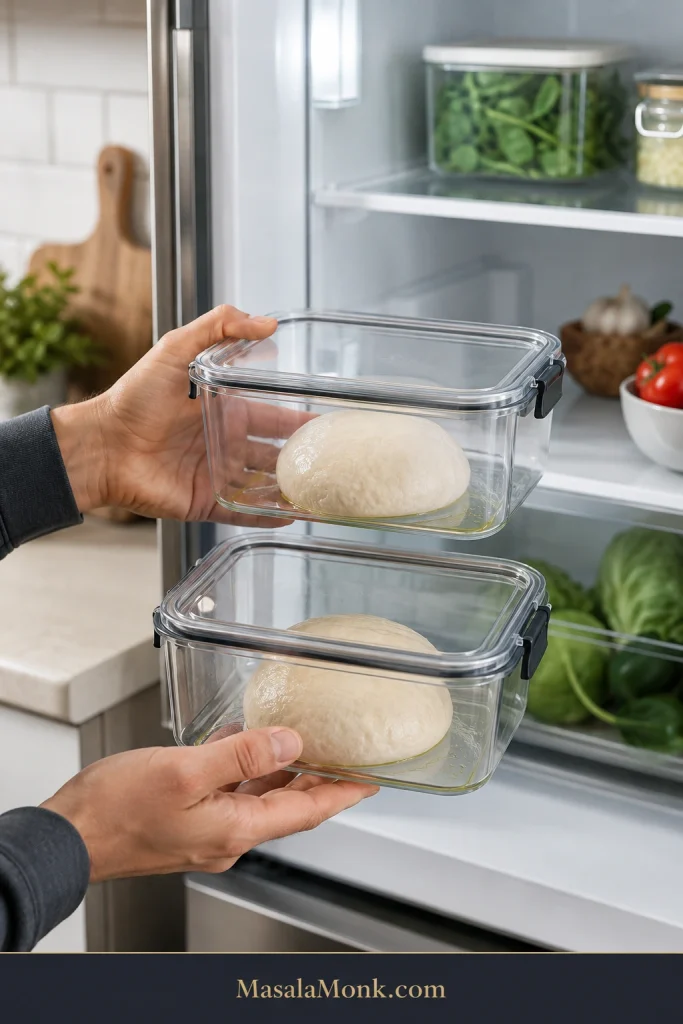
Place each ball seam-side down in its own lightly oiled covered container and refrigerate at about 37–40°F / 3–4°C for 48 hours.
Watch where the tension goes: the top should become smoother while the seam gathers underneath. Stop once the ball is cohesive—over-tightening the skin only creates more tension for the dough to relax later.
Balling before refrigeration lets each portion ferment and relax in the shape you will later stretch. Separate containers also make it easier to lift one cleanly without disturbing the other.
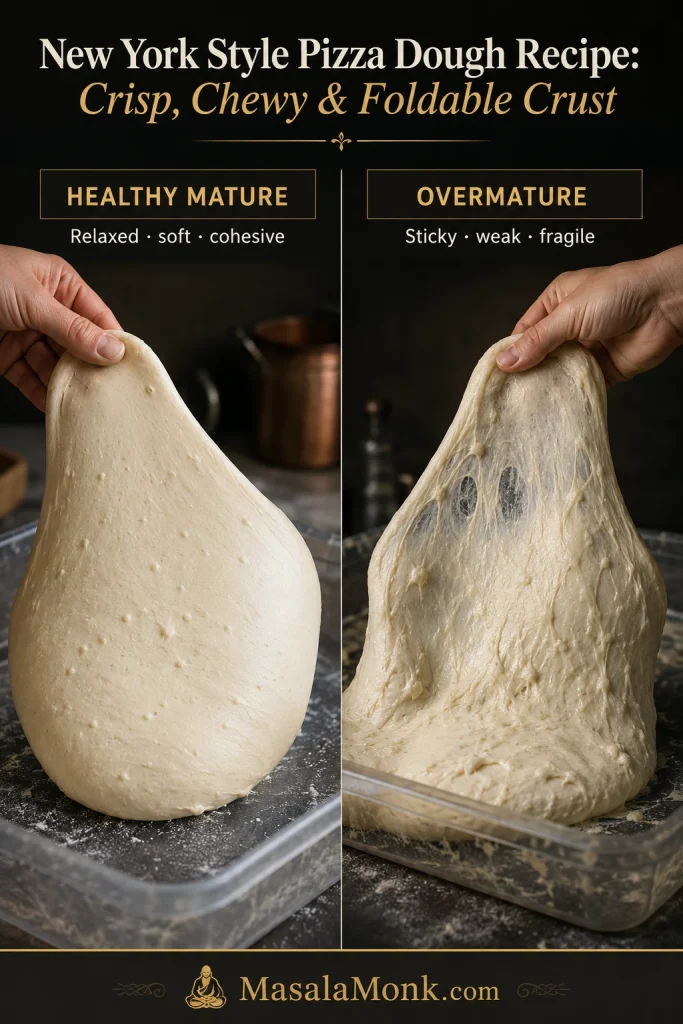
Separate clear containers turn cold fermentation into something you can actually observe. You can compare spreading, bubbles and weakening from day to day while the lids protect the dough surface from drying.
After a day in the refrigerator, modest spreading and puffiness are completely normal. A quiet-looking dough ball is not a reason to add more yeast next time.
Warm, Stretch, Top and Bake
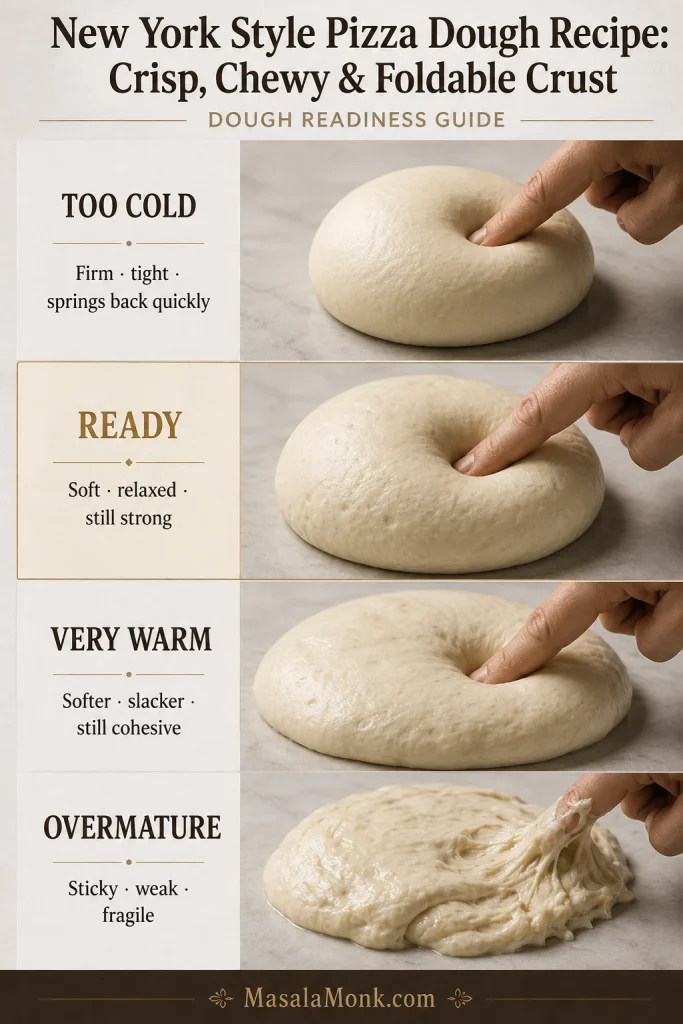
Take the dough out about 2–3 hours before baking when the room is around 70°F / 21°C. Begin checking it sooner in a warmer kitchen.
About halfway through that warm-up, start preheating the oven. Put your steel or stone in the oven and heat at 500–550°F / 260–288°C, or the highest suitable temperature your oven allows, for about an hour.
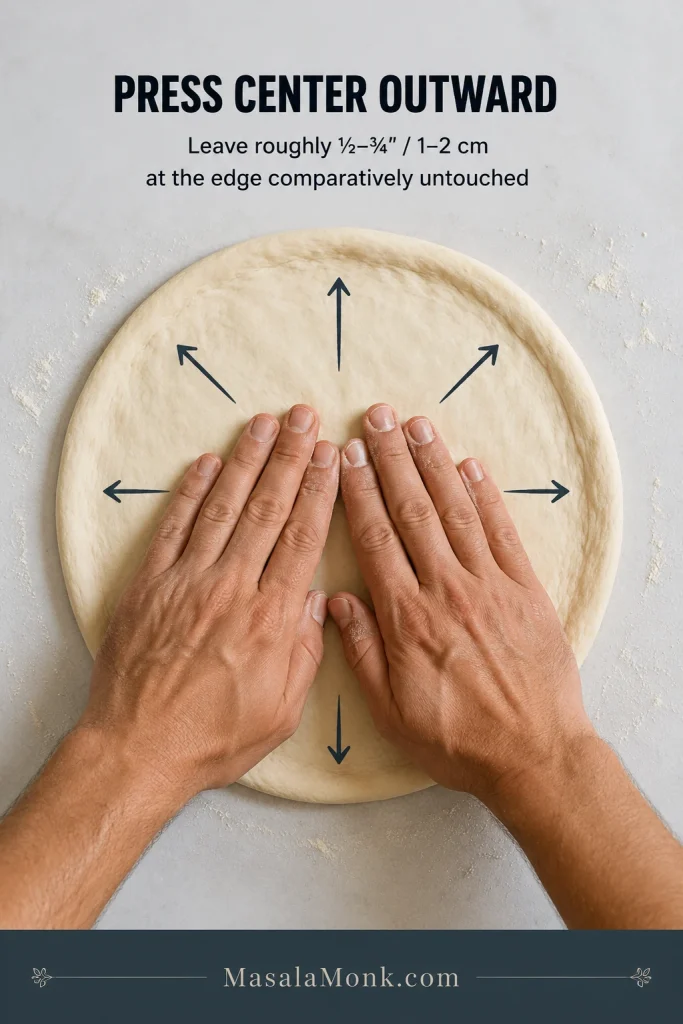
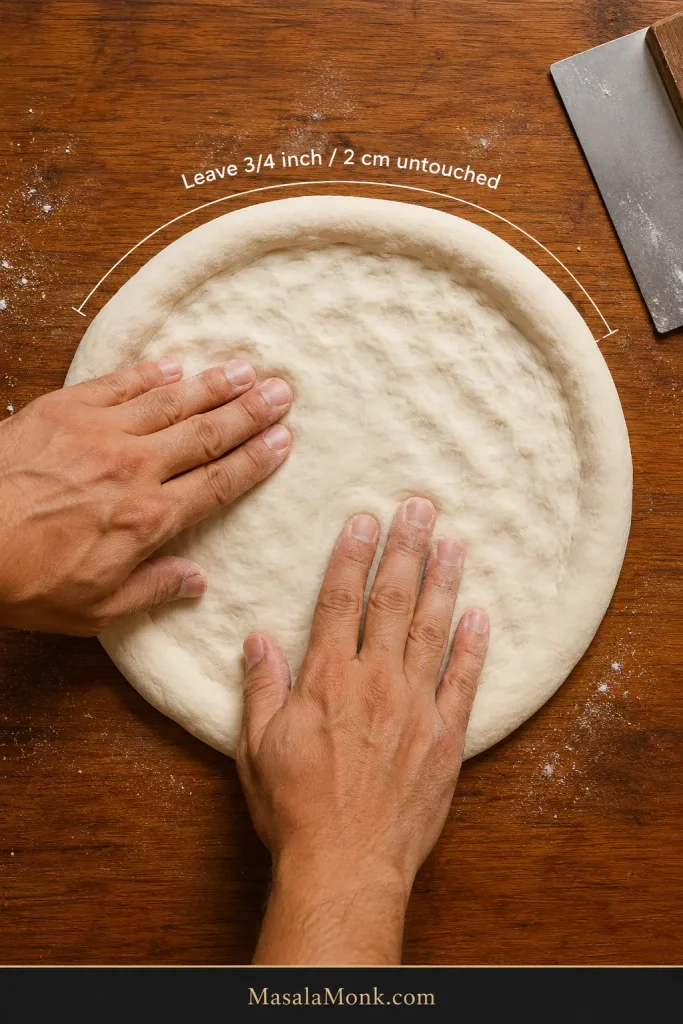
Release one dough ball gently from its container. Flour both sides lightly, then press from the center outward while leaving the outer ½–¾ inch / 1–2 cm comparatively untouched.
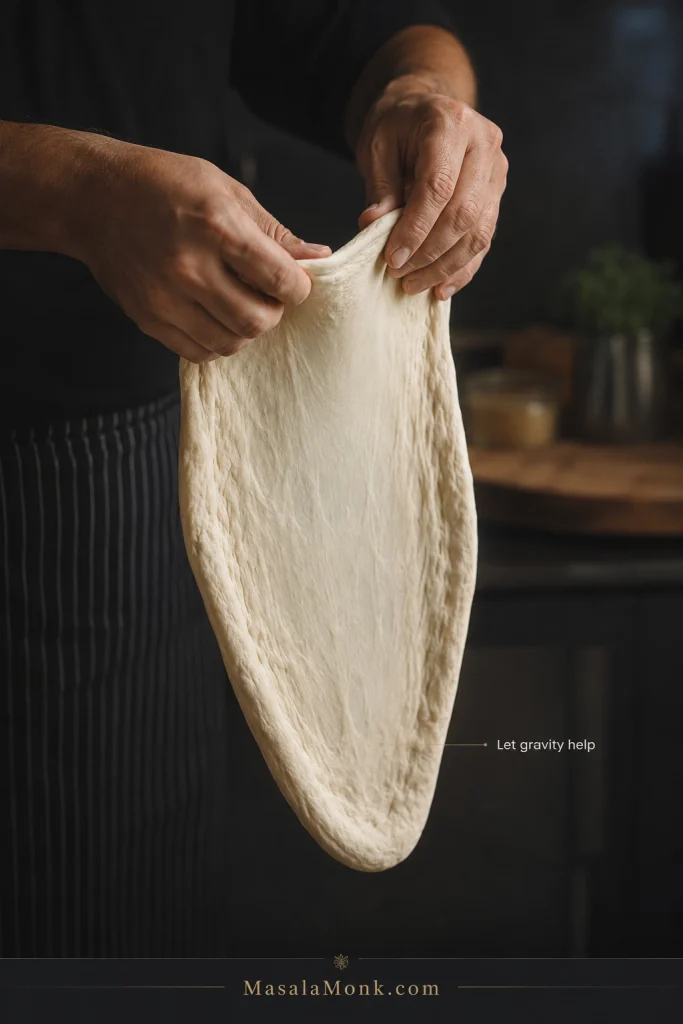
Lift and rotate the dough, letting gravity help. Stop around 14 inches / 36 cm for an easier, fuller crust, or continue toward 15 inches / 38 cm for a thinner center.
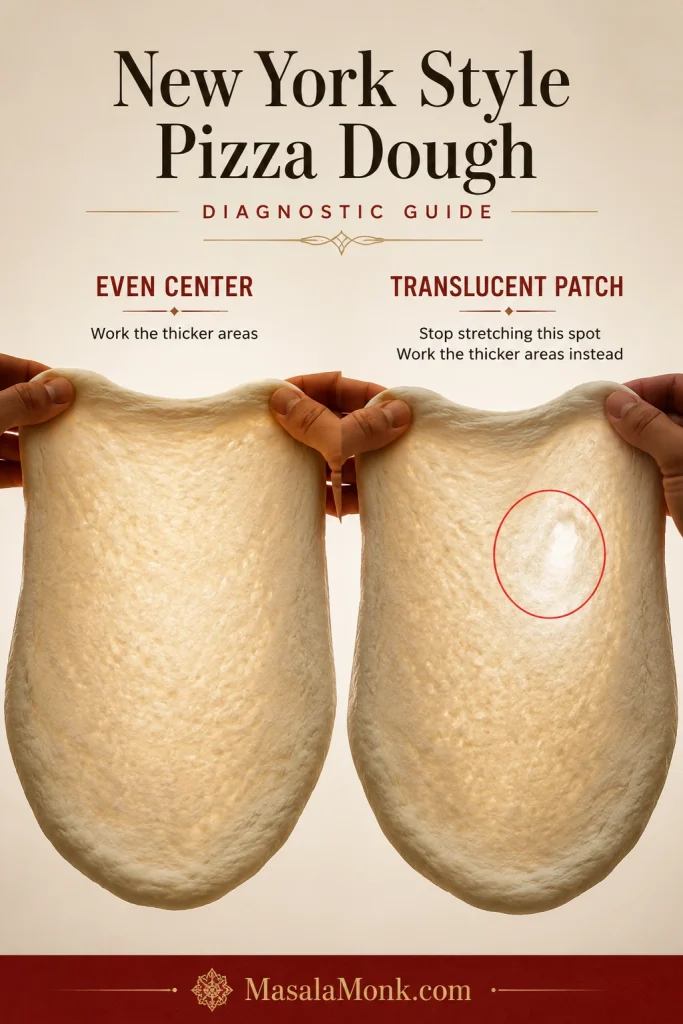
Check for translucent patches or pinholes, then move the dough to a lightly dusted peel. Shake it immediately. The entire skin should move freely.
Use about 115 g sauce and 115 g mozzarella for the baseline version, leaving some red sauce visible between the cheese.
Shake the peel again. Loosen any stuck point before approaching the oven.
Launch onto the fully heated steel or stone. Bake until the underside is browned, the rim has good color and the center is cooked through. On steel this is often about 5–7 minutes.
If the bottom is ready before the top has enough color, finish briefly under the broiler.
Move the finished pizza to a wire rack for 30–60 seconds, then transfer it to a board and slice.
Four Small Checks That Prevent Common Problems
Skip the rolling pin for this version; it presses gas from the rim. Preserve the outer band without building a thick rope around the pizza. The untopped edge will rise on its own.
If the dough repeatedly snaps back, cover it for 5–10 minutes and try again. A slightly oval pizza tastes just as good as a perfect circle, so protect an even center and let perfect geometry wait.
If the pizza lands oval or slightly off-center but is safely on the baking surface, leave it there. Shape matters far less than keeping your hands away from a blazing oven.
A browned underside, properly colored rim and cooked center without a broad gummy band tell you the pizza is ready.
“Thin crust” is not specific enough. Cracker crust is thin, and Neapolitan pizza is thin through the center too. The New York slice lives in the balance between crispness, chew and flexibility.
Look for a thin browned shell underneath, a narrow tender-chewy layer above it, a modest rim, and enough flexibility for the slice to fold cleanly.
It is the kind of slice you can pick up by the crust, fold lengthwise and eat one-handed without the toppings sliding into your lap.
Cracker-style pizza goes farther toward dryness and snap. Neapolitan pizza has a lighter, puffier outer rim. Thicker delivery-style pizza carries more bread through the center. New York sits between those extremes.
Compare the center as well as the rim. Cracker crust stays thin and dry. New York keeps a narrow chewy layer above the crisp base, while Neapolitan shifts more of its volume into an airy outer edge.
If what you really want is fresh mozzarella, tomato and basil on a lighter pizza, the Margherita Pizza recipe handles that wetter topping balance separately.
That crisp-chewy balance comes from more than one ingredient. Hydration, flour strength, fermentation and the home-oven bake all have to support the same result.
Why This Dough Formula Works
New York dough formulas vary. Some are relatively dry and easy to handle; others run wetter. Flour strength, sugar, oil, fermentation and oven setup all shift the result.
This formula favors a generous margin for success in a home kitchen. The point is not to chase the wettest dough you can handle; it is to make a dough that opens thin without turning the first launch into a high-wire act.
What Hydration Is Best for New York-Style Pizza Dough?
There is no single required hydration. This home-oven formula uses 63.5%. That gives the dough enough water to stay tender and stretch thin without making a first-time launch unnecessarily fussy.
Ingredient
Baker’s percentage
Flour
100%
Water
63.5%
Salt
2%
Sugar
1.25%
Olive oil
3%
Instant yeast
0.2%
63.5% water: enough for a tender, stretchable center without making the launch unnecessarily difficult.
2% salt: seasons the crust and helps control fermentation.
1.25% sugar: assists browning in a home oven without making the crust taste sweet.
3% olive oil: adds tenderness and helps the crust retain moisture during the bake.
0.2% instant yeast: enough for the recommended 48-hour schedule.
Higher hydration can make excellent pizza, but it asks more from the flour, stretching technique and launch. Lower hydration is easier to handle but has less moisture to spare during a long home-oven bake.
Why Is the Yeast Amount So Small?
Because the recommended version spends about 48 hours fermenting slowly in the refrigerator, it needs very little yeast. Using more simply moves the dough through its fermentation window faster.
The recipe uses instant yeast because it can go directly into the flour. If you prefer active dry yeast, the recipe card above gives the conversion and activation method.
Prefer natural leavening? The Sourdough Pizza Dough recipe uses starter instead. Starter strength and timing make it a different fermentation system even though some readiness cues overlap.
Once the percentages are set, flour strength determines how comfortably the dough can carry them.
What Is the Best Flour for New York-Style Pizza Dough?
Start with bread flour around 12–13% protein. It gives this dough enough strength to stretch thin while retaining the chew that makes the crust satisfying.
Only have all-purpose flour? Pizza is still on. A reasonably strong AP flour can work very well. The dough may feel softer in your hands, so stop the stretch a little sooner if the center starts thinning faster than expected.
Flour
Can you use it?
What changes?
Bread flour
Recommended
Reliable strength and chewy structure
High-gluten flour
Yes
More strength and chew; can resist stretching if heavily developed
Strong all-purpose flour
Yes
Softer crust; often an excellent option
Weaker all-purpose flour
Yes, with care
May feel wetter and tear sooner at the same hydration
Tipo 00
Sometimes
The label alone does not tell you dough strength or whether the flour suits your oven
Whole wheat
Not as a direct 1:1 swap
Changes water absorption, flavor and extensibility
Gluten-free blend
No direct swap
Needs a formula built specifically without wheat gluten
If a weaker flour makes the dough substantially softer, try taking 5–10 g water out of the next batch. If that helps, record the adjustment and use it as your starting point next time.
What Should Cold-Fermented Pizza Dough Look Like?
Should Pizza Dough Double in the Fridge?
No. New York pizza dough may expand only modestly during cold fermentation. Look for small bubbles, some spreading, a softer shape and easier stretching instead of waiting for a dramatic doubling.
Open the container after a day and the ball may look surprisingly quiet. That alone is not bad news.
Around 24 hours: expect modest fermentation activity and dough that is beginning to relax.
Around 48 hours: the ball should feel softer and more willing to open while still lifting cleanly from its container. This is the intended window for the main recipe.
Around 72 hours: expect more relaxation. Pay closer attention to strength: the dough should still hold together without turning gluey and fragile.
During cold fermentation, spread and strength tell you more than height alone. A later dough can be broader and softer yet still be healthy; the important warning is when relaxation turns into stickiness and fragility.
Refrigerator temperature matters throughout. A fridge at 37–40°F / 3–4°C gives you more predictable timing than one running several degrees warmer.
Relaxed but healthy: spread somewhat, soft, and able to lift in one piece.
Possibly overfermented: unusually flat, newly sticky, weak, translucent in places and easy to tear with little resistance.
Dough that feels much wetter after several days has not necessarily gained water. As its gluten structure weakens, it becomes less effective at holding the water already present.
Liftability is a useful maturity clue. Healthy pizza dough stretches but still comes away as one piece; overmature dough elongates, thins and tears much more readily under the same gentle handling.
How Much Dough Do You Need Per Pizza?
Ball weight and finished diameter work together. Too much dough at a small diameter gives you a thicker, breadier pizza even when fermentation is perfect.
Finished pizza
Practical dough range
How to use it
12 inches / 30 cm
About 230–270 g / 8.1–9.5 oz
Lower end for a thinner result; upper end is easier to handle
14 inches / 36 cm
About 300–340 g / 10.6–12 oz
This recipe uses 340 g for an easier first attempt
15 inches / 38 cm
About 320–360 g / 11.3–12.7 oz
The same 340 g ball gives a thinner NY-style center
16 inches / 41 cm
About 350–400 g / 12.3–14.1 oz
Best with confident stretching and a large baking surface
That extra inch changes more than the number on a ruler. The same dough is spread across a larger area, so the 15-inch version develops a thinner center and gives you less handling margin than the 14-inch version.
A clean 14-inch pizza is better than forcing a resistant ball to 15 inches. With practice, the same dough usually stretches farther and more evenly.
If what you actually want is a thicker pan crust with crisp cheese around the edges, the Detroit-Style Pizza recipe is the better direction.
Match Pizza Size to Your Baking Surface
Match the pizza to the baking surface, not just the dough ball. A 14-inch pizza is manageable on a 15-inch surface; for a 15-inch pizza, a 16-inch surface or larger gives you much more landing margin.
Work backward from your equipment. Measure the usable width of the pizza steel or stone before stretching, because a pizza that nearly fills the surface leaves very little room for an imperfect launch.
Give the dough room, too. A container around 1 quart / 1 liter works comfortably for a 340 g ball. Crowded balls can merge and flatten awkwardly, while re-balling a relaxed dough immediately before baking creates fresh tension that needs time to settle again.
Once a ball has had enough room and time to relax, the next question is whether it is ready to open.
Is My Dough Ready to Stretch?
Ready pizza dough feels soft, stretches with gentle resistance, and still has enough strength to lift cleanly.
Two hours out of the refrigerator is planning advice. Your hands get the final vote.
The center can remain cooler than the room. It only needs to warm enough for the ball to open willingly without repeated tearing or snap-back.
Still too cold: firm, tight and quick to spring back. Cover it and wait.
Ready: soft and willing to stretch, yet cohesive enough to lift cleanly.
Very warm: softer and slacker but still cohesive. Use it once it opens willingly.
Overmature: increasingly sticky, weak and fragile. Handle gently and use promptly.
Use shape and resistance together. A soft-looking ball that still snaps back may need more time, while a broad warm ball can still be perfectly usable if it lifts cleanly and retains strength.
One kitchen may have workable dough after 90 minutes; another may need 2½ hours. Once it opens comfortably, extra counter time brings no automatic benefit.
Get everything else ready first: sauce portioned, cheese grated, toppings nearby, peel dusted and oven hot. Thin dough becomes more likely to stick if it sits around while you look for ingredients.
Release the ball gently with your fingers or a plastic scraper. Flour both sides lightly, press the center outward with your fingertips, and preserve the outer ½–¾ inch / 1–2 cm.
Pressing does not manufacture a giant rim; it redistributes thickness. The outer band rises later because it has been compressed and stretched less than the center.
When the disk is large enough to lift, rotate it through your hands and let gravity help. Keep moving around the pizza so one spot does not take all the stretching.
Keep the pizza dough moving through your hands so gravity is shared around the circle. If the same low point hangs longest on every turn, that area will become the first dangerously thin spot.
An even 14-inch center beats a 15-inch pizza with one paper-thin half and one thick half.
When It Springs Back
The annoying part of spring-back is that pulling harder usually makes it worse.
Put the partially stretched dough down, cover it, and wait 5–10 minutes. That short pause often does more than another five minutes of tugging.
Already warm but still snapping back hard? Strong flour or aggressive mixing can leave the dough unusually elastic. Give it another short rest.
When the dough fights back, rest beats force.
The useful change after a short rest is resistance, not volume. The pizza dough should open farther under the same gentle pressure rather than merely looking larger because it sat on the counter.
When It Tears
How the dough felt just before it tore helps identify the problem.
Tight and resistant: it was probably stretched before relaxing enough. Stop and rest it.
Loose, sticky and fragile: the dough may be overfermented or the flour may not have enough strength for the hydration.
A small tear is repairable. Pinch the edges together. For a larger pinhole, borrow a tiny piece from a thicker part of the rim and press it over the opening, then leave the patch alone for a minute.
Read the dough around the hole. Smooth, taut tear edges point toward excess tension; ragged, wet-looking edges suggest weaker structure. The tear itself is only half the diagnosis.
When one area starts looking translucent, leave it alone and work on thicker parts of the dough. A hole that develops later can let sauce through and glue that spot to the peel.
Backlighting exaggerates thinness, so compare one area with the dough around it. A single patch that suddenly glows much brighter than its neighbors is a better warning than translucency by itself.
Thin New York-style pizza rewards restraint. Start with the 115 g sauce + 115 g mozzarella baseline from the recipe and add more only after you know how your oven handles the extra moisture and weight.
Use the baseline cheese pizza as your reference point. Once the crust bakes well with a restrained topping load, you can add more sauce, cheese or toppings later and know that moisture and weight—not a new dough formula—are the variables.
Thick pizza sauce: spread a thin, even layer. The Pizza Sauce Recipes guide has tomato, white garlic, vodka, BBQ and other options.
Whole-milk low-moisture mozzarella: grate it from a block if possible for a cleaner melt.
Other toppings: add enough to taste them without burying the thin center under excess water and weight.
Loose sauce, watery vegetables and fresh cheeses all bring more moisture. Adjust the load accordingly. Once baked, a light drizzle of Hot Honey Sauce gives you sweet heat without adding that moisture to the raw pizza.
The Peel Shake Test
Dust the peel lightly.
Put the stretched dough on it.
Shake it now. The whole skin should move.
Top quickly.
Shake it again.
If one spot sticks, free that spot before launching.
Watch the center as well as the rim. A pizza is not truly free if the edge wiggles while one hidden area in the middle remains anchored to the peel.
If the pizza will not slide on the counter, it will not suddenly become easier while you are leaning into a 550°F oven. For one stubborn spot, slide a long spatula or thin turner underneath and dust the edge of the tool lightly with flour if needed.
Rescue the problem locally. Freeing only the stuck point helps preserve the pizza’s shape and reduces the chance of dragging toppings or creating a new weak spot elsewhere.
Peel Tips: Wood vs Metal and One-Peel Setups
A wooden peel is forgiving for building and launching raw pizza. A thin metal peel works particularly well for turning and retrieving it.
Using one peel for everything is fine. Let it cool and dry completely before placing the next raw dough on it; moisture from a hot finished pizza can make the next launch unexpectedly sticky.
How Much Flour or Semolina Should Be on the Peel?
Flour or fine semolina works well for dusting. Cornmeal is optional and adds a coarser texture, but loose grains can scorch on a hot steel. Use the minimum dusting needed to keep the pizza moving.
Dusting should be barely visible once the pizza is moving. If loose flour or semolina piles around the dough after a shake, there is probably more on the peel than the launch needs.
Your first pizza is partly dinner and partly calibration. It still counts as dinner.
If the dough handled beautifully but comes out pale underneath, check the baking setup before rewriting the formula.
Setup
Preheat
Planning range
What to expect
Pizza steel
About 60 min
Often about 5–7 min
Strong bottom heat; easiest route to a crisp-chewy home-oven NY crust
Pizza stone
At least 60 min
Often about 7–15 min
Very good results, with gentler heat transfer than steel
Heavy inverted sheet
About 45–60 min
Often about 8–12+ min
Useful without specialty equipment; expect gentler bottom browning
Those are planning ranges. The pizza itself decides when it is ready.
Balance Top Heat and Bottom Heat
Put a steel or stone roughly in the middle of the oven and preheat at 500–550°F / 260–288°C, or the highest suitable setting your oven allows.
An infrared thermometer can tell you whether the baking surface is still heating or has recovered between pizzas, but you do not need one universal surface-temperature number. Use the underside of the pizza to calibrate your setup.
When the Cheese Is Done Before the Crust
Dark cheese is not proof that the crust is cooked. If the mozzarella is racing ahead while the underside remains pale, the top and bottom heat are out of balance.
Cheese and crust are separate doneness signals. When they disagree, diagnose the oven’s heat balance instead of extending the bake until the darker one becomes even darker.
Top ready, bottom pale: preheat the surface longer, move it lower, or otherwise strengthen the bottom heat.
Bottom dark too early: move the surface higher so the top has more time to catch up.
Bottom excellent, top nearly there: finish briefly under the broiler.
Treat rack position as a calibration change. Keep the dough and topping load the same on the next pizza. Then you can tell whether the new position improved the balance between top browning and bottom heat.
What a Properly Browned Pizza Underside Looks Like
The first time you lift a home-oven pizza and find a properly browned base instead of pale dough, the long preheat suddenly makes sense.
Judge the pattern as well as the darkness. The target is broad, dry, mottled browning across the pizza base—not one burnt ring around a center that is still pale.
Let the Steel or Stone Recover Between Pizzas
The preheat beep is not the finish line. Oven air heats much faster than a thick steel or stone. During a batch, the reverse problem appears: every pizza removes stored heat, so give the surface a few minutes to recover if later pizzas begin browning more slowly.
Consecutive pizzas are useful evidence. If identical dough and topping loads brown differently, the changing variable may be stored heat in the steel or stone rather than anything in the dough.
Alternative Oven Setups: 450°F Ovens and Outdoor Pizza Ovens
If your oven tops out around 450°F / 230°C: you can still make good pizza, particularly on a fully heated steel. Expect a longer bake and somewhat gentler bottom browning. Keep toppings light and use the broiler when necessary to finish the top without drying out the whole crust.
Using an Ooni or another outdoor pizza oven? Bake this as New York pizza: lower and longer than Neapolitan. Ooni’s New York-style pizza guidance notes that traditional New York pizzas bake at roughly 500–650°F / 260–340°C, while compact pizza ovens may need somewhat more heat. Follow the NY-style guidance for your oven rather than simply running maximum flame.
The sugar and oil in this dough brown much faster at extreme pizza-oven temperatures.
This is the moment the percentages stop mattering.
Lift a slice. Smell the crust. Look underneath. Fold it.
Read the Crust Before You Fold It
Start with the crust. The bare rim should smell toasted and taste wheaty and savory, with gentle fermented depth instead of a strong yeast flavor.
Look at the top. The mozzarella should be melted and lightly mottled, with patches of red sauce still visible between the cheese. The rim should look fully baked.
Look underneath. You want a thin browned shell with darker spotting, not a pale floury base or one that has burned uniformly black.
Read the slice from the bottom upward. If the shell is crisp but the center crumb is much thicker than this, look first at dough weight and finished diameter before chasing more oven heat.
Look at the cross-section. Above the crisp shell should be a narrow tender-chewy layer. A very thin moist line directly beneath the sauce can be normal; a broad pasty or gummy band is not.
Width is the useful cue. A normal moist line hugs the underside of the sauce; a gummy band occupies a noticeable portion of the crumb and looks compressed rather than simply moist.
Fold the Slice: Floppy, Flexible or Cracker-Hard?
Now fold it. The slice should bend lengthwise without snapping, and the folded slice should support its tip reasonably well. Some dip beneath the toppings is normal; immediate collapse points to a softer base or heavier load.
Use the fold as a screening test, not a single-cause diagnosis. If the slice misses the target, confirm the clue against its underside, cross-section and topping load before deciding what to change next.
Floppy: soft underside, wet tip or weak support. Check bottom heat, topping moisture, bake time and dough-to-diameter ratio.
The target: crisp shell, tender-chewy interior, toasted flavor and a clean fold.
Cracker-hard: dry, rigid and prone to snapping. The bake probably removed too much moisture.
If your slice missed the target, everything below is the repair manual. Jump to the stage where things went wrong; you do not need to read every troubleshooting table.
Troubleshooting New York Pizza Dough
Most pizza failures are surprisingly local. Sticky dough does not mean the oven is wrong, and a pale base does not mean fermentation failed. Fix the symptom you are actually seeing.
Choose the table that matches the stage where the problem appeared: dough and fermentation, stretching and launching, or baking. The best first question is often: when did it start going wrong?
Start with the earliest abnormal moment because pizza problems can cascade. A small tear can leak sauce, and that wet spot can stick to the peel. The ugly launch that follows may be the final symptom rather than the original cause.
Why Is My Pizza Dough Sticky, Flat or Weak?
What you see
What’s probably happening
Do this now
Next time
Dough is almost batter-like
Measurement error or flour too weak for the water
Check ingredient weights before adding lots of flour
Weigh flour/water; reduce water with weaker flour
Dough is lightly tacky
Probably normal
Keep going
Nothing unless it causes actual handling trouble
Very sticky immediately after mixing
Flour still hydrating or gluten not developed yet
Cover 10–15 minutes first
Keep the short hydration rest
Still smears after resting
Flour may not comfortably hold the planned hydration
After checking weights, add flour 5 g at a time
Record the correction and adjust water next batch
Much stickier after 2–3 days
Dough may be moving past its best fermentation window
Handle gently and use promptly
Shorter ferment, less yeast or colder storage
Barely expanded in the fridge
Cold fermentation may simply be slow
Judge bubbles and handling rather than waiting for doubling
Check actual fridge temperature before increasing yeast
If your symptom is already in the table, resist changing three other things on the same batch. One useful change teaches you something. Five changes create another mystery.
Why Won’t My Pizza Stretch or Slide Off the Peel?
What you see
What’s probably happening
Do this now
Next time
Won’t reach the intended diameter
Dough is tight or stretching is uneven
Rest it; bake a slightly smaller pizza
Give it enough warm-up and use the size ranges
Center becomes translucent
One area is being stretched too much
Stop touching that spot
Rotate the dough and work thicker areas
Rim is much thicker than expected
Too much dough was protected at the edge
Bake it as-is
Preserve a modest border instead of building a thick rope
Pizza sticks to the peel
Too much time, too little dusting or a wet spot
Locate and loosen the stuck area
Prepare toppings first and do both shake tests
Next pizza suddenly sticks
Peel may still be damp from retrieving the previous pizza
Dry it completely before rebuilding
Let one peel cool and dry or use separate launch/retrieval peels
One spot sticks after saucing
A small tear may be leaking sauce
Get dry flour beneath that point
Inspect for pinholes before topping
Pizza folds during launch
The skin was not moving freely
Salvage gently
Launch only when the entire pizza slides
Pizza lands oval
Imperfect launch
Leave it alone if safely on the baking surface
Prioritize a clean launch over a perfect circle
Bottom tastes burnt and floury
Too much loose flour/semolina/cornmeal
Clear burnt material before the next pizza
Brush off excess bench flour
Why Is My Pizza Pale, Gummy or Burning?
What you see
Check first
Do this now
Next time
Pale bottom
Baking-surface heat
Give it more bottom heat if the top allows
Preheat longer or adjust rack/surface position
Bottom burns first
Too much bottom heat relative to top
Move the pizza higher to finish if needed
Start the surface higher
Top done, bottom pale
Steel/stone is not delivering enough heat
Avoid drying the pizza with a very long bake
Preheat longer or move the surface lower
Cheese dark but crust underdone
Top heat is outrunning bottom heat
Finish cautiously; judge the crust separately
Rebalance rack position and baking-surface heat
Cheese browns too early
Strong top heat or warm cheese
Finish the crust carefully
Chill grated mozzarella 10–15 minutes and keep sauce cold
Pizza is thick and bready
Too much dough for the finished diameter
Serve it and note the size
Stretch farther or use a smaller ball
Crust is hard or cracker-like
Bake ran too long
No complete rescue after baking
Increase effective heat and shorten the bake
Center is soggy
Wet toppings or weak bottom heat
Return briefly if the crust can take it
Reduce moisture and strengthen bottom heat
Thick gummy band under sauce
Underbake, excess thickness or too much moisture
Cook further if possible
Stretch thinner, top lighter, strengthen bottom heat
Can You Change the Sugar, Oil, Malt or Fermentation Method?
For bread flour, all-purpose flour, Tipo 00, whole wheat and gluten-free options, use the flour guide above. The changes below affect the formula more directly.
Remove the sugar? Yes, but the crust loses some help with browning at home-oven temperatures.
Remove the oil? Yes, but expect changes in tenderness, moisture retention and high-heat behavior.
Need diastatic malt? No. Malt products vary, and some bread flours already contain malted barley flour or added enzymes. The sugar in this formula keeps the first batch simpler.
Need a poolish? No. Preferments can make excellent pizza, but a 48-hour direct dough already has plenty of time to develop flavor.
If the crust is working and you simply want another flavor, change the topping before rebuilding the dough formula. A restrained layer from the pesto recipe and variations guide is one easy direction.
How to Store and Freeze the Dough
Yes, this dough freezes well. If you know you will not use both balls, freeze one after about 24 hours of cold fermentation.
The two-day version is the main refrigerator target, with a carefully managed three-day version as the planned extension. Once a ball becomes progressively flatter, stickier and more fragile, use it.
Cold-ferment the individual balls for about 24 hours.
Transfer each to a lightly oiled airtight freezer container or freezer bag.
For best quality, aim to use the dough within about a month.
Move it to the refrigerator 12–24 hours before you plan to bake.
Once thawed, give it enough counter time to become soft and willing to stretch.
Thawed dough may feel stickier than fresh dough. A light dusting of flour is fine; avoid kneading a large amount of new flour into an already fermented ball.
A Couple of Common Questions
Can I use a bread machine?
Yes, if its dough cycle comfortably handles this quantity. Let the machine mix and knead, then remove the dough instead of letting a standard bread-program rise control the fermentation. Continue with the room-temperature rest, balling and refrigerator schedule above.
Do I need New York City water to make New York-style pizza?
No. Mineral content can affect dough behavior to some degree, but ordinary good-tasting drinking water can make excellent pizza. If your tap water tastes strongly chlorinated or has an unusual mineral character, filtered water is a sensible choice. There is no reason to import water from New York; Serious Eats’ New York water experiment likewise found no compelling reason to treat NYC water as the secret to great pizza.
The Slice Tells You Whether the Dough Worked
You do not need dramatic refrigerator rise, extreme hydration, imported flour, a poolish or a professional oven.
The payoff is much simpler: a crust worth eating all the way to the edge and a slice that folds the way you hoped it would.
A good New York slice should feel casual in the hand. The fold adds support without making the center rigid, so the slice is easy to eat without fighting either a collapsing tip or a brittle crust.
And when the first pizza is not quite there, let it teach you one thing before changing five. Sometimes the steel simply wanted another ten minutes of heat—and the second pizza is the one that makes you smile.
If you make this dough, share the flour you used, how long you fermented it, how large you stretched the ball, and whether you baked on steel, stone or a sheet. Those details make it much easier to compare notes and understand why the same dough behaves differently from one kitchen to another.
A good Margherita pizza bends when you lift a slice, but it does not collapse. The underside has enough color to support the toppings, the rim remains tender, and the basil still smells fresh when the pizza reaches the table.
That balance comes from restraint. Margherita pizza uses tomato, mozzarella, fresh basil and olive oil, applied lightly enough that the crust remains part of every bite.
The disappointing homemade version often looks ready from above but tells a different story underneath: a pale base, a damp center and mozzarella that has released more water than the oven could remove.
You do not need a pizza oven to avoid that result. A heavy metal baking sheet, enough preheating and a lighter hand with the toppings can take a regular home oven surprisingly far. The rule is simple: control the moisture above and build the heat below.
Make the same-day dough, divide it in two and stretch each ball to about 12 inches / 30 cm.
Top lightly with thick crushed tomato and mozzarella blotted until no loose water remains on the surface. The raw pizza should look less covered than a standard cheese pizza.
Bake on a thoroughly preheated inverted metal sheet at the hottest safe oven setting, ideally 475–500°F / 245–260°C. Lift one edge and check underneath after 9 minutes.
Per pizza: about 255 g dough · 75 g prepared tomato topping · 75 g fresh mozzarella
Make it now
Easy Homemade Margherita Pizza
Using bread flour, canned plum tomatoes, fresh mozzarella and an inverted baking sheet? Follow the main route below. The later sections help when the dough pulls back, the cheese runs wet or the oven needs a different approach.
This amount makes a tender, moderately substantial home-oven crust. Stretch closer to 11 inches / 28 cm for a fuller rim or to the full 12 inches / 30 cm for a thinner center.
Makes: Two 12-inch / 30 cm pizzas · Serves: 3–4 Active time: About 35 minutes · Rise and rest: About 2¼–3¼ hours Preheat: About 40–55 minutes, overlapping the final rest Bake: 10–13 minutes per pizza, plus surface recovery Total: About 3–4 hours
Equipment
Digital kitchen scale, strongly recommended
Large mixing bowl
Dough scraper or flexible spatula
Two covered containers or one lightly oiled tray
Heavy uncoated metal baking sheet rated for your oven temperature
Pizza peel, thin wooden board or another flat baking sheet for transfer
Parchment paper, optional and only when rated for the oven temperature
For the pizza dough
300 g bread flour or strong all-purpose flour, about 2½ cups when spooned and leveled
195 g water, 195 ml or about ¾ cup plus 1 tablespoon
6 g fine sea salt, about 1 teaspoon
½ teaspoon instant yeast, about 1.5 g
1 teaspoon extra-virgin olive oil, about 5 g
Additional flour or fine semolina for dusting, used sparingly
Yeast alternatives: use the same ½ teaspoon / about 1.5 g active dry yeast and allow more rise time when needed. Dissolving it first is optional unless the package directs otherwise. For fresh yeast, use about 4–5 g.
For the no-cook tomato topping
150 g crushed canned whole plum tomatoes, about ⅔ cup, using only enough packing juice to make a thick, spreadable topping
1–1½ g fine sea salt, about ¼ teaspoon, adjusted to the tomatoes and cheese
1 teaspoon extra-virgin olive oil
Begin with less salt when the tomatoes or mozzarella are already salty. For a more seasoned home-style topping, add a little finely grated garlic; omit it for the cleaner tomato flavor used in the main recipe.
For topping two pizzas
150 g fresh cow’s-milk mozzarella, about 5¼ oz, weighed after draining
10–12 fresh basil leaves
2 teaspoons extra-virgin olive oil, for finishing
Instructions
Make the dough and prepare the toppings
Mix and rest. Combine the water and yeast in a large bowl. Add the flour and mix until no dry patches remain. Cover and rest for 15 minutes.
Add the salt and oil. Work in the salt and olive oil, then knead for 6–8 minutes until the dough is smoother, elastic and slightly tacky.
Let the dough rise. Shape it into a ball, cover and leave until 60–80% larger, lighter and visibly aerated. This commonly takes 1¼–2 hours.
Divide, ball and preheat. Divide the dough into two equal pieces of about 255 g and shape them into smooth balls. Cover and rest for 45–60 minutes. Immediately place a heavy baking sheet upside down in the lower third of the oven and heat to its highest safe setting, ideally 475–500°F / 245–260°C. Once the oven reaches temperature, continue heating the sheet for another 15–20 minutes.
Prepare the toppings. Near the end of the dough rest, crush and season the tomatoes. Tear the mozzarella into small pieces, place them between absorbent towels and blot thoroughly.
Shape, top and bake
Shape the first pizza. Press from the center outward while leaving a ¾-inch / 2 cm rim untouched. Lift and rotate the dough until it reaches about 12 inches / 30 cm. If it keeps springing back, stop fighting it. Cover and rest for another 10 minutes.
Choose the transfer method. For a peel or board, dust lightly, place the dough on it and test that it slides. For parchment, shape and top the pizza directly on a trimmed sheet of temperature-rated paper; transfer the paper with the pizza.
Top lightly. Spread 75 g prepared tomato topping, about ⅓ cup, across the dough. Add 75 g drained mozzarella, about 2⅔ oz, keeping the center lightly topped.
Transfer and bake. When using a peel or board, give it one final gentle shake and transfer the pizza immediately if it moves as one piece. Check underneath after 9 minutes, rotate if one side colors faster and continue until the base is browned.
Finish, recover and repeat. Remove the pizza when the underside is browned, the rim has expanded and the center is set. Add half the basil—about 5–6 leaves—and 1 teaspoon olive oil. Rest for 1–2 minutes before slicing. Let the oven return to temperature, then give the baking sheet another 3–5 minutes to recover before repeating with the remaining dough and toppings.
Adjust for a different oven
For an oven that stops at 450°F / 230°C: continue heating the inverted sheet for 20–25 minutes after the oven reaches temperature. Use 60 g / about 2 oz low-moisture mozzarella from the beginning, or use 75 g / about 2⅔ oz well-drained fresh mozzarella and add it during the final 3–4 minutes. Check the underside after 11 minutes.
Fan or convection oven: start checking one or two minutes earlier because moving air can color the top faster. See the oven-specific notes below for the full adjustment.
Parchment: check the manufacturer’s maximum-temperature rating and trim exposed corners. Remove the parchment before using the broiler.
The home-oven balance: keep the dough and topping load consistent, then let underside color tell you what the oven needs.
Keeping the topping load this light gives the center a better chance to set before the base overbrowns.
Choose Your Oven Setup
The inverted baking sheet is the best starting point for a regular oven. It is inexpensive, easy to load and capable of producing a properly browned base when given enough time to heat.
The flat back of an inverted sheet removes the raised rim, giving the peel a cleaner, shallower path into the oven.
Setup
Best use
Main trade-off
Inverted heavy baking sheet
Best default for a regular oven
Accessible and reliable, though slower than steel
Pizza steel
Fast and deep bottom browning
Can burn loose flour or an overly thin center
Pizza stone
Gentler bottom heat than steel
Needs a long preheat and slower recovery
Inverted sheet at 450°F / 230°C
Ovens with a lower maximum temperature
Needs a longer bake and drier or later-added cheese
Steel browns fastest, stone more gently, and an inverted sheet is the accessible default; let underside color guide later adjustments.
On a smaller screen, scroll sideways to see the full table.
What Is Margherita Pizza?
Margherita tells you what is on the pizza: tomato, mozzarella, basil and olive oil. Neapolitan describes more of the dough, shaping and intensely hot baking tradition. A Margherita can be Neapolitan, but a home-oven pizza baked for several minutes is not identical to one cooked in roughly a minute.
A successful home-oven Margherita can have a moderate rim and restrained spotting; it does not need wood-fired Neapolitan char.
The traditional Neapolitan pizza standards use hand-shaped dough, tomato, fior di latte or buffalo mozzarella, basil and extra-virgin olive oil in an oven far hotter than most domestic models. This recipe keeps that topping identity while adapting the dough and baking method to a regular oven.
Margherita pizza is famously associated with Queen Margherita of Savoy and an 1889 visit to Naples, although similar tomato-and-mozzarella pizzas existed earlier.
Why This Method Works in a Home Oven
A pizza oven removes moisture quickly. A regular oven gives the tomato and cheese more time to release it, so the toppings must remain lighter and the baking surface must begin fully heated.
The home-oven rule: the longer the pizza needs to bake, the less loose moisture it can carry. Dry the mozzarella, use a thin tomato layer and preheat the baking surface fully.
Pale underneath usually means more bottom heat; a wet center over a browned base points instead to excess topping moisture.
The dough carries enough water to remain tender without becoming needlessly difficult to shape. Measured toppings leave room for the center to bake through. There is no prize for using the whole ball of cheese.
Choosing Margherita Pizza Ingredients
Use bread flour for the easiest home-oven dough
Bread flour stretches reliably and browns well during a longer home bake. Strong all-purpose flour also works; hold back one teaspoon of water if yours is particularly soft.
“00” is an Italian flour classification, not a guarantee that every bag will behave the same way in a home oven. Choose one formulated for the temperature and fermentation schedule you plan to use.
Choose canned whole plum tomatoes
Canned whole plum tomatoes are the dependable year-round choice. They should smell bright when the can opens and crush into pulpy tomato rather than disappearing into watery juice.
San Marzano tomatoes are excellent when available, but they are not compulsory. A flavorful ordinary plum tomato with good body is more useful than an expensive can carrying too much liquid. A prepared sauce also works when time is limited; compare the options in this pizza sauce guide.
Match the mozzarella to the speed of the bake
Choose well-drained fresh mozzarella for a fast, hot bake and low-moisture whole-milk mozzarella when the pizza needs longer in the oven.
Fresh cow’s-milk mozzarella, often sold as fior di latte, gives the pizza its milky flavor and separate creamy pools. Buffalo mozzarella is richer and usually wetter.
The practical rule is simple: the longer the bake, the more useful a drier cheese becomes. Coarsely grate low-moisture mozzarella or tear thin slices into small pieces so it scatters across the tomato instead of forming a heavy blanket.
Choose mozzarella by moisture as much as by style: wetter cheese suits faster bakes, while slower ovens benefit from drier cheese.
Finish with basil and olive oil
Add most or all the basil after baking. The residual heat softens the leaves just enough while preserving the fragrance that makes Margherita pizza feel fresh rather than heavy.
Add most basil after baking so the leaves soften in the residual heat without losing their fresh, herbal aroma.
For a softer cooked-basil note, tuck two or three leaves beneath the mozzarella before baking. A light dusting of Parmesan or Pecorino is optional, but the main pizza needs only mozzarella.
The dough will look ragged immediately after mixing. Leave it alone for 15 minutes and the flour will absorb more water, turning the same rough mass into something noticeably easier to knead.
Wait the full 15 minutes before correcting rough dough with extra flour or water; the rest often smooths it on its own.
After kneading, it should feel elastic and less rough without becoming dry. Slight tackiness is useful. Too much added flour makes the dough easier to handle for a few minutes and the finished crust less tender.
Slightly tacky dough pulls gently at the skin and releases; wet dough smears or leaves paste on your fingers.
Let it rise, divide and relax
The dough is ready for dividing when it has expanded by 60–80%, softened and developed small bubbles beneath the surface. It should feel lighter than it did after kneading.
Mark the starting height in a straight-sided container so a 60–80% rise is easy to judge instead of guess.
Adjust for the room: use mildly warm water in a cool kitchen below 70°F / 21°C, room-temperature water in a comfortable kitchen around 70–79°F / 21–26°C and cool tap water in a warm kitchen at 80°F / 27°C or above. In a warm room, check the dough after about an hour.
Dividing and balling tightens the dough again. After its final 45–60-minute rest, a ball that resisted your hands begins to widen beneath gentle fingertip pressure. That change matters more than the clock.
A relaxed dough yields broadly under your fingertips instead of pushing back in one tight spot.
Fix sticky, dry or slow dough
Too sticky: pause for five minutes and handle it with lightly damp or oiled hands.
Too dry: wet your fingertips and knead in one teaspoon of water at a time.
Slow to rise: move the covered bowl somewhere comfortably warm and allow more time.
Rising too quickly: divide and ball it early, then refrigerate briefly if dinner is delayed.
Dry surface: cover the dough properly. A skin resists stretching and can tear.
Sticky, dry or slow dough usually needs a small correction; large flour, water or heat changes can create a second problem.
For a naturally fermented base, use this sourdough pizza dough and return here for the tomato, mozzarella and basil quantities.
How to Prevent a Watery Margherita Pizza
Water rarely comes from one dramatic mistake. It is usually the combined effect of loose tomato, wet mozzarella, heavy topping and a base that did not begin hot enough.
Tomato and mozzarella should remain juicy. The aim is not to dry the life out of them, only to remove the loose water that would collect in the center before the crust has time to brown.
Make a thick no-cook tomato sauce
Crush the tomatoes by hand or pulse them only briefly. Drag a spoon through the mixture. The trail should remain visible for a moment instead of filling immediately with juice.
A spoon trail that holds briefly signals tomato thick enough to spread lightly without flowing toward the center.
Drain excess packing liquid rather than cooking the tomatoes merely to thicken them. The no-cook topping keeps a brighter, fresher tomato flavor after baking. Sugar is rarely needed when the tomatoes are balanced.
For a cooked, garlicky red sauce, use this homemade marinara sauce and keep its pizza layer thin.
Drain fresh mozzarella after tearing it
A whole mozzarella ball can feel dry outside while holding substantial water inside. Tear or slice it first, spread the pieces between clean towels and blot firmly.
The cheese should remain moist and milky without loose water shining on the surface. Properly drained mozzarella melts into creamy pools instead of leaving a wet blanket across the tomato.
Blot until free water is gone, then stop; the cheese should stay soft and milky rather than feel dried out.
Particularly wet cheese may need 20–30 minutes between absorbent towels. During a bake longer than about 12 minutes, add fresh mozzarella for the final 3–4 minutes or use low-moisture mozzarella from the beginning.
How to Shape, Top and Transfer the Pizza
Once the tomato and mozzarella are ready, the challenge shifts from moisture to movement: shaping the dough and getting it onto the hot surface without losing the rim.
Stretch without crushing the rim
Press from the center outward while leaving a ¾-inch / 2 cm border untouched. Rotate the dough as you work, then lift it over the backs of your hands and allow gravity to widen the center.
Leave the outer ¾ inch / 2 cm untouched so trapped gas remains available to expand into the rim.
Stop before the middle becomes fragile. If the dough keeps pulling back, cover it and wait another 10–15 minutes. An oval is not a failed pizza. An even center and intact rim matter more than a perfect circle.
If the dough keeps shrinking back, cover it and rest briefly; forcing it usually makes shaping harder.
Use a peel, board or parchment
For a peel or board, dust lightly and shake the shaped dough before topping. It should move as one piece. Work a dough scraper beneath any stuck patch, add a pinch of flour or semolina and test the slide again.
For parchment, shape and top the pizza directly on a trimmed sheet rated for your oven temperature, then transfer the paper with the pizza. Remove it before using the broiler.
Choose peel or parchment before topping so you are not changing transfer methods under the weight of tomato and cheese.
A heavy layer of loose flour burns quickly on a steel, stone or hot sheet and can leave the underside bitter.
Keep the toppings light
Spread the tomato thinly enough that a little dough remains faintly visible. Scatter the mozzarella instead of creating a continuous blanket, and give the center the lightest topping.
Visible gaps between mozzarella keep the center lightly loaded, giving the crust a better chance to set before moisture collects.
If using a peel or board, give it one final gentle shake after topping. If the pizza moves as one piece, transfer it immediately.
A single sticking spot only needs a local fix; loosen that patch instead of adding extra flour across the peel.
How to Bake Margherita Pizza in Your Oven
The cheese may look ready before the base is. Treat the times below as your first check rather than a guaranteed finish, then lift an edge and trust what you see underneath.
Baking setup
Additional heating after oven reaches temperature
First check
Common finish range
Steel at 500–550°F / 260–288°C
25–30 minutes
5 minutes
6–8 minutes
Stone at 500°F / 260°C or hotter
30–45 minutes, or manufacturer guidance
7 minutes
8–10 minutes
Inverted sheet at 475–500°F / 245–260°C
15–20 minutes
9 minutes
10–13 minutes
Inverted sheet at 450°F / 230°C
20–25 minutes
11 minutes
12–16 minutes
Treat the first-check time as the moment to look underneath, not a command to pull the pizza from the oven.
On a smaller screen, scroll sideways to compare the baking setups.
Surface thickness and oven cycling affect both preheat and recovery. Follow the manufacturer’s guidance when a steel or stone requires longer.
Inverted sheet, stone or steel
The inverted sheet removes the raised rim that would otherwise block the transfer. Use a heavy plain metal sheet rated for your oven temperature.
A steel transfers heat fastest, giving the base deeper color while the center remains flexible. A stone heats more gently and recovers more slowly. Start with the surface in the lower third for stronger bottom heat; move it upward only when the underside consistently finishes before the rim.
When the base is ready but the rim remains pale, move the pizza—not the heavy baking surface—to an upper rack or broiler-safe tray. Remove any parchment, broil briefly and watch continuously.
Lower-temperature and fan ovens
At 450°F / 230°C, keep the sheet near the lower element and use low-moisture mozzarella or add fresh mozzarella near the end. Check the base around 11 minutes.
In a fan or convection oven, use the hottest setting allowed by the oven and baking surface. Moving air can color and dry the top faster, so check one or two minutes earlier.
How to Tell When the Pizza Is Done
Rim: expanded, set and browned in spots.
Underside: golden to deep brown with darker speckles rather than blond and soft.
Tomato: concentrated and glossy without a visible pool of liquid.
Mozzarella: melted into separate creamy pools.
Center: flexible but structurally set, with no gummy line beneath the tomato.
Judge the rim, tomato, mozzarella and center together; melted cheese alone does not mean the base is ready.
Lift one edge and look underneath. A properly heated surface should have turned the base from pale and floury to browned and firm enough to support the center.
Broad, even browning matters more than a few dramatic dark spots; a pale center can hide beneath impressive blisters.
Use what that pizza shows you before launching the second. A pale base needs a longer surface recovery; a wet center needs less moisture or later-added cheese.
Fresh tomatoes should replace most or all of the canned tomato rather than sit over a complete sauce layer. Sauce, juicy tomato slices and fresh mozzarella together can overwhelm a slower home bake.
Choose ripe plum, Roma or another meaty tomato. Slice it about ⅛ inch / 3 mm thick, remove loose seed gel from very juicy fruit, lightly salt the slices and leave them on absorbent towels for 10–15 minutes. Blot both sides before weighing and topping.
Weigh fresh tomatoes after draining and blotting, because equally sized tomatoes can shed very different amounts of water.
For one 12-inch pizza: use about 140 g / 5 oz prepared fresh tomato, weighed after removing loose seed gel and blotting; 65 g / about 2¼ oz well-drained mozzarella; 5–6 basil leaves; and 1 teaspoon olive oil. The tomato weight is higher because these are drained slices of flesh rather than a thin layer of crushed sauce.
Place halved cherry tomatoes cut-side up so more of their liquid can evaporate. Extra ripe tomatoes can become this tomato sauce from fresh tomatoes.
Margherita Pizza Troubleshooting
The first pizza is not a verdict. It is the clearest information your oven can give you. The color underneath, moisture in the center and feel of the crust usually reveal what needs to change.
Problem
Save this pizza
Change the next one
Wet center
Move individual slices to a dry skillet over medium-low heat and check underneath every 30 seconds
Use drier cheese, less tomato or a longer sheet preheat
Pale underside
If the top can take more baking, leave the pizza on the hot surface a little longer; for finished slices, use the dry-skillet method
Preheat longer and let the surface recover fully
Bottom browning too fast
If the base is already dark but the rim needs color, move the pizza—not the hot baking surface—to an upper rack or broiler-safe tray for a brief finish
Reduce surface heat or shorten the initial bake
Dough springs back
Cover and wait 10–20 minutes
Allow the full final dough-ball rest
Center tears
Pinch the tear closed, or patch it with a small piece taken from an overly thick edge
Stop stretching sooner and watch the center thickness
Pizza sticks to the peel
Work a dough scraper beneath the stuck patch, add a pinch of flour or semolina and test the slide again
Prepare toppings first and test the dough before topping
Toppings slide when sliced
Rest the pizza for another minute before cutting again
Reduce moisture and keep the center lightly topped
A wet center with a pale base needs more bottom heat; a wet center over a dark base needs less topping moisture.
On a smaller screen, scroll sideways to compare the immediate rescue with the next-pizza correction.
The main pizza needs none of these adjustments. Use them when you need a faster dough, a smaller batch or a thinner crust.
Make one pizza: Halve the dough ingredients and use the per-pizza topping quantities already listed. Alternatively, make the full batch and freeze the second dough ball after the first rise and balling. Thaw overnight in the refrigerator, then leave it covered until relaxed enough to stretch.
Store-bought dough: Leave refrigerated dough covered until it feels soft and stretches without repeatedly springing back. Depending on the room and dough, this commonly takes 45–90 minutes.
Fast no-yeast dough: When there is no time for fermentation, this Greek yogurt pizza dough provides a faster homemade base.
Thin crust: Use about 220 g / 7¾ oz dough for one 12-inch pizza. Stretch the center more thinly, reduce the prepared tomato topping to 60 g / about ¼ cup and the fresh mozzarella to 60–65 g / about 2–2¼ oz, then check the underside earlier.
Make Ahead, Store and Reheat
Prepare the components ahead
Tomato topping: refrigerate in a covered container for up to three days. Stir and drain any separated liquid before using it.
Mozzarella: tear, drain and blot it several hours ahead. Refrigerate it in a covered container lined with a clean absorbent towel.
Frozen dough: freeze individual balls after the first rise for up to three months. Thaw overnight in the refrigerator, then leave covered until relaxed enough to stretch.
Assembled raw pizza: shape and top it only after the oven and baking surface are ready.
When the open tomatoes and remaining basil outlast pizza night, use them in a pot of tomato basil soup.
Store and reheat leftovers
Cool leftover slices before covering and refrigerate them in an airtight container for up to three days.
For the best reheating result, place a slice in a dry skillet over medium-low heat and cover for 2–4 minutes. Uncover briefly at the end. The base should crisp again while the mozzarella softens without becoming rubbery.
When the cheese needs help softening, add a few drops of water beside the slice—not on it—and cover again. An oven or air fryer also works at 375–400°F / 190–200°C; check after three minutes in an air fryer and five minutes in an oven.
Cover to warm the cheese and center, then uncover to vent steam and restore the skillet-crisped base.
Frequently Asked Questions
What is the difference between Margherita pizza and cheese pizza?
A typical cheese pizza often uses cooked sauce and a continuous layer of grated mozzarella. Margherita pizza keeps the tomato and cheese lighter, then finishes with fresh basil and olive oil.
What is the best mozzarella for Margherita pizza?
Well-drained fresh cow’s-milk mozzarella gives the classic creamy pools; low-moisture mozzarella is more forgiving in a slower oven. See how to match mozzarella to your bake.
Can I make Margherita pizza without a stone?
Yes. A thoroughly preheated heavy baking sheet turned upside down works well in a regular oven. See Choose Your Oven Setup for the sheet, stone and steel trade-offs.
Can I bake both pizzas at once?
Baking them one at a time gives each pizza the strongest bottom heat and most even result. Bake both together only when the oven has two thoroughly preheated surfaces and enough space for air to circulate; rotate or swap their positions if they color unevenly.
Is Margherita pizza vegetarian?
The pizza contains no meat, but some mozzarella and hard cheeses use animal-derived rennet. Check the label when you need strictly vegetarian cheese.
The First Slice Is Where the Restraint Makes Sense
Your pizza may be oval, and the launch may feel more hurried than graceful. Once the base is browned and the center holds, neither matters much.
Add the basil, wait a minute, then cut a slice. It should bend without dropping its tomato and cheese. The first slice tells the truth.
The browned crust, half-empty plate and crumbs are the payoff: the method worked well enough to disappear into dinner.