
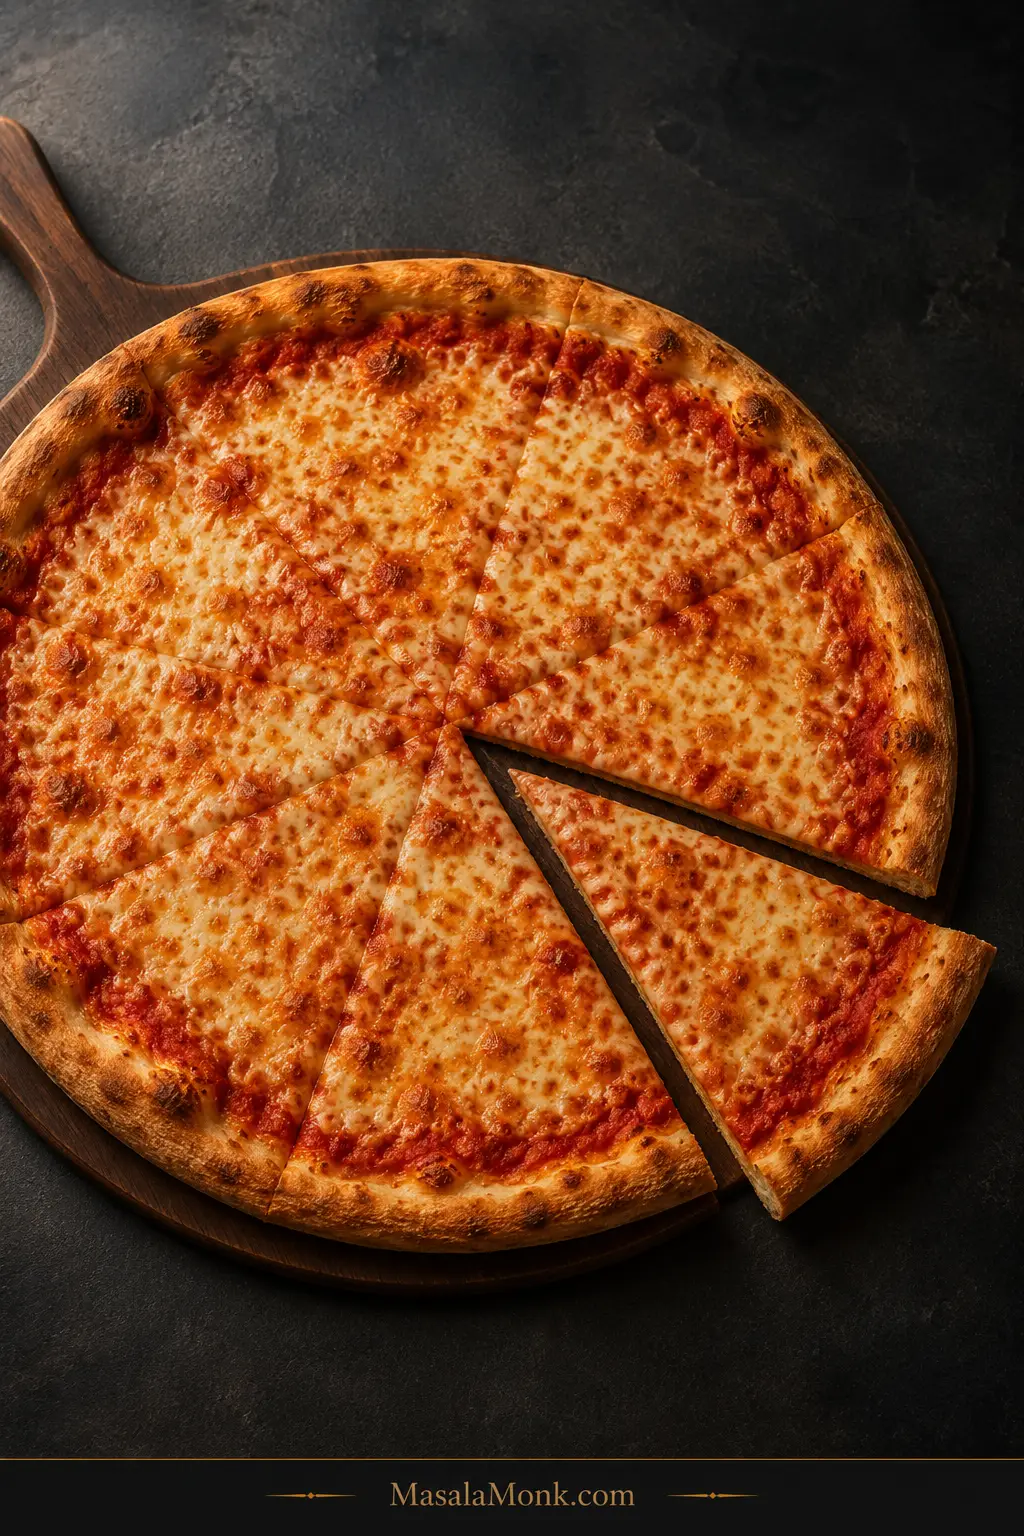
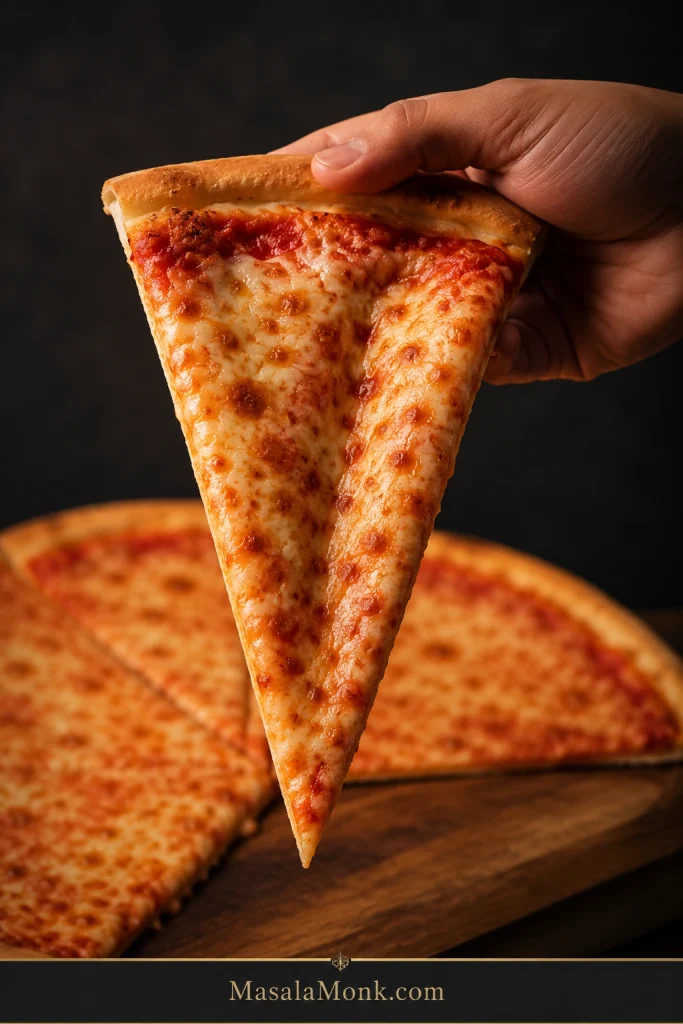
Lift a hot New York-style slice by the crust and the center should bend before it breaks. The underside should be browned and crisp, the rim should have a satisfying chew, and the slice should fold down the middle without snapping like a cracker or collapsing into a wet heap.
A perfectly respectable dough can turn out thick and bready if it stays too small, or rubbery if you stretch it while tight. A baking surface that is not ready leaves the bottom pale; a long bake in a cooler oven can make the crust dry and brittle.
This version uses a 48-hour cold ferment, bread flour, 63.5% hydration, and small amounts of sugar and olive oil that suit a home oven. Just as importantly, it shows you what normal looks and feels like along the way—so a quiet dough in the refrigerator, a tacky first mix, or a stubborn stretch does not send you into a round of fixes the dough never needed.
The finished crust should taste as good as it feels: toasted and wheaty, gently savory, with fermented depth but no obvious sweetness from the sugar. Even the bare rim should be worth eating.
Quick Answer: New York Style Pizza Dough
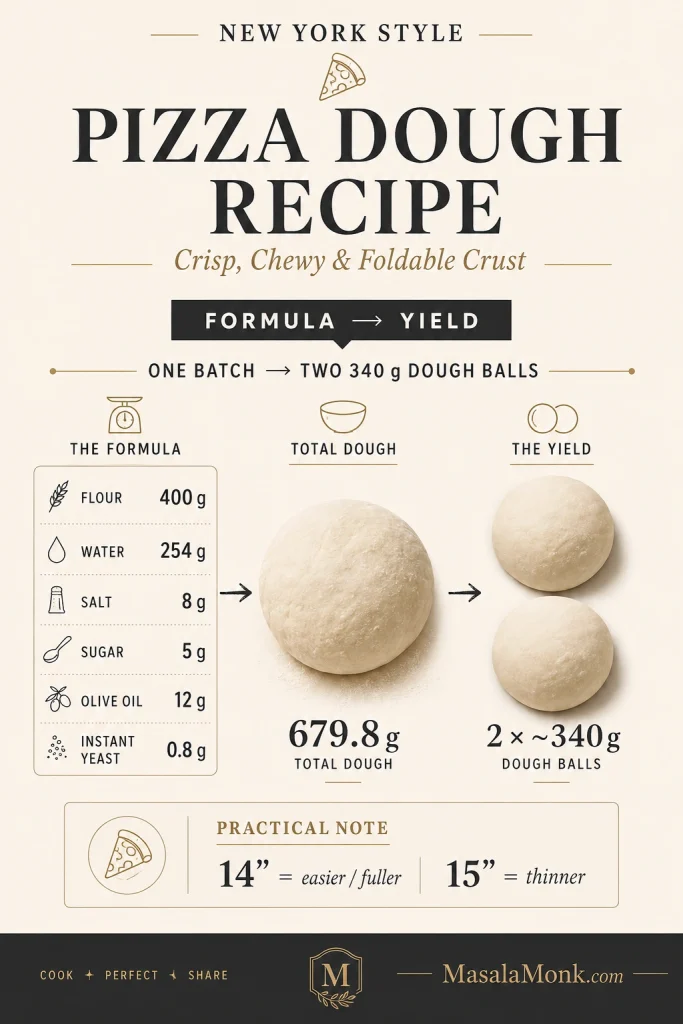
For two 14–15-inch New York-style pizzas, use 400 g bread flour, 254 g water, 8 g salt, 5 g sugar, 12 g olive oil and 0.8 g instant yeast. Divide into two dough balls of about 340 g / 12 oz each and cold-ferment them for about 48 hours.
The finished pizza should be thin and browned underneath, crisp at the surface, chewy inside, and flexible enough to fold. A 14-inch pizza gives you more margin during stretching and launching; take the same ball closer to 15 inches when you want a thinner center and the dough is opening easily.
A small amount of sugar assists browning before a home-oven bake dries the crust out, while olive oil helps the interior stay tender. Stretch by hand, top with restraint, check that the pizza slides on the peel, and fully heat the steel or stone before baking.
The rule worth remembering: use the clock to plan pizza; use the dough to decide when it is ready.
How Long Should New York Pizza Dough Ferment? 24 vs 48 vs 72 Hours
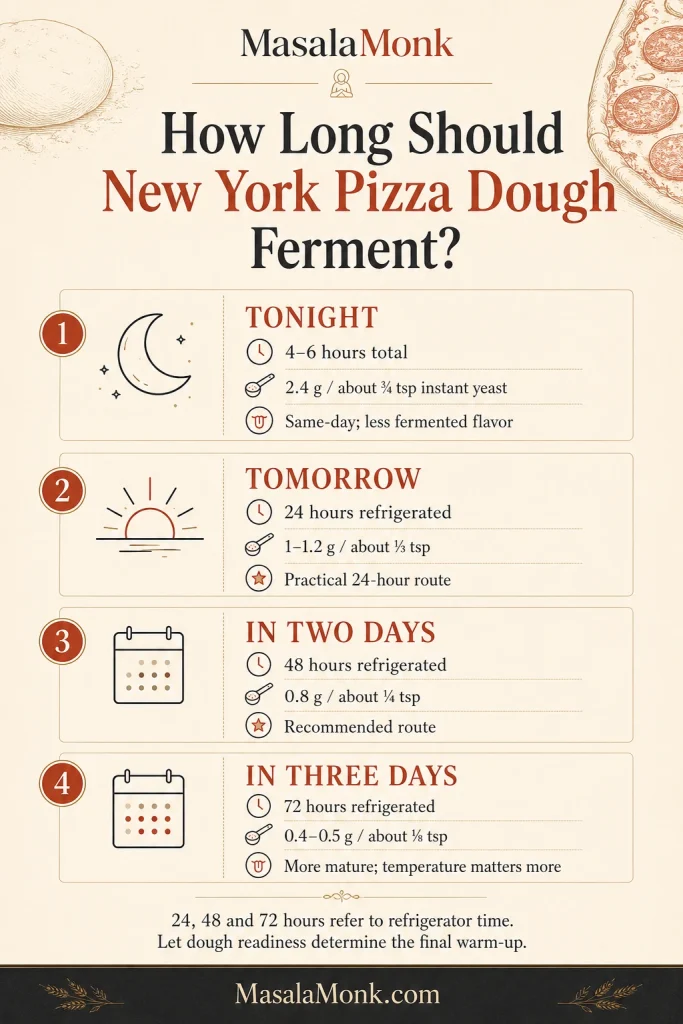
The 48-hour version is the main recipe here. It gives the dough time to develop flavor and relax while leaving a comfortable margin before fermentation becomes harder to control. Shorter and longer schedules work too; change the yeast to suit the schedule.
| When you want pizza | Instant yeast for 400 g flour | What to expect |
|---|---|---|
| Tonight | 2.4 g / about ¾ tsp | About 4–6 hours total; good same-day crust with less fermented flavor |
| Tomorrow | 1–1.2 g / about ⅓ tsp | A practical 24-hour route |
| In two days | 0.8 g / about ¼ tsp | Recommended 48-hour version |
| In three days | 0.4–0.5 g / about ⅛ tsp | A more mature 72-hour dough; temperature matters more |
How to Plan Your Pizza Dough Fermentation Schedule
For the refrigerated routes, 24, 48 and 72 hours refer to time in the refrigerator, not the entire schedule. Change the yeast and cold-ferment time as shown, keep the mixing and balling method the same, then let the dough’s readiness cues determine the final warm-up.
The 24- and 72-hour routes are starting points, not stopwatch formulas. A warmer refrigerator moves fermentation faster. These schedules assume about 37–40°F / 3–4°C in the refrigerator and 68–72°F / 20–22°C in the kitchen.
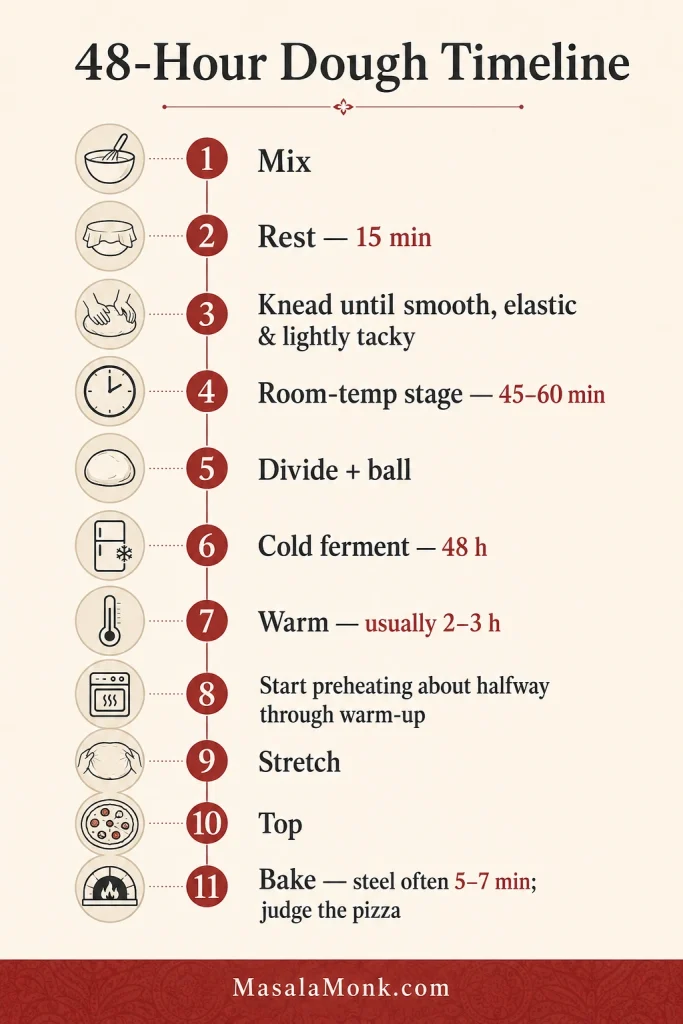
Planning Friday evening pizza? Mix Wednesday mid-afternoon, refrigerate the shaped balls by late afternoon, then take them out at roughly the same time Friday for a 2–3 hour warm-up before dinner.
Need Pizza Tonight? Use the 4–6-Hour Version
Keep the flour, water, salt, sugar and oil unchanged, but increase the instant yeast to 2.4 g / about ¾ teaspoon. Plan on roughly 4–6 hours from mixing to baking.
- Mix, rest and knead as directed in the main recipe.
- Cover the whole dough and leave it around 70–75°F / 21–24°C for 60–90 minutes.
- Divide and ball it.
- Leave the balls covered for another 2½–4 hours, checking for soft, aerated dough that stretches willingly.
- Stretch, top and bake as usual.
The same-day version makes a crisp, chewy pizza but develops less fermented flavor than the two-day dough. If even that is too much waiting, Greek Yogurt Pizza Dough skips yeast entirely.
The complete recipe below follows the 48-hour cold-ferment path.
New York Style Pizza Dough Recipe
Recipe at a Glance
- Yield: 2 dough balls, about 340 g / 12 oz each
- Pizza size: Two 14–15-inch pizzas
- Hands-on dough prep: About 25 minutes
- Initial room-temperature stage: 45–60 minutes
- Cold ferment: About 48 hours
- Warm-up before stretching: Usually 2–3 hours around 70°F / 21°C
- Total elapsed planning time: Roughly 51–52 hours from mixing to baking
- Oven: 500–550°F / 260–288°C, or the highest suitable setting your oven allows
- Bake on steel: Often about 5–7 minutes
- Hydration: 63.5%
Weights are the reference measurements for this dough; cup and spoon equivalents are approximate.
Dough Ingredients
- 400 g / 14.1 oz bread flour, preferably around 12–13% protein; about 3⅓ cups if spooned into the cup and leveled
- 254 g water, about 254 ml / 1 cup plus 1 tablespoon, cool to room temperature
- 8 g fine sea salt, about 1⅓–1½ teaspoons depending on the salt
- 5 g granulated sugar, about 1¼ teaspoons
- 12 g olive oil, about 13 ml / 2½–2¾ teaspoons
- 0.8 g instant yeast, about ¼ teaspoon
A ¼-teaspoon measure is more useful than a whole-gram kitchen scale for the yeast if you do not own a 0.1 g precision scale.
Active dry yeast works too. Use about 1 g / ⅓ teaspoon and activate it in a little of the recipe water according to the package directions.
Halving the formula works, but the instant yeast drops to about 0.4 g / ⅛ teaspoon. Without a precision scale, making both balls and freezing one after its first day of cold fermentation is usually easier.
For Shaping and a Plain Cheese Pizza
For each 14–15-inch pizza, have ready:
- Flour for the work surface
- Flour or fine semolina for the peel
- 115–150 g / 4–5¼ oz thick pizza sauce
- 115–150 g / 4–5¼ oz whole-milk low-moisture mozzarella, grated from a block if possible
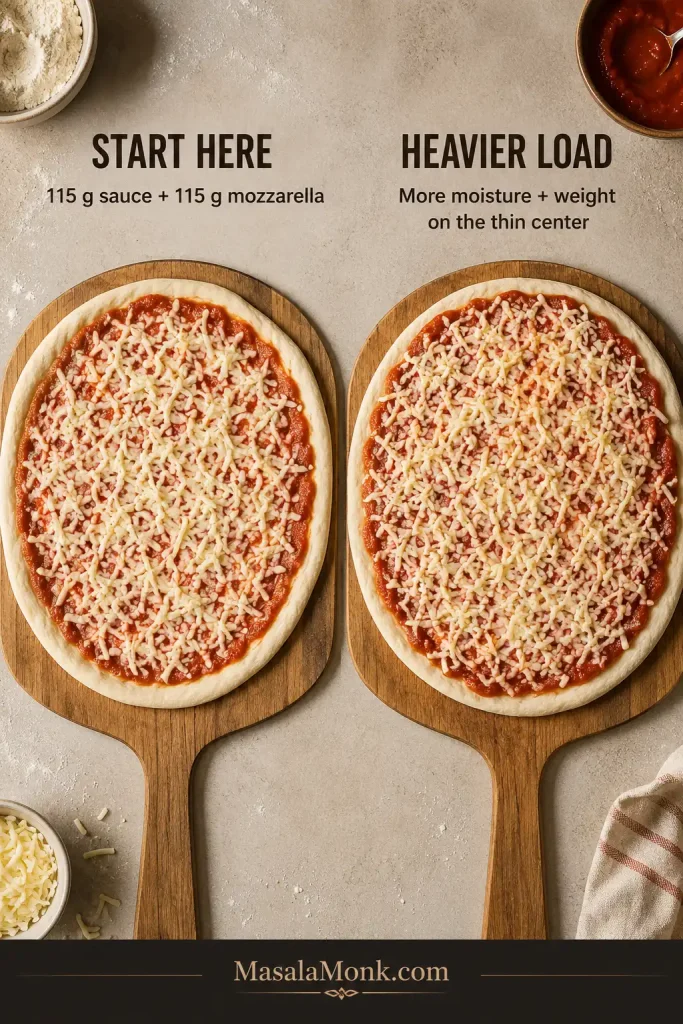
For your first pizza, start around 115 g sauce and 115 g mozzarella. Move toward 150 g once you know how your sauce, dough and oven handle the extra load.
Keep the sauce and cheese chilled until you need them. If mozzarella tends to brown before the crust is ready, chill the grated cheese for 10–15 minutes before topping.
Useful Equipment
- Digital kitchen scale
- 0.1 g precision scale or measuring spoons for yeast
- Large mixing bowl
- Dough scraper or flexible spatula
- Two covered containers, around 1 quart / 1 liter each
- Pizza peel
- Pizza steel, stone or heavy baking sheet
- Wire cooling rack
- Optional infrared thermometer
Mix and Develop the Dough
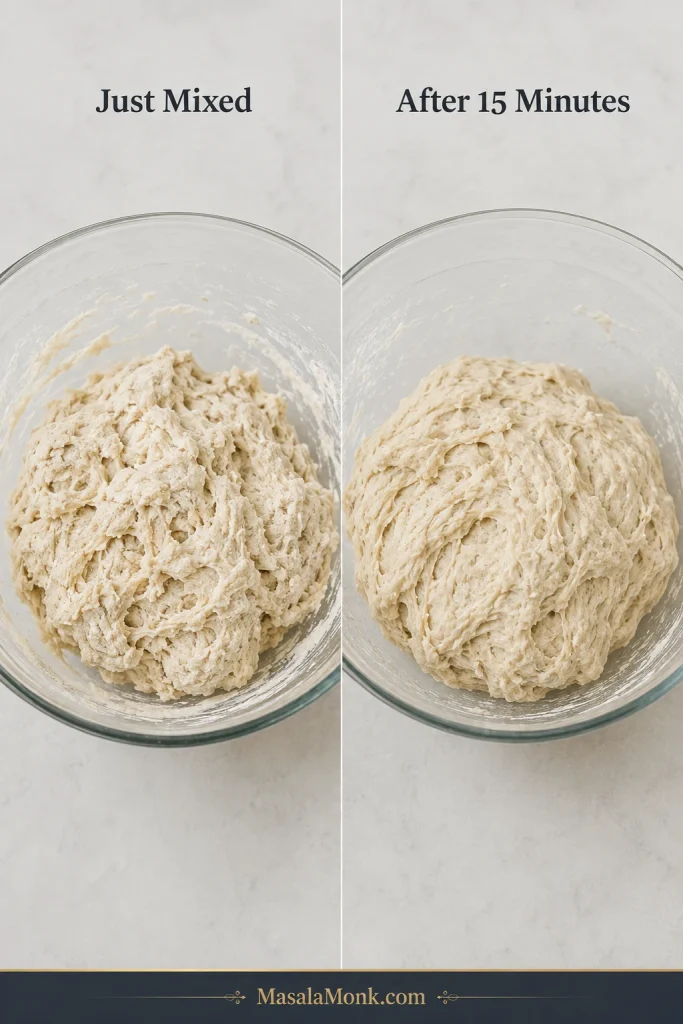
- Whisk the flour, instant yeast, sugar and salt together in a large bowl. Add the water and stir until no large pockets of dry flour remain. The dough should look rough and shaggy.
- Cover and leave it alone for 15 minutes. During this short rest the flour absorbs water, and an awkward sticky mass often becomes much easier to handle.
- Knead until the dough begins to smooth out, then work in the olive oil gradually.
- Continue kneading until the dough is cohesive, elastic and lightly tacky—usually another 5–7 minutes by hand or 4–6 minutes on low speed in a stand mixer.
How Tacky Should Pizza Dough Feel?
Checkpoint: press a clean finger against the dough. A little cling is fine. It should release without coating your finger in paste and feel soft and supple in your hands.
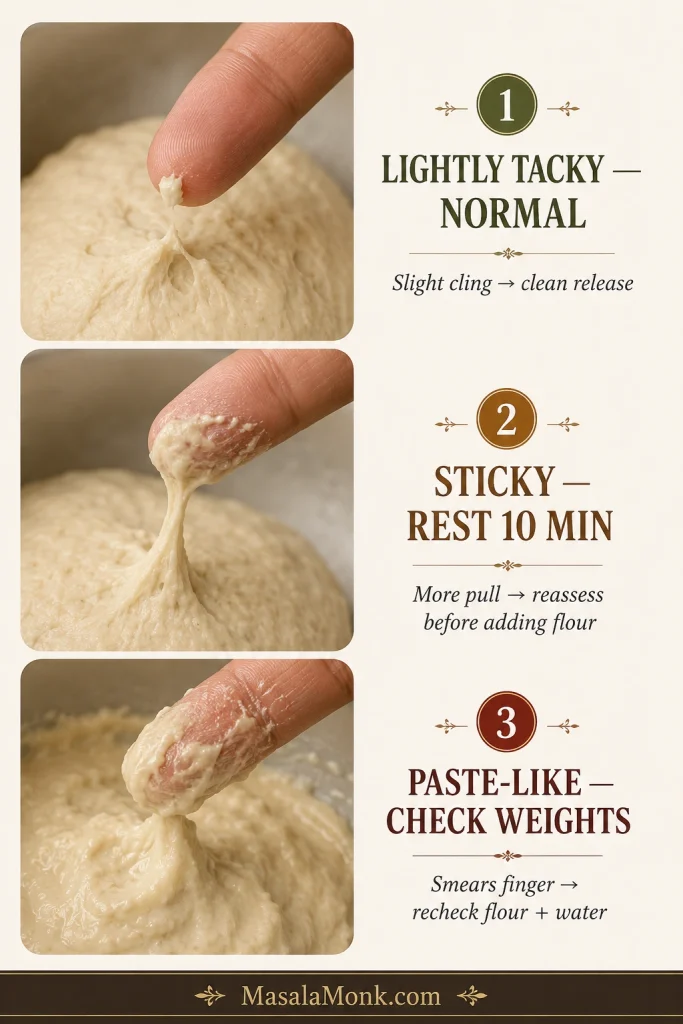
Still sticky enough to worry you? Cover it for another 10 minutes before reaching for flour. Time often solves what extra flour would only hide.
If it still smears instead of holding itself together, recheck the flour and water weights. When those are correct, work in flour 5 g at a time and stop as soon as the dough becomes manageable. Record how much you needed and use that as a reference for the next batch.
If you track dough temperature, aim for roughly 76–80°F / 24–27°C after mixing. Cooler water helps in a hot kitchen and warmer water helps in a cold one. Without a thermometer, stop mixing before the dough feels noticeably warm.
Using a Food Processor or Spiral Mixer?
Food processor: pulse the dry ingredients to combine, then add the water and oil together. Process until the dough forms a ball and continue only briefly—about another 15–20 seconds—until smooth and elastic. Stop before the dough becomes noticeably warm.
Spiral mixer: fixed stand-mixer minutes are less useful because spiral mixers develop dough differently. Stop when the dough is smooth, elastic and cohesive, using finished dough temperature as a guardrail.
Ball and Cold Ferment
- Cover the mixed dough and leave it at room temperature for 45–60 minutes. It does not need to double.
- Divide it into two equal pieces of about 340 g / 12 oz each.
- Shape each piece into a ball. Pull the outer edges underneath as you rotate the dough until the top becomes smooth, then pinch the seam lightly underneath. Create gentle surface tension and stop before the skin begins tearing.
- Place each ball seam-side down in its own lightly oiled covered container and refrigerate at about 37–40°F / 3–4°C for 48 hours.
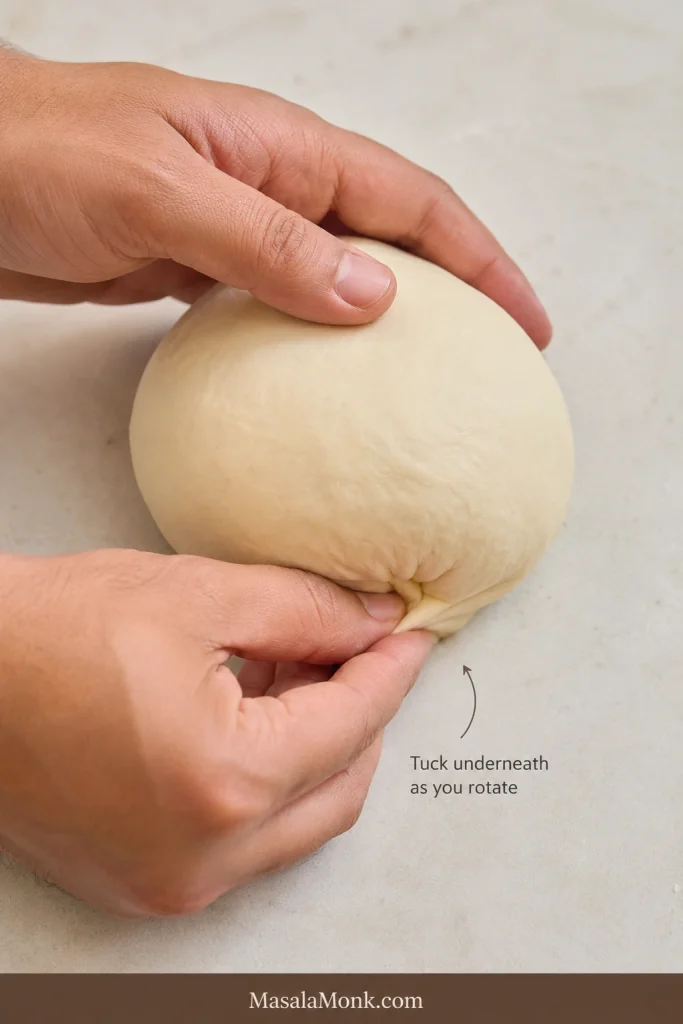
Balling before refrigeration lets each portion ferment and relax in the shape you will later stretch. Separate containers also make it easier to lift one cleanly without disturbing the other.
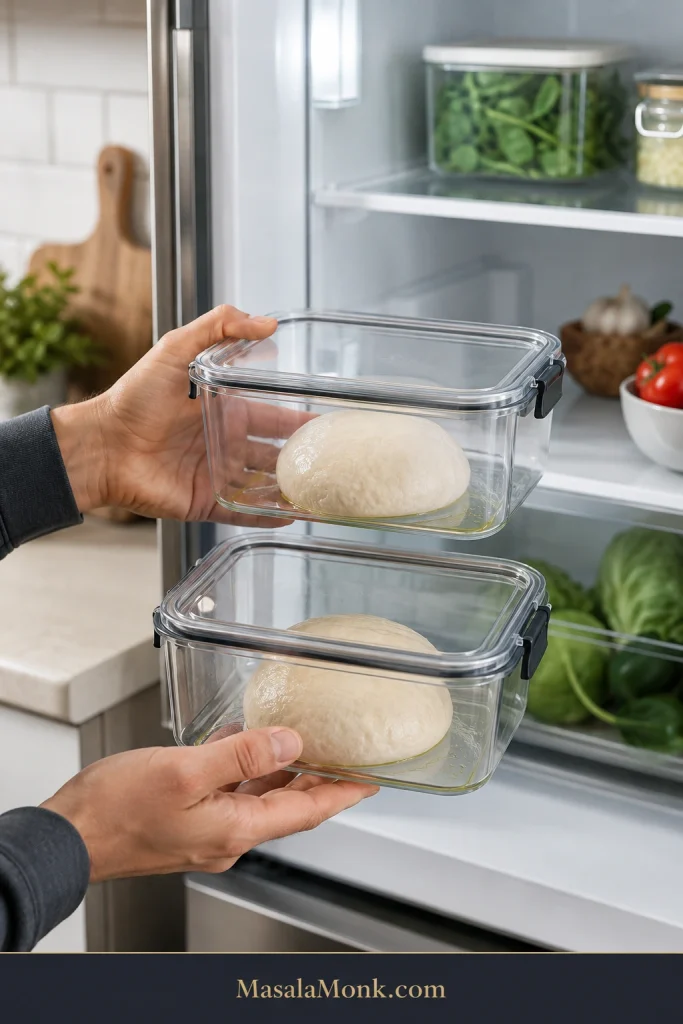
After a day in the refrigerator, modest spreading and puffiness are completely normal. A quiet-looking dough ball is not a reason to add more yeast next time.
Warm, Stretch, Top and Bake
- Take the dough out about 2–3 hours before baking when the room is around 70°F / 21°C. Begin checking it sooner in a warmer kitchen.
- About halfway through that warm-up, start preheating the oven. Put your steel or stone in the oven and heat at 500–550°F / 260–288°C, or the highest suitable temperature your oven allows, for about an hour.
- Release one dough ball gently from its container. Flour both sides lightly, then press from the center outward while leaving the outer ½–¾ inch / 1–2 cm comparatively untouched.
- Lift and rotate the dough, letting gravity help. Stop around 14 inches / 36 cm for an easier, fuller crust, or continue toward 15 inches / 38 cm for a thinner center.
- Check for translucent patches or pinholes, then move the dough to a lightly dusted peel. Shake it immediately. The entire skin should move freely.
- Use about 115 g sauce and 115 g mozzarella for the baseline version, leaving some red sauce visible between the cheese.
- Shake the peel again. Loosen any stuck point before approaching the oven.
- Launch onto the fully heated steel or stone. Bake until the underside is browned, the rim has good color and the center is cooked through. On steel this is often about 5–7 minutes.
- If the bottom is ready before the top has enough color, finish briefly under the broiler.
- Move the finished pizza to a wire rack for 30–60 seconds, then transfer it to a board and slice.
Four Small Checks That Prevent Common Problems
Skip the rolling pin for this version; it presses gas from the rim. Preserve the outer band without building a thick rope around the pizza. The untopped edge will rise on its own.
If the dough repeatedly snaps back, cover it for 5–10 minutes and try again. A slightly oval pizza tastes just as good as a perfect circle, so protect an even center and let perfect geometry wait.
If the pizza lands oval or slightly off-center but is safely on the baking surface, leave it there. Shape matters far less than keeping your hands away from a blazing oven.
A browned underside, properly colored rim and cooked center without a broad gummy band tell you the pizza is ready.
Need help with one part? Jump to flour · cold fermentation · dough readiness · stretching · launching · baking · troubleshooting.
What Makes the Crust New York Style?
“Thin crust” is not specific enough. Cracker crust is thin, and Neapolitan pizza is thin through the center too. The New York slice lives in the balance between crispness, chew and flexibility.
Look for a thin browned shell underneath, a narrow tender-chewy layer above it, a modest rim, and enough flexibility for the slice to fold cleanly.
It is the kind of slice you can pick up by the crust, fold lengthwise and eat one-handed without the toppings sliding into your lap.
Cracker-style pizza goes farther toward dryness and snap. Neapolitan pizza has a lighter, puffier outer rim. Thicker delivery-style pizza carries more bread through the center. New York sits between those extremes.

If what you really want is fresh mozzarella, tomato and basil on a lighter pizza, the Margherita Pizza recipe handles that wetter topping balance separately.
That crisp-chewy balance comes from more than one ingredient. Hydration, flour strength, fermentation and the home-oven bake all have to support the same result.
Why This Dough Formula Works
New York dough formulas vary. Some are relatively dry and easy to handle; others run wetter. Flour strength, sugar, oil, fermentation and oven setup all shift the result.
This formula favors a generous margin for success in a home kitchen. The point is not to chase the wettest dough you can handle; it is to make a dough that opens thin without turning the first launch into a high-wire act.
What Hydration Is Best for New York-Style Pizza Dough?
There is no single required hydration. This home-oven formula uses 63.5%. That gives the dough enough water to stay tender and stretch thin without making a first-time launch unnecessarily fussy.
| Ingredient | Baker’s percentage |
|---|---|
| Flour | 100% |
| Water | 63.5% |
| Salt | 2% |
| Sugar | 1.25% |
| Olive oil | 3% |
| Instant yeast | 0.2% |
- 63.5% water: enough for a tender, stretchable center without making the launch unnecessarily difficult.
- 2% salt: seasons the crust and helps control fermentation.
- 1.25% sugar: assists browning in a home oven without making the crust taste sweet.
- 3% olive oil: adds tenderness and helps the crust retain moisture during the bake.
- 0.2% instant yeast: enough for the recommended 48-hour schedule.
Higher hydration can make excellent pizza, but it asks more from the flour, stretching technique and launch. Lower hydration is easier to handle but has less moisture to spare during a long home-oven bake.
Why Is the Yeast Amount So Small?
Because the recommended version spends about 48 hours fermenting slowly in the refrigerator, it needs very little yeast. Using more simply moves the dough through its fermentation window faster.
The recipe uses instant yeast because it can go directly into the flour. If you prefer active dry yeast, the recipe card above gives the conversion and activation method.
Prefer natural leavening? The Sourdough Pizza Dough recipe uses starter instead. Starter strength and timing make it a different fermentation system even though some readiness cues overlap.
Once the percentages are set, flour strength determines how comfortably the dough can carry them.
What Is the Best Flour for New York-Style Pizza Dough?
Start with bread flour around 12–13% protein. It gives this dough enough strength to stretch thin while retaining the chew that makes the crust satisfying.
Only have all-purpose flour? Pizza is still on. A reasonably strong AP flour can work very well. The dough may feel softer in your hands, so stop the stretch a little sooner if the center starts thinning faster than expected.
| Flour | Can you use it? | What changes? |
|---|---|---|
| Bread flour | Recommended | Reliable strength and chewy structure |
| High-gluten flour | Yes | More strength and chew; can resist stretching if heavily developed |
| Strong all-purpose flour | Yes | Softer crust; often an excellent option |
| Weaker all-purpose flour | Yes, with care | May feel wetter and tear sooner at the same hydration |
| Tipo 00 | Sometimes | The label alone does not tell you dough strength or whether the flour suits your oven |
| Whole wheat | Not as a direct 1:1 swap | Changes water absorption, flavor and extensibility |
| Gluten-free blend | No direct swap | Needs a formula built specifically without wheat gluten |
If a weaker flour makes the dough substantially softer, try taking 5–10 g water out of the next batch. If that helps, record the adjustment and use it as your starting point next time.
What Should Cold-Fermented Pizza Dough Look Like?
Should Pizza Dough Double in the Fridge?
No. New York pizza dough may expand only modestly during cold fermentation. Look for small bubbles, some spreading, a softer shape and easier stretching instead of waiting for a dramatic doubling.
Open the container after a day and the ball may look surprisingly quiet. That alone is not bad news.
Around 24 hours: expect modest fermentation activity and dough that is beginning to relax.
Around 48 hours: the ball should feel softer and more willing to open while still lifting cleanly from its container. This is the intended window for the main recipe.
Around 72 hours: expect more relaxation. Pay closer attention to strength: the dough should still hold together without turning gluey and fragile.
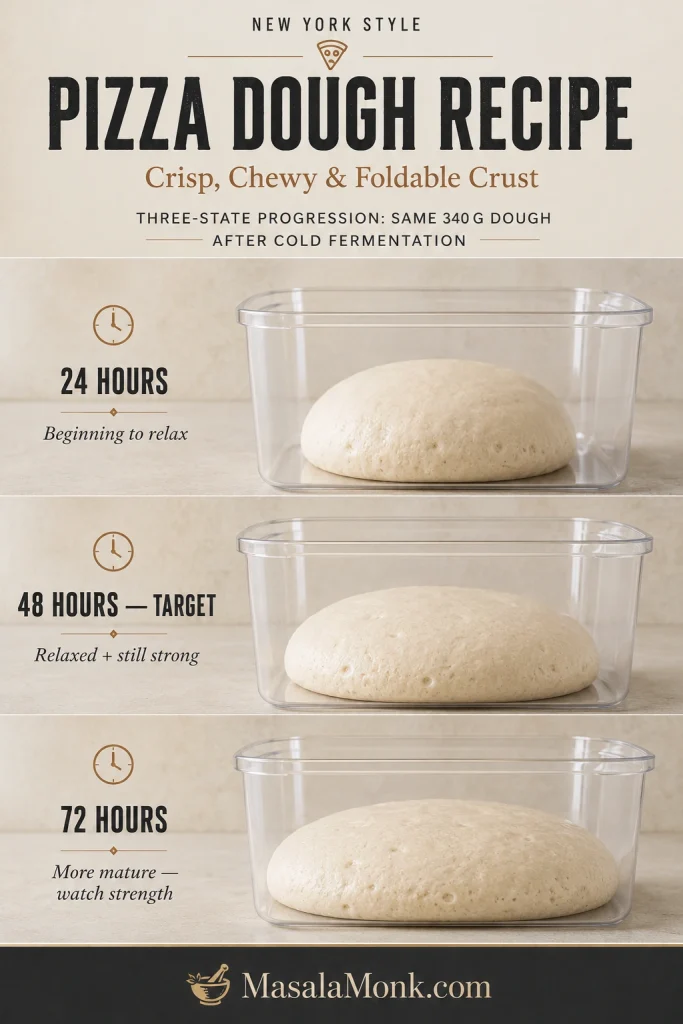
Refrigerator temperature matters throughout. A fridge at 37–40°F / 3–4°C gives you more predictable timing than one running several degrees warmer.
- Relaxed but healthy: spread somewhat, soft, and able to lift in one piece.
- Possibly overfermented: unusually flat, newly sticky, weak, translucent in places and easy to tear with little resistance.
Dough that feels much wetter after several days has not necessarily gained water. As its gluten structure weakens, it becomes less effective at holding the water already present.
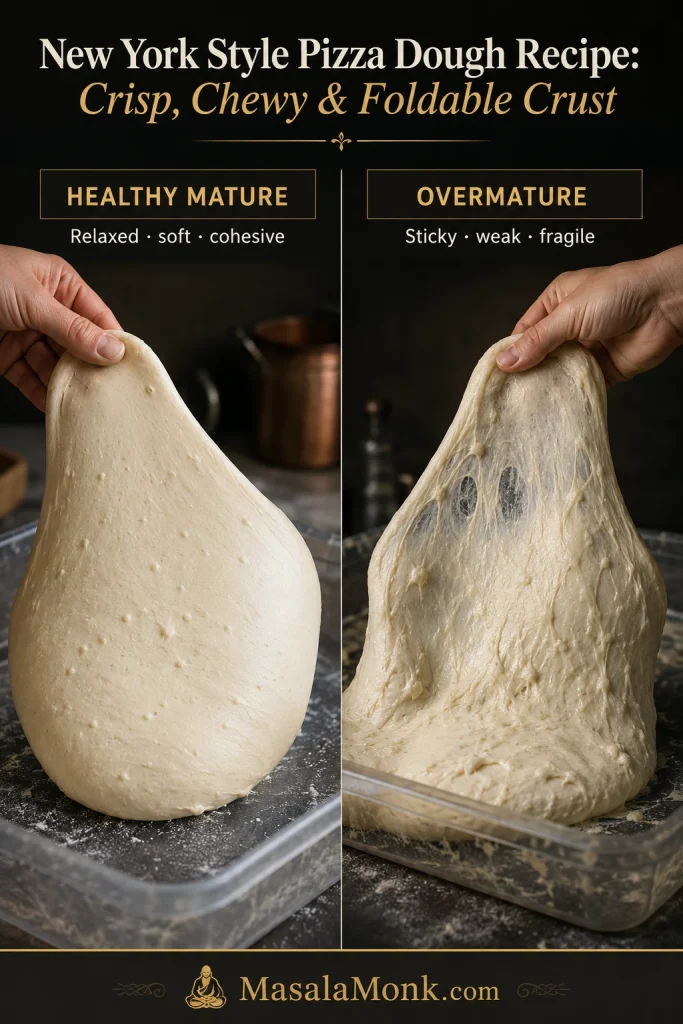
How Much Dough Do You Need Per Pizza?
Ball weight and finished diameter work together. Too much dough at a small diameter gives you a thicker, breadier pizza even when fermentation is perfect.
| Finished pizza | Practical dough range | How to use it |
|---|---|---|
| 12 inches / 30 cm | About 230–270 g / 8.1–9.5 oz | Lower end for a thinner result; upper end is easier to handle |
| 14 inches / 36 cm | About 300–340 g / 10.6–12 oz | This recipe uses 340 g for an easier first attempt |
| 15 inches / 38 cm | About 320–360 g / 11.3–12.7 oz | The same 340 g ball gives a thinner NY-style center |
| 16 inches / 41 cm | About 350–400 g / 12.3–14.1 oz | Best with confident stretching and a large baking surface |
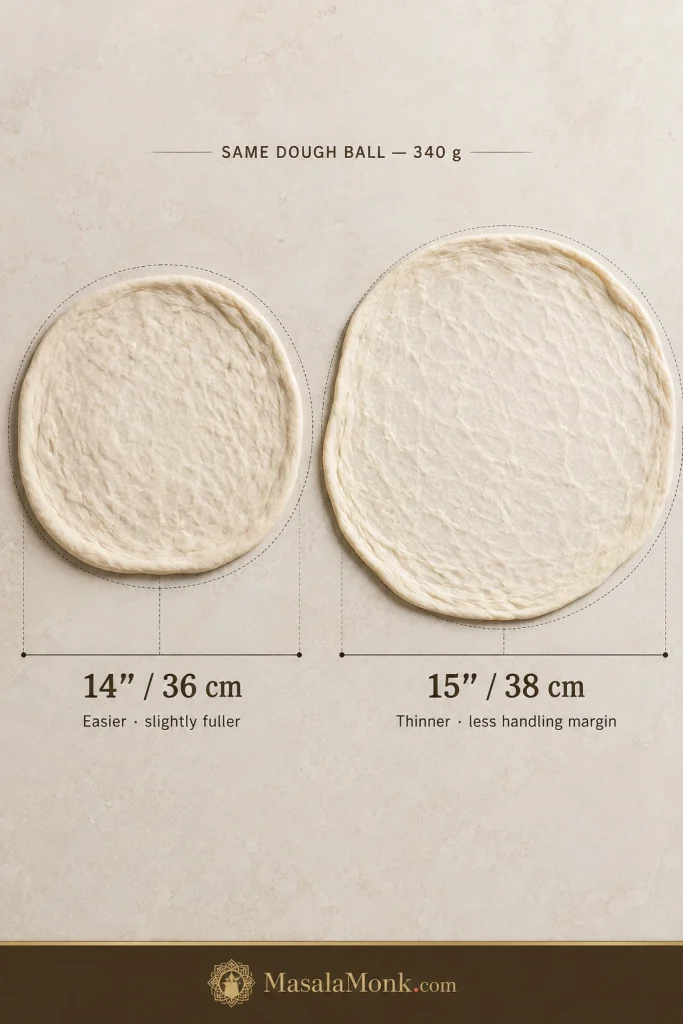
A clean 14-inch pizza is better than forcing a resistant ball to 15 inches. With practice, the same dough usually stretches farther and more evenly.
If what you actually want is a thicker pan crust with crisp cheese around the edges, the Detroit-Style Pizza recipe is the better direction.
Match Pizza Size to Your Baking Surface
Match the pizza to the baking surface, not just the dough ball. A 14-inch pizza is manageable on a 15-inch surface; for a 15-inch pizza, a 16-inch surface or larger gives you much more landing margin.
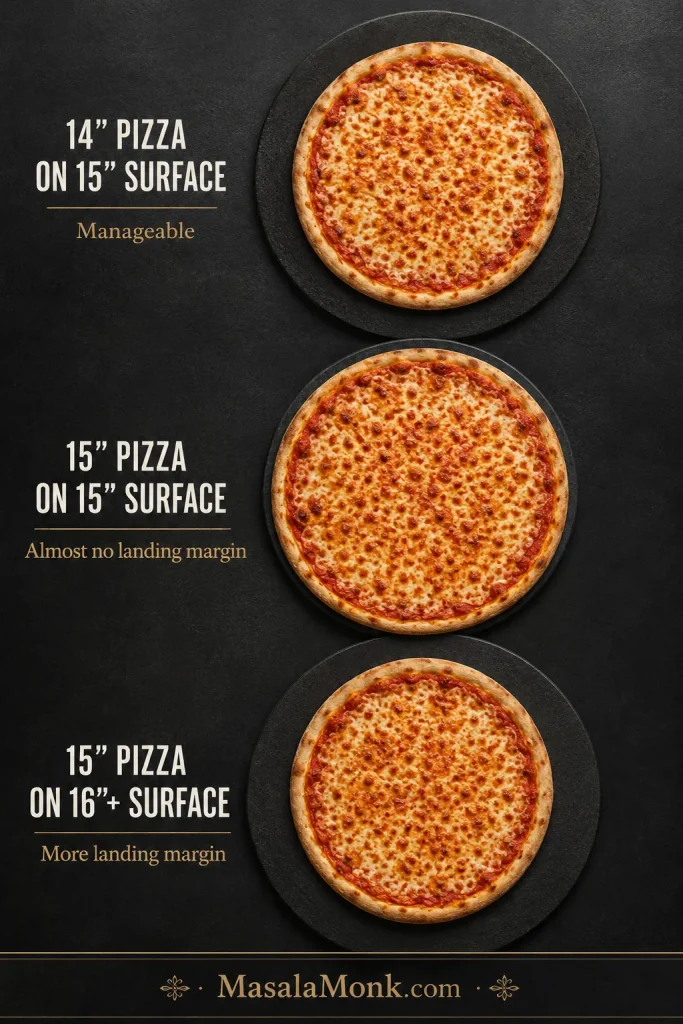
Give the dough room, too. A container around 1 quart / 1 liter works comfortably for a 340 g ball. Crowded balls can merge and flatten awkwardly, while re-balling a relaxed dough immediately before baking creates fresh tension that needs time to settle again.
Once a ball has had enough room and time to relax, the next question is whether it is ready to open.
Is My Dough Ready to Stretch?
Ready pizza dough feels soft, stretches with gentle resistance, and still has enough strength to lift cleanly.
Two hours out of the refrigerator is planning advice. Your hands get the final vote.
The center can remain cooler than the room. It only needs to warm enough for the ball to open willingly without repeated tearing or snap-back.
- Still too cold: firm, tight and quick to spring back. Cover it and wait.
- Ready: soft and willing to stretch, yet cohesive enough to lift cleanly.
- Very warm: softer and slacker but still cohesive. Use it once it opens willingly.
- Overmature: increasingly sticky, weak and fragile. Handle gently and use promptly.
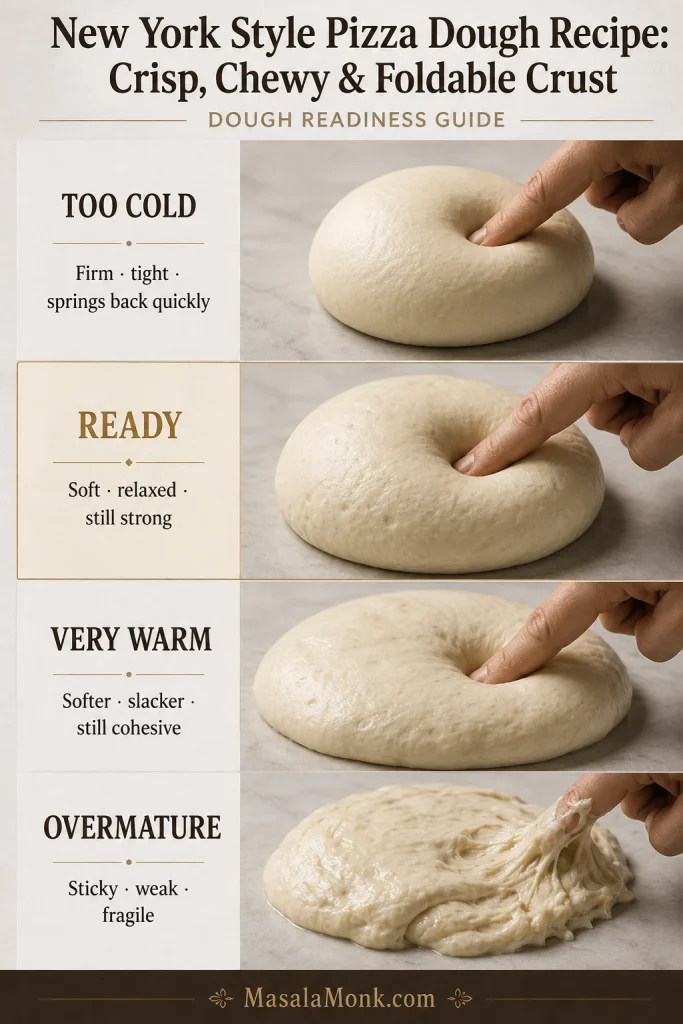
One kitchen may have workable dough after 90 minutes; another may need 2½ hours. Once it opens comfortably, extra counter time brings no automatic benefit.
Next: Stretch the dough without fighting it →
How to Stretch the Dough Without Fighting It
Get everything else ready first: sauce portioned, cheese grated, toppings nearby, peel dusted and oven hot. Thin dough becomes more likely to stick if it sits around while you look for ingredients.
Release the ball gently with your fingers or a plastic scraper. Flour both sides lightly, press the center outward with your fingertips, and preserve the outer ½–¾ inch / 1–2 cm.
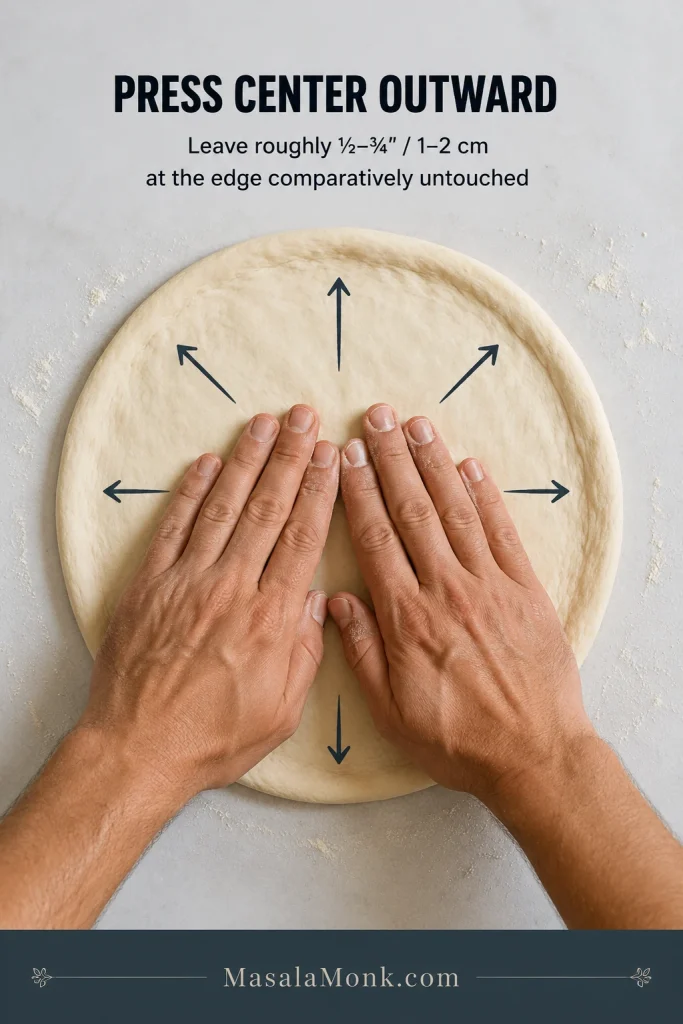
When the disk is large enough to lift, rotate it through your hands and let gravity help. Keep moving around the pizza so one spot does not take all the stretching.
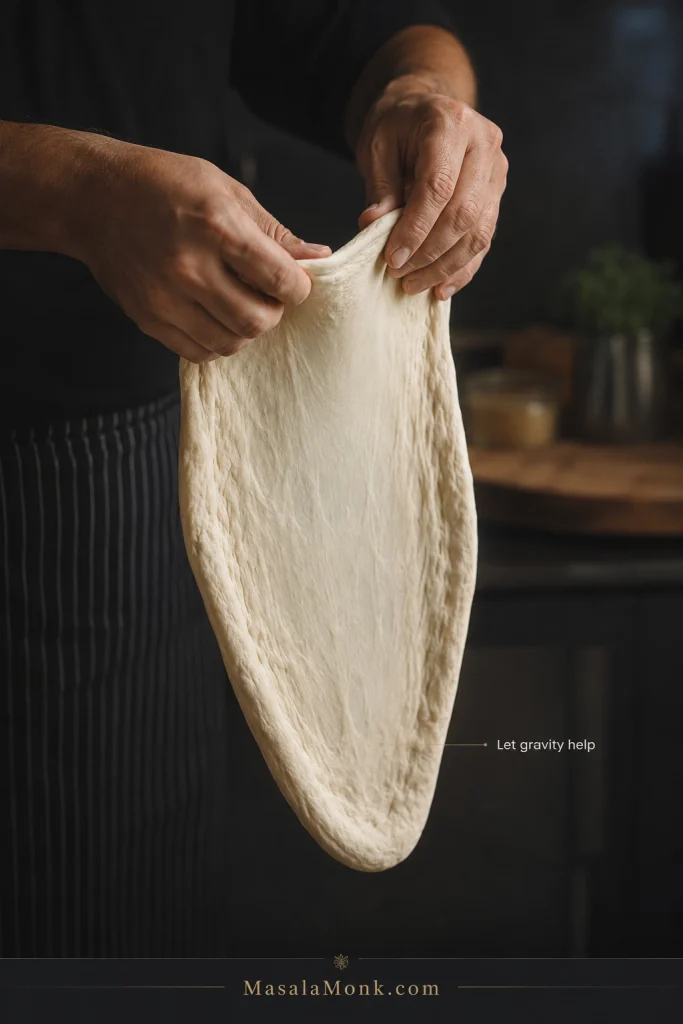
An even 14-inch center beats a 15-inch pizza with one paper-thin half and one thick half.
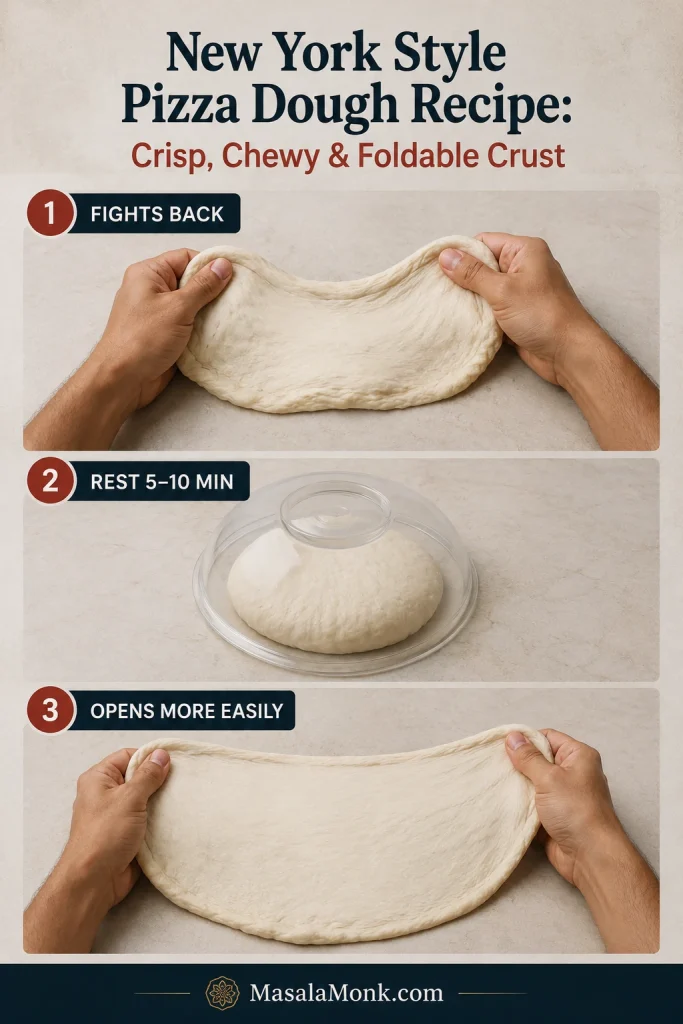
When It Springs Back
The annoying part of spring-back is that pulling harder usually makes it worse.
Put the partially stretched dough down, cover it, and wait 5–10 minutes. That short pause often does more than another five minutes of tugging.
Already warm but still snapping back hard? Strong flour or aggressive mixing can leave the dough unusually elastic. Give it another short rest.
When the dough fights back, rest beats force.
When It Tears
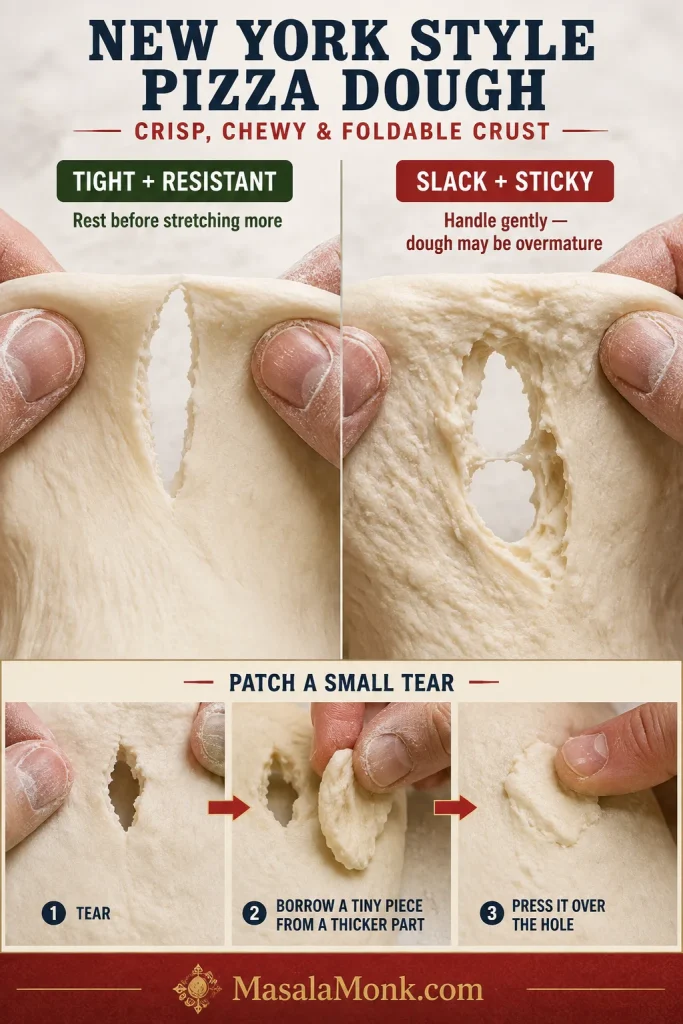
How the dough felt just before it tore helps identify the problem.
- Tight and resistant: it was probably stretched before relaxing enough. Stop and rest it.
- Loose, sticky and fragile: the dough may be overfermented or the flour may not have enough strength for the hydration.
A small tear is repairable. Pinch the edges together. For a larger pinhole, borrow a tiny piece from a thicker part of the rim and press it over the opening, then leave the patch alone for a minute.
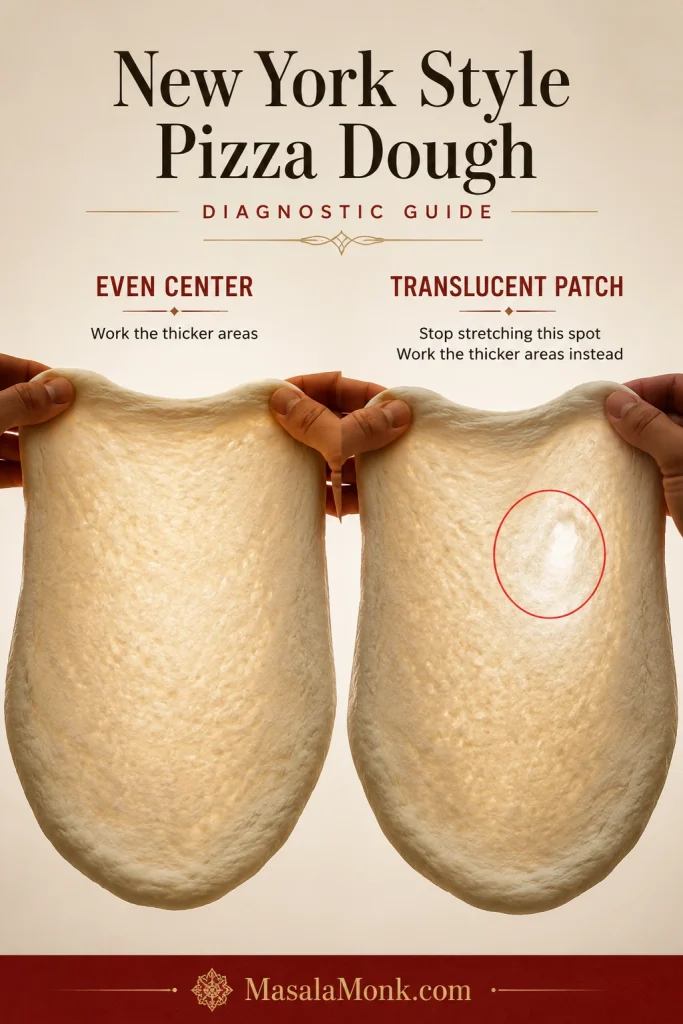
When one area starts looking translucent, leave it alone and work on thicker parts of the dough. A hole that develops later can let sauce through and glue that spot to the peel.
Next: Top lightly and launch cleanly →
Top Lightly and Launch Cleanly
Thin New York-style pizza rewards restraint. Start with the 115 g sauce + 115 g mozzarella baseline from the recipe and add more only after you know how your oven handles the extra moisture and weight.
- Thick pizza sauce: spread a thin, even layer. The Pizza Sauce Recipes guide has tomato, white garlic, vodka, BBQ and other options.
- Whole-milk low-moisture mozzarella: grate it from a block if possible for a cleaner melt.
- Other toppings: add enough to taste them without burying the thin center under excess water and weight.
Loose sauce, watery vegetables and fresh cheeses all bring more moisture. Adjust the load accordingly. Once baked, a light drizzle of Hot Honey Sauce gives you sweet heat without adding that moisture to the raw pizza.
The Peel Shake Test
- Dust the peel lightly.
- Put the stretched dough on it.
- Shake it now. The whole skin should move.
- Top quickly.
- Shake it again.
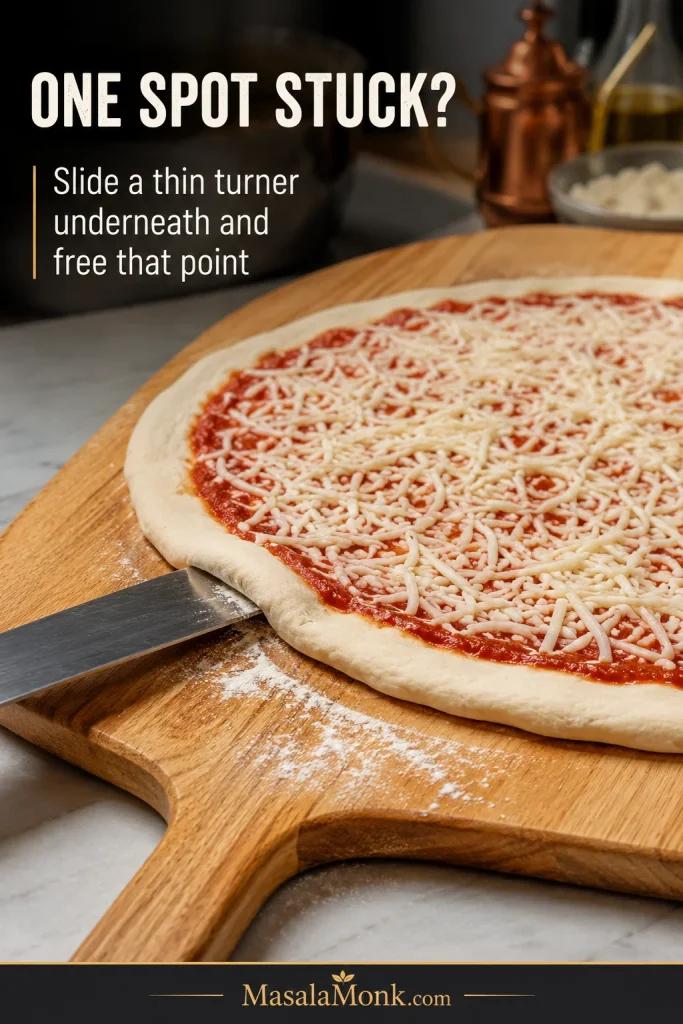
- If one spot sticks, free that spot before launching.

If the pizza will not slide on the counter, it will not suddenly become easier while you are leaning into a 550°F oven. For one stubborn spot, slide a long spatula or thin turner underneath and dust the edge of the tool lightly with flour if needed.
Peel Tips: Wood vs Metal and One-Peel Setups
A wooden peel is forgiving for building and launching raw pizza. A thin metal peel works particularly well for turning and retrieving it.
Using one peel for everything is fine. Let it cool and dry completely before placing the next raw dough on it; moisture from a hot finished pizza can make the next launch unexpectedly sticky.
How Much Flour or Semolina Should Be on the Peel?
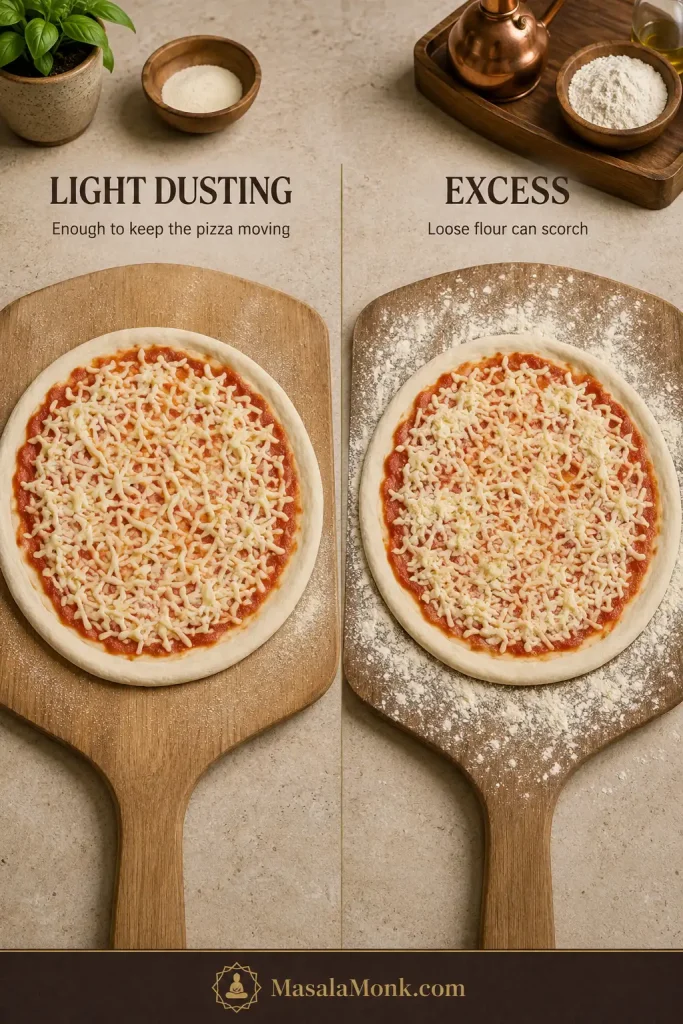
Flour or fine semolina works well for dusting. Cornmeal is optional and adds a coarser texture, but loose grains can scorch on a hot steel. Use the minimum dusting needed to keep the pizza moving.
Next: Bake the pizza and balance top and bottom heat →
How to Bake New York Style Pizza at Home
Your first pizza is partly dinner and partly calibration. It still counts as dinner.
If the dough handled beautifully but comes out pale underneath, check the baking setup before rewriting the formula.
| Setup | Preheat | Planning range | What to expect |
|---|---|---|---|
| Pizza steel | About 60 min | Often about 5–7 min | Strong bottom heat; easiest route to a crisp-chewy home-oven NY crust |
| Pizza stone | At least 60 min | Often about 7–15 min | Very good results, with gentler heat transfer than steel |
| Heavy inverted sheet | About 45–60 min | Often about 8–12+ min | Useful without specialty equipment; expect gentler bottom browning |
Those are planning ranges. The pizza itself decides when it is ready.
Balance Top Heat and Bottom Heat
Put a steel or stone roughly in the middle of the oven and preheat at 500–550°F / 260–288°C, or the highest suitable setting your oven allows.
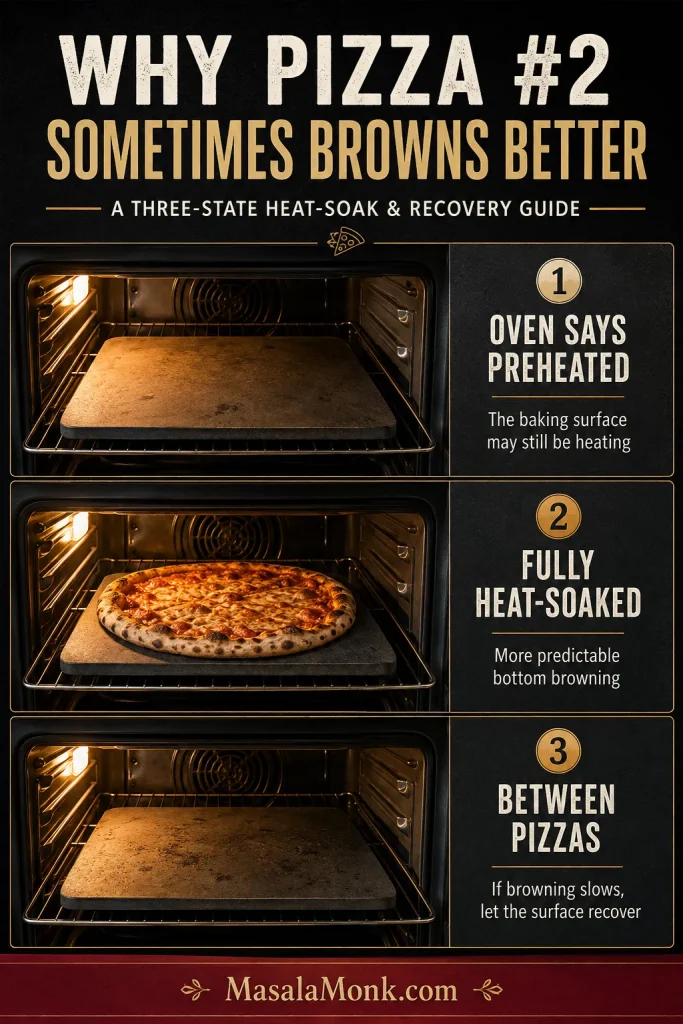
An infrared thermometer can tell you whether the baking surface is still heating or has recovered between pizzas, but you do not need one universal surface-temperature number. Use the underside of the pizza to calibrate your setup.
When the Cheese Is Done Before the Crust
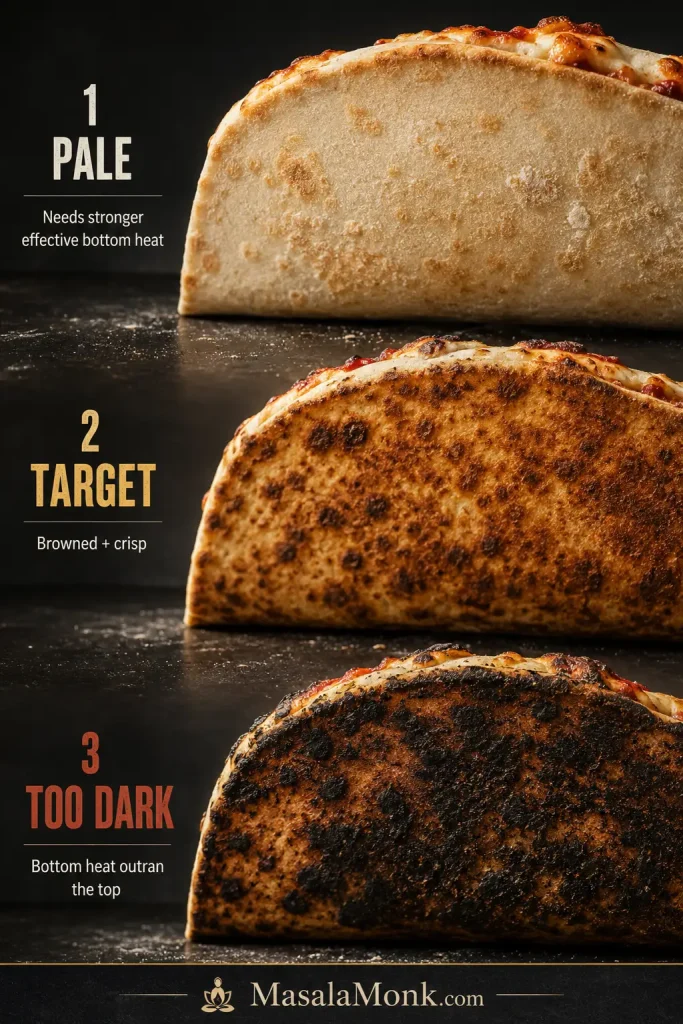
Dark cheese is not proof that the crust is cooked. If the mozzarella is racing ahead while the underside remains pale, the top and bottom heat are out of balance.
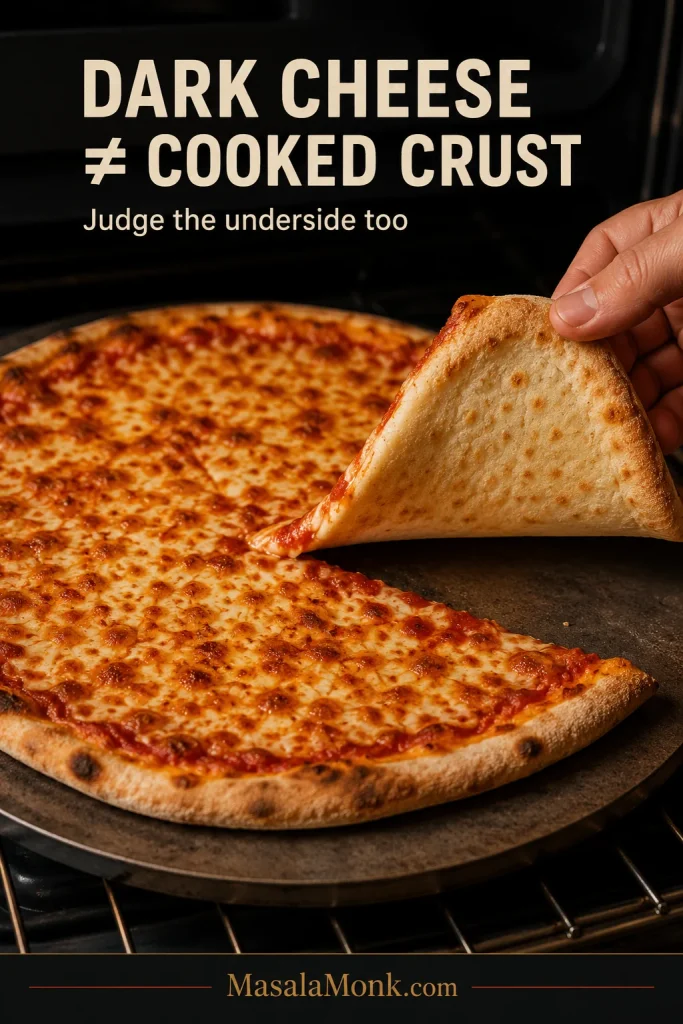
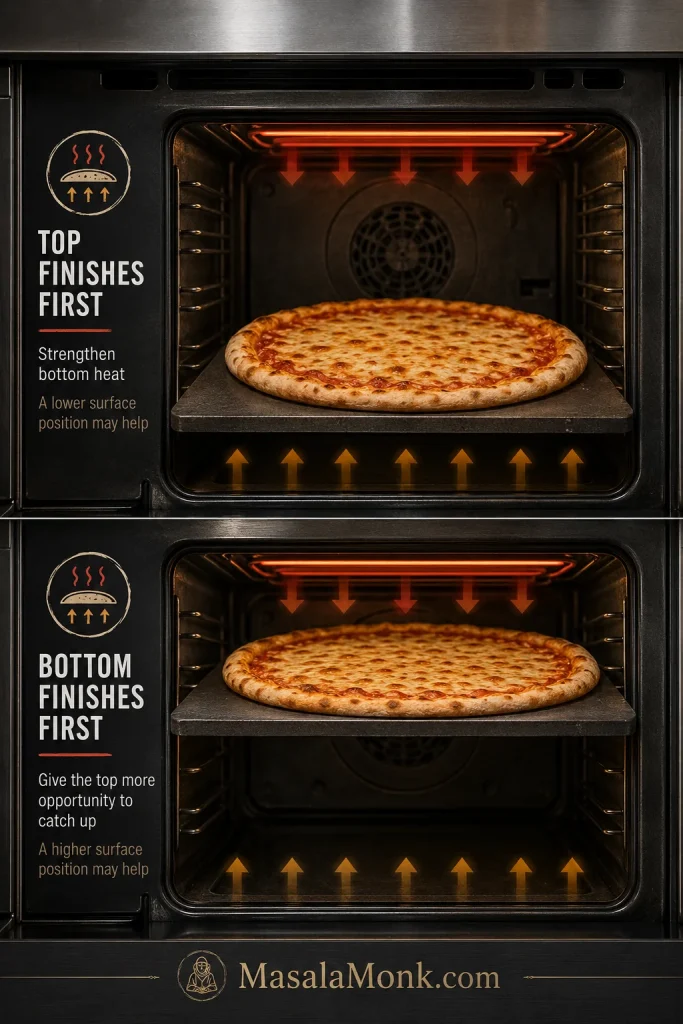
- Top ready, bottom pale: preheat the surface longer, move it lower, or otherwise strengthen the bottom heat.
- Bottom dark too early: move the surface higher so the top has more time to catch up.
- Bottom excellent, top nearly there: finish briefly under the broiler.
What a Properly Browned Pizza Underside Looks Like
The first time you lift a home-oven pizza and find a properly browned base instead of pale dough, the long preheat suddenly makes sense.
Let the Steel or Stone Recover Between Pizzas
The preheat beep is not the finish line. Oven air heats much faster than a thick steel or stone. During a batch, the reverse problem appears: every pizza removes stored heat, so give the surface a few minutes to recover if later pizzas begin browning more slowly.
Alternative Oven Setups: 450°F Ovens and Outdoor Pizza Ovens
If your oven tops out around 450°F / 230°C: you can still make good pizza, particularly on a fully heated steel. Expect a longer bake and somewhat gentler bottom browning. Keep toppings light and use the broiler when necessary to finish the top without drying out the whole crust.
Using an Ooni or another outdoor pizza oven? Bake this as New York pizza: lower and longer than Neapolitan. Ooni’s New York-style pizza guidance notes that traditional New York pizzas bake at roughly 500–650°F / 260–340°C, while compact pizza ovens may need somewhat more heat. Follow the NY-style guidance for your oven rather than simply running maximum flame.
The sugar and oil in this dough brown much faster at extreme pizza-oven temperatures.
Next: Run the New York slice test →
The New York Slice Test: Did It Work?
This is the moment the percentages stop mattering.
Lift a slice. Smell the crust. Look underneath. Fold it.
Read the Crust Before You Fold It
Start with the crust. The bare rim should smell toasted and taste wheaty and savory, with gentle fermented depth instead of a strong yeast flavor.
Look at the top. The mozzarella should be melted and lightly mottled, with patches of red sauce still visible between the cheese. The rim should look fully baked.
Look underneath. You want a thin browned shell with darker spotting, not a pale floury base or one that has burned uniformly black.
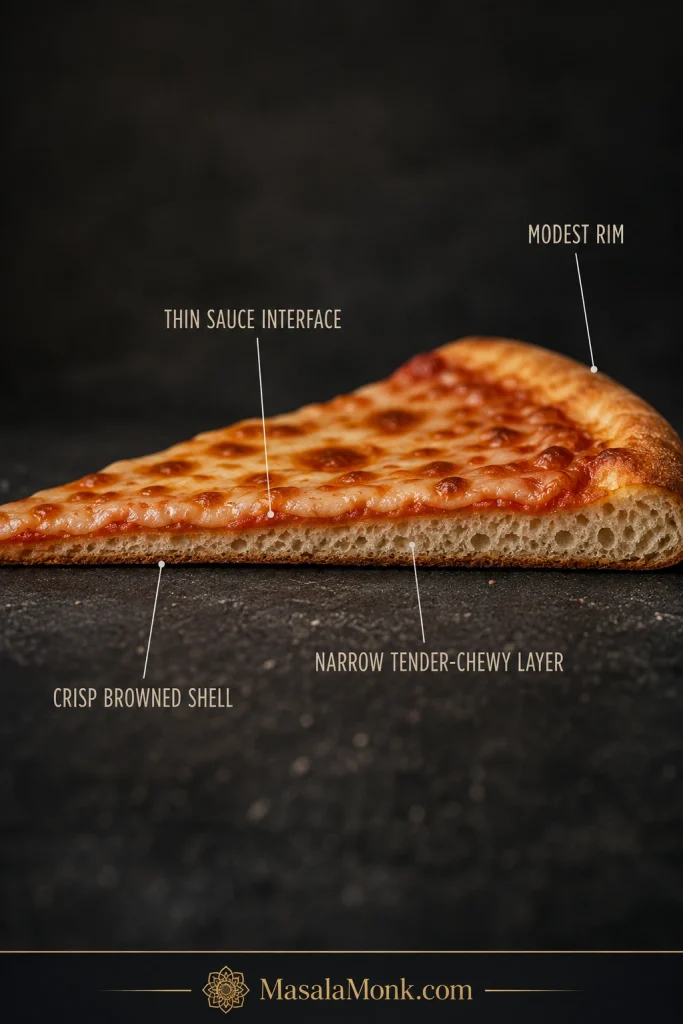
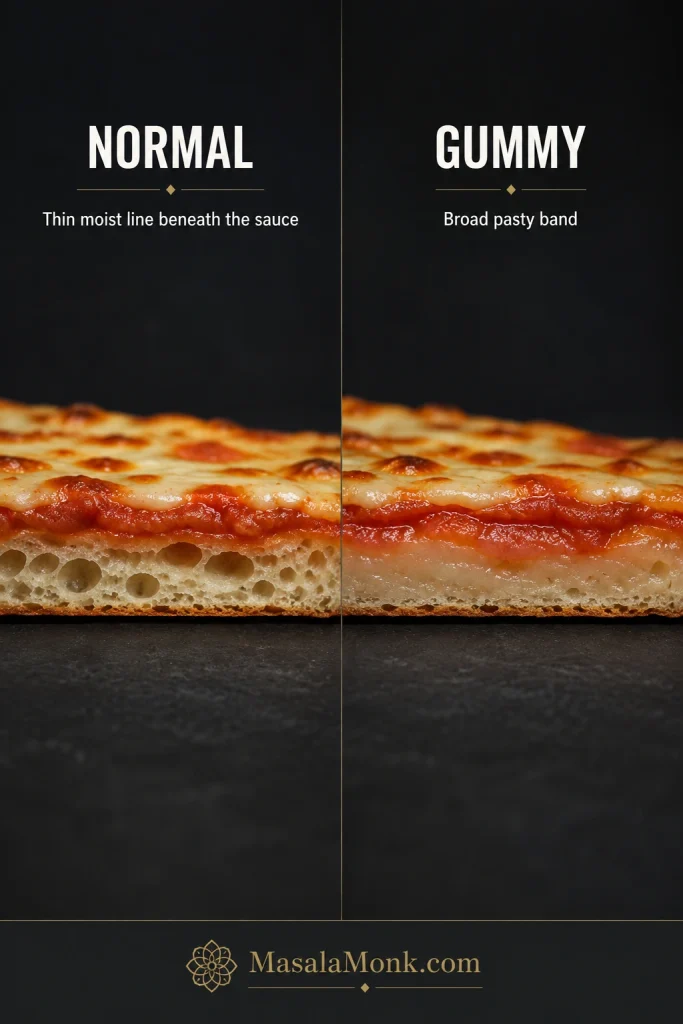
Look at the cross-section. Above the crisp shell should be a narrow tender-chewy layer. A very thin moist line directly beneath the sauce can be normal; a broad pasty or gummy band is not.
Fold the Slice: Floppy, Flexible or Cracker-Hard?
Now fold it. The slice should bend lengthwise without snapping, and the folded slice should support its tip reasonably well. Some dip beneath the toppings is normal; immediate collapse points to a softer base or heavier load.
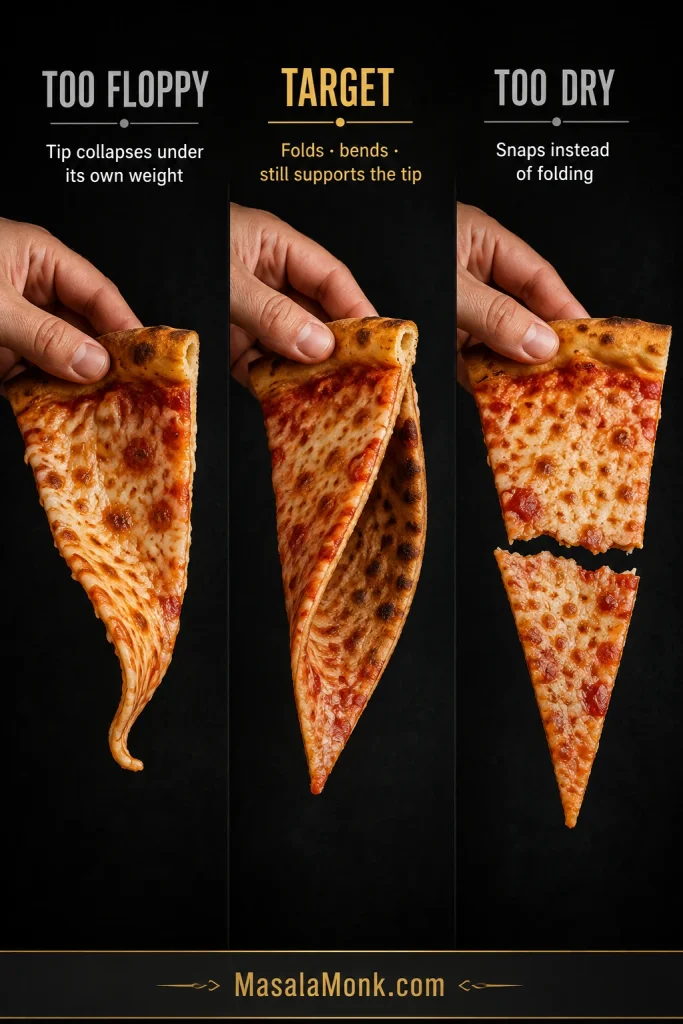
- Floppy: soft underside, wet tip or weak support. Check bottom heat, topping moisture, bake time and dough-to-diameter ratio.
- The target: crisp shell, tender-chewy interior, toasted flavor and a clean fold.
- Cracker-hard: dry, rigid and prone to snapping. The bake probably removed too much moisture.
If your slice missed the target, everything below is the repair manual. Jump to the stage where things went wrong; you do not need to read every troubleshooting table.
Troubleshooting New York Pizza Dough
Most pizza failures are surprisingly local. Sticky dough does not mean the oven is wrong, and a pale base does not mean fermentation failed. Fix the symptom you are actually seeing.
Choose the table that matches the stage where the problem appeared: dough and fermentation, stretching and launching, or baking. The best first question is often: when did it start going wrong?
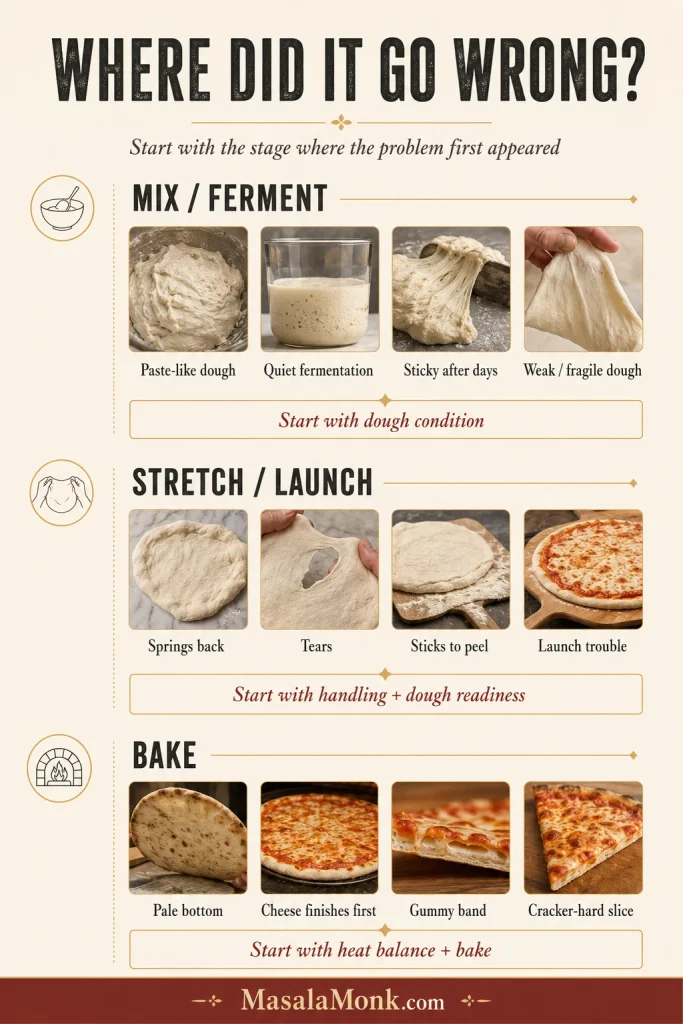
Why Is My Pizza Dough Sticky, Flat or Weak?
| What you see | What’s probably happening | Do this now | Next time |
|---|---|---|---|
| Dough is almost batter-like | Measurement error or flour too weak for the water | Check ingredient weights before adding lots of flour | Weigh flour/water; reduce water with weaker flour |
| Dough is lightly tacky | Probably normal | Keep going | Nothing unless it causes actual handling trouble |
| Very sticky immediately after mixing | Flour still hydrating or gluten not developed yet | Cover 10–15 minutes first | Keep the short hydration rest |
| Still smears after resting | Flour may not comfortably hold the planned hydration | After checking weights, add flour 5 g at a time | Record the correction and adjust water next batch |
| Much stickier after 2–3 days | Dough may be moving past its best fermentation window | Handle gently and use promptly | Shorter ferment, less yeast or colder storage |
| Barely expanded in the fridge | Cold fermentation may simply be slow | Judge bubbles and handling rather than waiting for doubling | Check actual fridge temperature before increasing yeast |
| Broad, flat and fragile | Possible overfermentation | Use promptly if still workable | Shorter fermentation or less yeast |
| Strong fermented/alcoholic smell + weak, slack dough | Dough is very mature | Use it now if it still holds together | Shorter or colder fermentation |
| Keeps shrinking back | Too cold or gluten still tight | Cover 5–10 minutes | More warm-up or gentler dough development |
| Tears while tight | Forced before relaxing | Stop stretching and rest | Warm longer and stretch gradually |
| Tears while slack and sticky | Overmature dough or insufficient flour strength | Patch gently and make a smaller pizza | Adjust fermentation or flour |
If your symptom is already in the table, resist changing three other things on the same batch. One useful change teaches you something. Five changes create another mystery.
Why Won’t My Pizza Stretch or Slide Off the Peel?
| What you see | What’s probably happening | Do this now | Next time |
|---|---|---|---|
| Won’t reach the intended diameter | Dough is tight or stretching is uneven | Rest it; bake a slightly smaller pizza | Give it enough warm-up and use the size ranges |
| Center becomes translucent | One area is being stretched too much | Stop touching that spot | Rotate the dough and work thicker areas |
| Rim is much thicker than expected | Too much dough was protected at the edge | Bake it as-is | Preserve a modest border instead of building a thick rope |
| Pizza sticks to the peel | Too much time, too little dusting or a wet spot | Locate and loosen the stuck area | Prepare toppings first and do both shake tests |
| Next pizza suddenly sticks | Peel may still be damp from retrieving the previous pizza | Dry it completely before rebuilding | Let one peel cool and dry or use separate launch/retrieval peels |
| One spot sticks after saucing | A small tear may be leaking sauce | Get dry flour beneath that point | Inspect for pinholes before topping |
| Pizza folds during launch | The skin was not moving freely | Salvage gently | Launch only when the entire pizza slides |
| Pizza lands oval | Imperfect launch | Leave it alone if safely on the baking surface | Prioritize a clean launch over a perfect circle |
| Bottom tastes burnt and floury | Too much loose flour/semolina/cornmeal | Clear burnt material before the next pizza | Brush off excess bench flour |
Why Is My Pizza Pale, Gummy or Burning?
| What you see | Check first | Do this now | Next time |
|---|---|---|---|
| Pale bottom | Baking-surface heat | Give it more bottom heat if the top allows | Preheat longer or adjust rack/surface position |
| Bottom burns first | Too much bottom heat relative to top | Move the pizza higher to finish if needed | Start the surface higher |
| Top done, bottom pale | Steel/stone is not delivering enough heat | Avoid drying the pizza with a very long bake | Preheat longer or move the surface lower |
| Cheese dark but crust underdone | Top heat is outrunning bottom heat | Finish cautiously; judge the crust separately | Rebalance rack position and baking-surface heat |
| Cheese browns too early | Strong top heat or warm cheese | Finish the crust carefully | Chill grated mozzarella 10–15 minutes and keep sauce cold |
| Pizza is thick and bready | Too much dough for the finished diameter | Serve it and note the size | Stretch farther or use a smaller ball |
| Crust is hard or cracker-like | Bake ran too long | No complete rescue after baking | Increase effective heat and shorten the bake |
| Center is soggy | Wet toppings or weak bottom heat | Return briefly if the crust can take it | Reduce moisture and strengthen bottom heat |
| Thick gummy band under sauce | Underbake, excess thickness or too much moisture | Cook further if possible | Stretch thinner, top lighter, strengthen bottom heat |
| First pizza pale, next one excellent | Surface was not fully heated | Keep baking; the surface is finally ready | Preheat longer |
| Earlier pizzas great, later ones pale | Surface lost stored heat | Pause before the next launch | Allow recovery between pizzas |
Useful jumps: Recheck the slice test · Jump to the recipe · Back to the Quick Answer
Adjustments, Storage and Common Questions
Can You Change the Sugar, Oil, Malt or Fermentation Method?
For bread flour, all-purpose flour, Tipo 00, whole wheat and gluten-free options, use the flour guide above. The changes below affect the formula more directly.
- Remove the sugar? Yes, but the crust loses some help with browning at home-oven temperatures.
- Remove the oil? Yes, but expect changes in tenderness, moisture retention and high-heat behavior.
- Need diastatic malt? No. Malt products vary, and some bread flours already contain malted barley flour or added enzymes. The sugar in this formula keeps the first batch simpler.
- Need a poolish? No. Preferments can make excellent pizza, but a 48-hour direct dough already has plenty of time to develop flavor.
If the crust is working and you simply want another flavor, change the topping before rebuilding the dough formula. A restrained layer from the pesto recipe and variations guide is one easy direction.
How to Store and Freeze the Dough
Yes, this dough freezes well. If you know you will not use both balls, freeze one after about 24 hours of cold fermentation.
The two-day version is the main refrigerator target, with a carefully managed three-day version as the planned extension. Once a ball becomes progressively flatter, stickier and more fragile, use it.
- Cold-ferment the individual balls for about 24 hours.
- Transfer each to a lightly oiled airtight freezer container or freezer bag.
- For best quality, aim to use the dough within about a month.
- Move it to the refrigerator 12–24 hours before you plan to bake.
- Once thawed, give it enough counter time to become soft and willing to stretch.
Thawed dough may feel stickier than fresh dough. A light dusting of flour is fine; avoid kneading a large amount of new flour into an already fermented ball.
A Couple of Common Questions
Can I use a bread machine?
Yes, if its dough cycle comfortably handles this quantity. Let the machine mix and knead, then remove the dough instead of letting a standard bread-program rise control the fermentation. Continue with the room-temperature rest, balling and refrigerator schedule above.
Do I need New York City water to make New York-style pizza?
No. Mineral content can affect dough behavior to some degree, but ordinary good-tasting drinking water can make excellent pizza. If your tap water tastes strongly chlorinated or has an unusual mineral character, filtered water is a sensible choice. There is no reason to import water from New York; Serious Eats’ New York water experiment likewise found no compelling reason to treat NYC water as the secret to great pizza.
The Slice Tells You Whether the Dough Worked
You do not need dramatic refrigerator rise, extreme hydration, imported flour, a poolish or a professional oven.
The payoff is much simpler: a crust worth eating all the way to the edge and a slice that folds the way you hoped it would.
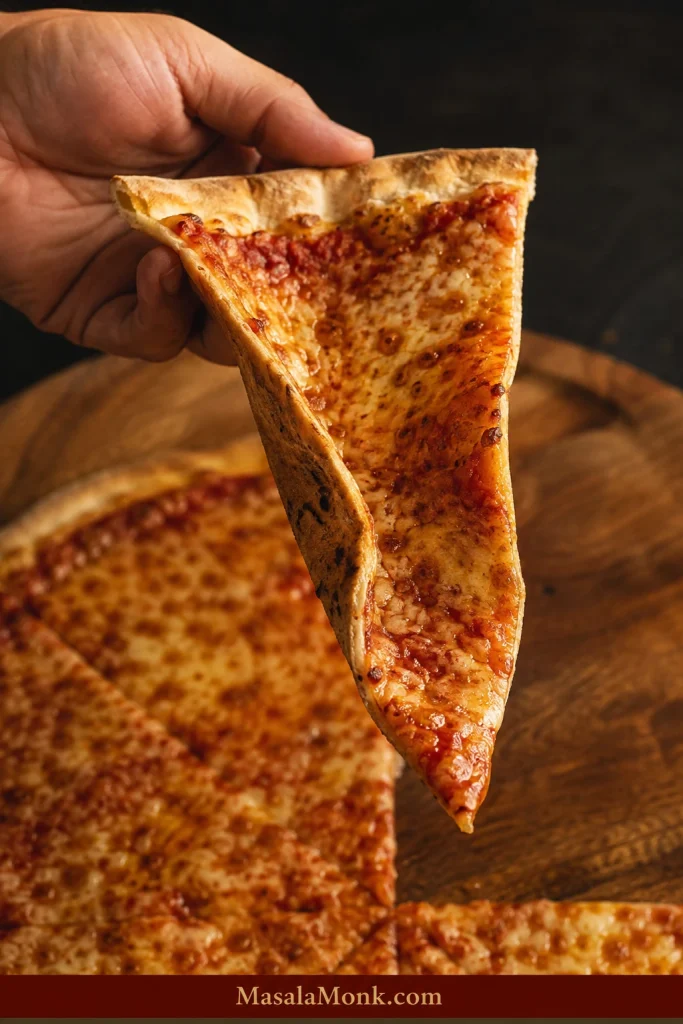
And when the first pizza is not quite there, let it teach you one thing before changing five. Sometimes the steel simply wanted another ten minutes of heat—and the second pizza is the one that makes you smile.
If you make this dough, share the flour you used, how long you fermented it, how large you stretched the ball, and whether you baked on steel, stone or a sheet. Those details make it much easier to compare notes and understand why the same dough behaves differently from one kitchen to another.
Ready to make it? Jump to the recipe · Back to the Quick Answer








