Posted on Leave a comment

New York Style Pizza Dough Recipe: Crisp, Chewy & Foldable Crust

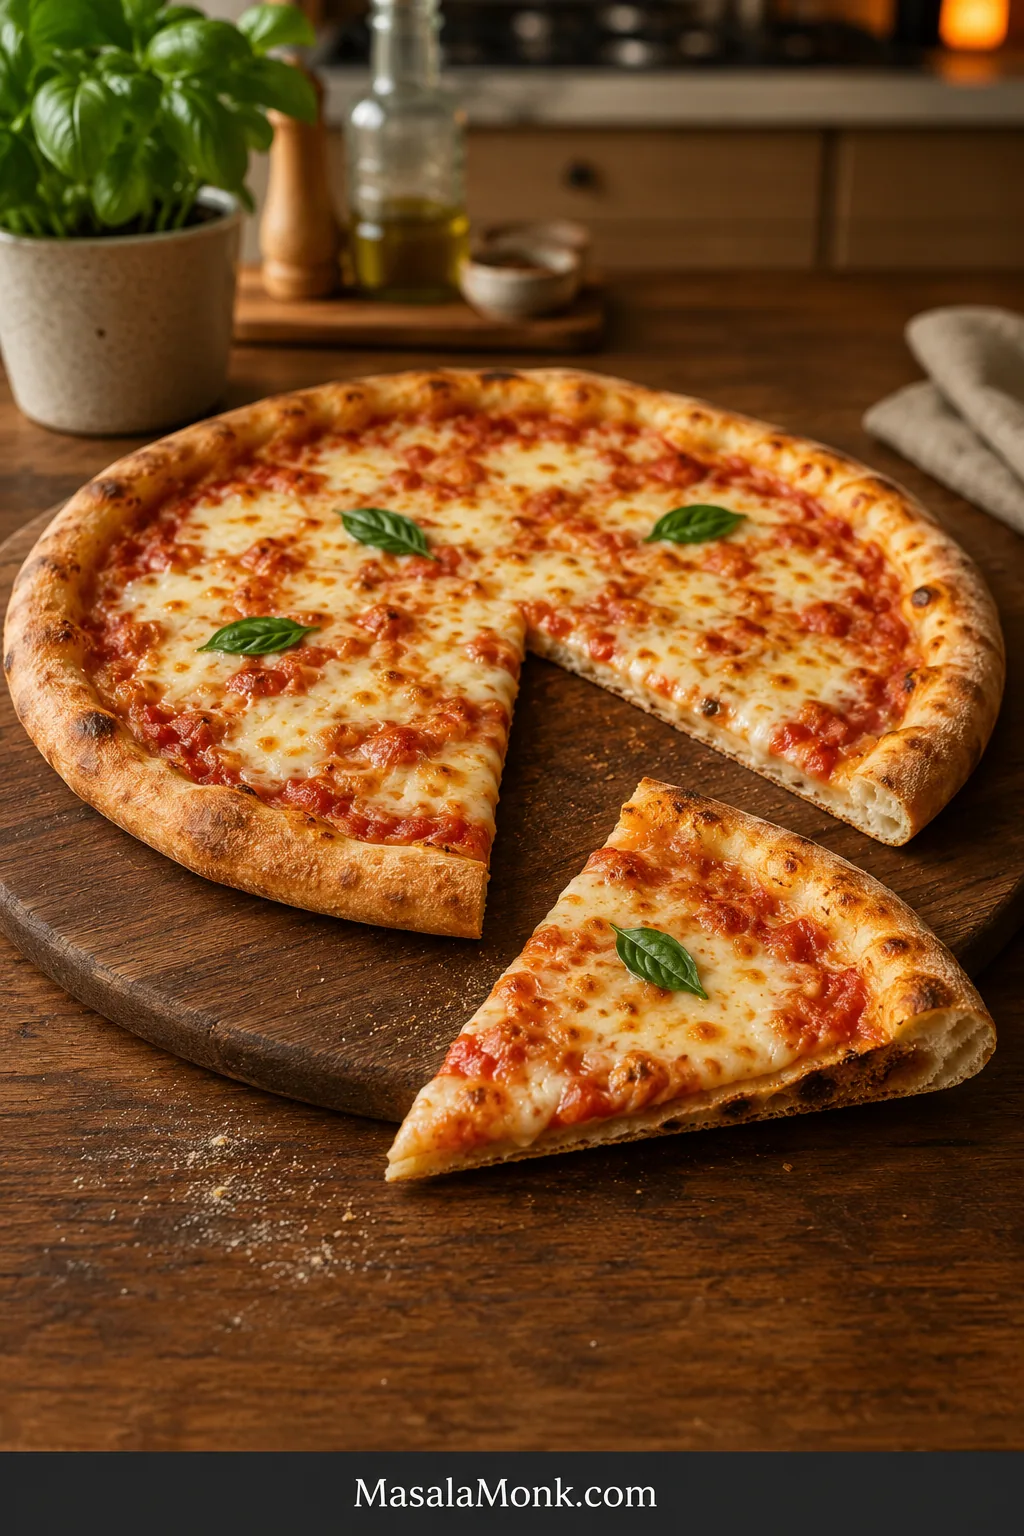
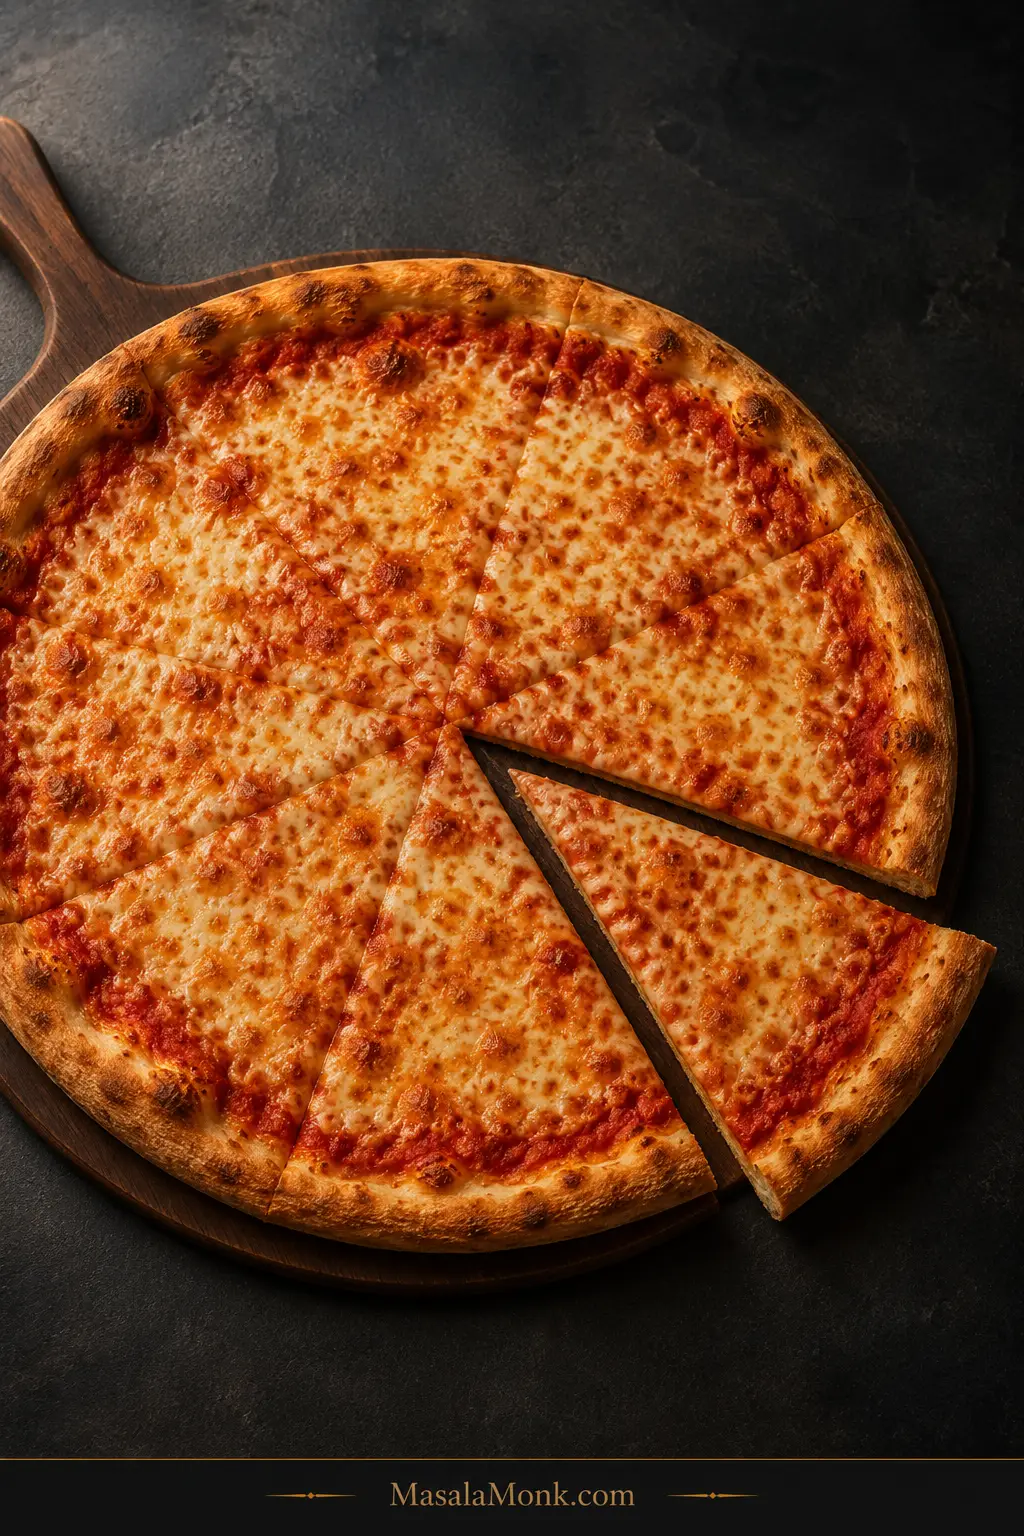
Plain New York-style cheese pizza with a thin center, modest browned rim, mottled mozzarella, visible tomato sauce and one slice pulled slightly away on a dark surface.

Lift a hot New York-style slice by the crust and the center should bend before it breaks. The underside should be browned and crisp, the rim should have a satisfying chew, and the slice should fold down the middle without snapping like a cracker or collapsing into a wet heap.
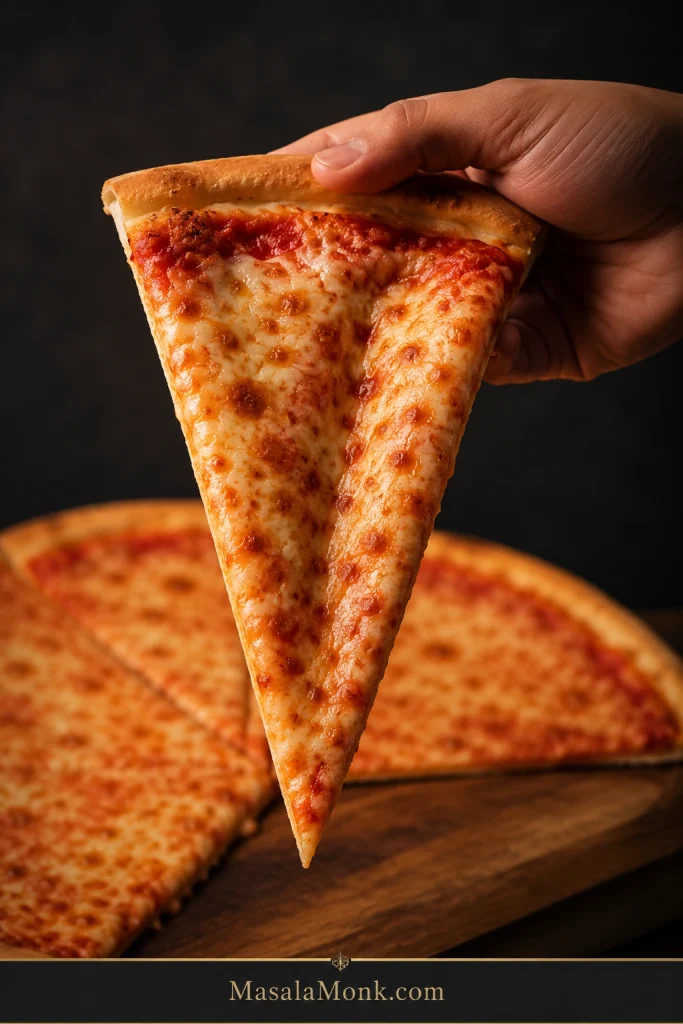
Hand holding a thin New York-style cheese slice in a gentle lengthwise fold, with melted mozzarella, visible tomato sauce and the pointed tip supported below.
Folding a New York slice lengthwise is structural as much as cultural. It stiffens a thin center, making the slice easier to hold without turning the crust itself thick or rigid.

A perfectly respectable dough can turn out thick and bready if it stays too small, or rubbery if you stretch it while tight. A baking surface that is not ready leaves the bottom pale; a long bake in a cooler oven can make the crust dry and brittle.

This version uses a 48-hour cold ferment, bread flour, 63.5% hydration, and small amounts of sugar and olive oil that suit a home oven. Just as importantly, it shows you what normal looks and feels like along the way—so a quiet dough in the refrigerator, a tacky first mix, or a stubborn stretch does not send you into a round of fixes the dough never needed.

The finished crust should taste as good as it feels: toasted and wheaty, gently savory, with fermented depth but no obvious sweetness from the sugar. Even the bare rim should be worth eating.

Quick Answer: New York Style Pizza Dough

For two 14–15-inch New York-style pizzas, use 400 g bread flour, 254 g water, 8 g salt, 5 g sugar, 12 g olive oil and 0.8 g instant yeast. Divide into two dough balls of about 340 g / 12 oz each and cold-ferment them for about 48 hours.

The finished pizza should be thin and browned underneath, crisp at the surface, chewy inside, and flexible enough to fold. A 14-inch pizza gives you more margin during stretching and launching; take the same ball closer to 15 inches when you want a thinner center and the dough is opening easily.

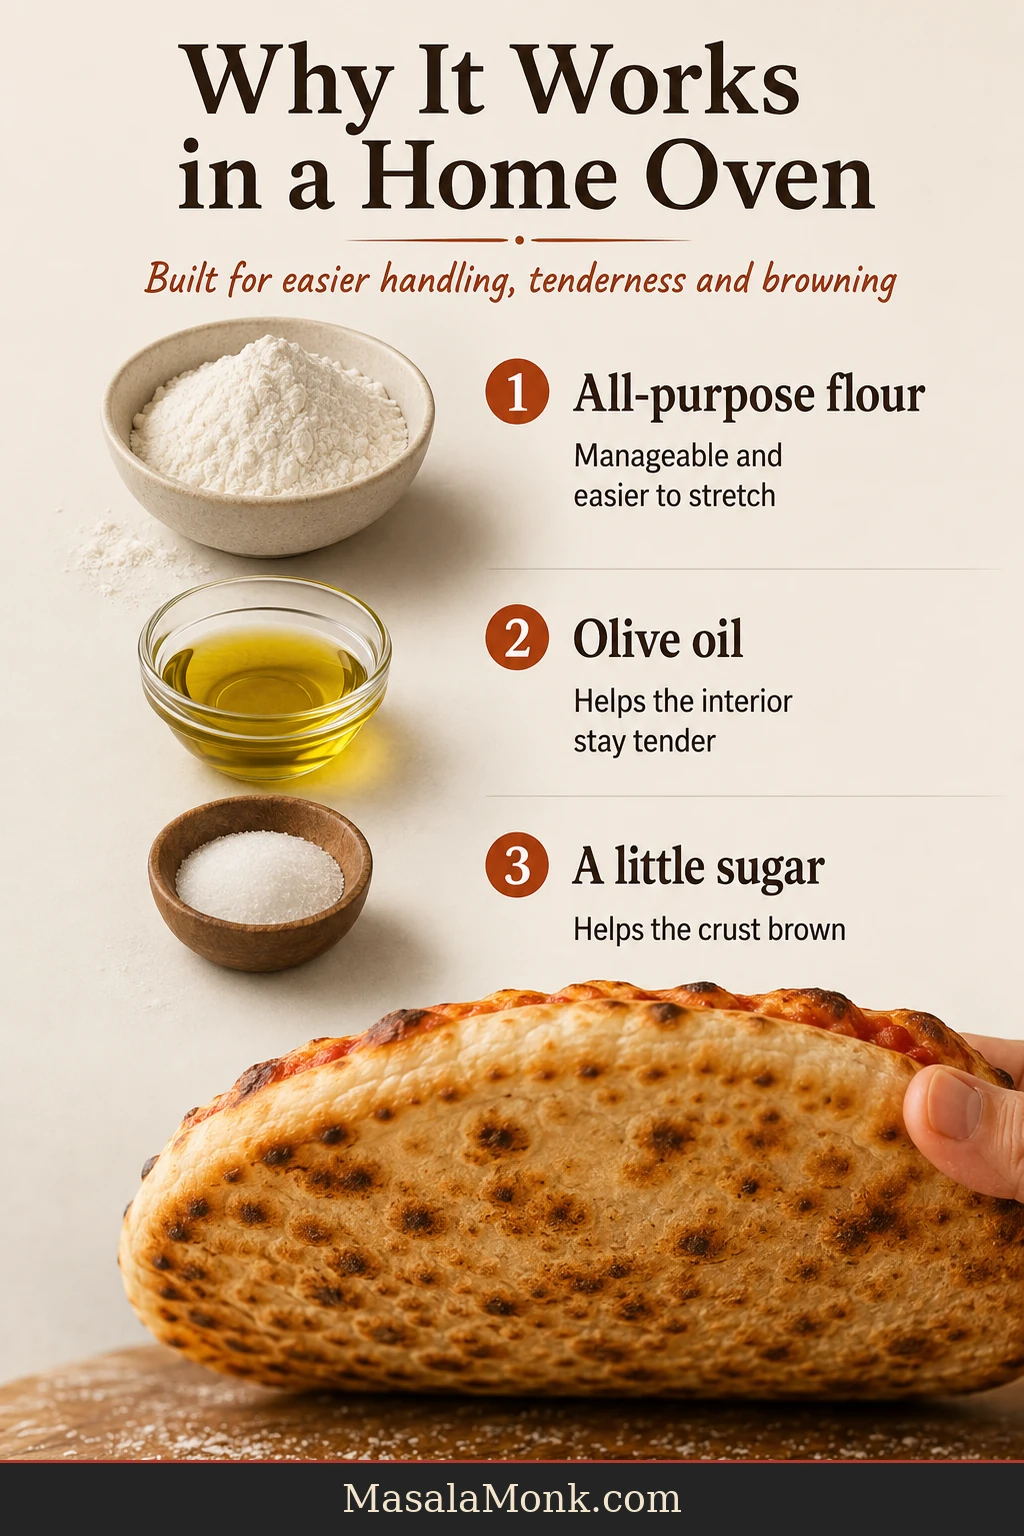
A small amount of sugar assists browning before a home-oven bake dries the crust out, while olive oil helps the interior stay tender. Stretch by hand, top with restraint, check that the pizza slides on the peel, and fully heat the steel or stone before baking.

The rule worth remembering: use the clock to plan pizza; use the dough to decide when it is ready.

How Long Should New York Pizza Dough Ferment? 24 vs 48 vs 72 Hours

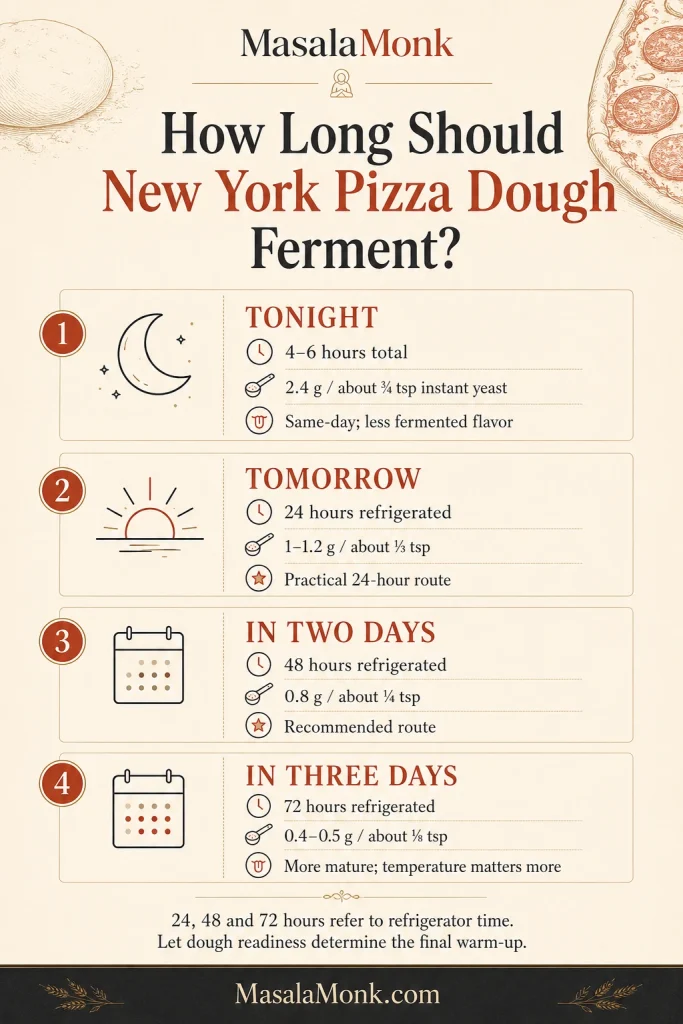
The 48-hour version is the main recipe here. It gives the dough time to develop flavor and relax while leaving a comfortable margin before fermentation becomes harder to control. Shorter and longer schedules work too; change the yeast to suit the schedule.

When you want pizzaInstant yeast for 400 g flourWhat to expect
Tonight2.4 g / about ¾ tspAbout 4–6 hours total; good same-day crust with less fermented flavor
Tomorrow1–1.2 g / about ⅓ tspA practical 24-hour route
In two days0.8 g / about ¼ tspRecommended 48-hour version
In three days0.4–0.5 g / about ⅛ tspA more mature 72-hour dough; temperature matters more
Fermentation guide comparing same-day, 24-hour, 48-hour and 72-hour routes for New York-style pizza dough, with different yeast amounts and timing notes.
For New York-style pizza dough, longer is not automatically better. Choose the ferment that fits your schedule, then watch relaxation and remaining strength. A well-timed dough is more useful than one kept cold simply because another day sounds better.

How to Plan Your Pizza Dough Fermentation Schedule

For the refrigerated routes, 24, 48 and 72 hours refer to time in the refrigerator, not the entire schedule. Change the yeast and cold-ferment time as shown, keep the mixing and balling method the same, then let the dough’s readiness cues determine the final warm-up.

The 24- and 72-hour routes are starting points, not stopwatch formulas. A warmer refrigerator moves fermentation faster. These schedules assume about 37–40°F / 3–4°C in the refrigerator and 68–72°F / 20–22°C in the kitchen.

Planning Friday evening pizza? Mix Wednesday mid-afternoon, refrigerate the shaped balls by late afternoon, then take them out at roughly the same time Friday for a 2–3 hour warm-up before dinner.
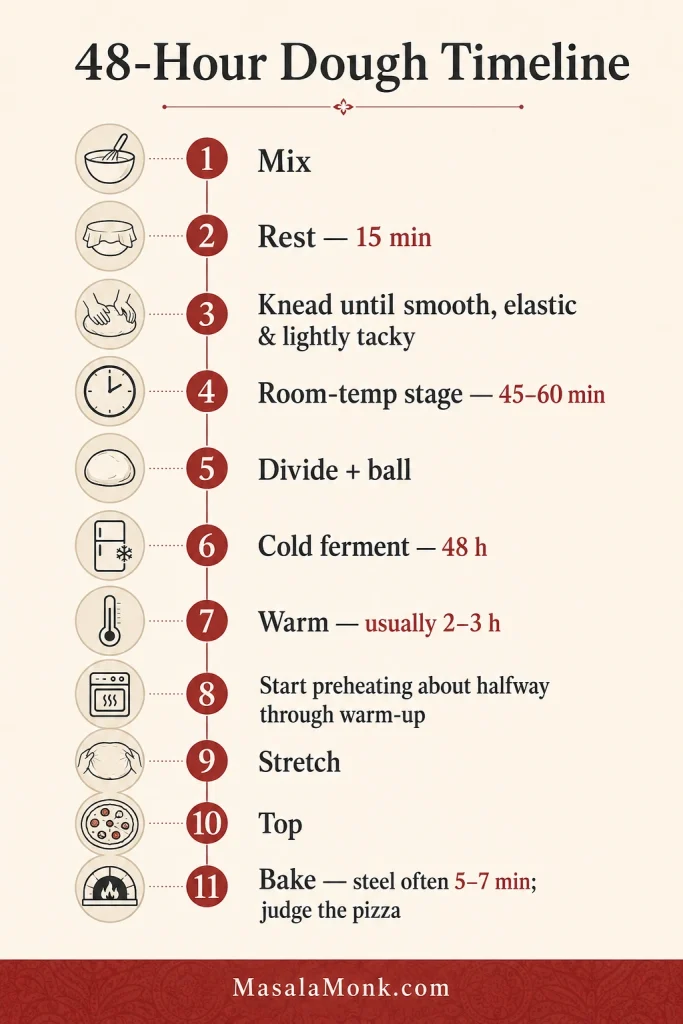
Vertical 48-hour New York-style pizza dough timeline from mixing and resting through cold fermentation, warm-up, oven preheating, stretching, topping and baking.
The 48-hour route is mostly waiting, not work. Once the dough is chilled, overlap the final warm-up with oven preheating. That keeps pizza night from feeling like a two-day project.
Need Pizza Tonight? Use the 4–6-Hour Version

Keep the flour, water, salt, sugar and oil unchanged, but increase the instant yeast to 2.4 g / about ¾ teaspoon. Plan on roughly 4–6 hours from mixing to baking.

  1. Mix, rest and knead as directed in the main recipe.
  2. Cover the whole dough and leave it around 70–75°F / 21–24°C for 60–90 minutes.
  3. Divide and ball it.
  4. Leave the balls covered for another 2½–4 hours, checking for soft, aerated dough that stretches willingly.
  5. Stretch, top and bake as usual.

The same-day version makes a crisp, chewy pizza but develops less fermented flavor than the two-day dough. If even that is too much waiting, Greek Yogurt Pizza Dough skips yeast entirely.

The complete recipe below follows the 48-hour cold-ferment path.

New York Style Pizza Dough Recipe

Recipe at a Glance

  • Yield: 2 dough balls, about 340 g / 12 oz each
  • Pizza size: Two 14–15-inch pizzas
  • Hands-on dough prep: About 25 minutes
  • Initial room-temperature stage: 45–60 minutes
  • Cold ferment: About 48 hours
  • Warm-up before stretching: Usually 2–3 hours around 70°F / 21°C
  • Total elapsed planning time: Roughly 51–52 hours from mixing to baking
  • Oven: 500–550°F / 260–288°C, or the highest suitable setting your oven allows
  • Bake on steel: Often about 5–7 minutes
  • Hydration: 63.5%

Weights are the reference measurements for this dough; cup and spoon equivalents are approximate.

Dough Ingredients

  • 400 g / 14.1 oz bread flour, preferably around 12–13% protein; about 3⅓ cups if spooned into the cup and leveled
  • 254 g water, about 254 ml / 1 cup plus 1 tablespoon, cool to room temperature
  • 8 g fine sea salt, about 1⅓–1½ teaspoons depending on the salt
  • 5 g granulated sugar, about 1¼ teaspoons
  • 12 g olive oil, about 13 ml / 2½–2¾ teaspoons
  • 0.8 g instant yeast, about ¼ teaspoon

A ¼-teaspoon measure is more useful than a whole-gram kitchen scale for the yeast if you do not own a 0.1 g precision scale.

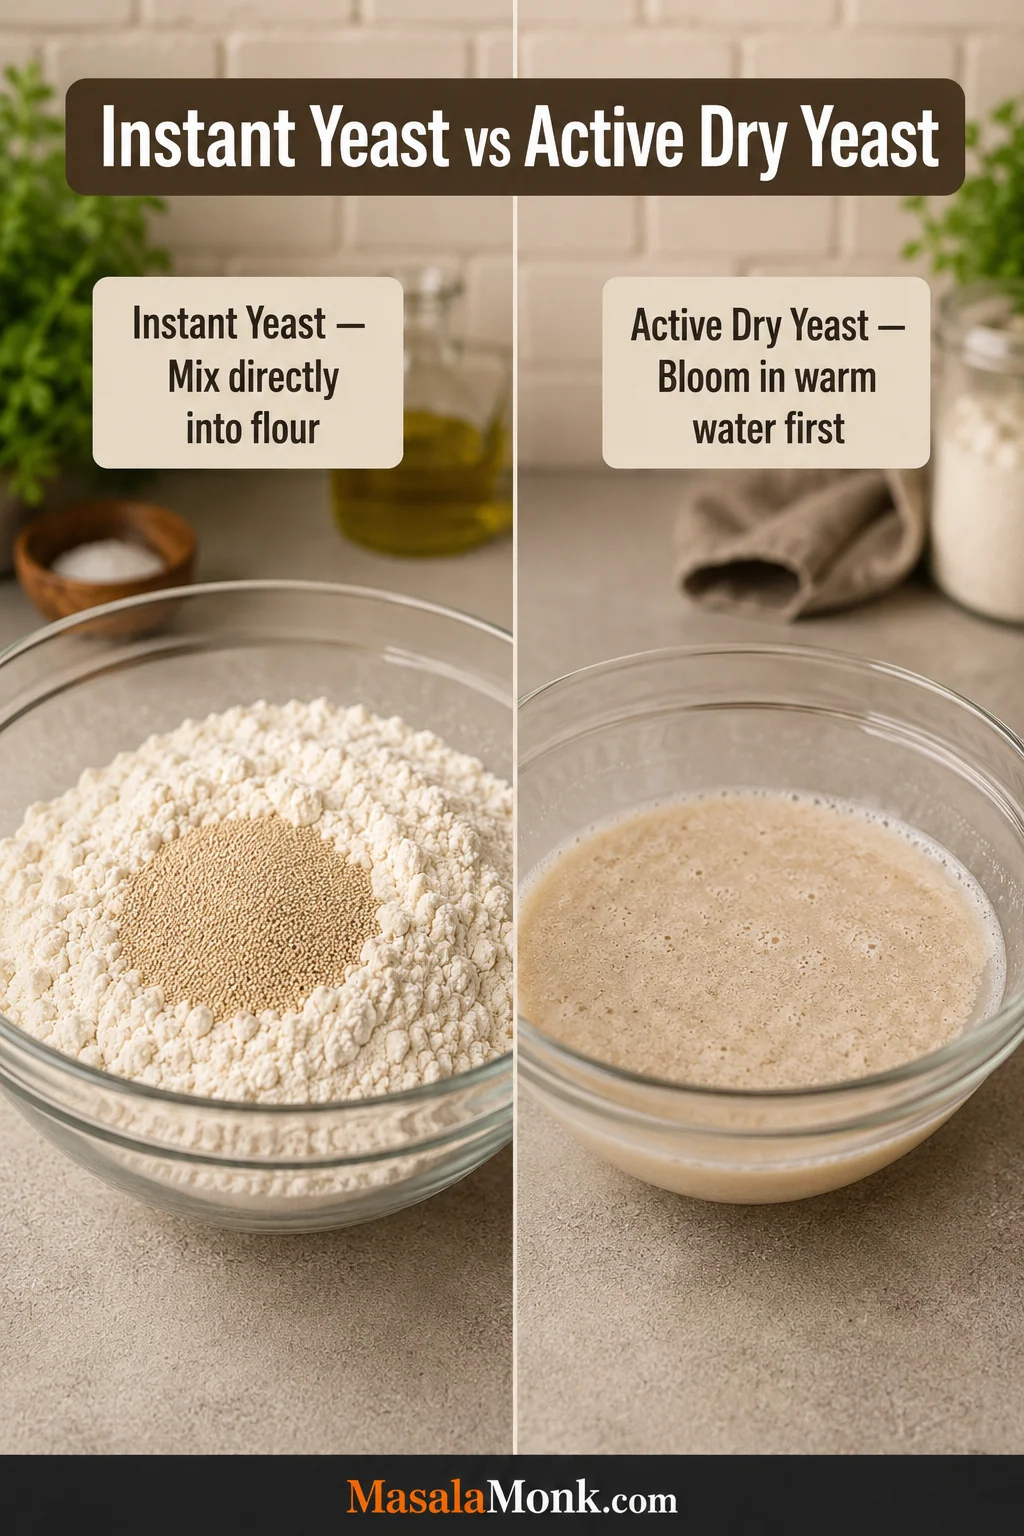
Active dry yeast works too. Use about 1 g / ⅓ teaspoon and activate it in a little of the recipe water according to the package directions.

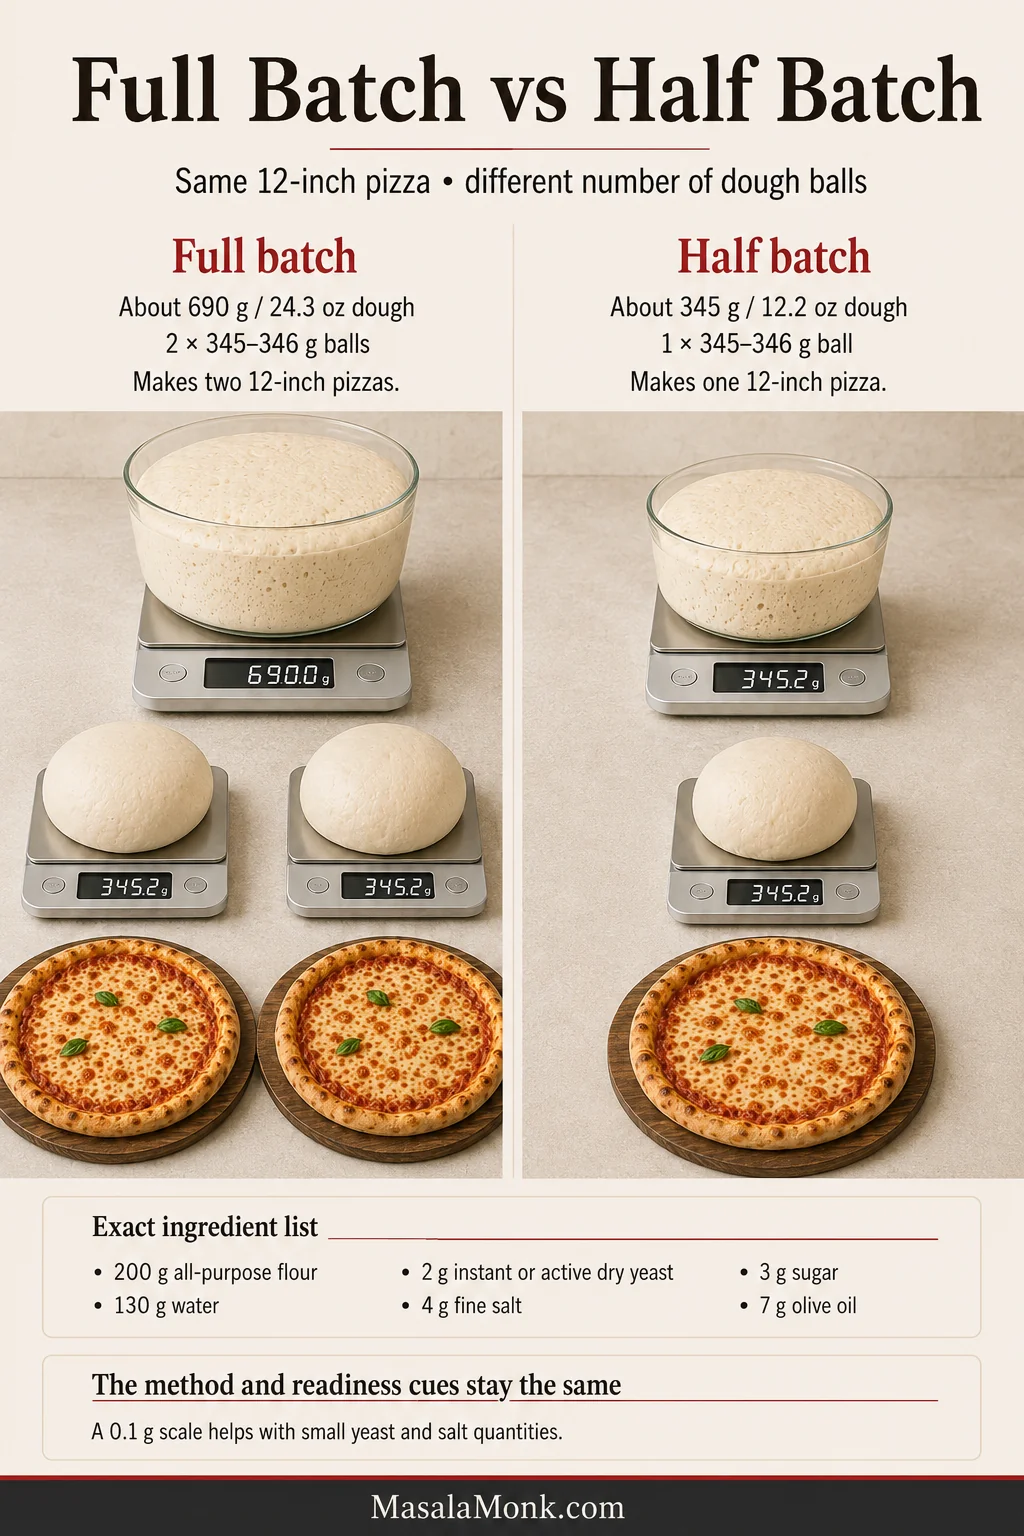
Halving the formula works, but the instant yeast drops to about 0.4 g / ⅛ teaspoon. Without a precision scale, making both balls and freezing one after its first day of cold fermentation is usually easier.
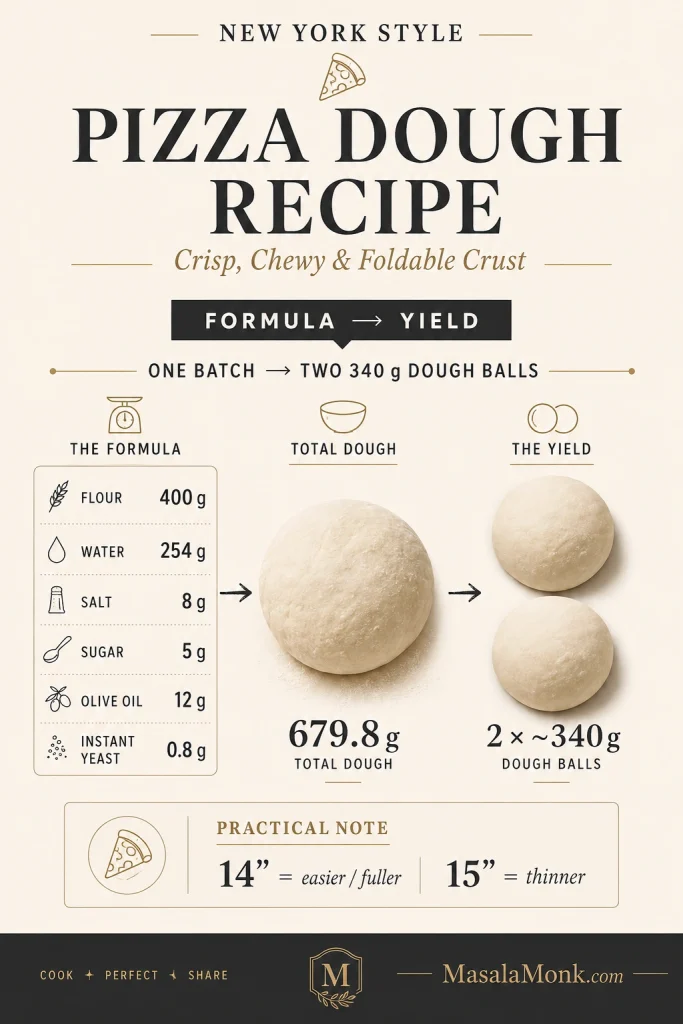
Formula board showing one batch of New York-style pizza dough divided into two approximately 340-gram balls for two 14- to 15-inch pizzas.
Portion by weight, not by eye. Two evenly sized pizza dough balls make the finished pizzas easier to compare. That means differences in thickness, browning or handling are less likely to come from one ball simply being larger.

For Shaping and a Plain Cheese Pizza

For each 14–15-inch pizza, have ready:

  • Flour for the work surface
  • Flour or fine semolina for the peel
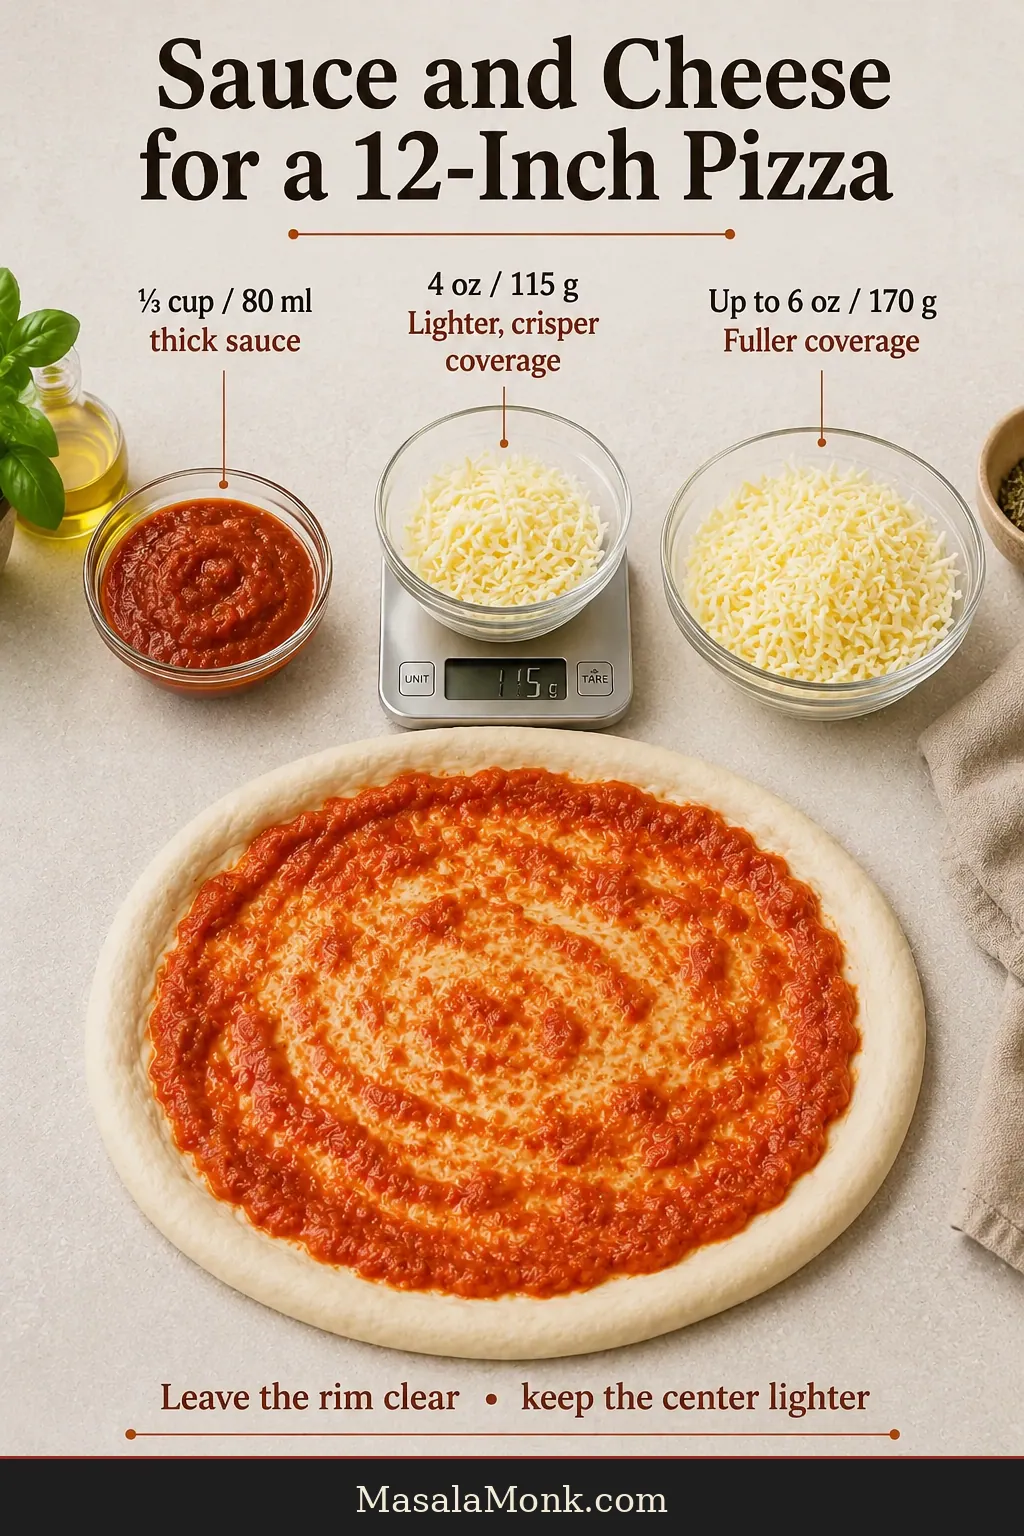
  • 115–150 g / 4–5¼ oz thick pizza sauce
  • 115–150 g / 4–5¼ oz whole-milk low-moisture mozzarella, grated from a block if possible

For your first pizza, start around 115 g sauce and 115 g mozzarella. Move toward 150 g once you know how your sauce, dough and oven handle the extra load.

Keep the sauce and cheese chilled until you need them. If mozzarella tends to brown before the crust is ready, chill the grated cheese for 10–15 minutes before topping.

Useful Equipment
  • Digital kitchen scale
  • 0.1 g precision scale or measuring spoons for yeast
  • Large mixing bowl
  • Dough scraper or flexible spatula
  • Two covered containers, around 1 quart / 1 liter each
  • Pizza peel
  • Pizza steel, stone or heavy baking sheet
  • Wire cooling rack
  • Optional infrared thermometer

Mix and Develop the Dough

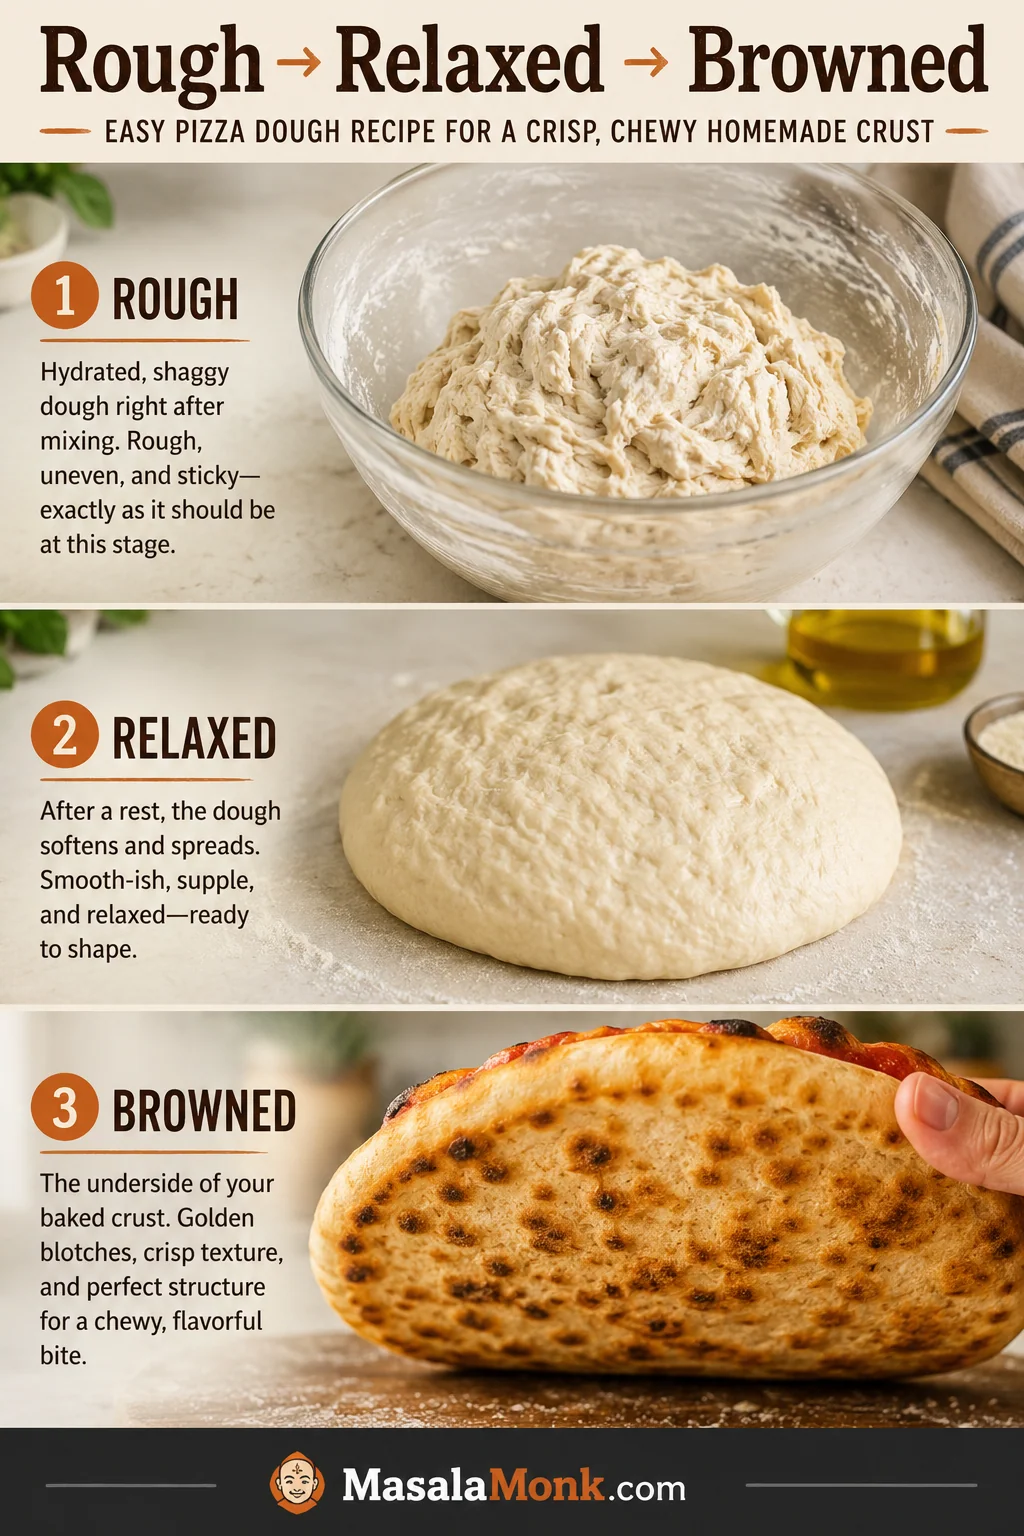
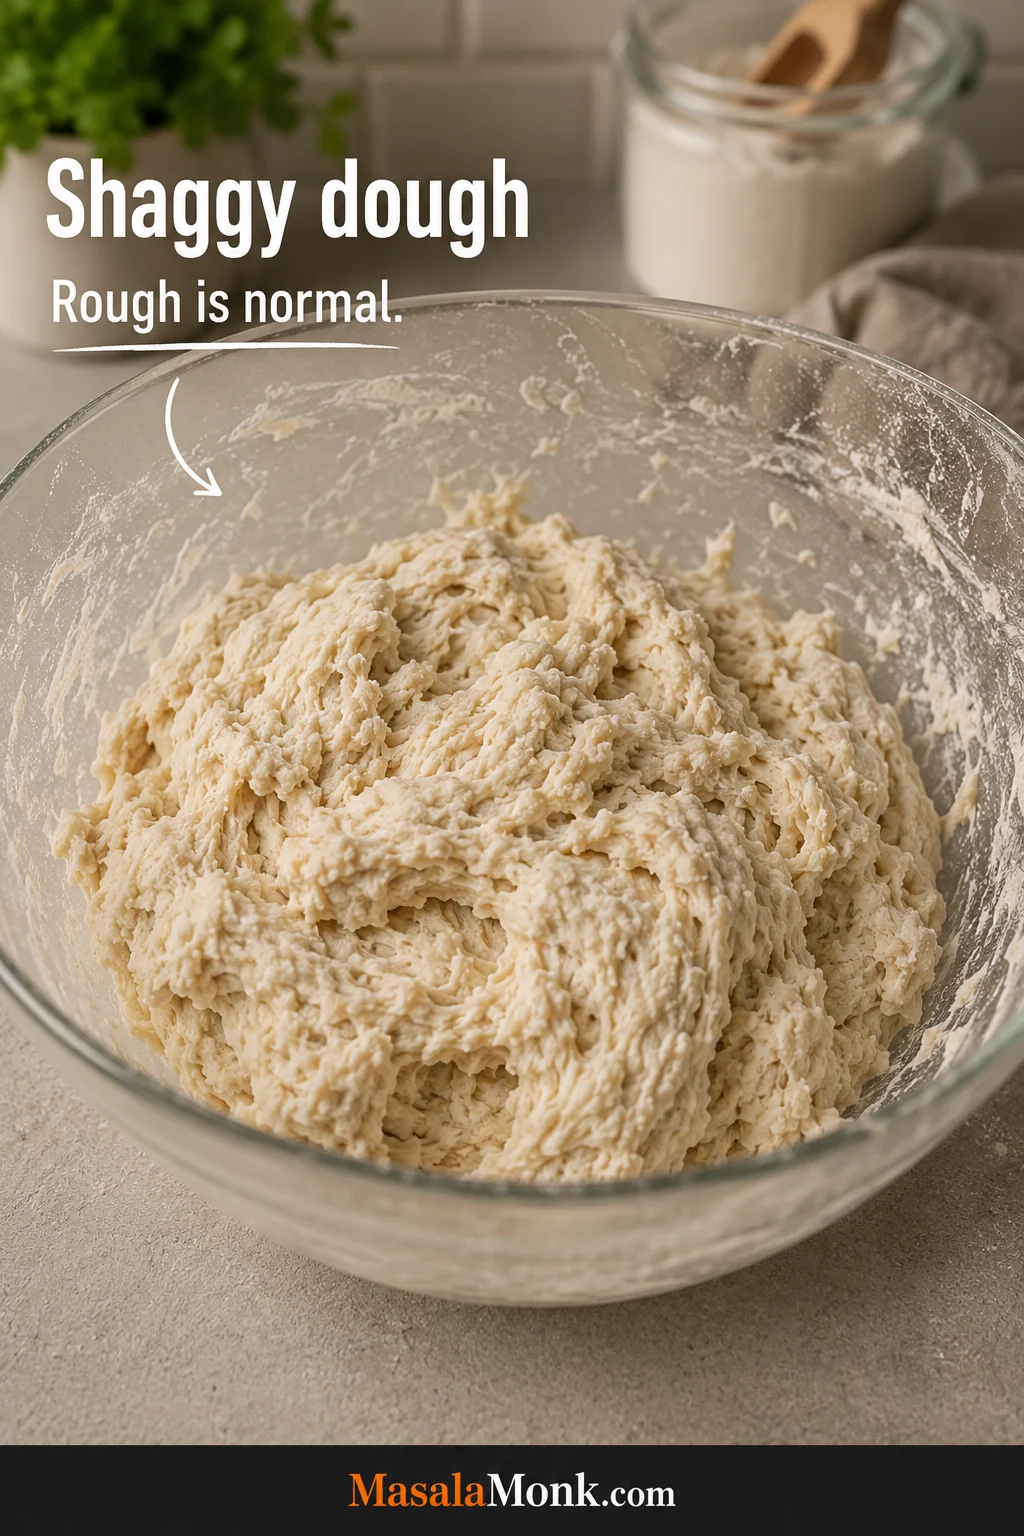
  1. Whisk the flour, instant yeast, sugar and salt together in a large bowl. Add the water and stir until no large pockets of dry flour remain. The dough should look rough and shaggy.
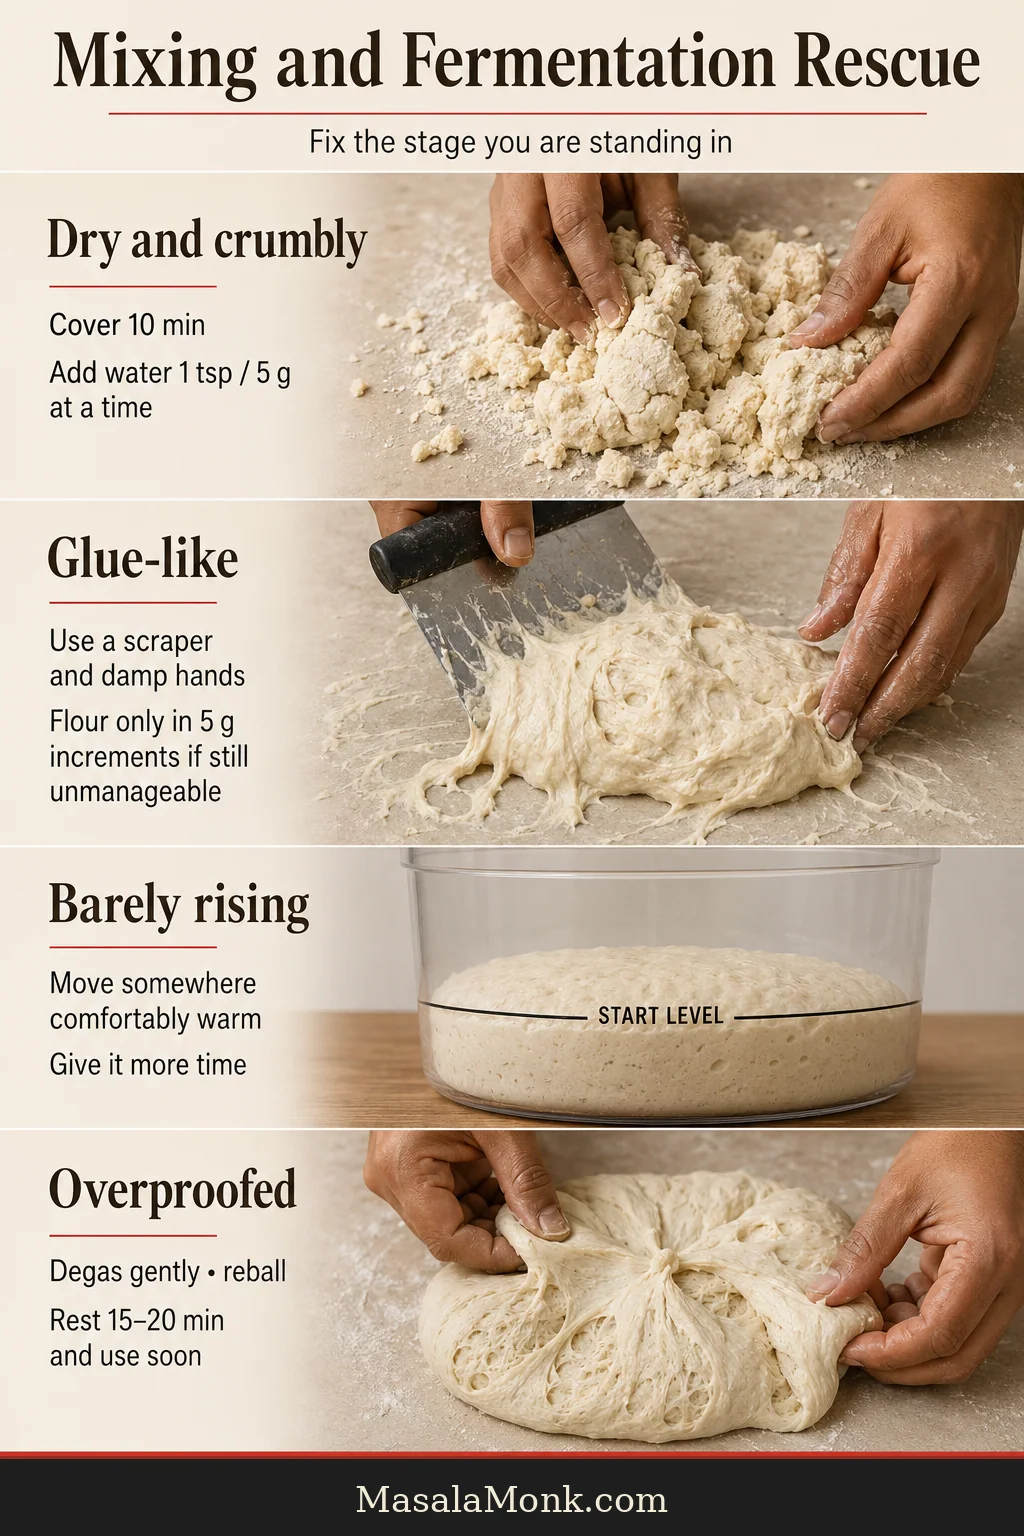
  2. Cover and leave it alone for 15 minutes. During this short rest the flour absorbs water, and an awkward sticky mass often becomes much easier to handle.
  3. Knead until the dough begins to smooth out, then work in the olive oil gradually.
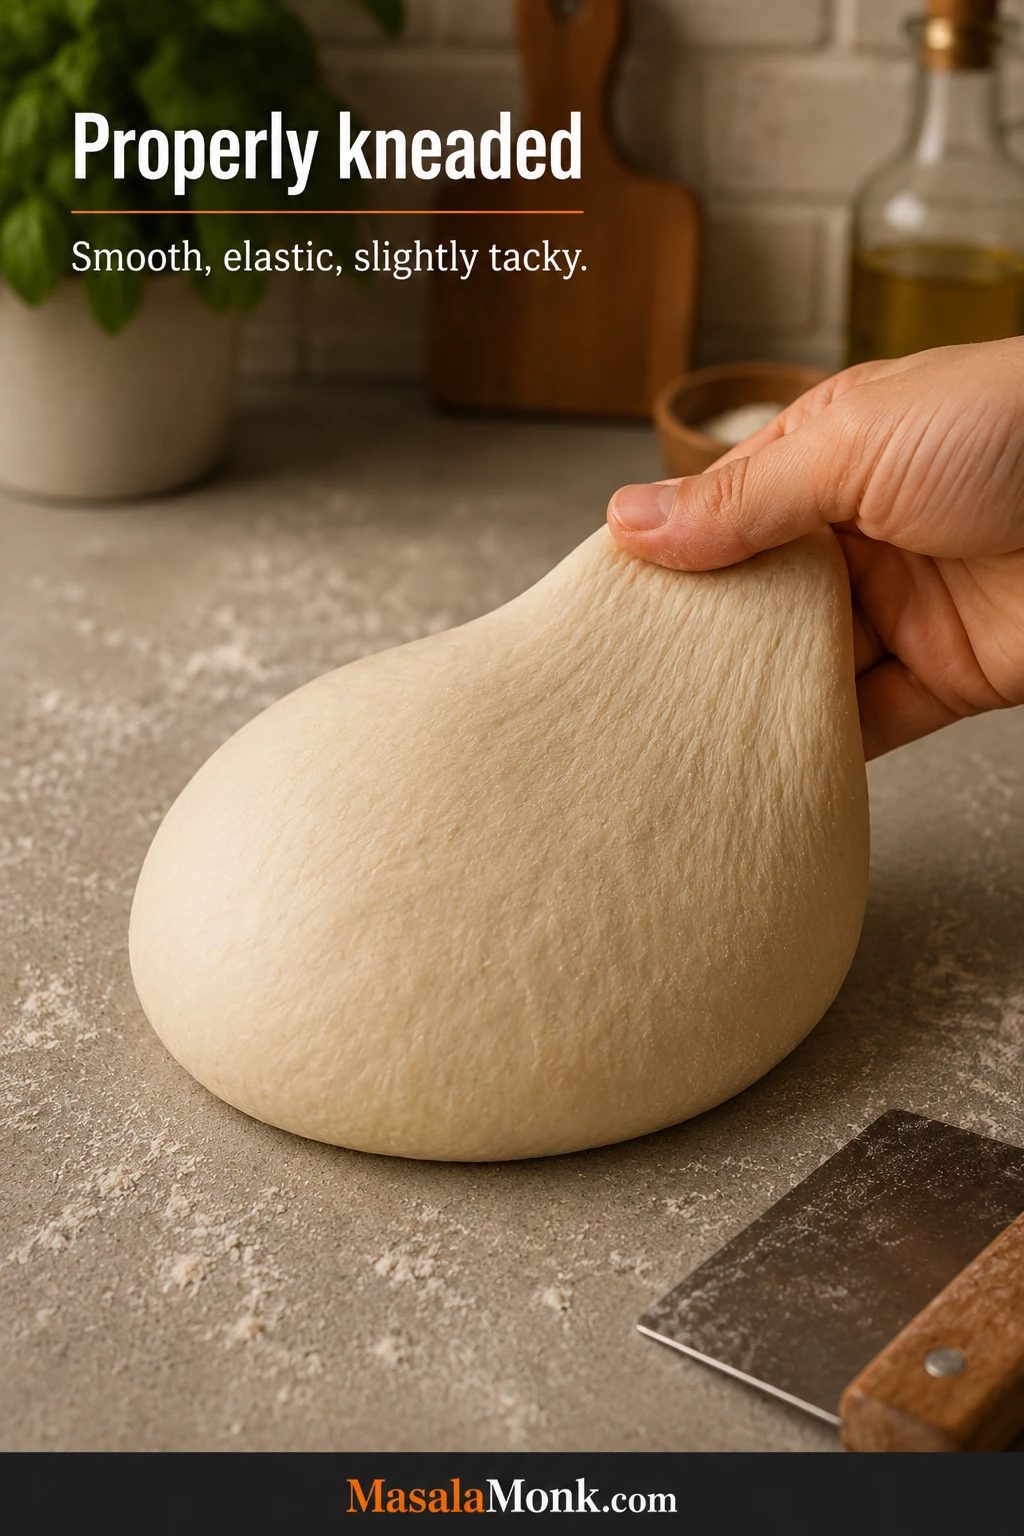
  4. Continue kneading until the dough is cohesive, elastic and lightly tacky—usually another 5–7 minutes by hand or 4–6 minutes on low speed in a stand mixer.
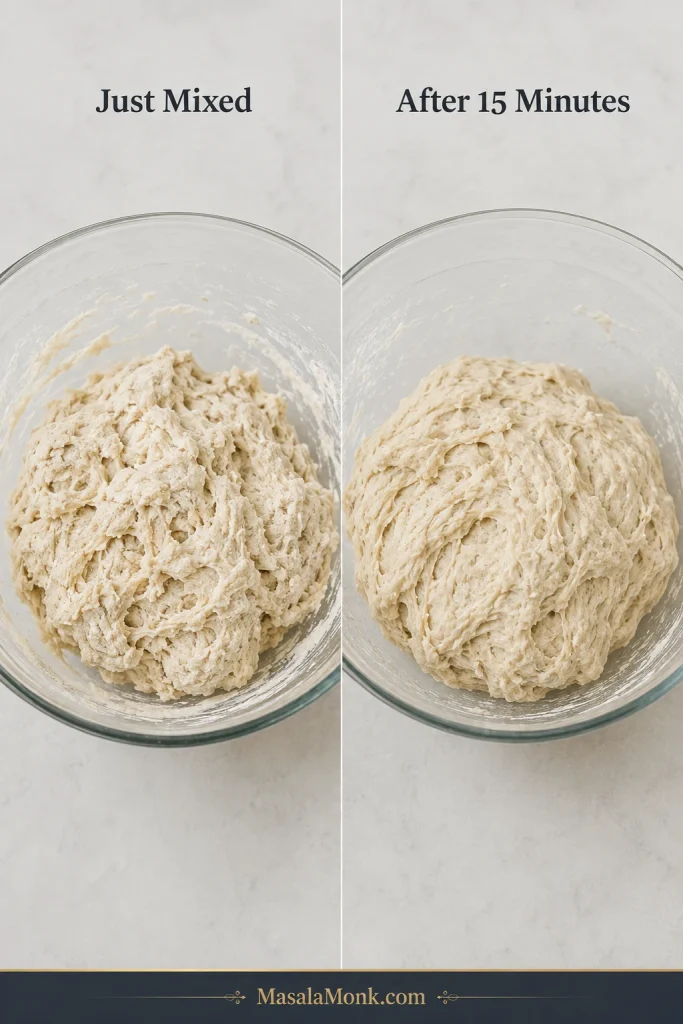
Same pizza dough in the same bowl before and after a 15-minute rest, changing from rough and shaggy to slightly more hydrated and cohesive.
Look for a modest change after the rest: fewer dry ridges, better hydration and dough that feels more unified. It can still look rough; the smooth, elastic finish comes later during kneading.

How Tacky Should Pizza Dough Feel?

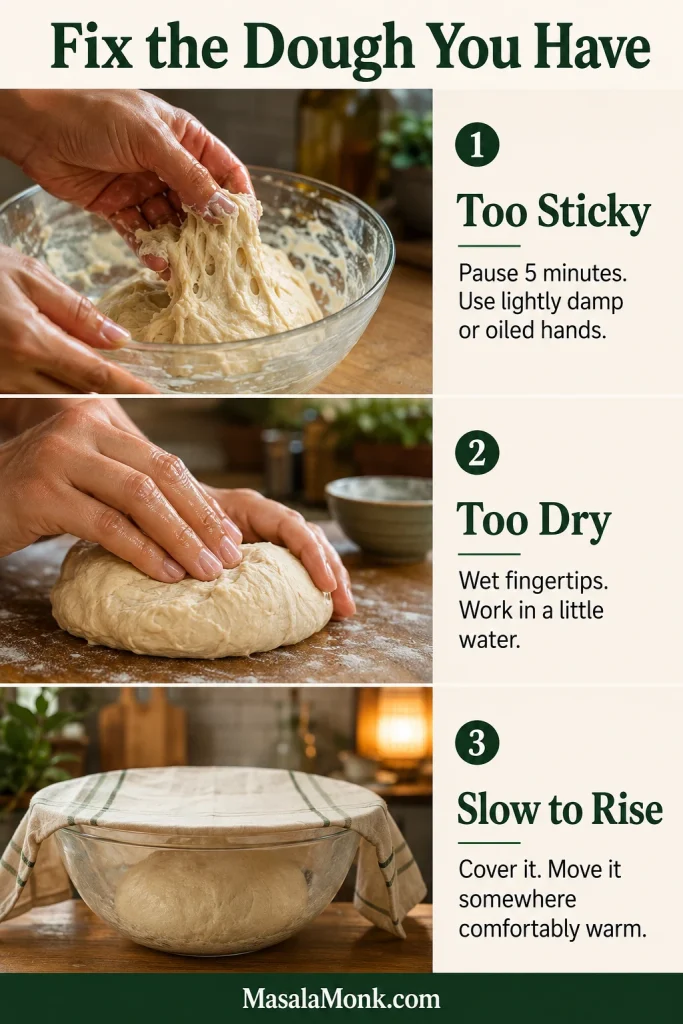
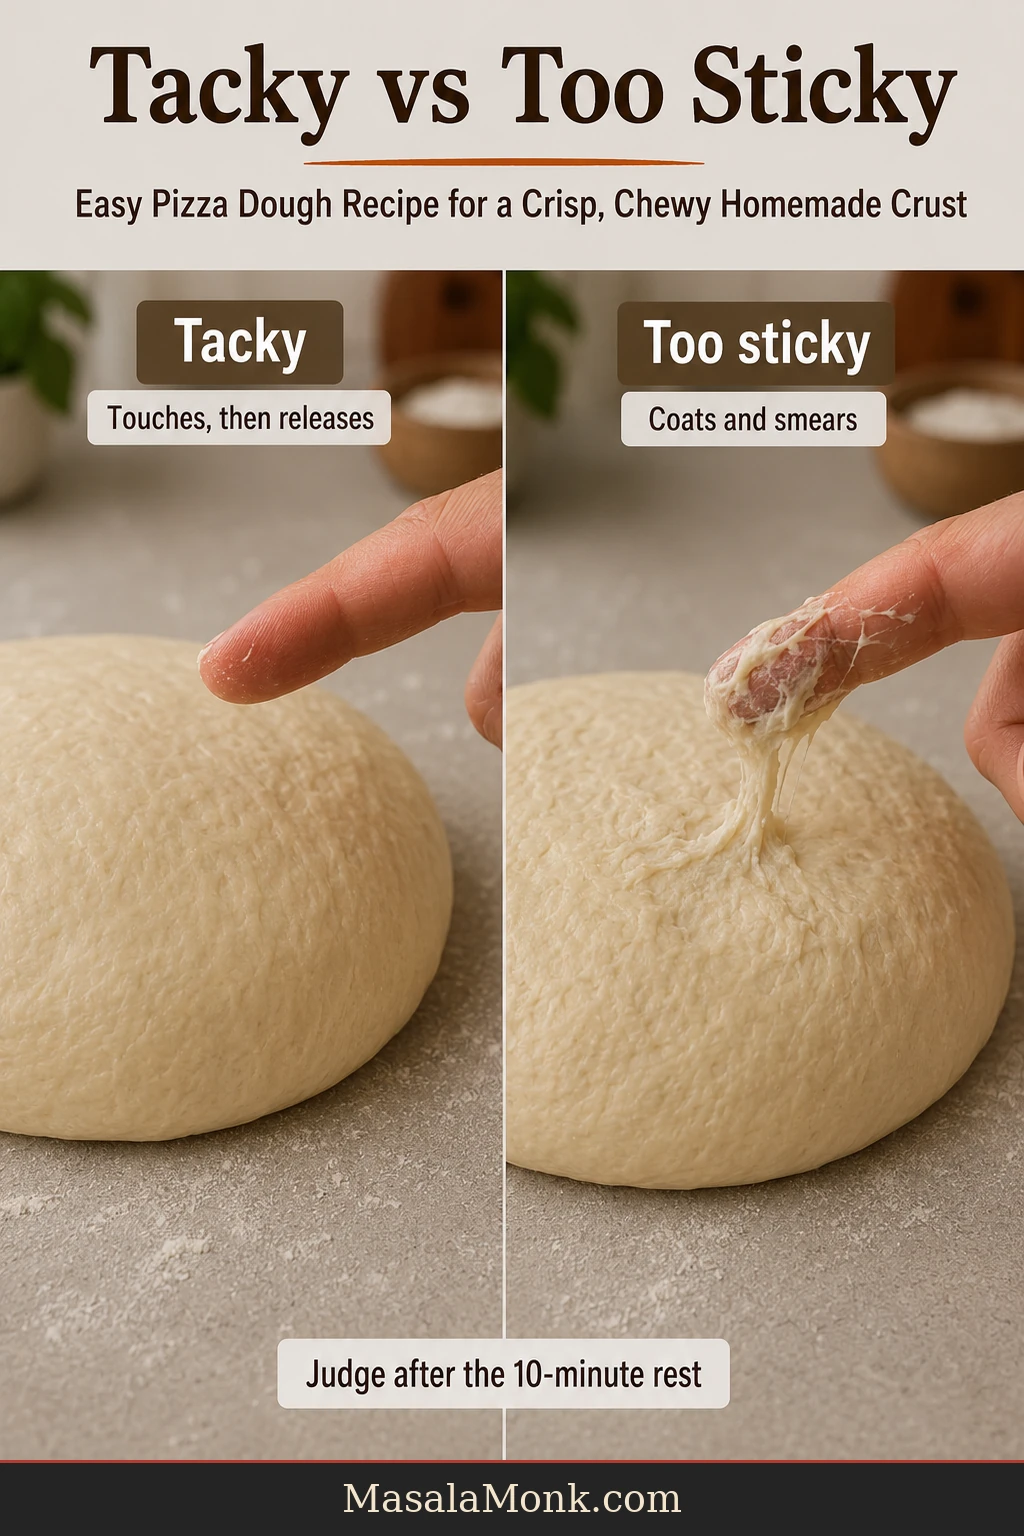
Checkpoint: press a clean finger against the dough. A little cling is fine. It should release without coating your finger in paste and feel soft and supple in your hands.
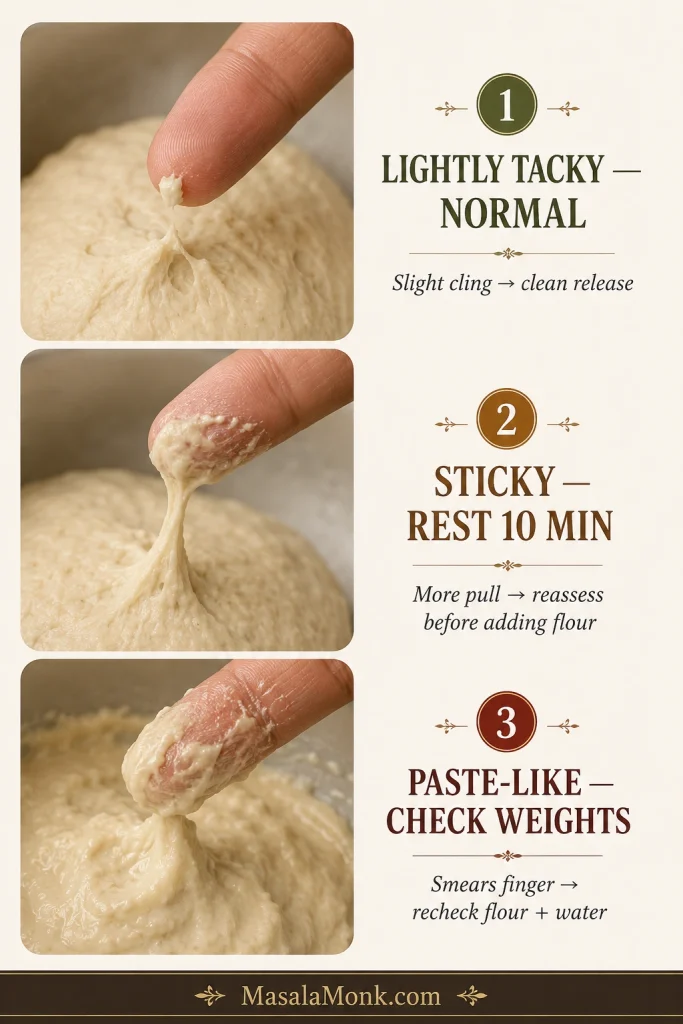
Three fingertip tests comparing lightly tacky dough that releases cleanly, sticky dough that stretches from the finger and paste-like dough that smears.
Judge the release, not just the touch. Slight cling followed by a mostly clean fingertip is manageable; a wet coating or smear left behind is the more useful warning that the dough needs another look.

Still sticky enough to worry you? Cover it for another 10 minutes before reaching for flour. Time often solves what extra flour would only hide.

If it still smears instead of holding itself together, recheck the flour and water weights. When those are correct, work in flour 5 g at a time and stop as soon as the dough becomes manageable. Record how much you needed and use that as a reference for the next batch.

If you track dough temperature, aim for roughly 76–80°F / 24–27°C after mixing. Cooler water helps in a hot kitchen and warmer water helps in a cold one. Without a thermometer, stop mixing before the dough feels noticeably warm.

Using a Food Processor or Spiral Mixer?

Food processor: pulse the dry ingredients to combine, then add the water and oil together. Process until the dough forms a ball and continue only briefly—about another 15–20 seconds—until smooth and elastic. Stop before the dough becomes noticeably warm.

Spiral mixer: fixed stand-mixer minutes are less useful because spiral mixers develop dough differently. Stop when the dough is smooth, elastic and cohesive, using finished dough temperature as a guardrail.

Ball and Cold Ferment

  1. Cover the mixed dough and leave it at room temperature for 45–60 minutes. It does not need to double.
  2. Divide it into two equal pieces of about 340 g / 12 oz each.
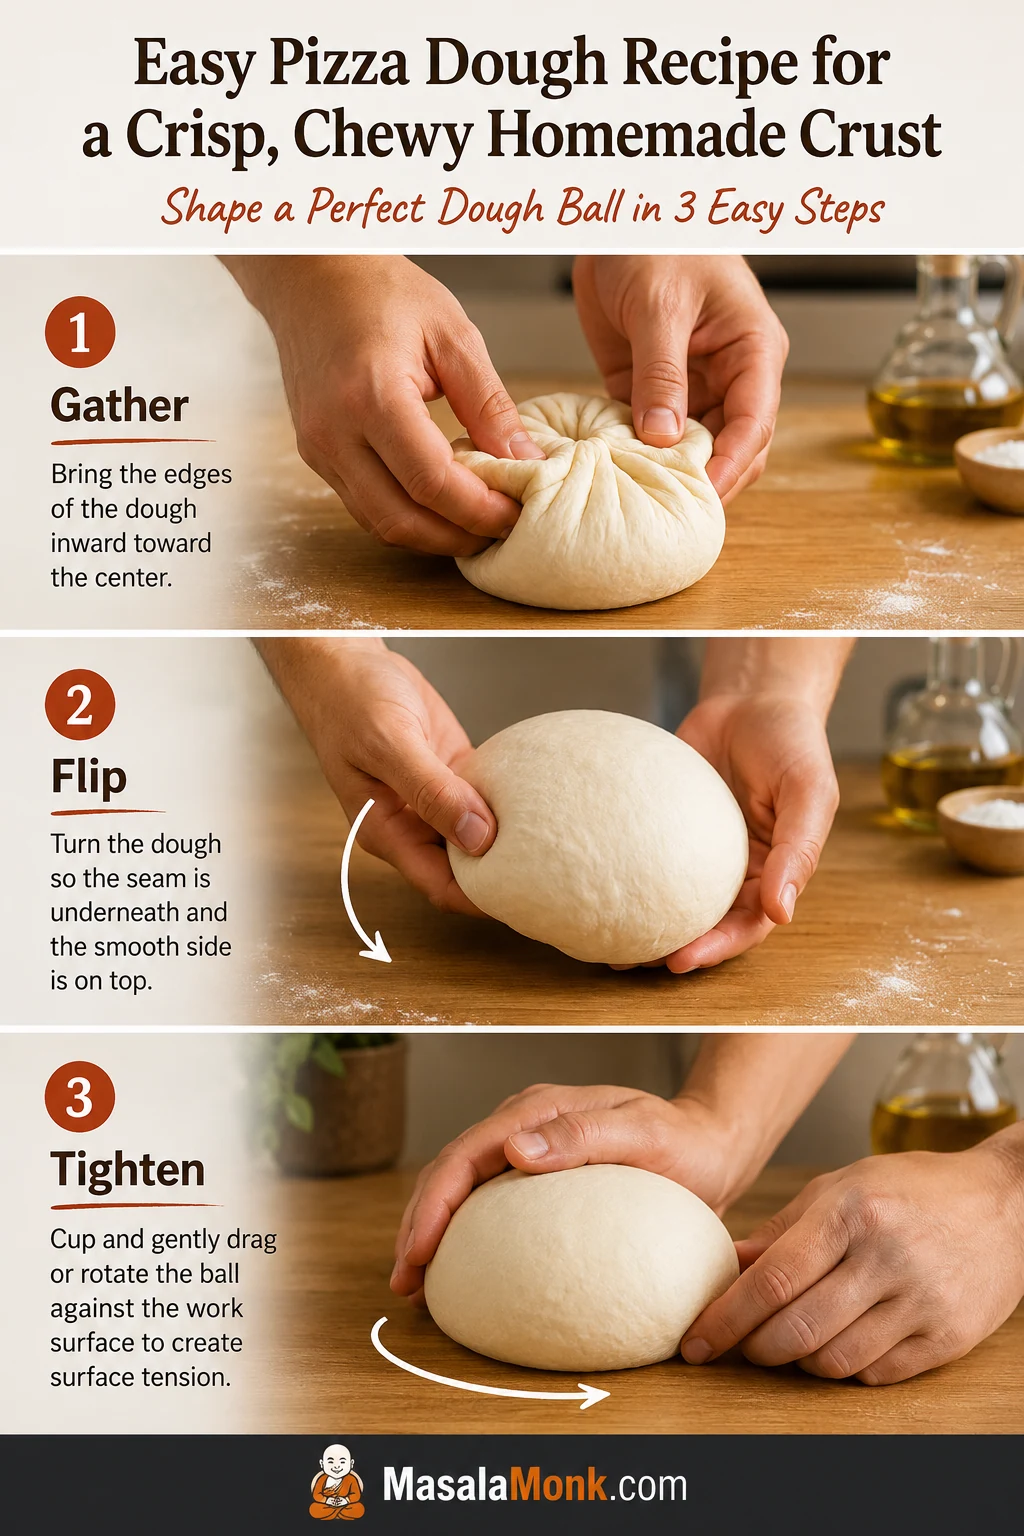
  3. Shape each piece into a ball. Pull the outer edges underneath as you rotate the dough until the top becomes smooth, then pinch the seam lightly underneath. Create gentle surface tension and stop before the skin begins tearing.
  4. Place each ball seam-side down in its own lightly oiled covered container and refrigerate at about 37–40°F / 3–4°C for 48 hours.
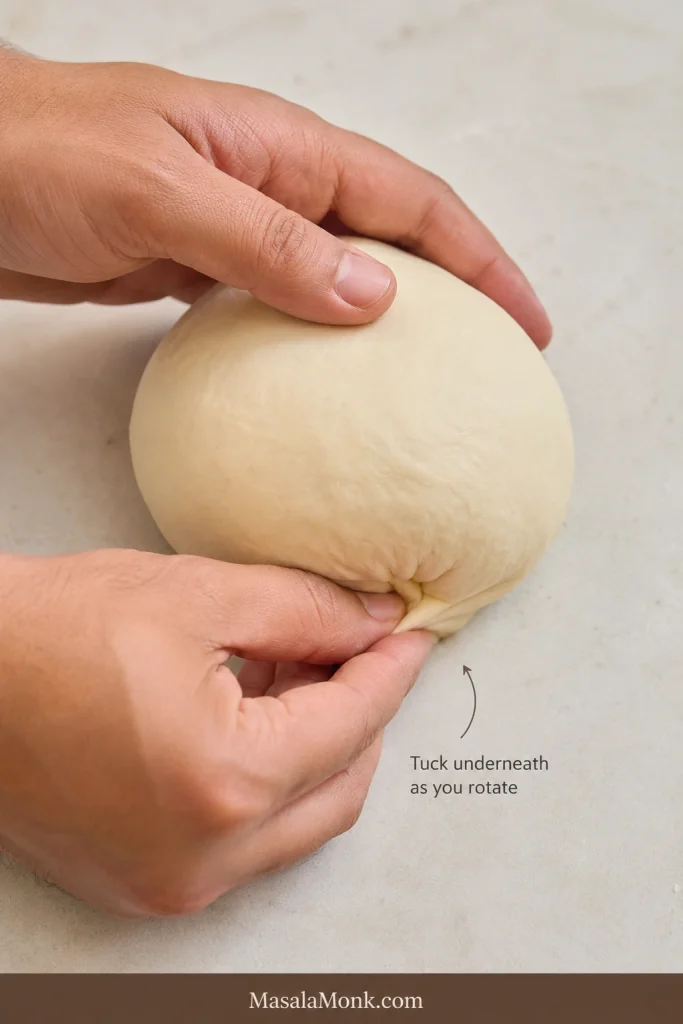
Hands rotating New York-style pizza dough and tucking its edges underneath to create a smooth top and gathered seam.
Watch where the tension goes: the top should become smoother while the seam gathers underneath. Stop once the ball is cohesive—over-tightening the skin only creates more tension for the dough to relax later.

Balling before refrigeration lets each portion ferment and relax in the shape you will later stretch. Separate containers also make it easier to lift one cleanly without disturbing the other.
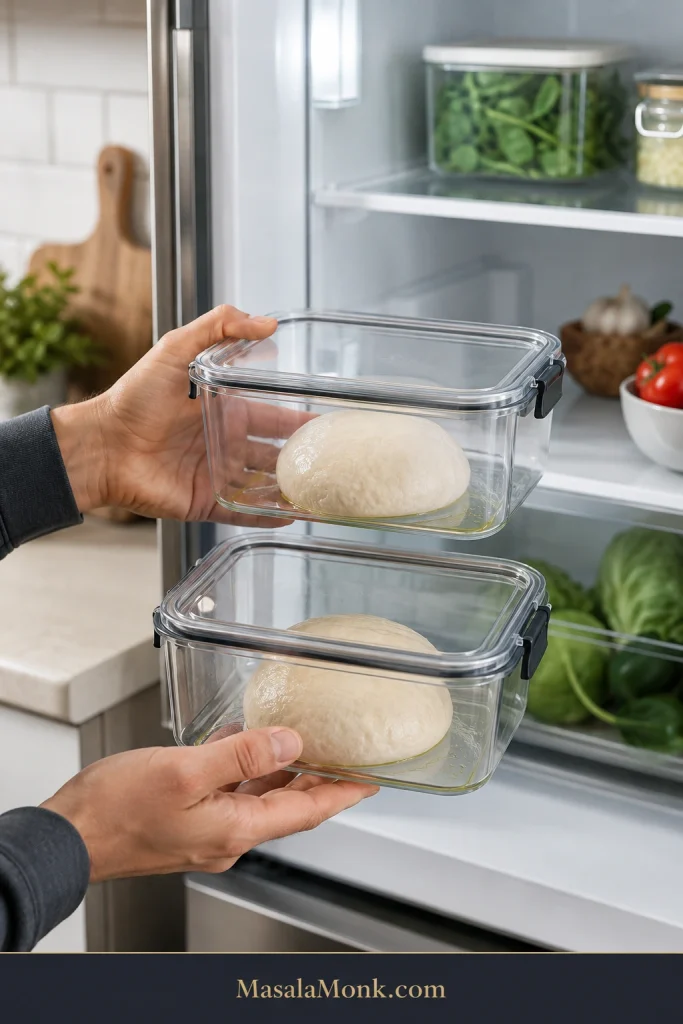
Two fresh New York-style pizza dough balls in separate lightly oiled clear lidded containers with room around each ball.
Separate clear containers turn cold fermentation into something you can actually observe. You can compare spreading, bubbles and weakening from day to day while the lids protect the dough surface from drying.

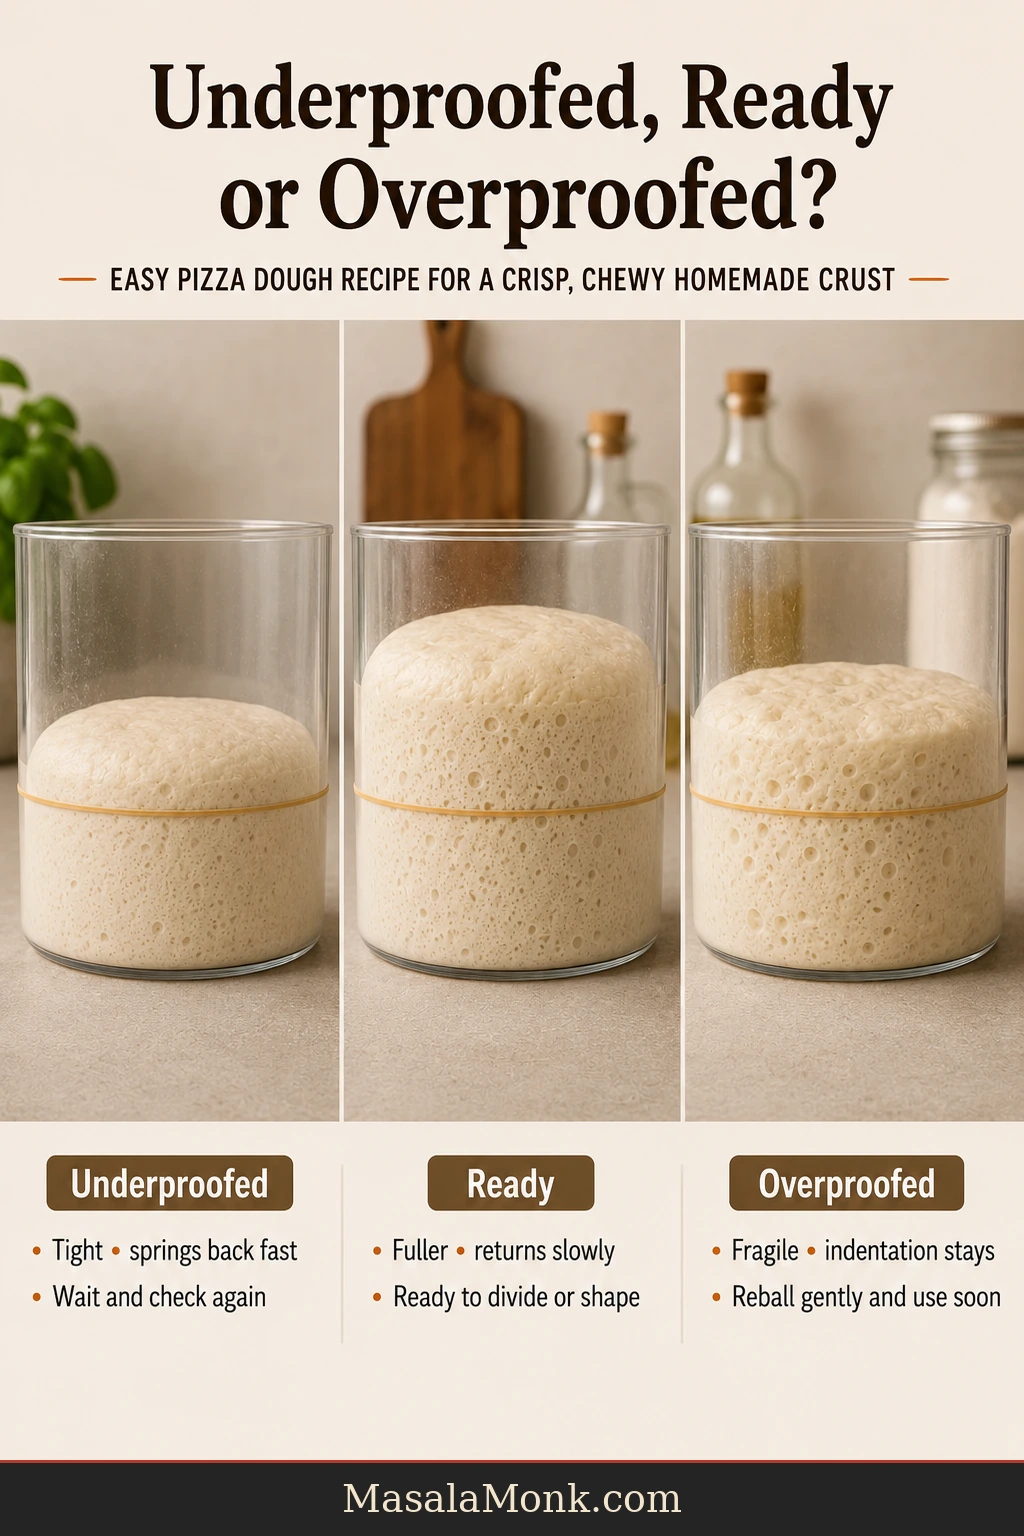
After a day in the refrigerator, modest spreading and puffiness are completely normal. A quiet-looking dough ball is not a reason to add more yeast next time.

Warm, Stretch, Top and Bake

  1. Take the dough out about 2–3 hours before baking when the room is around 70°F / 21°C. Begin checking it sooner in a warmer kitchen.
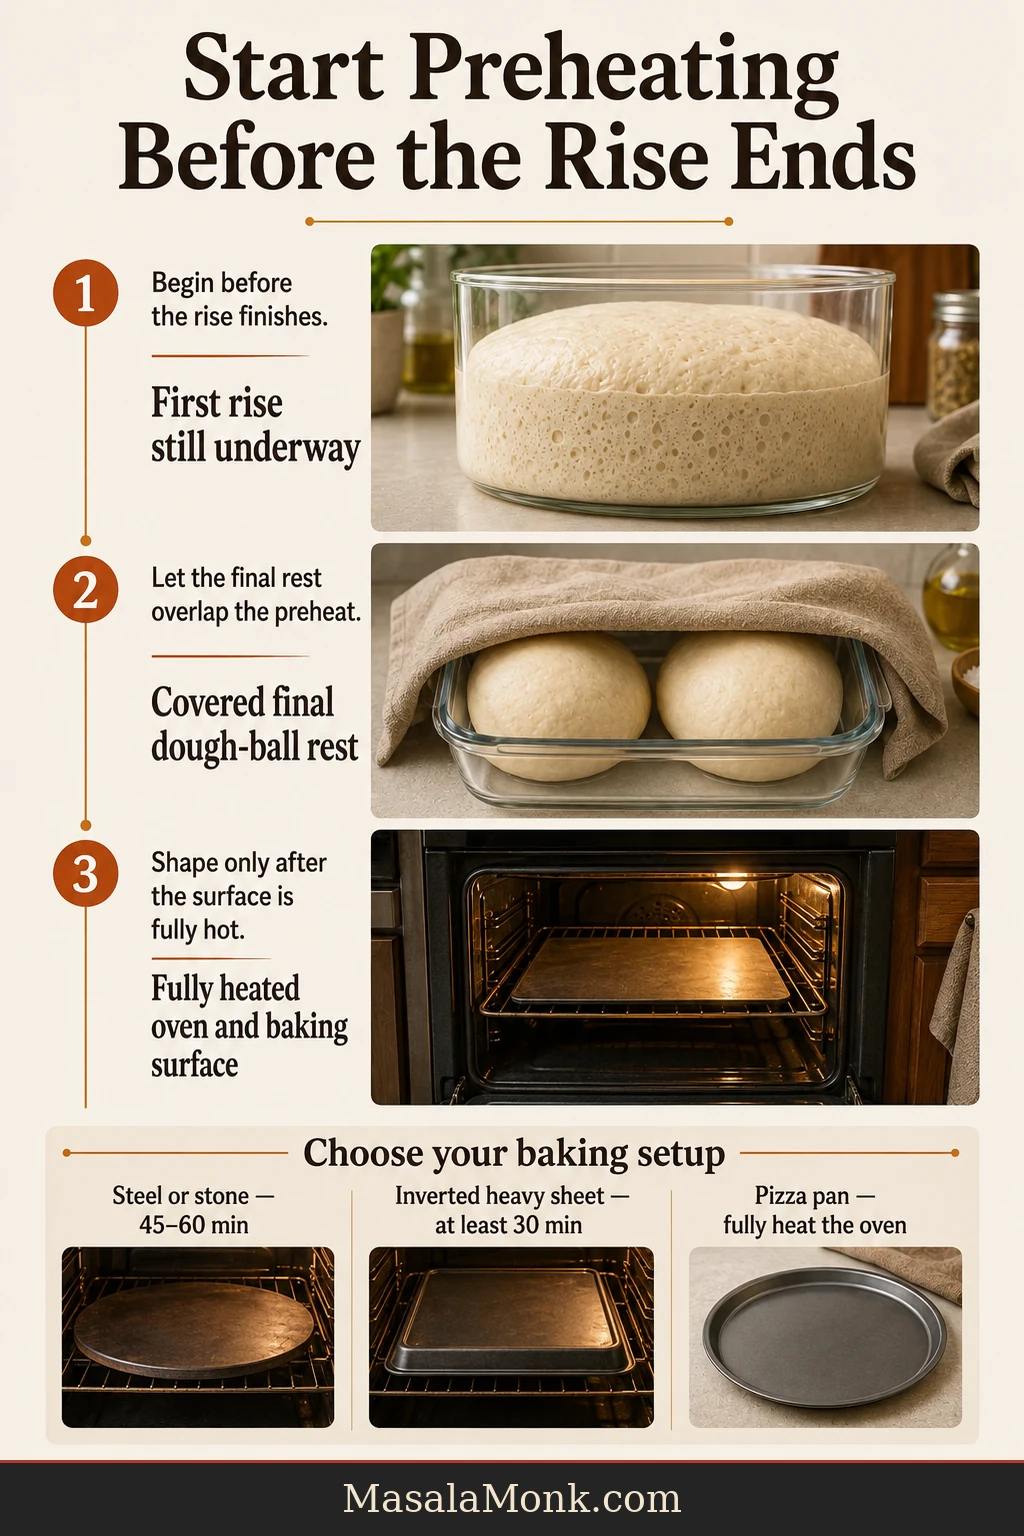
  2. About halfway through that warm-up, start preheating the oven. Put your steel or stone in the oven and heat at 500–550°F / 260–288°C, or the highest suitable temperature your oven allows, for about an hour.
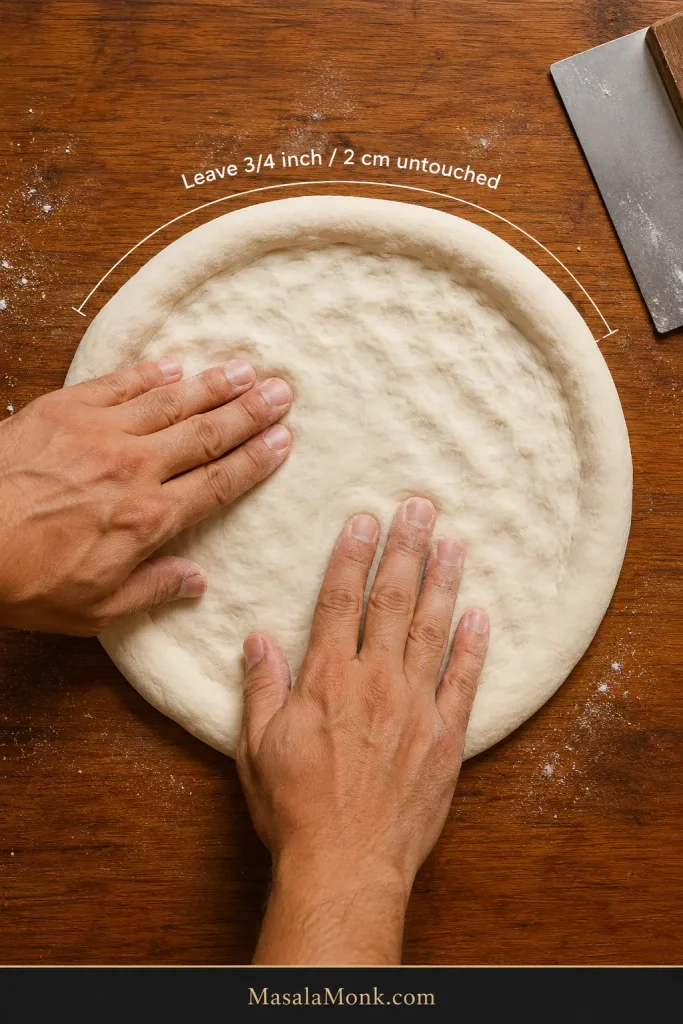
  3. Release one dough ball gently from its container. Flour both sides lightly, then press from the center outward while leaving the outer ½–¾ inch / 1–2 cm comparatively untouched.
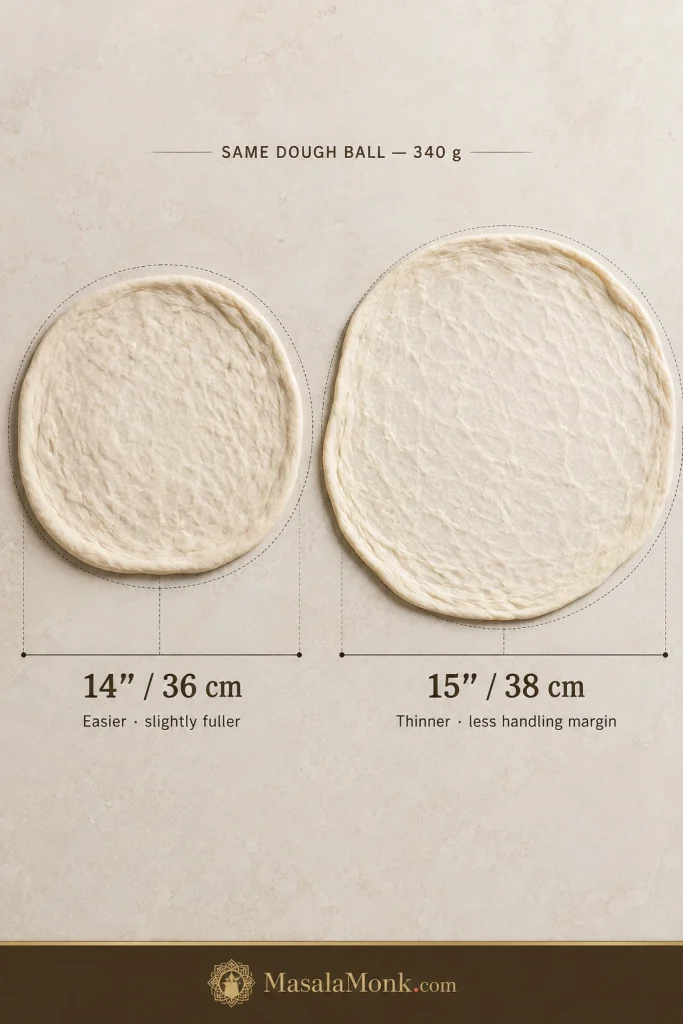
  4. Lift and rotate the dough, letting gravity help. Stop around 14 inches / 36 cm for an easier, fuller crust, or continue toward 15 inches / 38 cm for a thinner center.
  5. Check for translucent patches or pinholes, then move the dough to a lightly dusted peel. Shake it immediately. The entire skin should move freely.
  6. Use about 115 g sauce and 115 g mozzarella for the baseline version, leaving some red sauce visible between the cheese.
  7. Shake the peel again. Loosen any stuck point before approaching the oven.
  8. Launch onto the fully heated steel or stone. Bake until the underside is browned, the rim has good color and the center is cooked through. On steel this is often about 5–7 minutes.
  9. If the bottom is ready before the top has enough color, finish briefly under the broiler.
  10. Move the finished pizza to a wire rack for 30–60 seconds, then transfer it to a board and slice.

Four Small Checks That Prevent Common Problems

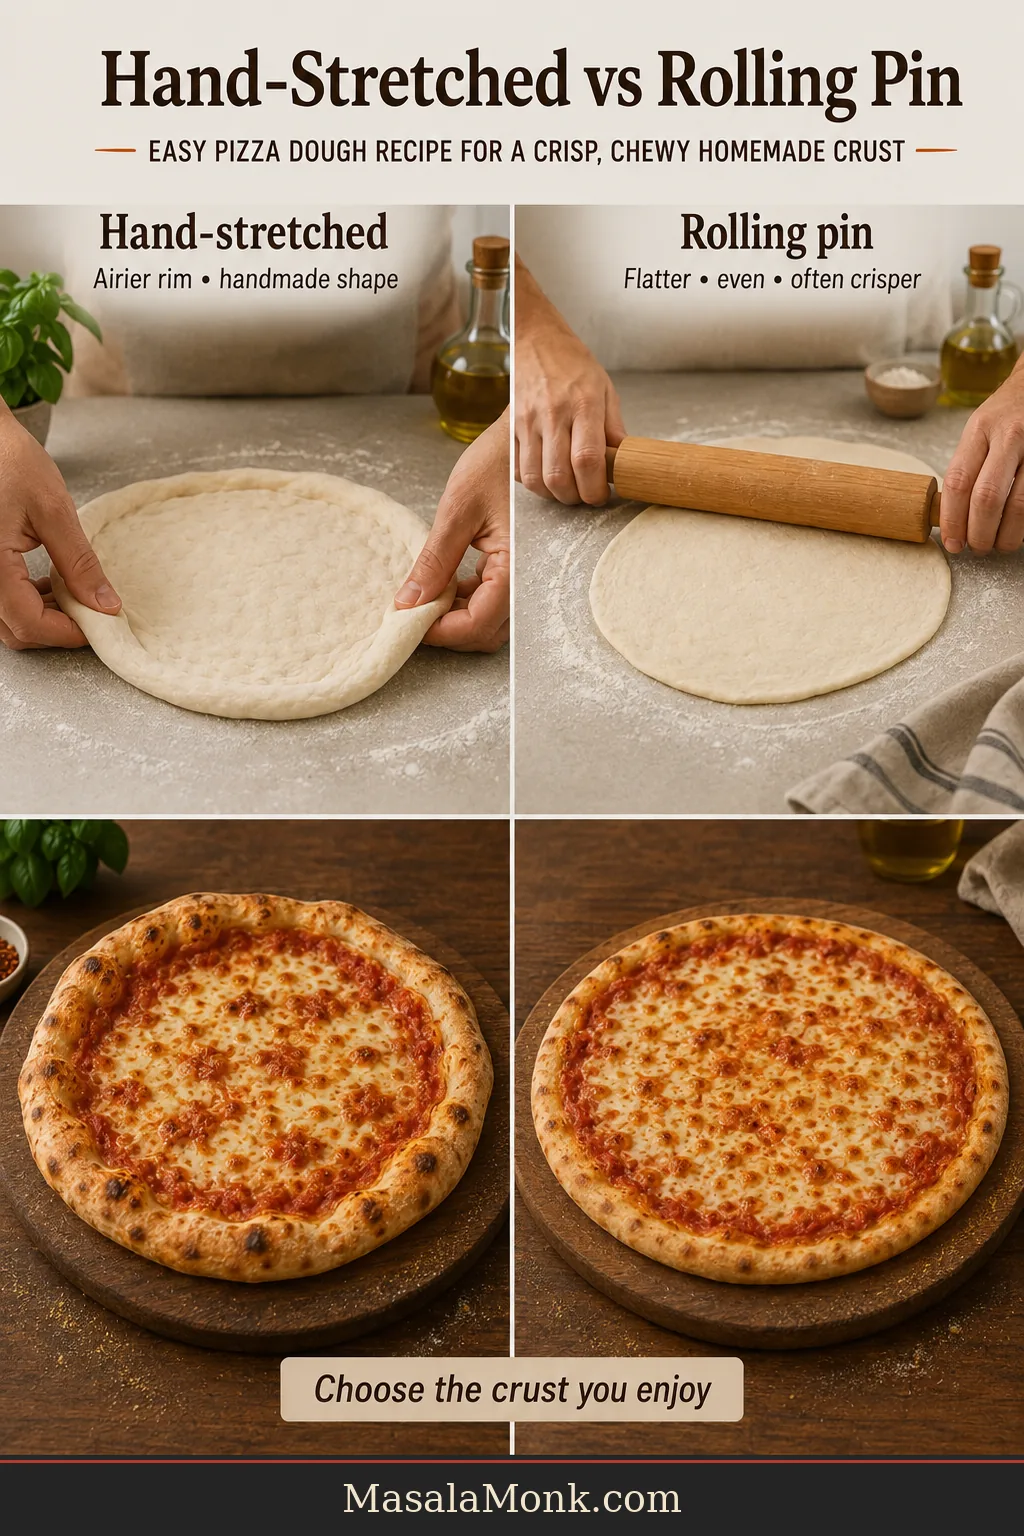
Skip the rolling pin for this version; it presses gas from the rim. Preserve the outer band without building a thick rope around the pizza. The untopped edge will rise on its own.

If the dough repeatedly snaps back, cover it for 5–10 minutes and try again. A slightly oval pizza tastes just as good as a perfect circle, so protect an even center and let perfect geometry wait.

If the pizza lands oval or slightly off-center but is safely on the baking surface, leave it there. Shape matters far less than keeping your hands away from a blazing oven.

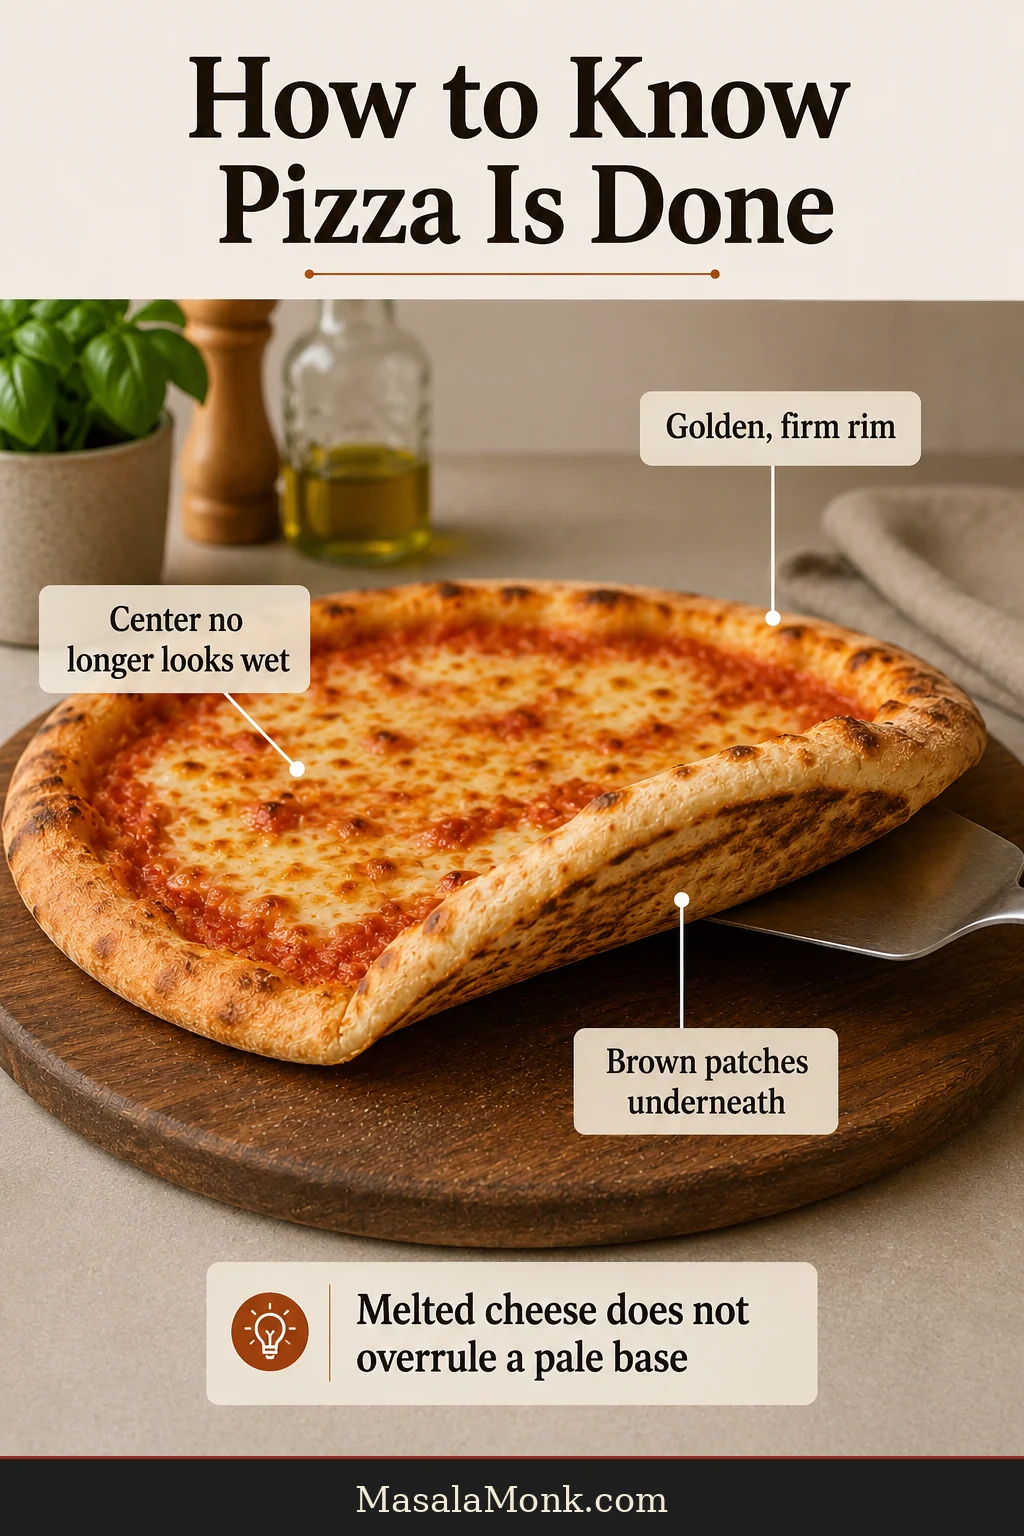
A browned underside, properly colored rim and cooked center without a broad gummy band tell you the pizza is ready.

Need help with one part? Jump to flour · cold fermentation · dough readiness · stretching · launching · baking · troubleshooting.

What Makes the Crust New York Style?

“Thin crust” is not specific enough. Cracker crust is thin, and Neapolitan pizza is thin through the center too. The New York slice lives in the balance between crispness, chew and flexibility.

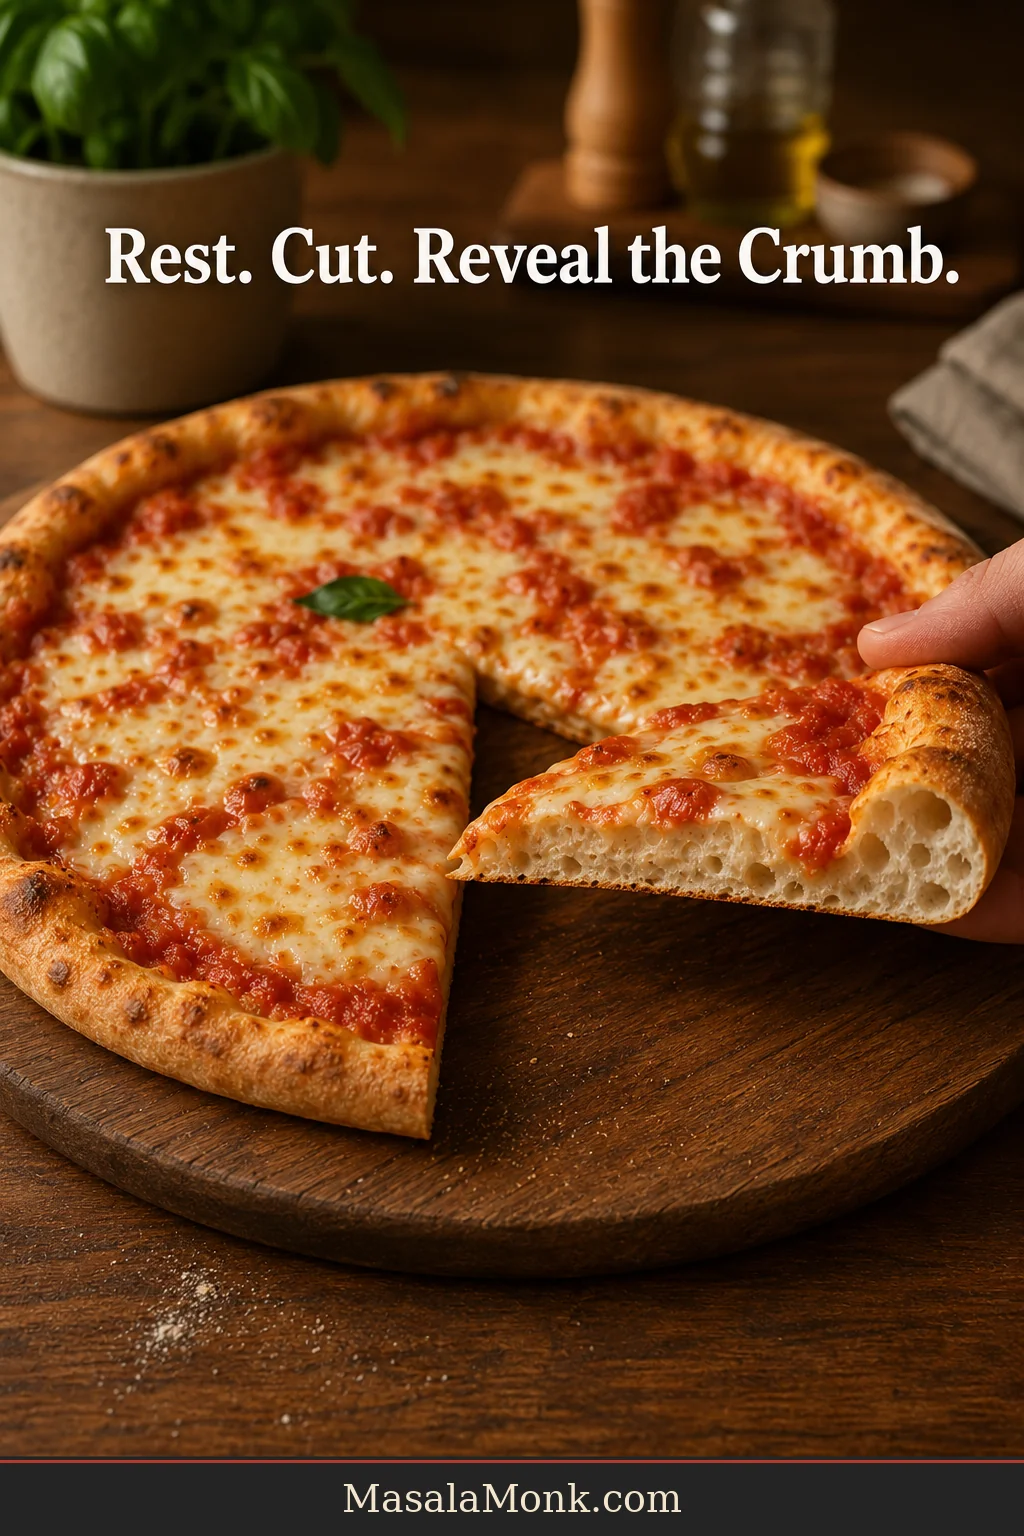
Look for a thin browned shell underneath, a narrow tender-chewy layer above it, a modest rim, and enough flexibility for the slice to fold cleanly.

It is the kind of slice you can pick up by the crust, fold lengthwise and eat one-handed without the toppings sliding into your lap.

Cracker-style pizza goes farther toward dryness and snap. Neapolitan pizza has a lighter, puffier outer rim. Thicker delivery-style pizza carries more bread through the center. New York sits between those extremes.

Cross-sectional comparison of cracker-thin, New York-style and Neapolitan pizza crusts showing differences in center thickness, crumb and rim.
Compare the center as well as the rim. Cracker crust stays thin and dry. New York keeps a narrow chewy layer above the crisp base, while Neapolitan shifts more of its volume into an airy outer edge.

If what you really want is fresh mozzarella, tomato and basil on a lighter pizza, the Margherita Pizza recipe handles that wetter topping balance separately.

That crisp-chewy balance comes from more than one ingredient. Hydration, flour strength, fermentation and the home-oven bake all have to support the same result.

Why This Dough Formula Works

New York dough formulas vary. Some are relatively dry and easy to handle; others run wetter. Flour strength, sugar, oil, fermentation and oven setup all shift the result.

This formula favors a generous margin for success in a home kitchen. The point is not to chase the wettest dough you can handle; it is to make a dough that opens thin without turning the first launch into a high-wire act.

What Hydration Is Best for New York-Style Pizza Dough?

There is no single required hydration. This home-oven formula uses 63.5%. That gives the dough enough water to stay tender and stretch thin without making a first-time launch unnecessarily fussy.

IngredientBaker’s percentage
Flour100%
Water63.5%
Salt2%
Sugar1.25%
Olive oil3%
Instant yeast0.2%
  • 63.5% water: enough for a tender, stretchable center without making the launch unnecessarily difficult.
  • 2% salt: seasons the crust and helps control fermentation.
  • 1.25% sugar: assists browning in a home oven without making the crust taste sweet.
  • 3% olive oil: adds tenderness and helps the crust retain moisture during the bake.
  • 0.2% instant yeast: enough for the recommended 48-hour schedule.

Higher hydration can make excellent pizza, but it asks more from the flour, stretching technique and launch. Lower hydration is easier to handle but has less moisture to spare during a long home-oven bake.

Why Is the Yeast Amount So Small?

Because the recommended version spends about 48 hours fermenting slowly in the refrigerator, it needs very little yeast. Using more simply moves the dough through its fermentation window faster.

The recipe uses instant yeast because it can go directly into the flour. If you prefer active dry yeast, the recipe card above gives the conversion and activation method.

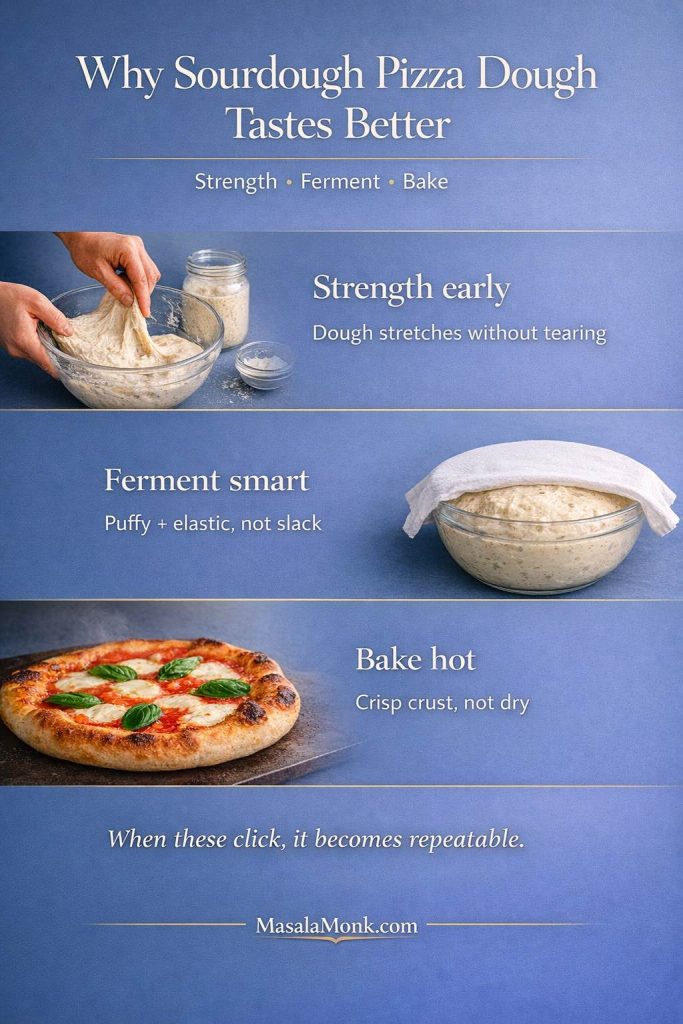
Prefer natural leavening? The Sourdough Pizza Dough recipe uses starter instead. Starter strength and timing make it a different fermentation system even though some readiness cues overlap.

Once the percentages are set, flour strength determines how comfortably the dough can carry them.

What Is the Best Flour for New York-Style Pizza Dough?

Start with bread flour around 12–13% protein. It gives this dough enough strength to stretch thin while retaining the chew that makes the crust satisfying.

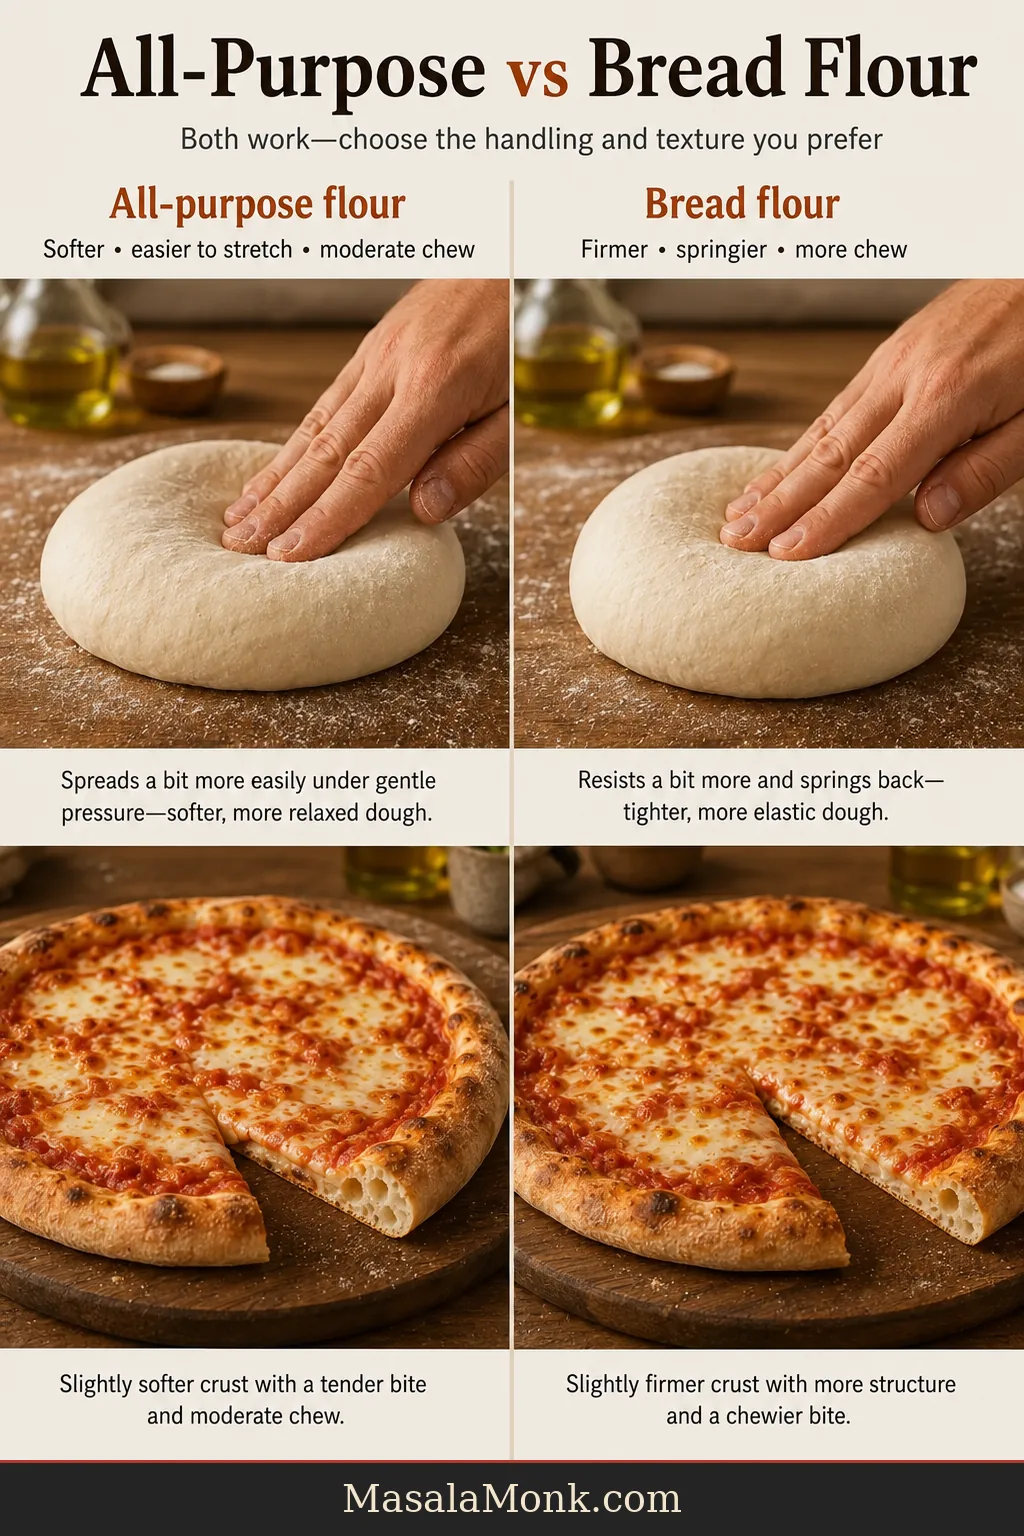
Only have all-purpose flour? Pizza is still on. A reasonably strong AP flour can work very well. The dough may feel softer in your hands, so stop the stretch a little sooner if the center starts thinning faster than expected.

FlourCan you use it?What changes?
Bread flourRecommendedReliable strength and chewy structure
High-gluten flourYesMore strength and chew; can resist stretching if heavily developed
Strong all-purpose flourYesSofter crust; often an excellent option
Weaker all-purpose flourYes, with careMay feel wetter and tear sooner at the same hydration
Tipo 00SometimesThe label alone does not tell you dough strength or whether the flour suits your oven
Whole wheatNot as a direct 1:1 swapChanges water absorption, flavor and extensibility
Gluten-free blendNo direct swapNeeds a formula built specifically without wheat gluten

If a weaker flour makes the dough substantially softer, try taking 5–10 g water out of the next batch. If that helps, record the adjustment and use it as your starting point next time.

What Should Cold-Fermented Pizza Dough Look Like?

Should Pizza Dough Double in the Fridge?

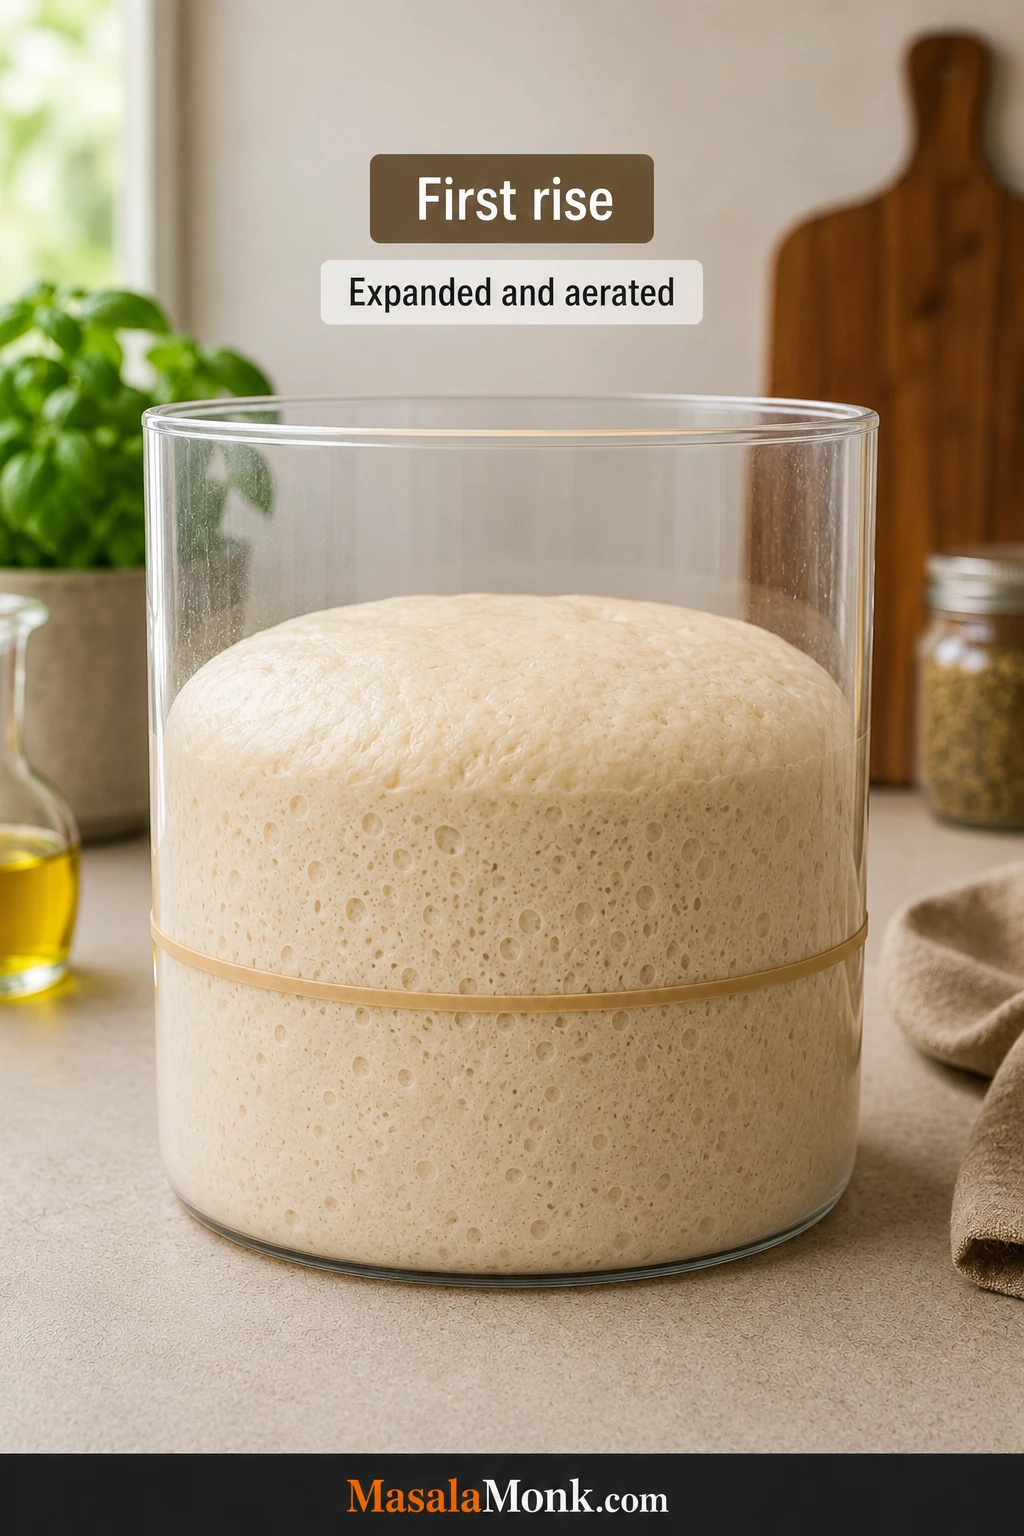
No. New York pizza dough may expand only modestly during cold fermentation. Look for small bubbles, some spreading, a softer shape and easier stretching instead of waiting for a dramatic doubling.

Open the container after a day and the ball may look surprisingly quiet. That alone is not bad news.

Around 24 hours: expect modest fermentation activity and dough that is beginning to relax.

Around 48 hours: the ball should feel softer and more willing to open while still lifting cleanly from its container. This is the intended window for the main recipe.

Around 72 hours: expect more relaxation. Pay closer attention to strength: the dough should still hold together without turning gluey and fragile.
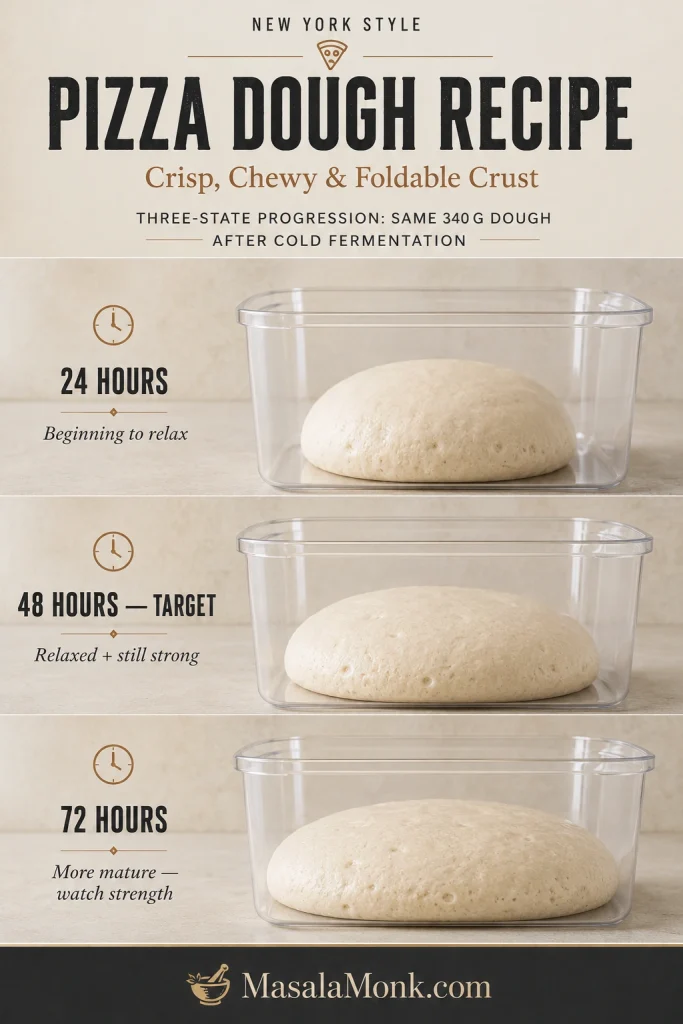
Three New York-style pizza dough balls after 24, 48 and 72 hours of refrigeration, showing progressively more spreading and relaxation.
During cold fermentation, spread and strength tell you more than height alone. A later dough can be broader and softer yet still be healthy; the important warning is when relaxation turns into stickiness and fragility.

Refrigerator temperature matters throughout. A fridge at 37–40°F / 3–4°C gives you more predictable timing than one running several degrees warmer.

  • Relaxed but healthy: spread somewhat, soft, and able to lift in one piece.
  • Possibly overfermented: unusually flat, newly sticky, weak, translucent in places and easy to tear with little resistance.

Dough that feels much wetter after several days has not necessarily gained water. As its gluten structure weakens, it becomes less effective at holding the water already present.
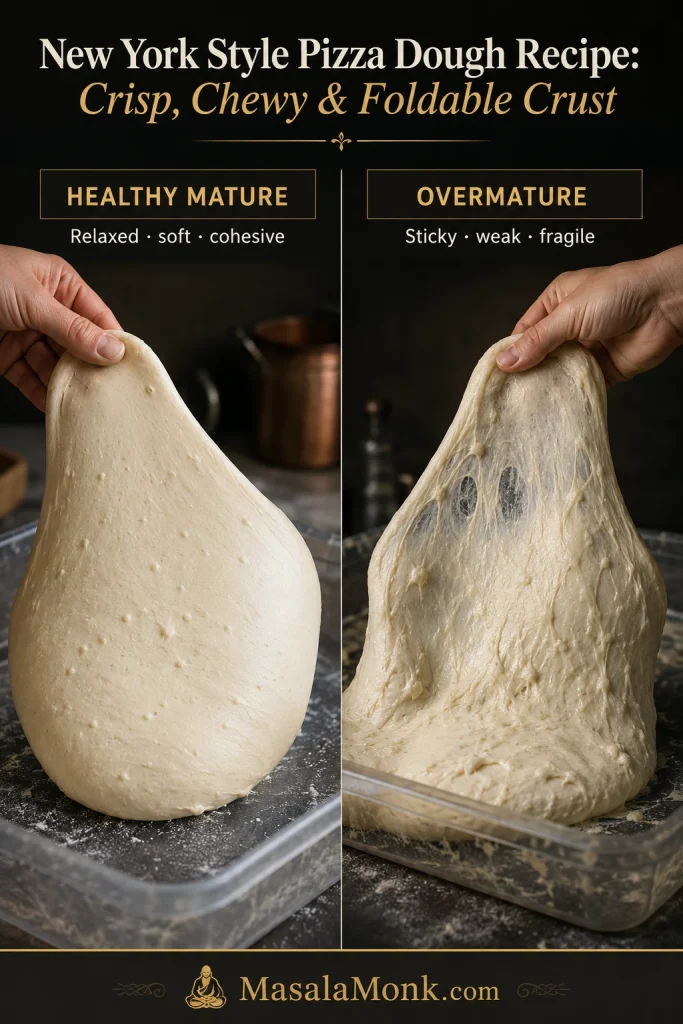
Healthy mature pizza dough lifting as a cohesive mass beside overmature dough that looks slack, sticky, translucent and fragile.
Liftability is a useful maturity clue. Healthy pizza dough stretches but still comes away as one piece; overmature dough elongates, thins and tears much more readily under the same gentle handling.

How Much Dough Do You Need Per Pizza?

Ball weight and finished diameter work together. Too much dough at a small diameter gives you a thicker, breadier pizza even when fermentation is perfect.

Finished pizzaPractical dough rangeHow to use it
12 inches / 30 cmAbout 230–270 g / 8.1–9.5 ozLower end for a thinner result; upper end is easier to handle
14 inches / 36 cmAbout 300–340 g / 10.6–12 ozThis recipe uses 340 g for an easier first attempt
15 inches / 38 cmAbout 320–360 g / 11.3–12.7 ozThe same 340 g ball gives a thinner NY-style center
16 inches / 41 cmAbout 350–400 g / 12.3–14.1 ozBest with confident stretching and a large baking surface
Same 340-gram pizza dough ball stretched to 14 inches and 15 inches, with the larger pizza skin visibly thinner.
That extra inch changes more than the number on a ruler. The same dough is spread across a larger area, so the 15-inch version develops a thinner center and gives you less handling margin than the 14-inch version.

A clean 14-inch pizza is better than forcing a resistant ball to 15 inches. With practice, the same dough usually stretches farther and more evenly.

If what you actually want is a thicker pan crust with crisp cheese around the edges, the Detroit-Style Pizza recipe is the better direction.

Match Pizza Size to Your Baking Surface

Match the pizza to the baking surface, not just the dough ball. A 14-inch pizza is manageable on a 15-inch surface; for a 15-inch pizza, a 16-inch surface or larger gives you much more landing margin.
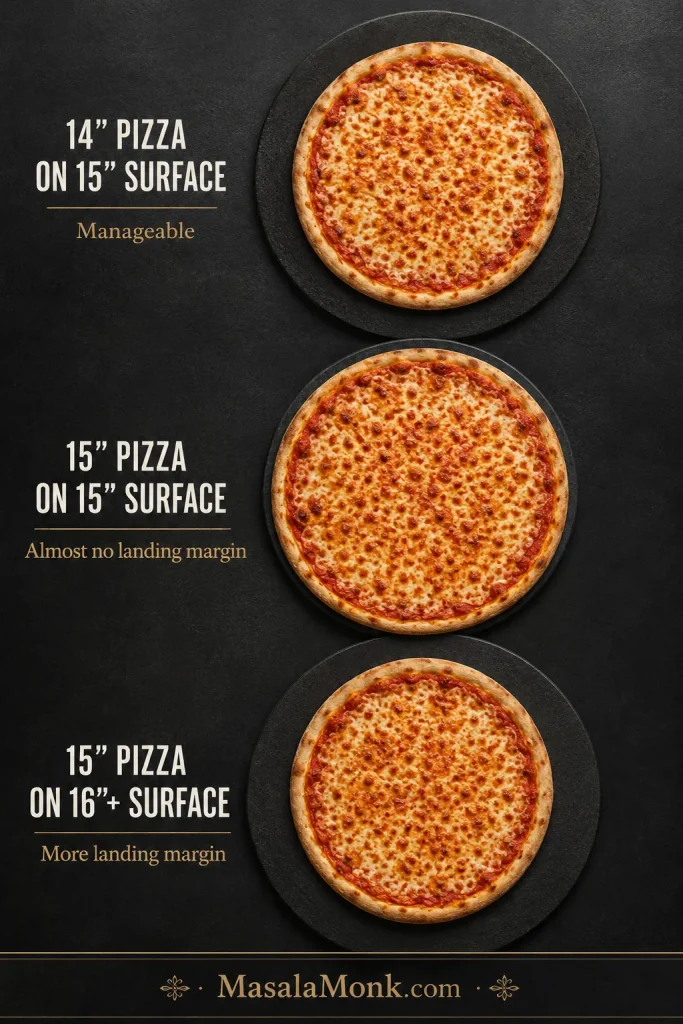
Overhead guide comparing pizza diameter with baking-surface size, including a tight-fitting pizza and examples with more landing margin.
Work backward from your equipment. Measure the usable width of the pizza steel or stone before stretching, because a pizza that nearly fills the surface leaves very little room for an imperfect launch.

Give the dough room, too. A container around 1 quart / 1 liter works comfortably for a 340 g ball. Crowded balls can merge and flatten awkwardly, while re-balling a relaxed dough immediately before baking creates fresh tension that needs time to settle again.

Once a ball has had enough room and time to relax, the next question is whether it is ready to open.

Is My Dough Ready to Stretch?

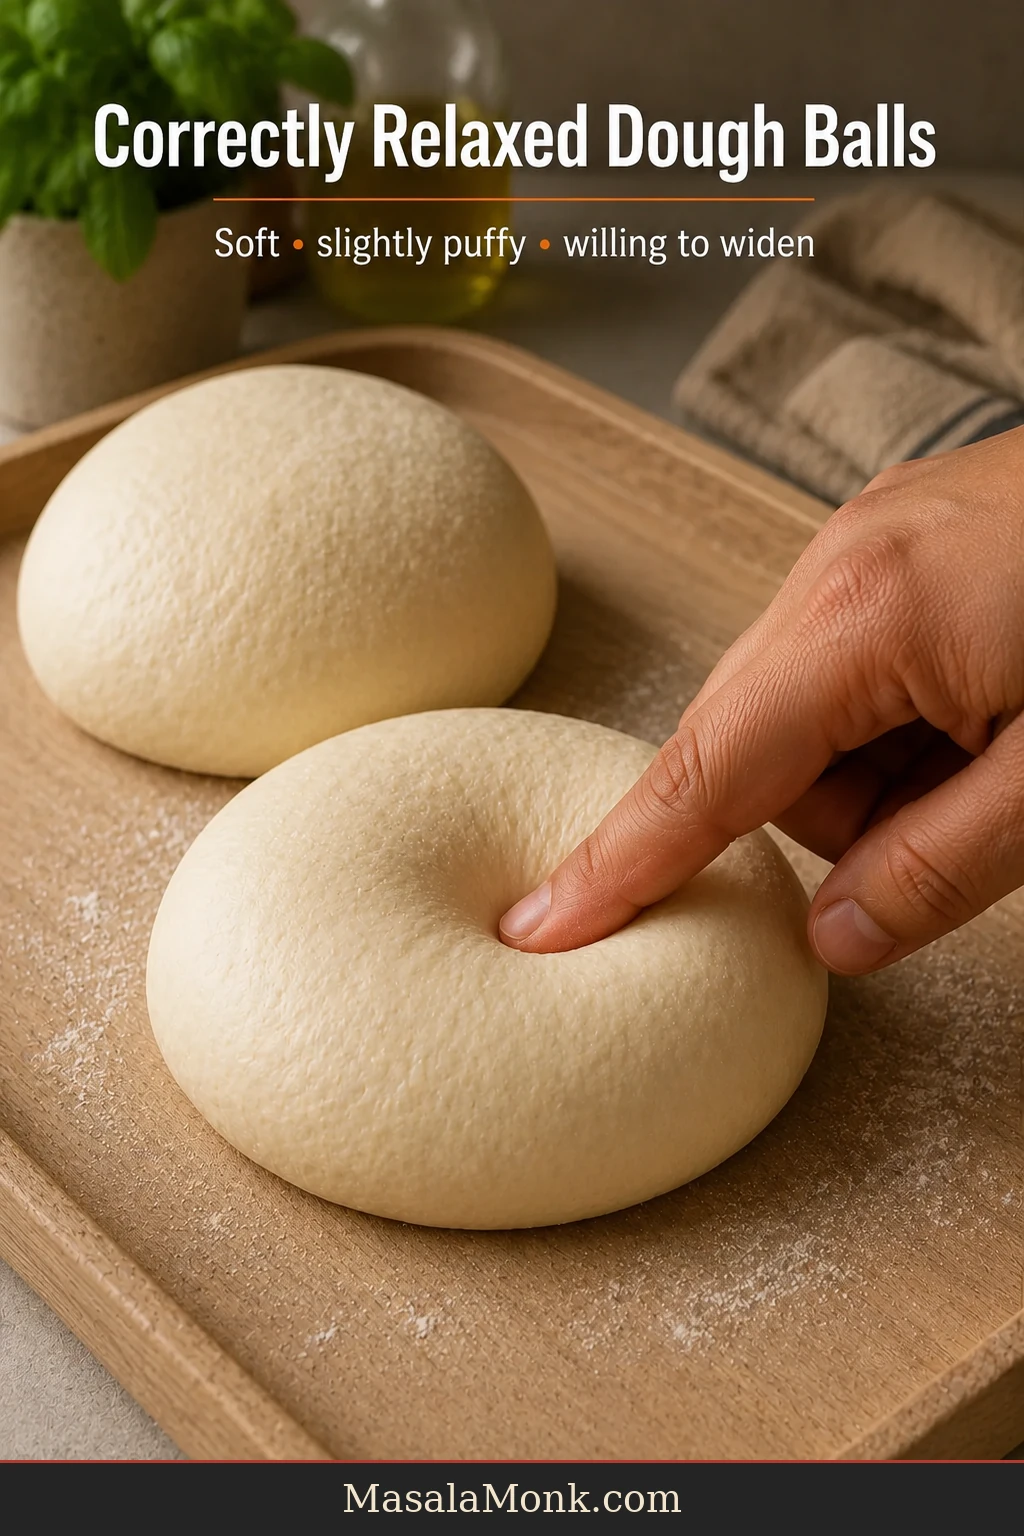
Ready pizza dough feels soft, stretches with gentle resistance, and still has enough strength to lift cleanly.

Two hours out of the refrigerator is planning advice. Your hands get the final vote.

The center can remain cooler than the room. It only needs to warm enough for the ball to open willingly without repeated tearing or snap-back.

  • Still too cold: firm, tight and quick to spring back. Cover it and wait.
  • Ready: soft and willing to stretch, yet cohesive enough to lift cleanly.
  • Very warm: softer and slacker but still cohesive. Use it once it opens willingly.
  • Overmature: increasingly sticky, weak and fragile. Handle gently and use promptly.
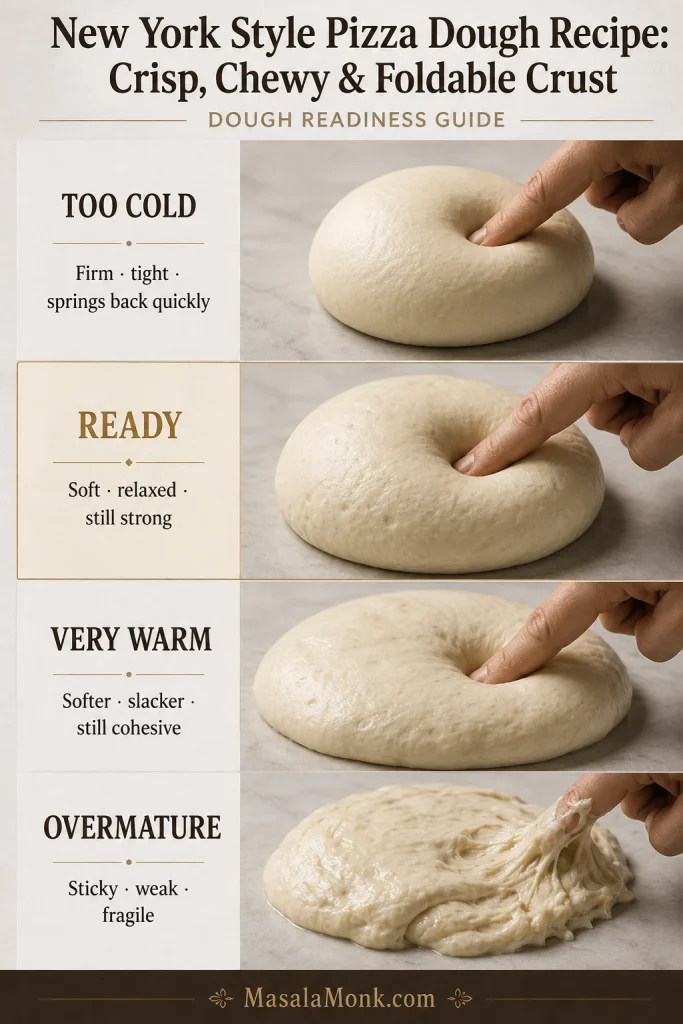
Four New York-style pizza dough states labeled too cold, ready, very warm and overmature, ranging from compact and tight to broad, sticky and weak.
Use shape and resistance together. A soft-looking ball that still snaps back may need more time, while a broad warm ball can still be perfectly usable if it lifts cleanly and retains strength.

One kitchen may have workable dough after 90 minutes; another may need 2½ hours. Once it opens comfortably, extra counter time brings no automatic benefit.

Next: Stretch the dough without fighting it

How to Stretch the Dough Without Fighting It

Get everything else ready first: sauce portioned, cheese grated, toppings nearby, peel dusted and oven hot. Thin dough becomes more likely to stick if it sits around while you look for ingredients.

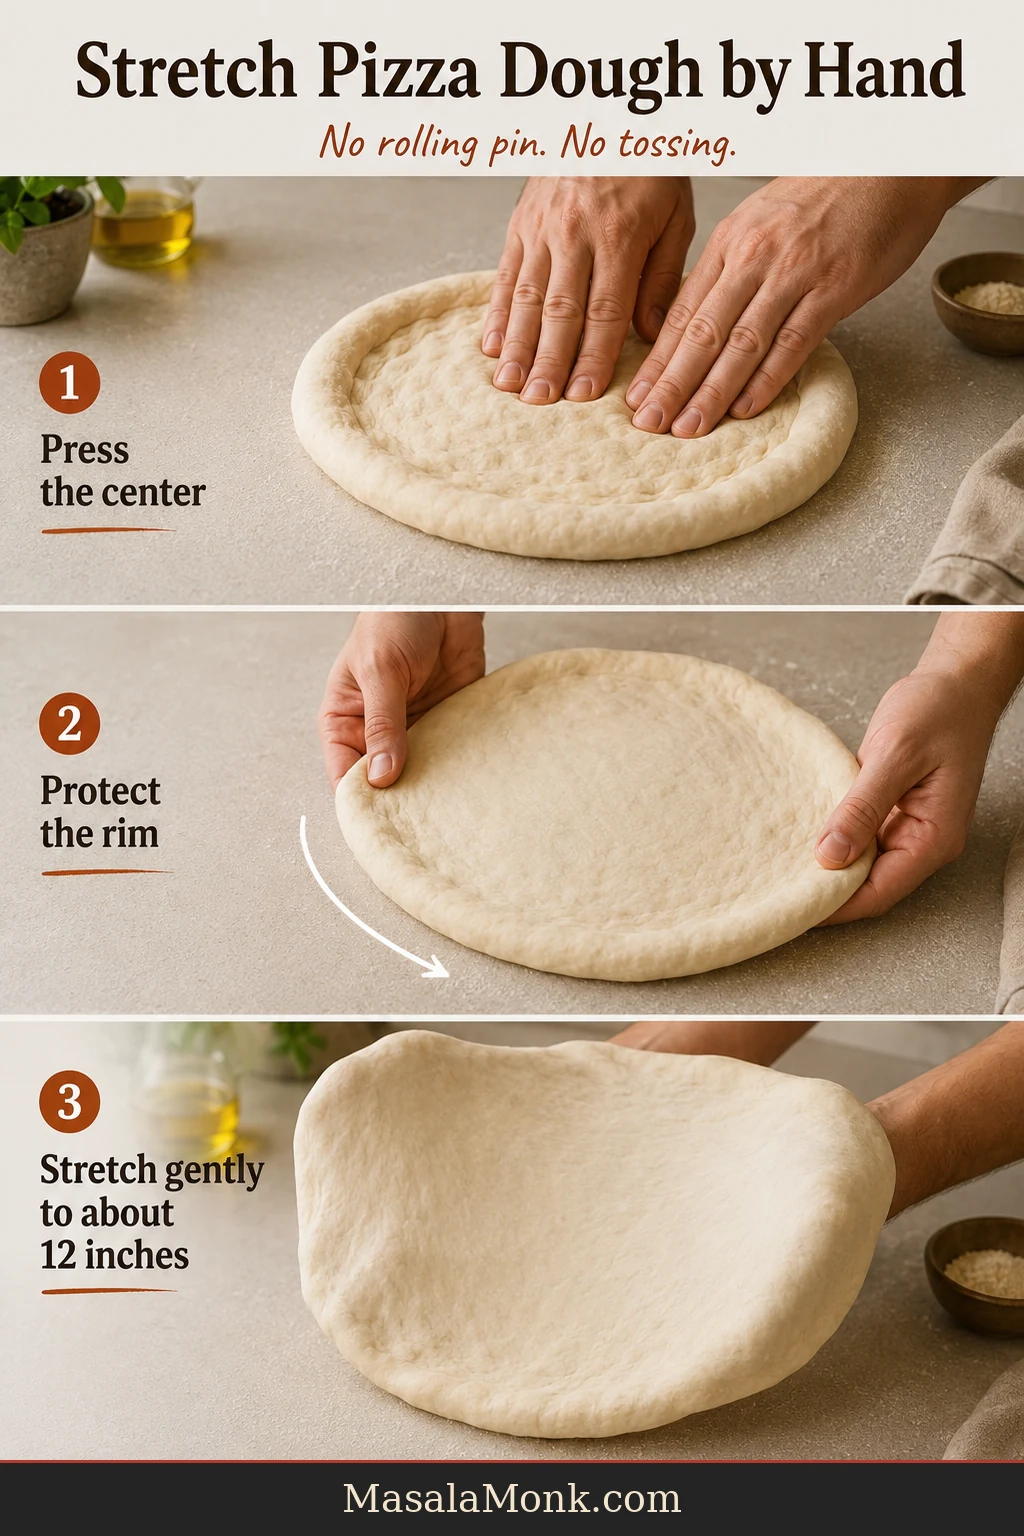
Release the ball gently with your fingers or a plastic scraper. Flour both sides lightly, press the center outward with your fingertips, and preserve the outer ½–¾ inch / 1–2 cm.
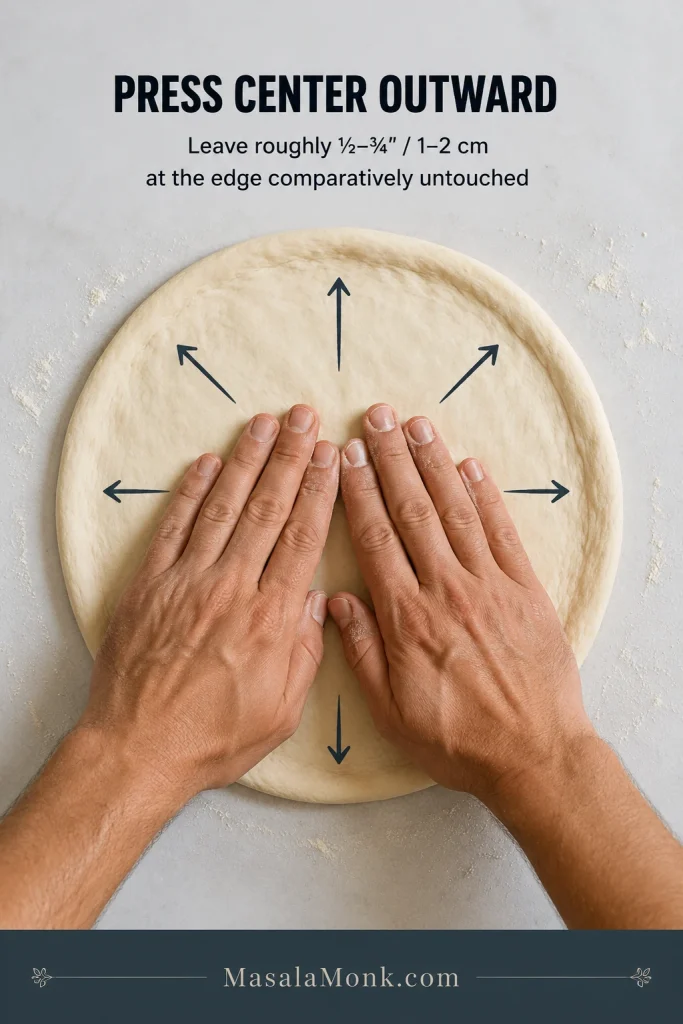
Fingertips pressing pizza dough from the center outward while leaving a narrow outer edge relatively untouched.
Pressing does not manufacture a giant rim; it redistributes thickness. The outer band rises later because it has been compressed and stretched less than the center.

When the disk is large enough to lift, rotate it through your hands and let gravity help. Keep moving around the pizza so one spot does not take all the stretching.
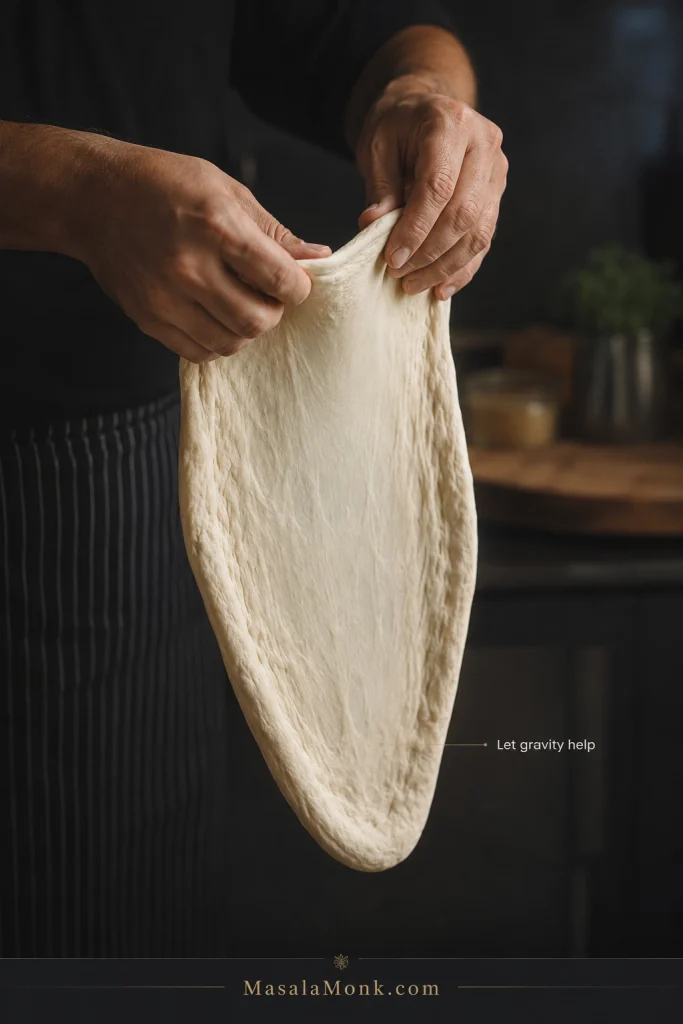
Hands supporting and rotating a pizza dough skin vertically while gravity gently stretches the center.
Keep the pizza dough moving through your hands so gravity is shared around the circle. If the same low point hangs longest on every turn, that area will become the first dangerously thin spot.

An even 14-inch center beats a 15-inch pizza with one paper-thin half and one thick half.

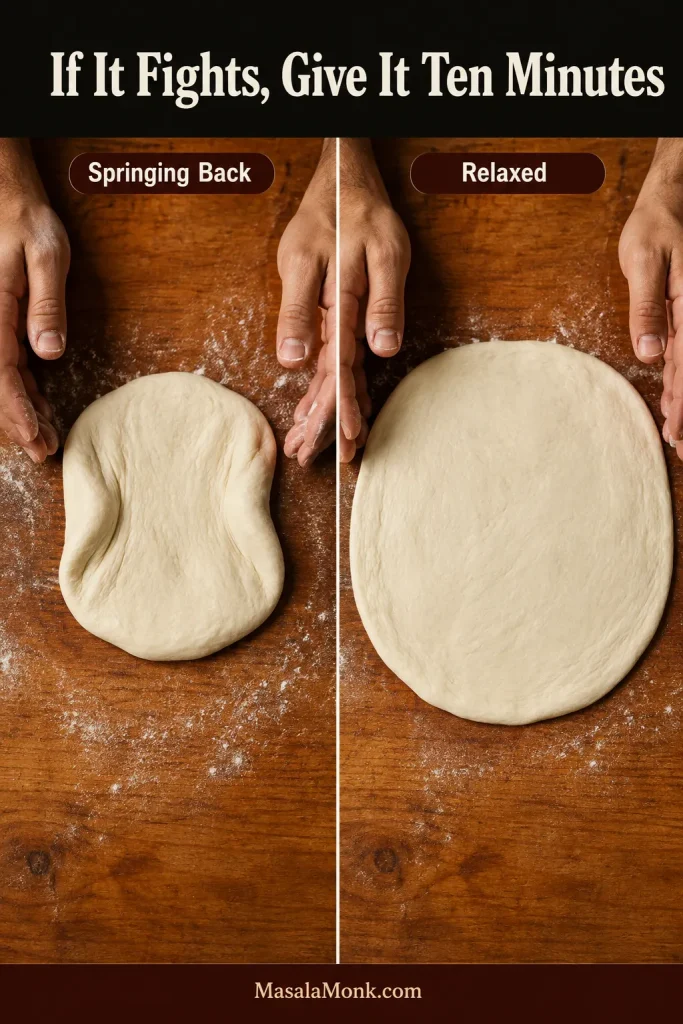
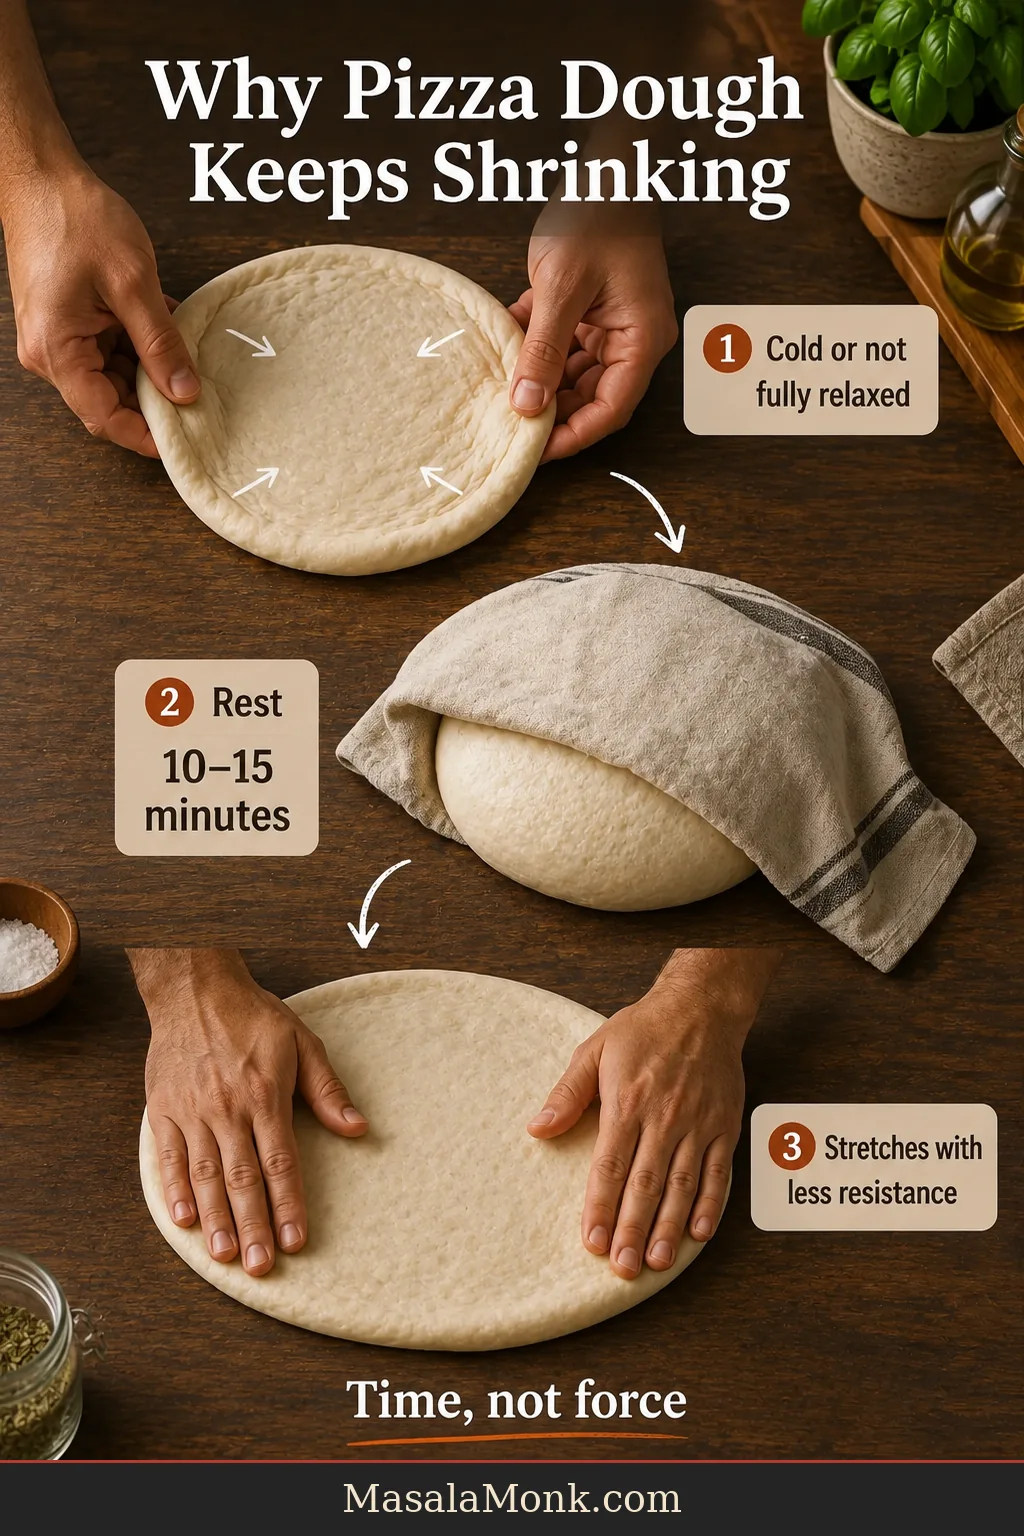
When It Springs Back

The annoying part of spring-back is that pulling harder usually makes it worse.

Put the partially stretched dough down, cover it, and wait 5–10 minutes. That short pause often does more than another five minutes of tugging.

Already warm but still snapping back hard? Strong flour or aggressive mixing can leave the dough unusually elastic. Give it another short rest.

When the dough fights back, rest beats force.
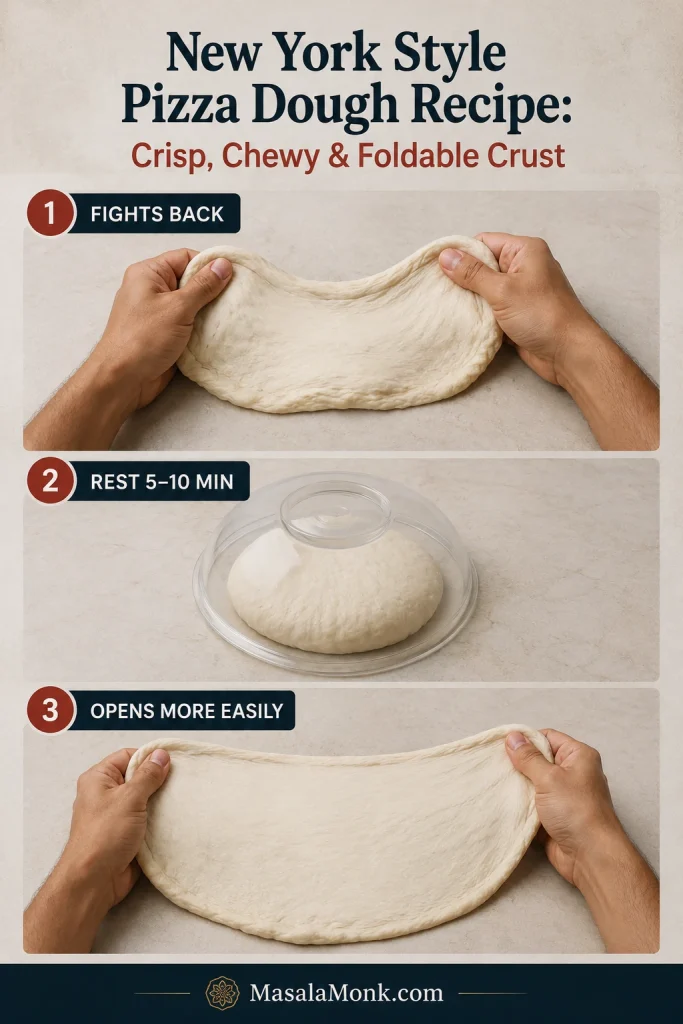
Three-stage comparison of pizza dough resisting stretching, resting covered for several minutes and then opening more easily.
The useful change after a short rest is resistance, not volume. The pizza dough should open farther under the same gentle pressure rather than merely looking larger because it sat on the counter.

When It Tears

How the dough felt just before it tore helps identify the problem.

  • Tight and resistant: it was probably stretched before relaxing enough. Stop and rest it.
  • Loose, sticky and fragile: the dough may be overfermented or the flour may not have enough strength for the hydration.

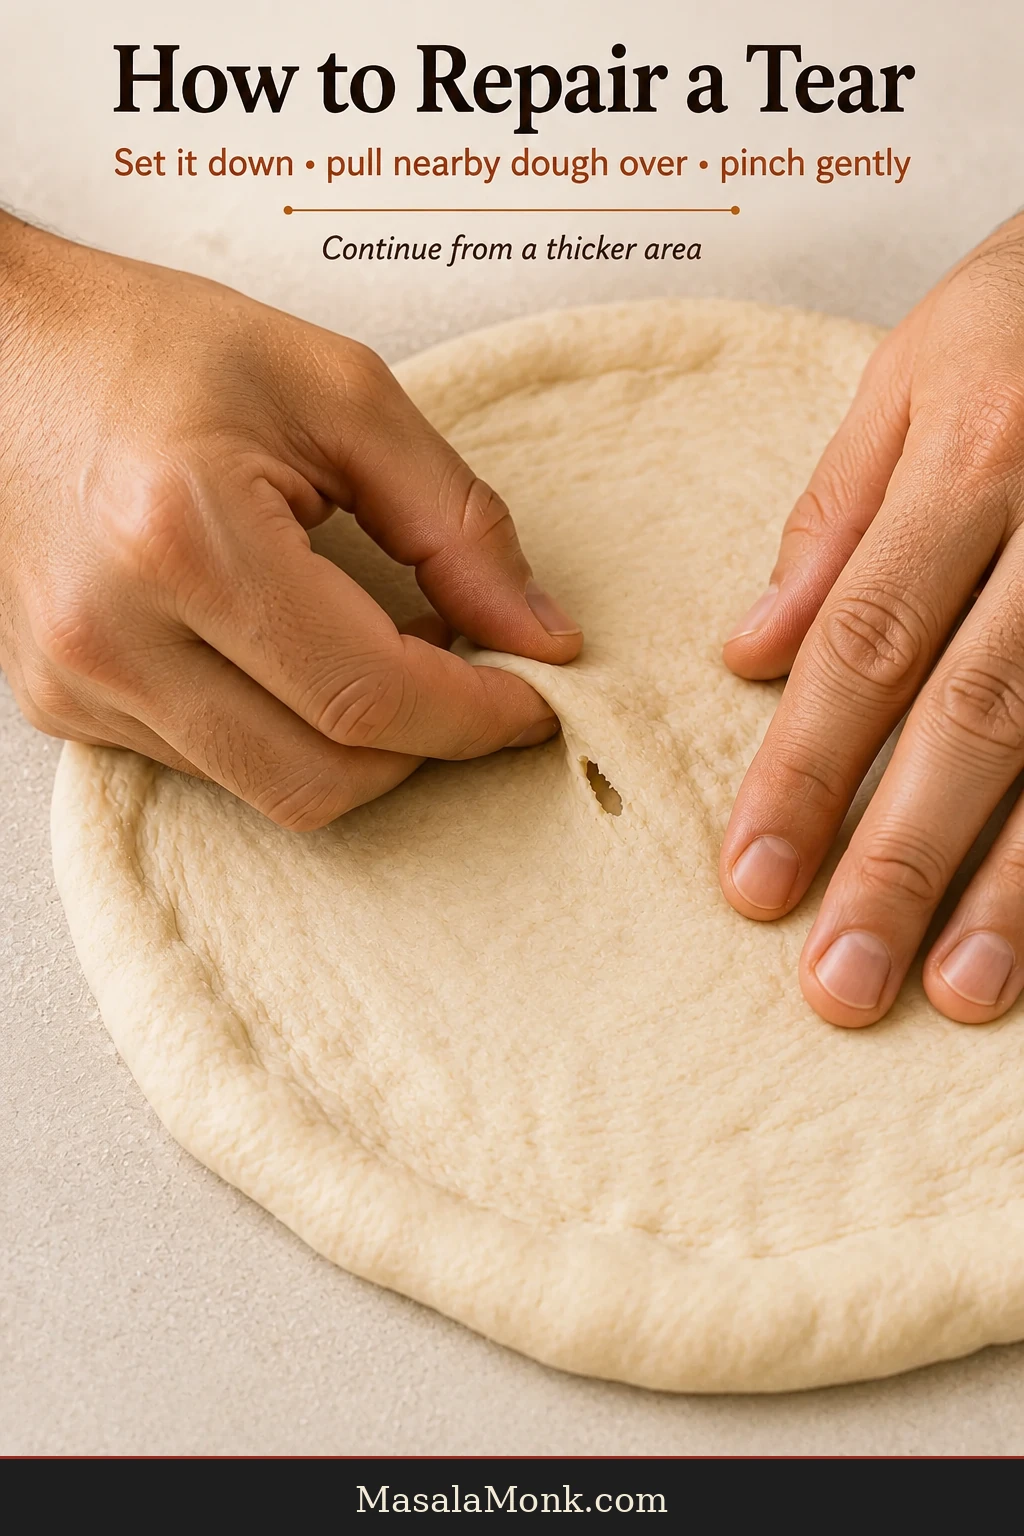
A small tear is repairable. Pinch the edges together. For a larger pinhole, borrow a tiny piece from a thicker part of the rim and press it over the opening, then leave the patch alone for a minute.
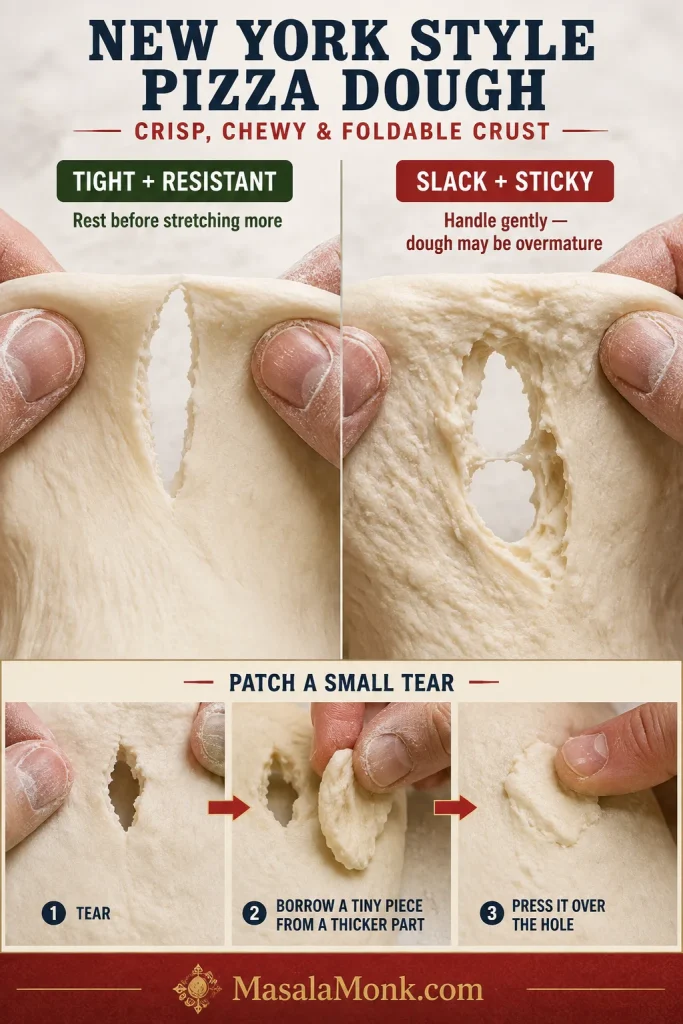
Comparison of a clean tear in taut pizza dough and a ragged tear in slack sticky dough, with a small patch placed over a hole.
Read the dough around the hole. Smooth, taut tear edges point toward excess tension; ragged, wet-looking edges suggest weaker structure. The tear itself is only half the diagnosis.

When one area starts looking translucent, leave it alone and work on thicker parts of the dough. A hole that develops later can let sauce through and glue that spot to the peel.
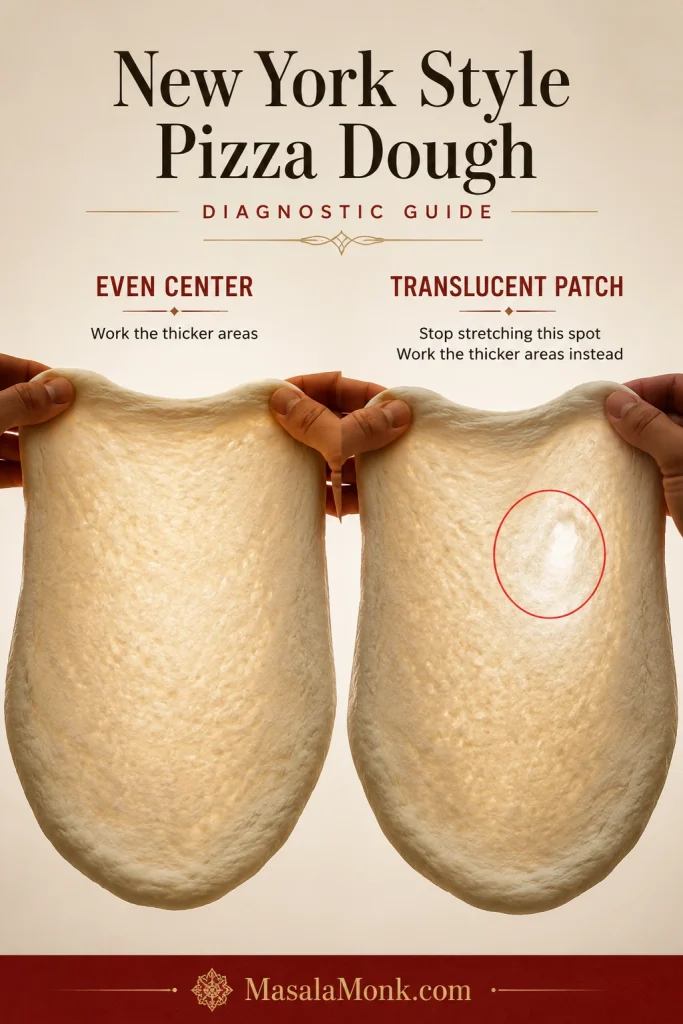
Backlit pizza dough showing an evenly thin center beside a localized nearly transparent weak patch.
Backlighting exaggerates thinness, so compare one area with the dough around it. A single patch that suddenly glows much brighter than its neighbors is a better warning than translucency by itself.

Next: Top lightly and launch cleanly

Top Lightly and Launch Cleanly

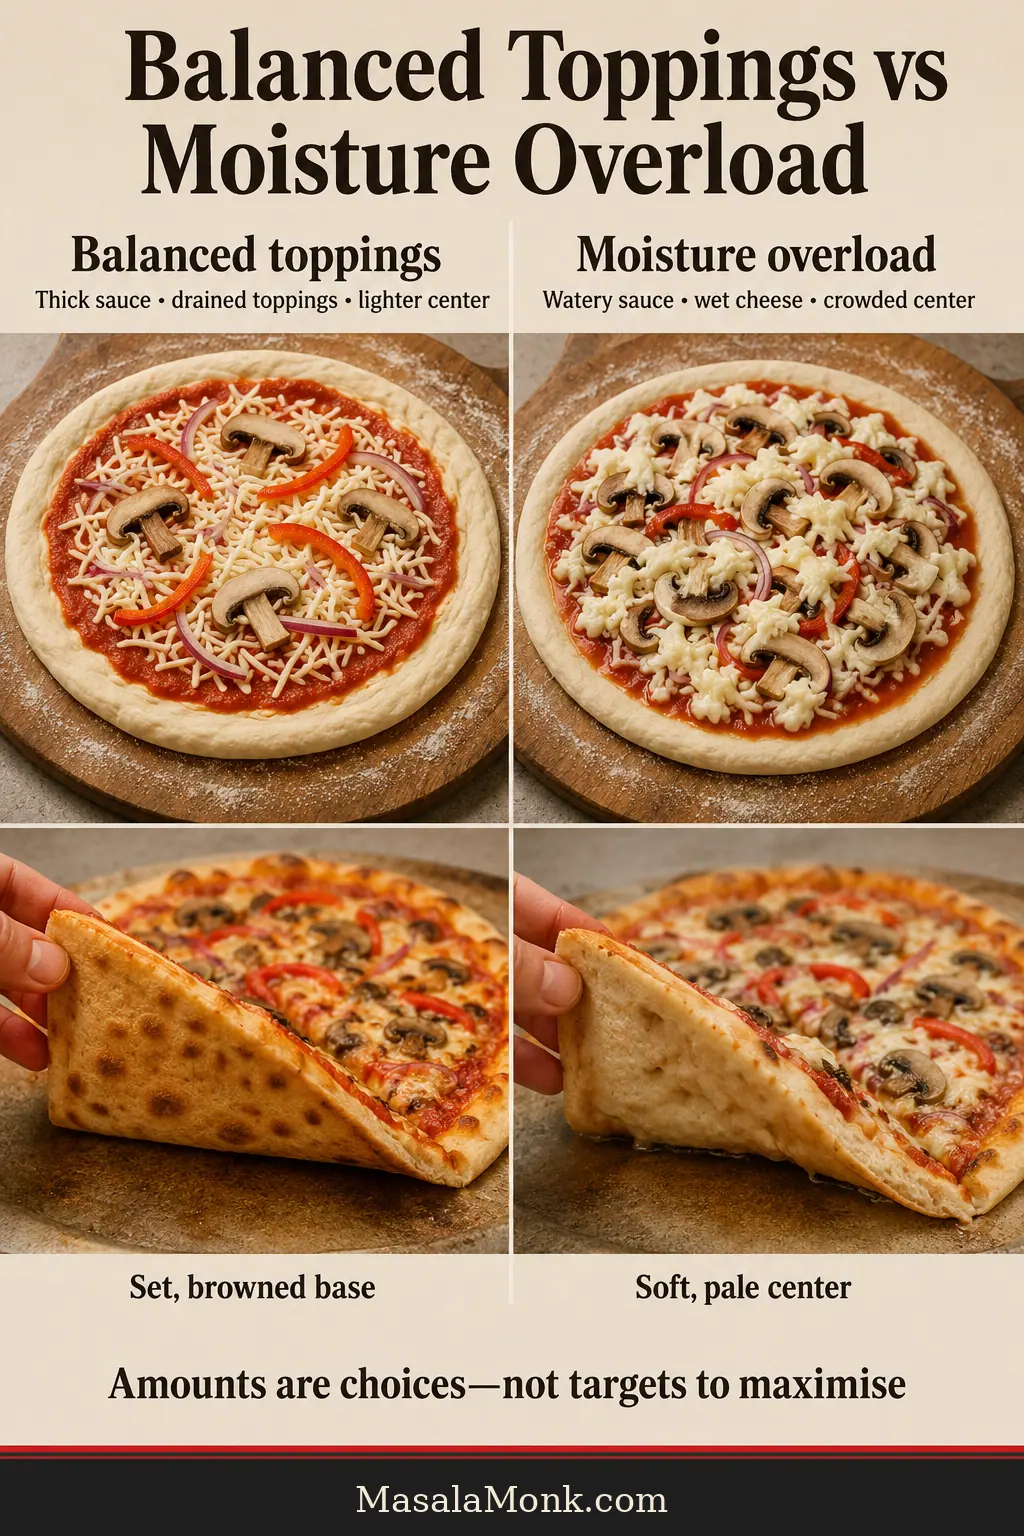
Thin New York-style pizza rewards restraint. Start with the 115 g sauce + 115 g mozzarella baseline from the recipe and add more only after you know how your oven handles the extra moisture and weight.
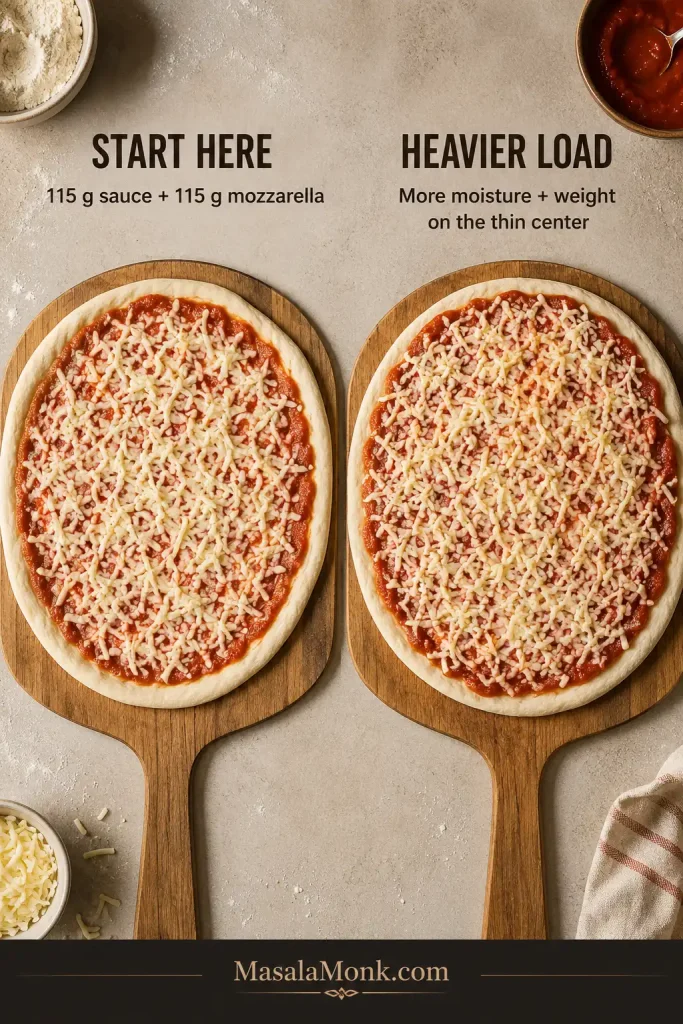
Two raw New York-style cheese pizzas comparing a restrained sauce-and-mozzarella load with a visibly heavier topping load.
Use the baseline cheese pizza as your reference point. Once the crust bakes well with a restrained topping load, you can add more sauce, cheese or toppings later and know that moisture and weight—not a new dough formula—are the variables.
  • Thick pizza sauce: spread a thin, even layer. The Pizza Sauce Recipes guide has tomato, white garlic, vodka, BBQ and other options.
  • Whole-milk low-moisture mozzarella: grate it from a block if possible for a cleaner melt.
  • Other toppings: add enough to taste them without burying the thin center under excess water and weight.

Loose sauce, watery vegetables and fresh cheeses all bring more moisture. Adjust the load accordingly. Once baked, a light drizzle of Hot Honey Sauce gives you sweet heat without adding that moisture to the raw pizza.

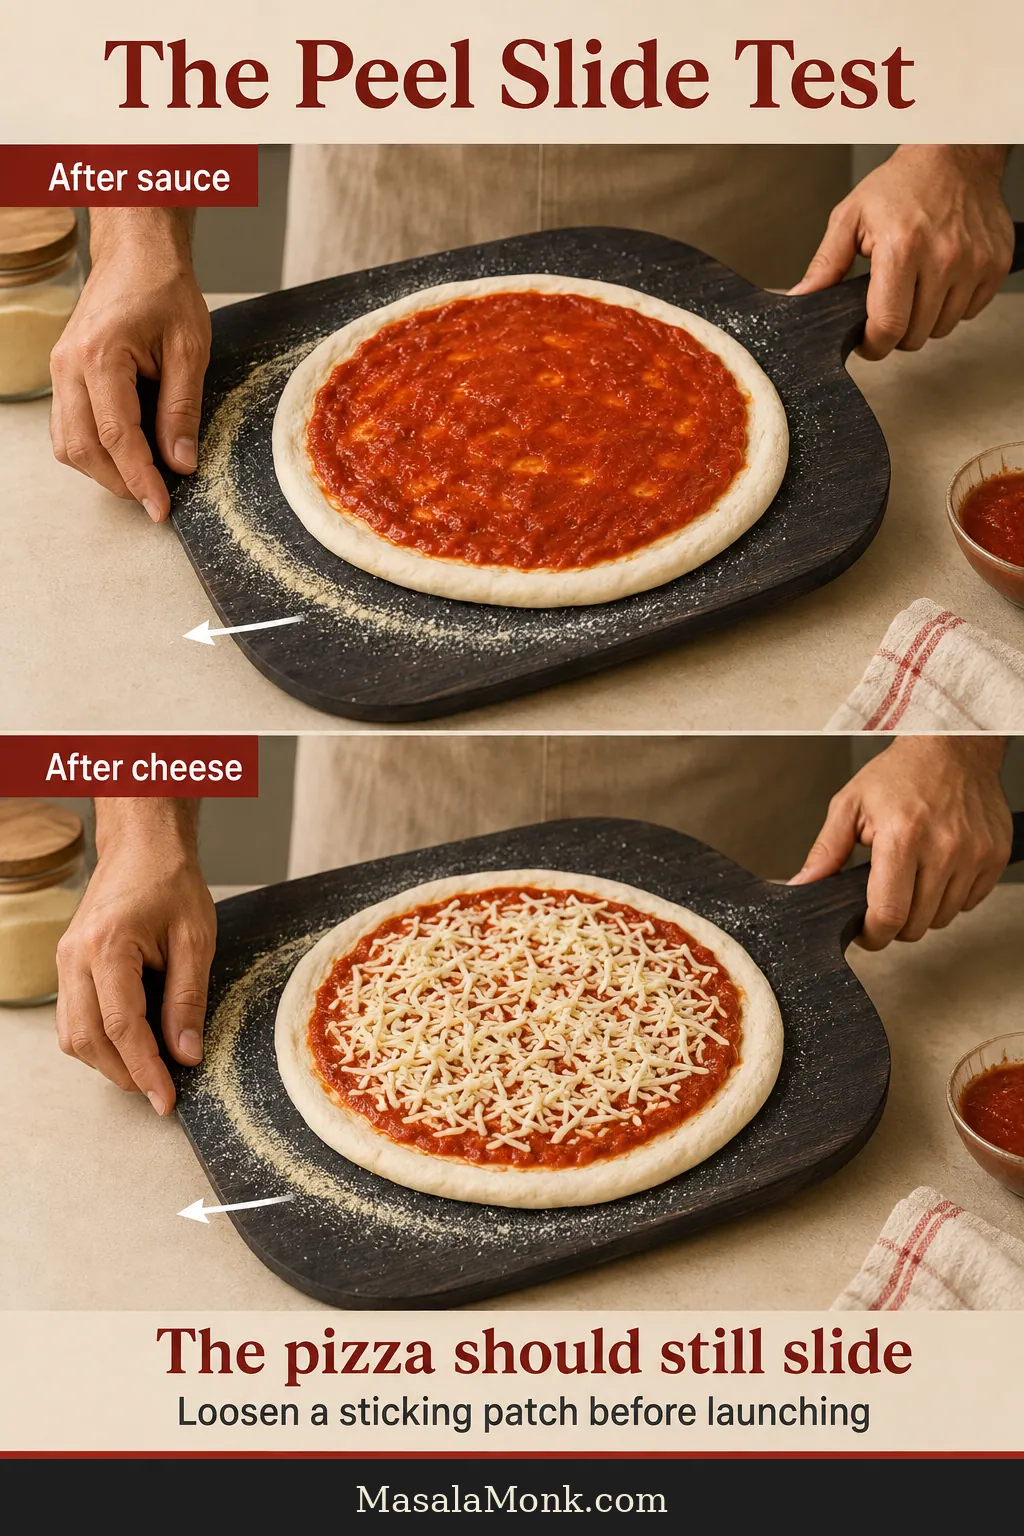
The Peel Shake Test

  1. Dust the peel lightly.
  2. Put the stretched dough on it.
  3. Shake it now. The whole skin should move.
  4. Top quickly.
  5. Shake it again.
  6. If one spot sticks, free that spot before launching.

Raw topped cheese pizza sliding freely on a wooden pizza peel during a short shake test before baking.
Watch the center as well as the rim. A pizza is not truly free if the edge wiggles while one hidden area in the middle remains anchored to the peel.

If the pizza will not slide on the counter, it will not suddenly become easier while you are leaning into a 550°F oven. For one stubborn spot, slide a long spatula or thin turner underneath and dust the edge of the tool lightly with flour if needed.
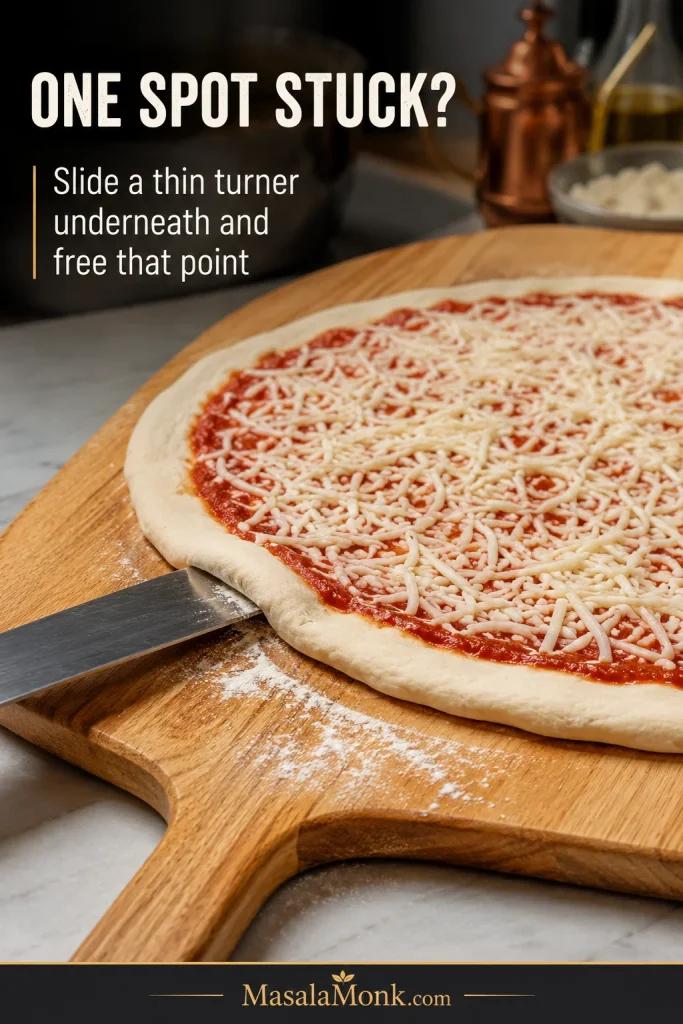
Thin metal turner sliding beneath one stuck area of a raw topped cheese pizza on a wooden peel.
Rescue the problem locally. Freeing only the stuck point helps preserve the pizza’s shape and reduces the chance of dragging toppings or creating a new weak spot elsewhere.
Peel Tips: Wood vs Metal and One-Peel Setups

A wooden peel is forgiving for building and launching raw pizza. A thin metal peel works particularly well for turning and retrieving it.

Using one peel for everything is fine. Let it cool and dry completely before placing the next raw dough on it; moisture from a hot finished pizza can make the next launch unexpectedly sticky.

How Much Flour or Semolina Should Be on the Peel?

Flour or fine semolina works well for dusting. Cornmeal is optional and adds a coarser texture, but loose grains can scorch on a hot steel. Use the minimum dusting needed to keep the pizza moving.
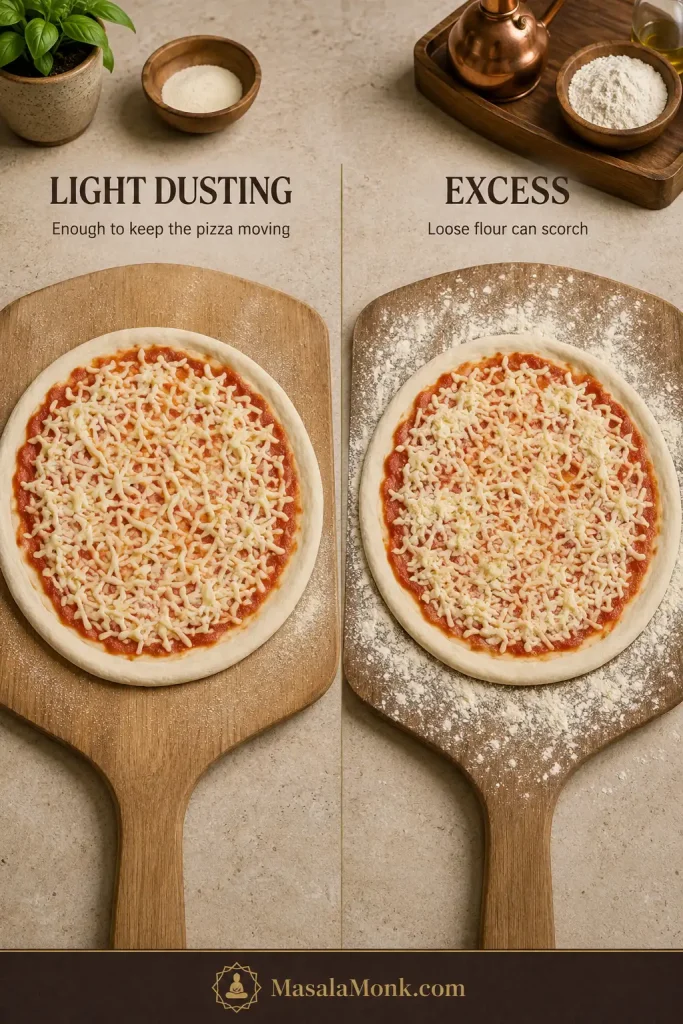
Two raw cheese pizzas on wooden peels, one with a light dusting of flour or semolina and one with visibly excessive loose dusting.
Dusting should be barely visible once the pizza is moving. If loose flour or semolina piles around the dough after a shake, there is probably more on the peel than the launch needs.

Next: Bake the pizza and balance top and bottom heat

How to Bake New York Style Pizza at Home

Your first pizza is partly dinner and partly calibration. It still counts as dinner.

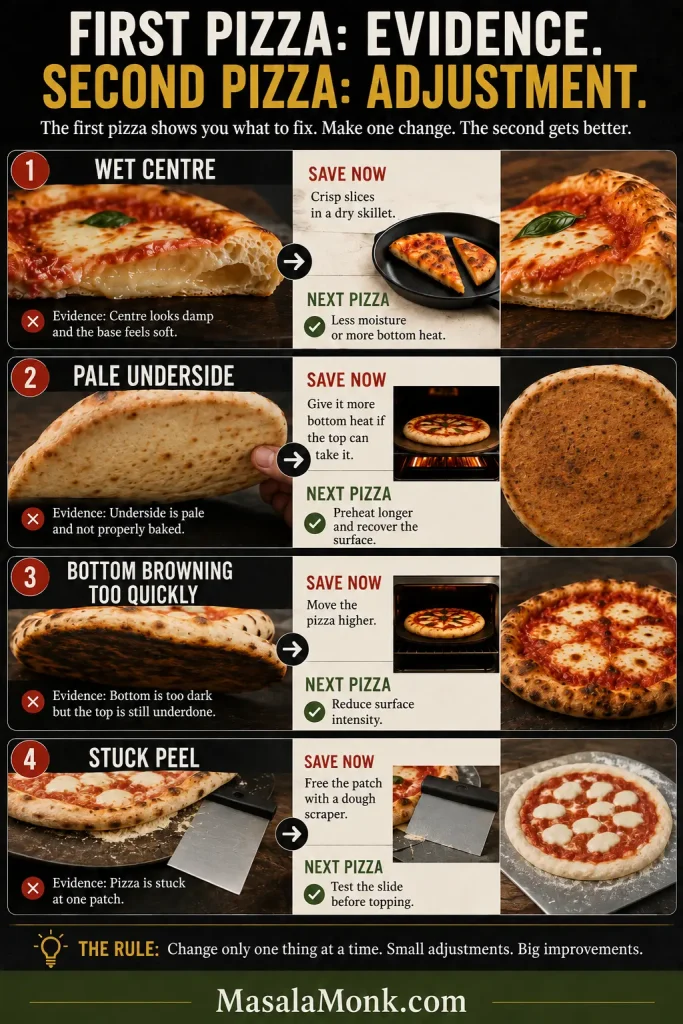
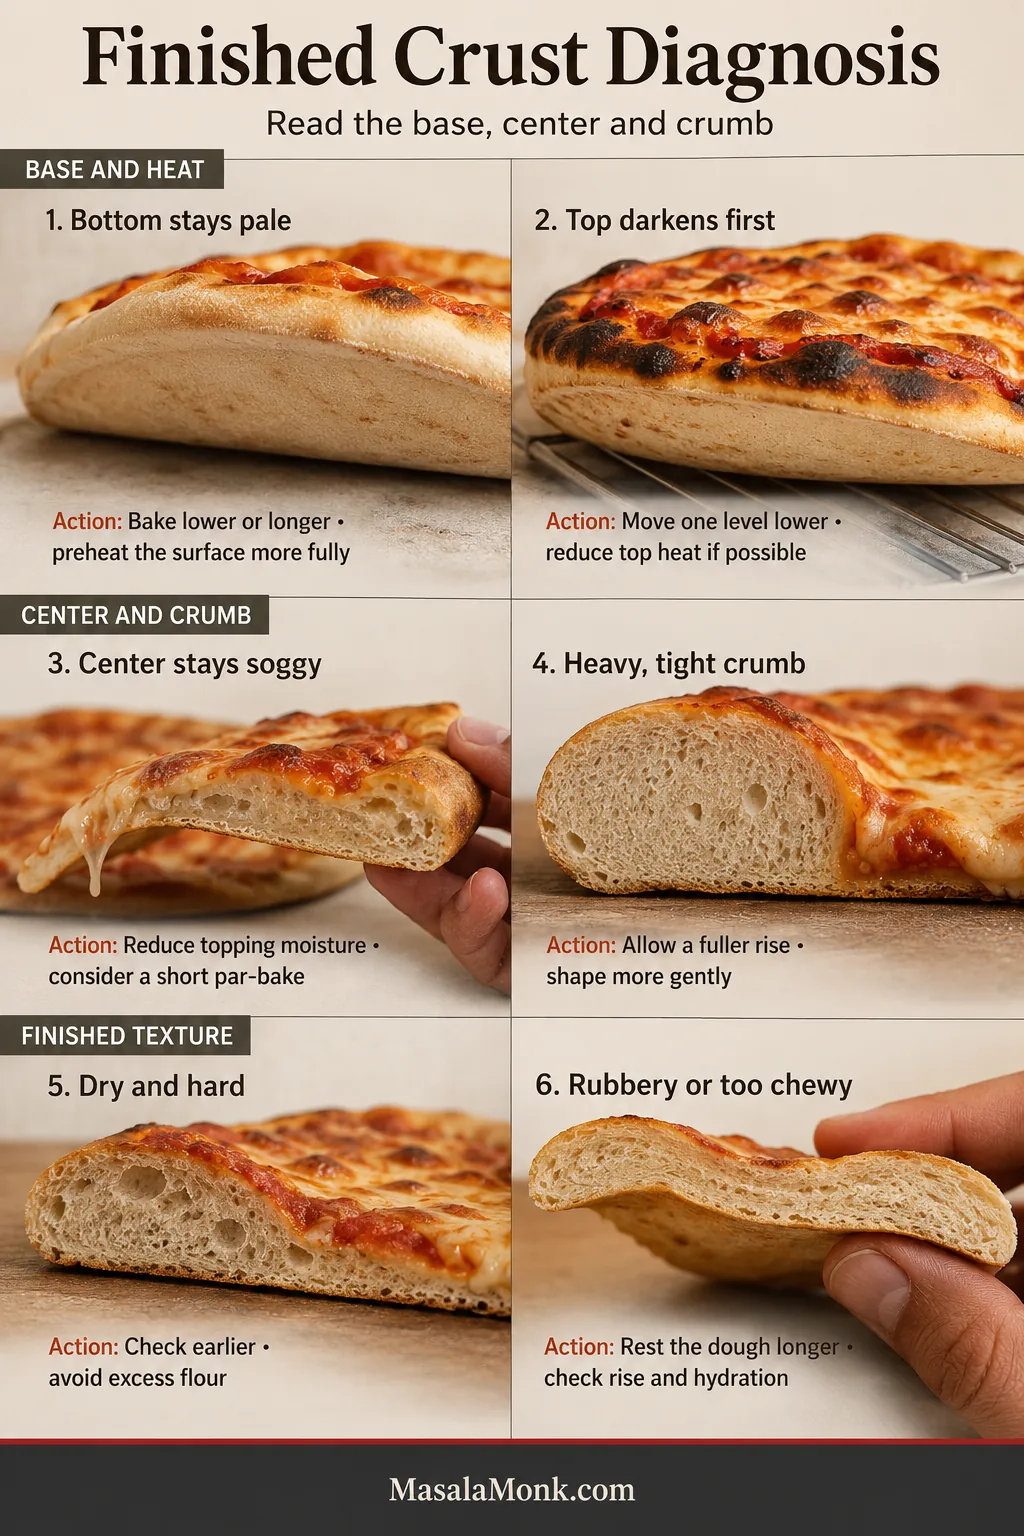
If the dough handled beautifully but comes out pale underneath, check the baking setup before rewriting the formula.

SetupPreheatPlanning rangeWhat to expect
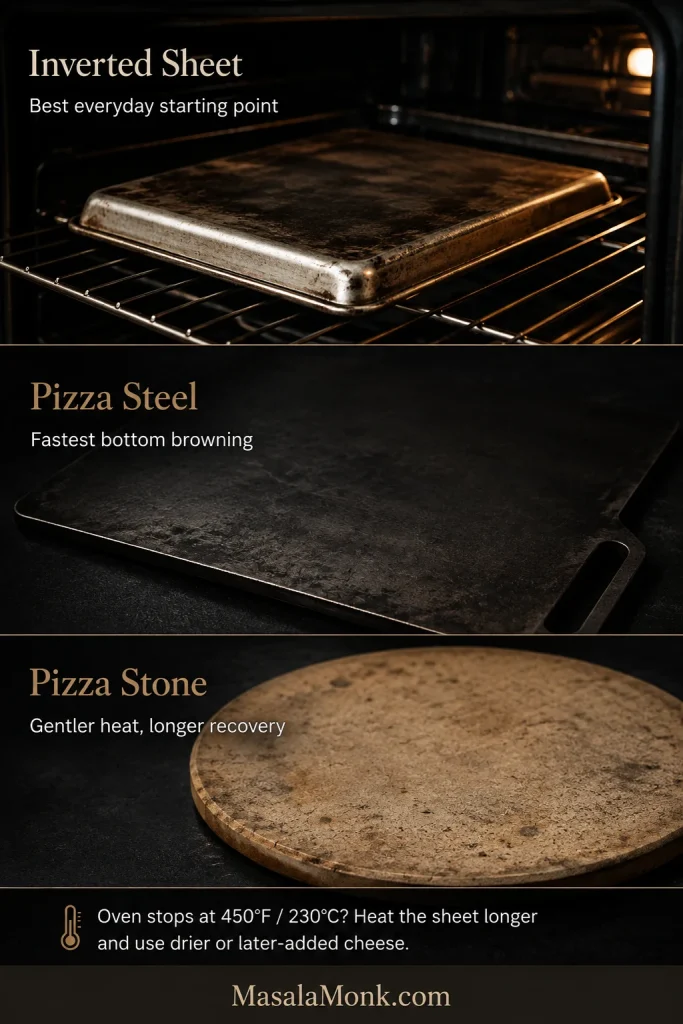
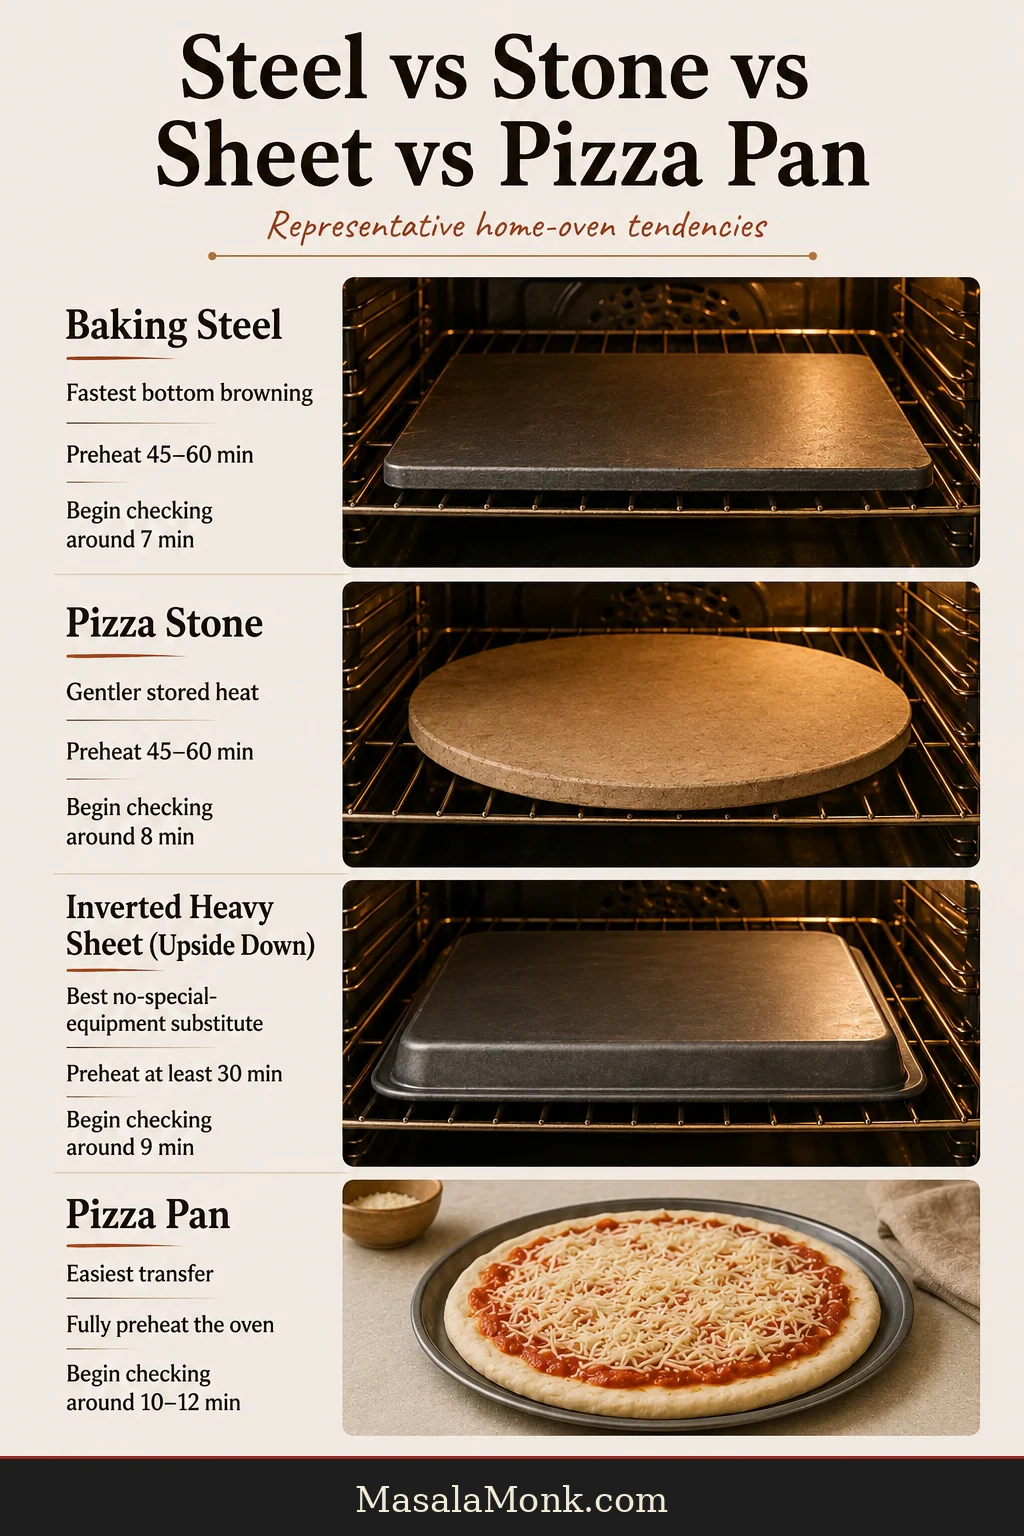
Pizza steelAbout 60 minOften about 5–7 minStrong bottom heat; easiest route to a crisp-chewy home-oven NY crust
Pizza stoneAt least 60 minOften about 7–15 minVery good results, with gentler heat transfer than steel
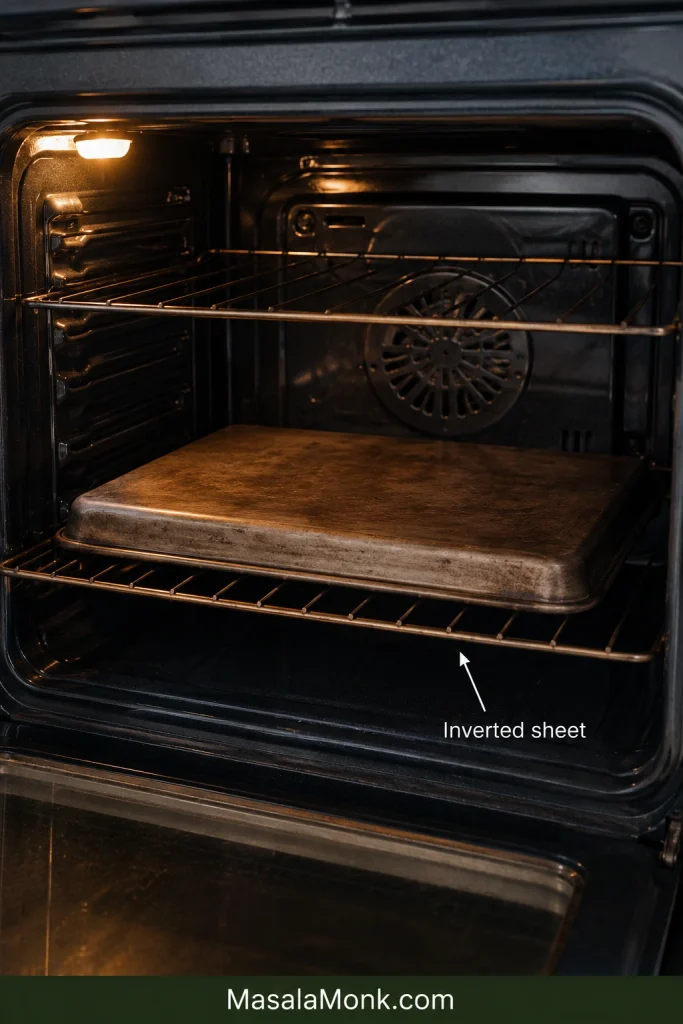
Heavy inverted sheetAbout 45–60 minOften about 8–12+ minUseful without specialty equipment; expect gentler bottom browning

Those are planning ranges. The pizza itself decides when it is ready.

Balance Top Heat and Bottom Heat

Put a steel or stone roughly in the middle of the oven and preheat at 500–550°F / 260–288°C, or the highest suitable setting your oven allows.

An infrared thermometer can tell you whether the baking surface is still heating or has recovered between pizzas, but you do not need one universal surface-temperature number. Use the underside of the pizza to calibrate your setup.

When the Cheese Is Done Before the Crust

Dark cheese is not proof that the crust is cooked. If the mozzarella is racing ahead while the underside remains pale, the top and bottom heat are out of balance.
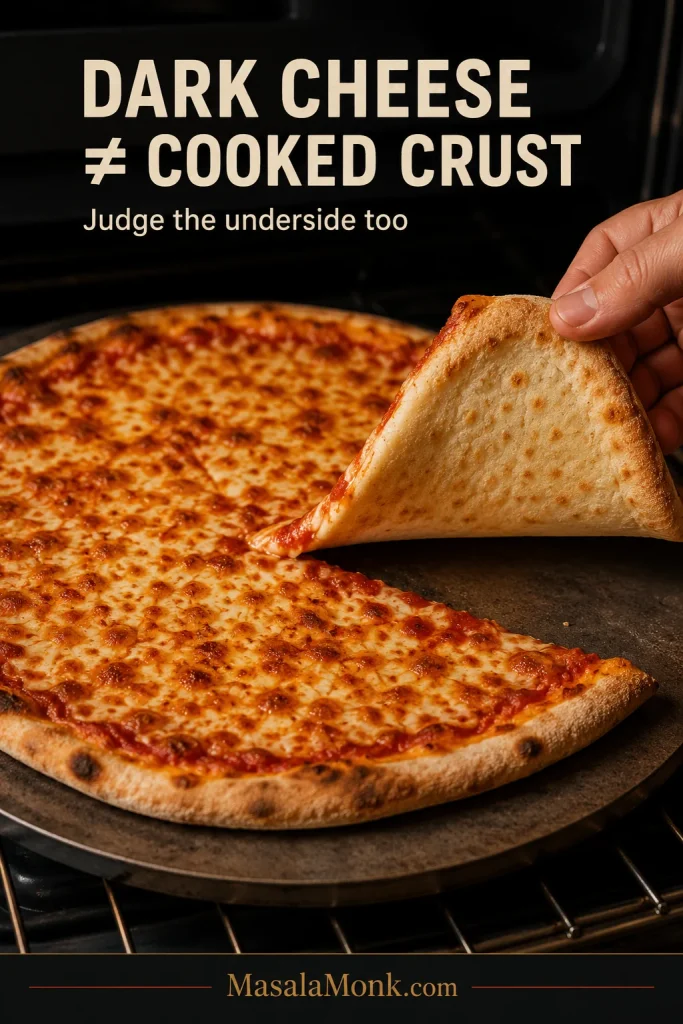
Cheese pizza with a deeply browned top and one slice lifted to reveal a noticeably pale underside inside a home oven.
Cheese and crust are separate doneness signals. When they disagree, diagnose the oven’s heat balance instead of extending the bake until the darker one becomes even darker.
  • Top ready, bottom pale: preheat the surface longer, move it lower, or otherwise strengthen the bottom heat.
  • Bottom dark too early: move the surface higher so the top has more time to catch up.
  • Bottom excellent, top nearly there: finish briefly under the broiler.
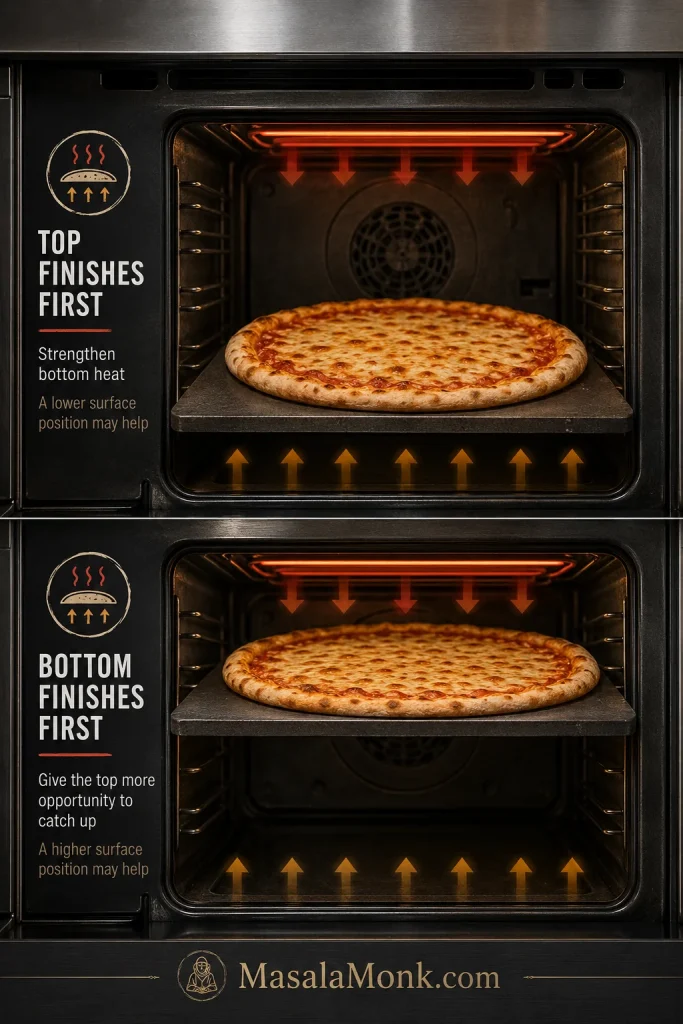
Domestic oven comparison showing pizza baked on different rack or baking-surface positions to adjust top and bottom heat.
Treat rack position as a calibration change. Keep the dough and topping load the same on the next pizza. Then you can tell whether the new position improved the balance between top browning and bottom heat.

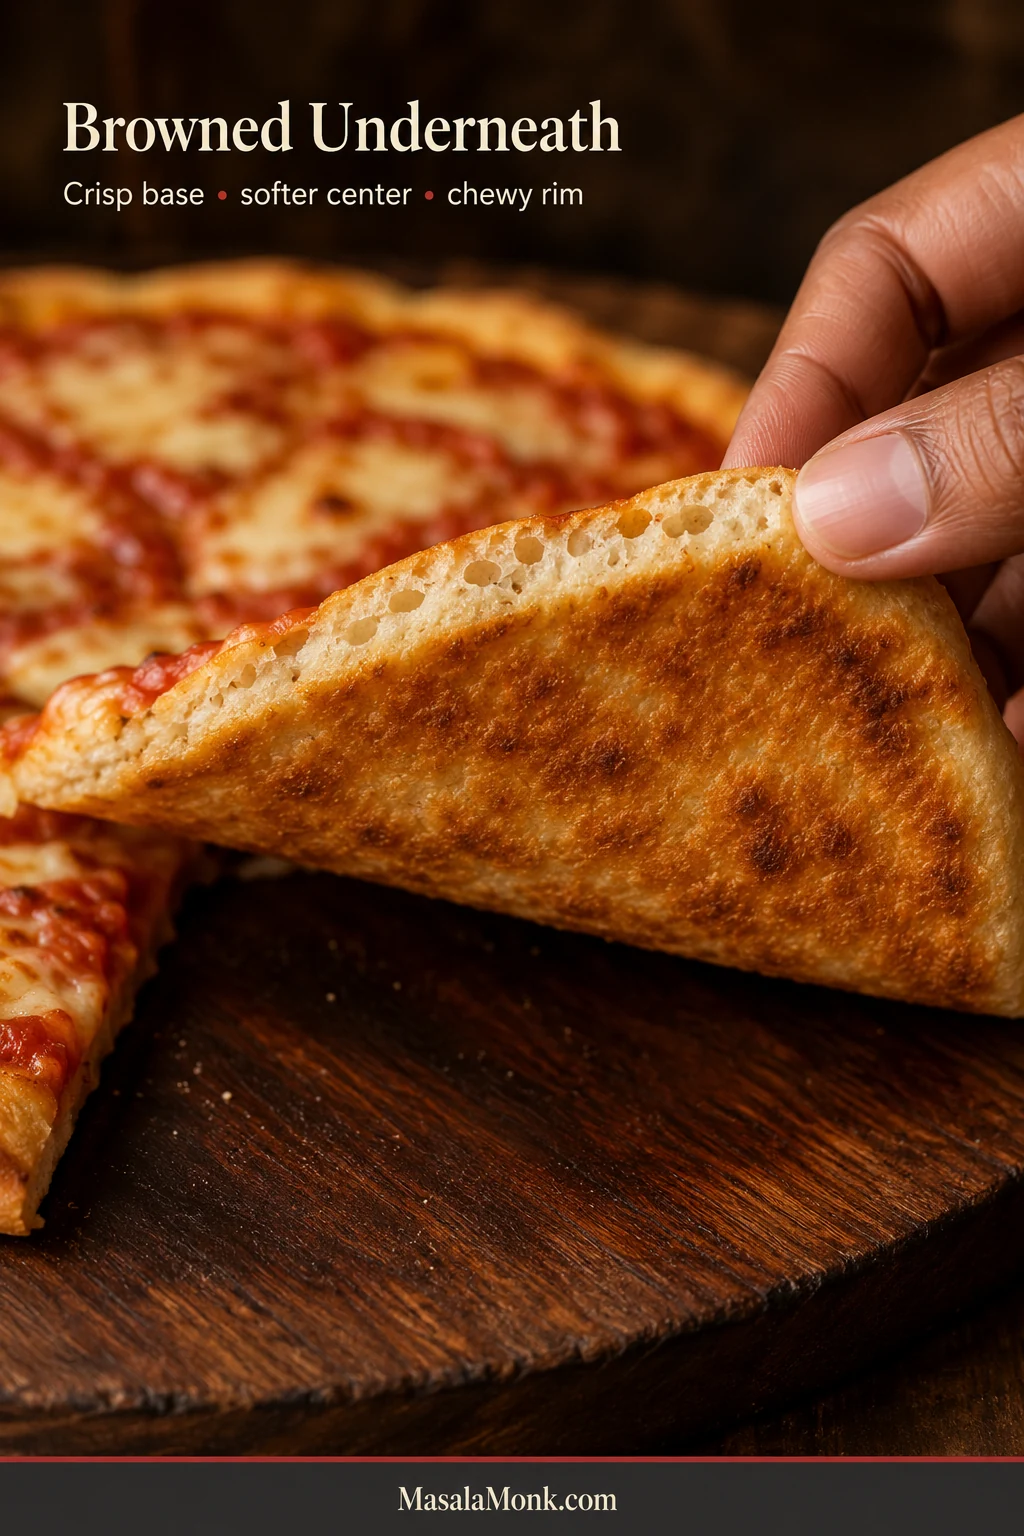
What a Properly Browned Pizza Underside Looks Like

The first time you lift a home-oven pizza and find a properly browned base instead of pale dough, the long preheat suddenly makes sense.
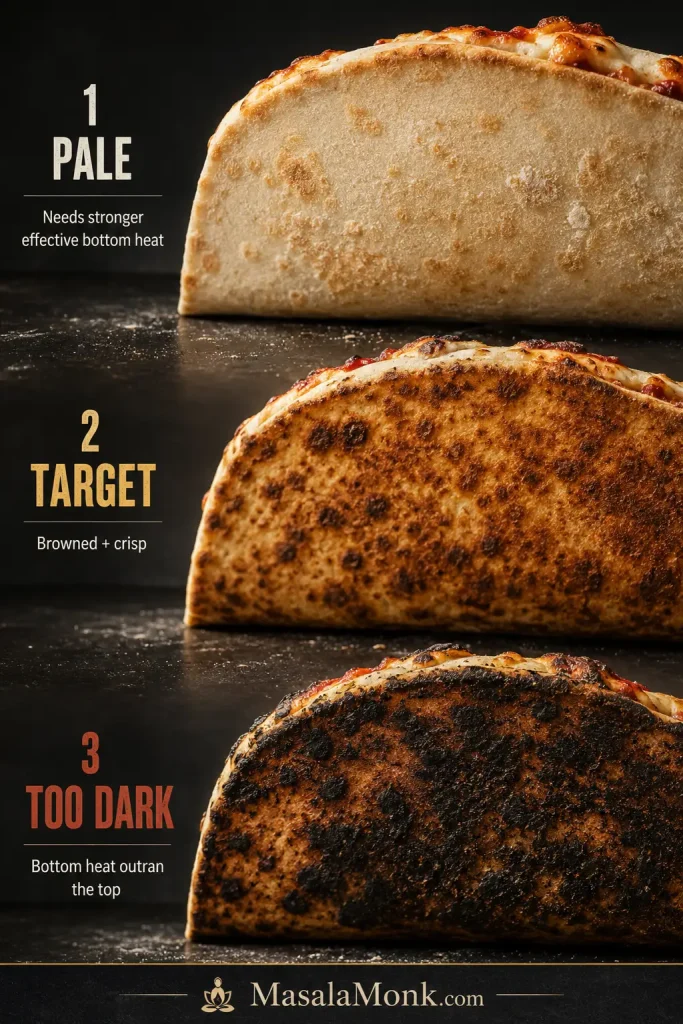
Three pizza undersides comparing a pale base, evenly mottled brown target browning and an overly dark scorched base.
Judge the pattern as well as the darkness. The target is broad, dry, mottled browning across the pizza base—not one burnt ring around a center that is still pale.

Let the Steel or Stone Recover Between Pizzas

The preheat beep is not the finish line. Oven air heats much faster than a thick steel or stone. During a batch, the reverse problem appears: every pizza removes stored heat, so give the surface a few minutes to recover if later pizzas begin browning more slowly.
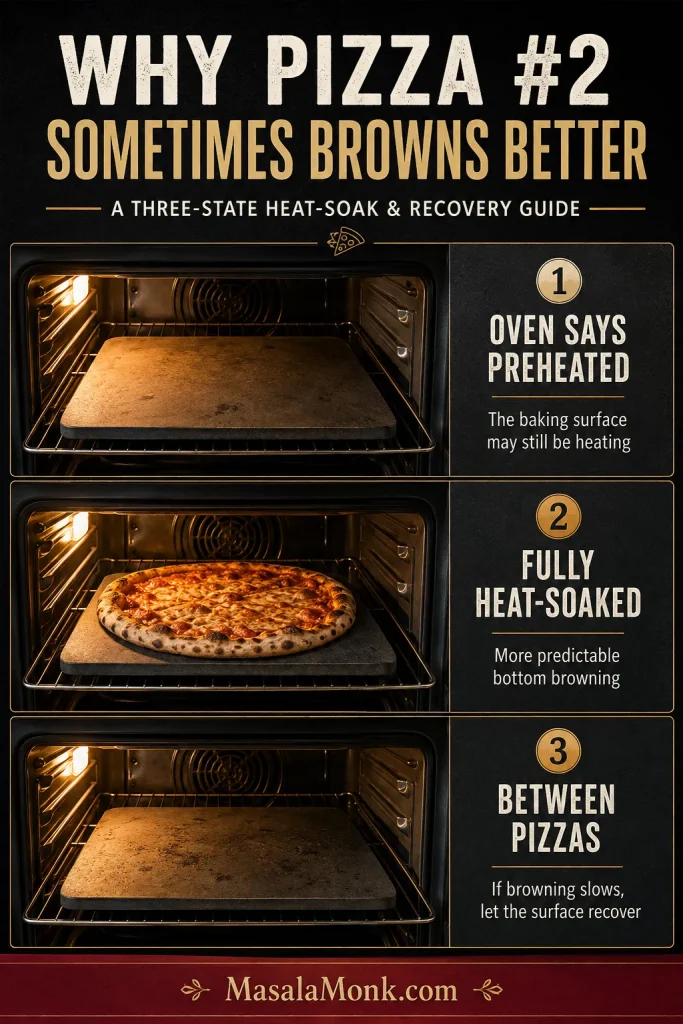
Three-stage home-oven guide showing a baking surface before full heat soak, fully heated and recovering between pizzas.
Consecutive pizzas are useful evidence. If identical dough and topping loads brown differently, the changing variable may be stored heat in the steel or stone rather than anything in the dough.
Alternative Oven Setups: 450°F Ovens and Outdoor Pizza Ovens

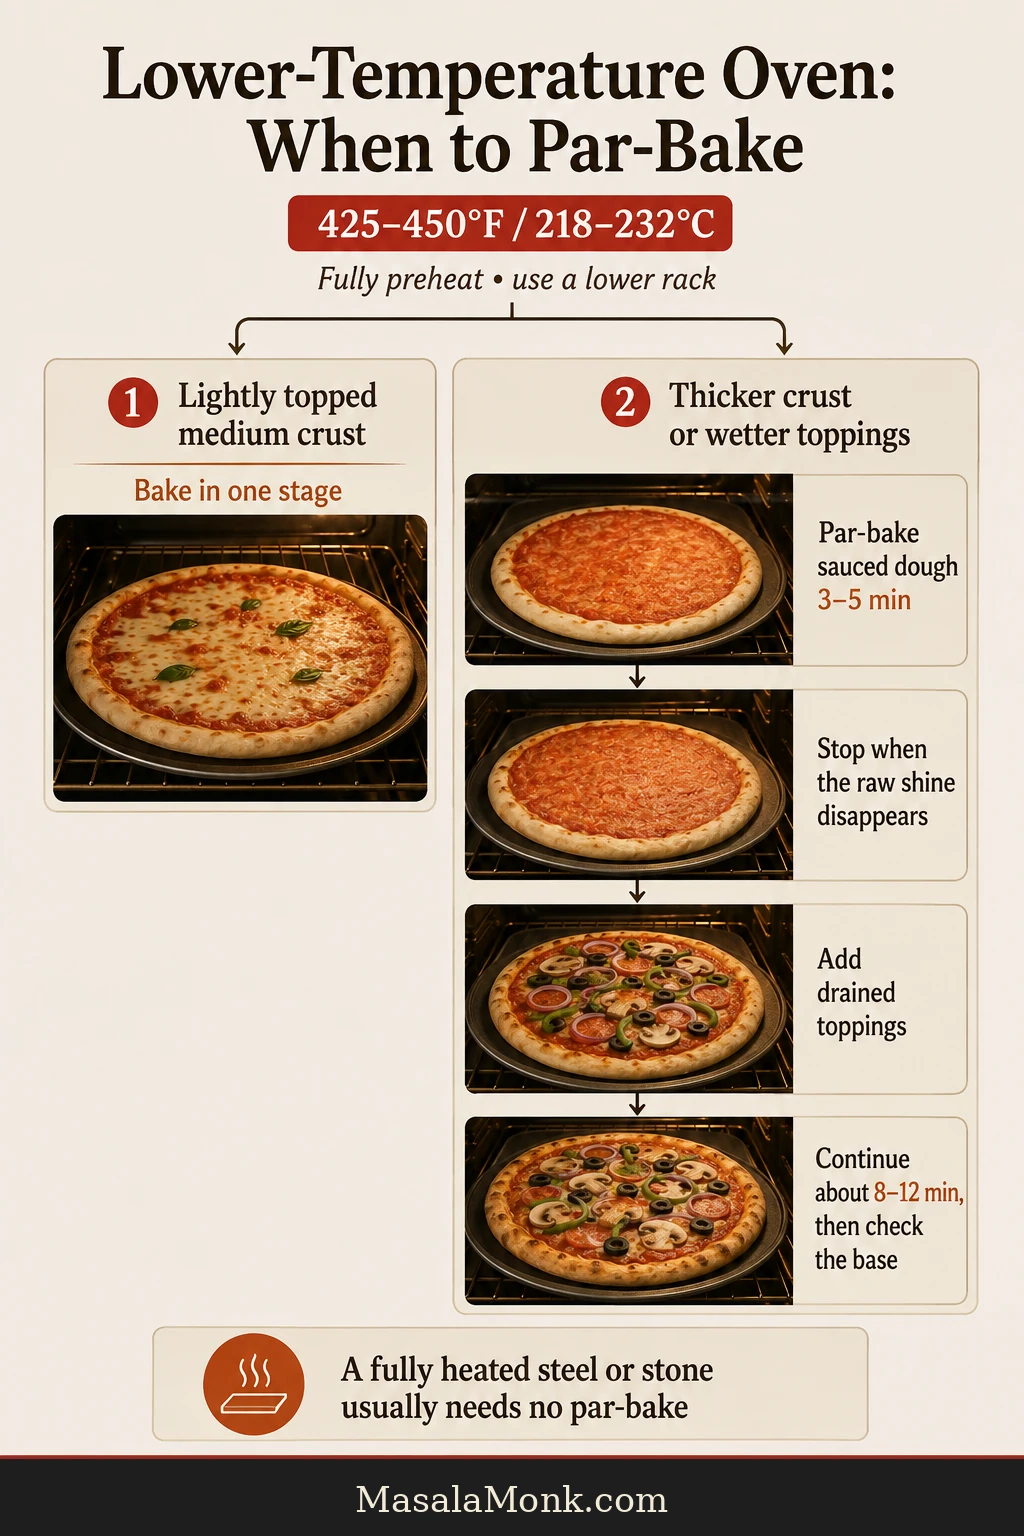
If your oven tops out around 450°F / 230°C: you can still make good pizza, particularly on a fully heated steel. Expect a longer bake and somewhat gentler bottom browning. Keep toppings light and use the broiler when necessary to finish the top without drying out the whole crust.

Using an Ooni or another outdoor pizza oven? Bake this as New York pizza: lower and longer than Neapolitan. Ooni’s New York-style pizza guidance notes that traditional New York pizzas bake at roughly 500–650°F / 260–340°C, while compact pizza ovens may need somewhat more heat. Follow the NY-style guidance for your oven rather than simply running maximum flame.

The sugar and oil in this dough brown much faster at extreme pizza-oven temperatures.

Next: Run the New York slice test

The New York Slice Test: Did It Work?

This is the moment the percentages stop mattering.

Lift a slice. Smell the crust. Look underneath. Fold it.

Read the Crust Before You Fold It

Start with the crust. The bare rim should smell toasted and taste wheaty and savory, with gentle fermented depth instead of a strong yeast flavor.

Look at the top. The mozzarella should be melted and lightly mottled, with patches of red sauce still visible between the cheese. The rim should look fully baked.

Look underneath. You want a thin browned shell with darker spotting, not a pale floury base or one that has burned uniformly black.
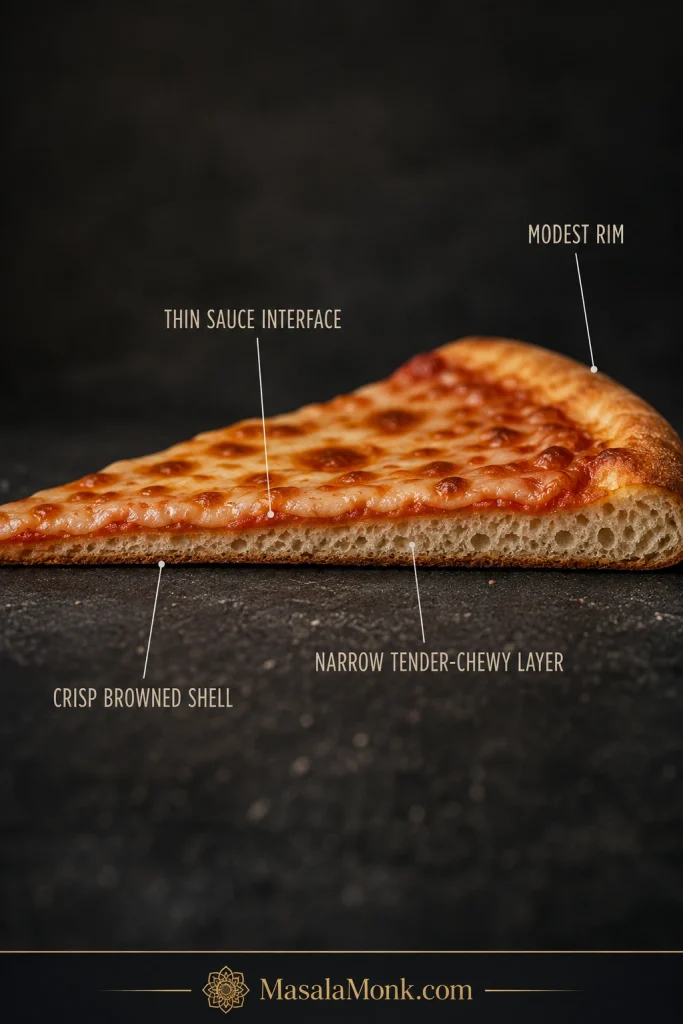
Side cross-section of New York-style cheese pizza showing a browned bottom shell, narrow chewy crumb, thin moist layer beneath the sauce and modest rim.
Read the slice from the bottom upward. If the shell is crisp but the center crumb is much thicker than this, look first at dough weight and finished diameter before chasing more oven heat.

Look at the cross-section. Above the crisp shell should be a narrow tender-chewy layer. A very thin moist line directly beneath the sauce can be normal; a broad pasty or gummy band is not.
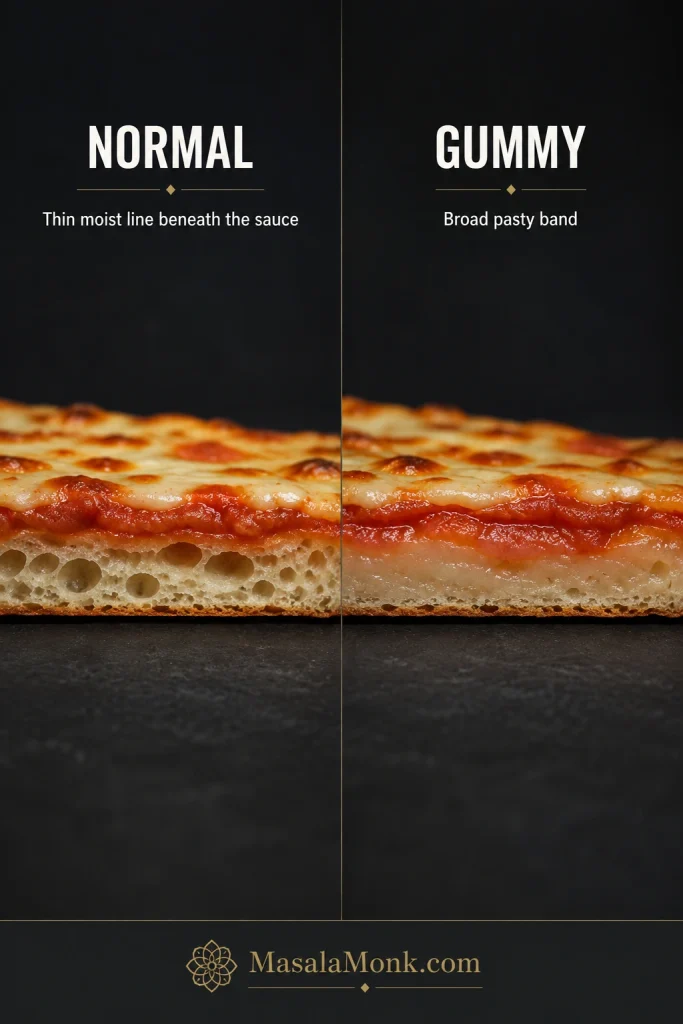
Two cheese-pizza center cross-sections comparing a thin moist line beneath the sauce with a broad pale gummy band.
Width is the useful cue. A normal moist line hugs the underside of the sauce; a gummy band occupies a noticeable portion of the crumb and looks compressed rather than simply moist.

Fold the Slice: Floppy, Flexible or Cracker-Hard?

Now fold it. The slice should bend lengthwise without snapping, and the folded slice should support its tip reasonably well. Some dip beneath the toppings is normal; immediate collapse points to a softer base or heavier load.
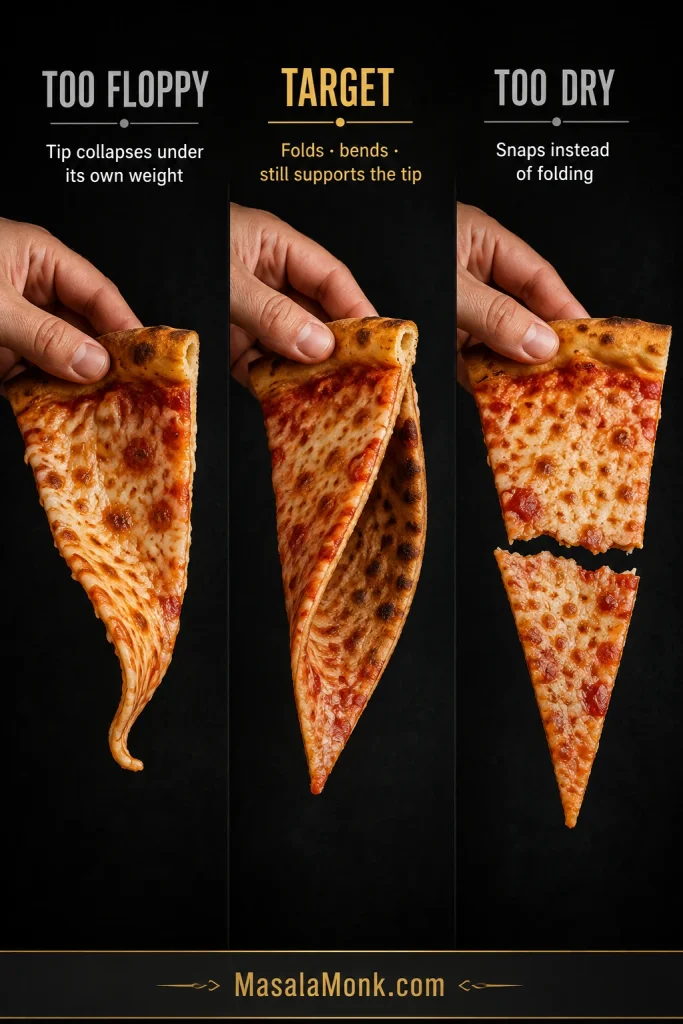
Three hand-held cheese slices comparing a floppy collapsing slice, a flexible supported fold and a dry slice that cracks instead of bending.
Use the fold as a screening test, not a single-cause diagnosis. If the slice misses the target, confirm the clue against its underside, cross-section and topping load before deciding what to change next.
  • Floppy: soft underside, wet tip or weak support. Check bottom heat, topping moisture, bake time and dough-to-diameter ratio.
  • The target: crisp shell, tender-chewy interior, toasted flavor and a clean fold.
  • Cracker-hard: dry, rigid and prone to snapping. The bake probably removed too much moisture.

If your slice missed the target, everything below is the repair manual. Jump to the stage where things went wrong; you do not need to read every troubleshooting table.

Troubleshooting New York Pizza Dough

Most pizza failures are surprisingly local. Sticky dough does not mean the oven is wrong, and a pale base does not mean fermentation failed. Fix the symptom you are actually seeing.

Choose the table that matches the stage where the problem appeared: dough and fermentation, stretching and launching, or baking. The best first question is often: when did it start going wrong?
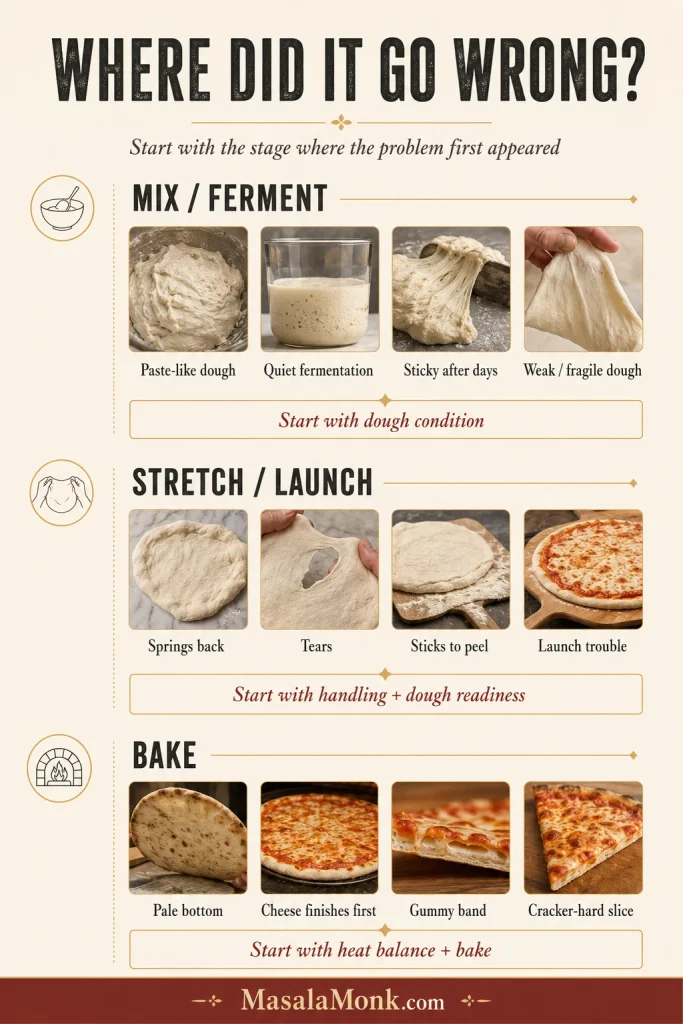
Troubleshooting guide grouping pizza problems into mixing and fermentation, stretching and launch, and baking stages with example symptoms.
Start with the earliest abnormal moment because pizza problems can cascade. A small tear can leak sauce, and that wet spot can stick to the peel. The ugly launch that follows may be the final symptom rather than the original cause.

Why Is My Pizza Dough Sticky, Flat or Weak?

What you seeWhat’s probably happeningDo this nowNext time
Dough is almost batter-likeMeasurement error or flour too weak for the waterCheck ingredient weights before adding lots of flourWeigh flour/water; reduce water with weaker flour
Dough is lightly tackyProbably normalKeep goingNothing unless it causes actual handling trouble
Very sticky immediately after mixingFlour still hydrating or gluten not developed yetCover 10–15 minutes firstKeep the short hydration rest
Still smears after restingFlour may not comfortably hold the planned hydrationAfter checking weights, add flour 5 g at a timeRecord the correction and adjust water next batch
Much stickier after 2–3 daysDough may be moving past its best fermentation windowHandle gently and use promptlyShorter ferment, less yeast or colder storage
Barely expanded in the fridgeCold fermentation may simply be slowJudge bubbles and handling rather than waiting for doublingCheck actual fridge temperature before increasing yeast
Broad, flat and fragilePossible overfermentationUse promptly if still workableShorter fermentation or less yeast
Strong fermented/alcoholic smell + weak, slack doughDough is very matureUse it now if it still holds togetherShorter or colder fermentation
Keeps shrinking backToo cold or gluten still tightCover 5–10 minutesMore warm-up or gentler dough development
Tears while tightForced before relaxingStop stretching and restWarm longer and stretch gradually
Tears while slack and stickyOvermature dough or insufficient flour strengthPatch gently and make a smaller pizzaAdjust fermentation or flour

If your symptom is already in the table, resist changing three other things on the same batch. One useful change teaches you something. Five changes create another mystery.

Why Won’t My Pizza Stretch or Slide Off the Peel?

What you seeWhat’s probably happeningDo this nowNext time
Won’t reach the intended diameterDough is tight or stretching is unevenRest it; bake a slightly smaller pizzaGive it enough warm-up and use the size ranges
Center becomes translucentOne area is being stretched too muchStop touching that spotRotate the dough and work thicker areas
Rim is much thicker than expectedToo much dough was protected at the edgeBake it as-isPreserve a modest border instead of building a thick rope
Pizza sticks to the peelToo much time, too little dusting or a wet spotLocate and loosen the stuck areaPrepare toppings first and do both shake tests
Next pizza suddenly sticksPeel may still be damp from retrieving the previous pizzaDry it completely before rebuildingLet one peel cool and dry or use separate launch/retrieval peels
One spot sticks after saucingA small tear may be leaking sauceGet dry flour beneath that pointInspect for pinholes before topping
Pizza folds during launchThe skin was not moving freelySalvage gentlyLaunch only when the entire pizza slides
Pizza lands ovalImperfect launchLeave it alone if safely on the baking surfacePrioritize a clean launch over a perfect circle
Bottom tastes burnt and flouryToo much loose flour/semolina/cornmealClear burnt material before the next pizzaBrush off excess bench flour

Why Is My Pizza Pale, Gummy or Burning?

What you seeCheck firstDo this nowNext time
Pale bottomBaking-surface heatGive it more bottom heat if the top allowsPreheat longer or adjust rack/surface position
Bottom burns firstToo much bottom heat relative to topMove the pizza higher to finish if neededStart the surface higher
Top done, bottom paleSteel/stone is not delivering enough heatAvoid drying the pizza with a very long bakePreheat longer or move the surface lower
Cheese dark but crust underdoneTop heat is outrunning bottom heatFinish cautiously; judge the crust separatelyRebalance rack position and baking-surface heat
Cheese browns too earlyStrong top heat or warm cheeseFinish the crust carefullyChill grated mozzarella 10–15 minutes and keep sauce cold
Pizza is thick and breadyToo much dough for the finished diameterServe it and note the sizeStretch farther or use a smaller ball
Crust is hard or cracker-likeBake ran too longNo complete rescue after bakingIncrease effective heat and shorten the bake
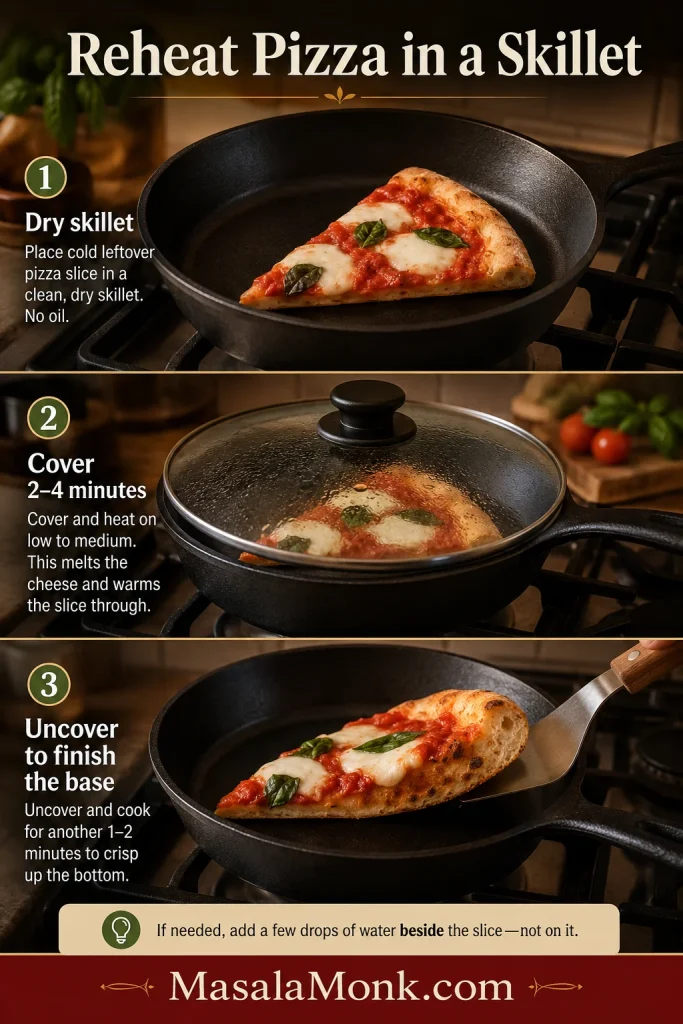
Center is soggyWet toppings or weak bottom heatReturn briefly if the crust can take itReduce moisture and strengthen bottom heat
Thick gummy band under sauceUnderbake, excess thickness or too much moistureCook further if possibleStretch thinner, top lighter, strengthen bottom heat
First pizza pale, next one excellentSurface was not fully heatedKeep baking; the surface is finally readyPreheat longer
Earlier pizzas great, later ones paleSurface lost stored heatPause before the next launchAllow recovery between pizzas

Useful jumps: Recheck the slice test · Jump to the recipe · Back to the Quick Answer

Adjustments, Storage and Common Questions

Can You Change the Sugar, Oil, Malt or Fermentation Method?

For bread flour, all-purpose flour, Tipo 00, whole wheat and gluten-free options, use the flour guide above. The changes below affect the formula more directly.

  • Remove the sugar? Yes, but the crust loses some help with browning at home-oven temperatures.
  • Remove the oil? Yes, but expect changes in tenderness, moisture retention and high-heat behavior.
  • Need diastatic malt? No. Malt products vary, and some bread flours already contain malted barley flour or added enzymes. The sugar in this formula keeps the first batch simpler.
  • Need a poolish? No. Preferments can make excellent pizza, but a 48-hour direct dough already has plenty of time to develop flavor.

If the crust is working and you simply want another flavor, change the topping before rebuilding the dough formula. A restrained layer from the pesto recipe and variations guide is one easy direction.

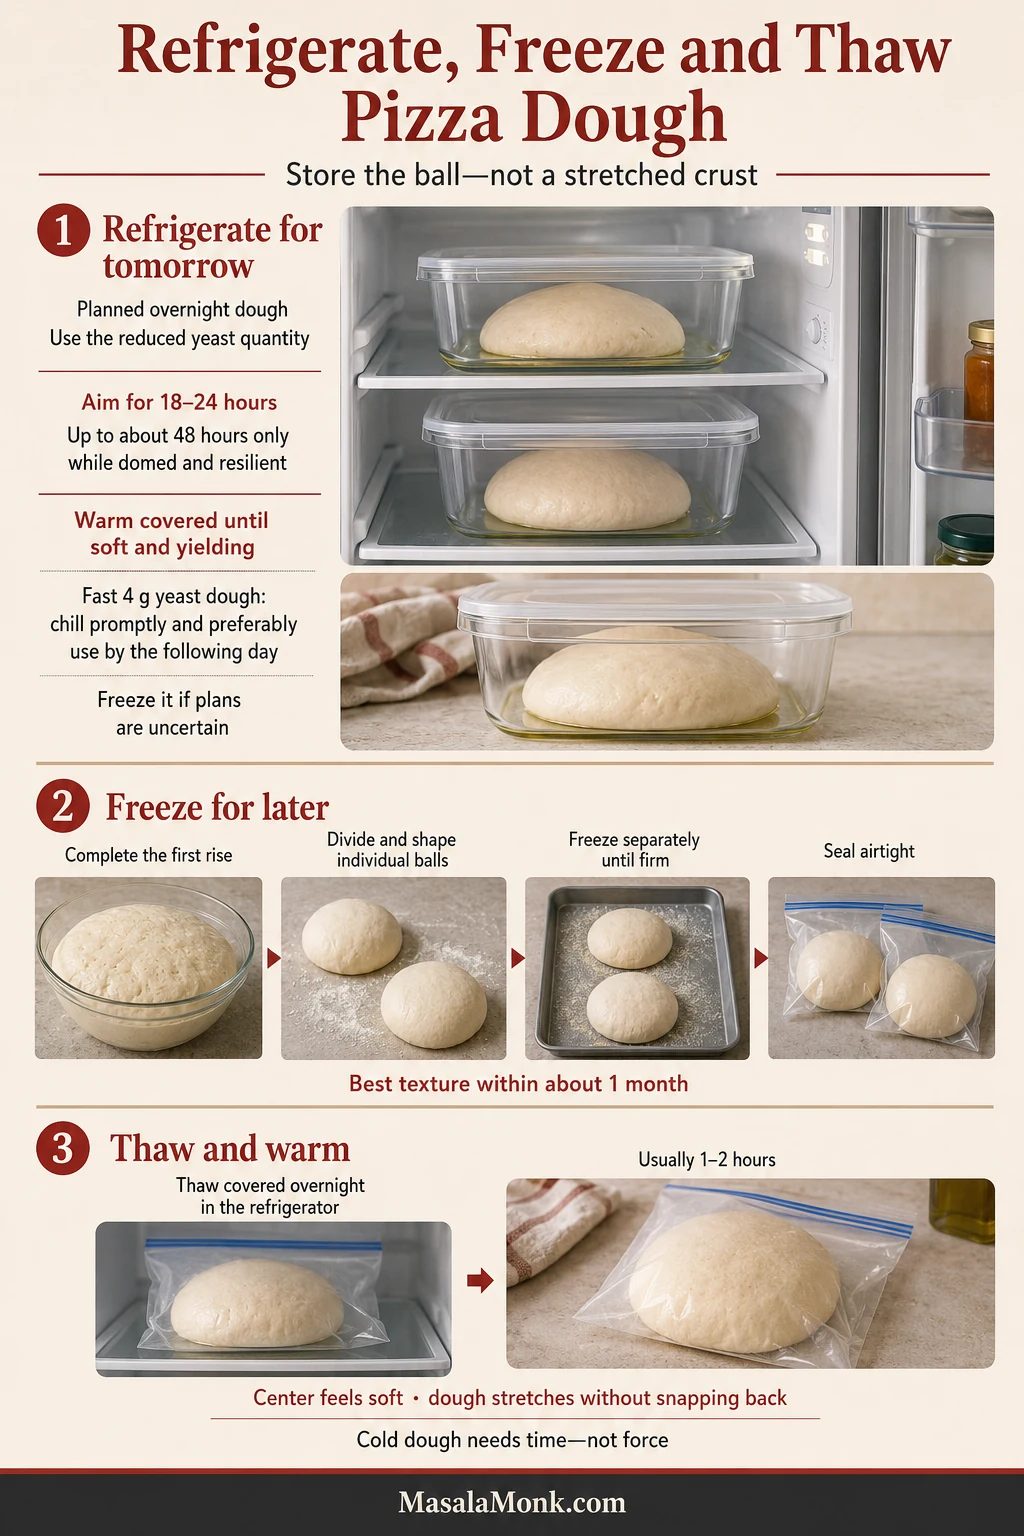
How to Store and Freeze the Dough

Yes, this dough freezes well. If you know you will not use both balls, freeze one after about 24 hours of cold fermentation.

The two-day version is the main refrigerator target, with a carefully managed three-day version as the planned extension. Once a ball becomes progressively flatter, stickier and more fragile, use it.

  1. Cold-ferment the individual balls for about 24 hours.
  2. Transfer each to a lightly oiled airtight freezer container or freezer bag.
  3. For best quality, aim to use the dough within about a month.
  4. Move it to the refrigerator 12–24 hours before you plan to bake.
  5. Once thawed, give it enough counter time to become soft and willing to stretch.

Thawed dough may feel stickier than fresh dough. A light dusting of flour is fine; avoid kneading a large amount of new flour into an already fermented ball.

A Couple of Common Questions

Can I use a bread machine?

Yes, if its dough cycle comfortably handles this quantity. Let the machine mix and knead, then remove the dough instead of letting a standard bread-program rise control the fermentation. Continue with the room-temperature rest, balling and refrigerator schedule above.

Do I need New York City water to make New York-style pizza?

No. Mineral content can affect dough behavior to some degree, but ordinary good-tasting drinking water can make excellent pizza. If your tap water tastes strongly chlorinated or has an unusual mineral character, filtered water is a sensible choice. There is no reason to import water from New York; Serious Eats’ New York water experiment likewise found no compelling reason to treat NYC water as the secret to great pizza.

The Slice Tells You Whether the Dough Worked

You do not need dramatic refrigerator rise, extreme hydration, imported flour, a poolish or a professional oven.

The payoff is much simpler: a crust worth eating all the way to the edge and a slice that folds the way you hoped it would.
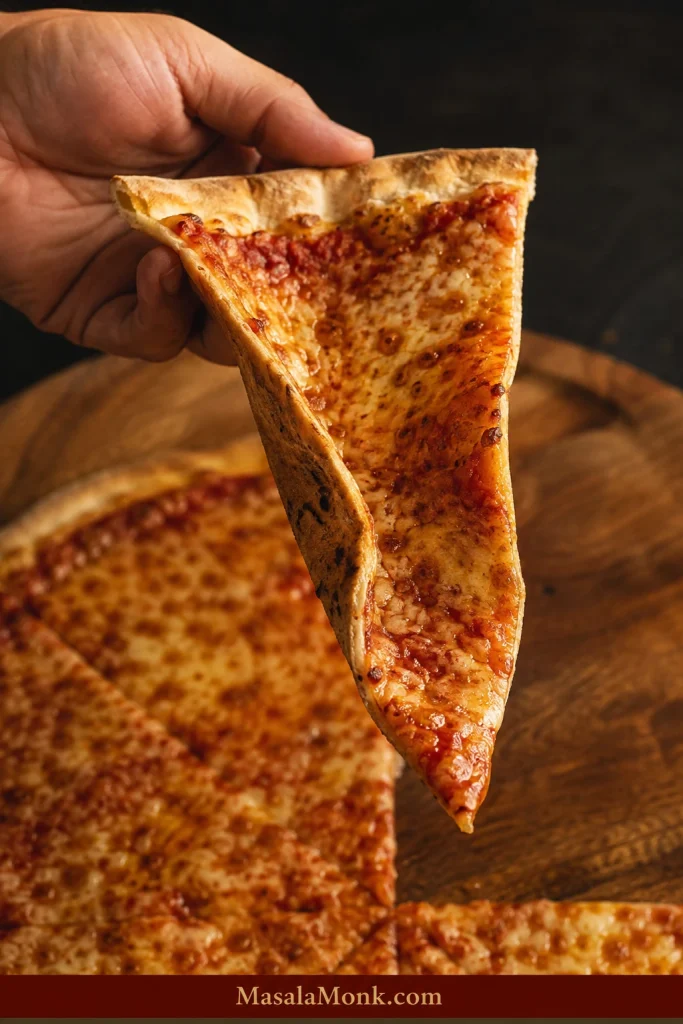
Hand holding a New York-style cheese slice with a gentle lengthwise fold, supported tip, browned underside, melted mozzarella and visible tomato sauce.
A good New York slice should feel casual in the hand. The fold adds support without making the center rigid, so the slice is easy to eat without fighting either a collapsing tip or a brittle crust.

And when the first pizza is not quite there, let it teach you one thing before changing five. Sometimes the steel simply wanted another ten minutes of heat—and the second pizza is the one that makes you smile.

If you make this dough, share the flour you used, how long you fermented it, how large you stretched the ball, and whether you baked on steel, stone or a sheet. Those details make it much easier to compare notes and understand why the same dough behaves differently from one kitchen to another.

Ready to make it? Jump to the recipe · Back to the Quick Answer
Posted on Leave a comment

Hot Honey Sauce Recipe: Easy, Spicy and Ready in 2 Minutes

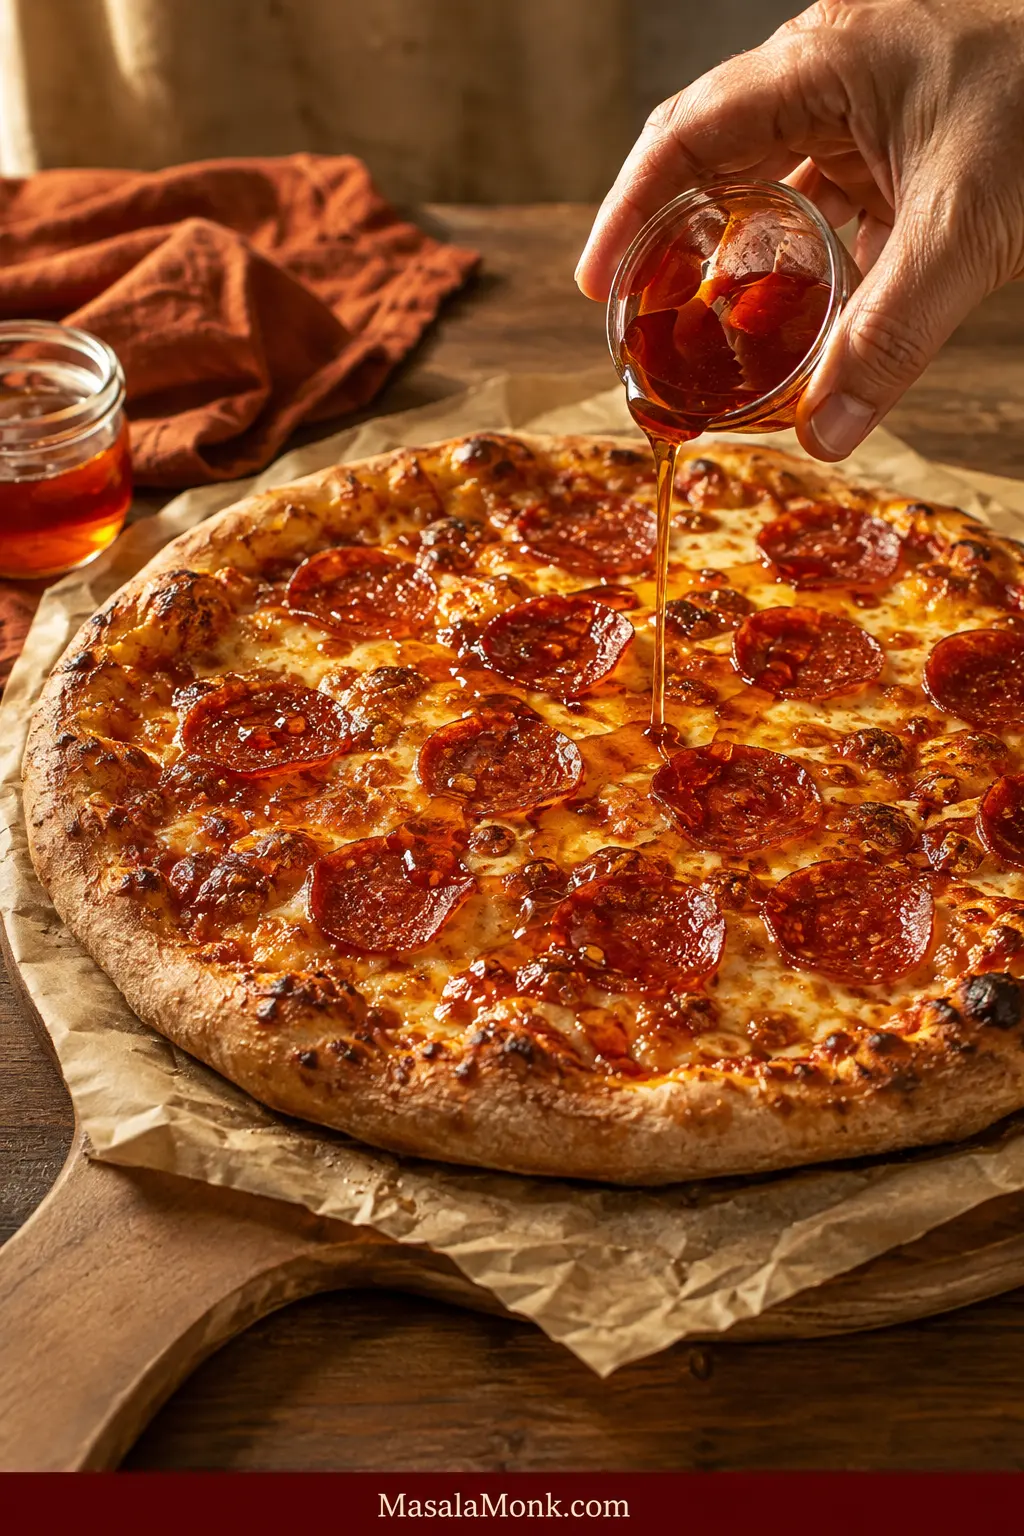
A thin stream of glossy amber-red hot honey being drizzled over a freshly baked pepperoni pizza with browned crust and melted cheese.

Hot honey sauce is what you make when plain honey feels too sweet, ordinary hot sauce feels too sharp and the food in front of you needs both. It gives pizza a glossy finishing drizzle, wakes up chicken tenders, clings to crisp wings and turns a warm biscuit into something worth slowing down for.

In its simplest form, hot honey is a two-ingredient, no-cook mixture of honey and hot sauce. A small pinch of salt can sharpen the balance when the sauce needs it. Whisk everything together in about two minutes and use it immediately.

You can also infuse honey with dried chilli for a clearer pepper flavour or add butter for a richer glaze. They share the same name, but they do different jobs: one drizzles, one tastes clearly of dried chilli and one stays where it lands.

Quick formula

Hot Honey Sauce at a Glance

Start with an 8:1 ratio of honey to thin cayenne-style hot sauce: ½ cup / 170 g honey to 1 tablespoon / 15 ml hot sauce for the full batch. Add one small pinch of salt only if the sauce needs it.

Cayenne raises the heat without adding more liquid. If the sweetness feels heavy, stir in a little vinegar or lemon juice. Honey and hot sauce may already be enough.

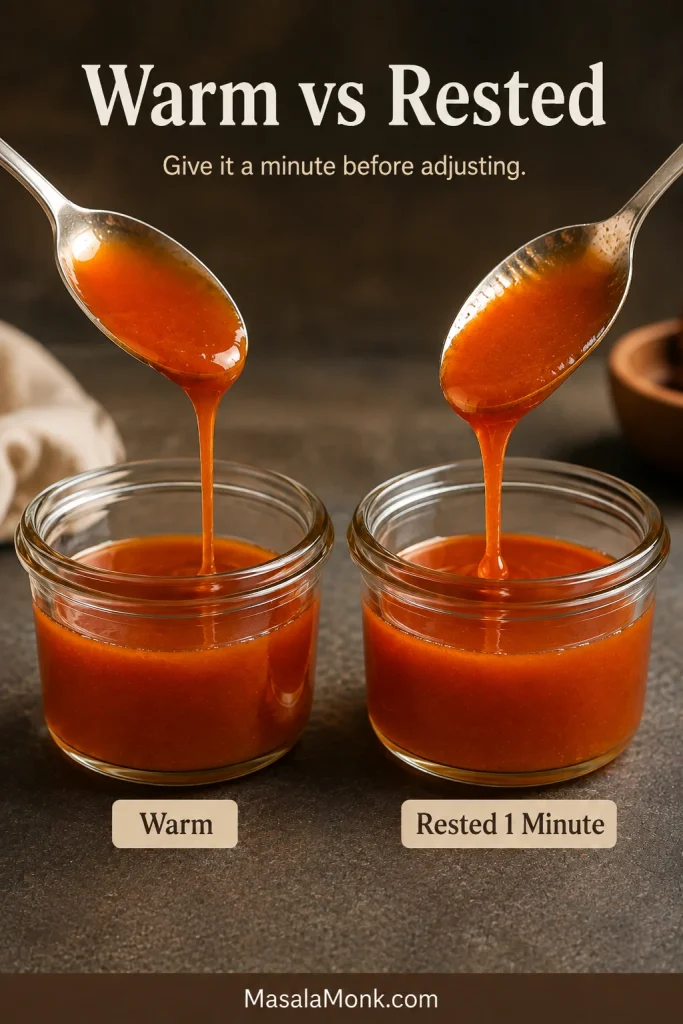
Warm hot honey always looks looser. Give it a minute before deciding that it needs more honey.

Overhead arrangement of half a cup of honey, one tablespoon of hot sauce and a bowl of finished hot honey illustrating an eight-to-one ratio.
Scale the 8:1 ratio easily: 8 teaspoons honey to 1 teaspoon thin hot sauce makes a small test batch.

Choose Your Hot Honey Sauce

The no-cook sauce is the everyday choice. For a more distinct pepper flavour, use the dried-chilli infusion. Butter turns hot honey into a glaze that coats wings, chicken or salmon.

Swipe or scroll sideways to see the full table.

MethodConsistencyHands-onTotalBest for
Quick hot honey sauceSmooth and pourable2 minutes2 minutesPizza, chicken, sandwiches and dipping
Chilli-infused hot honeyClear, glossy and lightly texturedAbout 5 minutesAbout 10–20 minutesPizza, biscuits, cheese and fried foods
Buttery hot honey glazeRich, glossy and clingyAbout 5 minutesAbout 5–7 minutesWings, tenders, salmon and vegetables
Three hot honey styles side by side: smooth translucent drizzle, dried-chilli-infused honey with flakes, and a thicker buttery glaze.
Choose by how the sauce should behave: smooth hot honey drizzles, butter glaze clings, and dried-chilli infusion leaves visible chilli in the sauce.

Make this first

Quick No-Cook Hot Honey Sauce Recipe

This is the default sauce: honey-led, clearly spicy and fluid enough to drizzle while still leaving a light coating on chicken, bread or pizza crust.

Time
2 minutes

Yield
About 9 tbsp / 135 ml

Serving size
1 tbsp / 15 ml

Texture
Glossy and pourable

Ingredients

Core ingredients

  • ½ cup runny honey — 4 fl oz / 120 ml; about 6 oz / 170 g by weight
  • 1 tablespoon thin, medium-heat cayenne-style hot sauce — ½ fl oz / 15 ml

Optional after tasting

  • One small pinch fine salt — useful when the hot sauce is not already salty
  • Up to 1 teaspoon apple cider vinegar or lemon juice — added ¼ teaspoon at a time
  • ⅛–¼ teaspoon cayenne pepper for extra heat

Method

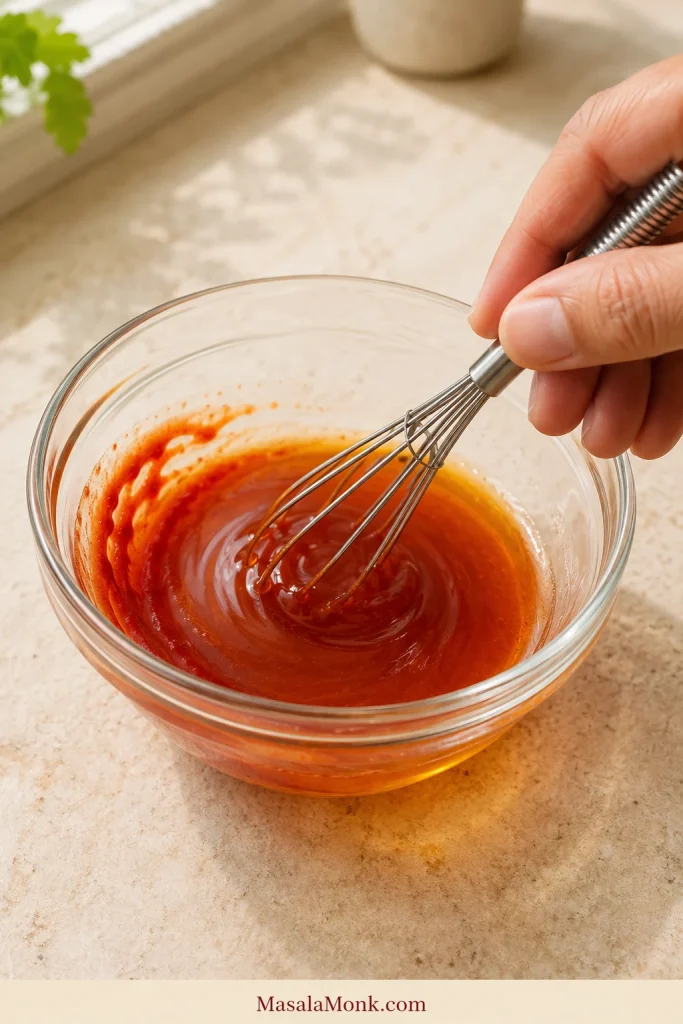
  1. Whisk. Combine the honey and hot sauce in a small bowl until the colour is even and no red streaks remain. Stir in the salt if needed.
  2. Taste. The honey should come through first, then give way to the hot sauce’s tang and chilli warmth.
  3. Adjust only if needed. Cayenne makes it hotter. Vinegar or lemon juice lightens sweetness that lingers too heavily.
A hand whisking honey and hot sauce in a clear glass bowl while a few darker red streaks remain around the edge.
Sweep the whisk around the bowl edge before stopping; concentrated hot sauce can hide along the rim.

For a finer drizzle: warm the sauce over low heat for 30–60 seconds or microwave it in a microwave-safe bowl for 10 seconds at a time. Stop as soon as the honey loosens. It does not need to bubble.

That is it—no simmering, steeping or special chilli required.

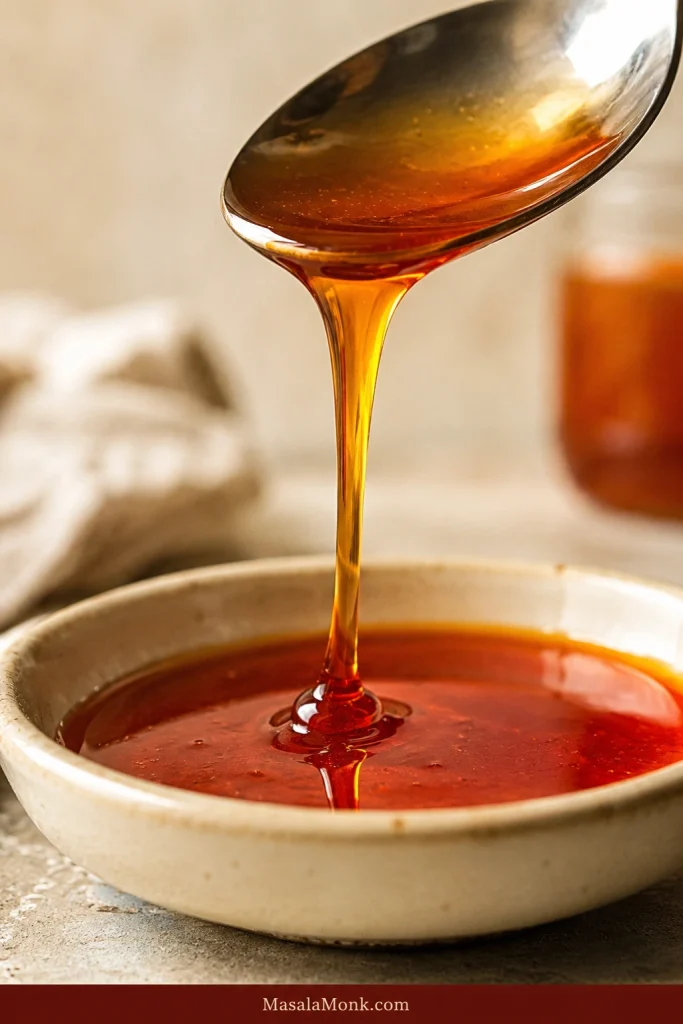
What success looks like: the sauce falls from a spoon in a smooth ribbon and leaves a light glossy film behind. Honey should arrive first and chilli should follow. If the first taste already works, leave it alone.

Glossy amber-red hot honey falling from a silver spoon in one smooth ribbon into a shallow cream-coloured dish.
A good drizzle stays continuous for a moment, letting you draw thin lines instead of blobs.

Recipe Notes

  • Taste your hot sauce first: cayenne sauce, Sriracha and concentrated habanero sauce will not produce the same flavour or flow.
  • Sauce crisp food last: the longer fried food sits under honey, the softer its coating becomes.

How to Use Hot Honey Sauce

A light coating is usually enough. Taste the food before pouring on more.

Brown first; glaze late. Crisp food gets the sauce shortly before serving.

Swipe or scroll sideways to see the full table.

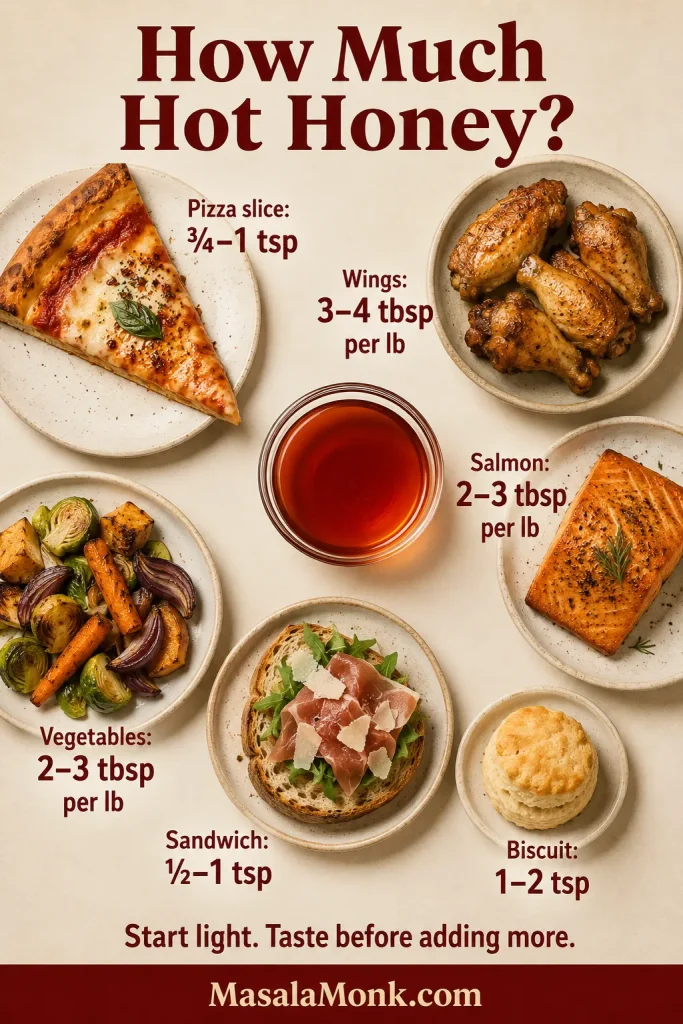
FoodStarting amountWhen to add it
12-inch pizza2–3 tbsp / 30–45 mlImmediately after baking
One pizza slice¾–1 tsp / 4–5 mlAfter baking
1 lb / 450 g wings3–4 tbsp / 45–60 mlToss after cooking
1 lb / 450 g tenders3–4 tbsp / 45–60 mlToss or drizzle shortly before serving
1 lb / 450 g salmon2–3 tbsp / 30–45 mlBrush on near the end
1 lb / 450 g vegetables2–3 tbsp / 30–45 mlAdd near the end or after roasting
Four sandwiches2–4 tsp / 10–20 mlDrizzle during assembly
Biscuits or cornbread1–2 tsp per servingAdd at the table
Overhead serving guide with pizza, wings, salmon, roasted vegetables, a sandwich and a biscuit arranged around hot honey with suggested portions.
Use the guide as a starting range; even distribution often gives enough sweet heat without more sauce.

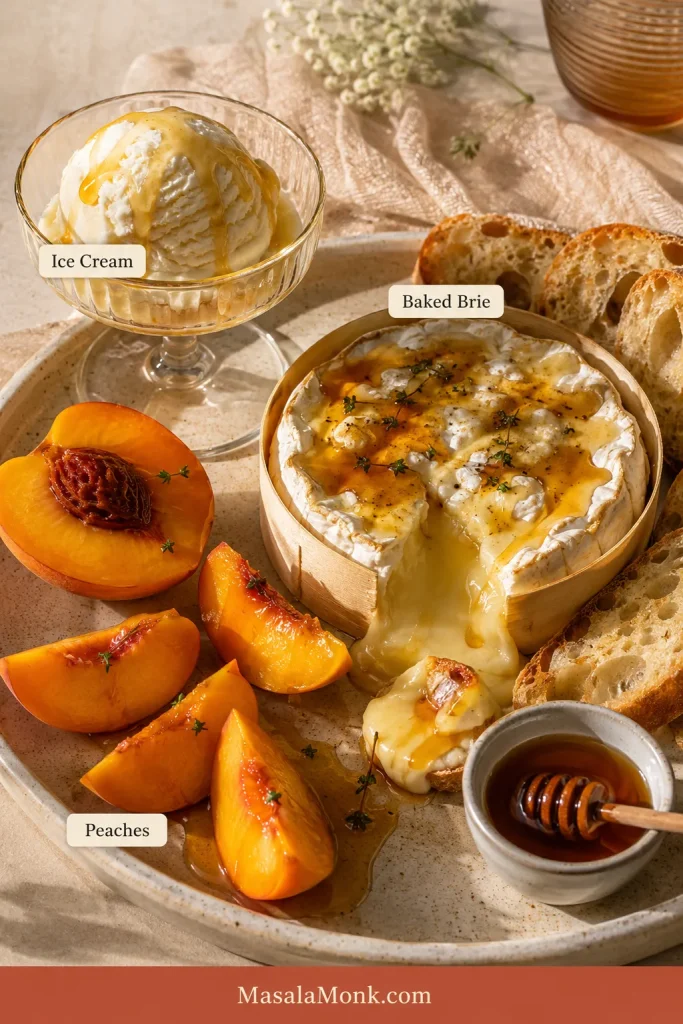
For a sweeter contrast, try a teaspoon over vanilla ice cream, baked brie or ripe peaches. Cold dairy softens the heat; warm cheese and fruit brighten the sweetness.

Hot honey drizzled over vanilla ice cream, baked brie and ripe peaches in one bright editorial food arrangement.
For desserts, drizzle at the table so the contrast stays distinct against cold dairy, warm cheese or fruit.

Hot Honey for Pizza

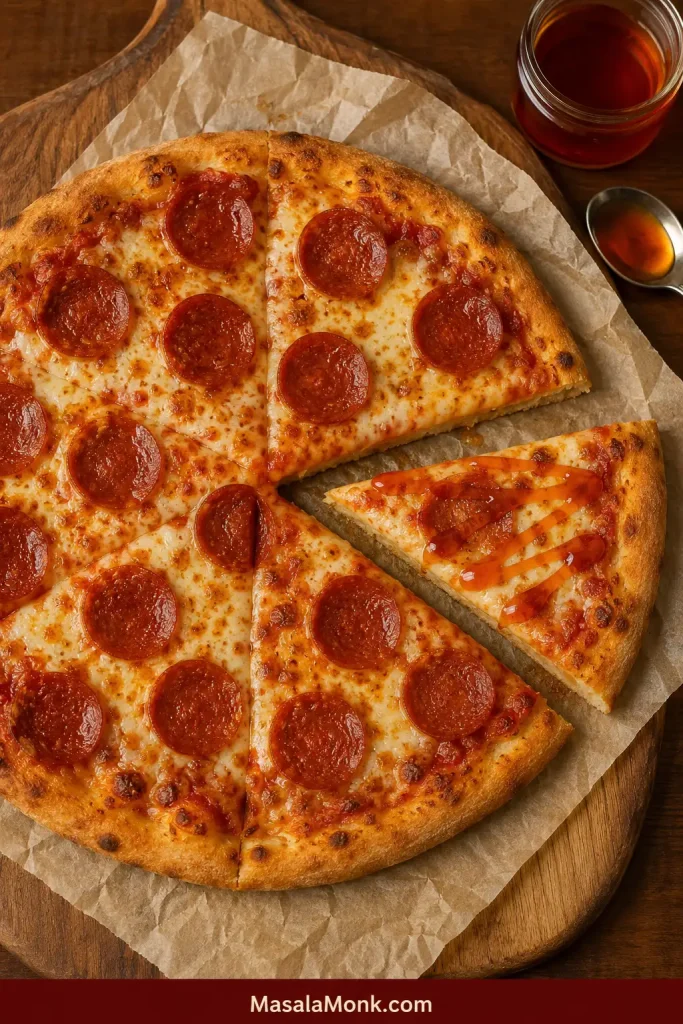
Hot honey belongs on the pizza after it leaves the oven. Residual heat loosens the drizzle without baking it into the cheese.

Not sure whether it belongs there? Drizzle one slice first. The cheese tastes richer, salty toppings become sharper and the crust suddenly feels worth dipping. Then decide whether the rest needs it.

Overhead pepperoni pizza with one slice pulled slightly away and drizzled with hot honey while the rest of the pizza remains undrizzled.
Test a slice with representative toppings; extra cheese, cured meat or pickles can change how much heat the pizza needs.

Choose the base from these pizza sauce recipes, then finish with a light drizzle. Too much makes the centre wet and sweet.

Hot Honey for Wings and Chicken Tenders

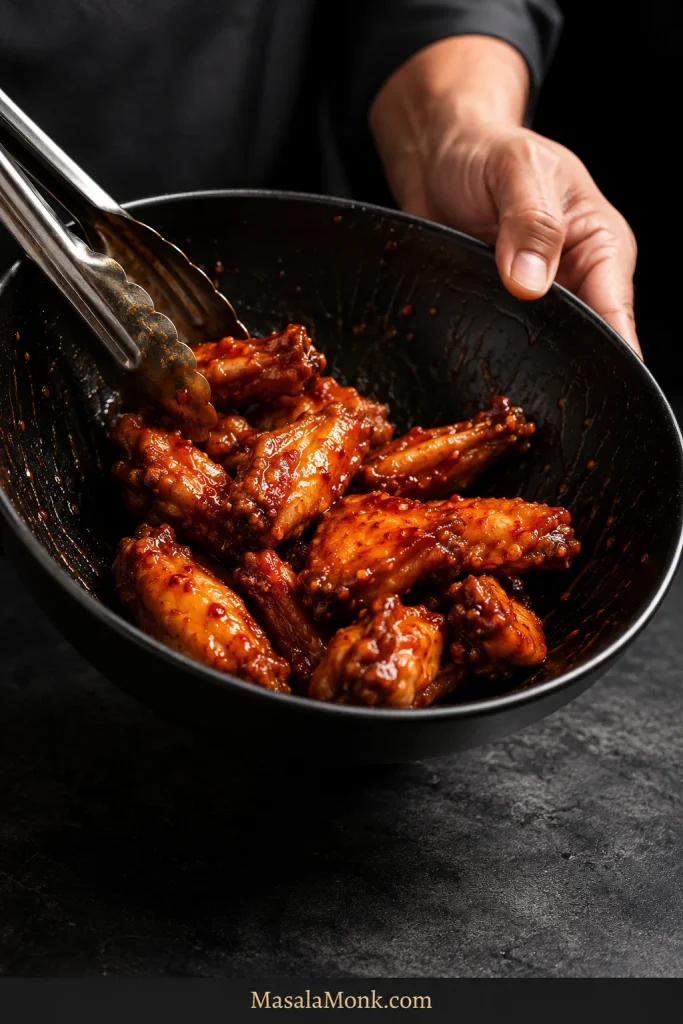
Cook the chicken until crisp, then add the sauce shortly before serving.

Crisp chicken wings being tossed in a dark bowl with a thin glossy hot honey coating and no visible pool of sauce at the bottom.
Use a wide bowl and toss rather than stir so a smaller amount coats the wings evenly.

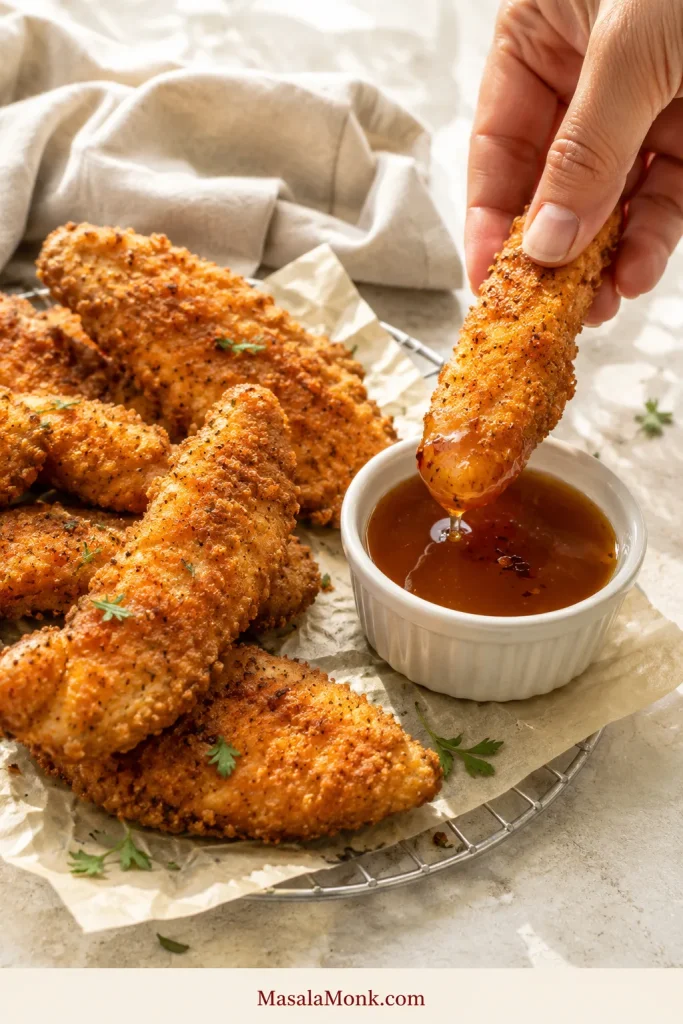
Serve honey mustard chicken tenders with hot honey on the side so the crumb stays crisp until each bite is dipped.

A crisp chicken tender being dipped into a small ramekin of smooth hot honey while the remaining tenders stay unsauced.
Dip one edge to keep sauce and crunch in the same bite; a full dunk softens more coating.

Crisp food should not sit in sauce while everyone slowly finds their way to the table.

Hot Honey Glaze for Salmon

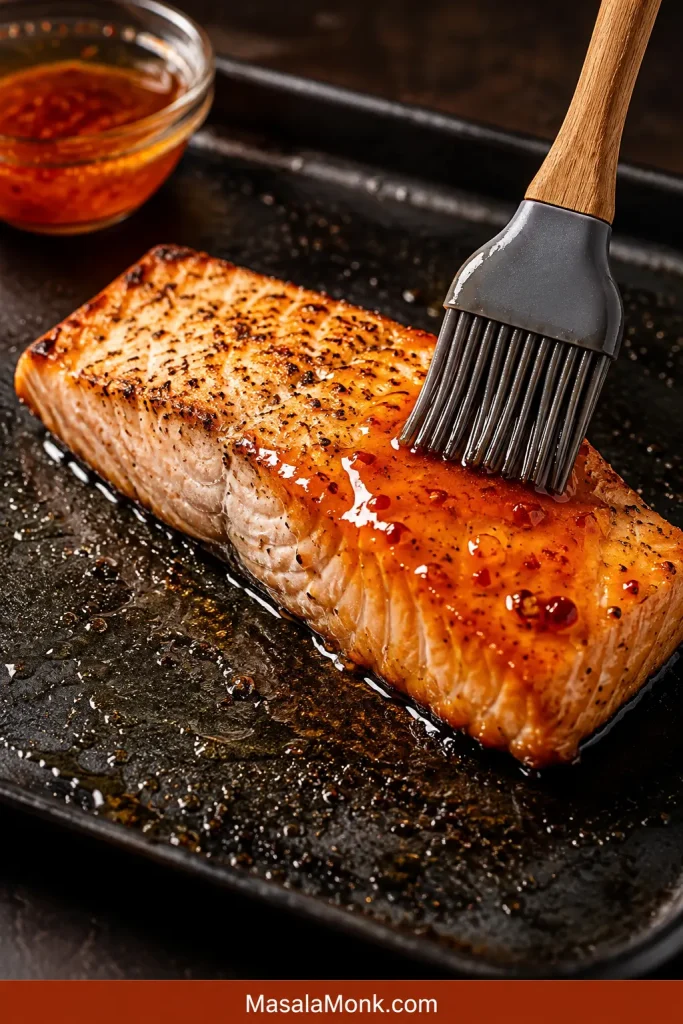
Brush the glaze on once the salmon is nearly opaque and beginning to flake. In this honey garlic salmon, the fish browns before the honey sauce enters the pan.

A silicone brush applying a thin glossy hot honey glaze to part of an already browned salmon fillet.
Brush salmon with a thin film, not a puddle; it clings evenly and is easy to build.

Hot Honey on Sandwiches

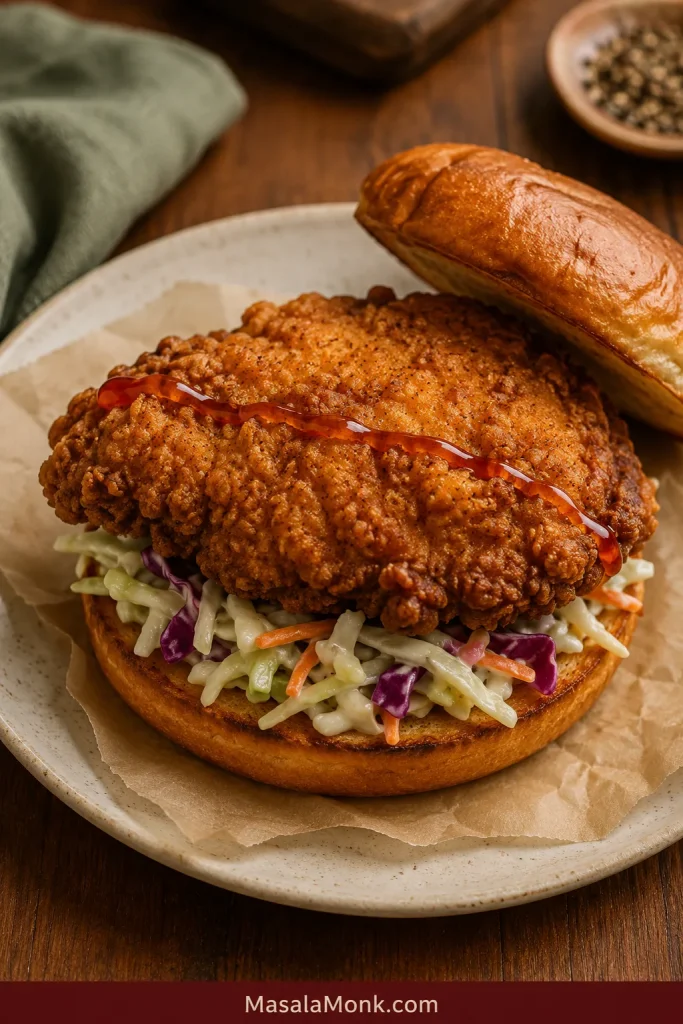
Usually, a thin line across the filling is enough. A heavier pour sinks into the bread and dulls the contrast between crisp, creamy and salty ingredients.

An open crispy chicken sandwich with one thin line of translucent amber-red hot honey across the filling and the top bun set aside.
Put hot honey on the filling rather than the bun so the bread stays drier and the chicken stays crisp.

It works particularly well on the crispy, Buffalo and BBQ options in these chicken sandwich recipes.

Hot Honey on Roasted Vegetables

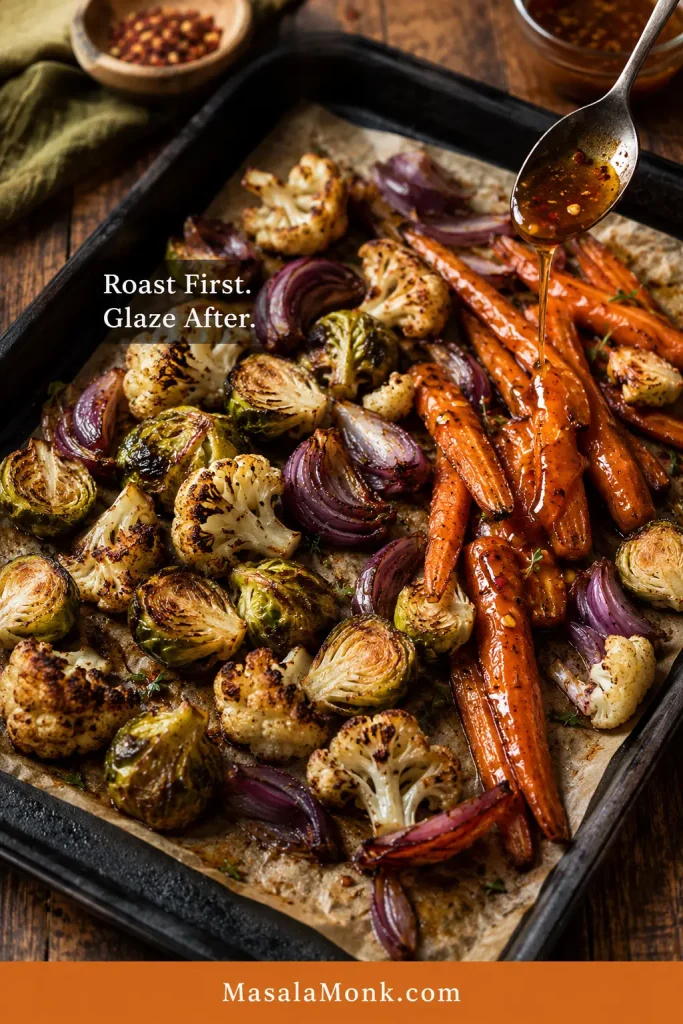
Carrots, sweet potatoes, cauliflower, Brussels sprouts and squash all take hot honey well. Let them brown and become tender before adding it.

These oven roasted carrots show the timing clearly: the vegetables should look roasted before they look glazed.

A spoon adding hot honey to deeply browned roasted carrots, Brussels sprouts, cauliflower and red onion after roasting.
Toss roasted vegetables while the tray is still hot; residual heat helps a little hot honey spread farther.

Hot Honey Ingredients and Substitutions

The bottle changes more than the heat. It can make the sauce sharper, thinner or thicker, sweeter, saltier or more garlicky before you add anything else.

Best Honey for Hot Honey

Ordinary runny honey is the easiest choice. Mild clover or a light, gently flavoured wildflower honey lets the chilli stand out. Darker honey brings more character.

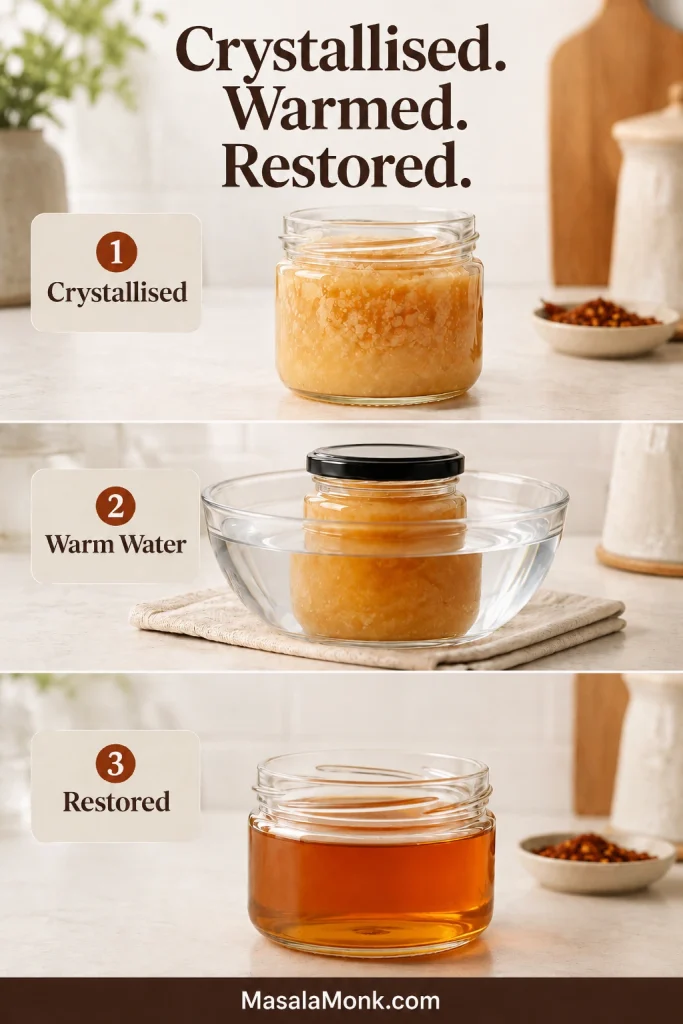
Partially crystallised honey is still fine. Set the tightly closed, heat-safe glass jar in warm—not boiling—water, or heat the measured honey briefly over low heat. Once it flows freely, use it.

Choose the Right Hot Sauce

This recipe is written for a thin, medium-heat cayenne sauce—the familiar kind that pours easily from the bottle.

Swipe or scroll sideways to see the full table.

Hot-sauce styleStart withEffect on the hot honey
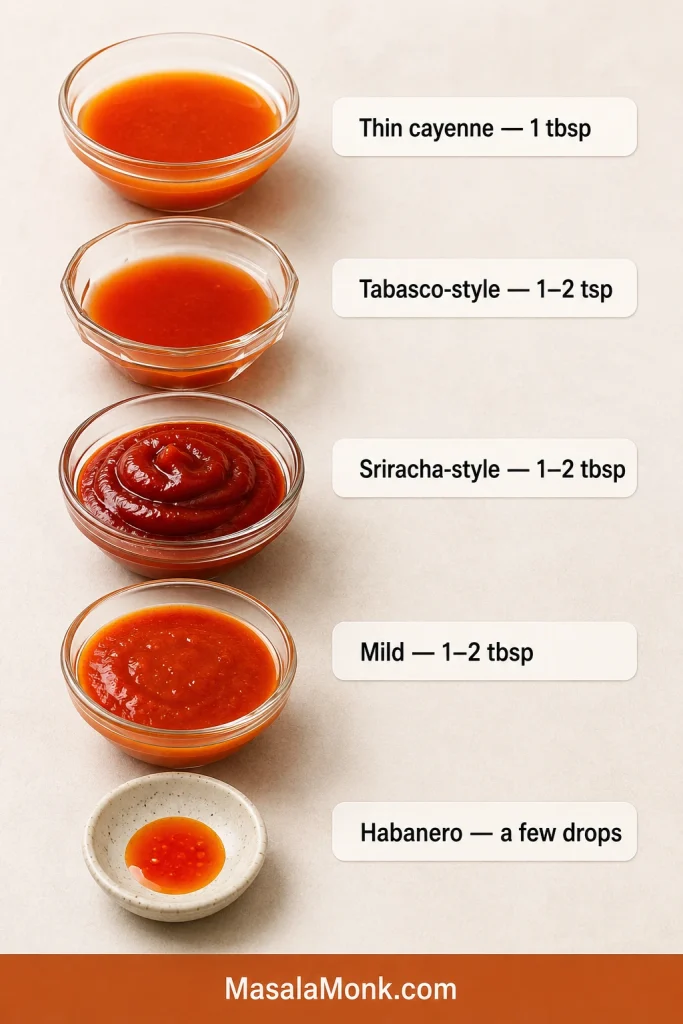
Thin cayenne-style sauce1 tbsp / 15 mlModerate acidity and easy pourability
Tabasco-style sauce1–2 tsp / 5–10 mlSharper, thinner and more concentrated
Sriracha1–2 tbsp / 15–30 mlThicker, sweeter and more garlicky
Mild hot sauce1–2 tbsp / 15–30 mlMore tang before strong heat develops
Habanero or super-hot sauceA few dropsStrong heat without noticeably thinning the honey
Five unbranded hot sauce styles with visibly different thicknesses and suggested starting amounts, from thin cayenne sauce to concentrated habanero sauce.
Watch viscosity as well as heat; a thick sauce can alter the drizzle more than a hotter sauce used by the drop.

Fruit-based sauces make the mixture sweeter and more aromatic. Habanero sauces bring sharper, faster heat. The pepper sauce guide compares those styles in more detail.

Cayenne and Dried Chilli Flakes

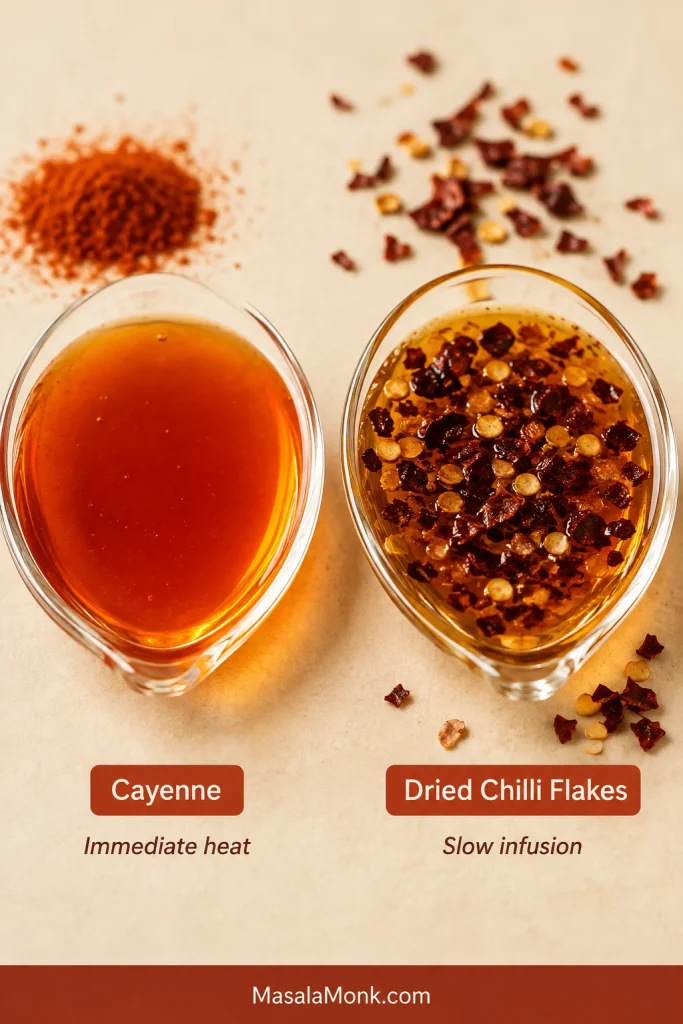
Cayenne gives immediate heat without adding liquid. It is useful when the flavour is right but the sauce needs more fire.

Dried chilli flakes release their warmth more slowly. Leave them in if you are serving the hot honey soon and want the heat to keep building. Strain them out before bottling or storing.

Smooth cayenne-based hot honey beside clear amber honey containing dried chilli flakes, comparing immediate heat with a slower infusion.
Cayenne keeps hot honey smooth; dried chilli adds visible texture and slower-building heat.

Oregon State University Extension’s infused-honey safety guidance explains handling, straining, storage and spoilage signs for honey infused with fully dried ingredients.

Acid, salt and butter: bottled hot sauce may already bring all the acidity the honey needs, so taste before adding more. A small pinch of salt clears away some of the syrupy sweetness. Butter changes the job completely, turning the drizzle into a glaze that stays on the food.

How Spicy Should Hot Honey Be?

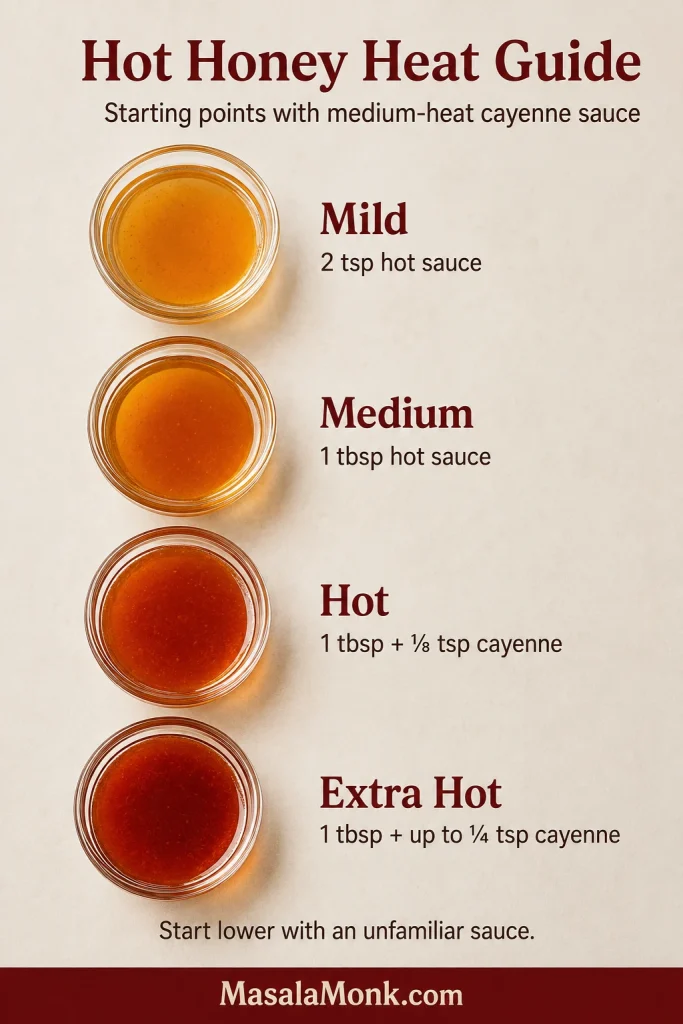
The amounts below are starting points using a medium-heat cayenne-style hot sauce. They are not universal heat ratings; begin lower with an unfamiliar sauce or cayenne powder.

Swipe or scroll sideways to see the full table.

Heat levelCayenne-style hot sauceCayenne powderWhat to expect
Mild2 tsp / 10 mlNoneMostly honey with a warm finish
Medium1 tbsp / 15 mlNoneClear chilli warmth after the sweetness
Hot1 tbsp / 15 ml⅛ tspStronger heat without changing the flow
Extra hot1 tbsp / 15 mlUp to ¼ tspStrong, lingering heat
Four smooth hot honey samples labelled mild, medium, hot and extra hot with increasing amounts of hot sauce and ground cayenne.
Change one variable at a time: hot sauce affects acidity and flow, while cayenne mostly raises heat.

A spoonful tasted alone feels much hotter than the same amount spread across dinner.

Made it hotter than you wanted? Jump to the troubleshooting guide →

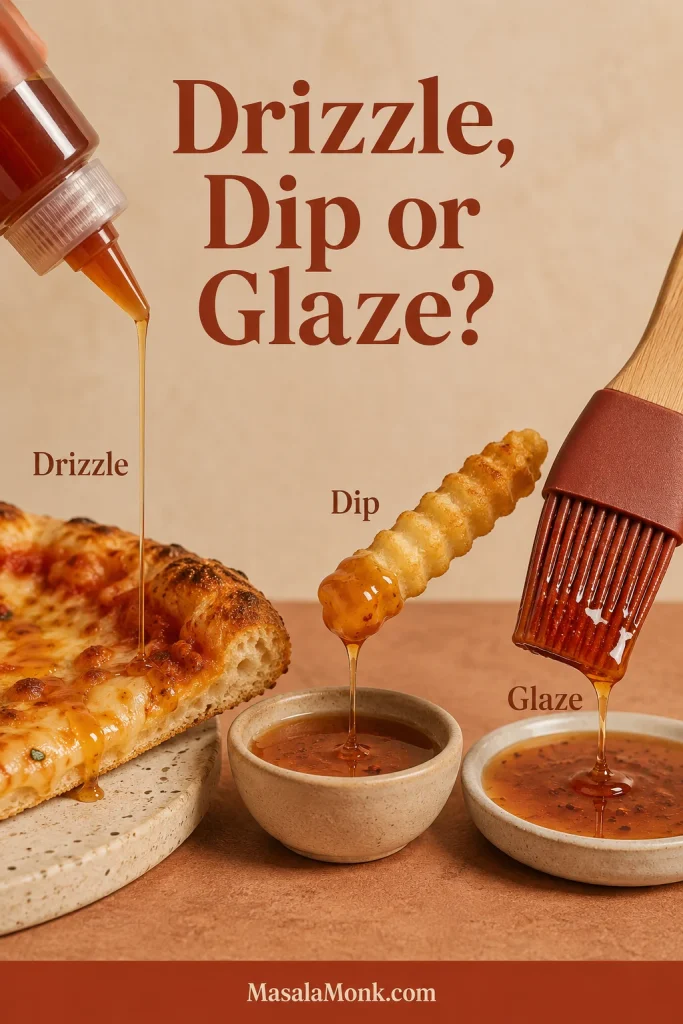
Make It a Drizzle, Dip or Glaze

For dipping, stir hot honey into Dijon or mayonnaise. When you need a coating rather than a pour, use the butter glaze.

To adjust the consistency: let a thin-looking sauce cool before changing it. More honey will thicken it. If it is too thick, warmth may be all it needs. When the flavour is already right, thin only the portion you plan to serve with a few drops of warm water.

Three hot honey uses shown together: a thin drizzle over crust, a fry lifted from dipping sauce, and glaze coating a silicone brush.
Drizzle is a last-second accent, dip stays separate until the bite, and glaze is meant to cling.

Hot Honey Dipping Sauce

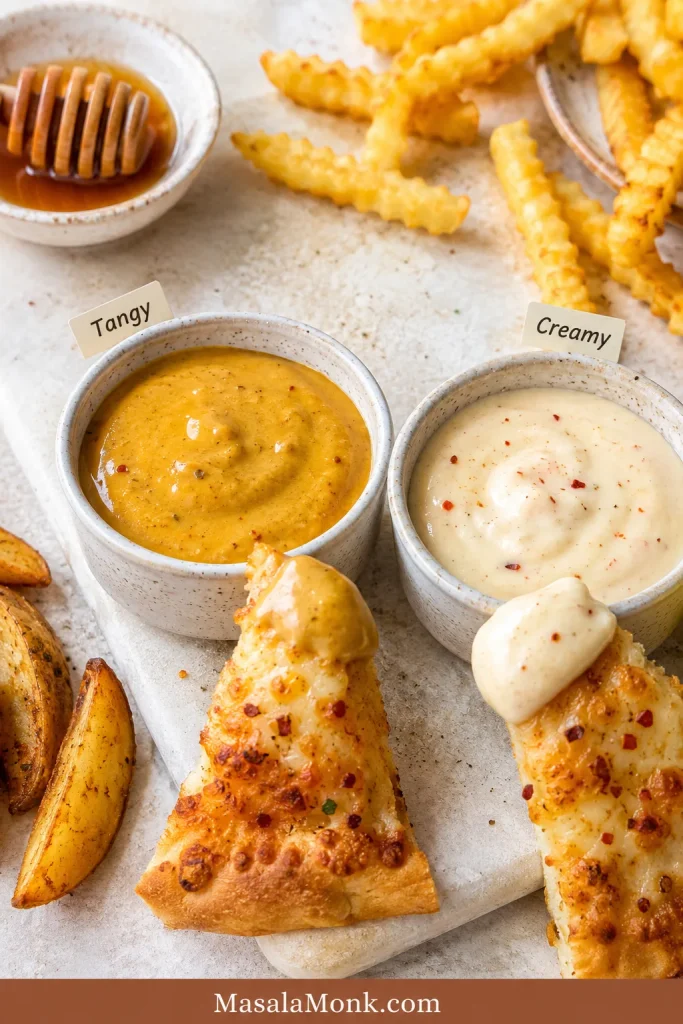
  • Tangy mustard dip: mix 2 tablespoons Dijon mustard with 1 tablespoon hot honey. Stir in more hot honey for a sweeter dip.
  • Creamy hot honey dip: mix ¼ cup / 60 g mayonnaise with 1–2 tablespoons hot honey.
Two ramekins containing a golden hot honey mustard dip and a pale creamy hot honey dip served with crisp potato pieces.
Mustard adds tang; a creamy hot honey dip softens the edge of heavily seasoned fried food.

Refrigerate both dips promptly.

Need a sauce that clings to wings? Jump to the buttery glaze →

Two More Ways to Make Hot Honey

Choose the infusion when you want the dried chilli itself to come through. Butter is better when the sauce needs to stay on a wing instead of running into the bowl.

Classic Chilli-Infused Hot Honey

  • ½ cup honey — 4 fl oz / 120 ml; about 6 oz / 170 g by weight
  • ½–1 teaspoon fully dried red pepper flakes
  • One small pinch fine salt, optional
  • ½ teaspoon apple cider vinegar, optional for immediate use
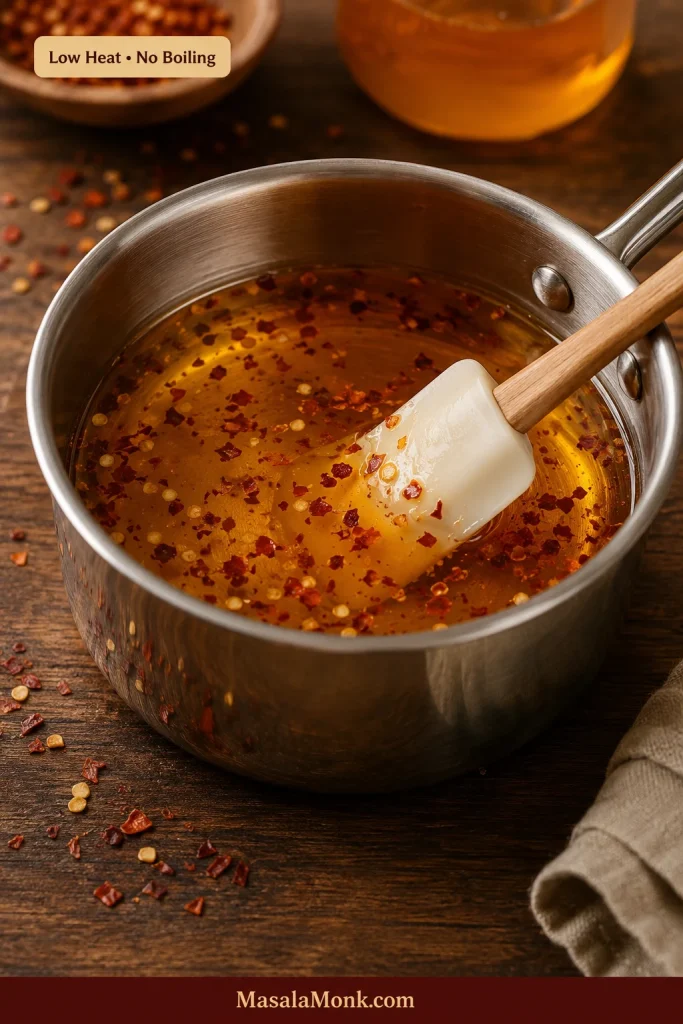
  1. Combine the honey and dried chilli flakes in a small saucepan.
  2. Warm over low heat for 3–4 minutes, stirring often. The honey should loosen and smell like warm chilli—not caramel.
  3. Remove it from the heat. Use it immediately for gentle warmth or leave it for 5–15 minutes for more chilli flavour.
  4. Stir in the salt. For a sauce being served now, vinegar can lighten sweetness that still feels heavy.
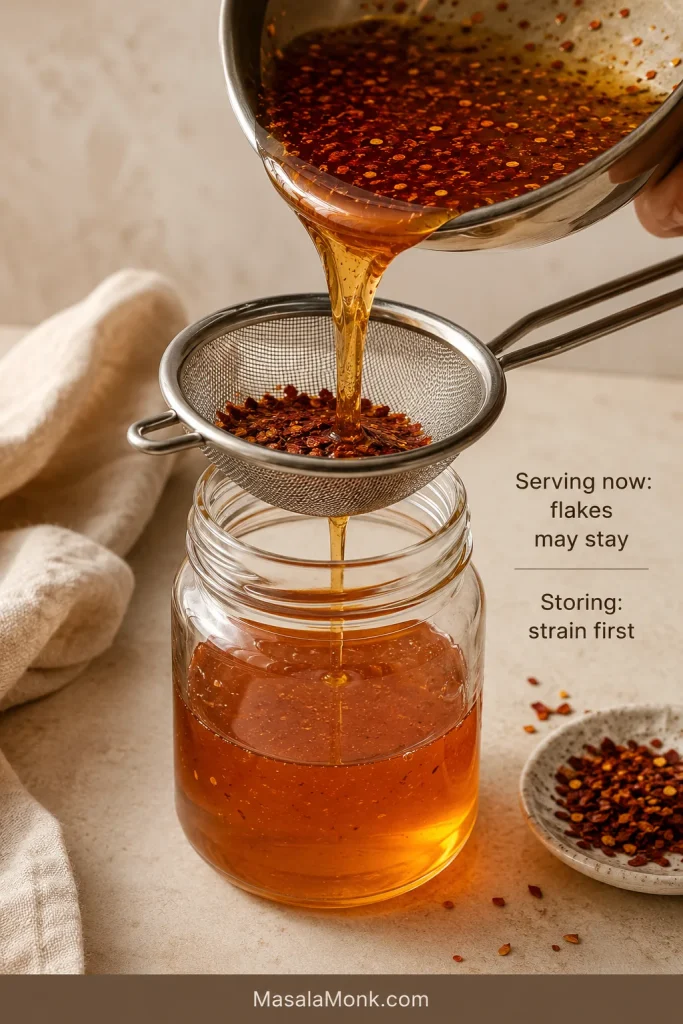
  5. Strain for a smooth drizzle.
Clear amber honey with dried red chilli flakes warming gently in a small stainless saucepan with a calm, unbubbled surface.
Watch the surface: looser honey and easy stirring are enough. Active bubbling means the infusion is too hot.

The chilli may taste quiet at first. Give it a few minutes before adding more; a gentle infusion can become fierce while it rests.

A saucepan of dried-chilli hot honey resting off the heat beside a tasting spoon and an untouched portion of extra dried chilli flakes.
After resting, stir before tasting again; settled flakes can make one spoonful much hotter than the batch.

Serving now or storing? Flakes may remain in a batch being served immediately, but strain them out before bottling or storing.

Dried-chilli hot honey being poured through a fine metal strainer into a clean glass jar while the chilli flakes remain trapped in the mesh.
Let the sieve drain naturally rather than pressing the flakes; fewer fine solids make a cleaner pour.

Making the infusion ahead? Jump to storage and reheating →

Buttery Hot Honey Wing Sauce and Glaze

  • ¼ cup honey — 2 fl oz / 60 ml; about 3 oz / 85 g by weight
  • 2 tablespoons unsalted butter — 1 oz / 28 g
  • 1 tablespoon hot sauce — ½ fl oz / 15 ml
  • ¼ teaspoon garlic powder
  • One small pinch fine salt, optional
  • ½ teaspoon apple cider vinegar, optional
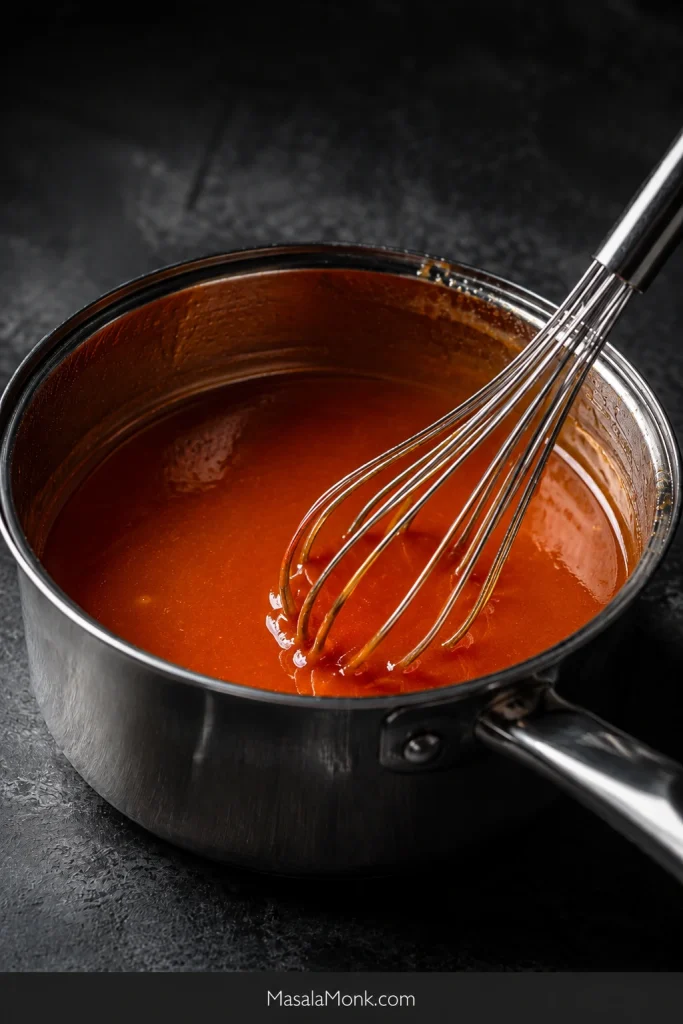
  1. Melt the butter in a small saucepan over low heat.
  2. Stir in the honey, hot sauce, garlic powder and salt. Add the vinegar now if using.
  3. Whisk for 2–3 minutes, just until smooth and glossy.
  4. Remove it before vigorous bubbling begins. Let it stand for 1–2 minutes before tossing or brushing.
Smooth red-gold buttery hot honey glaze being whisked in a small stainless saucepan on a dark surface.
A smooth butter glaze should show no clear butter ring; whisk trails should quickly close into one glossy surface.

With air fryer chicken wings, let the skin crisp before adding the warm glaze.

Warm glaze can look alarmingly loose. Give it a minute. Glossy streaks in the tossing bowl are fine; a pool beneath the wings means you used too much or the glaze needs another spoonful of honey.

Two matching red-gold hot honey glazes compared side by side, with the warm glaze flowing in a longer stream and the rested glaze clinging more.
After resting, look for cling rather than stiffness: the glaze should coat the spoon but still move when tilted.

Hot Honey Variations

Make the plain sauce first. Change it only if the food calls for something more specific.

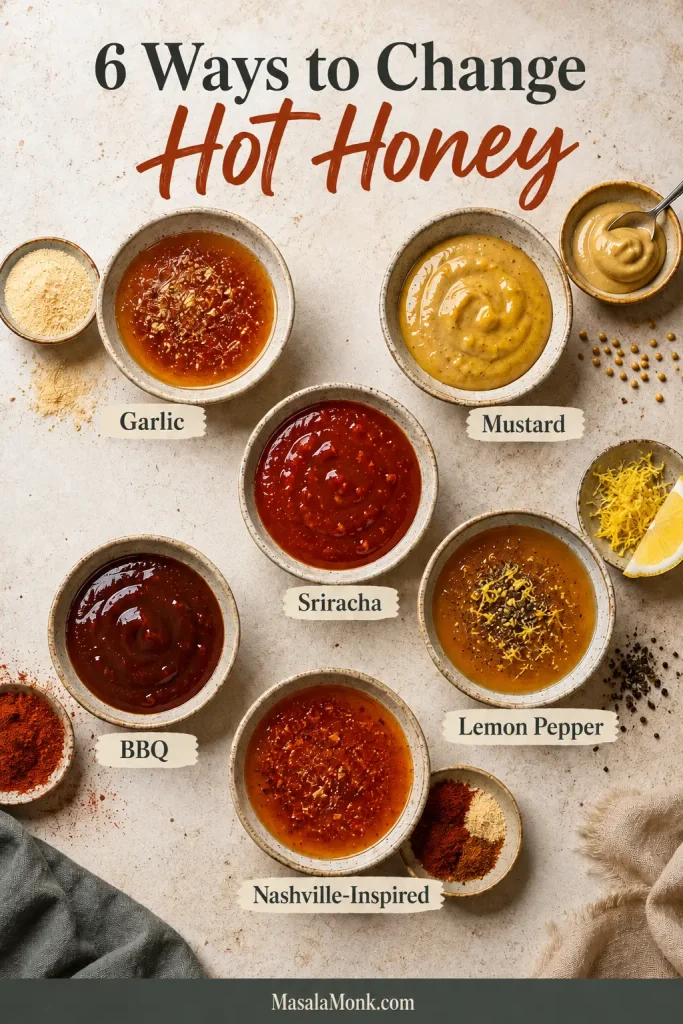
Six labelled hot honey variations made with garlic powder, mustard, Sriracha-style sauce, BBQ sauce, lemon pepper and Nashville-inspired spices.
Try one flavour family at a time; garlic, mustard or BBQ should still taste like hot honey.
  • Garlic hot honey: stir in ¼ teaspoon garlic powder. It works particularly well on chicken and honey garlic pork chops.
  • Hot honey mustard: mix 2 tablespoons Dijon with 1–2 tablespoons hot honey.
  • Honey-Sriracha: replace the cayenne-style sauce with 1–2 tablespoons Sriracha for a thicker, sweeter and more garlicky sauce.
  • Hot honey BBQ: stir 2–3 tablespoons hot honey into ½ cup BBQ sauce. Brush it over chicken or pork near the end of cooking.
  • Lemon pepper: add ½ teaspoon finely grated lemon zest and ¼ teaspoon coarse black pepper. It is especially good on lemon pepper chicken wings.
  • Nashville-inspired: add ⅛ teaspoon each cayenne and smoked paprika, plus a small pinch of garlic powder.

How to Fix Hot Honey Sauce

Hot honey is forgiving. Most batches are one small adjustment from balance, so judge the flavour first and the consistency second.

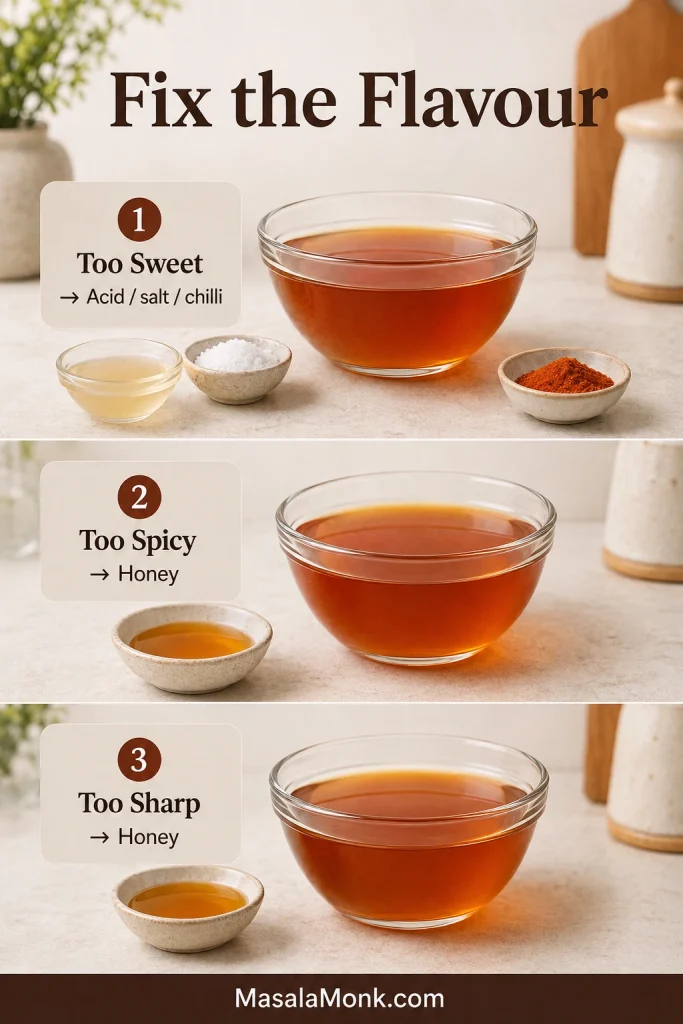
Three smooth bowls of hot honey showing corrections for sauce that is too sweet, too spicy or too sharp, with acid, salt, cayenne and honey nearby.
Fix one problem at a time: make a small correction, stir, then retaste. Multiple changes are harder to judge.

Swipe or scroll sideways to see the full table.

What happenedWhyWhat to do
Too sweetIt needs brightness, salt or heatStir in a little vinegar, salt or chilli
Too spicyToo much chilli or a long infusionAdd honey and remove any chilli solids
Too acidicThe hot sauce or vinegar is too sharpAdd honey
Too thinIt is still warm or contains too much liquidCool first, then add honey if needed
Too thick while coolThe honey is cold or the ratio needs adjustingWarm gently; thin only the serving portion if needed
Hard or chewy after cookingIt was heated too farRewarm and loosen the serving portion with a little liquid
Scorched or bitterThe honey overheatedStart again; burnt honey cannot be repaired
Butter separatedThe glaze became too hotRemove from the heat and whisk firmly
Wings became soggyToo much sauce or too much waitingUse less and toss immediately before serving
Gets hotter in storageChilli solids remain in the jarStrain them out or dilute the sauce with honey
Grainy or crystallisedNatural honey crystallisationWarm in a water bath or short microwave bursts

How to Store and Reheat Hot Honey Sauce

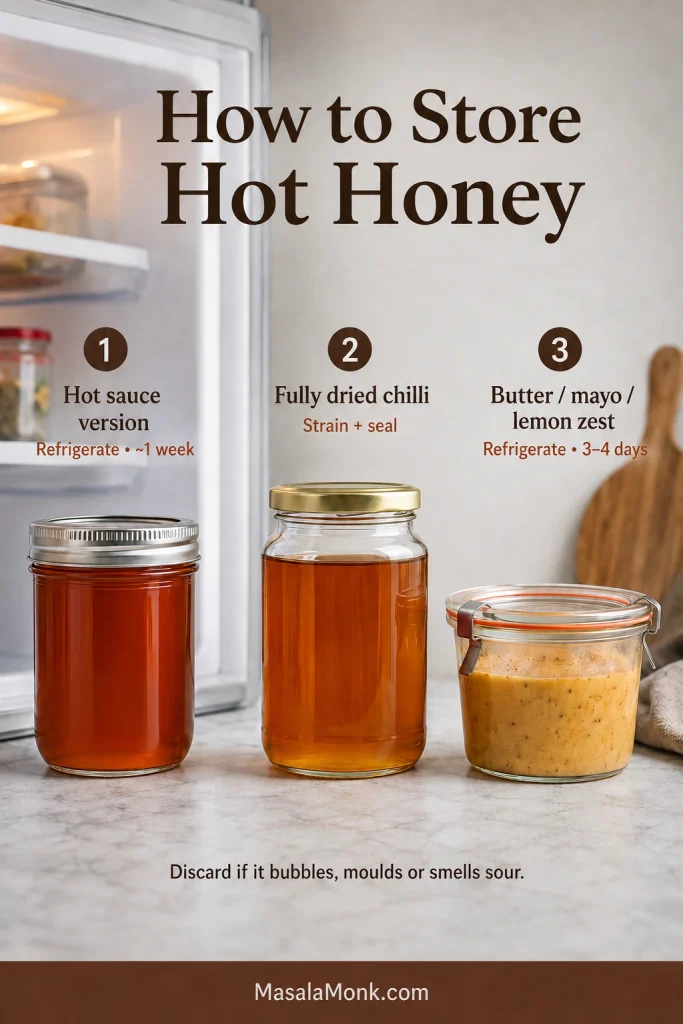
  • Bottled-hot-sauce version: refrigerate it and use it within about one week for the best flavour and texture. This is a cautious home-kitchen window because bottled sauces vary in acidity and moisture.
  • Fully dried-chilli infusion: strain it into a clean, tightly sealed food-grade container before storing. Keep moisture out. Refrigerate the batch if vinegar has been added.
  • Butter glaze, mayonnaise dip or lemon-zest variation: refrigerate promptly and use within 3–4 days.
Three containers illustrating storage for smooth bottled-sauce hot honey, strained fully dried-chilli honey, and a refrigerated butter or creamy hot honey variation.
Label the jar with the version you made; storage changes with butter, mayonnaise, lemon zest or dried-chilli infusion.

Discard any batch that develops bubbling, mould or an alcoholic or sour smell.

To loosen cold hot honey, microwave it in a microwave-safe container with any metal lid removed, in 10-second bursts. Set a tightly closed, heat-safe glass jar in warm—not boiling—water as another option. Butter glaze can be rewarmed over the lowest heat. Stop as soon as the sauce flows again.

Do not give honey to a child under 12 months. See the USDA explanation of the infant-botulism risk.

Hot Honey Sauce FAQ

What Is Hot Honey Sauce Made From?

The simplest version is honey and hot sauce, with a small pinch of salt only if the balance needs it.

Can You Make Hot Honey With Regular Hot Sauce?

Yes. A thin cayenne-style hot sauce is the easiest choice; use less if the bottle is unusually hot or sharp.

Do You Need to Cook Hot Honey?

No. Whisk the bottled-hot-sauce version together cold; heat only to loosen thick honey or infuse dried chilli.

Can You Make Hot Honey Without Vinegar?

Yes. Skip it when the hot sauce already gives the mixture enough brightness.

Can I Use Cayenne Instead of Chilli Flakes?

Yes. Cayenne gives immediate, even heat; chilli flakes create a slower infusion and visible texture.

Does Homemade Hot Honey Need Refrigeration?

Refrigerate the bottled-hot-sauce version in this recipe. Fully dried-chilli infusions have separate storage guidance, while butter glaze, mayonnaise dip and lemon-zest versions should remain refrigerated.

Why Did My Hot Honey Harden or Crystallise?

Honey naturally crystallises, and a cooked sauce can also stiffen if heated too long. Warm it gently until it flows again. If it smells scorched or tastes bitter, start over.

Three-stage guide showing grainy crystallised hot honey, the sealed jar sitting in warm water, and the same honey restored to a smooth amber liquid.
Crystals often appear at the sides or bottom first. Stop warming once the graininess has dissolved throughout.

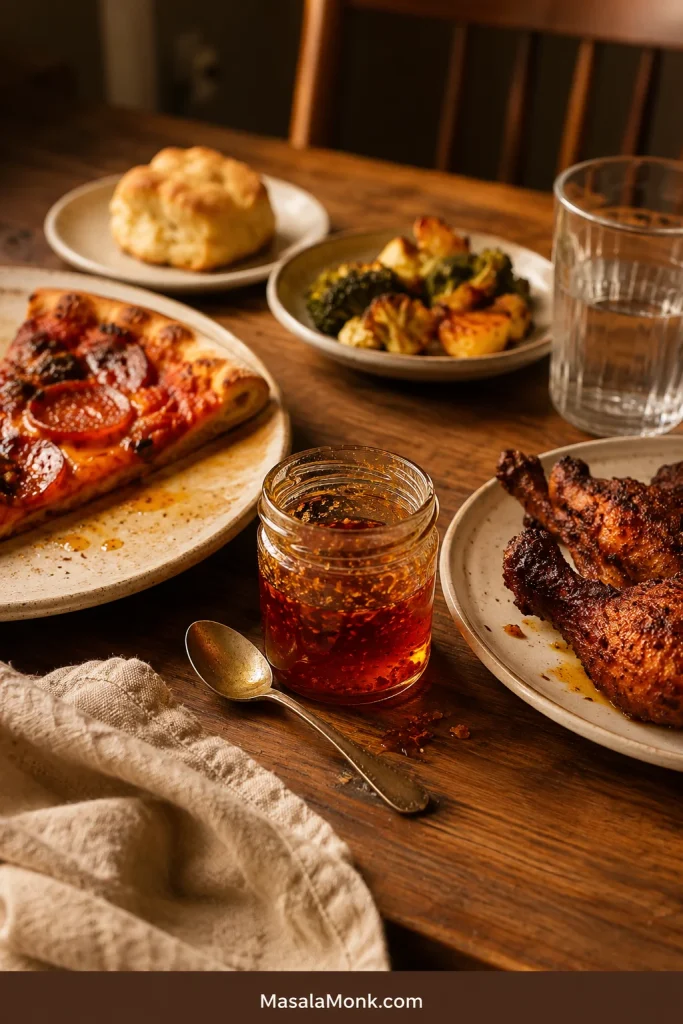
A Small Jar That Solves Dinner

The jar looks almost too simple for how often it solves dinner. Then it lands on hot pizza or crisp chicken, the honey turns glossy and the chilli arrives a second later.

A partly served evening meal with pizza, crisp chicken, roasted vegetables and a biscuit surrounding a small used jar of hot honey on a wooden table.
Keep the jar on the table and let everyone add their own; the right amount is personal.

What did you drizzle it over first?

Posted on Leave a comment

Margherita Pizza Recipe: Easy Homemade Pizza With Tomato, Mozzarella and Basil

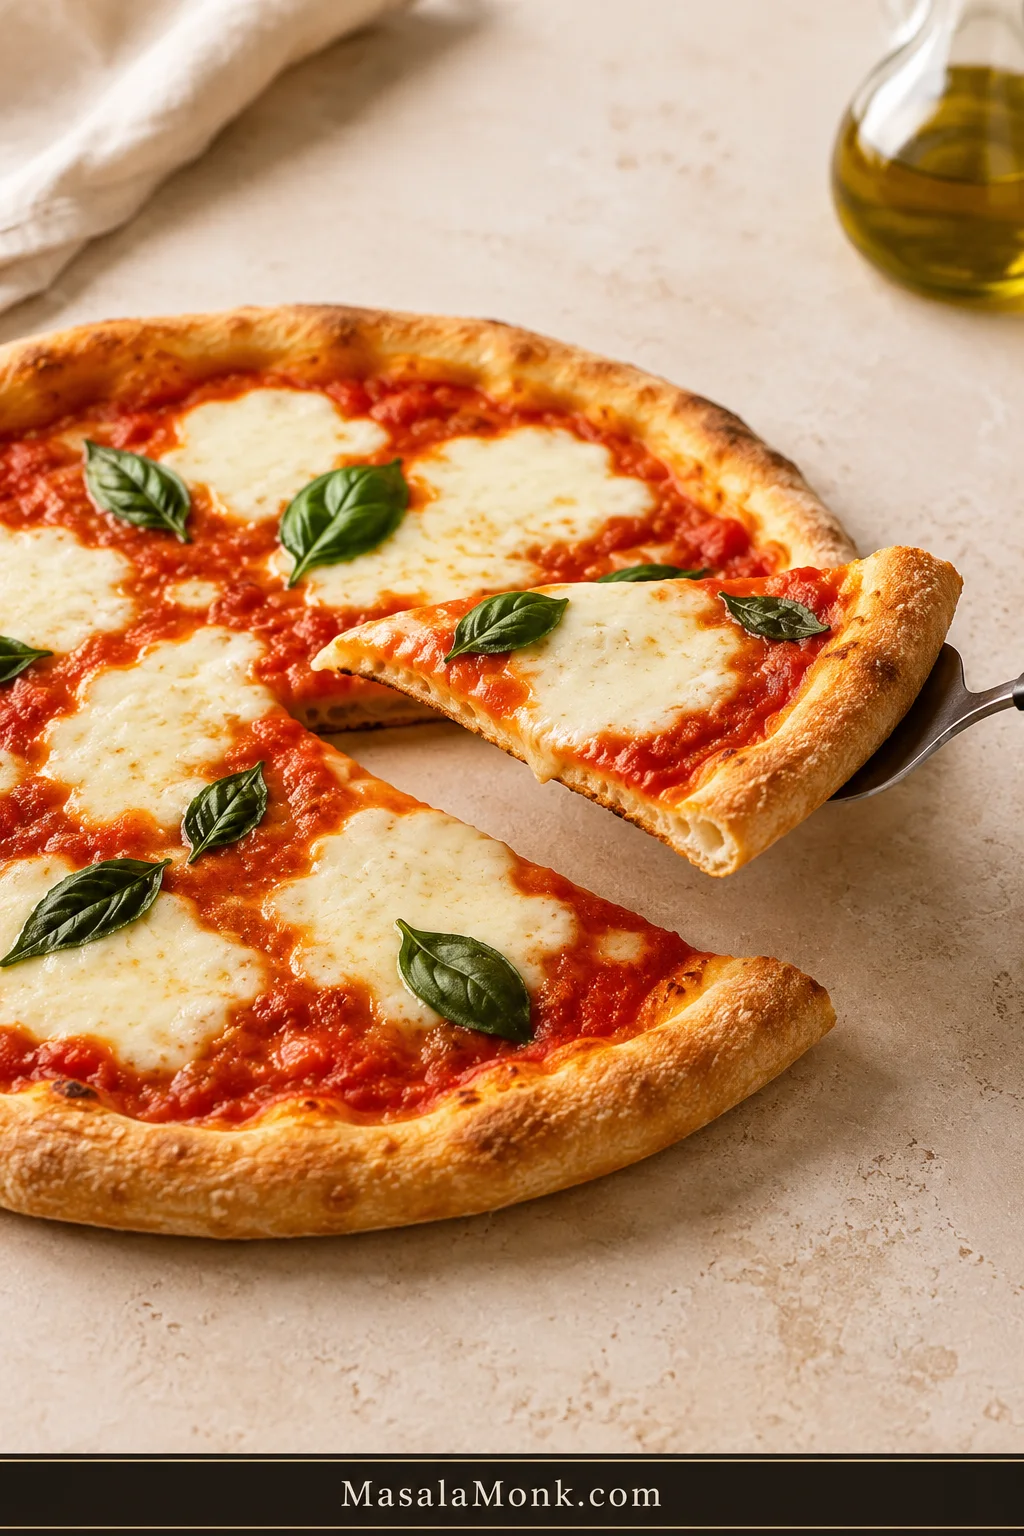
Homemade Margherita pizza with one slice gently lifted on a server, showing a slight bend, browned crust, tomato, mozzarella and fresh basil.

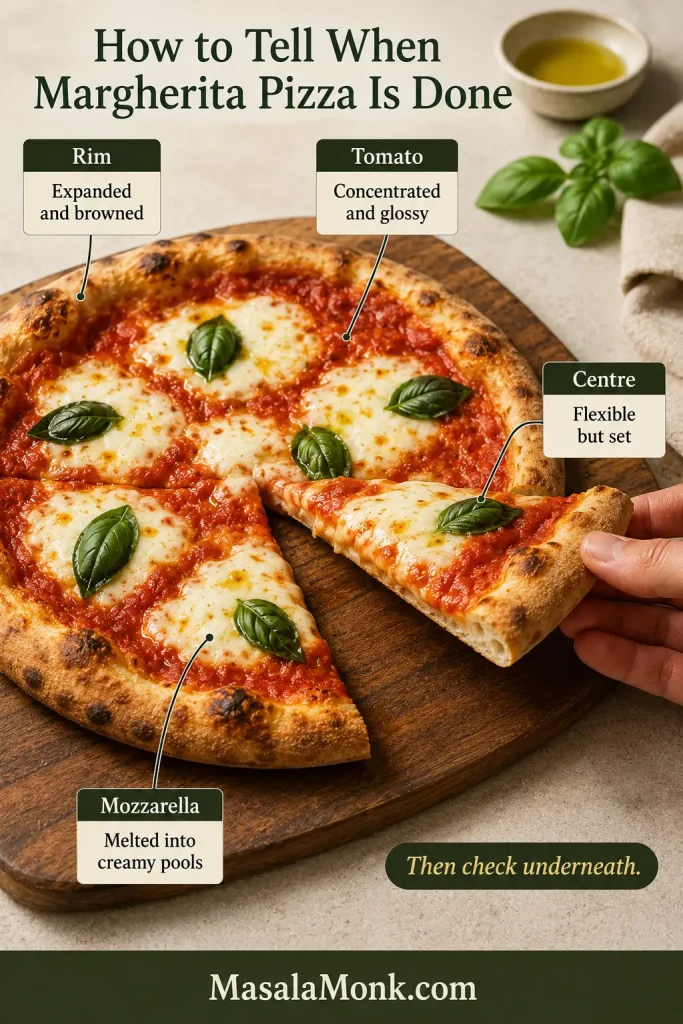
A good Margherita pizza bends when you lift a slice, but it does not collapse. The underside has enough color to support the toppings, the rim remains tender, and the basil still smells fresh when the pizza reaches the table.

That balance comes from restraint. Margherita pizza uses tomato, mozzarella, fresh basil and olive oil, applied lightly enough that the crust remains part of every bite.

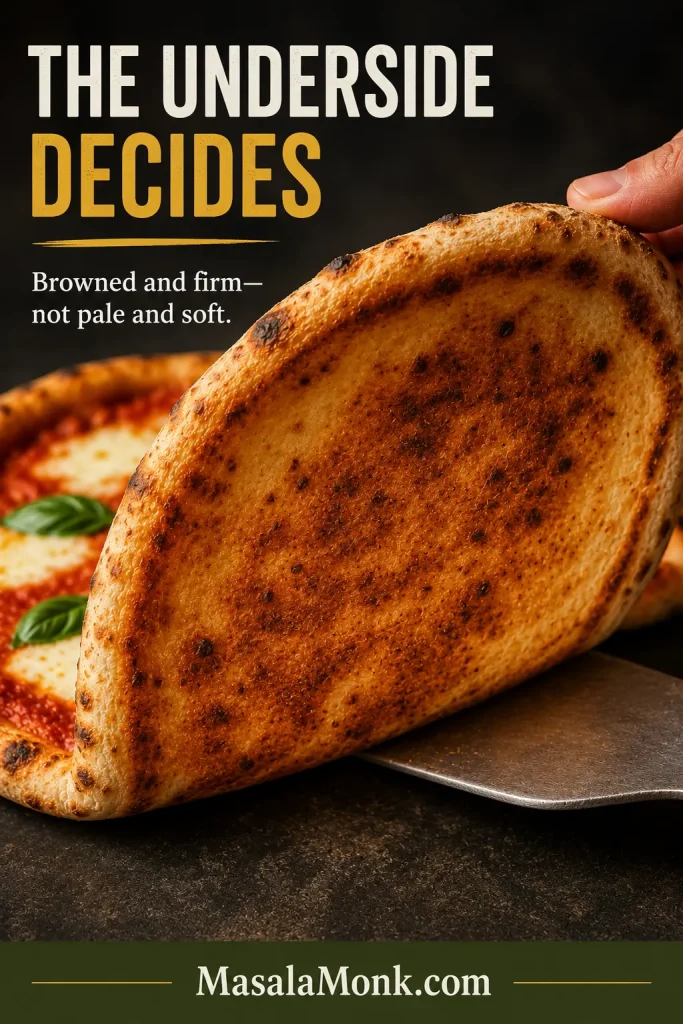
The disappointing homemade version often looks ready from above but tells a different story underneath: a pale base, a damp center and mozzarella that has released more water than the oven could remove.

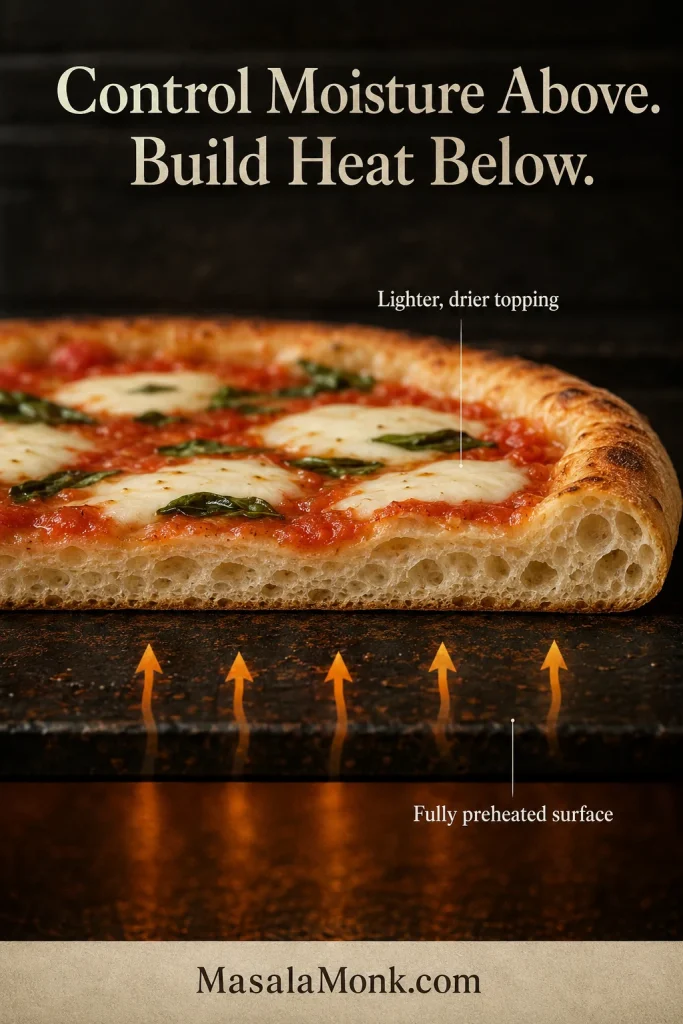
You do not need a pizza oven to avoid that result. A heavy metal baking sheet, enough preheating and a lighter hand with the toppings can take a regular home oven surprisingly far. The rule is simple: control the moisture above and build the heat below.

Quick answer
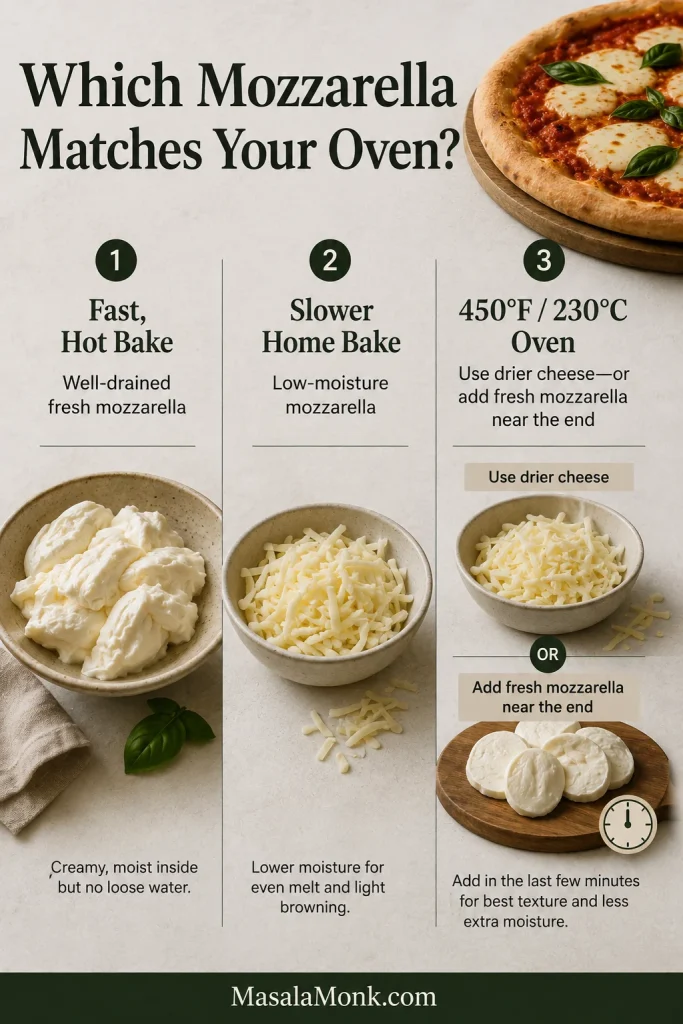
Margherita Pizza at a Glance

Make the same-day dough, divide it in two and stretch each ball to about 12 inches / 30 cm.

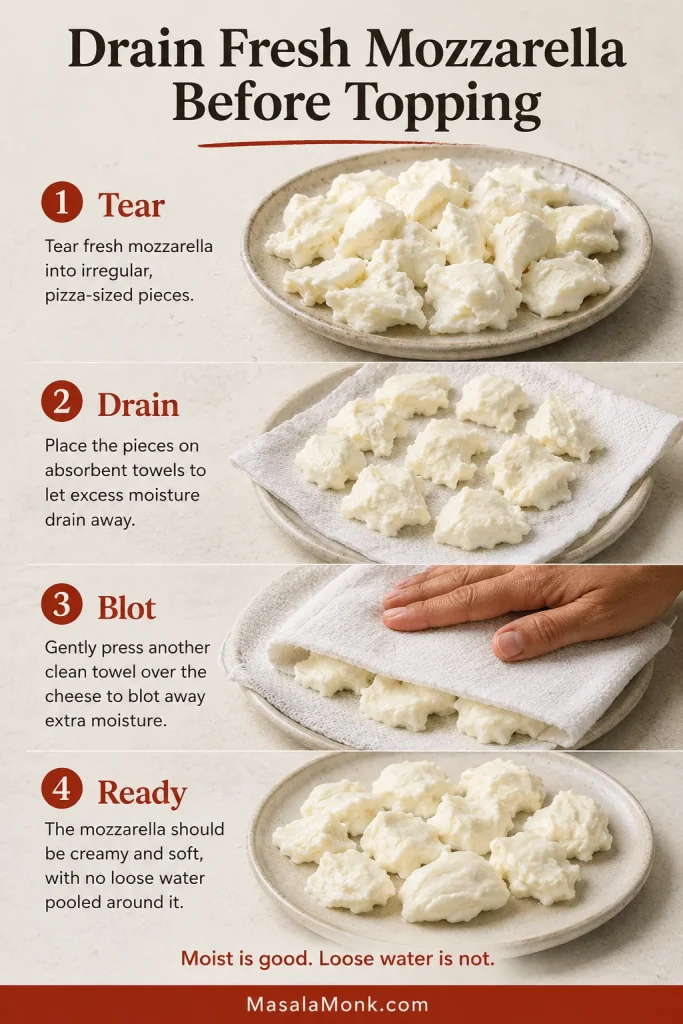
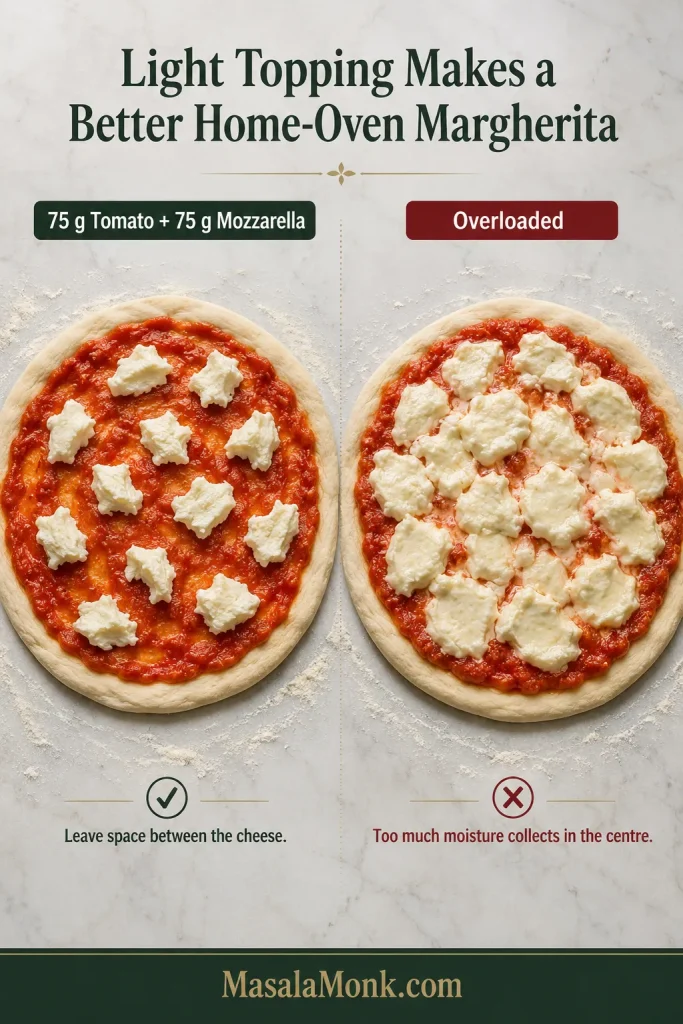
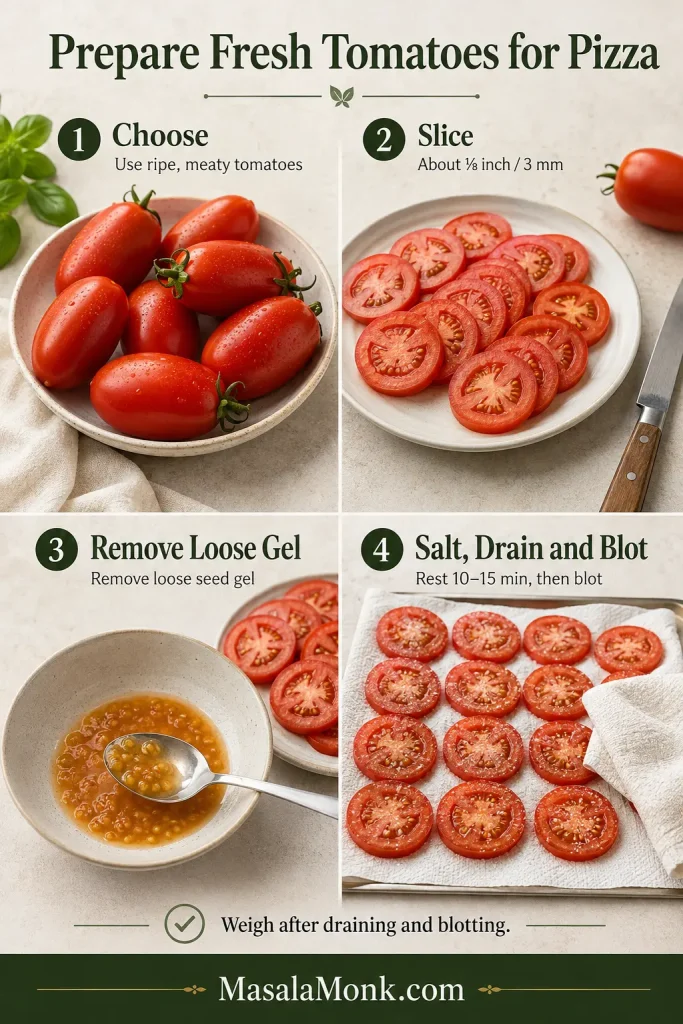
Top lightly with thick crushed tomato and mozzarella blotted until no loose water remains on the surface. The raw pizza should look less covered than a standard cheese pizza.

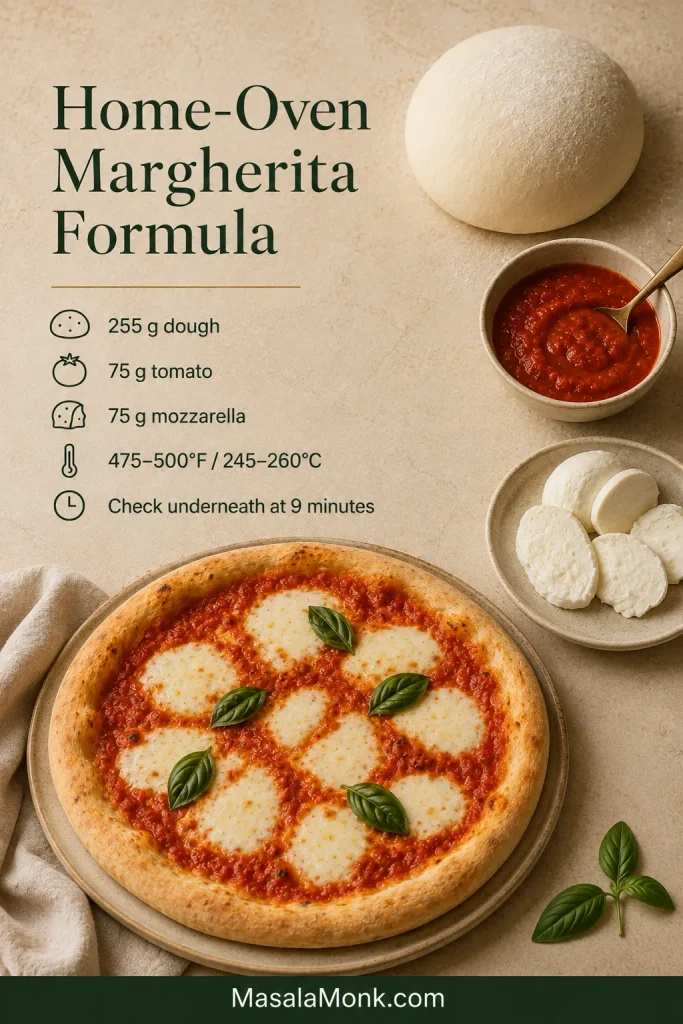
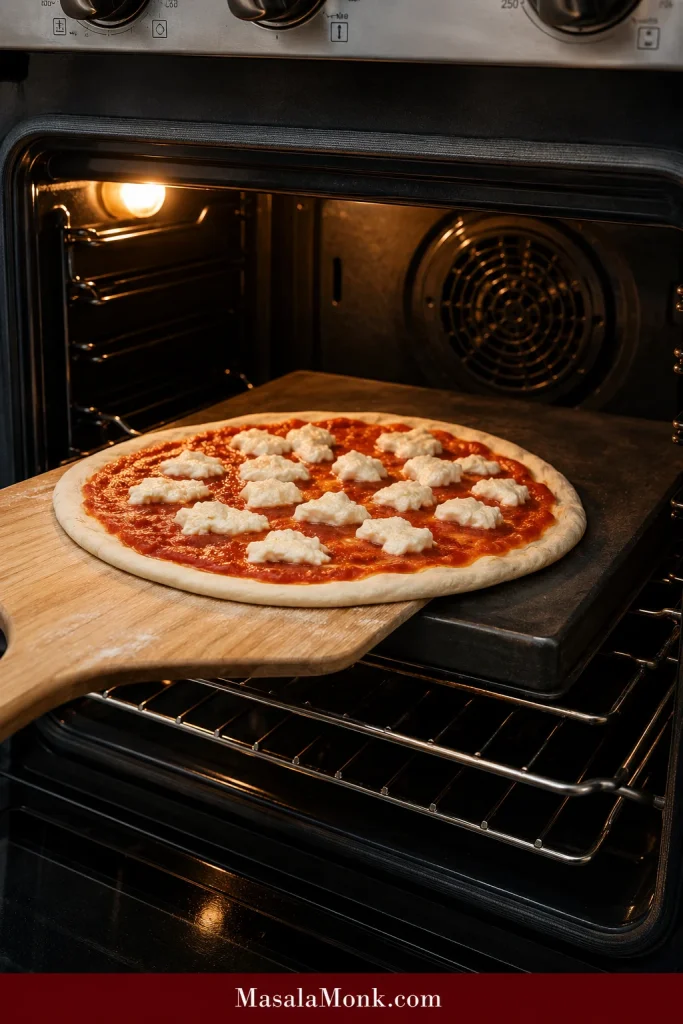
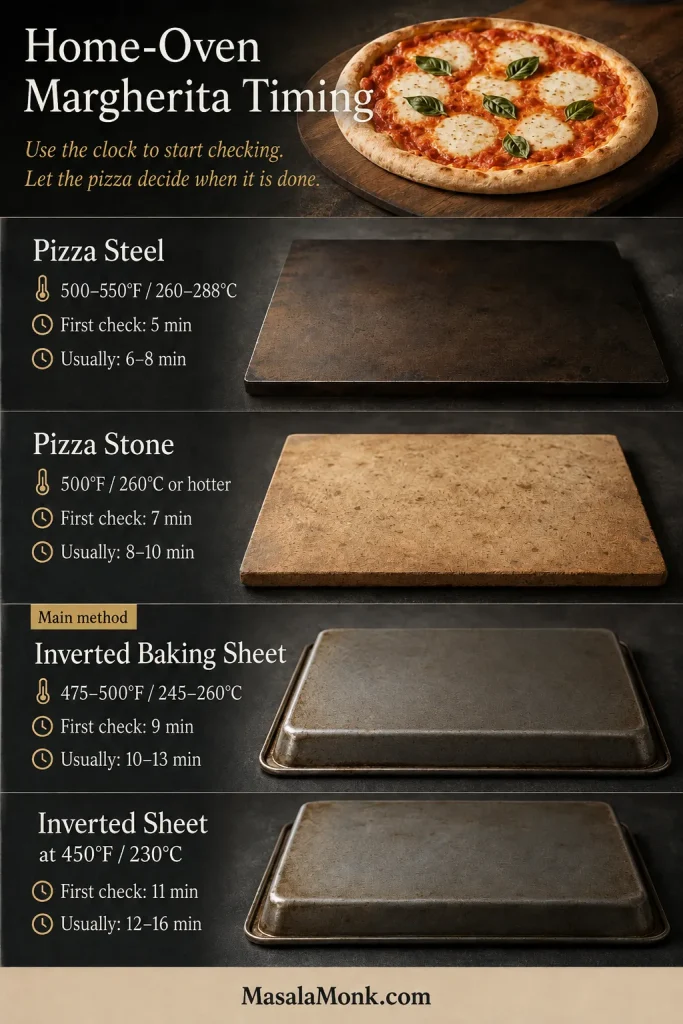
Bake on a thoroughly preheated inverted metal sheet at the hottest safe oven setting, ideally 475–500°F / 245–260°C. Lift one edge and check underneath after 9 minutes.

Per pizza: about 255 g dough · 75 g prepared tomato topping · 75 g fresh mozzarella

Make it now

Easy Homemade Margherita Pizza

Using bread flour, canned plum tomatoes, fresh mozzarella and an inverted baking sheet? Follow the main route below. The later sections help when the dough pulls back, the cheese runs wet or the oven needs a different approach.

This amount makes a tender, moderately substantial home-oven crust. Stretch closer to 11 inches / 28 cm for a fuller rim or to the full 12 inches / 30 cm for a thinner center.

Makes: Two 12-inch / 30 cm pizzas · Serves: 3–4
Active time: About 35 minutes · Rise and rest: About 2¼–3¼ hours
Preheat: About 40–55 minutes, overlapping the final rest
Bake: 10–13 minutes per pizza, plus surface recovery
Total: About 3–4 hours

Equipment

  • Digital kitchen scale, strongly recommended
  • Large mixing bowl
  • Dough scraper or flexible spatula
  • Two covered containers or one lightly oiled tray
  • Heavy uncoated metal baking sheet rated for your oven temperature
  • Pizza peel, thin wooden board or another flat baking sheet for transfer
  • Parchment paper, optional and only when rated for the oven temperature

For the pizza dough

  • 300 g bread flour or strong all-purpose flour, about 2½ cups when spooned and leveled
  • 195 g water, 195 ml or about ¾ cup plus 1 tablespoon
  • 6 g fine sea salt, about 1 teaspoon
  • ½ teaspoon instant yeast, about 1.5 g
  • 1 teaspoon extra-virgin olive oil, about 5 g
  • Additional flour or fine semolina for dusting, used sparingly

Yeast alternatives: use the same ½ teaspoon / about 1.5 g active dry yeast and allow more rise time when needed. Dissolving it first is optional unless the package directs otherwise. For fresh yeast, use about 4–5 g.

For the no-cook tomato topping

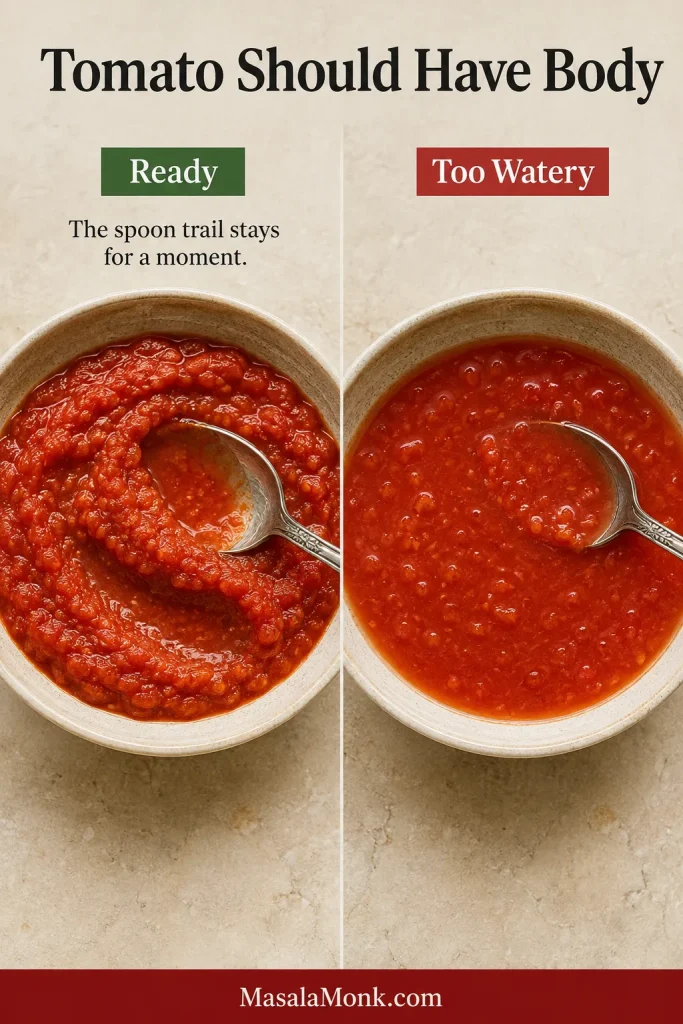
  • 150 g crushed canned whole plum tomatoes, about ⅔ cup, using only enough packing juice to make a thick, spreadable topping
  • 1–1½ g fine sea salt, about ¼ teaspoon, adjusted to the tomatoes and cheese
  • 1 teaspoon extra-virgin olive oil

Begin with less salt when the tomatoes or mozzarella are already salty. For a more seasoned home-style topping, add a little finely grated garlic; omit it for the cleaner tomato flavor used in the main recipe.

For topping two pizzas

  • 150 g fresh cow’s-milk mozzarella, about 5¼ oz, weighed after draining
  • 10–12 fresh basil leaves
  • 2 teaspoons extra-virgin olive oil, for finishing

Instructions

Make the dough and prepare the toppings

  1. Mix and rest. Combine the water and yeast in a large bowl. Add the flour and mix until no dry patches remain. Cover and rest for 15 minutes.
  2. Add the salt and oil. Work in the salt and olive oil, then knead for 6–8 minutes until the dough is smoother, elastic and slightly tacky.
  3. Let the dough rise. Shape it into a ball, cover and leave until 60–80% larger, lighter and visibly aerated. This commonly takes 1¼–2 hours.
  4. Divide, ball and preheat. Divide the dough into two equal pieces of about 255 g and shape them into smooth balls. Cover and rest for 45–60 minutes. Immediately place a heavy baking sheet upside down in the lower third of the oven and heat to its highest safe setting, ideally 475–500°F / 245–260°C. Once the oven reaches temperature, continue heating the sheet for another 15–20 minutes.
  5. Prepare the toppings. Near the end of the dough rest, crush and season the tomatoes. Tear the mozzarella into small pieces, place them between absorbent towels and blot thoroughly.

Shape, top and bake

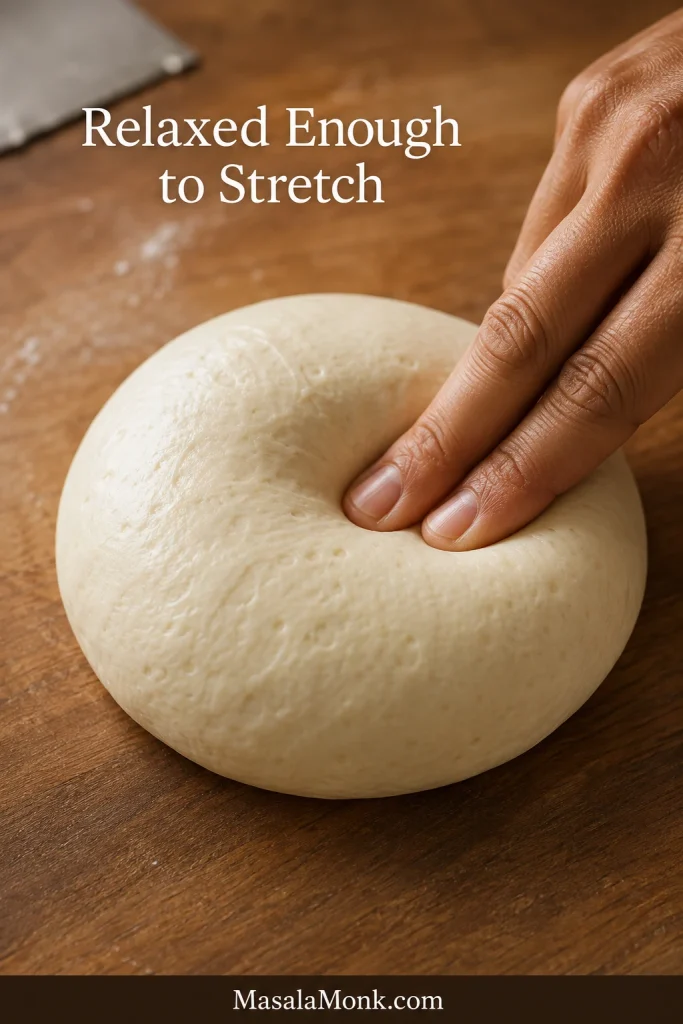
  1. Shape the first pizza. Press from the center outward while leaving a ¾-inch / 2 cm rim untouched. Lift and rotate the dough until it reaches about 12 inches / 30 cm. If it keeps springing back, stop fighting it. Cover and rest for another 10 minutes.
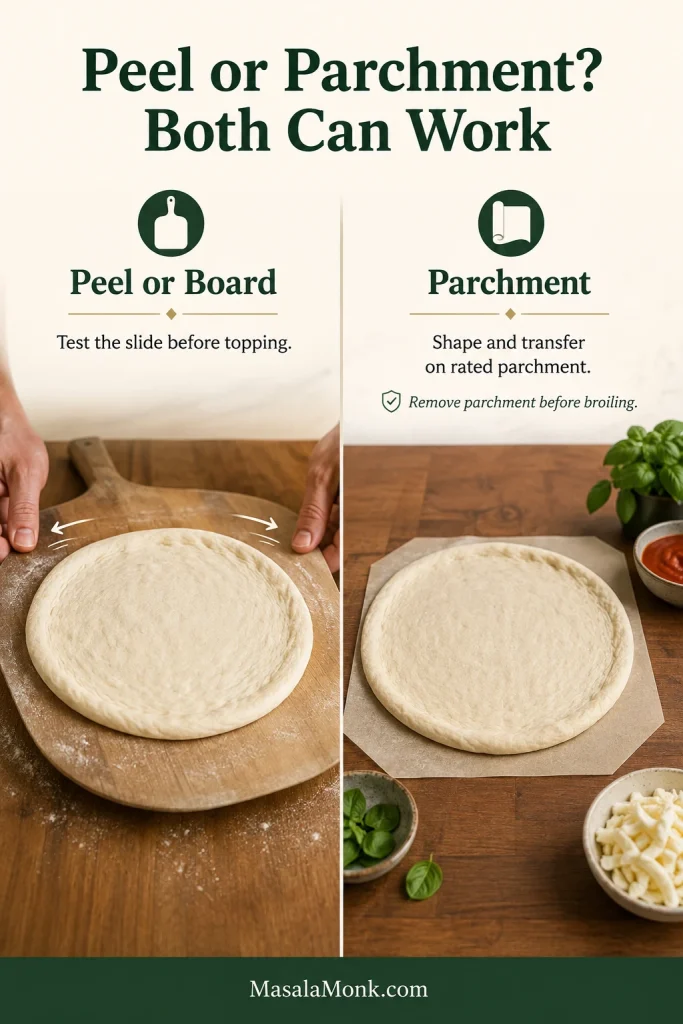
  2. Choose the transfer method. For a peel or board, dust lightly, place the dough on it and test that it slides. For parchment, shape and top the pizza directly on a trimmed sheet of temperature-rated paper; transfer the paper with the pizza.
  3. Top lightly. Spread 75 g prepared tomato topping, about ⅓ cup, across the dough. Add 75 g drained mozzarella, about 2⅔ oz, keeping the center lightly topped.
  4. Transfer and bake. When using a peel or board, give it one final gentle shake and transfer the pizza immediately if it moves as one piece. Check underneath after 9 minutes, rotate if one side colors faster and continue until the base is browned.
  5. Finish, recover and repeat. Remove the pizza when the underside is browned, the rim has expanded and the center is set. Add half the basil—about 5–6 leaves—and 1 teaspoon olive oil. Rest for 1–2 minutes before slicing. Let the oven return to temperature, then give the baking sheet another 3–5 minutes to recover before repeating with the remaining dough and toppings.

Adjust for a different oven

For an oven that stops at 450°F / 230°C: continue heating the inverted sheet for 20–25 minutes after the oven reaches temperature. Use 60 g / about 2 oz low-moisture mozzarella from the beginning, or use 75 g / about 2⅔ oz well-drained fresh mozzarella and add it during the final 3–4 minutes. Check the underside after 11 minutes.

Fan or convection oven: start checking one or two minutes earlier because moving air can color the top faster. See the oven-specific notes below for the full adjustment.

Parchment: check the manufacturer’s maximum-temperature rating and trim exposed corners. Remove the parchment before using the broiler.

The home-oven balance: keep the dough and topping load consistent, then let underside color tell you what the oven needs.

Home-oven Margherita pizza formula graphic showing measured dough, prepared tomato and mozzarella portions with baking temperature and timing guidance.
Keeping the topping load this light gives the center a better chance to set before the base overbrowns.

Choose Your Oven Setup

The inverted baking sheet is the best starting point for a regular oven. It is inexpensive, easy to load and capable of producing a properly browned base when given enough time to heat.

Heavy metal baking sheet positioned upside down on a lower rack inside a domestic oven, with its flat underside facing upward.
The flat back of an inverted sheet removes the raised rim, giving the peel a cleaner, shallower path into the oven.
SetupBest useMain trade-off
Inverted heavy baking sheetBest default for a regular ovenAccessible and reliable, though slower than steel
Pizza steelFast and deep bottom browningCan burn loose flour or an overly thin center
Pizza stoneGentler bottom heat than steelNeeds a long preheat and slower recovery
Inverted sheet at 450°F / 230°COvens with a lower maximum temperatureNeeds a longer bake and drier or later-added cheese
Comparison guide showing an inverted baking sheet, pizza steel and pizza stone as different surfaces for baking pizza in a home oven.
Steel browns fastest, stone more gently, and an inverted sheet is the accessible default; let underside color guide later adjustments.

On a smaller screen, scroll sideways to see the full table.

What Is Margherita Pizza?

Margherita tells you what is on the pizza: tomato, mozzarella, basil and olive oil. Neapolitan describes more of the dough, shaping and intensely hot baking tradition. A Margherita can be Neapolitan, but a home-oven pizza baked for several minutes is not identical to one cooked in roughly a minute.

Side-by-side comparison of a moderately browned home-oven Margherita pizza and a more inflated, deeply spotted Neapolitan-style pizza.
A successful home-oven Margherita can have a moderate rim and restrained spotting; it does not need wood-fired Neapolitan char.

The traditional Neapolitan pizza standards use hand-shaped dough, tomato, fior di latte or buffalo mozzarella, basil and extra-virgin olive oil in an oven far hotter than most domestic models. This recipe keeps that topping identity while adapting the dough and baking method to a regular oven.

Margherita pizza is famously associated with Queen Margherita of Savoy and an 1889 visit to Naples, although similar tomato-and-mozzarella pizzas existed earlier.

Why This Method Works in a Home Oven

A pizza oven removes moisture quickly. A regular oven gives the tomato and cheese more time to release it, so the toppings must remain lighter and the baking surface must begin fully heated.

The home-oven rule: the longer the pizza needs to bake, the less loose moisture it can carry. Dry the mozzarella, use a thin tomato layer and preheat the baking surface fully.

Pizza cross-section graphic showing restrained tomato and mozzarella above the dough and heat rising from a thoroughly preheated baking surface below.
Pale underneath usually means more bottom heat; a wet center over a browned base points instead to excess topping moisture.

The dough carries enough water to remain tender without becoming needlessly difficult to shape. Measured toppings leave room for the center to bake through. There is no prize for using the whole ball of cheese.

Choosing Margherita Pizza Ingredients

Use bread flour for the easiest home-oven dough

Bread flour stretches reliably and browns well during a longer home bake. Strong all-purpose flour also works; hold back one teaspoon of water if yours is particularly soft.

“00” is an Italian flour classification, not a guarantee that every bag will behave the same way in a home oven. Choose one formulated for the temperature and fermentation schedule you plan to use.

Choose canned whole plum tomatoes

Canned whole plum tomatoes are the dependable year-round choice. They should smell bright when the can opens and crush into pulpy tomato rather than disappearing into watery juice.

San Marzano tomatoes are excellent when available, but they are not compulsory. A flavorful ordinary plum tomato with good body is more useful than an expensive can carrying too much liquid. A prepared sauce also works when time is limited; compare the options in this pizza sauce guide.

Match the mozzarella to the speed of the bake

Choose well-drained fresh mozzarella for a fast, hot bake and low-moisture whole-milk mozzarella when the pizza needs longer in the oven.

Fresh cow’s-milk mozzarella, often sold as fior di latte, gives the pizza its milky flavor and separate creamy pools. Buffalo mozzarella is richer and usually wetter.

The practical rule is simple: the longer the bake, the more useful a drier cheese becomes. Coarsely grate low-moisture mozzarella or tear thin slices into small pieces so it scatters across the tomato instead of forming a heavy blanket.

Mozzarella comparison guide showing drained fresh mozzarella, low-moisture mozzarella and an option for a slower, lower-temperature home oven.
Choose mozzarella by moisture as much as by style: wetter cheese suits faster bakes, while slower ovens benefit from drier cheese.

Finish with basil and olive oil

Add most or all the basil after baking. The residual heat softens the leaves just enough while preserving the fragrance that makes Margherita pizza feel fresh rather than heavy.

Fresh green basil leaves being scattered by hand over a just-baked Margherita pizza with tomato and melted mozzarella.
Add most basil after baking so the leaves soften in the residual heat without losing their fresh, herbal aroma.

For a softer cooked-basil note, tuck two or three leaves beneath the mozzarella before baking. A light dusting of Parmesan or Pecorino is optional, but the main pizza needs only mozzarella.

Ready to cook? Return to the main recipe ↑

Mix, Ferment and Stretch the Dough

Mix and knead without drying it out

The dough will look ragged immediately after mixing. Leave it alone for 15 minutes and the flour will absorb more water, turning the same rough mass into something noticeably easier to knead.

Before-and-after comparison of the same pizza dough, showing a rough shaggy mixture becoming smoother after a 15-minute covered rest.
Wait the full 15 minutes before correcting rough dough with extra flour or water; the rest often smooths it on its own.

After kneading, it should feel elastic and less rough without becoming dry. Slight tackiness is useful. Too much added flour makes the dough easier to handle for a few minutes and the finished crust less tender.

Close-up of a fingertip lifting from soft pizza dough with slight tack but no wet dough coating the finger.
Slightly tacky dough pulls gently at the skin and releases; wet dough smears or leaves paste on your fingers.

Let it rise, divide and relax

The dough is ready for dividing when it has expanded by 60–80%, softened and developed small bubbles beneath the surface. It should feel lighter than it did after kneading.

Pizza dough shown before and after rising in matching straight-sided containers, with the risen dough visibly larger and aerated.
Mark the starting height in a straight-sided container so a 60–80% rise is easy to judge instead of guess.

Adjust for the room: use mildly warm water in a cool kitchen below 70°F / 21°C, room-temperature water in a comfortable kitchen around 70–79°F / 21–26°C and cool tap water in a warm kitchen at 80°F / 27°C or above. In a warm room, check the dough after about an hour.

Dividing and balling tightens the dough again. After its final 45–60-minute rest, a ball that resisted your hands begins to widen beneath gentle fingertip pressure. That change matters more than the clock.

Two fingertips gently pressing a rested pizza dough ball and leaving shallow indentations in its soft surface.
A relaxed dough yields broadly under your fingertips instead of pushing back in one tight spot.

Fix sticky, dry or slow dough

  • Too sticky: pause for five minutes and handle it with lightly damp or oiled hands.
  • Too dry: wet your fingertips and knead in one teaspoon of water at a time.
  • Slow to rise: move the covered bowl somewhere comfortably warm and allow more time.
  • Rising too quickly: divide and ball it early, then refrigerate briefly if dinner is delayed.
  • Dry surface: cover the dough properly. A skin resists stretching and can tear.
Three-part pizza dough troubleshooting guide showing sticky dough, dry dough being moistened and covered dough resting somewhere warm.
Sticky, dry or slow dough usually needs a small correction; large flour, water or heat changes can create a second problem.

For a naturally fermented base, use this sourdough pizza dough and return here for the tomato, mozzarella and basil quantities.

How to Prevent a Watery Margherita Pizza

Water rarely comes from one dramatic mistake. It is usually the combined effect of loose tomato, wet mozzarella, heavy topping and a base that did not begin hot enough.

Tomato and mozzarella should remain juicy. The aim is not to dry the life out of them, only to remove the loose water that would collect in the center before the crust has time to brown.

Make a thick no-cook tomato sauce

Crush the tomatoes by hand or pulse them only briefly. Drag a spoon through the mixture. The trail should remain visible for a moment instead of filling immediately with juice.

Two bowls of crushed tomato compared side by side, with thicker tomato holding a spoon trail and watery tomato flowing back together.
A spoon trail that holds briefly signals tomato thick enough to spread lightly without flowing toward the center.

Drain excess packing liquid rather than cooking the tomatoes merely to thicken them. The no-cook topping keeps a brighter, fresher tomato flavor after baking. Sugar is rarely needed when the tomatoes are balanced.

For a cooked, garlicky red sauce, use this homemade marinara sauce and keep its pizza layer thin.

Drain fresh mozzarella after tearing it

A whole mozzarella ball can feel dry outside while holding substantial water inside. Tear or slice it first, spread the pieces between clean towels and blot firmly.

The cheese should remain moist and milky without loose water shining on the surface. Properly drained mozzarella melts into creamy pools instead of leaving a wet blanket across the tomato.

Four-step sequence showing fresh mozzarella torn into pieces, drained on towels, blotted and ready to use without visible pooled water.
Blot until free water is gone, then stop; the cheese should stay soft and milky rather than feel dried out.

Particularly wet cheese may need 20–30 minutes between absorbent towels. During a bake longer than about 12 minutes, add fresh mozzarella for the final 3–4 minutes or use low-moisture mozzarella from the beginning.

How to Shape, Top and Transfer the Pizza

Once the tomato and mozzarella are ready, the challenge shifts from moisture to movement: shaping the dough and getting it onto the hot surface without losing the rim.

Stretch without crushing the rim

Press from the center outward while leaving a ¾-inch / 2 cm border untouched. Rotate the dough as you work, then lift it over the backs of your hands and allow gravity to widen the center.

Hands pressing pizza dough outward from the center while leaving a raised outer border marked as ¾ inch or 2 cm untouched.
Leave the outer ¾ inch / 2 cm untouched so trapped gas remains available to expand into the rim.

Stop before the middle becomes fragile. If the dough keeps pulling back, cover it and wait another 10–15 minutes. An oval is not a failed pizza. An even center and intact rim matter more than a perfect circle.

Side-by-side comparison showing tight pizza dough shrinking inward and rested dough remaining wider after stretching.
If the dough keeps shrinking back, cover it and rest briefly; forcing it usually makes shaping harder.

Use a peel, board or parchment

For a peel or board, dust lightly and shake the shaped dough before topping. It should move as one piece. Work a dough scraper beneath any stuck patch, add a pinch of flour or semolina and test the slide again.

For parchment, shape and top the pizza directly on a trimmed sheet rated for your oven temperature, then transfer the paper with the pizza. Remove it before using the broiler.

Pizza transfer guide comparing shaped dough on a lightly dusted wooden peel with dough prepared on trimmed parchment paper.
Choose peel or parchment before topping so you are not changing transfer methods under the weight of tomato and cheese.

A heavy layer of loose flour burns quickly on a steel, stone or hot sheet and can leave the underside bitter.

Keep the toppings light

Spread the tomato thinly enough that a little dough remains faintly visible. Scatter the mozzarella instead of creating a continuous blanket, and give the center the lightest topping.

Two raw pizzas compared overhead, one lightly topped with separated mozzarella pieces and one crowded with excess tomato and cheese.
Visible gaps between mozzarella keep the center lightly loaded, giving the crust a better chance to set before moisture collects.

If using a peel or board, give it one final gentle shake after topping. If the pizza moves as one piece, transfer it immediately.

Raw Margherita pizza being transferred from a wooden peel onto the flat back of a hot inverted baking sheet in a domestic oven.
A single sticking spot only needs a local fix; loosen that patch instead of adding extra flour across the peel.

How to Bake Margherita Pizza in Your Oven

The cheese may look ready before the base is. Treat the times below as your first check rather than a guaranteed finish, then lift an edge and trust what you see underneath.

Baking setupAdditional heating after oven reaches temperatureFirst checkCommon finish range
Steel at 500–550°F / 260–288°C25–30 minutes5 minutes6–8 minutes
Stone at 500°F / 260°C or hotter30–45 minutes, or manufacturer guidance7 minutes8–10 minutes
Inverted sheet at 475–500°F / 245–260°C15–20 minutes9 minutes10–13 minutes
Inverted sheet at 450°F / 230°C20–25 minutes11 minutes12–16 minutes
Margherita pizza timing guide comparing pizza steel, pizza stone and inverted baking sheet methods with temperatures and first-check times.
Treat the first-check time as the moment to look underneath, not a command to pull the pizza from the oven.

On a smaller screen, scroll sideways to compare the baking setups.

Surface thickness and oven cycling affect both preheat and recovery. Follow the manufacturer’s guidance when a steel or stone requires longer.

Inverted sheet, stone or steel

The inverted sheet removes the raised rim that would otherwise block the transfer. Use a heavy plain metal sheet rated for your oven temperature.

A steel transfers heat fastest, giving the base deeper color while the center remains flexible. A stone heats more gently and recovers more slowly. Start with the surface in the lower third for stronger bottom heat; move it upward only when the underside consistently finishes before the rim.

When the base is ready but the rim remains pale, move the pizza—not the heavy baking surface—to an upper rack or broiler-safe tray. Remove any parchment, broil briefly and watch continuously.

Lower-temperature and fan ovens

At 450°F / 230°C, keep the sheet near the lower element and use low-moisture mozzarella or add fresh mozzarella near the end. Check the base around 11 minutes.

In a fan or convection oven, use the hottest setting allowed by the oven and baking surface. Moving air can color and dry the top faster, so check one or two minutes earlier.

How to Tell When the Pizza Is Done

  • Rim: expanded, set and browned in spots.
  • Underside: golden to deep brown with darker speckles rather than blond and soft.
  • Tomato: concentrated and glossy without a visible pool of liquid.
  • Mozzarella: melted into separate creamy pools.
  • Center: flexible but structurally set, with no gummy line beneath the tomato.
Finished Margherita pizza with callouts identifying a browned rim, glossy tomato, melted mozzarella and a gently flexible center.
Judge the rim, tomato, mozzarella and center together; melted cheese alone does not mean the base is ready.

Lift one edge and look underneath. A properly heated surface should have turned the base from pale and floury to browned and firm enough to support the center.

Close-up of a pizza underside lifted on a metal server, showing broad golden-brown color with scattered darker speckles.
Broad, even browning matters more than a few dramatic dark spots; a pale center can hide beneath impressive blisters.

Use what that pizza shows you before launching the second. A pale base needs a longer surface recovery; a wet center needs less moisture or later-added cheese.

Pizza not matching these cues? Jump to troubleshooting →

Margherita Pizza With Fresh Tomatoes

Fresh tomatoes should replace most or all of the canned tomato rather than sit over a complete sauce layer. Sauce, juicy tomato slices and fresh mozzarella together can overwhelm a slower home bake.

Choose ripe plum, Roma or another meaty tomato. Slice it about ⅛ inch / 3 mm thick, remove loose seed gel from very juicy fruit, lightly salt the slices and leave them on absorbent towels for 10–15 minutes. Blot both sides before weighing and topping.

Four-stage fresh tomato preparation guide showing plum tomatoes, thin slices, loose seed gel being removed and salted slices draining on towels.
Weigh fresh tomatoes after draining and blotting, because equally sized tomatoes can shed very different amounts of water.

For one 12-inch pizza: use about 140 g / 5 oz prepared fresh tomato, weighed after removing loose seed gel and blotting; 65 g / about 2¼ oz well-drained mozzarella; 5–6 basil leaves; and 1 teaspoon olive oil. The tomato weight is higher because these are drained slices of flesh rather than a thin layer of crushed sauce.

Place halved cherry tomatoes cut-side up so more of their liquid can evaporate. Extra ripe tomatoes can become this tomato sauce from fresh tomatoes.

Margherita Pizza Troubleshooting

The first pizza is not a verdict. It is the clearest information your oven can give you. The color underneath, moisture in the center and feel of the crust usually reveal what needs to change.

ProblemSave this pizzaChange the next one
Wet centerMove individual slices to a dry skillet over medium-low heat and check underneath every 30 secondsUse drier cheese, less tomato or a longer sheet preheat
Pale undersideIf the top can take more baking, leave the pizza on the hot surface a little longer; for finished slices, use the dry-skillet methodPreheat longer and let the surface recover fully
Bottom browning too fastIf the base is already dark but the rim needs color, move the pizza—not the hot baking surface—to an upper rack or broiler-safe tray for a brief finishReduce surface heat or shorten the initial bake
Dough springs backCover and wait 10–20 minutesAllow the full final dough-ball rest
Center tearsPinch the tear closed, or patch it with a small piece taken from an overly thick edgeStop stretching sooner and watch the center thickness
Pizza sticks to the peelWork a dough scraper beneath the stuck patch, add a pinch of flour or semolina and test the slide againPrepare toppings first and test the dough before topping
Toppings slide when slicedRest the pizza for another minute before cutting againReduce moisture and keep the center lightly topped
Four-part Margherita pizza troubleshooting guide showing a wet center, pale underside, overly dark bottom and pizza dough stuck to a peel.
A wet center with a pale base needs more bottom heat; a wet center over a dark base needs less topping moisture.

On a smaller screen, scroll sideways to compare the immediate rescue with the next-pizza correction.

Try again: return to the main recipe ↑

Shortcuts and Dough Options

The main pizza needs none of these adjustments. Use them when you need a faster dough, a smaller batch or a thinner crust.

Make one pizza: Halve the dough ingredients and use the per-pizza topping quantities already listed. Alternatively, make the full batch and freeze the second dough ball after the first rise and balling. Thaw overnight in the refrigerator, then leave it covered until relaxed enough to stretch.

Store-bought dough: Leave refrigerated dough covered until it feels soft and stretches without repeatedly springing back. Depending on the room and dough, this commonly takes 45–90 minutes.

Fast no-yeast dough: When there is no time for fermentation, this Greek yogurt pizza dough provides a faster homemade base.

Thin crust: Use about 220 g / 7¾ oz dough for one 12-inch pizza. Stretch the center more thinly, reduce the prepared tomato topping to 60 g / about ¼ cup and the fresh mozzarella to 60–65 g / about 2–2¼ oz, then check the underside earlier.

Make Ahead, Store and Reheat

Prepare the components ahead

  • Tomato topping: refrigerate in a covered container for up to three days. Stir and drain any separated liquid before using it.
  • Mozzarella: tear, drain and blot it several hours ahead. Refrigerate it in a covered container lined with a clean absorbent towel.
  • Frozen dough: freeze individual balls after the first rise for up to three months. Thaw overnight in the refrigerator, then leave covered until relaxed enough to stretch.
  • Assembled raw pizza: shape and top it only after the oven and baking surface are ready.

When the open tomatoes and remaining basil outlast pizza night, use them in a pot of tomato basil soup.

Store and reheat leftovers

Cool leftover slices before covering and refrigerate them in an airtight container for up to three days.

For the best reheating result, place a slice in a dry skillet over medium-low heat and cover for 2–4 minutes. Uncover briefly at the end. The base should crisp again while the mozzarella softens without becoming rubbery.

When the cheese needs help softening, add a few drops of water beside the slice—not on it—and cover again. An oven or air fryer also works at 375–400°F / 190–200°C; check after three minutes in an air fryer and five minutes in an oven.

Three-stage guide showing a leftover Margherita pizza slice reheated in a dry skillet, first uncovered, then covered and finally uncovered again.
Cover to warm the cheese and center, then uncover to vent steam and restore the skillet-crisped base.

Frequently Asked Questions

What is the difference between Margherita pizza and cheese pizza?

A typical cheese pizza often uses cooked sauce and a continuous layer of grated mozzarella. Margherita pizza keeps the tomato and cheese lighter, then finishes with fresh basil and olive oil.

What is the best mozzarella for Margherita pizza?

Well-drained fresh cow’s-milk mozzarella gives the classic creamy pools; low-moisture mozzarella is more forgiving in a slower oven. See how to match mozzarella to your bake.

Can I make Margherita pizza without a stone?

Yes. A thoroughly preheated heavy baking sheet turned upside down works well in a regular oven. See Choose Your Oven Setup for the sheet, stone and steel trade-offs.

Can I bake both pizzas at once?

Baking them one at a time gives each pizza the strongest bottom heat and most even result. Bake both together only when the oven has two thoroughly preheated surfaces and enough space for air to circulate; rotate or swap their positions if they color unevenly.

Is Margherita pizza vegetarian?

The pizza contains no meat, but some mozzarella and hard cheeses use animal-derived rennet. Check the label when you need strictly vegetarian cheese.

The First Slice Is Where the Restraint Makes Sense

Your pizza may be oval, and the launch may feel more hurried than graceful. Once the base is browned and the center holds, neither matters much.

Add the basil, wait a minute, then cut a slice. It should bend without dropping its tomato and cheese. The first slice tells the truth.

Partially eaten homemade Margherita pizza on a dining table with a slice on a plate, a hand, water glass, linen and pizza cutter.
The browned crust, half-empty plate and crumbs are the payoff: the method worked well enough to disappear into dinner.

Back to the beginning ↑

Posted on Leave a comment

Easy Pizza Dough Recipe for a Crisp, Chewy Homemade Crust

Homemade cheese pizza on a dark wooden board with a golden crust, browned cheese and a cut slice revealing a medium-thick center and chewy rim.

Good homemade pizza begins with contrast: a crisp browned base, a chewy rim and a center tender enough to bend without feeling raw. Lift an edge before judging the cheese. The underside should already be firm and freckled with brown.

This is dependable same-day pizza dough for a normal home oven and the equipment you already own. The recipe gives you a clear default; the guide helps you read the dough, adapt to your baking surface and recover common problems. It is an everyday home-oven crust, not a specialized high-heat Neapolitan formula.

The ingredients are simple. The transformation is what matters: a rough mixture becomes smoother under the hand, lighter during the rise and willing to widen after its final rest. When the dough resists, more force is rarely the answer.

Remember the sequence: rough after mixing, relaxed before stretching, browned underneath before slicing.

Three-stage pizza dough guide showing rough mixed dough, a soft relaxed dough ball and a baked pizza with a browned underside.
The middle stage is the useful checkpoint: once the dough holds a soft indentation instead of snapping back, stretching becomes far less likely to cause tears.

Start here

Quick Answer: Easy Pizza Dough for Two 12-Inch Pizzas

This recipe makes about 690 g / 24.3 oz dough, divided into two 345–346 g / 12.2 oz balls. Each makes a medium-thickness 12-inch crust with a defined chewy rim. Allow about three hours for the first pizza and up to 3¾ hours for both.

Two equal pizza dough balls beside two matching 12-inch homemade pizzas, with total and per-ball dough weights displayed.
Equal dough-ball weight keeps stretching, topping and bake-time expectations consistent, so both 12-inch pizzas behave like the same recipe.

All-purpose flour and instant yeast are the easiest defaults. The dough should become smoother after kneading, fuller and lighter during the rise, then soft enough to widen after its final covered rest.

Bake at 500°F / 260°C, or the highest setting your oven and equipment safely allow. A steel or stone works fastest, while a sturdy pan or preheated uncoated sheet can still produce a properly browned base.

What “easy” means here: not instant, but understandable and forgiving. The ingredients are ordinary, a mixer is optional and the timing is honest. A little tackiness, an uneven circle or an extra minute underneath will not ruin the batch.

Same-Day, Slow Same-Day or Overnight Pizza Dough

Making pizza tonight? Use the fast same-day route and go straight to the recipe. Choose slow same-day or overnight only when that timing fits your plans better.

RouteWhen to beginYeastBest reason to choose it
Fast same dayAbout 3 hours before the first pizza; up to 3¾ hours for both4 g instant or active dry yeastThe recipe below and the most practical route for pizza tonight
Slow same dayMorning1.5–1.6 g instant yeastMore flavor with no overnight planning
OvernightPrevious day0.8 g instant yeastMake-ahead convenience and relaxed shaping
Pizza-dough timeline options

How the Three Pizza Dough Timelines Work

Fast same day — the recipe below: Check the first rise around 75 minutes in a moderate kitchen or 45–50 minutes in a very warm one. Rest the divided balls for 25–35 minutes.

Slow same day: Use ½ teaspoon / 1.5–1.6 g instant yeast and cool water. Mix in the morning and rise until clearly expanded and aerated. Divide into balls; refrigerate if dinner is still several hours away, then let them soften and relax before stretching.

Overnight: Use ¼ teaspoon / about 0.8 g instant yeast. Rest for 20 minutes, divide and refrigerate the covered balls for 18–24 hours. Before stretching, leave them covered until the centers lose their firm chill and the dough yields instead of snapping back.

Vertical timeline comparing fast same-day, slow same-day and overnight pizza dough schedules with different start times and yeast amounts.
Match yeast to your available time: same-day pizza dough uses more for speed, while overnight pizza dough trades urgency for flexibility and flavor.

Need pizza in under an hour? This Greek yogurt pizza dough is the faster no-rise alternative.

Make it now

Easy Homemade Pizza Dough Recipe

A same-day dough for two medium-thickness 12-inch pizzas with a crisp base, chewy rim and soft center. Mix it by hand, in a stand mixer or in a food processor, then bake it on a steel, stone, pizza pan or preheated sheet.

Yield
2 × 12-inch pizzas; about 690 g dough, usually 345–346 g per ball

Hands-on
About 25–30 minutes

First rise
About 45–105+ minutes, kitchen-dependent

Final rest
About 25–35 minutes

Bake per pizza
About 7–16 minutes

Total timing
First pizza 2½–3¼ hours; both 3–3¾ hours

Equipment

  • Large mixing bowl
  • Digital kitchen scale, strongly recommended
  • Sturdy spoon or flexible dough scraper
  • Bench scraper
  • Stand mixer or food processor, optional
  • Covered bowl and two covered dough-ball containers
  • Baking steel, pizza stone, pizza pan or heavy uncoated baking sheet
  • Pizza peel or parchment paper, used within the manufacturer’s temperature rating

Ingredients

IngredientMetric weightUS volume
Unbleached all-purpose flour400 g / 14.1 ozAbout 3⅓ cups, spooned and leveled
Water260 g / 9.2 ozAbout 1 cup plus 1½ tbsp; warm for hand or mixer, cool or room temperature for a food processor
Instant yeast4 gAbout 1⅓ tsp
Fine sea salt8 gAbout 1⅓ tsp. For salt, trust the weight
Granulated sugar6 gAbout 1½ tsp
Olive oil14 g / 0.5 oz1 tbsp
Flour, fine semolina or rice flour for handlingAs neededUse lightly
Ingredient weights and volume equivalents
Measured pizza dough ingredients arranged in bowls, including flour, water, yeast, salt, sugar and olive oil with metric quantities.
The flour-to-water balance is decided before mixing; a packed cup of flour can quietly erase the softness this homemade pizza dough was designed to have.

Using Active Dry Yeast

Use the same 4 g / about 1⅓ teaspoons. Stir it with the sugar into the warm water and leave for 5–10 minutes, until creamy or lightly foamy. Add the oil, then continue with the recipe. Allow extra rise time when needed.

Instant yeast beside dry ingredients compared with active dry yeast dissolving in warm water.
Active dry yeast needs only creaminess or light foam to show activity; waiting for a dramatic foamy cap can waste time unnecessarily.

Instructions

1. Mix Until No Dry Flour Remains

Combine the flour, instant yeast, sugar and salt in the bowl. Use warm water when mixing by hand or mixer, and cool or room-temperature water in a food processor. Add the olive oil, then stir until the mixture forms one rough mass with no large dry pockets.

The dough should look shaggy, uneven and less promising than the finished result. The short rest and kneading will smooth it out. See what shaggy pizza dough looks like.

2. Cover and Rest for 10 Minutes

Leave the rough dough covered for 10 minutes. This gives the flour time to absorb water and often makes the dough much easier to handle.

3. Knead by Hand, Mixer or Food Processor

By hand: Knead for about 7–9 minutes. Push the dough away, fold it back and rotate. Use a bench scraper to lift sticking dough instead of covering the counter with flour.

By stand mixer: Use the dough hook on low to medium-low speed for about 5–7 minutes, stopping once to scrape the bowl if necessary.

By food processor: Use instant yeast and cool or room-temperature water. Pulse the dry ingredients, add the water and oil while running, then stop when the dough gathers. Process another 20–30 seconds; it should feel elastic, not hot. With active dry yeast, bloom it in 60 g warm water and add 200 g cool water.

Whichever method you use, the rough mass should become smoother and more elastic beneath your hand. It should gather itself back together after a gentle press while retaining a slight tackiness. Dough that smears across your fingers still needs attention. See the properly kneaded dough cue.

4. Let the Dough Rise Until Ready

Shape the dough into a ball and place it in a lightly oiled bowl. Cover and leave it in a comfortably warm, draft-free place until it looks roughly doubled and visibly aerated, usually 75–105 minutes.

Warm kitchens move faster and cool rooms take longer. Look for a fuller, softly rounded dough with small bubbles beneath the surface. It should feel lighter, and a fingertip mark should ease back slowly. Compare underproofed, ready and overproofed dough.

Start preheating before the rise ends. A steel or stone needs 45–60 minutes at full heat, while an inverted heavy sheet needs at least 30 minutes. Begin during the latter part of a moderate rise; in a very warm kitchen, start sooner. The preheat should overlap with the rise and final rest rather than begin after them.

5. Divide Into Two Dough Balls

Turn the dough onto a clean surface and divide it equally. Each ball will usually weigh 345–346 g / about 12.2 oz.

Bring the edges of each portion toward the center, turn it seam-side down and cup your hands around it. Drag it gently across the counter to tighten the surface without tearing it.

Hands folding pizza dough edges toward the center, turning the seam underneath and rounding the portion into a smooth ball.
Keep the gathered seam underneath so the upper skin can tighten without tearing or squeezing out every fermentation bubble.

6. Cover and Relax for 25–35 Minutes

Place the balls in lightly oiled covered containers or on a covered tray with room between them. Let them rest until softer, slightly puffy and easier to press.

If a ball snaps immediately back, cover it and give it another 10 minutes. Dough that fights is asking for time, not force. See what a relaxed dough ball looks like.

7. Make Sure the Oven and Baking Surface Are Fully Heated

Before shaping, confirm that a steel or stone has heated at 500°F / 260°C, or the highest safe setting, for 45–60 minutes. A heavy inverted uncoated sheet needs at least 30 minutes. A pizza pan can enter a fully heated oven without being preheated.

8. Stretch One Dough Ball

Lightly flour the counter. Press the dough from the center outward while leaving a ½–¾-inch rim mostly untouched. Rotate as it widens, then stretch it over the backs of your hands or knuckles until it reaches approximately 12 inches.

If it keeps shrinking, put it down, cover it and wait 10–15 minutes before continuing. Keep the second dough ball covered and away from the oven’s heat while you shape, top and bake the first. See the hand-stretching technique.

9. Transfer and Top Lightly

Move the dough to a lightly floured peel, parchment rated for the temperature you are actually using or a prepared pizza pan before adding toppings. Stretch and top one pizza at a time. Raw topped dough absorbs moisture while it waits.

High-heat transfer: Use parchment and baking sheets only within their printed temperature limits. At a higher setting, launch from a lightly floured peel or bake on a suitable pizza pan. Never place parchment beneath a broiler.

  • Use about ⅓ cup / 80 ml thick pizza sauce.
  • Add 4–6 oz / 115–170 g shredded low-moisture mozzarella.
  • Pre-cook or drain toppings that release a lot of moisture, and keep the overall topping load restrained.
  • Leave the rim clear and keep the center lighter than the outer portion.

Dust beneath the dough lightly because excess flour or semolina can scorch. Use a thick sauce that clings instead of pooling; see the pizza sauce guide for suitable options.

10. Bake Until the Bottom Is Browned

During the first few minutes, the untouched rim should begin swelling while the base sets against the hot surface. Bake until the rim is golden, the center no longer looks wet and the underside has browned patches. See the complete doneness guide.

11. Rest Briefly Before Slicing

Rest the pizza on a board or rack for 2–3 minutes. The cheese settles, steam escapes and the base may give a faint crackle as it firms. Keep the second ball covered and let a stone or steel regain heat before the next pizza.

Rested homemade pizza with one slice cut and separated to show a fully baked crumb with moderate irregular air pockets.
Cutting immediately compresses the crumb with trapped steam; a short rest lets the slice reveal its true tender center and crisp base.

Recipe Notes

  • Weigh the flour, water, salt and yeast whenever possible. Packed flour is the largest source of accidental dryness.
  • For one pizza, halve every ingredient. The visual rise cues remain the same.

Need Help With the Dough?

Already cooking? Jump to the decision in front of you.

Choosing Flour, Yeast and Water for This Dough

All-purpose flour and instant yeast are the dependable defaults. Water, sugar, oil and salt are balanced to keep the dough manageable and help it brown before a longer home-oven bake dries it out.

Why This Dough Works in a Home Oven

A normal home oven bakes pizza more slowly than a dedicated high-heat oven. Therefore, the formula must color reliably while the center stays tender through the longer exposure.

All-purpose flour, olive oil and a small amount of sugar arranged beside a golden home-oven pizza crust.
This home-oven pizza dough is balanced for a longer bake: sugar helps color arrive before dryness, while oil protects tenderness.

All-Purpose Flour Is the Easiest Default

Unbleached all-purpose flour gives the dough enough strength to trap gas and carry toppings without the extra resistance of bread flour. It is the everyday flour for homemade pizza crust—or pizza base in India and the UK. Weigh it because packed cups easily make dough dry.

Flour strength matters more once you begin chasing a particular pizza style. King Arthur Baking’s beginner’s guide to homemade pizza offers a useful comparison of all-purpose, bread and 00 flour.

All-Purpose vs Bread Flour Pizza Dough

Yes. Bread flour gives the rim more chew and structure but feels firmer and more resistant. All-purpose flour is easier for a first batch.

Begin with 260 g water. After the rest, add more only if the dough feels clearly dry or stiff, working in 1 teaspoon / 5 g at a time. Bread-flour dough may also need a longer final rest.

All-purpose and bread-flour pizza dough compared side by side, showing softer spreading dough and firmer structured dough.
Press both doughs equally: all-purpose flour spreads more readily, whereas bread flour holds its shape and springs back with greater resistance.

If the stronger dough keeps pulling back, see why pizza dough keeps shrinking before adding more flour.

FlourHow the dough behavesWhat to expectBest use
All-purposeSoft and forgivingCrisp base with moderate chewEveryday default
Bread flourStronger and springierChewier, more structured rimReaders who want more chew
Tipo 00Smooth but brand-dependentResult depends heavily on the flour, style and ovenOptional, not required here
Whole wheatMore absorbent and less extensibleHeartier and denserBetter as a separate formula
How common flours change handling and texture

Instant Yeast vs Active Dry Yeast

Instant yeast goes directly into the flour and is the simplest same-day choice. Dissolve active dry yeast in the warm water first and allow extra rise time when needed. Red Star’s yeast FAQ explains the common dry types.

How Warm Should the Water Be?

For the fast route, use water around 100–105°F / 38–41°C, comfortably warm against the inside of your wrist and never hot or steaming. Use cool water for the slower schedules.

Why Use Sugar, Olive Oil and Salt?

Sugar supports browning in a home oven without making the crust sweet. Olive oil helps the dough stretch and keeps the interior tender. Salt seasons the dough and moderates fermentation; weigh it because different salts fill a teaspoon differently.

How to Read Pizza Dough at Every Stage

Each stage leaves visible and tactile clues. Use the times to know when to look. Let the dough confirm when the stage is finished.

StageWhat success looks likeWhat to avoid
Freshly mixedShaggy mass with no large dry pocketsAdding flour before the dough rests
After kneadingSmoother, elastic and slightly tackyDry, stiff or heavily flour-coated dough
After first riseExpanded, aerated and softly roundedFollowing the timer despite little expansion
After dividingSmooth balls with light surface tensionTearing the outer skin or kneading out every bubble
Ready to stretchSoft, relaxed and willing to widenCold dough that springs back immediately
Pizza-dough cues from mixing through stretching

What Shaggy Pizza Dough Looks Like

At this stage, the mass should hold together when lifted but still look rough and irregular. Smoothness is not the goal until after the rest and kneading.

Rough shaggy pizza dough gathered in a bowl with an uneven surface and no large patches of dry flour.
Rough ridges are harmless; hidden dry flour at the bottom of the bowl is what tells you shaggy pizza dough still needs another turn.

How Properly Kneaded Pizza Dough Feels

Smoothness is only one clue. Gently press and release the dough; useful elasticity shows in how it gathers itself back together without feeling stiff or dry.

Smooth elastic pizza dough being gently pressed and stretched by clean hands, with a cohesive surface and slight tackiness.
Properly kneaded pizza dough looks cohesive and elastic, stretches without immediately tearing and springs back only partway after a gentle press.

Tacky vs Sticky Pizza Dough

Tacky dough touches the hand and releases with little residue. Dough that is too sticky for this formula keeps coating the fingers and smearing across the surface even after the rest.

This is where many people panic and add too much flour. Let the short rest work first. Use damp or lightly oiled hands and a scraper. If the dough still coats and smears after the rest, add flour in 1 teaspoon or about 5 g increments.

Close comparison of tacky pizza dough releasing almost cleanly from a fingertip and overly sticky dough coating the finger and work surface.
Use the residue as the test: a clean release is workable, while a visible coating means the pizza dough is still too sticky for comfortable handling.

If the dough remains unmanageable, use the mixing and fermentation rescue guide rather than adding a large handful of flour.

Making Pizza Dough in a Food Processor

A processor develops dough quickly and adds heat. Use cool water with instant yeast and process only 20–30 seconds after the dough gathers. With active dry yeast, warm only the blooming portion of the water.

How to Tell When Pizza Dough Has Risen

A straight-sided container makes the rise easy to read. Mark the starting height; once the dough is fuller and lighter, press gently. The mark should ease back slowly while the dough still holds its shape.

When to look: Start around 45–50 minutes in a very warm kitchen, 60 minutes in a warm room and 75 minutes in a moderate room. Cool kitchens need longer; follow the expansion.

Risen pizza dough in a straight-sided container with a marked starting level, rounded aerated surface and fingertip indentation.
Marking the container before fermentation makes the first rise measurable; memory is a poor benchmark once the dough becomes rounded and aerated.

Underproofed vs Ready vs Overproofed Pizza Dough

StageVolume and surfaceFinger responseWhat to do
UnderproofedTight, dense-looking and only modestly expandedIndentation springs back quicklyCover and wait; check again in 15 minutes
ReadyFuller, softly rounded and visibly aeratedIndentation returns slowly and incompletelyDivide or shape, depending on the stage
OverproofedFragile, very bubbly, possibly flattened or beginning to collapseIndentation remains and the dough feels weakDegas gently, reball, rest briefly and use soon
Underproofed, ready and overproofed dough
Three containers comparing tight underproofed dough, rounded aerated ready dough and fragile flattened overproofed dough.
Proofing is a three-signal decision: expansion, surface strength and finger response should agree before you divide or rescue the dough.

For slow or fragile dough, continue to the fermentation rescue section.

How to Stretch Pizza Dough Without Tearing

How to Tell Dough Balls Are Relaxed

Same-day dough should feel soft after its covered rest. Refrigerated dough needs time for the center to lose its hard chill.

A ready ball yields when pressed and begins spreading instead of snapping back. The first stretch is often awkward; once the dough relaxes, shaping becomes much easier.

Two soft slightly puffy pizza dough balls resting on a work surface while one is gently pressed with a fingertip.
A relaxed pizza dough ball settles slightly wider at the base; a tall, tight dome usually needs more covered time before stretching.

How to Stretch Pizza Dough by Hand

Use your fingertips to press from the center outward, leaving the outer ½–¾ inch mostly untouched. Rotate frequently so one area does not become paper-thin while the rest stays thick.

Hands pressing, rotating and widening pizza dough over the knuckles while preserving a thicker outer rim.
Rotate after every few presses so the center thins evenly; one neglected area often becomes the tear point later.

Why Pizza Dough Keeps Shrinking

Cold dough feels firm through the center, while tight gluten may feel warmer but spring back quickly. Cover either one for 10–15 minutes before testing the stretch again.

Partially stretched pizza dough shown resisting, resting under a cover and then widening more easily under gentle pressure.
Forcing shrinking pizza dough usually creates a thin center and stubborn rim; a covered pause relaxes the whole round more evenly.

Hand-Stretched vs Rolling-Pin Pizza Crust

Hand stretching preserves more air around the rim. A rolling pin creates a flatter, more even and often crisper crust.

A rolling pin is not a failure. Choose the crust you enjoy and the method your hands are comfortable using. If you still want some lift, avoid rolling repeatedly over the outer rim.

Hand-stretched pizza with a fuller irregular rim compared with rolling-pin pizza that has a flatter, more even crust.
Look at the edge profile: hand stretching preserves a fuller rim, whereas rolling evens the thickness and trades some lift for crispness.

How to Repair a Pizza Dough Tear

Lay the dough flat, overlap the edges of the opening and pinch until the seam holds. Resume stretching from a different part of the round instead of pulling directly on the repair.

Close view of hands pulling nearby pizza dough over a small hole and gently pinching the tear closed.
Repair the hole from the nearest thick area rather than adding a separate scrap; the patch can then stretch as part of the original dough.

The Pizza Peel Slide Test

Test movement once after sauce and again after cheese. If one area catches, lift that edge and work a small pinch of flour or semolina underneath before adding more toppings.

Raw topped pizza on a dark peel with semolina tracks indicating that the dough can move side to side before launching.
The semolina trail is the proof: if the topped pizza shifts as one piece, the raw dough has not bonded to the peel.

Once the topped dough slides freely, continue to the home-oven baking guide.

Back to RecipeChoose a Baking SetupCheck Topping AmountsFix a Problem

How to Bake Pizza in the Oven You Already Own

Once the dough is stretched, heat beneath it determines whether the base stays pale or browns properly. More stored heat means a crisper underside, while the rim should begin swelling before the cheese fully melts.

When to Start Preheating the Oven and Baking Surface

Begin during the latter part of the first rise so the surface heats while the divided dough balls complete their final covered rest. This overlap avoids adding an unnecessary wait after shaping.

Pizza-making workflow showing dough rising while a home oven and baking surface preheat before shaping begins.
The oven beep measures hot air, not the heat stored in steel or stone; extra preheating protects the first pizza from a pale underside.

Baking Steel vs Pizza Stone, Sheet and Pan

SetupRack and preheatBegin checkingLikely bake window
Baking steelMiddle to upper-middle; 45–60 minutes at 500°F / 260°C or oven maximum7 minutesAbout 7–10 minutes
Pizza stoneMiddle; 45–60 minutes at high heat8 minutesAbout 8–12 minutes
Inverted heavy uncoated sheetLower-middle; at least 30 minutes; confirm the pan rating9 minutesAbout 9–13 minutes
Perforated pizza panLower-middle; fully preheat oven10 minutesAbout 10–14 minutes
Solid pizza pan or sheetLower third; fully preheat oven12 minutesAbout 12–16 minutes
Home-oven baking setups and first-check times
Baking steel, pizza stone, inverted heavy sheet and round pizza pan shown with their home-oven preheating and baking roles.
Choose the surface around your weakest point: steel adds color, stone tempers heat, an inverted sheet saves cost and a pan removes launch anxiety.

Steel browns fastest, while stone delivers slightly gentler heat. An inverted uncoated sheet is the strongest no-special-equipment substitute, and a pizza pan makes transfer easiest. Keep every pan and parchment product within its printed temperature limit.

The First Puff in a Home Oven

Watch the protected rim during the opening minutes. Early swelling shows that trapped gas is expanding while the hot surface begins setting the base.

Early-stage pizza baking in a home oven with the rim beginning to puff while the cheese is only partly melted.
The rim should begin swelling before the pizza looks finished. If it stays flat, check proofing, rim handling and oven heat before changing the formula.

What the First Pizza Teaches the Second

Compare three things on the first pizza: underside color, center support and rim rise. Together, they show whether the next round needs more surface heat, lighter toppings or a longer dough rest.

Three-stage guide showing a first pizza with a pale underside, an empty baking surface reheating and a second pizza with deeper browning.
Use the first underside as oven calibration; surface recovery matters more than blindly adding extra minutes to the second pizza.

Lower-Temperature Ovens and When to Par-Bake

At 425–450°F / 218–232°C, fully preheat the oven and bake on a lower rack. A lightly topped medium crust can often bake in one stage on a perforated pan or preheated inverted heavy sheet.

For thicker crusts or wet toppings, par-bake the sauced dough for 3–5 minutes. Then add drained toppings and continue for roughly 8–12 minutes before checking the base. A fully heated steel or stone usually needs no par-bake.

Decision guide for a lower-temperature home oven showing a one-stage lightly topped pizza and a sauced par-bake followed by toppings.
In a lower-temperature oven, the par-bake ends when the raw sauce shine disappears—not when the pizza crust is already browned.

How to Know the Pizza Is Done

  • Look for a rim that is golden and firm.
  • The center should no longer appear wet.
  • Brown patches should be visible underneath.
  • When lifted, the base should support itself instead of folding at the center.
  • Melted cheese matters, but its color does not overrule an underdone crust.
Finished pizza lifted slightly with a metal spatula to show a set center, golden rim and browned underside.
A finished pizza should support itself when lifted; melted cheese can hide a center that remains wet and structurally weak.

If the base is set but the center stays soft, compare the topping-moisture examples before changing the dough formula.

How Much Sauce, Cheese and Other Toppings to Use

Watery sauce, fresh mozzarella, raw mushrooms or heavy cheese can leave a good crust soft and pale. Use the ranges below as choices rather than targets to maximize.

Sauce and Cheese for a 12-Inch Pizza

  • Keep sauce to roughly ⅓ cup / 80 ml for a 12-inch pizza.
  • Use about 4 oz / 115 g low-moisture mozzarella for a lighter, crisper pizza or up to 6 oz / 170 g for fuller coverage.
  • Leave the rim clear and keep the center lighter than the outer portion.
Measured thick tomato sauce and two portions of shredded low-moisture mozzarella beside a sauced 12-inch pizza dough round.
Keep the center lighter because sauce, cheese and steam concentrate there over the thinnest part of the 12-inch pizza dough.

Balanced Pizza Toppings vs Moisture Overload

  • Drain fresh mozzarella and pat away excess moisture.
  • Pre-cook vegetables that release substantial water.
  • Cool cooked toppings before placing them on raw dough.

For a classic red base, use a thick homemade marinara sauce that clings instead of running. Spread pesto thinly, and avoid building a wet mound where the crust needs the strongest heat.

Balanced pizza toppings with a browned supported base compared with an overloaded pizza whose pale center bends beneath wet toppings.
Compare the lifted slices: balanced toppings leave a supported browned base, while excess moisture softens the center before color develops.

Pizza Dough Troubleshooting, in the Order Problems Happen

Start with the stage you are standing in. You should not need to diagnose bread science before rescuing dinner.

Mixing and Fermentation Rescue

ProblemFix it nowLikely cause or next-time adjustment
Dough is dry and crumblyCover for 10 minutes, then add water 1 teaspoon / 5 g at a timeToo much flour, packed cups or absorbent flour
Dough is glue-likeRest, then use a scraper and damp hands. Add flour only in 5 g increments if still unmanageableFlour has not hydrated yet or water and flour were mismeasured
Dough tears while kneadingCover for 10 minutes, then resumeGluten needs time or the dough is too dry
Active dry yeast shows no visible activity after 10 minutesA little creaminess or light foam is enough; check the date and water temperature if the mixture remains unchangedInactive yeast or water outside the useful warm range
Dough barely risesMove it to a comfortably warm place and allow more timeCool room, old yeast or overheated water
Dough overproofed or smells sharply alcoholicDegas gently, reball, rest 15–20 minutes and use soonToo much yeast, excessive warmth or too long a rise
Mixing and fermentation problems, immediate fixes and likely causes
Four-part pizza dough guide showing dry crumbly dough, glue-like sticky dough, barely risen dough and fragile overproofed dough.
Troubleshoot by behavior: crumbly, glue-like, slow-rising and fragile dough need different corrections, so one extra handful of flour cannot solve everything.

Shaping and Transfer Problems

ProblemFix it nowLikely cause or next-time adjustment
Dough keeps shrinkingCover and rest 10–15 minutesDough is cold or gluten is tight
Dough tears while stretchingPinch the hole closed and stretch a thicker areaThe center was pressed too thin, the dough is too dry or it rested too briefly
Pizza sticks to the peelLift the edge, add a pinch of semolina or flour underneath, or transfer to temperature-rated parchmentTopping took too long or the peel was under-dusted
Shaping and transfer problems with immediate fixes

For visual help, revisit shrinking dough, tear repair or the peel slide test.

Finished Pizza Crust Diagnosis

ProblemFix it nowLikely cause or next-time adjustment
Bottom stays paleBake lower or longer and give the surface more preheatWeak bottom heat, thick crust or an insulated pan
Top darkens before the bottom brownsMove the pizza one level lower and reduce top heat when the oven allowsThe pizza is too close to the top element or the base lacks stored heat
Center stays soggyReduce topping moisture and consider a short par-bakeToo much sauce, cheese or wet toppings
Crust is heavy with a tight crumbServe this one. Next time allow a fuller rise and shape more gentlyUnderproofing, weak yeast, too much flour or a flattened rim
Crust is dry and hardBegin checking earlier on the next pizzaToo little water, too much bench flour, thin rolling or overbaking
Crust is rubbery or excessively chewyLet the remaining dough ball rest longer before stretchingNext time allow a fuller first rise, check hydration and avoid excess flour
Finished-crust problems, immediate fixes and likely causes
Six-part finished pizza crust guide comparing a pale bottom, darkened top, soggy center, tight crumb, dry crust and dense bendable crust.
The baked crust is a diagnostic record: base color reveals heat, center softness reveals moisture, and crumb structure reveals fermentation and handling.

Back to RecipeStore the DoughMake One PizzaBack to Top

Make Ahead, Refrigerate, Freeze and Thaw

Pizza dough can be planned for tomorrow or saved from today. Use the reduced-yeast version for a planned overnight rise; chill a leftover fast-rise ball promptly and use it sooner, or freeze it.

Pizza dough storage timeline showing covered balls in a refrigerator, separate balls being frozen and sealed, and one ball thawing before use.
Thawed pizza dough is ready when its center softens—not merely when the outside loses its chill—so keep it covered while the temperature equalizes.

Refrigerating Pizza Dough

  1. Use the reduced overnight yeast quantity.
  2. Mix and knead the dough.
  3. Rest it for about 20 minutes.
  4. Divide and form individual dough balls.
  5. Place them in lightly oiled covered containers with room to expand.
  6. Aim to use the dough balls after 18–24 hours. In a reliably cold refrigerator, they may remain usable for up to about 48 hours, provided they remain domed and resilient rather than flattened or overflowing.
  7. Let the balls warm, covered, until they feel soft and stretch without pulling back.

A ball from the fast 4 g yeast recipe contains more yeast than the overnight version. Refrigerate it promptly and preferably use it by the following day. Freeze it if your plans are uncertain.

If you want a naturally leavened and longer-fermented route instead of commercial yeast, use the sourdough pizza dough recipe.

Freezing Pizza Dough

For the fast same-day formula, freeze after the first rise and after dividing into balls.

  1. Complete the first rise.
  2. Divide and shape individual balls.
  3. Coat them very lightly with oil.
  4. Freeze separately until firm, then seal airtight.

For the strongest rise and best texture, use frozen dough within about one month.

How to Thaw Frozen Dough

Thaw it overnight in the refrigerator while covered. The next day, leave it covered at room temperature until the center is soft and the dough stretches without snapping back, usually one to two hours.

Cool baked slices, refrigerate within two hours and use within 3–4 days. Reheat in a skillet, hot oven or air fryer when you want the base crisp again.

Halving the Recipe and Using the Extra Dough

The full recipe makes about 690 g / 24.3 oz of dough. Divide it equally into two balls, usually 345–346 g / about 12.2 oz each, for two medium-thickness 12-inch pizzas.

Full-batch and half-batch pizza dough guide comparing 690 grams with two 345 to 346 gram balls against 345 grams with one same-size ball, plus the exact halved ingredient quantities.
Halve every ingredient while keeping the dough-ball target near 345–346 g, so the single pizza remains the same 12-inch size.

Make Only One Pizza

  • 200 g all-purpose flour
  • 130 g water
  • 2 g instant or active dry yeast
  • 4 g fine salt
  • 3 g sugar
  • 7 g olive oil

The method and readiness cues stay the same. A scale that reads to 0.1 g is helpful for the small yeast and salt quantities. Otherwise, make the full recipe and refrigerate or freeze the second ball.

Return to the full pizza dough recipe for the method and visual readiness cues.

Other Ways to Use This Dough

Use the dough for calzones, stromboli, garlic knots, breadsticks, mini pizzas or rolls. Keep filled shapes restrained and well sealed, and check small pieces early.

When you want a full garlic-buttered loaf instead of a quick knot or breadstick, this homemade garlic bread loaf uses a dedicated enriched dough built for that softer result.

Frequently Asked Questions

Can I omit the sugar? Yes. The dough will still rise, though a quick home-oven crust may brown a little less readily. Keep the same flour and water quantities.

Can I omit the olive oil? Yes. The dough may feel firmer and the baked crust may be chewier and less tender. Do not automatically replace the oil with more flour. Check the dough after its 10-minute rest.

Can I use plain flour? Yes. In the UK and India, plain flour is the closest everyday equivalent to all-purpose flour. Weigh it, then add water in small increments only if the rested dough feels unusually stiff.

Can I bake one pizza and save the other dough ball? Yes. Refrigerate a fast same-day ball promptly and preferably use it by the following day. For a planned 18–24-hour cold rise, use the reduced overnight yeast quantity. See the complete refrigerating, freezing and thawing guide for longer storage.

Can I double the recipe? Yes. Double every ingredient by weight and divide the dough into four balls. Check your mixer or processor capacity; use two batches when the machine is small.

How long does baked pizza keep? Refrigerate cooled slices within two hours and use within 3–4 days.

The Last Check Before You Slice

Pizza dough does not need to look polished at every stage. It may begin rough, cling to the counter or need ten quiet minutes before it stretches comfortably. None of those things means dinner is lost.

The first pizza shows you how your flour, room and oven behave. The second lets you use that information: give the dough another rest if it pulled back, let the surface reheat if the base stayed pale and lighten the center if the toppings slowed the bake.

Before pulling the pizza out, lift the edge. Brown patches underneath and a set center are the final signs that the crust is ready.

Hand lifting a pizza slice at a low angle to reveal a golden underside with scattered brown patches and a moderately aerated cut edge.
Look for a pattern rather than maximum darkness: an even golden underside with scattered brown patches is crisp without crossing into scorching.

The cutter should meet a little resistance at the crisp base before moving through the softer center and chewy rim. That is how this recipe becomes your pizza dough, not a set of instructions you have to follow blindly.

How did the crust turn out? Tell us which flour, yeast route and baking surface you used—and where the dough surprised you. Those details help us answer the next reader whose pizza behaves the same way.
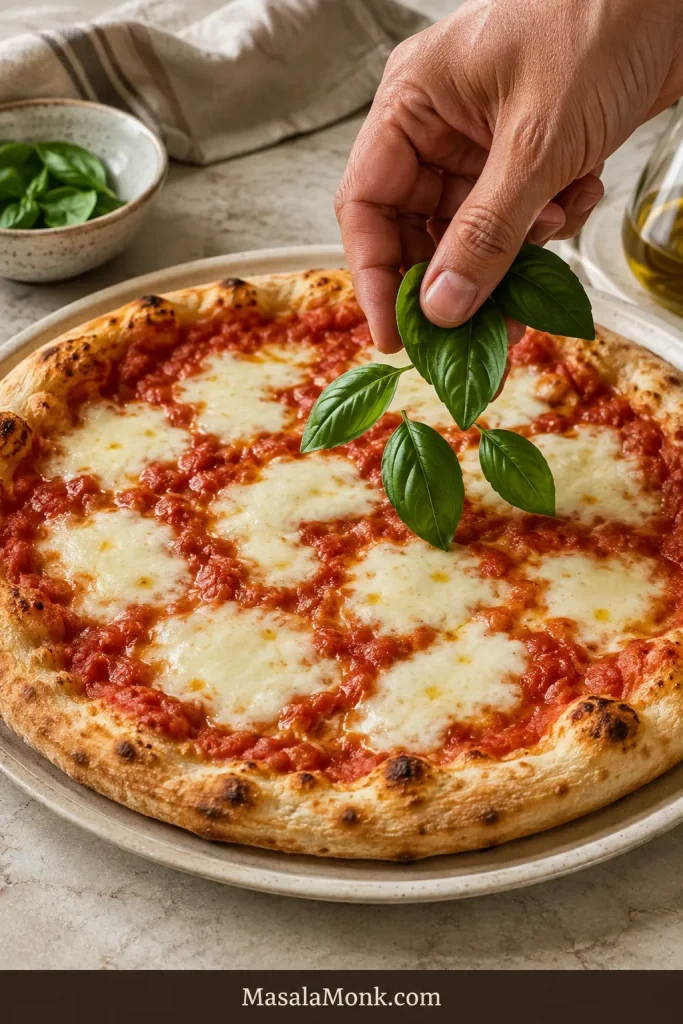
Back to top ↑

Posted on 10 Comments

Sourdough Pizza Dough Recipe (Crispy Crust & Easy Pizza Base)

Sourdough pizza dough cover image showing a golden, crispy crust pizza with a cheese-pull slice lifted, plus sauce, basil, and olive oil props.

There’s a particular moment in pizza making that feels like magic: you slide a raw, slightly wobbly round of dough into a hot oven, and within minutes it turns into something alive—edges lifting, bubbles forming, the bottom taking on color, the whole kitchen smelling like toasted wheat and caramelized cheese. When that dough is sourdough pizza dough, the magic gets a little deeper. The crust tastes fuller. The aroma is richer. Even a simple topping combo feels more “finished,” as if the base itself is seasoning the pizza.

At the same time, sourdough pizza dough can feel intimidating if you’ve only made quick yeast dough before. Starter timing, fermentation windows, sticky dough, shaping fears—there are a lot of ways to overthink it. So this post is built for real life: one reliable sourdough pizza dough recipe, clear steps that don’t require fancy equipment, and enough flexibility to handle a same-day bake or a cold ferment when you have time.

Along the way, you’ll also see natural variations—thin and crisp, chewier and thicker, or even a pan-friendly version—because one good sourdough pizza base should carry you through many pizza nights. When you want extra support, you can jump to MasalaMonk’s beginner-friendly sourdough starter recipe to tighten up feeding and starter strength, or browse the broader sourdough lineup in Sourdough Bread Recipes if you’re in the mood to bake beyond pizza.

And because pizza night is never only about the crust, you’ll also find an easy way to expand your topping and sauce options using MasalaMonk’s pizza sauce recipes and pesto recipe guide, plus a few cocktail pairings that make a homemade pie feel like a proper plan.

Let’s get into it.


Why sourdough pizza dough tastes better (and how to keep it easy)

Sourdough pizza has a flavor advantage that’s hard to miss: more depth, more aroma, a little tang, and a longer finish. The reason isn’t mysterious. Fermentation changes the dough. Over time, flour and water become something else—more fragrant, more elastic, and more flavorful.

Still, flavor alone doesn’t guarantee a great crust. A sourdough pizza crust can be pale, tough, or oddly dense if the bake setup is weak or if the dough never develops enough structure. That’s why this method is built around three practical goals:

Sourdough pizza dough gets better when you nail three things: build strength early so it stretches easily, ferment until the dough is puffy (not slack), and bake hot so the crust turns crisp instead of dry.

First, develop strength early so the dough stretches into a pizza base without tearing.

Second, ferment until the dough is lively but not collapsed, so you get lift instead of flatness.

Third, bake with enough heat that the crust sets quickly, which keeps it crisp rather than dry.

Once those three pieces click, sourdough pizza dough becomes repeatable. You’re no longer gambling on vibes—you’re steering the process.

If you want your starter to feel dependable before you begin, the day-by-day routine in MasalaMonk’s sourdough starter recipe is a solid foundation. It’s especially helpful if your starter tends to be sluggish, overly sour, or inconsistent from week to week.

Also Read: Balti Paneer Gravy (Restaurant-Style, Creamy + Bold Recipe)


Ingredients for sourdough pizza dough

A reliable sourdough pizza dough recipe doesn’t need an ingredient parade. In fact, fewer ingredients usually means fewer surprises.
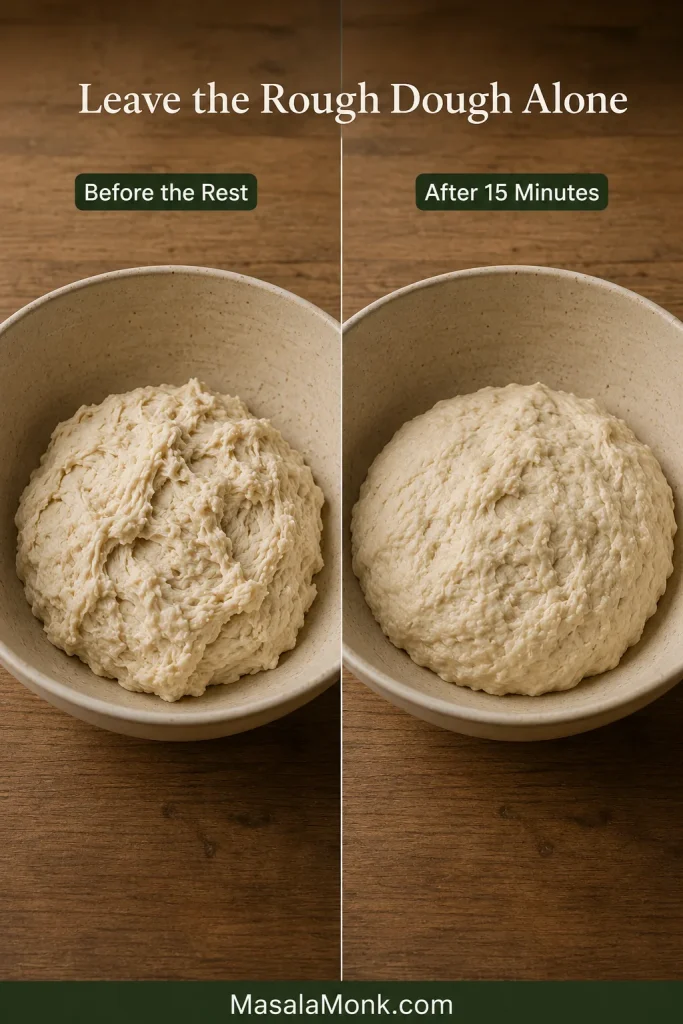
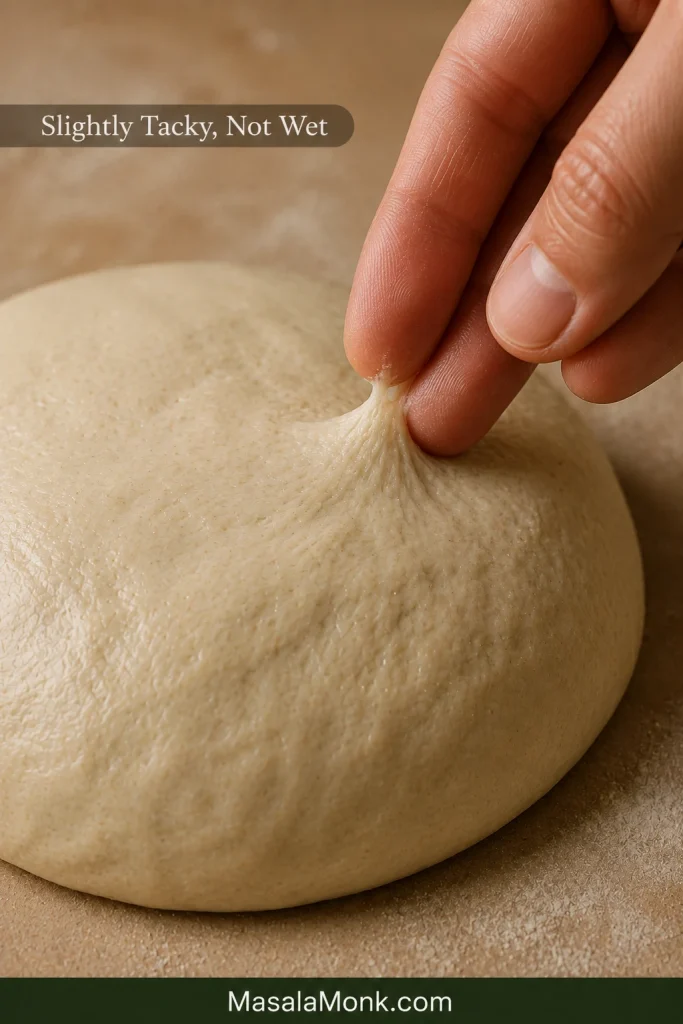
You only need flour, water, salt, and an active starter to make sourdough pizza dough—olive oil is optional, but it helps the dough handle smoothly in a home oven.
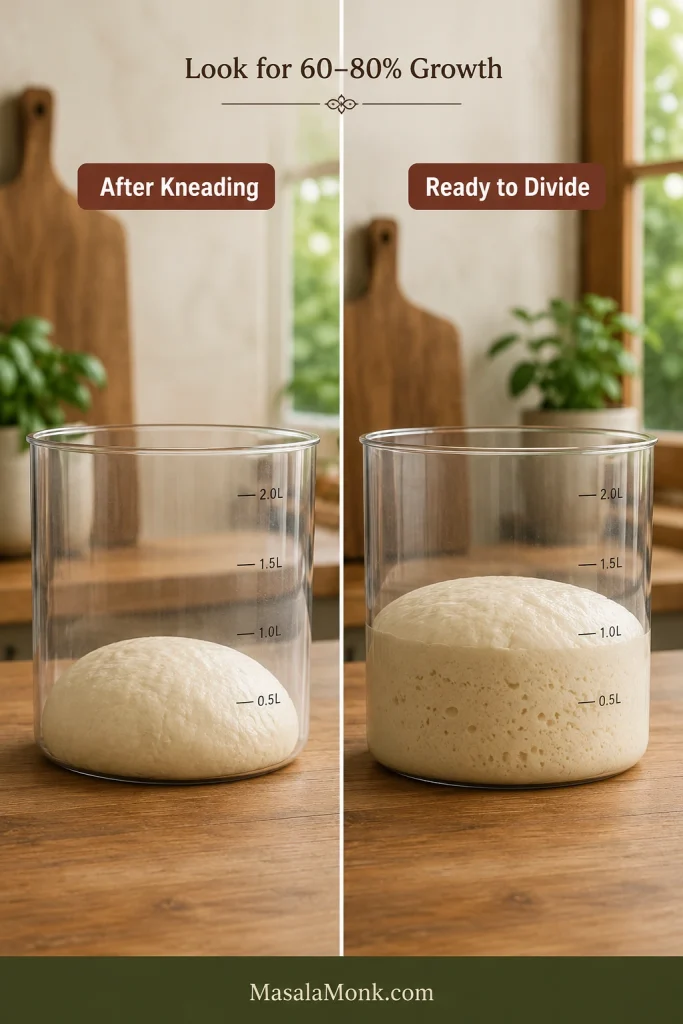

What you need

  • Flour: bread flour works beautifully; “00” flour is also excellent; a blend is ideal if you like
  • Water: room temperature for most kitchens
  • Salt: essential for flavor and dough strength
  • Active sourdough starter: bubbly and recently fed
  • Olive oil (optional): helpful for tenderness in a home oven and makes handling easier

That’s it. Everything else—sugar, honey, malt, milk—can come later if you want to experiment. For now, this base method covers the core “pizza dough with sourdough starter” approach and gives you a crust that can go thin and crisp or thicker and chewier depending on how you shape it.

About the flour choice (simple, useful guidance)

If you already have bread flour, use it. Bread flour tends to make shaping easier because it’s naturally stronger. If you have “00” flour, it can produce a beautifully tender yet crisp crust, especially in hotter bakes. If you want the best of both worlds, blend them: part bread flour for strength, part “00” for tenderness.

Meanwhile, if you only have all-purpose flour, you can still make sourdough pizza dough. You may simply need a slightly gentler hand during stretching and a little more attention to dough strength early on.

Also Read: Mojito Recipe (Classic) + Ratios, Pitcher, Mocktail & Easy Variations


Active starter vs discard for sourdough pizza

This matters, and the good news is that it’s not complicated.

Sourdough starter for pizza dough comparison showing active starter versus discard, with active starter rising faster and discard needing longer timing.
For sourdough pizza dough, an active starter gives a quicker, more predictable rise, while discard can still work—but you’ll need a longer, more flexible fermentation window.

Active starter = predictable rise, cleaner timing

For the main sourdough pizza dough recipe below, an active starter is your best friend. A starter that has been fed and is bubbling well will ferment dough in a more predictable window and usually gives better lift.

If you’re unsure whether your starter is “ready,” the quick-read approach is simple: it should look airy, smell pleasantly tangy (not harsh), and show visible activity. If it’s been in the fridge, give it a feed or two at room temperature until it behaves consistently again. The troubleshooting steps in the sourdough starter recipe guide are especially useful for this.

Discard can work too, but it’s a different lane

Sourdough discard pizza can be fantastic, particularly for bolder toppings and deeper flavor. However, discard-based dough behaves differently and often needs adjustments. If you want a dedicated discard approach, King Arthur’s sourdough discard pizza crust recipe is a trustworthy reference and a nice option when your starter is unfed but you still want pizza tonight.

For this post, though, we’ll build the primary dough with active starter, then you can branch out once you’ve nailed the method.

Also Read: Paloma Recipe: 12 Paloma Cocktail Drinks


The sourdough pizza dough recipe (makes 2 large pizzas or 3 medium)

This recipe is designed to be flexible. You can bake the same day, or you can cold ferment for deeper flavor and easier shaping.

Dough formula (grams)

  • 500 g flour (bread flour, “00,” or a blend)
  • 350 g water (70% hydration; adjust slightly if needed)
  • 100 g active sourdough starter (100% hydration starter)
  • 10 g salt
  • 15–20 g olive oil (optional)
Sourdough pizza dough recipe in grams showing flour, water, starter, salt, optional olive oil, and dough ball yield for two large or three medium pizzas.
Save this grams formula as your go-to sourdough pizza dough base—then choose 480g balls for large pizzas or 320g balls for medium pizzas, depending on the crust thickness you want.

This yields about 960 g total dough, which is perfect for:

  • 2 x ~480 g dough balls (two large pies, roughly 12–14 inch depending on thickness)
  • or 3 x ~320 g dough balls (three medium pies)

If you want thinner crust, make smaller dough balls. If you want thicker, go larger. Your dough ball weight has a bigger impact on the final sourdough pizza crust than most people expect.

Also Read: Air Fryer Donuts Recipe (2 Ways): Glazed Homemade Donuts + Biscuit Donuts


How to make sourdough pizza dough step by step

1) Mix the dough (and make it easy on yourself)

In a large bowl, add the water and sourdough starter. Stir until the starter loosens into the water. It doesn’t have to dissolve perfectly—just break it up enough that it’s mostly distributed.

Next, add the flour and mix until you don’t see dry patches. At this stage the dough will look shaggy and uneven, which is exactly right.

Step 1: Mix until there’s no dry flour, then rest 20–30 minutes—shaggy dough is normal, and the rest makes it noticeably smoother with no kneading.

Now pause. Let the dough rest for 20–30 minutes.

That rest matters because it hydrates the flour and starts gluten development without effort. Later on, you’ll find that the dough becomes smoother and stronger with much less work.

After the rest, sprinkle in the salt. If you’re using olive oil, add it now as well. Then mix until the salt is fully incorporated.

At first, the dough may feel slippery or messy. Keep going anyway; it comes together faster than you think.

2) Build dough strength without beating it up

Sourdough pizza dough can be strong without being overworked. Instead of kneading for a long time, use a short sequence of gentle strength-building.

Step 2 of sourdough pizza dough showing stretch-and-folds to build strength, with dough turning smoother and more elastic before bulk fermenting.
Step 2: Do 3–4 gentle folds over 60–90 minutes—this builds strength so your sourdough pizza dough stretches more easily and bakes into a better crust.

Over the next 60–90 minutes, do 3–4 rounds of stretch-and-folds:

  • Wet your hand lightly.
  • Lift one side of the dough, stretch upward, fold it over the center.
  • Rotate the bowl and repeat a few times until the dough tightens into a smoother mound.

Between rounds, cover the bowl and let the dough relax.

With each round, you’ll notice the dough becoming more elastic and cohesive. That’s exactly what you want: a dough that will stretch into a sourdough pizza base without turning into a fragile sheet.

3) Bulk ferment until the dough is airy, not exhausted

After the final fold, cover the dough and let it rise at room temperature until it looks slightly puffed, smoother, and more alive—often 3–5 hours, depending on your kitchen and starter strength.

Step 3: Bulk ferment until the dough looks lightly domed and feels airy—stop before it turns overly slack, then move on to shaping sourdough pizza dough balls.

Instead of chasing a clock, watch for clues:

  • the dough looks more rounded and airy
  • the surface feels slightly domed rather than flat
  • the dough jiggles a little when you move the bowl

If your kitchen runs warm, this stage will move faster. If it’s cooler, it may take longer. Either way, your goal is fermentation that builds flavor and gas, not fermentation that collapses.

When bulk fermentation is done, the dough should feel extensible and lightly airy. If it’s already very bubbly and slack, don’t push it too far—move on to dividing.

4) Divide into sourdough pizza dough balls

Turn the dough onto a lightly floured counter. Divide into your preferred sizes.

For two larger pizzas: 2 dough balls (~480 g each).
For three medium pizzas: 3 dough balls (~320 g each).

Step 4 sourdough pizza dough card showing two dough balls labeled 320g and 480g with guidance to shape tight balls and proof until relaxed before fermenting.
Step 4: Divide and shape tight sourdough pizza dough balls—use 480g for two large pizzas or 320g for three medium, then proof until relaxed so stretching is easy.

Shape each portion into a tight ball:

  • Fold edges into the center until the surface tightens.
  • Turn seam-side down.
  • Cup your hands around the dough and rotate gently to seal.

Set the dough balls into lightly oiled containers (or a covered tray) so they don’t stick.

From here, you choose your schedule: same-day baking or cold fermentation.

Also Read: Tapas Recipe With a Twist: 5 Indian-Inspired Small Plates


Same-day sourdough pizza dough (quick schedule that still works)

Sometimes you want a quick sourdough pizza dough that’s still made with starter, not commercial yeast. While sourdough naturally benefits from time, you can absolutely make a same-day version when your starter is strong and your kitchen is reasonably warm.

Use this same-day sourdough pizza dough rhythm when you want pizza tonight: mix, rest, fold, bulk ferment, shape dough balls, then bake hot for a crisp crust.

Here’s the rhythm:

  • Mix + rest + folds as written
  • Bulk ferment until lightly airy (don’t force huge rise)
  • Divide into dough balls
  • Let the dough balls rest at room temp until relaxed and slightly puffy, usually 1–2 hours

When the dough balls feel soft, supple, and easy to stretch, you’re ready to shape.

This “sourdough pizza dough same day” approach is about practicality. It won’t taste identical to a 24-hour cold ferment, yet it still delivers a flavorful sourdough pizza crust with great texture if you bake hot enough.

If you want more depth, shift to cold fermentation.

Also Read: Air Fryer Salmon Recipe (Time, Temp, and Tips for Perfect Fillets)


Cold ferment sourdough pizza dough (for better flavor and easier shaping)

Cold fermentation is where sourdough pizza dough starts feeling effortless. The dough relaxes. The flavor deepens. Stretching becomes smoother, and the crust often bakes more evenly.

Cold fermenting sourdough pizza dough deepens flavor and makes shaping easier—chill the dough balls 12–48 hours, warm them 60–120 minutes, then stretch into your pizza base.

After you’ve shaped dough balls, cover them and refrigerate.

A common sweet spot is 12–48 hours. King Arthur’s sourdough pizza crust recipe leans into a chilled window for exactly these reasons, and it’s a great confirmation that cold time helps both schedule and results.

When you’re ready to bake:

  • remove dough balls from the fridge
  • let them sit covered at room temperature until they feel relaxed, usually 60–120 minutes

Cold dough tears easily. Warmed dough stretches willingly. So give it time to wake up.

Also Read: Masterclass in Chai: How to Make the Perfect Masala Chai (Recipe)


How to shape a sourdough pizza base without tearing

Shaping is where sourdough pizza dough goes from “maybe” to “yes.” It’s also where most frustration happens—usually because the dough is too cold, too tight, or simply handled too aggressively.

Step-by-step guide showing how to shape a sourdough pizza base: press to leave a 1-inch rim, stretch evenly, and form a 10–12 inch pizza base with the rim intact.
Press from the center outward, stretch gently and evenly, and keep a 1-inch rim—if the dough snaps back, rest it 15–20 minutes so your sourdough pizza base stretches without tearing.

Start with a relaxed dough ball

If the dough snaps back, it’s not a failure. It’s a signal.

Cover it and let it rest another 15–20 minutes. Then try again. Often, that one pause changes everything.

Press, then stretch—don’t yank

Dust the counter lightly with flour. Place the dough ball down and press from the center outward, leaving a thicker rim.

Once you’ve formed a rough disk, lift and stretch gently with your hands. Move around the edge in small steps rather than pulling hard in one spot.

If the center starts thinning too much, set the dough down and let it relax for a minute. Then continue.

Rolling pins: when they help and when they hurt

A rolling pin can be useful if you want a flatter base. However, it also pushes out gases that help the rim puff. If your dream crust includes a lively edge, skip the pin. If you’re aiming for a thinner, crisper sourdough pizza crust, a pin can be acceptable.

Either way, the dough should still feel elastic, not fragile. If it’s fragile, it’s likely under-strengthened or under-rested.

Also Read: 10 Low Carb Chia Pudding Recipes for Weight Loss (Keto, High-Protein, Dairy-Free)


How to bake sourdough pizza for a crisp crust

Your oven setup matters more than your topping choices. Even the best sourdough pizza dough recipe can bake pale and soft if the oven isn’t truly hot.

Underside view of sourdough pizza crust showing a browned, crisp bottom and airy rim on a peel, with text “Bake Hot • Preheat Long.”
Want a crisp sourdough pizza base instead of a soft bottom? Preheat your oven and baking surface longer than you think, then bake hot so the crust sets fast and stays airy at the rim.

Preheat longer than you think

Set your oven as hot as it safely goes—often 260°C / 500°F or higher if possible.

Place a pizza steel or stone inside while preheating. Then preheat for at least 45 minutes.

That long preheat isn’t extra. It’s the difference between:

  • a crust that springs and sets quickly
  • and a crust that dries out slowly while trying to color

Steel vs stone vs tray

  • Steel: strong bottom color, fast baking, excellent for crisp crust
  • Stone: great results, slightly gentler bottom heat
  • Heavy tray: workable if preheated; best for moderate thickness
Comparison guide showing pizza steel vs pizza stone vs baking tray for sourdough pizza, with notes on fast baking, balanced heat, and preheating at least 45 minutes.
A steel gives the strongest crisp bottom, a stone bakes more gently with balanced heat, and a heavy tray still works—just preheat your baking surface for at least 45 minutes.

If you’re baking with a dedicated pizza oven, timing shifts dramatically. For that environment, Ooni’s recipe page is a useful reference because it’s built for higher heat and faster bakes.

Keep toppings balanced so the base stays crisp

This is the quiet secret behind many “why is my pizza soggy?” problems. Even a great sourdough pizza base can suffer under too much sauce, too much cheese, or wet toppings.

Instead:

  • use a thin layer of sauce
  • choose low-moisture cheese when possible
  • pre-cook watery vegetables if needed
  • keep the topping load lighter for thinner crust
Comparison image showing sourdough pizza toppings balance: “too much” versus “just enough” toppings to keep the pizza base crisp, with tips for thin sauce and low-moisture cheese.
A crisp sourdough pizza crust needs breathing room—use a thin sauce layer, choose low-moisture cheese, and keep toppings balanced so the base bakes dry and golden instead of soft.

You can still make a generous pizza. You’re just aiming for balance, so the crust can crisp before the center turns heavy.

Pan-style option when you want a thicker, forgiving crust

If you want a thicker base with crisp edges, pan pizza is a beautiful direction. Even though it’s not sourdough-specific, Serious Eats’ foolproof pan pizza recipe is a great model for pan technique—how oil affects crispness, how the pan bakes the sides, and why thicker dough benefits from that environment.

Pan-style sourdough pizza baked in a cast-iron skillet with a thicker crust and crisp browned edges, labeled “Oil the pan • Bake hot.”
Want a thicker, more forgiving sourdough pizza base? Bake it pan-style—oil the skillet, use slightly thicker dough, and bake hot for crisp edges and a chewy center.

For sourdough, the idea is the same: slightly thicker dough, a well-oiled pan, and a hot bake that crisps the bottom and edges.

Also Read: Keto Hot Chocolate Recipe (Sugar-Free Hot Cocoa) + Best Homemade Mix


Sauce and topping ideas that make sourdough pizza shine

Sourdough pizza already brings flavor, so your toppings don’t need to shout. In fact, simpler combinations often taste more “complete” because the crust contributes so much.

That said, variety is what makes pizza night fun. If you want easy ways to change the mood without reinventing the whole plan, start with sauces.

Three pizza sauce options for sourdough pizza—marinara, white garlic sauce, and pesto—shown in bowls with a slice of sourdough crust.
Swap the sauce to change the whole sourdough pizza: go classic with marinara, creamy with white garlic, or bright and herby with pesto—same dough, totally different vibe.

Sauce ideas (and a way to build options fast)

A sourdough pizza recipe becomes ten recipes when you swap the sauce. That’s why MasalaMonk’s pizza sauce recipes is such a useful read: marinara, white garlic, Alfredo, buffalo, BBQ, vodka, ranch—seven directions from the same base.

Meanwhile, if you want a bright, herby route, MasalaMonk’s pesto recipe guide gives you classic basil pesto plus variations that pair beautifully with mushrooms, roasted vegetables, or even a simple mozzarella-and-tomato topping.

Topping combos that work especially well with sourdough pizza crust

Here are a few combinations that tend to harmonize with the crust rather than compete with it:

Sourdough pizza topping ideas card showing five topping combinations, including marinara and mozzarella, white garlic and mushrooms, pesto and roasted vegetables, vodka sauce with chili flakes, and BBQ chicken.
These five topping combos make sourdough pizza night easy—swap sauces, keep toppings balanced, and let the sourdough crust stay crisp while the flavors shine.
  • Marinara + mozzarella + basil
    Classic, clean, and the sourdough flavor reads clearly.
  • White garlic sauce + mushrooms + mozzarella
    Earthy toppings pair beautifully with tangy crust.
  • Pesto + mozzarella + roasted vegetables
    Bright, herby, and flavorful without heaviness.
  • Vodka sauce + mozzarella + chili flakes
    A richer sauce that still bakes cleanly if used lightly.
  • BBQ sauce + onion + chicken (light topping load)
    Best on a slightly thicker base, especially if your oven isn’t extremely hot.

If you prefer bold toppings, sourdough can take them. Just keep one thing in mind: bold topping choices often taste best when the crust is crisp enough to provide contrast.

Also Read: Dirty Martini Recipe (Classic, Extra Dirty, No Vermouth, Spicy, Blue Cheese, Tequila + Batched)


Troubleshooting sourdough pizza dough and crust (the fixes that matter)

Even with a dependable method, dough will occasionally misbehave. Instead of starting over, it’s more useful to diagnose what’s happening.

If your sourdough pizza dough feels sticky, your crust turns tough, the bottom stays pale, or the dough snaps back—use these quick fixes to get a stronger dough and a crisp, golden crust.

My sourdough pizza dough is sticky—what now?

Sticky dough often comes from one of these:

  • hydration is high for your flour
  • the dough didn’t develop enough strength early
  • the dough got too warm during fermentation
  • shaping started before the dough fully relaxed

Rather than dumping flour into the dough at the end, make two small adjustments next time:

  1. build a little more strength with one extra fold early on
  2. chill dough balls for a short cold ferment, then bring them back to room temp before shaping

In the moment, use light flour on the bench, keep your hands calm, and avoid forcing thinness too quickly.

My sourdough pizza crust is tough

A tough crust is often a bake problem, not a dough problem. It usually happens when:

  • the oven wasn’t hot enough
  • the baking surface wasn’t fully preheated
  • the pizza baked too long trying to brown

A better strategy is higher heat and faster bake. Preheat longer, use steel if you have it, and keep toppings lighter so the crust sets quickly.

The pizza base is pale and soft underneath

This almost always points to insufficient bottom heat.

Try:

  • longer preheat
  • moving the baking surface higher or lower depending on your oven’s heat pattern
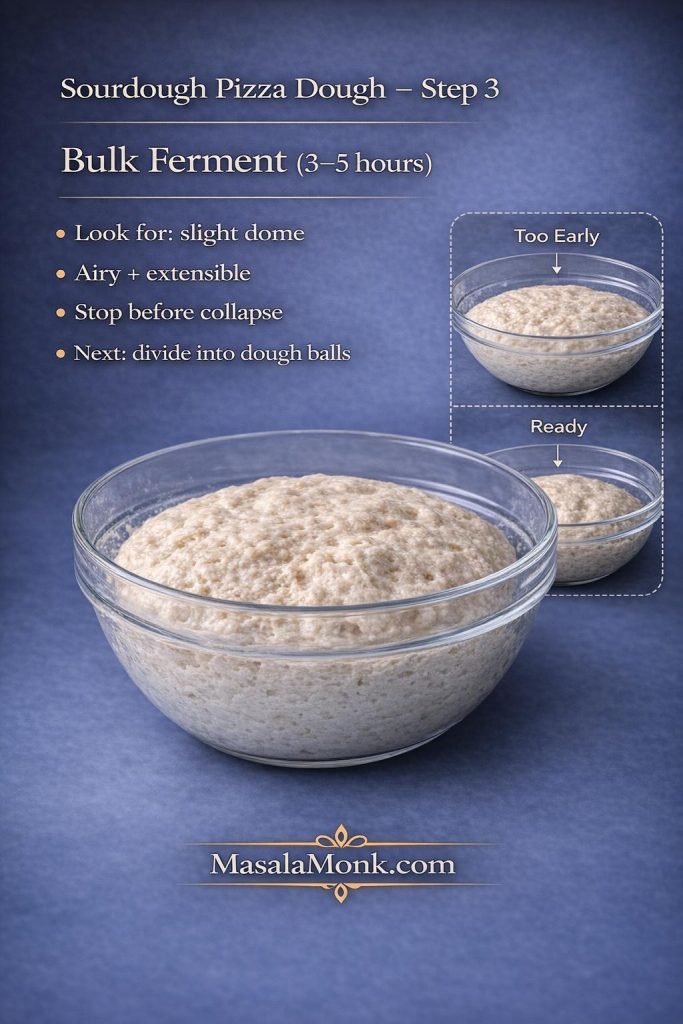
  • using a steel if possible
  • par-baking the base briefly if you’re making a thicker pizza base
King Arthur also discusses how sourdough crusts can behave differently in browning and suggests practical fixes for thicker crust styles in their sourdough pizza resources, which can be reassuring when your crust looks lighter than expected but still bakes through.
The dough snaps back while stretching

Snapping back means the dough is tight. Tight dough needs time.

Cover it. Walk away for 15 minutes. Come back and stretch again.

Often, that small rest is the whole solution. If this happens frequently, a longer cold ferment usually improves extensibility dramatically.

Also Read: Fish and Chips Reimagined: 5 Indian Twists (Recipe + Method)


Pizza night pairings: cocktails that actually match sourdough pizza

When pizza is homemade, drinks become part of the atmosphere. You don’t need anything complicated—just something that plays nicely with cheese, tomato, and a toasty crust.

Pizza night pairing image with a sourdough pizza slice and four cocktail options—mule in a copper mug, punch in a tall glass, martini with olives, and an espresso cocktail.
Turn sourdough pizza night into a plan: pair your pie with a bright mule, an easy punch, a savory martini, or an espresso cocktail for dessert—pick one drink and make it feel special.

Here are a few of our blog posts that pair naturally with sourdough pizza night:

  • Fresh, fizzy, and bright: a classic Moscow Mule is hard to beat when your toppings lean spicy or rich.
  • Party-friendly pitcher option: rum punch fits perfectly when you’re feeding a crowd and want something easy to pour.
  • Savory pairing for olive-forward or salty toppings: a briny dirty martini can feel surprisingly right with mushrooms, olives, or deeply savory pizzas.
  • After-dinner move: if pizza night turns into dessert night, an espresso martini is a fun, coffee-forward finish.

You can keep it simple: pick one drink direction, make the pizza, and suddenly the whole evening feels intentional.

Also Read: Ravioli Recipe Reinvented: 5 Indian-Inspired Twists on the Italian Classic


Storing and reheating sourdough pizza (so it still tastes good tomorrow)

Leftover pizza is only disappointing when it’s handled roughly. Sourdough pizza can reheat beautifully—especially because the crust has structure—if you warm it in a way that respects the crust.

Storing leftovers safely

Let the pizza cool, then refrigerate it promptly in a covered container.

For timing and safe handling, FoodSafety.gov’s cold storage chart specifically lists pizza storage guidance, including fridge and freezer windows. It’s a helpful reference when you’re deciding whether a slice is still within a safe range. (Cold Food Storage Chart)

When reheating, the USDA recommends reheating leftovers to 165°F for safety. Their leftovers guidance is straightforward and worth keeping in mind when you’re reheating more than just a slice or two. (Leftovers and Food Safety)

Guide showing how to reheat sourdough pizza using a skillet, oven, or air fryer to restore a crisp crust, with tips for fast crisping and reheating multiple slices.
For the crispiest sourdough pizza crust, reheat in a skillet; for several slices, use the oven; for quick crunch, use an air fryer—stop as soon as it’s hot and revived.

Best ways to reheat sourdough pizza

Skillet method (best for crisp bottom):
Warm a skillet over medium heat, place the slice in, and cover loosely. The bottom crisps, while the cover helps the top warm without drying out.

Oven method (best for multiple slices):
Heat the oven and warm slices on a tray until the cheese softens and the crust crisps again.

Air fryer method (quick and crisp):
A short reheat in the air fryer works well, particularly for restoring texture.

Whichever method you use, aim for “hot and revived,” not “cooked again.” The goal is to bring the crust back to life, not to dry it out.

Guide showing how to freeze sourdough pizza slices in a container and how to freeze sourdough pizza dough balls, with tips to reheat slices crisp and thaw dough balls in the fridge overnight.
Freeze baked sourdough pizza slices for quick meals, or freeze dough balls for future pizza nights—thaw dough in the fridge overnight, then warm before stretching for the best crust.

Freezing pizza and freezing dough balls

If you want future pizza nights to be easier, freezing helps.

  • Freeze baked slices for quick lunches or fast dinners.
  • Freeze dough balls if you want fresh-baked pizza later without starting from scratch.

For dough balls, freeze after fermentation, wrap well, and thaw in the fridge overnight. Then let the dough come back toward room temperature before stretching. Cold dough is tight; warmer dough is cooperative.

Also Read: Croquettes Recipe: One Master Method + 10 Popular Variations


A calm, repeatable workflow for sourdough pizza at home

If sourdough pizza feels like a “special occasion” thing right now, here’s the shift: treat it like a rhythm, not a performance. The more familiar you get with the stages—mix, strengthen, ferment, divide, rest, bake—the less dramatic it becomes.

One week you might do a same-day sourdough pizza dough for a spontaneous dinner. Another week you might plan a cold ferment because you want deeper flavor and a smoother shaping experience. Either way, you’re building the same foundation: a sourdough pizza base that supports whatever toppings you love and bakes into a crust that tastes like you meant it.

Sourdough pizza dough gets easier when you treat it like a rhythm: mix, strengthen, ferment, divide, rest, then bake—repeat weekly and your pizza base and crust improve every time.

And when you want to expand without reinventing the wheel, here are some blog posts that keep pizza night interesting:

From there, it’s simply repetition. Each bake teaches your hands what the dough should feel like. Each pizza shows you how your oven behaves. Before long, “sourdough pizza dough recipe” stops being an intimidating phrase and becomes a reliable plan.

Also Read: How to Make a Flax Egg (Recipe & Ratio for Vegan Baking)

FAQ: Sourdough Pizza Dough, Crust, and Base

1. What is the difference between sourdough pizza dough, sourdough pizza crust, and sourdough pizza base?

They usually refer to different stages of the same thing. Sourdough pizza dough is the raw dough before shaping, sourdough pizza base is the shaped round before toppings, and sourdough pizza crust often means the baked result. Even so, many recipes use the terms interchangeably, so the method is typically the same.

2. Can I make sourdough pizza dough the same day?

Yes, you can make sourdough pizza dough the same day if your starter is active and your kitchen is warm enough. In that case, give the dough enough time to bulk ferment, then let the dough balls rest until they feel soft and easy to stretch. That said, a cold ferment usually improves flavor and handling.

3. How long should I ferment sourdough pizza dough for the best flavor?

For the best balance of flavor and texture, many home bakers ferment sourdough pizza dough overnight in the fridge after dividing it into dough balls. However, a same-day sourdough pizza recipe can still work well. If you have more time, a longer cold ferment often gives a better sourdough pizza crust with easier stretching.

4. Can I use sourdough discard for pizza dough?

Yes, sourdough discard pizza dough is possible, although it behaves differently from dough made with active starter. For example, discard may ferment more slowly and produce a slightly denser result unless the recipe is designed for it. Therefore, if you use discard, expect to adjust timing and texture a little.

5. Why is my sourdough pizza dough sticky?

Most often, sticky sourdough pizza dough comes from high hydration, weak gluten development, or warm dough. In contrast, a dough with enough strength and a short rest between steps feels much easier to shape. To fix it, build more strength early, chill the dough if needed, and use only a light dusting of flour while shaping.

6. Why does my sourdough pizza dough snap back when I stretch it?

Usually, the dough is too tight or not rested enough. Instead of forcing it, let it sit covered for 10 to 20 minutes and try again. Afterward, it should stretch more easily into a sourdough pizza base without tearing.

7. What is the best flour for sourdough pizza dough?

Bread flour is a strong choice because it gives structure and makes shaping easier. Meanwhile, 00 flour can produce a tender, crisp sourdough pizza crust, especially in high-heat baking. Many bakers prefer a blend of both for a balanced result.

8. How do I get a crispy sourdough pizza crust at home?

To get a crispy sourdough pizza crust, preheat your oven longer, use a hot baking surface, and avoid overloading the pizza with sauce or toppings. In addition, a thinner stretch and a well-heated steel or stone help the base set quickly. As a result, the crust crisps before it dries out.

9. Why is my sourdough pizza base soft in the center?

A soft center usually means the dough did not get enough bottom heat or the toppings were too wet. For instance, too much sauce, fresh mozzarella, or watery vegetables can slow down browning. To improve it, preheat longer, use fewer wet toppings, and stretch the dough a little thinner.

10. What size should sourdough pizza dough balls be?

It depends on the pizza style you want. Smaller sourdough pizza dough balls make thinner, crisper pizzas, while larger dough balls create a thicker, chewier crust. As a general guide, medium dough balls work best when you want an easy-to-handle sourdough pizza recipe for a home oven.

11. Can I freeze sourdough pizza dough balls?

Yes, sourdough pizza dough balls freeze well and make future pizza nights much easier. Ideally, freeze them after fermentation, wrap them well, and thaw them in the fridge before using. Then let the dough rest at room temperature so the pizza base stretches without fighting back.

12. Can I freeze baked sourdough pizza?

Yes, baked sourdough pizza freezes well, especially if you cool the slices before storing. Later, reheat the slices in an oven, skillet, or air fryer to bring back some crispness in the crust. This way, leftover sourdough pizza still tastes good instead of turning chewy or dry.

13. Is sourdough pizza healthier than regular pizza?

Sourdough pizza can be easier for some people to digest because of the longer fermentation, and many people also prefer the flavor. Still, the overall nutrition depends on your flour, toppings, cheese, and portion size. In other words, sourdough improves the base, but the full pizza still depends on what you build on top.

14. What is the best hydration for sourdough pizza dough?

A moderate hydration is usually the easiest starting point for home bakers because it balances stretchability and control. Higher hydration can give a more open, airy crust, but it also makes shaping harder. Accordingly, if you are new to sourdough pizza dough, start in the middle and adjust after a few bakes.

15. Can I make a sourdough pizza base without a pizza stone or steel?

Absolutely. You can bake a sourdough pizza base on a preheated tray or pan and still get great results. Although a steel or stone helps with bottom heat, a hot oven and lighter toppings matter just as much. Therefore, don’t wait for perfect equipment before making your sourdough pizza recipe.

16. How do I keep the rim puffy on a sourdough pizza crust?

Leave a border when pressing the dough, and avoid flattening that edge with a rolling pin. Likewise, don’t overload the rim with sauce or cheese. Once baked, that untouched edge has room to puff and brown, which gives you a more attractive sourdough pizza crust.

17. Why does my sourdough pizza crust turn tough after reheating?

Usually, it is being reheated too long or at too high a heat without enough moisture control. Instead, warm it just until hot, then stop. A skillet method often works especially well because it re-crisps the bottom while keeping the rest of the slice from drying out.

18. Can I use this sourdough pizza dough recipe for thin crust and thick crust?

Yes, the same sourdough pizza dough recipe can produce both styles. The difference comes from dough ball size, shaping thickness, and bake method. For thin crust, stretch more and top lightly; for a thicker pizza base, use a larger dough ball and give it a little more structure during shaping.