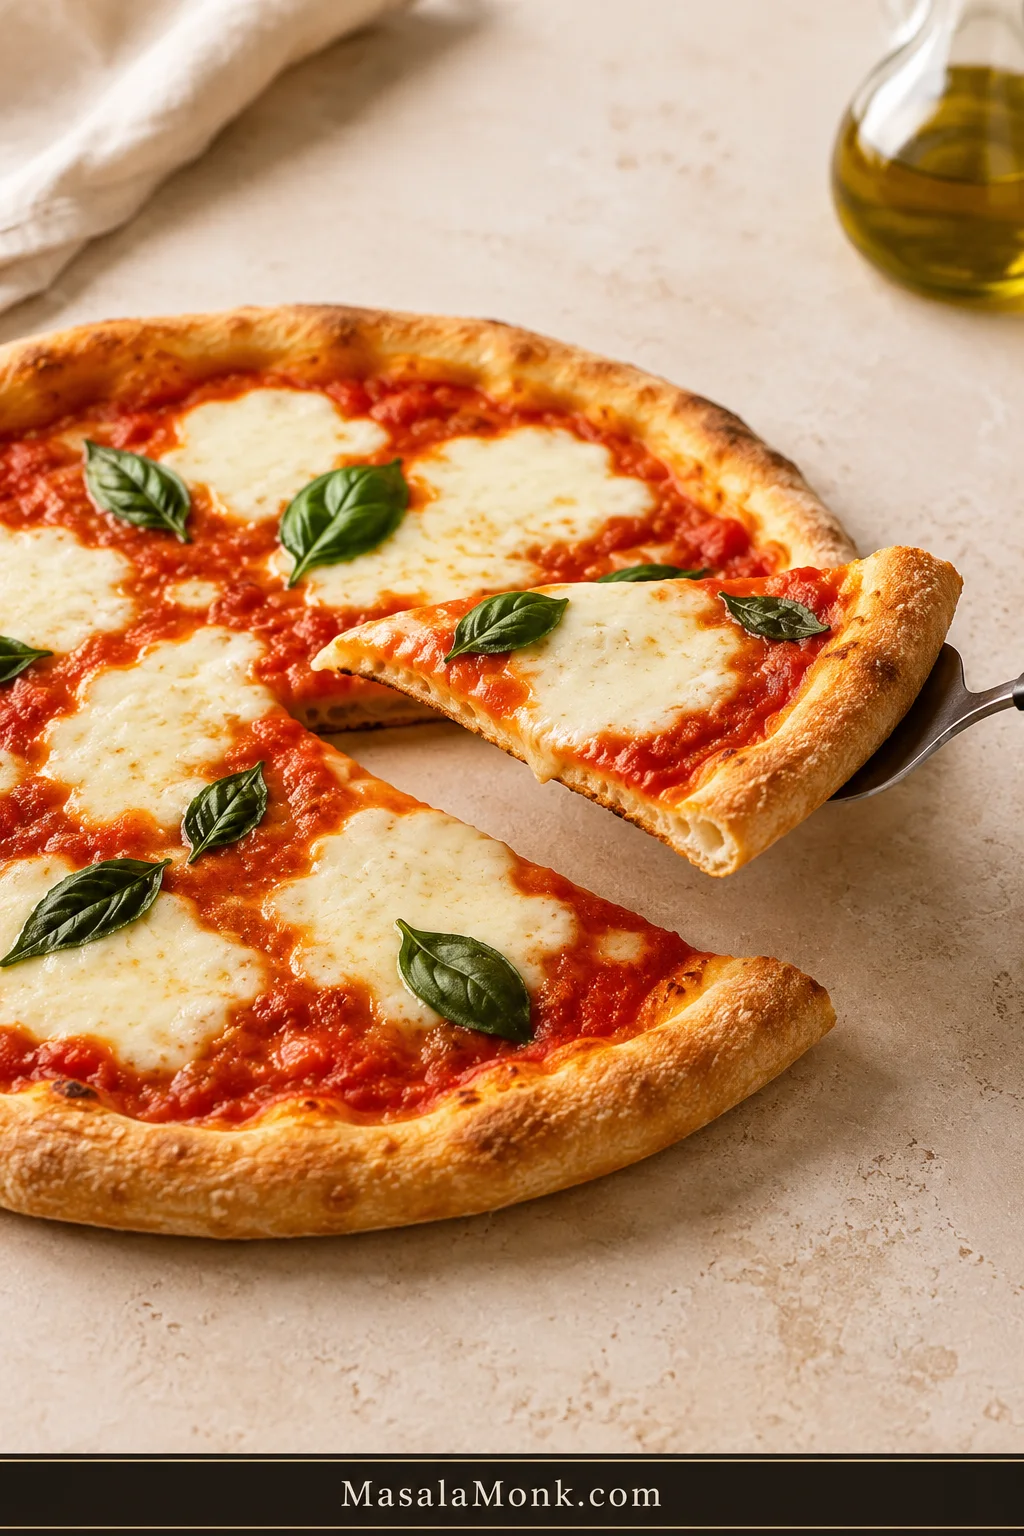
A good Margherita pizza bends when you lift a slice, but it does not collapse. The underside has enough color to support the toppings, the rim remains tender, and the basil still smells fresh when the pizza reaches the table.
That balance comes from restraint. Margherita pizza uses tomato, mozzarella, fresh basil and olive oil, applied lightly enough that the crust remains part of every bite.
The disappointing homemade version often looks ready from above but tells a different story underneath: a pale base, a damp center and mozzarella that has released more water than the oven could remove.
You do not need a pizza oven to avoid that result. A heavy metal baking sheet, enough preheating and a lighter hand with the toppings can take a regular home oven surprisingly far. The rule is simple: control the moisture above and build the heat below.
Quick answer
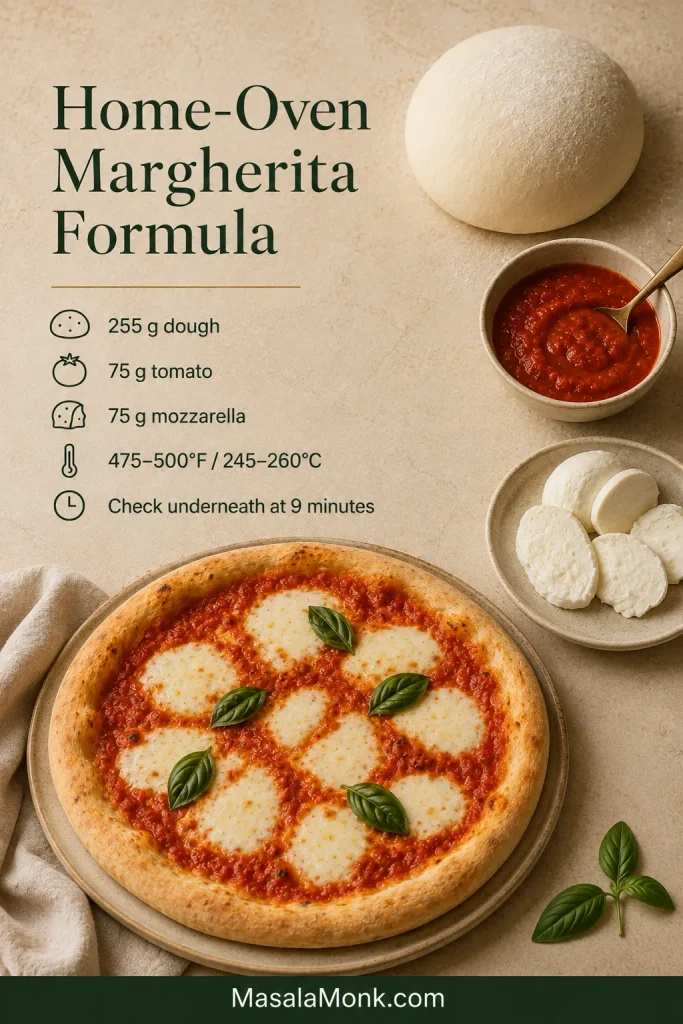
Margherita Pizza at a Glance
Make the same-day dough, divide it in two and stretch each ball to about 12 inches / 30 cm.
Top lightly with thick crushed tomato and mozzarella blotted until no loose water remains on the surface. The raw pizza should look less covered than a standard cheese pizza.
Bake on a thoroughly preheated inverted metal sheet at the hottest safe oven setting, ideally 475–500°F / 245–260°C. Lift one edge and check underneath after 9 minutes.
Per pizza: about 255 g dough · 75 g prepared tomato topping · 75 g fresh mozzarella
Make it now
Easy Homemade Margherita Pizza
Using bread flour, canned plum tomatoes, fresh mozzarella and an inverted baking sheet? Follow the main route below. The later sections help when the dough pulls back, the cheese runs wet or the oven needs a different approach.
This amount makes a tender, moderately substantial home-oven crust. Stretch closer to 11 inches / 28 cm for a fuller rim or to the full 12 inches / 30 cm for a thinner center.
Makes: Two 12-inch / 30 cm pizzas · Serves: 3–4
Active time: About 35 minutes · Rise and rest: About 2¼–3¼ hours
Preheat: About 40–55 minutes, overlapping the final rest
Bake: 10–13 minutes per pizza, plus surface recovery
Total: About 3–4 hours
Equipment
- Digital kitchen scale, strongly recommended
- Large mixing bowl
- Dough scraper or flexible spatula
- Two covered containers or one lightly oiled tray
- Heavy uncoated metal baking sheet rated for your oven temperature
- Pizza peel, thin wooden board or another flat baking sheet for transfer
- Parchment paper, optional and only when rated for the oven temperature
For the pizza dough
- 300 g bread flour or strong all-purpose flour, about 2½ cups when spooned and leveled
- 195 g water, 195 ml or about ¾ cup plus 1 tablespoon
- 6 g fine sea salt, about 1 teaspoon
- ½ teaspoon instant yeast, about 1.5 g
- 1 teaspoon extra-virgin olive oil, about 5 g
- Additional flour or fine semolina for dusting, used sparingly
Yeast alternatives: use the same ½ teaspoon / about 1.5 g active dry yeast and allow more rise time when needed. Dissolving it first is optional unless the package directs otherwise. For fresh yeast, use about 4–5 g.
For the no-cook tomato topping
- 150 g crushed canned whole plum tomatoes, about ⅔ cup, using only enough packing juice to make a thick, spreadable topping
- 1–1½ g fine sea salt, about ¼ teaspoon, adjusted to the tomatoes and cheese
- 1 teaspoon extra-virgin olive oil
Begin with less salt when the tomatoes or mozzarella are already salty. For a more seasoned home-style topping, add a little finely grated garlic; omit it for the cleaner tomato flavor used in the main recipe.
For topping two pizzas
- 150 g fresh cow’s-milk mozzarella, about 5¼ oz, weighed after draining
- 10–12 fresh basil leaves
- 2 teaspoons extra-virgin olive oil, for finishing
Instructions
Make the dough and prepare the toppings
- Mix and rest. Combine the water and yeast in a large bowl. Add the flour and mix until no dry patches remain. Cover and rest for 15 minutes.
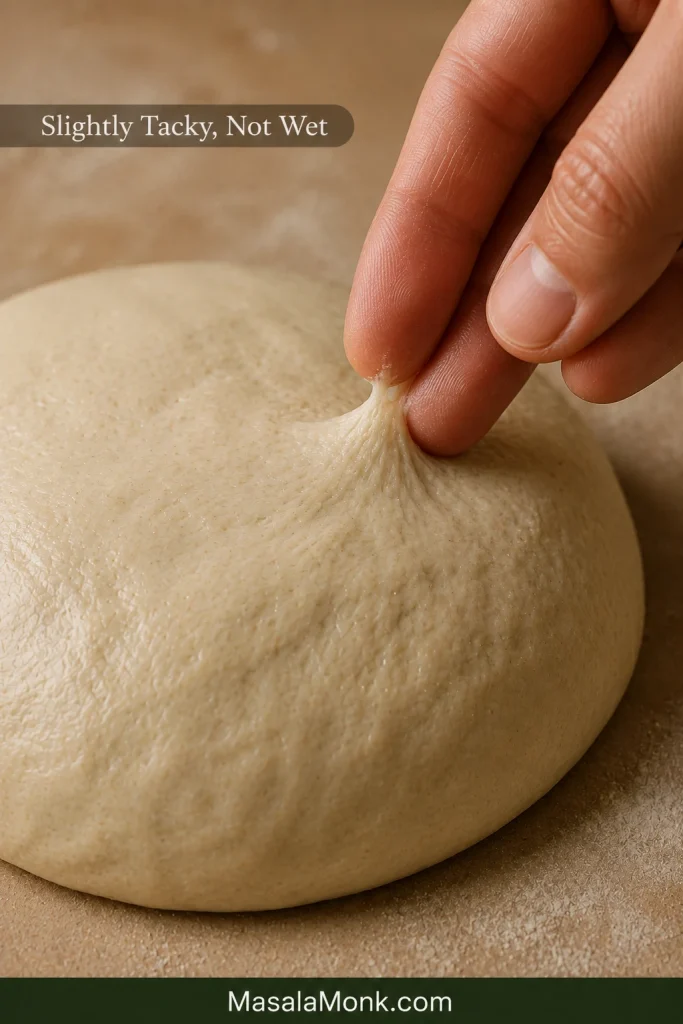
- Add the salt and oil. Work in the salt and olive oil, then knead for 6–8 minutes until the dough is smoother, elastic and slightly tacky.
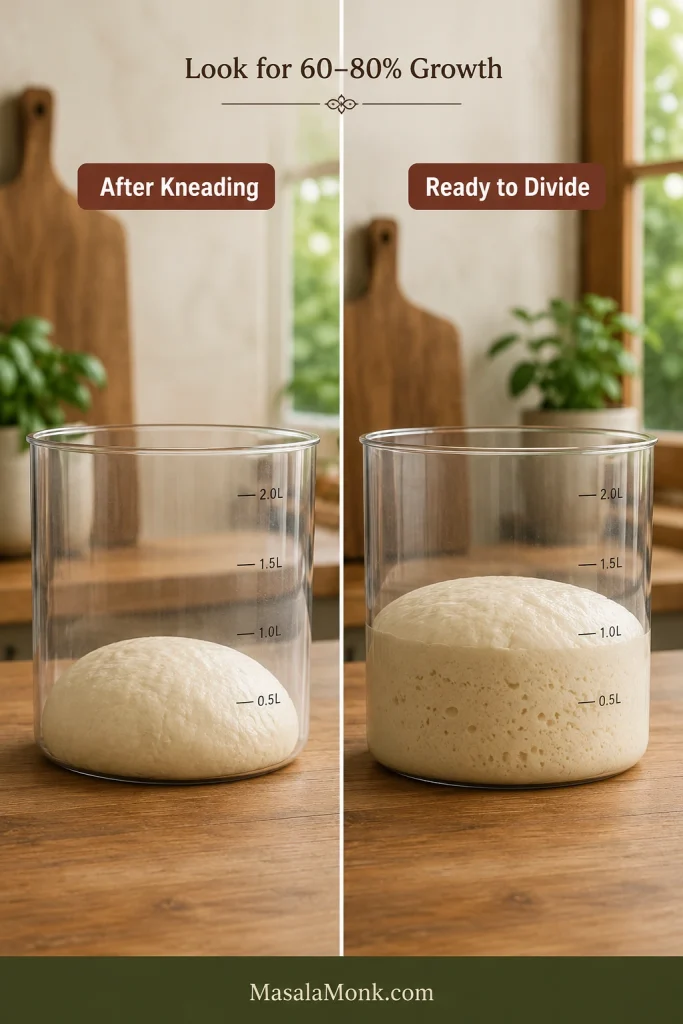
- Let the dough rise. Shape it into a ball, cover and leave until 60–80% larger, lighter and visibly aerated. This commonly takes 1¼–2 hours.
- Divide, ball and preheat. Divide the dough into two equal pieces of about 255 g and shape them into smooth balls. Cover and rest for 45–60 minutes. Immediately place a heavy baking sheet upside down in the lower third of the oven and heat to its highest safe setting, ideally 475–500°F / 245–260°C. Once the oven reaches temperature, continue heating the sheet for another 15–20 minutes.
- Prepare the toppings. Near the end of the dough rest, crush and season the tomatoes. Tear the mozzarella into small pieces, place them between absorbent towels and blot thoroughly.
Shape, top and bake
- Shape the first pizza. Press from the center outward while leaving a ¾-inch / 2 cm rim untouched. Lift and rotate the dough until it reaches about 12 inches / 30 cm. If it keeps springing back, stop fighting it. Cover and rest for another 10 minutes.
- Choose the transfer method. For a peel or board, dust lightly, place the dough on it and test that it slides. For parchment, shape and top the pizza directly on a trimmed sheet of temperature-rated paper; transfer the paper with the pizza.
- Top lightly. Spread 75 g prepared tomato topping, about ⅓ cup, across the dough. Add 75 g drained mozzarella, about 2⅔ oz, keeping the center lightly topped.
- Transfer and bake. When using a peel or board, give it one final gentle shake and transfer the pizza immediately if it moves as one piece. Check underneath after 9 minutes, rotate if one side colors faster and continue until the base is browned.
- Finish, recover and repeat. Remove the pizza when the underside is browned, the rim has expanded and the center is set. Add half the basil—about 5–6 leaves—and 1 teaspoon olive oil. Rest for 1–2 minutes before slicing. Let the oven return to temperature, then give the baking sheet another 3–5 minutes to recover before repeating with the remaining dough and toppings.
Adjust for a different oven
For an oven that stops at 450°F / 230°C: continue heating the inverted sheet for 20–25 minutes after the oven reaches temperature. Use 60 g / about 2 oz low-moisture mozzarella from the beginning, or use 75 g / about 2⅔ oz well-drained fresh mozzarella and add it during the final 3–4 minutes. Check the underside after 11 minutes.
Fan or convection oven: start checking one or two minutes earlier because moving air can color the top faster. See the oven-specific notes below for the full adjustment.
Parchment: check the manufacturer’s maximum-temperature rating and trim exposed corners. Remove the parchment before using the broiler.
The home-oven balance: keep the dough and topping load consistent, then let underside color tell you what the oven needs.
Choose Your Oven Setup
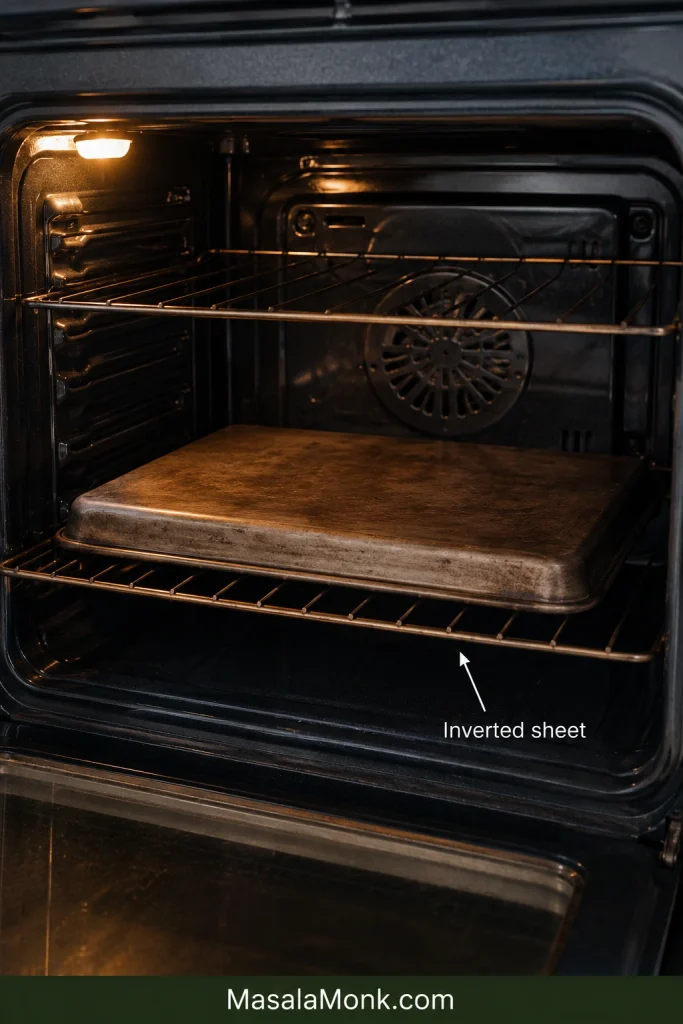
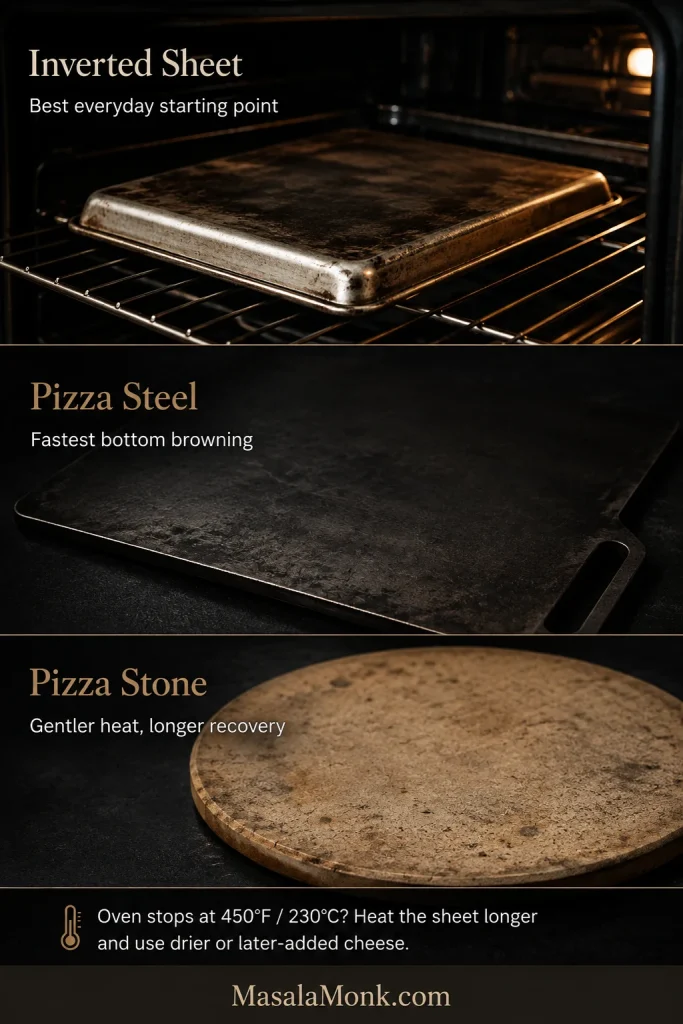
The inverted baking sheet is the best starting point for a regular oven. It is inexpensive, easy to load and capable of producing a properly browned base when given enough time to heat.
| Setup | Best use | Main trade-off |
|---|---|---|
| Inverted heavy baking sheet | Best default for a regular oven | Accessible and reliable, though slower than steel |
| Pizza steel | Fast and deep bottom browning | Can burn loose flour or an overly thin center |
| Pizza stone | Gentler bottom heat than steel | Needs a long preheat and slower recovery |
| Inverted sheet at 450°F / 230°C | Ovens with a lower maximum temperature | Needs a longer bake and drier or later-added cheese |
On a smaller screen, scroll sideways to see the full table.
What Is Margherita Pizza?
Margherita tells you what is on the pizza: tomato, mozzarella, basil and olive oil. Neapolitan describes more of the dough, shaping and intensely hot baking tradition. A Margherita can be Neapolitan, but a home-oven pizza baked for several minutes is not identical to one cooked in roughly a minute.

The traditional Neapolitan pizza standards use hand-shaped dough, tomato, fior di latte or buffalo mozzarella, basil and extra-virgin olive oil in an oven far hotter than most domestic models. This recipe keeps that topping identity while adapting the dough and baking method to a regular oven.
Margherita pizza is famously associated with Queen Margherita of Savoy and an 1889 visit to Naples, although similar tomato-and-mozzarella pizzas existed earlier.
Why This Method Works in a Home Oven
A pizza oven removes moisture quickly. A regular oven gives the tomato and cheese more time to release it, so the toppings must remain lighter and the baking surface must begin fully heated.
The home-oven rule: the longer the pizza needs to bake, the less loose moisture it can carry. Dry the mozzarella, use a thin tomato layer and preheat the baking surface fully.
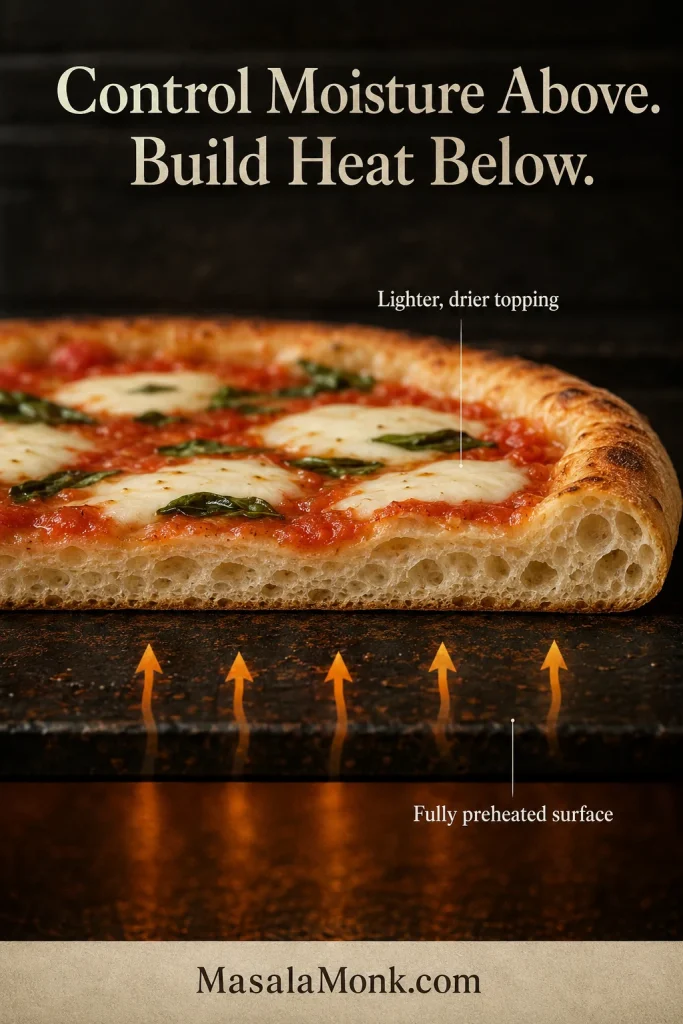
The dough carries enough water to remain tender without becoming needlessly difficult to shape. Measured toppings leave room for the center to bake through. There is no prize for using the whole ball of cheese.
Choosing Margherita Pizza Ingredients
Use bread flour for the easiest home-oven dough
Bread flour stretches reliably and browns well during a longer home bake. Strong all-purpose flour also works; hold back one teaspoon of water if yours is particularly soft.
“00” is an Italian flour classification, not a guarantee that every bag will behave the same way in a home oven. Choose one formulated for the temperature and fermentation schedule you plan to use.
Choose canned whole plum tomatoes
Canned whole plum tomatoes are the dependable year-round choice. They should smell bright when the can opens and crush into pulpy tomato rather than disappearing into watery juice.
San Marzano tomatoes are excellent when available, but they are not compulsory. A flavorful ordinary plum tomato with good body is more useful than an expensive can carrying too much liquid. A prepared sauce also works when time is limited; compare the options in this pizza sauce guide.
Match the mozzarella to the speed of the bake
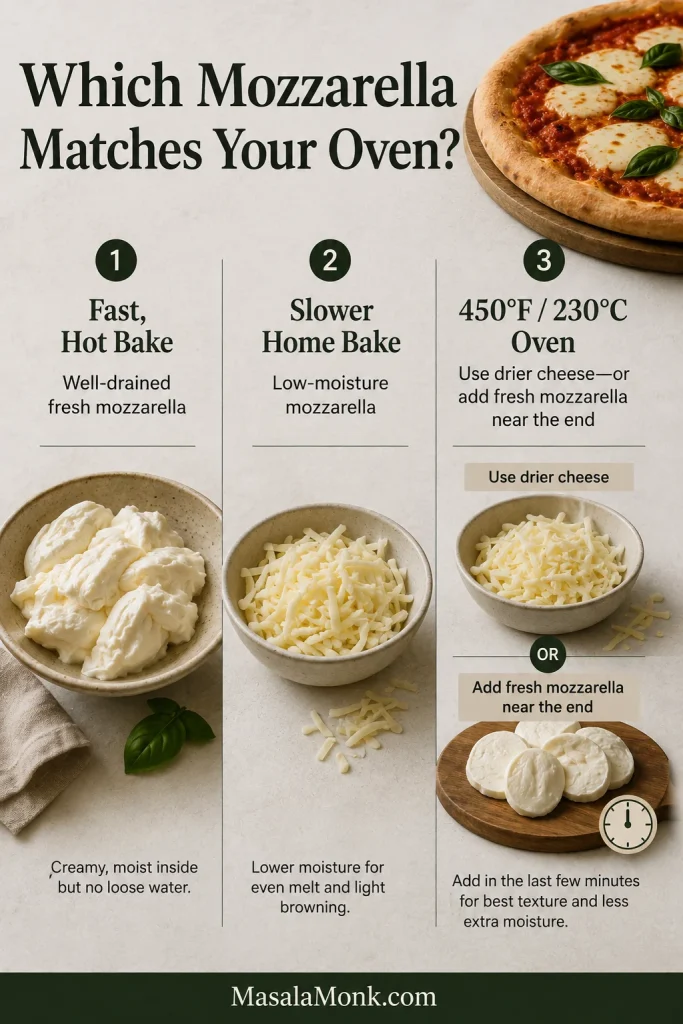
Choose well-drained fresh mozzarella for a fast, hot bake and low-moisture whole-milk mozzarella when the pizza needs longer in the oven.
Fresh cow’s-milk mozzarella, often sold as fior di latte, gives the pizza its milky flavor and separate creamy pools. Buffalo mozzarella is richer and usually wetter.
The practical rule is simple: the longer the bake, the more useful a drier cheese becomes. Coarsely grate low-moisture mozzarella or tear thin slices into small pieces so it scatters across the tomato instead of forming a heavy blanket.
Finish with basil and olive oil
Add most or all the basil after baking. The residual heat softens the leaves just enough while preserving the fragrance that makes Margherita pizza feel fresh rather than heavy.
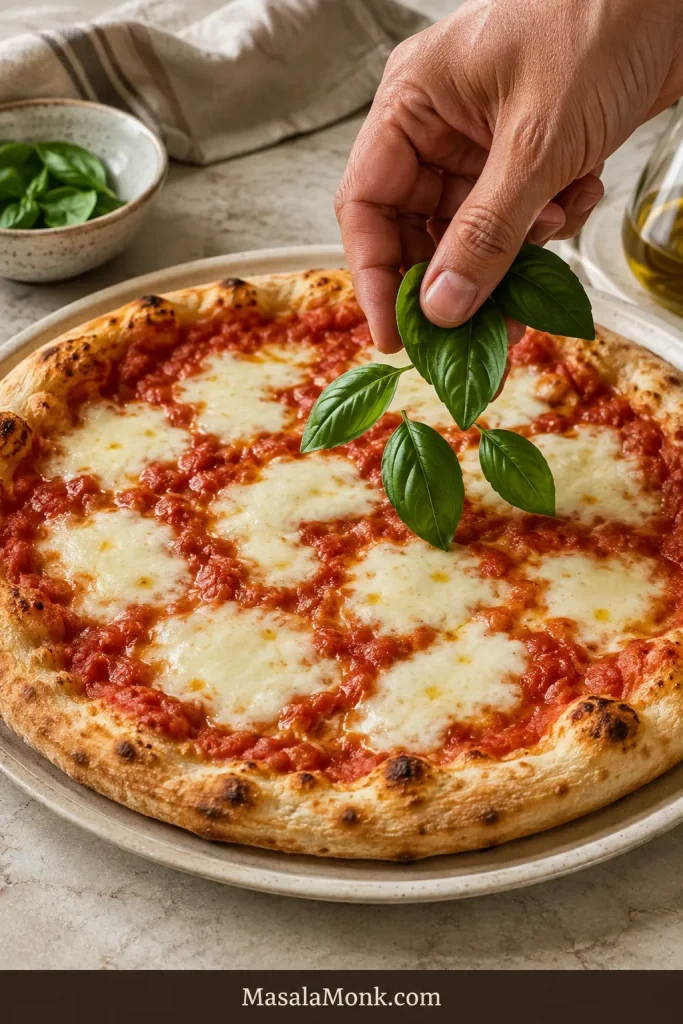
For a softer cooked-basil note, tuck two or three leaves beneath the mozzarella before baking. A light dusting of Parmesan or Pecorino is optional, but the main pizza needs only mozzarella.
Ready to cook? Return to the main recipe ↑
Mix, Ferment and Stretch the Dough
Mix and knead without drying it out
The dough will look ragged immediately after mixing. Leave it alone for 15 minutes and the flour will absorb more water, turning the same rough mass into something noticeably easier to knead.
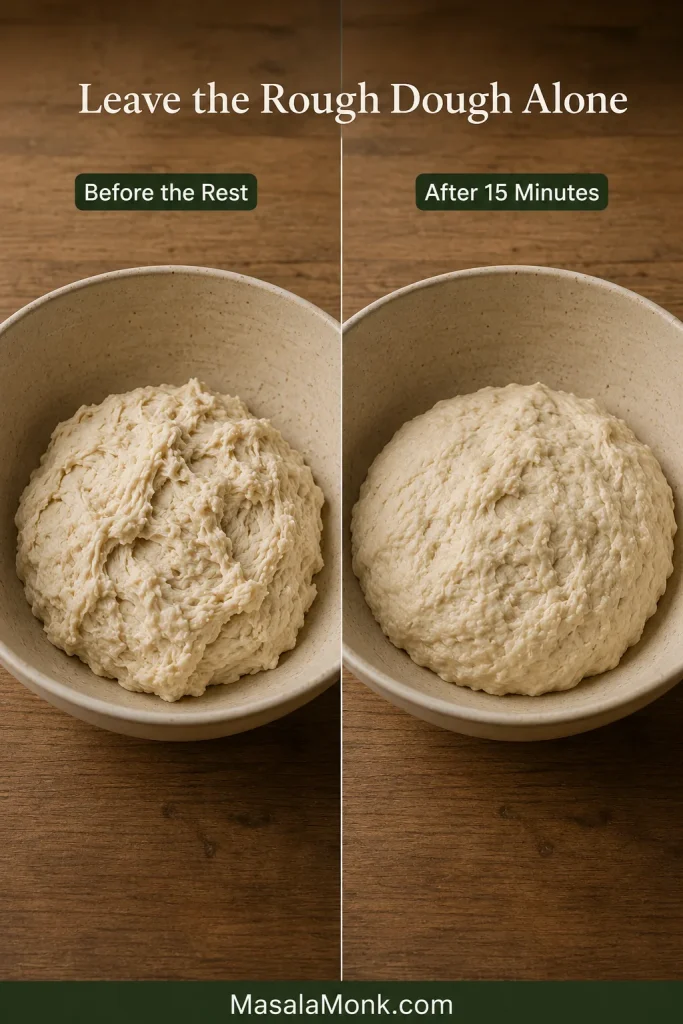
After kneading, it should feel elastic and less rough without becoming dry. Slight tackiness is useful. Too much added flour makes the dough easier to handle for a few minutes and the finished crust less tender.
Let it rise, divide and relax
The dough is ready for dividing when it has expanded by 60–80%, softened and developed small bubbles beneath the surface. It should feel lighter than it did after kneading.
Adjust for the room: use mildly warm water in a cool kitchen below 70°F / 21°C, room-temperature water in a comfortable kitchen around 70–79°F / 21–26°C and cool tap water in a warm kitchen at 80°F / 27°C or above. In a warm room, check the dough after about an hour.
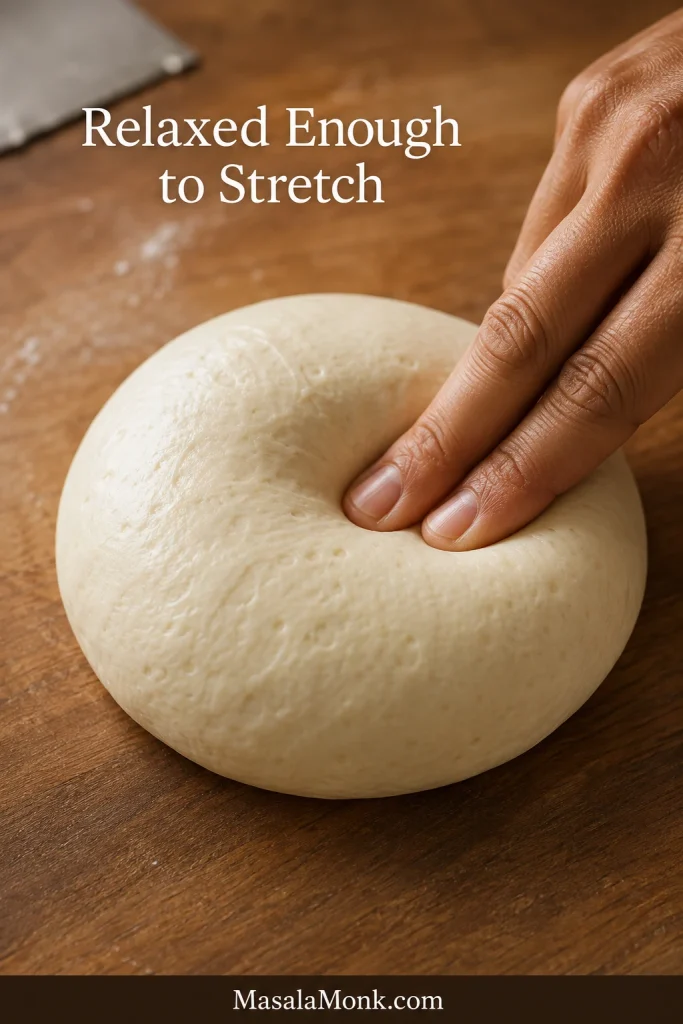
Dividing and balling tightens the dough again. After its final 45–60-minute rest, a ball that resisted your hands begins to widen beneath gentle fingertip pressure. That change matters more than the clock.
Fix sticky, dry or slow dough
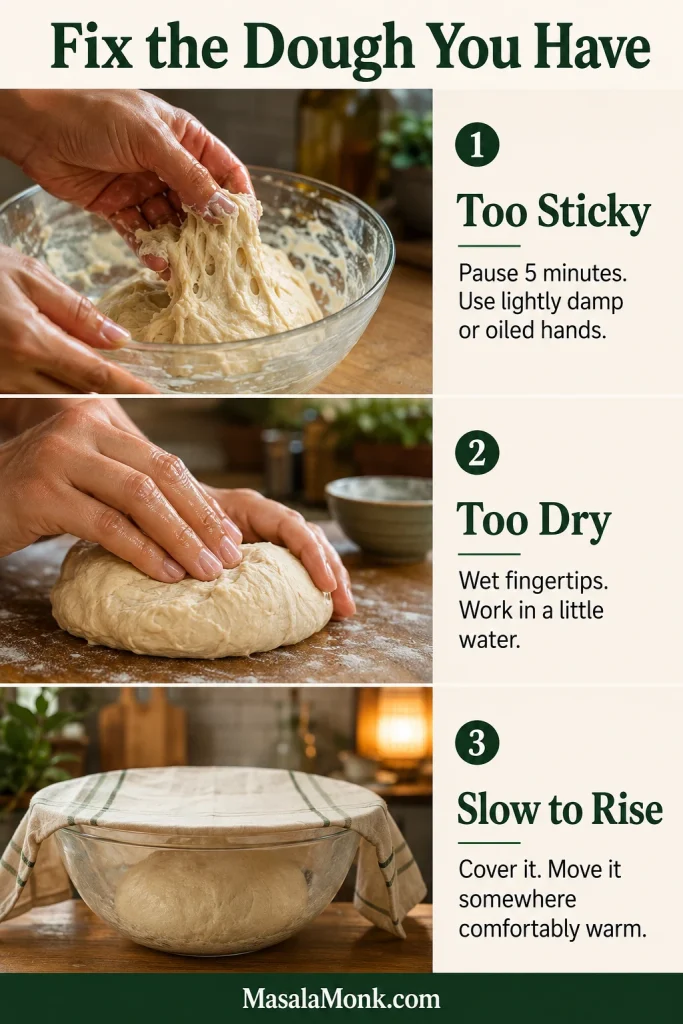
- Too sticky: pause for five minutes and handle it with lightly damp or oiled hands.
- Too dry: wet your fingertips and knead in one teaspoon of water at a time.
- Slow to rise: move the covered bowl somewhere comfortably warm and allow more time.
- Rising too quickly: divide and ball it early, then refrigerate briefly if dinner is delayed.
- Dry surface: cover the dough properly. A skin resists stretching and can tear.
For a naturally fermented base, use this sourdough pizza dough and return here for the tomato, mozzarella and basil quantities.
How to Prevent a Watery Margherita Pizza
Water rarely comes from one dramatic mistake. It is usually the combined effect of loose tomato, wet mozzarella, heavy topping and a base that did not begin hot enough.
Tomato and mozzarella should remain juicy. The aim is not to dry the life out of them, only to remove the loose water that would collect in the center before the crust has time to brown.
Make a thick no-cook tomato sauce
Crush the tomatoes by hand or pulse them only briefly. Drag a spoon through the mixture. The trail should remain visible for a moment instead of filling immediately with juice.
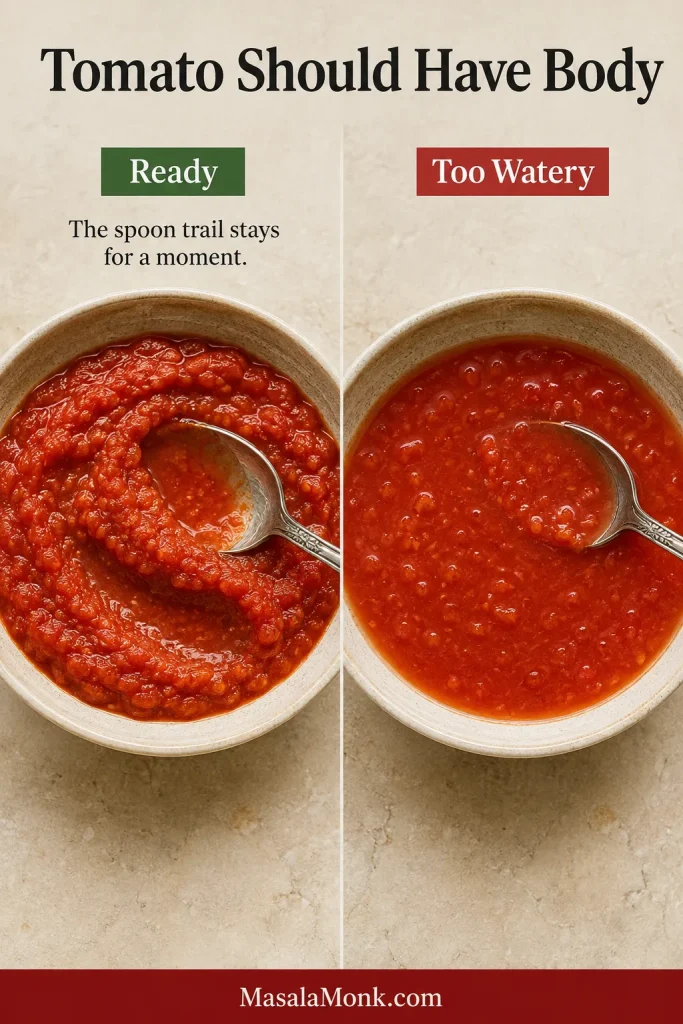
Drain excess packing liquid rather than cooking the tomatoes merely to thicken them. The no-cook topping keeps a brighter, fresher tomato flavor after baking. Sugar is rarely needed when the tomatoes are balanced.
For a cooked, garlicky red sauce, use this homemade marinara sauce and keep its pizza layer thin.
Drain fresh mozzarella after tearing it
A whole mozzarella ball can feel dry outside while holding substantial water inside. Tear or slice it first, spread the pieces between clean towels and blot firmly.
The cheese should remain moist and milky without loose water shining on the surface. Properly drained mozzarella melts into creamy pools instead of leaving a wet blanket across the tomato.
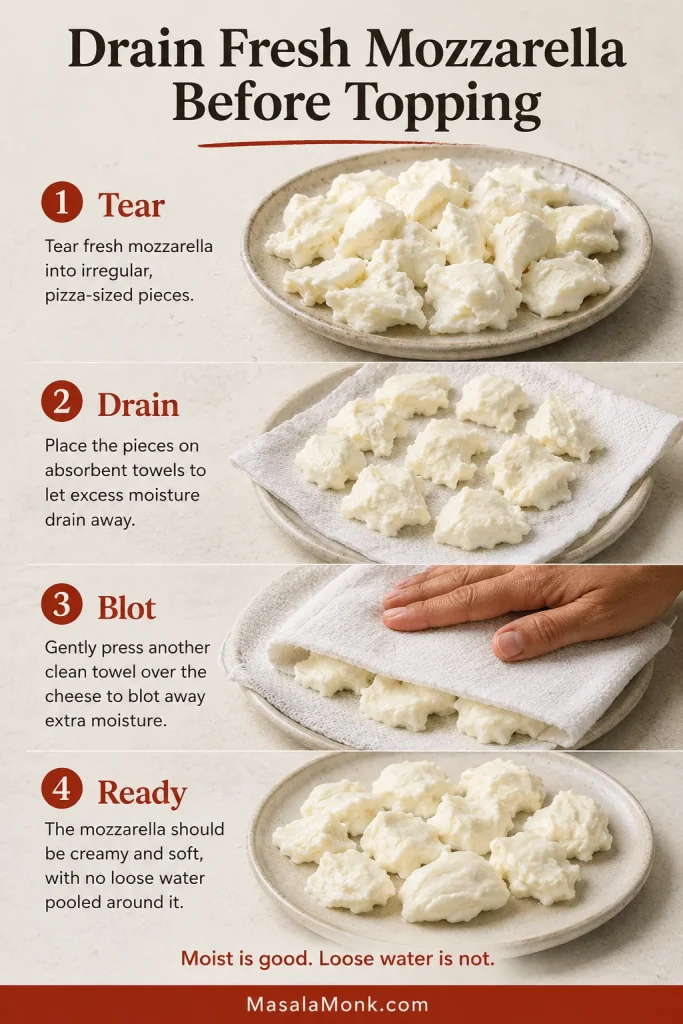
Particularly wet cheese may need 20–30 minutes between absorbent towels. During a bake longer than about 12 minutes, add fresh mozzarella for the final 3–4 minutes or use low-moisture mozzarella from the beginning.
How to Shape, Top and Transfer the Pizza
Once the tomato and mozzarella are ready, the challenge shifts from moisture to movement: shaping the dough and getting it onto the hot surface without losing the rim.
Stretch without crushing the rim
Press from the center outward while leaving a ¾-inch / 2 cm border untouched. Rotate the dough as you work, then lift it over the backs of your hands and allow gravity to widen the center.
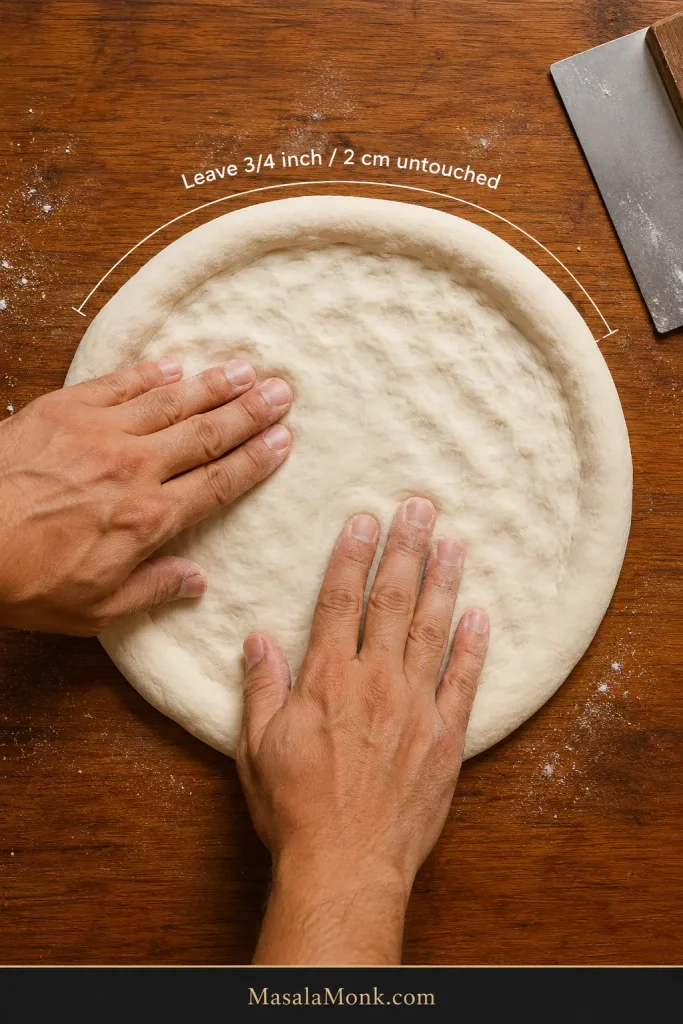
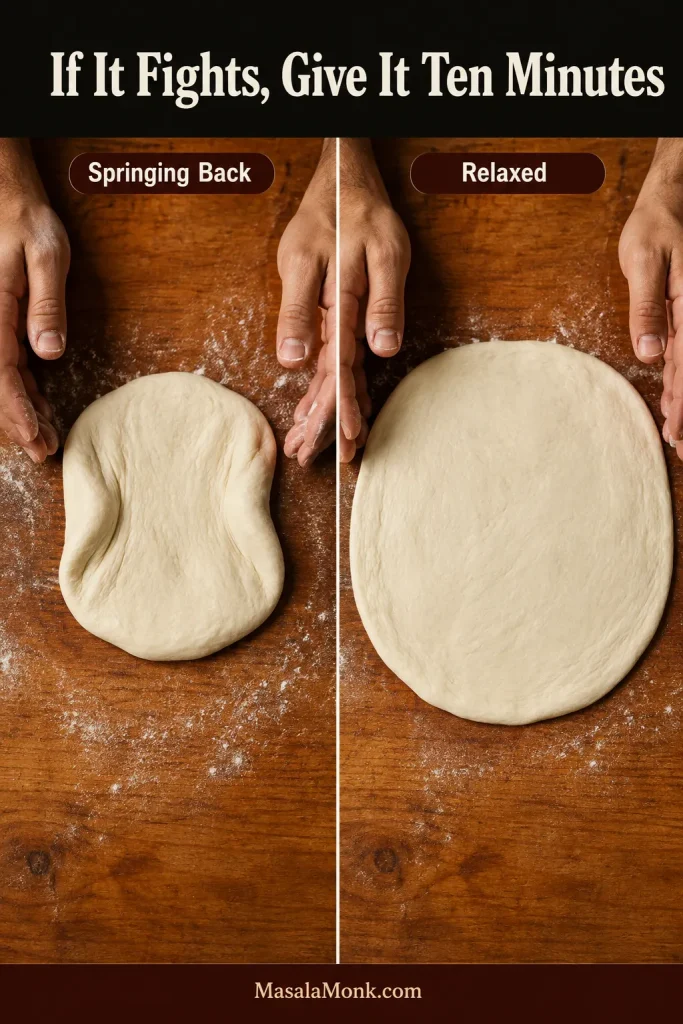
Stop before the middle becomes fragile. If the dough keeps pulling back, cover it and wait another 10–15 minutes. An oval is not a failed pizza. An even center and intact rim matter more than a perfect circle.
Use a peel, board or parchment
For a peel or board, dust lightly and shake the shaped dough before topping. It should move as one piece. Work a dough scraper beneath any stuck patch, add a pinch of flour or semolina and test the slide again.
For parchment, shape and top the pizza directly on a trimmed sheet rated for your oven temperature, then transfer the paper with the pizza. Remove it before using the broiler.
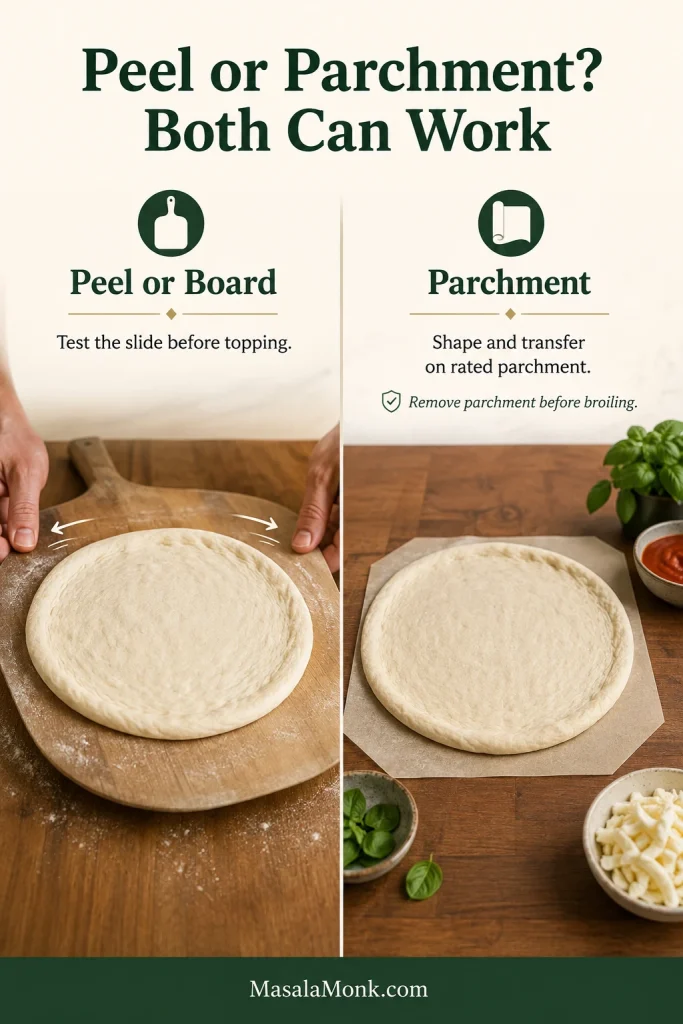
A heavy layer of loose flour burns quickly on a steel, stone or hot sheet and can leave the underside bitter.
Keep the toppings light
Spread the tomato thinly enough that a little dough remains faintly visible. Scatter the mozzarella instead of creating a continuous blanket, and give the center the lightest topping.
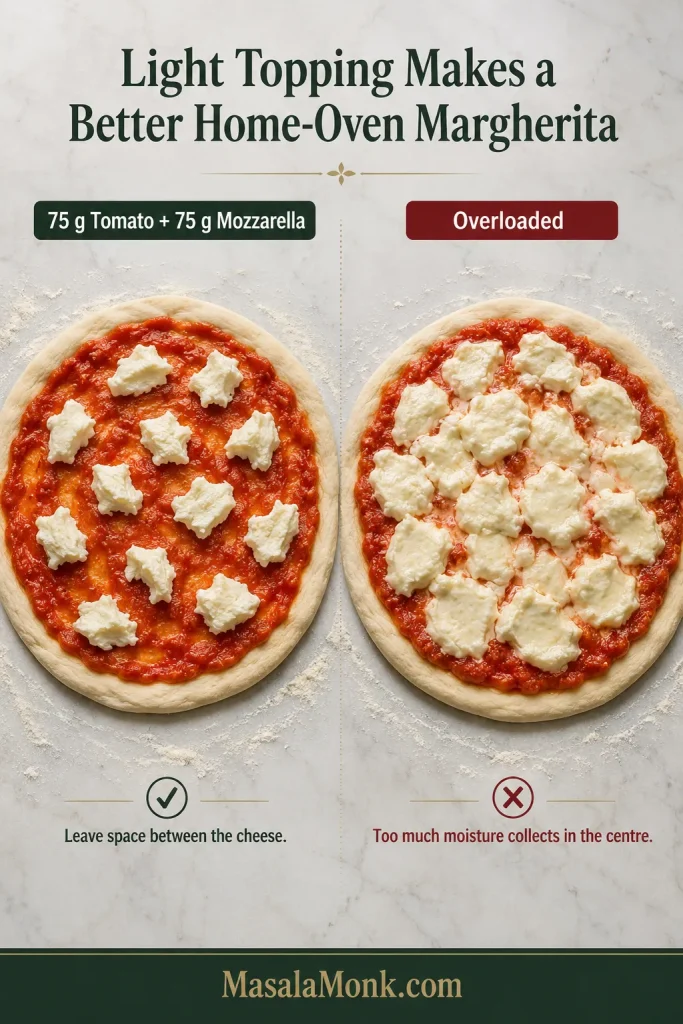
If using a peel or board, give it one final gentle shake after topping. If the pizza moves as one piece, transfer it immediately.
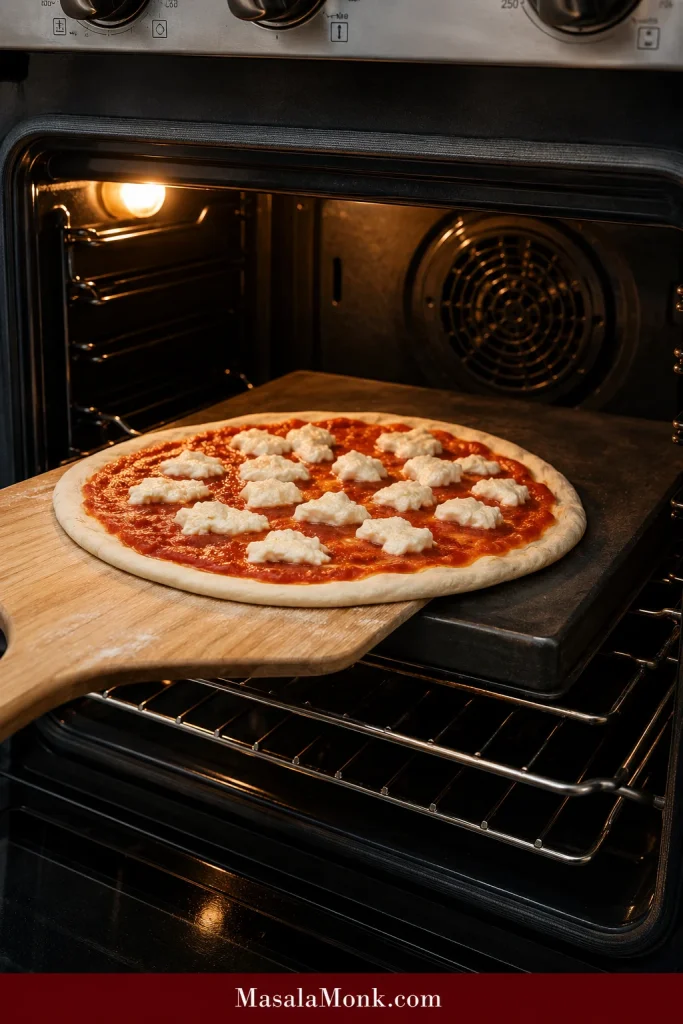
How to Bake Margherita Pizza in Your Oven
The cheese may look ready before the base is. Treat the times below as your first check rather than a guaranteed finish, then lift an edge and trust what you see underneath.
| Baking setup | Additional heating after oven reaches temperature | First check | Common finish range |
|---|---|---|---|
| Steel at 500–550°F / 260–288°C | 25–30 minutes | 5 minutes | 6–8 minutes |
| Stone at 500°F / 260°C or hotter | 30–45 minutes, or manufacturer guidance | 7 minutes | 8–10 minutes |
| Inverted sheet at 475–500°F / 245–260°C | 15–20 minutes | 9 minutes | 10–13 minutes |
| Inverted sheet at 450°F / 230°C | 20–25 minutes | 11 minutes | 12–16 minutes |
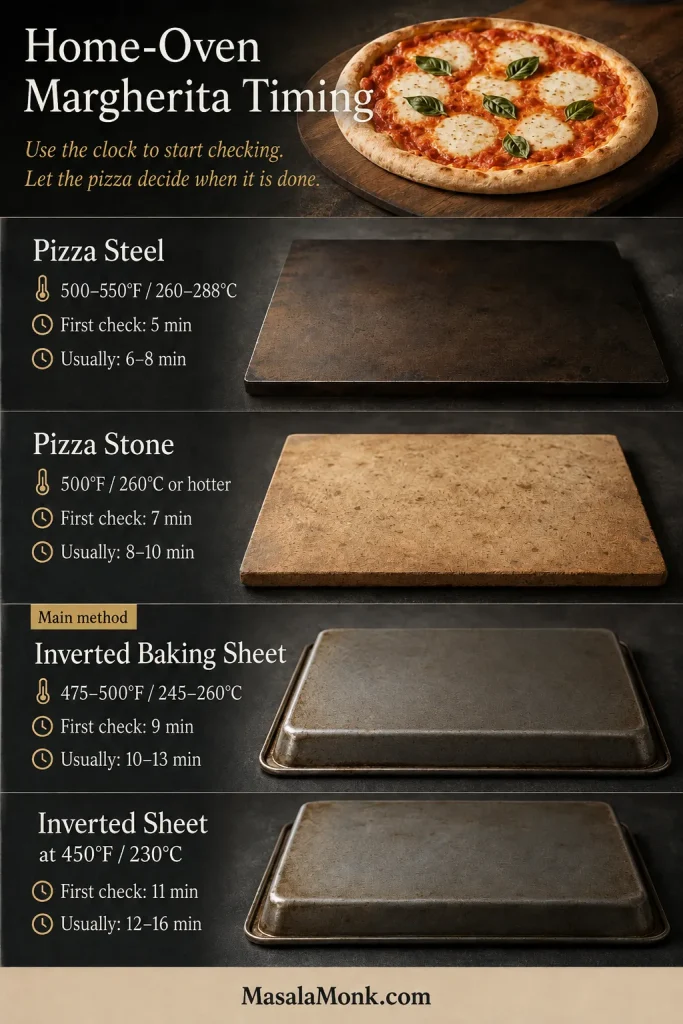
On a smaller screen, scroll sideways to compare the baking setups.
Surface thickness and oven cycling affect both preheat and recovery. Follow the manufacturer’s guidance when a steel or stone requires longer.
Inverted sheet, stone or steel
The inverted sheet removes the raised rim that would otherwise block the transfer. Use a heavy plain metal sheet rated for your oven temperature.
A steel transfers heat fastest, giving the base deeper color while the center remains flexible. A stone heats more gently and recovers more slowly. Start with the surface in the lower third for stronger bottom heat; move it upward only when the underside consistently finishes before the rim.
When the base is ready but the rim remains pale, move the pizza—not the heavy baking surface—to an upper rack or broiler-safe tray. Remove any parchment, broil briefly and watch continuously.
Lower-temperature and fan ovens
At 450°F / 230°C, keep the sheet near the lower element and use low-moisture mozzarella or add fresh mozzarella near the end. Check the base around 11 minutes.
In a fan or convection oven, use the hottest setting allowed by the oven and baking surface. Moving air can color and dry the top faster, so check one or two minutes earlier.
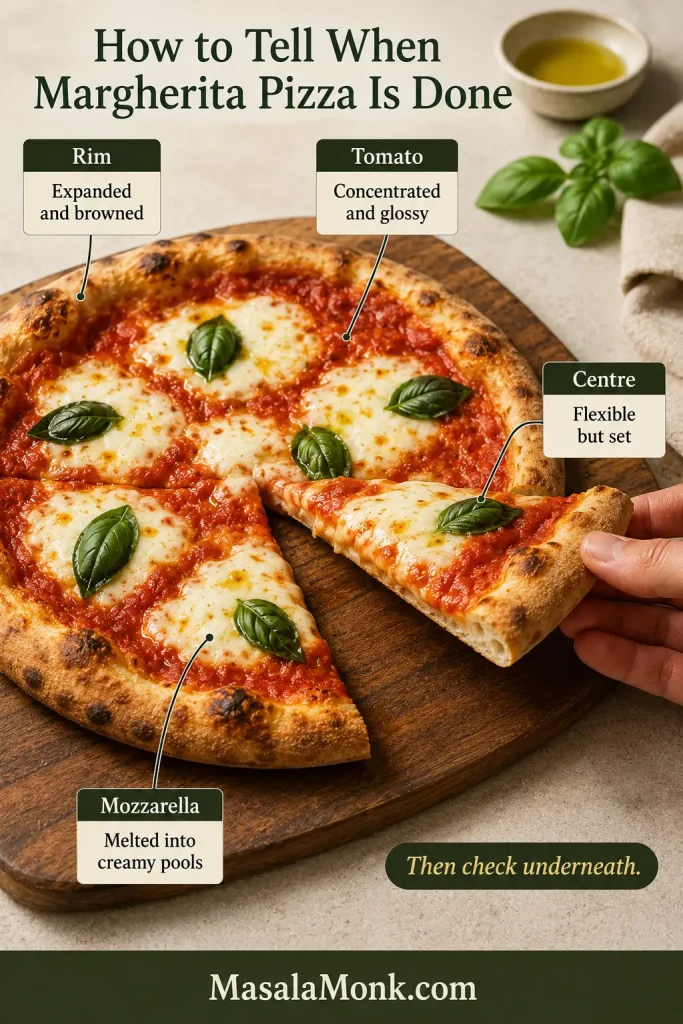
How to Tell When the Pizza Is Done
- Rim: expanded, set and browned in spots.
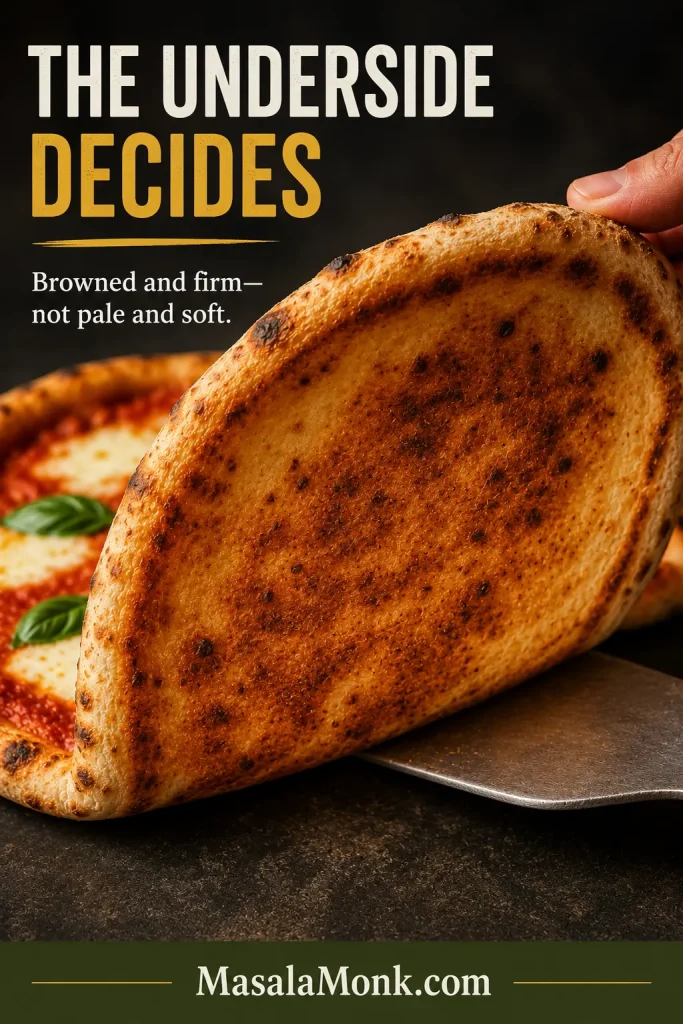
- Underside: golden to deep brown with darker speckles rather than blond and soft.
- Tomato: concentrated and glossy without a visible pool of liquid.
- Mozzarella: melted into separate creamy pools.
- Center: flexible but structurally set, with no gummy line beneath the tomato.
Lift one edge and look underneath. A properly heated surface should have turned the base from pale and floury to browned and firm enough to support the center.
Use what that pizza shows you before launching the second. A pale base needs a longer surface recovery; a wet center needs less moisture or later-added cheese.
Pizza not matching these cues? Jump to troubleshooting →
Margherita Pizza With Fresh Tomatoes
Fresh tomatoes should replace most or all of the canned tomato rather than sit over a complete sauce layer. Sauce, juicy tomato slices and fresh mozzarella together can overwhelm a slower home bake.
Choose ripe plum, Roma or another meaty tomato. Slice it about ⅛ inch / 3 mm thick, remove loose seed gel from very juicy fruit, lightly salt the slices and leave them on absorbent towels for 10–15 minutes. Blot both sides before weighing and topping.
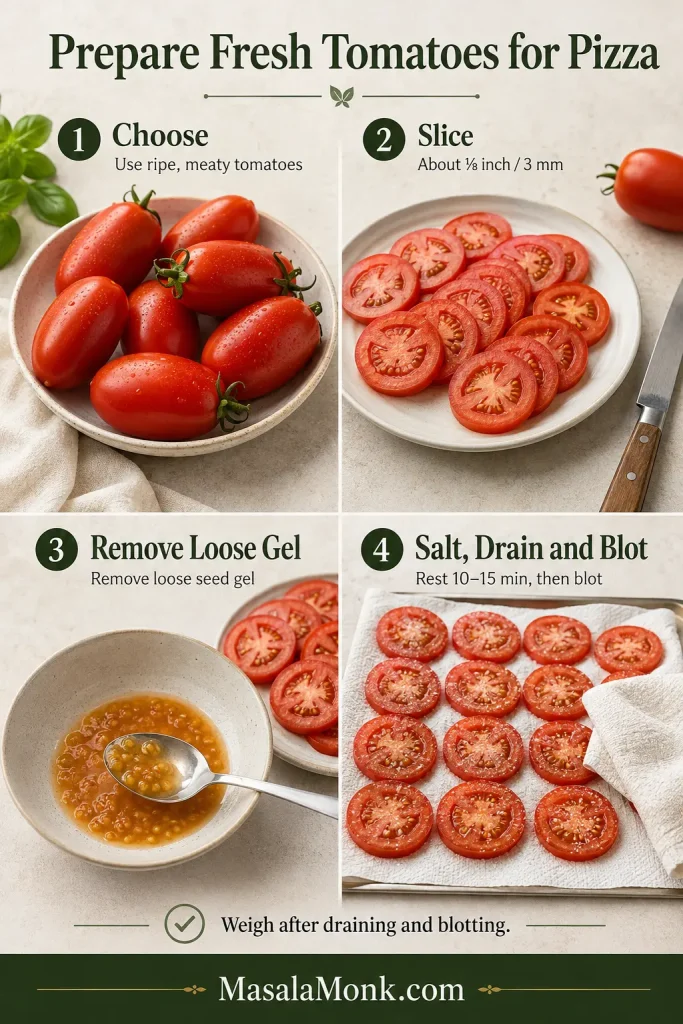
For one 12-inch pizza: use about 140 g / 5 oz prepared fresh tomato, weighed after removing loose seed gel and blotting; 65 g / about 2¼ oz well-drained mozzarella; 5–6 basil leaves; and 1 teaspoon olive oil. The tomato weight is higher because these are drained slices of flesh rather than a thin layer of crushed sauce.
Place halved cherry tomatoes cut-side up so more of their liquid can evaporate. Extra ripe tomatoes can become this tomato sauce from fresh tomatoes.
Margherita Pizza Troubleshooting
The first pizza is not a verdict. It is the clearest information your oven can give you. The color underneath, moisture in the center and feel of the crust usually reveal what needs to change.
| Problem | Save this pizza | Change the next one |
|---|---|---|
| Wet center | Move individual slices to a dry skillet over medium-low heat and check underneath every 30 seconds | Use drier cheese, less tomato or a longer sheet preheat |
| Pale underside | If the top can take more baking, leave the pizza on the hot surface a little longer; for finished slices, use the dry-skillet method | Preheat longer and let the surface recover fully |
| Bottom browning too fast | If the base is already dark but the rim needs color, move the pizza—not the hot baking surface—to an upper rack or broiler-safe tray for a brief finish | Reduce surface heat or shorten the initial bake |
| Dough springs back | Cover and wait 10–20 minutes | Allow the full final dough-ball rest |
| Center tears | Pinch the tear closed, or patch it with a small piece taken from an overly thick edge | Stop stretching sooner and watch the center thickness |
| Pizza sticks to the peel | Work a dough scraper beneath the stuck patch, add a pinch of flour or semolina and test the slide again | Prepare toppings first and test the dough before topping |
| Toppings slide when sliced | Rest the pizza for another minute before cutting again | Reduce moisture and keep the center lightly topped |
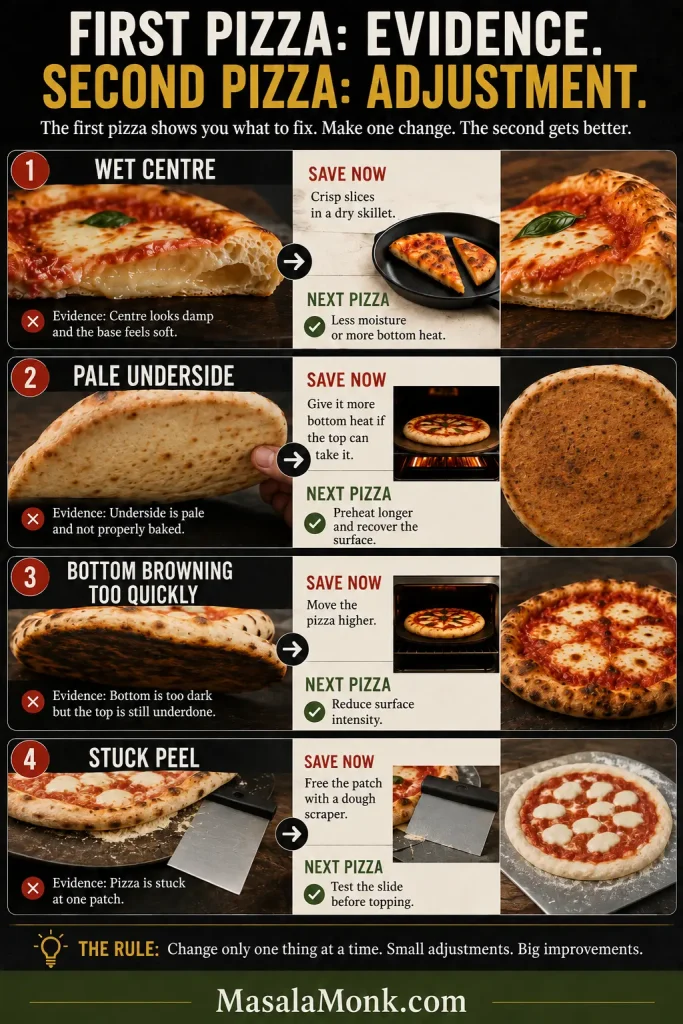
On a smaller screen, scroll sideways to compare the immediate rescue with the next-pizza correction.
Try again: return to the main recipe ↑
Shortcuts and Dough Options
The main pizza needs none of these adjustments. Use them when you need a faster dough, a smaller batch or a thinner crust.
Make one pizza: Halve the dough ingredients and use the per-pizza topping quantities already listed. Alternatively, make the full batch and freeze the second dough ball after the first rise and balling. Thaw overnight in the refrigerator, then leave it covered until relaxed enough to stretch.
Store-bought dough: Leave refrigerated dough covered until it feels soft and stretches without repeatedly springing back. Depending on the room and dough, this commonly takes 45–90 minutes.
Fast no-yeast dough: When there is no time for fermentation, this Greek yogurt pizza dough provides a faster homemade base.
Thin crust: Use about 220 g / 7¾ oz dough for one 12-inch pizza. Stretch the center more thinly, reduce the prepared tomato topping to 60 g / about ¼ cup and the fresh mozzarella to 60–65 g / about 2–2¼ oz, then check the underside earlier.
Make Ahead, Store and Reheat
Prepare the components ahead
- Tomato topping: refrigerate in a covered container for up to three days. Stir and drain any separated liquid before using it.
- Mozzarella: tear, drain and blot it several hours ahead. Refrigerate it in a covered container lined with a clean absorbent towel.
- Frozen dough: freeze individual balls after the first rise for up to three months. Thaw overnight in the refrigerator, then leave covered until relaxed enough to stretch.
- Assembled raw pizza: shape and top it only after the oven and baking surface are ready.
When the open tomatoes and remaining basil outlast pizza night, use them in a pot of tomato basil soup.
Store and reheat leftovers
Cool leftover slices before covering and refrigerate them in an airtight container for up to three days.
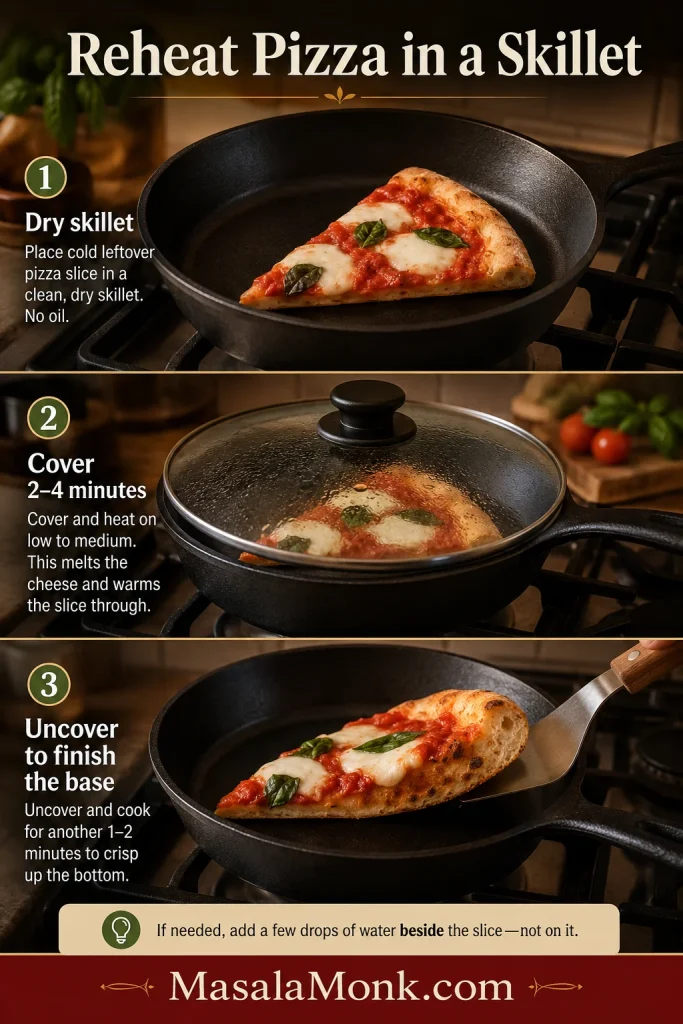
For the best reheating result, place a slice in a dry skillet over medium-low heat and cover for 2–4 minutes. Uncover briefly at the end. The base should crisp again while the mozzarella softens without becoming rubbery.
When the cheese needs help softening, add a few drops of water beside the slice—not on it—and cover again. An oven or air fryer also works at 375–400°F / 190–200°C; check after three minutes in an air fryer and five minutes in an oven.
Frequently Asked Questions
What is the difference between Margherita pizza and cheese pizza?
A typical cheese pizza often uses cooked sauce and a continuous layer of grated mozzarella. Margherita pizza keeps the tomato and cheese lighter, then finishes with fresh basil and olive oil.
What is the best mozzarella for Margherita pizza?
Well-drained fresh cow’s-milk mozzarella gives the classic creamy pools; low-moisture mozzarella is more forgiving in a slower oven. See how to match mozzarella to your bake.
Can I make Margherita pizza without a stone?
Yes. A thoroughly preheated heavy baking sheet turned upside down works well in a regular oven. See Choose Your Oven Setup for the sheet, stone and steel trade-offs.
Can I bake both pizzas at once?
Baking them one at a time gives each pizza the strongest bottom heat and most even result. Bake both together only when the oven has two thoroughly preheated surfaces and enough space for air to circulate; rotate or swap their positions if they color unevenly.
Is Margherita pizza vegetarian?
The pizza contains no meat, but some mozzarella and hard cheeses use animal-derived rennet. Check the label when you need strictly vegetarian cheese.
The First Slice Is Where the Restraint Makes Sense
Your pizza may be oval, and the launch may feel more hurried than graceful. Once the base is browned and the center holds, neither matters much.
Add the basil, wait a minute, then cut a slice. It should bend without dropping its tomato and cheese. The first slice tells the truth.