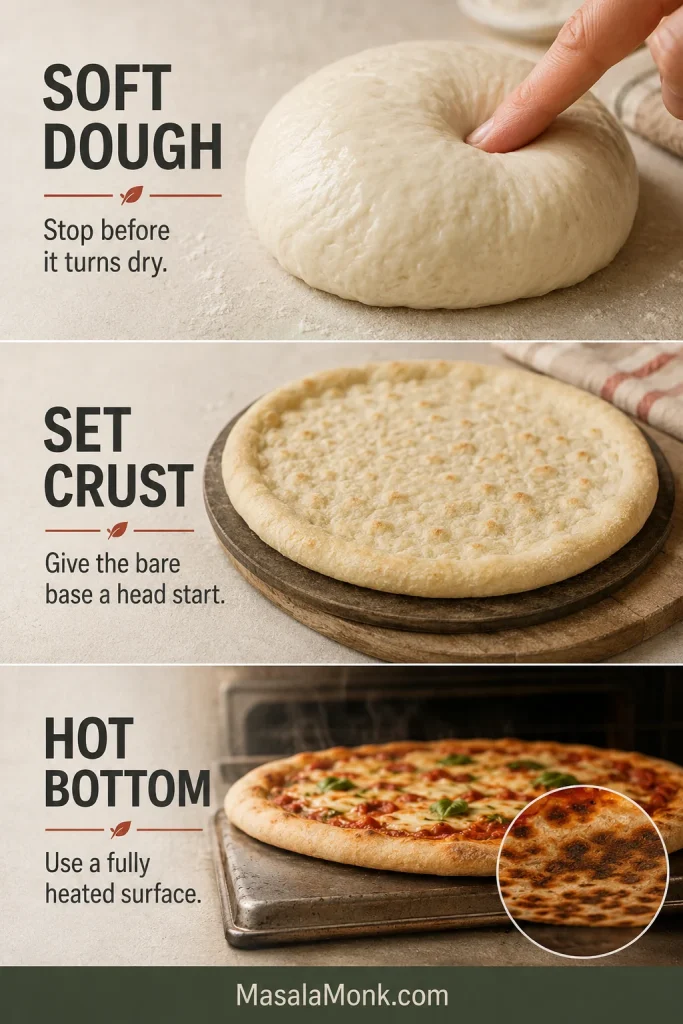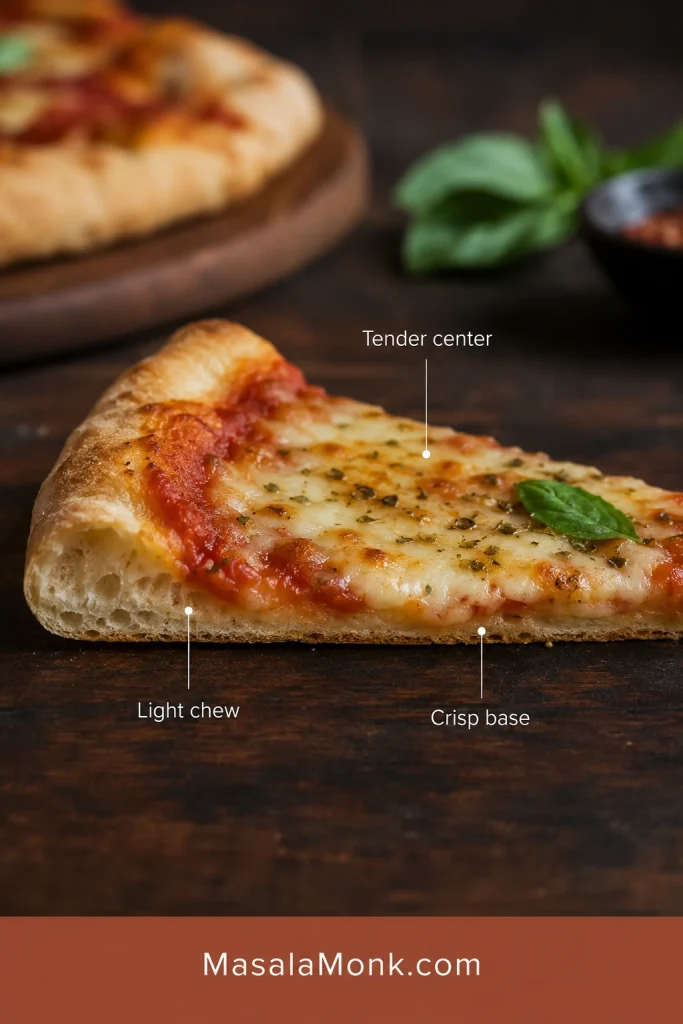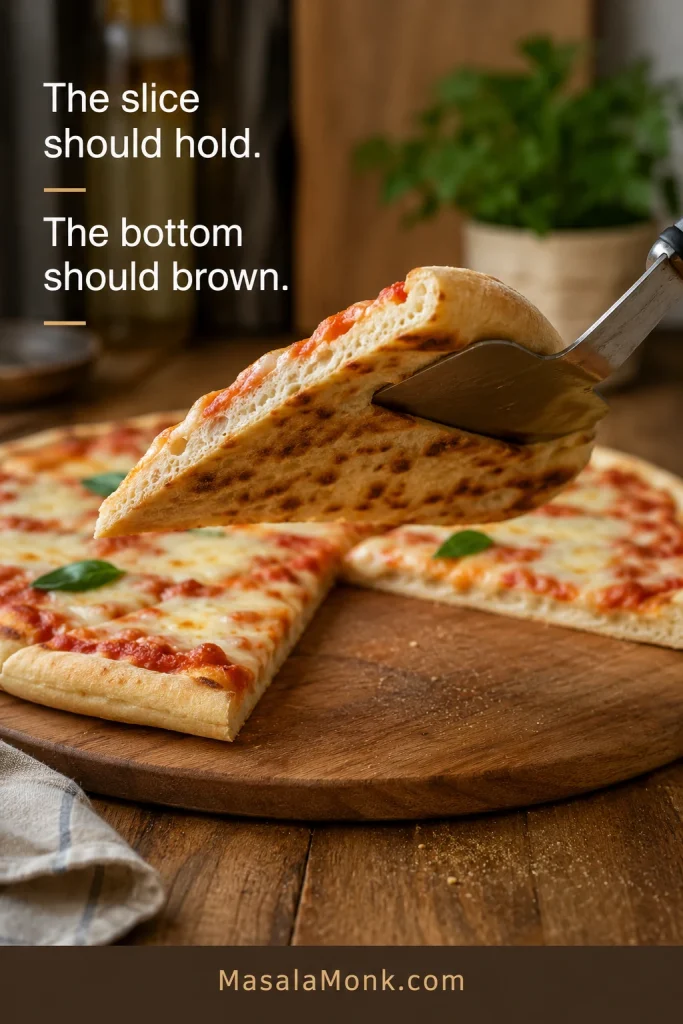
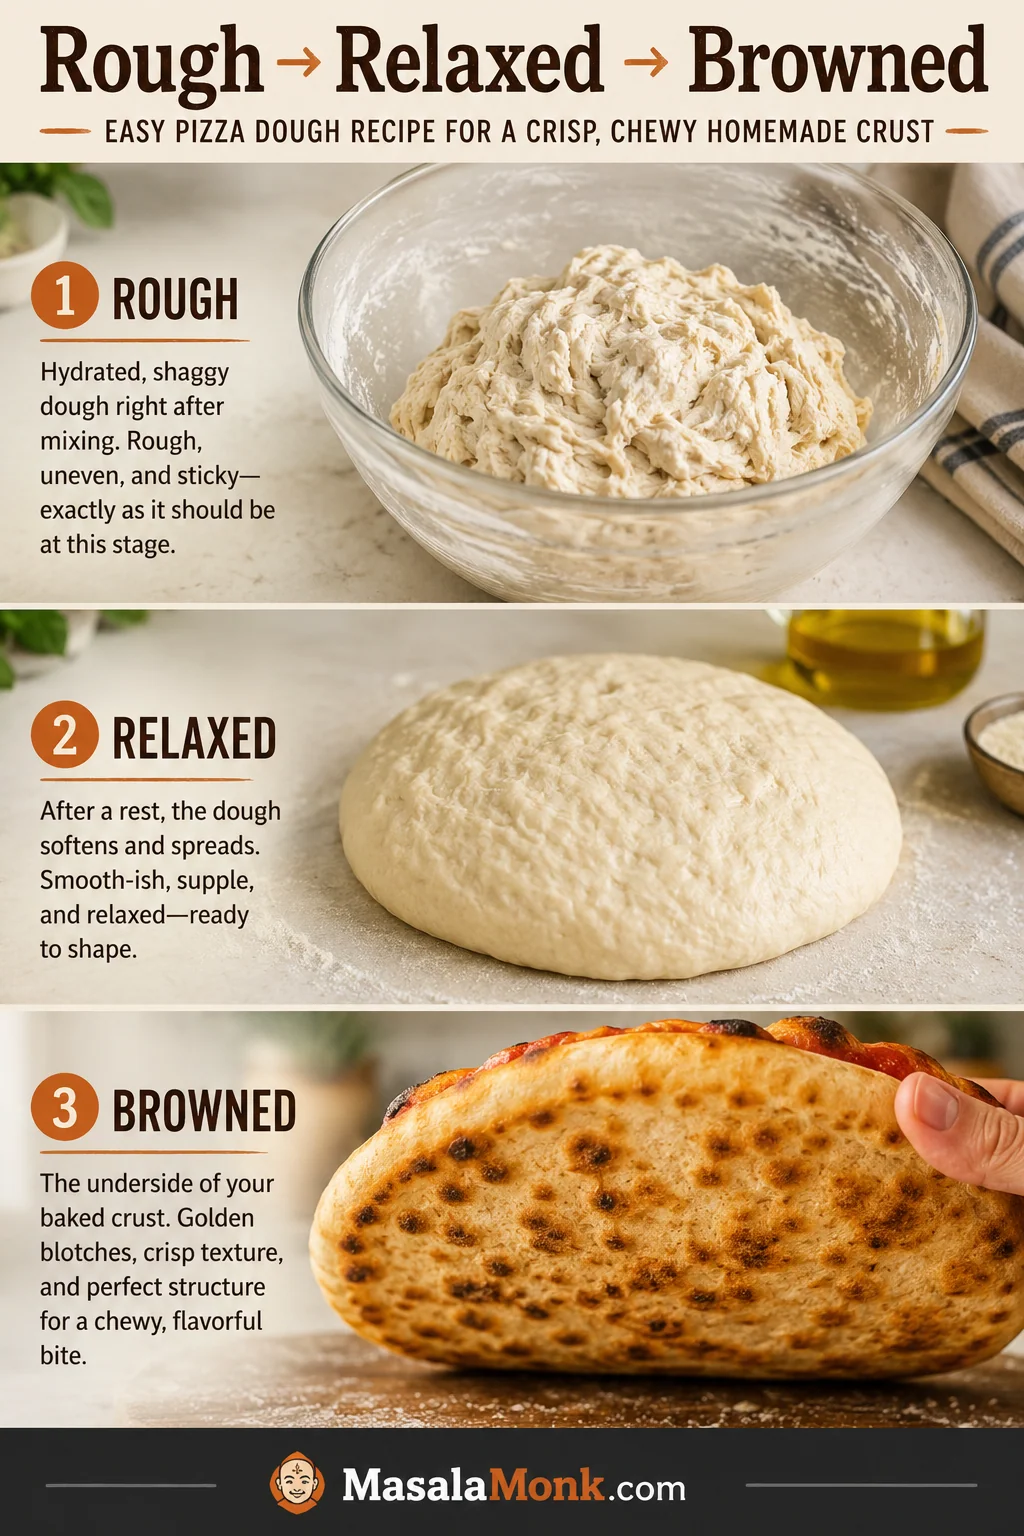
Good homemade pizza begins with contrast: a crisp browned base, a chewy rim and a center tender enough to bend without feeling raw. Lift an edge before judging the cheese. The underside should already be firm and freckled with brown.
This is dependable same-day pizza dough for a normal home oven and the equipment you already own. The recipe gives you a clear default; the guide helps you read the dough, adapt to your baking surface and recover common problems. It is an everyday home-oven crust, not a specialized high-heat Neapolitan formula.
The ingredients are simple. The transformation is what matters: a rough mixture becomes smoother under the hand, lighter during the rise and willing to widen after its final rest. When the dough resists, more force is rarely the answer.
Remember the sequence: rough after mixing, relaxed before stretching, browned underneath before slicing.
Start here
Quick Answer: Easy Pizza Dough for Two 12-Inch Pizzas
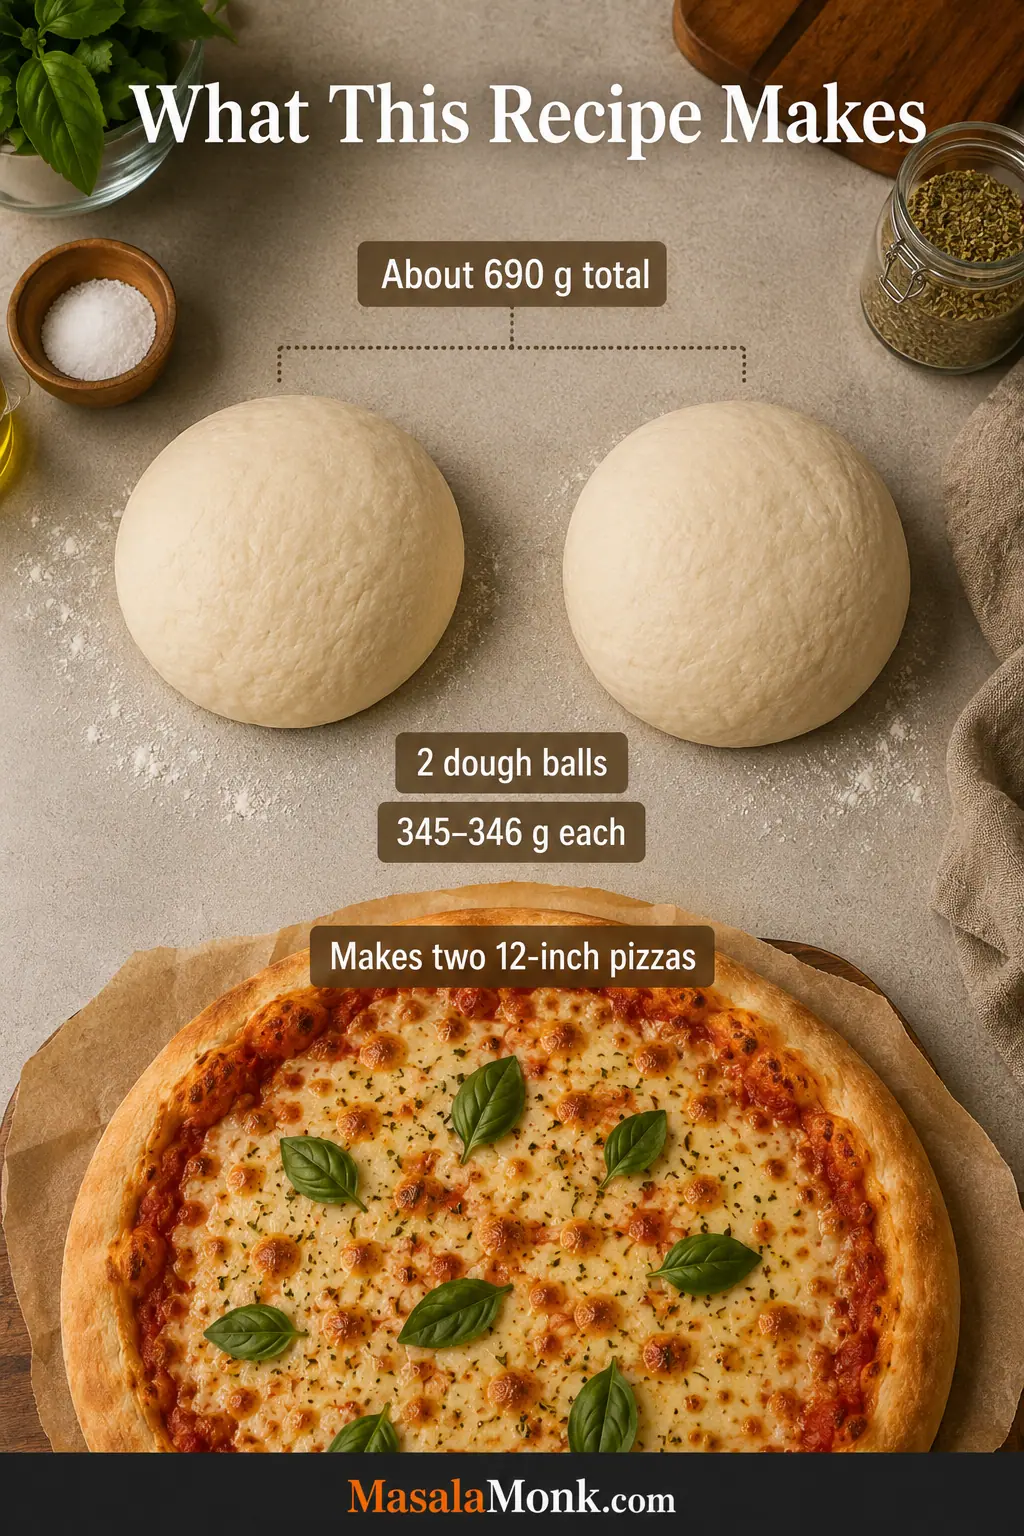
This recipe makes about 690 g / 24.3 oz dough, divided into two 345–346 g / 12.2 oz balls. Each makes a medium-thickness 12-inch crust with a defined chewy rim. Allow about three hours for the first pizza and up to 3¾ hours for both.
All-purpose flour and instant yeast are the easiest defaults. The dough should become smoother after kneading, fuller and lighter during the rise, then soft enough to widen after its final covered rest.
Bake at 500°F / 260°C, or the highest setting your oven and equipment safely allow. A steel or stone works fastest, while a sturdy pan or preheated uncoated sheet can still produce a properly browned base.
What “easy” means here: not instant, but understandable and forgiving. The ingredients are ordinary, a mixer is optional and the timing is honest. A little tackiness, an uneven circle or an extra minute underneath will not ruin the batch.
Same-Day, Slow Same-Day or Overnight Pizza Dough
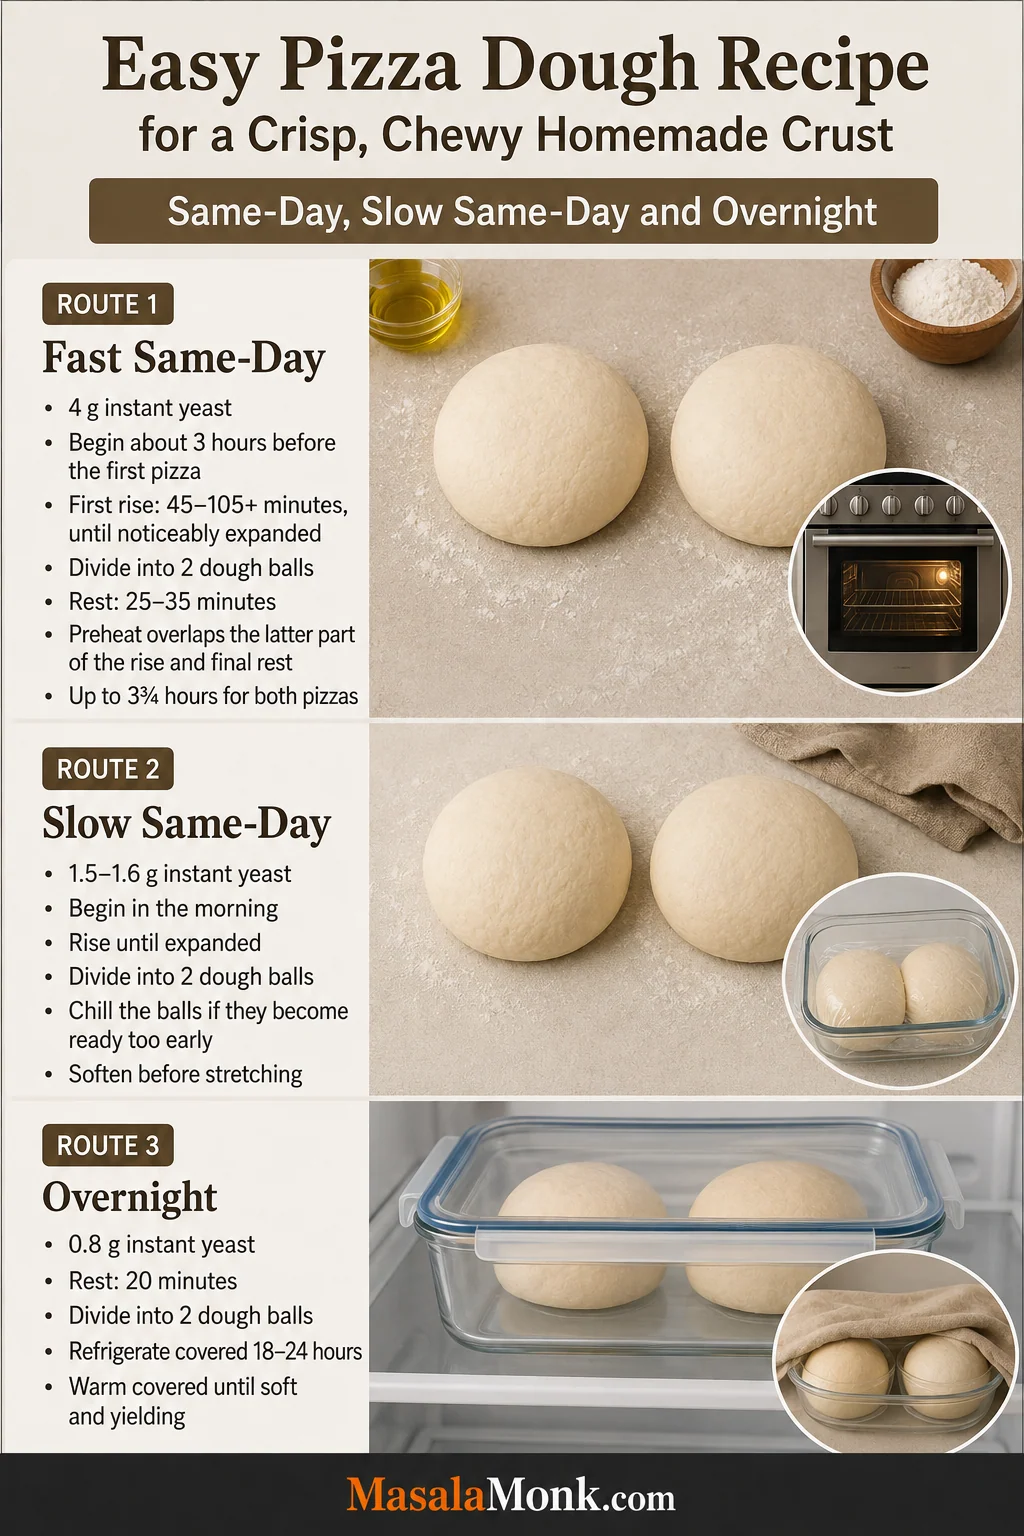
Making pizza tonight? Use the fast same-day route and go straight to the recipe. Choose slow same-day or overnight only when that timing fits your plans better.
| Route | When to begin | Yeast | Best reason to choose it |
|---|---|---|---|
| Fast same day | About 3 hours before the first pizza; up to 3¾ hours for both | 4 g instant or active dry yeast | The recipe below and the most practical route for pizza tonight |
| Slow same day | Morning | 1.5–1.6 g instant yeast | More flavor with no overnight planning |
| Overnight | Previous day | 0.8 g instant yeast | Make-ahead convenience and relaxed shaping |
How the Three Pizza Dough Timelines Work
Fast same day — the recipe below: Check the first rise around 75 minutes in a moderate kitchen or 45–50 minutes in a very warm one. Rest the divided balls for 25–35 minutes.
Slow same day: Use ½ teaspoon / 1.5–1.6 g instant yeast and cool water. Mix in the morning and rise until clearly expanded and aerated. Divide into balls; refrigerate if dinner is still several hours away, then let them soften and relax before stretching.
Overnight: Use ¼ teaspoon / about 0.8 g instant yeast. Rest for 20 minutes, divide and refrigerate the covered balls for 18–24 hours. Before stretching, leave them covered until the centers lose their firm chill and the dough yields instead of snapping back.
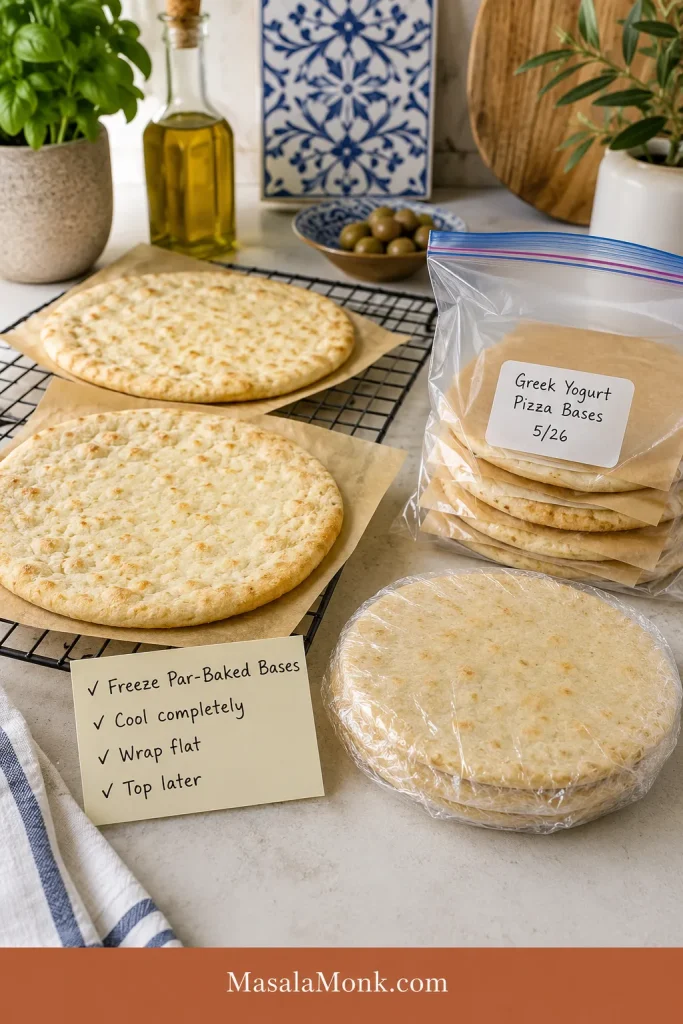
Need pizza in under an hour? This Greek yogurt pizza dough is the faster no-rise alternative.
Make it now
Easy Homemade Pizza Dough Recipe
A same-day dough for two medium-thickness 12-inch pizzas with a crisp base, chewy rim and soft center. Mix it by hand, in a stand mixer or in a food processor, then bake it on a steel, stone, pizza pan or preheated sheet.
Equipment
- Large mixing bowl
- Digital kitchen scale, strongly recommended
- Sturdy spoon or flexible dough scraper
- Bench scraper
- Stand mixer or food processor, optional
- Covered bowl and two covered dough-ball containers
- Baking steel, pizza stone, pizza pan or heavy uncoated baking sheet
- Pizza peel or parchment paper, used within the manufacturer’s temperature rating
Ingredients
| Ingredient | Metric weight | US volume |
|---|---|---|
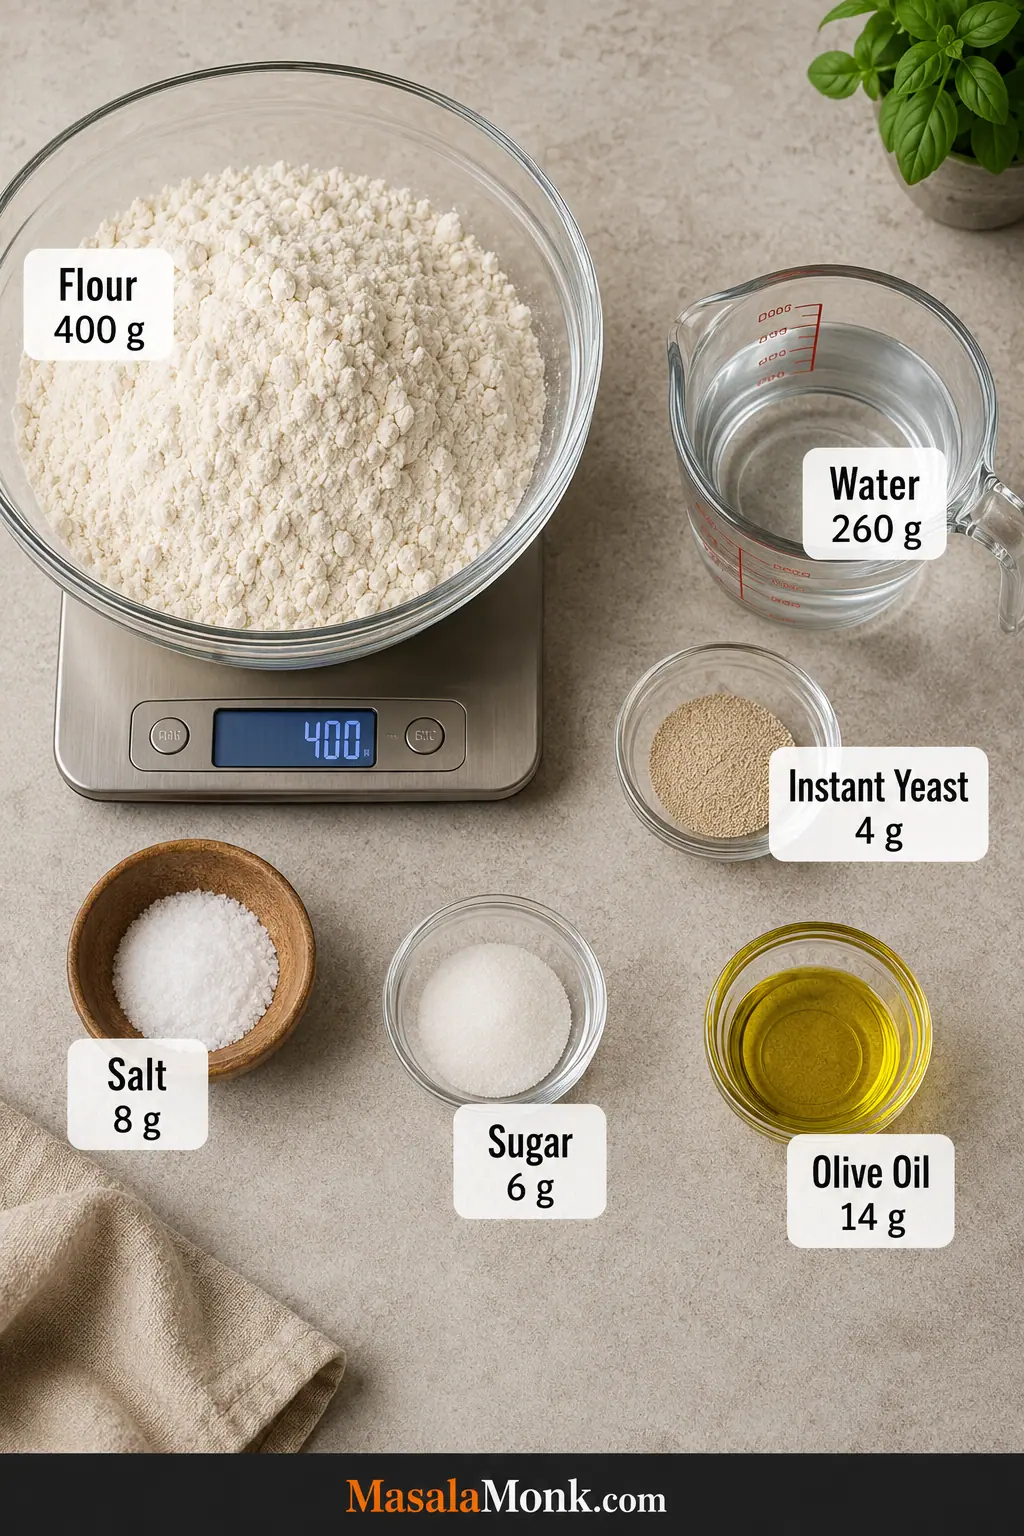
| Unbleached all-purpose flour | 400 g / 14.1 oz | About 3⅓ cups, spooned and leveled |
| Water | 260 g / 9.2 oz | About 1 cup plus 1½ tbsp; warm for hand or mixer, cool or room temperature for a food processor |
| Instant yeast | 4 g | About 1⅓ tsp |
| Fine sea salt | 8 g | About 1⅓ tsp. For salt, trust the weight |
| Granulated sugar | 6 g | About 1½ tsp |
| Olive oil | 14 g / 0.5 oz | 1 tbsp |
| Flour, fine semolina or rice flour for handling | As needed | Use lightly |
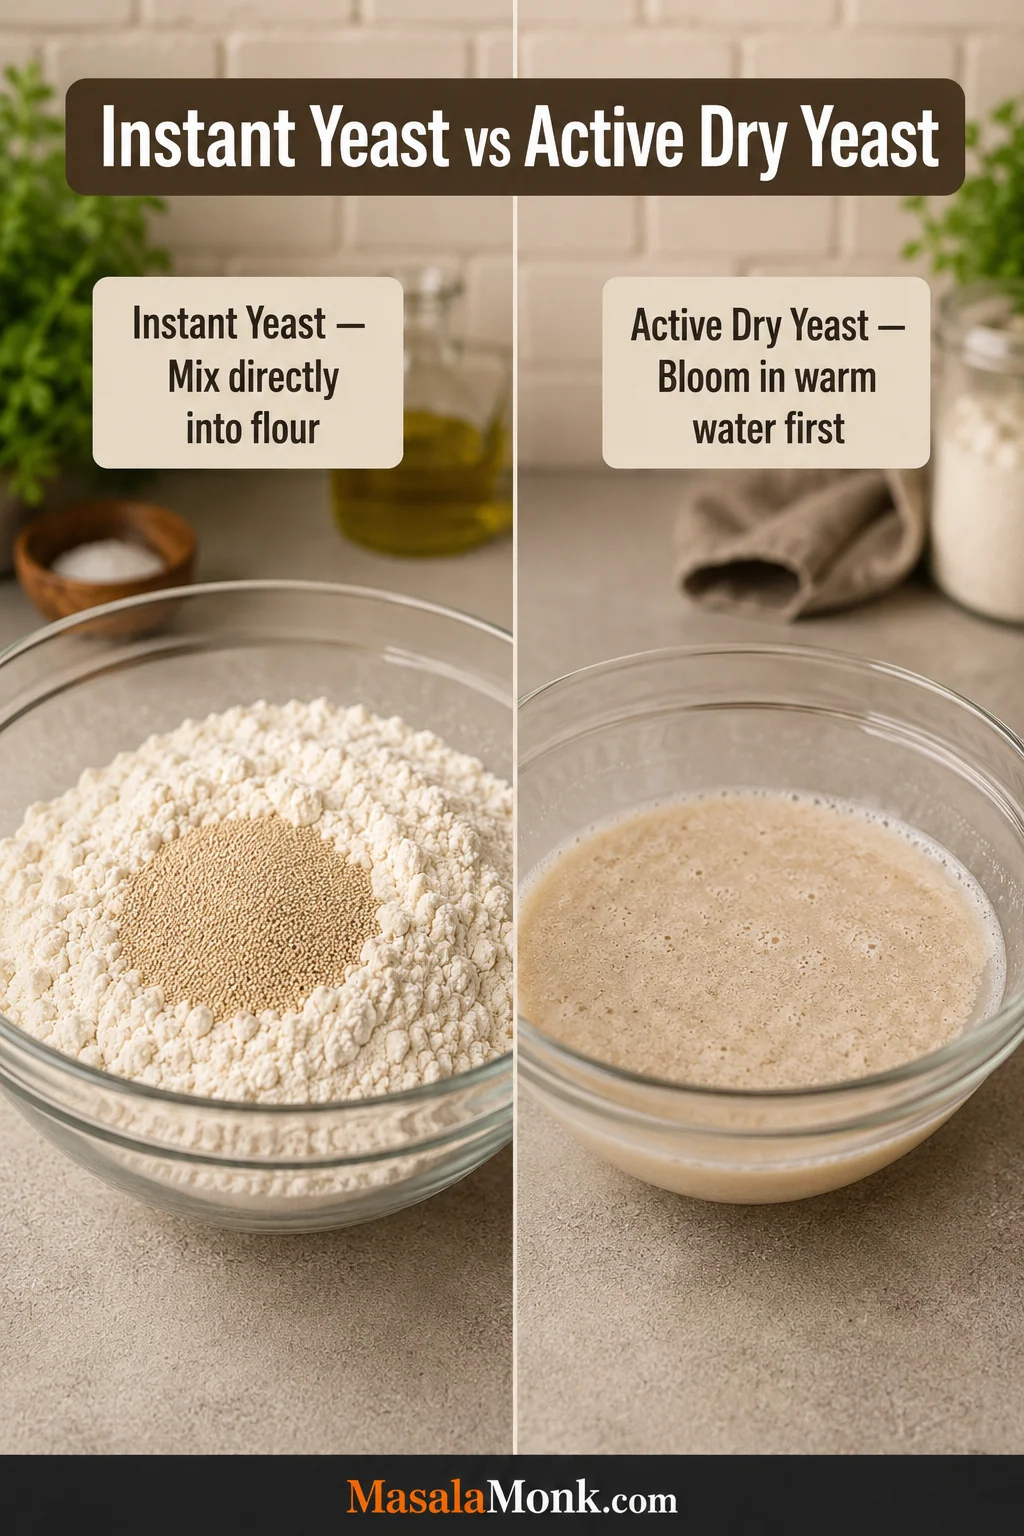
Using Active Dry Yeast
Use the same 4 g / about 1⅓ teaspoons. Stir it with the sugar into the warm water and leave for 5–10 minutes, until creamy or lightly foamy. Add the oil, then continue with the recipe. Allow extra rise time when needed.
Instructions
1. Mix Until No Dry Flour Remains
Combine the flour, instant yeast, sugar and salt in the bowl. Use warm water when mixing by hand or mixer, and cool or room-temperature water in a food processor. Add the olive oil, then stir until the mixture forms one rough mass with no large dry pockets.
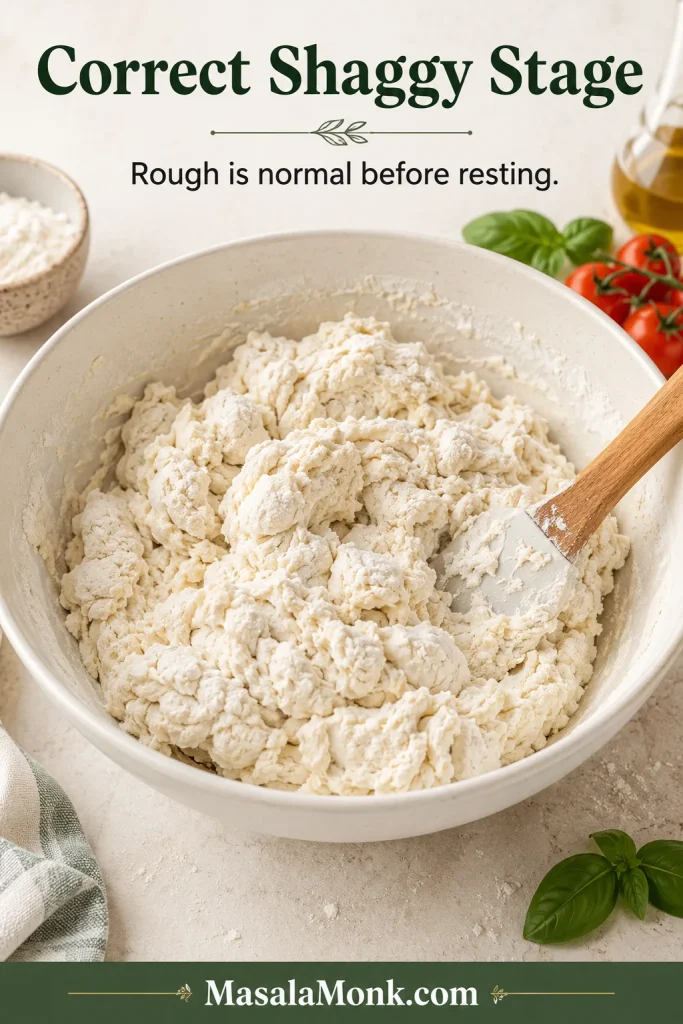
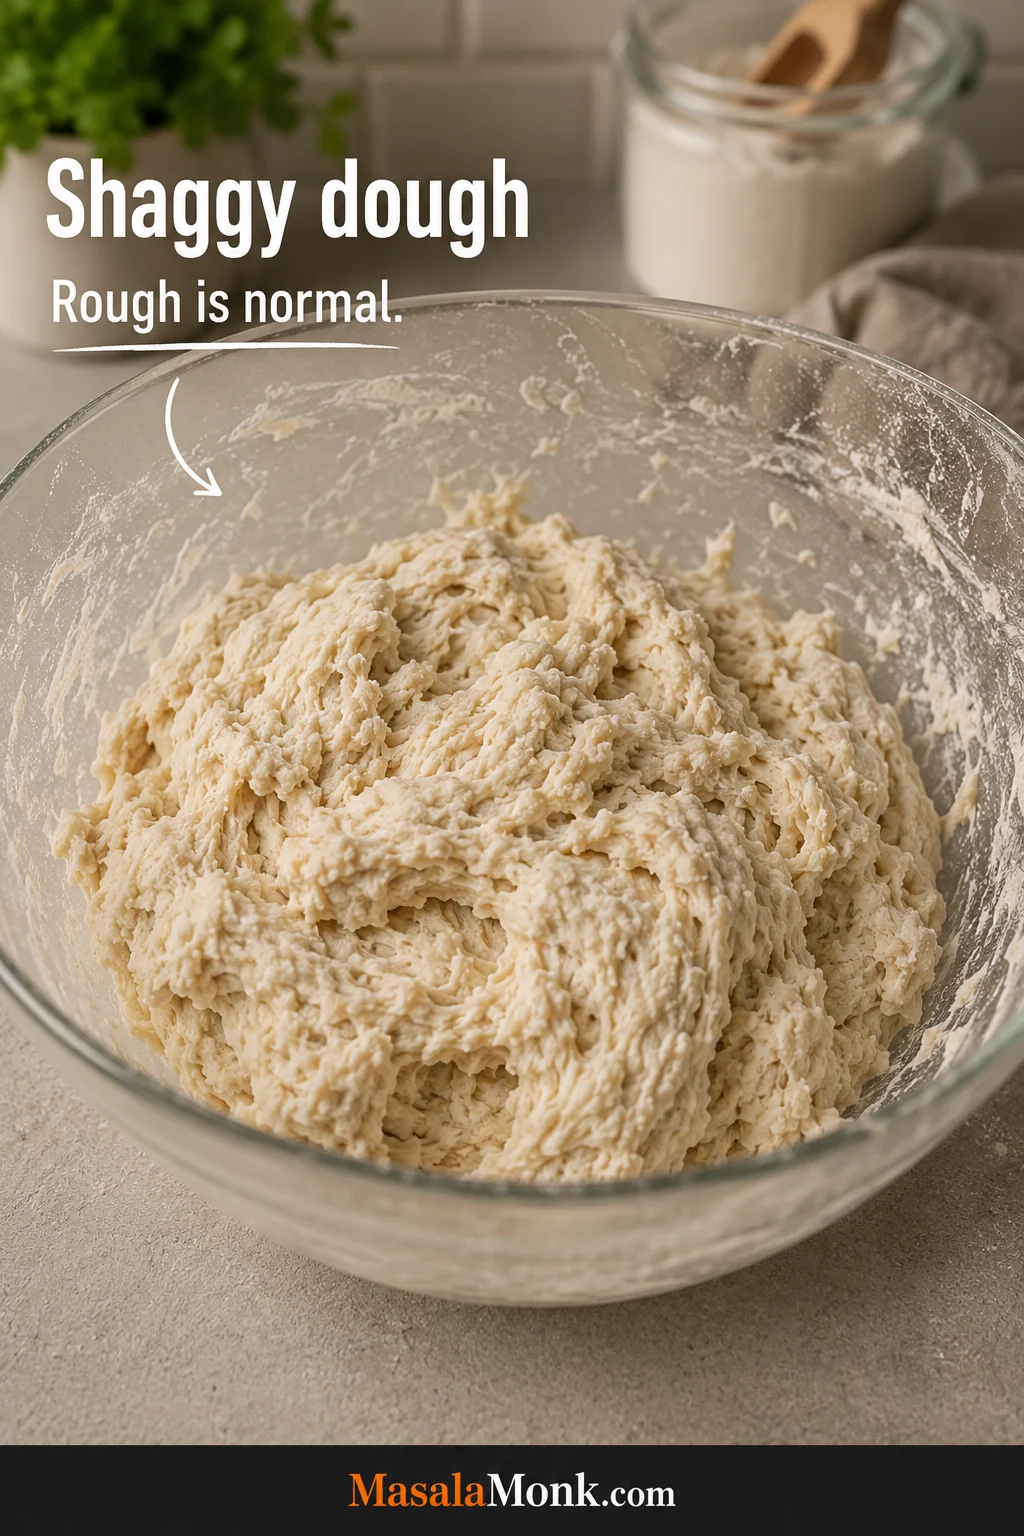
The dough should look shaggy, uneven and less promising than the finished result. The short rest and kneading will smooth it out. See what shaggy pizza dough looks like.
2. Cover and Rest for 10 Minutes
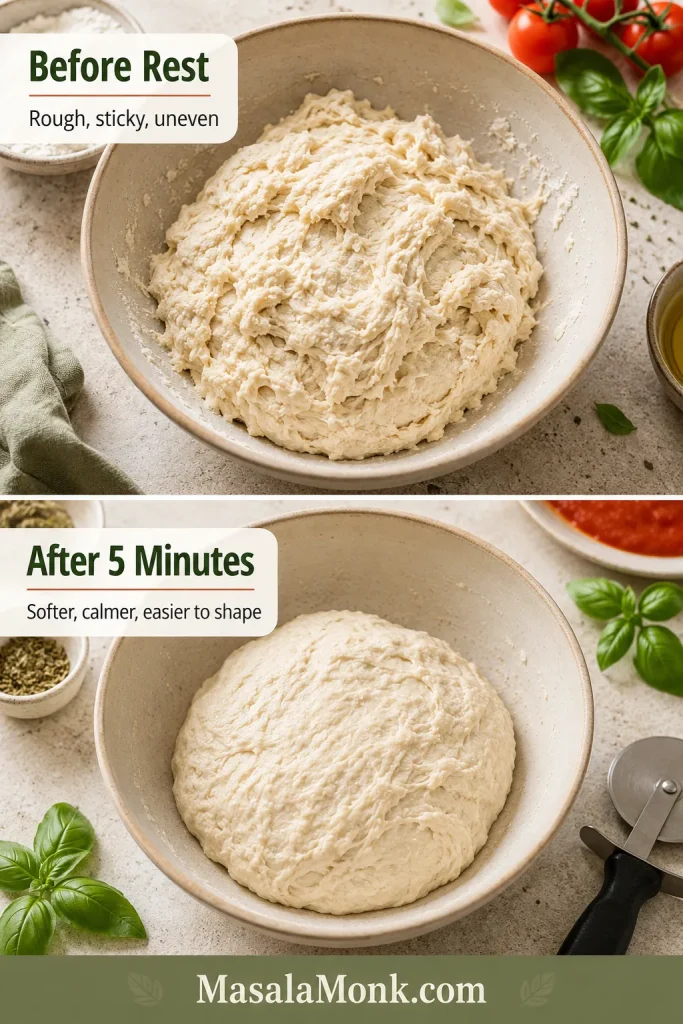
Leave the rough dough covered for 10 minutes. This gives the flour time to absorb water and often makes the dough much easier to handle.
3. Knead by Hand, Mixer or Food Processor
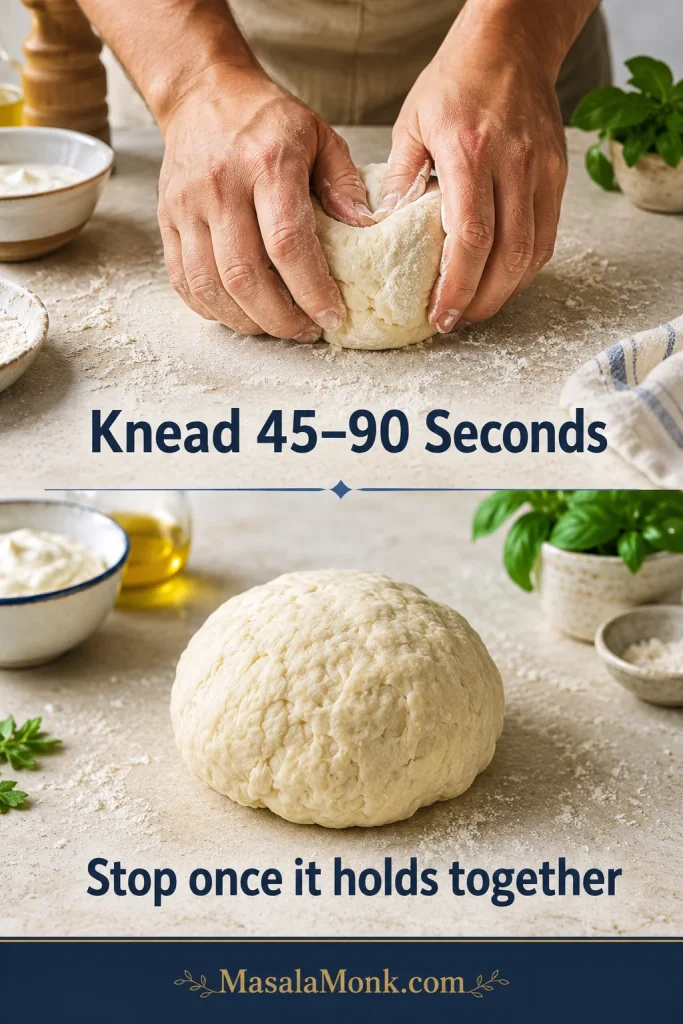
By hand: Knead for about 7–9 minutes. Push the dough away, fold it back and rotate. Use a bench scraper to lift sticking dough instead of covering the counter with flour.
By stand mixer: Use the dough hook on low to medium-low speed for about 5–7 minutes, stopping once to scrape the bowl if necessary.
By food processor: Use instant yeast and cool or room-temperature water. Pulse the dry ingredients, add the water and oil while running, then stop when the dough gathers. Process another 20–30 seconds; it should feel elastic, not hot. With active dry yeast, bloom it in 60 g warm water and add 200 g cool water.
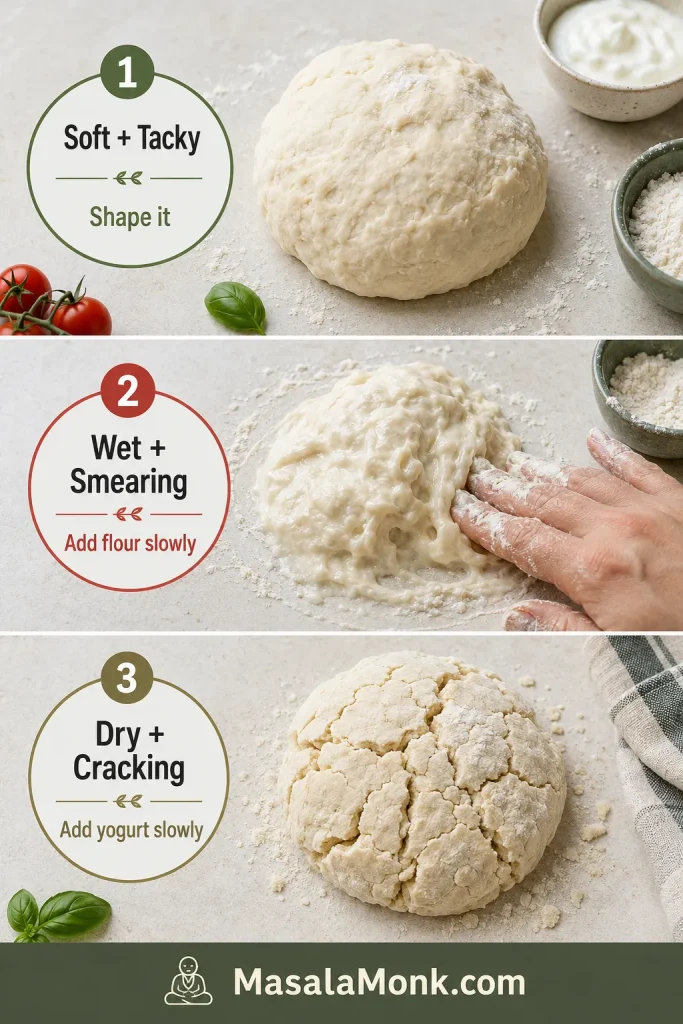
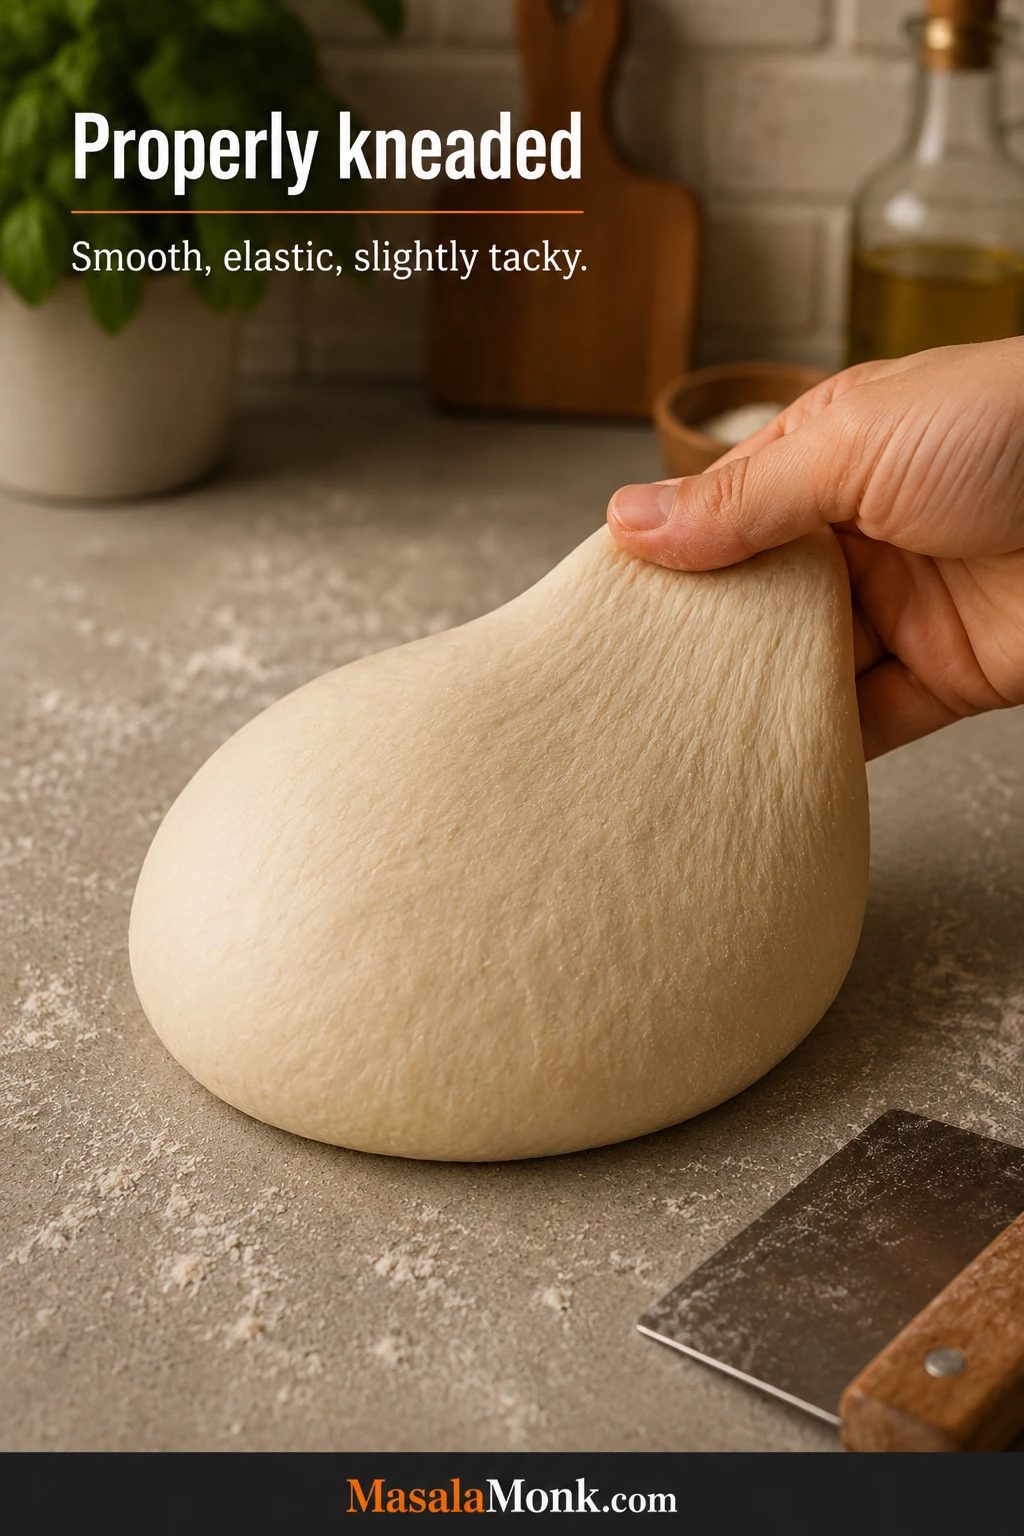
Whichever method you use, the rough mass should become smoother and more elastic beneath your hand. It should gather itself back together after a gentle press while retaining a slight tackiness. Dough that smears across your fingers still needs attention. See the properly kneaded dough cue.
4. Let the Dough Rise Until Ready
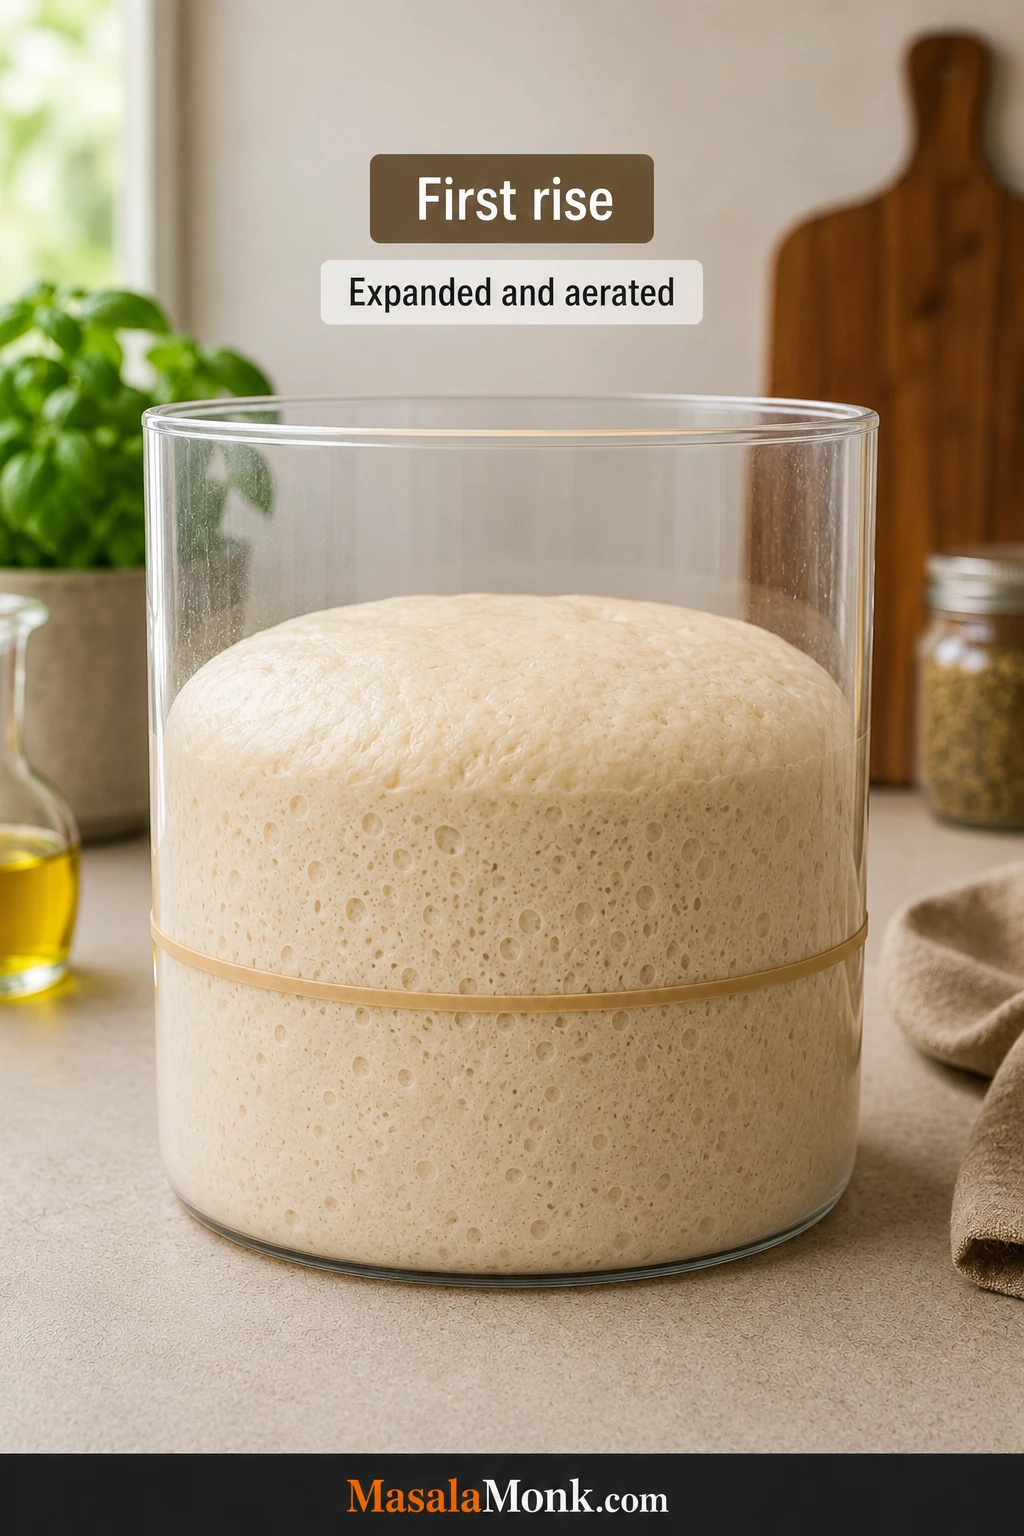
Shape the dough into a ball and place it in a lightly oiled bowl. Cover and leave it in a comfortably warm, draft-free place until it looks roughly doubled and visibly aerated, usually 75–105 minutes.
Warm kitchens move faster and cool rooms take longer. Look for a fuller, softly rounded dough with small bubbles beneath the surface. It should feel lighter, and a fingertip mark should ease back slowly. Compare underproofed, ready and overproofed dough.
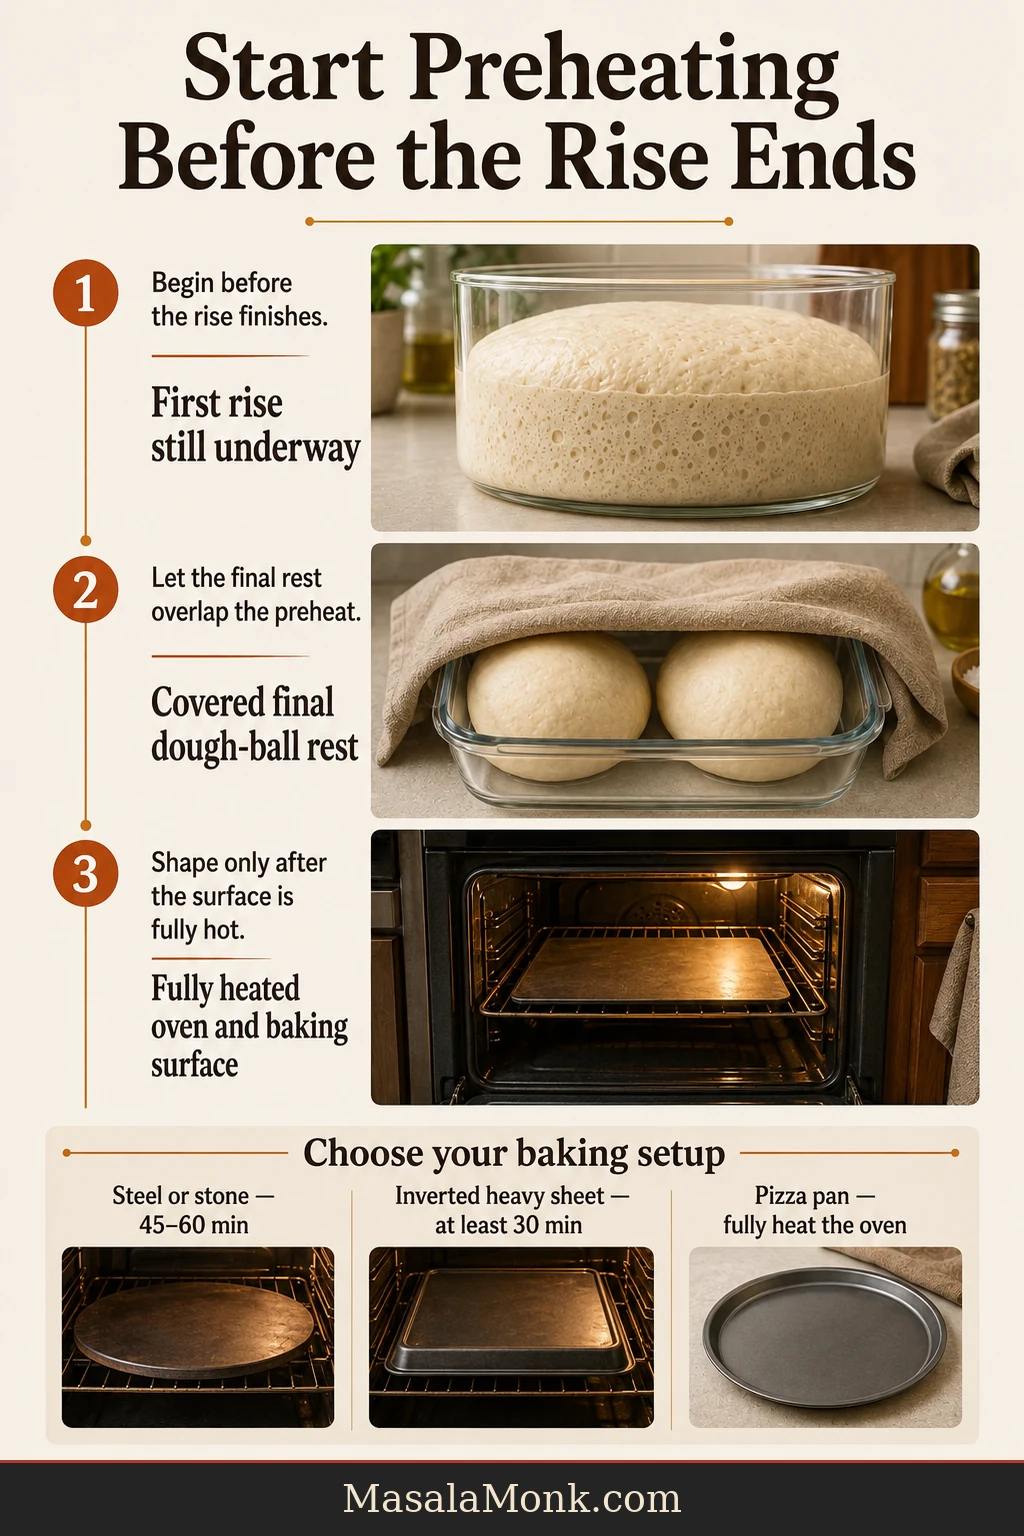
Start preheating before the rise ends. A steel or stone needs 45–60 minutes at full heat, while an inverted heavy sheet needs at least 30 minutes. Begin during the latter part of a moderate rise; in a very warm kitchen, start sooner. The preheat should overlap with the rise and final rest rather than begin after them.
5. Divide Into Two Dough Balls
Turn the dough onto a clean surface and divide it equally. Each ball will usually weigh 345–346 g / about 12.2 oz.
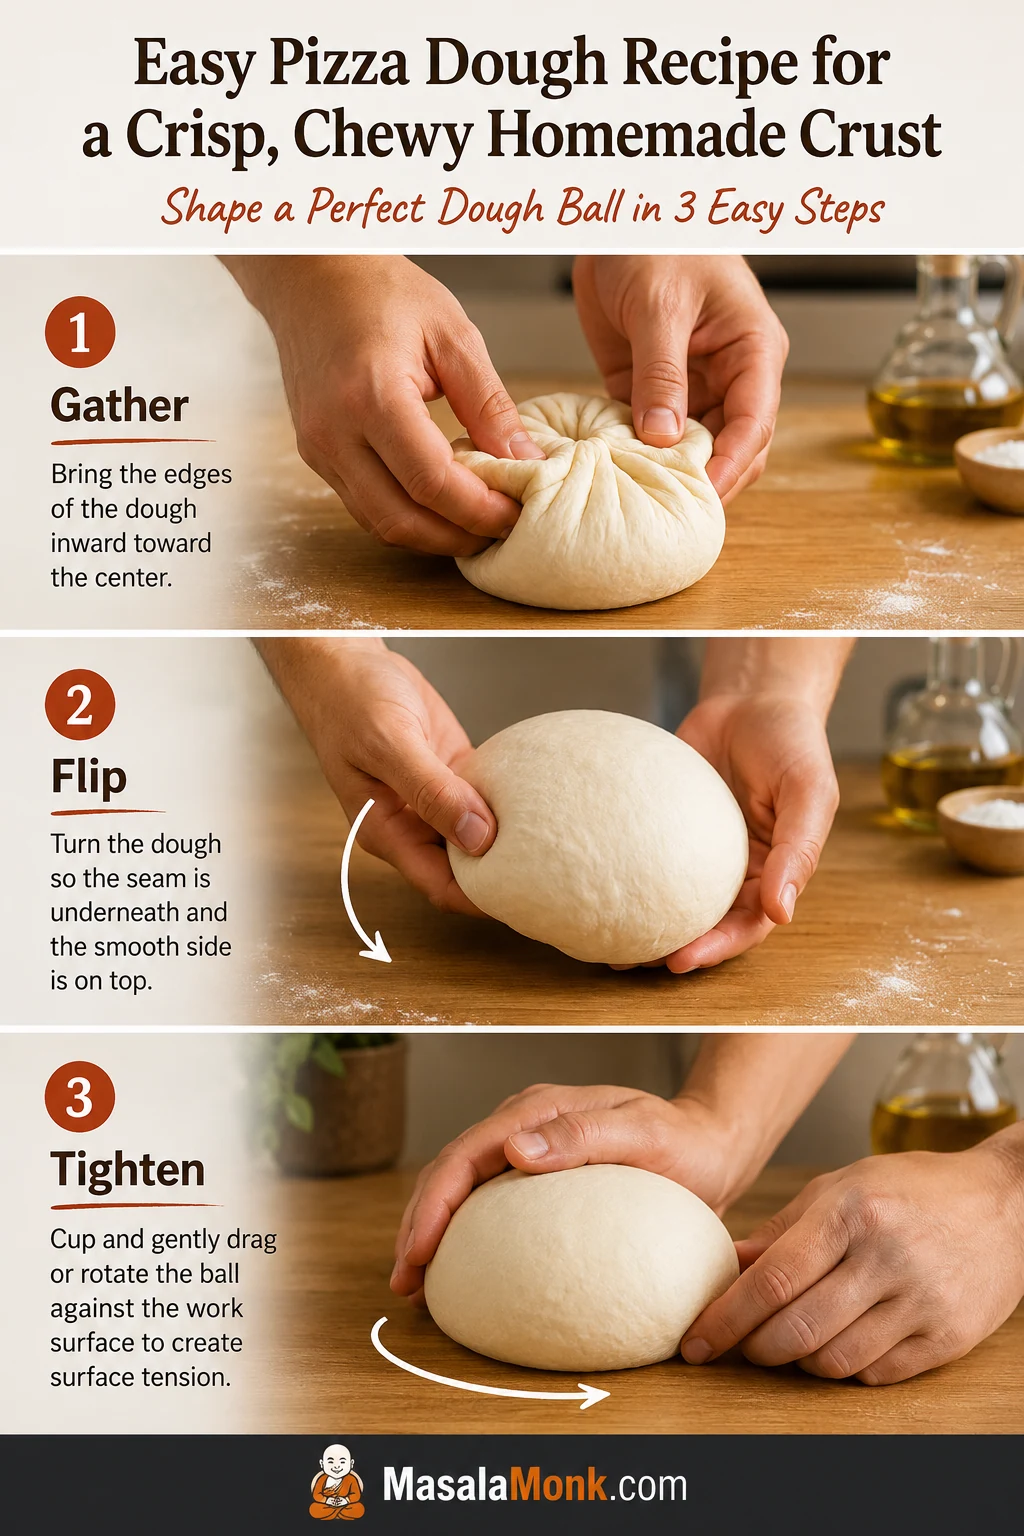
Bring the edges of each portion toward the center, turn it seam-side down and cup your hands around it. Drag it gently across the counter to tighten the surface without tearing it.
6. Cover and Relax for 25–35 Minutes
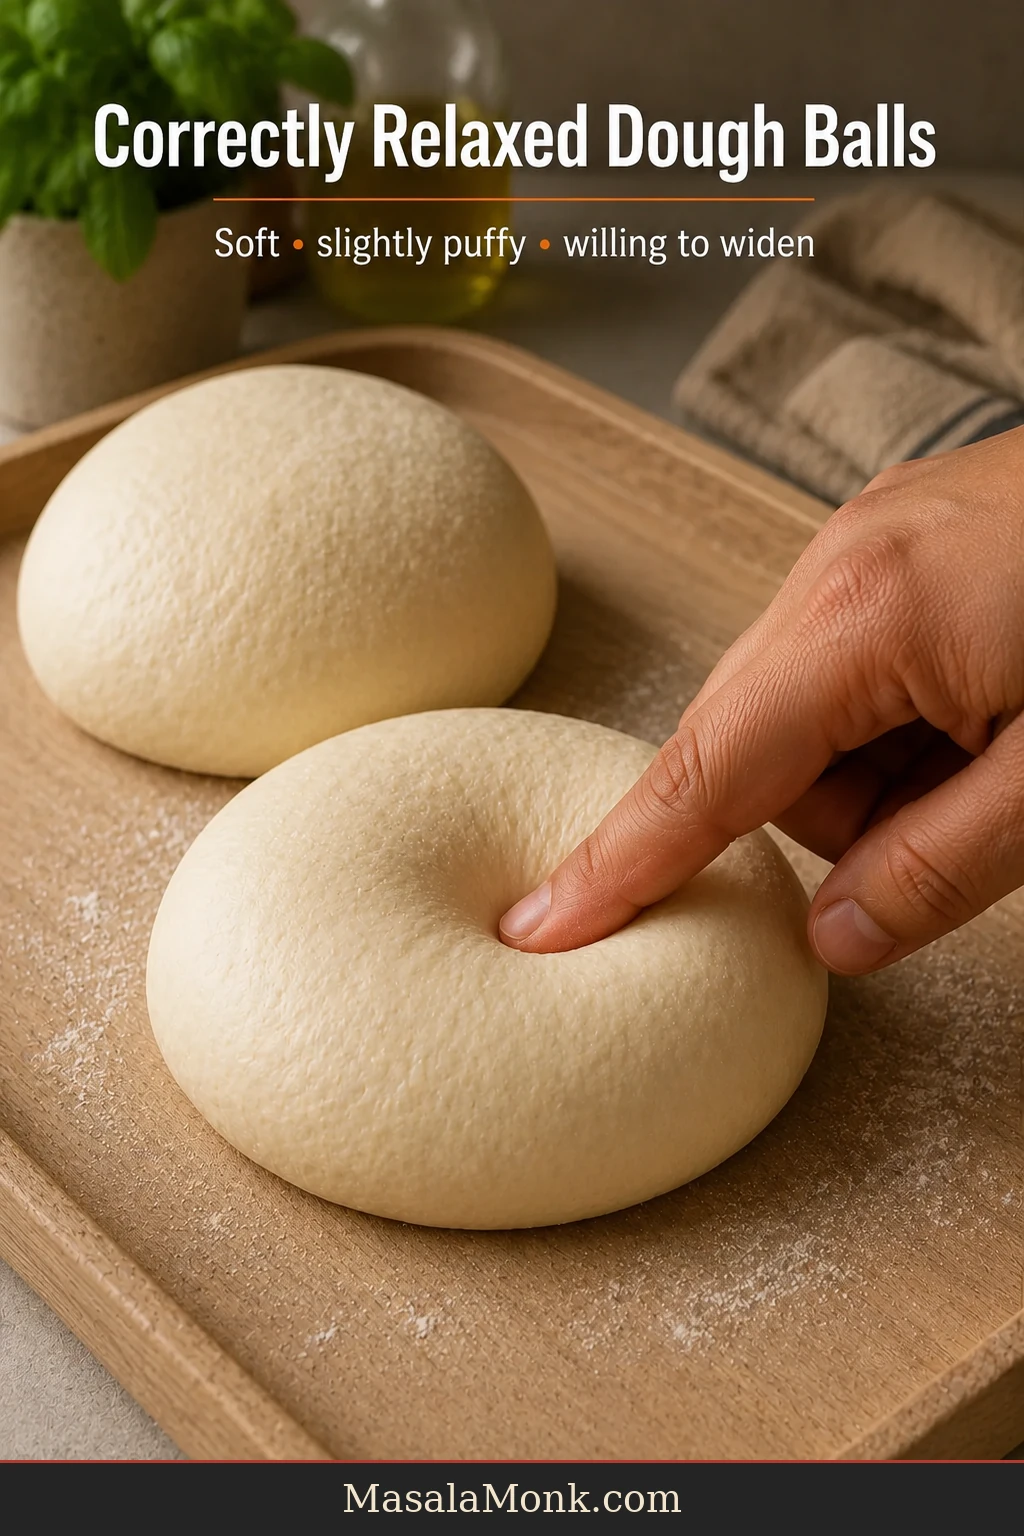
Place the balls in lightly oiled covered containers or on a covered tray with room between them. Let them rest until softer, slightly puffy and easier to press.
If a ball snaps immediately back, cover it and give it another 10 minutes. Dough that fights is asking for time, not force. See what a relaxed dough ball looks like.
7. Make Sure the Oven and Baking Surface Are Fully Heated
Before shaping, confirm that a steel or stone has heated at 500°F / 260°C, or the highest safe setting, for 45–60 minutes. A heavy inverted uncoated sheet needs at least 30 minutes. A pizza pan can enter a fully heated oven without being preheated.
8. Stretch One Dough Ball
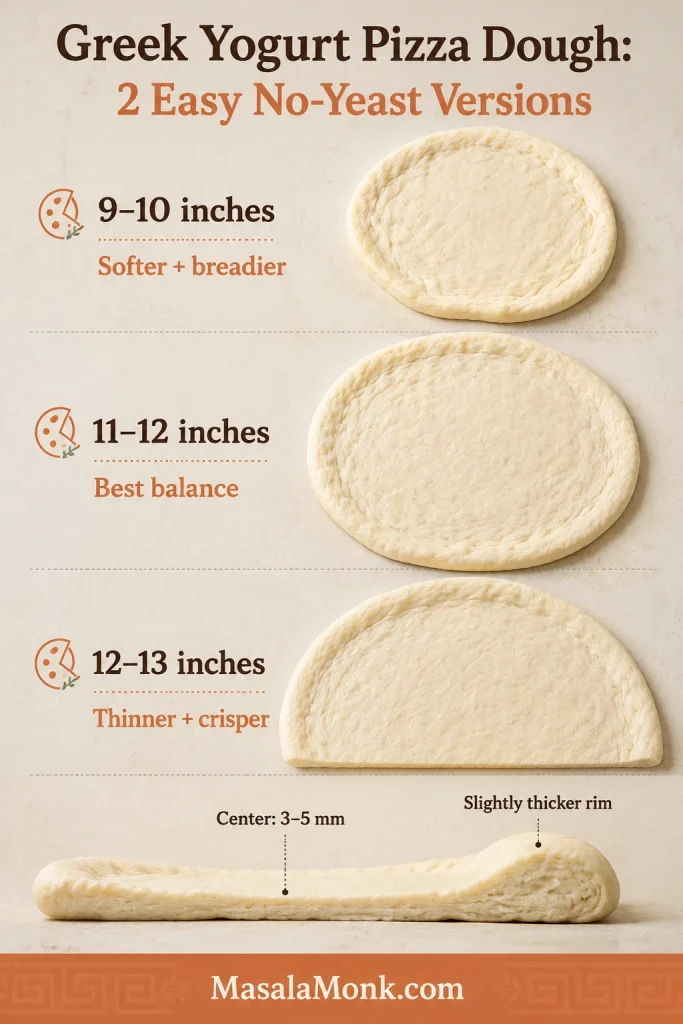
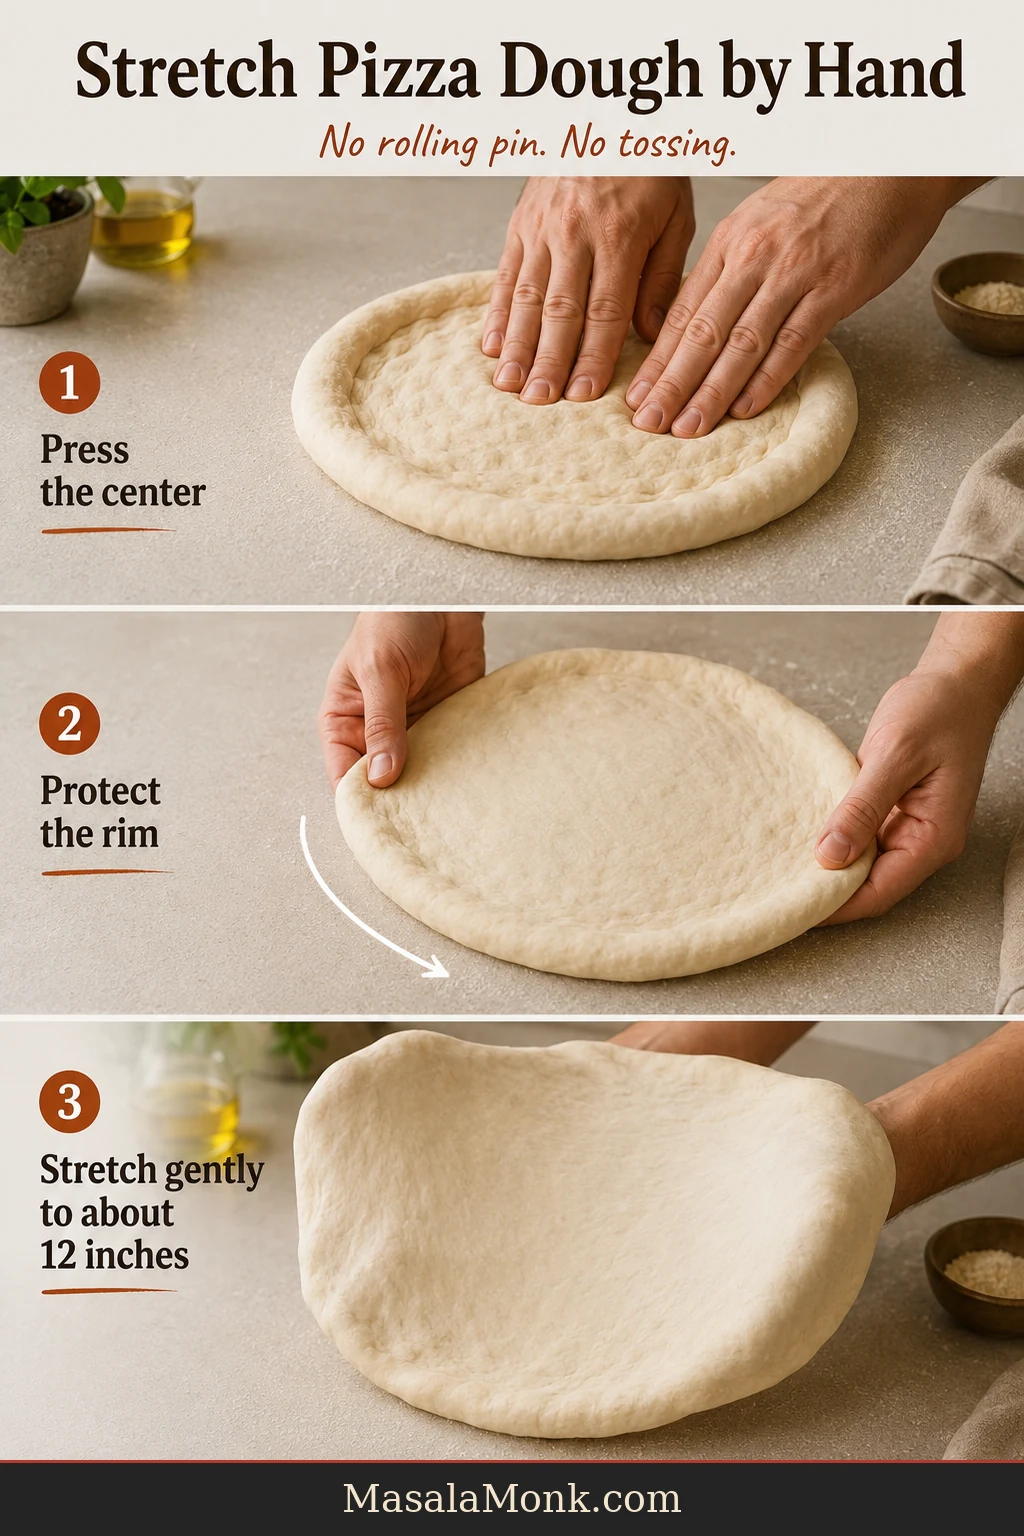
Lightly flour the counter. Press the dough from the center outward while leaving a ½–¾-inch rim mostly untouched. Rotate as it widens, then stretch it over the backs of your hands or knuckles until it reaches approximately 12 inches.
If it keeps shrinking, put it down, cover it and wait 10–15 minutes before continuing. Keep the second dough ball covered and away from the oven’s heat while you shape, top and bake the first. See the hand-stretching technique.
9. Transfer and Top Lightly
Move the dough to a lightly floured peel, parchment rated for the temperature you are actually using or a prepared pizza pan before adding toppings. Stretch and top one pizza at a time. Raw topped dough absorbs moisture while it waits.
High-heat transfer: Use parchment and baking sheets only within their printed temperature limits. At a higher setting, launch from a lightly floured peel or bake on a suitable pizza pan. Never place parchment beneath a broiler.
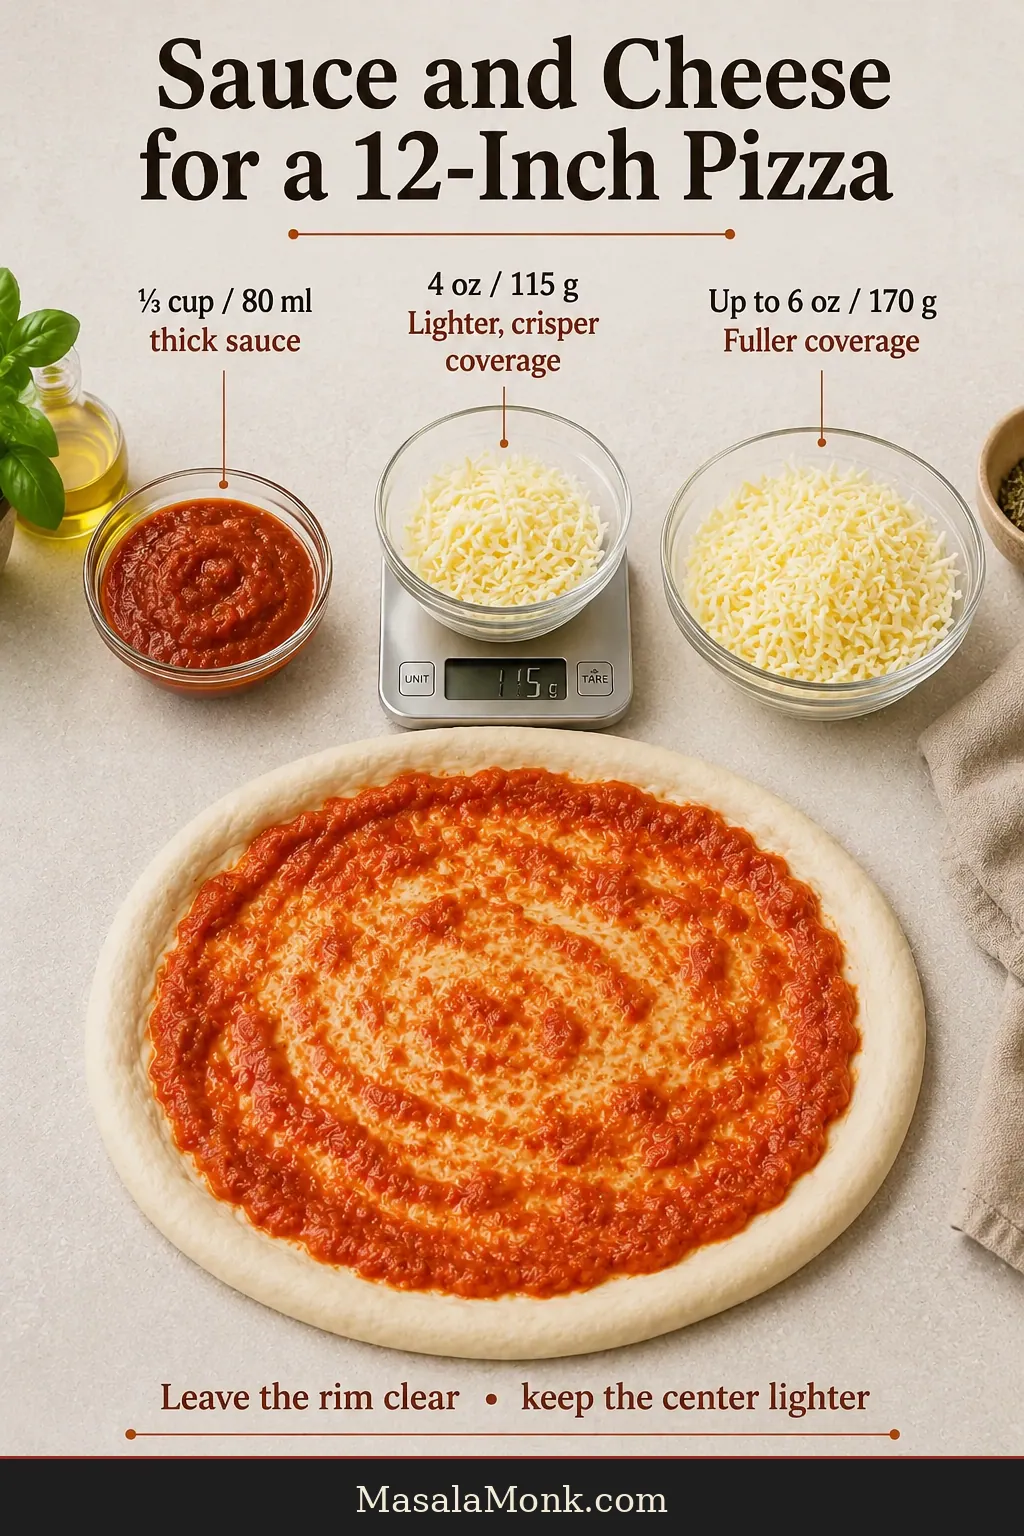
- Use about ⅓ cup / 80 ml thick pizza sauce.
- Add 4–6 oz / 115–170 g shredded low-moisture mozzarella.
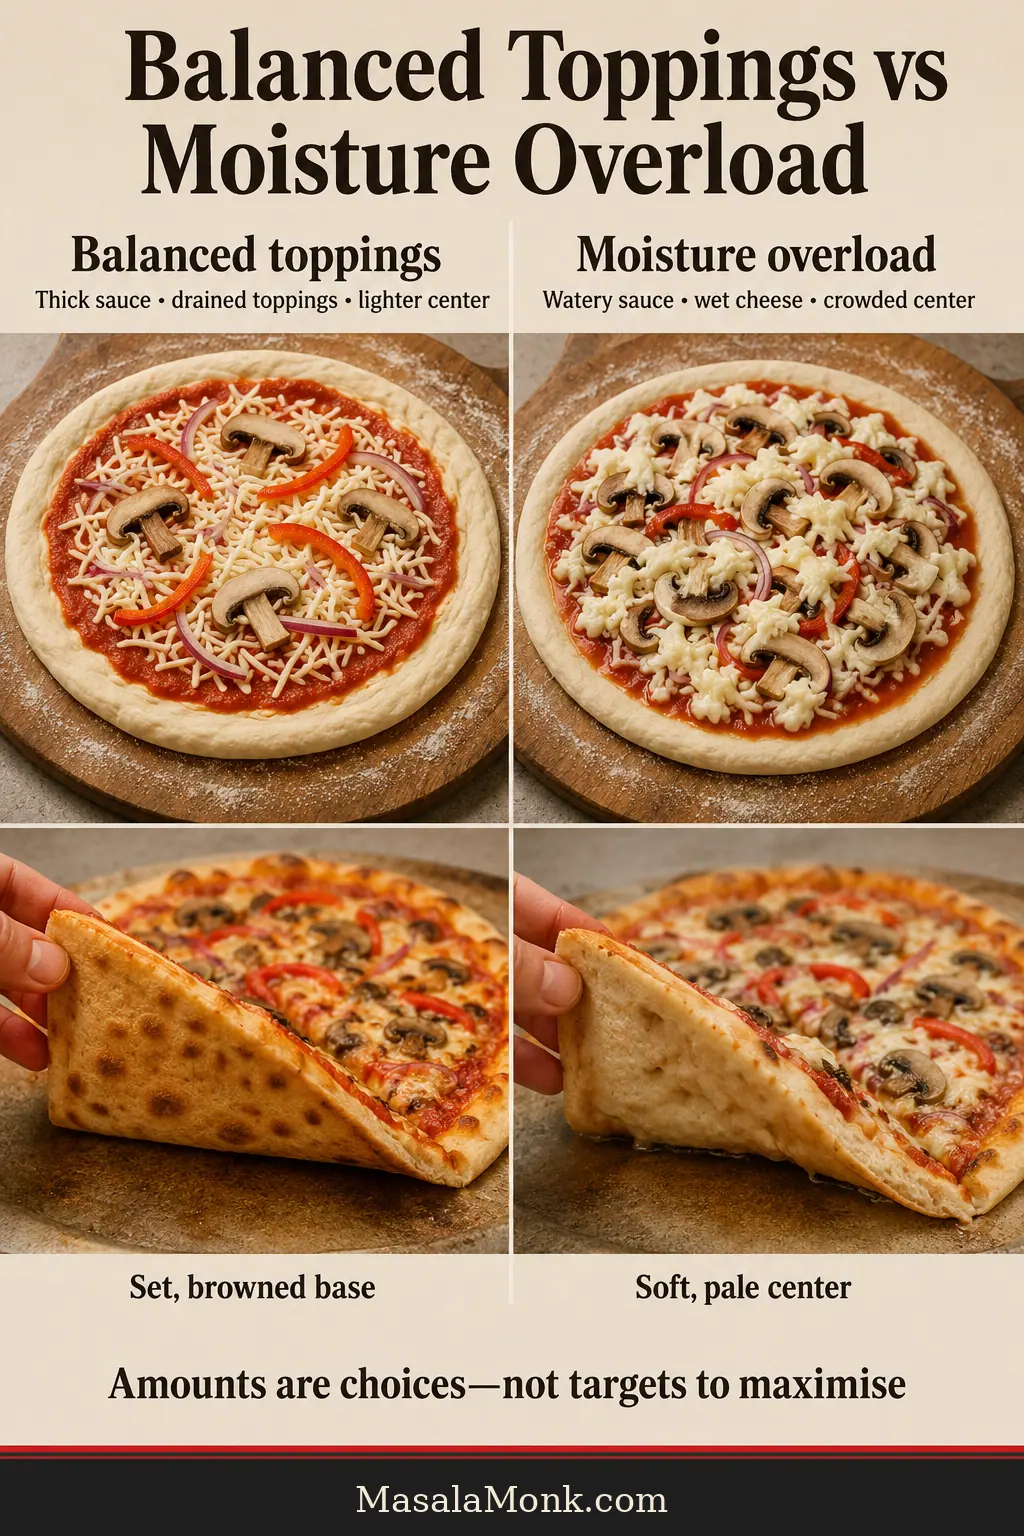
- Pre-cook or drain toppings that release a lot of moisture, and keep the overall topping load restrained.
- Leave the rim clear and keep the center lighter than the outer portion.
Dust beneath the dough lightly because excess flour or semolina can scorch. Use a thick sauce that clings instead of pooling; see the pizza sauce guide for suitable options.
10. Bake Until the Bottom Is Browned
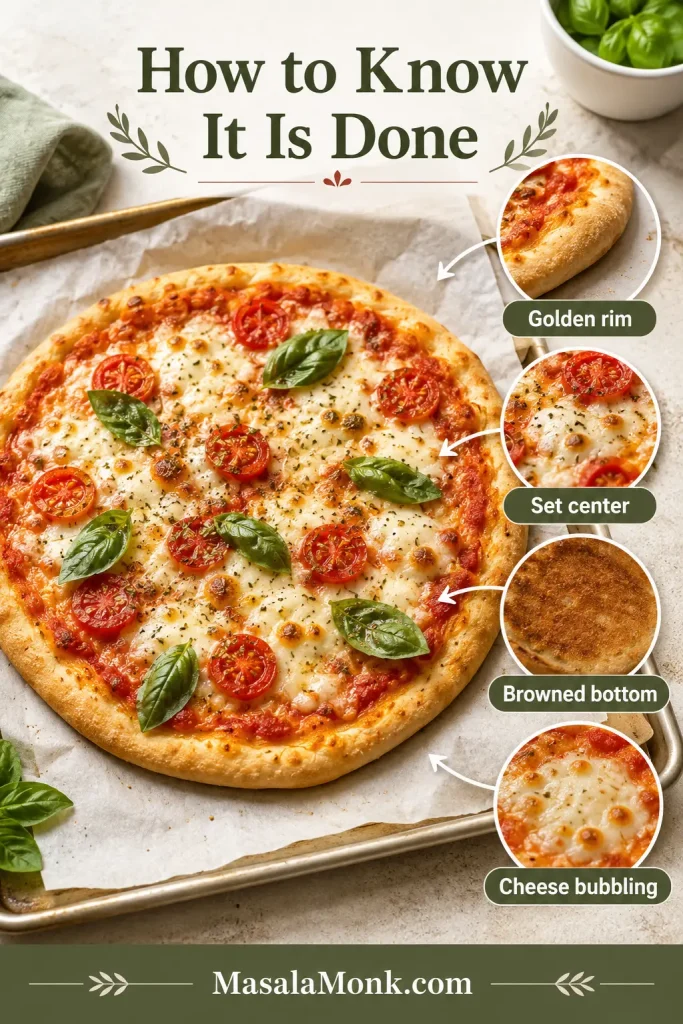
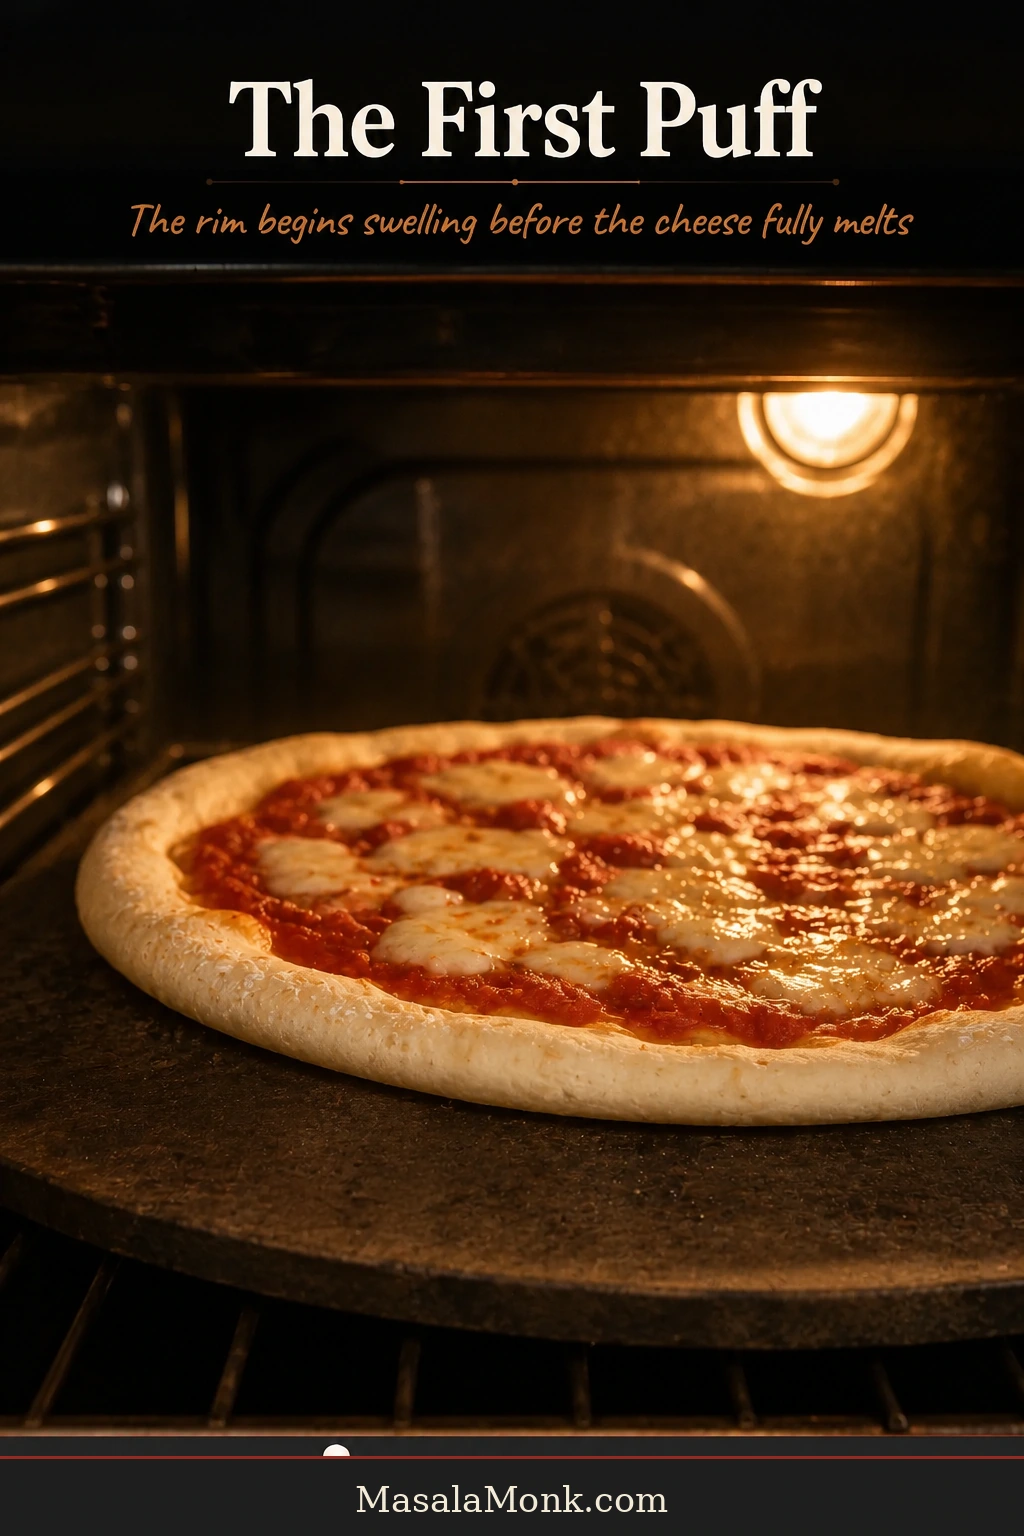
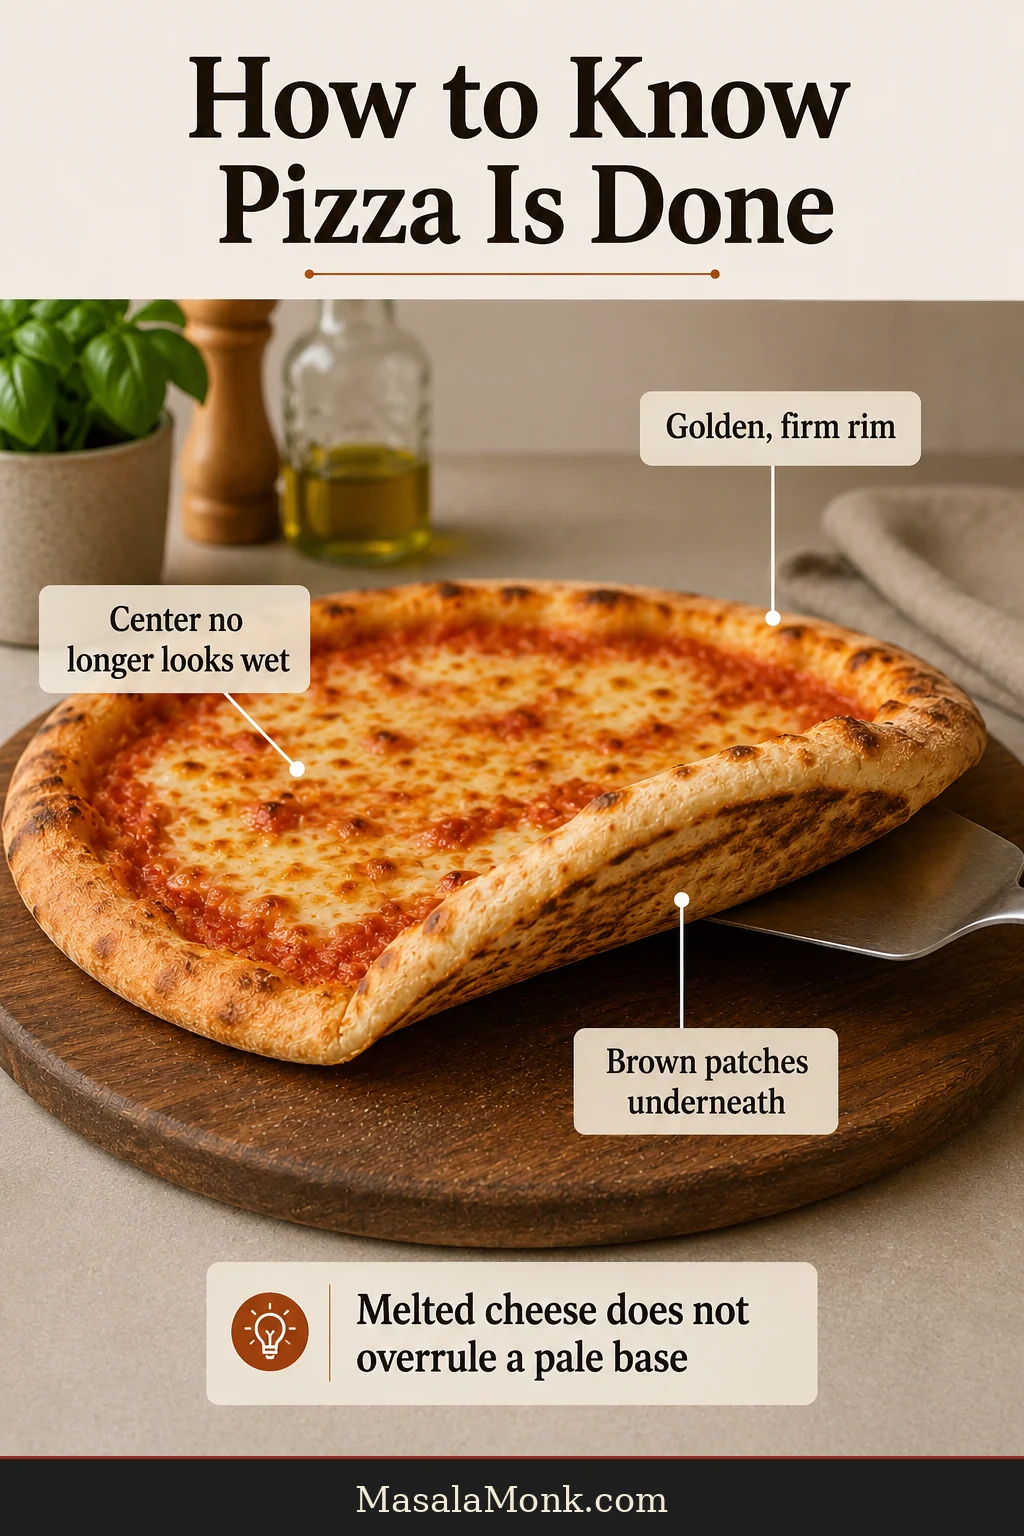
During the first few minutes, the untouched rim should begin swelling while the base sets against the hot surface. Bake until the rim is golden, the center no longer looks wet and the underside has browned patches. See the complete doneness guide.
11. Rest Briefly Before Slicing
Rest the pizza on a board or rack for 2–3 minutes. The cheese settles, steam escapes and the base may give a faint crackle as it firms. Keep the second ball covered and let a stone or steel regain heat before the next pizza.

Recipe Notes
- Weigh the flour, water, salt and yeast whenever possible. Packed flour is the largest source of accidental dryness.
- For one pizza, halve every ingredient. The visual rise cues remain the same.
Need Help With the Dough?
Already cooking? Jump to the decision in front of you.
IngredientsDough feel and risingStretchingBaking setupToppingsTroubleshootingStorageHalf batch
Choosing Flour, Yeast and Water for This Dough
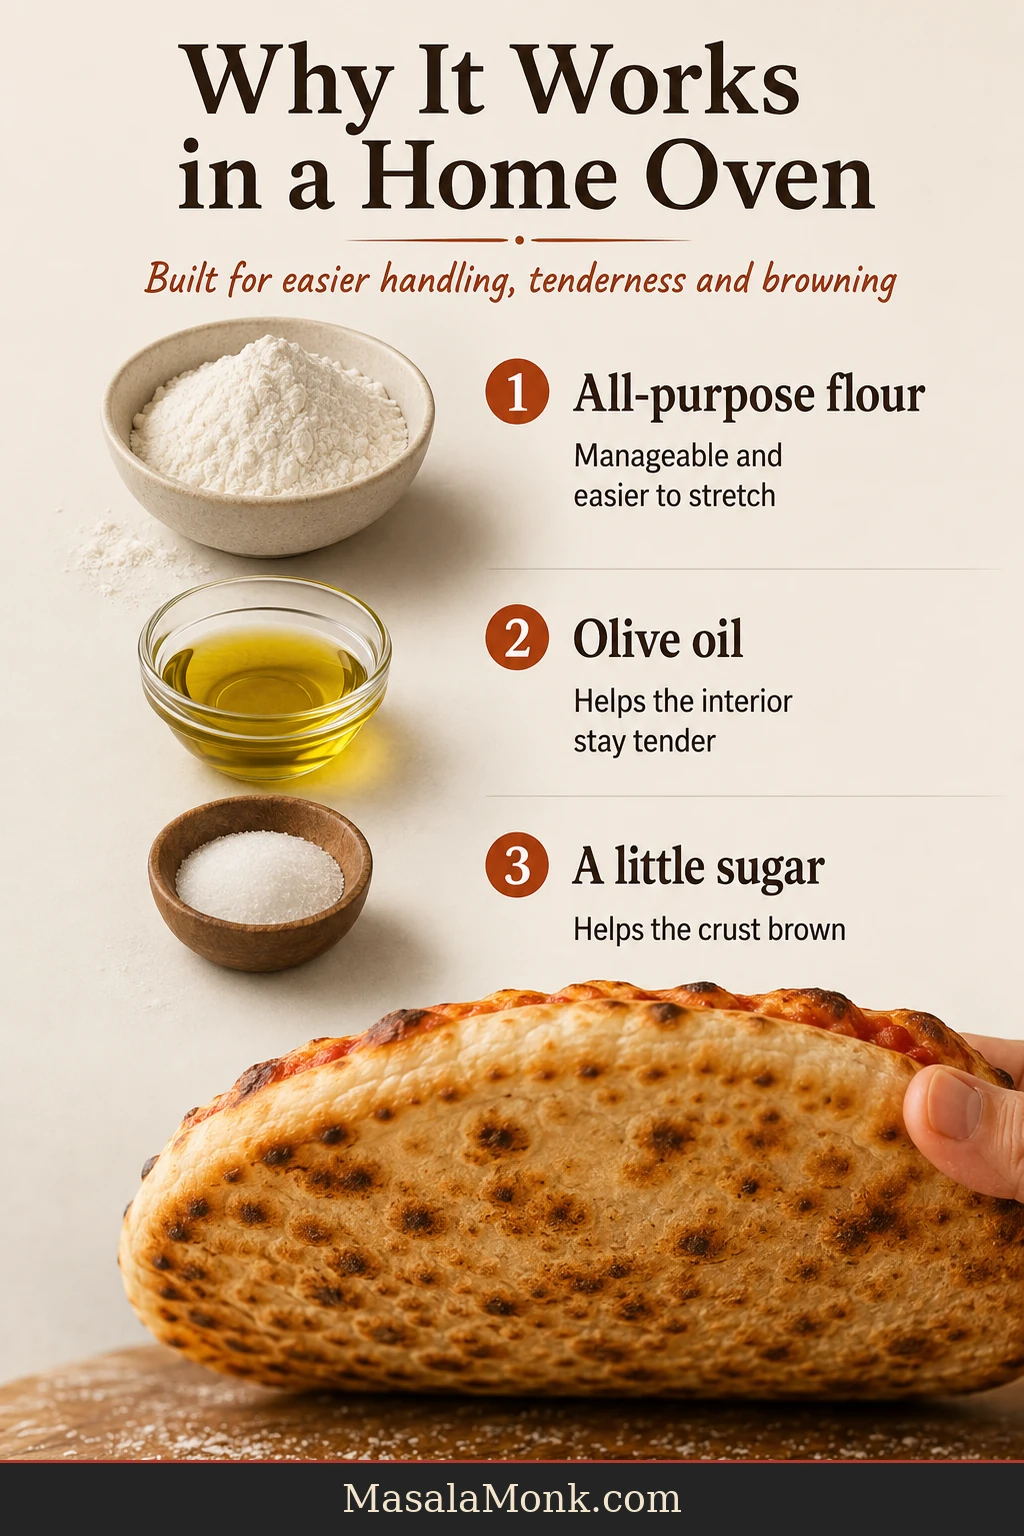
All-purpose flour and instant yeast are the dependable defaults. Water, sugar, oil and salt are balanced to keep the dough manageable and help it brown before a longer home-oven bake dries it out.
Why This Dough Works in a Home Oven
A normal home oven bakes pizza more slowly than a dedicated high-heat oven. Therefore, the formula must color reliably while the center stays tender through the longer exposure.
All-Purpose Flour Is the Easiest Default
Unbleached all-purpose flour gives the dough enough strength to trap gas and carry toppings without the extra resistance of bread flour. It is the everyday flour for homemade pizza crust—or pizza base in India and the UK. Weigh it because packed cups easily make dough dry.
Flour strength matters more once you begin chasing a particular pizza style. King Arthur Baking’s beginner’s guide to homemade pizza offers a useful comparison of all-purpose, bread and 00 flour.
All-Purpose vs Bread Flour Pizza Dough
Yes. Bread flour gives the rim more chew and structure but feels firmer and more resistant. All-purpose flour is easier for a first batch.
Begin with 260 g water. After the rest, add more only if the dough feels clearly dry or stiff, working in 1 teaspoon / 5 g at a time. Bread-flour dough may also need a longer final rest.
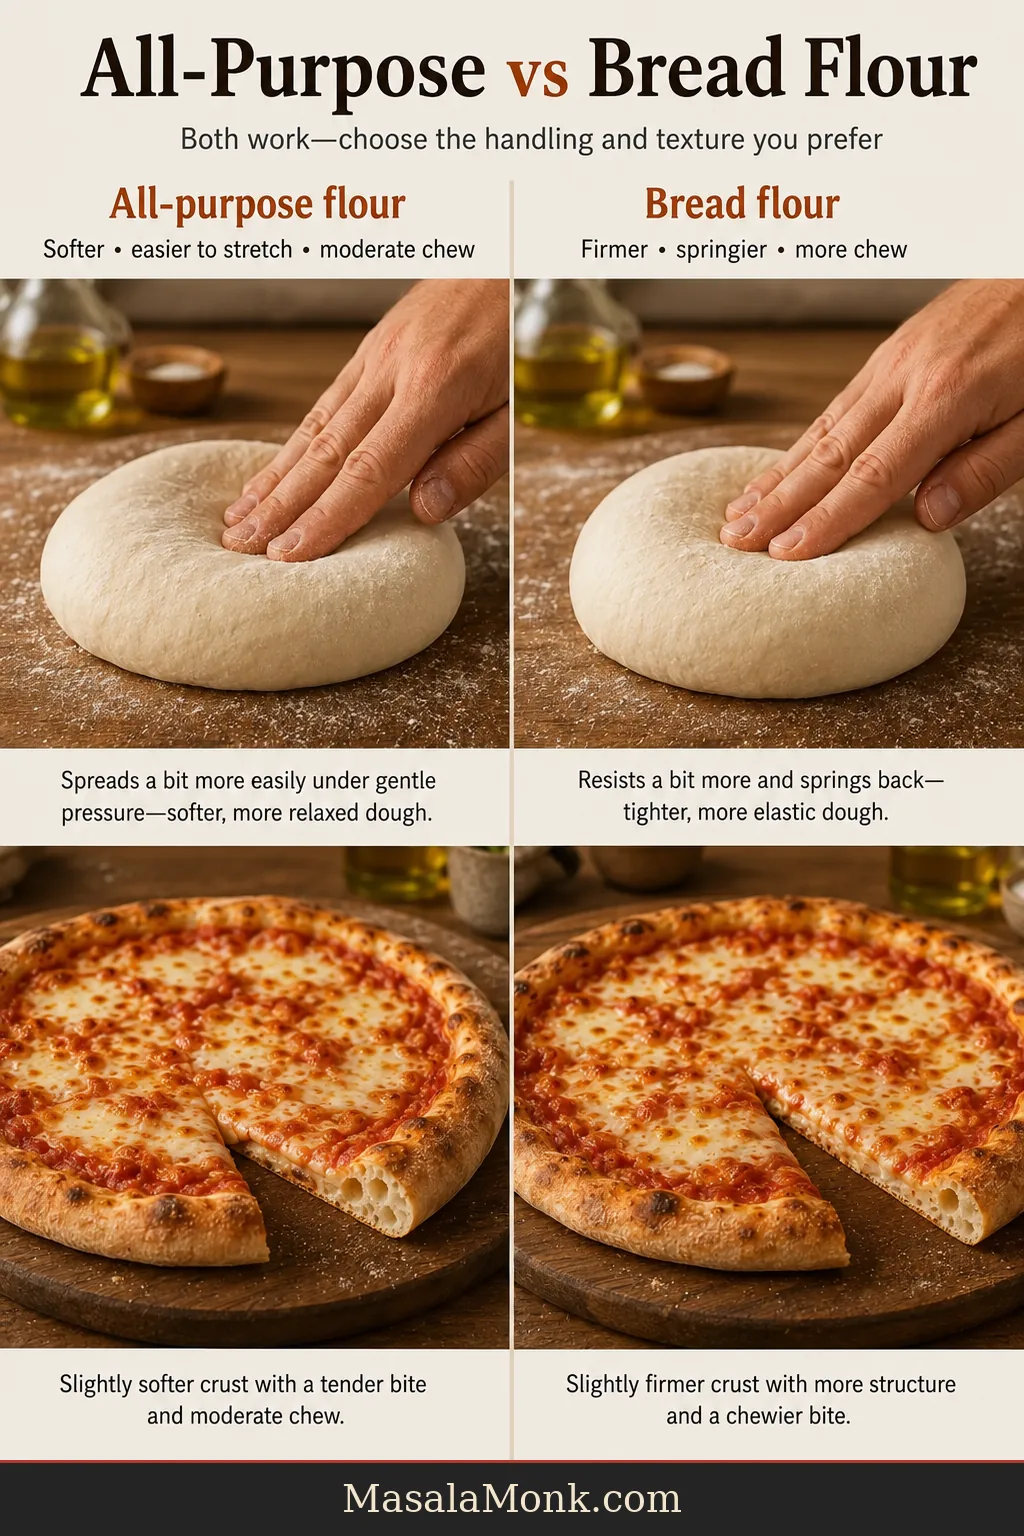
If the stronger dough keeps pulling back, see why pizza dough keeps shrinking before adding more flour.
| Flour | How the dough behaves | What to expect | Best use |
|---|---|---|---|
| All-purpose | Soft and forgiving | Crisp base with moderate chew | Everyday default |
| Bread flour | Stronger and springier | Chewier, more structured rim | Readers who want more chew |
| Tipo 00 | Smooth but brand-dependent | Result depends heavily on the flour, style and oven | Optional, not required here |
| Whole wheat | More absorbent and less extensible | Heartier and denser | Better as a separate formula |
Instant Yeast vs Active Dry Yeast
Instant yeast goes directly into the flour and is the simplest same-day choice. Dissolve active dry yeast in the warm water first and allow extra rise time when needed. Red Star’s yeast FAQ explains the common dry types.
How Warm Should the Water Be?
For the fast route, use water around 100–105°F / 38–41°C, comfortably warm against the inside of your wrist and never hot or steaming. Use cool water for the slower schedules.
Why Use Sugar, Olive Oil and Salt?
Sugar supports browning in a home oven without making the crust sweet. Olive oil helps the dough stretch and keeps the interior tender. Salt seasons the dough and moderates fermentation; weigh it because different salts fill a teaspoon differently.
How to Read Pizza Dough at Every Stage
Each stage leaves visible and tactile clues. Use the times to know when to look. Let the dough confirm when the stage is finished.
| Stage | What success looks like | What to avoid |
|---|---|---|
| Freshly mixed | Shaggy mass with no large dry pockets | Adding flour before the dough rests |
| After kneading | Smoother, elastic and slightly tacky | Dry, stiff or heavily flour-coated dough |
| After first rise | Expanded, aerated and softly rounded | Following the timer despite little expansion |
| After dividing | Smooth balls with light surface tension | Tearing the outer skin or kneading out every bubble |
| Ready to stretch | Soft, relaxed and willing to widen | Cold dough that springs back immediately |
What Shaggy Pizza Dough Looks Like
At this stage, the mass should hold together when lifted but still look rough and irregular. Smoothness is not the goal until after the rest and kneading.
How Properly Kneaded Pizza Dough Feels
Smoothness is only one clue. Gently press and release the dough; useful elasticity shows in how it gathers itself back together without feeling stiff or dry.
Tacky vs Sticky Pizza Dough
Tacky dough touches the hand and releases with little residue. Dough that is too sticky for this formula keeps coating the fingers and smearing across the surface even after the rest.
This is where many people panic and add too much flour. Let the short rest work first. Use damp or lightly oiled hands and a scraper. If the dough still coats and smears after the rest, add flour in 1 teaspoon or about 5 g increments.
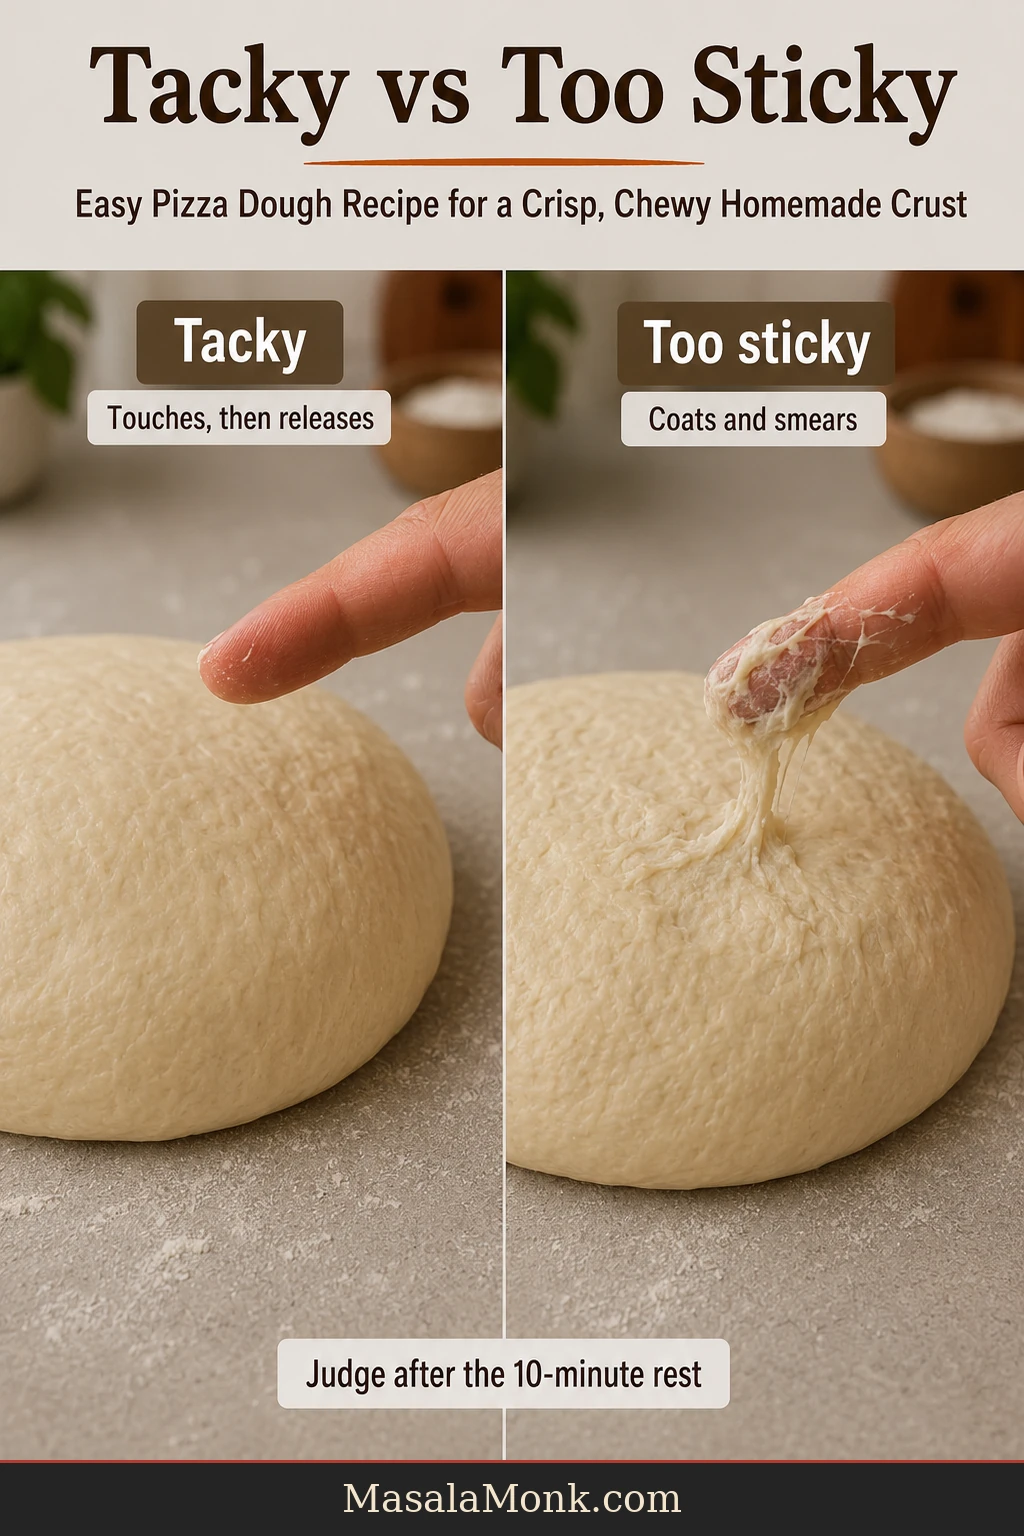
If the dough remains unmanageable, use the mixing and fermentation rescue guide rather than adding a large handful of flour.
Making Pizza Dough in a Food Processor
A processor develops dough quickly and adds heat. Use cool water with instant yeast and process only 20–30 seconds after the dough gathers. With active dry yeast, warm only the blooming portion of the water.
How to Tell When Pizza Dough Has Risen
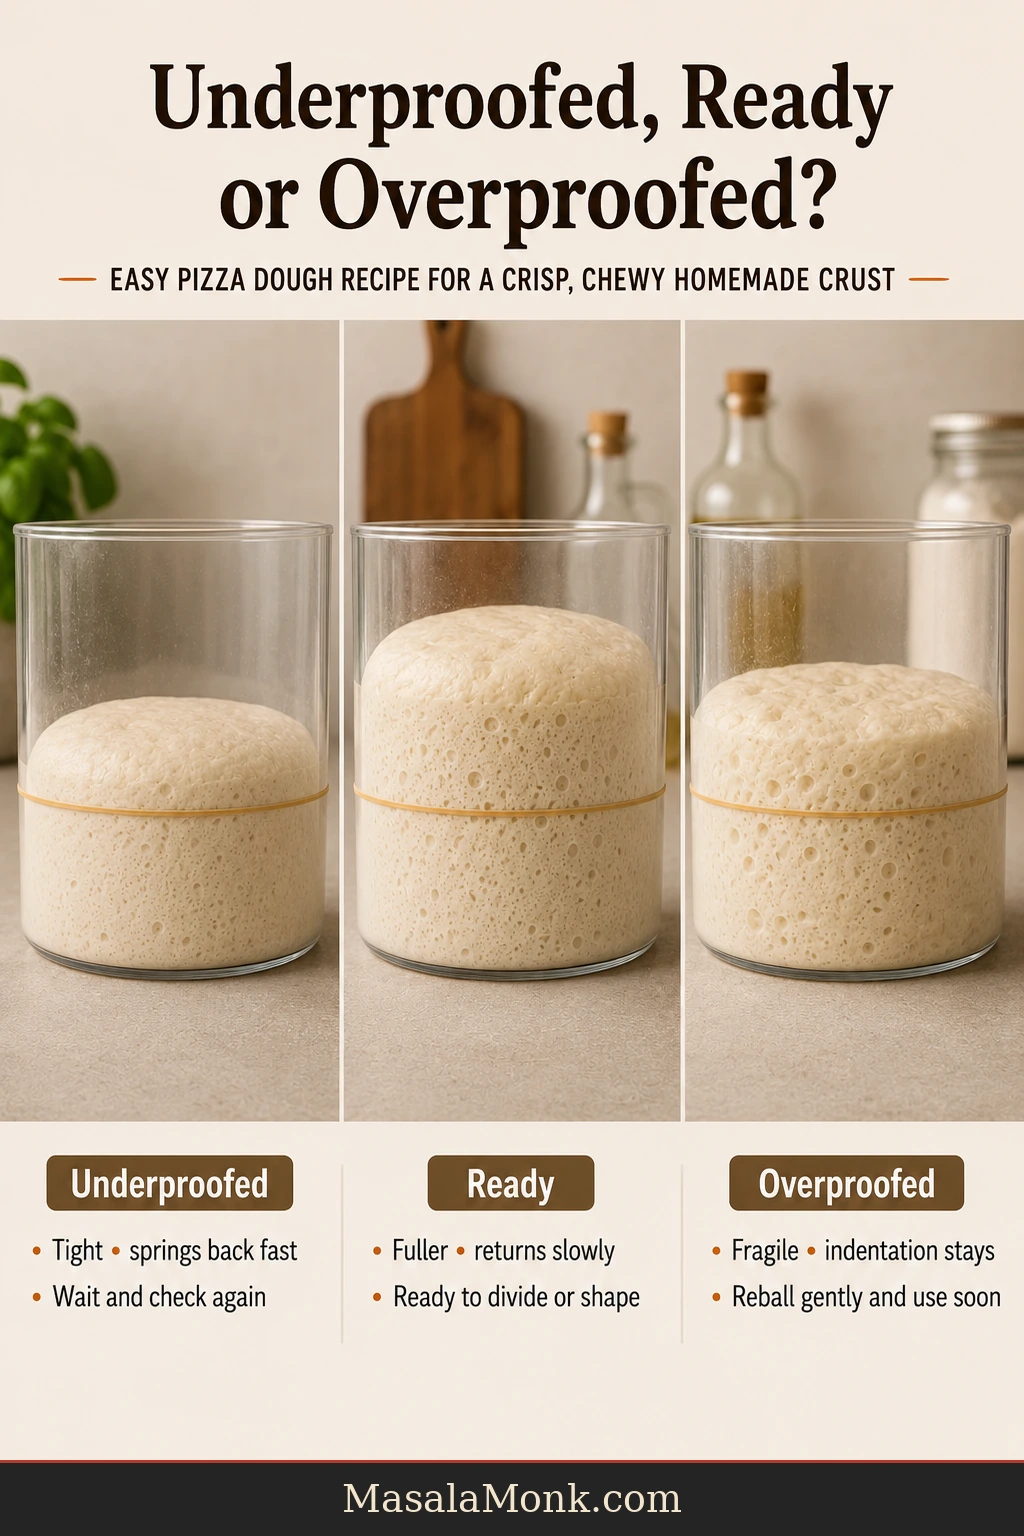
A straight-sided container makes the rise easy to read. Mark the starting height; once the dough is fuller and lighter, press gently. The mark should ease back slowly while the dough still holds its shape.
When to look: Start around 45–50 minutes in a very warm kitchen, 60 minutes in a warm room and 75 minutes in a moderate room. Cool kitchens need longer; follow the expansion.
Underproofed vs Ready vs Overproofed Pizza Dough
| Stage | Volume and surface | Finger response | What to do |
|---|---|---|---|
| Underproofed | Tight, dense-looking and only modestly expanded | Indentation springs back quickly | Cover and wait; check again in 15 minutes |
| Ready | Fuller, softly rounded and visibly aerated | Indentation returns slowly and incompletely | Divide or shape, depending on the stage |
| Overproofed | Fragile, very bubbly, possibly flattened or beginning to collapse | Indentation remains and the dough feels weak | Degas gently, reball, rest briefly and use soon |
For slow or fragile dough, continue to the fermentation rescue section.
How to Stretch Pizza Dough Without Tearing
How to Tell Dough Balls Are Relaxed
Same-day dough should feel soft after its covered rest. Refrigerated dough needs time for the center to lose its hard chill.
A ready ball yields when pressed and begins spreading instead of snapping back. The first stretch is often awkward; once the dough relaxes, shaping becomes much easier.
How to Stretch Pizza Dough by Hand
Use your fingertips to press from the center outward, leaving the outer ½–¾ inch mostly untouched. Rotate frequently so one area does not become paper-thin while the rest stays thick.
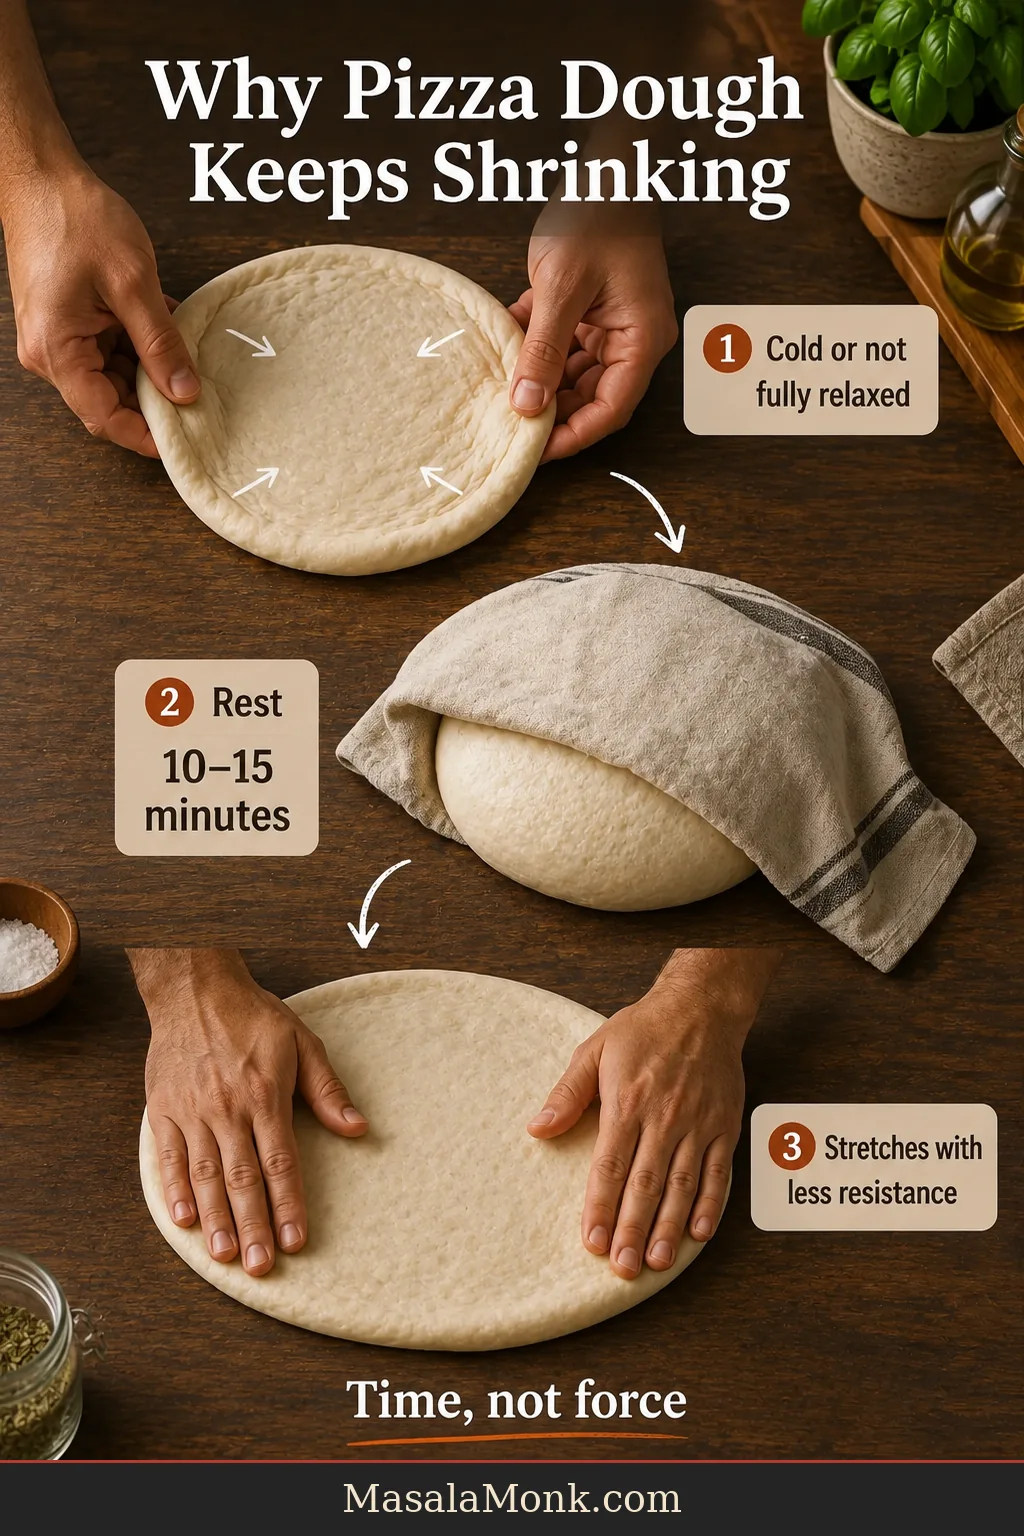
Why Pizza Dough Keeps Shrinking
Cold dough feels firm through the center, while tight gluten may feel warmer but spring back quickly. Cover either one for 10–15 minutes before testing the stretch again.
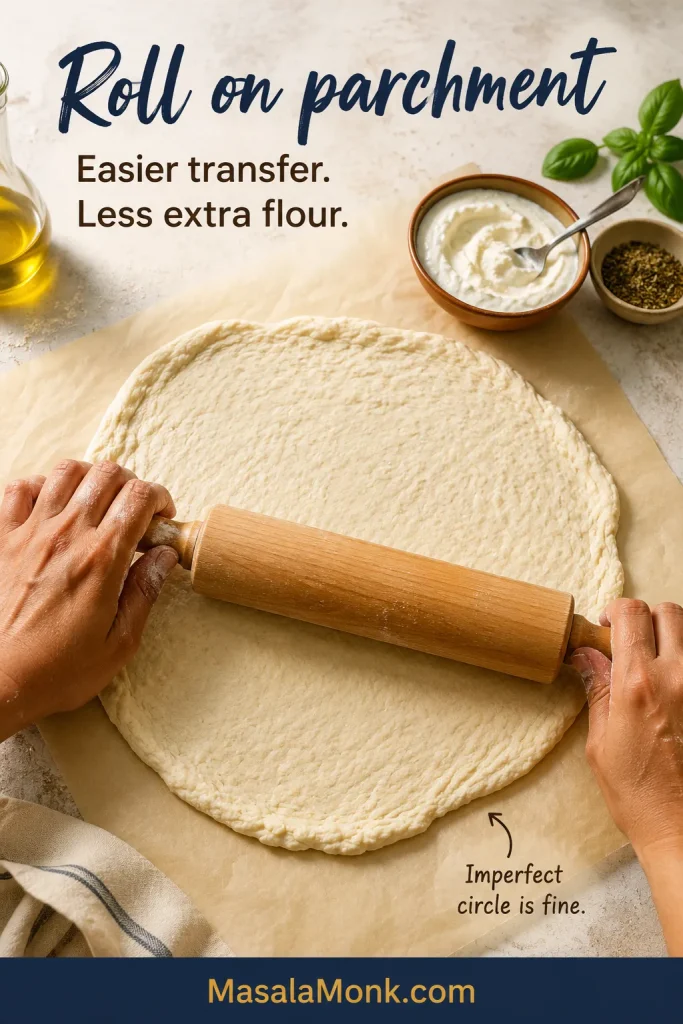
Hand-Stretched vs Rolling-Pin Pizza Crust
Hand stretching preserves more air around the rim. A rolling pin creates a flatter, more even and often crisper crust.
A rolling pin is not a failure. Choose the crust you enjoy and the method your hands are comfortable using. If you still want some lift, avoid rolling repeatedly over the outer rim.

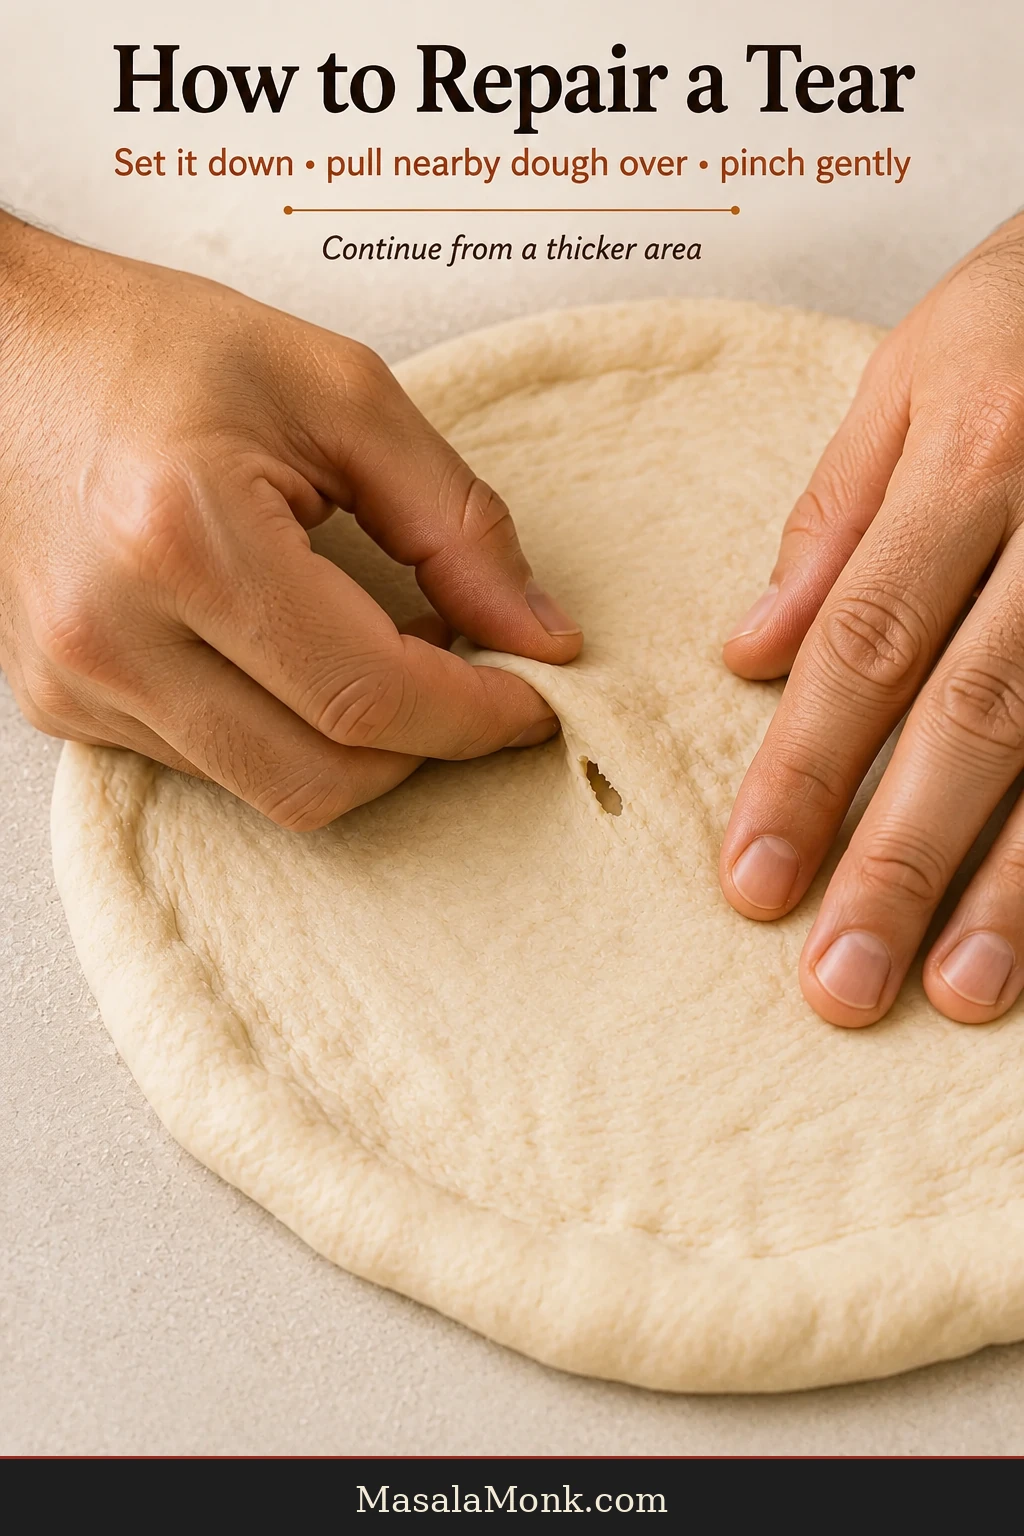
How to Repair a Pizza Dough Tear
Lay the dough flat, overlap the edges of the opening and pinch until the seam holds. Resume stretching from a different part of the round instead of pulling directly on the repair.
The Pizza Peel Slide Test
Test movement once after sauce and again after cheese. If one area catches, lift that edge and work a small pinch of flour or semolina underneath before adding more toppings.
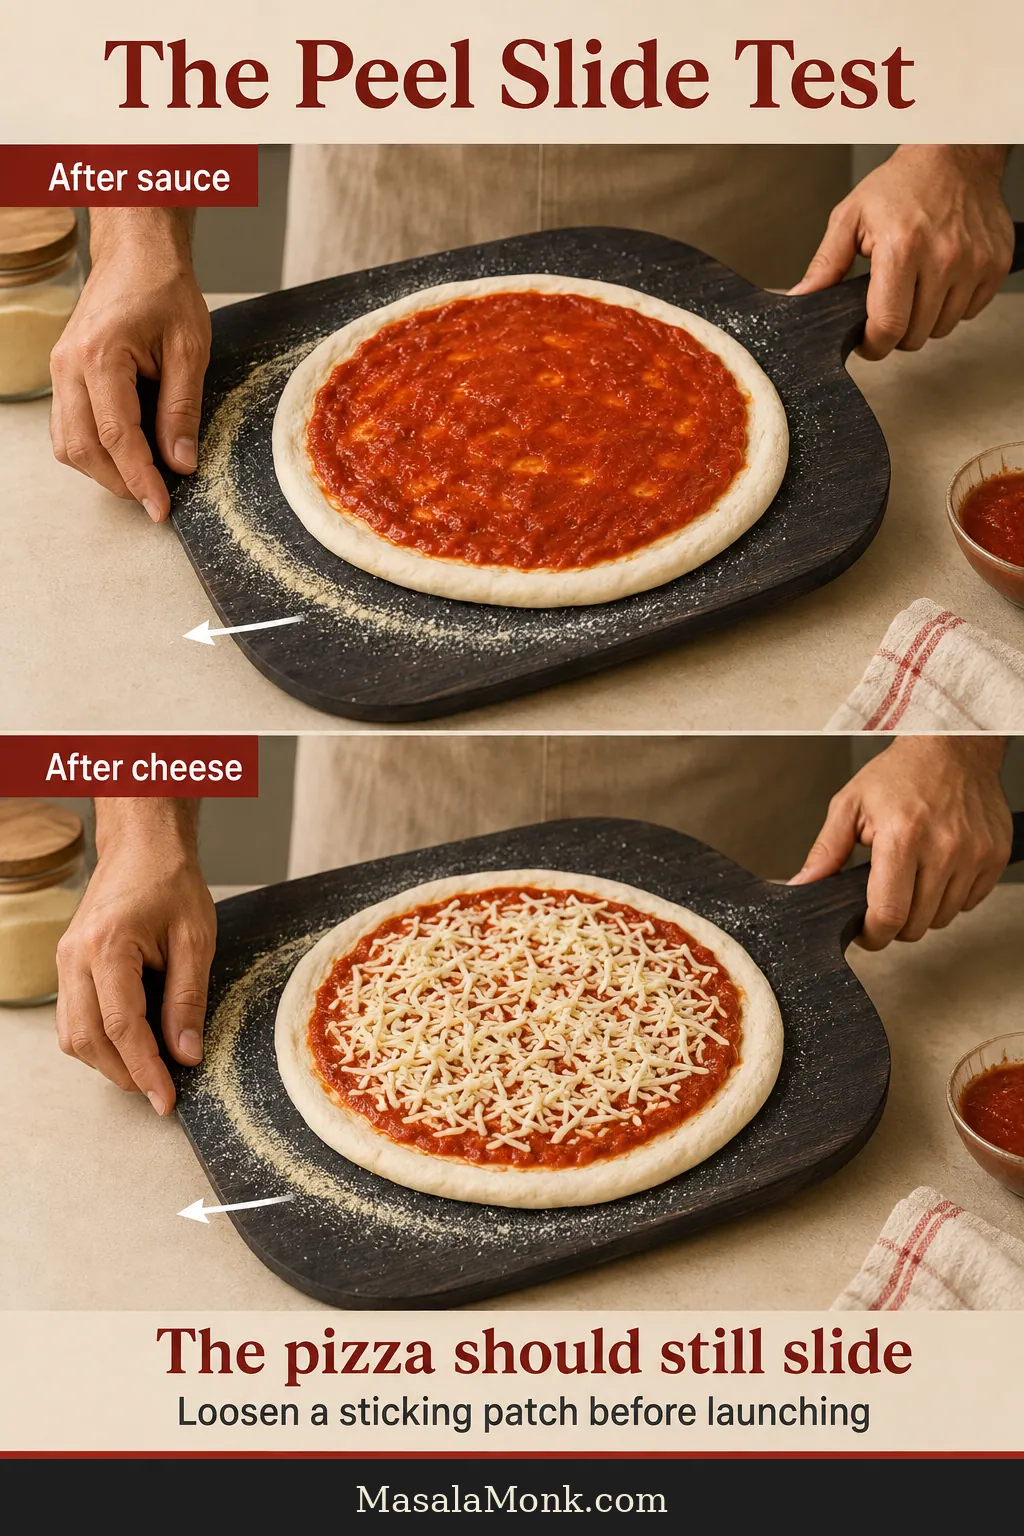
Once the topped dough slides freely, continue to the home-oven baking guide.
Back to RecipeChoose a Baking SetupCheck Topping AmountsFix a Problem
How to Bake Pizza in the Oven You Already Own
Once the dough is stretched, heat beneath it determines whether the base stays pale or browns properly. More stored heat means a crisper underside, while the rim should begin swelling before the cheese fully melts.
When to Start Preheating the Oven and Baking Surface
Begin during the latter part of the first rise so the surface heats while the divided dough balls complete their final covered rest. This overlap avoids adding an unnecessary wait after shaping.
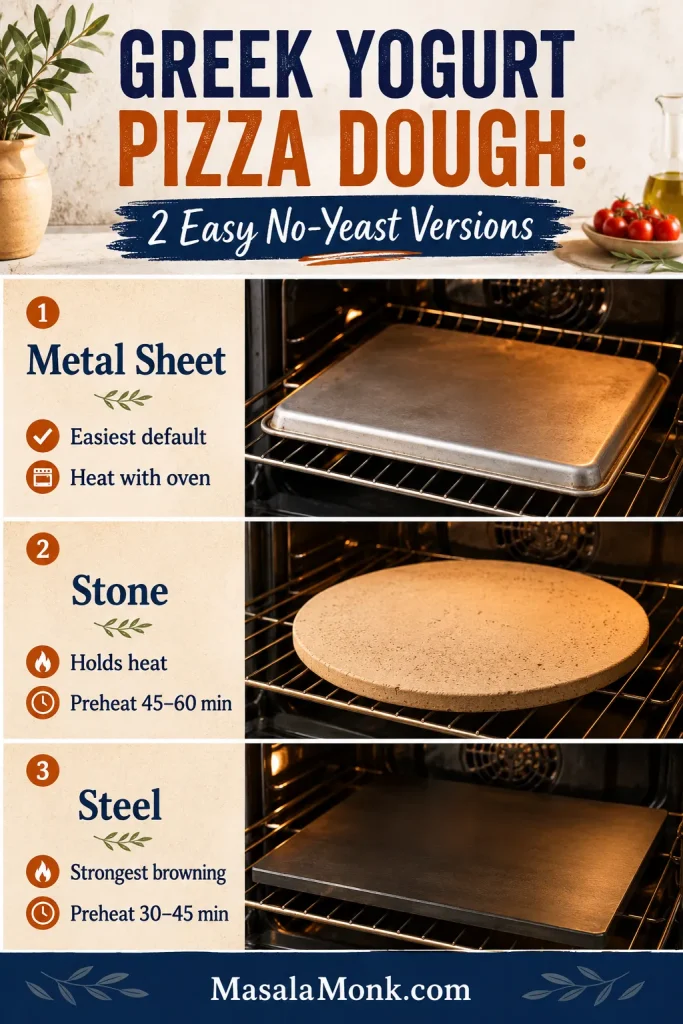
Baking Steel vs Pizza Stone, Sheet and Pan
| Setup | Rack and preheat | Begin checking | Likely bake window |
|---|---|---|---|
| Baking steel | Middle to upper-middle; 45–60 minutes at 500°F / 260°C or oven maximum | 7 minutes | About 7–10 minutes |
| Pizza stone | Middle; 45–60 minutes at high heat | 8 minutes | About 8–12 minutes |
| Inverted heavy uncoated sheet | Lower-middle; at least 30 minutes; confirm the pan rating | 9 minutes | About 9–13 minutes |
| Perforated pizza pan | Lower-middle; fully preheat oven | 10 minutes | About 10–14 minutes |
| Solid pizza pan or sheet | Lower third; fully preheat oven | 12 minutes | About 12–16 minutes |
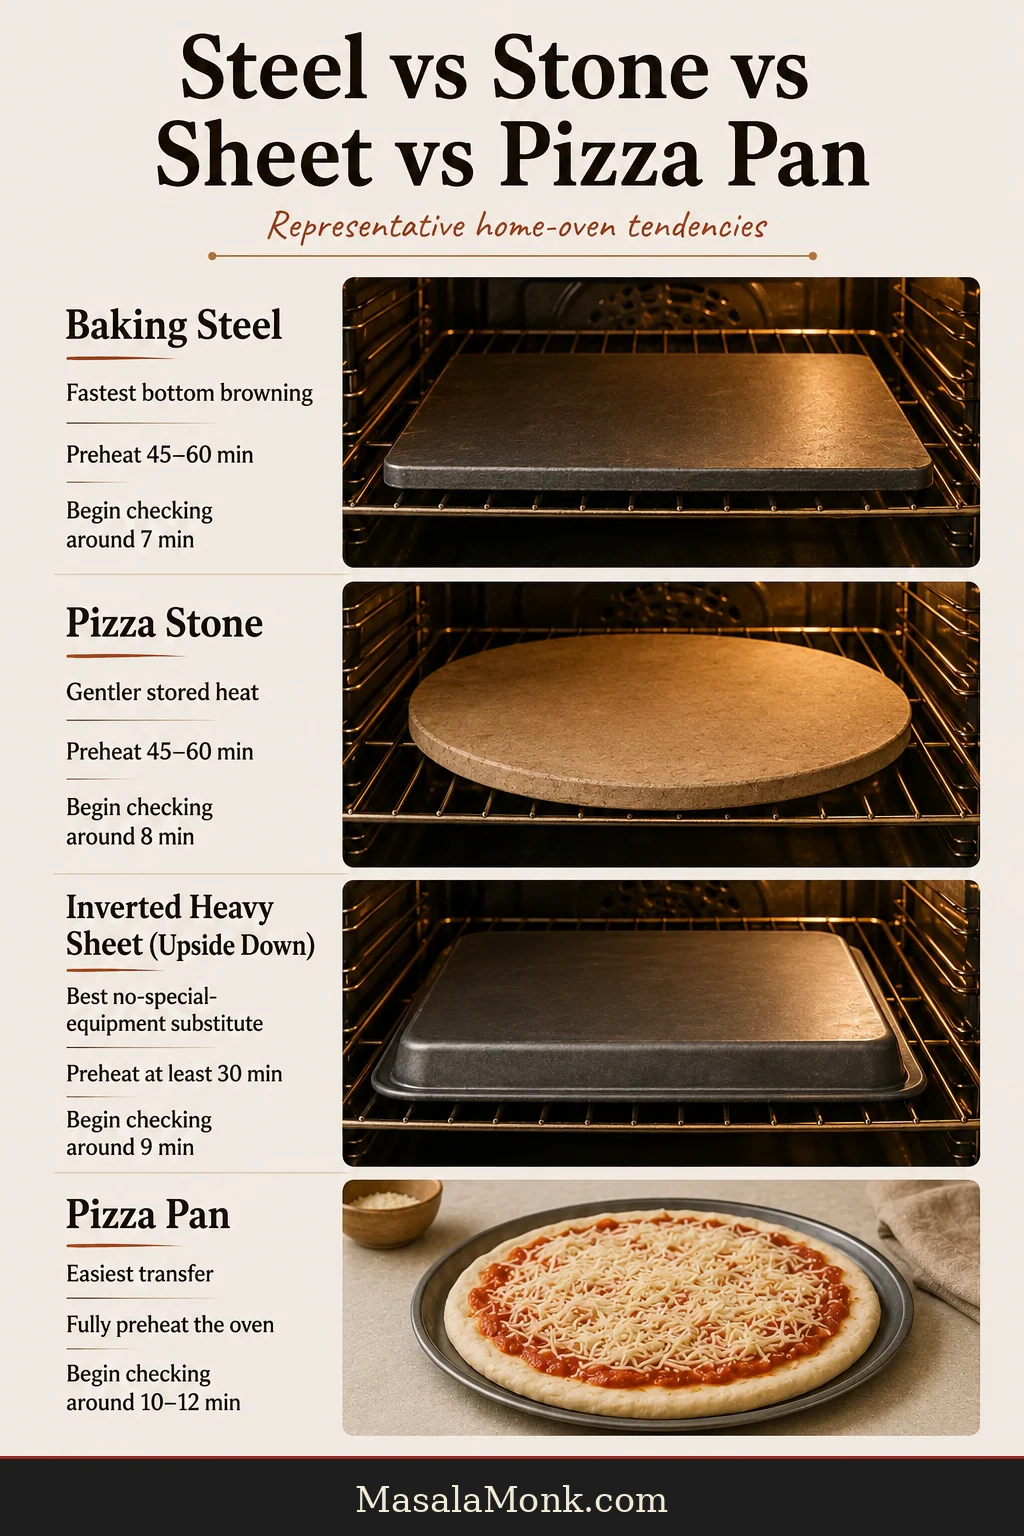
Steel browns fastest, while stone delivers slightly gentler heat. An inverted uncoated sheet is the strongest no-special-equipment substitute, and a pizza pan makes transfer easiest. Keep every pan and parchment product within its printed temperature limit.
The First Puff in a Home Oven
Watch the protected rim during the opening minutes. Early swelling shows that trapped gas is expanding while the hot surface begins setting the base.
What the First Pizza Teaches the Second
Compare three things on the first pizza: underside color, center support and rim rise. Together, they show whether the next round needs more surface heat, lighter toppings or a longer dough rest.

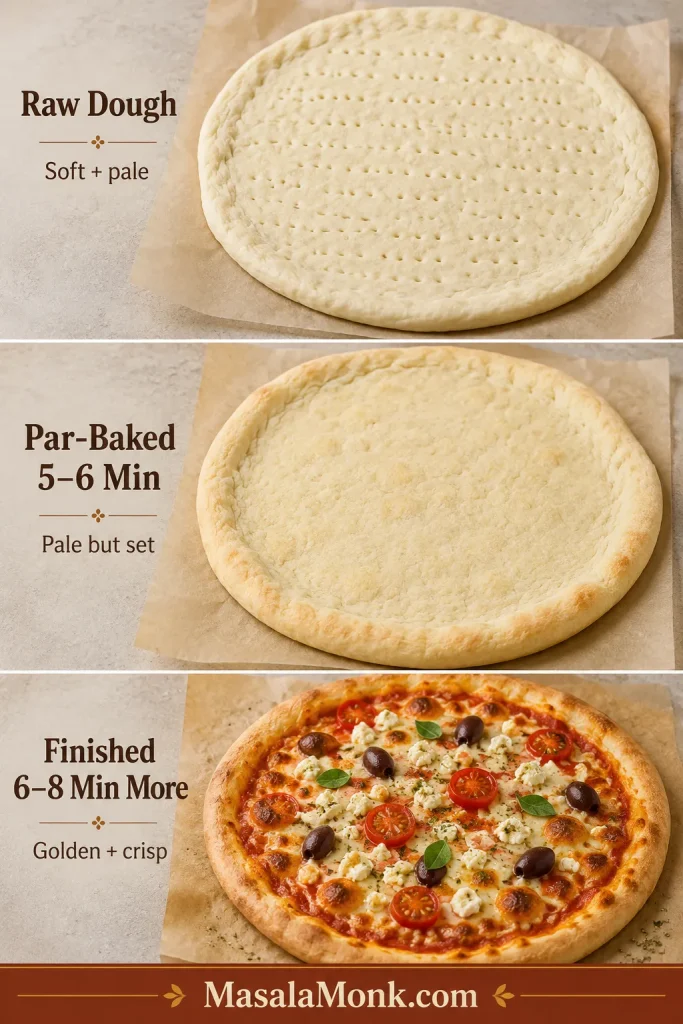
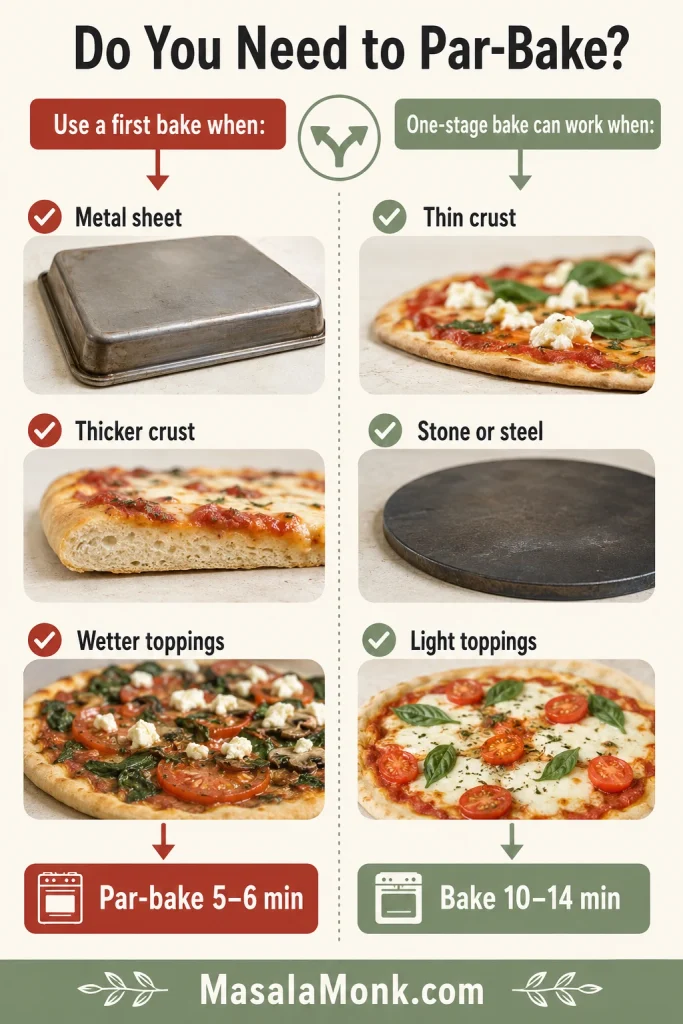
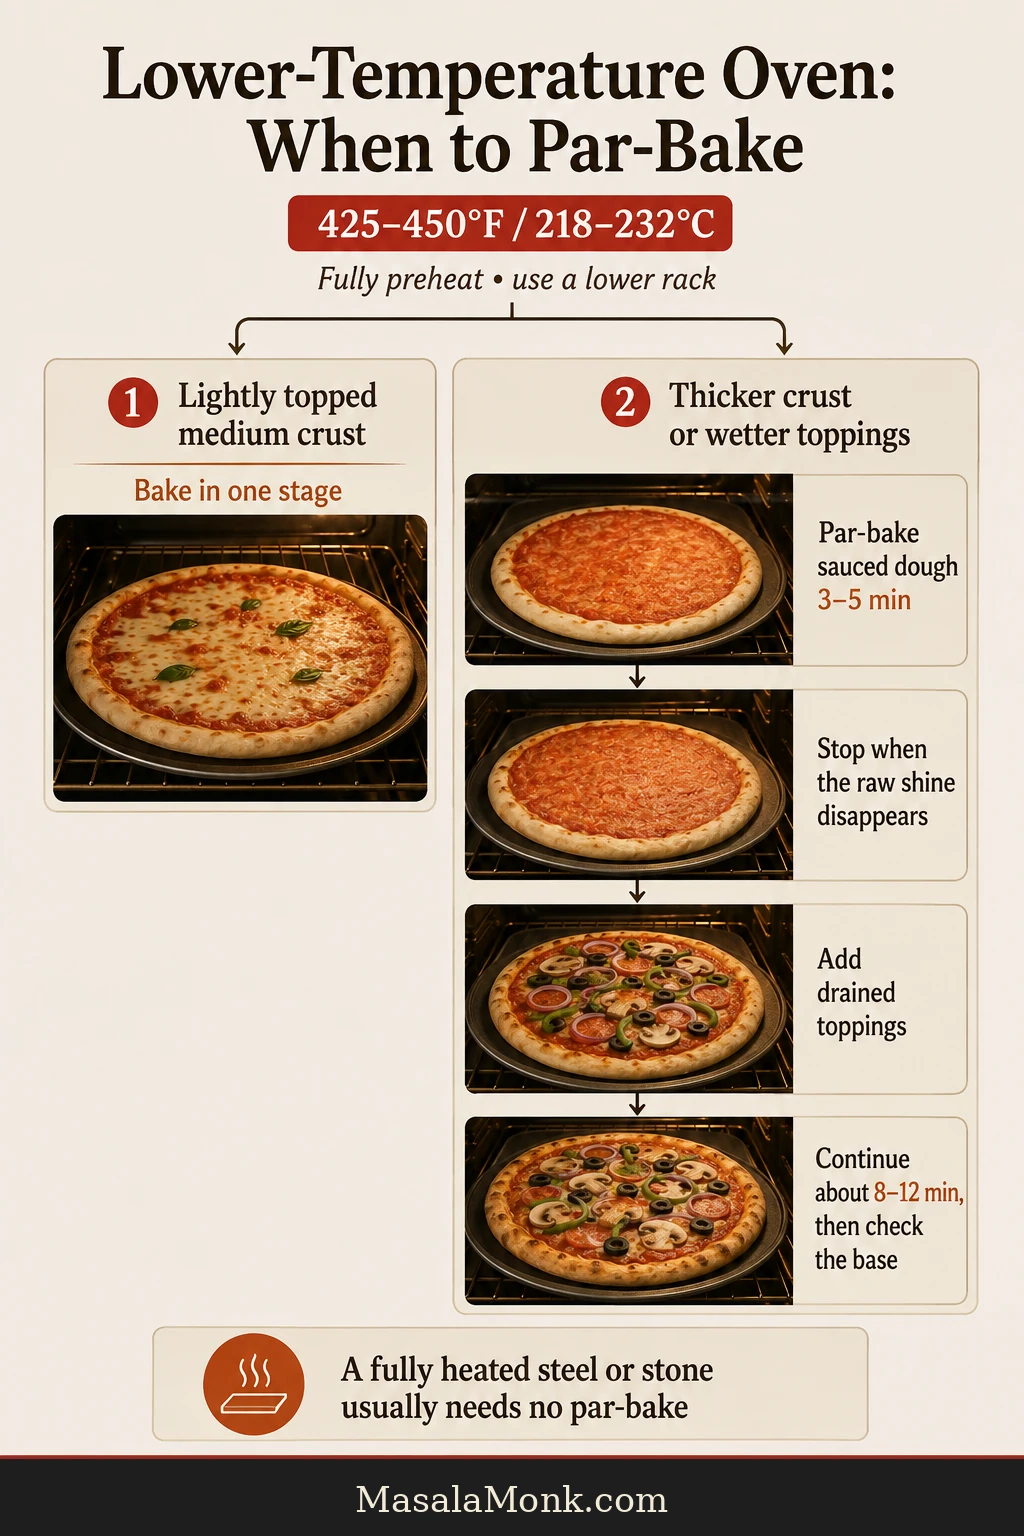
Lower-Temperature Ovens and When to Par-Bake
At 425–450°F / 218–232°C, fully preheat the oven and bake on a lower rack. A lightly topped medium crust can often bake in one stage on a perforated pan or preheated inverted heavy sheet.
For thicker crusts or wet toppings, par-bake the sauced dough for 3–5 minutes. Then add drained toppings and continue for roughly 8–12 minutes before checking the base. A fully heated steel or stone usually needs no par-bake.
How to Know the Pizza Is Done
- Look for a rim that is golden and firm.
- The center should no longer appear wet.
- Brown patches should be visible underneath.
- When lifted, the base should support itself instead of folding at the center.
- Melted cheese matters, but its color does not overrule an underdone crust.
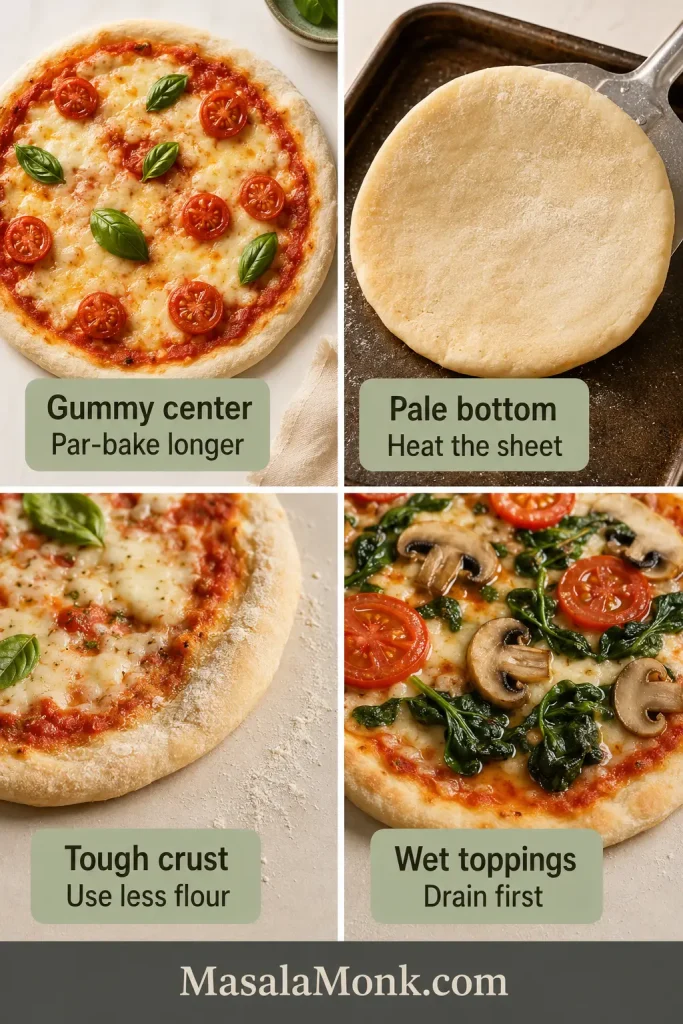
If the base is set but the center stays soft, compare the topping-moisture examples before changing the dough formula.
How Much Sauce, Cheese and Other Toppings to Use
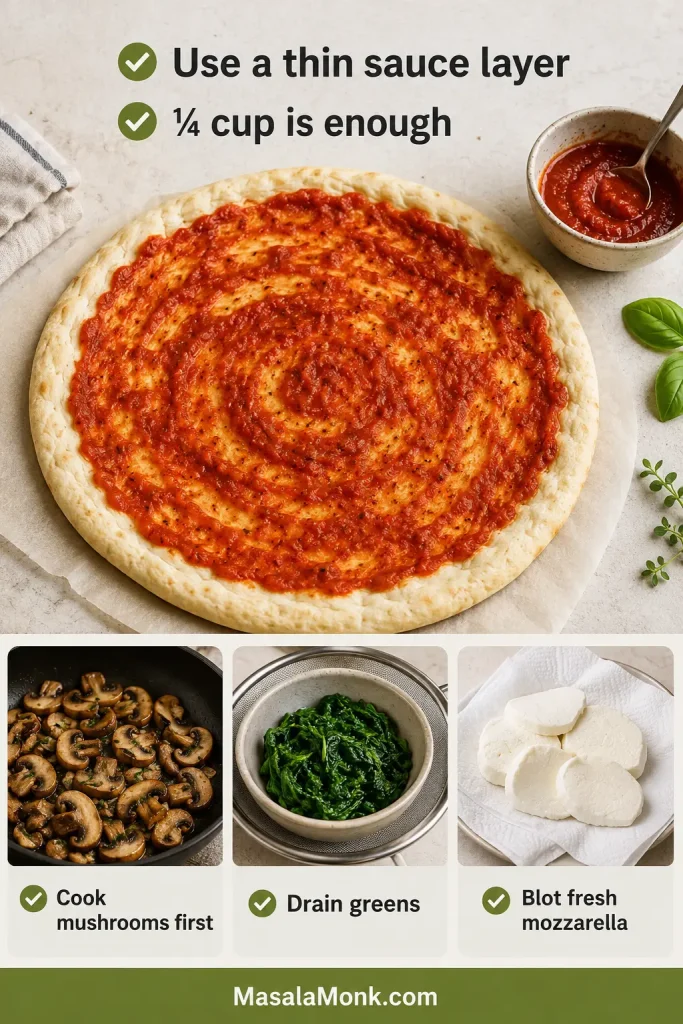
Watery sauce, fresh mozzarella, raw mushrooms or heavy cheese can leave a good crust soft and pale. Use the ranges below as choices rather than targets to maximize.
Sauce and Cheese for a 12-Inch Pizza
- Keep sauce to roughly ⅓ cup / 80 ml for a 12-inch pizza.
- Use about 4 oz / 115 g low-moisture mozzarella for a lighter, crisper pizza or up to 6 oz / 170 g for fuller coverage.
- Leave the rim clear and keep the center lighter than the outer portion.
Balanced Pizza Toppings vs Moisture Overload
- Drain fresh mozzarella and pat away excess moisture.
- Pre-cook vegetables that release substantial water.
- Cool cooked toppings before placing them on raw dough.
For a classic red base, use a thick homemade marinara sauce that clings instead of running. Spread pesto thinly, and avoid building a wet mound where the crust needs the strongest heat.
Pizza Dough Troubleshooting, in the Order Problems Happen
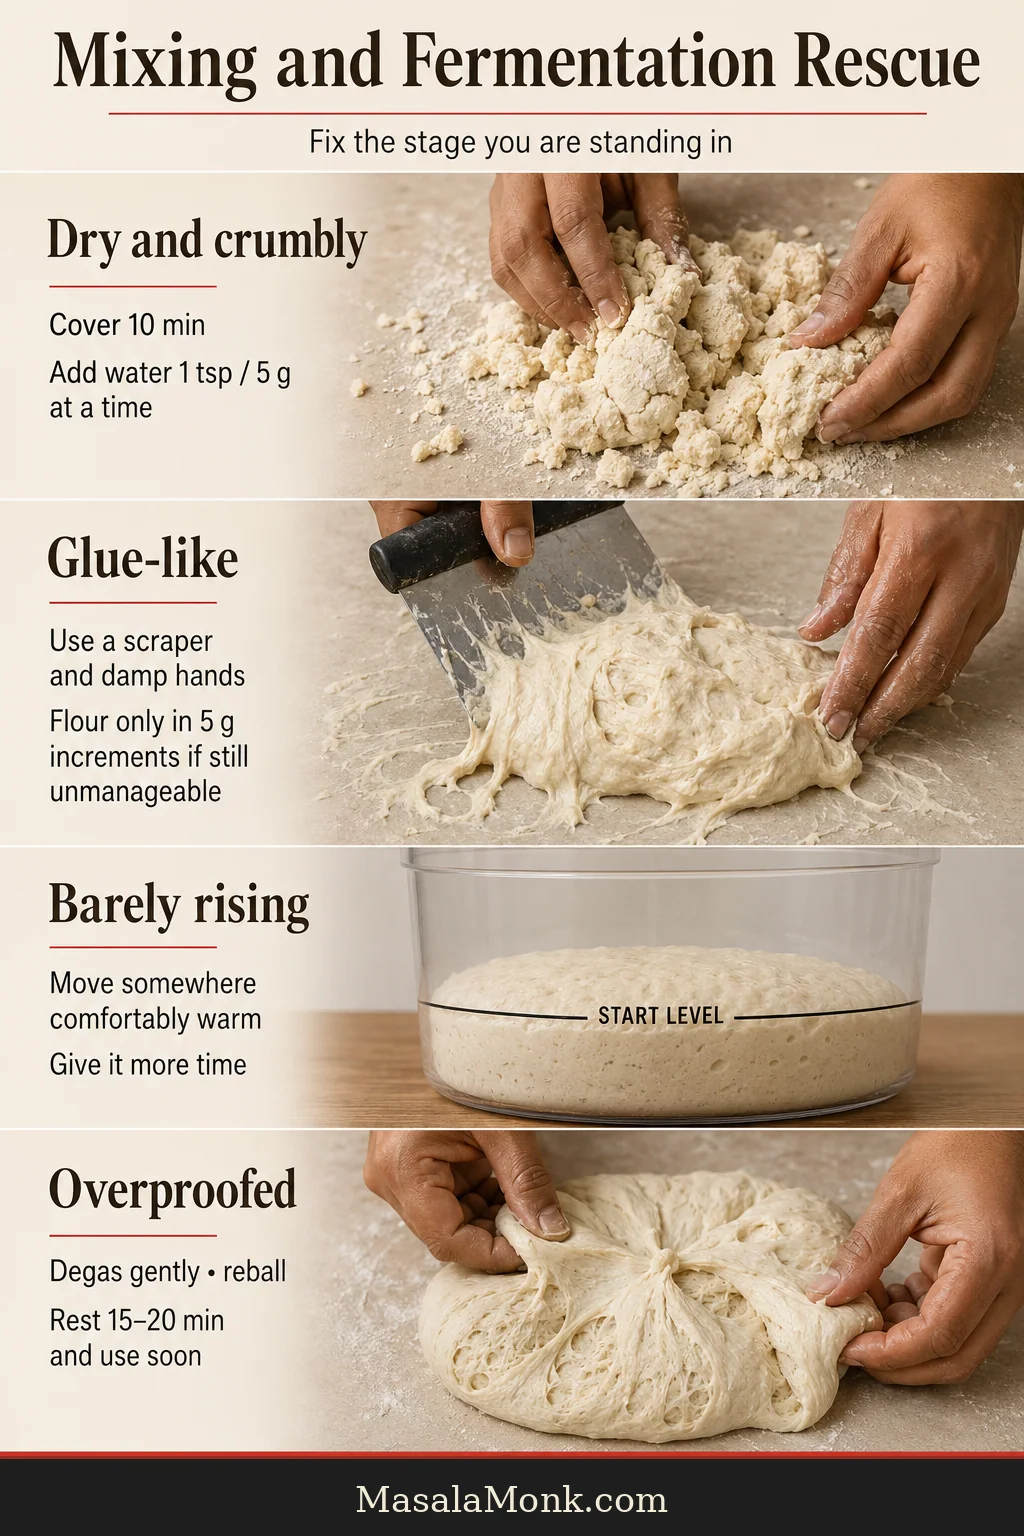
Start with the stage you are standing in. You should not need to diagnose bread science before rescuing dinner.
Mixing and Fermentation Rescue
| Problem | Fix it now | Likely cause or next-time adjustment |
|---|---|---|
| Dough is dry and crumbly | Cover for 10 minutes, then add water 1 teaspoon / 5 g at a time | Too much flour, packed cups or absorbent flour |
| Dough is glue-like | Rest, then use a scraper and damp hands. Add flour only in 5 g increments if still unmanageable | Flour has not hydrated yet or water and flour were mismeasured |
| Dough tears while kneading | Cover for 10 minutes, then resume | Gluten needs time or the dough is too dry |
| Active dry yeast shows no visible activity after 10 minutes | A little creaminess or light foam is enough; check the date and water temperature if the mixture remains unchanged | Inactive yeast or water outside the useful warm range |
| Dough barely rises | Move it to a comfortably warm place and allow more time | Cool room, old yeast or overheated water |
| Dough overproofed or smells sharply alcoholic | Degas gently, reball, rest 15–20 minutes and use soon | Too much yeast, excessive warmth or too long a rise |
Shaping and Transfer Problems
| Problem | Fix it now | Likely cause or next-time adjustment |
|---|---|---|
| Dough keeps shrinking | Cover and rest 10–15 minutes | Dough is cold or gluten is tight |
| Dough tears while stretching | Pinch the hole closed and stretch a thicker area | The center was pressed too thin, the dough is too dry or it rested too briefly |
| Pizza sticks to the peel | Lift the edge, add a pinch of semolina or flour underneath, or transfer to temperature-rated parchment | Topping took too long or the peel was under-dusted |
For visual help, revisit shrinking dough, tear repair or the peel slide test.
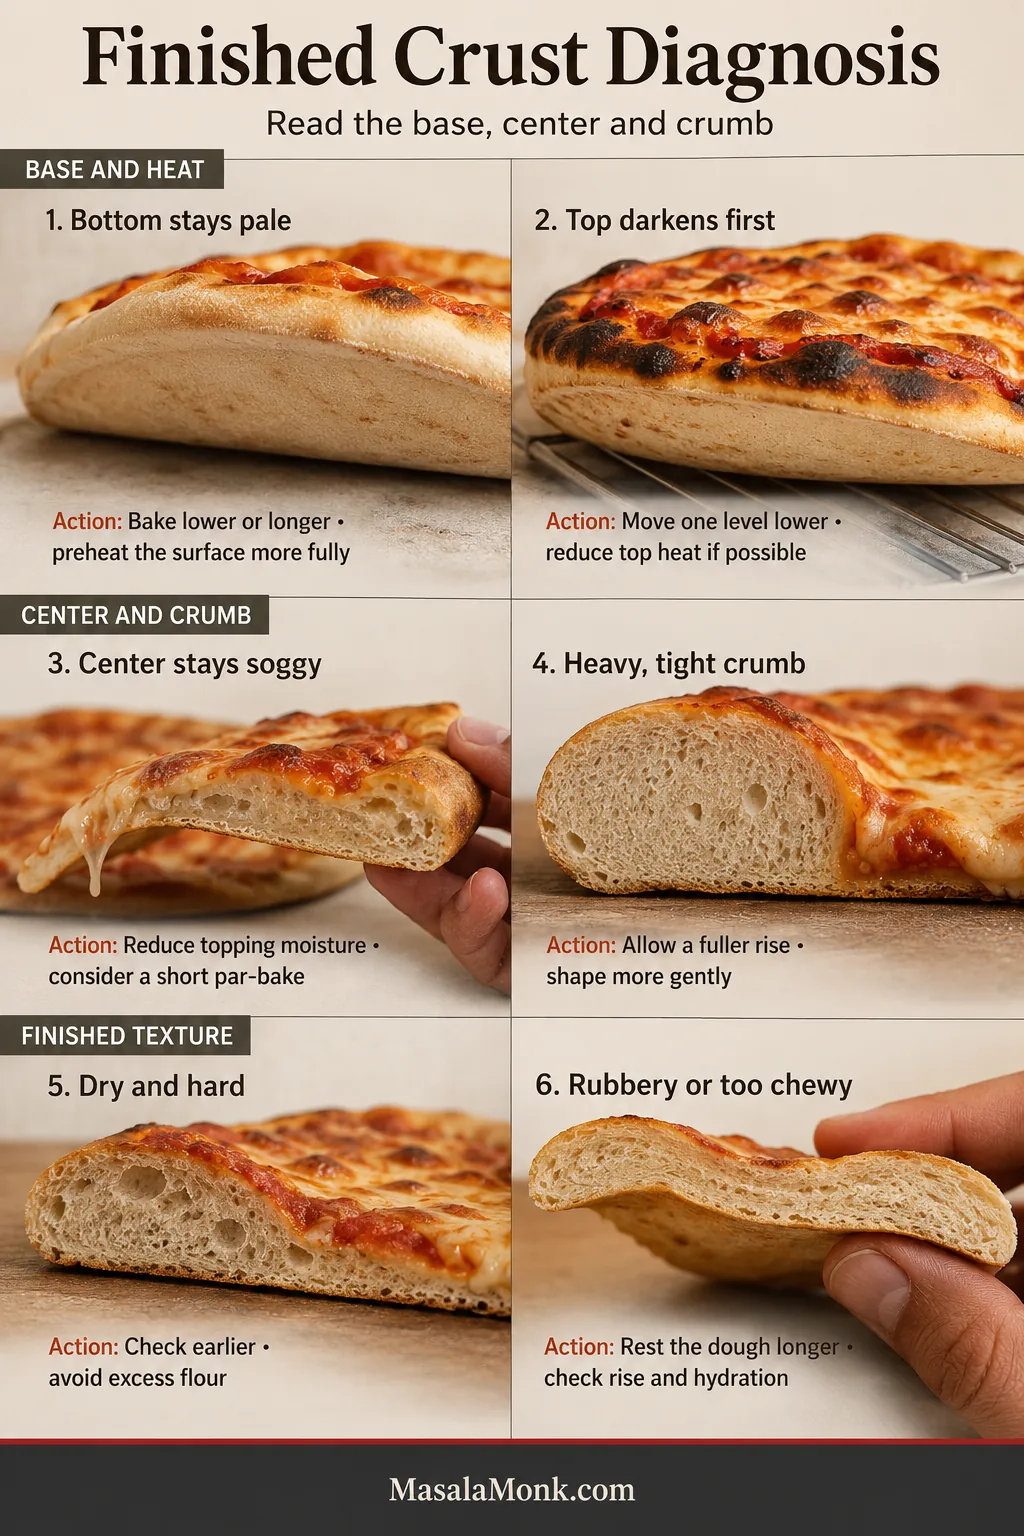
Finished Pizza Crust Diagnosis
| Problem | Fix it now | Likely cause or next-time adjustment |
|---|---|---|
| Bottom stays pale | Bake lower or longer and give the surface more preheat | Weak bottom heat, thick crust or an insulated pan |
| Top darkens before the bottom browns | Move the pizza one level lower and reduce top heat when the oven allows | The pizza is too close to the top element or the base lacks stored heat |
| Center stays soggy | Reduce topping moisture and consider a short par-bake | Too much sauce, cheese or wet toppings |
| Crust is heavy with a tight crumb | Serve this one. Next time allow a fuller rise and shape more gently | Underproofing, weak yeast, too much flour or a flattened rim |
| Crust is dry and hard | Begin checking earlier on the next pizza | Too little water, too much bench flour, thin rolling or overbaking |
| Crust is rubbery or excessively chewy | Let the remaining dough ball rest longer before stretching | Next time allow a fuller first rise, check hydration and avoid excess flour |
Back to RecipeStore the DoughMake One PizzaBack to Top
Make Ahead, Refrigerate, Freeze and Thaw
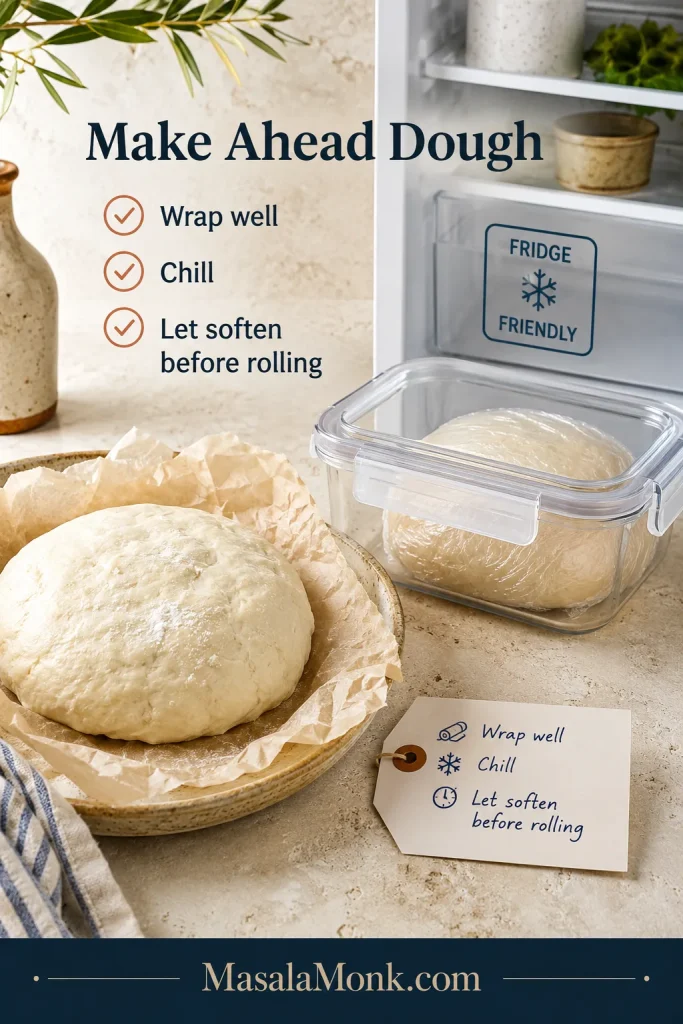
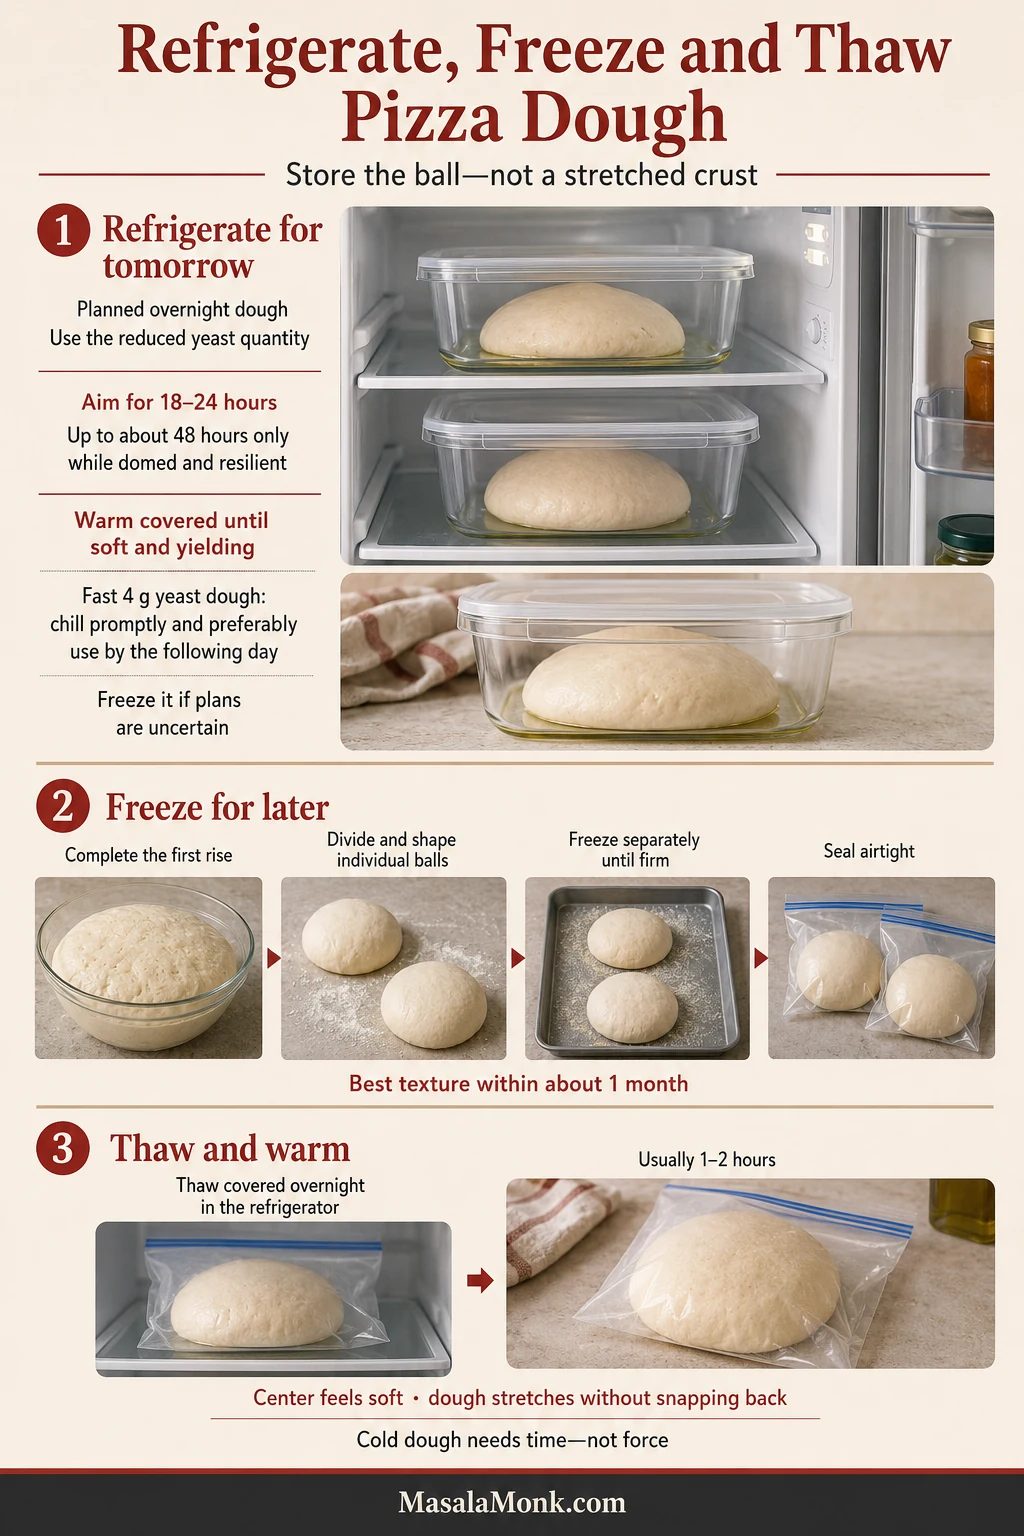
Pizza dough can be planned for tomorrow or saved from today. Use the reduced-yeast version for a planned overnight rise; chill a leftover fast-rise ball promptly and use it sooner, or freeze it.
Refrigerating Pizza Dough
- Use the reduced overnight yeast quantity.
- Mix and knead the dough.
- Rest it for about 20 minutes.
- Divide and form individual dough balls.
- Place them in lightly oiled covered containers with room to expand.
- Aim to use the dough balls after 18–24 hours. In a reliably cold refrigerator, they may remain usable for up to about 48 hours, provided they remain domed and resilient rather than flattened or overflowing.
- Let the balls warm, covered, until they feel soft and stretch without pulling back.
A ball from the fast 4 g yeast recipe contains more yeast than the overnight version. Refrigerate it promptly and preferably use it by the following day. Freeze it if your plans are uncertain.
If you want a naturally leavened and longer-fermented route instead of commercial yeast, use the sourdough pizza dough recipe.
Freezing Pizza Dough
For the fast same-day formula, freeze after the first rise and after dividing into balls.
- Complete the first rise.
- Divide and shape individual balls.
- Coat them very lightly with oil.
- Freeze separately until firm, then seal airtight.
For the strongest rise and best texture, use frozen dough within about one month.
How to Thaw Frozen Dough
Thaw it overnight in the refrigerator while covered. The next day, leave it covered at room temperature until the center is soft and the dough stretches without snapping back, usually one to two hours.
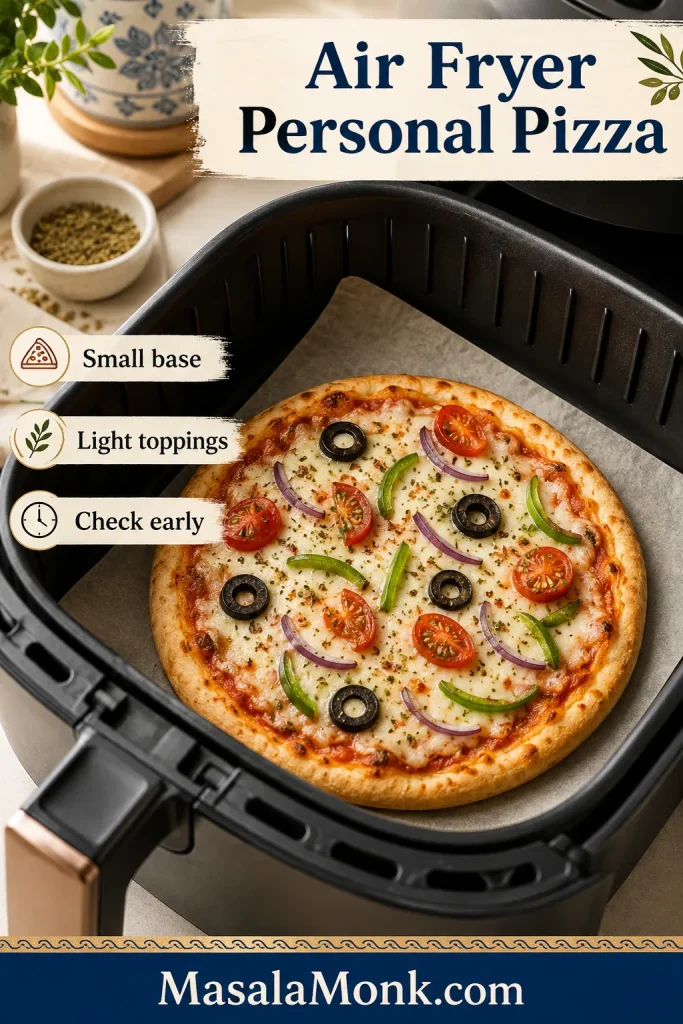
Cool baked slices, refrigerate within two hours and use within 3–4 days. Reheat in a skillet, hot oven or air fryer when you want the base crisp again.
Halving the Recipe and Using the Extra Dough
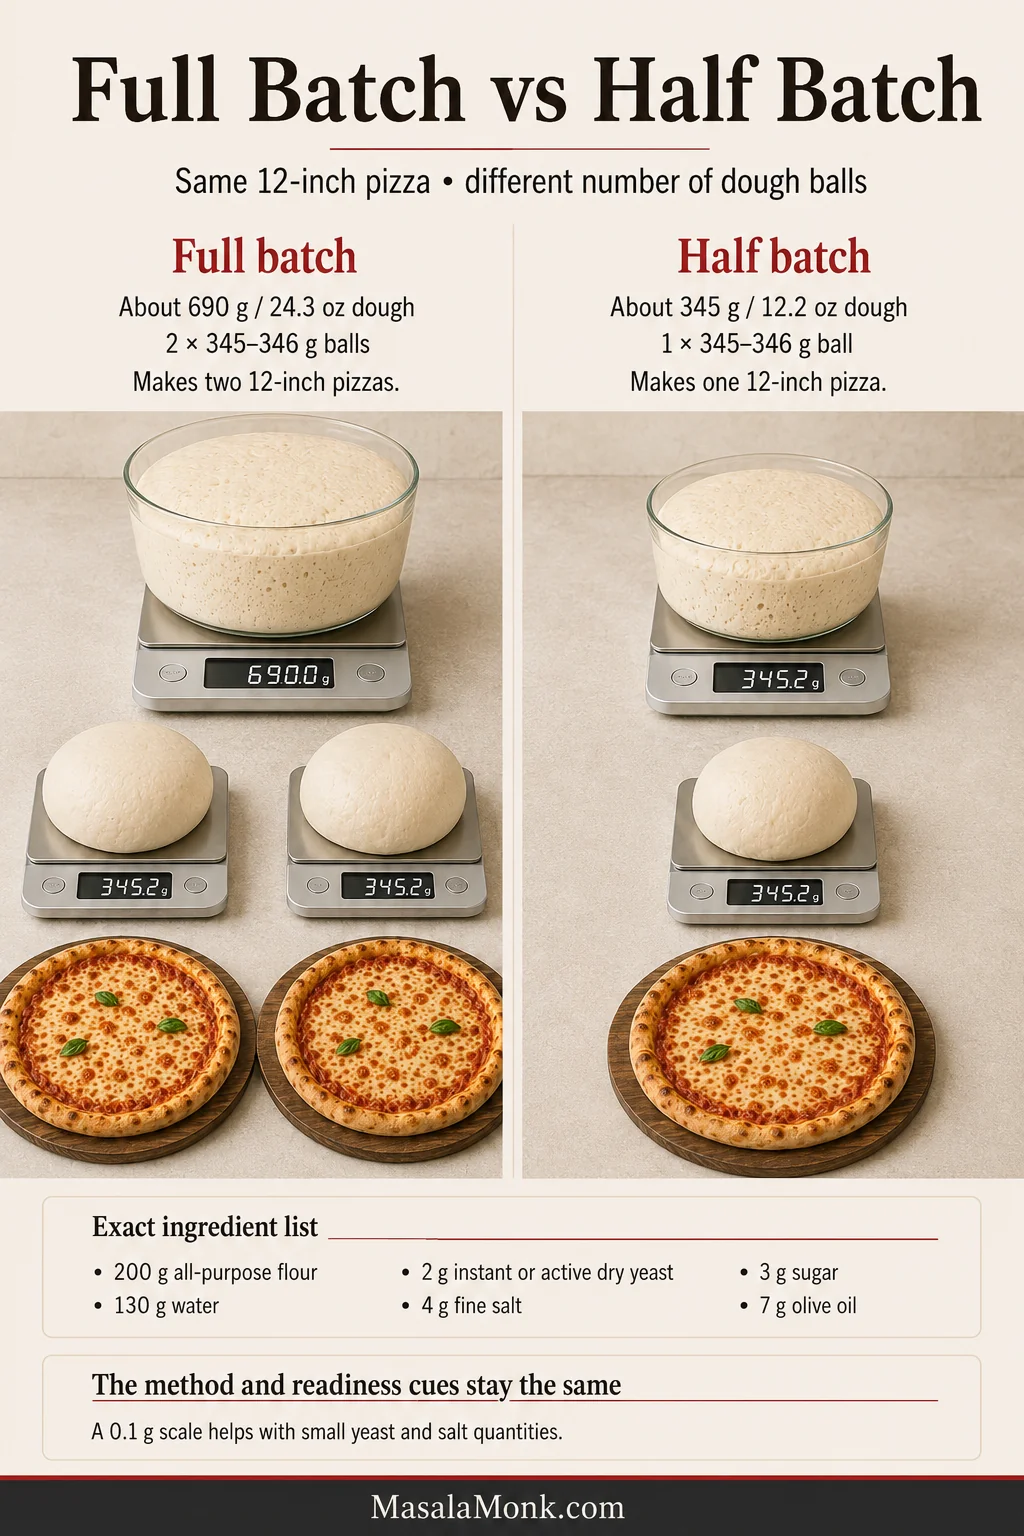
The full recipe makes about 690 g / 24.3 oz of dough. Divide it equally into two balls, usually 345–346 g / about 12.2 oz each, for two medium-thickness 12-inch pizzas.
Make Only One Pizza
- 200 g all-purpose flour
- 130 g water
- 2 g instant or active dry yeast
- 4 g fine salt
- 3 g sugar
- 7 g olive oil
The method and readiness cues stay the same. A scale that reads to 0.1 g is helpful for the small yeast and salt quantities. Otherwise, make the full recipe and refrigerate or freeze the second ball.
Return to the full pizza dough recipe for the method and visual readiness cues.
Other Ways to Use This Dough
Use the dough for calzones, stromboli, garlic knots, breadsticks, mini pizzas or rolls. Keep filled shapes restrained and well sealed, and check small pieces early.
When you want a full garlic-buttered loaf instead of a quick knot or breadstick, this homemade garlic bread loaf uses a dedicated enriched dough built for that softer result.
Frequently Asked Questions
Can I omit the sugar? Yes. The dough will still rise, though a quick home-oven crust may brown a little less readily. Keep the same flour and water quantities.
Can I omit the olive oil? Yes. The dough may feel firmer and the baked crust may be chewier and less tender. Do not automatically replace the oil with more flour. Check the dough after its 10-minute rest.
Can I use plain flour? Yes. In the UK and India, plain flour is the closest everyday equivalent to all-purpose flour. Weigh it, then add water in small increments only if the rested dough feels unusually stiff.
Can I bake one pizza and save the other dough ball? Yes. Refrigerate a fast same-day ball promptly and preferably use it by the following day. For a planned 18–24-hour cold rise, use the reduced overnight yeast quantity. See the complete refrigerating, freezing and thawing guide for longer storage.
Can I double the recipe? Yes. Double every ingredient by weight and divide the dough into four balls. Check your mixer or processor capacity; use two batches when the machine is small.
How long does baked pizza keep? Refrigerate cooled slices within two hours and use within 3–4 days.
The Last Check Before You Slice
Pizza dough does not need to look polished at every stage. It may begin rough, cling to the counter or need ten quiet minutes before it stretches comfortably. None of those things means dinner is lost.
The first pizza shows you how your flour, room and oven behave. The second lets you use that information: give the dough another rest if it pulled back, let the surface reheat if the base stayed pale and lighten the center if the toppings slowed the bake.
Before pulling the pizza out, lift the edge. Brown patches underneath and a set center are the final signs that the crust is ready.
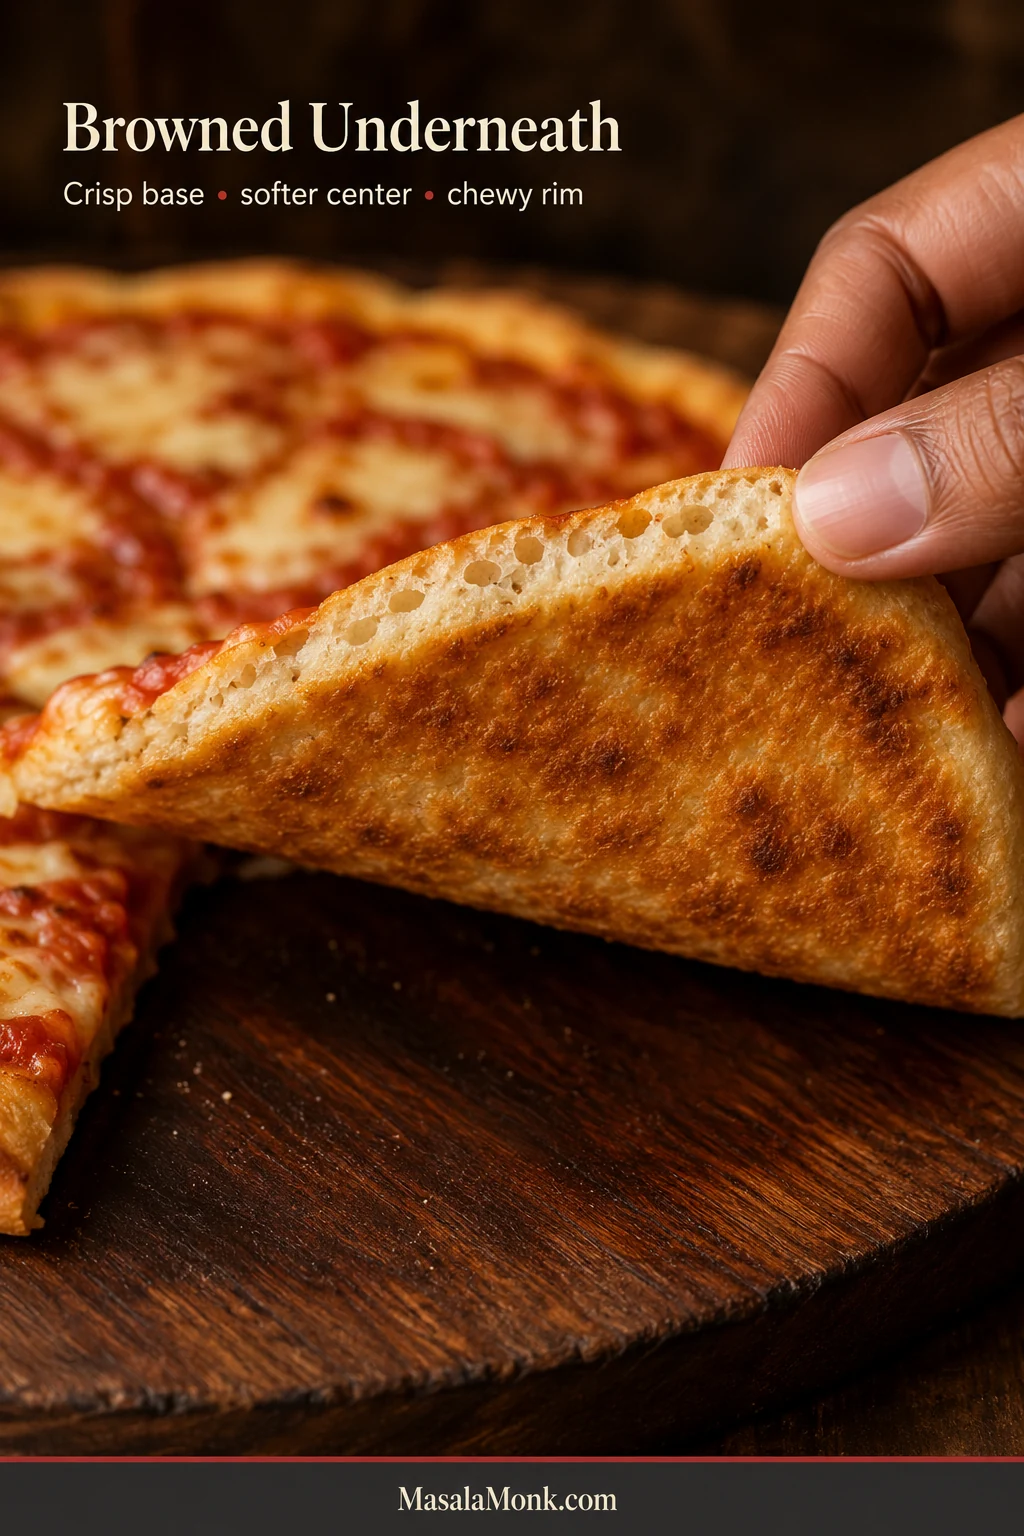
The cutter should meet a little resistance at the crisp base before moving through the softer center and chewy rim. That is how this recipe becomes your pizza dough, not a set of instructions you have to follow blindly.
How did the crust turn out? Tell us which flour, yeast route and baking surface you used—and where the dough surprised you. Those details help us answer the next reader whose pizza behaves the same way.