A torn piece of warm soft pretzel should come out of the bowl carrying a generous coat of beer cheese: enough to settle into the salty browned grooves, but not so much that it slides straight back off before the first bite.
This dip takes about 15 minutes, but cheddar gives you very little warning before creamy turns grainy. Too much heat can push out oil, tighten the cheese, or split what should have been a smooth sauce.
Cook the base. Melt the cheese. Let the beer-and-milk mixture thicken first. Then take the saucepan off the heat and stir in the cheddar a little at a time.
The result is a warm, melted pub-style dip made for homemade soft pretzels and pretzel bites—not the cold, spreadable style usually associated with Kentucky beer cheese.
Use 285 g / 10 oz sharp cheddar, 160 ml / ⅔ cup balanced lager, 180 ml / ¾ cup whole milk, and a light butter-and-flour roux.
Cook the beer-and-milk base until it lightly coats a spoon, then take the pan off the heat before adding the cheddar gradually.
Helles or a balanced pale lager is the easiest beer choice. An amber Märzen-style Oktoberfest lager is toastier and particularly good with salty pretzels. Use 0.0% beer if avoiding alcohol.
Beer Cheese Recipe for Pretzels
There’s no cream cheese in this version. A light roux gives the cheddar enough body to stay creamy while keeping the flavor firmly cheddar-forward.
Prep
5 minutes
Cook
About 10 minutes
Total
About 15 minutes
Yield
About 2½ cups / 600 ml; around 6–8 appetizer servings
You’ll need: a 2- to 3-quart / 2- to 3-liter saucepan, whisk and box grater. A kitchen scale is especially helpful for the cheddar. A small slow cooker is optional if you need to keep the finished dip warm.
Ingredients
285 g / 10 oz sharp cheddar, freshly grated from a block
28 g / 2 tbsp unsalted butter
16 g / 2 tbsp all-purpose flour
180 ml / ¾ cup whole milk
160 ml / ⅔ cup balanced lager, such as Helles, pale lager, pilsner or Märzen
1 tsp Dijon mustard
1 tsp Worcestershire sauce
½ tsp garlic powder
¼ tsp smoked paprika
Pinch to ⅛ tsp cayenne, to taste
Freshly ground black pepper, to taste
Fine salt, only if needed after the cheese is melted
Instructions
Grate and weigh the cheddar first. Have all 285 g / 10 oz ready beside the stove before you start.
Make the light roux. Melt the butter over medium to medium-low heat. Whisk in the flour and cook for about 1 minute. Keep it pale and gently bubbly. Once the raw flour smell is gone, move on.
Add the milk, then the beer. Whisk in the milk gradually so the roux stays smooth. Pour in the beer and keep whisking through the foam. It may puff up briefly; that’s normal.
Thicken and season the base. Bring it to a gentle simmer and cook for roughly 1–3 minutes, whisking regularly. Stop when it lightly coats the back of a spoon but still pours readily. It’ll look thinner than finished cheese dip, and that’s where you want it—the cheddar is still coming. Whisk in the Dijon, Worcestershire, garlic powder, smoked paprika and cayenne.
Ignore the beer foam and watch the liquid underneath. When the base lightly coats a spoon but still moves freely, it is ready for the off-heat cheese-melting stage.
Now Melt the Cheese
Take the saucepan completely off the heat. Let the active bubbling settle before the cheese goes in.
Add the cheddar in 4–6 handfuls. Let each addition mostly disappear before adding the next. Once the first couple of handfuls melt in smoothly, you’re on the right track—keep going at the same unhurried pace.
If the last handful needs help, use the lowest heat. A few seconds is enough. Stir until it loosens, then pull the pan away again. Don’t let the finished sauce boil.
Wait 1–2 minutes before judging the texture. Beer cheese thickens as it cools, so don’t rush to fix a sauce that may already be right.
Taste, then season. The cheddar is what you want to notice first, with the beer still clearly there. Dijon, Worcestershire, paprika and cayenne should sit underneath rather than tasting like separate ingredients. Finish with salt and black pepper only as needed.
Recipe Notes
Weigh the cheddar if you can. A loose cup and a packed cup of grated cheese can hold very different amounts, so weight is more reliable.
Whole milk gives the best body. 2% works too, though the dip may finish slightly looser.
Sweet paprika can replace smoked paprika if you don’t want the faint smoky edge.
For a vegetarian version, use a vegetarian Worcestershire-style sauce; traditional Worcestershire commonly contains anchovies.
If the sauce is smooth and the pretzels are warm, you can stop here. The rest is for choosing a different beer or cheese, understanding what happened in the pan, fixing a troublesome batch, or keeping the bowl creamy for a crowd.
What Beer Works Best for Beer Cheese?
For the easiest first batch, choose Helles or a balanced pale lager. Märzen is the strongest match with a salty soft pretzel.
Choose by intensity: pale lager keeps cheddar forward; maltier or hoppier beers make the beer more assertive. If you dislike its bitterness beside cheddar, the saucepan won’t hide it.
How Different Beer Styles Change the Dip
Beer style
What it does in the dip
Pale lager / Helles
Clean, mild and gently malty. The easiest all-around choice.
Pilsner
Crisper, with a slightly more noticeable hop edge.
Märzen / amber Oktoberfest-style lager
Toastier and maltier; especially good against a browned, salty pretzel crust.
Amber / brown ale
Adds deeper caramel and toasted-malt notes.
Stout
Darkens the sauce and adds roasted, sometimes bitter notes that can compete with sharp cheddar.
IPA
Use it when you genuinely want hop bitterness in the finished dip; aggressive hops can become more noticeable with heat.
You don’t need expensive or unusual craft beer here. A straightforward lager often makes a better dip than a beer with so much personality that the cheddar has nowhere to go.
With a pale lager, the cheddar stays firmly in front. Märzen adds enough toasted malt that it almost feels like an extension of the browned pretzel crust.
For stronger beer flavor, choose a maltier or more assertive style before increasing the quantity. Pouring in more beer also adds more liquid and can leave the sauce thinner than you wanted.
Does the alcohol cook out? Not completely during a short recipe like this. USDA nutrient-retention data account for alcohol that can remain after food preparation, so don’t rely on simmering to make regular beer alcohol-free. To avoid alcohol, choose beer labeled 0.0%. If you need to avoid alcohol completely, check the alcohol statement on the label.
Best Cheese for Beer Cheese
Build this around sharp cheddar. It keeps enough character after milk and beer soften it. Extra-sharp gives you more bite, though very dry aged cheddar is less forgiving in a smooth melted sauce.
Freshly grated block cheese is the easier route. Bagged cheddar may melt perfectly well, but block cheese gives you one less variable while you’re watching the heat.
For a nuttier, slightly rounder edge, replace about 55 g / 2 oz of the cheddar with Gruyère while keeping the total cheese at 285 g / 10 oz.
Whichever cheese you use, heat matters more than almost anything else.
Why Beer Cheese Breaks
Cheddar holds fat and water inside a protein network. Too much heat can tighten those proteins and push the fat and moisture apart instead of letting them stay together in a creamy sauce.
That’s why the roux-and-milk base gets cooked first and the cheese goes in later. Once the base is ready, the job changes from cooking to melting.
The cheese sauce guide goes further into roux ratios, cheese behavior and beer-free cheddar sauces if you want the deeper technique.
What the Right Consistency Looks Like
Two visual cues matter most. Before the cheddar, the base lightly coats a spoon. After it, the finished sauce coats a pretzel.
A heavy ridge on the spoon means the base has gone too far; sauce that sheets off the pretzel is still too loose. Judge movement, not minutes.
Drag a torn pretzel through the bowl and lift it. The cheese should fill the grooves in the crust, stay attached on the way to your mouth, and slowly level itself again after the pretzel leaves a trail through it.
Smooth but too thick? Add warm milk. Smooth but too thin? Let it rest, then use low heat if needed. Grainy, oily or clumped? Stop heating it first.
Identify the failure before changing the pan. More cheese can make an already-tight dip heavier, and more heat can worsen separation. Diagnose first; adjust second.
The dip is too thin
If it’s still smooth but obviously runny after resting, return it to very low heat and stir until it tightens slightly. Pull it away again before it boils. A slightly loose dip still tastes good; a grainy one is much harder to fix.
The dip is too thick or pasty
Add warm milk 1 tbsp / 15 ml at a time. Stop when the spoon trail begins closing slowly behind the spoon. Cooling, reducing the base too far, excess flour or too much cheese can all make it tighten.
The sauce is grainy or oily
Stop heating it and let the pan cool for a moment. Stir or whisk gently. A splash of warm milk or cream may help a mildly separated sauce come back together.
For slight grit, a brief pass with an immersion blender can improve the texture. A badly broken sauce may never become completely smooth again, and turning the heat up usually makes things worse.
There’s a rubbery cheese lump in watery liquid
The cheddar seized instead of melting into the base, usually because it got too hot too quickly. Stop cooking. A severe break is difficult to recover completely.
The sauce is stringy
Try a splash of warm milk if the sauce is otherwise smooth. Too much cheese—especially when shredded cheese is estimated by volume instead of weighed—or a particularly stretchy cheese can push the sauce toward strings.
It tastes bland
Check the salt first. Then taste for Dijon, Worcestershire and cayenne. If the cheddar itself seems lost, choose a sharper cheese next time rather than adding more to an already-thick sauce.
It tastes bitter
A heavily hopped beer or beer that has reduced too far is the usual suspect. Extra dairy can soften the edge, but strong hop bitterness is difficult to erase completely.
It turns stiff as it cools
Some thickening is normal. Cheese fat firms as the temperature drops. Warm the dip gently and stir in a splash of milk if it needs loosening.
People eat very differently around a snack table, so these numbers are starting points rather than strict portions.
Guests
How much to make
6–8
1 batch / about 2½ cups / 600 ml
9–12
1 batch with several substantial appetizers; 2 batches if pretzels and cheese are a major part of the spread
13–16
2 batches / about 5 cups / 1.2 L
A batch stretches farther when there’s something substantial and cold on the table too, such as 7 layer dip. When warm pretzels and beer cheese are the main attraction, make more.
Keeping the Dip Warm
Don’t worry about keeping it exactly as loose as it was when it left the stove. It just needs to stay hot, creamy and easy to scoop while people keep coming back for another pretzel.
Make the dip on the stove, then transfer it while hot. For longer service, keep the dip at 140°F / 60°C or warmer, following USDA hot-holding guidance.
Keep the heat gentle enough that the cheese isn’t bubbling steadily around the edges.
Slow-cooker WARM settings vary, so check the actual temperature if the dip will be sitting for a while. Stir occasionally and add warm milk when it begins to tighten.
If the dip needs to stay smooth for a long party, replace 30–55 g / 1–2 oz of the cheddar with American cheese. Its emulsifying salts make a long warm hold more forgiving—the same reason dips such as Rotel dip stay smooth and scoopable.
Reheat refrigerator-cold leftovers separately before transferring them to the slow cooker. Use the cooker to hold already-hot dip, not to slowly reheat a chilled batch.
Serving it without hot holding? Don’t leave the dip at room temperature for more than 2 hours, or more than 1 hour when the surrounding temperature is above 90°F / 32°C.
What to Serve With Beer Cheese
Soft pretzels are still the best answer. Their browned crust and salt cut through the richness, while the chewy middle is sturdy enough to scoop without falling apart.
Build contrast around the beer cheese: something chewy, something crisp or fresh, and something hearty. Pretzels, apples or vegetables, and sausage or potatoes make an easy mix.
Soft pretzels and pretzel bites
Pretzel rods or pretzel bread
Bratwurst or smoked sausage
Crusty bread
Apple slices
Broccoli or cauliflower
French fries or potato wedges
Jalapeño poppers for a hotter bite on the same table
For something crisp alongside the pretzels, crispy homemade fries work especially well; keep the cheese slightly looser so it coats rather than buries them. Baked jalapeño poppers add heat on the side without making the entire bowl spicy.
Make Ahead, Storage and Reheating
Fresh is silkiest, but you can make beer cheese a day ahead. Cool it promptly, refrigerate it in a covered container, then reheat gently with a splash of milk if it has tightened.
Use refrigerated leftovers within 3–4 days. Cold beer cheese will look much firmer because the cheese fat has set, so judge the texture only after it’s warm again.
Reheat the beer cheese fully before judging its texture. Once it is hot and smooth, add milk only if it still needs loosening; it will tighten again as it cools.
USDA leftovers guidance recommends reheating refrigerated leftovers to 165°F / 74°C. Reheat gently on the stove or in short microwave intervals, stirring often.
If you’re holding the reheated dip for serving, keep it at 140°F / 60°C or warmer.
Freezing isn’t the best choice for texture. Dairy-and-cheese sauces can come back grainy or slightly separated after thawing, so refrigeration is much more reliable.
Variations and Dietary Options
Want it hotter? Add more cayenne, hot sauce or finely chopped jalapeño.
Need it flourless? Use a formula built around cornstarch or sodium citrate rather than simply leaving the flour out of this one. Sodium citrate is an emulsifying salt that helps melted cheese stay smooth, and those approaches need different ratios.
Need it gluten-free too? Use a flourless version or a gluten-free thickener, and make sure the beer is certified gluten-free.
What About Kentucky Beer Cheese?
It’s a different kind of beer cheese. This recipe is hot and flowing, built for dipping pretzels. Kentucky beer cheese is generally served cold or at room temperature, with a thicker spreadable texture and often a sharper, spicier flavor. Crackers and vegetables are common companions.
When the bowl is right, there isn’t much ceremony left: a pretzel still warm enough to smell buttery when you tear it open, a spoon trail that slowly disappears into the cheese, and enough sauce caught in the crust to make the next piece inevitable.
Cook the base. Melt the cheese. Then get the bowl to the table while the pretzels are still warm.
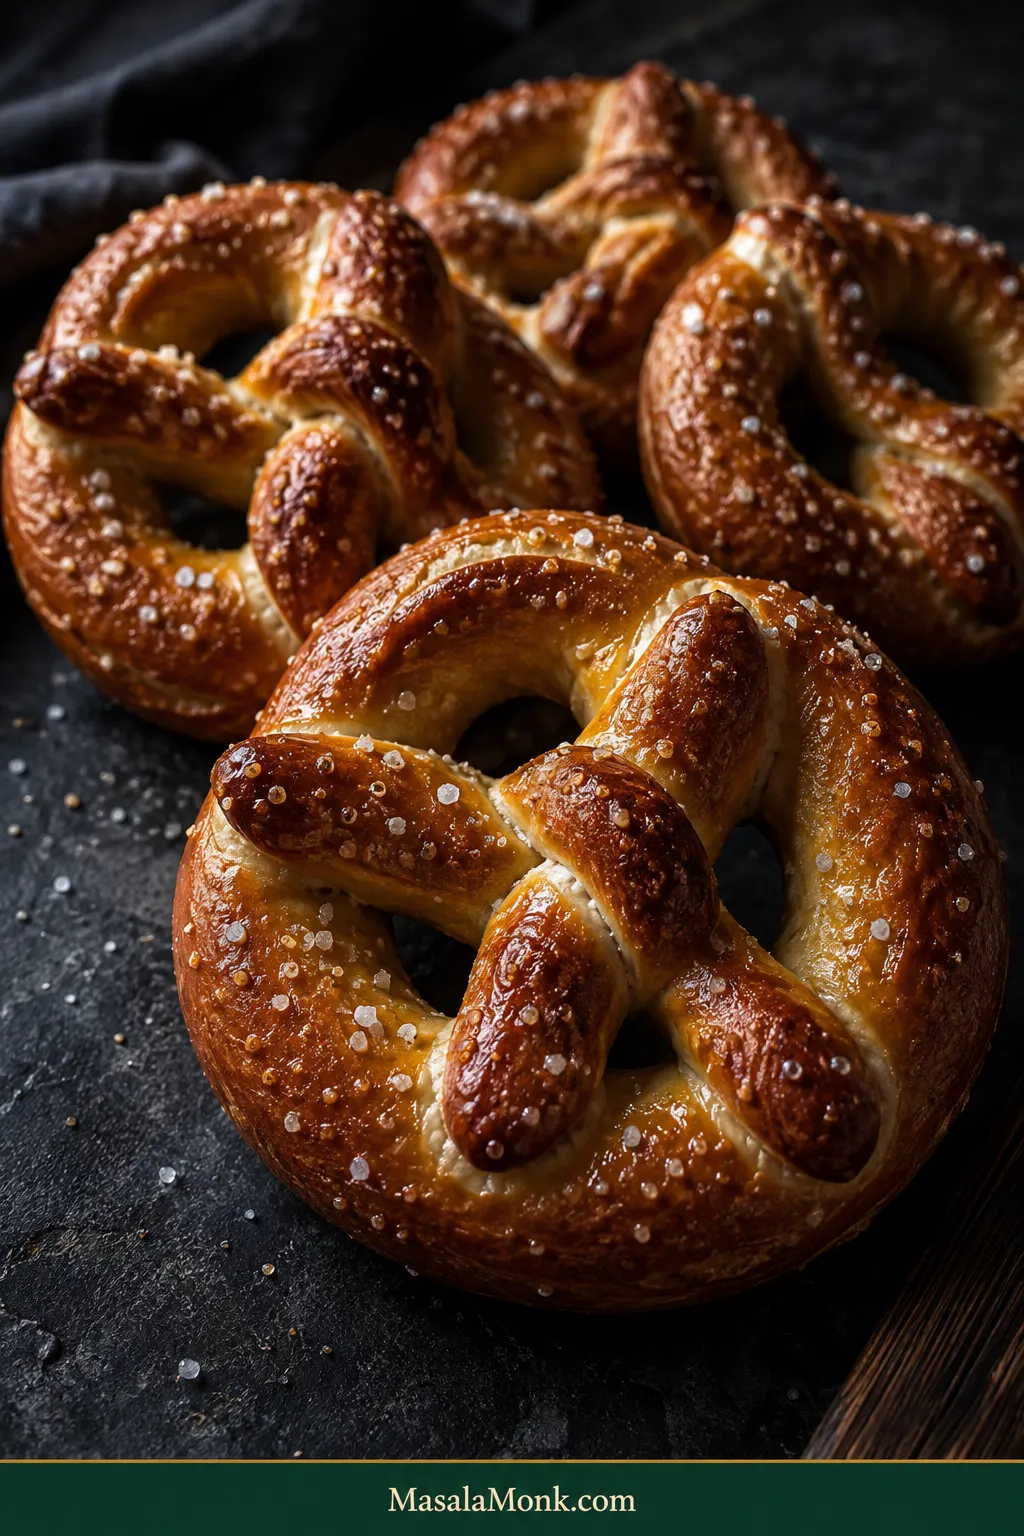
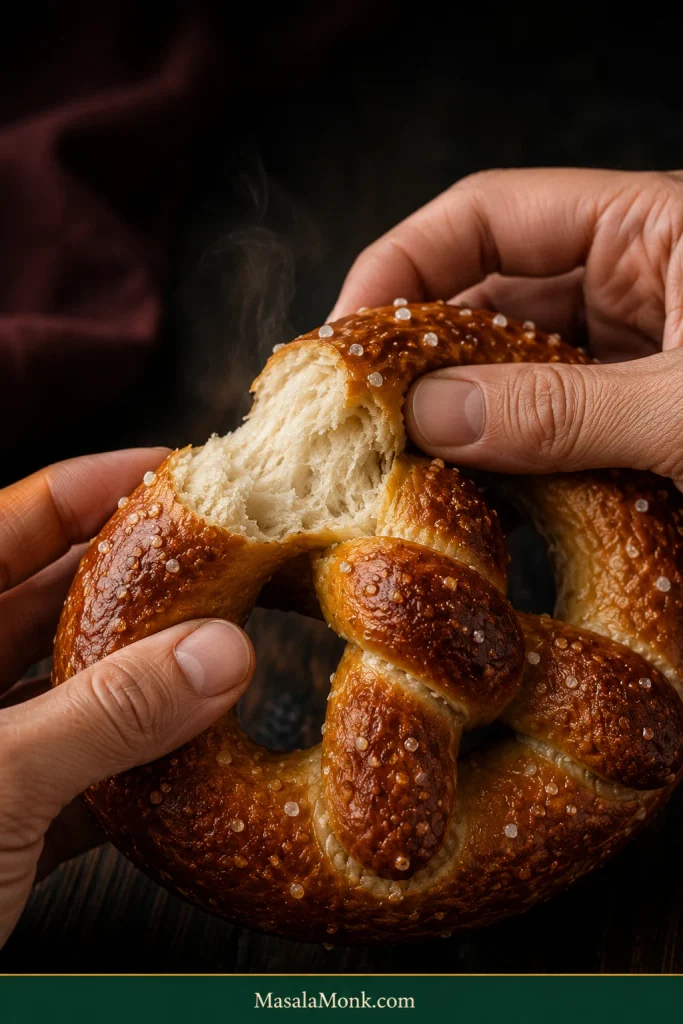
Pull apart a good soft pretzel and the browned crust should resist for just a moment before giving way to a warm, soft center. The surface has a little chew, salt arrives before sweetness, and enough melted butter clings to the hot crust that some of it ends up on your fingertips.
The best ones barely make it to the cooling rack. Give them five minutes, tear through the thick curve, and the center should compress gently between your fingers before slowly pushing back.
The shapes won’t all come out identical, especially on a first batch. Once a tray of browned pretzels is sitting there warm under a layer of melted butter, that suddenly matters a lot less.
Soft pretzels can look like the sort of thing that takes bakery training, but the awkward-looking parts become surprisingly ordinary once you know what to watch for. Is the dough actually too sticky? Why does the rope keep shrinking? Are those holes big enough? How long should the baking-soda bath take?
Nothing here depends on guessing what “enough flour,” “a long rope,” or “golden brown” is supposed to mean. Make a soft dough, give it time to puff, roll long ropes, dip them briefly, then bake until the crust looks properly browned.
The Method in One Minute
You don’t need lye, an egg wash, or a stand mixer.
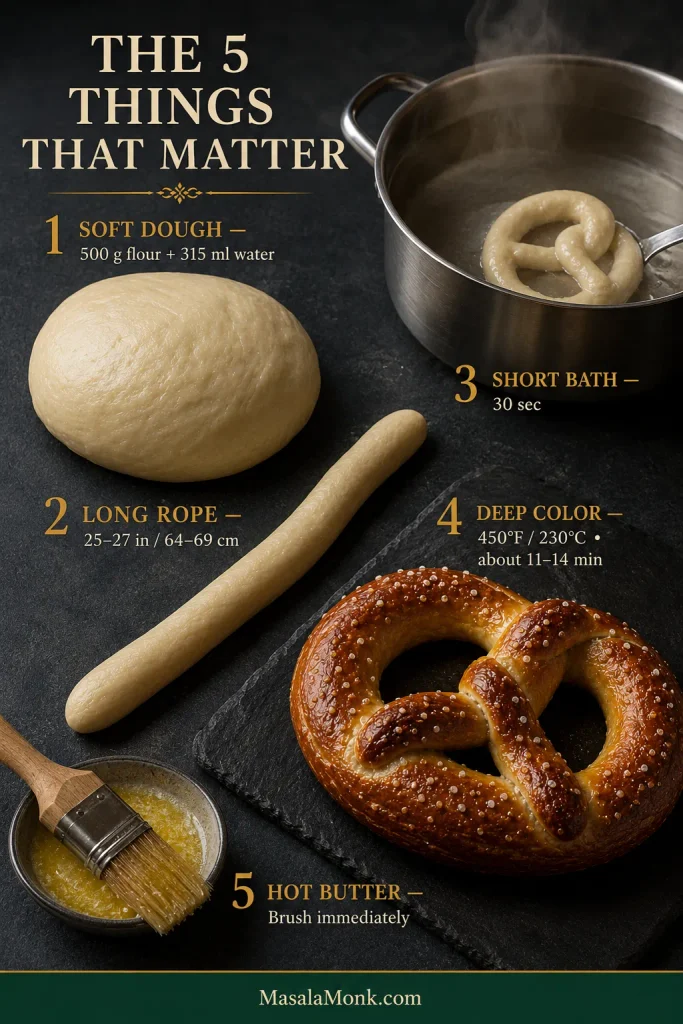
Soft dough. Long rope. Short bath. Deep color. Hot butter. Those are the five things worth remembering.
Soft dough: start with 500 g flour and 315 ml warm water. Rest for 10 minutes, knead fully, then decide whether the dough needs the reserved 10 ml water or a little extra flour.
Long rope: divide into 8 pieces of about 110 g each. Roll partway, let them relax while you work through the batch, then finish at 25–27 inches / 64–69 cm.
Short bath: use 1.9 L / 8 cups water with 75 g baking soda and give each pretzel 30 seconds total.
Deep color: bake at 450°F / 230°C. Start checking around 11 minutes and look for deep golden-brown crust with darker raised curves.
Hot butter: brush immediately after baking, then let the pretzels stand for 5 minutes before serving.
Think of these as a sequence, not five separate tricks. Each soft-pretzel checkpoint sets up the next, so correcting problems early makes everything downstream easier.
Homemade Soft Pretzel Recipe
These are substantial pretzels rather than thin, crisp ones: deeply browned outside, lightly chewy through the crust, tender in the middle, and brushed with butter straight from the oven.
Plan on 40–50 minutes of hands-on work and about 2 hours from start to finish. Your part comes in short bursts—mix and knead, roll and shape, dip and bake—with most of the time between those stages spent waiting for the dough or the oven.
Yield
8 large pretzels
Piece weight
About 110 g / 3.9 oz each
Active time
40–50 minutes
Rise
45–60 minutes
Bake
Usually 11–14 minutes
Oven
450°F / 230°C
Total time
About 2 hours
Before You Start
A kitchen scale is strongly recommended, especially for the flour and eight equal portions.
Clear about 3 feet / 90 cm of counter space for the long ropes.
Use a wide, high-sided pot or Dutch oven and have a broad slotted spatula or spider ready for lifting the wet pretzels.
Set both prepared baking sheets beside the pot before dipping. Once you start, the drain-salt-transfer rhythm moves quickly.
Ingredients
For the dough
500 g / 17.6 oz all-purpose flour; if measuring by volume, expect about 4 to 4¼ cups depending on how you fill the cup, so weighing is much more reliable
315 ml / 1⅓ cups warm water, 100–110°F / 38–43°C
10 ml / 2 teaspoons additional warm water, reserved and used only if needed
7 g / 2¼ teaspoons instant yeast
18 g / about 1½ tablespoons packed light brown sugar; granulated sugar can replace it at the same weight
9 g / about 1½ teaspoons fine sea salt
28 g / 2 tablespoons unsalted butter, melted and cooled until just warm
For the baking-soda bath
1.9 L / 8 cups water
75 g / about ⅓ cup baking soda
For finishing
Pretzel salt or coarse sea salt, as needed
42 g / 3 tablespoons unsalted or salted butter, melted
Salted finishing butter is fine; just use a lighter hand with the coarse salt on top.
Instructions
1. Mix and rest
Combine the 315 ml / 1⅓ cups warm water, yeast, brown sugar, and melted butter in a large bowl. Add the flour and fine salt and mix until no large patches of dry flour remain.
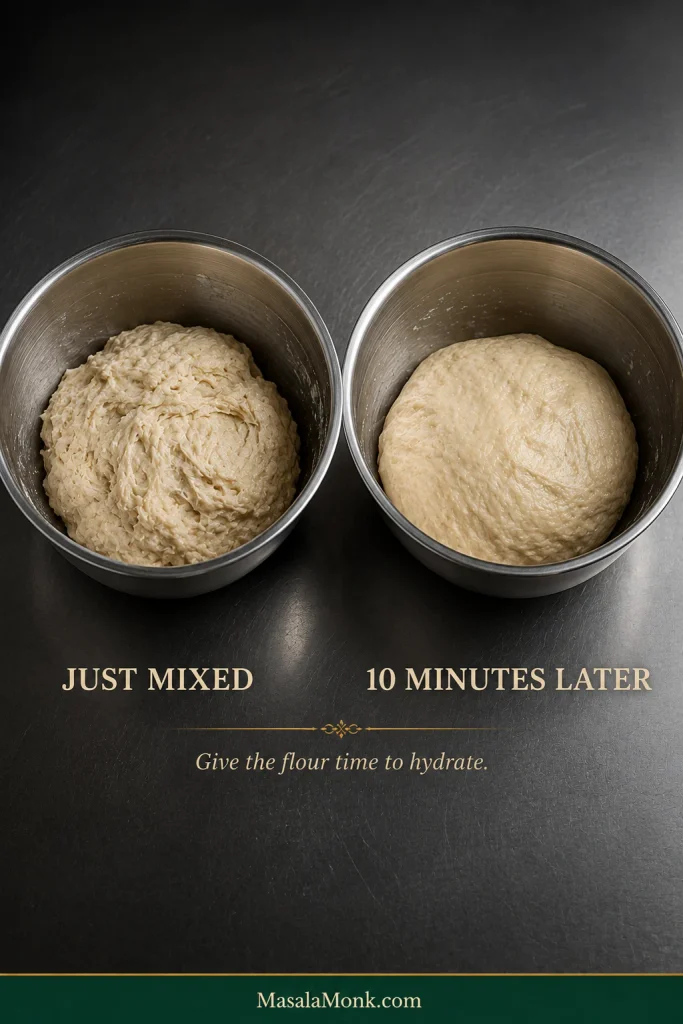
The mixture will look rough and shaggy. Cover it and leave it alone for 10 minutes. When you come back, it should already look a little calmer even though it isn’t smooth yet.
Before judging hydration, let the flour absorb the water it already has. That short rest can prevent an unnecessary correction later.
2. Knead and let it rise
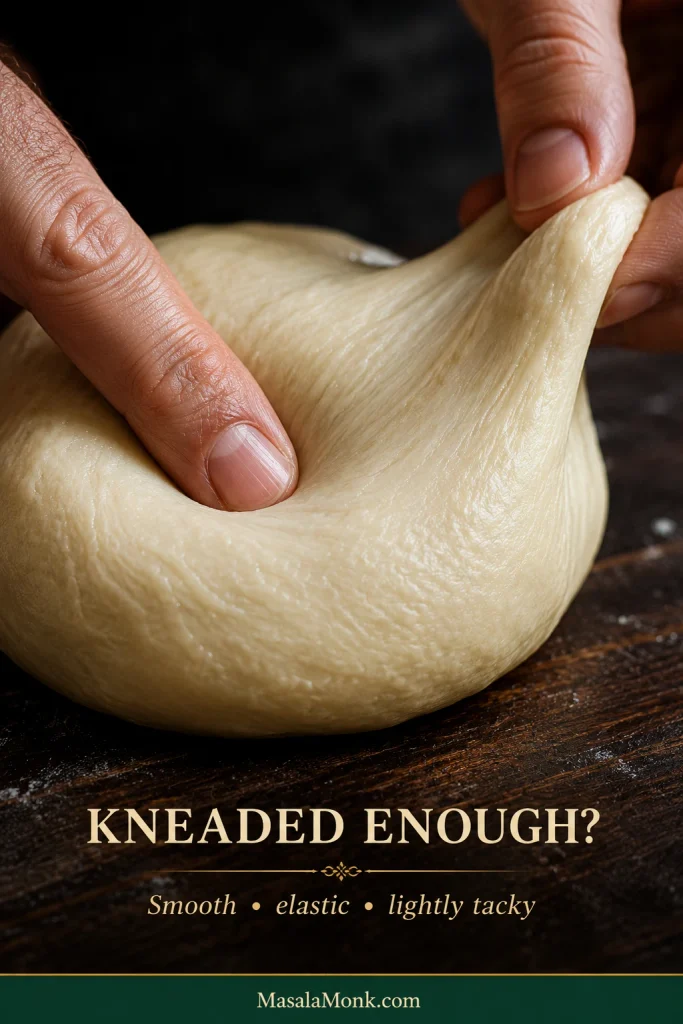
Knead with a dough hook for 6–8 minutes, or by hand for 8–10 minutes. The finished dough should feel smooth, elastic, soft, and lightly tacky.
Press a clean fingertip onto the surface. It should feel tacky without leaving your finger heavily coated. A stiff dough can take the reserved water 1 teaspoon at a time; a mixture that still smears heavily after the full knead can take flour 1 tablespoon at a time.
Knead first. Adjust second.
A finished knead gives you a fair texture test. Look for elastic rebound and a clean release rather than chasing a perfectly polished dough ball.
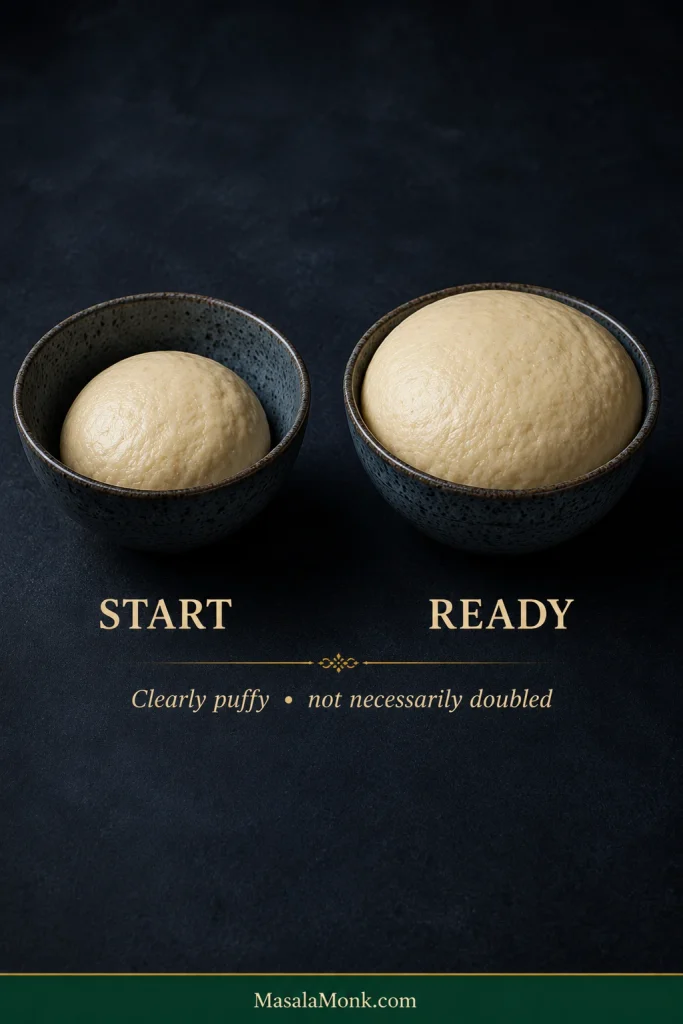
Place the dough in a lightly greased bowl, cover, and let it rise until clearly puffy and substantially larger, usually 45–60 minutes. It does not need to double.
If the change is hard to judge, mark the starting height on the outside of the bowl with a small piece of tape or an elastic band. Use the mark as a visual reference, not a precise measure of volume.
3. Heat the oven and divide the dough
As the rise nears completion, heat the oven to 450°F / 230°C. If baking both trays together, position one rack in the upper-middle and one in the lower-middle of the oven.
Fill the wide pot with the 1.9 L / 8 cups water for the bath and begin heating it, but don’t add the baking soda yet. Prepare two baking sheets with silicone mats or parchment rated for 450°F / 230°C; lightly oil the parchment.
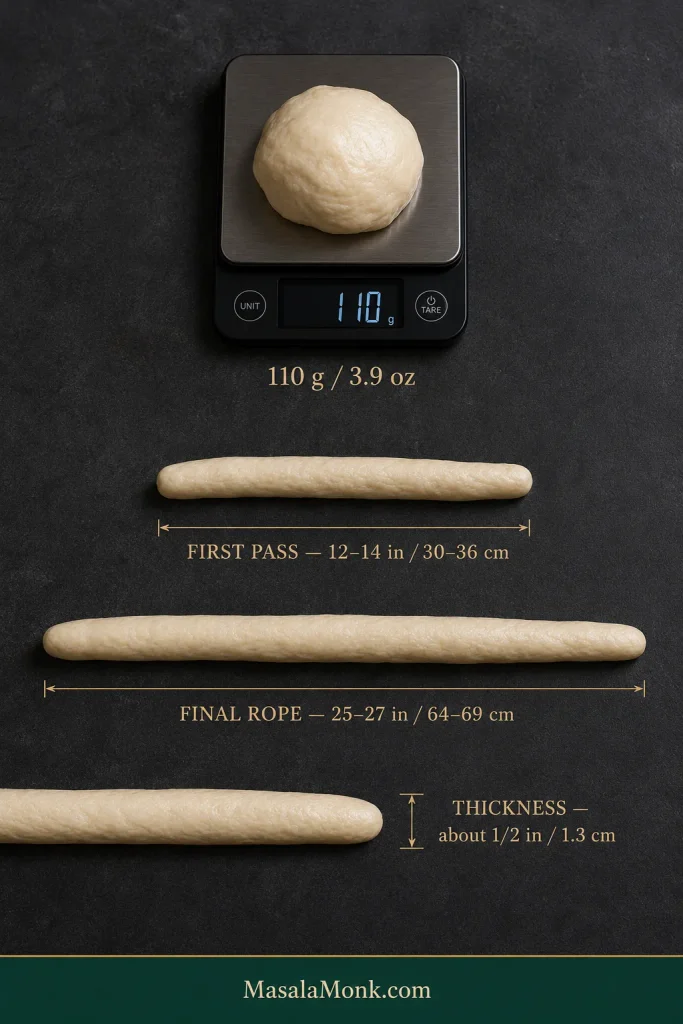
Turn out the risen dough, gently press away any obvious large gas pockets, and divide into 8 equal pieces of about 110 g / 3.9 oz each.
4. Roll and shape
Roll each portion first to 12–14 inches / 30–36 cm. Work through all eight, then return to the first and finish it at 25–27 inches / 64–69 cm, about ½ inch / 1.3 cm thick.
Treat those dimensions as a target, not a ruler test. What matters is a rope long and slender enough to leave generous openings, without thin weak spots that will bake much faster than the rest.
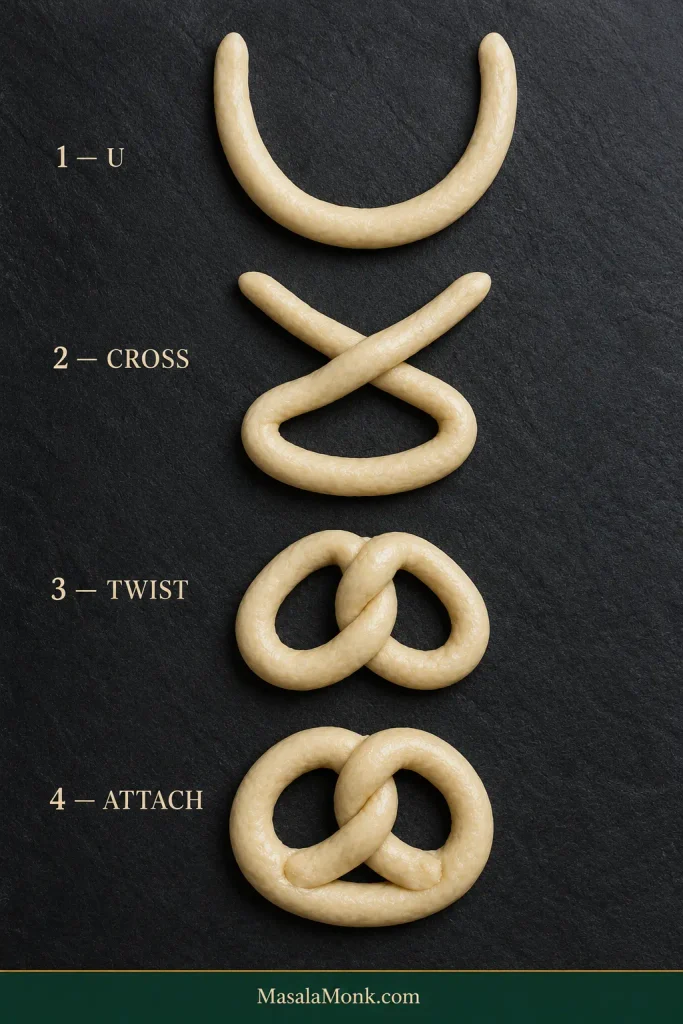
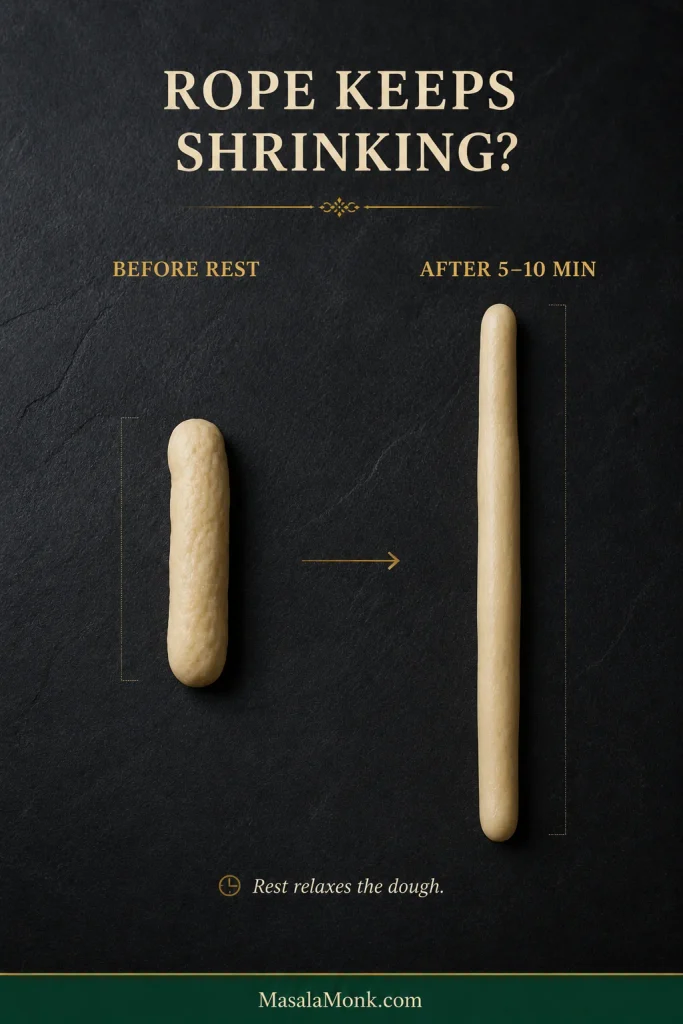
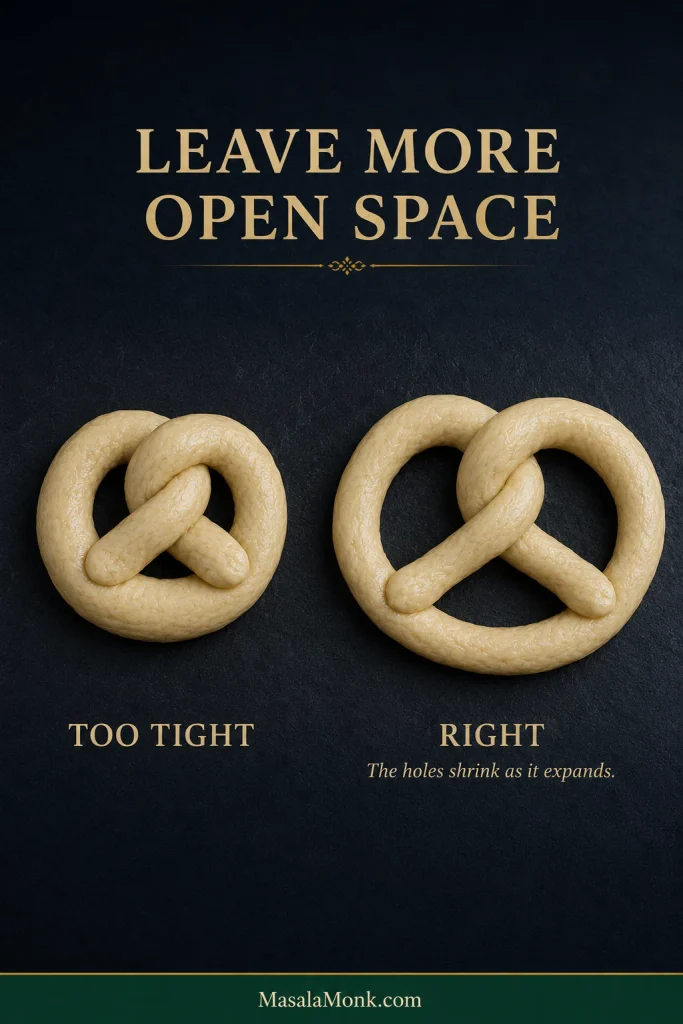
A rope that keeps shrinking needs another 5 minutes of rest. Shape it into a wide U, cross the ends, twist once, then bring them down onto the lower curve and press firmly.
Keep the openings larger than you think you need; they shrink as the pretzel expands. Loosely cover finished shapes while you work through the batch.
After the twist, the attachment points matter. Secure the ends against the lower curve while preserving enough open space for the pretzel to expand cleanly.
5. Prepare the baking-soda bath
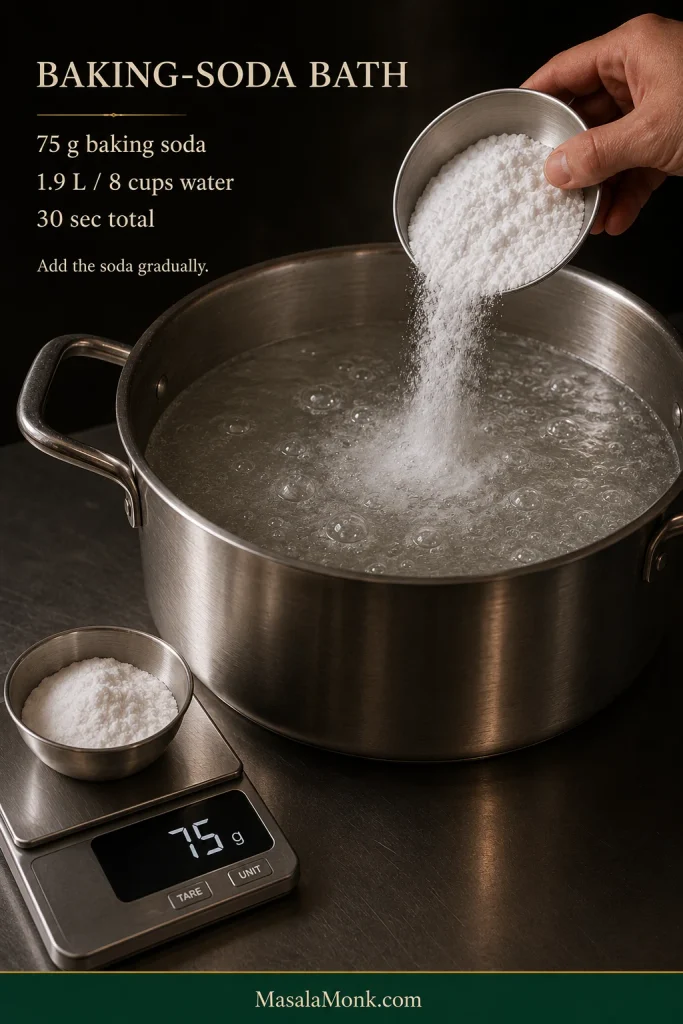
When the water is almost boiling, reduce the heat slightly and add the 75 g / about ⅓ cup baking soda gradually. It may foam. Bring the bath back to a gentle, controlled boil.
6. Dip, drain, and salt
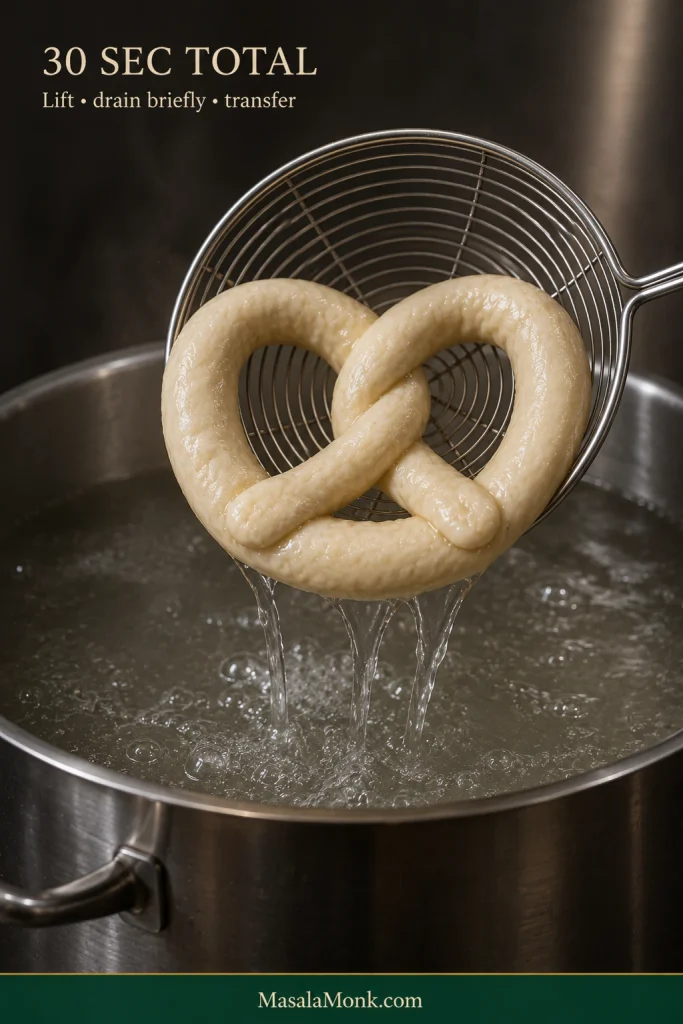
Lower 1–2 pretzels at a time into the bath and give each one 30 seconds total. If part floats above the surface, use about 15 seconds on one side, flip, then 15 seconds on the other.
Lift with a spider or broad slotted spatula, drain briefly over the pot, then transfer to the prepared sheet and add coarse salt while the surface is still damp.
Once the pretzel leaves the bath, drainage matters too. Let excess water run off so the treated surface reaches the tray damp rather than puddled.
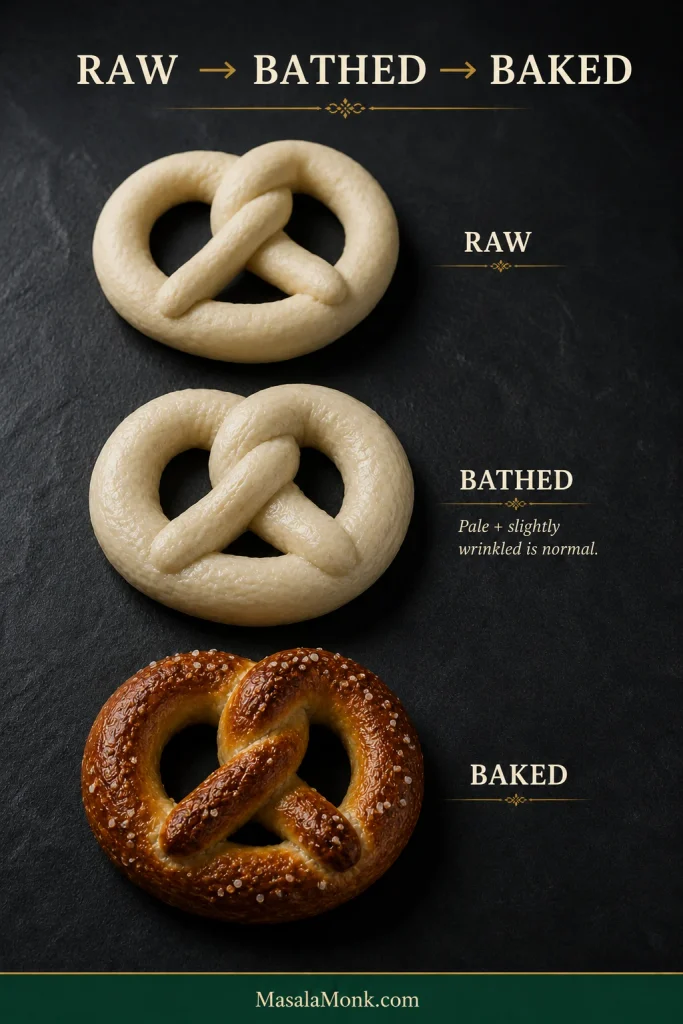
They may look puffier, wrinkled, and still surprisingly pale. Leave them alone. This is the moment ordinary-looking dough starts becoming recognizably pretzel-like; the dramatic color comes next.
7. Bake until deeply browned
Arrange 4 pretzels per tray. Start checking around 11 minutes; most batches need 11–14 minutes, although two trays can take a little longer in some ovens.
Swap the trays between the upper and lower racks and rotate them front to back only if your oven browns unevenly. Take the pretzels out when the crust is deep golden-brown with darker areas over the raised curves. Pale bread-gold is too early.
Only room for one tray? Bake four first. Keep the remaining shaped pretzels loosely covered in the refrigerator while the first tray bakes, then dip them immediately before the second tray goes into the oven.
8. Butter and serve
Brush the pretzels generously with melted butter as soon as they leave the oven.
The salt looks a little less stark once the butter hits it, the crust picks up that familiar bakery-counter sheen, and some of the butter disappears straight into the hot surface.
Give them 5 minutes, then serve.
Inside, the crumb should recover rather than shred or cling. Small-to-moderate pores signal a substantial soft pretzel instead of cottony bread or an underbaked center.
If something in the recipe made you hesitate, start with the section that matches it below. You don’t need to read every section before baking; the deeper guide is here for the moments when you want to understand what the dough is doing or fix something that doesn’t look quite right.
A pretzel should taste distinct from ordinary bread before the mustard ever touches it.
The baking-soda treatment changes the outside so it browns quickly in the oven and develops more roasted flavor and surface chew than untreated bread. The middle should still tear easily and stay tender, with enough structure that the thick curve feels like a pretzel rather than a fluffy dinner roll.
This is a buttery American soft pretzel. Bavarian lye pretzels are typically darker, firmer, and more intensely flavored.
Soft, not fluffy; chewy, not tough; buttery, not brioche-like.
Too bread-like: pale surface, very little crust chew, or an unusually fluffy center.
Right: browned exterior with a slight tug at the surface and a center that compresses when pinched, then slowly pushes back.
Too aggressive: hard or dry crust, or a noticeable mineral, bitter, or baking-soda-like flavor.
That difference matters in the oven too. A baking-soda pretzel does not need to become uniformly as dark as a lye-treated Bavarian one before it is finished.
What Each Ingredient Does
Flour
All-purpose flour gives enough strength for long ropes without making the dough unnecessarily resistant. Weigh it if possible; an overfilled measuring cup is one of the easiest ways to turn a soft batch dry and stubborn.
After kneading, the ball should still yield easily when you press your palm into it. That softness makes the long ropes easier to roll later.
Warm Water and Yeast
Start with 315 ml / 1⅓ cups water and keep another 10 ml / 2 teaspoons in reserve. Flour absorption varies, so the final splash goes in only if the dough still feels too firm after kneading.
The water should feel comfortably warm, around 100–110°F / 38–43°C. If it feels genuinely hot to your hand, let it cool.
Instant yeast goes straight into the mixture. If you have active dry yeast, use the same 7 g / 2¼ teaspoons; dissolve it in the warm water with the sugar first and allow the rise a little more time if needed.
There isn’t a direct substitute for yeast in this dough. No-yeast pretzels use a different leavening system and behave differently enough to be treated as a separate recipe.
Sugar, Butter and Salt
Eighteen grams rounds the flavor and supports browning without making the pretzels noticeably sweet. Granulated sugar can replace it at the same weight.
A small amount in the dough keeps the bite tender. Most of the obvious butter flavor comes later, when melted butter hits the crust straight from the oven.
Unsalted butter gives the most predictable seasoning, but salted butter will still work. Because brands vary and the amount used in the dough is small, keep the fine salt as written and simply avoid going too heavy with the coarse finishing salt.
Fine salt disperses through the dough. Pretzel salt or coarse sea salt belongs on the damp surface after the soda bath.
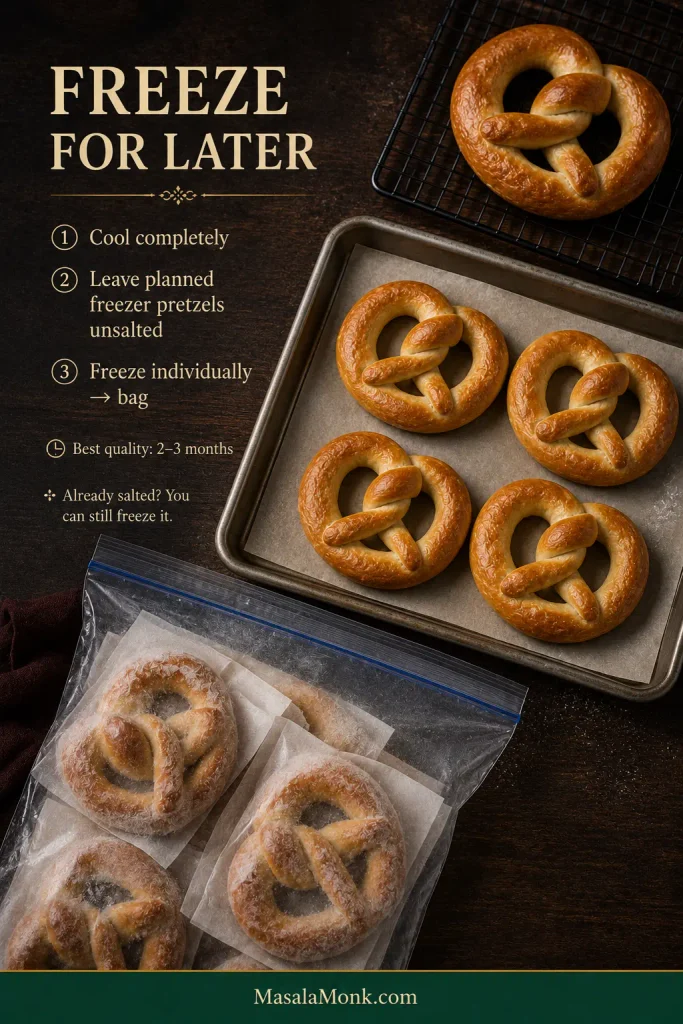
If you’re deliberately baking part of the batch for the freezer, leave those pretzels unsalted. Large crystals attract moisture during storage and can partly dissolve into the crust.
The bath needs baking soda. Baking powder is formulated differently and will not create the same surface treatment.
All-Purpose Flour or Bread Flour?
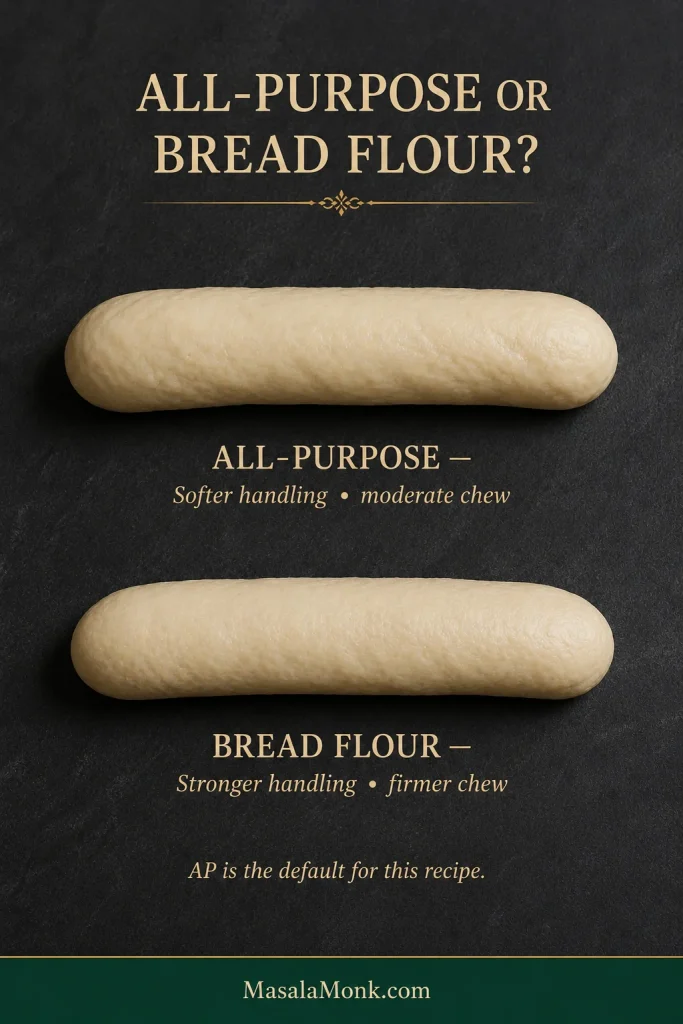
All-purpose flour makes a softer pretzel that is easier to roll; bread flour produces a stronger dough and a chewier finished bite.
Flour
How it handles
Finished pretzel
All-purpose
Softer, easier to stretch
Tender middle, moderate chew
Bread flour
Stronger, more resistant
Firmer, chewier bite
Choose bread flour because you want a firmer chew—not because a batch feels sticky. Stickiness is better diagnosed through kneading and hydration than by changing flour mid-recipe.
Cake flour isn’t a good direct substitute here; its lower protein makes it harder to build the structure needed for long ropes. Whole-wheat and gluten-free flours change the dough enough that they are not simple 1:1 swaps.
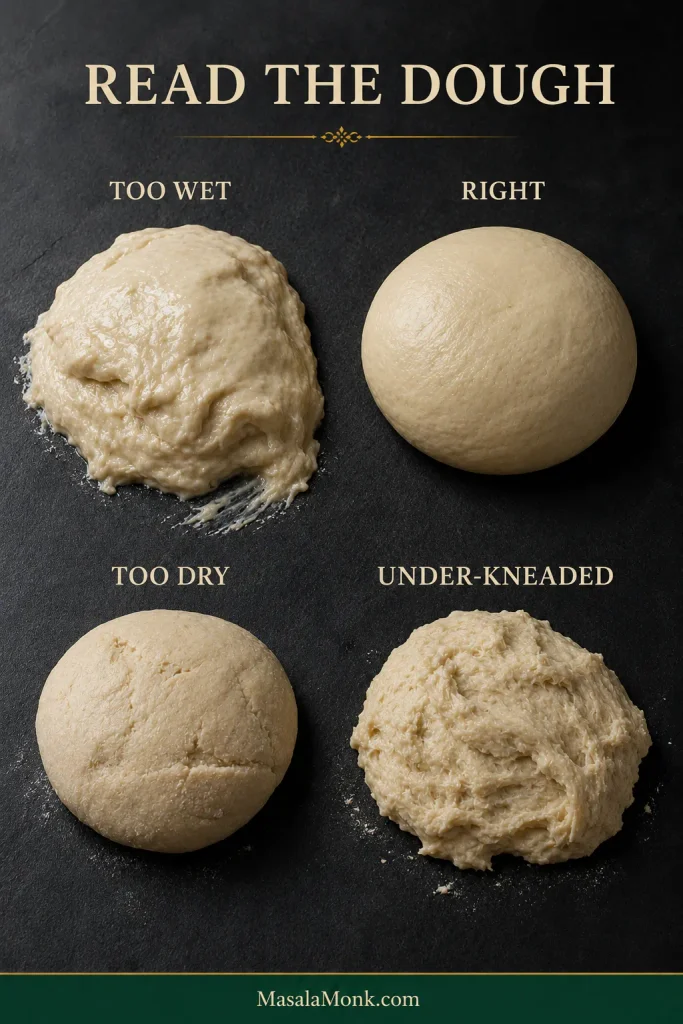
Read the Dough Before You Add More Flour
Why is my pretzel dough so sticky?
Pretzel dough should be soft and lightly tacky, but it should hold itself together and leave your fingertip mostly clean. Rest and knead it fully before reaching for more flour.
Freshly mixed dough often looks wetter than it will ten minutes later. The flour keeps absorbing water during the rest, while kneading builds enough strength for the shaggy mixture to become smooth and elastic.
When the balance is right, press it with a finger and the surface should give easily, then slowly rebound without smearing.
Dough state
What it feels like
What to do
Too wet
Smears heavily, coats fingers, struggles to hold itself
Knead fully first; then add flour 1 tbsp at a time if needed
Stiff, rough, resistant; tears instead of stretching
Add reserved water 1 tsp at a time
Under-kneaded
Shaggy, uneven, quick to tear
Keep kneading before changing hydration
Diagnose soft pretzel dough after it has actually been kneaded. Before then, rough under-developed dough can easily be mistaken for a hydration problem.
How do you know when kneading is finished?
The ball should look smoother, feel elastic, and stretch noticeably farther before it tears. A flawless bakery-style windowpane isn’t required.
Once it is smooth, stretchy, lightly tacky, and holding itself together well, move on.
How Much Should Pretzel Dough Rise?
Once the dough looks clearly puffier and substantially larger, it is ready to divide. It does not need to double.
Yeast moves faster in a warm kitchen and slower in a cool one, so use 45–60 minutes as a guide and let the dough’s appearance make the final call.
Lift the cover and the compact ball you left behind should now look softer, rounder, and noticeably fuller in the bowl. You’re building the soft middle here; the distinctive pretzel crust comes later in the bath and oven.
If you’re unsure how much it has grown, a piece of tape or elastic band marking the starting height makes the change much easier to see.
Letting the dough go much farther makes long ropes harder to control and can leave the finished middle fluffier than intended.
Watch the whole mass, not just the top of the dough. Useful fermentation shows as broader expansion and a softer, airier look throughout the bowl.
Why Rope Length Changes the Finished Pretzel
For a 110 g pretzel, aim for a rope 25–27 inches / 64–69 cm long and about ½ inch / 1.3 cm thick.
Use those dimensions as practical targets. The amount of dough, rope length, and size of the openings need to work together.
A small portion stretched to 26 inches becomes thin; a heavier piece can remain thick enough to close its own holes as it expands.
That combination keeps the loops open while leaving enough dough through the curves for a substantial soft center.
Consistent portions remove one shaping variable. When every piece starts around the same size, an unusually stubborn rope is easier to recognize as tension rather than a portioning problem.
How to Roll the Dough Without Fighting It
Why does the rope keep shrinking?
If the rope keeps springing shorter, stop rolling and let it rest for 5–10 minutes. Tight gluten needs time, not more force.
Springback is tension, not a request for more flour or harder rolling. A rope that repeatedly retracts is telling you the gluten needs to relax.
Take every portion to 12–14 inches / 30–36 cm before trying to make any one rope full length. By the time you return to the first piece, it should feel noticeably less springy and much easier to stretch.
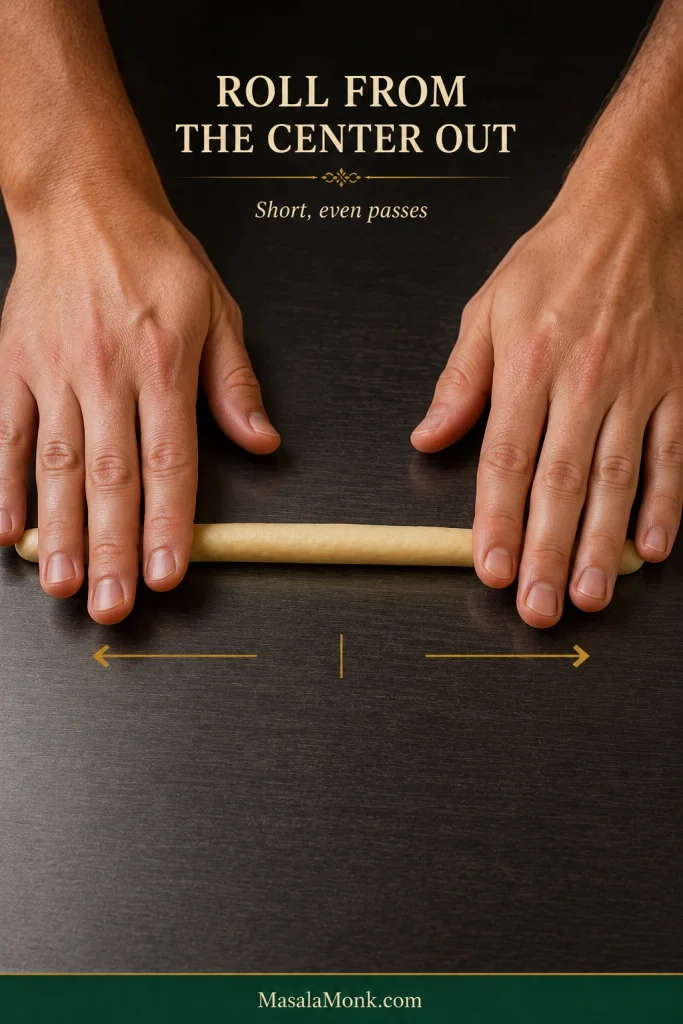
Place both palms near the middle and roll outward in short passes, gradually moving your hands toward the ends. Lengthen the whole rope a little at a time; concentrating pressure on one stubborn spot can make it skinny.
Slightly tapered ends are fine. What you want to avoid is a rope with thick bulges separated by paper-thin sections.
A heavily floured counter makes the rope skid beneath your palms. Keep the work surface mostly bare so the dough has enough grip to lengthen; if it starts sliding, wipe away loose flour and lightly dampen your hands.
If the rope skates instead of lengthening, think traction before flour. Even outward pressure works best when the dough can gently grip the counter.
Keep the openings generous
This is one of those moments when the raw pretzel should look slightly wrong. Leave more open space than you think you need because the dough swells in the bath and again in the oven.
What looks almost comically open on the counter becomes much more familiar after baking.
Your first pretzel may be the least photogenic one on the tray. By number three or four, your hands usually understand the twist better than your brain does. That’s when shaping starts becoming fun.
Empty space is part of the pretzel shape. Generous raw openings give the swelling curves somewhere to expand instead of closing into a tight knot.
The Baking-Soda Bath
How long should the pretzels stay in the bath?
For this recipe, give each pretzel 30 seconds total. Keep that timing tied to the stated ratio of 75 g baking soda in 1.9 L / 8 cups water.
Keep the baking-soda bath controlled rather than violent. Gradual addition and a roomy pot make the inevitable fizz easier to manage around delicate shaped pretzels.
Need less bath liquid? Keep roughly the same concentration—about 40 g baking soda per liter of water—and use enough solution for the pretzel to float freely without folding against the pot or becoming crowded. Flip it if the upper surface remains exposed.
The first bath can look dramatic, but once the pot and timer are ready, it is one of the quickest parts of the whole recipe.
What the bath actually does
The alkaline bath changes the outside of the dough so it browns faster and develops a chewier skin. Skip it and the result moves much closer to ordinary bread tied into a pretzel shape.
This is the moment the recipe stops behaving quite like ordinary bread. The dough may still look pale when it comes out of the water, but the treated surface is now ready for the rapid browning that happens in the oven.
Compare texture and expansion as well as color. The bathed pretzel changes only modestly; the oven is where the major puffing and browning finally happen.
Thirty seconds is enough for this particular bath. Leaving the pretzels in much longer can make the surface gummy or tough and may introduce an unpleasant mineral or baking-soda taste.
The soda bath already does the important browning work. Egg wash can add more shine, but it isn’t necessary here, and the hot butter supplies plenty of gloss afterward.
Bake for Color, Not Just Time
At 450°F / 230°C, start checking around 11 minutes; most batches take 11–14 minutes.
For the first few minutes they mostly puff. Then the color catches up quickly, and the smell changes with it.
The timer gets you to the window. The crust tells you when to stop.
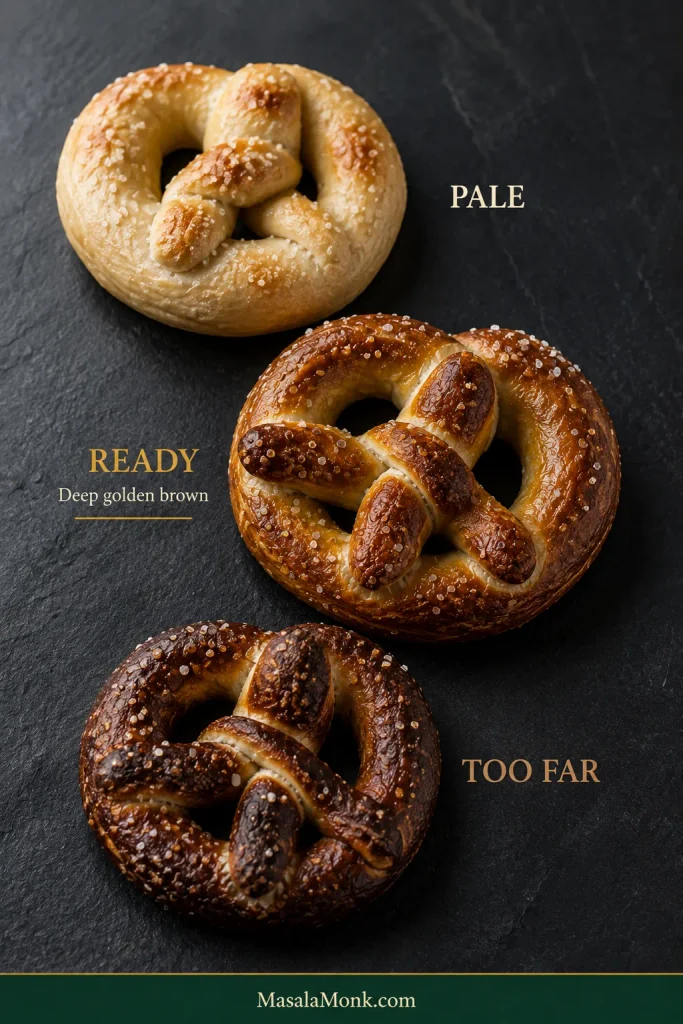
Too pale: beige or light bread-gold. Give them more time.
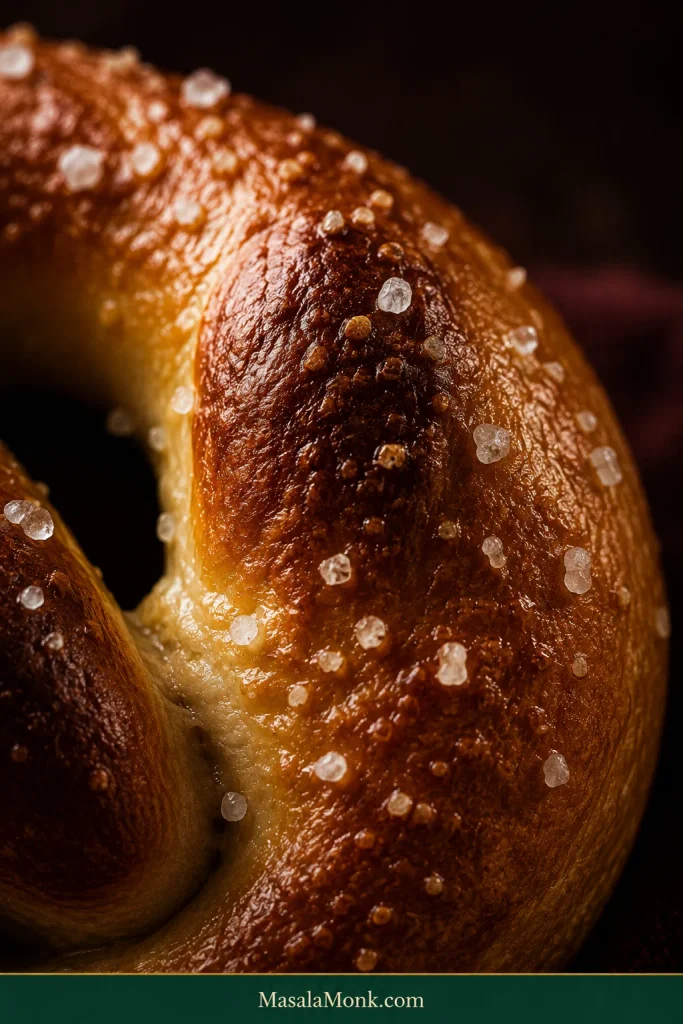
Ready: deep golden-brown with darker color over the raised curves. The surface should tug slightly against your teeth before the soft middle gives way.
Too far: very dark thin areas, a dry-feeling crust, or an underside beginning to scorch.
Before pulling the tray, check more than the prettiest curve. The thick center should be richly browned without the thinner tips or underside beginning to scorch.
Bottoms darkening well before the tops usually means the pan or rack is giving them too much heat from below. A lighter sheet pan, a slightly higher rack, or stacking the loaded sheet over a second empty pan can help.
Color is the better everyday guide. If the crust looks right but you’re worried about the thickest section being underbaked, an instant-read thermometer will generally land around 195–200°F / 91–93°C.
Once the overall color looks right, look more closely at the surface. A good soft-pretzel crust can show small blisters and natural tonal variation rather than a perfectly smooth shell.
Tiny blisters and uneven browning are welcome handmade texture. The target crust looks thin and chewy—not perfectly smooth, lacquered or uniformly dark.
Troubleshooting: What Went Wrong?
Most imperfect batches are still very edible. Start with the result you can see and change one thing next time; one imperfect detail rarely means the whole recipe failed.
Dough & Rise
What happened
Most likely cause
Try this
Dough smears everywhere
Too wet or not kneaded enough
Finish the rest and knead before adding flour
Dough feels stiff
Too much flour or too little water
Add reserved water gradually
Dough rises very slowly
Cool room or sluggish but active yeast
Give it more time in a comfortably warm spot
Dough shows no rise
Inactive yeast or water that was too hot
Start again with fresh yeast and comfortably warm water
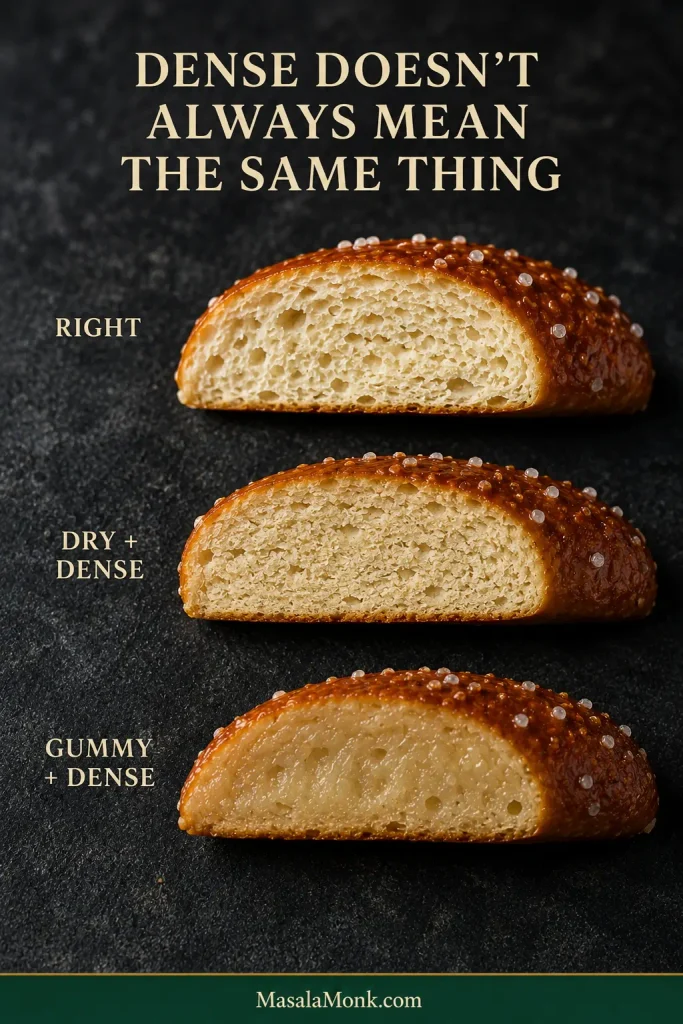
Dense and dry
Too much flour or excessive baking
Keep the dough softer or shorten the bake
Dense and gummy
Underbaked center
Bake longer
Dry density and gummy density are different problems. A tight, dry crumb points toward too much flour or too much oven time. A moist, tacky center usually means the pretzel simply needed longer to bake.
Two pretzels can both feel “dense” for opposite reasons. The cross-section helps separate a moisture-starved crumb from one that simply needed more baking.
Rolling, Shaping & Bath
What happened
Most likely cause
Try this
Rope keeps shrinking
Gluten is tight
Rest another 5–10 minutes
Rope slides under your hands
Too much flour on the counter
Remove loose flour and lightly dampen palms
Rope gets thin in random spots
Too much pressure in one area
Roll outward in short, even passes
Holes disappear
Rope too short or openings too small
Roll longer and shape more openly
Ends come loose
Weak seal
Dab with water and press firmly
Pretzel goes limp in the bath
Overproofing or weak structure
Stop the first rise earlier and make sure the dough is fully kneaded
Shape distorts while lifting
Handling issue
Use a broad spider or slotted spatula
Slight wrinkles after bath
Usually normal
Don’t reshape; bake as usual
Surface feels gummy
Too much bath time or poor draining
Keep to 30 seconds and drain briefly
Mineral or bitter taste
Too much soda exposure
Use the measured ratio and timing
Baking & Storage
What happened
Most likely cause
Try this
Pale and bread-like
Incomplete bath or not enough browning
Use the full dip and bake beyond pale bread-gold
Nicely browned but very fluffy inside
Too much proofing or overly thick ropes
Stop the rise earlier and roll longer
Bottom burns before top browns
Dark pan, low rack, or strong bottom heat
Move higher or use a lighter/doubled sheet pan
Crust is very tough
Overbaking or too much bath exposure
Check oven time and 30-second dip
Pretzels stick to parchment
Untreated paper under wet dough
Use a silicone mat rated for 450°F / 230°C or lightly oil parchment
Coarse salt becomes wet later
Salt pulled moisture to the surface
For planned storage or freezing, leave coarse salt off; already-salted leftovers can still be frozen
If the pretzel browned well, tasted good, and simply came out a little lopsided, that’s a shaping problem—not a bad batch.
Soft pretzels are at their best fresh from the oven, but you don’t have to arrange your whole day around that moment. The easiest make-ahead route is to bake the pretzels first and freeze them; overnight dough works too, but its next-day timing depends on how much fermentation happened in the refrigerator.
Make the dough the night before
After kneading, place the dough in a lightly greased covered bowl and refrigerate overnight. The goal is an overnight rest rather than an extended cold ferment.
The next day, divide and shape while still cool, or let the dough sit briefly at room temperature first if it feels too firm to roll comfortably.
After shaping, let the pretzels lose some of their refrigerator chill and relax slightly before dipping. Don’t wait for a pronounced second rise; once the dough is easy to handle and the shapes are no longer fridge-cold, move on to the bath.
Storing baked pretzels
Store completely cooled pretzels airtight at room temperature for up to 3 days. The crust softens during storage, so reheating gives a much better result than eating one cold the next day.
For longer storage, freeze rather than refrigerate.
Freeze them baked
For a planned freezer batch, cool the pretzels completely and leave off the coarse salt. Freeze them individually until firm, then transfer to a freezer-safe bag or container. Already-salted leftovers can still be frozen, although some salt crystals may soften or partly dissolve. For best quality, use within 2–3 months.
Freezing individually preserves shape and gives you options later. Once firm, the pretzels can share a bag while still coming apart one at a time.
How to reheat soft pretzels
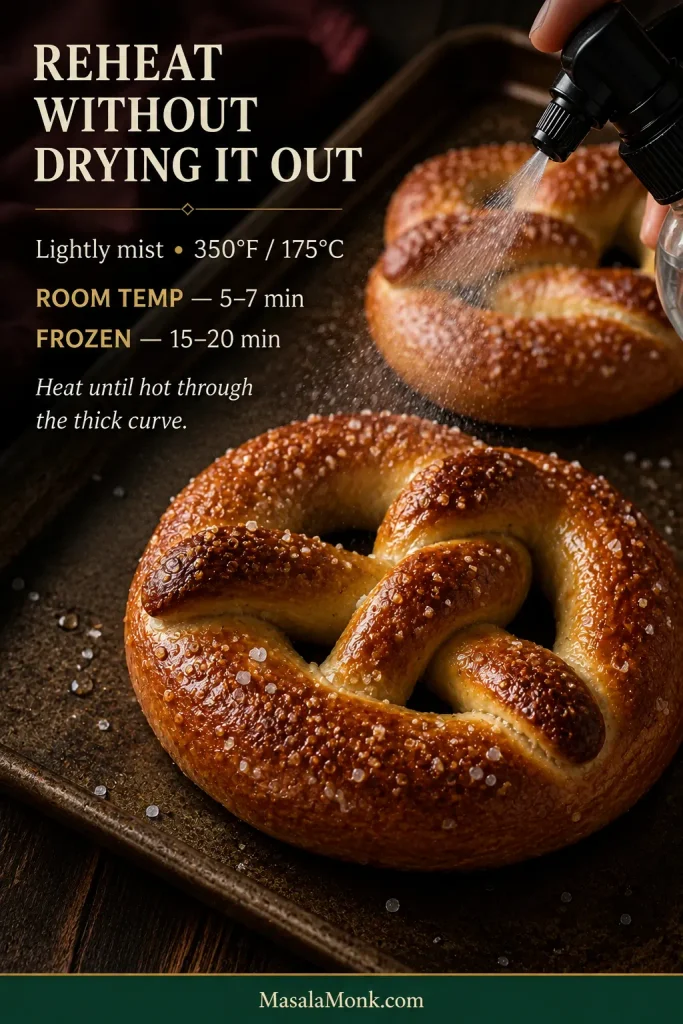
For a room-temperature pretzel, a 350°F / 175°C oven for 5–7 minutes gives the best balance of soft center and revived crust. Lightly mist or brush a dry surface with water first.
From frozen, lightly mist the surface, add fresh coarse salt if the pretzel was frozen unsalted, and heat at 350°F / 175°C for 15–20 minutes, until hot through the center.
Use moderate heat so the center warms before the thinner ends turn hard.
Other reheating options
Air fryer, room-temperature pretzel: start around 325°F / 165°C and check after about 3 minutes. Air fryers vary, so check early before the thinner ends dry out.
Microwave, room-temperature pretzel: start with about 15 seconds, then add another 5–10 seconds only if needed. It is fast and soft, but you lose most of the crust.
Can I double the recipe?
The ingredient math doubles easily. Mixer capacity may not.
For an ordinary home stand mixer, two separate dough batches are more predictable than asking it to knead roughly a kilogram of flour at once.
Two Easy Finishes
Cinnamon Sugar
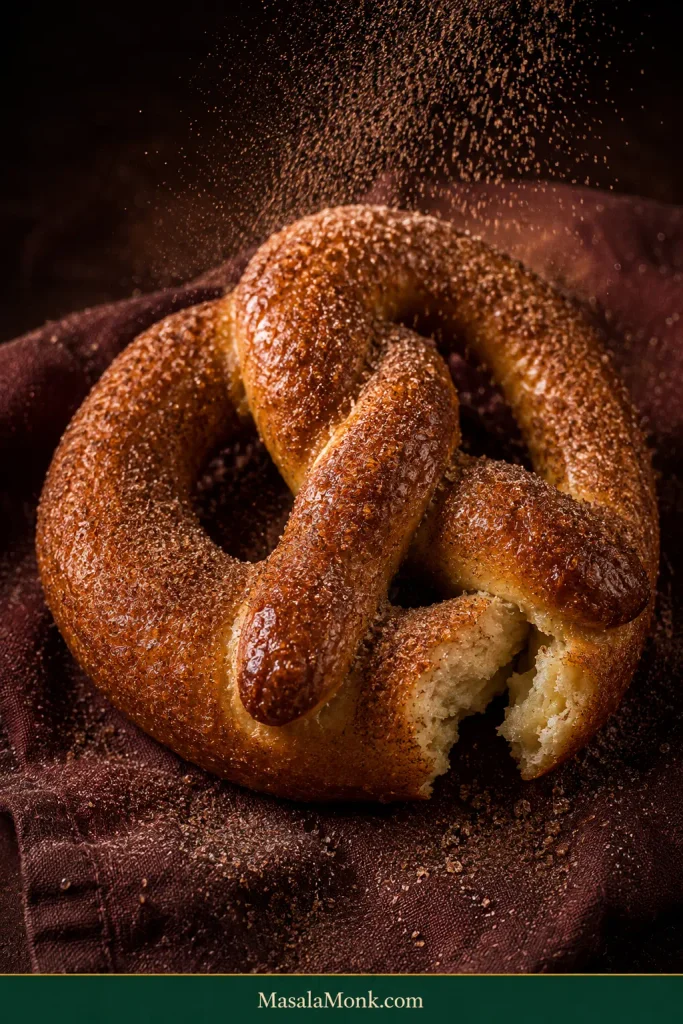
Skip the coarse salt. Brush the baked pretzel generously with butter, then coat it with cinnamon sugar while still warm.
The butter catches the sugar in a thin sandy layer instead of letting half of it fall onto the plate. Add the cinnamon sugar only after baking so it doesn’t scorch at 450°F.
A cinnamon-sugar pretzel should still look like a pretzel underneath. Aim for a fine sparkling coat that complements the browned crust rather than burying it.
Garlic Butter
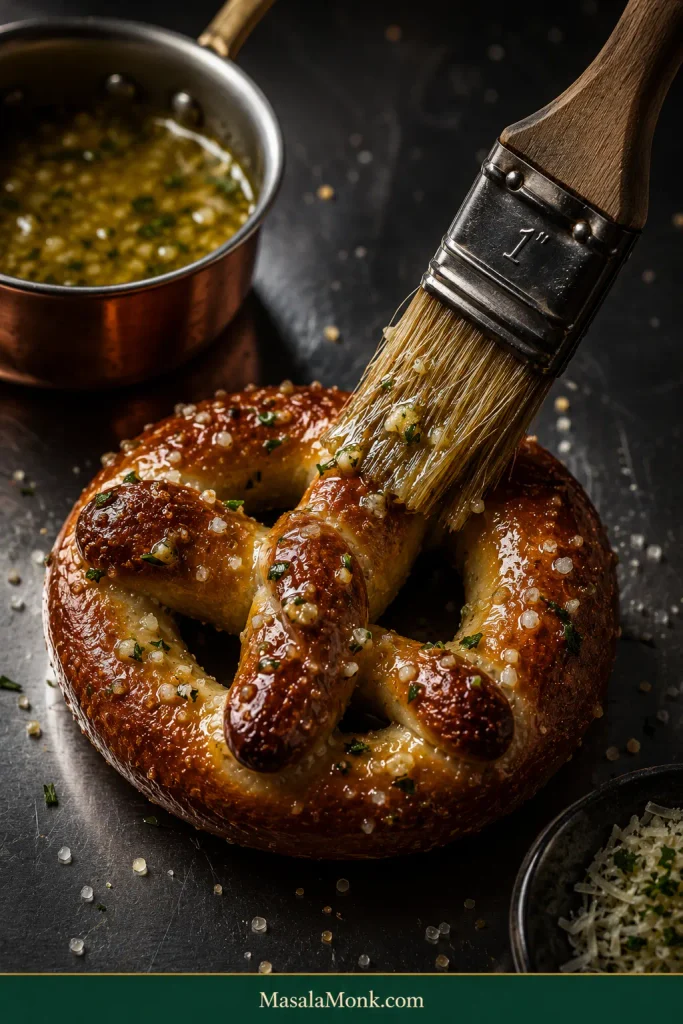
Mix the finishing butter with finely grated garlic or gently cooked minced garlic and brush it over the pretzel while the crust is still hot enough to absorb it. Parsley or a little finely grated Parmesan can go on afterward.
If warm bread and garlic butter is the combination you’re really after, this homemade garlic bread loaf takes that combination further.
Garlic butter works best as a thin savory finish. You want visible garlic and a warm sheen on the crust—not a pretzel saturated with butter.
What to Serve With Them
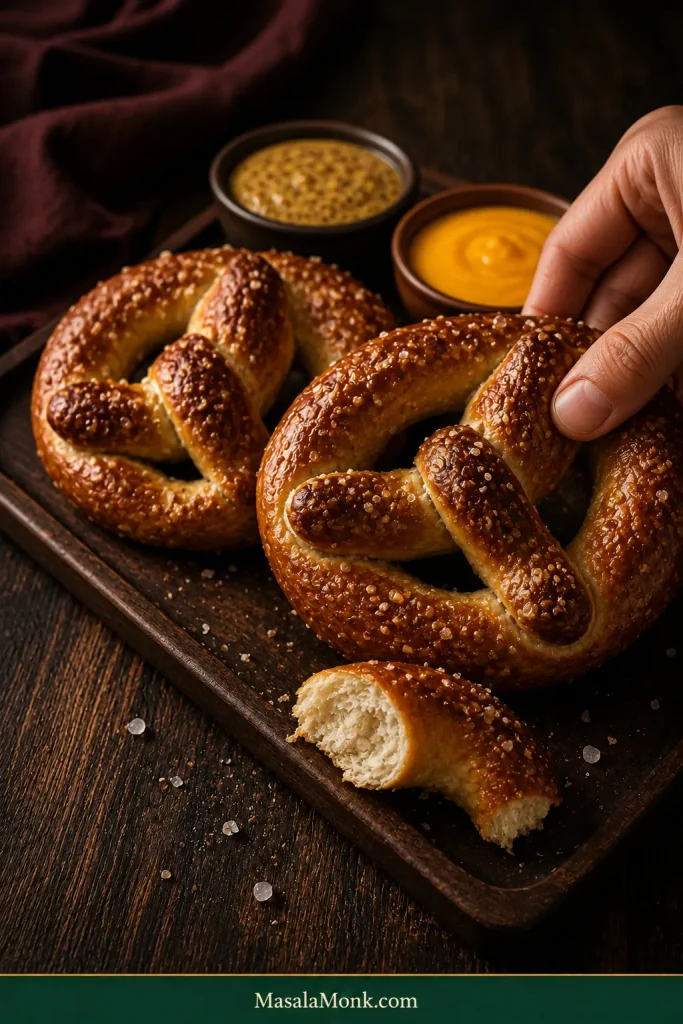
A warm salted pretzel doesn’t need much. Yellow mustard gives you the sharp, familiar version; Dijon is tangier and more assertive.
For something sweeter, honey mustard can be mixed a little thicker so it clings to the pretzel instead of running off.
If you’re firmly in the cheese-with-pretzels camp, a warm cheddar cheese sauce is hard to argue with. The creamy sauce against that salty browned crust is the whole point.
The best serving plan is simply to have people nearby when the tray comes out. Warm pretzels lose more by waiting than they gain from having a special occasion attached to them.
The final contrast is simple: salty browned crust outside, a warm soft center inside, and something sharp or creamy waiting at the side.
Give them five minutes, then tear into the thick curve while it is still warm. The browned skin should pull slightly before it opens, and the middle should feel soft rather than cottony. A little butter will probably end up on your fingers.
There can be mustard waiting nearby. The first pretzel rarely needs much convincing.