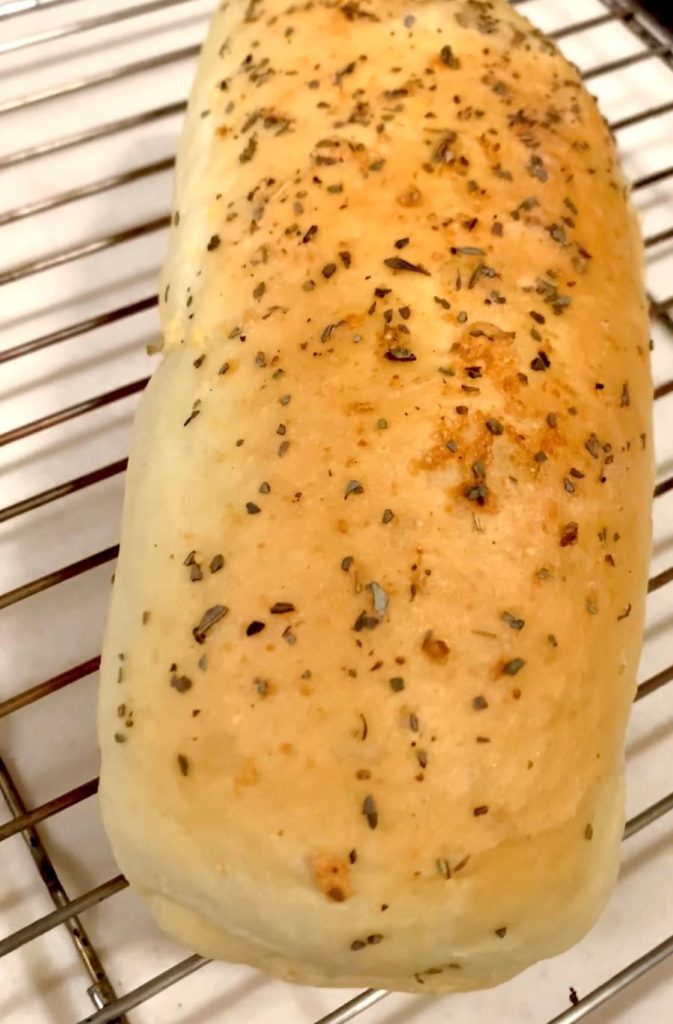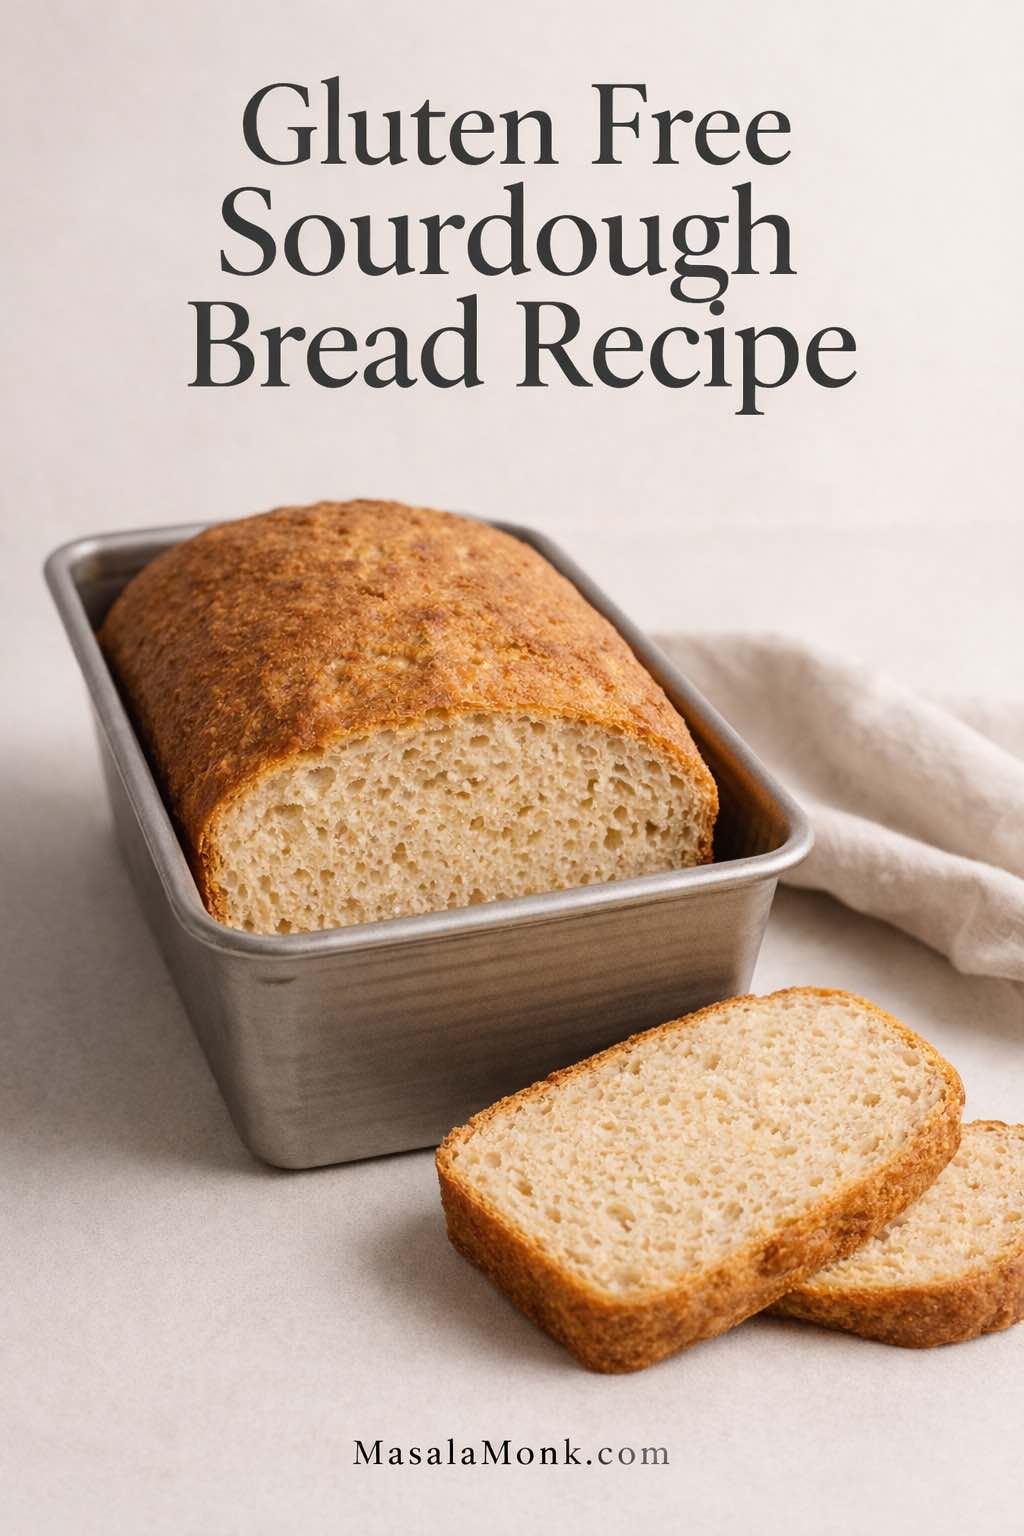
A good gluten free sourdough bread recipe should give you a loaf that feels properly baked, slices cleanly, and tastes like real bread rather than a compromise. This version is built as a loaf-pan, psyllium-supported, custom-blend method because that is the most dependable way to get structure, flavor, and repeatable home results without asking the dough to behave like a dramatic free-form boule.
Gluten free sourdough can still be frustrating, though. Some loaves bake up dense, some stay gummy in the middle, and some look promising right until you cut into them too early. So this guide does more than hand you a formula. It shows you what the dough should look like, how to judge the starter, when to move forward, and what to fix if the loaf falls short.
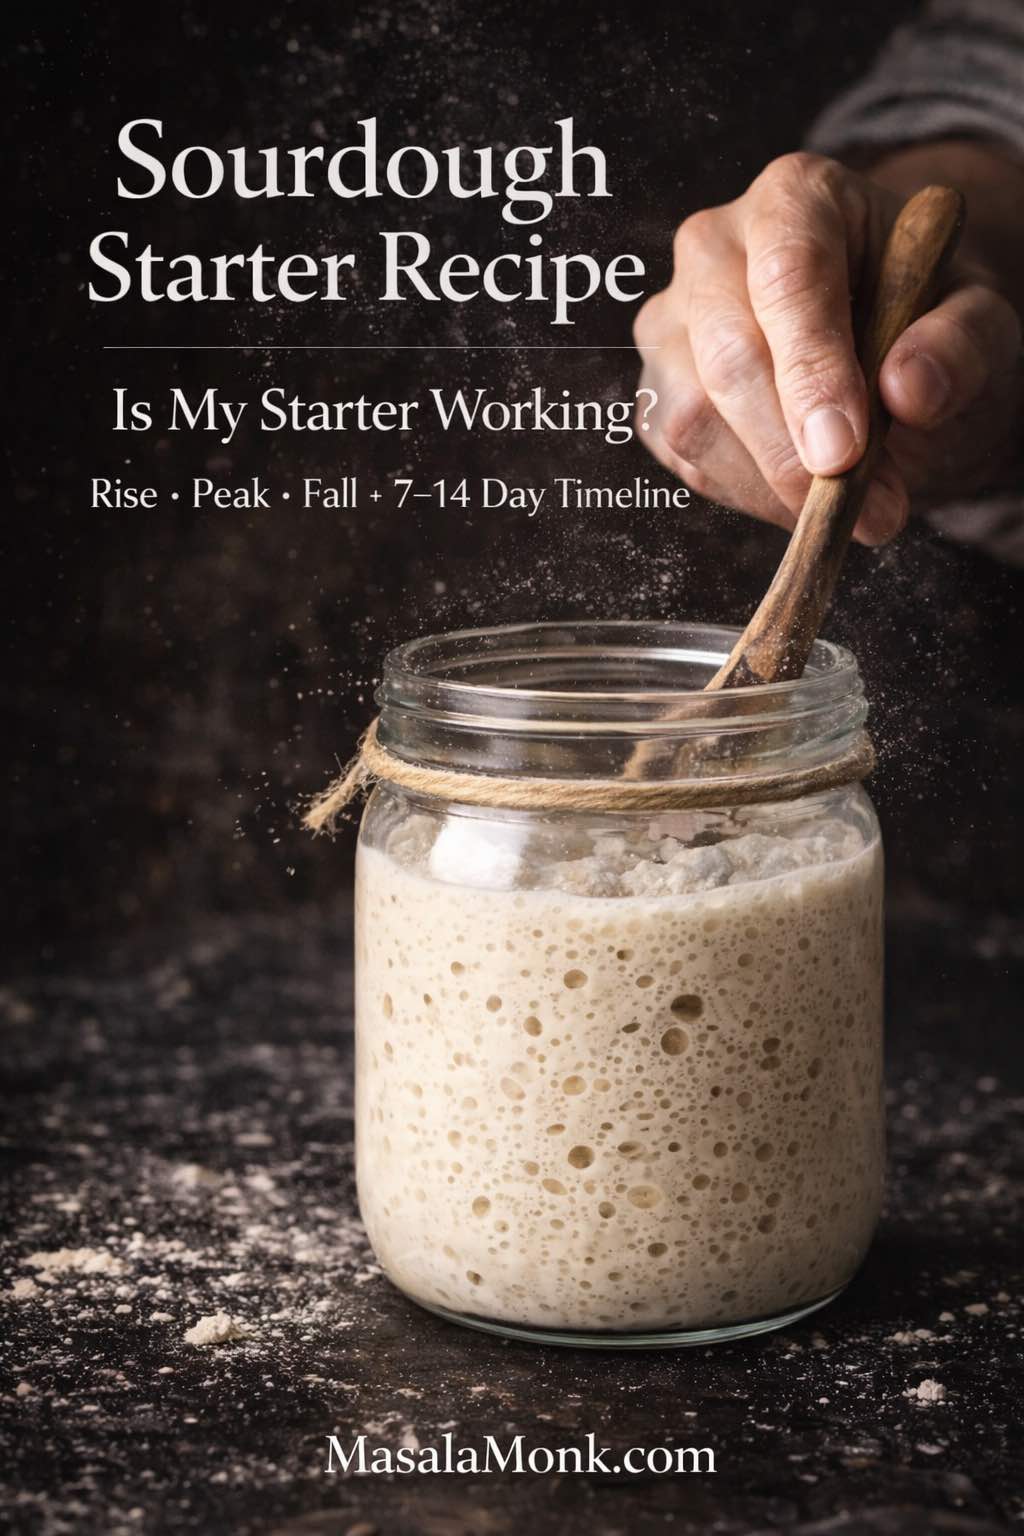
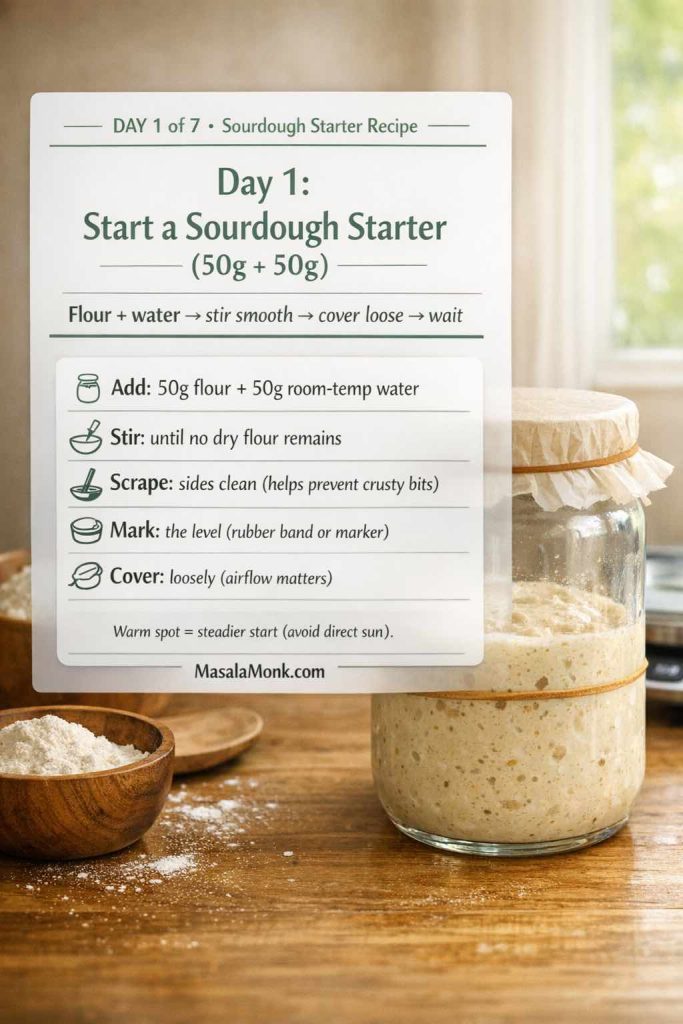
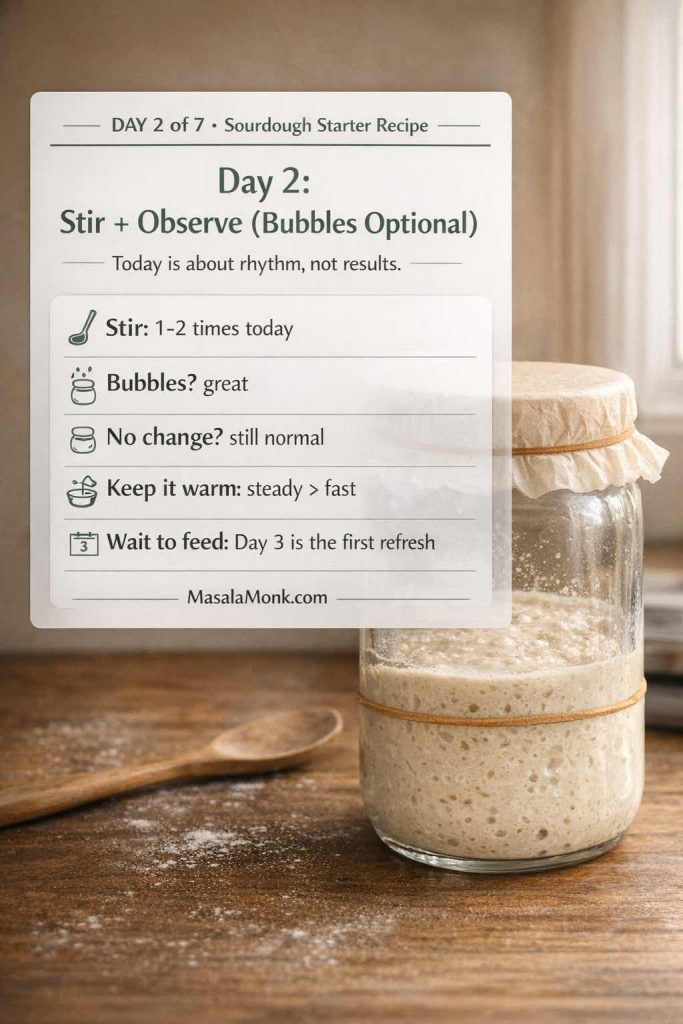
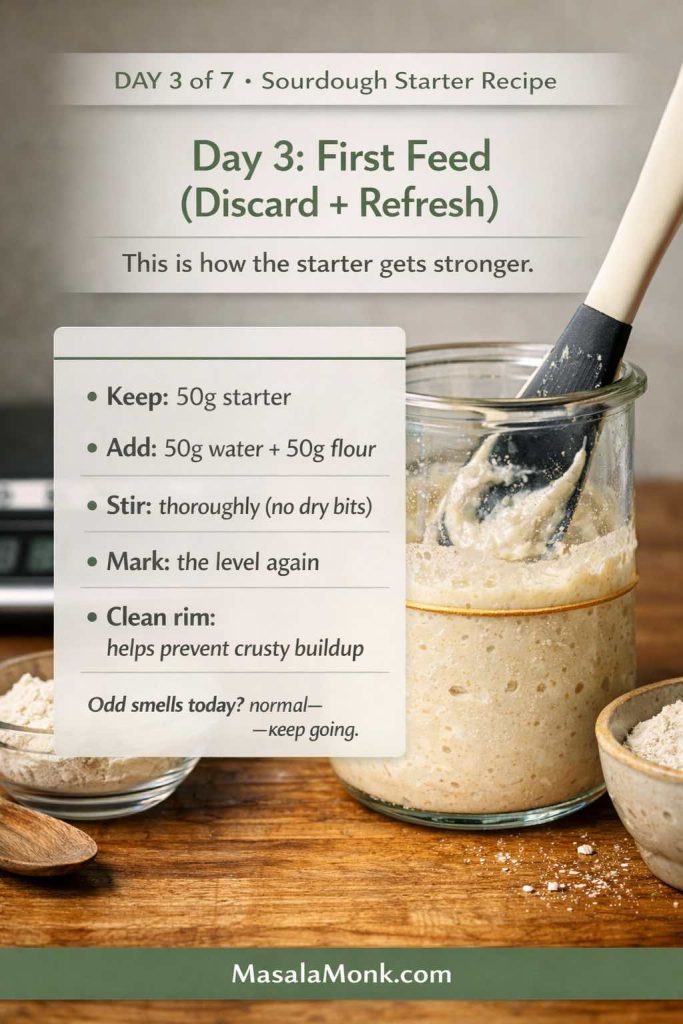
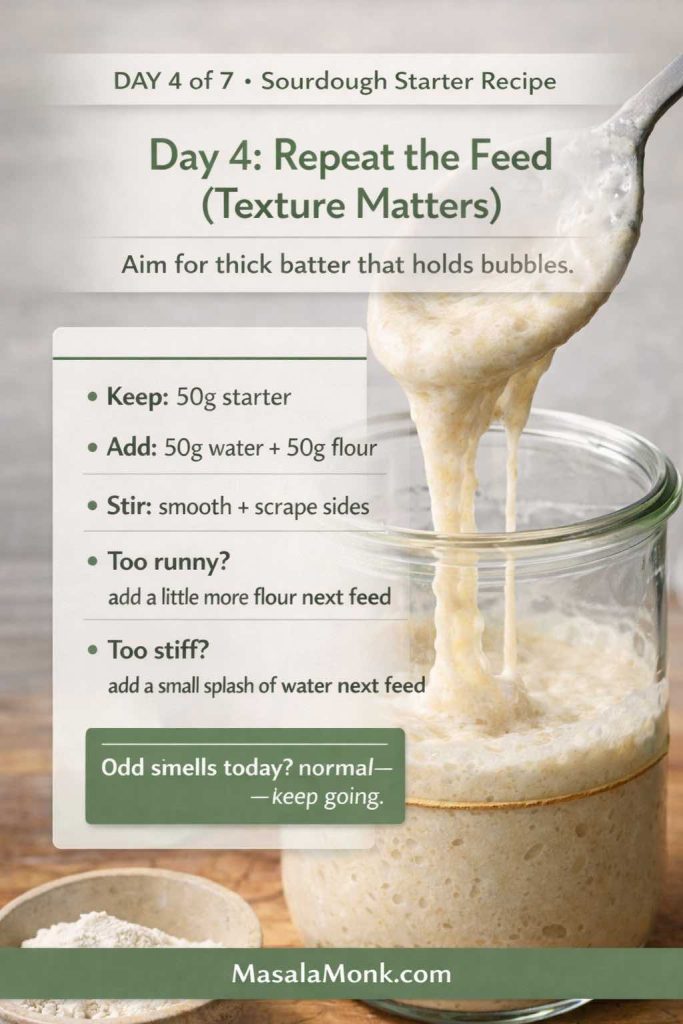
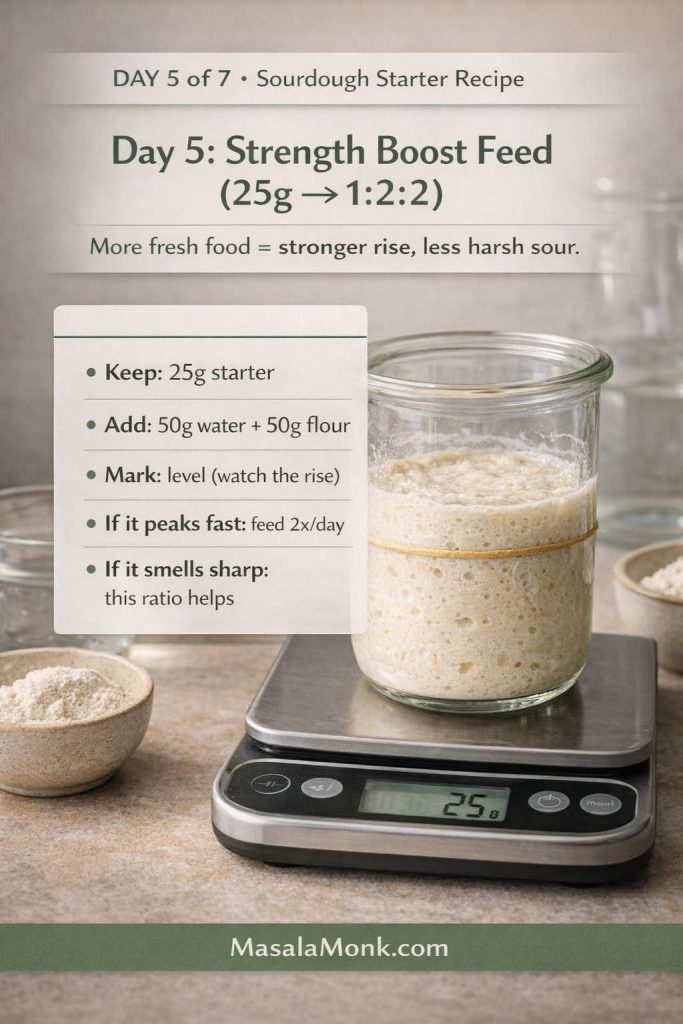
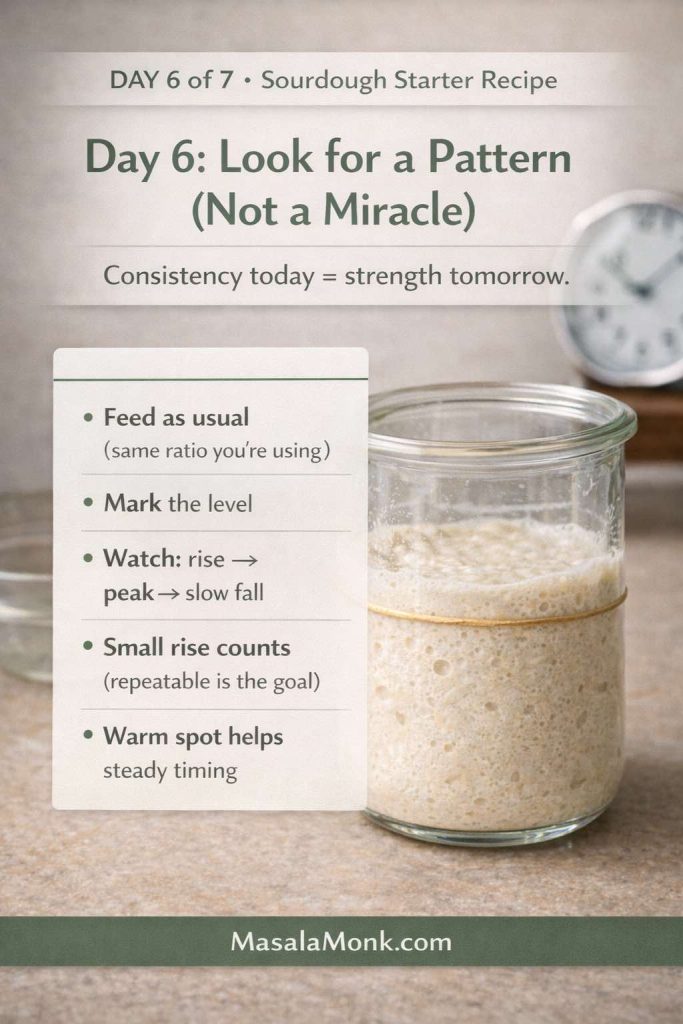
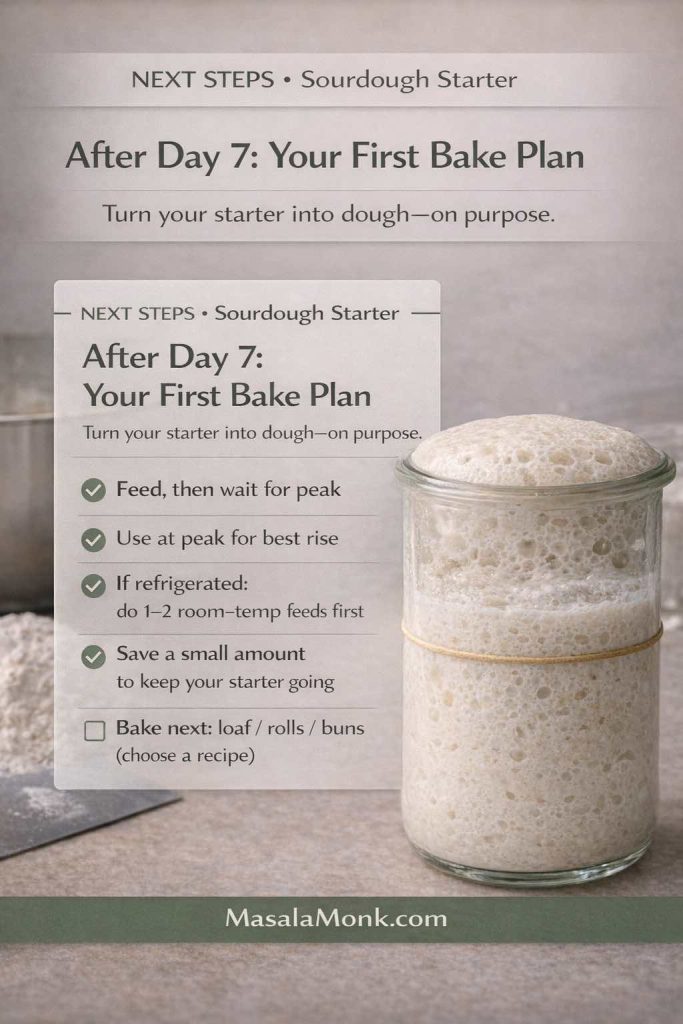
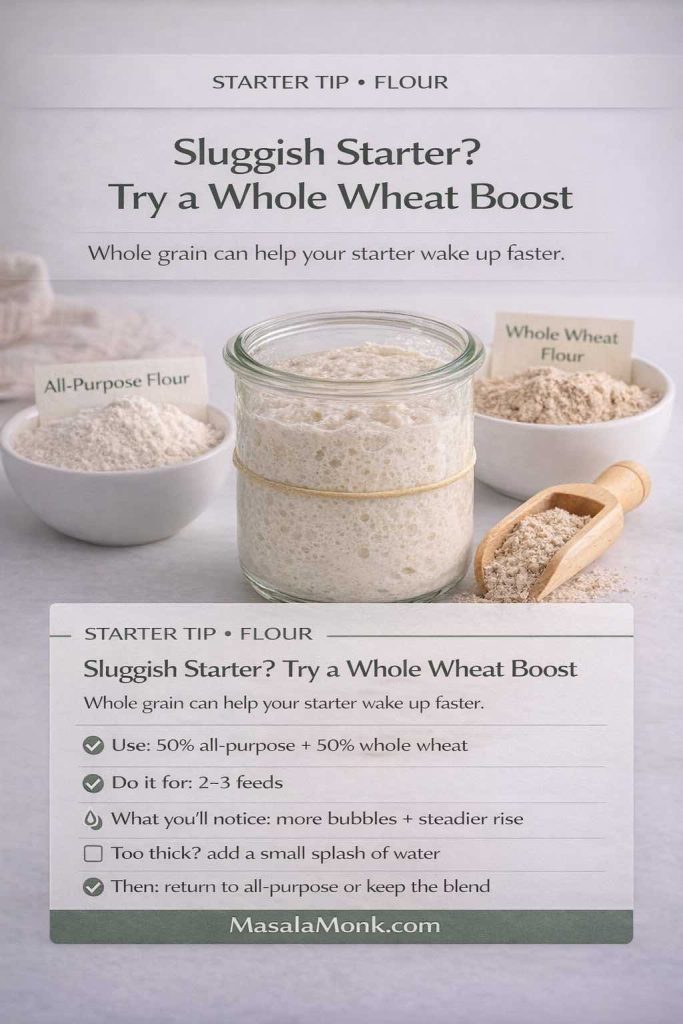
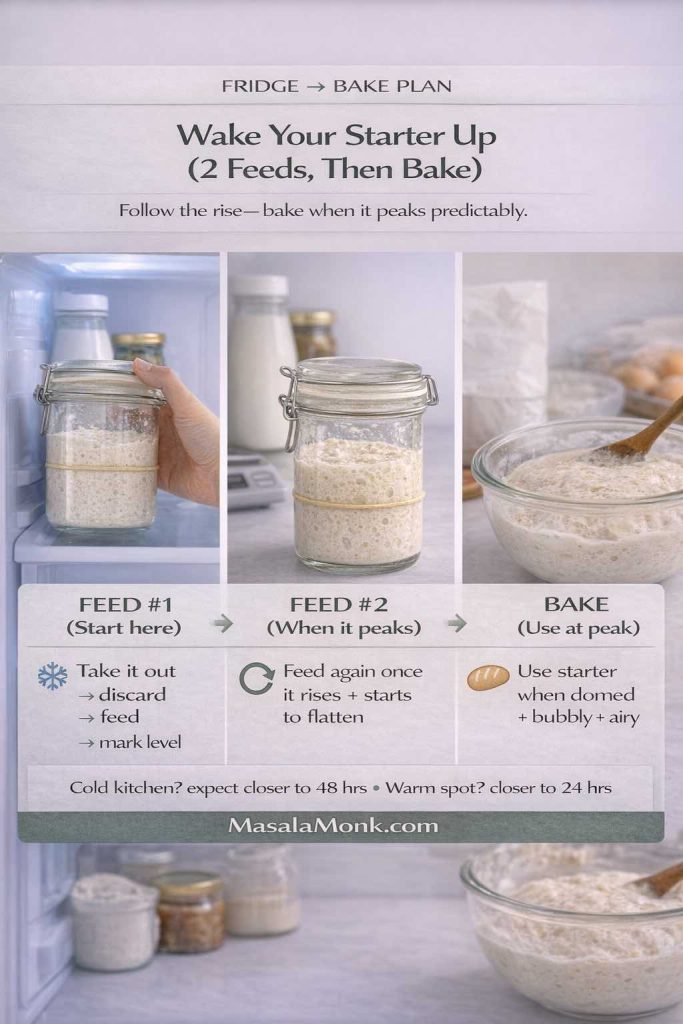
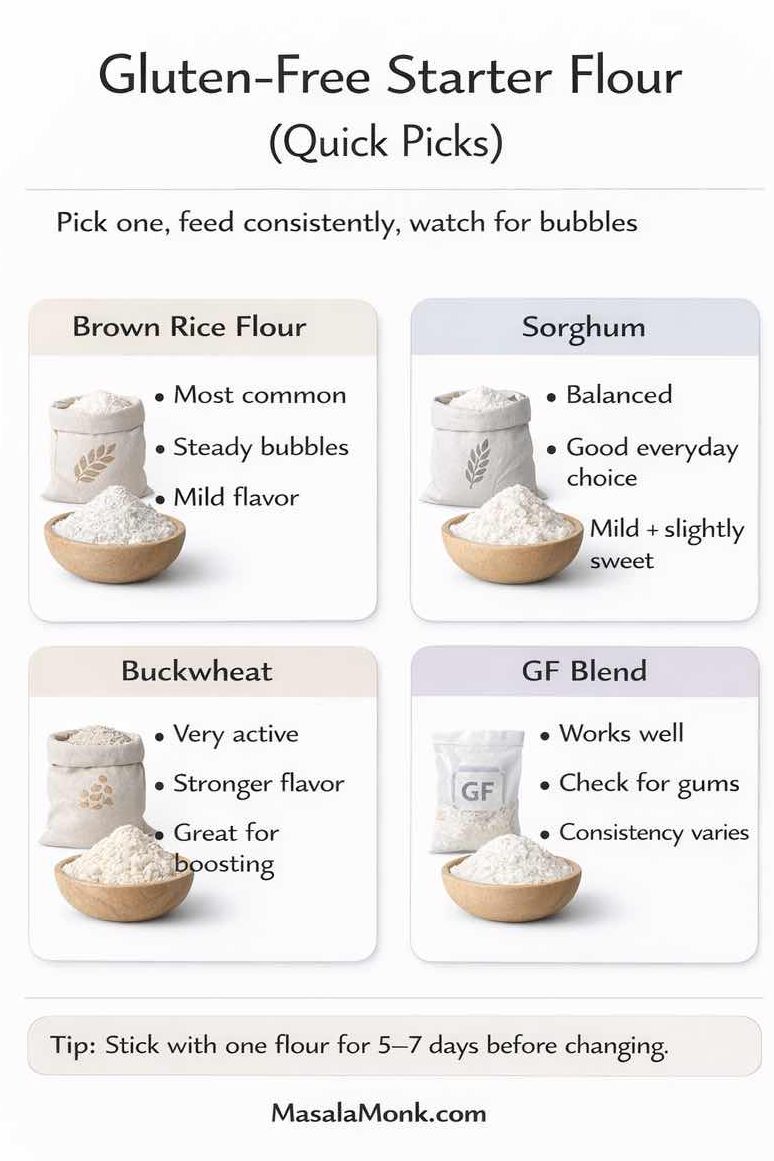
If your culture still feels unpredictable, pause and strengthen that first with the sourdough starter guide before you bake a full loaf. A better starter solves more problems than most flour tweaks ever will.
Quick Answers for This Gluten Free Sourdough Bread Recipe
Best default route: custom flour blend, active starter, loaf pan. This is the safest place to start.
Best pan: an 8½ x 4½-inch loaf pan. It gives the most forgiving path to a well-set loaf.
Main proof cue: bake when the loaf looks modestly puffy and lighter than before, not dramatically doubled.
Main bake cue: the loaf should reach about 205°F to 210°F internally and look fully set, not pale and soft.
Expected dough feel: soft, sticky, cohesive, and more like a sculptable paste than kneadable wheat dough.
Biggest mistake: misreading a soft dough as “wrong” or slicing too early and blaming the recipe for a crumb that has not finished setting.
Also Read: Sourdough Focaccia Recipe
Who This Loaf Is For
- Best for: readers making their first serious gluten free sourdough loaf and wanting a dependable pan bread for toast, sandwiches, and everyday slicing.
- Best for: bakers who want visible dough cues, practical proofing guidance, and a method that prioritises consistency over drama.
- Less ideal for: anyone chasing a lofty free-form artisan boule on the first try. This method is built around reliability first.
Tested direction: this loaf is written for an 8½ x 4½-inch metal loaf pan, whole psyllium husk, and a 100% hydration gluten free starter, with room-temperature fermentation in a normal home oven.
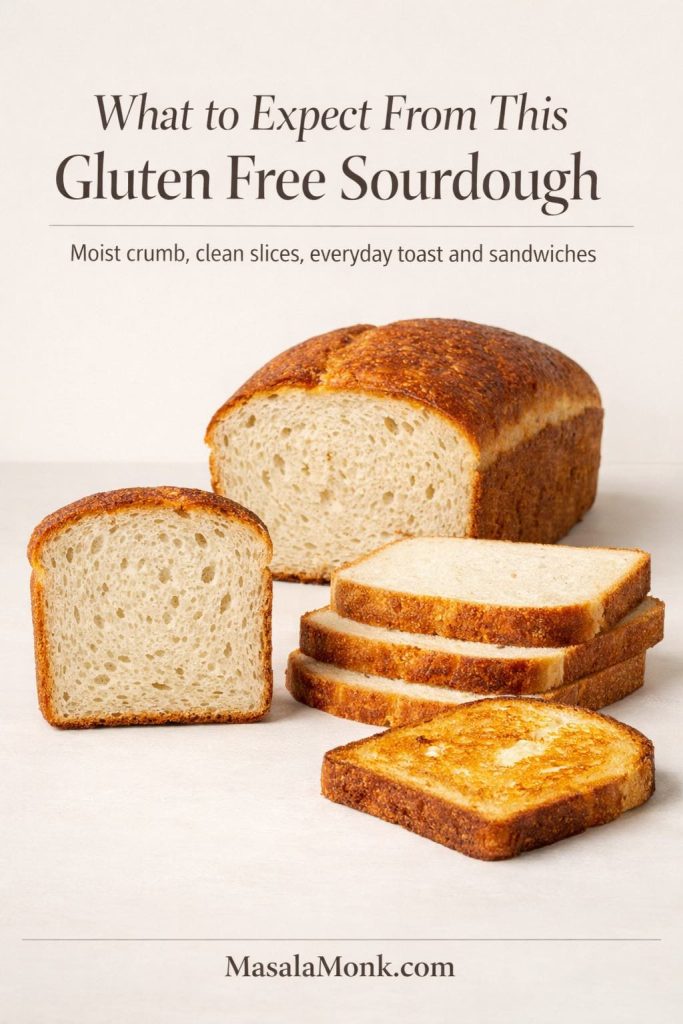
What Kind of Gluten Free Sourdough Bread to Expect
This loaf is meant to give you bread that feels genuinely useful at the table: a crust that looks properly baked, a crumb that stays moist without turning pasty, and slices sturdy enough for toast, sandwiches, or simple buttered bread. The sourness is usually present but not aggressively sharp, especially if your starter is healthy but your fermentation stays moderate.
It also helps to set one expectation early. This is not wheat dough, and it is not trying to behave like wheat dough. The loaf usually rises more modestly, the dough stays softer, and the best texture often shows up only after the bread has cooled completely. In many kitchens, day-two slices toast especially well.
Why Gluten Free Sourdough Bread Behaves Differently
In wheat sourdough, gluten gives the dough much of its stretch, gas-holding power, and structural resilience. Once fermentation begins, that network helps the loaf expand and keep shape. Gluten free dough does not have that advantage, so the bread has to build structure another way.
That does not mean a good rise is impossible. It means the loaf depends more heavily on flour balance, hydration, starter activity, binder support, proofing, and bake setup. As a result, gluten free bread tends to reveal mistakes faster. If the starter is weak, the dough is too tight, the hydration is too high for the blend, or the loaf is underbaked, the crumb usually tells on you.
That is why it should not be judged against wheat-dough cues. The dough often looks softer. The rise can be subtler. The shaping is gentler. The success markers are different.
For readers who want a quick refresher on the bigger picture, MasalaMonk’s what gluten is explainer makes the rest of this loaf easier to understand.
Structure comes from hydration, fermentation, and binders
Once gluten is out of the picture, hydration starts doing far more than people expect. Water is not just there to bring the dough together. It helps the flours absorb fully, supports fermentation, activates psyllium, and shapes the final crumb.
Fermentation matters just as much. A lively starter does more than add tang. It lightens the dough, brings internal aeration, and gives the loaf a better chance of baking into something open enough to feel like bread rather than a dense substitute.
Then there is the binder. In this loaf, psyllium husk is the quiet structural engine. When hydrated properly, it creates a gel that helps hold water, improves cohesion, and supports gas retention. It does not recreate gluten, yet it does give the dough enough internal support to rise and set more convincingly.
Gluten free dough should not feel like wheat dough
This is one of the most important mindset shifts in the whole recipe. Gluten free sourdough dough often feels softer, stickier, and more paste-like than wheat dough. That can be completely normal.
The best mental model is this: think sticky, sculptable paste rather than kneadable wheat dough. After mixing, it should not run like batter, yet it should not feel firm enough to knead confidently either. This is exactly where many readers panic and start adding flour they did not need.
The opposite mistake happens too. Some readers assume a very loose dough must be right because gluten free dough is “supposed to be wet,” and they end up with more hydration than the flour system can hold. So the goal is not to force this dough into a wheat template. The goal is to learn what it looks like when it is on track, then trust those cues.
What success looks like
A successful loaf is not defined by one dramatic sign. It is a combination of smaller, more dependable ones.
Before baking, the dough should look more aerated and lighter than it did after mixing. It may not double dramatically, and that is fine. After baking, the loaf should feel set rather than damp and heavy. The crumb should be moist but not wet, tender but not fragile, and structured enough to slice without tearing into paste. Finally, the flavor should have real development. Even a mild loaf should taste deeper than a fast yeast bread made from the same flour.
That is the standard here: not “good for gluten free,” but genuinely good bread.
Also Read: Easy English Scone Recipe
Choose the Right Flour Path for Gluten Free Sourdough Bread
Gluten free sourdough recipes vary widely because they often start from very different flour systems. Some use a 1:1 blend for convenience. Others build a custom blend for control. Both routes can work. They simply reward different priorities.
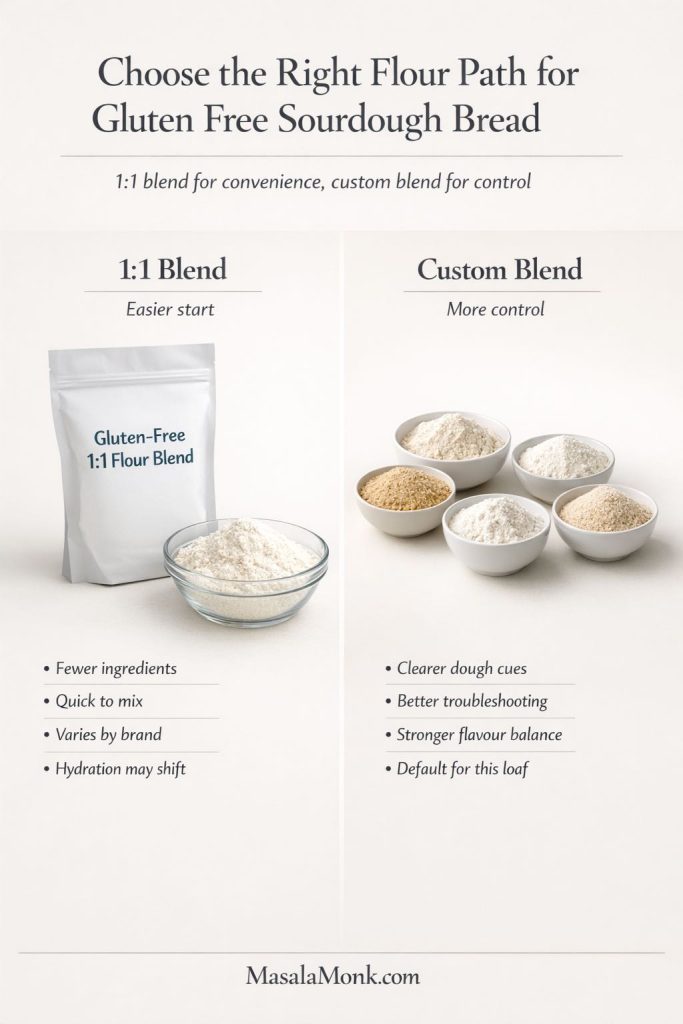
Route A: Use a 1:1 blend for convenience
A 1:1 gluten free flour blend is the easier place to start. It cuts down the shopping list, simplifies measuring, and gets you to mixing faster. For some readers, that simplicity matters enough to make it the right choice.
Even so, convenience comes with trade-offs. One 1:1 blend may absorb water beautifully. Another may turn gummy with the same hydration. Some contain gums already. Others lean starch-heavy and stay pale or under-set unless everything else is dialed in. The first thing that usually shifts is hydration and handling, which is why a dough made with one blend can feel noticeably different from the same formula made with another.
Route B: Use a custom blend for more control
A custom blend asks more from you at the start, yet it gives more control in return. You can decide how much whole-grain body, softness, absorbency, and starch support the loaf gets instead of inheriting a generic mix with unknown priorities.
That matters in sourdough because fermentation interacts with each flour differently. One flour may add flavor but weigh the loaf down when overused. Another can make the dough feel stronger. Others tighten more during resting than readers expect. A custom blend turns those variables into recipe decisions instead of accidental surprises.
Which route this recipe uses
This recipe uses a custom blend as the default because it produces a more dependable, brand-agnostic result. It also makes the dough cues easier to teach. When I tell you what the dough should feel like after mixing, after resting, or after proofing, those cues mean more when the flour system is built deliberately rather than borrowed from an unknown premade blend.
That does not mean you cannot adapt this loaf to a 1:1 blend later. It means the cleanest way to learn the method is to make it once as written in a loaf pan, then adjust from there once you understand how the dough should behave.
Also Read: White Russian Recipe: 7 Variants to Try, From Classic to Frozen
Ingredients That Matter Most in Gluten Free Sourdough Bread
In a strong gluten free sourdough loaf, some ingredients build structure, some drive fermentation, and some only refine the final result. Knowing which is which makes substitutions much safer.
The flour blend
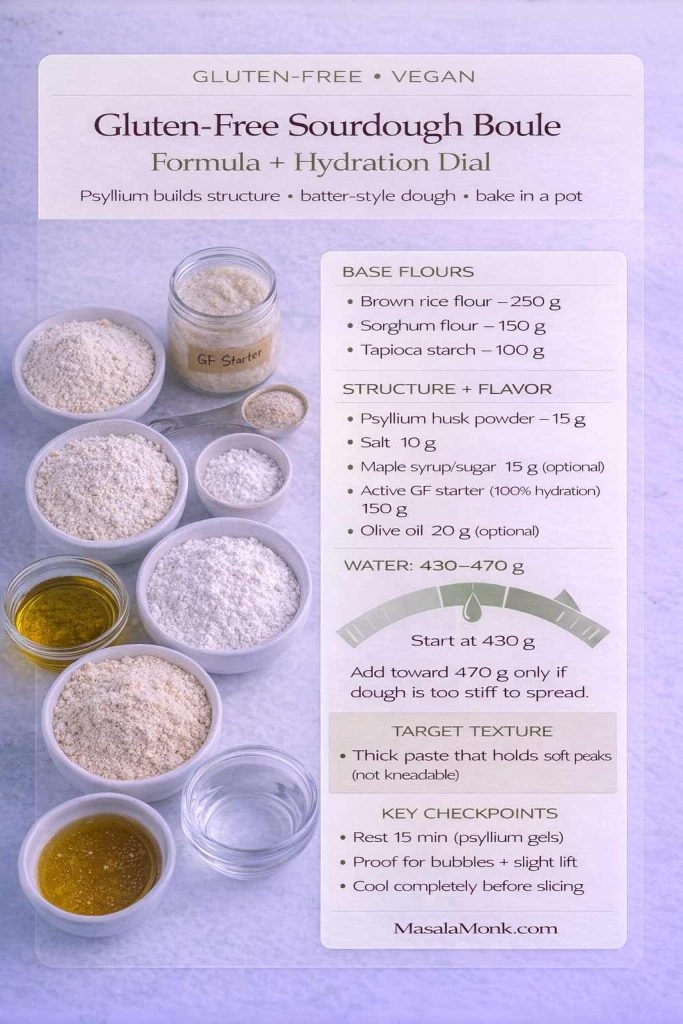
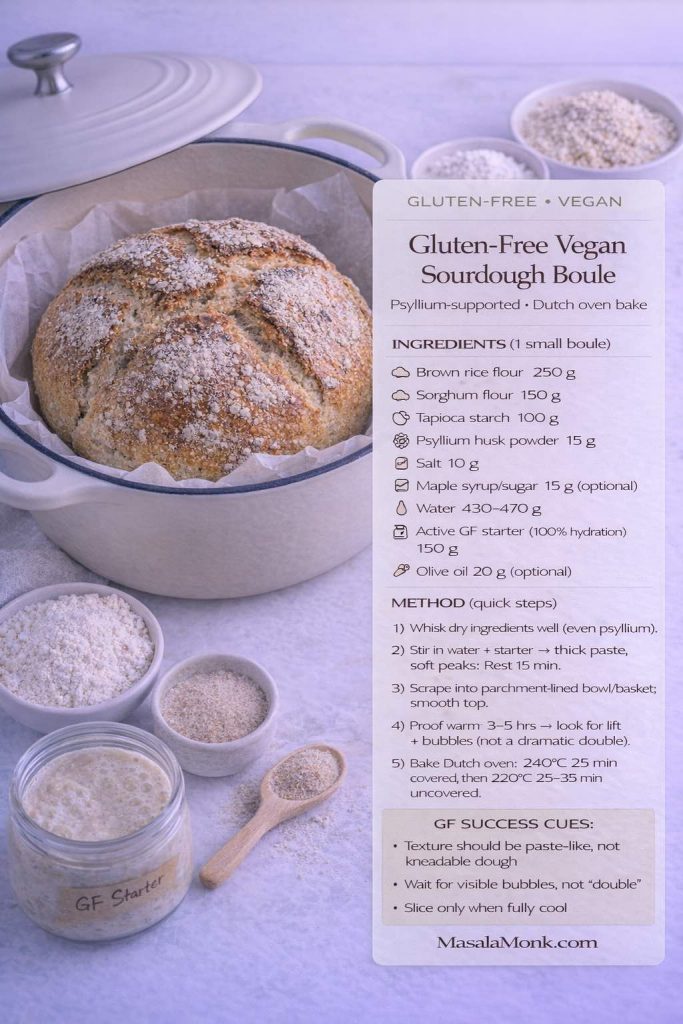
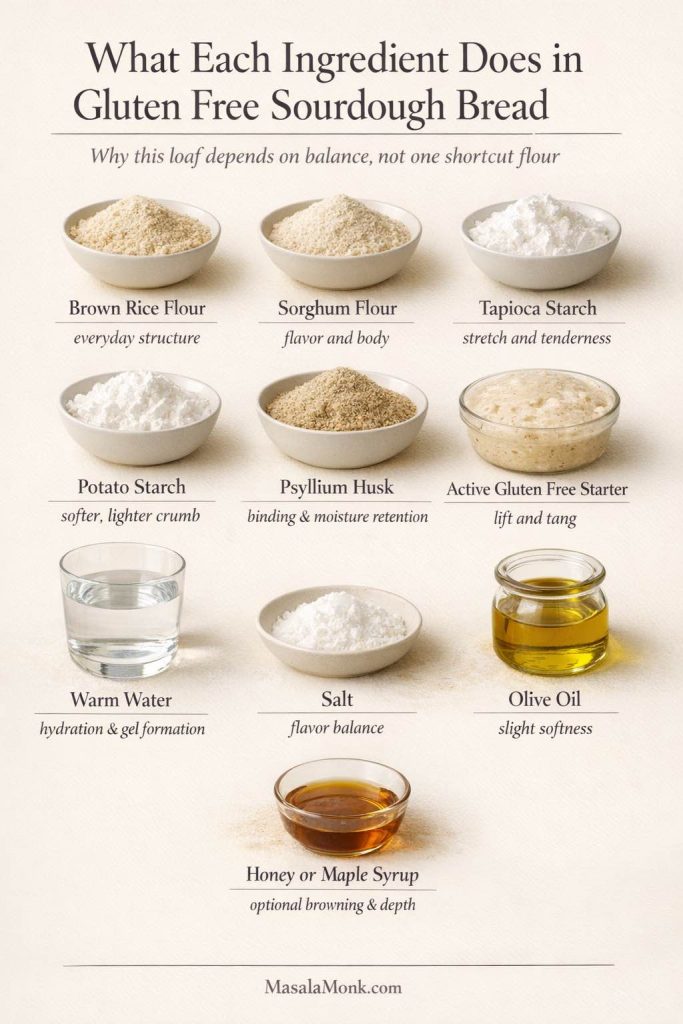
This loaf uses brown rice flour, sorghum flour, tapioca starch, and potato starch.
Brown rice flour gives dependable everyday structure without pushing the flavor too dark. Sorghum adds more character and helps the bread taste like bread instead of starch. Tapioca starch adds flexibility and tenderness, which helps keep the crumb from feeling rigid once cooled. Potato starch softens the blend further and supports a lighter eating texture.
The ratio matters. Too much whole-grain flour and the loaf can turn heavy. Too much starch and the crumb can become too soft or stay under-set in the middle. The point of this blend is balance: enough body to taste satisfying, enough lightness to avoid density, and enough structure to slice well.
The starter behind a good loaf
The starter is both the flavor engine and the lift source. In gluten free sourdough, that matters even more because the dough has fewer structural advantages to hide a weak culture.
A strong starter helps lighten the dough, deepen the flavor, and create the internal activity that keeps the loaf from baking into a compact block. A sluggish starter often leaves readers adjusting proof times, flour amounts, and oven settings when the real problem was the culture from the start.
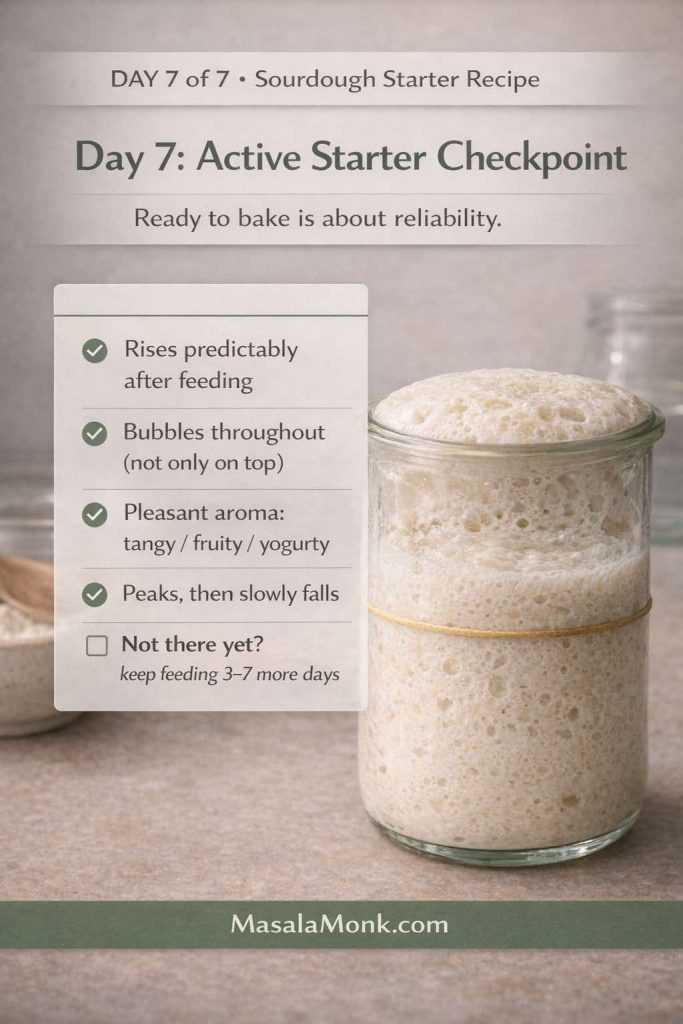
For this loaf, use an active 100 percent hydration gluten free starter that has clearly risen after feeding, shows bubbles throughout the jar, and smells pleasantly sour rather than harsh. If your culture still feels inconsistent, go back to the sourdough starter guide before changing the bread formula.
Hydration
Hydration shapes nearly everything here. It influences how the flours absorb, how psyllium sets, how fermentation moves through the dough, and whether the crumb bakes up moist or gummy.
Because gluten free flour systems vary so much, hydration is never one-size-fits-all. It also changes during resting. A dough that seems slightly soft right after mixing can become far better behaved after the flours and psyllium absorb water fully. On the other hand, a dough that already feels very stiff at mixing usually tightens more as it rests.
That is why this recipe includes a deliberate short rest before you judge the dough too harshly.
Psyllium husk
Psyllium is the structural key in this formula. Once hydrated, it helps the dough hold water, improves cohesion, supports gas retention, and makes the finished loaf much easier to slice cleanly.
Without enough binder support, a loaf may ferment and still spread too much, collapse, or cool into a crumb that feels wet and fragile. With a good psyllium gel, the dough behaves with much more confidence.
Because psyllium quality varies, color can vary too. Some brands produce a slightly darker or faintly purple-gray crumb. That can look strange the first time, but it does not automatically mean the loaf failed.
Salt and optional additions
Salt does more than season the loaf. It sharpens flavor and helps keep fermentation balanced. Without enough salt, the bread can taste dull even when the starter is healthy. Too much, on the other hand, can make the dough feel tighter and less balanced.
A little olive oil softens the crumb slightly and rounds out the eating texture. A small amount of honey or maple syrup can help with browning and add a little flavor depth. These are fine-tuning ingredients, though, not rescue ingredients. They only help once the flour, starter, hydration, and binder are already doing their jobs.
Also Read: Mango Sorbet Recipe: Healthy & Plant Based Dessert
Gluten Free Sourdough Bread Formula and Why It Works
This loaf is built around a simple but deliberate balance: enough whole-grain flour to taste like bread, enough starch to keep the crumb from turning heavy, and enough psyllium support to hold that hydration together in a loaf pan.
The full measured ingredient list appears in the recipe card, but the logic matters here just as much as the numbers. Brown rice flour gives dependable structure, sorghum brings more flavor, tapioca and potato starch keep the crumb lighter, and psyllium helps the dough hold moisture and slice cleanly once baked.
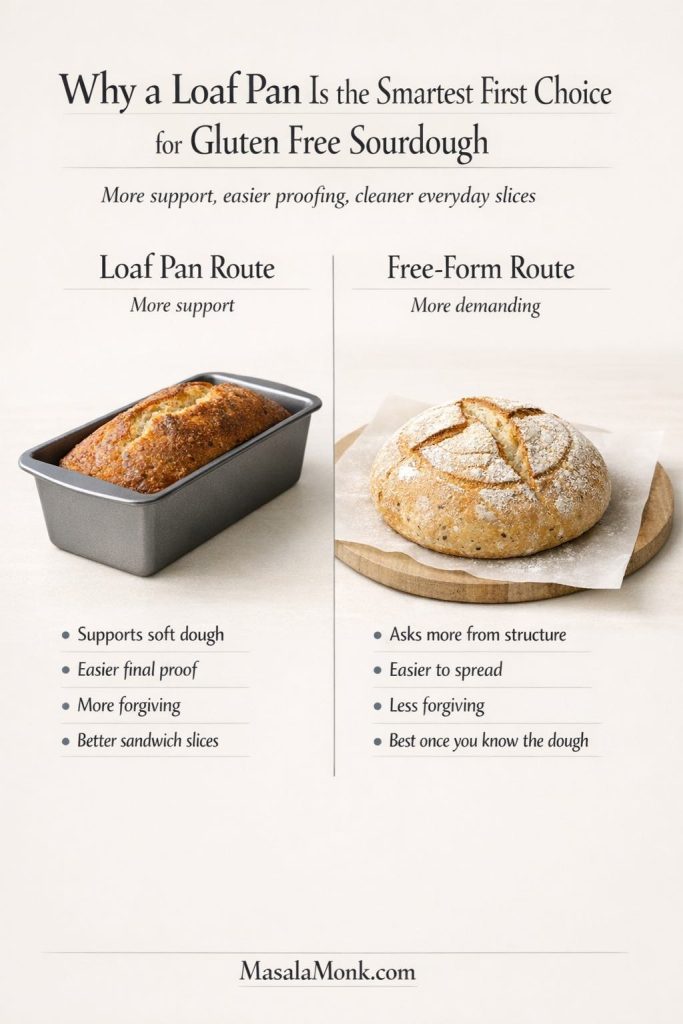
The water level is generous because gluten free sourdough needs more moisture than many readers expect, yet it is still restrained enough to work reliably in a loaf pan. That pan matters too. A free-form loaf or Dutch oven can work later, but the loaf pan is the smartest route when consistency is the priority.
Why this recipe is written in grams
This recipe is written in grams because gluten free flour blends vary too much by volume for cups to stay dependable. Measuring by weight gives you a far better shot at repeating the same dough texture, the same fermentation behavior, and the same loaf structure next time.
Equipment That Improves Your Gluten Free Sourdough Bread Results
You do not need a professional bakery setup to make good gluten free sourdough, but a few tools genuinely improve consistency.
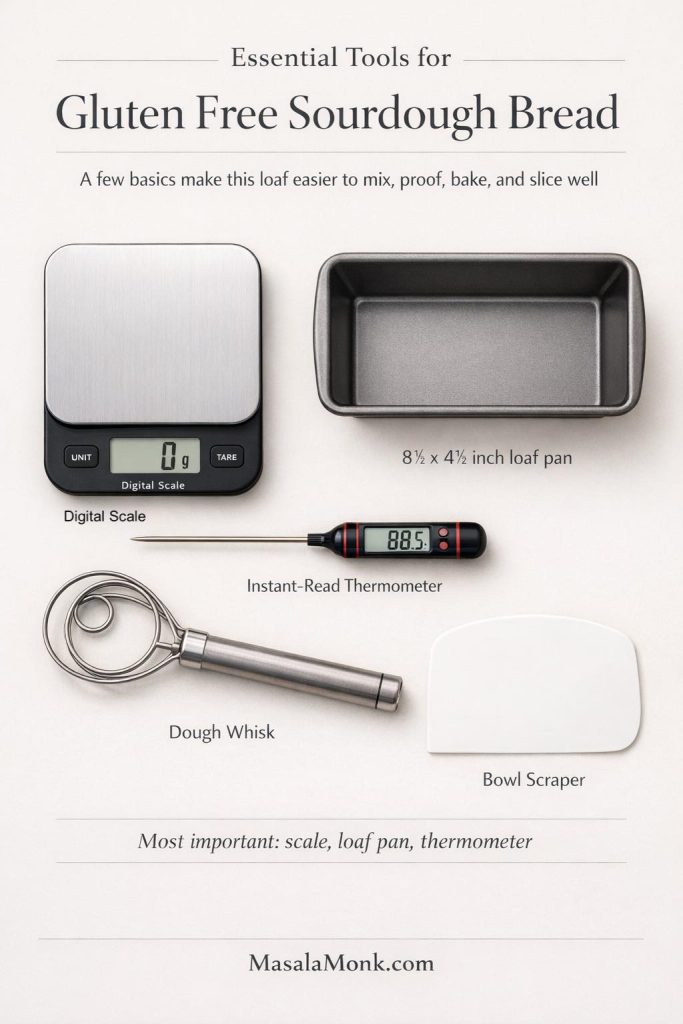
A digital scale is essential, not optional. Gluten free flours vary too much by volume for cups to stay dependable. An 8½ x 4½-inch loaf pan is the most forgiving format for most readers because it supports the dough during proofing and baking. A Dutch oven can work, yet it asks more from the dough and from your handling. If your goal is a repeatable first success, the loaf pan is the smarter default.
A sturdy spatula or dough whisk helps with mixing. A bowl scraper makes transfer neater. Most importantly, an instant-read thermometer gives you a much clearer finish line than crust color alone. Gluten free loaves can look done before the center has fully set, so temperature is one of the best protections against gumminess.
Also Read: Protein Ice Cream Recipe: 10 Creamy Homemade Recipes
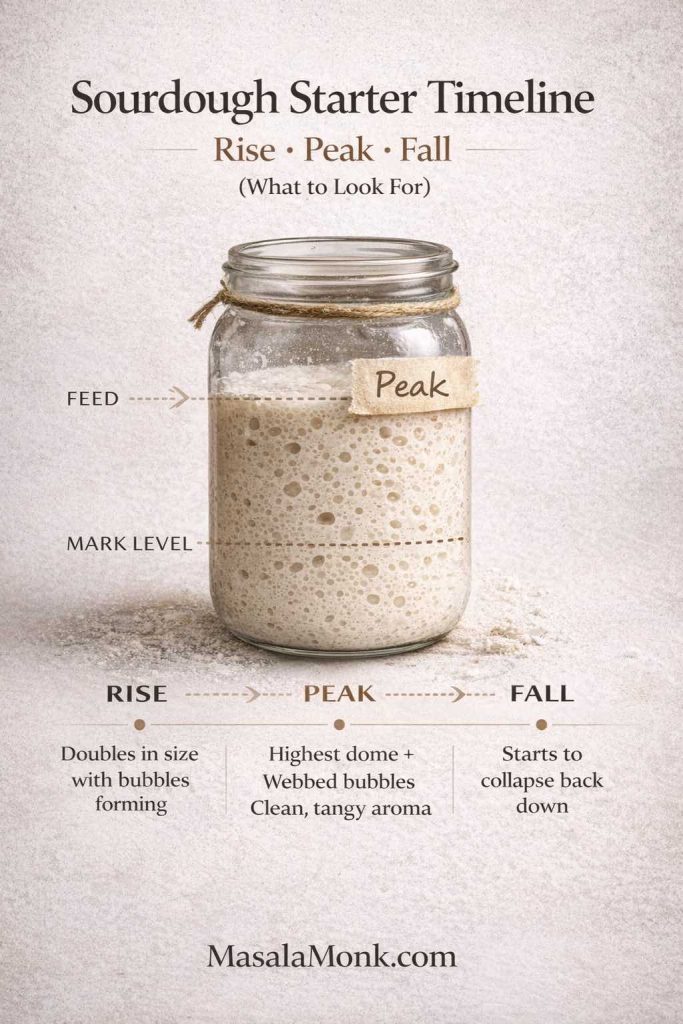
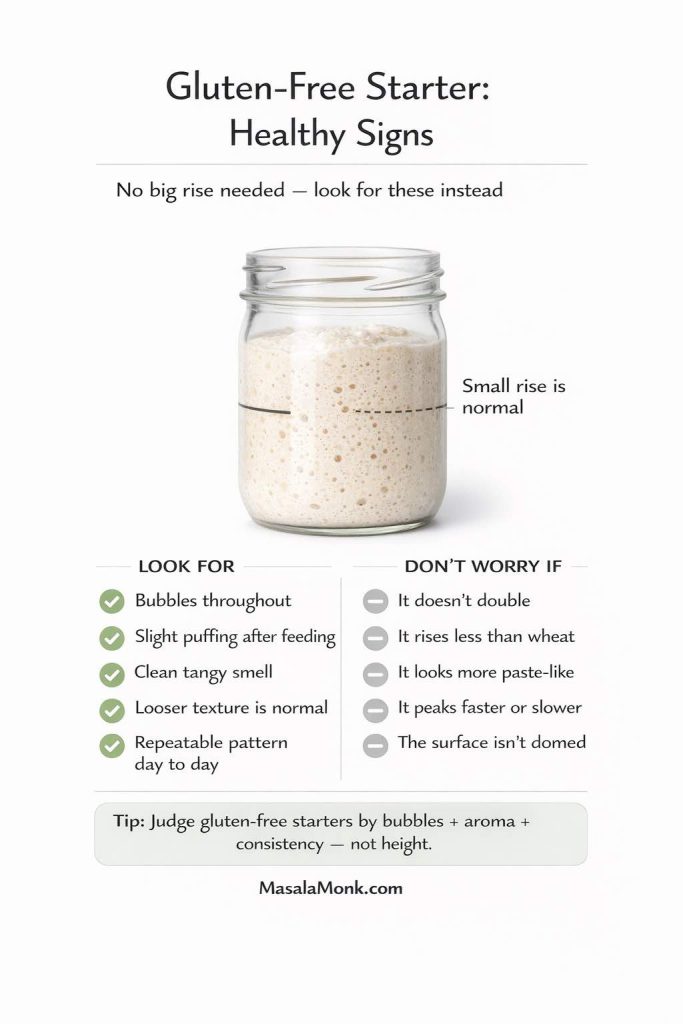
Starter Readiness for Gluten Free Sourdough Bread
“Use an active starter” sounds straightforward until you realize how loosely that phrase gets used. For this loaf, active needs to mean something visible.
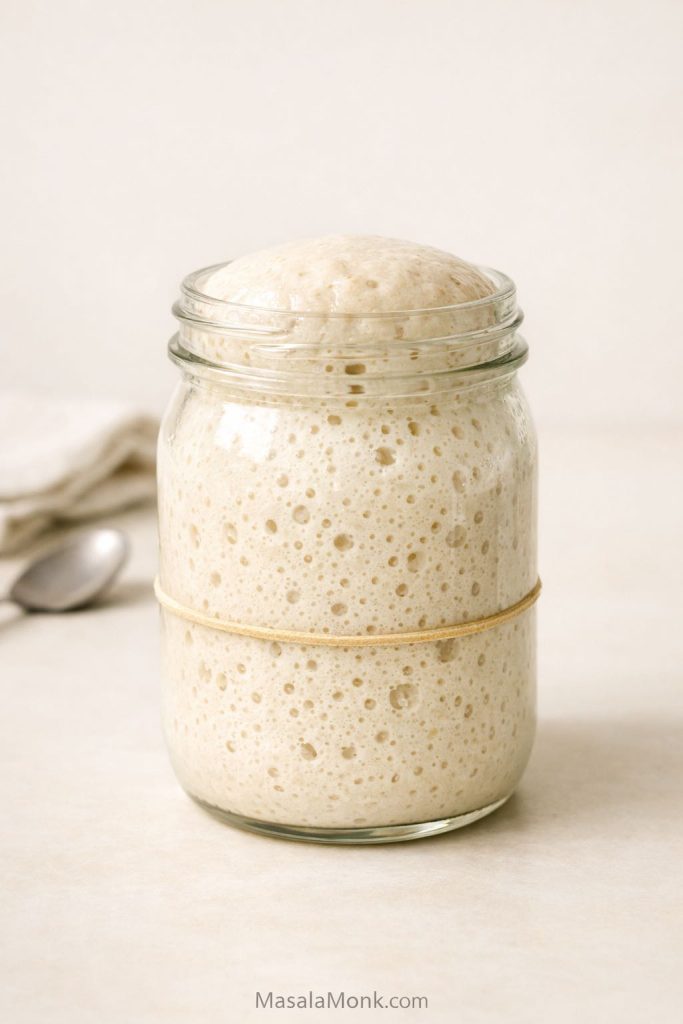
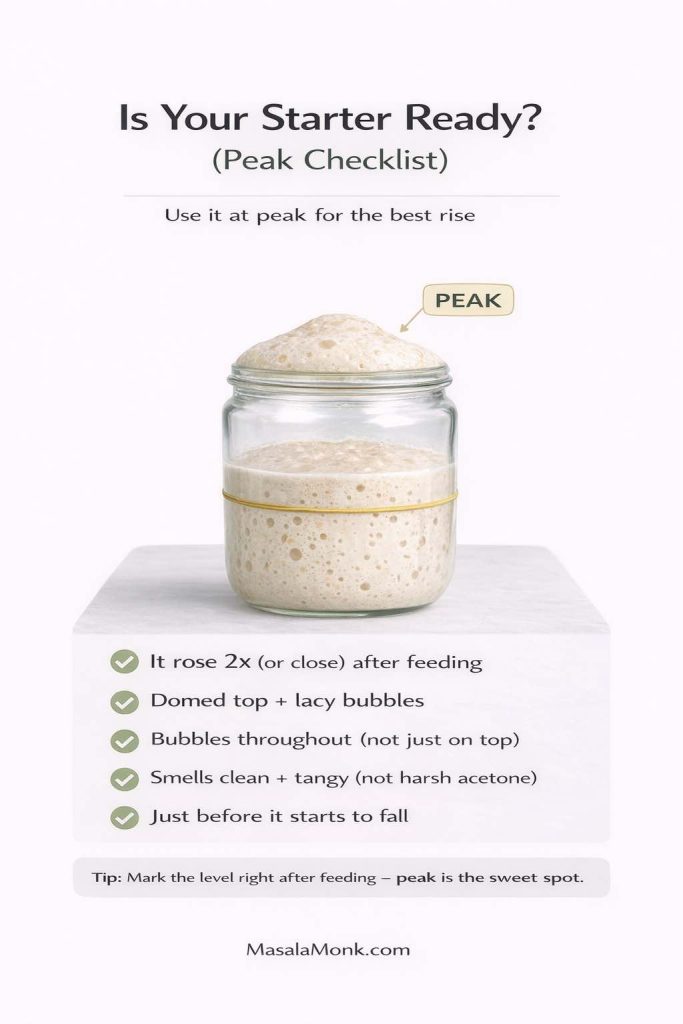
What an active starter should look like
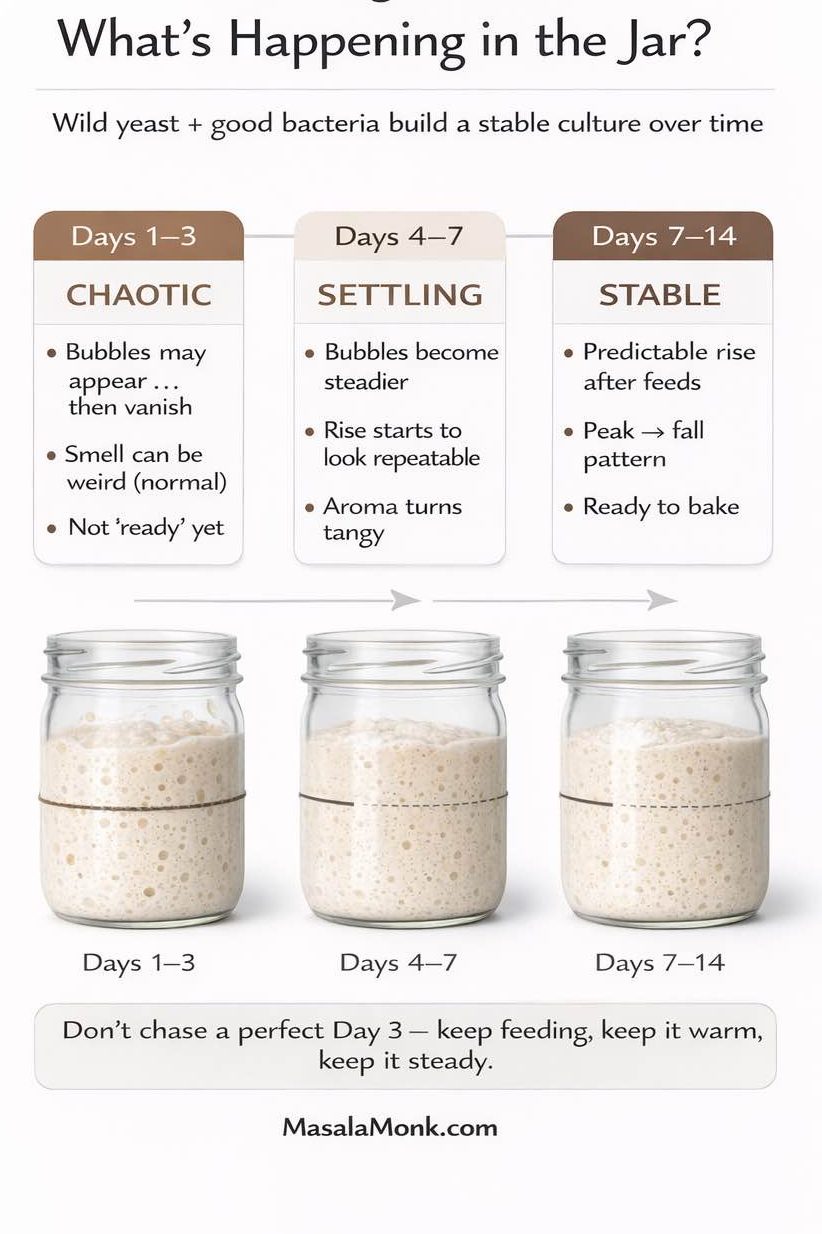
A ready starter should look aerated throughout the jar, not just bubbly on top. After feeding, it should rise clearly enough that you do not have to guess whether anything happened. If your starter usually doubles, great. If it does not fully double but reliably rises, loosens, and fills with bubbles after feeding, that can still be enough. What matters most is clear activity, not dramatic performance.
Visually, you want a jar that looks clearly lifted, bubbly through the middle rather than just foamy at the top, and still strong rather than flat or separated. If the top has fully collapsed and the starter looks slack, refresh it before baking.
A sourdough starter is a live culture of wild yeast and lactic acid bacteria, so visible rise, bubbles, and recovery after feeding matter more than starter myths or wishful thinking.
The best times to use it
There are three especially useful starter states to understand here.
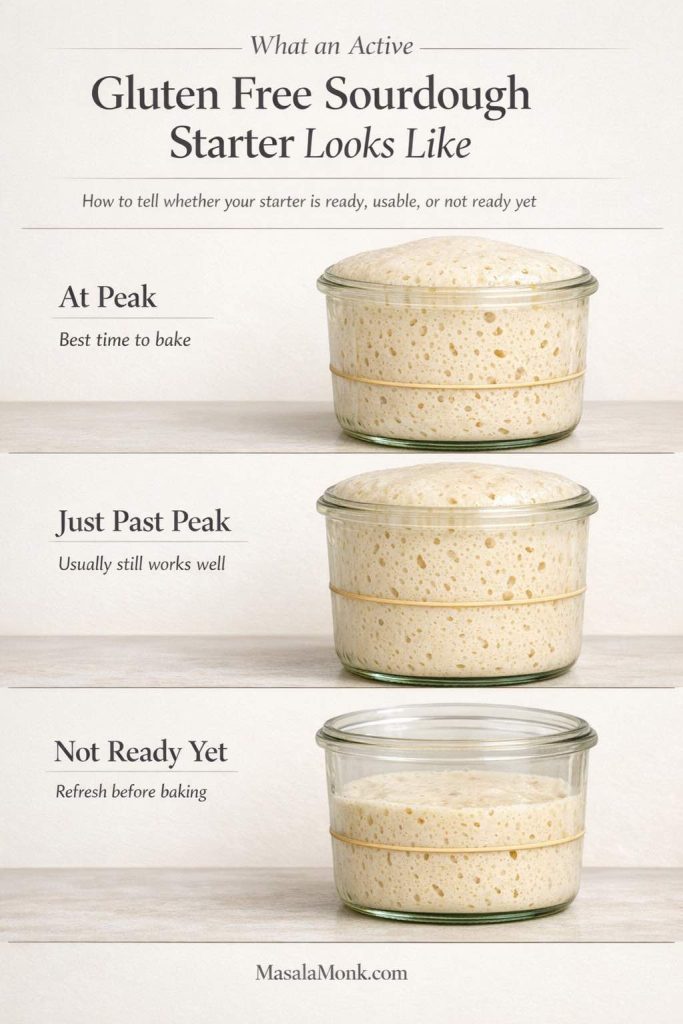
- At peak: the starter has risen clearly, still looks domed or almost domed, and feels lively throughout. This is the easiest and safest state to use.
- Just past peak: the starter still looks active and aerated, but the top may be starting to flatten slightly rather than sit high and rounded. This can still work very well, especially if it remains strong and bubbly.
- Straight from the fridge: sometimes workable if the culture was strong before refrigeration, but far less dependable if there is any sign of weakness. When in doubt, refresh it first.
When your starter is not ready yet
What should make you stop? Weak bubbling, sluggish recovery after feeding, a starter that separates badly, or a culture that smells more harsh than pleasantly sour. In those cases, the problem is rarely the bread formula. The culture simply is not ready yet.
Also Read: Homemade Mango Ice Cream Recipe
Timing Framework: What This Process Usually Looks Like
Times vary by starter strength, room temperature, and flour behavior, so use these as orientation points rather than strict rules.
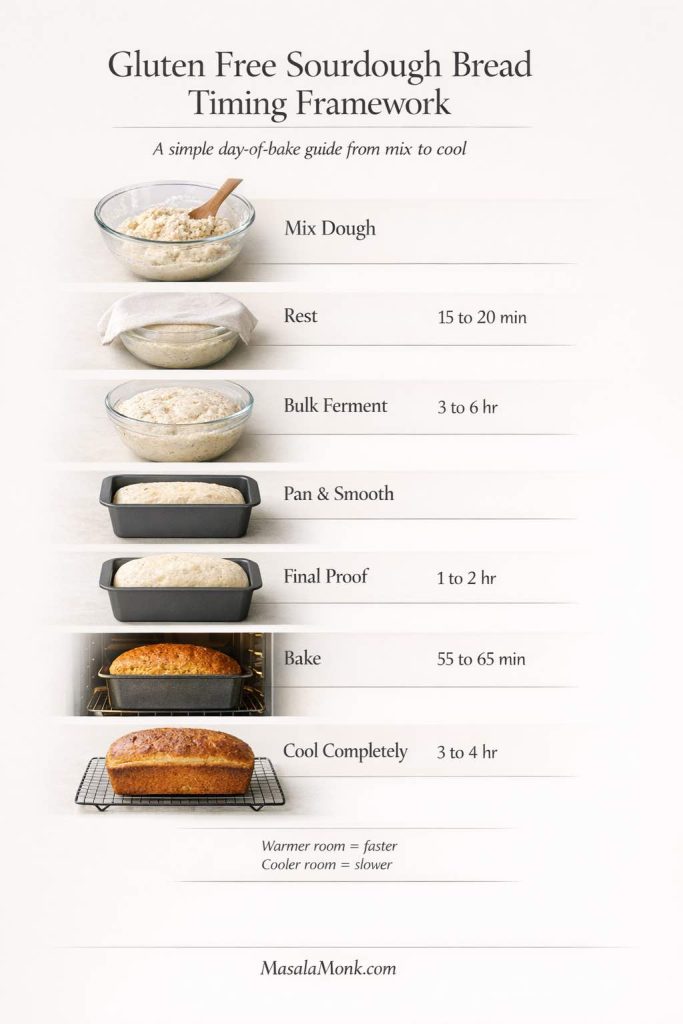
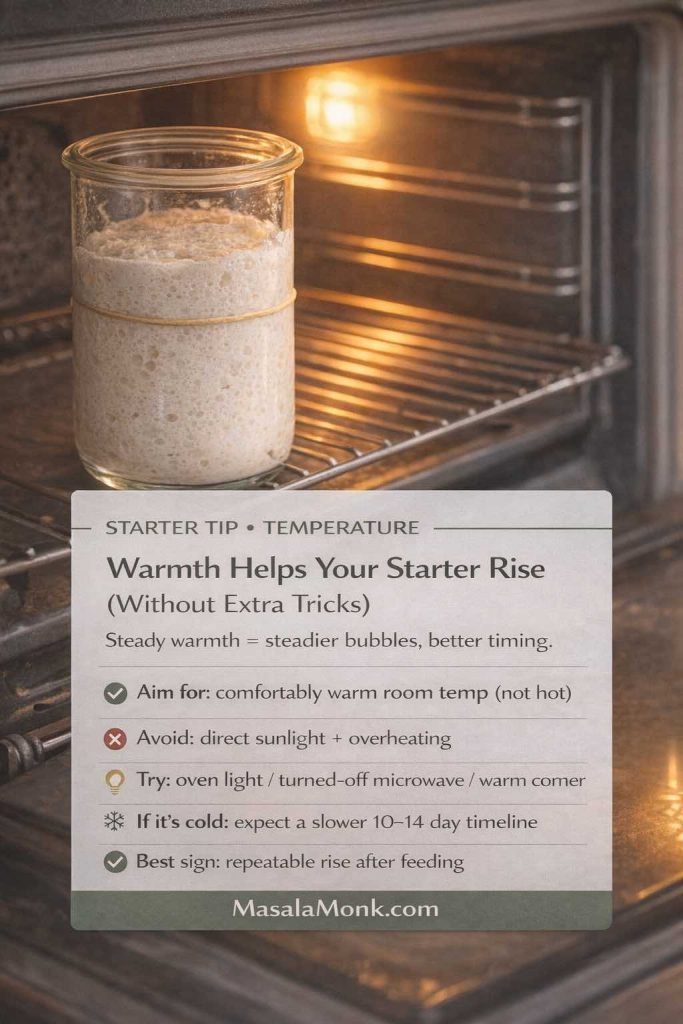
Warm kitchen: roughly 26°C to 28°C / 79°F to 82°F
If your kitchen runs warm, bulk fermentation may move along in about 3 hours, and the final proof may be ready in roughly 1 hour. Watch the dough closely so it does not overproof.
Moderate kitchen: roughly 22°C to 24°C / 72°F to 75°F
In a moderate room, bulk fermentation often lands around 4 to 5 hours, with a final proof of about 1 to 2 hours.
Cooler kitchen: roughly 18°C to 20°C / 64°F to 68°F
If your room runs cool, bulk fermentation may need 5 to 6 hours or even a bit more, and the final proof may take closer to 2 hours.
Optional overnight route
For a slightly more developed flavor, you can refrigerate the shaped loaf after a modest room-temperature start to the final proof, then bake the next day once it no longer feels cold and inert. This is best used after you have already made the loaf once and understand what the dough looks like when it is on track.
Also Read: Cookie Pie Recipe: 10 Best Flavors, Fillings and Variations
Ingredients for This Gluten Free Sourdough Bread Recipe
Before you start mixing, gather everything first. This loaf uses a custom flour blend, active starter, psyllium husk, water, salt, olive oil, and an optional small amount of honey or maple syrup. For the full recipe card with yield, timing, and notes, you can also jump to the recipe card here.
One-glance formula snapshot
- Pan: 8½ x 4½-inch loaf pan
- Starter: active gluten free starter at 100% hydration
- Expected dough feel: soft, sticky, cohesive, and smoothable
- Bake target: 205°F to 210°F internal temperature
- Proof target: modestly puffy and lighter than before, not dramatically doubled
- Cooling minimum: 3 to 4 hours before slicing
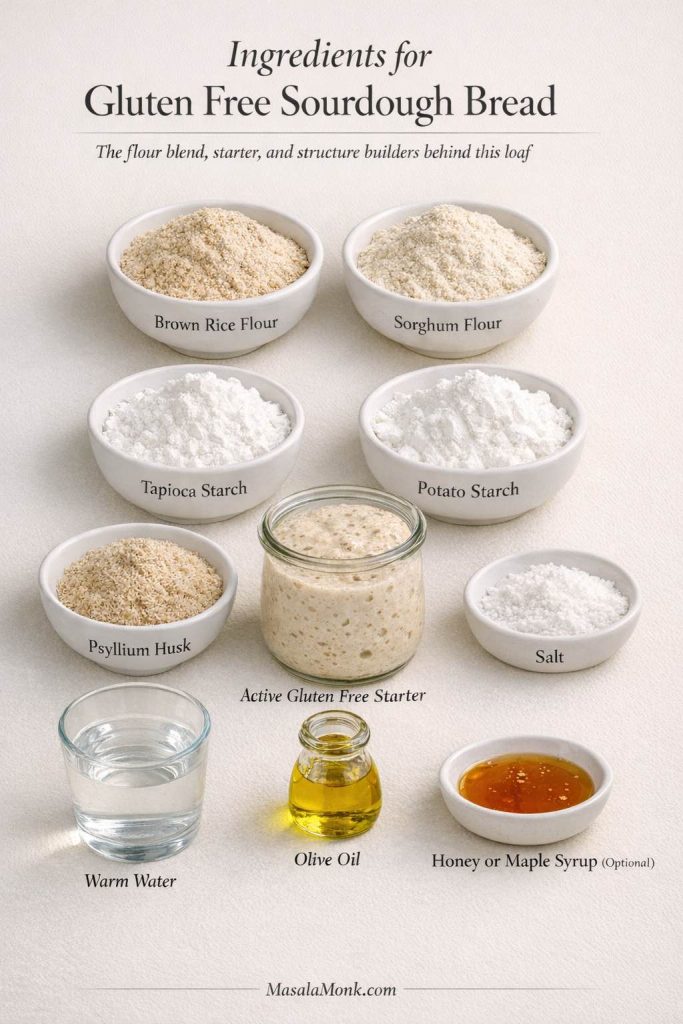
- 150 g active gluten free sourdough starter, 100% hydration
- 220 g brown rice flour
- 120 g sorghum flour
- 80 g tapioca starch
- 40 g potato starch
- 14 g whole psyllium husk
- 10 g fine sea salt
- 430 g warm water
- 15 g olive oil
- 10 g honey or maple syrup, optional
↓ Jump to the method | ↓ Jump to the full recipe card
How to Make Gluten Free Sourdough Bread Step by Step
Step 1: Make the psyllium gel
Whisk the warm water and psyllium husk together in a medium bowl. Leave it for 2 to 3 minutes until it thickens into a gel.
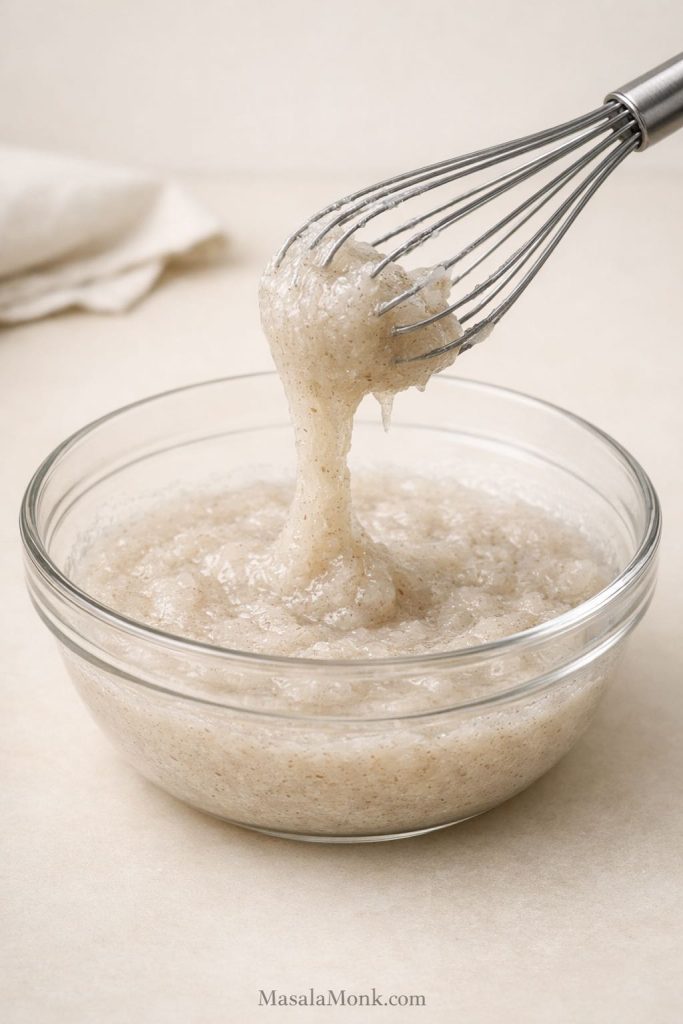
This step does more than hydrate the binder. It helps distribute psyllium evenly through the dough, which improves cohesion and reduces the chance of dry patches later.
The gel should look thickened but still stirrable. It should not look watery, yet it should not feel like a solid rubber mass either.
Step 2: Mix the dough
In a large bowl, whisk together the brown rice flour, sorghum flour, tapioca starch, potato starch, and salt. Add the psyllium gel, active starter, olive oil, and optional honey or maple syrup. Mix thoroughly until no dry pockets remain.
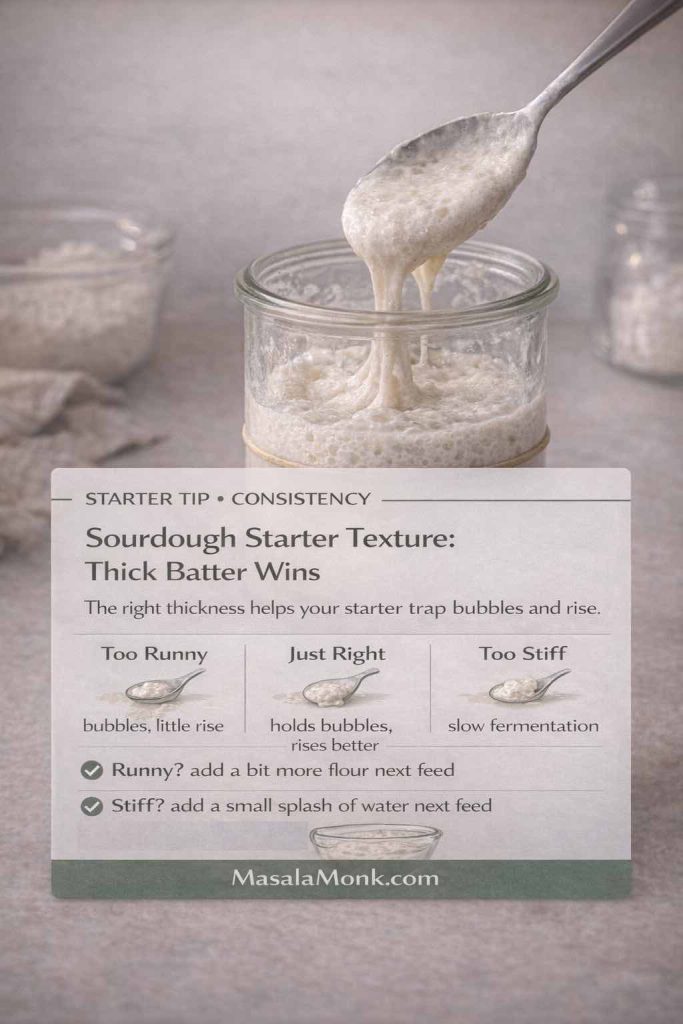
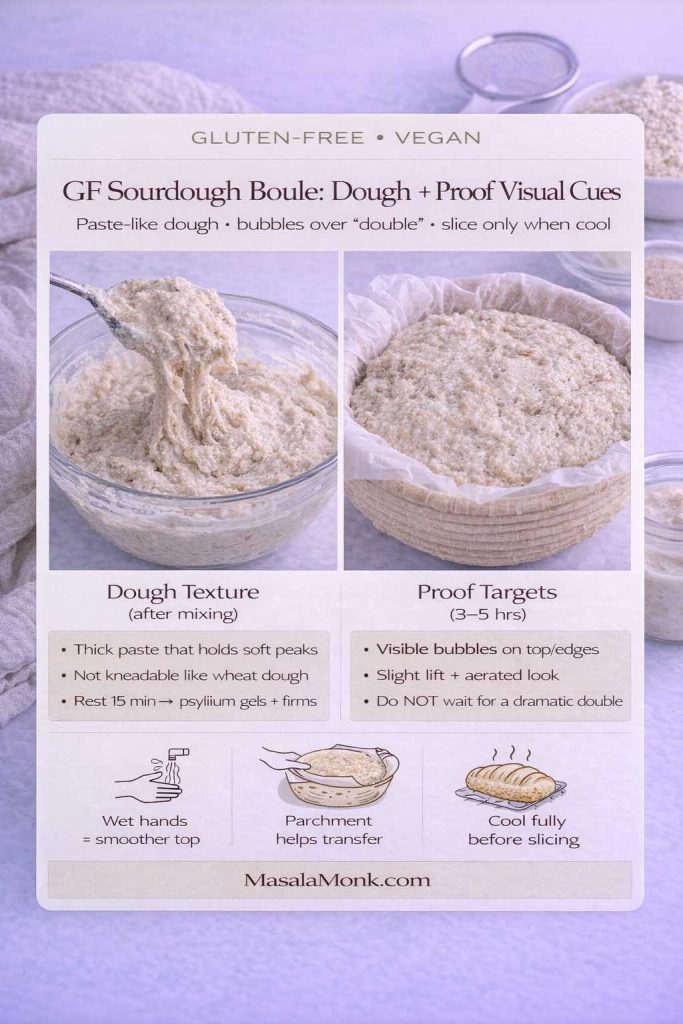
At this stage, the dough should look sticky, soft, and cohesive. Think thick, supple paste leaning toward very soft dough rather than anything you would knead like wheat bread. It should hold together, but it should not feel firm.
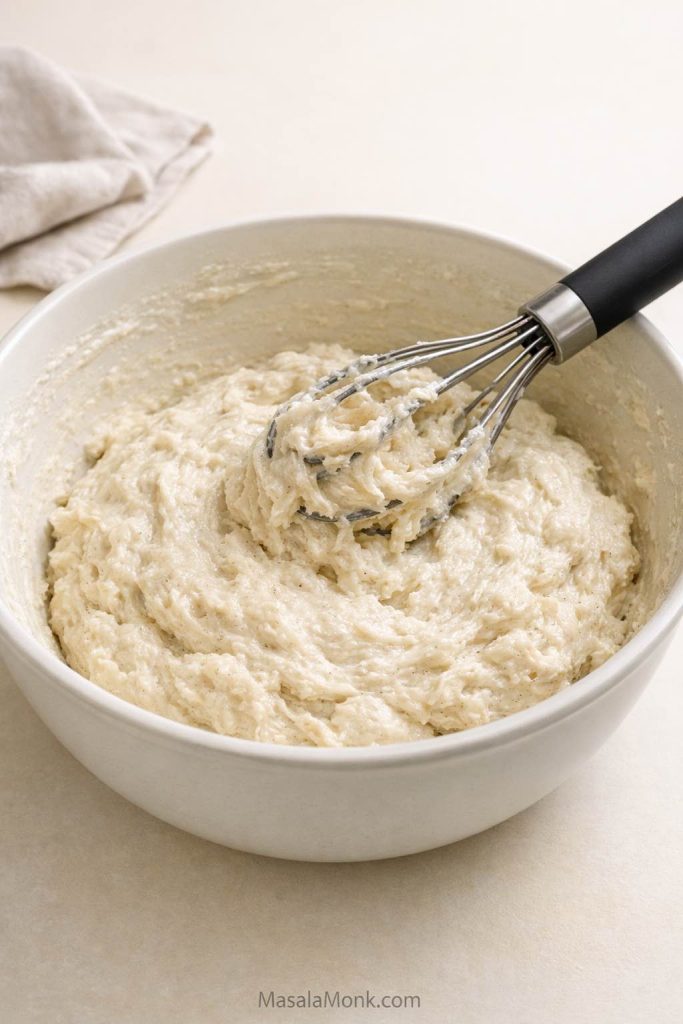
If it resists mixing and feels stubbornly tight, it is probably too stiff already. If it pours or sloshes like batter, it has likely gone too far in the wet direction.
Step 3: Rest the dough
Cover the bowl and leave the dough for 15 to 20 minutes. This short rest gives the flours and psyllium time to absorb water more fully before you judge the texture.
After resting, the dough should feel smoother, more organised, and slightly stronger. It should still be soft, but it should no longer feel shapeless. This is often the point where readers realise the dough was not “wrong” after all; it simply needed time to hydrate.
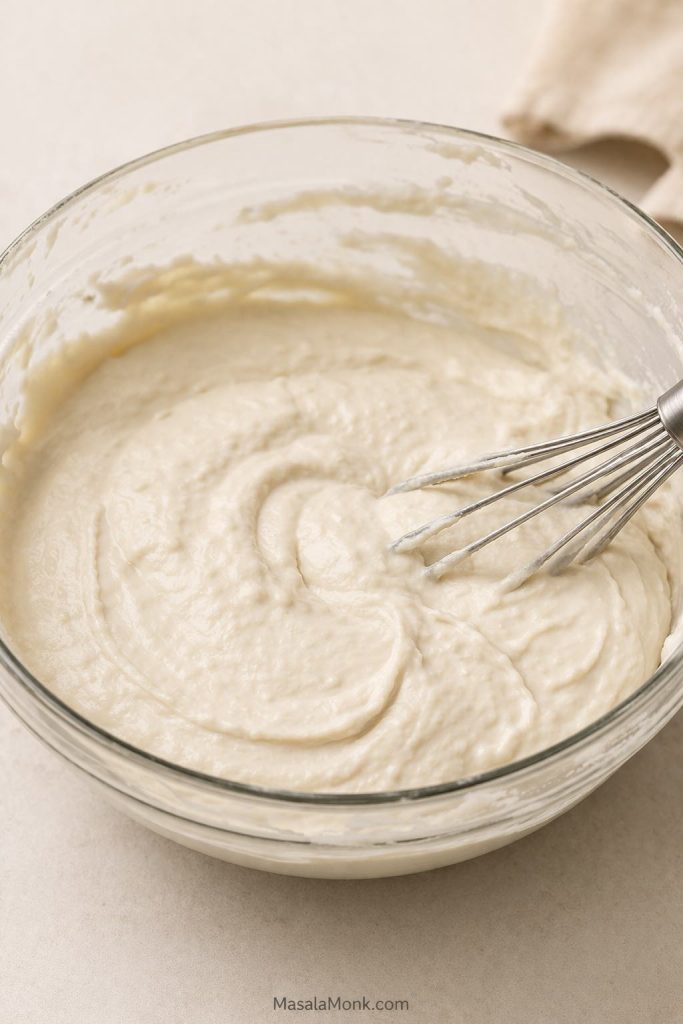
If it becomes dramatically tighter than expected, add a small splash of water. If it still looks unusually loose, continue with the loaf-pan format and note that the blend may need slight adjustment next time.
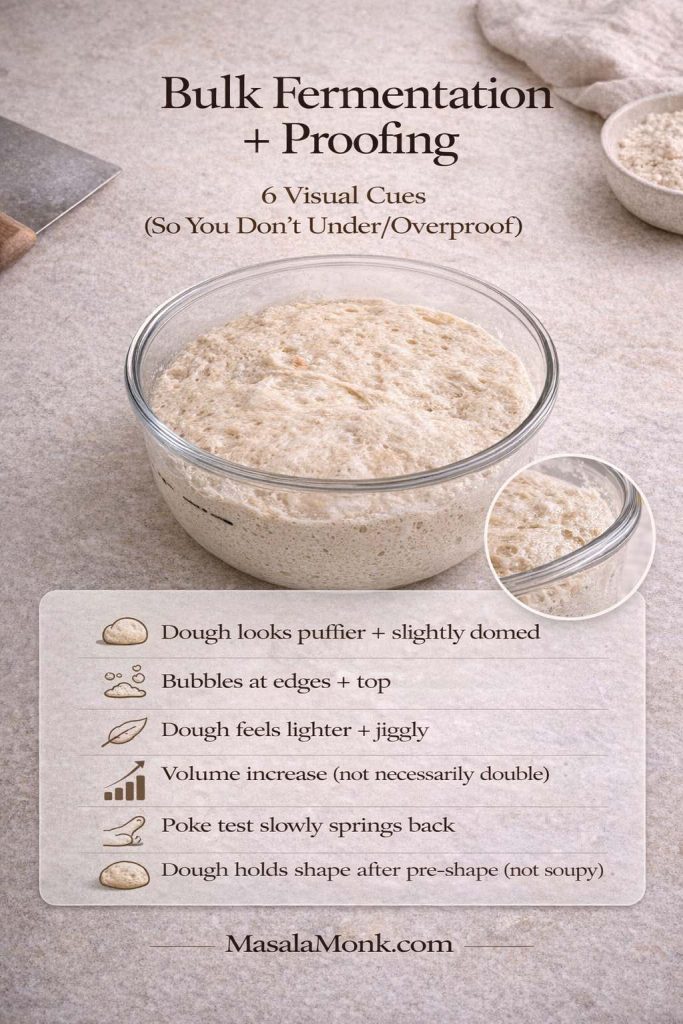
Step 4: Bulk ferment
Leave the dough covered at room temperature until it looks visibly aerated and somewhat lighter. In many kitchens this takes 3 to 5 hours, but room temperature and starter strength matter more than the clock.
You are not waiting for dramatic doubling. Instead, look for a dough that seems about 50 to 75 percent more lively rather than massively larger. It should look puffier, hold a bit more internal air, and feel less heavy than when it started.
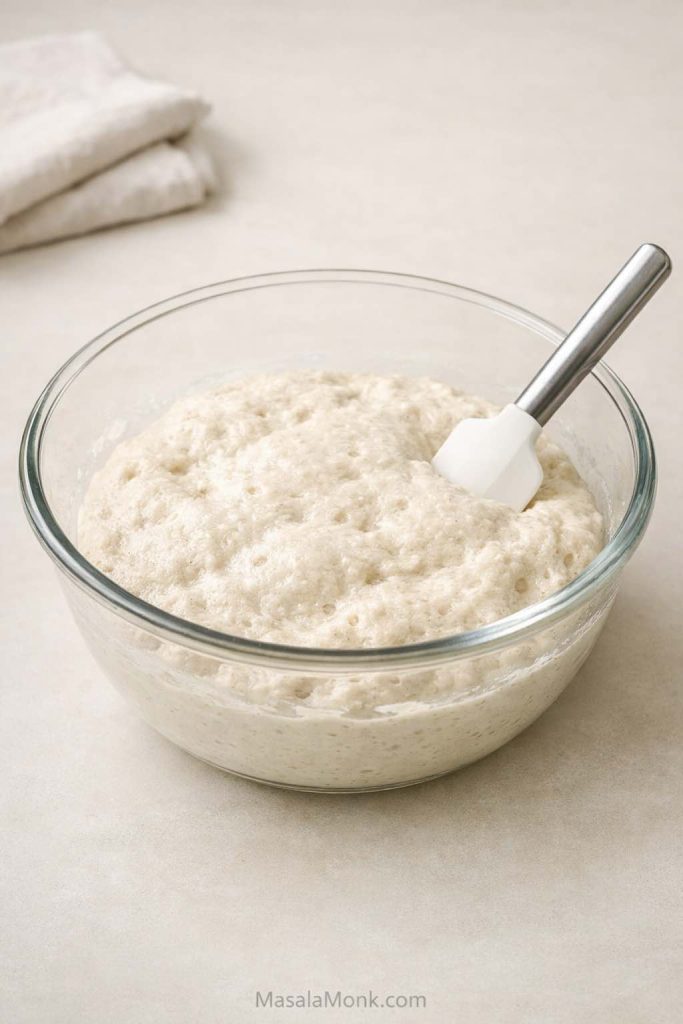
If the dough still looks almost exactly the same several hours later, the starter is usually the first thing to question.
Step 5: Transfer to the pan
Scrape the dough into a parchment-lined or well-greased loaf pan. Smooth the top with wet fingers or a spatula. Add seeds on top here if you want them.
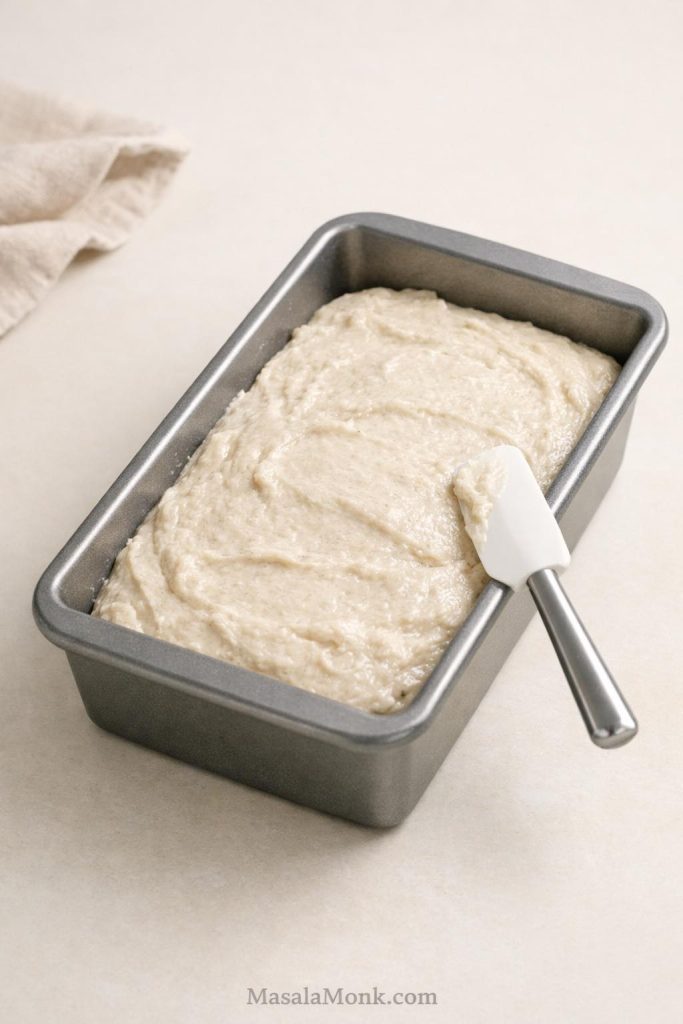
This is not a dramatic shaping step. You are guiding the dough into place and preserving whatever lightness fermentation created. Gluten free sourdough rewards calm handling more than aggressive shaping.
The dough should smooth willingly, even if it remains soft. It should not fight you like stiff dough, and it should not look like it has no internal support at all.
Step 6: Final proof
Cover the pan and let the loaf proof until it looks slightly expanded, a little airy, and visibly lighter than when it first went into the pan. In many kitchens this takes about 1 to 2 hours.
What does ready look like? The loaf should seem modestly puffed, not dramatically tall. The surface should look a little more alive, and if you gently touch it, it should not feel dense and immovable. What you are chasing here is a loaf that looks ready, not maxed out.
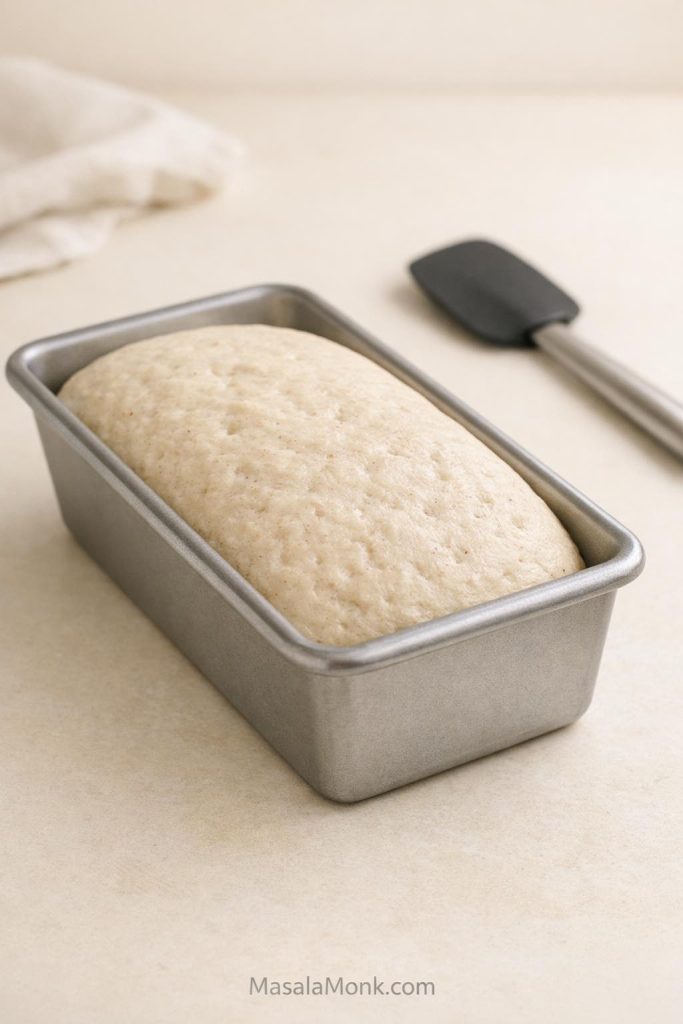
Bake now if: the loaf looks modestly puffed, lighter than before, and softly aerated without seeming fragile.
Wait longer if: it still looks dense, heavy, flat, or almost unchanged from when it first went into the pan.
You have probably gone too far if: it starts looking fragile, overexpanded, or slightly unstable, as though it might sink rather than hold itself.
Step 7: Bake
While the loaf proofs, preheat the oven to 230°C / 445°F.
Bake the loaf for 20 minutes at 230°C / 445°F. Then lower the oven to 210°C / 410°F and bake for another 35 to 45 minutes, until the crust is deep golden and the internal temperature reaches about 96°C to 99°C / 205°F to 210°F.
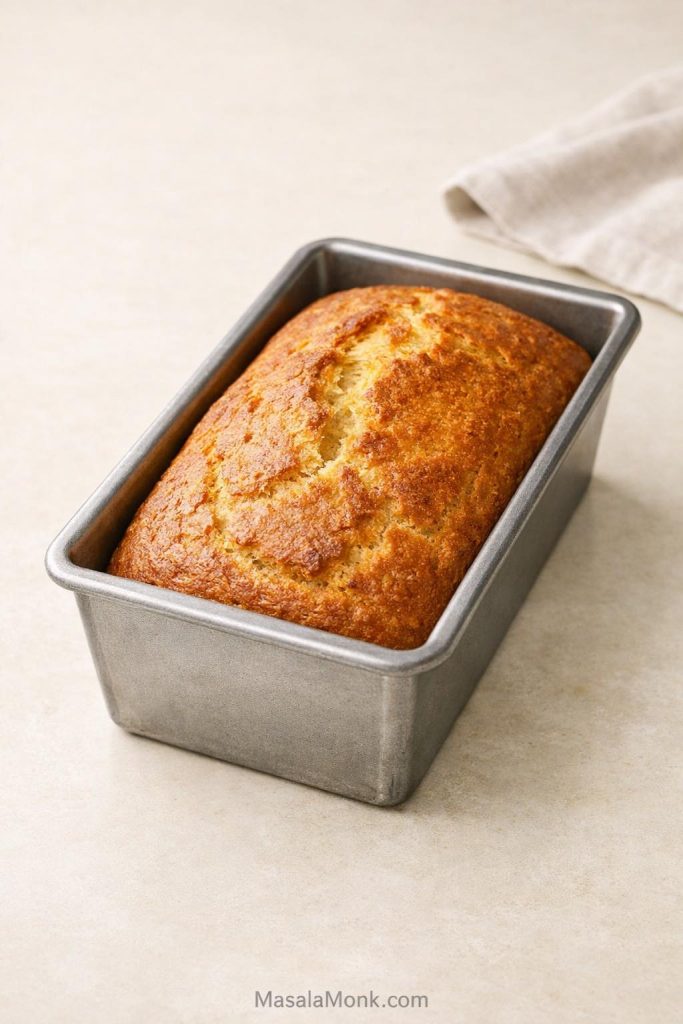
If the top darkens too quickly, tent it loosely with foil during the second part of the bake.
The loaf should look fully set when done, not pale and soft. It should also feel lighter than a wet, underbaked loaf of the same size. When you tap the top gently, it should feel firm rather than damp and delicate.
Step 8: Cool completely
Leave the loaf in the pan for about 10 minutes, then move it to a rack and cool completely, ideally for at least 3 to 4 hours.
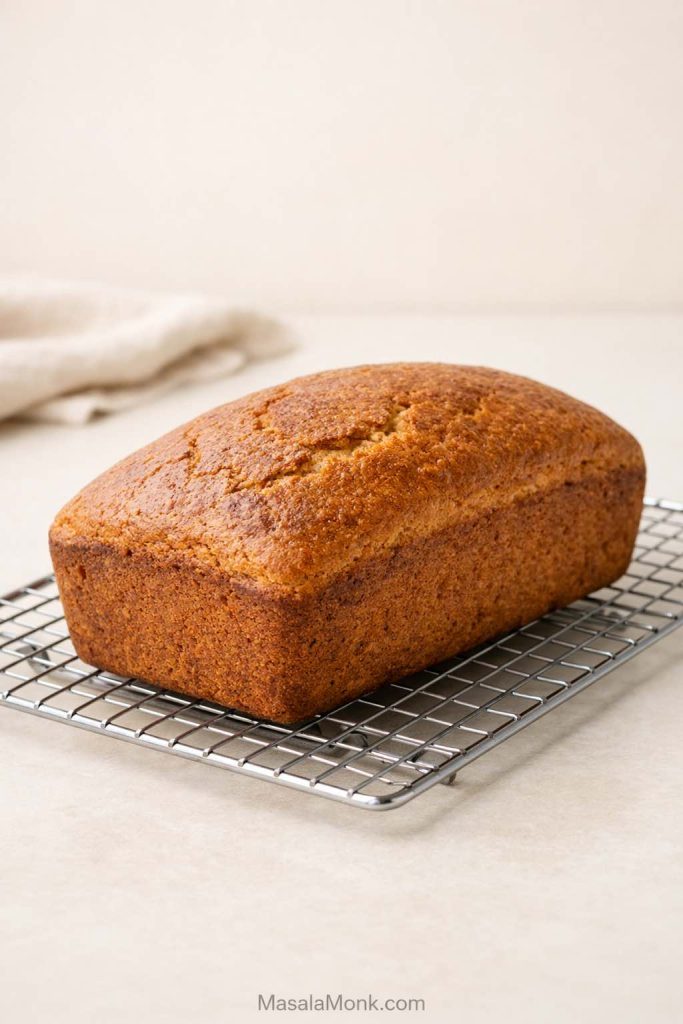

This is not a fussy extra step. Cooling is part of the bake. Slice too early and even a properly baked loaf can seem falsely gummy because the crumb has not finished setting.
↑ Back to ingredients | ↓ Jump to the full recipe card
Also Read: Punjabi Mutton Bhuna – Amritsari Village-Style Gosht Recipe
What Gluten Free Sourdough Bread Dough Should Look Like at Every Stage
Timing helps, yet appearance and feel matter more.
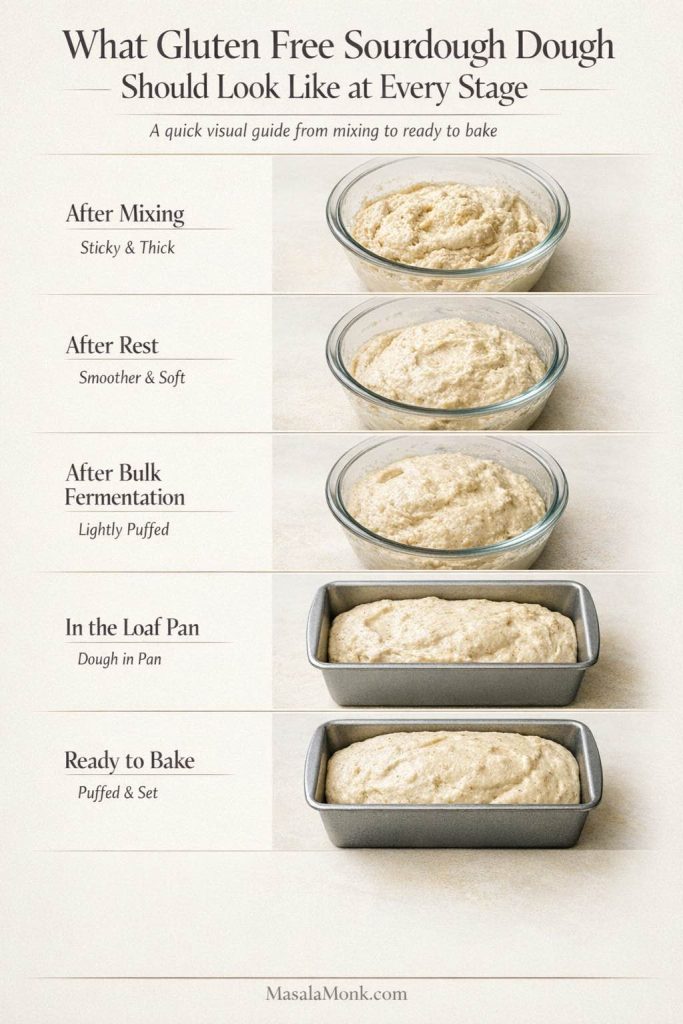
- After mixing: the dough should look fully hydrated, sticky, and cohesive. It should not have dry flour pockets. It should not pour like cake batter either.
- After the short rest: the dough should feel smoother, slightly stronger, and more organised. It should still be soft, but less sloppy than it looked at first.
- During bulk fermentation: look for dough that seems lighter, more aerated, and a little puffy rather than one that is simply sitting in the bowl unchanged.
- Ready to proof in the pan: after transfer, the surface should smooth out easily. The dough should still be soft, yet it should not look like it has no internal support at all.
- Ready to bake: the loaf should look modestly expanded and clearly lighter than before. Think “puffy and ready,” not “maxed out and fragile.”
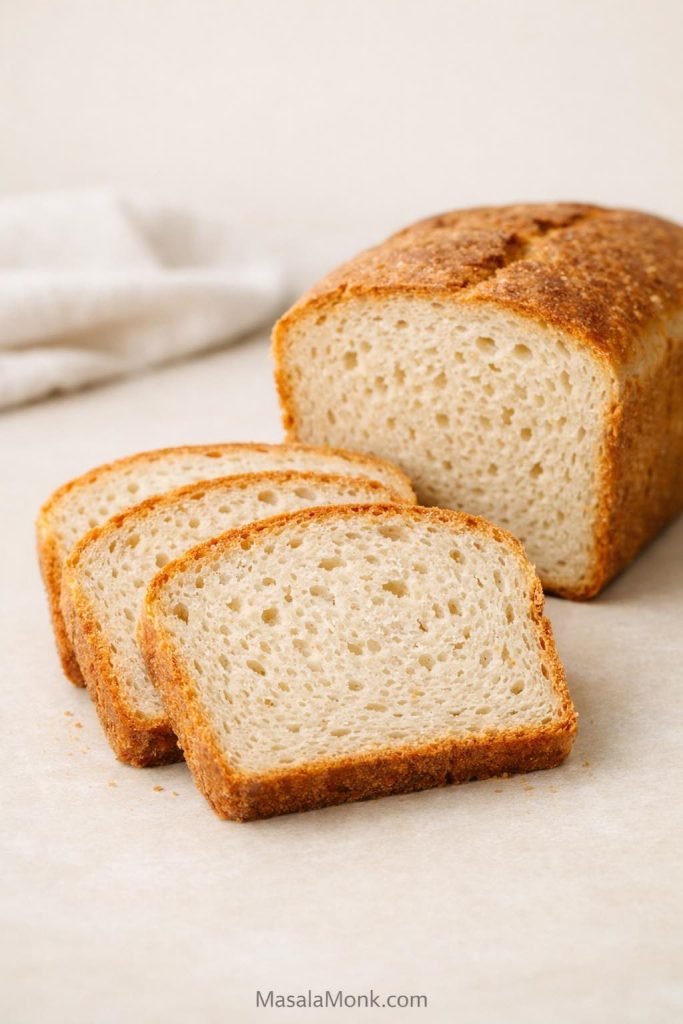
- Fully baked and fully cooled: the crust should feel set. The loaf should not feel suspiciously heavy for its size. When sliced, the crumb should look moist and tender, not wet and sticky.
How to Tell If Gluten Free Sourdough Bread Needs More Proofing
Proofing is where many loaves succeed or fail, so it helps to separate the three most common states clearly.
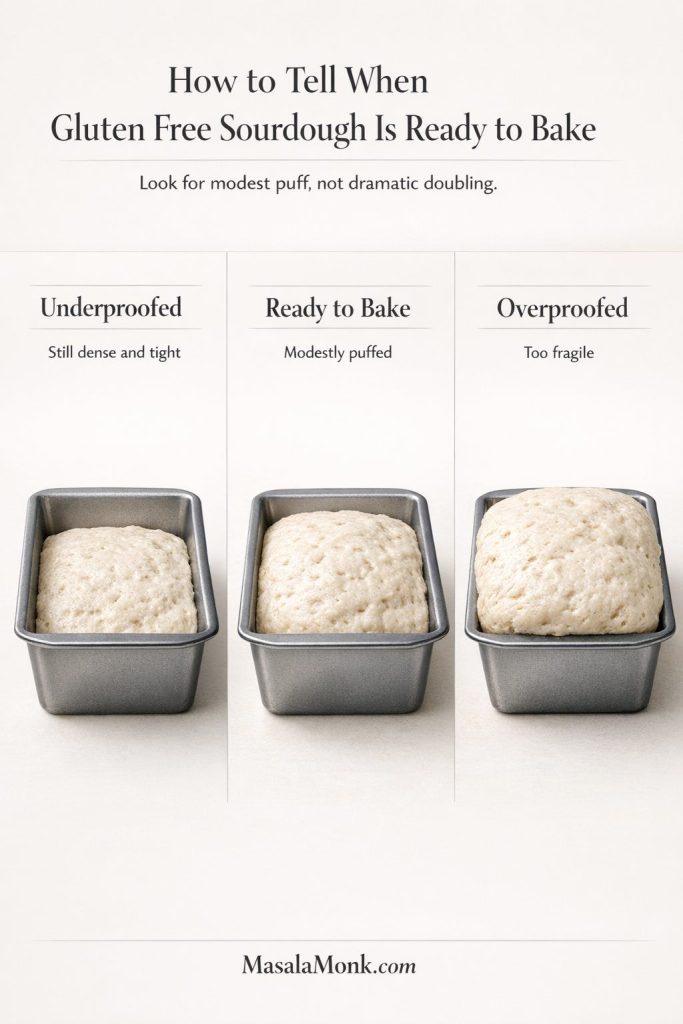
- Underproofed: the dough still looks dense, heavy, and only faintly active. It may bake into a loaf with a tight crumb and weak lift.
- Properly proofed: the loaf looks modestly puffy, lighter than before, and softly aerated without seeming fragile. This is the target.
- Overproofed: the loaf starts to look too delicate, overexpanded, or a little unstable. It may sink, spread, or lose structure in the oven.
When in doubt, remember that gluten free sourdough usually rewards restraint. You are not waiting for an enormous rise. You are looking for a loaf that seems clearly more alive than before, but still stable.
Also Read: Peach Cobbler with Canned Peaches (Dessert Recipe)
Troubleshooting by Symptom
Most gluten free sourdough problems come back to a few repeated causes: weak starter, mismatched hydration, unbalanced flour, overproofing, underbaking, or slicing too soon.
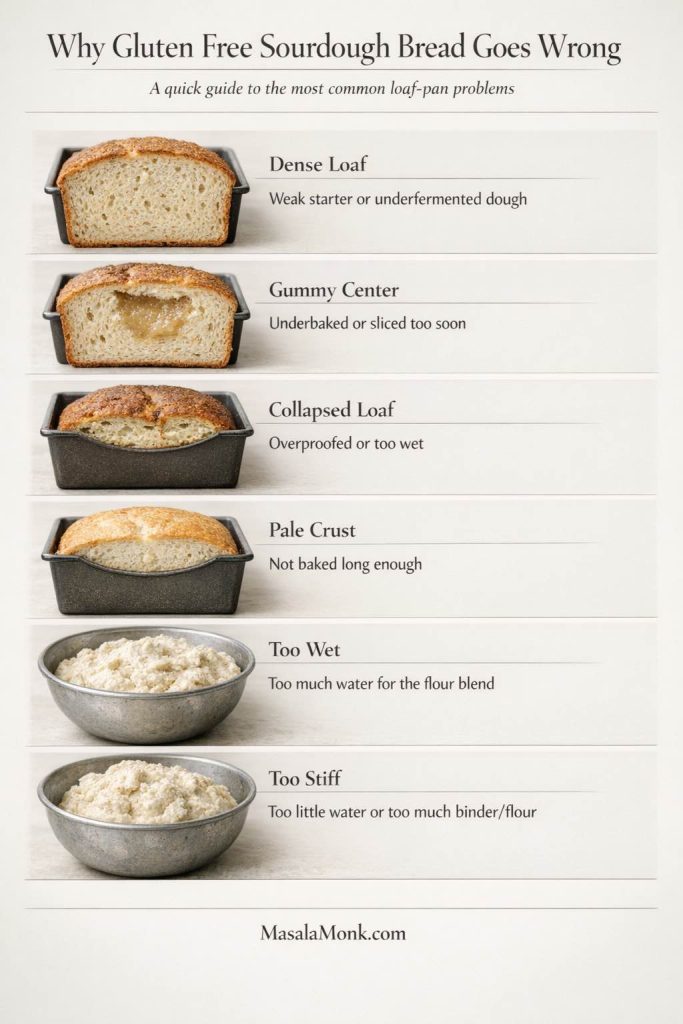
Why is my loaf dense?
Most likely cause: weak starter, dough that was too stiff, or fermentation that never got far enough.
What you likely saw before baking: the dough barely changed during bulk fermentation and still looked heavy when it went into the pan.
How to confirm it: the crumb came out tight and heavy without much internal openness.
What to change next time: strengthen the starter first, then check whether the dough tightened too much during resting. If it did, increase hydration slightly.
Why is the center gummy?
Most likely cause: underbaking, too much hydration for the chosen flour system, or slicing too early.
What you likely saw before baking: the loaf may have looked fine in the oven and browned reasonably well, but it still felt heavier than it should for its size.
How to confirm it: the center still felt wet, sticky, or pasty even after cooling.
What to change next time: trust the thermometer, extend the bake if needed, and cool the loaf fully before slicing. If the problem persists, reduce hydration slightly or revisit flour absorption.
Why did the loaf spread or collapse?
Most likely cause: overproofing, excessive hydration, or weak binder support.
What you likely saw before baking: the loaf looked puffy but also a little fragile, overinflated, or unstable in the pan.
How to confirm it: it sank or spread instead of holding shape in the oven.
What to change next time: shorten the final proof slightly, keep the loaf pan as the default format, and check whether the dough looked too loose even after resting.
Why is the crust pale or underbaked?
Most likely cause: insufficient bake time or weak preheating.
What you likely saw before baking: the loaf entered the oven looking fine, but the oven itself may not have been thoroughly heated or the bake may have been cut short once the top gained some colour.
How to confirm it: the loaf colours slowly, the crust stays soft, or the bottom feels under-set even when the top looks done.
What to change next time: preheat more thoroughly, keep the loaf in longer, and use the thermometer rather than crust color alone.
Why is the dough too wet?
Most likely cause: flour variability or slightly excessive hydration.
What you likely saw before baking: even after the short rest, the dough still looked unusually loose and hard to smooth into the pan cleanly.
How to confirm it: the dough feels overly slack rather than soft and cohesive.
What to change next time: reduce water slightly next time, or revisit whether a flour swap changed how the blend absorbs moisture.
Why is the dough too stiff?
Most likely cause: too little water, overly absorbent flour, or too much binder.
What you likely saw before baking: the dough felt stubbornly tight early on and became even tighter during resting instead of smoothing out.
How to confirm it: it resists mixing, smoothing, and expansion more than it should.
What to change next time: increase hydration a little, and avoid adding extra flour just because the dough does not feel like wheat dough.
Why is the flavor not sour enough?
Most likely cause: a mild starter or a fermentation schedule that moved too quickly.
What you likely saw before baking: the dough rose reasonably well, but fermentation stayed efficient rather than especially long or flavour-building.
How to confirm it: the loaf performs reasonably well but tastes gentler than you wanted.
What to change next time: extend fermentation modestly where appropriate or use the optional overnight route once you know the dough well.
Why does the crumb look purple or gray?
Most likely cause: psyllium color reaction rather than a failed loaf.
What you likely saw before baking: nothing especially alarming in the dough itself, but the final crumb later showed an odd tint.
How to confirm it: the structure and taste are otherwise fine, but the crumb carries an unusual hue.
What to change next time: try a different psyllium brand if the appearance bothers you.
Also Read: Avocado Chocolate Mousse Recipe
Substitutions: What Is Usually Safe and What Is Risky
Once a loaf works, it is tempting to start swapping ingredients casually. Some changes are manageable. Others can change structure, hydration, or proofing enough to make the dough feel like an entirely different recipe.
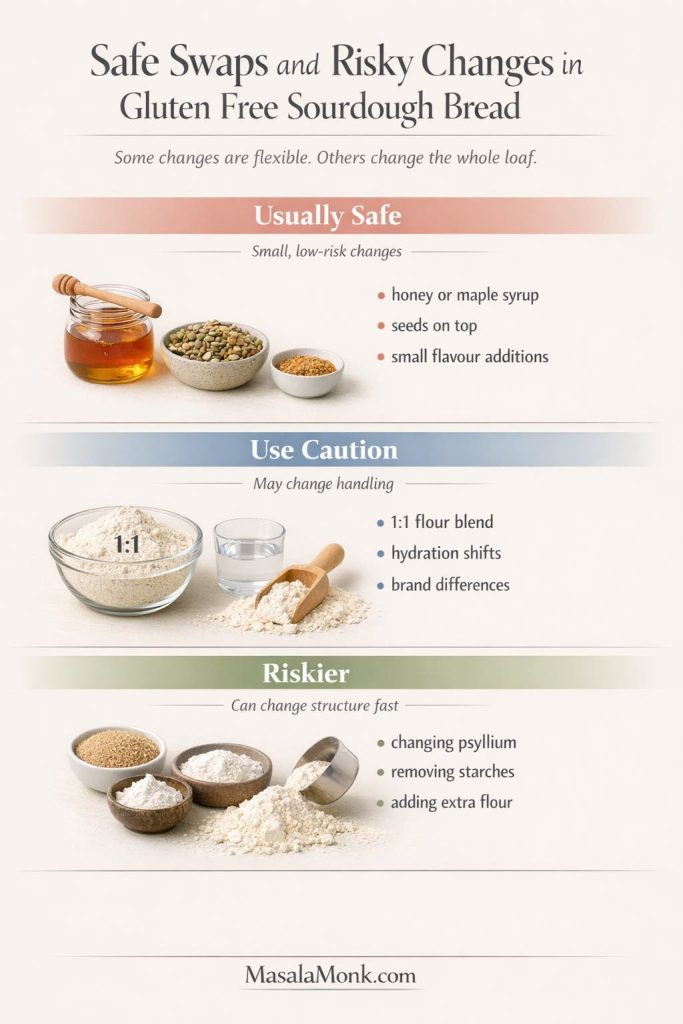
- Usually safer: swapping honey for maple syrup, adding seeds on top, or making small flavor additions that do not change the dough’s structure much.
- Use caution: replacing the custom blend with a 1:1 blend. This can work, but hydration may need adjustment and blends with added gums may handle differently.
- Riskier: changing psyllium casually, removing starches wholesale, or adding extra flour just to make the dough feel more familiar.
- Best first-bake rule: make the loaf once as written in the loaf pan, then experiment after you know what the dough should look like.
If you do adapt the flour route later, change one variable at a time. That makes it much easier to tell whether the difference came from flour absorption, starter behavior, proofing, or bake time.
How to Store and Freeze Gluten Free Sourdough Bread
Gluten free sourdough changes noticeably over time, so storage matters more than many readers expect.
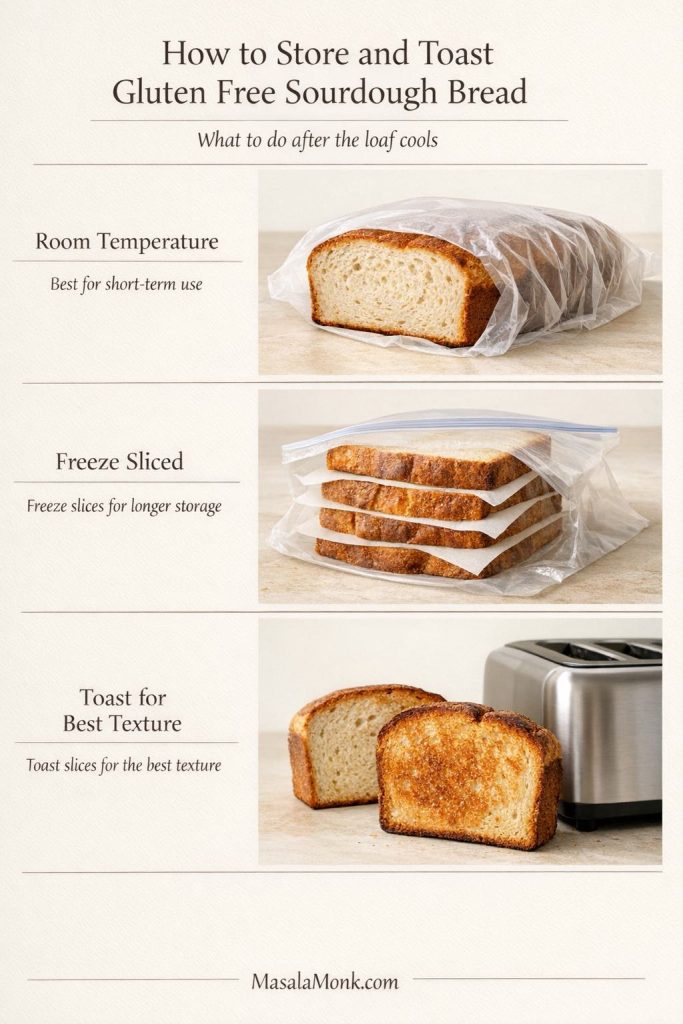
The loaf is often at its best once fully cool and settled, then again the next day when sliced and toasted. Store it wrapped at room temperature for short-term use if your kitchen is cool and dry. For longer holding, sliced freezing is the better option.
Freeze slices individually or with parchment between them so you can toast only what you need. Toasting or reheating slices usually restores the texture more effectively than letting the loaf sit on the counter for days. In many kitchens, this is where it tastes most convincing.
Also Read: Mango Margarita Recipe (Frozen or On the Rocks)
Variations That Make Sense
Once the base loaf works, small changes can make it more useful without rewriting the whole method.
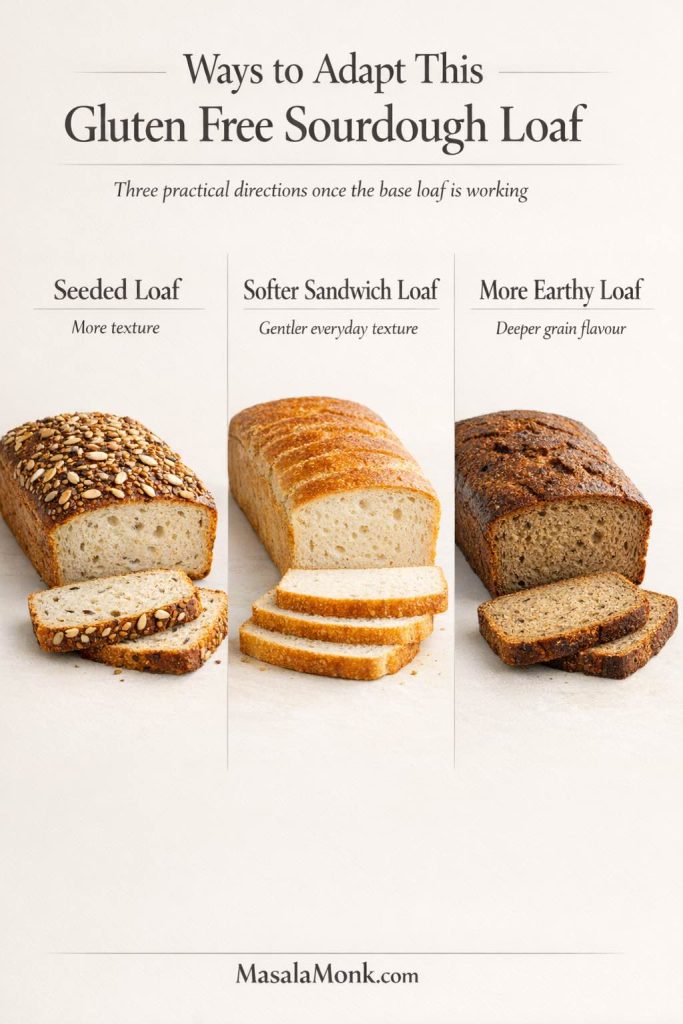
A seeded version adds texture and extra flavor to the crust. A softer sandwich-style loaf can be encouraged with a bit more oil and a gentler baking finish. For a more earthy whole-grain direction, adjust the darker flours thoughtfully rather than replacing the starches wholesale.
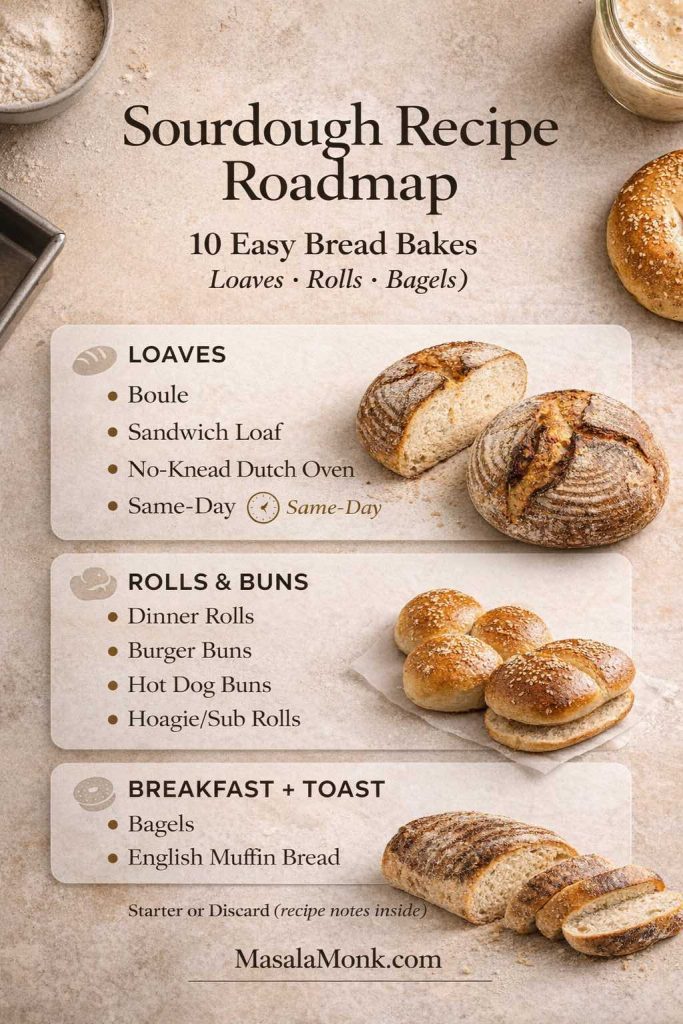
Once your starter is reliable, sourdough pizza dough is also an excellent next bake. Sourdough English muffins make another good follow-up when you want a different texture payoff without leaving the sourdough rhythm behind.
Frequently Asked Questions About Gluten Free Sourdough Bread
Can I make this without psyllium husk?
Not without rebuilding the formula. Psyllium is doing real structural work here, so removing it changes cohesion, hydration, and final texture all at once.
Can I use a 1:1 flour blend?
Yes, though hydration may need adjustment and the dough may behave differently depending on the blend. Some premade mixes also contain gums, which changes handling.
Can I use starter straight from the fridge?
Sometimes. A very healthy starter can still perform well after refrigeration, but refreshing it first is the safer choice when consistency matters.
Why didn’t my loaf double in size?
Because gluten free sourdough often does not need dramatic doubling to work well. Look for visible aeration and moderate expansion instead of a huge rise.
Why is it gummy even though it looks done?
The loaf may still be underbaked, or it may have been sliced too early. In this category, crust color alone is not enough. Internal temperature and full cooling matter.
Is sourdough bread gluten free?
Regular wheat sourdough is not automatically gluten free just because it ferments longer. For anyone managing celiac disease or a medically necessary gluten-free diet, this loaf needs to be made entirely with gluten free ingredients and handled carefully to avoid cross-contact. Packaged ingredients labeled gluten free and careful kitchen handling both matter.
Also Read: Falafel Recipe: Crispy Homemade, Air Fryer and Baked Falafel
Gluten Free Sourdough Bread Recipe Card
Gluten Free Sourdough Bread Recipe
Yield: 1 medium loaf
Prep time: about 20 minutes active work
Bulk fermentation: about 3 to 5 hours in many kitchens
Final proof: about 1 to 2 hours
Bake time: about 55 to 65 minutes
Cooling time: at least 3 to 4 hours
Tested format: 8½ x 4½-inch metal loaf pan, whole psyllium husk, active 100% hydration gluten free starter.
Ingredients
- 150 g active gluten free sourdough starter, 100% hydration
- 220 g brown rice flour
- 120 g sorghum flour
- 80 g tapioca starch
- 40 g potato starch
- 14 g whole psyllium husk
- 10 g fine sea salt
- 430 g warm water
- 15 g olive oil
- 10 g honey or maple syrup, optional
Method
- Whisk the warm water and psyllium husk together and let it thicken into a gel.
- Mix the flours, starches, and salt in a large bowl.
- Add the psyllium gel, starter, oil, and optional sweetener. Mix until no dry patches remain.
- Rest the dough for 15 to 20 minutes.
- Bulk ferment until visibly aerated and somewhat lighter, usually 3 to 5 hours.
- Transfer the dough to a prepared loaf pan and smooth the top.
- Proof until slightly expanded and modestly puffy, usually 1 to 2 hours.
- Bake at 230°C / 445°F for 20 minutes, then at 210°C / 410°F for 35 to 45 minutes more, until the loaf reaches about 96°C to 99°C / 205°F to 210°F internally.
- Cool completely before slicing.
Notes
- A loaf pan is the most reliable format for this recipe.
- This recipe is written in grams for consistency and easier troubleshooting.
- Let the dough rest before deciding it is too wet or too stiff.
- When the loaf seems unusually sluggish, fix the starter before changing the entire formula.
- The loaf is ready to bake when it looks modestly puffy and lighter than before, not dramatically doubled.
- The bread is fully baked when the crust looks set and the center reaches about 205°F to 210°F.
Final Notes for Making the Best Gluten Free Sourdough Bread
The best loaves usually come down to three things.
- Use a genuinely ready starter.
- Judge the dough by its own cues instead of by wheat expectations.
- Bake and cool the loaf fully before slicing.
Once that rhythm is in place, this gluten free sourdough bread recipe becomes much less intimidating and much more repeatable. The next natural step is either strengthening your culture with the sourdough starter guide or branching into another starter bake such as sourdough pizza dough, Sourdough English muffins, or the broader sourdough bread recipes collection.