Posted on Leave a comment

Homemade Soft Pretzel Recipe: Chewy, Buttery & Easy

Several homemade soft pretzels with deep golden-brown crusts, darker raised curves, coarse salt and a light buttery sheen on a dark surface.

Pull apart a good soft pretzel and the browned crust should resist for just a moment before giving way to a warm, soft center. The surface has a little chew, salt arrives before sweetness, and enough melted butter clings to the hot crust that some of it ends up on your fingertips.

The best ones barely make it to the cooling rack. Give them five minutes, tear through the thick curve, and the center should compress gently between your fingers before slowly pushing back.

The shapes won’t all come out identical, especially on a first batch. Once a tray of browned pretzels is sitting there warm under a layer of melted butter, that suddenly matters a lot less.

Soft pretzels can look like the sort of thing that takes bakery training, but the awkward-looking parts become surprisingly ordinary once you know what to watch for. Is the dough actually too sticky? Why does the rope keep shrinking? Are those holes big enough? How long should the baking-soda bath take?

Nothing here depends on guessing what “enough flour,” “a long rope,” or “golden brown” is supposed to mean. Make a soft dough, give it time to puff, roll long ropes, dip them briefly, then bake until the crust looks properly browned.

The Method in One Minute

You don’t need lye, an egg wash, or a stand mixer.

Soft dough. Long rope. Short bath. Deep color. Hot butter. Those are the five things worth remembering.

  • Soft dough: start with 500 g flour and 315 ml warm water. Rest for 10 minutes, knead fully, then decide whether the dough needs the reserved 10 ml water or a little extra flour.
  • Long rope: divide into 8 pieces of about 110 g each. Roll partway, let them relax while you work through the batch, then finish at 25–27 inches / 64–69 cm.
  • Short bath: use 1.9 L / 8 cups water with 75 g baking soda and give each pretzel 30 seconds total.
  • Deep color: bake at 450°F / 230°C. Start checking around 11 minutes and look for deep golden-brown crust with darker raised curves.
  • Hot butter: brush immediately after baking, then let the pretzels stand for 5 minutes before serving.
Soft pretzel guide showing five checkpoints: soft dough, a long rope, a short baking-soda bath, deep browning and butter added while hot.
Think of these as a sequence, not five separate tricks. Each soft-pretzel checkpoint sets up the next, so correcting problems early makes everything downstream easier.

Homemade Soft Pretzel Recipe

These are substantial pretzels rather than thin, crisp ones: deeply browned outside, lightly chewy through the crust, tender in the middle, and brushed with butter straight from the oven.

Plan on 40–50 minutes of hands-on work and about 2 hours from start to finish. Your part comes in short bursts—mix and knead, roll and shape, dip and bake—with most of the time between those stages spent waiting for the dough or the oven.

Yield8 large pretzels
Piece weightAbout 110 g / 3.9 oz each
Active time40–50 minutes
Rise45–60 minutes
BakeUsually 11–14 minutes
Oven450°F / 230°C
Total timeAbout 2 hours

Before You Start

  • A kitchen scale is strongly recommended, especially for the flour and eight equal portions.
  • Clear about 3 feet / 90 cm of counter space for the long ropes.
  • Use a wide, high-sided pot or Dutch oven and have a broad slotted spatula or spider ready for lifting the wet pretzels.
  • Set both prepared baking sheets beside the pot before dipping. Once you start, the drain-salt-transfer rhythm moves quickly.

Ingredients

For the dough

  • 500 g / 17.6 oz all-purpose flour; if measuring by volume, expect about 4 to 4¼ cups depending on how you fill the cup, so weighing is much more reliable
  • 315 ml / 1⅓ cups warm water, 100–110°F / 38–43°C
  • 10 ml / 2 teaspoons additional warm water, reserved and used only if needed
  • 7 g / 2¼ teaspoons instant yeast
  • 18 g / about 1½ tablespoons packed light brown sugar; granulated sugar can replace it at the same weight
  • 9 g / about 1½ teaspoons fine sea salt
  • 28 g / 2 tablespoons unsalted butter, melted and cooled until just warm

For the baking-soda bath

  • 1.9 L / 8 cups water
  • 75 g / about ⅓ cup baking soda

For finishing

  • Pretzel salt or coarse sea salt, as needed
  • 42 g / 3 tablespoons unsalted or salted butter, melted

Salted finishing butter is fine; just use a lighter hand with the coarse salt on top.

Instructions

1. Mix and rest

Combine the 315 ml / 1⅓ cups warm water, yeast, brown sugar, and melted butter in a large bowl. Add the flour and fine salt and mix until no large patches of dry flour remain.

The mixture will look rough and shaggy. Cover it and leave it alone for 10 minutes. When you come back, it should already look a little calmer even though it isn’t smooth yet.

Pretzel dough immediately after mixing and after a 10-minute rest, with the rested dough looking calmer, more hydrated and less shaggy.
Before judging hydration, let the flour absorb the water it already has. That short rest can prevent an unnecessary correction later.

2. Knead and let it rise

Knead with a dough hook for 6–8 minutes, or by hand for 8–10 minutes. The finished dough should feel smooth, elastic, soft, and lightly tacky.

Press a clean fingertip onto the surface. It should feel tacky without leaving your finger heavily coated. A stiff dough can take the reserved water 1 teaspoon at a time; a mixture that still smears heavily after the full knead can take flour 1 tablespoon at a time.

Knead first. Adjust second.

Fully kneaded pretzel dough with a smooth, elastic surface being pressed to demonstrate its soft, lightly tacky texture.
A finished knead gives you a fair texture test. Look for elastic rebound and a clean release rather than chasing a perfectly polished dough ball.

Place the dough in a lightly greased bowl, cover, and let it rise until clearly puffy and substantially larger, usually 45–60 minutes. It does not need to double.

If the change is hard to judge, mark the starting height on the outside of the bowl with a small piece of tape or an elastic band. Use the mark as a visual reference, not a precise measure of volume.

3. Heat the oven and divide the dough

As the rise nears completion, heat the oven to 450°F / 230°C. If baking both trays together, position one rack in the upper-middle and one in the lower-middle of the oven.

Fill the wide pot with the 1.9 L / 8 cups water for the bath and begin heating it, but don’t add the baking soda yet. Prepare two baking sheets with silicone mats or parchment rated for 450°F / 230°C; lightly oil the parchment.

Turn out the risen dough, gently press away any obvious large gas pockets, and divide into 8 equal pieces of about 110 g / 3.9 oz each.

4. Roll and shape

Roll each portion first to 12–14 inches / 30–36 cm. Work through all eight, then return to the first and finish it at 25–27 inches / 64–69 cm, about ½ inch / 1.3 cm thick.

Treat those dimensions as a target, not a ruler test. What matters is a rope long and slender enough to leave generous openings, without thin weak spots that will bake much faster than the rest.

A rope that keeps shrinking needs another 5 minutes of rest. Shape it into a wide U, cross the ends, twist once, then bring them down onto the lower curve and press firmly.

Keep the openings larger than you think you need; they shrink as the pretzel expands. Loosely cover finished shapes while you work through the batch.

Step-by-step sequence showing a pretzel dough rope formed into a U, crossed, twisted once and attached to the lower curve.
After the twist, the attachment points matter. Secure the ends against the lower curve while preserving enough open space for the pretzel to expand cleanly.

5. Prepare the baking-soda bath

When the water is almost boiling, reduce the heat slightly and add the 75 g / about ⅓ cup baking soda gradually. It may foam. Bring the bath back to a gentle, controlled boil.

6. Dip, drain, and salt

Lower 1–2 pretzels at a time into the bath and give each one 30 seconds total. If part floats above the surface, use about 15 seconds on one side, flip, then 15 seconds on the other.

Lift with a spider or broad slotted spatula, drain briefly over the pot, then transfer to the prepared sheet and add coarse salt while the surface is still damp.

A pale soft pretzel being lifted from a baking-soda bath and allowed to drain, with a damp, slightly swollen surface.
Once the pretzel leaves the bath, drainage matters too. Let excess water run off so the treated surface reaches the tray damp rather than puddled.

They may look puffier, wrinkled, and still surprisingly pale. Leave them alone. This is the moment ordinary-looking dough starts becoming recognizably pretzel-like; the dramatic color comes next.

7. Bake until deeply browned

Arrange 4 pretzels per tray. Start checking around 11 minutes; most batches need 11–14 minutes, although two trays can take a little longer in some ovens.

Swap the trays between the upper and lower racks and rotate them front to back only if your oven browns unevenly. Take the pretzels out when the crust is deep golden-brown with darker areas over the raised curves. Pale bread-gold is too early.

Only room for one tray? Bake four first. Keep the remaining shaped pretzels loosely covered in the refrigerator while the first tray bakes, then dip them immediately before the second tray goes into the oven.

8. Butter and serve

Brush the pretzels generously with melted butter as soon as they leave the oven.

The salt looks a little less stark once the butter hits it, the crust picks up that familiar bakery-counter sheen, and some of the butter disappears straight into the hot surface.

Give them 5 minutes, then serve.

Torn soft pretzel showing a fine-to-moderately-fine, tender interior crumb beneath a deep golden-brown salted crust.
Inside, the crumb should recover rather than shred or cling. Small-to-moderate pores signal a substantial soft pretzel instead of cottony bread or an underbaked center.

Need a deeper check? Read the dough guide ↓ · Fix shaping or springback ↓ · Back to top ↑


If something in the recipe made you hesitate, start with the section that matches it below. You don’t need to read every section before baking; the deeper guide is here for the moments when you want to understand what the dough is doing or fix something that doesn’t look quite right.

Table of Contents

What Makes a Pretzel Taste Like a Pretzel?

A pretzel should taste distinct from ordinary bread before the mustard ever touches it.

The baking-soda treatment changes the outside so it browns quickly in the oven and develops more roasted flavor and surface chew than untreated bread. The middle should still tear easily and stay tender, with enough structure that the thick curve feels like a pretzel rather than a fluffy dinner roll.

This is a buttery American soft pretzel. Bavarian lye pretzels are typically darker, firmer, and more intensely flavored.

Soft, not fluffy; chewy, not tough; buttery, not brioche-like.

Too bread-like: pale surface, very little crust chew, or an unusually fluffy center.

Right: browned exterior with a slight tug at the surface and a center that compresses when pinched, then slowly pushes back.

Too aggressive: hard or dry crust, or a noticeable mineral, bitter, or baking-soda-like flavor.

Do I need lye?

No. Traditional lye treatment can produce a darker, shinier and more intensely flavored crust, but baking soda is far simpler for a home kitchen and still gives plenty of browning and chew.

That difference matters in the oven too. A baking-soda pretzel does not need to become uniformly as dark as a lye-treated Bavarian one before it is finished.

What Each Ingredient Does

Flour

All-purpose flour gives enough strength for long ropes without making the dough unnecessarily resistant. Weigh it if possible; an overfilled measuring cup is one of the easiest ways to turn a soft batch dry and stubborn.

After kneading, the ball should still yield easily when you press your palm into it. That softness makes the long ropes easier to roll later.

Warm Water and Yeast

Start with 315 ml / 1⅓ cups water and keep another 10 ml / 2 teaspoons in reserve. Flour absorption varies, so the final splash goes in only if the dough still feels too firm after kneading.

Salt bread uses a similar reserve-water approach: give the flour time to hydrate and the gluten time to develop before deciding that the mixture needs correcting.

The water should feel comfortably warm, around 100–110°F / 38–43°C. If it feels genuinely hot to your hand, let it cool.

Instant yeast goes straight into the mixture. If you have active dry yeast, use the same 7 g / 2¼ teaspoons; dissolve it in the warm water with the sugar first and allow the rise a little more time if needed.

There isn’t a direct substitute for yeast in this dough. No-yeast pretzels use a different leavening system and behave differently enough to be treated as a separate recipe.

Sugar, Butter and Salt

Eighteen grams rounds the flavor and supports browning without making the pretzels noticeably sweet. Granulated sugar can replace it at the same weight.

A small amount in the dough keeps the bite tender. Most of the obvious butter flavor comes later, when melted butter hits the crust straight from the oven.

Unsalted butter gives the most predictable seasoning, but salted butter will still work. Because brands vary and the amount used in the dough is small, keep the fine salt as written and simply avoid going too heavy with the coarse finishing salt.

Fine salt disperses through the dough. Pretzel salt or coarse sea salt belongs on the damp surface after the soda bath.

If you’re deliberately baking part of the batch for the freezer, leave those pretzels unsalted. Large crystals attract moisture during storage and can partly dissolve into the crust.

Freezing part of the batch? Jump to the freezer guide →

Baking Soda

The bath needs baking soda. Baking powder is formulated differently and will not create the same surface treatment.

All-Purpose Flour or Bread Flour?

All-purpose flour makes a softer pretzel that is easier to roll; bread flour produces a stronger dough and a chewier finished bite.

FlourHow it handlesFinished pretzel
All-purposeSofter, easier to stretchTender middle, moderate chew
Bread flourStronger, more resistantFirmer, chewier bite
Two pretzel dough portions comparing the slightly softer appearance of all-purpose flour dough with the somewhat more taut appearance of bread-flour dough.
Choose bread flour because you want a firmer chew—not because a batch feels sticky. Stickiness is better diagnosed through kneading and hydration than by changing flour mid-recipe.

Cake flour isn’t a good direct substitute here; its lower protein makes it harder to build the structure needed for long ropes. Whole-wheat and gluten-free flours change the dough enough that they are not simple 1:1 swaps.

Read the Dough Before You Add More Flour

Why is my pretzel dough so sticky?

Pretzel dough should be soft and lightly tacky, but it should hold itself together and leave your fingertip mostly clean. Rest and knead it fully before reaching for more flour.

Freshly mixed dough often looks wetter than it will ten minutes later. The flour keeps absorbing water during the rest, while kneading builds enough strength for the shaggy mixture to become smooth and elastic.

When the balance is right, press it with a finger and the surface should give easily, then slowly rebound without smearing.

Dough stateWhat it feels likeWhat to do
Too wetSmears heavily, coats fingers, struggles to hold itselfKnead fully first; then add flour 1 tbsp at a time if needed
RightSmooth, elastic, lightly tacky; fingertip releases mostly cleanStop adjusting
Too dryStiff, rough, resistant; tears instead of stretchingAdd reserved water 1 tsp at a time
Under-kneadedShaggy, uneven, quick to tearKeep kneading before changing hydration
Four pretzel dough states labeled too wet, right, too dry and under-kneaded, showing smearing, smooth elastic, stiff and rough undeveloped dough.
Diagnose soft pretzel dough after it has actually been kneaded. Before then, rough under-developed dough can easily be mistaken for a hydration problem.

How do you know when kneading is finished?

The ball should look smoother, feel elastic, and stretch noticeably farther before it tears. A flawless bakery-style windowpane isn’t required.

Once it is smooth, stretchy, lightly tacky, and holding itself together well, move on.

How Much Should Pretzel Dough Rise?

Once the dough looks clearly puffier and substantially larger, it is ready to divide. It does not need to double.

Yeast moves faster in a warm kitchen and slower in a cool one, so use 45–60 minutes as a guide and let the dough’s appearance make the final call.

Lift the cover and the compact ball you left behind should now look softer, rounder, and noticeably fuller in the bowl. You’re building the soft middle here; the distinctive pretzel crust comes later in the bath and oven.

If you’re unsure how much it has grown, a piece of tape or elastic band marking the starting height makes the change much easier to see.

Letting the dough go much farther makes long ropes harder to control and can leave the finished middle fluffier than intended.

Making the dough tonight? See the overnight method →

Pretzel dough at the beginning and end of its rise, with the ready dough visibly expanded and puffier throughout the bowl.
Watch the whole mass, not just the top of the dough. Useful fermentation shows as broader expansion and a softer, airier look throughout the bowl.

Why Rope Length Changes the Finished Pretzel

For a 110 g pretzel, aim for a rope 25–27 inches / 64–69 cm long and about ½ inch / 1.3 cm thick.

Use those dimensions as practical targets. The amount of dough, rope length, and size of the openings need to work together.

A small portion stretched to 26 inches becomes thin; a heavier piece can remain thick enough to close its own holes as it expands.

That combination keeps the loops open while leaving enough dough through the curves for a substantial soft center.

A pretzel dough portion weighing about 110 grams beside a long, evenly rolled rope illustrating the amount of dough used for one pretzel.
Consistent portions remove one shaping variable. When every piece starts around the same size, an unusually stubborn rope is easier to recognize as tension rather than a portioning problem.

How to Roll the Dough Without Fighting It

Why does the rope keep shrinking?

If the rope keeps springing shorter, stop rolling and let it rest for 5–10 minutes. Tight gluten needs time, not more force.

The same amount of pretzel dough before and after resting, with the unrested rope shorter and thicker and the rested rope longer and smoother.
Springback is tension, not a request for more flour or harder rolling. A rope that repeatedly retracts is telling you the gluten needs to relax.

Take every portion to 12–14 inches / 30–36 cm before trying to make any one rope full length. By the time you return to the first piece, it should feel noticeably less springy and much easier to stretch.

Pizza dough behaves much the same way when it tightens during stretching: a short rest fixes what more pulling usually makes worse.

Roll evenly on a mostly bare counter

Place both palms near the middle and roll outward in short passes, gradually moving your hands toward the ends. Lengthen the whole rope a little at a time; concentrating pressure on one stubborn spot can make it skinny.

Slightly tapered ends are fine. What you want to avoid is a rope with thick bulges separated by paper-thin sections.

A heavily floured counter makes the rope skid beneath your palms. Keep the work surface mostly bare so the dough has enough grip to lengthen; if it starts sliding, wipe away loose flour and lightly dampen your hands.

Two hands rolling a long pretzel dough rope from its center toward the ends on a mostly bare dark work surface.
If the rope skates instead of lengthening, think traction before flour. Even outward pressure works best when the dough can gently grip the counter.

Keep the openings generous

This is one of those moments when the raw pretzel should look slightly wrong. Leave more open space than you think you need because the dough swells in the bath and again in the oven.

What looks almost comically open on the counter becomes much more familiar after baking.

Your first pretzel may be the least photogenic one on the tray. By number three or four, your hands usually understand the twist better than your brain does. That’s when shaping starts becoming fun.

Two raw pretzels comparing a compact shape with small openings to a correctly shaped pretzel with broad open spaces.
Empty space is part of the pretzel shape. Generous raw openings give the swelling curves somewhere to expand instead of closing into a tight knot.

The Baking-Soda Bath

How long should the pretzels stay in the bath?

For this recipe, give each pretzel 30 seconds total. Keep that timing tied to the stated ratio of 75 g baking soda in 1.9 L / 8 cups water.

Baking soda being added gradually to a wide stainless-steel pot of hot water, with a digital scale displaying 75 grams.
Keep the baking-soda bath controlled rather than violent. Gradual addition and a roomy pot make the inevitable fizz easier to manage around delicate shaped pretzels.

Need less bath liquid? Keep roughly the same concentration—about 40 g baking soda per liter of water—and use enough solution for the pretzel to float freely without folding against the pot or becoming crowded. Flip it if the upper surface remains exposed.

The first bath can look dramatic, but once the pot and timer are ready, it is one of the quickest parts of the whole recipe.

What the bath actually does

The alkaline bath changes the outside of the dough so it browns faster and develops a chewier skin. Skip it and the result moves much closer to ordinary bread tied into a pretzel shape.

This is the moment the recipe stops behaving quite like ordinary bread. The dough may still look pale when it comes out of the water, but the treated surface is now ready for the rapid browning that happens in the oven.

Three pretzels showing the progression from pale raw dough to a pale, damp, slightly swollen bathed pretzel and a deep golden-brown baked pretzel.
Compare texture and expansion as well as color. The bathed pretzel changes only modestly; the oven is where the major puffing and browning finally happen.

Something went wrong in the bath? Go straight to the shaping and bath fixes →

Thirty seconds is enough for this particular bath. Leaving the pretzels in much longer can make the surface gummy or tough and may introduce an unpleasant mineral or baking-soda taste.

The soda bath already does the important browning work. Egg wash can add more shine, but it isn’t necessary here, and the hot butter supplies plenty of gloss afterward.

Bake for Color, Not Just Time

At 450°F / 230°C, start checking around 11 minutes; most batches take 11–14 minutes.

For the first few minutes they mostly puff. Then the color catches up quickly, and the smell changes with it.

The timer gets you to the window. The crust tells you when to stop.

Too pale: beige or light bread-gold. Give them more time.

Ready: deep golden-brown with darker color over the raised curves. The surface should tug slightly against your teeth before the soft middle gives way.

Too far: very dark thin areas, a dry-feeling crust, or an underside beginning to scorch.

Three baked soft pretzels comparing pale, properly browned and overly dark crust stages.
Before pulling the tray, check more than the prettiest curve. The thick center should be richly browned without the thinner tips or underside beginning to scorch.

Bottoms darkening well before the tops usually means the pan or rack is giving them too much heat from below. A lighter sheet pan, a slightly higher rack, or stacking the loaded sheet over a second empty pan can help.

Need another baking fix? Jump to baking and storage troubleshooting →

An optional temperature check

Color is the better everyday guide. If the crust looks right but you’re worried about the thickest section being underbaked, an instant-read thermometer will generally land around 195–200°F / 91–93°C.

Once the overall color looks right, look more closely at the surface. A good soft-pretzel crust can show small blisters and natural tonal variation rather than a perfectly smooth shell.

Extreme close-up of a soft pretzel crust with deep golden browning, darker raised areas, coarse salt and small natural surface blisters.
Tiny blisters and uneven browning are welcome handmade texture. The target crust looks thin and chewy—not perfectly smooth, lacquered or uniformly dark.

Troubleshooting: What Went Wrong?

Most imperfect batches are still very edible. Start with the result you can see and change one thing next time; one imperfect detail rarely means the whole recipe failed.

Dough & Rise

What happenedMost likely causeTry this
Dough smears everywhereToo wet or not kneaded enoughFinish the rest and knead before adding flour
Dough feels stiffToo much flour or too little waterAdd reserved water gradually
Dough rises very slowlyCool room or sluggish but active yeastGive it more time in a comfortably warm spot
Dough shows no riseInactive yeast or water that was too hotStart again with fresh yeast and comfortably warm water
Dense and dryToo much flour or excessive bakingKeep the dough softer or shorten the bake
Dense and gummyUnderbaked centerBake longer

Dry density and gummy density are different problems. A tight, dry crumb points toward too much flour or too much oven time. A moist, tacky center usually means the pretzel simply needed longer to bake.

Three soft pretzel cross-sections labeled right, dry and dense, and gummy and dense, showing tender, dry compact and damp compressed crumbs.
Two pretzels can both feel “dense” for opposite reasons. The cross-section helps separate a moisture-starved crumb from one that simply needed more baking.

Rolling, Shaping & Bath

What happenedMost likely causeTry this
Rope keeps shrinkingGluten is tightRest another 5–10 minutes
Rope slides under your handsToo much flour on the counterRemove loose flour and lightly dampen palms
Rope gets thin in random spotsToo much pressure in one areaRoll outward in short, even passes
Holes disappearRope too short or openings too smallRoll longer and shape more openly
Ends come looseWeak sealDab with water and press firmly
Pretzel goes limp in the bathOverproofing or weak structureStop the first rise earlier and make sure the dough is fully kneaded
Shape distorts while liftingHandling issueUse a broad spider or slotted spatula
Slight wrinkles after bathUsually normalDon’t reshape; bake as usual
Surface feels gummyToo much bath time or poor drainingKeep to 30 seconds and drain briefly
Mineral or bitter tasteToo much soda exposureUse the measured ratio and timing

Baking & Storage

What happenedMost likely causeTry this
Pale and bread-likeIncomplete bath or not enough browningUse the full dip and bake beyond pale bread-gold
Nicely browned but very fluffy insideToo much proofing or overly thick ropesStop the rise earlier and roll longer
Bottom burns before top brownsDark pan, low rack, or strong bottom heatMove higher or use a lighter/doubled sheet pan
Crust is very toughOverbaking or too much bath exposureCheck oven time and 30-second dip
Pretzels stick to parchmentUntreated paper under wet doughUse a silicone mat rated for 450°F / 230°C or lightly oil parchment
Coarse salt becomes wet laterSalt pulled moisture to the surfaceFor planned storage or freezing, leave coarse salt off; already-salted leftovers can still be frozen

If the pretzel browned well, tasted good, and simply came out a little lopsided, that’s a shaping problem—not a bad batch.

Back to recipe ↑ · Store, freeze and reheat ↓

Make Ahead, Store, Freeze and Reheat

Soft pretzels are at their best fresh from the oven, but you don’t have to arrange your whole day around that moment. The easiest make-ahead route is to bake the pretzels first and freeze them; overnight dough works too, but its next-day timing depends on how much fermentation happened in the refrigerator.

Make the dough the night before

After kneading, place the dough in a lightly greased covered bowl and refrigerate overnight. The goal is an overnight rest rather than an extended cold ferment.

The next day, divide and shape while still cool, or let the dough sit briefly at room temperature first if it feels too firm to roll comfortably.

After shaping, let the pretzels lose some of their refrigerator chill and relax slightly before dipping. Don’t wait for a pronounced second rise; once the dough is easy to handle and the shapes are no longer fridge-cold, move on to the bath.

Storing baked pretzels

Store completely cooled pretzels airtight at room temperature for up to 3 days. The crust softens during storage, so reheating gives a much better result than eating one cold the next day.

For longer storage, freeze rather than refrigerate.

Freeze them baked

For a planned freezer batch, cool the pretzels completely and leave off the coarse salt. Freeze them individually until firm, then transfer to a freezer-safe bag or container. Already-salted leftovers can still be frozen, although some salt crystals may soften or partly dissolve. For best quality, use within 2–3 months.

Unsalted baked soft pretzels shown cooling, freezing separately on a tray and then stored together in a freezer-safe bag.
Freezing individually preserves shape and gives you options later. Once firm, the pretzels can share a bag while still coming apart one at a time.

How to reheat soft pretzels

For a room-temperature pretzel, a 350°F / 175°C oven for 5–7 minutes gives the best balance of soft center and revived crust. Lightly mist or brush a dry surface with water first.

From frozen, lightly mist the surface, add fresh coarse salt if the pretzel was frozen unsalted, and heat at 350°F / 175°C for 15–20 minutes, until hot through the center.

Golden soft pretzels on a dark baking tray being lightly misted with water before reheating, with oven temperature and timings printed beside them.
Use moderate heat so the center warms before the thinner ends turn hard.

Other reheating options

Air fryer, room-temperature pretzel: start around 325°F / 165°C and check after about 3 minutes. Air fryers vary, so check early before the thinner ends dry out.

Microwave, room-temperature pretzel: start with about 15 seconds, then add another 5–10 seconds only if needed. It is fast and soft, but you lose most of the crust.

Can I double the recipe?

The ingredient math doubles easily. Mixer capacity may not.

For an ordinary home stand mixer, two separate dough batches are more predictable than asking it to knead roughly a kilogram of flour at once.

Two Easy Finishes

Cinnamon Sugar

Skip the coarse salt. Brush the baked pretzel generously with butter, then coat it with cinnamon sugar while still warm.

The butter catches the sugar in a thin sandy layer instead of letting half of it fall onto the plate. Add the cinnamon sugar only after baking so it doesn’t scorch at 450°F.

Deep golden soft pretzel coated with a fine cinnamon-sugar layer as additional cinnamon sugar falls over the surface.
A cinnamon-sugar pretzel should still look like a pretzel underneath. Aim for a fine sparkling coat that complements the browned crust rather than burying it.

Garlic Butter

Mix the finishing butter with finely grated garlic or gently cooked minced garlic and brush it over the pretzel while the crust is still hot enough to absorb it. Parsley or a little finely grated Parmesan can go on afterward.

If warm bread and garlic butter is the combination you’re really after, this homemade garlic bread loaf takes that combination further.

Freshly baked soft pretzel being brushed with melted garlic butter containing small pieces of garlic and herbs.
Garlic butter works best as a thin savory finish. You want visible garlic and a warm sheen on the crust—not a pretzel saturated with butter.

What to Serve With Them

A warm salted pretzel doesn’t need much. Yellow mustard gives you the sharp, familiar version; Dijon is tangier and more assertive.

For something sweeter, honey mustard can be mixed a little thicker so it clings to the pretzel instead of running off.

If you’re firmly in the cheese-with-pretzels camp, a warm cheddar cheese sauce is hard to argue with. The creamy sauce against that salty browned crust is the whole point.

The best serving plan is simply to have people nearby when the tray comes out. Warm pretzels lose more by waiting than they gain from having a special occasion attached to them.

Freshly baked salted soft pretzels on a dark wooden tray with an exposed interior crumb, a hand reaching for a pretzel, and bowls of mustard and cheese sauce behind.
The final contrast is simple: salty browned crust outside, a warm soft center inside, and something sharp or creamy waiting at the side.

Give them five minutes, then tear into the thick curve while it is still warm. The browned skin should pull slightly before it opens, and the middle should feel soft rather than cottony. A little butter will probably end up on your fingers.

There can be mustard waiting nearby. The first pretzel rarely needs much convincing.

Posted on Leave a comment

Soft Dinner Rolls Recipe: Fluffy, Buttery & Easy

Twelve golden dinner rolls baked in four rows of three, with pale touching sides and one roll opened to show the soft interior.

These soft dinner rolls have golden, buttery tops, pale pull-apart sides and a fluffy interior that tears into tender strands instead of feeling tight or heavy.

The dough is soft by design. If yeast rolls have turned dense on you before, the trouble may have started surprisingly early: a perfectly normal sticky dough gets enough extra flour to become comfortable to handle—and too firm to rise beautifully.

That softness is part of what gives these rolls their light, fluffy crumb. The trick is learning when sticky is perfectly normal—and when the dough genuinely needs a little more flour.

In practice, the process is simple: mix, knead, rise, shape, rise and bake. The extra detail is here for the moments when you look at the dough and wonder whether what you’re seeing is normal.

MasalaMonk rule: The clock tells you when to check; the dough tells you when it is ready.

What Makes Dinner Rolls Soft and Fluffy?

Soft dinner rolls stay light when the dough remains soft and slightly tacky, is kneaded until elastic, and gets enough time to become properly puffy during both rises.

Hands pulling apart two golden dinner rolls to reveal a pale, fluffy crumb with delicate strands between them.
A fluffy dinner roll should pull into tender strands rather than crumble like cake or resist like chewy bread; that tear is one of the clearest texture checks.

This recipe makes 12 buttery pull-apart rolls in a 9×13-inch / 23×33-cm pan. Bake at 350°F / 175°C in a conventional oven until the tops are golden and the center of a middle roll reaches about 190°F / 88°C.

Allow 2½–4 hours from start to finish. Most of that time is hands-off rising.

Jump to: Recipe · Dough Consistency · Proofing Guide · Troubleshooting

Soft, Fluffy & Buttery Dinner Rolls Recipe

Recipe at a Glance

Yield12 dinner rolls
Dough per roll69–72 g / 2.4–2.5 oz
Hands-on, with mixer25–30 minutes
Hands-on, by hand35–40 minutes
First rise60–90 minutes
Final rise45–75 minutes
Bake time18–22 minutes
Total elapsed time2½–4 hours
Pan9×13-inch / 23×33-cm
Oven350°F / 175°C conventional
Stand mixer required?No
Make ahead?Yes

Equipment

  • large mixing bowl
  • stand mixer with dough hook, optional
  • digital kitchen scale, strongly recommended
  • bench scraper or flexible dough scraper
  • 9×13-inch / 23×33-cm baking pan
  • instant-read thermometer, useful but optional
  • pastry brush

Ingredients

For the dough

  • 240 ml / 1 cup whole milk, warmed to 105–110°F / 40–43°C
  • 45 g granulated sugar, about 3 tablespoons + 2 teaspoons
  • 7 g / 2¼ teaspoons instant yeast
  • 1 large egg, about 50 g without the shell
  • 420 g / about 3½ cups all-purpose flour
  • up to 30 g / about ¼ cup additional all-purpose flour, kept separate as a reserve
  • 8 g / about 1¼ teaspoons fine sea salt
  • 57 g / 4 tablespoons unsalted butter, softened
Overhead ingredient setup with 420 grams of base flour in a large bowl and 30 grams of reserve flour in a smaller bowl, with milk, egg, butter, sugar, yeast and salt nearby.
Keep the 30 g reserve separate. It is adjustment room, not flour you are expected to use.

The butter should be soft enough that a fingertip presses into it easily, but not glossy, oily or partly melted.

For finishing

  • 28 g / 2 tablespoons unsalted butter, melted

If you have a scale, use it for the flour and salt. Small measuring differences matter much more with those ingredients than they do with the milk or butter.

1. Mix the milk, sugar, yeast and egg

Pour the warm milk into the bowl.

Using active dry yeast? Stir the same 7 g / 2¼ teaspoons into the warm milk with a pinch of the measured sugar. Let it stand for 5–10 minutes, until creamy or lightly foamy, then add the remaining sugar and the egg.

Using instant yeast as written? Add the sugar and yeast directly to the warm milk, then add the egg.

Stir briefly to combine.

2. Add the base flour and salt

Add all 420 g of the base flour and the salt. Keep the separate 30 g flour reserve out of the bowl for now.

Mix on low speed or stir with a sturdy spoon until no large patches of dry flour remain.

The dough will probably look rough and sticky. Give it 5 minutes before deciding anything needs correcting; the flour continues absorbing liquid during that short rest.

A sticky bowl at minute three is not a failed batch.

Two-stage comparison of the same dinner roll dough: rough and shaggy when first mixed, then slightly smoother and more cohesive after a five-minute rest.
After five minutes, the dough should look a little less ragged and more cohesive while still staying soft and sticky.

3. Start kneading

With a stand mixer, knead on low to medium-low speed for 3 minutes.

By hand, turn the dough onto a clean work surface and begin folding, stretching and pressing it. Use a dough scraper to gather sticky dough back together instead of reaching immediately for more flour.

You are not trying to make the dough tidy yet. You just want the rough mixture to begin becoming cohesive.

Hands kneading soft, tacky dinner roll dough on a stone counter while a metal bench scraper gathers dough from the surface.
A light smear is normal; most of the dough should still gather and move as one cohesive mass.

4. Work in the butter

Add the 57 g softened butter in 3 or 4 additions, letting most of each addition disappear into the dough before adding the next.

This is probably the least convincing the dough will look all day. The butter can make it softer, shinier and messier before the dough comes back together.

Hands working softened butter into pale dinner roll dough, which looks glossy, slippery and temporarily messy during incorporation.
Once most of one butter addition disappears into the dough, add the next. Temporary greasy streaks are normal and do not need correcting with extra flour.

With a mixer, continue kneading for another 5–8 minutes. By hand, total kneading will generally take 10–15 minutes, sometimes longer.

5. Check the dough before adding reserve flour

By the end of kneading, the dough should feel soft, stretchy and cohesive, with a slight tack but no wet smear.

Stretch a small piece gently between your fingers. It should become noticeably thinner before tearing.

Smooth kneaded dinner roll dough beside unused reserve flour, with a small piece of dough stretched thin between fingers before tearing.
Use the whole dough and the stretch test together: a soft cohesive mound plus a thin elastic stretch matters more than achieving a flawless windowpane.

Only now should you decide whether any of the 30 g flour reserve is needed. Dough that still smears heavily and cannot hold itself together can take more flour in 5–10 g additions, worked in fully before you judge again.

Soft, elastic and only a little tacky? You’re there—leave the flour alone.

6. First rise

Lightly grease a clean bowl and place the dough inside. Cover so the surface does not dry out.

Let it rise until roughly doubled and visibly aerated. Start paying close attention around the 60-minute mark; cooler kitchens take longer and warm kitchens move faster.

Dinner roll dough in the same clear container before rising and after it has roughly doubled and become lighter and more aerated.
A straight-sided container makes the first rise easier to judge because the dough rises upward instead of spreading sideways across a wide bowl.

A kitchen already around 82°F / 28°C or above does not need an artificially warm rising spot. While the dough works, you can get the rest of dinner moving instead of hovering over the bowl.

7. Divide

Turn the risen dough onto a clean work surface and press gently to release the largest gas pockets.

Weigh the whole piece and divide by 12. Expect pieces of approximately 69–72 g / 2.4–2.5 oz, depending on how much reserve flour the dough needed.

Digital kitchen scale showing a roughly 70-gram piece of dinner roll dough beside a bench scraper and several divided portions.
Weigh the finished dough and divide by 12; the exact portion weight can shift slightly with the reserve flour used.

That extra minute with the scale prevents a pan where one oversized roll is still raw while the smallest has already finished baking.

8. Shape smooth rounds

Working with one portion at a time:

  1. Flatten gently.
  2. Bring the outside edges underneath.
  3. Gather the seam below.
  4. Turn seam-side down.
  5. Cup your hand around the dough.
  6. Move it in small circles against the work surface until the top looks smooth and lightly tightened.
Step-by-step shaping sequence showing dough flattened gently, edges tucked underneath, seam placed down and the dough cupped into a smooth round.
Tucking the seam underneath creates gentle surface tension; as a result, each dinner roll is encouraged to rise upward instead of relaxing outward.

The surface should feel tidy, not stretched to the point of tearing. Use bench flour sparingly; a little grip against the counter helps create surface tension.

9. Arrange in the pan

Lightly butter or grease a 9×13-inch / 23×33-cm pan.

Arrange the rolls in 4 rows of 3, leaving visible gaps. Those spaces will narrow during the final rise until twelve separate rounds begin looking like one pan of dinner rolls.

Twelve shaped raw dinner rolls arranged in four rows of three in a rectangular pan, with visible gaps before the final rise.
Give every roll similar room to expand so the whole pan reaches final proof more evenly.

Where neighboring rolls meet, their sides stay pale and especially tender. Those protected edges become the soft pull-apart part that tears away with almost no crust.

10. Final rise

Cover with lightly greased plastic wrap or another roomy cover that will not stick to the tops as they expand.

Let the rolls become clearly larger, rounded and pillowy. Begin looking closely around 45 minutes, then bake when the rolls look and feel ready—not simply because the timer says so.

Begin heating the oven to 350°F / 175°C conventional before the rise is finished.

Tight-looking rolls need more time. Once they look pillowy while still feeling resilient, they are ready for the oven.

Three-pan comparison of twelve dinner rolls: underproofed with clear gaps, ready when fuller and touching, and overproofed when slack and more flattened.
Compare the spaces between the rolls as well as their height: shrinking gaps give you a second proofing cue when judging size alone feels uncertain.

11. Bake

Bake in the preheated oven and begin checking at 18 minutes. Standard-size rolls will generally finish within 18–22 minutes.

The tops should be golden, the middle rolls should look set, and an instant-read thermometer inserted into the center of a middle roll should read about 190°F / 88°C.

Already enough color on top while the centers still need time? Tent the pan loosely with foil. Once the middle is done, take the rolls out; deeper browning is not worth a drier crumb.

Still unsure about the center? See the doneness guide.

As the tops turn golden, the kitchen starts smelling buttery and freshly baked.

12. Butter and serve

Brush the hot tops immediately with the 28 g melted butter, then let the rolls rest for 5–10 minutes.

A hand brushing melted butter over the golden tops of twelve freshly baked dinner rolls in their pan.
Brush the rolls while they are still hot; then a thin layer of butter melts into the crust instead of sitting heavily on top.

Keep the Rolls Together Until Serving

They stay warmer as a group, the touching sides remain tender, and everyone can simply pull one away at the table.

A hand pulling one golden dinner roll from a shared pan, exposing the pale tender side where it touched another roll.
Keeping the batch joined protects the pale, tender sides until each roll is pulled away to serve.

Saving them for later instead? Move them to a wire rack after about 10 minutes so steam does not collect underneath.

Tear one open while it is still warm. The crumb should give gently under your fingers and pull apart with a little stretch instead of breaking into a tight or crumbly mass.

Need help with a specific stage? Jump to sticky dough, kneading, the first rise, final proof, doneness, dense rolls or make-ahead timing.

Before troubleshooting individual stages, it helps to know what a successful roll should feel like.

The Texture We’re After

Soft and fluffy are related, but they are not the same thing.

A good dinner roll has a tender crust, moist crumb and light internal structure, with enough elasticity to pull apart cleanly instead of crumbling. The joined sides should peel apart with very little crust, while the top stays thin and golden.

Torn dinner roll annotated to show its thin golden top, pale side, moist crumb, pull-apart structure and fully baked center.
Look for a thin golden top, pale tender sides and a moist, airy crumb that pulls into soft strands instead of crumbling or feeling chewy.

The target flavor is buttery enough that a warm roll tastes good on its own, but restrained enough to sit beside gravy, soup or stew without competing with dinner. Mild sweetness and a pleasant yeast aroma should round things out without pushing the roll toward cake or heavy brioche.

Ingredient Choices That Matter

All-purpose vs. bread flour. All-purpose flour is the default because it gives the rolls enough strength to rise without making the crumb overly chewy. Bread flour can work, but expect a slightly stronger bite. Flour absorbs liquid differently from one brand to another, which is why a small reserve stays out of the bowl until after kneading.

Milk, Butter, Egg, Sugar, Salt & Yeast

Milk. Whole milk gives the dough a little more richness, but 2% works well too. If 2% is already in the fridge, use it. You do not need a grocery run to make good dinner rolls.

Butter and egg. Butter contributes tenderness and richness; the egg brings moisture, color and structure. A second brushing of butter after baking softens the hot tops further. For a sweeter enriched dough, our soft cinnamon roll recipe takes those ingredients in a different direction.

Sugar, salt and salted butter. These rolls should taste gently sweet, not dessert-like. Sugar helps with richness and browning; salt keeps the bread from tasting flat. Salted butter can work, but brands vary, so unsalted gives you better control over the 8 g salt in the recipe.

Yeast. Instant yeast goes straight into the mixture as written. Active dry yeast works too; Step 1 shows exactly how to use it. Red Star Yeast’s yeast FAQ has a deeper comparison if you want one.

No egg, gluten-free or no yeast. None is a simple one-for-one omission. Each changes the dough enough to need an adjusted formula.

Once those ingredients meet in the bowl, the first real judgment arrives quickly: is the dough supposed to feel this sticky?

How Sticky Should Dinner Roll Dough Be?

Dinner-roll dough should feel soft, elastic and slightly tacky after kneading—not wet enough to smear and not firm enough to feel stiff. Dough that still cannot hold itself together after proper kneading can take flour in 5–10 g additions.

Dough stateWhat it feels likeWhat to do
Too wetSmears heavily and cannot hold together after kneadingAdd reserved flour 5–10 g at a time
RightSupple, elastic and cohesive with a slight tackLeave it alone
Too dryFirm, rough, tight or reluctant to stretchStop adding flour
Three dough states labeled Too Wet, Right and Too Dry: wet dough smears and spreads, correct dough is soft and cohesive, and dry dough looks firm and tight.
Use the dough’s contact with the work surface as a tie-breaker: slight tack is normal, whereas a persistent wet smear after kneading signals a different consistency.

Fresh enriched dough can feel considerably stickier than the finished dough. Kneading gives the flour more time to absorb liquid, develops elasticity and works the butter fully into the mixture. Humidity can shift the final feel too.

When to Add the Reserve Flour

Wait until the dough has rested and been properly kneaded before reaching for the reserve. If it still leaves a persistent wet smear and cannot hold itself together, add flour in 5–10 g increments; otherwise, leave the reserve alone.

Decision guide showing base flour followed by mixing, resting and kneading, with small additions of reserve flour only if the dough still smears.
Think of the 30 g reserve as a ceiling, not a target. Because flour absorption varies, properly developed dinner roll dough may need only part of it.

Already a little firmer than you wanted? Stop adding flour and carry on. A slightly firm dough can still rise and bake well, and repeatedly adjusting it in pursuit of a perfect texture can create a bigger problem than the one you started with.

Ready to continue? Return to Step 5: Check the dough.

How to Know When Kneading Is Done

Kneading is done when the dough has changed from rough and sticky to smoother, elastic and able to stretch noticeably thin before tearing.

Pull off a small piece and stretch it slowly. Dough that tears almost immediately with a rough edge still needs development. As it becomes ready, that same piece will stretch thinner and may begin to look slightly translucent before it tears.

Three-stage kneading comparison showing dough tearing quickly at first, stretching farther as it develops and stretching thin when ready.
Watch the tear edge as well as stretch length: rough, jagged tearing suggests less development, while a smoother elastic pull shows the dough gaining strength.

You do not need a flawless bakery-school windowpane every time you make dinner.

A small dough batch may still cling near the bottom of a large mixer bowl when it has developed properly, so a spotless bowl is not the goal. Judge the dough’s elasticity and stretch first.

Working by hand? Use a scraper to gather sticky dough from the counter and keep kneading without continually dusting in more flour. If a long mixer knead makes both the bowl and dough noticeably hot, especially on a warm day, give them a brief pause.

Dough developed? Return to Step 6: First rise.

First Rise: Let the Dough Set the Pace

The dough is ready to divide when it has roughly doubled, looks visibly aerated and feels much lighter under your hands than it did after kneading.

Not sure whether it has truly doubled? Look at the overall volume, not only the height. A wide bowl can make vertical change deceptive. A quick photograph at the beginning—or a straight-sided container when you have one—makes comparison much easier.

The 60–90 minute range tells you when to pay attention. A cool room stretches the wait; a hot kitchen shortens it.

By this point, the sticky mixture that made you suspicious at the beginning should feel calmer, airier and far easier to divide.

Risen and airy? Return to Step 7: Divide.

Choose Your Roll Size

The standard batch makes 12 rolls weighing about 69–72 g / 2.4–2.5 oz each. For a first batch, stick with this size.

Making 15 smaller rolls? Aim for 55–58 g / about 2 oz each and begin checking them earlier.

Making 10 larger rolls? Aim for 83–86 g / about 3 oz each. They will generally need longer in the oven, so judge the center to decide when they are finished.

Three shaped raw dinner roll portions with subtle size differences: smaller 55 to 58 grams, standard 69 to 72 grams and larger 83 to 86 grams.
Small weight differences are hard to judge by eye, so weigh portions when consistent roll size matters.

Half Batch or Double Batch

Half batch: For 6 standard rolls, halve every ingredient. Beat the egg first and use 25 g of it, then bake in a smaller dish that still allows the rolls to expand toward one another.

Double batch: For 24 rolls, double the ingredients, keep the individual portion size the same and use two pans. The bake time does not double just because the quantity of dough did.

Underproofed, Ready or Overproofed?

In this guide, final proof means the shaped rolls’ last rise before baking.

Dinner rolls are ready to bake when they look distinctly puffy, the gaps between them have mostly closed, and a shallow fingertip indentation returns very slowly. Fast springback means more time; fragile dough that barely recovers has gone too far.

Underproofed

The rolls still look compact and tight, and a shallow fingertip indentation springs back quickly.

Ready to bake

The gaps have narrowed dramatically, the tops look rounded and pillowy, and the whole pan appears fuller. A shallow indentation stays visible or returns only slowly while the dough still feels resilient.

Three proofed dough rounds after a shallow finger poke: one nearly springs back, one keeps a slight dent and one retains a deeper indentation.
Keep the poke shallow and judge recovery rather than dent depth; pressing too deeply can make even well-proofed dinner roll dough harder to interpret.

This is the moment the pan stops looking like twelve dough balls and starts looking like dinner rolls.

Overproofed

The rolls may look extremely swollen, slack or fragile. An indentation barely recovers, and the dough may begin to deflate when touched.

Once they reach this state, do not give them more room-temperature rise time. Bake promptly, handle the pan gently and expect less lift in the oven if they have already gone too far.

You do not have to turn the poke test into an examination. Tight needs time. Pillowy and resilient means bake.

Rolls pillowy and resilient? Return to Step 11: Bake.

How Do You Know Dinner Rolls Are Done?

Dinner rolls are done when the tops are golden, a center roll looks fully set, and its middle reaches about 190°F / 88°C.

Twelve golden dinner rolls with labels for golden top and set middle, plus an unbranded thermometer in a center roll reading 190 degrees Fahrenheit, about 88 degrees Celsius.
Check a middle roll rather than an edge roll: the outer rolls heat sooner, while the center gives a better read on whether the whole pan is baked through.

Begin checking standard rolls at 18 minutes. Tops that are coloring faster than the center is baking can be loosely tented with foil. Once a middle roll is done, remove the pan instead of leaving it in solely for deeper color.

Pan material also affects browning. Dark metal can color bread faster than lighter metal, while glass and ceramic behave differently again, so treat 18–22 minutes as a practical range and watch the rolls themselves.

For more on using internal temperature with yeast breads, King Arthur Baking’s thermometer guide explains the technique in more depth.

Center done? Return to Step 12: Butter and serve.

Dinner Roll Success Checkpoints

If you want one quick pass through the whole process, these are the six checkpoints worth remembering before you change the formula or blame the clock.

Six-step guide showing soft dough, developed stretch, a doubled first rise, smooth shaping, pillowy final proof and golden baked dinner rolls.
When timing feels uncertain, use these visual and tactile checkpoints to decide when to move on instead of forcing the dough to match the clock.

Dinner Roll Troubleshooting

When something goes wrong, the fastest clue is often when the batch changed direction.

Barely any rise: A cool room can simply make fermentation slow. Dough that shows no meaningful movement at all makes the yeast—and whether the milk was excessively hot—more important suspects.

Puffy rolls that spread, flatten or collapse: Very fast expansion followed by fragile, overinflated dough points toward a final rise that went too far. Rolls that spread before becoming properly puffy may have needed more kneading, or the rounds may not have been tightened enough during shaping.

Top browns before the middle is ready: Tent loosely with foil once the rolls have enough color and let the center finish. If the same surface or side keeps coloring first, pay attention to how your oven and pan are browning the batch before changing the dough.

Dark bottoms: A pan that browns the base quickly—or simply too much oven time—may be responsible. Start checking sooner on the next batch and note whether the bottoms consistently color well before the tops.

Three browning examples showing an evenly baked roll, a dark top protected with loose foil and a roll with an overly dark bottom.
A dark top and a dark bottom are different clues. First identify which surface is outpacing the center before changing anything about the dinner roll dough itself.

Damp bottoms after cooling: That is usually trapped steam. Move rolls you are saving to a rack after their short rest in the pan.

Dense rolls and hard rolls give even better clues when you replay the batch in order.

Why Dinner Rolls Turn Out Dense

Dense dinner rolls usually come back to too much flour, dough that wasn’t kneaded enough, rolls baked before they had puffed properly, or a center that needed more time in the oven. The stage where the problem first appeared tells you where to look.

Five-stage dense-roll troubleshooting timeline showing stiff dough, rough tearing, little first-rise growth, twelve tight underproofed rolls and a baked roll with a heavy center.
Don’t diagnose dense dinner rolls from the finished crumb alone; instead, replay the batch in order because the same heavy texture can begin during mixing, kneading, proofing or baking.

Stiff from the beginning? Excess flour moves to the top of the suspect list. Tight dough cannot expand as freely.

Rough and tearing after kneading? The dough probably needed more kneading. Yeast can produce gas, but the dough still needs enough elasticity to hold it.

Barely rose the first time? Yeast activity and temperature matter more here. Cold dough may simply be slow; dough that never moves points more strongly toward a yeast problem.

Good first rise, but tight-looking rolls at bake time? They probably went into the oven before the final rise was complete.

Huge, fragile rolls that later sagged? The final rise probably went too far.

Beautiful outside, wet and heavy inside? The centers needed more baking.

Dense is not one failure. The timeline tells you where to look.

Why Did My Dinner Rolls Turn Hard?

Hard straight from the oven usually points toward excess flour or overbaking. Rolls that were soft hot but firm after cooling were probably already borderline dry. If they become dry only the next day, storage and normal bread staling matter more.

Three-part guide comparing dinner rolls that are hard immediately after baking, become firmer after cooling or turn dry by the following day.
Don’t change the dough formula for a day-two storage problem. If the rolls were soft when fresh, cooling, sealing and reheating deserve more attention than flour or yeast.

Hard immediately: Revisit flour and bake time first.

Soft while piping hot, then noticeably firmer: Steam can temporarily make a slightly dry crumb feel more tender than it really is. Cooling reveals the true texture.

Good on day one, dry on day two: Cool the rolls completely before sealing them airtight, then warm leftovers before serving again.

Once the rolls are well risen and tender, keeping them that way is mostly a matter of cooling, storing and reheating gently.

Soft when fresh but dry later? Go to storage and reheating · Back to recipe.

Make-Ahead Dinner Rolls

Best fresh texture: make and bake the rolls the same day.

Planning to bake tomorrow? Shape the rolls, arrange them in the pan, cover well and refrigerate immediately instead of completing the room-temperature final rise. Keep them chilled for up to 16 hours.

The next day, bring the pan out 2–3 hours before you expect to bake and let the rolls finish rising. A warm kitchen may move faster; a cool one may need longer. Bake when they reach the same pillowy, resilient state described above.

Baking for Thanksgiving or Christmas? The overnight route can make the day considerably calmer when the oven and your attention are already busy.

Lowest-stress long-term option: bake the rolls first. Cool completely, freeze airtight, then thaw and warm when you need them.

Make-ahead dinner roll guide showing same-day preparation, shaped rolls refrigerated overnight and fully baked rolls cooled for freezing.
Overnight chilling is a scheduling tool, not a shortcut: the shaped rolls still need to become pillowy and resilient before they are ready to bake the next day.

Baking after an overnight chill? Check final proof before the oven.

Store, Freeze & Reheat

These rolls are at their best warm on the day they are baked. Airtight storage keeps leftovers good, but reheating is what brings back much of that fresh-baked tenderness.

Saving leftovers? Move the rolls to a rack after about 10 minutes, cool completely, then seal airtight. Keep at room temperature for 2–3 days or freeze for up to 2 months for best quality.

Room-temperature roll: microwave one for 10–15 seconds, just until pleasantly warm.

Frozen rolls: thaw them first. For several thawed rolls, cover loosely with foil and warm at 300°F / 150°C for 8–15 minutes, depending on the amount.

Storage and reheating guide showing dinner rolls stored airtight at room temperature, frozen, microwaved individually and reheated together in the oven.
Cool the rolls completely before sealing them: trapped steam can leave the bottoms damp, while exposed bread loses moisture surprisingly quickly.

A little melted butter afterward is optional.

A ten-second warm-up tomorrow is a far better bargain than overbaking the rolls today.

What to Serve With Soft Dinner Rolls

After all the dough talk, this part can stay simple.

Dinner Rolls with Roast, Gravy, Soup or Stew

Serve the rolls beside a roast, soup, stew or anything with enough gravy or sauce to make tearing off another piece seem sensible. Slow cooker brisket gives them exactly that sort of plate.

A torn golden dinner roll being dipped into brown gravy beside roast beef and mashed potatoes on a dinner plate.
Because the crumb is mild and tender, these soft dinner rolls absorb savory gravy without competing with the roast or turning the plate noticeably sweeter.

Dinner Rolls with Dal Tadka

They do not have to stay inside the American roast-dinner box, either. A warm roll is surprisingly good beside dal tadka, where the tender crumb can scoop up buttery lentils.

A hand dipping a torn golden dinner roll into yellow dal tadka topped with cumin, curry leaf and a dried red chile.
Tear the roll rather than slicing it smooth; the irregular fluffy crumb gives thick dal and its spiced tadka more surface to cling to.

Left the next day, split one for a small sandwich—or simply warm it, add butter and let breakfast be easy.

When the Dough Starts Making Sense

Soft enriched dough can look uncertain before it becomes reassuring.

At first it sticks. Butter makes it messier for a while. Rise times refuse to fit neatly into every kitchen.

Then the checkpoints begin to feel familiar.

You notice when tacky is perfectly normal and when wet really does mean wet. You feel the dough becoming elastic. The first rise makes the same dough that looked awkward in the bowl feel light under your hands. Later, the gaps in the pan disappear and you recognize that the rolls are ready without needing a timer to persuade you.

That is when homemade dinner rolls stop feeling like a gamble.

And when the pan finally comes out golden and the butter disappears into the hot tops, tear one open while it is still warm. The crumb should be light, tender and just stretchy enough to remind you why that softer dough was worth trusting in the first place.

Close-up of a freshly torn golden dinner roll showing a continuous pale, fluffy crumb with delicate strands and more rolls blurred behind it.
The final texture check is simple: a continuous, tender crumb should tear easily without revealing a gummy center, hollow pocket or dry, crumbly interior.

Back to recipe · Back to top

Posted on 11 Comments

Sourdough Recipe: 10 Easy Bread Bakes (Loaves, Rolls & Bagels)

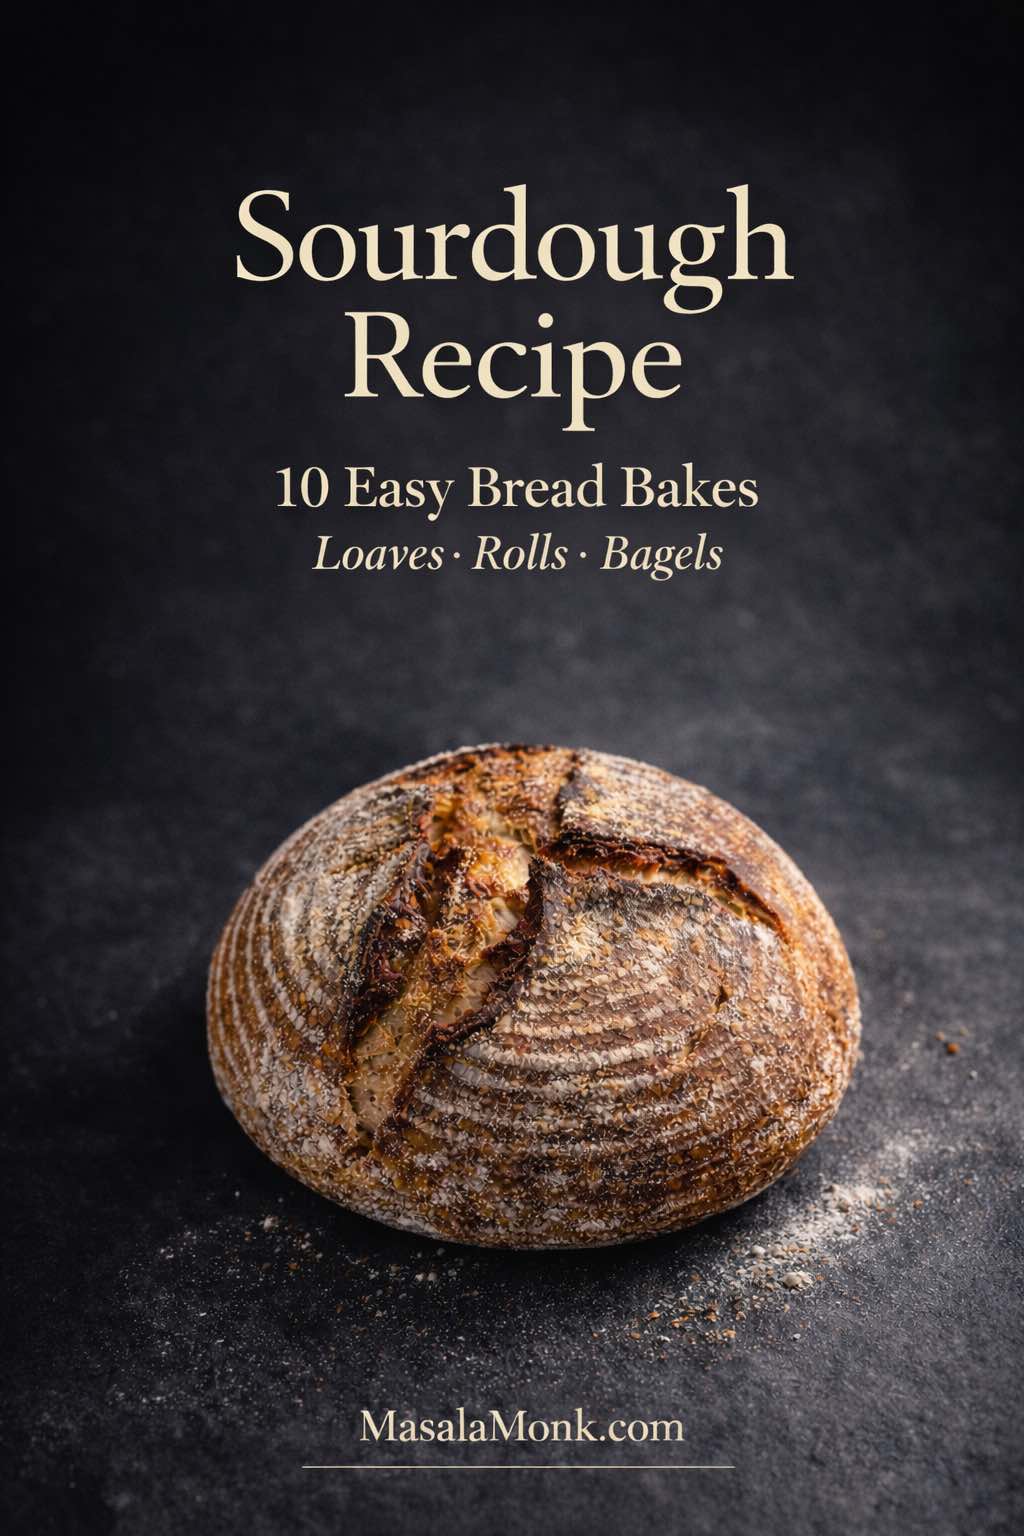
Portrait magazine-style cover on a dark slate background with a rustic sourdough boule dusted with flour. Text overlay reads “Sourdough Recipe” and “10 Easy Bread Bakes — Loaves • Rolls • Bagels,” with “MasalaMonk.com” in the footer.

Some days you want a dramatic crusty loaf that sings when it cools. Other days you just want a soft sandwich slice that behaves, a pan of dinner rolls that tear like cotton, or a chewy bagel that makes breakfast feel like a small win. This sourdough recipe guide is built for all of those moods—without forcing you to become a different person each time you bake.

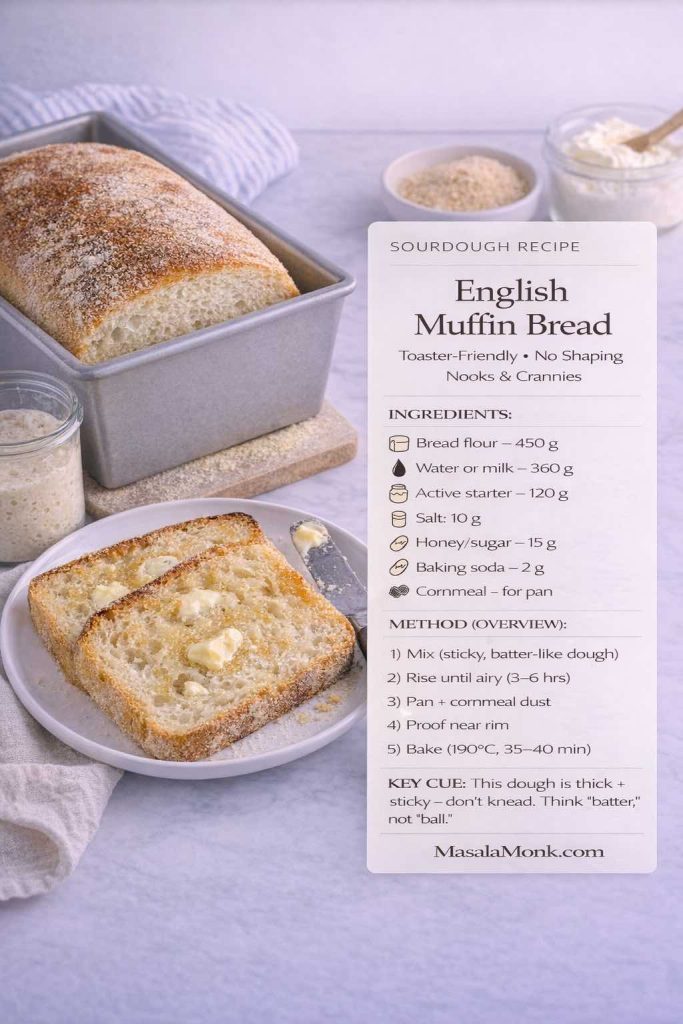
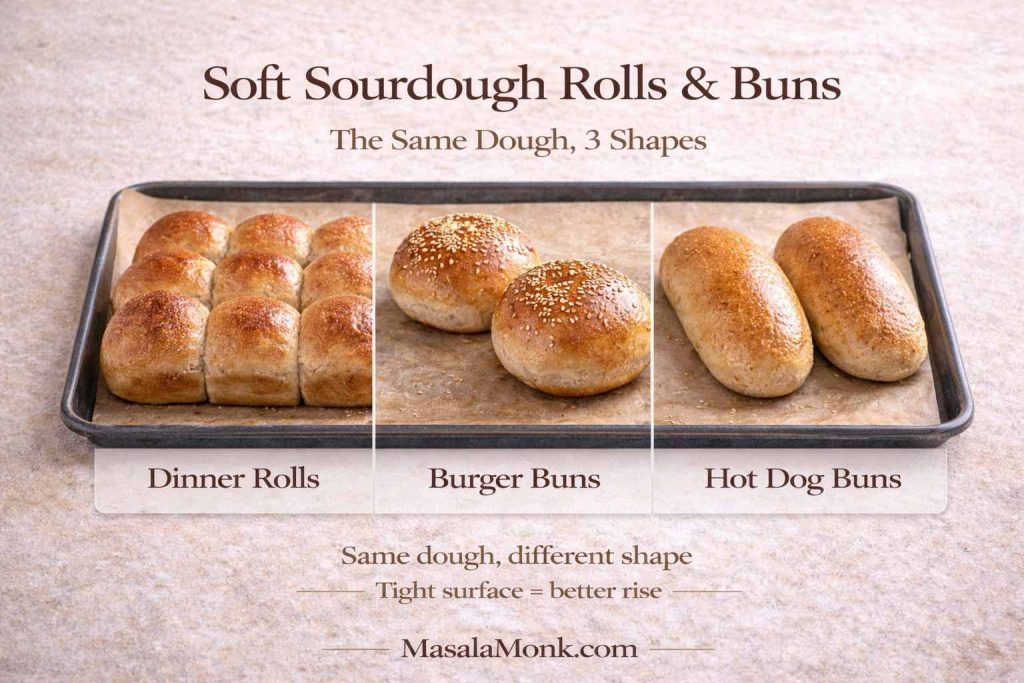
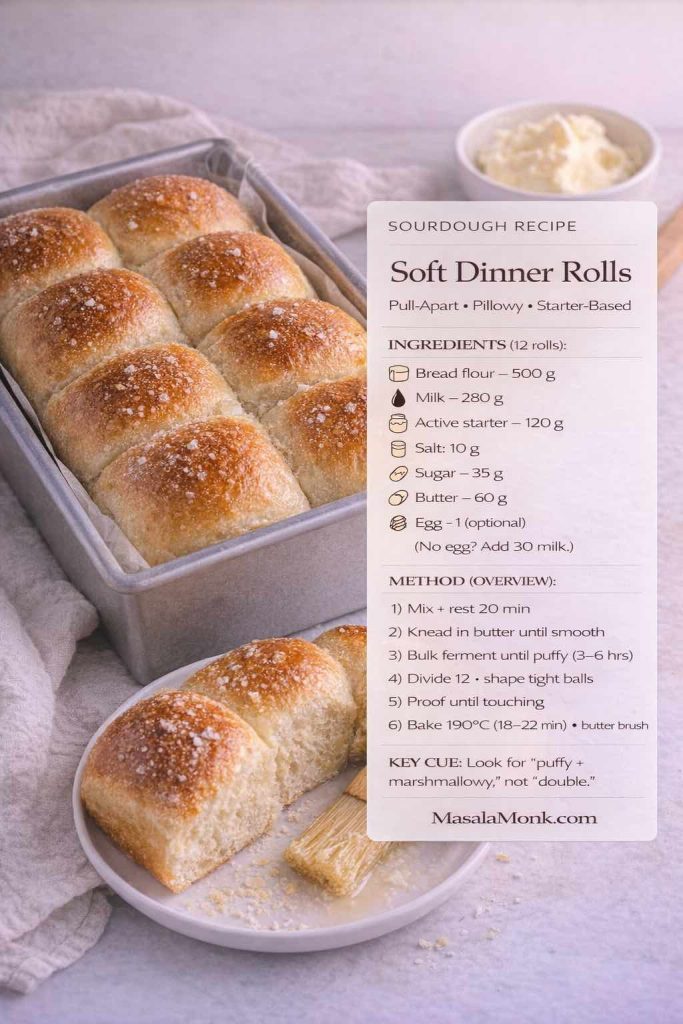
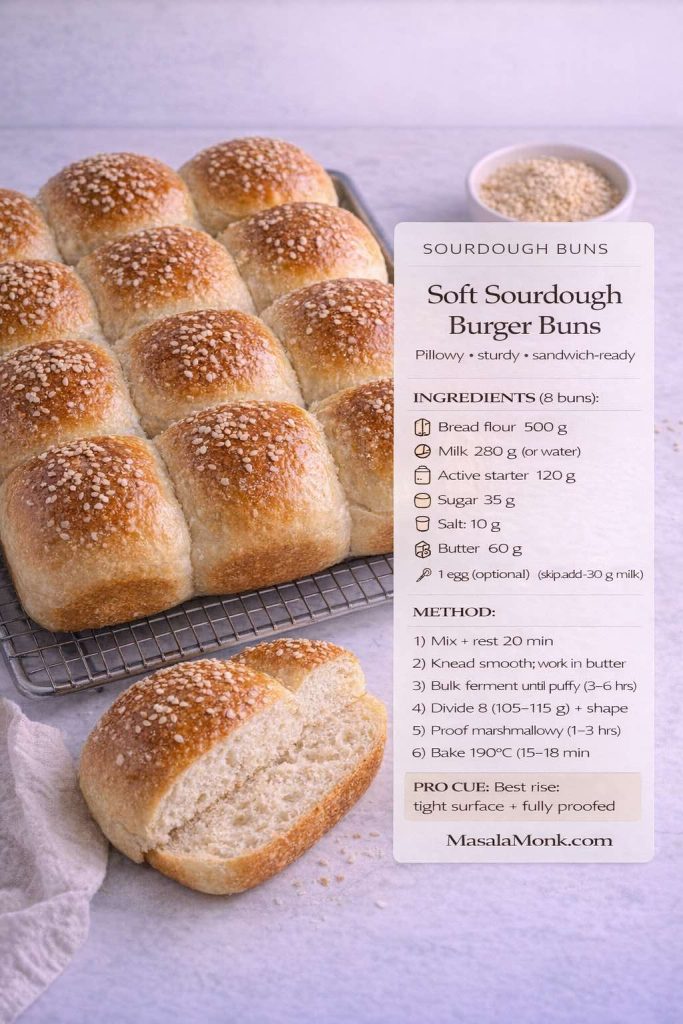
We’ll work in metric, lean on a single “house” starter, and then branch into ten bakes you can rotate through: a classic boule, a loaf-pan sandwich bread, a same-day loaf, a no-knead Dutch oven bread, English muffin bread, soft dinner rolls, burger buns, hot dog buns, hoagie/sub rolls, and sourdough bagels—plus one gluten-free vegan boule that still feels like real bread.

Along the way, you’ll also see where discard fits naturally, how to nudge your bread more sour when you want that tang, and how to choose equipment—cast iron, Dutch oven, bread pot, loaf pan, baking dish, stand mixer—without overthinking it.
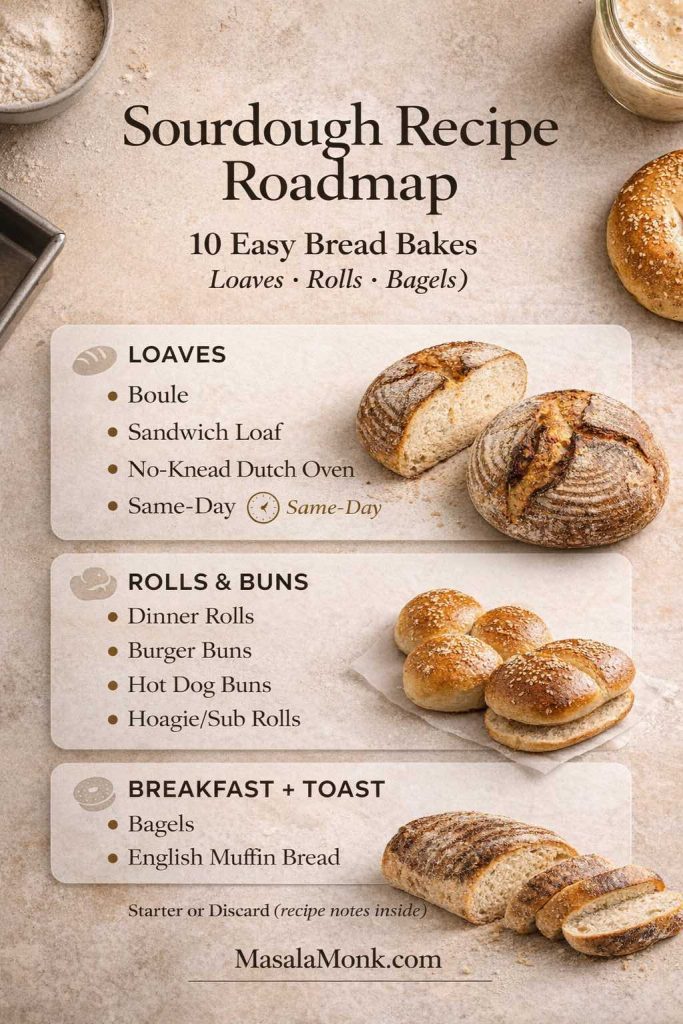
Portrait infographic titled “Sourdough Recipe Roadmap” showing 10 easy bread bakes grouped into three sections: Loaves (boule, sandwich loaf, no-knead Dutch oven, same-day), Rolls & Buns (dinner rolls, burger buns, hot dog buns, hoagie/sub rolls), and Breakfast + Toast (bagels, English muffin bread). Photoreal bread flatlay background with MasalaMonk.com in the footer.
This sourdough recipe roadmap helps you pick your next bake at a glance—classic loaves, soft rolls and buns, plus bagels and English muffin bread. Use it as a quick guide while you work through the 10 recipes below (and save it for future baking days).

For foundational starter and technique references, these are genuinely useful reads you can keep open in another tab:


The starter you have vs the starter you need

A sourdough starter isn’t one thing—it’s a living culture that behaves differently depending on when you use it. Once you get that, the entire process becomes easier.
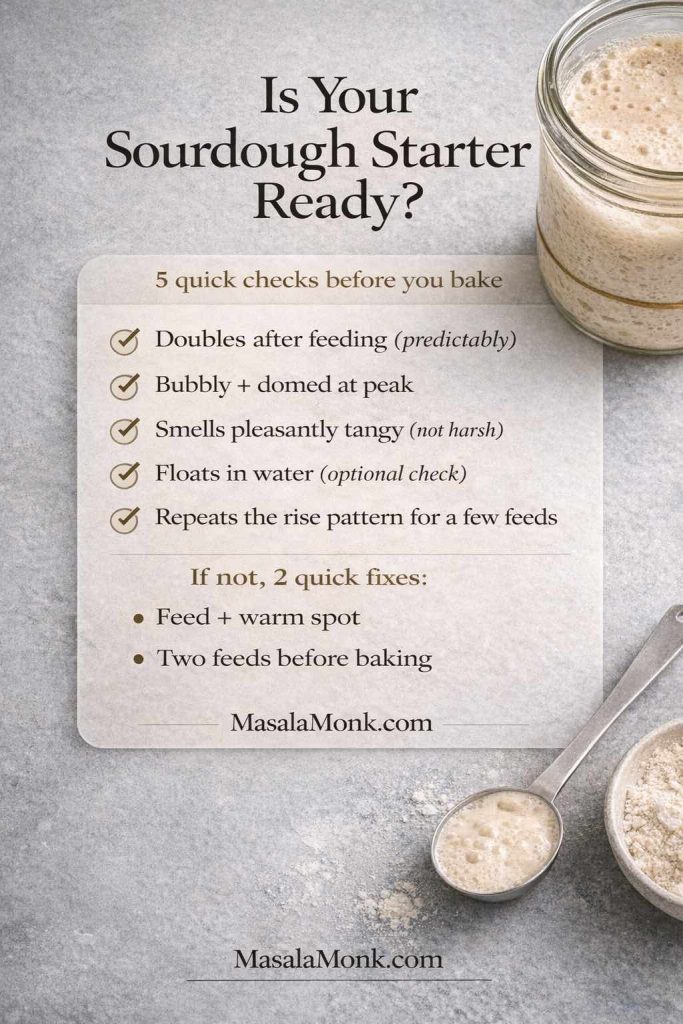
Portrait infographic titled “Is Your Sourdough Starter Ready?” on a gray stone background with a jar of bubbly starter. Text lists 5 quick checks before you bake (doubles after feeding, bubbly and domed, pleasant tangy smell, optional float test, repeats rise pattern) plus 2 quick fixes, with MasalaMonk.com in the footer.
Before you start any sourdough recipe, run this 60-second starter checklist—especially if your last loaf turned out dense or flat. A starter that rises predictably and looks bubbly at peak makes every bake below (boule, sandwich loaf, rolls, buns, and bagels) far more reliable.

Active (ripe) starter

This is the starter that’s been fed and has risen predictably—bubbly, domed, and at or near peak. It has the strength to lift dough without help. Most “true sourdough bread” recipes use this version: boules, baguette-style loaves, bagels, and most rolls.

If your starter feels sluggish, it’s usually not “dead,” it’s just underfed, too cold, or too new. A steady feed schedule and a warmer spot often fixes it. King Arthur’s step-by-step method is a solid reference: Sourdough starter recipe.

Discard (unfed starter)

Discard is starter that hasn’t been fed recently—often pulled straight from the fridge. It brings flavor, but it doesn’t always bring the same lift. That’s why many discard-friendly doughs either:

  • use a longer fermentation window, or
  • add a small amount of commercial yeast (a common, perfectly valid approach for a same-day sourdough bread).
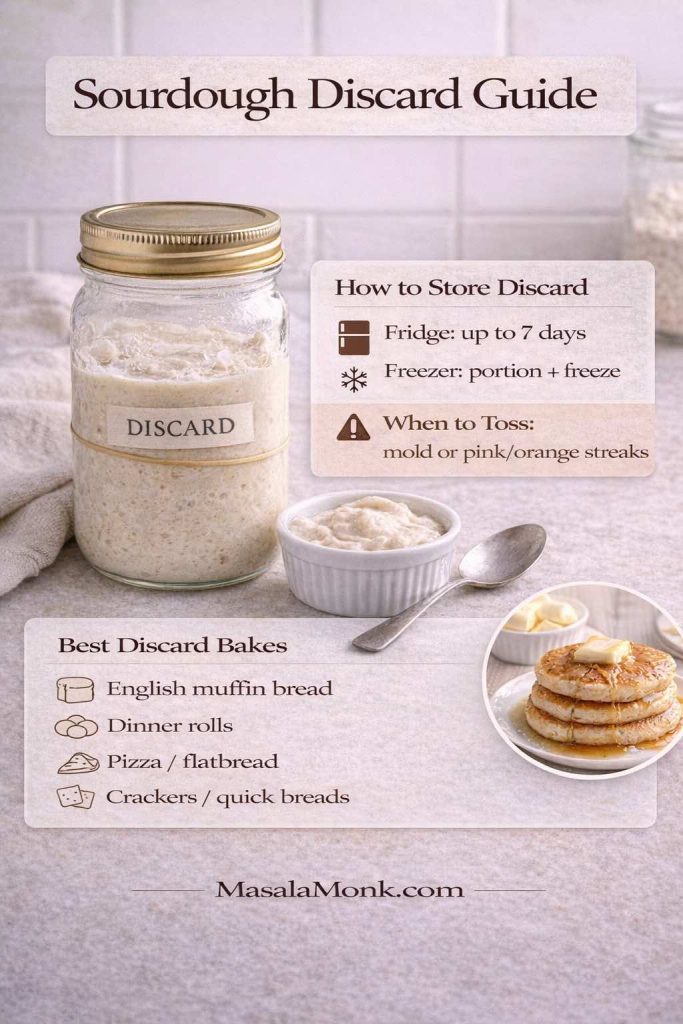
Portrait infographic titled “Sourdough Discard Guide” showing a jar labeled “DISCARD” on a neutral kitchen counter. A text card explains how to store discard (fridge up to 7 days, freezer portion and freeze) and when to toss (mold or pink/orange streaks). Another card lists best discard bakes: English muffin bread, dinner rolls, pizza/flatbread, and crackers/quick breads. MasalaMonk.com appears in the footer.
Don’t waste starter—this sourdough discard guide shows how to store discard safely, when to toss it, and the best ways to use it. Keep it handy whenever you’re baking through this sourdough recipe collection, especially for quick breads, rolls, and easy discard bakes.

Discard also shines in recipes that don’t rely solely on fermentation for rise—crackers, pancakes, waffles, English muffins. Serious Eats has a great discard roundup if you like repurposing: What to do with sourdough discard.

Freezing or drying sourdough starter (so you always have a backup)

If you want a safety net, keep a backup starter in one of these forms:

  • Freeze: spoon starter into small portions (ice-cube style), freeze solid, then store airtight. Thaw in the fridge, then feed 2–3 times until it rises predictably again.
  • Dry: spread a thin layer of starter on parchment, air-dry until fully brittle, then crush and store airtight. Rehydrate with water and flour, then feed daily until active.

When to toss starter: mold, or pink/orange streaks and an unpleasant “off” smell. Otherwise, most “dead” starters are simply cold, underfed, or inconsistent.

Also Read: Peanut Butter Fudge: Recipes & Guide (8 Methods + Easy Variations)


Equipment that makes sourdough feel simpler

You can bake great sourdough with very little. Still, a few choices remove friction.

Dutch oven, cast iron, or “bread pot”

A preheated Dutch oven (including enameled cast iron like a Le Creuset-style bread pot) traps steam, which helps oven spring and crust. If you don’t have one, a heavy lidded pot works. If all you have is a sheet pan, you can still bake—steam becomes the puzzle instead of the pot.
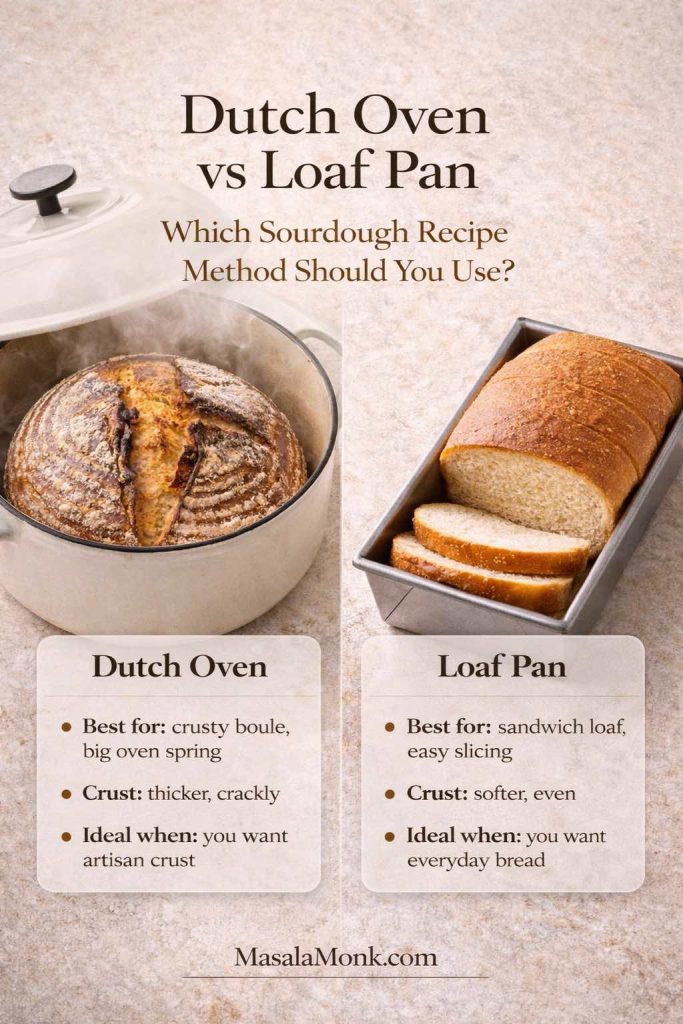
Portrait infographic titled “Dutch Oven vs Loaf Pan: Which Sourdough Recipe Method Should You Use?” showing a sourdough boule steaming in a Dutch oven on the left and a sliced sandwich loaf in a loaf pan on the right. Text compares each method: Dutch oven for a crusty boule and big oven spring with a thicker crackly crust, and loaf pan for easy-slicing sandwich bread with a softer even crust. MasalaMonk.com appears in the footer.
Not sure which sourdough recipe method to choose? Use this quick comparison: bake in a Dutch oven when you want a crusty artisan boule and strong oven spring, or use a loaf pan for softer sandwich bread that slices neatly for everyday toast and lunches.

Loaf pan, bread tin, baking pan

Loaf-pan sourdough is underrated. It’s practical, it slices cleanly, and it turns “homemade bread” into “weekday bread” immediately. If you’re building a sourdough sandwich loaf routine, a loaf pan becomes your best friend.

Loaf pan size matters more than people think

A standard 9×5 in / 23×13 cm pan gives the most forgiving rise and clean slices. Smaller pans make taller loaves but can overproof faster; larger pans can look “short” unless you scale the dough up. When in doubt, use the 9×5 and proof until the dough crowns 2–3 cm above the rim.

Stand mixer (KitchenAid and friends)

A stand mixer can make softer enriched doughs—rolls, buns, sandwich loaves—feel effortless. Meanwhile, high-hydration boules still benefit from folds and time more than aggressive mixing. If you do use a mixer for rustic dough, keep it gentle and brief, then rely on folds to finish the job.

Bread makers and Bread machine sourdough: what it’s best for (and how to adapt)

Some machines include a sourdough setting, and many can handle mixing, kneading, and baking a loaf-pan style sourdough bread. The main limitation is crust and shape, not flavor. A bread machine is most useful for loaf-pan style sourdough—think sandwich bread, English muffin bread, and soft everyday loaves. The machine won’t mimic a Dutch-oven crust, yet it can still deliver excellent flavor.

A simple way to adapt any loaf-pan sourdough in this guide:

  • Use active starter for the most reliable rise (discard can work, but timing gets unpredictable).
  • Choose the machine’s “Dough” cycle to mix + knead, then let the dough rise in the pan until it’s puffy and close to the rim.
  • If your kitchen is cool or your starter is young, a tiny pinch of instant yeast (like in the same-day loaf) keeps the schedule dependable without killing sourdough flavor.
  • For a softer crust, remove the loaf promptly and cool on a rack; for a deeper crust, use the “dark crust” setting if available.

If your goal is consistent everyday sandwich bread, a bread maker can be the easiest “set it and forget it” sourdough routine.

King Arthur even builds machine options into their recipes, including a bread-machine note for their beginner-friendly loaf: Basic sourdough bread recipe.

Also Read: 10 Vegan Chocolate Cake Recipes (Easy, Moist, & Dairy-Free)
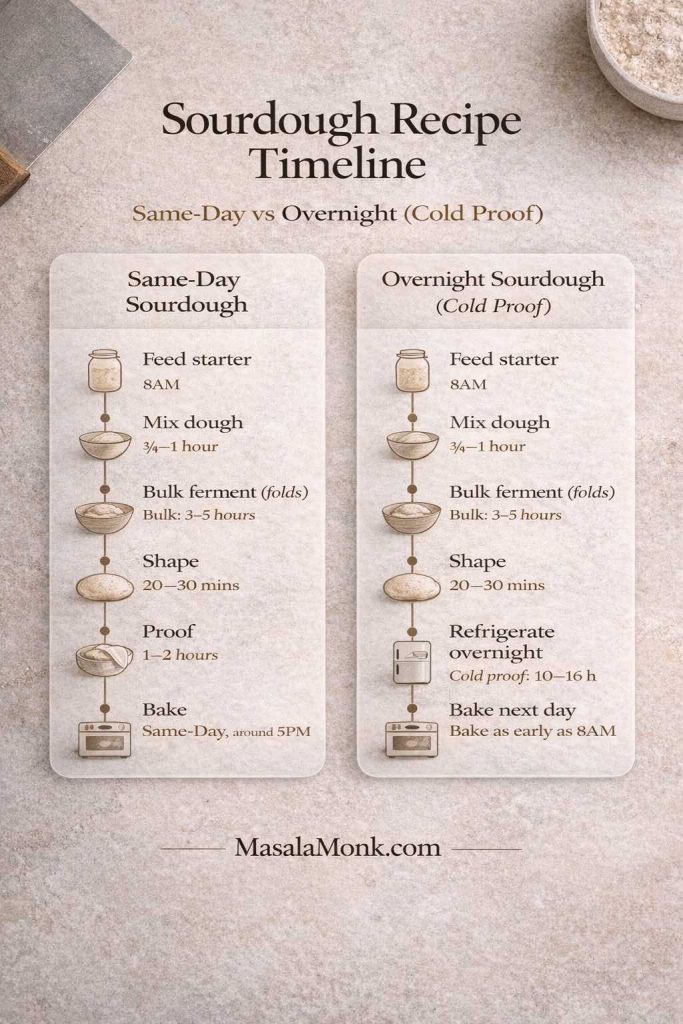

Portrait infographic titled “Sourdough Recipe Timeline: Same-Day vs Overnight (Cold Proof)” showing two side-by-side timelines. The Same-Day sourdough column lists feed starter, mix dough, bulk ferment with folds, shape, proof, and bake. The Overnight column lists feed starter, mix dough, bulk ferment with folds, shape, refrigerate overnight (cold proof 10–16 hours), then bake next day. Warm neutral stone background with simple step icons and MasalaMonk.com in the footer.
Use this sourdough recipe timeline to plan your bake without guesswork. Choose Same-Day sourdough when you want fresh bread by evening, or go Overnight (cold proof) for an easier schedule and deeper flavor—then follow the matching recipe method below.

One base rhythm that makes every sourdough recipe easier

Before we dive into the ten bakes, it helps to know the three levers you can pull:

  1. Time: longer fermentation tends to build more flavor.
  2. Temperature: warmer ferments move faster, cooler ferments move slower and can deepen flavor.
  3. Hydration: wetter doughs can give a more open crumb, while tighter doughs (bagels!) give chew.

If you want to keep starter at a steady temperature—especially in a warm climate or a cold kitchen—temperature control helps. Serious Eats has a clear explanation of the “sweet spot” and cooler maintenance ranges in their review of a dedicated starter box: Brod & Taylor Sourdough Home review. Even without a device, that concept matters: warmer for activity, cooler for steadier, slower fermentation.

Now, let’s bake.


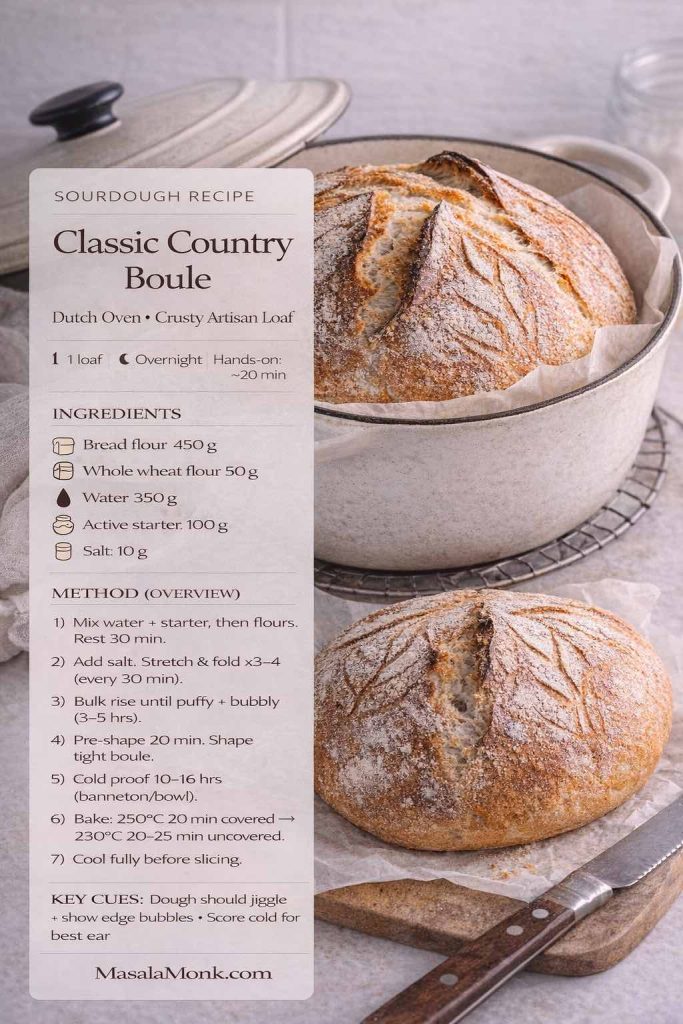
1) Classic Country Boule Recipe (crusty sourdough bread in a Dutch oven)

This is the loaf that anchors everything else. Once you can bake a confident sourdough boule, you can branch into rye, wholegrain, spelt, einkorn, seeded loaves, cinnamon raisin bread, cranberry walnut bread, and even mini sourdough bread bowls without changing your identity.

Ingredients (1 large boule)

  • Bread flour: 450 g
  • Whole wheat flour: 50 g
  • Water: 350 g
  • Active starter (100% hydration): 100 g
  • Salt: 10 g
Recipe card for a classic country sourdough boule baked in a Dutch oven, showing two crusty round loaves and a clean overlay with ingredients (bread flour, whole wheat flour, water, active starter, salt) plus an overnight method overview, bake temperatures, and key dough cues for oven spring.
This Classic Country Boule sourdough recipe card condenses the full method into one scannable reference—ingredients, key fermentation cues, and the Dutch oven bake schedule—so you can bake the crusty artisan loaf confidently without jumping around the page.

Method

Mix (evening works beautifully)

  1. Stir water and starter until milky.
  2. Add the flours and mix until no dry flour remains.
  3. Cover and rest 30 minutes. This pause makes the dough easier to strengthen later.

Build strength
4. Sprinkle salt over the dough and work it in with pinches and folds.
5. Over the next 2 hours, do 3–4 rounds of stretch-and-folds (every 30 minutes). Each round should feel easier as the dough tightens.

Bulk ferment
6. Let the dough rise until it looks puffier and lively—jiggly, with bubbles forming along the sides. Depending on room temperature, this can take 3–5 hours after your last fold.

Shape
7. Turn the dough onto a lightly floured surface. Pre-shape into a loose round, then rest 20 minutes.
8. Final shape into a tight boule: pull the dough toward you to create surface tension without tearing.

Cold proof
9. Place seam-side up in a floured banneton or cloth-lined bowl. Refrigerate 10–16 hours.

Bake
10. Preheat a Dutch oven to 250°C for 30–45 minutes.
11. Tip the dough onto parchment, score, and place it into the hot pot.
12. Bake 20 minutes covered, then reduce to 230°C and bake 20–25 minutes uncovered until deeply browned.
13. Cool fully. The crumb keeps setting as it cools, and slicing early can make it gummy.

Make it more sour (without making it dense)

If you want extra sour sourdough bread, the simplest shift is time and temperature: a longer cold proof often deepens tang. Another option is using a slightly lower hydration starter and letting the dough ferment a little longer before shaping. Serious Eats explains the microbial balance clearly in their deep dive on starter behavior: The Science of Sourdough Starters.

Wholegrain, spelt, rye, and einkorn variations

  • For a whole wheat sourdough bread: increase whole wheat flour to 150 g and reduce bread flour to 350 g. Add 10–20 g extra water if the dough feels tight.
  • For a rye sourdough or sourdough rye loaf: replace 50–100 g of bread flour with rye flour. Rye ferments enthusiastically, so watch the dough rather than the clock.
  • For spelt sourdough: swap 100 g of bread flour with spelt. Spelt dough can feel softer, so handle gently and avoid over-proofing.
  • For einkorn flour sourdough: start small—swap 50–75 g first. Einkorn’s gluten behaves differently, so the dough may spread more; a loaf pan version can be easier at first.
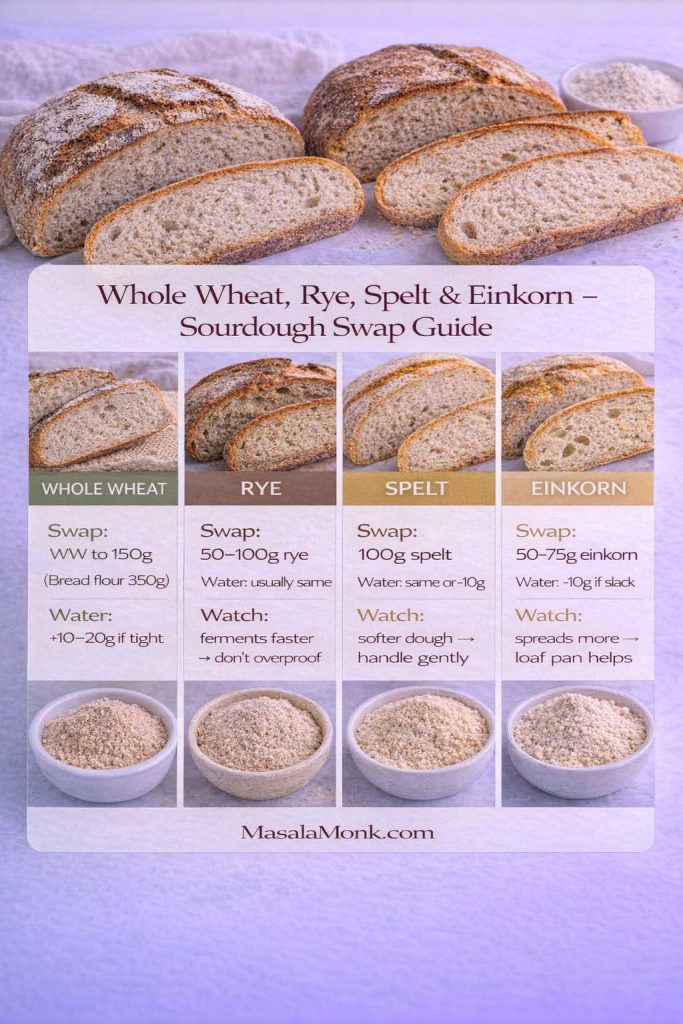
Infographic titled ‘Whole Wheat, Rye, Spelt & Einkorn — Sourdough Swap Guide’ with four columns. Each column shows a loaf/crumb photo and a quick swap rule: Whole wheat—raise whole wheat to 150 g and reduce bread flour to 350 g; add 10–20 g water if dough feels tight. Rye—swap 50–100 g rye; ferments faster so don’t overproof. Spelt—swap 100 g spelt; dough feels softer so handle gently. Einkorn—swap 50–75 g; spreads more so a loaf pan helps. MasalaMonk.com footer.
Use this sourdough flour swap guide when you want to push the classic boule toward whole wheat, rye, spelt, or einkorn without guessing. It keeps the change simple (what to swap) and practical (what to watch) so you can get the flavor you want while keeping structure, rise, and scoring predictable.

If you’re curious which flours help starters thrive, Serious Eats tested options and explains why rye and wholegrain often jump-start activity: The best flour for sourdough starters.

Easy add-ins: cinnamon raisin, cranberry orange, cranberry walnut, pumpkin

Once you’ve made the classic boule, add-ins become straightforward—keep the dough the same, then fold these in after the first fold set:

  • Cinnamon raisin swirl: 120–150 g raisins + a thin cinnamon-sugar layer during shaping (don’t overdo sugar or the swirl can leak).
  • Cranberry orange: 120 g dried cranberries + zest of 1 orange (add 10–15 g extra water if the dough tightens).
  • Cranberry walnut: 100–120 g cranberries + 80–100 g toasted walnuts (toast first for better flavor).
  • Pumpkin sourdough: replace 50–80 g of the water with pumpkin purée (pumpkin changes dough feel—watch texture, not the clock).

These small swaps help you hit a lot of “flavored sourdough bread” searches without writing full extra recipes.

Turn this boule dough into mini sourdough bread bowls

Instead of one boule, divide the dough into 4–6 pieces after bulk fermentation. Shape each piece tightly into a small round, cold proof on a tray, then bake on a preheated stone or heavy sheet with steam. Once cooled, slice the tops and hollow gently. These sourdough soup bowls are perfect with thick stews or creamy soups.

Also Read: Kahlua Drinks: 10 Easy Cocktail Recipes (Milk, Vodka, Coffee)
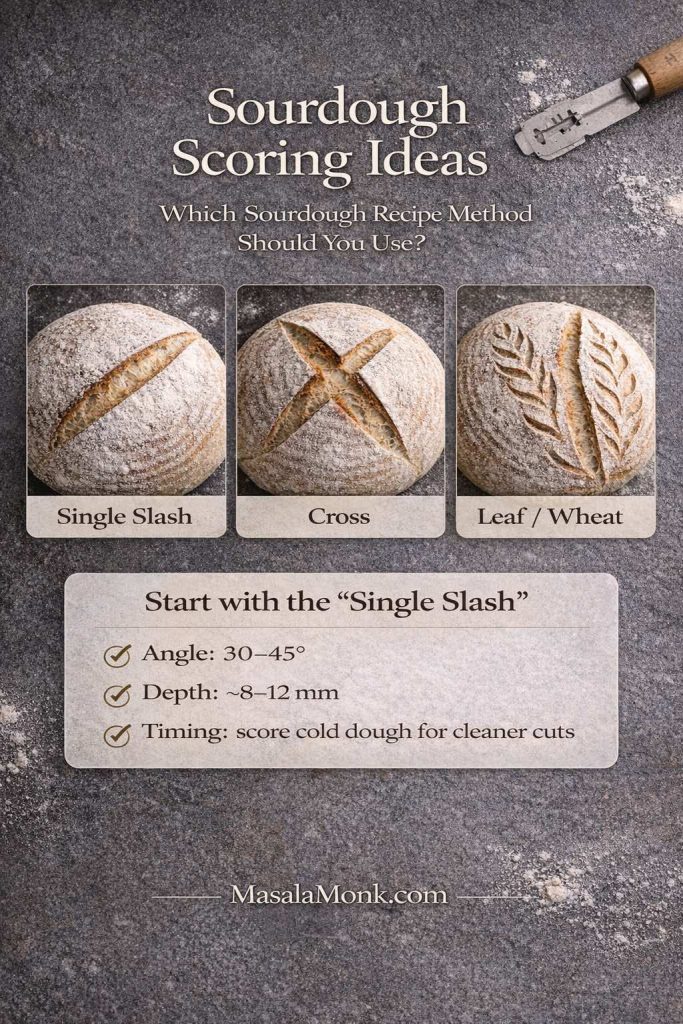

These sourdough scoring ideas make shaping and baking feel less intimidating. Start with the single slash for the most reliable oven spring, then try a cross or leaf pattern once you’re comfortable. Use the angle + depth cues here right before baking your boule.

2) Soft Sandwich Loaf Recipe (loaf pan sourdough bread for everyday)

A sourdough sandwich bread recipe should slice cleanly, toast beautifully, and feel soft enough for breakfast and lunch. This is the bread you’ll reach for when you want peanut butter, grilled cheese, or a turkey sourdough sandwich without wrestling a crust.

Ingredients (1 loaf pan, about 23×13 cm / 9×5 in)

  • Bread flour: 400 g
  • Whole wheat flour: 100 g (optional; replace with bread flour for a whiter loaf)
  • Milk or water: 300 g
  • Active starter: 100 g
  • Salt: 10 g
  • Honey or sugar: 20 g
  • Butter or neutral oil: 30 g
Soft sourdough sandwich loaf on a cutting board with buttered slices and a clean text overlay recipe card titled “Soft Sandwich Loaf,” showing loaf-pan size, ingredients (flour, milk/water, active starter, salt, honey/sugar, butter/oil) and a short method overview; MasalaMonk.com in the footer.
This soft sourdough sandwich loaf recipe card is the quick-glance version of the loaf-pan method below—ingredients + the exact proofing cue to watch so your slices stay tender, even, and clean-cut.

Method

  1. Mix milk and starter until combined.
  2. Add flours, honey/sugar, salt, and butter/oil. Mix to a shaggy dough, then rest 20 minutes.
  3. Knead until smoother and elastic—6–8 minutes by hand or 4–5 minutes in a stand mixer on low.
  4. Cover and let rise until noticeably puffy, about 60–80% increased in size.
  5. Shape into a log: flatten into a rectangle, roll tightly, pinch the seam.
  6. Place seam-side down in a greased loaf pan.
  7. Proof until the dough crowns 2–3 cm above the pan rim.
  8. Bake at 190°C for 35–45 minutes. Cool fully before slicing.

Make it sandwich-ready with MasalaMonk pairings

Once this loaf becomes routine, sandwiches become a rotating habit rather than a repetitive meal:


Portrait infographic titled “Bulk Fermentation + Proofing: 6 Visual Cues (So You Don’t Under/Overproof)” showing a glass bowl of risen sourdough dough on a light stone counter with a small bubble close-up inset. Text lists six cues: dough looks puffier and slightly domed, bubbles at edges and top, dough feels lighter and jiggly, volume increase not necessarily double, poke test slowly springs back, and dough holds shape after pre-shape. MasalaMonk.com is in the footer.
Nail the rise on every sourdough recipe with these bulk fermentation and proofing cues. Use the dome, bubbles, jiggle, and poke-test signals here to know when your dough is ready to shape and bake—so your loaves, rolls, buns, and bagels come out lighter instead of dense or flat.

3) Same-Day Sourdough Bread Recipe (fast, reliable, still flavorful)

Some days you want fresh bread by dinner without the full overnight arc. This same day sourdough recipe borrows the best idea from “everyday sourdough” approaches: give the starter a head start, then use a tiny pinch of yeast as backup so the loaf rises on your schedule.

Ingredients (1 loaf)

  • Bread flour: 500 g
  • Water: 340 g
  • Active starter: 120 g
  • Salt: 10 g
  • Instant yeast: 1 g (optional but extremely helpful)
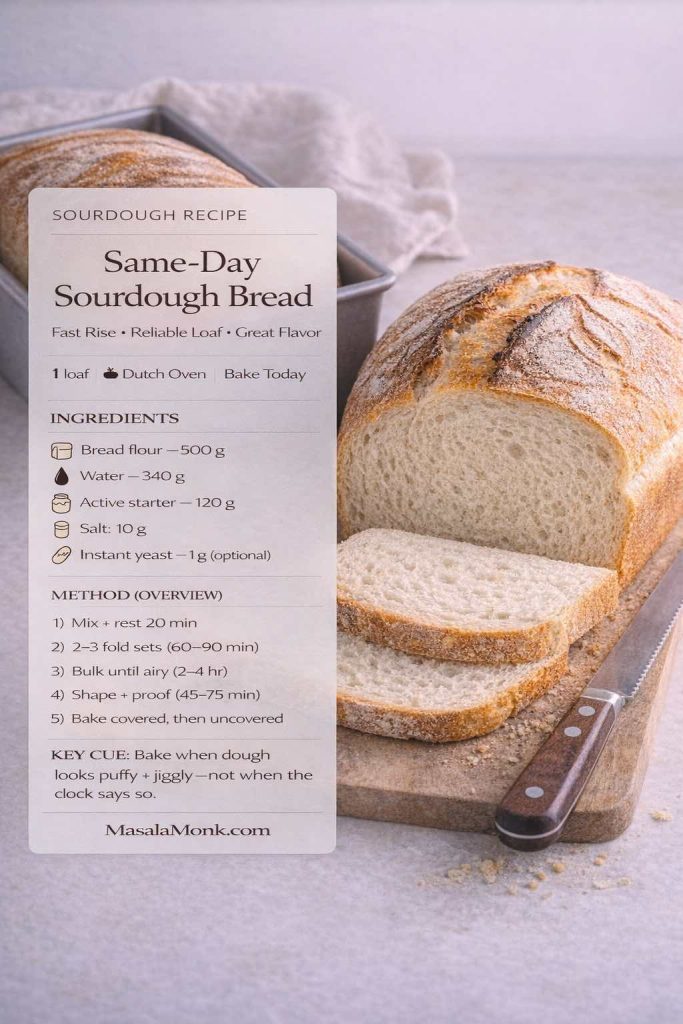
Recipe card overlay for Same-Day Sourdough Bread showing a sliced loaf on a board. Text lists ingredients (bread flour, water, active starter, salt, optional instant yeast) and a short method: mix + rest, 2–3 fold sets, bulk until airy, shape + proof, bake covered then uncovered. MasalaMonk.com in footer.
Same-Day Sourdough Bread (quick visual checklist): This card is the fast version of Recipe #3—ingredients + the five checkpoints that matter most (folds → airy bulk → short proof → covered bake → uncovered finish). Use it to keep your timing on track while you follow the full steps in this section.

Method

  1. Mix water and starter, then add flour, salt, and yeast (if using). Mix until no dry flour remains. Rest 20 minutes.
  2. Over the next 60–90 minutes, do 2–3 sets of folds.
  3. Bulk ferment until the dough looks inflated and airy, typically 2–4 hours depending on warmth.
  4. Shape into a boule and proof 45–75 minutes while you preheat the oven and pot.
  5. Bake in a preheated Dutch oven at 250°C for 20 minutes covered, then 230°C for 20–25 minutes uncovered.

If you love this “forgiving but tasty” lane, King Arthur’s loaf-pan version is worth bookmarking because it’s built for success, even when your starter isn’t perfect: Easy everyday sourdough bread recipe.

Also Read: Hot Chocolate Coffee: 3 Easy Recipes (Cocoa, Mix, or Espresso)
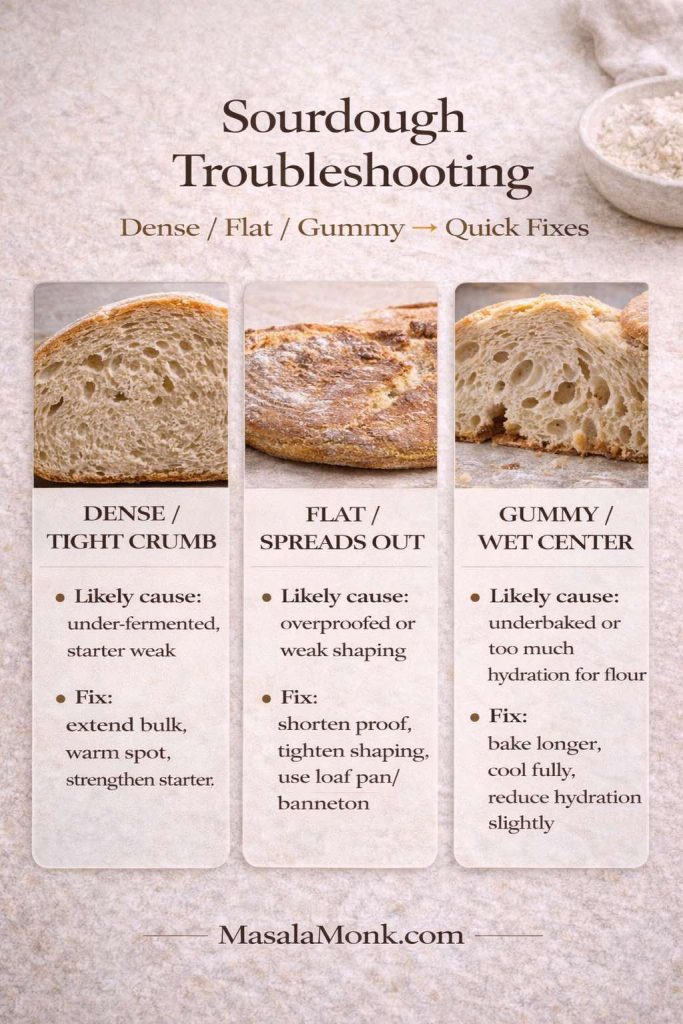

If a sourdough recipe ever turns out dense, flat, or gummy, use this quick troubleshooting guide to diagnose the problem and fix your next bake. It’s especially helpful when you’re switching between methods (same-day vs overnight) or moving from loaf pans to Dutch oven boules.

4) No-Knead Dutch Oven Loaf Recipe (hands-off, overnight, crusty)

No knead sourdough is ideal when you want a rustic loaf without shaping drama. You mix, you wait, you fold a little, and time does the rest. It’s also a nice entry point when you’re still learning what “fermented enough” feels like.

Ingredients (1 loaf)

  • Bread flour: 500 g
  • Water: 375 g
  • Active starter: 100 g
  • Salt: 10 g
Photographic recipe card for “No-Knead Dutch Oven Loaf” (sourdough recipe). A golden sourdough loaf sits in a white Dutch oven as a hand lifts the lid; steam rises. A clean text overlay lists ingredients (bread flour, water, active starter, salt) and a simple method overview (mix at night, rest, fold, shape + proof, bake covered then uncovered). MasalaMonk.com appears in the footer.
No-knead sourdough Dutch oven loaf (recipe card): a hands-off, overnight method you can follow at a glance—ingredients + the exact flow (mix → rest → fold → shape → bake) so you get a crusty loaf without overthinking timing. Save this card as your quick checkpoint while you bake the full method in Section 4.

Method

  1. In the evening, mix everything until combined. Cover.
  2. Leave at room temperature 10–14 hours.
  3. In the morning, gently fold the dough over itself a few times to tighten it. Rest 20 minutes.
  4. Shape lightly into a round and proof 45–90 minutes.
  5. Bake in a preheated Dutch oven: 250°C for 20 minutes covered, then 230°C for 20–25 minutes uncovered.

If you like seeing the method explained step-by-step with visuals, King Arthur’s guide-style post is clear: How to make no-knead sourdough bread.

Also Read: Cappuccino Recipe: How to Make a Perfect Cappuccino at Home


5) English Muffin Bread Recipe (toaster-friendly sourdough, minimal effort)

English muffin bread is the bread you bake when you want nooks and crannies without shaping rounds or dealing with a stone. It’s especially good for breakfast—toast it hard, then let butter and jam do their thing.

Ingredients (1 loaf)

  • Bread flour: 450 g
  • Water or milk: 360 g
  • Active starter: 120 g
  • Salt: 10 g
  • Honey or sugar: 15 g
  • Baking soda: 2 g
  • Cornmeal (for dusting): as needed
Photograph-style recipe card for sourdough English muffin bread in a loaf pan with cornmeal crust and two buttered toasted slices. Clean overlay lists ingredients and a short method overview for a no-shaping, toaster-friendly sourdough loaf with “nooks and crannies,” plus MasalaMonk.com branding in the footer.
This sourdough English muffin bread card is the “easy breakfast loaf” in this guide—no shaping, no Dutch oven, just a sticky batter-style dough that bakes up with nooks and crannies. Use it as a quick visual checklist while you follow the full method below (and save it for repeat toaster mornings).

Method

  1. Mix liquids and starter, then add flour, salt, and honey/sugar. The dough will be sticky—closer to a thick batter than a kneadable dough.
  2. Cover and rise until noticeably airy, often 3–6 hours.
  3. Grease a loaf pan and dust lightly with cornmeal.
  4. Scrape in the dough, smooth the top with wet fingers, and proof until it nears the rim.
  5. Bake at 190°C for 35–40 minutes.

Breakfast ideas with this sourdough bread recipe

Once you have this loaf, breakfast becomes easy to repeat without feeling repetitive:


Portrait infographic titled “Soft Sourdough Rolls & Buns” showing one dough made into three shapes on a baking tray: dinner rolls (pull-apart), burger buns (round seeded buns), and hot dog buns (oval rolls). Text notes “Same dough, different shape” and “Tight surface = better rise,” with MasalaMonk.com in the footer.
This soft sourdough rolls and buns guide shows how one dough becomes three bakes—dinner rolls, burger buns, and hot dog buns. Use it as a quick shaping reference before you start the rolls section below, so your dough rises higher and bakes up pillowy.

6) Soft Dinner Rolls Recipe (pull-apart sourdough rolls with starter)

Soft sourdough dinner rolls are a different kind of pleasure: tender crumb, gentle sweetness, a golden top, and a pan that disappears faster than you expect. They’re also forgiving, especially if you keep the dough enriched.

Ingredients (for recipe of 12 sourdough dinner rolls )

  • Bread flour: 500 g
  • Milk: 280 g
  • Active starter: 120 g
  • Salt: 10 g
  • Sugar: 35 g
  • Butter: 60 g
  • Egg: 1 (about 50 g) — optional
    • If skipping egg, add 30 g extra milk.
Soft sourdough dinner rolls in a baking pan with a clean recipe card overlay titled “Soft Dinner Rolls.” The card lists ingredients for 12 rolls (bread flour, milk, active starter, salt, sugar, butter, optional egg) and a short method overview: mix and rest, knead in butter, bulk ferment until puffy, divide and shape, proof until touching, then bake and brush with butter. MasalaMonk.com in the footer.
This soft sourdough dinner rolls recipe card gives you the full ingredient list plus the key checkpoints (bulk ferment “puffy + marshmallowy,” proof until the rolls touch, then bake). Use it as a quick visual recap while you follow the detailed steps in Section 6: Soft Dinner Rolls—especially helpful when you’re baking enriched dough and don’t want to overproof.

Method

  1. Mix milk and starter (plus egg, if using). Add flour, sugar, and salt. Mix until shaggy. Rest 20 minutes.
  2. Knead until smoother, then knead in butter until the dough is cohesive and elastic.
  3. Bulk ferment until it looks puffy and lighter, typically 3–6 hours depending on temperature.
  4. Divide into 12 pieces (about 85–90 g each). Shape into tight balls.
  5. Place in a greased pan, cover, and proof until the rolls are soft and touching.
  6. Bake at 190°C for 18–22 minutes. Brush with butter while warm.

If you like comparing your rolls to a well-tested benchmark, this recipe is excellent for technique and texture: Super soft sourdough rolls.

Also Read: Cranberry Moscow Mule Recipe: A Festive Holiday Cocktail With Easy Variations


7) Burger Buns Recipe (soft sourdough buns for sandwiches)

A sourdough bun should be sturdy enough to hold sauces yet tender enough to bite through cleanly. This dough builds on the roll formula because it already has that soft, enriched structure.

Ingredients (for recipe of 8 sourdough buns for sandwiches)

Use the same dough as the Soft Dinner Rolls. After bulk fermentation, shape as buns instead of rolls.

Method

  1. Divide dough into 8 pieces (about 105–115 g each).
  2. Shape into tight balls, then gently flatten to a thick disc.
  3. Proof on a tray until puffy and marshmallowy.
  4. Brush with milk or egg wash if desired.
  5. Bake at 190°C for 15–18 minutes.
Photo of soft sourdough burger buns on a cooling rack with sesame tops, plus a clean recipe overlay card titled “Soft Sourdough Burger Buns” showing ingredients and a short step-by-step method for pillowy, sandwich-ready buns, with MasalaMonk.com in the footer.
This soft sourdough burger buns recipe card gives you the full buns-at-a-glance view—ingredients, proofing checkpoints, and the bake window—so you can follow the bun method without scrolling back and forth while shaping and proofing.

Sandwich pairings that make buns feel “planned”

  • Build a spicy, street-style vibe with authentic grilled Bombay sandwich flavors adapted into bun form—chutney, potatoes, crisp veg, and heat.
  • For a creamy upgrade, the base ideas in homemade mayo variations let you swing from garlic mayo to spicy mayo without changing the whole sandwich.
  • If you want chicken options that don’t feel repetitive, chicken sandwich recipes gives multiple directions that work brilliantly in soft sourdough buns.

8) Hot Dog Buns Recipe (sourdough hotdog buns that stay soft)

Hot dog buns often dry out quickly. Sourdough can help them stay tender longer, especially when the dough includes milk and butter.

Ingredients (for recipe of 10 sourdough hotdog buns)

Use the same dough as Soft Dinner Rolls.
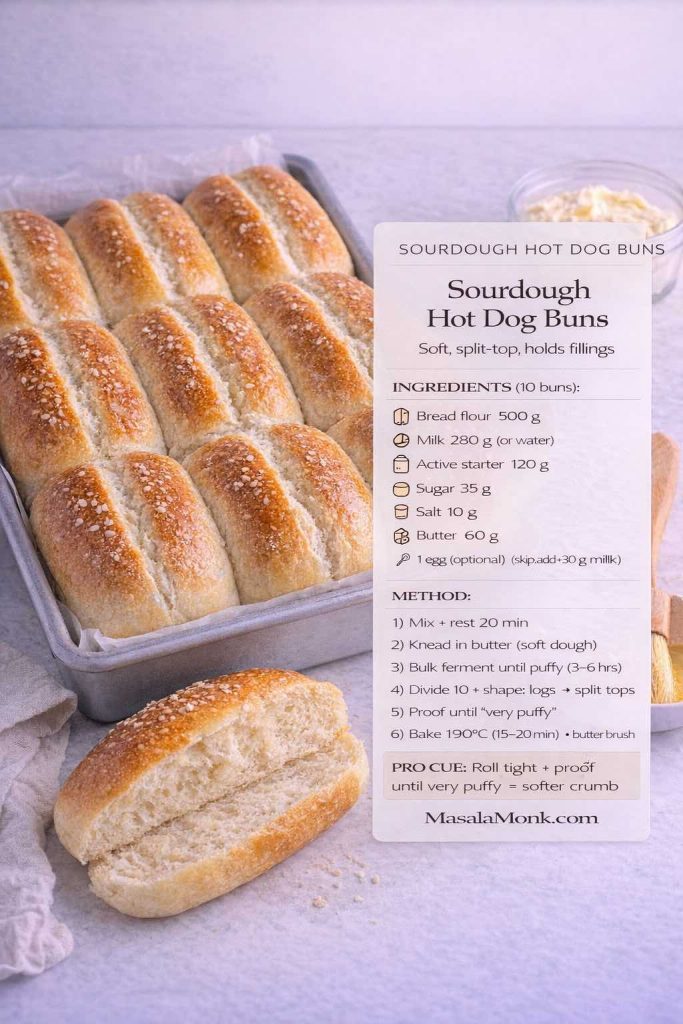
Recipe card photo of golden sourdough hot dog buns in a baking pan with one bun sliced open to show a soft crumb. Text overlay reads ‘Sourdough Hot Dog Buns’ with ingredients, short method steps, and a pro cue for softer buns. MasalaMonk.com in the footer.
This sourdough hot dog buns recipe card gives you the full at-a-glance method—soft crumb, split-top shape, and a proofing cue that keeps the buns pillowy. Use it right before shaping so your buns bake up tall and tender, then follow the full steps in the section above for timing details and swaps.

Method

  1. Divide into 10 pieces (about 85–90 g).
  2. Shape each piece into a tight ball, rest 10 minutes, then roll into a short log.
  3. Place seam-side down on a tray or in a bun pan.
  4. Proof until the logs look puffy and almost doubled.
  5. Bake at 190°C for 14–17 minutes.

If you want to keep buns soft for longer, cool them fully, then store airtight. For freezing, slice before freezing so you can toast from frozen without thawing.

Also Read: Baked Ziti Recipe Collection: 15 Easy Variations


9) Hoagie + Sub Rolls Recipe (sourdough sandwich rolls)

These are the rolls you bake when you want an honest-to-goodness sub: crisp edge, chewy bite, enough structure to handle fillings. They’re also the shape that makes leftover chicken, roasted vegetables, or paneer feel like an actual meal.

Ingredients (for recipe of 6 sourdough sandwich rolls)

  • Bread flour: 500 g
  • Water: 320 g
  • Active starter: 120 g
  • Salt: 10 g
  • Sugar: 15 g
  • Olive oil: 20 g
Photographic recipe card for sourdough hoagie and sub rolls (sourdough sandwich rolls) showing sesame-topped rolls on a board plus a filled sub. Overlay lists ingredients for 6 rolls and a short method (mix, knead, bulk ferment, shape, proof, bake) with a steam tip; MasalaMonk.com in the footer.
Sourdough hoagie + sub rolls, at a glance: use this quick recipe card when you want sandwich rolls that hold fillings—crisp edge, chewy bite, and a soft interior. Screenshot/save it for repeat bakes, then follow the full method below for timing cues during bulk fermentation and proofing.

Method

  1. Mix water and starter, then add flour, sugar, salt, and oil. Mix until combined. Rest 20 minutes.
  2. Knead until smooth—6–8 minutes by hand or 4–5 minutes on low in a stand mixer.
  3. Bulk ferment until puffy, usually 3–5 hours depending on warmth.
  4. Divide into 6 pieces (about 160–170 g). Pre-shape into small logs, rest 15 minutes.
  5. Shape tightly into longer rolls: flatten gently, roll up firmly, pinch seam, then taper ends if you like.
  6. Proof seam-side down until the rolls feel lighter and look expanded.
  7. Bake at 220°C for 16–20 minutes. For better crust, create steam by placing a tray of hot water on the bottom rack during the first 10 minutes.

For a filling that’s simple but ridiculously satisfying, try a hot, melty build based on mushroom cheese sandwich flavors—sautéed mushrooms, spice, cheese, and a spread.

Also Read: Manhattan Cocktail Recipe (Classic + 6 Variations)


10) Chewy Sourdough Bagels Recipe (boil + bake, real bagel texture)

Sourdough bagels are a different animal: stiff dough, serious kneading, tight shaping, then a quick boil that sets the crust before baking. The payoff is huge—chew, shine, and that “real bagel” bite.

For a classic reference recipe with a proven method, King Arthur’s version is excellent: Sourdough bagels recipe. Here’s a streamlined metric approach that stays true to the technique.
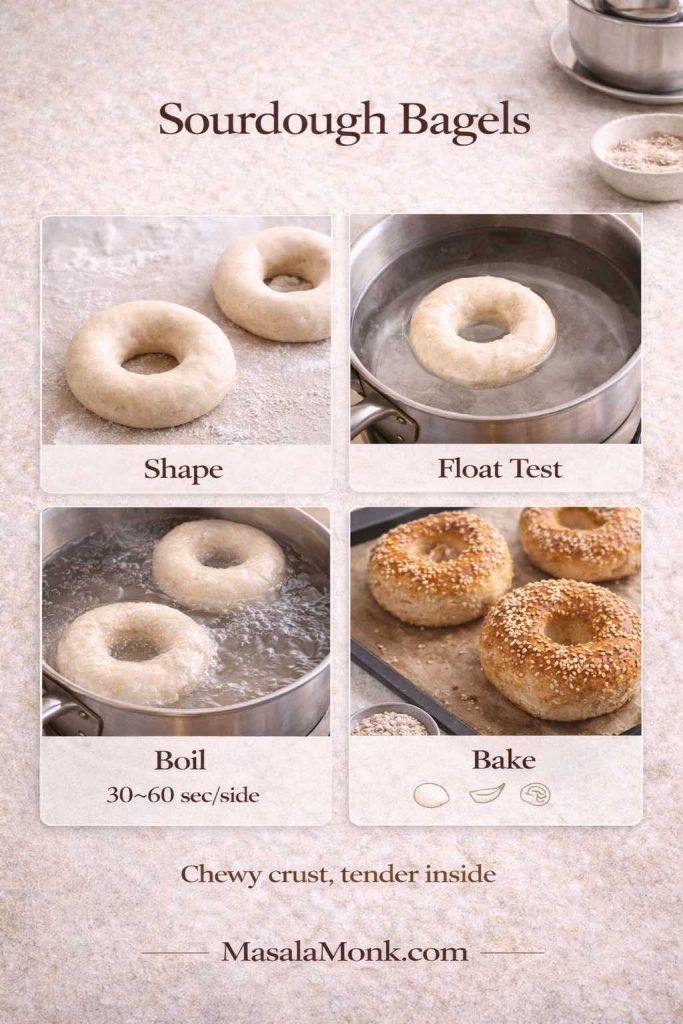
Portrait four-panel infographic titled “Sourdough Bagels” showing the steps: Shape (raw bagel rings on a floured surface), Float Test (bagel floating in water), Boil (bagels boiling with note “30–60 sec/side”), and Bake (golden sesame bagels on a tray). Text at bottom says “Chewy crust, tender inside,” with MasalaMonk.com in the footer.
This sourdough bagels step card breaks the method into four simple checkpoints—shape, float test, boil, then bake—so you get that classic chewy crust and tender inside. Save it as a quick reference, then follow the full sourdough bagel recipe below for exact timings and quantities.

Ingredients (for Recipe of 8 Sourdough bagels)

  • Bread flour: 500 g
  • Water: 250 g
  • Active starter: 150 g
  • Salt: 10 g
  • Honey or sugar: 25 g

Water bath

  • Water: 2000 g
  • Honey: 20 g
  • Salt: 3 g
Photograph of sesame sourdough bagels on a rack and board with a clean recipe overlay titled “Sourdough Bagels: Chewy Bagels (Boil + Bake),” listing ingredients (bread flour, water, active starter, salt, honey/sugar), a water-bath formula, float-test cue, boil time per side, bake temperature, and MasalaMonk.com in the footer.
This sourdough bagels recipe card gives you the full method in one glance—stiff dough, a quick float test, 30–45 seconds per side in the honey water bath, then bake until deep golden. Use it right before you boil so you nail the chew without over-proofing or over-boiling.

Method

  1. Mix everything into a stiff dough. Knead until very smooth, 8–10 minutes. A stand mixer helps here, although hand kneading works if you stay patient.
  2. Bulk ferment 2–4 hours. Bagel dough doesn’t need to double; it should simply look slightly puffier and smoother.
  3. Divide into 8 pieces (about 115–120 g). Rest 10 minutes.
  4. Shape: either poke a hole in the center and stretch, or roll into a rope and wrap around your hand.
  5. Proof 30–60 minutes. A quick float test helps: if a bagel floats in water, it’s ready to boil.
  6. Boil 30–45 seconds per side in the honey-salt water bath.
  7. Bake at 220°C for 18–22 minutes until deeply golden.

Bagels make breakfast feel effortless, especially when you pair them with a spread and something crunchy. For ideas that stay practical, this roundup is full of combinations: breakfast sandwich recipes.

Also Read: Classic Rum Punch + 9 Recipes (Pitcher & Party-Friendly)


Bonus: Gluten-Free Vegan Sourdough Boule Recipe (a true gluten-free boule path)

Gluten-free sourdough can be genuinely good—provided you treat it like its own category instead of pretending it will behave like wheat. The dough is usually more like a thick batter, structure often comes from psyllium husk, and baking in a pot helps hold shape.

This gluten-free vegan sourdough bread recipe uses a gluten-free starter (often built from brown rice flour). If you need a starter method, Serious Eats offers a clear baseline starter guide (wheat-based), and the fermentation logic still helps even when your flour changes: Sourdough starter basics.
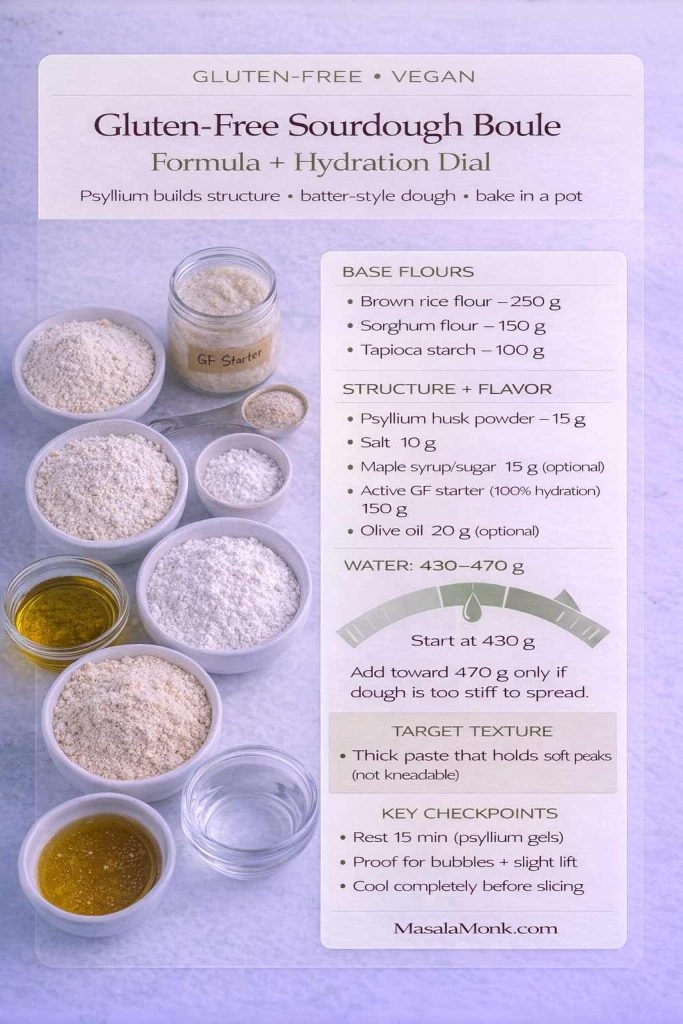
Gluten-free vegan sourdough boule recipe card showing measured ingredients (brown rice flour, sorghum flour, tapioca starch, psyllium husk, salt, maple/sugar optional, active gluten-free starter, olive oil optional) plus a hydration dial recommending water 430–470 g, target texture “thick paste that holds soft peaks,” and key checkpoints (rest 15 minutes, proof for bubbles + slight lift, cool before slicing). MasalaMonk.com in footer.
Gluten-Free Vegan Sourdough Boule (Formula + Hydration Dial): Use this as your mixing reference—start your water at 430 g, then only move toward 470 g if the dough feels too stiff to spread. For gluten-free sourdough, the goal isn’t a kneadable dough; it should look like a thick paste that holds soft peaks, then show bubbles + a little lift before baking in a pot.

Ingredients (for 1 small Sourdough Boule Recipe)

  • Brown rice flour: 250 g
  • Sorghum flour: 150 g
  • Tapioca starch: 100 g
  • Psyllium husk powder: 15 g
  • Salt: 10 g
  • Maple syrup or sugar: 15 g (optional, helps fermentation)
  • Water: 430–470 g (start with 430 g, add as needed)
  • Active gluten-free starter (100% hydration): 150 g
  • Olive oil: 20 g (optional, improves tenderness)
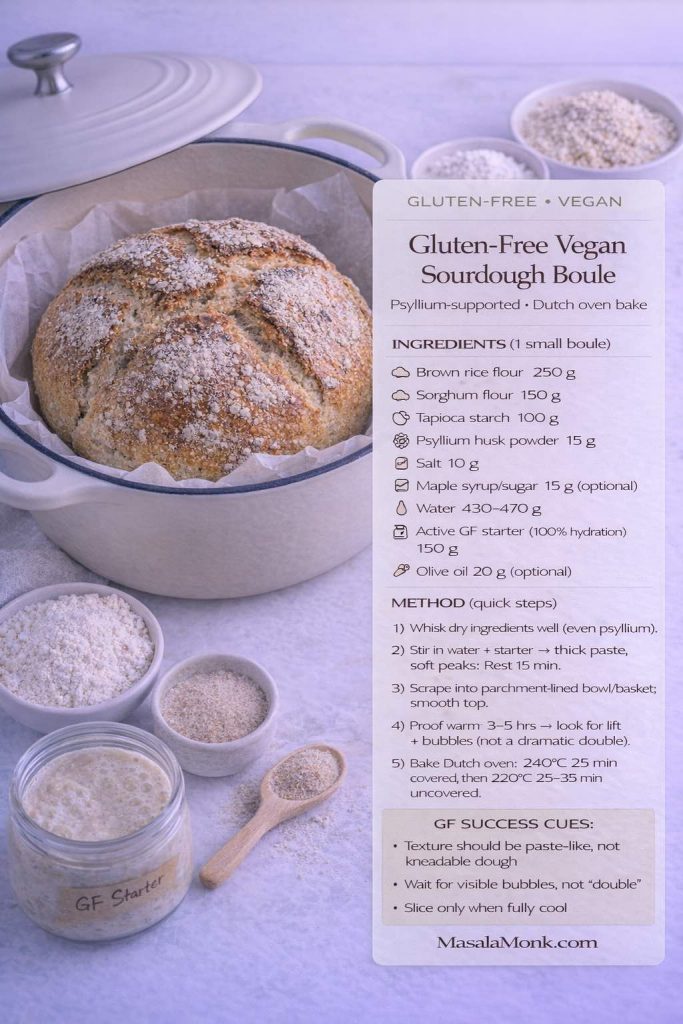
Gluten-free vegan sourdough boule in a Dutch oven with a clean recipe-card overlay listing brown rice flour, sorghum, tapioca, psyllium, starter, and quick bake steps, plus “success cues,” with MasalaMonk.com in the footer.
This gluten-free vegan sourdough boule recipe card pulls the full method into one glance—key flours, psyllium “structure,” the paste-like dough reminder, and the two-stage Dutch oven bake. Use it while you mix and proof so you don’t chase a wheat-style “double,” and save it as your quick checkpoint for repeat gluten-free bakes.

Method

  1. Whisk dry ingredients thoroughly so psyllium distributes evenly.
  2. Stir in water and starter. The dough should resemble a thick, sticky paste that holds soft peaks. Rest 15 minutes to let psyllium gel.
  3. Scrape into a parchment-lined bowl or proofing basket. Smooth the top with wet fingers.
  4. Proof at warm room temperature until slightly risen and aerated—often 3–5 hours. Don’t chase a dramatic double; aim for visible lift and bubbles.
  5. Bake in a preheated Dutch oven at 240°C for 25 minutes covered, then 220°C for 25–35 minutes uncovered.
  6. Cool completely before slicing. Gluten-free sourdough firms as it cools, and cutting early can make it feel gummy.
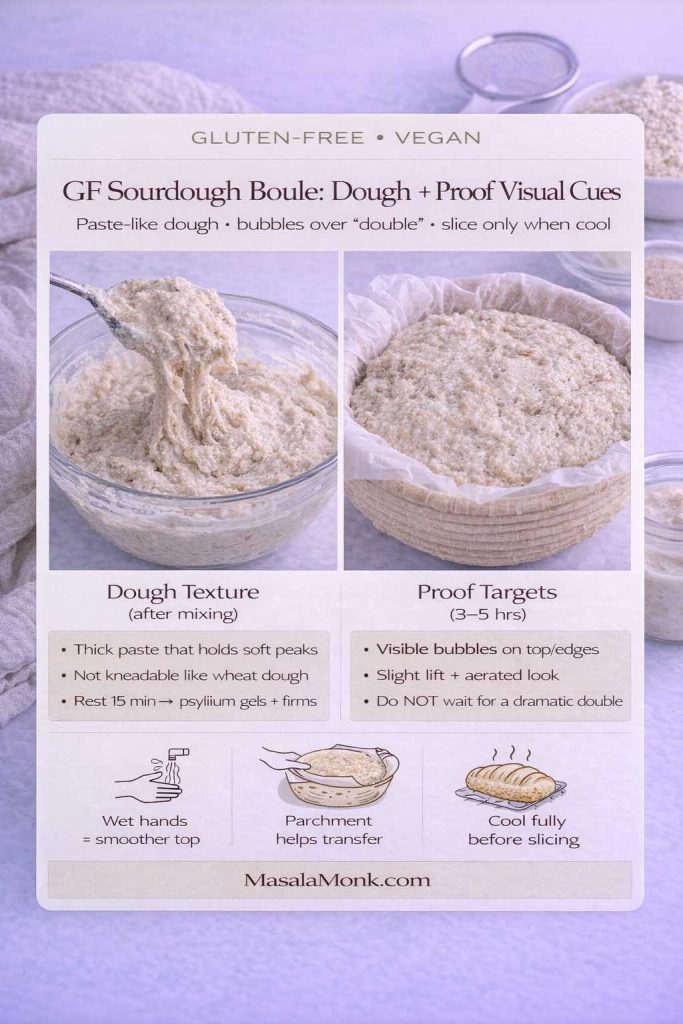
Gluten-free vegan sourdough boule visual guide showing thick paste-like dough after mixing and a proofed dough in a lined basket, with notes to look for bubbles and slight lift (not a full double), plus tips: wet hands to smooth, parchment for transfer, and cool completely before slicing.
Gluten-free sourdough behaves differently from wheat dough—use these dough + proof cues to stay on track. Aim for a thick paste that holds soft peaks, then proof for visible bubbles and a slightly aerated lift (don’t wait for a dramatic double). Finish by cooling the boule fully before slicing so the crumb sets instead of turning gummy.

This loaf pairs beautifully with soups and sauces, because gluten-free crust loves something to soak up. If you want a simple sauce rotation for dipping and topping, keep these handy:


A sourdough pizza detour that fits naturally (starter or discard)

Even if you’re not baking pizza weekly, sourdough pizza dough is one of the best ways to “use your starter without a ceremony.” It’s also a satisfying path for evenings when you want something baked, but not another loaf.

When pizza night happens, the dough is only half the story. A great sauce makes sourdough crust taste intentional—whether you want classic red, garlicky, spicy, or creamy. Start with your pizza sauce recipes for easy options that work on sourdough bases, then switch it up with a fresh, herby spread like pesto recipes and variations when you want something brighter.

Sourdough pizza dough: an easy base formula (starter or discard)

Sourdough pizza works because the dough doesn’t need a dramatic rise to taste great—fermentation does the heavy lifting for flavor.

Base formula (2 medium pizzas):

  • Bread flour: 500 g
  • Water: 325–350 g (start lower if your flour is weaker)
  • Salt: 10 g
  • Active starter: 100 g (or discard 150–200 g if you’re using it for flavor)
  • Olive oil (optional): 10–20 g

Simple timeline options:

  • Same-day: warm kitchen, starter at peak → mix → 2–3 fold sets → bulk until airy → divide → rest → stretch and bake.
  • Overnight: mix → bulk partway → refrigerate → next day portion → warm up → stretch and bake.

If you want the crust more sour, choose the overnight path and give it more time cold.


Where this leaves you (and what to bake first)

If you want the most “foundational” two-bake pairing, start with the classic country boule and the soft sandwich loaf. You’ll get crust, crumb, shaping, and loaf-pan confidence in one week, and after that the rolls and buns feel like friendly variations rather than new projects.

Meanwhile, if you want quick wins, the same-day loaf plus English muffin bread makes sourdough feel useful immediately—toastable, sliceable, repeatable.

Whenever you’re ready to turn today’s bread into tomorrow’s meal, a few MasalaMonk staples make the rotation easy:

FAQs: Sourdough Recipe Questions (Starter, Timing, Flavor, Tools)

1) What’s the difference between a sourdough recipe using active starter vs discard?

An active (ripe) starter has peak strength, so it can lift the dough on its own and gives you the most predictable rise for a true sourdough bread. By contrast, discard is older and usually less powerful; still, it brings flavor, and it works well in longer-fermented doughs or recipes designed for discard. In practice, if you want a classic sourdough bread recipe with a tall loaf and open crumb, use active starter. Meanwhile, if you want a faster, more flexible bake or you’re trying to reduce waste, a sourdough discard recipe can be the right fit.

2) How do I know when my sourdough starter is ready to bake with?

Look for a starter that rises reliably after feeding, shows plenty of bubbles, and smells pleasantly tangy rather than harsh. Ideally, it should reach its peak in a predictable window in your kitchen. If it’s doubling, holding some structure at peak, and looks airy instead of watery, it’s generally ready. Even so, if your starter is new, it may still bake fine in a sandwich loaf recipe or same-day sourdough bread recipe before it’s strong enough for a lofty country boule.

3) Why didn’t my sourdough bread rise?

Usually it’s one of three things: the starter wasn’t strong enough, the dough was under-fermented, or the dough was over-fermented. Under-fermentation can happen if your kitchen is cool or the dough didn’t get enough time. Over-fermentation can happen if the dough sat too long in warmth and lost strength before baking. Additionally, too much flour during shaping can prevent a good seal and weaken structure. When in doubt, aim for dough that feels lighter, looks puffier, and shows bubbles at the edges before you shape.

4) Why is my sourdough recipe turning out dense and tight?

Density often comes from either weak fermentation or insufficient gluten development. If the dough never becomes airy during bulk, the crumb stays tight. On the other hand, if the dough is handled roughly late in fermentation, you can knock out the gas that would have become lift in the oven. Also, very low hydration doughs tend to be tighter. If you want a more open crumb, choose a slightly higher hydration sourdough boule recipe and handle it more gently near the end.

5) How do I make my sourdough more sour?

To get extra sour sourdough bread, extend fermentation in cooler conditions. A longer cold proof in the fridge generally increases tang without sacrificing structure. Similarly, using more whole grain flour (especially rye) can boost flavor. Another approach is keeping the starter on a slightly stiffer feeding routine, which can shift acidity. However, if you push too far, the loaf can turn slack, so aim for “more sour” through time and temperature rather than simply letting dough sit forever.

6) How do I make my sourdough less sour?

If your loaf tastes sharper than you like, shorten the cold proof, reduce the total fermentation time, and keep the starter on a regular feeding rhythm so it stays mild. In addition, using more bread flour and less whole grain can soften acidity. Finally, bake sooner once the dough is properly fermented; waiting far past readiness can intensify sour notes.

7) What does “same-day sourdough” really mean?

Same-day sourdough usually means you bake within a single day rather than doing an overnight cold proof. Sometimes it’s a true starter-only approach in a warm kitchen with excellent timing. More often, it’s a hybrid sourdough bread recipe that uses starter for flavor plus a tiny amount of yeast for reliability. Either way, the goal is similar: a good loaf today, without needing to plan two days ahead.

8) Is a no-knead sourdough recipe actually better for beginners?

Often, yes. No-knead sourdough relies on time and folds rather than intensive kneading, which reduces the chance of overworking the dough. Additionally, the schedule can feel simpler: mix, rest, fold occasionally, then shape and bake. That said, even a no-knead method still needs fermentation awareness, so learning what “puffy and airy” looks like is more important than memorizing minutes.

9) Can I bake sourdough without a Dutch oven?

Absolutely. While a Dutch oven makes steam management easy, you can bake on a preheated tray or stone with a steam setup. For example, you can place a metal tray in the oven while it preheats, then pour hot water into it when the bread goes in. Alternatively, you can bake in a loaf pan to support shape and still get great results. The crust may be slightly different, yet the flavor can be just as good.

10) Can I bake sourdough in a loaf pan instead of shaping a boule?

Yes, and it’s one of the most practical ways to make sourdough bread for sandwiches. Loaf-pan sourdough is easier to slice, easier to store, and less sensitive to shaping technique. Additionally, if you’re working with higher whole grain content or softer dough, the pan provides helpful structure.

11) What’s the best flour for sourdough starter?

Bread flour works well, although many starters become more vigorous with some whole wheat or rye added to feedings. Rye flour, in particular, often boosts activity quickly. That said, the best flour for starter is ultimately the one you can feed consistently, because regular feeding rhythm matters more than chasing a “perfect” flour.

12) What’s the best flour for sourdough bread?

For a classic loaf with strong structure, bread flour is the easiest choice. Whole wheat flour adds flavor and nutrition but can reduce loft if you go too high without adjusting hydration. Rye flour increases fermentation activity and adds a deeper flavor. Spelt and einkorn bring character; however, they behave differently, so smaller substitutions are easier at first.

13) Why is my sourdough dough so sticky?

Stickiness can come from higher hydration, insufficient gluten development, or fermentation that has gone too far. First, use slightly wet hands for folds and shaping rather than dumping in extra flour. Next, add an extra fold set early to strengthen the dough. Finally, watch fermentation—if the dough becomes slack and puddly, it may be over-proofed.

14) How do I know when bulk fermentation is done?

Instead of waiting for a perfect “double,” look for a dough that feels lighter, looks puffier, and shows bubbles along the edges. The surface should appear smoother and slightly domed rather than flat. If you gently shake the bowl, the dough should jiggle. Once those signs show up, shaping usually goes better and the crumb improves.

15) How long should I cold proof sourdough?

Most loaves do well with an overnight cold proof, roughly 10–16 hours. Shorter proofs can still work, especially for same-day sourdough bread. Longer proofs can increase sourness and improve scoring, although if you go too long the dough can weaken and lose oven spring.

16) Why did my sourdough spread out instead of rising up?

Spreading often happens when the dough is over-fermented, under-shaped, or too wet for your flour’s strength. Additionally, if the dough isn’t tightened enough during shaping, it won’t hold a tall profile. A banneton can help support the dough during proofing. Otherwise, using a loaf pan is a simple fix while you build shaping confidence.

17) Why did my sourdough crust go soft after cooling?

A soft crust usually means steam got trapped during cooling or the loaf wasn’t baked long enough to drive off moisture. Cool bread on a rack with airflow. Also, bake a bit longer until the crust is deeply browned. Finally, avoid storing the loaf in a sealed bag until it’s fully cool.

18) How do I score sourdough so it opens nicely?

Scoring works best when the dough is cold and the surface is slightly dry, which is why many bakers score after a fridge proof. Use a sharp blade, make confident cuts, and angle slightly to encourage an “ear.” Additionally, one clean primary cut usually performs better than many shallow decorative lines when you’re chasing oven spring.

19) Can I use a stand mixer for sourdough dough?

Yes, especially for sandwich loaf recipes, buns, and sourdough dinner rolls. For rustic boules, mixing briefly in a stand mixer can help, yet folds still matter for structure. Either way, avoid overheating the dough—if it warms too much, fermentation can race ahead before the dough is strong.

20) Can I make sourdough in a bread machine?

You can, particularly for loaf-pan style sourdough bread. Bread machines are great for mixing and baking a consistent sandwich loaf. However, if you want a crusty Dutch-oven boule with a bold ear, an oven bake is usually better. Still, a bread machine can be a practical everyday sourdough option when you value convenience.

21) What’s the easiest sourdough recipe for beginners?

A loaf-pan sourdough sandwich bread recipe is often the easiest place to start because the pan supports the dough and slicing is straightforward. Alternatively, a no-knead sourdough recipe can be beginner-friendly because it relies more on time than technique. If your starter is still maturing, those two styles tend to be forgiving.

22) How should I store sourdough starter?

If you bake often, keeping the starter at room temperature with regular feedings works well. If you bake occasionally, storing it in the fridge slows it down and reduces maintenance. Either way, try to feed it once or twice after refrigeration before you use it in a true sourdough bread recipe, especially for a boule or bagels.

23) How do I store sourdough bread so it stays fresh?

For crusty loaves, a paper bag or bread box helps maintain the crust better than plastic. For soft sandwich loaves and buns, airtight storage keeps them tender. And for longer storage, slice and freeze; then toast straight from frozen to revive texture.

24) Can I make sourdough rolls from starter without commercial yeast?

Yes. Soft sourdough rolls can rise solely from active starter, although they take longer and benefit from a warm proof. If your starter is young or your kitchen is cool, the dough may need extra time. Alternatively, a tiny amount of yeast can make timing easier without erasing sourdough flavor.

25) Why do my sourdough bagels turn out tough?

Bagels need a stiff dough, but if they ferment too long or bake too hard, they can become overly tough. Also, too much flour during shaping can dry the surface. Aim for a smooth, well-kneaded dough, proof until slightly puffy, then boil briefly rather than excessively. That balance keeps chew pleasant rather than jaw-breaking.

26) How do I revive a frozen or dried sourdough starter?

If your starter was frozen, thaw it in the fridge first, then give it a few patient feeds at room temperature. Start small: stir 20–30 g starter with equal parts water and flour (by weight), keep it warm, and feed again once it rises and begins to fall. Most starters need 2–4 feed cycles to regain predictable lift, especially if they were frozen for a while.

For a dried starter, crumble a small amount into water first and let it soften fully before adding flour. It may look sleepy for a day or two, so focus on signs of life—tiny bubbles and a mild tang—before you judge strength. Once it begins rising in a repeatable pattern after feeding, it’s ready to bake with. Until then, use it in loaf-pan breads or same-day methods rather than a tall country boule.

27) What’s the best hydration for a beginner sourdough loaf?

For most beginners, a “middle” hydration is the sweet spot: wet enough to get a tender crumb, but not so wet that shaping feels like wrestling. In practical terms, dough that feels tacky yet manageable usually performs better than dough that’s either stiff and dry or so loose it spreads instantly.

If you’re using strong bread flour, you can push hydration higher over time. Meanwhile, if you’re using more whole wheat, rye, spelt, or einkorn, the dough can feel stickier or softer even at the same hydration, so it helps to start slightly lower and add water only if the dough truly feels tight. The goal is not maximum water—it’s a dough you can strengthen with folds and shape with confidence.

28) Can I bake sourdough in a loaf pan without a banneton?

Yes—and it’s one of the easiest ways to make sourdough more consistent. A loaf pan supports the dough during proofing, which means you can get good height even if your shaping is still developing. It’s also the most practical path to sourdough you can slice neatly for toast and sandwiches.

To make it work smoothly, focus on one cue: proof until the dough crowns above the rim of the pan, looks aerated, and feels lighter. If you underproof, the loaf stays tight; if you overproof, it can collapse or bake up gummy. The pan won’t replace fermentation, but it does remove a lot of stress from the shaping stage.

29) What’s the easiest way to use sourdough discard every week without waste?

The easiest rhythm is to keep a small “discard jar” in the fridge and use it in one repeatable bake you actually enjoy—something that fits your week. For many people that’s English muffin bread (toaster-friendly), pancakes/waffles, quick flatbreads, or a simple discard pizza crust. Those options use discard for flavor and don’t demand perfect starter strength.

A good habit is portioning: if you know you’ll only bake once or twice, freeze discard in small amounts so you can thaw exactly what you need. Also, label the jar with the date so you’re not guessing. If the discard ever shows mold or pink/orange streaks, toss it—otherwise, most “old” discard is still perfectly useful for baking.

30) Why did my sourdough bagels fail the float test?

The float test is really a fermentation test: a bagel that sinks is usually underproofed, meaning there isn’t enough gas trapped inside yet. The fix is simple—give the shaped bagels a little more proofing time in a warm spot, then test again. Bagel dough is stiff, so it can look “fine” on the surface while still needing more time.

Less often, bagels fail the float test because the starter wasn’t strong enough, the dough was too cold, or the bagels were over-tightened and degassed during shaping. If your kitchen is cool, proofing takes longer. If your starter is young or sluggish, you’ll need more time—or you can choose a more forgiving schedule (like a longer fermentation or a small yeast assist) until your starter becomes reliably powerful.