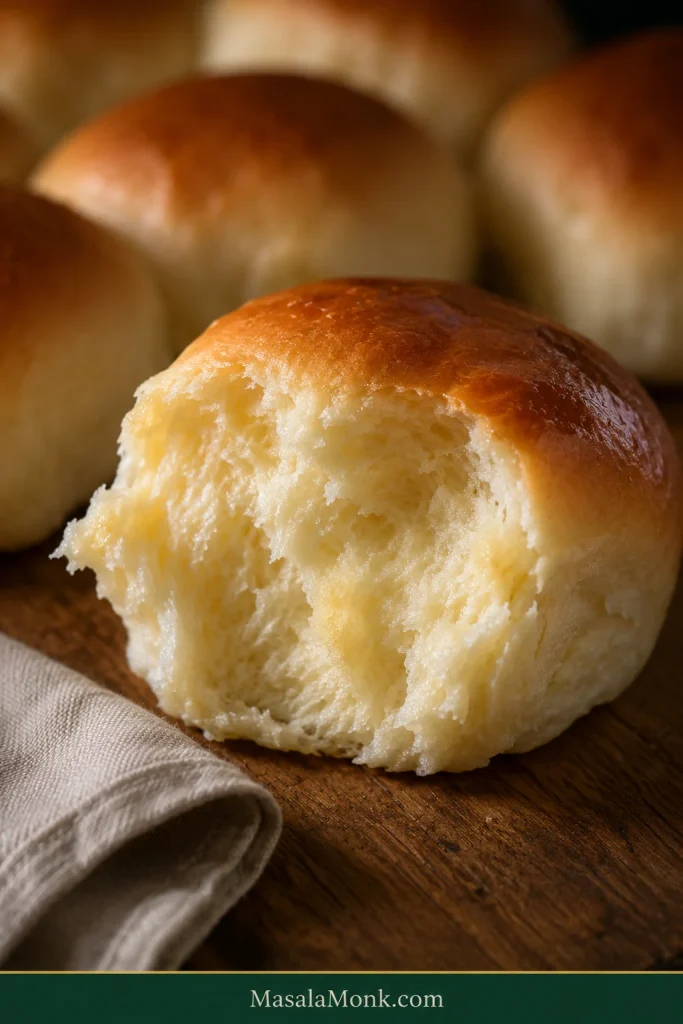
These soft dinner rolls have golden, buttery tops, pale pull-apart sides and a fluffy interior that tears into tender strands instead of feeling tight or heavy.
The dough is soft by design. If yeast rolls have turned dense on you before, the trouble may have started surprisingly early: a perfectly normal sticky dough gets enough extra flour to become comfortable to handle—and too firm to rise beautifully.
That softness is part of what gives these rolls their light, fluffy crumb. The trick is learning when sticky is perfectly normal—and when the dough genuinely needs a little more flour.
In practice, the process is simple: mix, knead, rise, shape, rise and bake. The extra detail is here for the moments when you look at the dough and wonder whether what you’re seeing is normal.
MasalaMonk rule: The clock tells you when to check; the dough tells you when it is ready.
What Makes Dinner Rolls Soft and Fluffy?
Soft dinner rolls stay light when the dough remains soft and slightly tacky, is kneaded until elastic, and gets enough time to become properly puffy during both rises.
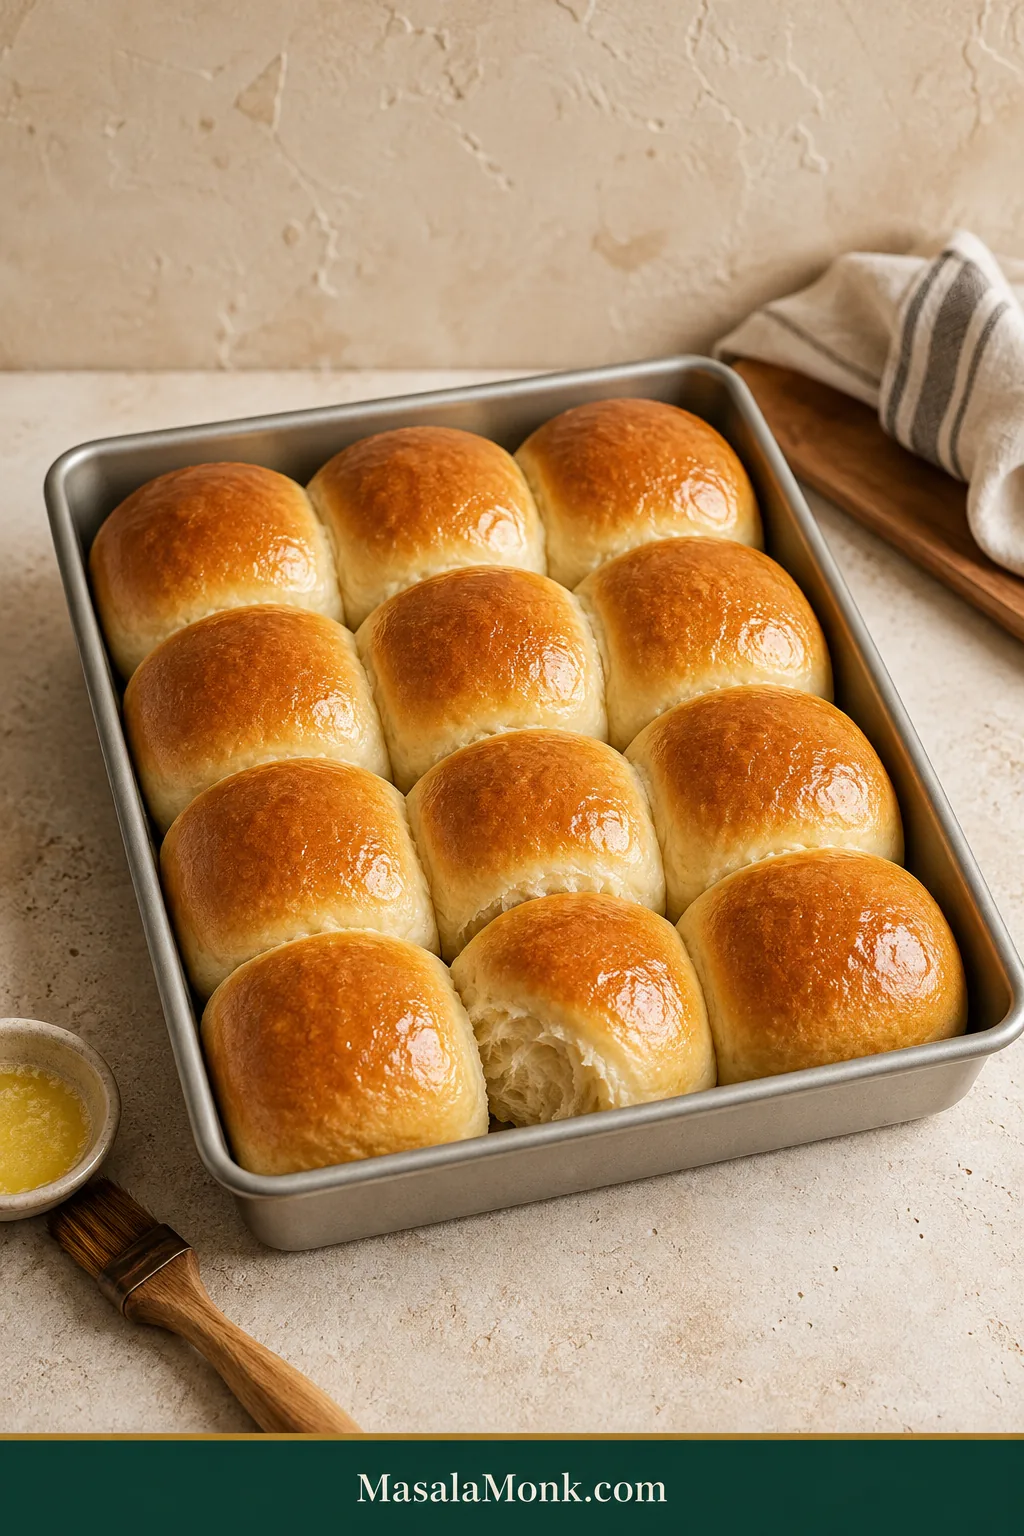
This recipe makes 12 buttery pull-apart rolls in a 9×13-inch / 23×33-cm pan. Bake at 350°F / 175°C in a conventional oven until the tops are golden and the center of a middle roll reaches about 190°F / 88°C.
Allow 2½–4 hours from start to finish. Most of that time is hands-off rising.
Jump to: Recipe · Dough Consistency · Proofing Guide · Troubleshooting
Soft, Fluffy & Buttery Dinner Rolls Recipe
Recipe at a Glance
| Yield | 12 dinner rolls |
|---|---|
| Dough per roll | 69–72 g / 2.4–2.5 oz |
| Hands-on, with mixer | 25–30 minutes |
| Hands-on, by hand | 35–40 minutes |
| First rise | 60–90 minutes |
| Final rise | 45–75 minutes |
| Bake time | 18–22 minutes |
| Total elapsed time | 2½–4 hours |
| Pan | 9×13-inch / 23×33-cm |
| Oven | 350°F / 175°C conventional |
| Stand mixer required? | No |
| Make ahead? | Yes |
Equipment
- large mixing bowl
- stand mixer with dough hook, optional
- digital kitchen scale, strongly recommended
- bench scraper or flexible dough scraper
- 9×13-inch / 23×33-cm baking pan
- instant-read thermometer, useful but optional
- pastry brush
Ingredients
For the dough
- 240 ml / 1 cup whole milk, warmed to 105–110°F / 40–43°C
- 45 g granulated sugar, about 3 tablespoons + 2 teaspoons
- 7 g / 2¼ teaspoons instant yeast
- 1 large egg, about 50 g without the shell
- 420 g / about 3½ cups all-purpose flour
- up to 30 g / about ¼ cup additional all-purpose flour, kept separate as a reserve
- 8 g / about 1¼ teaspoons fine sea salt
- 57 g / 4 tablespoons unsalted butter, softened
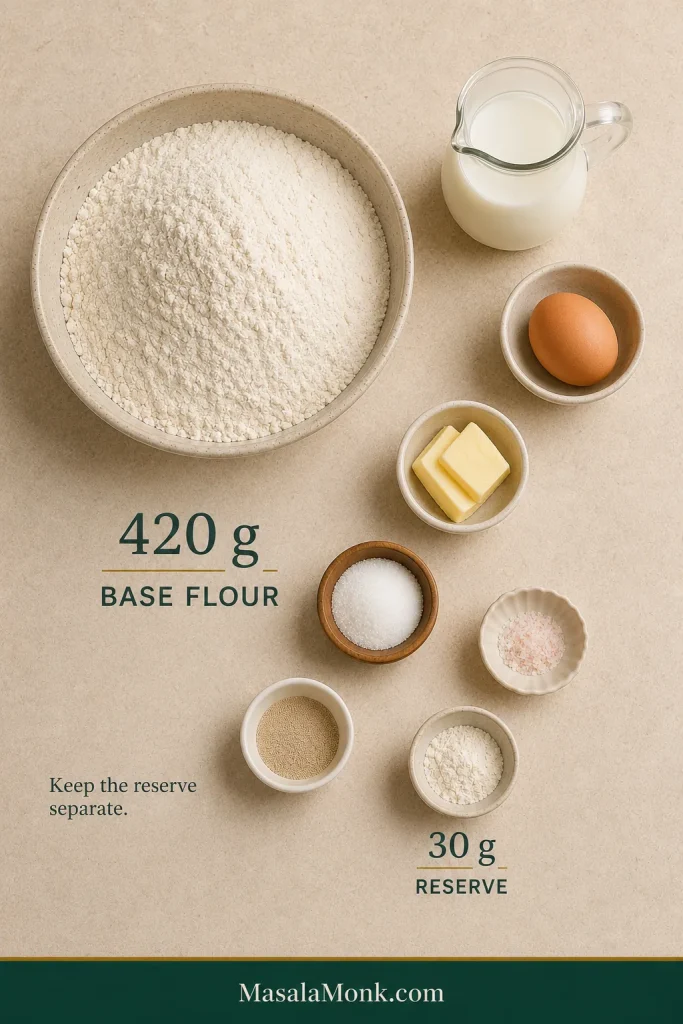
The butter should be soft enough that a fingertip presses into it easily, but not glossy, oily or partly melted.
For finishing
- 28 g / 2 tablespoons unsalted butter, melted
If you have a scale, use it for the flour and salt. Small measuring differences matter much more with those ingredients than they do with the milk or butter.
1. Mix the milk, sugar, yeast and egg
Pour the warm milk into the bowl.
Using active dry yeast? Stir the same 7 g / 2¼ teaspoons into the warm milk with a pinch of the measured sugar. Let it stand for 5–10 minutes, until creamy or lightly foamy, then add the remaining sugar and the egg.
Using instant yeast as written? Add the sugar and yeast directly to the warm milk, then add the egg.
Stir briefly to combine.
2. Add the base flour and salt
Add all 420 g of the base flour and the salt. Keep the separate 30 g flour reserve out of the bowl for now.
Mix on low speed or stir with a sturdy spoon until no large patches of dry flour remain.
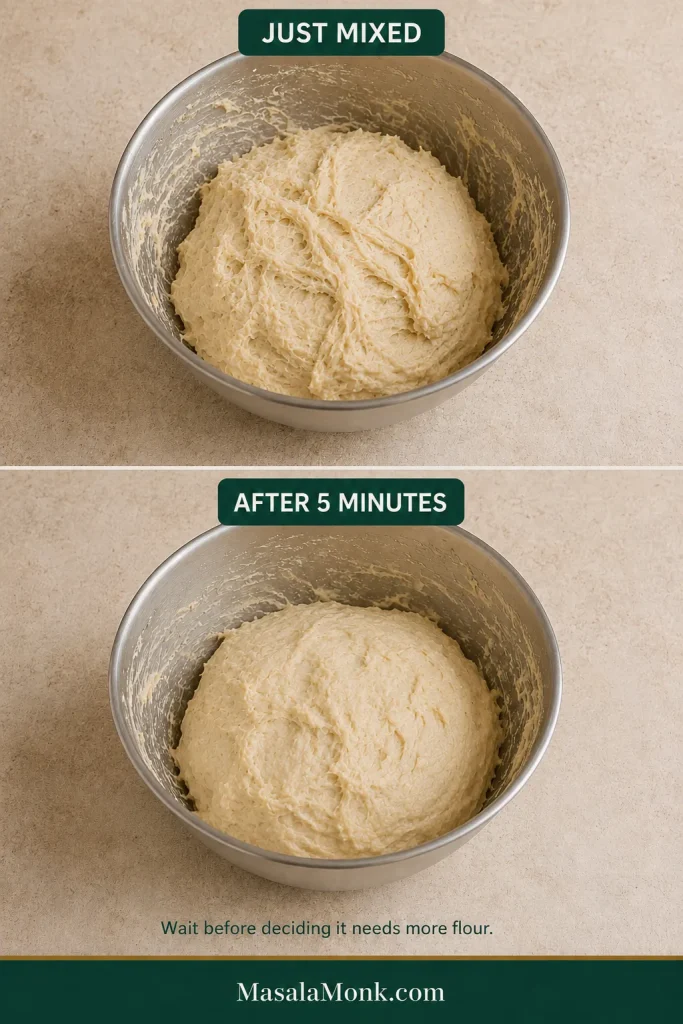
The dough will probably look rough and sticky. Give it 5 minutes before deciding anything needs correcting; the flour continues absorbing liquid during that short rest.
A sticky bowl at minute three is not a failed batch.
3. Start kneading
With a stand mixer, knead on low to medium-low speed for 3 minutes.
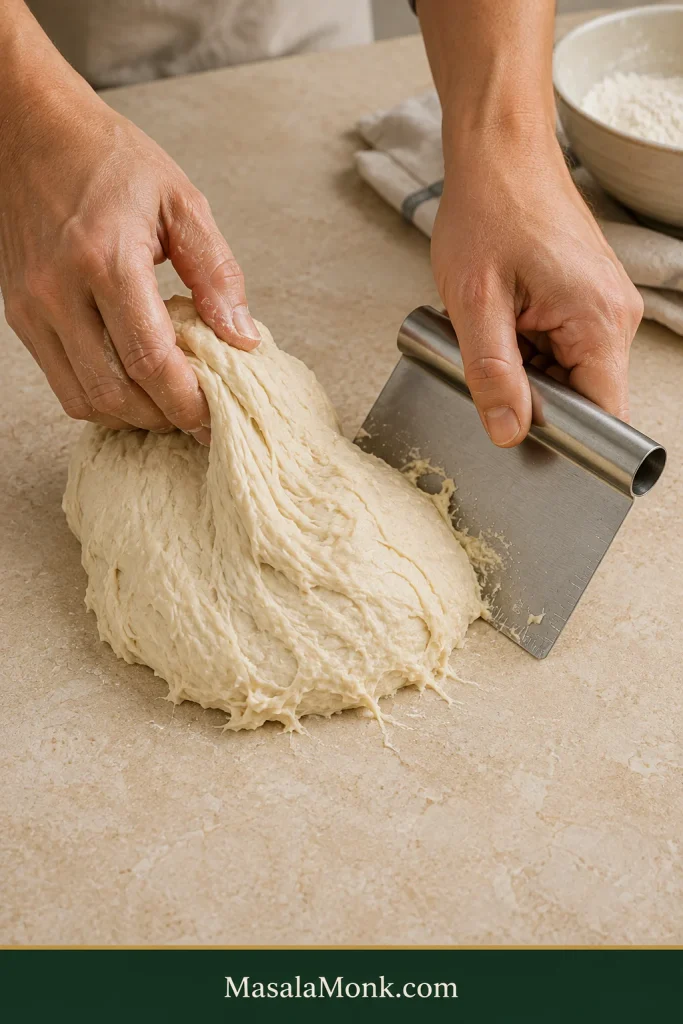
By hand, turn the dough onto a clean work surface and begin folding, stretching and pressing it. Use a dough scraper to gather sticky dough back together instead of reaching immediately for more flour.
You are not trying to make the dough tidy yet. You just want the rough mixture to begin becoming cohesive.
4. Work in the butter
Add the 57 g softened butter in 3 or 4 additions, letting most of each addition disappear into the dough before adding the next.
This is probably the least convincing the dough will look all day. The butter can make it softer, shinier and messier before the dough comes back together.
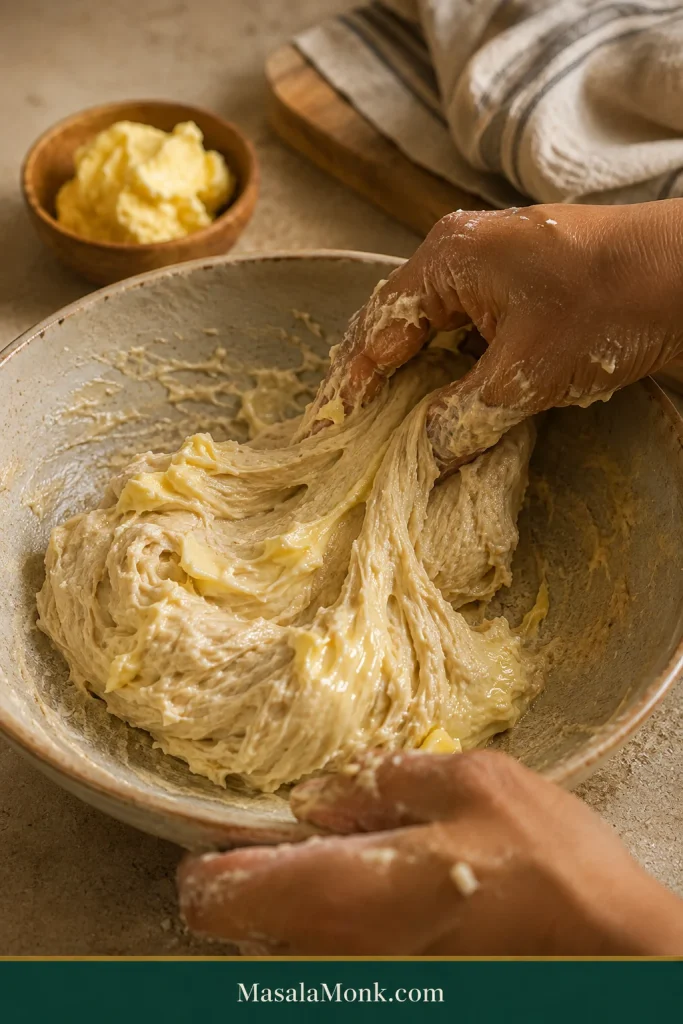
With a mixer, continue kneading for another 5–8 minutes. By hand, total kneading will generally take 10–15 minutes, sometimes longer.
5. Check the dough before adding reserve flour
By the end of kneading, the dough should feel soft, stretchy and cohesive, with a slight tack but no wet smear.
Stretch a small piece gently between your fingers. It should become noticeably thinner before tearing.
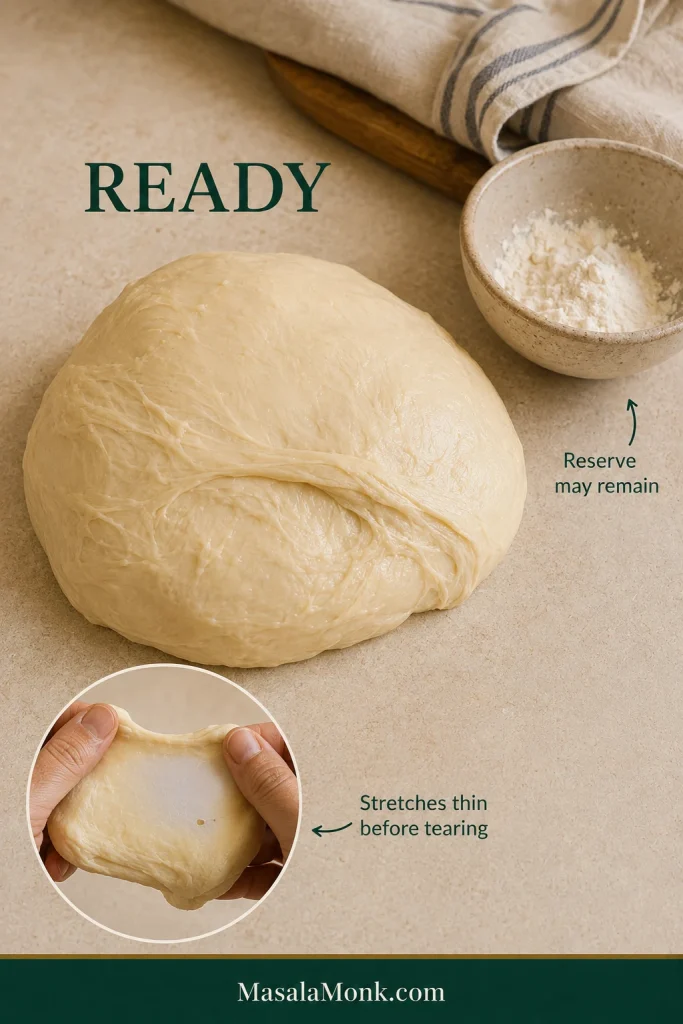
Only now should you decide whether any of the 30 g flour reserve is needed. Dough that still smears heavily and cannot hold itself together can take more flour in 5–10 g additions, worked in fully before you judge again.
Soft, elastic and only a little tacky? You’re there—leave the flour alone.
6. First rise
Lightly grease a clean bowl and place the dough inside. Cover so the surface does not dry out.
Let it rise until roughly doubled and visibly aerated. Start paying close attention around the 60-minute mark; cooler kitchens take longer and warm kitchens move faster.
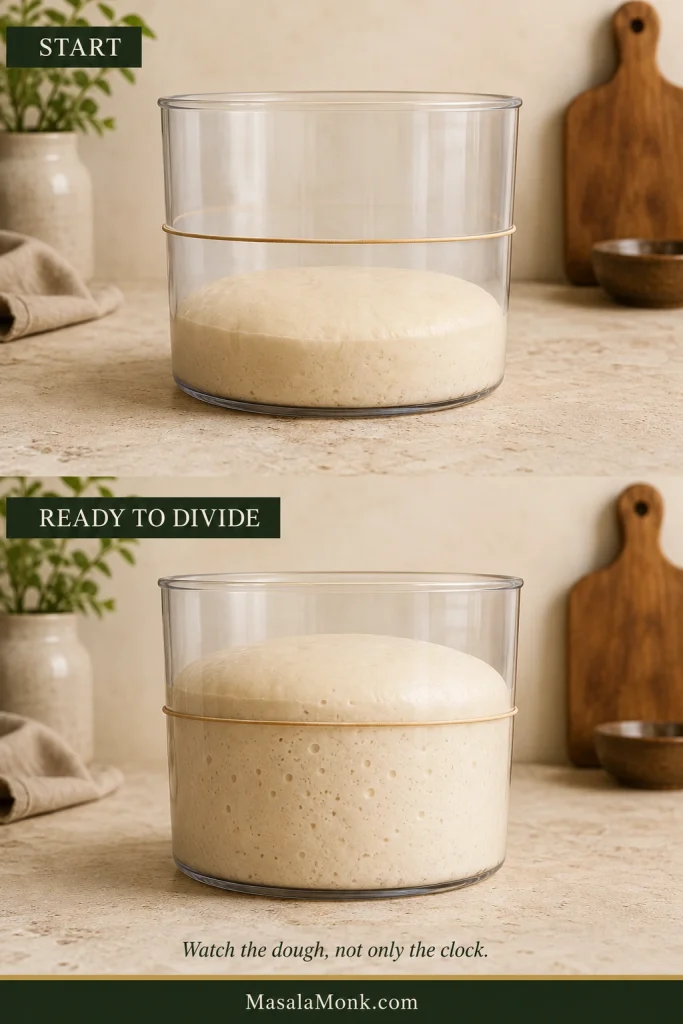
A kitchen already around 82°F / 28°C or above does not need an artificially warm rising spot. While the dough works, you can get the rest of dinner moving instead of hovering over the bowl.
7. Divide
Turn the risen dough onto a clean work surface and press gently to release the largest gas pockets.
Weigh the whole piece and divide by 12. Expect pieces of approximately 69–72 g / 2.4–2.5 oz, depending on how much reserve flour the dough needed.
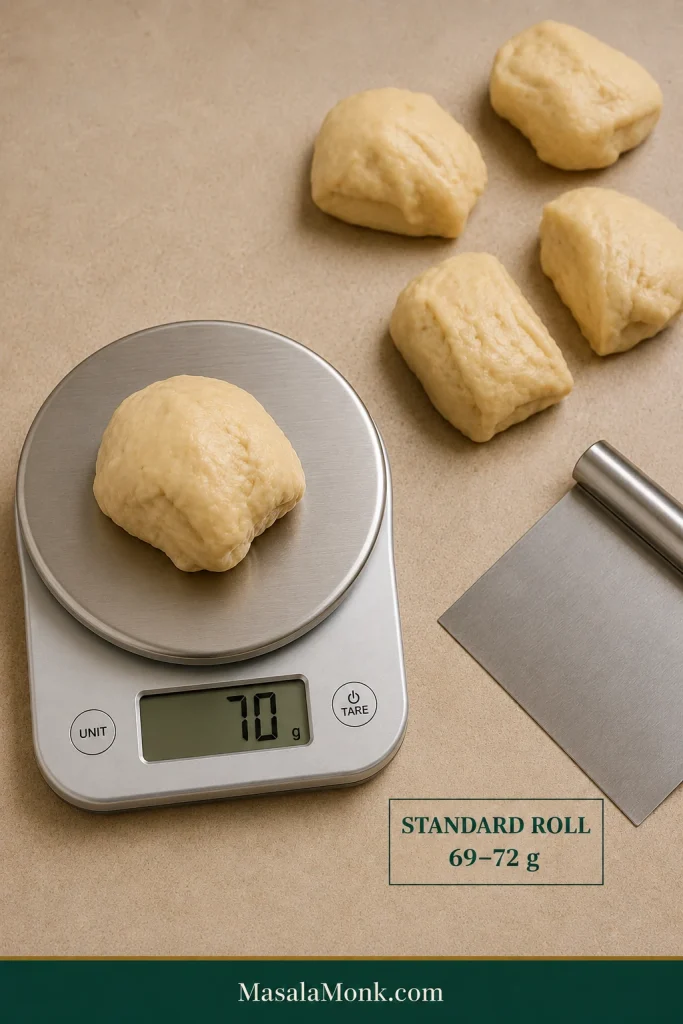
That extra minute with the scale prevents a pan where one oversized roll is still raw while the smallest has already finished baking.
8. Shape smooth rounds
Working with one portion at a time:
- Flatten gently.
- Bring the outside edges underneath.
- Gather the seam below.
- Turn seam-side down.
- Cup your hand around the dough.
- Move it in small circles against the work surface until the top looks smooth and lightly tightened.
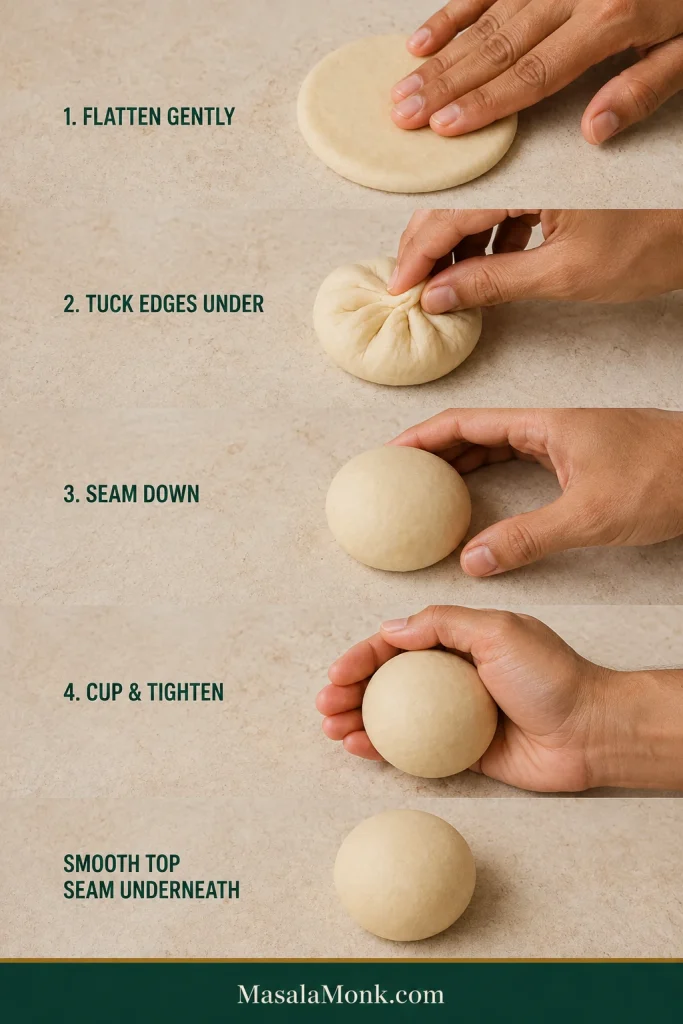
The surface should feel tidy, not stretched to the point of tearing. Use bench flour sparingly; a little grip against the counter helps create surface tension.
9. Arrange in the pan
Lightly butter or grease a 9×13-inch / 23×33-cm pan.
Arrange the rolls in 4 rows of 3, leaving visible gaps. Those spaces will narrow during the final rise until twelve separate rounds begin looking like one pan of dinner rolls.
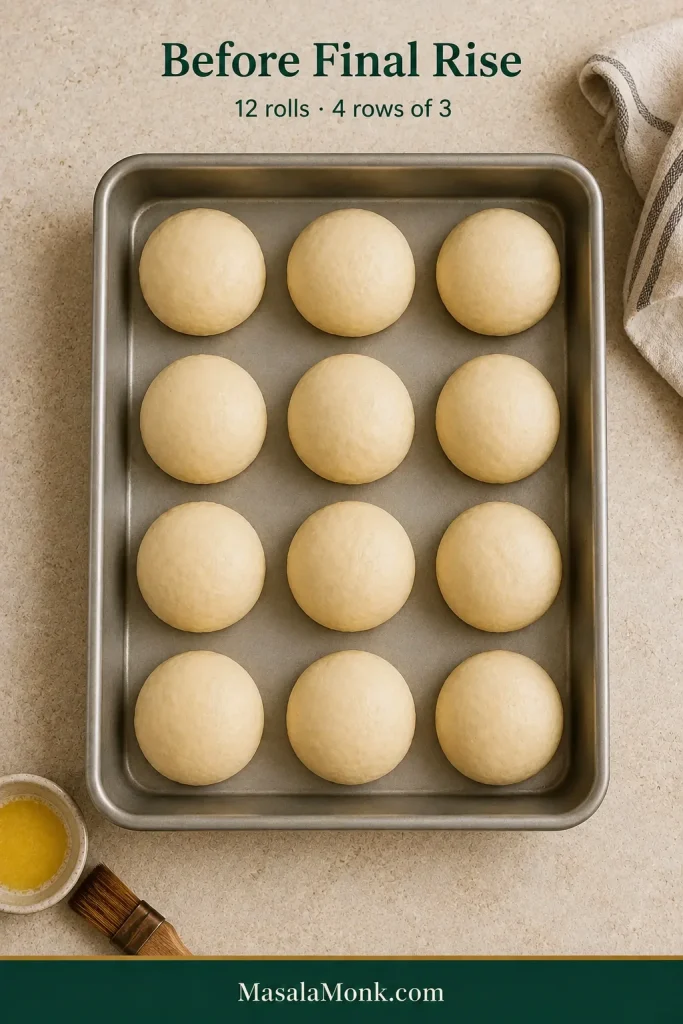
Where neighboring rolls meet, their sides stay pale and especially tender. Those protected edges become the soft pull-apart part that tears away with almost no crust.
10. Final rise
Cover with lightly greased plastic wrap or another roomy cover that will not stick to the tops as they expand.
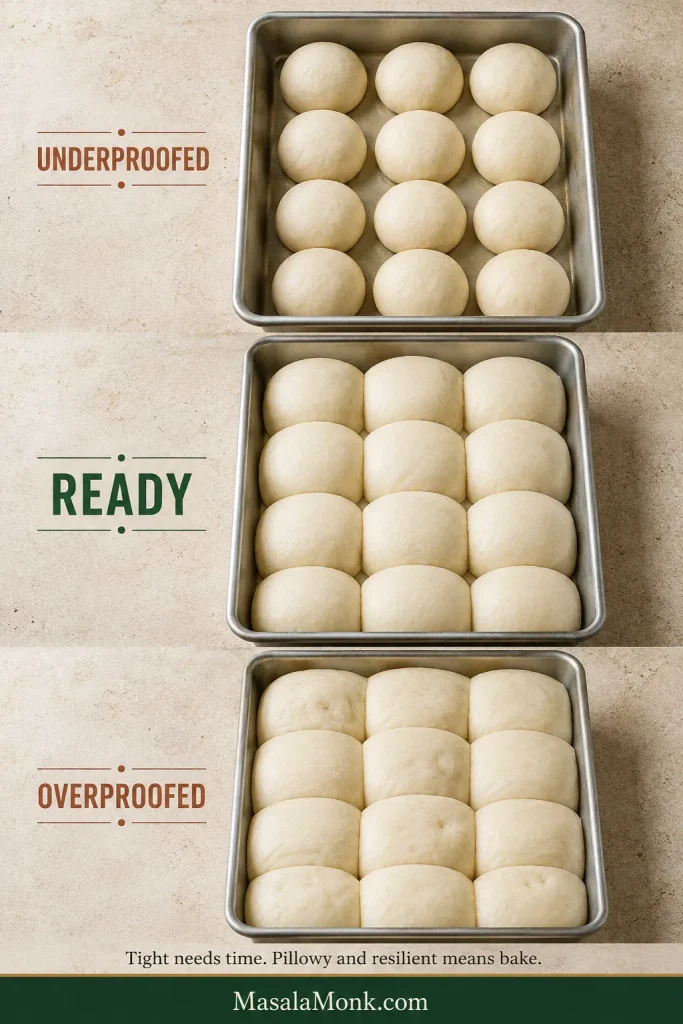
Let the rolls become clearly larger, rounded and pillowy. Begin looking closely around 45 minutes, then bake when the rolls look and feel ready—not simply because the timer says so.
Begin heating the oven to 350°F / 175°C conventional before the rise is finished.
Tight-looking rolls need more time. Once they look pillowy while still feeling resilient, they are ready for the oven.
11. Bake
Bake in the preheated oven and begin checking at 18 minutes. Standard-size rolls will generally finish within 18–22 minutes.
The tops should be golden, the middle rolls should look set, and an instant-read thermometer inserted into the center of a middle roll should read about 190°F / 88°C.
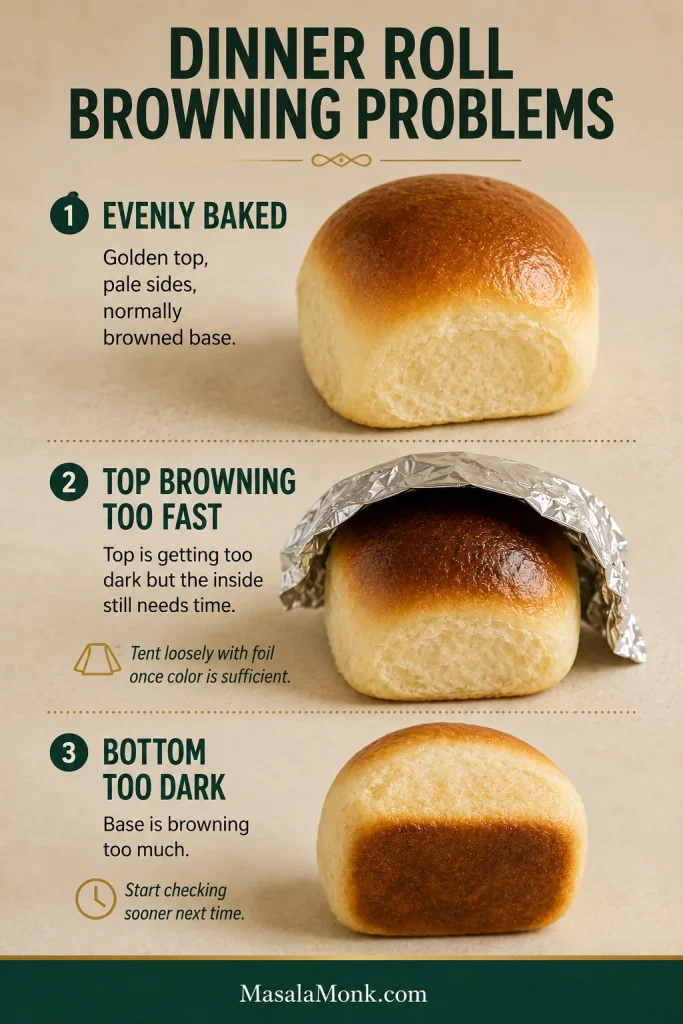
Already enough color on top while the centers still need time? Tent the pan loosely with foil. Once the middle is done, take the rolls out; deeper browning is not worth a drier crumb.
Still unsure about the center? See the doneness guide.
As the tops turn golden, the kitchen starts smelling buttery and freshly baked.
12. Butter and serve
Brush the hot tops immediately with the 28 g melted butter, then let the rolls rest for 5–10 minutes.
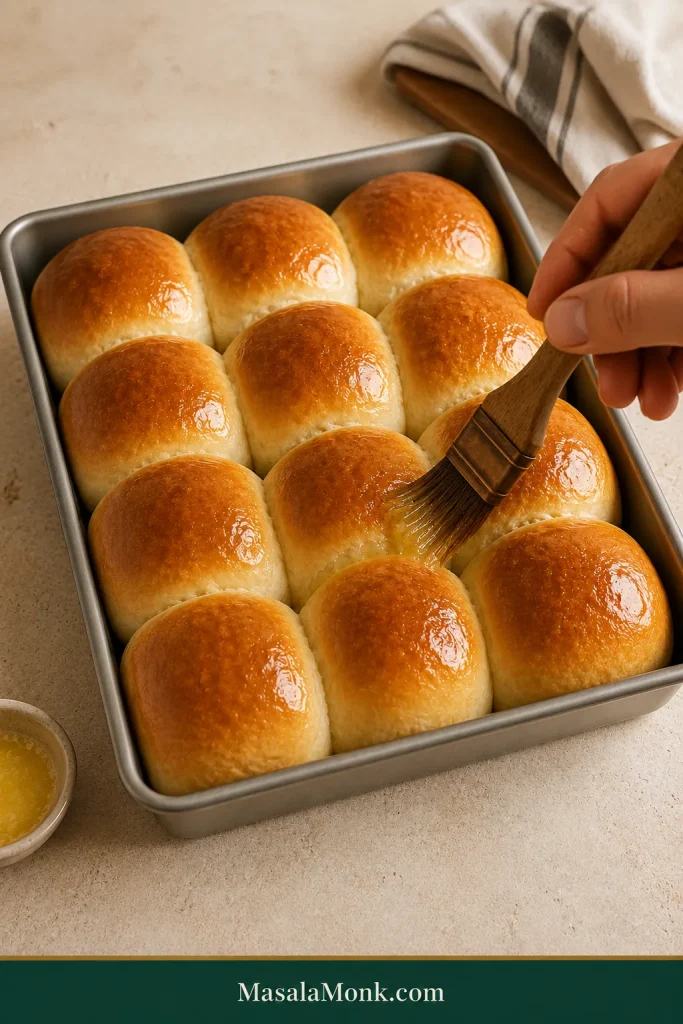
Keep the Rolls Together Until Serving
They stay warmer as a group, the touching sides remain tender, and everyone can simply pull one away at the table.
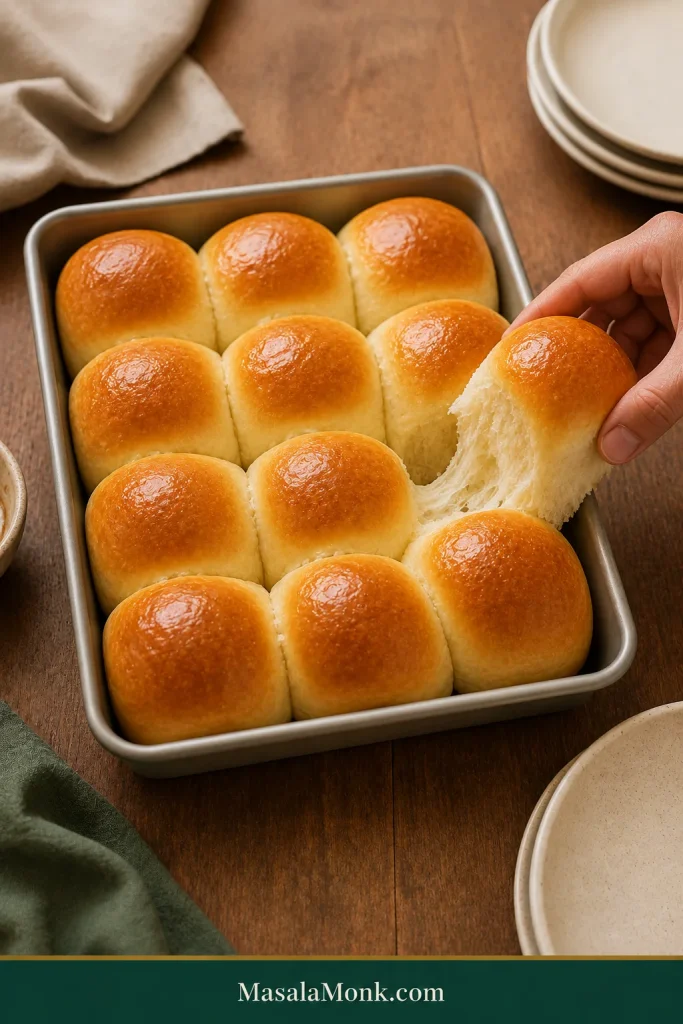
Saving them for later instead? Move them to a wire rack after about 10 minutes so steam does not collect underneath.
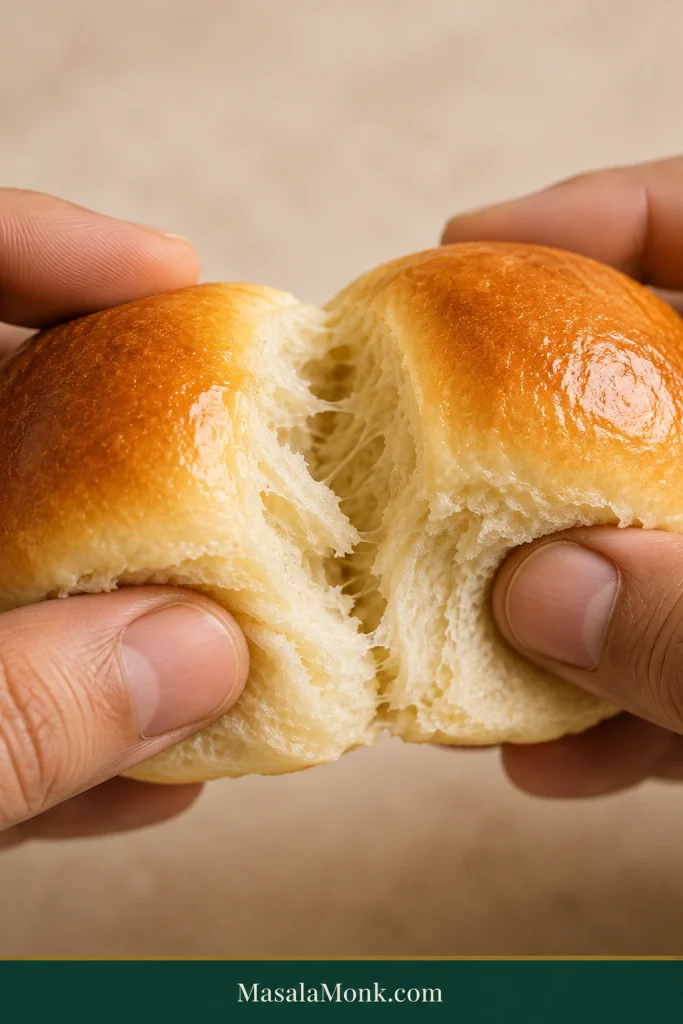
Tear one open while it is still warm. The crumb should give gently under your fingers and pull apart with a little stretch instead of breaking into a tight or crumbly mass.
Need help with a specific stage? Jump to sticky dough, kneading, the first rise, final proof, doneness, dense rolls or make-ahead timing.
Before troubleshooting individual stages, it helps to know what a successful roll should feel like.
The Texture We’re After
Soft and fluffy are related, but they are not the same thing.
A good dinner roll has a tender crust, moist crumb and light internal structure, with enough elasticity to pull apart cleanly instead of crumbling. The joined sides should peel apart with very little crust, while the top stays thin and golden.
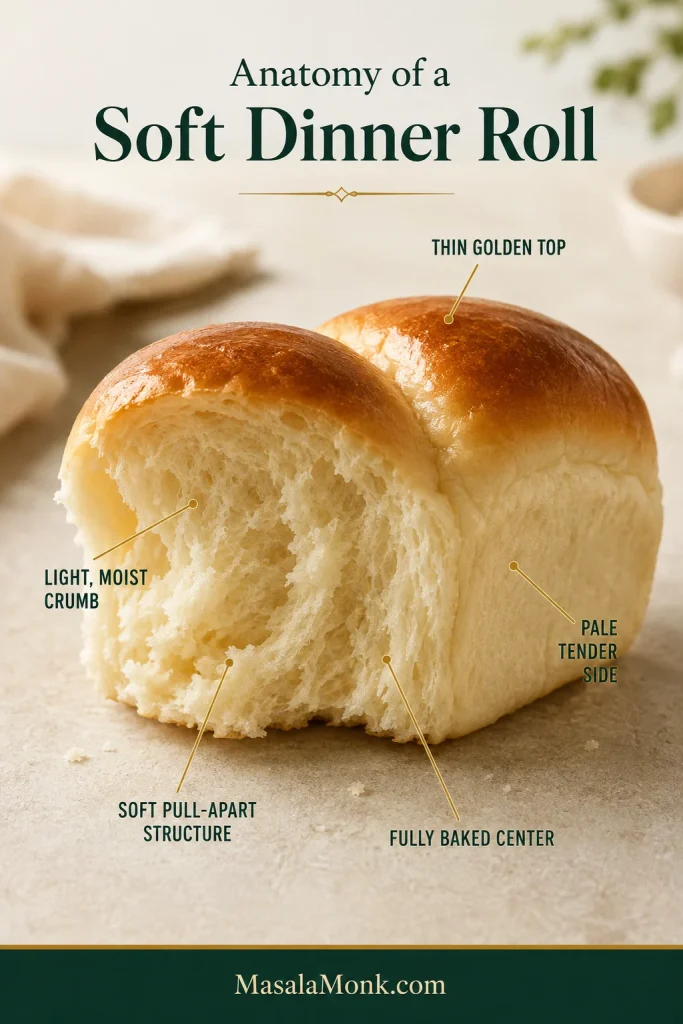
The target flavor is buttery enough that a warm roll tastes good on its own, but restrained enough to sit beside gravy, soup or stew without competing with dinner. Mild sweetness and a pleasant yeast aroma should round things out without pushing the roll toward cake or heavy brioche.
Ingredient Choices That Matter
All-purpose vs. bread flour. All-purpose flour is the default because it gives the rolls enough strength to rise without making the crumb overly chewy. Bread flour can work, but expect a slightly stronger bite. Flour absorbs liquid differently from one brand to another, which is why a small reserve stays out of the bowl until after kneading.
Milk, Butter, Egg, Sugar, Salt & Yeast
Milk. Whole milk gives the dough a little more richness, but 2% works well too. If 2% is already in the fridge, use it. You do not need a grocery run to make good dinner rolls.
Butter and egg. Butter contributes tenderness and richness; the egg brings moisture, color and structure. A second brushing of butter after baking softens the hot tops further. For a sweeter enriched dough, our soft cinnamon roll recipe takes those ingredients in a different direction.
Sugar, salt and salted butter. These rolls should taste gently sweet, not dessert-like. Sugar helps with richness and browning; salt keeps the bread from tasting flat. Salted butter can work, but brands vary, so unsalted gives you better control over the 8 g salt in the recipe.
Yeast. Instant yeast goes straight into the mixture as written. Active dry yeast works too; Step 1 shows exactly how to use it. Red Star Yeast’s yeast FAQ has a deeper comparison if you want one.
No egg, gluten-free or no yeast. None is a simple one-for-one omission. Each changes the dough enough to need an adjusted formula.
Once those ingredients meet in the bowl, the first real judgment arrives quickly: is the dough supposed to feel this sticky?
How Sticky Should Dinner Roll Dough Be?
Dinner-roll dough should feel soft, elastic and slightly tacky after kneading—not wet enough to smear and not firm enough to feel stiff. Dough that still cannot hold itself together after proper kneading can take flour in 5–10 g additions.
| Dough state | What it feels like | What to do |
|---|---|---|
| Too wet | Smears heavily and cannot hold together after kneading | Add reserved flour 5–10 g at a time |
| Right | Supple, elastic and cohesive with a slight tack | Leave it alone |
| Too dry | Firm, rough, tight or reluctant to stretch | Stop adding flour |
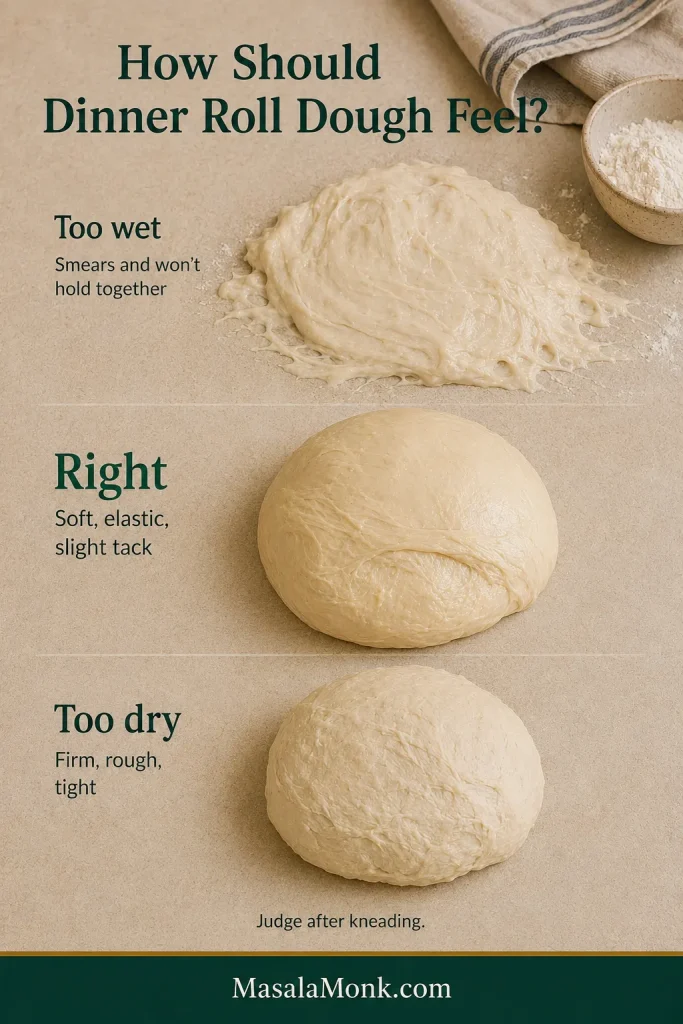
Fresh enriched dough can feel considerably stickier than the finished dough. Kneading gives the flour more time to absorb liquid, develops elasticity and works the butter fully into the mixture. Humidity can shift the final feel too.
When to Add the Reserve Flour
Wait until the dough has rested and been properly kneaded before reaching for the reserve. If it still leaves a persistent wet smear and cannot hold itself together, add flour in 5–10 g increments; otherwise, leave the reserve alone.
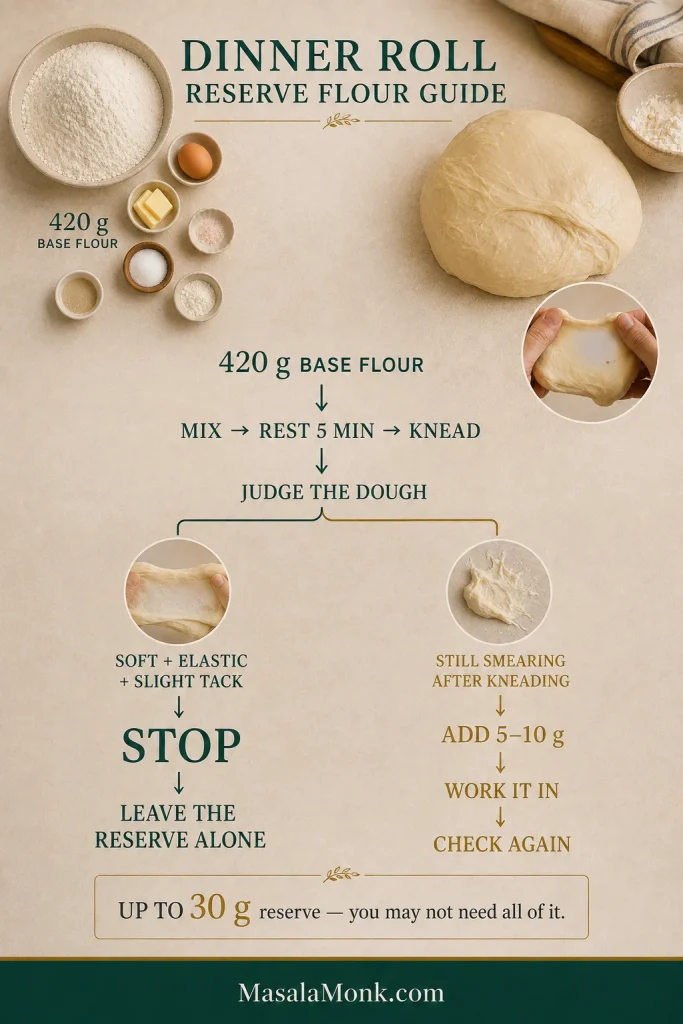
Already a little firmer than you wanted? Stop adding flour and carry on. A slightly firm dough can still rise and bake well, and repeatedly adjusting it in pursuit of a perfect texture can create a bigger problem than the one you started with.
Ready to continue? Return to Step 5: Check the dough.
How to Know When Kneading Is Done
Kneading is done when the dough has changed from rough and sticky to smoother, elastic and able to stretch noticeably thin before tearing.
Pull off a small piece and stretch it slowly. Dough that tears almost immediately with a rough edge still needs development. As it becomes ready, that same piece will stretch thinner and may begin to look slightly translucent before it tears.
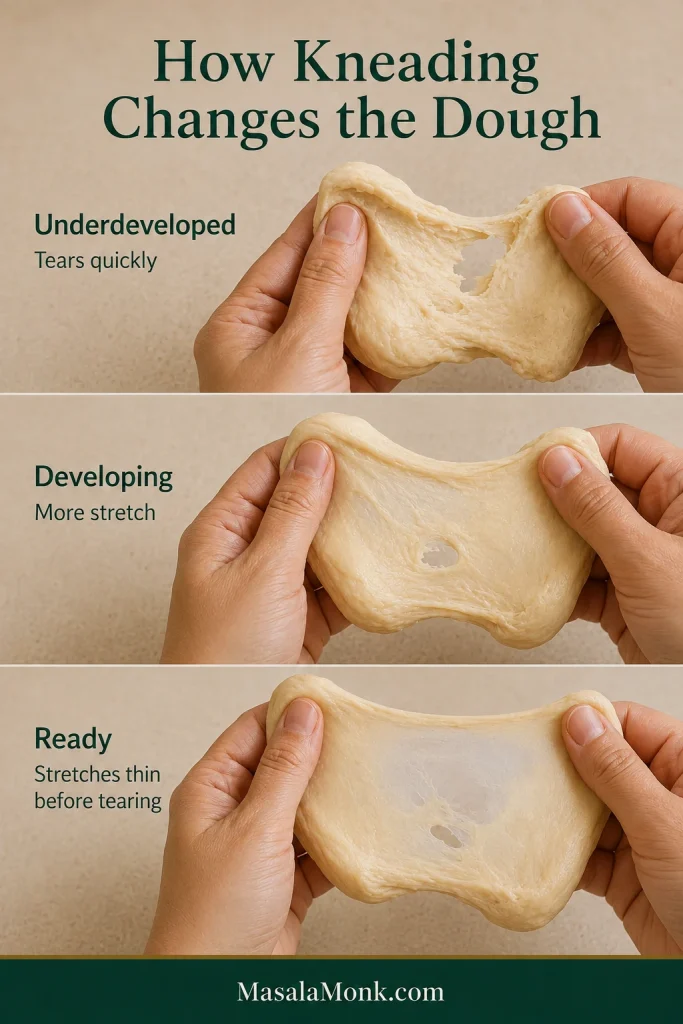
You do not need a flawless bakery-school windowpane every time you make dinner.
A small dough batch may still cling near the bottom of a large mixer bowl when it has developed properly, so a spotless bowl is not the goal. Judge the dough’s elasticity and stretch first.
Working by hand? Use a scraper to gather sticky dough from the counter and keep kneading without continually dusting in more flour. If a long mixer knead makes both the bowl and dough noticeably hot, especially on a warm day, give them a brief pause.
Dough developed? Return to Step 6: First rise.
First Rise: Let the Dough Set the Pace
The dough is ready to divide when it has roughly doubled, looks visibly aerated and feels much lighter under your hands than it did after kneading.
Not sure whether it has truly doubled? Look at the overall volume, not only the height. A wide bowl can make vertical change deceptive. A quick photograph at the beginning—or a straight-sided container when you have one—makes comparison much easier.
The 60–90 minute range tells you when to pay attention. A cool room stretches the wait; a hot kitchen shortens it.
By this point, the sticky mixture that made you suspicious at the beginning should feel calmer, airier and far easier to divide.
Risen and airy? Return to Step 7: Divide.
Choose Your Roll Size
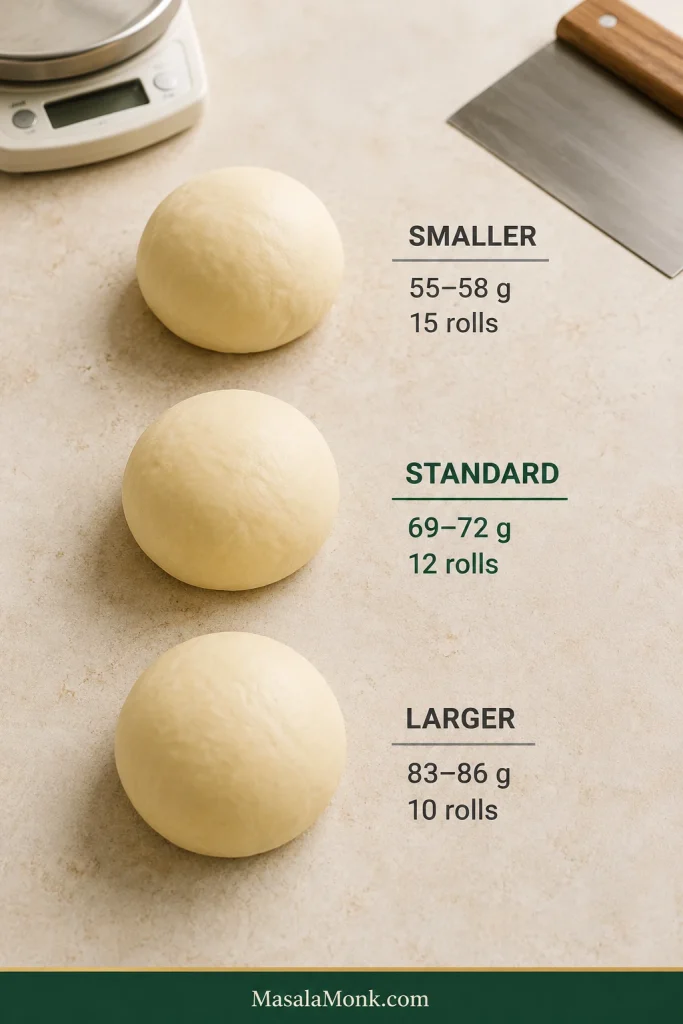
The standard batch makes 12 rolls weighing about 69–72 g / 2.4–2.5 oz each. For a first batch, stick with this size.
Making 15 smaller rolls? Aim for 55–58 g / about 2 oz each and begin checking them earlier.
Making 10 larger rolls? Aim for 83–86 g / about 3 oz each. They will generally need longer in the oven, so judge the center to decide when they are finished.
Half Batch or Double Batch
Half batch: For 6 standard rolls, halve every ingredient. Beat the egg first and use 25 g of it, then bake in a smaller dish that still allows the rolls to expand toward one another.
Double batch: For 24 rolls, double the ingredients, keep the individual portion size the same and use two pans. The bake time does not double just because the quantity of dough did.
Underproofed, Ready or Overproofed?
In this guide, final proof means the shaped rolls’ last rise before baking.
Dinner rolls are ready to bake when they look distinctly puffy, the gaps between them have mostly closed, and a shallow fingertip indentation returns very slowly. Fast springback means more time; fragile dough that barely recovers has gone too far.
Underproofed
The rolls still look compact and tight, and a shallow fingertip indentation springs back quickly.
Ready to bake
The gaps have narrowed dramatically, the tops look rounded and pillowy, and the whole pan appears fuller. A shallow indentation stays visible or returns only slowly while the dough still feels resilient.
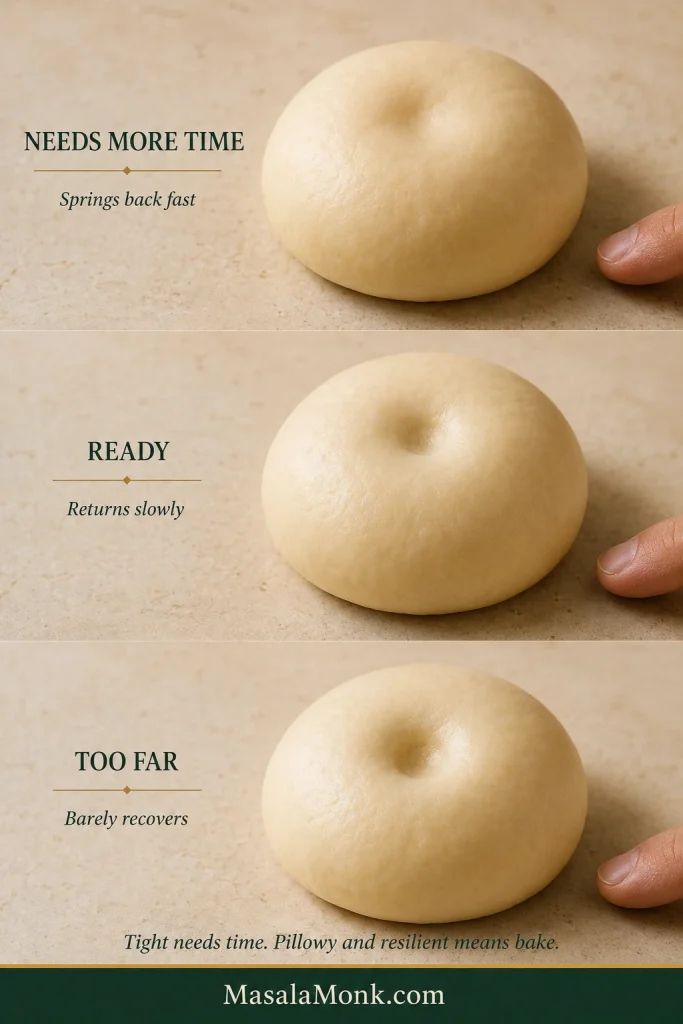
This is the moment the pan stops looking like twelve dough balls and starts looking like dinner rolls.
Overproofed
The rolls may look extremely swollen, slack or fragile. An indentation barely recovers, and the dough may begin to deflate when touched.
Once they reach this state, do not give them more room-temperature rise time. Bake promptly, handle the pan gently and expect less lift in the oven if they have already gone too far.
You do not have to turn the poke test into an examination. Tight needs time. Pillowy and resilient means bake.
Rolls pillowy and resilient? Return to Step 11: Bake.
How Do You Know Dinner Rolls Are Done?
Dinner rolls are done when the tops are golden, a center roll looks fully set, and its middle reaches about 190°F / 88°C.
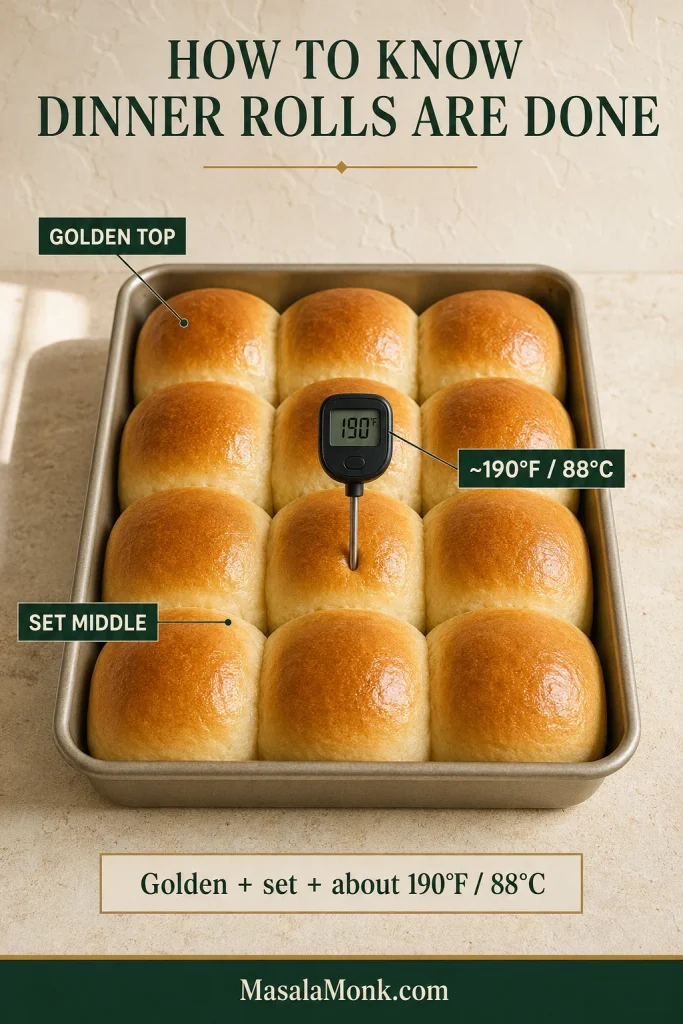
Begin checking standard rolls at 18 minutes. Tops that are coloring faster than the center is baking can be loosely tented with foil. Once a middle roll is done, remove the pan instead of leaving it in solely for deeper color.
Pan material also affects browning. Dark metal can color bread faster than lighter metal, while glass and ceramic behave differently again, so treat 18–22 minutes as a practical range and watch the rolls themselves.
For more on using internal temperature with yeast breads, King Arthur Baking’s thermometer guide explains the technique in more depth.
Center done? Return to Step 12: Butter and serve.
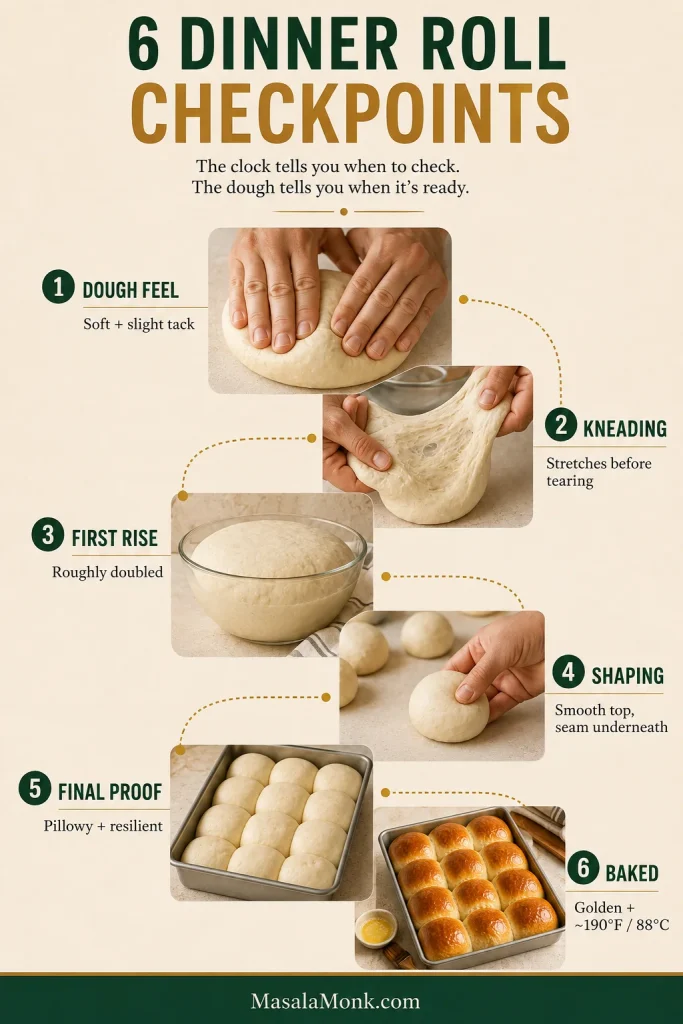
Dinner Roll Success Checkpoints
If you want one quick pass through the whole process, these are the six checkpoints worth remembering before you change the formula or blame the clock.
Dinner Roll Troubleshooting
When something goes wrong, the fastest clue is often when the batch changed direction.
Barely any rise: A cool room can simply make fermentation slow. Dough that shows no meaningful movement at all makes the yeast—and whether the milk was excessively hot—more important suspects.
Puffy rolls that spread, flatten or collapse: Very fast expansion followed by fragile, overinflated dough points toward a final rise that went too far. Rolls that spread before becoming properly puffy may have needed more kneading, or the rounds may not have been tightened enough during shaping.
Top browns before the middle is ready: Tent loosely with foil once the rolls have enough color and let the center finish. If the same surface or side keeps coloring first, pay attention to how your oven and pan are browning the batch before changing the dough.
Dark bottoms: A pan that browns the base quickly—or simply too much oven time—may be responsible. Start checking sooner on the next batch and note whether the bottoms consistently color well before the tops.
Damp bottoms after cooling: That is usually trapped steam. Move rolls you are saving to a rack after their short rest in the pan.
Dense rolls and hard rolls give even better clues when you replay the batch in order.
Why Dinner Rolls Turn Out Dense
Dense dinner rolls usually come back to too much flour, dough that wasn’t kneaded enough, rolls baked before they had puffed properly, or a center that needed more time in the oven. The stage where the problem first appeared tells you where to look.
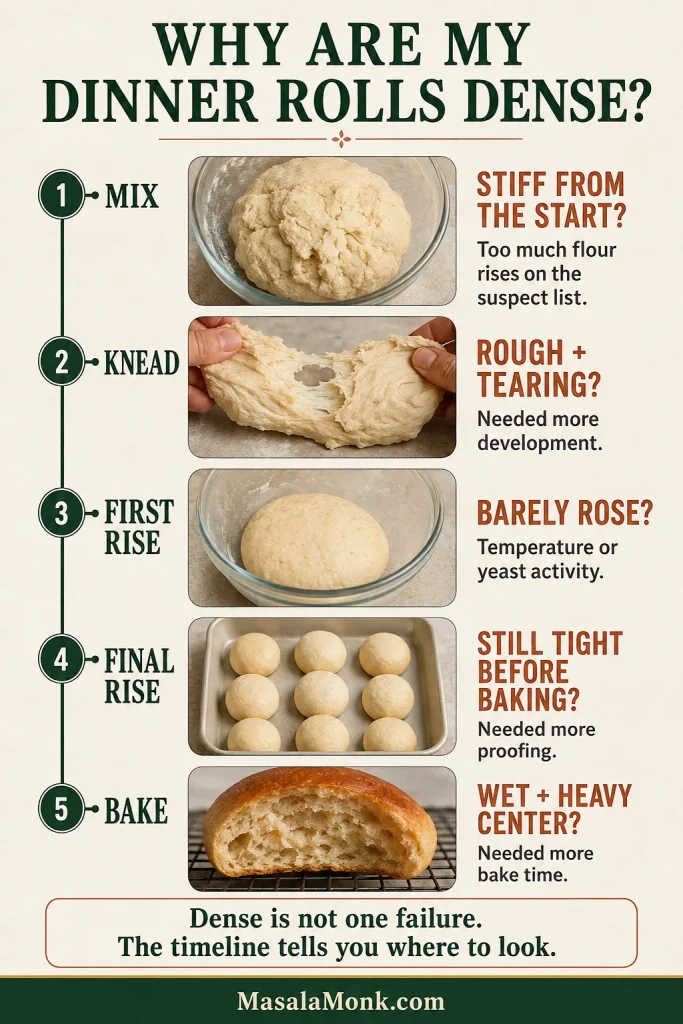
Stiff from the beginning? Excess flour moves to the top of the suspect list. Tight dough cannot expand as freely.
Rough and tearing after kneading? The dough probably needed more kneading. Yeast can produce gas, but the dough still needs enough elasticity to hold it.
Barely rose the first time? Yeast activity and temperature matter more here. Cold dough may simply be slow; dough that never moves points more strongly toward a yeast problem.
Good first rise, but tight-looking rolls at bake time? They probably went into the oven before the final rise was complete.
Huge, fragile rolls that later sagged? The final rise probably went too far.
Beautiful outside, wet and heavy inside? The centers needed more baking.
Dense is not one failure. The timeline tells you where to look.
Why Did My Dinner Rolls Turn Hard?
Hard straight from the oven usually points toward excess flour or overbaking. Rolls that were soft hot but firm after cooling were probably already borderline dry. If they become dry only the next day, storage and normal bread staling matter more.
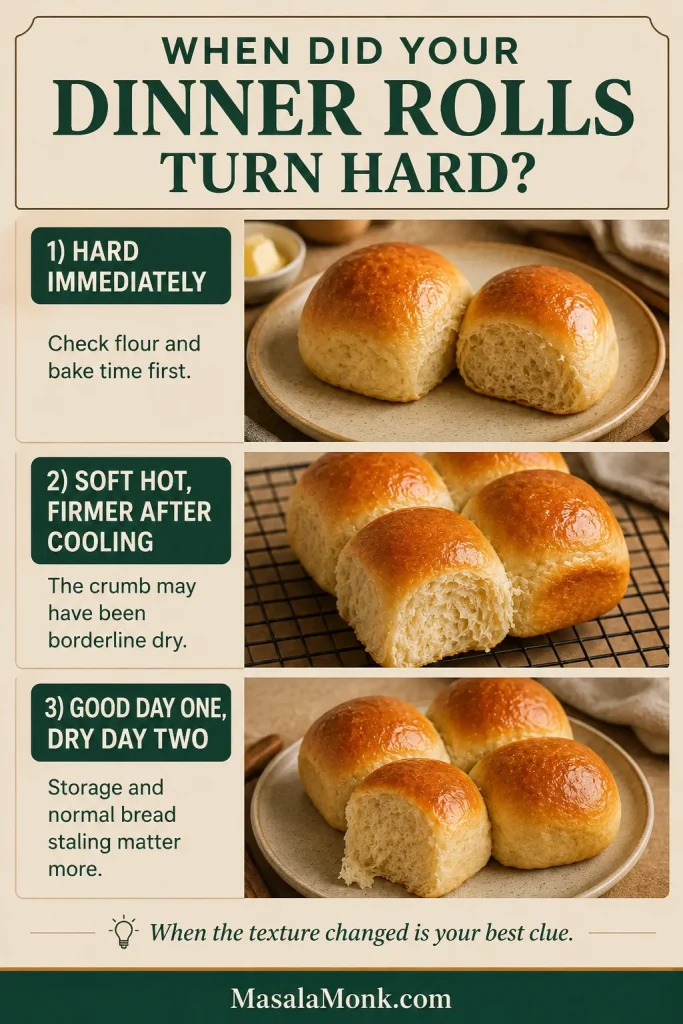
Hard immediately: Revisit flour and bake time first.
Soft while piping hot, then noticeably firmer: Steam can temporarily make a slightly dry crumb feel more tender than it really is. Cooling reveals the true texture.
Good on day one, dry on day two: Cool the rolls completely before sealing them airtight, then warm leftovers before serving again.
Once the rolls are well risen and tender, keeping them that way is mostly a matter of cooling, storing and reheating gently.
Soft when fresh but dry later? Go to storage and reheating · Back to recipe.
Make-Ahead Dinner Rolls
Best fresh texture: make and bake the rolls the same day.
Planning to bake tomorrow? Shape the rolls, arrange them in the pan, cover well and refrigerate immediately instead of completing the room-temperature final rise. Keep them chilled for up to 16 hours.
The next day, bring the pan out 2–3 hours before you expect to bake and let the rolls finish rising. A warm kitchen may move faster; a cool one may need longer. Bake when they reach the same pillowy, resilient state described above.
Baking for Thanksgiving or Christmas? The overnight route can make the day considerably calmer when the oven and your attention are already busy.
Lowest-stress long-term option: bake the rolls first. Cool completely, freeze airtight, then thaw and warm when you need them.
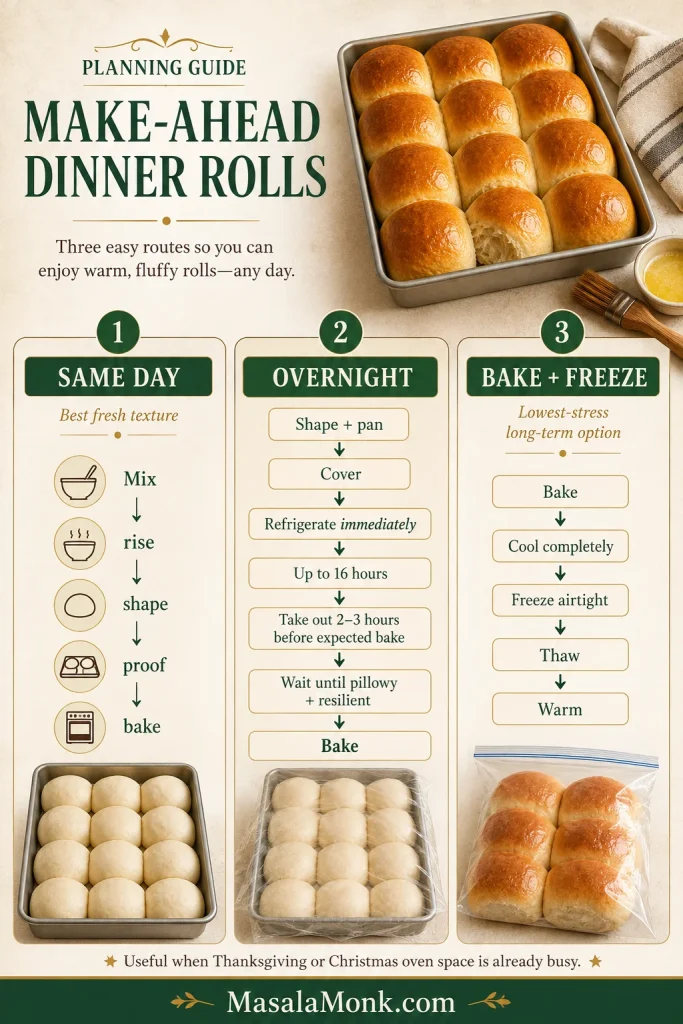
Baking after an overnight chill? Check final proof before the oven.
Store, Freeze & Reheat
These rolls are at their best warm on the day they are baked. Airtight storage keeps leftovers good, but reheating is what brings back much of that fresh-baked tenderness.
Saving leftovers? Move the rolls to a rack after about 10 minutes, cool completely, then seal airtight. Keep at room temperature for 2–3 days or freeze for up to 2 months for best quality.
Room-temperature roll: microwave one for 10–15 seconds, just until pleasantly warm.
Frozen rolls: thaw them first. For several thawed rolls, cover loosely with foil and warm at 300°F / 150°C for 8–15 minutes, depending on the amount.
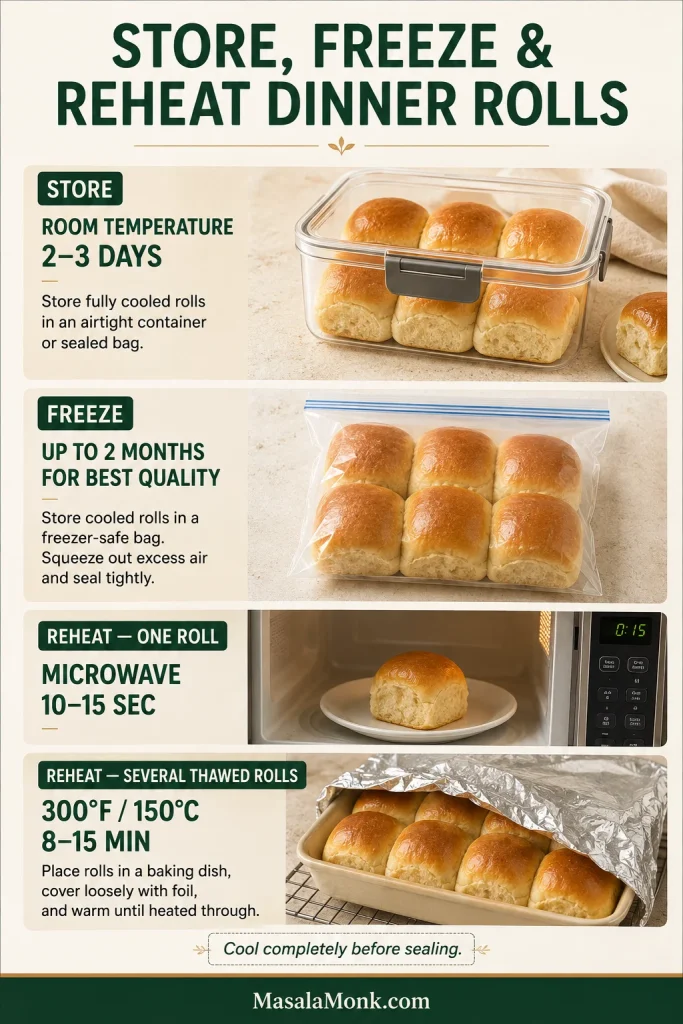
A little melted butter afterward is optional.
A ten-second warm-up tomorrow is a far better bargain than overbaking the rolls today.
What to Serve With Soft Dinner Rolls
After all the dough talk, this part can stay simple.
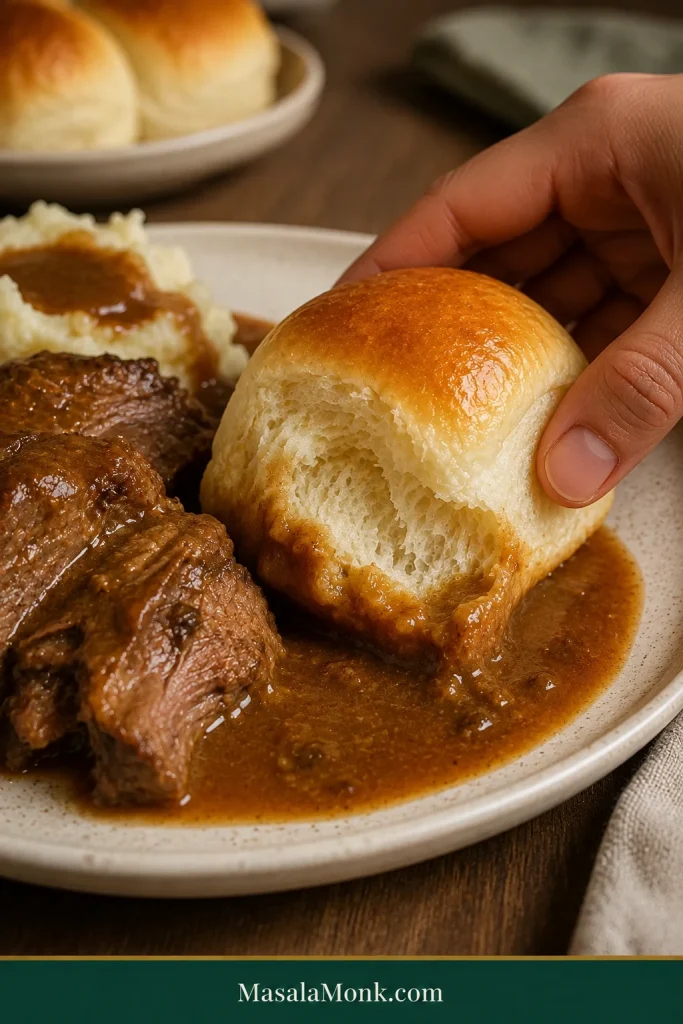
Dinner Rolls with Roast, Gravy, Soup or Stew
Serve the rolls beside a roast, soup, stew or anything with enough gravy or sauce to make tearing off another piece seem sensible. Slow cooker brisket gives them exactly that sort of plate.
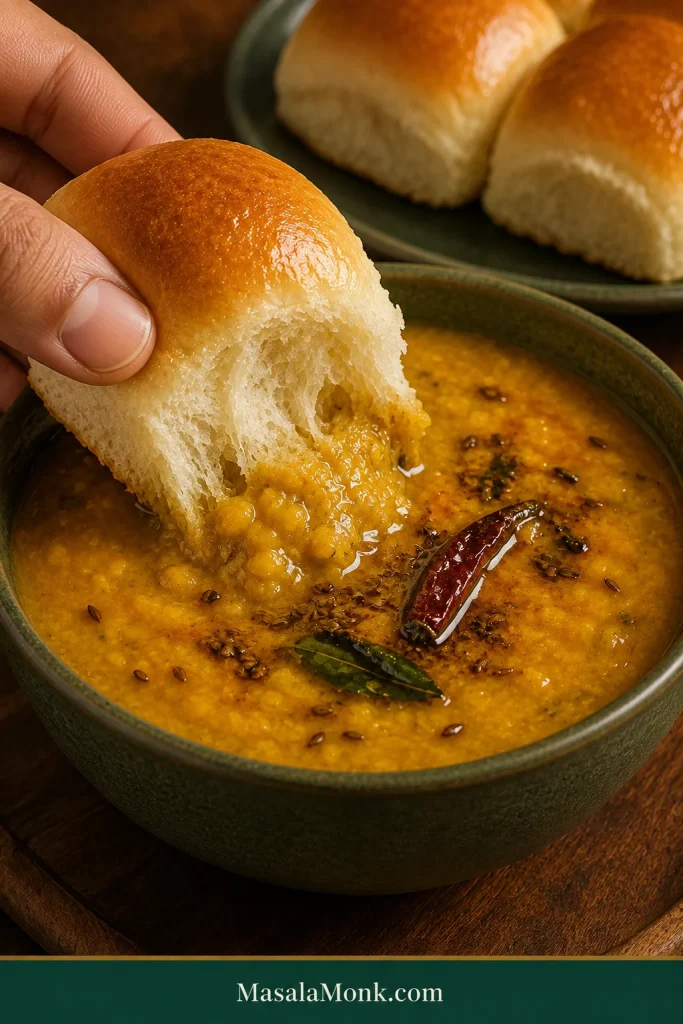
Dinner Rolls with Dal Tadka
They do not have to stay inside the American roast-dinner box, either. A warm roll is surprisingly good beside dal tadka, where the tender crumb can scoop up buttery lentils.
Left the next day, split one for a small sandwich—or simply warm it, add butter and let breakfast be easy.
When the Dough Starts Making Sense
Soft enriched dough can look uncertain before it becomes reassuring.
At first it sticks. Butter makes it messier for a while. Rise times refuse to fit neatly into every kitchen.
Then the checkpoints begin to feel familiar.
You notice when tacky is perfectly normal and when wet really does mean wet. You feel the dough becoming elastic. The first rise makes the same dough that looked awkward in the bowl feel light under your hands. Later, the gaps in the pan disappear and you recognize that the rolls are ready without needing a timer to persuade you.
That is when homemade dinner rolls stop feeling like a gamble.
And when the pan finally comes out golden and the butter disappears into the hot tops, tear one open while it is still warm. The crumb should be light, tender and just stretchy enough to remind you why that softer dough was worth trusting in the first place.