Posted on Leave a comment

Southern Buttermilk Biscuits Recipe: Flaky, Tall and Tender

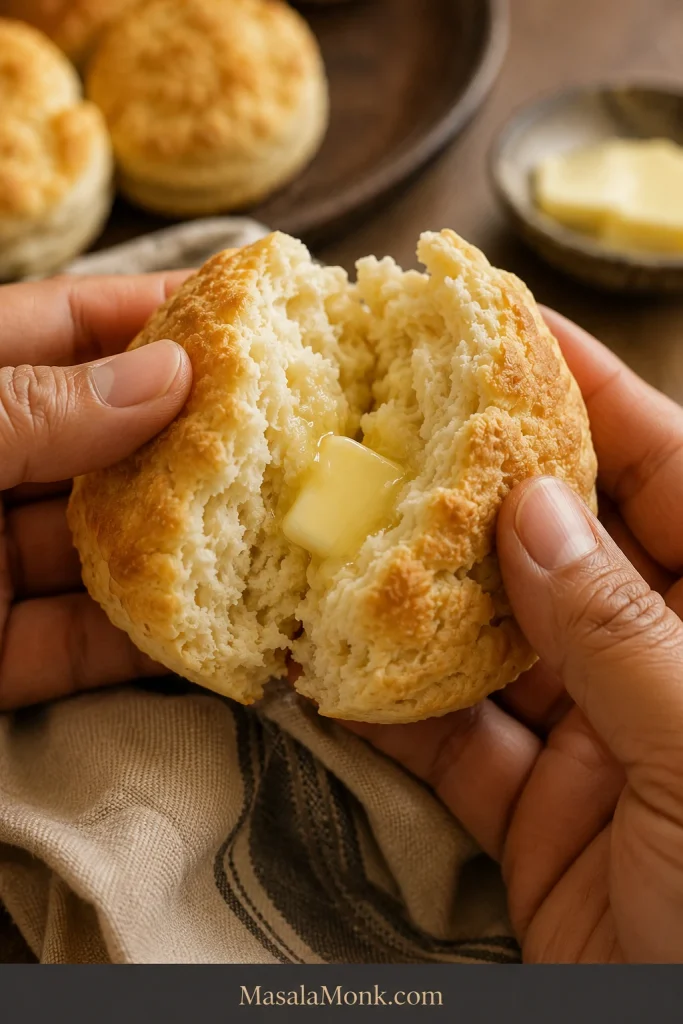
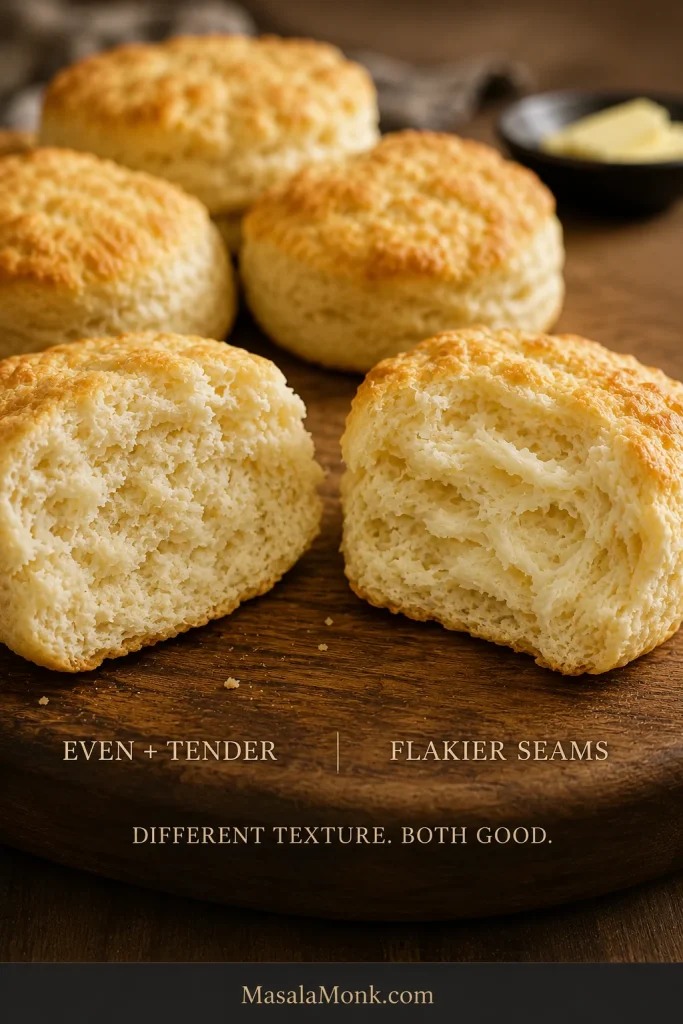
Golden Southern buttermilk biscuits on a wooden board, with one split open to reveal a soft interior with natural flaky seams and melting butter.

Pull apart a hot Southern biscuit and the center should open in tender, buttery layers, with the top golden and the middle moist enough to catch a melting swipe of butter.

These are the biscuits we’re making here: tall enough for visible layers, with a soft, tender center and buttery seams that separate easily while warm. You don’t need a food processor or rolling pin, and chilling only comes into play if the butter begins to soften while you work.

The whole batch takes about 35 minutes. Once you know what the butter and dough are supposed to feel like, biscuit-making becomes much less mysterious.

Quick Answer

For tall, flaky Southern buttermilk biscuits, keep the butter and buttermilk cold, mix until the dough is rough and lightly tacky, then fold and turn the dough four times before patting it to a full 1 inch / 2.5 cm thick.

Cut straight down with a sharp cutter, arrange the biscuits almost touching, and bake at 450°F / 230°C conventional until the tops are golden and the centers are baked through.

Start with 225 g of the buttermilk and reserve the final 15 g / 1 tablespoon. If dry flour still falls away when you press the mixture, add some or all of the reserve until the dough holds together.

Cold fat. Soft dough. Four folds. One-inch thickness. Hot oven. Those are the five things worth remembering.

Southern Buttermilk Biscuits Recipe

Makes about 8 biscuits with a 2½-inch / 6.4-cm cutter.

Ingredients

  • 300 g / 10.6 oz / about 2½ cups all-purpose flour, spooned and leveled if measuring by cups, plus a little for the counter
  • 14 g / 1 tablespoon + ½ teaspoon double-acting baking powder
  • 2 g / ½ teaspoon baking soda
  • 6 g fine sea salt or table salt / about 1 teaspoon
  • 8 g / 2 teaspoons granulated sugar
  • 113 g / 4 oz / ½ cup unsalted butter, very cold and cut into small cubes
  • 240 g / about 1 cup cold cultured buttermilk, divided — start with 225 g and reserve 15 g / about 1 tablespoon
  • 15 g / 1 tablespoon melted butter, for brushing after baking

Use the gram measurements when possible. Flour is easy to overmeasure by volume, and even a modest extra scoop changes how much liquid the dough needs.

What You’ll Need

A digital kitchen scale is the most useful extra, along with a large bowl, pastry blender, fork or flexible spatula, sharp biscuit cutter, and sturdy baking sheet. A bench scraper is handy for handling the dough and for cutting square biscuits, but it isn’t essential.

No pastry blender? Use your fingertips to work the cold butter into the flour. Warm hands soften butter quickly, so work briefly and stop while distinct pieces remain.

Method

  1. Heat the oven. Set a rack in the center and preheat to 450°F / 230°C conventional. Line a sturdy, light-colored baking sheet with parchment rated for that temperature, or use a clean unlined sheet. A dark pan browns the bottoms faster, so check underneath a little earlier.
  2. Mix the dry ingredients. Whisk the flour, baking powder, baking soda, salt, and sugar thoroughly.
  3. Cut in the butter. Work until most pieces are roughly pea-size, with a few larger flat flakes visible. The mixture will look uneven.
  4. Add 225 g of buttermilk. Stir with a fork or flexible spatula until shaggy clumps form. Press a handful together. If dry flour still falls away, add some of the reserved 15 g / 1 tablespoon. Use the rest only if the mixture still needs it to hold together.
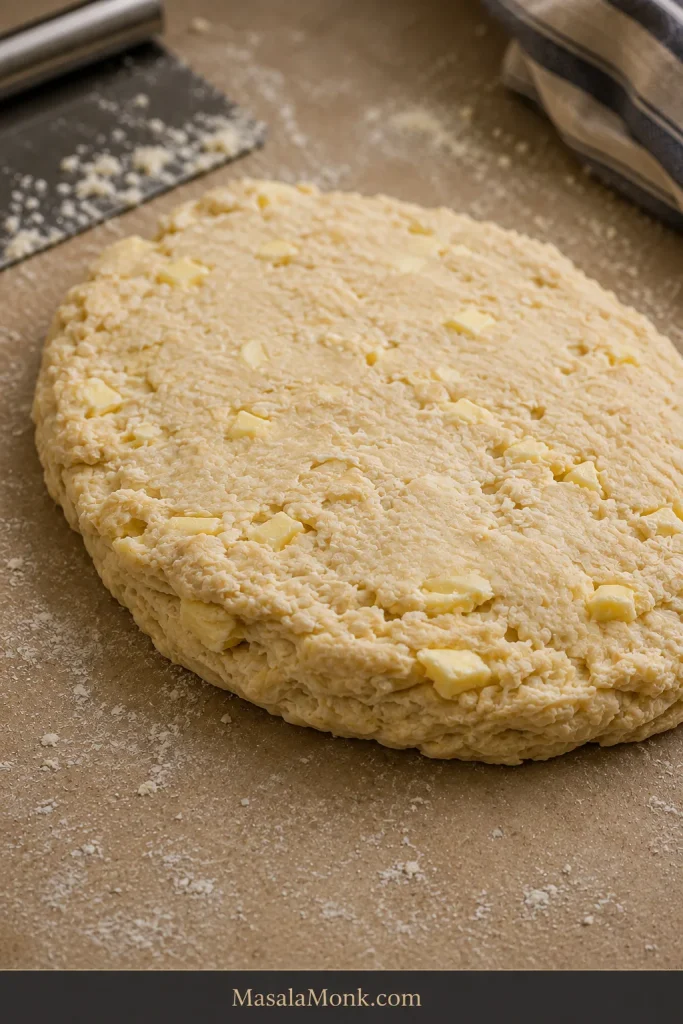
  5. Bring it together. Dust the counter with just enough flour to prevent obvious sticking—you should still be able to see the counter through it. Turn out the shaggy mixture and press the loose pieces into a rough rectangle.
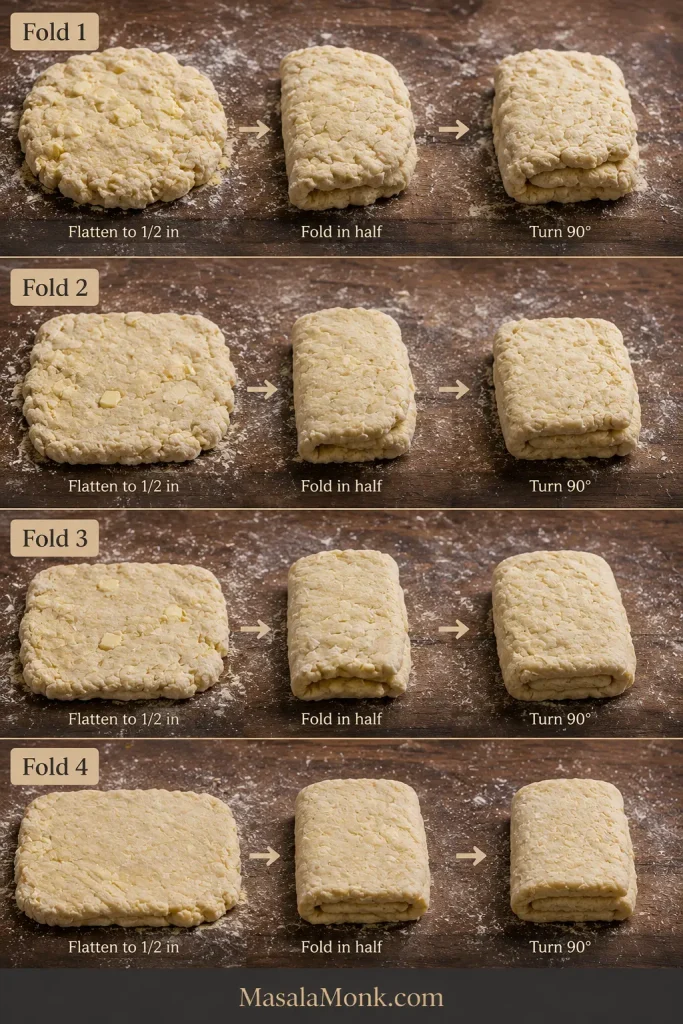
  6. Fold and turn four times. Flatten the rectangle to roughly ½ inch / 1.25 cm thick, fold it in half, then turn it 90 degrees. Flatten it again and repeat the fold-and-turn process three more times, for four folds total. By the later folds, the scruffy pile starts looking recognizably like biscuit dough while pieces of butter remain visible.

Shape, Cut and Bake

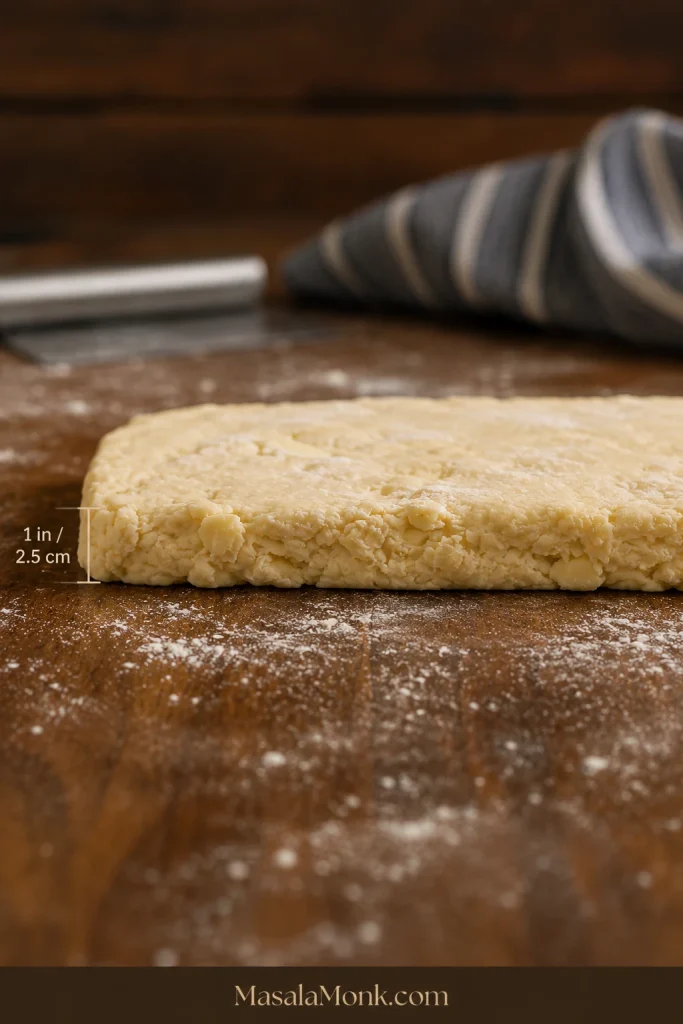
  1. Pat to 1 inch / 2.5 cm thick. Keep the slab reasonably even; the edges can stay rustic.
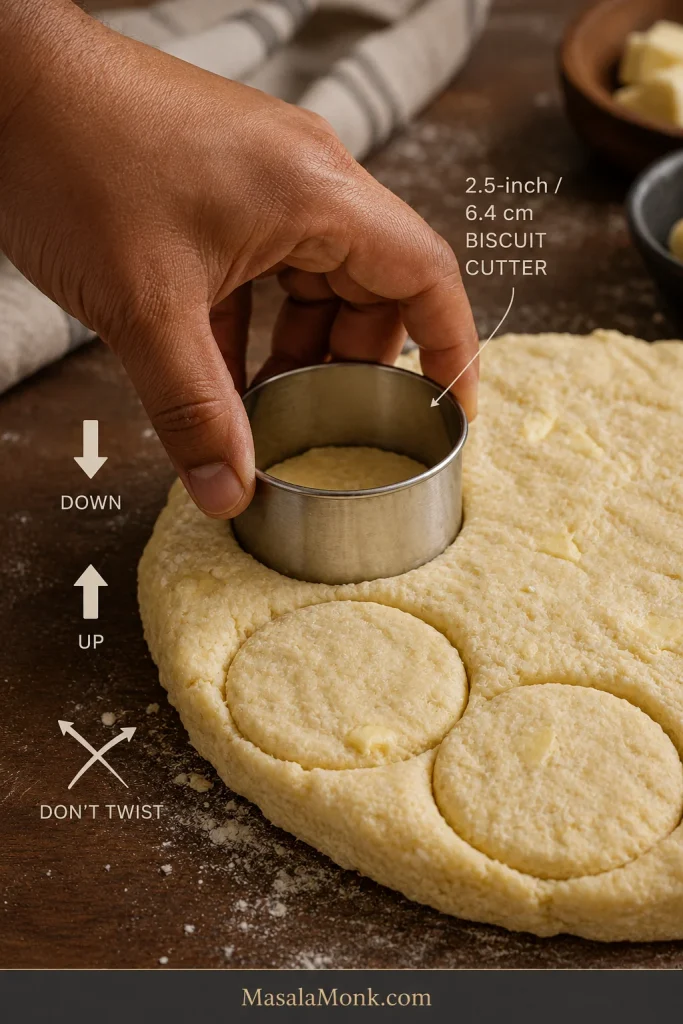
  2. Cut straight down. Lightly flour a sharp 2½-inch / 6.4-cm biscuit cutter, press straight through the dough, and lift straight up. Don’t twist the cutter.
Hand pressing a round metal biscuit cutter straight down into dough with instructions to lift straight up and not twist.
A clean vertical cut leaves the layered edge open. Pinched or dragged rims usually mean the cutter twisted.
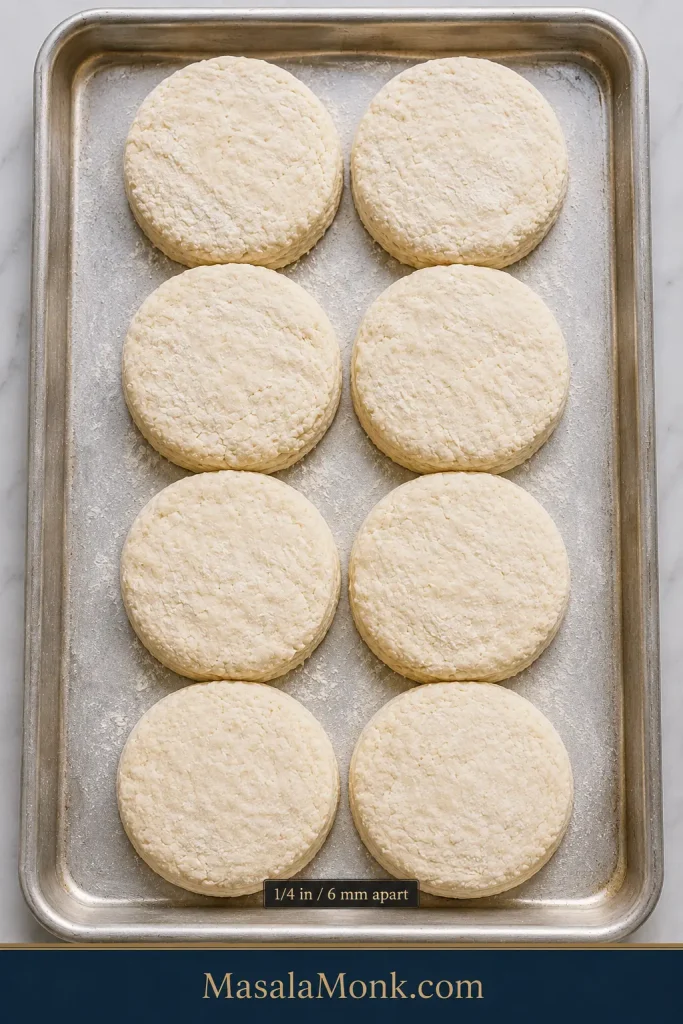
  1. Arrange almost touching. Place the biscuits about ¼ inch / 6 mm apart. Press the scraps together once and cut the remaining biscuits.
Eight raw biscuit rounds arranged close together with narrow quarter-inch gaps on a light aluminum baking sheet.
Leave narrow visible gaps—about ¼ inch / 6 mm. Slumping rounds signal warm dough, not a need for wider spacing.
  1. Bake. Bake for 12–15 minutes, beginning to check at 12 minutes. Look for golden tops, set sides, browned bottoms, and centers without a gummy stripe.
  2. Brush and serve. Brush the hot tops with melted butter and serve warm.

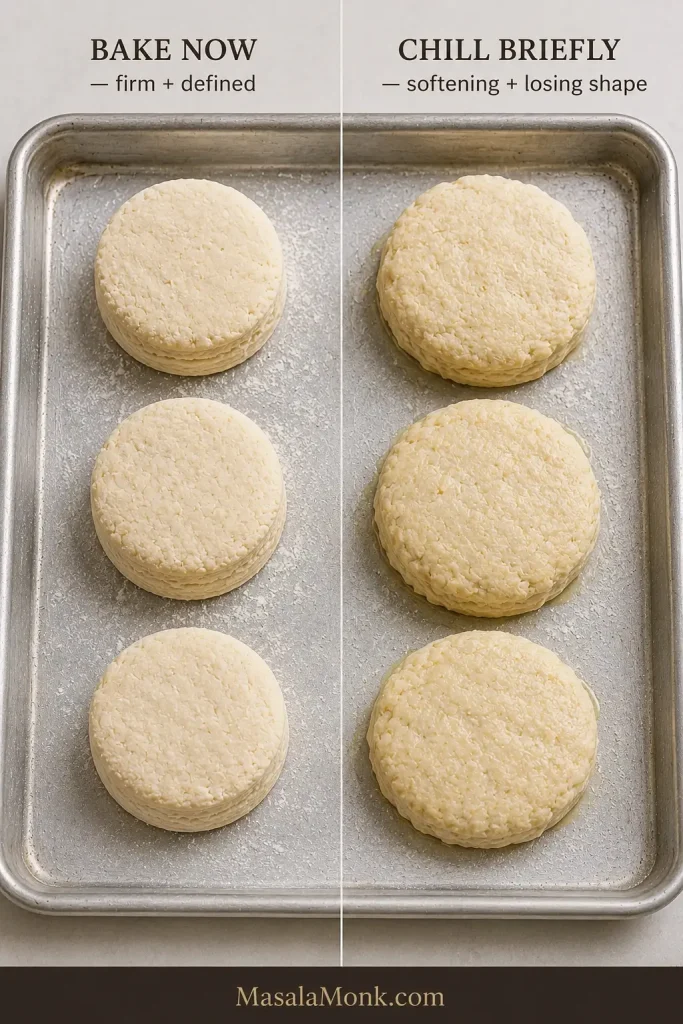
Warm-kitchen check: Cool, firm cut biscuits can go straight into the oven. When they become soft enough to lose their clean shape or start looking greasy, chill the tray briefly until the butter firms again.

Comparison of firm defined raw biscuits ready to bake and softer slightly slumped biscuits that should be chilled briefly.
Firm, upright cut edges can go straight to the oven; softened or slightly greasy rounds benefit from a brief chill.

Using fan/convection? If you normally reduce conventional baking temperatures for your oven, use around 425°F / 220°C and begin checking early.

Table of Contents

What Makes a Southern Biscuit Southern?

There is no single ingredient that gets to decide. Southern biscuits belong to a broad tradition of tender quick breads, with flour, fat, shaping, and preferred crust varying from kitchen to kitchen.

Across Southern kitchens, you’ll find soft-wheat and self-rising flours, butter, lard, shortening, buttermilk, hand-shaped cathead biscuits, neatly cut rounds, soft pull-apart sides, and biscuits baked farther apart for more crust.

Some people picture a tall cut biscuit with obvious layers. Others grew up eating softer biscuits baked shoulder-to-shoulder in a pan. Both belong at the table.

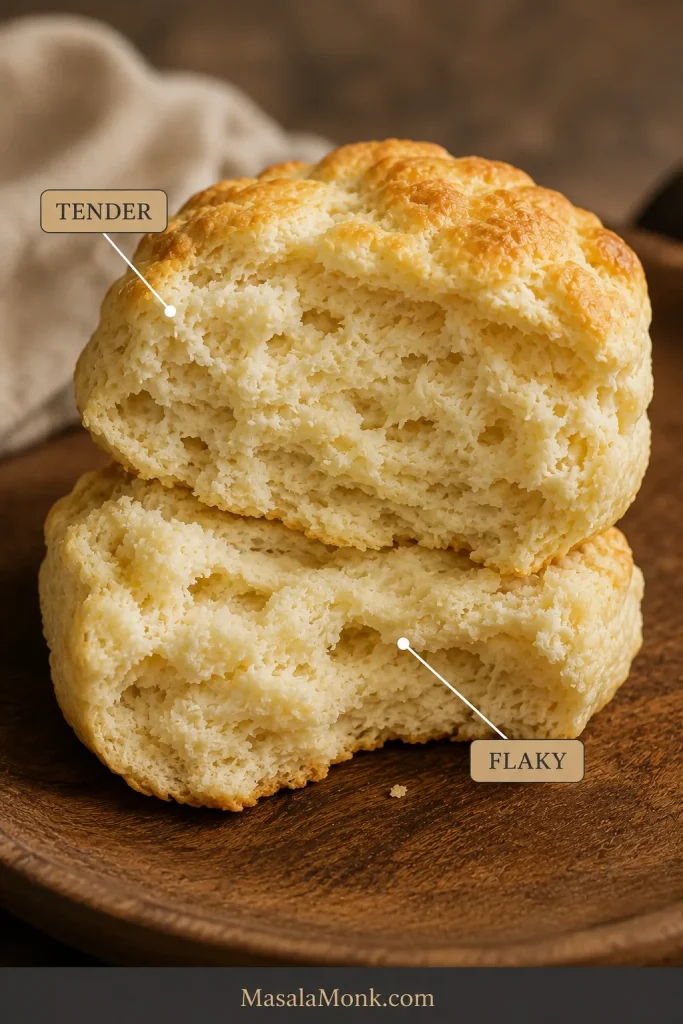
This version sits between old-fashioned tenderness and heavily laminated bakery-style biscuits. The folds create visible buttery seams and good height, while the center stays soft and distinctly biscuit-like. Tender describes how softly the crumb yields; flaky describes how easily the biscuit separates along buttery seams.

Split biscuit with callouts identifying a soft tender crumb and a natural flaky seam.
Tenderness is the soft crumb; flakiness is the few buttery seams that pull apart. You want both without croissant-like sheets.

Ingredients That Change the Biscuit

With only a handful of ingredients, small changes show up clearly in the finished biscuit. Flour builds the crumb. Baking powder supplies most of the rise, while baking soda works with tangy buttermilk and helps with browning.
Butter brings flavor and helps create the seams that separate as the biscuit rises.

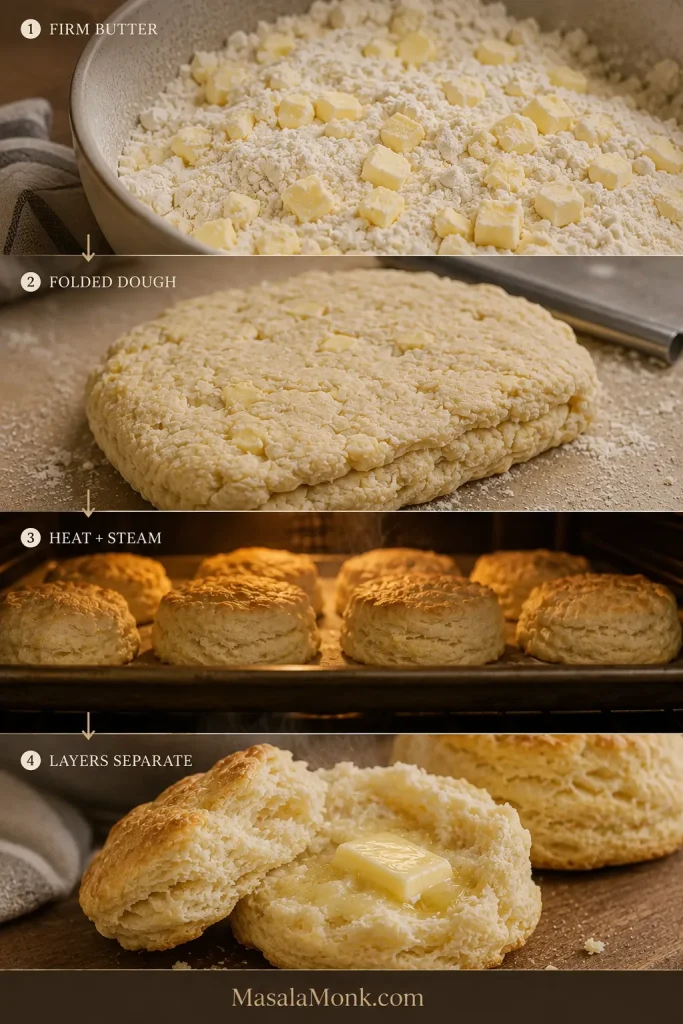
Keeping those butter pieces firm lets them stay distinct until baking; as the butter melts and releases steam, it helps the folded layers separate.

Four-stage guide showing firm butter in dough, folded biscuit dough, heat and steam during baking, and a finished biscuit with separated seams.
Firm butter stays distinct long enough to create steam and separation in the oven, leaving biscuit-like seams rather than pastry layers.

Buttermilk brings moisture, acidity, and dairy flavor. Salt makes everything taste fuller, while two teaspoons of sugar encourage browning without making the biscuits sweet.

Flour: All-Purpose, Soft Wheat and White Lily

For this recipe, regular all-purpose flour is the default. You do not need White Lily to make a tender Southern biscuit.

Soft-wheat flour has a long association with Southern biscuits because its lower protein content makes a delicate crumb easier to achieve. White Lily’s place in Southern baking comes from its soft red winter wheat, but this recipe was written for ordinary all-purpose flour.

If White Lily or another soft Southern flour isn’t sold where you live, there is no reason to postpone breakfast.

FlourWhat It Tends to Give YouBest Approach
Regular all-purpose flourTender crumb with enough structure for visible layersFollow the recipe as written
Soft-wheat all-purpose flourEspecially delicate crumbWatch the buttermilk because absorption can differ
Self-rising flourA convenient, classic Southern routeUse a biscuit recipe written for the particular self-rising flour you have

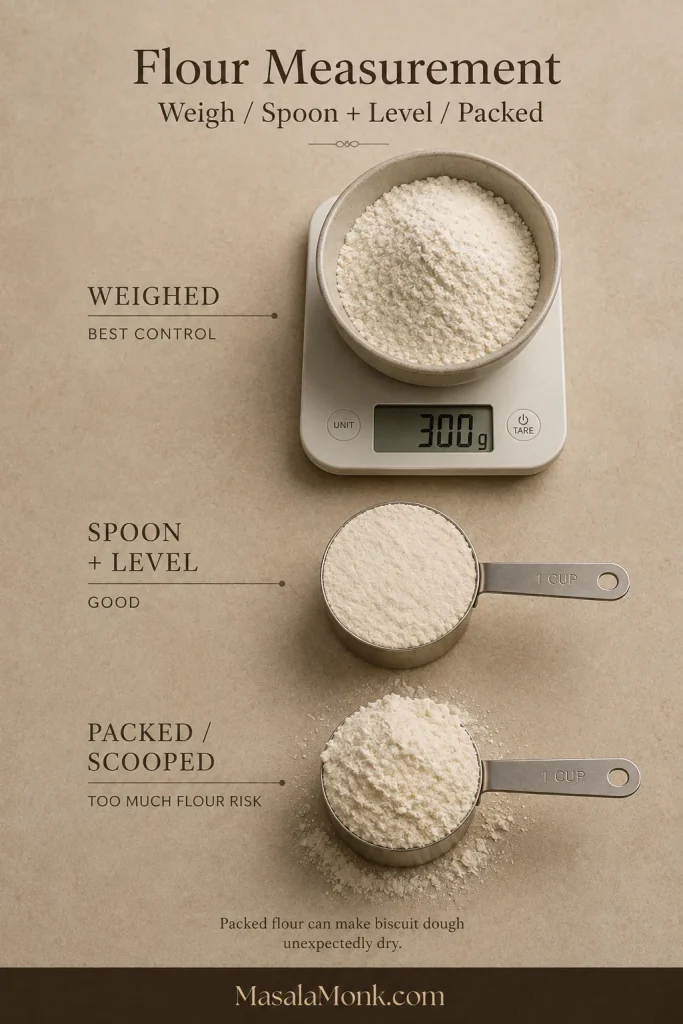
Flour packed into a measuring cup can weigh considerably more than flour spooned in and leveled. Extra flour needs extra liquid; without it, the raw mixture starts dry and the baked crumb often does too.

Flour measured as 300 grams on a digital scale, spooned and leveled into a cup, and packed into a measuring cup.
A packed cup can quietly add extra flour. Weighing 300 g removes that variable before hydration even begins.

What About Self-Rising Flour?

Self-rising flour can make excellent Southern biscuits, but brands vary in their leavening and salt. It isn’t an exact substitute for the flour, baking powder, baking soda, and salt used here, so use a biscuit recipe written specifically for the self-rising flour you have.

Butter, Lard or Shortening?

FatWhat ChangesWhy Use It
ButterRich flavor with obvious flaky seamsThe best fit for this version
LardVery tender crumb with good flakeClassic savory richness
ShorteningSoft, tender crumb with less buttery flavorStable and easy to handle
BlendBalanced tenderness and layeringA middle ground between flavor and stability

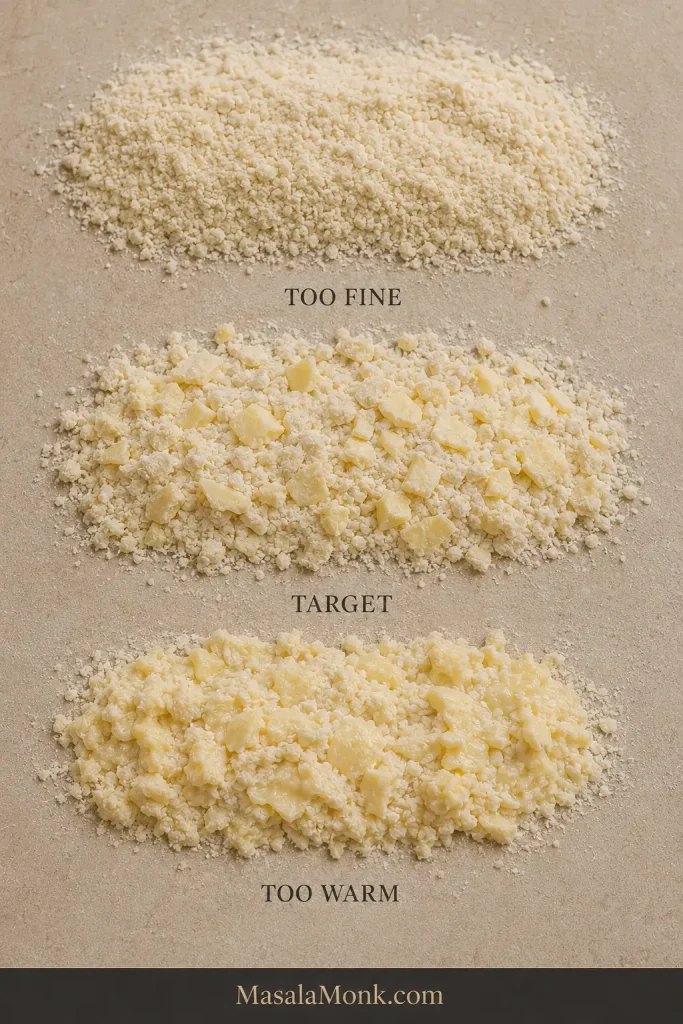
Butter is the fat used for this version, but how it is worked into the flour matters just as much as which fat you choose. This is the point where the mixture is easiest to assess before any liquid goes in.

Three flour-and-butter mixtures labeled too fine, target and too warm, showing fine crumbs, distinct butter pieces and softened smeared butter.
Stop while individual butter pieces are still easy to see. Fine crumbs or greasy smears have gone too far.

Start With Cold Cultured Buttermilk

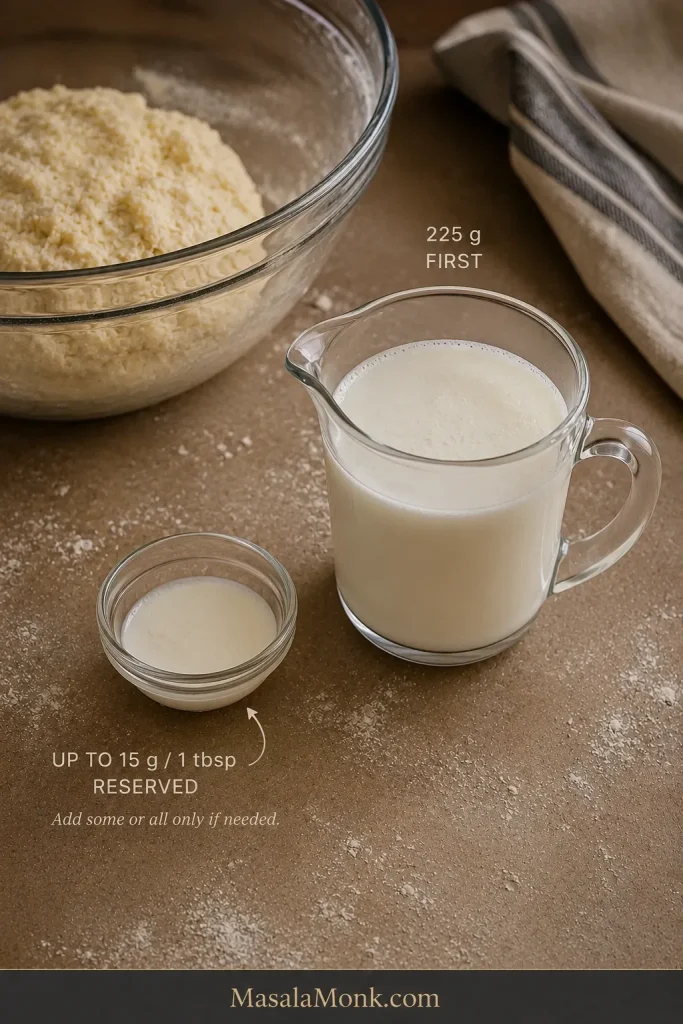
Cultured buttermilk brings acidity, dairy flavor, and a thicker body than ordinary milk. Its consistency varies from carton to carton, and flour absorption varies too, which is why the final tablespoon stays in reserve until you see whether the mixture needs it.

A larger portion of buttermilk labeled 225 grams first beside a smaller reserve of up to 15 grams or 1 tablespoon.
Hold back the final tablespoon so you can correct a dry mixture without making the whole dough too wet.

Leftover buttermilk makes especially good fluffy buttermilk pancakes the next morning.
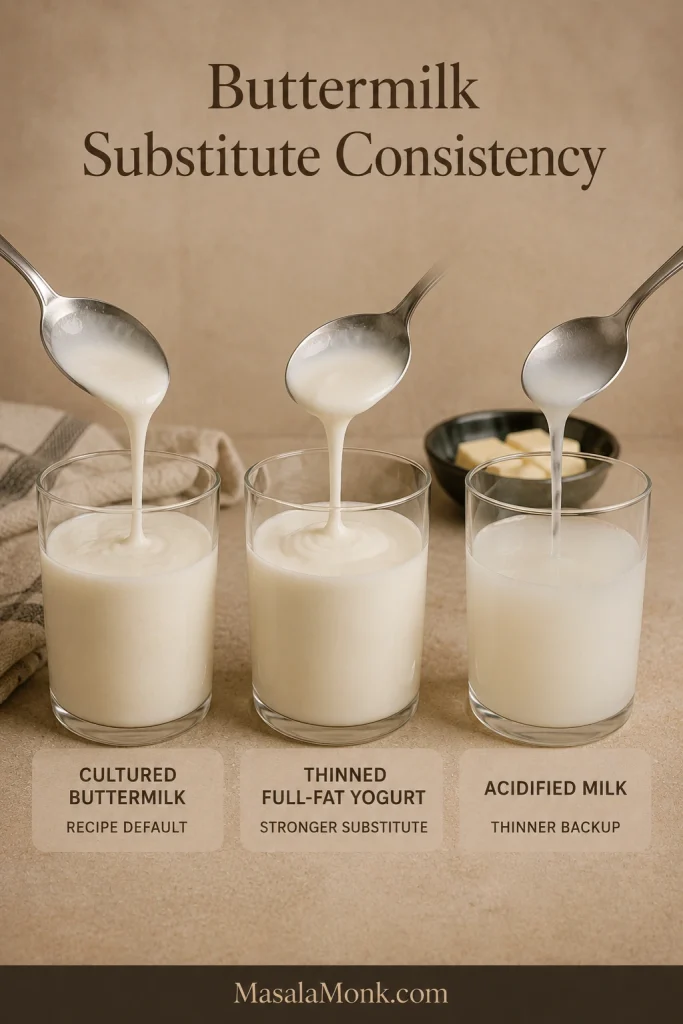
No buttermilk today? For an emergency substitute, thin full-fat plain yogurt with whole milk until it is pourable but still creamy. Use the consistency as your guide because this isn’t an exact one-for-one substitution.

Whole milk mixed with lemon juice or vinegar can also work in a pinch, although the mixture is thinner than cultured buttermilk. If buttermilk is rarely available to you, a biscuit recipe designed around milk or another dairy will be easier to repeat.

Cultured buttermilk, thinned full-fat yogurt and acidified milk shown pouring with visibly different thicknesses.
Match cultured buttermilk’s creamy pour as closely as you can; a thin substitute changes how quickly the flour hydrates.

Learn the Dough by Feel

If biscuit dough has made you second-guess yourself before, this is usually the moment. Good biscuit dough looks rougher and feels softer than many people expect.

“Do not overmix” is easy advice to repeat. Knowing what to look for when you stop is far more useful.

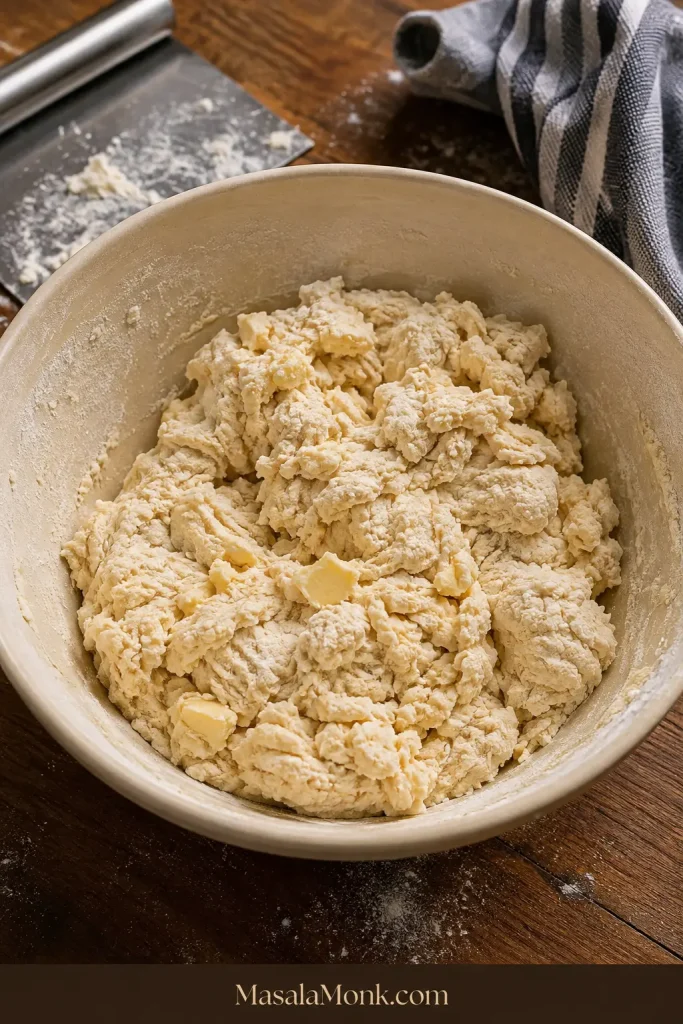
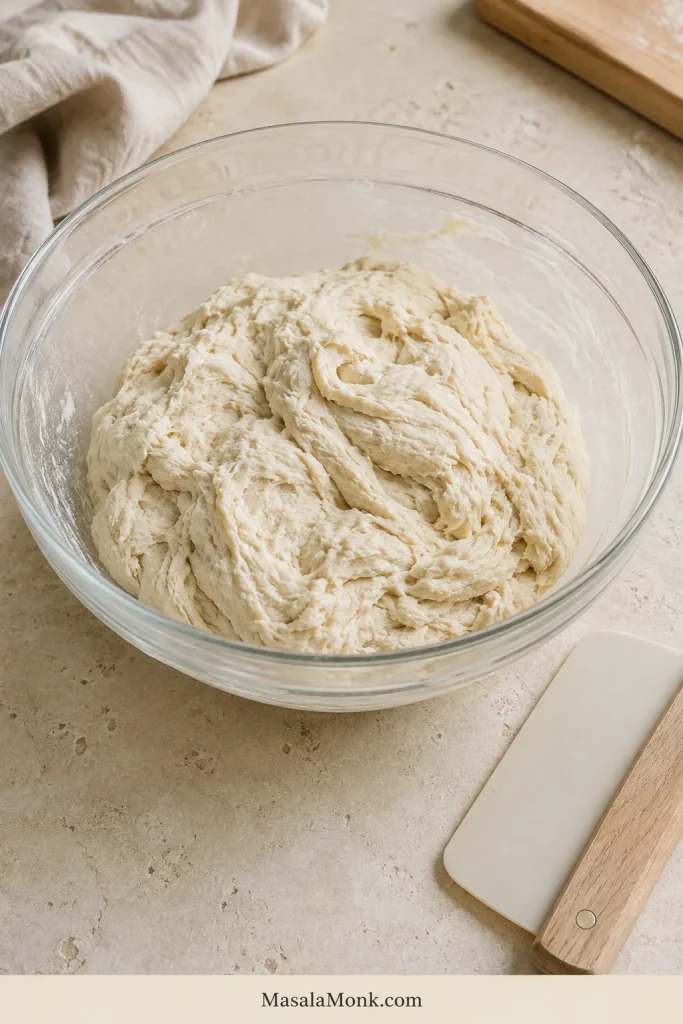
Shaggy buttermilk biscuit dough in a mixing bowl with uneven clumps, loose floury bits and visible butter pieces.
A few dry-looking patches are fine if a squeezed handful holds together. Don’t stir to a smooth dough.

Too Dry

The shaggy mixture breaks into dusty pieces, loose flour sits underneath, and a handful refuses to stay together when squeezed.

Add a little of the reserved buttermilk and press again. Use the rest only if loose dry flour remains and the mixture still refuses to hold together.

Just Right

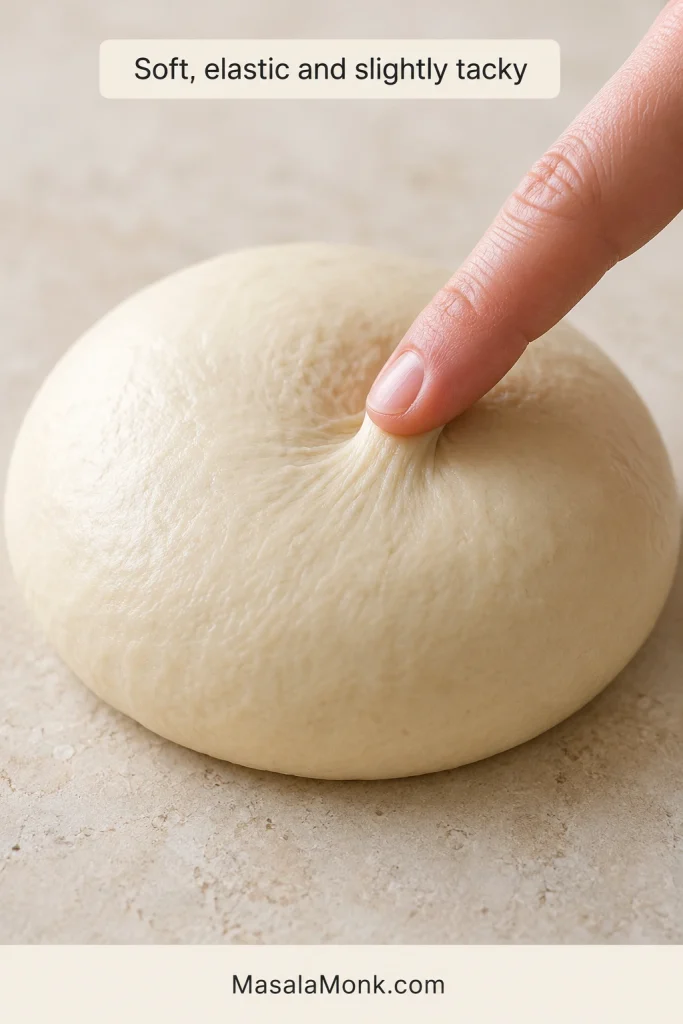
The mixture looks rough and uneven. It feels lightly tacky and holds when pressed without becoming smooth or elastic. Pieces and flat streaks of butter remain visible.

This is the stage people often accidentally “fix” with extra flour. Leave it alone. Biscuit dough does not need to become neat before it becomes good.

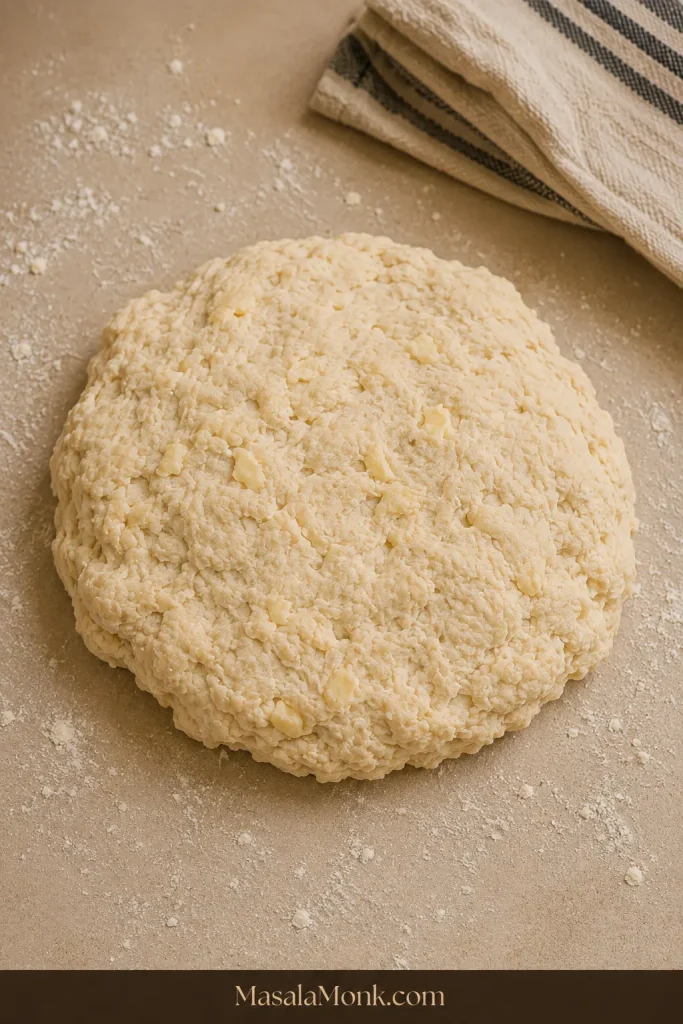
Rough, softly gathered biscuit dough with irregular edges and small visible pieces of butter on a lightly floured counter.
The target is rough, soft and lightly tacky—not smooth, elastic or paste-like.

Too Wet

A mixture that smears across the counter, slumps instead of holding a rectangle, or clings to your hands in thick paste has moved beyond light tackiness.

When the dough is only slightly sticky, correct the surface rather than changing the dough itself. A small dusting of flour on the counter is usually enough.

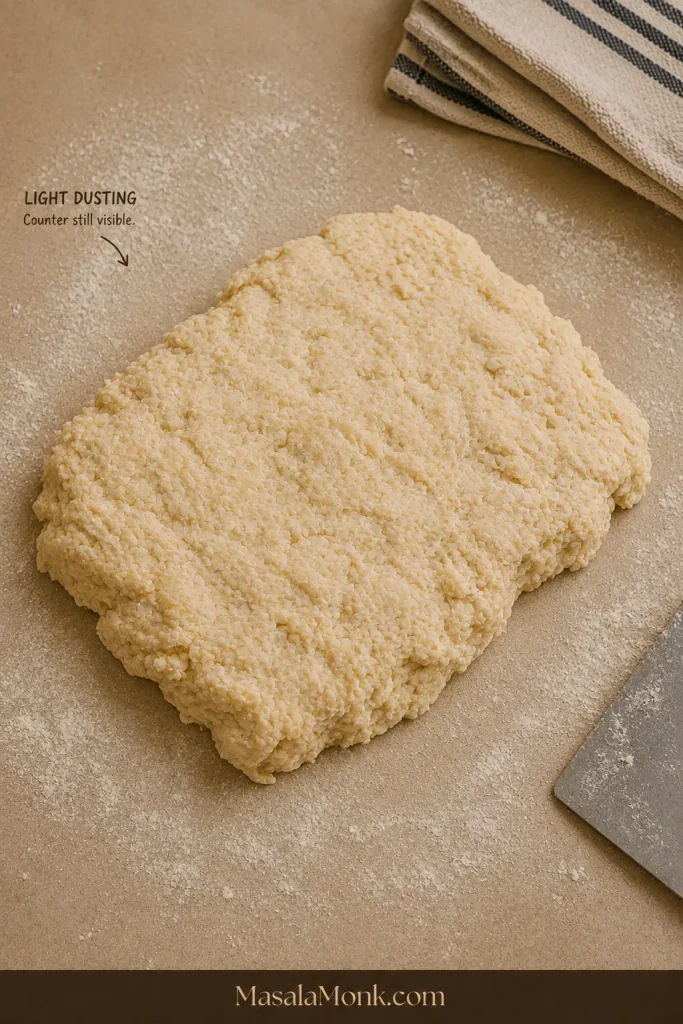
Rough pre-fold biscuit dough on a counter with a thin dusting of flour and much of the work surface still visible.
You only need enough flour to prevent sticking. White ridges or a heavily coated underside mean too much.
Once you can recognize this texture by feel, the recipe stops being something you follow nervously and starts becoming something you know how to make.

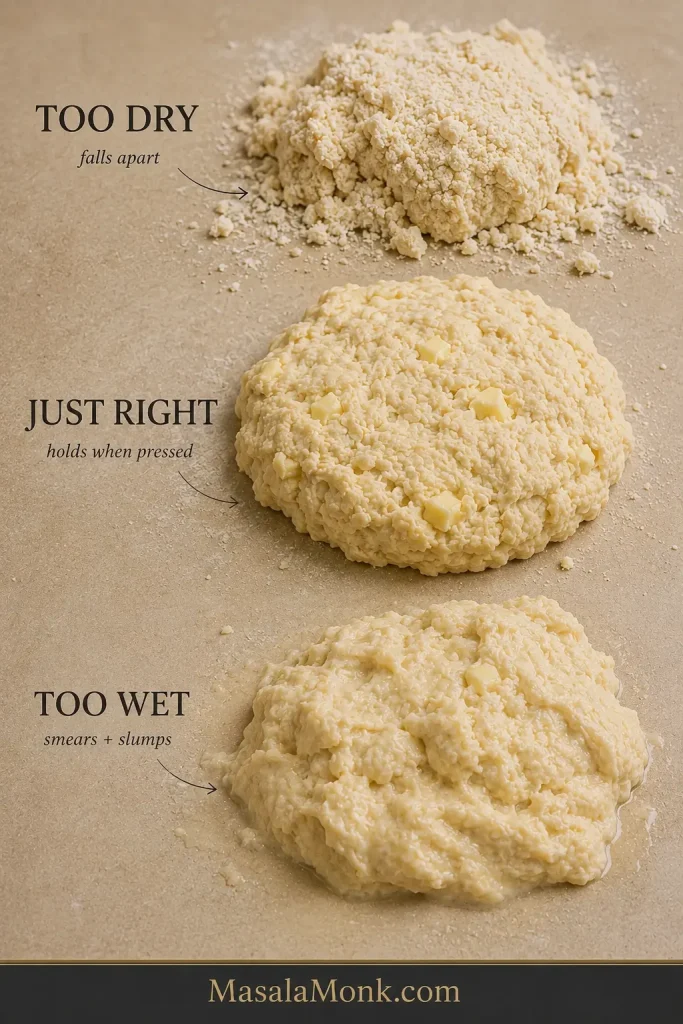
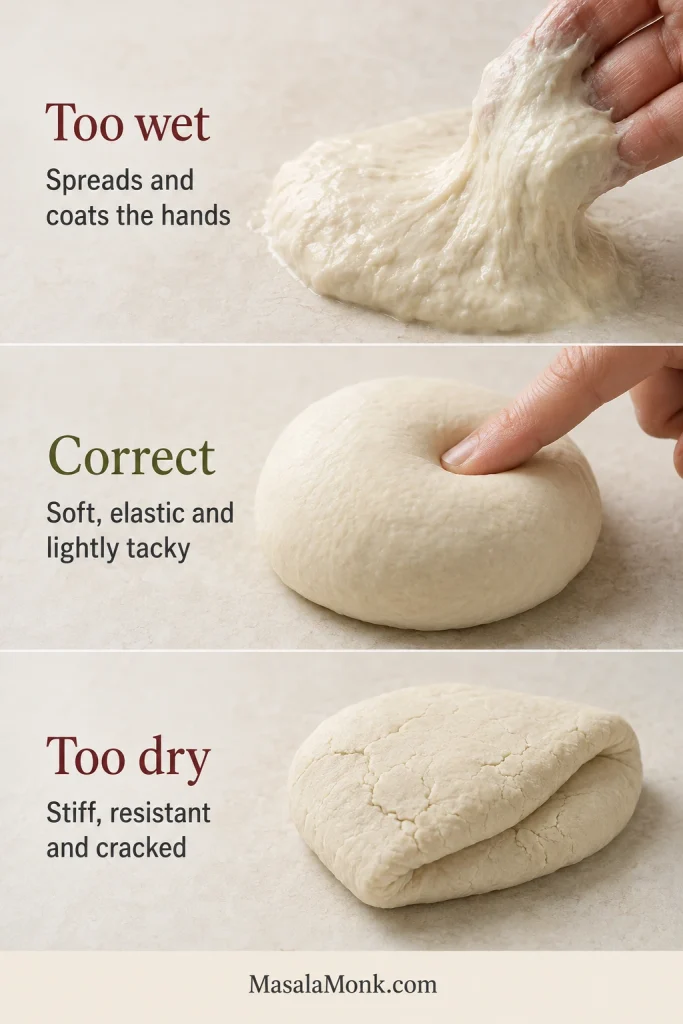
Three biscuit dough states labeled too dry, just right and too wet, showing crumbly, cohesive and sticky slumping textures.
Dry dough fractures, good dough presses together, and overly wet dough sticks heavily and slumps or smears.

Need the quantities or sequence again? Back to Recipe ↑

Why These Biscuits Rise Tall and Flaky

The folds create seams, starting thickness gives the biscuit room to rise, and cutting and spacing shape the final height and crust.

Four Folds Build Layers Without Overworking the Dough

Each fold stacks pieces of butter and dough over one another. In the oven, those rough layers separate into the seams that make a warm biscuit easy to pull apart.

Four-stage guide showing biscuit dough flattened, folded in half and turned through four rounds as it becomes progressively more structured.
Later folds should feel slightly more structured while the surface stays rustic. Stop if the dough turns springy or polished.

A biscuit with very little folding has a softer, more even crumb. More elaborate lamination creates increasingly dramatic sheets. Four simple folds give this version a middle ground: visible flake and good height with a soft biscuit crumb.

Close-up of folded biscuit dough with a rough surface, subtle seams and small pieces of butter still visible throughout.
Pale butter flecks should remain visible after folding; greasy translucent smears mean the dough has warmed too much.

Thickness and a Clean Cut Set Up the Rise

Starting thickness limits how tall a biscuit can become. A thin biscuit can rise beautifully and finish short simply because it had less height at the beginning.
Side view of hand-patted biscuit dough measuring about 1 inch or 2.5 centimeters thick.
Check from the side: an even 1-inch slab gives every biscuit the same starting chance to rise.

A sharp cut also leaves the folded edge open to rise. Twisting presses those edges together, which is why the recipe uses one straight downward cut and a straight lift. King Arthur Baking’s guide to higher-rising biscuits goes deeper into the relationship between cutting and rise.

Shape and Spacing Change the Crust

If You Want…Choose…
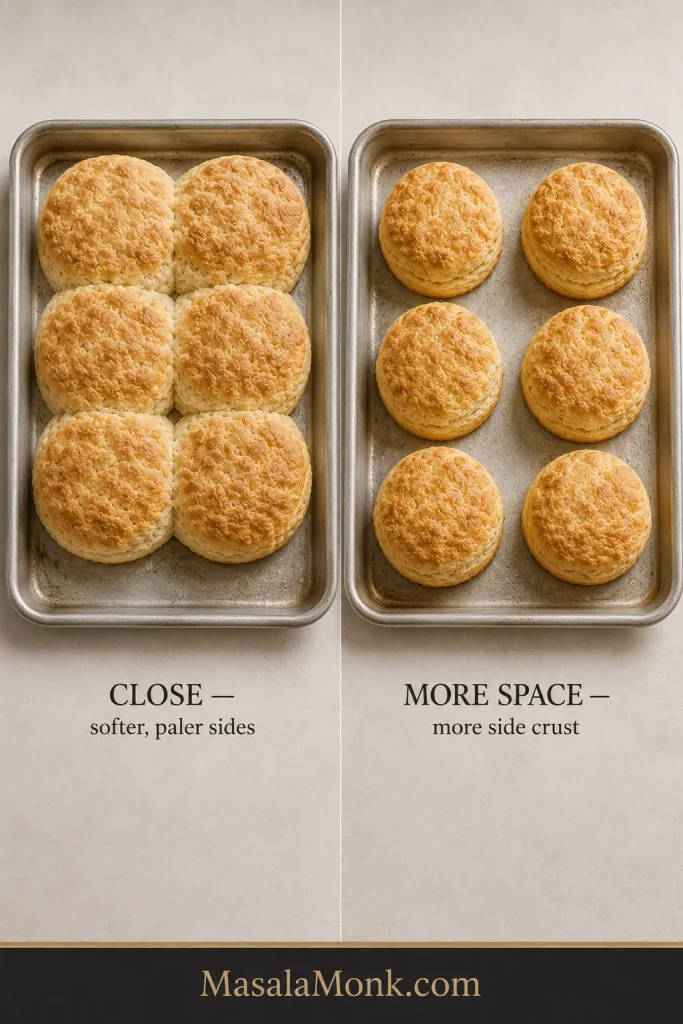
Soft pull-apart sidesBiscuits touching or almost touching
More browned crust around each biscuitMore space between the biscuits
Classic round biscuitsA sharp round cutter
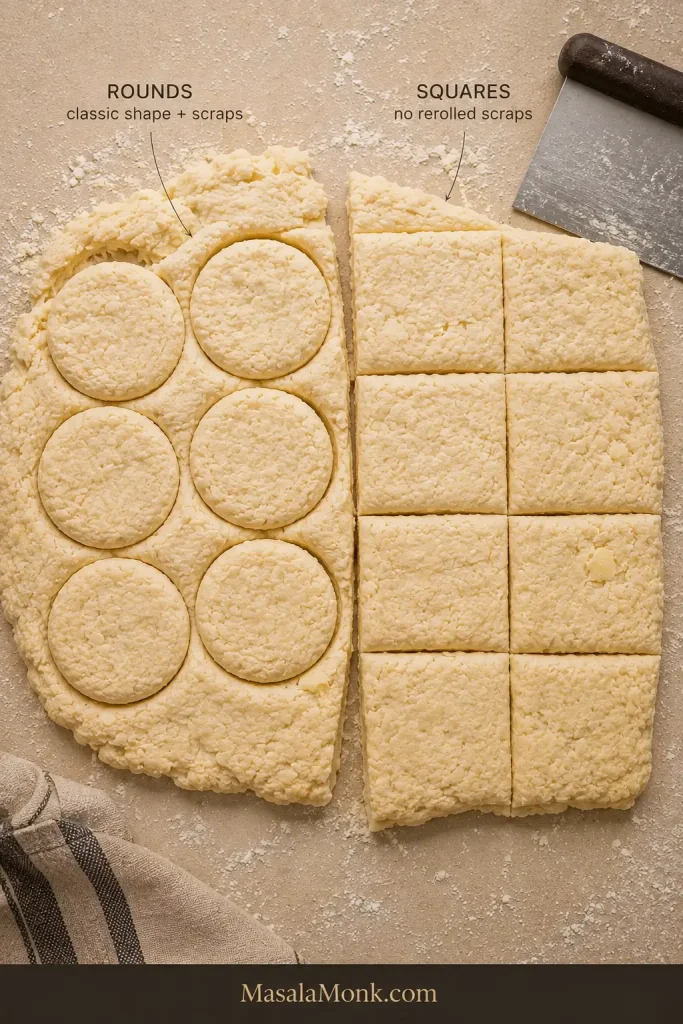
No rerolled scrapsSquares cut with a sharp knife or bench scraper

Close biscuits support one another as they rise and shield their sides from some direct oven heat, leaving those sides pale and soft. More room exposes additional surface to heat and creates more crust.

Matched baked biscuits showing close spacing with pale soft sides and wider spacing with more browned side crust.
Close spacing gives softer sides; more room gives more browned crust. Choose one result and keep spacing consistent.

Rounds leave scraps between the cuts. Press them together once and cut again. Biscuits cut from the scraps may rise a little less evenly because that dough has already been handled. Squares avoid scraps altogether.

Round biscuits cut with a metal cutter beside square biscuits cut with a bench scraper, with scraps visible around the round cuts.
Rounds create scraps; tight cutting reduces them. Squares avoid scraps altogether.

A biscuit can lean or split unevenly and still be excellent inside. Height gives you useful feedback; perfection is not the goal.

Bake Hot and Look Beyond the Top

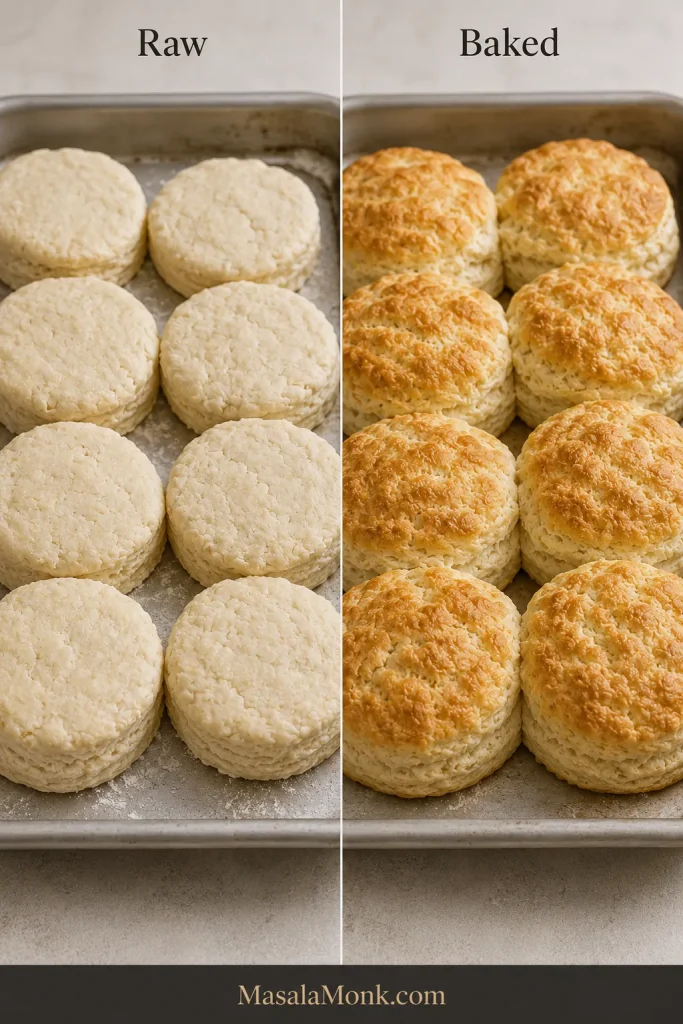
Oven heat affects more than browning: it also controls how quickly the biscuit structure sets while the dough expands. That makes the before-and-after shape worth watching alongside color.

The same tray of biscuit rounds shown before baking and after rising into tall golden biscuits.
Successful biscuits gain much more height than width. A spreading footprint is a useful clue even when the tops brown well.

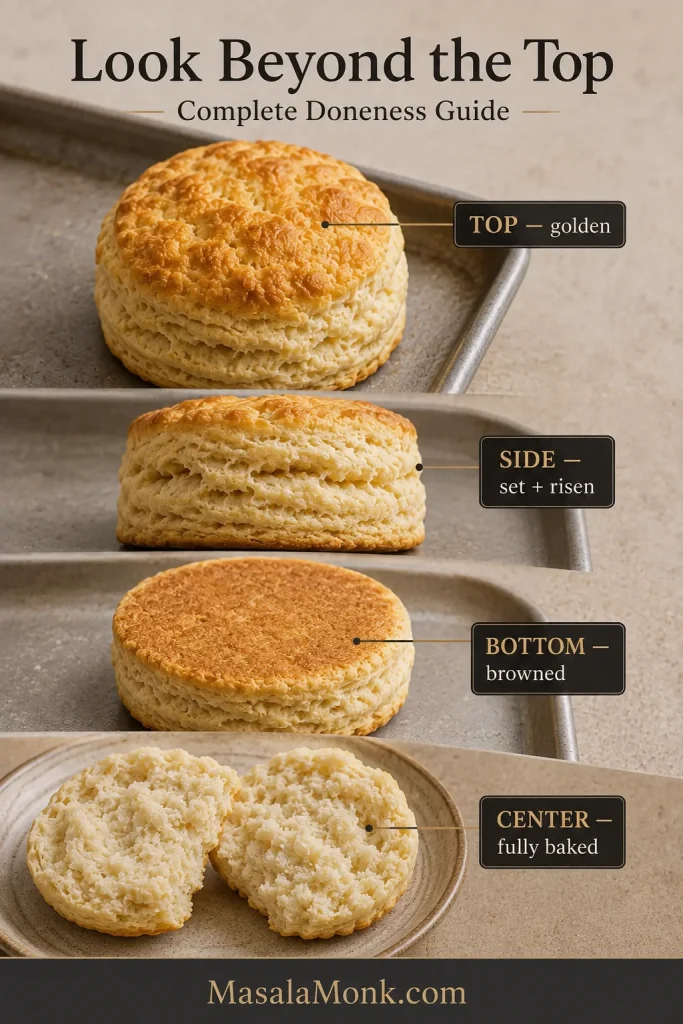
For this size and thickness, use 450°F / 230°C conventional. Begin checking around 12 minutes, and look at the whole biscuit instead of judging it by the top alone.

Four-part biscuit doneness guide showing a golden top, risen set side, browned bottom and fully baked split center.
When color and center disagree, trust the center. Golden tops cannot rescue a glossy, compressed middle.
  • Top: golden, with no raw-looking floury patches.
  • Sides: set and risen, with visible separation through the layers.
  • Bottom: evenly browned, not scorched.
  • Center: fully set, without glossy raw dough or a gummy stripe.

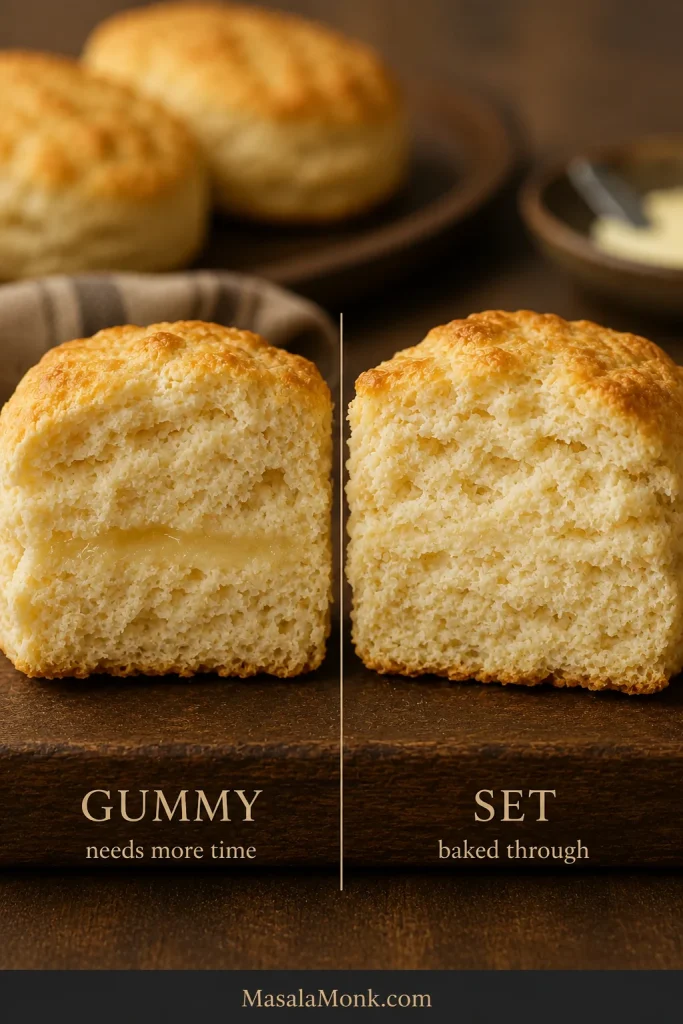
A large or extra-thick biscuit can become beautifully golden before its center is completely baked. When in doubt, split one of the less-perfect biscuits and look inside.

Split biscuits comparing a narrow glossy gummy stripe in the center with an evenly baked tender interior.
A gummy center often looks slightly glossy and compressed rather than obviously raw.

If they rose well, split easily, and are tender through the middle, they’re done. Eat one while it’s hot.

Hot biscuit pulled open to reveal a tender irregular crumb with natural flaky seams and melting butter.

How did the batch turn out? Fix a flat, dry, tough or gummy biscuit → · Back to Recipe ↑

Troubleshooting Flat, Tough or Dry Biscuits

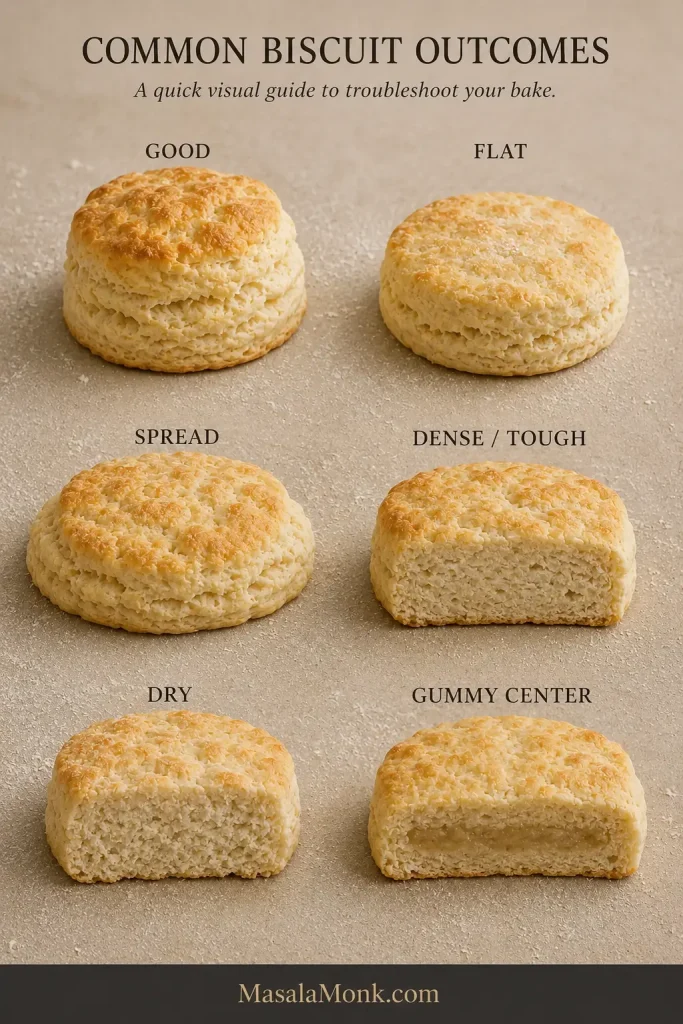
A low, dry, or oddly shaped batch usually leaves clues about what happened.

Six biscuit outcomes labeled good, flat, spread, dense or tough, dry and gummy center, with visible differences in shape and crumb.
Read the shape first, then the crumb: together they usually point back to the stage that went wrong.
Baking powder that has been open for a long time is worth replacing when repeated batches stay unusually low. When browning or timing consistently seems far from what the recipe describes, an inexpensive oven thermometer can also tell you whether the oven is reaching the temperature you set.

What You SeeWhere to LookNext Batch
Flat and wideWarm butter, tired leavener, thin starting slab, oven not fully hotKeep the fat firm, use fresh baking powder, start thick, preheat fully
Tough or bread-likeExtra flour, prolonged mixing or kneadingWeigh the flour and stop while the mixture is rough
DryToo much flour, too little buttermilk, long bakeCheck hydration before shaping and begin checking the oven sooner
Tender but no obvious layersButter worked in finely, less foldingLeave some butter pieces visible and use the four folds
Spread sidewaysWarm butter, overly loose dough, oven not fully hotFirm the shaped biscuits before baking and check the oven
Leaning or crookedUneven slab or angled cutPat evenly and cut vertically
Dark bottomsDark or thin pan, low rack, hot-running ovenCheck earlier, use a heavier pan if possible, or move the rack higher
Gummy middleThick or large biscuit pulled before the center setGive the middle more time and verify oven temperature

Flat: No Rise or Too Much Spread?

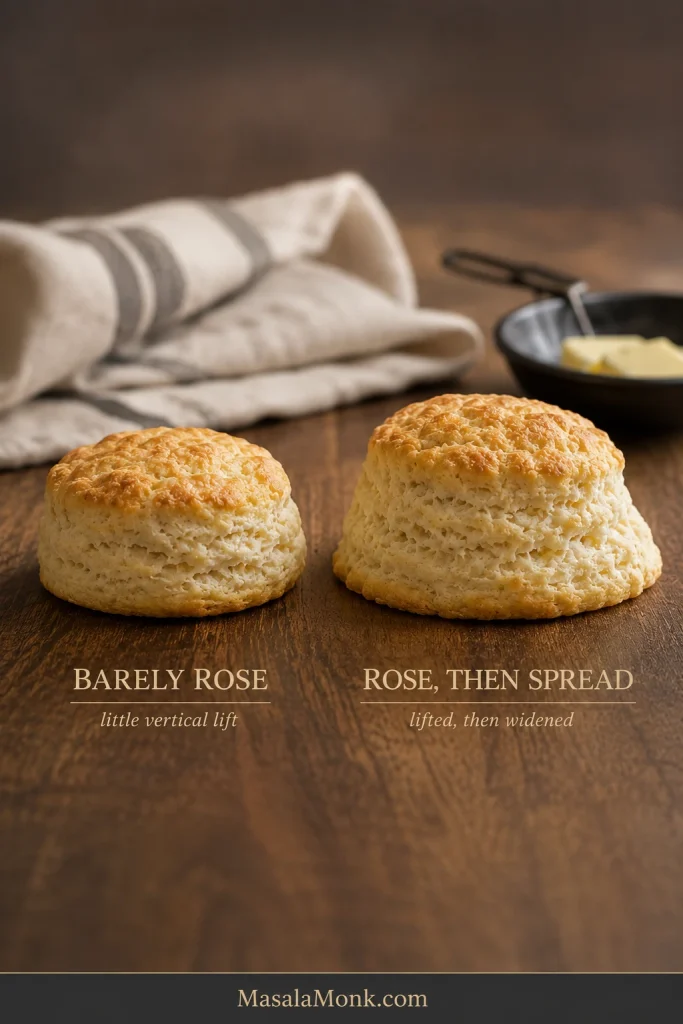
A biscuit that barely gains height points toward tired leavening, a thin starting slab, or an oven that never became fully hot. A biscuit that lifts and then widens points more toward warm butter or dough too loose to hold itself upright.

Side-profile comparison of a short compact biscuit that barely rose and a wider biscuit that rose before spreading outward.
Short and narrow points to poor lift; noticeably wider points more toward spread. Similar height can hide different failures.

Tough Is Different From Crisp

A browned edge can be pleasantly crisp. Toughness shows up through the center as a firm, bread-like chew where the crumb ought to yield. Extra flour and continued mixing after the dough has come together are common reasons.

Dry: Dough Problem or Oven Problem?

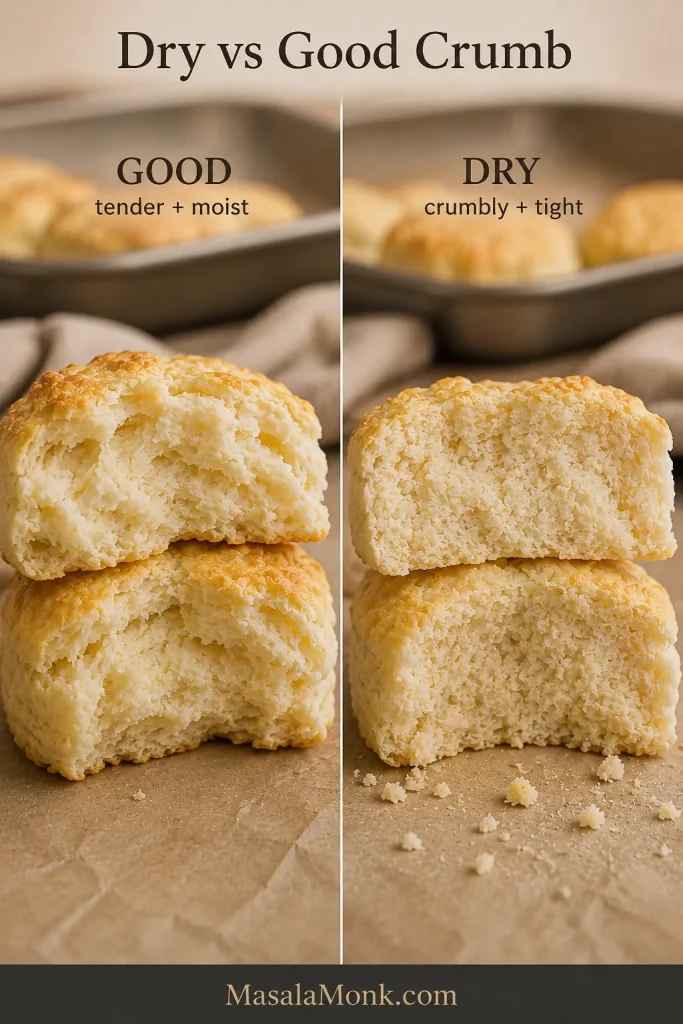
Raw dough that crumbles and needs firm pressure to stay together started too dry. Dough that went into the oven cohesive and came out dry points more toward baking time. Even a couple of unnecessary minutes can change the crumb noticeably.

Side-by-side biscuit interiors comparing a soft tender crumb with a tighter, drier and more crumbly interior.
Good crumb bends and separates softly; dry crumb fractures and sheds small loose pieces.

Tender Without Layers Can Still Be a Good Biscuit

A tender biscuit with a soft, even crumb may simply have had its butter worked in more finely. That’s a perfectly good biscuit with a different texture.

Two successful biscuit interiors labeled even and tender versus flakier seams, both shown as acceptable results.
Tenderness matters more than layer count. An even, soft crumb can be every bit as successful as a flakier one.

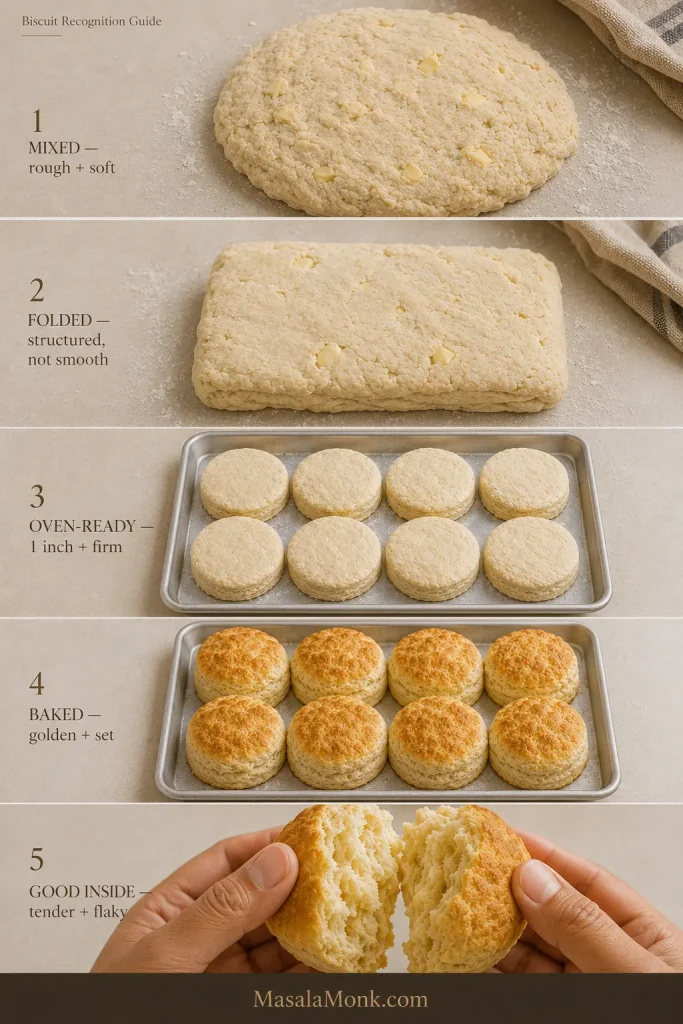
Before moving into make-ahead, this recognition guide gathers the recipe’s main visual checkpoints in one place—from mixed dough through the finished crumb.

Five-stage guide showing rough mixed dough, folded dough, close-spaced oven-ready rounds, baked biscuits and a tender flaky interior.
Match your dough or biscuit to the closest stage here, then continue from that visual checkpoint instead of guessing.
Make Ahead, Freeze, Store and Reheat

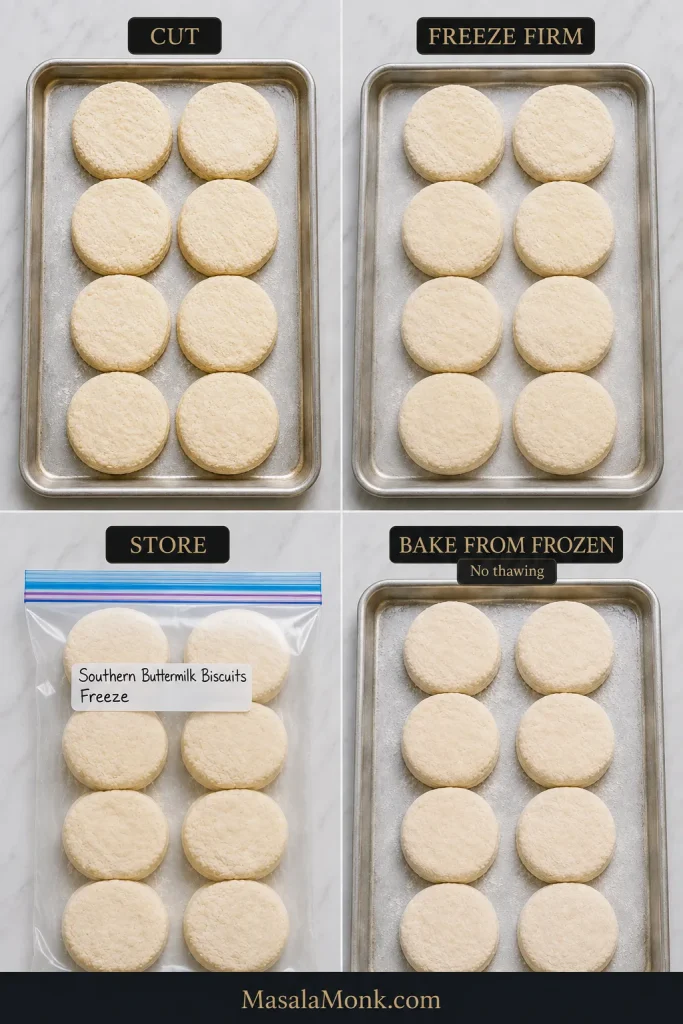
If flouring the counter first thing in the morning is the only thing standing between you and homemade biscuits, freeze the cut biscuits before baking.
Four-step guide showing raw biscuits cut on a tray, frozen firm, stored in a freezer bag and returned frozen to a baking sheet.
Freeze until the rounds are firm enough to transfer without denting, then bag them.

Freeze Before Baking

  1. Prepare and cut the biscuits normally.
  2. Place them on a lined tray with space between them.
  3. Freeze until completely firm.
  4. Transfer to a freezer-safe bag or airtight container.
  5. Use within 2 months for best quality.

Bake Straight From Frozen

Put the biscuits straight into the 450°F / 230°C conventional oven without thawing. Frozen biscuits take longer than fresh ones, so use the same top, side, bottom, and center cues instead of assuming another recipe’s timing will fit this dough.

Store and Reheat Baked Biscuits

  • Room temperature: Cool completely and keep airtight for up to 2 days.
  • Longer storage: Freeze them instead of refrigerating them for several days.
  • Freeze baked biscuits: Wrap well once cool and use within 2 months for best quality.
  • Oven: Reheat at 350°F / 175°C for 5–8 minutes, until warm through the center.
  • Microwave: For one biscuit, start with 10–15 seconds and add another short burst only if needed.

A reheated biscuit that seems a little dry usually comes back nicely when split hot and spread with butter.

What to Serve With Southern Biscuits

The first biscuit off the tray barely needs anything. Salted butter, honey, or a spoonful of homemade pear jam are enough.

If potatoes belong on the breakfast plate too, crispy air-fryer hash browns keep the stovetop free while the rest of breakfast comes together.

Biscuits also make excellent breakfast sandwiches with eggs and sausage, country ham, or fried chicken. For a bigger Sunday or holiday table, a brown sugar honey glazed ham turns them into the bread everyone keeps reaching for between bites.

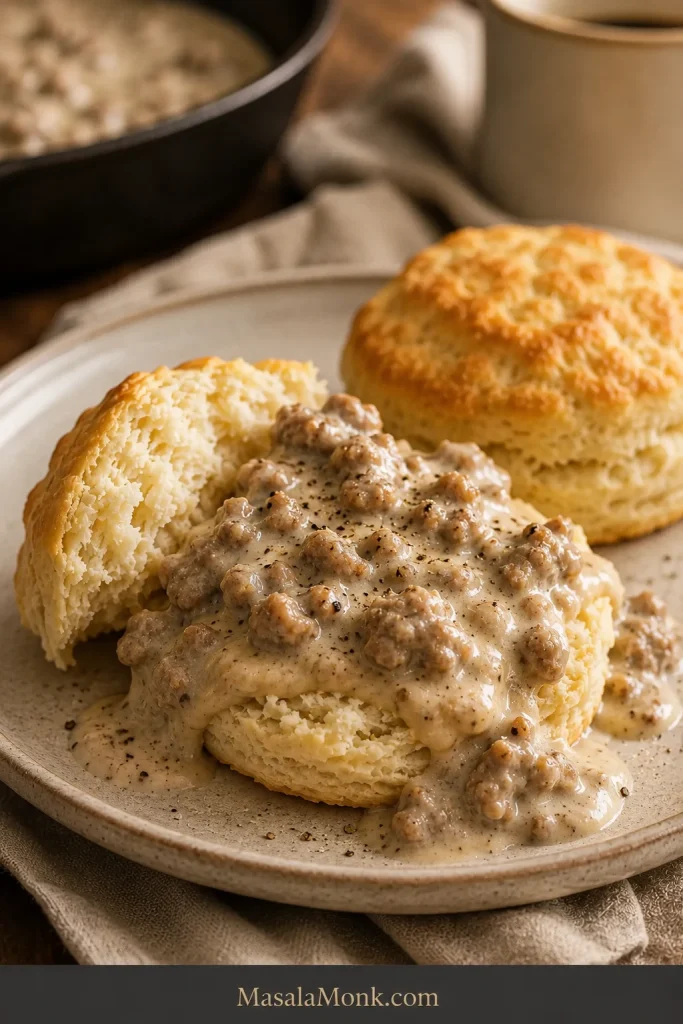
And, of course, a soft but sturdy biscuit is exactly what you want underneath peppery sausage gravy, where the gravy can settle into the torn layers without turning the whole biscuit to mush.

Split Southern buttermilk biscuit covered with creamy sausage gravy, browned sausage pieces and black pepper, with another golden biscuit nearby.
Split rather than crush the biscuit so gravy soaks into the crumb while some baked crust stays intact.

Southern Buttermilk Biscuit FAQs

Do I need White Lily flour for Southern biscuits?

No. Soft-wheat flour can make especially delicate biscuits, but ordinary all-purpose flour works very well when the recipe is designed around it. This recipe uses all-purpose flour deliberately.

Why is my biscuit dough sticky?

A little tackiness is normal. Dough that sticks lightly to your fingers but holds its shape is in the right zone. Heavy smearing and slumping call for a small dusting of flour.

Can I make biscuits without a biscuit cutter?

Yes. Cut the final rectangle into squares with a sharp knife or bench scraper. Squares give you clean edges and leave no scraps.

Can I make the biscuits the night before?

The easiest make-ahead route is to cut and freeze the raw biscuits, then bake them directly from frozen. That keeps morning work minimal while preserving the cold butter and freshly mixed dough structure.


The next batch should feel less mysterious. You now know what firm butter, soft dough that holds together, and a fully baked center look like.

Pull one apart while it is still warm. The center should give along the folds, and a little butter should disappear straight into the crumb. Then decide whether the first biscuit needs honey, jam, or nothing at all.

Back to Recipe ↑ · Back to Top ↑

Posted on Leave a comment

Zucchini Bread Recipe: Easy, Moist and Never Soggy

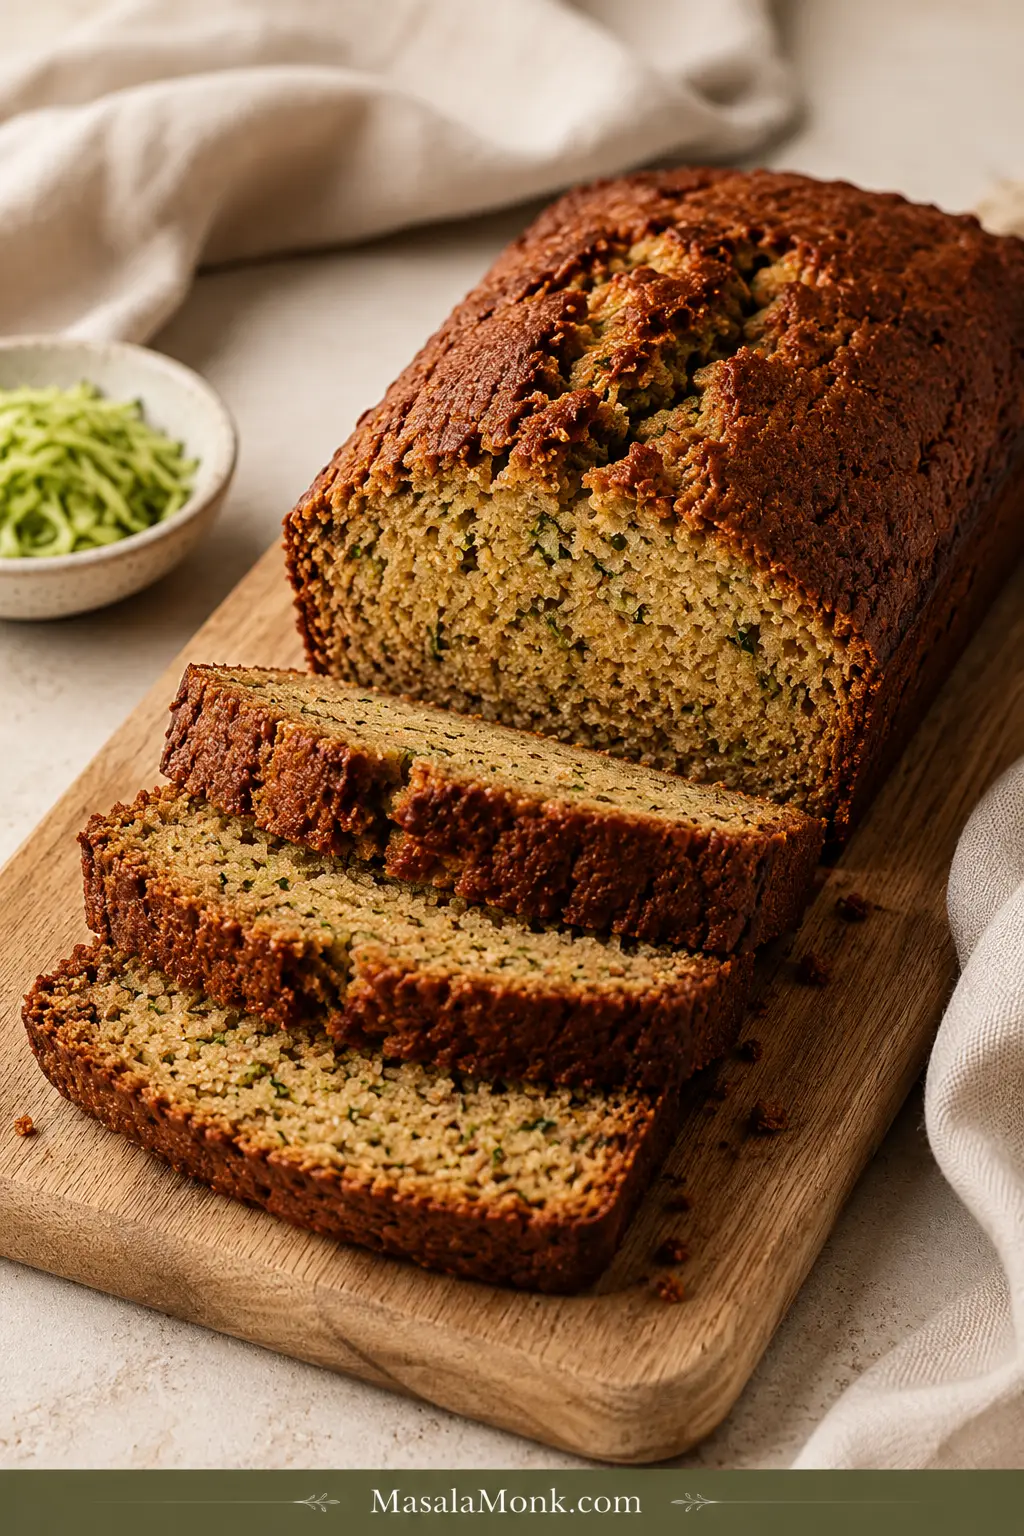
Sliced homemade zucchini bread with a deeply golden cracked top, tender cinnamon-colored crumb and small green zucchini flecks.

A good zucchini bread has a deeply golden top with a natural split down the middle, warm cinnamon in the first bite, and a tender crumb dotted with little green flecks. A slice should bend gently without falling apart, with enough moisture to stay lovely today and still be worth reaching for tomorrow.

Zucchini creates that tenderness, but it can also make the middle deceptive. The crust may look beautifully baked while the batter underneath still needs a few more minutes.

This version keeps the process easy: one bowl, no mixer, no peeling small or medium zucchini, and no wringing fresh shreds dry. You grate, stir, fold and bake.

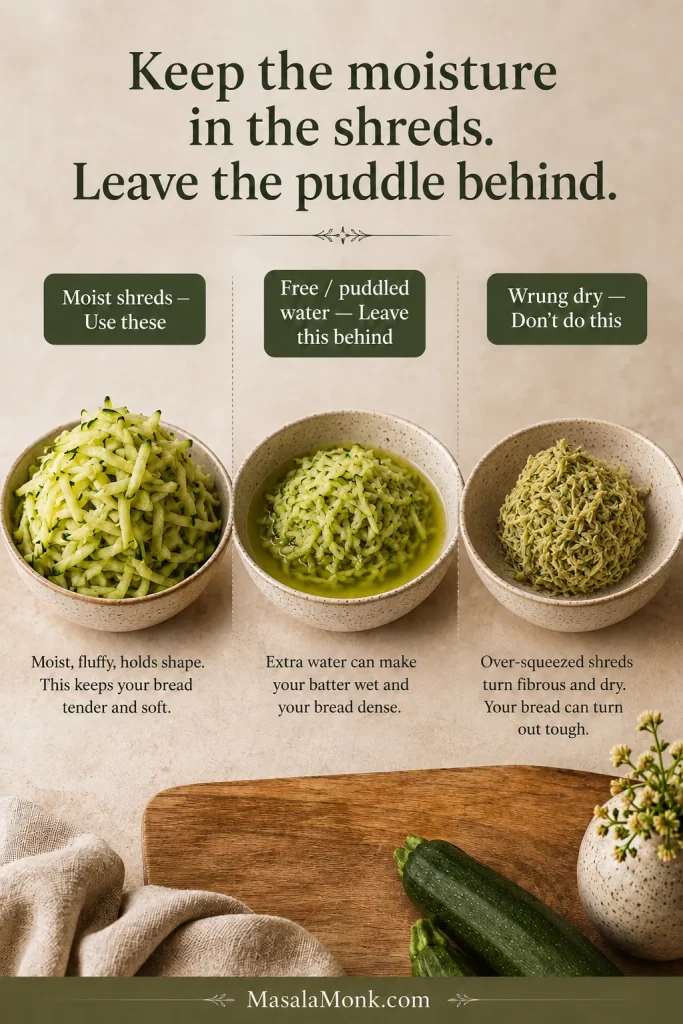
Keep the moisture in the shreds, leave the puddle behind, and bake until the middle is set.

Quick Answer: How Do You Make Moist Zucchini Bread Without a Wet Middle?

Do not squeeze fresh zucchini dry for this recipe. Grate it on the large holes of a box grater and use 370g / 13 oz, about 2 firmly packed cups. Weigh the shreds themselves; if liquid has collected separately beneath them, leave that puddle behind.

Bake the thick batter in a 9 × 5-inch / 23 × 13 cm loaf pan at 350°F / 175°C. The crack across the top should reveal baked crumb, and a thin skewer or knife pushed into the loaf should show no raw batter.

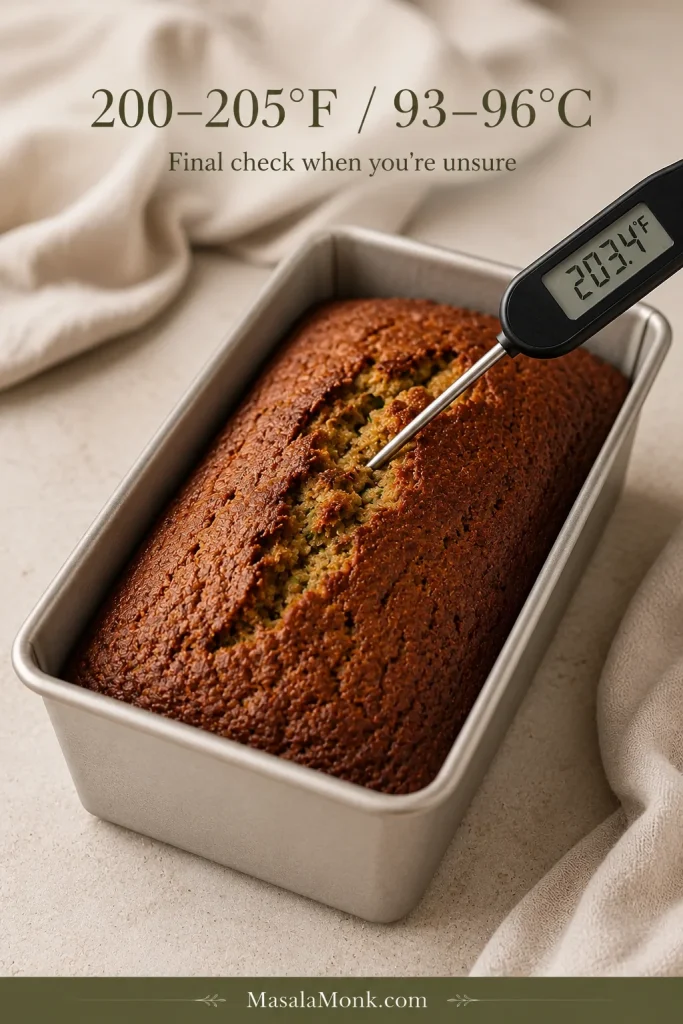
You can make good zucchini bread without a thermometer. If you have one, it gives you the most objective final check when the crack or tester leaves any doubt. Around 200–205°F / 93–96°C indicates the loaf is baked through.

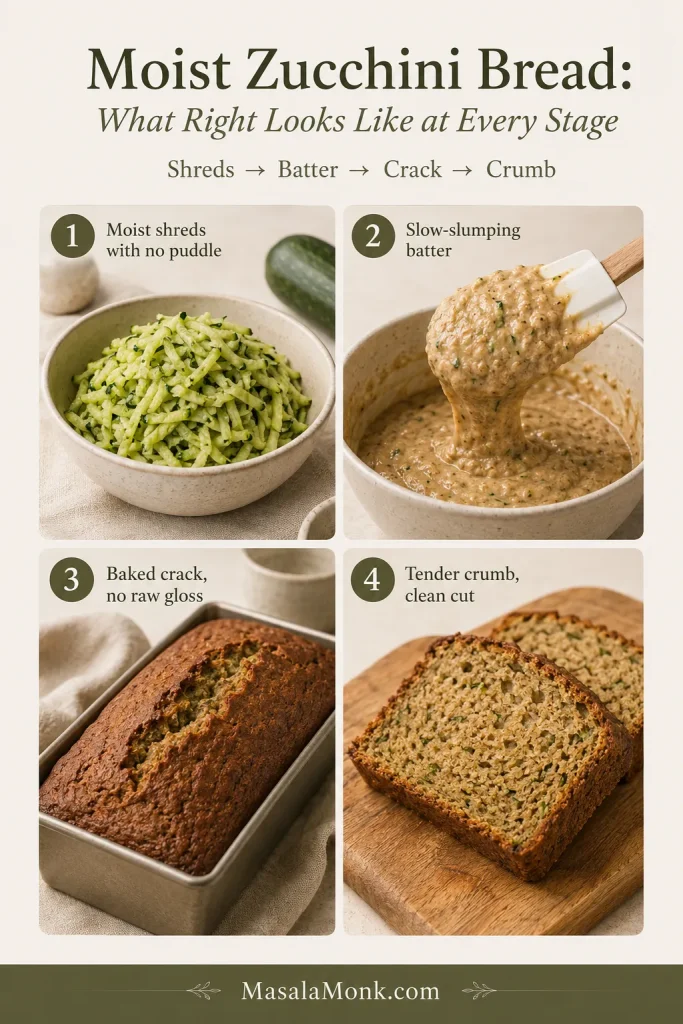
Four-stage zucchini bread guide showing moist grated zucchini, thick batter, a baked center crack and a clean-cut finished crumb.
Use the sequence as checkpoints: moist shreds → thick batter → baked crack → settled crumb. Problems are easier to correct before the loaf reaches the oven.

Zucchini Bread Recipe

This is a cinnamon-forward, oil-based loaf with plenty of zucchini, a golden split top and a crumb that stays tender without feeling wet. Make it plain, or fold in nuts or chocolate when that sounds better.

Recipe at a Glance

Yield1 loaf, about 8–10 generous slices
Pan9 × 5-inch / 23 × 13 cm loaf pan; light-colored metal preferred. Using glass or dark metal? See the pan notes.
Oven350°F / 175°C
PrepAbout 15 minutes
BakeAbout 55–60 minutes; check the loaf itself for doneness
Zucchini370g / 13 oz freshly grated zucchini, not wrung dry
Cooling15 minutes in the pan, then completely on a rack

You will need: one large mixing bowl, a box grater, fork or whisk, flexible spatula, 9 × 5-inch loaf pan, parchment paper and a cooling rack. A digital scale is particularly helpful; an instant-read thermometer is optional.

Ingredients

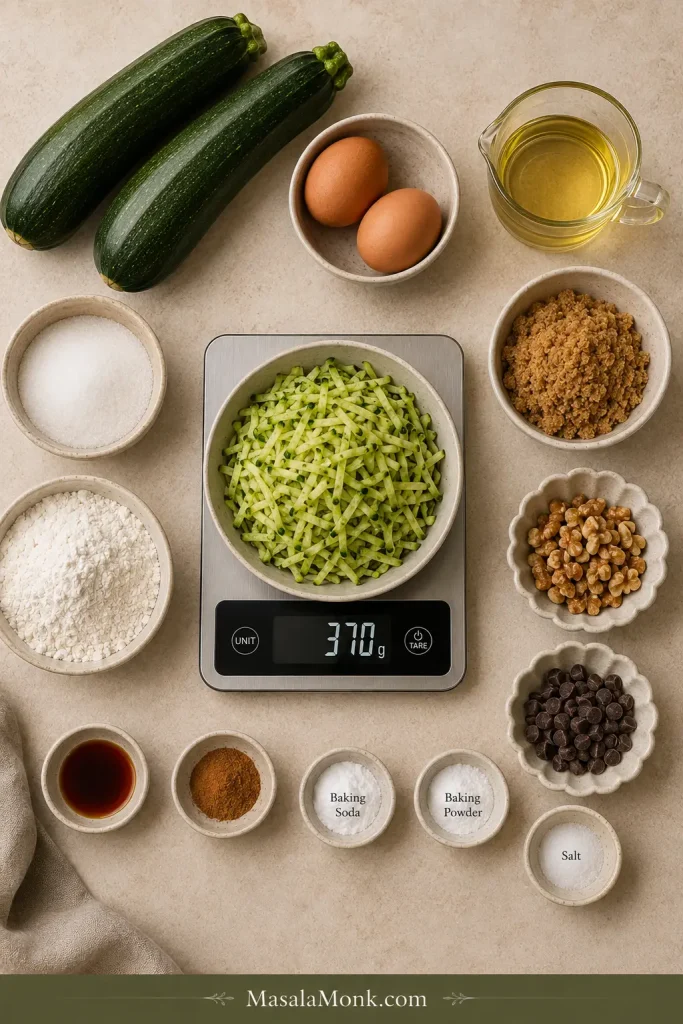
Zucchini bread ingredients arranged around a digital scale holding grated zucchini at 370 grams, with two eggs, flour, sugars, oil and spices.
Weigh 370g of the grated flesh you will actually use, especially if an oversized zucchini needs trimming first.
  • 370g / 13 oz freshly grated zucchini, about 2 firmly packed cups, not wrung dry
  • 2 large eggs
  • 160ml / ⅔ cup neutral oil, such as sunflower, canola or vegetable oil
  • 95g / 3.4 oz (½ cup packed) brown sugar, light or dark
  • 100g / 3.5 oz (½ cup) granulated sugar
  • 1 teaspoon vanilla extract
  • 1 teaspoon fine salt
  • ¾ teaspoon baking soda
  • ½ teaspoon baking powder
  • 1¼ teaspoons ground cinnamon
  • ⅛ teaspoon ground nutmeg, optional
  • 260g / 9.2 oz (2 cups) all-purpose flour, spooned and leveled if using cups
  • Up to 85g / 3 oz chopped walnuts, pecans or chocolate chips, optional

Instructions

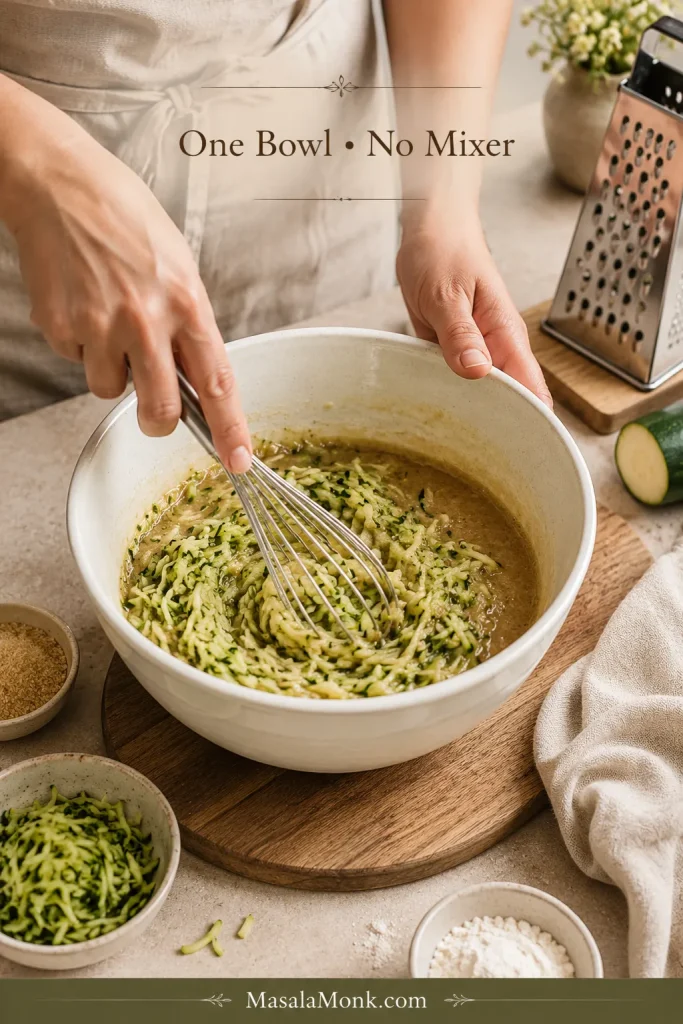
Hands mixing grated zucchini and wet ingredients in a large cream bowl beside a box grater, with no electric mixer present.
Hand mixing makes it easier to stop as soon as the batter comes together.

Prep and Mix the Batter

  1. Heat the oven. Set a rack in the center and preheat to 350°F / 175°C. Lightly grease a 9 × 5-inch / 23 × 13 cm loaf pan and line the long sides with a parchment sling.
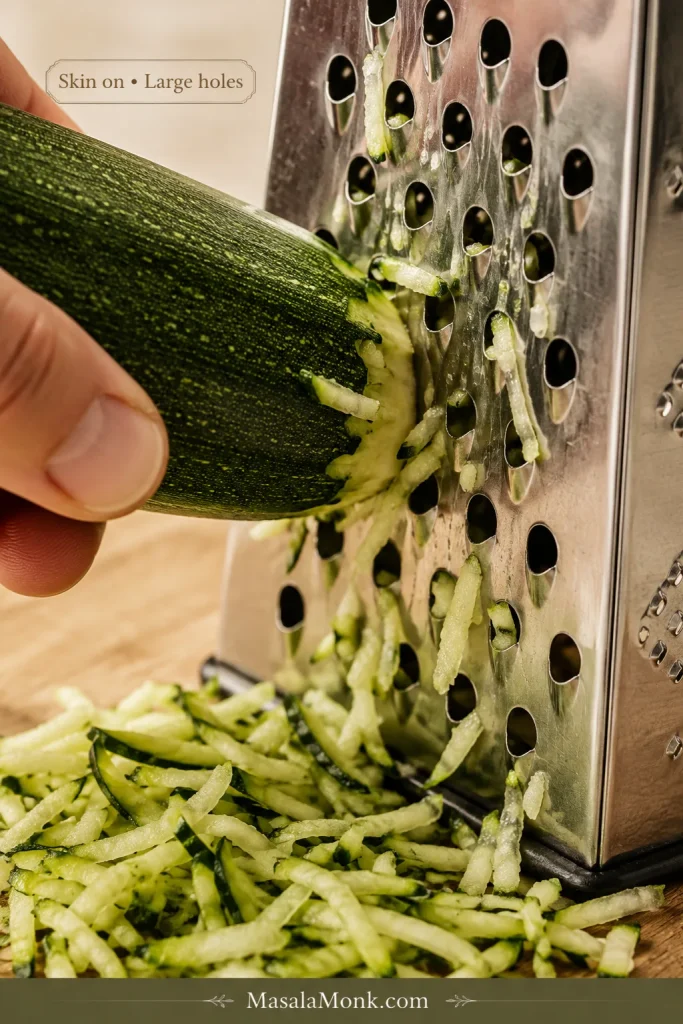
  2. Grate the zucchini. Leave small and medium zucchini unpeeled and grate them on the large holes of a box grater. Measure 370g / 13 oz. Keep the moisture in the shreds, but leave behind any liquid that has pooled separately. Using oversized or frozen zucchini? See the prep notes first.
  3. Mix the wet ingredients. Put the grated zucchini in a large bowl. Add the eggs, oil, brown sugar, granulated sugar, vanilla and salt. Stir until evenly combined.
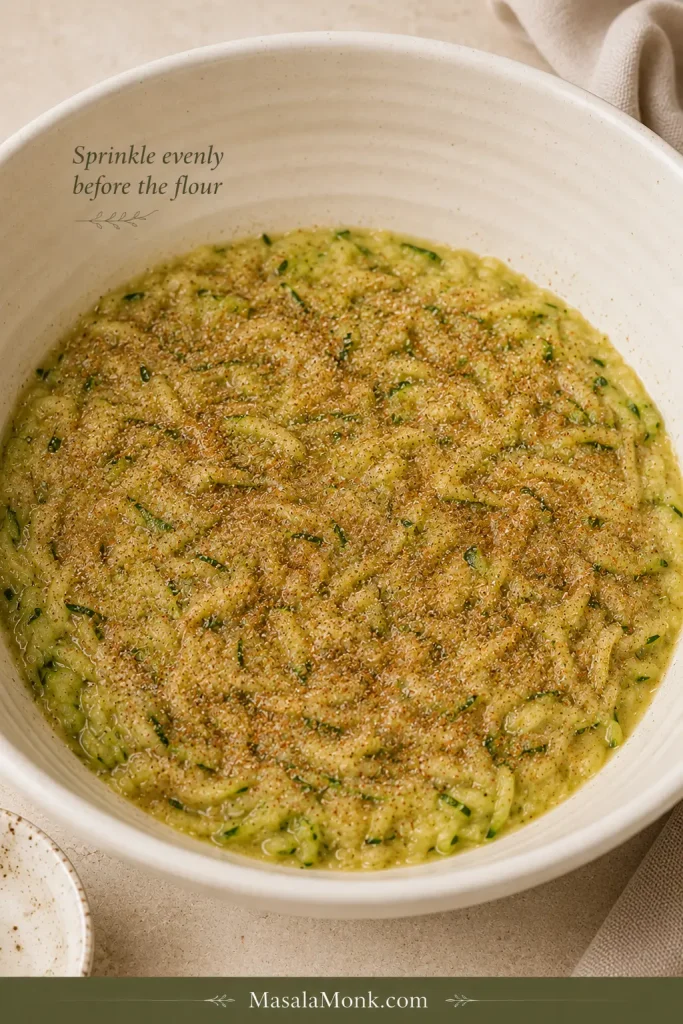
  4. Add the spices and leaveners. Sprinkle the cinnamon, nutmeg, baking soda and baking powder evenly across the surface. Stir thoroughly, scraping around the bowl, so everything is well distributed before the flour goes in.
Cinnamon and small amounts of baking soda and baking powder evenly scattered over a wet zucchini mixture before flour is added.
Scatter the leaveners broadly before the flour goes in so they distribute evenly through the loaf.
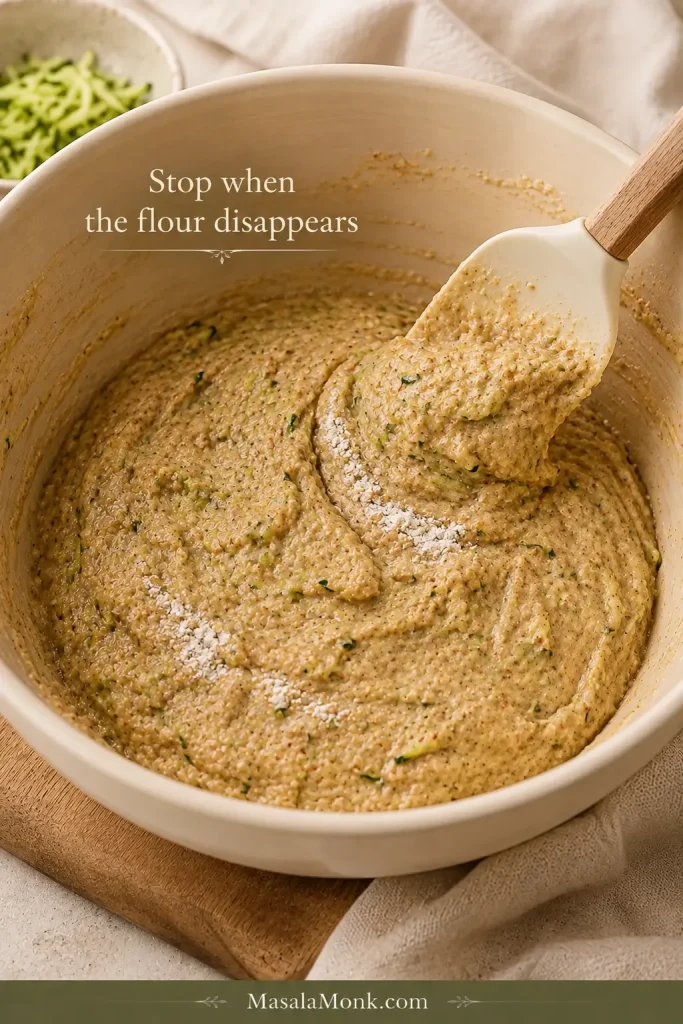
  1. Fold in the flour. Add the flour and fold just until the last dry streak disappears. Fold in nuts or chocolate chips now, if using. The batter should spread easily with a spatula and slump slowly when lifted.
Zucchini bread batter being gently folded with a spatula while a few final streaks of dry flour remain visible.
Stop when the last dry flour streak disappears; extra folding only works the batter harder.

Fill, Bake and Cool

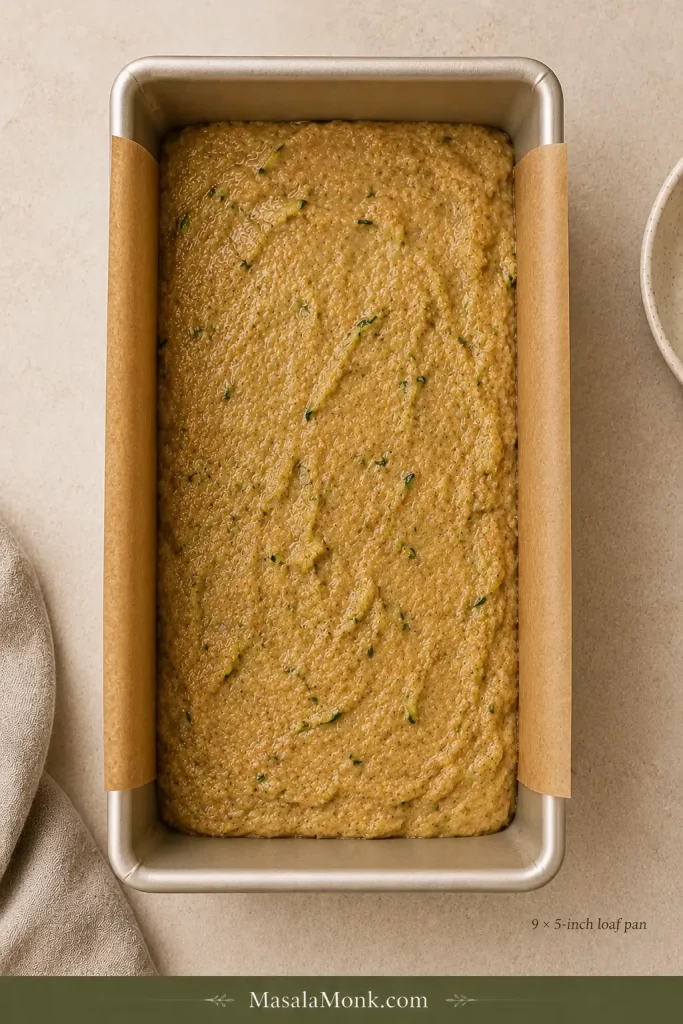
  1. Fill the pan. Scrape the entire batch into the prepared pan and smooth the top lightly.
Thick zucchini bread batter spread in a parchment-lined light metal 9 by 5 inch loaf pan with space remaining above the batter.
Use the full batch in the intended 9×5-inch pan so the center bakes at the expected depth.
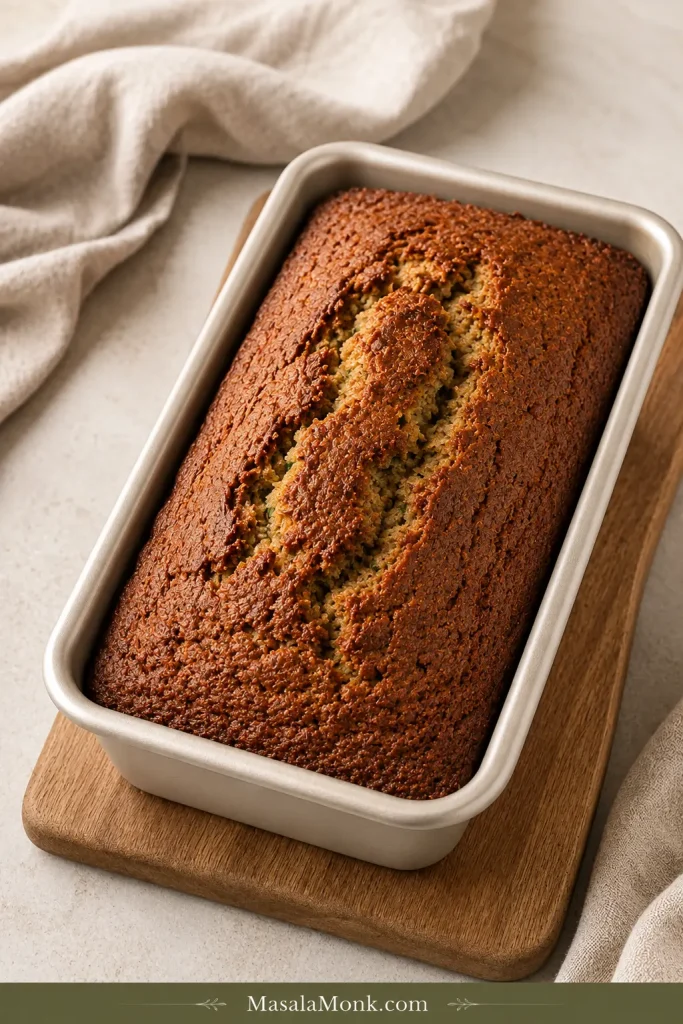
  1. Bake. Bake for about 55–60 minutes. Near the end of that window, the top will usually be deeply golden with a natural crack running across it.
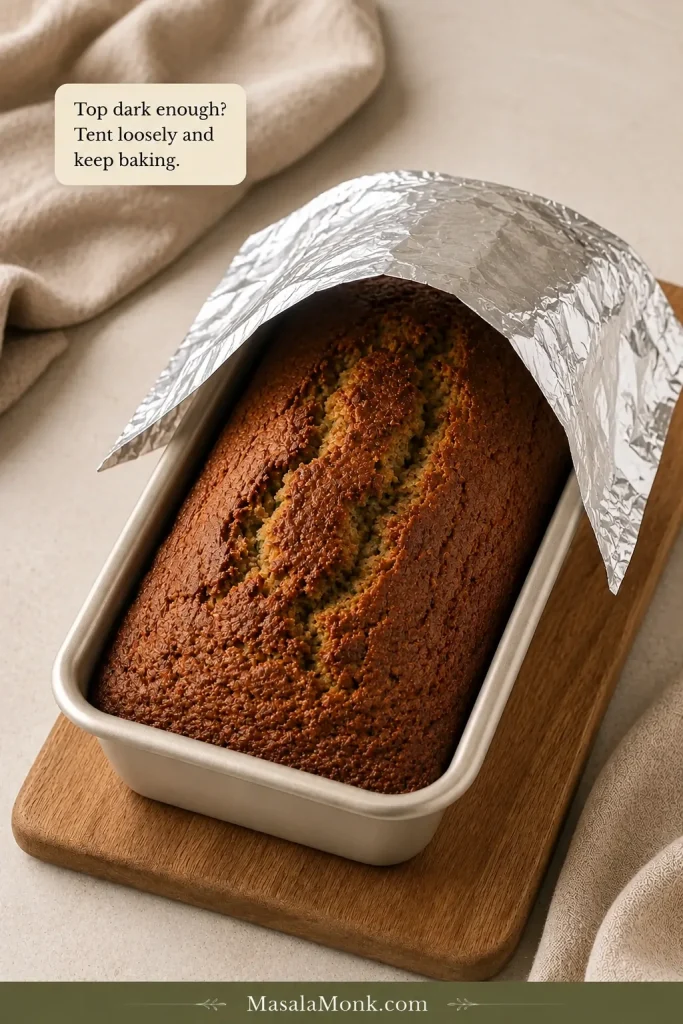
  2. Check before removing it. Look into the crack and test the loaf with a thin skewer or knife. A few tender crumbs are fine; shiny raw batter needs more time. Loosely tent the top with foil if it already has enough color.
Golden-brown zucchini bread with a natural central crack still inside a light-colored metal loaf pan after baking.
Once the top is golden and split, the center—not surface color—decides whether the loaf is done.
  1. Cool. Leave the bread in its pan for about 15 minutes, then lift it onto a rack. Cool completely for clean slices and a fully settled crumb.

Recipe source: Adapted from Smitten Kitchen’s Ultimate Zucchini Bread, with additional guidance here on zucchini moisture, doneness and common texture problems.

Table of Contents

Which Zucchini Are You Using?

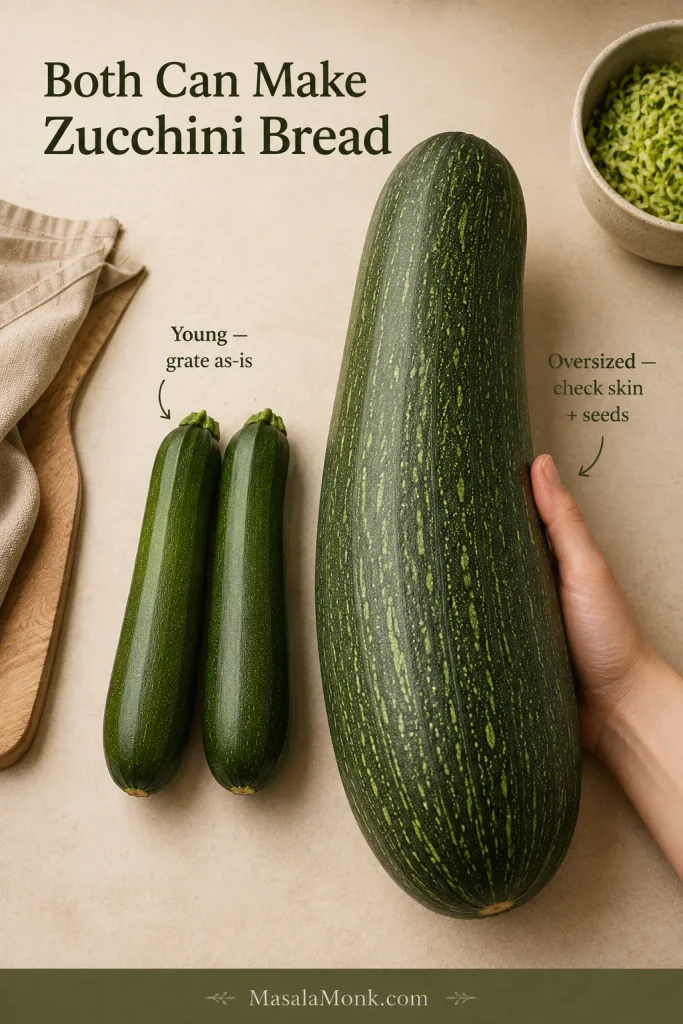
Freshly grated zucchini is the reference point for this loaf. Small supermarket zucchini are the simplest route, but the oversized one hiding beneath the garden leaves can work too.

Several small young zucchini beside one very large garden zucchini, comparing the sizes that can be used for zucchini bread.
Prep changes with zucchini size; the target stays 370g of usable grated flesh.
You haveWhat to do
Small or medium fresh zucchiniLeave the skin and seeds in place. Grate and measure 370g.
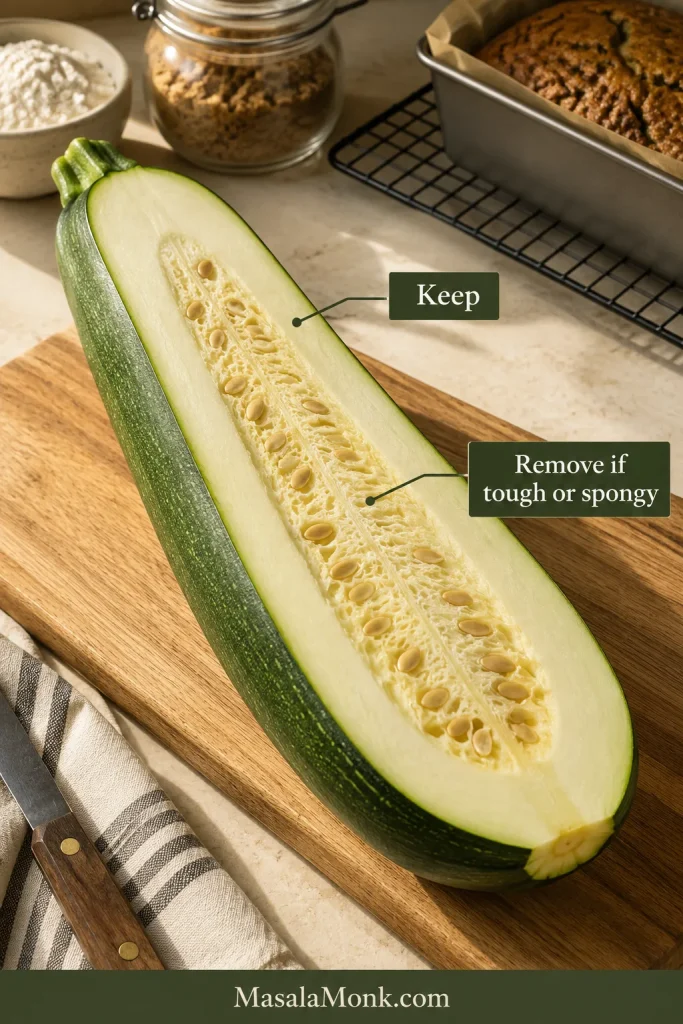
Large garden zucchiniCut it open first. Remove tough skin or a pale, spongy cavity full of hard seeds if necessary, then grate and measure 370g of the usable flesh.
Frozen shredded zucchiniIt can work, but it will not behave exactly like fresh zucchini after thawing. See the note below.

How to Prepare Zucchini for Bread

Peel, Seeds and Grating

Do you need to peel it? No. Thin zucchini skin softens during baking and leaves the familiar green flecks through each slice. Peel only an oversized mature zucchini whose skin has become leathery.

What about the seeds? Leave young seeds alone. With a huge garden zucchini, scoop out the middle only when it has become pale, spongy and filled with hard mature seeds.

Large mature zucchini cut lengthwise to show firm usable outer flesh and a pale, seeded central cavity that may need removing.
Remove a hard-seeded, spongy center before weighing so the 370g reflects usable flesh.

Which grater? Use the large holes of a box grater. They produce strands that disappear comfortably into the baked crumb without turning the raw zucchini into pulp.

Unpeeled green zucchini being grated on the large holes of a stainless steel box grater, with green-edged shreds collecting below.
Grate over a plate or shallow bowl so separately pooled liquid is easy to leave behind.

Should You Squeeze Zucchini for Zucchini Bread?

No—fresh zucchini should not be squeezed dry for this loaf. Its moisture is part of what keeps the crumb tender.

A bowl of freshly grated zucchini can look surprisingly wet. That alone does not mean anything has gone wrong.

Moisture held inside and on the shreds belongs in the recipe. Water that has collected separately as a puddle does not. Leave that free liquid behind, but do not twist or wring the zucchini into a dry, fibrous mass.

Keep the moisture in the shreds; leave the puddle behind.

Three grated zucchini states showing moist fluffy shreds, zucchini sitting in separately pooled liquid and tightly squeezed dry zucchini.
Judge separated liquid, not simple dampness: keep moist shreds, leave the puddle, and don’t wring them dry.

Grated too much? Keep the extra out of the batter so the ratio stays intact. These crispy zucchini chips turn the surplus into something thin, salty and crunchy instead.

Can You Use Frozen Zucchini for Zucchini Bread?

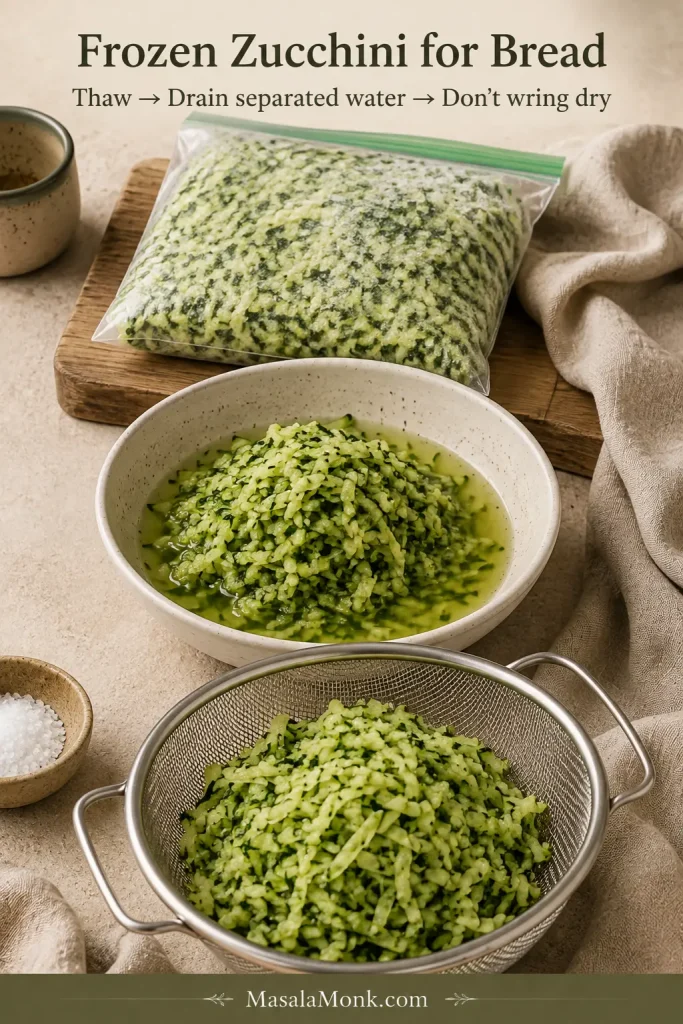
Yes, but fresh zucchini gives the most predictable result here. Freezing breaks down the shreds and makes them release considerably more water as they thaw.

Thaw frozen zucchini completely and let any liquid that has separated freely drain away. Do not wring the remaining shreds dry. Drained frozen zucchini is not a gram-for-gram equivalent to the fresh amount in the recipe, so some variation is unavoidable.

The batter checkpoint matters more when you use frozen zucchini. It should still spread easily, slump slowly from the spatula and have no distinct layer of liquid collecting around it. A bag of summer zucchini saved for later can still make a good loaf; it simply asks you to pay closer attention to the bowl.

Frozen grated zucchini, thawed zucchini releasing liquid and drained zucchini shreds that remain visibly moist.
After thawing, drain freely separated liquid without wringing the shreds; then use batter consistency as the better checkpoint.

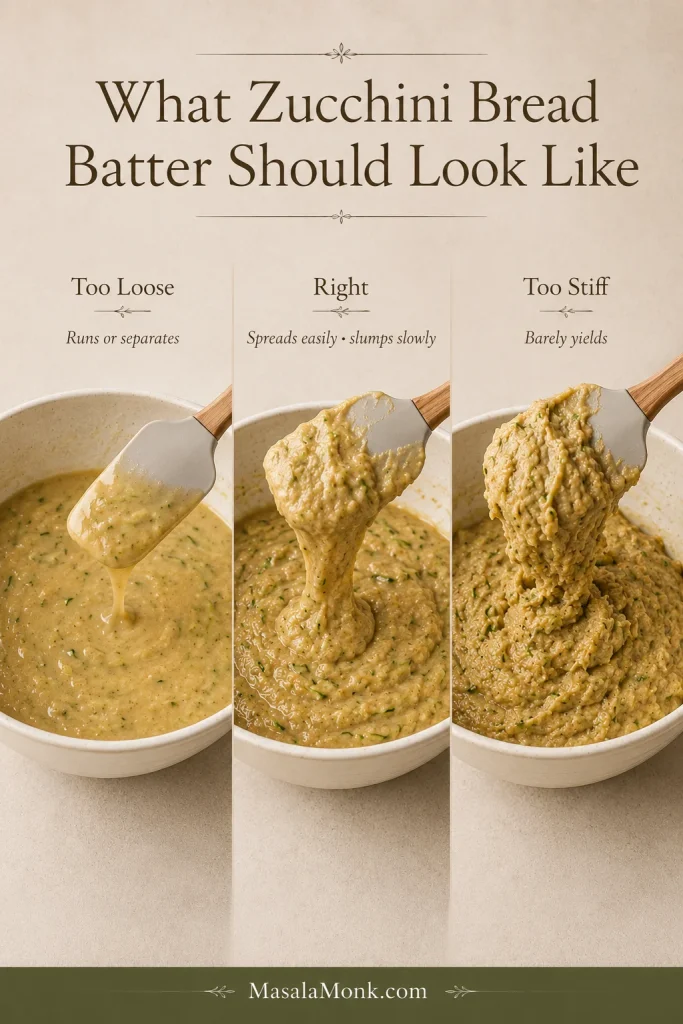
What Should Zucchini Bread Batter Look Like?

The batter should be thick enough to spread into the pan and loose enough to slump slowly from the spatula. Green strands of zucchini will still be visible through the cinnamon-speckled mixture.

A little visible moisture from the grated zucchini is normal. A distinct layer of liquid separating around the batter is different; check whether free zucchini water went into the bowl and recheck the measurements before baking.

Three zucchini bread batters comparing a thin runny mixture, thick slow-slumping correct batter and an overly stiff batter.
If the batter is too loose or stiff, recheck zucchini water and flour before adding anything.

A mixture that barely yields to the spatula can point to too much flour.

How to Know Zucchini Bread Is Done

Zucchini bread is done when the crack through the top reveals baked crumb and a tester pushed into the loaf carries no raw batter. The clock tells you when to begin looking; these cues tell you when to stop baking.

Check the Crack, Then Use a Tester

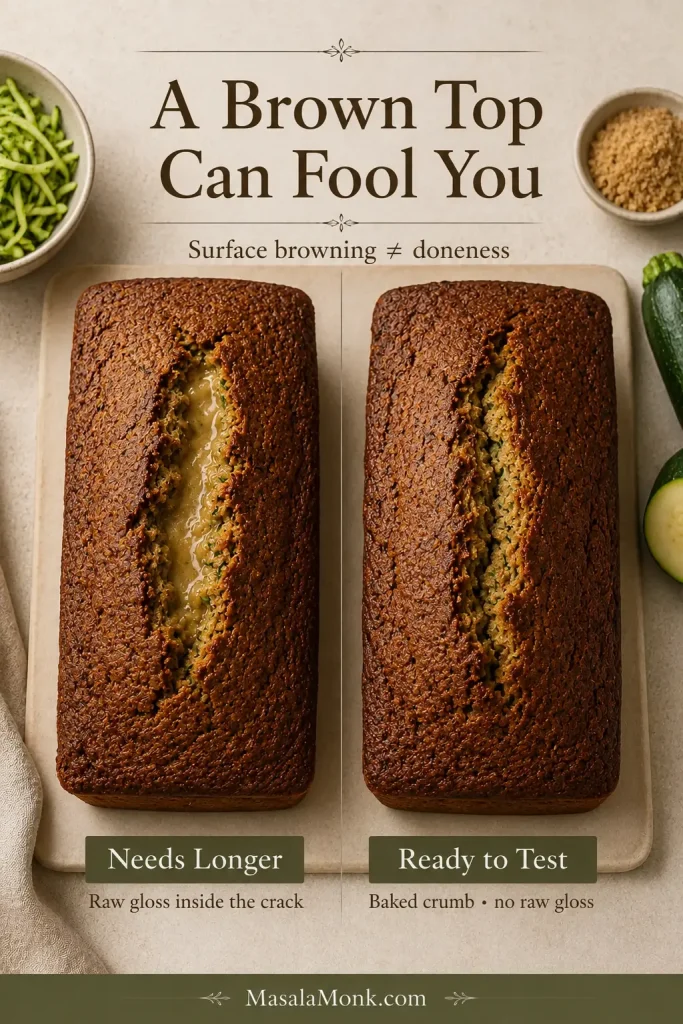
A deeply golden top is persuasive, especially once the kitchen smells like the loaf must be done. Check the crack anyway.

Shiny batter down inside that opening needs more oven time. Baked crumb has lost the raw gloss.

Two similarly browned zucchini loaves comparing a crack with glossy raw batter and a crack showing opaque baked crumb.
Once the crust is brown enough, judge the center—not the surface color or the clock.

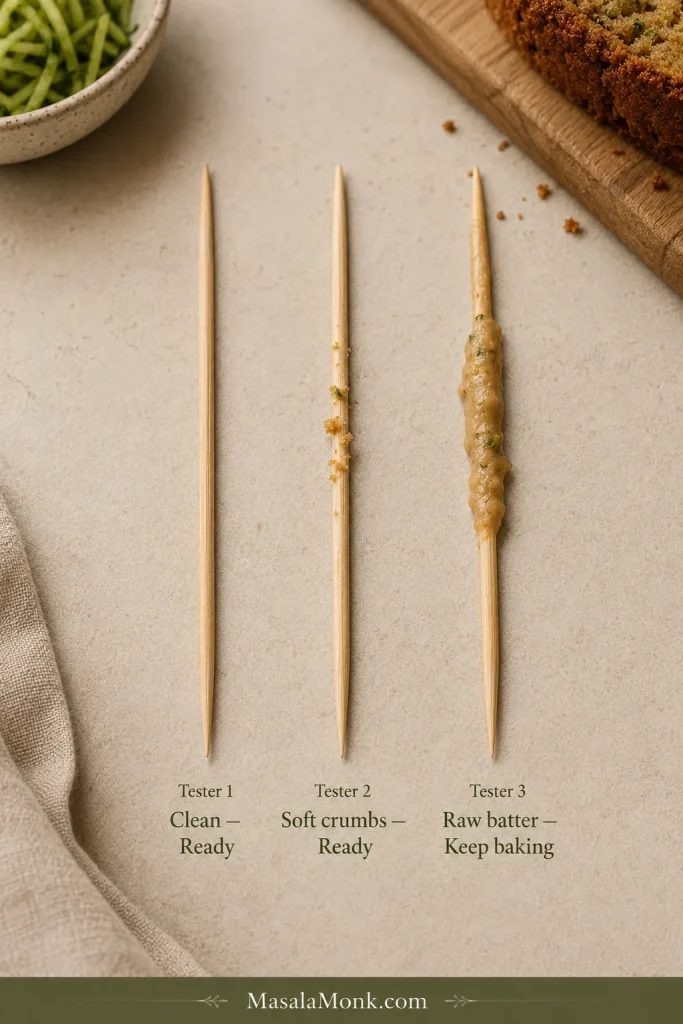
Next, push a thin skewer or knife into the thickest part. A clean tester or a few tender crumbs are both fine. A streak of uncooked batter is not.

Three wooden testers showing a clean tester, a few soft baked crumbs and a thick smear of raw zucchini bread batter.
Test the thickest center; an edge can look done while the deepest batter still needs time.

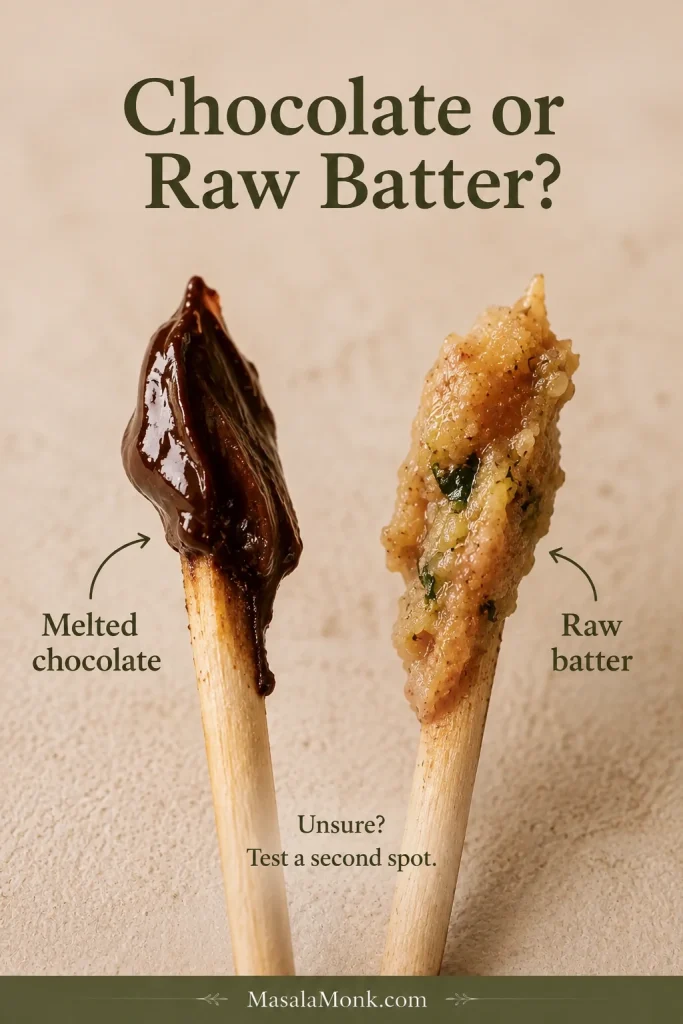
Chocolate chips can imitate wet batter, so test another spot before deciding.

Two close-up baking testers comparing dark melted chocolate residue with a pale, wet smear of raw zucchini bread batter.
If a tester hits melted chocolate, test a nearby spot before extending the bake.

A Thermometer Gives You One More Check

You can make good zucchini bread without a thermometer. If you have one, it gives you the most objective final check when the crack or tester leaves any doubt.

Move an instant-read probe slowly through the loaf and note the lowest reading. Around 200–205°F / 93–96°C indicates that the bread is baked through.

Instant-read thermometer inserted into the thick center of zucchini bread in a light metal pan, displaying about 203 degrees Fahrenheit.
Keep the probe off the pan and read the thickest part of the loaf.

King Arthur Baking’s quick-bread doneness guide explains the thermometer method in more detail.

Already baked it and found a wet or raw center? Go straight to troubleshooting →

The Hard Part: Let It Cool

This is the instruction nobody wants when the kitchen smells like cinnamon and the loaf is sitting three feet away.

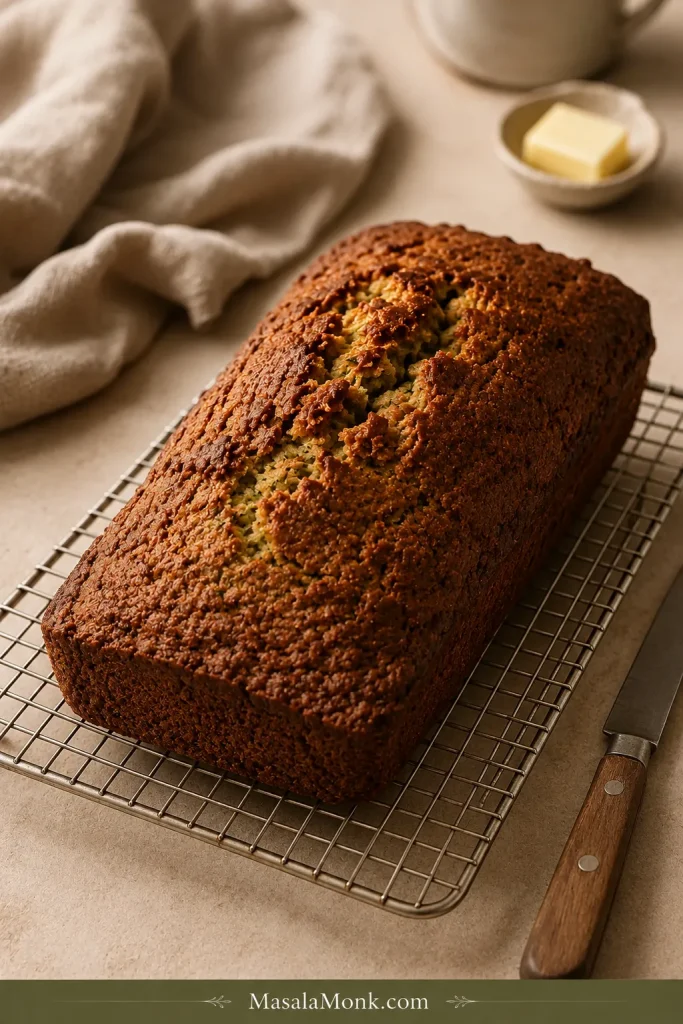
Whole golden zucchini bread cooling on a wire rack beside a knife, butter and neutral linen in warm natural light.

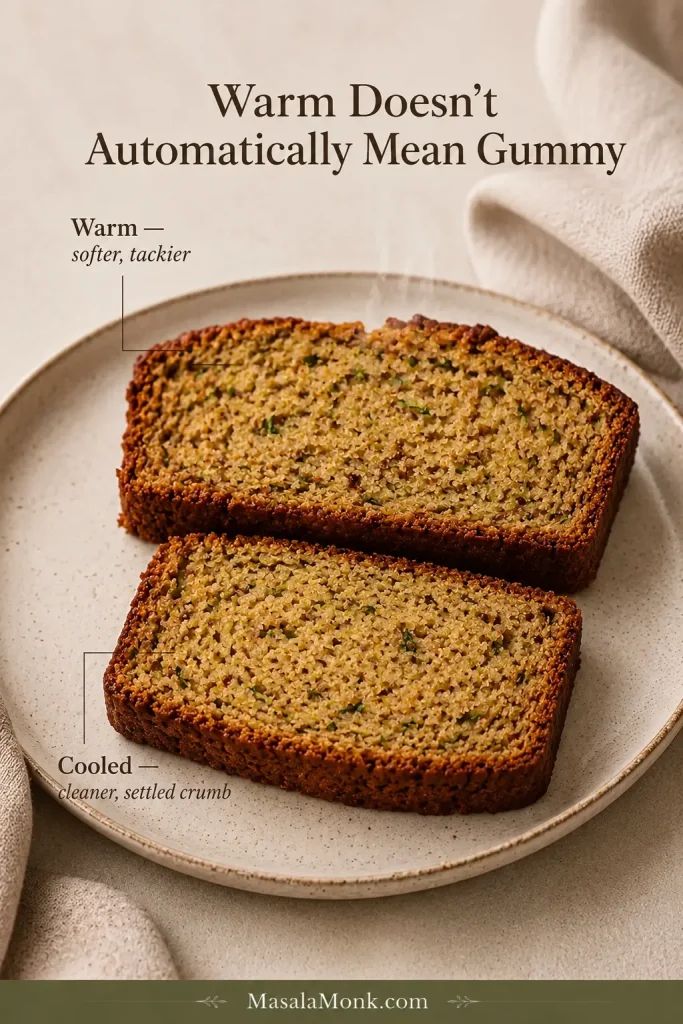
Give it about 15 minutes in the pan, then move it to a rack. Steam continues to escape while the crumb settles, so a just-baked slice naturally feels tackier than one cut later.

You can steal a warm slice. Just wait until the loaf has cooled before deciding that its tender middle is actually gummy.

Two fully baked zucchini bread slices comparing a softer warm crumb with a cleaner, more settled cooled crumb.
Judge gumminess on a cooled slice; warmth and trapped steam can temporarily make a fully baked crumb feel tackier.

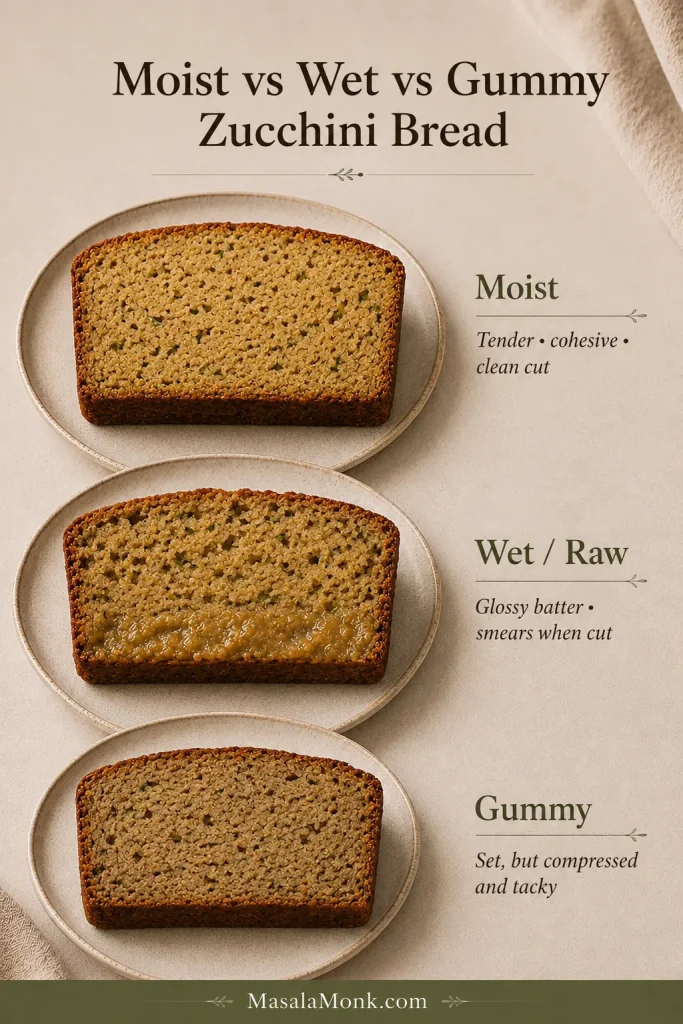
Moist, Wet or Gummy?

Moist: The cooled crumb is tender, holds together and cuts cleanly. That’s the texture you’re after.

Wet: Raw-looking or paste-like batter remains through the loaf and smears onto the knife. It needed more baking.

Gummy: The bread holds together but feels tacky, compressed or rubbery. Underbaking can cause it, but excess free water, heavy mixing or cutting while very hot can contribute too.

A slightly tacky patch directly beneath the top crust is different from a stripe of raw batter running through the loaf.

Three zucchini bread slices comparing a tender baked crumb, a glossy raw band and an opaque but compressed gummy crumb.
Wet or raw points back to doneness; a fully set but gummy crumb points to moisture, mixing or cooling.

Zucchini Bread Troubleshooting

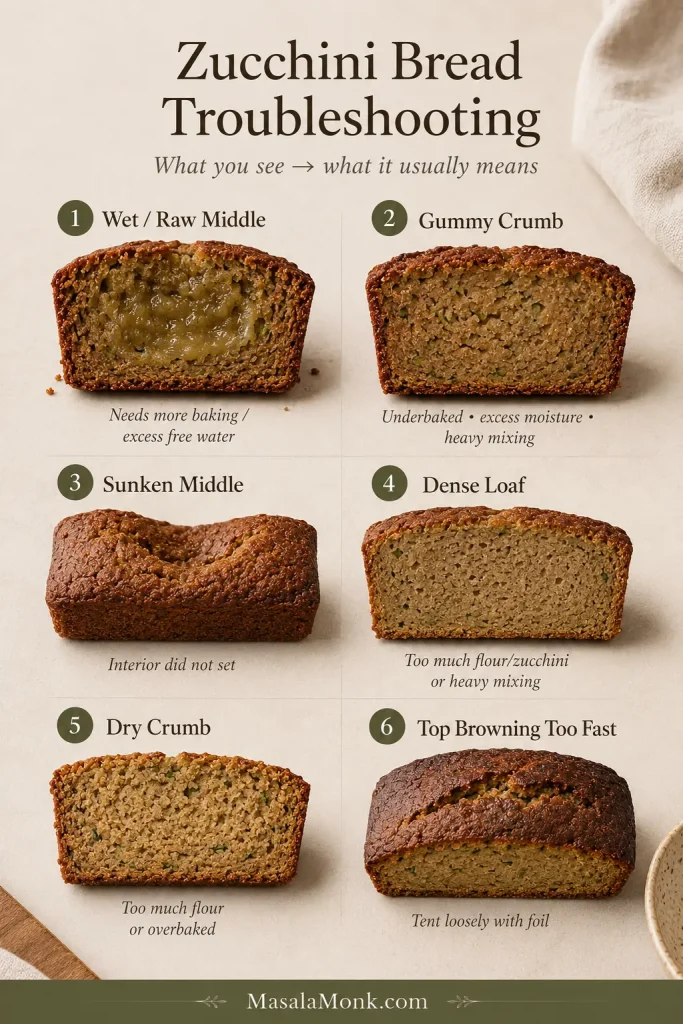
Troubleshooting guide showing zucchini bread with a raw center, gummy crumb, sunken middle, dense crumb, dry crumb and an overly browned top.
Start with the symptom you can see and change one variable at a time.
ProblemLikely causeNext move
Wet or raw middleMore baking time needed; excess free water; oven running coolKeep a whole, hot loaf baking until the raw batter is gone
Gummy crumbUnderbaking, excess moisture, heavy mixing or cutting very hotMix only until combined, bake fully and cool before judging
Sunken middleInterior had not set; inaccurate leavener; pan too small or overfilledCheck measurements, pan size and doneness
Dense loafToo much flour, too much zucchini or heavy mixingWeigh the key ingredients and stop folding once combined
Dry crumbToo much flour, zucchini wrung dry or loaf overbakedKeep the zucchini’s natural moisture and remove the loaf once baked through
Top browning too quicklyDark pan or strong top heatLoosely tent with foil while the loaf finishes

If the top is already dark enough while the center still needs time, loosely tent the loaf with foil and continue baking. The foil is a shield for the crust, not a signal that the middle is finished.

Deeply browned zucchini bread in a light metal loaf pan with aluminum foil loosely arched above the top to prevent further browning.
Keep the foil loose with an air gap; shield the browned crust without wrapping the loaf.

Why Is My Zucchini Bread Raw in the Middle?

Usually because the loaf needed more time, excess free water entered the batter, or the oven was running cooler than expected.

A loaf that is still whole and hot can go back into the oven. Cover the top loosely with foil when it already has enough color and continue until the raw batter is gone.

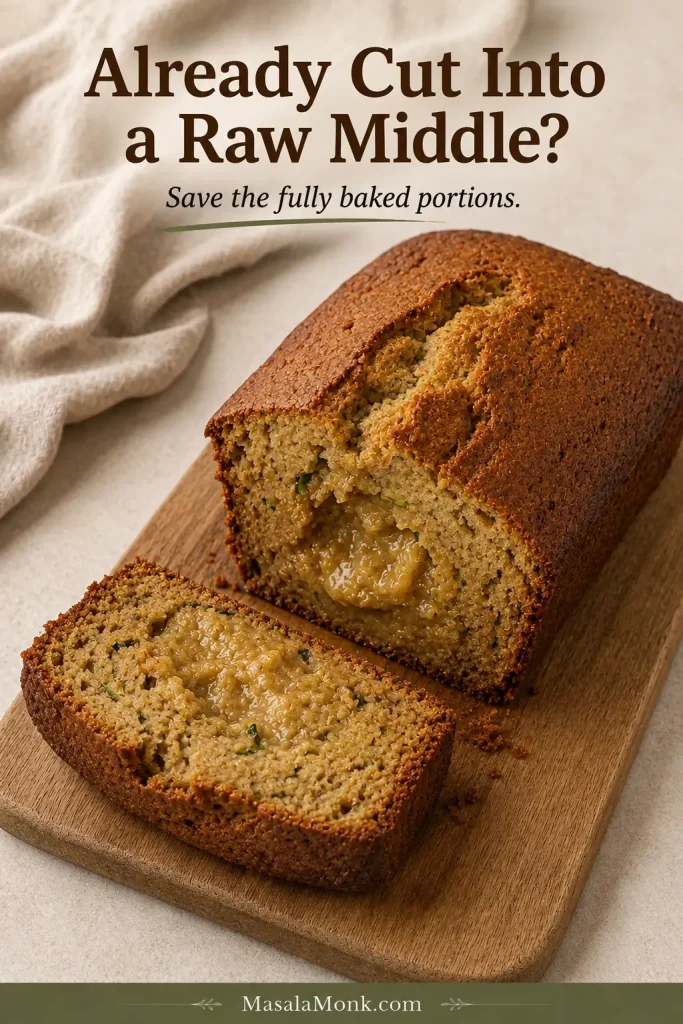
If you’ve already cut into it and found a genuinely raw middle, the options are unfortunately narrower. Save the fully baked portions. Continuing to bake the whole cut loaf tends to dry the parts that were already done before the exposed batter cooks evenly.

Cut zucchini bread showing fully baked outer crumb surrounding a glossy raw section in the middle of the loaf.
Once the loaf is cut open, protect the baked portions rather than trying to finish it like an intact loaf.

↑ Back to the recipe · Recheck doneness

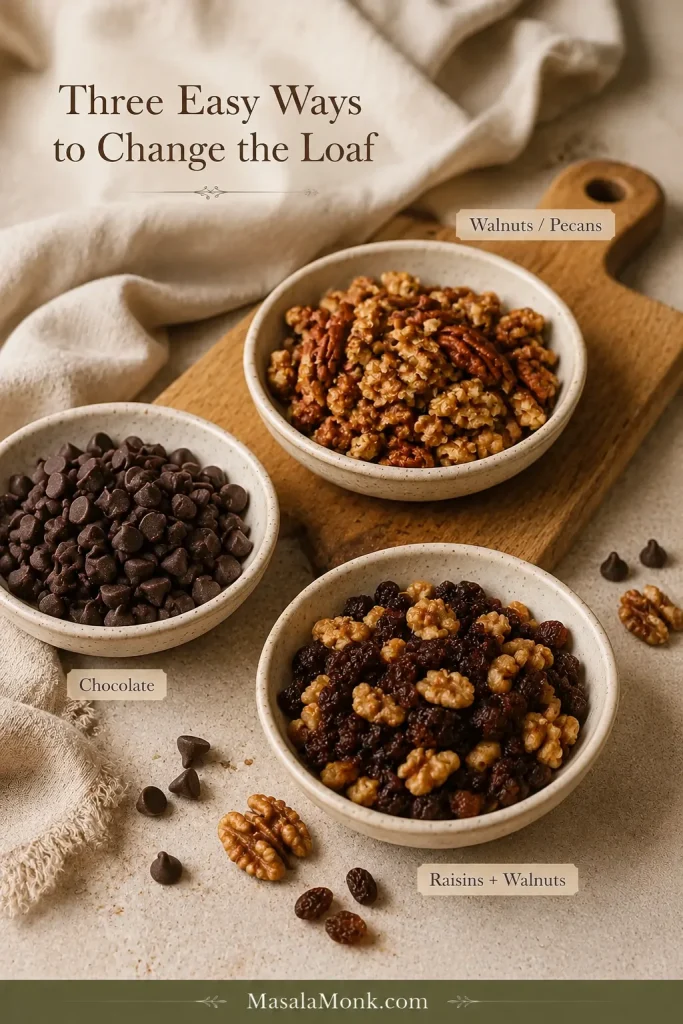
Easy Add-Ins

Walnuts or pecans: Fold in up to 85g / 3 oz. Walnuts give the loaf the more familiar old-fashioned crunch; pecans are slightly sweeter.

Chocolate chips: Use up to 85g / 3 oz semi-sweet or dark chocolate. In a slightly warm slice, the chips soften into little melted pockets against the cinnamon crumb.

Raisins: About 75g / 2.6 oz, roughly ½ cup, gives the loaf a more old-fashioned recipe-box feel. Raisins and walnuts work especially well together.

Walnuts and pecans, chocolate chips, and raisins with walnuts arranged in bowls as optional zucchini bread add-ins.
Distribute add-ins evenly so every slice gets some without heavy clusters weakening the crumb.

If that combination of grated vegetables, cinnamon and nuts is the part you love most, it takes a richer turn in this carrot cake with cream cheese frosting.

Before You Start Swapping Ingredients

Zucchini bread is forgiving, but flour, eggs, sugar, oil and zucchini moisture all help determine the final crumb. Change several at once and you’re effectively making a different recipe.

For the first loaf, keep the eggs and oil as written. Butter and applesauce both work in zucchini breads designed around them, but they do not perform exactly the same job as neutral oil here.

If applesauce is the change you are considering, this banana bread made with applesauce shows how a quick bread can be built around fruit puree from the start.

Eggless, vegan, gluten-free, keto and almond-flour versions change the structure enough that they are better treated as their own recipes instead of casual swaps inside this one.

Ready to bake? Return to the zucchini bread recipe →

The Pan Matters More Than It Seems

The full batch fits a 9 × 5-inch / 23 × 13 cm loaf pan. A light-colored metal pan gives you more control over browning during the long bake.

Dark metal usually browns the crust faster. When the top has enough color before the loaf is finished, cover it loosely with foil and keep baking.

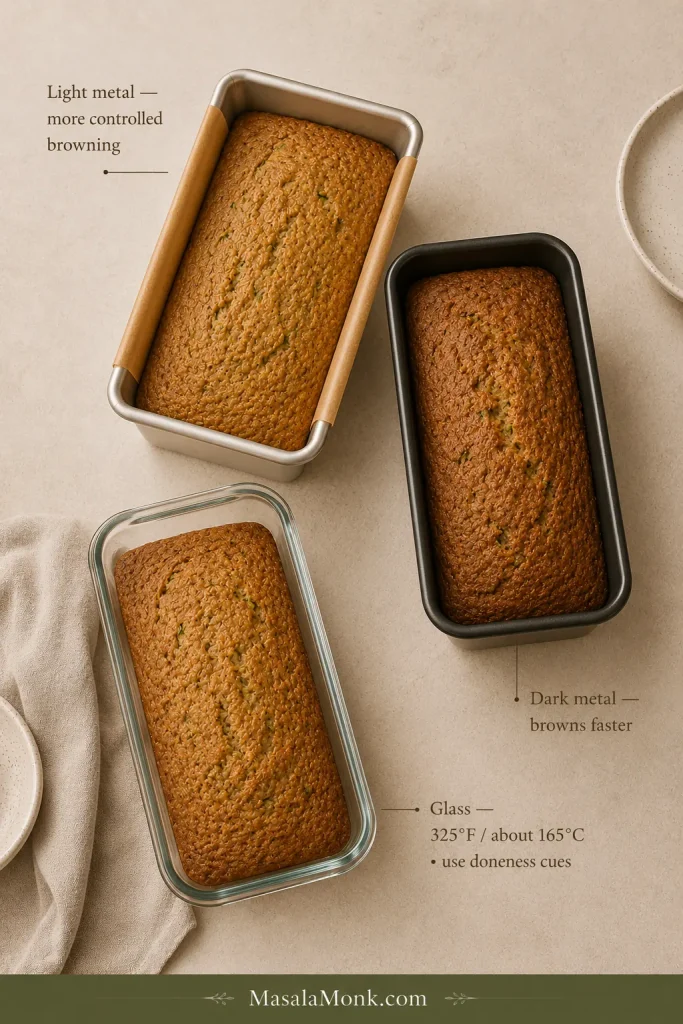
Glass behaves differently from metal and holds heat longer. If glass is what you have, King Arthur Baking recommends reducing the oven temperature by 25°F; for this loaf, that means 325°F / about 165°C. Expect the timing to change and use the same doneness cues instead of relying on the original clock time.

Three zucchini loaves baked in similarly sized light metal, dark metal and clear glass pans to compare pan materials and browning.
Keep the 9×5 size constant when comparing pan materials so batter depth does not become a second variable.

A noticeably smaller loaf pan makes the batter deeper and changes the bake. Use the specified 9 × 5-inch pan when possible instead of forcing the full batch into something smaller. Muffins and mini loaves need their own baking times, so the full-loaf timing should not be used for either.

Storing and Freezing Zucchini Bread

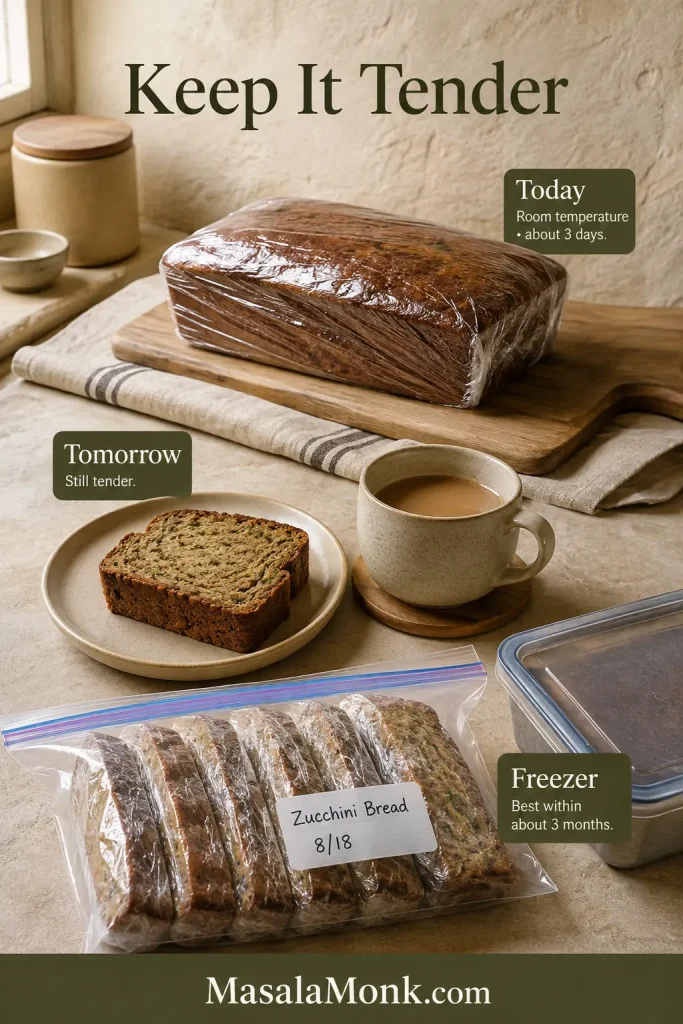
Room temperature: Cool the loaf completely before covering it. Keep it well wrapped or in an airtight container for about 3 days. Wrapping while warm traps steam against the crust.

Refrigerator: A very hot or humid kitchen is the main reason to refrigerate it. Chilled quick bread firms up, so let a slice lose its chill or warm it gently before eating.

Freezer: Wrap the completely cooled loaf or individual slices tightly and place them in a freezer-safe bag or container. For best quality, use them within about 3 months. Individual slices are especially handy: pull one out, let it thaw on the counter, and breakfast is mostly handled.

Wrapped whole zucchini bread for room-temperature storage, a slice served with coffee and individually wrapped slices packed for freezing.
Freeze the cooled loaf in portions so you can thaw one slice without repeatedly exposing the rest.

For another simple cinnamon bake that keeps well for the next day, try this fresh apple cake.

Frequently Asked Questions

Can You Taste the Zucchini in Zucchini Bread?

Not strongly. Cinnamon, vanilla and brown sugar reach you first. The zucchini mostly contributes moisture, tenderness and little green flecks instead of an obvious vegetable flavor.

Can You Use Yellow Summer Squash Instead?

A young, firm yellow summer squash can work much like zucchini. Grate it the same way. An oversized mature squash may need tough skin or a coarse seed cavity removed first.

Can You Double the Recipe?

Yes. Divide a double batch between two 9 × 5-inch pans. One extra-deep loaf would bake very differently; the pan section explains why depth and material matter.

The Slice You’re Looking For

Once the loaf has cooled, the knife should pass through without dragging a wet streak behind it. The slice bends gently, the crumb holds together, and cinnamon reaches you before zucchini ever does.

That’s the balance this bread is after: the zucchini keeps the crumb tender, while enough oven time turns the middle from batter into bread.

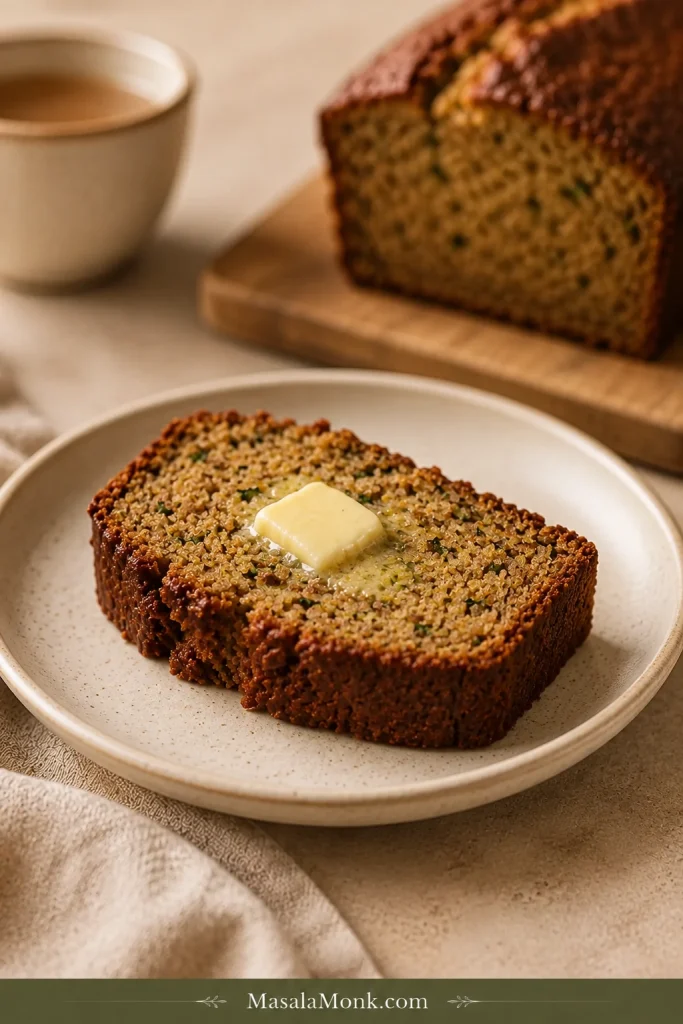
Add butter if you like. It does not need much else.

Thick slice of golden zucchini bread with tender green-flecked crumb and a small pat of melting butter, with the remaining loaf softly blurred behind.

What did you make yours with: small fresh zucchini, one of those enormous garden zucchini, or zucchini from the freezer?

↑ Back to the recipe · ↑ Back to top

Posted on Leave a comment

Greek Pita Bread Recipe: Soft, Thick and Pocketless for Gyros

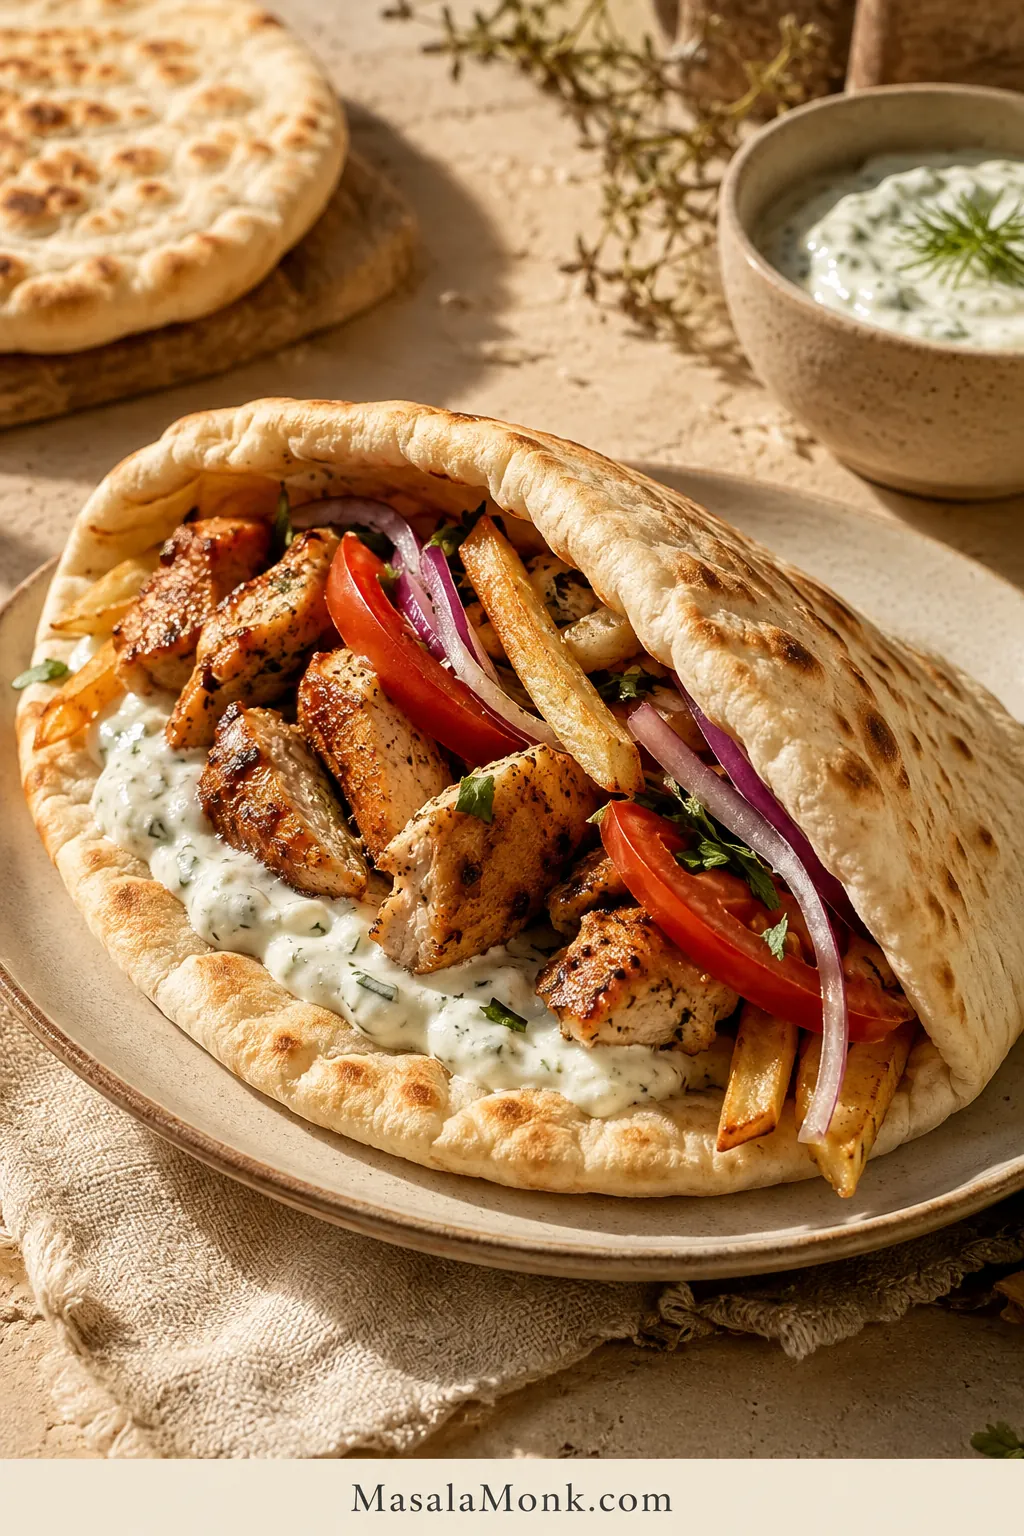
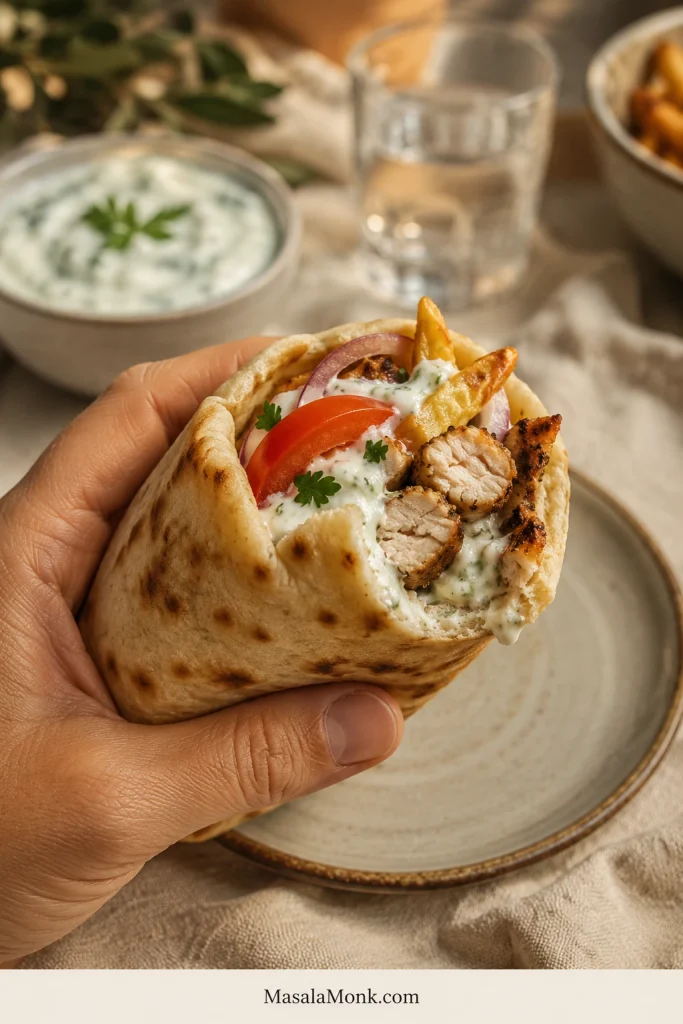
Soft Greek gyro pita folded around grilled chicken, tzatziki, tomato, red onion and fries, with the browned pocketless bread clearly visible.

The first Greek pita rarely makes it into the finished stack. It comes off the skillet warm and mottled, gets folded between impatient fingers, and loses a torn edge before the chicken, tomato and thick Greek tzatziki reach the table.

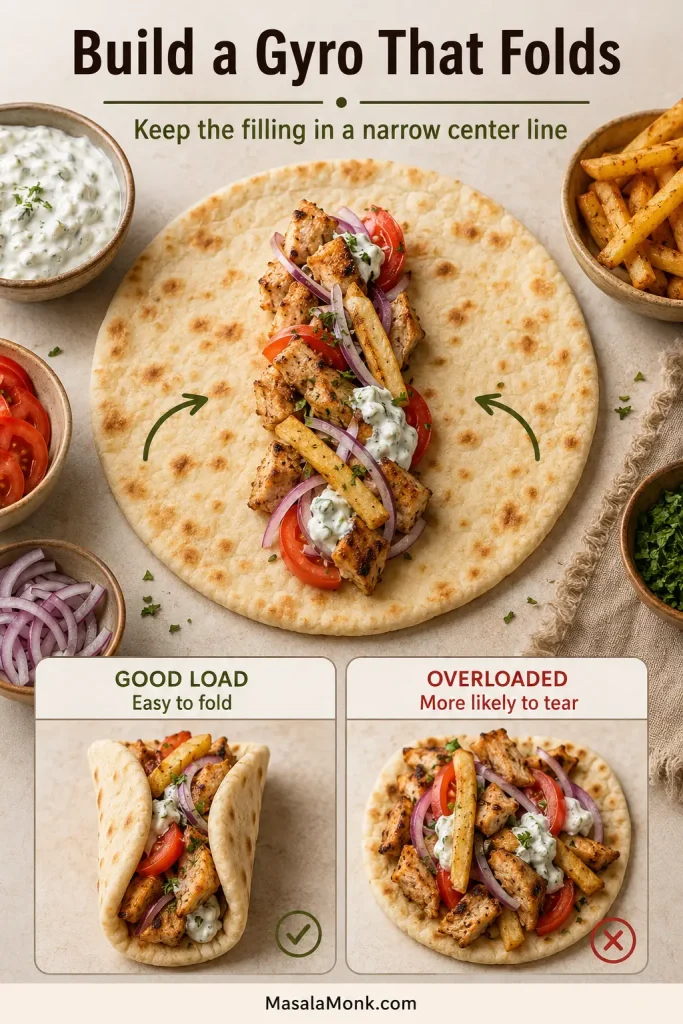
That bend is the whole point. This Greek pita bread recipe makes the soft, thick, pocketless bread used for gyros and souvlaki. It should feel substantial in the hand, fold into a deep U and carry meat, sauce, onion and even fries without splitting along the crease.

The reward of making it fresh shows up once the pita is filled: the warm bread bends with the meat and sauce instead of feeling like a separate wrapper around them.

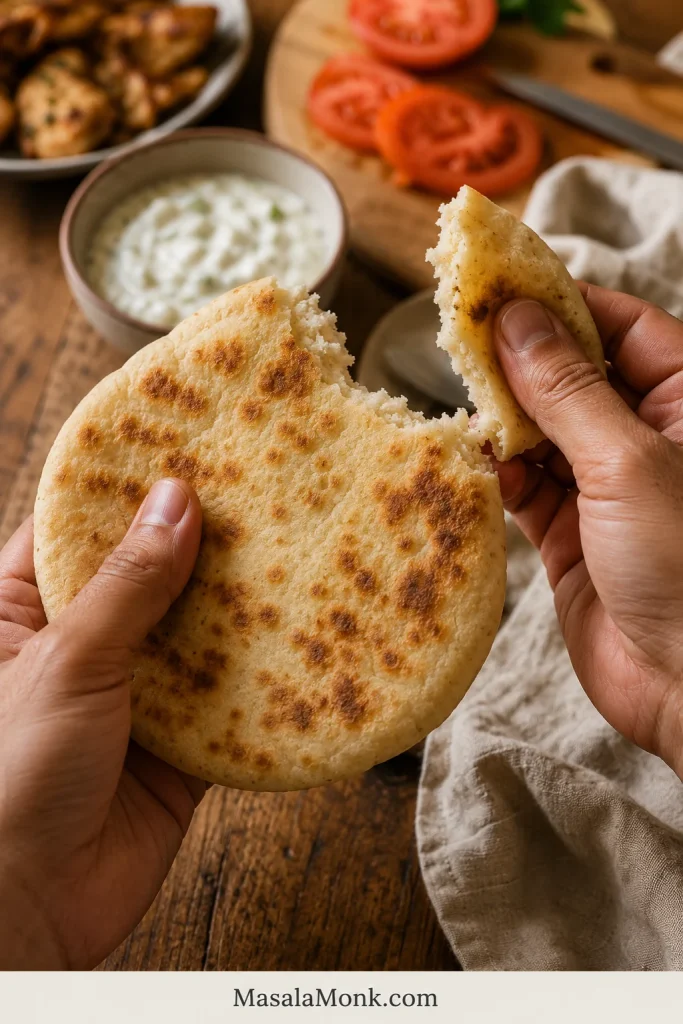
Hands tearing a warm Greek pita to reveal its soft cooked interior while dinner ingredients sit nearby.
Tear one while it is warm for a quick crumb check: the center should pull apart cleanly, not smear, clump or feel pasty.

A disappointing pita can still look beautifully spotted, only to feel heavy in the center, crack at the fold or turn stiff while the rest of dinner is being assembled.

The method depends on three things: a soft but workable dough, equal rounds with an even center, and steady skillet heat. With those in balance, the remaining seven settle into an easy rhythm.

You may also see this pocketless bread called gyro bread, souvlaki bread, Greek flatbread, Greek pitta or yiros bread. Small bubbles and partial puffing are welcome; a complete balloon and a clean internal pocket are not the goal. For the thinner bread that inflates and splits for stuffing, choose a pocket-pita recipe instead.

Quick answer

The Greek Pita Method in One Minute

  • Make a soft dough: start with 500 g bread flour and 325 g water. After resting and kneading, it should feel tacky and elastic—not stiff, runny or glue-like.
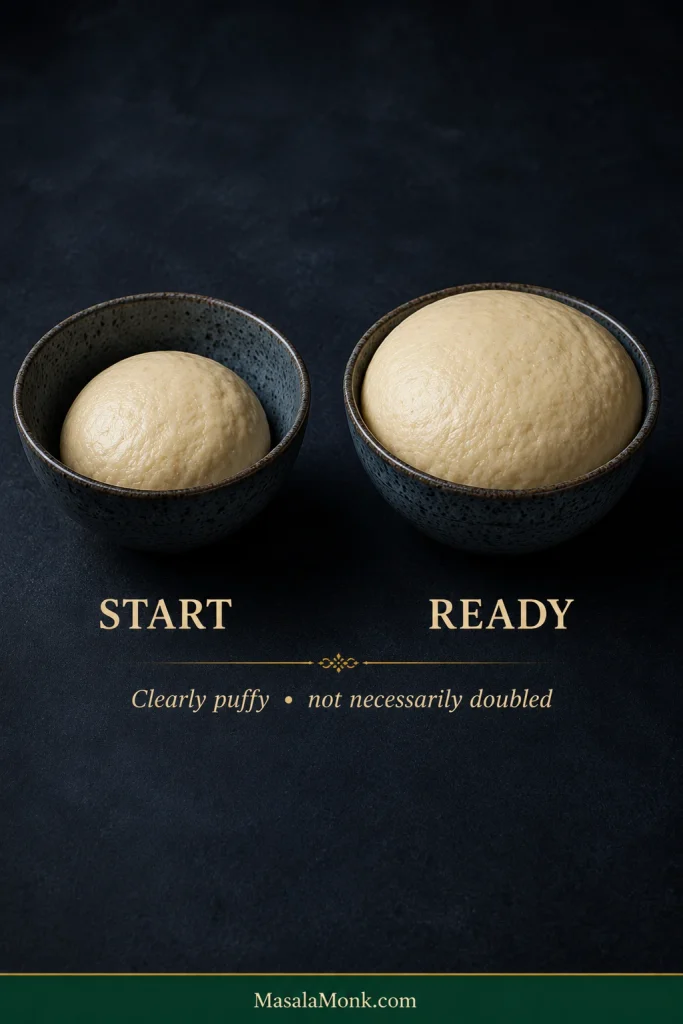
  • Let it rise by appearance: wait until the dough is airy and close to doubled, usually 60–90 minutes.
  • Make every round even: divide the dough into eight equal balls and roll each to the same width and thickness.
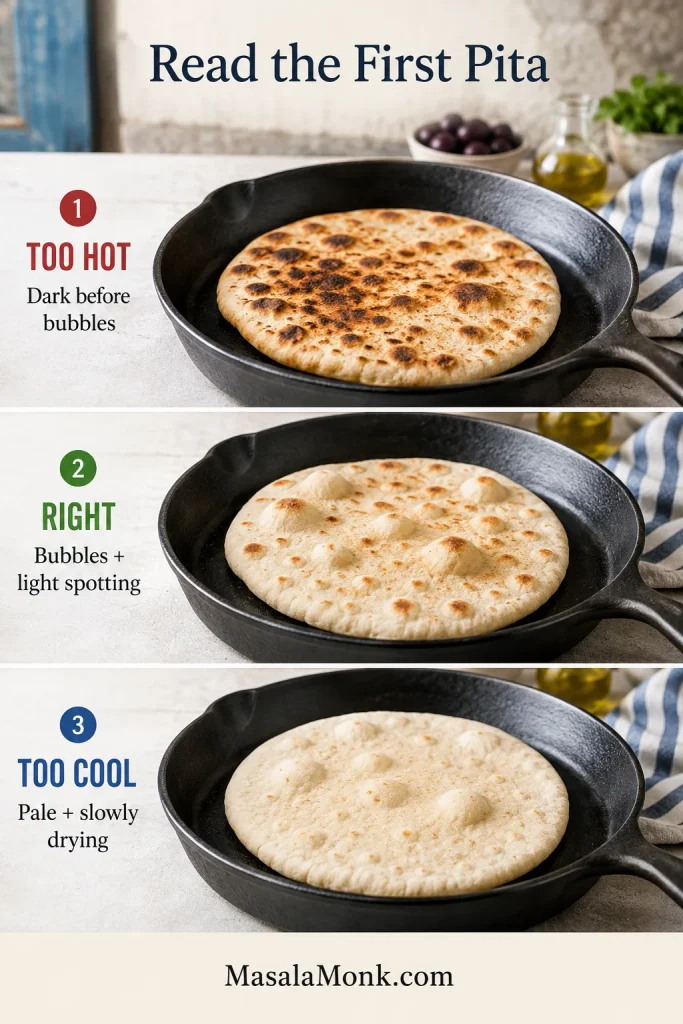
  • Let the first pita set the heat: bubbles and light brown spotting should develop together. Adjust the burner before cooking the rest.
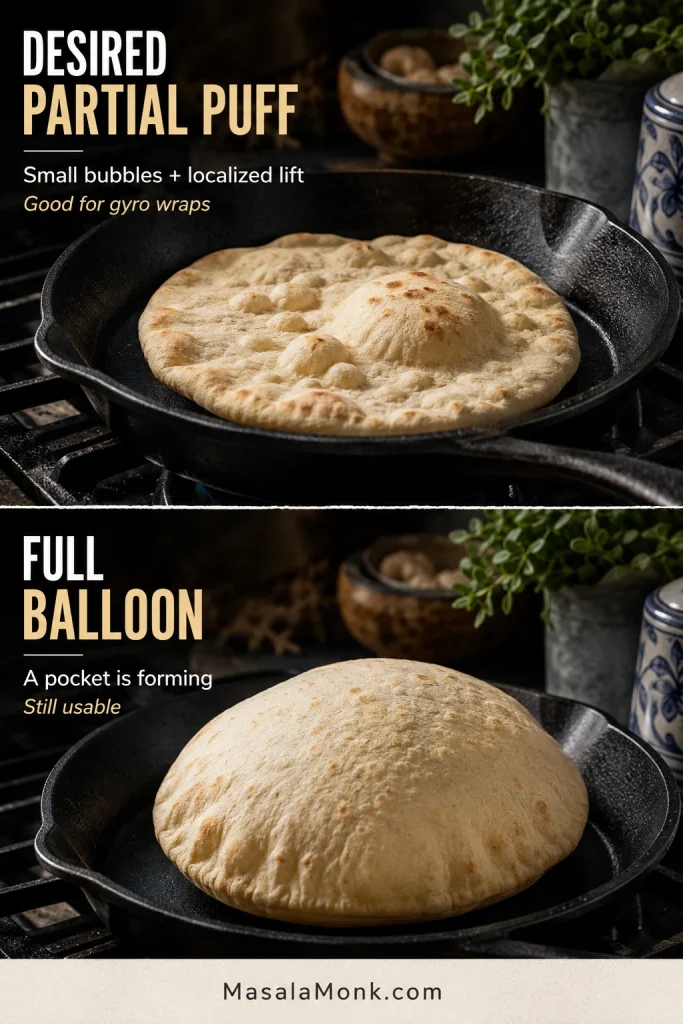
  • Look for scattered bubbles: partial lift is correct for gyro bread; the round does not need to balloon completely.
  • Stack as you cook: the towel-covered stack keeps the whole batch soft enough to fold at dinner.

Shape for the wrap, cook for the center and stack for the softness.

Make it now

Greek Pita Bread Recipe

This yeasted skillet pita is soft, lightly chewy and pocketless by design. Eight equal rounds cook quickly in a wiped film of olive oil, then soften together under a towel while the rest of the meal catches up.

Prep & shaping
About 20–25 minutes

Kneading
6–10 minutes

First rise
60–90 minutes

Ball rest
15 minutes

Skillet cooking
About 20–30 minutes

Yield
8 pitas

Total elapsed time: allow about 2 to 2¾ hours, including rests, rising, shaping and batch cooking. A warm kitchen—and rolling later rounds while the earlier ones cook—will keep you near the shorter end. Weigh the finished dough after kneading and divide its actual weight by eight so the portions remain equal.

Plan the cook

Mix, then rest 10 minutes → knead 6–10 minutes → rise 60–90 minutes → divide and rest 15 minutes → shape and cook each pita for roughly 2–3 minutes. The first round may take a little longer while you adjust the heat; after that, the batch should settle into a steady rhythm.

Set a plate and clean towel beside the skillet before cooking begins. Shape the first two rounds before heating the pan. After that, roll the next one while the skillet briefly recovers—or while the current pita cooks once you feel comfortable watching both.

Equipment

  • Digital kitchen scale
  • Large mixing bowl
  • Flexible dough scraper
  • Stand mixer with dough hook, optional
  • Rolling pin
  • Ruler or measuring tape for the first round
  • Heavy cast-iron, stainless-steel or nonstick skillet, ideally 25–30 cm / 10–12 inches wide
  • Spatula or tongs
  • Lid that fits the skillet, optional for briefly finishing a thick or gummy center
  • Plate and clean kitchen towel for the finished stack

Ingredients

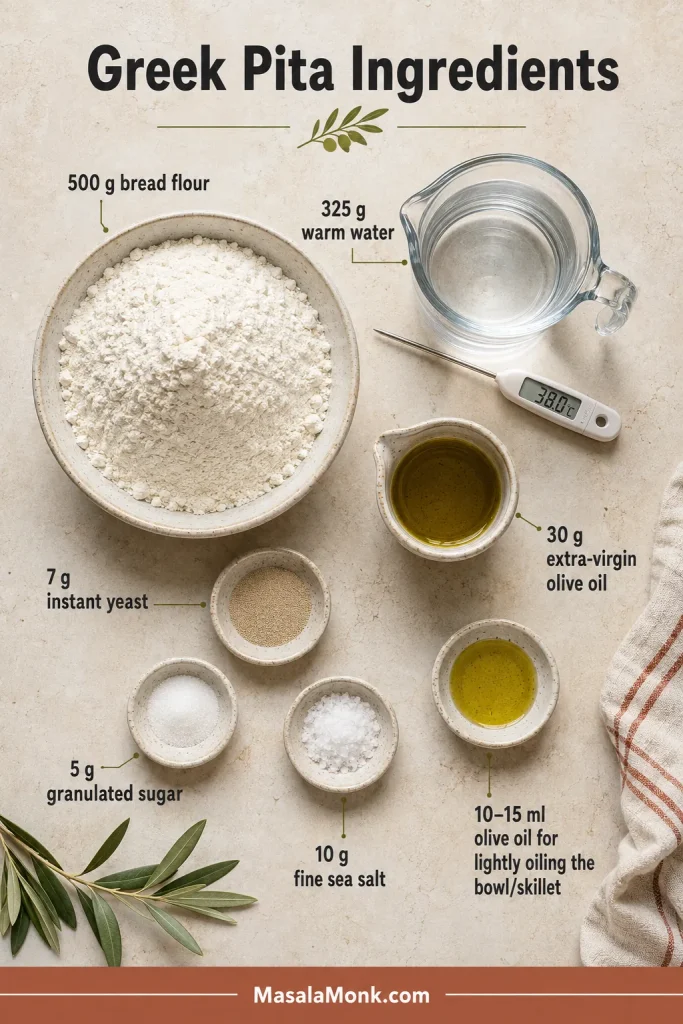
  • 500 g / 17.6 oz bread flour, about 4 cups plus 3 tablespoons when spooned and leveled; use the gram measure for the most consistent dough
  • 325 g / 325 ml warm water, about 1⅓ cups plus 2 teaspoons, at approximately 38–41°C / 100–106°F
  • 30 g extra-virgin olive oil, roughly 2 tablespoons plus ¾ teaspoon
  • 7 g instant yeast, about 2¼ teaspoons or one 7 g sachet
  • 10 g fine sea salt, approximately 1¾ teaspoons depending on crystal size
  • 5 g granulated sugar, about 1¼ teaspoons
  • 10–15 ml / 2–3 teaspoons olive oil for lightly oiling the bowl and skillet, used in very thin films

Instructions

Mix and rise

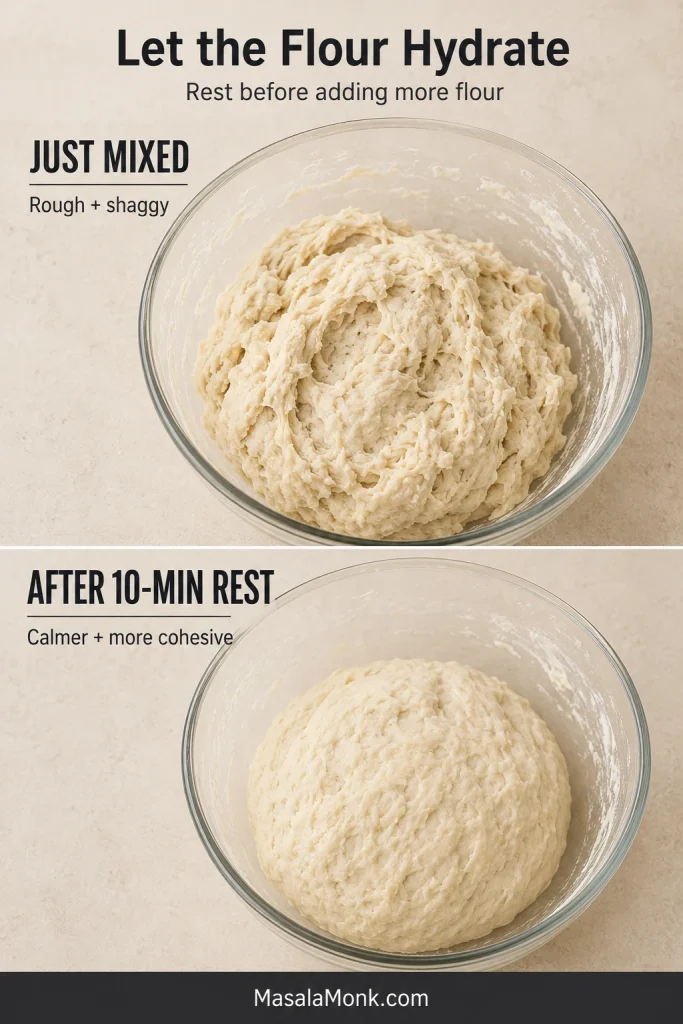
  1. Mix and rest. Whisk the flour, yeast, sugar and salt in a large bowl. Add the warm water and 30 g olive oil, then mix until no dry flour remains. Cover and rest for 10 minutes. The rough surface should look calmer and the dough should feel less clingy before kneading begins.
  2. Knead until soft and elastic. Knead by hand for 8–10 minutes or in a stand mixer on low to medium-low for 6–7 minutes. The dough should become smoother, stretch before tearing and hold a soft ball. It may cling briefly to a clean finger, but it should not coat the hand in paste.
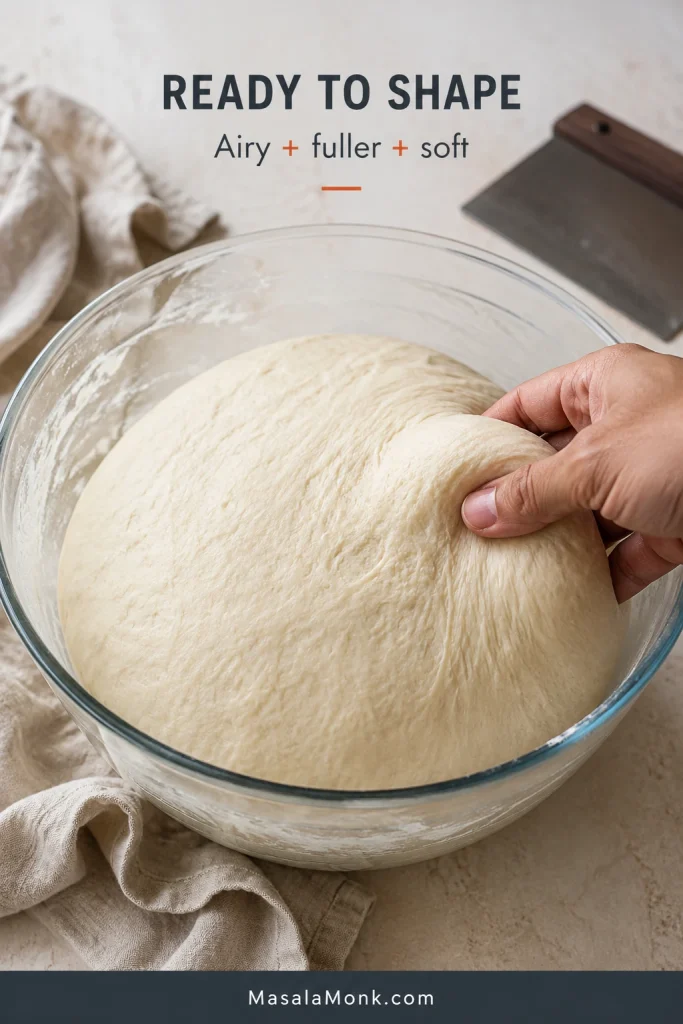
  3. Let the dough rise. Lightly oil the bowl, turn the dough once and cover. Leave for 60–90 minutes, or until it looks airy and is close to doubled. When you lift the cover, the dough should feel lighter and fuller beneath your hand—not merely larger. A cool kitchen may need longer.

Divide and shape

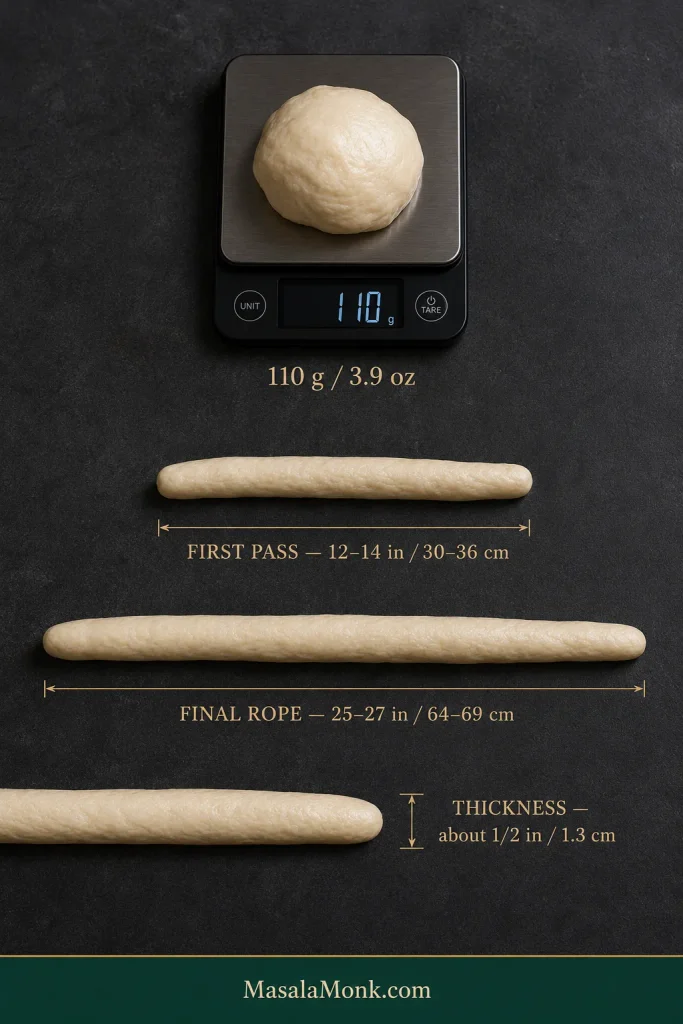
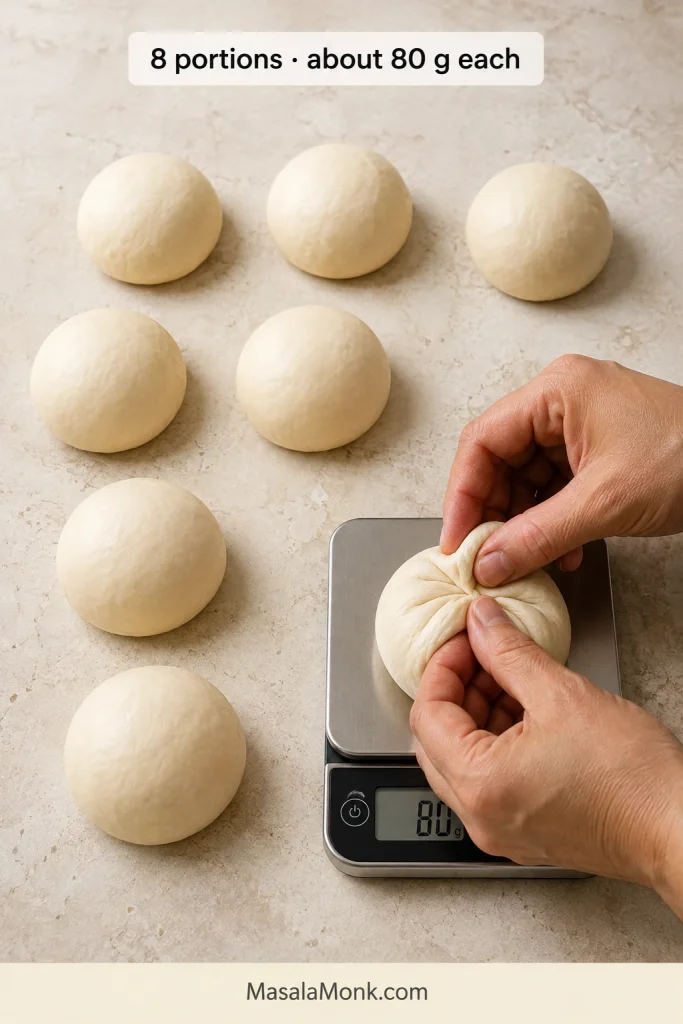
  1. Divide by weight. Turn the dough onto a lightly oiled work surface and weigh it. Divide the actual weight by eight; most batches will give pieces close to 109–110 g / about 3.9 oz. Shape each piece into a smooth ball.
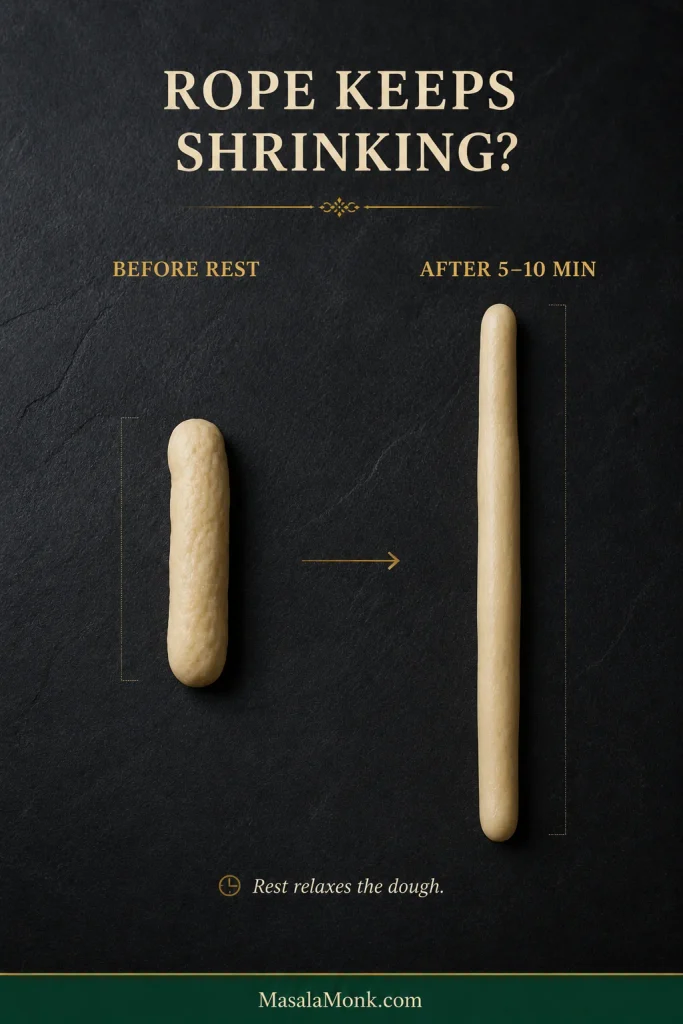
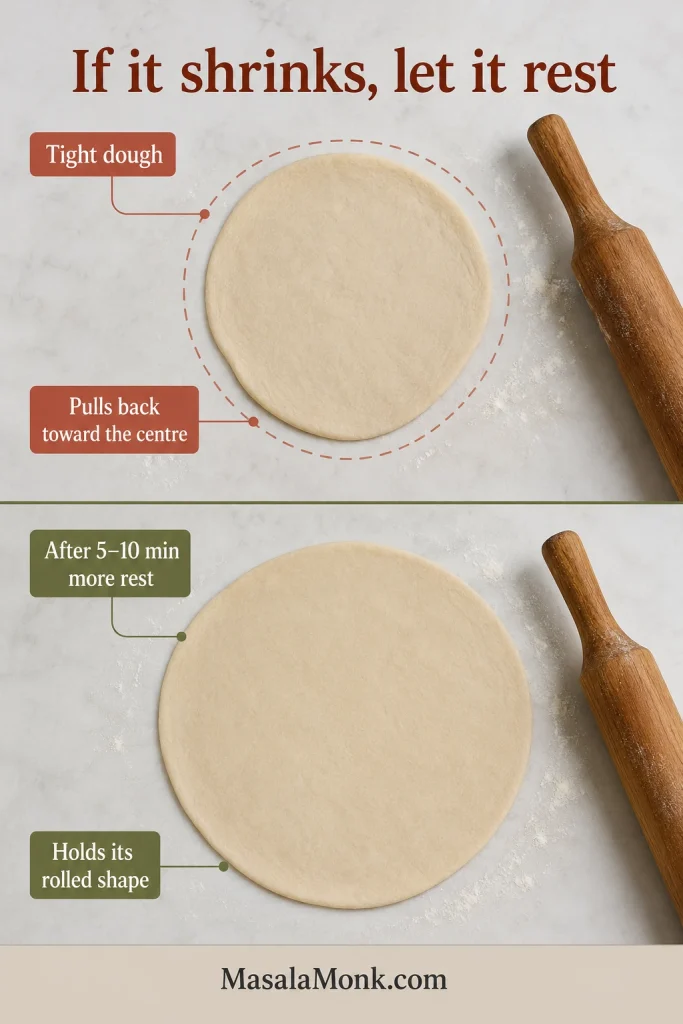
  2. Rest the dough balls. Cover and rest for 15 minutes. This relaxes the gluten so the rounds roll out without fighting back. If one still shrinks strongly, leave it covered for another 5 minutes.
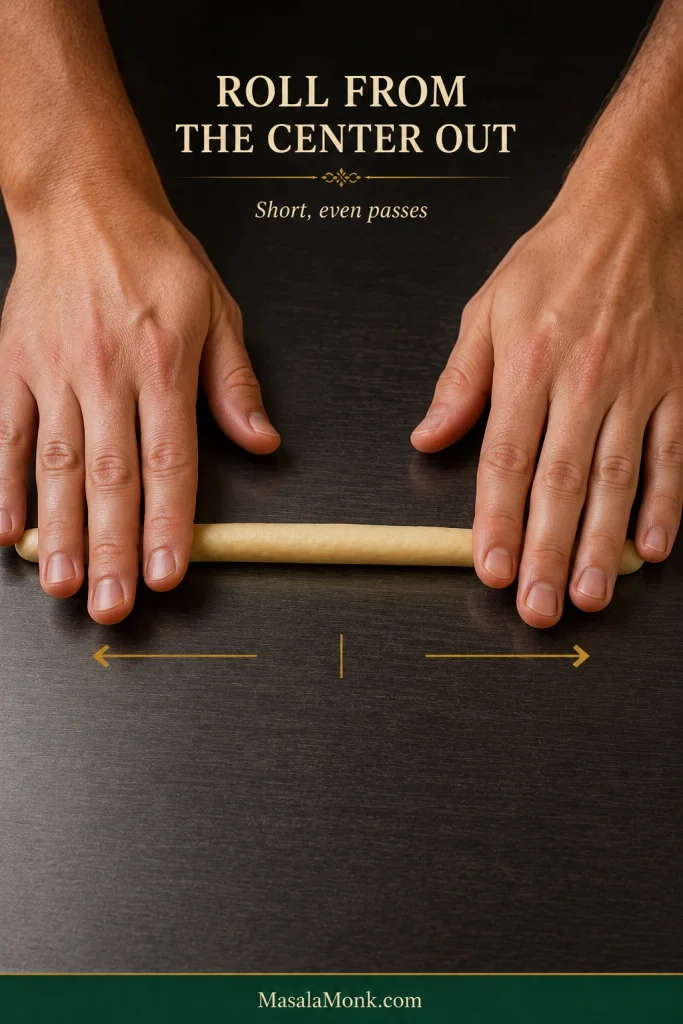
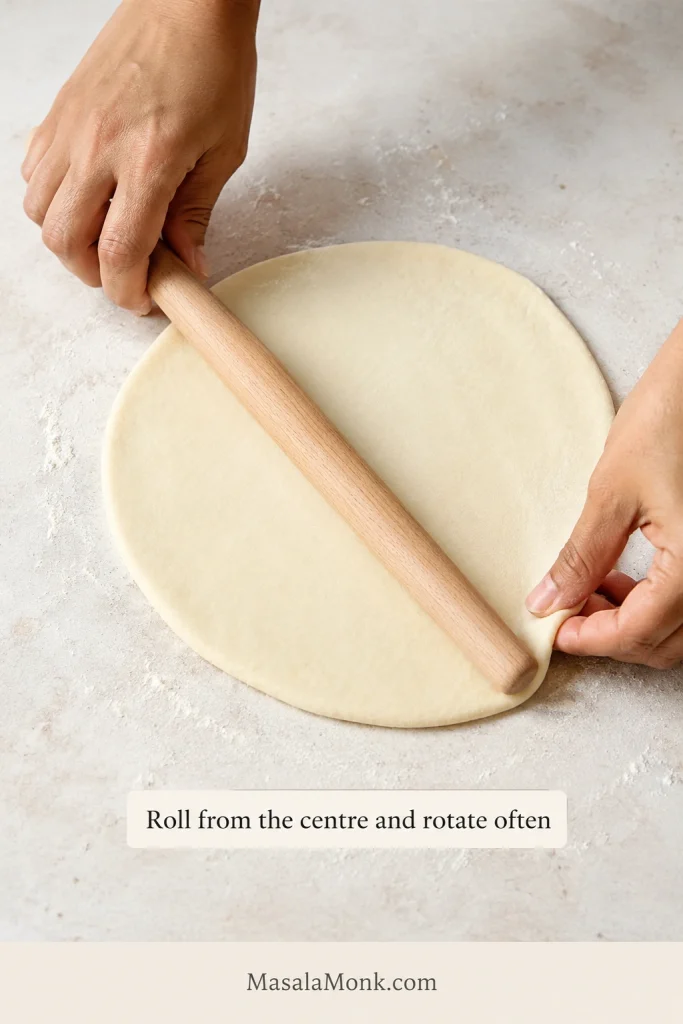
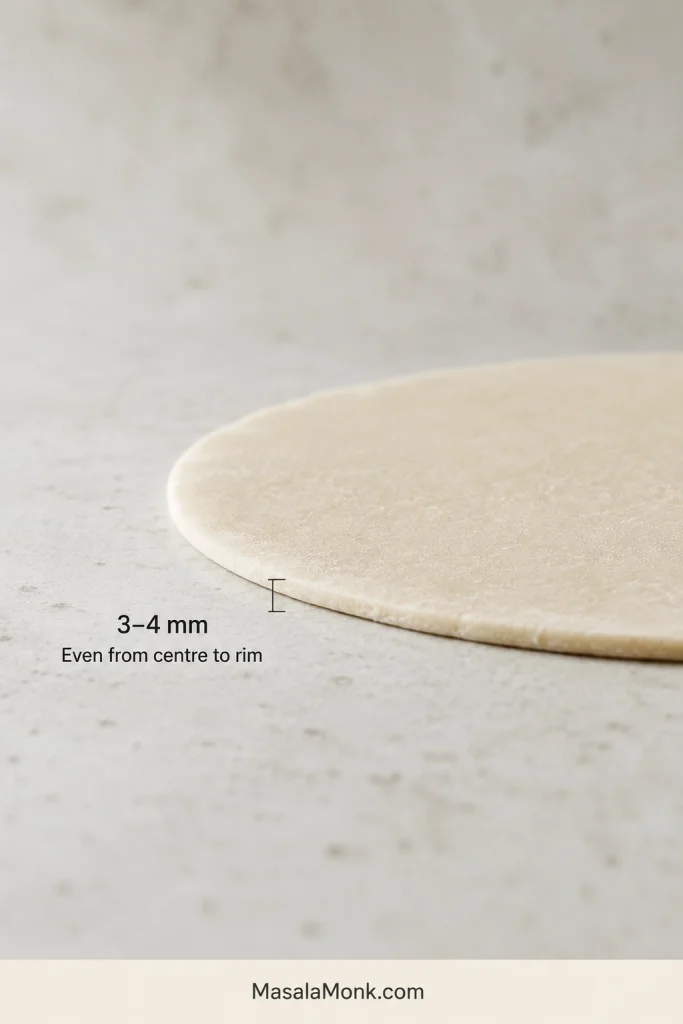
  3. Shape the first two pitas. Press one ball into a disk, then roll from the center outward to 18–19 cm / 7–7½ inches and about 5 mm / 0.2 inch thick. Rotate often and check that the center is not thicker than the edges. Repeat with a second ball and keep the remaining balls covered.

Cook and finish

  1. Preheat and lightly oil the skillet. Heat a heavy cast-iron or stainless-steel skillet over medium-high for about 3–4 minutes. If using nonstick, follow your pan maker’s heat guidance and avoid prolonged empty preheating. Add roughly ¼ teaspoon oil and wipe it into a thin film. The oil should shimmer lightly without smoking heavily.
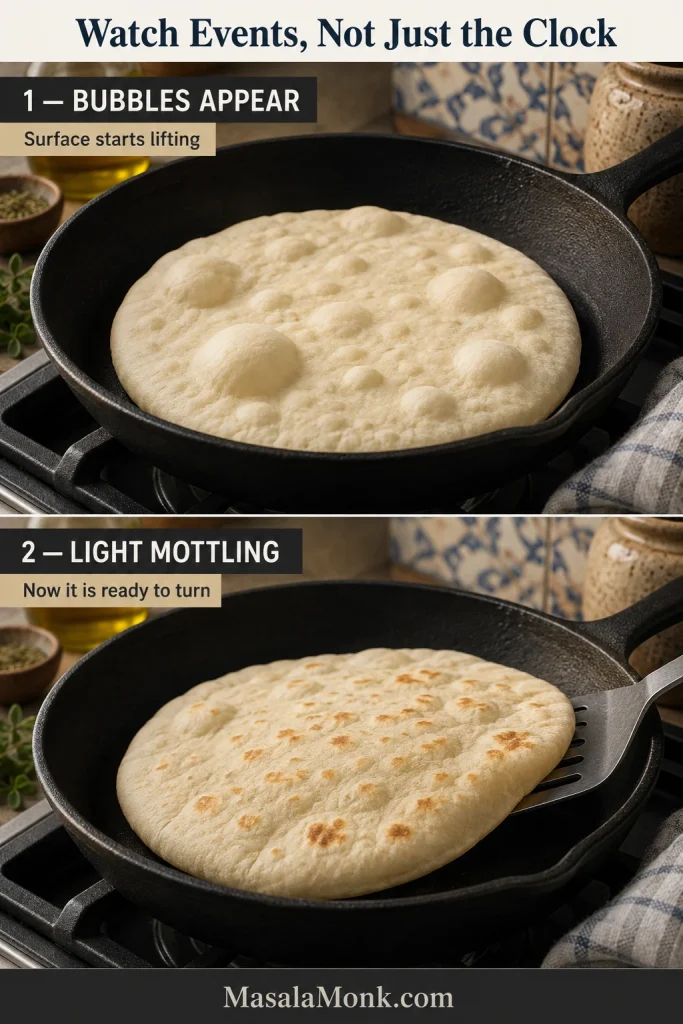
  2. Cook the first pita and set the heat. Lay in the pita and watch the order of events. Small bubbles should begin before the underside becomes deeply browned. Begin checking at 60 seconds; flip when the first side has scattered light-brown spots, usually within 60–90 seconds. Cook the second side for about 45–75 seconds, then give it one brief final turn only when the center still feels heavy.
  3. Cook the remaining pitas, then stack and cover. Keep every round close to the same width and thickness, and shape at a pace that lets you watch the skillet. Transfer each finished pita directly to the waiting stack and cover again. A surface that looks slightly dry at first should soften beneath the towel. Refresh the skillet with a thin film of oil when it looks dry, usually after two or three pitas.
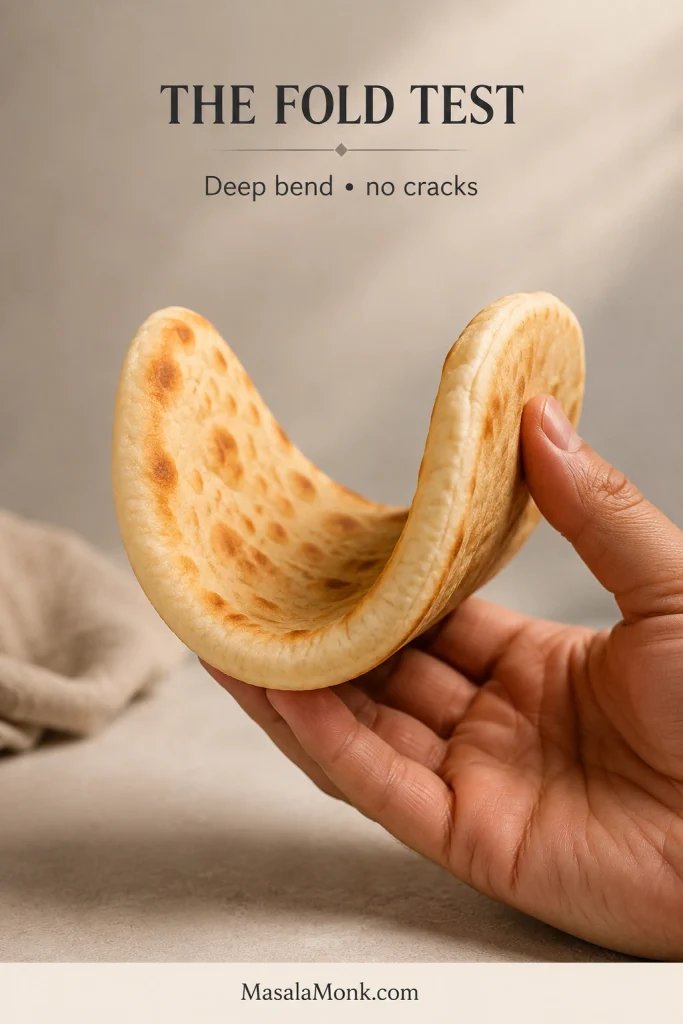
  4. Perform the fold test. After a few minutes in the covered stack, bend one pita into a deep U. It should fold without cracking, have no gummy center and remain substantial enough to support a loaded gyro.

Recipe notes

  • Small bubbles and partial lift are desirable. The pita does not need a complete separable pocket.
  • Dark spots before bubbles mean the pan is too hot; reduce the heat. A pita that stays pale and slowly dries needs more heat.
  • When the outside is colored but the center is gummy, lower the heat, flip more often and cover the skillet for 20–30 seconds.
  • For all-purpose flour, hold back 15 g of the 325 g water. Add it after the hydration rest only when the dough feels firm.
  • Keep unshaped dough balls covered and avoid rolling all eight rounds far in advance.

If the dough feels stickier than expected, a pita balloons or the first brown spots arrive too soon, use the guide below to find the cause.

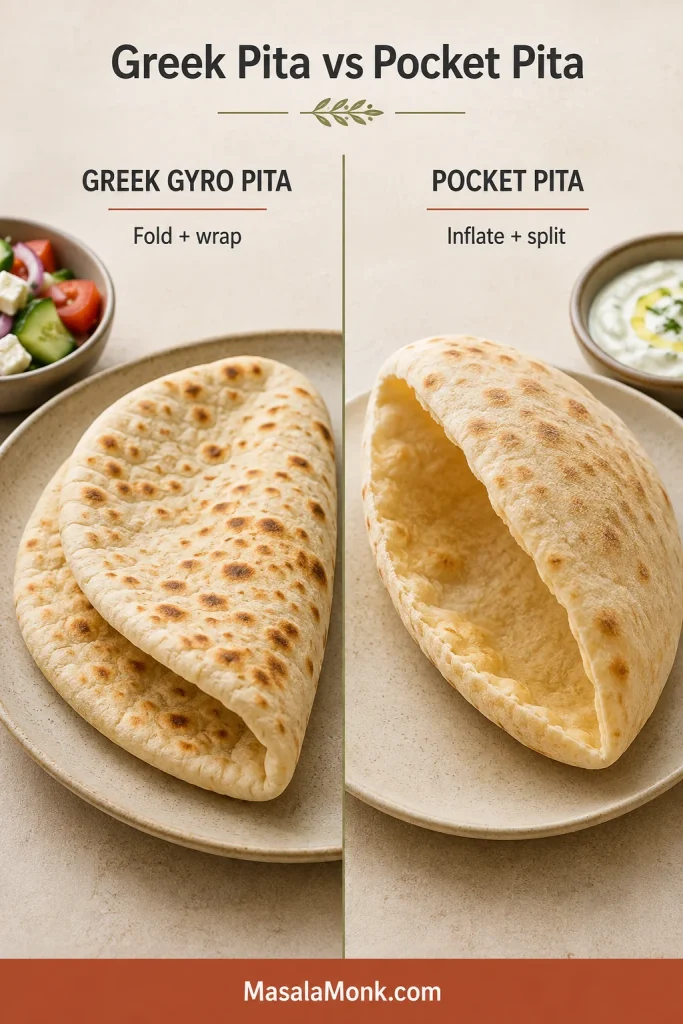
Greek Pita vs Pocket Pita: What Is the Difference?

Greek gyro pita and pocket pita begin with similar ingredients, but they are shaped and cooked for different jobs. Pocket pita is meant to separate into two thin walls. Greek pita is meant to remain one substantial round that can bend around the filling.

FeatureGreek gyro pitaPocket pita
Main useWrap around gyros and souvlakiSplit and stuff
StructureThick and pocketlessThinner with a separated pocket
Desired liftSmall bubbles and partial puffingFull ballooning
Typical cookingSkillet, griddle or grillVery hot oven or baking surface
Success testFolds deeply without crackingInflates and opens cleanly
Side-by-side comparison of thick folded Greek gyro pita and thinner pita bread opened to reveal an internal pocket.
For gyros, one continuous pocketless round gives you a broader, sturdier fold than two thin pocket walls.

Cooking method alone does not decide whether a pocket forms. Thickness, evenness, proofing after shaping and how quickly steam builds inside the dough all matter. A skillet pita can balloon, while an oven-baked round can remain pocketless.

For this recipe, the right question is not “Did it inflate completely?” It is “Did it become light enough inside while staying strong enough to fold?”

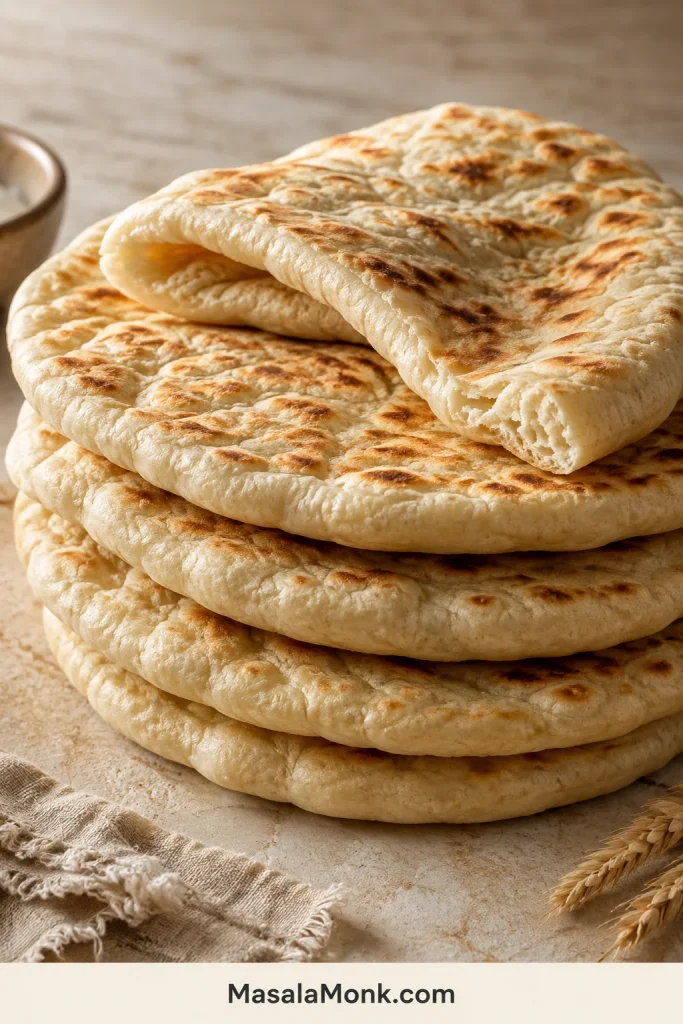
Stack of soft thick Greek pitas with mottled brown spots, including one draped over the stack to show flexibility and thickness.
Watch the edges as the stack waits: soft Greek pita should drape slightly rather than stand rigidly or crack when lifted.

Need the other style? Use MasalaMonk’s homemade pita bread recipe, which is designed to inflate and split for stuffing.

Ingredients for Soft, Foldable Greek Pita

With only flour, water, yeast, oil, salt and sugar, small changes show up clearly in the finished pita. Flour provides the structure for a loaded fold, water keeps the crumb soft, and olive oil helps that softness last after cooling.

Bread flour, warm water, olive oil, instant yeast, salt and sugar measured for Greek pita dough.
The ingredient list is short, so measurement errors have nowhere to hide; excess flour shows up later as a stiffer fold.

Bread flour or all-purpose flour?

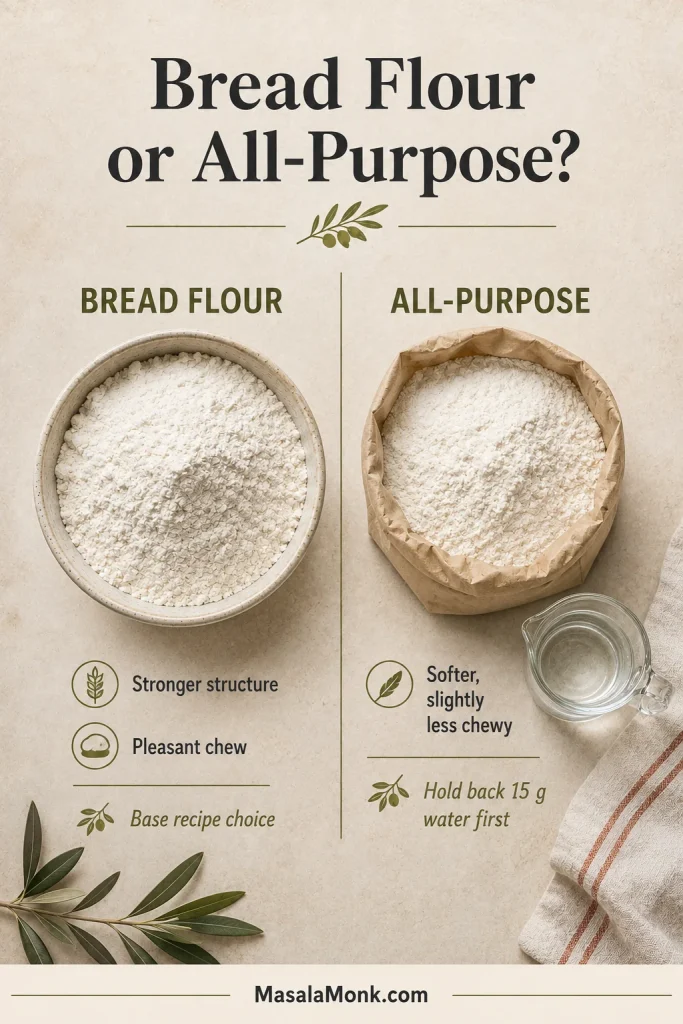
Bread flour is the best choice for this version because its stronger gluten gives the pita pleasant chew and enough strength for a moist gyro filling.

All-purpose flour makes a softer, slightly less chewy pita. Because absorption varies by brand, hold back 15 g water, then add it gradually after the rest only when the dough feels firm.

Weigh the flour whenever possible. A packed cup can add enough flour to turn a bendable pita dry. King Arthur Baking lists a level cup of bread or all-purpose flour at about 120 g; the 500 g measure is more consistent than scooping.

Bread flour and all-purpose flour compared for Greek pita, with water beside the all-purpose flour to indicate hydration adjustment.
Switching flour changes handling more than the goal: whether you use bread flour or all-purpose, judge success by the same soft fold.

Warm water and instant yeast

Water around 38–41°C / 100–106°F gives the dough a comfortable start. Instant yeast can be mixed directly with the flour. King Arthur Baking notes that active dry yeast can replace instant yeast at the same weight, although it may start more slowly.

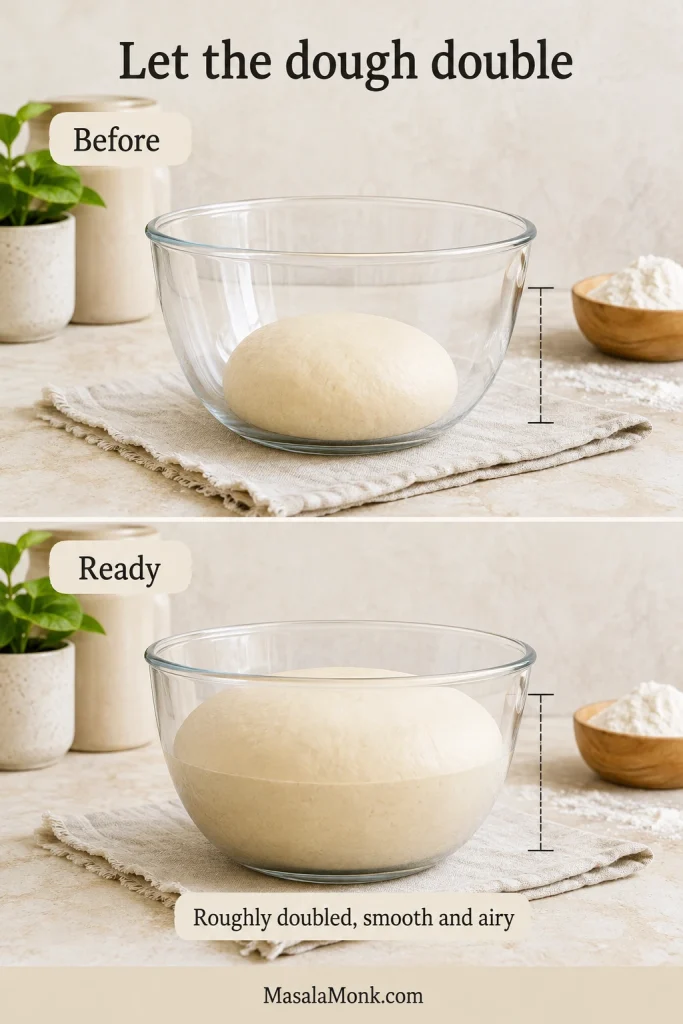
Let expansion set the pace. A warm kitchen may bring the dough close to doubled in an hour; a cool room may need another 30 minutes or more. Move on when it looks airy and feels fuller.

Risen Greek pita dough in a mixing bowl, visibly fuller and softly domed, with a hand gently touching the airy dough.
Under-risen dough often reappears later as dense pita, so waiting here is cheaper than troubleshooting the whole batch.

Olive oil inside the dough and in the skillet

Olive oil has two jobs here. The 30 g mixed into the dough helps the pita stay tender after it cools; the much smaller amount in the skillet helps the surface stay supple while it browns.

Use only a wiped film of oil in the skillet. A visible pool makes the surface heavier and more fried, while the thin coating used here gives mottled browning without weighing the pita down.

Salt adds flavor and strengthens the dough, while the small amount of sugar supports fermentation and browning without making the pita taste sweet. Weigh the salt because fine sea salt, table salt and kosher salt occupy different volumes.

What Greek Pita Dough Should Feel Like

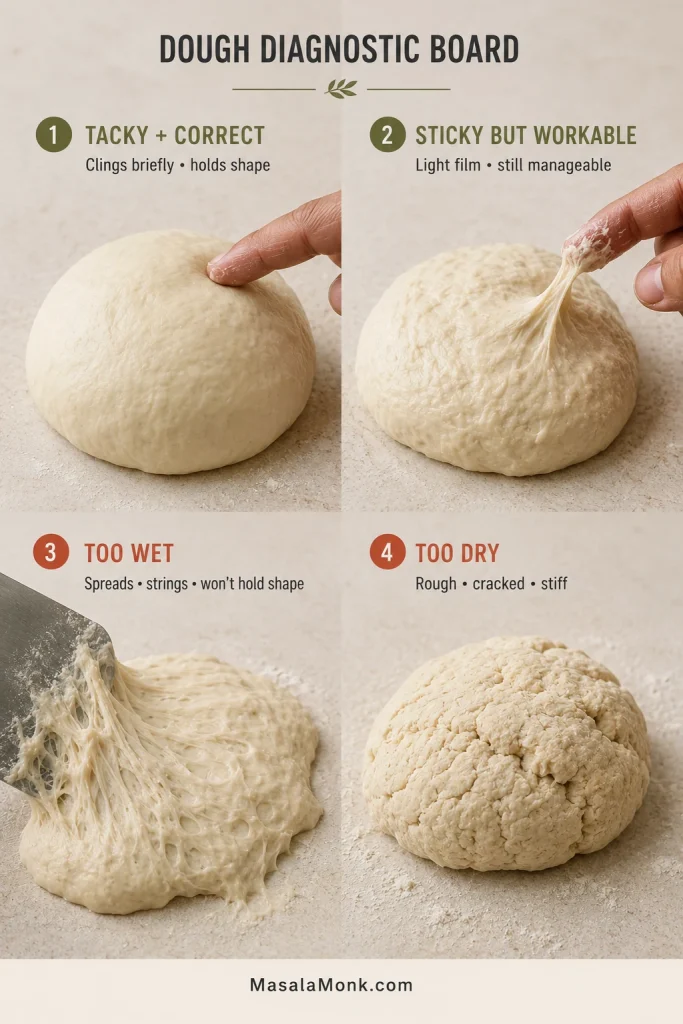
“Sticky” is too broad to guide a useful correction. The dough can cling slightly and still be exactly right. What matters is whether it can hold a soft shape after the flour has hydrated and the gluten has developed.

Dough stateWhat it looks and feels likeWhat to do
Tacky and correctClings briefly, releases with gentle movement and holds a soft ballKeep kneading; do not add flour
Sticky but workableLeaves a light film and is easier with a scraper or oiled handsRest, knead and reassess
Too wetSpreads, strings like glue and cannot hold a rounded shapeAdd flour 1 tablespoon at a time after the rest
Too dryRough, cracked, stiff and prone to tearingKnead in water 1 teaspoon at a time
Four pita dough textures compared: tacky and correct, sticky but workable, overly wet and spreading, and overly dry with cracks.
When texture labels feel subjective, use shape as the tie-breaker: workable dough can cling a little and still support a soft ball.

Correct the process before correcting the flour. Incorporate every dry patch, give the rough dough its 10-minute rest, then knead it fully. A mixture that feels alarming in the first minute often becomes supple without any extra flour.

Before-and-after comparison showing rough shaggy Greek pita dough just mixed and smoother, more cohesive dough after a 10-minute rest.
Use the 10-minute rest as a diagnostic pause: it separates temporary stickiness from dough that genuinely needs correction.

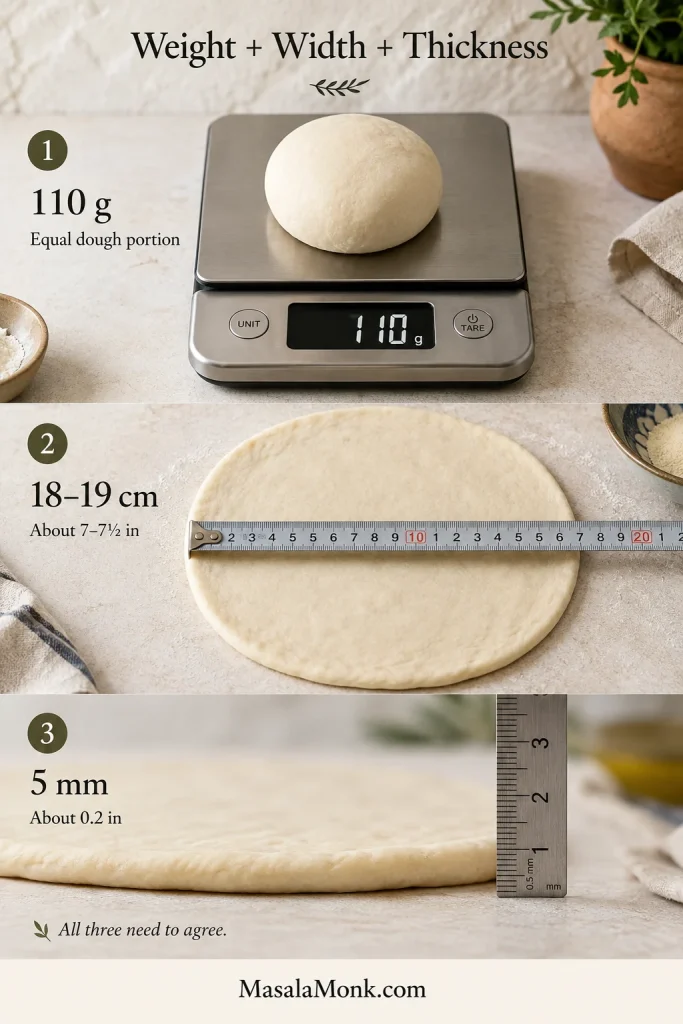
Weight, Width and Thickness Must Agree

“Roll into circles” leaves too much to chance. Dough weight, finished width and thickness need to match; change one and the way the pita cooks changes with it.

TargetWhy it matters
About 110 g / 3.9 oz per dough ballKeeps all eight pitas within one cooking window
18–19 cm / 7–7½ inches wideLarge enough for a gyro without becoming a thin wrap
About 5 mm / 0.2 inch thickSubstantial enough to hold filling but thin enough to cook through quickly
Three-step Greek pita measurement guide showing a 110-gram dough ball, an 18–19-centimeter rolled round and 5-millimeter dough thickness.
For this Greek pita, those three numbers act as a doneness control: keep the weight but shrink the diameter, and the center gets thicker.

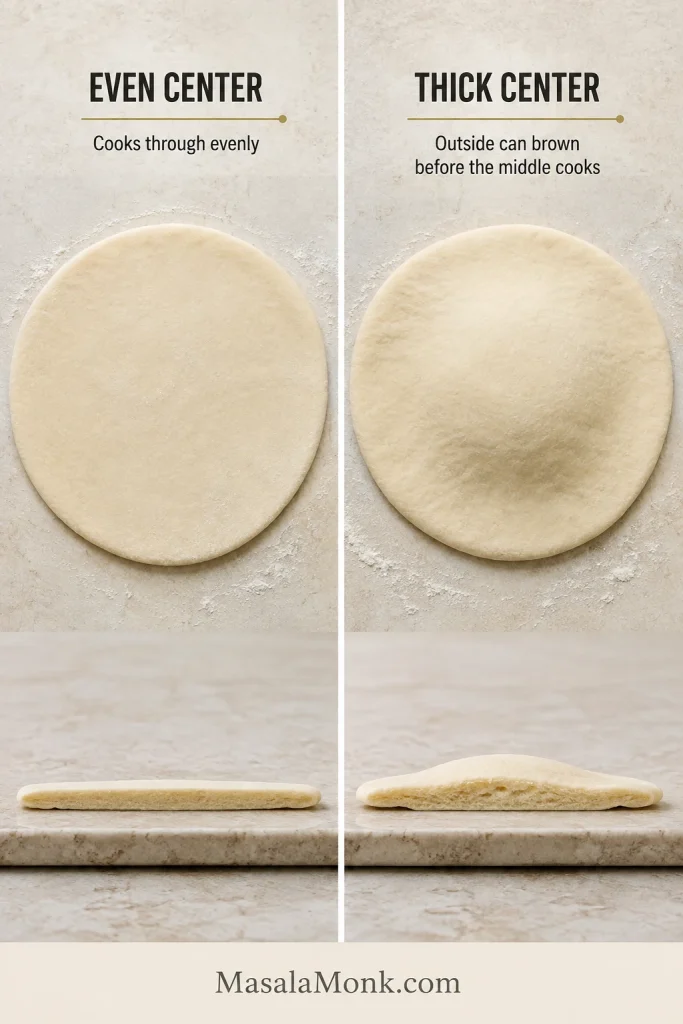
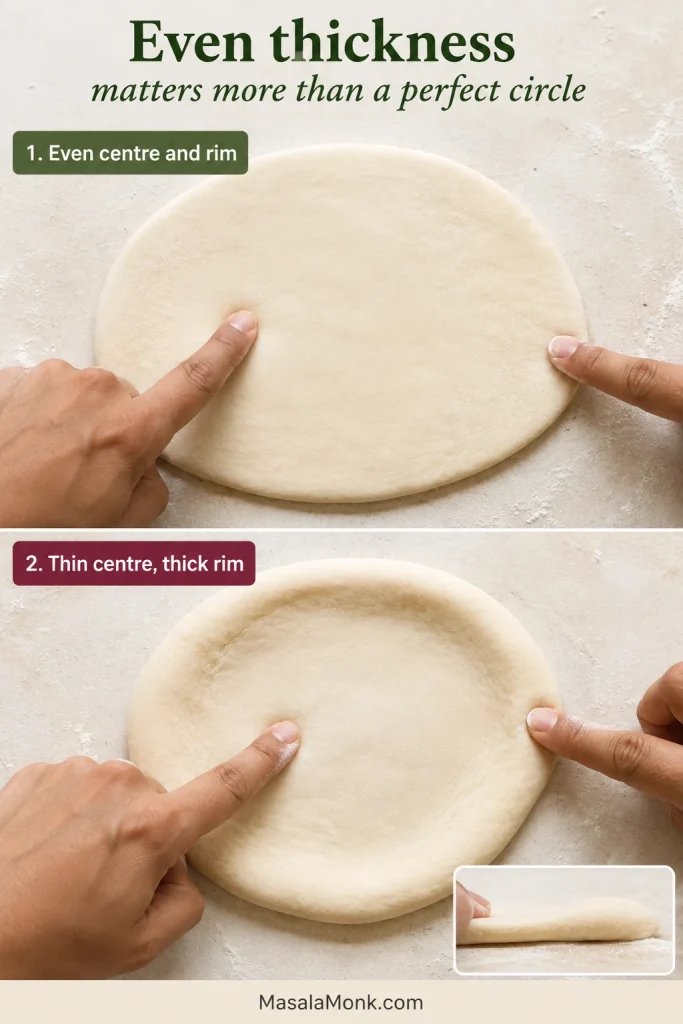
Roll from the center outward and rotate the disk frequently. Run your fingertips over the center before it enters the skillet. An apparently even round can hide a thick mound in the middle, which is where gummy bread usually begins.

Two rolled pita rounds with similar diameter shown from above and in profile, one evenly thick and one noticeably thicker in the center.
A thick center is deceptive because the surface can brown on schedule while the middle is still lagging behind.

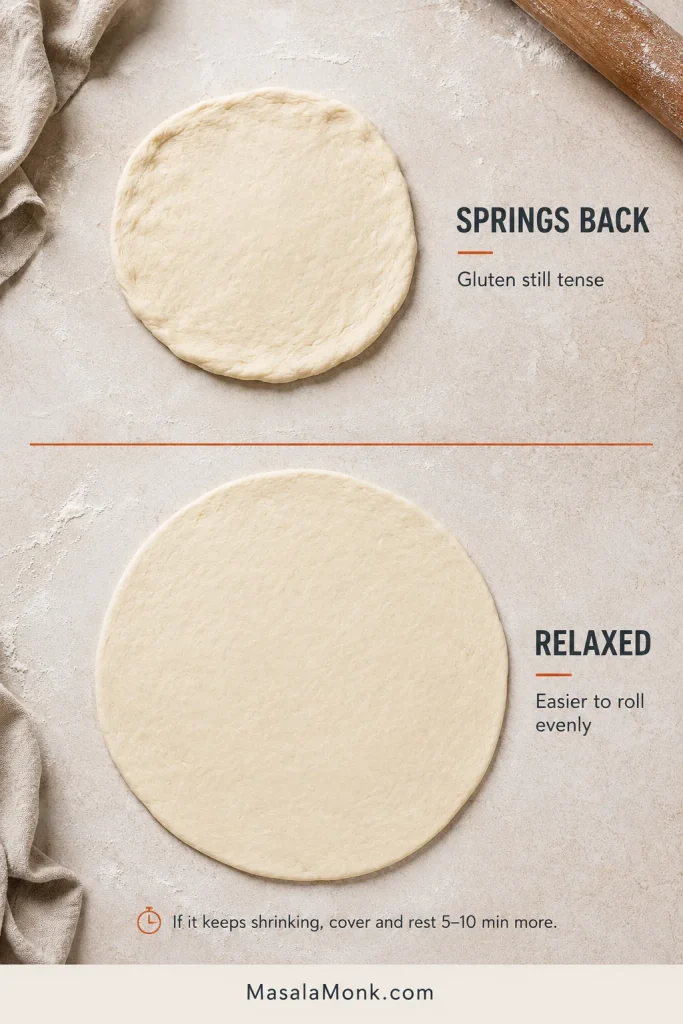
When the dough repeatedly shrinks, stop pushing. Cover it and wait another 5–10 minutes. A short rest relaxes the gluten more effectively than extra pressure, which often creates thin centers and thick edges.

Comparison of a pita dough round that contracted after rolling and a wider relaxed round that stays evenly rolled after extra rest.
Prioritize even thickness over a perfect circle; forcing springy dough can create thin spots and a hidden heavy center.

A rolling pin gives beginners the easiest way to repeat that even center. Hand stretching can work once the dough feels familiar, but it is easier to leave a hidden mound in the middle.

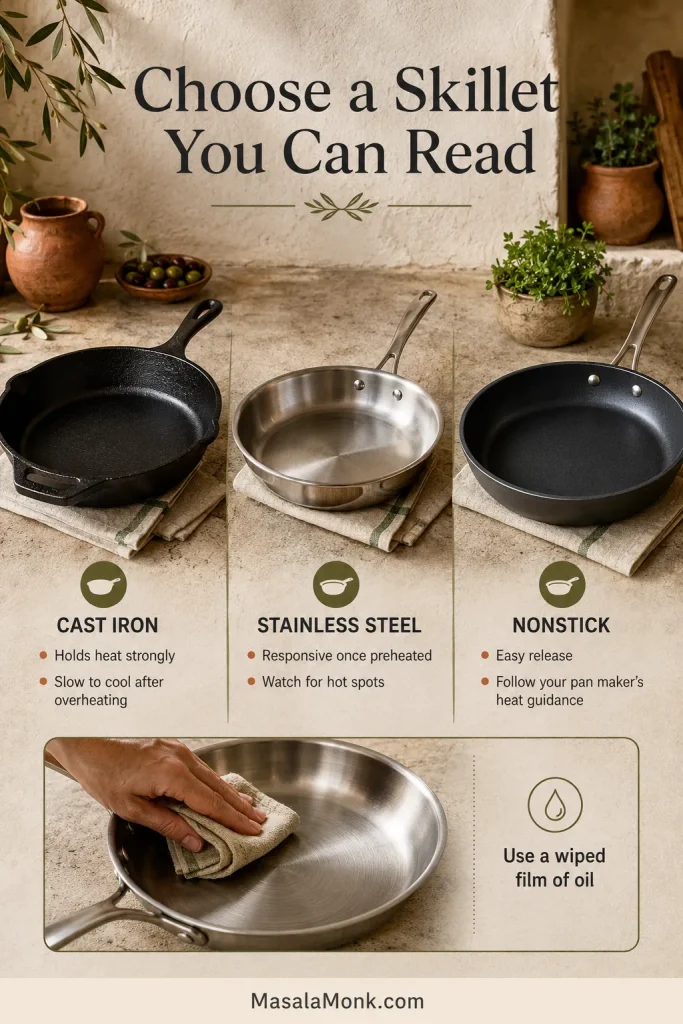
Choose a Skillet You Can Read

For the skillet, familiarity matters more than prestige. Cast iron browns strongly but stays hot after the burner is lowered. Stainless steel responds faster but needs a good preheat and a thin oil film. Heavy nonstick is forgiving and easy to handle, though the spotting may be gentler.

Skillet comparison showing cast iron holding heat strongly, stainless responding after preheating and nonstick releasing easily, with only a thin wiped film of oil.
The best skillet is the one you can recover quickly from a mistake; controllability matters more than maximum heat.

Avoid a very thin pan if possible; hot spots can darken one area before the center cooks. Have the plate, towel and optional lid beside the stove so finished pitas can be covered immediately and a stubborn center can get a brief covered finish.

Skillet Heat, Timing and the First Pita

“Medium-high” means something different on every stove. Use the first pita to set the heat: bubbles and light color should develop at roughly the same pace.

Three pitas compared in a skillet: one browning too quickly, one with balanced bubbles and light spotting, and one remaining pale on low heat.
Treat the first pita as calibration, not a sacrifice: make one heat adjustment, then stop chasing darker spots once the pan settles.
Stage or signalWhat to look forWhat to do
PreheatA wiped oil film shimmers without smoking heavilyFor cast iron or stainless, start near medium-high after about 3–4 minutes of preheating; follow your pan maker’s heat guidance for nonstick
Early cookingSmall bubbles begin before deep color forms underneathKeep the setting when lift and light spotting arrive together
First sideBegin checking at 60 seconds; look for scattered light-brown spotsFlip before the surface becomes stiff or deeply charred
Second sideUsually 45–75 seconds; mottled color and a flexible bodyAdd one brief final turn only when the center feels heavy
Dark spots before bubblesThe pan is outrunning the centerReduce heat; move cast iron off the burner briefly
Pale and slowly dryingThe pan is too coolRaise the heat and let the skillet recover before the next pita
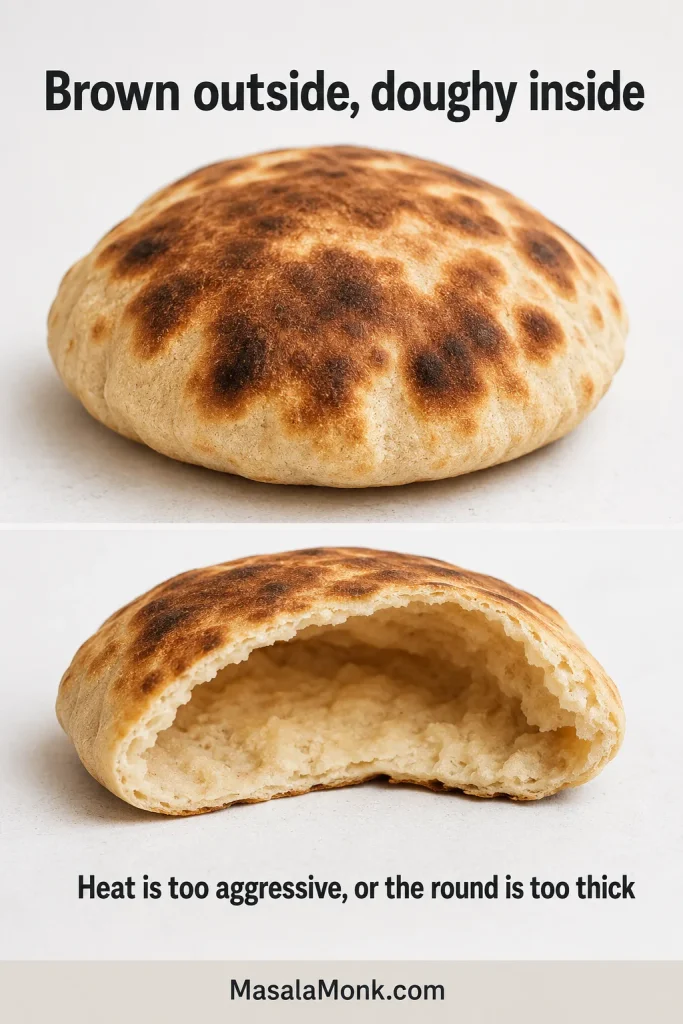
Brown outside, gummy insideThe round is too thick, the heat is too high or bothLower the heat, flip more often and cover briefly

Bubbles Before Deep Browning

Two-stage skillet comparison showing bubbles forming on a pale pita followed by light brown mottling before the bread is turned.
If color outruns bubbles, changing the flip time will not fix the batch—the pan temperature needs changing.

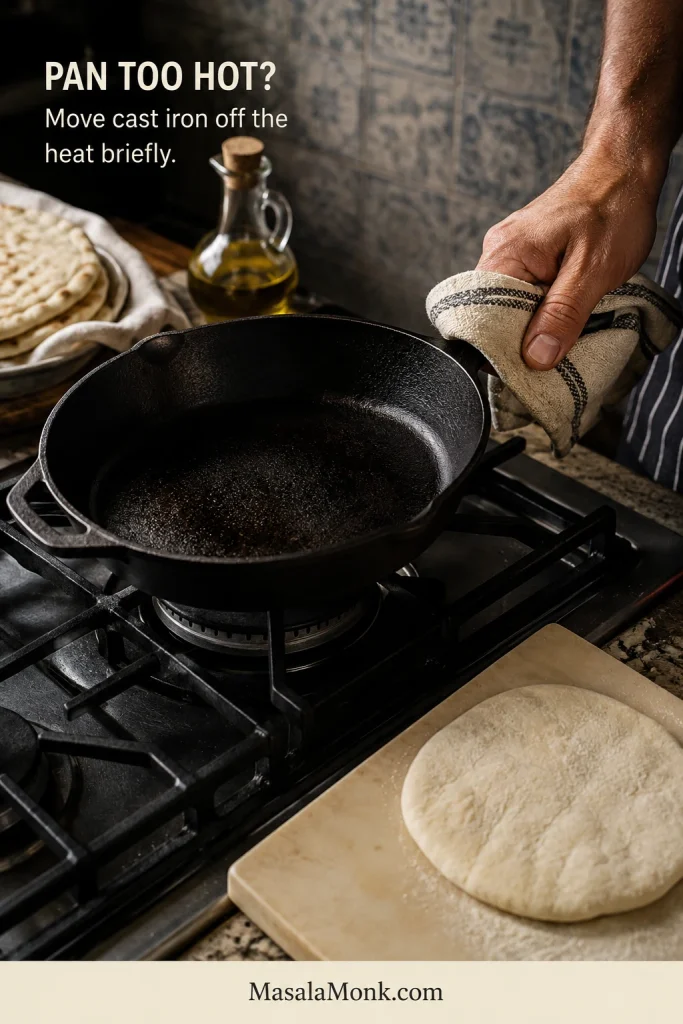
When Cast Iron Runs Too Hot

Cast iron holds onto a mistake. When it becomes too hot, turning down the burner may not help immediately; move the pan off the heat for 30–60 seconds before the next pita.

Hand using a protective cloth to move a hot cast-iron skillet away from the burner while an uncooked pita round waits nearby.
With cast iron, use the recovery pause productively—shape the next round while the pan sheds excess heat instead of leaving finished pita exposed.

When bubbles and light color are developing at roughly the same pace, stop adjusting. By the third pita, the pan usually settles into a rhythm and the kitchen begins to smell of toasted wheat and warm olive oil. Hold the heat there rather than chasing darker spots.

How to Keep Greek Pita Light but Pocketless

Pocketless does not mean flat and dense. Numerous small bubbles and a few larger blisters create the light interior this bread needs. The aim is simply to prevent one complete balloon from separating the round into two thin walls.

Skillet comparison showing one Greek pita with several localized puffs and another inflated into one large balloon-like pocket.
One full balloon is data, not disaster; use that pita, then make the smallest heat or shaping change needed for the next round.
  • Aim for about 5 mm thickness. Very thin pitas inflate more readily, dry faster and tear more easily around a wet filling.
  • Rest the balls before shaping. A long proof after rolling encourages more expansion and increases the chance of a full pocket.
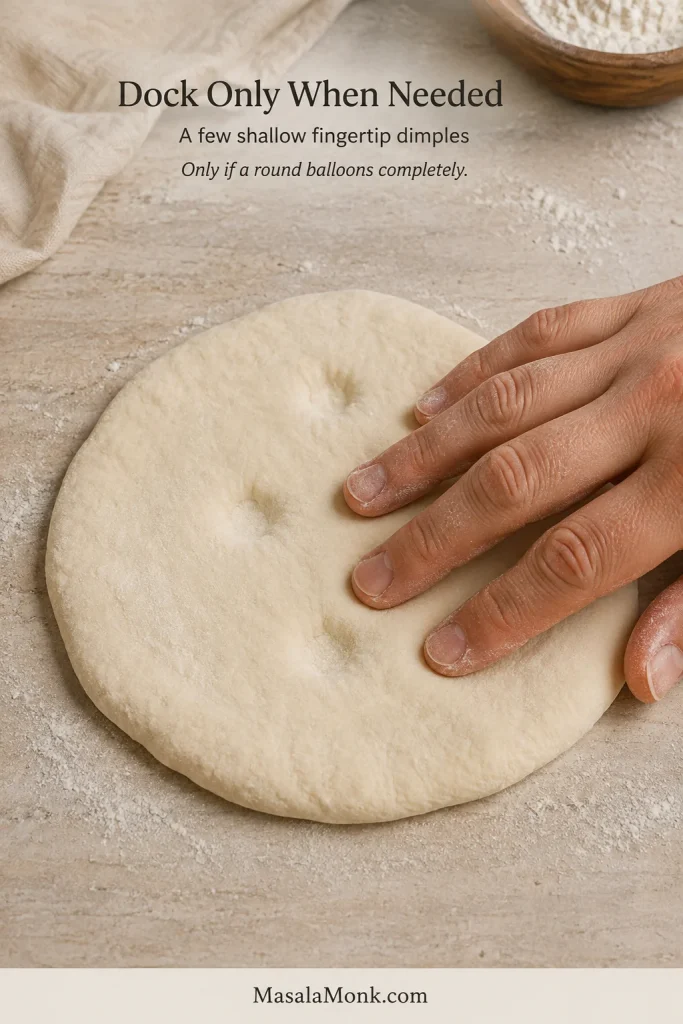
  • Dock only when needed. Start with an undimpled round. If one balloons completely, lightly dimple the remaining rounds with your fingertips; too many holes suppress the smaller bubbles that keep the bread light.

A fully inflated pita is not ruined. Press it gently as it cools and use it as a wrap, then make the smallest shaping change needed for the next round.

Fingers pressing a few shallow dimples into a rolled pita dough round without piercing holes through it.
If a pita balloons completely, use only a few shallow fingertip dimples on the remaining rounds; aggressive docking can trade the pocket problem for dense bread.

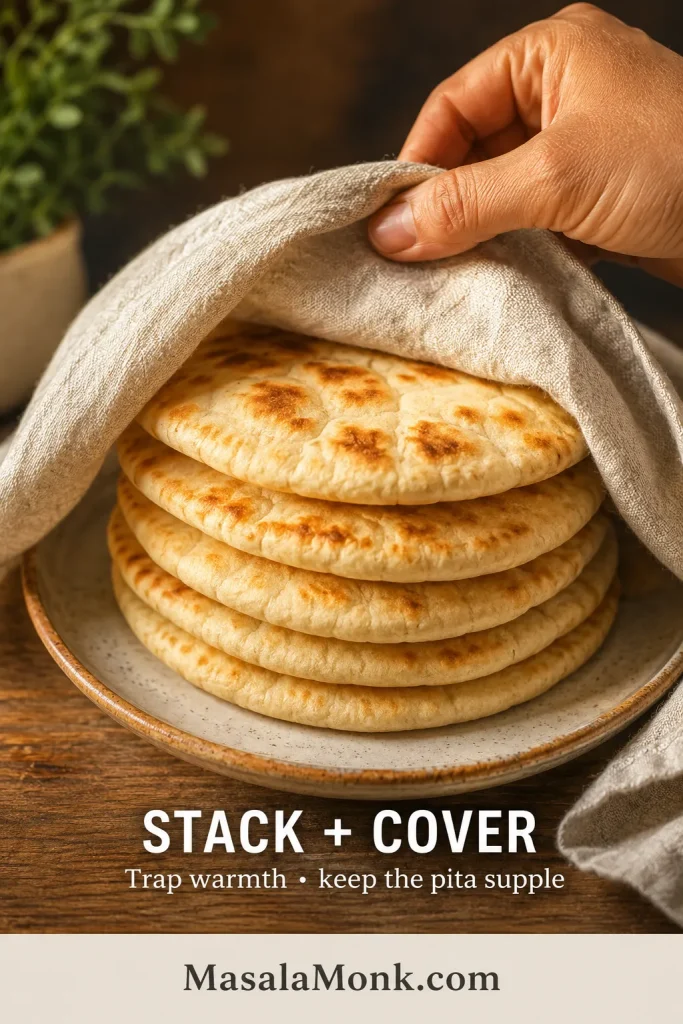
As each pita leaves the skillet, add it to the stack and cover it again. That gentle trapped warmth softens the surface and keeps the first rounds flexible while the rest of the batch cooks.

Freshly cooked Greek pitas stacked together while a hand pulls a light linen towel over them to keep the bread soft.
The towel is part of texture control, not just serving prep; it protects the early rounds while the skillet is still busy.

Cooking now? Return to the recipe ↑ · Open troubleshooting ↓

Greek Pita Troubleshooting

Start with what went wrong. Sticky dough needs a different fix from a pita that browned before its center cooked, and a longer cook cannot restore moisture to bread left uncovered. Match the fix to the failure you can actually see.

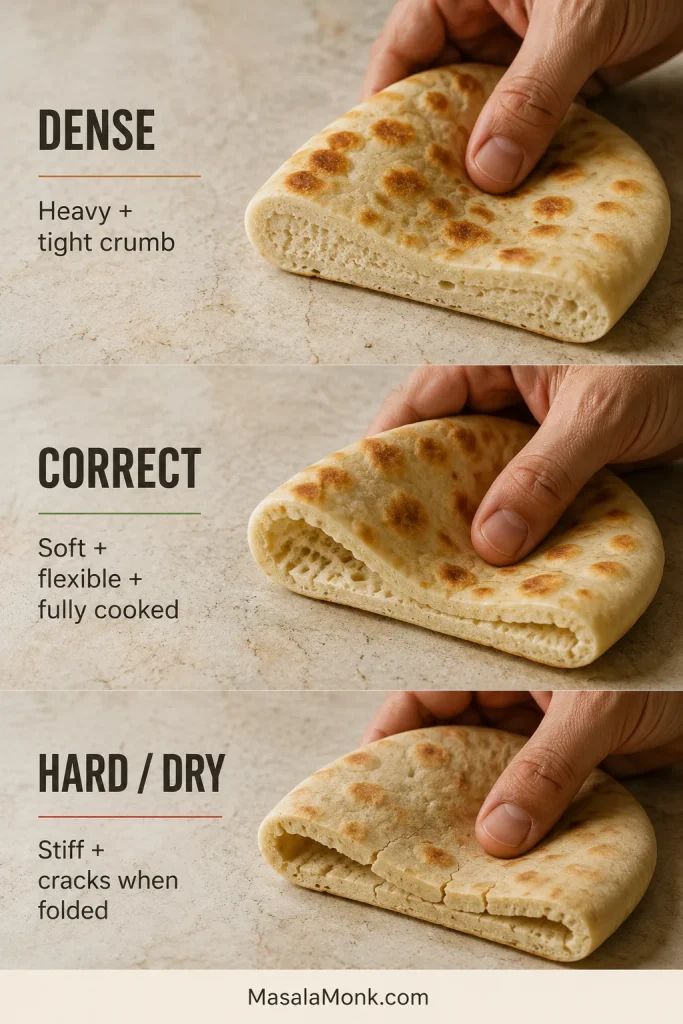
Three folded Greek pitas compared: dense pita with tight crumb, correctly cooked soft pita, and dry pita cracking as it bends.
Dense Greek pita and dry pita need different fixes: one needs better lift or heat balance, while the other needs better moisture protection.

Dough and Shaping Problems

ProblemLikely causeWhat to do nowNext time
Dough is extremely stickyFlour has not hydrated, dough is under-kneaded or flour absorbs less waterRest 10 minutes, knead fully and use oiled hands or a scraperAdd flour only 1 tablespoon at a time if it still cannot hold a ball
Dough is dry or crackingToo much flour, packed cup measures or very absorbent flourKnead in water 1 teaspoon at a time, then restWeigh the flour and minimize bench flour
Dough did not riseCold room, inactive yeast or water was too hotMove it somewhere warmer and allow more time; if there is still no visible activity after an extended warm rest, restart with fresh yeastCheck the yeast date and keep the water near 38–41°C / 100–106°F
Round springs backGluten is still tenseCover and rest another 5–10 minutesKeep the full 15-minute ball rest

Cooking, Texture and Folding Problems

ProblemLikely causeWhat to do nowNext time
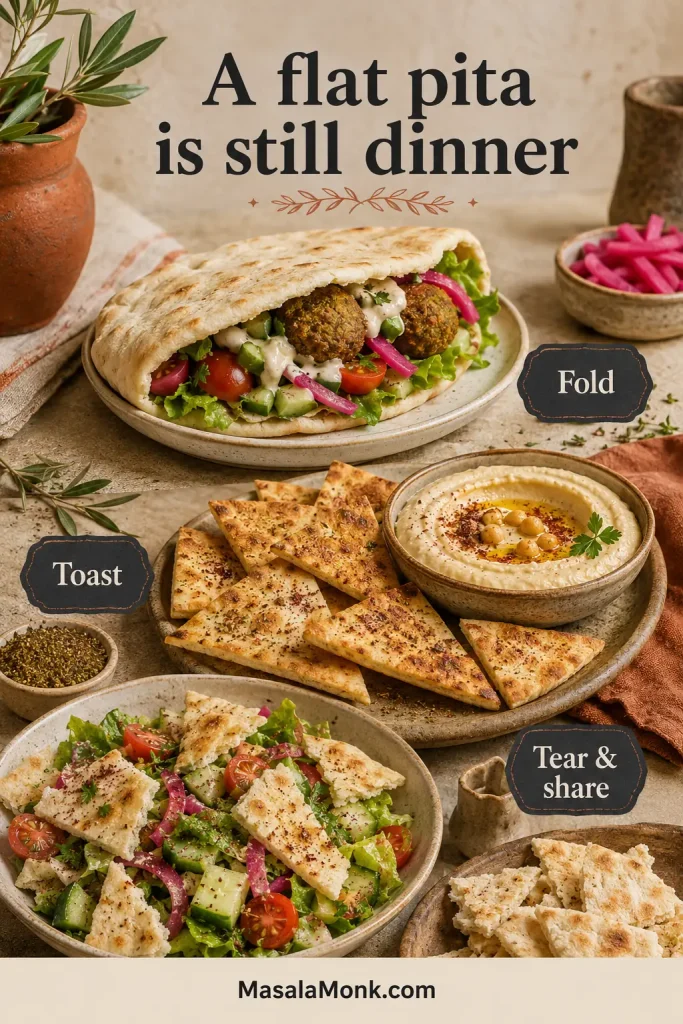
Pita is denseDry dough, weak rise, low skillet heat or excessive dockingKeep it covered to soften the surface, then serve it warm for dipping or cut it into wedges; the dense crumb cannot be made light after cookingKeep the dough soft, let it rise until airy, preheat the skillet fully and avoid excessive docking
Center is raw or gummyRound is too thick or pan is too hotLower heat, flip more often and cover 20–30 secondsMeasure the first round and keep the center near 5 mm
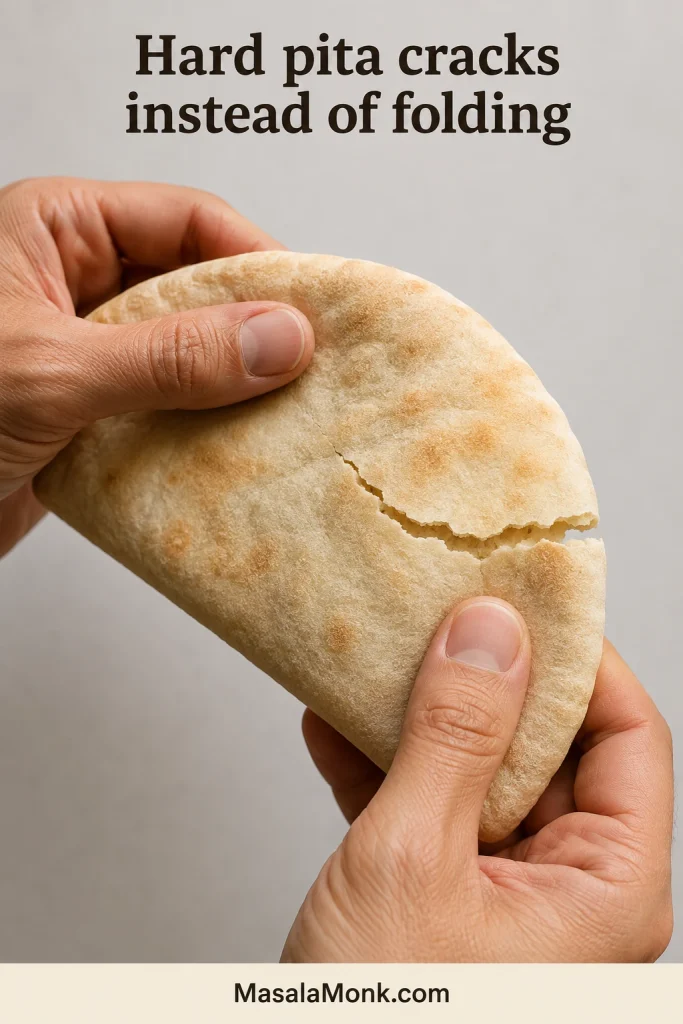
Pita is hardOvercooked, cooked too slowly, dry dough or left exposedSprinkle lightly with water, cover and warm brieflyCook faster and stack immediately
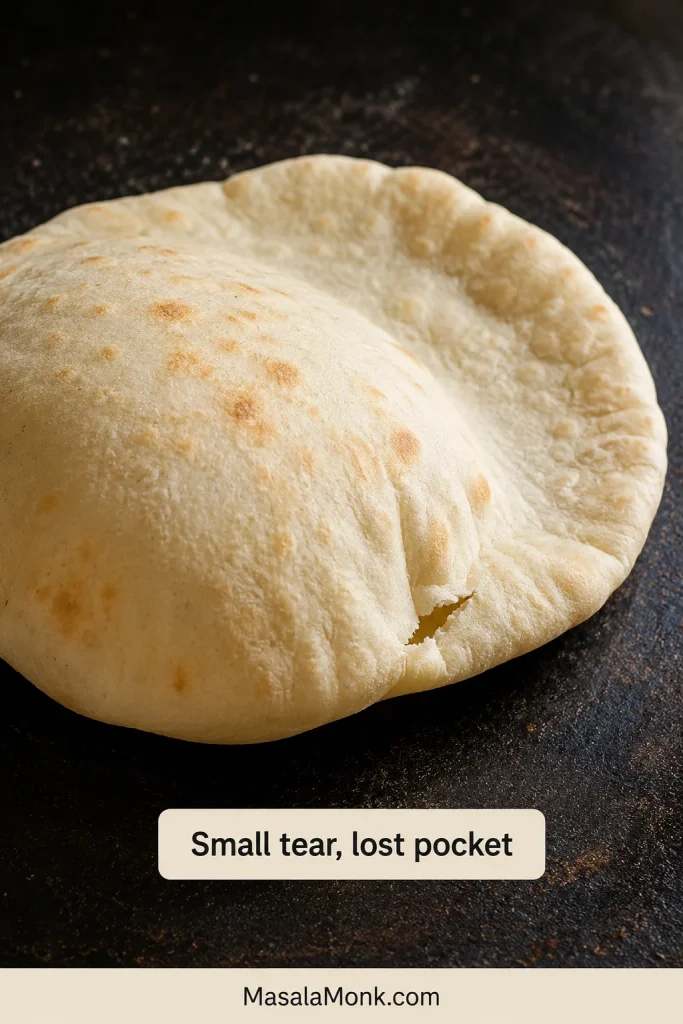
Pita formed a full pocketRound was too thin, heat was intense or shaped dough rested too longPress gently as it cools and use it normallyRoll the remaining rounds slightly thicker, cook them promptly after shaping, lower the heat if they balloon too fast and dimple lightly only when needed
No bubbles appearedUnder-proofed dough, cool pan or excessive prickingLet the remaining balls rest a little longer and raise the heat slightlyLet the dough rise until airy, preheat the skillet fully and avoid aggressive docking
Pita tears around fillingToo thin, dry, overcooked, cold or overloadedWarm it before folding, redistribute the filling and remove some if the wrap is overloadedKeep the center near 5 mm, protect the covered stack and avoid overfilling

If the Center Is Gummy

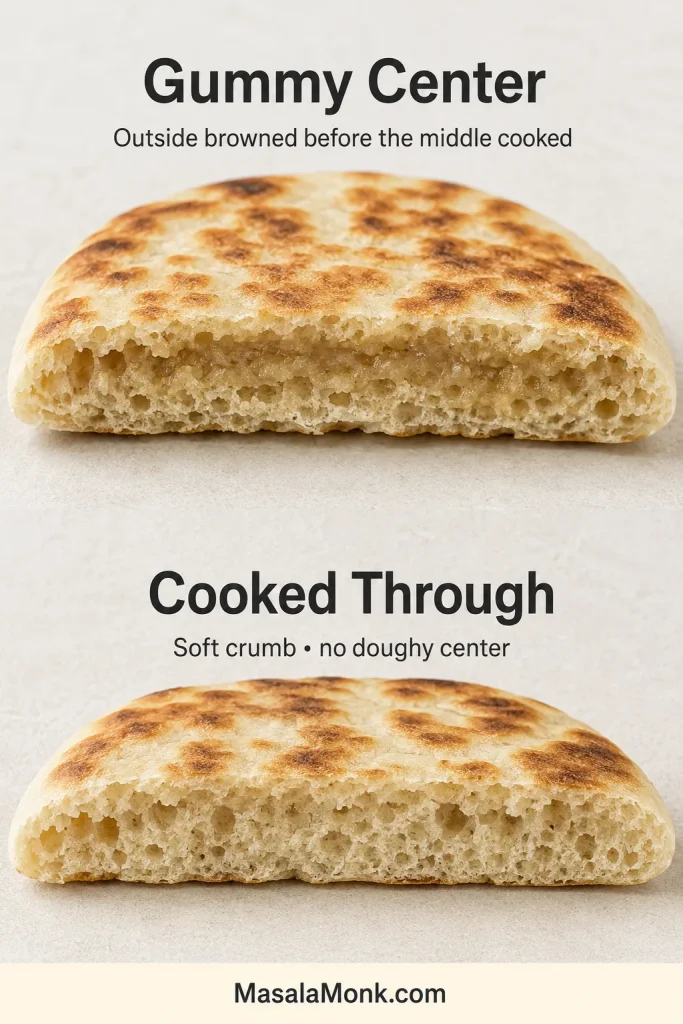
When the outside browns before the center sets, check the round’s thickness and the skillet heat together. A longer cook alone can dry the surface while leaving the underlying cause unchanged.

Cross-section comparison of Greek pita with a dense damp undercooked center and pita with a fully set soft cooked crumb.
A gummy middle is a geometry-and-heat problem, not a cue to cook every pita longer; fix the thick center or pan temperature.

Most batches will not need every fix in these tables. Once thickness and pan heat are working together, the remaining rounds usually become much easier.

Problem solved? Back to the recipe ↑ · Store or freeze ↓ · How to serve ↓

Can You Make Greek Pita Ahead?

Yes. Cook the pitas completely earlier in the day, cool them, store them airtight and reheat them just before serving. This leaves the last-minute cooking for chicken souvlaki, vegetables and sauce rather than the bread. After reheating, hold the pitas in a covered stack until everyone is ready to assemble.

How to Store and Freeze Greek Pita

Cool the pitas completely before sealing them. Warm bread trapped in a bag produces condensation, which makes the surfaces wet and encourages sticking.

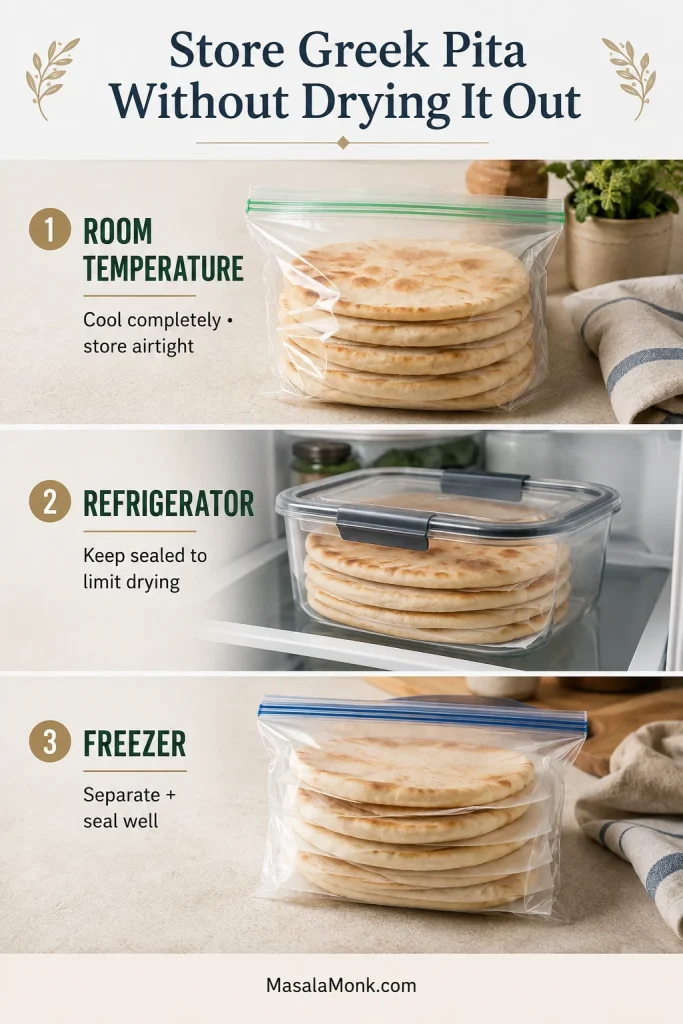
  • Room temperature: store airtight for up to 2 days; the best texture is on the day of cooking and the following day.
  • Refrigerator: keep for up to 4–5 days; chilling firms the starch, so plan to reheat.
  • Freezer: separate with parchment if needed, press out excess air and freeze flat for up to 2–3 months.
Greek pita storage guide showing cooled bread sealed airtight at room temperature, sealed in the refrigerator, and parchment-separated in a freezer bag.
Parchment makes frozen pita easier to separate, but the real protection comes from cooling fully and sealing out as much air as possible.

For an easy next-day lunch, warm one pita and fill it with Mediterranean chickpea salad. Add any loose dressing only when you are ready to eat.

Freezing bread while it is still fresh gives a better result than waiting until it begins to stale. Storage duration and peak texture are not the same promise.

How to Reheat Greek Pita Without Drying It Out

MethodBest forHow to do it
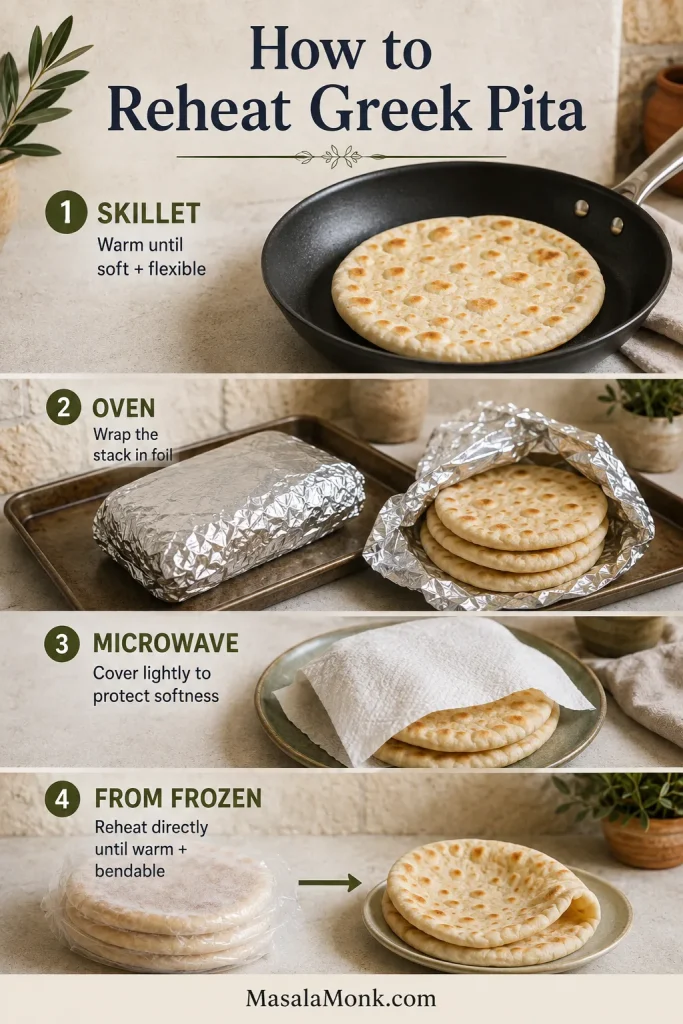
SkilletOne or two pitasWarm over medium for 20–30 seconds per side; add a few drops of water and cover briefly when dry
OvenA batchWrap the stack in foil and heat at 175°C / 350°F for 5–8 minutes
MicrowaveOne pita in a hurryWrap in a barely damp paper towel and heat for 10–15 seconds
From frozenUnplanned servingWarm covered in a skillet over medium-low or heat a foil-wrapped stack in the oven until the pita is warm through and bends easily again
Four Greek pita reheating methods: warm in a skillet, heat a foil-wrapped stack in the oven, microwave lightly covered, or reheat directly from frozen until flexible.
Reheating Greek pita is easier when storage was airtight: a dry pita may need a touch of moisture, while a well-stored one needs only gentle heat.

The target is flexibility, not crispness. Long microwave bursts make pita rubbery while hot and tough once it cools. An uncovered oven dries the outside before the center softens.

How to Serve Greek Pita

Build a gyro or souvlaki pita

Warm the pita and arrange the filling in a line through the center. Meat goes in first, followed by thick sauce, tomato, thin onion and optional homemade fries. Lay the fries above the meat, away from the lowest fold where sauce and steam collect.

Greek pita with gyro fillings arranged in a narrow center line and clear side margins, compared with an overloaded pita whose filling crowds the fold.
Leave clean bread on both sides of the filling line; that unused margin is what gives the pita somewhere to bend.

Choose a thick sauce, especially when tomato and lemon are already adding moisture. A dense spoonful of Greek tzatziki stays with the filling and away from the lower fold.

Perfect closure is unnecessary. Fold the bottom upward, bring in the sides and let parchment or foil hold the lower half while the top remains open. The bread should support the meal, not hide it.

In the first bite, the bread should still feel warm and soft against the cool sauce and juicy filling, with enough chew at the fold to hold everything together.

Hand holding a bitten chicken gyro with soft browned Greek pita, tzatziki, tomato, red onion and fries visible inside the fold.
If the filling slides out after the first bite, look at loading and sauce placement before blaming the fold itself.

For something cold and crisp beside a rich wrap, a simple cucumber salad with dill and onion brings acidity and crunch without adding another heavy component.

Serve it with meze and dips

Cut the same warm pitas into wedges for tzatziki, hummus, whipped feta, roasted eggplant dip, olives or grilled vegetables.

Mediterranean meze table with Greek pita wedges alongside tzatziki, hummus, falafel, salad, olives and grilled vegetables.
For meze, changing the cut is enough—the same soft Greek pita can move from gyro wrap to dip-ready wedges without a second dough.

For a more substantial vegetarian plate, add crisp homemade falafel and let the warm bread, cool sauce and crunchy chickpea centers provide the contrast.

Greek Pita Bread FAQs

Dough, Shaping and Cooking

Does Greek pita bread have a pocket?

Greek pita used for gyros and souvlaki is normally pocketless. Small bubbles and partial inflation are welcome because the bread is designed to fold around filling, while pocket pita is designed to split for stuffing.

How thick should Greek pita be?

For these 110 g rounds, aim for about 5 mm / 0.2 inch. Thinner rounds dry and pocket more readily; a much thicker center can remain gummy after the outside browns.

Can I use all-purpose flour instead of bread flour?

Yes, but hold back 15 g water at first because all-purpose flour may absorb less. Add the reserved water gradually after mixing and resting only when the dough feels firm.

Why is my pita dough so sticky?

Soft pita dough should be tacky. Give it the 10-minute hydration rest and knead it fully before adding flour. Use a scraper and lightly oiled hands; add flour only if the dough still cannot hold a soft ball.

Can Greek pita be baked instead of cooked in a skillet?

It can, but a very hot oven encourages faster inflation and a drier surface. This recipe uses a skillet because it gives closer control over the softly mottled, pocketless result; oven timing cannot be copied directly from the pan method.

Storage, Dietary Needs and Variations

How do I keep pita soft for a party?

Stack and cover the pitas as they cook. When making them ahead, cool and store them airtight, then reheat the foil-wrapped stack shortly before serving. Keep every round covered until it reaches the table.

Is this Greek pita vegan and dairy-free?

As written, the pita itself is vegan and dairy-free. Choose vegan fillings and sauces for a fully vegan meal.

Can I turn this into a yogurt or no-yeast pita?

Not without changing the bread. Yogurt alters moisture, acidity, protein and browning, while removing yeast changes flavor and internal lift. A yogurt-enriched or no-yeast flatbread needs its own liquid and flour proportions.

The Fold Is the Final Test

Brown spots tell you the skillet was hot. The fold tells you whether the whole method worked.

Hand holding an unfilled Greek pita in a deep U-shaped bend, showing a soft mottled surface with no cracks or tearing.
Do the fold test after a few minutes under the towel, not straight from the skillet; you are testing retained softness, not just fresh heat.

A good Greek pita can wait under its towel while the chicken finishes, the tomato is sliced and the tzatziki comes out of the refrigerator. When the table is ready, it should still feel soft and strong enough to carry everything, with a warm wheat-and-olive-oil aroma released as it bends.

Back to the recipe ↑ · Back to the beginning ↑

Posted on Leave a comment

Homemade Pita Bread Recipe: Soft, Puffy Pockets in the Oven or on the Stovetop

Stack of soft homemade pita with one bread cut open to show a hollow pocket beside a bowl of hummus.

The best part of making pita happens quickly. A flat round lands on the hot surface, a few bubbles appear, and then the bread lifts into a pale balloon. Once it settles, that balloon becomes a pocket ready for falafel, chicken, crunchy salad or the vegetables already waiting in the fridge.

A frustrating batch begins almost the same way. The dough cooks, picks up a few spots and stays stubbornly flat. One half may inflate while the other remains attached. A pocket may also appear, yet the bread can become too crisp to open without tearing.

Whole pita fully inflated into a pale balloon on a dark baking surface inside an oven.
A perfectly symmetrical dome is unnecessary; once the lift travels across the round and the surface sets, remove it.

This recipe shows you how to make soft Middle Eastern-style pita that puffs into a pocket you can open and fill. The oven gives you the most reliable pocket; a skillet, griddle or tawa creates more browned flavor, although full pockets are less consistent. Soft dough, even rolling, a thoroughly heated surface and a towel beside the oven or stove do most of the work.

The first round gives you useful clues rather than a final verdict. Its bubbles, color and pocket show what to change before the next round: more heat, a longer rest or more even rolling.

Start here

The Pita Method in One Minute

Make a soft dough with 360 g all-purpose flour and 250 g water. Knead until elastic, let it double, then divide it into eight pieces weighing about 80 g each. After a short rest, roll the pieces to roughly 6½–7 inches / 16–18 cm and 3–4 mm thick.

For the strongest pocket, bake on a steel, stone or heavy inverted tray that has heated for a full 30–45 minutes at 475°F / 245°C. Watch through the oven window from about 2½–3 minutes and remove the pita once it is inflated and set, before deep browning.

No stone or steel? Preheat a heavy uncoated baking sheet upside down and use it as the hot surface.

Roll evenly. Heat fully. Cover quickly. Those three decisions matter more than making a perfectly circular pita.

Pita method infographic showing flour and water weights, eight portions, rolling size, dough thickness and oven temperature.

Choose Your Cooking Method

  • Choose the oven for the strongest pocket. Intense heat from below gives steam its best chance to separate the two sides before the bread dries.
  • A skillet, griddle or tawa gives more browned flavor. Expect darker toasted spots, but full pockets will be less consistent.
  • Without a stone or steel, preheat a heavy inverted tray. It provides a flat oven surface, although it may need more time to recover between batches.

Both methods are useful, but they do not produce identical pita: the oven favors a complete pocket, while direct pan contact develops more toasted color.

Comparison of a pale, evenly puffed oven pita and a more toasted pita cooked on a skillet or tawa.

Planning ahead? Use the reduced-yeast overnight schedule in the variations section.

Greek pita and quick yogurt flatbread are different breads, not two more cooking methods for this dough. Greek pita is thicker and deliberately pocketless; yogurt flatbread does not rely on yeast or promise a hollow center.

Making a folded Greek-style meal instead? The thicker pita used with chicken souvlaki is designed to bend around the filling; this thinner version is designed for stuffing.

Whichever method you choose, remove the bread before it becomes stiff. A flat pita is still dinner—it can be folded, dipped or toasted later.

Homemade Pita Bread Recipe

Soft, lightly chewy pita that puffs into a hollow pocket on a thoroughly heated surface. Use the oven for the strongest pocket or a skillet, griddle or tawa for a more browned finish.

Recipe at a glance

  • Yield: 8 whole pitas
  • Serves: About 4 as shared bread or 8 as sandwiches, using one pita per person
  • Active preparation: About 35–45 minutes
  • Rise and rest: About 65–115 minutes
  • Oven cooking: About 15–40 minutes, depending on whether the surface holds one or two pitas and how quickly it recovers between batches
  • Stovetop cooking: About 25–40 minutes
  • Oven-method total: About 2 hours to 2 hours 45 minutes
  • Stovetop-method total: About 2 hours 10 minutes to 3 hours
  • Oven temperature: 475°F / 245°C

Some stages overlap: Later rounds are rolled while earlier batches cook, so the preparation, resting and cooking ranges should not be added separately. Most of the elapsed time is hands-off rising, resting and preheating.

Equipment

  • Digital kitchen scale
  • Large mixing bowl
  • Dough scraper or sturdy spatula
  • Rolling pin
  • Clean kitchen towels
  • Baking steel, pizza stone or heavy uncoated baking sheet for the oven method
  • Heavy cast-iron skillet, carbon-steel pan, griddle or tawa for the stovetop method
  • Optional: Stand mixer with dough hook; infrared thermometer

Ingredients

Use the weights when possible. Flour and salt can vary noticeably by scooping method and crystal size.

  • 360 g all-purpose flour (12.7 oz / about 3 cups, spooned and leveled), plus a little for dusting
  • 250 g water (250 ml / about 1 cup plus 1 tablespoon)
  • 5 g instant yeast (about 1½ teaspoons)
  • 6 g granulated sugar (about 1½ teaspoons)
  • 8 g fine salt (about 1¼ teaspoons, depending on the salt)
  • 14 g olive oil (15 ml / 1 tablespoon), plus a few drops for the bowl

Using active dry yeast: Check the brand instructions before substituting. Some active dry yeasts can replace instant yeast 1:1 by weight; others recommend a slightly larger amount. Dissolve it first only when directed by the manufacturer, and allow more time if the dough rises slowly.

Make and shape the dough

Mix, rest and knead

  1. Mix the dry ingredients. Whisk together the flour, instant yeast, sugar and salt in a large bowl.
  2. Add the water and oil, then rest. Use room-temperature water in a hot kitchen or lukewarm water, about 90–105°F / 32–41°C, in a cool room. Stir until no dry flour remains. Cover and rest the rough dough for 10 minutes.
  3. Knead until elastic. Work the dough by hand for 8–10 minutes, or with a dough hook on low to medium-low speed for 6–8 minutes. It should become smooth, soft and slightly tacky.

Rise, divide and roll

  1. Let the dough double. Place it in a lightly oiled bowl, cover and leave until roughly twice its original volume, about 45–90 minutes. A clear or straight-sided bowl makes the increase easier to judge.
  2. Begin preheating early. For the oven method, start heating the steel, stone or inverted tray when the dough has risen by roughly half to two-thirds. Give the surface a full 30–45 minutes before the first pita goes in. For the stovetop method, begin heating the pan when the shaped rounds are nearly ready.
  3. Divide and shape. Cut or weigh the dough into eight portions of about 80 g each. Draw the edges underneath each portion to make a smooth ball, cover and rest for 15 minutes.
  4. Roll only enough for the next one or two batches. Working from the center outward, roll each ball while lifting and turning often, until it measures about 6½–7 inches / 16–18 cm and 3–4 mm thick.
  5. Rest the rounds. Run your fingertips over the center and rim. Your pita does not need to be perfectly round, but it should feel evenly thin. Place each round on a lightly floured cloth, board or peel and cover for 5–10 minutes, until relaxed but not noticeably puffy.
  6. Keep the remaining dough covered. Roll the next set while the first batch cooks. Before transferring a round, brush off visible excess flour so it does not scorch on the hot surface.

Cook the pita

Have the towel ready before the first round goes in; once the first blister appears, the batches can move quickly.

Oven method

  1. Give the surface its full preheat. Place the steel, stone or inverted tray on the middle rack and heat the oven to 475°F / 245°C. Position it slightly below the middle when the top of your oven browns aggressively.
  2. Check parchment before using it at 475°F / 245°C. Follow the manufacturer’s maximum temperature and transfer the pita directly to the hot steel, stone or tray whenever possible.
  3. Transfer without stretching. Place one or two rounds on the hot surface, depending on its size. Leave enough room to load and remove each pita without pulling, folding or crowding it.
  4. Watch for the first lift. Begin watching through the oven window after about 2½–3 minutes. Avoid repeatedly opening the oven; when the view is poor, make one quick check at about 3 minutes.
  5. Take it out before deep browning. Most pitas need about 3–5 minutes. Remove each one when most or all of the round has inflated and the surfaces look set but remain pale enough to bend.
  6. Cover immediately to keep it soft. Move each pita directly beneath a clean towel.

Stovetop, griddle or tawa method

  1. Preheat a heavy dry pan until evenly hot. Medium-high heat is a sensible starting point. When measured, aim for a surface temperature around 425–450°F / 218–232°C.
  2. Add one pita and watch for bubbles. Cook for 20–30 seconds, then flip when the first bubbles appear.
  3. Keep turning every 20–30 seconds. Cook until the pita inflates or the raw, damp-looking patches disappear. It should remain soft enough to bend, usually after about 2½–4 minutes in total.
  4. Cover before cooking the next round. Move the pita beneath the towel before it stiffens.

Pita bread guide

Pita Dough, Heat and Troubleshooting

You can begin with the recipe above. The guide below shows what to look for at each stage and what to change before the next round.

Why Pita Puffs Into a Pocket

The pocket is created by steam. Fermentation makes the dough lighter and easier to stretch, but the dramatic balloon happens when moisture inside the thin round heats rapidly.

As the bottom touches the hot surface, it begins setting almost immediately. Moisture trapped inside turns to steam and lifts the upper layer away from it. Once both sides have set, the bread can hold the balloon long enough for the pocket to move across the round. The pita settles as the steam escapes, but the two layers remain separated.

Infographic showing heat setting the pita base, steam lifting the upper layer and two thin walls remaining separated.

Four things open the pocket

  • Moisture: Soft dough supplies the steam.
  • Even thickness: The round heats at a similar rate from edge to edge.
  • An intact surface: Steam remains inside instead of escaping through a tear.
  • Stored heat: The pan, stone or tray sets the bread before it slowly dries.

After the balloon settles, the two cooked layers should remain separated through most of the round; a few isolated bubbles are not the same as a usable pocket.

Close-up of a cut pita with two thin bread walls surrounding a continuous hollow center.
Look for one continuous cavity rather than isolated edge bubbles; that separation is what makes the bread easy to fill.

Pita Bread Ingredients and Dough Texture

Flour and water control structure and steam

All-purpose flour develops enough gluten for the dough to stretch and hold steam without making the bread excessively chewy. Bread flour can also work, although it may need a little more water and usually produces a firmer bite.

Milk Street’s pita troubleshooting identifies the same problem: excess flour creates a drier, thicker round with less moisture available for steam. Water hydrates the flour, helps the dough stretch and becomes the steam that opens the pocket. Its temperature mainly controls the pace of fermentation; it does not need to be hot.

Flour absorption varies by brand, climate and storage, so give the rough dough its 10-minute rest before deciding it needs more flour.

Rough, shaggy pita dough in a clear bowl with all visible flour hydrated.

Yeast, salt, sugar and oil shape fermentation and texture

Yeast produces gas and flavor during the first rise, but steam performs the final lift. Salt seasons the pita, strengthens the dough and steadies fermentation. Sugar supports light browning without making the bread sweet, while olive oil helps the cooled pita remain tender and flexible.

Both sugar and oil can be omitted for a leaner dough. The pita may color more slowly and feel less tender after cooling, but neither ingredient creates the pocket.

Soft dough is better than easy, dry dough

Sticky dough makes many bakers nervous. Stiff dough creates the harder problem here.

During the first minutes of mixing, the dough may cling to your fingers. After resting and kneading, it should gather into a smooth mass. If it clings lightly and then releases, you are closer than you may think. Do not make the dough dry simply because dry dough feels easier to handle.

A fingertip pressing into smooth pita dough and leaving a shallow indentation.
  • Correctly tacky: Soft, elastic and lightly clinging before releasing.
  • Too wet: Flowing, spreading quickly or coating the hands heavily after kneading. Add flour one teaspoon at a time.
  • Too dry: Stiff, resistant or cracking around folded edges. Add water one teaspoon at a time during early mixing.

This is usually where another handful of flour feels tempting. Give the dough its rest first; it may become far easier to handle without changing the formula. A dough can look lively in the bowl and reveal its dryness only beneath the rolling pin.

Comparison of wet pita dough coating the hands, correctly hydrated dough holding its shape and dry dough with cracks.

Let the dough double

Once the dough feels soft and elastic, give it enough time to rise and become airy. The rise may take 45–90 minutes. Move on when the dough has roughly doubled, the surface looks smooth and gently domed, and the dough feels lighter than it did after kneading.

The same bowl of pita dough before proofing and after expanding to roughly twice its original volume.
Mark the starting level on the bowl; the height change is easier to judge than the clock.

How to Roll Pita So the Pocket Can Open

Portion and rest the dough

Keeping each piece close to 80 g makes it easier to roll every pita to the same diameter and thickness. Draw the rough edges underneath, close the seam at the base and rest the covered balls for 15 minutes.

Seven smooth dough balls beside an eighth 80-gram portion being shaped on a digital scale.
Correct small weight differences while dividing; equal portions are easier to roll to the same size and cook at the same pace.

When a ball keeps shrinking toward the center, it is asking for more rest, not more force. Cover it, roll another piece and return in 5–10 minutes.

Comparison of tight pita dough shrinking after rolling and relaxed dough holding its larger shape after resting.

Roll to an even 3–4 mm thickness

Roll outward from the middle, rotate the dough and lift it frequently. Frequent turning spreads pressure more evenly than repeated passes in one direction.

Hands rolling pita dough outward from the center while lifting the edge to rotate the round.

Use light, consistent fingertip pressure to compare the center, middle and rim. The target is an even 3–4 mm round without a paper-thin weak spot.

Side view of a raw pita round with an even edge measuring approximately 3 to 4 millimeters.
Check the center, middle and rim with the same fingertip pressure; one thin patch can vent steam.

Shape matters less than thickness. A slightly irregular outline can still puff well, while a thin middle surrounded by a padded rim heats unevenly.

Comparison of evenly rolled pita dough and a round with a thin center and thicker outer rim.

Keep the rounds covered and intact

Roll only enough for the next one or two cooking batches. A large steel may hold two pitas; a small oven-toaster-grill (OTG), skillet or tawa may cook only one. Keeping the remaining dough as covered balls prevents later rounds from drying while they wait.

Keep each rolled surface smooth and intact. Dust lightly, brush away visible excess flour and support the round during transfer instead of pulling it from one edge.

Two-step sequence showing loose flour brushed from a rolled pita and the full round supported during transfer.

Pita Temperatures for Ovens, OTGs and Skillets

A modest oven can make excellent pita. The important question is how much heat the surface beneath the dough has stored. Begin with these settings, then watch the first round. Fast bubbles signal strong heat; slow drying means the surface needs more time.

EquipmentBegin withWatch fromRemove when
Conventional oven475°F / 245°C; steel, stone or heavy inverted tray heated for 30–45 minutes2½–3 minutes through the windowInflated, set and flexible
Fan or convection ovenAbout 450°F / 230°C; conventional mode when availableAbout 2½ minutesThe pocket opens before the exterior dries
Small OTGHighest stable setting near 230–250°C; top and bottom heat where availableAbout 3 minutesThe pita inflates before either side hardens
Oven limited to 220–230°CMaximum heat; warm the surface for the full 45 minutesAbout 3 minutesThe layers have separated and the bread remains flexible, even without a complete balloon
Skillet, griddle or tawaHeavy dry surface; approximately 425–450°F / 218–232°C when measuredFirst flip after 20–30 secondsNo raw-looking patches remain and the bread bends easily

In a small OTG, move the tray higher when the underside darkens before the top lifts. Move it lower when the upper surface dries while the underside remains pale.

OTG guide showing higher, lower and balanced tray positions based on which side of the pita cooks first.

For the oven, preheat the surface—not only the air

The oven may announce that it is ready while a thick stone or steel is still catching up. Give the surface the full 30–45 minutes before loading the first pita. Steel transfers heat quickly and recovers well, stone gives steadier heat, and a heavy inverted tray offers an affordable alternative that may need a little longer between loads.

Comparison of pita rounds arranged on a baking steel, pizza stone and heavy inverted baking tray.

Support the round with both hands, a peel or a wide spatula during transfer. With enough stored heat, the first blisters appear quickly and one edge may rise before a wave of inflation moves across the bread.

Four oven stages showing pita flat, developing blisters, lifting at one edge and inflating fully.
Watch the direction of the lift rather than waiting for a perfectly symmetrical balloon.

Remove the pita as soon as its surfaces are set and the bread still bends easily. Waiting for deep color can leave the pocket walls brittle.

Two hands gently bending a pale cooked pita without cracking it.
Pale is a texture cue here, not a sign of underbaking; extra color usually costs flexibility.

The order matters. A flat first pita and a slow final pita usually point to different problems. If the first round barely bubbles, remove it while soft and give the surface another 10 minutes before loading the next one. A flat first pita is disappointing, but the other seven are still covered and waiting. When the early pitas puff and later ones slow down, close the oven for 2–3 minutes so the surface can recover.

Decision guide linking a flat first pita, slowing later pitas and consistently weak puffing with different heat adjustments.

For the skillet, griddle or tawa, watch the bread

A surface around 425–450°F / 218–232°C is a useful starting range. King Arthur uses a similar measured range for its stovetop sourdough pita.

If the pita sits quietly and dries slowly, raise the heat. Dark spots appearing before the center cooks mean the heat should come down. Flip when the first bubbles appear and continue turning every 20–30 seconds.

Three-stage sequence showing bubbles forming on pita, the round being flipped and the bread finishing soft on a tawa.

When one section inflates while another stays attached, press briefly beside the flat portion with a spatula without pressing directly on the balloon. Half a pocket does not mean the recipe failed; one area of that round may simply have been thicker or made weaker contact with the pan.

Once the damp-looking patches disappear, several more minutes usually produce a cracker instead of a late pocket. Remove the bread while it bends easily.

Why Your Pita Did Not Puff—and What to Change Next

Most flat pitas come back to four things: heat, thickness, moisture or a steam leak. Match what you saw to the most likely cause, then change one thing on the next round.

Four pita problems showing insufficient heat, uneven thickness, dry cracked dough and a tear that releases steam.
What you sawLikely causeWhat to change
No lift: no bubbles, tiny bubbles or only the first pita stayed flatCool surface, thick round or dry doughPreheat longer, check thickness and weigh the flour and water
Uneven lift: half inflated or the pocket stopped partway acrossUneven rolling, padded rim, fold or steam leakCompare the center and rim and inspect the round for damage
Poor cooking: brown outside and doughy inside, or puffed but hardExcess heat, excessive thickness or too much cooking timeLower the heat, roll evenly and remove the next pita sooner
Dough trouble: shrinking, sticking, cracking or excessive stickinessInsufficient rest, kneading or hydration adjustmentRest tight dough and adjust flour or water one teaspoon at a time

Use the first visible symptom to choose one adjustment. Keeping the other variables steady makes the next pita a useful test rather than another guess.

Five-row troubleshooting guide pairing visible pita problems with changes to heat, thickness, hydration, cooking time and surface recovery.

When the surface is too cool

An underheated surface produces slow bubbles and gradual drying instead of a quick wave of inflation. Give the steel, stone or tray more time before loading the next round.

Pale cooked pita remaining flat on a dark surface with only a few small bubbles.

When the round is uneven

Only one half inflated. The tempting response is to keep cooking, but the problem probably began beneath the rolling pin. Compare the center and rim of the next round by touch, then rotate it more frequently as you roll.

Pita with one side inflated and the other side flat, plus a cut view showing partial internal separation.
One inflated side proves the dough can trap steam; inspect thickness and pan contact before blaming the yeast.

When the outside browns before the center cooks

Strong color with a damp or dense center means the exterior set before heat reached the thicker interior. Lower excessively aggressive heat, roll the next round more evenly or correct both problems together.

The same pita shown with strong exterior browning and a dense, damp center in its thicker section.
Exterior color is not proof the center is cooked; thickness controls whether heat reaches the middle in time.

When the dough is too dry

Dry dough may rise in the bowl but resist every pass of the rolling pin. Weigh the ingredients, allow the hydration rest and avoid adding large handfuls of flour simply to make the dough easier to handle.

When steam finds a way out

A small tear, dry crack, folded edge or stretched patch releases steam before the two sides separate. Loosen stuck dough gently instead of pulling it from one edge.

Partly inflated pita with a small tear near the rim and a flatter section beyond the damaged area.

When puffed pita turns hard

Hard pita usually points to excess cooking, overly dry dough or a delay before covering. Remove the next bread once it has puffed and set, then place it beneath a clean dry towel immediately.

Two hands bending a dry pita as a crack opens across its pale surface.
The first crack during a gentle bend is a better dryness warning than color alone.

A pocketless pita still earns its place at the table: fold it while soft, toast it into chips or tear it into salads and dips.

Three uses for pocketless pita: folded around filling, toasted into chips and torn for dips or salad.

Recheck the three stages most likely to change the next batch: dough texture, rolling thickness or surface heat.

Back to recipe cardBack to the top ↑

Keep Pita Soft, Then Store or Freeze It

The final texture is decided during the first few minutes after cooking. Lift the towel after a minute or two and the stack should feel warm, supple and lightly steamy, with the dry surfaces beginning to soften.

Freshly cooked pita being placed beneath a light towel over a warm stack of bread.
Use a dry towel, not a damp one; shared warmth softens the surface without making the stack wet.
  • Place each cooked pita directly beneath a clean dry towel.
  • Stack the pitas loosely so their shared warmth softens the surfaces.
  • Open the towel slightly once the completed stack stops steaming heavily.
  • Cool completely before sealing the bread in a bag or container.

Pita is one of those breads worth freezing on purpose. A brief reheat restores it more successfully than several days in the refrigerator.

Store at room temperature or freeze

Store completely cooled pita in an airtight bag or container at room temperature for up to two days for the best texture. Refrigeration may delay mold, but it also makes pita stale and firm more quickly. Freeze the bread instead when it will not be eaten within two days.

  1. Cool the pita completely.
  2. Place parchment between the rounds.
  3. Slide the stack into a freezer bag.
  4. Remove excess air and seal tightly.
  5. Freeze flat for up to three months.

Freezing the stack flat and separating the rounds prevents them from sticking together, so one pita can be removed without thawing the rest.

Cooled pita stacked with parchment between each bread inside a flat transparent freezer bag labeled Pita.

Reheat for the texture you want

  • Soft for opening and filling: Add a few drops of water to a skillet, add the pita, cover for 15–20 seconds, then uncover and heat for about 20 seconds per side.
  • Lightly browned: Heat in a dry skillet for about 20–30 seconds per side.
  • Several pitas together: Wrap the stack in foil and heat at 350°F / 175°C for about 5–8 minutes.
  • A fast single pita: Wrap it in a lightly damp towel and microwave for 10–20 seconds.
  • Crisp pita: Heat uncovered in the oven or air fryer, checking frequently.
  • Straight from frozen: Use gentle steam in a covered skillet or foil-wrapped oven first, followed by a short dry finish.

Begin with the shortest reheating time. Another ten seconds is easier to add than moisture is to put back.

Three reheating methods showing pita softened under a damp towel, browned in a skillet and baked into crisp wedges.
Reheating is a texture decision: add moisture for flexibility, use dry heat for browning and extend dry heat only for crispness.

How to Open a Pita Pocket Without Tearing It

Let the pita rest beneath the towel until it is warm and comfortable to handle. Cut the round in half with a sharp knife instead of pulling it apart from the edge.

Along the cut edge, you should see two thin walls with a clear space between them. Ease the sides open with your fingers. A small blunt knife can loosen one lightly attached patch, but do not force a section that never separated.

Three-step sequence showing a warm pita cut in half, its separated walls identified and the pocket gently opened.

When the cut edge separates cleanly beneath your fingertips, you know the pocket formed: two soft walls, open and ready to fill.

Partially puffed pita can still hold a compact filling. Use the open portion, fold the whole round around the food or cut it into wedges.

What to Serve With Homemade Pita

Fresh pita needs very little. Tear one while it is warm and drag it through hummus or olive oil, or cut it open while the bread is still soft enough to bend around the filling. Stuffing the bread rather than folding it? First see how to open a pita pocket without tearing it.

Fill or fold

Keep the filling compact when using a pocket. A thicker Greek-style pita is better suited to folding around a large gyro-style meal.

Pita pocket filled with falafel, cucumber, tomato, herbs, pickled turnip and tahini sauce.
Place sturdy fillings first, then add salad and sauce so pressure stays away from the cut edge.

For more sharpness, add a small spoonful of tangy amba sauce. Its sour mango, turmeric, chili and fenugreek work especially well with falafel, chickpeas, roasted vegetables, eggs and shawarma-style fillings.

Tear and share

  • Hummus
  • Baba ganoush
  • Labneh with olive oil and herbs
  • Olive oil with za’atar
  • Fresh tabbouleh with parsley, tomato, mint and lemon as part of a mezze plate

Use leftover pita

  • Cut it into wedges for pita chips
  • Toast pieces for fattoush
  • Spread a whole round lightly with pizza sauce, add cheese or vegetables and bake until the edges crisp
  • Toast and crush it over soup or salad

Pita Bread Variations and Scaling

Make the base recipe once before changing it. Once you know how the dough should feel, small variations become much easier to judge.

Flour variations

Use all-purpose flour as the baseline. Bread flour and partial whole wheat can work with small hydration adjustments, while fully whole-wheat pita needs a separately balanced formula.

Guide showing all-purpose flour, bread flour, partial whole wheat and fully whole-wheat flour with different pita dough adjustments.

Bread flour gives a slightly chewier pita; replace the all-purpose flour with the same weight. After the hydration rest, add a teaspoon or two of water only when the dough feels noticeably firm.

To make part-whole-wheat pita, replace 35–70 g of the all-purpose flour with fine whole-wheat flour. That gives roughly 10–20% whole wheat, with a nuttier flavor and slightly greater water absorption. A 100% whole-wheat pita needs its own water range, resting strategy and handling guidance.

Make-ahead starting point

An overnight schedule works better with less yeast, so reduce the instant yeast to about 2 g / ⅔ teaspoon. Knead the dough as usual, leave it covered at room temperature for 20–30 minutes, then refrigerate for about 8–16 hours.

The next day, let the dough stand until relaxed and no longer refrigerator-cold—often 45–75 minutes—before dividing. Refrigerator temperature and yeast activity vary, so judge its softness instead of relying only on the clock.

Scale the batch

Scale every ingredient by weight and keep each dough ball close to 80 g. The oven temperature remains the same. For a double batch, use a larger bowl, roll in small waves and pause when the baking surface begins losing heat.

Changes that need more than a simple substitution

No-yeast yogurt flatbread, Greek pocketless pita, sourdough pita, gluten-free pita and 100% whole-wheat pita behave differently enough to need separately balanced recipes. Removing the yeast or replacing the flour in this dough will not reliably produce the same pocket.

Baker’s percentages for scaling

Flour 100% · Water 69.4% · Salt 2.2% · Instant yeast 1.4% · Sugar 1.7% · Olive oil 3.9%

Frequently Asked Questions

Puffing, texture and equipment

Why did my pita not puff?

The usual causes are insufficient surface heat, uneven thickness, dry dough or a tear that releases steam. Use the troubleshooting guide to match what you saw to the next adjustment.

Why did my pita turn hard or crisp?

Pita usually turns hard because it was cooked too long, made from overly dry dough or left uncovered after cooking. Remove it once it has inflated and set, before deep browning, and place it beneath a clean towel while warm.

Can I make pita without a baking stone?

Yes. Preheat a heavy uncoated baking sheet upside down to create a flat loading surface. It may need more recovery time between batches than a stone or steel.

Make-ahead, ingredients and pita styles

Can pita dough be made ahead or frozen?

For make-ahead dough, use the reduced-yeast starting point in the variations section, then let the refrigerated dough soften and relax before dividing. Baked pita freezes more predictably than raw dough, so freeze the cooked and fully cooled bread unless you already know how your dough behaves after thawing.

Can I omit the sugar or olive oil?

Yes. The pocket can still form without either ingredient. With no sugar, fermentation and browning may be slower. Without oil, the pita will be leaner and may feel less tender after cooling.

Is pita bread the same as naan?

No. Pita is rolled thin and heated quickly so steam can separate it into two sides. Naan is usually softer, thicker and more enriched, often with yogurt, milk, butter or ghee. Both are flatbreads, but they are made for different textures.

Is Greek pita the same as pocket pita?

No. A Greek-style pita is generally thicker, softer and deliberately pocketless. It is normally cooked in a skillet and folded around fillings. Pocket pita is rolled thinner and exposed to intense heat so steam can push the two sides apart.


The First Pita Is Allowed to Teach You

The first round may rise cleanly, or it may show that the surface needs another ten minutes. Either result tells you something before the other seven reach the heat.

Keep the remaining dough covered, adjust one thing and try again. When everything lines up, the change happens in seconds: the bread lifts, the pocket travels from one edge to the other, and the towel begins filling with warm, soft pitas.

How did your first pita behave—full balloon, half pocket or stubbornly flat—and were you using an oven, OTG, skillet or tawa?

Roll evenly. Heat fully. Cover quickly. The pocket may be the dramatic part, but those three quiet decisions are what make it possible.

Back to recipe cardBack to the top ↑

Posted on Leave a comment

Salt Bread Recipe (Shio Pan): Crispy-Bottomed Buttery Rolls

Golden crescent-shaped salt bread rolls on a cooling rack, with one roll torn open to show the crumb and another turned over to show the browned underside.

The first warm roll rarely waits for the rest to reach the table. Its underside is deep golden and lightly crisp, almost fried in the butter that escaped during baking. Pull it apart and the crumb stretches before it tears, revealing a small hollow where the cold butter used to be.

That contrast is the point of this salt bread recipe: a thin shell, a butter-crisped base, a soft middle with a gentle chew, and enough salt to sharpen the richness without turning the bread harsh.

Called shio pan in Japan and commonly known as sogeum-ppang in Korea, salt bread resembles a croissant but is much more approachable at home. It asks for patience more than advanced pastry skill: there is no lamination, and a short rest usually solves dough that resists the rolling pin.

Keep one rule in mind: the butter may soften during proofing, but it should remain wrapped inside the dough until the rolls begin rising in the oven. Once it melts, steam opens the hollow and some butter slips beneath the bread to crisp the base. A little butter on the tray is not defeat.

Salt bread feels special enough to tear open beside coffee, yet simple enough to serve with soup or turn into a small breakfast sandwich. What looks like a bakery showpiece is really an everyday pleasure: warm bread, melted butter, a little salt and an underside worth turning over to inspect.

Hands holding a freshly torn salt bread roll with a pale soft crumb, thin crust and small hollow, with more rolls blurred in the background.
Once the roll is torn open, look for bread-like softness rather than croissant layers: a thin crust, pale crumb and modest butter pocket.

Start here

Make the Crisp-Bottomed Bakery Style First

This is the classic version to make first and the clearest place to learn how the dough, butter and hot tray work together before exploring softer milk-bread or no-knead variations.

  • Use 200 g water first; add the reserved 10 g only after the dough has rested and begun developing strength, and only when it still feels unusually firm.
  • Keep the final proof moderate; the rolls should become puffy without a greasy sheen or butter seeping onto the tray.
  • Lift first, butter second; let the rolls begin expanding before a substantial butter pool appears, then bake until the underside is deeply browned.

For a softer roll that stays tender longer, use a separate tangzhong- or egg-enriched version.

Most of the time is hands-off. Pay closest attention when deciding on the final water, rolling the long triangles and judging the proof; uneven first crescents and a modest hollow can still make excellent salt bread.

Make it now

Salt Bread Recipe (Shio Pan)

This eggless dough uses water and milk powder rather than fresh milk. It makes eight rolls with crisp buttered bases and soft, lightly chewy centres. Use the gram measurements for the most dependable dough; cup and spoon measures are included for convenience.

Recipe at a Glance

  • Yield: 8 rolls
  • Preparation and shaping: About 55–75 minutes, including short rests
  • Skill level: Beginner-friendly; allow time for shaping
  • First rise: About 60–90 minutes
  • Final proof: About 60–120 minutes; begin checking at 60
  • Bake: About 17–20 minutes; begin checking at 15
  • Total time: About 3¾–5½ hours

Ingredients

Overhead ingredient board showing bread flour, cake flour, water, milk powder, sugar, salt, instant yeast, butter, neutral oil and flaky salt.
Weigh the salt bread ingredients before mixing so the flour blend, water, dough butter and 13 g filling batons stay balanced from the start.

For the Dough

  • 240 g bread flour (about 2 cups, spooned and levelled)
  • 60 g cake flour (about ½ cup)
  • 18 g non-fat milk powder (about 2½ tablespoons)
  • 15 g granulated sugar (about 1 tablespoon plus ½ teaspoon)
  • 4 g instant yeast (about 1¼ teaspoons)
  • 6 g fine sea salt (about 1 teaspoon, depending on crystal size)
  • 200–210 g water
    Start with 200 g / 200 ml (about ¾ cup plus 1½ tablespoons); reserve the final 10 g / 10 ml (about 2 teaspoons).
  • 22 g unsalted butter, softened but not greasy (about 1½ tablespoons)

Choose the water temperature for your kitchen: chilled in a hot room, cool in a moderate room or mildly warm in a cold room. The goal is a finished dough near 24–26°C / 75–79°F.

For the Filling and Finish

  • 104 g cold salted butter, divided into eight 13 g pieces, about 3.7 oz total
  • 1–2 teaspoons neutral oil, for the rising bowl and a bare metal baking sheet
  • Water for lightly misting the shaped rolls
  • About ½ teaspoon flaky sea salt, or enough for a restrained finish
  • Optional: butter collected from the hot tray, for brushing over the baked rolls

The 13 g filling is deliberate: it is intended to create a modest hollow and help brown the base without making cavity size the main measure of success.

Essential Equipment

  • Digital kitchen scale
  • Stand mixer with dough hook, or a clean work surface for hand kneading; the full hand method appears beneath the main instructions
  • Large bowl and cover for fermentation
  • Bench scraper or flexible dough scraper
  • Rolling pin
  • Large rimmed, light-coloured metal baking sheet, about 33 × 46 cm / 13 × 18 inches
  • Wire cooling rack

Helpful, but not required: an instant-read thermometer, oven thermometer, fine-mist spray bottle, pastry brush and ruler. Without a thermometer, the finished dough should feel cool to neutral against the inside of your wrist—not distinctly warm.

Instructions

Prepare and Mix

  1. Prepare the filling butter. Divide it into eight 13 g / 0.46 oz pieces and shape short batons roughly 4 cm / 1½ inches long. Aim for 13 g each; the batons do not need to look identical. Refrigerate until firm but not frozen hard.
Butter batons arranged on a tray, with one piece on a digital scale reading 13 g and another piece beside a ruler.
The 13 g butter baton is intentionally moderate; it encourages a small hollow and browned base without turning the tray greasy.
  1. Begin the dough. Place the bread flour, cake flour, milk powder, sugar and instant yeast in the mixer bowl. Add 200 g water at the temperature suited to your kitchen and mix on low until no dry flour remains. Cover and rest for 15 minutes.
  2. Add salt, build strength and decide on the final water. Knead with the fine salt on low to medium-low for about 5 minutes. If the dough still feels unusually firm, add the reserved water 2–3 g at a time, allowing each addition to disappear before adding more. Do not worry if the dough still looks sticky and uneven.
  1. Work in the dough butter. Add the softened butter gradually. The dough may briefly look greasy and broken; keep kneading instead of adding flour. Continue for 7–10 minutes, until smooth, elastic and able to pass a windowpane test: a small piece stretches into a thin film before tearing. Once it turns smooth again, the hardest mixing stage is over.
  2. Check the temperature. A useful final dough temperature is 24–26°C / 75–79°F. If it is much warmer, cover and refrigerate for 10–15 minutes. Without a thermometer, it should feel cool to neutral against your wrist, not distinctly warm.
Four-stage board showing salt bread dough changing from shaggy to briefly greasy, then smooth, then satiny and ready.
At first the dough looks shaggy; after butter is added, it may briefly look worse. Keep kneading until it turns smooth, satiny and elastic.

Rise, Divide and Shape

  1. Let the dough rise. Place it in a lightly oiled bowl, cover and leave at about 24–26°C / 75–79°F until noticeably fuller, close to doubled and lighter when you lift an edge, commonly 60–90 minutes.
  2. Gently deflate, divide and round. Turn out the dough and press out only the largest gas pockets; do not flatten it aggressively. Divide into eight pieces of about 70–72 g / 2.5 oz, shape into balls and cover. Rest for 15 minutes, keeping pieces covered whenever they are waiting.
  1. Form tapered pieces. Roll each ball into a short carrot or teardrop about 10–12 cm / 4–5 inches long. Cover and rest another 10 minutes if the dough pulls back strongly.
Four-stage guide showing dough divided into eight portions, rounded by hand, rested under a cloth and shaped into teardrops.
After the first rise, divide evenly, keep each piece covered and shape short teardrops before rolling them into long triangles.
  1. Roll long triangles. Aim for 40–45 cm / 16–18 inches long and 5–7 cm / 2–2¾ inches wide at the base. Use only enough flour to prevent sticking. If the dough pulls back, cover it for five minutes before continuing.
    Why the length matters: A longer triangle creates more turns; a short, thick one produces a breadier roll, while translucent dough is more likely to tear. Rest creates length; force creates tears. Shaping usually feels easier by the third or fourth roll.
Comparison board showing a short thick dough triangle, a correct long triangle with measurements and an over-thin triangle with a tear.
For classic salt bread shaping, length matters more than force. A rested 40–45 cm triangle gives more turns without thin, tear-prone patches.
  1. Enclose the butter. Place one cold baton across the broad end, leaving enough dough at both sides to cover it. Roll forward with light tension, keep the butter centred and finish with the pointed tip beneath the roll.
Five-step salt bread rolling guide showing butter placed on the dough, covered, sealed at the sides, rolled and finished tip-side down.
Before rolling, cover the butter completely and close the sides gently; then finish with the final dough tip underneath.

Proof and Bake

  1. Arrange and proof. Lightly oil a bare 33 × 46 cm / 13 × 18-inch metal sheet, or use parchment for gentler browning. Stagger the rolls 5–7 cm / 2–3 inches apart, cover and proof at 23–25°C / 73–77°F. Begin checking at 60 minutes. Ready rolls feel lighter and softer, jiggle gently and return slowly and partly after a light press; dramatic doubling is unnecessary.
    Butter warning: The tray should ideally remain dry during proofing. A faint greasy sheen means the butter is becoming too warm; visible puddling or butter running from an end means it has begun escaping.
Eight unbaked crescent rolls spaced on a light metal baking tray with labels for tip underneath, spacing and staggered arrangement.
Before proofing, check two things: the tip should sit underneath, and the rolls need enough space to expand without crowding.
  1. Preheat while the rolls finish proofing. When they are visibly fuller but still spring back quickly—usually 30–40 minutes before readiness—set a rack in the middle or slightly below. Heat to 220°C / 425°F conventional or 205°C / 400°F fan.
  2. Mist and salt. Once the rolls are ready and the oven is fully heated, mist them lightly so the surfaces look evenly damp, not wet. Add a restrained pinch of flaky salt. If the filling butter tastes distinctly salty, use only a few flakes—or skip the topping on the first batch.
  1. Bake. Load the tray and immediately reduce to 205°C / 400°F conventional or 190°C / 375°F fan. Watch through the door during the early rise. Begin checking at 15 minutes; most batches finish in 17–20. Near the end, lift one: the underside should be firm and browned. As an optional backup, the crumb beside the hollow should reach about 91–93°C / 195–200°F.
  2. Cool correctly. Rest on the pan for 3–5 minutes, brush with pooled butter if desired, then move the rolls to a wire rack before trapped steam softens the bottoms.
Board comparing a golden salt bread top, a browned underside and a pale underside that needs more bottom heat.
A golden top is not enough for shio pan. Turn one roll over and confirm the underside is firm, browned and crisp.

Hand-Kneading Method

Making the dough by hand

Mix the flours, milk powder, sugar, yeast and 200 g water until shaggy; cover and rest for 20 minutes. Add the salt and knead briefly. If the dough remains firm, add the reserved water a teaspoon or less at a time before adding the softened butter.

Knead the butter in gradually for 10–15 minutes, using short covered rests when the dough becomes slippery or tight. A bench scraper and lightly damp hands are better than extra flour. Stop when the dough is elastic and passes the same windowpane test.

Four-panel hand-kneading guide showing dough being mixed, rested, combined with butter and kneaded until smooth and elastic.
If kneading by hand, use short rests instead of extra flour. The enriched dough becomes easier to handle without drying out.

Five Signs the Batch Worked

  • Top: deep golden, not merely blond.
  • Underside: browned, crisp and glossy from the butter.
  • Inside: soft and airy with a gentle chew, not cakey or dense.
  • Hollow: modest and butter-made; it does not need to occupy half the roll.
  • Flavour: buttery and savoury, with flaky salt appearing in small bright bursts.

Prioritise a browned base and light crumb over an oversized cavity.

Five-part board showing close-ups of a golden top, browned base, soft crumb, modest hollow and light flaky salt on salt bread.
A successful salt bread batch does not need a giant cavity. Judge the top, base, crumb, hollow and salt balance together.

The recipe above is enough to begin. The guide below explains how the flour, butter, proofing and tray work together—and what to change when your batch looks different.

What Is Salt Bread?

Japanese salt bread, or shio pan, is a lightly enriched yeast roll wrapped around cold butter. In the oven, steam opens a small space inside while some butter reaches the metal sheet and browns the underside. King Arthur Baking’s guide shows the same classic crescent-and-butter structure.

The flavour should be buttery and savoury, not sharply salty. Developed dough holds the butter long enough to create the hollow, while direct tray heat turns later leakage into a crisp base. Despite the similar name, shio pan is unrelated to American salt-rising bread.

Shio Pan, Sogeum-Ppang and Croissants

Shio pan is the Japanese name most often used in English-language recipes; Korean salt bread is commonly called sogeum-ppang. The styles overlap, though Korean café versions often lean softer, milkier or more heavily filled. This recipe targets the classic crisp-bottomed style associated most closely with Japanese shio pan. Eater’s account of the Korean salt-bread boom follows its spread through bakeries and cafés.

The crescent shape resembles a croissant, but the method is simpler. Croissants use repeated folds of dough and butter; salt bread is rolled once around one butter baton and has no laminated flaky layers.

Cutaway diagram of salt bread with labels for thin crust, soft crumb, butter hollow, butter-crisped base and flaky salt, plus a small croissant inset.
Salt bread is not laminated like a croissant. Instead, wrapped butter melts inside soft dough while the base fries against the tray.

Choose the Texture You Want

Salt bread recipes can look contradictory because they are aiming at different textures. The same crescent can feel chewy and crusty or milky and pillowy, depending on the dough beneath it.

Three-column board comparing classic crisp-bottomed salt bread, soft café-style salt bread and a no-knead salt bread route.
This recipe targets classic crisp-bottomed salt bread. However, softer café-style rolls and no-knead versions need different formulas or workflows.

The Classic Crisp-Bottomed Style

This lightly enriched dough is soft inside but keeps more chew and crust than a pillowy milk roll. Some bakeries describe that balance as semi-hard salt bread.

When to Choose a Softer Version

Tangzhong, milk, egg or more sugar can produce a softer Korean café-style roll, but they also change hydration, proofing and browning. Use a formula built for that result. Our soft cinnamon roll recipe shows how richer dough trades crust contrast for a plush crumb.

When to Choose No-Knead

No-knead salt bread relies on time, folds and usually refrigeration to build strength. It is a separate method, not this dough with the mixer step removed.

Ingredients, Swaps and What Changes

Once you know the texture you want, most first batches involve three decisions: which flour you have, whether milk powder is available and how salty the filling butter tastes. For the intended result, use the listed flour blend, plain milk powder and firm salted butter.

Bread Flour and Cake Flour

Bread flour supplies the strength needed for long shaping and butter containment; roughly 11.5–13 percent protein is useful when the package lists it. Our guide to what gluten is explains why that protein network gives dough its stretch.

Cake flour softens the dough and makes it easier to lengthen. All-purpose flour can replace it, though the roll may be slightly firmer.

Can You Use Only All-Purpose Flour?

Yes, but all-purpose flour varies widely. Begin with 195–200 g water, let the dough rest and start developing strength before deciding whether it needs more.

Milk Powder: What It Adds and How to Omit It

Plain non-fat milk powder adds dairy flavour, browning and tenderness without much extra liquid. Whole-milk powder is usually workable; malted or sweetened powders are not direct gram-for-gram substitutes.

You can omit it without replacing its weight with flour. Begin with 195–200 g water because the dough may feel looser, then add more only after the rest if needed. Expect less dairy flavour and lighter browning. A milk- or tangzhong-based roll needs its own balanced formula.

Sugar, Salt and Yeast

The small sugar quantity supports fermentation and browning without making the bread sweet. Fine salt seasons the dough evenly; flaky salt belongs on top.

Using active dry yeast: use 4 g and follow the packet. Many modern products can be mixed directly with the flour; when proofing is required, dissolve the yeast in 30 g / 2 tablespoons of the recipe water at the manufacturer’s stated temperature and count it in the total.

Butter in the Dough and Butter Inside

Softened unsalted butter tenderises the dough; add it only after some gluten has developed. Salted filling butter gives stronger savoury contrast, while unsalted butter gives tighter salt control. Avoid whipped, tub and spreadable butters because they melt and leak differently.

ChangeWhat to Expect
Use only bread flourA stronger, chewier roll that may resist shaping
Replace cake flour with all-purposeA slightly firmer inside, depending on protein level
Use only all-purpose flourVariable strength and water absorption; begin with less water
Omit milk powderA looser dough, less dairy flavour and lighter browning; begin with less water
Use a balanced milk-based doughA softer, richer roll with different liquid needs and faster browning
Use a tangzhong-based formulaA more pillowy crumb that stays soft longer
Each substitution changes dough strength, softness, browning or butter behaviour.
Decision board showing the listed flour blend, an all-purpose flour option with less water and a no-milk-powder option with adjusted hydration.
The listed flour blend is the most dependable path. If using all-purpose flour or skipping milk powder, adjust water slowly instead of guessing.

Equipment and Baking-Tray Choices

For a first batch, use a light-coloured bare metal sheet brushed with a thin film of oil. A scale keeps the rolls balanced; the tray determines whether escaped butter browns the base or leaves it greasy.

Baking SurfaceLikely ResultBest Use
Dark metalFast, strong base browningCheck early to prevent burning
Light metalCrispness with more controlled colourMost forgiving first choice
Parchment on metalEasy release with a slightly paler, less crisp baseWhen sticking is a concern
Silicone or insulated sheetPaler, softer baseNot preferred for this recipe
Tray material changes how quickly leaked butter browns the underside.
Four-way comparison board showing salt bread baked on light metal, parchment on metal, dark metal and silicone or insulated surfaces with different underside results.
The baking surface changes the underside first. Light metal gives controlled browning, while parchment, dark metal and insulated surfaces shift the texture.

A 33 × 46 cm / 13 × 18-inch sheet fits eight staggered rolls with roughly 5–7 cm / 2–3 inches between them. Use two batches on a smaller tray.

A light mist helps the salt adhere and slows early surface drying. Aim for evenly damp, not dripping; elaborate steam methods vary too much between home ovens to be necessary here.

Four Cues That Decide the Batch

The recipe gives the sequence. These four moments tell you whether the dough is ready to move on.

1. The Buttered Dough Turns Satiny Again

The dough may look greasy after the butter goes in. Keep kneading rather than adding flour. It is ready when the greasy film disappears, the surface becomes smooth and satiny, and a small piece stretches into a thin windowpane.

Hands stretching salt bread dough into a thin windowpane, with insets showing a dough thermometer range of 24–26°C and a wrist-touch cue.
Once the buttered dough turns smooth again, check for a thin windowpane and a cool-to-neutral feel before moving on.

2. The Triangle Stops Fighting the Rolling Pin

If the dough still shrinks, cover it for five minutes. It is tense, not failed; the triangle should lengthen without becoming translucent. More pressure usually stretches one weak patch, while rest relaxes the whole piece more evenly.

Split image showing forced dough with a weak torn patch beside rested dough stretched into a longer, smoother triangle.
If the triangle fights back, pause. Rest relaxes the whole piece, while extra pressure often stretches one weak patch.

Wrap the cold butter with light tension and tuck the pointed tail underneath. Once all eight are shaped, the difficult handwork is finished; the dough now needs time.

3. The Rolls Feel Light and Alive

Ready rolls feel lighter and softer, not merely larger. Dramatic doubling is unnecessary.

StageWhat the Press DoesWhat You SeeNext Move
UnderproofedSprings back quicklyCompact, firm and barely jigglyCover and continue proofing
ReadyReturns slowly and partlyClearly fuller, soft and gently jiggly; tray ideally dryMist, salt and bake
Warm but not readyStill returns with resilienceNeeds more lift, but butter is softening or a faint sheen appearsChill 5–10 minutes, then continue cooler
OverproofedDent remainsVery swollen, fragile and easy to deflateBake promptly
Begin checking at 60 minutes; dough condition matters more than strict doubling.
Four-stage proofing board showing underproofed, ready, too-warm and overproofed salt bread rolls on a metal tray.
Ready salt bread rolls look fuller and softer, not dramatically doubled. If the tray turns shiny, the butter is warming faster than the dough is proofing.

4. The Underside Turns Firm and Brown

The rolls should lift before butter begins hissing around their bases. Near the finish, lift one carefully: the underside should be firm, brown and glossy rather than pale and soft.

Extreme close-up of the deeply browned butter-fried underside of a salt bread roll on a dark surface.
The defining shio pan texture is underneath: a firm, browned base where melted butter crisps the dough against the hot tray.

Leave the rolls on the hot sheet for 3–5 minutes, then move them to a rack. Cutting immediately compresses the crumb; lingering on the tray lets condensation soften the base.

When Butter on the Tray Is Normal—and When It Is Not

Once baking begins, the tray does not need to remain dry. During this stage, the useful question is when the butter appeared: later leakage helps build the crisp base, while butter lost during proofing escaped before the roll could hold it.

Lift First, Butter Second

The butter rule

Lift first, butter second. The tray should ideally stay dry during proofing. A faint sheen is a warning to cool the rolls; visible puddling or butter running from an end means the filling is escaping too early. Once the rolls have lifted in the oven, later sizzling is usually doing useful work.

Two-stage board showing salt bread rolls rising cleanly early in baking and later browning as butter bubbles lightly around the bases.
The key is timing. If the rolls lift first and butter appears later, that butter can help crisp the base instead of ruining the batch.

Proofing Leakage Cues

Three-stage proofing board showing unbaked salt bread rolls on a dry tray, then with a faint greasy sheen, then with visible butter leakage.
During proofing, a dry tray is ideal. A faint greasy sheen is a warning; visible butter running from the roll means leakage has started.

Use Timing to Diagnose the Butter

When the Butter AppearsWhat It Probably MeansWhat to Do
During final proofingToo early. The room or filling is too warm, the dough is overproofed, thin or open at one side.Move the tray somewhere cooler. If the rolls still need time, chill for 5–10 minutes, then continue proofing more moderately.
In a large rush immediately after loadingUsually too early. Look for exposed butter, a tear, warm dough, loose wrapping or an oven that was not fully heated.Continue baking this batch, then correct the weak spot, temperature or preheat on the next one.
Later, after the rolls expand and begin colouringUsually desirable. The dough has begun setting and the later butter pool is browning the base.Let the butter sizzle around the rolls, but watch that it does not turn black or smoke.
A large greasy pool with no hollowThe butter escaped before producing enough steam inside, often because the filling was warm, the dough weak or the wrapping loose.Keep the filling colder, develop the dough fully and cover the butter more securely. Do not add more butter simply to chase a larger hollow.
No visible leakageNot necessarily a problem; more butter may have remained inside the roll.Check the crumb and underside. A pale base and greasy interior point to insufficient tray heat or bake depth.
A useful butter pool appears after expansion, not while the shaped rolls are still proofing. Watch through the oven door where possible; repeated opening during the early rise costs heat.

Butter Timing Visual Guide

Five-stage butter timing guide showing leakage during proofing, early bake, after oven lift, late bake and a large butter pool.
Butter leakage means different things at different stages. So before changing the recipe, first check when the butter appeared.

Salt Bread in a Hot or Cold Kitchen

Three-zone guide showing water choices for hot, moderate and cold kitchens with dough bowls and temperature cues.
Water temperature is one of the easiest ways to control enriched dough. Start cooler in a hot kitchen and use only mild warmth in a cold one.
Split guide showing hot-kitchen controls with chilled tools and covered dough, and cold-kitchen controls with mildly warm water and longer proofing.
Instead of relying only on the clock, adjust the workflow: keep butter firm in a hot kitchen and give dough gentler time in a cold kitchen.

Hot-Kitchen Guidance

In a room above about 27°C / 81°F, fixed times become much less useful. Dough ferments faster, mixer friction matters more and the filling can soften while the next roll is still being shaped.

  • Start with cold water; chill the mixer bowl as well when the room is especially hot.
  • Keep unused butter refrigerated and shape in two batches when working slowly.
  • Check the dough temperature after mixing and proof in the coolest practical place.
  • Briefly chill shaped rolls if a greasy sheen begins appearing.
  • Avoid aggressively warm oven-proofing settings.

A hot room is not a reason to add handfuls of flour. Cool the dough first, then reassess it.

Cold-Kitchen Guidance

  • Use mildly warm—not hot—water.
  • Allow fermentation to take longer.
  • Use a gently warm location away from direct heat.
  • Let expansion and softness decide the timing; a cool kitchen may simply need longer.

A slower rise is usually safer than overheating the dough. Give the yeast time to work while the butter stays neatly inside the rolls.

Salt Bread Troubleshooting: Dough, Butter and Browning Problems

An imperfect first tray rarely means the whole recipe is wrong. The earliest moment it differed from the cues above usually gives the clearest clue.

Match the First Visible Problem to the Fix

ProblemWhat Probably HappenedWhat to Change Next Time
Dough is extremely stickyGluten is underdeveloped or the dough is too warmRest it, continue mixing and cool it before adding flour
Dough snaps backThe gluten is tenseCover and rest for 10–15 minutes
Dough tears into thin patchesIt was rolled too quickly or still lacks strengthRoll gradually and allow another rest
Rolls unwindLoose shaping or the pointed tip faces upwardRoll with light tension and place the tip underneath
Bread is denseUnderproofing, weak yeast, underdeveloped gluten or too much flourDevelop the dough fully, then let volume, softness and feel guide the timing
Bread spreads instead of risingWeak gluten, overproofing or warm doughDevelop the dough fully and shorten or cool the final proof
Bottom stays paleInsulated tray, low heat, insufficient contact or a rack set too highUse a non-insulated metal sheet that browns the base more readily, or move the tray lower. If the top is already brown, shield it loosely while the underside finishes.
Bottom burnsVery dark tray, low rack or too much exposed butterRaise the tray, use light metal or reduce heat slightly
Inside feels greasyUnderbaking, premature leakage or filling pieces larger than 13 gBake more fully and confirm the filling weight. Reduce the butter only when larger pieces were used or a particular butter repeatedly leaves an excessively greasy crumb.

For butter leakage or a missing hollow, use the timing guide above. When a correctly baked base softens later, move to the storage and reheating section.

Visual Troubleshooting Guide

Six-panel troubleshooting board showing sticky dough, torn triangle, unwinding roll, dense crumb, pale base and burnt base with short corrections.
Salt bread troubleshooting starts with the first visible clue: sticky dough, tearing, unwinding, dense crumb, pale base or burnt base.

Make-Ahead, Storage and Reheating

An Example Four-and-a-Half-Hour Timeline

  • 0:00–0:30: portion the butter, mix and knead
  • 0:30–1:45: first rise, ending when the dough is close to doubled and lighter
  • 1:45–2:30: divide, rest and shape
  • 2:30–4:00: final proof, looking for soft, gently jiggly rolls
  • Around 3:20: begin preheating while the rolls finish proofing
  • 4:00–4:20: mist, salt and bake
  • 4:20–4:30: settle briefly, rack and serve warm

This example assumes a 75-minute first rise and a 90-minute final proof. Use the clock to plan your day, not to overrule the dough. Move the later times according to how quickly the dough develops.

Vertical timeline showing final proof beginning, when to start preheating, ready-to-bake rolls and baked salt bread with browned bases.
Begin preheating when the rolls are fuller but not ready yet; the oven should be hot before proofed, butter-filled dough has to wait.

Making the Dough the Night Before

For morning shaping and baking, reduce the yeast so the dough does not outrun the refrigerator. As a cautious starting point, use 1.5 g instant yeast for a warmer refrigerator or a hold approaching 12 hours, and up to 2 g for a reliably cold refrigerator and a hold closer to 8 hours.

  1. Mix and knead, then leave the covered dough at room temperature for 15–20 minutes.
  2. Refrigerate for 8–12 hours at about 4°C / 40°F or colder.
  3. Divide while cool and rest until the pieces relax enough to shape.
  4. Use freshly chilled filling butter and proof by the same readiness cues; expect a longer final proof.
Timeline showing evening mixing, overnight dough in the refrigerator, morning dough portions and bake-day shaped and baked salt bread rolls.
For overnight salt bread, chill the dough before shaping. In the morning, divide, shape, proof until light and bake fresh.

Keep the butter-filled final proof on the day of baking. Shaped rolls held overnight leave less room between a good proof and softened filling.

Doubling the Recipe

Check the mixer’s dough capacity before doubling; when uncertain, mix two batches. Shape and proof the 16 rolls in staggered groups so the first tray does not finish proofing while the second is still being rolled.

Storage

  • Best texture: within the first hour
  • Room temperature: airtight for one day, or two days with some loss of crispness
  • Refrigerator: not preferred because bread stales faster
  • Freezer: freeze fully cooled rolls airtight while fresh
  • Day-old rolls: toast or turn into French-toast-style slices

How to Reheat Salt Bread

MethodStarting GuidanceResult
Air fryer175°C / 350°F for 2–4 minutesFast, strong recrisping
Toaster oven175°C / 350°F for 4–6 minutesEven warming and crispness
Conventional oven175°C / 350°F for 5–8 minutesBest for several rolls
MicrowaveUse a very brief intervalWarm and soft, not crisp
Times are starting ranges; compact appliances may brown the salt and thin ends sooner.
Reheating guide showing salt bread warmed in an oven, toaster oven and air fryer, with close-ups of crisp browned undersides.
Reheat salt bread with dry heat, not steam. The goal is a warm crumb while the butter-crisped underside firms back up.

Serving Ideas and Easy Variations

Salt bread is at its best before it becomes a serving suggestion at all—torn open beside coffee while the underside still crackles. Once it reaches the table, its savoury butteriness makes it just as comfortable beside soup, eggs or something sweet.

  • Serve with coffee or tea.
  • Pair with a creamy bowl such as tomato bisque, keeping the roll above the broth until the moment you eat.
  • Split for a small egg sandwich while the crumb is still soft and the base remains crisp.
  • Add a thin layer of orange marmalade for a bright sweet-salty contrast that cuts through the butter.
  • Toast a day-old roll for a compact savoury sandwich.

Once the classic batch feels familiar, these are the easiest ways to change the flavour without losing the crescent shape and crisp base.

  • Garlic butter: use a firm, chilled garlic-herb butter; exposed garlic can scorch.
  • Cheese: tuck in a small piece of low-moisture cheese and resist overfilling.
  • Red bean and butter: use a modest spoonful of sweet red-bean paste and slightly less butter so the filling stays balanced.
  • Softer milk-bread style: use a separately balanced dough with milk, egg or tangzhong; those additions change hydration, proofing and browning together.

Frequently Asked Questions

Why Did My Salt Bread Not Form a Hollow?

A modest hollow is enough. When there is no hollow and a large greasy pool forms, use the butter-timing guide, then review dough strength, wrapping and proofing.

Diagnostic board showing three salt bread outcomes: no hollow with a large butter pool, no hollow with little leakage, and a small hollow with good bread.
No hollow does not automatically mean failure. Check leakage, butter position and dough strength, then judge the crumb and base before chasing a bigger cavity.

Can You Make Salt Bread Without a Stand Mixer?

Yes. Use the hand-kneading instructions beneath the main method, adding covered rests whenever the dough becomes slippery or tight. A true no-knead version needs its own fold-and-refrigerate formula.

Can the Dough Be Refrigerated Overnight?

Yes. Use the reduced-yeast method above, keep the refrigerator near 4°C / 40°F or colder and shape the cool dough the next day.

Can Salt Bread Be Frozen Before or After Baking?

Baked rolls are the dependable option: cool, wrap airtight and freeze while fresh. Shaped butter-filled dough needs a method developed specifically for freezing because yeast activity, proofing and leakage can change.

Is This Salt Bread Dairy-Free?

No. Milk powder and butter both affect flavour, browning and filling behaviour. Use a dedicated dairy-free formula instead of replacing both casually.

Can Salt Bread Be Baked in an Air Fryer?

Some air fryers can bake small trial batches, but basket size, element distance and fan strength vary too widely for one dependable timing. This formula is designed for a conventional oven and metal tray; use the air fryer primarily for reheating.


When the First Batch Comes Together

The first batch teaches you more than the timer can. Notice whether the dough relaxed under the rolling pin, whether the shaped rolls reached a light, resilient proof, and whether the underside browned before the top became too dark. Those moments tell you what to adjust next time.

Your first tray will tell its own story. Did the butter appear during proofing, immediately after loading, or only once the rolls had lifted? Share what you saw and which tray you used; those details may help another baker understand their batch.

Then pull one roll apart while it is still warm. The crumb should stretch before it tears, the warm centre should release a deep butter aroma, and the underside should give a light crackle between your fingers. That is the moment the extra rests, careful shaping and patient proofing stop feeling fussy and start feeling worthwhile.