Posted on — Leave a comment

Irish Soda Bread Recipe: Easy, Crusty & Tender

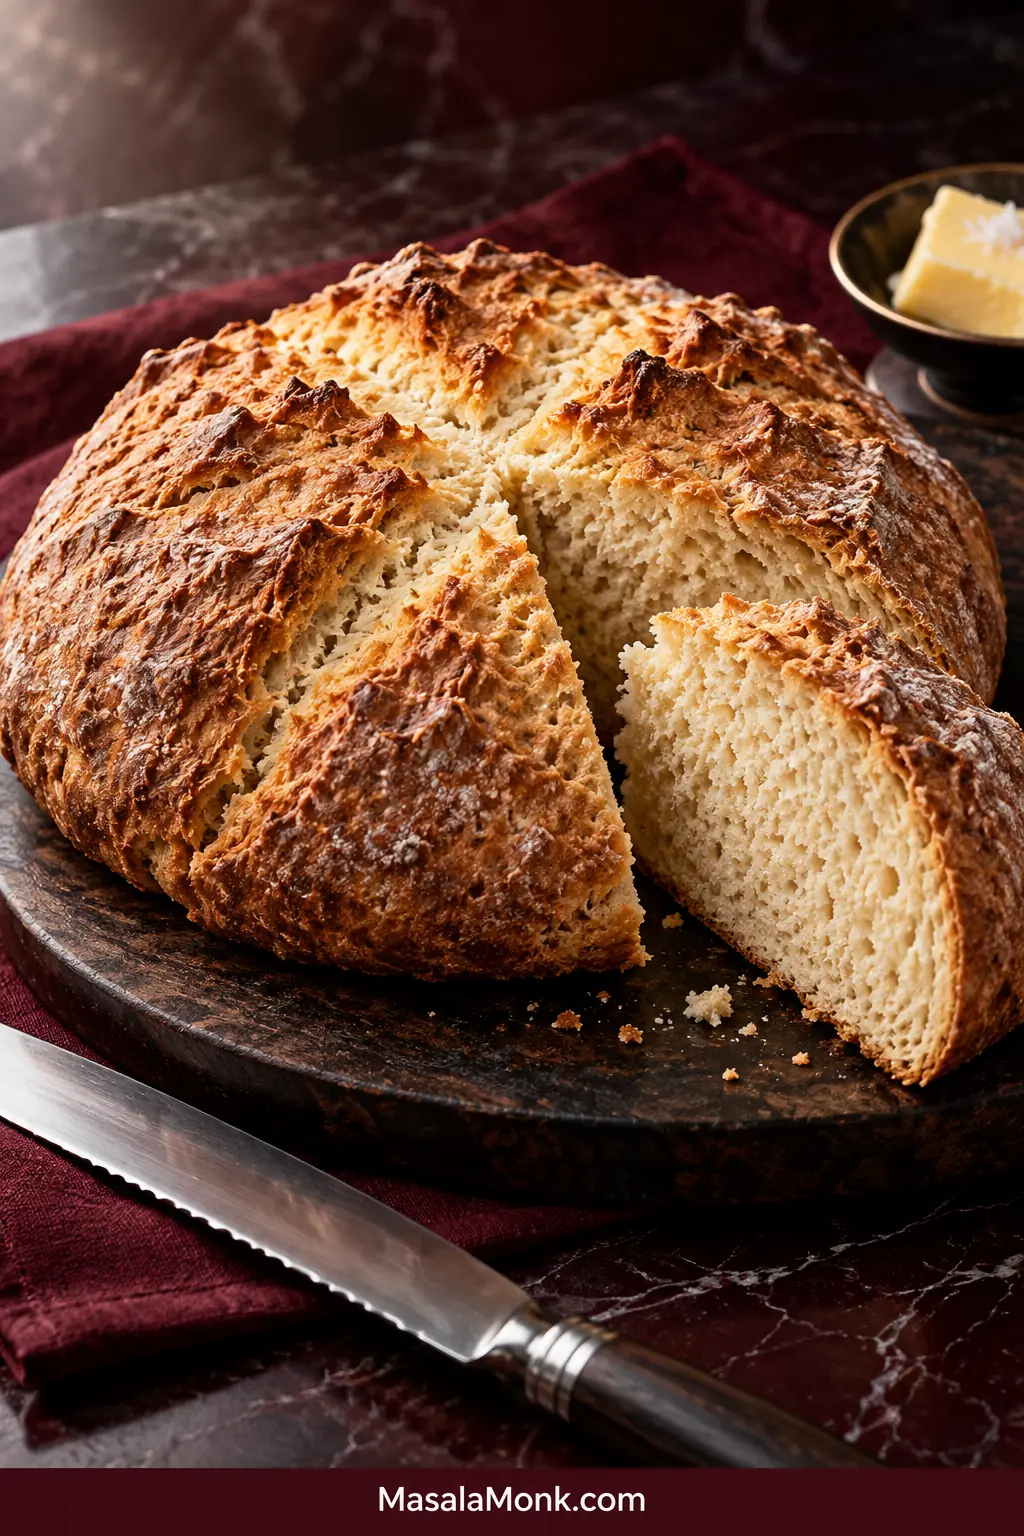
Low, round Irish soda bread on a dark red surface, deeply scored with an X and cut open to show a pale, close-grained crumb, with butter and a bread knife nearby.

This Irish soda bread recipe gives you a craggy, deeply golden crust around a tender, close-grained buttermilk crumb. Once the loaf has rested, the crust should give a little crackle under the knife.
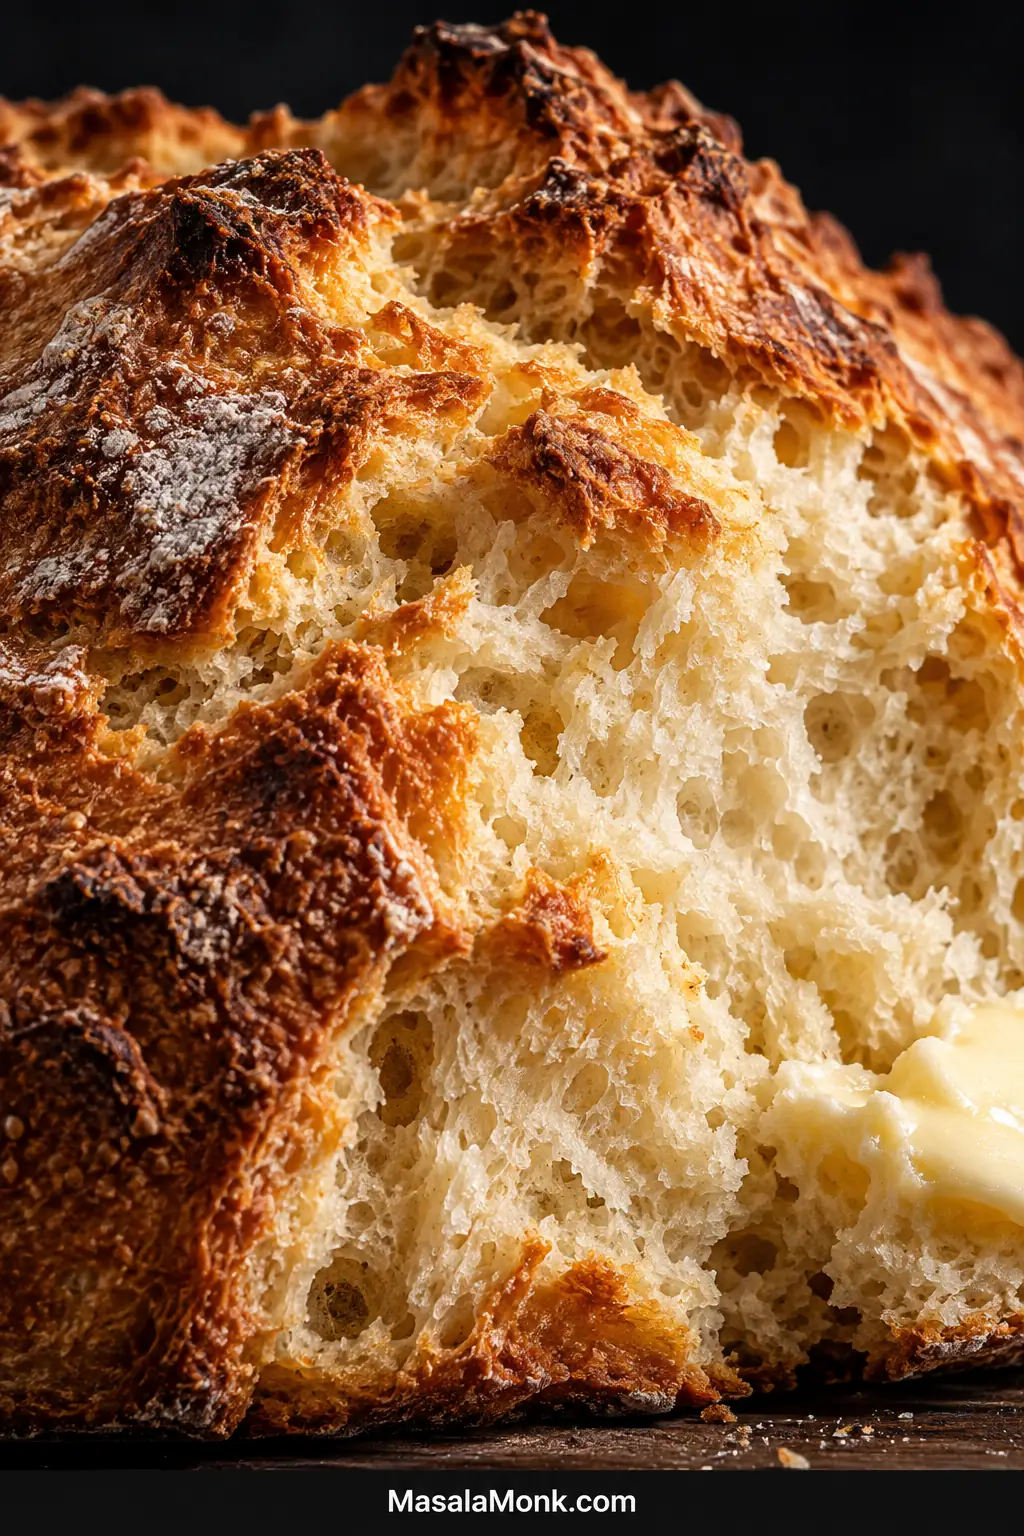
Extreme close-up of a craggy golden soda bread crust and pale, close-grained crumb with softened butter at the edge.
A close crumb can still be tender. The useful cue is separation: once cooled, the cut face should look set and moist enough for butter, not smeared or cotton-dry.

You only need four ingredients: flour, baking soda, salt and buttermilk. There is no yeast or proofing, and the dough only needs a few quick folds—not kneading until smooth and elastic. Once the oven is hot, mixing and shaping takes about 10 minutes and the loaf bakes for another 40–45 minutes.

The few places that need judgment are the buttermilk, loaf shape, depth of the cross and final doneness. Once you know what to look for, none of them is difficult.

Before you start: keep a little buttermilk back, expect a shaggy dough, flatten the loaf instead of making a tall ball, and plan to check the middle rather than trusting the crust alone.

Irish Soda Bread Recipe

Easy, Crusty & Tender Irish Soda Bread

A lean four-ingredient white soda bread with no yeast or proofing, a craggy crust and a gently tangy, close crumb.

Yield
1 round loaf, about 10 slices

Hands-On
About 10 minutes

Bake
About 40–45 minutes

Cooling
About 1 hour

Prep + Bake + Cool
About 1 hr 50–1 hr 55 min

Loaf Size
7½–8 in / 19–20 cm wide

Equipment

You need a large mixing bowl, light-colored baking sheet, sharp knife and cooling rack. A kitchen scale and instant-read thermometer are useful if you have them. If lining the sheet, use parchment rated for 450°F / 230°C.

Ingredients

  • 3¾ cups / 450 g all-purpose flour, spooned and leveled if using cups
  • 1 level teaspoon baking soda / bread soda / bicarbonate of soda, about 5 g
  • 1 teaspoon fine sea salt / about 6 g
  • Up to 1⅔ cups / 400 ml cultured buttermilk, divided
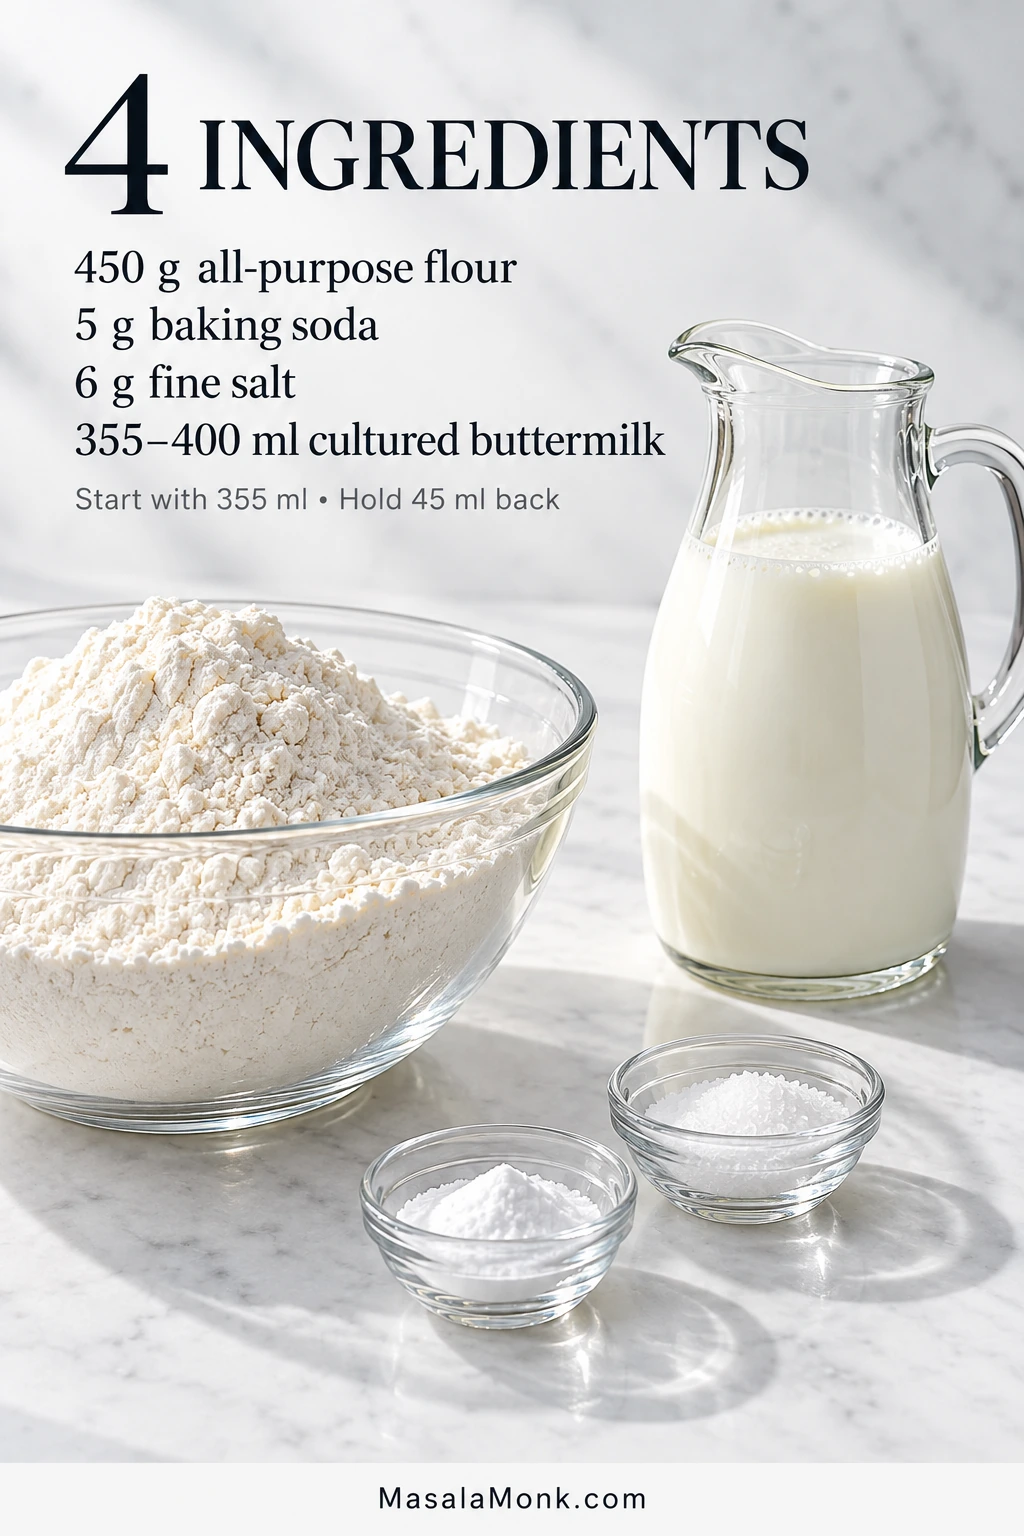
Flour, baking soda, salt and a glass jug of cultured buttermilk arranged with printed ingredient amounts for Irish soda bread.
The flour, soda and salt are fixed; the buttermilk is the variable. Because flour absorption and dairy thickness change from brand to brand, think of 400 ml as the upper limit rather than an amount to force in.

Start with 1½ cups / 355 ml buttermilk. Keep about 3 tablespoons / 45 ml in reserve. You may not need all of it.

Baking soda and baking powder are not interchangeable here. Buttermilk supplies the acid the baking soda needs, so a 1:1 swap changes how the loaf rises.

No buttermilk? See the buttermilk substitutes below.

Dough still looks too dry or too loose? Jump to the dough guide before adding more liquid or flour.

Method

Mix the Dough

  1. Heat the oven and prepare the sheet. Set the oven to 450°F / 230°C conventional or 410°F / 210°C fan/convection. Use parchment rated for this heat or bake on a clean, unlined light-colored sheet. If your sheet is dark, check the underside a little earlier because it may brown faster.
  2. Mix the dry ingredients. Put the flour, baking soda and salt in a large bowl and whisk thoroughly. Even mixing helps prevent bitter pockets of soda.
  3. Add the buttermilk gradually and keep moving. Pour in 1½ cups / 355 ml and quickly draw the flour into the liquid. Once wet meets dry, the soda is already reacting. If dry flour remains, add reserved buttermilk 1 tablespoon / 15 ml at a time. Stop when the dough clings lightly to your fingers but can still hold its shape.

Before shaping, pause here and compare the dough with the visual below. It should move as one shaggy mass and feel lightly tacky, without looking polished or elastic like kneaded yeast dough.
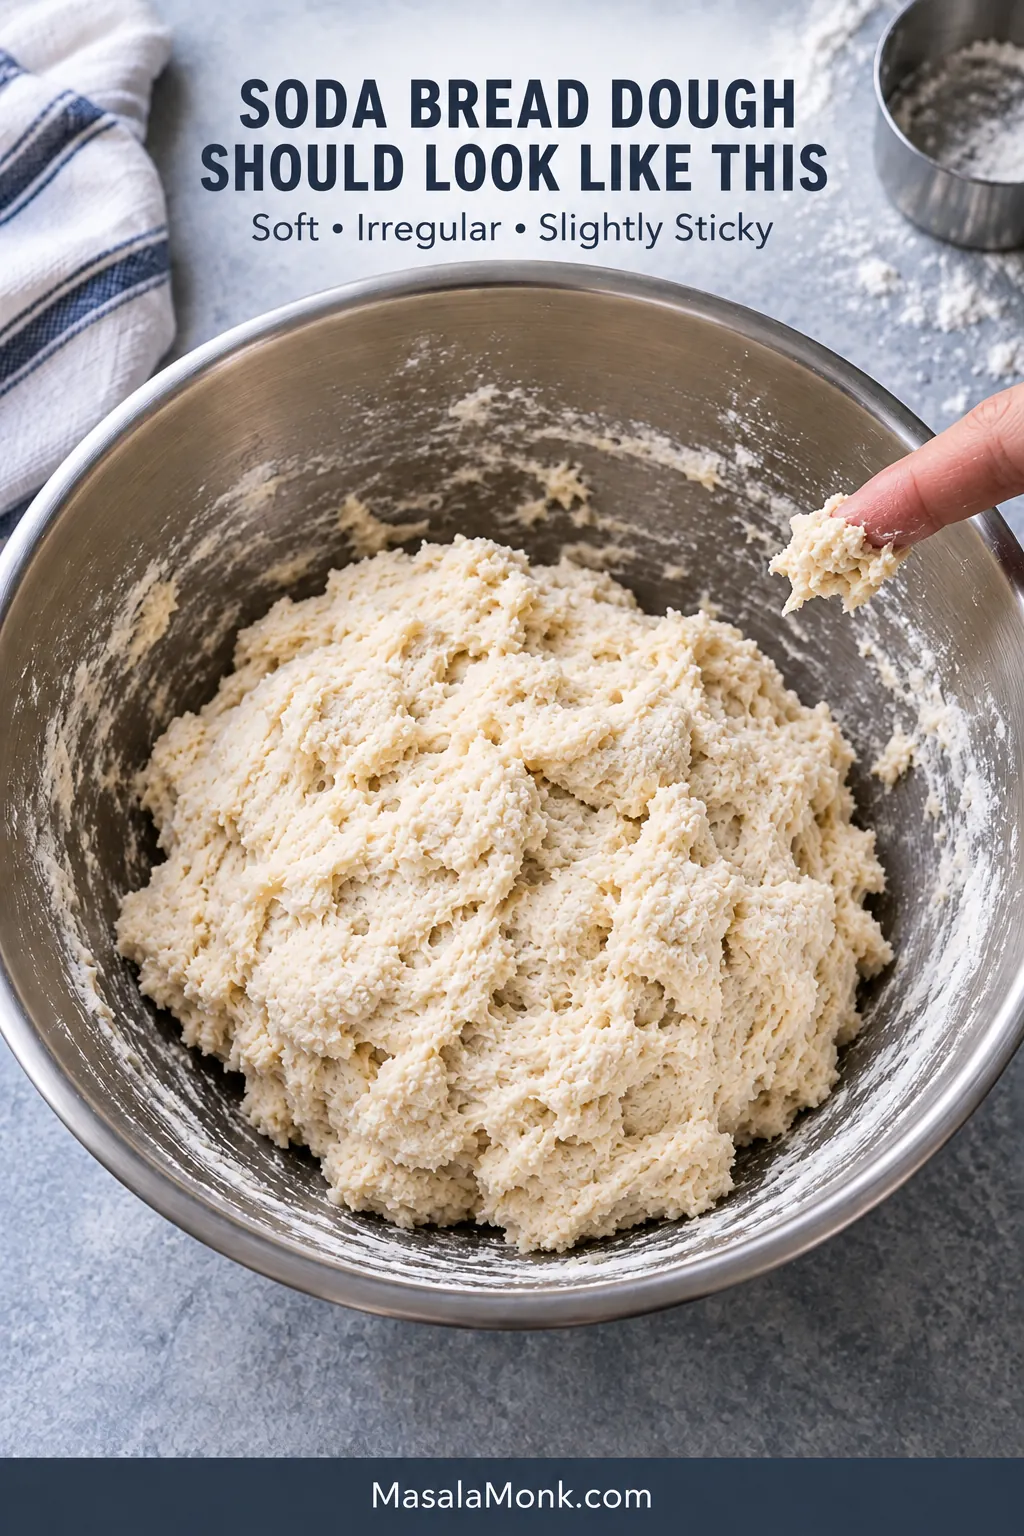
Shaggy, slightly sticky soda bread dough in a stainless-steel bowl, with a small piece of dough clinging to a fingertip.
Roughness is a stopping cue, not a flaw. Once Irish soda bread dough holds together with a little tack, extra mixing only makes it neater—not better.

Shape, Score and Bake

  1. Gather and shape. Turn the dough onto a very lightly floured surface. One or two gentle folds are enough if it needs tidying. Shape it about 7½–8 inches / 19–20 cm across and 1½–1¾ inches / 4–4.5 cm high. Don’t spend time making it perfect; a few creases and rough edges belong on soda bread.
  2. Give it a deep cross. Slash an X about halfway to two-thirds through the loaf—roughly ¾–1 inch / 2–2.5 cm deep at this thickness—and carry the cuts nearly to the edges.
  3. Bake hot, then lower the heat. Start with 15 minutes at 450°F / 230°C conventional or 410°F / 210°C fan/convection. Reduce the oven to 400°F / 200°C conventional or about 355°F / 180°C fan/convection and continue for another 25–30 minutes.
  4. Check for doneness. Look for a deeply golden crust, a set-looking cross and a hollow sound underneath. If you have a thermometer, the thickest part should be around 200–205°F / 93–96°C. When the crust is ready before the middle, tent it loosely with foil and keep baking.
  5. Cool before slicing. Move the loaf to a rack and leave it for about 1 hour for the cleanest crumb. If you want warm bread, 30–45 minutes is workable, but expect a softer slice.

Recipe Notes

  • Use conventional heat if your oven offers both. Fan/convection temperatures are included for ovens that need them.
  • If you’re unsure about an older box of baking soda, test it or replace it rather than guessing.
  • For a softer crust, loosely drape a clean tea towel over the loaf while it cools. Leave it uncovered for a crisper crust.

If everything above makes sense, you can stop there and bake. The rest is for the moments when the dough feels odd, the crust gets ahead of the middle, or you need to change an ingredient.

Read the Dough, Not the Measuring Jug

This is not a smooth, polished bread dough. It should look irregular and feel soft enough to be slightly sticky while still holding itself together.

Flour does not absorb liquid identically from one bag, brand or country to another, and buttermilk can be thick or surprisingly fluid. Darina Allen’s soda bread masterclass likewise gives a liquid range rather than one compulsory amount.
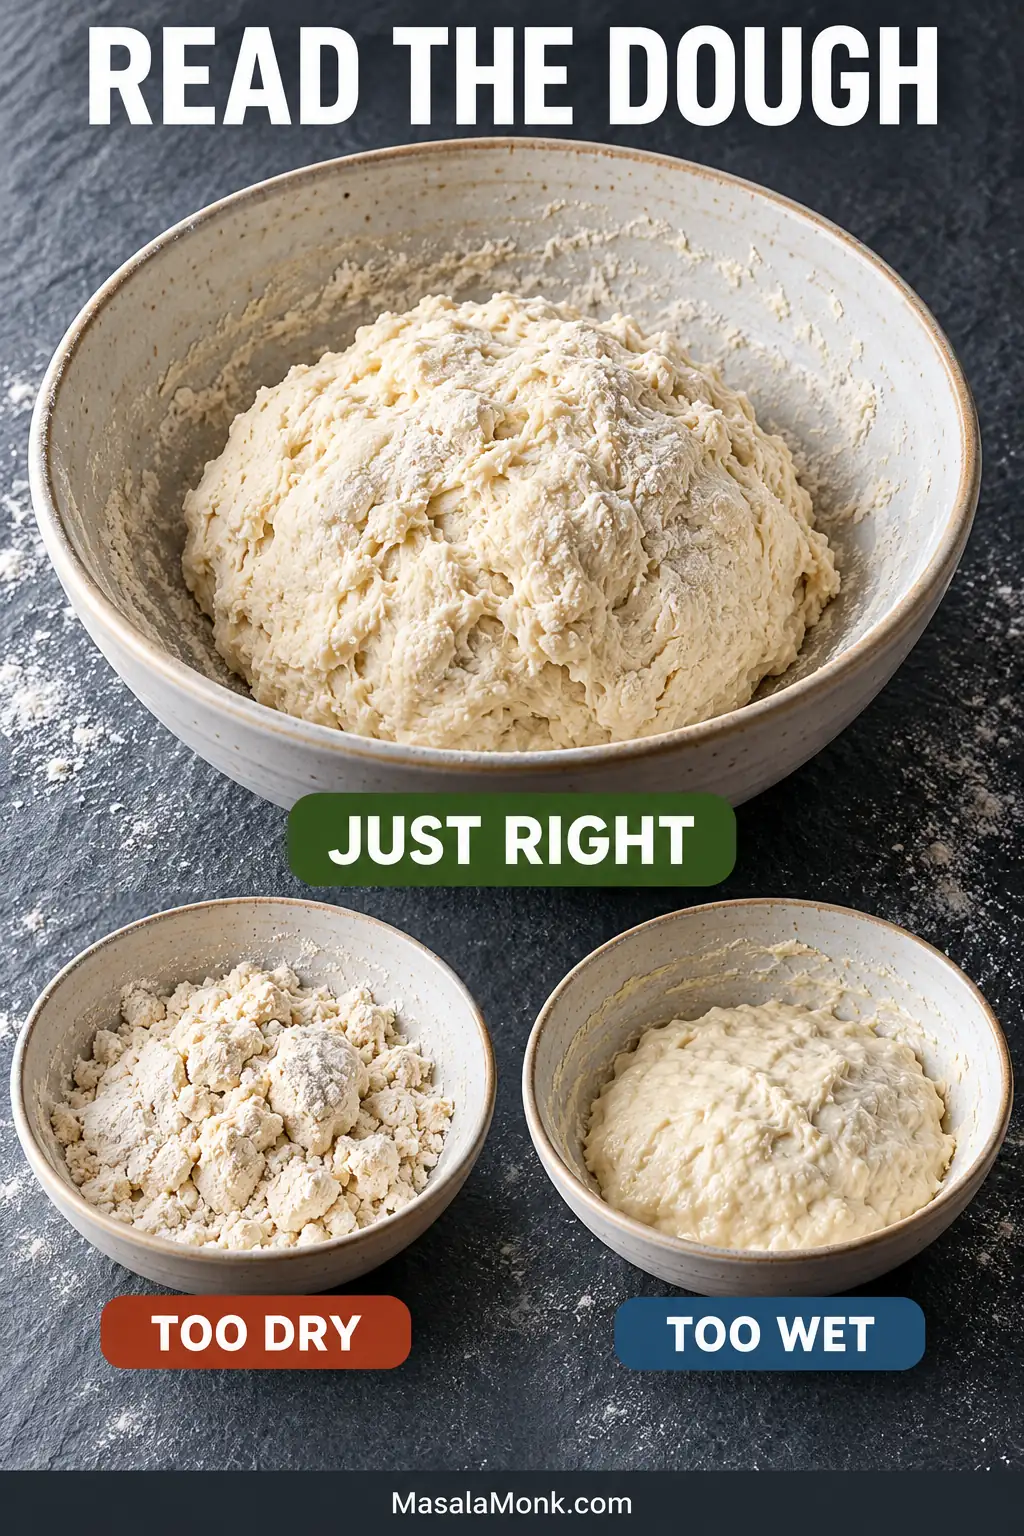
Comparison of three soda bread dough states labeled Too Dry, Just Right and Too Wet; the correct dough forms a soft, shaggy mound.
Watch what the dough does when you stop touching it: dry dough fractures, correctly hydrated dough holds a shaggy mound, and overly wet dough keeps slumping.

Too dry

Loose flour remains, cracks fall apart, and a gentle squeeze will not make the dough hold together. Add reserved buttermilk 1 tablespoon / 15 ml at a time.

Just right: the dough clings lightly to your fingers but stays where you put it. Sticky is not automatically too wet. Once you reach this stage, leave it alone.

Too wet

The dough flows, puddles or slumps badly instead of keeping its shape. First make sure all the flour has been incorporated. If it still cannot hold itself, add a small amount of flour cautiously.

Weighing the flour makes this easier. A heavily packed measuring cup followed by extra bench flour can push the loaf toward dry before it reaches the oven.

Keep It Rough, Low and Deeply Scored

Once the dough comes together, the less fussing, the better.

Rough: stop early

One or two gentle folds may help the dough come together. Beyond that, there is little to gain from working it. A few creases and rough edges are exactly at home on this bread.

Low: give the middle a chance

Keeping the loaf squat gives heat less distance to travel before the middle sets. Think roughly 8 inches / 20 cm wide and under 2 inches / 5 cm high, rather than a tall compact ball.
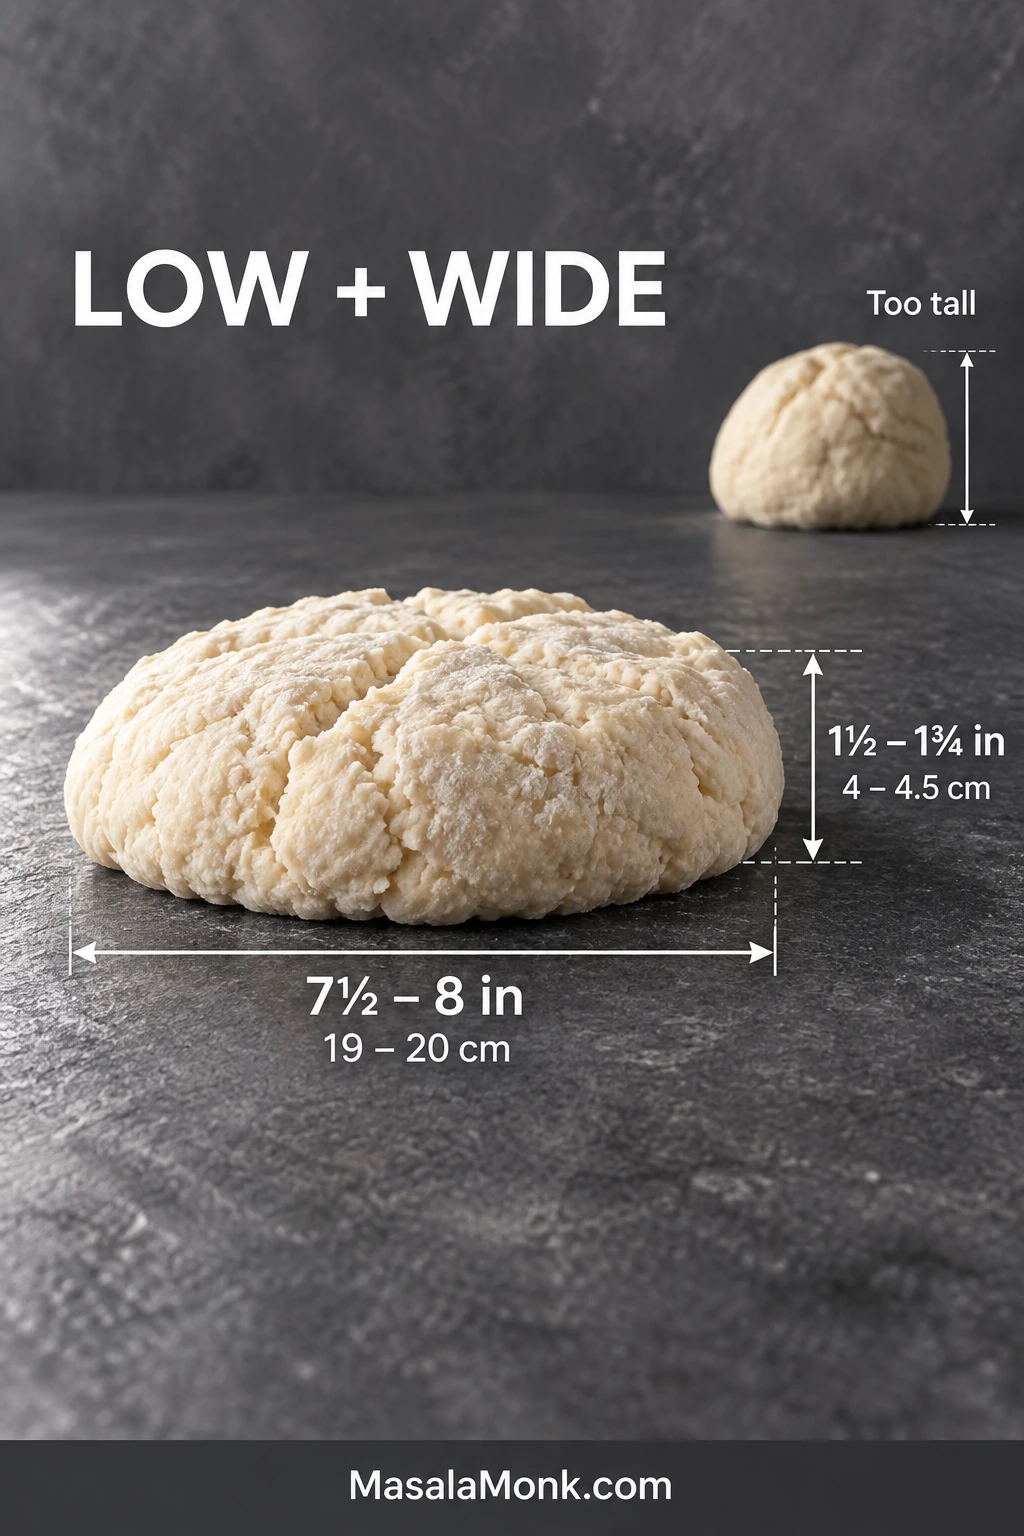
Side view of raw soda bread dough shaped into a low round, with arrows marking 7½–8 inches wide and 1½–1¾ inches high.
Judge the side profile before you score. If the raw loaf still resembles a compact ball, press it flatter now; deep scoring will not fully compensate for an overly tall center.

Score it deeply

The cross gives the expanding dough room to open and lets heat reach farther into the thickest part. Give it a proper cut—roughly halfway to two-thirds through—instead of scratching the surface.

Irish tradition gives the cross another job too: letting the fairies out. The practical reason is still handy when dinner is waiting.
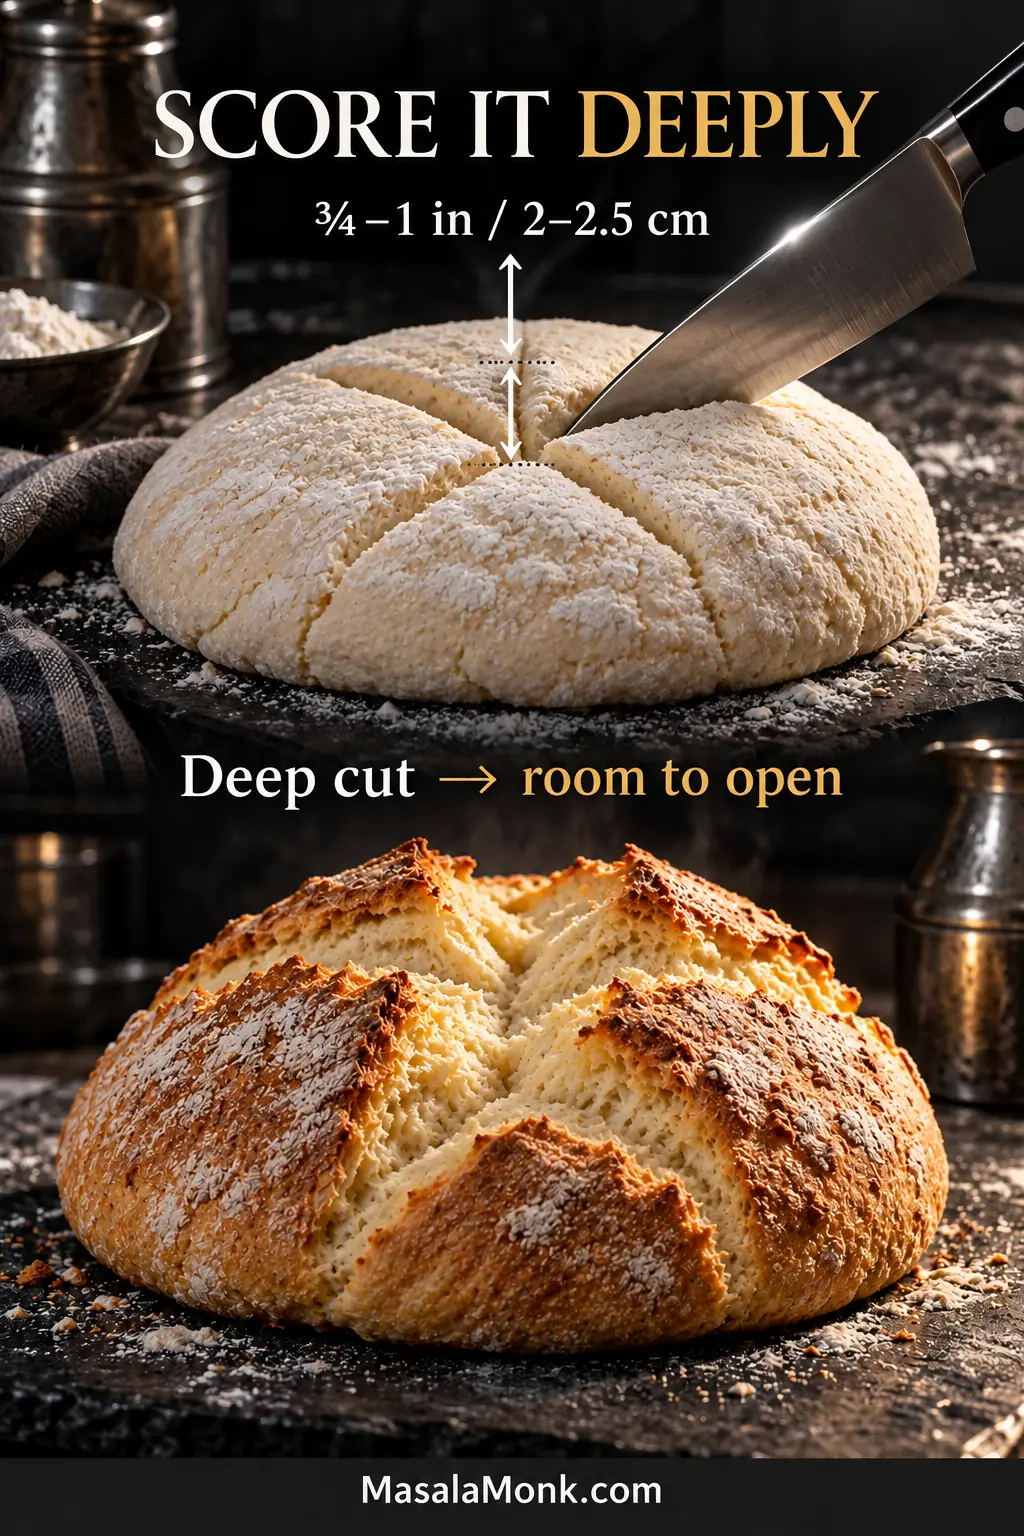
Raw soda bread being cut with a deep X beside the baked loaf opened along the score, with a ¾–1 inch depth guide.
A useful X is both deep and long. Carry the cuts nearly to the edges so the loaf can open across its whole top instead of splitting wherever pressure finds a weak spot.

The Crust Can Lie About the Center

Don’t let color make the decision by itself. Use several cues together.
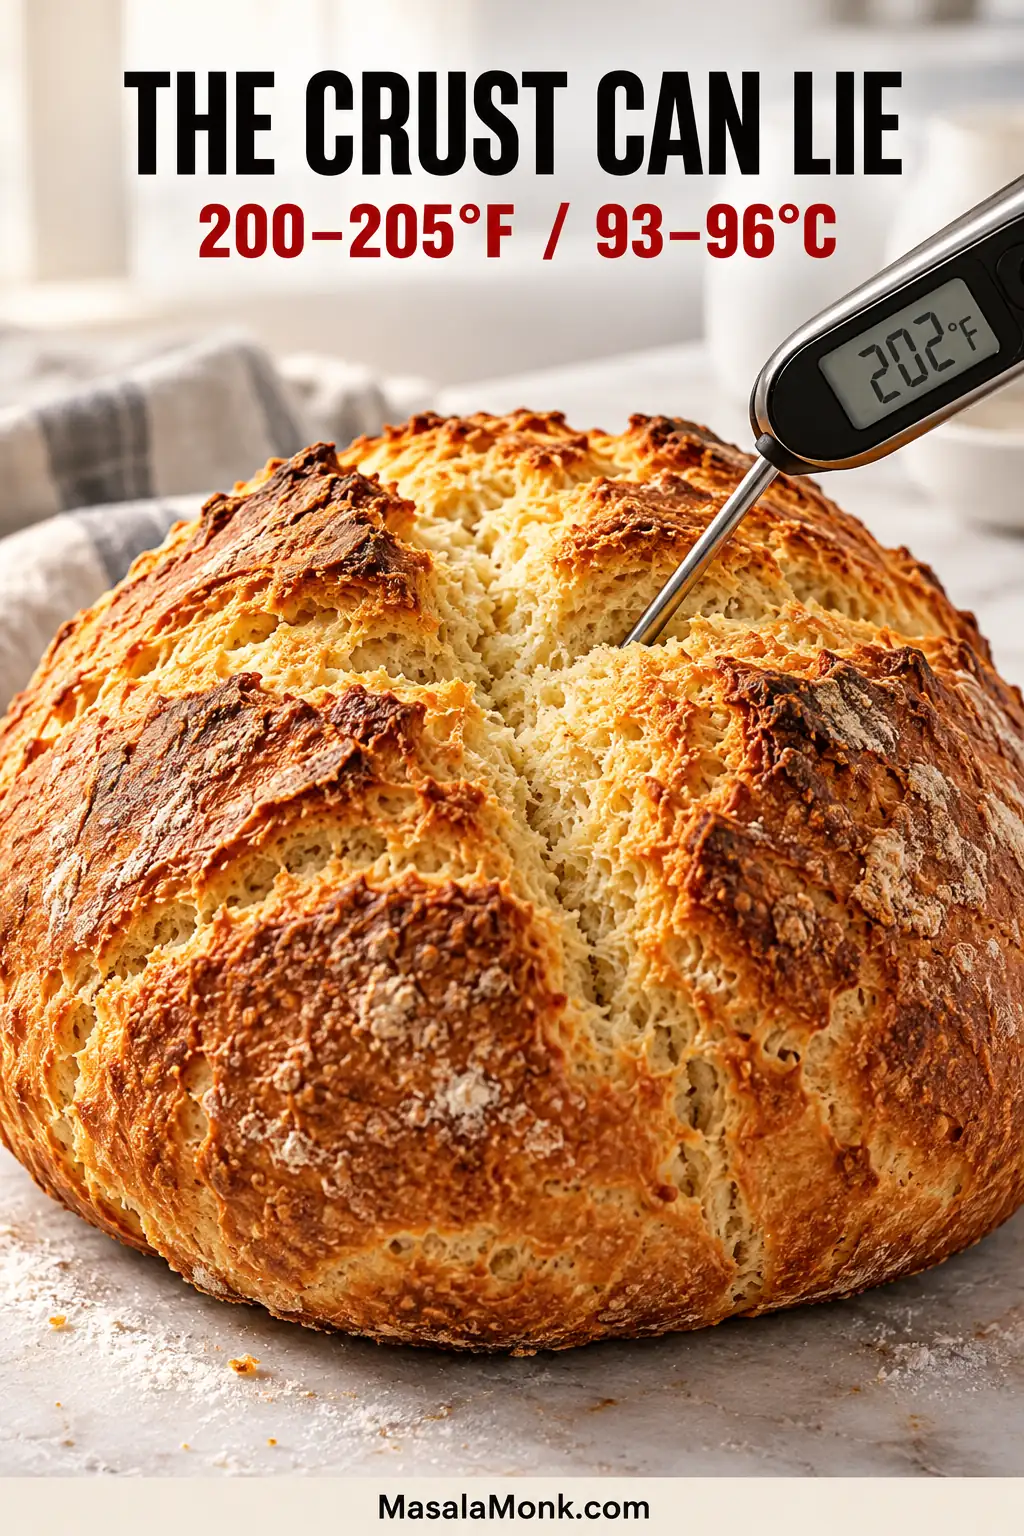
Golden soda bread with a probe thermometer inserted into the center, showing a 202°F reading and a target range of 200–205°F, or 93–96°C.
Probe the thickest solid section, not the open cross. That gives a more representative reading of the center when checking for roughly 200–205°F (93–96°C).
CheckWhat You Want
CrustDeeply golden and firm.
UndersideA hollow sound when tapped.
Opened crossThe exposed crumb looks set rather than wet or paste-like.
ThermometerThe thickest part around 200–205°F / 93–96°C.

If the crust is ready first, tent the loaf loosely with foil and keep baking. When the underside still feels damp, take the loaf off the baking sheet and return it directly to the oven rack for a few minutes.

Give the crumb time to settle. About an hour on the rack lets the interior set properly. Cut sooner if you want warm bread, but expect a softer slice.

If Your Soda Bread Didn’t Behave

Most soda-bread problems are small and fixable. Find the symptom that matches your loaf and change one thing on the next one; that’s usually enough.

Dough and Shape Problems

What Happened?Why It Happens & What to Change
Why is my dough sticky?If it still holds its shape, it may be completely fine. Extra flour is usually unnecessary.
Why does the dough spread like batter?There is too much liquid for the flour. Hold some buttermilk back and add the last of it gradually.
Why does the dough crumble apart?It needs more moisture or started with too much flour. Add reserved buttermilk 1 tbsp / 15 ml at a time.
Why is the loaf heavy and tough?Too much flour, too little liquid and excessive handling are the main causes.
Why did the loaf burst or mushroom?The score may have been too shallow. Give the expanding dough a deeper path through the top.

Baking, Crumb and Crust Problems

What Happened?Why It Happens & What to Change
Why is the middle raw or gummy?A truly raw middle usually points to a loaf that was too tall, too wet or underbaked. If the crumb is baked through but seems gummy, slicing before it had time to cool can be the reason.
Why is the crust dark before the center is done?The outside is cooking faster than the middle. Shape the next loaf flatter; once the crust is dark enough, tent with foil.
Why is it dry and crumbly?Too much flour or too much oven time are common causes. Weigh the flour and use the interior to decide when the loaf is finished.
Why does it taste bitter or soapy?Too much baking soda, too little acidity or unevenly mixed soda can leave an alkaline flavor.
Why did it barely rise?Old soda, weak acidity or dough left sitting after mixing can contribute. Soda bread will still rise less dramatically than yeast bread.
Why is the crust so hard?Loosely drape the well-baked loaf with a clean tea towel while it cools. The trapped steam softens the crust.

Raw Center vs Soft Crumb

A soft slice is not automatically underbaked. Use the comparison below to separate a genuinely raw center from a tender crumb that is simply still warm.
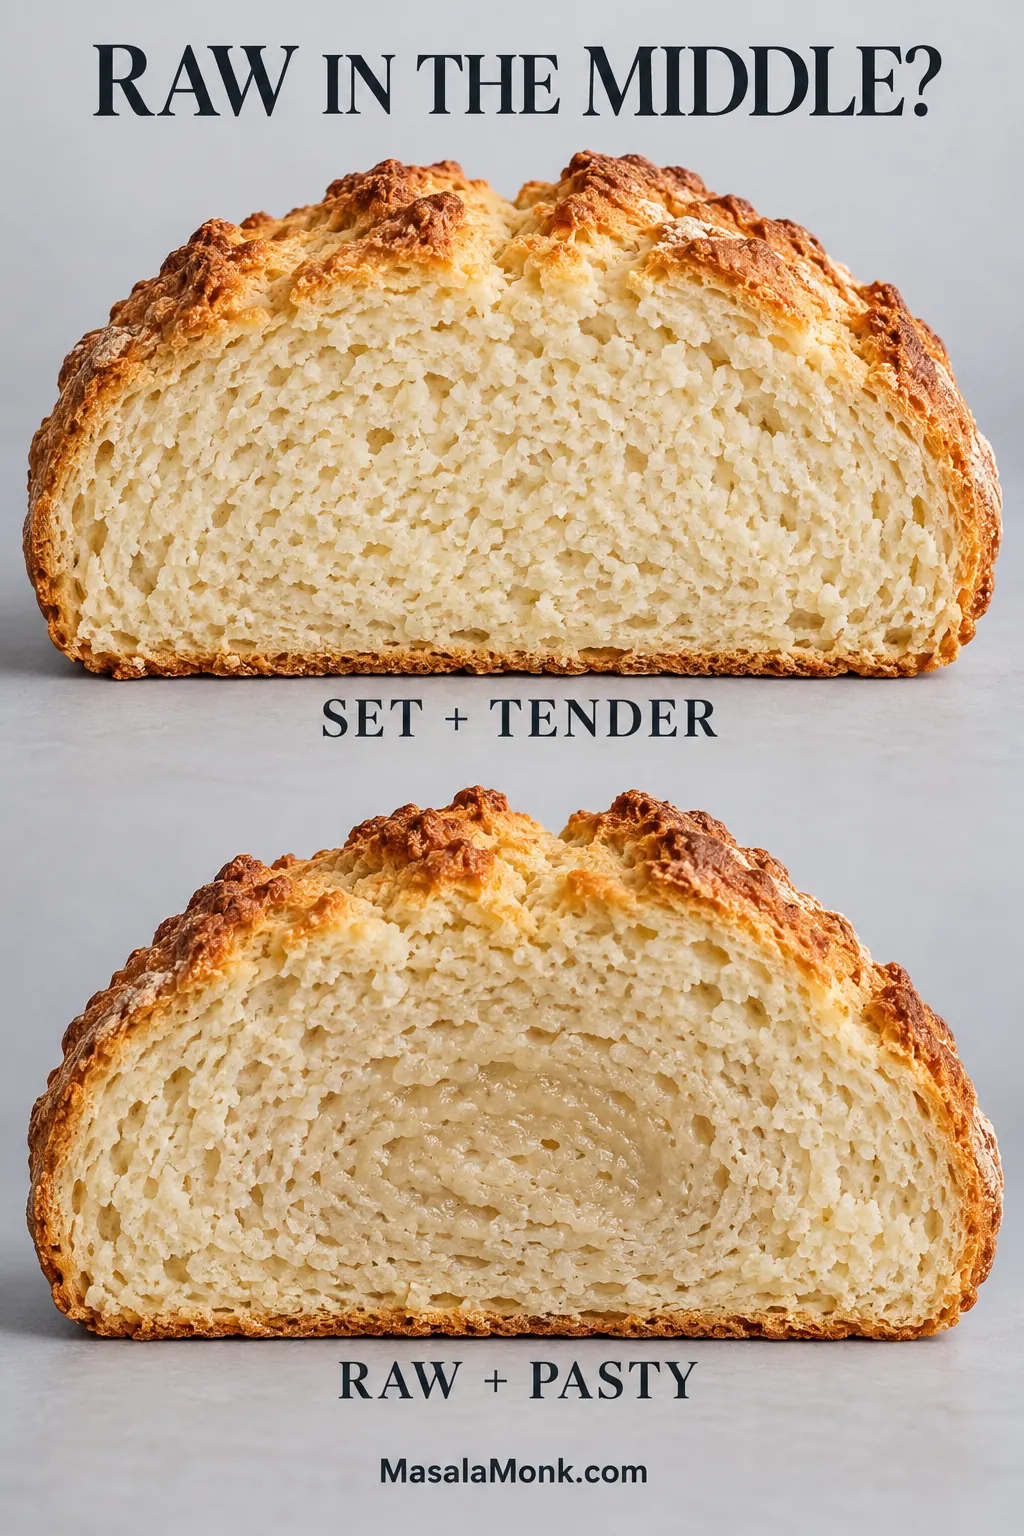
Two cut soda bread loaves labeled Set + Tender and Raw + Pasty; the underbaked loaf has a damp, compressed center.
A raw center loses normal crumb definition: the cells compress into a darker, paste-like band instead of separating cleanly. After cooling, a baked-through center should still look close-grained, but it should cut and tear like bread.

If the center is fully set but simply close-grained, see what normal Irish soda bread texture looks like before changing the recipe.

Is Irish Soda Bread Supposed to Be Dense?

A good soda bread is close-grained and substantial while still feeling tender. Dense is normal; gummy or leaden is not.
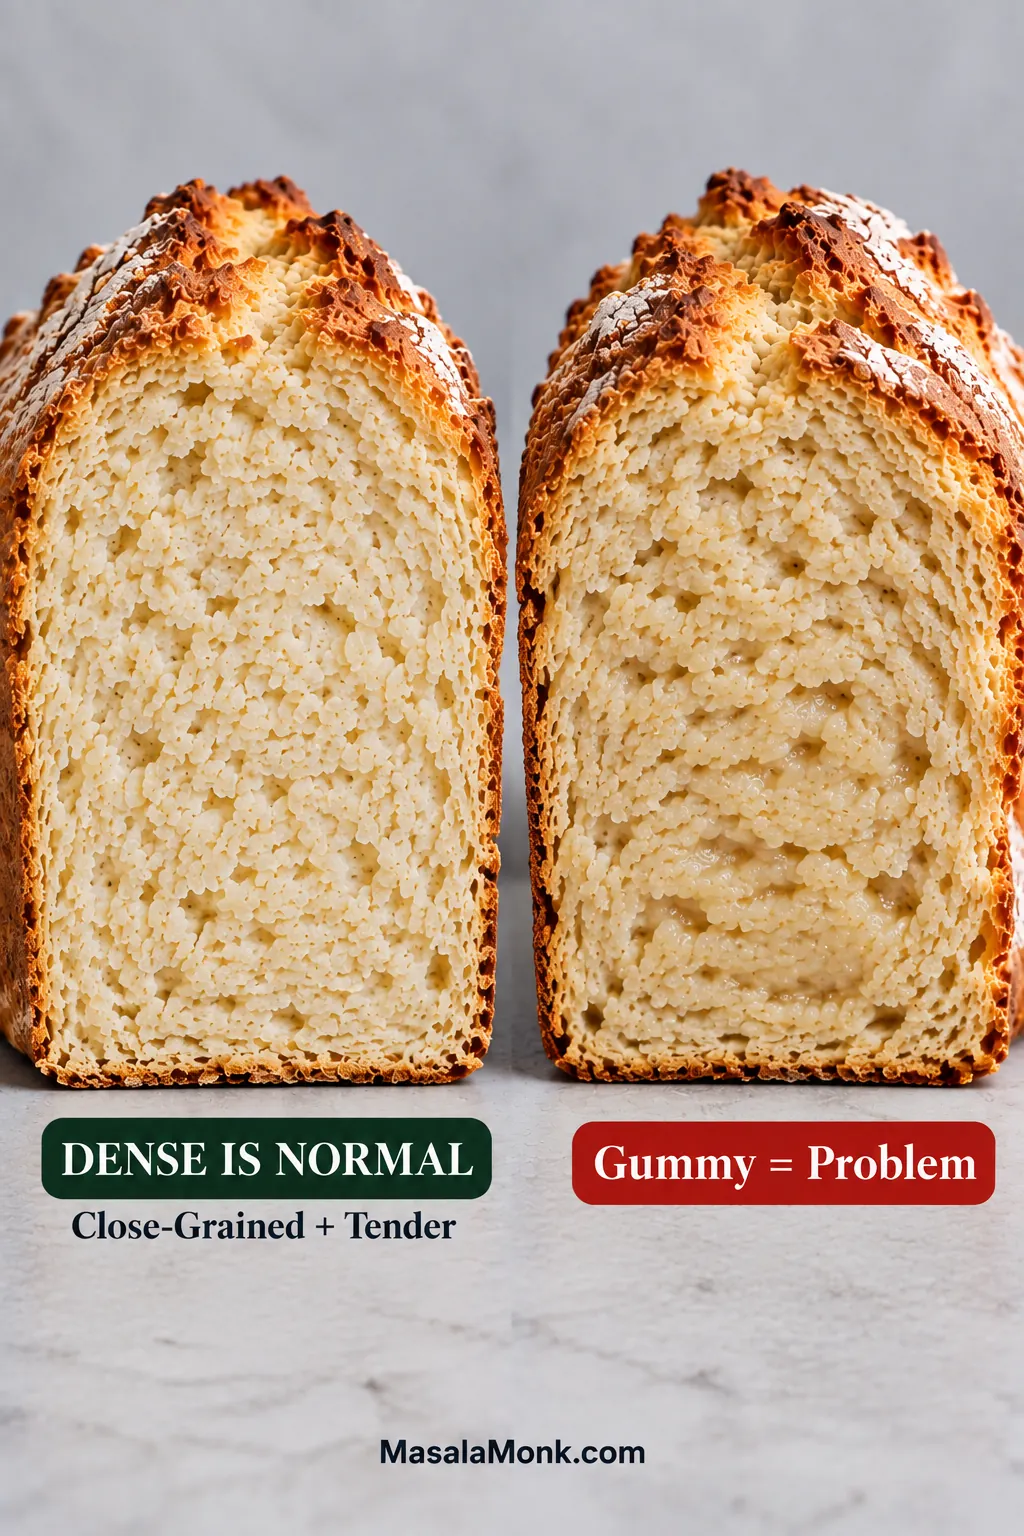
Two soda bread halves comparing a close-grained tender crumb with a darker, compressed gummy crumb labeled Gummy = Problem.
Look for definition rather than airiness: a properly baked close crumb still shows distinct cells and a clean cut face, whereas gummy crumb looks tacky, compressed and smeared.

If what you see is actually wet or paste-like in the middle, go back to the raw-center comparison; that is a different problem from ordinary density.

When it is right, a slice feels sturdy in your hand but gives easily under the teeth. The edge has some crackle, while the crumb stays tender enough for butter to sink into it.

That close crumb is one reason soda bread works so well beside Guinness beef stew. A thick slice can catch the stout gravy without immediately collapsing into the bowl.

The flavor should be wheaty, lightly salty and gently tangy. A strong baking-soda taste is a warning sign. Because the acidic dairy helps keep that balance right, substitutions deserve a little care.

Can You Make Irish Soda Bread Without Buttermilk?

Yes, but keep two things intact: enough acidity for the baking soda and roughly the right consistency for the dough.
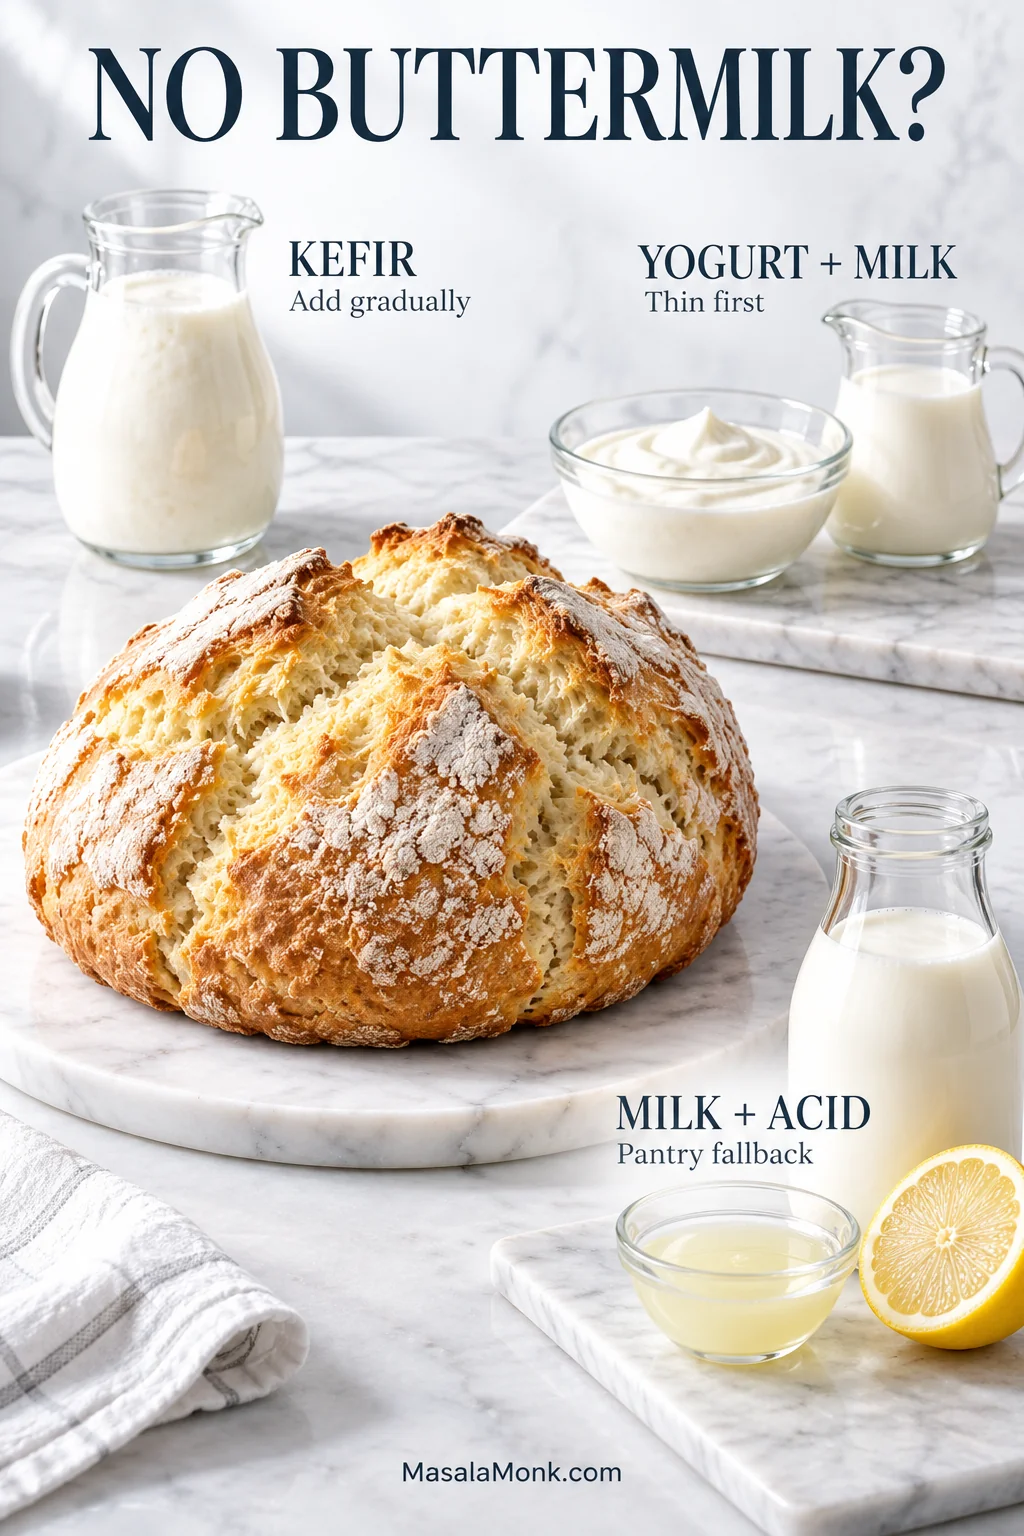
Kefir, thinned yogurt with milk, and milk with lemon shown as three buttermilk substitutes for Irish soda bread.
When a substitute pours thinner than cultured buttermilk, be more conservative with the last splash. In practice, kefir is usually closest in body, while acidified milk usually requires the most restraint with the final liquid addition.
SubstituteHow to Use It
KefirWorks very well here. Pour it in gradually because some brands are noticeably thicker than others.
Plain full-fat yogurtThin it with milk until it pours roughly like cultured buttermilk or heavy cream. Greek yogurt will need more milk than ordinary plain yogurt.
Whole milk + lemon or vinegarPantry fallback: for 400 ml total, add 25 ml / 1 tbsp + 2 tsp lemon juice or white vinegar to the jug, then fill with whole milk to 400 ml. Rest 5–10 minutes and add gradually because the mixture is thinner than cultured buttermilk.
Plain milkToo low in acidity for this baking-soda recipe.

Whichever substitute you use, let the dough decide the final amount. If it looks crumbly or too loose, revisit the dough guide before correcting it.

Bought a whole carton of buttermilk? Use the rest in our fluffy buttermilk pancakes the next morning.

Do You Need Irish Flour for Soda Bread?

For this white soda bread, ordinary U.S. all-purpose flour works well. Bread flour is unnecessary, and you do not need to hunt down specialty Irish flour.
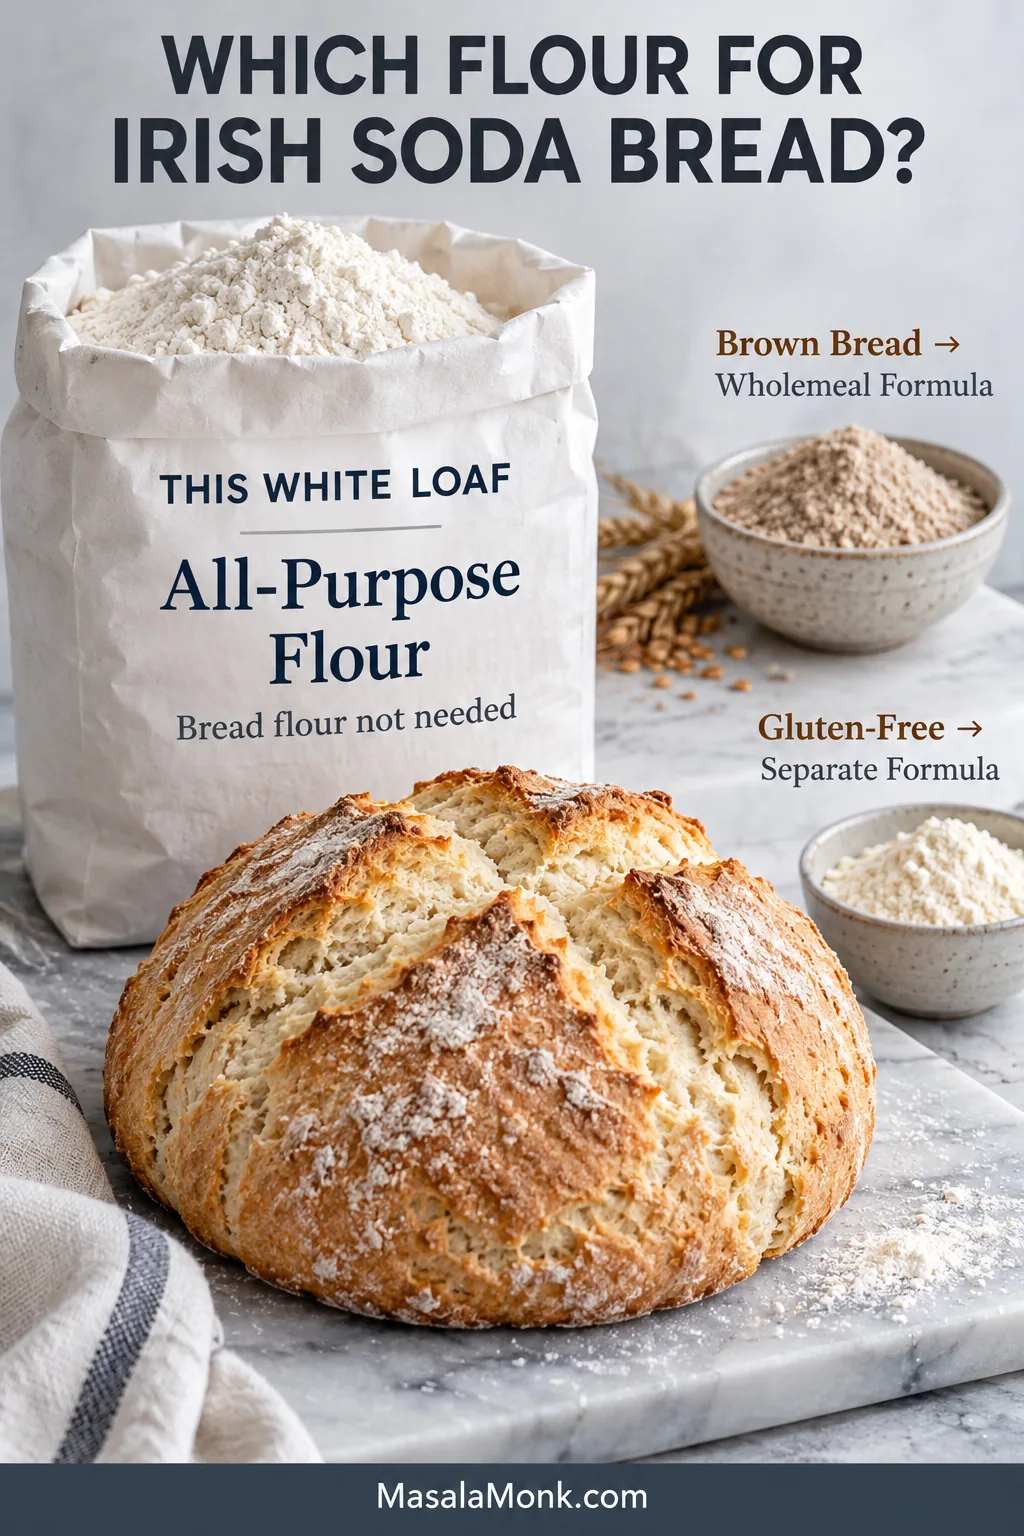
All-purpose flour and a white soda bread loaf shown as the main choice, with smaller wholemeal and gluten-free flour references.
Two bags of all-purpose flour can absorb buttermilk differently. That is why the recipe holds 45 ml back and adjusts by feel instead of prescribing one compulsory final volume.

For brown soda bread, wholemeal flour changes both the texture and how much liquid the dough needs. Irish-style wholemeal flour can be an excellent choice there. Gluten-free soda bread likewise needs a formula built around gluten-free flour rather than a straight swap into this loaf.

Raisins or No Raisins?

Plain savory soda bread is a traditional everyday Irish form; dried fruit belongs to enriched relatives such as Spotted Dog and to many Irish-American soda breads. If you grew up with raisins and caraway, your family version is not imaginary—and neither is the plain loaf someone else remembers.
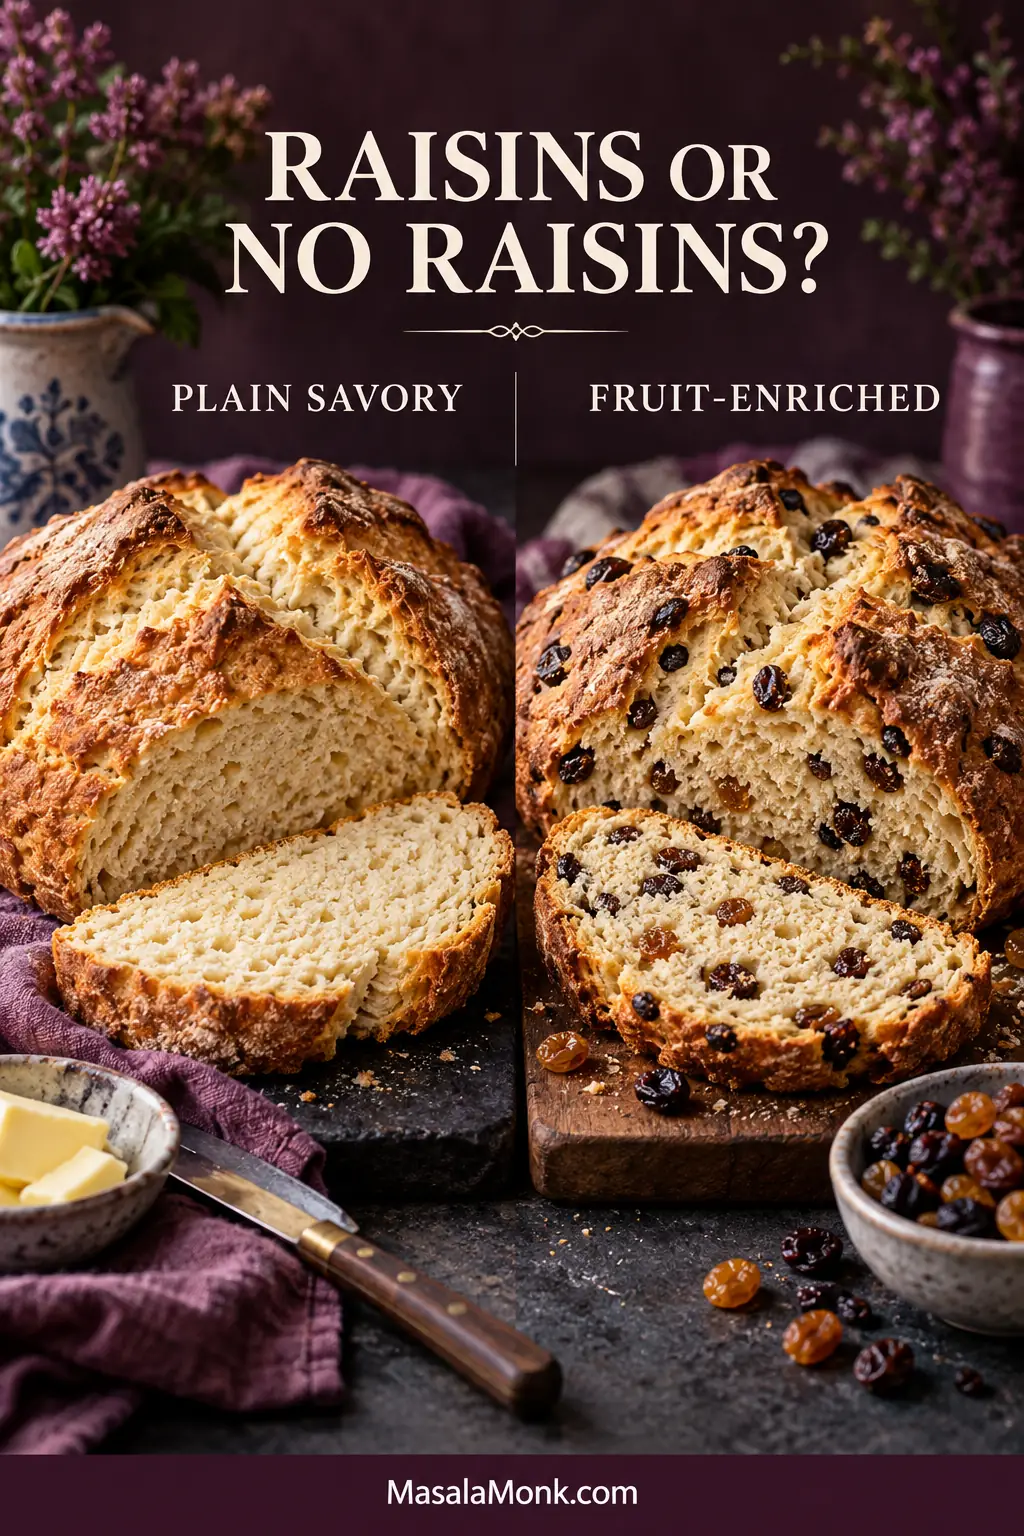
Plain white soda bread beside a fruit-enriched loaf dotted with raisins or currants.
For the simple fruit version here, keep the same low, deeply scored shape and distribute the dried fruit through the crumb rather than letting it cluster.

Irish household recipes still vary. Bord Bia’s traditional white soda bread, for example, includes butter and egg and lists cream of tartar as optional.

The main loaf here stays lean and savory. Cultured buttermilk already supplies the acidity needed for the baking soda, so cream of tartar is unnecessary.

A simple fruit version

Toss 3.5 oz / 100 g dried fruit—roughly ⅔ cup, depending on whether you use currants, raisins or sultanas—through the dry ingredients before adding the buttermilk. Then add the liquid gradually as usual.

That gives you a straightforward fruit soda bread. A fully enriched Spotted Dog changes more than the fruit.

Spotted Dog and Irish-American soda bread

Spotted Dog—also known regionally by names including Railway Cake—is an enriched relative of soda bread, made with dried fruit and often egg or sugar.

Irish-American versions commonly add butter, egg, sugar and dried fruit, and some family recipes use caraway. If egg goes into the dough, count it as part of the wet ingredients instead of adding it on top of the full amount of buttermilk.

White, Brown, Wheaten and Farls

  • White soda bread: primarily white flour; this is the style used here.
  • Brown soda bread / Irish brown bread: substantial wholemeal flour and a different amount of liquid.
  • Wheaten bread: a closely related Northern Irish wholemeal bread tradition.
  • Soda farls: flatter soda-bread dough divided into quarters and commonly cooked on a griddle.
  • Potato farls: a separate potato-based griddle bread, often served alongside soda farls.

What to Eat With Irish Soda Bread

The first slice barely needs a plan. Let the loaf cool enough for the crumb to set, cut through the crust and spread it generously with salted butter while there is still a little warmth inside.

For lunch or dinner, thick slices are particularly good beside creamy white bean soup. The crisp crust brings contrast to the soft beans while the crumb picks up the broth.
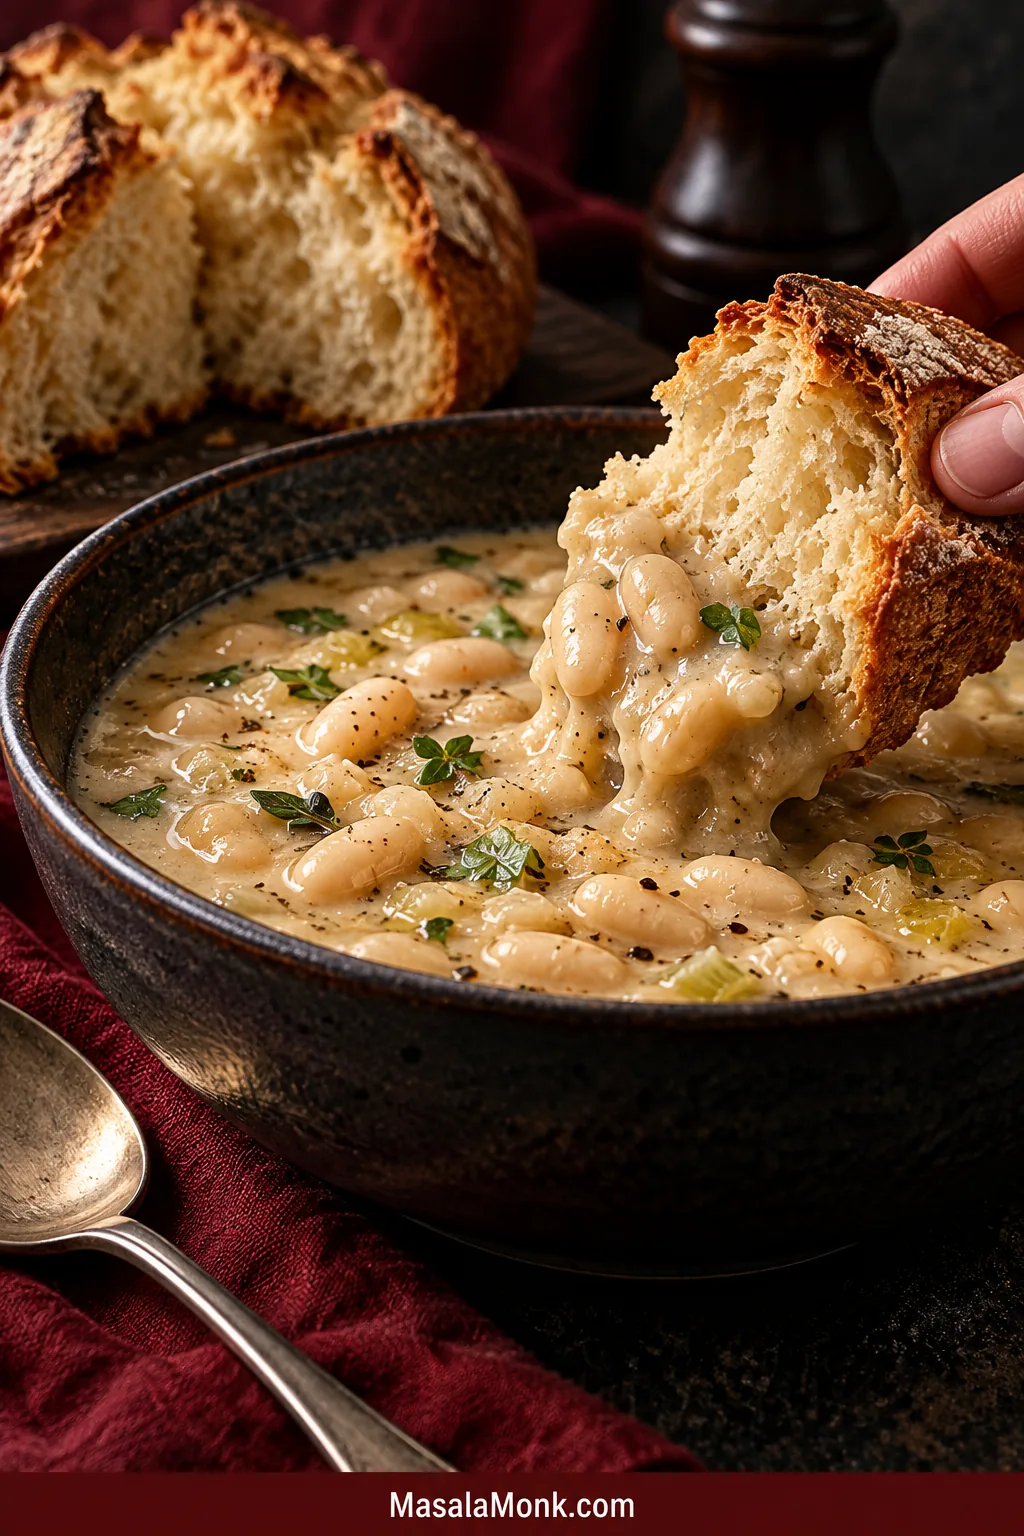
A hand dips a thick piece of Irish soda bread into creamy white bean soup with whole beans visible in a dark bowl.
For dipping, cut a thick piece with crust along one edge. The crust works like a firm handle while the exposed crumb takes on broth, making the last few bites easier to scoop rather than fish from the bowl.

Eggs, mature cheddar and smoked salmon are natural savory partners too.

For something sweeter, salted butter and homemade orange marmalade are excellent against the mild buttermilk tang. Jam and honey work beautifully as well.

Fresh Today, Toast Tomorrow

Soda bread is best on day one, excellent toasted on day two, and better frozen than left to dry out after that.
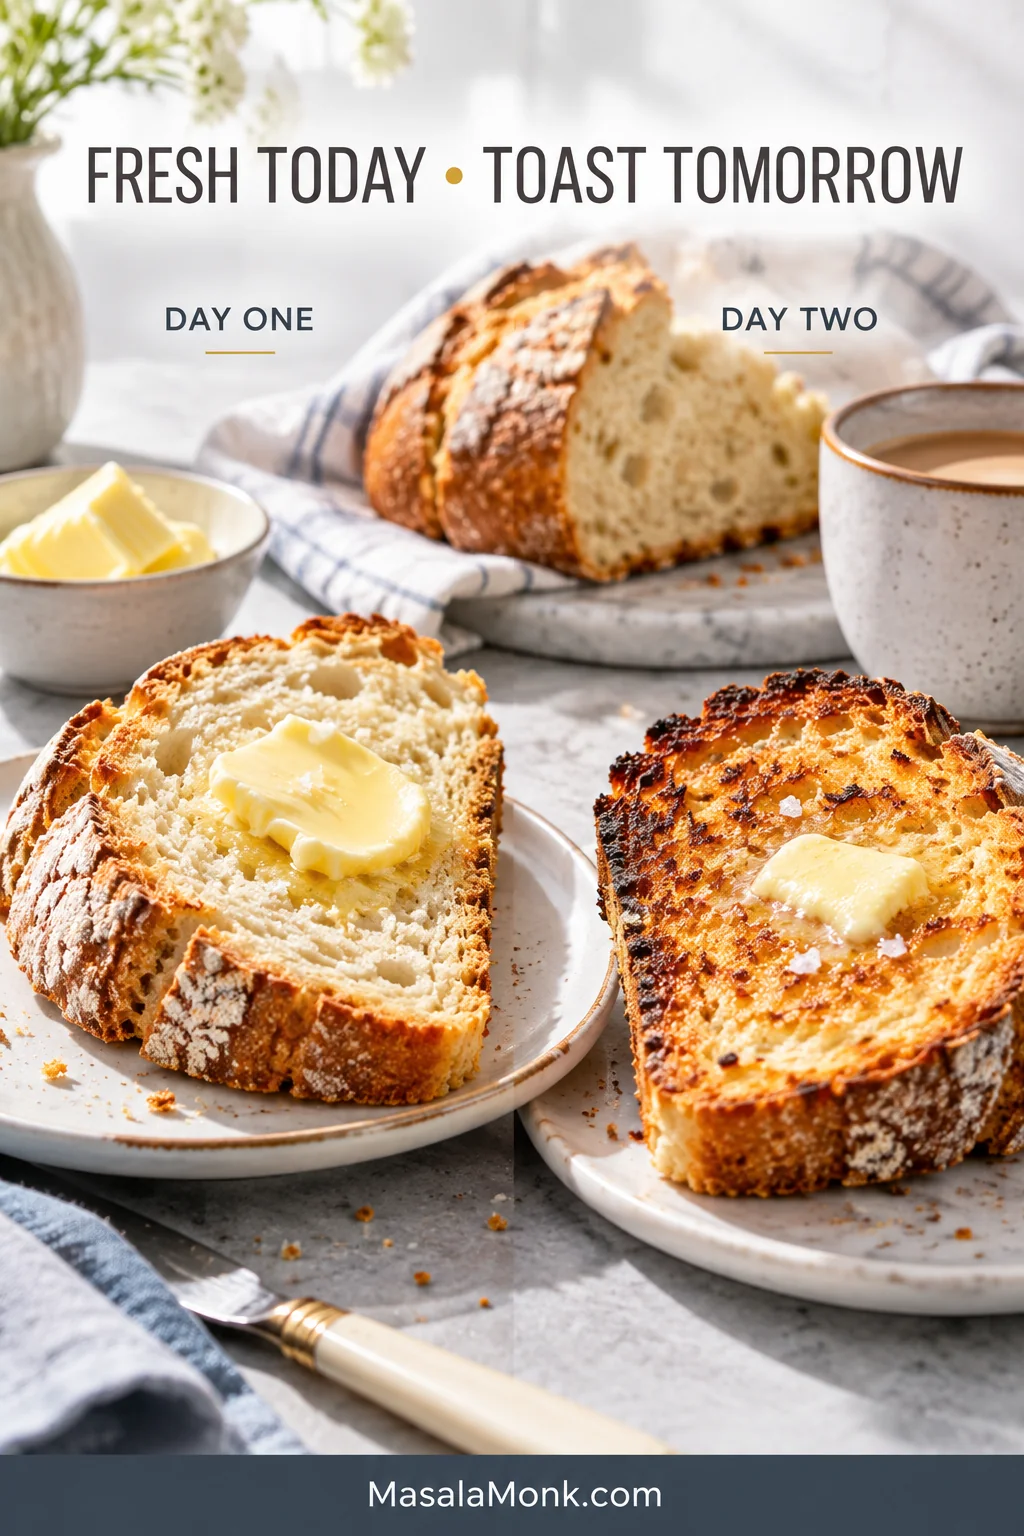
Fresh buttered Irish soda bread beside a deeply toasted buttered slice, labeled Day One and Day Two.
Day-two soda bread benefits from real browning, not just warming. Toast a reasonably thick slice until the cut face crisps while the middle keeps some tenderness.

Day one: enjoy it once the crumb has set. Cool completely before wrapping whatever is left.

Day two: keep it well wrapped at room temperature and toast it. A thick slice makes a sturdy base for avocado toast, or use one to scoop up shakshuka and its tomato-pepper sauce and soft yolk.

For longer storage: freeze the cooled loaf or individual slices for up to about 3 months for best quality. Slices can go straight into the toaster from frozen; larger pieces can thaw before reheating. If the bread becomes properly stale, toast it hard, serve it under eggs, or use larger leftovers in bread pudding where the drier crumb becomes useful.

A Few Useful Questions

Why doesn’t Irish soda bread need yeast?

Buttermilk’s acidity reacts with baking soda to make the gas that lifts the loaf, so there is no yeast or proofing stage. Once wet and dry meet, shape and bake the dough without leaving it sitting around.

Can I make the dough ahead?

Better not. Have the baking sheet ready and the oven hot before you mix, then shape and bake the dough straight away.

Can I bake it in a loaf pan?

Yes, but don’t transfer the round-loaf timing blindly to a loaf pan. A deeper pan changes how quickly heat reaches the middle, so rely on the same doneness cues and expect the bake to take longer.

Can I make this gluten-free?

Not reliably with a one-for-one flour swap. Use a soda bread recipe built around gluten-free flour instead.

Is Irish soda bread healthy?

This particular loaf has no added sugar or butter, but it is still made primarily with white flour. Wholemeal soda breads generally provide more fiber, while enriched versions may add butter, egg, sugar and dried fruit. How it fits into your diet depends on the portion and what you eat with it.

After about an hour on the rack, cut through the opened cross. The crumb should be set but still tender. A thick slice with salted butter is enough.
Posted on — Leave a comment

Southern Buttermilk Biscuits Recipe: Flaky, Tall and Tender

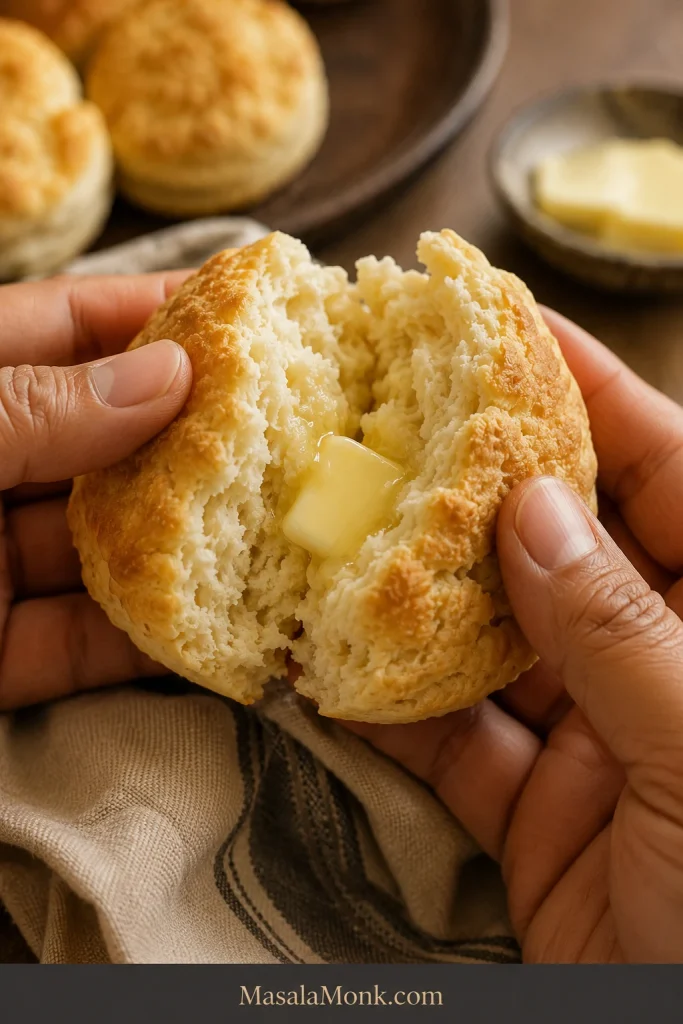
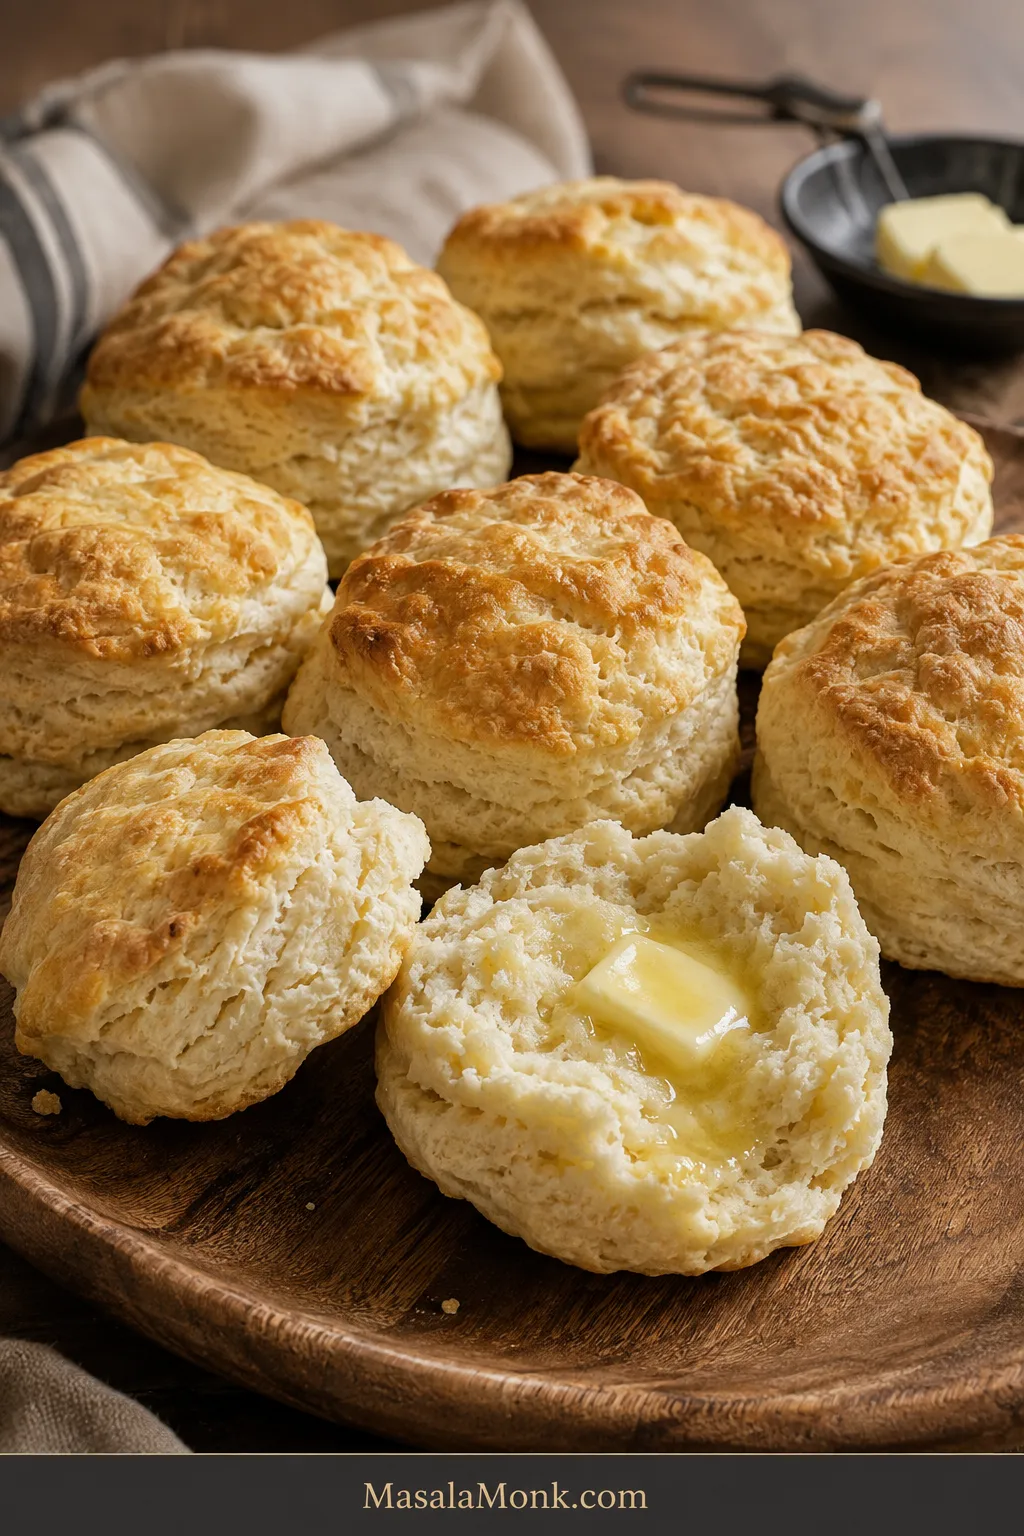
Golden Southern buttermilk biscuits on a wooden board, with one split open to reveal a soft interior with natural flaky seams and melting butter.

Pull apart a hot Southern biscuit and the center should open in tender, buttery layers, with the top golden and the middle moist enough to catch a melting swipe of butter.

These are the biscuits we’re making here: tall enough for visible layers, with a soft, tender center and buttery seams that separate easily while warm. You don’t need a food processor or rolling pin, and chilling only comes into play if the butter begins to soften while you work.

The whole batch takes about 35 minutes. Once you know what the butter and dough are supposed to feel like, biscuit-making becomes much less mysterious.

Quick Answer

For tall, flaky Southern buttermilk biscuits, keep the butter and buttermilk cold, mix until the dough is rough and lightly tacky, then fold and turn the dough four times before patting it to a full 1 inch / 2.5 cm thick.

Cut straight down with a sharp cutter, arrange the biscuits almost touching, and bake at 450°F / 230°C conventional until the tops are golden and the centers are baked through.

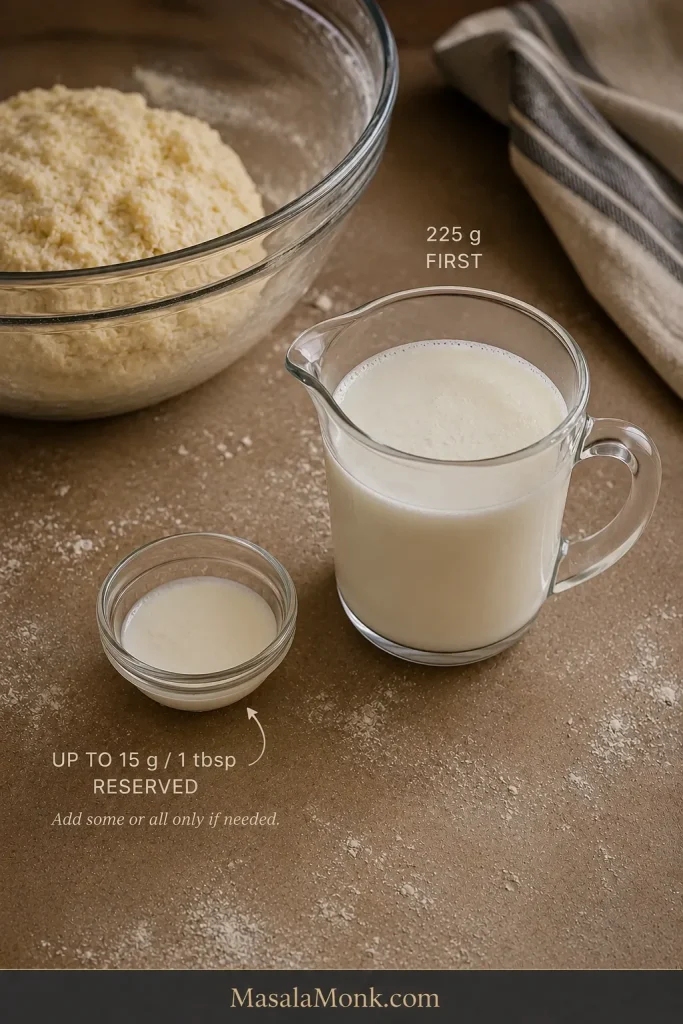
Start with 225 g of the buttermilk and reserve the final 15 g / 1 tablespoon. If dry flour still falls away when you press the mixture, add some or all of the reserve until the dough holds together.

Cold fat. Soft dough. Four folds. One-inch thickness. Hot oven. Those are the five things worth remembering.

Southern Buttermilk Biscuits Recipe

Makes about 8 biscuits with a 2½-inch / 6.4-cm cutter.

Ingredients

  • 300 g / 10.6 oz / about 2½ cups all-purpose flour, spooned and leveled if measuring by cups, plus a little for the counter
  • 14 g / 1 tablespoon + ½ teaspoon double-acting baking powder
  • 2 g / ½ teaspoon baking soda
  • 6 g fine sea salt or table salt / about 1 teaspoon
  • 8 g / 2 teaspoons granulated sugar
  • 113 g / 4 oz / ½ cup unsalted butter, very cold and cut into small cubes
  • 240 g / about 1 cup cold cultured buttermilk, divided — start with 225 g and reserve 15 g / about 1 tablespoon
  • 15 g / 1 tablespoon melted butter, for brushing after baking

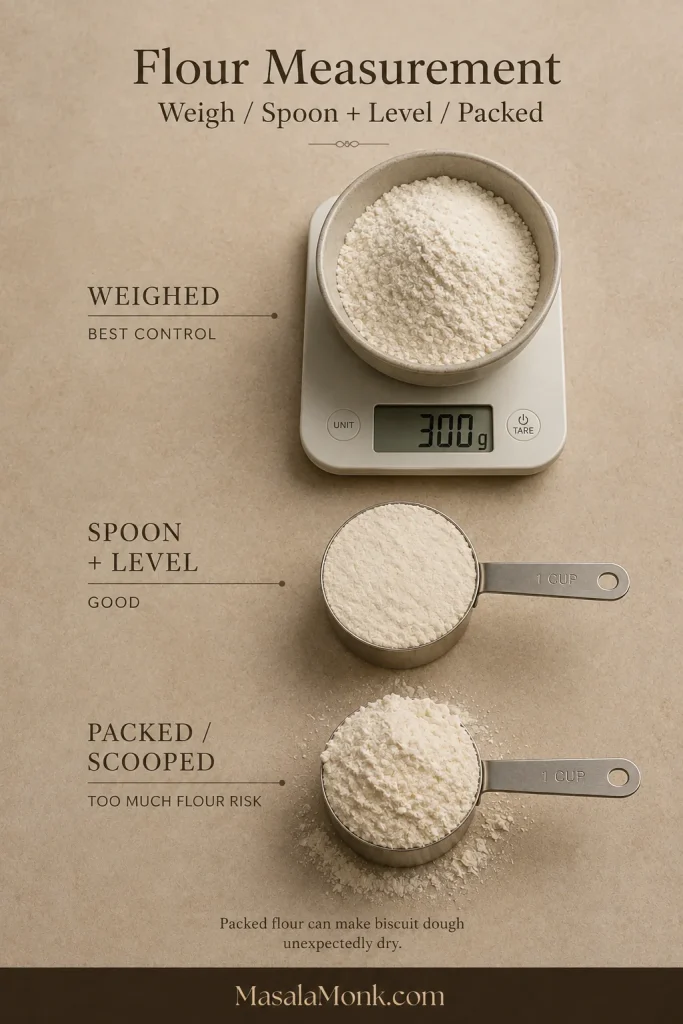
Use the gram measurements when possible. Flour is easy to overmeasure by volume, and even a modest extra scoop changes how much liquid the dough needs.

What You’ll Need

A digital kitchen scale is the most useful extra, along with a large bowl, pastry blender, fork or flexible spatula, sharp biscuit cutter, and sturdy baking sheet. A bench scraper is handy for handling the dough and for cutting square biscuits, but it isn’t essential.

No pastry blender? Use your fingertips to work the cold butter into the flour. Warm hands soften butter quickly, so work briefly and stop while distinct pieces remain.

Method

  1. Heat the oven. Set a rack in the center and preheat to 450°F / 230°C conventional. Line a sturdy, light-colored baking sheet with parchment rated for that temperature, or use a clean unlined sheet. A dark pan browns the bottoms faster, so check underneath a little earlier.
  2. Mix the dry ingredients. Whisk the flour, baking powder, baking soda, salt, and sugar thoroughly.
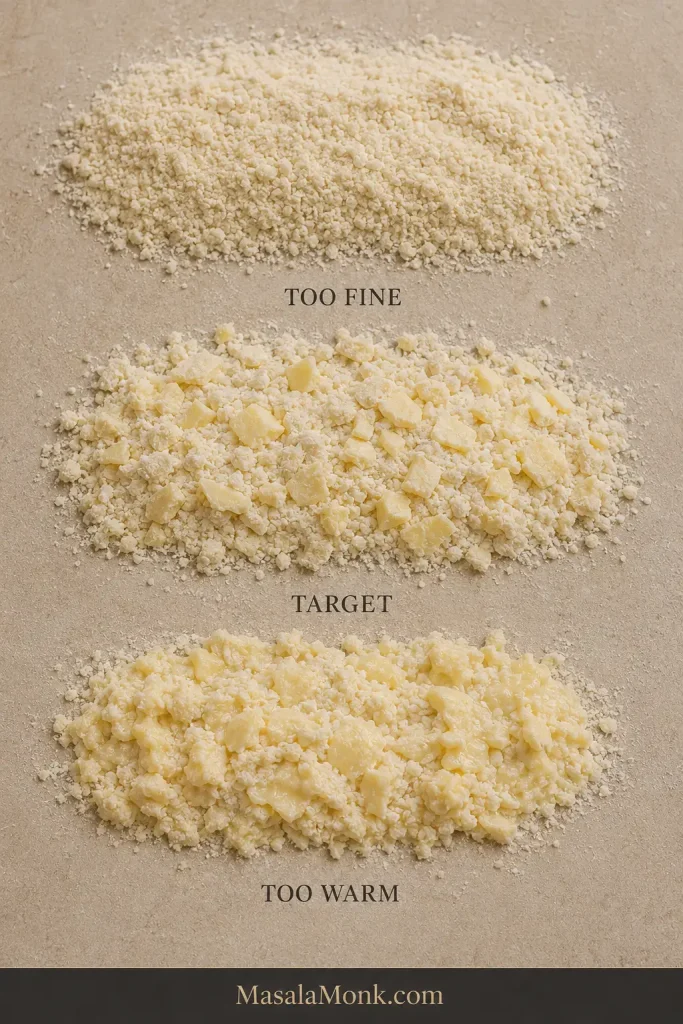
  3. Cut in the butter. Work until most pieces are roughly pea-size, with a few larger flat flakes visible. The mixture will look uneven.
  4. Add 225 g of buttermilk. Stir with a fork or flexible spatula until shaggy clumps form. Press a handful together. If dry flour still falls away, add some of the reserved 15 g / 1 tablespoon. Use the rest only if the mixture still needs it to hold together.
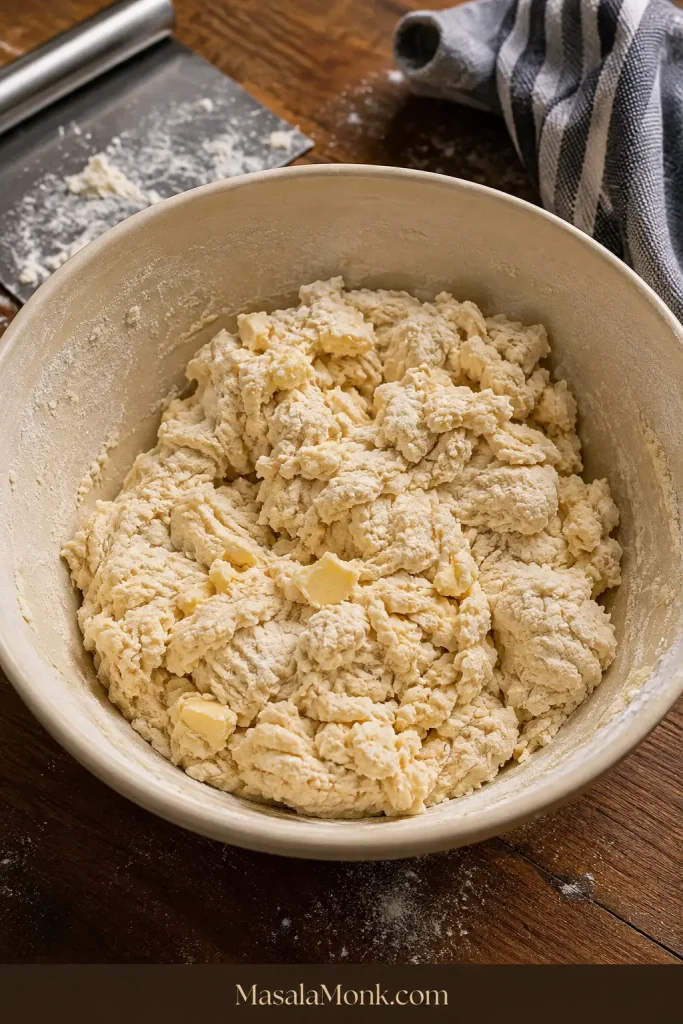
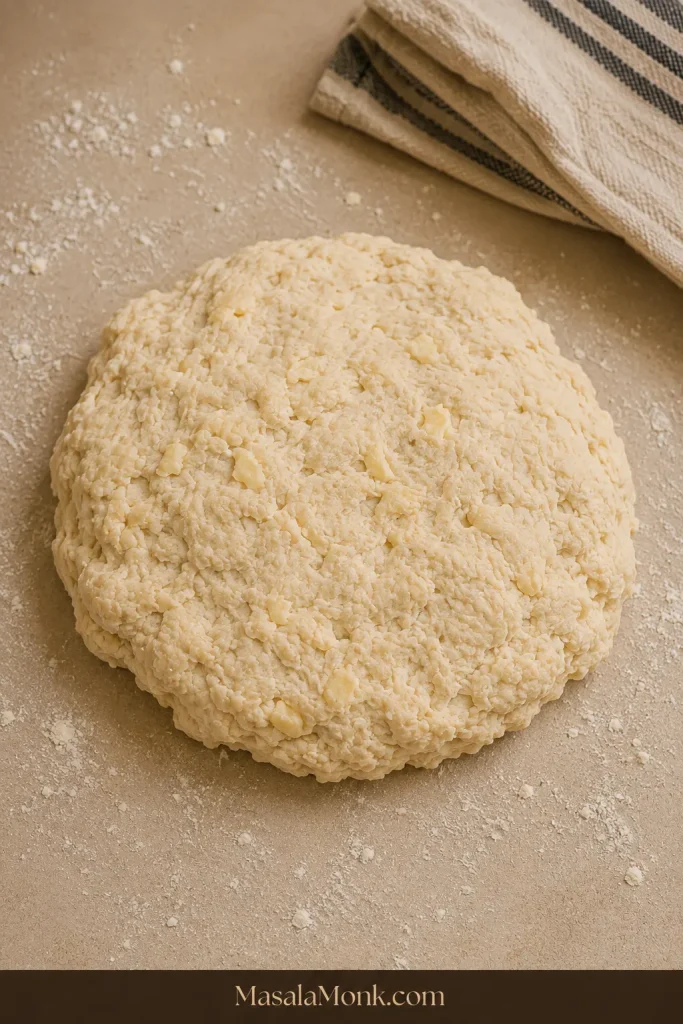
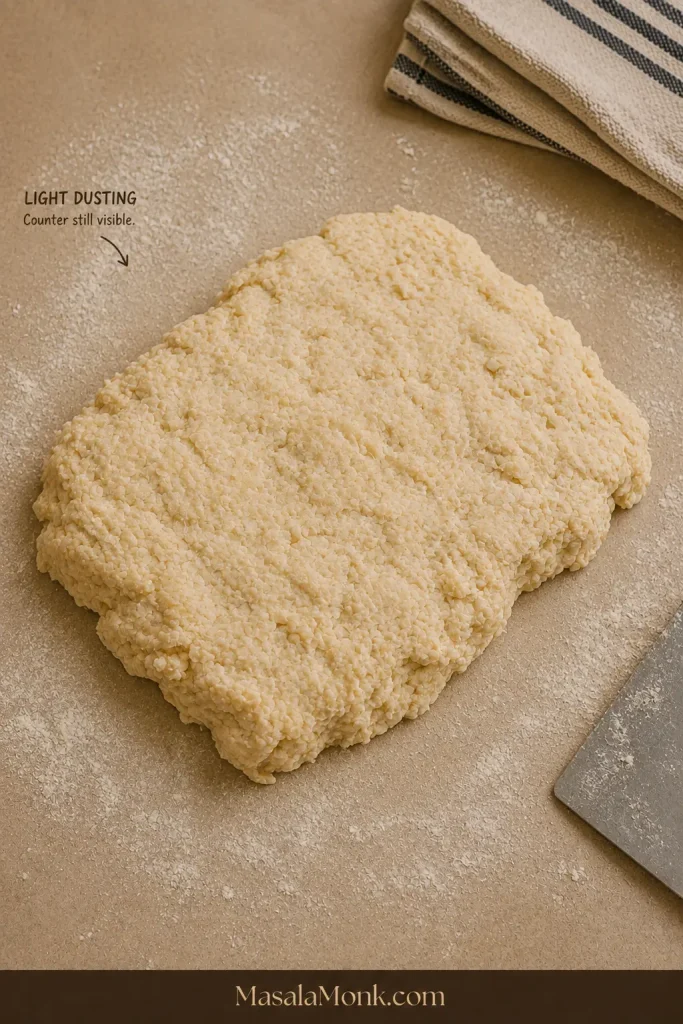
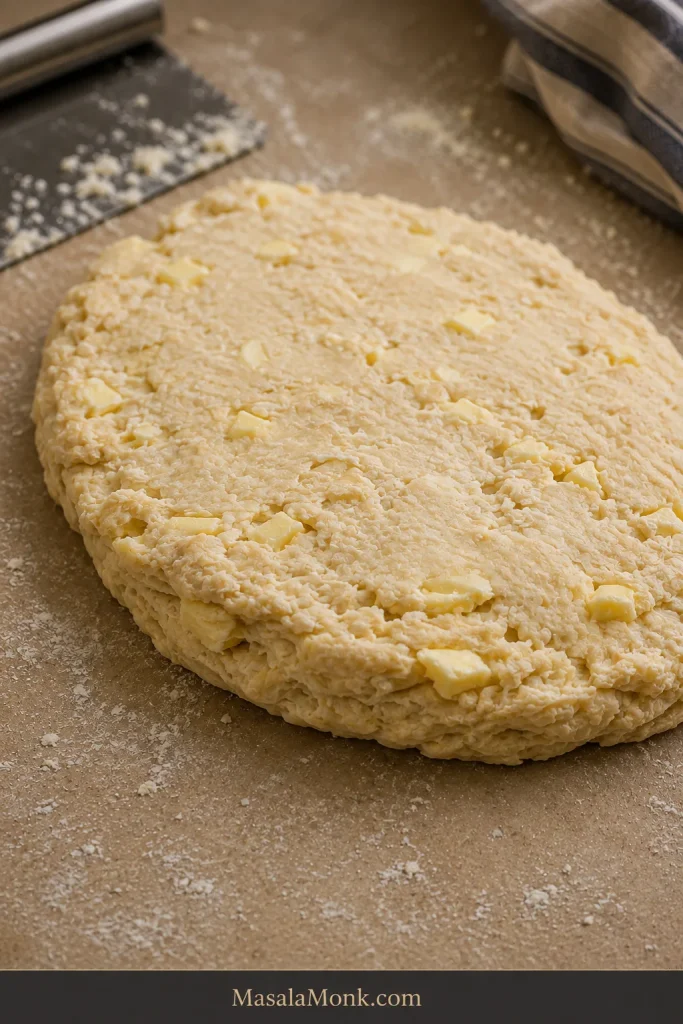
  5. Bring it together. Dust the counter with just enough flour to prevent obvious sticking—you should still be able to see the counter through it. Turn out the shaggy mixture and press the loose pieces into a rough rectangle.
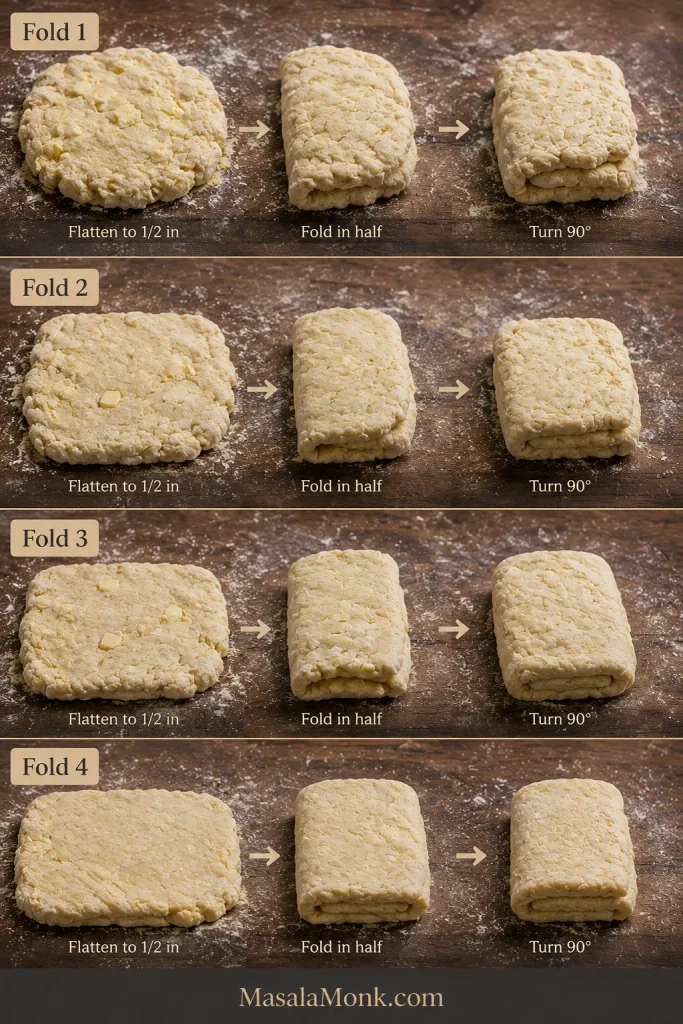
  6. Fold and turn four times. Flatten the rectangle to roughly ½ inch / 1.25 cm thick, fold it in half, then turn it 90 degrees. Flatten it again and repeat the fold-and-turn process three more times, for four folds total. By the later folds, the scruffy pile starts looking recognizably like biscuit dough while pieces of butter remain visible.

Shape, Cut and Bake

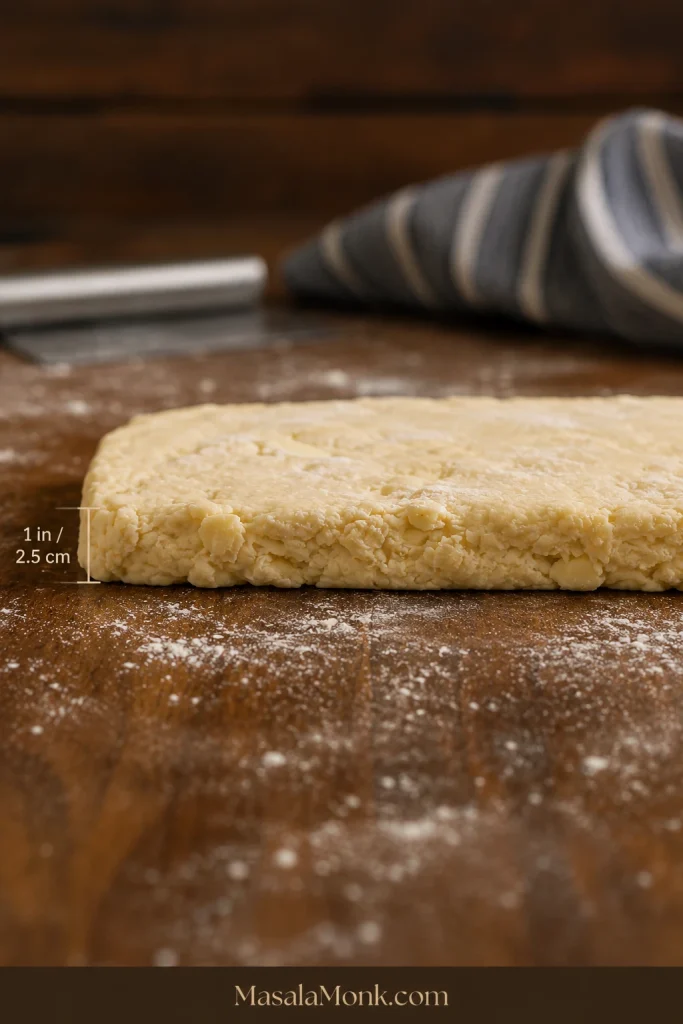
  1. Pat to 1 inch / 2.5 cm thick. Keep the slab reasonably even; the edges can stay rustic.
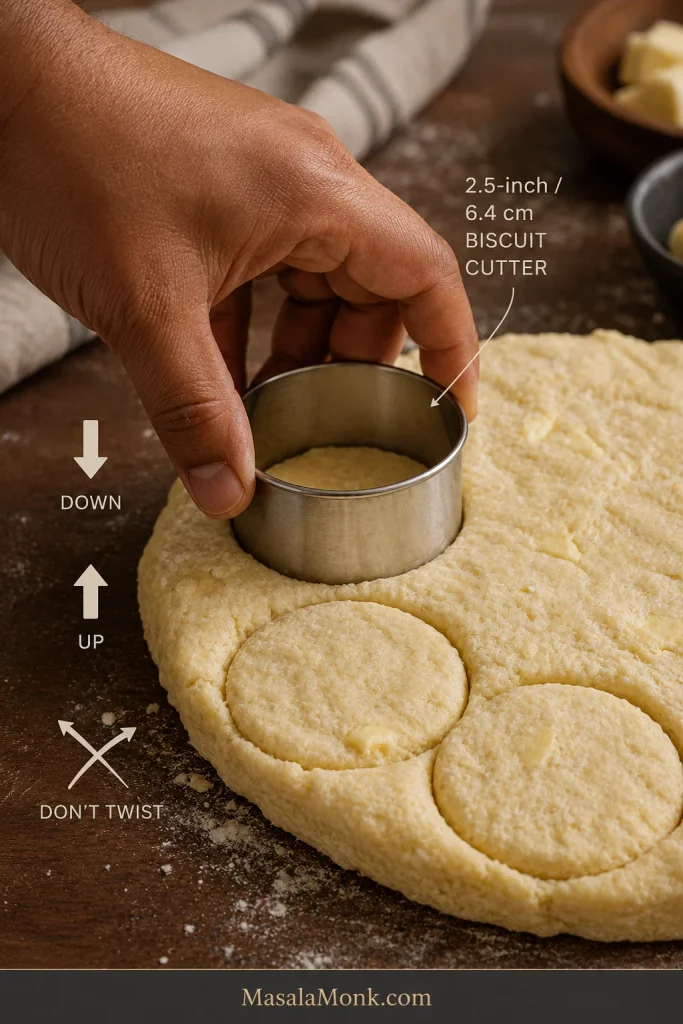
  2. Cut straight down. Lightly flour a sharp 2½-inch / 6.4-cm biscuit cutter, press straight through the dough, and lift straight up. Don’t twist the cutter.
Hand pressing a round metal biscuit cutter straight down into dough with instructions to lift straight up and not twist.
A clean vertical cut leaves the layered edge open. Pinched or dragged rims usually mean the cutter twisted.
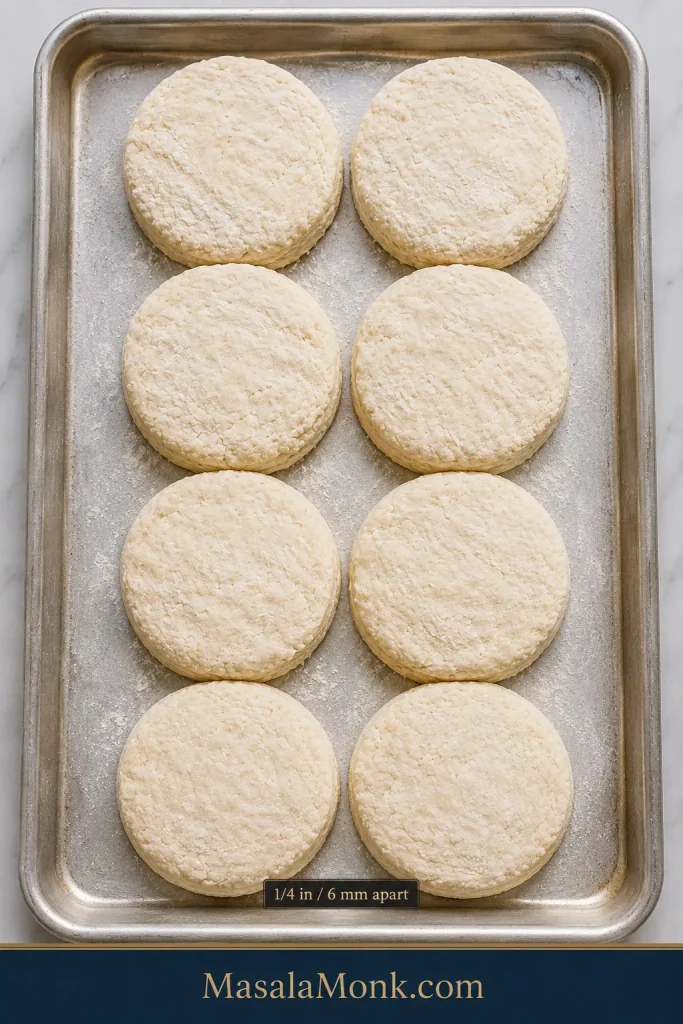
  1. Arrange almost touching. Place the biscuits about ¼ inch / 6 mm apart. Press the scraps together once and cut the remaining biscuits.
Eight raw biscuit rounds arranged close together with narrow quarter-inch gaps on a light aluminum baking sheet.
Leave narrow visible gaps—about ¼ inch / 6 mm. Slumping rounds signal warm dough, not a need for wider spacing.
  1. Bake. Bake for 12–15 minutes, beginning to check at 12 minutes. Look for golden tops, set sides, browned bottoms, and centers without a gummy stripe.
  2. Brush and serve. Brush the hot tops with melted butter and serve warm.

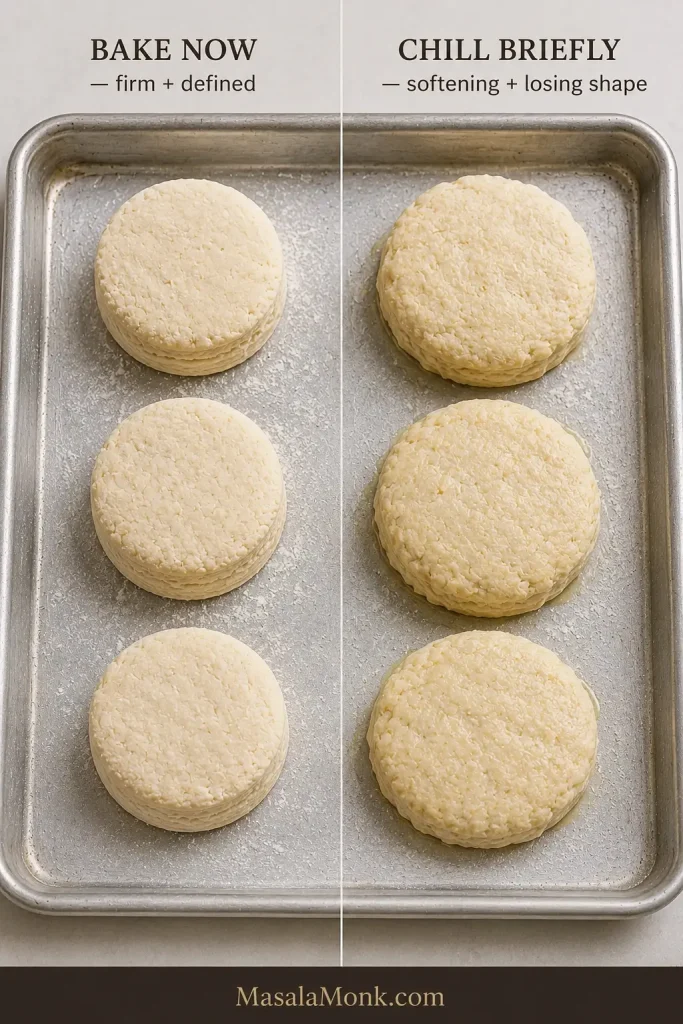
Warm-kitchen check: Cool, firm cut biscuits can go straight into the oven. When they become soft enough to lose their clean shape or start looking greasy, chill the tray briefly until the butter firms again.

Comparison of firm defined raw biscuits ready to bake and softer slightly slumped biscuits that should be chilled briefly.
Firm, upright cut edges can go straight to the oven; softened or slightly greasy rounds benefit from a brief chill.

Using fan/convection? If you normally reduce conventional baking temperatures for your oven, use around 425°F / 220°C and begin checking early.

Table of Contents

What Makes a Southern Biscuit Southern?

There is no single ingredient that gets to decide. Southern biscuits belong to a broad tradition of tender quick breads, with flour, fat, shaping, and preferred crust varying from kitchen to kitchen.

Across Southern kitchens, you’ll find soft-wheat and self-rising flours, butter, lard, shortening, buttermilk, hand-shaped cathead biscuits, neatly cut rounds, soft pull-apart sides, and biscuits baked farther apart for more crust.

Some people picture a tall cut biscuit with obvious layers. Others grew up eating softer biscuits baked shoulder-to-shoulder in a pan. Both belong at the table.

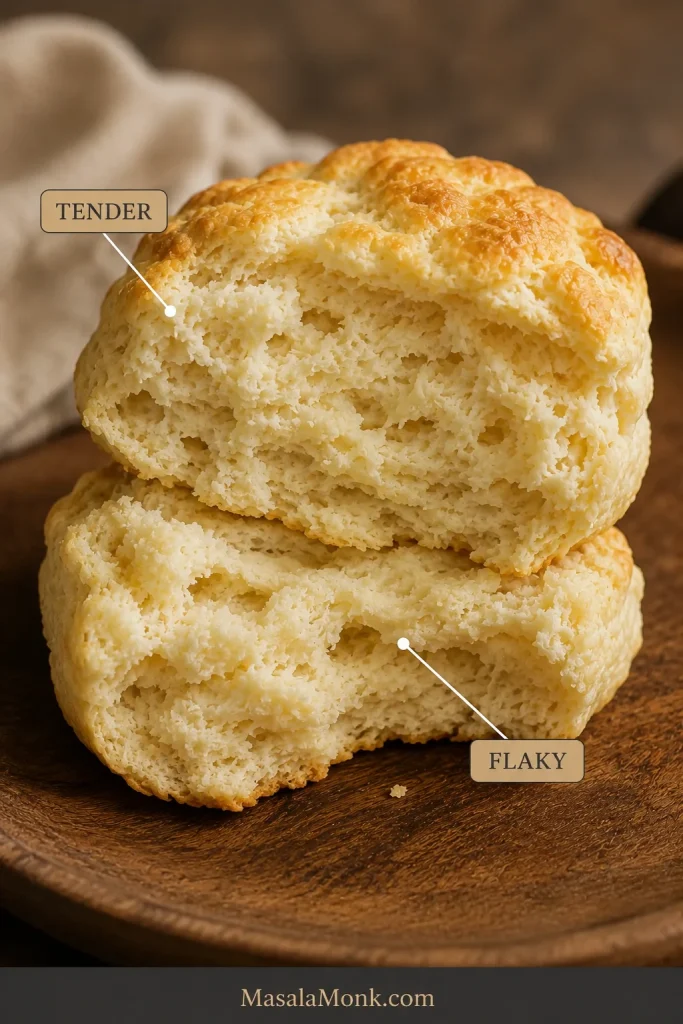
This version sits between old-fashioned tenderness and heavily laminated bakery-style biscuits. The folds create visible buttery seams and good height, while the center stays soft and distinctly biscuit-like. Tender describes how softly the crumb yields; flaky describes how easily the biscuit separates along buttery seams.

Split biscuit with callouts identifying a soft tender crumb and a natural flaky seam.
Tenderness is the soft crumb; flakiness is the few buttery seams that pull apart. You want both without croissant-like sheets.

Ingredients That Change the Biscuit

With only a handful of ingredients, small changes show up clearly in the finished biscuit. Flour builds the crumb. Baking powder supplies most of the rise, while baking soda works with tangy buttermilk and helps with browning.

Butter brings flavor and helps create the seams that separate as the biscuit rises.

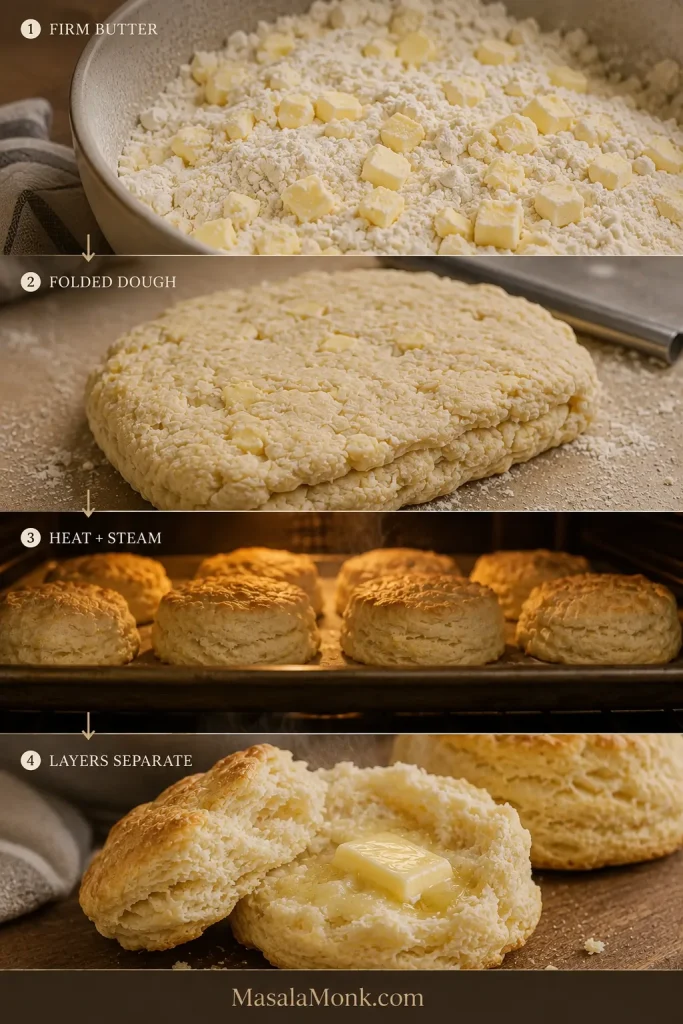
Keeping those butter pieces firm lets them stay distinct until baking; as the butter melts and releases steam, it helps the folded layers separate.

Four-stage guide showing firm butter in dough, folded biscuit dough, heat and steam during baking, and a finished biscuit with separated seams.
Firm butter stays distinct long enough to create steam and separation in the oven, leaving biscuit-like seams rather than pastry layers.

Buttermilk brings moisture, acidity, and dairy flavor. Salt makes everything taste fuller, while two teaspoons of sugar encourage browning without making the biscuits sweet.

Flour: All-Purpose, Soft Wheat and White Lily

For this recipe, regular all-purpose flour is the default. You do not need White Lily to make a tender Southern biscuit.

Soft-wheat flour has a long association with Southern biscuits because its lower protein content makes a delicate crumb easier to achieve. White Lily’s place in Southern baking comes from its soft red winter wheat, but this recipe was written for ordinary all-purpose flour.

If White Lily or another soft Southern flour isn’t sold where you live, there is no reason to postpone breakfast.

FlourWhat It Tends to Give YouBest Approach
Regular all-purpose flourTender crumb with enough structure for visible layersFollow the recipe as written
Soft-wheat all-purpose flourEspecially delicate crumbWatch the buttermilk because absorption can differ
Self-rising flourA convenient, classic Southern routeUse a biscuit recipe written for the particular self-rising flour you have

Flour packed into a measuring cup can weigh considerably more than flour spooned in and leveled. Extra flour needs extra liquid; without it, the raw mixture starts dry and the baked crumb often does too.

Flour measured as 300 grams on a digital scale, spooned and leveled into a cup, and packed into a measuring cup.
A packed cup can quietly add extra flour. Weighing 300 g removes that variable before hydration even begins.

What About Self-Rising Flour?

Self-rising flour can make excellent Southern biscuits, but brands vary in their leavening and salt. It isn’t an exact substitute for the flour, baking powder, baking soda, and salt used here, so use a biscuit recipe written specifically for the self-rising flour you have.

Butter, Lard or Shortening?

FatWhat ChangesWhy Use It
ButterRich flavor with obvious flaky seamsThe best fit for this version
LardVery tender crumb with good flakeClassic savory richness
ShorteningSoft, tender crumb with less buttery flavorStable and easy to handle
BlendBalanced tenderness and layeringA middle ground between flavor and stability

Butter is the fat used for this version, but how it is worked into the flour matters just as much as which fat you choose. This is the point where the mixture is easiest to assess before any liquid goes in.

Three flour-and-butter mixtures labeled too fine, target and too warm, showing fine crumbs, distinct butter pieces and softened smeared butter.
Stop while individual butter pieces are still easy to see. Fine crumbs or greasy smears have gone too far.

Start With Cold Cultured Buttermilk

Cultured buttermilk brings acidity, dairy flavor, and a thicker body than ordinary milk. Its consistency varies from carton to carton, and flour absorption varies too, which is why the final tablespoon stays in reserve until you see whether the mixture needs it.

A larger portion of buttermilk labeled 225 grams first beside a smaller reserve of up to 15 grams or 1 tablespoon.
Hold back the final tablespoon so you can correct a dry mixture without making the whole dough too wet.

Leftover buttermilk makes especially good fluffy buttermilk pancakes the next morning.

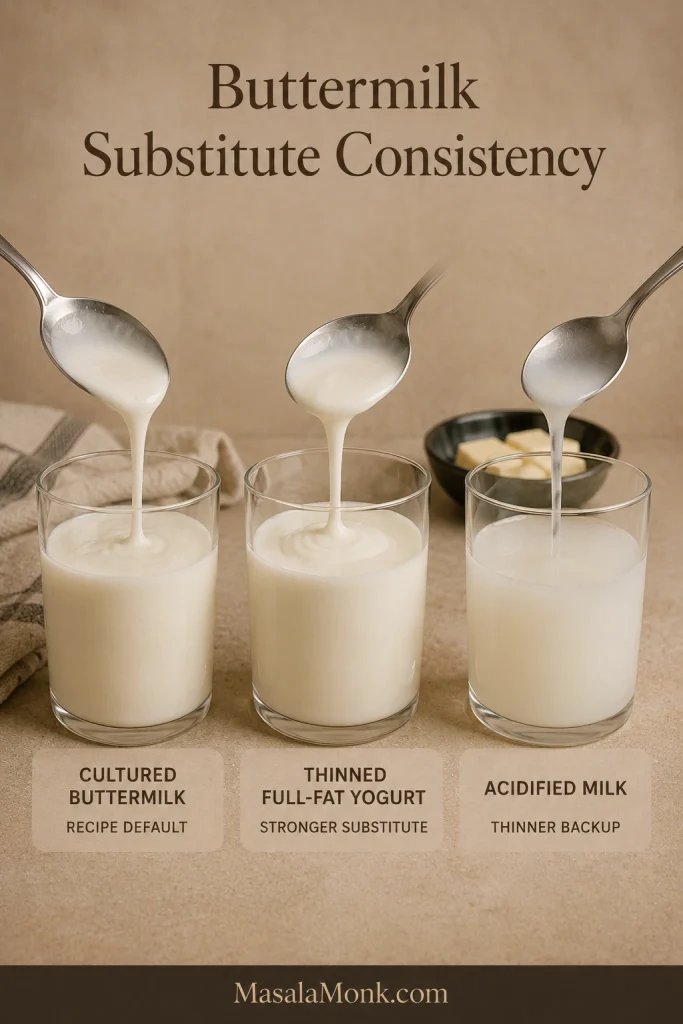
No buttermilk today? For an emergency substitute, thin full-fat plain yogurt with whole milk until it is pourable but still creamy. Use the consistency as your guide because this isn’t an exact one-for-one substitution.

Whole milk mixed with lemon juice or vinegar can also work in a pinch, although the mixture is thinner than cultured buttermilk. If buttermilk is rarely available to you, a biscuit recipe designed around milk or another dairy will be easier to repeat.

Cultured buttermilk, thinned full-fat yogurt and acidified milk shown pouring with visibly different thicknesses.
Match cultured buttermilk’s creamy pour as closely as you can; a thin substitute changes how quickly the flour hydrates.

Learn the Dough by Feel

If biscuit dough has made you second-guess yourself before, this is usually the moment. Good biscuit dough looks rougher and feels softer than many people expect.

“Do not overmix” is easy advice to repeat. Knowing what to look for when you stop is far more useful.

Shaggy buttermilk biscuit dough in a mixing bowl with uneven clumps, loose floury bits and visible butter pieces.
A few dry-looking patches are fine if a squeezed handful holds together. Don’t stir to a smooth dough.

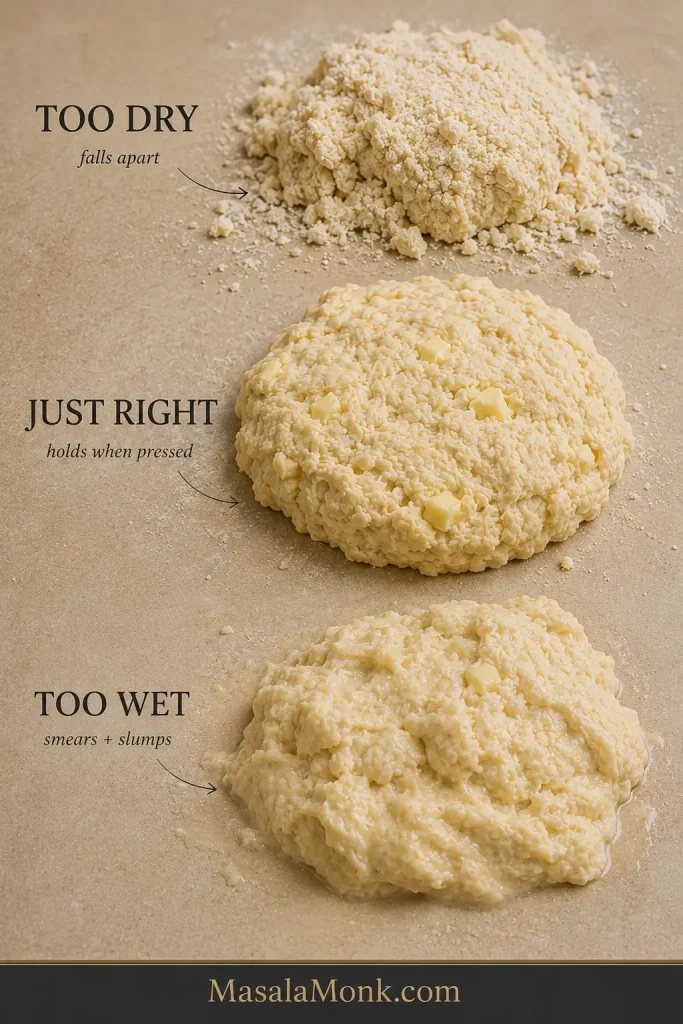
Too Dry

The shaggy mixture breaks into dusty pieces, loose flour sits underneath, and a handful refuses to stay together when squeezed.

Add a little of the reserved buttermilk and press again. Use the rest only if loose dry flour remains and the mixture still refuses to hold together.

Just Right

The mixture looks rough and uneven. It feels lightly tacky and holds when pressed without becoming smooth or elastic. Pieces and flat streaks of butter remain visible.

This is the stage people often accidentally “fix” with extra flour. Leave it alone. Biscuit dough does not need to become neat before it becomes good.

Rough, softly gathered biscuit dough with irregular edges and small visible pieces of butter on a lightly floured counter.
The target is rough, soft and lightly tacky—not smooth, elastic or paste-like.

Too Wet

A mixture that smears across the counter, slumps instead of holding a rectangle, or clings to your hands in thick paste has moved beyond light tackiness.

When the dough is only slightly sticky, correct the surface rather than changing the dough itself. A small dusting of flour on the counter is usually enough.

Rough pre-fold biscuit dough on a counter with a thin dusting of flour and much of the work surface still visible.
You only need enough flour to prevent sticking. White ridges or a heavily coated underside mean too much.

Once you can recognize this texture by feel, the recipe stops being something you follow nervously and starts becoming something you know how to make.

Three biscuit dough states labeled too dry, just right and too wet, showing crumbly, cohesive and sticky slumping textures.
Dry dough fractures, good dough presses together, and overly wet dough sticks heavily and slumps or smears.

Need the quantities or sequence again? Back to Recipe ↑

Why These Biscuits Rise Tall and Flaky

The folds create seams, starting thickness gives the biscuit room to rise, and cutting and spacing shape the final height and crust.

Four Folds Build Layers Without Overworking the Dough

Each fold stacks pieces of butter and dough over one another. In the oven, those rough layers separate into the seams that make a warm biscuit easy to pull apart.

Four-stage guide showing biscuit dough flattened, folded in half and turned through four rounds as it becomes progressively more structured.
Later folds should feel slightly more structured while the surface stays rustic. Stop if the dough turns springy or polished.

A biscuit with very little folding has a softer, more even crumb. More elaborate lamination creates increasingly dramatic sheets. Four simple folds give this version a middle ground: visible flake and good height with a soft biscuit crumb.

Close-up of folded biscuit dough with a rough surface, subtle seams and small pieces of butter still visible throughout.
Pale butter flecks should remain visible after folding; greasy translucent smears mean the dough has warmed too much.

Thickness and a Clean Cut Set Up the Rise

Starting thickness limits how tall a biscuit can become. A thin biscuit can rise beautifully and finish short simply because it had less height at the beginning.

Side view of hand-patted biscuit dough measuring about 1 inch or 2.5 centimeters thick.
Check from the side: an even 1-inch slab gives every biscuit the same starting chance to rise.

A sharp cut also leaves the folded edge open to rise. Twisting presses those edges together, which is why the recipe uses one straight downward cut and a straight lift. King Arthur Baking’s guide to higher-rising biscuits goes deeper into the relationship between cutting and rise.

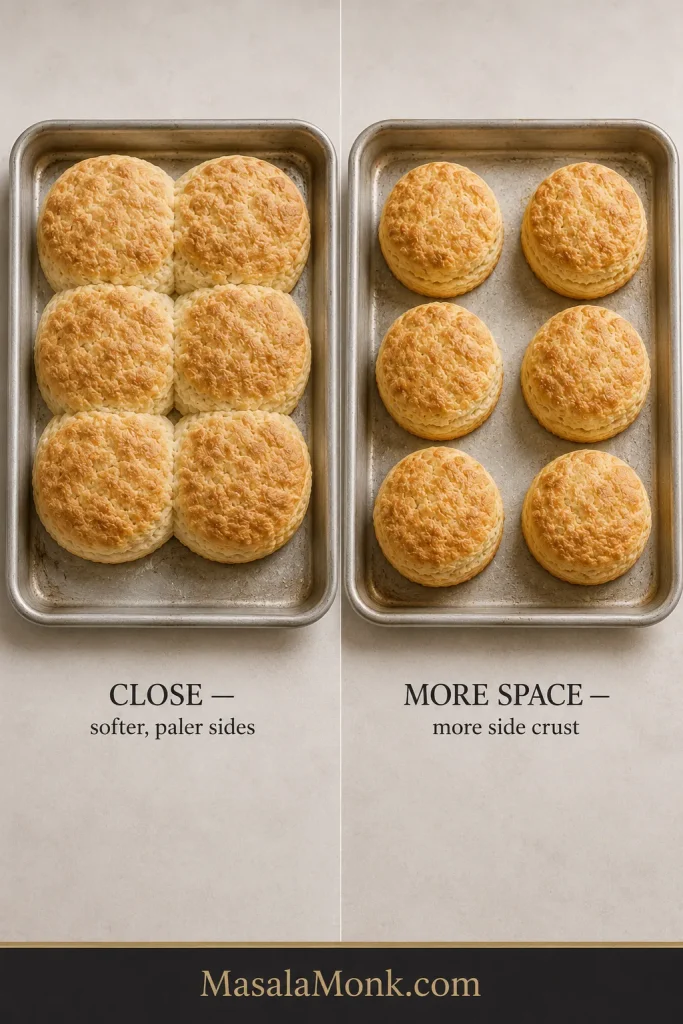
Shape and Spacing Change the Crust

If You Want…Choose…
Soft pull-apart sidesBiscuits touching or almost touching
More browned crust around each biscuitMore space between the biscuits
Classic round biscuitsA sharp round cutter
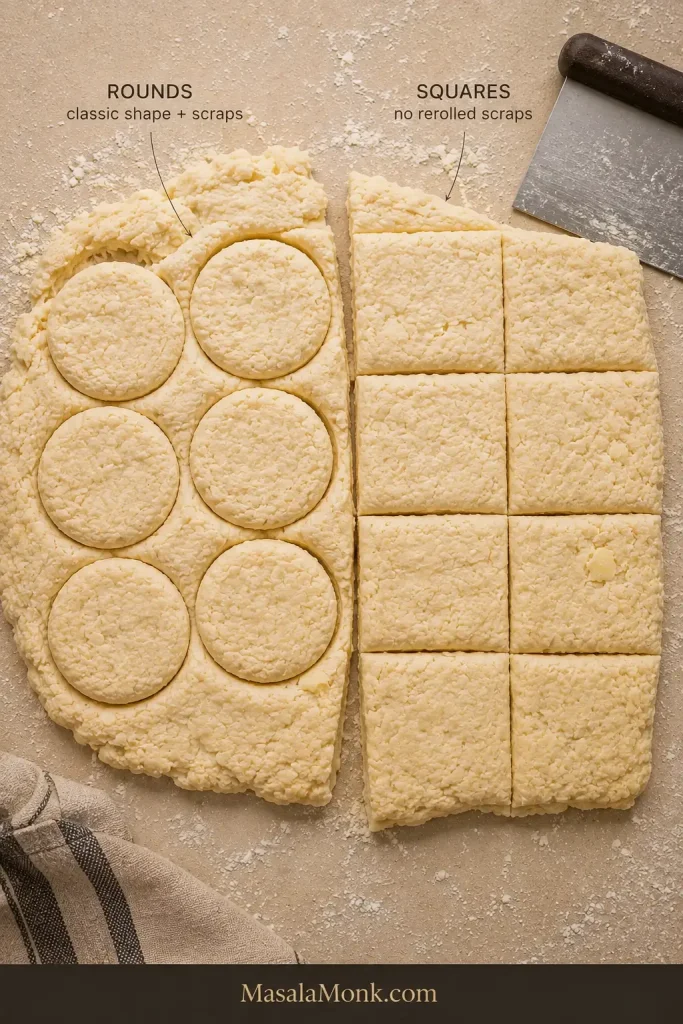
No rerolled scrapsSquares cut with a sharp knife or bench scraper

Close biscuits support one another as they rise and shield their sides from some direct oven heat, leaving those sides pale and soft. More room exposes additional surface to heat and creates more crust.

Matched baked biscuits showing close spacing with pale soft sides and wider spacing with more browned side crust.
Close spacing gives softer sides; more room gives more browned crust. Choose one result and keep spacing consistent.

Rounds leave scraps between the cuts. Press them together once and cut again. Biscuits cut from the scraps may rise a little less evenly because that dough has already been handled. Squares avoid scraps altogether.

Round biscuits cut with a metal cutter beside square biscuits cut with a bench scraper, with scraps visible around the round cuts.
Rounds create scraps; tight cutting reduces them. Squares avoid scraps altogether.

A biscuit can lean or split unevenly and still be excellent inside. Height gives you useful feedback; perfection is not the goal.

Bake Hot and Look Beyond the Top

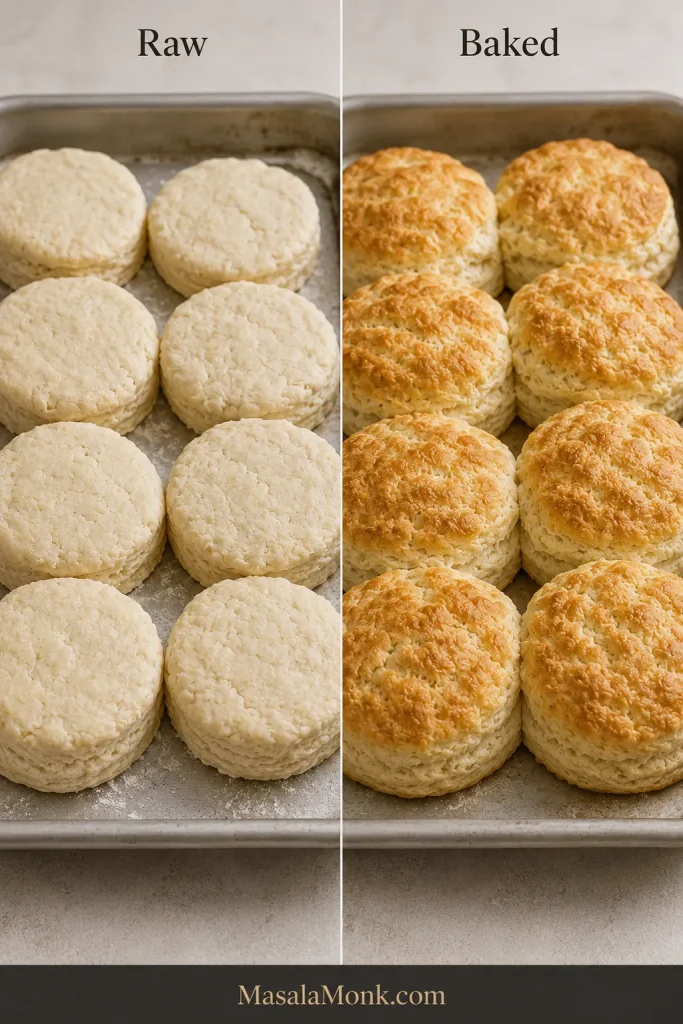
Oven heat affects more than browning: it also controls how quickly the biscuit structure sets while the dough expands. That makes the before-and-after shape worth watching alongside color.

The same tray of biscuit rounds shown before baking and after rising into tall golden biscuits.
Successful biscuits gain much more height than width. A spreading footprint is a useful clue even when the tops brown well.

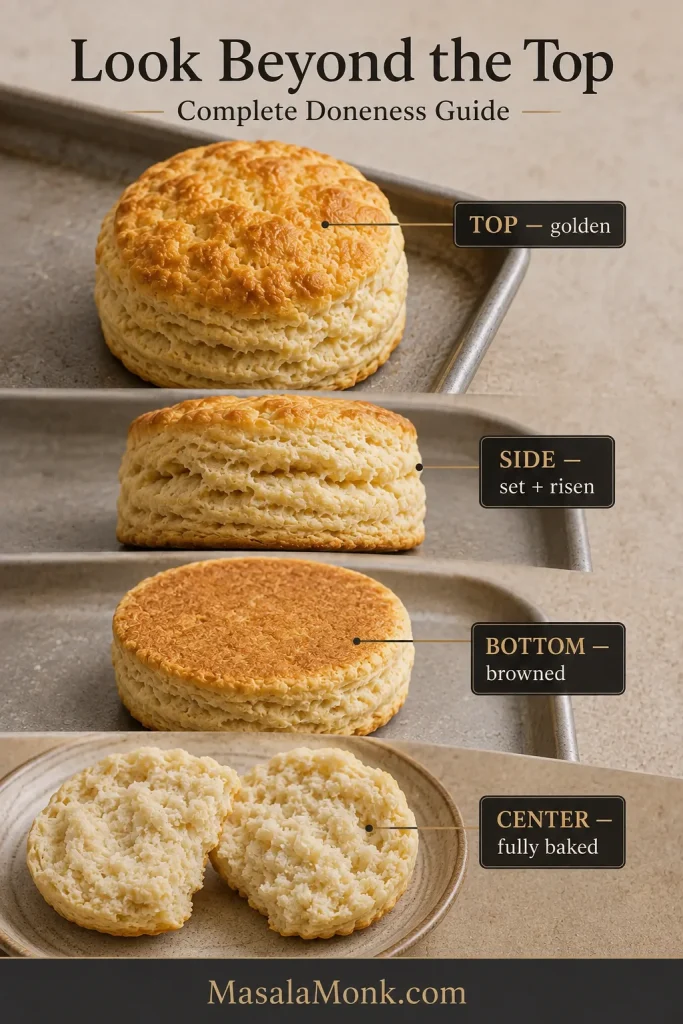
For this size and thickness, use 450°F / 230°C conventional. Begin checking around 12 minutes, and look at the whole biscuit instead of judging it by the top alone.

Four-part biscuit doneness guide showing a golden top, risen set side, browned bottom and fully baked split center.
When color and center disagree, trust the center. Golden tops cannot rescue a glossy, compressed middle.
  • Top: golden, with no raw-looking floury patches.
  • Sides: set and risen, with visible separation through the layers.
  • Bottom: evenly browned, not scorched.
  • Center: fully set, without glossy raw dough or a gummy stripe.

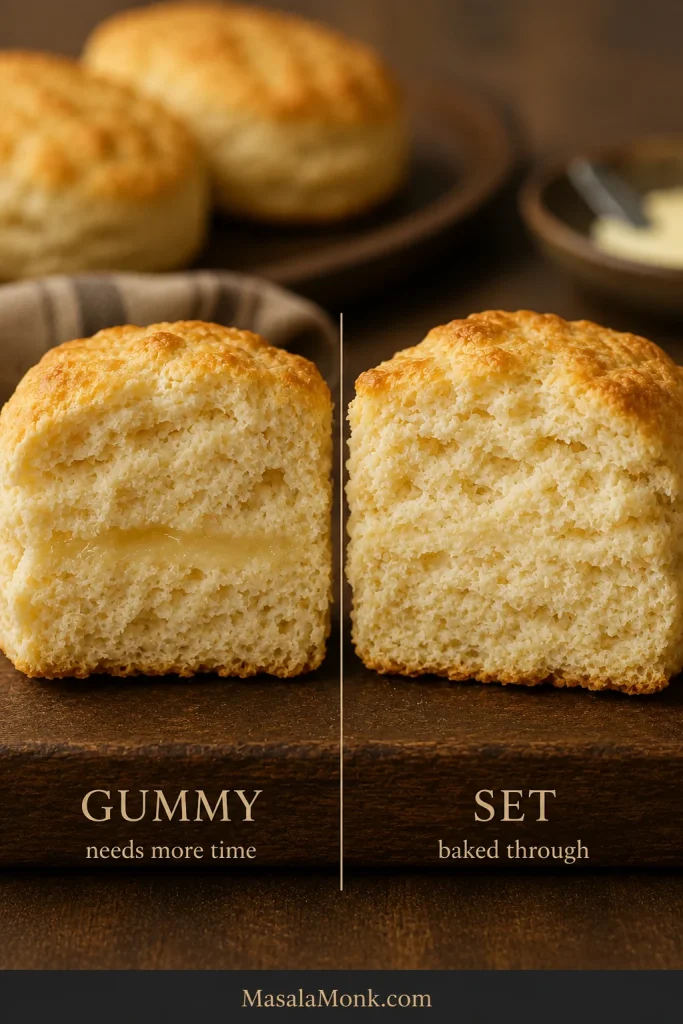
A large or extra-thick biscuit can become beautifully golden before its center is completely baked. When in doubt, split one of the less-perfect biscuits and look inside.

Split biscuits comparing a narrow glossy gummy stripe in the center with an evenly baked tender interior.
A gummy center often looks slightly glossy and compressed rather than obviously raw.

If they rose well, split easily, and are tender through the middle, they’re done. Eat one while it’s hot.

Hot biscuit pulled open to reveal a tender irregular crumb with natural flaky seams and melting butter.

How did the batch turn out? Fix a flat, dry, tough or gummy biscuit → · Back to Recipe ↑

Troubleshooting Flat, Tough or Dry Biscuits

A low, dry, or oddly shaped batch usually leaves clues about what happened.

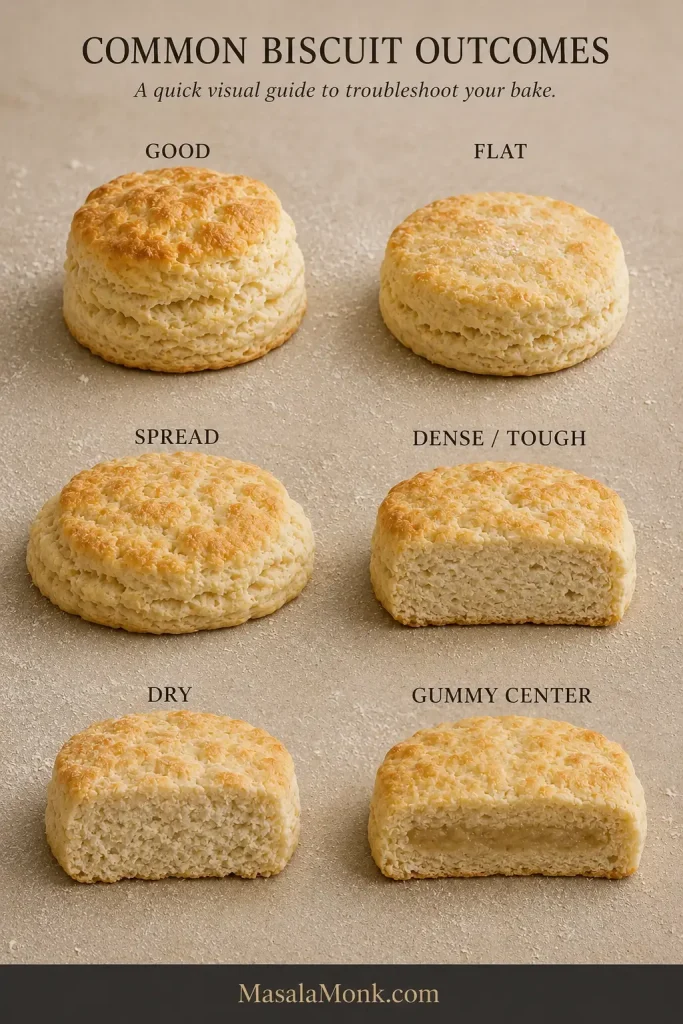
Six biscuit outcomes labeled good, flat, spread, dense or tough, dry and gummy center, with visible differences in shape and crumb.
Read the shape first, then the crumb: together they usually point back to the stage that went wrong.

Baking powder that has been open for a long time is worth replacing when repeated batches stay unusually low. When browning or timing consistently seems far from what the recipe describes, an inexpensive oven thermometer can also tell you whether the oven is reaching the temperature you set.

What You SeeWhere to LookNext Batch
Flat and wideWarm butter, tired leavener, thin starting slab, oven not fully hotKeep the fat firm, use fresh baking powder, start thick, preheat fully
Tough or bread-likeExtra flour, prolonged mixing or kneadingWeigh the flour and stop while the mixture is rough
DryToo much flour, too little buttermilk, long bakeCheck hydration before shaping and begin checking the oven sooner
Tender but no obvious layersButter worked in finely, less foldingLeave some butter pieces visible and use the four folds
Spread sidewaysWarm butter, overly loose dough, oven not fully hotFirm the shaped biscuits before baking and check the oven
Leaning or crookedUneven slab or angled cutPat evenly and cut vertically
Dark bottomsDark or thin pan, low rack, hot-running ovenCheck earlier, use a heavier pan if possible, or move the rack higher
Gummy middleThick or large biscuit pulled before the center setGive the middle more time and verify oven temperature

Flat: No Rise or Too Much Spread?

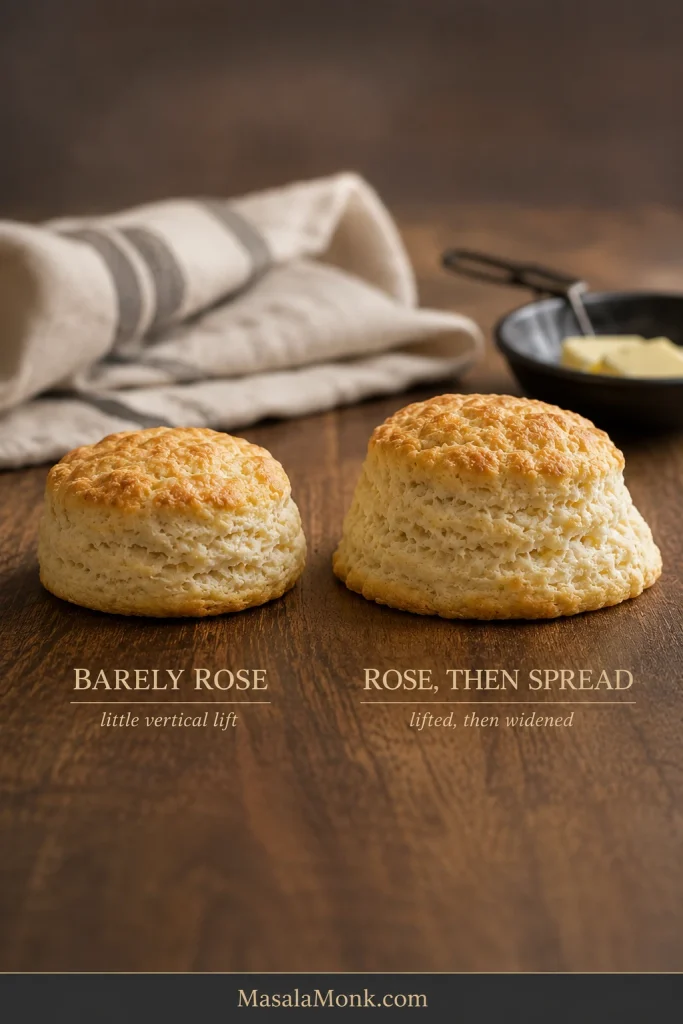
A biscuit that barely gains height points toward tired leavening, a thin starting slab, or an oven that never became fully hot. A biscuit that lifts and then widens points more toward warm butter or dough too loose to hold itself upright.

Side-profile comparison of a short compact biscuit that barely rose and a wider biscuit that rose before spreading outward.
Short and narrow points to poor lift; noticeably wider points more toward spread. Similar height can hide different failures.

Tough Is Different From Crisp

A browned edge can be pleasantly crisp. Toughness shows up through the center as a firm, bread-like chew where the crumb ought to yield. Extra flour and continued mixing after the dough has come together are common reasons.

Dry: Dough Problem or Oven Problem?

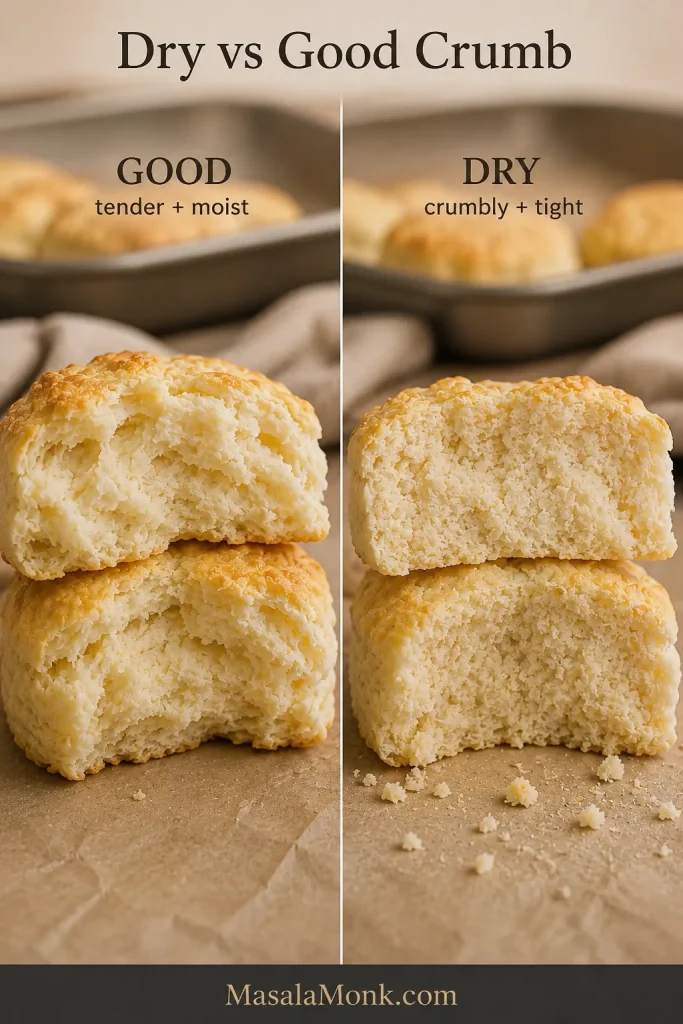
Raw dough that crumbles and needs firm pressure to stay together started too dry. Dough that went into the oven cohesive and came out dry points more toward baking time. Even a couple of unnecessary minutes can change the crumb noticeably.

Side-by-side biscuit interiors comparing a soft tender crumb with a tighter, drier and more crumbly interior.
Good crumb bends and separates softly; dry crumb fractures and sheds small loose pieces.

Tender Without Layers Can Still Be a Good Biscuit

A tender biscuit with a soft, even crumb may simply have had its butter worked in more finely. That’s a perfectly good biscuit with a different texture.

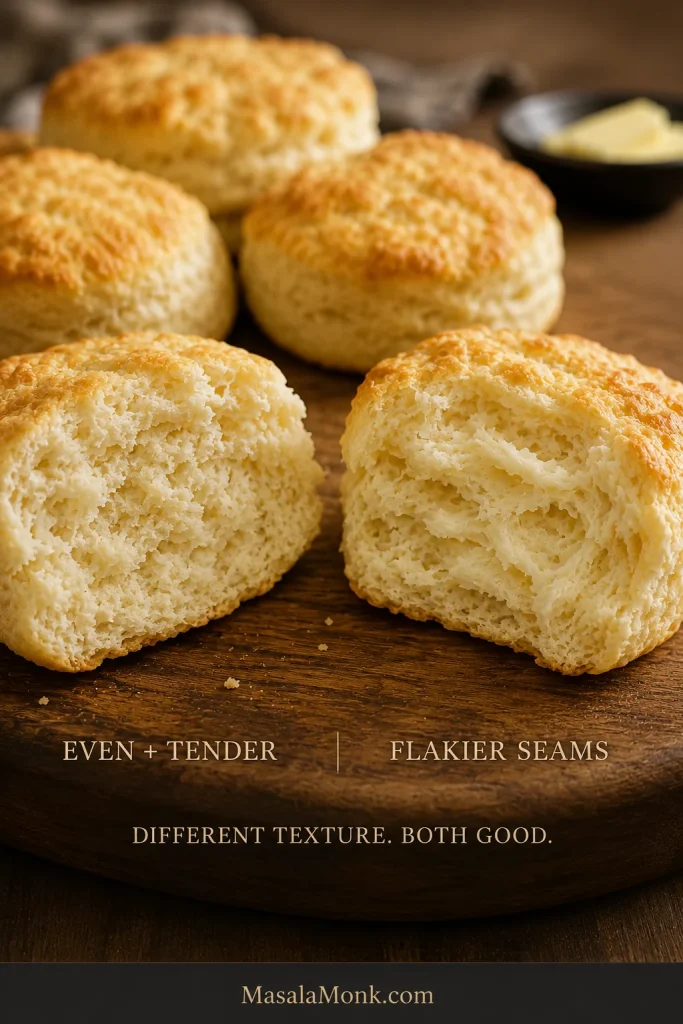
Two successful biscuit interiors labeled even and tender versus flakier seams, both shown as acceptable results.
Tenderness matters more than layer count. An even, soft crumb can be every bit as successful as a flakier one.

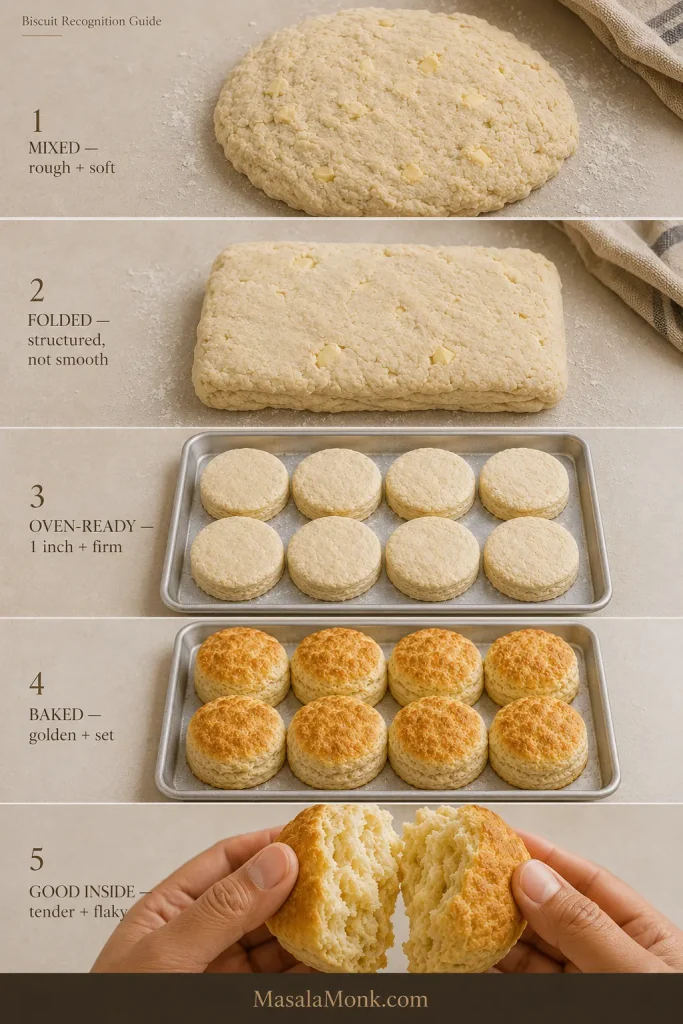
Before moving into make-ahead, this recognition guide gathers the recipe’s main visual checkpoints in one place—from mixed dough through the finished crumb.

Five-stage guide showing rough mixed dough, folded dough, close-spaced oven-ready rounds, baked biscuits and a tender flaky interior.
Match your dough or biscuit to the closest stage here, then continue from that visual checkpoint instead of guessing.

Make Ahead, Freeze, Store and Reheat

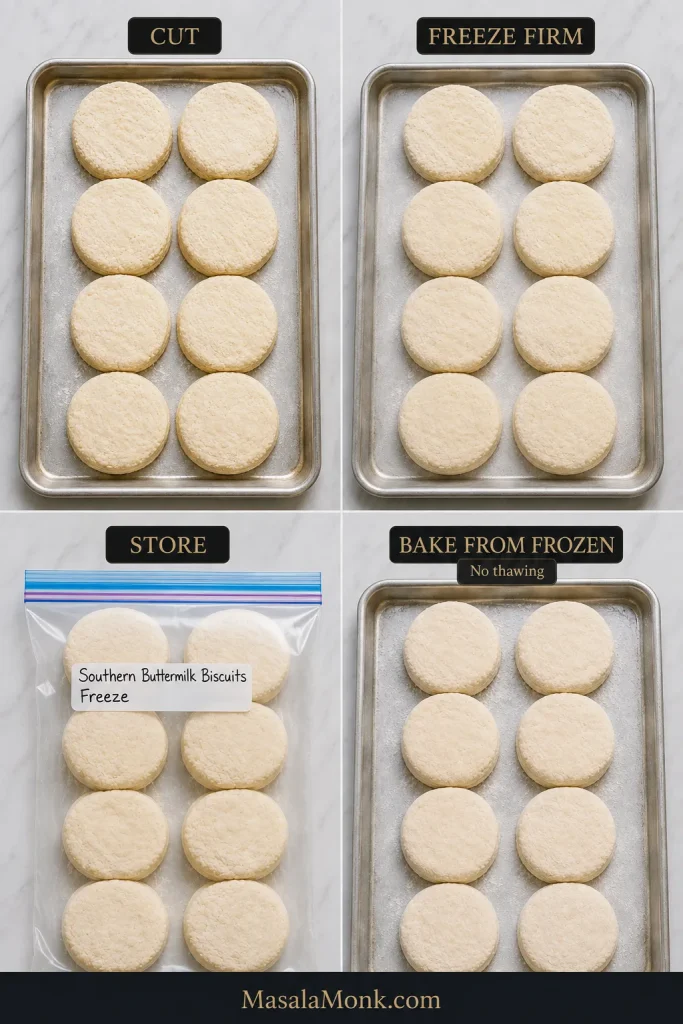
If flouring the counter first thing in the morning is the only thing standing between you and homemade biscuits, freeze the cut biscuits before baking.

Four-step guide showing raw biscuits cut on a tray, frozen firm, stored in a freezer bag and returned frozen to a baking sheet.
Freeze until the rounds are firm enough to transfer without denting, then bag them.

Freeze Before Baking

  1. Prepare and cut the biscuits normally.
  2. Place them on a lined tray with space between them.
  3. Freeze until completely firm.
  4. Transfer to a freezer-safe bag or airtight container.
  5. Use within 2 months for best quality.

Bake Straight From Frozen

Put the biscuits straight into the 450°F / 230°C conventional oven without thawing. Frozen biscuits take longer than fresh ones, so use the same top, side, bottom, and center cues instead of assuming another recipe’s timing will fit this dough.

Store and Reheat Baked Biscuits

  • Room temperature: Cool completely and keep airtight for up to 2 days.
  • Longer storage: Freeze them instead of refrigerating them for several days.
  • Freeze baked biscuits: Wrap well once cool and use within 2 months for best quality.
  • Oven: Reheat at 350°F / 175°C for 5–8 minutes, until warm through the center.
  • Microwave: For one biscuit, start with 10–15 seconds and add another short burst only if needed.

A reheated biscuit that seems a little dry usually comes back nicely when split hot and spread with butter.

What to Serve With Southern Biscuits

The first biscuit off the tray barely needs anything. Salted butter, honey, or a spoonful of homemade pear jam are enough.

If potatoes belong on the breakfast plate too, crispy air-fryer hash browns keep the stovetop free while the rest of breakfast comes together.

Biscuits also make excellent breakfast sandwiches with eggs and sausage, country ham, or fried chicken. For a bigger Sunday or holiday table, a brown sugar honey glazed ham turns them into the bread everyone keeps reaching for between bites.

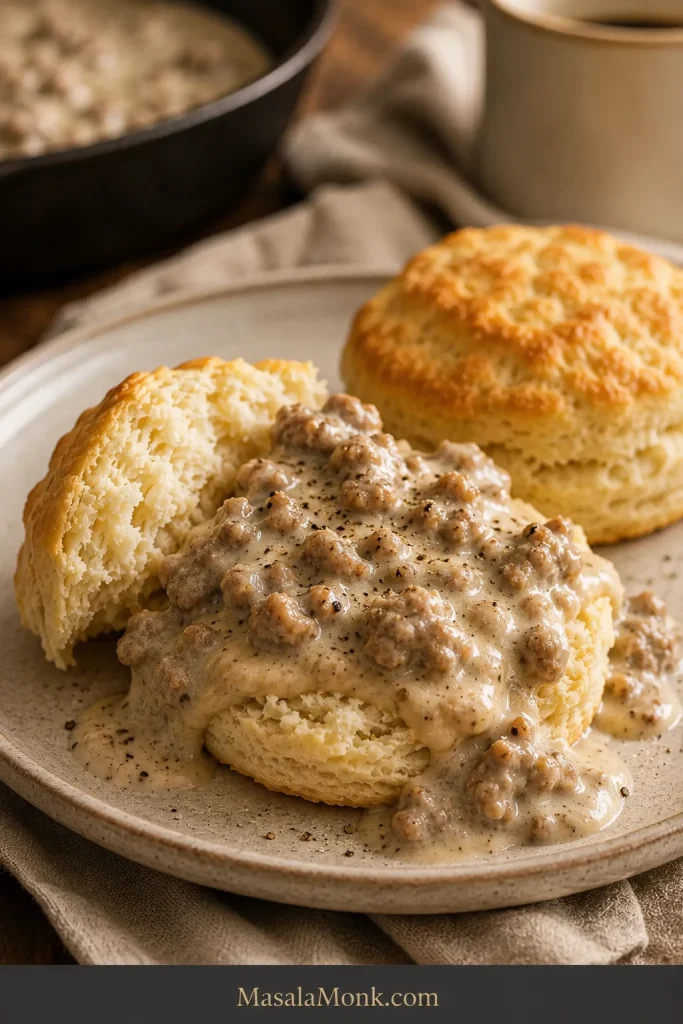
And, of course, a soft but sturdy biscuit is exactly what you want underneath peppery sausage gravy, where the gravy can settle into the torn layers without turning the whole biscuit to mush.

Split Southern buttermilk biscuit covered with creamy sausage gravy, browned sausage pieces and black pepper, with another golden biscuit nearby.

Split rather than crush the biscuit so gravy soaks into the crumb while some baked crust stays intact.

Southern Buttermilk Biscuit FAQs

Do I need White Lily flour for Southern biscuits?

No. Soft-wheat flour can make especially delicate biscuits, but ordinary all-purpose flour works very well when the recipe is designed around it. This recipe uses all-purpose flour deliberately.

Why is my biscuit dough sticky?

A little tackiness is normal. Dough that sticks lightly to your fingers but holds its shape is in the right zone. Heavy smearing and slumping call for a small dusting of flour.

Can I make biscuits without a biscuit cutter?

Yes. Cut the final rectangle into squares with a sharp knife or bench scraper. Squares give you clean edges and leave no scraps.

Can I make the biscuits the night before?

The easiest make-ahead route is to cut and freeze the raw biscuits, then bake them directly from frozen. That keeps morning work minimal while preserving the cold butter and freshly mixed dough structure.


The next batch should feel less mysterious. You now know what firm butter, soft dough that holds together, and a fully baked center look like.

Pull one apart while it is still warm. The center should give along the folds, and a little butter should disappear straight into the crumb. Then decide whether the first biscuit needs honey, jam, or nothing at all.

Back to Recipe ↑ · Back to Top ↑

Posted on — Leave a comment

Why Buttermilk Deserves a Spot in Your Fridge Are You Using It Right?

In a culinary world brimming with superfoods and diet trends, buttermilk stands out as a humble yet fascinating ingredient. Once a simple byproduct of butter-making, buttermilk has transcended its origins to become a staple in kitchens and cultures worldwide. Its journey from an accidental discovery to a cherished component of countless recipes is a testament to its versatility, nutritional benefits, and unique flavor. Let’s dive into the tangy depths of buttermilk, exploring its science, health benefits, and culinary prowess.

The Science of Sour Unpacking Buttermilk’s Creation

Buttermilk’s story begins in the pastoral landscapes of dairy farming, where the churning of cream yields butter and a leftover liquid—traditionally called buttermilk. However, the buttermilk we find on supermarket shelves today is often a cultured product, created by adding lactic acid bacteria to milk. This fermentation process thickens the milk, imbuing it with a tangy flavor and a creamy texture that enhances everything from baked goods to marinades.

Nutritional Nectar or Just Another Beverage?

Buttermilk’s reputation as a healthful ingredient is well-earned. Packed with calcium, vitamin B12, riboflavin, and phosphorus, it’s a nutritional powerhouse that supports bone health, energy production, and cellular function. Moreover, the probiotics introduced during the fermentation process contribute to a healthy gut microbiome, aiding digestion and potentially boosting immunity.

However, not all buttermilk is created equal. While traditional and cultured buttermilk boast health benefits, some commercial versions may contain additives or excess sodium. Savvy consumers should read labels carefully, opting for products with minimal ingredients to reap the full health rewards.

Culinary Chameleon: Buttermilk in the Kitchen

Buttermilk’s culinary applications are as diverse as they are delicious. Its acidic nature tenderizes proteins in marinades, adding moisture without the fat. In baking, buttermilk interacts with baking soda to produce carbon dioxide, lending a light, airy texture to pancakes, biscuits, and cakes. Its tangy flavor also makes it an excellent base for dressings, dips, and cool beverages, offering a refreshing twist on traditional recipes.

DIY Dairy: The Joy of Homemade Buttermilk

For the adventurous and health-conscious, making buttermilk at home is a simple and rewarding endeavor. By fermenting milk with a bit of existing cultured buttermilk, one can create a fresh supply of this tangy treasure. This not only ensures a product free from unwanted additives but also connects us to the traditional practices of our culinary ancestors.

Buttermilk’s Place at the Table: A Modern Renaissance

As we navigate a world where processed foods are omnipresent, buttermilk offers a return to simplicity and wholesomeness. Its resurgence in popularity reflects a broader trend towards fermented foods and their associated health benefits. Whether used in a rustic loaf of bread, a batch of tender fried chicken, or a cooling lassi, buttermilk enriches our meals with its depth of flavor and nutritional profile.

In Conclusion: The Resurgence of a Dairy Darling

Buttermilk’s journey from a humble byproduct to a celebrated kitchen staple is a story of rediscovery and appreciation. As we learn more about its health benefits, culinary versatility, and cultural significance, buttermilk stands poised to reclaim its rightful place in the pantheon of beloved dairy products. So, the next time you reach for that carton of buttermilk, know that you’re not just adding an ingredient to your recipe; you’re embracing a piece of culinary heritage, nourishing your body, and delighting your palate.

10 FAQs for “Why Buttermilk Deserves a Spot in Your Fridge Are You Using It Right?”

What exactly is buttermilk?

Buttermilk is a fermented dairy product, traditionally the liquid leftover after churning butter. Today, it’s commonly made by adding cultures to milk, creating a tangy, thick liquid.

Can buttermilk benefit my health?

Yes, buttermilk is rich in calcium, protein, vitamins, and probiotics, making it beneficial for bone health, digestion, and more.

Is buttermilk high in fat?

Traditional buttermilk from churning is low in fat. Cultured buttermilk based on low-fat or skim milk also contains minimal fat.

How can I use buttermilk in cooking?

Buttermilk is versatile in the kitchen, perfect for tenderizing meats, adding moisture to baked goods, and creating creamy dressings and sauces.

Can I make buttermilk at home?

Absolutely! Add a tablespoon of vinegar or lemon juice to a cup of milk and let it sit for about 10 minutes, or culture milk with a buttermilk starter.

Does buttermilk need to be refrigerated?

Yes, store buttermilk in the refrigerator to maintain its freshness and prevent spoilage.

How long does buttermilk last?

When stored properly in the fridge, buttermilk can last up to two weeks. Always check the expiration date and look for signs of spoilage.

Can I freeze buttermilk?

Yes, buttermilk can be frozen, though it may separate when thawed. It’s best used in cooked dishes if frozen and thawed.

Is buttermilk suitable for lactose intolerant individuals?

Buttermilk contains lactose, though the fermentation process can reduce its levels. Lactose-intolerant individuals should proceed with caution or seek lactose-free options.

Can I substitute buttermilk in recipes?

Yes, for 1 cup of buttermilk, you can use 1 cup of milk mixed with 1 tablespoon of vinegar or lemon juice, or use yogurt or sour cream thinned with water.

Blog Tags

buttermilk, cooking tips, health benefits, dairy alternatives, fermentation, homemade recipes, baking secrets, probiotics, kitchen hacks, culinary versatility