
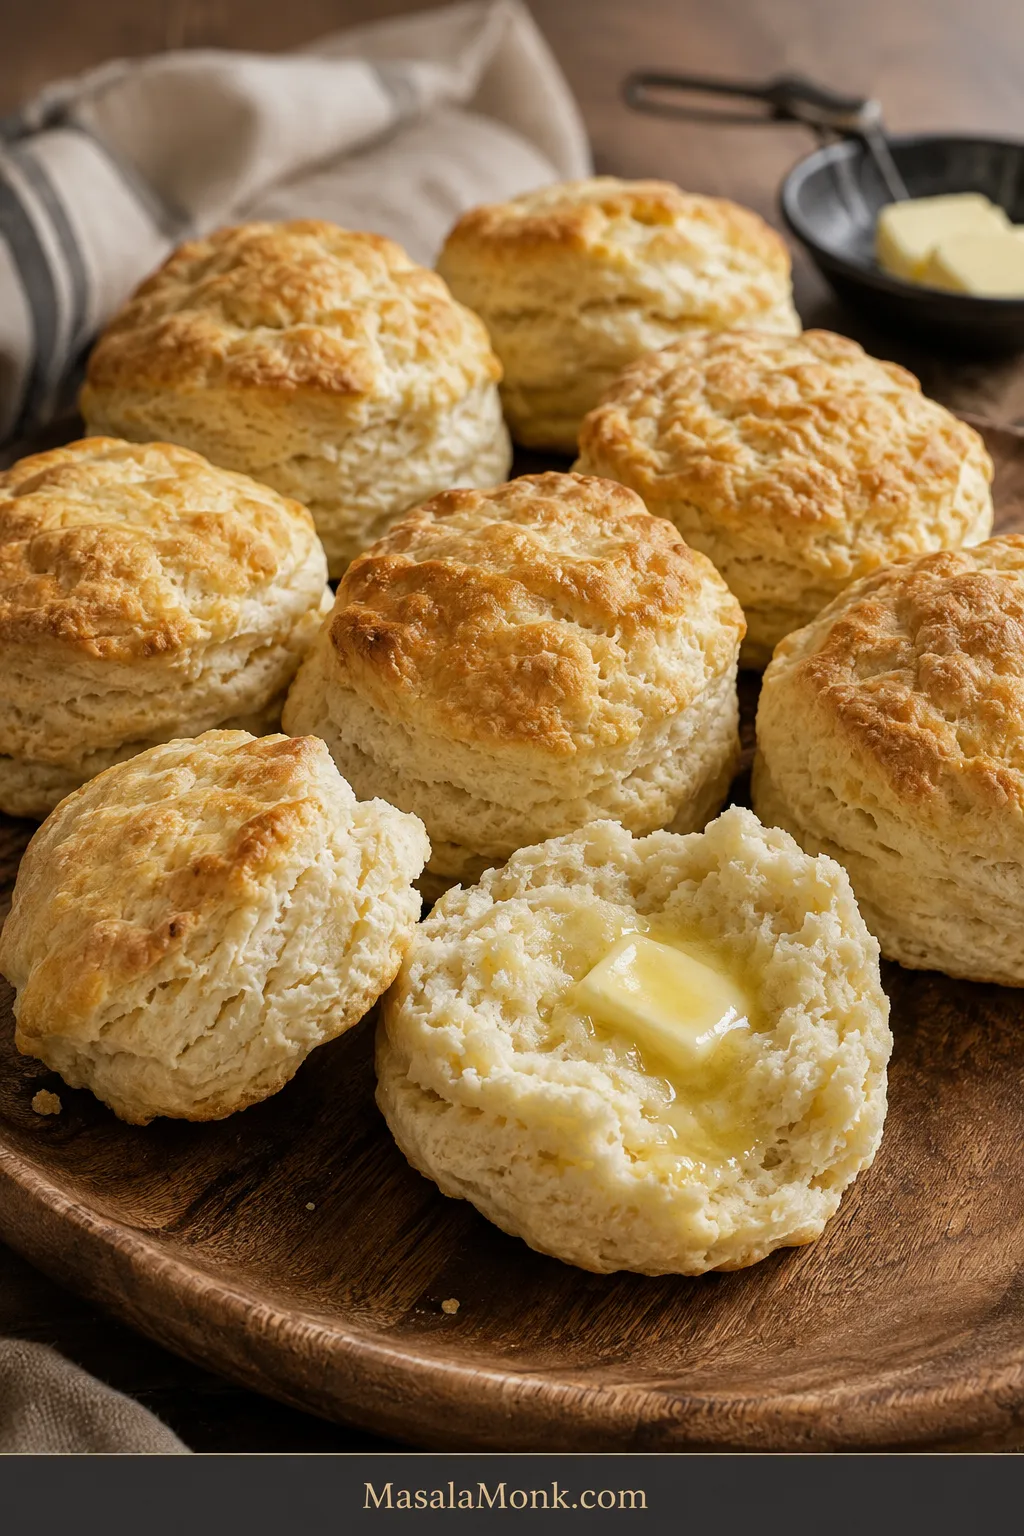
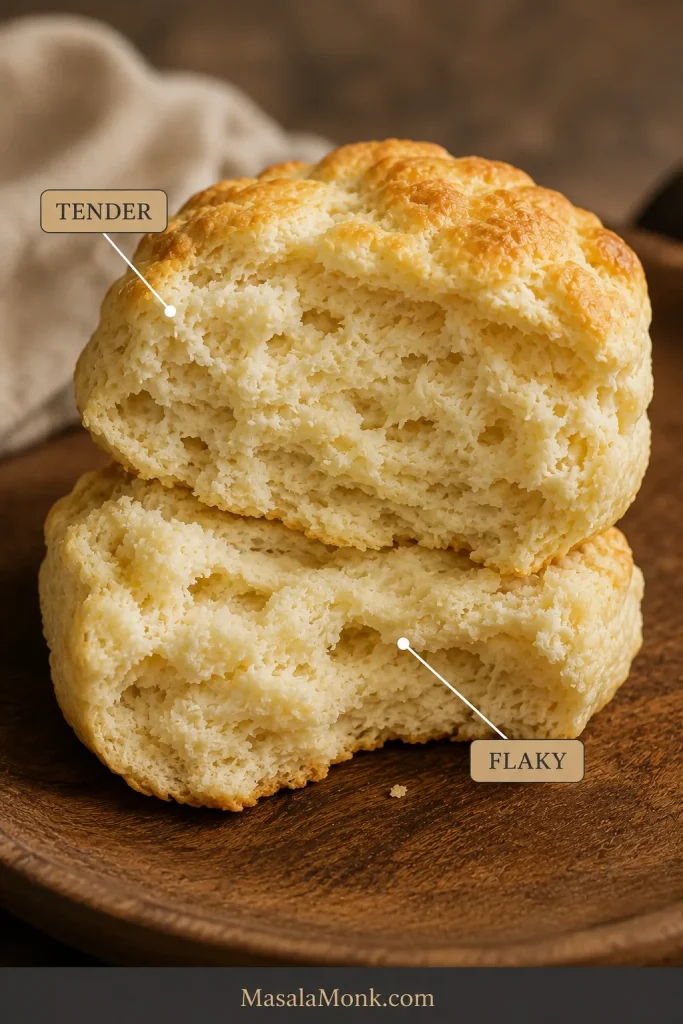
Pull apart a hot Southern biscuit and the center should open in tender, buttery layers, with the top golden and the middle moist enough to catch a melting swipe of butter.
These are the biscuits we’re making here: tall enough for visible layers, with a soft, tender center and buttery seams that separate easily while warm. You don’t need a food processor or rolling pin, and chilling only comes into play if the butter begins to soften while you work.
The whole batch takes about 35 minutes. Once you know what the butter and dough are supposed to feel like, biscuit-making becomes much less mysterious.
Quick Answer
For tall, flaky Southern buttermilk biscuits, keep the butter and buttermilk cold, mix until the dough is rough and lightly tacky, then fold and turn the dough four times before patting it to a full 1 inch / 2.5 cm thick.
Cut straight down with a sharp cutter, arrange the biscuits almost touching, and bake at 450°F / 230°C conventional until the tops are golden and the centers are baked through.
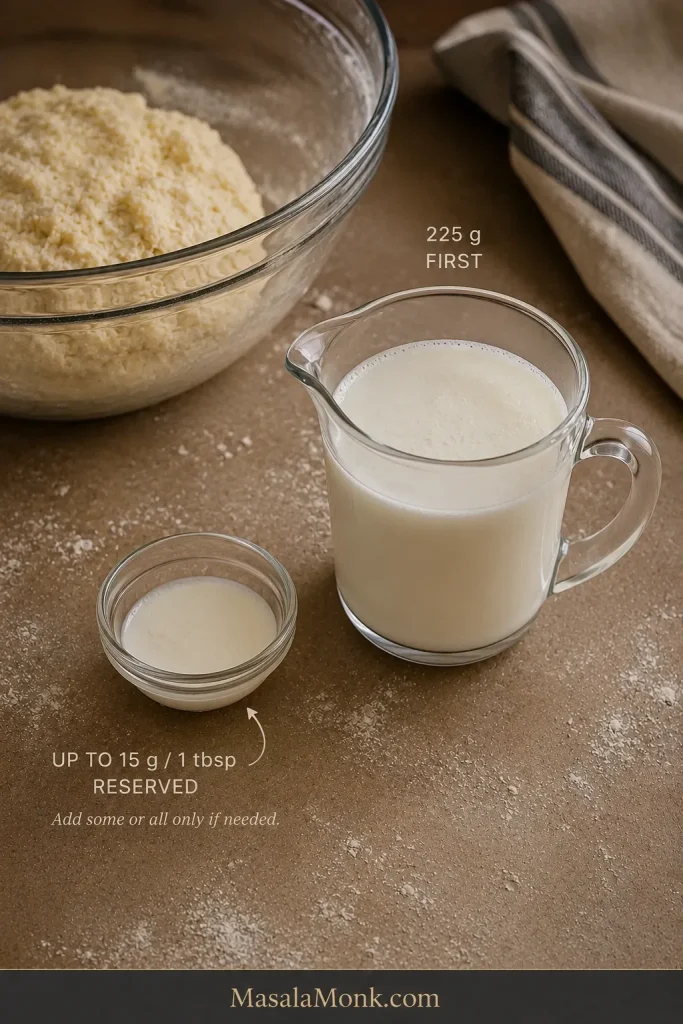
Start with 225 g of the buttermilk and reserve the final 15 g / 1 tablespoon. If dry flour still falls away when you press the mixture, add some or all of the reserve until the dough holds together.
Cold fat. Soft dough. Four folds. One-inch thickness. Hot oven. Those are the five things worth remembering.
Southern Buttermilk Biscuits Recipe
Makes about 8 biscuits with a 2½-inch / 6.4-cm cutter.
Ingredients
- 300 g / 10.6 oz / about 2½ cups all-purpose flour, spooned and leveled if measuring by cups, plus a little for the counter
- 14 g / 1 tablespoon + ½ teaspoon double-acting baking powder
- 2 g / ½ teaspoon baking soda
- 6 g fine sea salt or table salt / about 1 teaspoon
- 8 g / 2 teaspoons granulated sugar
- 113 g / 4 oz / ½ cup unsalted butter, very cold and cut into small cubes
- 240 g / about 1 cup cold cultured buttermilk, divided — start with 225 g and reserve 15 g / about 1 tablespoon
- 15 g / 1 tablespoon melted butter, for brushing after baking
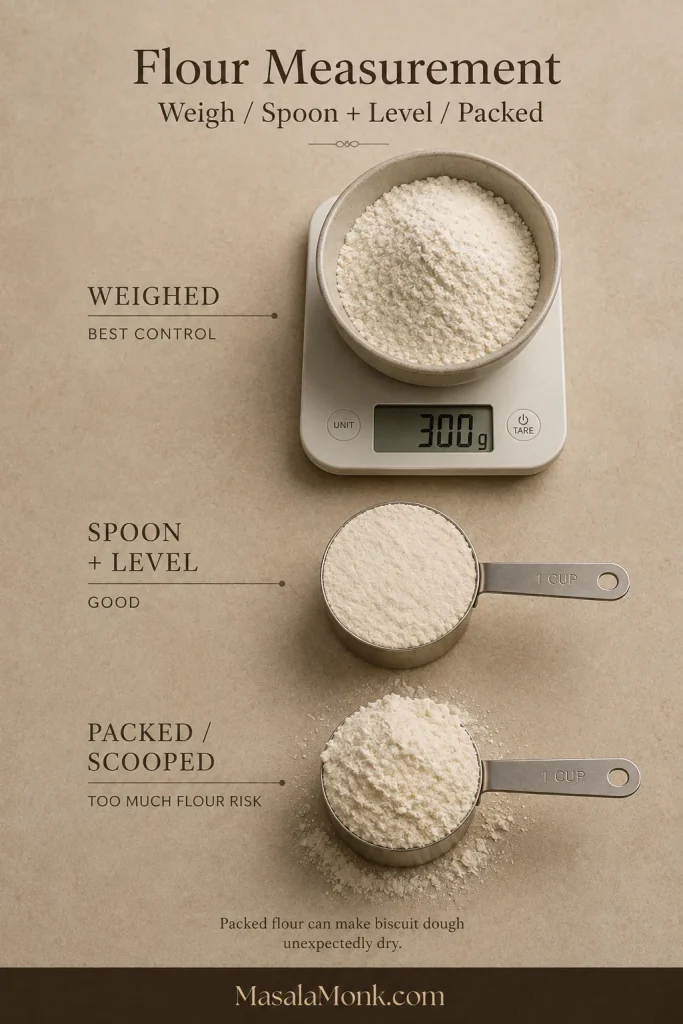
Use the gram measurements when possible. Flour is easy to overmeasure by volume, and even a modest extra scoop changes how much liquid the dough needs.
What You’ll Need
A digital kitchen scale is the most useful extra, along with a large bowl, pastry blender, fork or flexible spatula, sharp biscuit cutter, and sturdy baking sheet. A bench scraper is handy for handling the dough and for cutting square biscuits, but it isn’t essential.
No pastry blender? Use your fingertips to work the cold butter into the flour. Warm hands soften butter quickly, so work briefly and stop while distinct pieces remain.
Method
- Heat the oven. Set a rack in the center and preheat to 450°F / 230°C conventional. Line a sturdy, light-colored baking sheet with parchment rated for that temperature, or use a clean unlined sheet. A dark pan browns the bottoms faster, so check underneath a little earlier.
- Mix the dry ingredients. Whisk the flour, baking powder, baking soda, salt, and sugar thoroughly.
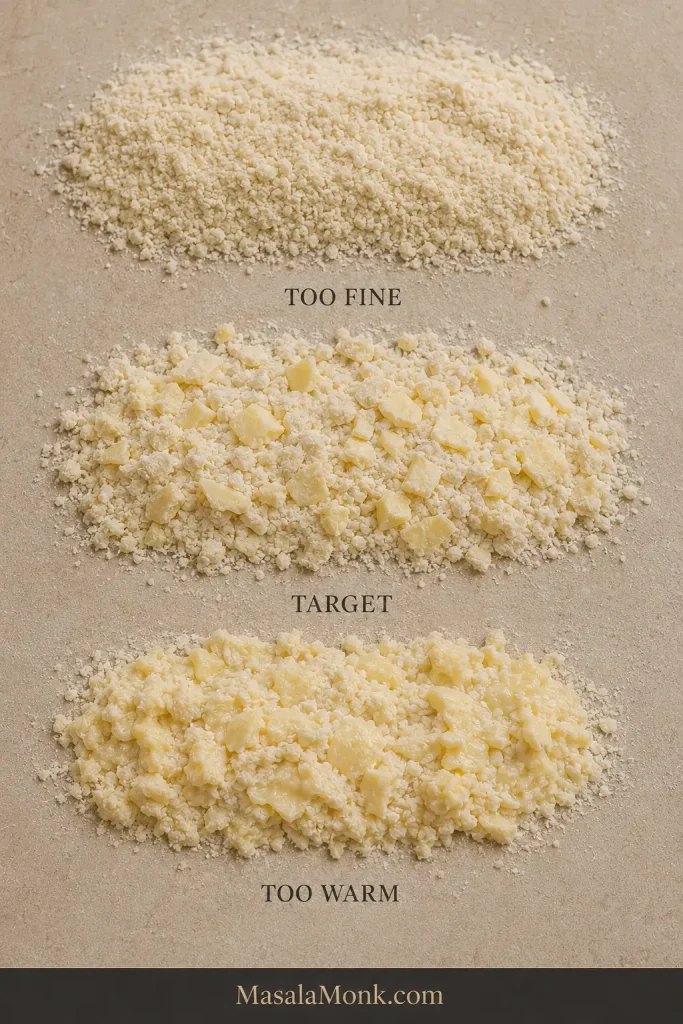
- Cut in the butter. Work until most pieces are roughly pea-size, with a few larger flat flakes visible. The mixture will look uneven.
- Add 225 g of buttermilk. Stir with a fork or flexible spatula until shaggy clumps form. Press a handful together. If dry flour still falls away, add some of the reserved 15 g / 1 tablespoon. Use the rest only if the mixture still needs it to hold together.
- Bring it together. Dust the counter with just enough flour to prevent obvious sticking—you should still be able to see the counter through it. Turn out the shaggy mixture and press the loose pieces into a rough rectangle.
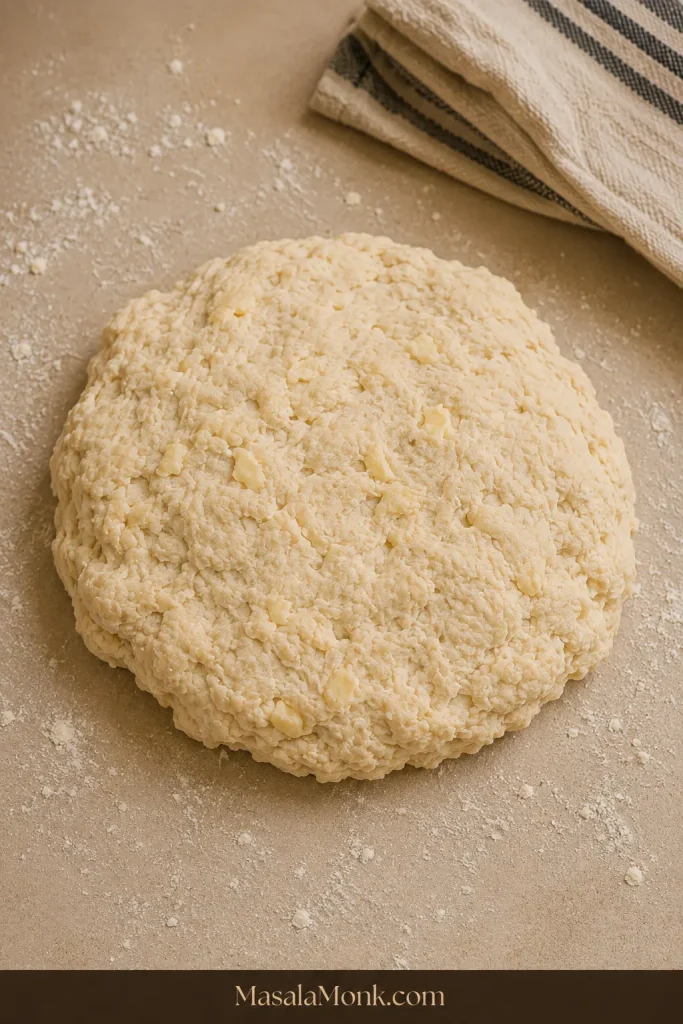
- Fold and turn four times. Flatten the rectangle to roughly ½ inch / 1.25 cm thick, fold it in half, then turn it 90 degrees. Flatten it again and repeat the fold-and-turn process three more times, for four folds total. By the later folds, the scruffy pile starts looking recognizably like biscuit dough while pieces of butter remain visible.
Shape, Cut and Bake
- Pat to 1 inch / 2.5 cm thick. Keep the slab reasonably even; the edges can stay rustic.
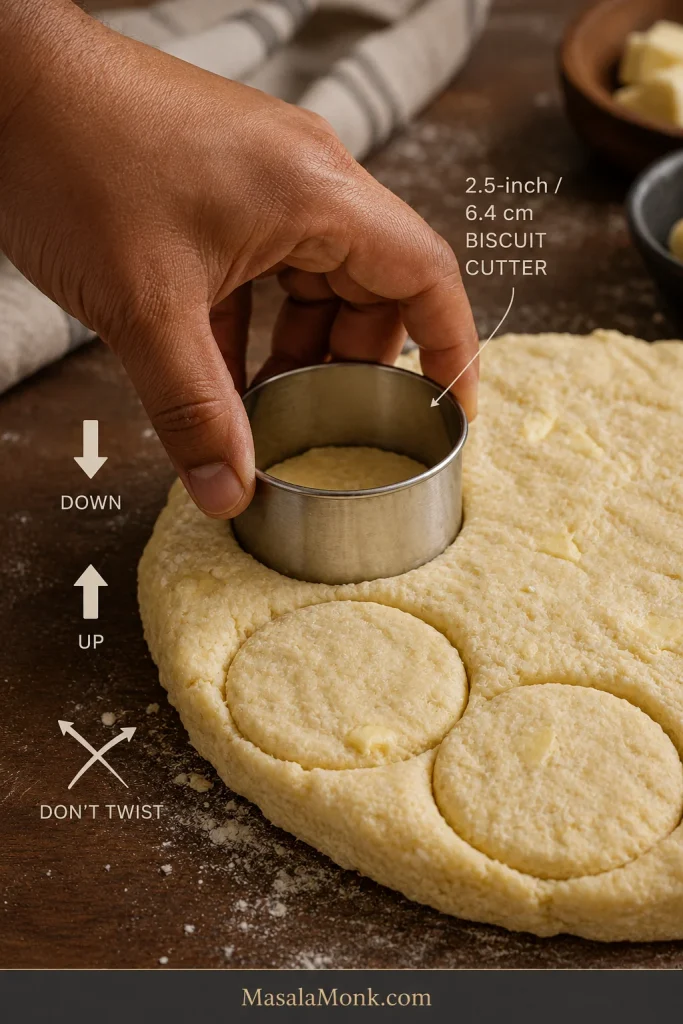
- Cut straight down. Lightly flour a sharp 2½-inch / 6.4-cm biscuit cutter, press straight through the dough, and lift straight up. Don’t twist the cutter.
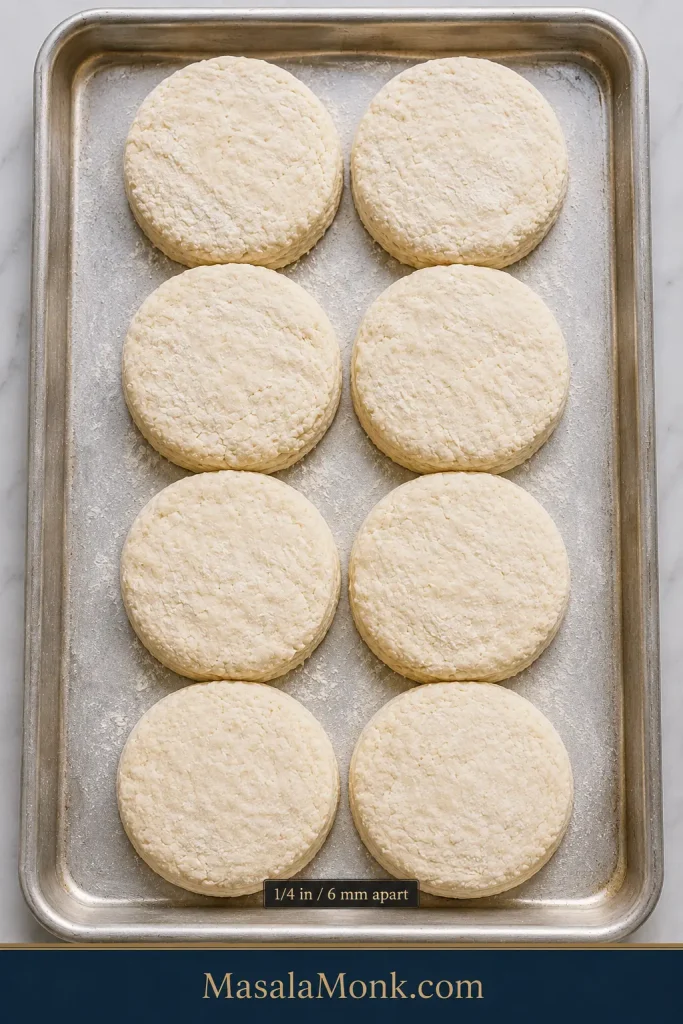
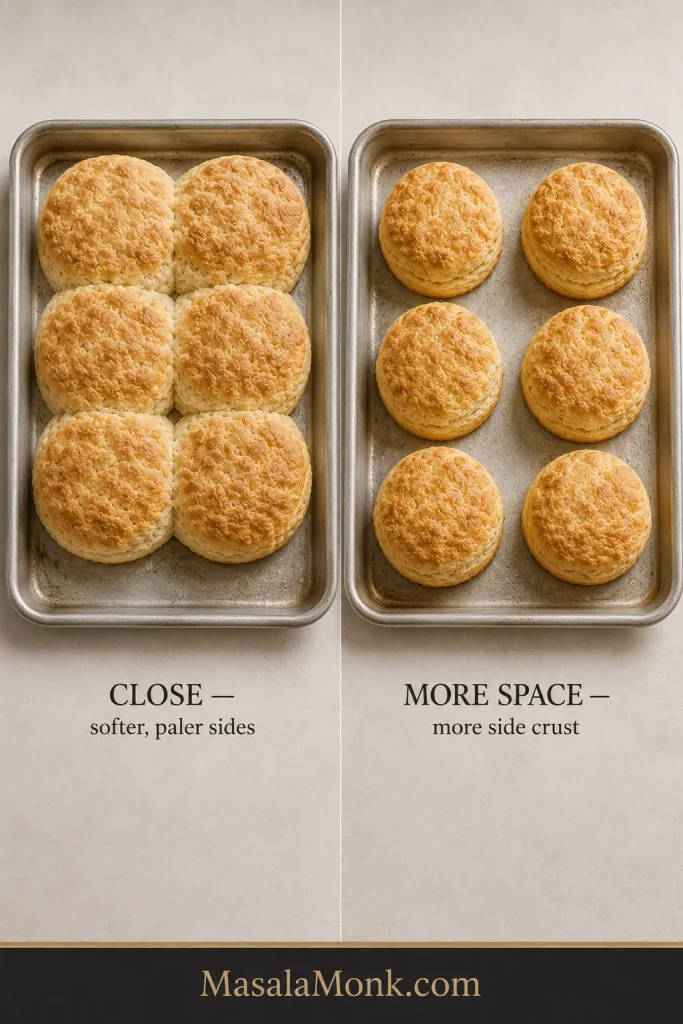
- Arrange almost touching. Place the biscuits about ¼ inch / 6 mm apart. Press the scraps together once and cut the remaining biscuits.
- Bake. Bake for 12–15 minutes, beginning to check at 12 minutes. Look for golden tops, set sides, browned bottoms, and centers without a gummy stripe.
- Brush and serve. Brush the hot tops with melted butter and serve warm.
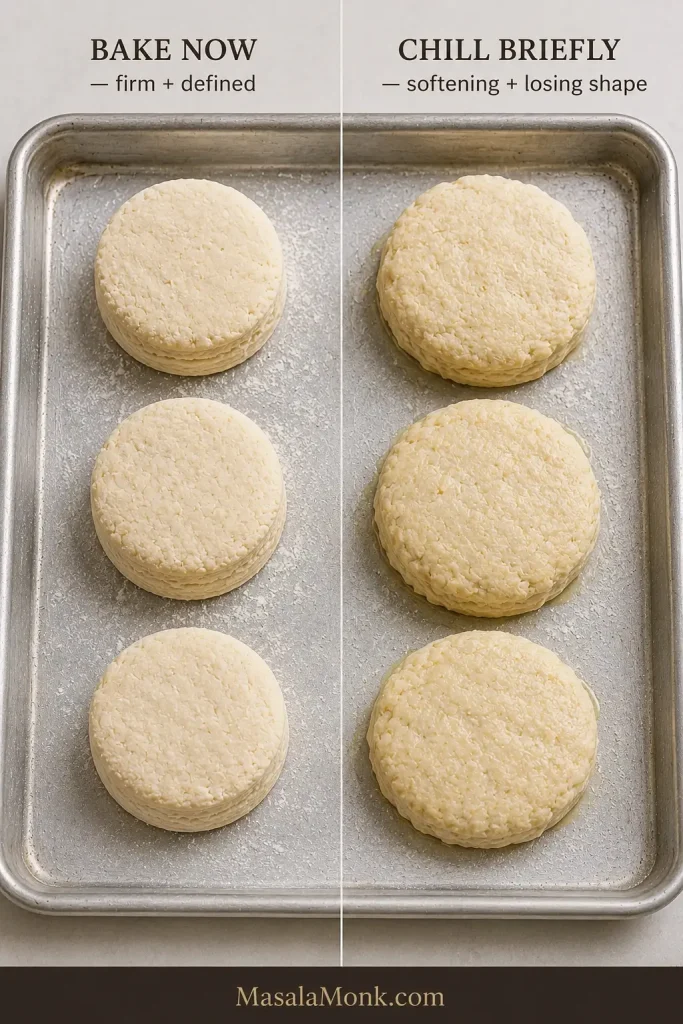
Warm-kitchen check: Cool, firm cut biscuits can go straight into the oven. When they become soft enough to lose their clean shape or start looking greasy, chill the tray briefly until the butter firms again.
Using fan/convection? If you normally reduce conventional baking temperatures for your oven, use around 425°F / 220°C and begin checking early.
Table of Contents
- Southern Buttermilk Biscuits Recipe
- What Makes a Southern Biscuit Southern?
- Ingredients and Flour Choices
- Learn the Dough by Feel
- Why These Biscuits Rise Tall and Flaky
- Bake and Doneness
- Troubleshooting
- Make Ahead, Freeze, Store and Reheat
- What to Serve With Southern Biscuits
- FAQ
What Makes a Southern Biscuit Southern?
There is no single ingredient that gets to decide. Southern biscuits belong to a broad tradition of tender quick breads, with flour, fat, shaping, and preferred crust varying from kitchen to kitchen.
Across Southern kitchens, you’ll find soft-wheat and self-rising flours, butter, lard, shortening, buttermilk, hand-shaped cathead biscuits, neatly cut rounds, soft pull-apart sides, and biscuits baked farther apart for more crust.
Some people picture a tall cut biscuit with obvious layers. Others grew up eating softer biscuits baked shoulder-to-shoulder in a pan. Both belong at the table.
This version sits between old-fashioned tenderness and heavily laminated bakery-style biscuits. The folds create visible buttery seams and good height, while the center stays soft and distinctly biscuit-like. Tender describes how softly the crumb yields; flaky describes how easily the biscuit separates along buttery seams.
Ingredients That Change the Biscuit
With only a handful of ingredients, small changes show up clearly in the finished biscuit. Flour builds the crumb. Baking powder supplies most of the rise, while baking soda works with tangy buttermilk and helps with browning.
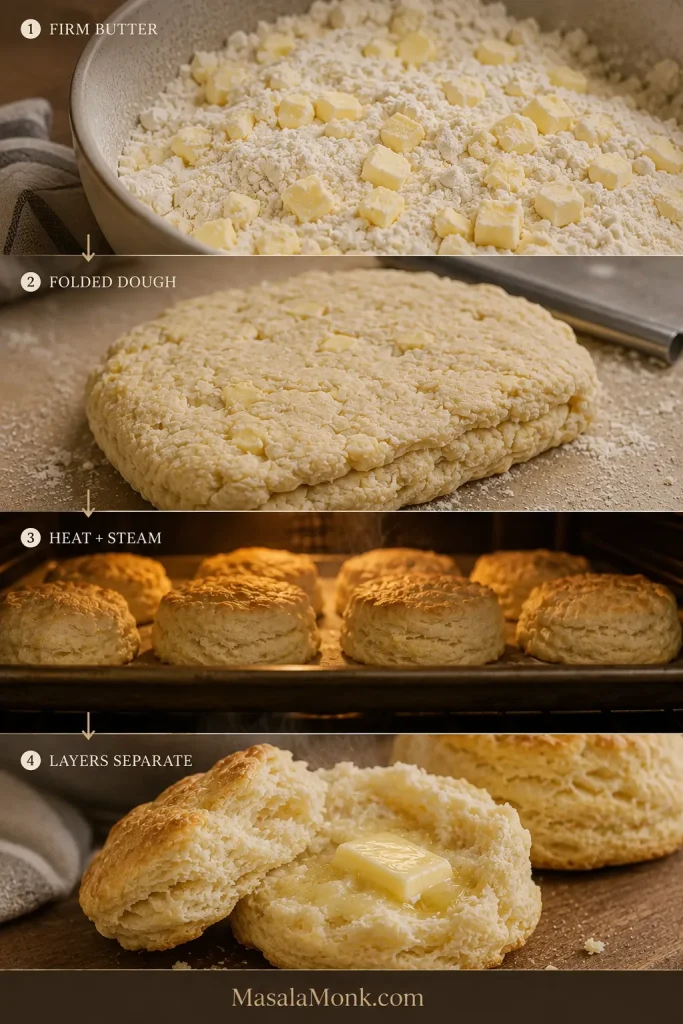
Butter brings flavor and helps create the seams that separate as the biscuit rises.
Keeping those butter pieces firm lets them stay distinct until baking; as the butter melts and releases steam, it helps the folded layers separate.
Buttermilk brings moisture, acidity, and dairy flavor. Salt makes everything taste fuller, while two teaspoons of sugar encourage browning without making the biscuits sweet.
Flour: All-Purpose, Soft Wheat and White Lily
For this recipe, regular all-purpose flour is the default. You do not need White Lily to make a tender Southern biscuit.
Soft-wheat flour has a long association with Southern biscuits because its lower protein content makes a delicate crumb easier to achieve. White Lily’s place in Southern baking comes from its soft red winter wheat, but this recipe was written for ordinary all-purpose flour.
If White Lily or another soft Southern flour isn’t sold where you live, there is no reason to postpone breakfast.
| Flour | What It Tends to Give You | Best Approach |
|---|---|---|
| Regular all-purpose flour | Tender crumb with enough structure for visible layers | Follow the recipe as written |
| Soft-wheat all-purpose flour | Especially delicate crumb | Watch the buttermilk because absorption can differ |
| Self-rising flour | A convenient, classic Southern route | Use a biscuit recipe written for the particular self-rising flour you have |
Flour packed into a measuring cup can weigh considerably more than flour spooned in and leveled. Extra flour needs extra liquid; without it, the raw mixture starts dry and the baked crumb often does too.
What About Self-Rising Flour?
Self-rising flour can make excellent Southern biscuits, but brands vary in their leavening and salt. It isn’t an exact substitute for the flour, baking powder, baking soda, and salt used here, so use a biscuit recipe written specifically for the self-rising flour you have.
Butter, Lard or Shortening?
| Fat | What Changes | Why Use It |
|---|---|---|
| Butter | Rich flavor with obvious flaky seams | The best fit for this version |
| Lard | Very tender crumb with good flake | Classic savory richness |
| Shortening | Soft, tender crumb with less buttery flavor | Stable and easy to handle |
| Blend | Balanced tenderness and layering | A middle ground between flavor and stability |
Butter is the fat used for this version, but how it is worked into the flour matters just as much as which fat you choose. This is the point where the mixture is easiest to assess before any liquid goes in.
Start With Cold Cultured Buttermilk
Cultured buttermilk brings acidity, dairy flavor, and a thicker body than ordinary milk. Its consistency varies from carton to carton, and flour absorption varies too, which is why the final tablespoon stays in reserve until you see whether the mixture needs it.
Leftover buttermilk makes especially good fluffy buttermilk pancakes the next morning.
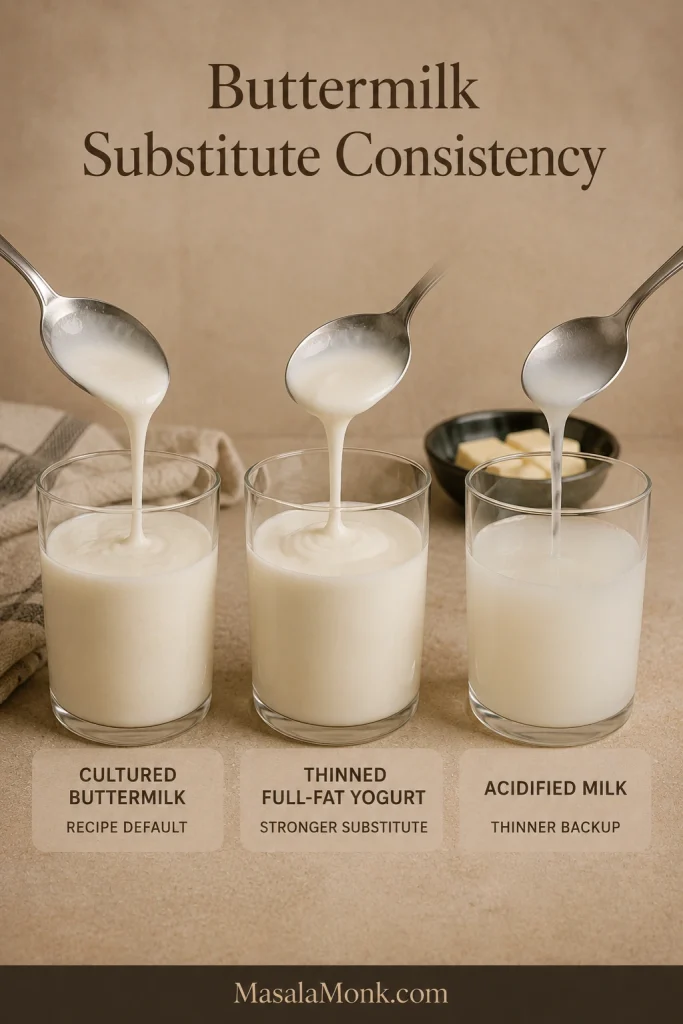
No buttermilk today? For an emergency substitute, thin full-fat plain yogurt with whole milk until it is pourable but still creamy. Use the consistency as your guide because this isn’t an exact one-for-one substitution.
Whole milk mixed with lemon juice or vinegar can also work in a pinch, although the mixture is thinner than cultured buttermilk. If buttermilk is rarely available to you, a biscuit recipe designed around milk or another dairy will be easier to repeat.
Learn the Dough by Feel
If biscuit dough has made you second-guess yourself before, this is usually the moment. Good biscuit dough looks rougher and feels softer than many people expect.
“Do not overmix” is easy advice to repeat. Knowing what to look for when you stop is far more useful.
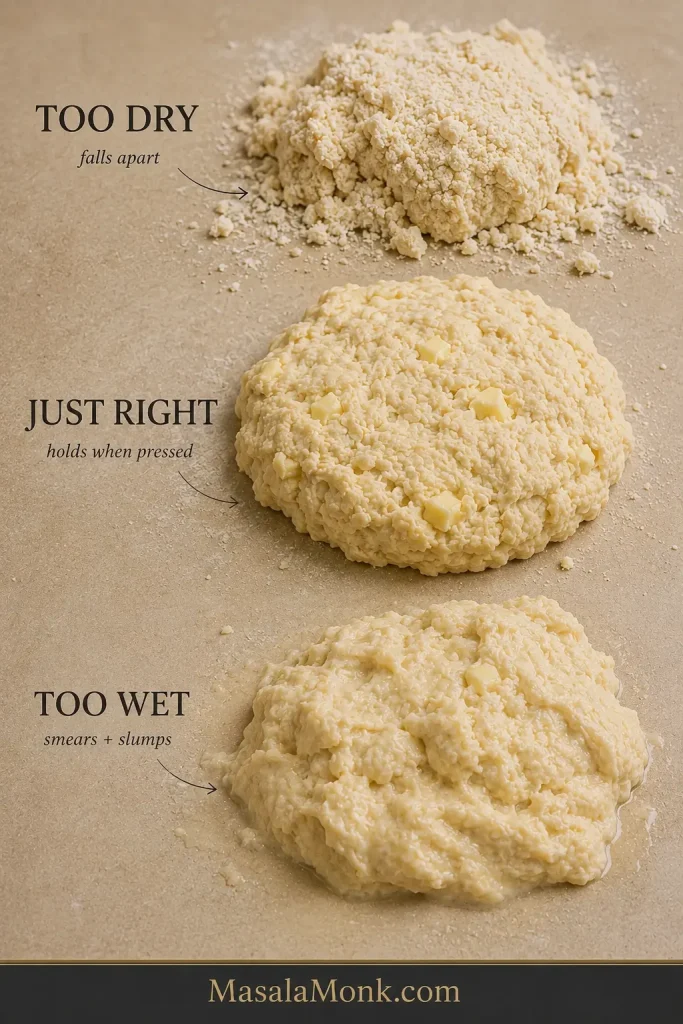
Too Dry
The shaggy mixture breaks into dusty pieces, loose flour sits underneath, and a handful refuses to stay together when squeezed.
Add a little of the reserved buttermilk and press again. Use the rest only if loose dry flour remains and the mixture still refuses to hold together.
Just Right
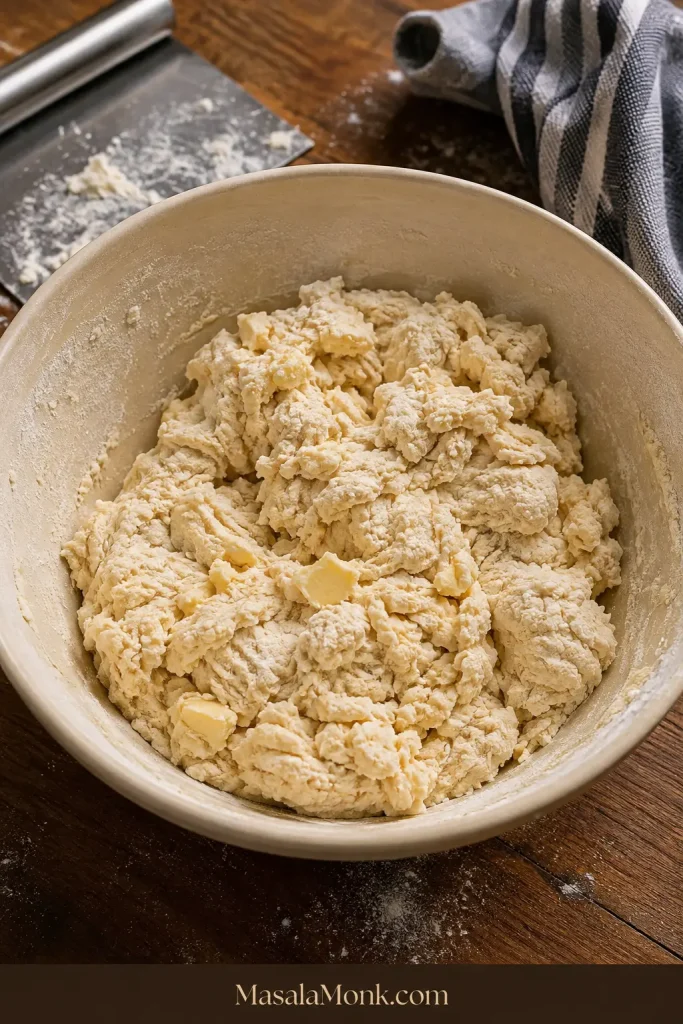
The mixture looks rough and uneven. It feels lightly tacky and holds when pressed without becoming smooth or elastic. Pieces and flat streaks of butter remain visible.
This is the stage people often accidentally “fix” with extra flour. Leave it alone. Biscuit dough does not need to become neat before it becomes good.
Too Wet
A mixture that smears across the counter, slumps instead of holding a rectangle, or clings to your hands in thick paste has moved beyond light tackiness.
When the dough is only slightly sticky, correct the surface rather than changing the dough itself. A small dusting of flour on the counter is usually enough.
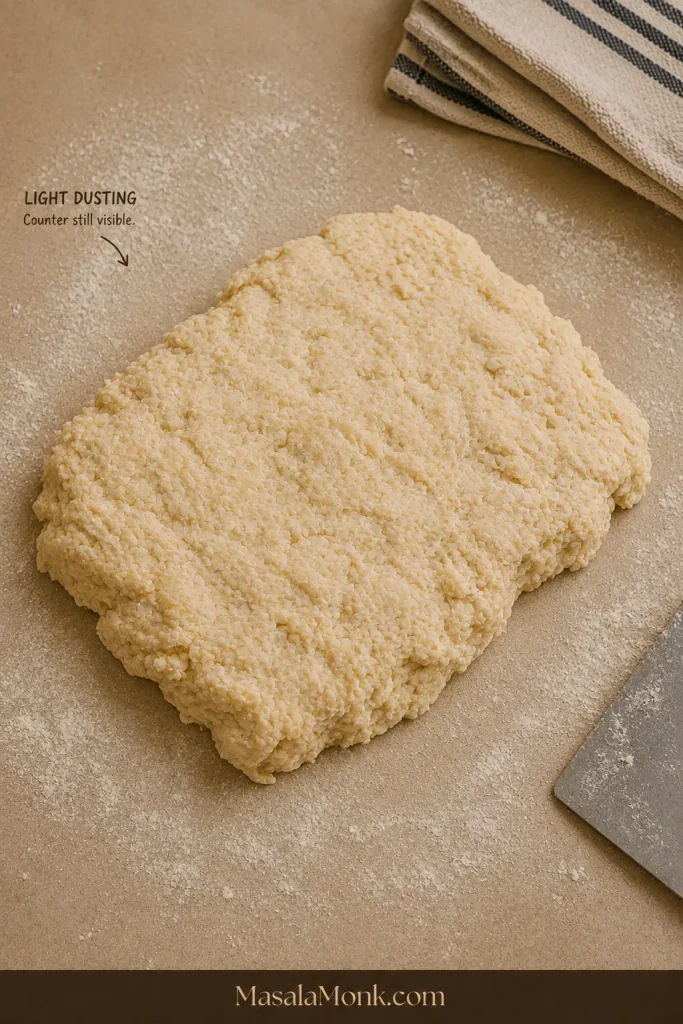
Once you can recognize this texture by feel, the recipe stops being something you follow nervously and starts becoming something you know how to make.
Need the quantities or sequence again? Back to Recipe ↑
Why These Biscuits Rise Tall and Flaky
The folds create seams, starting thickness gives the biscuit room to rise, and cutting and spacing shape the final height and crust.
Four Folds Build Layers Without Overworking the Dough
Each fold stacks pieces of butter and dough over one another. In the oven, those rough layers separate into the seams that make a warm biscuit easy to pull apart.
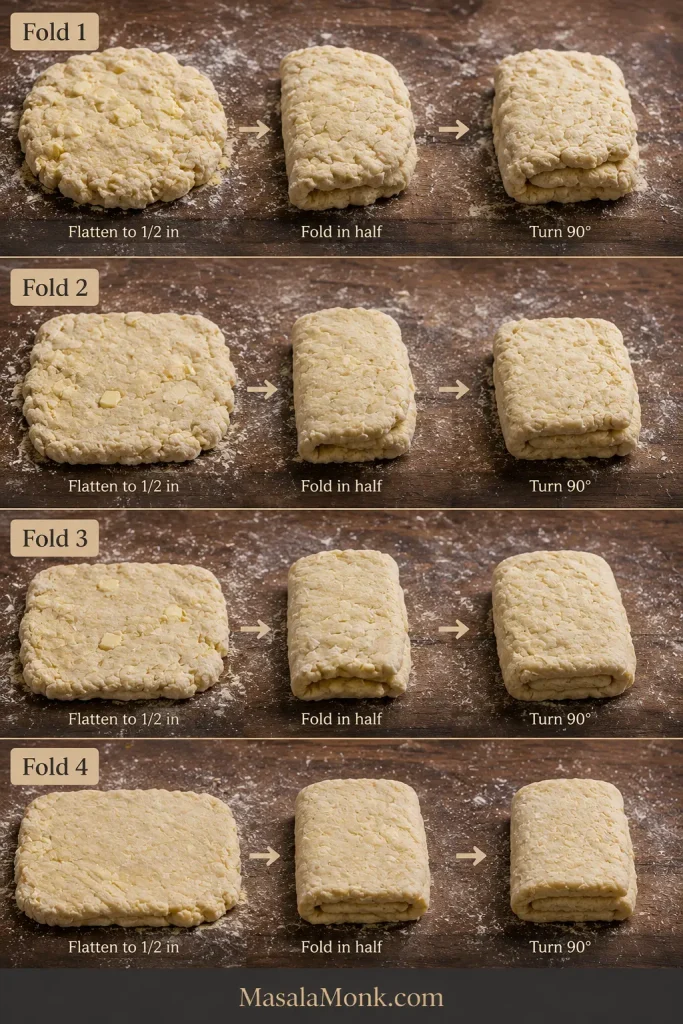
A biscuit with very little folding has a softer, more even crumb. More elaborate lamination creates increasingly dramatic sheets. Four simple folds give this version a middle ground: visible flake and good height with a soft biscuit crumb.
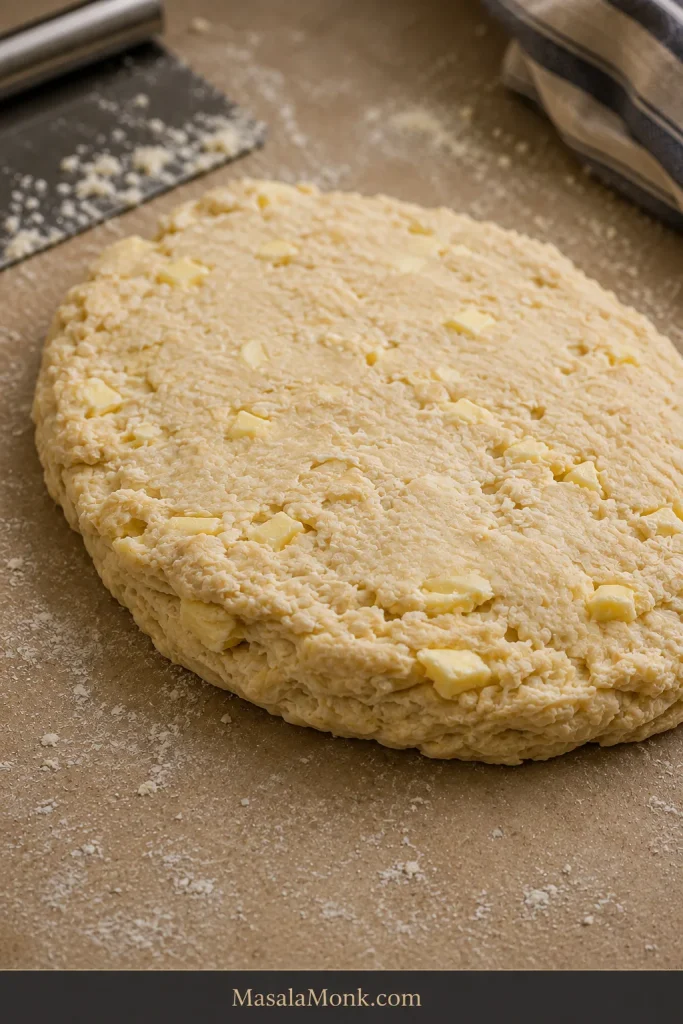
Thickness and a Clean Cut Set Up the Rise
Starting thickness limits how tall a biscuit can become. A thin biscuit can rise beautifully and finish short simply because it had less height at the beginning.
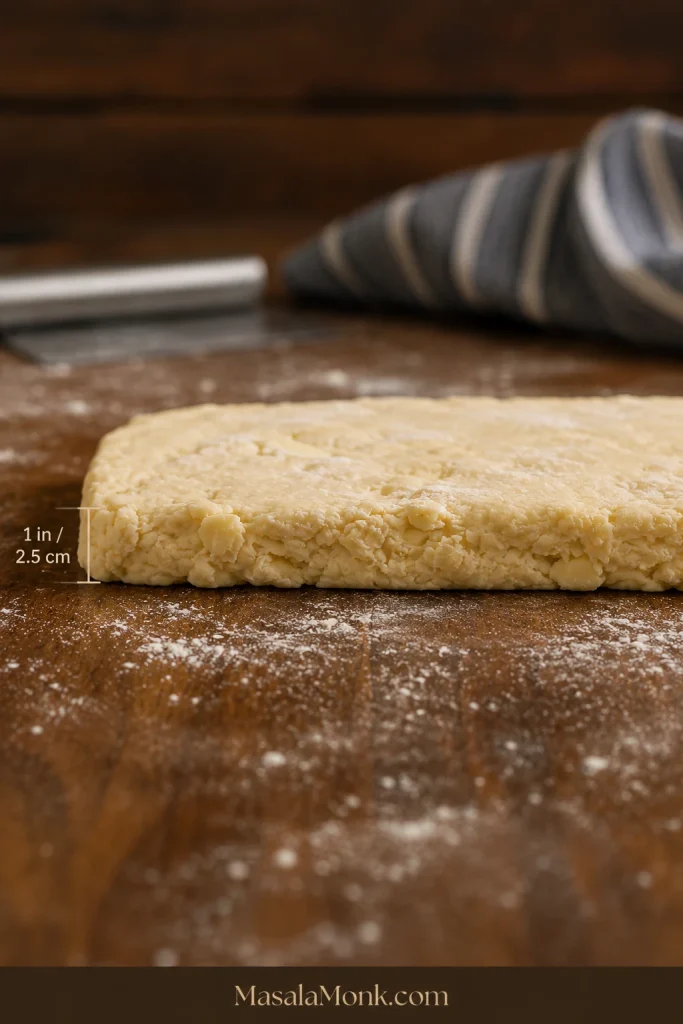
A sharp cut also leaves the folded edge open to rise. Twisting presses those edges together, which is why the recipe uses one straight downward cut and a straight lift. King Arthur Baking’s guide to higher-rising biscuits goes deeper into the relationship between cutting and rise.
Shape and Spacing Change the Crust
| If You Want… | Choose… |
|---|---|
| Soft pull-apart sides | Biscuits touching or almost touching |
| More browned crust around each biscuit | More space between the biscuits |
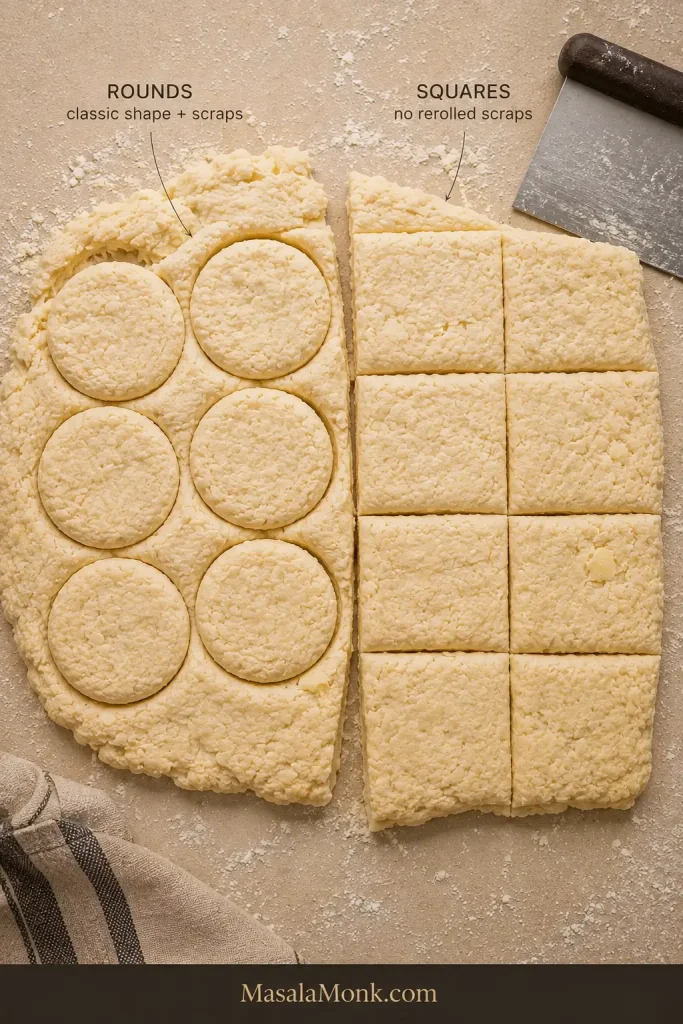
| Classic round biscuits | A sharp round cutter |
| No rerolled scraps | Squares cut with a sharp knife or bench scraper |
Close biscuits support one another as they rise and shield their sides from some direct oven heat, leaving those sides pale and soft. More room exposes additional surface to heat and creates more crust.
Rounds leave scraps between the cuts. Press them together once and cut again. Biscuits cut from the scraps may rise a little less evenly because that dough has already been handled. Squares avoid scraps altogether.
A biscuit can lean or split unevenly and still be excellent inside. Height gives you useful feedback; perfection is not the goal.
Bake Hot and Look Beyond the Top
Oven heat affects more than browning: it also controls how quickly the biscuit structure sets while the dough expands. That makes the before-and-after shape worth watching alongside color.
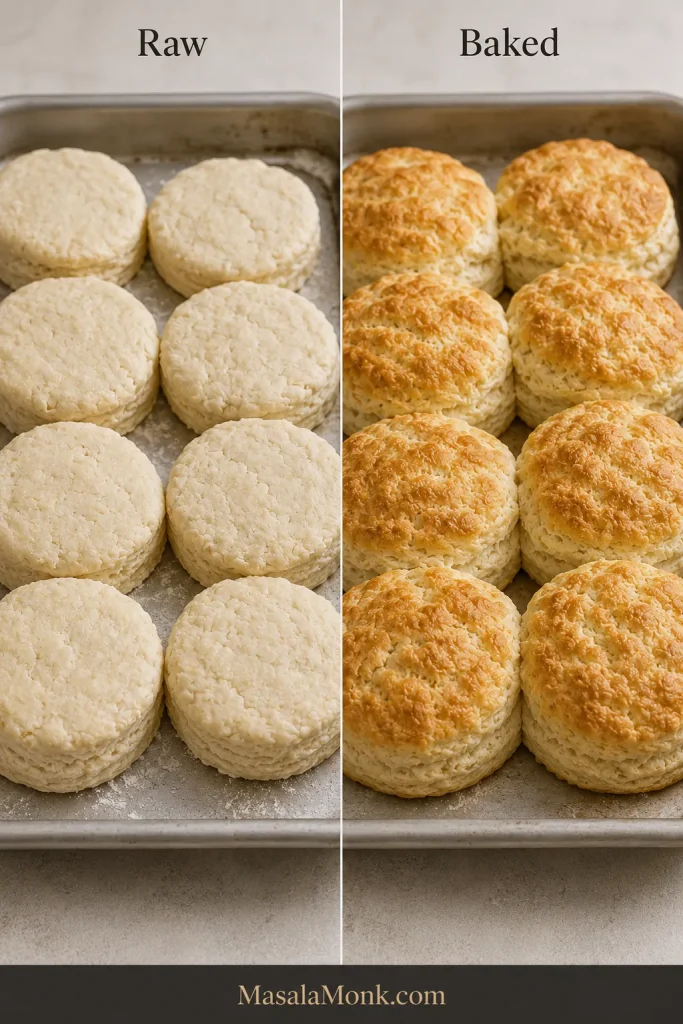
For this size and thickness, use 450°F / 230°C conventional. Begin checking around 12 minutes, and look at the whole biscuit instead of judging it by the top alone.
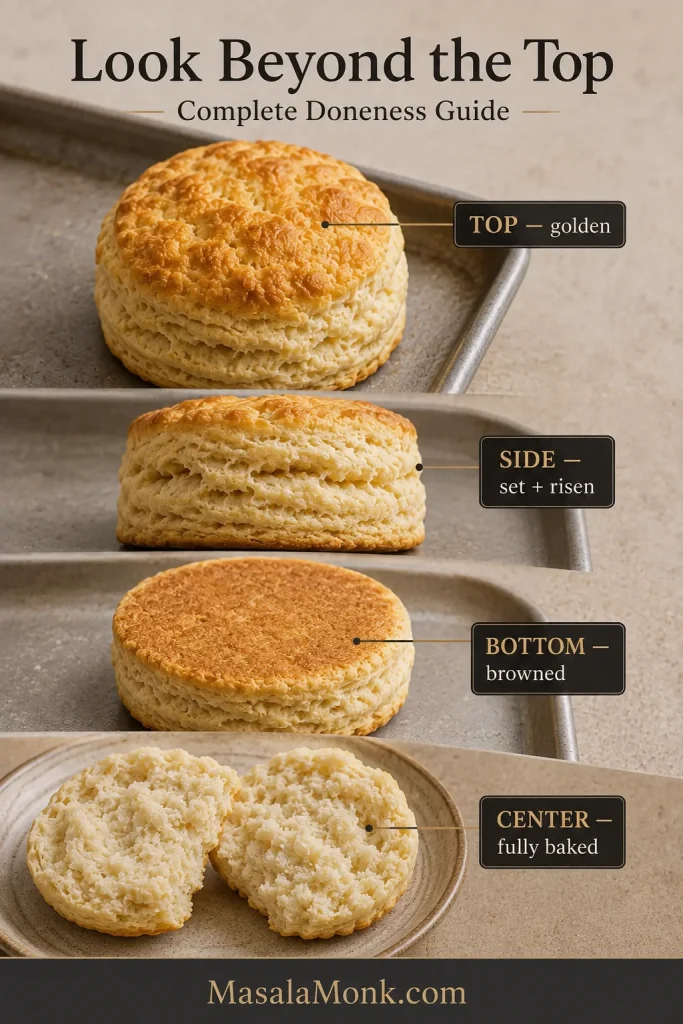
- Top: golden, with no raw-looking floury patches.
- Sides: set and risen, with visible separation through the layers.
- Bottom: evenly browned, not scorched.
- Center: fully set, without glossy raw dough or a gummy stripe.
A large or extra-thick biscuit can become beautifully golden before its center is completely baked. When in doubt, split one of the less-perfect biscuits and look inside.
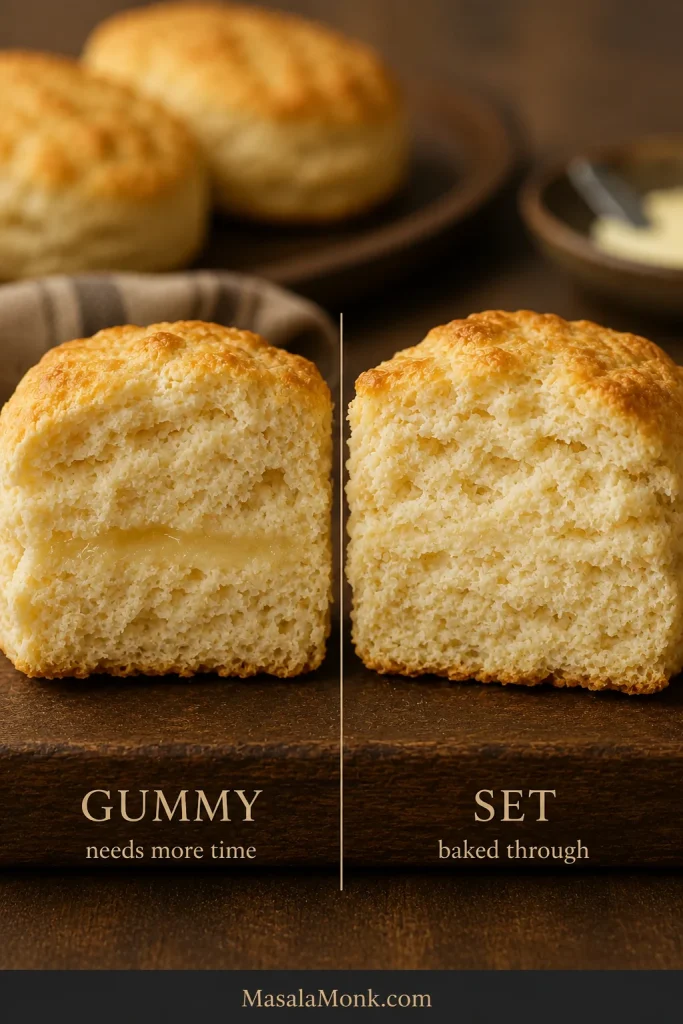
If they rose well, split easily, and are tender through the middle, they’re done. Eat one while it’s hot.
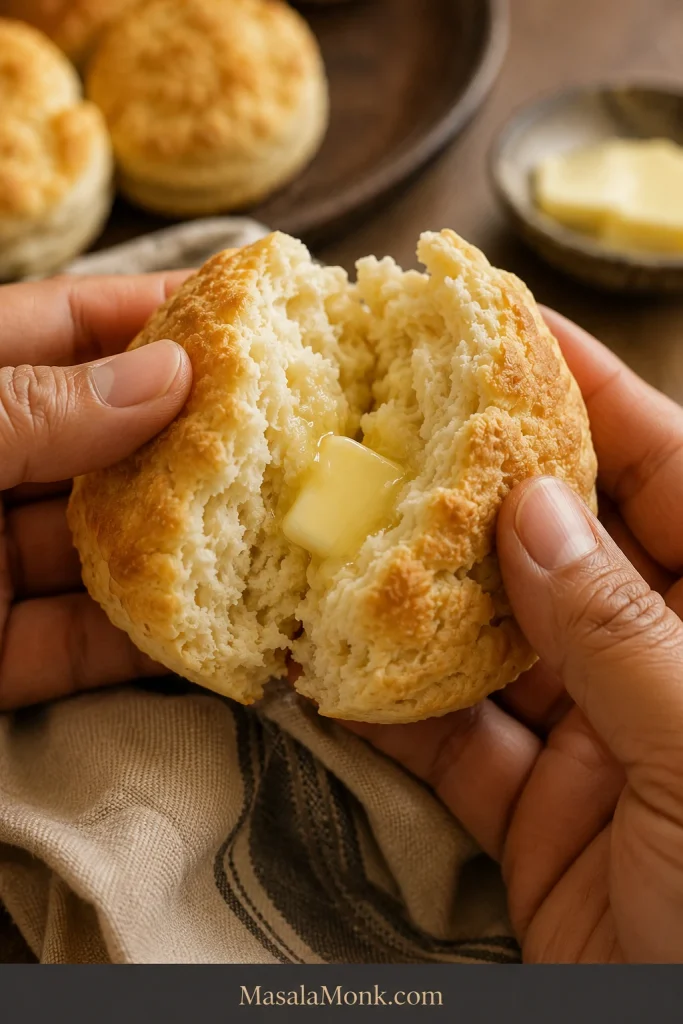
How did the batch turn out? Fix a flat, dry, tough or gummy biscuit → · Back to Recipe ↑
Troubleshooting Flat, Tough or Dry Biscuits
A low, dry, or oddly shaped batch usually leaves clues about what happened.
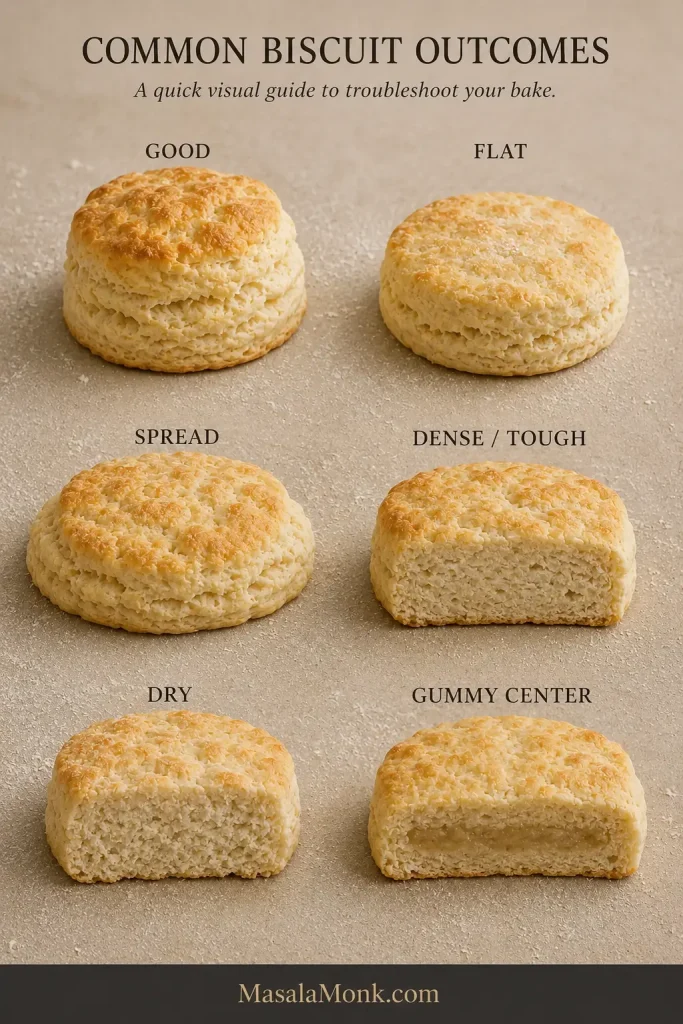
Baking powder that has been open for a long time is worth replacing when repeated batches stay unusually low. When browning or timing consistently seems far from what the recipe describes, an inexpensive oven thermometer can also tell you whether the oven is reaching the temperature you set.
| What You See | Where to Look | Next Batch |
|---|---|---|
| Flat and wide | Warm butter, tired leavener, thin starting slab, oven not fully hot | Keep the fat firm, use fresh baking powder, start thick, preheat fully |
| Tough or bread-like | Extra flour, prolonged mixing or kneading | Weigh the flour and stop while the mixture is rough |
| Dry | Too much flour, too little buttermilk, long bake | Check hydration before shaping and begin checking the oven sooner |
| Tender but no obvious layers | Butter worked in finely, less folding | Leave some butter pieces visible and use the four folds |
| Spread sideways | Warm butter, overly loose dough, oven not fully hot | Firm the shaped biscuits before baking and check the oven |
| Leaning or crooked | Uneven slab or angled cut | Pat evenly and cut vertically |
| Dark bottoms | Dark or thin pan, low rack, hot-running oven | Check earlier, use a heavier pan if possible, or move the rack higher |
| Gummy middle | Thick or large biscuit pulled before the center set | Give the middle more time and verify oven temperature |
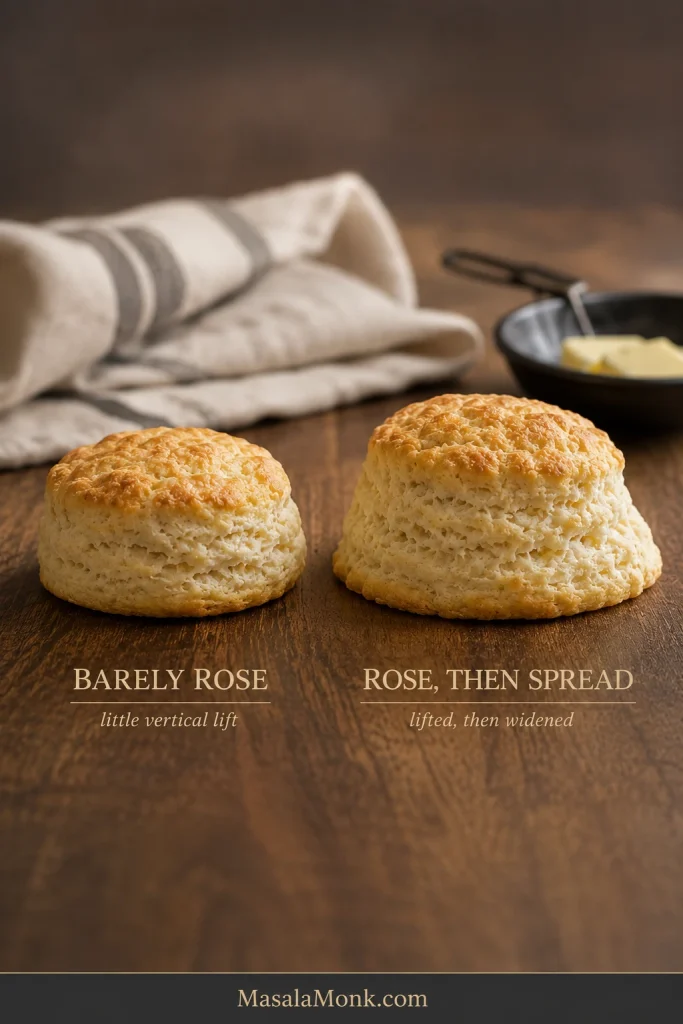
Flat: No Rise or Too Much Spread?
A biscuit that barely gains height points toward tired leavening, a thin starting slab, or an oven that never became fully hot. A biscuit that lifts and then widens points more toward warm butter or dough too loose to hold itself upright.
Tough Is Different From Crisp
A browned edge can be pleasantly crisp. Toughness shows up through the center as a firm, bread-like chew where the crumb ought to yield. Extra flour and continued mixing after the dough has come together are common reasons.
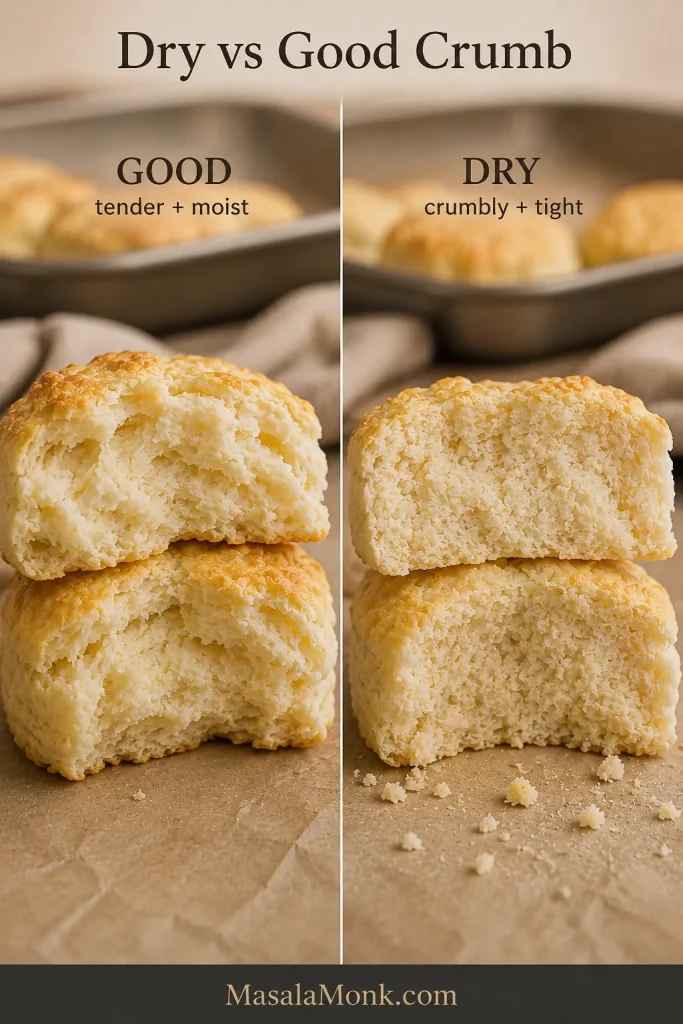
Dry: Dough Problem or Oven Problem?
Raw dough that crumbles and needs firm pressure to stay together started too dry. Dough that went into the oven cohesive and came out dry points more toward baking time. Even a couple of unnecessary minutes can change the crumb noticeably.
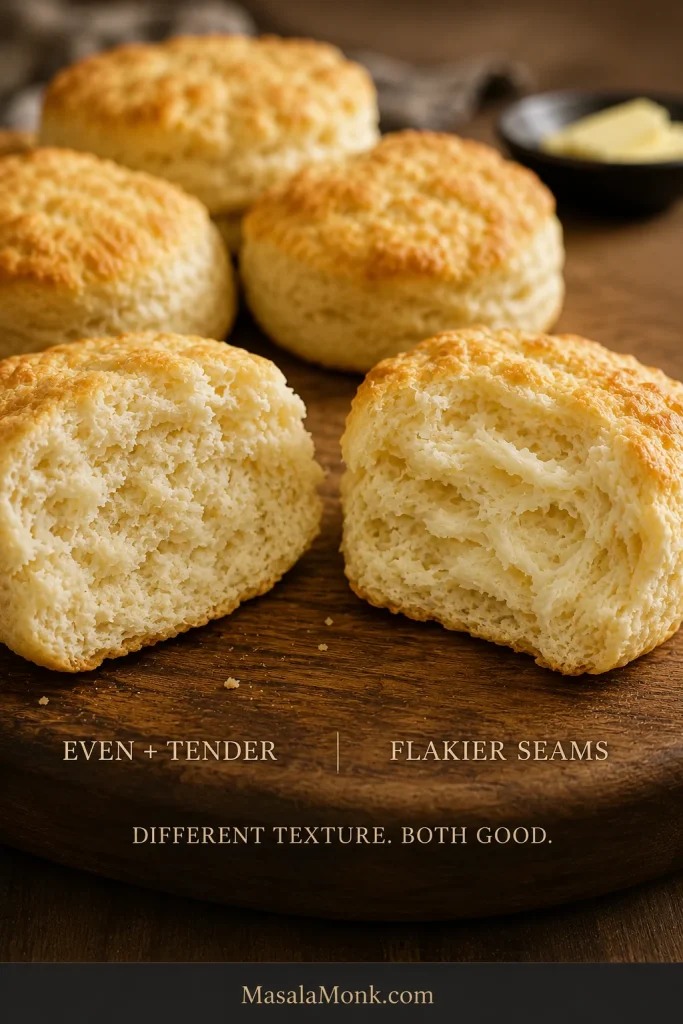
Tender Without Layers Can Still Be a Good Biscuit
A tender biscuit with a soft, even crumb may simply have had its butter worked in more finely. That’s a perfectly good biscuit with a different texture.
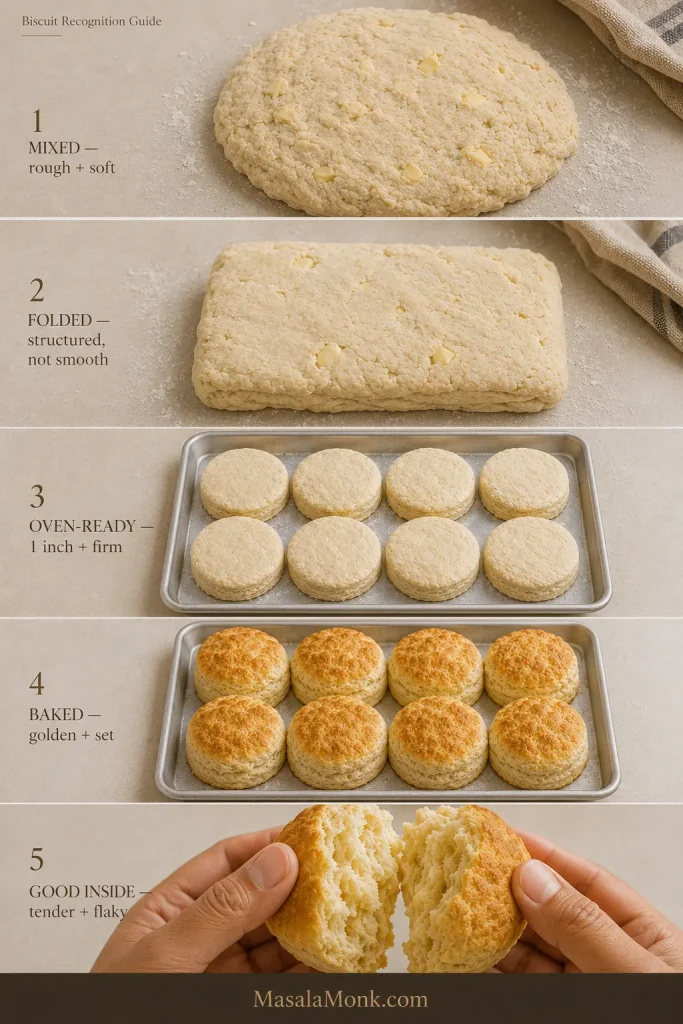
Before moving into make-ahead, this recognition guide gathers the recipe’s main visual checkpoints in one place—from mixed dough through the finished crumb.
Make Ahead, Freeze, Store and Reheat
If flouring the counter first thing in the morning is the only thing standing between you and homemade biscuits, freeze the cut biscuits before baking.
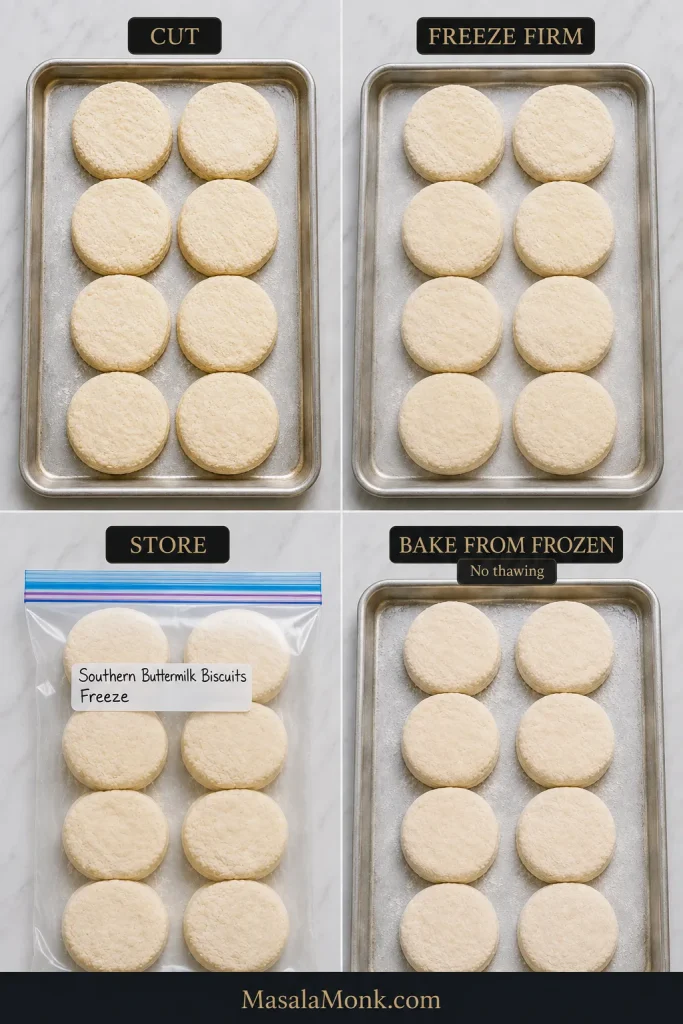
Freeze Before Baking
- Prepare and cut the biscuits normally.
- Place them on a lined tray with space between them.
- Freeze until completely firm.
- Transfer to a freezer-safe bag or airtight container.
- Use within 2 months for best quality.
Bake Straight From Frozen
Put the biscuits straight into the 450°F / 230°C conventional oven without thawing. Frozen biscuits take longer than fresh ones, so use the same top, side, bottom, and center cues instead of assuming another recipe’s timing will fit this dough.
Store and Reheat Baked Biscuits
- Room temperature: Cool completely and keep airtight for up to 2 days.
- Longer storage: Freeze them instead of refrigerating them for several days.
- Freeze baked biscuits: Wrap well once cool and use within 2 months for best quality.
- Oven: Reheat at 350°F / 175°C for 5–8 minutes, until warm through the center.
- Microwave: For one biscuit, start with 10–15 seconds and add another short burst only if needed.
A reheated biscuit that seems a little dry usually comes back nicely when split hot and spread with butter.
What to Serve With Southern Biscuits
The first biscuit off the tray barely needs anything. Salted butter, honey, or a spoonful of homemade pear jam are enough.
If potatoes belong on the breakfast plate too, crispy air-fryer hash browns keep the stovetop free while the rest of breakfast comes together.
Biscuits also make excellent breakfast sandwiches with eggs and sausage, country ham, or fried chicken. For a bigger Sunday or holiday table, a brown sugar honey glazed ham turns them into the bread everyone keeps reaching for between bites.
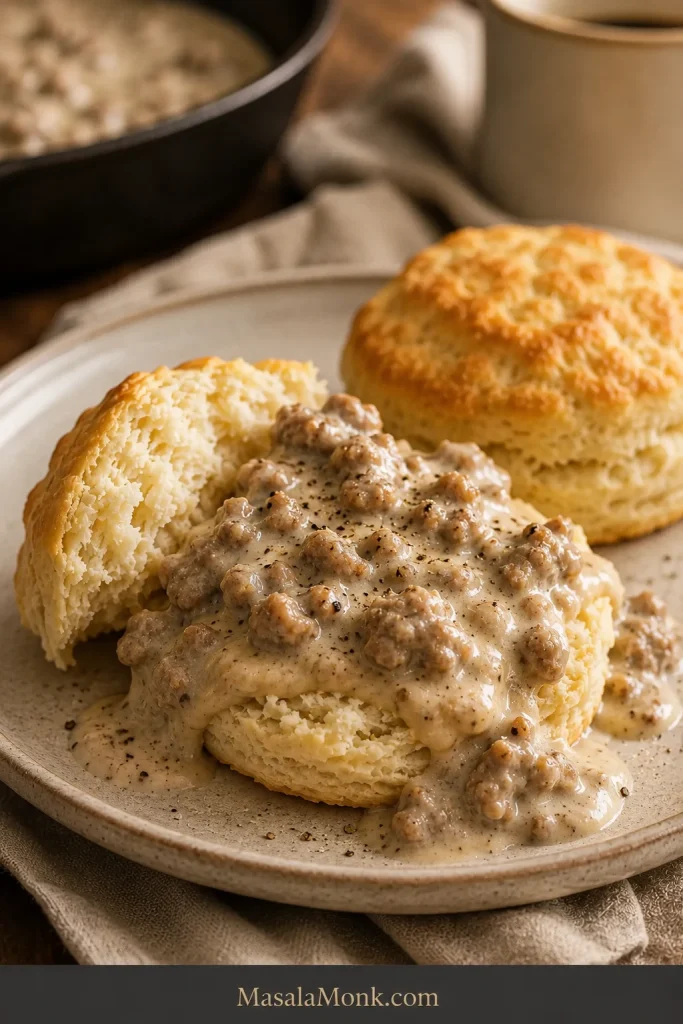
And, of course, a soft but sturdy biscuit is exactly what you want underneath peppery sausage gravy, where the gravy can settle into the torn layers without turning the whole biscuit to mush.
Southern Buttermilk Biscuit FAQs
Do I need White Lily flour for Southern biscuits?
No. Soft-wheat flour can make especially delicate biscuits, but ordinary all-purpose flour works very well when the recipe is designed around it. This recipe uses all-purpose flour deliberately.
Why is my biscuit dough sticky?
A little tackiness is normal. Dough that sticks lightly to your fingers but holds its shape is in the right zone. Heavy smearing and slumping call for a small dusting of flour.
Can I make biscuits without a biscuit cutter?
Yes. Cut the final rectangle into squares with a sharp knife or bench scraper. Squares give you clean edges and leave no scraps.
Can I make the biscuits the night before?
The easiest make-ahead route is to cut and freeze the raw biscuits, then bake them directly from frozen. That keeps morning work minimal while preserving the cold butter and freshly mixed dough structure.
The next batch should feel less mysterious. You now know what firm butter, soft dough that holds together, and a fully baked center look like.
Pull one apart while it is still warm. The center should give along the folds, and a little butter should disappear straight into the crumb. Then decide whether the first biscuit needs honey, jam, or nothing at all.








