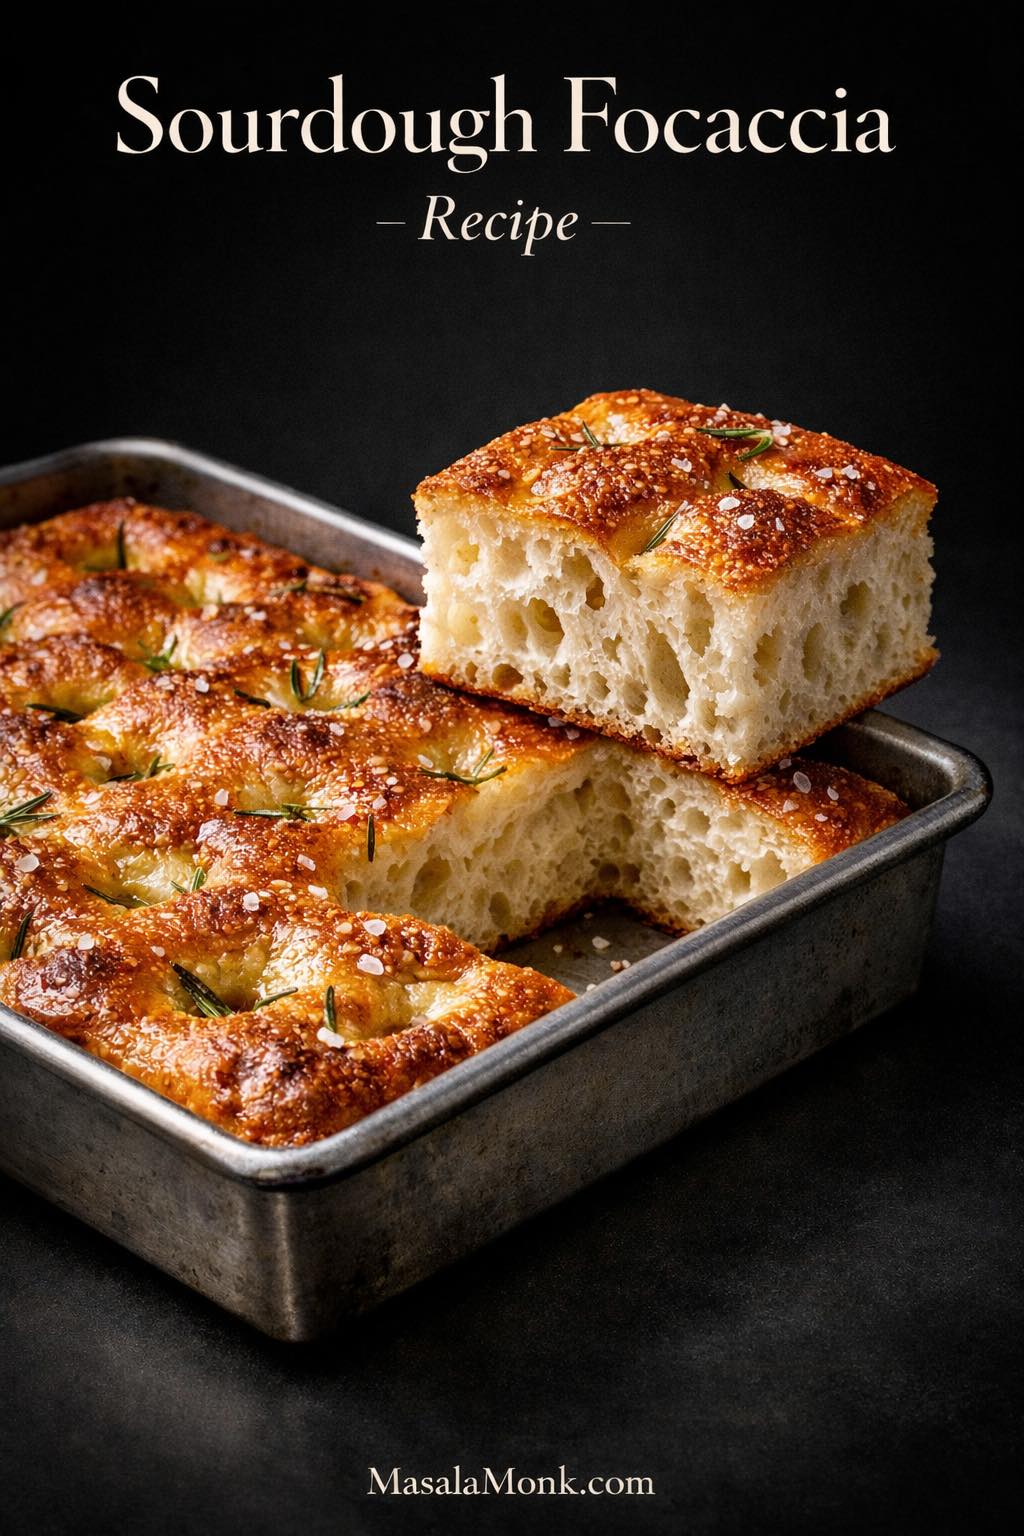
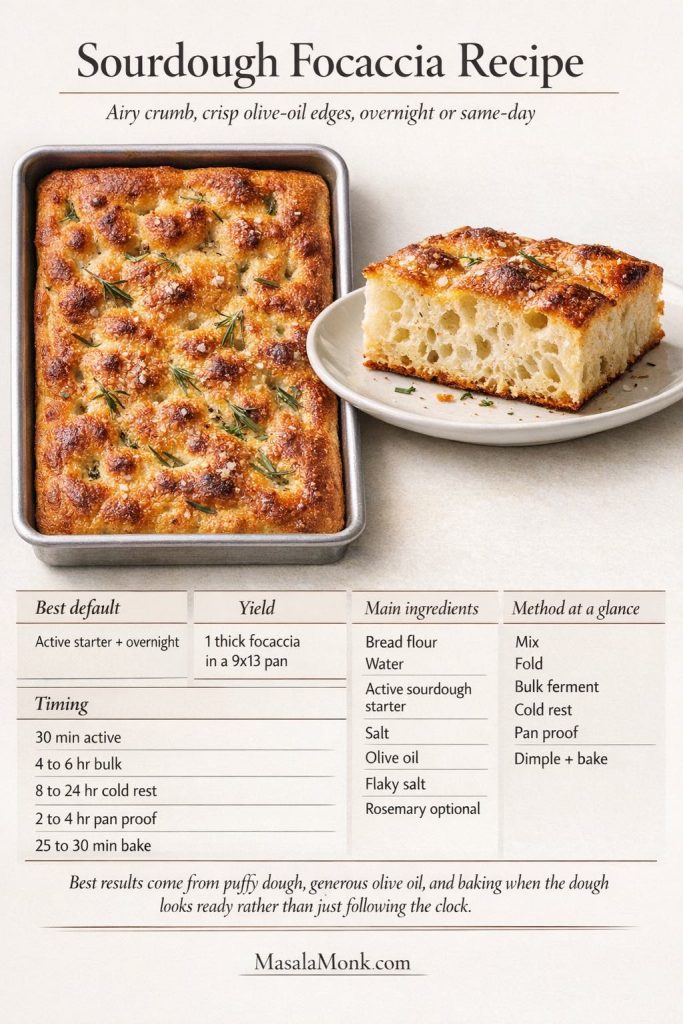
A good sourdough focaccia recipe should give you three things: a light, airy crumb, crisp olive-oil edges, and a method that feels clear before you even start mixing. This version is built around active sourdough starter, an overnight rest, and a 9×13-inch metal pan because that is the easiest way to get the best balance of lift, flavor, structure, and ease at home.
Real baking is rarely that tidy, though. Some days your starter is strong and you want focaccia by dinner. Other days you want to use discard and keep the dough moving without gambling on it. So this guide shows you the main route first, then helps you adjust when real life gets in the way. Just as importantly, it shows you what the dough should look and feel like at each stage, because that matters far more than blindly following the clock.
Quick answers before you bake
Best default route: active starter, overnight rest, 9×13-inch metal pan. This is the safest place to start.
Can you make it the same day? Yes, if your starter is strong and your kitchen is warm. You just need to watch the dough more closely.
Can you use discard? Yes. It usually moves more slowly, though, unless you add a little yeast.
Best pan: a well-oiled 9×13-inch metal pan. It gives the best browning, the best structure, and the fewest surprises.
Main success cue: bake when the dough looks puffy and lightly jiggly. If it still looks tight and reluctant, it is not ready yet.
Also Read: Easy English Scone Recipe
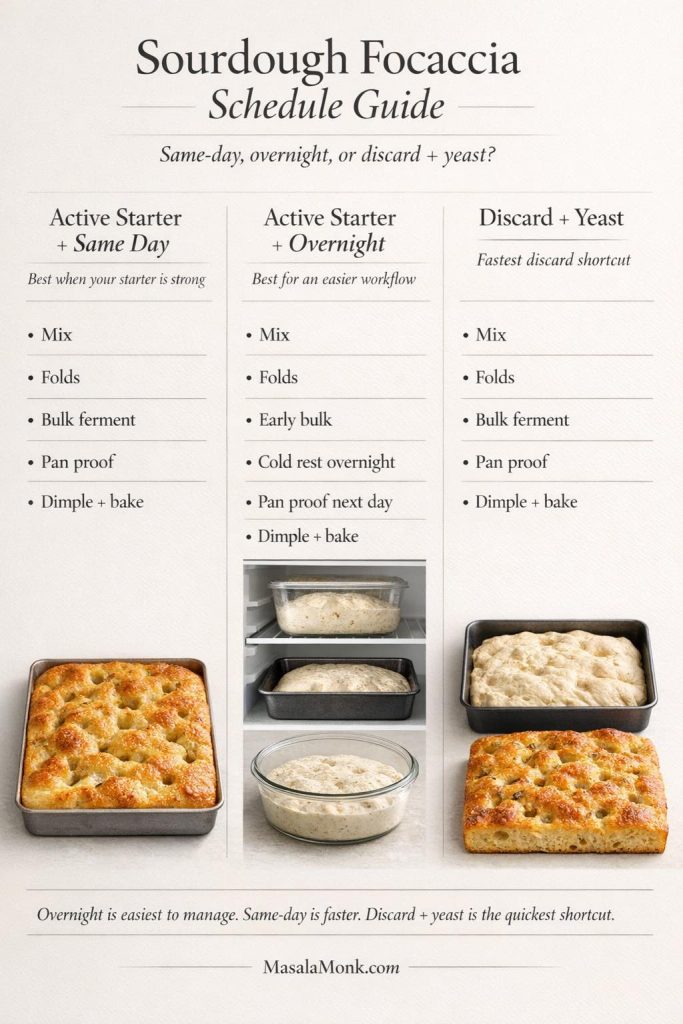
Choose your sourdough focaccia route
For the best overall result, choose active starter + overnight. This is the route I would hand to most people first. It gives you the best natural lift, the best flavor, and the calmest workflow.
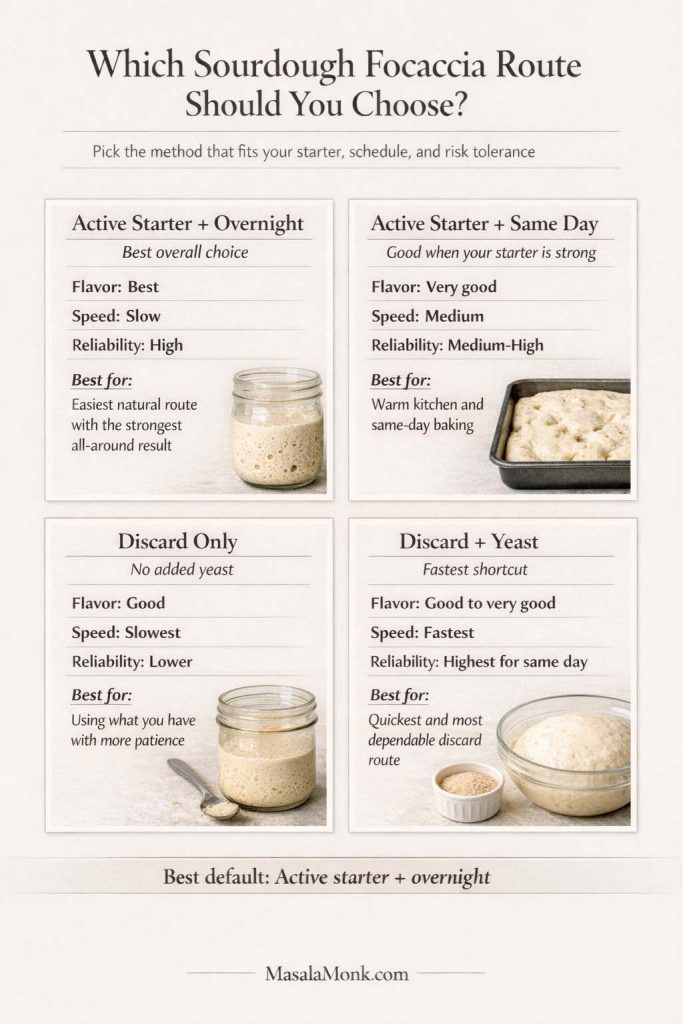
Choose active starter + same day when your starter is lively, the room is warm, and you want focaccia on the table by dinner. It can turn out beautifully, but you do need to stay more tuned in because the dough can move faster than you expect.
Choose discard only when using what you already have matters more than speed. Focaccia is forgiving enough that this can still work well, especially because the dough is pan-baked, but it usually takes more patience.
Choose discard + yeast when you want the safest shortcut. If you want a fast same-day focaccia and do not want to bet everything on tired discard, this is the smart route.
Why this sourdough focaccia recipe works
High hydration gives the crumb its open, airy texture
Focaccia dough should feel wetter and looser than many bakers expect at first. That extra water is what helps create the glossy irregular bubbles, soft interior, and lively bite that make focaccia feel worth baking. Add too much extra flour just to make the dough feel tidy and the crumb usually tightens fast.
Olive oil helps create the crisp, deeply golden edges
Focaccia needs enough olive oil under it and over it to bake the way focaccia should. The oil in the pan lightly fries the base as it bakes, while the oil on top helps browning, protects the surface, and gives the crust its rich golden finish. A cautious hand with the oil usually leads to a paler, drier result. Extra-virgin olive oil gives a stronger flavor, while regular olive oil tastes lighter; either one works. For a useful visual benchmark of how generously focaccia can be oiled without becoming greasy, King Arthur Baking’s big and bubbly focaccia is worth studying.
Time matters more than heavy kneading
This dough does not need aggressive kneading. It needs time, a few rounds of folds, and enough fermentation to become visibly airy before it goes into the oven. Put differently, the dough needs gas, softness, and some internal strength. Once it has those, the oven can do the rest.
A pan makes focaccia more forgiving than many sourdough loaves
One reason sourdough focaccia is such a strong beginner bake is that the pan supports the dough from start to finish. There is no shaping a boule, no scoring, and no need to trap oven spring inside a freestanding loaf. The pan also makes a wet dough much easier to handle, which is a big part of why focaccia is such a satisfying place to start.
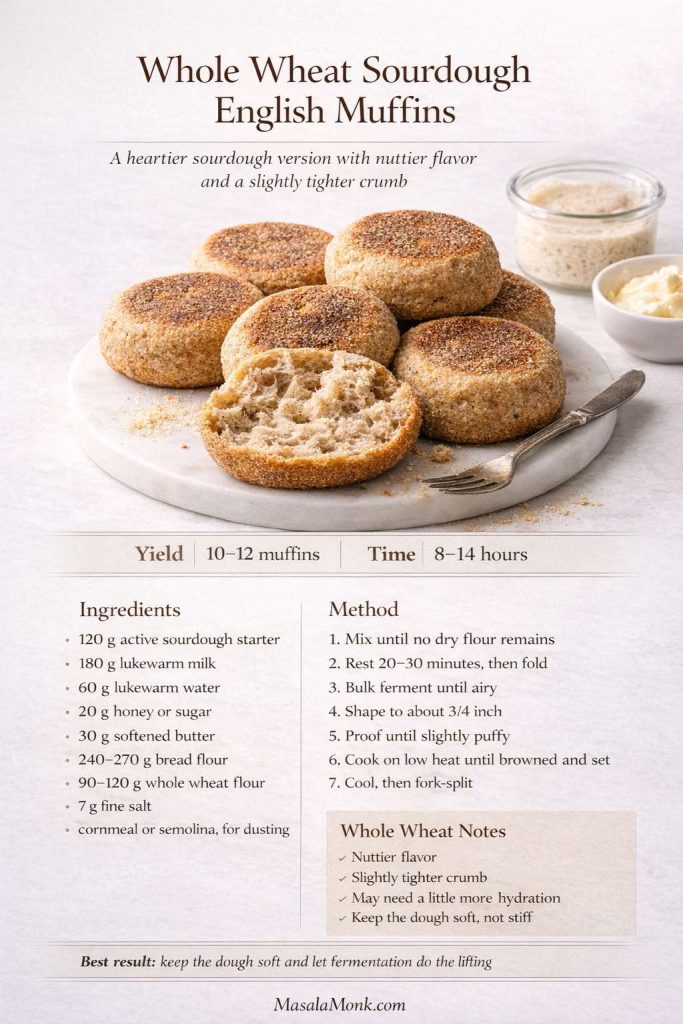
Also Read: Sourdough English Muffins Recipe
Active starter vs discard: which should you use?
The best result in this article comes from active starter, and that is the route the full recipe follows. This formula assumes a 100% hydration starter, meaning equal weights of flour and water in the starter itself.
Use active starter for the strongest natural rise
Use active starter when it looks like a starter you would trust for a full loaf: domed, expanded, bubbly, and recently peaked or close to it. Ideally, it should have clearly risen after feeding and still look full of life. If it rose hours ago and has already collapsed back down, it is much less likely to give you the same lift here.
Use discard when flexibility matters more than maximum lift
Discard works well in focaccia because the dough is high-hydration and pan-baked. Even so, discard is usually weaker than active starter, so the rise may be slower, especially in a cool kitchen or on a tighter schedule. Serious Eats has a useful sourdough discard explainer if you want a broader look at how discard behaves in baking.
Use a little yeast with discard when you want speed and reliability
A small amount of instant yeast is the smartest shortcut when you want discard focaccia the same day. It does not make the bread less respectable. It simply makes the dough more dependable when the discard itself is not lively enough to do all the work quickly.
Also Read: White Russian Recipe: 7 Variants to Try, From Classic to Frozen
Same-day vs overnight sourdough focaccia
The main recipe below uses an overnight schedule because that route is easier to manage and easier to get right. Same-day focaccia is absolutely possible. Overnight focaccia is simply calmer, more flexible, and usually less stressful.
Choose the same-day method when you want bread by dinner
A same-day focaccia works best when your starter is active, the room is fairly warm, or you are willing to use a little yeast. It is a good route for spontaneous baking, but you do need to stay more attentive because the dough can move faster than you expect once the kitchen warms up.
Choose the overnight method when you want a calmer workflow
Overnight focaccia fits real life more easily. You can mix the dough in the evening, build some early strength, then refrigerate it and finish the pan proof the next day. The whole process feels less rushed, and the dough is usually calmer to handle.
Room temperature changes the timeline more than most recipes admit
At 76 to 78°F, dough can move much faster than it does at 68 to 70°F. That matters whether you are using active starter or discard. A warm kitchen can shorten fermentation by hours, while a cool kitchen can make the same dough seem stubborn. The dough matters more than the clock.
- Warm kitchen, active starter: bulk fermentation can take around 4 to 5 hours.
- Cool kitchen, active starter: bulk fermentation can take around 5 to 7 hours.
- Discard only: expect more time unless the discard is unusually lively.
- Discard + yeast: expect the fastest same-day route.
Ingredients for sourdough focaccia and what each one does
The main recipe below makes 1 thick focaccia in a 9×13-inch pan, enough for about 8 to 12 servings depending on how you cut it.
Main dough ingredients
- 500 g bread flour
- 400 g water
- 100 g active sourdough starter, ripe and bubbly
- 12 g fine sea salt
- 20 g olive oil for the dough
- 2 to 3 tablespoons olive oil for the pan
- 1 to 2 tablespoons olive oil for the top
- flaky salt for finishing
- rosemary or other toppings as desired
Optional route adjustments
For an all-purpose flour version, replace the bread flour with all-purpose flour. The focaccia will still be very good, though usually a little softer and slightly less chewy.
For a discard-only version, replace the active starter with 100 g sourdough discard and expect a slower rise.
For a discard + yeast same-day version, use 100 g sourdough discard and add 4 g instant yeast when mixing.
Bread flour vs all-purpose flour
Bread flour gives the dough more strength, a little more height, and a chewier bite. For that reason, it is the better choice when you want more dramatic bubbles and better structure. All-purpose flour still works well and produces a slightly softer focaccia. If you are using standard all-purpose flour rather than bread flour, start by reducing the water by about 25 to 40 g and only add more if the dough still feels manageable. Weaker all-purpose flours usually absorb less water.
Why olive oil matters so much in focaccia
Olive oil is part of the structure as much as it is part of the flavor. It helps tenderize the crumb, improves browning, protects the surface, and creates the crisp underside and edges that make good focaccia feel rich rather than plain.
Salt, water, and hydration
Salt sharpens flavor and strengthens the dough. Water gives the dough its loose, airy potential. This is supposed to be a sticky dough. If you keep correcting it with extra flour until it feels tidy, you will lose the texture that makes focaccia worth baking. On humid days or with lower-protein flour, the dough may feel even looser than usual. Resist the urge to dump in a lot of extra flour all at once.
Toppings and when they should be added
Rosemary and flaky salt are the best place to start. Olives and thin onion slices also work well before baking because they bring strong flavor without flooding the dough. Wetter toppings such as fresh tomatoes or fresh mozzarella need a lighter hand or a later addition so they do not weigh down the surface. More delicate herbs are usually better added after baking, while harder herbs such as rosemary can go on before the bread hits the oven.
Also Read: Mango Sorbet Recipe: Healthy & Plant Based Dessert
Best pan for sourdough focaccia
The best pan for most home bakers is a 9×13-inch metal pan. It gives the most predictable thickness, the strongest browning, and the best balance between a soft interior and crisp olive-oil edges.
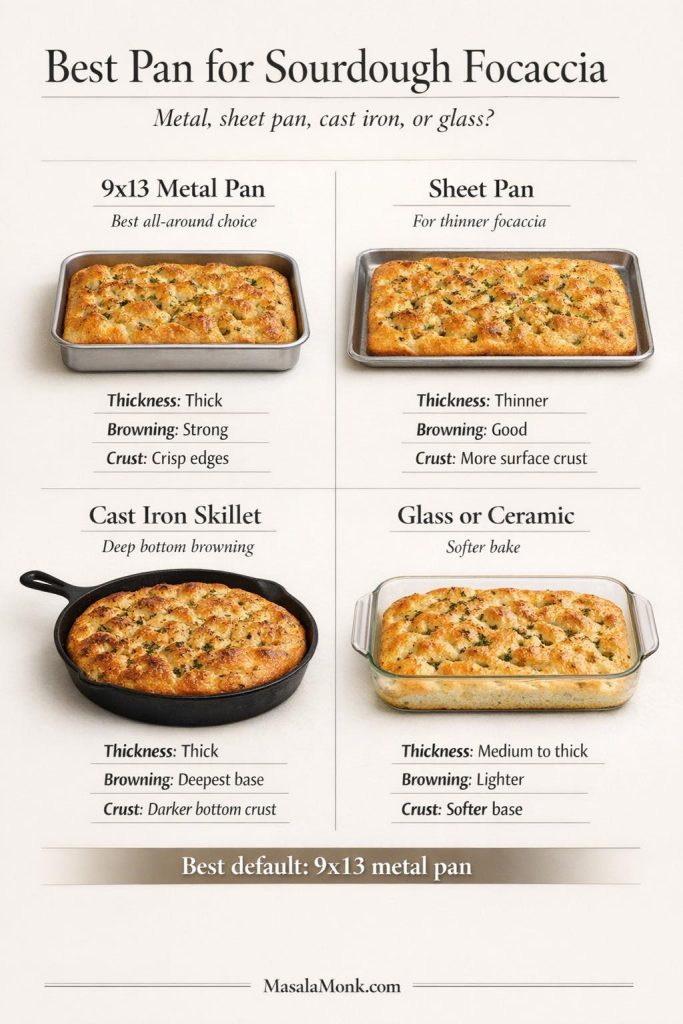
9×13-inch metal pan for classic thick focaccia
This is the pan the main recipe is built around. Use it when you want a bakery-style slab with height, chew, and deeply golden edges.
Sheet pan for thinner focaccia
Use a sheet pan when you want a thinner focaccia with more crust and less height. The dough will spread more, bake faster, and feel a little more snackable.
Cast iron skillet for deeper browning
A well-oiled cast iron skillet can give you a darker, more assertive bottom crust. It is a strong choice when deep browning matters more than the classic rectangular shape.
Glass and ceramic pans for a softer base
Glass and ceramic pans can still work, but they usually brown less aggressively than metal. As a result, the bottom tends to stay softer and the bake may need a little longer. If you use glass, grease it more carefully than you think you need to, because sticking can be more annoying there than in a well-oiled metal pan.
Also Read: Protein Ice Cream Recipe: 10 Creamy Homemade Recipes
How to make sourdough focaccia step by step
This is the main method and the one to choose first: active starter + overnight schedule + 9×13-inch metal pan.
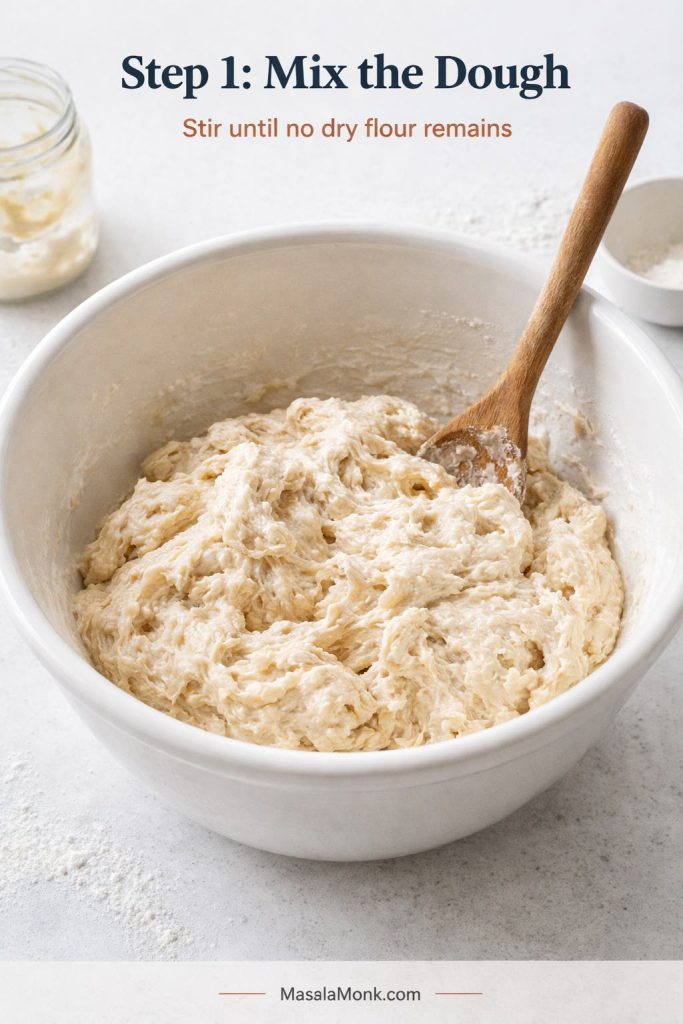
Mix the dough
In a large bowl, combine the bread flour, water, active sourdough starter, salt, and 20 g olive oil. Mix until no dry flour remains.
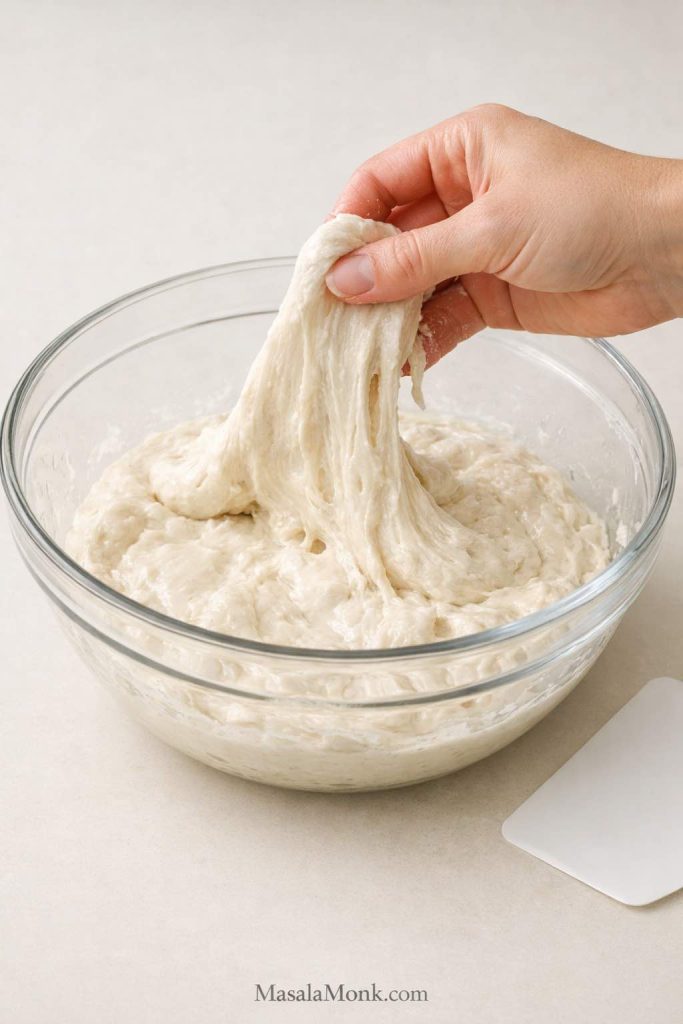
The dough will look rough, sticky, and a little unruly at this stage. That is normal. You are not aiming for a smooth kneaded dough.
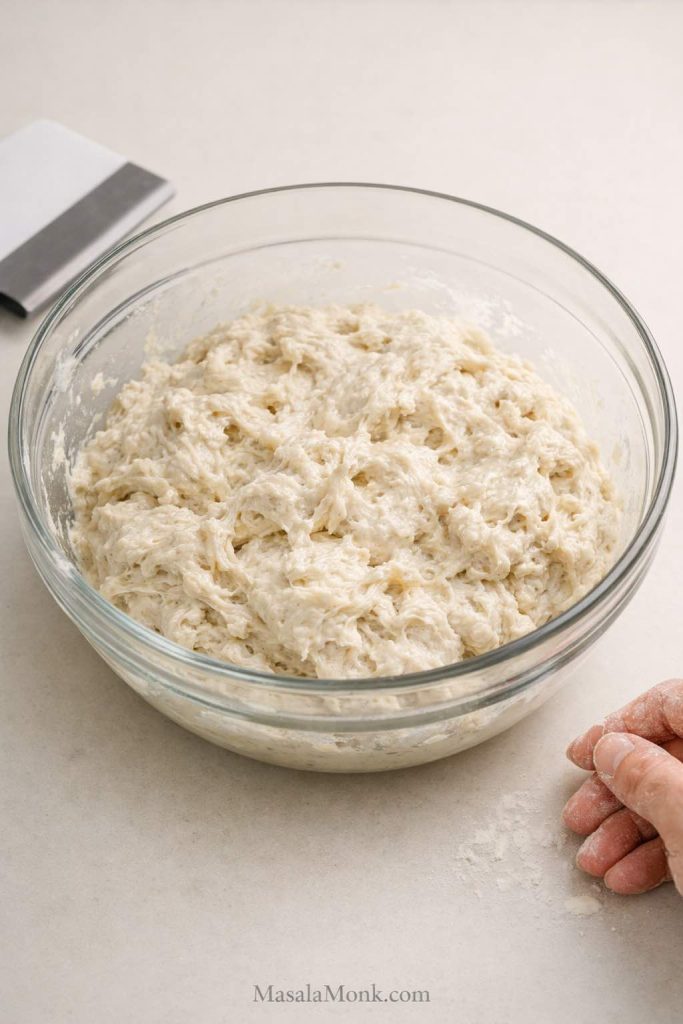
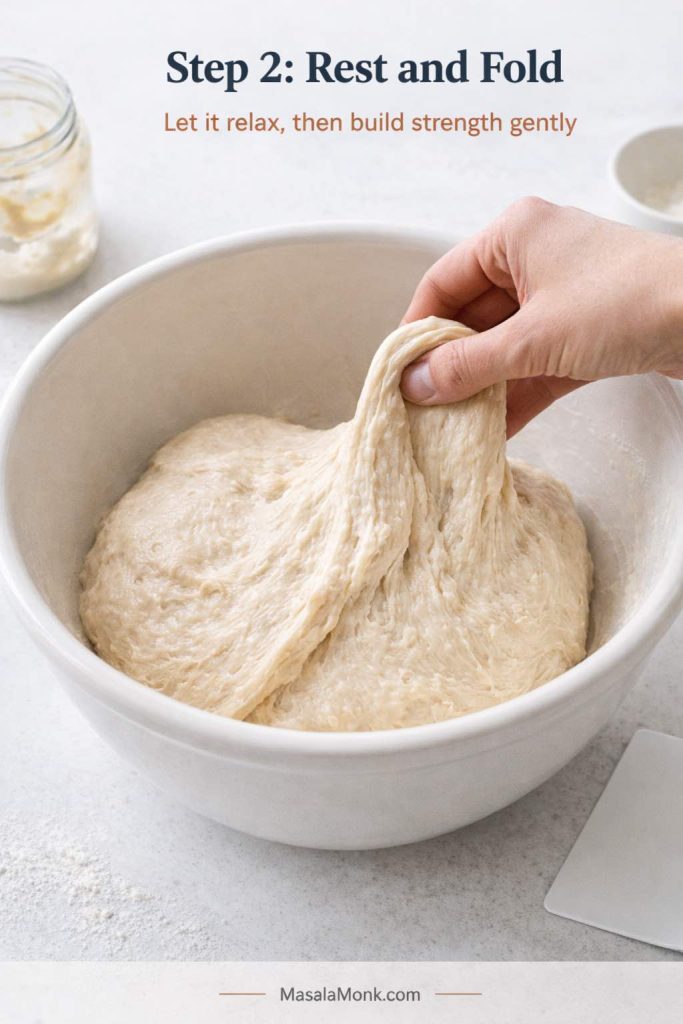
Rest and strengthen the dough
Cover the bowl and let the dough rest for 20 minutes.
Then perform one round of stretch-and-folds by pulling one side of the dough up and folding it over itself. Rotate the bowl and repeat on all sides.
Repeat this process 3 more times, resting 20 to 30 minutes between rounds. By the final fold, the dough should still be sticky but noticeably smoother, more elastic, and better able to hold itself.
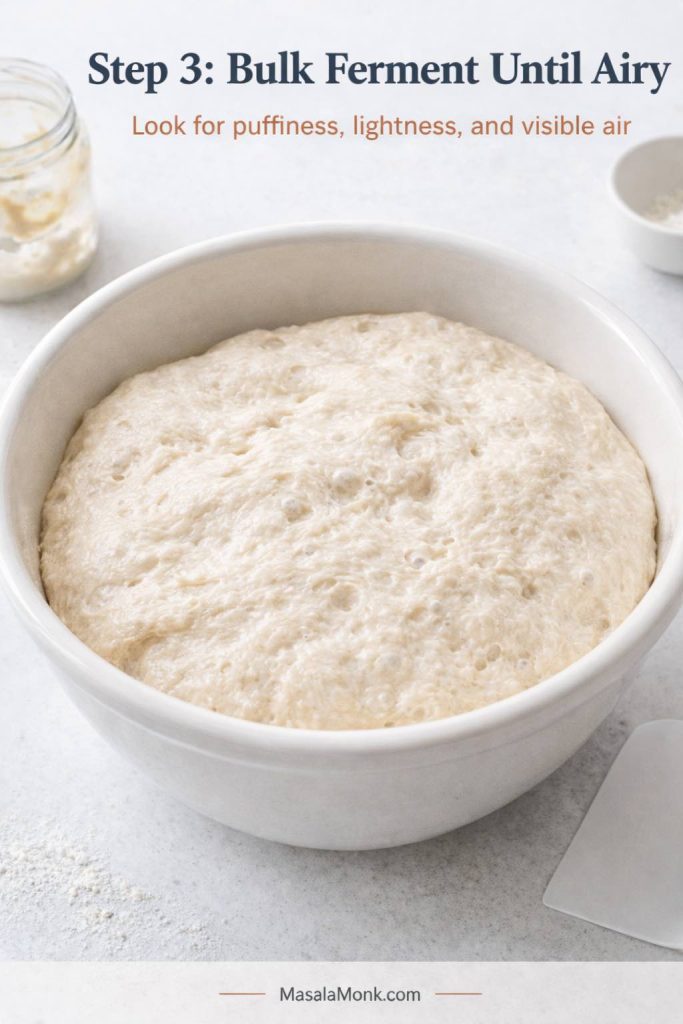
Bulk ferment until the dough looks airy and alive
After the folds, cover the bowl and let the dough ferment at room temperature until it looks visibly fuller, lighter, and more aerated.
At 74 to 78°F, this usually takes about 4 to 6 hours total from mixing with active starter.
Do not chase a perfect doubling. What matters is that the dough looks alive. You want some visible bubbles, a softer feel, and a bowl of dough that no longer looks dense and inactive. If it still looks tight and compact, keep waiting.
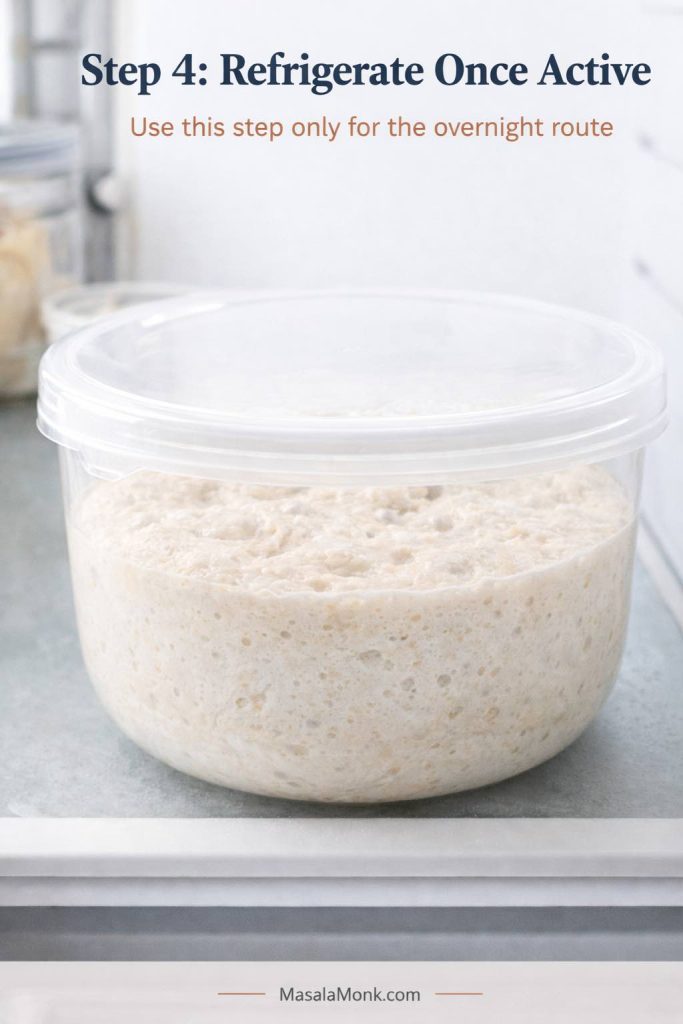
Refrigerate for the overnight route
Once the dough has clearly gained strength and activity, cover it well and refrigerate it for 8 to 24 hours.
This rest makes the schedule easier, deepens the flavor, and usually leaves you with a calmer dough the next day. Cover it well so the surface does not dry out in the fridge. Also, do not assume that longer is always better: push the cold rest too far and the dough can get more sour while losing some of its lift.
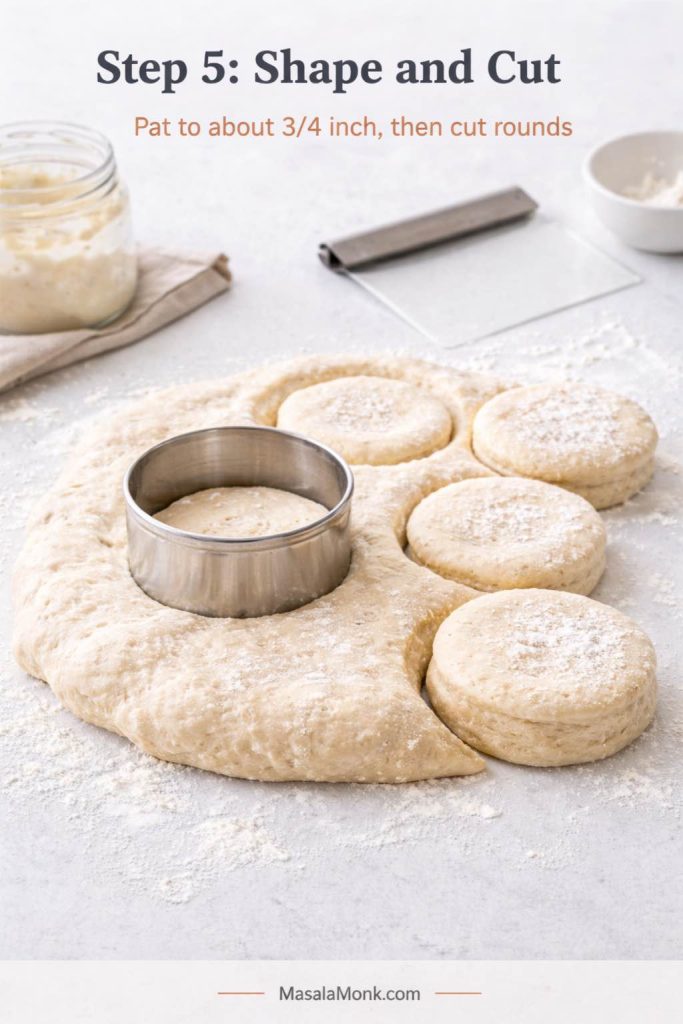
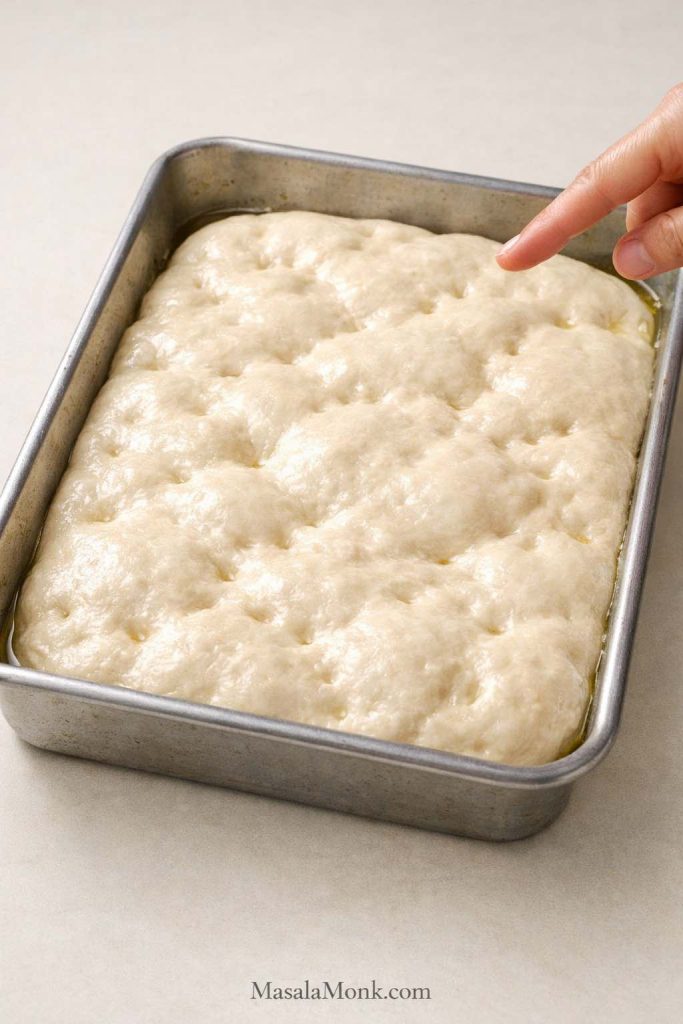
Oil the pan and transfer the dough
Pour 2 to 3 tablespoons olive oil into a 9×13-inch metal pan and coat the bottom well.
Tip the dough gently into the pan. Turn it once or twice so the outside picks up some oil.
If it does not want to reach the corners yet, do not force it. Let it relax for 15 to 20 minutes, then stretch it gently again. Focaccia usually rewards patience.
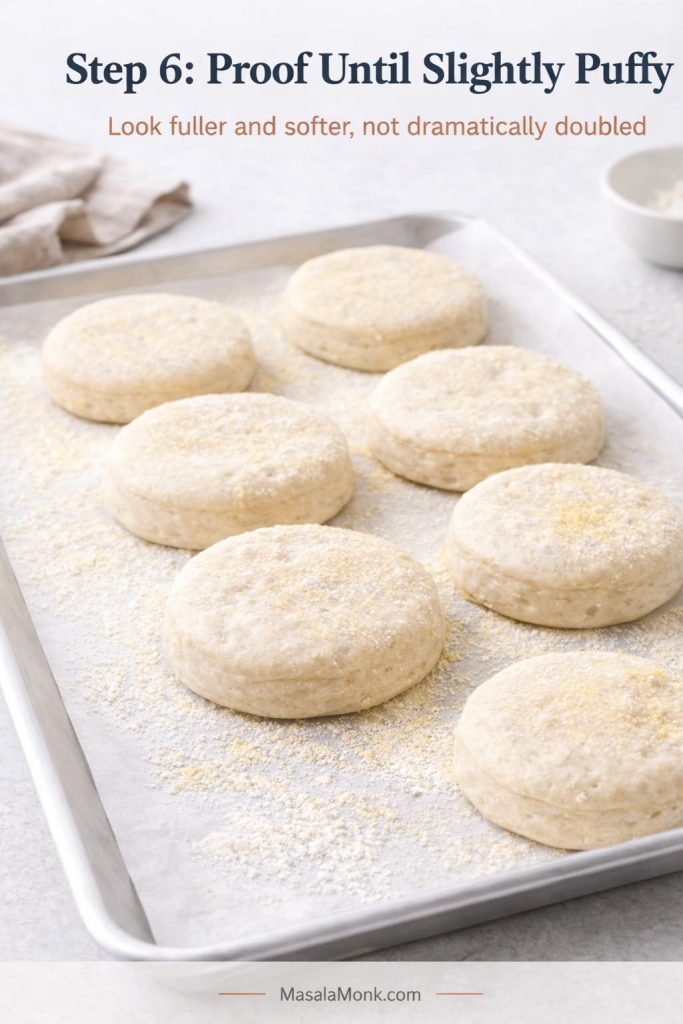
Proof in the pan until puffy and jiggly
Let the dough proof in the pan at room temperature until it looks fuller, softer, and lightly inflated. In a warm room, this often takes 2 to 4 hours after the cold dough goes into the pan, but the dough is a better guide than the clock.
Look for a dough that feels easygoing rather than tense. It should wobble lightly when the pan moves, show some air under the surface, and accept dimples without fighting back. The full proofing cues are broken down in the next section.
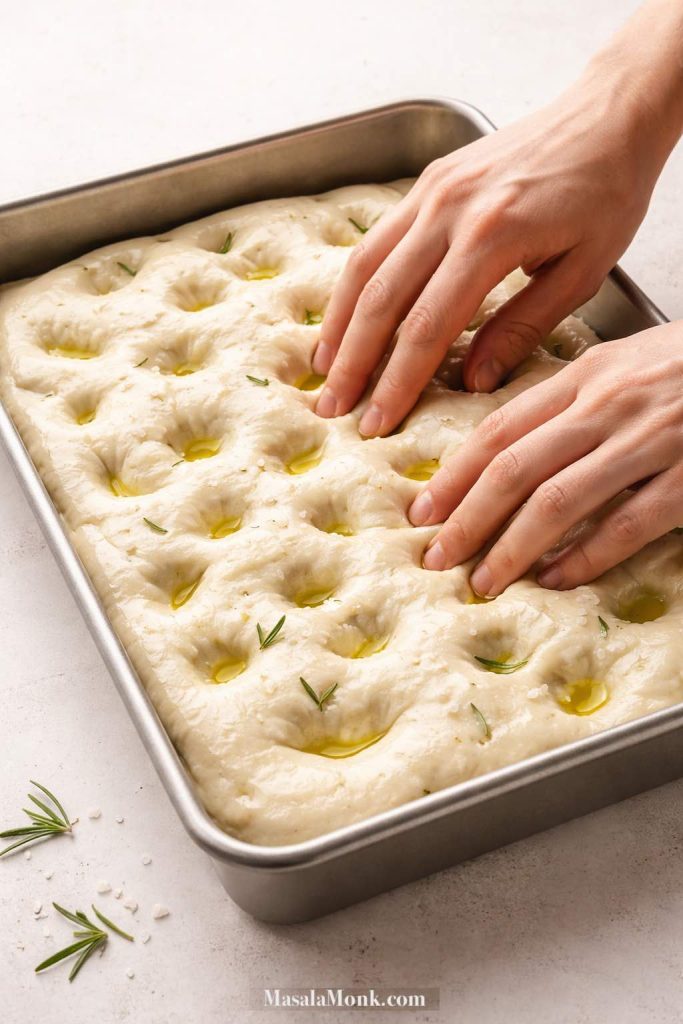
Dimple, top, and bake
Set the oven to 450°F.
Drizzle the top with 1 to 2 tablespoons olive oil. Lightly oil your fingertips, then press straight down to dimple the dough all over. Sprinkle with flaky salt and add your toppings.
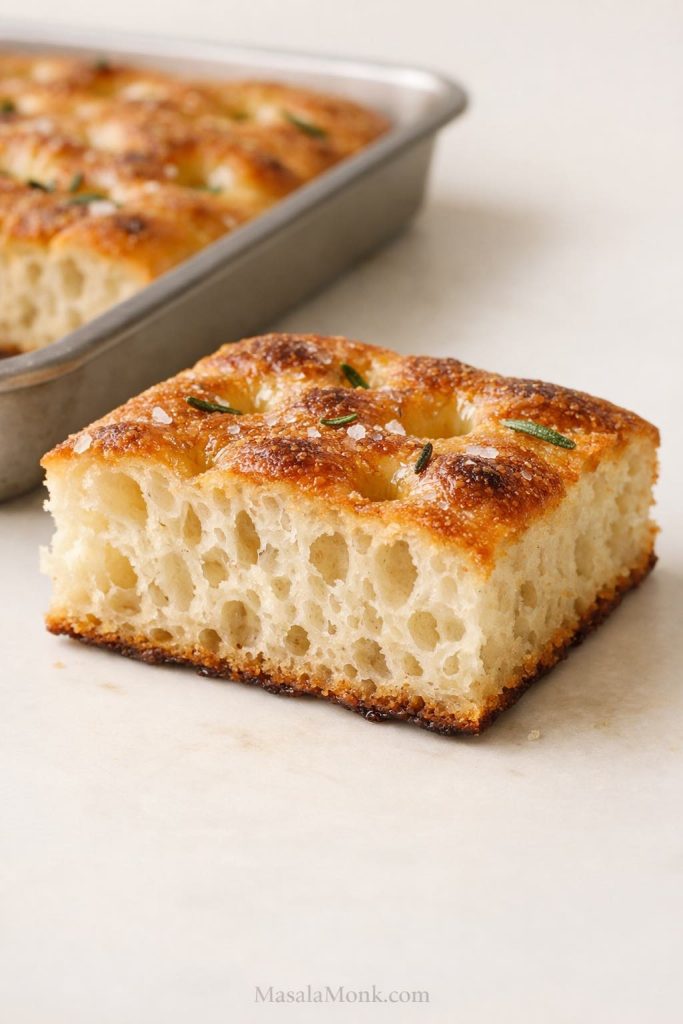
Bake for 25 to 30 minutes, or until the top is deeply golden and the edges are richly browned. If the top darkens too quickly before the bread feels baked through, lower the oven slightly or move the pan to a lower rack.
Cool, slice, and serve
Let the focaccia cool in the pan for 5 to 10 minutes, then lift it out and cool it a little more on a rack if possible. That helps the bottom stay crisper.
Slice while still slightly warm or at room temperature.
Also Read: Cookie Pie Recipe: 10 Best Flavors, Fillings and Variations
How to tell when sourdough focaccia is proofed enough
This is the most important judgment call in the whole recipe. If the dough is proofed well, the crumb has a real chance of turning out airy and dramatic. Bake too early and the bread usually comes out flatter and tighter.
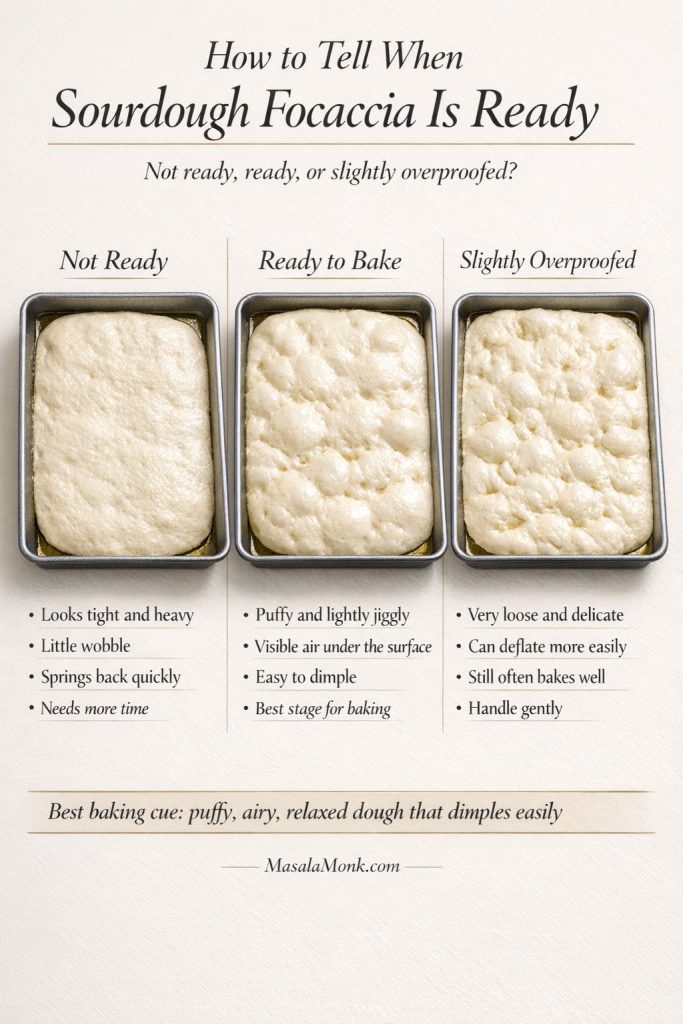
Signs your dough needs more time
The dough looks flat in the pan, feels heavy rather than buoyant, and resists your fingertips. When you press into it, it springs back quickly and does not want to hold the dimple. This is where a lot of bakers go wrong: the dough looks spread out, so they assume it is ready. It is not. It still needs time.
- tight surface
- little to no wobble
- heavy feel
- resists stretching toward the corners
Signs it is ready to dimple and bake
The dough looks puffy, slightly wobbly, and airy under the surface. Your fingers can press in easily, and the dough feels soft and almost marshmallowy rather than tense. More importantly, it should look like a dough that has actually trapped gas, not one that is merely spreading because it is wet.
- puffy appearance
- light wobble when the pan moves
- visible air pockets under the surface
- easy dimpling without the dough fighting back
What slightly overproofed focaccia looks like
A slightly overproofed dough can feel extremely loose and fragile, and it may deflate more easily when handled. Even then, focaccia often still bakes reasonably well because the pan supports it. You may lose some height, but you can still get very good bread.
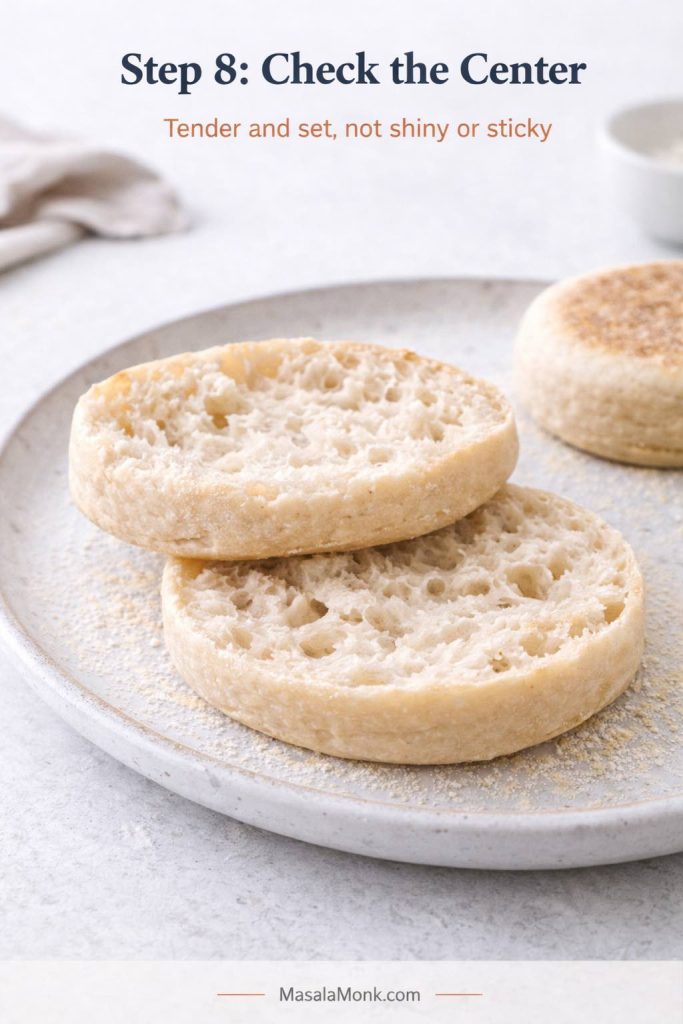
What underproofed focaccia looks like after baking
Underproofed focaccia usually comes out flatter, tighter, and less bubbly. The crumb feels more bread-like than airy, and the dramatic holes never really develop.
Also Read: Cookie Pie Recipe: 10 Best Flavors, Fillings and Variations
Best toppings for sourdough focaccia
The best toppings support the bread instead of burying it. Let the topping plan get too heavy or too wet and the focaccia starts losing the texture that made it worth baking in the first place.
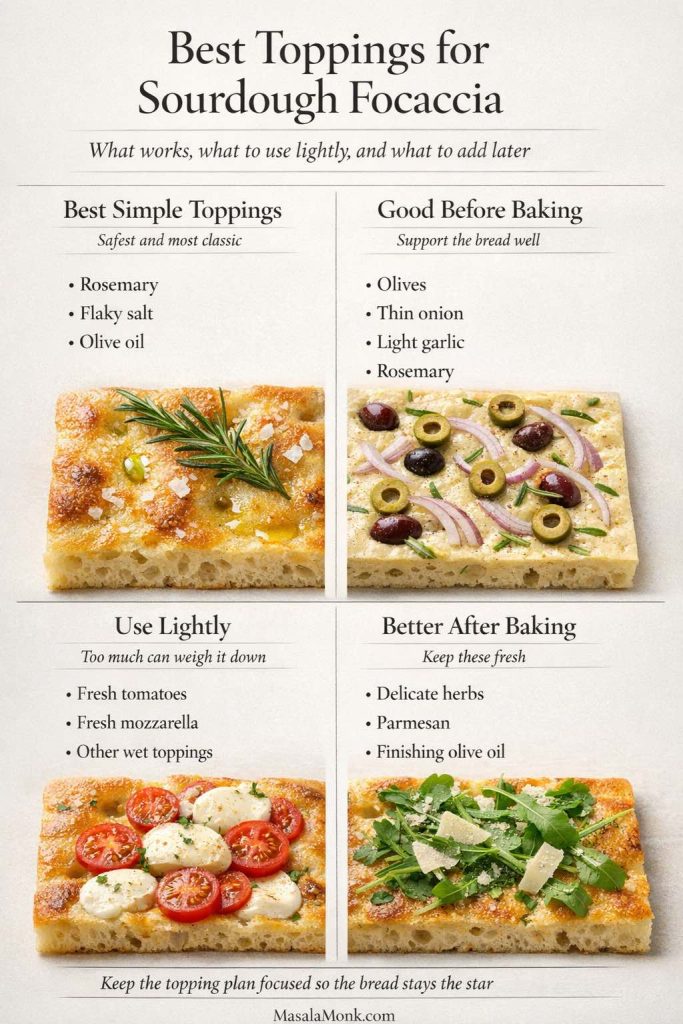
The best simple topping: rosemary, olive oil, and flaky salt
This is still the most reliable and satisfying version. It lets the bread stay the star, smells incredible, and avoids the sogginess that comes from piling too much on top.
Toppings that work well before baking
Olives, thin onion slices, rosemary, and a restrained amount of garlic all work well before baking. Garlic, however, can burn if it is sliced too thin or left too exposed, so keep it modest and let the olive oil protect it.
Toppings that need a lighter hand
Fresh tomatoes, fresh mozzarella, and other watery toppings should be used in moderation. Too much moisture softens the surface, interferes with browning, and can weigh down the dough. Once you want a more heavily topped bread, the result starts leaning toward pizza rather than classic focaccia.
What to add after baking
More delicate herbs, a final drizzle of good olive oil, or finishing touches such as parmesan are often better after baking. That way the flavors stay fresh instead of getting dulled in the oven.
Topping combinations that work well together
- rosemary and flaky salt
- rosemary and olive
- onion and olive
- light cherry tomato and oregano
- garlic and rosemary
Keep the topping plan focused. Let the bread do most of the talking.
Also Read: Peach Cobbler with Canned Peaches (Dessert Recipe)
Troubleshooting sourdough focaccia
Why is my sourdough focaccia dense instead of airy?
The most common causes are underproofing, weak starter, old discard without enough time, or too much added flour. Usually the fix is more fermentation, not more flour.
Why didn’t it get big bubbles?
Either the dough never built enough gas, or the gas it had was knocked out by rough handling. Good bubbles need both strong fermentation and gentle treatment.
Why is my focaccia gummy in the middle?
It may need a slightly longer bake, especially if it is thick or heavily topped. It can also seem gummier than it really is when sliced too hot. Let it cool briefly before cutting.
Why is it pale instead of deeply golden?
The oven may not be hot enough, the pan may not brown strongly, or there may not be enough olive oil on the dough and in the pan. A metal pan really helps here.
Why did it stick to the pan?
Usually there was not enough oil underneath, or the bread sat too long before being released. Oil the pan generously and loosen the focaccia while it is still warm if needed.
Why did it spread too much?
Either the dough never built enough strength during the folds, or it was proofed before it had enough internal structure. High hydration is good, but the dough still needs some strength.
Why does it taste too sour?
The dough may have fermented too long, the discard may have been especially acidic, or the kitchen may have been warm enough to push fermentation harder than expected. Use fresher discard or shorten the fermentation slightly next time.
Can you save overproofed focaccia?
Often yes. Transfer it gently to a well-oiled pan, dimple carefully, and bake it. You may lose some height, but focaccia is forgiving enough that the result can still be very good.
Also Read: Punjabi Mutton Bhuna – Amritsari Village-Style Gosht Recipe
Same-day and overnight schedules at a glance
These are working timelines, not hard laws. If the dough is moving faster than expected, refrigerate it sooner. If it is lagging, give it warmth or more time.
Sample same-day timeline with active starter
Use this when you have strong starter and a warm kitchen.
- 8:00 a.m. Mix the dough.
- 8:20 a.m. to 9:30 a.m. Complete 4 rounds of folds.
- 9:30 a.m. to 1:00 p.m. Let the dough bulk ferment until airy.
- 1:00 p.m. Transfer to the pan.
- 1:00 p.m. to 3:00 p.m. Pan proof until puffy and jiggly.
- 3:00 p.m. Dimple, top, and bake.
Sample overnight timeline with active starter
This is the best default route in the article.
- 6:00 p.m. Mix the dough.
- 6:20 p.m. to 7:30 p.m. Complete 4 rounds of folds.
- 7:30 p.m. to 10:00 p.m. Let the dough gain early strength and activity.
- 10:00 p.m. Refrigerate overnight.
- Next day, 10:00 a.m. Transfer to the pan.
- 10:00 a.m. to 1:00 p.m. Pan proof until puffy.
- 1:00 p.m. Dimple, top, and bake.
Sample discard + yeast fast timeline
Use this when you want the easiest quick route.
- 9:00 a.m. Mix discard, flour, water, salt, olive oil, and instant yeast.
- 9:20 a.m. to 10:30 a.m. Complete 4 rounds of folds.
- 10:30 a.m. to 1:00 p.m. Bulk ferment until airy.
- 1:00 p.m. Transfer to the pan.
- 1:00 p.m. to 2:30 p.m. Pan proof.
- 2:30 p.m. Dimple, top, and bake.
Also Read: Masterclass in Chai: How to Make the Perfect Masala Chai (Recipe)
Variations
Rosemary sourdough focaccia
Top the dough with rosemary, flaky salt, and olive oil for the cleanest and most classic version.
Whole wheat sourdough focaccia
Replace 100 to 150 g of the bread flour with whole wheat flour for a nuttier flavor and a slightly heartier crumb. Expect a little less loft and a little more chew.
Cast iron sourdough focaccia
Bake the dough in a well-oiled cast iron skillet when you want a darker, more assertive bottom crust and a rounder shape.
Sourdough focaccia pizza-style
Top more heavily after the first bake or split and fill it after baking when you want a pizza-inspired version. If you already like working with sourdough pizza dough, this is another satisfying way to use a soft, high-hydration dough.
Garlic and olive focaccia
Use sliced olives and a restrained amount of garlic so the top becomes aromatic and savory without turning harsh or greasy.
Also Read: Avocado Chocolate Mousse Recipe
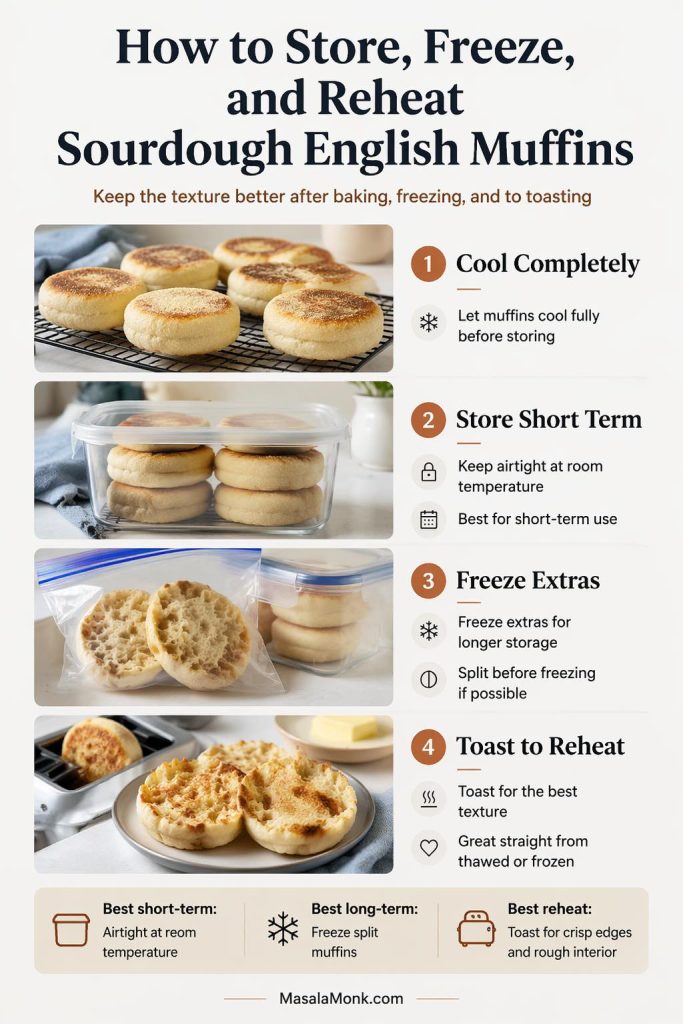
How to store, reheat, and freeze sourdough focaccia
Best way to store focaccia for 1 to 2 days
Focaccia is best the day it is baked and still very good on day two. Once it is fully cool, wrap it well and keep it at room temperature. Do not trap it while warm, or the steam will soften the crust you just worked for.
How to reheat for crisp edges again
Reheat the focaccia in a hot oven or toaster oven for a few minutes rather than microwaving it. That is the easiest way to bring the edges back to life.
Can you freeze sourdough focaccia?
Yes. Freeze it once fully cool, either whole or in slices, wrapped well. Reheat from frozen or thaw first and warm it in the oven.
Best leftover uses
Use leftover focaccia for sandwiches, alongside soup, or lightly toasted with eggs. Day-old focaccia still has plenty to offer if you warm it well.
Also Read: Falafel Recipe: Crispy Homemade, Air Fryer and Baked Falafel
Frequently asked questions about sourdough focaccia
Can I use sourdough discard instead of active starter?
Yes. Discard works well in focaccia, but it is usually slower and less forceful than active starter. For the most reliable result, use active starter. For the quickest discard version, add a little yeast.
Do I need yeast for sourdough discard focaccia?
No. You can make it without yeast if you give it enough time. Yeast simply makes the rise faster and more dependable.
Is focaccia easier than sourdough bread?
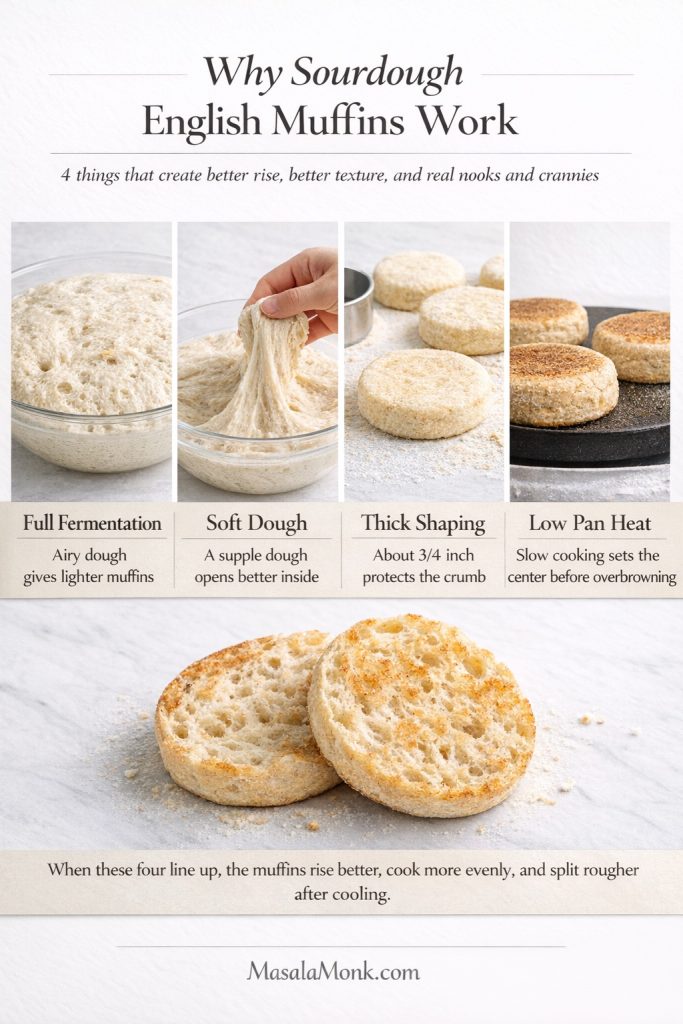
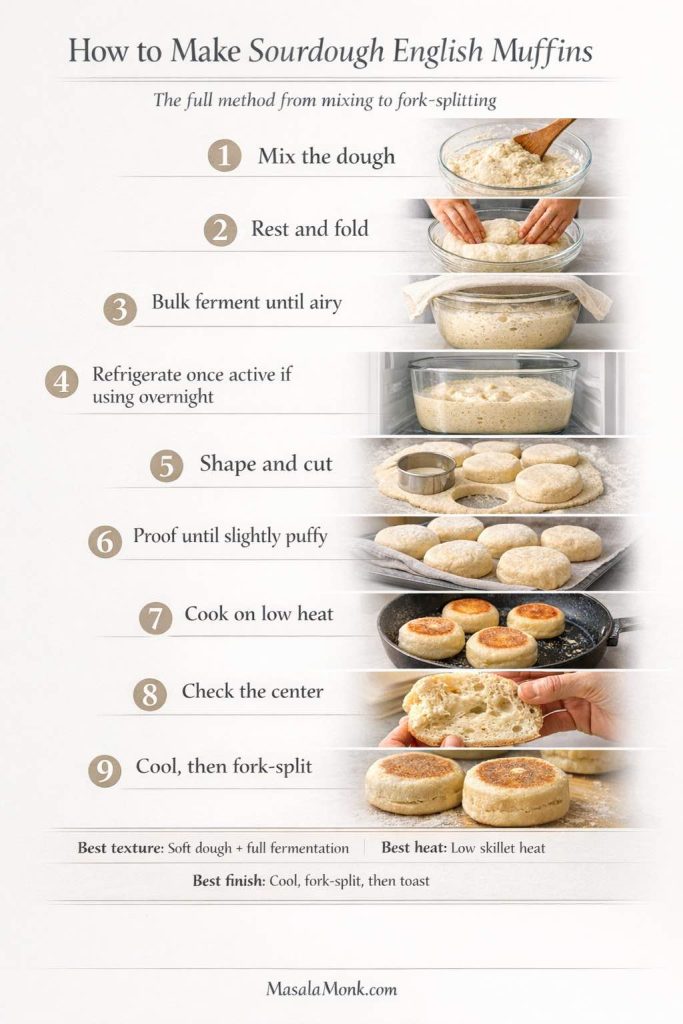
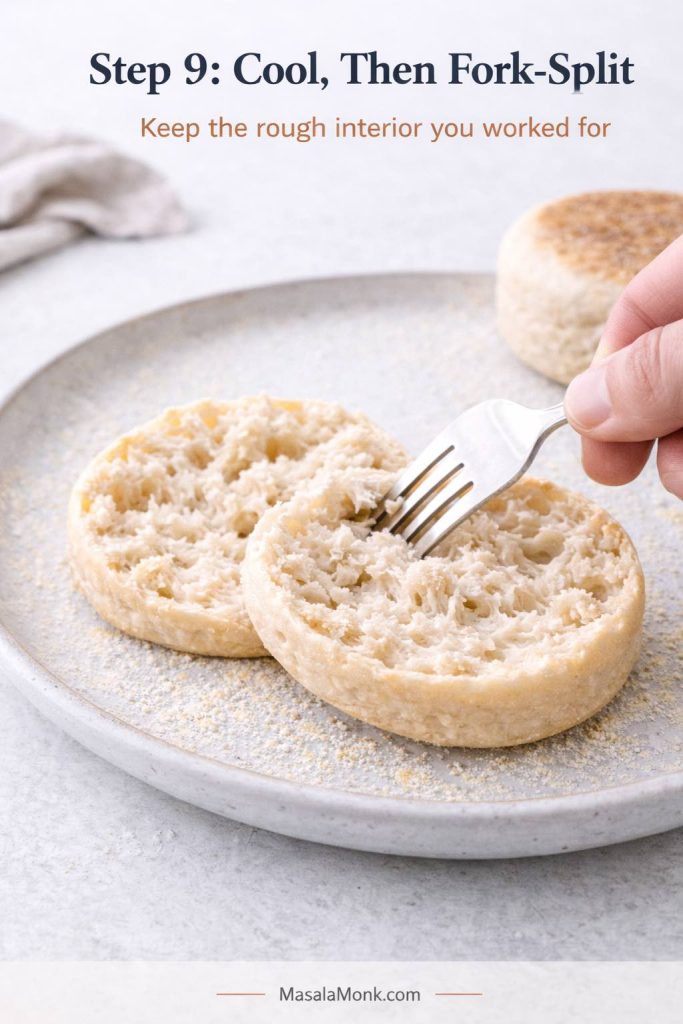
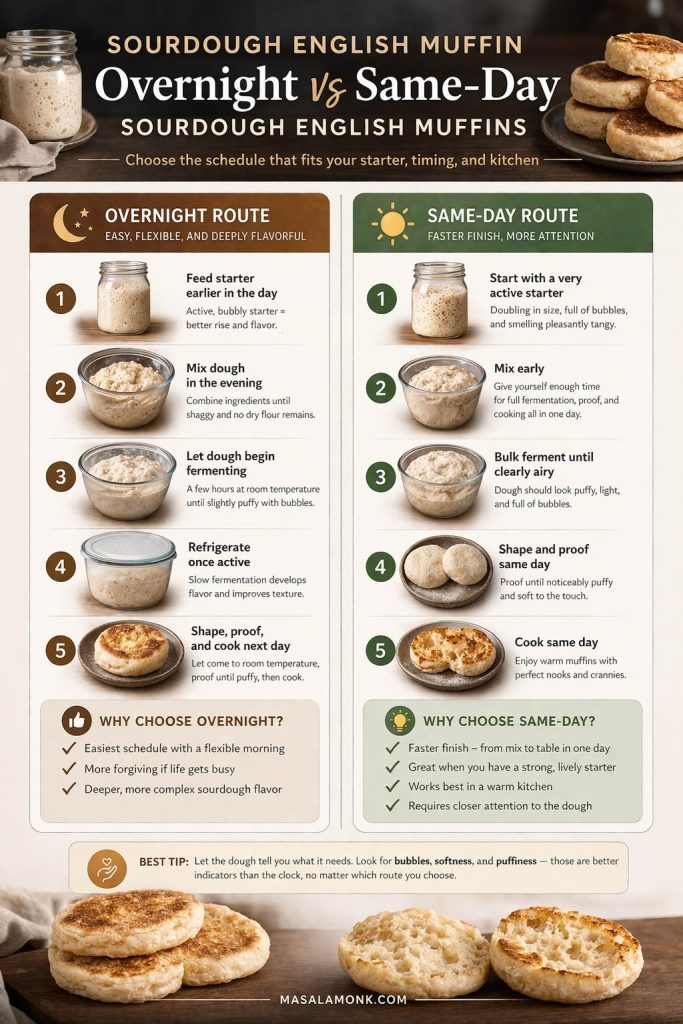
For most bakers, yes. The pan makes it more forgiving, and there is no shaping or scoring to master. If you want another approachable follow-up bake after this, sourdough English muffins are another useful way to build confidence with fermentation and dough cues.
Can I refrigerate the dough overnight?
Yes. In fact, the overnight route is the main method here because it makes the process easier and more consistent.
What flour is best for sourdough focaccia?
Bread flour is the best all-around choice for height and structure, but all-purpose flour still works very well.
What pan gives the crispiest bottom?
A well-oiled metal pan or cast iron skillet usually gives the best browning and the crispest base.
Also Read: Mango Margarita Recipe (Frozen or On the Rocks)
Recipe card
Sourdough Focaccia Recipe
Yield: 1 focaccia in a 9×13-inch pan
Serves: 8 to 12
Prep time: 30 minutes active time
Bulk fermentation: about 4 to 6 hours with active starter at warm room temperature
Cold rest: 8 to 24 hours
Pan proof: about 2 to 4 hours
Bake time: 25 to 30 minutes
Ingredients
- 500 g bread flour
- 400 g water
- 100 g active sourdough starter
- 12 g fine sea salt
- 20 g olive oil for the dough
- 2 to 3 tablespoons olive oil for the pan
- 1 to 2 tablespoons olive oil for the top
- flaky salt
- rosemary or other toppings as desired
Optional adjustments
- use 100 g sourdough discard in place of active starter for a slower discard version
- add 4 g instant yeast when using discard for a faster same-day version
Method
- Mix the bread flour, water, starter, salt, and 20 g olive oil until no dry flour remains.
- Rest the dough for 20 minutes.
- Perform 4 rounds of stretch-and-folds, resting 20 to 30 minutes between rounds.
- Let the dough bulk ferment until it looks fuller, lighter, and visibly airy.
- Refrigerate the dough for 8 to 24 hours once it has clearly gained activity.
- Oil a 9×13-inch metal pan well and transfer the dough.
- Let it proof in the pan until puffy, jiggly, and easy to dimple.
- Heat the oven to 450°F.
- Drizzle the top with olive oil, dimple all over, and add flaky salt and toppings.
- Bake for 25 to 30 minutes until deeply golden.
- Cool for 5 to 10 minutes in the pan, then lift out and cool a little more before slicing.
Notes
- The best default route is active starter + overnight.
- This formula assumes a 100% hydration starter.
- Use starter that is recently peaked or close to peak for the best lift.
- If using all-purpose flour, reduce the water slightly to keep the dough manageable.
- Use discard when convenience matters more than maximum lift.
- Add instant yeast to discard when you want the fastest and most dependable same-day result.
- A 9×13-inch metal pan gives the best all-around crust and structure.
- The dough is ready when it looks puffy, airy, and softly inflated, not flat and tight.
A good focaccia should feel generous, not tense. Once you know which route makes sense, what the dough should look like, and when to wait instead of forcing it, this becomes one of the easiest breads to come back to. For more ideas beyond this one, the site’s broader sourdough bread recipe guide is a useful next stop.