Posted on — Leave a comment

Focaccia Recipe: Easy, No-Knead, Crispy and Airy

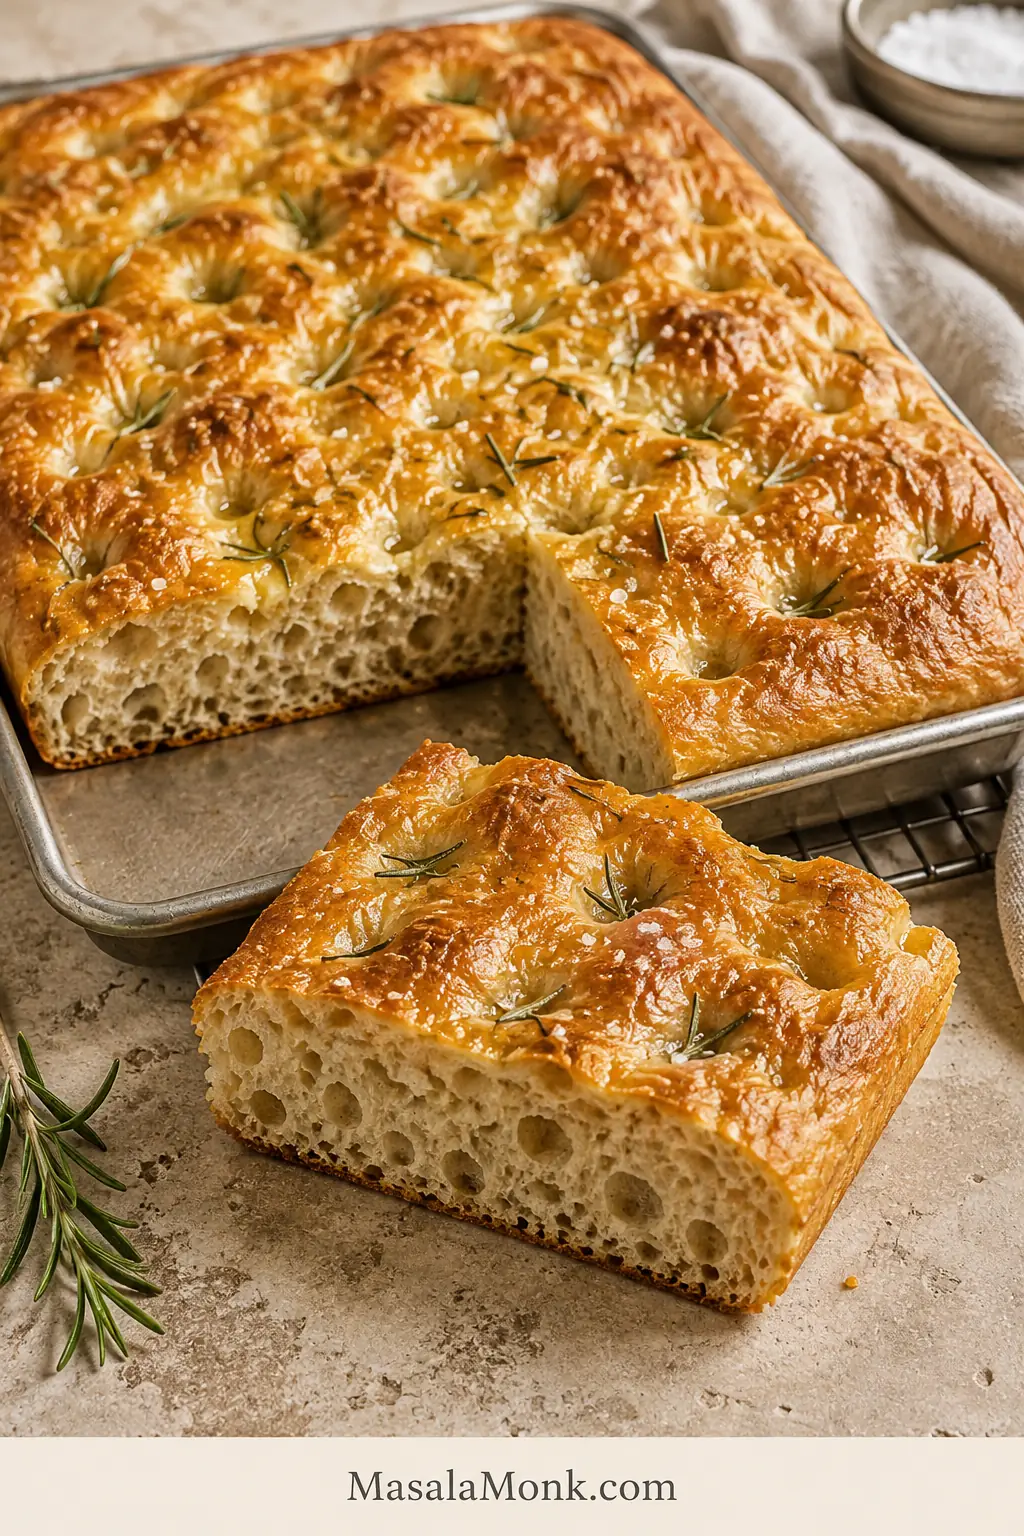
Golden rosemary focaccia with a cut square in front showing an airy crumb and thin browned bottom crust.

There is a particular moment when homemade focaccia feels worth the wait: you lift one corner from the pan and find a deeply golden, crisp underside, while the bread above it still feels almost impossibly soft.

This is that kind of focaccia—deeply dimpled, olive-oil-rich and airy through the middle, with irregular bubbles and a light, open crumb.

This easy focaccia recipe keeps the work remarkably low: one mixing bowl, no mixer and no traditional kneading. Most of the time belongs to fermentation, not to you. Because wet dough behaves differently from one flour and kitchen to another, the method tells you what each important stage should look and feel like, not just how long to wait.

The first thing to know: focaccia dough should feel very sticky. The real question is whether it stretches and holds together as one connected mass.

Quick Answer

For airy focaccia with a crisp olive-oil bottom, use 500 g bread flour or strong all-purpose flour and begin with 400 g water. Hold back another 20 g water and add it only if the rested dough remains cohesive enough to take it.

Mix with 4 g instant yeast, rest for 20 minutes, give the dough one quick fold, then leave it at room temperature for a short 30-minute warm start.

Refrigerate for 18–36 hours, planning around 24. The next day, proof in a well-oiled 9 × 13-inch metal pan until bubbly and softly wobbling, then bake at 450°F / 230°C conventional until deeply golden above and crisp underneath.

The whole recipe comes down to three decisions: let your flour tell you whether it needs the final 20 g water, let the dough tell you when proofing is finished, and let the underside tell you when the loaf is truly done.
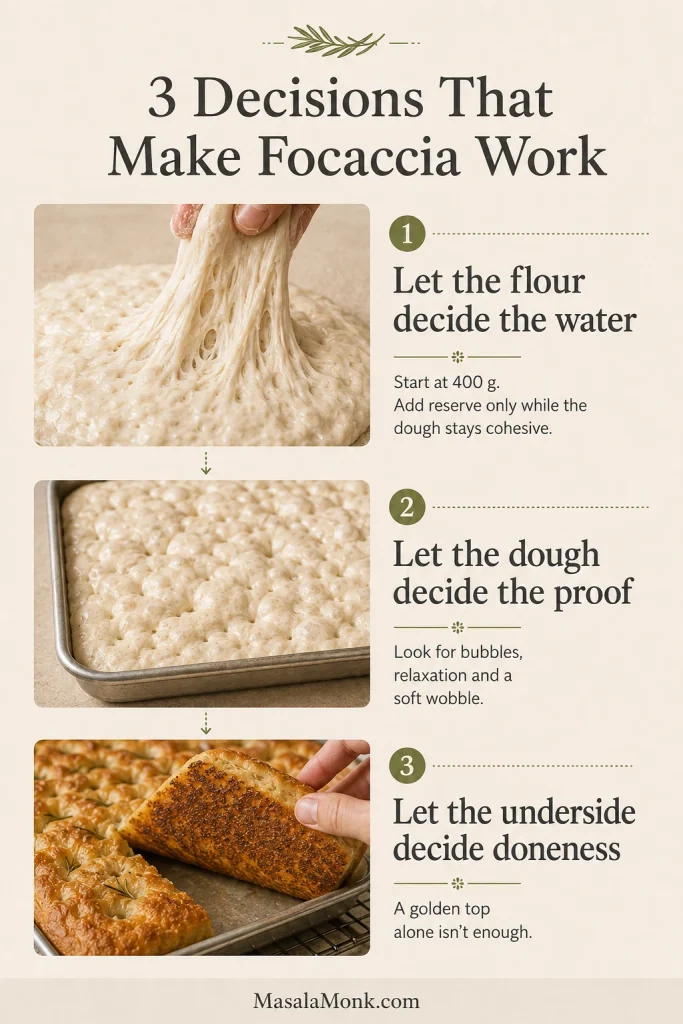
Guide showing sticky focaccia dough, bubbly proofed dough in a pan, and the browned underside of baked focaccia.
Water, proofing and doneness are separate checkpoints; getting one right cannot rescue another that has gone too far.

Overnight vs Same-Day Focaccia: Choose Your Route

Overnight — RecommendedSame-Day
Yeast4 g instant yeast6 g instant yeast
Hands-on workVery lowA little more
Main fermentation18–36 hours refrigerated; plan around 24About 1½–2½ hours warm
Typical elapsed timeAbout 27–30 hours on the 24-hour cold routeRoughly 4–6 hours
FlavorDeeper and more developedMilder and fresher
Best whenYou can start the day beforeYou want focaccia tonight

Choose overnight when you can. The longer fermentation develops more flavor while keeping the actual work very small.

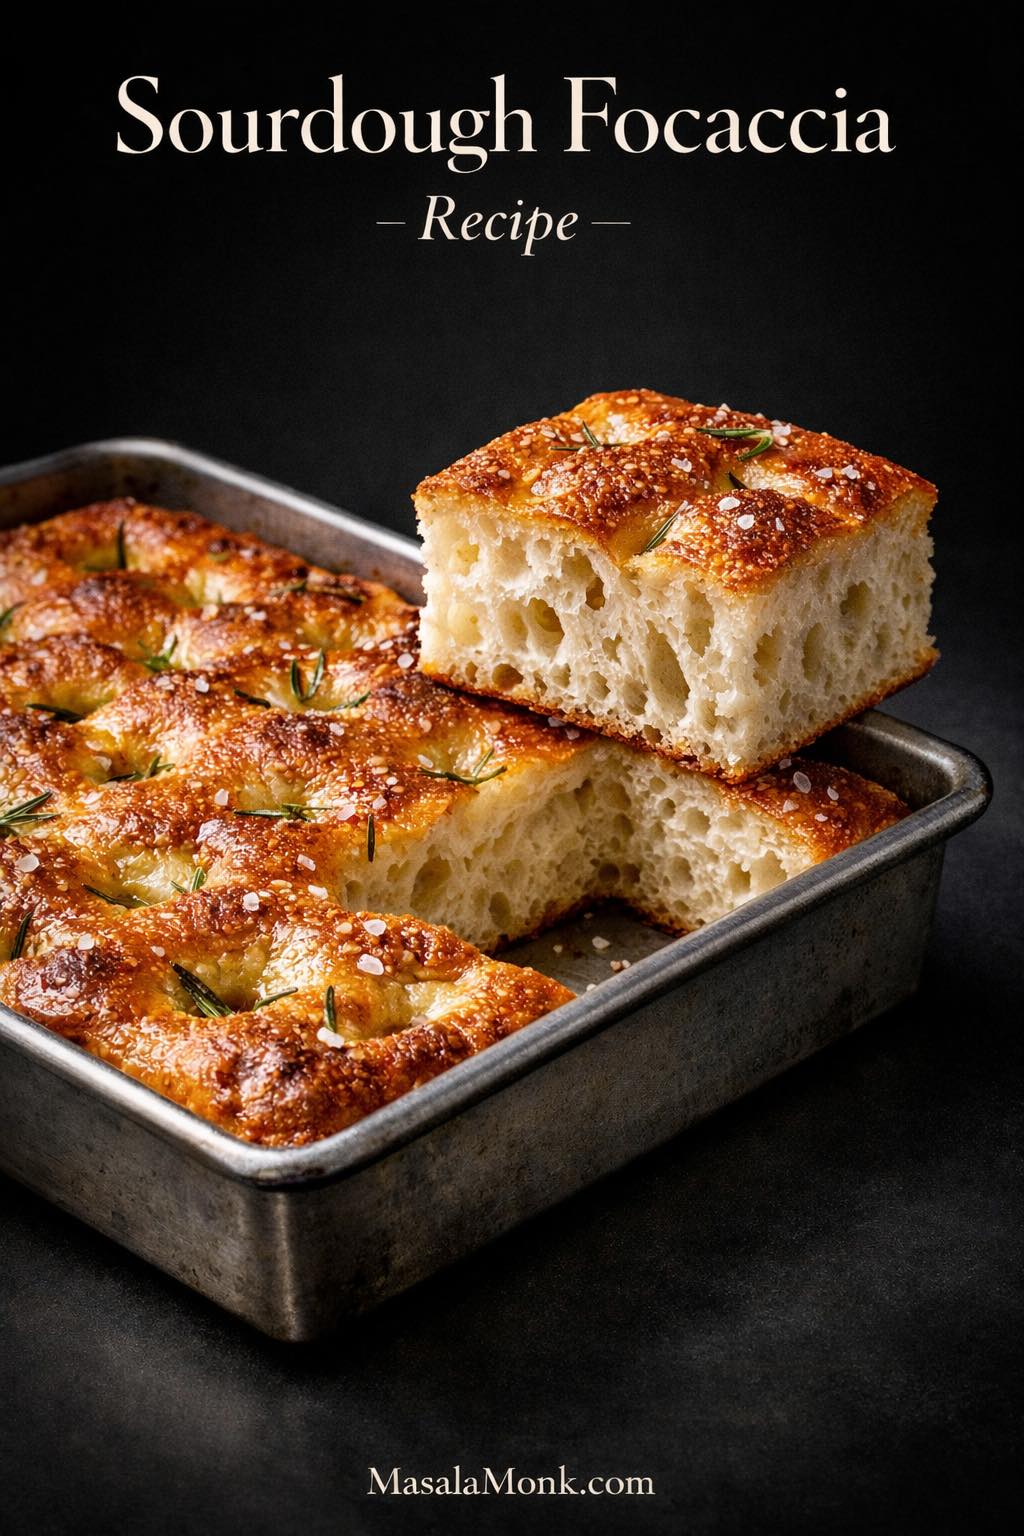
Prefer natural fermentation? Use our sourdough focaccia recipe rather than trying to convert the yeast formula by guesswork.

Easy No-Knead Focaccia Recipe

Easy No-Knead Focaccia

An overnight focaccia with a crisp olive-oil bottom, deeply golden top and soft, irregularly airy crumb.

Yield: 1 large 9 × 13-inch focaccia; about 8 generous or 12 smaller pieces

Active time: about 25 minutes

Plan ahead: for about 24 hours in the refrigerator, start roughly 27–30 hours before serving. Starting the evening before can still work for next-day dinner using the early end of the 18–36-hour cold-ferment window.

Cold ferment: 18–36 hours; plan around 24 when your schedule allows

Final proof: at 70–75°F / 21–24°C, start checking after about 2 hours; many batches need 3–4

Bake: about 22–28 minutes

Pan: 9 × 13-inch / approximately 23 × 33 cm metal pan

Oven: 450°F / 230°C conventional/static; about 425°F / 220°C fan/convection, checking earlier

Ingredients

  • 500 g / 17.6 oz bread flour or strong all-purpose flour, about 4–4¼ cups by volume
  • 400 g / 400 ml water, about 1⅔ cups
  • Up to 20 g / 20 ml additional water, held back
  • 11 g fine sea salt, roughly 1¾–2 teaspoons depending on the salt
  • 4 g instant yeast, about 1¼ teaspoons
  • 45 ml / 3 tablespoons extra-virgin olive oil for the pan
  • 30 ml / 2 tablespoons extra-virgin olive oil for the top
  • Flaky finishing salt
  • 1 tablespoon fresh rosemary leaves, optional

Method

  1. Mix the water and instant yeast. Add the flour and fine sea salt and stir until no dry flour remains.
  2. Cover and rest for 20 minutes. Add the reserved water gradually, stopping as soon as the dough is very sticky, stretchy and cohesive. You may not need all 20 g.
  3. Give the dough one quick 30-second fold around the bowl.
  4. Cover and rest at room temperature for about 30 minutes, until slightly smoother and more relaxed. It doesn’t need to double.
  5. Refrigerate for 18–36 hours, preferably around 24.
  6. If your metal pan tends to stick, give it a whisper-thin coat of butter or nonstick spray. Pour in 3 tablespoons / 45 ml olive oil, transfer the chilled dough gently into the pan, and rest for 10–20 minutes whenever it resists stretching toward the corners.
  7. Cover and proof until visibly bubbly and soft enough to wobble when the pan is nudged.
  8. Preheat to 450°F / 230°C conventional/static for at least 30 minutes, with a rack in the lower-middle or lower third. For fan/convection, start around 425°F / 220°C and check earlier.
  9. Oil your fingertips and dimple deeply to the pan. Drizzle over the remaining 2 tablespoons / 30 ml olive oil, then add flaky salt and rosemary.
  10. Bake for about 22–28 minutes, until deeply golden on top, crisp and browned underneath, and set through the center.
  11. Rest in the pan for 3–5 minutes, then transfer to a wire rack.

Cooking now? The recipe card above is enough to cook from. Everything below is optional guidance for understanding the dough, adapting the recipe or fixing something that looks unusual.

Table of Contents


Focaccia Ingredients

Focaccia begins with flour, water, yeast, salt and olive oil. The bigger differences come from how much water your flour can handle, how far fermentation goes, how fully the dough proofs and how efficiently the pan browns it. Those are the variables worth learning to read.

For salt, trust the 11 g weight because teaspoon volume varies with crystal size. Extra-virgin olive oil gives the surface the most aroma and flavor, although regular olive oil works too.
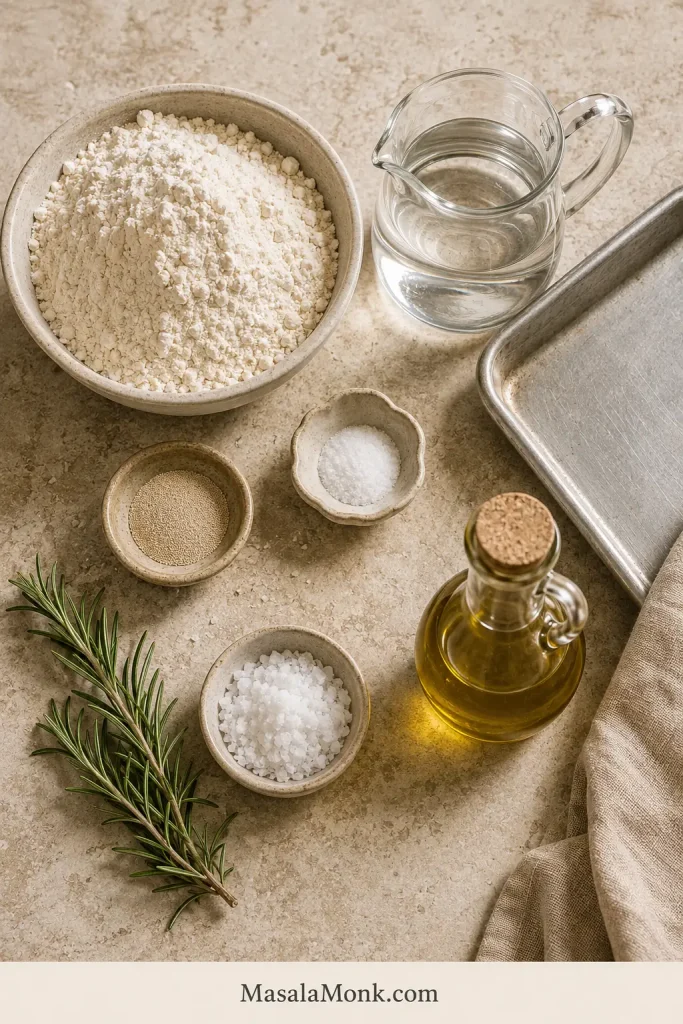
Flour, water, yeast, salt, olive oil and rosemary arranged beside a rectangular metal baking pan.
Olive oil works twice here: 3 tablespoons beneath the dough encourage browning; 2 tablespoons on top settle into the dimples and season the crust.

How Wet Should Focaccia Dough Be?

This recipe starts at 80% hydration and can rise to 84%. The 400 g base is the dependable starting point; the held-back 20 g lets stronger flour take a little more water when it can support it.

Don’t chase 84% just because the water is there. A cohesive dough at 80% is better than forcing extra water into flour that can’t support it.

The first mixed dough may cling enthusiastically to your fingers and be exactly where it needs to be. If you have made our homemade pita bread, this will feel dramatically wetter: focaccia gets the support of a pan instead of having to hold itself as a free-standing flatbread.

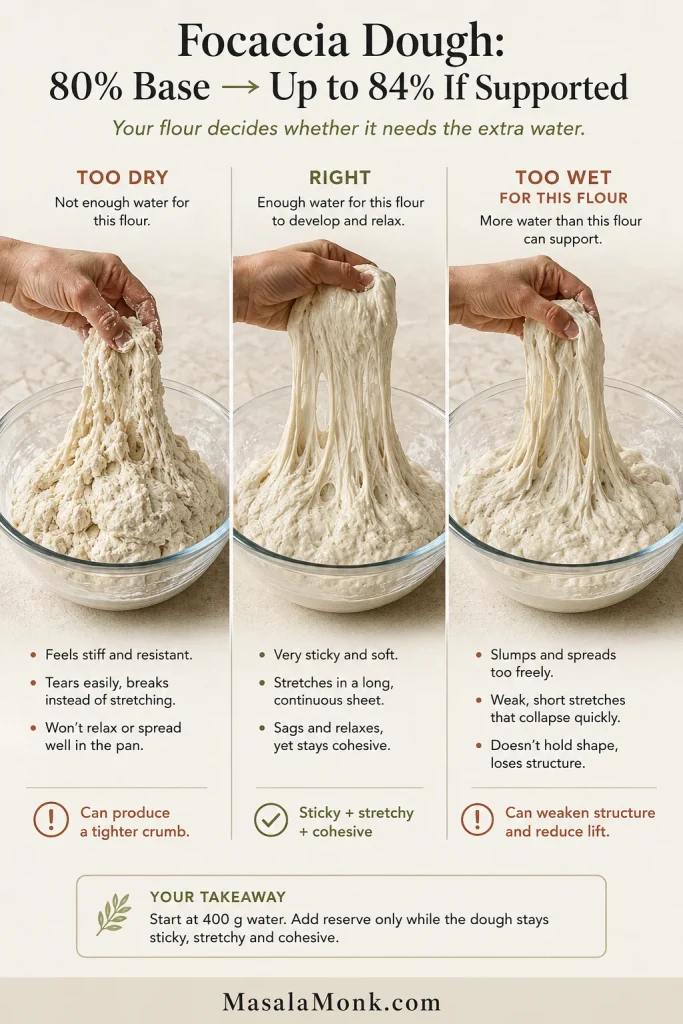
What you want is dough that feels very sticky but stretches as one connected mass.

StateWhat you will noticeNext move
Too dryFirm, conventionally kneadable, resistant and prone to tearingAdd some reserved water
RightVery sticky, loose and soft, yet stretchy and cohesiveCarry on
Too wet for the flourFlows freely and develops little structure even after restingStop adding water and check flour/measurements
Three focaccia dough consistencies comparing firm dry dough, sticky cohesive dough, and very loose spreading dough.
Sticky is expected. If the dough still stretches as one connected mass, wet or lightly oiled hands are better than adding more flour.

How to Use the Reserved Water

Wait the full 20 minutes before judging it. Flour keeps absorbing water as it rests, and a rough sticky mixture can become noticeably more organized without kneading.

Add about 10 g of the reserved water. If it disappears into the dough and the mass stretches together, decide whether it can take the final 10 g.

Some batches will finish at 400 g water. Others will use all 420 g. Both can become excellent focaccia.
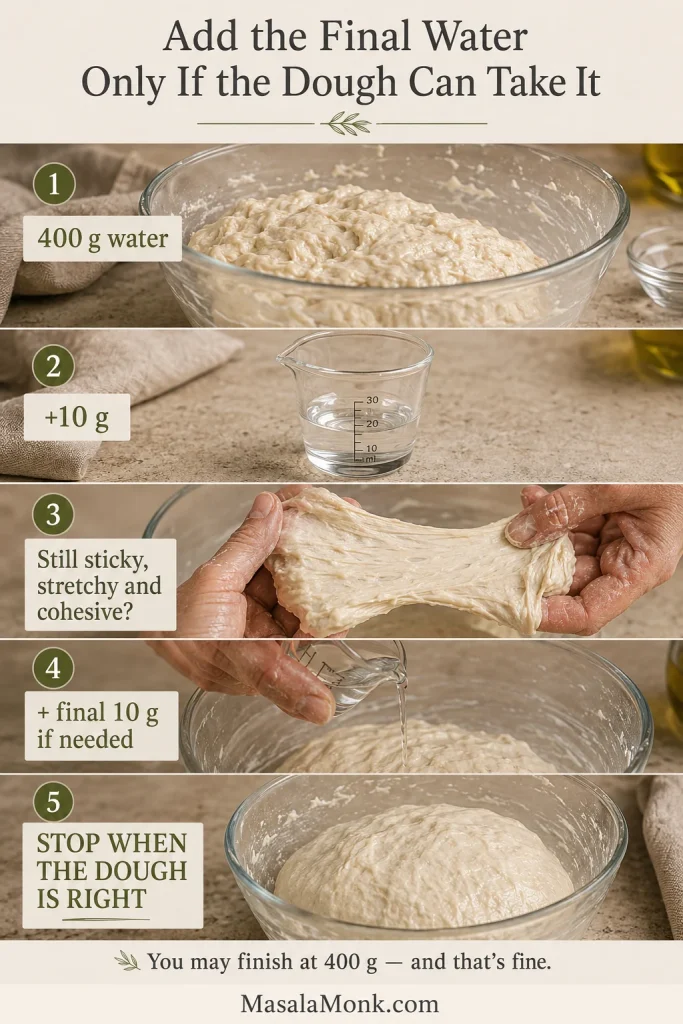
Step-by-step guide showing reserved water added gradually to sticky focaccia dough while checking its consistency.
That final 20 g is only 4% of the flour weight, yet it can decide whether the dough stays supple or loses support.

Dough already turned soupy? See what to check before changing the formula.

What Is the Best Flour for Focaccia?

For the easiest first batch, choose bread flour around 11–13% protein. It gives wet dough enough strength to stretch and hold fermentation gas while generally handling high hydration well.

Strong all-purpose flour is also excellent and can produce a slightly softer crumb. More important than the wording on the bag is the flour’s strength and how eagerly it absorbs water.

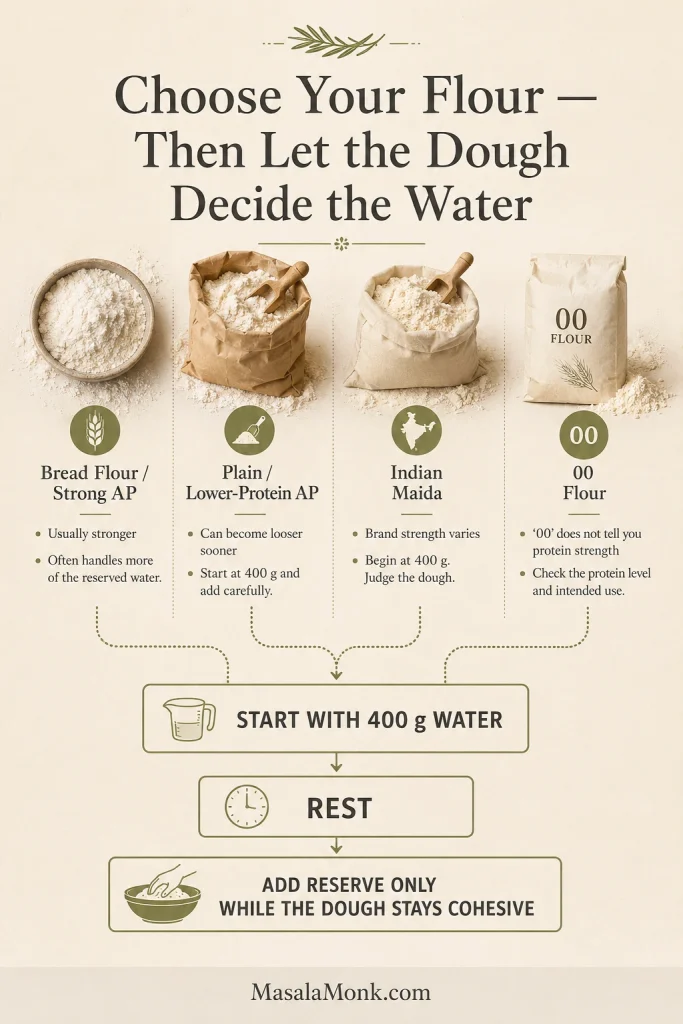
FlourWhat to expectWater approach
Bread flourStrong, stretchy dough; slightly chewier crumbOften handles the full amount comfortably
Strong all-purposeGood strength with a slightly softer crumbAdd reserved water gradually
Lower-protein plain/APLooser dough at the same hydrationExpect to leave some reserved water out
Indian maidaStrength and absorption vary greatly by brandBegin at 400 g and judge the dough
00 flourStrength varies from product to productCheck protein level and intended use
Flour guide comparing bread flour, all-purpose flour, Indian maida and 00 flour with a shared water-adjustment method.
Flours with the same label can absorb water differently; the reserved-water method makes this formula more reliable across brands.

You can see the same flour-strength trade-off in our sourdough pizza dough, although pizza also has to stretch and support itself without a pan.

A scale earns its place here. A heavily packed cup of flour can quietly turn the same formula into a much drier dough. Weighing 500 g removes that variable immediately.

Flour and Yeast Substitutions

  • All-purpose flour: yes, especially when it is reasonably strong. Hold back the final water and let the texture guide you.
  • Indian maida: also possible, but brands vary substantially. Begin with the base 400 g water and add more only while the dough keeps enough structure.
  • 00 flour: 00 tells you about the flour’s Italian milling/refinement classification, not its protein strength. Check the protein level and intended use.
  • Whole wheat: a modest partial substitution can work, but expect different water absorption and a tighter crumb. Make the white-flour version first so you know the texture you are aiming for.
  • Active dry yeast: yes. Follow the conversion and blooming directions on your package; if your brand permits a 1:1 swap for instant yeast, use 4 g. Fermentation may move a little more slowly, so use the same readiness cues rather than forcing the original timing.
  • Sourdough starter: starter contributes both flour and water and changes the fermentation schedule. If you are beginning from scratch, our sourdough starter recipe covers the first step; for the bread itself, use the sourdough focaccia linked above.
  • Gluten-free flour: this wheat-based formula is not designed for a direct gluten-free swap. Gluten-free focaccia needs its own structure system.

The Best Pan and Equipment for Focaccia

A bowl, digital scale, 9 × 13-inch metal pan and wire rack cover almost everything you need.

  • Digital scale: especially helpful for flour, water, salt and yeast.
  • Large covered bowl: an airtight lid makes the refrigerator stage easier.
  • 9 × 13-inch / approximately 23 × 33 cm metal pan: the reference pan for this recipe.
  • Flexible scraper or spatula: handy with wet dough, but optional.
  • Wire rack: important for keeping the underside crisp after baking.

Metal is the easiest route to the crisp bottom promised here because it transfers heat quickly into the oil and dough. A reliably nonstick pan needs only olive oil; an older or grabby pan benefits from the thinnest film of butter or nonstick spray first.

Dark metal browns faster. Begin checking the underside a little earlier if your pan is very dark.

Glass and ceramic can still make good focaccia, but the base generally colors more slowly. The King Arthur Baking focaccia pan comparison gives a clear demonstration of how pan material changes browning.
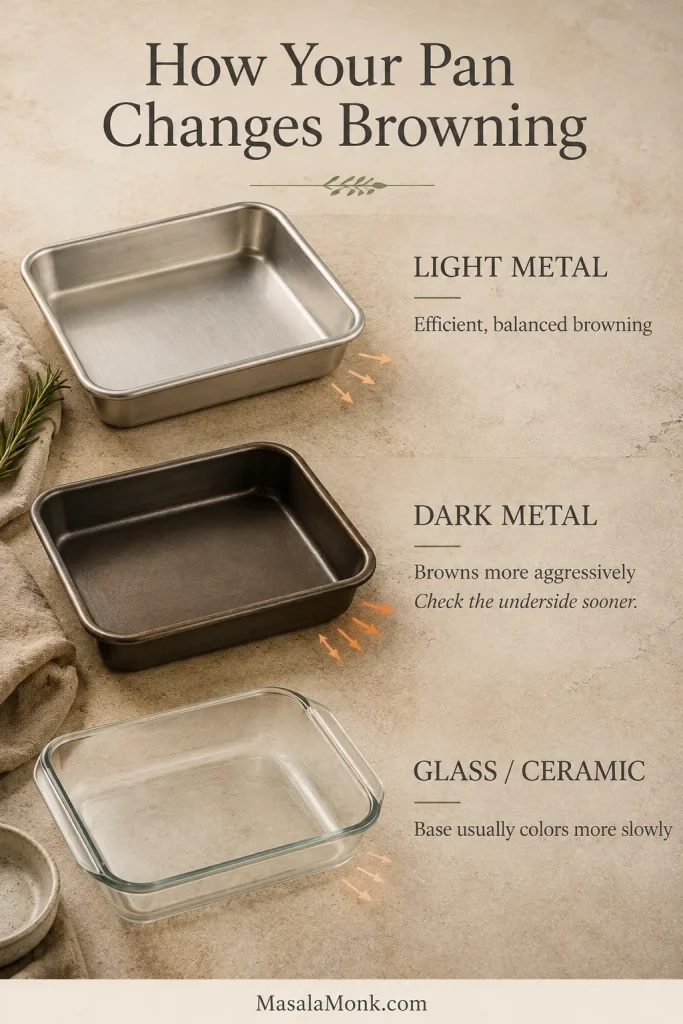
Light metal, dark metal, glass and ceramic baking pans compared for how they affect focaccia browning.
If the top is ready but the bottom stays pale, suspect the pan and heat path before changing the dough.

Using another pan size? See how to scale the dough by pan area.

How to Make Focaccia

Making focaccia is simple; the real skill is recognizing when the dough is ready for the next stage.

1. Mix the Dough

Pour 400 g water into a large bowl and stir in 4 g instant yeast. Room-temperature or slightly cool water is fine in a warm kitchen; use mildly lukewarm water around 80°F / 27°C when the room is cool.

Add 500 g flour and 11 g fine sea salt. Stir with a sturdy spoon, spatula or wet hand until no dry flour remains.

It may look messier than you hoped. Give it the full 20-minute rest before changing anything, then add reserved water only while the dough remains stretchy and cohesive.
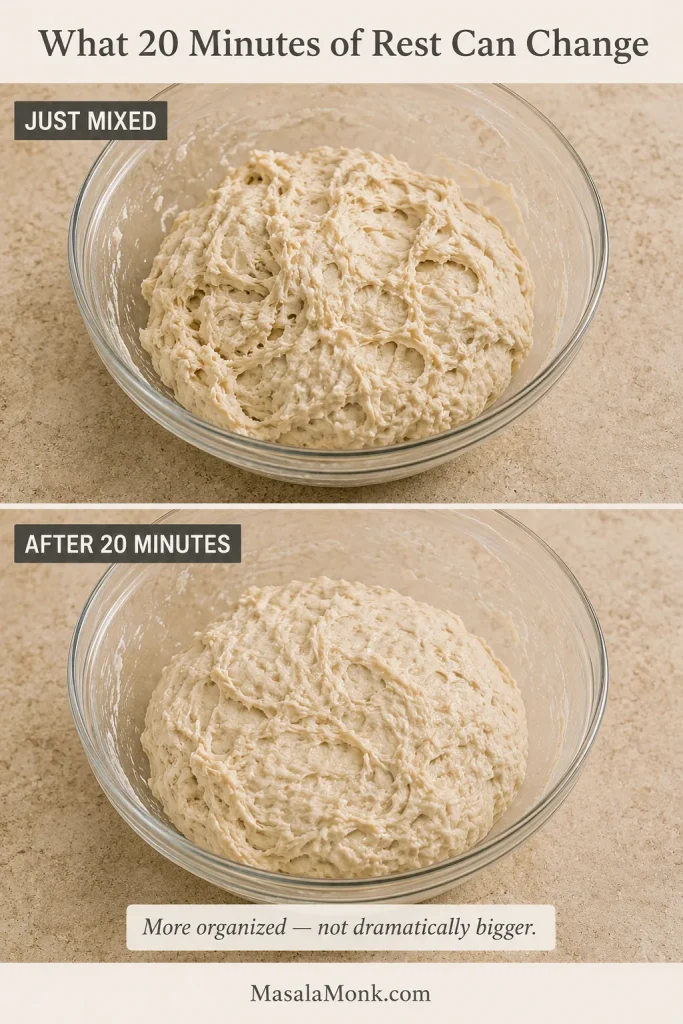
Focaccia dough in the same glass bowl immediately after mixing and again after a 20-minute rest, looking more unified.
A short rest makes rough dough more connected before extra water is added, so hydration is easier to judge afterward.

2. Give It One Quick Fold

Wet one hand, lift an edge until you meet a little resistance, fold it toward the center, rotate the bowl and repeat around the remaining sides.

About 30 seconds is enough. Cover the bowl and leave it at room temperature for another 30 minutes. The surface should begin to look smoother and the mass more relaxed; it doesn’t need to grow dramatically.

From here, time does most of the work.
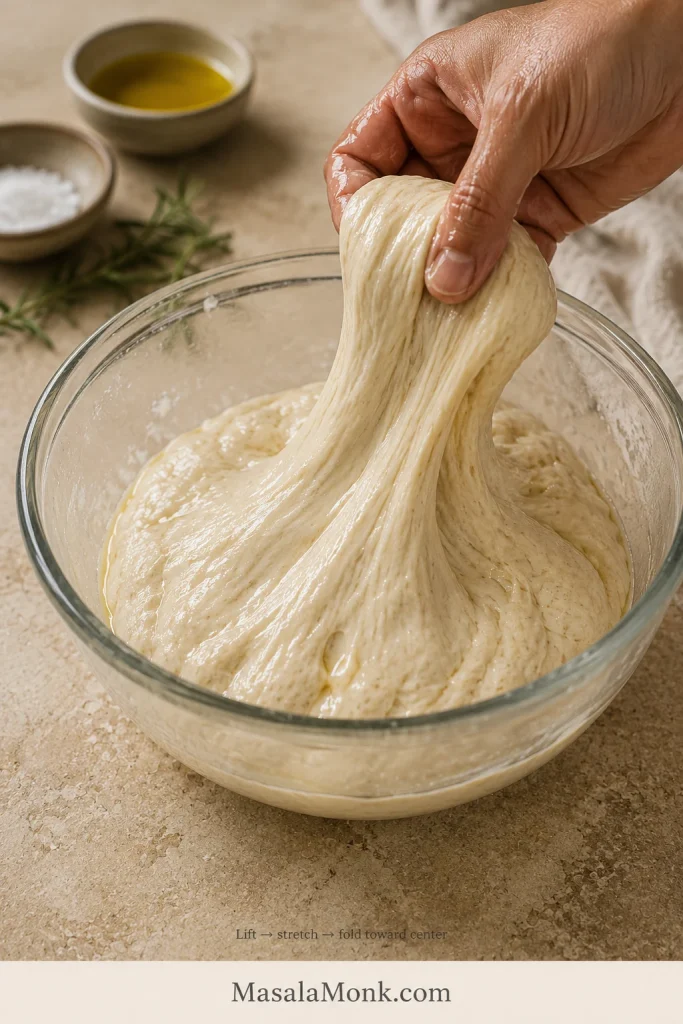
A hand lifting and stretching sticky focaccia dough in a glass bowl before folding it toward the center.
This quick fold is not kneading; it simply gives wet dough more organization with very little handling.

3. Cold Ferment

Cover the bowl airtight and refrigerate. Plan around 24 hours. The normal flexible window is 18–36 hours.

This assumes a properly cold refrigerator around 37–40°F / 3–4°C. A warmer fridge moves fermentation faster; a very cold one may leave the dough looking surprisingly quiet.

With a genuinely cold refrigerator and dough that looks strong, the ferment can sometimes stretch toward 48 hours. Think of that as an extension, not a target.

Keep the bowl well covered so the surface stays supple and doesn’t develop a dry skin.

A modest refrigerator rise is fine. The warm pan proof is where a quiet-looking dough often becomes much more visibly aerated.
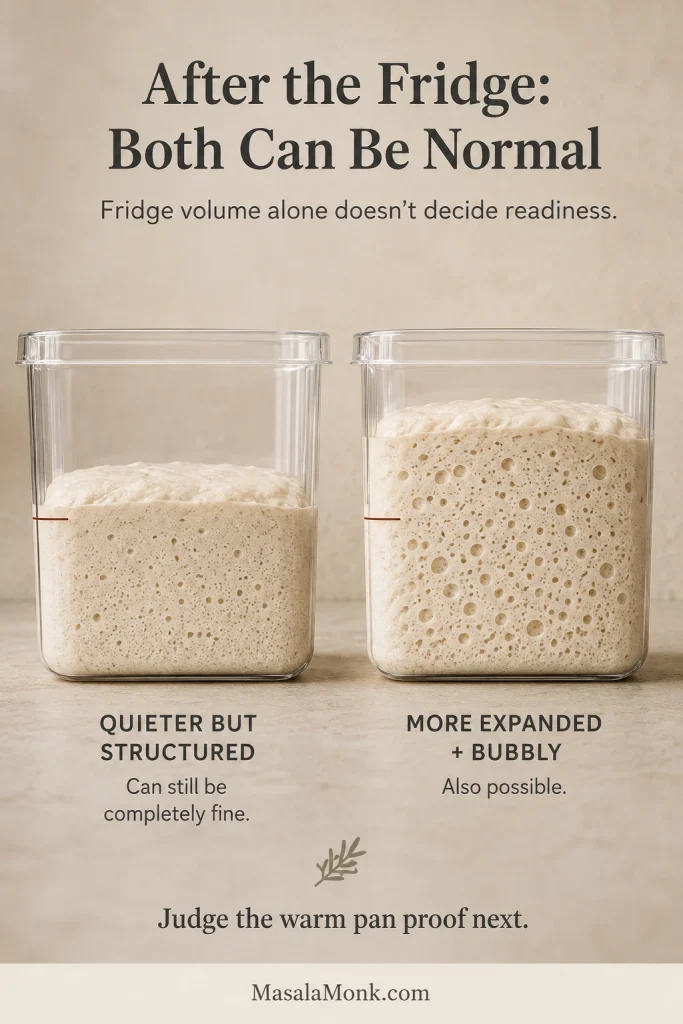
Two bowls of refrigerated focaccia dough showing modest expansion in one and more bubbles and volume in the other.
Cold dough looks quieter and firmer, so judge it again after warming in the pan before assuming fermentation failed.

When the dough comes out, the job changes: you have built the air; now you want to preserve it.

Want Focaccia for Dinner? Here’s a Simple Timeline

Suppose you want to eat around 7 p.m. on Saturday. This schedule gives the dough roughly 19 hours in the refrigerator, comfortably inside the flexible 18–36-hour range.

  • Friday around 7 p.m.: mix, rest and fold.
  • Before 8 p.m.: cover and refrigerate.
  • Saturday around 2:30–3 p.m.: oil the pan and transfer the dough.
  • During the afternoon: let the final proof develop.
  • Around 6 p.m.: start preheating and check the dough.
  • When fully proofed: dimple, top and bake.

A warm kitchen may get there earlier; a cool one may need longer. The timetable plans dinner. The focaccia decides when it enters the oven.
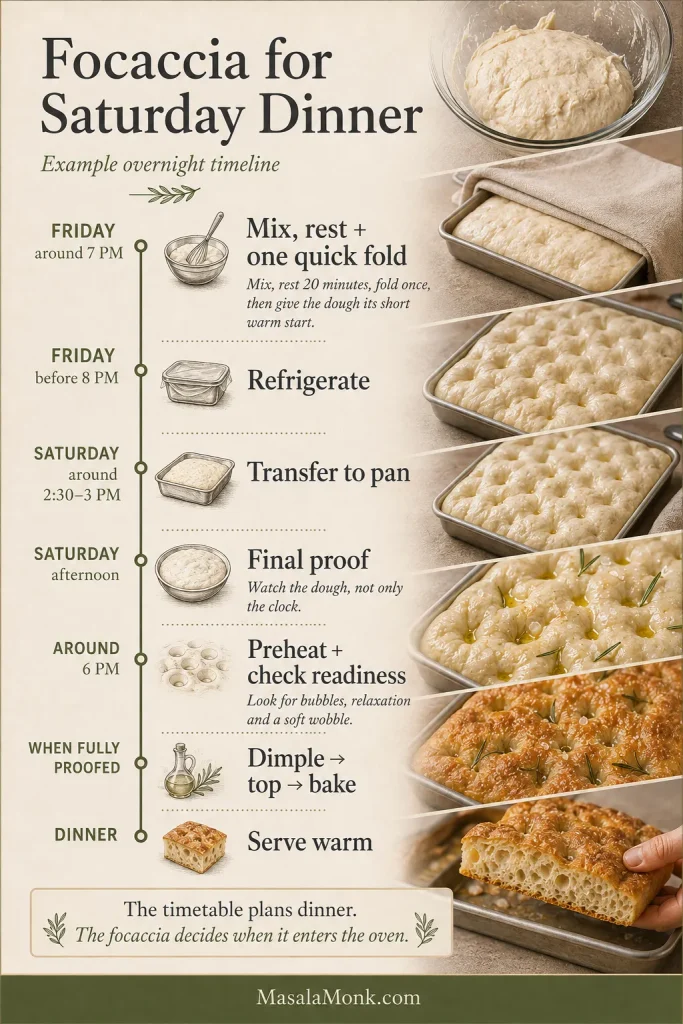
Overnight focaccia timeline from Friday evening mixing through refrigeration, Saturday proofing, baking and dinner.
Plan backward from dinner and protect extra time for the final proof instead of trying to rush it.

Need focaccia today instead? Use the same-day route.

4. Prepare the Pan

Give a stick-prone metal pan a whisper-thin coat of butter or nonstick spray, then spread 45 ml / 3 tablespoons olive oil across the bottom and corners.

The oil is doing more than preventing sticking: against hot metal, it helps create the crisp, almost fried underside that makes this style of focaccia so satisfying.

5. Transfer Without Losing All That Air

Ease the chilled dough into the pan with wet or lightly oiled hands. Handle it gently. Those bubbles took hours to build.
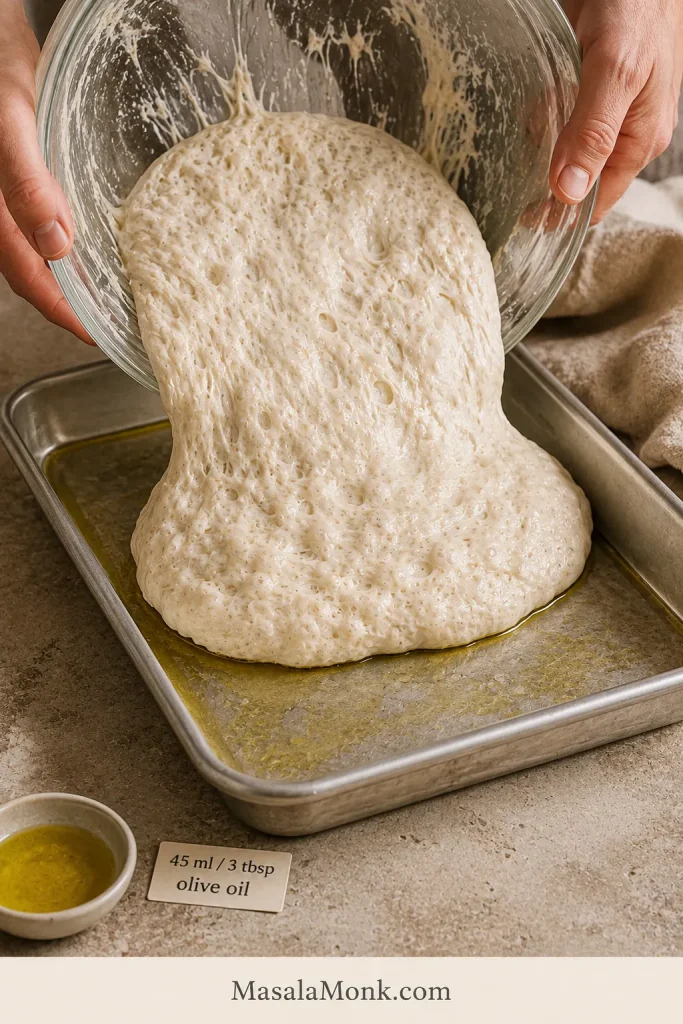
Bubbly fermented focaccia dough being gently tipped from a glass bowl into an olive-oiled rectangular metal pan.
Fermentation has built gas worth keeping by now; let gravity and olive oil help move the dough instead of pressing it flat.

Stretch toward the corners until the dough begins pushing back, then stop.

Shrinking back? Wait 10–20 minutes, then try again. Relaxed gluten stretches far more willingly.

You don’t need to force every corner immediately. The final proof gives the dough more time to settle into the pan.
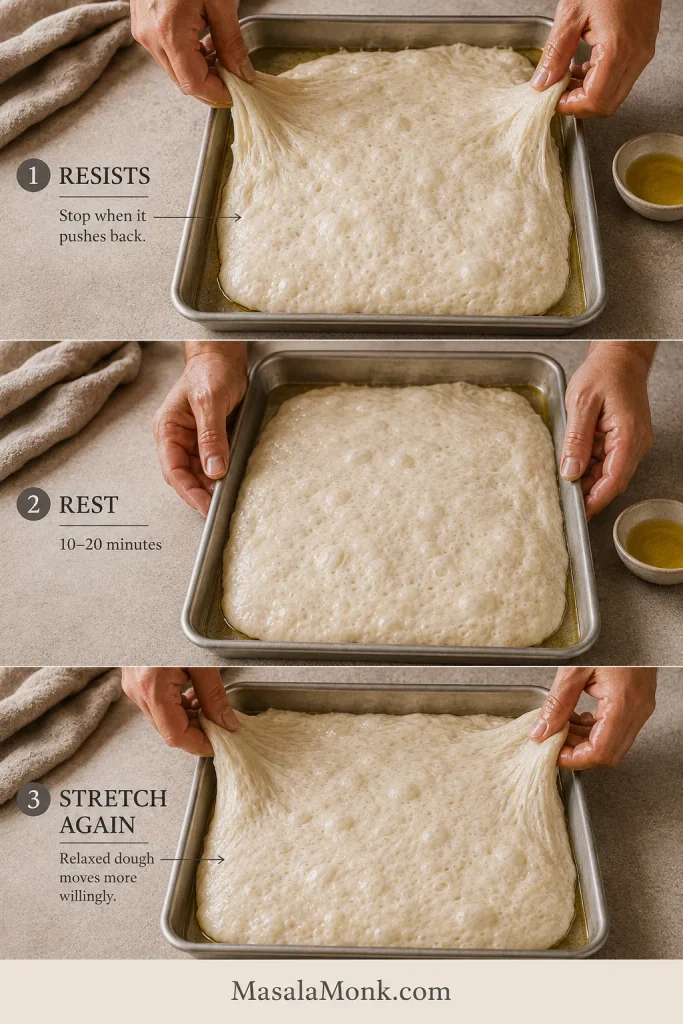
Three-stage guide showing focaccia dough resisting the pan corners, resting, then stretching farther after relaxing.
Forcing resistant dough can tear the surface and squeeze out gas; a short rest usually makes the next stretch easier.

6. Proof Until It Looks Full of Life

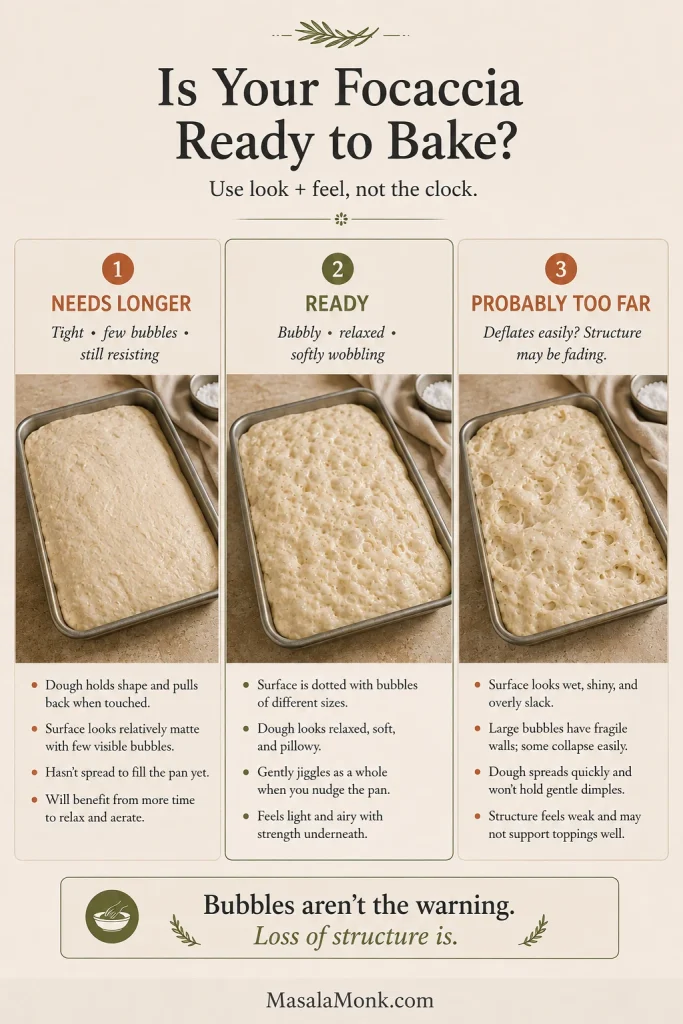
Ready focaccia looks visibly bubbly and wobbles softly when you nudge the pan.

This is where the visual cues matter more than the timetable. At 70–75°F / 21–24°C, start checking after about 2 hours; many batches need closer to 3–4 hours.

In kitchens warmer than about 75°F / 24°C, begin checking earlier. Above 80°F / 27°C, watch closely because the final proof can move quickly.

By the end, bubbles should be visible on or beneath the surface and the dough should feel light and relaxed. An almost comically bubbly pan is usually something to enjoy.
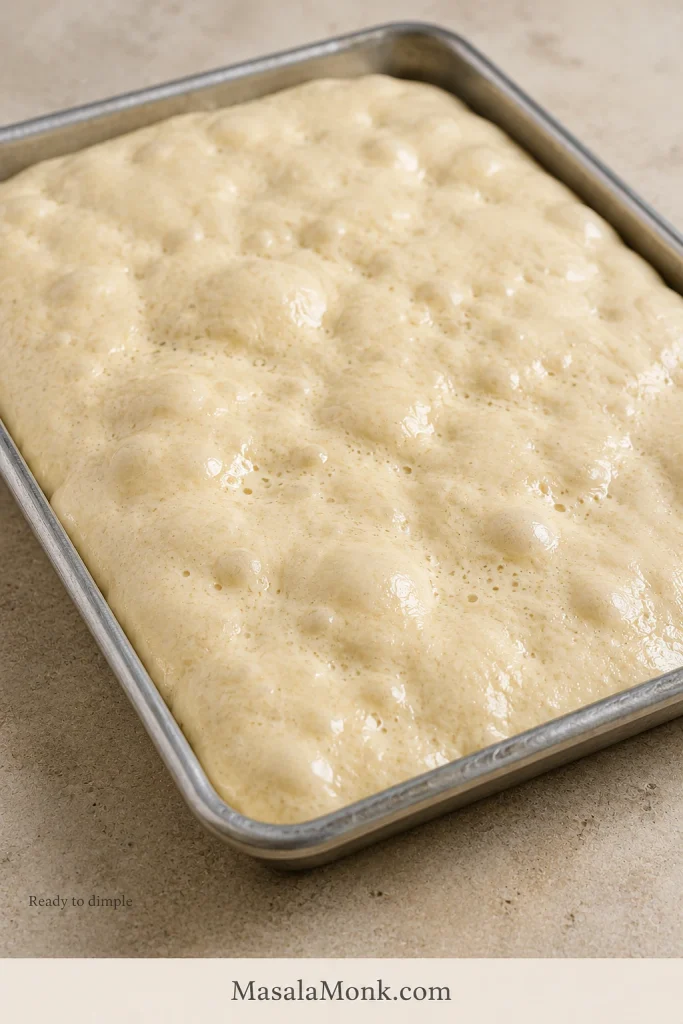
Close view of fully proofed focaccia dough filling a metal pan with a relaxed surface and many visible bubbles.
Watch the edges as well as the bubbles: relaxed dough settles toward the pan instead of pulling back.
Proof stateWhat you seeWhat to do
Needs longerTight surface, few bubbles, little wobble, still resisting the panKeep proofing
ReadyExpanded, relaxed, visibly aerated and softly wobblingDimple and bake
Probably too farVery fragile structure that loses substantial volume from gentle handlingHandle carefully and bake now
Three pans of focaccia dough showing underproofed, properly proofed and structurally weakened proofing stages.
Bubble count is not a proofing score; what matters is whether the aeration is still supported by soft, resilient dough.

Ready before dinner? Cover the pan and refrigerate it to slow fermentation until you are closer to baking.

Something looks wrong right now? Jump to Focaccia Rescue.

From here things move quickly: dimple, oil, salt, bake.

7. Dimple Deeply

While the proof finishes, preheat the oven for at least 30 minutes. In most ovens, moving the pan lower favors bottom browning; moving it higher favors the top.
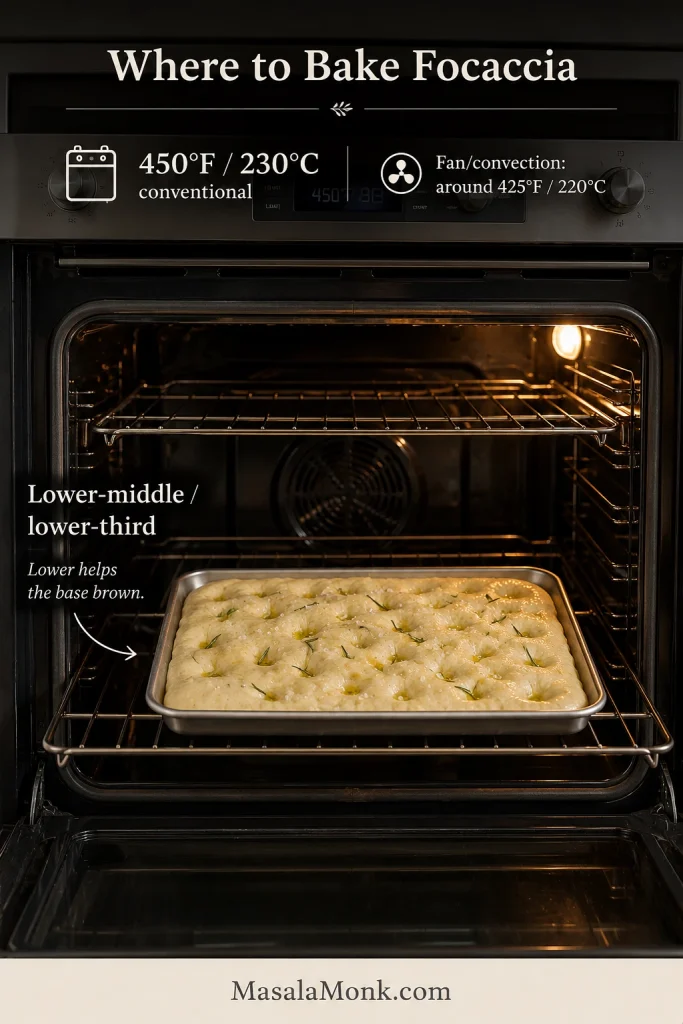
Prepared focaccia in a rectangular pan placed on a lower-middle rack inside a home oven.
Pan color changes how rack position behaves; very dark metal may need an earlier underside check than lighter aluminum.

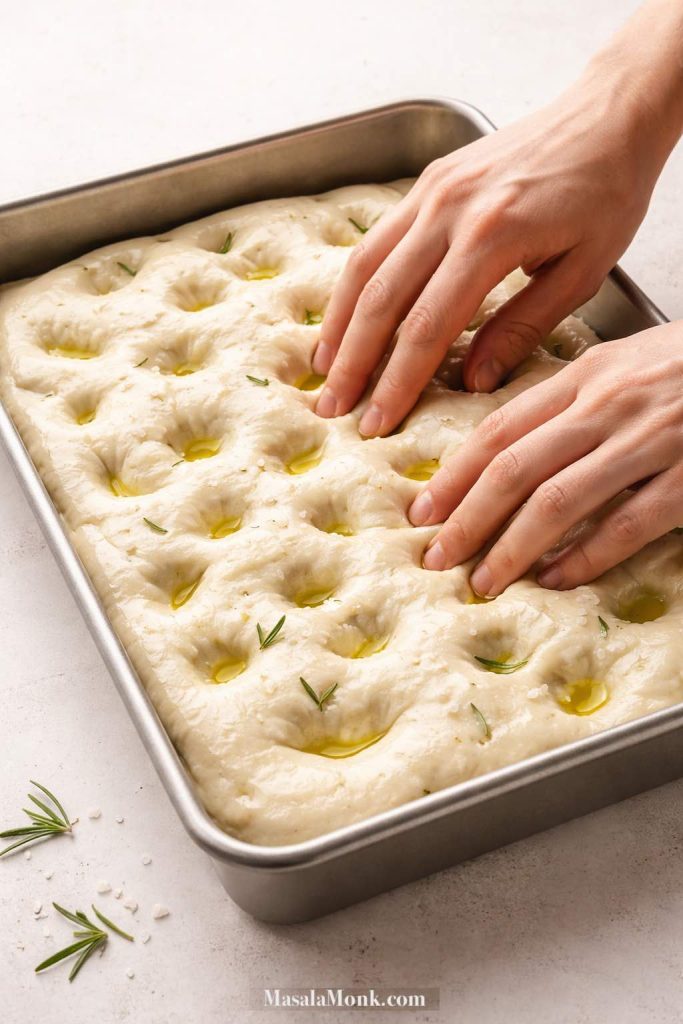
Oil your fingertips and press vertically through the dough until your fingers reach the pan. Make real dimples, but don’t drag sideways and flatten the trapped air.

A few large bubbles may pop. That’s fine. Dimpling redistributes oversized pockets and creates craters where the olive oil can collect.

A well-proofed dough feels wonderfully soft here—your fingers sink through, the surface rises around them and the pan finally starts looking unmistakably like focaccia.
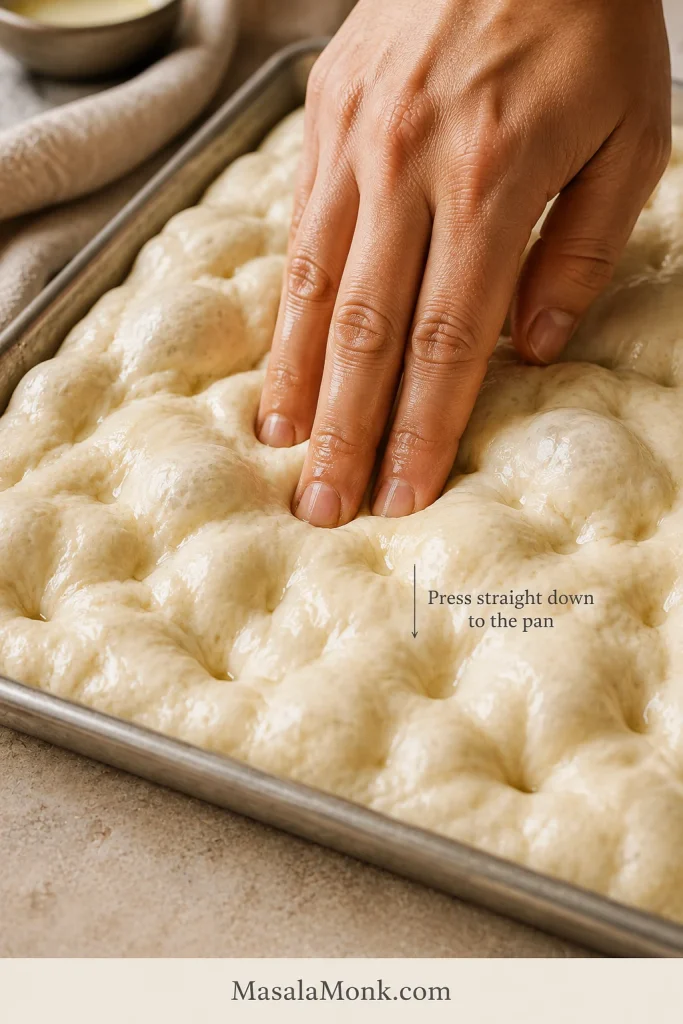
Fingertips pressing vertically into soft, bubbly focaccia dough to make deep dimples in the pan.
Spread the presses across the pan rather than chasing the biggest bubbles; this keeps dimpling even without flattening the dough.

8. Add Olive Oil, Salt and Rosemary

Drizzle over the remaining 30 ml / 2 tablespoons olive oil, letting some collect in the dimples.

Add a light, even scattering of flaky salt. If using rosemary, press the leaves lightly into the oil so exposed tips are less likely to scorch.
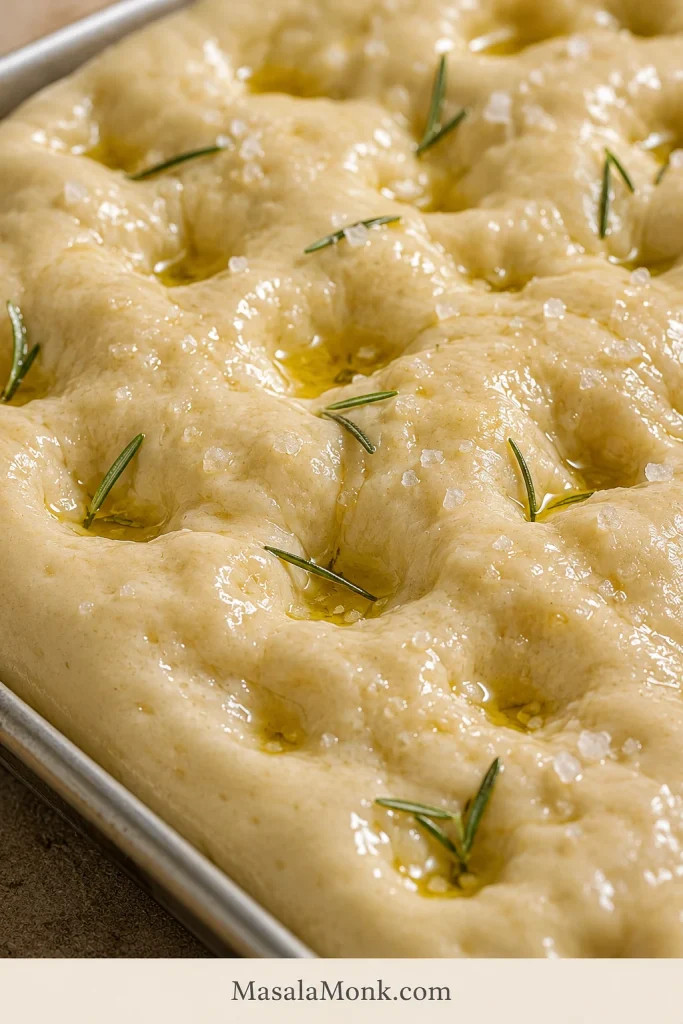
Close-up of raw dimpled focaccia dough with olive oil pooled in the indentations, rosemary and flaky salt.
Olive oil settling into the dimples deepens browning and richness, while the raised dough stays softer and breadier.

9. Bake Until the Top and Bottom Agree

Bake for about 22–28 minutes. Rotate the pan once after the loaf has set if your oven has an obvious hot side.

As it gets close, the kitchen should smell of toasted bread, warm olive oil and rosemary. Slide a thin spatula under an edge and look underneath.

The top is the tempting part to trust. Lift an edge anyway. A beautiful golden surface does not guarantee a crisp bottom.

If the top is darkening faster than the base, move the pan lower and shield the surface loosely with foil if needed. A well-browned underside with a pale top calls for a brief finish higher in the oven.
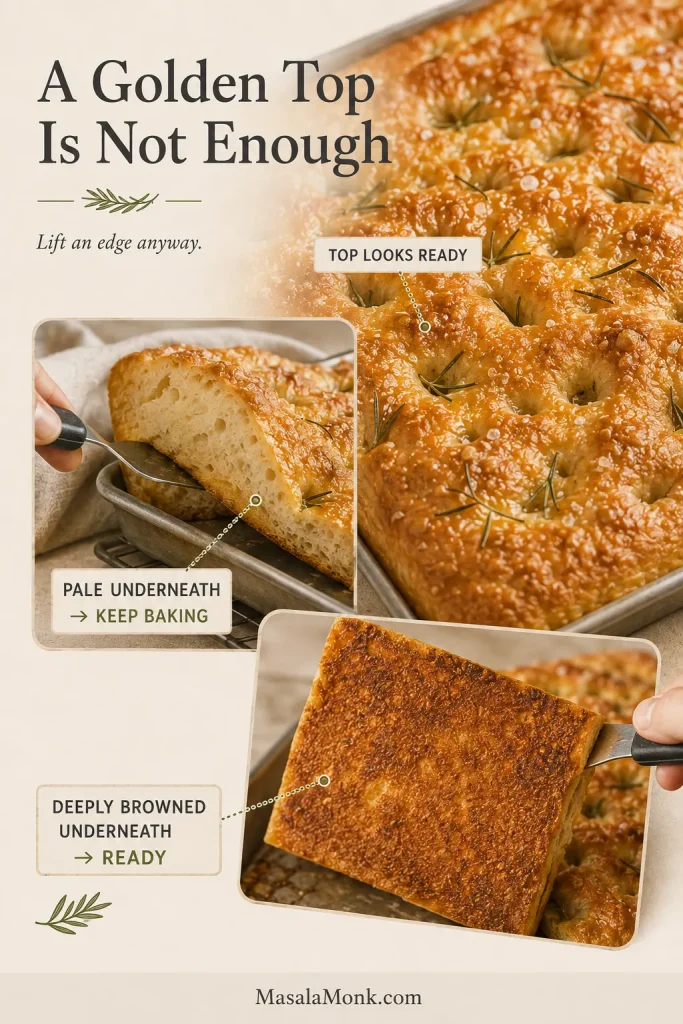
Doneness guide comparing a golden focaccia top with a pale underside and a properly deep-browned underside.
If the top consistently outruns the base, treat it as a heat-balance problem rather than baking until the center dries.

Not sure whether it is finished? Use the doneness guide below.

10. Protect the Crust You Just Made

Let the focaccia sit in the pan for 3–5 minutes, then move it to a wire rack.

Hot bread keeps releasing steam. Trapped underneath, that steam can soften a crisp base surprisingly quickly.

Give the crumb another 15–20 minutes before slicing if you want the cleanest texture. By then the base should feel firm and lightly crackly while the middle remains tender.
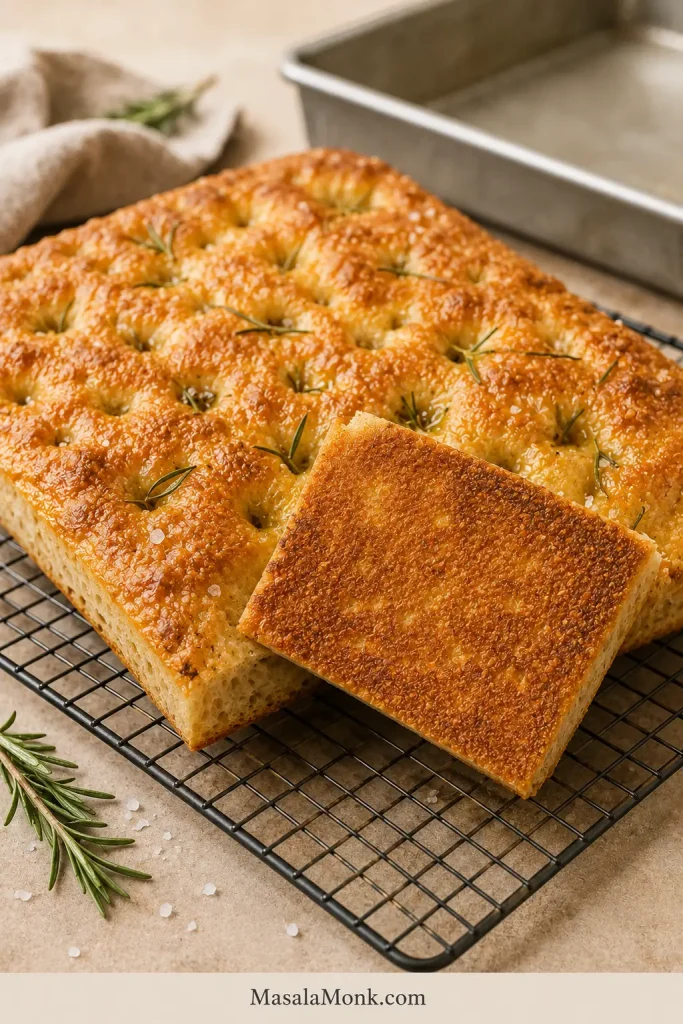
Baked rosemary focaccia cooling on a wire rack with part of its crisp golden-brown underside visible.
A plate or board can trap steam beneath hot focaccia; airflow underneath helps preserve the crisp base.

Back to Recipe ↑ · Back to Quick Answer ↑

How to Know When Focaccia Is Done

Focaccia is done when the top is deeply golden, the edges and underside are crisp and browned, and the center is set without a gummy band.

Use the whole loaf instead of chasing one magic thermometer reading.

  • Top: deeply golden and dimpled, not pale blond.
  • Edges: browned and crisp.
  • Bottom: golden-brown, firm and crisp, never pale or steamed.
  • Center: set and springy without a wet gummy band.
  • Crumb: moist and tender with irregular holes of different sizes.
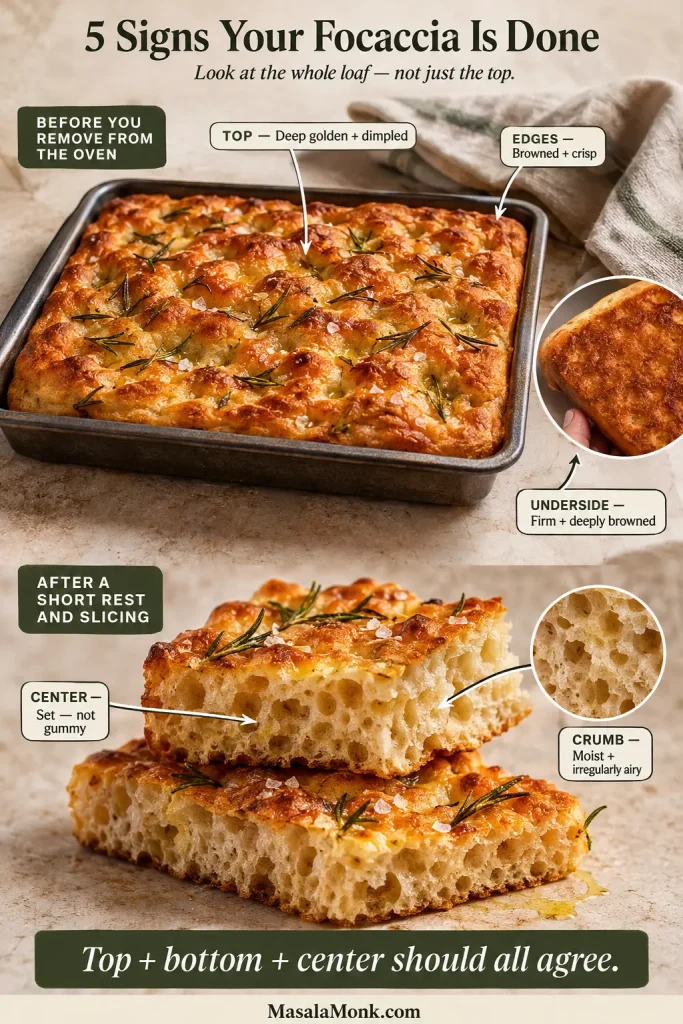
Guide showing golden top, crisp edges and browned underside before removal, then set center and airy crumb after slicing.
Top, edges and underside decide when the focaccia leaves the oven; center and crumb confirm the bake after resting. No mid-bake slicing needed.

One enormous social-media bubble is not required. Excellent focaccia can have small, medium and large pockets; what matters is a light, open crumb.
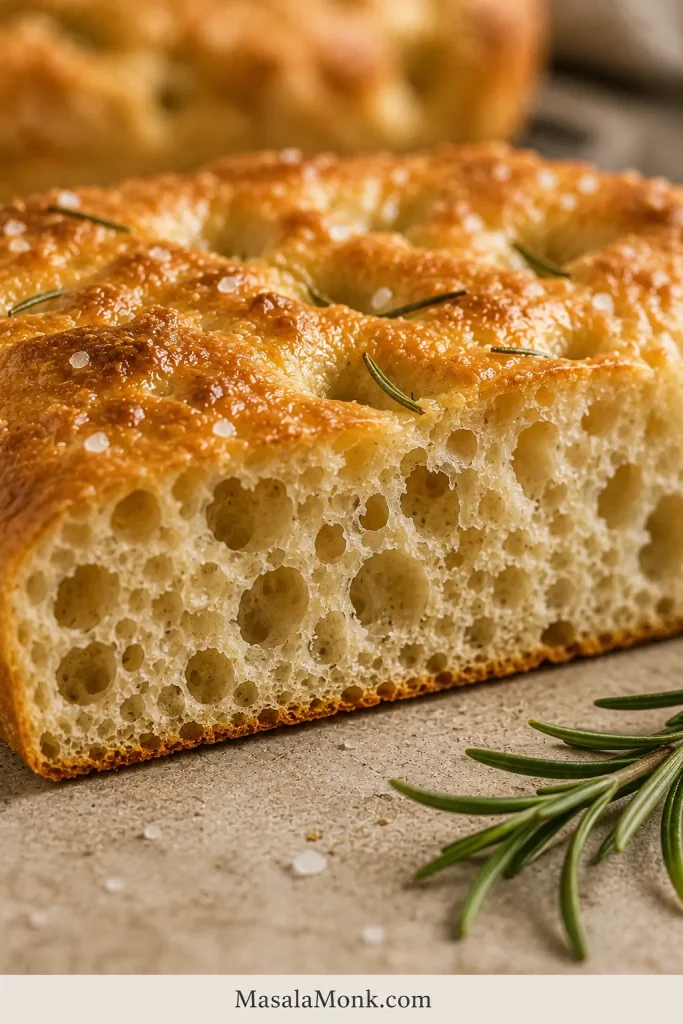
Close-up of sliced rosemary focaccia showing a moist crumb with small, medium and larger irregular air pockets.
Look at the walls between the holes as well as their size: an open crumb should look set, springy and fully baked.

Crispy is not the same as hard. The crust should crackle and then give way to a soft center.

If the center is fully cooked but the base needs only a little more crispness, remove the focaccia from its pan and return it directly to the oven rack for a few minutes. With an already-dark top, switch the oven off while the underside dries. A genuinely pale, underbaked base needs the oven left on and close attention.
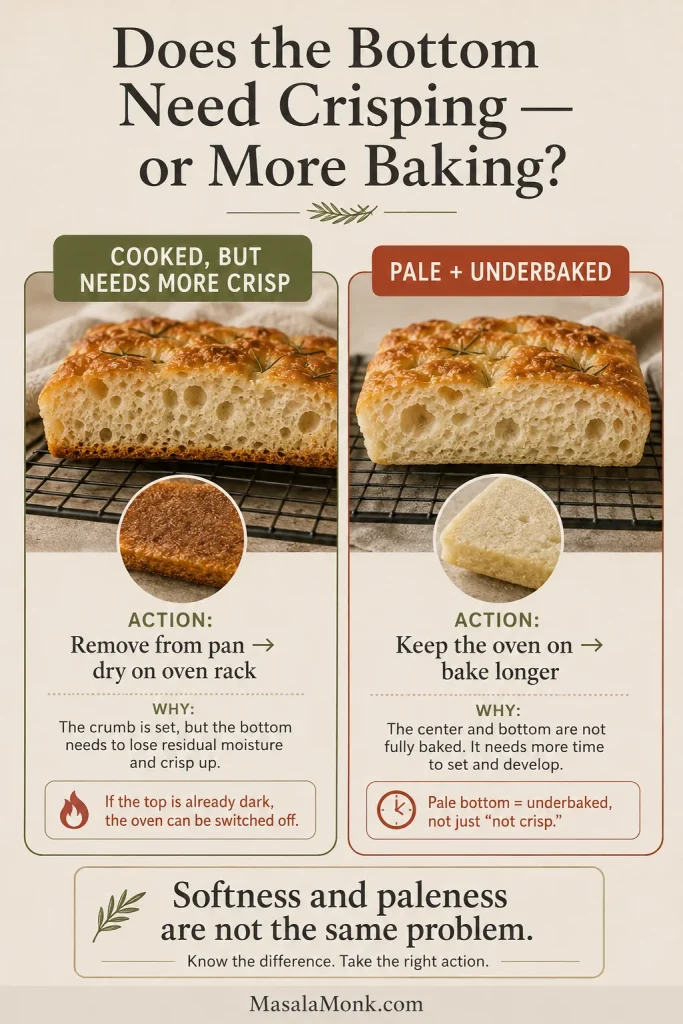
Comparison of fully cooked focaccia with a browned but soft bottom and focaccia with a pale underbaked bottom.
A browned-but-soft base needs drying; a genuinely pale base still needs baking. They are different problems.

If the same crust or center problem keeps returning, jump to baking troubleshooting.


Focaccia Rescue: What to Do Right Now

This is the fast version for when you are already standing in the kitchen. Find what you see and keep moving.
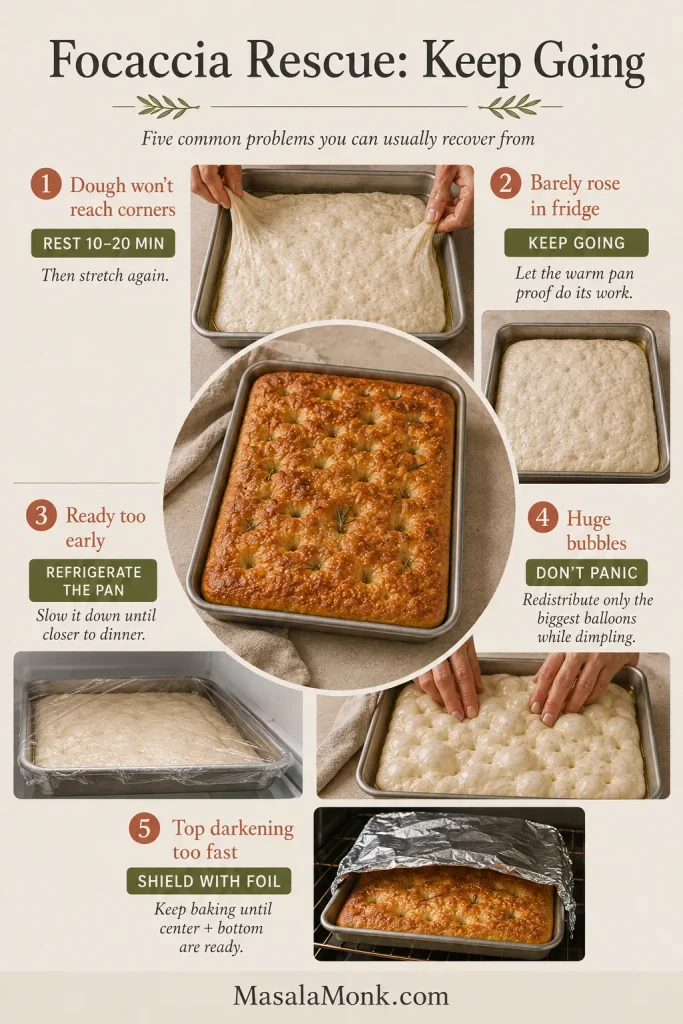
Rescue guide for focaccia dough that resists stretching, rises slowly, proofs early, forms huge bubbles or browns too fast.
Most rescue moves buy time or preserve structure; few mid-process problems improve with sudden additions of flour or water.
What happened?Can I keep going?Do this now
Forgot the foldYesContinue with the cold ferment.
Dough is extremely stickyUsuallyIf it is cohesive and stretchy, use wet or oiled hands and continue.
Dough won’t reach the cornersYesRest 10–20 minutes, then stretch again.
Barely rose in the refrigeratorYesContinue to the warm pan proof.
Dough looks huge in the refrigeratorYesPan it earlier and shorten the final proof.
Dough is ready hours before dinnerYesCover and refrigerate the pan.
There are enormous bubblesYesRedistribute only the biggest balloons while dimpling.
Dough seems slightly overproofedUsuallyHandle gently and bake now.
Surface has begun to dryUsuallyRestore an airtight cover and handle the skin gently.
Top is getting dark too quicklyYesShield loosely with foil and keep baking.
Bottom is pale near the endYesMove lower or finish the cooked loaf briefly outside the pan.

Need It Today? Make Same-Day Focaccia

Allow roughly 4–6 hours from mixing to serving, depending on room temperature and fermentation speed.

The overnight recipe remains the master method. For same-day focaccia, only three things change:

  • Yeast: increase from 4 g to 6 g instant yeast.
  • Folds: use two quick folds about 20 minutes apart. If the dough still spreads like batter with very little structure after the second, give it one more fold 20 minutes later.
  • Fermentation: replace the overnight cold ferment with a warm bulk rise around 75–79°F / 24–26°C until the dough looks substantially larger and clearly aerated, commonly about 1½–2½ hours.

The pan, final-proof cues, dimpling and baking stay the same. After bulk fermentation, transfer to the prepared pan and proof until soft, bubbly and lively, commonly another 1–2 hours.

The flavor is a little younger than the overnight loaf, but warm from the oven with crisp edges and olive oil shining in the dimples, it hardly feels like a compromise.
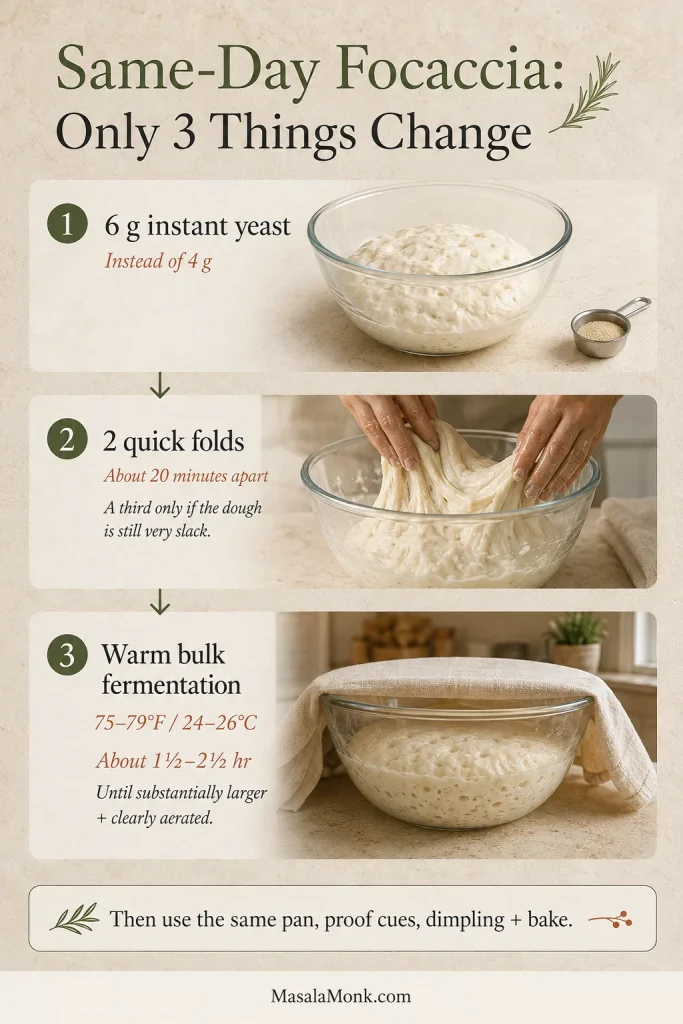
Same-day focaccia guide showing 6 grams of yeast, two bowl folds and warm bulk fermentation in a covered glass bowl.
Warm fermentation makes room temperature more influential, so start checking early even though the readiness cues stay the same.

Back to the main recipe ↑

Can I Use a Different Pan?

Use the full recipe in a 9 × 13-inch pan for the reference thickness. Spread the same batch across a 13 × 18-inch half sheet when you intentionally want much thinner, crisper focaccia.
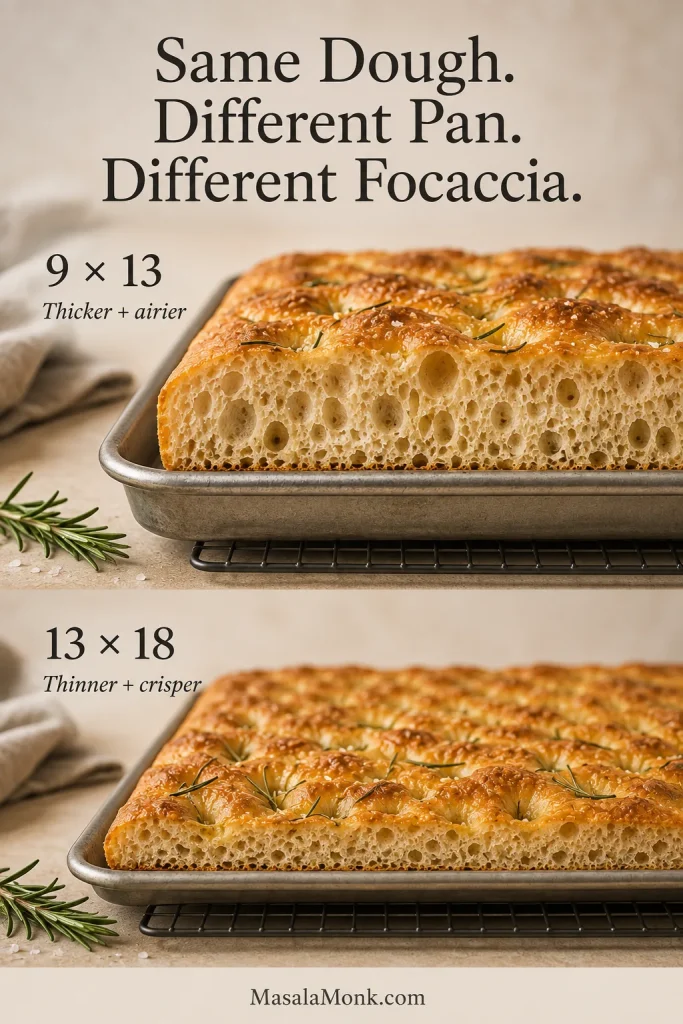
Side-by-side rosemary focaccia showing a thicker 9 by 13 version and a thinner 13 by 18 sheet-pan version.
A 13×18 half-sheet has twice the area of a 9×13 pan, so the same dough starts at roughly half the depth.

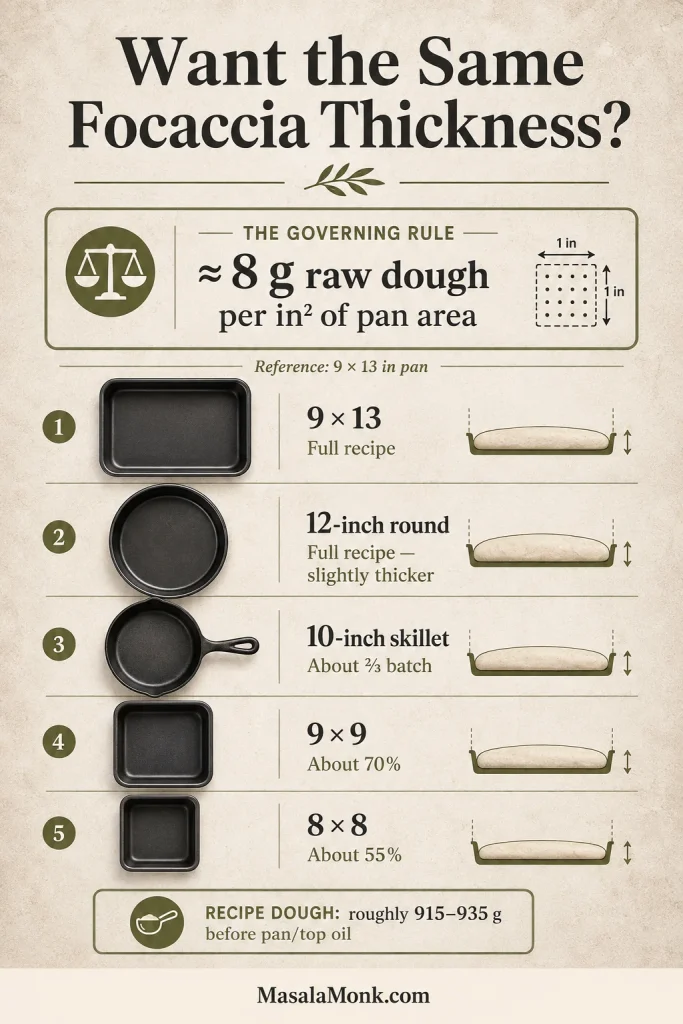
To keep roughly the same thickness as this 9 × 13-inch loaf in another pan, aim for about 8 g dough per square inch of pan area.

You don’t need to calculate it yourself. This recipe produces roughly 915–935 g dough before the pan and topping oil are added.

PanApproximate dough amountResult
9 × 13 inFull recipeReference thickness
12-inch roundFull recipeVery similar, slightly thicker
Two 8-inch roundsFull recipe divided between themAbout 15–17% thicker before baking
10-inch skilletAbout two-thirdsClose to reference thickness
9 × 9 inAbout 70%Close to reference thickness
8 × 8 inAbout 55%Close to reference thickness; 50% is slightly thinner
13 × 18 in half sheetFull recipeMuch thinner and crisper
Pan-size guide showing dough amounts for a 9 by 13 pan, round pan, skillet and smaller square pans using about 8 grams per square inch.
A 12-inch round and a 9×13 pan have almost the same area, so the full batch gives a similar dough depth.

Different shapes with similar dough depth should bake in roughly the same neighborhood. Thin focaccia finishes faster; a substantially deeper loaf needs more time through the center.

Focaccia Toppings That Bake Well

Once you know the basic dough, toppings are where focaccia becomes endlessly adaptable.

Wet toppings such as juicy tomatoes, mushrooms and watery vegetables can slow browning or leave damp patches. Drain them well, roast them first or use less.

For pizza-style focaccia, keep the tomato layer restrained and thick enough to cling without soaking into the dough. Our pizza sauce recipes go deeper into sauces designed to stay where you put them.

Heavy toppings—large amounts of cheese, olives or vegetables—can press down the dough. Scatter rather than blanket.

Burn-prone toppings such as thin garlic and delicate herbs may become bitter before the bread is done. Press them into oily dimples, add them partway through baking or finish afterward.
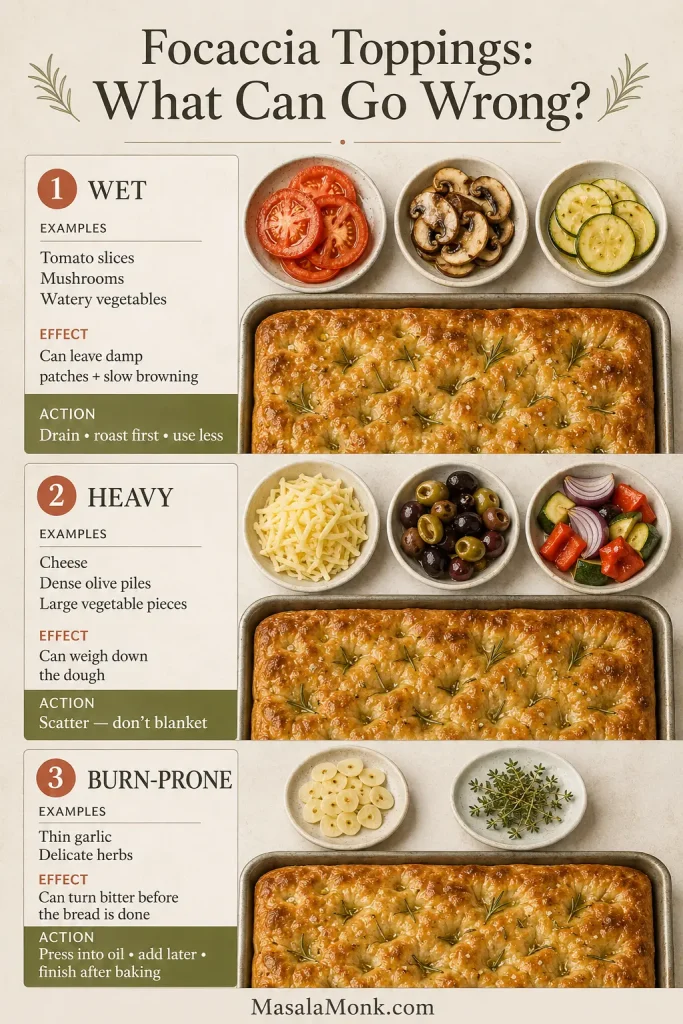
Topping guide grouping tomatoes and mushrooms as wet, cheese and olives as heavy, and garlic and herbs as burn-prone.
Toppings bake better when excess moisture, weight and burn risk are managed before they reach the oven.

A spoonful of basil pesto after baking adds fresh basil, garlic and olive oil without scorching the herbs.

For your first loaf, rosemary and flaky salt are still hard to beat. They let you taste what the focaccia itself is doing.

What About Traditional Focaccia Brine?

Some classic Genoese focaccia methods use a mixture of water and olive oil over the dimpled surface before baking, allowing the liquid to collect in the craters.

The treatment creates a characteristically moist, salty top and helps explain why focaccia Genovese can feel quite different from the thicker, open-crumb version on this page.

This loaf uses olive oil and finishing salt without that extra water treatment. If you want to see a traditional Genoese bakery method in context, La Cucina Italiana’s focaccia from Genoa shows the water-and-oil finish and a much hotter, faster regional bake.

How to Serve Focaccia

Warm focaccia rarely needs a formal plan. Put good olive oil on the table and pieces have a habit of disappearing.

The open crumb is excellent beside soup because it catches broth while the browned edges keep some bite. Try it with our tomato basil soup for an easy tomato-and-herb dinner.

For an appetizer, cut the bread into strips and serve it with olives and hummus without tahini. The crisp edges are particularly good for dipping.

Thicker pieces make excellent sandwiches once completely cool. Split them horizontally with a serrated knife so the airy crumb stays intact instead of being compressed from above.
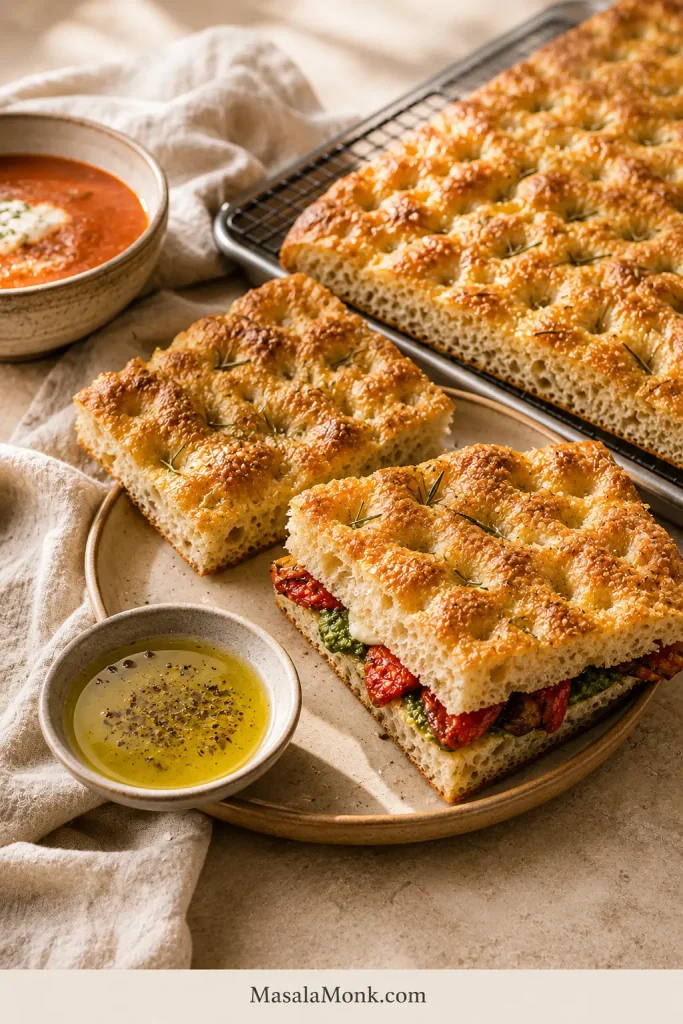
Rosemary focaccia served with olive oil and tomato soup, with one piece split and filled as a sandwich.
Cut strips for dipping; keep larger pieces for sandwiches so the airy crumb stays resilient around the filling.

How to Store, Freeze and Reheat Focaccia

Focaccia is at its best the day it is baked, while the contrast between crisp crust and tender center is strongest.

Cool plain focaccia completely before wrapping or placing it in an airtight container. At room temperature, it is best within about 1–2 days. Refrigerate leftovers topped with cheese, meat or another perishable ingredient.

For longer storage, cut the cooled loaf into practical portions, wrap or seal them airtight and freeze for up to 1 month for best quality.

How to Make Focaccia Crispy Again

  • One or two pieces: about 5–8 minutes at 375°F / 190°C.
  • A larger slab: roughly 10–15 minutes at 375°F / 190°C, until crisp outside and hot through the middle.
  • From frozen: reheat directly from frozen and allow a few extra minutes.

The microwave warms focaccia but does very little for the underside. Dry oven heat is what brings the crackle back.
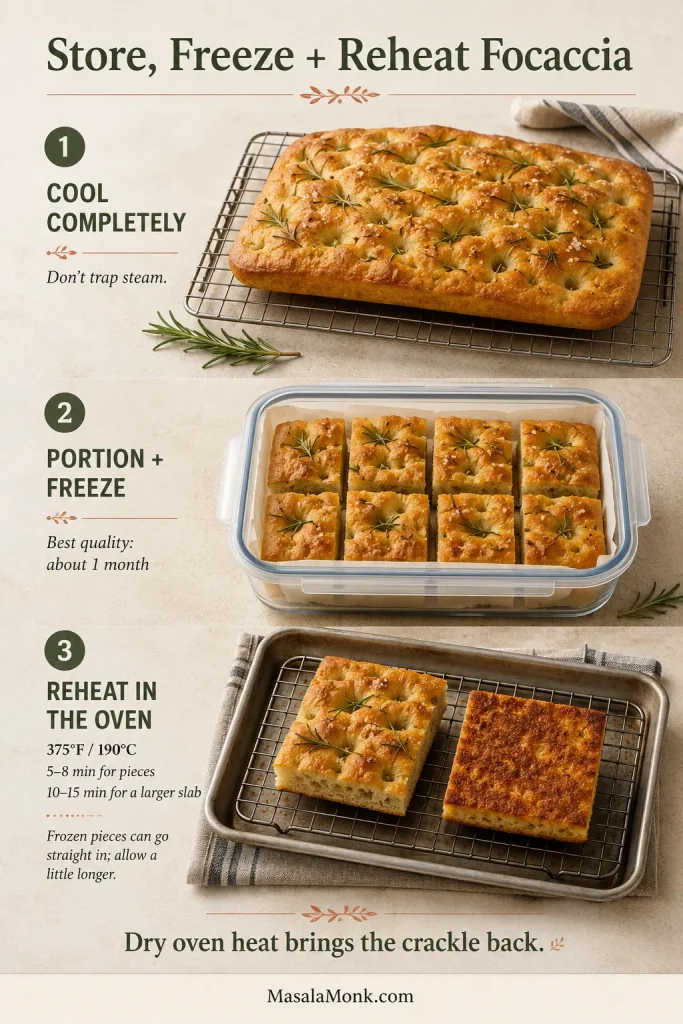
Three-stage guide showing focaccia cooling on a rack, portioned in a freezer container, and reheated in the oven.
Freeze smaller portions so you can restore crispness later without reheating the rest of the loaf.

Focaccia Troubleshooting: Why It Happened

The rescue table gets you through the current batch. This section explains what the result can tell you about the next one.

Dough, rise and crumb problems

Start by deciding whether the dough lacked gas, lost structure or simply spread too thin; those clues point toward different causes.
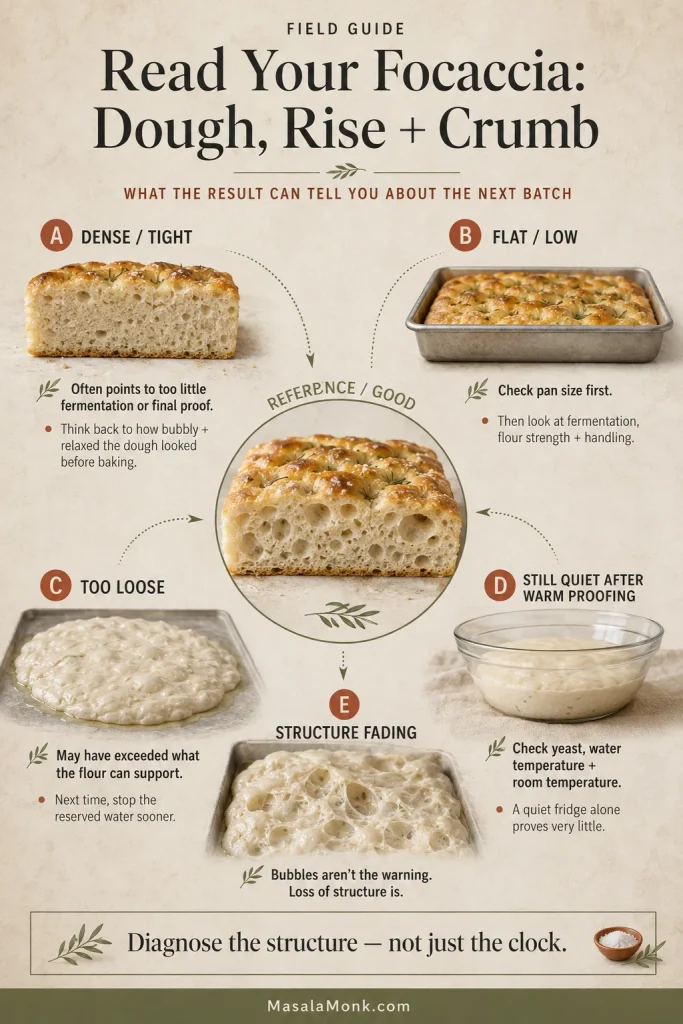
Troubleshooting guide comparing dense crumb, flat focaccia, overly loose dough, quiet warm-proofed dough and weakened bubbly dough.
Change one variable at a time; the failure pattern usually points toward hydration, fermentation, proofing or pan depth.

Why Is My Focaccia Dense?

A tight, dense crumb usually points to insufficient fermentation or final proof.

Think back to the dough just before it went into the oven. A tight surface with few bubbles needed more time. Dough that became extremely inflated and then collapsed tells a different story: fermentation probably outran its ability to hold the gas. A wet, gummy center points more toward baking than proofing.

Why Is My Focaccia Flat?

First check the pan size. A full batch spread across a large sheet tray will naturally bake much flatter than the same dough in a 9 × 13-inch pan.

If pan size wasn’t the issue, look next at fermentation, flour strength and handling. Too little fermentation, collapse after an overlong proof, weak flour or rough handling can all reduce height.

Why Did My Focaccia Dough Turn Soupy?

Dough that flows with little structure after its rest has probably exceeded what that flour can comfortably absorb—or a measurement went wrong.

On the next batch, begin at the 400 g water base and add the reserve only while the dough stays cohesive. Trying to rescue an overly loose dough with a large late addition of flour usually creates a different texture altogether.

Why Didn’t My Focaccia Rise?

A quiet refrigerator alone proves very little. If the dough stays inactive even after plenty of warm proofing, check the yeast, water temperature and room temperature.

Old yeast, excessively hot mixing water, a very cold room or a measuring error are the first places to look. Judge the dough after it has had a fair chance to warm before deciding the cold ferment failed.

Did I Overproof My Focaccia?

Bubbles aren’t the warning. Loss of structure is.

Dough that deflates dramatically from gentle handling and struggles to retain gas has probably gone farther than ideal. Next time, bake sooner or refrigerate the pan once it reaches that bubbly, softly wobbling stage.

Crust, pan and baking problems

Here, the location of the failure matters: the underside, center, pan contact and cooling environment each point you toward a different fix.
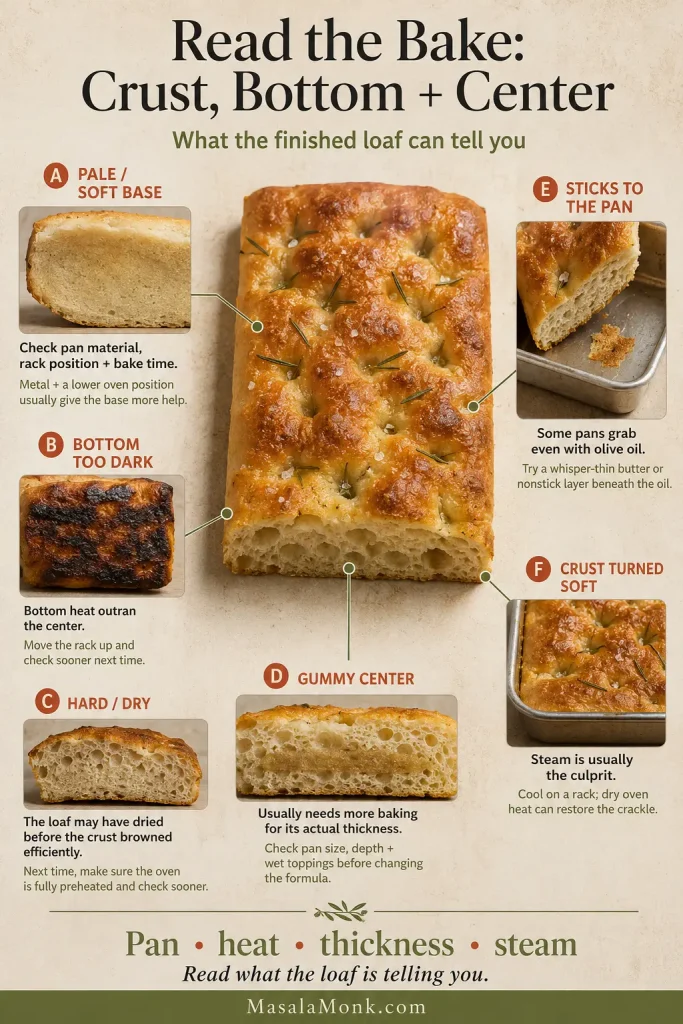
Troubleshooting guide showing pale, burnt, dry, gummy, sticking and steam-softened focaccia baking problems.
Identify the visible symptom first; the sections below explain the likely cause and next-batch fix.

Why Is the Bottom Pale or Soggy?

Start with three things: pan material, rack position and bake time.

Metal browns the base more efficiently than glass or ceramic, and a lower rack generally gives the underside more help. A deeper loaf or moisture-heavy toppings may simply need longer. Once baked, move the focaccia to a rack before trapped steam softens the crust.

Why Did the Bottom Burn Before the Middle Was Done?

The bottom heat was too aggressive for that pan and loaf thickness.

Very dark metal, a rack close to the lower heating element or an oven running hotter than its display can all make the underside race ahead. Next time, move the rack up one level and start checking sooner.

Why Is My Focaccia Hard Instead of Crisp?

Hard focaccia has usually dried too much before the crust browned efficiently. A thoroughly preheated oven and conductive pan create the contrast you want: crackly outside, soft inside.

Why Is the Middle Gummy?

A gummy center usually means the loaf needed more baking for its actual thickness.

Before changing the formula, compare the pan with the reference 9 × 13-inch size. A smaller pan makes a deeper focaccia, while glass, ceramic and wet toppings can leave the center lagging behind the top. Also give a high-hydration loaf a short rest before judging the crumb; cutting immediately can make a properly baked center look wetter than it will twenty minutes later.

Why Did My Focaccia Stick Even With Olive Oil?

Oil can’t compensate completely for a pan surface that consistently grabs bread. Crust development matters too.

When the same pan causes trouble repeatedly, give it a very thin butter or nonstick-spray layer beneath the olive oil on the next batch.

Why Did My Crisp Focaccia Turn Soft?

Steam is usually the culprit. Move the hot loaf to a rack promptly and cool it fully before wrapping. A few minutes of dry oven heat will restore much of the crackle later.


Once You Know What to Look For

The first batch can make wet focaccia dough feel strange. Then you watch it change: a sticky bowl becomes stretchy, the pan fills with trapped air, your fingers sink into the proofed surface, and eventually a browned loaf comes out with a crisp underside that crackles under the knife.

After that, the dough feels much less mysterious. You are no longer trying to make every batch obey an exact clock; you know which signs actually matter.

And if the loaf comes out a little lower, darker or less dramatically bubbled than the one you imagined, serve it warm anyway. Good focaccia has a generous margin for imperfection.

If you make this focaccia, tell us which flour you used, whether you needed the final 20 g water, and roughly how warm your kitchen was. Those three details help the next baker too.
Back to Recipe ↑ · Back to Quick Answer ↑

Posted on — 1 Comment

Sourdough Focaccia Recipe

Sourdough focaccia recipe hero image showing thick golden focaccia in a metal pan with airy open crumb, deep dimples, olive oil, flaky salt, and rosemary.

A good sourdough focaccia recipe should give you three things: a light, airy crumb, crisp olive-oil edges, and a method that feels clear before you even start mixing. This version is built around active sourdough starter, an overnight rest, and a 9×13-inch metal pan because that is the easiest way to get the best balance of lift, flavor, structure, and ease at home.

Real baking is rarely that tidy, though. Some days your starter is strong and you want focaccia by dinner. Other days you want to use discard and keep the dough moving without gambling on it. So this guide shows you the main route first, then helps you adjust when real life gets in the way. Just as importantly, it shows you what the dough should look and feel like at each stage, because that matters far more than blindly following the clock.

Quick answers before you bake

Best default route: active starter, overnight rest, 9×13-inch metal pan. This is the safest place to start.

Can you make it the same day? Yes, if your starter is strong and your kitchen is warm. You just need to watch the dough more closely.

Can you use discard? Yes. It usually moves more slowly, though, unless you add a little yeast.

Best pan: a well-oiled 9×13-inch metal pan. It gives the best browning, the best structure, and the fewest surprises.

Main success cue: bake when the dough looks puffy and lightly jiggly. If it still looks tight and reluctant, it is not ready yet.

Also Read: Easy English Scone Recipe

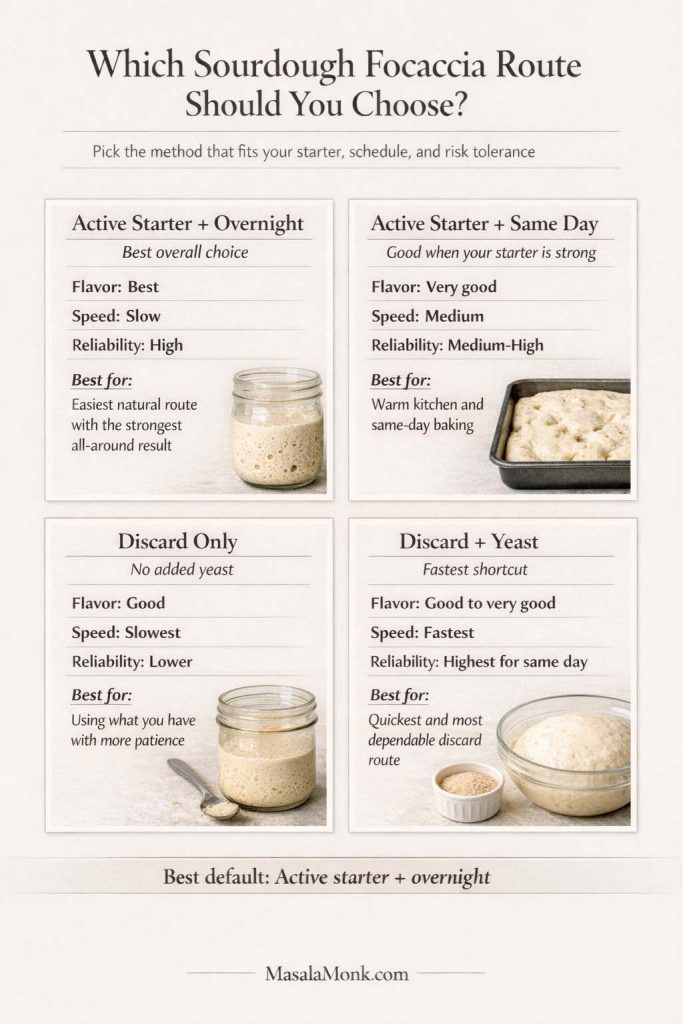
Choose your sourdough focaccia route

For the best overall result, choose active starter + overnight. This is the route I would hand to most people first. It gives you the best natural lift, the best flavor, and the calmest workflow.

Sourdough focaccia route guide comparing active starter overnight, active starter same day, discard only, and discard plus yeast options.
Start with active starter and an overnight rest when you want the strongest all-around result, move to same-day when your starter is lively, use discard when flexibility matters more than speed, and bring in a little yeast when you want the quickest dependable shortcut.

Choose active starter + same day when your starter is lively, the room is warm, and you want focaccia on the table by dinner. It can turn out beautifully, but you do need to stay more tuned in because the dough can move faster than you expect.

Choose discard only when using what you already have matters more than speed. Focaccia is forgiving enough that this can still work well, especially because the dough is pan-baked, but it usually takes more patience.

Choose discard + yeast when you want the safest shortcut. If you want a fast same-day focaccia and do not want to bet everything on tired discard, this is the smart route.

Why this sourdough focaccia recipe works

High hydration gives the crumb its open, airy texture

Focaccia dough should feel wetter and looser than many bakers expect at first. That extra water is what helps create the glossy irregular bubbles, soft interior, and lively bite that make focaccia feel worth baking. Add too much extra flour just to make the dough feel tidy and the crumb usually tightens fast.

Olive oil helps create the crisp, deeply golden edges

Focaccia needs enough olive oil under it and over it to bake the way focaccia should. The oil in the pan lightly fries the base as it bakes, while the oil on top helps browning, protects the surface, and gives the crust its rich golden finish. A cautious hand with the oil usually leads to a paler, drier result. Extra-virgin olive oil gives a stronger flavor, while regular olive oil tastes lighter; either one works. For a useful visual benchmark of how generously focaccia can be oiled without becoming greasy, King Arthur Baking’s big and bubbly focaccia is worth studying.

Time matters more than heavy kneading

This dough does not need aggressive kneading. It needs time, a few rounds of folds, and enough fermentation to become visibly airy before it goes into the oven. Put differently, the dough needs gas, softness, and some internal strength. Once it has those, the oven can do the rest.

A pan makes focaccia more forgiving than many sourdough loaves

One reason sourdough focaccia is such a strong beginner bake is that the pan supports the dough from start to finish. There is no shaping a boule, no scoring, and no need to trap oven spring inside a freestanding loaf. The pan also makes a wet dough much easier to handle, which is a big part of why focaccia is such a satisfying place to start.

Also Read: Sourdough English Muffins Recipe

Active starter vs discard: which should you use?

The best result in this article comes from active starter, and that is the route the full recipe follows. This formula assumes a 100% hydration starter, meaning equal weights of flour and water in the starter itself.

Use active starter for the strongest natural rise

Use active starter when it looks like a starter you would trust for a full loaf: domed, expanded, bubbly, and recently peaked or close to it. Ideally, it should have clearly risen after feeding and still look full of life. If it rose hours ago and has already collapsed back down, it is much less likely to give you the same lift here.

Use discard when flexibility matters more than maximum lift

Discard works well in focaccia because the dough is high-hydration and pan-baked. Even so, discard is usually weaker than active starter, so the rise may be slower, especially in a cool kitchen or on a tighter schedule. Serious Eats has a useful sourdough discard explainer if you want a broader look at how discard behaves in baking.

Use a little yeast with discard when you want speed and reliability

A small amount of instant yeast is the smartest shortcut when you want discard focaccia the same day. It does not make the bread less respectable. It simply makes the dough more dependable when the discard itself is not lively enough to do all the work quickly.

Also Read: White Russian Recipe: 7 Variants to Try, From Classic to Frozen

Same-day vs overnight sourdough focaccia

The main recipe below uses an overnight schedule because that route is easier to manage and easier to get right. Same-day focaccia is absolutely possible. Overnight focaccia is simply calmer, more flexible, and usually less stressful.

Choose the same-day method when you want bread by dinner

A same-day focaccia works best when your starter is active, the room is fairly warm, or you are willing to use a little yeast. It is a good route for spontaneous baking, but you do need to stay more attentive because the dough can move faster than you expect once the kitchen warms up.

Choose the overnight method when you want a calmer workflow

Overnight focaccia fits real life more easily. You can mix the dough in the evening, build some early strength, then refrigerate it and finish the pan proof the next day. The whole process feels less rushed, and the dough is usually calmer to handle.

Room temperature changes the timeline more than most recipes admit

At 76 to 78°F, dough can move much faster than it does at 68 to 70°F. That matters whether you are using active starter or discard. A warm kitchen can shorten fermentation by hours, while a cool kitchen can make the same dough seem stubborn. The dough matters more than the clock.

  • Warm kitchen, active starter: bulk fermentation can take around 4 to 5 hours.
  • Cool kitchen, active starter: bulk fermentation can take around 5 to 7 hours.
  • Discard only: expect more time unless the discard is unusually lively.
  • Discard + yeast: expect the fastest same-day route.

Ingredients for sourdough focaccia and what each one does

The main recipe below makes 1 thick focaccia in a 9×13-inch pan, enough for about 8 to 12 servings depending on how you cut it.

Main dough ingredients

  • 500 g bread flour
  • 400 g water
  • 100 g active sourdough starter, ripe and bubbly
  • 12 g fine sea salt
  • 20 g olive oil for the dough
  • 2 to 3 tablespoons olive oil for the pan
  • 1 to 2 tablespoons olive oil for the top
  • flaky salt for finishing
  • rosemary or other toppings as desired

Optional route adjustments

For an all-purpose flour version, replace the bread flour with all-purpose flour. The focaccia will still be very good, though usually a little softer and slightly less chewy.

For a discard-only version, replace the active starter with 100 g sourdough discard and expect a slower rise.

For a discard + yeast same-day version, use 100 g sourdough discard and add 4 g instant yeast when mixing.

Bread flour vs all-purpose flour

Bread flour gives the dough more strength, a little more height, and a chewier bite. For that reason, it is the better choice when you want more dramatic bubbles and better structure. All-purpose flour still works well and produces a slightly softer focaccia. If you are using standard all-purpose flour rather than bread flour, start by reducing the water by about 25 to 40 g and only add more if the dough still feels manageable. Weaker all-purpose flours usually absorb less water.

Why olive oil matters so much in focaccia

Olive oil is part of the structure as much as it is part of the flavor. It helps tenderize the crumb, improves browning, protects the surface, and creates the crisp underside and edges that make good focaccia feel rich rather than plain.

Salt, water, and hydration

Salt sharpens flavor and strengthens the dough. Water gives the dough its loose, airy potential. This is supposed to be a sticky dough. If you keep correcting it with extra flour until it feels tidy, you will lose the texture that makes focaccia worth baking. On humid days or with lower-protein flour, the dough may feel even looser than usual. Resist the urge to dump in a lot of extra flour all at once.

Toppings and when they should be added

Rosemary and flaky salt are the best place to start. Olives and thin onion slices also work well before baking because they bring strong flavor without flooding the dough. Wetter toppings such as fresh tomatoes or fresh mozzarella need a lighter hand or a later addition so they do not weigh down the surface. More delicate herbs are usually better added after baking, while harder herbs such as rosemary can go on before the bread hits the oven.

Also Read: Mango Sorbet Recipe: Healthy & Plant Based Dessert

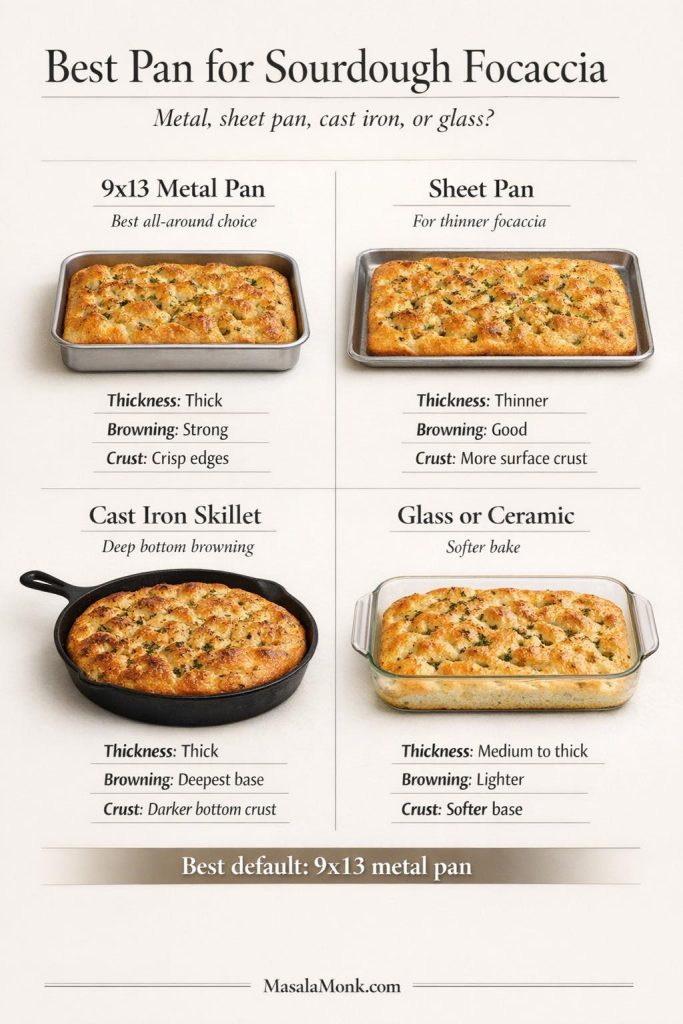
Best pan for sourdough focaccia

The best pan for most home bakers is a 9×13-inch metal pan. It gives the most predictable thickness, the strongest browning, and the best balance between a soft interior and crisp olive-oil edges.

Best pan for sourdough focaccia guide comparing a 9x13 metal pan, sheet pan, cast iron skillet, and glass or ceramic pan for thickness, browning, and crust.
A 9×13 metal pan is still the safest default, but changing the pan changes the bread too: sheet pans bake thinner, cast iron deepens the bottom crust, and glass or ceramic usually leaves the base a little softer.

9×13-inch metal pan for classic thick focaccia

This is the pan the main recipe is built around. Use it when you want a bakery-style slab with height, chew, and deeply golden edges.

Sheet pan for thinner focaccia

Use a sheet pan when you want a thinner focaccia with more crust and less height. The dough will spread more, bake faster, and feel a little more snackable.

Cast iron skillet for deeper browning

A well-oiled cast iron skillet can give you a darker, more assertive bottom crust. It is a strong choice when deep browning matters more than the classic rectangular shape.

Glass and ceramic pans for a softer base

Glass and ceramic pans can still work, but they usually brown less aggressively than metal. As a result, the bottom tends to stay softer and the bake may need a little longer. If you use glass, grease it more carefully than you think you need to, because sticking can be more annoying there than in a well-oiled metal pan.

Also Read: Protein Ice Cream Recipe: 10 Creamy Homemade Recipes

How to make sourdough focaccia step by step

This is the main method and the one to choose first: active starter + overnight schedule + 9×13-inch metal pan.

Mix the dough

In a large bowl, combine the bread flour, water, active sourdough starter, salt, and 20 g olive oil. Mix until no dry flour remains.

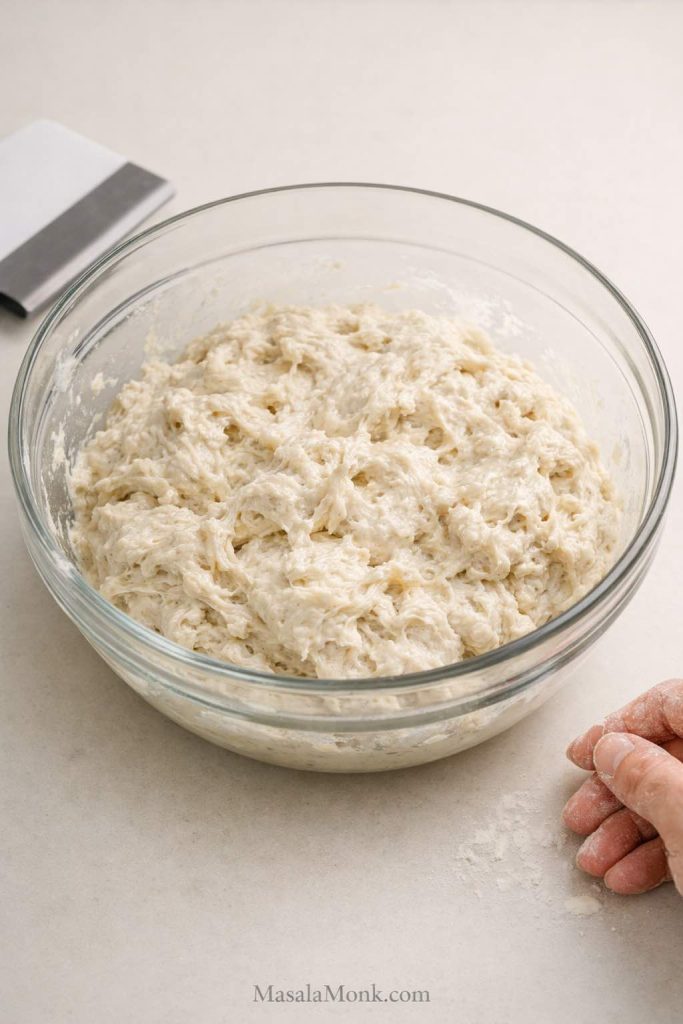
The dough will look rough, sticky, and a little unruly at this stage. That is normal. You are not aiming for a smooth kneaded dough.

Freshly mixed sourdough focaccia dough in a glass bowl showing a rough sticky high-hydration early stage before folds.
At this stage, the dough should look rough, sticky, and looser than many bakers expect; that slightly unruly texture is exactly what sets up a lighter, airier focaccia later on.

Rest and strengthen the dough

Cover the bowl and let the dough rest for 20 minutes.

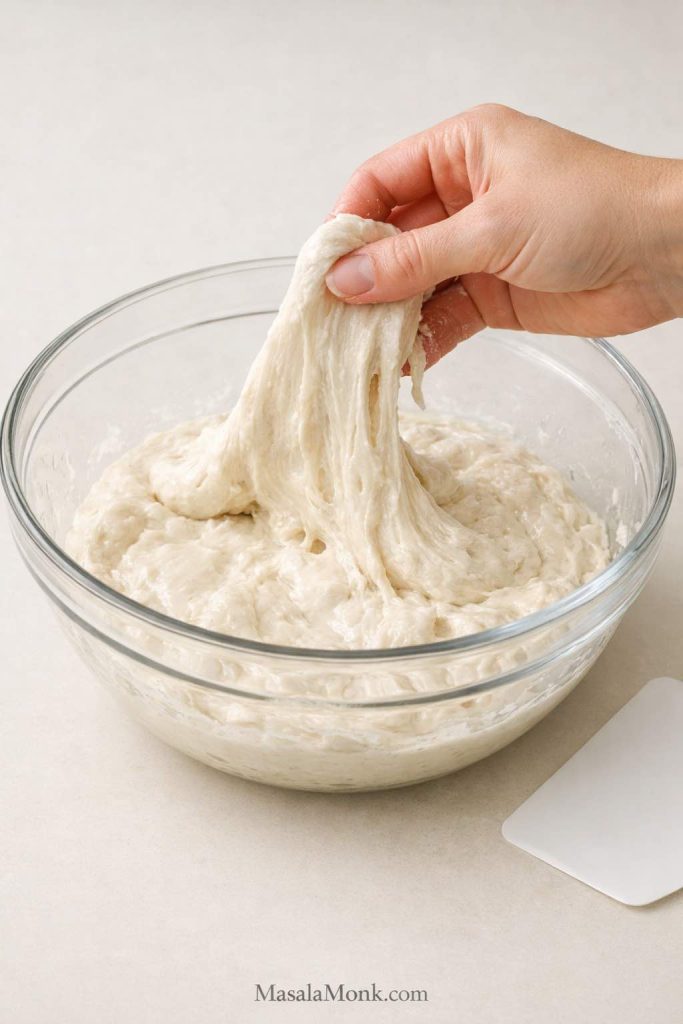
Then perform one round of stretch-and-folds by pulling one side of the dough up and folding it over itself. Rotate the bowl and repeat on all sides.

Repeat this process 3 more times, resting 20 to 30 minutes between rounds. By the final fold, the dough should still be sticky but noticeably smoother, more elastic, and better able to hold itself.

Hand lifting and folding sticky sourdough focaccia dough in a glass bowl during a stretch-and-fold.
This step is about gentle strength, not hard kneading; the dough should stretch softly, feel sticky, and fold back over itself without needing extra flour to make it behave.

Bulk ferment until the dough looks airy and alive

After the folds, cover the bowl and let the dough ferment at room temperature until it looks visibly fuller, lighter, and more aerated.

At 74 to 78°F, this usually takes about 4 to 6 hours total from mixing with active starter.

Do not chase a perfect doubling. What matters is that the dough looks alive. You want some visible bubbles, a softer feel, and a bowl of dough that no longer looks dense and inactive. If it still looks tight and compact, keep waiting.

Refrigerate for the overnight route

Once the dough has clearly gained strength and activity, cover it well and refrigerate it for 8 to 24 hours.

This rest makes the schedule easier, deepens the flavor, and usually leaves you with a calmer dough the next day. Cover it well so the surface does not dry out in the fridge. Also, do not assume that longer is always better: push the cold rest too far and the dough can get more sour while losing some of its lift.

Oil the pan and transfer the dough

Pour 2 to 3 tablespoons olive oil into a 9×13-inch metal pan and coat the bottom well.

Tip the dough gently into the pan. Turn it once or twice so the outside picks up some oil.

If it does not want to reach the corners yet, do not force it. Let it relax for 15 to 20 minutes, then stretch it gently again. Focaccia usually rewards patience.

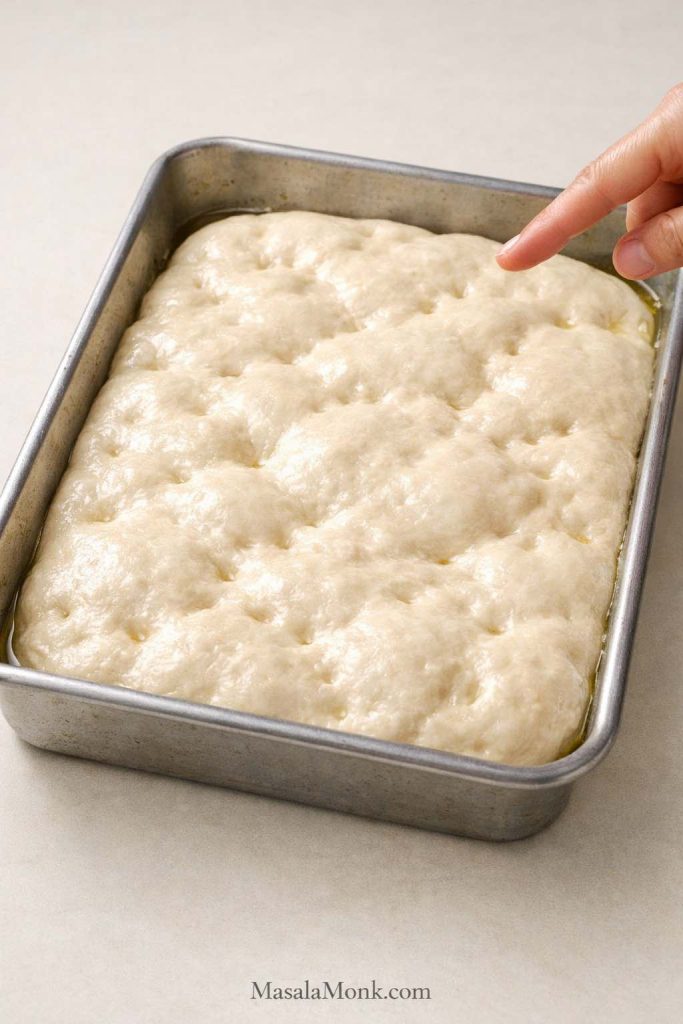
Proof in the pan until puffy and jiggly

Let the dough proof in the pan at room temperature until it looks fuller, softer, and lightly inflated. In a warm room, this often takes 2 to 4 hours after the cold dough goes into the pan, but the dough is a better guide than the clock.

Look for a dough that feels easygoing rather than tense. It should wobble lightly when the pan moves, show some air under the surface, and accept dimples without fighting back. The full proofing cues are broken down in the next section.

Proofed sourdough focaccia dough in a 9x13 metal pan showing a puffy airy surface ready to dimple before baking.
By this stage, the dough should look fuller, softer, and lightly airy in the pan, with enough visible puff that dimpling feels easy rather than forced.

Dimple, top, and bake

Set the oven to 450°F.

Drizzle the top with 1 to 2 tablespoons olive oil. Lightly oil your fingertips, then press straight down to dimple the dough all over. Sprinkle with flaky salt and add your toppings.

Bake for 25 to 30 minutes, or until the top is deeply golden and the edges are richly browned. If the top darkens too quickly before the bread feels baked through, lower the oven slightly or move the pan to a lower rack.

Hands dimpling proofed sourdough focaccia dough in a 9x13 metal pan with olive oil before baking.
Once the dough is fully proofed, it should accept dimples easily and hold little pools of olive oil instead of springing back tight, which is one of the clearest signs that it is ready for the oven.

Cool, slice, and serve

Let the focaccia cool in the pan for 5 to 10 minutes, then lift it out and cool it a little more on a rack if possible. That helps the bottom stay crisper.

Slice while still slightly warm or at room temperature.

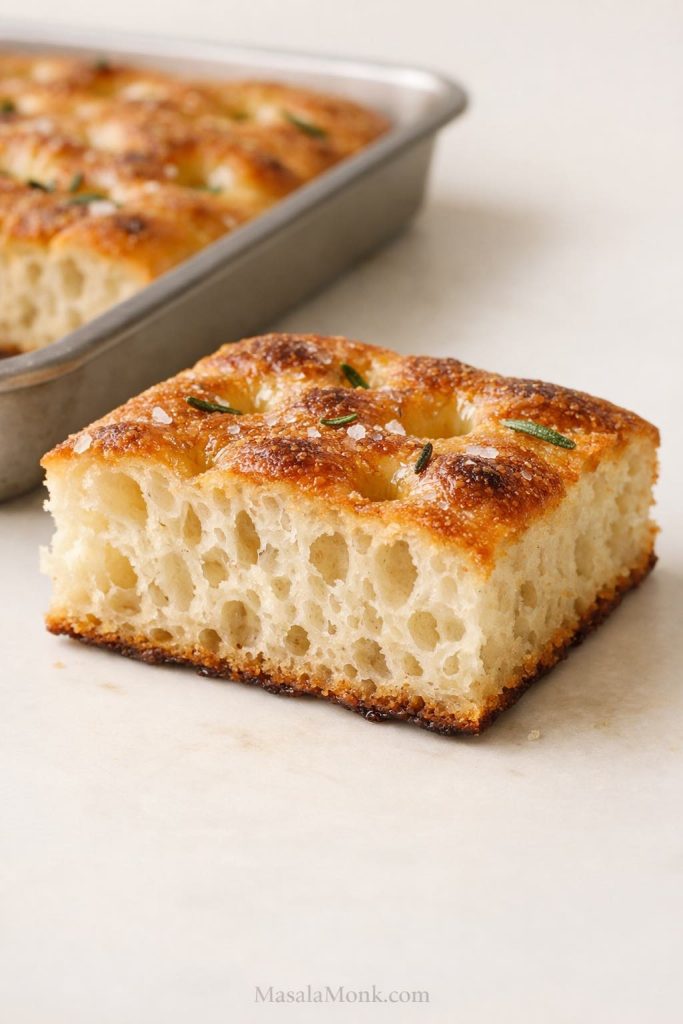
Close-up of a baked sourdough focaccia slice showing an airy crumb, golden top, olive-oil dimples, and crisp browned bottom edge.
This is the payoff you are aiming for: an airy interior, a bronzed top, and crisp olive-oil edges that feel generous rather than tight or bready.

Also Read: Cookie Pie Recipe: 10 Best Flavors, Fillings and Variations

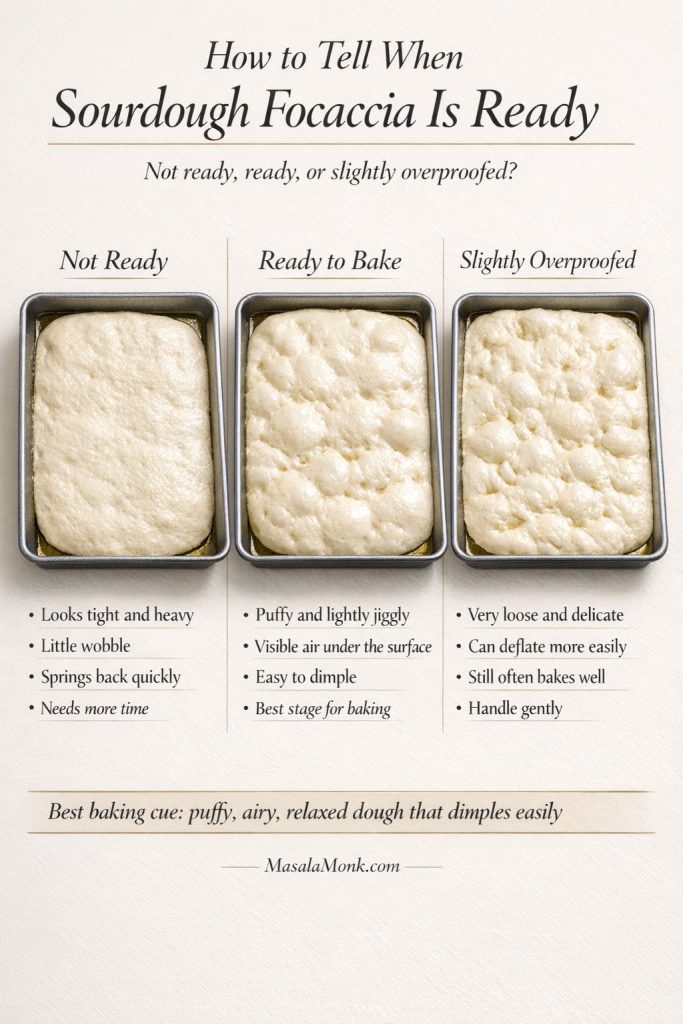
How to tell when sourdough focaccia is proofed enough

This is the most important judgment call in the whole recipe. If the dough is proofed well, the crumb has a real chance of turning out airy and dramatic. Bake too early and the bread usually comes out flatter and tighter.

Sourdough focaccia proofing guide showing not ready, ready to bake, and slightly overproofed dough in pans before baking.
Tight dough still needs time, puffy dough with a light wobble is ready to bake, and slightly overproofed dough can still turn out well if you handle it gently.

Signs your dough needs more time

The dough looks flat in the pan, feels heavy rather than buoyant, and resists your fingertips. When you press into it, it springs back quickly and does not want to hold the dimple. This is where a lot of bakers go wrong: the dough looks spread out, so they assume it is ready. It is not. It still needs time.

  • tight surface
  • little to no wobble
  • heavy feel
  • resists stretching toward the corners

Signs it is ready to dimple and bake

The dough looks puffy, slightly wobbly, and airy under the surface. Your fingers can press in easily, and the dough feels soft and almost marshmallowy rather than tense. More importantly, it should look like a dough that has actually trapped gas, not one that is merely spreading because it is wet.

  • puffy appearance
  • light wobble when the pan moves
  • visible air pockets under the surface
  • easy dimpling without the dough fighting back

What slightly overproofed focaccia looks like

A slightly overproofed dough can feel extremely loose and fragile, and it may deflate more easily when handled. Even then, focaccia often still bakes reasonably well because the pan supports it. You may lose some height, but you can still get very good bread.

What underproofed focaccia looks like after baking

Underproofed focaccia usually comes out flatter, tighter, and less bubbly. The crumb feels more bread-like than airy, and the dramatic holes never really develop.

Also Read: Cookie Pie Recipe: 10 Best Flavors, Fillings and Variations

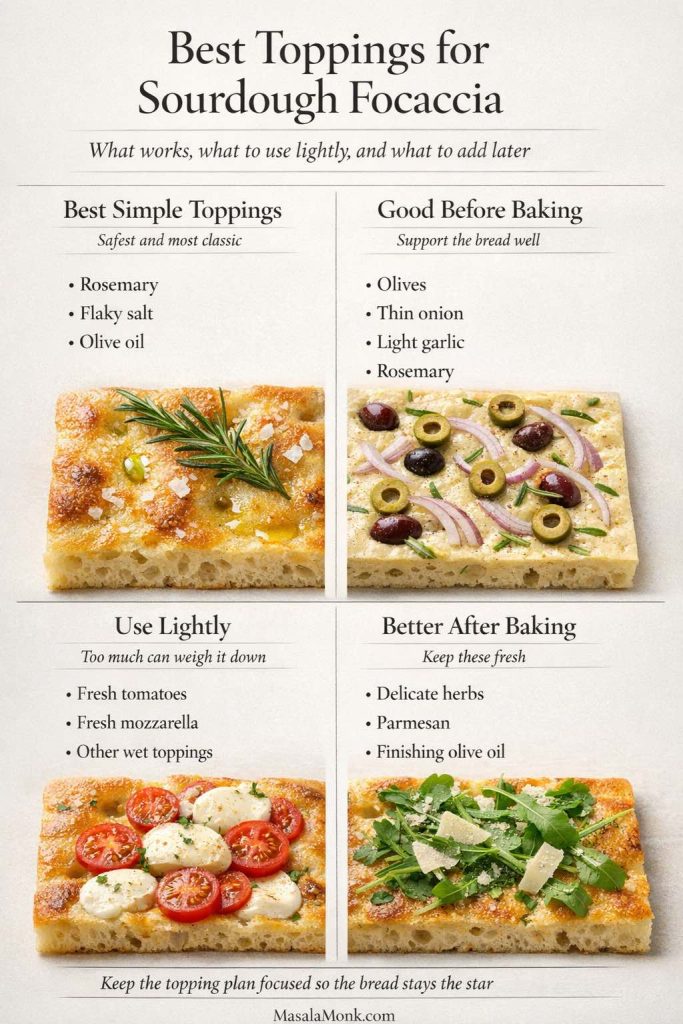
Best toppings for sourdough focaccia

The best toppings support the bread instead of burying it. Let the topping plan get too heavy or too wet and the focaccia starts losing the texture that made it worth baking in the first place.

Best toppings for sourdough focaccia guide showing simple toppings, before-baking toppings, wetter toppings to use lightly, and finishing toppings to add after baking.
The best focaccia toppings do not compete with the bread; they support it. Classic toppings such as rosemary, flaky salt, and olive oil keep the bake clean and balanced, while wetter toppings need a lighter hand and fresher finishes are often better added after baking.

The best simple topping: rosemary, olive oil, and flaky salt

This is still the most reliable and satisfying version. It lets the bread stay the star, smells incredible, and avoids the sogginess that comes from piling too much on top.

Toppings that work well before baking

Olives, thin onion slices, rosemary, and a restrained amount of garlic all work well before baking. Garlic, however, can burn if it is sliced too thin or left too exposed, so keep it modest and let the olive oil protect it.

Toppings that need a lighter hand

Fresh tomatoes, fresh mozzarella, and other watery toppings should be used in moderation. Too much moisture softens the surface, interferes with browning, and can weigh down the dough. Once you want a more heavily topped bread, the result starts leaning toward pizza rather than classic focaccia.

What to add after baking

More delicate herbs, a final drizzle of good olive oil, or finishing touches such as parmesan are often better after baking. That way the flavors stay fresh instead of getting dulled in the oven.

Topping combinations that work well together

  • rosemary and flaky salt
  • rosemary and olive
  • onion and olive
  • light cherry tomato and oregano
  • garlic and rosemary

Keep the topping plan focused. Let the bread do most of the talking.

Also Read: Peach Cobbler with Canned Peaches (Dessert Recipe)

Troubleshooting sourdough focaccia

Why is my sourdough focaccia dense instead of airy?

The most common causes are underproofing, weak starter, old discard without enough time, or too much added flour. Usually the fix is more fermentation, not more flour.

Why didn’t it get big bubbles?

Either the dough never built enough gas, or the gas it had was knocked out by rough handling. Good bubbles need both strong fermentation and gentle treatment.

Why is my focaccia gummy in the middle?

It may need a slightly longer bake, especially if it is thick or heavily topped. It can also seem gummier than it really is when sliced too hot. Let it cool briefly before cutting.

Why is it pale instead of deeply golden?

The oven may not be hot enough, the pan may not brown strongly, or there may not be enough olive oil on the dough and in the pan. A metal pan really helps here.

Why did it stick to the pan?

Usually there was not enough oil underneath, or the bread sat too long before being released. Oil the pan generously and loosen the focaccia while it is still warm if needed.

Why did it spread too much?

Either the dough never built enough strength during the folds, or it was proofed before it had enough internal structure. High hydration is good, but the dough still needs some strength.

Why does it taste too sour?

The dough may have fermented too long, the discard may have been especially acidic, or the kitchen may have been warm enough to push fermentation harder than expected. Use fresher discard or shorten the fermentation slightly next time.

Can you save overproofed focaccia?

Often yes. Transfer it gently to a well-oiled pan, dimple carefully, and bake it. You may lose some height, but focaccia is forgiving enough that the result can still be very good.

Also Read: Punjabi Mutton Bhuna – Amritsari Village-Style Gosht Recipe

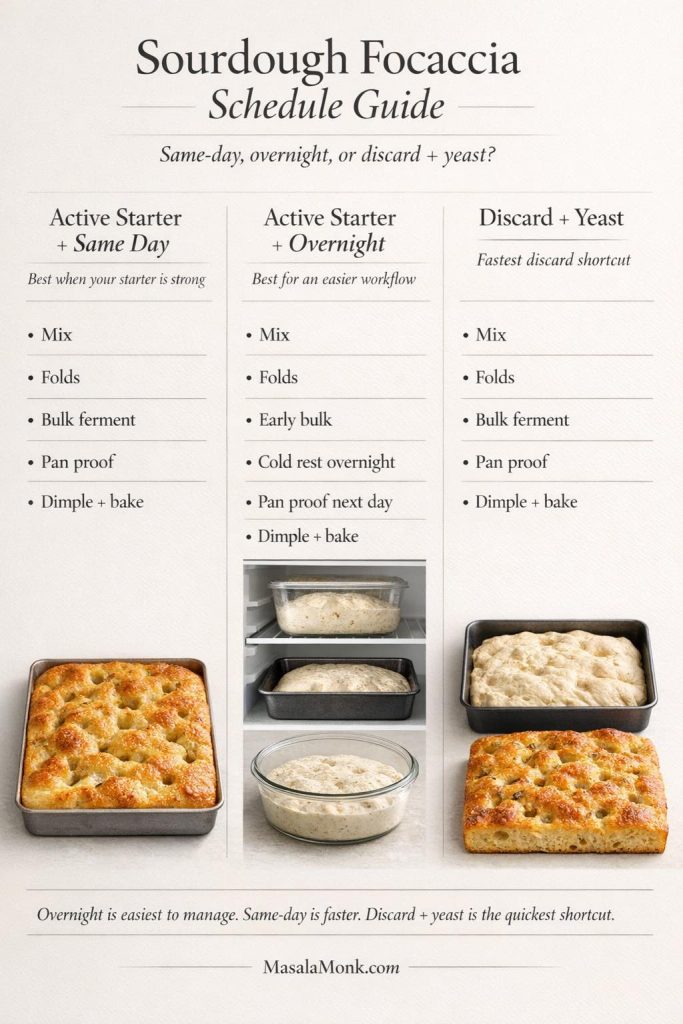
Same-day and overnight schedules at a glance

These are working timelines, not hard laws. If the dough is moving faster than expected, refrigerate it sooner. If it is lagging, give it warmth or more time.

Sourdough focaccia schedule guide comparing active starter same day, active starter overnight, and discard plus yeast timing options.
The overnight route is easier to fit around real life, same-day focaccia works when your starter is strong and the room is warm, and discard plus yeast is the fastest way to get the dough moving without much drama.

Sample same-day timeline with active starter

Use this when you have strong starter and a warm kitchen.

  • 8:00 a.m. Mix the dough.
  • 8:20 a.m. to 9:30 a.m. Complete 4 rounds of folds.
  • 9:30 a.m. to 1:00 p.m. Let the dough bulk ferment until airy.
  • 1:00 p.m. Transfer to the pan.
  • 1:00 p.m. to 3:00 p.m. Pan proof until puffy and jiggly.
  • 3:00 p.m. Dimple, top, and bake.

Sample overnight timeline with active starter

This is the best default route in the article.

  • 6:00 p.m. Mix the dough.
  • 6:20 p.m. to 7:30 p.m. Complete 4 rounds of folds.
  • 7:30 p.m. to 10:00 p.m. Let the dough gain early strength and activity.
  • 10:00 p.m. Refrigerate overnight.
  • Next day, 10:00 a.m. Transfer to the pan.
  • 10:00 a.m. to 1:00 p.m. Pan proof until puffy.
  • 1:00 p.m. Dimple, top, and bake.

Sample discard + yeast fast timeline

Use this when you want the easiest quick route.

  • 9:00 a.m. Mix discard, flour, water, salt, olive oil, and instant yeast.
  • 9:20 a.m. to 10:30 a.m. Complete 4 rounds of folds.
  • 10:30 a.m. to 1:00 p.m. Bulk ferment until airy.
  • 1:00 p.m. Transfer to the pan.
  • 1:00 p.m. to 2:30 p.m. Pan proof.
  • 2:30 p.m. Dimple, top, and bake.

Also Read: Masterclass in Chai: How to Make the Perfect Masala Chai (Recipe)

Variations

Rosemary sourdough focaccia

Top the dough with rosemary, flaky salt, and olive oil for the cleanest and most classic version.

Whole wheat sourdough focaccia

Replace 100 to 150 g of the bread flour with whole wheat flour for a nuttier flavor and a slightly heartier crumb. Expect a little less loft and a little more chew.

Cast iron sourdough focaccia

Bake the dough in a well-oiled cast iron skillet when you want a darker, more assertive bottom crust and a rounder shape.

Sourdough focaccia pizza-style

Top more heavily after the first bake or split and fill it after baking when you want a pizza-inspired version. If you already like working with sourdough pizza dough, this is another satisfying way to use a soft, high-hydration dough.

Garlic and olive focaccia

Use sliced olives and a restrained amount of garlic so the top becomes aromatic and savory without turning harsh or greasy.

Also Read: Avocado Chocolate Mousse Recipe

How to store, reheat, and freeze sourdough focaccia

Best way to store focaccia for 1 to 2 days

Focaccia is best the day it is baked and still very good on day two. Once it is fully cool, wrap it well and keep it at room temperature. Do not trap it while warm, or the steam will soften the crust you just worked for.

How to reheat for crisp edges again

Reheat the focaccia in a hot oven or toaster oven for a few minutes rather than microwaving it. That is the easiest way to bring the edges back to life.

Can you freeze sourdough focaccia?

Yes. Freeze it once fully cool, either whole or in slices, wrapped well. Reheat from frozen or thaw first and warm it in the oven.

Best leftover uses

Use leftover focaccia for sandwiches, alongside soup, or lightly toasted with eggs. Day-old focaccia still has plenty to offer if you warm it well.

Also Read: Falafel Recipe: Crispy Homemade, Air Fryer and Baked Falafel

Frequently asked questions about sourdough focaccia

Can I use sourdough discard instead of active starter?

Yes. Discard works well in focaccia, but it is usually slower and less forceful than active starter. For the most reliable result, use active starter. For the quickest discard version, add a little yeast.

Do I need yeast for sourdough discard focaccia?

No. You can make it without yeast if you give it enough time. Yeast simply makes the rise faster and more dependable.

Is focaccia easier than sourdough bread?

For most bakers, yes. The pan makes it more forgiving, and there is no shaping or scoring to master. If you want another approachable follow-up bake after this, sourdough English muffins are another useful way to build confidence with fermentation and dough cues.

Can I refrigerate the dough overnight?

Yes. In fact, the overnight route is the main method here because it makes the process easier and more consistent.

What flour is best for sourdough focaccia?

Bread flour is the best all-around choice for height and structure, but all-purpose flour still works very well.

What pan gives the crispiest bottom?

A well-oiled metal pan or cast iron skillet usually gives the best browning and the crispest base.

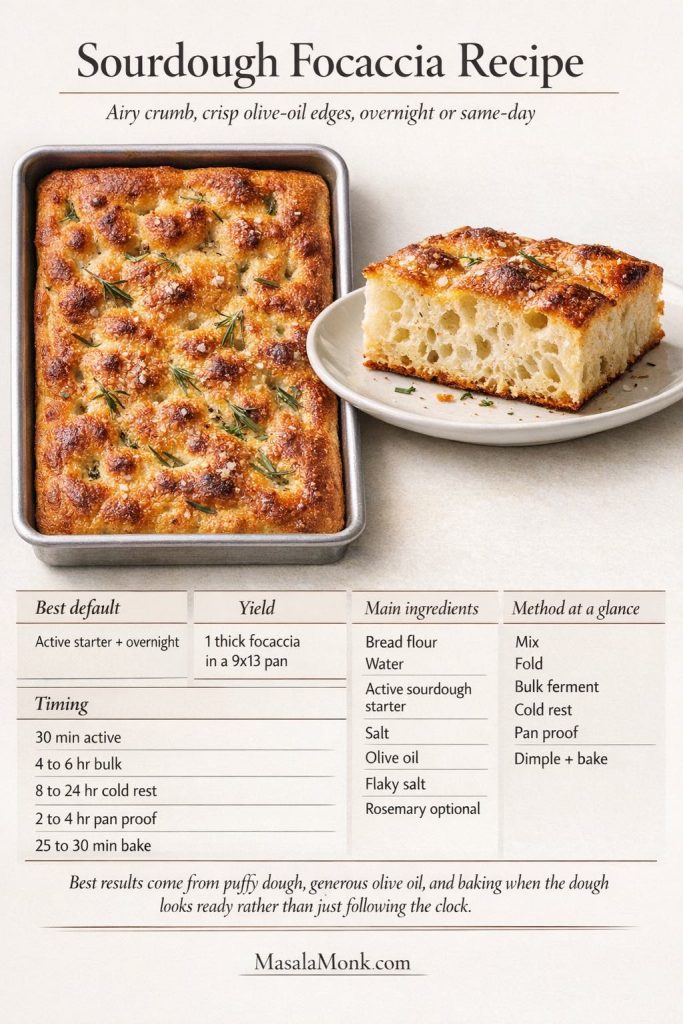
Sourdough focaccia recipe card showing a baked focaccia in a 9x13 pan, a cut square with airy crumb, and a summary of timing, ingredients, and method.
Once the route is clear, the bake itself becomes straightforward: mix, fold, let the dough gain strength, give it enough time to look puffy and ready, and bake for a focaccia with a light crumb and crisp olive-oil edges.

Also Read: Mango Margarita Recipe (Frozen or On the Rocks)

Recipe card

Sourdough Focaccia Recipe

Yield: 1 focaccia in a 9×13-inch pan
Serves: 8 to 12
Prep time: 30 minutes active time
Bulk fermentation: about 4 to 6 hours with active starter at warm room temperature
Cold rest: 8 to 24 hours
Pan proof: about 2 to 4 hours
Bake time: 25 to 30 minutes

Ingredients

  • 500 g bread flour
  • 400 g water
  • 100 g active sourdough starter
  • 12 g fine sea salt
  • 20 g olive oil for the dough
  • 2 to 3 tablespoons olive oil for the pan
  • 1 to 2 tablespoons olive oil for the top
  • flaky salt
  • rosemary or other toppings as desired

Optional adjustments

  • use 100 g sourdough discard in place of active starter for a slower discard version
  • add 4 g instant yeast when using discard for a faster same-day version

Method

  1. Mix the bread flour, water, starter, salt, and 20 g olive oil until no dry flour remains.
  2. Rest the dough for 20 minutes.
  3. Perform 4 rounds of stretch-and-folds, resting 20 to 30 minutes between rounds.
  4. Let the dough bulk ferment until it looks fuller, lighter, and visibly airy.
  5. Refrigerate the dough for 8 to 24 hours once it has clearly gained activity.
  6. Oil a 9×13-inch metal pan well and transfer the dough.
  7. Let it proof in the pan until puffy, jiggly, and easy to dimple.
  8. Heat the oven to 450°F.
  9. Drizzle the top with olive oil, dimple all over, and add flaky salt and toppings.
  10. Bake for 25 to 30 minutes until deeply golden.
  11. Cool for 5 to 10 minutes in the pan, then lift out and cool a little more before slicing.

Notes

  • The best default route is active starter + overnight.
  • This formula assumes a 100% hydration starter.
  • Use starter that is recently peaked or close to peak for the best lift.
  • If using all-purpose flour, reduce the water slightly to keep the dough manageable.
  • Use discard when convenience matters more than maximum lift.
  • Add instant yeast to discard when you want the fastest and most dependable same-day result.
  • A 9×13-inch metal pan gives the best all-around crust and structure.
  • The dough is ready when it looks puffy, airy, and softly inflated, not flat and tight.

A good focaccia should feel generous, not tense. Once you know which route makes sense, what the dough should look like, and when to wait instead of forcing it, this becomes one of the easiest breads to come back to. For more ideas beyond this one, the site’s broader sourdough bread recipe guide is a useful next stop.