
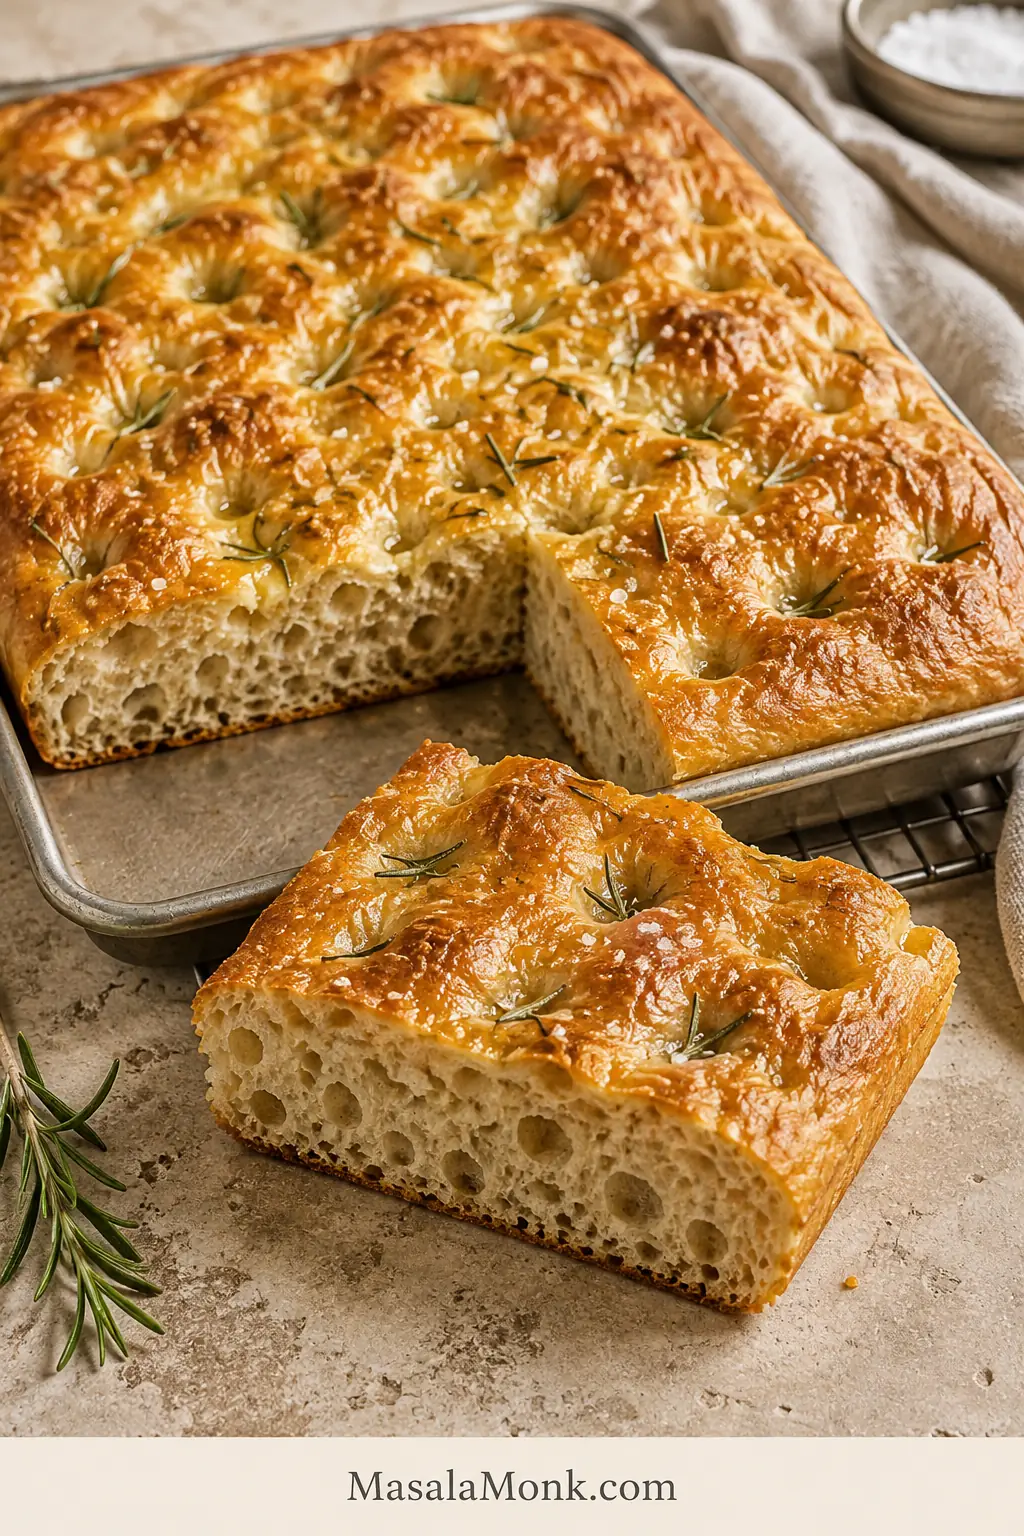
There is a particular moment when homemade focaccia feels worth the wait: you lift one corner from the pan and find a deeply golden, crisp underside, while the bread above it still feels almost impossibly soft.
This is that kind of focaccia—deeply dimpled, olive-oil-rich and airy through the middle, with irregular bubbles and a light, open crumb.
This easy focaccia recipe keeps the work remarkably low: one mixing bowl, no mixer and no traditional kneading. Most of the time belongs to fermentation, not to you. Because wet dough behaves differently from one flour and kitchen to another, the method tells you what each important stage should look and feel like, not just how long to wait.
The first thing to know: focaccia dough should feel very sticky. The real question is whether it stretches and holds together as one connected mass.
Quick Answer
For airy focaccia with a crisp olive-oil bottom, use 500 g bread flour or strong all-purpose flour and begin with 400 g water. Hold back another 20 g water and add it only if the rested dough remains cohesive enough to take it.
Mix with 4 g instant yeast, rest for 20 minutes, give the dough one quick fold, then leave it at room temperature for a short 30-minute warm start.
Refrigerate for 18–36 hours, planning around 24. The next day, proof in a well-oiled 9 × 13-inch metal pan until bubbly and softly wobbling, then bake at 450°F / 230°C conventional until deeply golden above and crisp underneath.
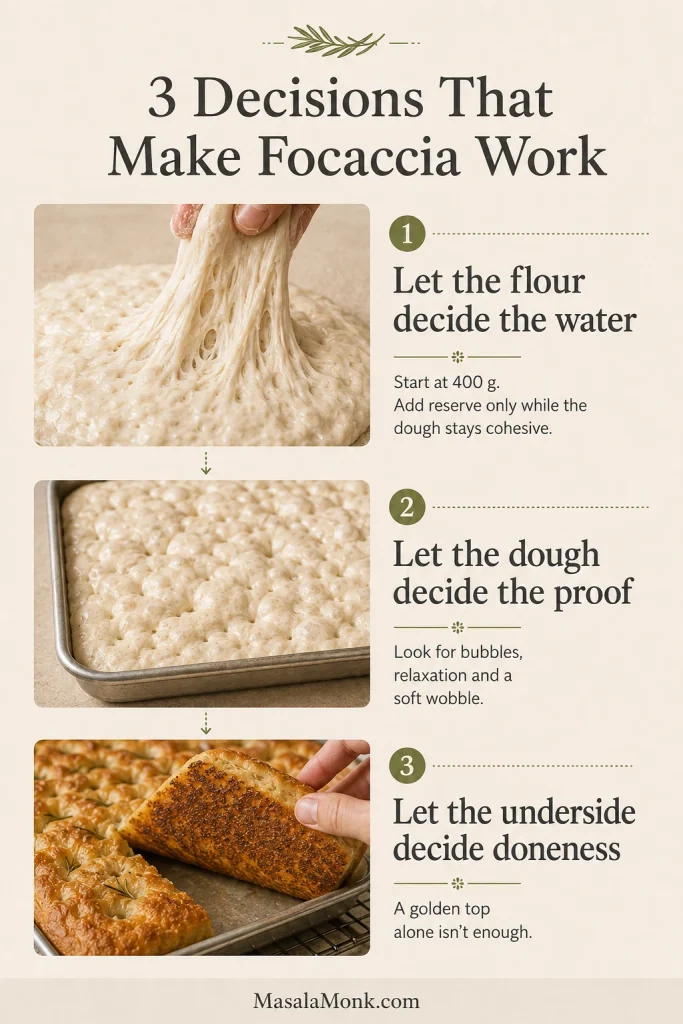
The whole recipe comes down to three decisions: let your flour tell you whether it needs the final 20 g water, let the dough tell you when proofing is finished, and let the underside tell you when the loaf is truly done.
Overnight vs Same-Day Focaccia: Choose Your Route
| Overnight — Recommended | Same-Day | |
|---|---|---|
| Yeast | 4 g instant yeast | 6 g instant yeast |
| Hands-on work | Very low | A little more |
| Main fermentation | 18–36 hours refrigerated; plan around 24 | About 1½–2½ hours warm |
| Typical elapsed time | About 27–30 hours on the 24-hour cold route | Roughly 4–6 hours |
| Flavor | Deeper and more developed | Milder and fresher |
| Best when | You can start the day before | You want focaccia tonight |
Choose overnight when you can. The longer fermentation develops more flavor while keeping the actual work very small.
Prefer natural fermentation? Use our sourdough focaccia recipe rather than trying to convert the yeast formula by guesswork.
Easy No-Knead Focaccia Recipe
Easy No-Knead Focaccia
An overnight focaccia with a crisp olive-oil bottom, deeply golden top and soft, irregularly airy crumb.
Ingredients
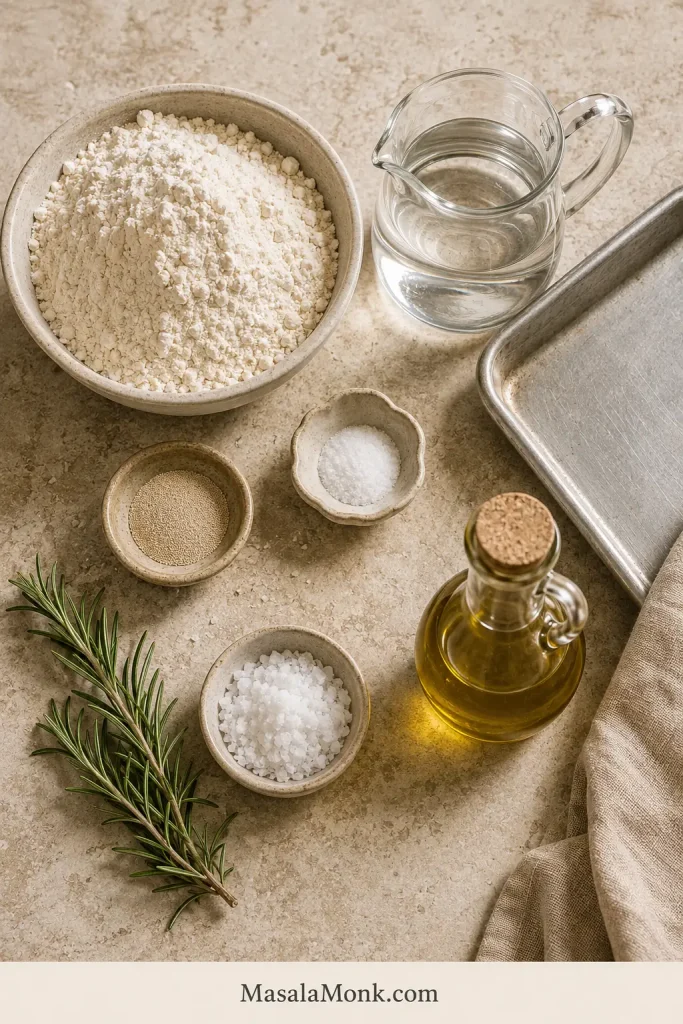
- 500 g / 17.6 oz bread flour or strong all-purpose flour, about 4–4¼ cups by volume
- 400 g / 400 ml water, about 1⅔ cups
- Up to 20 g / 20 ml additional water, held back
- 11 g fine sea salt, roughly 1¾–2 teaspoons depending on the salt
- 4 g instant yeast, about 1¼ teaspoons
- 45 ml / 3 tablespoons extra-virgin olive oil for the pan
- 30 ml / 2 tablespoons extra-virgin olive oil for the top
- Flaky finishing salt
- 1 tablespoon fresh rosemary leaves, optional
Method
- Mix the water and instant yeast. Add the flour and fine sea salt and stir until no dry flour remains.
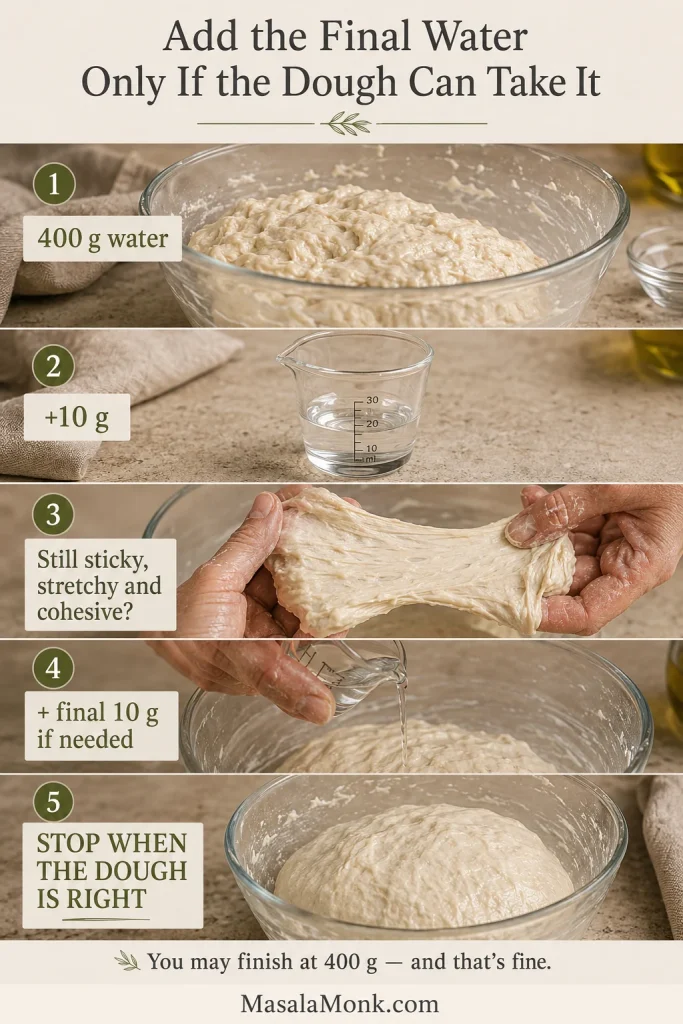
- Cover and rest for 20 minutes. Add the reserved water gradually, stopping as soon as the dough is very sticky, stretchy and cohesive. You may not need all 20 g.
- Give the dough one quick 30-second fold around the bowl.
- Cover and rest at room temperature for about 30 minutes, until slightly smoother and more relaxed. It doesn’t need to double.
- Refrigerate for 18–36 hours, preferably around 24.
- If your metal pan tends to stick, give it a whisper-thin coat of butter or nonstick spray. Pour in 3 tablespoons / 45 ml olive oil, transfer the chilled dough gently into the pan, and rest for 10–20 minutes whenever it resists stretching toward the corners.
- Cover and proof until visibly bubbly and soft enough to wobble when the pan is nudged.
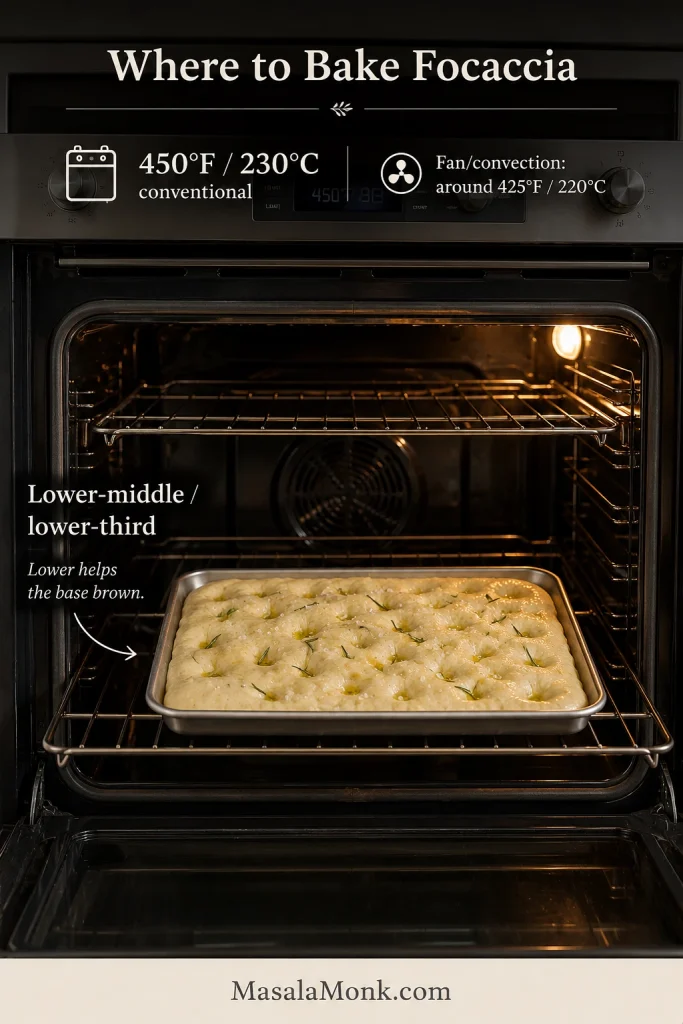
- Preheat to 450°F / 230°C conventional/static for at least 30 minutes, with a rack in the lower-middle or lower third. For fan/convection, start around 425°F / 220°C and check earlier.
- Oil your fingertips and dimple deeply to the pan. Drizzle over the remaining 2 tablespoons / 30 ml olive oil, then add flaky salt and rosemary.
- Bake for about 22–28 minutes, until deeply golden on top, crisp and browned underneath, and set through the center.
- Rest in the pan for 3–5 minutes, then transfer to a wire rack.
Cooking now? The recipe card above is enough to cook from. Everything below is optional guidance for understanding the dough, adapting the recipe or fixing something that looks unusual.
Table of Contents
Start Here
Dough & Baking
Focaccia Ingredients
Focaccia begins with flour, water, yeast, salt and olive oil. The bigger differences come from how much water your flour can handle, how far fermentation goes, how fully the dough proofs and how efficiently the pan browns it. Those are the variables worth learning to read.
For salt, trust the 11 g weight because teaspoon volume varies with crystal size. Extra-virgin olive oil gives the surface the most aroma and flavor, although regular olive oil works too.
How Wet Should Focaccia Dough Be?
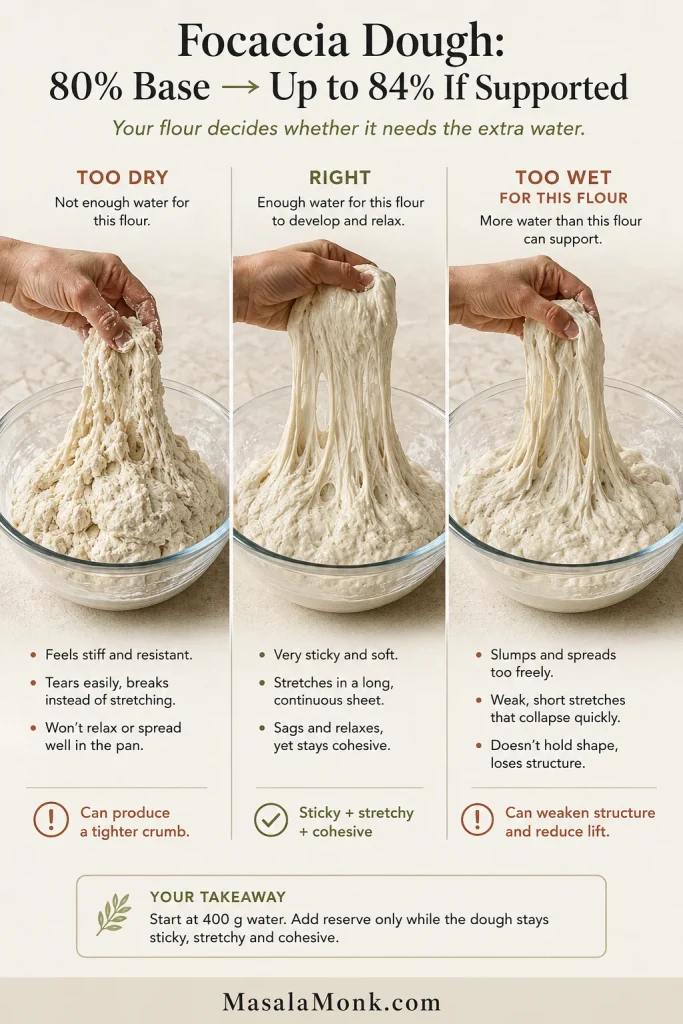
This recipe starts at 80% hydration and can rise to 84%. The 400 g base is the dependable starting point; the held-back 20 g lets stronger flour take a little more water when it can support it.
Don’t chase 84% just because the water is there. A cohesive dough at 80% is better than forcing extra water into flour that can’t support it.
The first mixed dough may cling enthusiastically to your fingers and be exactly where it needs to be. If you have made our homemade pita bread, this will feel dramatically wetter: focaccia gets the support of a pan instead of having to hold itself as a free-standing flatbread.
What you want is dough that feels very sticky but stretches as one connected mass.
| State | What you will notice | Next move |
|---|---|---|
| Too dry | Firm, conventionally kneadable, resistant and prone to tearing | Add some reserved water |
| Right | Very sticky, loose and soft, yet stretchy and cohesive | Carry on |
| Too wet for the flour | Flows freely and develops little structure even after resting | Stop adding water and check flour/measurements |
How to Use the Reserved Water
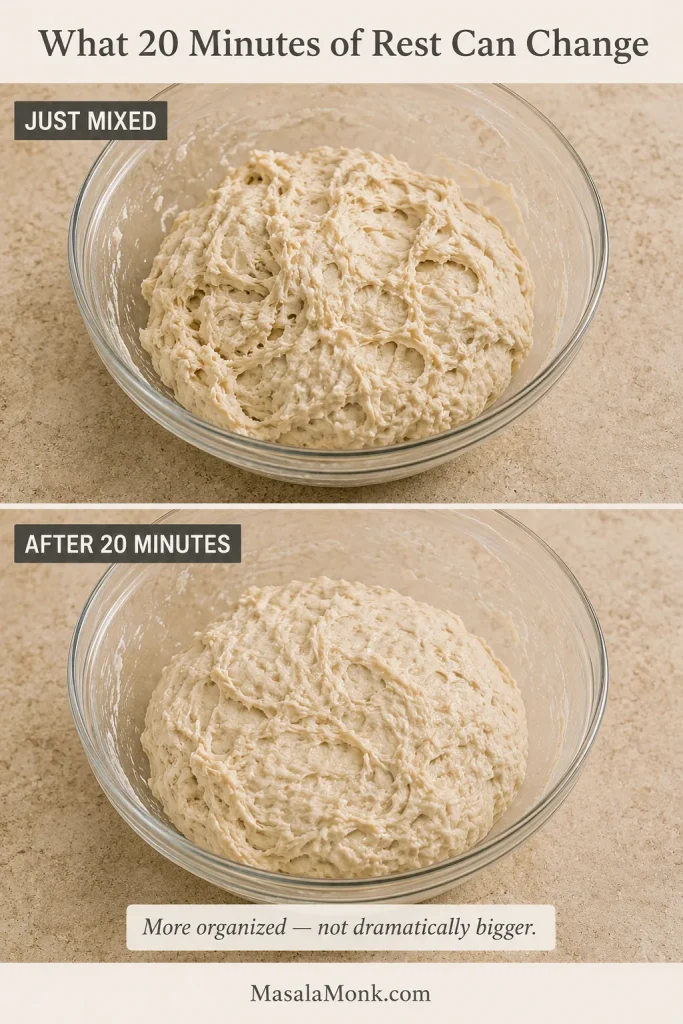
Wait the full 20 minutes before judging it. Flour keeps absorbing water as it rests, and a rough sticky mixture can become noticeably more organized without kneading.
Add about 10 g of the reserved water. If it disappears into the dough and the mass stretches together, decide whether it can take the final 10 g.
Some batches will finish at 400 g water. Others will use all 420 g. Both can become excellent focaccia.
Dough already turned soupy? See what to check before changing the formula.
What Is the Best Flour for Focaccia?
For the easiest first batch, choose bread flour around 11–13% protein. It gives wet dough enough strength to stretch and hold fermentation gas while generally handling high hydration well.
Strong all-purpose flour is also excellent and can produce a slightly softer crumb. More important than the wording on the bag is the flour’s strength and how eagerly it absorbs water.
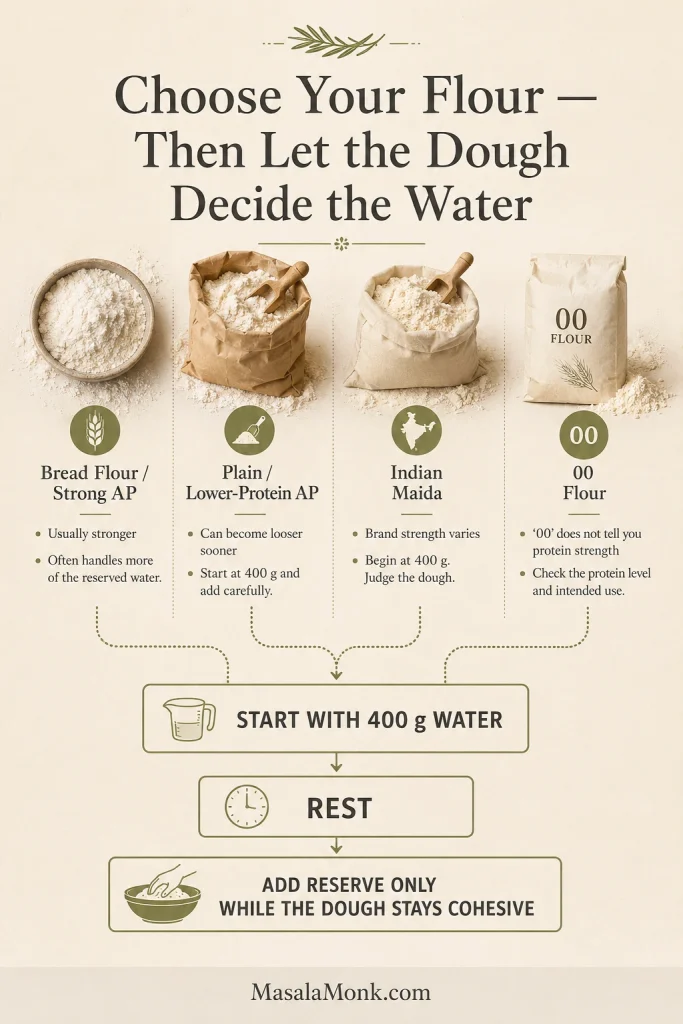
| Flour | What to expect | Water approach |
|---|---|---|
| Bread flour | Strong, stretchy dough; slightly chewier crumb | Often handles the full amount comfortably |
| Strong all-purpose | Good strength with a slightly softer crumb | Add reserved water gradually |
| Lower-protein plain/AP | Looser dough at the same hydration | Expect to leave some reserved water out |
| Indian maida | Strength and absorption vary greatly by brand | Begin at 400 g and judge the dough |
| 00 flour | Strength varies from product to product | Check protein level and intended use |
You can see the same flour-strength trade-off in our sourdough pizza dough, although pizza also has to stretch and support itself without a pan.
A scale earns its place here. A heavily packed cup of flour can quietly turn the same formula into a much drier dough. Weighing 500 g removes that variable immediately.
Flour and Yeast Substitutions
- All-purpose flour: yes, especially when it is reasonably strong. Hold back the final water and let the texture guide you.
- Indian maida: also possible, but brands vary substantially. Begin with the base 400 g water and add more only while the dough keeps enough structure.
- 00 flour: 00 tells you about the flour’s Italian milling/refinement classification, not its protein strength. Check the protein level and intended use.
- Whole wheat: a modest partial substitution can work, but expect different water absorption and a tighter crumb. Make the white-flour version first so you know the texture you are aiming for.
- Active dry yeast: yes. Follow the conversion and blooming directions on your package; if your brand permits a 1:1 swap for instant yeast, use 4 g. Fermentation may move a little more slowly, so use the same readiness cues rather than forcing the original timing.
- Sourdough starter: starter contributes both flour and water and changes the fermentation schedule. If you are beginning from scratch, our sourdough starter recipe covers the first step; for the bread itself, use the sourdough focaccia linked above.
- Gluten-free flour: this wheat-based formula is not designed for a direct gluten-free swap. Gluten-free focaccia needs its own structure system.
The Best Pan and Equipment for Focaccia
A bowl, digital scale, 9 × 13-inch metal pan and wire rack cover almost everything you need.
- Digital scale: especially helpful for flour, water, salt and yeast.
- Large covered bowl: an airtight lid makes the refrigerator stage easier.
- 9 × 13-inch / approximately 23 × 33 cm metal pan: the reference pan for this recipe.
- Flexible scraper or spatula: handy with wet dough, but optional.
- Wire rack: important for keeping the underside crisp after baking.
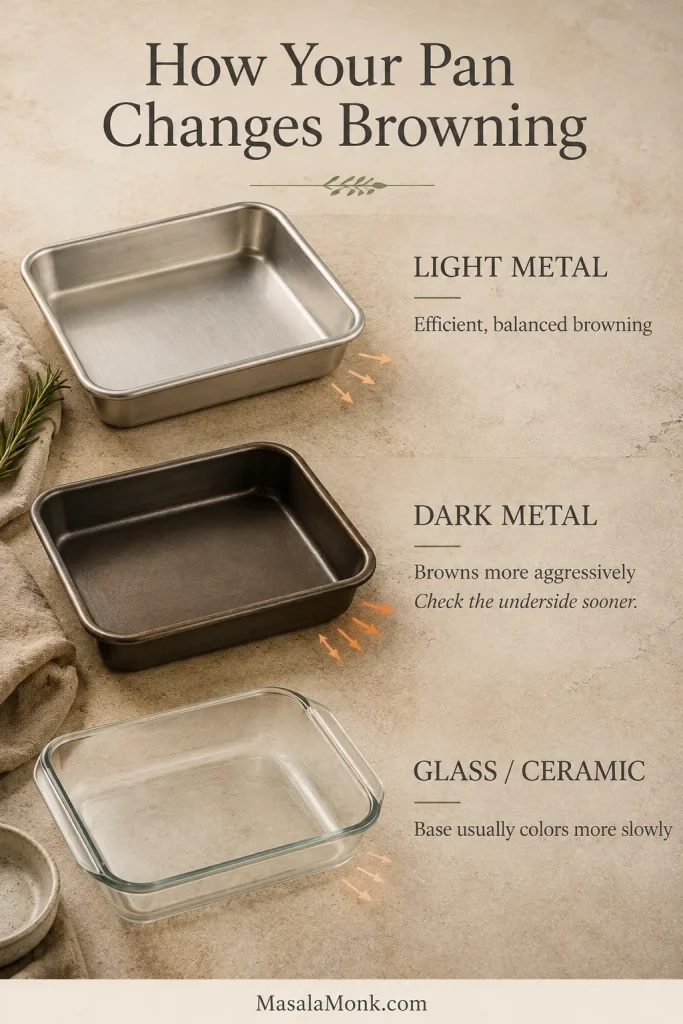
Metal is the easiest route to the crisp bottom promised here because it transfers heat quickly into the oil and dough. A reliably nonstick pan needs only olive oil; an older or grabby pan benefits from the thinnest film of butter or nonstick spray first.
Dark metal browns faster. Begin checking the underside a little earlier if your pan is very dark.
Glass and ceramic can still make good focaccia, but the base generally colors more slowly. The King Arthur Baking focaccia pan comparison gives a clear demonstration of how pan material changes browning.
Using another pan size? See how to scale the dough by pan area.
How to Make Focaccia
Making focaccia is simple; the real skill is recognizing when the dough is ready for the next stage.
1. Mix the Dough
Pour 400 g water into a large bowl and stir in 4 g instant yeast. Room-temperature or slightly cool water is fine in a warm kitchen; use mildly lukewarm water around 80°F / 27°C when the room is cool.
Add 500 g flour and 11 g fine sea salt. Stir with a sturdy spoon, spatula or wet hand until no dry flour remains.
It may look messier than you hoped. Give it the full 20-minute rest before changing anything, then add reserved water only while the dough remains stretchy and cohesive.
2. Give It One Quick Fold
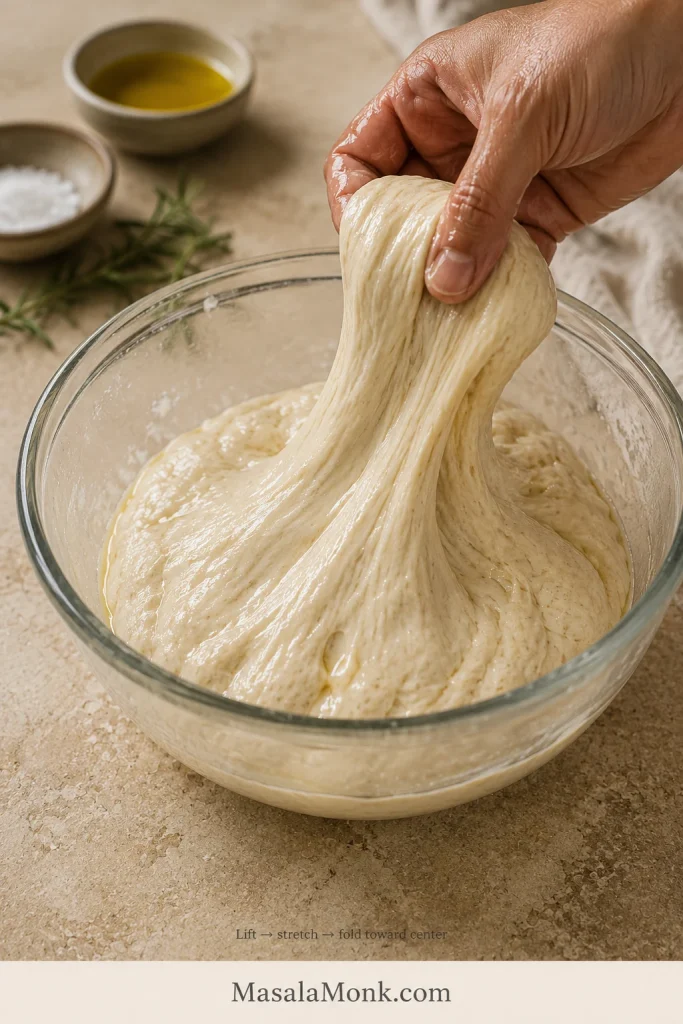
Wet one hand, lift an edge until you meet a little resistance, fold it toward the center, rotate the bowl and repeat around the remaining sides.
About 30 seconds is enough. Cover the bowl and leave it at room temperature for another 30 minutes. The surface should begin to look smoother and the mass more relaxed; it doesn’t need to grow dramatically.
From here, time does most of the work.
3. Cold Ferment
Cover the bowl airtight and refrigerate. Plan around 24 hours. The normal flexible window is 18–36 hours.
This assumes a properly cold refrigerator around 37–40°F / 3–4°C. A warmer fridge moves fermentation faster; a very cold one may leave the dough looking surprisingly quiet.
With a genuinely cold refrigerator and dough that looks strong, the ferment can sometimes stretch toward 48 hours. Think of that as an extension, not a target.
Keep the bowl well covered so the surface stays supple and doesn’t develop a dry skin.
A modest refrigerator rise is fine. The warm pan proof is where a quiet-looking dough often becomes much more visibly aerated.
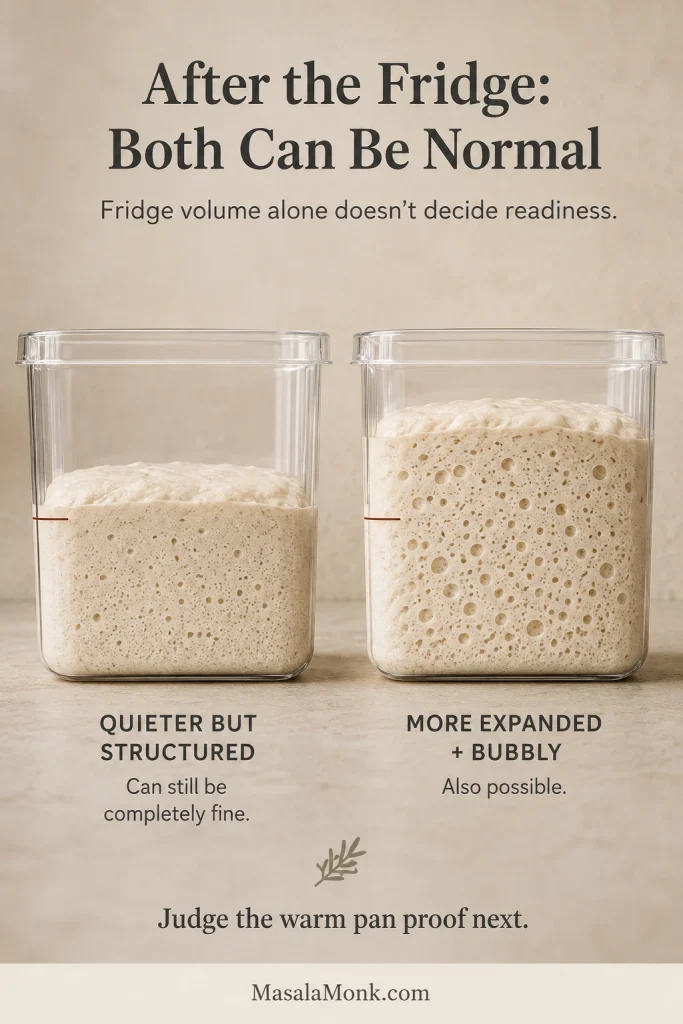
When the dough comes out, the job changes: you have built the air; now you want to preserve it.
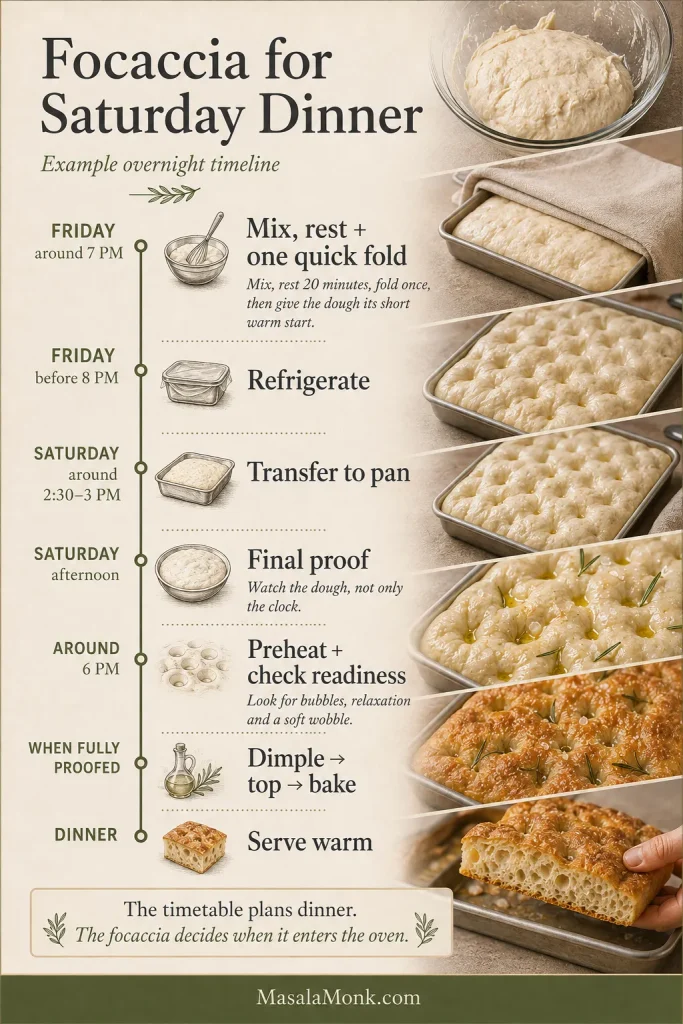
Want Focaccia for Dinner? Here’s a Simple Timeline
Suppose you want to eat around 7 p.m. on Saturday. This schedule gives the dough roughly 19 hours in the refrigerator, comfortably inside the flexible 18–36-hour range.
- Friday around 7 p.m.: mix, rest and fold.
- Before 8 p.m.: cover and refrigerate.
- Saturday around 2:30–3 p.m.: oil the pan and transfer the dough.
- During the afternoon: let the final proof develop.
- Around 6 p.m.: start preheating and check the dough.
- When fully proofed: dimple, top and bake.
A warm kitchen may get there earlier; a cool one may need longer. The timetable plans dinner. The focaccia decides when it enters the oven.
Need focaccia today instead? Use the same-day route.
4. Prepare the Pan
Give a stick-prone metal pan a whisper-thin coat of butter or nonstick spray, then spread 45 ml / 3 tablespoons olive oil across the bottom and corners.
The oil is doing more than preventing sticking: against hot metal, it helps create the crisp, almost fried underside that makes this style of focaccia so satisfying.
5. Transfer Without Losing All That Air
Ease the chilled dough into the pan with wet or lightly oiled hands. Handle it gently. Those bubbles took hours to build.
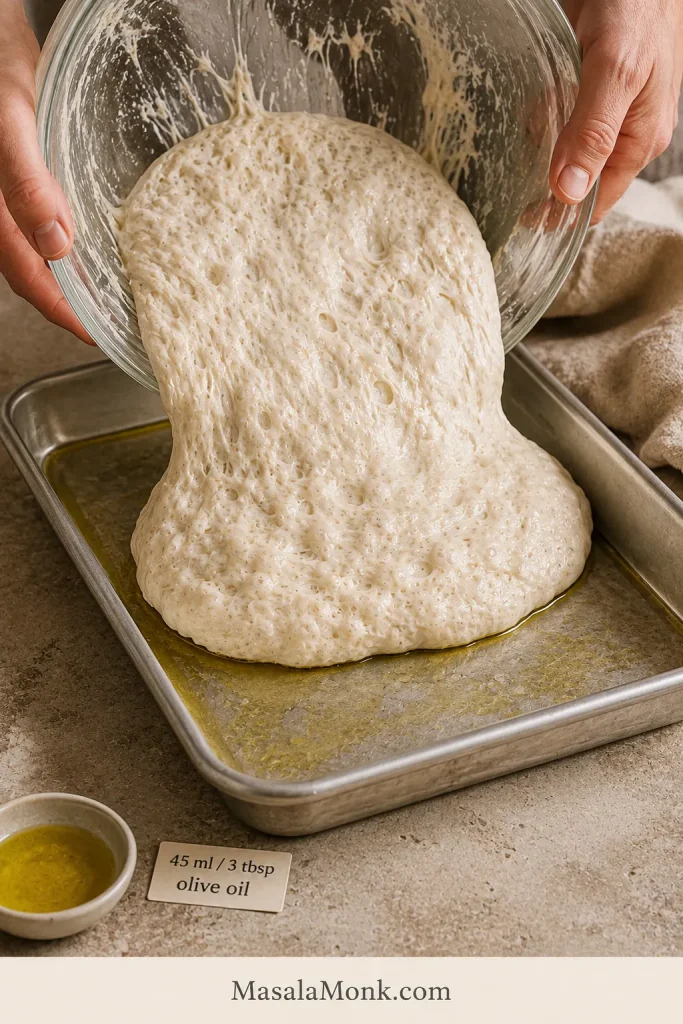
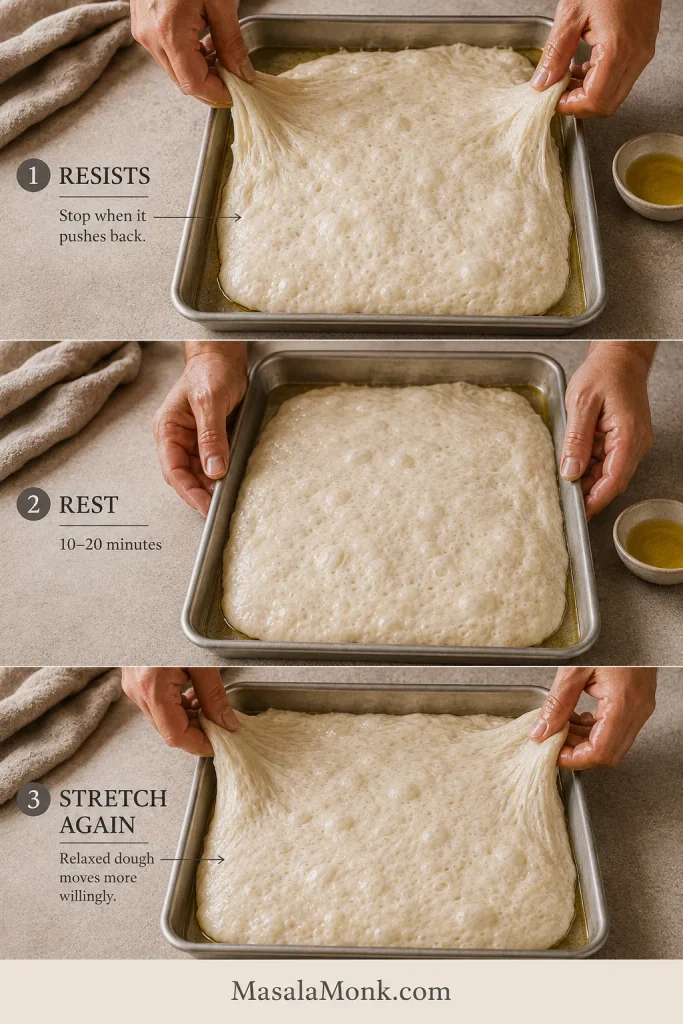
Stretch toward the corners until the dough begins pushing back, then stop.
Shrinking back? Wait 10–20 minutes, then try again. Relaxed gluten stretches far more willingly.
You don’t need to force every corner immediately. The final proof gives the dough more time to settle into the pan.
6. Proof Until It Looks Full of Life
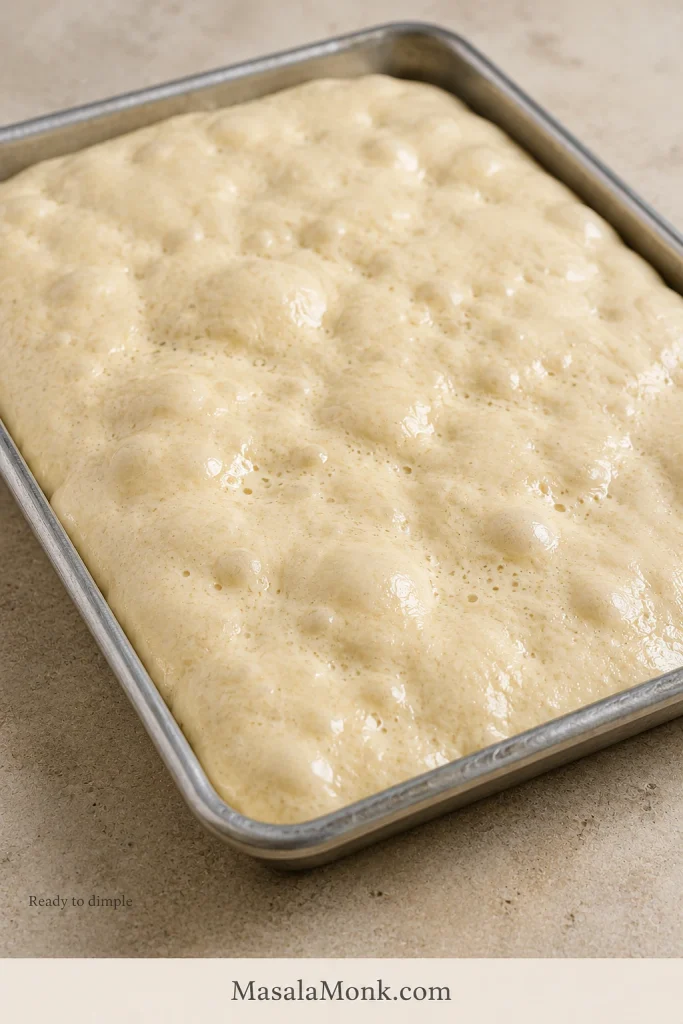
Ready focaccia looks visibly bubbly and wobbles softly when you nudge the pan.
This is where the visual cues matter more than the timetable. At 70–75°F / 21–24°C, start checking after about 2 hours; many batches need closer to 3–4 hours.
In kitchens warmer than about 75°F / 24°C, begin checking earlier. Above 80°F / 27°C, watch closely because the final proof can move quickly.
By the end, bubbles should be visible on or beneath the surface and the dough should feel light and relaxed. An almost comically bubbly pan is usually something to enjoy.
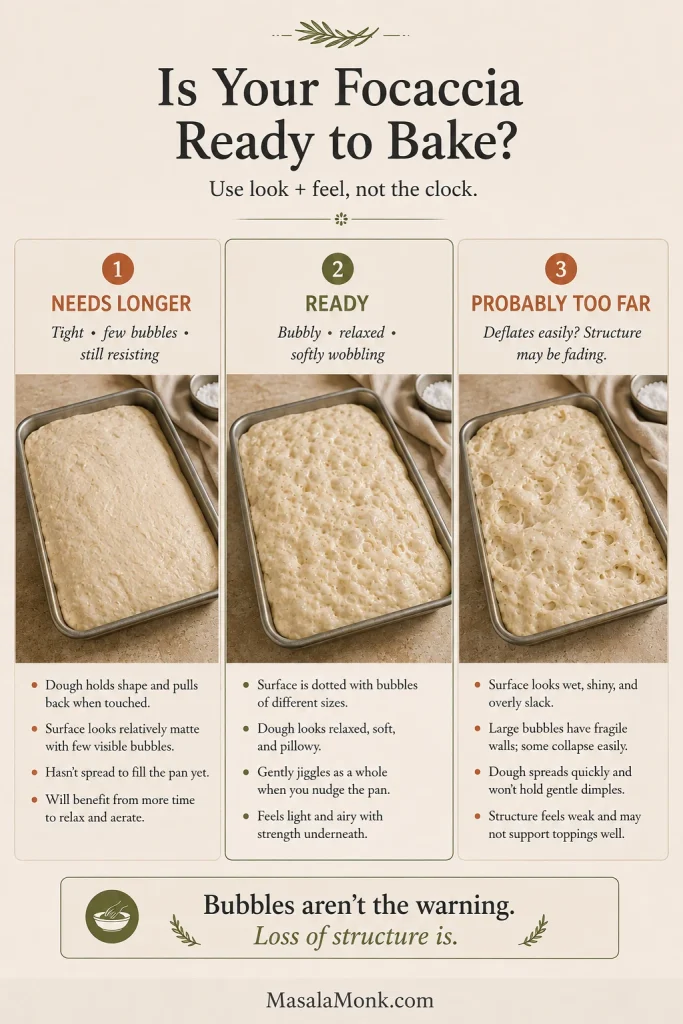
| Proof state | What you see | What to do |
|---|---|---|
| Needs longer | Tight surface, few bubbles, little wobble, still resisting the pan | Keep proofing |
| Ready | Expanded, relaxed, visibly aerated and softly wobbling | Dimple and bake |
| Probably too far | Very fragile structure that loses substantial volume from gentle handling | Handle carefully and bake now |
Ready before dinner? Cover the pan and refrigerate it to slow fermentation until you are closer to baking.
Something looks wrong right now? Jump to Focaccia Rescue.
From here things move quickly: dimple, oil, salt, bake.
7. Dimple Deeply
While the proof finishes, preheat the oven for at least 30 minutes. In most ovens, moving the pan lower favors bottom browning; moving it higher favors the top.
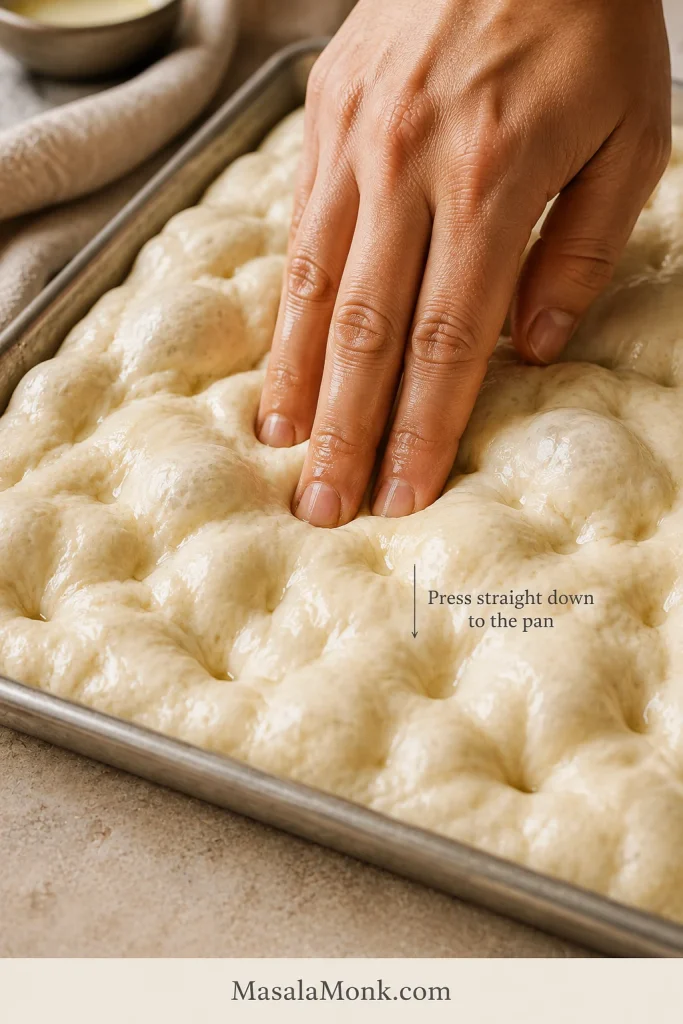
Oil your fingertips and press vertically through the dough until your fingers reach the pan. Make real dimples, but don’t drag sideways and flatten the trapped air.
A few large bubbles may pop. That’s fine. Dimpling redistributes oversized pockets and creates craters where the olive oil can collect.
A well-proofed dough feels wonderfully soft here—your fingers sink through, the surface rises around them and the pan finally starts looking unmistakably like focaccia.
8. Add Olive Oil, Salt and Rosemary
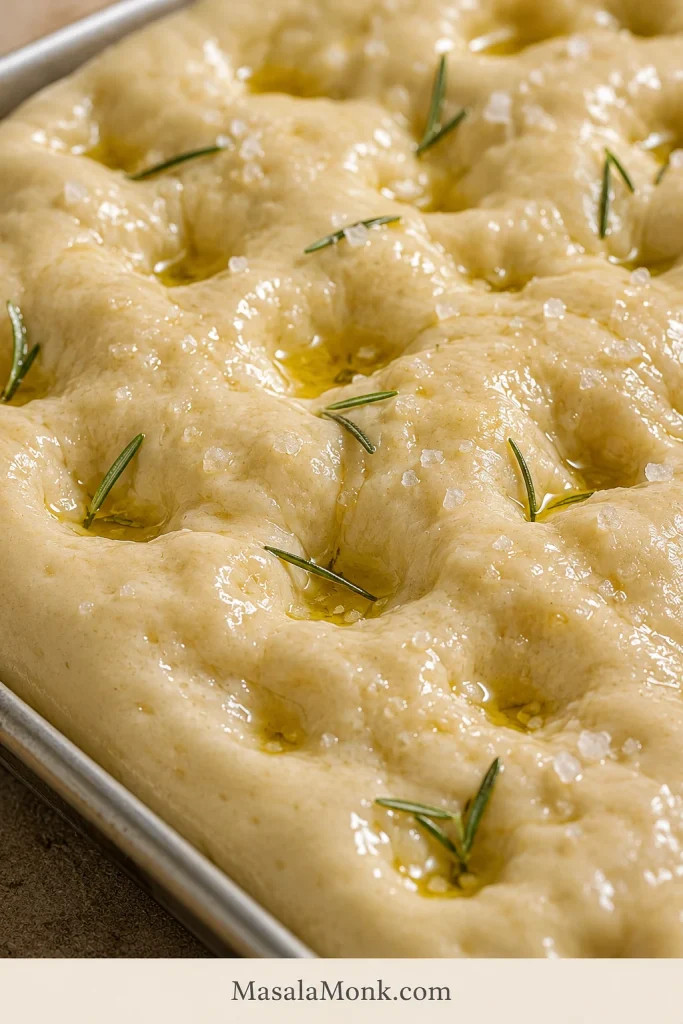
Drizzle over the remaining 30 ml / 2 tablespoons olive oil, letting some collect in the dimples.
Add a light, even scattering of flaky salt. If using rosemary, press the leaves lightly into the oil so exposed tips are less likely to scorch.
9. Bake Until the Top and Bottom Agree
Bake for about 22–28 minutes. Rotate the pan once after the loaf has set if your oven has an obvious hot side.
As it gets close, the kitchen should smell of toasted bread, warm olive oil and rosemary. Slide a thin spatula under an edge and look underneath.
The top is the tempting part to trust. Lift an edge anyway. A beautiful golden surface does not guarantee a crisp bottom.
If the top is darkening faster than the base, move the pan lower and shield the surface loosely with foil if needed. A well-browned underside with a pale top calls for a brief finish higher in the oven.
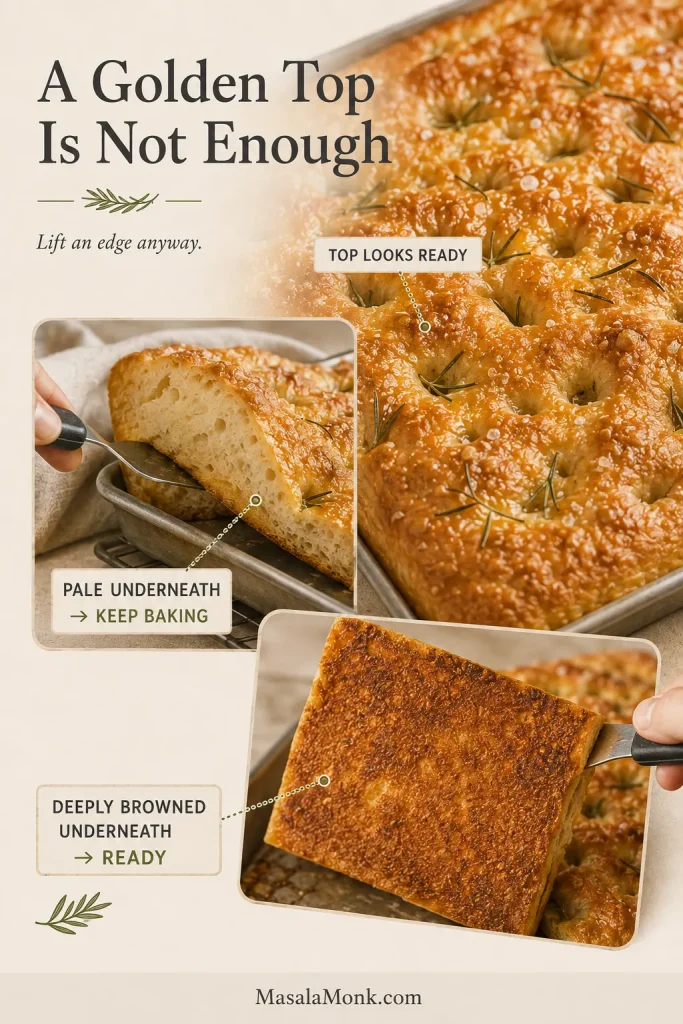
Not sure whether it is finished? Use the doneness guide below.
10. Protect the Crust You Just Made
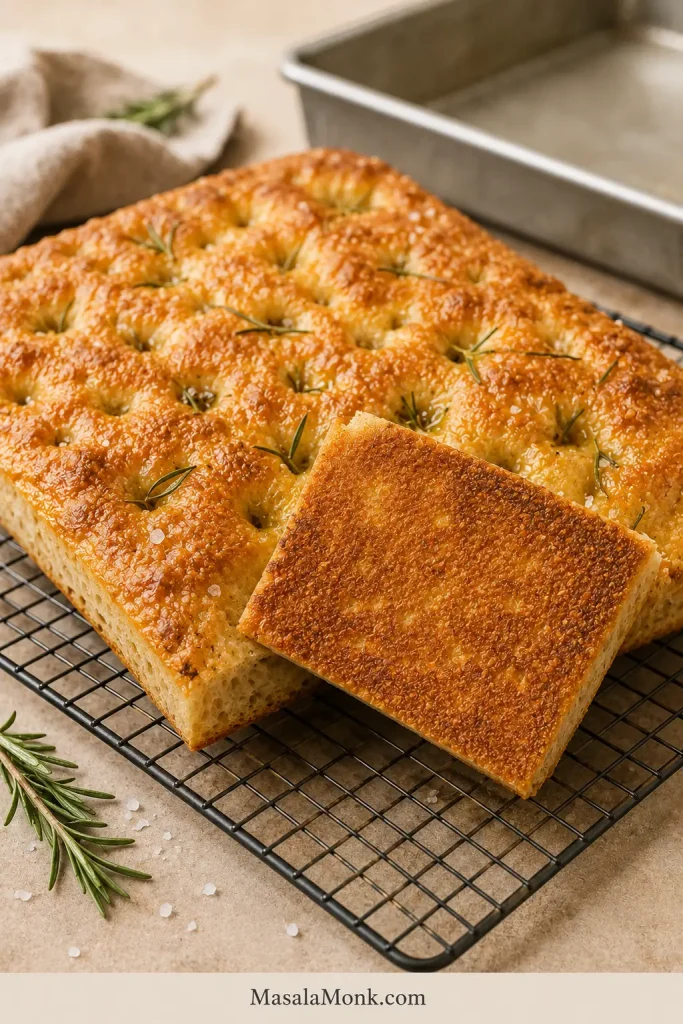
Let the focaccia sit in the pan for 3–5 minutes, then move it to a wire rack.
Hot bread keeps releasing steam. Trapped underneath, that steam can soften a crisp base surprisingly quickly.
Give the crumb another 15–20 minutes before slicing if you want the cleanest texture. By then the base should feel firm and lightly crackly while the middle remains tender.
Back to Recipe ↑ · Back to Quick Answer ↑
How to Know When Focaccia Is Done
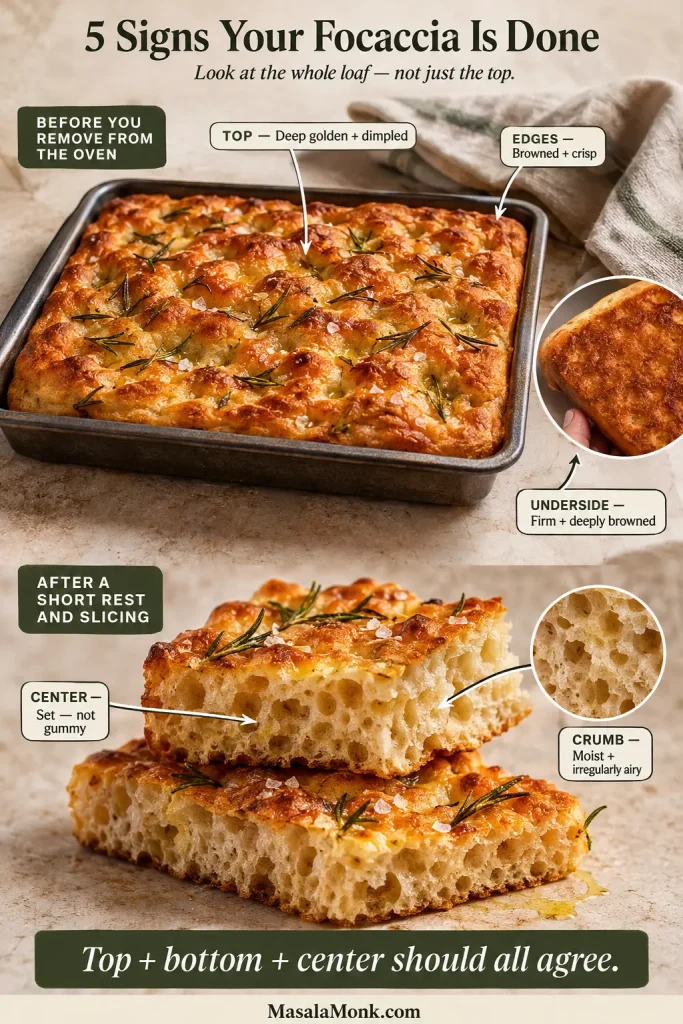
Focaccia is done when the top is deeply golden, the edges and underside are crisp and browned, and the center is set without a gummy band.
Use the whole loaf instead of chasing one magic thermometer reading.
- Top: deeply golden and dimpled, not pale blond.
- Edges: browned and crisp.
- Bottom: golden-brown, firm and crisp, never pale or steamed.
- Center: set and springy without a wet gummy band.
- Crumb: moist and tender with irregular holes of different sizes.
One enormous social-media bubble is not required. Excellent focaccia can have small, medium and large pockets; what matters is a light, open crumb.
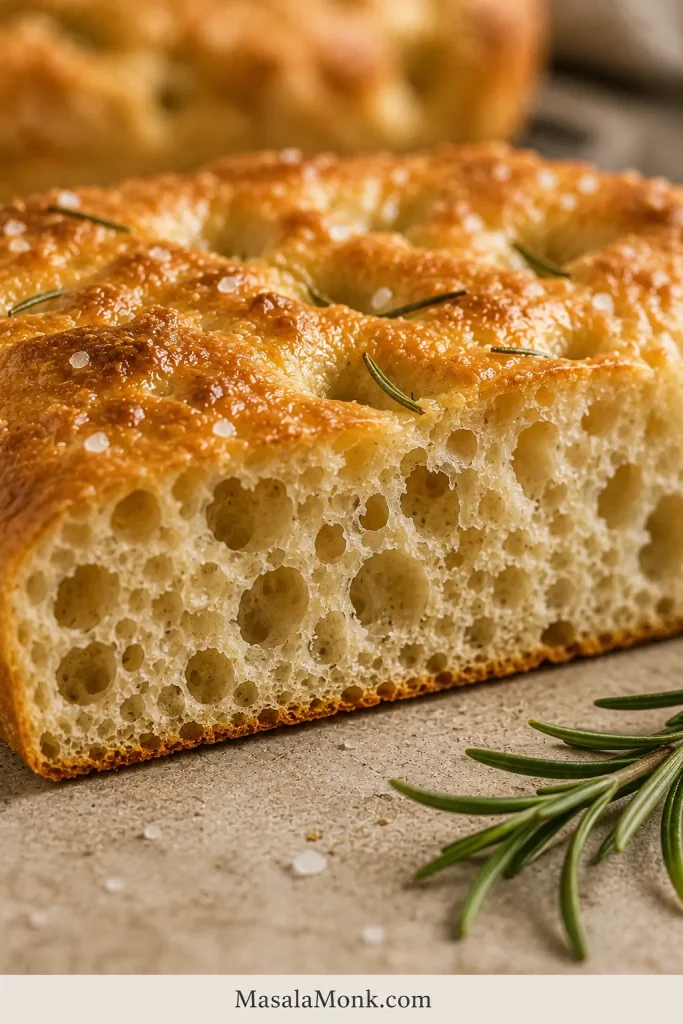
Crispy is not the same as hard. The crust should crackle and then give way to a soft center.
If the center is fully cooked but the base needs only a little more crispness, remove the focaccia from its pan and return it directly to the oven rack for a few minutes. With an already-dark top, switch the oven off while the underside dries. A genuinely pale, underbaked base needs the oven left on and close attention.
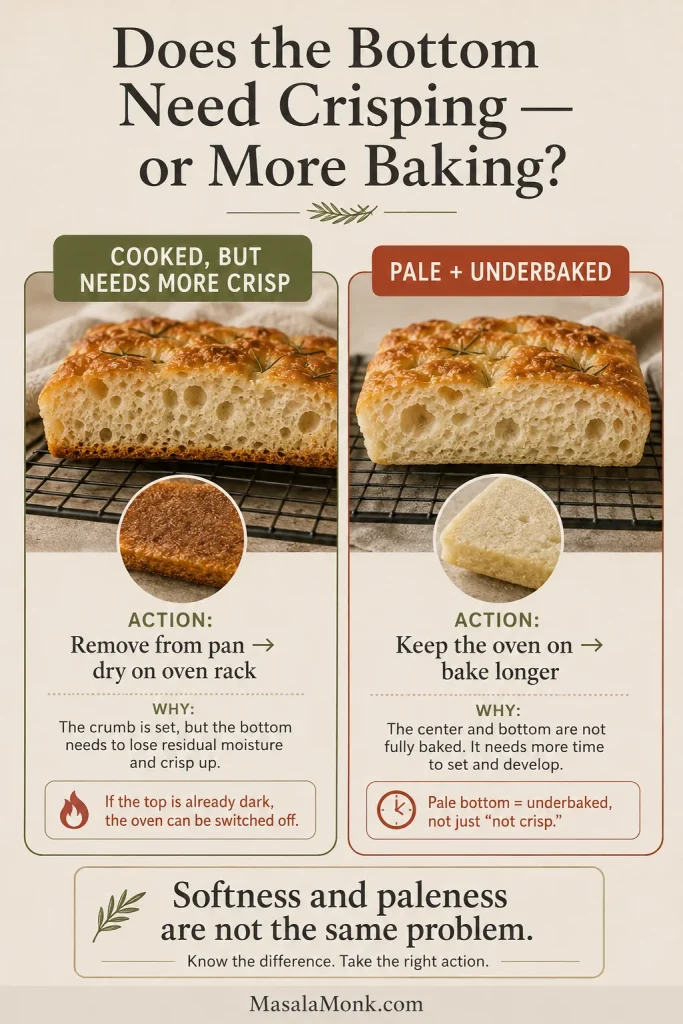
If the same crust or center problem keeps returning, jump to baking troubleshooting.
Focaccia Rescue: What to Do Right Now
This is the fast version for when you are already standing in the kitchen. Find what you see and keep moving.
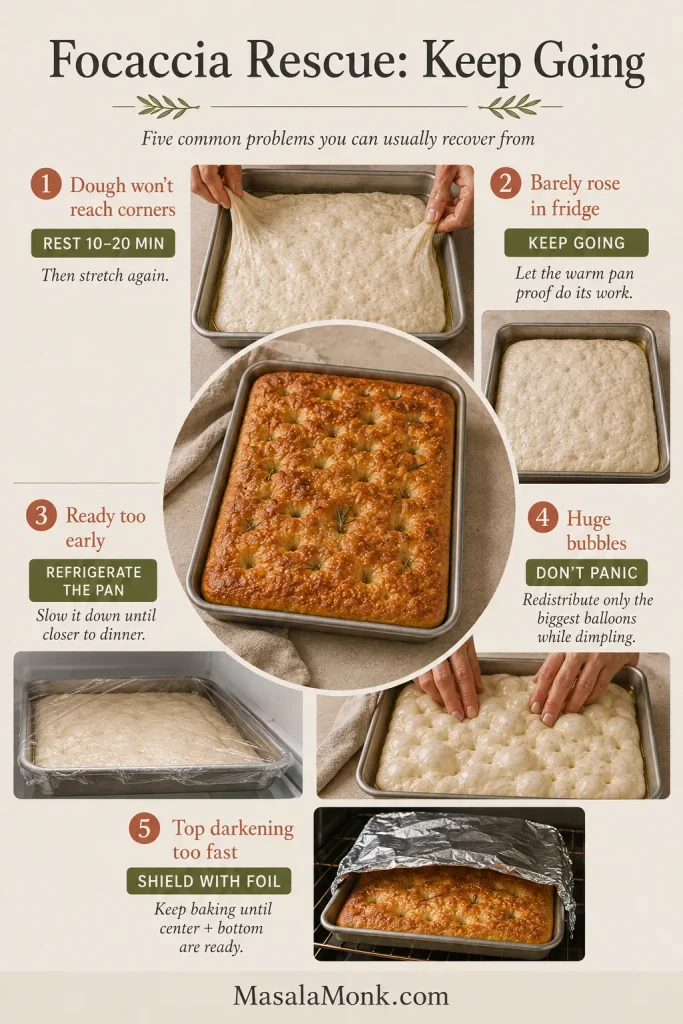
| What happened? | Can I keep going? | Do this now |
|---|---|---|
| Forgot the fold | Yes | Continue with the cold ferment. |
| Dough is extremely sticky | Usually | If it is cohesive and stretchy, use wet or oiled hands and continue. |
| Dough won’t reach the corners | Yes | Rest 10–20 minutes, then stretch again. |
| Barely rose in the refrigerator | Yes | Continue to the warm pan proof. |
| Dough looks huge in the refrigerator | Yes | Pan it earlier and shorten the final proof. |
| Dough is ready hours before dinner | Yes | Cover and refrigerate the pan. |
| There are enormous bubbles | Yes | Redistribute only the biggest balloons while dimpling. |
| Dough seems slightly overproofed | Usually | Handle gently and bake now. |
| Surface has begun to dry | Usually | Restore an airtight cover and handle the skin gently. |
| Top is getting dark too quickly | Yes | Shield loosely with foil and keep baking. |
| Bottom is pale near the end | Yes | Move lower or finish the cooked loaf briefly outside the pan. |
Need It Today? Make Same-Day Focaccia
Allow roughly 4–6 hours from mixing to serving, depending on room temperature and fermentation speed.
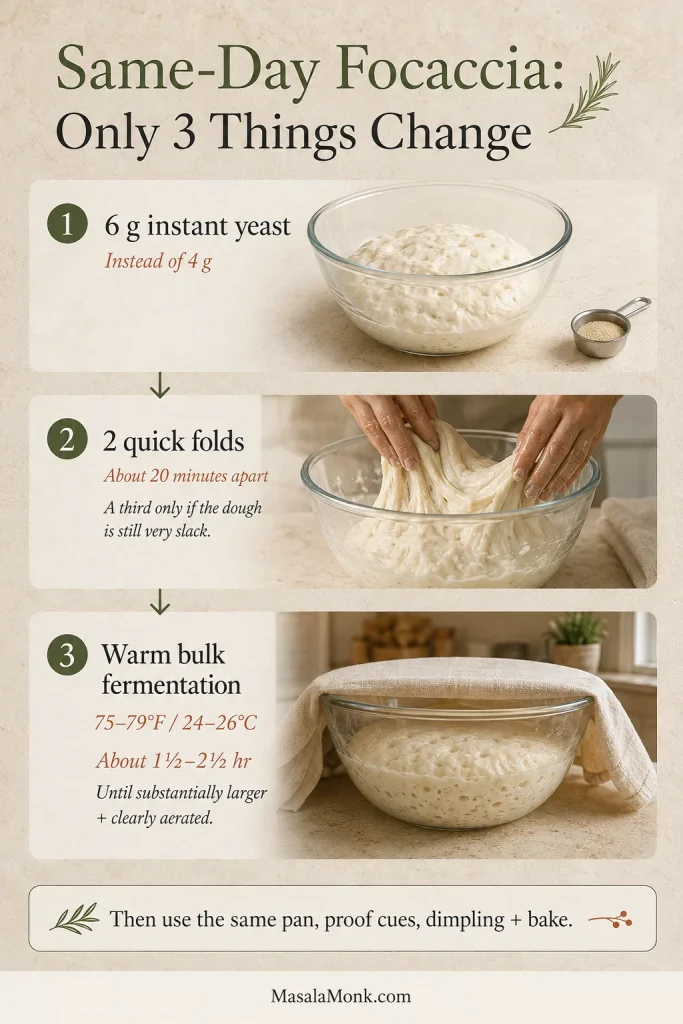
The overnight recipe remains the master method. For same-day focaccia, only three things change:
- Yeast: increase from 4 g to 6 g instant yeast.
- Folds: use two quick folds about 20 minutes apart. If the dough still spreads like batter with very little structure after the second, give it one more fold 20 minutes later.
- Fermentation: replace the overnight cold ferment with a warm bulk rise around 75–79°F / 24–26°C until the dough looks substantially larger and clearly aerated, commonly about 1½–2½ hours.
The pan, final-proof cues, dimpling and baking stay the same. After bulk fermentation, transfer to the prepared pan and proof until soft, bubbly and lively, commonly another 1–2 hours.
The flavor is a little younger than the overnight loaf, but warm from the oven with crisp edges and olive oil shining in the dimples, it hardly feels like a compromise.
Can I Use a Different Pan?
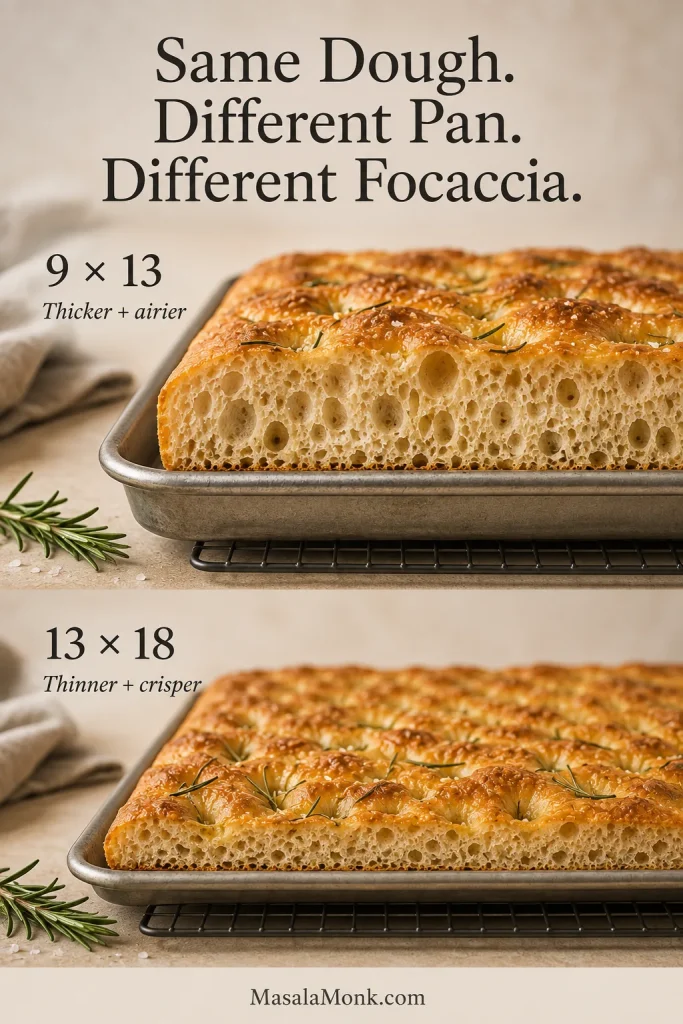
Use the full recipe in a 9 × 13-inch pan for the reference thickness. Spread the same batch across a 13 × 18-inch half sheet when you intentionally want much thinner, crisper focaccia.
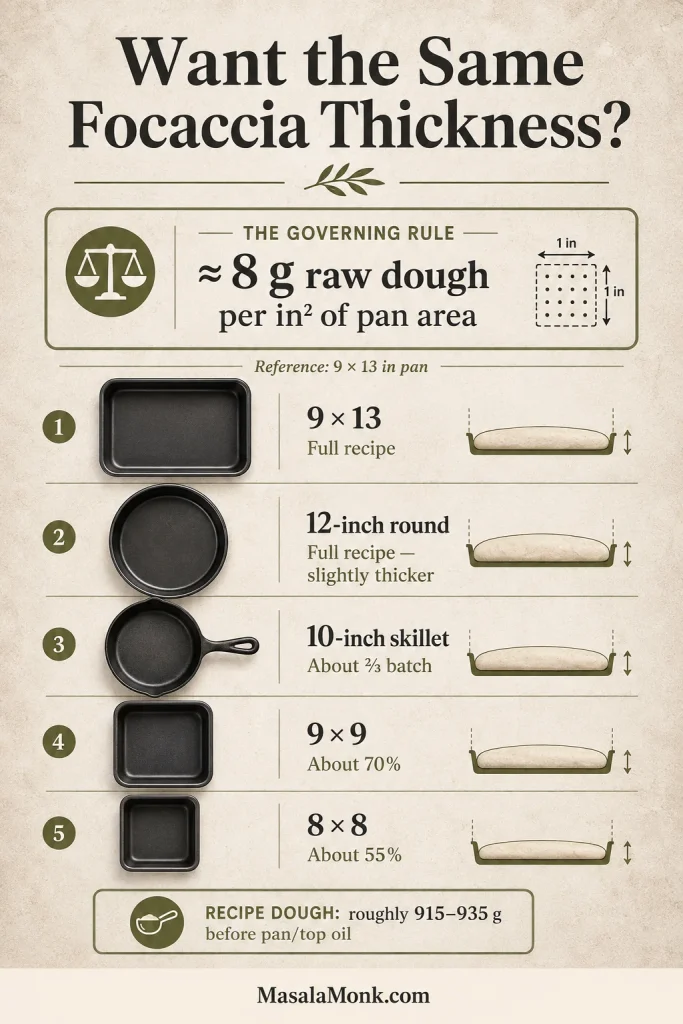
To keep roughly the same thickness as this 9 × 13-inch loaf in another pan, aim for about 8 g dough per square inch of pan area.
You don’t need to calculate it yourself. This recipe produces roughly 915–935 g dough before the pan and topping oil are added.
| Pan | Approximate dough amount | Result |
|---|---|---|
| 9 × 13 in | Full recipe | Reference thickness |
| 12-inch round | Full recipe | Very similar, slightly thicker |
| Two 8-inch rounds | Full recipe divided between them | About 15–17% thicker before baking |
| 10-inch skillet | About two-thirds | Close to reference thickness |
| 9 × 9 in | About 70% | Close to reference thickness |
| 8 × 8 in | About 55% | Close to reference thickness; 50% is slightly thinner |
| 13 × 18 in half sheet | Full recipe | Much thinner and crisper |
Different shapes with similar dough depth should bake in roughly the same neighborhood. Thin focaccia finishes faster; a substantially deeper loaf needs more time through the center.
Focaccia Toppings That Bake Well
Once you know the basic dough, toppings are where focaccia becomes endlessly adaptable.
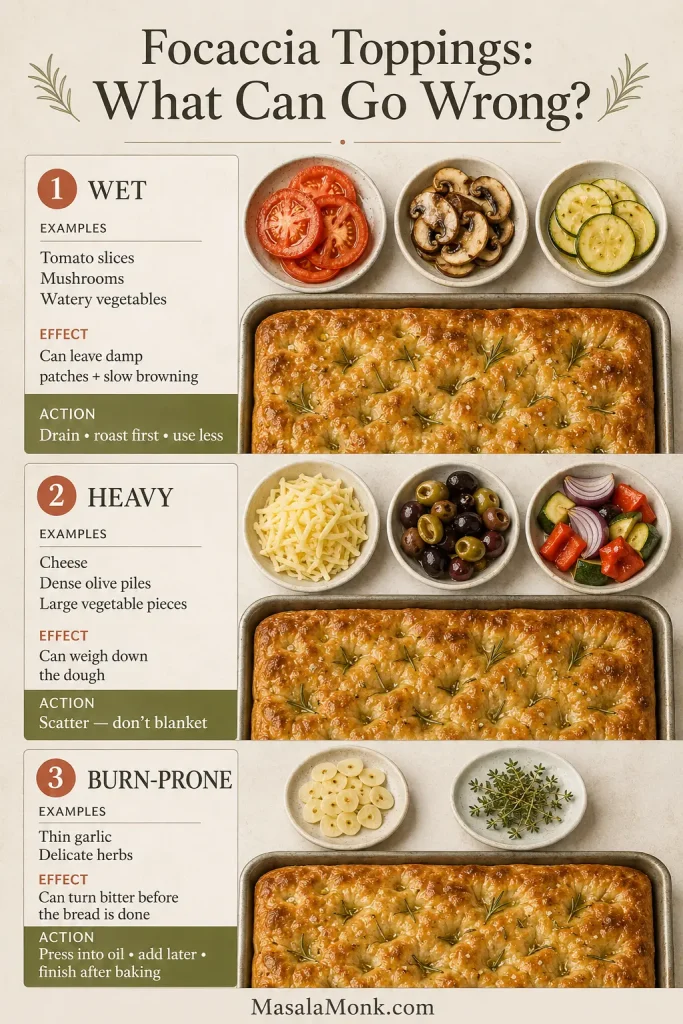
Wet toppings such as juicy tomatoes, mushrooms and watery vegetables can slow browning or leave damp patches. Drain them well, roast them first or use less.
For pizza-style focaccia, keep the tomato layer restrained and thick enough to cling without soaking into the dough. Our pizza sauce recipes go deeper into sauces designed to stay where you put them.
Heavy toppings—large amounts of cheese, olives or vegetables—can press down the dough. Scatter rather than blanket.
Burn-prone toppings such as thin garlic and delicate herbs may become bitter before the bread is done. Press them into oily dimples, add them partway through baking or finish afterward.
A spoonful of basil pesto after baking adds fresh basil, garlic and olive oil without scorching the herbs.
For your first loaf, rosemary and flaky salt are still hard to beat. They let you taste what the focaccia itself is doing.
What About Traditional Focaccia Brine?
Some classic Genoese focaccia methods use a mixture of water and olive oil over the dimpled surface before baking, allowing the liquid to collect in the craters.
The treatment creates a characteristically moist, salty top and helps explain why focaccia Genovese can feel quite different from the thicker, open-crumb version on this page.
This loaf uses olive oil and finishing salt without that extra water treatment. If you want to see a traditional Genoese bakery method in context, La Cucina Italiana’s focaccia from Genoa shows the water-and-oil finish and a much hotter, faster regional bake.
How to Serve Focaccia
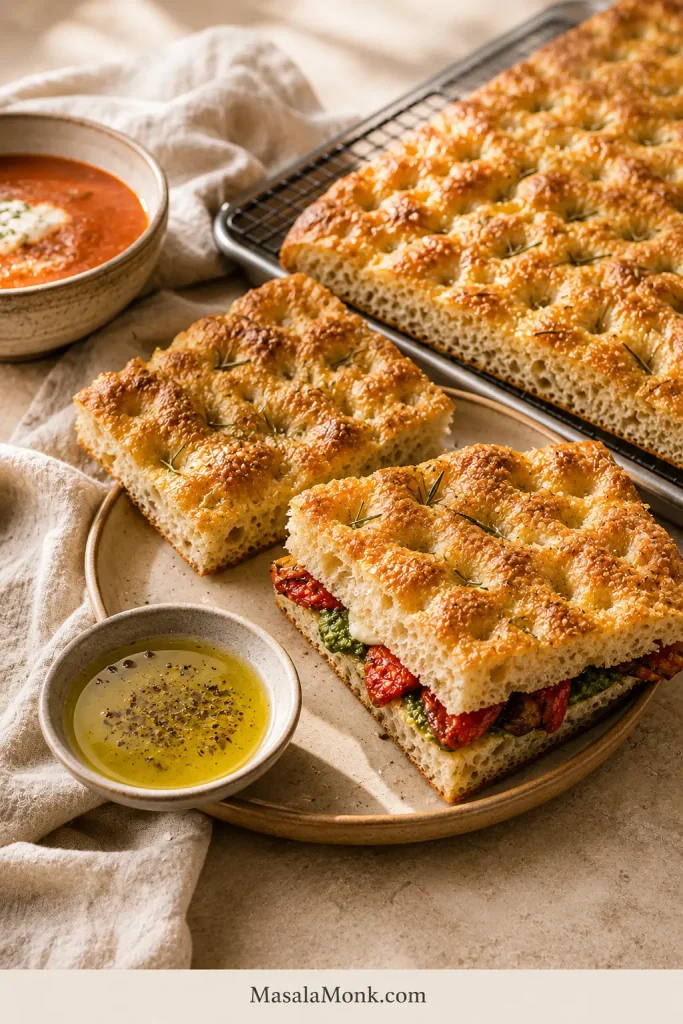
Warm focaccia rarely needs a formal plan. Put good olive oil on the table and pieces have a habit of disappearing.
The open crumb is excellent beside soup because it catches broth while the browned edges keep some bite. Try it with our tomato basil soup for an easy tomato-and-herb dinner.
For an appetizer, cut the bread into strips and serve it with olives and hummus without tahini. The crisp edges are particularly good for dipping.
Thicker pieces make excellent sandwiches once completely cool. Split them horizontally with a serrated knife so the airy crumb stays intact instead of being compressed from above.
How to Store, Freeze and Reheat Focaccia
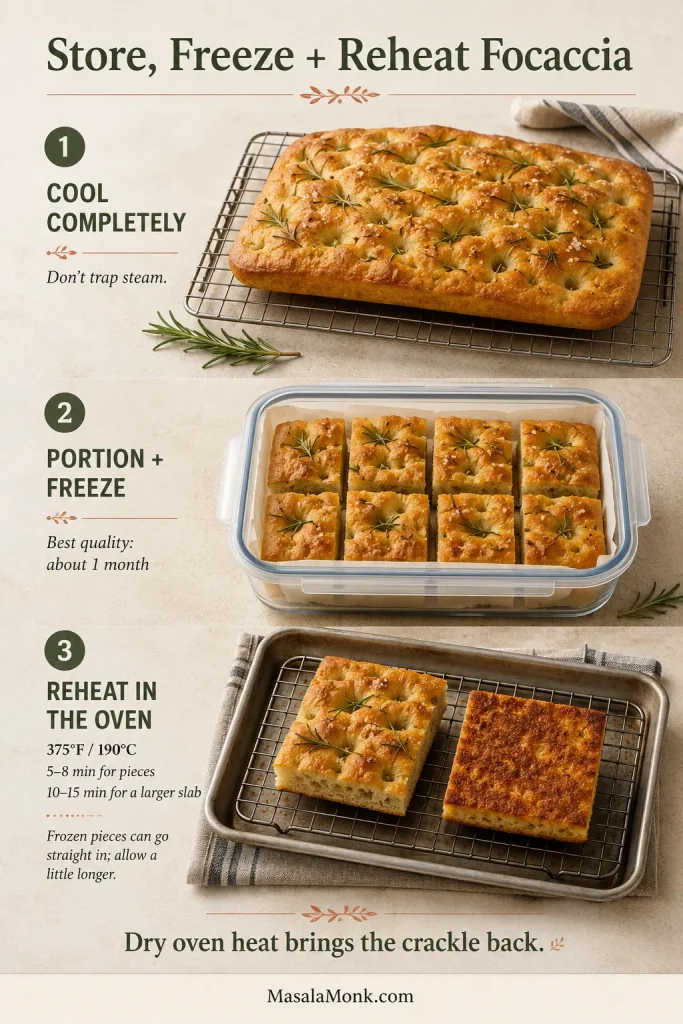
Focaccia is at its best the day it is baked, while the contrast between crisp crust and tender center is strongest.
Cool plain focaccia completely before wrapping or placing it in an airtight container. At room temperature, it is best within about 1–2 days. Refrigerate leftovers topped with cheese, meat or another perishable ingredient.
For longer storage, cut the cooled loaf into practical portions, wrap or seal them airtight and freeze for up to 1 month for best quality.
How to Make Focaccia Crispy Again
- One or two pieces: about 5–8 minutes at 375°F / 190°C.
- A larger slab: roughly 10–15 minutes at 375°F / 190°C, until crisp outside and hot through the middle.
- From frozen: reheat directly from frozen and allow a few extra minutes.
The microwave warms focaccia but does very little for the underside. Dry oven heat is what brings the crackle back.
Focaccia Troubleshooting: Why It Happened
The rescue table gets you through the current batch. This section explains what the result can tell you about the next one.
Dough, rise and crumb problems
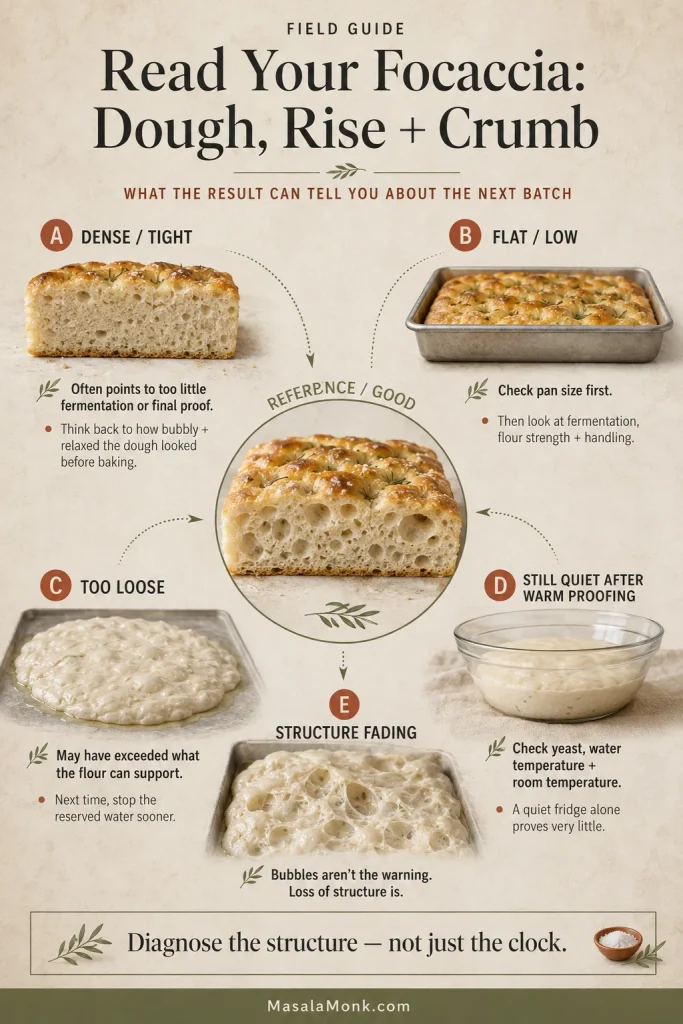
Start by deciding whether the dough lacked gas, lost structure or simply spread too thin; those clues point toward different causes.
Why Is My Focaccia Dense?
A tight, dense crumb usually points to insufficient fermentation or final proof.
Think back to the dough just before it went into the oven. A tight surface with few bubbles needed more time. Dough that became extremely inflated and then collapsed tells a different story: fermentation probably outran its ability to hold the gas. A wet, gummy center points more toward baking than proofing.
Why Is My Focaccia Flat?
First check the pan size. A full batch spread across a large sheet tray will naturally bake much flatter than the same dough in a 9 × 13-inch pan.
If pan size wasn’t the issue, look next at fermentation, flour strength and handling. Too little fermentation, collapse after an overlong proof, weak flour or rough handling can all reduce height.
Why Did My Focaccia Dough Turn Soupy?
Dough that flows with little structure after its rest has probably exceeded what that flour can comfortably absorb—or a measurement went wrong.
On the next batch, begin at the 400 g water base and add the reserve only while the dough stays cohesive. Trying to rescue an overly loose dough with a large late addition of flour usually creates a different texture altogether.
Why Didn’t My Focaccia Rise?
A quiet refrigerator alone proves very little. If the dough stays inactive even after plenty of warm proofing, check the yeast, water temperature and room temperature.
Old yeast, excessively hot mixing water, a very cold room or a measuring error are the first places to look. Judge the dough after it has had a fair chance to warm before deciding the cold ferment failed.
Did I Overproof My Focaccia?
Bubbles aren’t the warning. Loss of structure is.
Dough that deflates dramatically from gentle handling and struggles to retain gas has probably gone farther than ideal. Next time, bake sooner or refrigerate the pan once it reaches that bubbly, softly wobbling stage.
Crust, pan and baking problems
Here, the location of the failure matters: the underside, center, pan contact and cooling environment each point you toward a different fix.
Why Is the Bottom Pale or Soggy?
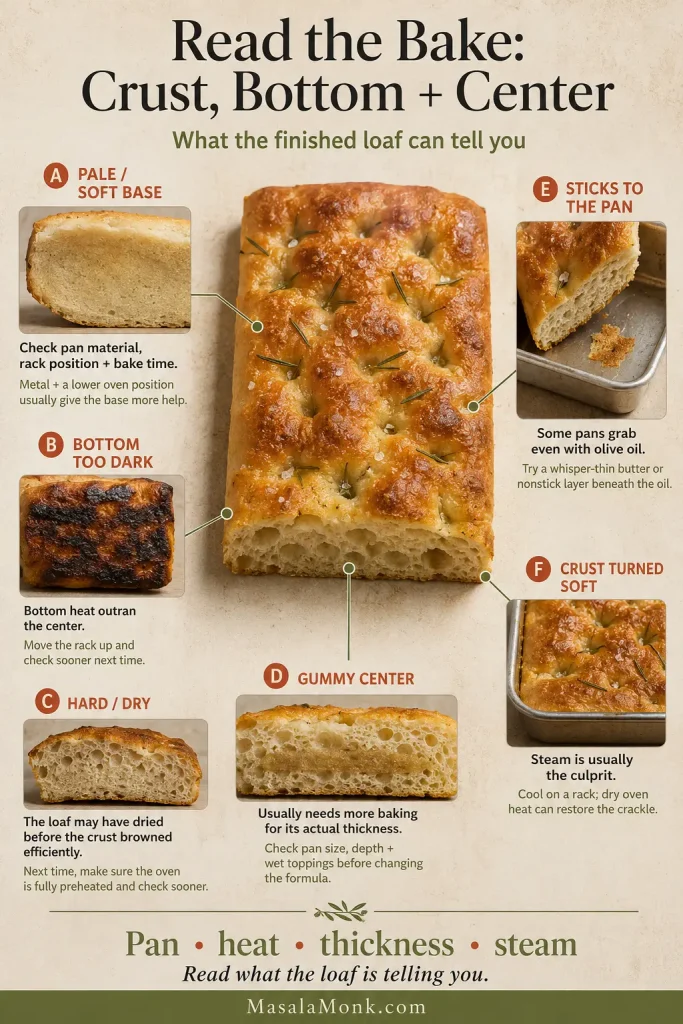
Start with three things: pan material, rack position and bake time.
Metal browns the base more efficiently than glass or ceramic, and a lower rack generally gives the underside more help. A deeper loaf or moisture-heavy toppings may simply need longer. Once baked, move the focaccia to a rack before trapped steam softens the crust.
Why Did the Bottom Burn Before the Middle Was Done?
The bottom heat was too aggressive for that pan and loaf thickness.
Very dark metal, a rack close to the lower heating element or an oven running hotter than its display can all make the underside race ahead. Next time, move the rack up one level and start checking sooner.
Why Is My Focaccia Hard Instead of Crisp?
Hard focaccia has usually dried too much before the crust browned efficiently. A thoroughly preheated oven and conductive pan create the contrast you want: crackly outside, soft inside.
Why Is the Middle Gummy?
A gummy center usually means the loaf needed more baking for its actual thickness.
Before changing the formula, compare the pan with the reference 9 × 13-inch size. A smaller pan makes a deeper focaccia, while glass, ceramic and wet toppings can leave the center lagging behind the top. Also give a high-hydration loaf a short rest before judging the crumb; cutting immediately can make a properly baked center look wetter than it will twenty minutes later.
Why Did My Focaccia Stick Even With Olive Oil?
Oil can’t compensate completely for a pan surface that consistently grabs bread. Crust development matters too.
When the same pan causes trouble repeatedly, give it a very thin butter or nonstick-spray layer beneath the olive oil on the next batch.
Why Did My Crisp Focaccia Turn Soft?
Steam is usually the culprit. Move the hot loaf to a rack promptly and cool it fully before wrapping. A few minutes of dry oven heat will restore much of the crackle later.
Once You Know What to Look For
The first batch can make wet focaccia dough feel strange. Then you watch it change: a sticky bowl becomes stretchy, the pan fills with trapped air, your fingers sink into the proofed surface, and eventually a browned loaf comes out with a crisp underside that crackles under the knife.
After that, the dough feels much less mysterious. You are no longer trying to make every batch obey an exact clock; you know which signs actually matter.
And if the loaf comes out a little lower, darker or less dramatically bubbled than the one you imagined, serve it warm anyway. Good focaccia has a generous margin for imperfection.
If you make this focaccia, tell us which flour you used, whether you needed the final 20 g water, and roughly how warm your kitchen was. Those three details help the next baker too.








