
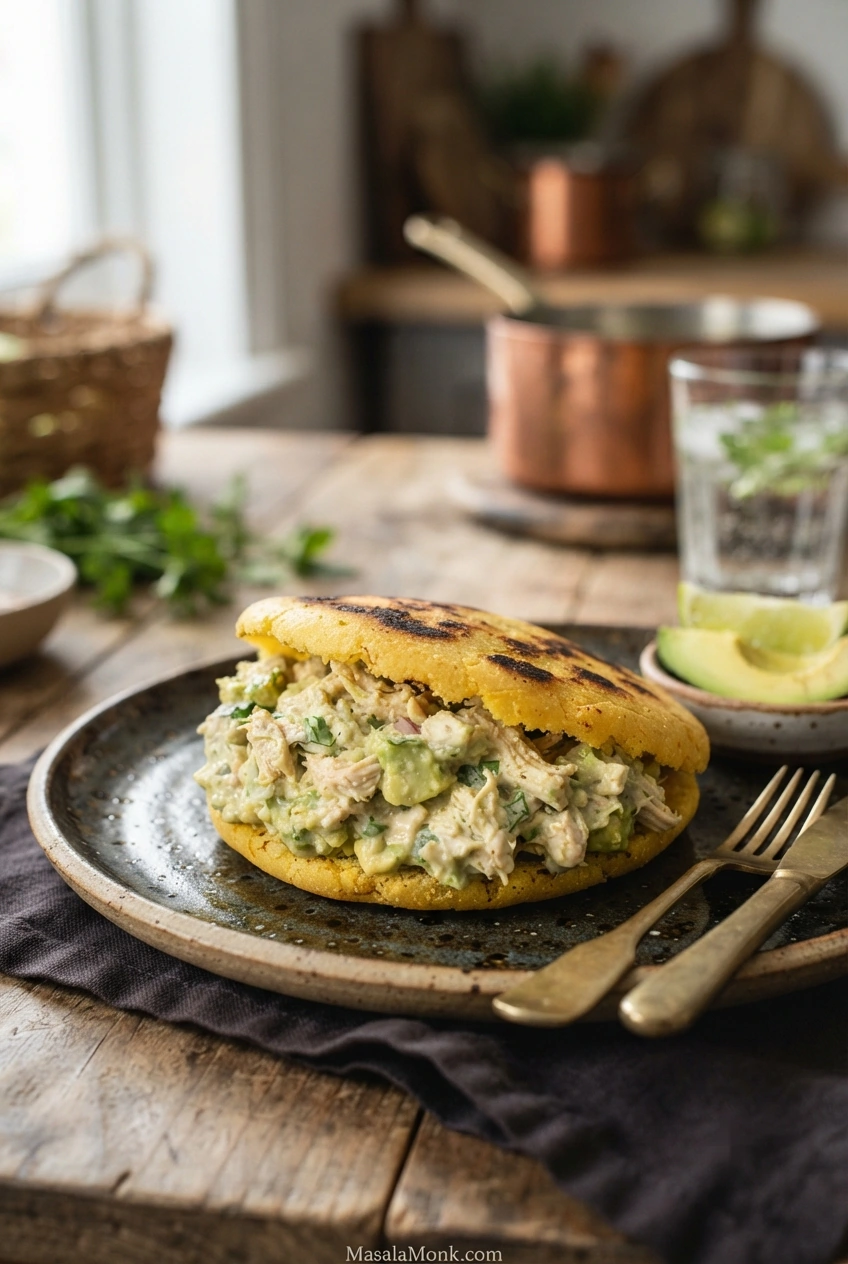
Break open a freshly cooked arepa and you’ll find soft corn beneath its toasted crust. A little butter melts into the center; fresh white cheese adds a pleasant saltiness. Shape the arepa thicker, and you can cut a pocket for chicken and avocado, seasoned black beans, shredded beef, or melting cheese.
Arepas are round corn cakes traditionally eaten in Colombia and Venezuela. They might accompany eggs at breakfast, take the place of bread beside a meal, or arrive generously stuffed with something savory. For the plain version here, you need precooked corn flour (masarepa), water, and salt.
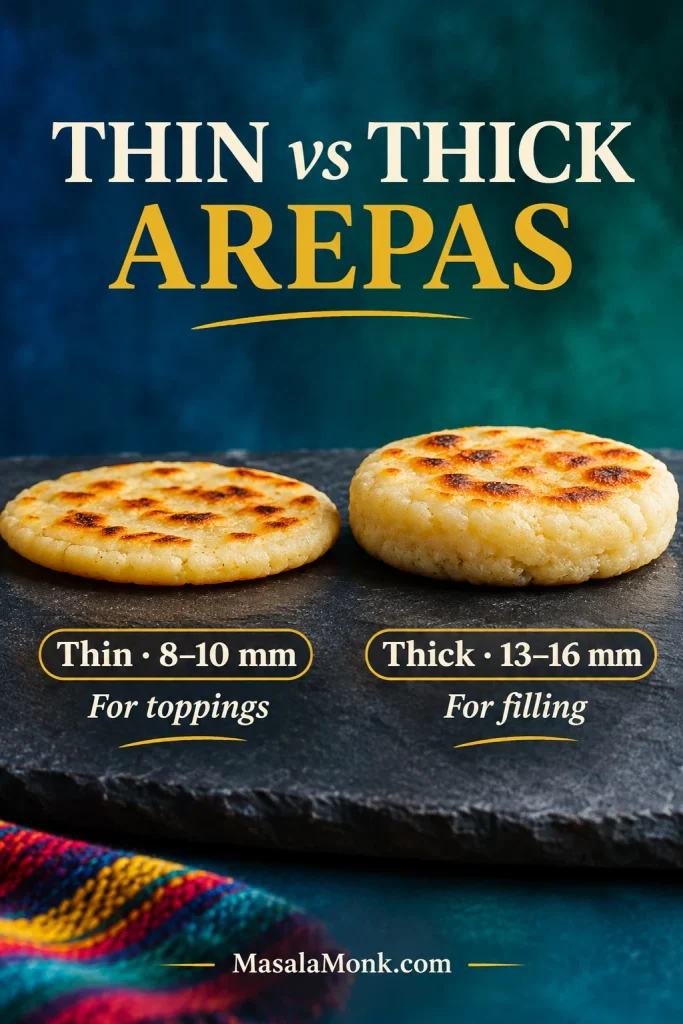
This arepas recipe covers two familiar preparations: thinner Colombian-style arepas for toppings and thicker Venezuelan-style arepas you can open and fill. Both countries have many other styles, but these two are an approachable place to start.
New to arepas? Try the plain thin version first. It cooks relatively quickly, and you can learn how the dough behaves before tackling a pocket. If you’re craving a stuffed arepa, start with the thicker version instead.
Jump to: Recipe Overview · Ingredients · Make the Dough · Thin Arepas · Thick Arepas · Cheese Arepas · Fillings · Troubleshooting
Arepas Recipe: One Dough, Thin or Thick Arepas
Mix the corn flour with salted water, rest for 10 minutes, shape the rounds, and cook them in a skillet. A wide griddle helps with larger batches, but an ordinary frying pan works too.
The same dough makes 8 thick arepas you can open and fill or 12 thinner breakfast-style arepas. Follow the covered-skillet method for thick arepas or the thin-skillet method for Colombian-style rounds. The skillet-and-oven method offers an alternative finish for thick arepas, rather than an additional cooking stage after the covered-skillet method.
Recipe at a Glance
| Yield | 8 thick arepas or 12 thin arepas |
| Servings | About 4, depending on fillings and appetite |
| Hands-on prep | About 15–20 minutes to mix and shape; beginners may take longer |
| Dough rest | 10 minutes |
| Thin arepas | 8–12 minutes per skillet batch |
| Thick arepas | 13–17 minutes per stovetop batch, or until cooked through |
| Full-batch example | Approximately 50–70 minutes total for 8 thick arepas when 4 fit on the griddle at once, including preparation, dough rest, cooking, and a short final rest |
The cooking times are per panful. A smaller skillet takes longer because the arepas cook in rounds; the oven option below is convenient for finishing several thick arepas together, though not necessarily quicker for a small batch.
How many per person? Two medium thick arepas with modest fillings make a substantial serving for many people; one generously stuffed arepa may be enough with a side. For thin arepas served with eggs or another dish, allow roughly two or three per person.
Ingredients for Homemade Arepas
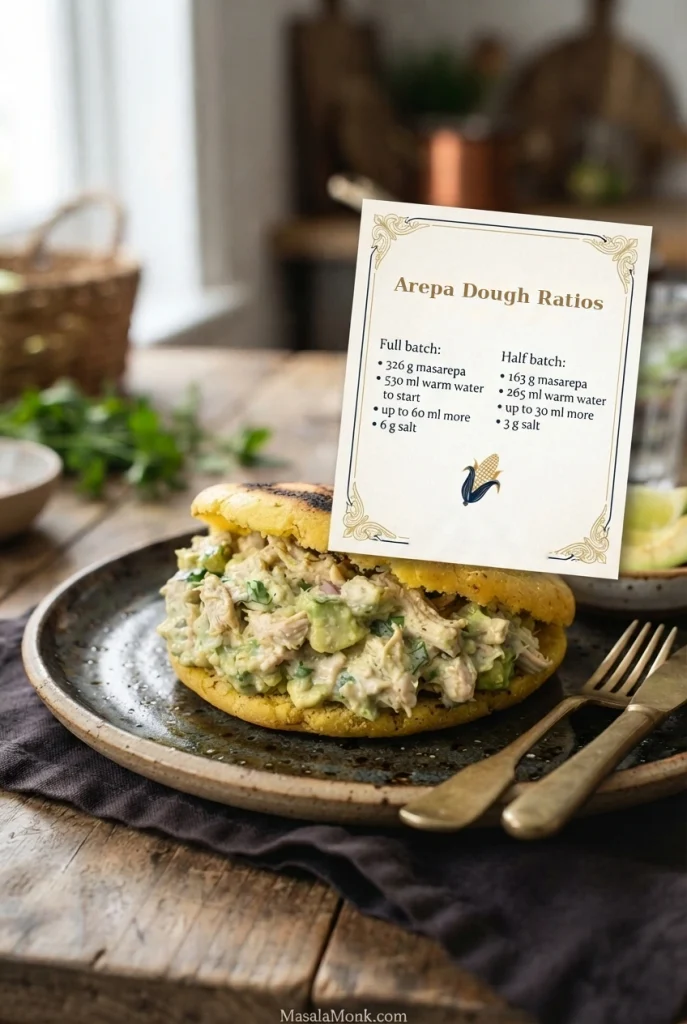
- 326 g / 11½ oz precooked arepa flour (approximately 2 US cups): White or yellow masarepa, also labeled harina de maíz precocida. The weight is this recipe’s reference quantity; cup volume varies by brand, so weigh if possible.
- 530 ml / 2¼ US cups comfortably warm water: The starting quantity. Keep another 60 ml / ¼ cup ready to add only if the dough needs it after resting. Some flours need a little more.
- 6 g fine salt (approximately 1 teaspoon): For plain dough. When mixing a salty cheese such as queso costeño into the dough, use 3–4 g instead.
- 1–2 teaspoons / 5–10 ml neutral oil, plus more if needed: For lightly greasing the skillet.
Check the package: Choose precooked corn flour intended for arepas, such as Harina P.A.N. Ordinary cornmeal, polenta, Mexican masa harina, Indian makki atta, and cornstarch are not direct substitutes for this dough. If the label is unclear, consult the arepa flour comparison before mixing.
Half batch — 4 thick or 6 thin arepas: 163 g masarepa; 265 ml / 1⅛ cups warm water to start; up to another 30 ml / 2 tablespoons for adjustment; and 3 g fine salt. For a salty cheese mixed into the half-batch dough, use about 1½–2 g salt.
Equipment: Mixing bowl, measuring jug, sturdy spoon, clean towel, wide spatula, and nonstick or well-seasoned skillet. A kitchen scale helps with portioning. For thick arepas, a lid is useful; a baking tray is needed only for the oven option.
How to Make Arepa Dough
If you’re used to making bread, arepa dough will feel different. There’s no yeast to activate or gluten to develop. Add water to the precooked corn flour until it forms a soft dough that holds together when pressed.
Mix, Rest, and Test the Dough
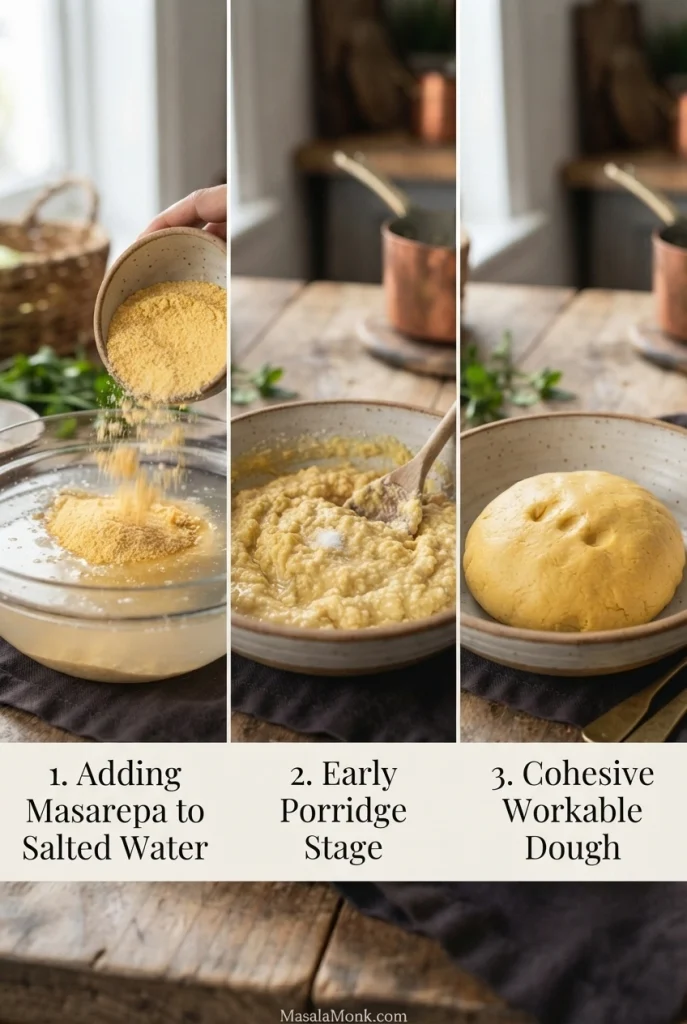
- Salt the water. For a full batch, pour 530 ml (2¼ cups) comfortably warm water into a bowl; for a half batch, use 265 ml (1⅛ cups). Dissolve 6 g salt for the full plain batch or 3 g for the half batch. If adding salty cheese to the dough, use the reduced salt amount given in the ingredients.
- Add the masarepa. Gradually stir in 326 g flour for a full batch or 163 g for a half batch. The mixture may look like thick porridge at first. Mix until there are no large dry pockets.
- Bring the dough together. Work gently with clean hands or a sturdy spoon for 1–2 minutes, until evenly moistened and cohesive. Bread-style kneading is unnecessary.
- Cover and rest for 10 minutes. The flour continues absorbing water, and the mixture usually firms up.
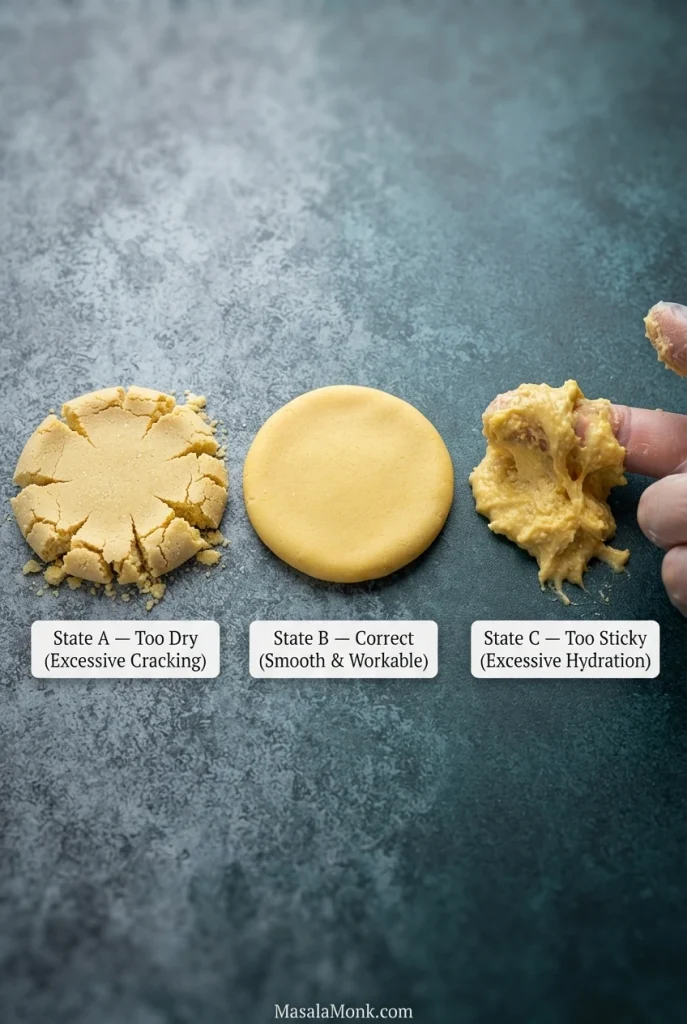
- Test a small disc. Roll a little dough into a ball, flatten it between your palms, and smooth the edge. It should hold its shape and lift without crumbling.
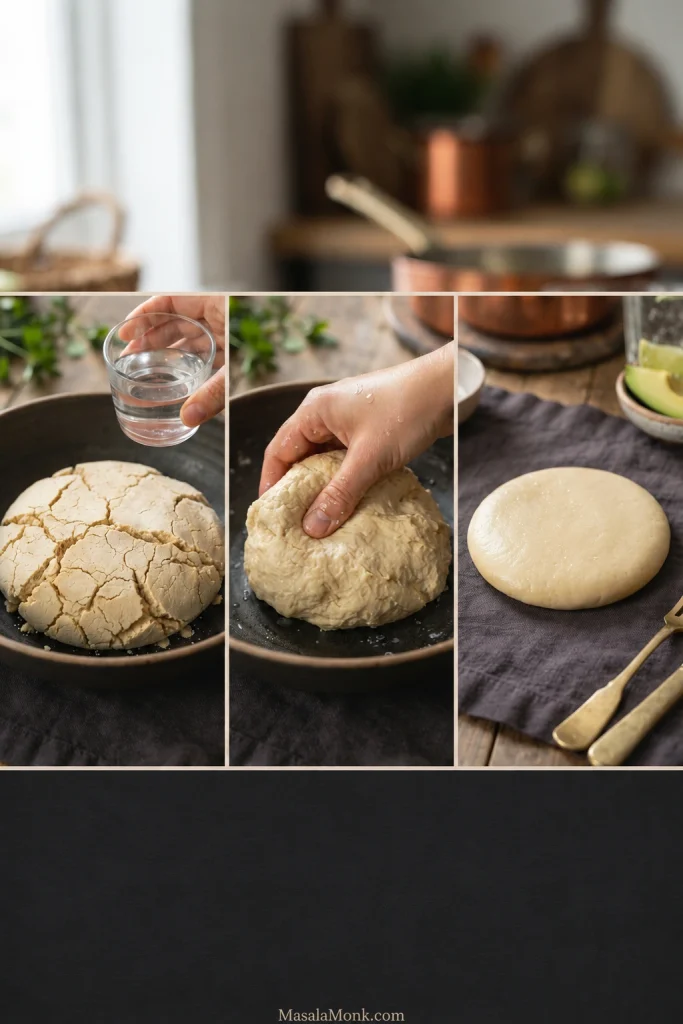
- Correct the moisture. Deep cracks around the edge mean it needs more water: mix in the reserved warm water 1 tablespoon (15 ml) at a time, then test again. You may not need the full reserve. Slight tackiness is fine; add a little masarepa only if the rested dough sticks heavily or cannot hold its shape.
Remember the dough test: Soft like modeling clay, smooth around the edges, and firm enough to lift. Small surface cracks can be smoothed with damp fingertips; deep splits around the rim call for more moisture.
How to Shape Arepas: Thin or Thick?
Divide the rested dough, roll each portion into a ball, and flatten it between your palms. Turn the disc as you press and smooth the rim with your fingertips.
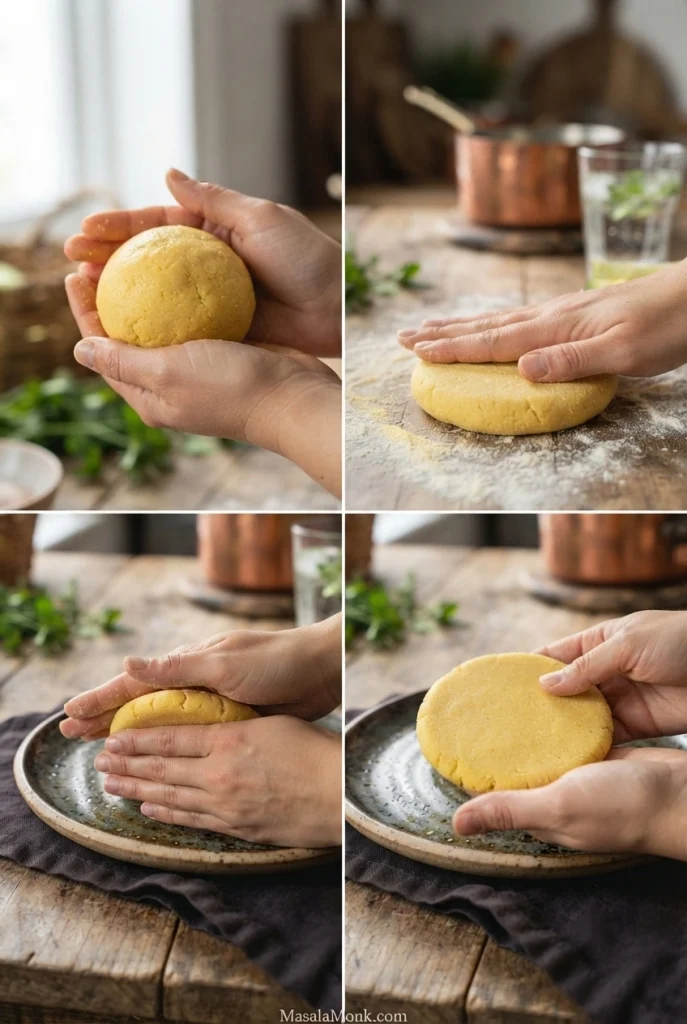
- Thin Colombian-style arepas: Divide the full batch into 12 portions of roughly 75 g (2½–2¾ oz). Shape each to about 10–11 cm (4 inches) across and 8–10 mm (⅓–⅜ inch) thick.
- Thick Venezuelan-style arepas: Divide the full batch into 8 portions of roughly 110 g (3¾–4 oz). Shape each to about 9–10 cm (3½–4 inches) across and 13–16 mm (½–⅝ inch) thick.
Don’t worry about a few grams either way. Keeping the rounds roughly the same thickness is more important than exact portion weights.
Set the shaped discs in a single layer and cover with a clean, slightly damp towel while the skillet heats. Smooth minor cracks with damp fingertips. If several discs split deeply, return them to the bowl, adjust the moisture, and reshape.
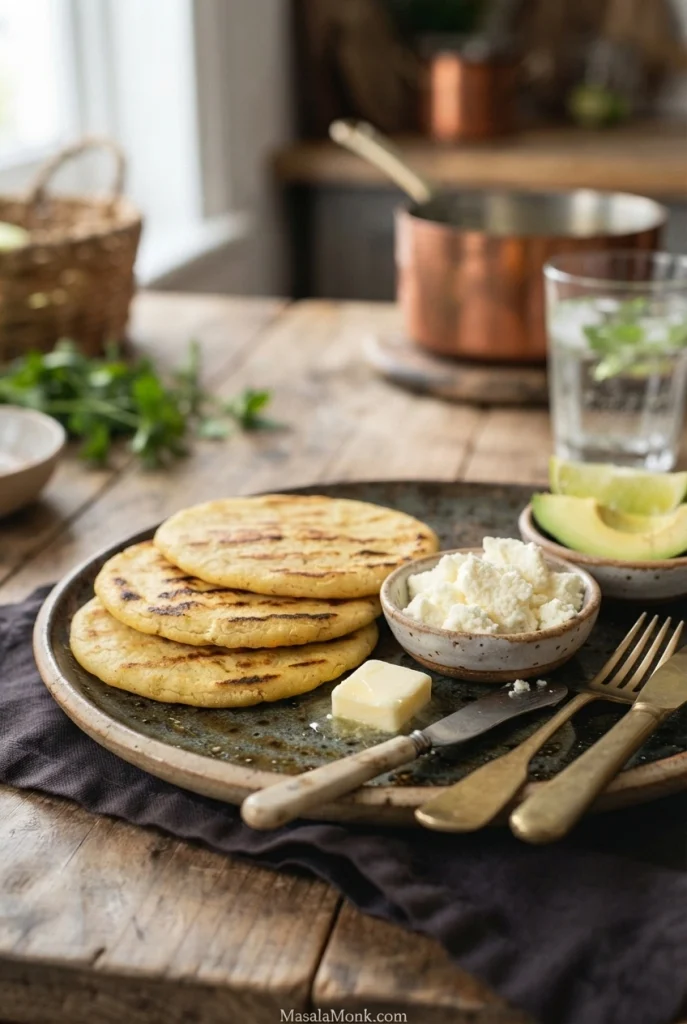
How to Cook Thin Colombian-Style Arepas
These thinner rounds toast directly against the skillet. Their surfaces become firm and golden in patches while the corn inside stays soft, making them easy to top with eggs or cheese.
- Preheat the skillet. Heat a nonstick or well-seasoned skillet over medium to medium-low heat for a few minutes.
- Grease lightly. If needed, wipe the surface with a little neutral oil. A thin sheen is enough.
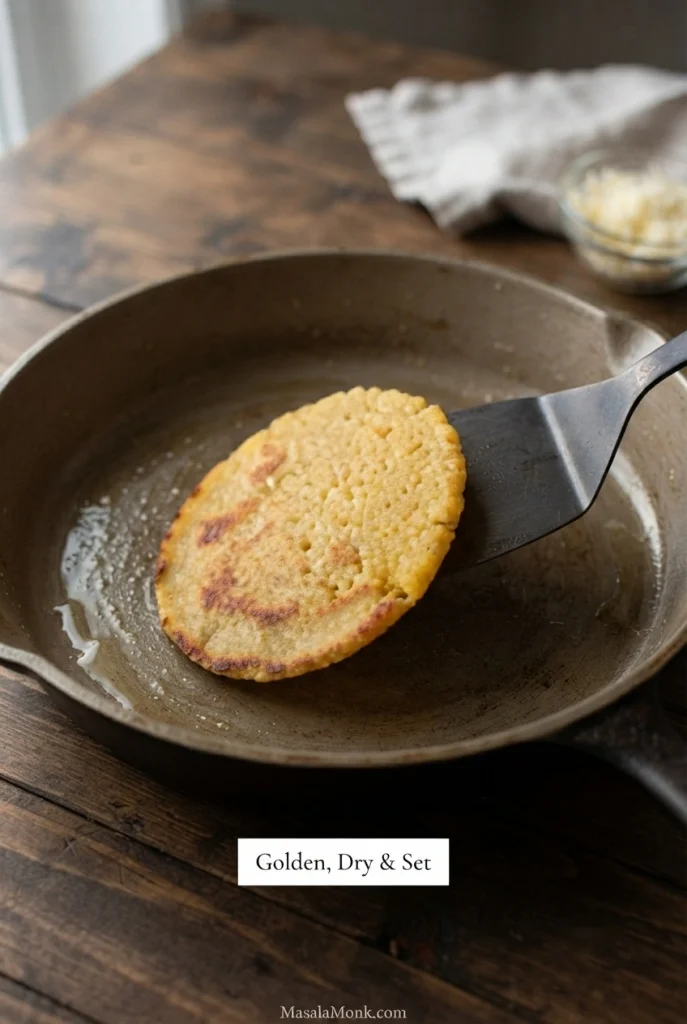
- Cook the first side. Add the discs without crowding. Cook for approximately 4–6 minutes, until the underside turns from moist-looking dough into a set surface with golden patches.
- Turn and finish. Flip with a wide spatula and cook another 4–6 minutes. The second side should be set, and the center should hold together when cut. Lower the heat if the surface darkens too quickly.
- Serve warm. Add butter, fresh cheese, eggs, or another topping while the crust still has its freshly toasted texture.
Eggs with tomato and onion are a familiar breakfast pairing. For that classic breakfast, see huevos pericos. Alternatively, try our scrambled eggs with cottage cheese.
How to Cook Thick Venezuelan-Style Arepas
Thick arepas need more time for heat to reach the center. The finished crust should be sturdy enough to open, with moist, cooked corn inside. For a small batch, the stovetop is simplest; the oven alternative lets several discs finish together.
Option A: Thick Arepas on the Stovetop
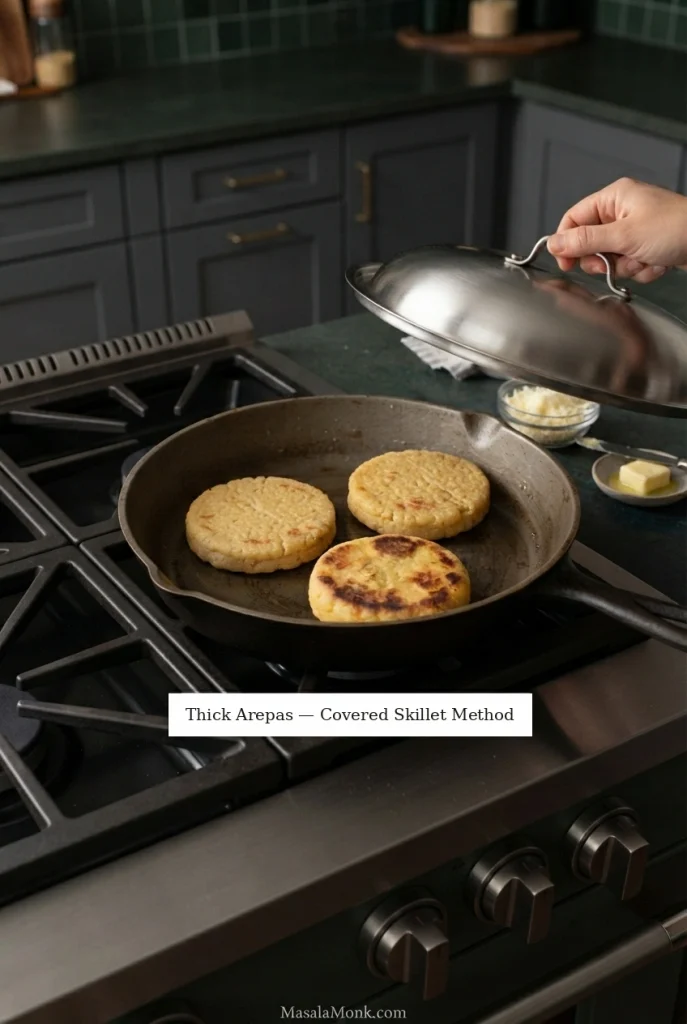
- Preheat. Heat a large skillet over medium heat, reducing toward medium-low if it becomes very hot.
- Arrange. Lightly grease if necessary, leaving enough space to turn the arepas.
- Cook the first side. Cover and cook for approximately 7–9 minutes, until the underside forms a dry, firm, lightly toasted crust. Reduce heat if it browns rapidly.
- Flip and finish. Remove the lid, turn carefully, and cook another 6–8 minutes. Without a lid, allow additional gentle cooking as needed instead of relying on exactly the same schedule.
- Check one. Let an arepa rest briefly and cut into it if unsure. The center should hold together while remaining soft and moist. A large patch of loose, gluey dough needs more cooking.
Let the finished arepas rest for about 5 minutes before opening them. Their shells should be sturdy in your hand without the centers becoming hard or dry.
Option B: Skillet-and-Oven Arepas
The skillet creates the crust; the oven finishes the center.
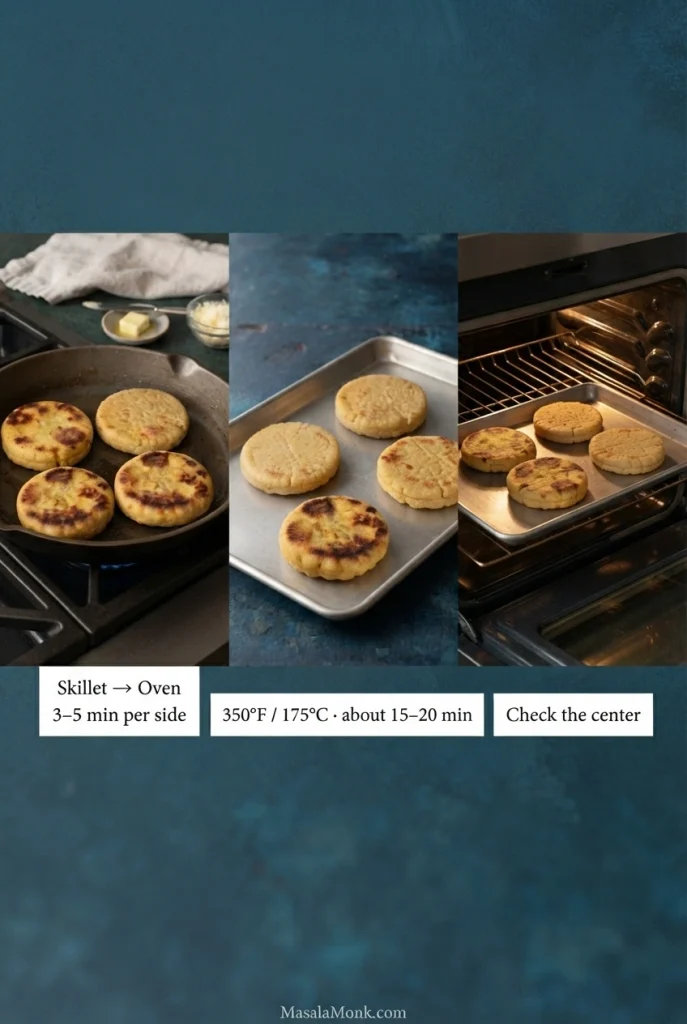
- Preheat the oven to 350°F / 175°C. Have a baking tray ready with room for the arepas in a single layer.
- Set the crust. Heat a lightly greased skillet over medium heat. Cook the thick discs for approximately 3–5 minutes per side, until both surfaces are firm and lightly toasted.
- Collect the panfuls. Transfer the griddled arepas to the tray without stacking. If the earliest batch must wait, loosely cover the tray with a clean, dry towel while the remaining discs brown.
- Finish in the oven. Remove the towel completely before putting the tray in the oven. Bake for approximately 15–20 minutes, then inspect one of the thickest or least-set arepas, regardless of panful. The center should be soft but cohesive, with no loose, wet dough. Continue baking in short intervals if needed.
- Rest for about 5 minutes before opening or filling.
How to Open an Arepa Without Breaking It
Hold the warm arepa securely in a folded, clean kitchen towel to protect your hand. With a small, sharp knife, cut a slit along one edge and carefully extend it into a pocket, leaving the opposite edge attached.
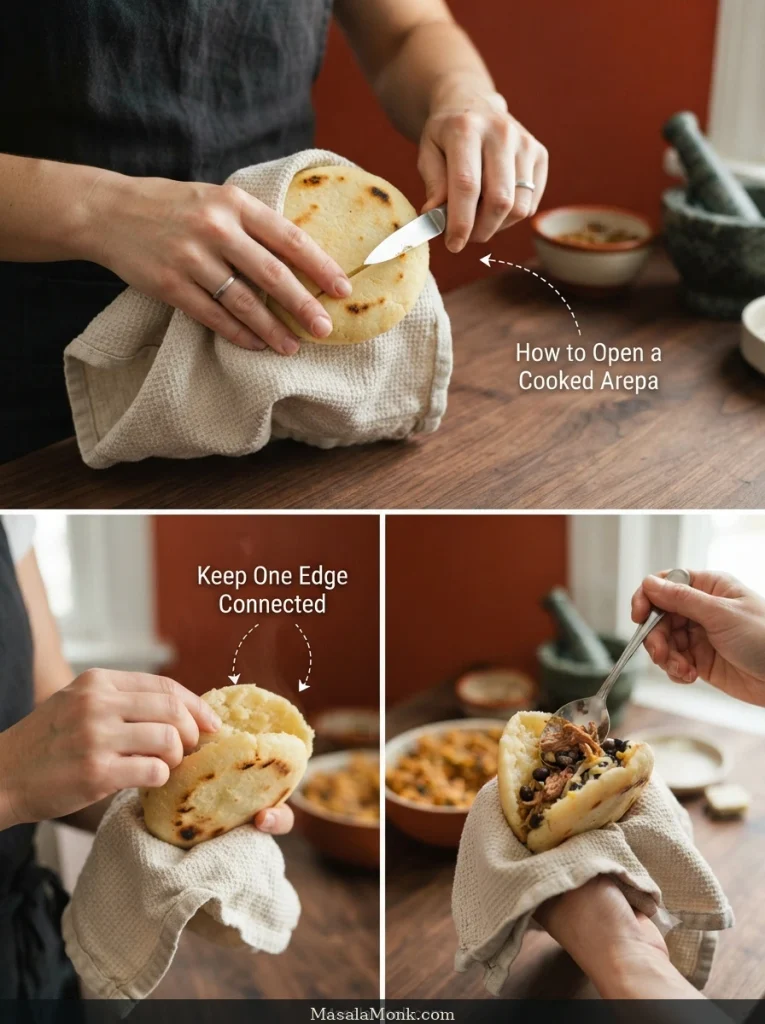
You’ll find soft cooked corn inside, not an empty cavity. For a deeper pocket, gently remove a little of the center while leaving enough around the edges to support the filling.
Begin with a few tablespoons of filling in a 9–10 cm arepa. Make more filling for a generous meal rather than forcing the shell so full that it tears. For filling ideas, compare reina pepiada, dominó, and pelúa.
Serving Your Arepas
Before adding a filling, try one plain while it’s still hot. The crust has a mild toasted-corn flavor, while the center is softer and more substantial. A little butter or fresh white cheese is enough to appreciate the difference.
Serve each panful as it finishes when possible. For a short wait, keep fully cooked plain arepas on a wire rack over a tray in a 200°F / 93°C oven. Prolonged holding can dry them out.
Hogao, a Colombian tomato-and-onion sauce, is a natural accompaniment. For a Mexican-inspired change alongside eggs or cheese, roasted salsa verde brings a sharper, tangier flavor.
Arepas with Cheese: Three Ways to Make Arepas con Queso
Cheese can be mixed into the dough, sealed inside before cooking, or tucked into a cooked arepa. Each calls for a slightly different cheese and gives a different result.
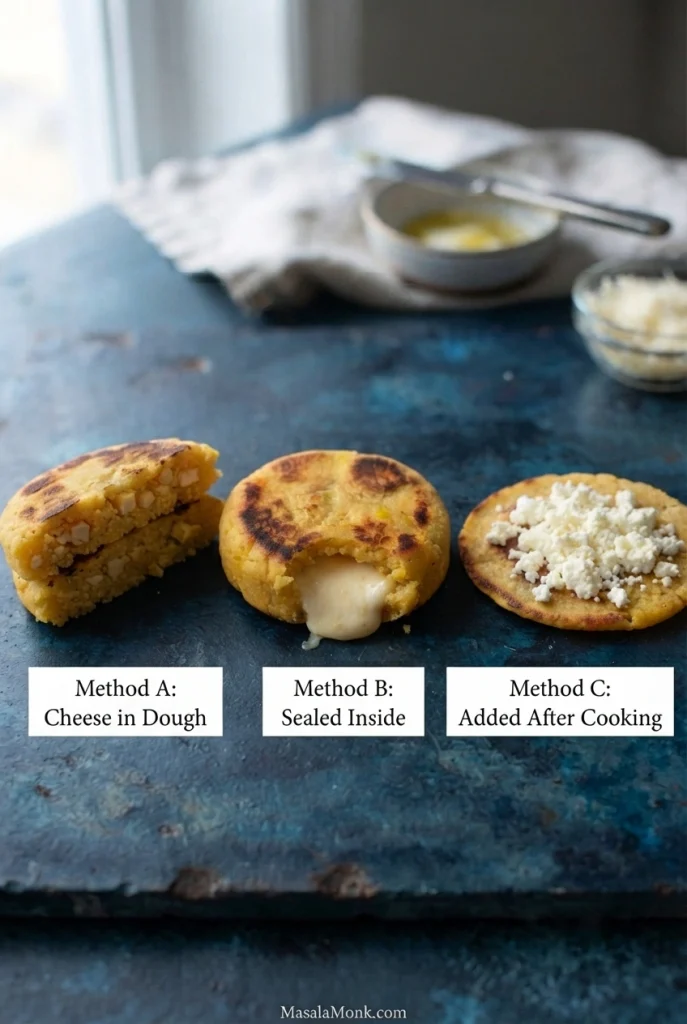
Mix Cheese into the Dough
Use 80–100 g / 3–3½ oz finely grated or crumbled cheese for the full batch. Mild mozzarella is an accessible option. Queso campesino adds a fresh, gentle flavor; queso costeño gives a saltier result.
For particularly salty cheese, use the reduced salt quantity listed with the base ingredients.
Prepare and rest the dough, then fold in the cheese. Check that it forms smooth discs, adding a touch of water if necessary. Cook using the thin or thick method, watching the crust because cheese can affect browning.
Seal Melting Cheese Inside Before Cooking
For a molten center, use 15–25 g / ½–1 oz grated low-moisture mozzarella or queso doble crema per thick arepa. These melt more readily than firm, crumbly cheeses.
Flatten one dough portion, place the cheese in the middle, and fold the dough around it. Pinch the seam shut and gently press into an evenly shaped disc. It may be thicker than an unfilled arepa; aim for an even layer of dough around the cheese rather than forcing the ordinary disc dimensions. Seal any cracks.
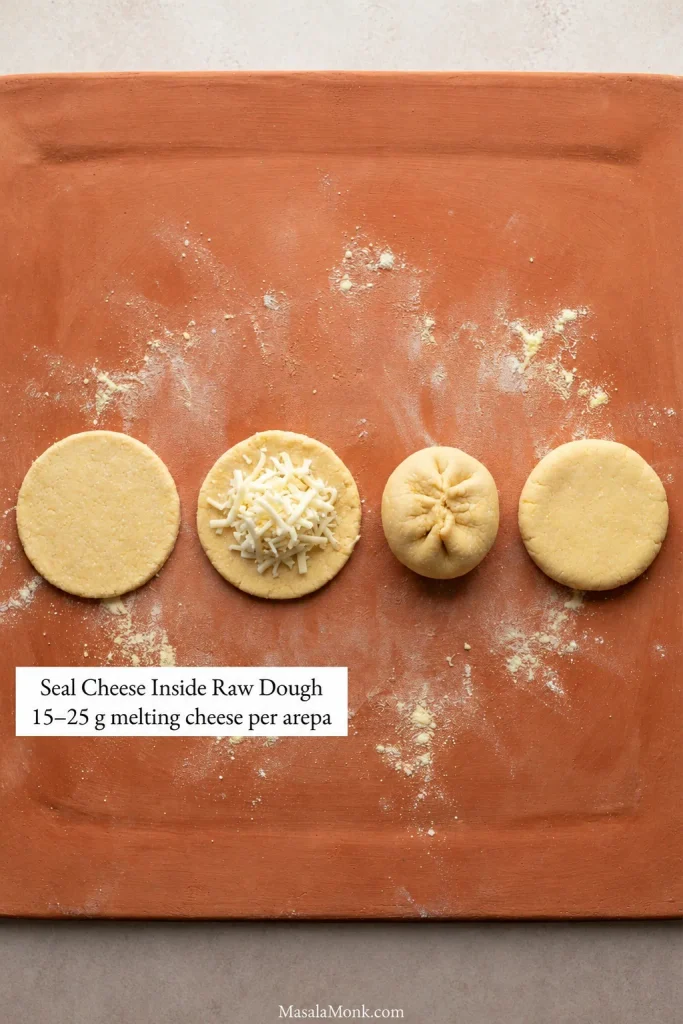
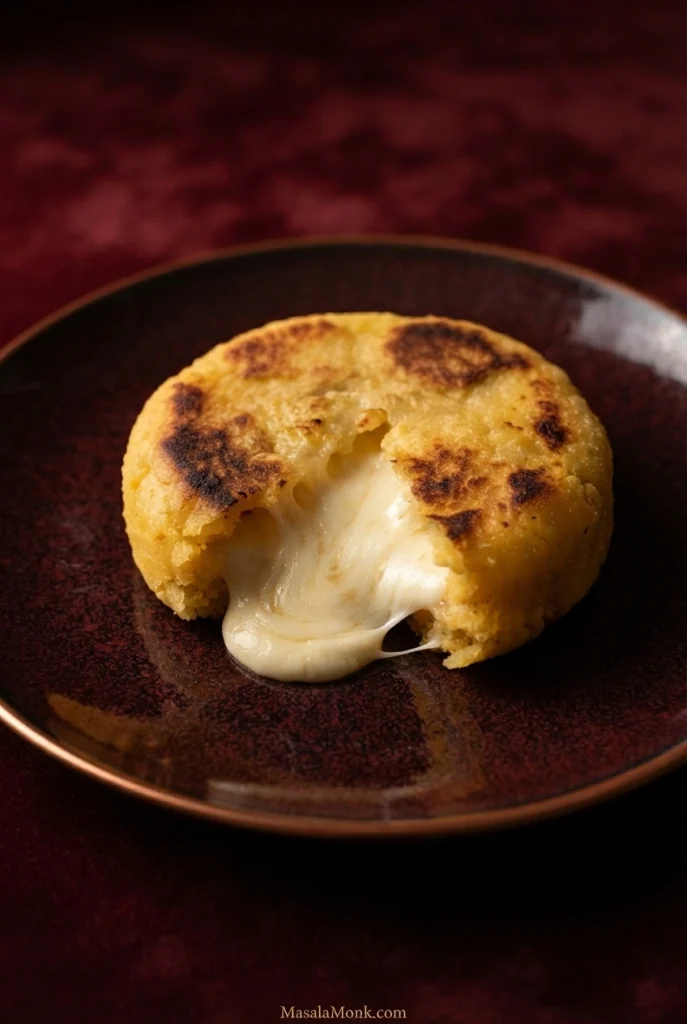
Cook using the skillet-and-oven method for thick arepas. Allow additional time if needed until the corn layer surrounding the cheese is cooked—not merely until the cheese has melted. Rest before cutting or biting: the cheese can be extremely hot. If you are unsure whether the corn layer is done, compare the cooked and undercooked centers.
Add Cheese After Cooking
Quesito, queso fresco, or another fresh white cheese can be crumbled over a thin arepa or tucked into a thick one after opening. For a melted center, add mozzarella or queso doble crema and return the filled arepa briefly to gentle heat.
Paneer makes a firmer, non-melting alternative if that is what you have. Our guide to making paneer at home explains why it holds its shape.
Useful jumps: Recipe ingredients · Recipe at a glance · Back to top.
Best Arepa Fillings, Toppings, and Breakfast Ideas
Dominó is quick when you have cooked black beans and white cheese. Reina pepiada needs cooked, cooled chicken and avocado. Pelúa is easiest with shredded beef already prepared.
The recipes below make modest fillings for 9–10 cm arepas and are independent of the main dough batch. For all eight thick arepas with the same filling, roughly double the reina pepiada or pelúa quantities, adjusting for appetite. New to stuffing arepas? First see how to cut a pocket without breaking it.
Reina Pepiada: Venezuelan Chicken and Avocado Arepas
Reina pepiada pairs shredded chicken with creamy avocado, served cool inside a freshly cooked arepa. Its name has a memorable Caracas history: in 1955, the Álvarez family honored Susana Duijm after she won Miss World, as described in El País’ account of reina pepiada.
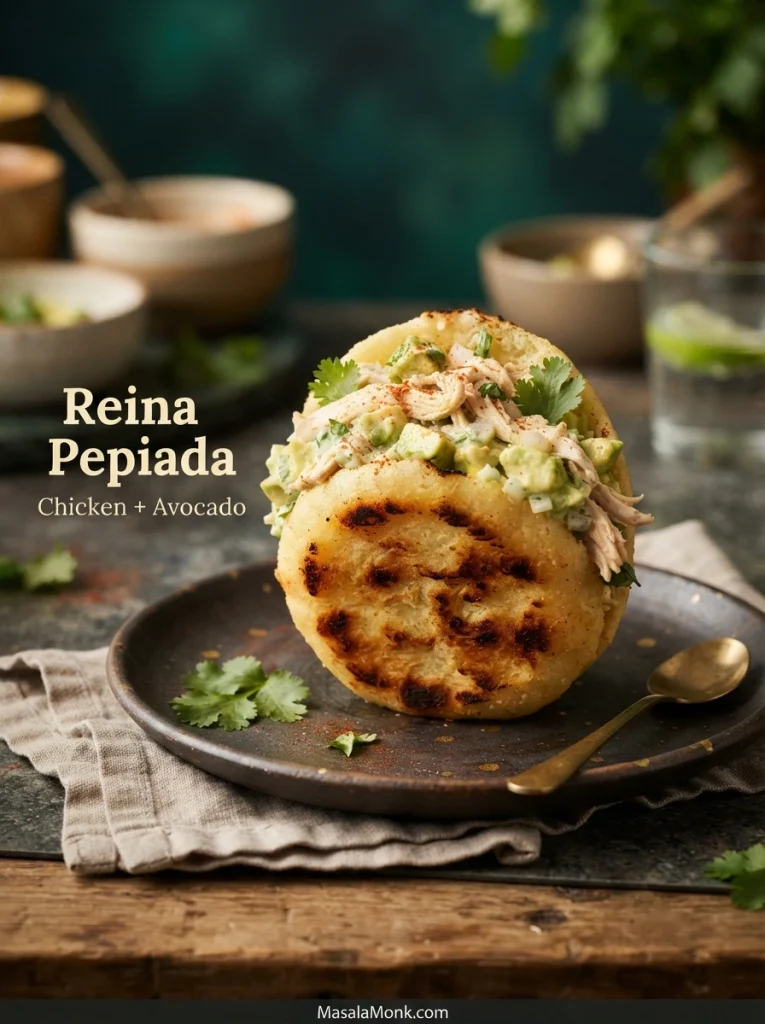
This quantity makes approximately 3–4 modestly filled medium arepas.
- 120 g / 4¼ oz fully cooked, cooled, shredded chicken
- 75 g / 2⅔ oz ripe avocado flesh, about half a medium avocado
- 15 g / 1 tablespoon mayonnaise
- 10 ml / 2 teaspoons lime juice, or to taste
- 1 tablespoon finely chopped onion, optional
- Chopped cilantro or parsley, salt, and black pepper to taste
Mash the avocado with the mayonnaise and lime juice, leaving a few small pieces if you like. Fold in the chicken, onion, and herbs. Season to taste and refrigerate until serving.
If you need to prepare the chicken first, our baked chicken breast recipe provides a straightforward method. Cool fully cooked chicken appropriately before mixing it with the avocado.
Spoon approximately 3–4 tablespoons into each warm arepa just before eating. The cool filling contrasts with the toasted corn.
Dominó: Black Beans and White Cheese
Dominó takes its name from the black-and-white contrast of beans and cheese, like the colors of domino tiles. With cooked beans ready, it comes together in moments.
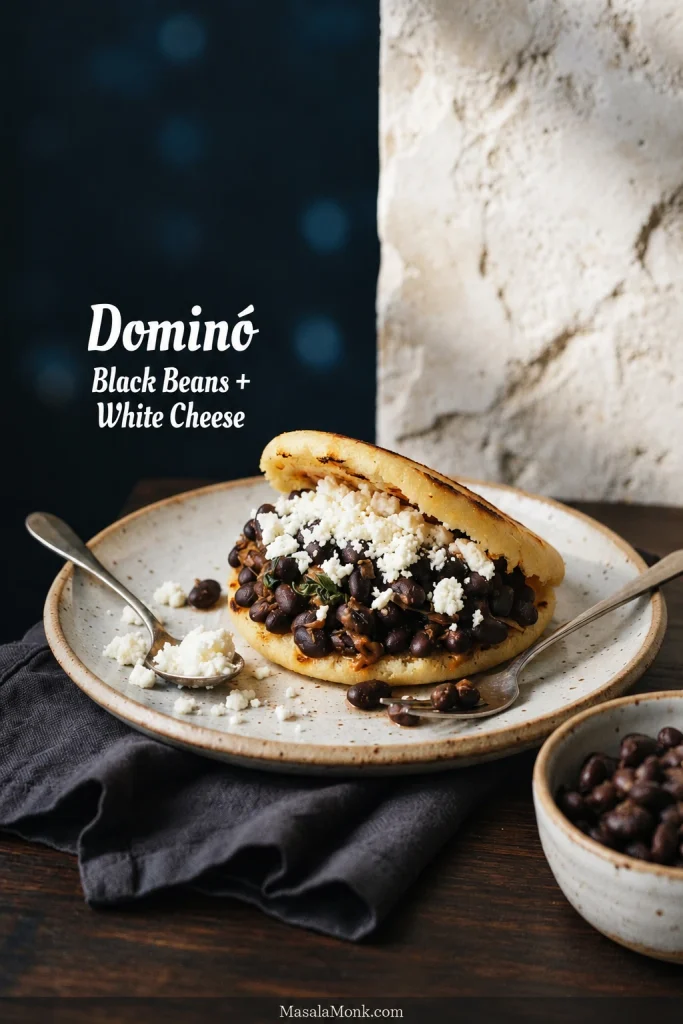
For each medium arepa, use 2–3 tablespoons warm, seasoned black beans and 1–2 tablespoons crumbled or grated white cheese. Drain away excess cooking liquid before filling the pocket. The beans should be moist, not soupy.
Pelúa: Shredded Beef and Yellow Cheese
Pelúa combines shredded beef, often Venezuelan carne mechada, with yellow cheese. Its name evokes the strands of meat and cheese spilling from the pocket. Warm beef softens the grated cheese as the arepa is filled.
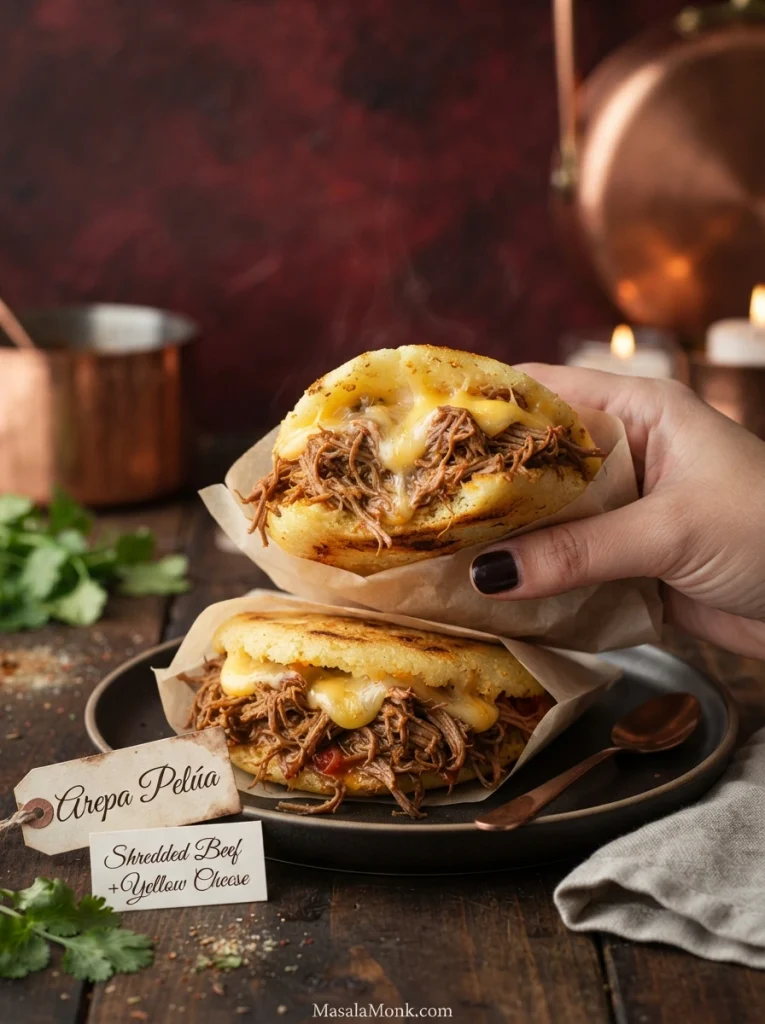
For approximately 3–4 modestly filled medium arepas, use:
- 120 g / 4¼ oz fully cooked, shredded beef
- 2 tablespoons finely chopped onion
- 2 tablespoons finely chopped sweet pepper
- 1 small tomato, finely chopped, about 60 g
- 1 small garlic clove, minced
- 1 teaspoon neutral oil
- 35 g / 1¼ oz grated yellow melting cheese
- Salt and black pepper to taste
Heat the oil in a skillet and soften the onion and sweet pepper. Add the tomato and garlic and cook until the tomato breaks down and most liquid evaporates. Stir in the cooked shredded beef and heat thoroughly. Season, spoon into the warm arepas, and add the yellow cheese.
This shortcut uses beef that is already cooked; traditional carne mechada starts with meat cooked until tender before shredding and seasoning it.
Leftover slow cooker barbacoa makes a smoky, Mexican-style variation. Its chile seasoning differs from Venezuelan carne mechada, but the shredded texture suits the pocket.
Huevos Pericos: Eggs with Tomato and Onion
Huevos pericos are softly scrambled eggs with tomato and onion, a familiar breakfast accompaniment to arepas. You can prepare them while the final panful cooks.
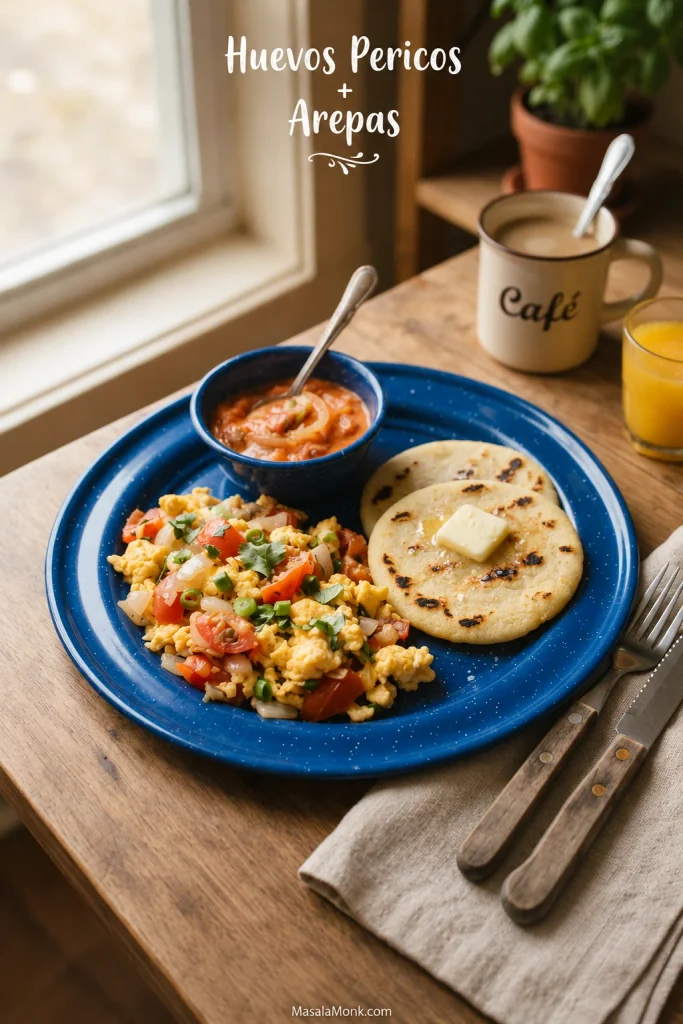
For two or three arepas, use 2 large eggs, 1 small chopped tomato, 2 tablespoons finely chopped onion, 1 teaspoon oil or butter, and a pinch of salt.
Cook the onion and tomato gently in the oil or butter until softened and some tomato moisture has evaporated. Add the beaten eggs and stir until softly set. Serve beside thin arepas or spoon into thicker ones.
Simple Vegetarian Fillings and Toppings
Warm black beans with avocado, sautéed mushrooms and peppers, sweet plantains with cheese, or a spoonful of hogao all work with plain arepas.
For a fresh, nontraditional topping, try well-drained cowboy caviar, with beans, corn, tomato, and crisp peppers. Use mostly the solids so the dressing does not soak the crust.
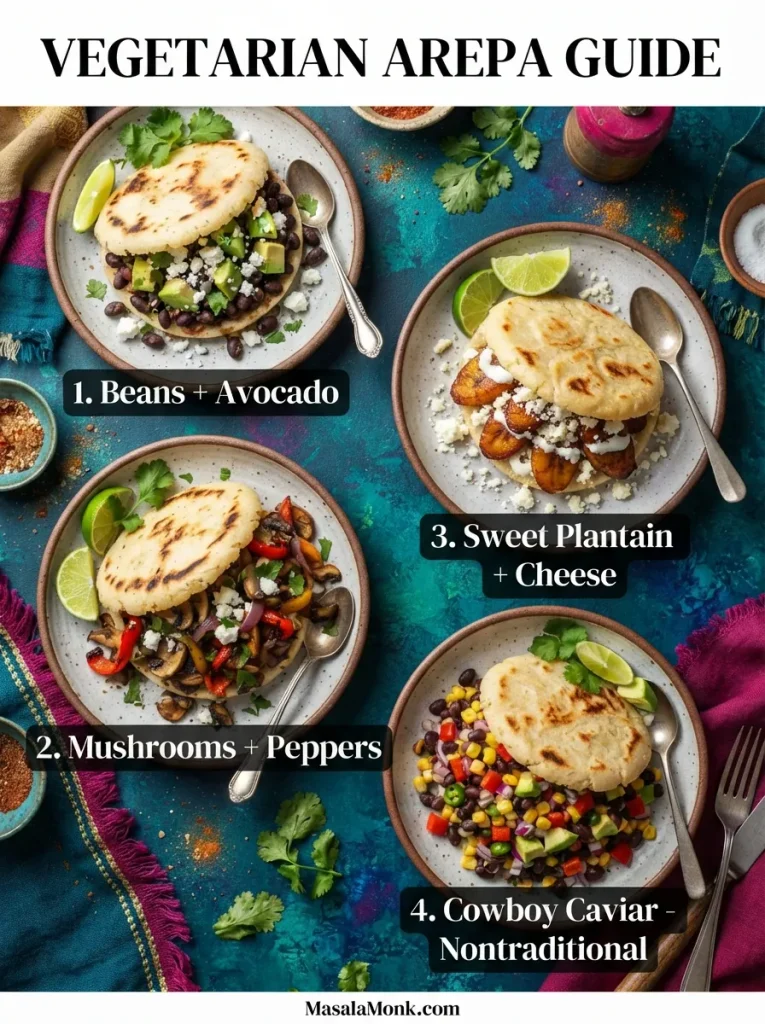
Fill thick arepas close to serving time, especially when using moist ingredients, so the shell keeps more of its toasted texture.
Colombian vs Venezuelan Arepas: What’s the Difference?
Many Colombian arepas are served with toppings or alongside another dish; thick stuffed arepas are especially recognizable in Venezuela. Both traditions include sweet, fried, crisp, and differently prepared corn versions, so the thin-versus-thick distinction is a starting point, not a universal rule.
Arepas have Indigenous roots that predate the modern borders of Colombia and Venezuela. Reporting on the arepa’s shared Colombian and Venezuelan history explores how its long-standing place in both countries makes claims of a single modern national birthplace misleading.
Colombian Arepas
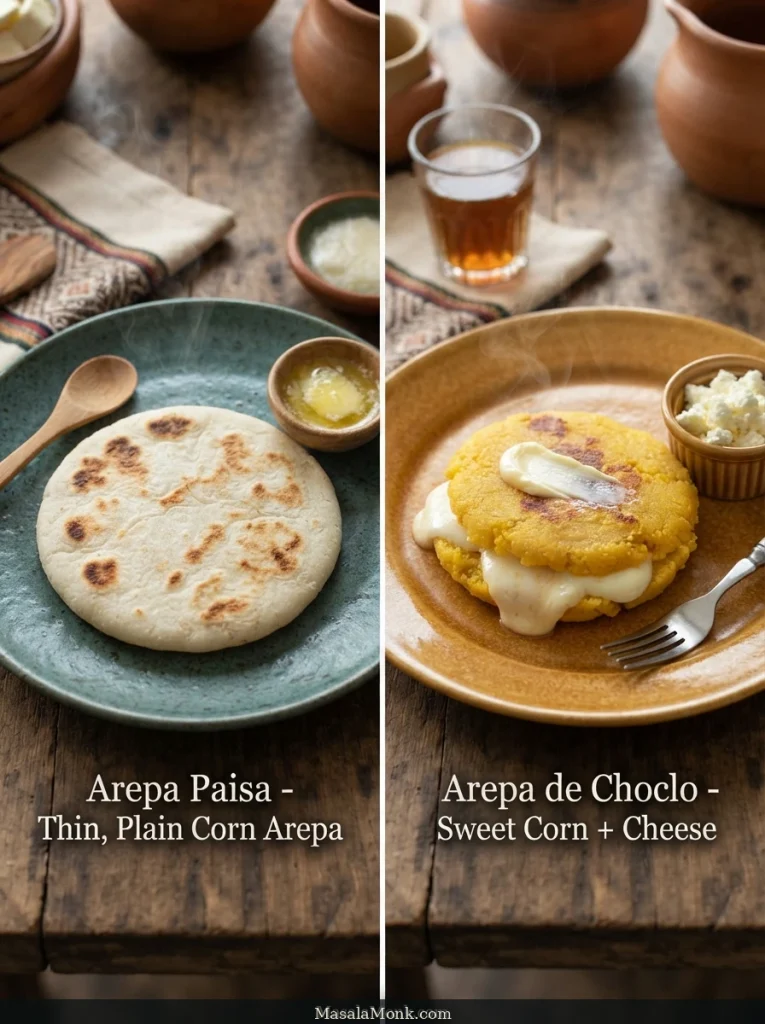
A plain arepa paisa, associated with Antioquia, is often thin and mild. Butter, cheese, or eggs turn it into breakfast; the same arepa may accompany lunch in place of bread.
Arepas de choclo use fresh sweet corn and have a softer texture and sweeter flavor, often paired with cheese. They are not made simply by sweetening the plain masarepa dough in this recipe.
On Colombia’s Caribbean coast, arepas de huevo are fried with an egg inside. Arepas santandereanas, associated with Santander, are known for a thin, crisp texture and savory character; traditional versions use corn with ingredients such as yuca and chicharrón.
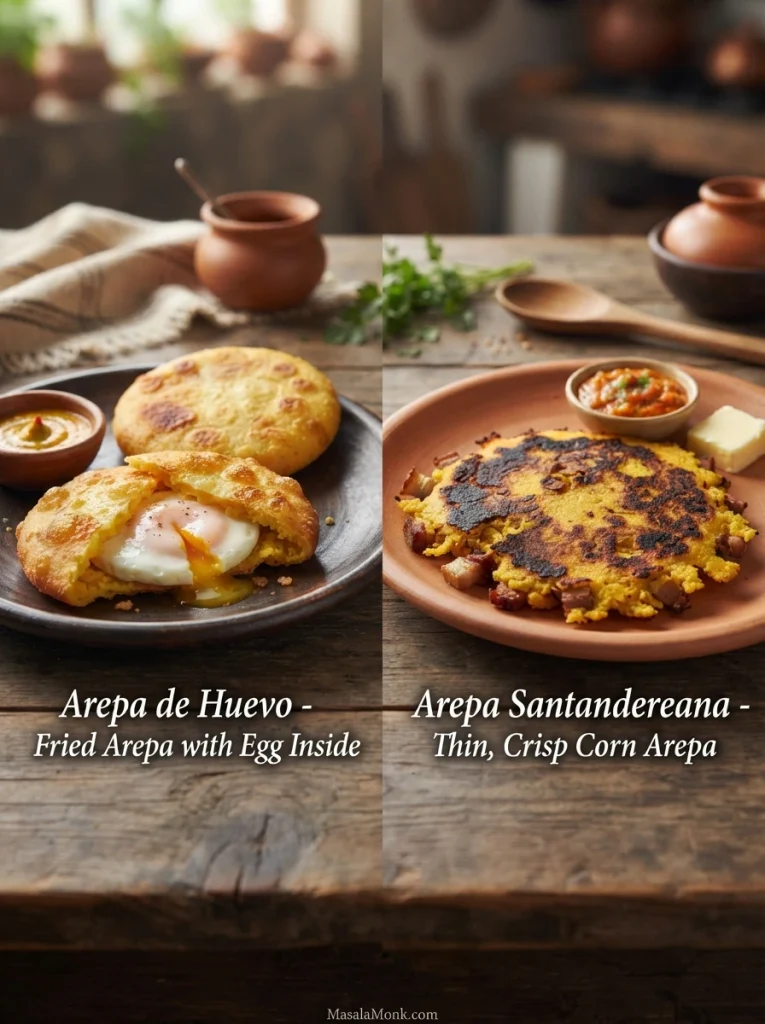
These distinctions are helpful when recreating an arepa you’ve eaten elsewhere. A sweet arepa de choclo or crisp arepa santandereana needs a different preparation from the basic griddled disc taught here.
Venezuelan Arepas
In Venezuela, arepas appear at breakfast, lunch, and dinner. A simple one with white cheese may start the day; with beans, chicken, or shredded beef, it becomes the main part of a meal.
Areperas helped make generously stuffed arepas especially recognizable. Reina pepiada, dominó, and pelúa each have names tied to their fillings, while regional preparations also vary in corn treatment, thickness, and cooking technique.
Return to: The plain arepas recipe · Back to top.
The Arepa Guide: Doneness, Flour, and Troubleshooting
How to Tell When Arepas Are Done
A cooked arepa has a dry, set exterior with toasted patches and a center that holds together while remaining soft and moist. Thick arepas are naturally denser inside than fluffy wheat bread.
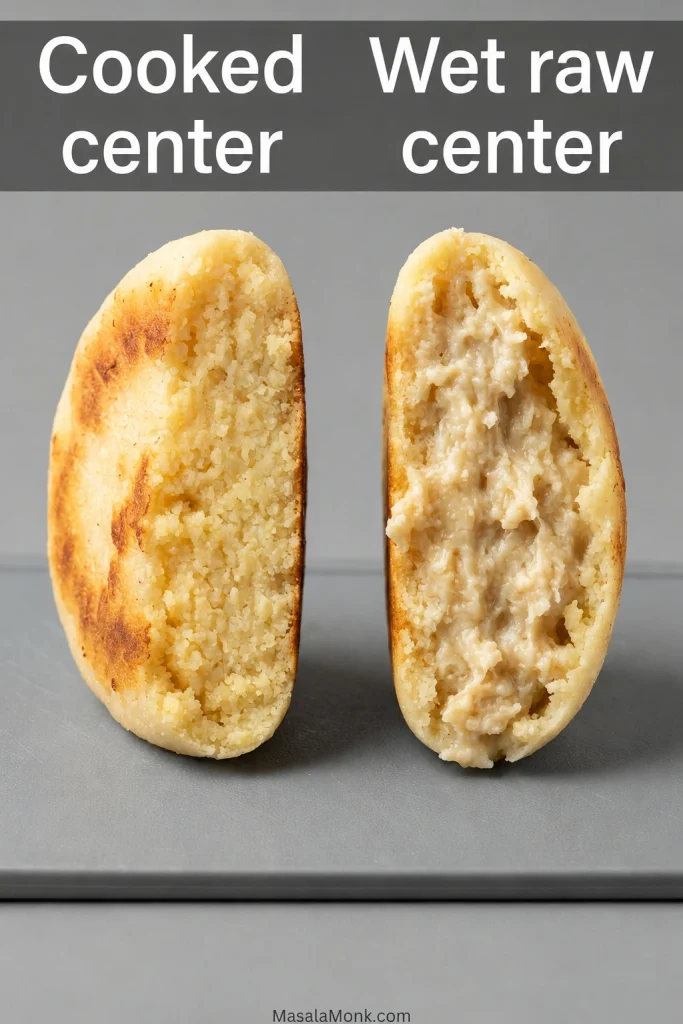
If uncertain, let one rest briefly and cut it open. Slight tackiness can be normal; a large area of loose, wet, gluey dough needs more cooking. Some arepas puff from steam, but puffing isn’t required.
If the crust is brown while the center remains wet, use the undercooked-center rescue below.
Best Flour for Arepas: Masarepa vs Masa Harina vs Cornmeal
Look for precooked corn flour labeled masarepa or harina de maíz precocida, intended for arepas. The corn has been cooked before drying and milling, so the flour forms a workable dough when mixed with water.
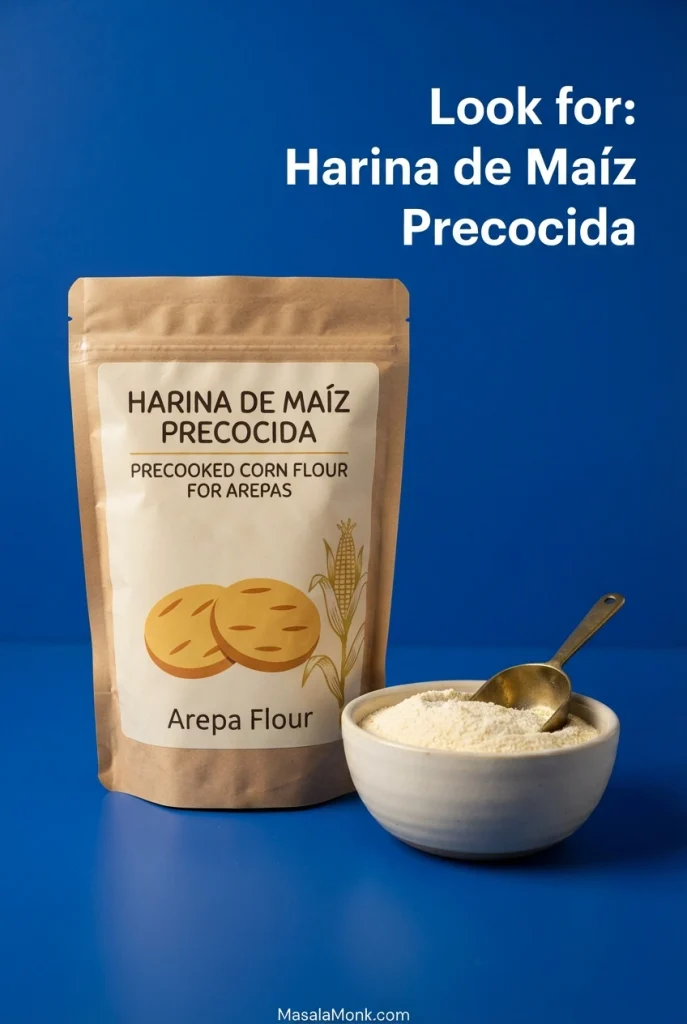
Names vary internationally. In the United States, corn flour can mean finely ground maize; in India and the United Kingdom, cornflour often means cornstarch. Neither description alone guarantees a suitable product.
| Flour or ingredient | Suitable for this recipe? |
|---|---|
| White masarepa | Yes, for the basic dough. |
| Yellow masarepa | Yes, when labeled as precooked arepa flour. |
| Harina P.A.N. | Yes, a familiar precooked arepa flour. |
| Other precooked arepa flour | Yes; adjust water to dough texture. |
| Mexican masa harina or Maseca | Not a direct substitute; processed differently. |
| Ordinary cornmeal or polenta | Needs another preparation. |
| Indian makki atta | Not equivalent to masarepa. |
| Cornstarch (cornflour in some countries) | No. It is primarily starch. |
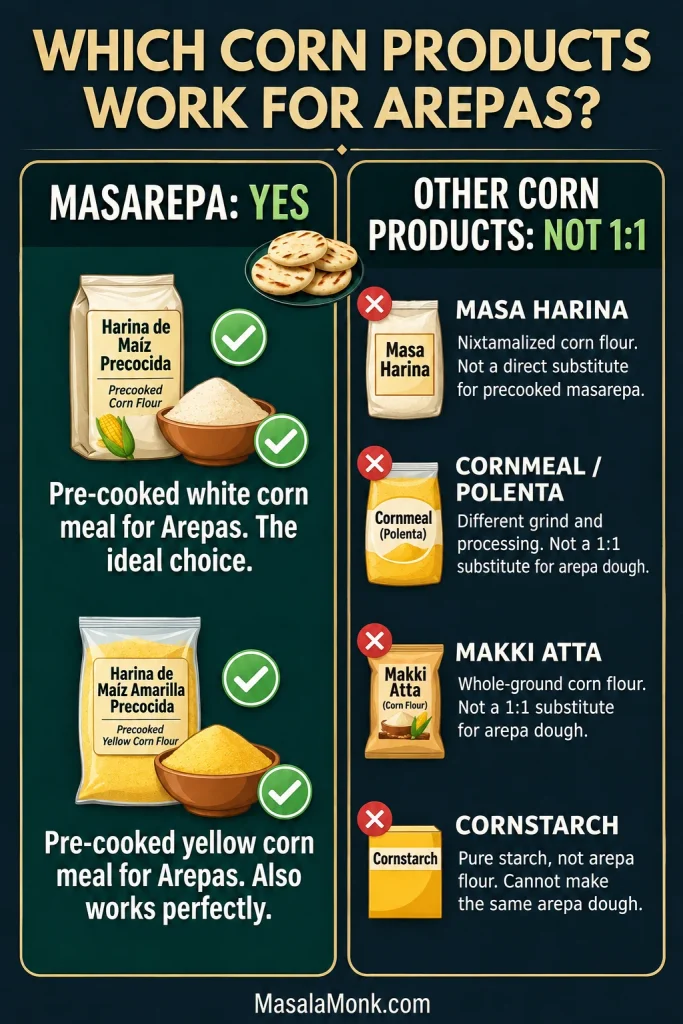
Is Masarepa the Same as Masa Harina?
No. Mexican masa harina is generally made from nixtamalized corn treated with an alkaline solution. Packaged masarepa used in many everyday Colombian and Venezuelan arepas is processed differently, which changes how it absorbs water and cooks.
Masa harina is excellent for Mexican tortillas, as explained in our homemade corn tortilla recipe, but should not be substituted one-for-one in this masarepa dough.
Some traditional arepas, including Venezuelan arepas peladas, are made from differently treated whole corn and follow their own methods.
How Much Water Does Masarepa Need?
Start with the listed water, let the dough rest, then test a small disc. If the edge splits deeply, mix in more water a tablespoon at a time; if it shapes smoothly, stop. Brands and grinds absorb different amounts.
For context, Epicurious’ published arepas recipe combines 326 g flour with the full 2½ cups water from the outset. Holding back the final quarter cup here makes adjustment easier.
White or Yellow Masarepa?
Either works. Yellow varieties have a different color and sometimes a stronger corn flavor; white varieties are often milder. Brand and milling can influence the result too.
If you cannot find precooked arepa flour, use a recipe developed for the corn ingredient available to you. Whole corn, polenta, ordinary cornmeal, and makki atta require different preparation, not a direct substitution. Already using masarepa but struggling with the texture? Revisit the rested-dough test.
Arepa Troubleshooting: Common Problems and How to Fix Them
| Problem | What to do |
|---|---|
| Deep cracks during shaping | Mix reserved warm water into the rested dough, a tablespoon at a time. Return to the dough test. |
| Cracks after shaping | Smooth small cracks with damp fingertips; keep covered. Rework and rehydrate deeply cracked discs. |
| Dough sticky or spreading | Rest fully, check the flour type, then add a little masarepa if necessary. |
| Discs crumble when lifted | Correct moisture and keep unused dough covered. |
| Arepas stick to the skillet | Preheat evenly, let the underside set, and check the cooking surface. |
| Crust burns too quickly | Lower the heat so the middle can finish. |
| Crust tears or peels | Allow the surface to set before turning; use a wide spatula. |
| Brown outside, wet inside | Use the oven-rescue method immediately below for a thick arepa. |
| Arepas turn dry or hard | Check hydration and avoid high heat or prolonged cooking. |
| Arepa doesn’t puff | Check the center. Puffing isn’t required. |
| Pocket tears when filled | Leave one edge connected; do not overfill. See the pocket method. |
| Cheese leaks out | Seal dough around cheese and smooth any cracks. |
| Reheated arepa becomes hard | Use gentler heat and avoid prolonged reheating. |
How to Rescue Arepas That Are Brown Outside but Raw Inside
For a thick arepa with a browned crust but loose, wet dough at the center, transfer to a preheated 325°F / 163°C oven. Check after approximately 5 minutes, then continue in short intervals until the middle sets.
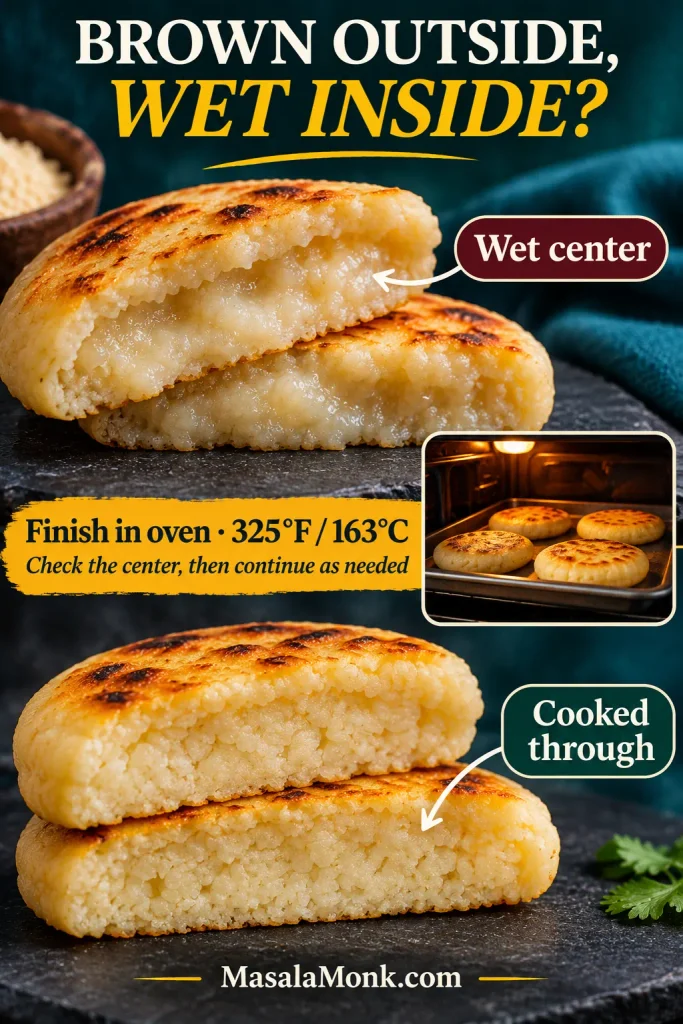
This is different from the regular 350°F / 175°C oven finish: the crust is already browned, so the gentler oven heat gives the center more time without repeatedly scorching the exterior on the skillet.
If the dough was made with unsuitable flour or became far too wet, more cooking may not fully restore the intended texture.
Why Are My Arepas Dry or Hard?
Underhydrated dough can crack and cook into a dry, firm center. If the dough shaped smoothly but the cooked arepas became hard, excessive heat or prolonged cooking may have dried them out.
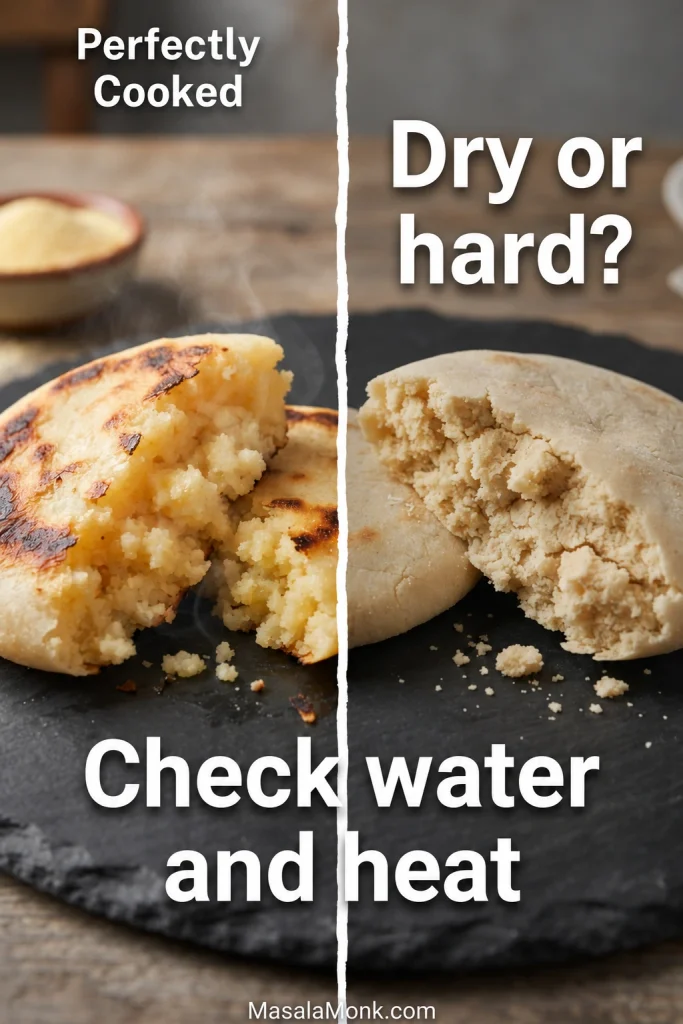
Next time, check the rested dough and use steadier heat. Remove the arepas as soon as their centers are done instead of leaving them on a hot pan.
Return to: Recipe ingredients · Back to top.
How to Store, Freeze, and Reheat Arepas
Keep plain cooked arepas separate from their fillings. You can reheat the corn shells without warming a chicken-avocado salad or letting a wet filling soften the crust.
Can You Make Arepa Dough Ahead?
For same-day preparation, shape the uncooked arepas up to approximately 4 hours ahead, arrange separately, cover well, and refrigerate. Cook from chilled, giving the centers a little additional time if needed. The Kitchn’s arepas make-ahead guidance uses the same four-hour window.
This is a convenient same-day preparation window, not a universal food-safety expiration time. For longer planning, freezing cooked arepas is often easier than keeping hydrated dough overnight, when the texture may change.
How Long Do Arepas Last in the Refrigerator?
Cool plain cooked arepas promptly and store covered at 40°F / 4°C or below. Use refrigerated cooked arepas within approximately 3–4 days.
Refrigerate perishable fillings within two hours of preparation, or one hour if the surrounding temperature is above 90°F / 32°C. See FoodSafety.gov’s four steps to food safety for safe chilling and handling.
How to Freeze Arepas
Cool plain cooked arepas promptly. Arrange them in a single layer on a parchment-lined tray and place the tray in the freezer until firm. Transfer to freezer-safe bags or containers, using parchment between layers if needed.
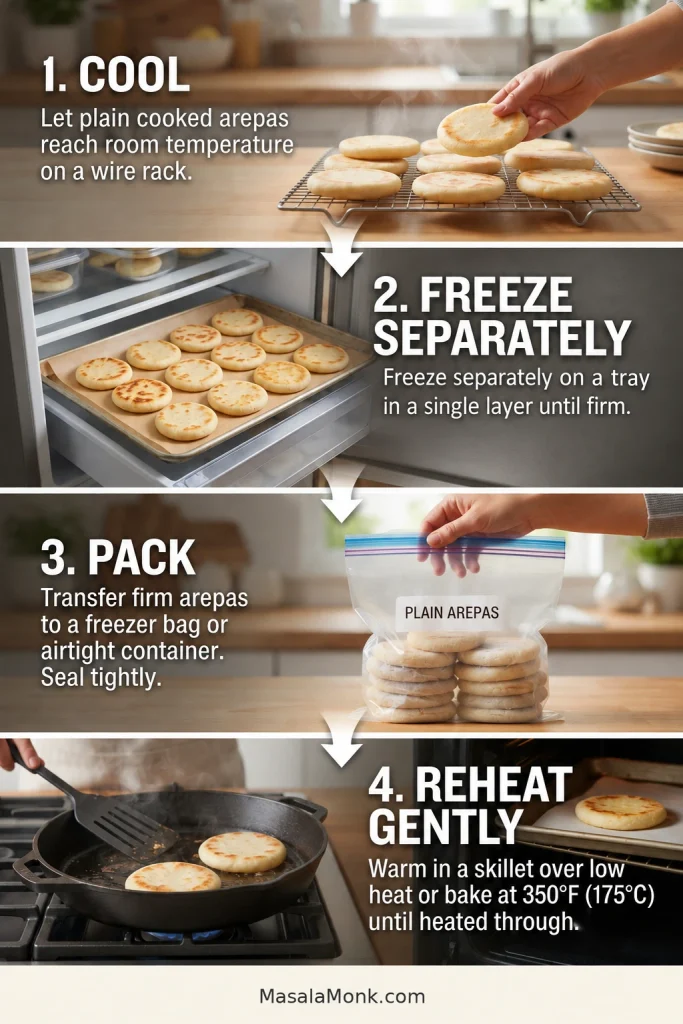
For the best eating quality, aim to use continuously frozen arepas within 2–3 months; this is a quality guideline, not a strict food-safety expiration date.
How to Reheat Arepas Without Drying Them Out
- Oven: Heat refrigerated plain arepas at about 350°F / 175°C for around 10 minutes, adjusting for thickness.
- Skillet: Reheat over medium-low heat, turning until the centers are hot and the crust regains some toasted texture.
- From frozen: Thaw in the refrigerator if convenient, or reheat directly from frozen with extra time until thoroughly hot.
Cooked meat and poultry leftovers intended to be served hot should reach 165°F / 74°C when reheated. Keep cold fillings such as reina pepiada refrigerated and spoon into warmed arepas just before serving.
Frequently Asked Questions About Arepas
Are Arepas Gluten-Free?
Plain arepas made with suitable corn-based masarepa, water, and salt contain no wheat ingredients. If you have celiac disease or require strict gluten avoidance, check flour labeling, cross-contact information, cookware, toppings, and fillings.
Are Arepas Vegan?
The basic dough is vegan: precooked corn flour, water, salt, and optional vegetable oil for the skillet. Beans, avocado, and vegetables make satisfying plant-based fillings.
Do Arepas Need Yeast, Baking Powder, or Eggs?
No. The basic masarepa dough needs none of them. Once hydrated, the precooked flour becomes shapeable and cooks directly on a skillet or griddle. Some regional or enriched versions include additional ingredients.
Are Arepas the Same as Pupusas or Gorditas?
No. Salvadoran pupusas commonly enclose fillings before griddling, while Mexican gorditas have their own regional masa preparations and cooking methods. Colombian and Venezuelan arepas belong to distinct traditions with griddled, fried, topped, and stuffed varieties.
Why Are Some Arepas Sweet and Others Savory?
The plain masarepa dough here has a mild corn flavor. Sweeter preparations, including Colombian arepas de choclo, use fresh sweet corn or another dough mixture and are often served with cheese.
Once you recognize the right dough texture and a properly cooked center, you can turn to the combinations that interest you most: breakfast eggs and hogao, cool chicken and avocado, or warm beans and cheese. Regional preparations offer plenty more to explore without changing what you learned from this first batch.
What do you like inside your arepas? If your family makes a particular regional version, we’d love to hear about that too.
Want to make another batch? Quick recipe overview · Ingredients and quantities · Back to top.








