Posted on Leave a comment

Sourdough Discard Pancakes: Fluffy, Tender & Easy to Get Right

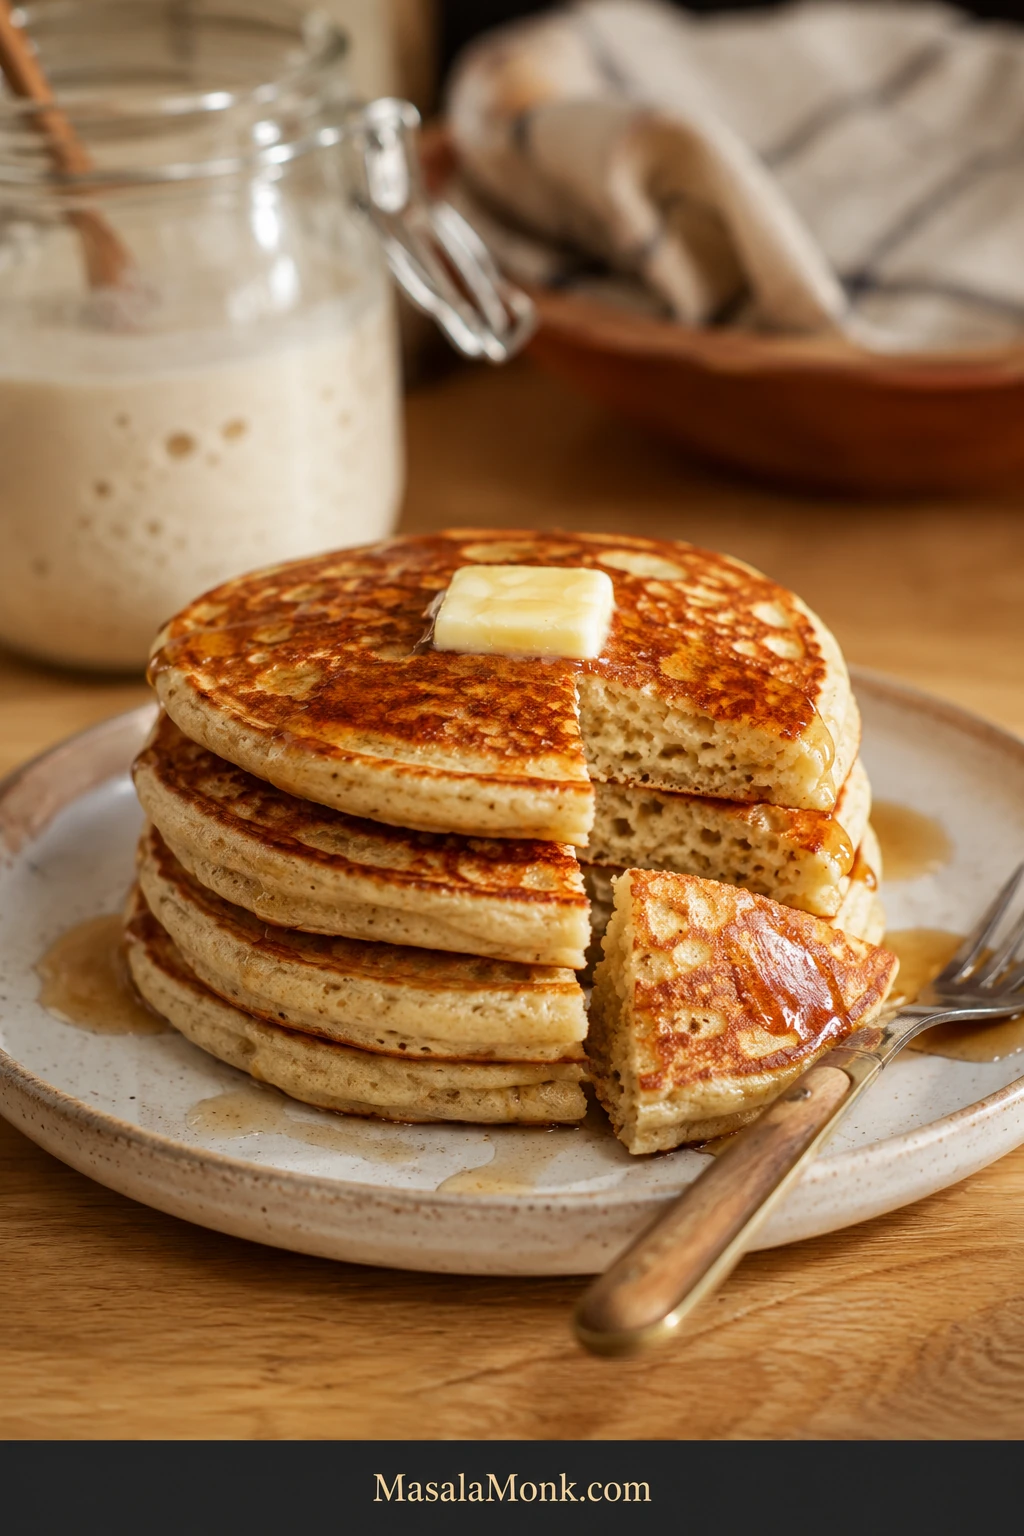
Stack of golden-brown sourdough discard pancakes with melting butter and maple syrup, with one cut pancake showing a soft cream-colored interior with small air pockets.

A jar of sourdough discard has a way of turning breakfast into a small negotiation. There is too much of it to feel good about throwing away.

But you also do not want to feed a starter, wait for it to peak, or spend the morning wondering why the first pancake is beautifully brown outside and still wet in the middle.

These sourdough discard pancakes are fluffy American-style pancakes with lightly crisped golden edges, a soft, springy center, and a mild sourdough tang that still leaves butter and maple syrup in charge. Refrigerator-cold discard works, and active starter works too. This is a same-day recipe: no feeding first, no overnight fermentation, no waiting for a rise.

Jump to the recipe · Check the batter · Troubleshooting

Discard does change from jar to jar. One pours; another mounds. Fresh discard may be thick and mild, while an older refrigerator jar can become sharper and looser.

So instead of pretending every jar needs exactly the same amount of milk, this recipe gives you a dependable starting point and a clear picture of what ready-to-cook batter looks like.
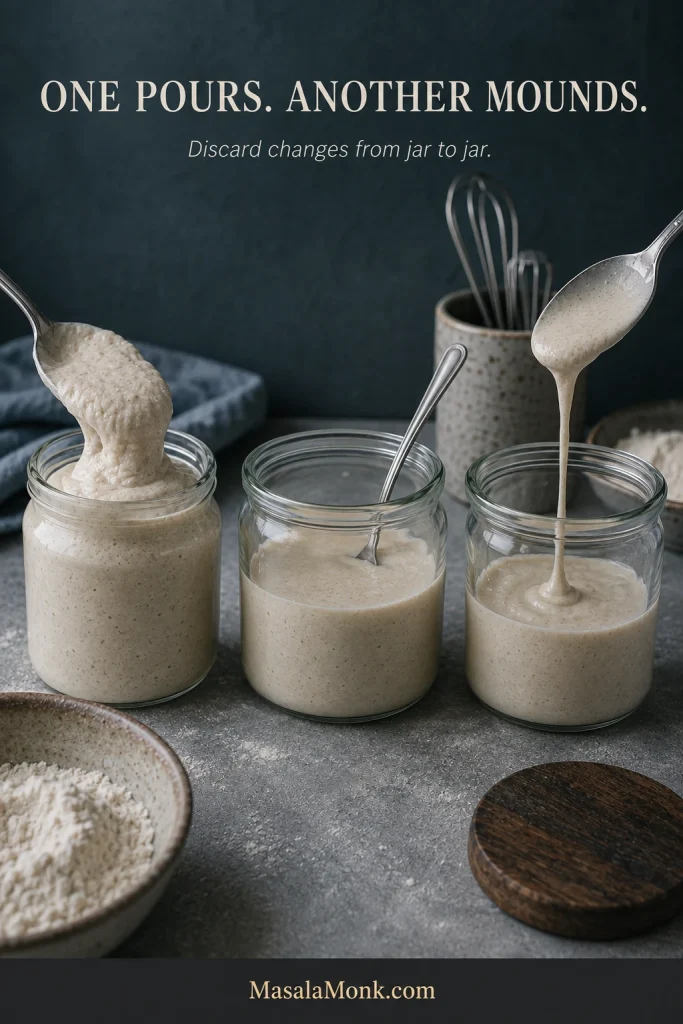
Several portions of sourdough discard showing visibly different consistencies, from thick and mounded to looser and more pourable.
One jar may pour while another mounds. Treat the final batter flow—not the discard’s starting thickness—as the calibration target.

The measurements get you started; the batter and first pancake tell you the rest.

Quick Answer: How Do You Make Fluffy Sourdough Discard Pancakes?

Cold, unfed sourdough discard works. Hands-on prep takes about 10 minutes, with no feeding or overnight wait. Baking powder and baking soda provide the same-day lift.

Use a thick but pourable batter, start the pan around 350°F / 175°C, and cook one tester pancake before filling the griddle. Flip when the edge looks matte, bubbles have formed and begun staying open, and the underside is golden.

Sourdough Discard Pancakes Recipe

This version uses 220 g discard—enough to make a real dent in the jar—while keeping enough fresh flour for a fluffy American-style crumb. Start with 200 ml milk and keep another 30 ml nearby only if the rested batter needs it.

Recipe at a Glance

Hands-on prepAbout 10 minutes
RestAbout 10 minutes
CookAbout 15–20 minutes on a roomy griddle
TotalAbout 35–40 minutes; longer with a small skillet
YieldAbout 12–13 pancakes
Serves3–4

Ingredients

  • 220 g sourdough discard, from a 100%-hydration starter
  • 180 g all-purpose flour, about 1½ cups spooned and leveled
  • 200 ml milk, about ¾ cup + 1½ tablespoons, plus up to 30 ml / 2 tablespoons more as needed
  • 2 large eggs, about 100 g without shells
  • 35 g unsalted butter, about 2½ tablespoons, melted and cooled until just warm, plus a little for the pan
  • 25 g granulated sugar, about 2 tablespoons
  • 8 g baking powder, about 2 teaspoons
  • 2 g baking soda, about ½ teaspoon
  • 4 g fine salt, roughly ⅔–¾ teaspoon
  • 1 teaspoon vanilla extract, optional

Weigh the discard if you can. Its cup volume can vary considerably depending on hydration, temperature, and whether the starter is bubbly or collapsed.
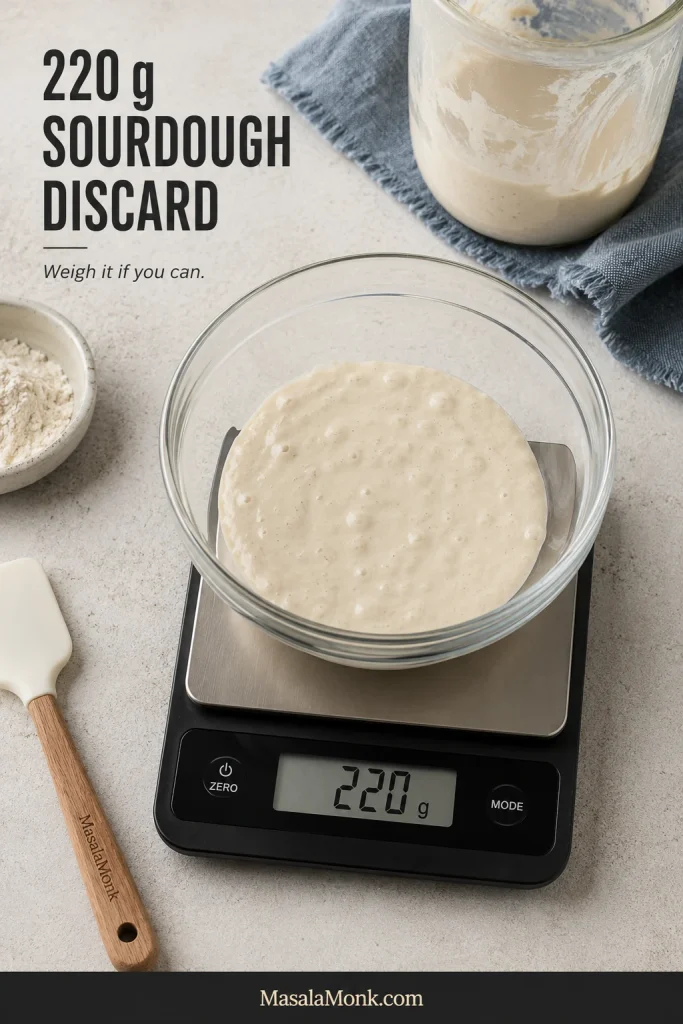
Glass bowl of sourdough discard on a digital kitchen scale reading 220 grams.
Weighing 220 g removes one variable before you begin adjusting the batter.

Instructions: Prepare the Pan and Batter

  1. Preheat the pan. Warm a skillet or griddle over medium to medium-low heat while you make the batter. If you can measure the cooking surface, start around 350°F / 175°C. Heavy cast iron needs a gentler, longer preheat than a thin nonstick pan.

Mix and Rest the Batter

  1. Mix dry and wet separately. In one bowl, whisk together the flour, baking powder, baking soda, and salt. Separately, whisk the discard with 200 ml milk, the eggs, sugar, vanilla, and melted butter. Refrigerator-cold discard can make hot butter firm up, so let the butter cool until just warm first. A few tiny butter flecks are harmless.
  2. Combine and rest. Add the dry ingredients to the wet and mix gently until the large streaks of flour disappear. Small lumps are fine. Let the batter sit for about 10 minutes so the flour can absorb the liquid.

Leave the little lumps alone. Once the large streaks of flour disappear, the short rest can finish hydrating the batter.
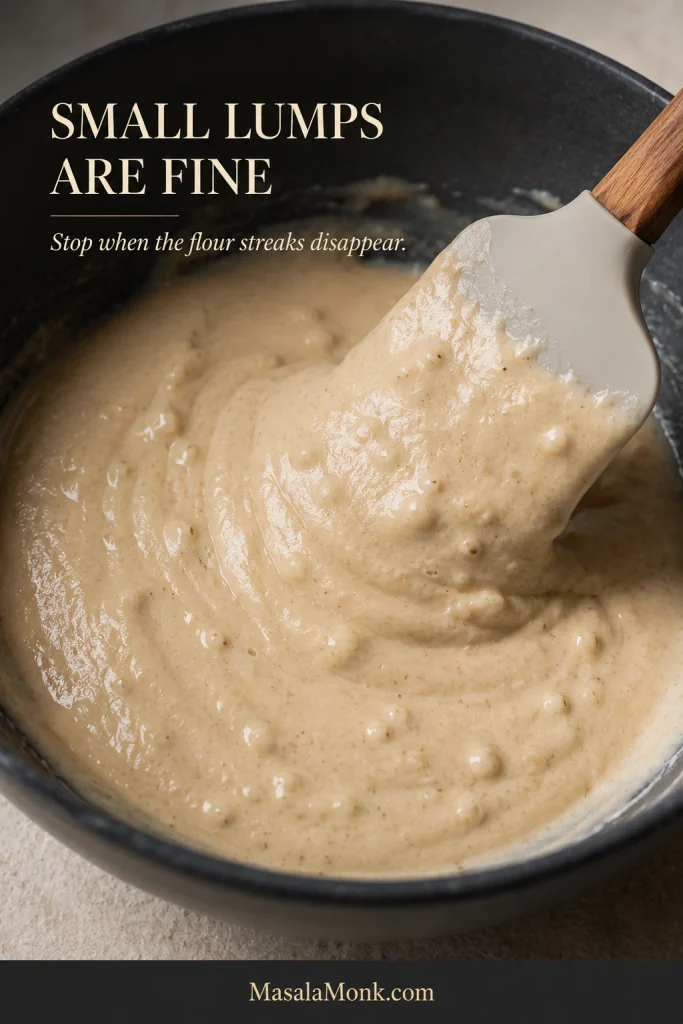
Close-up of pale sourdough pancake batter with small soft lumps and no visible pockets of dry flour.
Small soft lumps are fine; chasing perfect smoothness with extra stirring can make pancakes tougher.
  1. Check the thickness. After the rest, yours may already be ready to cook. The batter should fall in a slow, heavy ribbon and mound briefly before settling. A stiff batter can take milk 1 tablespoon / 15 ml at a time; a clearly runny batter can take flour about 1 tablespoon / 8 g at a time. If you need much more than the reserved 30 ml milk—or repeated additions of flour—pause and recheck the original measurements.

When the ribbon looks like this, stop adjusting. Let it settle briefly, then move on to the tester pancake.
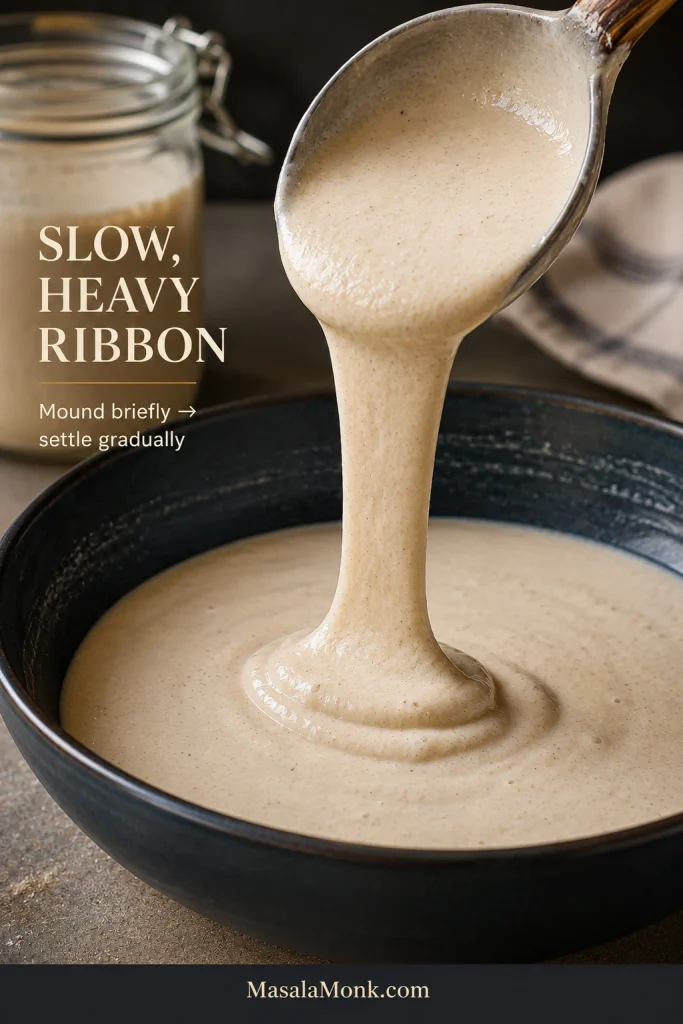
Thick sourdough pancake batter falling from a spoon in a slow ribbon and forming a low mound that begins settling back into the bowl.
Aim for the same slow, heavy ribbon even when two discard jars start differently. Final batter flow matters more than identical milk additions.

Cook the Tester, Then Finish the Batch

  1. Grease lightly and cook one tester. Coat the pan with a thin film of butter or neutral oil, then add about 60 g / a scant ¼ cup batter. The first pancake answers four questions: did it spread correctly, did it brown at the right speed, did the center set, and did the crumb stay tender?

Keep the tester close to 60 g / a scant ¼ cup. That keeps its spread and cooking cues aligned with the timings in this recipe.
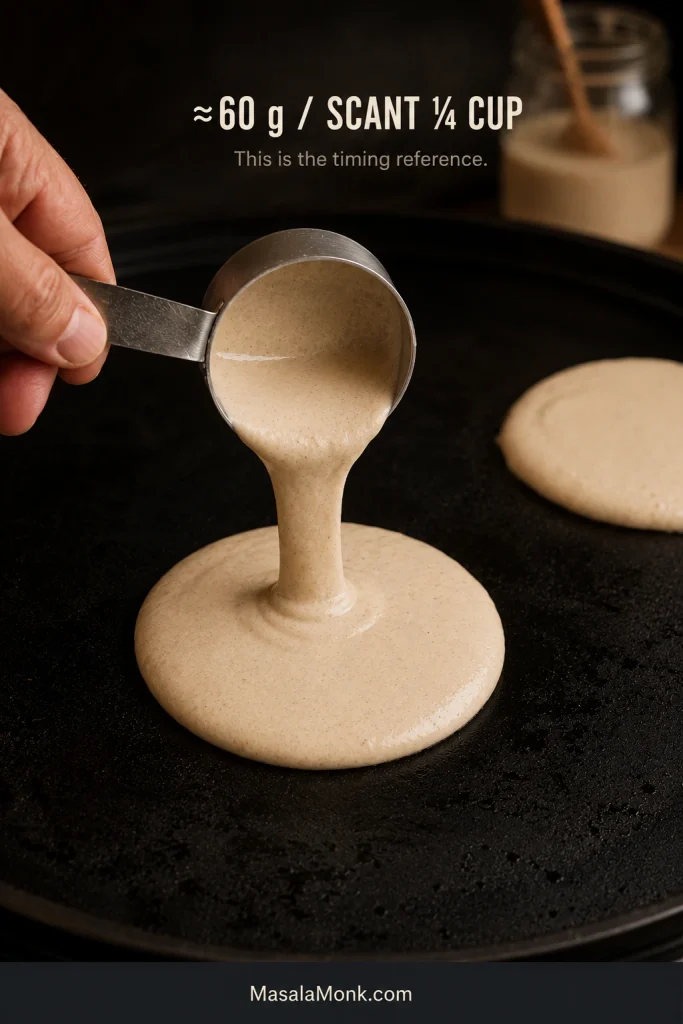
A scant quarter-cup measure portions about 60 grams of sourdough pancake batter onto a dark griddle.
A consistent 60 g portion makes spread, browning and doneness much easier to compare.
  1. Flip when the cues line up. For a roughly 60 g pancake, the first side usually takes about 2–3 minutes. Look for a matte outer edge, bubbles across the surface, a few bubbles that have burst and stayed open, and a golden underside. Flip once and cook the second side for roughly 1–2 minutes.

Use the cues together. The surface should look more set, the edge matte, and the underside golden before you turn the pancake.
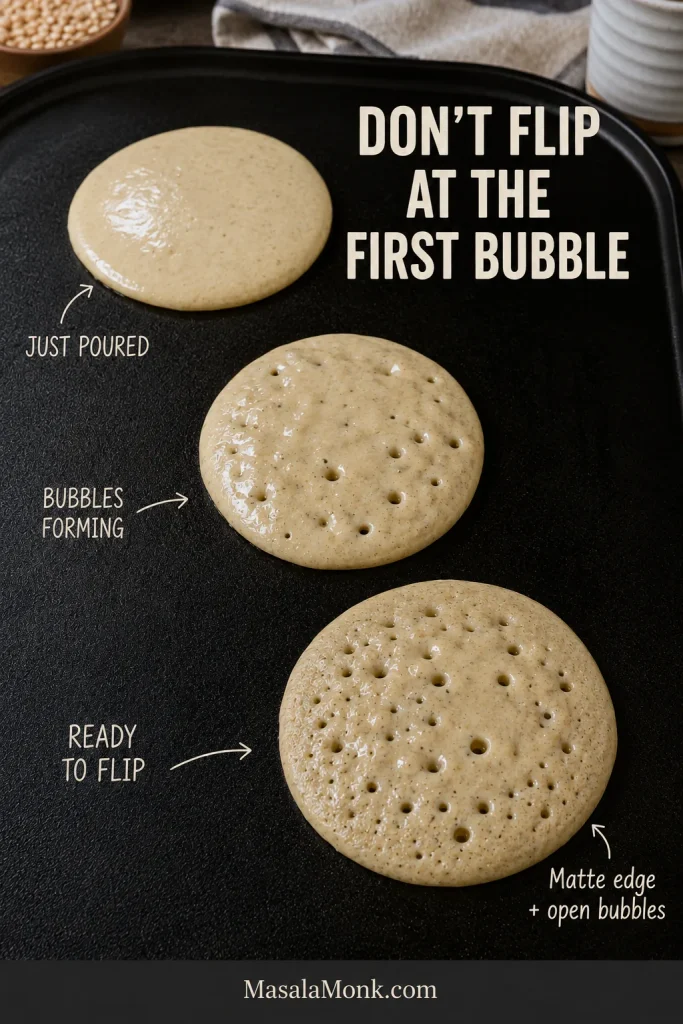
Three pancakes on one griddle show cooking stages from freshly poured batter to forming bubbles and a ready-to-flip pancake with a matte edge and open bubbles.
Don’t flip at the first bubbles. Wait for matte edges and a few burst bubbles that stay open.

Finish the Batch

  1. Adjust the pan, then cook the batch. A dark underside beneath a still-wet top means the pan is running too hot; lower the heat before the next pour. If the tester races outward, the batter needs a little more body. Once the center tears open soft and fully set, cook the remaining pancakes. If butter solids start getting too dark between batches, wipe the pan and grease it lightly again.
  2. Serve or keep warm. Eat the pancakes as they come off the griddle, or hold them on a wire rack over a sheet pan in a 200°F / 95°C oven while the rest cook.

Can I Use Cold Sourdough Discard or Active Starter?

Yes—cold refrigerator discard and active starter both work, as long as the starter is established and healthy. Cold discard can go straight into this same-day batter.
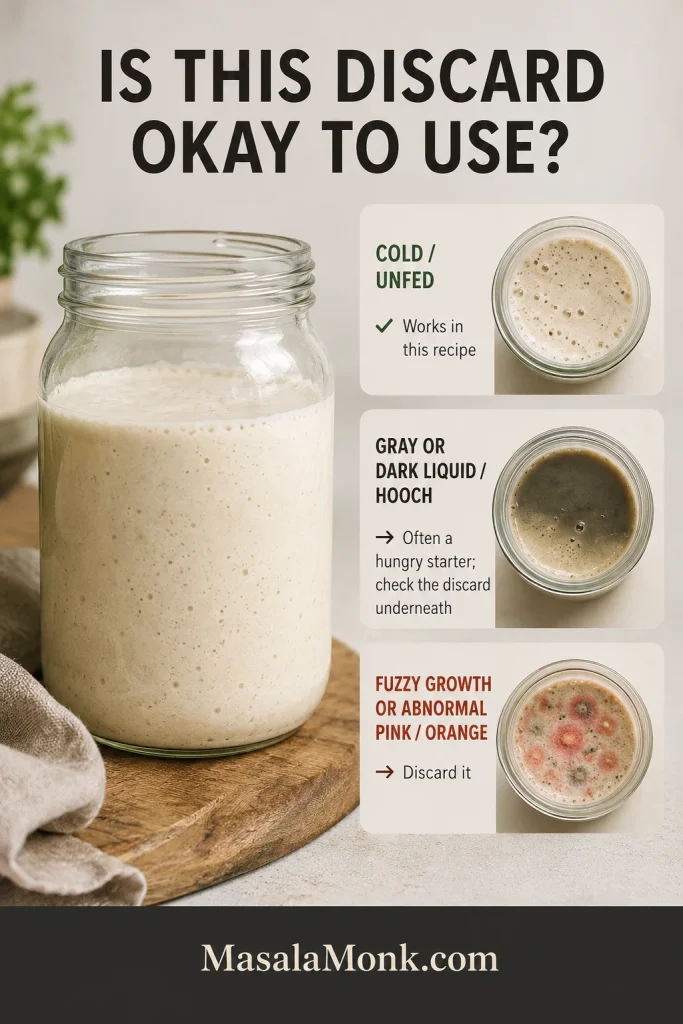
Sourdough discard safety guide showing cold unfed discard as usable, gray or dark hooch as a sign to inspect the discard underneath, and fuzzy growth or abnormal pink or orange color as reasons to discard it.
Gray or dark hooch alone is not mold. Fuzzy growth or abnormal pink/orange discoloration means the discard should not be used.
  • Cold, unfed refrigerator discard: use it directly.
  • Fresh or active starter: use the same weight.
  • Gray or dark liquid on top: this is usually hooch from a hungry starter, not mold. Pour it off if you want a milder result, then check the discard underneath as usual.
  • Discard from a brand-new starter that is not reliably active yet: wait until the starter is established and behaving consistently before saving its discard for cooking.
  • Moldy or abnormally discolored starter: fuzzy growth or unusual pink or orange discoloration means it should not go into breakfast.

How Old Can Sourdough Discard Be for Pancakes?

There is no single day when refrigerated discard suddenly becomes unusable. King Arthur Baking notes that refrigerated discard can keep for several weeks. Older discard usually tastes sharper and may become looser; use the safety checks above rather than age alone to decide whether it belongs in the batter.

If the starter itself is giving you trouble, our sourdough starter recipe for beginners goes deeper into feeding, texture, discard, and keeping a healthy culture.

Discard unusually thick or thin? Go to the batter consistency guide.

Sourdough Pancake Batter: Too Thin, Just Right, or Too Thick?

Get this part right and most of the rest becomes easy. Two people can weigh the same 220 g of discard and still see slightly different batter, especially when one jar is fresh and thick and another is older and looser.

The target is still the same: a slow, heavy ribbon that sits briefly on the surface before easing back into the bowl.

How to Adjust Thin or Thick Pancake Batter

What you seeWhat it meansWhat to do
Runs quickly from the scoop and spreads immediatelyToo thinAdd about 8 g / 1 tbsp flour, mix gently, and check again.
Falls in a thick ribbon and gradually relaxesJust rightCook the tester pancake.
Drops in a mound and barely movesToo thickAdd 15 ml / 1 tbsp milk, mix gently, and check the flow again.

A loose batter runs outward before the pancake has much chance to build height. At the other extreme, batter that barely moves can sit too tall, allowing the underside to brown before enough heat reaches the center.
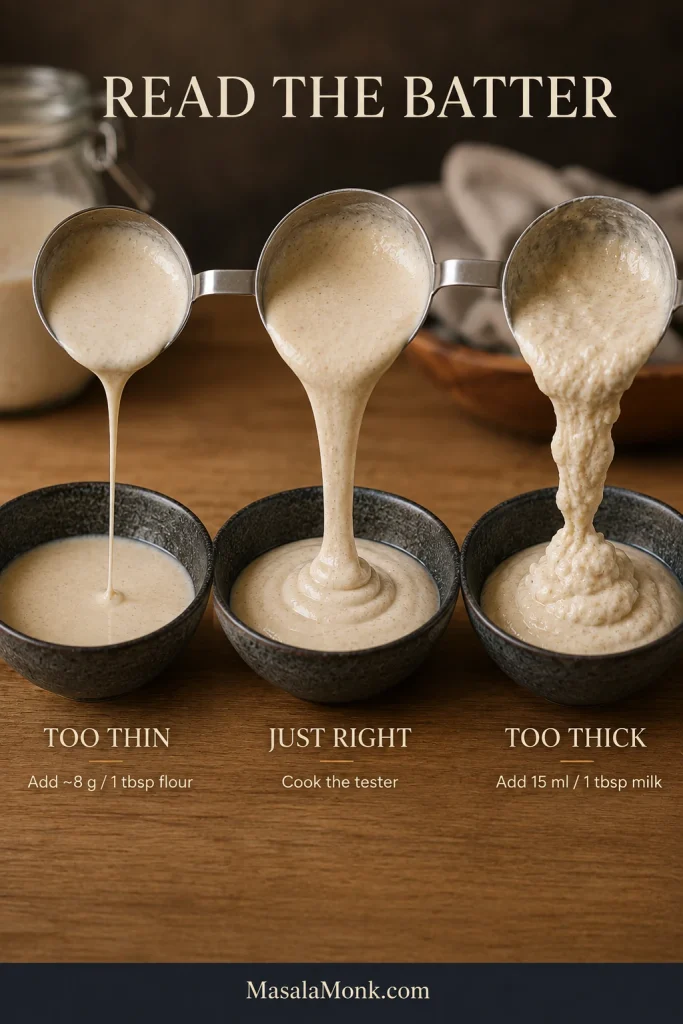
Three bowls compare sourdough pancake batter that is too thin, just right, and too thick; the guide suggests about 8 grams flour for thin batter and 15 milliliters milk for thick batter.
Correct thin or thick batter in small increments, then mix gently and check the flow again before adding more.

Let the First Pancake Check the Pan

The first pancake has a bad reputation. Give it a job instead.

A bad first pancake is useful information; finding the same problem after the whole bowl has been cooked is much more annoying. Check four things:
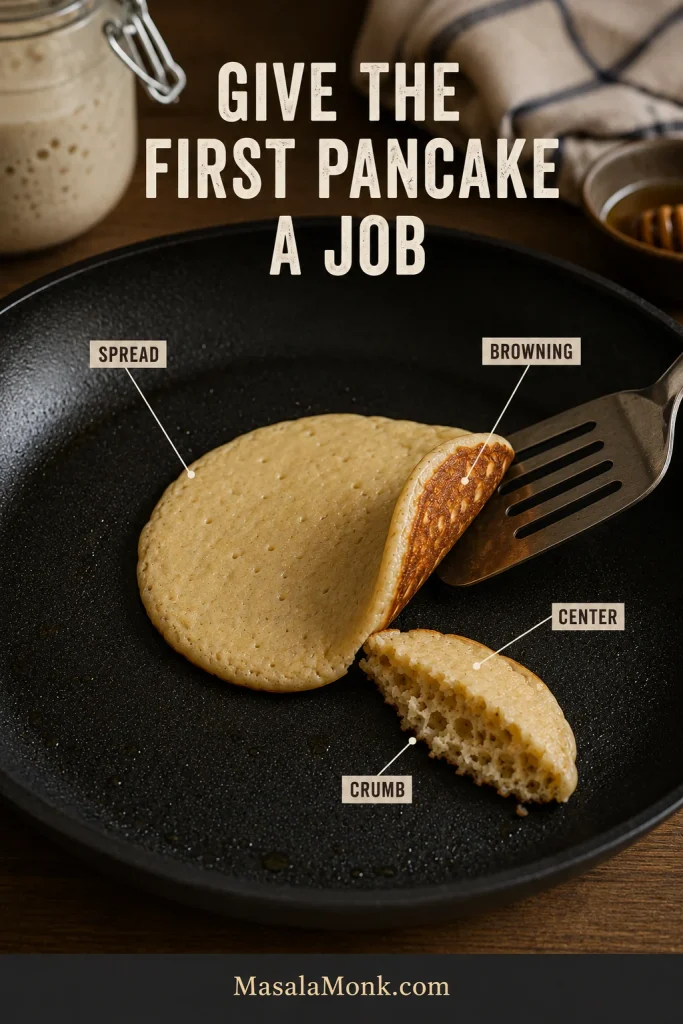
A single tester pancake is used to check its diameter, golden underside, cooked center, and exposed interior crumb before cooking the remaining batter.
After the tester, change one variable at a time so you know which adjustment actually fixed the problem.

What to Check on the Tester

  • Spread: does it widen into a neat, fairly thick round?
  • Browning: does the underside turn golden at roughly the same pace that the top begins to set?
  • Center: does it cook through before the bottom gets too dark?
  • Crumb: when torn open, is it soft and springy instead of shiny or paste-like?

Let that pancake overrule the temperature dial. Electric griddles, heavy cast iron, and thin skillets can behave very differently even when their settings sound similar.
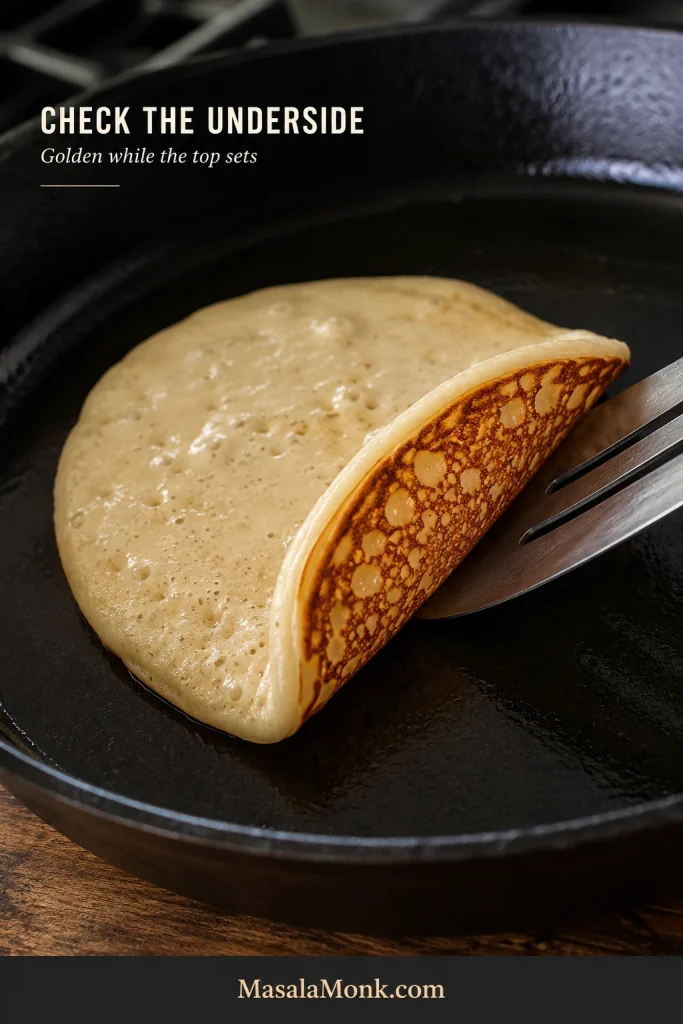
Pancake edge lifted with a spatula to reveal a mottled golden-brown underside while the top shows bubbles and a partly set surface.
The underside and surface should progress together; dark below and wet above usually means too much heat.

Read the Crumb

Once the tester tears open fluffy and fully set, breakfast gets much easier. The edges should be lightly browned and delicately crisp, while the warm center springs back instead of smearing against the fork.
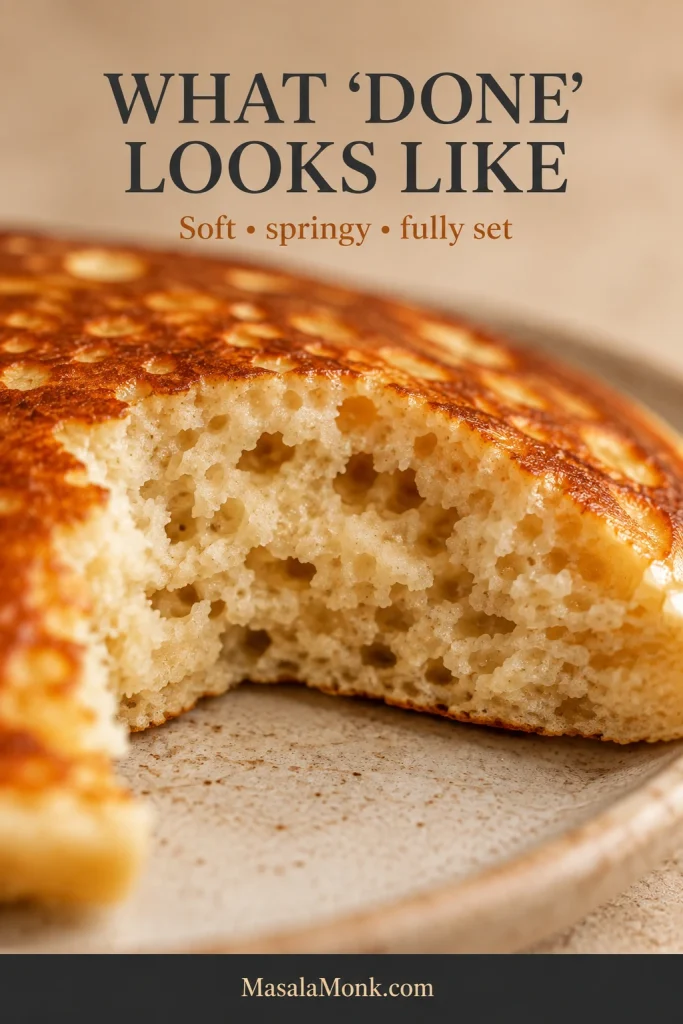
Torn sourdough pancake showing a fully cooked cream-colored interior with small irregular air pockets and a soft, set crumb.
Let a freshly torn pancake sit for a few seconds before judging it. Escaping steam can make a fully cooked center look temporarily wetter.

Once the tester is right, cook the remaining pancakes with the same portion and steady heat.
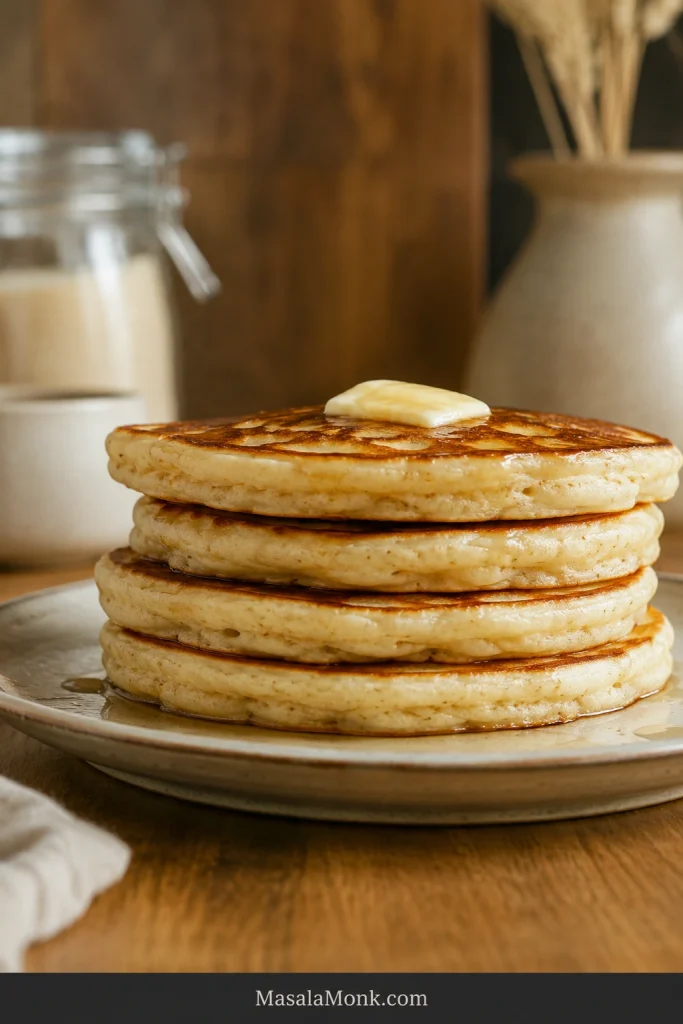
Side view of a stack of four fluffy golden sourdough discard pancakes with melting butter and lightly syruped edges.
A settled batter and steady griddle should give you a consistent batch.

Tester still not right? Go straight to troubleshooting.

Sourdough Discard Pancake Troubleshooting

Most pancake problems announce themselves early. The first question is simple: does the pan need adjusting, or does the batter?
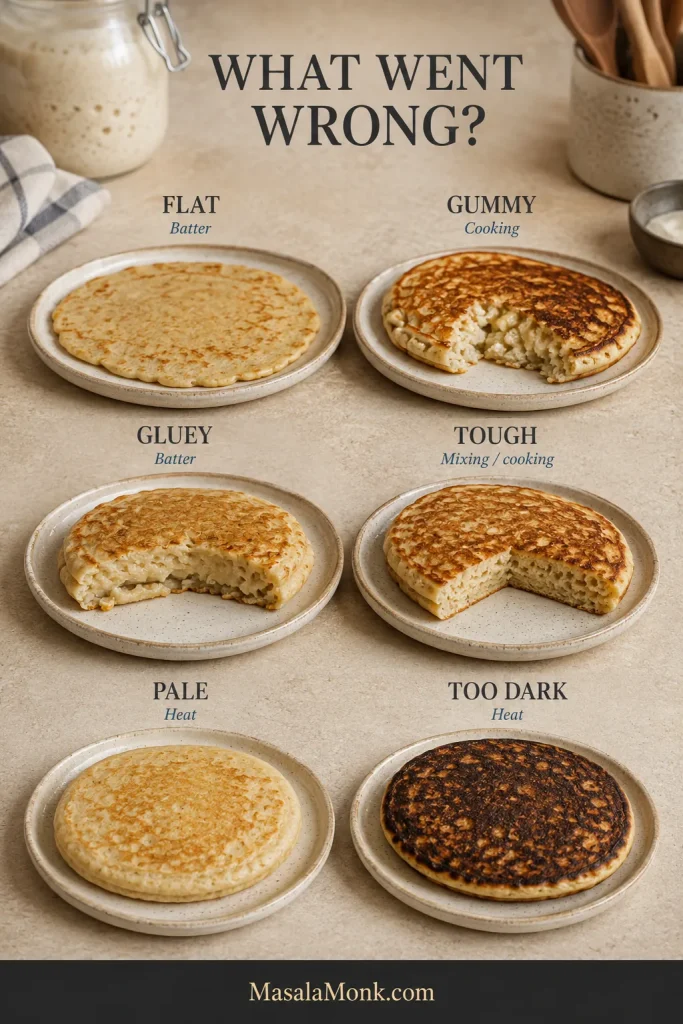
Troubleshooting guide showing six pancake problems: flat, gummy, gluey, tough, pale, and too dark, with each linked to batter, cooking, mixing, or heat.
Start with the symptom, then separate batter problems from heat, mixing and cooking problems before changing the recipe.

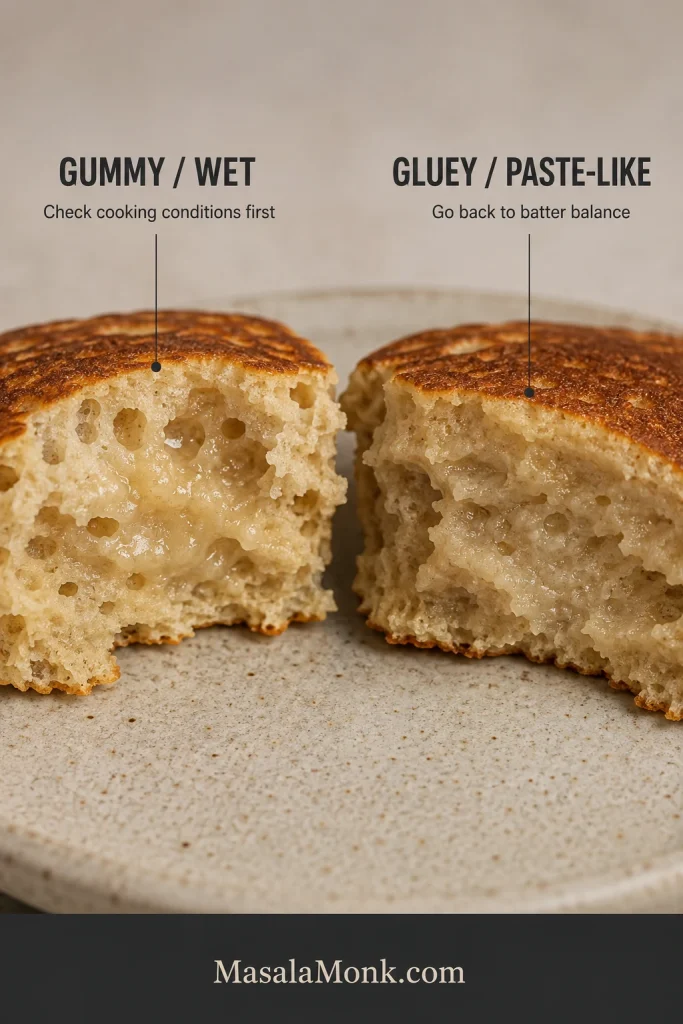
A gummy, wet middle often points to cooking conditions; a persistently gluey, paste-like crumb sends you back to the batter.
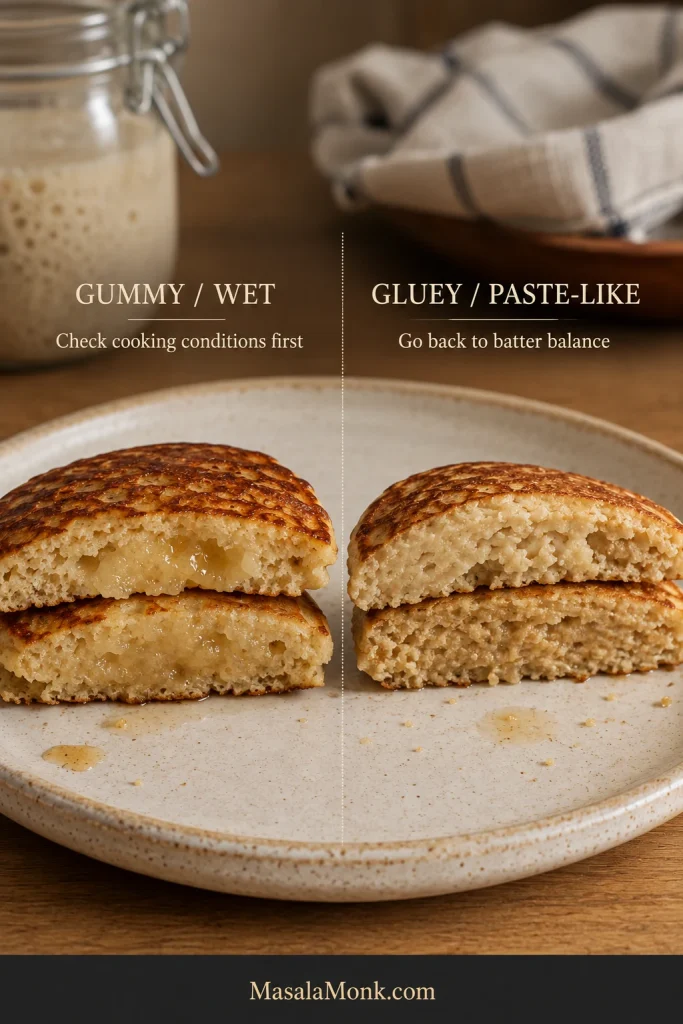
Two cut pancakes compare a gummy wet center with otherwise formed crumb against a broadly dense, paste-like gluey interior with poor air-cell structure.
Try one lower-and-slower tester first. If the wet center disappears, suspect cooking; if the crumb stays paste-like throughout, revisit batter balance.

Start With the Symptom

What happenedCheck firstWhat usually helps
Flat and spreadingBatter too looseThicken slightly; if the consistency already looks right, make sure the baking powder is fresh.
Golden outside, wet or gummy insidePan too hot, pancake too large, or batter sitting too tallLower the heat, make a slightly smaller pancake, or loosen an overly thick batter.
Gluey despite longer, gentler cookingToo much liquid or too little fresh flourRecheck discard thickness, milk, flour, and major substitutions.
Tough or rubberyOvermixing, too much added flour, or overcookingMix less, keep corrections small, and shorten the cook once the center is set.
Pale and slowPan too coolIncrease the heat slightly.
Too sourOlder, more acidic discardUse fresher discard next time.
Soapy or alkaline tasteToo much baking sodaStick to the measured amount.
Bubbly but still denseLoose batter, tired baking powder, or a pan that’s too coolCheck the batter first, then make sure the baking powder is fresh and the pan is hot enough.

Golden Outside, Gummy Inside

A beautifully browned underside with a wet middle means the surface is cooking faster than the center.
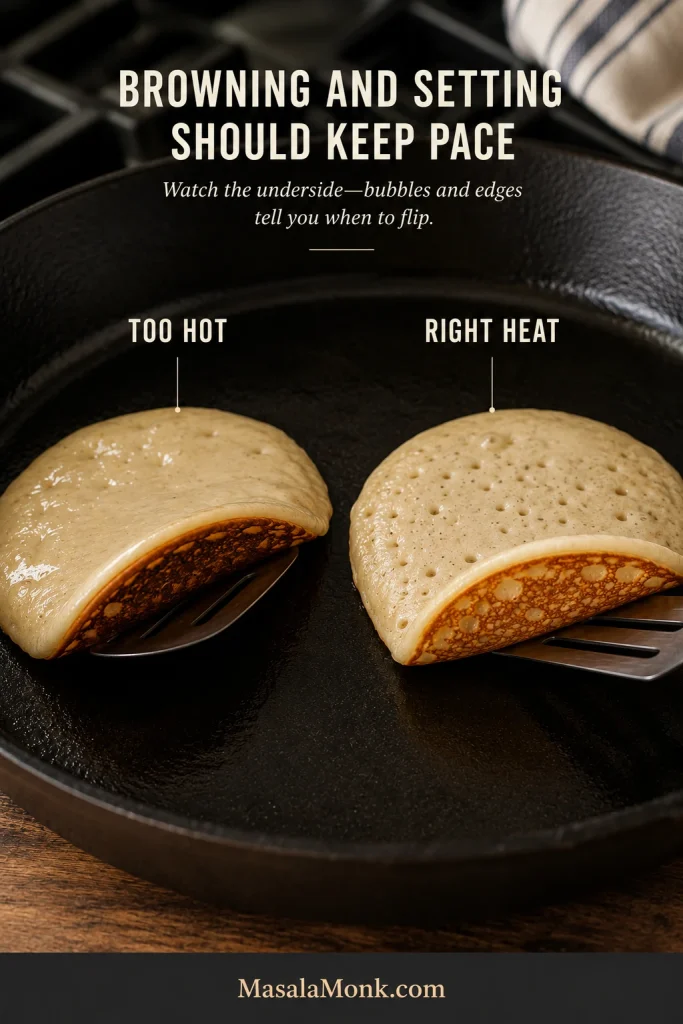
Two pancakes are lifted on spatulas: the too-hot example has a dark underside while the top remains wet, and the correct-heat example has a golden underside with bubbles and a more set top.
If later pancakes brown faster than the first, reduce the heat slightly; the skillet may simply be getting hotter.

Lower the heat for the next pancake. A very tall mound of batter may need a splash of milk. An oversized pour simply needs more time than the roughly 60 g pancakes used for these timings.
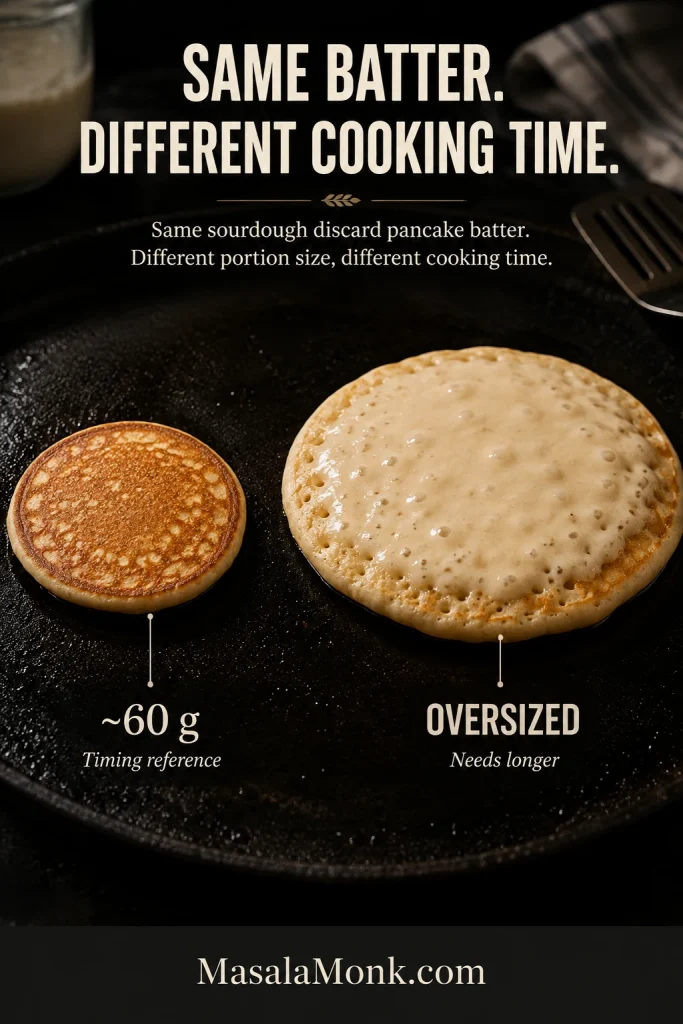
Two pancakes made from the same batter cook side by side; the smaller 60-gram pancake is more evenly set while the oversized pancake remains wetter in the center.
Larger pancakes need more time for heat to reach the center, even when the outside looks ready.

For repeated trouble, an instant-read thermometer can be a temporary learning tool. A center around 190°F / 88°C is a useful cooked-through reference. Once you recognize the correct crumb, there is no reason to measure every pancake.
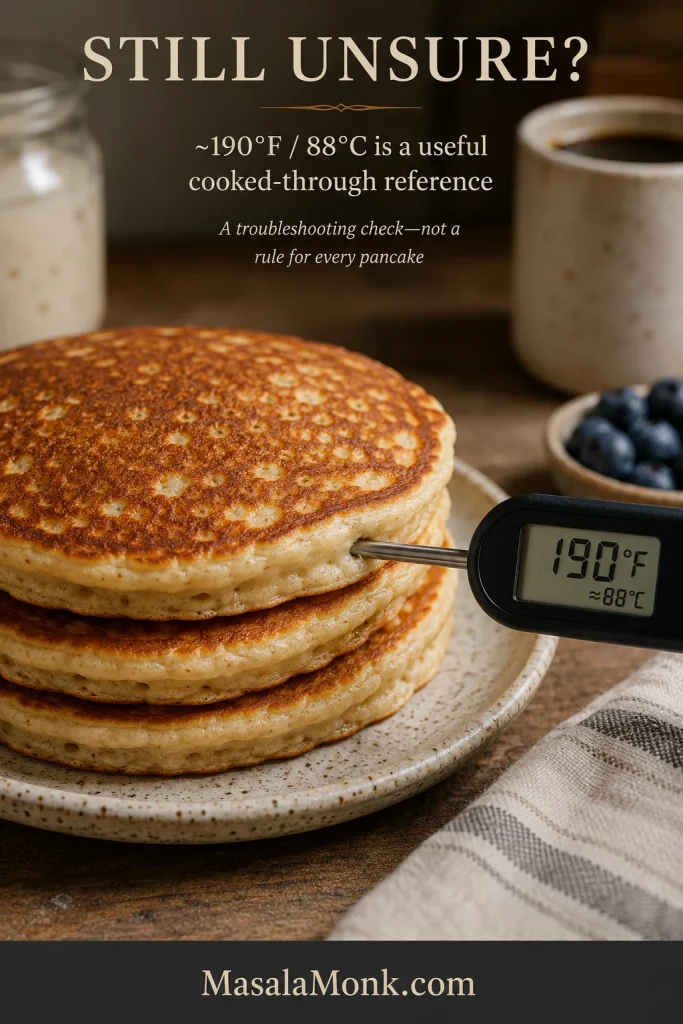
Instant-read thermometer inserted from the side into a stack of sourdough pancakes, displaying 190 degrees Fahrenheit and approximately 88 degrees Celsius.
Measure the thickest center, not the crust or pan-facing edge. Around 190°F / 88°C is a useful cooked-through reference while learning the cues.

The Center Stays Gluey Even After Longer Cooking

A persistently gluey center is different from one that simply needed another minute. When lower heat and enough cooking time still leave a paste-like interior, go back to the bowl before sacrificing the outside of another pancake.

Several things can push the crumb in this direction: very loose batter, using all the optional milk with unusually thin discard, too little fresh flour, or major substitutions.

If the batter is badly out of balance, cooking the pancake until the outside becomes leather will not rescue the middle.

Back to recipe · Check batter consistency · Back to top

Why Does Unfed Sourdough Discard Still Work in Pancakes?

Here, the baking powder and baking soda do the lifting. The discard brings flour, water, acidity, and sourdough flavor, but it does not need to raise the pancakes by itself.

This recipe assumes a 100%-hydration starter, meaning equal weights of flour and water are normally used when feeding it. So 100 g of discard contains roughly 50 g flour and 50 g water.
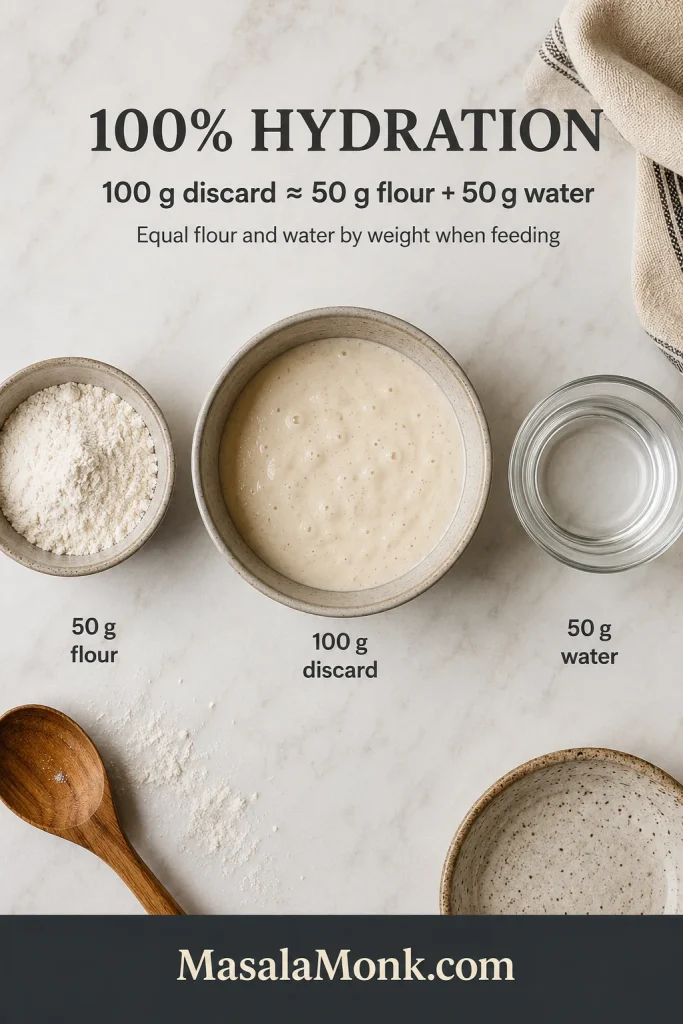
Overhead guide showing 100 grams of sourdough discard beside 50 grams of flour and 50 grams of water to explain 100 percent hydration.
Hydration is the flour-to-water ratio, not a visual thickness score. Two 100%-hydration starters can still look and feel different.

If your starter is much stiffer or wetter than a 100%-hydration starter, you may need a little more or less milk. That’s fine—after the rest, judge the bowl by the same batter cue.

Fresh flour and eggs give the pancakes enough body to set. Once the rested batter looks right, it can go straight to the griddle; the discard does not have to puff up the bowl the way active starter raises bread dough.

How Discard Age and Thickness Affect the Batter

Most jar-to-jar differences come down to flavor and how much extra milk the batter needs.

Your discardLikely effectWhat to do
Fresh or activeMilder flavor; sometimes a more aerated batterStart with the base recipe.
Older refrigeratedSharper flavor; may be looserStart with 200 ml milk and add more only if needed.
Very thinWetter final batterYou may need little or none of the reserved milk.
Very thickStiffer final batterAdd the reserved milk gradually after the rest.

If the batter looks right before you use the full extra 30 ml milk, stop there. The extra milk is there for the jars that need it.
Three bowls show pancake batter made with thin, typical, and thick sourdough discard, with guidance to use little or no reserved milk, check the ribbon, or add milk gradually up to 30 milliliters.
Hold back the extra milk until after the rest. That gives you room to calibrate thick discard without making a thinner jar too loose.

Make the Batch Fit the Discard You Actually Have

Sometimes the jar gives you the full 220 g. On other mornings, you scrape out only 60–70 g and breakfast still needs to happen. A discard recipe should not make you feed the starter again just to create enough discard for breakfast.

Choose the batch closest to what is in your jar. The ingredient amounts change, but each version uses the same mixing, resting, batter-checking, and cooking method as the main recipe.
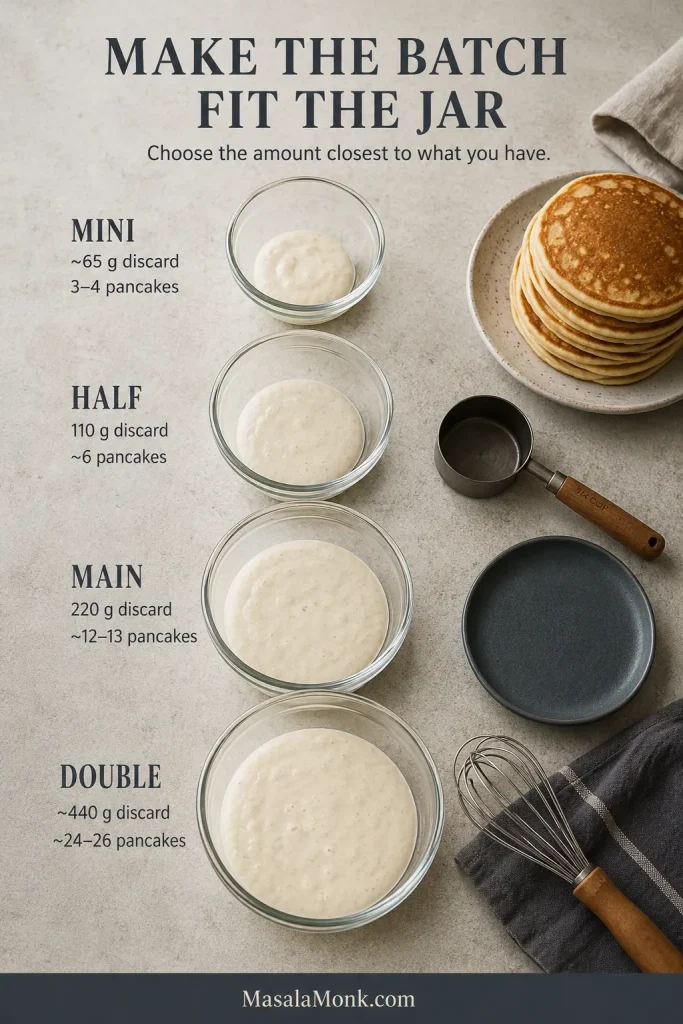
Batch-size guide showing about 65 grams discard for 3 to 4 pancakes, 110 grams for about 6, 220 grams for about 12 to 13, and about 440 grams for about 24 to 26 pancakes.
Choose the nearest established batch instead of forcing every gram into one formula; clean ratios are easier to cook predictably.

Mini Batch: About 65 g Discard

This is the “there really isn’t much in the jar” batch. It makes about 3–4 pancakes.
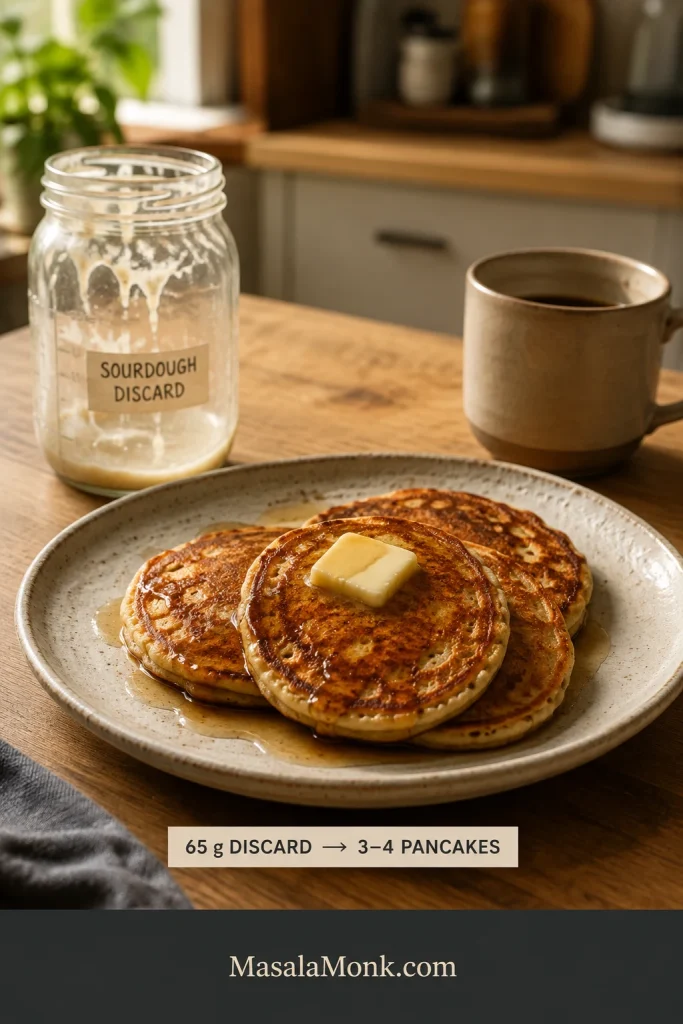
Small breakfast plate with three to four golden sourdough discard pancakes beside a nearly empty discard jar and a mug.
Even 65 g of discard is enough for a small 3–4-pancake breakfast.
  • 65 g sourdough discard
  • 55 g all-purpose flour
  • 60 ml milk, plus up to about 10 ml more if needed; add it 1 teaspoon / 5 ml at a time
  • 30 g beaten egg, about 2 tablespoons
  • 10 g melted butter, about 2 teaspoons
  • 8 g sugar, about 2 teaspoons
  • ½ teaspoon + ⅛ teaspoon baking powder
  • ⅛ teaspoon baking soda
  • Scant ¼ teaspoon fine salt
  • A small splash of vanilla, optional

Beat one egg, use 30 g for the batter, and save the rest for scrambled eggs or another breakfast use.

Half Batch: 110 g Discard

This is the neatest smaller batch because one large egg divides the main recipe cleanly in half. It makes about 6 pancakes.

  • 110 g sourdough discard
  • 90 g all-purpose flour, about ¾ cup
  • 100 ml milk, plus up to 15 ml more if needed; add it 1–2 teaspoons / 5–10 ml at a time
  • 1 large egg
  • 18 g melted butter, about 1 tablespoon + 1 teaspoon
  • 12–13 g sugar, about 1 tablespoon
  • 1 teaspoon baking powder
  • ¼ teaspoon baking soda
  • About ⅓ teaspoon fine salt
  • ½ teaspoon vanilla, optional

For the full 220 g discard batch, use the main recipe above. At every size, start with the listed milk and adjust only when the rested batter clearly needs it.

What If You Have 400–500 g of Sourdough Discard?

Have around 440 g? Double the whole recipe. That gives you roughly 24–26 pancakes.
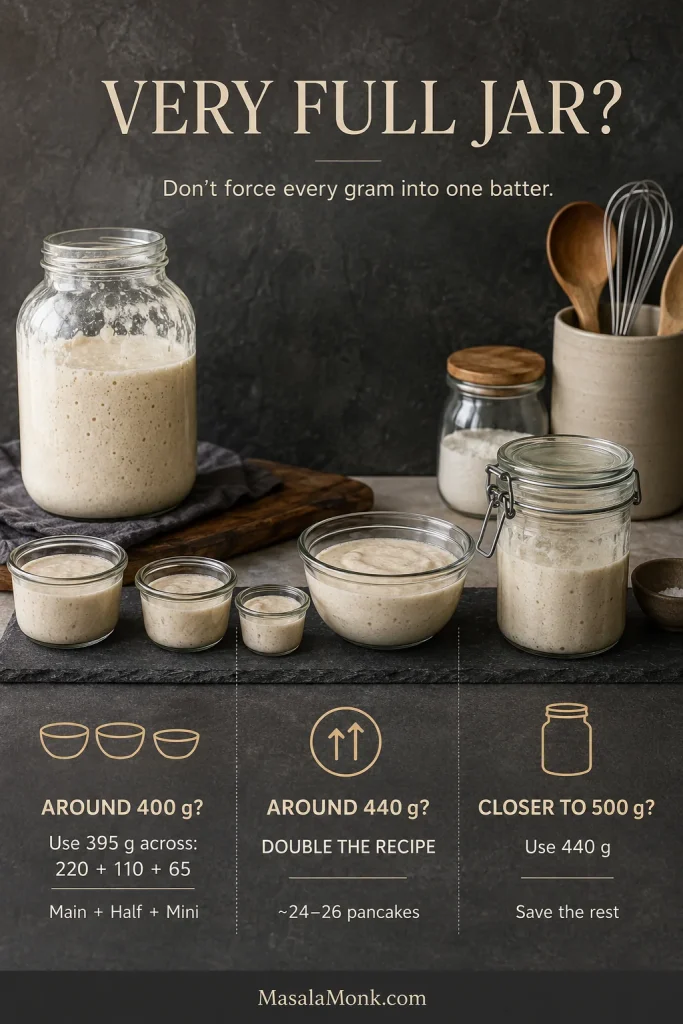
Guide for a large amount of sourdough discard: around 400 grams can use 395 grams across 220, 110 and 65 gram batches; around 440 grams doubles the recipe; closer to 500 grams uses 440 grams and saves the rest.
Around 440 g doubles cleanly. Near 400 g, the full + half + mini batches use 395 g; near 500 g, use 440 g and save the rest.
  • 440 g sourdough discard
  • 360 g all-purpose flour
  • 400 ml milk, plus up to 60 ml more if needed
  • 4 large eggs
  • 70 g melted butter
  • 50 g sugar
  • 16 g baking powder
  • 4 g baking soda
  • 8 g fine salt
  • 2 teaspoons vanilla, optional

Closer to 400 g? The full, half, and mini batches above use 395 g discard altogether, so you can make those three batches without wrestling with awkward egg fractions.

Closer to 500 g? Weigh out 440 g for the double batch and save the rest for another recipe.

Want to use 400–500 g of discard without ending up with two dozen pancakes? That’s a different recipe. Adding more discard here also adds more fermented flour and water, so the whole batter changes.

If the jar is still looking alarmingly full after breakfast, our sourdough banana bread with discard gives some of it another useful destination.

Can I Make This Sourdough Pancake Batter Overnight?

Not as written. This is a same-day batter, and the baking powder and baking soda go in before the short rest.

Don’t simply put the finished batter in the refrigerator until morning. Overnight sourdough pancakes need the long rest and the leaveners timed differently, so use a method written specifically for an overnight batter.

Easy Substitutions—and the Ones That Need a Different Recipe

Plant milk and neutral oil are straightforward changes. Eggs and gluten do much more work in the pancake, so removing either needs a recipe built for that change.
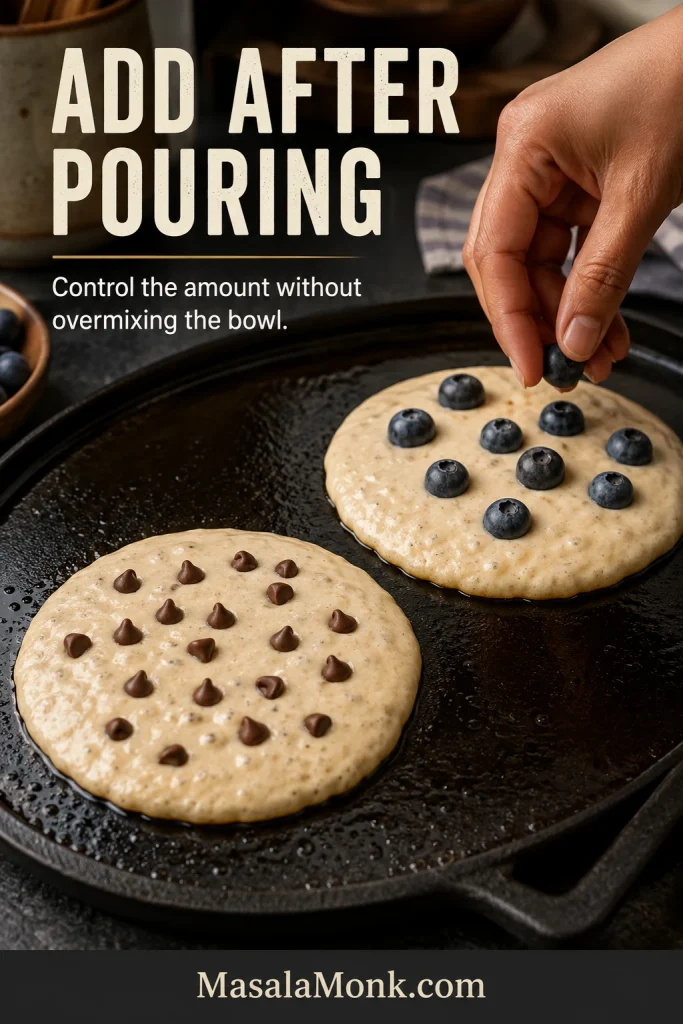
Two wet pancakes on a griddle, one topped with blueberries by hand and the other dotted with chocolate chips after the batter has been poured.
Scatter blueberries or chocolate chips after pouring so one batch can stay partly plain.

Substitution and Add-In Guide

ChangeHow to handle itWhat to expect
Unsweetened plant milkEasy swapUse it in place of the milk and check the rested batter the same way.
Neutral oil for butterEasy swapThe flavor will be less buttery, and the browning may differ slightly.
Blueberries or chocolate chipsEasy add-inScatter them over each pancake after pouring so you can control the amount without repeatedly stirring the whole bowl.
ButtermilkNot a straight 1:1 swapIt changes both acidity and batter thickness.
Eggless or veganUse a recipe designed for itRemoving eggs changes binding, moisture, and crumb.
Fully gluten-freeUse a gluten-free recipeYou need a gluten-free starter and a pancake recipe built around gluten-free flour.
No-added-flour/high-discardUse a high-discard recipeThe flour-to-liquid balance and finished texture will be different.

Buttermilk is a good example of why some swaps deserve their own recipe. If that is the pancake you actually want, our fluffy buttermilk pancakes are built around it from the start.

Thinking about replacing the eggs with flax? Our guide to how to make a flax egg explains what flax contributes and where it behaves differently from a chicken egg. That does not make it an automatic replacement for the two eggs here.

Storing, Freezing, and Reheating Sourdough Pancakes

Keep a Batch Warm

Set a wire rack over a sheet pan and keep cooked pancakes in a 200°F / 95°C oven while the rest cook. The rack lets steam escape instead of trapping it underneath the stack.

Refrigerate

Cool leftovers, refrigerate them promptly in a covered container, and use them within 3–4 days. That matches the USDA guidance for refrigerated cooked leftovers.

Freeze

Cool the pancakes completely, then freeze them in a single layer or separate small stacks with parchment. Once firm, transfer them to a freezer-safe bag or container. For the best texture, try to use them within about 1–2 months.
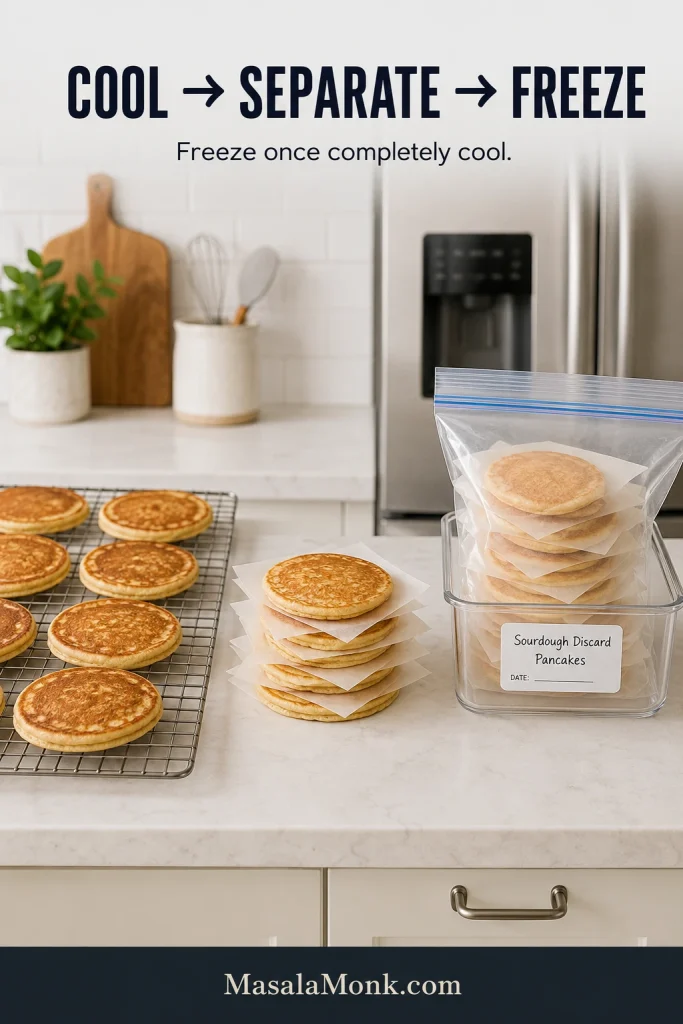
Pancakes shown cooling on a wire rack, stacked with sheets of parchment, and packed in a freezer-safe bag for storage.
Cool pancakes completely before packing; separating them makes it easier to remove only what you need.

Reheat

  • Toaster: great for one or two pancakes when you want slightly crisper edges.
  • Skillet: warm over low to medium-low heat for roughly 1–2 minutes per side.
  • Microwave: use short 15–20 second bursts; fastest, but also the softest finish.
  • Oven: warm several pancakes around 350°F / 175°C for about 5–7 minutes, adding more time when starting from frozen.
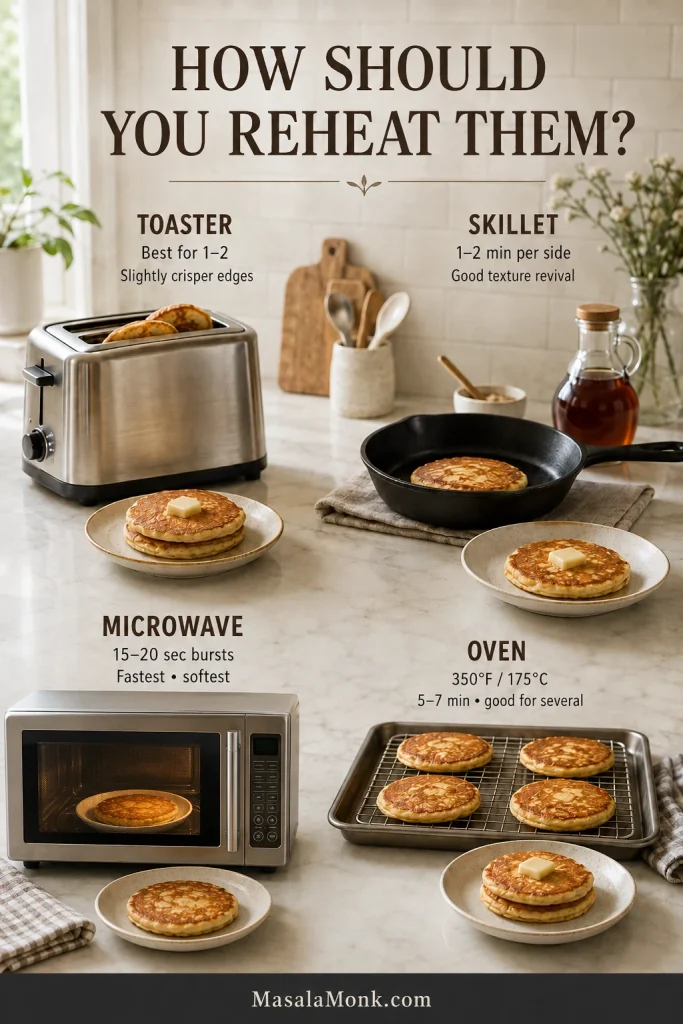
Reheating guide showing a toaster for 1 to 2 pancakes, skillet for 1 to 2 minutes per side, microwave in 15 to 20 second bursts, and oven at 350 degrees Fahrenheit or 175 degrees Celsius for 5 to 7 minutes.
Reheat only the pancakes you plan to eat; repeated warming and cooling gradually dries the crumb.

A Better Use for the Jar in the Fridge

The best sourdough discard pancake is not the one made from the most photogenic starter. It is the one that works with the jar you actually have.

Get the batter into that slow, heavy ribbon. Let the first pancake tell you what the pan needs. Then cook the rest while the edges take on color, the centers stay soft and springy, and a little butter starts melting into the warm stack.

When breakfast is finished, the discard jar is a little emptier instead of going into the bin—and the next jar should feel much less mysterious.
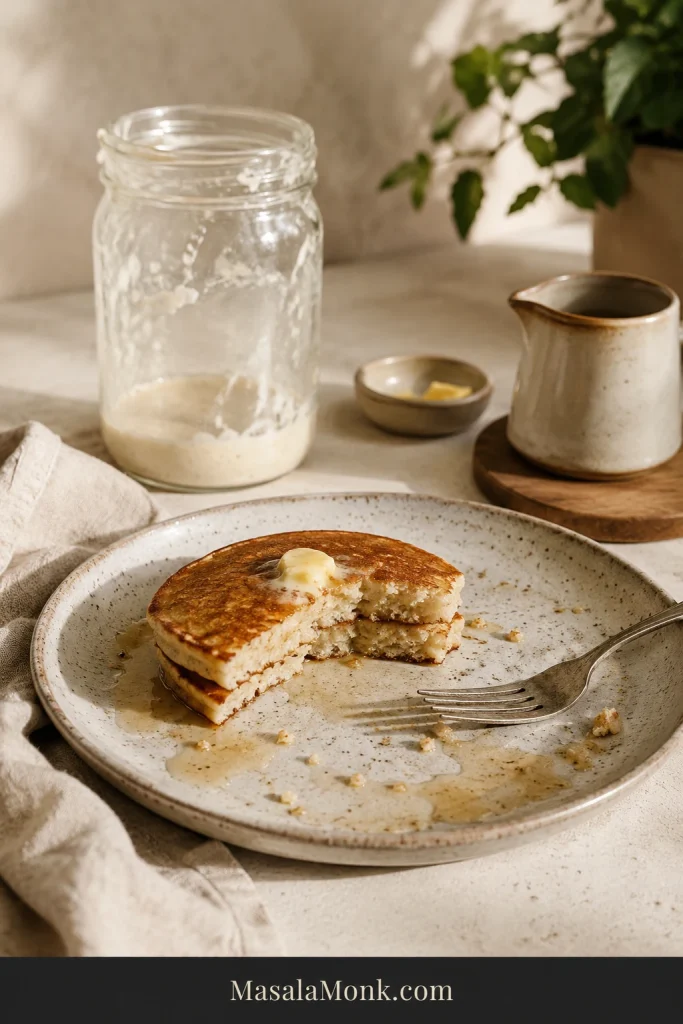
Partially eaten sourdough pancakes on a ceramic plate with a used fork, maple syrup traces, crumbs, and a nearly empty sourdough discard jar in the background.

If you make these, tell us what kind of discard you used and whether the batter needed any of the reserved milk. Sourdough jars behave differently, and your experience may help the next person staring into theirs.

Back to recipe · Back to top

Explore more sourdough: If sourdough is becoming less of a leftover-management project and more of a hobby, our sourdough bread recipes guide is a natural next step into loaves, rolls, buns, and longer-fermented doughs.
Posted on Leave a comment

Sourdough Banana Bread Recipe

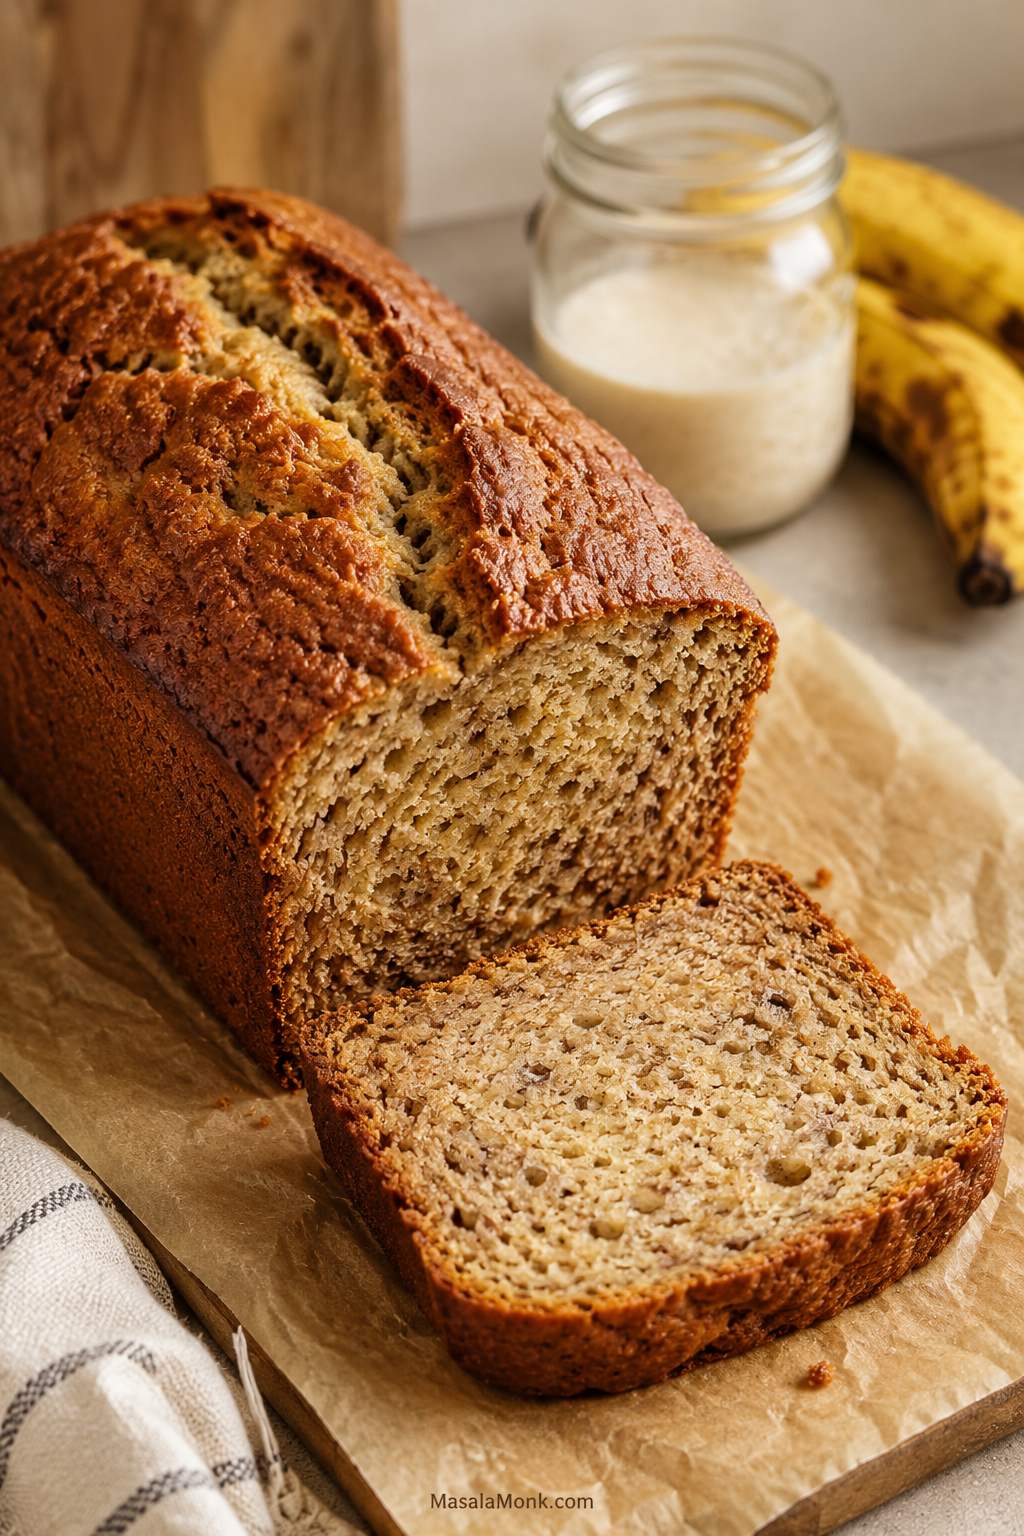
Sliced sourdough banana bread loaf on parchment with a moist crumb, ripe bananas, and a jar of sourdough discard in the background.

This sourdough banana bread recipe is for the two things home bakers hate wasting most: overripe bananas and sourdough discard. The loaf bakes up soft, fragrant, and deeply banana-forward, with brown sugar warmth, a tender crumb, and just enough sourdough tang to make each slice taste more rounded and interesting.

This is the bread you make when the bananas are too far gone for snacking but exactly right for baking. It is the kind of loaf that smells like a good decision before it even leaves the oven, especially if you plan to eat the first slice warm with butter.

Why This Sourdough Banana Bread Is Different

The batter comes together like a regular quick bread: no kneading, no shaping, no rise time, no mixer, and no complicated sourdough schedule. You only need about 15 minutes of hands-on prep, one main mixing bowl, and a standard loaf pan.

Meanwhile, the discard adds flavor, moisture, acidity, and a little tang, while baking soda and baking powder do the lifting. This sourdough banana bread recipe is designed to feel familiar first and sourdough-smart second, so the discard improves the loaf without making it complicated.

What makes this loaf especially reliable is the way it handles moisture. Ripe bananas and sourdough discard both make banana bread taste better, but too much of either can leave the middle gummy. This recipe keeps the banana and discard in a safe range, then gives you clear doneness cues so the loaf bakes up moist, tender, and sliceable.

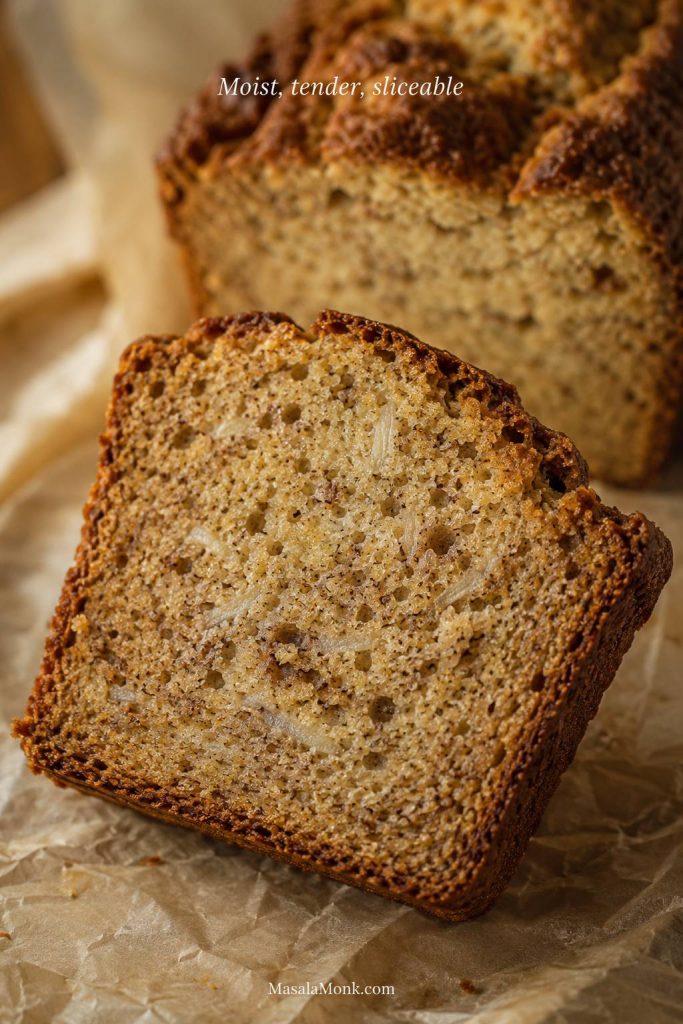
Close-up slice of sourdough discard banana bread with a soft crumb, banana flecks, and the words “Moist, tender, sliceable.”
A good sourdough discard banana bread slice should look tender and slightly plush, while still holding together when you pick it up.

So instead of guessing whether your bananas are “about right” or whether the loaf just needs five more minutes, you get clear amounts, clear texture cues, and a better chance at a loaf that slices the way banana bread should.

If your main worry is a wet center, the doneness cues and troubleshooting guide below are the two sections to keep closest.

Sourdough Banana Bread Recipe: Quick Answer

This sourdough discard banana bread is a same-day quick bread made with ripe bananas and sourdough discard or active starter. The discard gives the loaf a mild tang, deeper flavor, and extra moisture, but baking soda and baking powder do the lifting, so there is no rise time.

In this sourdough banana bread recipe, you can mix the batter and bake it right away. For the best texture, use very ripe bananas, measure the mashed banana instead of guessing, whisk the discard fully into the wet ingredients, and bake until no wet batter remains in the thickest part.

A good slice should feel soft and moist, but still hold together when you pick it up. It should taste like banana bread first, with just enough sourdough depth to make it more interesting than the usual loaf.

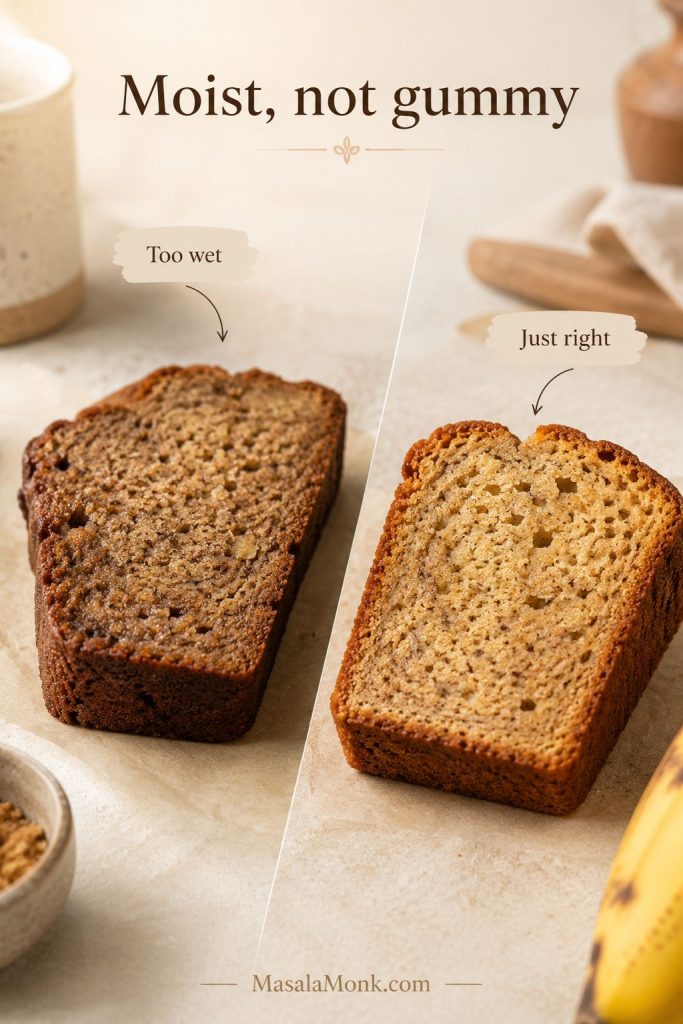
Comparison of two banana bread slices labeled “Too wet” and “Just right” under the heading “Moist, not gummy.”
Because ripe bananas and discard both add moisture, the best loaf needs enough structure and bake time to stay soft without turning heavy.

For exact quantities, pan size, and bake time, you can jump straight to the printable recipe card.

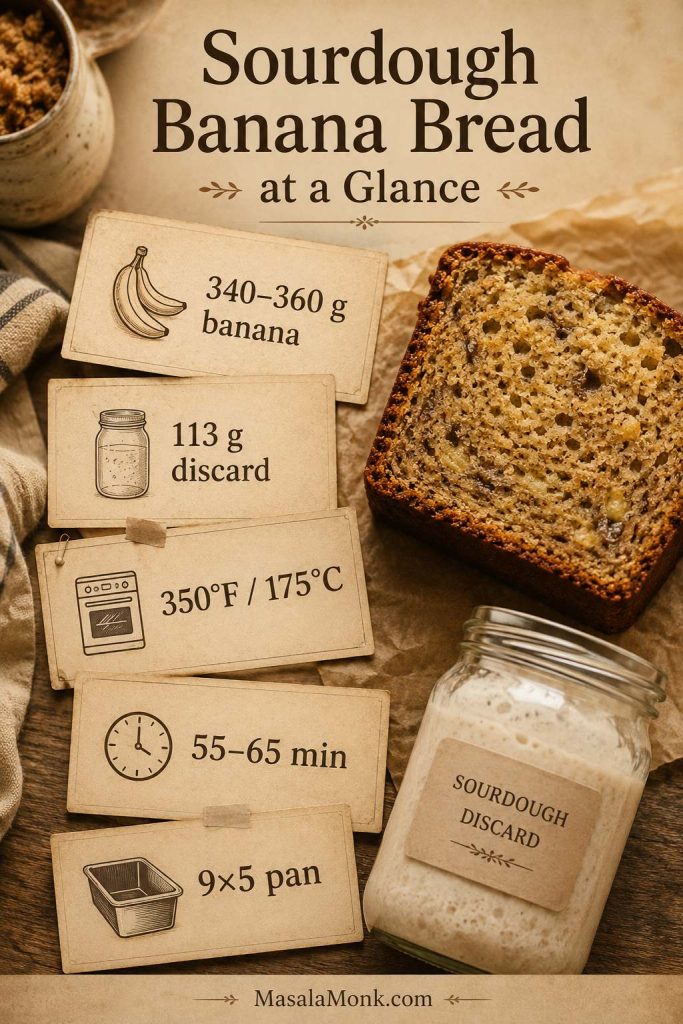
Sourdough Banana Bread Recipe at a Glance

  • Best pan: 9×5-inch light metal loaf pan
  • Oven: 350°F / 175°C
  • Bake time: 55–65 minutes
  • Banana amount: 340–360 g mashed ripe banana
  • Discard amount: 113 g / ½ cup sourdough discard
  • Texture goal: moist, tender, sliceable, and baked cleanly through the center

Those numbers matter most in three places: the ingredient measurements, the pan and bake-time notes, and the doneness test.

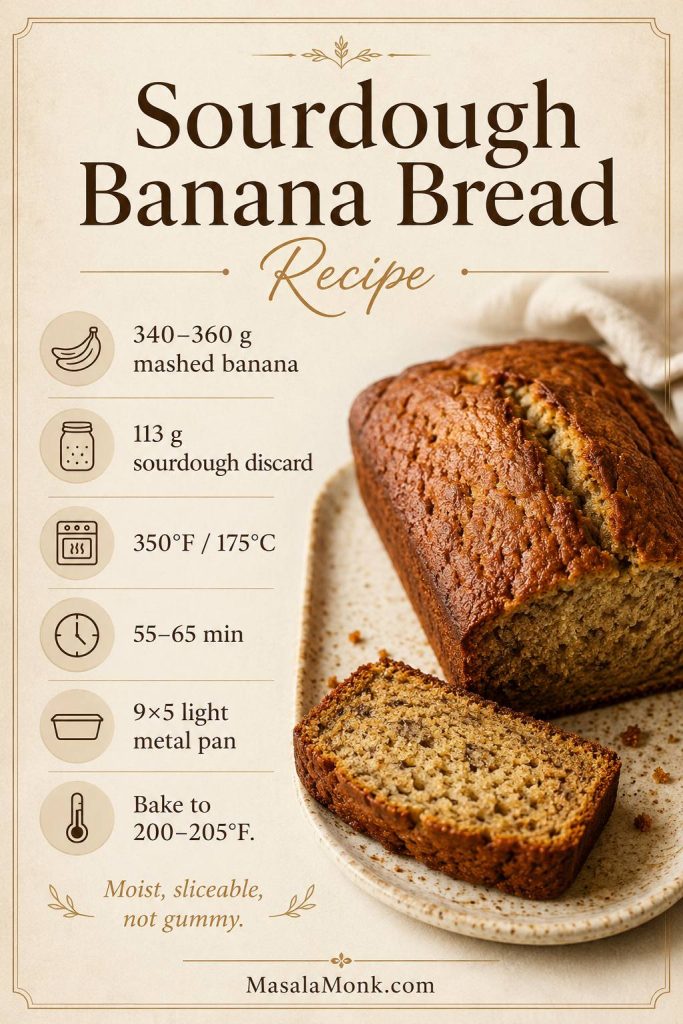
Sourdough banana bread at-a-glance card with 340–360 grams banana, 113 grams discard, 350 degrees Fahrenheit, 55–65 minutes, and 9×5 pan.
Keep these core numbers close: measured banana, steady discard, the right pan, and clear bake cues make the recipe easier to repeat.

What This Sourdough Banana Bread Tastes Like

This is not a sharp or sour loaf. Instead, it tastes like classic banana bread with more depth: sweet ripe banana first, then brown sugar, vanilla, butter, and a gentle sourdough note in the background.

The crumb should be moist and tender, not wet or pudding-like. Once cooled, the slices should hold together cleanly, with enough softness to feel cozy and enough structure to toast the next day.

Walnuts make it feel more breakfast-like and nutty. Chocolate chips, on the other hand, push it toward dessert. Either way, the base loaf stays simple enough for a weekday bake.

The Three Things That Make This Loaf Reliable

Measure the mashed banana, whisk the discard fully into the wet ingredients, and bake until the loaf tests clean at its tallest point. Together, those three small steps help it stay tender while still slicing neatly.

Why This Sourdough Banana Bread Recipe Works

You will like this loaf if you want banana bread that still feels familiar, just a little more grown-up. The discard does not take over. Instead, it deepens the flavor, softens the crumb, and gives you one more reason not to waste a jar of starter.

Why Moisture Control Matters

Although banana bread looks simple, the best loaves depend on balance. Too little moisture and the loaf feels dry. Too much banana or discard, however, and the center can take longer to bake through. The sweet spot is enough banana for flavor, enough flour for structure, and enough leavening to lift a dense, moist batter.

The recipe is built around the problem that makes sourdough banana bread tricky: ripe bananas and discard both add moisture, so the loaf needs enough structure, enough lift, and clear doneness cues to finish properly.

The key is moisture control: measure the banana by weight, keep the discard steady at 113 g, and bake by doneness cues instead of the clock alone. That is what gives you a slice that feels soft in the hand instead of fragile or underbaked.

  • Very ripe bananas bring natural sweetness, aroma, and moisture.
  • Sourdough discard adds gentle tang, acidity, and deeper flavor.
  • Brown sugar gives a warmer, caramel-like banana bread flavor.
  • Melted butter keeps the loaf rich and classic.
  • Baking soda plus baking powder gives more reliable lift than baking soda alone.
  • Measured banana helps the loaf bake through cleanly.

The Moisture-Control Rule

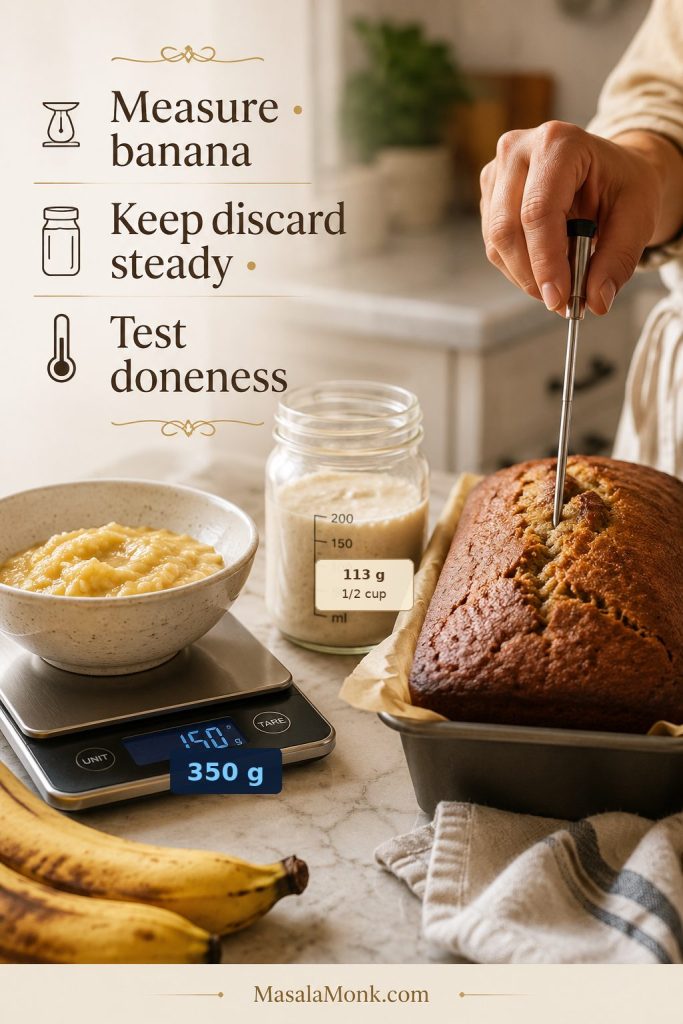
For this loaf, do not measure bananas by count alone. Measure the mashed banana, keep the discard steady, and bake by doneness cues. That is the difference between moist banana bread and a loaf that stays heavy in the middle.

Moisture-control guide with mashed banana on a scale, sourdough discard measured at 113 grams, and a banana bread loaf being tested for doneness.
Instead of guessing by banana count, this recipe controls the main moisture points before the loaf ever goes into the oven.

If you only remember one thing, remember this rule; then use the doneness section to confirm the loaf is fully baked before slicing.

Think of this as classic banana bread with a sourdough-discard upgrade. It is not trying to be chewy sandwich bread, and it is not trying to be aggressively tangy. Rather, it is soft, sliceable, fragrant, and practical.

Before You Start

Mash and measure the bananas first. If you have more than 360 g mashed banana, save the extra for oatmeal, pancakes, or a smoothie instead of adding it all to the loaf. That one step keeps the bread moist while helping the center bake through cleanly.

Ingredients for Sourdough Banana Bread

The ingredient list for this sourdough banana bread recipe is familiar, but a few details matter more because sourdough discard adds both moisture and acidity.

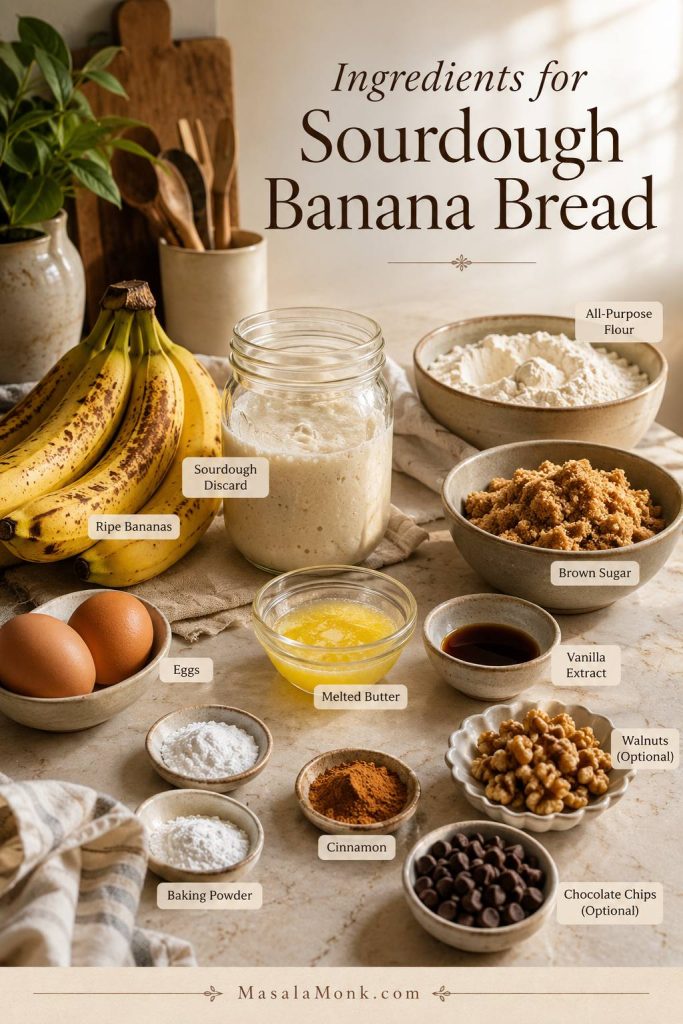
Ingredients for sourdough banana bread including ripe bananas, sourdough discard, flour, brown sugar, eggs, butter, vanilla, cinnamon, baking soda, baking powder, walnuts, and chocolate chips.
The ingredients are familiar, yet the balance matters: bananas bring flavor, discard adds depth, and the leaveners support a steady rise.

Very Ripe Bananas

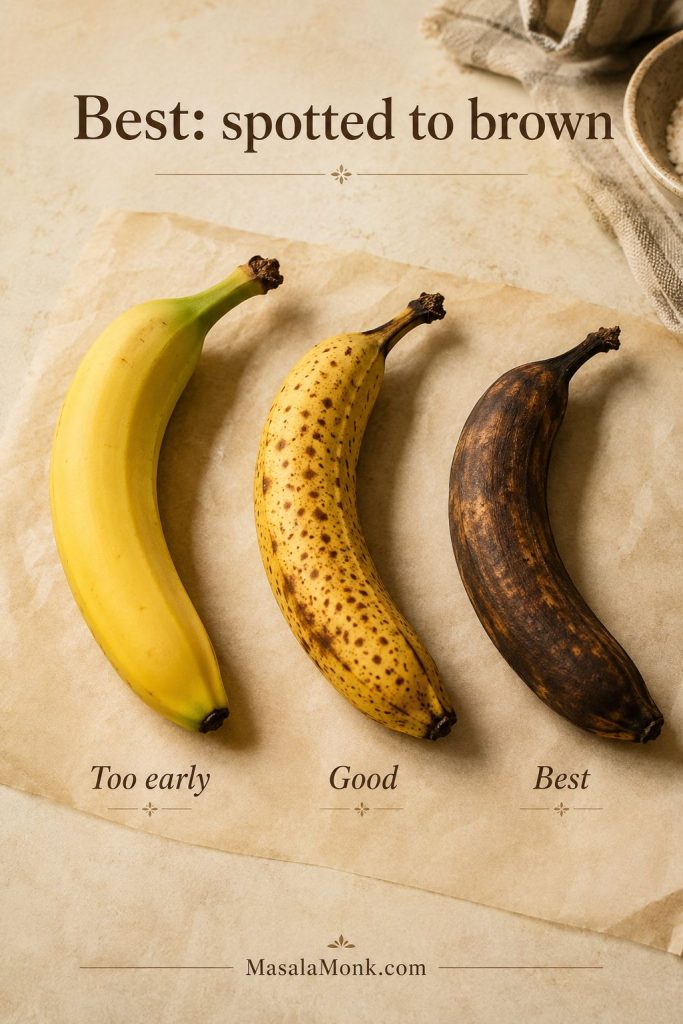
Use bananas with plenty of brown spots, or bananas that are fully soft and deeply fragrant. They should mash easily with a fork.

Banana ripeness guide with yellow, spotted, and very ripe brown bananas labeled as best when spotted to brown.
For the best banana bread flavor, choose bananas that smell sweet and mash easily; however, avoid fruit that smells fermented or spoiled.

Measure the Mashed Banana

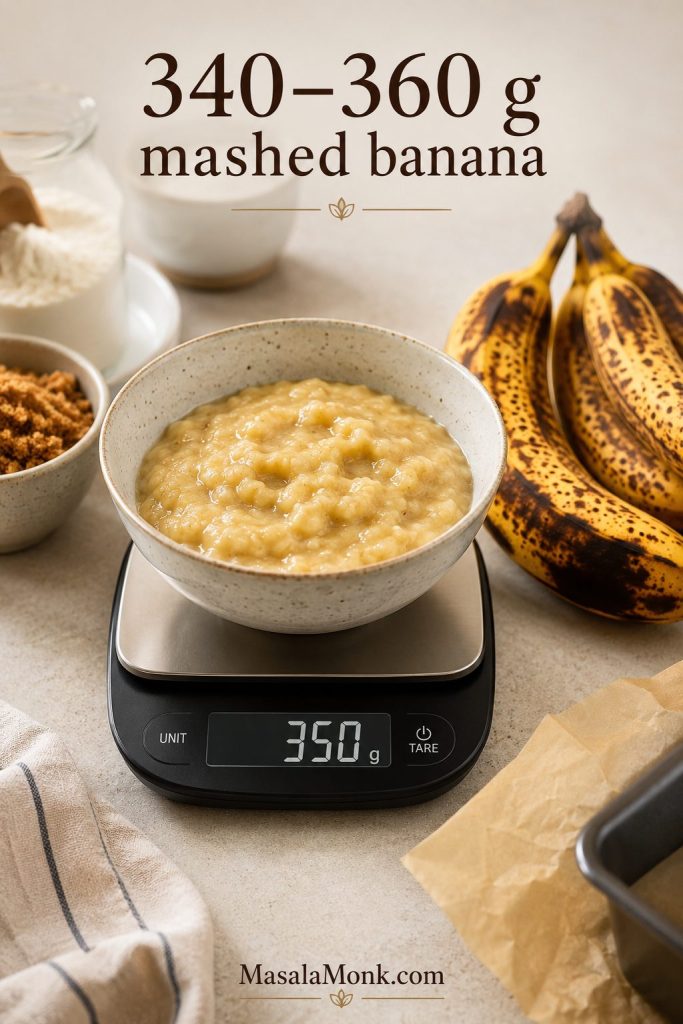
The best range is 340–360 g peeled mashed banana, which is about 1½ cups. That is usually 3 medium-to-large bananas; however, a scale saves you from guessing here, because three bananas can mean very different things depending on their size.

Bowl of mashed banana on a digital scale reading 350 grams with ripe bananas nearby and the text “340–360 g mashed banana.”
Banana size varies a lot, so weighing the mashed fruit is the easiest way to avoid an overly loose banana bread batter.

You do not need perfect-looking bananas for this recipe. You just need ripe, fragrant bananas and a measured amount, so the loaf gets banana flavor without turning heavy.

Banana Bread Texture Tip

Extra banana sounds harmless, but it can make the middle take much longer to set. Therefore, when your bananas are extra large, mash them first and measure the amount instead of adding every banana on the counter.

Can You Use Frozen Bananas?

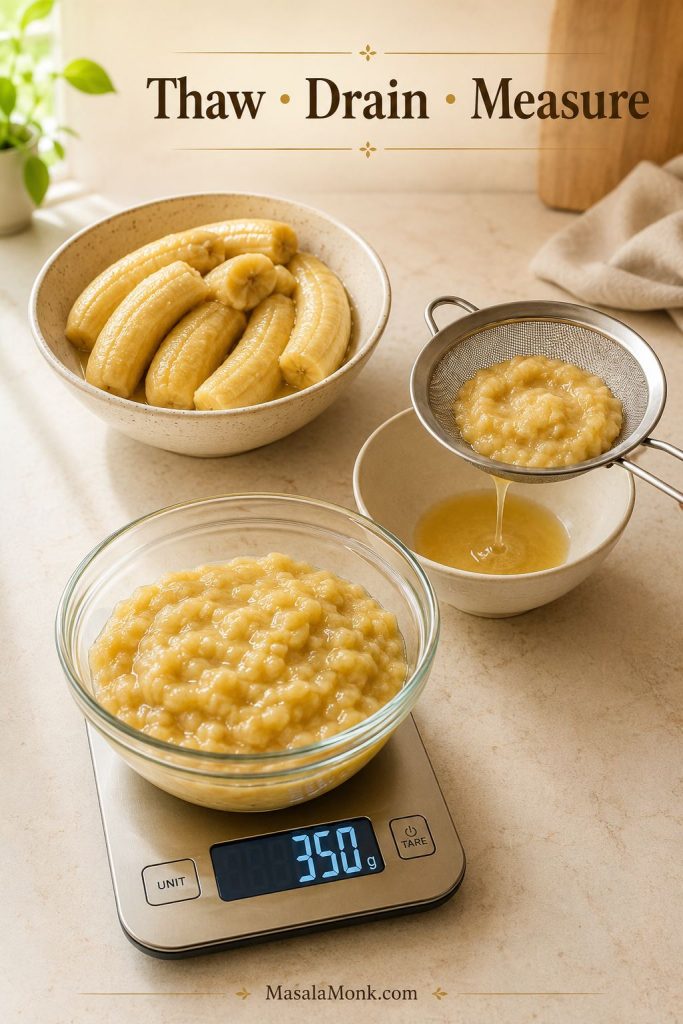
Yes. First, thaw frozen bananas; then drain off any watery liquid before measuring. Frozen bananas release more moisture than fresh ripe bananas, so measure the mashed fruit after thawing and keep it in the 340–360 g range.

Frozen banana process guide showing thawed bananas, liquid being drained, and mashed banana measured on a scale with the text “Thaw, Drain, Measure.”
Frozen bananas work well in sourdough banana bread, but draining the extra liquid first keeps the batter from becoming too wet.

Because thawed bananas release extra liquid, the mashed banana measurement matters even more here.

Sourdough Discard or Active Starter

Use 113 g / ½ cup sourdough discard. A discard from a starter fed with equal weights of flour and water works best here.

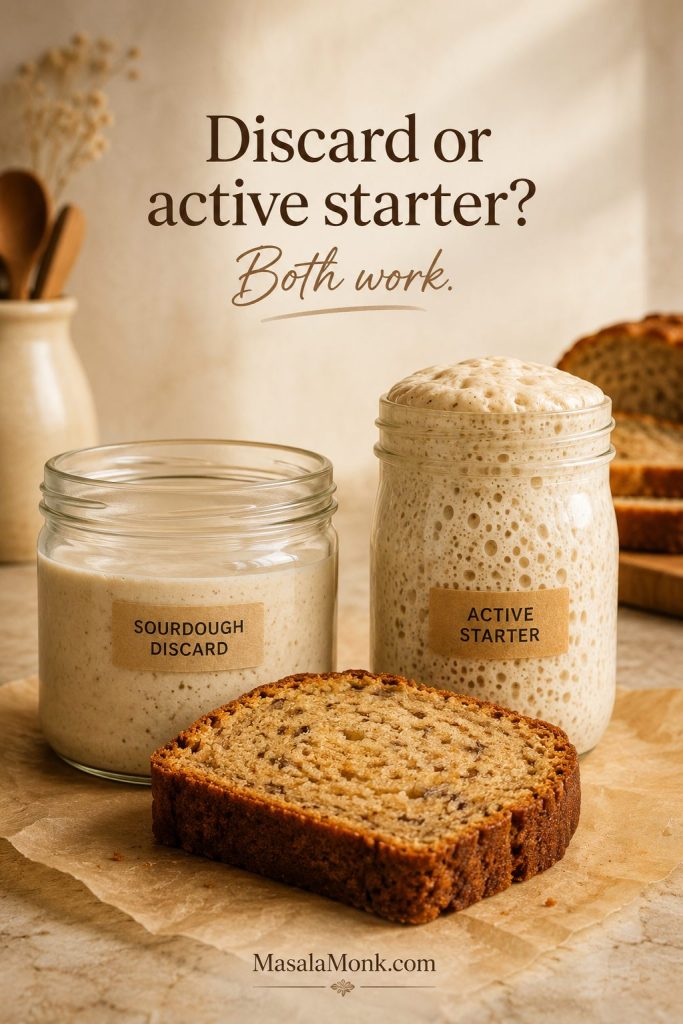
Fresh discard gives a milder loaf. Older fridge discard gives a stronger sourdough note. Active starter also works, and it may make the loaf slightly lighter. However, this recipe does not rely on the starter for rise.

Two jars of sourdough discard and active starter beside a slice of banana bread with the text “Discard or active starter? Both work.”
Discard gives this loaf a deeper tang, while active starter can make the flavor milder and the crumb slightly lighter.

For a clearer comparison, see the full discard vs active starter section before you choose.

For starter basics, feeding schedules, and discard handling, see this guide to how to feed and maintain a sourdough starter.

Flour, Sugar, Fat, and Eggs

All-purpose flour gives the cleanest structure. Brown sugar keeps the loaf moist and gives the flavor a caramel edge. Meanwhile, melted butter makes the loaf rich and familiar, while eggs help bind the batter and support the crumb.

If you measure flour by cups, spoon it into the cup and level it off instead of scooping directly from the bag, because scooped flour packs down easily. Too much packed flour can make the loaf dry, heavy, or dense.

FatBest ForTexture
Melted butterClassic banana bread flavorRich, tender, slightly denser
Neutral oilSoftest crumb and longer moistnessSofter, lighter, less buttery

Use a neutral oil such as avocado, canola, sunflower, or light olive oil if you choose the oil version. Avoid strongly flavored oils unless you already know you like them in sweet bakes.

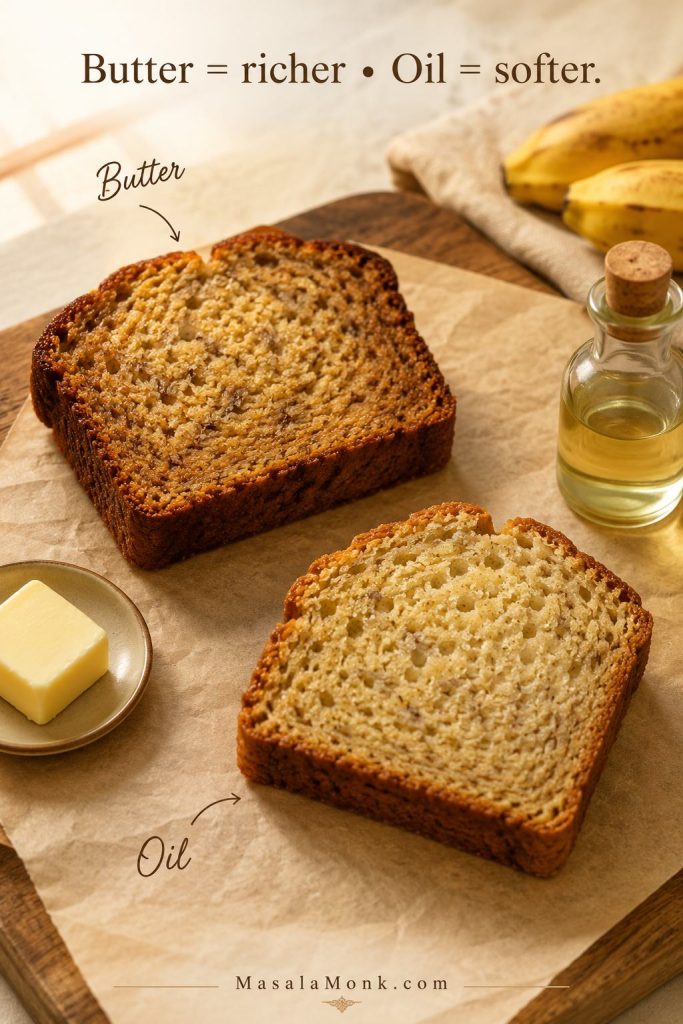
Two banana bread slices comparing butter and oil versions with butter, oil, bananas, and the text “Butter = richer, Oil = softer.”
Butter gives a classic banana bread flavor, whereas oil creates a softer crumb that can stay tender a little longer.

If you are choosing a version before baking, the version guide gives the quickest way to decide between classic, softer, tangier, walnut, or chocolate chip.

Baking Soda and Baking Powder

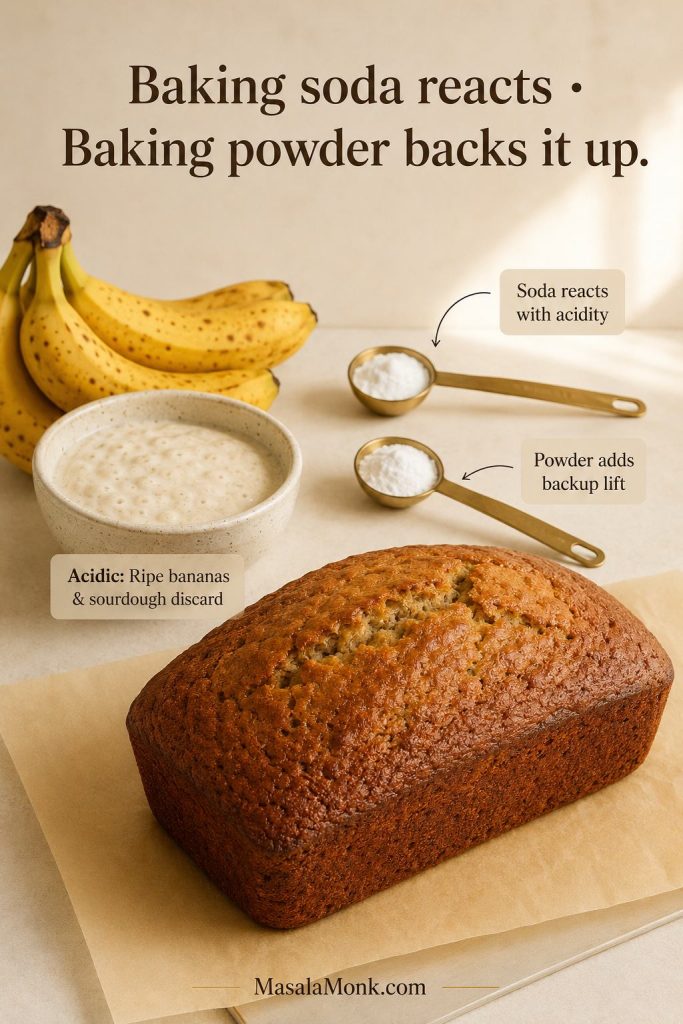
This recipe uses both for a steadier rise. Baking soda reacts with the acidity from the bananas, brown sugar, and sourdough discard, while baking powder adds backup lift so the loaf does not feel heavy for how moist the batter is.

Baking soda and baking powder guide with ripe bananas, sourdough discard, leaveners, and a domed banana bread loaf.
Even though this loaf uses sourdough discard, baking soda and baking powder still do the lifting for a steadier quick bread rise.

Optional Mix-Ins

Walnuts, pecans, and chocolate chips all work well. Keep mix-ins to about 85–115 g so the loaf does not become too heavy.

Blueberries can be added, but they bring extra moisture. For that reason, keep them to about 75–100 g, use them straight from the fridge or freezer, and avoid adding extra banana at the same time.

Sourdough Discard vs Active Starter

This is one of the most common questions when making banana bread with sourdough discard: does the starter need to be active? For this recipe, no. Discard is the easiest default.

In this loaf, discard is mostly a flavor and moisture ingredient. The baking soda and baking powder do the main lifting, so you do not need to wait for the starter to rise the batter.

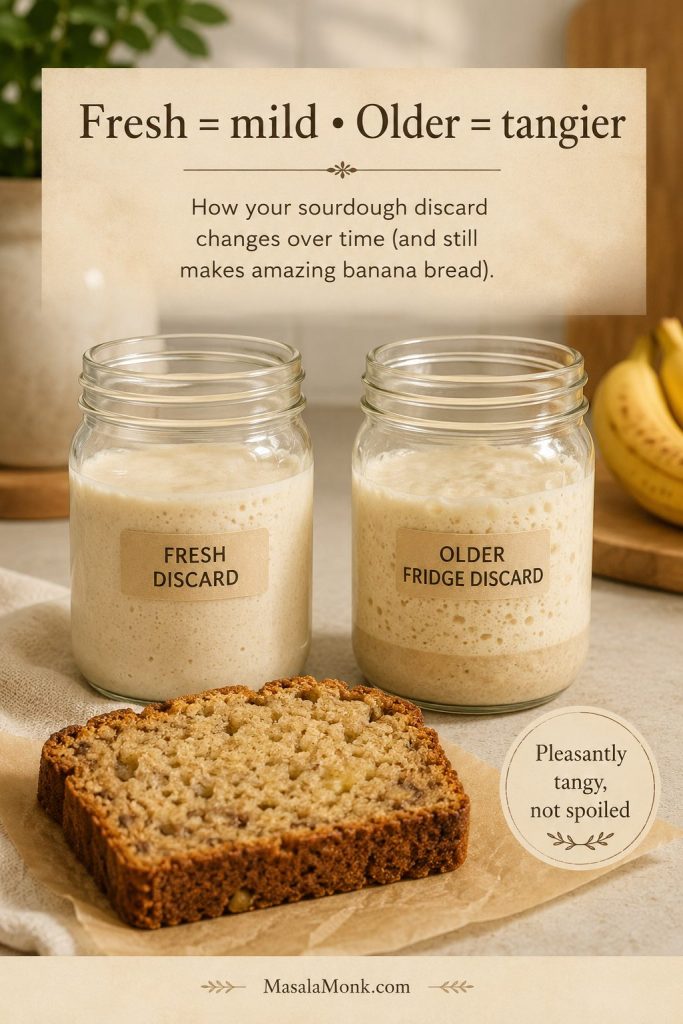
Fresh and older sourdough discard jars beside banana bread with the text “Fresh = mild, Older = tangier” and “Pleasantly tangy, not spoiled.”
Older discard can add more sourdough character, but it should smell pleasantly tangy rather than harsh, moldy, or unpleasant.
Starter TypeCan You Use It?What to Expect
Fresh discardYes, best defaultMild flavor, easy mixing, classic banana bread taste.
Older fridge discardYes, if it smells pleasantly tangyStronger sourdough note. Good for people who like more tang.
Active starterYesSlightly lighter loaf and usually less sour flavor.
Very runny discardYesBatter may be looser and the loaf may need a few extra minutes.
Very thick discardYesBring closer to room temperature and whisk well into the wet ingredients.
Brand-new starter discardNot idealEarly starter discard can smell harsh or unstable. Use mature discard for better flavor.

For more ways to use starter and discard in baking, keep this page on more sourdough bread recipes handy. It is useful when you want to move from quick discard bakes to focaccia, pizza dough, and simple bread projects.

Which Sourdough Banana Bread Version Should You Make?

Use the base recipe if you want a classic moist loaf. Then adjust only one or two things depending on the flavor or texture you want. Banana bread is forgiving, but the best versions come from changing one thing at a time.

If You Want…Use This Direction
Mild classic banana breadUse fresh discard or active starter.
More sourdough tangUse older but healthy fridge discard.
Softer crumbUse neutral oil instead of melted butter.
Richer flavorUse melted butter and dark brown sugar.
Less sweetnessReduce brown sugar to about 125 g.
Better structureDo not skip the baking powder.
Nutty banana breadAdd 85–115 g walnuts or pecans.
Dessert-style loafAdd 85–115 g chocolate chips.
Eggless loafUse flax eggs and cool the loaf completely before slicing.
Lowest risk of a wet centerWeigh the banana and bake to 200–205°F / 93–96°C.

Choose One Direction First

For a first bake, choose one direction and keep the rest of the loaf simple. Then you will know whether your repeat version is the buttery classic, the softer oil loaf, the walnut breakfast loaf, or the chocolate-chip treat.

What Not to Change the First Time

For your first loaf, do not increase the banana, increase the discard, remove the baking powder, and switch flour types all at once. Make the base version once, then adjust sweetness, fat, mix-ins, or tang after you know how your pan and oven behave.

If you already know your favorite banana bread style — walnut, chocolate chip, less sweet, extra tangy, or warm with butter — choose that direction first. Most people find their house version after two bakes: one classic loaf, then one small adjustment based on what they liked most.

How to Make Sourdough Banana Bread

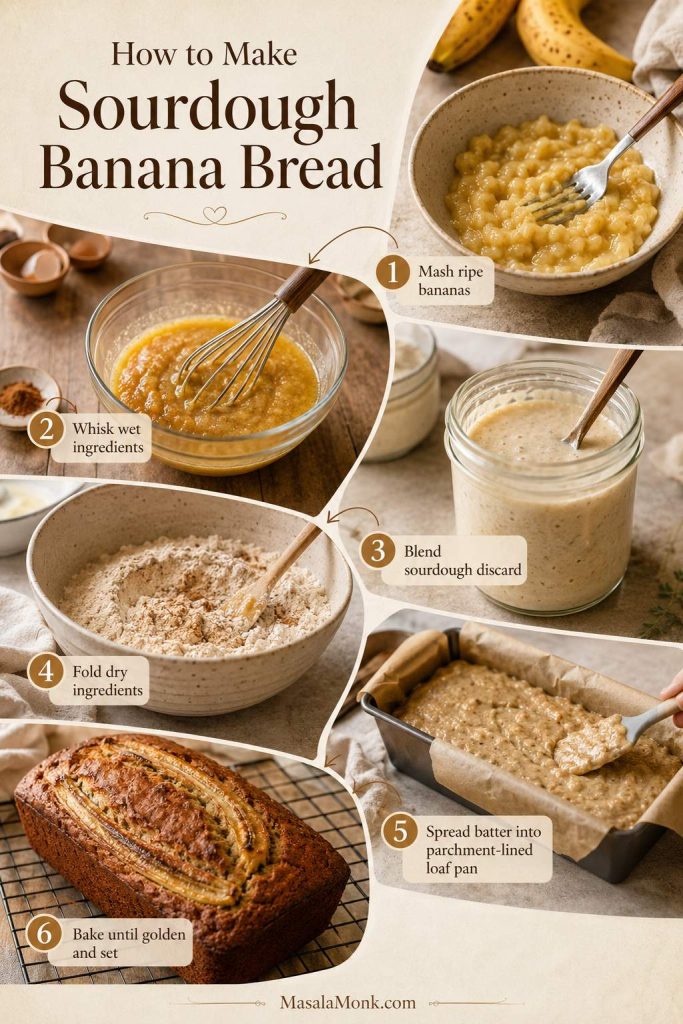
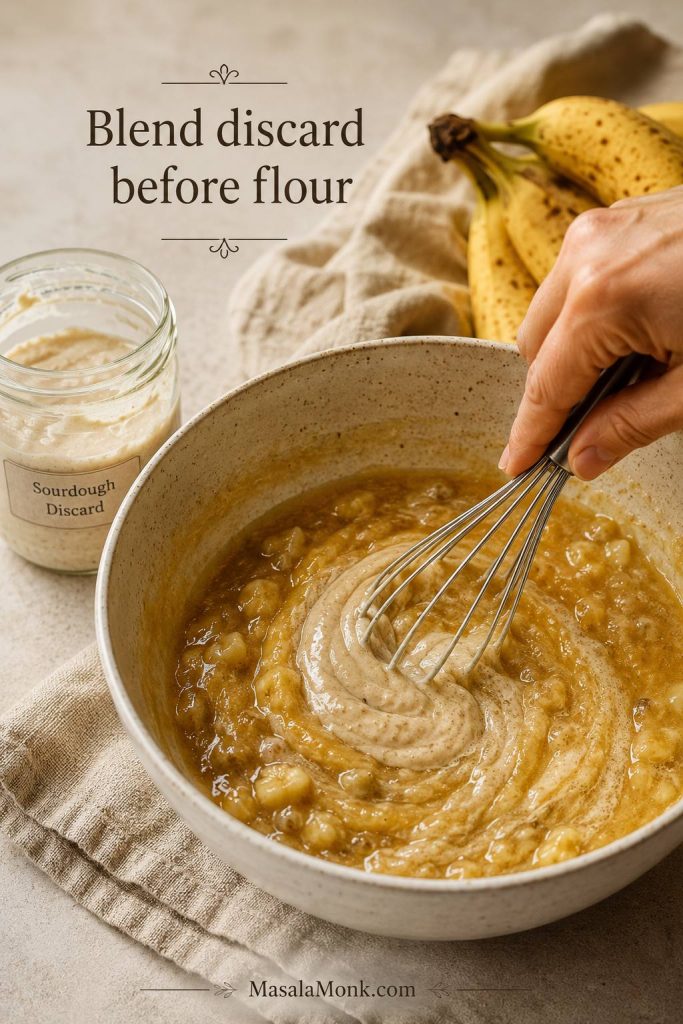
The method for this sourdough banana bread recipe is straightforward, but the order matters. Blend the discard into the wet ingredients before adding flour. That way, you avoid sticky sourdough streaks and get a more even crumb.

Step-by-step sourdough banana bread process showing mashed bananas, wet ingredients, sourdough discard, dry ingredients, loaf pan batter, and baked loaf.
Once the discard is fully blended into the wet mixture, the flour can be folded in gently without leaving sticky starter streaks.

1. Prepare the Pan and Oven

Preheat the oven to 350°F / 175°C. Then line a 9×5-inch / 23×13 cm loaf pan with parchment paper, leaving a little overhang so the baked loaf is easy to lift out.

If your loaf pan looks more than about three-quarters full after adding the batter, set a small amount aside and bake it as 1–2 muffins. An overfilled pan can rise unevenly or stay wet in the center.

2. Mash and Measure the Bananas

Mash the bananas until mostly smooth with a few small lumps. Then measure out 340–360 g. A few soft banana pieces are fine; however, large chunks can create wet pockets in the loaf.

3. Mix the Wet Ingredients

Whisk melted butter and brown sugar until glossy. Next, add the eggs, vanilla, mashed banana, and sourdough discard. Whisk until the discard is fully blended into the mixture.

At this point, the mixture should look glossy and loose, with no visible streaks of discard.

Hand whisking sourdough discard into banana bread wet ingredients in a bowl before flour is added.
At this stage, look for a glossy banana mixture with no visible discard streaks before the dry ingredients go in.

4. Fold in the Dry Ingredients

Add flour, baking soda, baking powder, salt, and cinnamon. Sprinkle the baking soda, baking powder, salt, and cinnamon evenly over the flour before folding so they distribute more evenly. Then fold gently with a spatula until no dry flour remains. Stop as soon as the batter comes together.

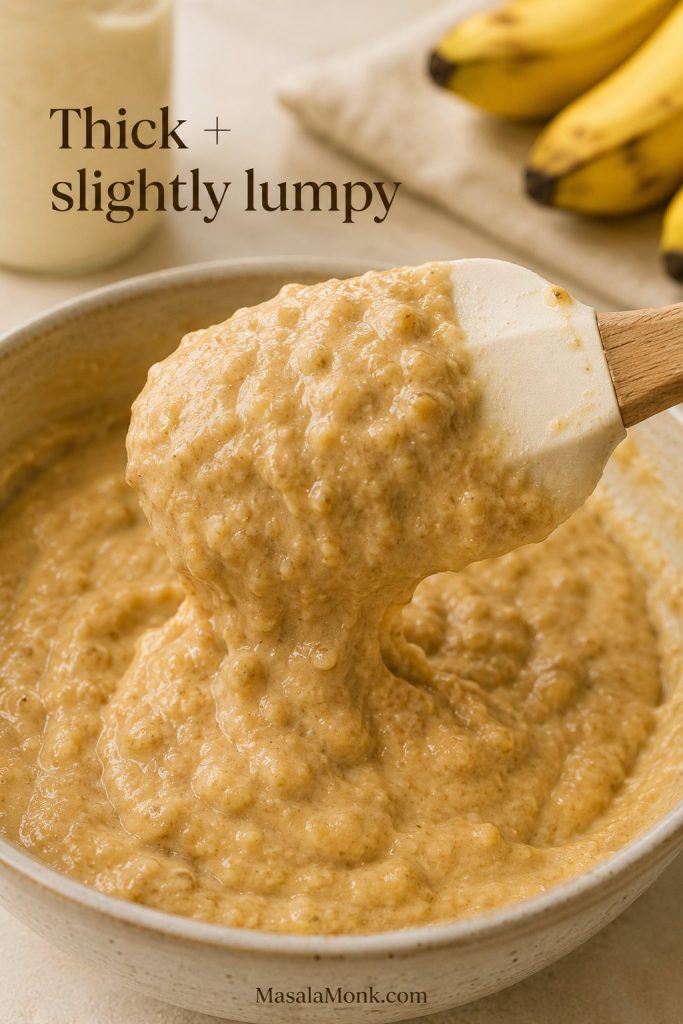
Thick slightly lumpy sourdough banana bread batter lifted with a spatula and the text “Thick + slightly lumpy.”
A thick, slightly lumpy batter is exactly what you want because it means the flour has been mixed in without overworking the loaf.

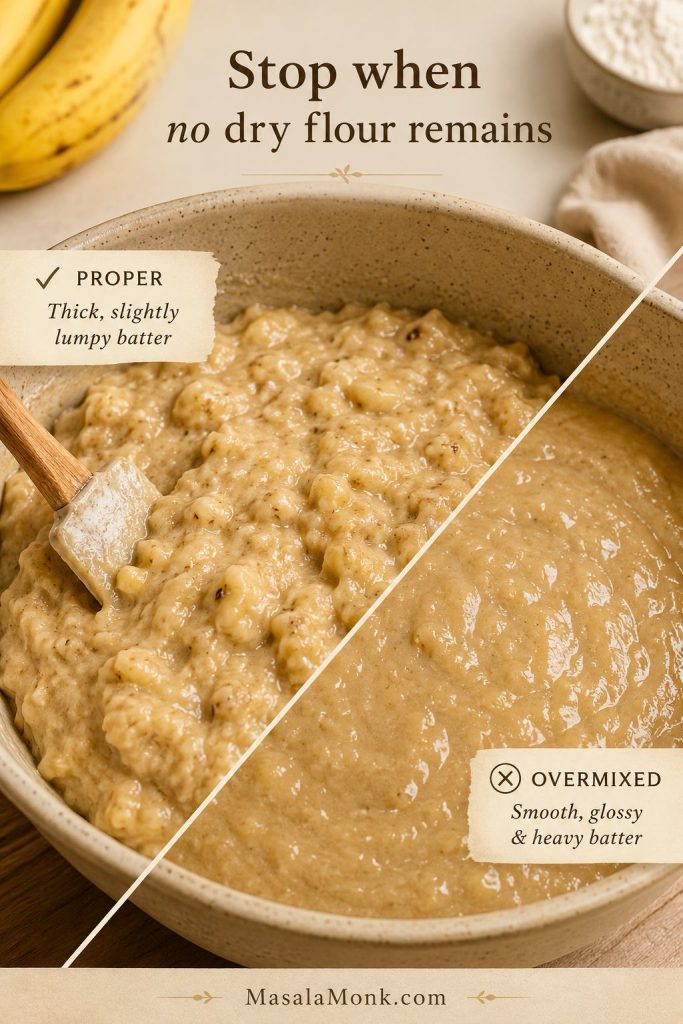
The batter should look thick and slightly lumpy, not smooth like cake batter. It should mound slightly in the pan; if it pours like pancake batter, the loaf may need longer to bake. A slightly uneven batter is a good sign here. Smooth, overworked batter is more likely to bake up heavy.

Comparison of properly mixed banana bread batter and overmixed batter with the text “Stop when no dry flour remains.”
A few small lumps are fine because overmixing can make banana bread dense, especially in a moist sourdough discard batter.

In fact, overmixing develops gluten and can make banana bread dense, tough, or heavy. If your past banana bread turned dense or gummy, compare your batter to the troubleshooting section before changing the recipe.

5. Add Mix-Ins

Fold in walnuts, pecans, or chocolate chips, if using. Keep the amount moderate so the loaf still rises and slices cleanly.

6. Bake and Cool

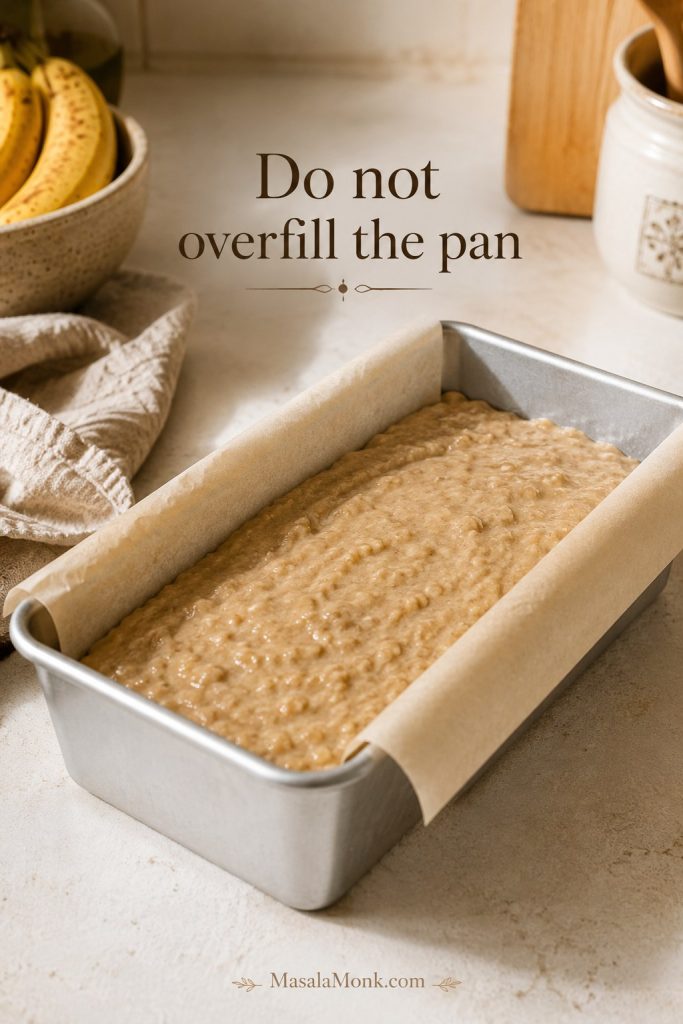
Spread the batter into the prepared pan and smooth the top. The batter should sit below the rim of the pan, with room to rise.

Sourdough banana bread batter spread in a parchment-lined light metal loaf pan with the text “Do not overfill the pan.”
A 9×5 light metal loaf pan gives the batter enough room to rise, while parchment makes the cooled loaf easier to lift out.

Bake for 55–65 minutes, or until the highest part of the loaf feels firm and no wet batter remains. When it is done, the top should look set and gently domed, not jiggly.

Finally, cool in the pan for 10–20 minutes. After that, lift the loaf onto a rack and let it cool before slicing.

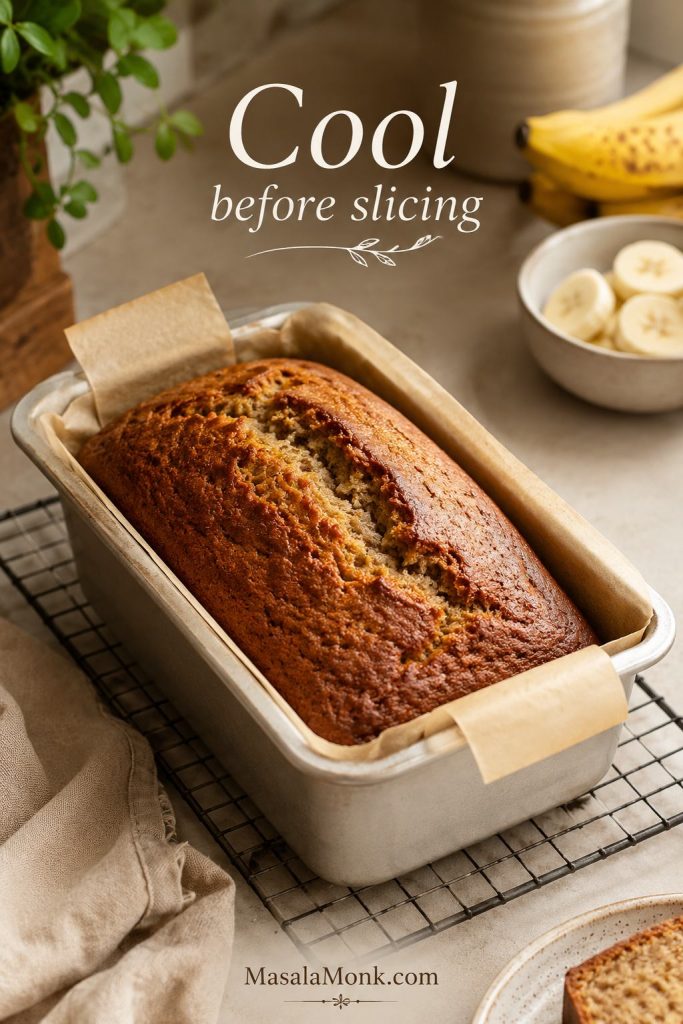
Freshly baked sourdough banana bread cooling in a parchment-lined metal loaf pan on a wire rack with the text “Cool before slicing.”
The loaf keeps firming as it cools, so this resting time is part of the texture — not just a waiting step.

Important Cooling Note

Warm banana bread is tempting, but slicing too early can make the middle seem wetter than it really is. Let it cool until the crumb has time to set.

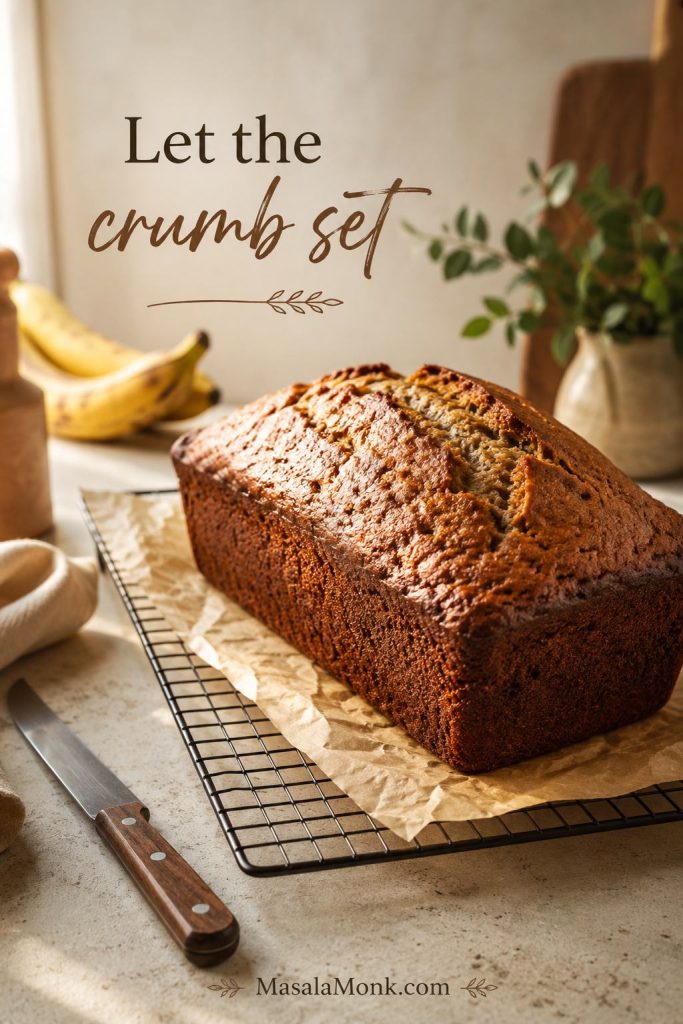
Whole sourdough banana bread loaf cooling on a rack with a knife nearby and the text “Let the crumb set.”
Cutting too soon can make a finished loaf seem underbaked, so give the crumb time to settle before the first slice.

Best Pan, Oven Temperature, and Bake Time for Sourdough Banana Bread

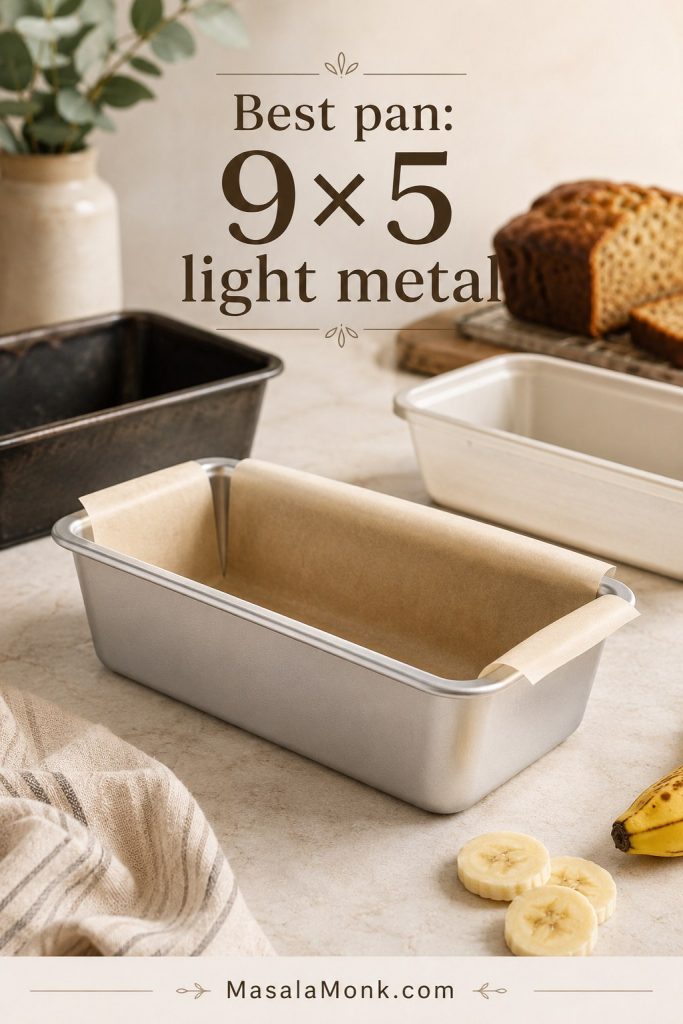
For this sourdough banana bread recipe, the most reliable setup is a 9×5-inch light metal loaf pan at 350°F / 175°C. Light metal helps the loaf bake evenly without the sides darkening too quickly.

Light metal 9×5 loaf pan lined with parchment beside other loaf pans and the text “Best pan: 9×5 light metal.”
Pan choice affects bake time: a light metal 9×5 pan helps the sides and center finish more evenly.

Banana bread is naturally dense and moist, so bake time is only a guide. The real test is whether the loaf is baked through at its tallest point.

That is why the doneness test matters more than the exact minute on the timer.

Pan or Oven SituationWhat to Do
9×5-inch light metal panMost reliable setup for this recipe. Start checking around 55 minutes.
8½×4½-inch panThe loaf will be taller and may need extra time in the middle.
Dark metal panBrowns faster. Tent with foil if the top darkens before the middle is done.
Glass or ceramic panMay bake differently and often needs a few extra minutes. Check the thickest part carefully.
Top browning too fastTent loosely with foil during the last part of baking.
Outside dark but middle wetNext time, bake at 325°F / 163°C for longer so the loaf has more time to bake through.

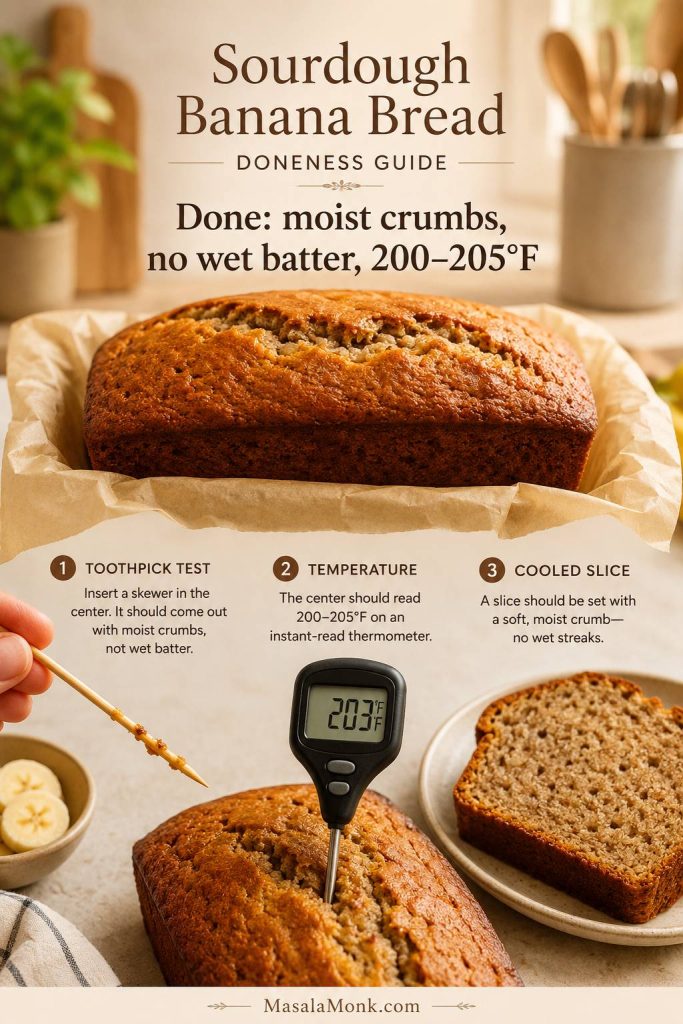
How to Tell When the Loaf Is Done

If your first worry is a wet middle, you are not alone. Banana bread often looks done on top before the loaf has finished baking through, so test the tallest part instead of trusting the browned crust.

Sourdough banana bread doneness guide with skewer crumbs, thermometer reading 203 degrees Fahrenheit, and a clean slice.
Because banana bread browns before the center always finishes, the thermometer and crumb test are more reliable than color alone.

A browned top is a clue, not a guarantee. The inside still needs time to settle into a soft, sliceable crumb.

  • A skewer inserted into the center should come out without wet batter.
  • A few moist crumbs are fine.
  • The top should spring back lightly when pressed.
  • The thickest part of the loaf should read about 200–205°F / 93–96°C on an instant-read thermometer.

Because banana smears on a skewer can look wet, look for raw batter rather than soft banana. When in doubt, give the loaf a few more minutes, especially if you used a smaller pan, extra banana, or runny discard.

How to Fix Gummy, Dense, or Dry Sourdough Banana Bread

Most texture problems in sourdough discard banana bread come down to moisture, mixing, or bake time. Once you know which one caused the problem, the next loaf is much easier to fix.

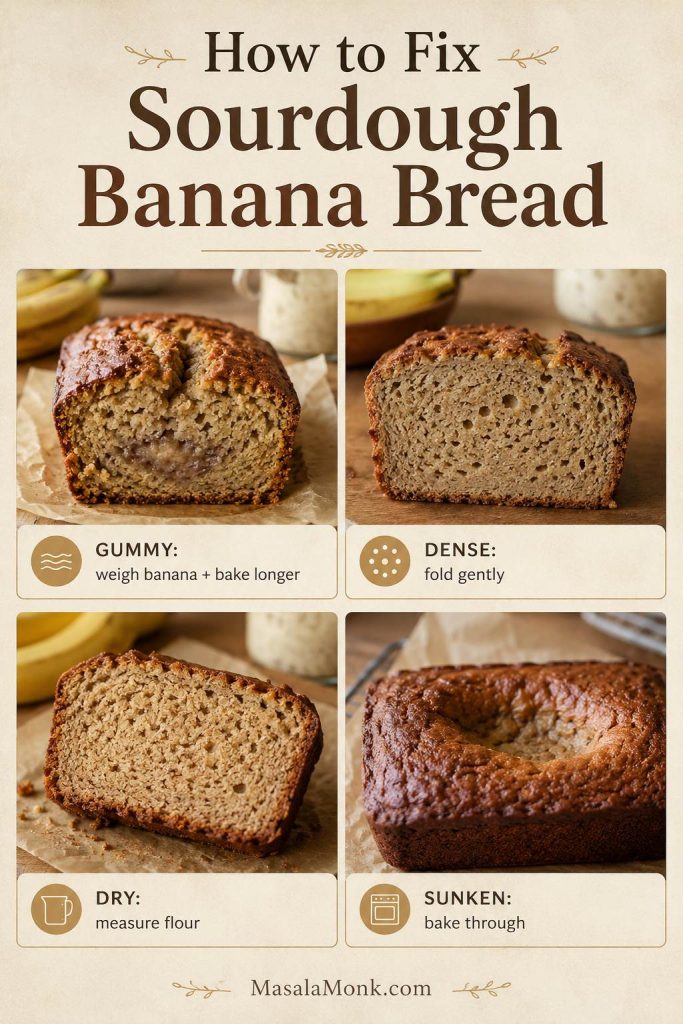
If your loaf failed once, do not assume the recipe is hopeless. Sourdough banana bread usually goes wrong for one of four reasons: too much banana, very wet discard, overmixing after flour, or pulling the loaf before the thickest part has finished baking.

Match the Problem Before You Change the Recipe

Troubleshooting board for sourdough banana bread with gummy, dense, dry, and sunken examples plus short fixes.
If a loaf fails, the fix is usually practical: adjust banana moisture, mix more gently, measure flour carefully, or bake a little longer.
ProblemLikely CauseFix
Gummy centerToo much banana, underbaking, overmixing, or slicing too soonWeigh the banana, bake longer, fold the flour gently, and cool before slicing.
Dense loafDiscard not blended well or batter overmixed after flourWhisk discard fully into wet ingredients, then fold dry ingredients lightly.
Dry loafToo much flour or overbakingWeigh flour or spoon-and-level it. Check a few minutes earlier next time.
Too sourOlder, very acidic discardUse fresher discard or active starter for a milder loaf.
Sunken middleUnderbaked center or too much moistureBake until the thickest part tests clean and avoid adding extra banana beyond the recipe range.
Dark outside, raw middleOven too hot, pan too dark, or loaf too tallTent with foil, use a lighter pan, or bake lower and longer next time.
Sticky sourdough streaksDiscard not fully mixed into wet ingredientsWhisk the discard with banana, eggs, butter, and sugar before adding flour.

If you only change one thing next time, weigh the mashed banana. It is the small, unglamorous step that solves more banana bread texture problems than almost anything else.

Once you know the cause, go back to the ingredient measurements, mixing method, or doneness cues rather than changing everything at once.

Sourdough Banana Bread Variations and Mix-Ins

Once this sourdough banana bread recipe works for you, the variations are easy. Keep mix-ins moderate and avoid adding extra wet ingredients unless you adjust the bake time.

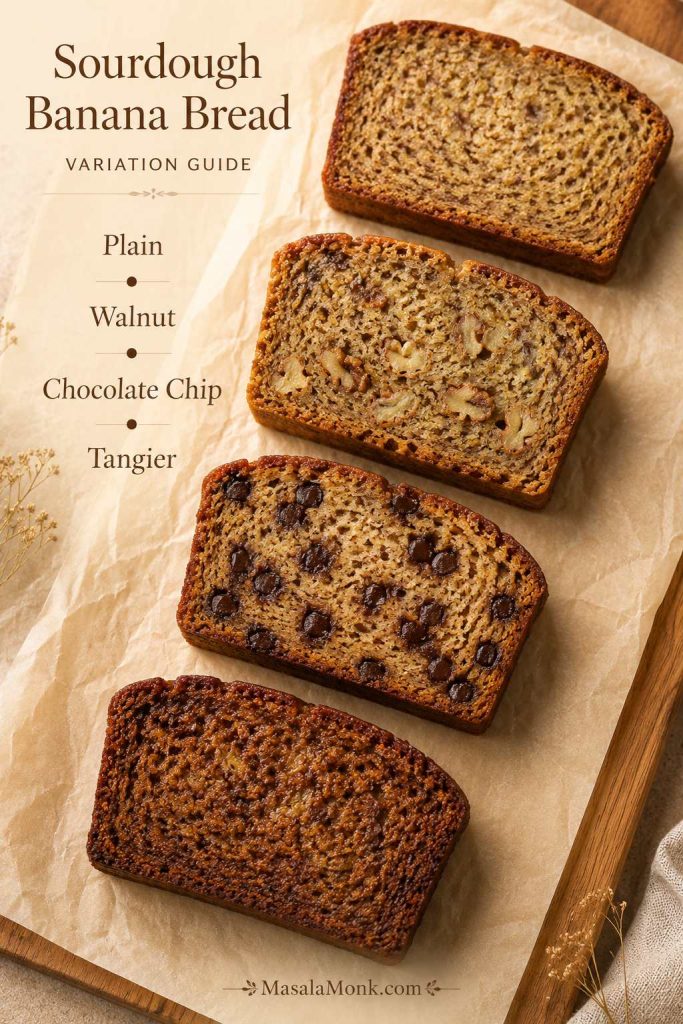
Sourdough banana bread variation guide with plain, walnut, chocolate chip, and tangier slices arranged on parchment.
Start with the base loaf first; then, once you know the texture, choose a walnut, chocolate chip, or tangier discard version.

Walnut Sourdough Banana Bread

Fold in 85–115 g chopped walnuts. Toasting the walnuts first gives a deeper flavor and helps them stay crisp inside the loaf.

Chocolate Chip Sourdough Banana Bread

Fold in 85–115 g chocolate chips. For a more dessert-like loaf, sprinkle a few extra chips on top before baking.

Less-Sweet Version

Reduce the brown sugar to about 125 g. The loaf will be less moist and less caramel-like, but still pleasant if your bananas are very ripe. However, avoid cutting the sugar too aggressively because sugar affects softness, browning, and shelf life.

Eggless Version

For an eggless version, use 2 flax eggs and expect a slightly softer, denser crumb. Let the loaf cool completely before slicing so the structure has time to set. This flax egg for quick breads guide explains the basic ratio and when flax eggs work best.

Healthier Banana Bread Direction

For a more wholesome loaf, replace up to half the all-purpose flour with whole wheat flour, reduce the sugar slightly, or use part Greek yogurt in place of a little butter. For a separate banana-bread style built around oat flour, see this healthy banana bread with oat flour.

Optional Long-Fermented Version

The same-day version gives the most classic banana bread texture, so start there if this is your first loaf. However, if you want deeper sourdough flavor, you can use a long-fermented method as long as the final leaveners are added close to baking.

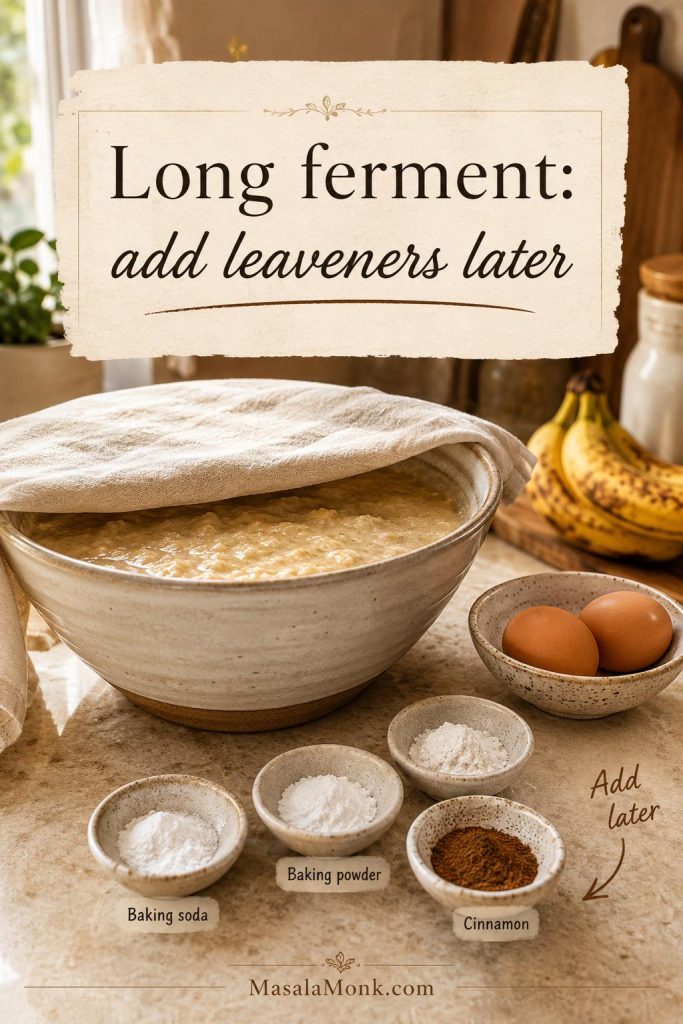
For a true long-fermented version, mix the flour, sourdough discard, mashed banana, melted butter, and brown sugar first. Cover and refrigerate overnight. The next day, let the mixture sit at room temperature for 20–30 minutes so it softens slightly. Beat the eggs and vanilla together first, then stir them into the fermented mixture. Sprinkle in the baking soda, baking powder, salt, and cinnamon, then fold until evenly combined and bake right away.

Long-fermented sourdough banana bread setup with covered batter, eggs, baking soda, baking powder, cinnamon, and the text “Long ferment: add leaveners later.”
The overnight rest is for flavor and fermentation, while the eggs, baking soda, and baking powder wait until baking day for better lift.

If the mixture looks very stiff the next day, do not panic. Let it soften at room temperature, then stir gently after adding the beaten eggs and vanilla.

The texture will be tangier and slightly less cake-like than the same-day loaf. Do not add the baking soda or baking powder before the overnight rest, because they give the loaf its best lift when added closer to baking.

Can This Become Muffins?

The flavor works beautifully as muffins, but the pan, fill level, and bake time change. Use this loaf as the flavor base, then bake muffin versions separately rather than treating the loaf timing as a direct swap. For another portioned breakfast-bake idea, these high protein muffins with banana or applesauce are useful when you want something meal-prep friendly.

How to Serve Sourdough Banana Bread

The first day, this loaf is soft enough to eat plain once it has cooled. For a warmer, richer slice, add salted butter, cream cheese, peanut butter, or a little honey.

The next day, toast a slice lightly until the edges crisp and the banana aroma comes back. That is also the best way to revive a frozen slice.

It is humble enough for a weekday breakfast and good enough to wrap up for someone who needs a little comfort. It also disappears slice by slice: breakfast, afternoon tea, lunchbox treat, late-night snack.

How to Store and Freeze Sourdough Banana Bread

Let the loaf cool completely before wrapping. Otherwise, warm banana bread traps steam, and that can make the crust sticky and the middle feel wetter than it should.

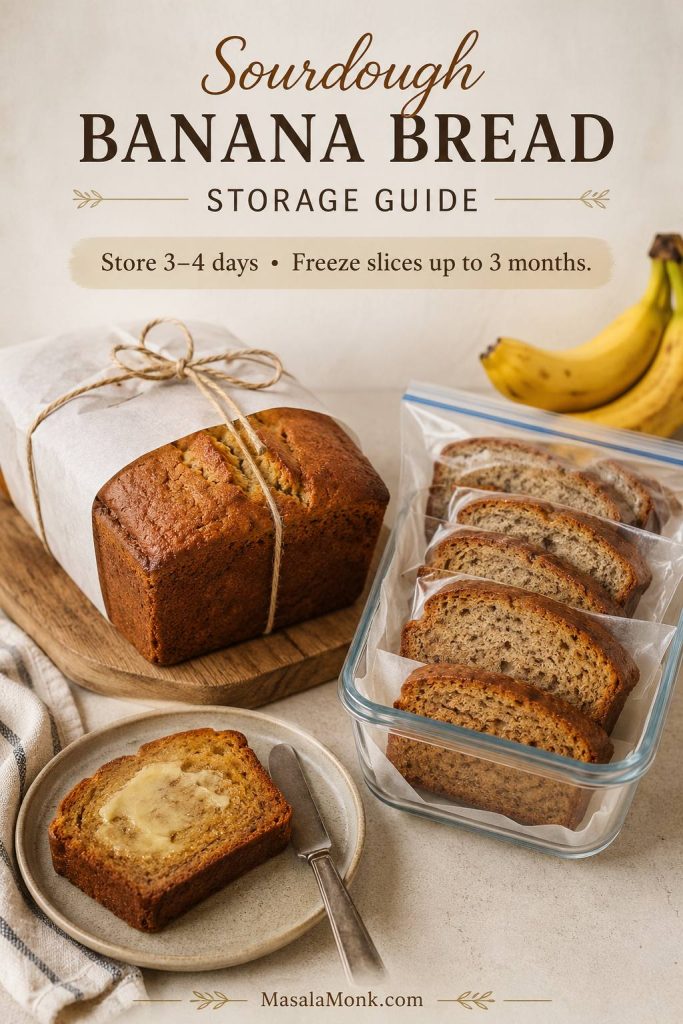
Storage guide for sourdough banana bread with wrapped loaf, sliced bread in a freezer container, and a buttered slice on a plate.
Wrap the loaf once it is fully cool, and freeze slices separately so you can toast one piece whenever you need it.
  • Room temperature: Wrap well and keep for 3–4 days.
  • Refrigerator: Useful in hot or humid weather, but the loaf may dry out faster.
  • Freezer: Freeze slices for up to 3 months for best texture.
  • To reheat: Warm gently, toast lightly, or microwave a slice briefly until soft.

Instead of freezing only the whole loaf, freeze slices so you can warm one piece at a time for breakfast, tea, or a quick sweet snack.

If you are baking ahead, the recipe card has the core times, pan size, and storage note in one place.

For general food-safe freezer guidance, the USDA’s overview of freezing and food safety is a helpful reference.

Printable Sourdough Banana Bread Recipe Card

Sourdough Banana Bread Recipe

This moist sourdough discard banana bread turns ripe bananas and starter discard into a soft, sliceable loaf with brown sugar warmth, gentle tang, and classic banana bread comfort.

Prep Time15 minutes

Cook Time55–65 minutes

Total Time1 hour 10 minutes to 1 hour 20 minutes, plus cooling

Yield1 loaf

Equipment

  • 9×5-inch / 23×13 cm loaf pan
  • Parchment paper
  • Mixing bowl
  • Whisk
  • Rubber spatula
  • Kitchen scale, recommended
  • Cooling rack
  • Instant-read thermometer, optional but helpful

Ingredients

  • 340–360 g very ripe bananas, peeled and mashed, about 1½ cups
  • 113 g sourdough discard, about ½ cup, ideally from a starter fed with equal weights flour and water
  • 240 g all-purpose flour, about 2 cups
  • 150 g packed brown sugar, about ¾ cup
  • 113 g unsalted butter, melted and cooled, about ½ cup
  • 2 large eggs
  • 2 teaspoons vanilla extract
  • 1 teaspoon baking soda
  • 1 teaspoon baking powder
  • ½ teaspoon fine salt
  • 1 teaspoon ground cinnamon, optional
  • 85–115 g chopped walnuts, pecans, or chocolate chips, optional

Instructions

  1. Preheat the oven to 350°F / 175°C. Line a 9×5-inch loaf pan with parchment paper.
  2. Mash the bananas and measure out 340–360 g. Set aside.
  3. In a large bowl, whisk melted butter and brown sugar until glossy.
  4. Add eggs, vanilla, mashed banana, and sourdough discard. Whisk until the discard is fully blended into the wet ingredients.
  5. Add flour, baking soda, baking powder, salt, and cinnamon. Sprinkle the leaveners and salt evenly over the flour, then fold gently with a spatula until no dry flour remains.
  6. Fold in walnuts, pecans, or chocolate chips, if using.
  7. Spread the batter into the prepared loaf pan and smooth the top.
  8. Bake for 55–65 minutes, or until the top is domed, the thickest part feels set, and a skewer inserted into the center shows moist crumbs but no wet batter. If the top browns too quickly, tent loosely with foil.
  9. The loaf is done when the thickest part reads about 200–205°F / 93–96°C.
  10. Cool in the pan for 10–20 minutes, then lift onto a rack and cool before slicing.

Recipe Notes

  • Fresh discard gives a mild flavor. Older discard gives a stronger sourdough note.
  • Active starter can be used in the same amount by weight.
  • Do not add extra banana without expecting a longer bake time.
  • For a less-sweet loaf, reduce brown sugar to about 125 g.
  • For a softer oil-based loaf, replace the melted butter with 100–110 g neutral oil.
  • For blueberries, use 75–100 g and avoid adding extra banana at the same time.
  • For a long-fermented version, use a separate method where the flour, discard, banana, butter, and sugar rest first, then add the eggs and final leaveners closer to baking.
  • Store wrapped at room temperature for 3–4 days, or freeze slices for up to 3 months.

Save these core cues for repeat bakes: measured banana, 113 g discard, a 9×5 pan, and a 200–205°F finish.

Sourdough banana bread recipe card with loaf and slice plus key cues for mashed banana, sourdough discard, oven temperature, bake time, pan size, and doneness temperature.
Save the core cues for later: measured banana, 113 g discard, a 9×5 pan, and a 200–205°F finish make the loaf easier to repeat.

More Ways to Use Ripe Bananas

If you still have bananas on the counter after this loaf, this banoffee pie recipe takes them in a caramel-and-cream dessert direction. For a no-oven breakfast, banana oatmeal pancakes use ripe banana for natural sweetness and moisture.

Once this base loaf works for you, it becomes a reliable discard recipe to return to whenever bananas go brown. After that, the walnut, chocolate chip, oil-based, and extra-tangy versions become easy little adjustments rather than brand-new recipes.

Once you know how your oven bakes this loaf, it becomes one of those quiet kitchen recipes you do not need a special occasion for: brown bananas, a little discard, one bowl, and a loaf that makes the next morning easier.

FAQs

Does sourdough banana bread taste sour?

It should taste like banana bread with a little extra depth, not like sour bread. Fresh discard gives the mildest flavor. Older fridge discard creates a stronger tang, especially if it has been sitting for several days.

Can I use active sourdough starter instead of discard?

Yes. Use the same amount by weight. Active starter usually gives a slightly lighter loaf and a milder sourdough flavor, while older discard gives more tang.

Is this a sourdough starter banana bread?

Yes. You can make it with sourdough discard or active starter. However, it is still a quick bread, so baking soda and baking powder do the main lifting while the starter adds moisture, acidity, tenderness, and flavor.

Why is my loaf gummy in the middle?

The most common causes are too much banana, underbaking, overmixing, or slicing before the loaf has cooled. Use 340–360 g mashed banana, fold the flour gently, and bake until no wet batter remains in the thickest part.

How ripe should bananas be for banana bread?

Use bananas with brown spots or fully brown skins. They should smell sweet and mash easily. Firm yellow bananas do not give the same sweetness, moisture, or banana flavor.

Can I use frozen bananas?

Yes. Thaw them first, drain off the watery liquid, then measure the mashed banana. Frozen bananas release more moisture than fresh ripe bananas, so keeping the amount in the 340–360 g range matters even more.

Should I use baking soda, baking powder, or both?

Both work best in this recipe. Baking soda reacts with the acidity in the bananas, brown sugar, and discard, while baking powder adds backup lift for a more reliable loaf.

What happens when the discard is very old?

Older discard can make the loaf tangier. That can be delicious when the discard smells pleasantly sour, but avoid discard that smells spoiled, moldy, or sharply unpleasant. For a mild loaf, use fresh discard or active starter.

Does the discard make the bread rise?

Not much. In this quick bread, baking soda and baking powder do the main lifting. The discard mostly adds moisture, acidity, tenderness, and flavor.

Can I make this dairy-free?

Yes. Replace the melted butter with 100–110 g neutral oil. The loaf will taste less buttery, but the crumb will stay soft and moist. This makes the loaf dairy-free, but not egg-free unless you also use the flax egg option.

Can I use whole wheat flour?

Yes, but start by replacing only half the all-purpose flour with whole wheat flour. A full whole-wheat loaf can taste heavier and absorb more moisture. If the batter feels unusually stiff, add 1–2 tablespoons of milk, yogurt, or water.

Can this sourdough banana bread recipe be made ahead?

Yes. The loaf keeps well at room temperature for 3–4 days and freezes nicely in slices. In fact, the flavor often tastes even better the next day because the banana, brown sugar, and sourdough notes settle together.

Can I bake this as muffins?

The batter can inspire muffins, but loaf timing does not translate directly. Muffins need a different pan, shorter bake time, and careful fill level. For the cleanest result, treat sourdough banana muffins as their own recipe rather than simply shrinking the loaf.

If you make this sourdough banana bread recipe, leave a comment with three details: fresh discard or older discard, butter or oil, and plain, walnut, or chocolate chip. Those notes help the next baker choose a version — and I would love to know which one becomes your repeat loaf.

Back to top