Posted on Leave a comment

Pumpkin Cream Cheese Muffins Recipe: Moist, Spiced & Cream Cheese-Filled

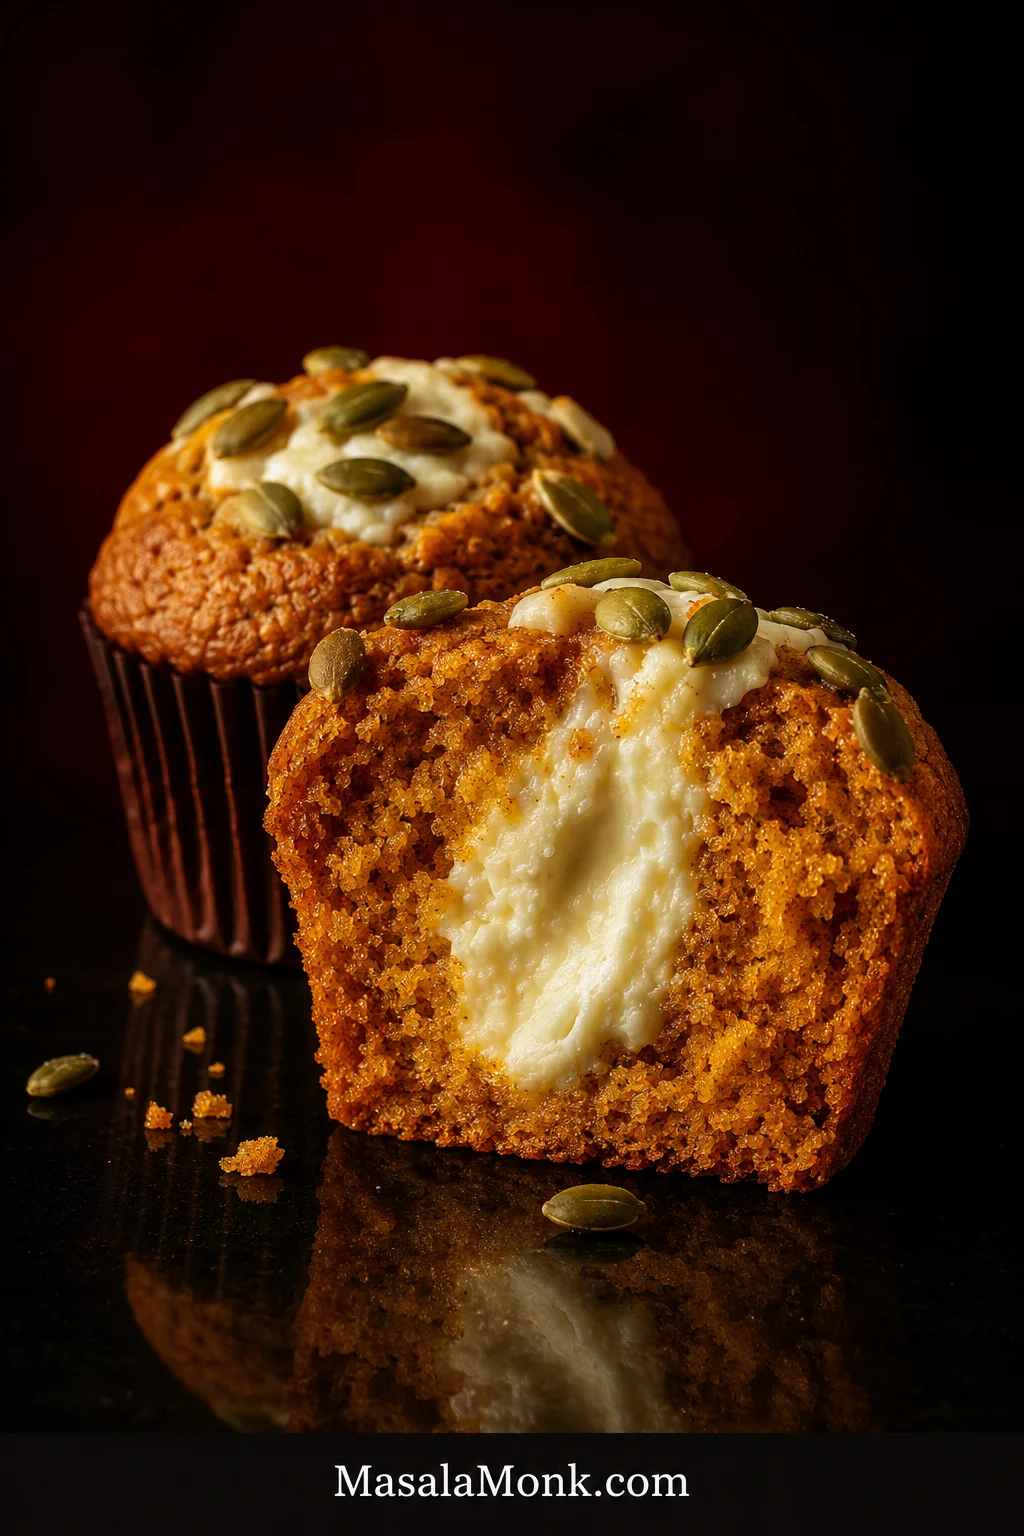
Cut-open pumpkin cream cheese muffin showing a generous white cream cheese center inside orange pumpkin crumb, with a whole pepita-topped muffin behind it.

Cut one of these pumpkin cream cheese muffins open after it has cooled a little and the best part should be obvious: a creamy white filling inside a tender, warmly spiced pumpkin muffin. Roasted pepitas bring a salty crunch to the top, while tangy cream cheese keeps the sweetness in balance.

The disappointing version looks promising from above and then gives you bite after bite of pumpkin with barely a streak of cream cheese inside. Here, each standard muffin gets about 1 1/2 tablespoons of filling, piped into the raw batter rather than left as a small dollop at the crown.

There’s no need to freeze the filling first or rest the batter. Once the cream cheese is smooth, the rest is whisk, fold, pipe and bake.

Pumpkin Cream Cheese Muffins Recipe

This batch makes about 12 generously filled muffins in a deep standard 12-cup pan. Shallower wells may give you 13 or 14. Let the pan decide the final yield instead of forcing every bit of batter into 12 cups.
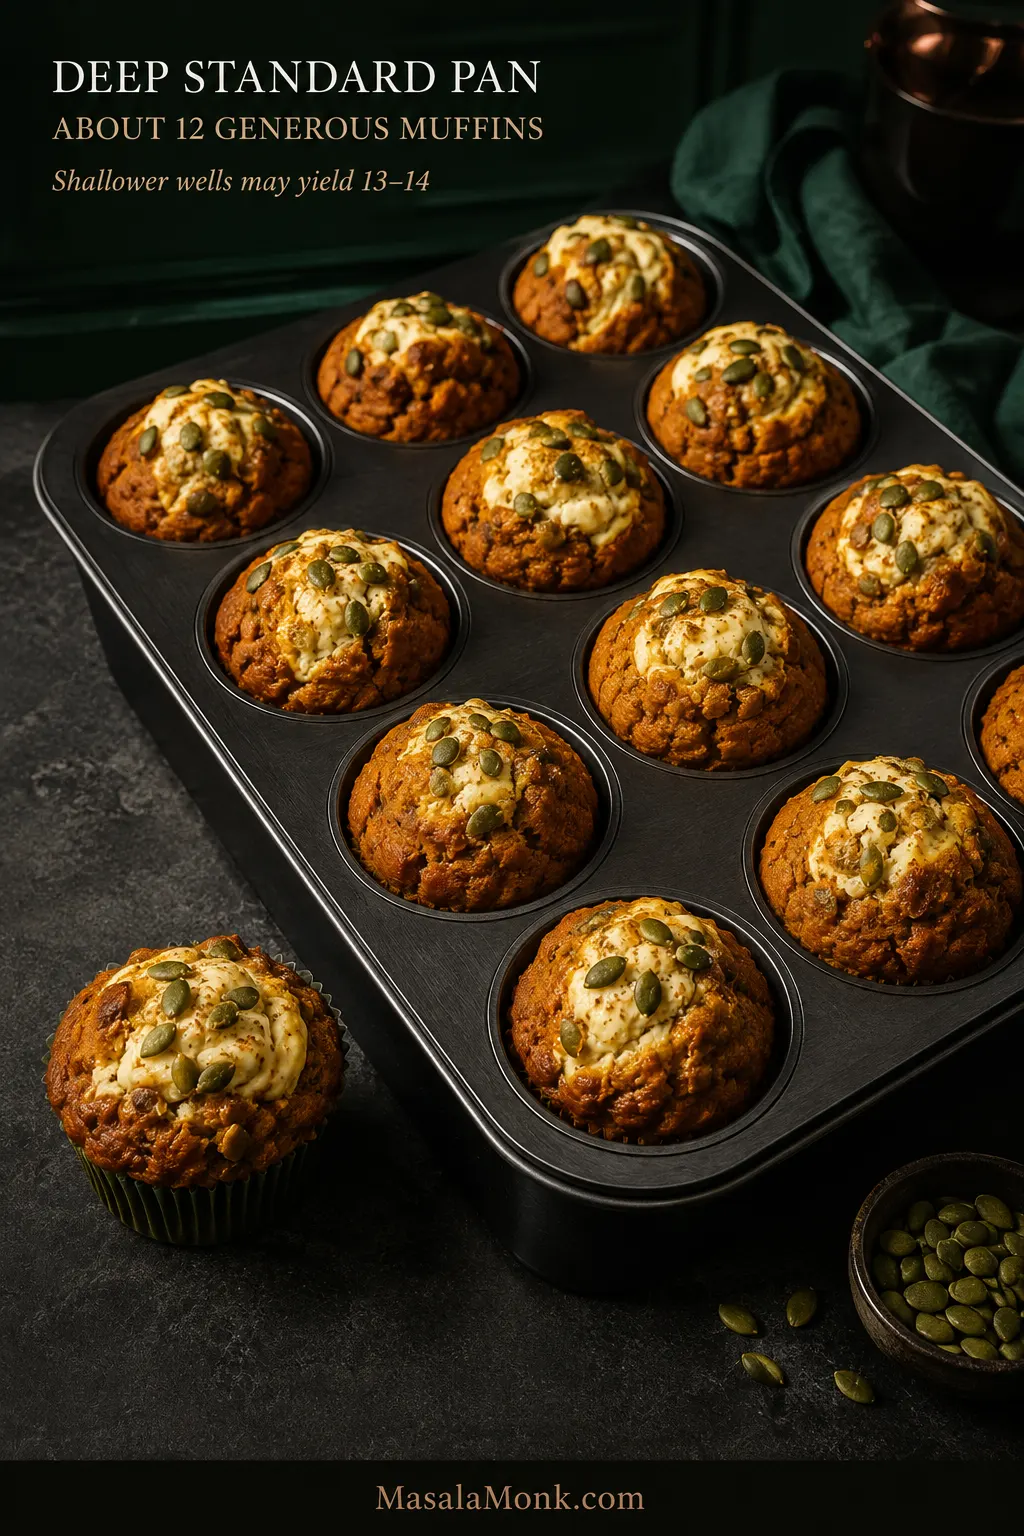
Deep 12-cup muffin pan filled with pumpkin cream cheese muffins, with batter portioned high in each lined well.
Use the pan, not the recipe yield, as the final portioning guide. If a shallower cup already looks comfortably full around 85–90 g of batter, move the rest into another liner rather than forcing a taller muffin into too little space.

The target is a tender, warmly spiced pumpkin crumb with enough structure to hold the cream cheese without turning dense or gummy.

  • Yield: about 12 standard muffins; 13–14 in shallower wells
  • Prep: about 25 minutes
  • Bake: about 19–23 minutes
  • Cool before a clean first cut: about 20–30 minutes
  • Conventional oven: 425°F / 220°C, then 350°F / 175°C
  • Fan/convection: as a starting point, reduce both temperatures by about 25°F / 15°C—roughly 400°F / 205°C, then 325°F / 165°C—and begin checking a little earlier; ovens vary
  • Batter rest: none

You will need: a standard muffin pan, liners, two large mixing bowls, a small bowl for the filling, a whisk, a flexible spatula and a piping bag or sturdy zip-top bag. A handheld mixer is convenient for smoothing the cream cheese, but properly softened cream cheese can also be stirred smooth by hand. A kitchen scale is especially useful for the flour and filling.

Cream Cheese Filling

  • 8 oz (226 g) full-fat block cream cheese, softened until pliable but still cool
  • 1/2 cup (60 g) confectioners’ sugar (powdered or icing sugar)
  • 1 tablespoon (8 g) all-purpose flour
  • 1 teaspoon (5 ml) vanilla extract
  • 1/8 teaspoon fine salt

Pumpkin Muffin Batter

  • 2 1/4 cups (280 g) all-purpose flour
  • 2 teaspoons pumpkin pie spice
  • 1 teaspoon ground cinnamon
  • 1 teaspoon baking powder
  • 1 teaspoon baking soda
  • 1/2 teaspoon fine salt
  • 2 large eggs
  • 3/4 cup packed light brown sugar (150 g); dark brown sugar also works
  • 1/3 cup granulated sugar (67 g)
  • 1 1/3 cups (330 g) 100% pumpkin purée
  • 1/2 cup (120 ml) neutral oil, such as vegetable, canola, sunflower or mild avocado oil
  • 1/3 cup (80 ml) whole milk
  • 2 teaspoons (10 ml) vanilla extract

For the Top

  • 1/4 cup (about 30 g) roasted salted pepitas (hulled pumpkin seeds)
  • 1/4 teaspoon pumpkin pie spice, optional

How to Make Pumpkin Cream Cheese Muffins

Prep, Mix the Filling and Batter

  1. Heat the oven. Position a rack in the middle and preheat a conventional oven to 425°F / 220°C. Line the muffin pan.
  1. Mix the filling. Smooth the softened cream cheese, then mix in the confectioners’ sugar, flour, vanilla and salt. Scoop some up with a spoon: it should sit in a soft mound briefly instead of running flat. Chill for 15–20 minutes if it has become loose. Transfer to a piping bag or sturdy zip-top bag and cut an opening about 1/2 inch / 1–1.5 cm wide.
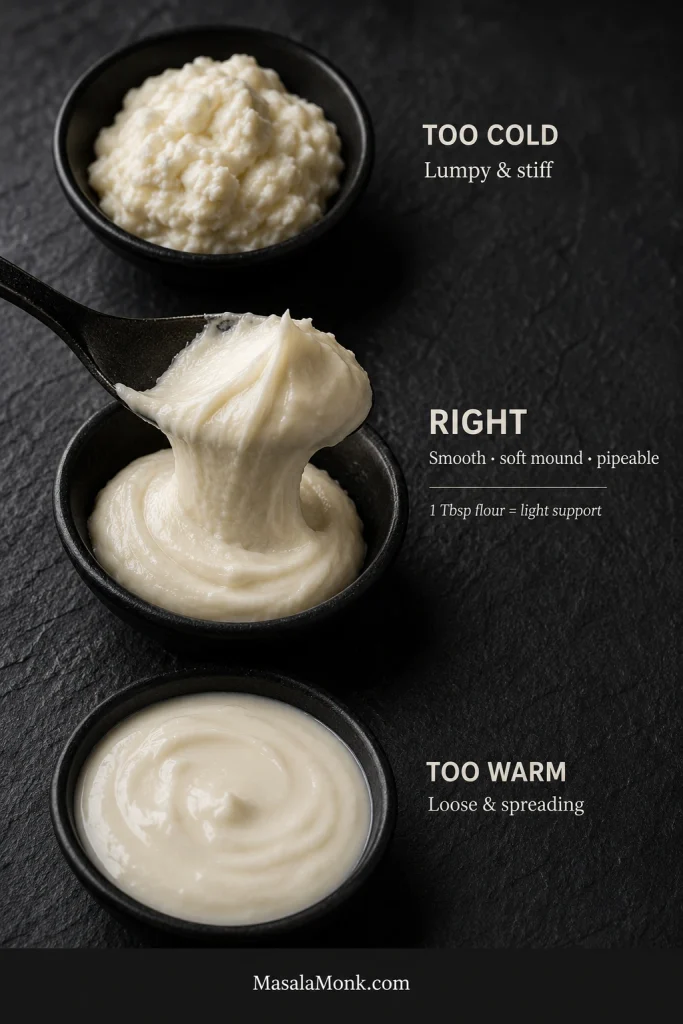
Three cream cheese filling consistencies comparing stiff and lumpy, smooth and pipeable, and loose spreading filling.
Temperature usually explains the filling before flour does. Lumpy filling is often still too cold; filling that spreads immediately has usually become too warm. Correct the temperature first so the center stays creamy rather than turning pasty.
  1. Whisk the dry ingredients. Combine the flour, pumpkin pie spice, cinnamon, baking powder, baking soda and salt.
  2. Mix the pumpkin base. In the second large bowl, whisk the eggs and both sugars until smooth. Add the pumpkin purée, oil, milk and vanilla and whisk again.
  1. Fold the batter. Add the dry ingredients to the pumpkin mixture and switch to a spatula. Fold until the last visible flour disappears. The batter should sit heavily on the spatula but still scoop easily. A few small lumps are fine. Stop there.
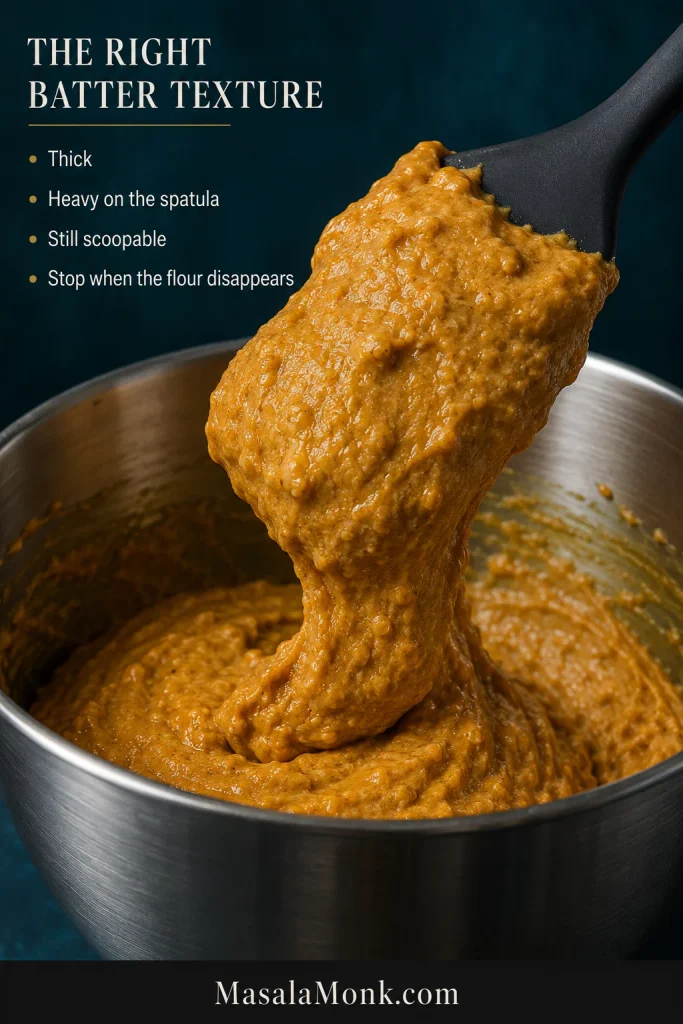
Thick orange pumpkin muffin batter held on a spatula above a mixing bowl, showing a heavy but scoopable consistency.
A few small lumps are a better stopping point than a perfectly smooth batter. Once the flour is incorporated, extra folding can tighten the pumpkin crumb long before the batter starts looking obviously overmixed.

Fill and Top the Muffins

  1. Fill the muffin wells. In a deep standard pan, divide the batter among 12 wells, about 95 g each. Shallower cups may already look full at 85–90 g; use a 13th or 14th liner instead of squeezing in the rest.
  1. Pipe in the cream cheese. Divide the filling among the muffins, about 24–25 g each when making 12. Insert the tip about 1/2 inch / 1–1.5 cm into the batter. Squeeze as you slowly pull the bag upward, finishing with some cream cheese visible at the surface. Keep the filling away from the liner.
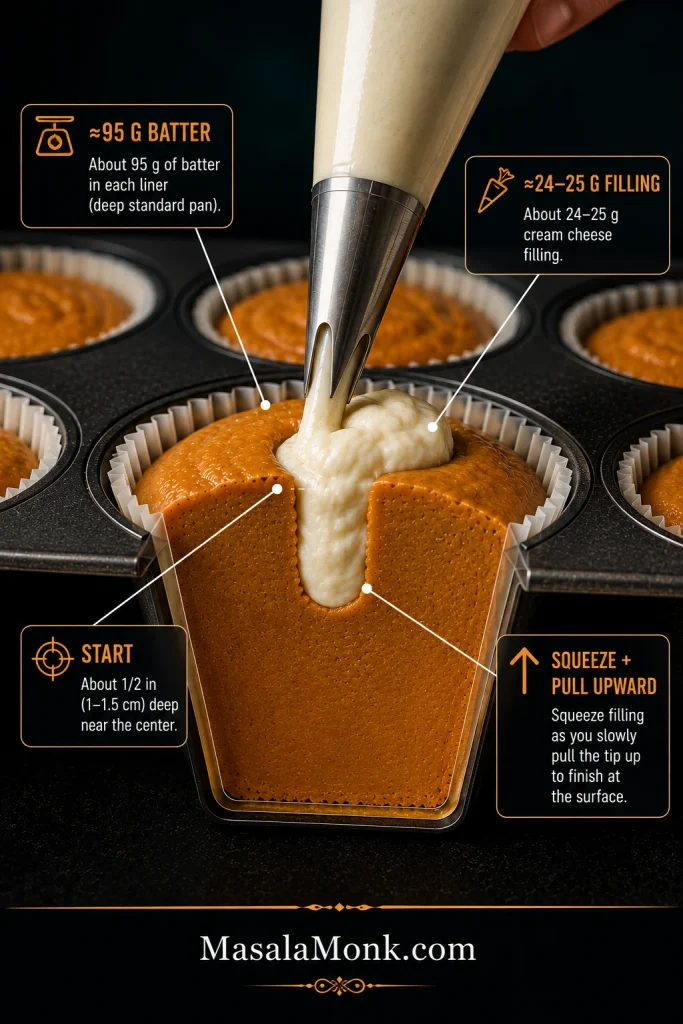
Cutaway of raw pumpkin muffin batter showing cream cheese piped near the center and pulled upward, with pumpkin batter left beneath the filling.
Piping upward creates a narrower vertical pocket instead of a broad cheese layer. That helps preserve pumpkin underneath and around the filling, which matters just as much as getting plenty of cream cheese into the muffin.
  1. Add the pepitas. Toss the pepitas with the optional 1/4 teaspoon pumpkin pie spice, if using, then scatter them around the exposed cream cheese and press very lightly. The white crowns will vary a bit from muffin to muffin. That’s fine.

Bake, Check and Cool

  1. Start hot. Bake at 425°F / 220°C for 5 minutes. The early heat encourages the thick batter to rise quickly. Without opening the oven, reduce the temperature to 350°F / 175°C so the centers can finish without overbaking the tops.
  2. Finish baking. Continue for another 14–18 minutes. Start checking near the early end of the range.
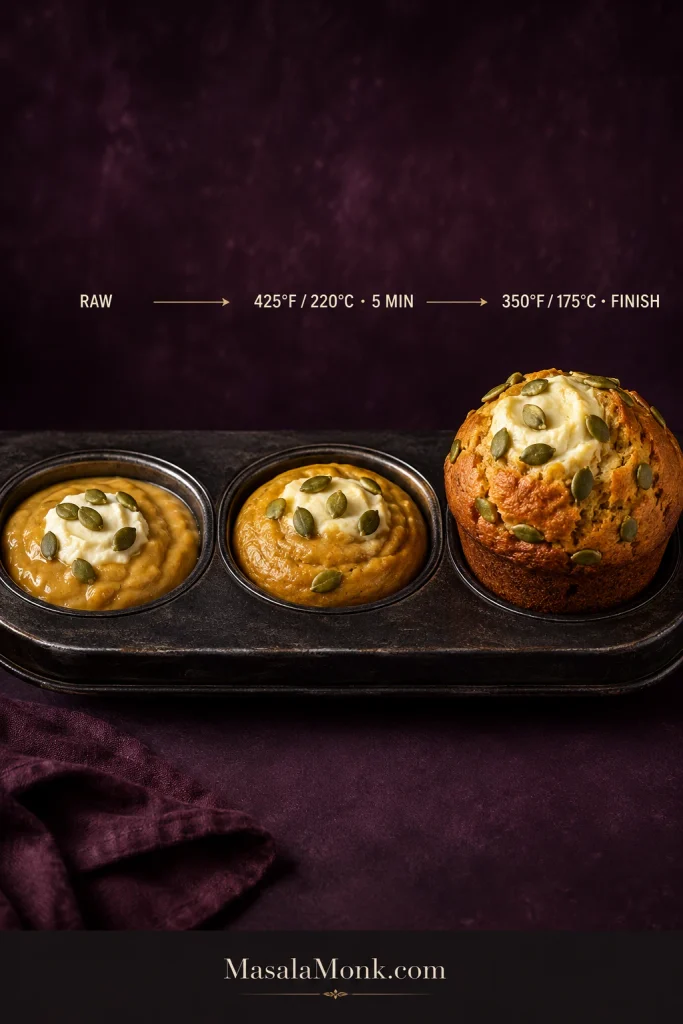
Three stages of a pumpkin cream cheese muffin showing raw batter, early rise after five minutes at 425°F, and the finished muffin at 350°F.
The two-temperature bake works as part of the whole system, not as a shortcut. Thick batter, sensible portioning and fresh leaveners still determine whether the muffin rises well; the hot start simply gives them an early advantage.
  1. Check beside the filling. Insert a toothpick into the pumpkin portion just off-center. A few moist crumbs are fine; wet batter isn’t. The top should spring back lightly and the exposed cream cheese should look set and more matte than glossy.
  2. Cool before cutting. Leave the muffins in the pan for about 5–10 minutes, then move them to a wire rack. Give the filling another 15–20 minutes to settle if you want a cleaner first cut.

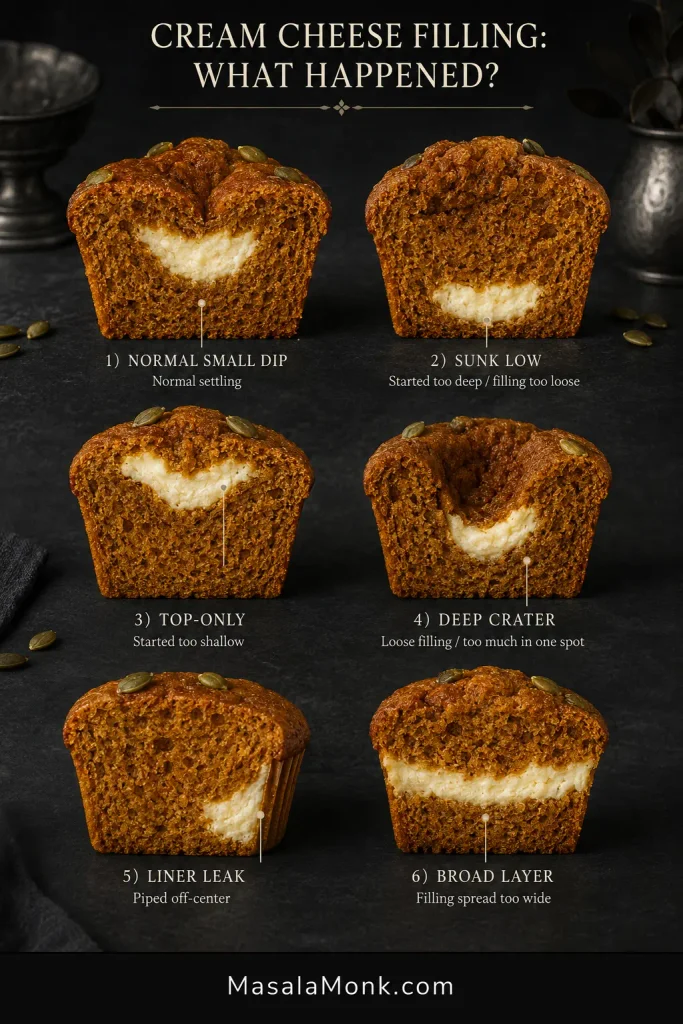
That first cut tells you more than the top does. Cream cheese settling slightly to one side is normal; a deep crater or filling pooled near the bottom is a different story.
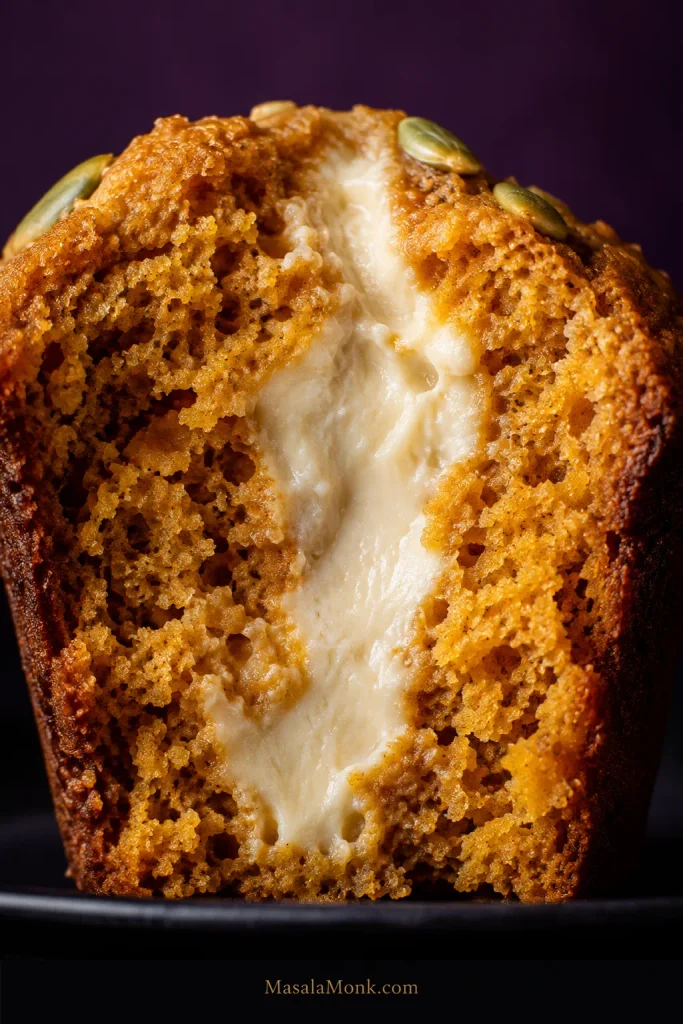
Macro cross-section of a pumpkin cream cheese muffin showing a creamy white center surrounded by tender orange crumb with open, baked pores.
The pumpkin crumb around the center should stay open and tender; a shiny, compressed band suggests excess moisture or underbaking.

That white center and pepita crown may look familiar.

Are These Starbucks Pumpkin Cream Cheese Muffins a Copycat?

They’re Starbucks-inspired rather than an exact replica. Starbucks’ 2026 Pumpkin Cream Cheese Muffin combines spiced pumpkin muffin, sweet cream-cheese filling and spiced pepitas. This recipe keeps that recognizable white center and pumpkin-seed top while using its own eggless filling, proportions and method.

If that seasonal coffee-shop muffin is what brought you here, homemade has one obvious advantage: you decide when the season starts—and how much cream cheese goes into the middle.

What Keeps the Muffins Tender and the Filling Creamy

A few ingredient choices do most of the work here: thick pumpkin keeps excess water in check, block cream cheese makes the center more predictable, oil helps the crumb stay tender after chilling, and fresh spices keep the pumpkin tasting lively after baking.
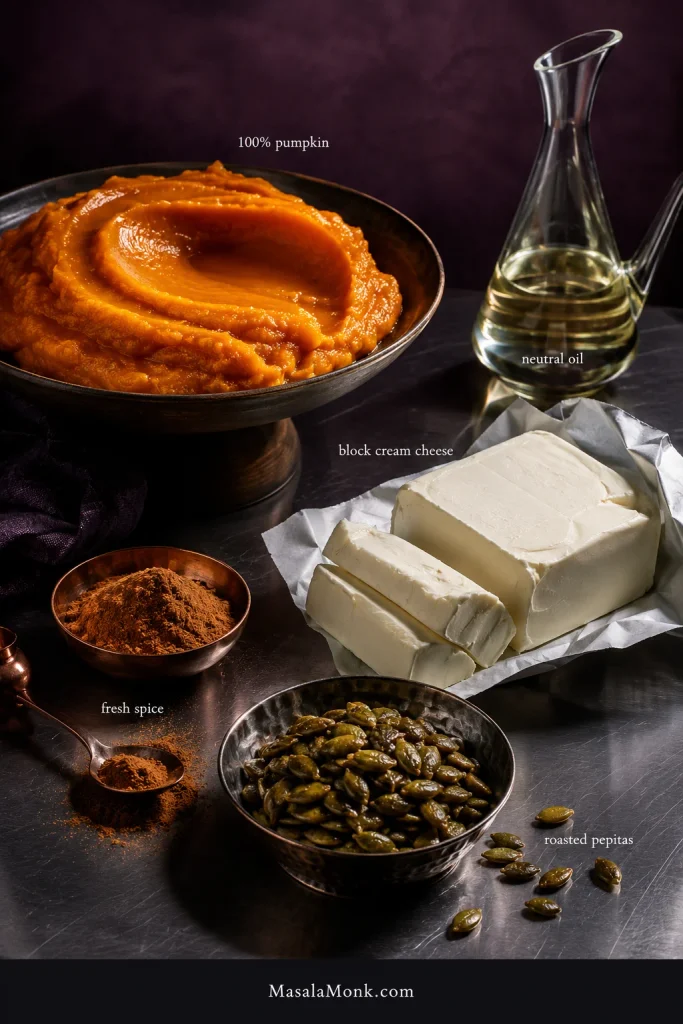
Editorial still life of thick pumpkin purée, block cream cheese, neutral oil, spices and green pepitas used for pumpkin cream cheese muffins.
Ingredient form matters more than brand here: thick purée, block cream cheese and neutral oil give the recipe its intended balance.

Use Thick Pumpkin Purée

Use plain 100% pumpkin purée, not pumpkin pie filling. Pie filling already contains sugar, spices and other ingredients, so it changes both flavor and moisture.

Homemade purée works when it is roughly as thick as canned pumpkin. Drag a spoon through it; the track should stay visible briefly instead of flooding straight back in. Our pumpkin bread recipe has more detail on canned versus fresh pumpkin and handling a watery homemade purée.
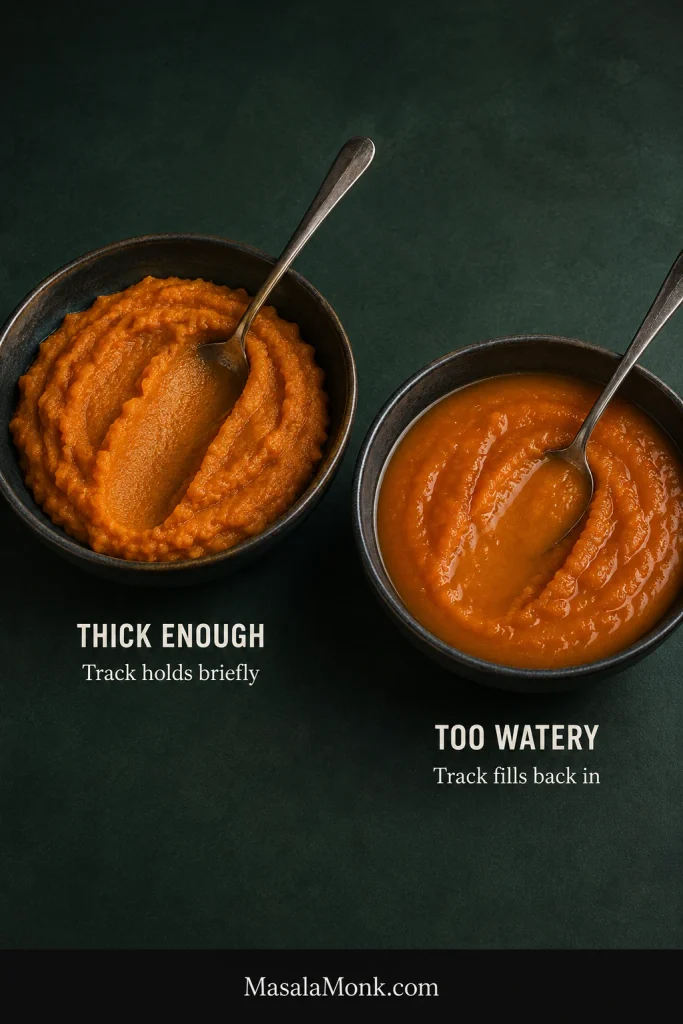
Two bowls comparing thick pumpkin purée that holds a spoon track with watery purée whose track quickly fills back in.
If homemade pumpkin purée closes over the spoon track almost immediately, deal with the excess water at the source. Draining or gently reducing it protects pumpkin flavor better than correcting a wet batter later with extra flour.

A typical 15 oz / 425 g can leaves roughly 95 g after you measure what this recipe needs. Save it for oatmeal, pancakes, soup, smoothies or a healthy pumpkin spice latte. Adding the remainder here would throw off the moisture balance.

Keep the Cream Cheese Cool Enough to Hold Its Shape

Use full-fat block or brick-style cream cheese. Tub-style, whipped and reduced-fat products may contain more water, stabilizers or incorporated air, making the filling less predictable.

You want the block pliable enough to mix without stubborn lumps while it still feels cool. Leave it in a hot kitchen too long and the mixture loosens noticeably.

Oil for Tenderness, Flour Measured Carefully

Neutral oil helps these muffins stay tender after cooling and refrigeration. Melted butter brings more buttery richness, but the texture firms more once chilled.

Weigh the flour if you can: 280 g. With cups, loosen it, spoon it in and level without packing. Extra flour makes this batter heavy surprisingly quickly.

Use Spices You Can Actually Smell

Smell your pumpkin pie spice before measuring it.

Pumpkin and cream cheese can mute a timid blend, so stale spices leave the finished muffins noticeably flat. Fresh cinnamon and ginger should announce themselves as soon as the jar opens and become even more noticeable once the pan is in the oven.

If you need a fresh blend, use our homemade pumpkin pie spice. In a pinch, replace the 2 teaspoons here with approximately 1 teaspoon cinnamon, 1/2 teaspoon ginger, 1/4 teaspoon nutmeg, 1/8 teaspoon cloves and 1/8 teaspoon allspice, then keep the additional teaspoon of cinnamon already listed in the batter.

How to Get a Creamy Center That Stays Put

Keep the filling creamy but pipeable. The tablespoon of flour already in the recipe gives the eggless center enough support; adding more can make it pasty. If the mixture stops holding a soft mound in a warm kitchen, chill it briefly instead of adding extra flour.

Pipe through the center. Start around the middle and squeeze as you pull upward, keeping pumpkin batter between the filling and liner. A small dip or slightly off-center cream-cheese crown after cooling is normal.

Filling sank, leaked or cratered? Jump to troubleshooting →

How to Tell When Pumpkin Cream Cheese Muffins Are Done

A toothpick pushed straight through the cream cheese may come back coated even when the muffin is fully baked. Test just beside it.

  • Press the top. It should spring back lightly.
  • Check the pumpkin portion. A few moist crumbs are fine; wet batter isn’t.
  • Look at the exposed cream cheese. It should appear set and more matte than glossy.
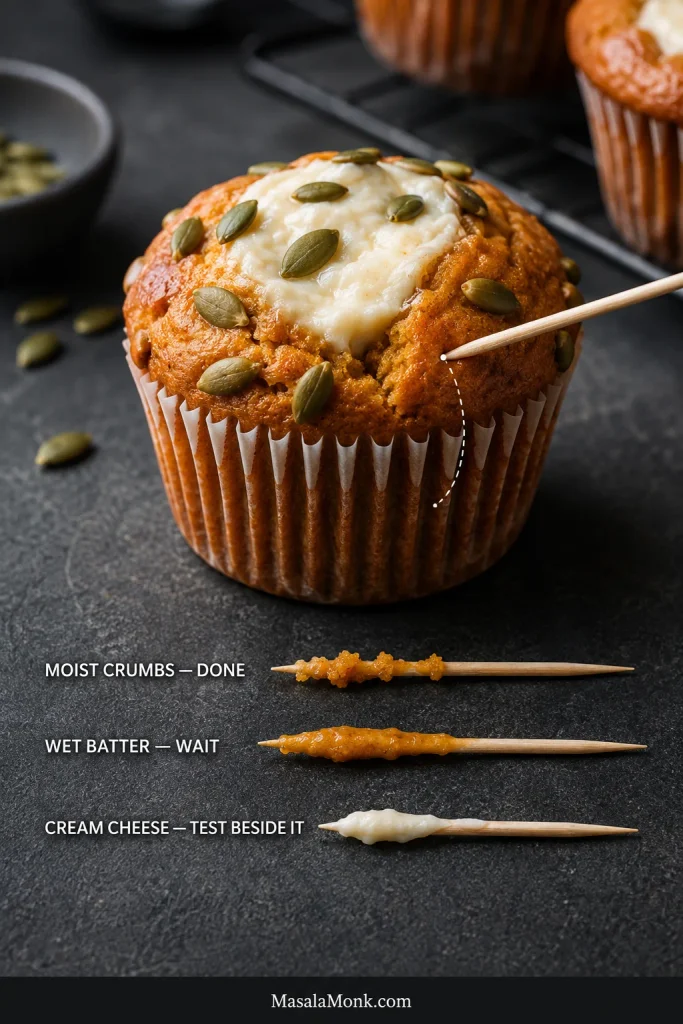
Pumpkin cream cheese muffin with a toothpick inserted beside the filling, plus examples of moist crumbs, wet batter and cream cheese on testers.
Do not wait for a bone-dry tester. A few moist crumbs from the pumpkin portion are a better endpoint than baking until every trace disappears, especially with a cream cheese center that naturally stays soft.

Troubleshooting Pumpkin Cream Cheese Muffins

The hardest part is sometimes knowing when to stop fixing something that isn’t broken. A small dip, an off-center white crown or two muffins that rise differently can still be completely good muffins.

For a real problem, match the symptom you saw and change one thing at a time.

Cream Cheese Filling Problems: Sinking, Leaking, Craters & Lumps

What you seeLikely causeNext time
Small dip after coolingNormal settlingLeave it alone if the surrounding muffin is baked.
Cream cheese sinks toward the bottomPiping started too deep, or the filling was very looseStart nearer the middle and briefly chill loose filling.
Most cream cheese stays on topPiping began too close to the surfaceInsert the bag a little farther before squeezing.
Deep craterLoose filling or too much filling concentrated in one spotChill the filling and spread it vertically as you withdraw the bag.
Filling leaks to the linerIt was piped off-centerKeep pumpkin batter between the cream cheese and paper.
Lumpy fillingCream cheese was too coldSoften it until pliable before mixing.
Muffin separates around the cream-cheese layerThe filling spread into a broad horizontal layerKeep the pocket narrower and more central.
Six pumpkin cream cheese muffin cross-sections comparing normal settling, sunk filling, top-only filling, a crater, liner leakage and a broad cream cheese layer.
Treat filling position as evidence. A problem that is mostly about where the cream cheese ended up usually points toward piping depth or direction; a loose cratered center suggests you should look at filling consistency instead.

Muffin Texture & Rise Problems: Dense, Gummy, Dry or Flat

What you seeLikely causeNext time
Dense or rubberyToo much mixing after the flour went inFold only until the last dry streak disappears.
Dry and heavyToo much flour or too much oven timeWeigh the flour and begin checking earlier.
Wet or gummyUnderbaking or watery pumpkin puréeUse thick purée and test beside the filling.
Flat topsWeak leavener, underheated oven or very loose batterUse fresh baking powder and soda and fully preheat the oven.
Lopsided topsUneven portions, off-center filling or uneven oven heatPortion carefully and keep the filling near the middle.
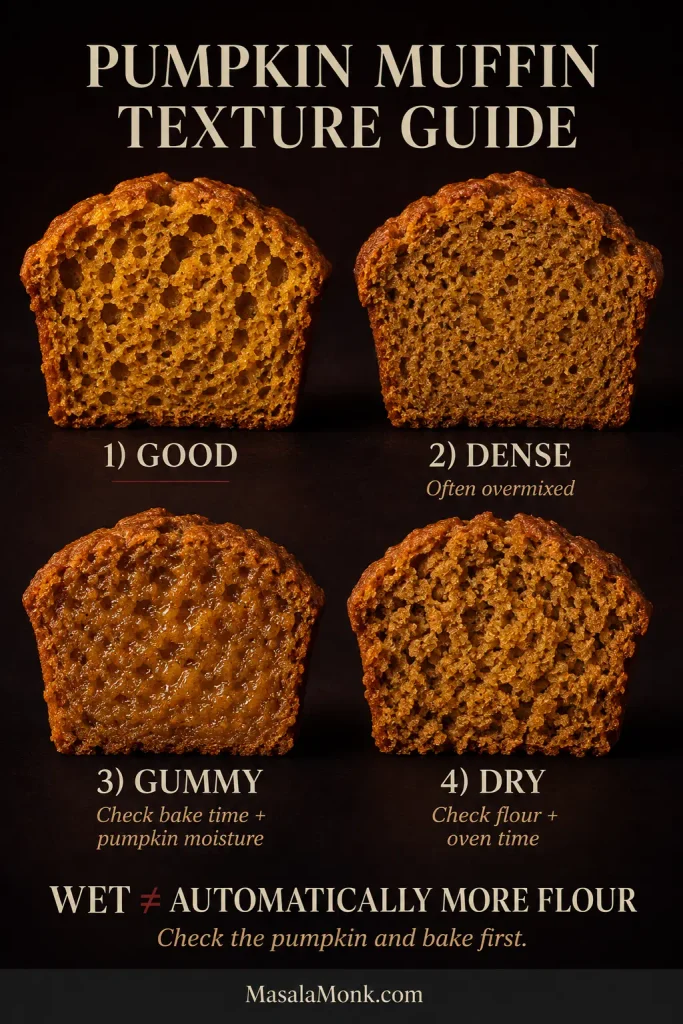
Four pumpkin muffin crumb examples labeled good, dense, gummy and dry, with visibly different pore structure and moisture.
The crumb tells you which direction to investigate. Tight pores suggest density, a shiny compressed interior points toward gumminess, and rough fragile crumb suggests dryness—three different problems that should not receive one generic fix.

A wet, heavy muffin doesn’t automatically need more flour. Check the pumpkin and baking time first, or an underbaking problem can easily become a dry-muffin problem on the next batch.

Once the muffin is baked through, the center should still be creamy while the pumpkin around it pulls apart cleanly rather than compressing into a wet, gummy band.
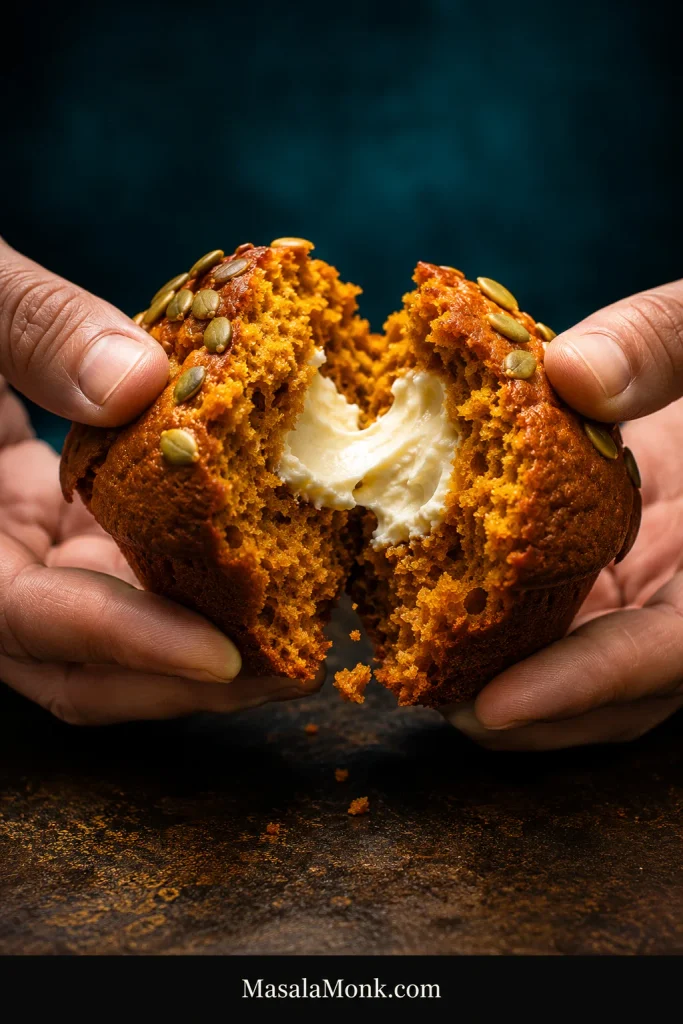
Hands breaking apart a pumpkin cream cheese muffin to reveal tender orange crumb, a thick white cream cheese center and pepitas on top.
This is the payoff: soft pumpkin crumb pulling away from a thick creamy center, with pepitas adding crunch at the top.

Back to the recipe ↑

Pumpkin Cream Cheese Muffin Variations

Once the base muffin works for you, these variations change one element at a time—the center, the crown or the mix-ins—without rebuilding the whole recipe.

Filled, Cheesecake-Style or Swirled?

They’re related, but they don’t give you the same muffin. The main recipe is a filled or stuffed pumpkin cream cheese muffin with a distinct creamy pocket inside. Add egg or egg yolk to a filling and it sets more firmly, closer to baked cheesecake. A surface swirl keeps more of the cream cheese near the top and gives the crown a marbled look.

Three cut pumpkin muffins comparing a soft filled center, a firmer cheesecake-style center and cream cheese swirled through the crown.
Filled gives the strongest cream-cheese pocket, cheesecake-style sets firmer, and a swirl spreads the tangy richness through more of the crown.

Keep the Pepitas for Salty Crunch

The muffin and filling are already sweet, so roasted salted pepitas bring welcome contrast without adding another sugary layer. Toss them with the optional pumpkin pie spice for a slightly more aromatic top.

Use Streusel for a Sweeter Bakery Muffin

Leave off the pepitas and mix:

  • 1/2 cup (63 g) all-purpose flour
  • 1/4 cup packed brown sugar (50 g)
  • 1 teaspoon cinnamon
  • 3 tablespoons (42 g) melted unsalted butter

Stir with a fork until irregular crumbs form, then divide the streusel evenly among the muffins, scattering it around rather than directly over the cream cheese.

Swirl the Cream Cheese for a Creamier Crown

A surface swirl needs only half of the main filling: 113 g cream cheese, 30 g confectioners’ sugar, about 1 1/2 teaspoons (4 g) flour, 1/2 teaspoon vanilla and a pinch of salt.

Divide it over the pumpkin batter and make a few loose passes with a toothpick or thin skewer. Stop while clear streaks of white and orange remain. Bake on the same standard-muffin schedule and test the pumpkin portion for doneness.

Chocolate Chip Pumpkin Cream Cheese Muffins

Fold 1/2 cup (about 85 g) semisweet chocolate chips into the pumpkin batter before filling the pan. Keep the cream-cheese quantity and baking method unchanged.

If you’re deciding which version to make, this final lineup shows how the four easiest finishes change the look and balance of the same pumpkin cream cheese muffin.
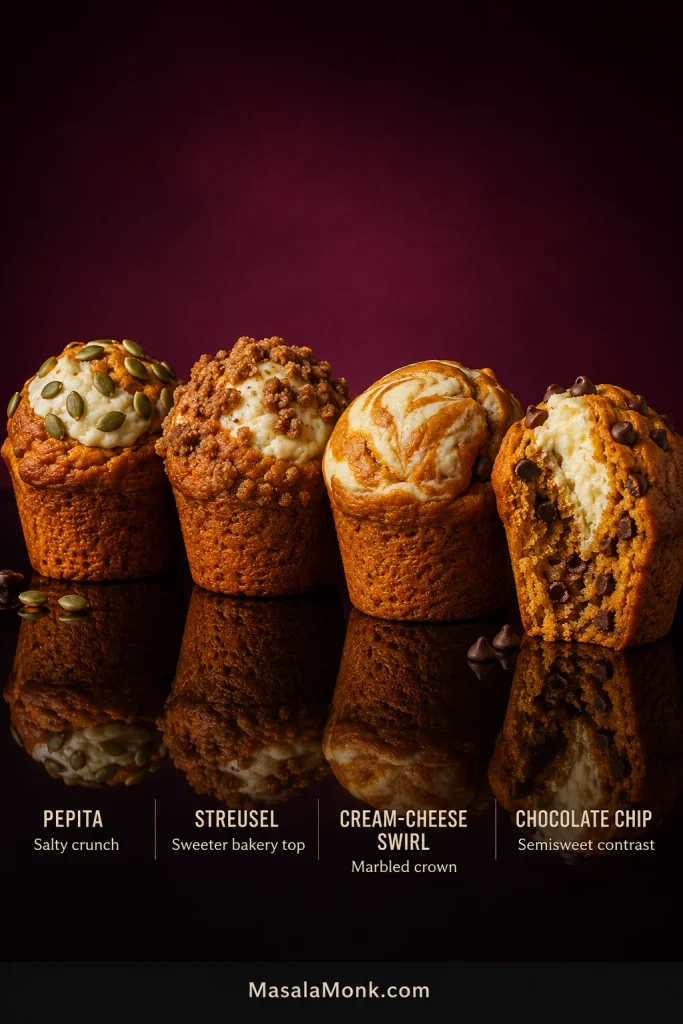
Four pumpkin cream cheese muffin variations topped with pepitas, streusel, a cream cheese swirl and chocolate chips.
Pepitas keep the top least sweet; streusel makes it richer, a cream-cheese swirl emphasizes tang, and semisweet chocolate adds deeper contrast.

Mini and Jumbo Pumpkin Cream Cheese Muffins

The standard and mini portions suggest a useful starting point for larger muffins: roughly 1 part cream-cheese filling for every 4 parts batter by weight. Use that as a starting point for larger cavities, not a fixed rule.
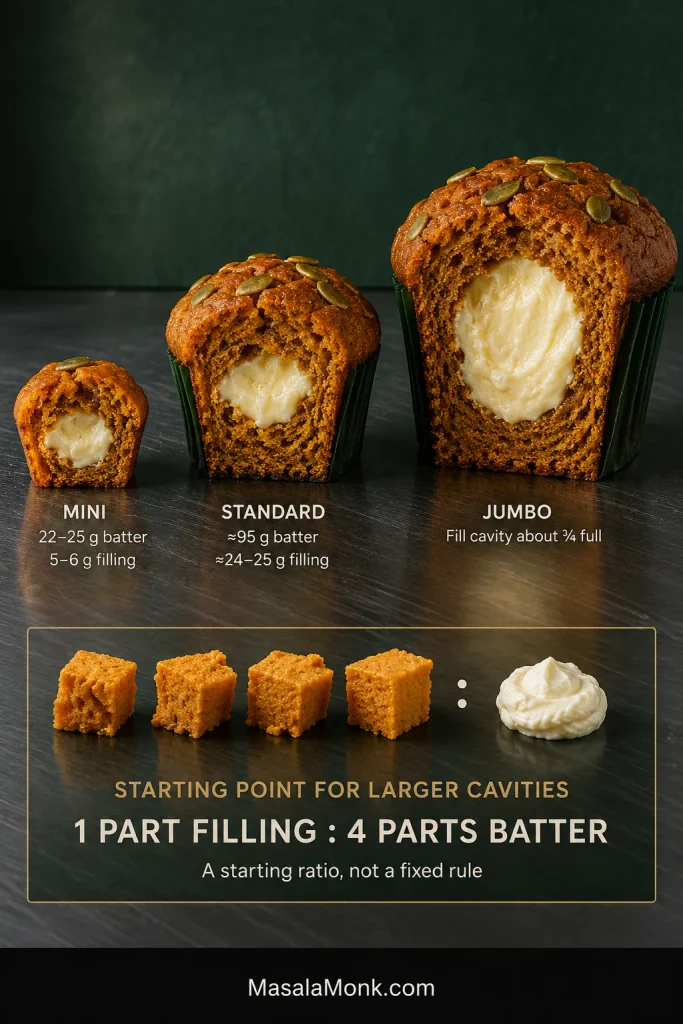
Cut-open mini, standard and jumbo pumpkin cream cheese muffins with portion guidance and a one-part filling to four-parts batter scaling ratio.
Scaling up is not just a matter of adding more filling. If cream cheese increases faster than the pumpkin batter around it, the shell becomes thinner and craters or leaks become more likely—so both parts should grow together.
SizeStarting pointBake
StandardAbout 95 g batter + 24–25 g filling in a deep 12-cup pan425°F / 220°C for 5 min, then 350°F / 175°C; start checking around 19 min total
MiniAbout 22–25 g batter + 5–6 g filling; roughly 48 minis from the full batch, depending on the pan350°F / 175°C throughout; start checking at 11–12 min, with many pans finishing around 12–14 min
JumboFill each cavity roughly three-quarters full, then use the 1:4 filling-to-batter ratio as a starting point425°F / 220°C for 5 min, then 350°F / 175°C; begin checking around 27 min total, with deeper pans sometimes needing longer

Jumbo cavities vary too much for one universal gram amount or bake time to be genuinely useful. Let the pan and the same doneness cues from the standard muffins guide you.

Back to the main recipe ↑

How to Store Pumpkin Cream Cheese Muffins

Because the filling is dairy-based, the timeline below separates cooling, refrigeration, serving and freezing so each stage is easy to follow.
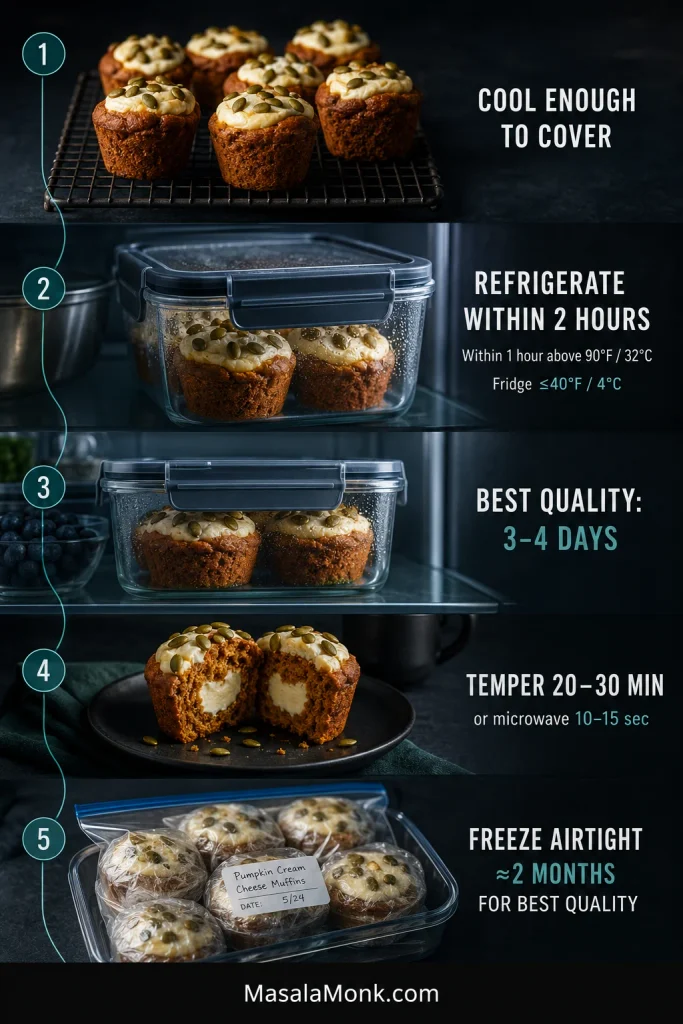
Storage guide showing pumpkin cream cheese muffins cooling, refrigerated in a sealed container, served after tempering and individually wrapped for freezing.
Storage changes texture as well as shelf life. Once chilled, the pumpkin crumb firms and the cream cheese loses some softness; a short temper at room temperature restores much of the freshly baked eating texture.

Do Pumpkin Cream Cheese Muffins Need to Be Refrigerated?

Yes. Let the muffins stop steaming and cool enough to cover, then refrigerate them while keeping the total room-temperature time under 2 hours. If the room or outdoor temperature is above 90°F / 32°C, keep that time under 1 hour. The FDA recommends keeping the refrigerator at 40°F / 4°C or below.

For the best quality, use the refrigerated muffins within about 3–4 days, consistent with USDA guidance for refrigerated leftovers. Give a chilled muffin 20–30 minutes at room temperature and it softens again while the filling loses its hard chill. A brief 10–15 second microwave warm-up works too.

Can You Freeze Pumpkin Cream Cheese Muffins?

Yes. Cool them completely, wrap well and freeze airtight for up to about 2 months for best quality. The filling may thaw slightly softer or a bit more granular than it was fresh.

Can You Make Them Ahead?

The cream-cheese filling can be mixed ahead and refrigerated separately; let it loosen just enough to pipe before assembling. For the muffins themselves, bake ahead rather than holding the fully mixed pumpkin batter overnight.

Pumpkin Cream Cheese Muffins FAQ

Can I Make Them Without a Piping Bag?

Yes. A sturdy zip-top bag with a corner cut off works well. You can also spoon in some pumpkin batter, add cream cheese to the middle and cover it with more batter. That gives you a more hidden pocket with less filling visible on top.
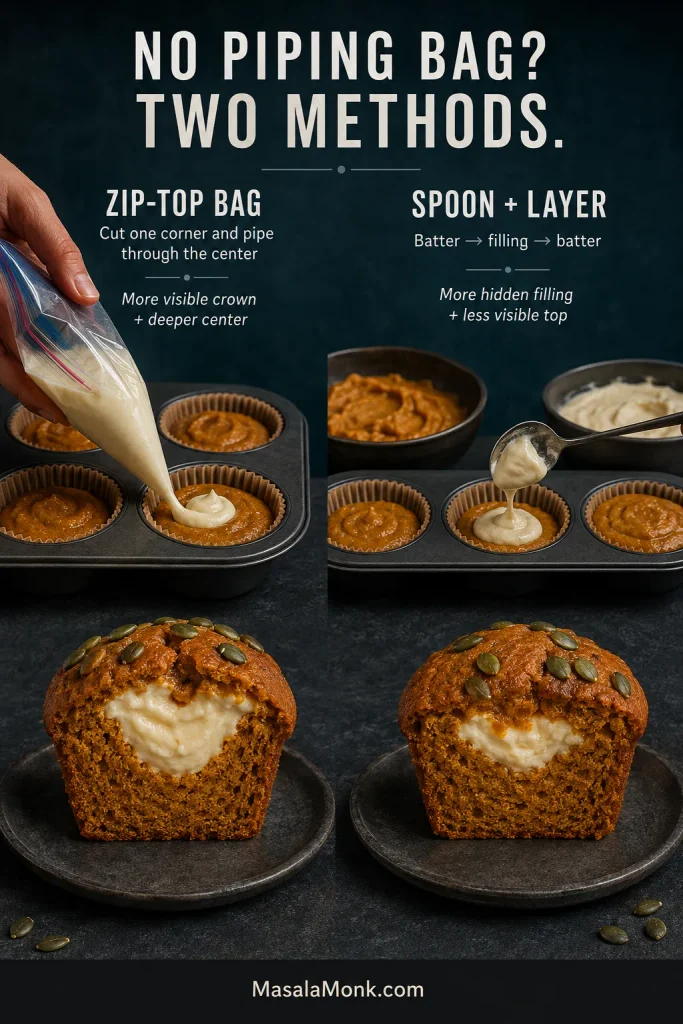
Two methods for filling pumpkin muffins without a piping bag: piping with a cut zip-top bag and spooning cream cheese between layers of batter.
Choose the workaround according to the result you want. A cut zip-top bag gives better control over a visible crown and central filling path; spoon-and-layer assembly is simpler when a hidden cream cheese pocket is perfectly fine.

Can I Replace the Oil With Butter?

Yes. Replace the 1/2 cup oil with 1/2 cup (113 g) melted unsalted butter and let it cool slightly before mixing it with the wet ingredients. You’ll get more buttery richness, but the muffin will firm somewhat more after cooling and refrigeration.

Can I Add Even More Cream Cheese?

The main recipe already uses a generous amount. Packing substantially more cream cheese into the same-size muffin leaves less pumpkin batter around it and makes craters, leaks and gummy edges more likely. For a bigger cream-cheese pocket, move to a larger muffin and scale the batter and filling together.

If you want one visual reference to keep beside the pan, the blueprint below is the most useful place to start.
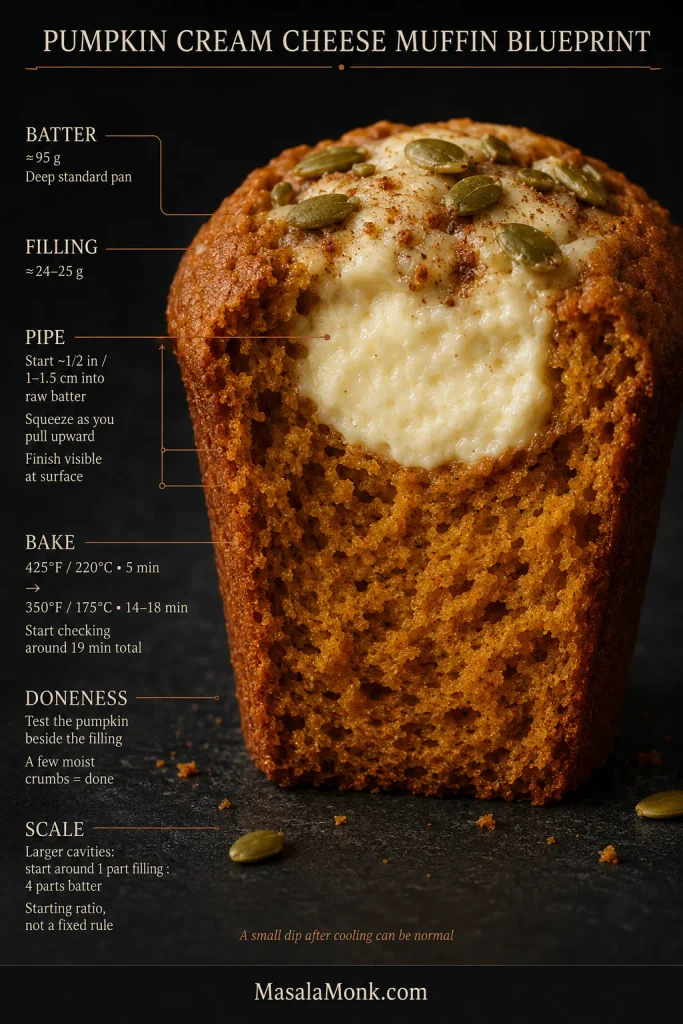
Annotated cutaway pumpkin cream cheese muffin showing batter and filling amounts, piping position, two-stage baking temperatures, doneness test and scaling ratio.
Use this as a troubleshooting map rather than a second recipe card. When a batch looks different, compare the batter-to-filling balance, piping position, bake sequence and doneness check before changing the formula itself.

Let the first one cool enough for the filling to settle, then cut straight through the middle. The tender pumpkin crumb should pull apart around a creamy white center, with salty pepitas cracking across the top. Take another bite, and there should still be cream cheese there.
Jump to the recipe ↑ · Troubleshooting · Back to top ↑

Posted on Leave a comment

Blueberry Muffin Recipe

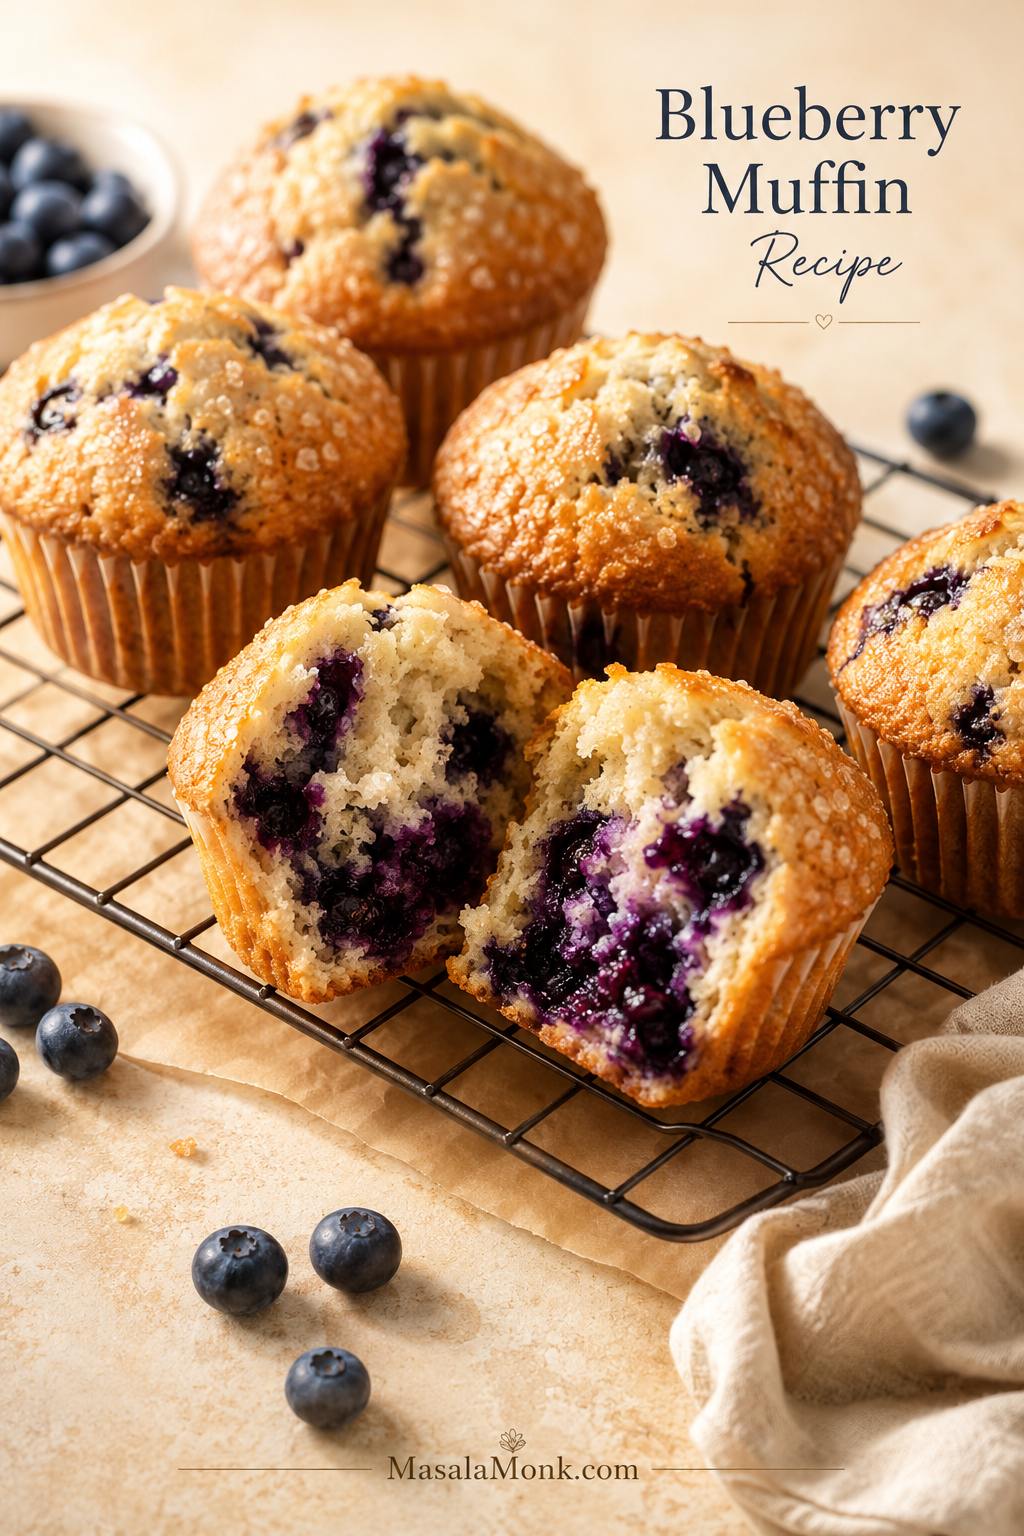
Golden blueberry muffins on a cooling rack with one muffin split open to show a soft blueberry-filled crumb.

A good blueberry muffin recipe should give you that warm bakery moment at home: golden tops, soft centers, juicy blueberries, and a crumb tender enough to pull apart while the muffin is still a little warm. The top should have a light sugar crunch, the center should stay plush, and the berries should burst into little jammy pockets instead of sinking into one wet layer.

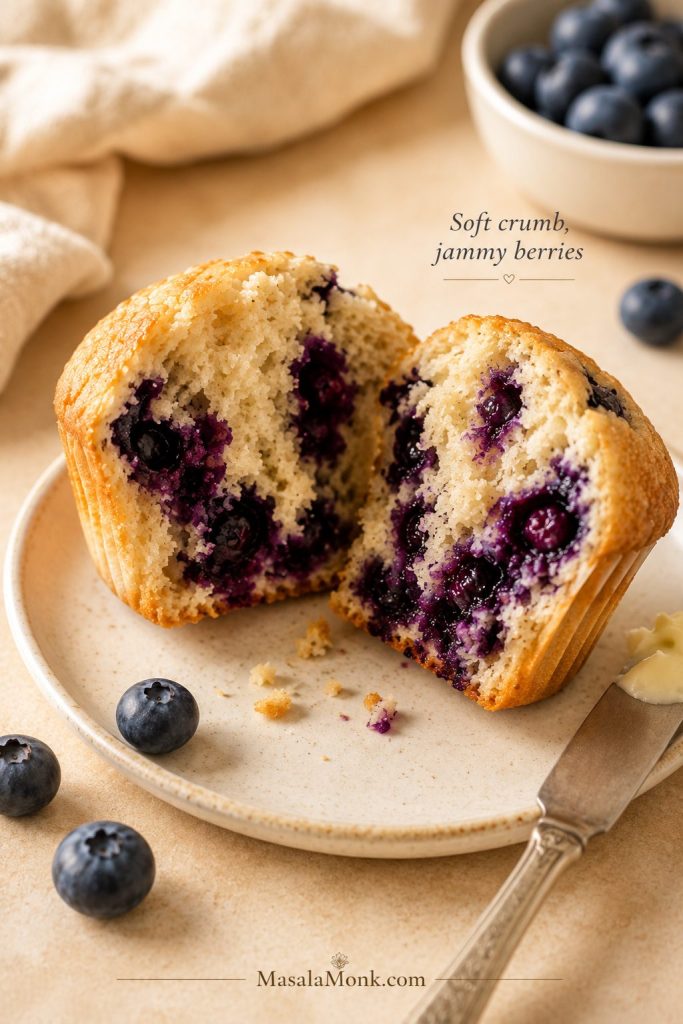
Close-up of a split blueberry muffin with moist crumb and jammy blueberry pockets.
Look for a crumb that pulls apart softly but still holds together. When the berries look jammy instead of watery, the muffins have enough moisture without turning soggy.

Blueberry muffins can look simple and still go wrong in familiar ways: dry, flat, dense, or streaked purple. Usually, the difference comes down to small choices — how much flour you use, how gently you mix, how cold the berries are, and how hot the oven starts.

The method stays easy. First, melted butter brings the flavor; then a small amount of oil keeps the crumb soft, sour cream adds tenderness, and a hot-start oven helps the tops rise tall and golden. Finally, use fresh berries when you have them, frozen berries when you need them, and coarse sugar or streusel depending on the kind of muffin you want today.

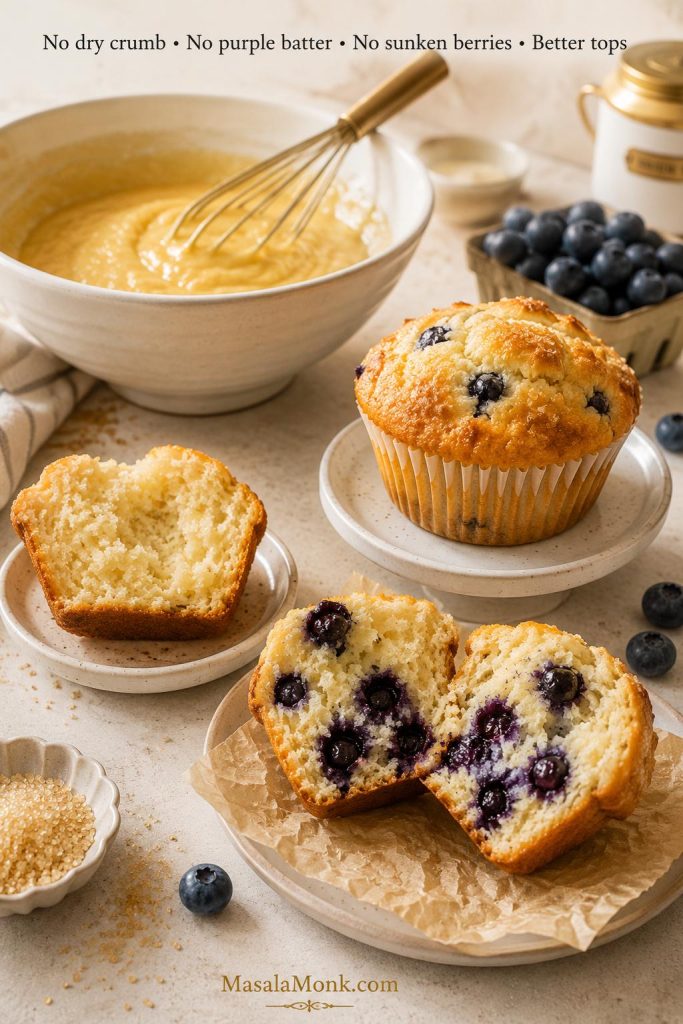
Think of this as the comfort of classic blueberry muffins with fewer of the usual disappointments: no dry crumb, no purple batter, no sunken berry layer, and no flat little tops hiding under the liner.

Blueberry muffin proof scene with moist crumb, clean batter, domed tops, and evenly distributed blueberries.
This is the promise of the recipe: fewer dry crumbs, fewer purple streaks, fewer sunken berries, and better tops. The method stays simple, but each step protects the final texture.

Already baking? Go straight to the recipe card. Working with frozen berries? The fresh vs frozen blueberry section will help before you mix.

Quick Answer: How to Make Moist Blueberry Muffins

For moist, fluffy blueberry muffins, this recipe uses a thick, scoopable batter made with melted butter, a little oil, sour cream, milk, and 1½ cups of blueberries. Then, fill the muffin cups almost to the top, bake at 425°F / 220°C for 5 minutes, and reduce the oven to 375°F / 190°C until the tops are golden and the centers are set.

Fresh blueberries give the cleanest-looking crumb, but frozen blueberries work well too. Keep them frozen until the last moment, fold them in gently, and bake right away so the batter stays bright instead of turning streaky purple.

If your last batch turned purple, flat, or soggy, the blueberry muffin troubleshooting table will help you fix the next one quickly.

The result should feel like a real bakery muffin: domed, golden, soft in the middle, and full of berries without turning wet at the bottom.

The key idea: you do not need a mixer or a bakery kitchen to get soft, tall blueberry muffins. A batter with enough body, a hot-start oven, and gentle blueberry folding do most of the work.

Blueberry Muffins at a Glance

Dry, flat, dense, or streaky muffins usually come from a few fixable choices. This quick overview shows what keeps the batch on track before you start mixing.

Yield 12 standard blueberry muffins
Prep time 15 minutes; add 3–5 minutes if making streusel
Optional rest 10–15 minutes for slightly taller tops
Bake time 18–22 minutes
Total time 35–40 minutes without rest; 45–55 minutes with optional rest; add 3–5 minutes if making streusel
Oven method 425°F / 220°C for 5 minutes, then 375°F / 190°C
Blueberries Fresh or frozen
Texture Soft, tender, golden, and blueberry-packed
Topping Coarse sugar by default, optional streusel
Mixer needed? No
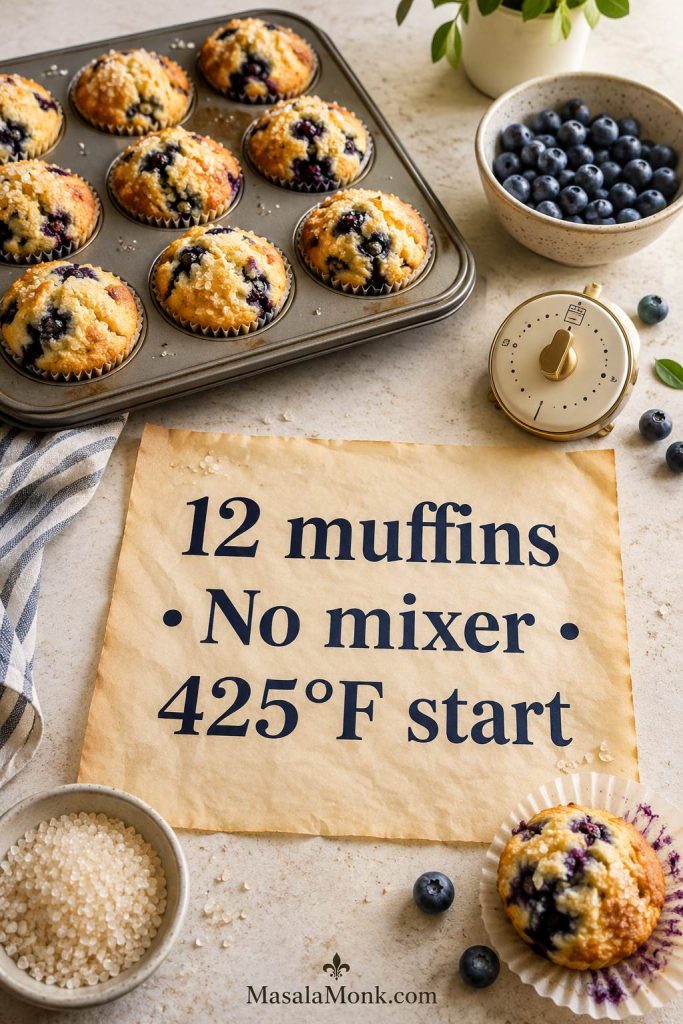
Blueberry muffins at a glance with a recipe card, muffin tin, blueberries, timer, and coarse sugar.
Before mixing, lock in the big decisions: 12 muffins, no mixer, and a hot 425°F start. That simple structure keeps the recipe easy while helping the muffins rise higher.

Why This Blueberry Muffin Recipe Works

Because this muffin recipe balances butter, oil, sour cream, and a hot-start bake, the blueberry muffins come out soft, lifted, and flavorful without needing a mixer.

Butter gives flavor, oil keeps the crumb soft

Butter gives blueberry muffins that rich homemade flavor. A small amount of oil keeps the crumb soft after cooling. The amount is small on purpose: enough for tenderness, not so much that the muffins feel greasy.

Sour cream gives the batter enough body

Sour cream adds richness, tenderness, and light tang. Full-fat sour cream gives the softest crumb, while low-fat sour cream can work if that is what you have. It also gives the batter enough structure to hold the berries instead of letting them slide straight to the bottom. The finished muffin should taste soft and buttery, not wet or oily.

A hot-start bake helps create taller tops

The muffins begin in a hot oven, which gives the batter an early lift. After 5 minutes, the temperature drops so the centers can bake through without drying out. That first burst of heat helps create a taller, more golden top without making the method complicated.

The plain-batter cushion keeps berries from sinking

This is the little step most blueberry muffin recipes skip. Before the blueberries go into the batter, spoon a small amount of plain batter into the bottom of each muffin cup. Then fold the berries into the remaining batter and fill the cups. It takes less than a minute, but it helps prevent that wet, sticky berry layer that can glue itself to the liner.

This idea is also discussed in Serious Eats’ blueberry muffin testing, and it is more useful than relying only on the old “toss the berries in flour” trick.

Ingredients for Homemade Blueberry Muffins

The ingredients are simple, but each one has a job. Together, they create a soft crumb, steady lift, and enough support to keep the blueberries evenly distributed.

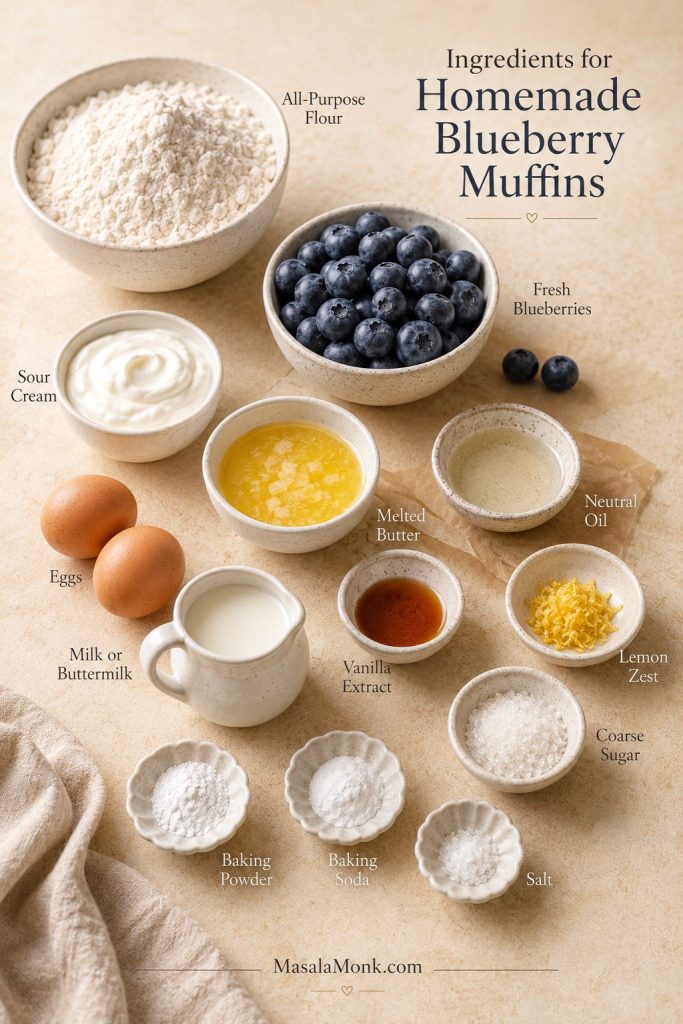
Ingredients for blueberry muffins including blueberries, flour, sour cream, butter, eggs, milk, vanilla, lemon zest, and coarse sugar.
Every ingredient has a job. Butter and vanilla build flavor, sour cream and oil protect softness, and the flour-liquid balance helps the blueberries stay suspended in the batter.

All-purpose flour

Use regular all-purpose flour for a tender, familiar muffin crumb. Weigh the flour if possible, because too much flour is one of the fastest ways to make muffins dry, dense, or heavy. When measuring by cups, spoon the flour into the cup and level it off instead of scooping directly from the bag.

Baking powder and baking soda

Baking powder gives the muffins lift, while baking soda works with the sour cream to help the batter rise and brown. Make sure both are fresh. Old leavening can give you flat muffins even when the mixture looks right.

Sugar

Three-quarters cup of granulated sugar keeps these muffins sweet enough for breakfast or brunch without pushing them into cupcake territory. Coarse sugar on top adds a light crunch and a bakeshop-style finish.

Melted butter and neutral oil

Melted butter keeps the method easy because you do not need a mixer. A small amount of neutral oil adds softness. Use a mild oil such as canola, vegetable, sunflower, or another neutral baking oil.

Eggs

Two large eggs help the muffins rise and hold together. Very cold eggs can be placed in a bowl of warm water for a few minutes while you prepare the dry ingredients.

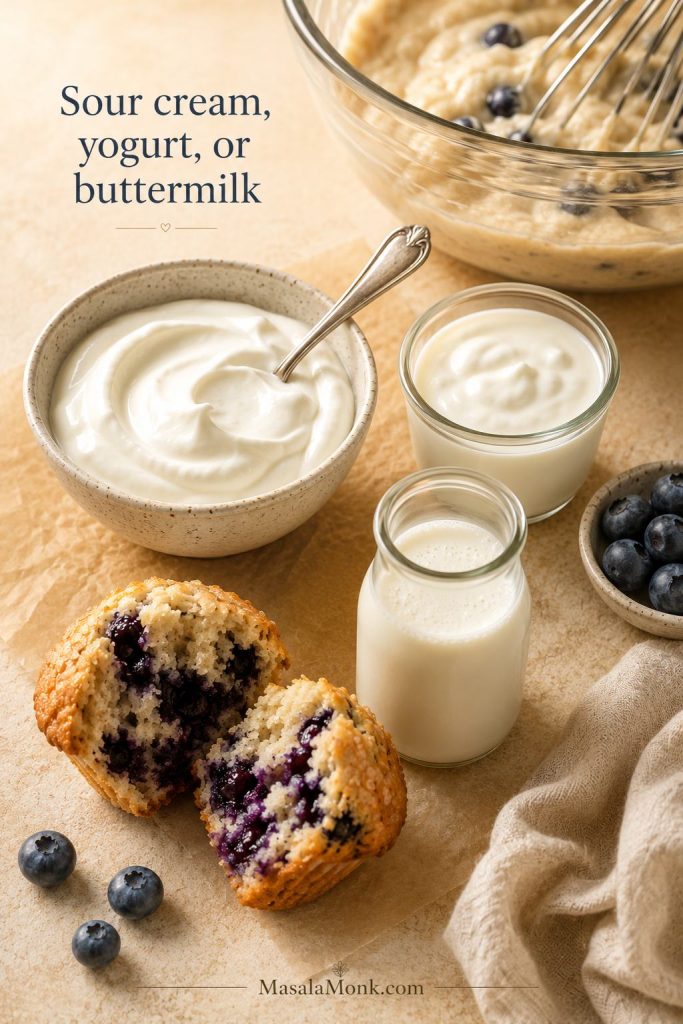
Sour cream, milk, buttermilk, or Greek yogurt

Sour cream gives the muffins tenderness and moisture. Milk loosens the batter just enough so it folds together without becoming runny. Buttermilk can replace the milk if you want a slightly tangier crumb, and plain Greek yogurt can replace the sour cream if it is thick rather than watery.

Sour cream, Greek yogurt, and buttermilk beside blueberry muffin batter and a split muffin crumb.
Sour cream gives the richest crumb, while thick Greek yogurt or buttermilk adds a gentle tang. Either way, the batter needs enough body so the muffins bake plush, not loose.

If you are mainly trying to make muffins more filling, keep this classic version as the texture benchmark first. Then use our high protein muffins guide for versions built around Greek yogurt, protein powder, cottage cheese, and freezer-friendly breakfast prep.

Blueberries

Use 1½ cups of blueberries for juicy muffins that still bake evenly. Smaller berries distribute more evenly, while large berries give bigger jammy pockets. Fresh blueberries are easiest, though frozen berries are completely fine when handled gently. For an extra berry-packed batch, you can increase to 1¾ cups, but the muffins will be softer and a little more delicate.

Using frozen berries today? Read the fresh vs frozen blueberry guide before folding them in, because handling matters more than the berries themselves.

If blueberries are the breakfast flavor you keep coming back to, these blueberry pancakes are another easy way to use fresh or frozen berries without turning breakfast into a project.

Coarse sugar or streusel

Coarse sugar is the cleanest default topping because it gives the muffins a light crunch without making them heavy. Use the quick streusel variation in the recipe card when you want a sweeter bakery-style crumb topping.

Fresh vs Frozen Blueberries for Muffins

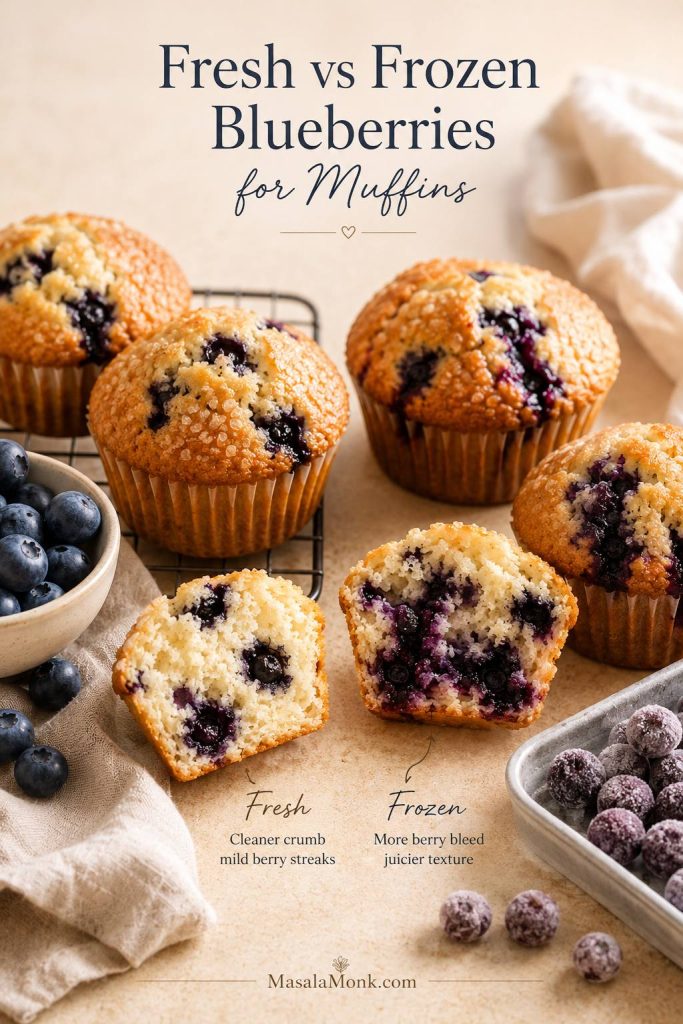
Both fresh and frozen blueberries work in this muffin recipe. The real difference is how much color and moisture they release into the batter.

Use fresh berries when presentation matters most. Use frozen berries when convenience matters most. If you want the cleanest crumb with frozen berries, use the rinse-and-dry method; otherwise, frozen-from-the-freezer is the fastest reliable route.

Fresh and frozen blueberries shown with blueberry muffin crumb examples for comparison.
Fresh blueberries usually give the cleanest-looking crumb. Frozen berries are just as useful, but they need colder handling because they release color and juice quickly once they soften.
Blueberry type Best use How to handle it
Fresh blueberries Cleanest batter and easiest folding Rinse, dry well, and fold gently
Frozen blueberries, fast method Convenience and year-round baking Add straight from the freezer
Frozen blueberries, cleanest batter method Less purple streaking Rinse briefly, dry very well, fold gently, and bake right away
Wild blueberries More even berry distribution Use slightly less if they are very small or juicy

For the fastest method, use frozen blueberries straight from the freezer. Once they thaw, they release juice quickly, which can turn the batter purple and make the muffins wetter.

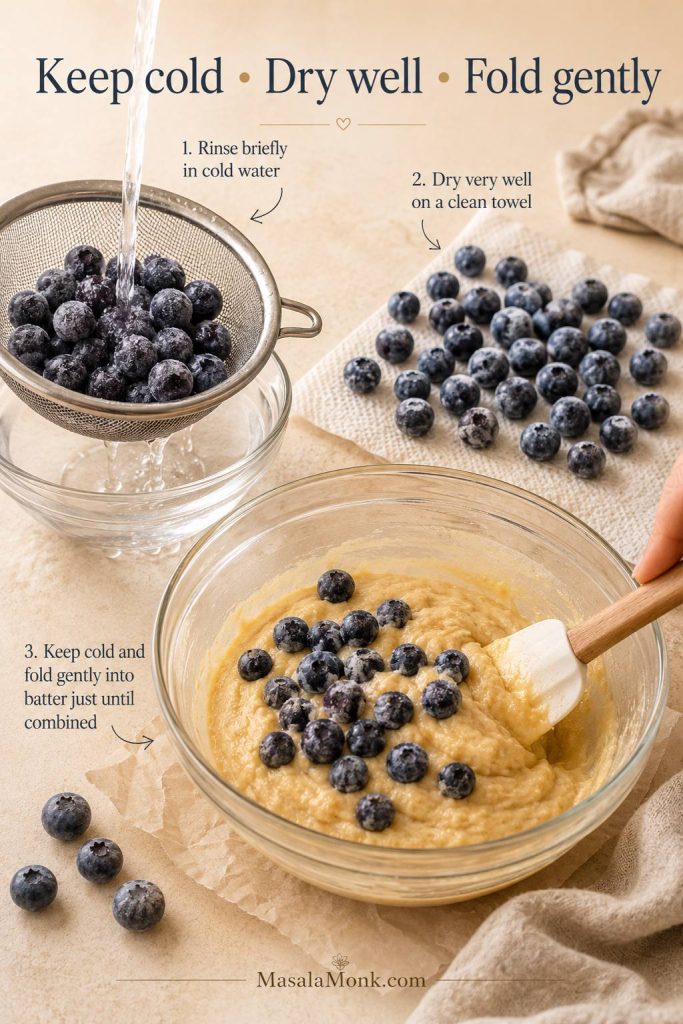
For the cleanest golden batter, you can briefly rinse frozen blueberries in cold water, dry them very well, and fold them in gently. King Arthur Baking’s frozen-blueberry guide explains this method in more detail.

Frozen blueberries being rinsed, dried on a towel, and folded into blueberry muffin batter.
For frozen blueberries, cold and dry is the rule. Add them at the end, fold gently, and bake soon after mixing so the batter stays golden instead of turning purple.
Best practical rule: fresh berries should be dry, and frozen berries should be cold. Wet berries and overmixing are what usually lead to streaky purple batter.

How to Make Blueberry Muffins

Before you start: preheat the oven fully, dry fresh blueberries well, keep frozen blueberries frozen, mix the batter gently, and fill the muffin cups almost to the top. These five steps prevent most dry, dense, flat, purple, or sunken blueberry muffins.

The method is simple, but the order matters. First, mix the dry and wet ingredients separately; then fold them together gently so the muffins stay tender.

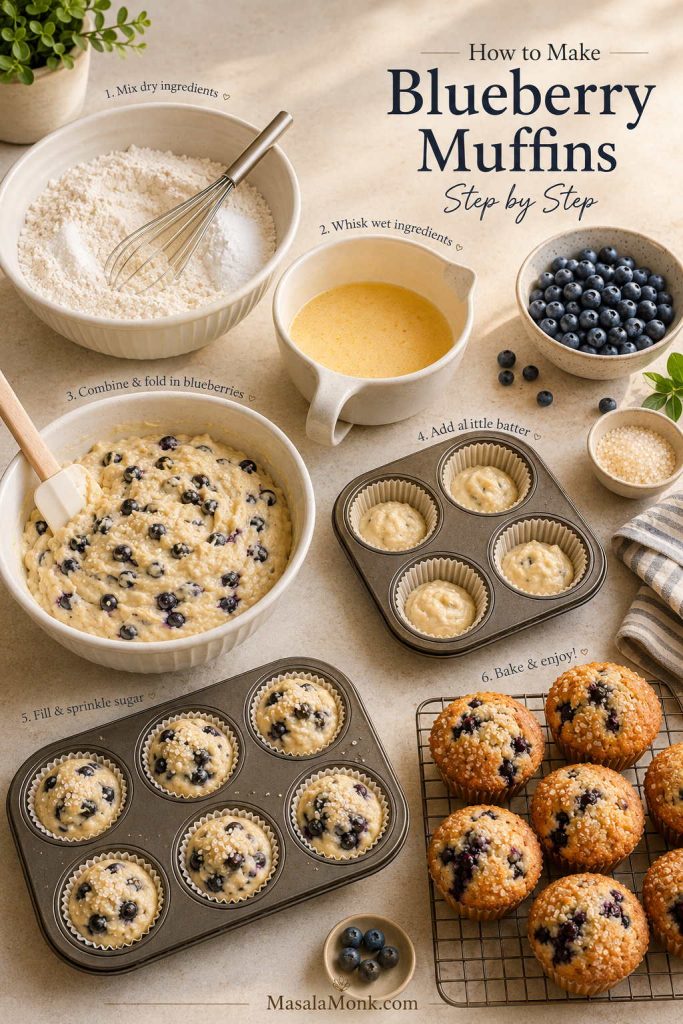
Step-by-step blueberry muffin process with dry ingredients, wet ingredients, plain batter, muffin cups, blueberries, and baked muffins.
The order is what makes this method different. Add the plain-batter cushion before folding in the blueberries, then fill the cups high so the fruit stays better distributed.

1. Prepare the pan and oven

Line a standard 12-cup muffin pan with paper liners. Then, heat the oven to 425°F / 220°C. To protect high muffin tops from sticking, lightly spray the top surface of the pan before filling the cups.

2. Mix the dry ingredients

In a large bowl, whisk together the flour, baking powder, baking soda, and salt. This helps distribute the leavening evenly so the muffins rise consistently.

3. Whisk the wet ingredients

In another bowl or large measuring jug, whisk the sugar, melted butter, oil, eggs, sour cream, milk, vanilla, and lemon zest if using until smooth. Let the butter cool slightly first, so it does not scramble the eggs.

4. Combine into a heavy, spoonable batter

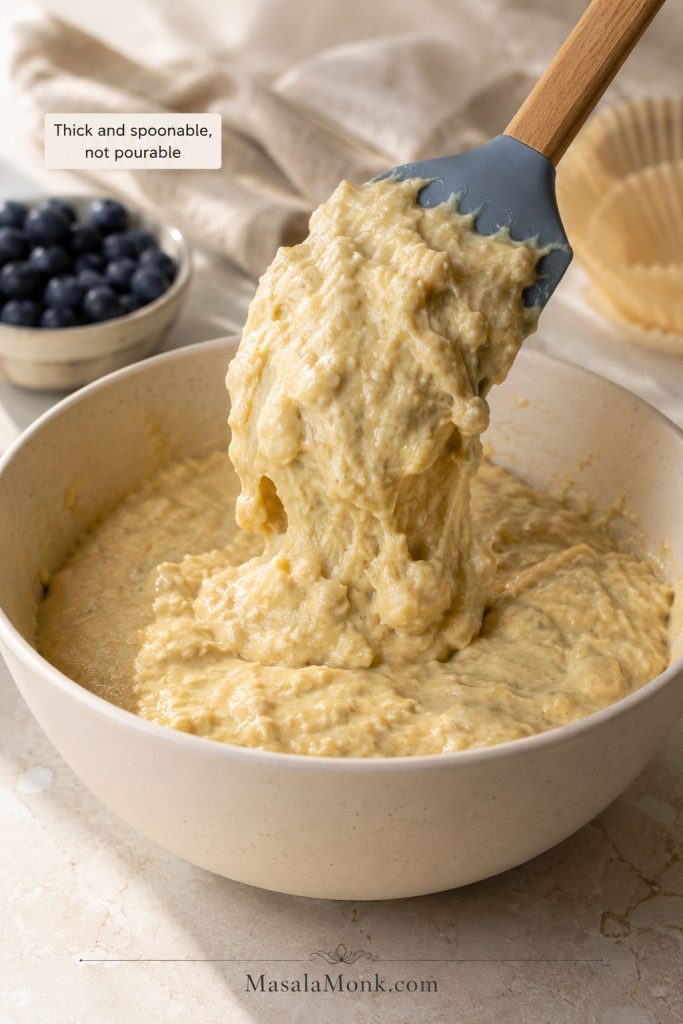
Pour the wet ingredients into the dry ingredients and fold with a spatula until no dry pockets of flour remain. A few small lumps are fine. At this point, the batter should look thick and spoonable, not pourable; when you lift the spatula, it should fall slowly in heavy ribbons.

Thick blueberry muffin batter lifted on a spatula with blueberries nearby but not mixed in yet.
The batter should mound on the spatula and fall slowly. That thick, spoonable texture helps create taller muffin tops and keeps the blueberries from sliding straight down.

A 10–15 minute rest can help if you have time. Let the plain batter sit before filling the muffin cups or folding in the blueberries; the short rest lets the flour hydrate and can make the batter bake up a little taller. The muffins still work without it.

5. Add the plain-batter cushion

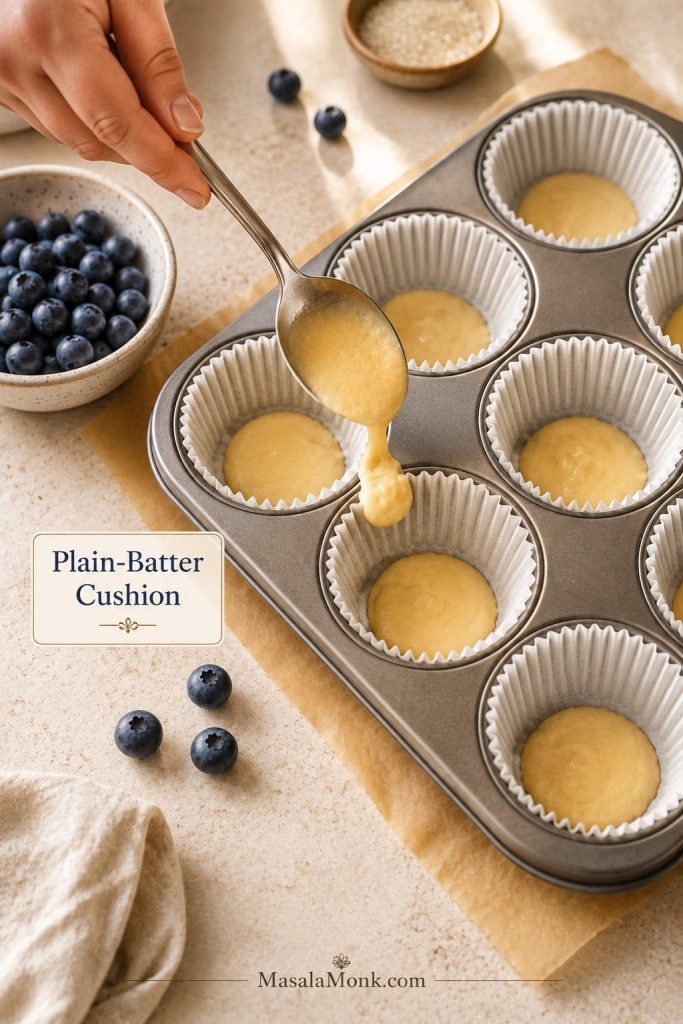
Before adding blueberries to the bowl, spoon about 1 tablespoon of plain batter into the bottom of each muffin cup. You are not filling the cup yet — just covering the bottom so the first berries do not bake directly against the liner.

Plain batter being spooned into lined muffin cups before blueberries are added.
This small base layer helps protect the muffin bottoms. Because the first spoonful has no berries, the fruit is less likely to bake into one sticky layer against the liner.

Want to see why this matters? The blueberries sinking section shows how this step keeps the fruit from collecting at the bottom.

6. Fold in the blueberries

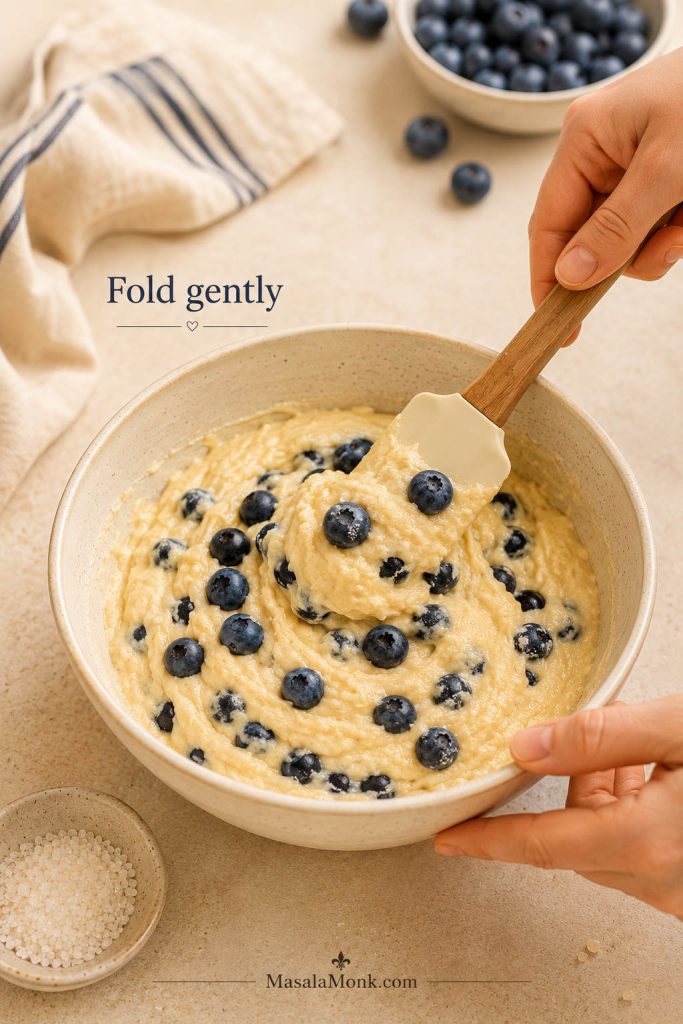
Add the blueberries to the remaining batter and fold gently. Use as few strokes as possible, especially with frozen berries. The goal is to distribute the fruit without crushing it or staining the batter.

Blueberries being gently folded into golden muffin batter with a spatula.
Fold gently once the blueberries go in. Overmixing can burst the berries, stain the batter purple, and make the finished muffins denser than they need to be.

7. Fill and top

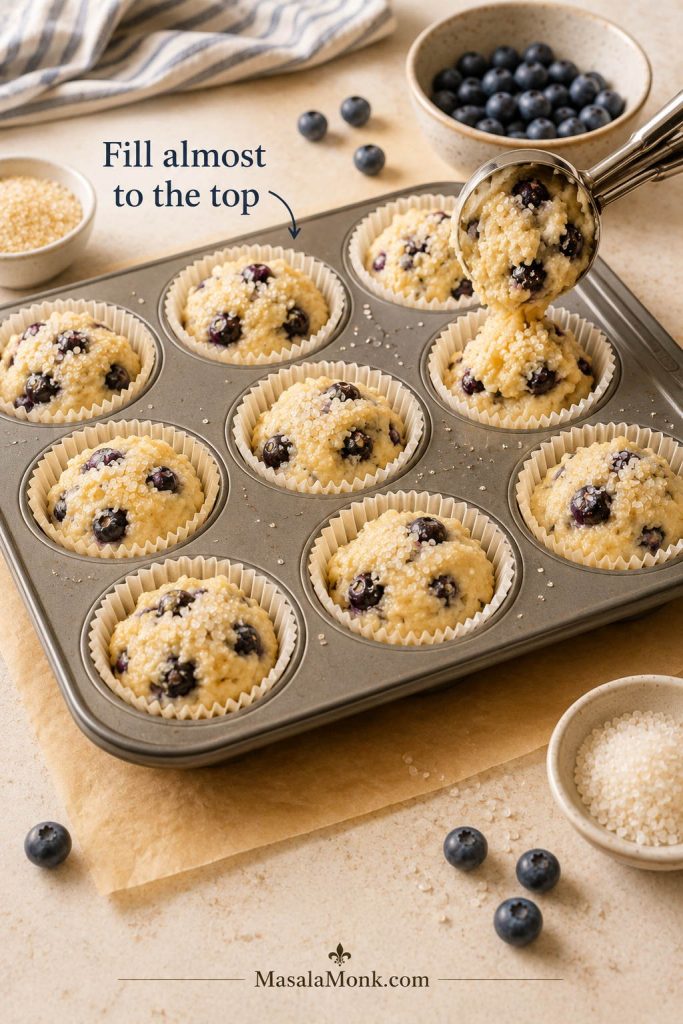
Divide the batter between the muffin cups, filling each one almost to the top. Then, sprinkle with coarse sugar, or add the streusel topping if using.

Blueberry muffin batter filled almost to the top of lined muffin cups with coarse sugar sprinkled over it.
Fill level matters more than most people think. For bakery-style blueberry muffin tops, the batter needs to sit close to the top of the liner before it goes into the oven.

For taller domes, see the bakery-style muffin tops section before you bake.

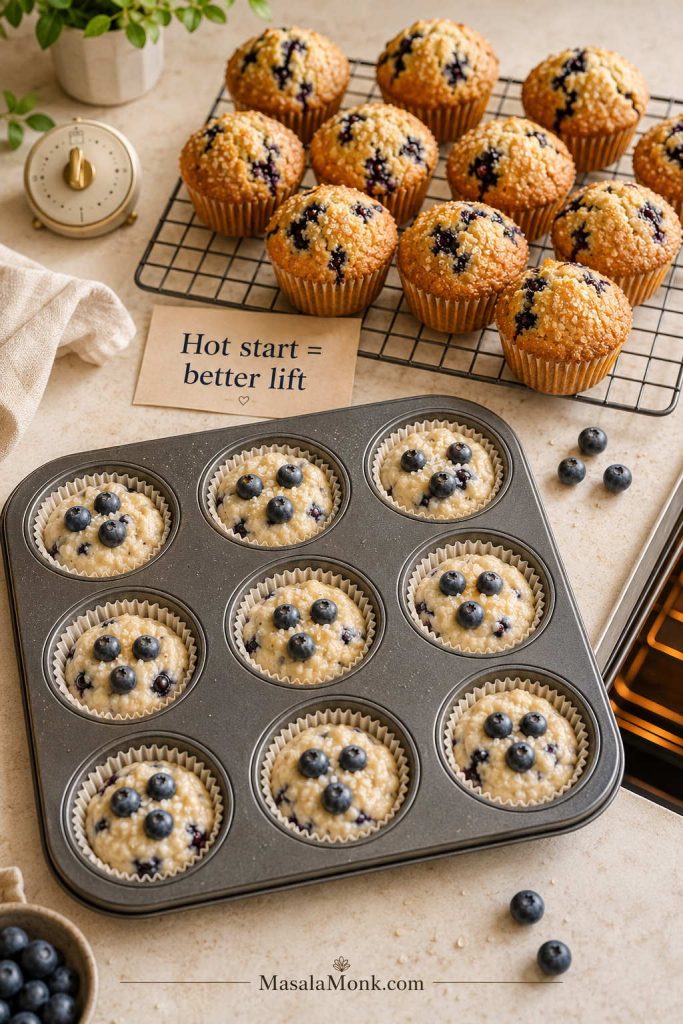
8. Bake hot, then finish lower

Bake at 425°F / 220°C for 5 minutes. Without opening the oven door, reduce the temperature to 375°F / 190°C and bake for another 13–17 minutes, or until the tops are golden and a toothpick inserted into the center comes out clean or with a few moist crumbs. Start checking at the early end of the range if your oven runs hot, and expect the upper end if your berries are frozen or very large.

Raw blueberry muffin batter in a muffin tin with finished domed muffins cooling behind it.
The hot-start bake gives the batter its first lift, while the lower temperature finishes the centers more gently. Together, those two stages help prevent flat, dry muffins.

Baking mini or jumbo muffins instead? Use the mini, standard, and jumbo bake-time chart instead of guessing.

How to tell when blueberry muffins are done

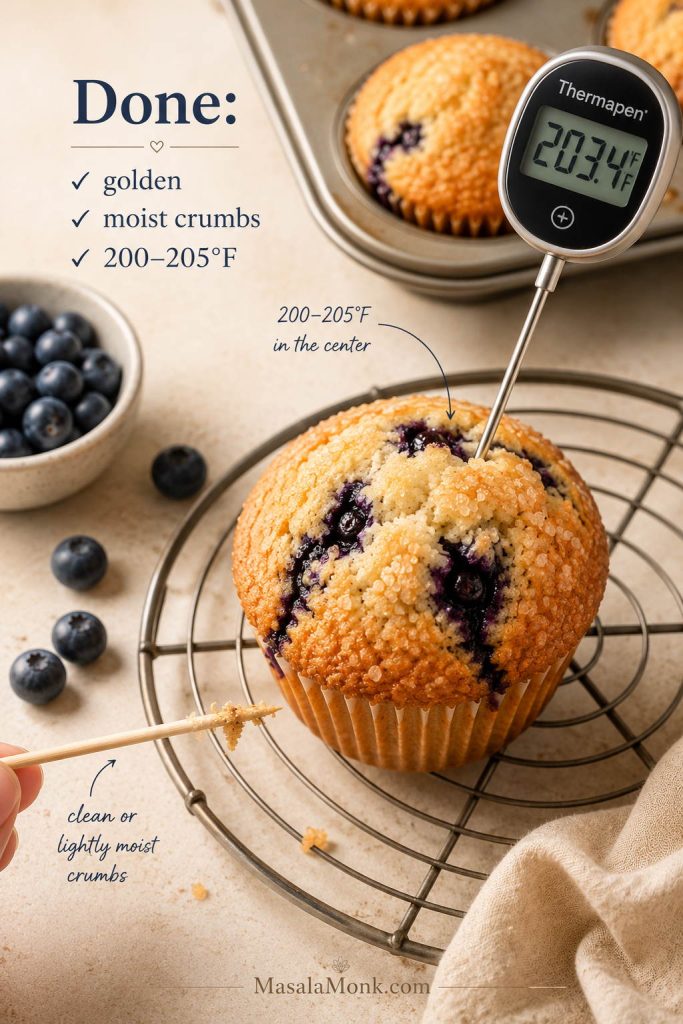
When they are ready, the tops should look set and lightly golden, and the muffins should spring back gently when touched near the center. For extra precision, the center of a fully baked muffin should register about 200–205°F / 93–96°C on an instant-read thermometer.

Blueberry muffin doneness guide with a golden muffin, toothpick crumbs, and thermometer reading about 203°F.
Use more than color to check doneness. A finished muffin should spring back lightly, show clean or moist crumbs on a toothpick, and read about 200–205°F in the center.

9. Cool before serving

Let the muffins cool in the pan for 5–10 minutes, then move them to a wire rack. Although they are wonderful warm, the crumb sets better if they get a few minutes to settle before you tear one open.

The first muffin is worth eating while it is still a little warm. Split it open, let the steam escape, and you should see a soft crumb with blueberries tucked through the center instead of pooled at the bottom.

Blueberry Muffin Recipe Card

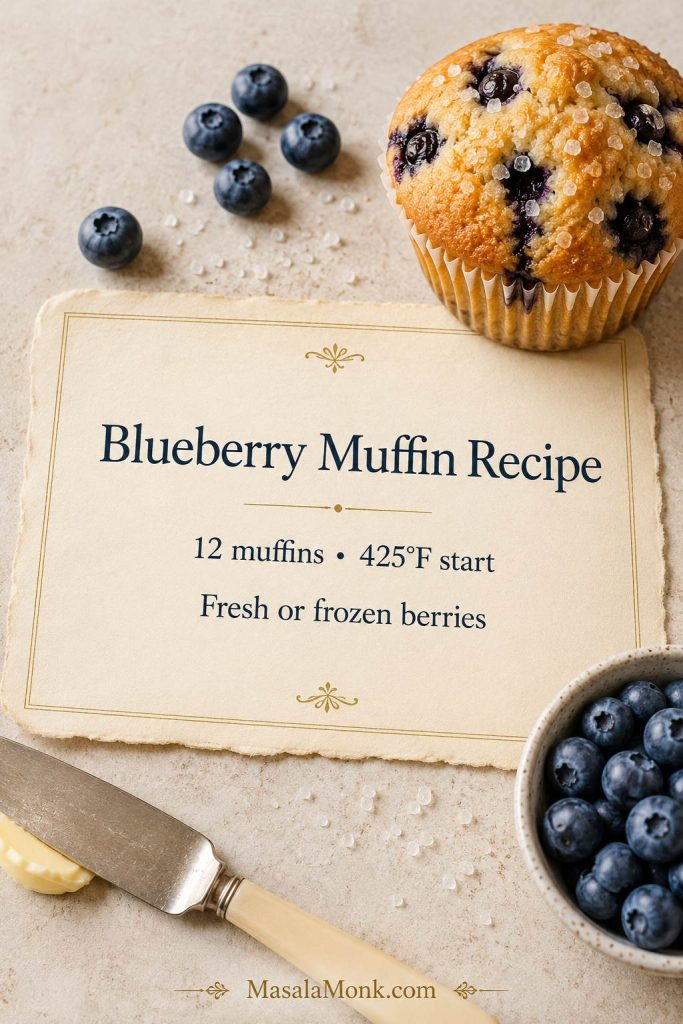
Blueberry muffin recipe card beside a golden muffin, blueberries, coarse sugar, and a butter knife.
Keep the core method simple: 12 muffins, fresh or frozen berries, and a hot oven start. Once those are right, sugar tops, streusel, or lemon zest become easy choices.

Blueberry Muffin Recipe

This blueberry muffin recipe makes soft, fluffy muffins with golden tops, juicy blueberries, and a simple no-mixer batter. Use fresh or frozen blueberries, finish with coarse sugar, or add the optional streusel topping.

Yield12 muffins
Prep15 minutes
Bake18–22 minutes
Total35–40 minutes, or 45–55 minutes with optional rest

Equipment

  • Standard 12-cup muffin pan
  • Paper liners
  • Large mixing bowl
  • Medium bowl or large measuring jug
  • Whisk
  • Silicone spatula
  • Large cookie scoop or ⅓-cup measure, optional
  • Wire cooling rack

Ingredients

  • 2 cups / 250g all-purpose flour
  • 2 teaspoons / about 8g baking powder
  • ½ teaspoon / about 2–3g baking soda
  • ½ teaspoon / about 3g fine salt
  • ¾ cup / 150g granulated sugar
  • ½ cup / 113g unsalted butter, melted and slightly cooled
  • 2 tablespoons / 30ml neutral oil
  • 2 large eggs, about 100g without shells
  • ½ cup / 120g sour cream
  • ¼ cup / 60ml milk or buttermilk
  • 2 teaspoons / 10ml vanilla extract
  • Optional: 1 teaspoon finely grated lemon zest, for a brighter blueberry flavor
  • 1½ cups / 210–225g / about 7½–8 oz blueberries, fresh or frozen
  • 1–2 tablespoons coarse sugar or turbinado sugar, for topping

Optional Streusel Topping

  • ⅓ cup / 42g all-purpose flour
  • ⅓ cup / 65g brown sugar or granulated sugar
  • ½ teaspoon cinnamon
  • 3 tablespoons / 42g melted butter

Instructions

  1. Line a standard 12-cup muffin pan with paper liners. Heat the oven to 425°F / 220°C.
  2. In a large bowl, whisk together the flour, baking powder, baking soda, and salt.
  3. In a separate bowl, whisk the sugar, melted butter, oil, eggs, sour cream, milk, vanilla, and lemon zest if using until smooth.
  4. Pour the wet ingredients into the dry ingredients. Fold gently with a spatula until no dry pockets of flour remain. A few small lumps are fine. The batter should be thick and spoonable, not dry or pourable.
  5. For slightly taller tops, let the plain batter rest for 10–15 minutes before folding in the blueberries. This step helps, but the muffins still work without it.
  6. Spoon about 1 tablespoon of plain batter into the bottom of each muffin cup.
  7. Fold the blueberries into the remaining batter with as few strokes as possible.
  8. Divide the batter among the muffin cups, filling each almost to the top.
  9. Sprinkle with coarse sugar. For streusel, stir the flour, sugar, cinnamon, and melted butter together until crumbly, then sprinkle over the muffins instead.
  10. Bake at 425°F / 220°C for 5 minutes. Without opening the oven, reduce the temperature to 375°F / 190°C and bake for another 13–17 minutes, until the tops are golden and a toothpick inserted in the center comes out clean or with a few moist crumbs. The center should be about 200–205°F / 93–96°C if checked with an instant-read thermometer.
  11. Cool in the pan for 5–10 minutes, then transfer to a wire rack.

Recipe Notes

  • Frozen blueberries: use straight from the freezer for the fastest method.
  • Cleanest batter with frozen berries: rinse briefly, dry very well, fold gently, and bake right away.
  • Plain-batter cushion: spoon a little plain batter into each cup before folding in the blueberries. This helps keep berries from baking directly against the liner.
  • For taller tops: let the plain batter rest for 10–15 minutes before folding in the blueberries.
  • With streusel: add about 3–5 minutes to the prep time.
  • For extra-tall bakery-style muffins: bake only 6 muffins at a time, using every other cup in the pan.
  • For more berries: increase to 1¾ cups / about 245g blueberries, but the muffins will be softer and slightly more delicate.
  • If the batter feels unusually stiff: fold in 1 extra tablespoon of milk. The batter should be thick and spoonable, not dry.

Storage

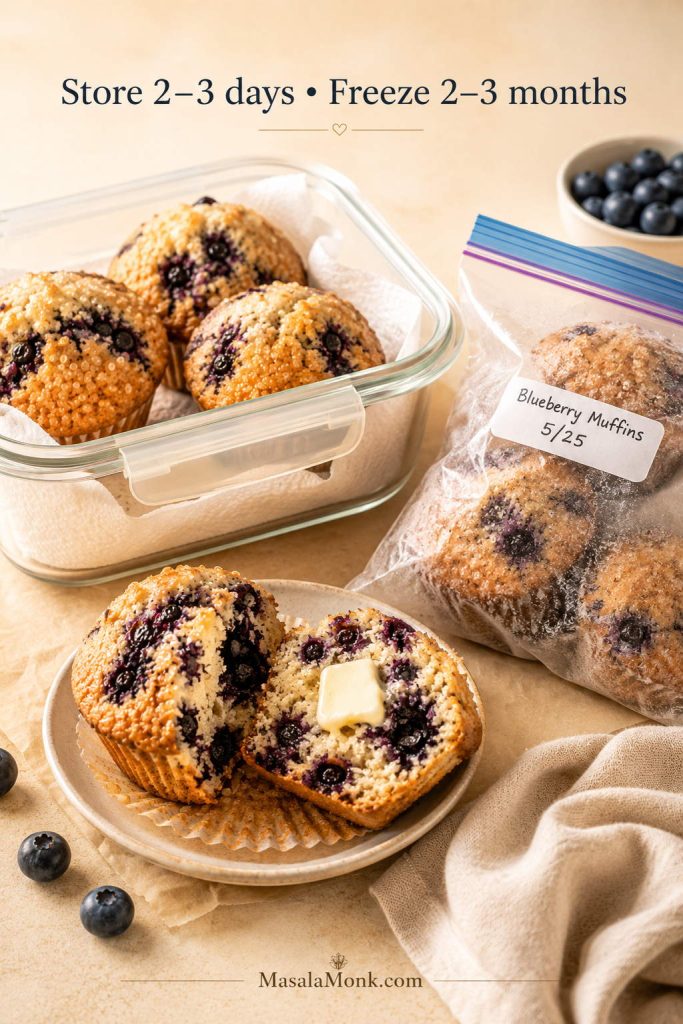
Store cooled muffins in an airtight container at room temperature for 2–3 days. Add a paper towel to absorb extra moisture and keep the tops from turning sticky. Freeze for up to 2–3 months.

How to Get Tall Bakery-Style Blueberry Muffin Tops

Tall muffin tops come from a few small habits working together: a batter with enough body, full muffin cups, and a hot oven at the beginning. This is the difference between a good homemade muffin and the one people reach for first on the brunch table.

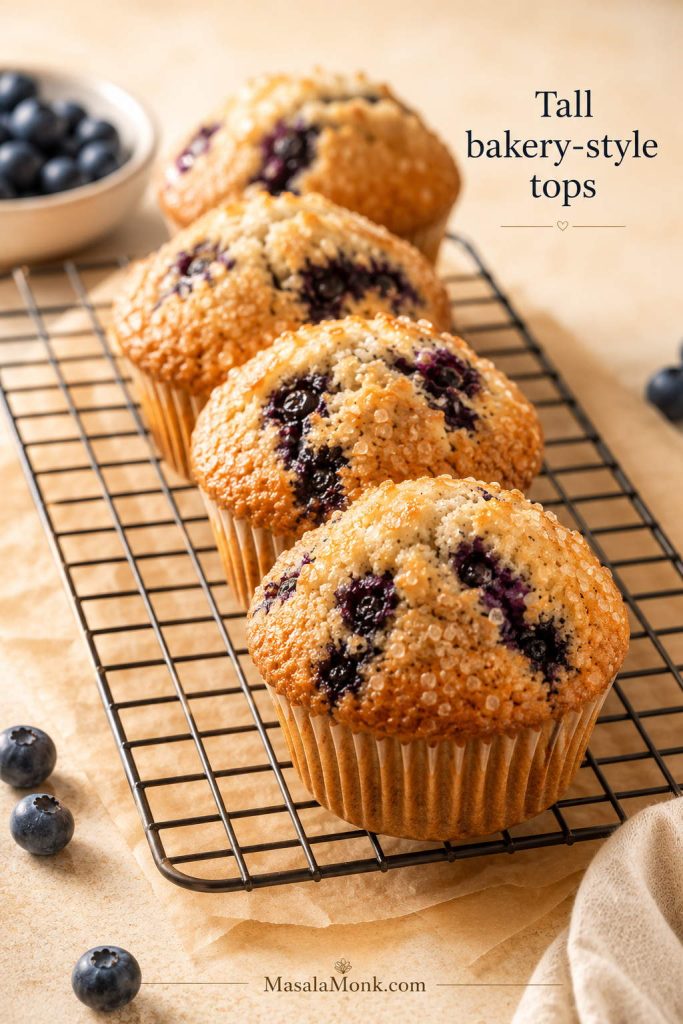
Tall bakery-style blueberry muffins with golden domed tops and coarse sugar on a cooling rack.
Bakery-style blueberry muffin tops come from stacking small advantages: thick batter, high fill, a hot oven start, and enough sugar on top for light crunch.
  • Use a batter that mounds instead of pours. Thin batter spreads before it rises.
  • Fill the cups almost to the top. Underfilled cups make shorter muffins.
  • Start with high heat. The first 5 minutes at 425°F / 220°C help push the tops upward.
  • Keep the oven closed when lowering the temperature. Just reduce the dial and let the muffins keep baking.
  • Use coarse sugar. It helps the tops bake with a light crunch.
  • Rest the plain batter for 10–15 minutes if you have time. This lets the flour hydrate and the batter thicken slightly before the berries go in.

For an extra bakery-style lift, bake only 6 muffins at a time and use every other cup in the muffin pan. This gives each muffin more heat circulation. It is optional, but helpful when you want especially tall domes.

If your muffins still bake up flat, the troubleshooting table will help you check oven heat, fill level, and leavening.

How to Keep Blueberries from Sinking

The most common advice is to toss blueberries in flour, but that is not always enough. Instead, the better approach is to build a batter that can actually support the berries and use the plain-batter cushion before the fruit goes in.

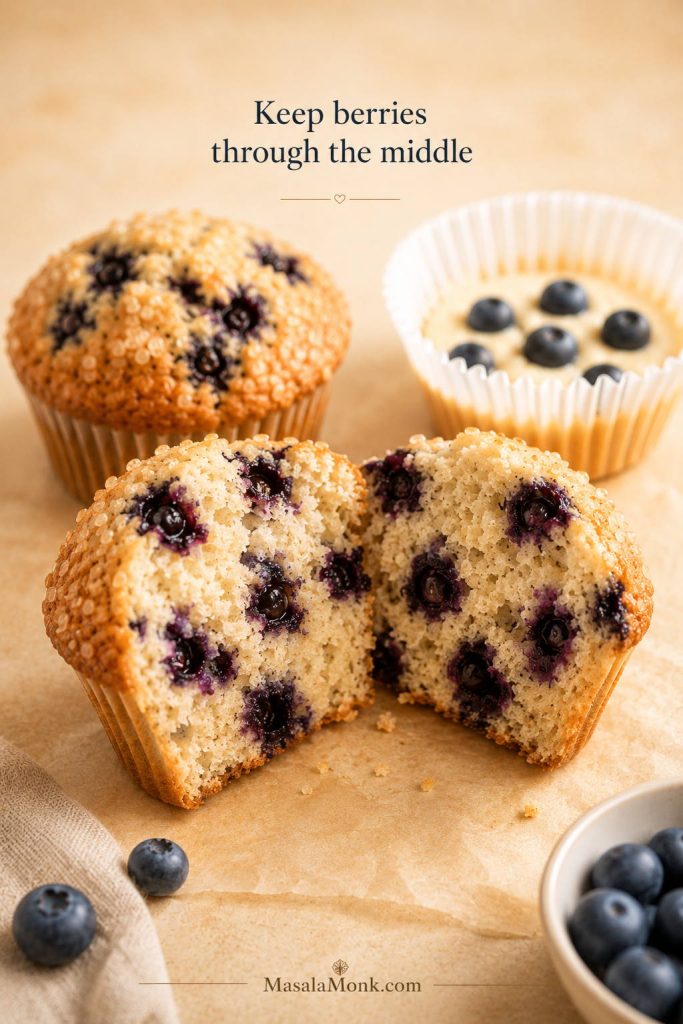
Split blueberry muffin showing blueberries distributed through the middle with a muffin cup of batter in the background.
When blueberries stay through the middle, the batter had enough support. The plain-batter cushion adds one more safeguard by keeping the first berries off the bottom.
  • Use a heavy, spoonable batter. This is the biggest help.
  • Dry fresh berries well. Wet berries slide and bleed more easily.
  • Keep frozen berries frozen. Once they thaw, they release juice quickly.
  • Use a reasonable amount of fruit. More berries are delicious, but too many can make muffins wet or fragile.
  • Add plain batter to the cups first. This keeps berries from sitting directly on the bottom.

A teaspoon of flour can help a little, but the plain-batter cushion does more of the real work.

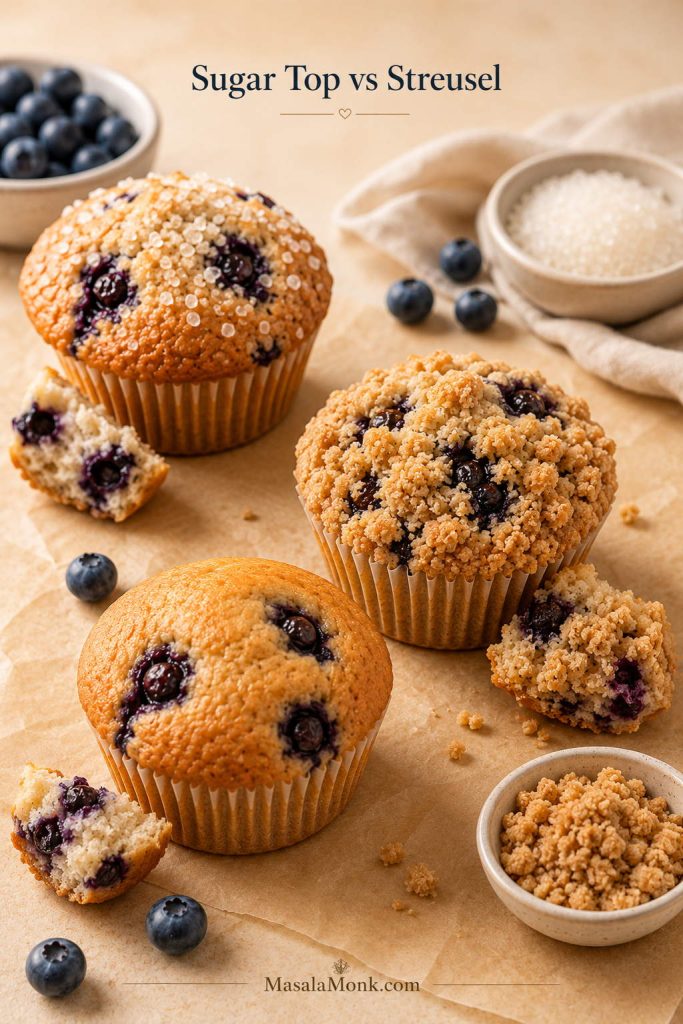
Sugar Top vs Streusel Topping

Choose the topping based on the kind of muffin you want today: a simple breakfast muffin, a sweeter bakery-style muffin, or a soft everyday snack.

Coarse sugar is the everyday choice. Streusel is the “people will ask where you bought these” choice. Either way, the topping should make the muffin more inviting without hiding the blueberries.

Three blueberry muffins with coarse sugar topping, streusel topping, and plain top shown with crumb pieces.
Coarse sugar keeps muffins crisp, simple, and breakfast-friendly. Streusel makes them sweeter and more bakery-style, so the best topping depends on the mood of the batch.
Topping Best for Texture
Coarse sugar Simple breakfast muffins Light crunch, golden top, not too sweet
Streusel Bakery-style muffins Buttery crumb topping, sweeter finish
No topping Everyday breakfast muffins Softer top, less sweetness

Mini, Standard, and Jumbo Blueberry Muffin Bake Times

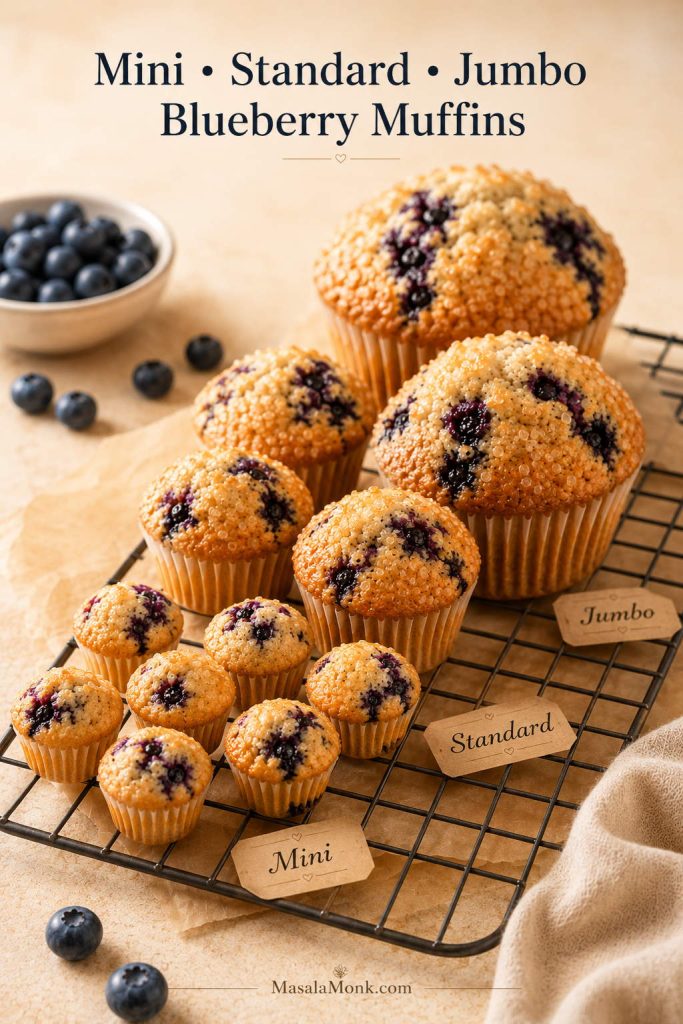
The amounts below fit a regular 12-cup muffin pan, but you can use the same mixture for mini or jumbo muffins with a few timing changes.

Mini, standard, and jumbo blueberry muffins arranged together on a cooling rack with size labels.
The same batter can work in mini, standard, or jumbo pans. Smaller muffins finish fast, while jumbo muffins need more time for the centers to set properly.
Muffin size Fill level Temperature Bake time
Mini muffins About ¾ full 350°F / 175°C throughout 11–14 minutes
Standard muffins Almost to the top 425°F / 220°C for 5 minutes, then 375°F / 190°C 18–22 minutes total
Jumbo muffins Almost to the top 425°F / 220°C for 5 minutes, then 350°F / 175°C 26–30 minutes total

Always check early the first time you use a new pan. Dark pans, thin pans, and frozen blueberries can all change the bake time slightly.

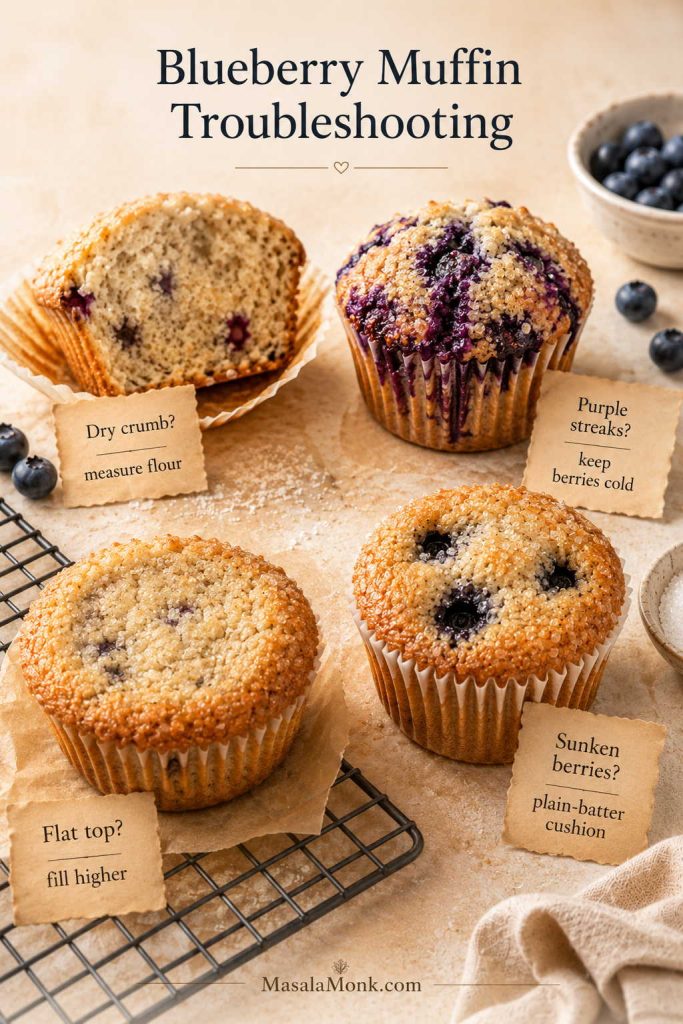
Blueberry Muffin Troubleshooting

Most blueberry muffin problems are fixable once you know what caused them. So, if a batch from this recipe ever turns out differently than expected, use this table to adjust the next one.

If your last batch was dry and purple, start with flour measurement and frozen-berry handling before changing the whole recipe. If it was flat, look first at fill level, oven heat, and whether your leavening is still fresh.

Blueberry muffin troubleshooting scene showing dry crumb, purple streaks, flat top, and sunken berries with small fix notes.
Blueberry muffin troubleshooting usually starts with five things: flour measurement, mixing, berry temperature, fill level, and oven heat. Fix those before changing the full recipe.
Problem Likely cause Fix next time
Dry muffins Too much flour or overbaking Use grams if possible, spoon-and-level flour, and check the muffins early
Dense muffins Overmixed batter Fold gently and stop when no dry pockets of flour remain
Flat tops Oven not hot enough or cups underfilled Preheat fully, fill cups almost to the top, and use the hot-start bake
Purple batter Frozen berries thawed or batter overmixed after berries were added Add frozen berries cold, fold gently, and bake right away
Sunken blueberries Thin batter, wet berries, or berries sitting at the bottom Add a spoonful of plain batter to each cup first and avoid thinning the batter
Soggy bottoms Too many berries or wet berries at the base Dry berries well and use the plain-batter cushion
Pale tops Low oven heat or no topping Use the hot start and sprinkle with coarse sugar
Muffins stuck to the pan Pan not lined or greased enough Use liners or grease the pan well, including the top surface if filling high

How to Store and Freeze Blueberry Muffins

Room temperature

Once the muffins cool completely, store them in an airtight container at room temperature for 2–3 days. When stacking, add a paper towel to the bottom of the container and another between layers. This helps absorb moisture from the blueberries and keeps the tops from turning sticky too quickly.

They are best the day they are baked, but the next morning they should still be soft enough to split and warm with a little butter.

Blueberry muffins stored in an airtight container with paper towel, frozen in a labeled bag, and reheated with butter.
Cool muffins fully before storing, or trapped steam can make the tops sticky. For longer storage, freeze them once cool and reheat gently when you want a quick breakfast.

Refrigerator

The refrigerator is not ideal because it can dry out the crumb. Use it only if your kitchen is very warm or humid.

Freezer

Freeze fully cooled muffins in a freezer-safe bag or container for up to 2–3 months. For the neatest muffins, freeze them in a single layer first, then pack them together once firm.

Reheating

Warm a room-temperature muffin in the microwave for 10–15 seconds. Meanwhile, warm a frozen muffin for 25–40 seconds, or reheat in a low oven until soft and warmed through.

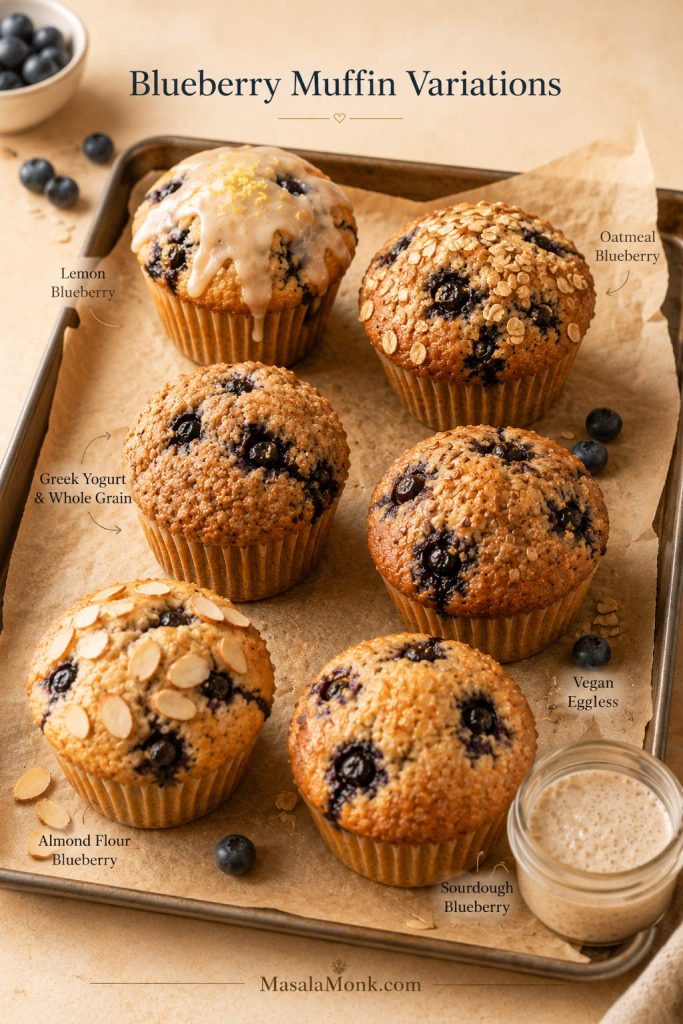
Blueberry Muffin Variations

Once you have the basic method down, you can take blueberry muffins in several directions. Lemon zest and topping changes are easy. Oats, almond flour, eggless, vegan, cottage cheese, and sourdough versions need more adjustment, but the same goal stays the same: a soft crumb, berries through the middle, and a top that rises instead of spreading.

Blueberry muffin variations on a bakery tray including lemon, oatmeal, whole grain yogurt, vegan eggless, almond flour, and sourdough styles.
Lemon zest, oats, yogurt, and streusel are easy ways to change the flavor. Bigger swaps like almond flour, eggless, vegan, or sourdough need a batter balanced for that style.

Lemon Blueberry Muffins

Add 1–2 teaspoons of fresh lemon zest to the batter for a brighter muffin. If you want a sweeter bakery finish, skip the coarse sugar and use a light lemon glaze after the muffins cool. Keep the lemon modest if you want blueberry to stay in front.

Blueberry Oatmeal Muffins

For a light oatmeal direction, replace ¼ cup of the flour with quick oats and add 1–2 tablespoons extra milk if the batter feels too stiff. For a true oat-heavy muffin, use a dedicated formula because oats absorb more moisture than flour. If you are choosing between rolled, quick, or oat-flour-style baking, this guide to oats will help you pick the right type before making an oatmeal version.

Healthy Blueberry Muffins

A lighter blueberry muffin usually leans on whole wheat flour, oats, Greek yogurt, applesauce, maple syrup, or less refined sugar. Do not cut all the fat at once; a little butter or oil is what keeps the crumb from tasting dry. The goal is a muffin that feels soft and satisfying, not worthy-but-disappointing.

Eggless Blueberry Muffins

Eggless blueberry muffins need enough moisture, lift, and structure to replace what eggs do. Yogurt, milk, vinegar, baking soda, and flax can all help, depending on the formula. If you are testing egg-free bakes, start with this flax egg guide so the swap is measured instead of guessed.

Vegan Blueberry Muffins

For vegan blueberry muffins, keep the spirit of this recipe — tender crumb, enough fat, and a batter that can hold berries — but use a formula built around plant milk and oil from the start. A straight swap for the butter, sour cream, milk, and eggs may work in small tweaks, but a fully vegan version needs its own balance.

Almond Flour Blueberry Muffins

Almond flour is not a 1:1 swap for all-purpose flour because it has no gluten and carries more fat. It can make tender low-carb bakes, but the batter needs more structural support. Before adapting this recipe, read this keto flour for baking guide so you understand how almond flour, coconut flour, binders, moisture, and lift work together.

Blueberry Cottage Cheese Muffins

Cottage cheese can add protein and moisture, especially when blended smooth before mixing. It works best when the batter is adjusted around it, because too much cottage cheese can make muffins heavy or damp instead of tender.

Blueberry Sourdough Muffins

Sourdough discard can add light tang and moisture to blueberry muffins, but it changes the flour-liquid balance. Add it only when the rest of the batter has been adjusted for the extra moisture and acidity. If you are still building or maintaining your starter, start with this sourdough starter recipe before using discard in sweet bakes.

What to Serve with Blueberry Muffins

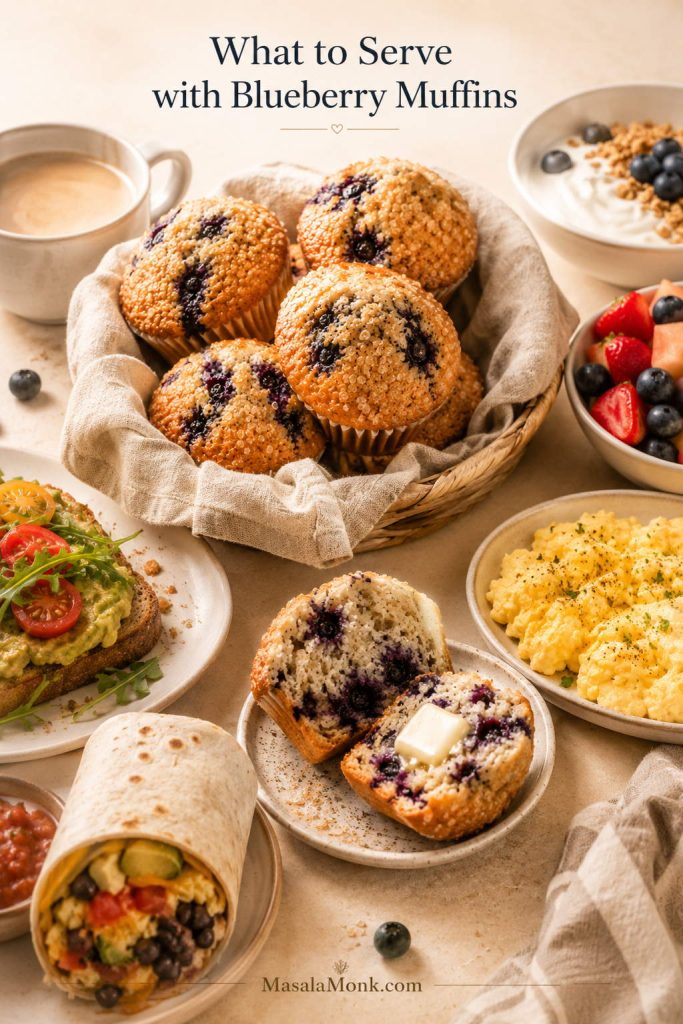
For a cozy breakfast, split one warm and let a little butter melt into the center. For brunch, pile the muffins into a basket with fruit, yogurt, eggs, and coffee so they feel like part of the table rather than a quick side.

Brunch table with blueberry muffins, a split buttered muffin, coffee, yogurt, fruit, scrambled eggs, avocado toast, and a breakfast burrito.
Blueberry muffins feel more complete when the table has contrast. Pair them with something savory, something creamy, and something fresh so brunch does not lean only sweet.

Blueberry muffins also work well with something savory, especially if you are serving them for brunch or meal prep. Try them with breakfast egg muffins, soft scrambled eggs, a simple yogurt bowl, or freezer-friendly meal prep breakfast burritos so the table has something sweet, something savory, and something fresh.

FAQs About Blueberry Muffins

Fresh or frozen blueberries: which is better for muffins?

Fresh blueberries are easiest because they release less color into the batter. Frozen blueberries are still a good option, especially when berries are out of season. Keep them cold, fold gently, and bake the muffins soon after mixing.

Should frozen blueberries be thawed before baking?

Keep them frozen until the last moment. Once frozen berries soften, they leak into the batter before the oven can set the crumb, which is why thawed berries often create purple streaks and wetter pockets.

Why did my blueberry muffin batter turn purple?

This usually happens when frozen berries thaw, when berries are wet, or when the batter is mixed too much after the fruit is added. Add blueberries last and fold with as few strokes as possible.

What keeps blueberry muffins moist?

These blueberry muffins stay moist because the recipe uses butter for flavor, a little oil for softness, sour cream for tenderness, and careful baking so the centers set without drying out.

Can I make these blueberry muffins with buttermilk?

Yes. Buttermilk can replace the milk in this recipe. It gives the muffins a slightly tangier flavor and works well with the baking soda and sour cream. The batter should still look thick and spoonable, so add only a small splash more milk if it feels unusually stiff.

Can I use Greek yogurt instead of sour cream?

Yes. Plain Greek yogurt can replace the sour cream in this recipe. Use full-fat or 2% yogurt for the softest crumb, and avoid very thin yogurt because it can loosen the batter too much.

How full should muffin cups be?

For tall standard muffins, fill the cups almost to the top. If you fill them only halfway, the muffins will usually bake up shorter and flatter.

Why are my blueberry muffins dense?

Dense muffins usually come from overmixing, too much flour, or old baking powder. Fold the batter gently, use grams if possible, and stop mixing as soon as no dry pockets of flour remain.

How do I make the muffin tops taller?

Fill the cups almost to the top and start the muffins in a hot oven. A short batter rest and baking every other cup can help even more if you want extra-tall tops.

Is streusel necessary?

No. Coarse sugar is enough for a blueberry muffin with a light crunchy top. Streusel is the sweeter bakery-style option when you want a crumb topping.

How do I know when blueberry muffins are done?

The tops should be golden and set, and a toothpick inserted into the center should come out clean or with a few moist crumbs. If you use an instant-read thermometer, aim for about 200–205°F / 93–96°C in the center.

Do blueberry muffins freeze well?

They freeze very well. Cool them completely first, then pack them in a freezer-safe bag or container for up to 2–3 months. Reheat gently in the microwave or a low oven.

Once you understand the batter texture, berry handling, and hot-start bake, blueberry muffins stop feeling unpredictable. The first batch gives you soft centers, golden tops, and berries through the middle; the next one lets you decide whether you are a coarse-sugar person, a streusel person, or a lemon-zest person.

Back to top

Posted on 4 Comments

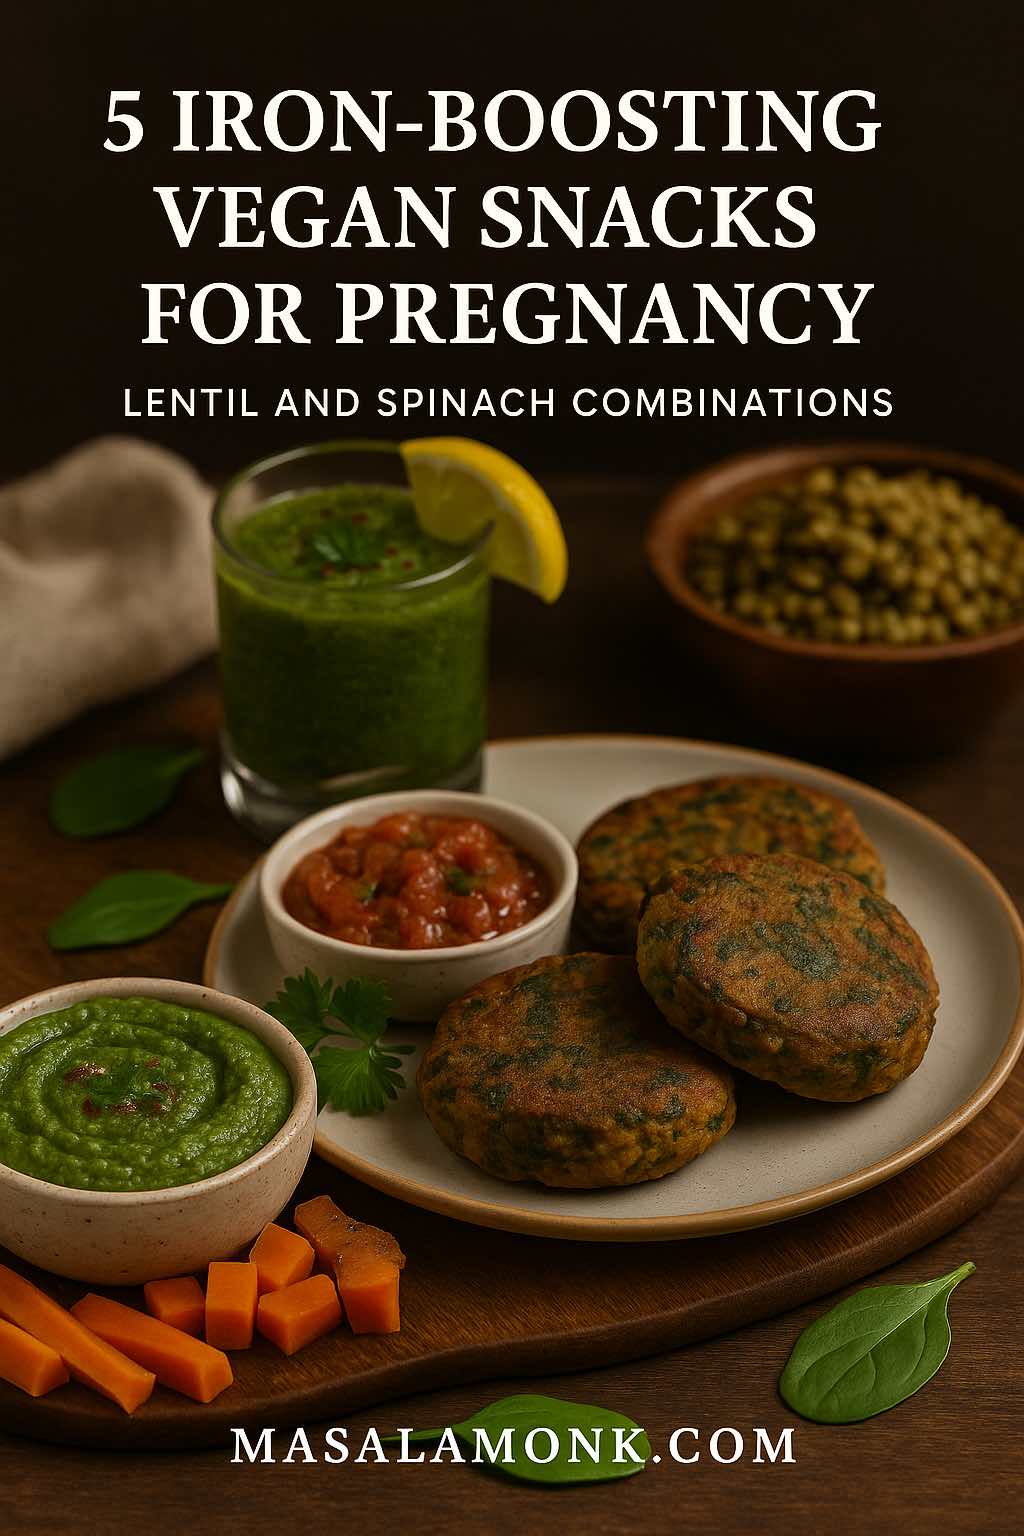
5 Iron-Boosting Vegan Snacks for Pregnancy: Lentil and Spinach Combinations

IRON-BOOSTING VEGAN SNACKS FOR PREGNANCY LENTIL AND SPINACH COMBINATIONS

Pregnancy is a beautiful journey—but let’s be honest, it can also leave you feeling exhausted, especially if your iron levels take a dip. Iron is the mineral that keeps your blood oxygenated and your energy steady, and during pregnancy your body needs almost 50% more of it—jumping from 18 mg/day to a whopping 27 mg/day.

If you’re following a plant-based lifestyle, you might already know that your iron comes in the “non-heme” form, which isn’t absorbed quite as efficiently as the “heme” iron from animal products. But don’t worry—research in 2025 has shown that with smart food pairings, preparation methods, and a little creativity in the kitchen, plant-based diets can fully support a healthy pregnancy.

And here’s where two humble heroes—lentils and spinach—come into play.


Why Iron Matters So Much During Pregnancy

During pregnancy, your blood volume increases by about 50%, which means your body is working double-time to carry oxygen to both you and your growing baby. That requires more hemoglobin—and hemoglobin is built from iron.

Daily iron needs:

  • Before pregnancy: ~18 mg/day
  • During pregnancy: ~27 mg/day

Low iron can lead to anemia, which may cause fatigue, dizziness, shortness of breath, and even affect your baby’s growth. Research from 2025 confirms that well-planned plant-based diets can meet these increased needs—especially when you pay attention to iron absorption.


Why Lentils + Spinach Are a Perfect Pair

  • Lentils: ~6–7 mg of iron per cooked cup, plus high folate content for fetal brain and spine development, fiber for digestion, and plant protein.
  • Spinach: ~6.4 mg of iron per cooked cup, along with vitamins A, K, and a touch of vitamin C.
  • Vitamin C synergy: Combining these with vitamin C-rich foods (bell peppers, lemon juice, tomatoes) can dramatically improve iron absorption.

💡 Pro tip: Cooking in a cast-iron pan can naturally increase the iron content of your meals—a method validated by recent UC Davis nutrition research.


The Science of Absorption (Made Simple)

Iron from plants (non-heme iron) isn’t absorbed as efficiently as iron from meat (heme iron). But there are easy ways to change that:

Do

  • Pair with vitamin C sources to boost absorption.
  • Soak, sprout, or ferment lentils to reduce phytates (iron blockers).
  • Cook in cast-iron cookware.

Don’t

  • Drink tea or coffee with iron-rich meals (tannins can block absorption by up to 60%).
  • Rely solely on spinach without pairing with other absorption-friendly foods.

5 Delicious Lentil + Spinach Snacks for Pregnancy

Pregnancy snacks don’t have to be bland or repetitive. With lentils and spinach as the foundation, you can create snacks that are not only rich in iron, folate, and fiber, but also bursting with flavor and texture. Here’s a detailed look at five tried-and-true recipes, with extra tips for enhancing absorption, making them in bulk, and adding variety.


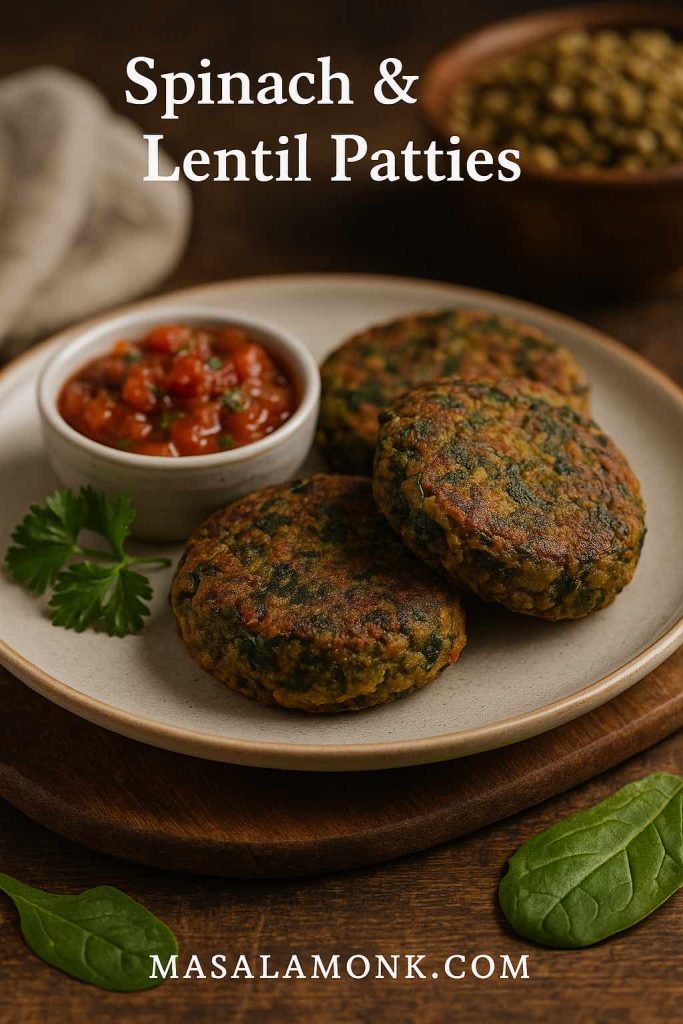
1. Spinach & Lentil Patties

Why they work:
These patties deliver iron, protein, and folate in a compact, freezer-friendly form. They’re satisfying enough for a midday hunger pang and versatile enough to double as a burger patty for dinner.

Spinach & Lentil Patties
“Iron-rich and freezer-friendly, these Spinach & Lentil Patties are the ultimate pregnancy snack—packed with folate, plant protein, and flavor. Pair with vitamin C-rich salsa to boost iron absorption and keep your energy levels steady all day.”

Ingredients:

  • 1 cup cooked brown or green lentils (soaked overnight for better digestion)
  • 2 cups fresh spinach leaves, finely chopped
  • ½ cup breadcrumbs or oat flour
  • 1 small onion, finely diced
  • 2 cloves garlic, minced
  • 1 tsp ground cumin
  • Juice of ½ lemon (vitamin C boost)
  • Salt & pepper to taste
  • 2 tbsp olive oil for pan-searing

Method:

  1. Prep the lentils: Boil soaked lentils until tender but not mushy. Drain well to prevent soggy patties.
  2. Cook the spinach: Sauté with onion and garlic until just wilted.
  3. Mix: Combine lentils, spinach mixture, breadcrumbs, spices, and lemon juice. Mash lightly, leaving some lentil texture.
  4. Shape: Form into small patties.
  5. Cook: Pan-sear in a cast-iron skillet until golden on each side.

💡 Related: Boosting Folate in Pregnancy: Top 5 Lentil and Bean Dishes

Pregnancy Tip: Pair with fresh tomato salsa or bell pepper chutney to increase non-heme iron absorption.

Make-Ahead: Freeze uncooked patties between parchment sheets. Cook straight from frozen, adding 2–3 extra minutes per side.


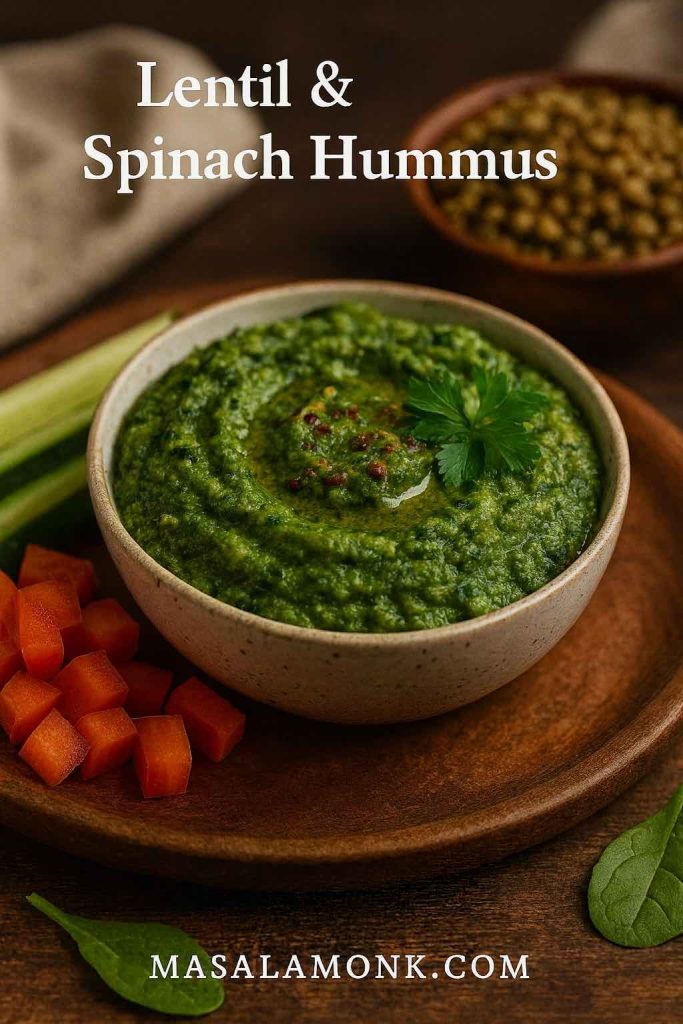
2. Lentil & Spinach Hummus

Why they work:
A smooth, creamy dip that sneaks in greens without compromising flavor. Perfect for an afternoon snack that also helps you meet your protein quota.

Lentil & Spinach Hummus
“Creamy, colorful, and nutrient-dense—this Lentil & Spinach Hummus is a pregnancy-friendly twist on a classic dip. With red lentils, leafy greens, and vitamin C from lemon juice, it’s an easy way to fuel up on iron and protein between meals.”

Ingredients:

  • 1 cup red lentils, boiled until soft
  • 1 cup spinach, blanched for 30 seconds
  • 2 tbsp tahini (calcium + healthy fats)
  • 2 tbsp lemon juice (vitamin C)
  • 1 garlic clove, roasted or raw
  • 1 tbsp olive oil
  • Salt & cumin to taste

Method:

  1. Cook lentils: Boil until soft, drain well.
  2. Blanch spinach: Drop into boiling water for 30 seconds, then shock in ice water to keep it green.
  3. Blend: Add lentils, spinach, tahini, lemon juice, garlic, olive oil, salt, and cumin to a food processor. Blend until creamy.

Serving Tip: Serve with carrot sticks, cucumber rounds, or bell pepper strips.

💡 Related: 5 Sugarless Snacks Rich in Iron for Pregnant Nights

Pregnancy Tip: Red lentils cook quickly and are easy to digest—ideal for pregnancy when digestion can slow down.

Flavor Variations: Add roasted red peppers or sun-dried tomatoes for a smoky twist.


3. Mini Spinach-Lentil Soup Shots

Why they work:
These are perfect when you want something warm and nourishing without committing to a full bowl. Great as a mid-morning boost or evening wind-down.

Mini Spinach-Lentil Soup Shots
“Warm, soothing, and bursting with nutrition—these Mini Spinach-Lentil Soup Shots are perfect for pregnancy snacking. Packed with plant-based iron, folate, and a touch of turmeric, they’re the ultimate comfort boost in a cup.”

Ingredients:

  • ½ cup red or yellow lentils
  • 2 cups vegetable broth (low sodium)
  • 1 cup chopped spinach
  • 1 medium tomato, diced (vitamin C)
  • ½ onion, chopped
  • 1 garlic clove, minced
  • ½ tsp turmeric
  • Salt & pepper to taste
  • Lemon wedges to serve

Method:

  1. Cook lentils: Simmer in vegetable broth with onion, garlic, tomato, and turmeric until soft.
  2. Add spinach: Stir in chopped spinach just before blending.
  3. Blend: Puree until silky smooth.
  4. Serve: Pour into small mugs or shot glasses, garnish with lemon.

💡 Related: 5 Folate-Focused Recipes for a Nourishing Pregnancy

Pregnancy Tip: Turmeric adds anti-inflammatory benefits, but keep portions moderate (¼–½ tsp) during pregnancy.

Make-Ahead: Freeze in small glass jars; thaw overnight for a ready-to-go warm snack.


4. Lentil & Spinach Falafel Wraps

Why they work:
These wraps are a complete mini-meal in one — protein-packed falafels made with lentils and spinach, wrapped with crisp vegetables and a creamy dressing. Perfect for a quick lunch or a portable pregnancy-friendly snack.

Lentil & Spinach Falafel Wraps
“Wholesome and portable, these Lentil & Spinach Falafel Wraps deliver plant-based iron, fiber, and healthy fats in every bite. Ideal for busy pregnancy days when you need a nourishing, on-the-go meal that’s as tasty as it is energizing.”

Ingredients:

  • 1 cup green lentils, cooked and drained
  • 1½ cups spinach, finely chopped
  • ¼ cup chickpea flour (binds and boosts protein)
  • 2 cloves garlic, minced
  • 1 tsp cumin powder
  • ½ tsp coriander powder
  • Salt & pepper to taste
  • 4 whole wheat pitas or wraps
  • Salad fillings: lettuce, tomato slices, cucumber sticks
  • Tahini or yogurt dressing
  • Lemon wedges

Method:

  1. Mix: In a food processor, blend lentils, spinach, garlic, chickpea flour, and spices into a coarse mixture.
  2. Shape: Form into small patties or balls.
  3. Cook: Bake at 200°C (390°F) for 20 minutes or pan-fry with minimal oil until golden.
  4. Assemble: Place falafels in pitas with salad fillings and drizzle generously with tahini or yogurt dressing. Squeeze lemon juice over before serving.

💡 Related: 10 Exotic Superfoods for a Healthy Pregnancy

Pregnancy Tip: Add sliced avocado for healthy fats and extra creaminess.

Batch Tip: Prepare falafel mixture in advance and refrigerate for up to 2 days, or freeze shaped falafels to cook later.


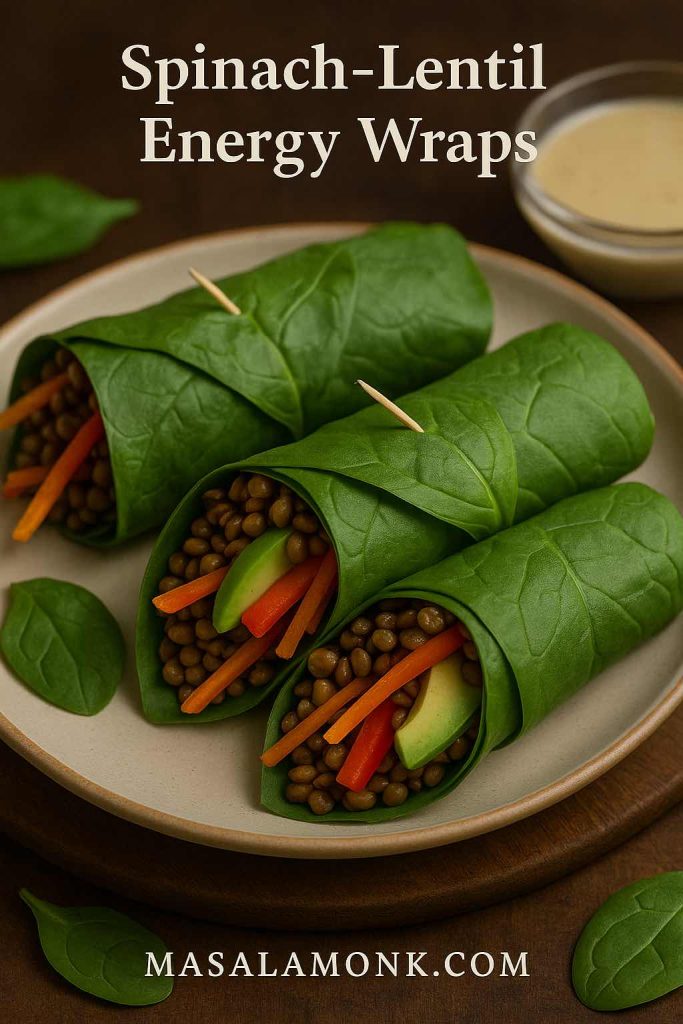
5. Spinach-Lentil Energy Wraps

Why they work:
Fresh, crunchy, and portable—these wraps require minimal prep and can be customized for different cravings.

Spinach-Lentil Energy Wraps
“Fresh, crunchy, and loaded with pregnancy-safe nutrients—these Spinach-Lentil Energy Wraps combine iron-rich lentils, crisp veggies, and creamy avocado for a satisfying, blood-sugar-friendly snack anytime.”

Ingredients:

  • Large spinach leaves or whole-grain tortillas
  • 1 cup cooked brown lentils
  • ½ cup shredded carrots
  • ½ cup thinly sliced bell peppers (vitamin C)
  • ¼ avocado, sliced (healthy fats)
  • 2 tbsp tahini-lemon dressing

Method:

  1. Prep filling: Mix lentils with carrots, bell peppers, and avocado.
  2. Assemble: Lay spinach leaves or tortillas flat, fill with lentil mixture.
  3. Dress: Drizzle with tahini-lemon dressing.
  4. Wrap & secure: Roll tightly and secure with a toothpick if needed.

💡 Related: 5 Omega-3 Rich Vegan Snack Ideas for Pregnant Women

Pregnancy Tip: These wraps are rich in fiber and healthy fats, helping to maintain steady blood sugar levels.

Make-Ahead: Pack in parchment for a quick grab-and-go snack; store in the fridge for up to 24 hours.


🥗 Final Pro Tips for All 5 Recipes

  • Enhance absorption: Always pair with a vitamin C source.
  • Diversify your greens: Swap spinach with kale or amaranth leaves for variety.
  • Play with spices: Pregnancy-safe spices like cumin, coriander, and fennel add flavor and aid digestion.
  • Mind your portions: Multiple smaller snacks can be easier on digestion than one large portion during pregnancy.

Pregnancy Nutrition Tip

Even with the best snack lineup, iron deficiency can still sneak up during pregnancy. Pay attention to symptoms like unusual fatigue, dizziness, or shortness of breath—and don’t skip your prenatal checkups. If your doctor recommends a supplement, it’s not a failure—it’s just an extra tool in your pregnancy wellness kit.


Final Thoughts

Pregnancy nutrition can feel overwhelming, but it doesn’t have to be complicated. By combining the humble lentil with vibrant spinach—and pairing them with vitamin C—you can create snacks that are as delicious as they are nourishing.

Think of these recipes as a starting point. Once you get the hang of the flavor combos, you’ll find endless variations. And by linking your snacks to other nutrient-packed recipes—like Folate-Focused Recipes or Omega-3 Rich Vegan Snack Ideas—you can build a pregnancy-friendly menu that keeps you energized and your baby thriving.

So go ahead—grab those lentils and spinach. Your body (and your baby) will thank you.

FAQs – Lentil & Spinach Pregnancy Snacks

1. Why are lentils and spinach recommended during pregnancy?

Lentils and spinach are both rich in iron, folate, and fiber—three nutrients vital for pregnancy. Iron supports healthy blood oxygen levels, folate aids fetal brain and spinal development, and fiber helps prevent constipation, which is common during pregnancy.


2. How much iron do I need daily while pregnant?

Most pregnant women need about 27 mg of iron per day, compared to 18 mg before pregnancy. Since plant-based iron (non-heme iron) is absorbed less efficiently, it’s important to pair it with vitamin C-rich foods like bell peppers, tomatoes, or lemon juice.


3. Can I meet my iron needs on a plant-based diet during pregnancy?

Yes. Research in 2025 confirms that with smart food pairings, soaking or sprouting legumes, and cooking methods like using cast-iron pans, plant-based diets can fully support healthy pregnancy iron levels.


4. Why should I pair lentils and spinach with vitamin C?

Vitamin C helps convert plant-based iron into a form your body can absorb more easily. Adding lemon juice, fresh tomatoes, or bell peppers to your lentil and spinach dishes can significantly boost iron uptake.


5. Can I freeze these snacks for later?

Absolutely. Most of these recipes—especially patties, cutlets, and falafel—can be frozen uncooked between parchment sheets or cooked and cooled before freezing. This makes healthy snacking quick and convenient.


6. Are these recipes safe for gestational diabetes?

Yes, with some adjustments. These snacks are high in fiber and protein, which help stabilize blood sugar. If needed, reduce or avoid added refined carbs (like breadcrumbs) and use oat or chickpea flour instead.


7. Can I substitute spinach with other greens?

Yes. Kale, Swiss chard, and amaranth leaves are excellent alternatives, offering similar nutrient profiles and slightly different flavors. Just adjust cooking times, as tougher greens may need a bit longer to soften.


8. Do lentils need to be soaked before cooking?

Soaking lentils isn’t strictly necessary, but it can reduce cooking time and help lower phytates—natural compounds that can reduce iron absorption. For better digestion during pregnancy, soaking is recommended.


9. Can I make these snacks gluten-free?

Yes. Replace breadcrumbs with oat flour, chickpea flour, or ground flaxseeds. All five recipes can be adapted to be 100% gluten-free without losing flavor or texture.


10. Are there any foods I should avoid pairing with these snacks?

Avoid consuming tea, coffee, or high-calcium dairy products at the same time as iron-rich meals, as tannins and calcium can block iron absorption. Instead, enjoy those beverages between meals.