Posted on — Leave a comment

Egg Drop Soup Recipe: Silky Chinese Restaurant-Style Soup in 15 Minutes

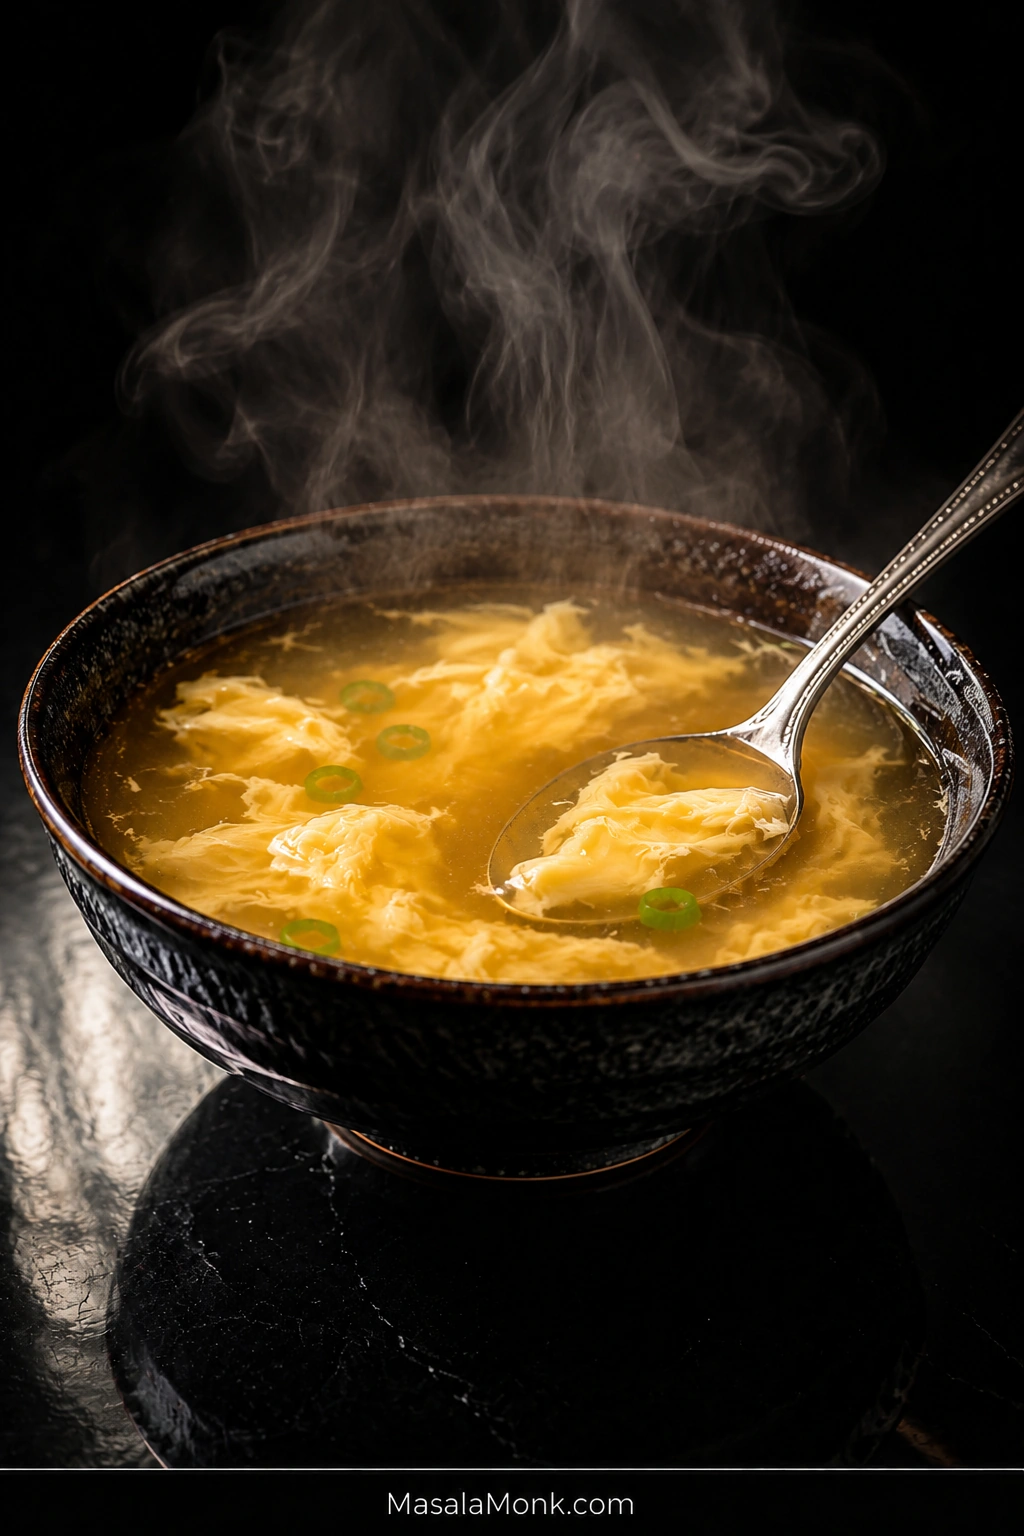
Steaming black bowl of golden egg drop soup with broad pale-yellow egg ribbons, sliced scallions, and a metal soup spoon on a dark reflective table.

Sometimes egg drop soup is the first thing you want from a Chinese takeout order: a steaming bowl, soft ribbons drifting through savory broth, a few scallion greens on top, and just enough body to make every spoonful feel silky.

The base is simple. The egg pour is the only part worth slowing down for.

Too much movement can break the egg into tiny flecks. A heavy pour can leave dense clumps. Stir before the egg has set and the ribbons may disappear into cloudy broth.

Thicken first. Create the movement first. Let the egg set before you move it again.

Quick formula: For the base recipe, use 4 cups / 946 ml chicken broth, 2 large eggs, 2 teaspoons / 10 ml water for the eggs, and 1½ tablespoons / about 12 g cornstarch.

In this guide

Egg Drop Soup Recipe

This makes 4 starter bowls or 2 generous bowls. The finished soup is broth-forward and lightly thickened, with soft egg ribbons suspended throughout.

Recipe at a Glance

Serves4 starter bowls or 2 generous bowls
PrepAbout 5 minutes
CookAbout 10 minutes
TotalAbout 15 minutes
PotMedium saucepan, about 2½–3 qt

Equipment

  • Medium saucepan, about 2½–3 quarts
  • Small bowl for the cornstarch slurry
  • Spouted measuring cup or another easy-pouring cup for the eggs
  • Fork or small whisk
  • Ladle or large spoon

Ingredients

  • 4 cups / 32 fl oz / 946 ml low-sodium chicken broth
  • 2 scallions, thinly sliced, white and green parts separated
  • 2 thin slices fresh ginger, about 5 g
  • ½–1 teaspoon chicken powder or bouillon, optional, depending on your broth
  • ¼ teaspoon ground white pepper, plus more to taste
  • ⅛ teaspoon turmeric, optional, for warmer color
  • 1½ tablespoons cornstarch, about 12 g
  • 1½ tablespoons / 22 ml cold water, for the slurry
  • 2 large eggs, about 100 g without shells
  • 2 teaspoons / 10 ml water, for loosening the eggs
  • ½ teaspoon / 2.5 ml toasted sesame oil, optional, plus more by drops to taste
  • Salt, as needed after tasting
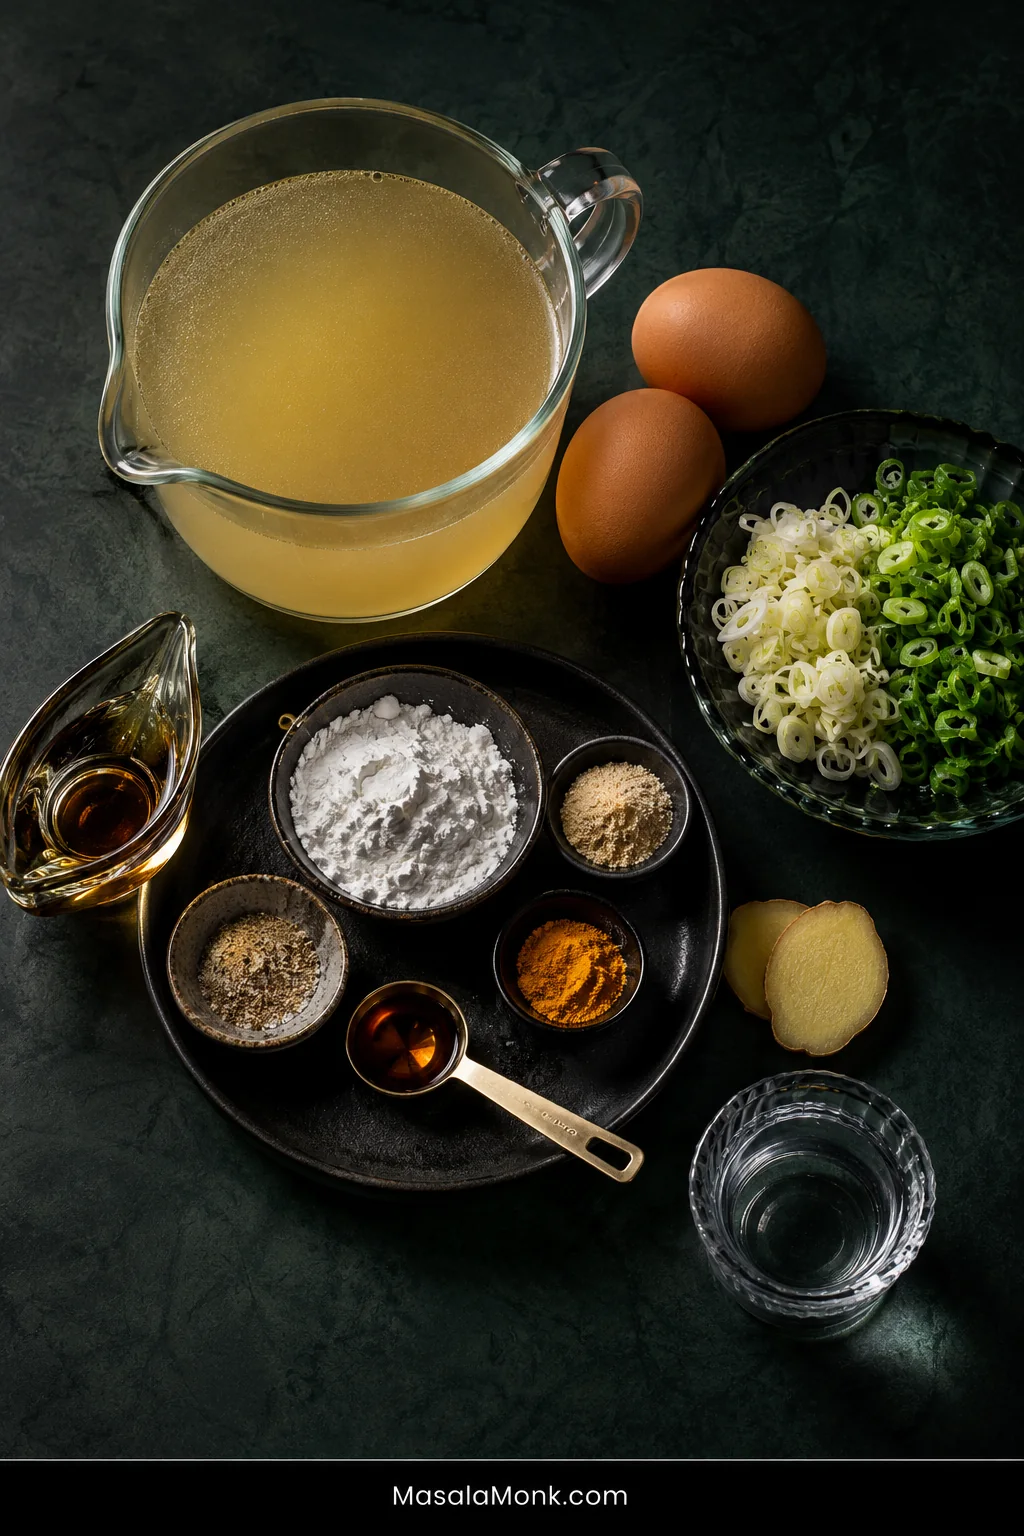
Overhead arrangement of chicken broth, two eggs, sliced scallions, ginger, cornstarch, white pepper, turmeric, sesame oil, salt, chicken powder, and water on a dark green surface.
Most of this recipe’s leverage sits in three things: broth for flavor, egg for texture, and cornstarch for body. The rest should stay deliberately restrained.

1. Season the Broth

Add the chicken broth, scallion whites, ginger, white pepper, and optional turmeric to a medium saucepan.

Bring to a boil, lower the heat, and simmer for 2–3 minutes. Remove the ginger slices after they have flavored the broth.

Now taste. If the chicken flavor is good but the broth simply tastes underseasoned, add salt. If the chicken flavor itself feels weak or hollow, add ½ teaspoon chicken powder or bouillon, let it dissolve, and taste again before using more.

Get the broth tasting good here. Cornstarch will change its texture and egg will add richness, but neither one can supply the savory foundation the broth is missing.
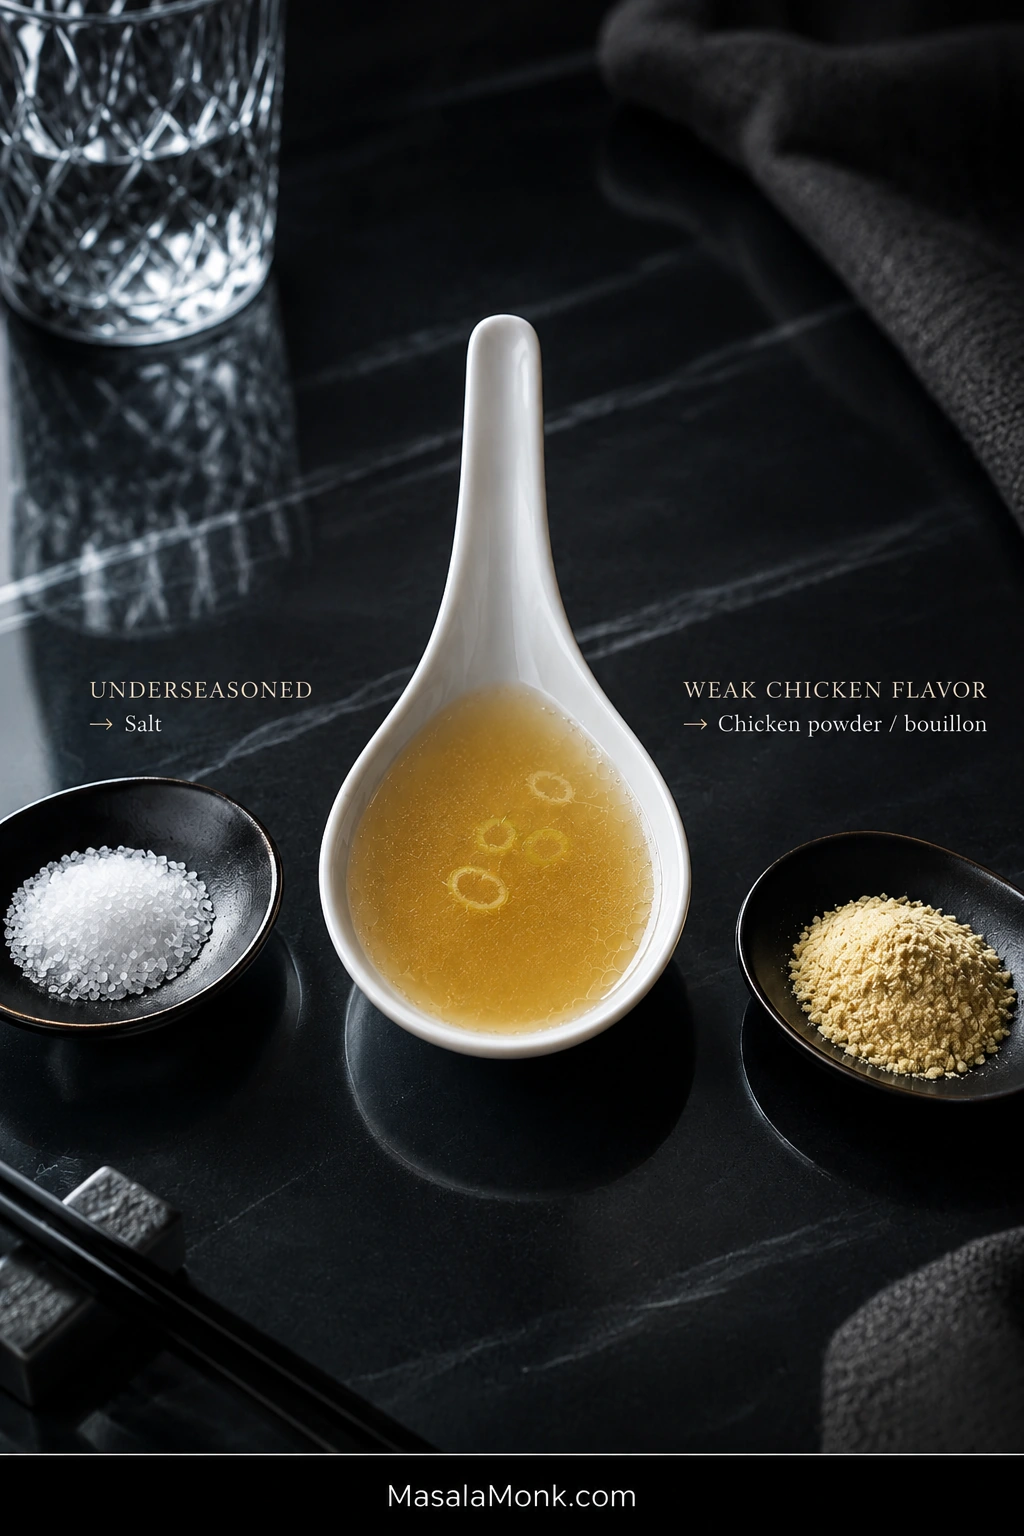
Golden broth in a white tasting spoon between a dish of salt and a dish of chicken powder, labeled for underseasoned broth versus weak chicken flavor.
If the broth is salty enough but still tastes hollow, the missing piece may be chicken depth rather than more salt.

2. Thicken the Broth

Mix the cornstarch with 1½ tablespoons / 22 ml cold water until smooth.

Stir the slurry again immediately before using it; cornstarch settles quickly. Pour it gradually into the simmering broth while stirring.

Cook for about 45–60 seconds, then drag a spoon through the pot. The broth should have a slight sheen, and the path behind the spoon should close almost immediately. A lingering trench means the soup is becoming too thick. If it looks almost unchanged from plain stock, give the starch another few seconds at a simmer.

The texture should remain fluid enough to move easily around the saucepan, with just enough body to feel silky on the spoon.
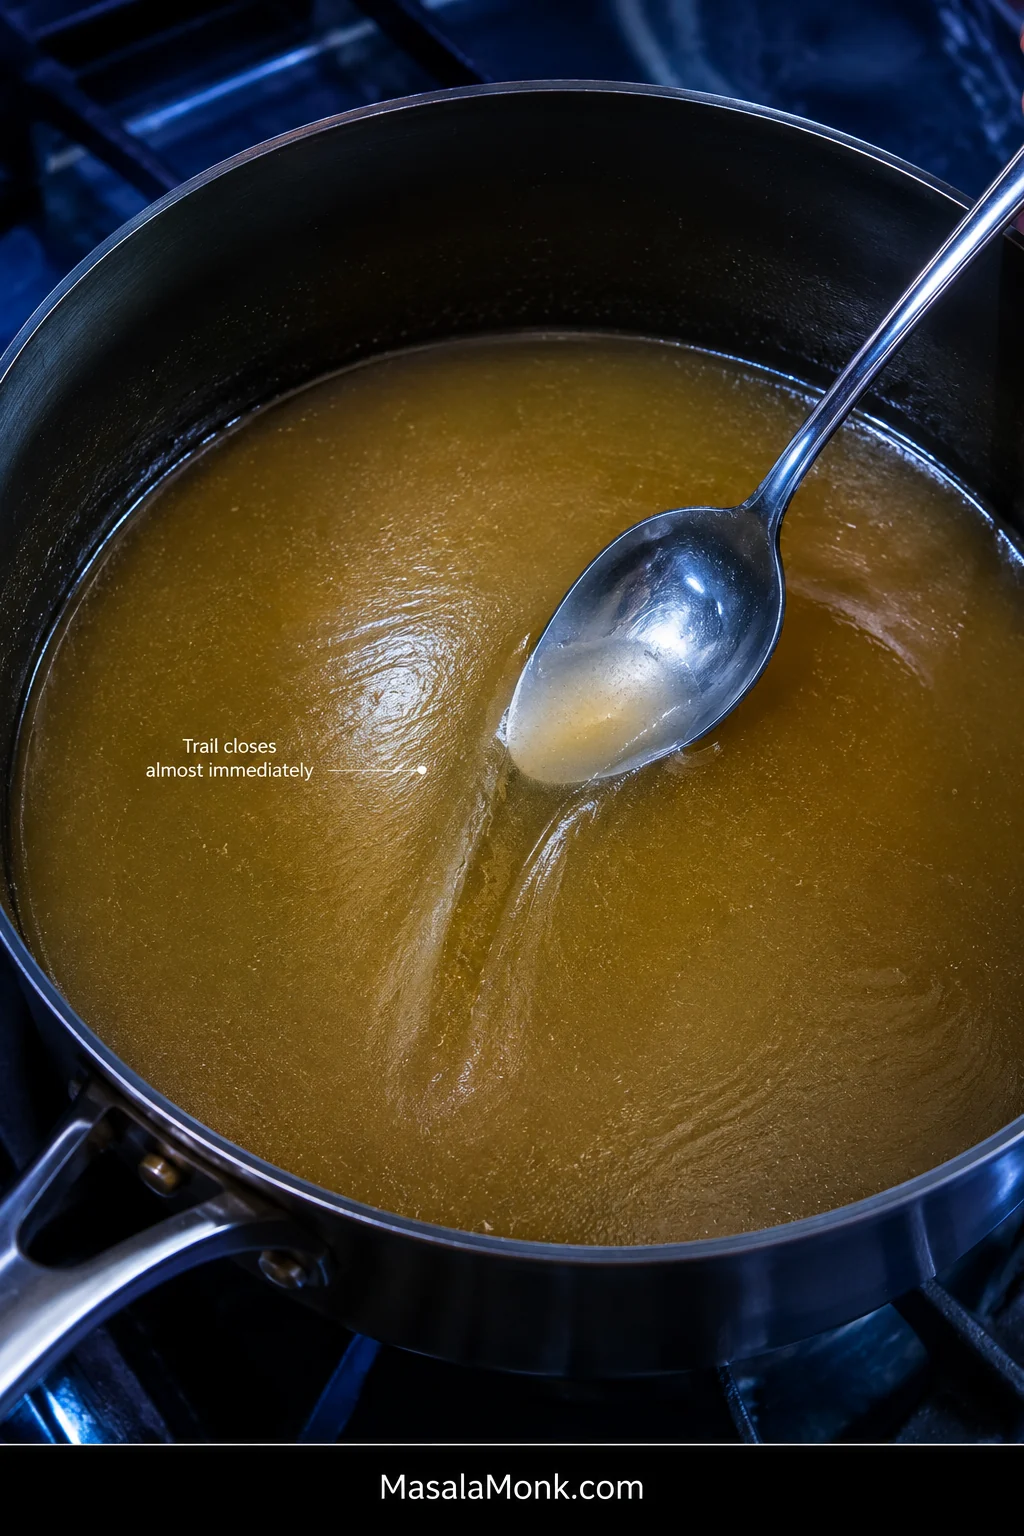
Metal spoon dragged through lightly thickened golden broth in a stainless saucepan, leaving a shallow trail that begins closing behind the spoon.
Think of the trail as a wake, not a trench. You want to glimpse where the spoon passed without leaving a channel that sits open behind it.

3. Prepare the Eggs

Beat the eggs with 2 teaspoons / 10 ml water until the yolks and whites are evenly combined and no clear, stringy ropes of egg white remain.

The added water makes the eggs easier to pour in a narrow stream. Stop once the mixture is smooth and fluid; foam does not help the ribbons.
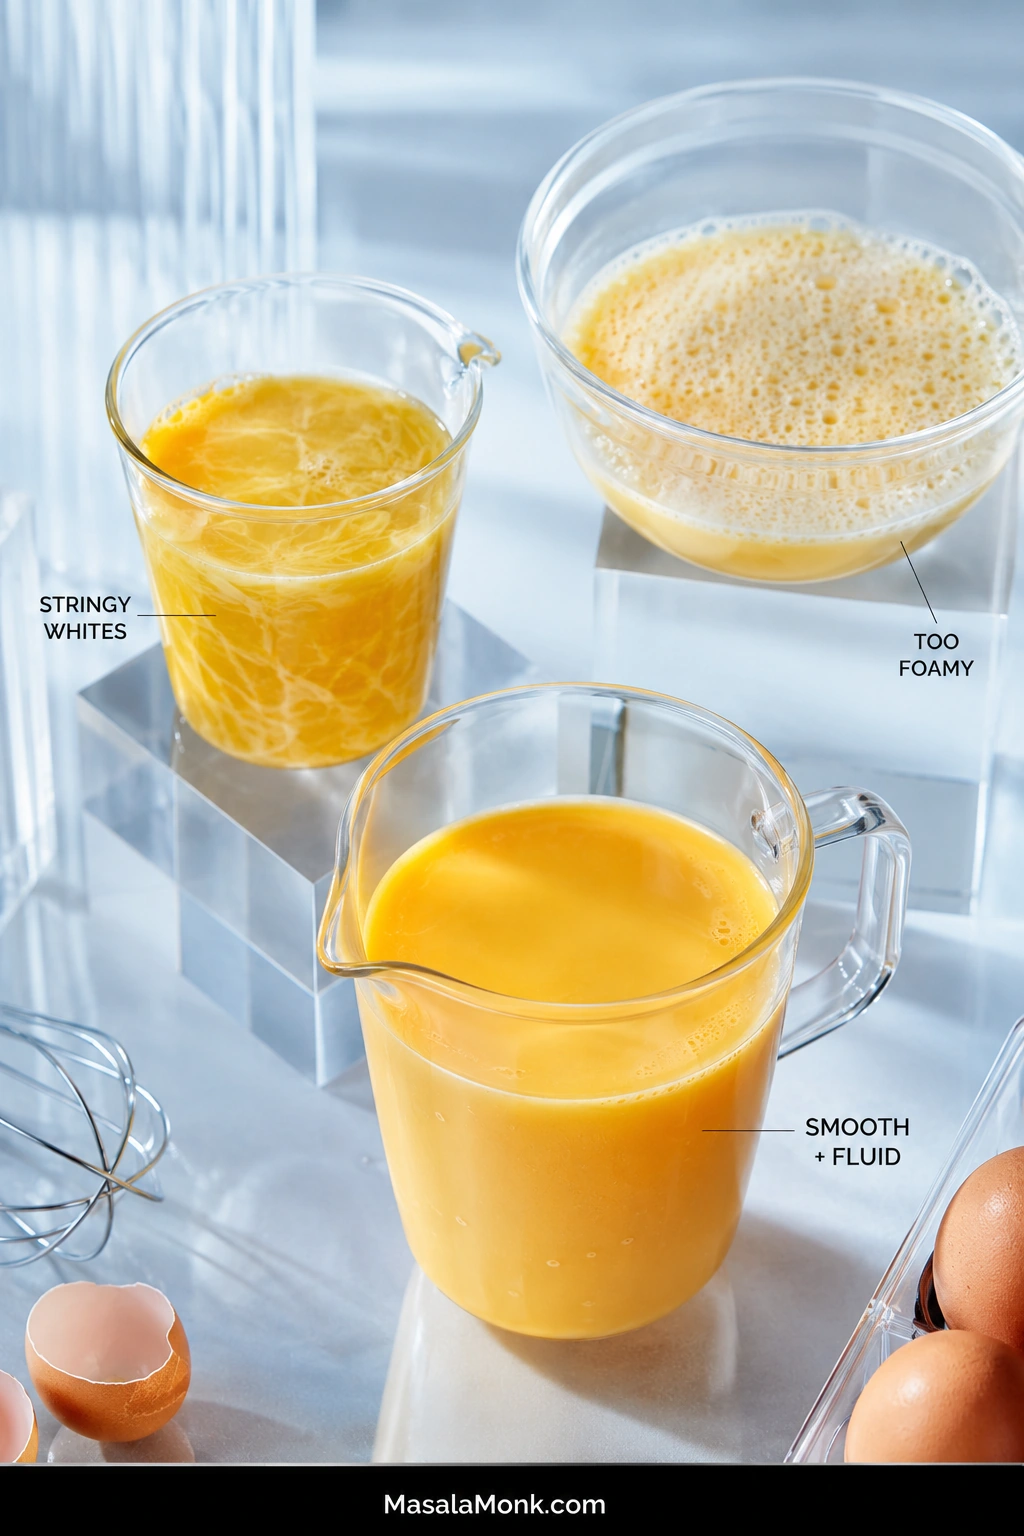
Three clear vessels compare beaten eggs with stringy whites, excessive foam, and a smooth fluid mixture ready for making egg ribbons.
The smooth sample gives you the most predictable pour. Stringy whites create uneven pieces, while excess foam makes the stream harder to control.

4. Make the Egg Ribbons

For this simmer-based method, keep a few quiet bubbles breaking the surface.

Give the broth one broad circular stir to create a slow current, then put the spoon down.

Pour the egg in a thin, steady stream around the pot, allowing the moving broth to carry it instead of repeatedly pouring into one spot.
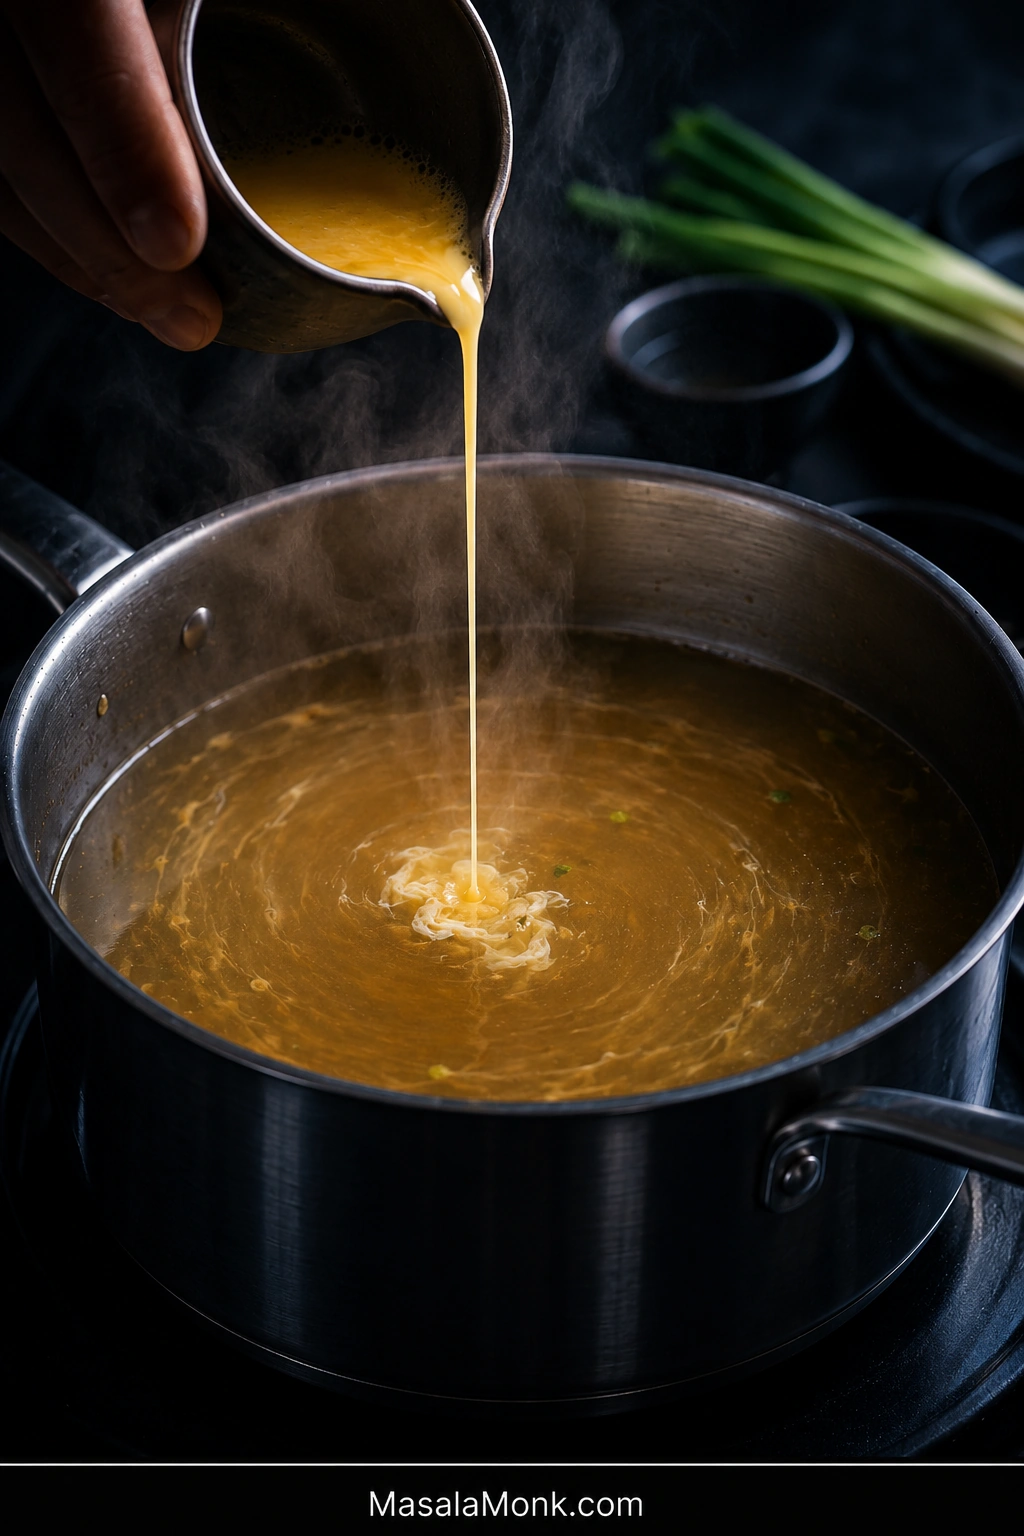
Thin stream of beaten egg being poured from a small spouted cup into mostly clear golden broth with a gentle circular current and the first egg wisps forming.
Because the spoon is out of the pot, the slow current can stretch a narrow pour into ribbons instead of breaking the setting egg into flecks.

Leave the soup untouched for about 10–15 seconds, or until the egg is opaque and distinct ribbons are visible. Use one or two easy strokes to separate pieces that have joined together.
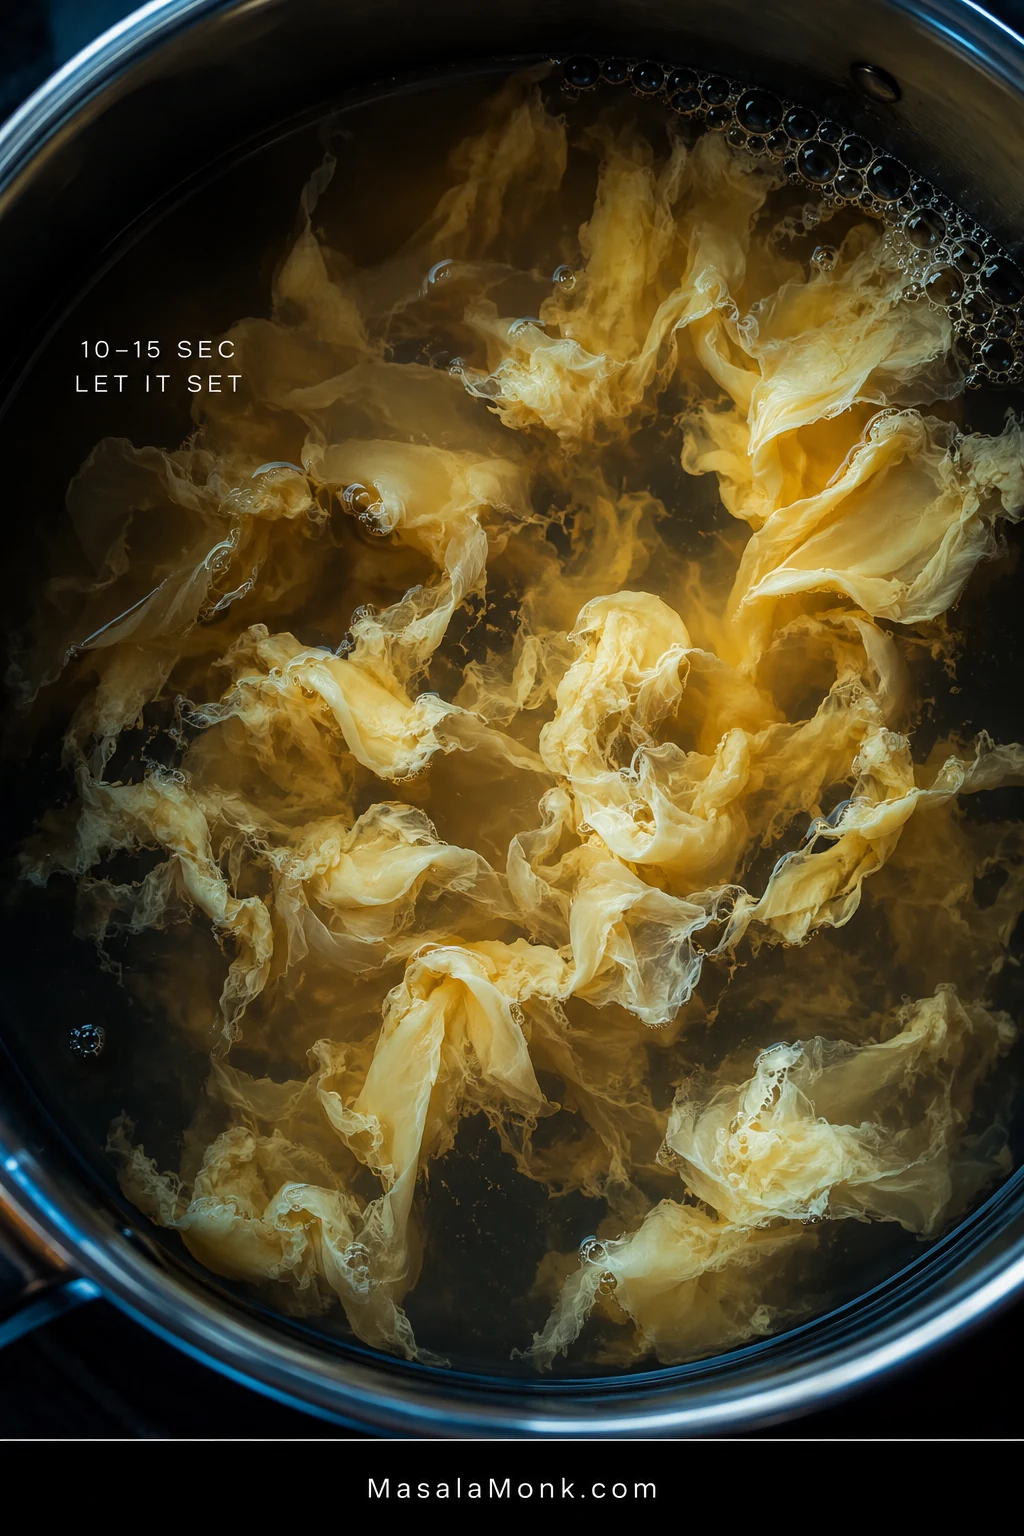
Close overhead view of pale egg ribbons blooming and setting in hot golden broth, with no spoon or stirring utensil touching the soup.
Watch the color change: translucent streaks become opaque folds. That shift—not the stopwatch alone—tells you the egg is ready for gentle separation.

Once those ribbons are visible, the tricky part is over.

A spouted cup gives you the most control. With a wider cup, hold a fork across the lip and let the beaten egg pass through the tines in a narrower stream.

5. Finish and Serve

Turn off the heat. Add the scallion greens and, if you like it, ½ teaspoon toasted sesame oil.

Taste once more. Add salt only when needed. Increase the sesame oil by drops so its toasted fragrance stays in the background.

Serve while the soup is steaming and the ribbons are soft.

Before You Sit Down: Check the Soup

  • The broth pours easily from the ladle.
  • The egg floats through it as ribbons or soft flowers instead of one heavy mass.
  • White pepper gives the sip a quiet warmth.

The ribbons do not need to look identical. When the soup tastes good and looks inviting, stop adjusting it and eat it hot.
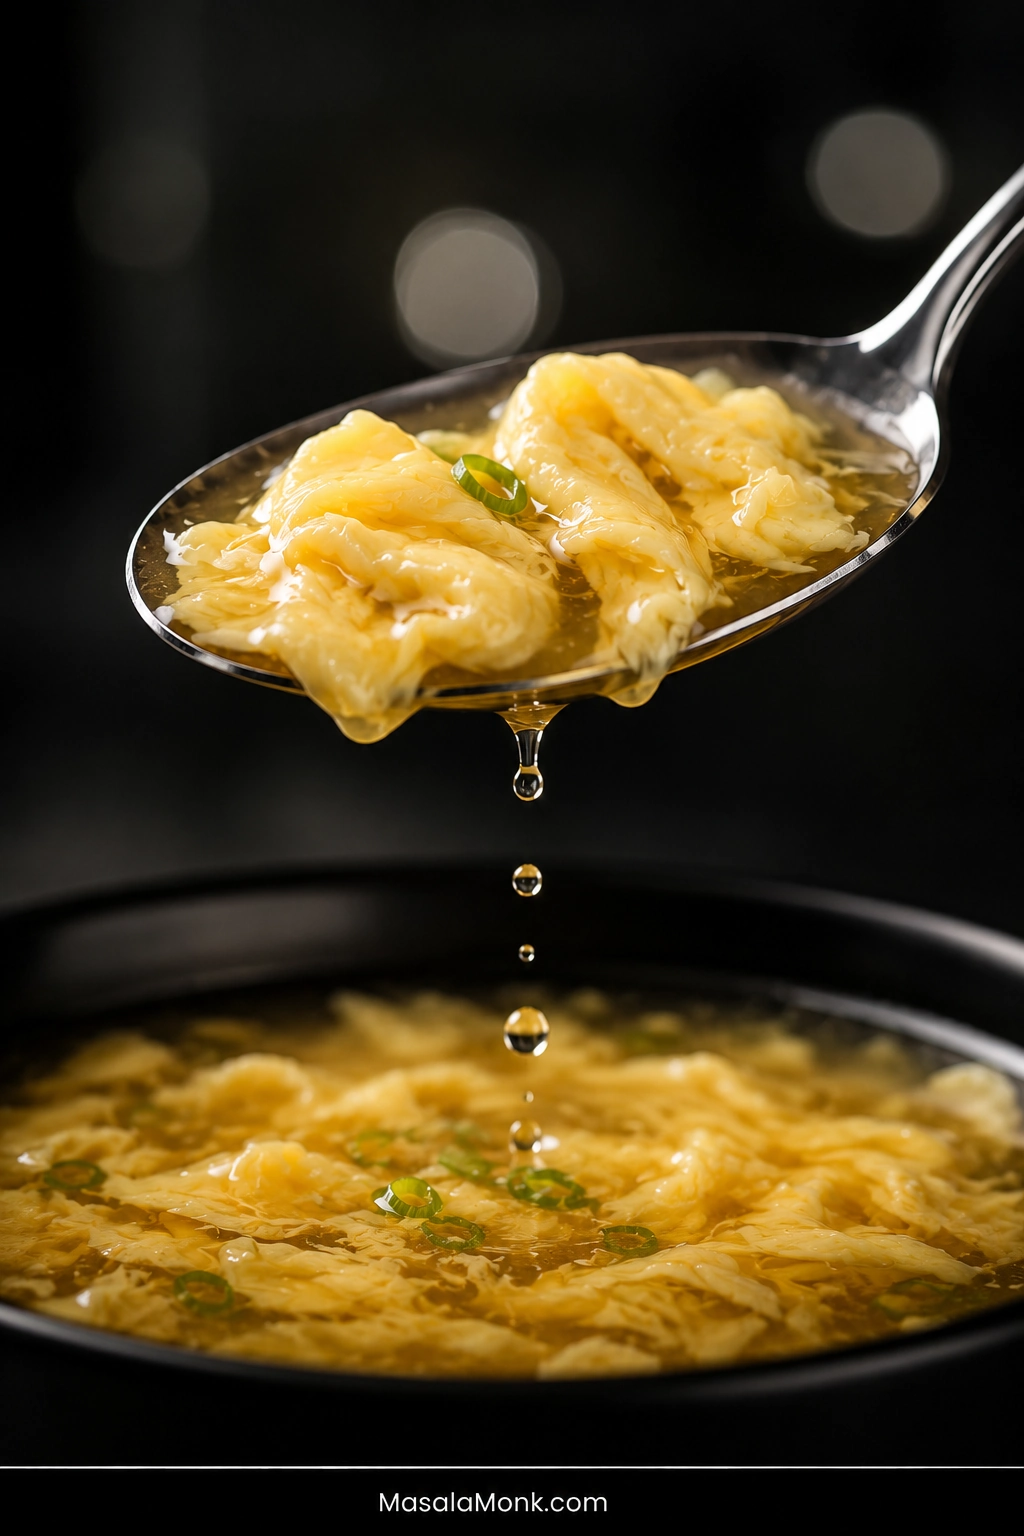
Close-up metal spoon lifting several soft folded egg ribbons and golden broth above a bowl of finished egg drop soup, with droplets falling from the spoon.
Lifted from the broth, tender ribbons should drape and fold rather than stand stiff like curds. That softness is more useful to judge than perfect shape.

Egg Drop Soup Ingredients: What Matters Most

Start with a clean-tasting chicken broth rather than one dominated by heavy roasting, tomatoes, or strong herbs. A mild broth is fine because you can correct its salt and savory strength before making the ribbons.

Cornstarch gives many restaurant-style versions their lightly glossy body and helps keep the egg suspended. The amount determines how broth-like or thick the finished soup feels.

White pepper supplies the familiar earthy warmth. Chicken powder or bouillon strengthens weak chicken flavor, while sesame oil is an optional finishing aroma and is best added cautiously.

Turmeric only adjusts color here. It is not needed for the flavor or for successful egg ribbons.

Choose Your Texture

One restaurant may serve egg drop soup almost broth-like while another makes it thick enough to cling to the spoon. Ribbon size varies too.

You want…Try this
A lighter brothStart with about 1 tbsp / 8 g cornstarch
The silky defaultUse 1½ tbsp / about 12 g
A thicker takeout textureIncrease gradually toward 2 tbsp / about 16 g
More eggUse 3 large eggs
Fine wispsUse a finer stream with more movement in the broth
Broad soft flowersGive the egg more stillness once it enters

These are starting points, not pass-or-fail rules. The difference between wisps, ribbons, and broad flowers is mostly texture and appearance.
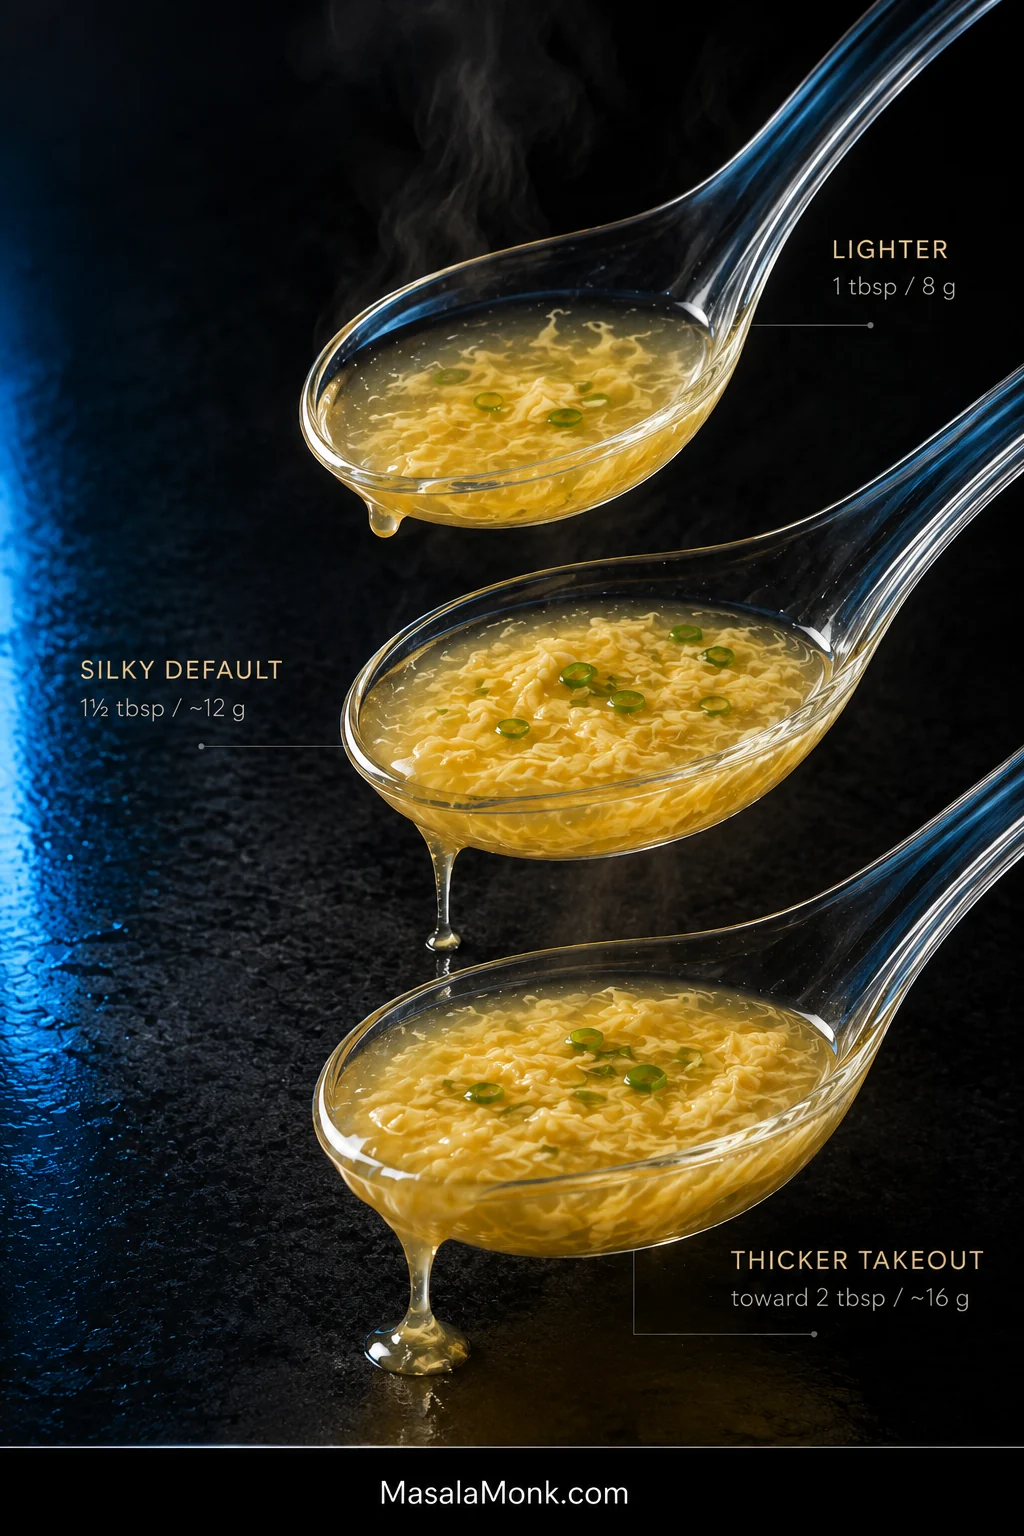
Three clear soup spoons compare lighter, silky-default, and thicker egg drop soup, labeled with 1 tablespoon, 1½ tablespoons, and about 2 tablespoons cornstarch.
Read the drips, not the color. Lighter broth runs cleanly off the spoon; a thicker takeout-style egg drop soup coats and releases more slowly.

Soup already too thin or thick? Jump to the texture fixes.

How to Get Silky Egg Ribbons

The shape of the egg comes down to four controls: broth body, heat, pour width, and movement.

A little starch slows the egg enough to help it remain suspended instead of immediately sinking through thin broth. Too much starch goes the other way and makes the soup heavy. Heat matters too: vigorous boiling can break delicate egg apart, while broth that has cooled too far may not set the stream cleanly with this simmer-based method.

Pour width changes the size of the pieces that enter the soup. A narrow stream produces finer ribbons; a heavier stream naturally forms broader ones. Movement determines how much those setting pieces are broken apart.

After you create a slow current, the broth can do most of the work. Continued stirring during the pour breaks the setting egg into smaller pieces before the ribbons have time to hold together.

Create the current → stop stirring → pour → wait → gently separate.
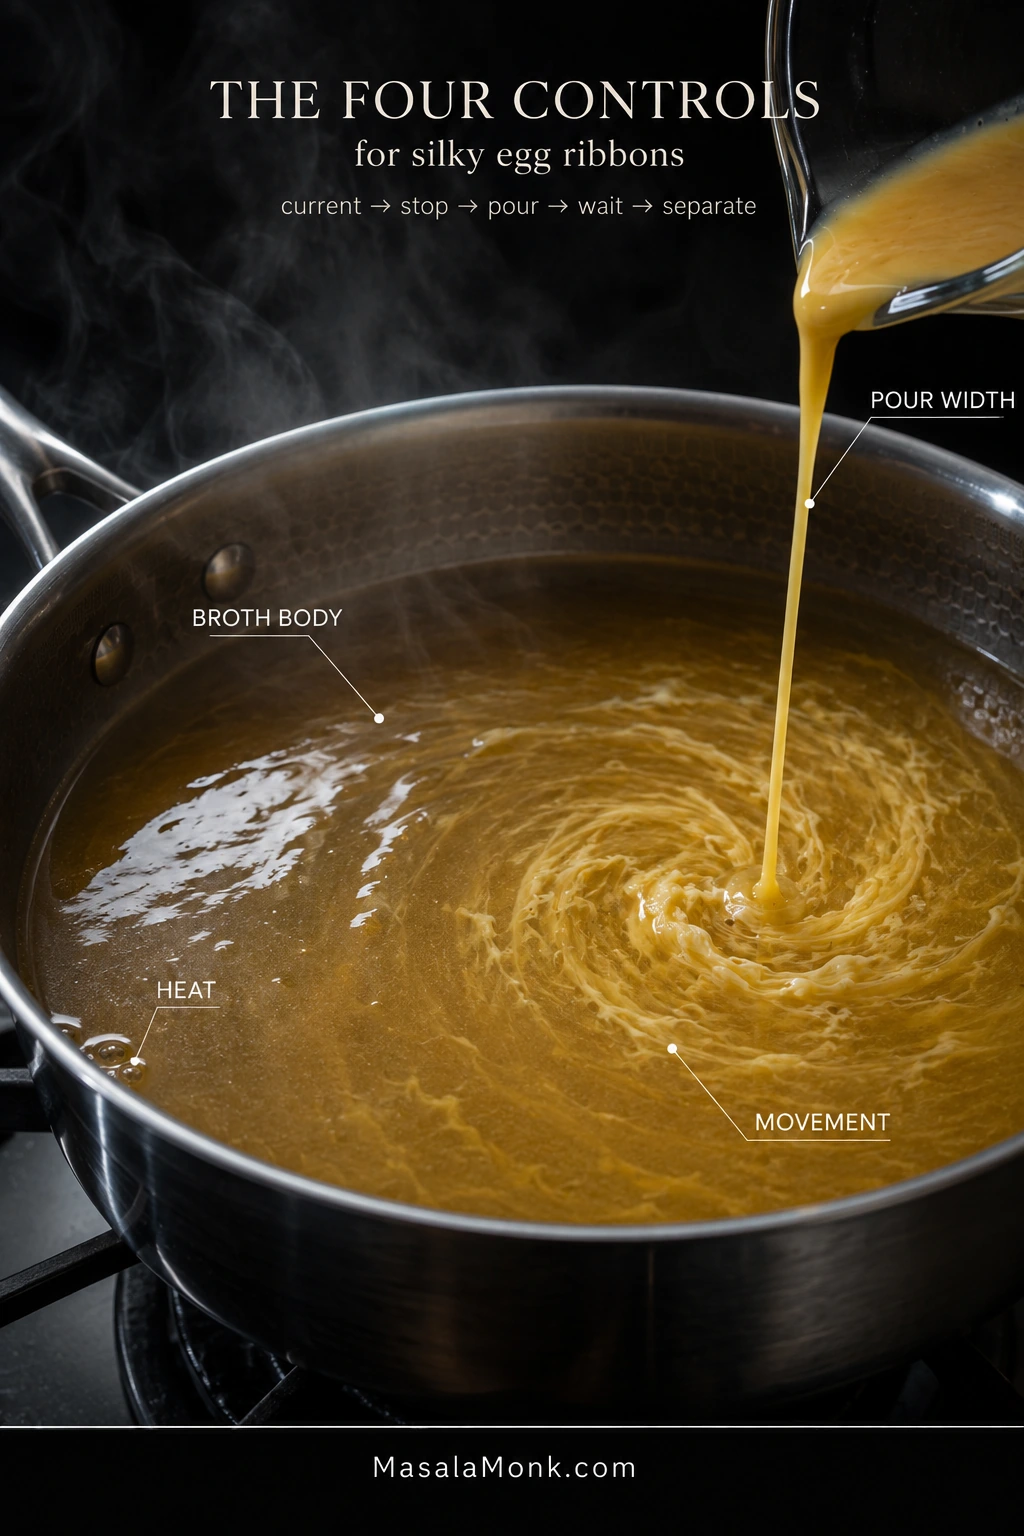
Saucepan of golden broth during an egg pour with labels pointing to broth body, gentle heat, thin pour width, and the circular movement of the liquid.
Use this as a diagnosis map rather than a formula. Large pieces point you toward pour width and stillness; tiny flecks point you toward excess movement or heat.

That same pause-before-stirring principle is useful in Hot and Sour Soup, where the egg shares the broth with tofu, mushrooms, and stronger seasonings.

Got clumps, flecks, or cloudy broth instead? Jump to troubleshooting.

Why Homemade Egg Drop Soup Doesn’t Taste Like the Restaurant

The frustrating batch is the one that looks right but tastes nothing like the soup you had in mind.

The difference is usually broth strength, salt and savory depth, white pepper, or how heavily sesame and soy are used. Start with what you can actually taste instead of adding every seasoning at once.

Weak chicken flavor: add some chicken powder or bouillon. Mild carton broth benefits more from this than a rich homemade stock.

Savory but flat: check the salt first. When the salt tastes right, add a very small pinch of MSG, stir, taste, and add more only if the broth needs it. Many chicken powders already contain MSG, so read the label before adding more. The FDA’s overview of MSG has more background on the ingredient and its use in food.

Missing warmth: add another touch of white pepper. Its heat tends to arrive toward the back of the sip without dominating the first taste.

Missing aroma: try a few drops of toasted sesame oil and stop when the fragrance becomes noticeable.

Tastes too busy: simplify. Skip the soy sauce, reduce or omit sesame oil, and let chicken broth, white pepper, ginger, and scallion carry the soup. Some takeout versions are much more restrained than heavily seasoned homemade recipes.
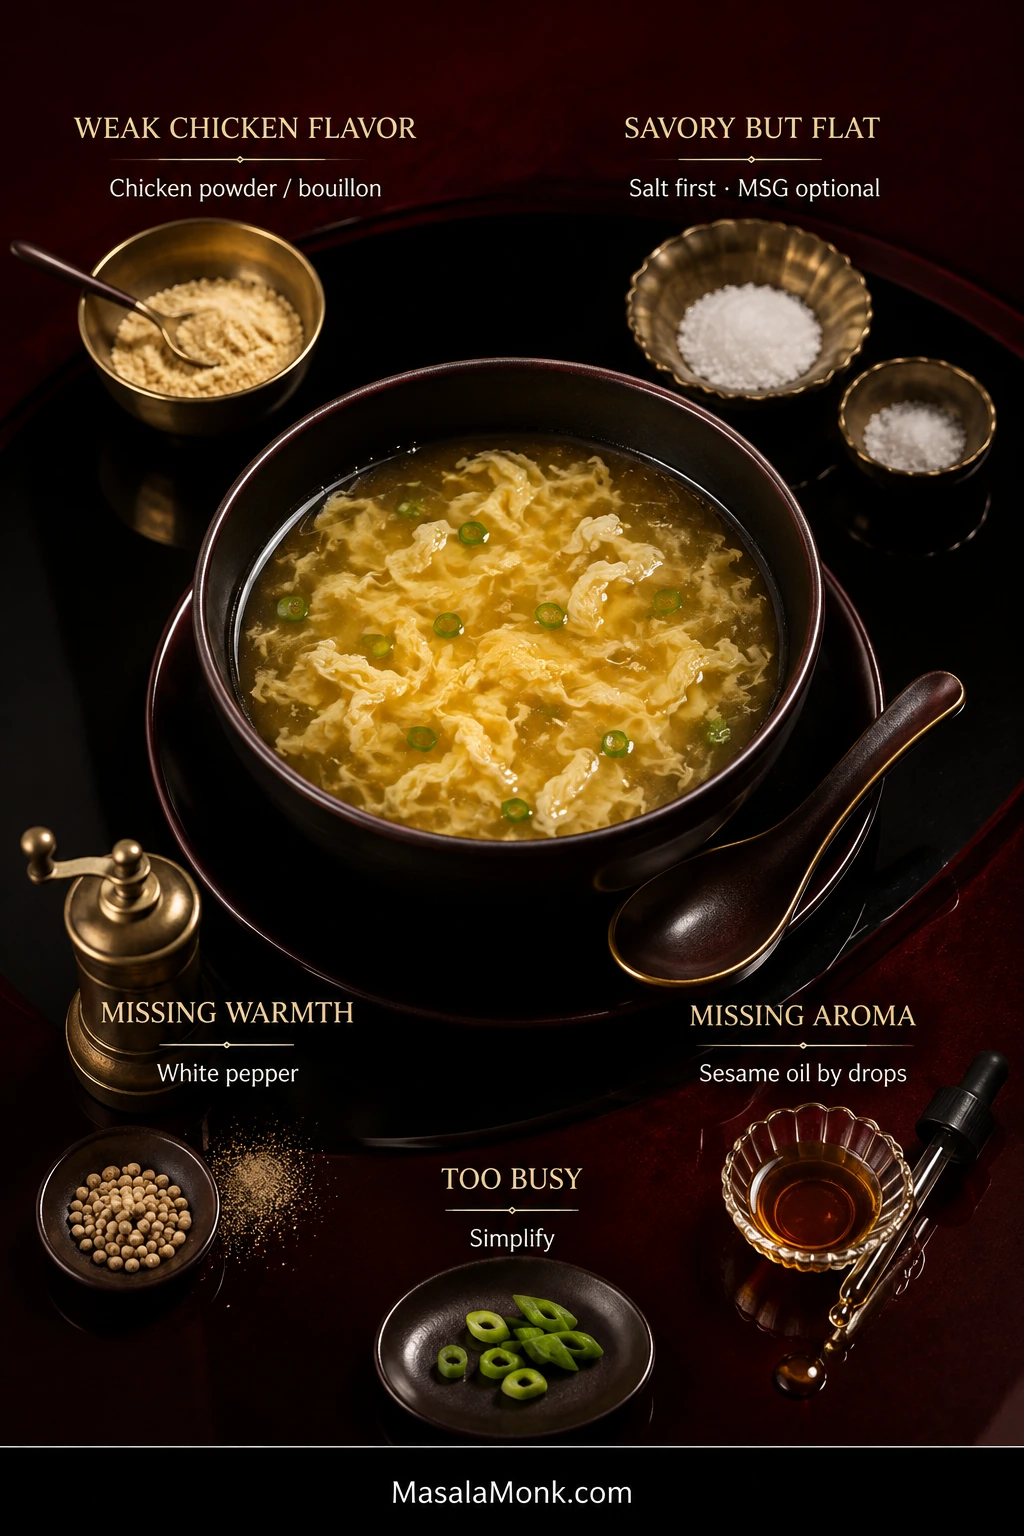
Dark red and black restaurant-style still life with egg drop soup surrounded by chicken powder, salt, white pepper, and sesame oil, with labels explaining five flavor adjustments.
Restaurant-style flavor often comes from restraint. The best correction is usually the smallest adjustment that makes the broth taste complete, then stopping there.

Do You Need Soy Sauce?

No. Soy sauce is perfectly usable, but it changes both the color and flavor of the broth.

For a pale, clean-tasting soup, build the chicken flavor first. Add soy when you specifically want its savory fermented character.

Why Is Restaurant Egg Drop Soup Yellow?

Egg drop soup can be naturally pale yellow; brighter restaurant-yellow versions may use turmeric or food coloring. Color has nothing to do with whether the ribbons formed correctly.

Chicken broth and egg yolks on their own can range from cream-gold to soft yellow.

For a warmer shade, the base recipe needs only ⅛ teaspoon turmeric. More can begin changing the flavor instead of simply warming the color.

Some Chinese-American restaurants use food coloring for a brighter takeout look. It is entirely cosmetic.

Pale soup is not failed soup.
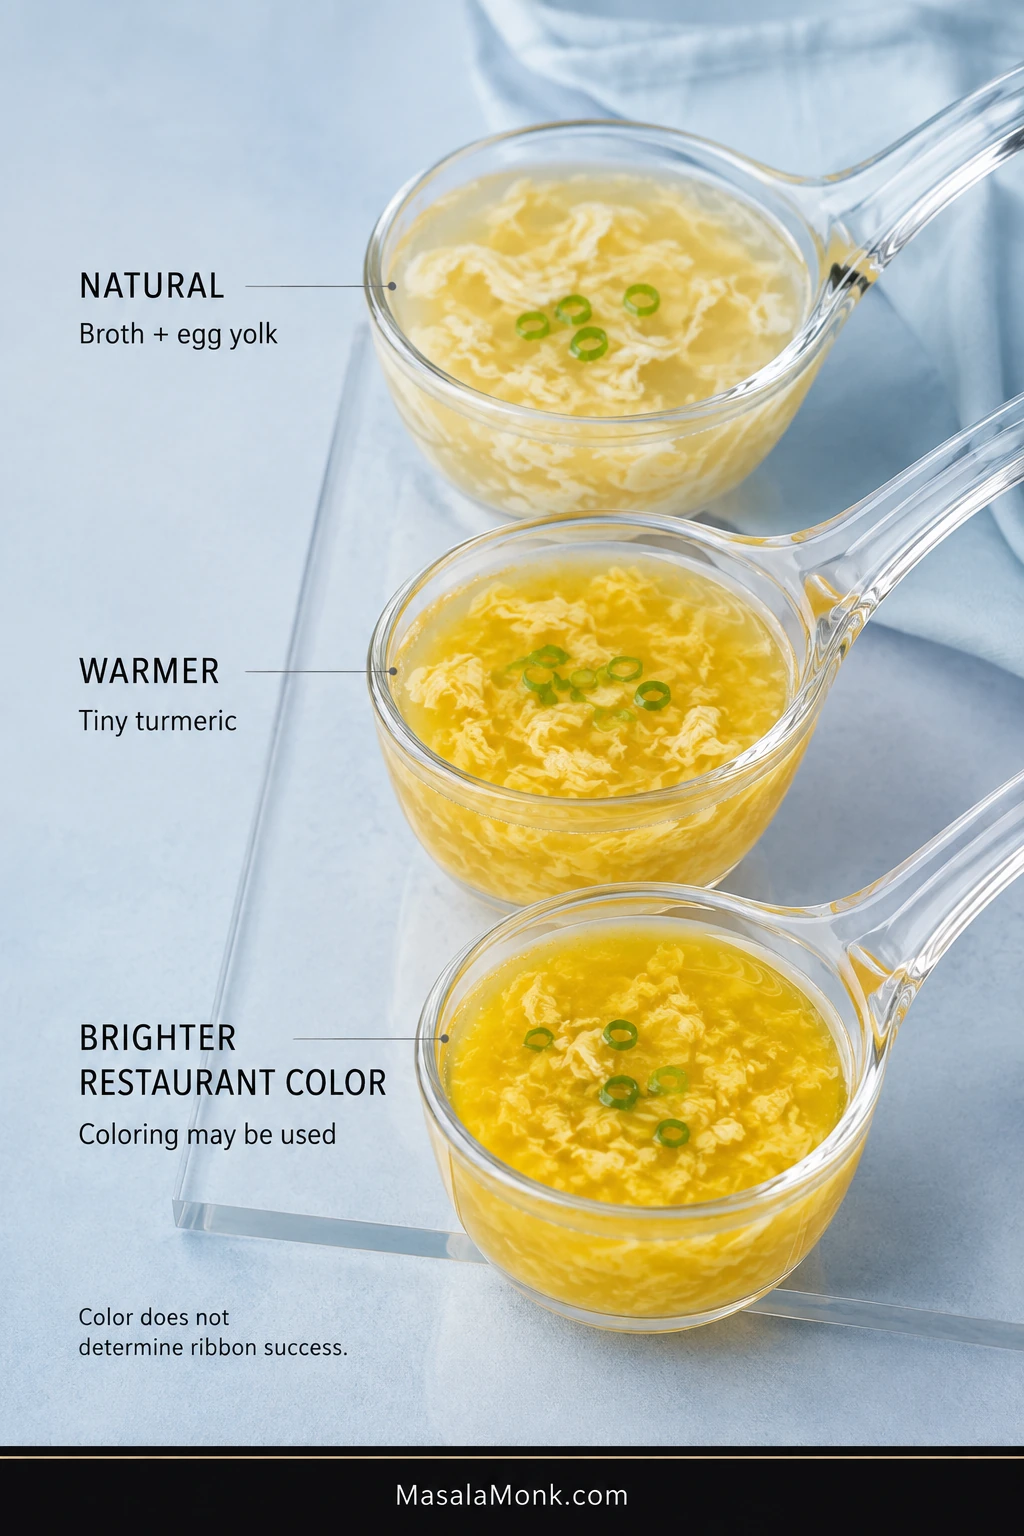
Three clear ladles of egg drop soup compare natural pale gold, warmer turmeric-yellow, and brighter restaurant-style yellow while keeping similar egg ribbons.
Color and technique are separate variables. A pale bowl can have perfect ribbons, while brighter restaurant-yellow soup may simply use turmeric or coloring.

Troubleshooting

Broth problems are easier to rescue than cooked egg. You can thicken a watery soup, loosen an over-thickened one, and strengthen a bland broth. After the egg has cooked into a particular shape, the useful question is what caused it and what can be done with the bowl you already have.

My Egg Disappeared and the Broth Turned Cloudy

The egg dispersed before distinct ribbons had time to set. Continuous stirring is the usual culprit; broth that has cooled too far can also make clean setting harder with this method.

Give the poured egg more stillness while it sets. The broth may stay cloudy, but that does not stop it from tasting good.
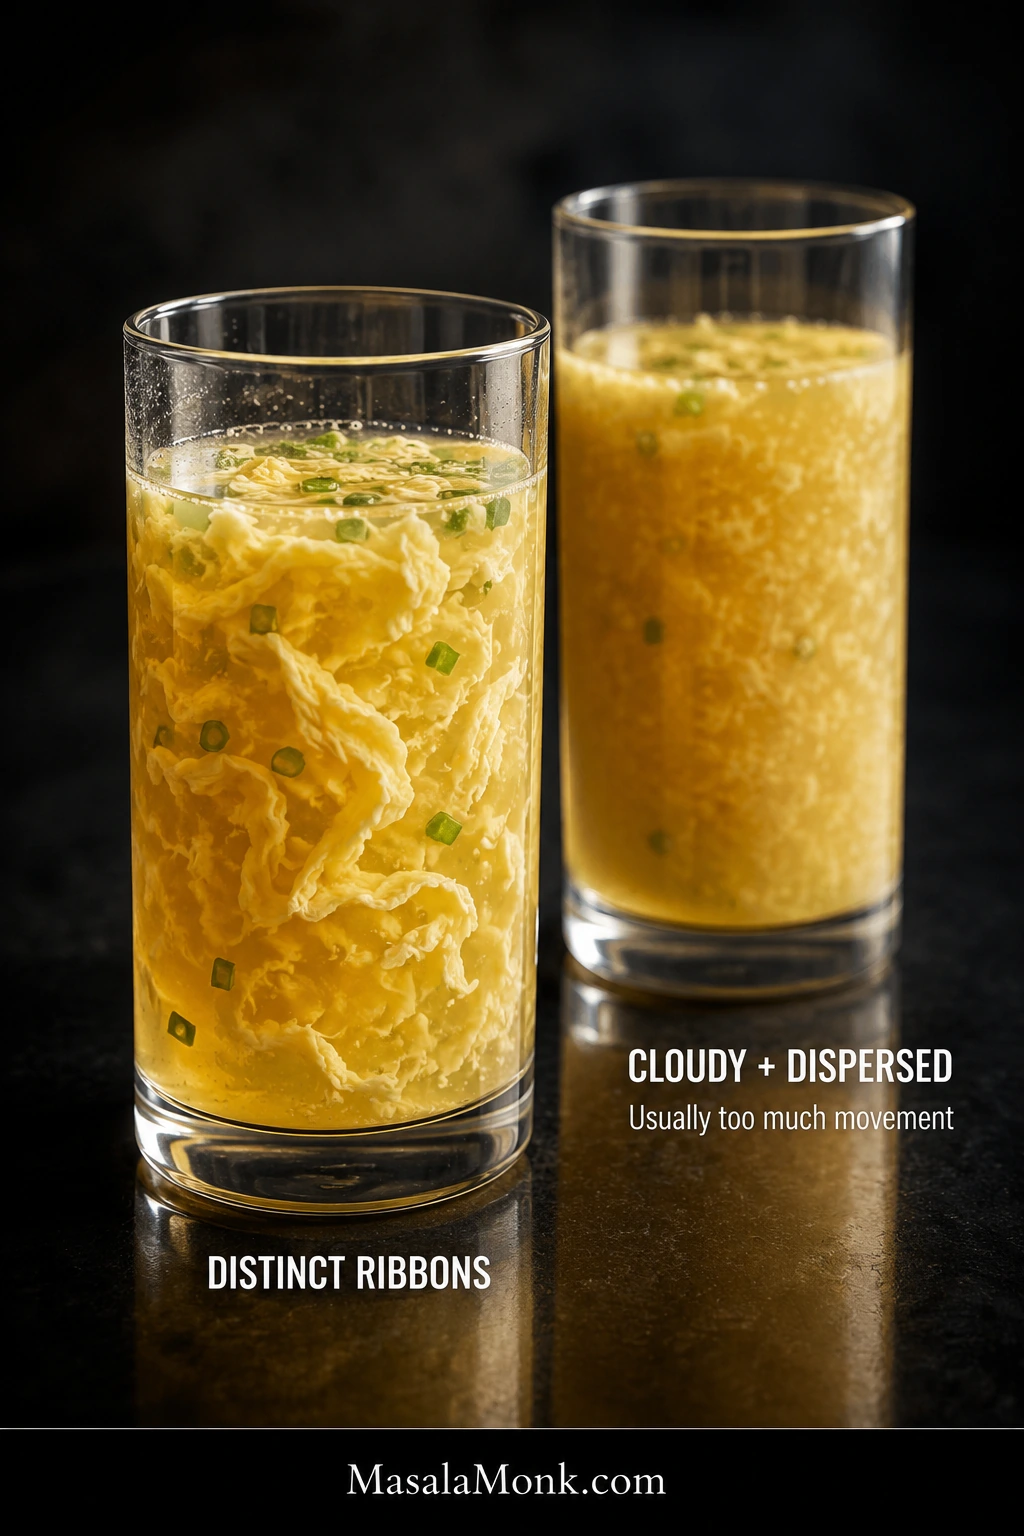
Two tall clear glasses compare golden broth with distinct egg ribbons against cloudier broth containing finely dispersed egg particles.
Glass makes the difference easy to see: distinct ribbons hold their shape, while dispersed egg turns the broth hazier. The cloudy version is different—not wasted.

I Got Scrambled-Looking Clumps

Large dense pieces usually mean too much egg reached one area at once, or thick ropes of white were still present in the beaten eggs.

A narrower pour and fully blended eggs prevent most of this. Separate the clumps lightly in the soup you already have and carry on. The texture is different, but dinner is still dinner.

I Got Tiny Flecks

The egg was broken apart by too much movement while it was trying to set.

Use less agitation after the pour. The flecks will not turn back into broad ribbons, but the soup itself is perfectly usable.

I Got One Big Sheet of Egg

The egg set with too little separation and joined into one connected piece.

Break the sheet gently into ribbons. When newly poured egg turns opaque, one or two careful strokes are enough to separate it before the whole mass sets together.

My Soup Is Too Thin

Give the original slurry about a minute at a simmer before assuming you need more starch.

Still too light? Mix 1 teaspoon / about 3 g cornstarch + 1 teaspoon / 5 ml cold water. Add part of it, simmer briefly, and reassess before using the rest.

My Soup Is Too Thick

Add hot low-sodium chicken broth a splash at a time, moving the spoon carefully around the ribbons.

If it takes a substantial amount of broth to loosen the soup, use less cornstarch when you make it again.
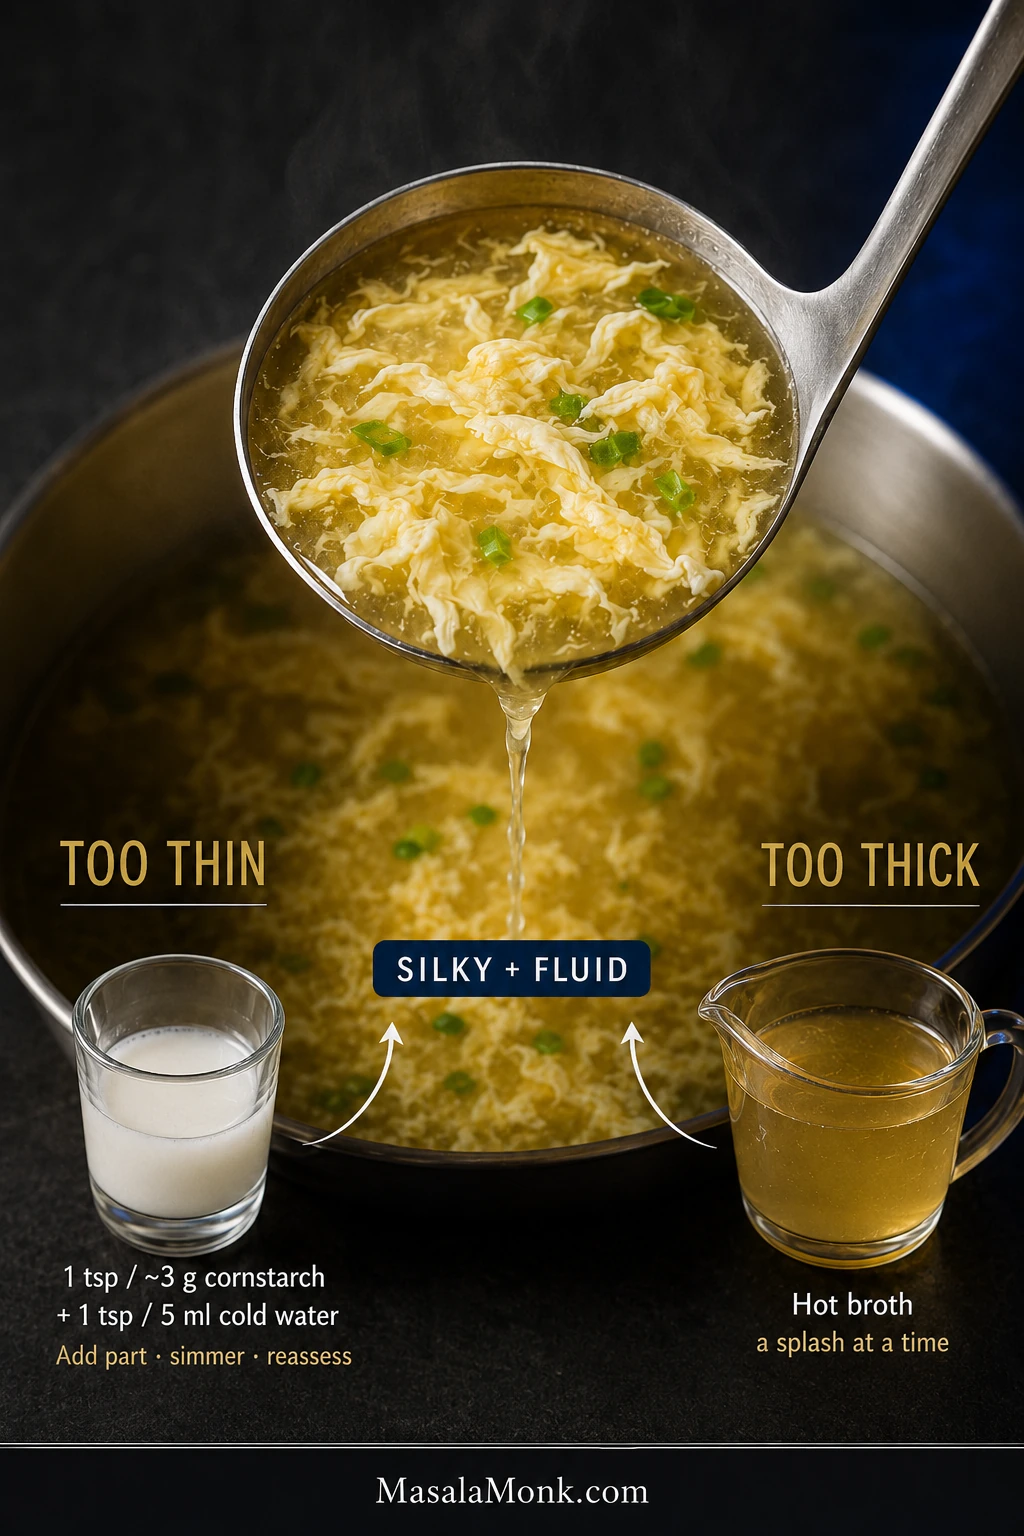
Egg drop soup ladle between a glass of cornstarch slurry for thin soup and a pitcher of hot broth for thick soup, with rescue amounts and a silky-fluid target.
Both rescues are deliberately incremental. Cornstarch keeps developing as it simmers, while extra broth also dilutes seasoning—so correct a little, then reassess.

Other Quick Fixes

  • Ribbons sank: thin broth, heavy pieces of egg, too much egg, or broth that cooled too far can contribute. Keep the base egg ratio and make sure the broth is back at a quiet simmer before pouring.
  • Rubbery egg: prolonged boiling after the ribbons have set is usually responsible. When the egg is opaque and set, finish the soup and get it off the heat.
  • Cornstarch lumps: if you spot them before adding the egg, strain the broth and return it to the saucepan. After ribbons have formed, remove obvious lumps with a spoon instead of sending the finished soup through a strainer.
  • Too much sesame oil: dilute the soup with more broth. Sesame is much easier to add than remove.
  • Broth looks brown: dark stock or soy sauce is usually responsible. The color alone does not mean anything went wrong.
  • Soup tastes of turmeric: dilute it when practical and use less in the next pot.
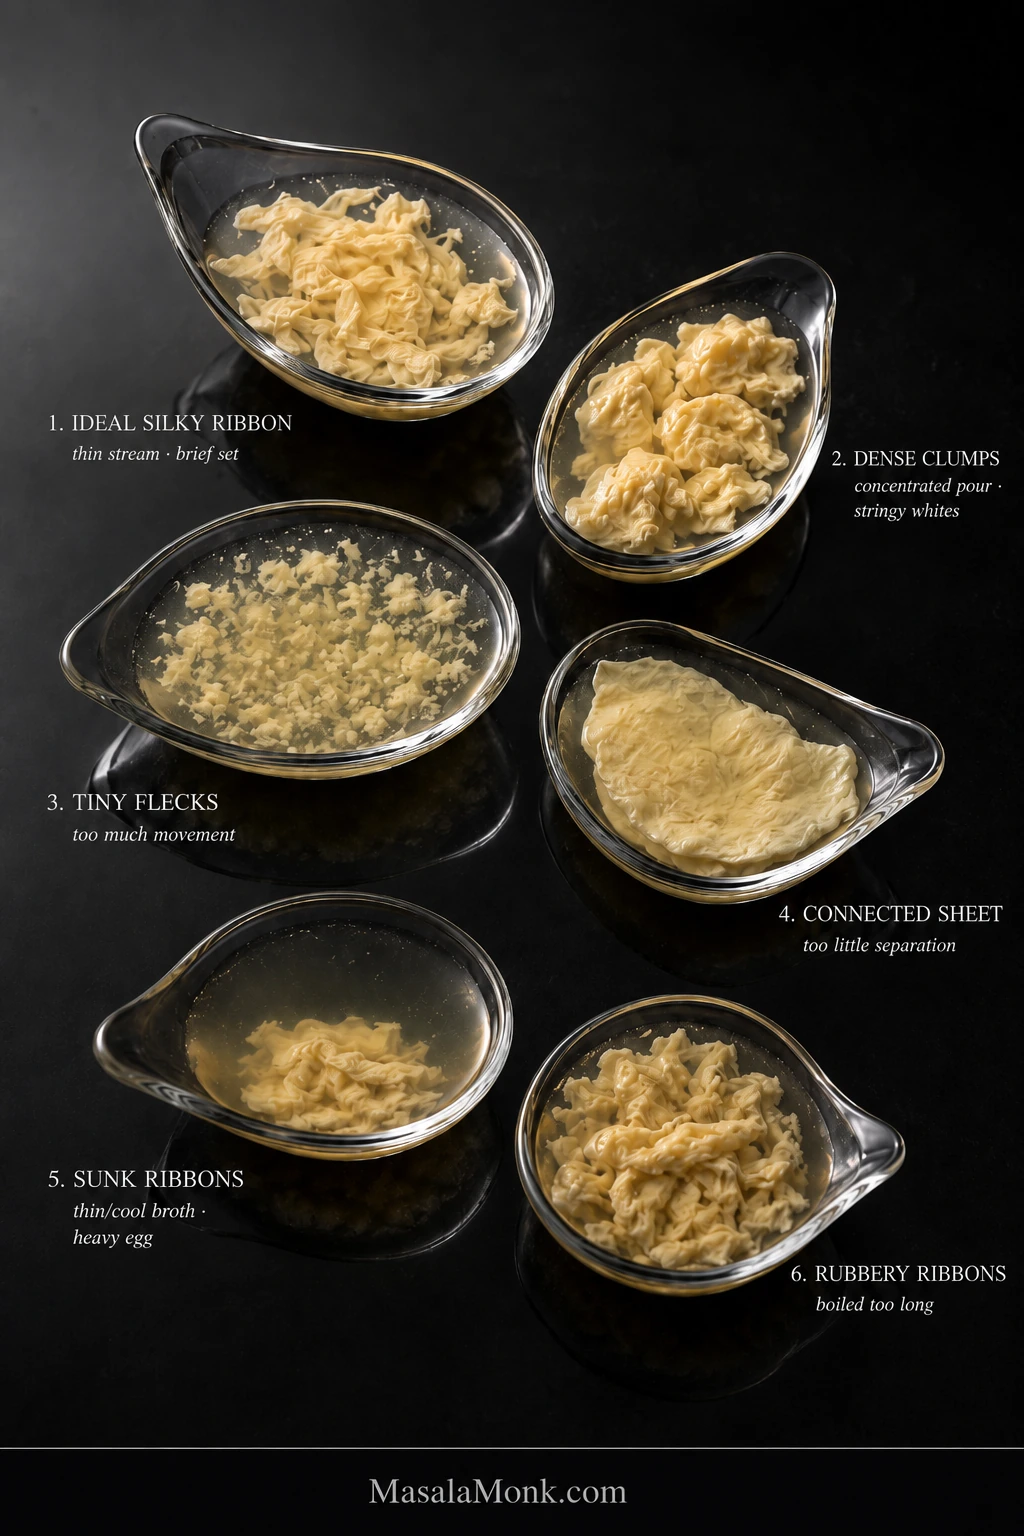
Six clear tasting dishes show ideal silky egg ribbons, dense clumps, tiny flecks, a connected egg sheet, sunk ribbons, and firmer rubbery ribbons with brief cause labels.
Identify the shape before choosing the fix. Clumps, flecks, sheets, sinking, and rubbery ribbons point back to different moments in the egg-drop process.

Ready to try again? Back to the recipe steps.

How to Scale Egg Drop Soup for One, Two or a Crowd

Egg drop soup is especially handy when you are cooking only for yourself. One egg and a couple of cups of broth are enough for a hot lunch or easy dinner without leaving a large pot behind.

NeedStarting brothEggCornstarch
1 generous bowl2 cups / 473 ml1 large / ~50 g2¼ tsp / ~6 g
Base recipe4 cups / 946 ml2 large / ~100 g1½ tbsp / ~12 g
6 starter bowls6 cups / 1.42 L3 large / ~150 g2¼ tbsp / ~18 g

Use about 1 teaspoon / 5 ml water per large egg to loosen the mixture.

Scale broth, eggs, and cornstarch by measurement. Salt, bouillon, and chicken powder are better adjusted by taste because brands vary so much.
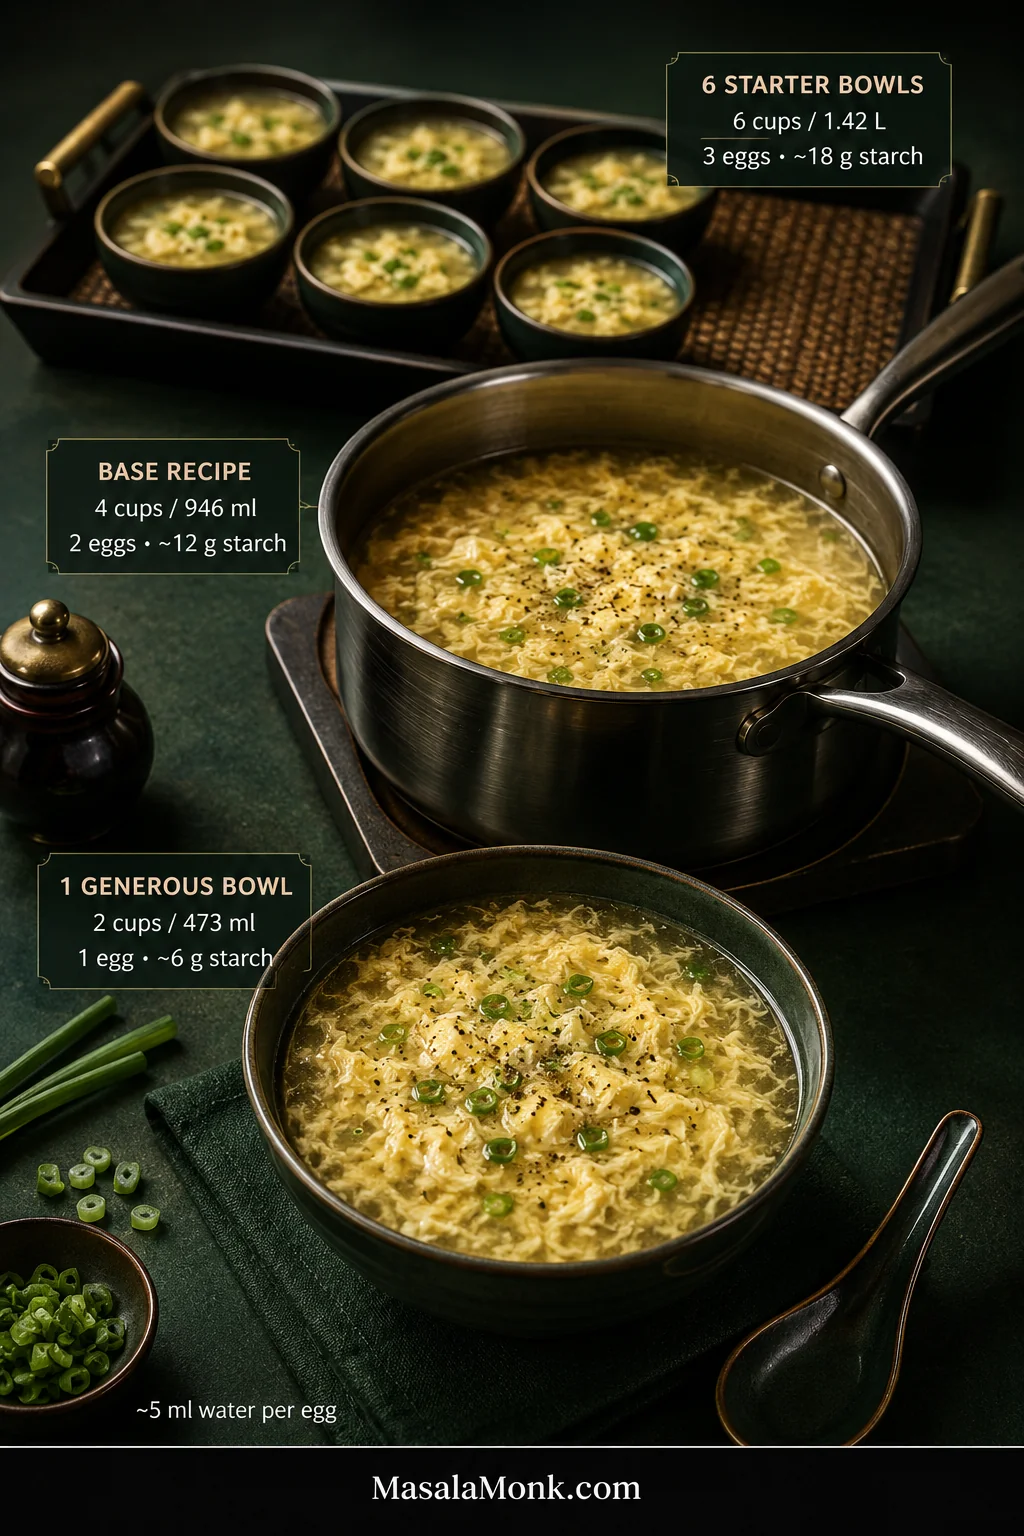
One large bowl, a saucepan of egg drop soup, and a tray of six small starter bowls labeled with broth, egg, and cornstarch quantities for each batch size.
Scaling changes more than the arithmetic. A larger pot can take longer to recover a gentle simmer, so re-check the heat before the egg pour.

Variations and Substitutions

Can I Make Egg Drop Soup Without Cornstarch?

Yes. Leave the cornstarch out and the egg will continue to form wisps or ribbons. The broth will simply be lighter and more delicate, without the glossy body common in many Chinese-American restaurant versions.

Other Easy Variations

  • Potato starch: make a cold slurry and begin with less than the full cornstarch quantity. Add gradually until the broth reaches the same spoon-path cue used in the base recipe; different starches do not always thicken one-for-one.
  • Vegetable broth: choose a clean, savory one. Dark roasted or tomato-heavy broth changes the character of the soup considerably.
  • Tofu: warm small cubes of soft or silken tofu in the seasoned broth before adding the slurry and egg. For a tofu-centered meal, serve the soup alongside Mapo Tofu and rice.
  • Shrimp: poach peeled, deveined shrimp until barely cooked, lift them out, and continue with the slurry and egg. Return the shrimp at the end just long enough to heat through.
  • Vegetables: peas, finely diced carrot, mushrooms, spinach, and other quick-cooking vegetables fit easily. Add firm vegetables earlier and delicate greens near the end.
  • Corn: a handful adds sweetness and texture. With enough corn to become a main flavor, the soup takes on a noticeably sweeter, fuller character.
  • Rice: spoon cooked rice into individual bowls so leftovers do not absorb most of the broth. Starting from dry rice? Our guide to cooking rice covers the basics.
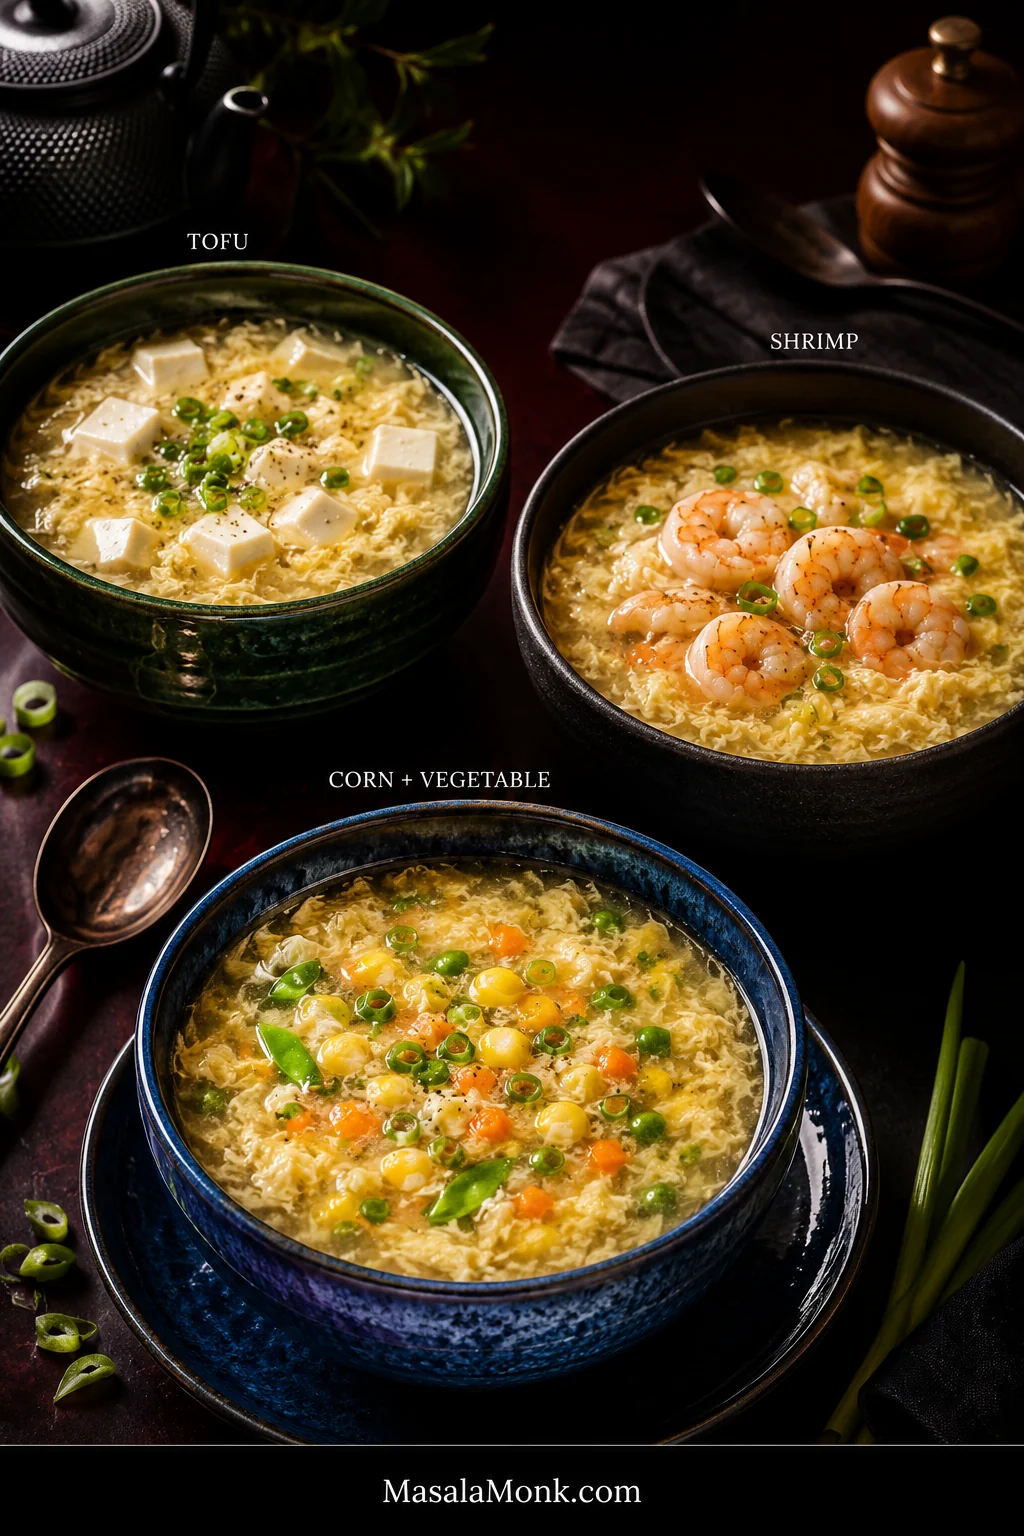
Three bowls of golden egg drop soup show tofu cubes, cooked shrimp, and a corn-and-vegetable variation in green, black, and blue ceramic bowls.
Whatever you add, leave enough open broth for the egg ribbons to move and stay visible. The variation should support the soup rather than crowd it.

Is Egg Flower Soup the Same as Egg Drop Soup?

Yes. Egg drop soup and egg flower soup generally refer to the same broad family of soups. “Egg flower” describes the soft, flower-like shapes created when beaten egg sets in hot broth.

The exact soup changes from kitchen to kitchen. Some versions are clear and delicate with fine wisps; others have broad flowers and noticeably more body.
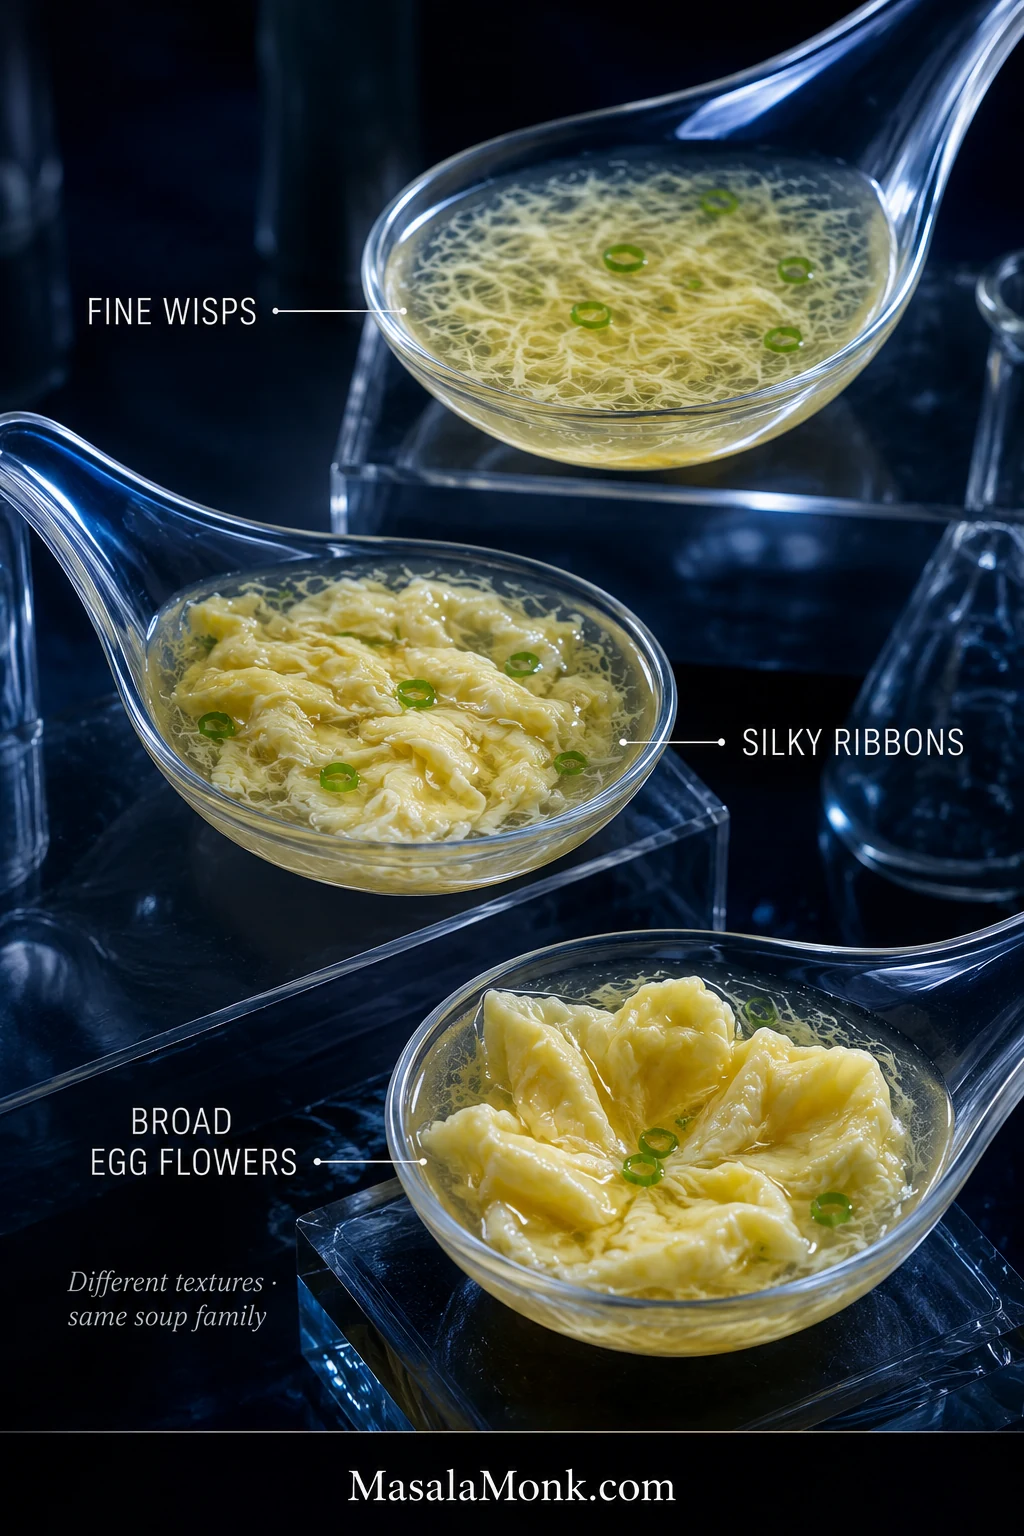
Three clear ladles compare very fine egg wisps, medium silky ribbons, and broad petal-like egg flowers in translucent golden broth.
This spectrum also explains why two restaurants can serve visibly different soups under the same name: ribbon geometry varies even when the underlying technique belongs to the same family.

Chinese home-style soups may include tomato, seaweed, tofu, corn, or vegetables. Many Chinese-American restaurant versions lean toward concentrated chicken flavor, some starch thickening, white pepper, and egg suspended through a pale or yellow broth.

Egg plays a completely different role in Egg Foo Young, another Chinese-American restaurant favorite where it becomes the body of the dish instead of delicate ribbons in broth.

Your favorite restaurant may serve its soup thinner, thicker, brighter, or more egg-heavy. The controls above make those differences easy to adjust.

What to Serve With Egg Drop Soup

As a starter, egg drop soup works especially well with something that brings more texture or substance to the table.

A small bowl before Chicken Fried Rice makes an easy takeout-style dinner: hot soup first, followed by separate grains, vegetables, egg, and chicken.

Crispy spring rolls add crunch; steamed dumplings, plain rice, Chinese-style noodles, stir-fried vegetables, and simple chicken or beef dishes all fit comfortably beside it.
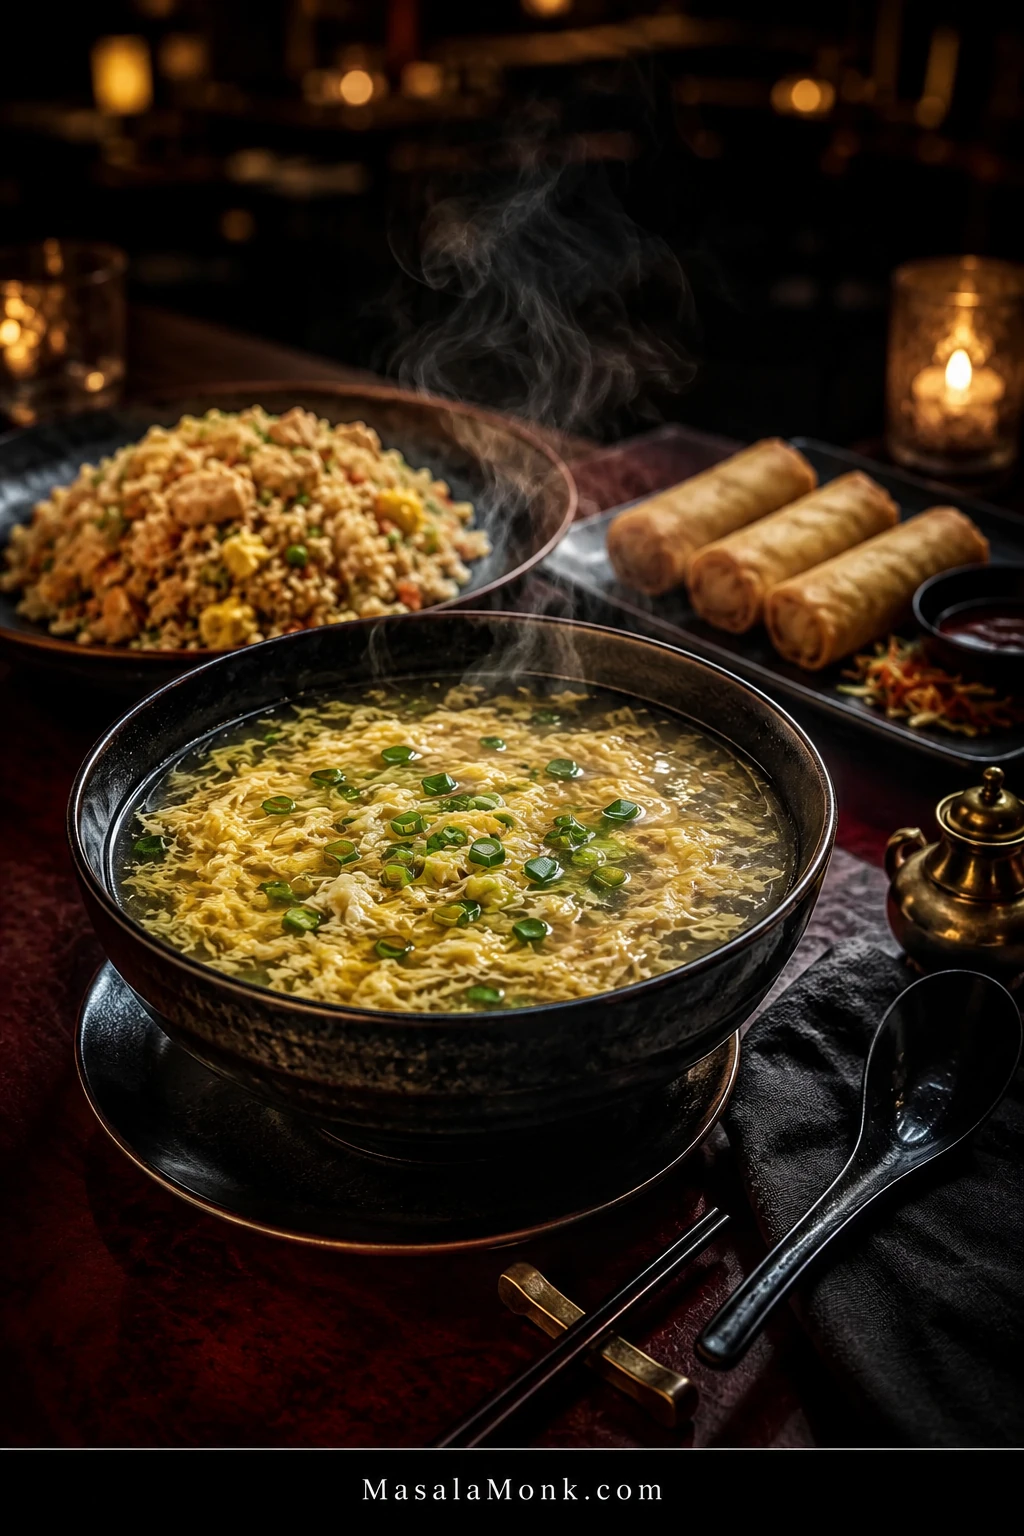
Steaming bowl of egg drop soup in the foreground with chicken fried rice and three crisp spring rolls on a dark red restaurant table behind it.
After all the technique, texture contrast is what makes the meal satisfying: soft soup beside fried rice, crisp spring rolls, dumplings, or another substantial side.

Two generous cups can also make a light lunch on their own, especially on a day when cooking anything elaborate sounds unnecessary.

Make Ahead, Store & Reheat

Egg drop soup is nicest when the ribbons have just been made, but the seasoned broth is easy to prepare ahead. That gives you most of the convenience while saving the egg for the last few minutes.

Best Make-Ahead Method

  1. Prepare the seasoned broth, remove the ginger slices, cool it, and refrigerate without cornstarch or egg.
  2. Bring the broth back to a simmer when you want the soup.
  3. Add a freshly mixed slurry.
  4. Add freshly beaten egg when the broth has the body you want.
  5. Finish with scallion greens and optional sesame oil.

A few minutes at the stove later, you have fresh ribbons without remaking the broth from the beginning.
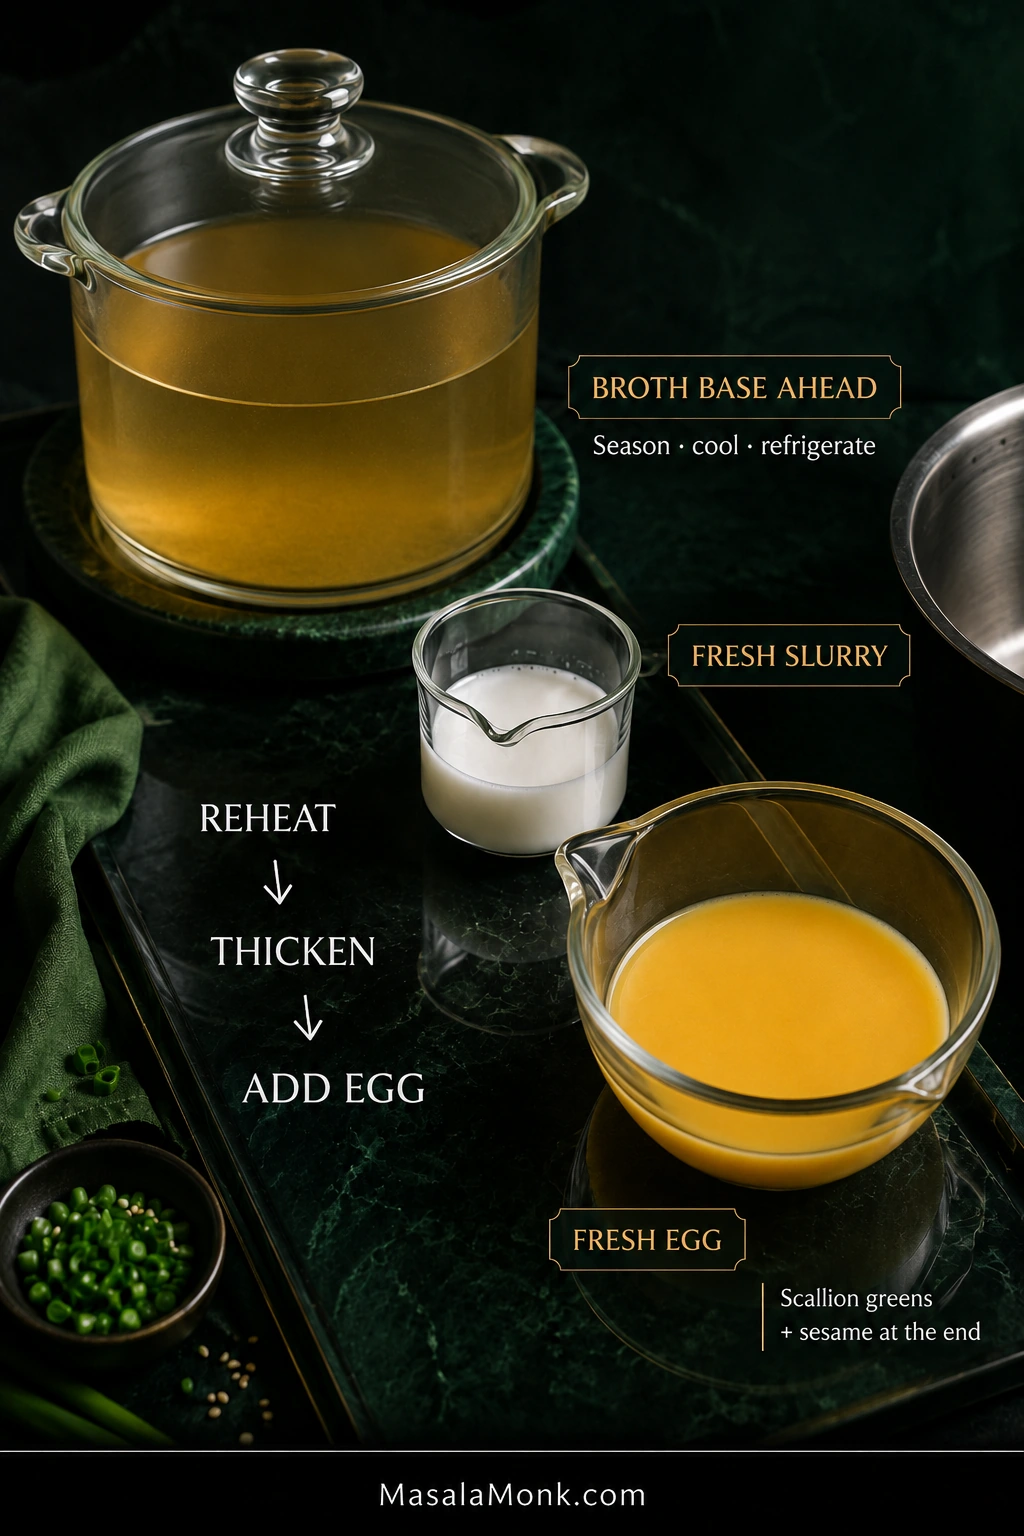
Clear container of seasoned golden broth beside fresh cornstarch slurry and smooth beaten egg, labeled to reheat the broth, thicken it, then add the egg.
Broth waits better than ribbons do. For make-ahead egg drop soup, hold the seasoned base, then thicken and pour the egg close to serving.

Storing Leftovers

Refrigerate leftovers promptly in a covered, shallow container. For the nicest ribbon and broth texture, aim to eat the soup within 1–2 days. Properly refrigerated cooked leftovers generally have a broader 3–4 day food-safety window at 40°F / 4°C or below.

Get leftovers into the refrigerator within 2 hours of cooking, or within 1 hour when the surrounding temperature is above 90°F / 32°C. The USDA guide to leftovers and reheating has the broader food-safety guidance.

Reheating

Bring leftover soup to a rolling boil when reheating and make sure it reaches 165°F / 74°C. After the soup is thoroughly hot, take it off the heat so the cooked ribbons spend as little extra time boiling as possible.

In the microwave, heat in shorter intervals and stir between them so the soup warms evenly.

If chilled soup has lost some of its original body, mix 1 teaspoon / about 3 g cornstarch + 1 teaspoon / 5 ml cold water. Add only as much of that slurry as the reheated soup needs.
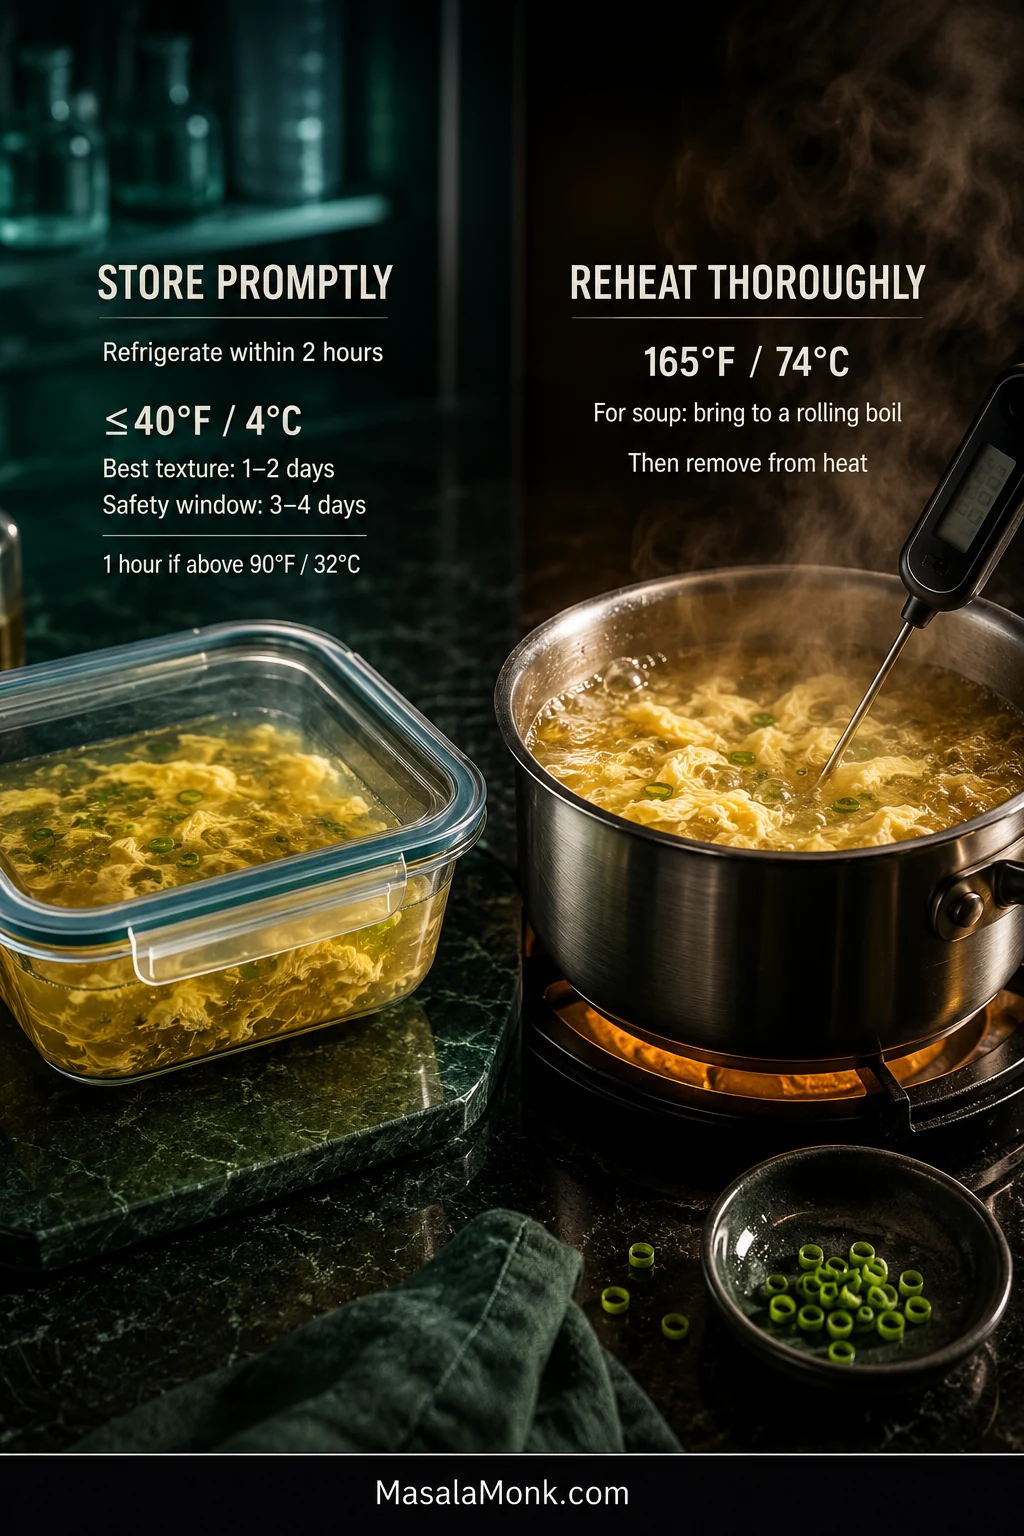
Covered shallow glass container of cooled egg drop soup beside a steaming saucepan being reheated, with storage temperatures, refrigeration timing, and 165°F or 74°C reheating guidance.
The shallow container is part of the method, not just storage. It helps leftovers cool more quickly and evenly; reheating then brings the soup back to serving temperature.

Can You Freeze It?

The seasoned broth base freezes better than the completed soup. Thaw and reheat the broth, then add fresh slurry and egg when you are ready to eat.


The best part of learning the egg pour is not making every ribbon look identical. It is knowing that a saucepan of broth and a couple of eggs can become that familiar steaming soup whenever you want it.

Some nights it is a starter before dinner. Some nights it is the whole point: something warm, savory, and comforting on the table in about 15 minutes.
Posted on — Leave a comment

Tinola Recipe: Filipino Chicken Tinola / Tinolang Manok with Papaya or Sayote

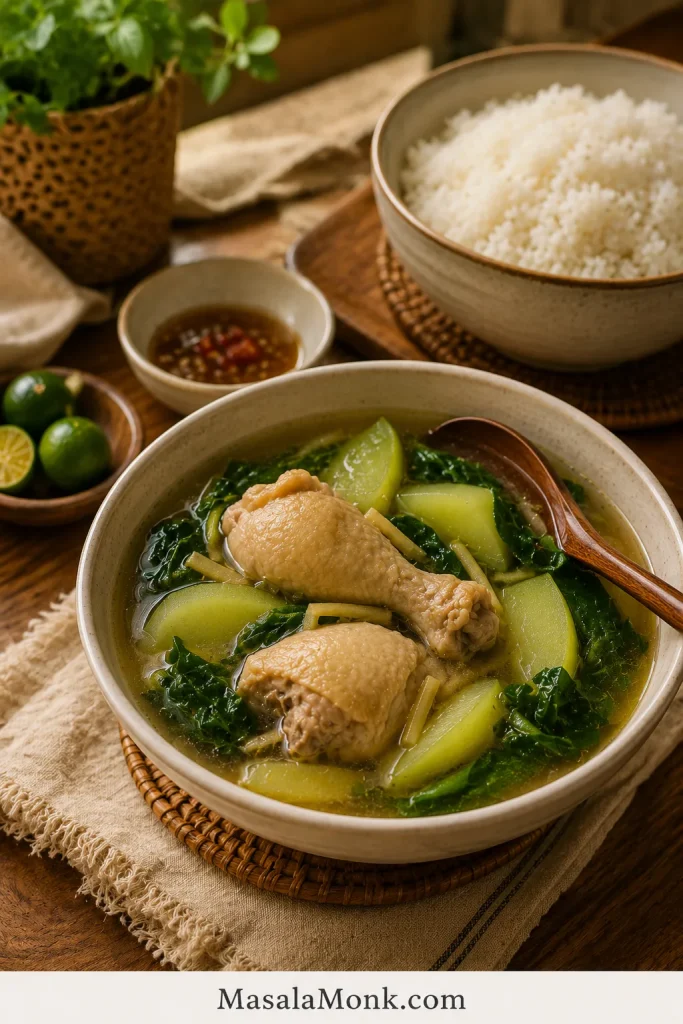
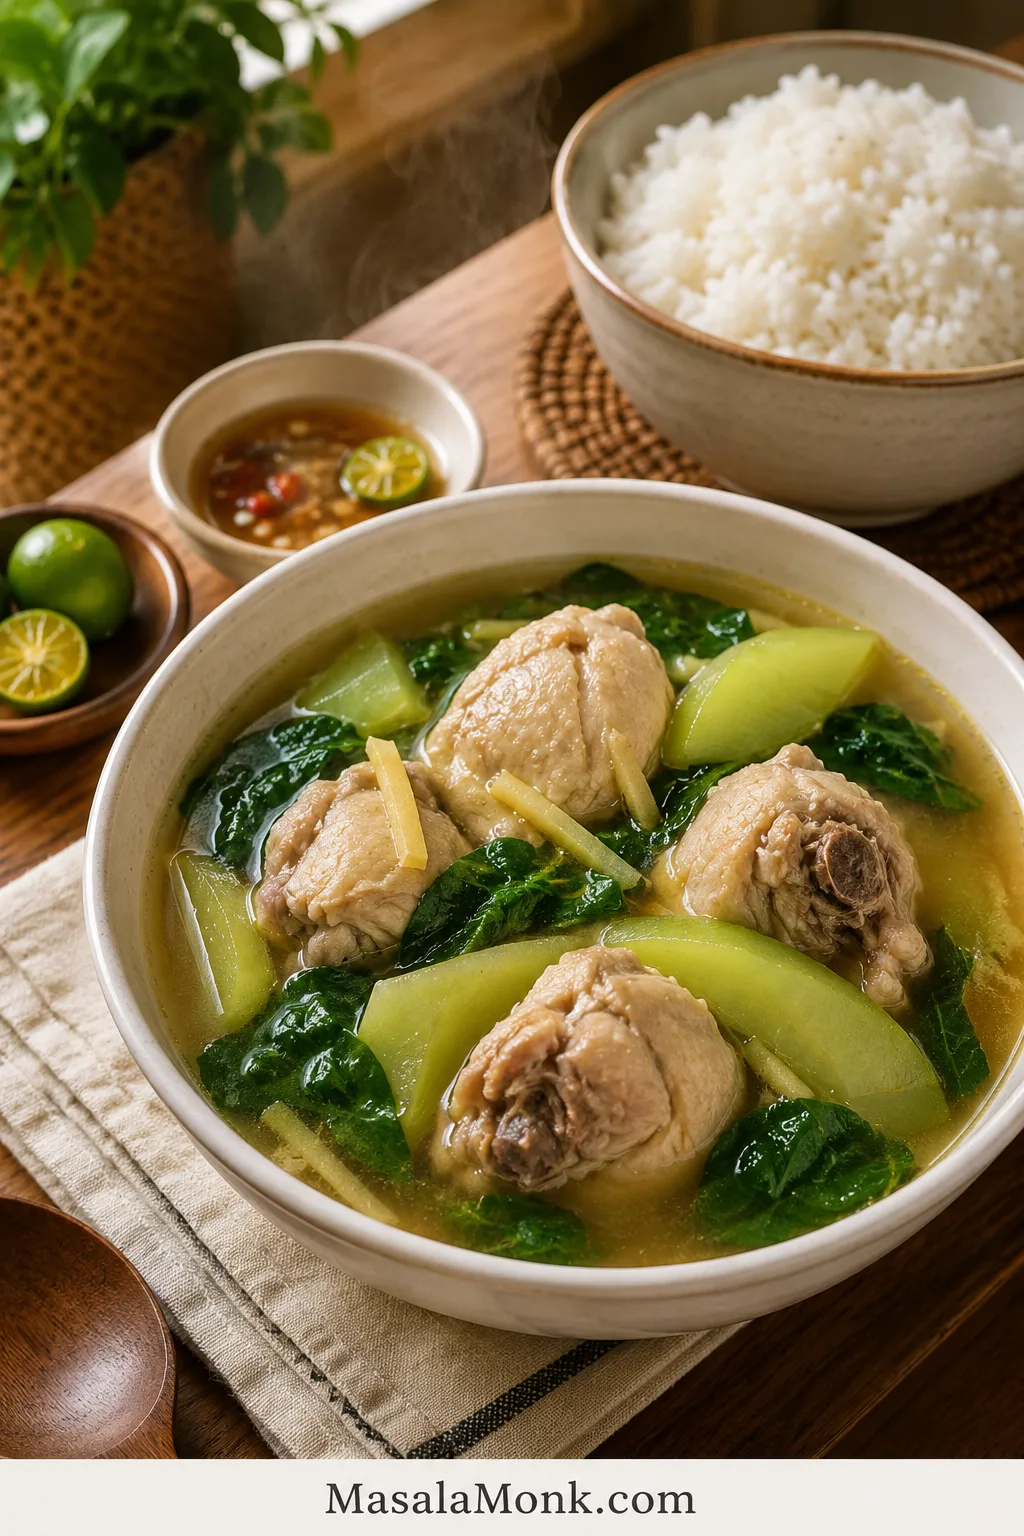
Bowl of Chicken Tinola with golden broth, bone-in chicken, green papaya or sayote wedges, leafy greens, steamed rice, calamansi, and dipping sauce.

Tinola is the kind of Filipino chicken soup that feels light and restorative, but still filling when poured over rice. In a good pot, the broth is clear, gingery, and savory, the chicken is tender, and the green papaya or sayote softens without falling apart.

It is the kind of soup that feels right when you want something gentle, but not empty — warm broth, tender chicken, fresh greens, and rice that soaks up every spoonful.

This Tinola recipe, also called Chicken Tinola or Tinolang Manok, is made with bone-in chicken, fresh ginger, garlic, onion, fish sauce, green papaya or sayote, and leafy greens like malunggay, dahon ng sili, spinach, or pechay.

This version keeps the flavor classic, but it also works in real kitchens: sayote if you cannot find green papaya, spinach if malunggay is not available, and clear timing cues so the soup tastes full instead of flat.

Most importantly, it is built around the two things that make or break Tinola: a broth that tastes gingery and full, not watery, and vegetables that turn tender without collapsing.

Quick Answer: What Is Tinola?

Tinola is a Filipino broth-based dish. The most common version is Tinolang Manok, which means Chicken Tinola. It is usually made with chicken, ginger, garlic, onion, fish sauce, green papaya or sayote, and leafy greens such as malunggay or dahon ng sili.

In English, Chicken Tinola is best described as a Filipino ginger chicken soup. It is usually eaten as a main dish with rice, not just as a starter soup.

  • Best chicken: bone-in thighs, drumsticks, wings, or mixed cuts.
  • Flavor base: fresh ginger, fish sauce, garlic, and onion.
  • Vegetable choice: green papaya for a softer classic feel, or sayote for a firmer bite.
  • Best greens: malunggay or dahon ng sili if available; spinach, pechay, or bok choy if not.
  • Best cooking cue: simmer gently until the chicken is tender and reaches 165°F / 74°C.

Make It Now

Have your chicken, ginger, and vegetables ready? Use this quick path, then follow the recipe card for exact amounts.

  1. Sauté ginger, garlic, and onion until fragrant.
  2. Add chicken and cook until the surface loses its raw color.
  3. Add fish sauce before the liquid so the chicken is seasoned early.
  4. Simmer gently until the chicken is tender.
  5. Add your chosen vegetable near the end, then finish with greens.

Classic but flexible: classic Tinola often means chicken, ginger, patis, green papaya, and malunggay or dahon ng sili. But Tinola is also a home dish, so many cooks use sayote when papaya is hard to find, spinach when malunggay is unavailable, and chicken broth or rice wash when the chicken needs a little help. The point is not to make the pot rigid; it is to keep the soup gingery, savory, clear, and good with rice.

A good pot of Tinola should feel simple, but not thin. The broth should taste like the chicken, ginger, and patis had time to become one thing, not like separate ingredients floating in hot water. That is why this recipe builds the flavor early and waits before adding the vegetables.

Save this Tinola rule: ginger early, patis before broth, chicken until tender, papaya or sayote late, greens last.

Tinola Recipe Card

Filipino Chicken Tinola / Tinolang Manok

This Chicken Tinola recipe keeps the two common problems away: watery broth and vegetables that fall apart before the chicken is tender. The chicken is seasoned early, the simmer stays gentle, and the vegetables go in when the meat is nearly ready.

Prep Time15 minutes
Cook Time45 minutes
Total Time1 hour
Servings4 to 6
MethodStovetop
CuisineFilipino
Main Equipment5 to 6 quart / 4.7 to 5.7 L pot or Dutch oven

Ingredients

  • 2 to 2 1/2 lb / 900 g to 1.1 kg bone-in chicken pieces, such as thighs, drumsticks, wings, or mixed cuts
  • 1 1/2 to 2 tablespoons neutral oil / 22 to 30 ml
  • 1 medium onion, sliced
  • 4 garlic cloves, minced or crushed
  • 45 to 60 g / 1 1/2 to 2 oz fresh ginger, sliced, julienned, or lightly smashed
  • 2 to 3 tablespoons fish sauce / patis / 30 to 45 ml, plus more to taste
  • 6 cups water, low-sodium chicken broth, or rice wash / 1.4 L
  • 350 to 500 g / 12 to 18 oz green papaya or sayote/chayote, peeled and cut into wedges. Remove seeds if using papaya.
  • 2 packed cups / 60 to 90 g malunggay, dahon ng sili, spinach, pechay, or bok choy
  • 1/2 teaspoon black pepper, plus more to taste
  • Salt, only if needed after tasting

Optional Ingredients

  • 1 chicken cube, only if using water and you want a stronger shortcut broth
  • Calamansi or lime, for serving
  • Fresh chili, for heat
  • Extra fish sauce, for serving
  • 1 stalk lemongrass, bruised, for a fragrant variation

Instructions

  1. Prep the chicken and vegetables. Cut the chicken into similar-sized pieces if needed. Peel your chosen vegetable. If using green papaya, remove the seeds. Cut the pieces into 1 1/2 to 2 inch wedges.
  2. Sauté the aromatics. Heat oil in a large pot over medium heat. Add onion, garlic, and ginger. Cook for 2 to 3 minutes, stirring often, until fragrant and softened. The pot should smell warm and clearly gingery.
  3. Add the chicken. Cook for 5 to 7 minutes, turning occasionally, until the chicken loses its raw color and begins to lightly brown on the surface.
  4. Season early. Add 2 tablespoons fish sauce and stir well. Cook for 1 to 2 minutes so the fish sauce coats the chicken and aromatics.
  5. Add liquid and skim. Pour in water, broth, or rice wash. Bring to a boil, then skim off foam or scum from the surface.
  6. Simmer gently. Lower the heat, cover partially, and simmer for 25 to 35 minutes, or until the chicken is tender and reaches 165°F / 74°C internally.
  7. Add the vegetables. Simmer for 5 to 12 minutes, depending on the size and firmness of the pieces, until fork-tender but not mushy.
  8. Finish with greens. Add malunggay, dahon ng sili, spinach, pechay, or bok choy. Cook for 1 to 2 minutes, or turn off the heat and cover until the greens wilt.
  9. Taste and serve. Adjust with more fish sauce, salt, black pepper, calamansi, or chili. Serve hot with steamed rice.

Recipe Notes

  • Bone-in thighs and drumsticks are the easiest choice if you want tender chicken and a fuller broth.
  • The pot should smell clearly of ginger before the liquid goes in.
  • Green papaya gives a softer, slightly sweet, more classic feel. Sayote stays firmer and fresher.
  • Delicate greens need only enough heat to wilt. Fold them in at the end so they stay bright.
  • A chicken cube can rescue a weak pot, especially if you are using plain water or lean chicken. Start with less fish sauce if you add one, then adjust at the end.

What Good Tinola Should Taste Like

A good bowl of Tinola tastes light, gingery, savory, and balanced. The soup is not heavy, but it has enough seasoning and chicken flavor to make you want to spoon it over rice.

The easiest test is the rice: spoon a little broth over hot rice. If it tastes warm, gingery, and savory without needing rescue, the pot is ready.

  • Ginger tastes noticeable, warm, and fresh.
  • Fish sauce gives depth without making the soup taste fishy.
  • Chicken turns tender, especially near the bone.
  • Green papaya softens more; sayote keeps a slightly firmer bite.
  • The greens taste fresh, not dull or overcooked.

Why This Tinola Recipe Works

This recipe is built to solve two common Tinola problems: broth that tastes watery and vegetables that turn mushy. The fix is not complicated. Start the flavor before the liquid goes in, simmer the chicken gently, then add the pieces only when the meat is nearly tender.

  • The flavor starts before the broth. Ginger, garlic, and onion cook in oil first so the soup has a warm aromatic base.
  • Fish sauce seasons the chicken early. Salt can season Tinola, but patis gives the broth its rounded, savory depth.
  • The simmer stays gentle. A steady simmer helps the chicken turn tender without making the liquid rough or cloudy.
  • The vegetables go in late. Do not add them just because the broth is boiling. Add them when the chicken is already nearly tender.
  • The greens stay fresh. Finish with them at the end so the soup keeps a bright green finish.

The simple idea: build flavor before the broth, wait for the chicken to turn tender, then add the vegetables and greens in stages. That is the difference between flat Tinola and a bowl you want to spoon over rice.

The rule below is the whole Tinola method in one glance: build ginger and patis early, give the chicken time, then protect the vegetables and greens at the end.

Five-step Chicken Tinola cooking rule showing ginger early, patis before broth, chicken until tender, vegetables late, and greens last.
Follow this Tinola order to build flavor and protect texture: ginger early, patis before broth, chicken until tender, vegetables late, and greens last.

Ingredients Explained

Think of the ingredients in layers: ginger for warmth, chicken for body, fish sauce for depth, papaya or sayote for texture, and greens for freshness. Once those layers make sense, the recipe becomes much easier to adjust without losing what makes Tinola taste like Tinola.

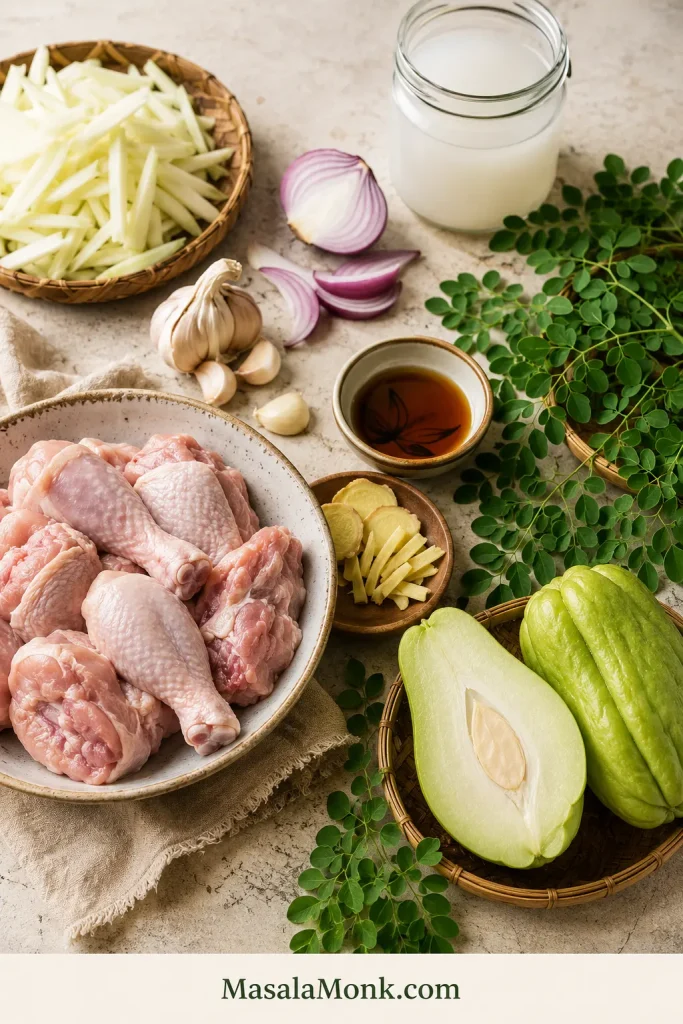
Chicken Tinola ingredients on a board, including bone-in chicken, ginger, garlic, onion, fish sauce, green papaya, sayote, malunggay leaves, and rice wash.
These Tinola ingredients each have a job: chicken gives body, ginger brings warmth, patis adds savory depth, and papaya or sayote gives the soup its gentle bite.

Chicken

Bone-in chicken gives Tinola the kind of body that plain water cannot create on its own. Thighs, drumsticks, wings, or a whole chicken cut into serving pieces all work well.

Boneless thighs can work if you want a faster version, but the broth will be lighter. Chicken breast is lean, but it can dry out if boiled hard or cooked too long. Use a gentle simmer and check it earlier if breast meat is what you have.

Ginger

Ginger is the backbone of Tinola. A small token slice is not enough. Use about 45 to 60 g / 1 1/2 to 2 oz fresh ginger for a full pot. Slice it, julienne it, or lightly smash it so it releases flavor into the oil and broth.

When the ginger hits the oil, the pot should smell sharp, warm, and awake. A weak aroma usually means the final broth will taste weak too. If the ginger feels shy, the Tinola will too.

Garlic and Onion

Garlic and onion round out the ginger. Cook them just until fragrant and softened before the chicken goes in; they do not need to brown deeply.

Fish Sauce / Patis

Fish sauce is where the broth starts getting its backbone. Let it hit the hot pot before the water goes in, and it seasons the chicken instead of just floating salty on top later.

Give it a minute in the hot pot so the sharp edge cooks off and the soup starts with depth instead of last-minute saltiness.

Water, Chicken Broth, or Rice Wash

Water works well if you use bone-in chicken, enough ginger, and proper seasoning. Low-sodium chicken broth gives a stronger shortcut flavor. Rice wash, sometimes called hugas bigas, gives the soup a little more body and a softer feel.

If using rice wash, use the second rinse rather than the first. The second rinse is usually cleaner while still giving the soup a little body. Use rice wash when you want a softer, slightly fuller broth; use water or low-sodium broth when you want a cleaner, lighter-tasting pot.

A chicken cube can rescue a weak pot, especially if you are using plain water or lean chicken. Use it if you need it, but let ginger, chicken, and fish sauce do most of the work.

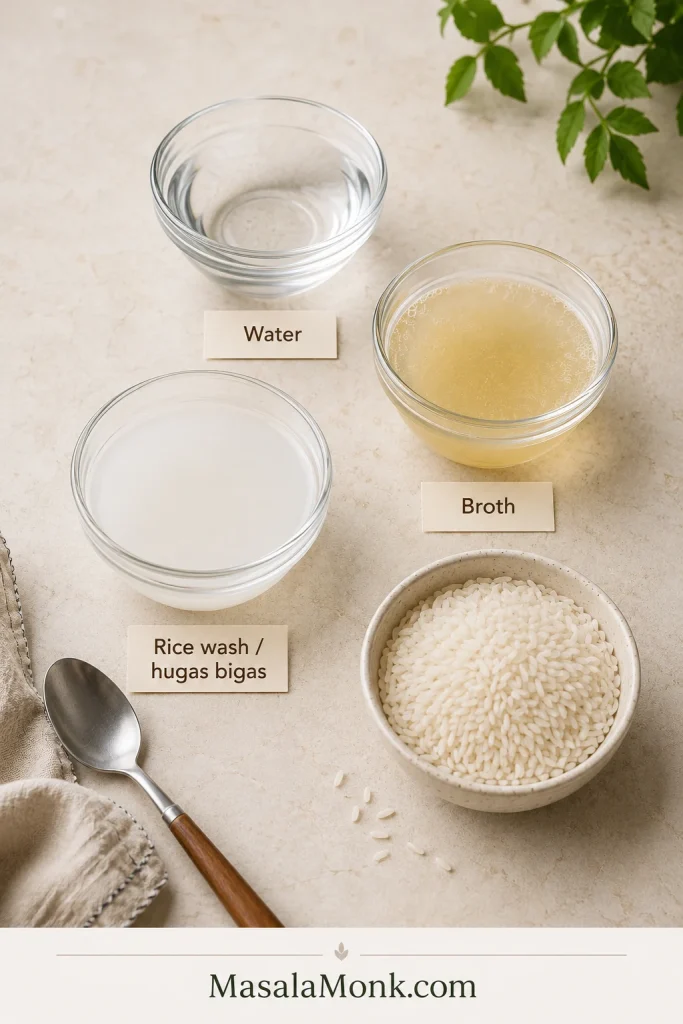
Three bowls labeled water, broth, and rice wash or hugas bigas, with uncooked rice nearby for making Chicken Tinola.
Rice wash, or hugas bigas, gives Tinola a softer body; meanwhile, plain water keeps it light, and broth adds shortcut depth.

Green Papaya or Sayote

Green papaya and sayote are both common in Tinola. Papaya becomes softer and slightly sweet, while sayote, also called chayote, stays firmer with a milder, fresher flavor.

Use the one your market gives you. Tinola is forgiving as long as the broth is gingery and the vegetable goes in at the right time.

Leafy Greens

Malunggay and dahon ng sili are classic Tinola greens. Spinach, pechay, and bok choy are practical substitutes. The exact leaf matters less than the timing.

Add something green and fresh at the end, then stop before the leaves lose their brightness.

Shopping Tip

Filipino markets may have the classic leaves and green papaya. At a regular supermarket, sayote/chayote and spinach can still get you a good, comforting pot.

Best Chicken Cuts for Tinola

The chicken cut matters because Tinola is not only about the meat — it is also about what the meat gives back to the pot.

Bone-in thighs, drumsticks, wings, or mixed cuts are the most forgiving choices for this soup because they can simmer without drying out.

Chicken CutBest ForNotes
Bone-in thighsBest flavor and tendernessThe easiest all-round choice.
DrumsticksBudget-friendly family mealsEasy to serve and good for broth.
WingsExtra collagen and bodyGreat mixed with thighs or drumsticks.
Whole chicken, cut upTraditional family-style potGives different textures in one soup.
Boneless thighsFaster weeknight versionLess broth depth, but still flavorful.
Chicken breastLean versionCan dry out; simmer gently and avoid overcooking.

Chicken should reach 165°F / 74°C internally. FoodSafety.gov lists 165°F / 74°C as the safe minimum internal temperature for chicken, turkey, and other poultry. See the safe minimum internal temperature chart.

Best all-round choice: use bone-in thighs and drumsticks. They give the soup enough flavor, cook evenly, and stay tender even if the pot simmers a little longer.

If you bought a larger pack of thighs and want a dry, crispy dinner another night, this air fryer chicken thighs recipe uses the same reliable cut in a completely different way.

Green Papaya vs Sayote

For many cooks, the first big choice is green papaya or sayote.

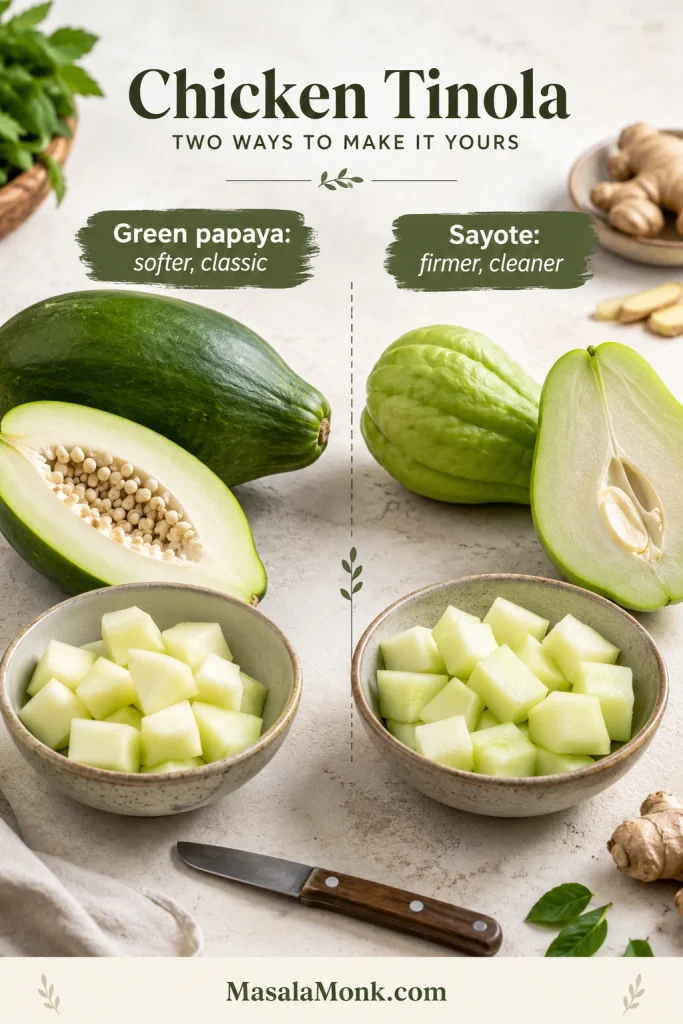
Green papaya gives the bowl a softer, more classic feel. Sayote keeps a firmer, cleaner bite. Neither one ruins the dish, so choose based on what you can find and what texture you like.

Green papaya and sayote shown side by side with whole and cut pieces for comparing vegetables used in Chicken Tinola.
Green papaya makes Tinola softer and more classic, while sayote stays firmer, cleaner, and easier to find in many markets.
OptionTextureFlavorBest For
Green papayaSoft-tender and absorbs brothMild, slightly sweetA more classic Tinola feel
Sayote / chayoteFirmer and cleanerMild, fresh, neutralEasy supermarket version
Semi-ripe papayaSofter and sweeterNoticeably sweetUse only if you intentionally want a sweeter soup
UpoSoft and wateryDelicateAvailable substitute
KalabasaCreamier and sweeterRicher, less classicA variation, not the default
Labanos / daikonFirm and slightly pepperySharperWorks in a pinch

If you want a clearer, more ginger-forward bowl, sayote is a very good choice. For the softer texture many people associate with Tinola, use green papaya.

If you buy a whole green papaya and have extra left after Tinola, you can use it in a fresh salad like this raw papaya salad.

Cut whichever one you use into wedges large enough to hold their shape. Add the pieces only after the chicken is nearly tender. If they go in too early, they can turn mushy before the chicken is done.

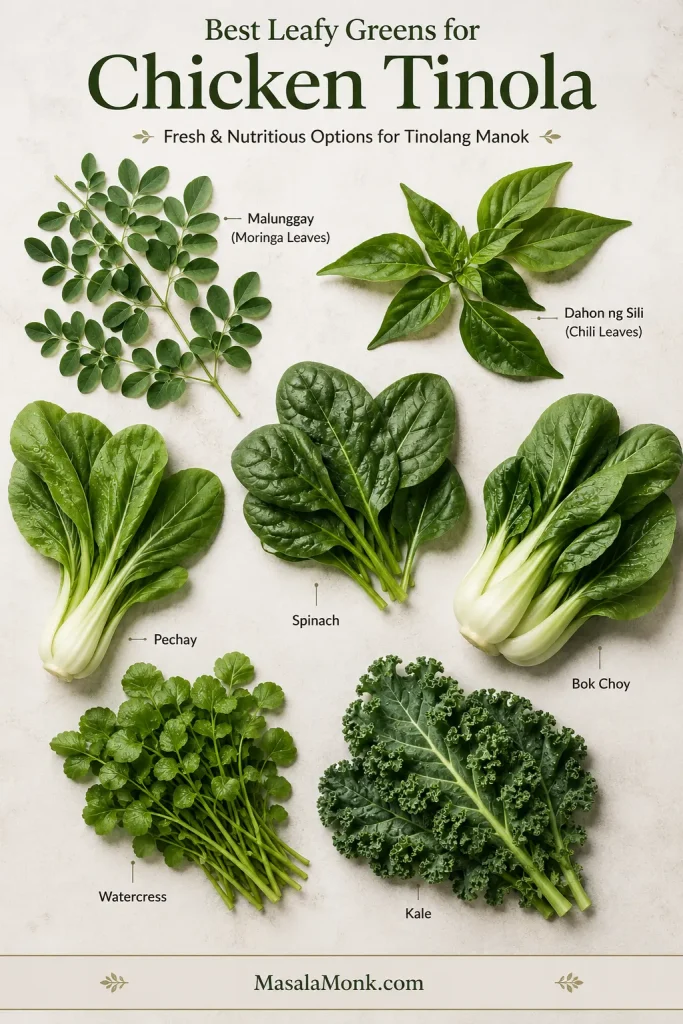
Tinola Greens: Malunggay, Dahon ng Sili, Spinach, Pechay, or Bok Choy

Traditional Tinola often uses malunggay or dahon ng sili. Outside the Philippines, those can be harder to find. Spinach, pechay, bok choy, or watercress will not make the soup wrong — they simply make it more practical for your kitchen.

Labeled guide board of Tinola greens, including malunggay, dahon ng sili, spinach, pechay, bok choy, watercress, and kale.
Malunggay and dahon ng sili are classic Tinola greens; however, spinach, pechay, bok choy, watercress, or kale can still work when timed well.
GreenTraditional?FlavorHow to Add
Malunggay / moringaYesEarthy, green, slightly bitterLast 1 to 2 minutes
Dahon ng sili / chili leavesYesMildly pepperyLast 1 to 2 minutes
SpinachSubstituteSoft and mildOff heat or last 1 minute
Pechay / bok choySubstituteMild with more bodyStems first, leaves last
KaleSubstituteStronger and chewierSimmer 2 to 4 minutes
WatercressSubstitutePeppery and freshLast minute

Do not add delicate greens too early. The leaves should still look alive, not dull. If you are using bok choy or pechay, add the thicker stems first and the leaves later. With spinach, turn off the heat and let the leaves wilt gently.

Equipment and Pot Size

Tinola is a simple one-pot soup, but the pot still matters. Use a pot wide enough that the chicken can sit in the aromatics before the liquid goes in. If the pot is too crowded, the chicken steams instead of picking up flavor from the ginger, garlic, onion, and fish sauce.

  • 5 to 6 quart / 4.7 to 5.7 L pot or Dutch oven: roomy enough for bone-in chicken, broth, papaya or sayote, and greens without boiling over.
  • Wide spoon or ladle: useful for skimming foam, scum, and extra oil from the surface.
  • Tongs: helpful for turning chicken pieces while they cook with the aromatics.
  • Instant-read thermometer: the most reliable way to check that chicken reaches 165°F / 74°C.

A smaller pot can still work, but keep the simmer gentle and watch the liquid level once the vegetables go in.

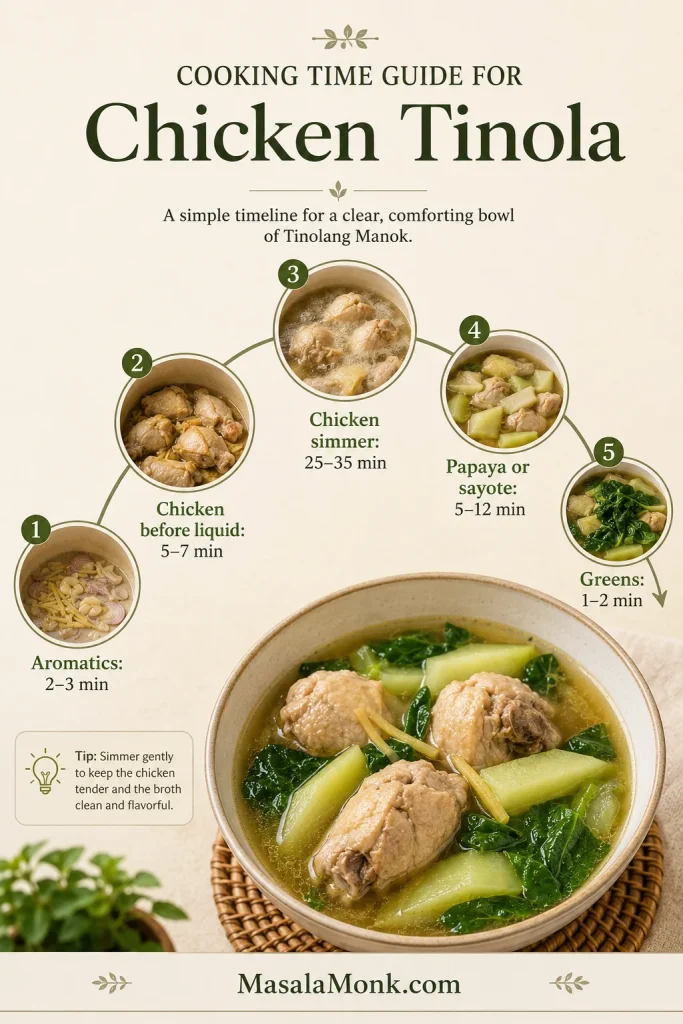
Cooking Time by Stage

Tinola is simple, but timing decides whether the bowl tastes clean and tender or flat and overcooked.

Cooking time guide for Chicken Tinola showing aromatics for 2 to 3 minutes, chicken before liquid for 5 to 7 minutes, chicken simmer for 25 to 35 minutes, papaya or sayote for 5 to 12 minutes, and greens for 1 to 2 minutes.
Good Tinola is mostly timing: aromatics first, chicken long enough to tenderize, vegetables near the end, and greens for the final minute.
StageApproximate TimeWhat to look for
Sauté ginger, garlic, and onion2 to 3 minutesAromatics smell warm, sharp, and fragrant.
Cook chicken before liquid5 to 7 minutesChicken loses raw color and lightly browns on the surface.
Fish sauce with chicken1 to 2 minutesFish sauce coats the chicken and smells savory.
Chicken simmer25 to 35 minutesChicken is tender and reaches 165°F / 74°C.
Papaya or sayote5 to 12 minutesPieces are fork-tender but still hold shape.
Leafy greens1 to 2 minutesLeaves are just wilted and still fresh-tasting.

Timing note: in most home pots, bone-in thighs and drumsticks begin turning tender around 30 minutes after the broth starts simmering. Sayote often softens faster than thick green papaya wedges, so start checking the vegetables at 5 minutes. Spinach wilts best off heat, while pechay and bok choy work better when the stems go in before the leaves.

Native chicken or very large bone-in pieces may need more time before the vegetables go in. Wait until the meat is already turning tender, or the pieces may overcook before the chicken is ready.

Back to top ↑

Step-by-Step Tinola Method

Once the aromatics are fragrant, the rest of the soup is mostly about patience: simmer the chicken gently, then add the vegetables when the meat is nearly tender.

1. Prep the Chicken and Vegetables

Pat the chicken dry if it is very wet. If the pieces are very uneven, cut larger pieces down so they cook more evenly.

Peel the green papaya or sayote. If using green papaya, remove the seeds. Cut the vegetable into 1 1/2 to 2 inch wedges so the pieces can simmer without falling apart.

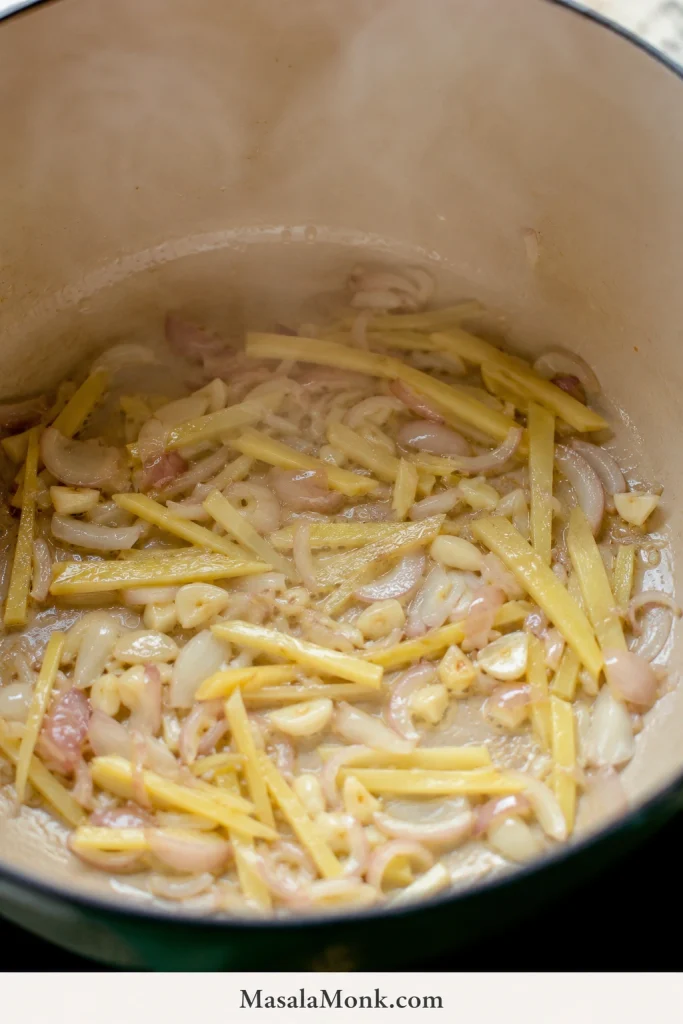
2. Sauté Ginger, Garlic, and Onion

Heat oil in a large pot over medium heat. Add the onion, garlic, and ginger. Cook for 2 to 3 minutes, stirring often.

The aromatics should smell warm, sharp, and fragrant. This is where the soup starts becoming Tinola, so do not rush past the ginger.

Sliced ginger, garlic, and onion sautéing in oil inside a pot for Chicken Tinola.
Start with ginger, garlic, and onion before adding water; as a result, the broth begins with aroma instead of tasting flat later.

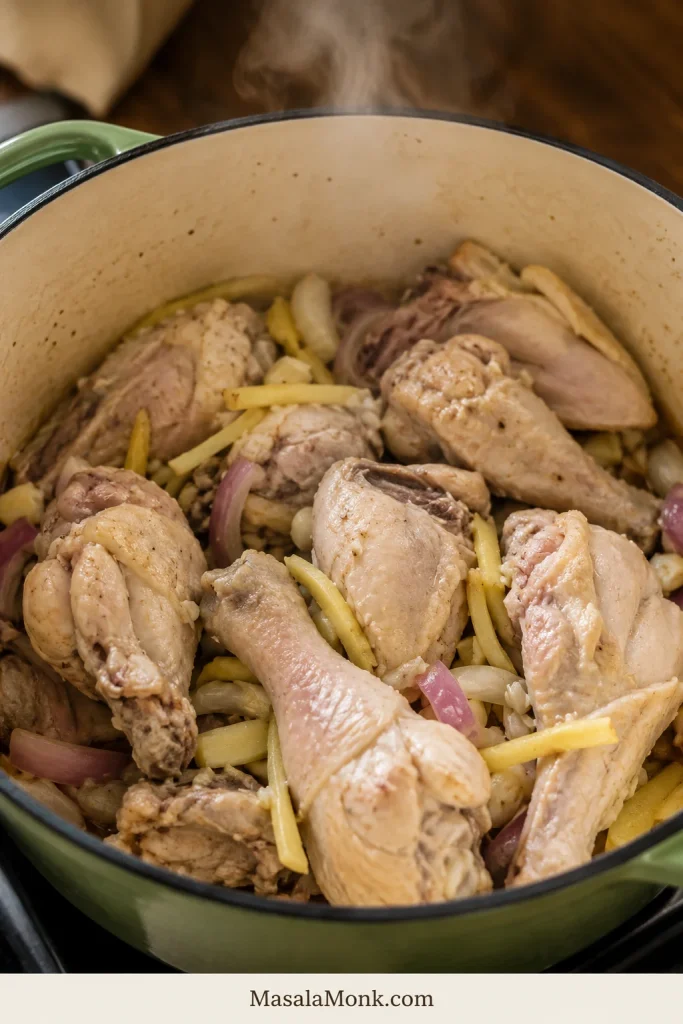
3. Add the Chicken and Lightly Brown It

Add the chicken pieces to the pot. Cook for 5 to 7 minutes, turning occasionally. The chicken does not need a deep brown crust, but the surface needs to lose its raw color and pick up some flavor from the aromatics.

This step gives the soup more depth than simply boiling raw chicken in water.

Bone-in chicken pieces cooking with sliced ginger, garlic, and onion in a pot before broth is added.
Cooking chicken with ginger and aromatics before the liquid goes in helps the meat season early and gives Tinola a fuller broth.

4. Add Fish Sauce Early

Add 2 tablespoons fish sauce and stir well. Let it cook with the chicken for 1 to 2 minutes before adding the liquid.

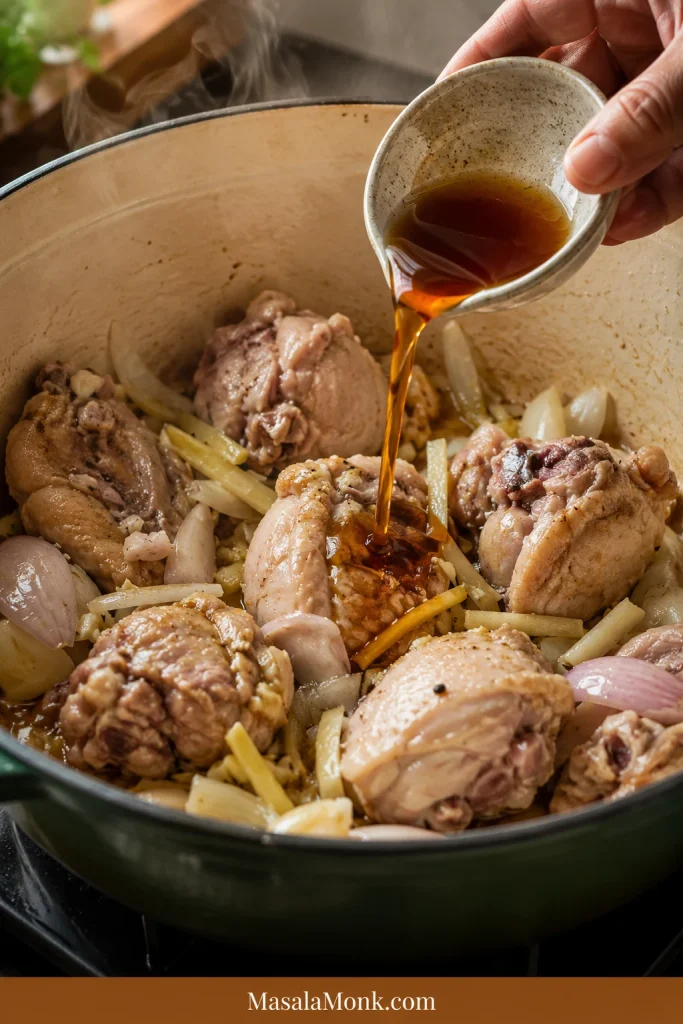
This gives the meat and aromatics a savory base. You can always add more fish sauce at the end, but adding some early helps the flavor cook into the soup instead of sitting only on the surface.

Fish sauce being poured into a pot with bone-in chicken, ginger, garlic, and onion before any broth is added.
Add patis before the broth, not after everything is diluted; this lets the chicken and aromatics absorb savory depth from the start.

5. Add Liquid, Boil, and Skim

Pour in 6 cups water, chicken broth, or rice wash. Bring the pot to a boil. As foam rises, skim it off with a wide spoon or ladle.

Skimming at this stage keeps the liquid clearer. It is much easier to remove foam before the vegetables and greens go in.

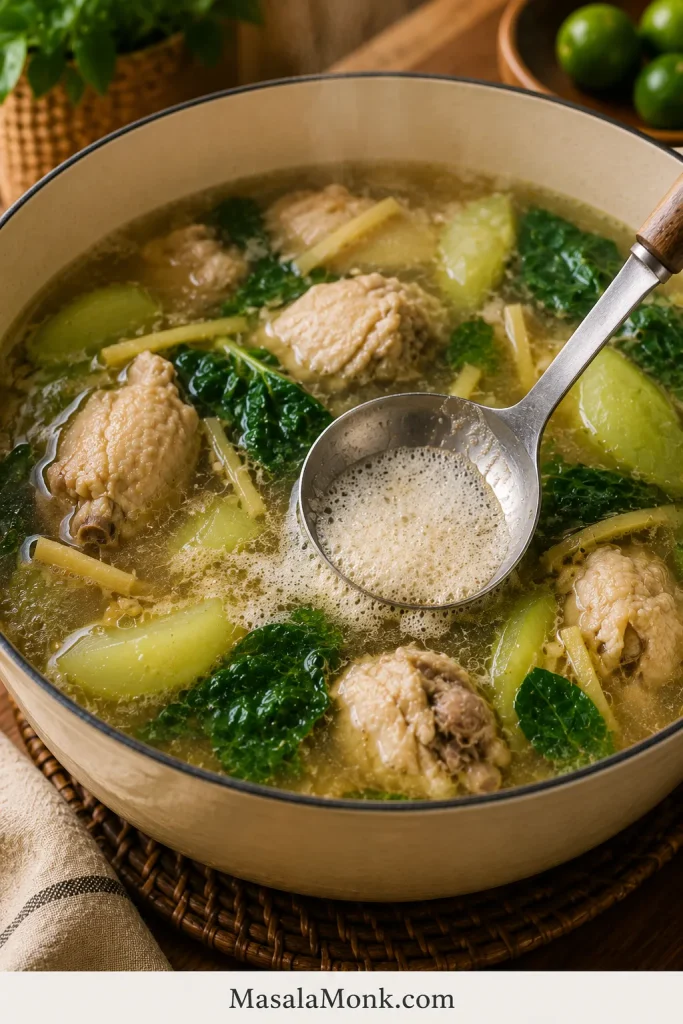
Ladle skimming foam from the surface of Chicken Tinola broth with chicken, ginger, greens, and vegetable pieces in the pot.
Skim the foam after the first boil, then lower the heat; this keeps Tinola broth cleaner without overworking the chicken.

6. Simmer Until the Chicken Is Tender

Lower the heat to a gentle simmer. Cover the pot partially and cook for 25 to 35 minutes, or until the chicken is tender and reaches 165°F / 74°C internally.

The chicken should feel tender near the bone. Avoid a hard boil. A rough boil can make the broth cloudy and the chicken tougher.

7. Add Green Papaya or Sayote

Add the green papaya or sayote once the chicken is nearly tender. Do not add them just because the broth is boiling; wait until the meat has already started giving flavor back to the pot. Simmer for 5 to 12 minutes, depending on how large and firm the pieces are.

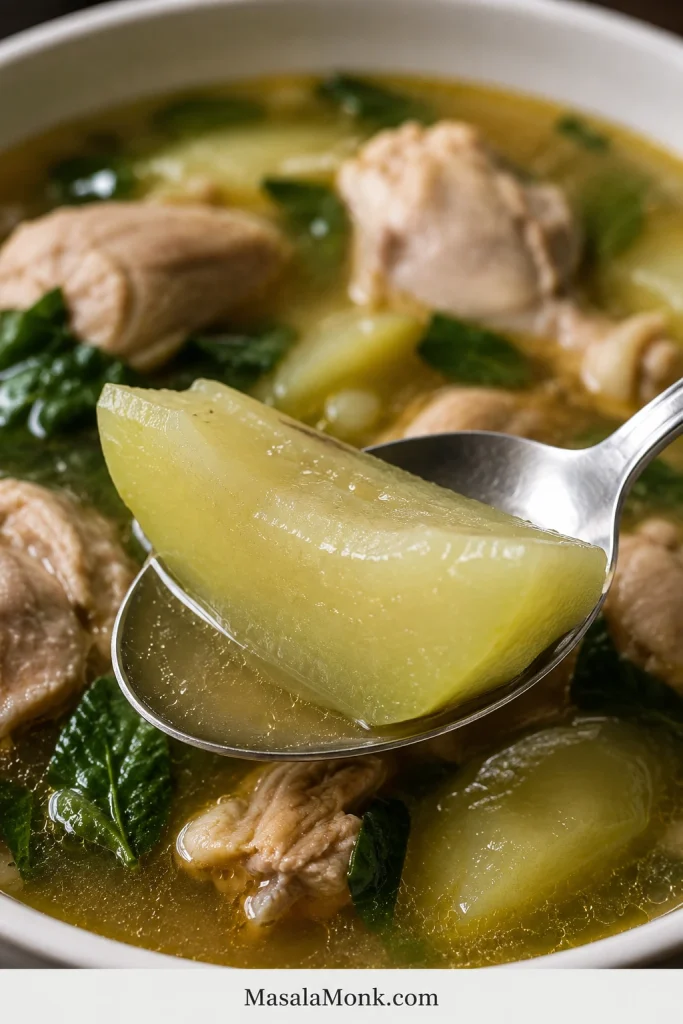
Look for tender edges with enough firmness in the center that the wedges do not collapse in the bowl. If they start breaking apart, they have gone too far.

Spoon lifting an intact green papaya or sayote wedge from Chicken Tinola broth, with chicken and greens in the background.
Add papaya or sayote near the end so the edges soften while the pieces still hold their shape in the bowl.

8. Add the Greens at the End

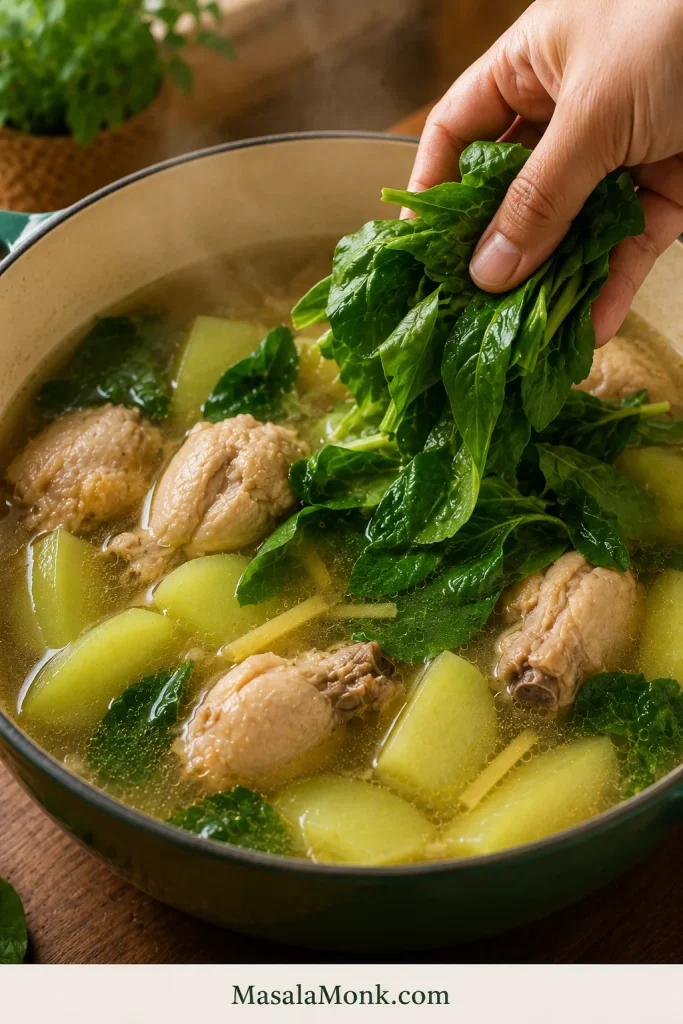
Add malunggay, dahon ng sili, spinach, pechay, or bok choy near the end. Delicate leaves need only 1 to 2 minutes. Spinach can often be added off heat and covered until wilted.

Pull them off the heat while they are still bright and just wilted. If they look dull and tired, they have cooked too long.

Hand adding fresh leafy greens to a pot of Chicken Tinola with broth, chicken pieces, and green vegetable wedges.
Greens go in last because they only need enough heat to wilt; that way, Chicken Tinola stays fresh, bright, and not overcooked.

9. Taste and Serve

Taste the soup before serving. Adjust with more fish sauce, salt, black pepper, calamansi, or chili.

The test is the rice: spoon a little broth over hot rice. If it tastes warm, gingery, and savory without needing rescue, the pot is ready. The broth can taste a touch stronger from the spoon than it does in the bowl, because rice softens everything.

Timing cue: add the vegetables after the chicken is mostly tender, not at the beginning. That one choice keeps the pieces from collapsing before the chicken is done.

Fix Bland Tinola Broth

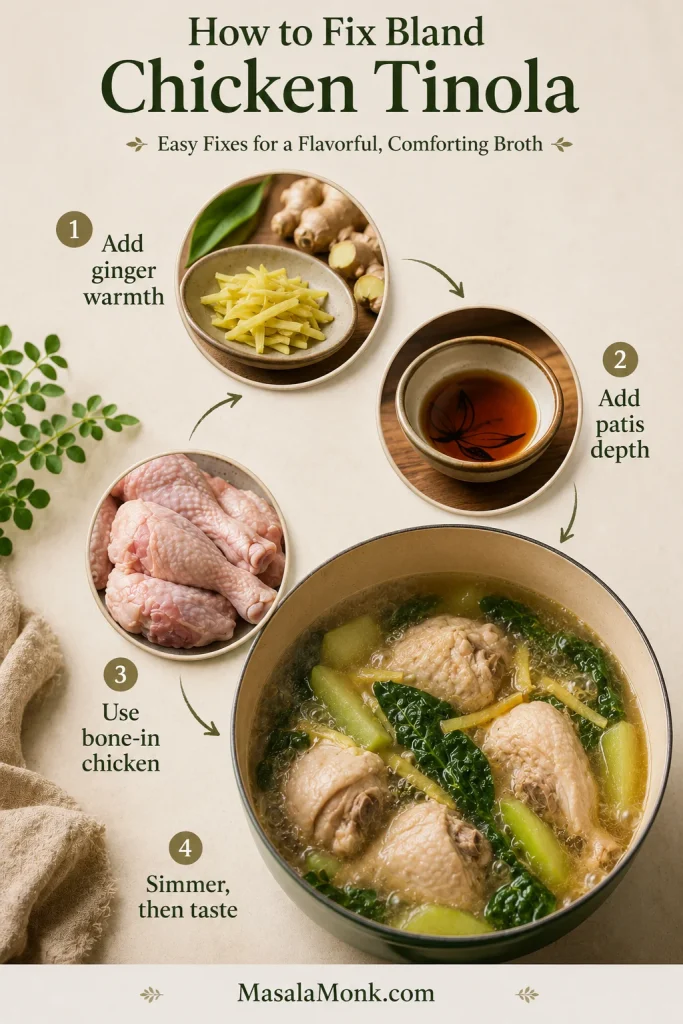
Bland Tinola is frustrating because it can look right before it tastes right — clear broth, chicken, greens, rice — but the spoonful feels empty.

It usually means one of four things: not enough ginger, not enough fish sauce, weak boneless chicken, or too much liquid without final seasoning.

The fix is usually not more salt alone. Tinola needs ginger warmth, chicken flavor, fish sauce depth, and a final taste before serving.

Troubleshooting guide for bland Chicken Tinola broth with ginger, fish sauce, bone-in chicken, and a simmering pot.
When Chicken Tinola tastes thin, fix the base first: strengthen the ginger, deepen with patis, simmer the chicken properly, then taste again.
  • Use bone-in chicken. It gives the broth more body than boneless breast.
  • Use enough fresh ginger. Tinola should smell warm and gingery before the liquid even goes in.
  • Sauté the aromatics first. Do not just boil everything together from the start.
  • Add fish sauce before simmering. Let it coat the chicken and aromatics.
  • Simmer gently. This keeps the chicken tender and the soup balanced.
  • Skim foam and extra oil. This improves both flavor and appearance.
  • Taste at the end. The soup may need more patis, salt, pepper, calamansi, or chili.

If your Tinola has ever tasted like hot water with chicken in it, start with ginger and patis before reaching for more salt. A few extra minutes of gentle simmering can also help the chicken give more back to the pot.

Fast fix for bland Tinola: simmer a few fresh ginger slices in the broth for 5 minutes, add a small splash of fish sauce, then taste again. If the soup still feels thin, let it simmer uncovered for a few minutes to concentrate slightly.

Keep Tinola Broth Clear

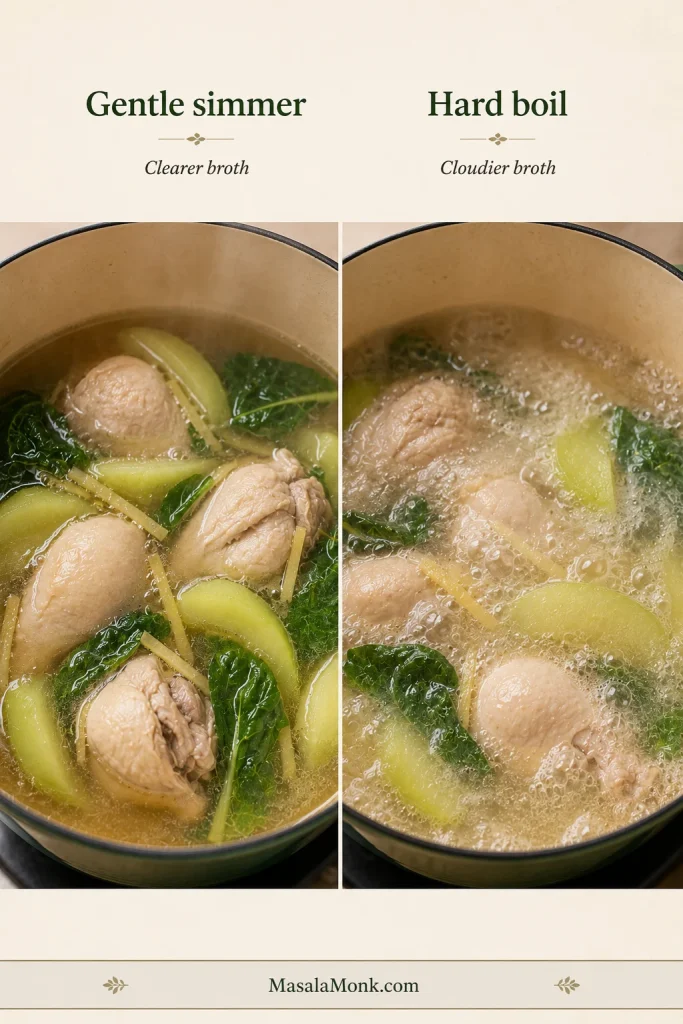
Clear Tinola broth comes from gentle cooking and good timing. Bring the liquid to a boil first, then skim off the foam or scum that rises to the surface. After that, lower the heat to a gentle simmer.

Comparison graphic showing gentle simmer with clearer Chicken Tinola broth beside hard boil with cloudier broth and stronger bubbling.
A gentle simmer keeps Tinola calmer and clearer; by contrast, a hard boil can make the broth cloudy and the chicken tougher.
  • Boil first, then skim. Remove foam while the surface is still easy to see.
  • Lower the heat after skimming. A gentle simmer keeps the broth calmer.
  • Use a wide spoon or ladle. It is easier to lift off scum and extra oil without stirring everything back in.
  • Finish with greens at the end. Delicate leaves stay brighter when they are not boiled for long.
  • Avoid hard boiling the chicken. Rough heat can make the liquid cloudy and the meat tougher.
  • Stop stirring aggressively once foam rises. Let it collect on the surface so you can skim it cleanly.
  • Pull delicate leaves before they turn dull. Fresh-looking greens make the whole bowl feel cleaner.

A home pot of Tinola does not need restaurant-perfect clarity. Skim what you can, keep the simmer gentle, and focus on a broth that tastes balanced and aromatic.

Tinola Ingredients in Tagalog and English

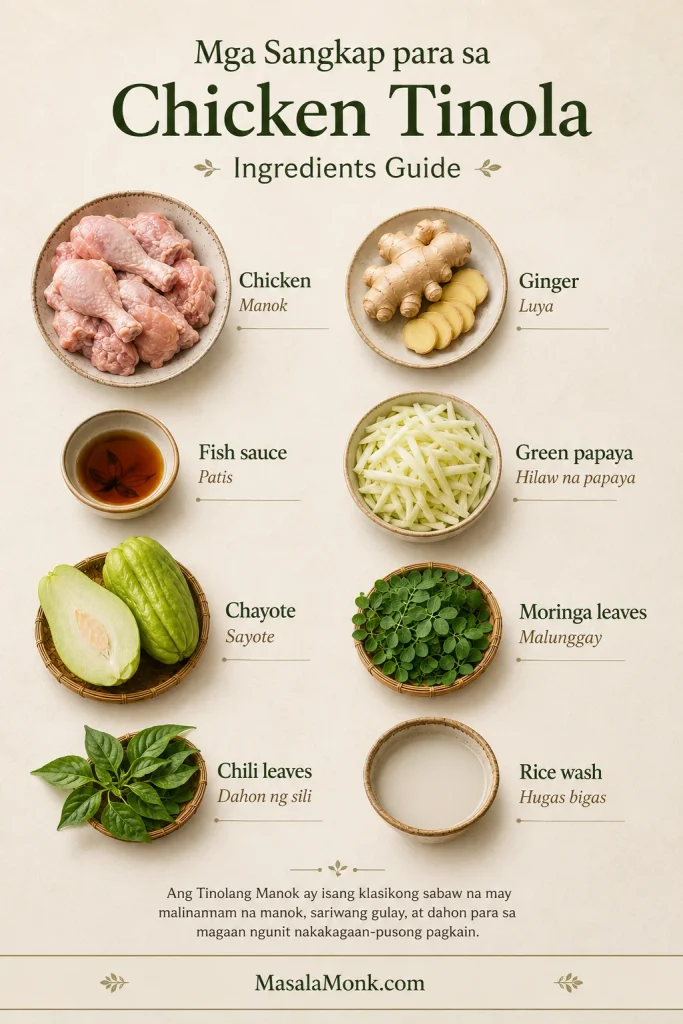
Tinola recipes often move between English, Tagalog, and market names, especially when you are shopping outside the Philippines. If you are shopping at a Filipino market, reading a family recipe, or watching a Tagalog cooking video, these are the ingredient names you are most likely to see.

Tagalog-English ingredient guide for Chicken Tinola showing chicken as manok, ginger as luya, fish sauce as patis, green papaya as hilaw na papaya, chayote as sayote, moringa leaves as malunggay, chili leaves as dahon ng sili, and rice wash as hugas bigas.
This Tagalog-English Tinola guide makes shopping and recipe reading easier, especially for manok, luya, patis, sayote, malunggay, and hugas bigas.
EnglishFilipino / Common Name
ChickenManok
GingerLuya
GarlicBawang
OnionSibuyas
Fish saucePatis
Green papayaHilaw na papaya
ChayoteSayote
Moringa leavesMalunggay
Chili leavesDahon ng sili
Rice washHugas bigas
Black pepperPaminta

A short Tagalog-style procedure would be:

Paano lutuin: igisa ang luya, bawang, sibuyas at manok; lagyan ng patis; pakuluan hanggang lumambot; idagdag ang papaya o sayote; tapusin sa malunggay o dahon ng sili.

In English: sauté ginger, garlic, onion, and chicken; season with fish sauce; simmer until tender; add papaya or sayote; finish with malunggay or chili leaves.

Serving Suggestions

Tinola is usually served as a main dish with steamed rice. The broth is often spooned over rice, so it needs enough flavor to carry the meal.

  • Steamed white rice
  • Extra fish sauce / patis on the side
  • Calamansi or lime
  • Fresh chili
  • Black pepper
  • A small dipping sauce of patis and calamansi

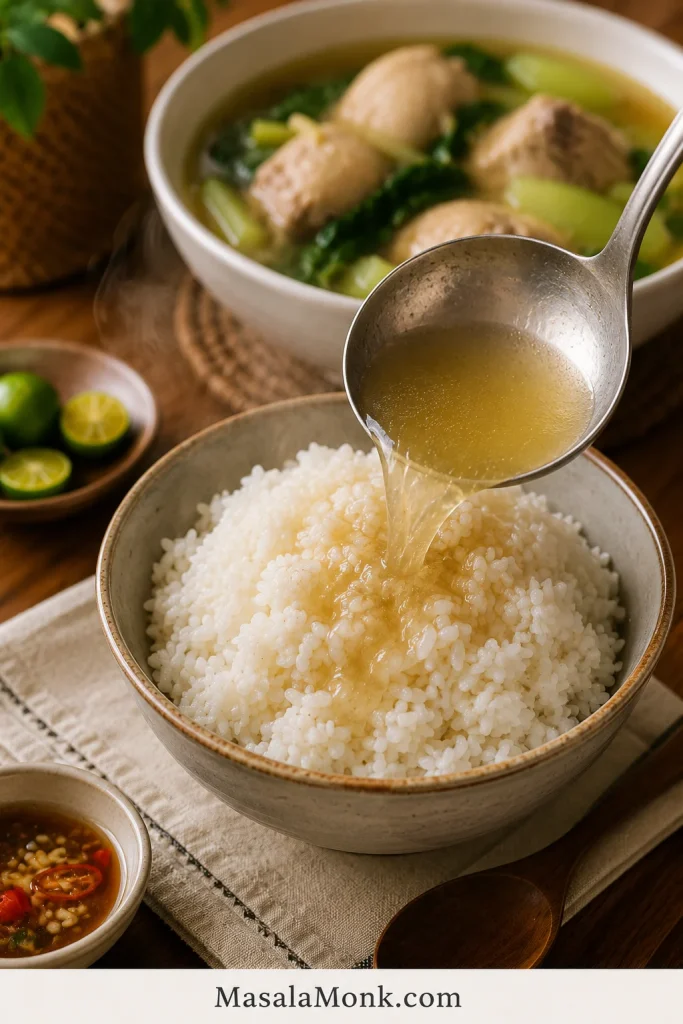
The broth does not need to taste salty by itself; it needs to wake up when it hits hot rice. If the soup tastes slightly strong alone but perfect over rice, you are in the right zone.

Golden Chicken Tinola broth being poured from a ladle over steamed white rice, with a bowl of Tinola in the background.
The rice test is simple: once the broth touches hot rice, it should taste rounded, savory, and alive — not weak or watery.

For another Filipino chicken classic, make Chicken Adobo on a different night. Adobo is darker, tangier, and braised, while Tinola is lighter, gingery, and broth-based.

For a Filipino vegetable dish that also belongs with rice, try Pinakbet Tagalog, a savory mix of tender vegetables and bagoong.

Tinola is especially good when you want something warm, light, and restorative. It is the kind of soup that feels gentle but still satisfying.

Storage, Freezing, and Reheating

Let leftover Tinola cool, then transfer it to an airtight container and refrigerate within 2 hours.

  • Refrigerator: store for up to 3 days.
  • Freezer: freeze the chicken and broth if needed, but expect the vegetables and greens to soften after thawing.
  • Best texture: freeze without the greens, then add fresh spinach, malunggay, pechay, or bok choy when reheating.
  • Reheating: warm gently on the stovetop until hot throughout. Reheated chicken should reach 165°F / 74°C.

Green papaya and sayote can soften after freezing, so expect a gentler texture if you freeze the finished soup.

Tinola Variations

Once the basic ginger broth method makes sense, you can adjust the vegetable, greens, broth, or protein. Keep the same quiet logic: build the flavor first, cook the main ingredient gently, and finish with the delicate pieces last.

Easy Swaps for This Recipe

  • Tinola with green papaya: softer, slightly sweet, and more classic in feel. Use firm green papaya, not ripe orange papaya.
  • Tinola with sayote: firmer, cleaner, and easy to find in many markets.
  • Tinola with malunggay: earthy, green, and traditional. Add it at the end.
  • Tinola with spinach or pechay: practical when malunggay or dahon ng sili are not available.
  • Tinola with rice wash: slightly fuller broth. Use the second rice rinse for a clearer flavor.

Variations That Cook a Little Differently

  • Native chicken Tinola: deeper flavor, but usually needs a longer simmer before the vegetables go in.
  • Instant Pot Tinola: pressure cook the chicken first, then add the vegetables separately so they do not overcook.
  • Fish or seafood Tinola: use the same ginger-broth idea, but cook fish or mussels briefly so they stay tender.
  • Tinola sa gata or golden Tinola: coconut milk, turmeric, or squash make the soup richer and less like the clear classic version.

Back to top ↑

Common Mistakes

MistakeWhat HappensFix
Using only boneless breastWeak broth and dry meatUse bone-in pieces, or simmer breast gently and check it early.
Not using enough gingerSoup tastes flatUse 45 to 60 g / 1 1/2 to 2 oz fresh ginger.
Adding fish sauce only at the endFlavor tastes salty but shallowAdd some before simmering, then adjust later.
Using a chicken cube with full fish sauceSoup becomes too saltyStart with less patis if using a cube, then adjust after simmering.
Adding too much waterSoup tastes thin even after seasoningUse about 6 cups liquid for 2 to 2 1/2 lb chicken, then simmer uncovered briefly if needed.
Boiling too hardCloudy broth and tougher chickenSkim first, then simmer gently.
Adding the vegetable too earlyPieces turn mushyAdd them after the chicken is nearly tender.
Overcooking greensDull, tired leavesFinish with greens at the end.
Not tasting before servingFinal soup tastes blandAdjust with patis, salt, pepper, calamansi, or chili.
Using ripe papaya by mistakeSoup becomes too sweetUse green papaya or switch to sayote.

FAQ

What is Tinola in English?

Tinola is often described in English as Filipino ginger chicken soup. The chicken version is called Tinolang Manok or Chicken Tinola.

What does Tinola mean?

Tinola generally refers to a Filipino broth-based dish. Tinolang Manok is the chicken version most people mean when they say Chicken Tinola.

Is Tinola the same as Tinolang Manok?

Tinola is the general dish. Tinolang Manok is the chicken version. Since chicken is the most common version, many people use Tinola and Tinolang Manok to mean the same thing.

What should Tinola taste like?

Tinola should taste light but not empty: gingery, savory, and good enough that the broth makes plain rice feel like a meal. If the soup tastes flat, it usually needs more patis, more ginger, or a few more minutes for the chicken to flavor the broth.

What are the main ingredients of Chicken Tinola?

The main ingredients are chicken, ginger, garlic, onion, fish sauce, water or broth, green papaya or sayote, and leafy greens such as malunggay, dahon ng sili, spinach, or pechay.

Do you use green papaya or sayote for Tinola?

Both work. Green papaya gives Tinola a softer, slightly sweet, more classic texture. Sayote stays firmer and tastes mild and fresh, which makes it useful when you want cleaner pieces in the bowl.

What can I substitute for green papaya in Tinola?

Sayote or chayote is the best substitute for green papaya. Upo, kalabasa, or labanos can work in some variations, but they change the flavor and texture.

What leaves are used in Tinola?

The classic choices are malunggay and dahon ng sili. When those are hard to find, spinach, pechay, bok choy, watercress, or kale can work. The important part is adding the greens late enough that they stay fresh.

What can I substitute for malunggay?

Spinach is the easiest substitute for malunggay. Pechay, bok choy, watercress, or kale can also work. Add delicate greens at the end so they do not overcook.

Can I use spinach, pechay, or bok choy in Tinola?

Yes. Spinach wilts quickly and can be added off heat. Pechay and bok choy work best when the thicker stems go in before the leaves.

What is dahon ng sili?

Dahon ng sili means chili leaves. They are used in some traditional Tinola recipes and give the soup a mild peppery green flavor.

What is the best chicken part for Tinola?

Bone-in thighs and drumsticks are the easiest all-round choice. They stay tender, add body to the broth, and are harder to overcook than breast meat.

How long should Tinola simmer?

Tinola usually simmers for about 25 to 35 minutes after the liquid is added, depending on the size of the chicken pieces. Add the vegetables near the end and cook for another 5 to 12 minutes.

How do you keep Tinola broth clear?

Bring the broth to a boil, skim off the foam, then lower the heat to a gentle simmer. Avoid hard boiling the soup for a long time.

Why does my Tinola taste bland?

Tinola tastes bland when the broth lacks ginger, patis, bone-in chicken flavor, or enough simmering time. More salt alone will not fix an empty broth; add ginger warmth, fish sauce depth, and enough time for the chicken to give flavor back to the pot.

Can I make Tinola without fish sauce?

You can, but fish sauce gives Tinola much of its savory depth. If avoiding fish sauce, use salt plus low-sodium chicken broth, and consider adding a little soy sauce or coconut aminos. The flavor will not be exactly traditional.

Can I freeze Chicken Tinola?

Chicken Tinola can be frozen, but the greens and vegetables may soften after thawing. For best results, freeze the chicken and broth, then add fresh greens when reheating.

What is the difference between Tinola and Nilagang Manok?

Tinola is a ginger-forward Filipino chicken soup usually made with fish sauce, green papaya or sayote, and leafy greens. Nilagang Manok is a simpler boiled chicken soup that often uses vegetables like cabbage, potatoes, or saba banana and does not have the same strong ginger profile.

Final Note

Served bowl of Chicken Tinola with ginger broth, bone-in chicken, green papaya or sayote, leafy greens, steamed rice, calamansi, and dipping sauce.
A finished bowl of Chicken Tinola should feel quiet but complete: warm broth, tender chicken, bright greens, and rice that makes the soup feel like dinner.

Tinola does not need to shout. No watery broth, no collapsed vegetables, no loud tricks — just generous ginger, chicken that has time to flavor the pot, patis added early, and greens folded in last. When those pieces come together, the soup tastes calm but complete: simple food that still feels cared for.

Back to top ↑