Posted on — Leave a comment

Chicken and Rice Soup Recipe: Easy, Brothy & Homemade

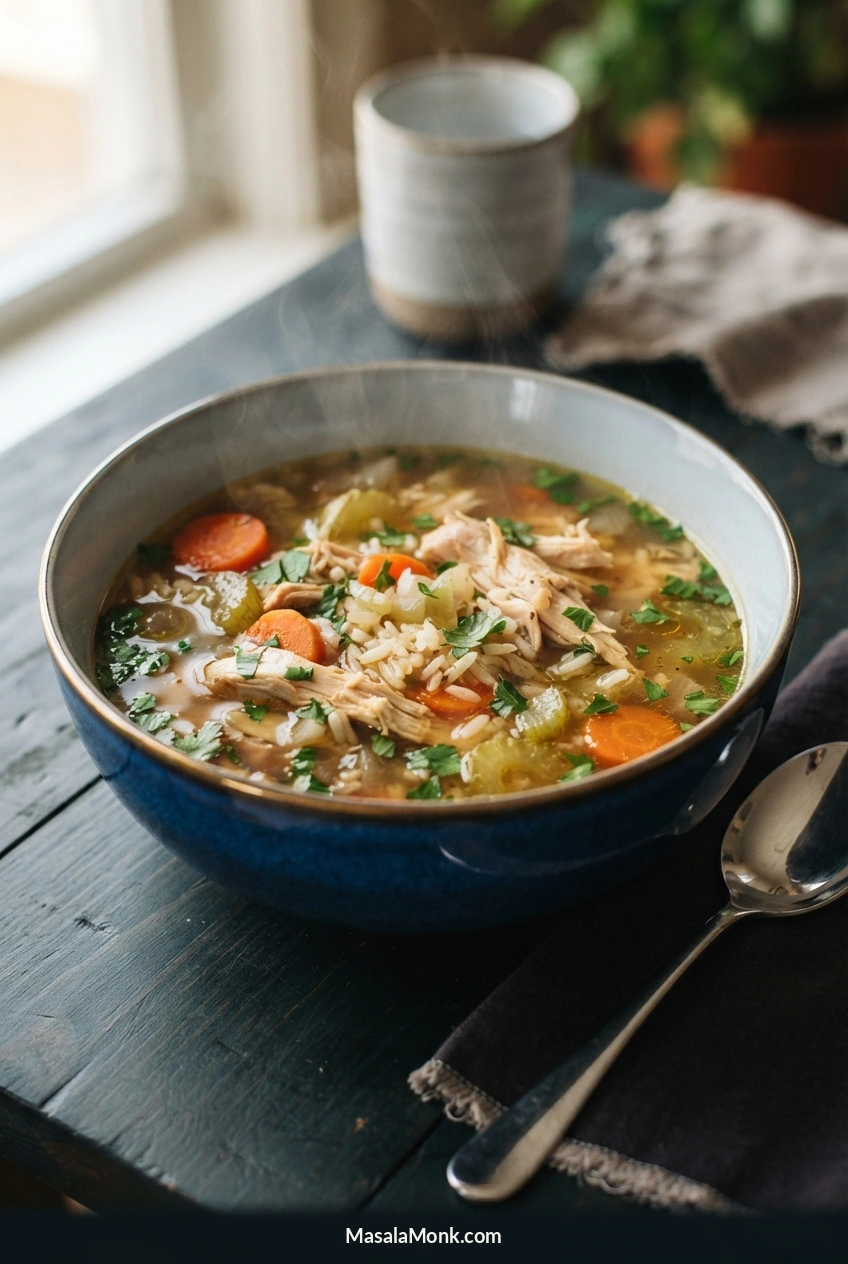
Deep blue ceramic bowl of golden chicken and rice soup with shredded chicken, separate white rice grains, carrot rounds, celery and parsley; a spoon rests on the table.

Rice gives chicken and rice soup its substance, but it also changes the broth as it cooks and sits. The grains swell, absorb liquid and can turn a light soup into a much thicker one. This version uses just enough rice to make the bowl satisfying, with tender chicken, carrots and celery and plenty of golden broth.

The important details are practical: lightly brown the chicken, keep the broth at a gentle simmer and stop when the rice is tender rather than mushy. These checks matter more than rigid cooking times.

Chicken, vegetables and rice may finish at different times. This easy homemade chicken and rice soup recipe shows how to manage them in one pot. It makes a generous dinner, and a little planning with the rice keeps tomorrow’s bowl just as inviting.

Fresh Tonight or Leftovers Tomorrow?

Eating most of the soup straight away? Cook the rice directly in the broth. Planning leftovers, freezing portions or keeping the soup warm for a gathering? Use the separate-rice method and add rice to individual bowls when serving. The grains won’t spend hours soaking up the broth.

Fresh tonight: rice in the pot. Leftovers tomorrow: rice in the bowl.
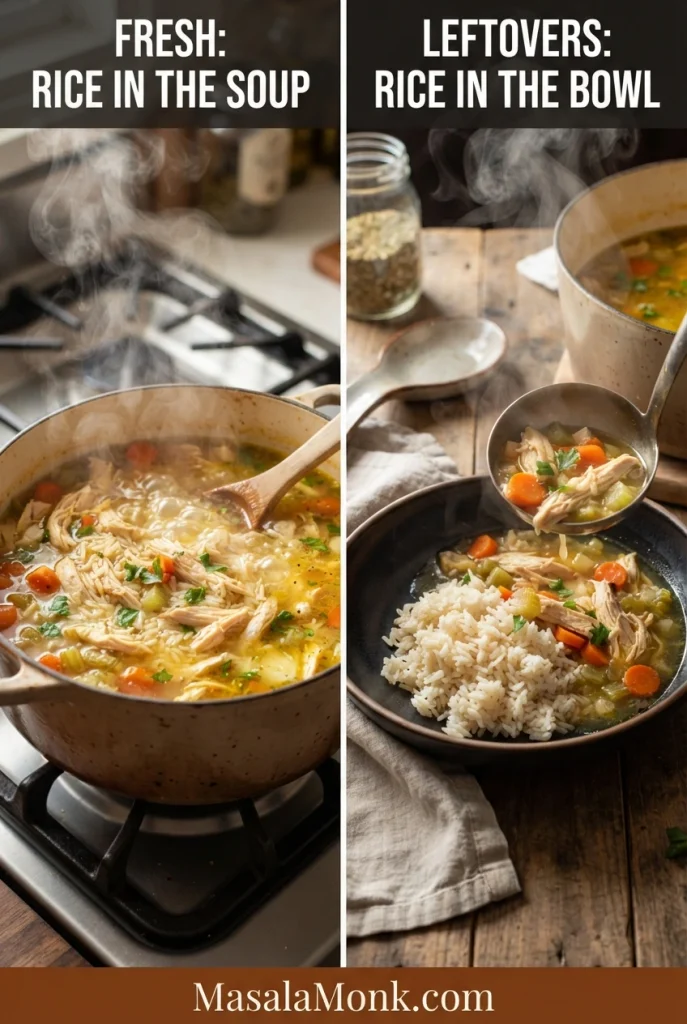
Two-panel chicken and rice soup comparison labeled ‘Fresh: rice in the soup’ over a pot and ‘Leftovers: rice in the bowl’ over soup being ladled onto separately cooked rice.
Fresh tonight: rice in the pot. Saving soup for later? Reheat any chilled rice thoroughly before adding hot soup.

Chicken and Rice Soup Recipe

This brothy stovetop recipe starts with browned chicken, onion, carrots and celery, then builds a gently seasoned broth with garlic, thyme and bay leaves. Long-grain white rice cooks in the same pot for the fresh version.

Makes about 6 moderate bowls · Prep about 15–20 minutes · Cook about 40–55 minutes · Total about 55–75 minutes

These times are approximate. Browning in batches, heating the broth and the strength of your stove can all affect the total.

You’ll need: a heavy soup pot or Dutch oven holding at least 5 liters / about 5¼ US quarts, a cutting board, sharp knife, wooden spoon or spatula and an instant-read thermometer. Add a small saucepan if you’re cooking the rice separately.
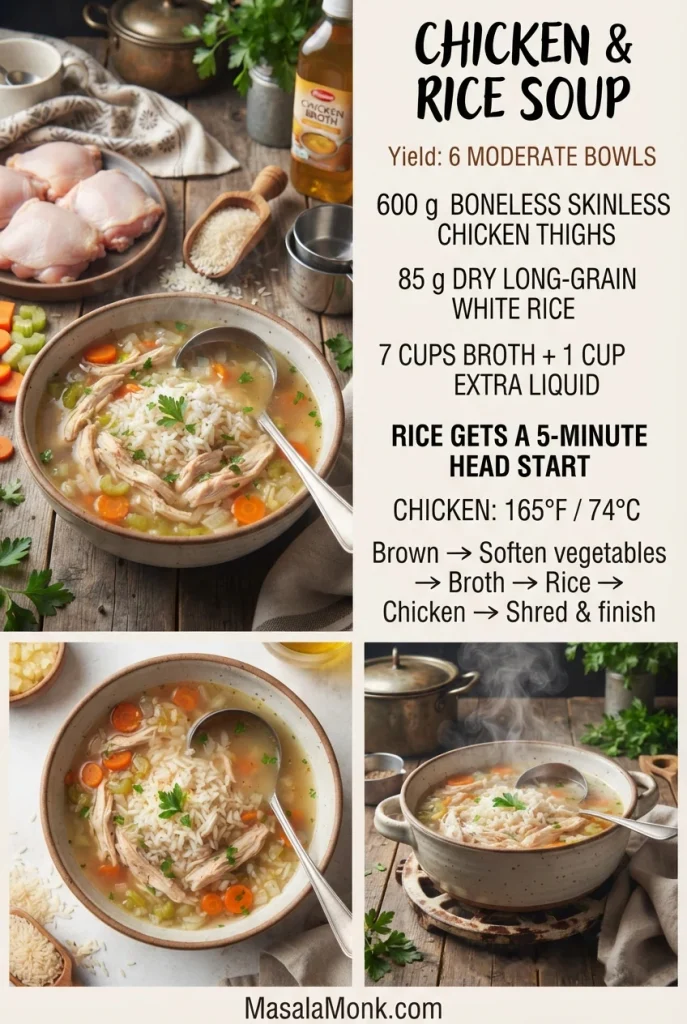
Vertical chicken and rice soup reference card with cooking photos and text listing six moderate bowls, 600 g skinless thighs, 85 g dry rice, broth quantities and the 165°F / 74°C chicken target.
The extra cup of liquid is for rice cooked in the pot. Skip it when cooking the rice separately.

Ingredients for Brothy Chicken and Rice Soup

Before heating the pot, dice the onion, slice the carrots and celery about 5–7 mm thick, mince the garlic and rinse and drain the rice. Keep the raw chicken on a separate tray, away from the prepared vegetables and parsley. Having everything ready now makes the stovetop stages much easier.
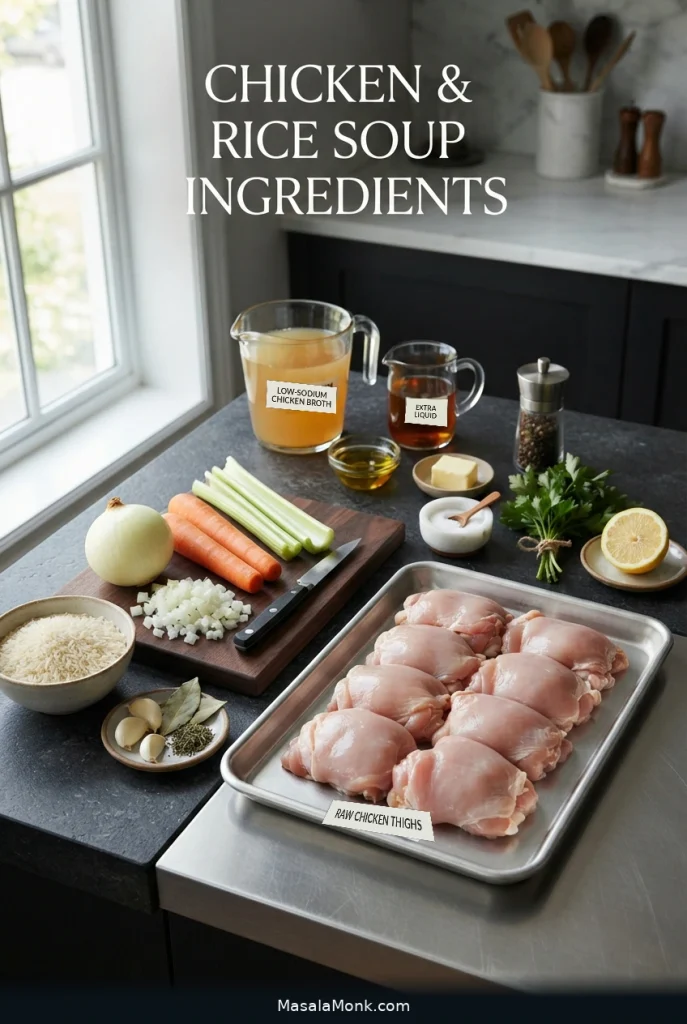
Chicken and rice soup ingredients arranged on a counter: raw skinless chicken on a metal tray, dry white rice, broth, carrot, celery, onion, garlic, parsley, lemon and seasonings.
Keep raw chicken on its own tray. Garlic goes in after the vegetables soften; parsley waits until the end.

Chicken

  • 600 g / 1 lb 5 oz boneless skinless chicken thighs
  • 1 teaspoon fine sea salt or table salt, about 5–6 g, divided, plus more to taste
  • ½ teaspoon freshly ground black pepper, plus more to finish

Boneless skinless chicken breast can replace the thighs by weight. Start checking it earlier because it dries out more readily. Using kosher salt? Measure by weight when possible; brands vary considerably by volume.

Soup

  • 1 tablespoon / 15 ml olive oil
  • 1 tablespoon / 14 g butter, or another tablespoon of olive oil for a dairy-free version
  • 1 medium onion, about 150 g / 5 oz, diced
  • 2 medium-large carrots, about 180 g / 6 oz, sliced about 5–7 mm / ¼ inch thick
  • 2–3 celery ribs, about 110–120 g / 4 oz, sliced about 5–7 mm / ¼ inch thick
  • 3 garlic cloves, finely chopped or minced
  • 1 teaspoon dried thyme
  • 2 bay leaves
  • 1.65 liters / 7 US cups low-sodium chicken broth or stock
  • 240 ml / 1 US cup water or additional low-sodium chicken broth, for the one-pot rice method only

If your broth already tastes rich and chickeny, use water for that extra cup. If it’s particularly light, more broth makes better sense.

Rice and Finish

  • 85 g / a scant ½ US cup uncooked long-grain white rice, rinsed and drained
  • 15 g / about ¼ cup chopped fresh parsley
  • 1 tablespoon / 15 ml fresh lemon juice, optional

The rice may look surprisingly sparse when dry, but it expands considerably during cooking. Adding more makes a thicker, rice-heavy soup, which is fine if that’s your preference. This version is deliberately brothy. Considering basmati, jasmine or brown rice? Check which rice works here before adjusting the timing.
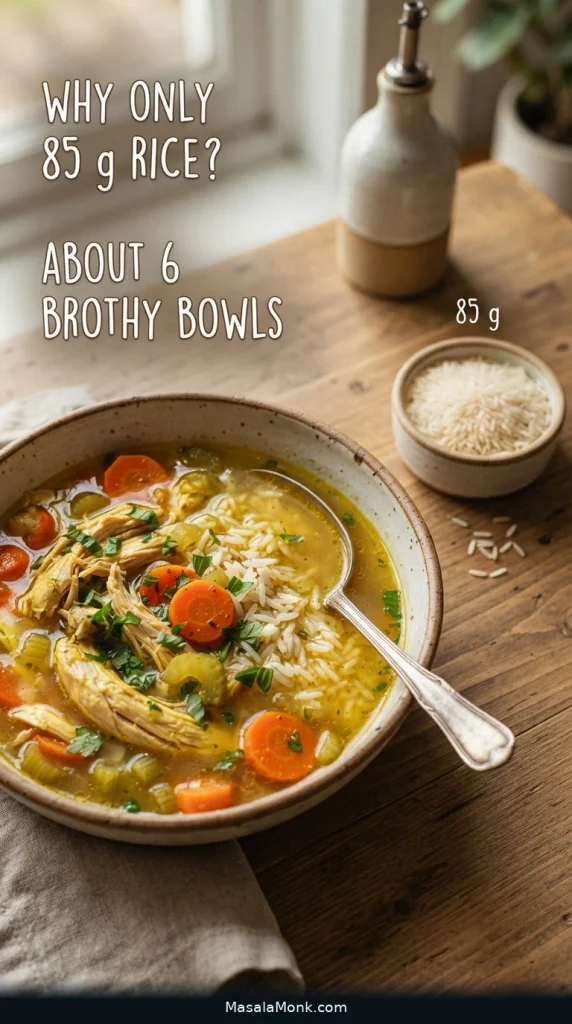
Small ramekin of dry white rice beside a bowl of chicken and rice soup; printed text asks ‘Why only 85 g rice?’ and says ‘About 6 brothy bowls.’
Weigh out 85 g of dry rice before rinsing. It looks modest, but that’s what keeps six bowls brothy.

Method

1. Give the Chicken Some Color

Pat the chicken dry and season it with about half the measured salt and some black pepper. Heat the olive oil over medium-high heat, add the thighs in a single layer and brown for about 2–3 minutes per side.
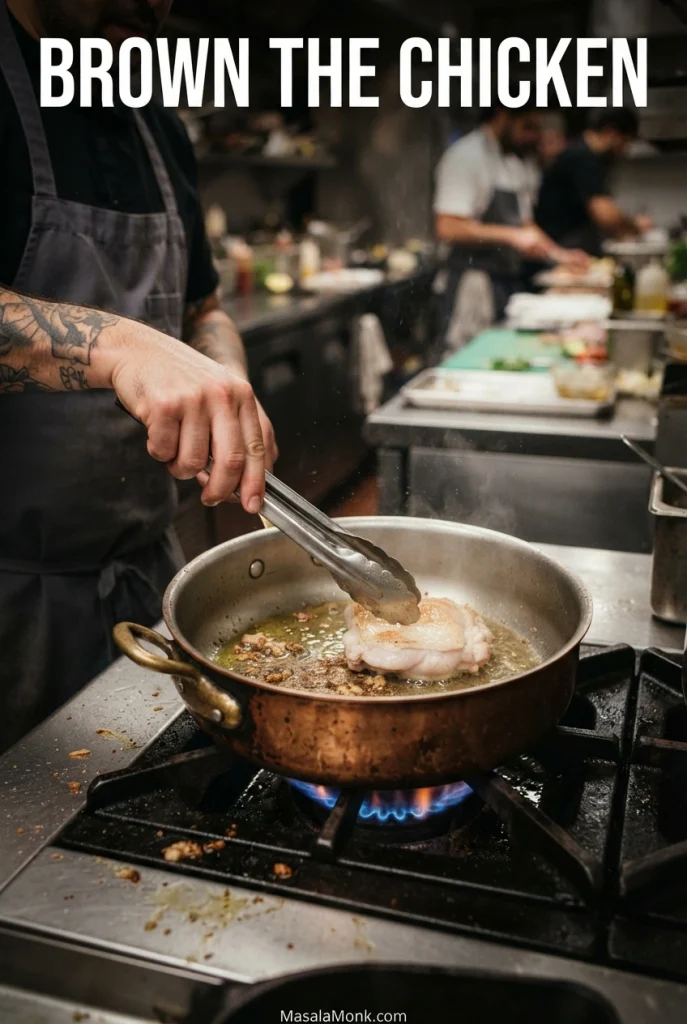
Tongs turning boneless chicken pieces in a shallow metal cooking pot over a gas burner, with golden-brown contact areas forming on the meat.
If a thigh sticks when you try to turn it, give it another few seconds. A browned surface usually releases more easily, leaving the golden crust on the chicken instead of the pan.

You’re looking for some golden-brown patches, not a deep crust on every surface. Pale patches are fine; the chicken will finish cooking in the broth.
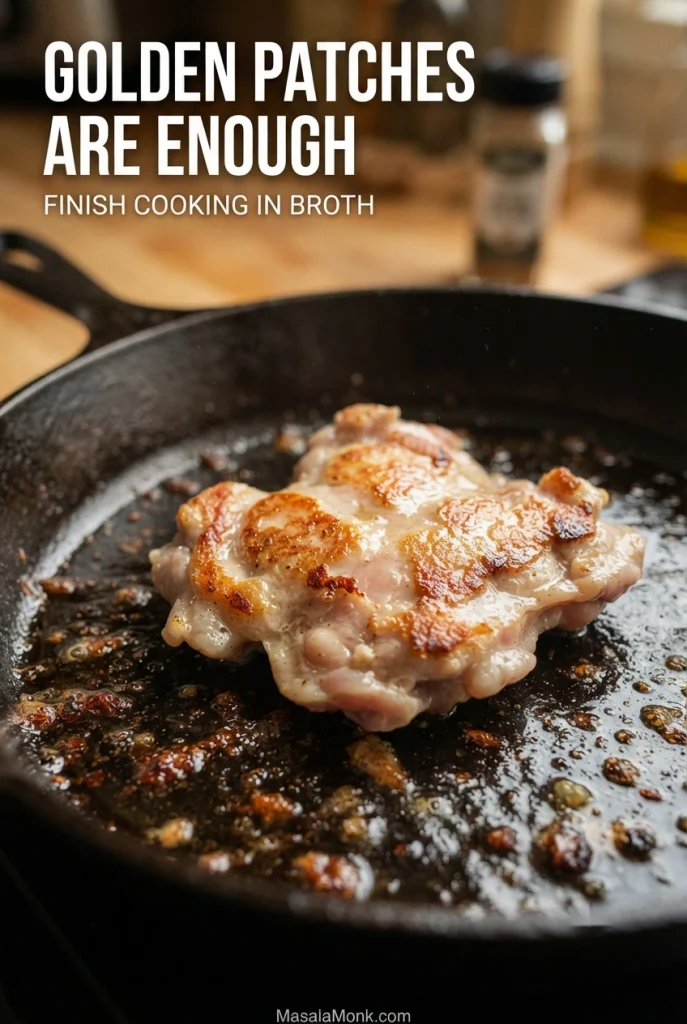
Close-up of a skinless chicken piece seared in a dark pan, with scattered golden patches and paler areas; on-image text says golden patches are enough.
Golden patches are plenty. Brown bits on the pot add flavor, but black, burnt residue can make the soup bitter; clear away any scorched bits before adding the broth.

Brown the chicken in two batches if the pot is crowded. Transfer it to a plate, leaving the browned bits behind. They’ll give the broth more savory depth.

2. Soften the Vegetables

With the vegetables already cut, you can move straight from browning the chicken to softening the onion, carrots and celery. The image below shows the slice thickness to aim for.

On a dark board, orange carrot rounds and half-moons are lined up beside curved pale-green celery slices and a metal ruler; the heading names these cut shapes.
Aim for slices around 5–7 mm thick. Halving particularly wide carrot rounds helps them cook alongside the celery.

Lower the heat to medium. Add the butter, onion, carrots and celery. Cook for about 6–8 minutes, stirring occasionally, until the onion softens and begins to smell sweet rather than sharp. The carrots and celery should start losing their raw firmness.
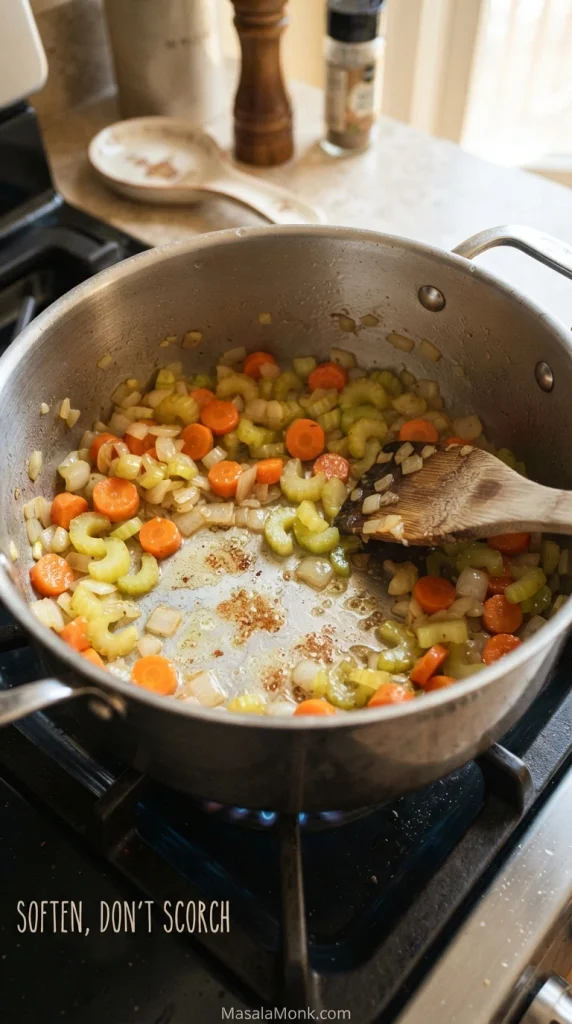
Diced onion, orange carrot rounds and curved celery slices being moved with a wooden spatula in a steel pot; label reads ‘Soften, don't scorch.’
The onions should soften and smell sweet. If the vegetables start browning aggressively, turn down the heat.

Add the garlic and thyme. Stir for about 30 seconds, just until fragrant.

3. Build the Broth

Pour in the chicken broth and the extra 1 cup / 240 ml water or broth. Scrape the bottom of the pot, loosening the browned bits into the liquid.
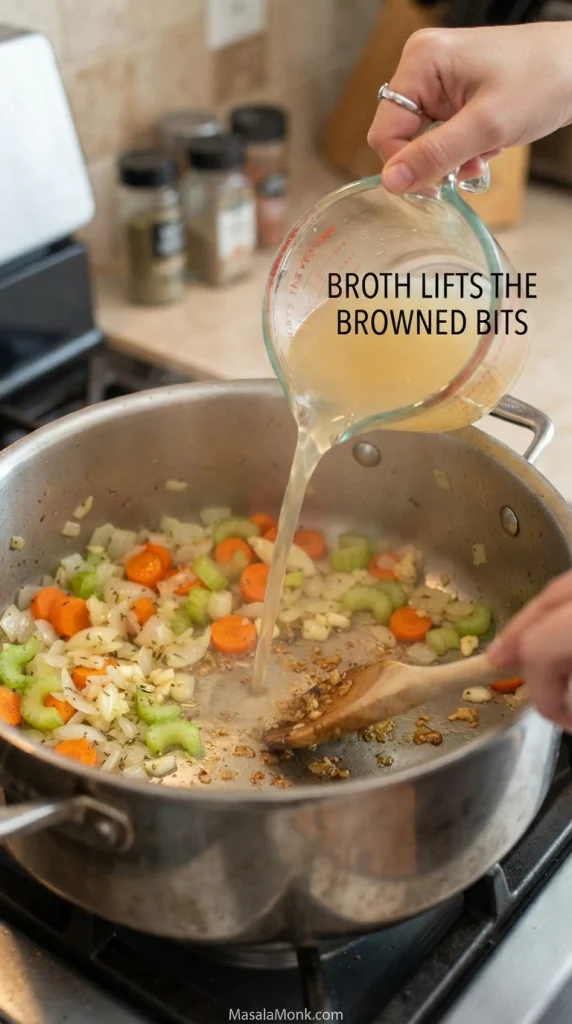
Light golden broth pours from a glass measuring jug into a stainless pot of onion, sliced carrots and celery as a wooden spoon scrapes browned residue.
A splash of broth loosens the browned bits while you can still see the pot bottom. Scrape gently, then pour in the rest.

Add the bay leaves and the remaining starting salt. Bring to a boil, then lower the heat to a gentle simmer.

4. Give the Rice a Head Start

Stir in the rinsed rice once so it spreads evenly through the hot broth. From here, keep the pot uncovered and maintain a gentle simmer.
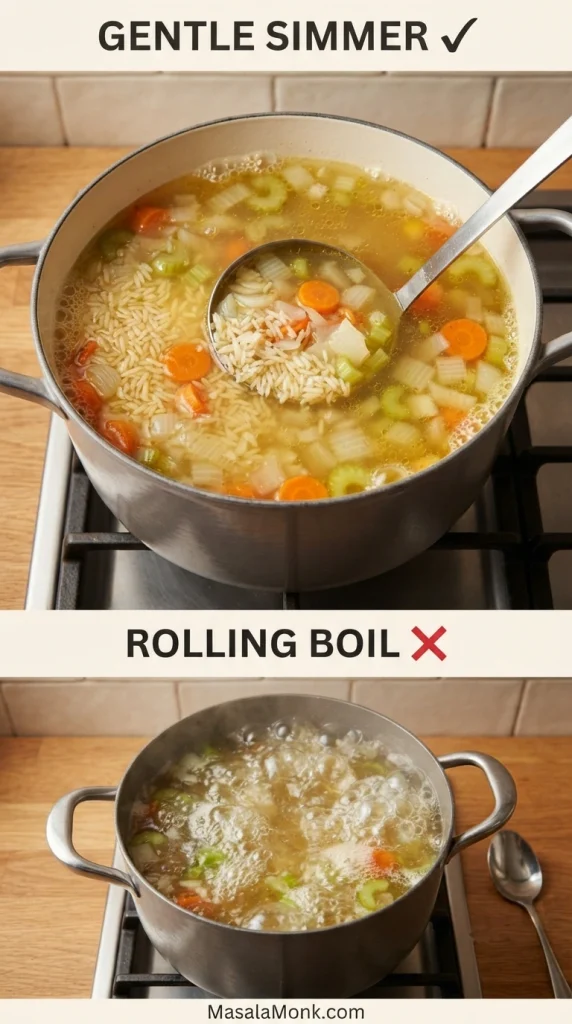
Stacked cooking comparison: the upper uncovered pot has small bubbles around rice and vegetables and is labeled gentle simmer; the lower pot has vigorous rolling-boil bubbles.
Look for small bubbles and easy movement in the broth, not a rolling boil. Gentle simmering is kinder to the rice.

Give standard long-grain white rice about a 5-minute head start before returning the chicken. Check the packet, though; faster-cooking rice may need less time.

Leave the rice mostly alone after the first stir. Give it an occasional gentle stir if needed to prevent sticking. The five minutes are a guide; the aim is to bring the chicken and rice close to doneness at the same time.

5. Return the Chicken and Check for Doneness

Return the browned chicken and any juices from its plate to the pot. Simmer gently, uncovered, for roughly 10–15 minutes, checking toward the earlier end of that range.
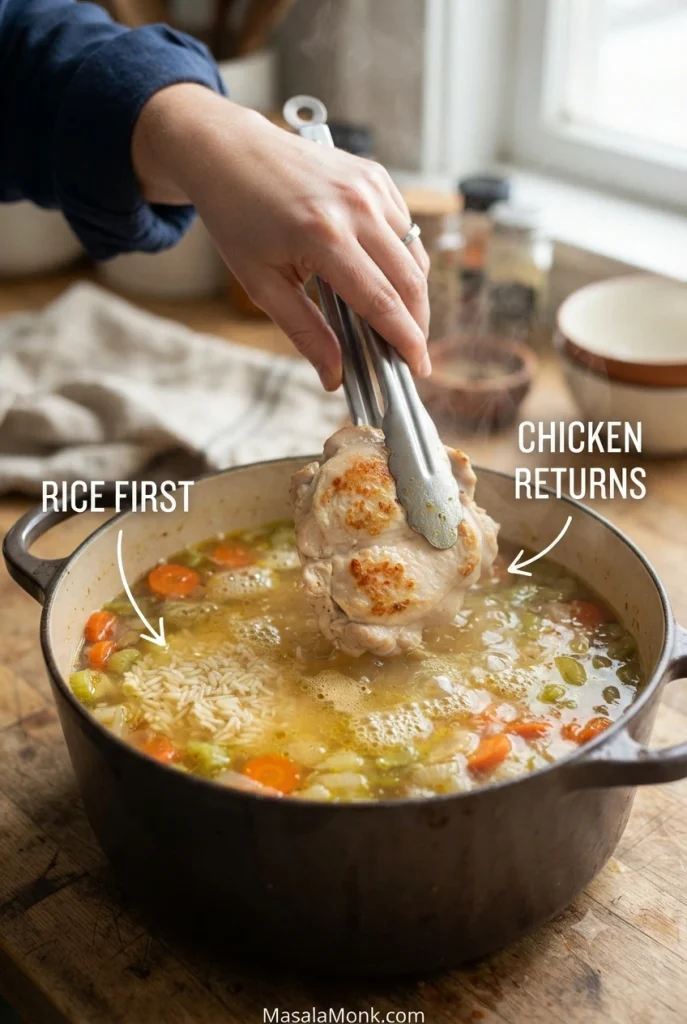
Kitchen tongs lower a whole browned chicken piece into golden broth containing carrots, celery and rice; labels point to the rice-first stage and the returning chicken.
Return the browned chicken along with the juices collected on its plate. Those juices belong in the broth.

Check the chicken first. Insert an instant-read thermometer into the thickest part. Poultry must reach at least 165°F / 74°C. Remove chicken breast promptly once safely cooked; thighs may benefit from additional gentle cooking until tender enough to shred.
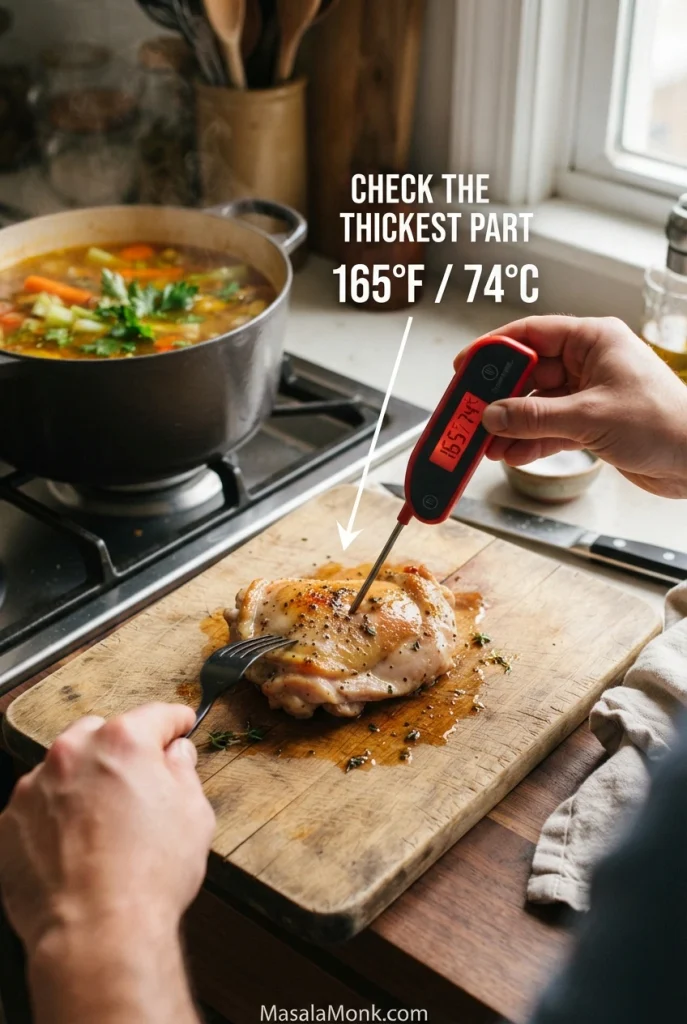
Instant-read thermometer probe inserted into a chicken thigh on a cutting board, with chicken soup in a pot behind it; on-image text gives the 165°F / 74°C target.
Check the thickest part of the chicken, not the surrounding broth. The thermometer should register at least 165°F / 74°C; check more than one spot if the thighs vary in size.

Now check the rice and vegetables. Taste a grain of rice. It should be tender throughout, with no hard or chalky center, while still holding its shape. Test a carrot with a fork; it should be tender without falling apart.

If the timings don’t match: When the chicken is safely cooked and tender but the rice or carrots still need time, lift the chicken onto a clean plate and let the pot simmer gently until they are ready. If the rice is done but the chicken is undercooked, keep cooking the chicken until it reaches at least 165°F / 74°C, even if the rice softens further.

When everything is cooked, turn off the heat. The rice will keep softening in the hot broth, so there’s no reason to leave the pot simmering while you finish the chicken.

6. Shred, Season and Serve

Transfer any chicken still in the pot to a clean cutting board. Let it rest briefly, then shred or cut it into bite-size pieces. Remove the bay leaves and return the chicken to the soup.
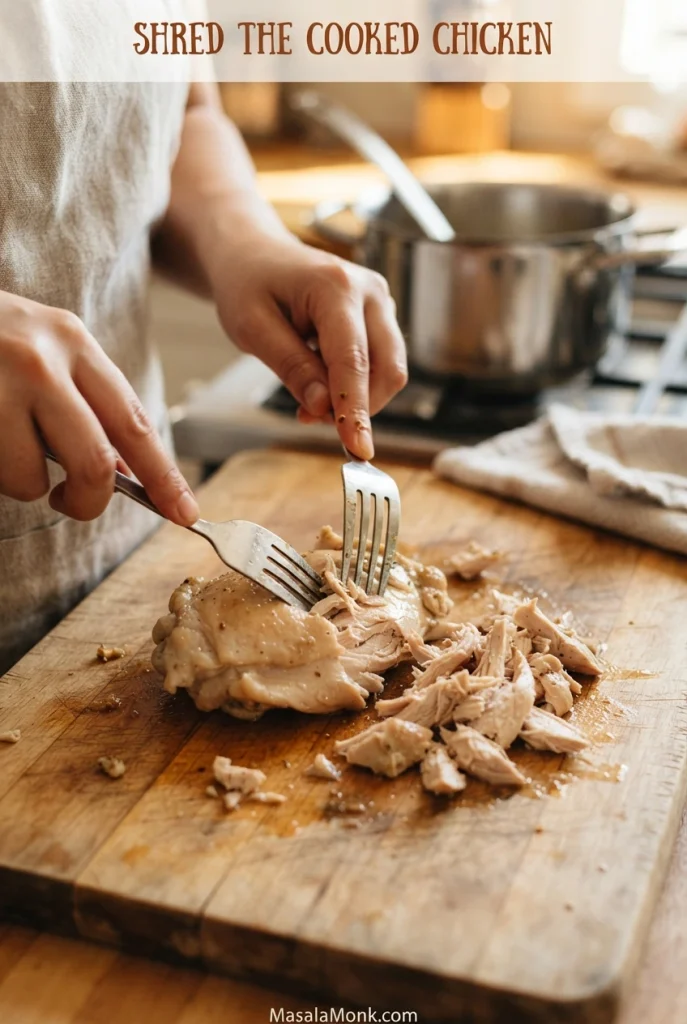
Two hands use forks to pull cooked chicken into uneven shreds on a wooden cutting board; a soup pot sits out of focus behind the board.
Shred into spoon-friendly pieces. If a thigh won’t pull apart neatly, slicing across the fibers works too.

Stir in the parsley just before serving so its fresh flavor stays noticeable. Taste the broth and adjust the salt and pepper.
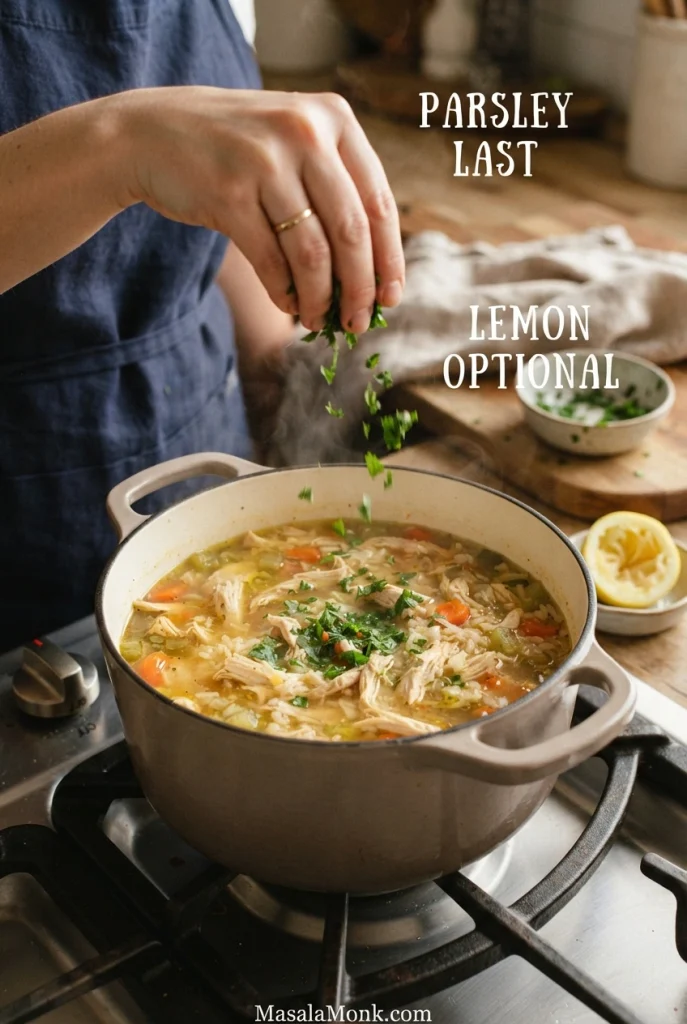
A hand sprinkles chopped green parsley over a pot of finished chicken and rice soup; text says ‘Parsley last’ and ‘Lemon optional.’
Parsley goes in just before serving. Pass lemon wedges at the table if some people like a brighter bowl.

A tablespoon of lemon juice is optional, but useful when the broth tastes rich yet slightly flat. The lemon should make the chicken broth taste brighter, not turn it into lemon soup.

What the Finished Soup Should Look Like

Ladle the soup while there’s still broth around the rice. If it has thickened while you’ve been getting dinner onto the table, check whether the grains are still intact. A splash of hot broth may be all it needs.
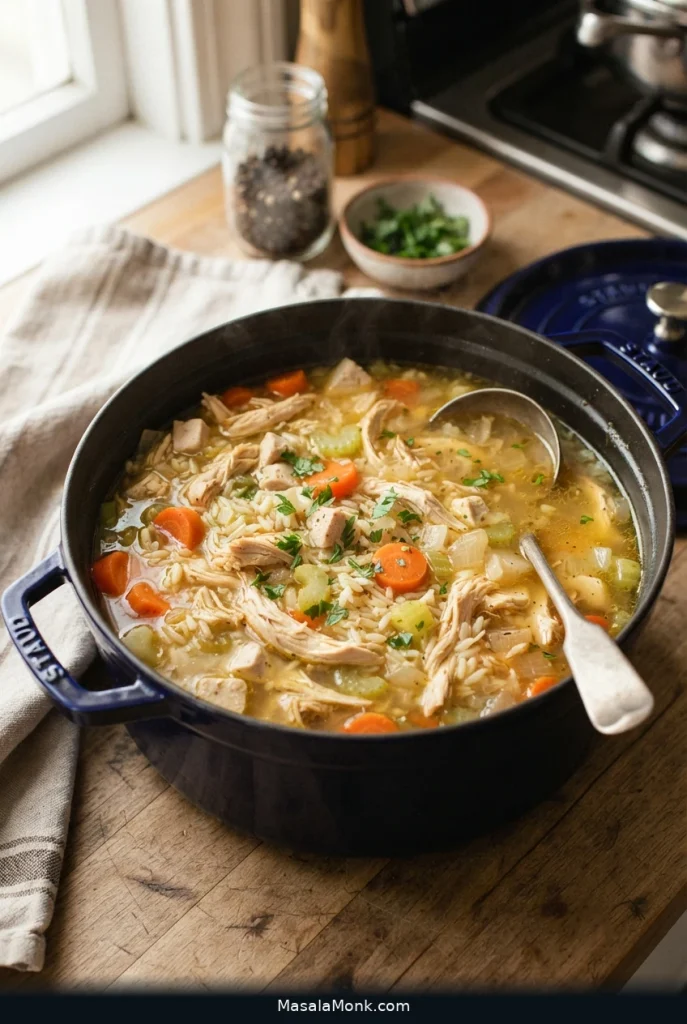
Large deep-blue Dutch oven filled with golden chicken and rice soup, shredded chicken, carrot rounds, celery and white rice; a ladle rests in the pot.
This is the texture to aim for: separate rice grains, generous golden broth and tender pieces of chicken.

A useful final texture check is the spoonful itself: tender rice should remain in separate grains, with broth moving between the chicken and vegetables rather than clinging like a thick sauce.
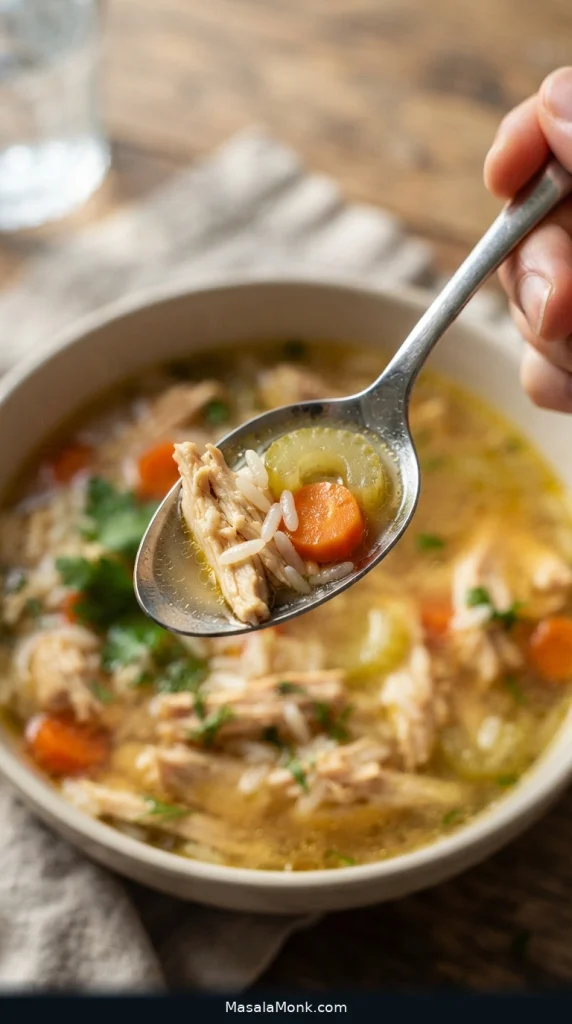
Close-up of a metal spoon over a soup bowl holding shredded chicken, a few white rice grains, a carrot slice and curved celery in golden broth.
Broth should run freely around the rice and chicken on the spoon. If it clings like sauce, check whether the rice is still intact.

Where next? Recipe at a glance · Make it ahead · Fix a problem


The Pot Has Three Clocks

The advantage of thinking in three clocks is knowing what to do when the timings don’t line up. Some ingredients can wait for the others; some are much harder to rescue once they’ve gone too far.
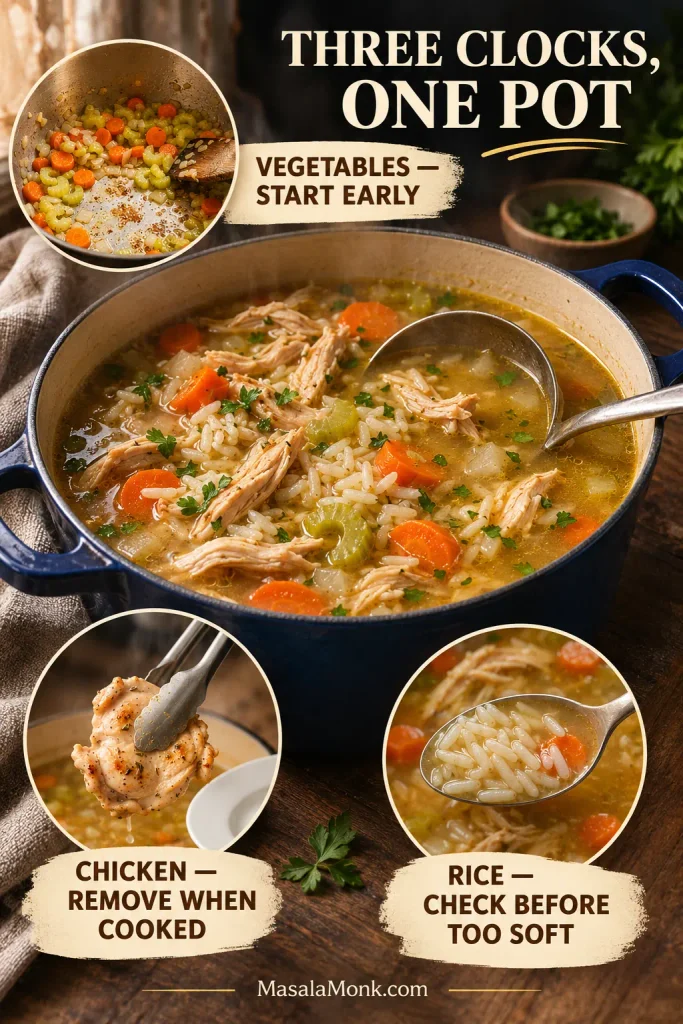
Three-clocks cooking guide around a pot of chicken and rice soup: vegetables starting early, tongs lifting a cooked chicken piece and a spoon lifting rice to check tenderness.
Three ingredients, three checks: chicken by thermometer, rice by taste and carrots by fork.

Vegetables need the early start. Carrots and celery take time to soften, particularly when cut thickly. Starting them before adding the broth reduces the chance of hard carrots alongside tender rice.

Chicken can leave the pot. Once it is safely cooked and tender, lift it out if the rice still needs time. The same approach helps with Chicken Noodle Soup, where the noodles and meat may reach their ideal texture at different moments.
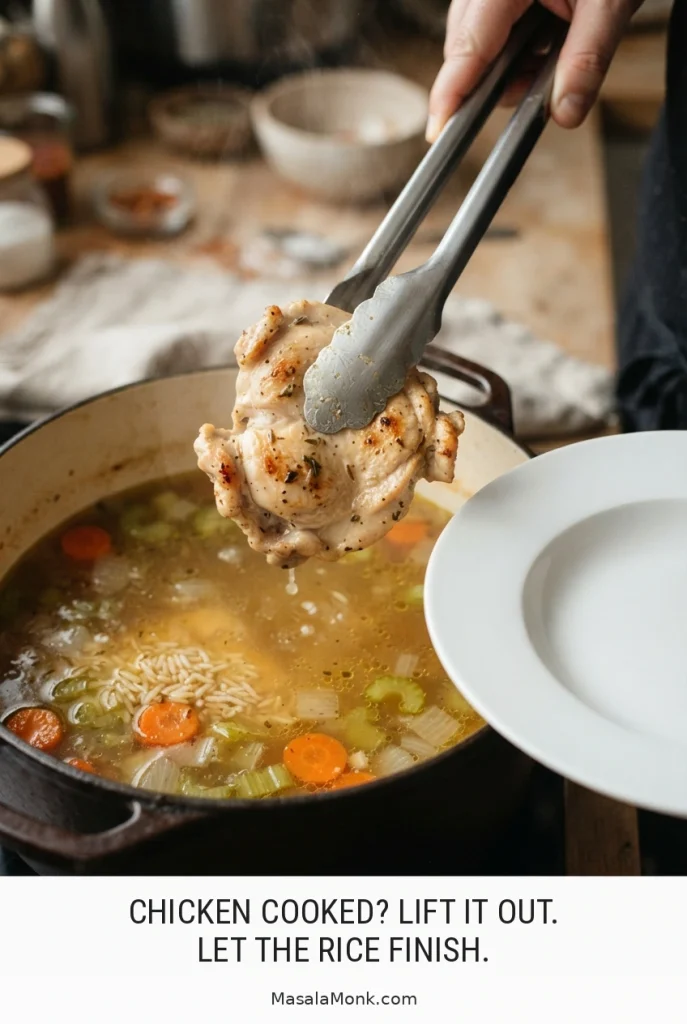
Metal tongs lift a cooked boneless chicken piece above a pot of rice-and-vegetable broth toward a white plate; the caption says to let the rice finish.
Once the chicken is safely cooked and tender, it can wait on a clean plate while the rice catches up.

Rice is harder to rescue. Once the grains are scattered through the broth, you can’t easily remove them without taking much of the soup along. That’s why measuring the rice, keeping a gentle simmer and checking the grains before they become too soft are important.

When a component is already overdone, use the troubleshooting guide instead of simmering everything longer.

Which Rice Belongs in Chicken and Rice Soup?

Long-grain white rice is the best all-purpose choice for this brothy chicken and rice soup. It cooks within a manageable window and generally stays distinct enough that the broth remains the main event.
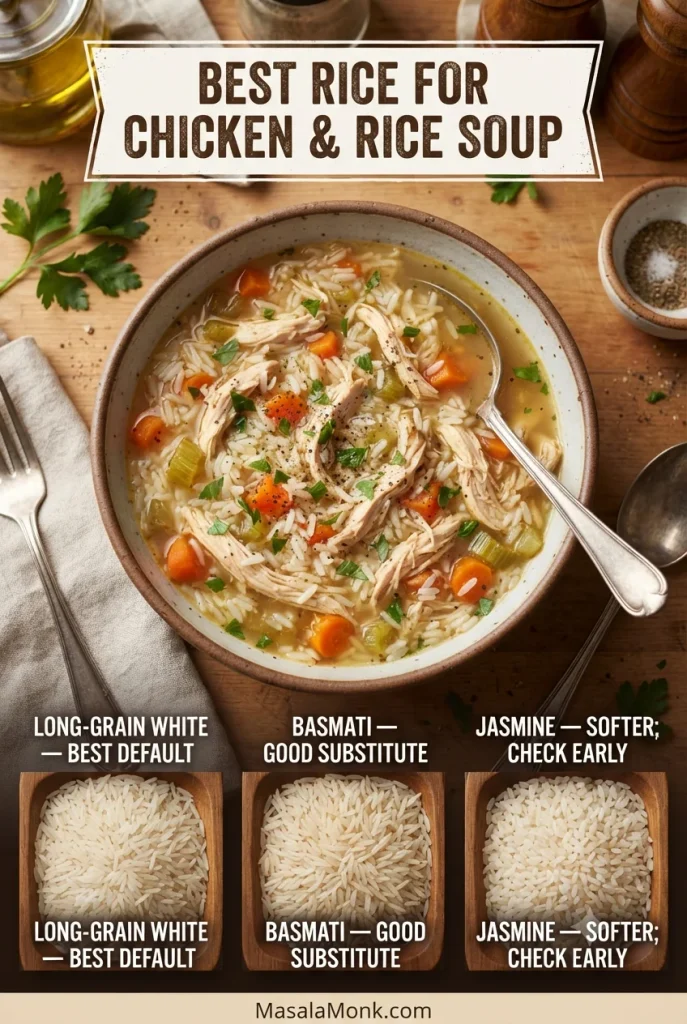
Rice-choice graphic with a bowl of chicken and rice soup above three labeled bowls of dry long-grain white, basmati and jasmine rice.
Long-grain white rice keeps the broth light. Basmati and jasmine work too, but follow their package times and check early.
RiceHow It Works in This Soup
Long-grain whiteTender, separate grains; best choice for the main one-pot method.
BasmatiAromatic and generally distinct; a good substitute. Start checking a little early.
JasmineFragrant and often softer; works, but needs closer attention to timing.
Brown riceChewier and slower to cook; best prepared separately.
Wild riceFirm and nutty, with a much longer cooking time; cook separately.
Converted or parboiled riceOften holds its shape well; follow the cooking time on the packet.
Instant or minute riceCooks very quickly; add near the end or prepare separately.
ArborioReleases more starch and makes the broth creamier; not ideal for this brothy version.

Rinsing long-grain white rice removes some loose surface starch, helping the broth stay clearer. If you’re cooking the grains separately, How to Cook Rice covers stovetop methods and timings for several common varieties.

Where Did the Broth Go?

Chicken and rice soup gets thicker because the rice continues absorbing broth while released starch thickens the liquid around it. This can happen even when the rice is fully cooked and the grains still look intact.
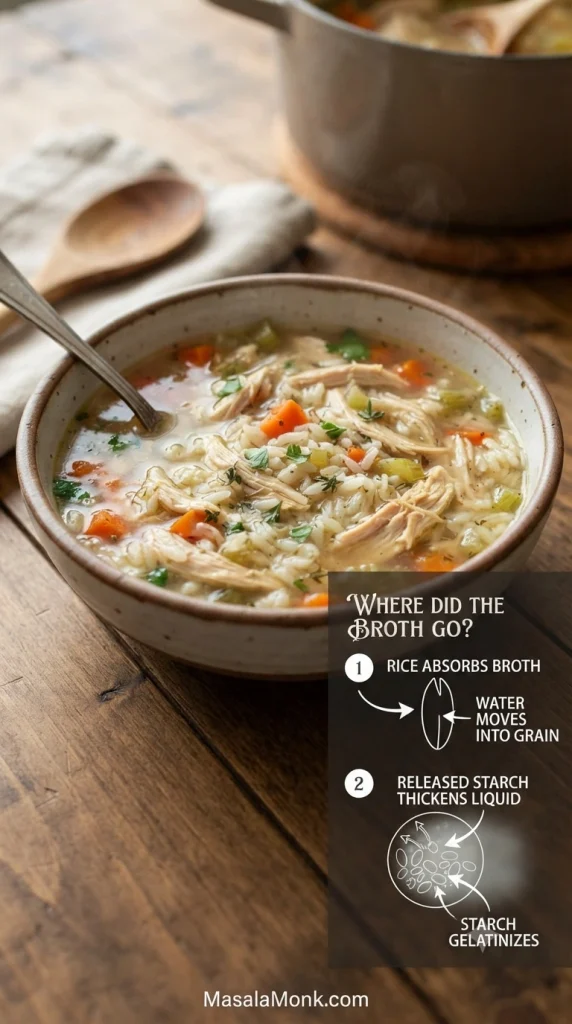
Bowl of chicken and rice soup beside a diagram titled ‘Where did the broth go?’ showing rice absorbing water and released starch making liquid thicker.
Even cooked rice keeps soaking up broth. For leftovers, loosen only the portion you’re reheating.

If the rice is still in separate grains, adding a little hot broth can loosen the soup again. Once the grains have broken down into mush, extra broth can thin the mixture but won’t bring back their original texture. Unsure which you have? Compare intact and mushy rice before making changes.

Cooking the Rice Separately for Leftovers

For make-ahead chicken and rice soup, cook and store the rice separately. It’s a small change that leaves tomorrow’s bowl with more broth and rice that hasn’t spent the night swelling in it.
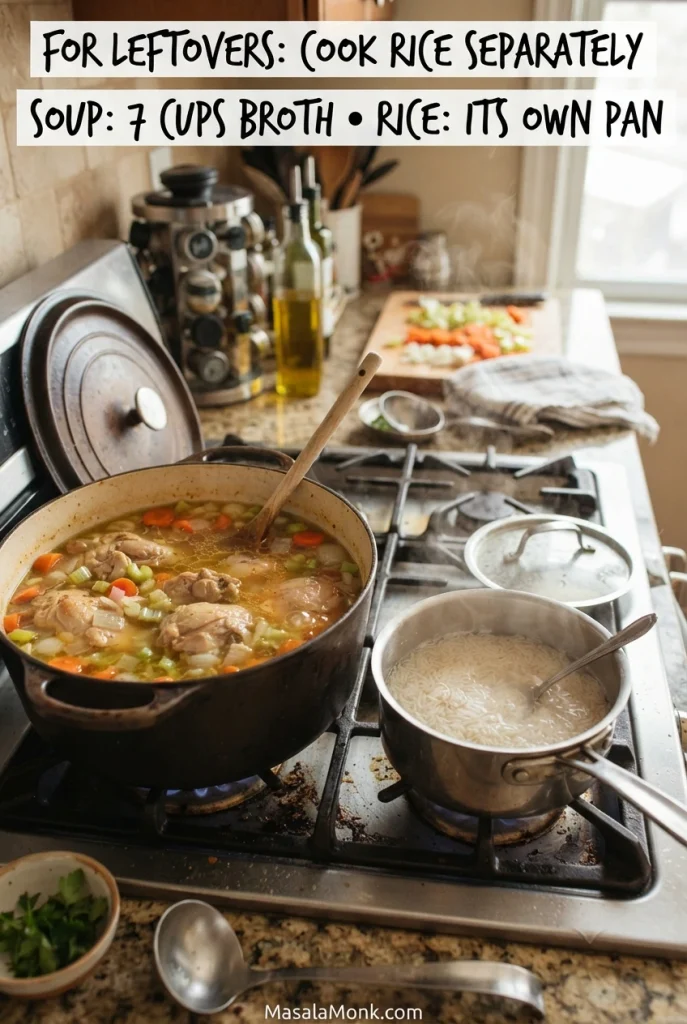
Large pot of golden chicken-and-vegetable soup beside a smaller saucepan of separately cooked white rice, with a heading advising separate rice for leftovers.
One pot of soup, one small pan of rice. You can stop each when it’s ready instead of cooking them to the same clock.

Cook the Soup Without Rice

  1. Brown the chicken and soften the vegetables as in Steps 1–2. For Step 3, add only the 7 cups / 1.65 liters broth, bay leaves and remaining starting salt; omit the extra 1 cup / 240 ml water or broth. Do not add the rice to the soup.
  2. Once the broth reaches a gentle simmer, return the browned chicken and its juices. Cook until the chicken reaches at least 165°F / 74°C and the vegetables are tender. Take the chicken out when ready rather than letting it overcook.
  3. Shred or chop the cooked chicken. Remove the bay leaves, return the chicken to the soup and stir in the parsley. Taste, then finish with salt, pepper and optional lemon as in Step 6 of the main recipe.
  4. Meanwhile, cook the 85 g dry rice separately according to its package directions. For more flavor, replace some of the cooking water with chicken broth.
  5. For serving right away, spoon some freshly cooked rice into each bowl—about 3–4 tablespoons per bowl is a starting point, depending on the cooked yield—and ladle the hot soup over it. Reheat previously refrigerated rice thoroughly before adding it to the bowls.
  6. For leftovers, divide the soup and rice into separate shallow containers. Cool them promptly and refrigerate or freeze according to the storage guidance below.

Assemble Each Bowl at Serving Time

Let everyone choose how much hot, cooked rice they want in their bowl, then ladle over the chicken-and-vegetable soup. The rest of the pot stays beautifully brothy.
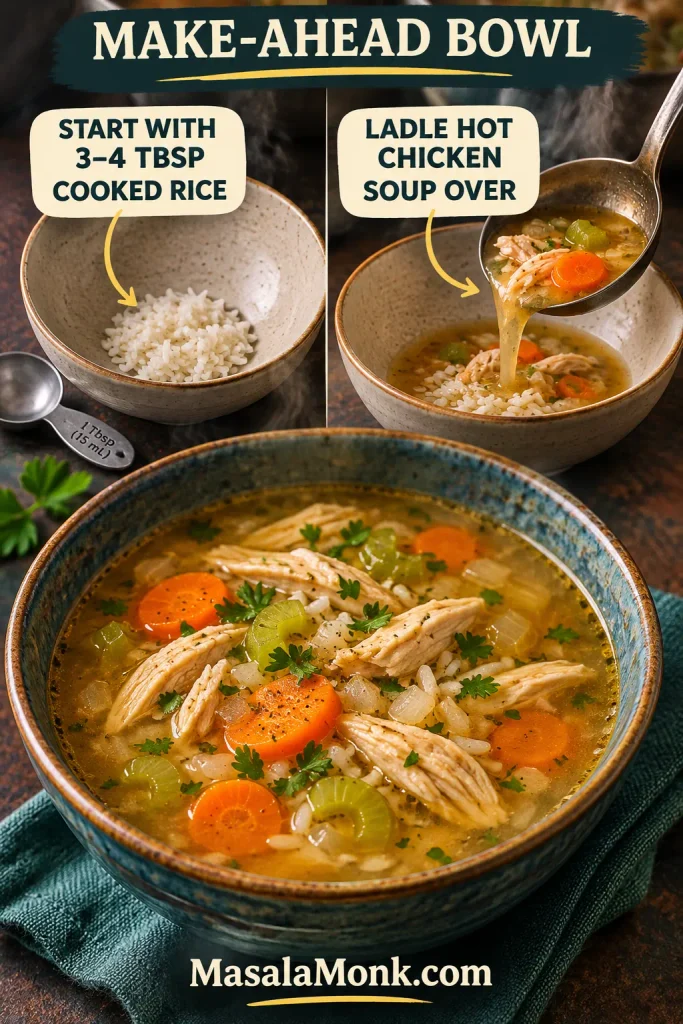
Make-ahead bowl image showing a small serving of cooked rice, a ladle pouring chicken-and-vegetable soup over rice, and a larger finished brothy bowl below.
A few tablespoons of cooked rice are a good starting point. Add more to individual bowls if you want a heartier meal.

Preparing meals for several days? Make fresh rice for later bowls or freeze the cooked rice promptly in individual portions. Extra rice that’s been cooled and stored properly can also become fried rice tomorrow. For cooling limits and safe reheating, jump to storage and reheating.

Rotisserie Chicken Version

Use 400–450 g / 14–16 oz cooked shredded chicken, roughly 3 loosely filled cups. It replaces the raw thighs, so skip the chicken-browning step and add the meat near the end.
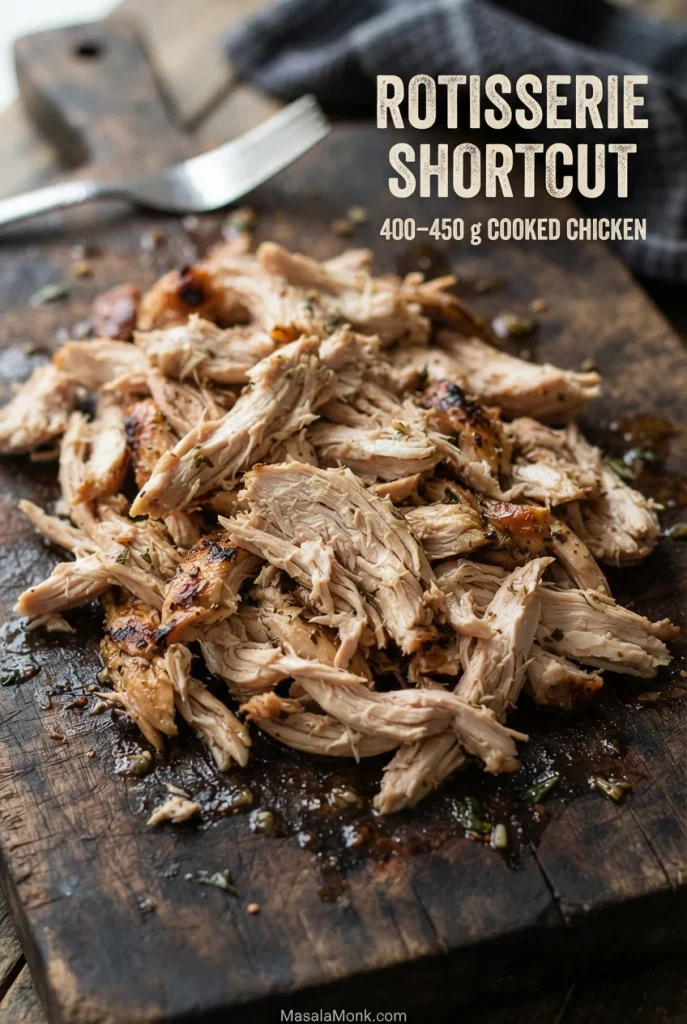
Shredded, already cooked rotisserie chicken piled on a dark wooden board beside a fork, under text specifying a 400–450 g cooked-chicken shortcut.
Remove skin, bones and cartilage before weighing 400–450 g of cooked rotisserie chicken. Taste before adding more salt.

Making this version for leftovers? Omit both the rice and the extra 240 ml liquid from the soup, as in the separate-rice method. Let the vegetables cook until tender, and add the already-cooked chicken only near the end.

Make Soup With Already-Cooked Chicken

  1. Heat the olive oil and butter over medium heat. Add the onion, carrots and celery and cook for 6–8 minutes. Stir in the garlic and thyme for another 30 seconds.
  2. Add the 7 cups / 1.65 liters chicken broth and bay leaves. For the fresh one-pot version, also add the extra 1 cup / 240 ml water or broth. Bring to a boil, then reduce to a gentle simmer. For fresh soup, add the rinsed rice and cook uncovered until the grains and vegetables are nearly tender, using the packet timing as a guide. For leftovers, skip the rice and simmer until the vegetables are tender.
  3. Add the cooked shredded chicken near the end. If it has been refrigerated, reheat it thoroughly to 165°F / 74°C throughout. If the rice is already tender, warm the chicken separately in a small saucepan with enough broth to heat it to that temperature, then combine just before serving.
  4. Remove the bay leaves. Stir in parsley and finish with black pepper and optional lemon. Taste before adding salt: rotisserie chicken is already seasoned, sometimes quite heavily.

If the Rice Is Ready Before the Chicken

Don’t keep simmering already-tender rice while chilled rotisserie chicken warms through. The small saucepan shown below lets you bring the chicken to a safe reheating temperature without sacrificing the rice.
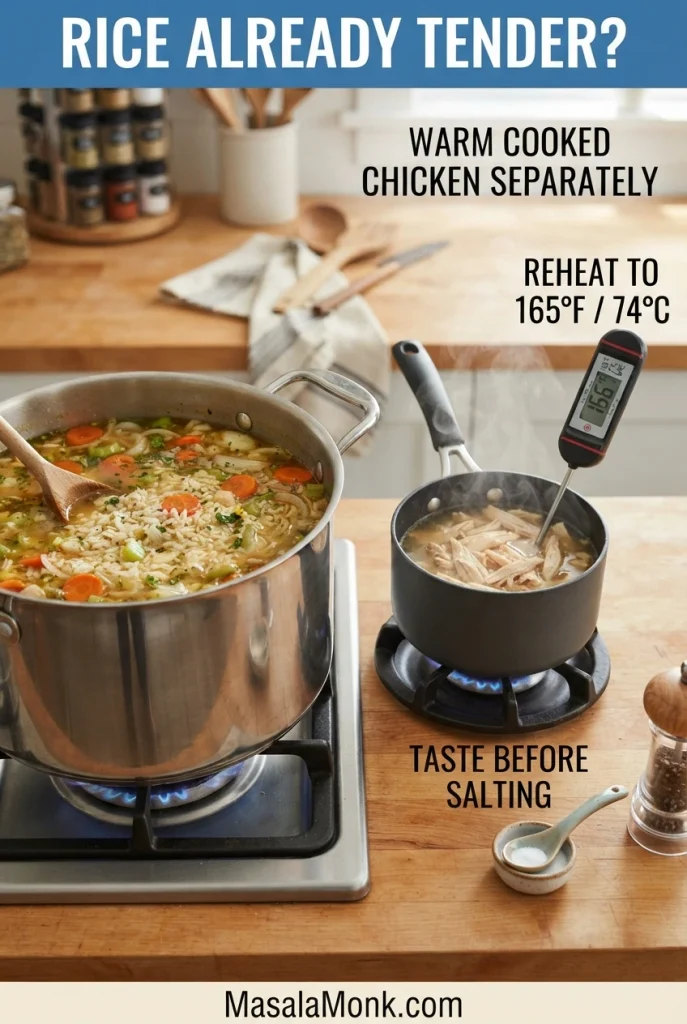
Two saucepans: chicken and rice soup in a large pot and cooked shredded chicken warming in broth in a smaller pan with a thermometer; labels give a 165°F / 74°C target.
A steaming pan doesn’t guarantee the chicken is hot all the way through. Stir and check the meat itself before combining it with tender rice.

This shortcut depends more on the quality of the chicken broth because you’re not getting the browned chicken bits from the main method.

Building Better Chicken Flavor

Soup tastes flat? Don’t reach for the thyme yet. Taste the broth first and work out what’s actually missing.

The broth tastes weak. Start with the seasoning. If it’s properly salted but still lacks depth, the broth may simply be too mild. The bone-in method in Chicken Soup builds more chicken flavor directly from the meat.

The broth tastes good but the chicken doesn’t. Shred the cooked chicken into smaller pieces and toss it with a few tablespoons of well-seasoned hot broth before serving. That can improve each bite, even if it won’t season the inside as effectively. Next time, season the raw chicken before cooking.

You thinned the soup and lost some flavor. Extra liquid dilutes seasoning along with the starch. Taste again after adding broth and adjust if needed.

The broth is rich but dull. A little fresh parsley or lemon may help more than another pinch of salt.

Vegetables That Fit the Pot

Onion, carrot and celery are enough for the base. If you want to use what you already have, a few other vegetables fit easily into this soup.
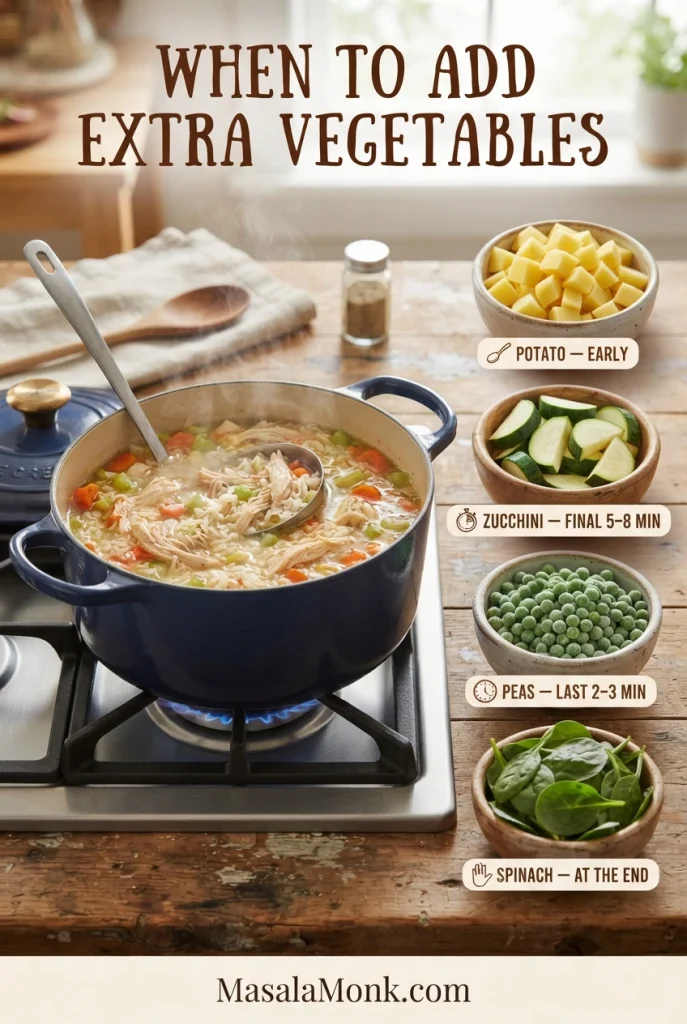
Optional-vegetable timing chart beside a chicken and rice soup pot, showing potato cubes, zucchini pieces, green peas and spinach with their respective cooking stages.
Potatoes need an early start; zucchini and peas go in late. Spinach can wilt in the residual heat.
  • Zucchini: add during the final 5–8 minutes so it stays tender rather than falling apart.
  • Frozen peas: add for the last 2–3 minutes, just long enough to heat through.
  • Spinach: stir in at the end and let the hot broth wilt it.
  • Potato: cut into small cubes and add early enough to become tender before the rice finishes.

No celery? Leave it out and add a little more carrot if you like. The flavor changes slightly, but the soup still works.

Want a more vegetable-heavy dish? Minestrone Soup takes things in another direction.

When the Pot Goes Wrong

If the soup looks different from what you expected, check the rice and chicken before changing anything. A thicker pot doesn’t automatically mean the rice has overcooked, and problems that look similar can need different fixes.
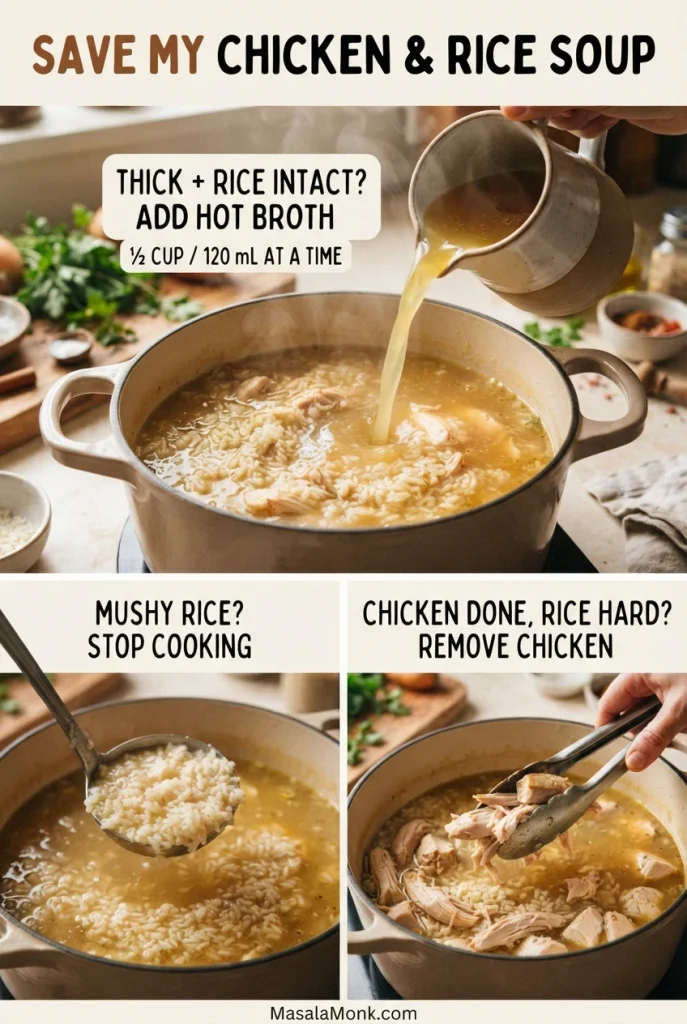
Three-scene chicken and rice soup troubleshooting guide showing hot broth poured into thick soup, mushy rice on a spoon and cooked chicken lifted with tongs.
If the solids are perfectly cooked but the broth seems watery, reduce a little liquid in another pan rather than boiling the whole soup longer.

Match the Symptom to the Fix

What HappenedWhat to Do
Soup is too thick, but rice grains are intactAdd hot broth about ½ cup / 120 ml at a time. Taste again afterward.
Rice has broken down and become mushyStop cooking. More broth may loosen the soup but cannot restore the grains.
Rice is hard, but chicken is cookedRemove the chicken and continue simmering until the rice is tender.
Rice is ready, but chicken is undercookedContinue cooking until the chicken reaches 165°F / 74°C. The rice may soften further; shorten its head start next time.
Rice is ready, but carrots are still hardRemove the chicken and simmer gently until carrots soften. Rice may become softer than intended. Cut carrots smaller next time.
Chicken is dryIt probably cooked too long. Check earlier next time, especially with breast.
Soup is much thicker the next dayAdd broth while reheating. For future batches, cook and store the rice separately.
Broth is too thin, but the solids are perfectly cookedRemove some broth and reduce it separately rather than boiling the chicken and rice longer.

How to Tell Whether Rice Is Actually Mushy

Before adding more broth, inspect a spoonful of rice. Separate grains can be loosened without losing their shape; broken-down rice cannot become distinct grains again.
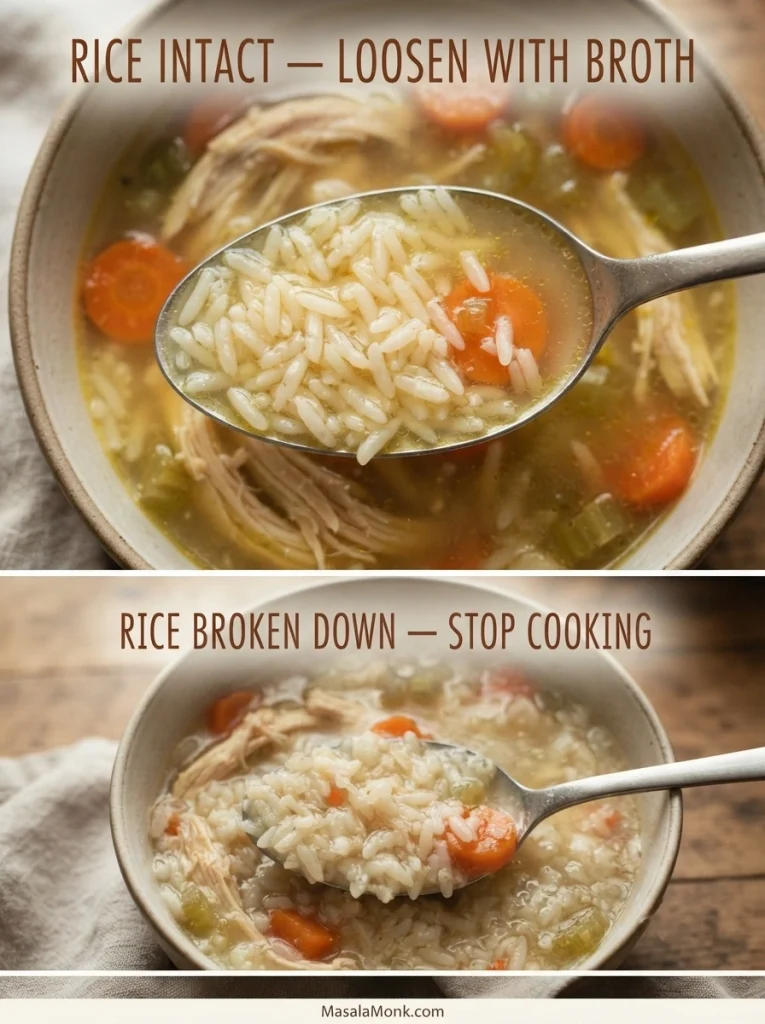
Two stacked close-ups of chicken and rice soup: separate, intact white rice grains on a spoon above, and swollen, broken-down rice in cloudy soup below.
Cloudy broth alone isn’t a failure. Intact, tender grains still have defined edges; overcooked grains break down and smear.

Prevent the same problem next time: Review the gentle simmer. If leftovers are the problem, the separate-rice method is usually the easier solution.

Variations

A creamier bowl. Use ½ cup / 120 ml less of the extra water or broth in the main recipe, then stir in ½ cup / 120 ml heavy cream at the end over low heat. Warm gently without returning the soup to a hard boil.
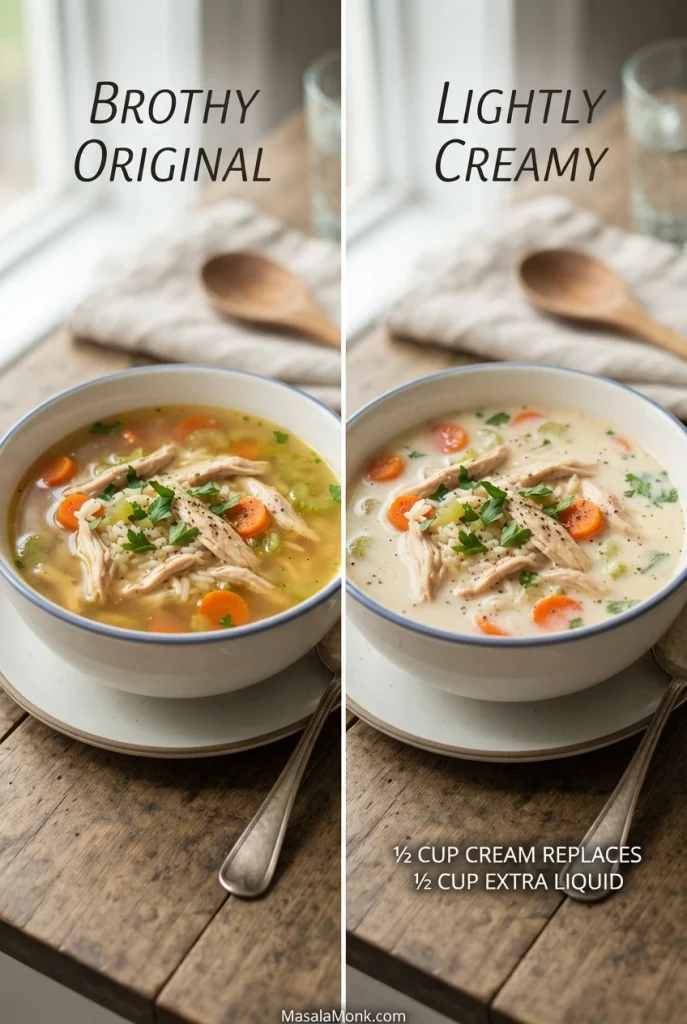
Side-by-side bowls of chicken and rice soup: the left has golden, clear broth, while the right has a paler lightly creamy broth; both contain chicken, rice, carrots and celery.
Both bowls start with the same soup. Add cream only at the end if you’d prefer a softer, richer broth.

More lemon and herbs. Add extra parsley and a squeeze of lemon to individual bowls. For a different silky egg-and-lemon chicken and rice soup, try Avgolemono Soup, which uses a different finishing technique.

Gluten-free. Rice is naturally gluten-free, but check packaged broth, bouillon and seasoning blends because ingredients vary.

Storage, Freezing and Reheating

Cool and refrigerate promptly. Divide leftover soup into shallow containers and refrigerate within 2 hours of cooking, or within 1 hour if exposed to temperatures above 90°F / 32°C. Cooked rice needs particularly quick cooling, ideally within 1 hour; don’t leave it in a warm pot.
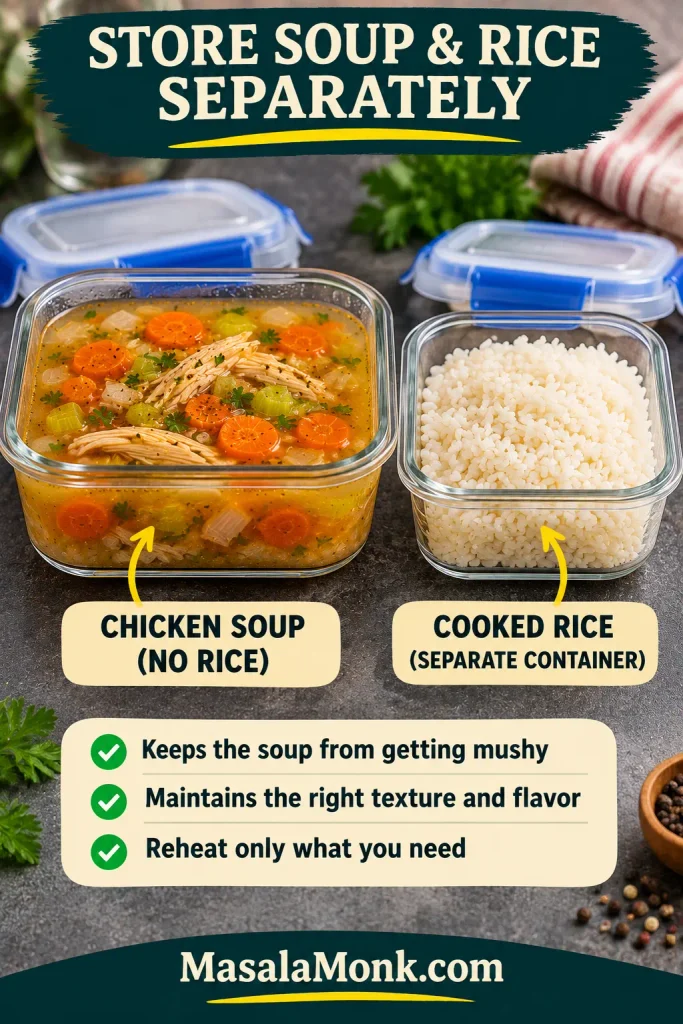
Two open rectangular glass containers: golden chicken-and-vegetable soup without rice on the left, cooked white rice on the right, and blue storage lids behind them.
Separate shallow containers help rice cool promptly and prevent it from swelling in the stored soup.

Soup without rice: Under US food-storage guidance, properly refrigerated meat-and-vegetable soup generally keeps for 3–4 days.

Cooked rice: The UK’s Food Standards Agency recommends refrigerating cooked rice promptly, using it within 24 hours and reheating it only once. If rice has already been mixed into the soup, following that shorter storage window is a cautious choice. For several days of meal prep, keep the rice-free soup separate and cook fresh rice or freeze rice portions promptly.
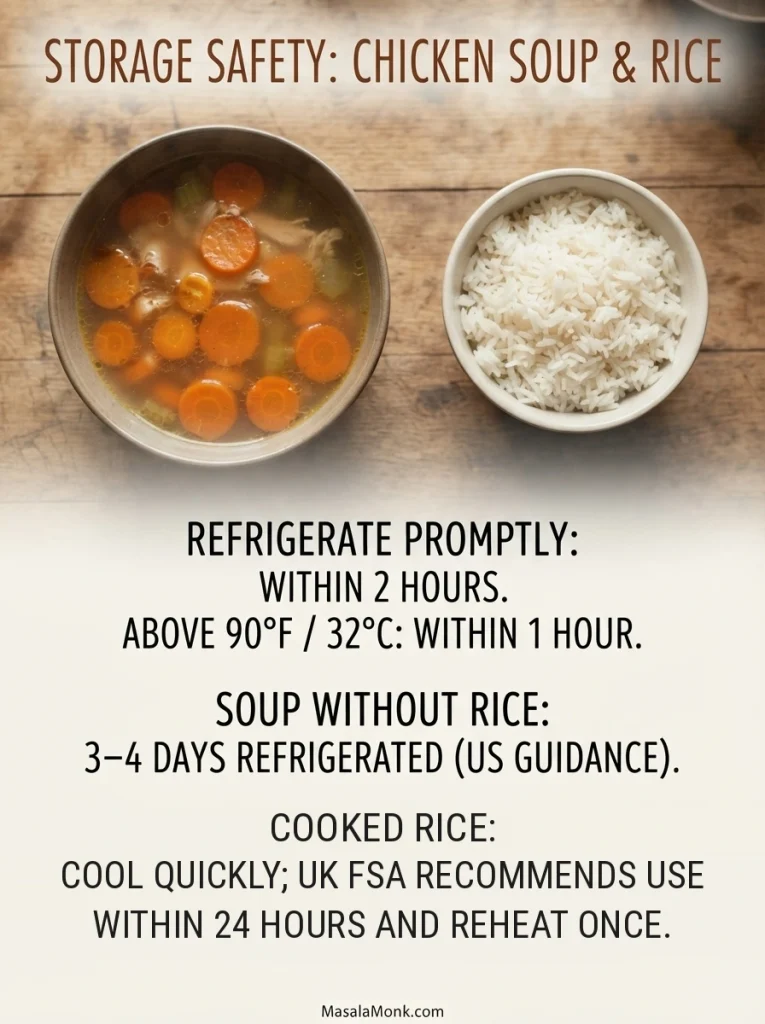
Chicken soup and cooked rice pictured above a storage-safety graphic: refrigerate promptly, US guidance gives rice-free soup three to four days, while UK advice says use chilled cooked rice within 24 hours.
Label the containers. Rice-free chicken soup and soup already mixed with rice have different recommended fridge-storage windows.

Uncooked rice can contain spores of Bacillus cereus that survive cooking. If cooked rice sits warm for too long, bacteria can grow and produce toxins that reheating may not remove. Rapid cooling matters just as much as getting leftovers hot again.

Freezing

Freeze the chicken-and-vegetable soup without rice when possible. Cook fresh rice when you reheat the soup, or freeze cooked rice separately after cooling it quickly. For best quality, use frozen soup within about 2–3 months.
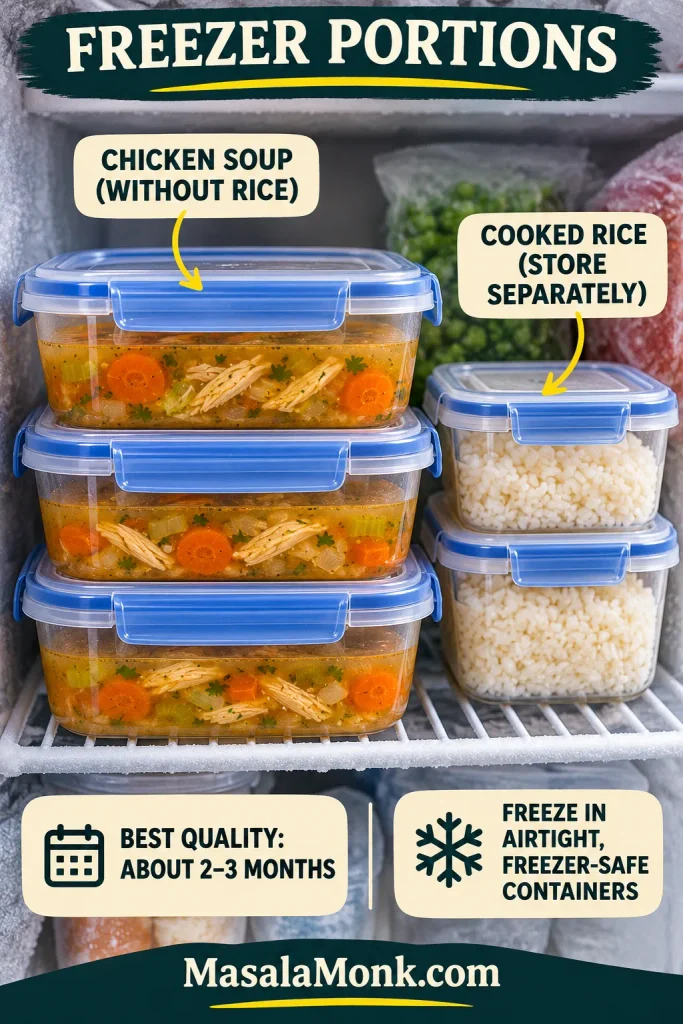
Inside a frosty freezer, three stacked sealed blue-lidded containers of rice-free chicken soup sit beside two smaller sealed containers of cooked white rice; labels advise separate freezing.
Freeze in meal-size portions, with the rice separate where possible. Two to three months is a quality target, not a sudden safety deadline.

Reheating

Stovetop. Bring refrigerated soup to a boil, stirring so it heats evenly. If it has thickened, add broth as needed and taste again. When rice has been refrigerated separately, reheat it thoroughly before combining with the soup.

Microwave. Reheat individual portions in a microwave-safe bowl, loosely covered, stirring between intervals to eliminate cold spots. Let the food stand briefly, then check that it’s heated throughout.

Under US guidance, reheated leftovers should reach 165°F / 74°C throughout. Reheat only the portions you intend to eat, especially when cooked rice is involved. Freshly cooked rice can go straight into serving bowls; chilled rice should be reheated thoroughly before serving.
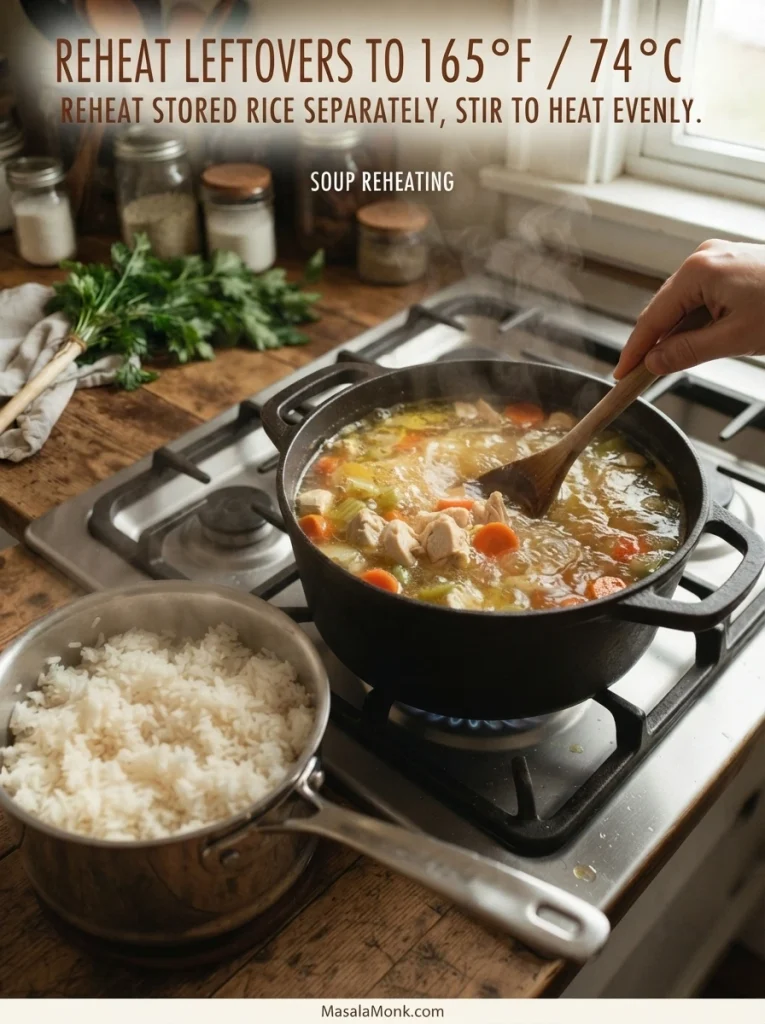
A hand stirs boiling chicken-and-vegetable soup in a black stovetop pot beside a separate saucepan of white rice; on-image instructions say reheat leftovers to 165°F / 74°C.
Reheat soup and refrigerated rice thoroughly before bringing them together. Add a little broth if the soup has thickened.

Ready for another bowl? Assemble stored soup and rice · Back to the recipe · Back to the beginning

Frequently Asked Questions

Can I put uncooked rice directly into chicken soup?

Yes. That’s the one-pot method used here. Keep the rice quantity modest, check it for tenderness and stop simmering once everything is cooked. For soup you plan to store, cooking rice separately gives you a better texture later.

Can I use cooked rice?

Yes. Add freshly cooked rice to individual bowls and ladle the hot soup over it. Previously refrigerated rice should be reheated thoroughly before combining; see the make-ahead bowl assembly for portioning and the storage guidance for safety.

How much rice should I use?

This recipe uses 85 g / a scant ½ US cup dry long-grain white rice for the whole pot. That’s intentionally modest for approximately six bowls. More rice makes a thicker soup and may require additional broth.

Can I double the recipe?

Yes. Use a pot holding at least 8 US quarts / about 7.5 liters, and allow more time to heat the larger quantity of broth. Double the main ingredients but increase salt cautiously because broth brands vary. Check chicken, rice and vegetables for doneness independently.

What to Serve With Chicken and Rice Soup

The bowl already has chicken, rice and vegetables, so it doesn’t need much beside it. A piece of homemade focaccia to drag through the last inch of broth is usually enough.
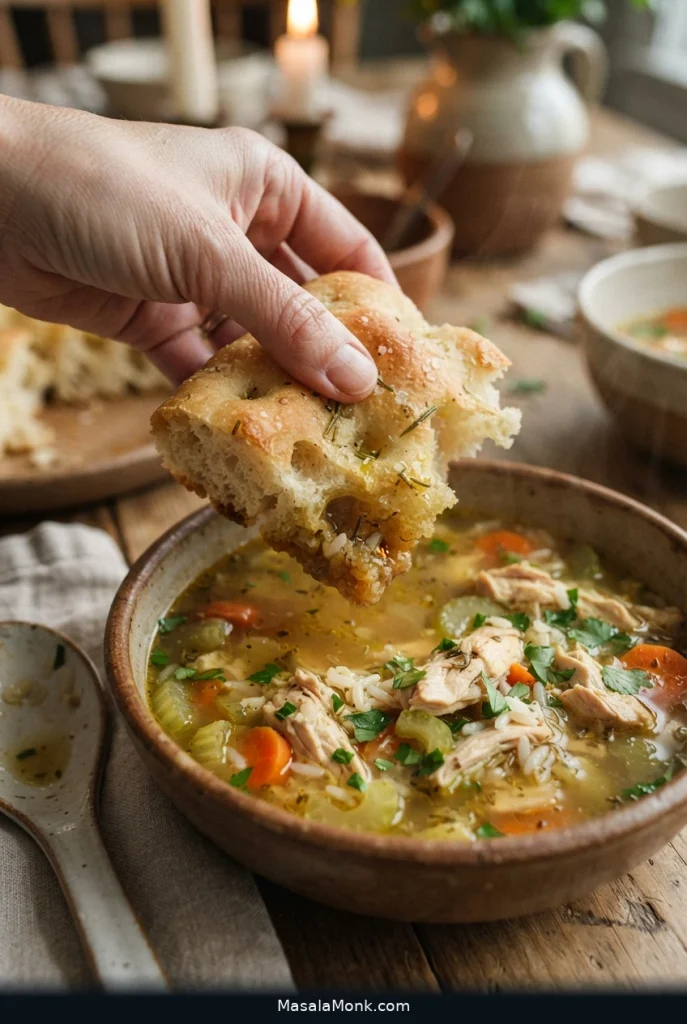
Hand holding a torn piece of focaccia with its porous crumb dipped into golden chicken and rice soup; shredded chicken and carrot slices are visible in the bowl.
A torn piece of focaccia catches the last spoonful of broth beautifully.

If you want something crisp alongside it, try a cucumber salad with a little vinegar, dill and onion. A grilled cheese sandwich makes the meal more substantial when you’re especially hungry.

Ladle the soup into deep bowls, add black pepper or a squeeze of lemon if you like, and bring it to the table while the broth is hot.
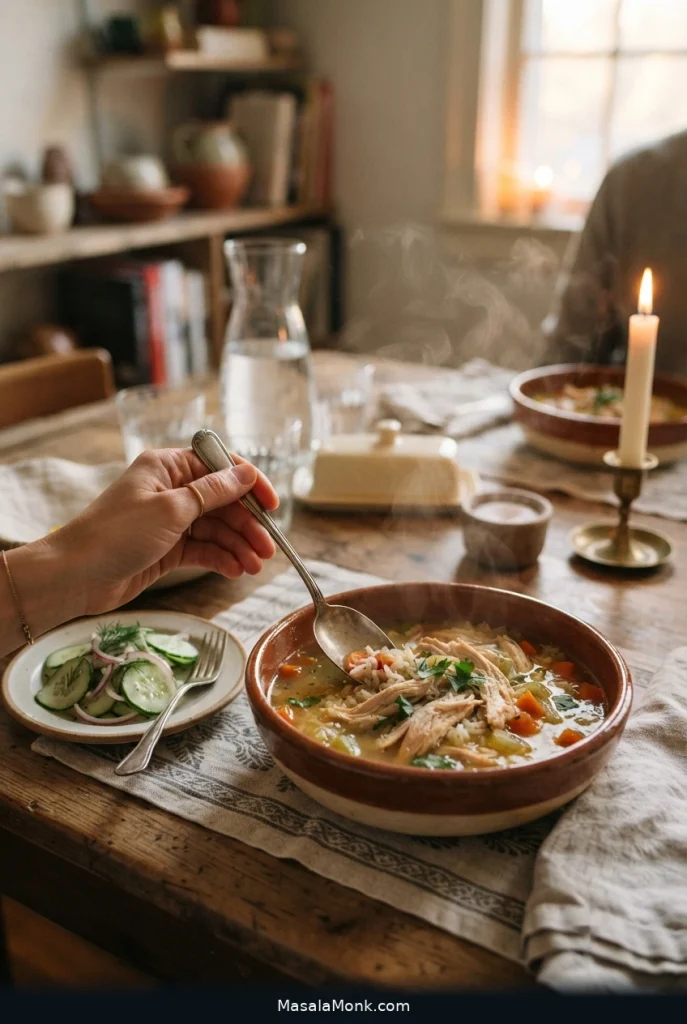
Warm dinner table with a bowl of chicken and rice soup, a small cucumber-and-onion salad, bread and another soup bowl in the background; a hand holds a spoon.
A hot, savory bowl with bread and a crisp cucumber salad: an easy dinner that doesn’t ask for much else.

Back to the recipe · Back to the beginning

Posted on — Leave a comment

Chicken Enchilada Soup Recipe: Easy, Creamy & Cheesy

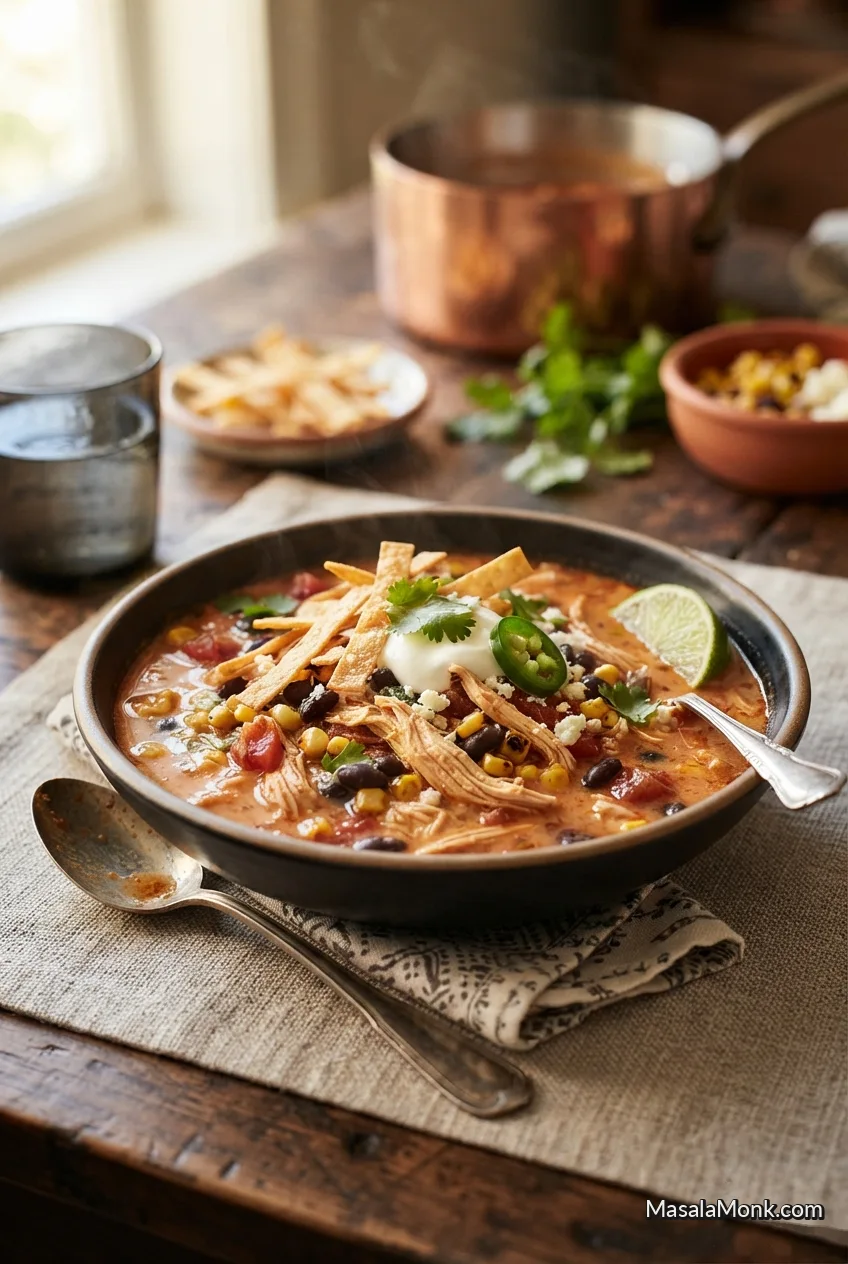
Wide dark bowl of creamy red-orange chicken enchilada soup with shredded chicken, black beans, corn, tortilla strips, sour cream, sliced jalapeño and a lime wedge.

A good chicken enchilada soup should still move when you tilt the ladle. This creamy red soup brings together shredded chicken, red enchilada sauce, black beans, corn and masa harina, then finishes with cream cheese, cheddar and Monterey Jack. The goal is a broth that clings to everything in the bowl without turning into queso or enchilada filling.

The first spoonful should bring red chile and cumin, followed by tender chicken, sweet corn and beans in a creamy broth. A squeeze of lime lifts the richness, while crisp tortilla strips add a crunch that gradually softens around the edges.

The order is what keeps this soup creamy rather than heavy: build the seasoned red base, cook raw chicken gently if using it, thicken with masa, and melt the cheeses over low heat. Already-cooked rotisserie chicken joins after the masa thickens, making it a useful shortcut.

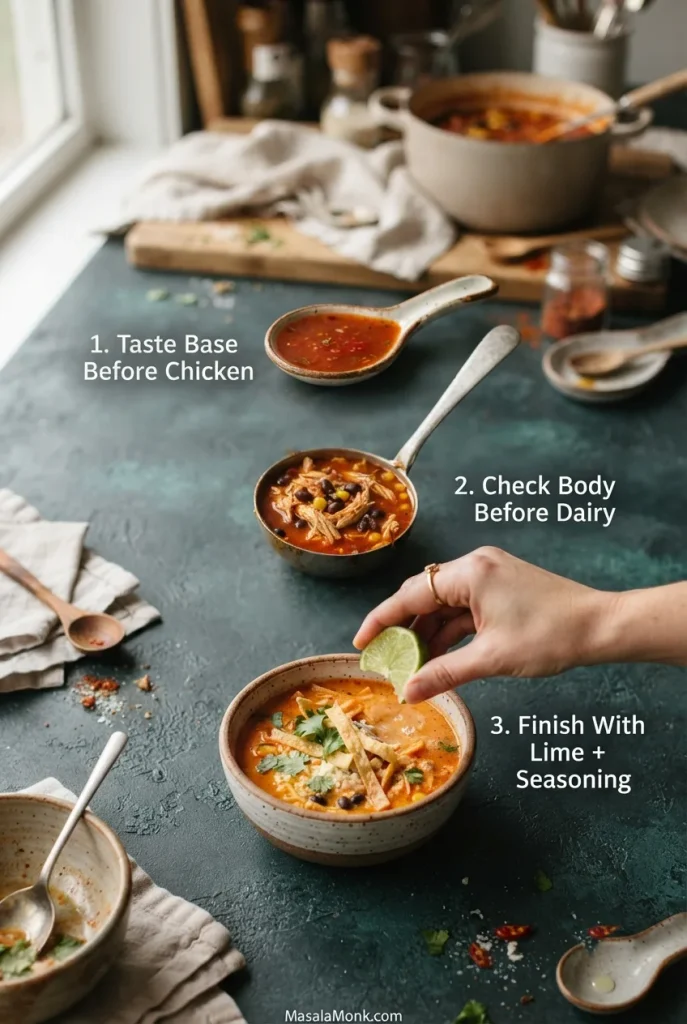
Three Moments That Decide the Soup

  • Before the raw chicken goes in: Taste the chile and enchilada flavor, not the final salt level. The base can be a little stronger than you want because the remaining ingredients will soften it.
  • Before the dairy: Look for a lightly thickened broth that coats a spoon without becoming heavy. This is the easiest moment to adjust it.
  • Before serving: Check that the chicken is tender, the cheese is smooth, and the lime and seasoning have brought the flavors together.
Three labeled cooking checkpoints: a spoon of red base before chicken, a ladle of chunky soup before dairy, and a finished bowl receiving lime.
At the first chicken enchilada soup checkpoint, use a separate clean tasting spoon. After raw chicken goes in, wait until it has cooked safely before tasting the liquid again; the other two checks happen later.

Chicken Enchilada Soup Recipe

Serves
About 6
Prep
About 20 minutes
Cook
About 40–45 minutes
Total
About 1 hour
Method
Stovetop
Pot
5–6 qt / 4.7–5.7 L

Jump to instructions if your ingredients are already prepared.

Equipment

  • 5- to 6-quart / 4.7- to 5.7-liter heavy pot or Dutch oven
  • Small bowl or measuring jug
  • Whisk
  • Instant-read thermometer

Ingredients

Aromatics and Spices

  • 2 tablespoons / 30 ml neutral oil or olive oil
  • 1 medium yellow onion, finely diced, about 6 oz / 170 g
  • 4 garlic cloves, minced
  • 1 small jalapeño, finely diced, with most of the pale inner ribs and seeds removed for milder heat, optional
  • 2 teaspoons mild American-style chili powder seasoning blend, not pure ground red chilli or cayenne
  • 1½ teaspoons ground cumin
  • 1 teaspoon smoked paprika
  • ½ teaspoon dried oregano

Enchilada Base and Chicken

  • 2½ cups / about 590 ml red enchilada sauce, measured
  • 1 can (14–14.5 oz / 400–410 g) fire-roasted diced tomatoes, with juices
  • 1 can (4 oz / 113 g) diced green chiles, with juices
  • 3 cups / 710 ml low-sodium chicken broth, divided, plus up to 1 cup / 240 ml more as needed
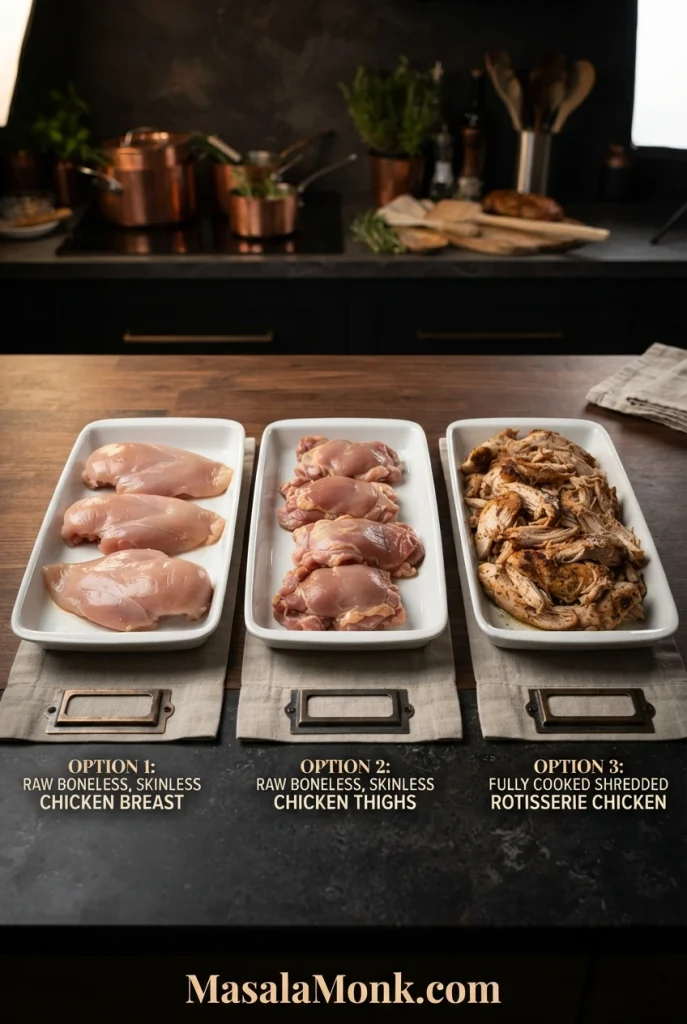
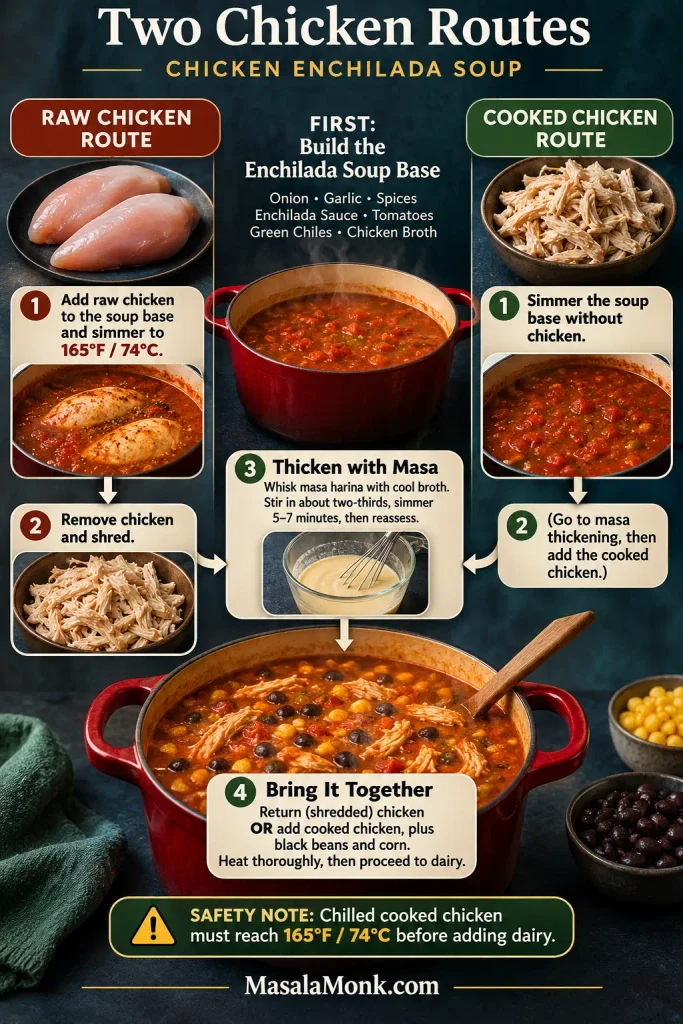
  • Chicken — choose one: 1½ lb / 680 g raw boneless, skinless chicken breast, or approximately 450–500 g / 3–3½ cups cooked shredded rotisserie or leftover chicken. See how the cooking routes differ.

Thickening and Add-ins

  • ⅓ cup / about 40–45 g masa harina
  • 1 can (15 oz / 425 g) black beans, drained and rinsed
  • 1 cup / about 160 g corn kernels, frozen or drained canned

Creamy Finish

  • 4 oz / 113 g full-fat cream cheese, cut into small cubes and softened
  • 4 oz / 113 g mild or medium cheddar, freshly grated
  • 2 oz / 57 g Monterey Jack, freshly grated
  • 1–2 tablespoons / 15–30 ml fresh lime juice, to taste
  • Freshly ground black pepper, to taste
  • Salt, as needed after the cheese has been added

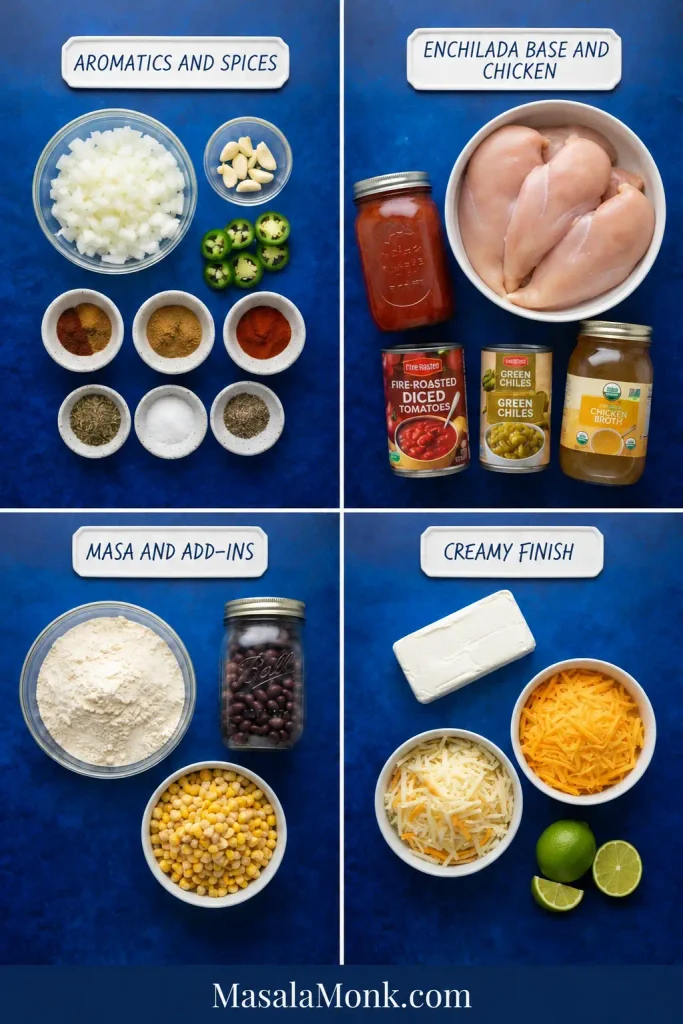
Here is the ingredient overview arranged by cooking stage. Use the measured list above for exact quantities.

Four-part overhead ingredient layout labeled aromatics and spices, enchilada base and chicken, masa and add-ins, and creamy finish; includes whole raw chicken breasts, black beans, corn and cheeses.
Arrange ingredients by cooking stage, but keep raw chicken away from ready-to-eat toppings. Also reserve the cool broth for masa before the rest enters the pot.

Ingredient Notes Before Cooking

Before you start: Cube the cream cheese when you begin preparing the ingredients so it has time to soften. Don’t leave perishable dairy unrefrigerated longer than two hours, or one hour above 90°F / 32°C. In a very hot kitchen, keep it refrigerated until needed and use the hot-broth whisking method below to help it blend. Why the dairy needs gentle heat.

Choosing your sauce: Start with a mild red enchilada sauce if you’re unsure about the heat, and check its sodium content. Measure the full 2½ cups rather than assuming two standard 10-oz cans will provide exactly that amount. For more buying advice, see choosing your enchilada sauce.

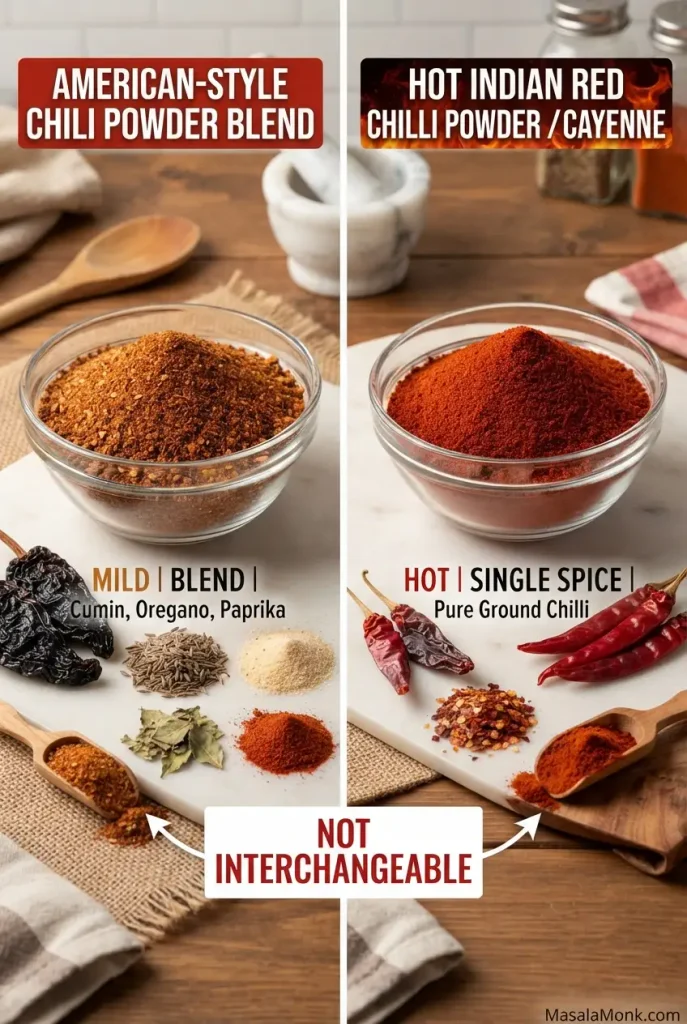
A note on chili powder: American-style chili powder is generally a mild seasoning blend. Hot Indian red chilli powder and cayenne are much stronger and are not spoon-for-spoon substitutes. For the gentlest version, use mild enchilada sauce and omit the optional jalapeño.

Comparison graphic with two bowls of ground spice: brown American-style chili powder blend and brighter red hot Indian chilli powder or cayenne, labeled not interchangeable.
Because chili powder means different things in different countries, read the ingredients rather than relying on color. A U.S.-style seasoning blend may include cumin, garlic or oregano; pure cayenne or red chilli powder is primarily ground hot pepper.

No fire-roasted tomatoes? Regular canned diced tomatoes are fine. Fire-roasted tomatoes add a slightly deeper roasted flavor, but they’re not essential.

For Serving

  • Crispy corn tortilla strips
  • Lime wedges
  • Fresh cilantro
  • Diced avocado
  • Pico de gallo
  • Sour cream, optional
  • Sliced jalapeño, optional

Ready-made crispy tortilla strips work well. You can also cut corn tortillas into thin strips and bake or shallow-fry them until crisp before serving.

Instructions

Build the Enchilada Base and Cook Chicken

  1. Cook the onion and spices. Heat oil in a heavy pot over medium heat. Cook the onion for 4–6 minutes until soft and translucent. Add garlic and optional jalapeño; stir for about 30 seconds. Add the chili powder blend, cumin, smoked paprika and oregano; stir another 30 seconds until fragrant.
  2. Build the enchilada base. Add the red enchilada sauce, diced tomatoes and green chiles, including their juices. Stir, scraping the bottom of the pot, and let everything bubble gently for 2–3 minutes.
  3. Add the broth and taste. Reserve ½ cup / 120 ml broth for the masa. Pour the remaining 2½ cups / 590 ml into the pot and bring it to a gentle simmer. Taste before adding raw chicken. The enchilada flavor and heat can be slightly stronger than you want in the finished soup. Leave the final salt adjustment until after the cheese.
  4. Cook the chicken, if starting raw. Submerge the chicken breasts in the gently simmering base, turning if needed. Begin checking after about 12 minutes; cook each breast until its thickest part reaches 165°F / 74°C. Thick breasts may need more than 18 minutes. Remove, rest briefly and shred. Using cooked chicken? Simmer the base alone for several minutes, then proceed to masa. Add the cooked shreds with beans and corn in step 7.

Thicken and Fill the Soup

  1. Make the masa slurry. Whisk the masa harina with the reserved cool broth until smooth. Add another splash of cool broth if the slurry is too thick to pour. See what the slurry should look like.
  2. Thicken the soup. Stir about two-thirds of the slurry into the gently simmering broth. Cook for 5–7 minutes, stirring occasionally. Check the consistency, then re-whisk and add more of the reserved slurry only if needed. Let any additional masa simmer for several minutes before checking again. Stop when the broth lightly coats a spoon but still pours easily.
  3. Add the chicken, beans and corn. Return the freshly cooked shredded chicken, or add the prepared cooked chicken, along with the black beans and corn. For the fresh-chicken route: simmer gently for about 3–5 minutes, until everything is hot. Using refrigerated cooked chicken? Bring the soup back to a boil, stirring, and verify that the chicken reaches 165°F / 74°C throughout before lowering the heat for the dairy.
  4. Make the final thickness adjustment. Give a thin soup a little more uncovered simmering time. If it’s thicker than you like, stir in warm broth ¼ cup / 60 ml at a time. This check accounts for the chicken, beans and corn now in the pot.

Melt the Cheeses and Serve

  1. Add the dairy. Reduce the heat to low. Put the softened cream cheese in a bowl. Add a ladle of mostly-liquid hot broth from the pot, avoiding the chicken, beans and corn, and whisk until smooth. Stir the mixture back into the pot. Add the cheddar and Monterey Jack a handful at a time, stirring gently until melted. Avoid boiling during this initial cheese-melting stage. See the tempering technique.
  2. Season and serve. Stir in 1 tablespoon / 15 ml lime juice. Taste, then adjust the lime, black pepper and salt. Ladle into bowls and finish with your favorite toppings.

Chicken Enchilada Soup: Step-by-Step Photos

Follow the changes in the pot as the red base becomes a pourable, creamy soup. The photos highlight the cues that are hardest to judge from cooking times alone.

Build the Red Base and Check Chicken Doneness

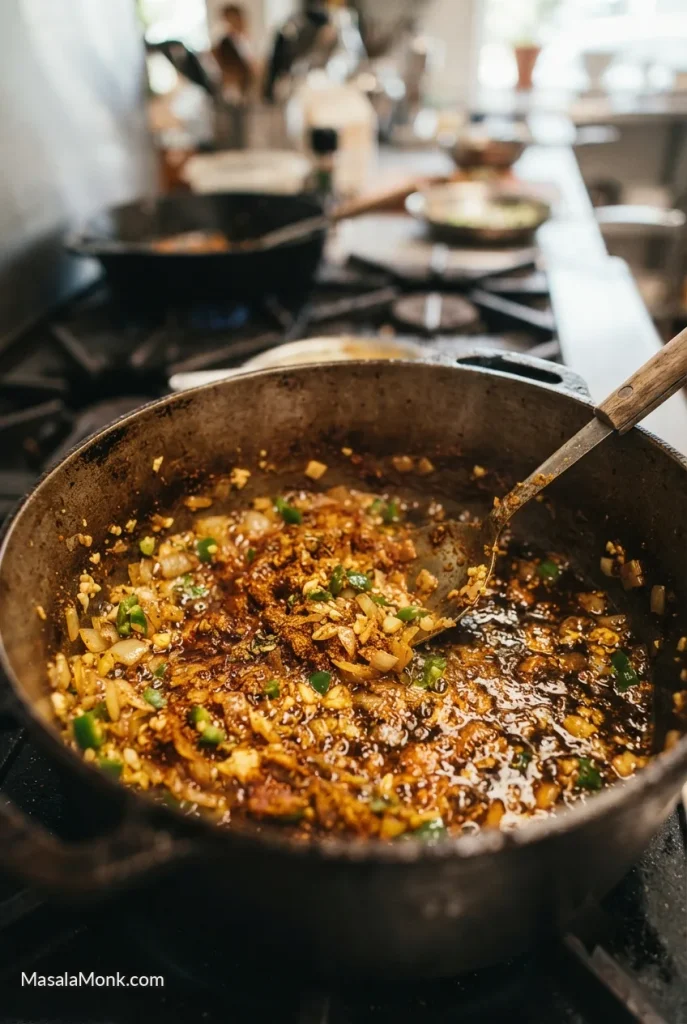
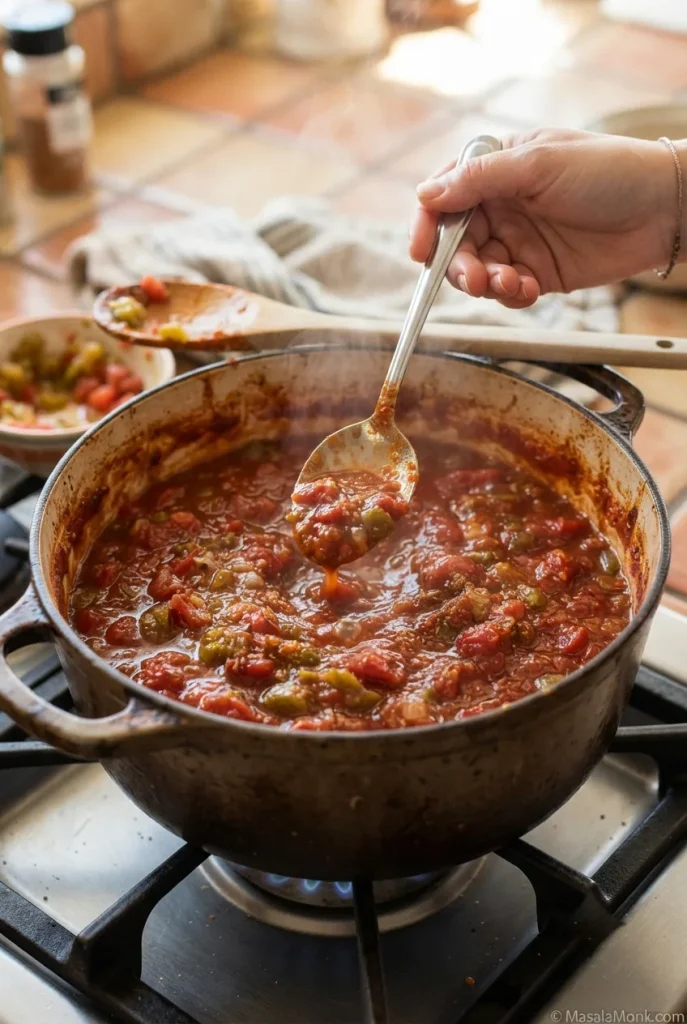
Aromatics should glisten, not scorch. The softened onion and spices should look glossy before the sauce goes in.

Close-up of softened diced onions, minced garlic, green jalapeño pieces and reddish ground spices glistening in oil in a dark cooking pot.
The spices should glisten in the oil. If they begin catching on the pot, lower the heat before adding the enchilada sauce.

The red base starts thick. Once the tomatoes, green chiles and enchilada sauce are stirred together, it will look more like a chunky sauce than a finished soup.

Spoon lifting a chunky red enchilada sauce and diced-tomato base with green chile pieces from a heavy pot, before the chicken goes in.
This chunky mixture loosens once the broth goes in. Judge the final thickness only after the masa has cooked.

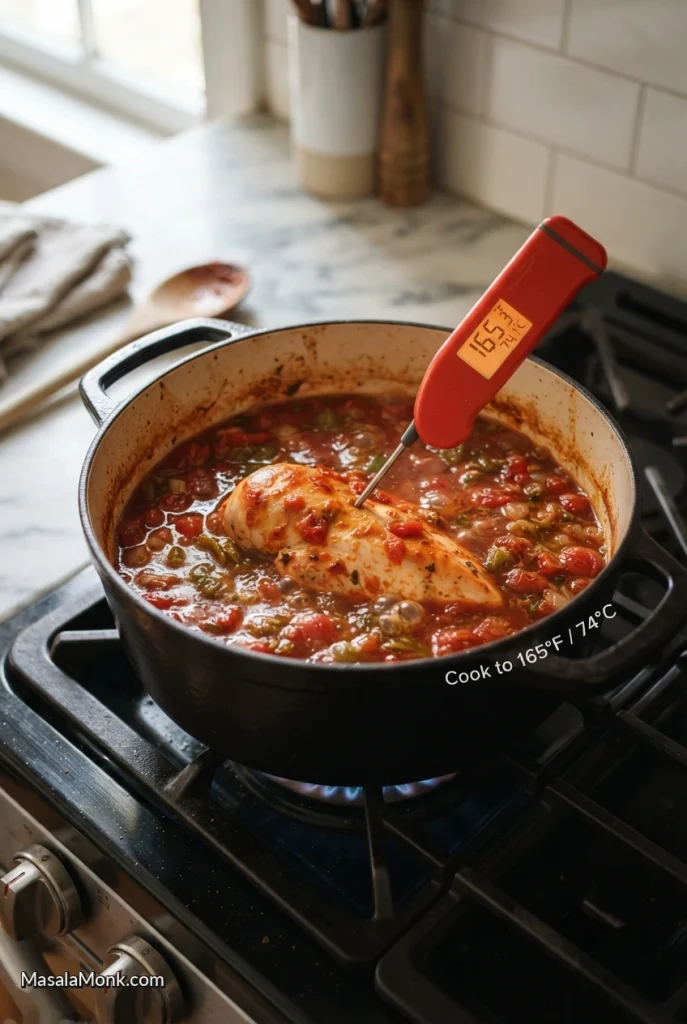
Check the thickest center. A thermometer confirms 165°F / 74°C more reliably than the cooking clock, especially with unevenly sized breasts.

Instant-read thermometer inserted into a cooked chicken breast in a Dutch oven of red enchilada broth on a gas stove; the graphic says cook to 165°F / 74°C.
When several chicken breasts vary in size, check each one at its thickest center rather than relying on a single cooking time. Keep the thermometer tip clear of the pot and remove each breast once it reaches 165°F / 74°C.

Make the Masa Slurry and Thicken the Broth

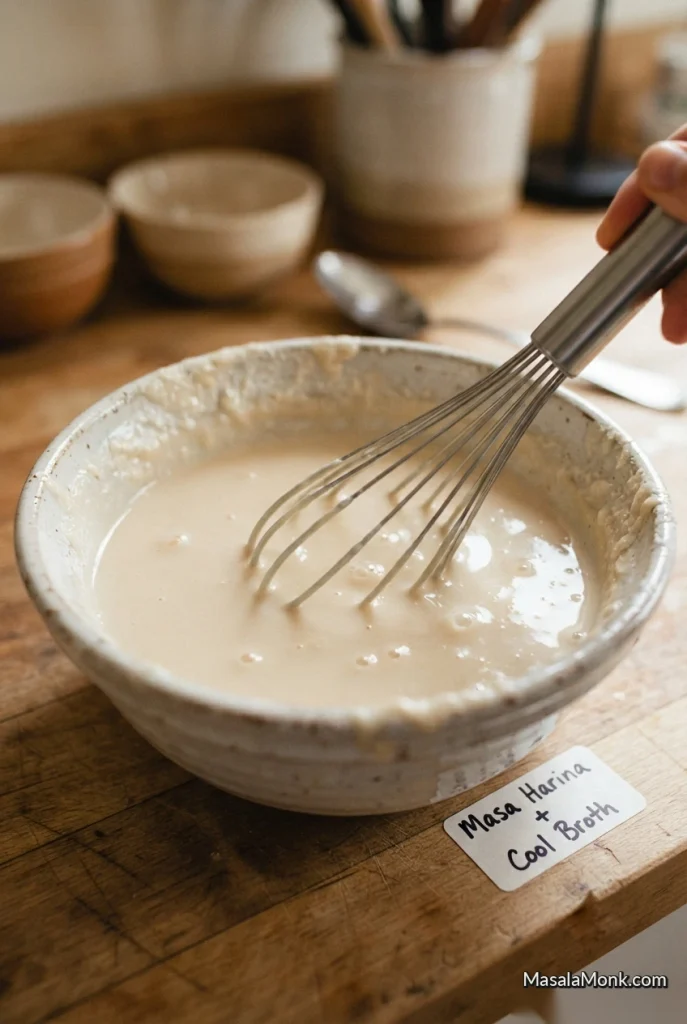
Look for a smooth, pourable slurry. No dry masa should remain on the bottom of the bowl.

Metal whisk in a ceramic bowl of pale, pourable masa harina and cool-broth slurry; a small note identifies the mixture.
Scrape the bowl as you whisk; dry masa can hide under the surface. The slurry should flow off the whisk.

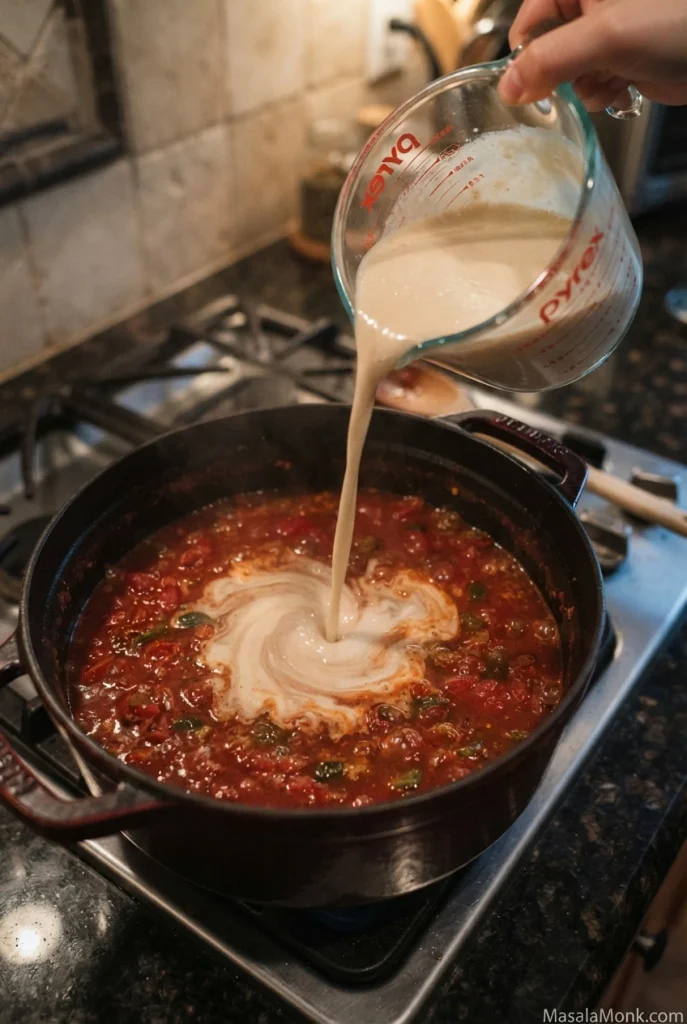
Add the masa gradually. The hot red broth should stay fluid as the slurry is stirred in. Let it thicken before using the rest.

Hand pouring pale masa harina slurry from a glass measuring jug into a dark pot of red enchilada soup base, with the liquid swirling where it meets the sauce.
Pour slowly while stirring the red base to keep the masa from clumping.

Before adding cheese: Return the shredded chicken to the thickened broth, or add your cooked rotisserie chicken, then stir in the black beans and corn. Heat everything through (to 165°F / 74°C if the cooked chicken was refrigerated), adjust the thickness, and only then lower the heat for the cheese.

Incorporate the Cheeses Gently

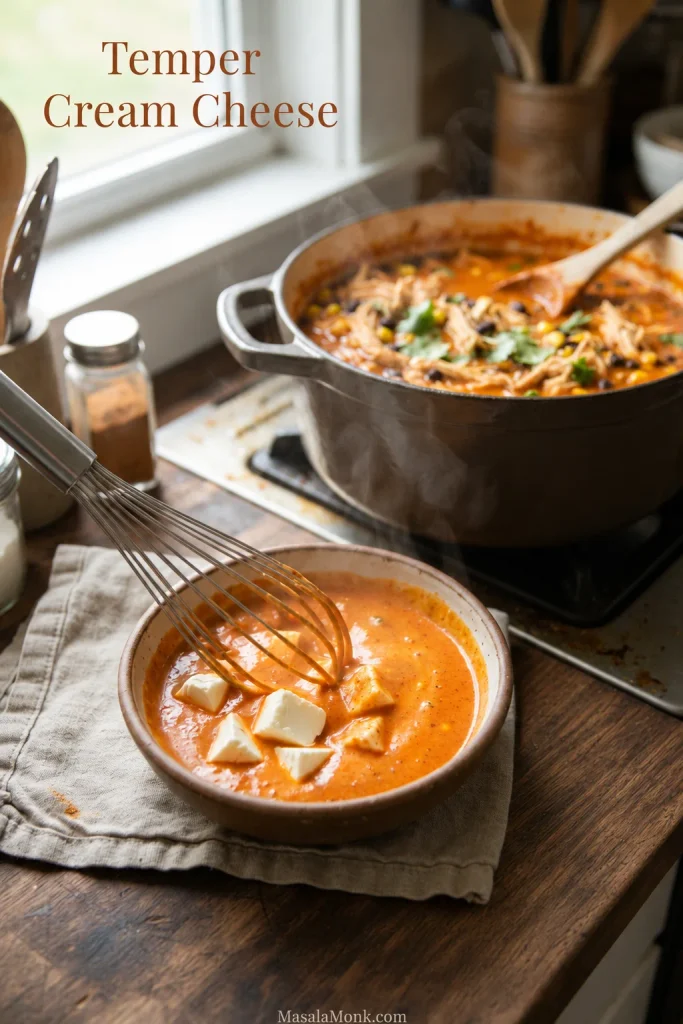
Whisk the cream cheese in a separate bowl. Use mostly-liquid hot broth from the pot, leaving the chicken, beans and corn behind in the ladle.

Separate ceramic bowl with softened cream-cheese cubes in orange soup and a metal whisk, beside a steaming pot of chicken enchilada soup.
Whisk out any remaining white cream-cheese pieces in the bowl before returning the mixture to the pot.

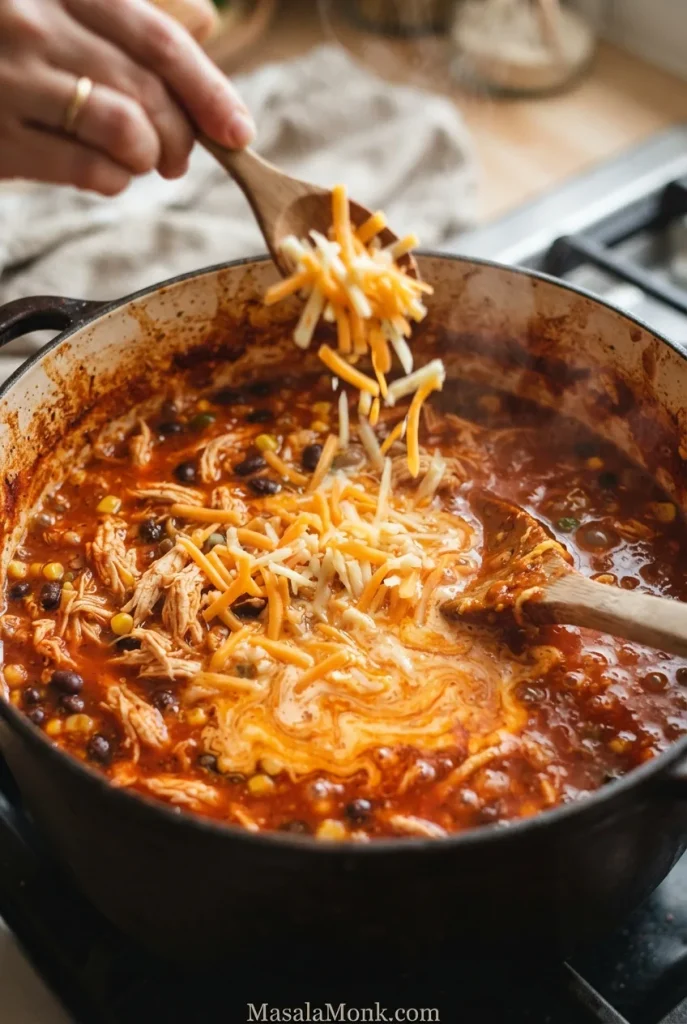
Watch the surface as the cheese melts. Keep the heat low and stir in small handfuls rather than letting the pot boil.

Hand using a wooden spoon to add freshly grated orange cheddar and pale Monterey Jack to a red soup pot containing shredded chicken, black beans and corn.
Add grated cheese by the handful over low heat, stirring until each addition melts.

Check the Finished Soup and Spoonful

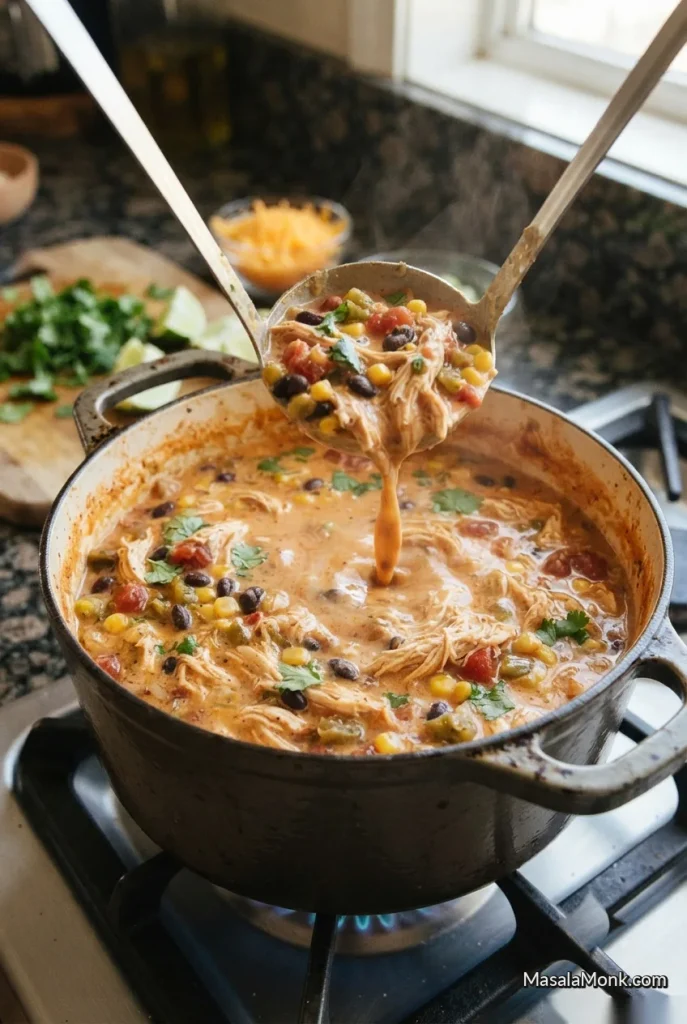
Look for creamy broth with distinct pieces. You should still recognize chicken shreds, black beans and corn; the liquid should not be a thick cheese sauce.

Ladle lifting creamy orange-red soup containing shredded chicken, black beans, corn and diced tomatoes from a steaming pot on the stove.
Stir gently from the bottom before serving to lift the beans and corn through the creamy broth.

Lift a spoonful before serving. The broth should drip easily between the chicken, beans and corn—not hang from the spoon in heavy strands.

Hand holding a spoon of shredded chicken, black beans and corn as a thin stream of creamy orange-red broth drips into a garnished soup bowl below.
The broth drips freely around the chicken, beans and corn. That is the creamy-but-pourable texture to aim for.

Choosing the Enchilada Sauce

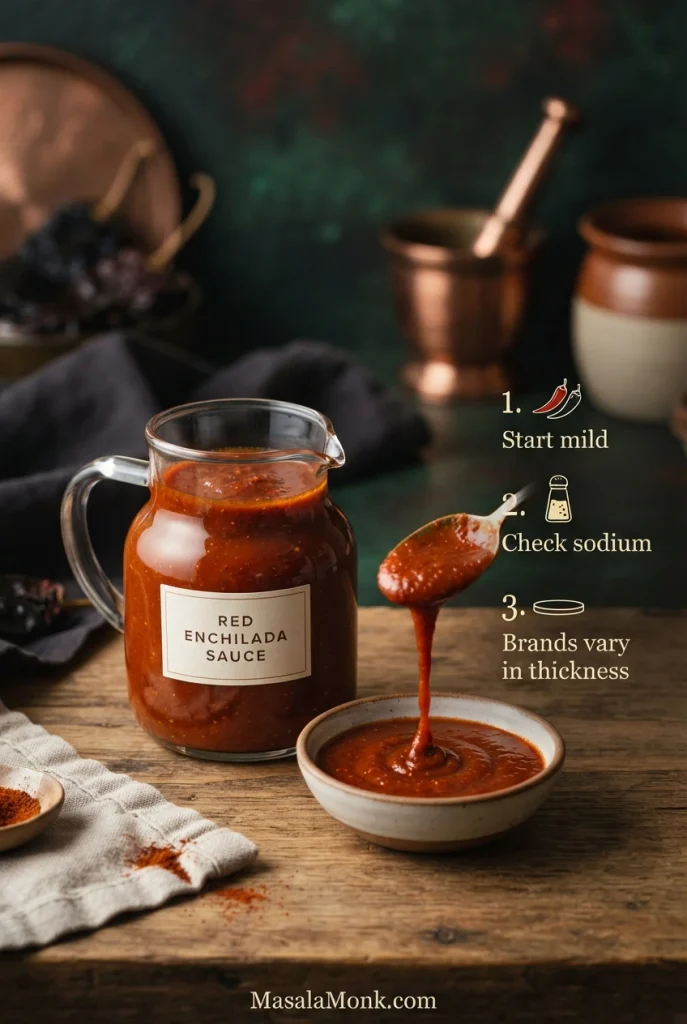
Red enchilada sauce does most of the flavor work in this recipe. One brand may be mild and tomato-forward, another smokier, saltier or noticeably hotter. For a first batch, choose a mild red sauce with a sodium level you’re comfortable with; you can adjust the seasoning at the end. If your sauce is especially thick, check the masa texture guide before using all the slurry.

Glass jug of red enchilada sauce and a spoon pouring sauce into a small bowl, with labels to start mild, check sodium and note that brands vary in thickness.
Watch how the enchilada sauce coats a spoon. Check the label for added starch or flour, which can change how much masa the soup needs.

What About Green Enchilada Sauce?

Green enchilada sauce usually leans on green chiles and often tomatillos, giving it a brighter, tangier flavor than the red chile-forward sauce used here. It can make a good soup, but changing the sauce changes the flavor balance, so treat it as a separate variation rather than expecting the same result.

Raw Chicken, Rotisserie Chicken or Thighs?

Boneless chicken breast is the default for the main recipe. Its mild flavor works well with the red enchilada base, and it shreds easily once cooked. The thermometer matters more than the clock, especially when the breasts are thick.

Three white trays on a counter displaying raw boneless skinless chicken breasts, raw boneless skinless thighs and cooked shredded rotisserie chicken, each labeled.
Choose one route: weigh breasts or thighs raw, or measure rotisserie chicken after cooking.

If dinner is already running late, cooked chicken is the shortcut worth taking. Rotisserie chicken works well, or you can prepare a baked chicken breast ahead of time and shred it after resting.

Boneless, skinless chicken thighs are another option. Use approximately the same raw weight as the breasts, check for the safe minimum of 165°F / 74°C, and allow additional cooking if needed for tenderness. Thighs are more forgiving when cooking time runs long and make the broth a little richer.

Two chicken routes share the same masa and dairy stages. Whole raw breast must simmer safely before shredding; already-cooked rotisserie chicken skips that step and joins after the masa thickens. If the cooked chicken was chilled, reheat it thoroughly to 165°F / 74°C before adding dairy.

Two-route chicken enchilada soup diagram: raw chicken is simmered to 165°F / 74°C and shredded before masa thickening; cooked chicken joins after masa. Chilled cooked chicken must reach 165°F / 74°C before dairy.
Rotisserie chicken is a shortcut to the chicken-cooking step, not to masa thickening or cheese finishing. Add cooked shreds only after the red base thickens to avoid needless simmering.

Get the Texture Right With Masa Harina

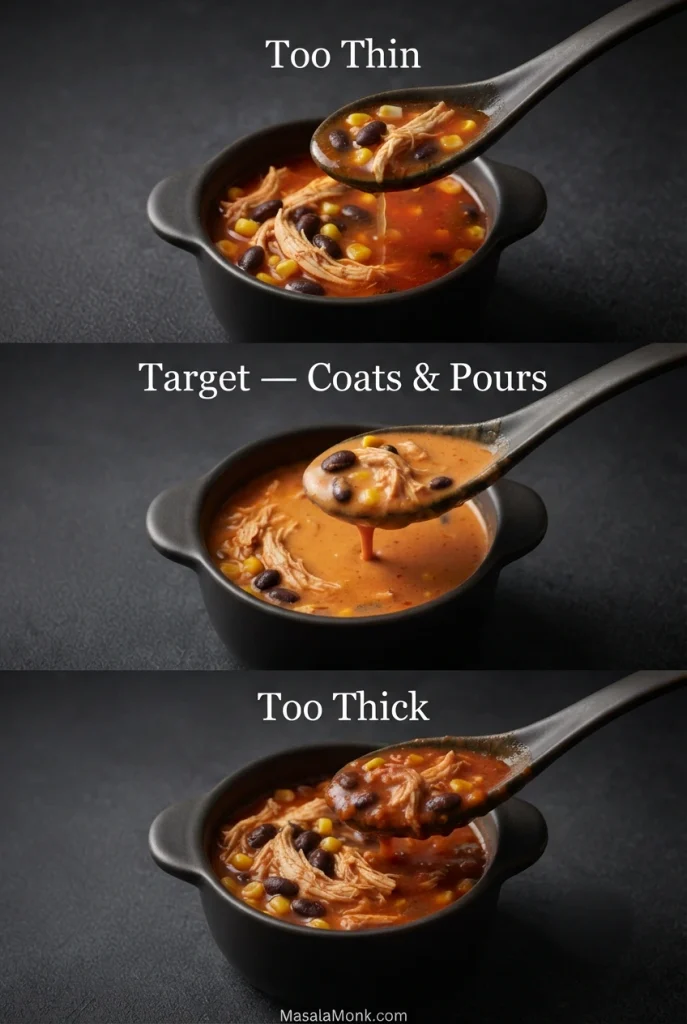
Masa harina gives chicken enchilada soup body and a mild corn-tortilla flavor. It thickens the broth before the cheeses go in. Commercial enchilada sauces vary in thickness, and some already contain starch, so a thick sauce may need less masa than a thin one. That’s why the slurry is added in stages. If the soup is already too thin or thick, skip to the consistency fixes.

Three labeled comparisons of chunky red chicken enchilada soup in bowls and spoons: too thin, target that coats and pours, and too thick.
The target broth falls smoothly from the spoon rather than running off like water or sticking in a thick mound.

Allow the masa time to hydrate before adding more. The result should be creamy and substantial but easy to spoon; if you want a brothier bowl, use less of the slurry.

What Masa Harina Adds to the Soup

Masa harina is made from nixtamalized corn and is commonly used for homemade corn tortillas. Its flavor and finely milled texture are different from ordinary coarse cornmeal.

Brands can absorb different amounts of liquid. Whisking masa with cool broth helps it disperse, and simmering gives it time to hydrate. Re-whisk any reserved slurry before adding it to the pot.

Masa-thickened soups may become noticeably thicker as they cool or sit overnight. A splash of broth during reheating can bring back a looser consistency.

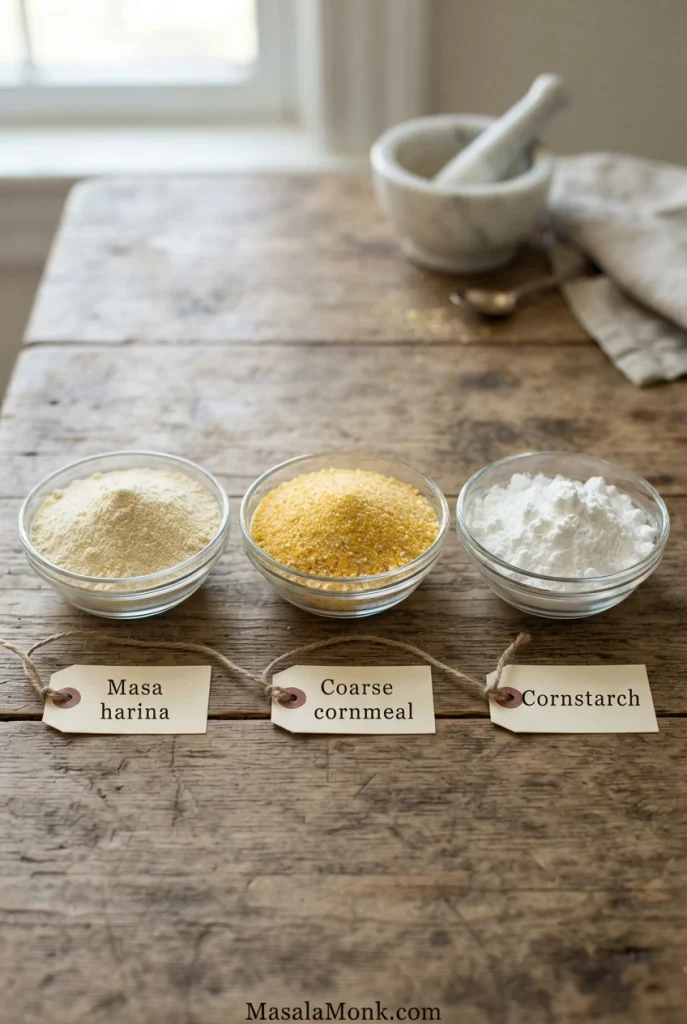
No Masa Harina?

For a practical starting alternative, whisk 1 tablespoon cornstarch with 2 tablespoons cool water or broth. Stir it into the simmering soup and let it thicken before deciding whether you need more. Cornstarch thickens without giving the broth the same corn-tortilla flavor as masa harina.

Three labeled glass bowls show fine pale masa harina, coarser yellow cornmeal and fine white cornstarch on a wooden worktop.
If a package says cornmeal or polenta, do not assume it will behave like finely milled masa harina. The visible grains are coarser; cornstarch may thicken the broth, but it will not give the same nixtamalized-corn flavor.

Other ways to add body include a few crushed corn tortillas or tortilla chips that soften into the base, or a little refried beans for a heartier finish. Each changes the flavor or texture, so start with a small amount and reassess.

Keep the Dairy Smooth

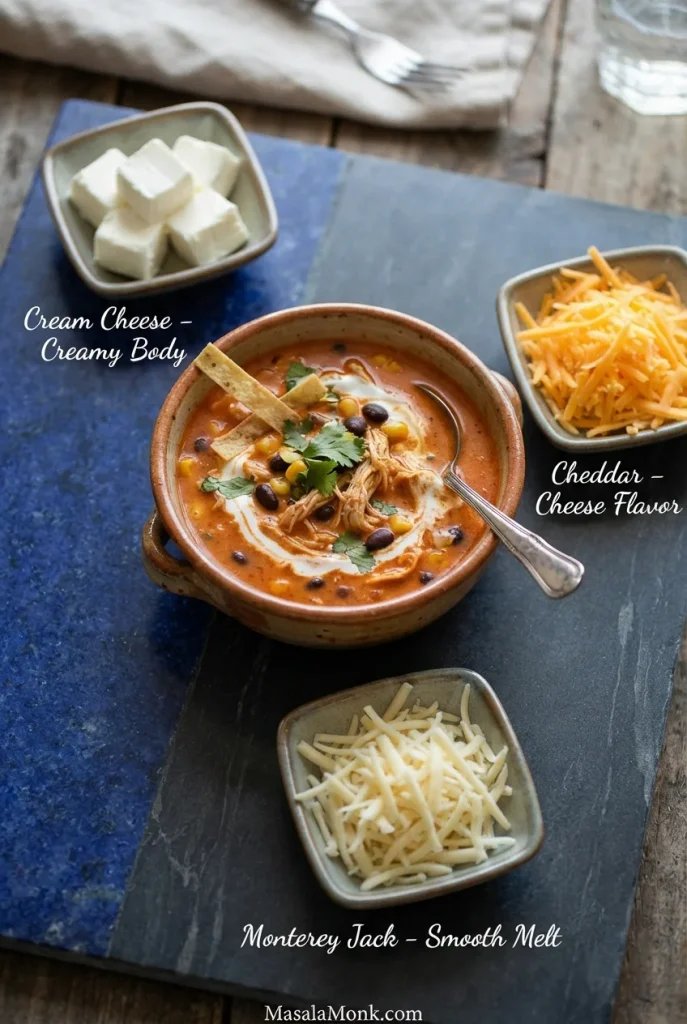
Cream cheese rounds out the enchilada broth, cheddar brings most of the stronger cheese flavor, and Monterey Jack helps the mixture melt smoothly.

Bowl of creamy chicken enchilada soup beside softened white cream-cheese cubes, grated orange cheddar and pale Monterey Jack, with labels for their individual roles.
Fine shreds of cheddar and Monterey Jack melt more evenly than thick pieces, whereas softened cream cheese can be whisked separately. Prepare them in different forms because they enter the soup differently.

The cream cheese is easiest to incorporate when softened and cut into small pieces. A block may feel soft on the outside while remaining firm in the center. Whisking it with a little hot soup first makes the final mixing easier.

The grated cheese needs even less drama. Lower heat gives it time to melt without encouraging graininess or fat separation. Freshly grated cheese is preferable because some packaged shredded cheeses contain anti-caking ingredients that can affect smoothness. If the cheese has already turned grainy or oily, use the cheese troubleshooting steps rather than raising the heat.

Fix My Chicken Enchilada Soup

Soup doesn’t always follow the plan, especially when enchilada sauces and masa brands vary. Start with what you can see in the pot. Some problems are easy to correct; others can at least be made less noticeable before serving.

Too thin or too thick

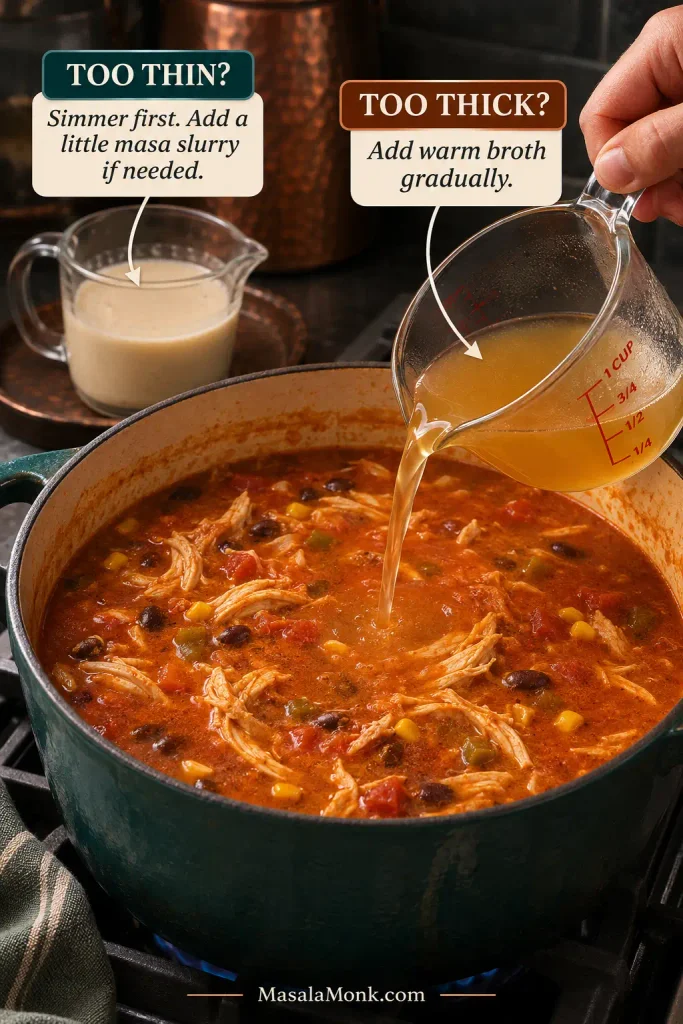
For thin soup, simmer uncovered for a few minutes and stir occasionally. Masa needs time to hydrate, so don’t rush to add more. If the broth remains watery, whisk a little additional masa with cool broth, stir it in and let it cook before checking again.

For overly thick soup, add warm broth a little at a time until you reach the consistency you prefer.

Correction graphic showing golden broth poured into chunky red chicken enchilada soup for soup that is too thick, plus a separate jug of pale masa slurry for soup that is too thin.
These are opposite corrections, not liquids to pour together. Decide whether the soup needs body or more broth; then change one thing, stir and reassess before repeating.

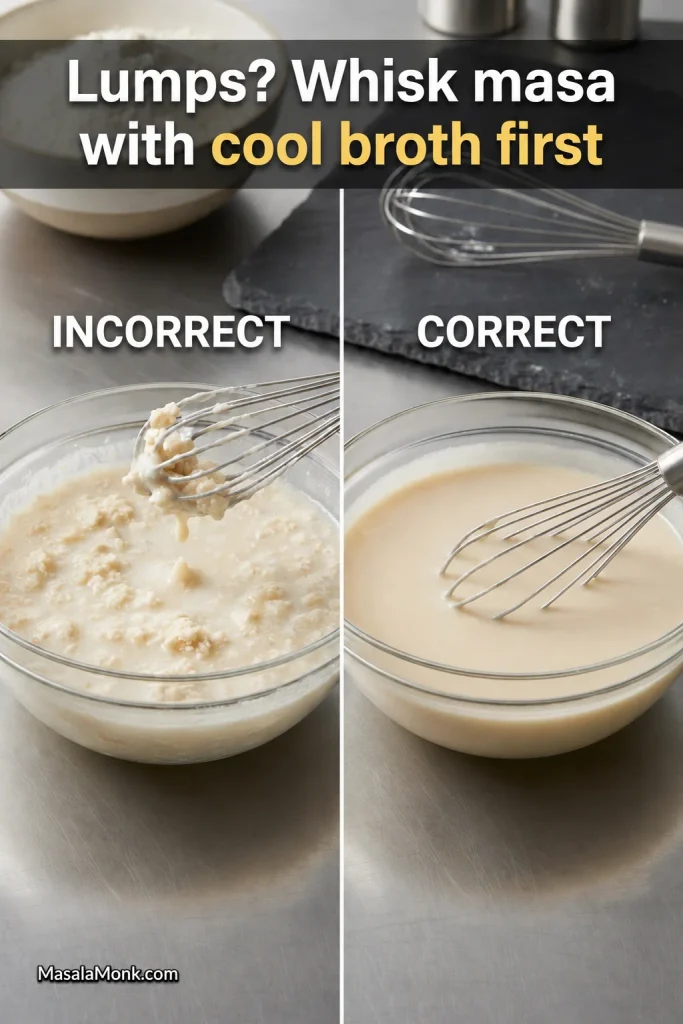
Gritty masa or masa lumps

Small masa lumps may loosen with careful whisking and a little additional simmering. A fine-mesh strainer can help remove isolated stubborn lumps, although it’s less practical once chicken and beans have been added. For prevention next time, compare with the smooth cool-broth slurry example.

Graininess throughout the pot is harder to correct. Coarse cornmeal, excessive masa or poorly dispersed masa can all contribute. Adding broth may reduce a heavy, chalky texture, but won’t necessarily eliminate the grit.

Split instructional image labeled incorrect and correct: clumpy masa mixture and whisk on the left; smooth pale masa slurry whisked with cool broth on the right.
If small masa clumps make it into the hot soup, a fine-mesh sieve is easiest to use before the chicken and beans return. However, gritty mouthfeel from coarse cornmeal is different; extra whisking may not make those particles disappear.

Lumpy cream cheese or grainy cheese

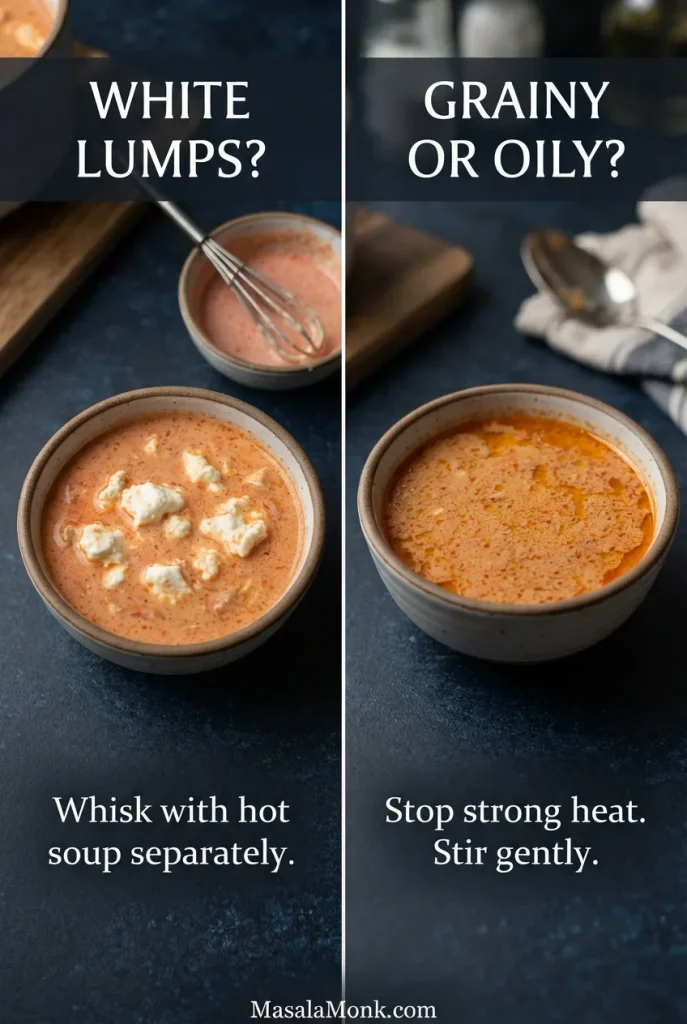
White cream-cheese pieces usually mean the cheese didn’t soften or disperse fully. Keep the heat low. Remove a little hot soup with the stubborn pieces, whisk them smooth in a bowl and return the mixture to the pot.

Tiny grains or a slick of oil may indicate that grated cheese has overheated and begun separating. Take the pot off strong heat and whisk gently. Slight separation may become less noticeable, but badly split cheese may not return to its original smoothness.

Split graphic comparing red soup with large white unmelted cream-cheese pieces and another bowl with a fine grainy, oily cheese surface; the labels suggest separate whisking or gentle heat.
Large white cream-cheese pieces can often be whisked smooth with a little hot broth. Fine oily grains suggest separated grated cheese; more heat makes that worse.

Dry chicken

Already overcooked the chicken? Shred it more finely and let it sit briefly in the warm broth before serving. That can make the meat feel less dry in each spoonful, although it can’t undo overcooking.

Next time, begin checking with a thermometer rather than relying on a fixed time. Large chicken breasts may need longer than thin ones, but either can dry out when left simmering after they’re cooked. The chicken-doneness photo shows where to check the thickest part.

The flavor is off

Bland: taste before adding more chili powder. A little lime or salt may be enough. When the enchilada flavor itself is weak, some extra red sauce may help more than simply increasing the heat.

Too spicy: unsalted broth can reduce the overall intensity. More dairy may soften the perception of heat, though it will also change the richness and thickness.

Too salty: add unsalted broth gradually. Depending on how much dilution is needed, you may also have to adjust the thickness afterward.

Toppings That Make the Bowl Better

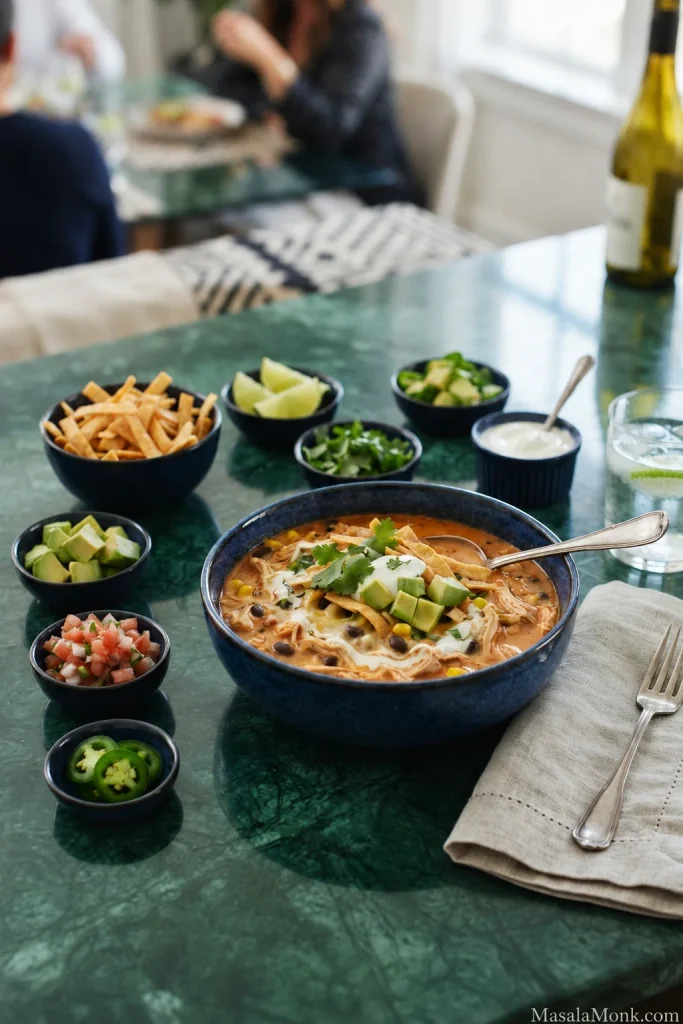
The soup already has plenty of richness, so the toppings work best when they bring something fresh or crisp. Cool pico de gallo adds tomato and onion, avocado gives you a buttery contrast, and fresh cilantro or sliced jalapeño lets you adjust each bowl at the table.

Blue bowl of chicken enchilada soup on a green table, surrounded by separate bowls of crisp tortilla strips, lime wedges, avocado, cilantro, pico de gallo, sliced jalapeño and sour cream.
Keep tortilla strips in a dry bowl away from steam and offer jalapeños, sour cream and lime separately. Then everyone can control heat, richness and acidity without changing the whole pot.

Some ready-made tortilla strips are already salty, so taste a dressed spoonful before adding more salt at the table. Keep the soup hot and add crunchy toppings just before serving.

Three Ways to Finish and Serve

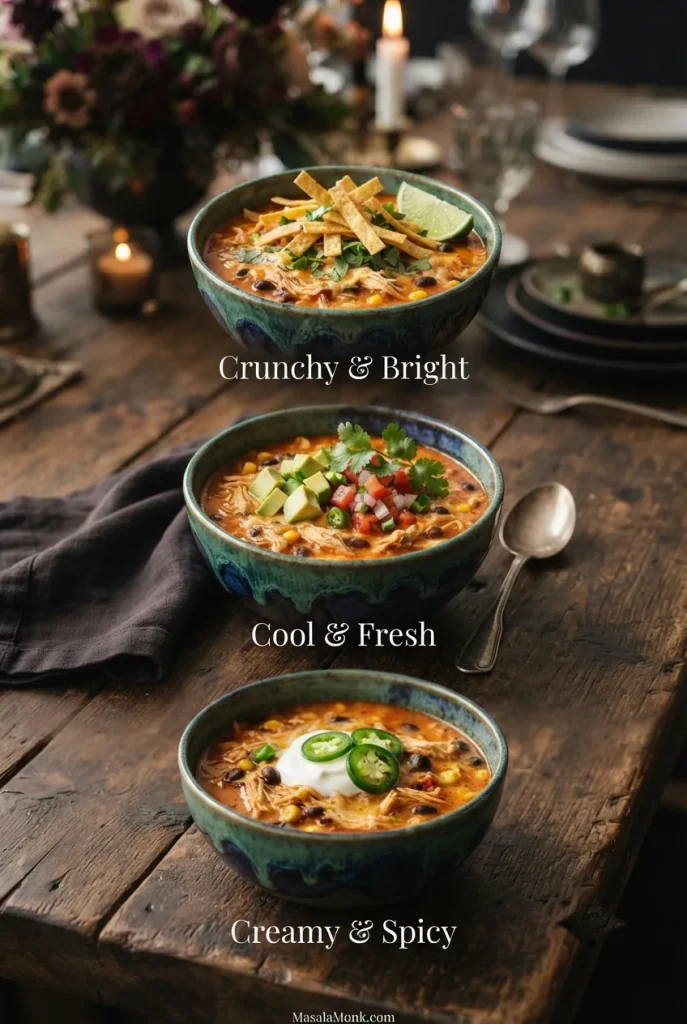
Use the same chicken-and-bean soup for every bowl, then add crunchy tortilla strips, cool avocado and pico, or sour cream with sliced jalapeño. Keep toppings separate until the bowls reach the table.

Three vertically arranged bowls of chicken enchilada soup labeled crunchy and bright with tortilla strips, cool and fresh with avocado and pico, and creamy and spicy with sour cream and jalapeño.
Tortilla strips add crunch, avocado and pico add freshness, and sour cream cools the bite of sliced jalapeño.

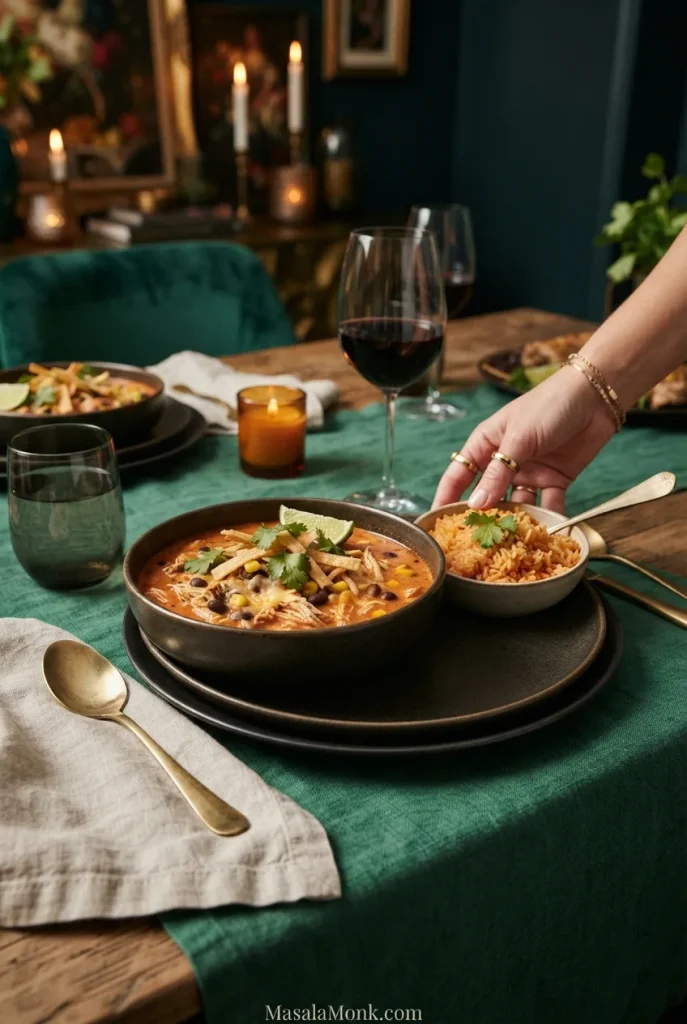
Serve chicken enchilada soup as a complete dinner. A small bowl of Mexican rice makes the meal more filling without changing the soup itself. Offer the rice separately so diners can choose their own portion.

Hand setting a small bowl of red Mexican rice beside a large bowl of creamy chicken enchilada soup on a dark green dining table.
Keep the rice on the side so it stays fluffy and the soup keeps its pourable texture.

Make Ahead, Store, Freeze and Reheat

Make ahead

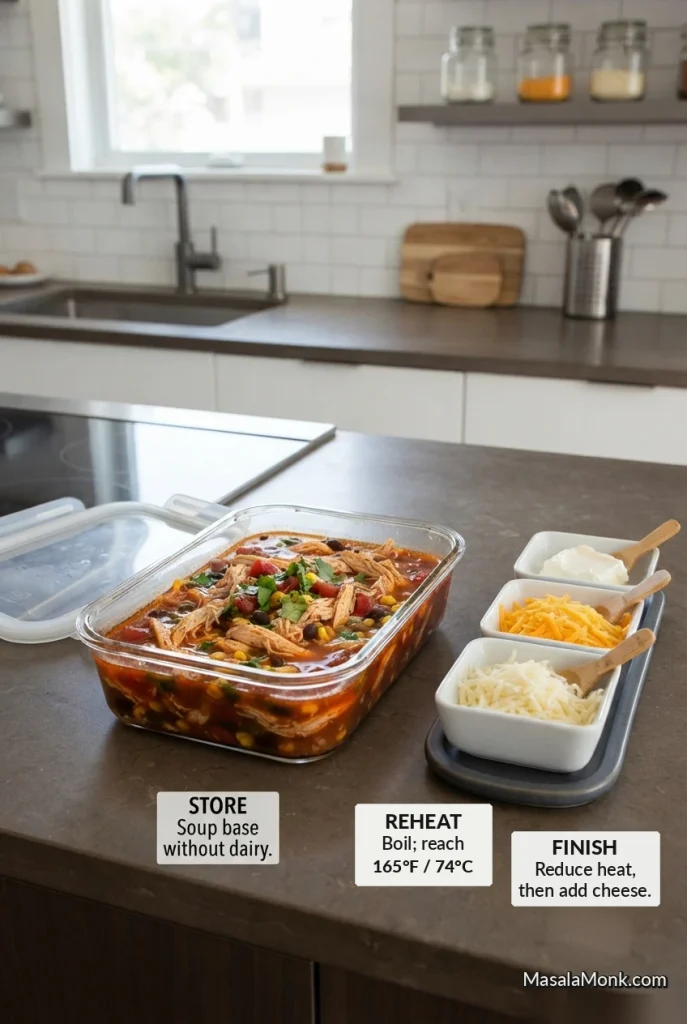
For the smoothest make-ahead result, prepare the soup through the chicken, masa, beans and corn, then refrigerate the base before adding cream cheese or grated cheese. Use the cooling and storage guidance below.

Container of red chicken enchilada soup base beside separate cream cheese and grated cheeses. Graphic reads: store without dairy; reheat to 165°F / 74°C; lower heat, then add cheese.
Label the make-ahead container “add cheese after reheating,” especially if someone else will serve it. Otherwise, the red chicken-and-bean base can look finished even though the creamy stage is still to come.

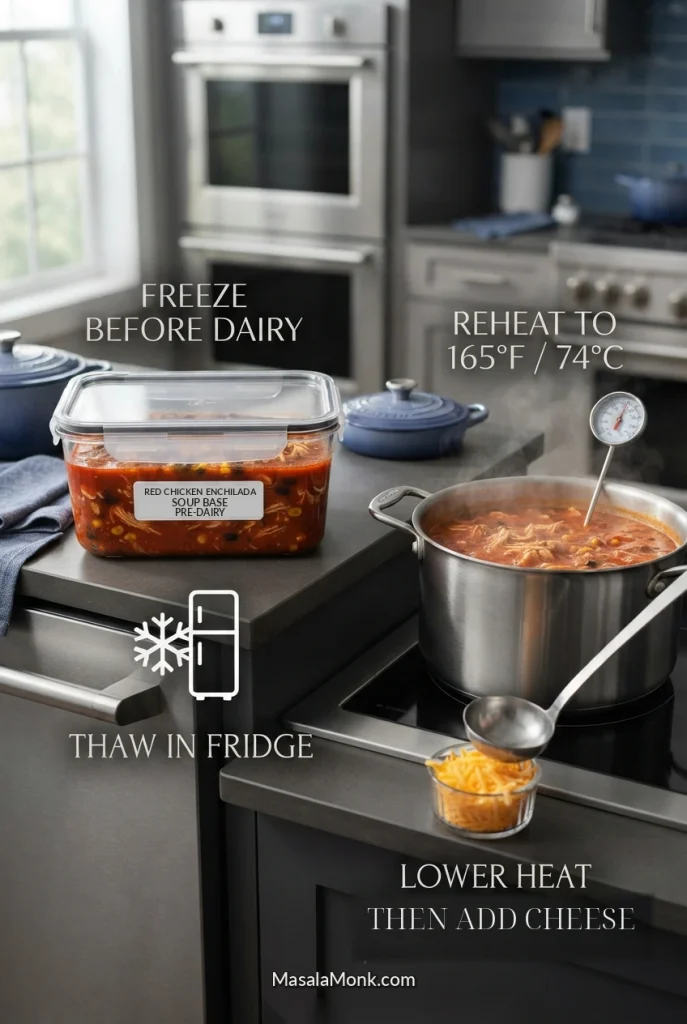
When you’re ready to serve, bring the refrigerated base to a boil and ensure it reaches at least 165°F / 74°C throughout. Stir so the chicken and thickened broth heat evenly. Then lower the heat and add the cream cheese and grated cheese as directed in the recipe.

Refrigerating and reheating

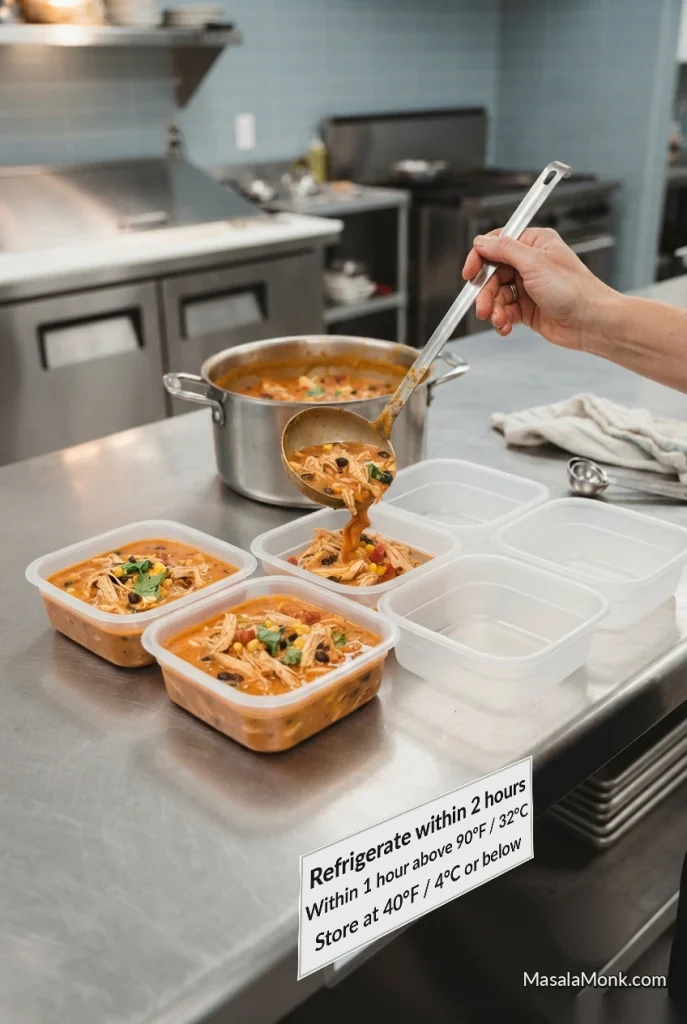
Divide leftovers into smaller, shallow containers so they cool quickly. Refrigerate within two hours of cooking, or within one hour if the surrounding temperature is above 90°F / 32°C. Don’t leave a large pot of hot soup sitting on the counter until it cools completely.

Chicken enchilada soup being ladled into several shallow storage containers. On-image instructions say refrigerate within 2 hours, within 1 hour above 90°F / 32°C, and store at 40°F / 4°C or below.
Before putting away chicken enchilada soup leftovers, write the cooking date on each shallow container. That simple label helps you apply the 3–4-day refrigerated-use window to the correct batch rather than relying on memory.

Store refrigerated leftovers at 40°F / 4°C or below and use them within 3–4 days.

Reheat leftover soup thoroughly to 165°F / 74°C throughout. USDA guidance also calls for reheated soups to be brought to a boil. Stir frequently to avoid cold spots and scorching. A fully finished dairy-based soup may lose some smoothness during reheating, but food safety takes priority over preserving the original texture.

Add fresh lime, avocado and tortilla strips after reheating rather than storing them in the soup.

Freezing

Freeze the soup before adding dairy if you can. Thaw it in the refrigerator, bring the base to a boil and reheat thoroughly, then lower the heat and add the cheeses.

Freezer-safe container of pre-dairy chicken enchilada soup next to a reheating pot. Graphic instructs: freeze before dairy, thaw in the fridge, reheat to 165°F / 74°C, then lower heat and add cheese.
Leave a little headspace when freezing the pre-dairy soup base, and date the container for easy rotation. Keep avocado, lime and tortilla strips out of the freezer portion; add them fresh once the reheated soup is ready.

For best quality, use frozen meat-containing soups within 2–3 months. This is a quality guideline for food kept continuously frozen at 0°F / −18°C or below, not an absolute safety deadline. Fully finished dairy-based soup can also be frozen, but may be grainier after thawing and reheating.

Home canning: This recipe has not been validated for safe home canning. Freeze it instead.

How This Chicken Enchilada Soup Compares

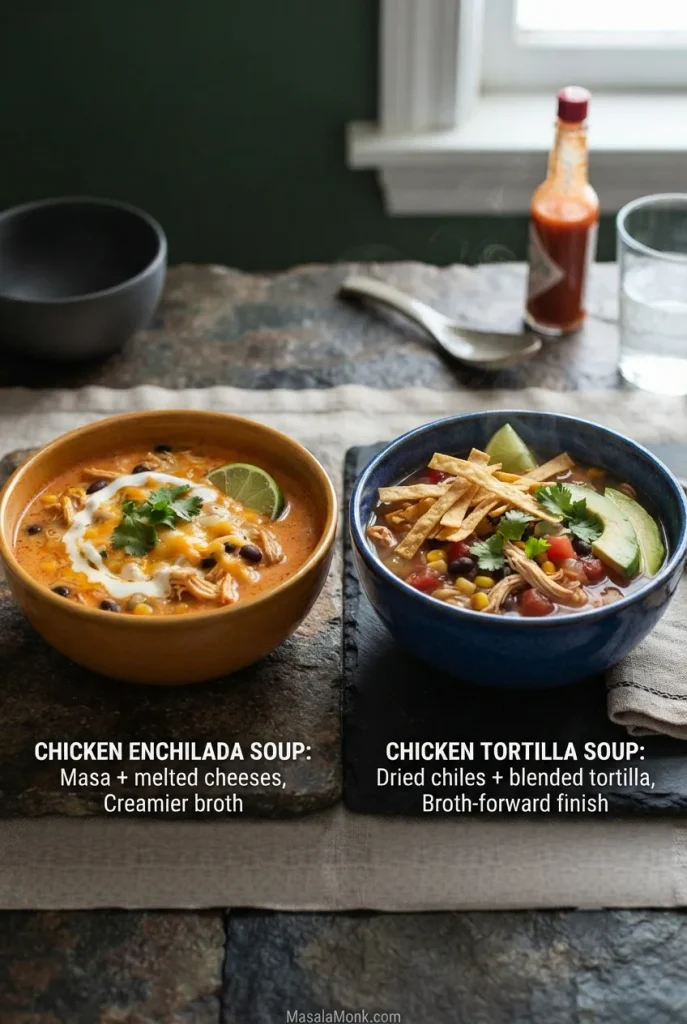
Chicken Enchilada Soup vs Chicken Tortilla Soup

Chicken enchilada soup is generally thicker, creamier and more cheese-forward, while chicken tortilla soup usually puts more emphasis on broth and tortillas. Our Chicken Tortilla Soup is more broth-forward; this enchilada soup gets its richer body from masa harina and the cheeses added to the pot.

Two labeled soup bowls side by side: creamy chicken enchilada soup with masa and melted cheeses on the left; red, broth-forward chicken tortilla soup made with dried chiles and blended tortilla on the right.
Garnishes alone cannot reliably distinguish chicken enchilada soup from chicken tortilla soup; both can contain chicken, beans, corn and tortilla strips. Instead, compare the broth between the solids: the enchilada version is creamier, while the tortilla version stays more chile-broth-forward.

Is This Like Chili’s Chicken Enchilada Soup?

This is not a Chili’s copycat. Chili’s-style versions tend to have a thicker, smoother masa-and-cheese body. This homemade version keeps recognizable chicken, black beans and corn in the broth and finishes with cream cheese, cheddar and Monterey Jack.


Made it? Tell us in the comments which enchilada sauce you used and whether you liked the soup thick and creamy or a little brothier. If you changed the masa or chicken, we’d love to know how it worked. Those details can help the next person cooking with the same ingredients.

Back to the Chicken Enchilada Soup Recipe · Back to top

Posted on — Leave a comment

Chicken and Sweetcorn Soup Recipe: Silky, Savoury & Easy

Bowl of chicken and sweetcorn soup with pieces of chicken, yellow corn kernels, pale egg ribbons and sliced spring onion in glossy broth.

A good spoonful of chicken and sweetcorn soup carries everything at once: glossy broth, sweetcorn kernels, tender chicken and pale ribbons of egg. The broth has enough thickness to hold them there, but it still runs easily back into the bowl.

The same soup can go wrong in opposite directions. Too little thickening and the chicken and corn sit in watery stock. Too much and the broth becomes gluey. Add the egg at the wrong moment and those silky ribbons turn into cloudy flecks or heavy clumps.

This chicken and sweetcorn soup recipe, often called Chinese chicken corn soup, is creamy in texture without containing cream. Fresh, frozen and canned sweetcorn all work, and you do not need creamed corn unless you happen to have it. From start to bowl, allow about 25–30 minutes.

You can keep it lighter and rich with sweetcorn flavour, or take it towards the thicker takeaway-style bowl you remember.

Body, Flow and Ribbons

Three things decide how this soup feels in the spoon.

  • Crushing some of the corn releases sweetness, flavour and natural body into the broth. Keep some kernels whole so the silky soup still has little bursts of sweetcorn in every spoonful.
  • The slurry takes the broth most of the way to the consistency you want. Add it gradually and stop a little short; the egg will thicken the soup slightly too.
  • The egg goes in last, forming ribbons in a broth that is already thick enough to support them.
Close-up spoonful of chicken sweetcorn soup containing chicken pieces, corn kernels and soft egg ribbons in thickened broth.
The ingredients should still have definition. You should meet juicy corn, tender chicken and soft egg separately in every spoonful.

The finished soup should suspend the chicken, corn and egg but still pour easily from a ladle. Dip in a spoon and the broth should cling lightly, then slide away. Think soup, not gravy.

Chicken and Sweetcorn Soup

Serves: 4 as a generous starter or about 3 as a light meal
Prep: about 10–15 minutes
Cook: about 15 minutes
Total: about 25–30 minutes
Texture: glossy, pourable and lightly thickened

Ingredients

Chicken

  • 225 g / 8 oz boneless skinless chicken breast or thigh, cut into small, roughly 1.5 cm pieces
  • 1 tsp cornflour/cornstarch
  • 1 tbsp / 15 ml water
  • ¼ tsp fine salt

Soup

  • 350 g / 12 oz sweetcorn kernels, fresh, frozen or drained canned corn
  • 950 ml / 4 US cups low-sodium chicken stock
  • 1 tsp finely grated fresh ginger
  • 3 spring onions/scallions, white and green parts separated and finely sliced
  • 1 tbsp / 15 ml light soy sauce
  • ¼ tsp ground white pepper, plus more to taste
  • Optional: ¼–½ tsp chicken bouillon powder, depending on its strength and saltiness, or a small pinch of MSG

Slurry

  • 2 tbsp / about 16 g cornflour/cornstarch — the fine white starch used for thickening, not cornmeal or finely ground whole corn
  • 3 tbsp / 45 ml cold water

Egg and Finish

  • 2 large eggs
  • 1 tsp toasted sesame oil
  • Salt, only if needed after tasting

About the stock: cubes, concentrates and bouillon powders vary enormously in saltiness. Mix them according to the packet and taste before adding anything extra.

About the soy sauce: regular or all-purpose soy sauce can stand in for light soy. Dark soy is not a straight substitute here; it will darken the broth and change the flavour.

About the sesame oil: toasted sesame oil gives the soup its deep nutty aroma at the end. Untoasted sesame oil is much milder and will not give quite the same finish.

Method

1. Prepare the chicken

Put the chicken in a small bowl with 1 teaspoon cornflour, 1 tablespoon water and ¼ teaspoon fine salt. Mix until the water has been absorbed and the pieces have only a light coating.

Small pieces of raw chicken covered with a thin, moist cornflour coating in a bowl.
This is enough cornflour coating: the chicken should look lightly slick and moist, not dusty or hidden beneath a layer of dry starch.

Set it aside while you prepare the corn. This small amount of starch helps protect the chicken from drying out without making the soup pasty.

2. Crush some of the corn

Take about 200 g / 7 oz of the sweetcorn and blend it with roughly 180 ml / ¾ cup of the measured chicken stock.

Stop while the corn is still slightly coarse. You want enough broken corn to thicken the broth naturally while leaving some texture. Keep the remaining 150 g / 5 oz kernels whole.

Whole yellow sweetcorn kernels beside partially crushed sweetcorn showing the two textures used in the soup.
Don’t blend every kernel smooth. Crushed sweetcorn gives the broth body, while whole kernels preserve the juicy pops of corn that make each spoonful more interesting.

No blender? A potato masher or the back of a sturdy spoon works too. The finished soup will simply have more texture.

3. Build the broth and cook the chicken

In a 3–4 litre / 3–4 quart saucepan, add the remaining stock, crushed-corn mixture, whole sweetcorn, ginger and white parts of the spring onions.

Bring to the boil, then lower the heat to a steady simmer. Cook for about 3 minutes. Before the slurry goes anywhere near the pot, the broth should already taste noticeably of sweetcorn.

Add the chicken in 2–3 batches, separating the pieces as they enter the broth. Let the soup return to a steady simmer, then cook for about 3–4 minutes, checking the largest pieces.

Pieces of coated raw chicken being added separately to a saucepan of simmering sweetcorn soup.
Give the chicken room as it enters the simmering broth. Otherwise, the damp cornflour coating can make neighbouring pieces stick together before their surfaces set.

Raw poultry should reach 74°C / 165°F. Once these small pieces are safely cooked, continued simmering will only make them drier.

Stir in the light soy sauce and ¼ teaspoon white pepper. Add the optional bouillon or MSG now if using it. Leave the final seasoning until the texture is set.

4. Set the thickness

Whisk 2 tablespoons cornflour with 3 tablespoons cold water until smooth. Cornflour settles quickly, so stir the slurry again immediately before pouring.

With the soup simmering, slowly pour in about two-thirds of the slurry while stirring. Let it return to a simmer and cook for about 30–60 seconds before deciding whether it needs more.

Dip in a spoon. The broth should lightly coat it, then run off easily. Stop just shy of the final thickness you want because the eggs will thicken the soup slightly too.

Thickened chicken and sweetcorn broth in a saucepan with pieces of chicken and corn suspended before beaten egg is added.
Use this as your pre-egg checkpoint: the broth should hold the chicken and corn in suspension but still look unmistakably like soup, not gravy.

Still too loose? Remix the remaining slurry and add some more. Do not pour in the rest simply because it is there.

5. Pour the egg ribbons

Lightly beat the eggs just until the yolks and whites are loosely combined. Do not whisk them foamy.

Lower the heat to a gentle simmer. Move a spoon slowly around the pot in one broad direction until the surface develops a smooth current. You want movement, not a whirlpool.

Drizzle the egg into the broth in a thin stream, working in two or three additions.

Thin stream of beaten egg being poured into simmering chicken sweetcorn soup as pale egg ribbons begin forming.
Pour the egg close to the surface in a thin, controlled stream. That makes it easier to distribute the egg across the broth instead of dropping a heavy pour into one spot.

For broader ribbons, pause for a few seconds between pours so the egg has time to set. If you prefer finer threads, keep the broth moving slowly as you drizzle.

After the final pour, leave the egg alone for about 10–15 seconds. Give the soup one slow stir and stop. The ribbons will not all look identical, and they do not need to.

6. Taste and finish

Turn off the heat. Stir in the toasted sesame oil and most of the green spring onion tops.

Taste the broth now. More white pepper gives warmth; salt corrects simple under-seasoning; a little more light soy adds both salt and savouriness. A few extra drops of toasted sesame oil can lift the aroma, but the sweetcorn should still come through clearly.

Ladle into warm bowls and scatter over the remaining spring onion greens.

Overhead view of chicken and sweetcorn soup topped with sliced spring onion, with chicken, corn and egg visible throughout the broth.
Finish for contrast rather than decoration. Fresh spring onion brightens the corn-rich broth; meanwhile, extra white pepper or chilli vinegar can bring warmth and sharpness at the table.

Cooking right now? You can stop here. If you want to fine-tune the bowl instead, compare restaurant styles, adjust the thickness, use the chicken and corn you already have, or troubleshoot something that went wrong.

What Kind of Chicken Sweetcorn Soup Are You Trying to Make?

Order chicken corn soup in Hong Kong, London or Delhi and the bowls may share the same basic idea while tasting and feeling quite different.

A Hong Kong-style version, 雞茸粟米羹, is a thick chicken-and-sweetcorn soup built around finely prepared chicken, corn and egg. Some bowls are relatively light and let the sweetcorn lead; others are much thicker.

British Chinese takeaway versions often lean more heavily on creamed corn, which can produce a thicker or sweeter bowl.

In many Indian and Pakistani Chinese restaurants, the soup is fuller and pepperier. Soy sauce, chilli sauce and chilli vinegar are often brought to the table so each person can make the bowl sharper, hotter or saltier.

Several bowls of chicken corn soup with visibly different broth thicknesses, colours and garnishes representing regional styles.
“Restaurant-style” depends on the restaurant. Chicken corn soup can be light and corn-forward, sweeter and heavily thickened, or peppery with chilli vinegar served alongside.

If the soup in your head is that thick, peppery Indian-Chinese restaurant bowl, use the fuller end of the slurry range and put chilli vinegar on the table. If your memory is of something lighter with more obvious sweetcorn flavour, stop thickening earlier. There isn’t one correct thickness; the bowl you’re trying to recreate is what matters.

A Western chicken-and-corn soup made with milk, cream, potato or a flour roux belongs to another branch altogether. Here, the creamy texture comes from corn, starch and egg rather than dairy.

How to Thicken Chicken Sweetcorn Soup Without Making It Gluey

The balance between crushed corn and slurry determines whether the finished soup stays light and brothy or moves towards a thicker takeaway-style bowl. Egg adds a little more body at the end.

Recipes can look oddly inconsistent here. One uses hardly any starch while another calls for several tablespoons. Some start with creamed corn; others use whole kernels. Much of the difference comes from how much the corn has already thickened the broth before the slurry goes in.

Crushed corn adds flavour and natural thickness. Cornflour then lets you fine-tune the finished consistency without losing the glossy texture.

Side-by-side chicken sweetcorn soups showing a lighter broth and a noticeably thicker broth consistency.
Both textures can be right. Less thickening gives chicken sweetcorn soup a lighter, more corn-forward finish; more creates the fuller texture familiar from many Chinese takeaways.

Want a Fuller Bowl?

Blend a larger proportion of the corn, then add the slurry gradually until the soup reaches the fuller consistency you want. Stop just short before the egg goes in.

Want It Lighter?

Crush less of the corn and stop thickening sooner. Corn and egg will always give the liquid some cloudiness, but the soup can still be light and brothy.

For a genuinely clear Chinese-style broth, wonton soup is the better direction: ginger, scallion and a light chicken broth without the corn-based thickness of this one.

Next: choose your egg-ribbon texture →

How to Make Egg Ribbons: Fine Threads or Broad Ribbons?

For broad egg ribbons, move the broth slowly and pause between pours. Fine threads need a gentle circular current while you drizzle the egg in a thin stream.

Whichever texture you prefer, keep the soup at a gentle simmer. Broad ribbons need some stillness so the egg can set into larger pieces; a steadier current stretches the same egg into finer strands. After the final pour, give it 10–15 seconds before stirring.

Side-by-side bowls of soup showing fine egg threads in one bowl and wider egg ribbons in the other.
Choose the egg texture you enjoy eating. Fine threads melt quietly into each spoonful, whereas broad ribbons make the egg a more noticeable part of the soup.

Egg drop soup strips the same technique back to its essentials, making pour width, broth movement and setting time especially easy to see.

Use the Chicken and Sweetcorn You Have

Chicken: Raw or Cooked

  • Raw chicken: Breast and thigh both work with the main method. Breast is leaner; thigh is richer and more forgiving if it stays in the pot slightly longer.
  • Cooked chicken: Shredded roast, poached or rotisserie chicken needs no starch coating. Add it near the end and give it only enough time to heat through.
Shredded cooked chicken being added to a saucepan containing sweetcorn soup.
Cooked chicken makes this an excellent leftover soup. Shred it fairly small so it spreads through the bowl without overwhelming the softer corn-and-egg texture.

Fresh, Frozen, Canned or Creamed Sweetcorn

  • Frozen sweetcorn: Use it straight from frozen if the kernels are loose. Give a solid frozen block a brief thaw so it is easier to measure and blend.
  • Canned sweetcorn: Drain well and use the same weight as the main recipe.
  • Fresh sweetcorn: Cut the kernels from the cob and use the same weight. When corn is sweet and in season, it gives the broth an especially bright flavour.
  • Creamed corn: Use about 200–225 g / 7–8 oz in place of the corn you would otherwise crush, while keeping about 150 g / 5 oz whole kernels for texture.
Fresh sweetcorn, frozen kernels, canned sweetcorn and creamed corn displayed as four ingredient options.
The corn you start with changes the bowl. Fresh, frozen and canned kernels stay distinct; creamed corn contributes body before any cornflour slurry reaches the saucepan.

Creamed corn, sometimes labelled cream-style corn, varies considerably by brand. Some is loose, some very thick and some surprisingly sweet. Start with roughly half the usual slurry and add more only after the soup has returned to a simmer.

No Cornflour or Cornstarch?

Blend about 300 g / 10½ oz of the 350 g sweetcorn with some of the stock, leaving roughly 50 g / 1¾ oz whole. Simmer that corn-rich broth for a few extra minutes before continuing with the chicken and egg.

Expect a softer, more corn-rich broth without quite the same glossy restaurant-style finish.

No egg? Leave it out. The corn and slurry will still thicken the soup. Egg whites alone also work if you want paler, more delicate ribbons.

Need it gluten-free? Use verified gluten-free stock and gluten-free tamari or soy sauce. Cornstarch itself is naturally gluten-free. If cross-contact matters, check the label too.

← Back to the chicken sweetcorn soup recipe

Chicken Sweetcorn Soup Troubleshooting

Most problems look worse than they are. Start with what is actually happening in the pot before adding anything else.

ProblemFirst Move
Watery brothBring it back to a simmer before adding more slurry.
Gluey brothLoosen it gradually with hot stock or water.
Egg ribbons went wrongStop stirring and see whether you have fine flecks, large clumps or sinking ribbons.
Chicken clumped or turned toughSeparate soft clumps; stop cooking once the chicken is safely done.

Watery or Gluey Broth

A watery soup may simply need more heat. Bring it back to a simmer and give the starch 30–60 seconds before adding anything else.

Still running like plain stock? Mix 1 teaspoon cornflour with 1 tablespoon / 15 ml cold water. Add half, let the soup simmer again, then decide whether the rest is necessary.

A soup that has gone too thick is easier to rescue than it looks. Add 2 tablespoons / 30 ml hot stock or water at a time, checking the flow between additions. Taste again once the consistency is right because dilution will soften the seasoning too.

Cornflour Lumps

A few lumps are annoying rather than fatal. Before the egg goes in, a quick whisk or brief strain will usually sort them out. Once the ribbons are there, leave the whisk alone and lift out obvious starch lumps with a spoon or small slotted spoon.

Lumps usually come from warm mixing liquid, slurry that was not completely smooth or starch that settled before pouring. Use cold water and stir the slurry again just before it reaches the pot.

When the Egg Goes Wrong

Egg is difficult to reshape once it has set, so the best rescue is usually to stop stirring and work with what you have.

  • Tiny cloudy flecks: the broth was probably boiling too hard or moving too quickly. Stop stirring and leave them alone.
  • Large scrambled-looking clumps: too much egg probably entered the same spot at once. Break only the largest pieces.
  • Ribbons sinking: thin broth is one possible cause, but a heavy pour, too much egg entering at once or broth that cooled too far can also weigh them down. Keep the soup at a gentle simmer and use a thinner stream next time.
Comparison showing tiny egg flecks, larger scrambled-looking egg clumps and poorly suspended egg ribbons in sweetcorn soup.
Read the egg before trying to fix it. Tiny flecks often point to excess heat or movement, whereas large scrambled-looking clumps suggest too much egg reached one spot at once.

See the egg-ribbon technique →

Chicken Clumped or Turned Tough

Starch-coated chicken can stick together when too much enters the pot at once. Separate what you can while the coating is still soft. A couple of joined pieces are not worth tearing the whole pot apart over.

Tough chicken is usually a timing problem. Small pieces cook quickly; once they are safely done, continued boiling only makes breast meat drier. Already-cooked chicken needs little more than reheating.

When the Flavour Feels Wrong

Start by asking whether the soup actually needs more salt. A bland bowl may need more depth from the stock, warmth from white pepper or the toasted aroma of sesame oil. Already salty but dull? More soy is unlikely to help.

Some canned or creamed corn can make the soup too sweet. Add unsalted stock gradually; it dilutes the sweetness while preserving more flavour than plain water. An over-gingery bowl can also be diluted with stock in roughly 60 ml / ¼ cup increments. Once the flavour is back in balance, check the thickness and seasoning again.

It Thickened While Sitting

Starch-thickened soup naturally gets thicker as it cools. A bowl that has only been sitting at the table can be loosened with some hot stock or water. After refrigeration, reheat the soup before deciding whether it needs thinning.

← Back to the recipe

From Starter to Supper: How to Make It a Meal

To turn it into a light meal without changing the character of the soup:

  • Add more chicken: increase it to about 300–350 g / 10–12 oz.
  • Add noodles: cook them separately and ladle the soup over them in the bowl. Keeping noodle starch out of the pot protects the broth you have just spent time getting right.

What to Serve Alongside

For a richer Chinese-style meal, sesame chicken gives you crisp, sticky chicken beside the soft soup, while fried rice makes an easy, familiar main.

Spring rolls add a crisp contrast.

Bowl of chicken sweetcorn soup served as part of a meal with fried rice, spring rolls and a chicken dish.
Build the meal around contrast. Because chicken sweetcorn soup is soft and silky, fried rice adds substance while crisp spring rolls give the plate a welcome change of texture.

How to Store, Freeze and Reheat Chicken Sweetcorn Soup

For make-ahead cooking, prepare the soup through step 3, cool and refrigerate it, then reheat and finish with the slurry and egg shortly before serving.

Refrigerating

Get leftovers into the refrigerator promptly. Refrigerate perishable food within 2 hours, or within 1 hour when the surrounding temperature is above 32°C / 90°F. A large pot cools faster when divided into smaller, shallow containers.

Keep the soup at 4°C / 40°F or below. FoodSafety.gov’s cold-storage guidance gives cooked soups and stews about 3–4 days in the refrigerator.

Freezing

For the best texture, freeze the soup after step 3, before adding the slurry and egg. Thaw and reheat it, then thicken the soup and add fresh egg ribbons before serving.

Finished soup can also be frozen, although the egg and starch-thickened broth may change slightly after thawing. For best quality, soups and stews are generally used within about 2–3 months in the freezer.

Step sequence showing chicken-and-corn soup base being stored and frozen, then reheated, thickened and finished with egg.
Treat freezing as a pause, not the final finish. Store the chicken-and-corn base first; after reheating, you can reset the thickness and make fresh egg ribbons just before serving.

Reheating

Reheat leftovers thoroughly to 74°C / 165°F; on the stovetop, bringing the soup to a boil is a simple way to make sure it is thoroughly hot. Lower the heat again before serving.

Too thick after reheating? Add some stock or water. Still thin once fully hot? Let it simmer first and use a small fresh slurry only if needed.

← Back to the recipe


What you are looking for in the spoon is simple: sweetcorn, tender chicken and visible strands of egg held in a glossy broth that still flows.

How do you like yours? Light and brothy or thick like the takeaway version? Fine egg threads or broad ribbons? Tell us in the comments.

Posted on — 2 Comments

Chicken Gnocchi Soup Recipe: Creamy, Cozy & Easy

Bowl of creamy chicken gnocchi soup with potato gnocchi, shredded chicken, spinach and thin pieces of carrot visible in the pale broth.

Plump potato gnocchi, juicy chicken and spinach sit in a warm ivory broth that is creamy without feeling heavy. Finely shredded carrot adds sweetness and color, while thyme, garlic and black pepper keep the broth savory.

If Olive Garden chicken gnocchi soup is the bowl you have in mind, this lands in familiar territory. The difference at home is control: chicken in most spoonfuls, tender gnocchi and enough creamy broth moving around them that it still feels unmistakably like soup.

The rule worth remembering: stop slightly loose. Gnocchi release starch as they cook and keep absorbing broth afterward. Let them finish, give the pot a short rest, then decide whether the soup actually needs thickening.

Read the Pot

StageWhat you’re looking for
BrothLightly thickened, still loose
DairySteaming with small edge bubbles, never boiling hard
GnocchiBeginning to float—now taste one
FinishLightly spoon-coating but flowing
Instructional collage showing loose broth, gentle edge bubbles after dairy is added, floating gnocchi being checked and finished creamy soup flowing from a spoon.
Because stovetops, pots and packaged gnocchi vary, use visual cues, tasting and the way the broth moves instead of relying on a rigid timer.

Chicken Gnocchi Soup Recipe

Chicken gnocchi soup is a creamy one-pot soup with potato gnocchi, chicken, spinach, onion, celery and carrot in a lightly thickened chicken broth. This version stays silky and flowing instead of becoming gravy-thick.

Prep: about 15 minutes
Cook: about 30 minutes
Total: about 45 minutes
Yield: about 6 generous servings

Equipment

  • 5- to 6-quart (4.7- to 5.7-liter) Dutch oven or heavy soup pot
  • Whisk
  • Box grater, if shredding the carrot

Ingredients

  • 3 tablespoons (42 g) unsalted butter
  • 1 medium yellow onion, finely diced, about 1 cup (140 g)
  • 2 celery ribs, finely diced, about ¾ cup (85 g)
  • 1 medium carrot, shredded or cut into fine matchsticks, about ½ cup (60 g)
  • 3 garlic cloves, minced, about 9 g
  • ¾ teaspoon dried thyme
  • 3 tablespoons all-purpose flour, about 24 g
  • 4 cups (32 fl oz / 950 ml) low-sodium chicken broth, plus more as needed
  • 2 cups (16 fl oz / 475 ml) half-and-half
  • 16 oz (454 g) potato gnocchi
  • 12–14 oz (340–400 g) cooked or rotisserie chicken, shredded or cut into bite-size pieces
  • 2 packed cups baby spinach, about 2 oz (60 g)
  • ½ teaspoon freshly ground black pepper, plus more to taste
  • Fine salt, to taste

Keep the vegetables small. Aim for onion and celery around ¼ inch (6 mm) or smaller, and shred the carrot or cut it into fine matchsticks. They should settle into the broth and leave the gnocchi and chicken as the substantial bites.

Build the Base

  1. Soften the vegetables. Melt the butter over medium heat. Add the onion, celery and carrot and cook for about 5–7 minutes, stirring occasionally. The onion should turn translucent and the vegetables should soften without taking on much color.
  2. Add the garlic and thyme. Stir for about 30 seconds. As soon as the garlic smells fragrant, move on.
  3. Cook the flour. Sprinkle it over the vegetables and stir continuously for 1–2 minutes. The dry flour should disappear and the mixture should look pale and a little foamy, not toasted brown.
  4. Add the broth. Pour in a small splash first and whisk until smooth, then gradually add the rest while scraping the bottom of the pot. Bring it to a gentle simmer. It should have some body but look a little too loose for the finished soup. That’s where you want it.
Three-step cooking sequence showing diced onion, celery and carrot softening, flour being stirred into the vegetables, and chicken broth being whisked into the pot.

Add the Dairy and Gnocchi

  1. Lower the heat and add the half-and-half. Bring the soup gently back up to temperature. Look for steam and an occasional small bubble around the edge. Don’t wait for a rolling boil.
  2. Add the gnocchi. Keep the soup at a gentle simmer. Many packaged potato gnocchi take about 3–5 minutes, but use that as a starting point. Once they float, taste one. It should be tender through the center and hold its shape. Dense in the middle? Give it another minute.

Finish the Soup

  1. Add the cooked chicken. Heat it through without simmering it longer than necessary. If you’re using chilled leftover chicken, reheat it to 165°F (74°C).
  2. Add the spinach. Stir for about 30–90 seconds, just until the leaves collapse and stay green.
  3. Turn off the heat. Let the soup rest for a few minutes before judging the consistency.
  4. Tip the spoon. A thin creamy film should remain while the broth slides back into the pot. If it sits like chicken pot pie filling, stir in warm broth ¼ cup (60 ml) at a time until it flows again.
  5. Taste a spoonful of broth. Add salt as needed and more black pepper if you want it. Rotisserie chicken and packaged broth may already bring plenty of salt, so taste first. The finished broth should taste clearly of chicken, with thyme and garlic in the background.
Cooked shredded chicken and fresh spinach being added near the end of cooking to a pot of creamy chicken gnocchi soup.

Still Too Thin?

First make sure the gnocchi are tender and the soup has rested. If it is watery after that, mix 1 tablespoon (about 8 g) cornstarch with 1 tablespoon (15 ml) cold water. Whisk it again just before using, stir about half into the soup and simmer gently for a minute. Check the spoon before adding the rest.

Cornstarch slurry being poured into a pot of chicken gnocchi soup beside a whisk, with the sequence add some, simmer and check.

Before serving, check one complete spoonful with gnocchi, chicken, spinach and broth together. The bowl should taste balanced and savory, with enough broth around the substantial ingredients that it still eats like soup.

Spoon lifted above creamy chicken gnocchi soup holding a potato gnocchi, shredded chicken, spinach and broth.

Making a substitution, using raw chicken or cooking ahead? These are the places where the soup changes most.

Which Gnocchi Work Best?

How to Tell When Gnocchi Are Done

Floating is a cue to check the gnocchi, not proof that they’re done. Potato gnocchi are small Italian dumplings typically made from potato and flour, often with egg. The type you buy changes how quickly they soften, so use the table below as a starting point and let tasting decide.

TypeWhat to watch
Refrigerated or freshOften cooks quickly; start checking early
Shelf-stableSome brands stay firmer in the center
FrozenStart with package guidance, then taste
HomemadeHandle gently and avoid a long simmer

Bite through one. At its best, the center feels soft and potatoey while the gnocchi stays intact in the broth. A dense middle needs another minute; gummy or collapsing gnocchi have gone too far.

Gnocchi doneness guide comparing a tender potato gnocchi center with a dense undercooked center and a soft, gummy overcooked gnocchi.

Once the gnocchi are tender, you can judge what they’ve done to the broth.

Creamy, Not Gravy-Thick

Chicken gnocchi soup should lightly coat a spoon but remain fluid enough for the gnocchi and chicken to move through the broth. The finished soup should still look like soup, not filling that sits still in the pot.

Side-by-side comparison showing chicken gnocchi soup immediately after cooking and the thicker consistency reached after a short rest.
A slightly loose finish gives the gnocchi room to absorb more broth as the pot rests; if it becomes too thick, warm broth restores flow better than more dairy.

The Spoon Test

After the pot has rested for a few minutes, tip the spoon. A light creamy film should remain on it, while most of the broth slides back into the pot.

Metal spoon coated with a thin layer of creamy broth above a bowl of chicken gnocchi soup, with broth dripping from the edge.
Check only after the short rest; judging the broth too early can make a naturally thickening soup look as though it needs unnecessary starch.

Thin, Right or Too Thick?

A deep trench that stays open after the spoon passes through means the soup has gone too far. Loosen it gradually with warm chicken broth, stirring and giving the pot a moment before checking again.

If the soup seems thin, finish cooking the gnocchi and let the pot rest before reaching for the slurry. Quite often, that’s all it needs.

Three-part comparison of chicken gnocchi soup labeled thin, right and too thick, showing progressively heavier broth on spoons.

Richness vs Thickness

More cream makes the soup richer. More starch makes it thicker. Those aren’t the same fix.

Instructional graphic contrasting cream for added richness with starch for added thickness above a pot of creamy chicken gnocchi soup.
Cream can increase richness, while starch adds body; neither one fixes a weak chicken broth, so identify the actual problem before adjusting the pot.

Half-and-Half, Milk or Cream?

Half-and-half gives the broth richness while leaving room for the chicken, thyme and garlic. Whole milk makes a lighter, slightly looser bowl. For something richer, replace up to 1 cup (240 ml) of the half-and-half with heavy cream.

Taste the broth before adding the dairy. Weak broth only gets quieter once the half-and-half goes in. A small amount of concentrated chicken base can deepen a weak broth; add it cautiously.

Rotisserie, Breast or Thigh?

Rotisserie chicken is the easiest option here. Remove the skin, shred or chop the meat and stir it in near the end so it only heats through.

Breast meat is leaner; thigh meat is richer and tends to stay juicy. Either works within the 12–14 oz (340–400 g) cooked-chicken target—enough chicken without crowding out the gnocchi.

Using Raw Chicken

Start with about 1 lb (450 g) boneless skinless chicken breast or thigh and cut it into bite-size pieces. Heat 1 tablespoon (15 ml) olive or neutral oil in the soup pot, add the chicken and cook, turning as needed, until the thickest pieces reach 165°F (74°C). Transfer the chicken to a plate.

Leave the browned bits in the pot; the vegetables and broth will pick them up as the soup comes together. Return the cooked chicken near the end. If you prefer to cook the meat separately, our baked chicken breast can be chopped or shredded and added near the end in the same way.

Crock-Pot Chicken Gnocchi Soup

The slow cooker works well as long as the dairy, gnocchi and spinach stay out of the long cooking phase. Use the same vegetables, broth, half-and-half, butter and seasonings as the stovetop recipe, but omit the 3 tablespoons of flour. The cornstarch slurry below takes its place.

Start with about 1 lb (450 g) boneless skinless chicken breast or thigh. Add the chicken, onion, celery, carrot, garlic, thyme, butter and broth to the slow cooker. Cook until the chicken is tender and reaches 165°F (74°C) in the thickest part, then remove and shred it. Use your slow cooker’s usual poultry timing as a guide; appliances and chicken thickness vary.

Near dinner, whisk 2 tablespoons (16 g) cornstarch with 2 tablespoons (30 ml) cold water. Stir about three-quarters of the slurry into the hot broth, then add the half-and-half and gnocchi. Cook the gnocchi until tender.

Return the chicken and add the spinach just long enough to wilt. Let the soup rest for a few minutes before judging the consistency. If it remains thin, add some or all of the remaining slurry and cook briefly before checking again.

Slow cooker with chicken, vegetables and broth, with dairy being poured in and bowls of potato gnocchi and spinach waiting to be added later.

Using the stovetop instead? Return to the main recipe. If the soup is already made but the texture is off, jump to troubleshooting.

Substitutions That Change the Soup

SwapWhat changes
Kale for spinachAdd it earlier; kale needs more time to become tender
Gluten-free gnocchiTiming and starch release may differ; omit the all-purpose flour and use the cornstarch-slurry approach from the Crock-Pot method
Extra gnocchiThey absorb more broth; keep extra broth ready instead of automatically adding more flour

When the Soup Isn’t Turning Out Right

What you seeWhat to do
Broth runs like milkFinish cooking the gnocchi and let the soup rest first. If it’s thin after that, use some slurry.
Spoon leaves a deep trenchThe soup has become too thick. Loosen it gradually with warm broth.
Gnocchi are dense insideThey’re underdone. Give them another minute, then taste again.
Gnocchi are gummy or breakingThey’ve cooked or held too long. Stop the heat and check earlier next time.
Dairy looks grainyThe heat was too aggressive. Remove the pot from the heat; next time keep the soup below a hard boil.
Soup tastes flouryThe roux needed longer. Next time cook the flour for the full 1–2 minutes.
Creamy but blandTaste for salt first. If the broth itself is weak, add a small amount of chicken base.
Chicken is dryCooked chicken simmered too long. Add it later next time.
Spinach is dark and limpIt went in too early. Add it only at the finish.
It was perfect, then got thickThe gnocchi kept absorbing broth. Loosen the soup with more broth.

If the Dairy Looks Grainy

Grainy dairy is a heat problem rather than a thickness problem. If the broth loses its smooth, uniform look after the half-and-half goes in, pull the pot away from aggressive heat before changing the amount of cream or starch. Next time, keep the soup at steaming heat with only small edge bubbles instead of a hard boil.

Comparison showing smooth creamy soup beside grainy, separated-looking broth caused by excessive heat after dairy was added.

Got the soup back on track? Return to the recipe, or see how to store, reheat and freeze it.

Make Ahead, Leftovers and Freezing

Leftovers and Meal Prep

Chicken gnocchi soup keeps in the refrigerator for 3–4 days, although the gnocchi soften and the soup thickens as it sits.

Reheating Next-Day Leftovers

For ordinary next-day leftovers, keep everything together. If the soup looks almost too thick to spoon straight from the refrigerator, nothing has gone wrong. Reheat it on the stovetop, stirring often, until it is piping hot throughout and reaches at least 165°F (74°C). Avoid prolonged boiling. Add chicken broth as needed; for one bowl, start with 1–2 tablespoons (15–30 ml) and see how it loosens.

Three-stage reheating guide showing thick refrigerated chicken gnocchi soup, broth being added during stovetop reheating and the loosened creamy soup ready to serve.
Restore temperature first, then restore flow; adjusting the soup while it is still cold can make you add more broth than the hot bowl actually needs.

Meal Prep for Several Days

If you’re deliberately cooking for several days, you can cook the gnocchi separately and add them while reheating individual portions. They’ll hold their texture better, but the soup base will stay a little looser because those gnocchi aren’t releasing their starch into the pot. Judge the consistency after reheating each portion with the gnocchi.

Meal-prep comparison showing finished chicken gnocchi soup stored together for short-term leftovers and soup base with cooked gnocchi stored separately for longer storage.
Separate storage gives you texture control and lets you add only the gnocchi needed for each reheated portion before fine-tuning the broth.

Divide leftovers into shallow containers, cover and refrigerate promptly, following USDA leftover-safety guidance.

Make Ahead and Freezing

For dinner later, prepare the vegetable-and-broth base ahead, before adding the dairy, gnocchi, chicken and spinach. Near dinner, reheat it and finish those ingredients in the pot. The last few minutes are quick.

Freezing Chicken Gnocchi Soup

You can freeze chicken gnocchi soup, but the texture is better if you freeze that base before adding the dairy, gnocchi, chicken and spinach. Finished soup may lose some smoothness after freezing, while the gnocchi soften considerably and the spinach becomes softer and darker.

Container of vegetable-and-broth soup base beside separate half-and-half, potato gnocchi, cooked chicken and spinach, showing which components are better added after freezing.
Freezing the base keeps the final texture decision for serving day, when the dairy, gnocchi, chicken and spinach can be added fresh.

Thaw and reheat the base, then finish the remaining ingredients close to serving.

Making it today? Go back to the recipe, or jump to serving ideas.

What to Serve with Chicken Gnocchi Soup

This is already a full bowl, so the best sides bring contrast. Crisp romaine with our homemade Caesar dressing adds lemon, pepper and crunch alongside the soft gnocchi and creamy broth.

For bread, our no-knead focaccia has an airy middle that catches the broth and browned edges that still have some bite.

Bowl of creamy chicken gnocchi soup served with crusty bread and a romaine salad with croutons.

The best bowl isn’t the thickest one. You want tender gnocchi, juicy chicken in the next spoonful and green ribbons of spinach moving through a broth that clings lightly without sitting still.

Eat it hot, while the gnocchi are still plump. And when only a little creamy broth is left underneath them, that’s the part the bread is for.

Nearly empty bowl with several potato gnocchi, pieces of chicken, spinach and a small amount of creamy broth remaining, with bread nearby.
Posted on — Leave a comment

Chicken Soup Recipe: Easy, Homemade & Comforting

Bowl of homemade chicken soup with chicken pieces, carrots, celery and parsley in golden broth, with a spoon lifting a bite.

A good bowl of homemade chicken soup has a golden, savory broth that tastes unmistakably of chicken, tender pieces of meat, and carrots and celery soft enough for the spoon without disappearing into it. It works as dinner with a piece of bread, but it is just as welcome in a smaller bowl when someone does not feel like eating much.

This is the simple brothy kind: no noodles, rice, cream or condensed soup in the base recipe. Bone-in chicken builds the broth in the same pot, and the vegetables go in later so they keep some texture. You do not need to make stock the day before.

If noodles are what you came for, the Chicken Noodle Soup Recipe has a separate method for the broth and noodle timing.

Before You Add More Water

For 40–48 oz / 1,130–1,360 g bone-in chicken thighs, start with 64 fl oz / 1,900 ml water. Add a little more only if needed to bring the liquid most of the way up the chicken.

An empty-looking stockpot is not a problem. Diluted broth is.

Raw chicken thighs and aromatics in a stainless-steel pot, with clear water reaching most of the way up the chicken.
Pot width changes how high the liquid sits, even with the same chicken weight. Use the listed starting quantity as a guide, then add the optional extra water only if the chicken needs it.

Chicken Soup Recipe

The chicken cooks first, the vegetables get a shorter simmer, and the meat returns only long enough to heat through. That order helps the chicken stay tender while the carrots and celery retain some character of their own.

Yield6 generous or 8 smaller bowls
Prep15–20 minutes
CookAbout 60–70 minutes
TotalAbout 75–90 minutes
Pot6–7 qt / 5.7–6.6 L Dutch oven or stockpot
Starting Water64 fl oz / 1,900 ml
Chicken Safety165°F / 74°C minimum; thighs may need additional gentle cooking for tenderness

Useful equipment: a 6–7 qt / 5.7–6.6 L Dutch oven or stockpot, an instant-read thermometer, a fine-mesh strainer, a large heatproof bowl, and tongs or a slotted spoon.

Ingredients

  • 40–48 oz / 1,130–1,360 g bone-in chicken thighs; remove the skin if attached for a cleaner, less fatty broth
  • 64 fl oz / 1,900 ml cool water, plus up to 8 fl oz / 240 ml more if needed
  • 1 large yellow onion, peeled and divided; half left in large pieces, half diced
  • 4 garlic cloves, lightly crushed
  • 2 bay leaves
  • 1 tsp whole black peppercorns
  • 4–6 parsley stems, plus 2–3 tbsp chopped parsley leaves for finishing
  • 3 medium carrots, sliced about ¼ inch / 6 mm thick
  • 3 celery ribs, sliced about ¼ inch / 6 mm thick
  • 2 tsp fine sea salt, divided, plus more to taste
  • Freshly ground black pepper, to taste
  • Fresh lemon juice, optional; start with 1 tsp / 5 ml

Method

Start the Broth

  1. Start the broth. Put the chicken thighs in the pot. Add the large pieces of onion, garlic, bay leaves, peppercorns, parsley stems and 1 tsp salt. Pour in 64 fl oz / 1,900 ml cool water. Add a little more, if needed, to bring the liquid most of the way up the chicken. The pieces do not have to be completely submerged.
  2. Bring it gently toward a simmer. Heat over medium to medium-high until steam rises and small bubbles begin appearing regularly. Pale foam may collect at the surface; skim it if you want a cleaner-looking broth. Lower the heat before the pot reaches a rolling boil.
Chicken broth heating in a pot, with small bubbles near the edges and gentle movement across the surface.
Your burner setting will depend on the pot and stovetop. Adjust the heat by watching the liquid, not the dial, until the surface moves gently without churning.

Cook the Chicken and Strain the Broth

  1. Simmer the chicken partially uncovered. Leave the lid slightly ajar. Begin checking the thickest thighs after about 30 minutes of gentle simmering. Measure the thickest part without touching the bone. Chicken must reach at least 165°F / 74°C. If a thigh is safely cooked but the meat still grips the bone firmly, give it a few more minutes until it loosens easily.
  2. Remove the chicken, strain the broth and check its flavor. Transfer the thighs to a plate. Strain the liquid through a fine-mesh strainer into a large heatproof bowl, discard the spent aromatics, then return the broth to the pot. Skim a heavy layer of surface fat if needed. If the flavor seems muted, add a small pinch of salt and stir. If the broth still tastes watery rather than merely under-seasoned, simmer it uncovered for 5–10 minutes, then check it again.
Golden chicken broth pouring through a fine-mesh strainer holding cooked onion pieces, herbs and other broth-building aromatics into a clear measuring jug.
Strain out the long-cooked broth aromatics now. Then the fresh carrots, celery and remaining onion can cook in the clean broth just long enough to become tender without turning mushy.

Cook the Vegetables and Prepare the Chicken

  1. Add the vegetables. Put the diced remaining onion, carrots and celery into the broth. There is no sauté step here; the vegetables cook directly in the finished broth and absorb its flavor as they soften. Simmer for about 10–15 minutes, until a knife passes through a carrot slice with light resistance.
  2. Cut the chicken for the spoon. Remove and discard the bones. Check the meat for any small bone fragments, then pull or cut it into roughly ¾–1 inch / 2–2.5 cm pieces. There is no need to shred it into fine strands.
Close-up of cooked chicken pieces with an inset showing a roughly ¾–1-inch (2–2.5 cm) piece.
After deboning, check the meat for small bone fragments before cutting it into serving pieces. This quick check is especially useful when the chicken has loosened around the bone during simmering.

Return the Chicken and Finish

  1. Return the chicken. Add it back to the pot for about 3–5 minutes, just long enough to become hot again.
  2. Finish the soup. Taste before adding the remaining 1 tsp salt; the broth may already have reduced enough. Add salt gradually only as needed, then finish with black pepper and chopped parsley. If it tastes savory but a little flat, try 1 tsp / 5 ml lemon juice. Add more only if the soup needs it. Ladle into bowls with enough broth to surround the chicken and vegetables.
A ladle lifting chicken and vegetables from a pot of golden chicken soup, with broth running back into the pot.
When serving, let each ladleful carry both chicken and vegetables along with broth. Otherwise, the first bowls can get most of the solids while later servings are left with mostly liquid.

Recipe Notes

  • Do not rinse raw chicken. Washing poultry can splash bacteria around the sink and nearby surfaces. Cooking it properly is what makes it safe.
  • Skin-on thighs: Leave the skin on for a richer broth, or remove it first if you want less fat to skim later. Since this version aims for a cleaner, lighter broth, starting skinless makes the final skimming easier and keeps the liquid from becoming unnecessarily greasy.
  • Salt: Different salts vary by crystal size. The listed fine-sea-salt amount is a starting point; finish the pot by taste.
  • No strainer? Lift out the onion, garlic, bay leaves, parsley stems and peppercorns with a slotted spoon. The broth may look more rustic, which is fine.
  • Timing: These times are estimates. Large thighs, a slow-heating pot or extra reduction can add time; temperature and tenderness determine when the chicken is ready.

About this recipe: This is a research-developed MasalaMonk recipe, not a claim of in-house test-kitchen validation. Chicken size, cookware and stovetop heat vary, so use the temperature and texture cues along with the approximate times.

Most chicken soup problems come down to a few decisions: whether the broth needs salt or reduction, whether the chicken needs more time, and when the vegetables should go in.

Match the Chicken to the Liquid

Raw bone-in chicken can build broth from water as it cooks. Boneless meat and already-cooked chicken contribute less to the liquid, so those versions are more dependable when they begin with prepared broth or stock.

Starting ChickenStart WithWhy
Bone-in thighsWaterThe meat, bones and connective tissue flavor the liquid as they cook.
Whole chickenWaterA whole bird brings plenty of bone and connective tissue for broth.
Boneless thighsBroth or stockThe meat stays juicy but contributes less body without the bones.
Chicken breastBroth or stockLean breast provides meat but relatively little broth-building power.
Rotisserie or leftover chickenBroth or stockThe meat is already cooked, so the liquid needs to carry the soup.
Chicken carcassPrepared broth for a quick boost; water for a longer simmerThe bones can enrich prepared broth or help form a longer-cooked stock.

Swapping bone-in thighs for boneless breast without changing the liquid can leave the soup surprisingly thin. The meat changed, but so did the source of the broth’s flavor and body. If you are starting with rotisserie or leftover chicken, see the quick adaptation method.

Broth or Stock?

Either works for shortcut versions. Stock often has more gelatin and body; broth can be lighter. Choose low-sodium or unsalted stock when possible so the liquid can reduce without becoming too salty.

When using a carton, taste it before adding the recipe’s full salt amount. Some store-bought broths are already seasoned, and concentrated stock can become more intense as it simmers. Start gently, then adjust the finished pot rather than trying to predict how much salt the liquid will need after reduction.

Onion and garlic provide the base flavor. Bay, peppercorns and parsley stems add background fragrance. The fresh vegetables are saved for later so they remain part of the meal, while parsley gives the finished soup a fresher edge. Lemon is optional: use it if the soup tastes rich but a little flat.

How Much Water Is Enough?

A wide stockpot can make a sensible amount of liquid look strangely low, while a narrower Dutch oven may cover the same chicken easily.

Watch the chicken, not the empty metal above it.

This is why water does not scale perfectly. A doubled batch may not need twice the water, and a half batch may need more than half. Pot width and how tightly the chicken fits change the level.

When to Add More Water

If the liquid sits well below most of the chicken, add water in small amounts until it reaches the intended level. Do not keep topping up the pot just because a few pieces are exposed. The liquid only needs to reach most of the way up the chicken, and you can reduce the broth later if it needs more concentration.

For a larger batch, arrange the chicken before deciding on the final water level. Wider pots also lose liquid faster during simmering, while deeper, narrower pots generally evaporate less.

If you add too much, reduce the broth uncovered later. It is easier to leave unnecessary water out in the first place.

A covered slow cooker loses much less liquid to evaporation than a stovetop pot. Do not transfer these water quantities directly to it; the Slow Cooker Chicken Noodle Soup uses a method suited to that different cooking environment.

Taste the Broth Before the Vegetables Go In

The chicken is out and the long-simmered aromatics are gone. Take a spoonful now. The liquid should smell clearly of chicken and taste savory even before the carrots and celery arrive.

If it tastes good, move on. If it seems muted, check the salt; if it is seasoned but watery, reduce it briefly. For the full order of fixes, jump to the bland chicken soup troubleshooting steps.

A spoon holding golden chicken broth above a pot, with bowls of prepared carrots, celery and onion waiting nearby.
Judge the liquid on its own before the vegetables go in. Their sweetness and texture can make a weak broth seem more finished than it really is.

165°F Means Safe; Tender May Take Longer

For reference, a gentle simmer may sit around 185–200°F / 85–93°C. You do not need to monitor the broth with a second thermometer; steady small bubbles and gentle movement are usually enough.

A hard boil can tear at the chicken and scatter proteins and fat through the liquid. The soup may look cloudier and feel greasier without gaining much flavor.

Check the Thickest Part

Measure the thickest part of a thigh without touching the bone. Poultry must reach at least 165°F / 74°C for safety.

Instant-read thermometer inserted into cooked chicken near a visible bone, displaying 165°F (74°C).
Touching bone can distort the reading. Insert the probe into the center of the thickest meat, keep its tip away from the bone, and wait for a stable temperature.

Check Tenderness Separately

Thigh meat can remain juicy above that minimum and often becomes easier to pull from the bone with a little additional gentle cooking. If the meat still holds tightly to the bone, give it another few minutes at a quiet simmer. Once it loosens easily, take it out and let the vegetables have the pot.

Cooked chicken being gently pulled apart around a bone to show its texture.
For the tenderness check, look for meat that yields rather than falls apart: it should release with gentle pressure while staying in recognizable, moist pieces.

Back to Recipe · Fix a Bland Broth

Why the Vegetables Go In Later

Add the vegetables only after the chicken has built the broth’s flavor; this helps them become tender without turning mushy. Carrot slices, celery and the remaining onion usually need around 10–15 minutes at this size. Stop while the pieces still hold their shape.

Keep the Cuts Consistent

Try to keep the carrot and celery pieces close to the listed ¼-inch / 6 mm thickness. Even cuts soften at roughly the same pace, so you are less likely to end up with crunchy carrot beside celery that has already gone limp. If your carrots are particularly wide, halve the rounds to make easy spoonfuls.

They will keep cooking briefly in the hot soup after the burner goes off, so there is no need to push them to complete softness in the pot. Once the chicken and vegetables are back together, taste the soup as a whole before deciding whether it needs anything else.

Your Chicken Soup Is Bland. Don’t Add Everything at Once.

If a pot tastes disappointing, it is tempting to reach for salt, bouillon, lemon and half the spice cupboard at once. Try one correction, then decide what is still missing.

Spoon of chicken soup beside a diagnostic guide listing salt, concentration, chicken depth, brightness and stopping when balanced.
The order matters because reduction cannot fix under-seasoning, and chicken base can add salt as well as chicken flavor. Make a small adjustment, then taste before moving to the next step.

1. Salt

Taste the soup hot. If it is clearly under-seasoned, add a pinch of salt, stir well and see whether the chicken flavor comes forward. Go gradually; you can always add more.

2. Concentration

If the seasoning is right but the soup still feels watery, simmer it uncovered briefly. Reduction strengthens the flavors already in the pot. Check it before making another change.

3. Chicken Flavor

If the broth is seasoned and concentrated but still lighter than you want, add concentrated chicken base in ½-teaspoon increments. Stir until dissolved before deciding whether it needs more. The base recipe does not require it; this is an option for a pot that still needs more chicken flavor.

4. Brightness

A rich broth can still taste a little flat. Add 1 tsp / 5 ml lemon juice. It should lift the flavor without making the soup distinctly lemony.

5. Stop When It Tastes Good

If the next spoonful tastes right, put the lemon, bouillon and spice jars away.

If the Soup Becomes Too Salty

Stop reducing it, because evaporation will concentrate the salt further. Instead, add a little unsalted water or low-sodium broth, then taste again. If you have extra unsalted cooked chicken or vegetables, those can also increase the batch without adding more salt. Avoid trying to hide excess salt with a large squeeze of lemon; acidity changes the flavor but does not remove the salt.

Cloudy, greasy or gelled instead? · Using different chicken?

Cloudy, Greasy, Gelled—or Actually Wrong?

Homemade chicken broth can look a little strange, especially after chilling. A pale layer on top and a golden jelly underneath, for example, are two different things—and both can be normal.

Cloudy Broth

A broth can lose its crystal-clear appearance when proteins and tiny droplets of fat become suspended in the liquid. That affects how it looks, but cloudiness by itself does not tell you whether the soup is good or bad.

Clear glass vessel containing pale, cloudy golden chicken broth, with text explaining that cloudiness does not automatically mean it is ruined.
Cloudiness describes appearance, not safety. Proteins and fine fat can affect clarity during cooking; safe cooling, refrigeration and the broth’s overall condition still matter.
What You NoticeLikely CauseWhat to Do
Cloudy brothProteins or fat dispersed through the liquidIf it tastes clean, eat it. Use a gentler simmer next time if clarity matters.
Thin shimmer of fatNormal rendered chicken fatLeave it unless the soup feels oily.
Heavy oil slickToo much surface fatSkim some off.
Firm pale layer after chillingSolidified chicken fatLift off as much as you prefer.
Golden broth that jiggles when coldGelatin from bones and connective tissueKeep it. It melts again when heated.
Broth does not gelLower gelatin concentrationIf it tastes good, leave it alone.
Stringy or dry chickenChicken overcookedRemove it sooner next time and return only to reheat.
Mushy vegetablesVegetables went in too early or cooked too longAdd them later and stop when tender.
Bitter brothStrong scraps, herbs or aromatics over-extractedDilute if mild. Severe bitterness may not be worth chasing.
Rotten, sulfurous or clearly spoiled smellPossible quality or safety problemIf the chicken or soup seems spoiled or unsafe, discard it.

Fat and Gelatin After Chilling

Chilling makes the difference easier to see. Rendered chicken fat firms into a pale layer at the surface, while gelatin-rich broth underneath may wobble like soft jelly. They are not the same thing.

Chilled chicken broth in transparent containers, showing a pale solid fat layer above golden gelled broth.
If you prefer a leaner broth, lift off some of the firm fat after chilling. The gelatin-rich broth beneath it is part of the stock-building process and loosens again as it warms.

Cloudy does not mean ruined. Good chicken soup does not have to look like consommé.

Use the Chicken You Have

Bone-in thighs do the meat and broth jobs at the same time. Other chicken works too; the liquid and timing just need to change with it.

Rotisserie or Leftover Cooked Chicken

Start with low-sodium chicken broth or stock. Cook the onion, carrots and celery until tender, then add chopped or shredded cooked chicken for the last few minutes. It only needs to heat through.

Rotisserie chicken can be well salted and may carry a strong roasted seasoning, so taste the broth before adding extra salt. Remove skin and bones first, then cut the meat into bite-size pieces; if you want to save the carcass, use the separate carcass method below rather than simmering the cooked meat for the whole cooking time.

Cooked chicken pieces being added to a pot of golden chicken soup with carrots and celery.
With rotisserie or leftover chicken, remove any unwanted skin and bones before adding the meat. Because it is already cooked, it only needs to warm through; taste before adding more salt, since seasoned chicken can bring some with it.

Rotisserie Carcass

Strip off the usable meat first. For a quick boost, simmer the carcass in prepared broth, then strain before adding the vegetables. Starting with water instead means a much longer simmer and is closer to making stock.

About vegetable scraps: use clean ingredients whose flavor you actually want in the broth. A stockpot is not a compost bin. Too many cabbage-family scraps, old herbs or tired vegetables can turn broth muddy or bitter.

Chicken breast: Start with broth or stock and remove the breast once it reaches 165°F / 74°C. Return the chopped meat near the end so it does not spend the whole vegetable-cooking period in the pot.

Boneless thighs: These stay juicy and are easy to cut, but contribute less body to the broth without the bones. Start them in broth or stock.

Canned chicken: Drain it and add it near the end like other cooked chicken. Use unsalted or low-sodium broth because the meat may already bring plenty of salt.

Whole Chicken

A whole bird is a traditional route to a larger batch and fuller broth. Add only enough water to mostly cover it rather than scaling the thigh recipe mechanically. If the bird is cut into pieces, the breast can come out while the legs and wings continue cooking.

Change the Flavor

The base recipe is intentionally simple, so small changes can move the soup in noticeably different directions. Pick one flavor idea rather than adding every aromatic at once; that keeps the broth tasting like chicken soup instead of a crowded spice mixture.

Bowl of chicken soup surrounded by lemon and herbs, turmeric and ginger, and garlic with black pepper as three flavor options.
Choose one direction at a time. Add ginger or garlic with the broth aromatics, but finish with lemon near the end so its brightness stays fresh and easy to judge.

For more aroma: Add a few thin slices of fresh ginger with the broth aromatics and use a little extra garlic. For a warmer, earthier flavor, add a restrained amount of turmeric as well. Strain the ginger out before the vegetables go in.

Choosing herbs: Parsley stays classic, dill is fresher and more distinctive, and thyme works quietly in the background. Use rosemary sparingly; too much can become woody or bitter in a long-simmered broth.

Want a smoky, chile-rich soup instead? Tomato, dried chiles, lime and crisp tortilla strips take the bowl in a different direction. The Chicken Tortilla Soup Recipe builds that flavor from the start.

When lemon should lead: Here, lemon is a finishing adjustment. Avgolemono Soup takes it in a different direction with an egg-lemon finish.

Lower-sodium version: Starting with water gives you control from the beginning. Skip chicken base, season gradually, and use pepper, parsley and a little lemon for contrast.

Chicken Soup When You Are Sick

Chicken soup is not a cure for a cold or another illness. Warm broth provides fluid, while tender chicken and soft vegetables can be easier to manage when appetite is low. A hot bowl can be comforting, too.

If you are making it for somebody else, keep the pot fairly mild and let them add extra pepper or lemon at the table. The ginger-garlic version is a good choice when a little more aroma sounds appealing.

For a soup where fresh ginger is central from the beginning, Chicken Tinola combines bone-in chicken, ginger, garlic and a clear savory broth.

Storing Chicken Soup

This brothy version freezes well because there are no noodles or rice sitting in the liquid. The first job is cooling a large pot promptly, rather than waiting for it to become completely cold on the counter.

Cool, Store and Reheat

Divide leftovers among smaller, shallow containers so heat escapes faster. Refrigerate perishable food within two hours under normal conditions, and sooner in very hot weather. USDA food-safety guidance covers safe handling and cold-storage recommendations.

In the Fridge

Use refrigerated chicken soup within 3–4 days. Freeze portions you will not reach within that window.

In the Freezer

For best quality, use frozen soup within about 2–3 months. Food kept continuously frozen at 0°F / −18°C remains safe indefinitely, but flavor and texture gradually decline. Leave room for expansion in the container and label it before it disappears into the back of the freezer.

Thawing Frozen Soup

For the easiest planning, move a portion to the refrigerator the day before you need it. If you reheat soup directly from frozen, warm it gently in a saucepan and stir as it loosens so the edges do not overheat while the center remains frozen. Do not thaw a container on the counter at room temperature.

Reheating

Reheat leftovers thoroughly to 165°F / 74°C. When practical, warm only what you plan to eat rather than repeatedly heating and cooling the full batch.

Four-stage chicken soup storage guide showing cooling, refrigeration, freezing and reheating, with storage durations and a 165°F (74°C) reheating temperature.
Freeze meal-size portions so you can thaw and reheat only what you need. That also reduces repeated warming and cooling of the full batch; leave a little headspace in freezer containers for expansion.

Back to Recipe · Go to FAQ · Back to Top

Chicken Soup FAQ

Do I Need to Brown the Chicken First?

No. Browning gives the chicken roasted flavor and darkens the broth slightly. Starting directly in water keeps this version lighter and simpler.

Can I Make This Soup Ahead?

Yes. Cool and refrigerate it promptly, then reheat thoroughly when needed. The vegetables may soften more as they sit. For the freshest texture, make the broth and chicken ahead, refrigerate them safely, then cook the fresh vegetables when you are ready to finish the soup.

Can I Make Chicken Soup in an Instant Pot?

Yes, but pressure cooking changes both timing and liquid behavior. This stovetop method lets you judge the broth before the vegetables go in, so a pressure-cooker version needs its own liquid amount and cooking method.

Can I Add Rice or Orzo?

Yes. Both absorb broth as they cook and continue doing so in leftovers. If you want to preserve a clear, brothy soup for storage, cook the starch separately and add it to individual bowls.

If the broth tastes good before the carrots and celery go in, the hard part is already done.

Back to Recipe · Back to Guide · Back to Top